
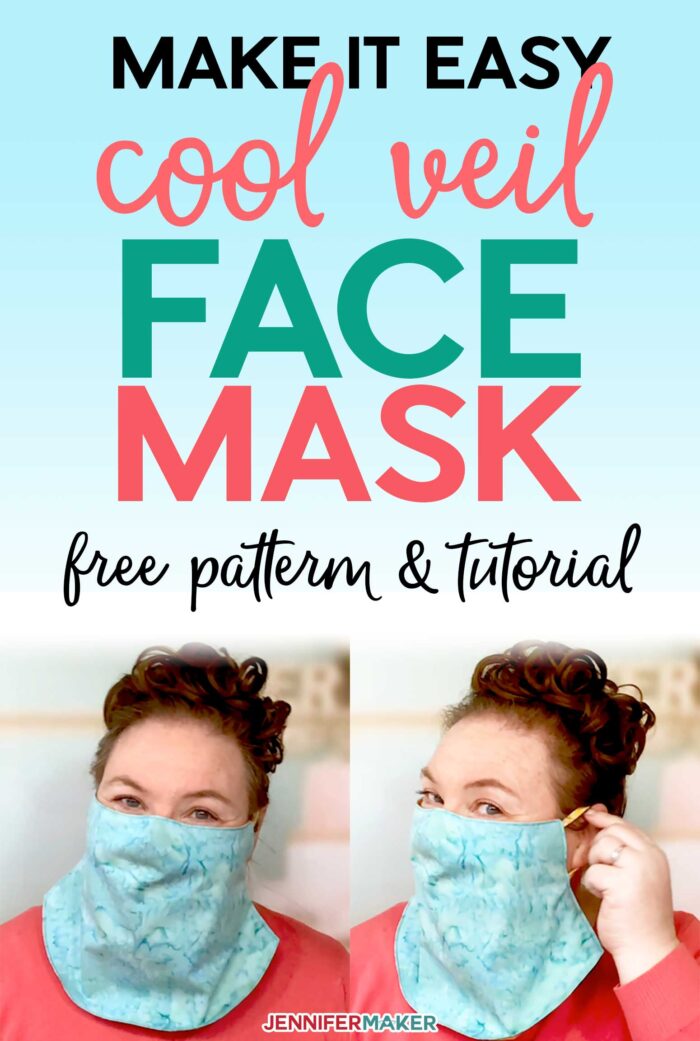
Learn how to make an easy veil face mask, with or without a filter pocket. The veil is cool and refreshing, perfect for staying cool this summer!
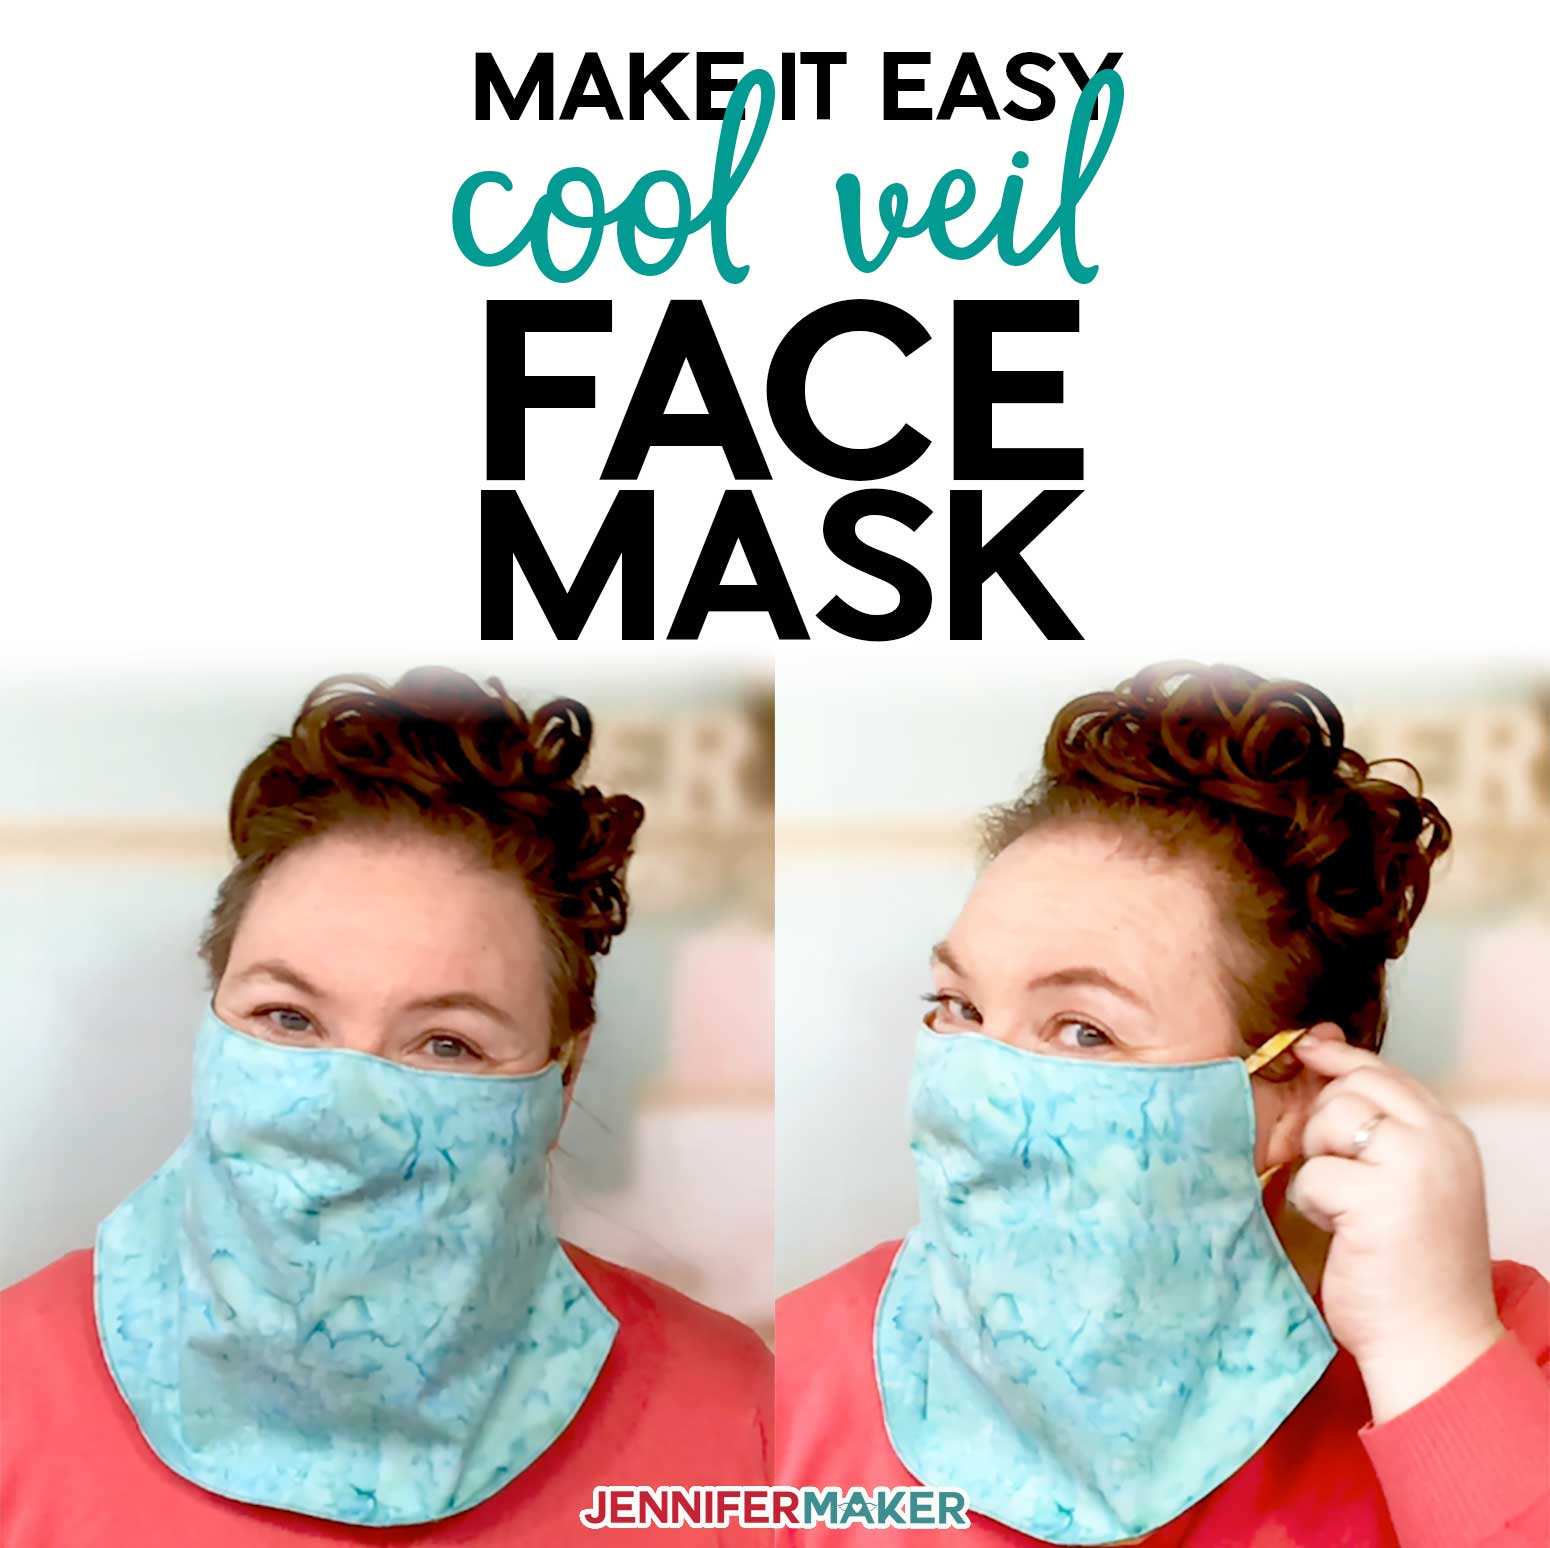
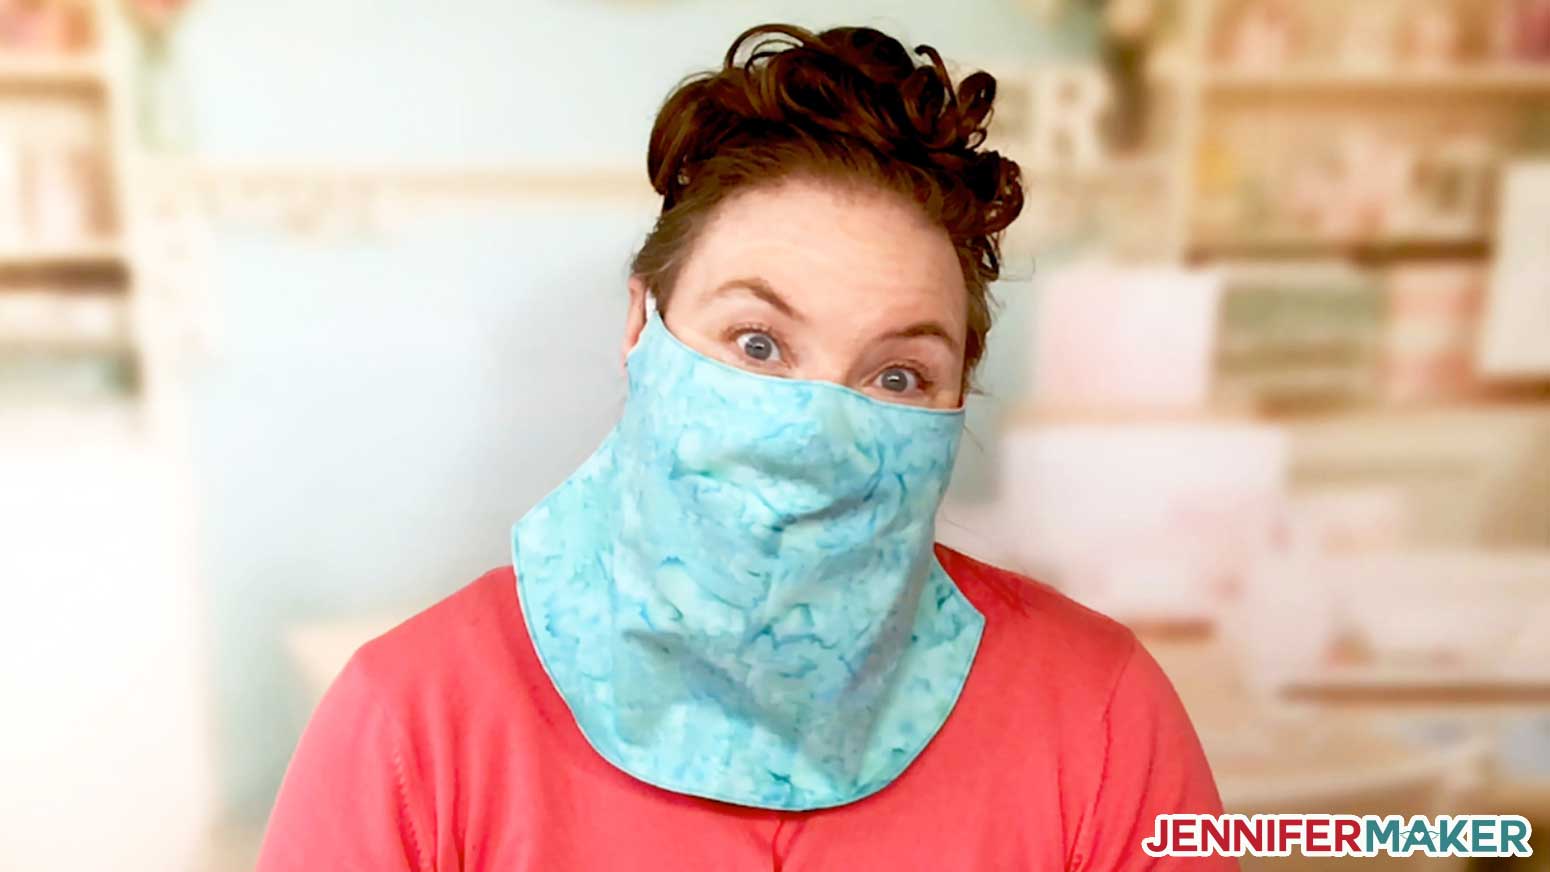
Having a variety of different face masks is a great thing, especially when they’re stylish alternatives to the traditional fitted face mask. In the past week, I’ve designed a neck gaiter style and a scarf style face mask, but I may be most excited about this light and cool veil style I’m making now. It’s been really hot lately, and I think this veil face mask will be a lot more comfortable in the heat. It keeps your neck free for air to circulate and even provides a little sun protection! I’m happy to share this pattern with you and show you how to sew this cool veil face mask!

Watch my step-by-step tutorial video on how to make this cool veil face mask here:
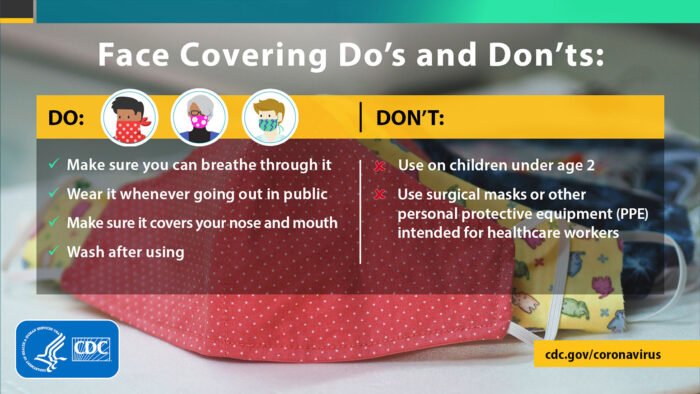
Why Face Masks? The CDC continues to recommend that everyone over the age of 2 wear cloth face coverings when leaving their homes. And recently, many states have started requiring that we wear face masks in public. This 2-3 layer face mask with an optional filter pocket is intended to prevent or slow community transmission and fulfill public mask-wearing requirements.

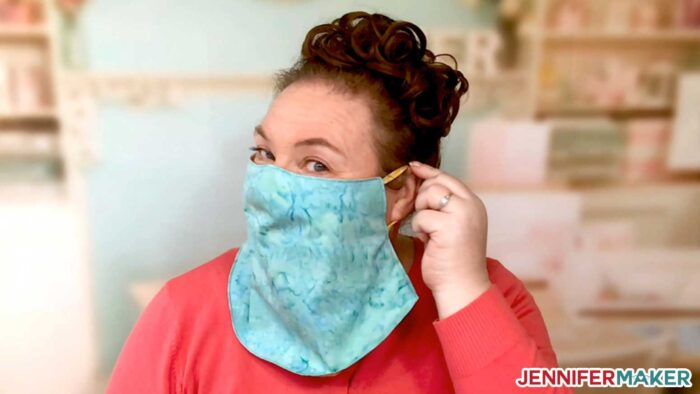
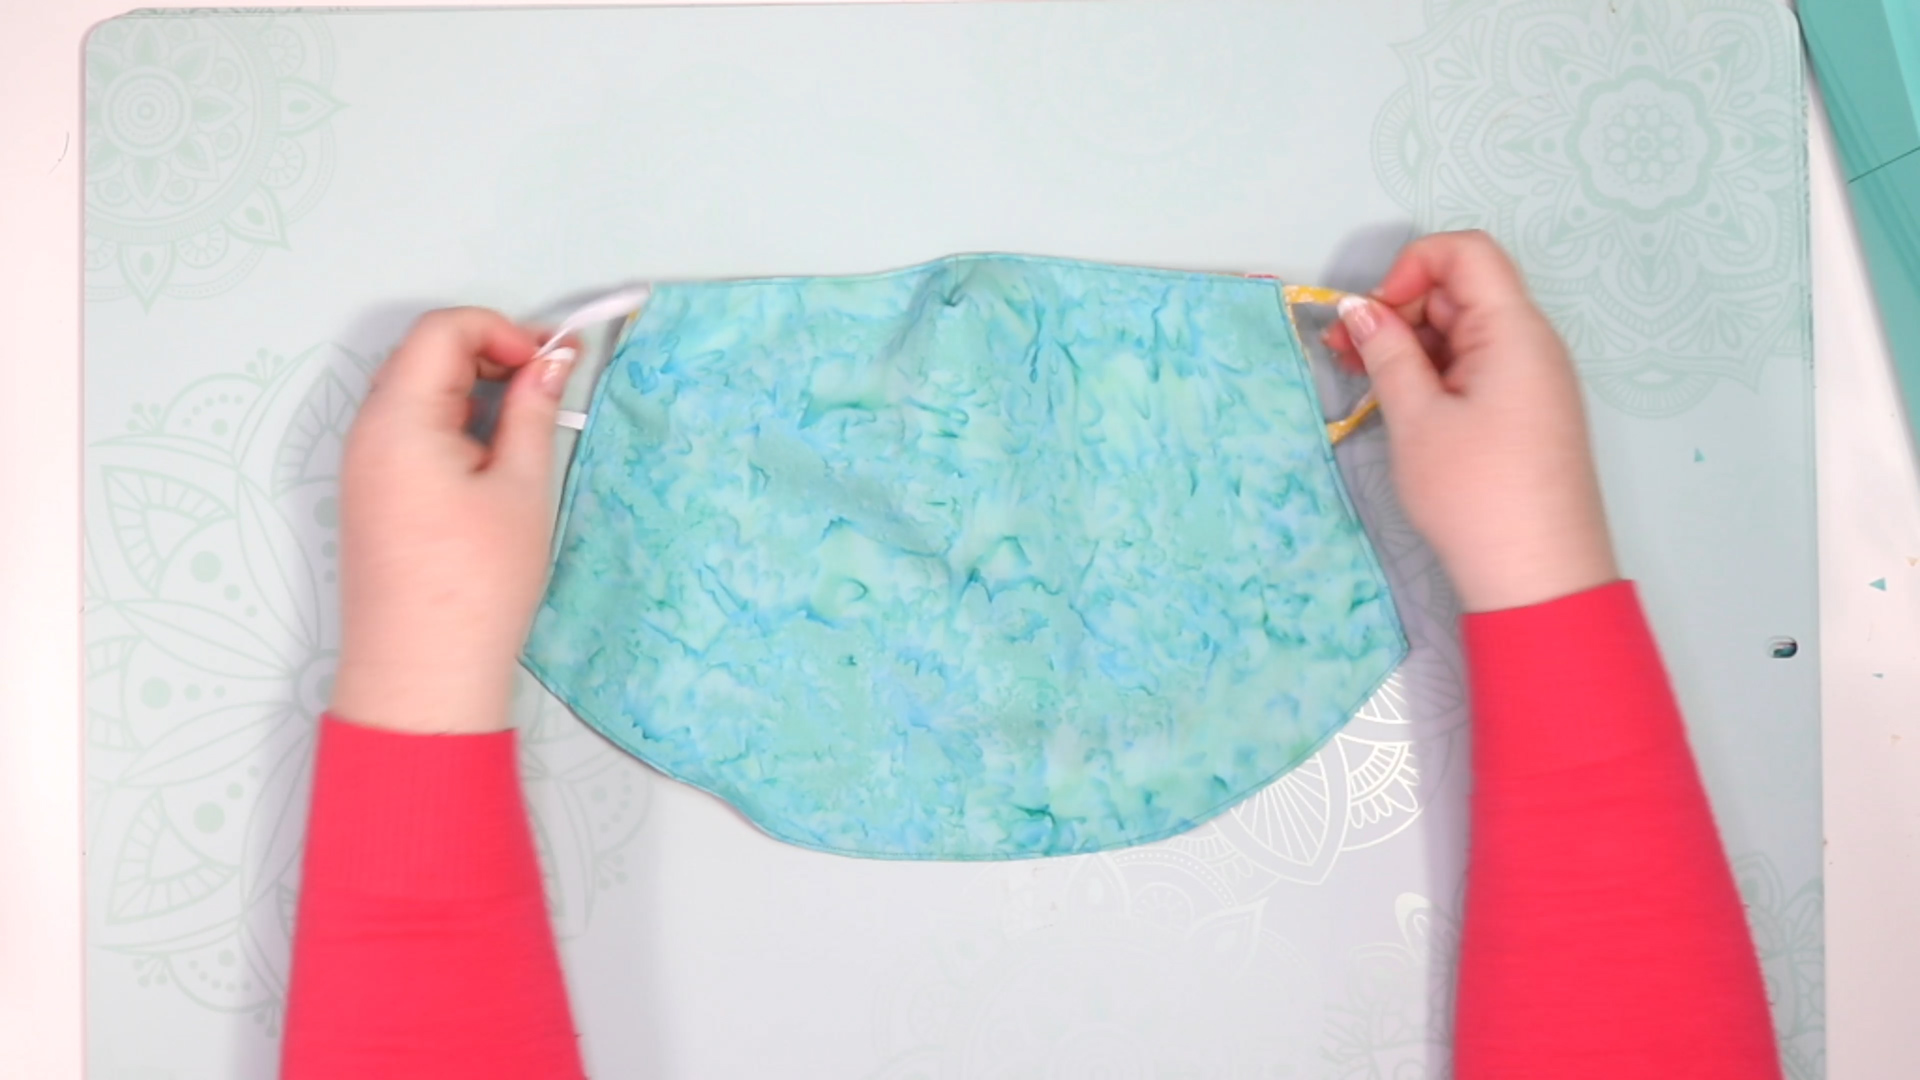
This veil face mask stays on with ear loops — make them using either 1/4″ elastic or just use strips of stretchy knit fabric, as I have in the photo below:
You can put an optional filter pocket inside the veil face mask if you want, too! I used a comfy cotton knit fabric for my filter pocket so it would be soft against my face.
Learn more about face masks and get more answers to your questions in my DIY Face Mask Guide:

Ready to make your own cool veil scarf face masks? This step-by-step tutorial shows you how to do it. This post contains some affiliate links for your convenience (which means if you make a purchase after clicking a link I will earn a small commission but it won’t cost you a penny more)! Read my full disclosure policy.
Materials to Make a Cool Veil Face Mask with an Optional Filter Pocket
View my Amazon shopping list with the exact items we used to make this project!
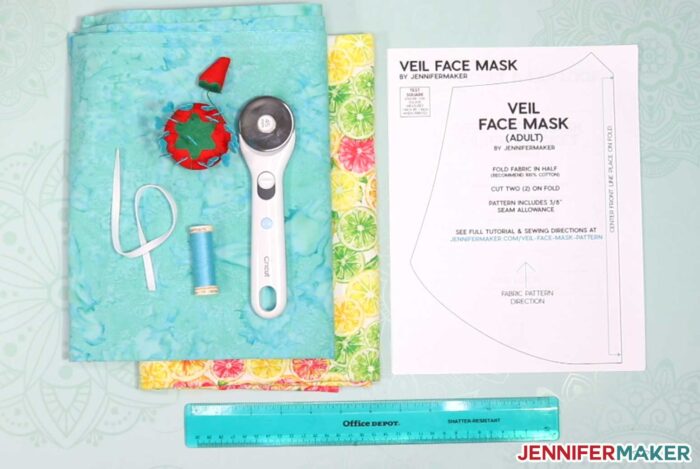
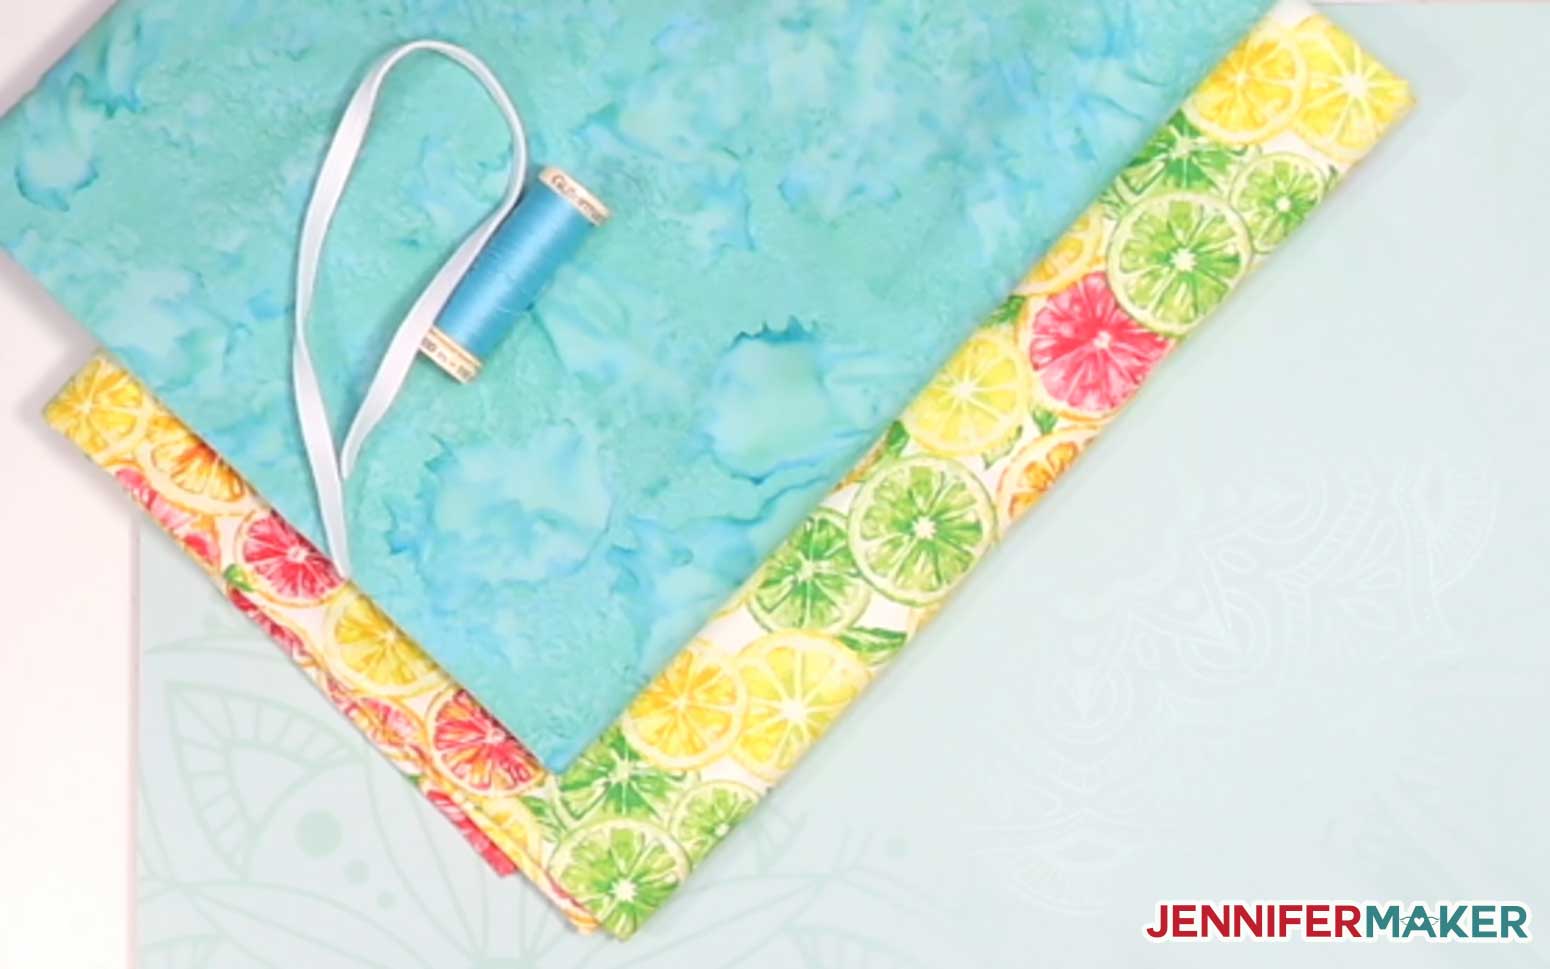
- At least 12″ x 36″ of 100% cotton fabric, densely woven — I used this blue batik cotton and this yellow lemon lime pattern
- Something to make ear loops from, such as 11 inches of 1/4″ wide elastic or some stretchy knit interlock fabric
- Thread
- Pins (for keeping fabric attached while sewing)
- (Optional) Something you can use as a filter — see my Face Mask Materials List for notes, effectiveness, and breathability so you can make an informed decision
- Scissors
- Ruler
- Sewing machine as shown in the video, this sewing machine as another option, or needle and thread for hand sewing
- A way to cut your material, such as a Cricut Maker, a rotary blade or scissors
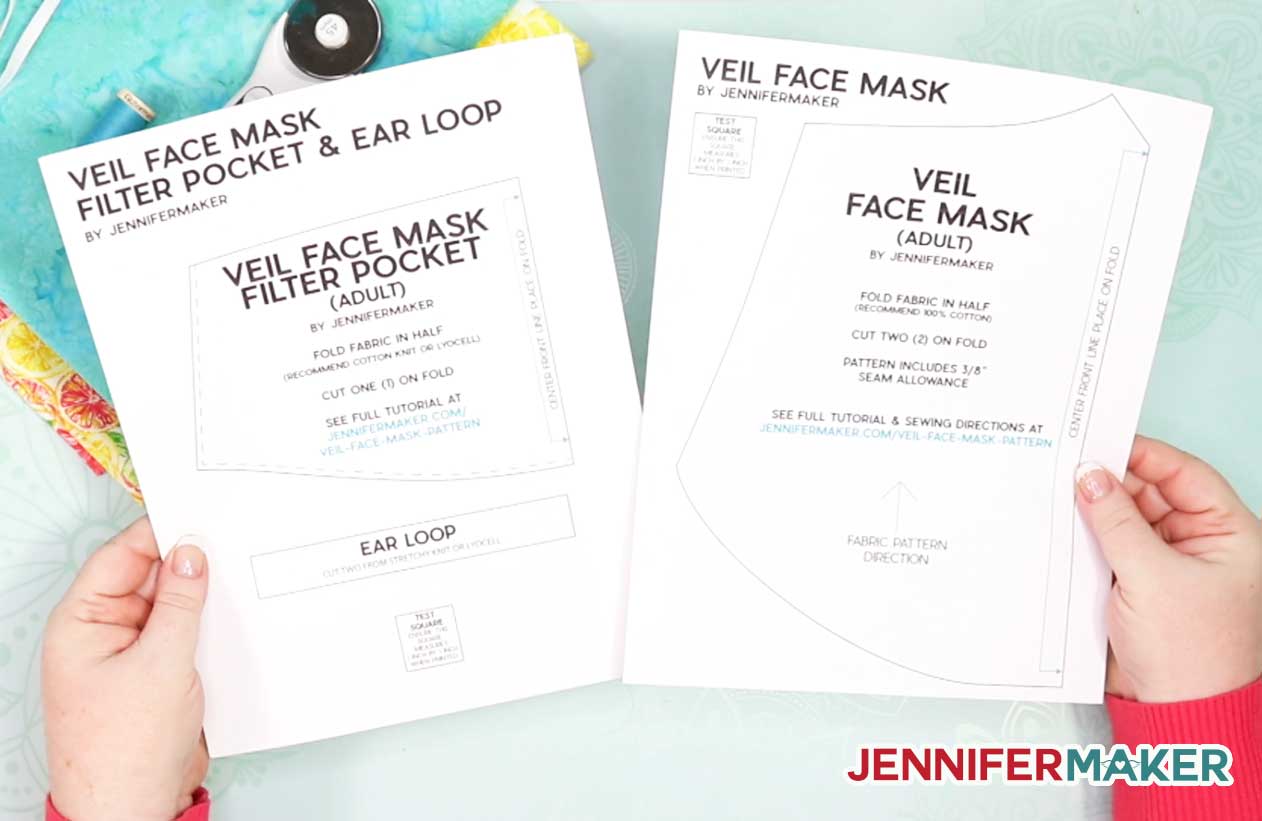
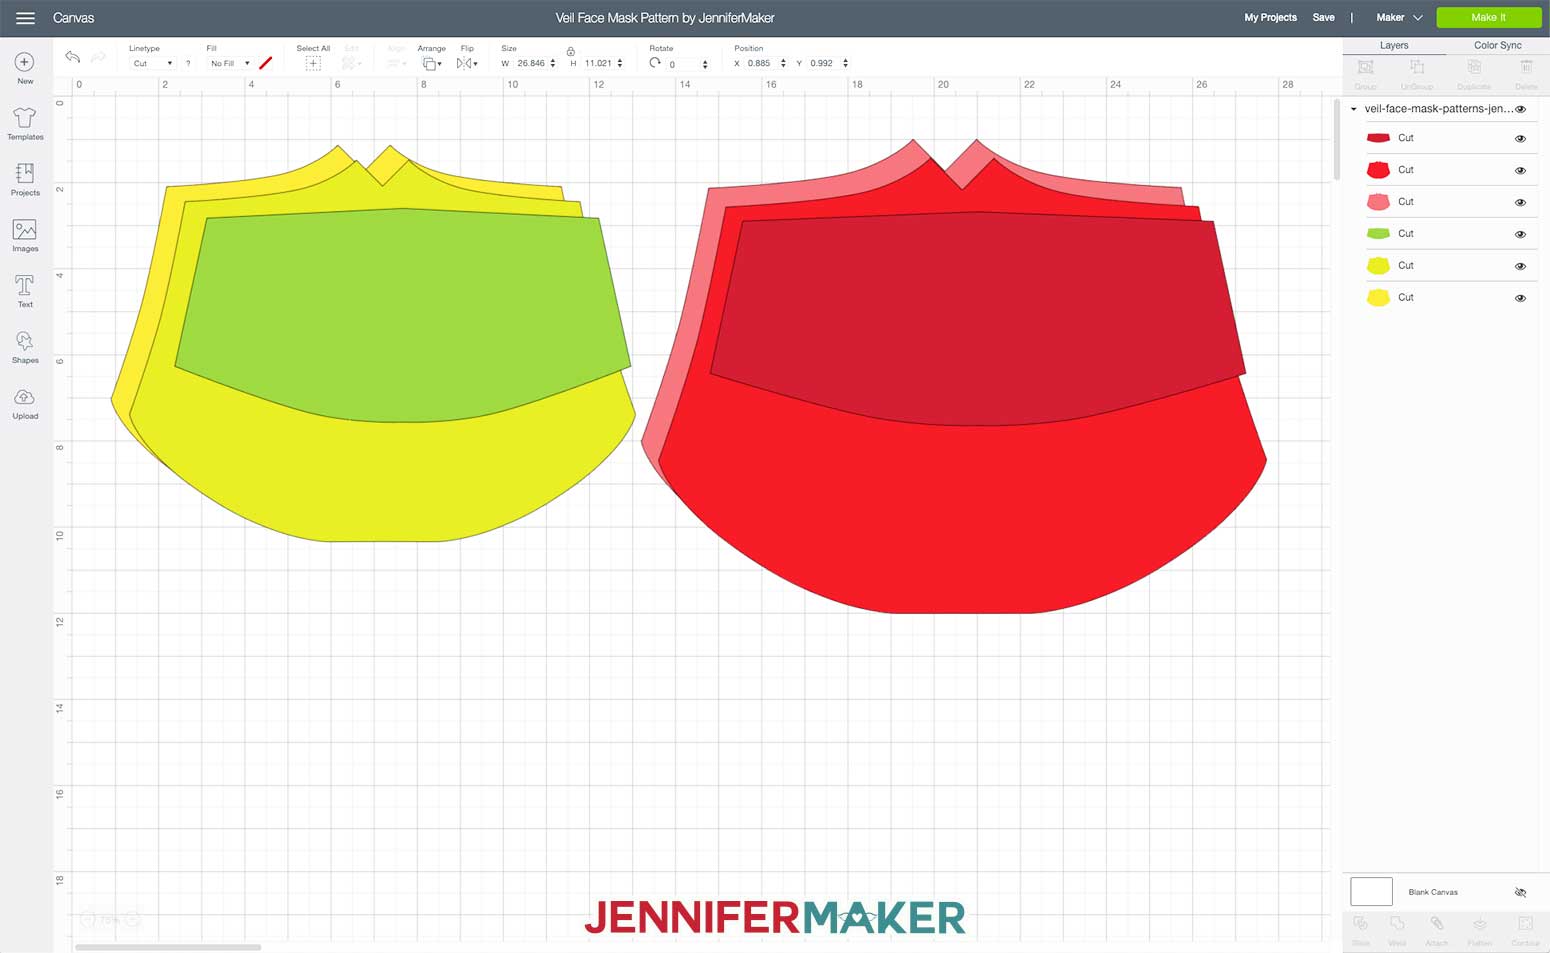
- Design #225 (My free veil face mask printable PDF pattern/SVG cut file available here and in my free resource library—get the password by filling out the form at the bottom of this page)
How to Cut and Sew a Cool Veil Face Mask
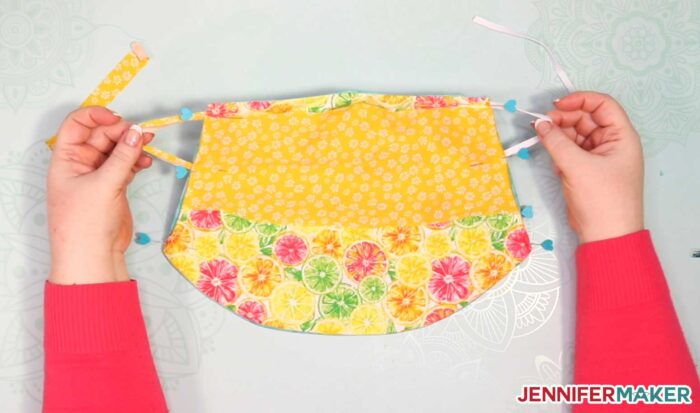
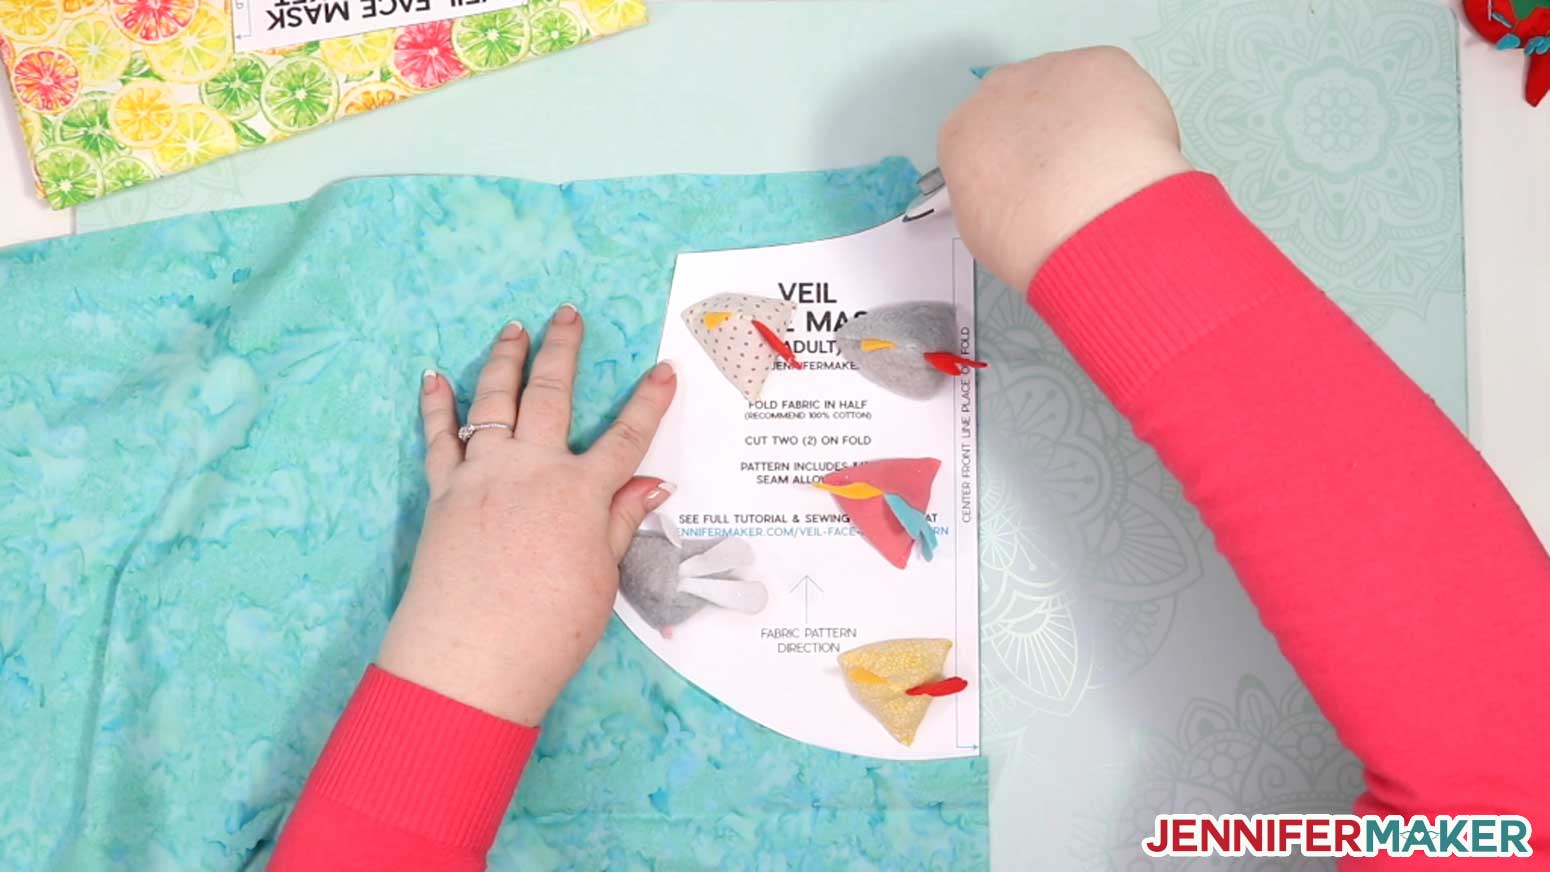
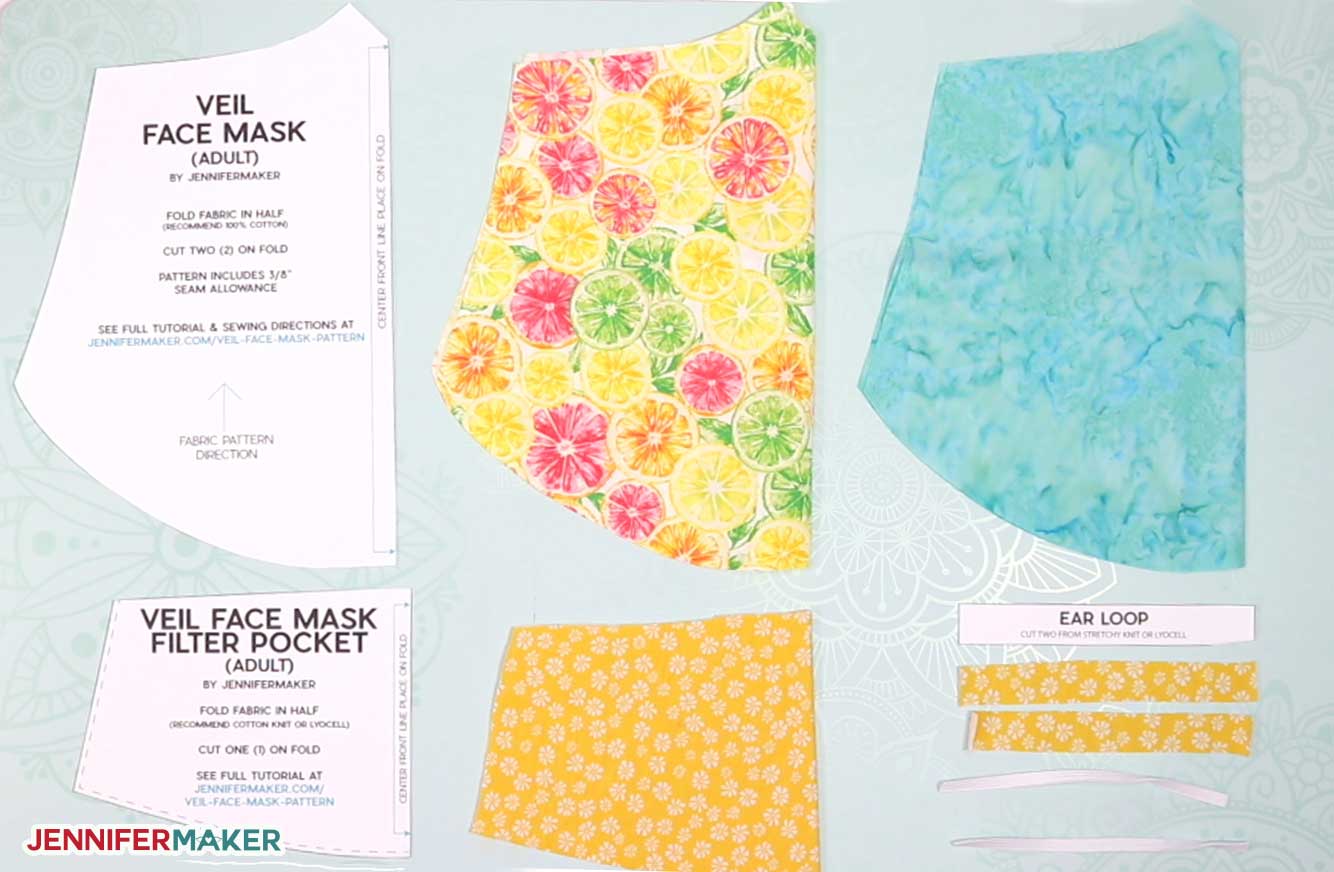
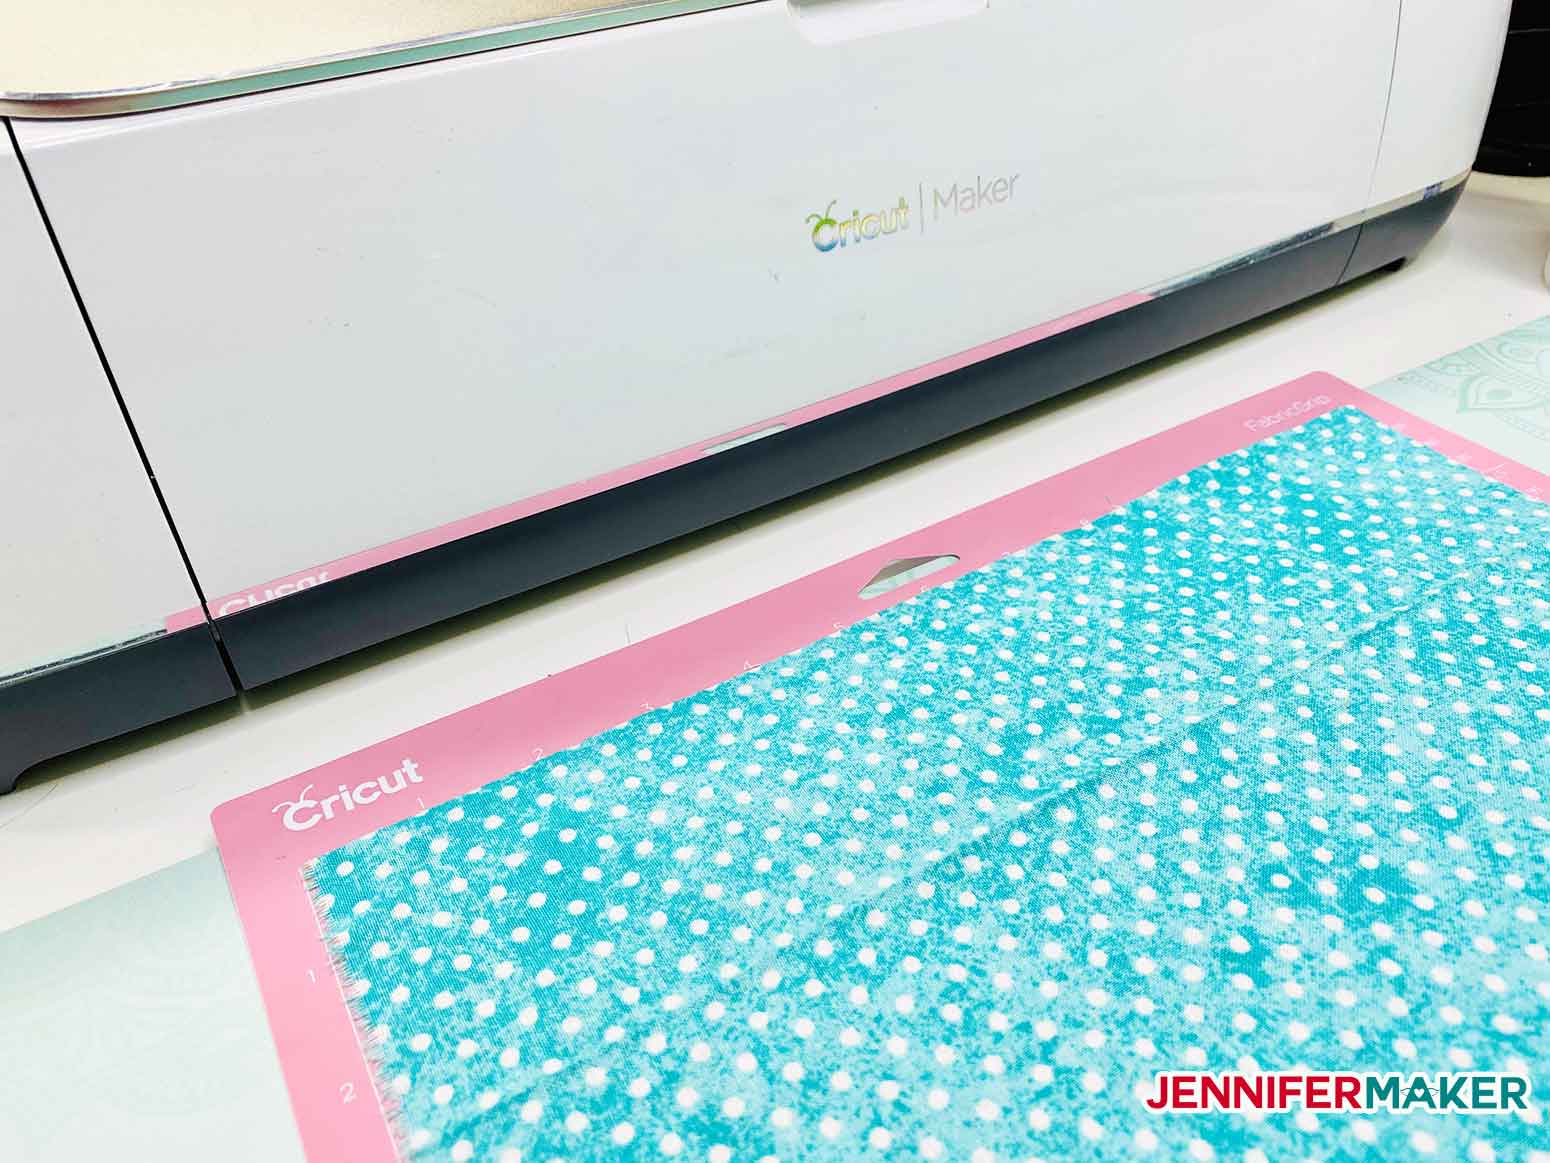
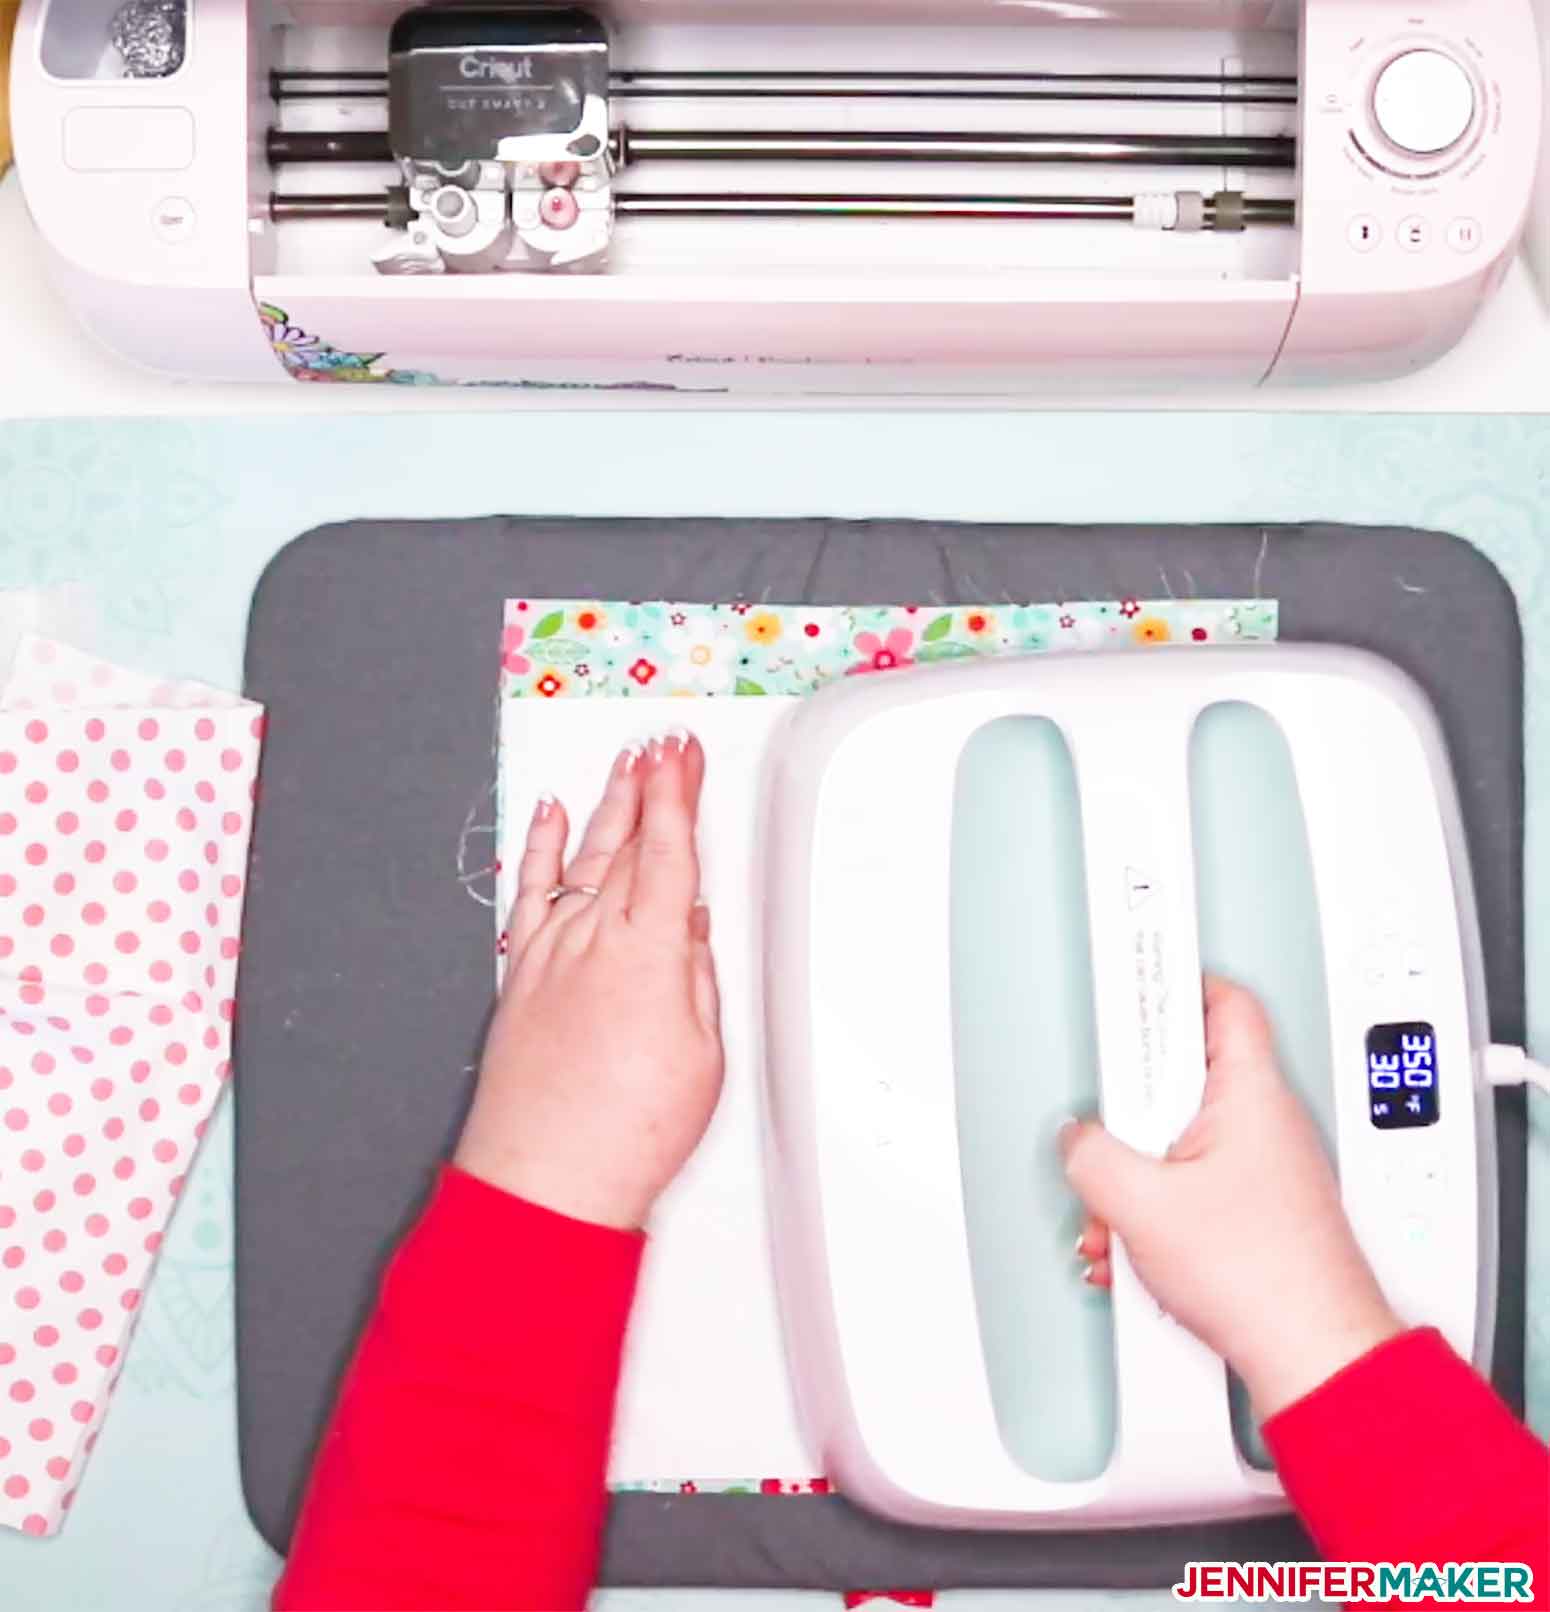
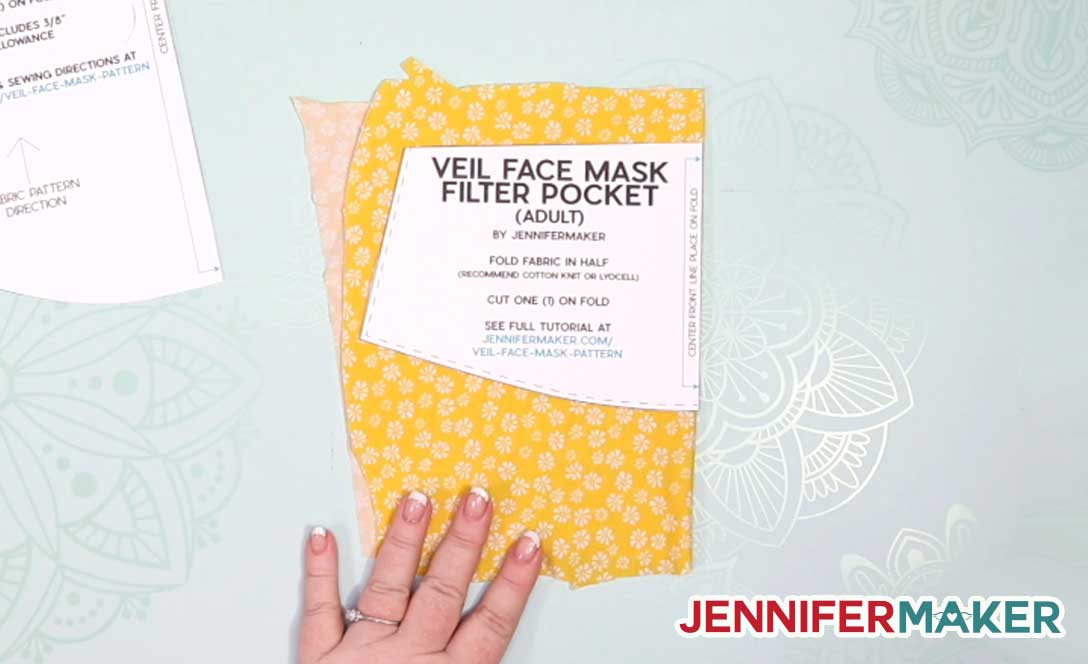
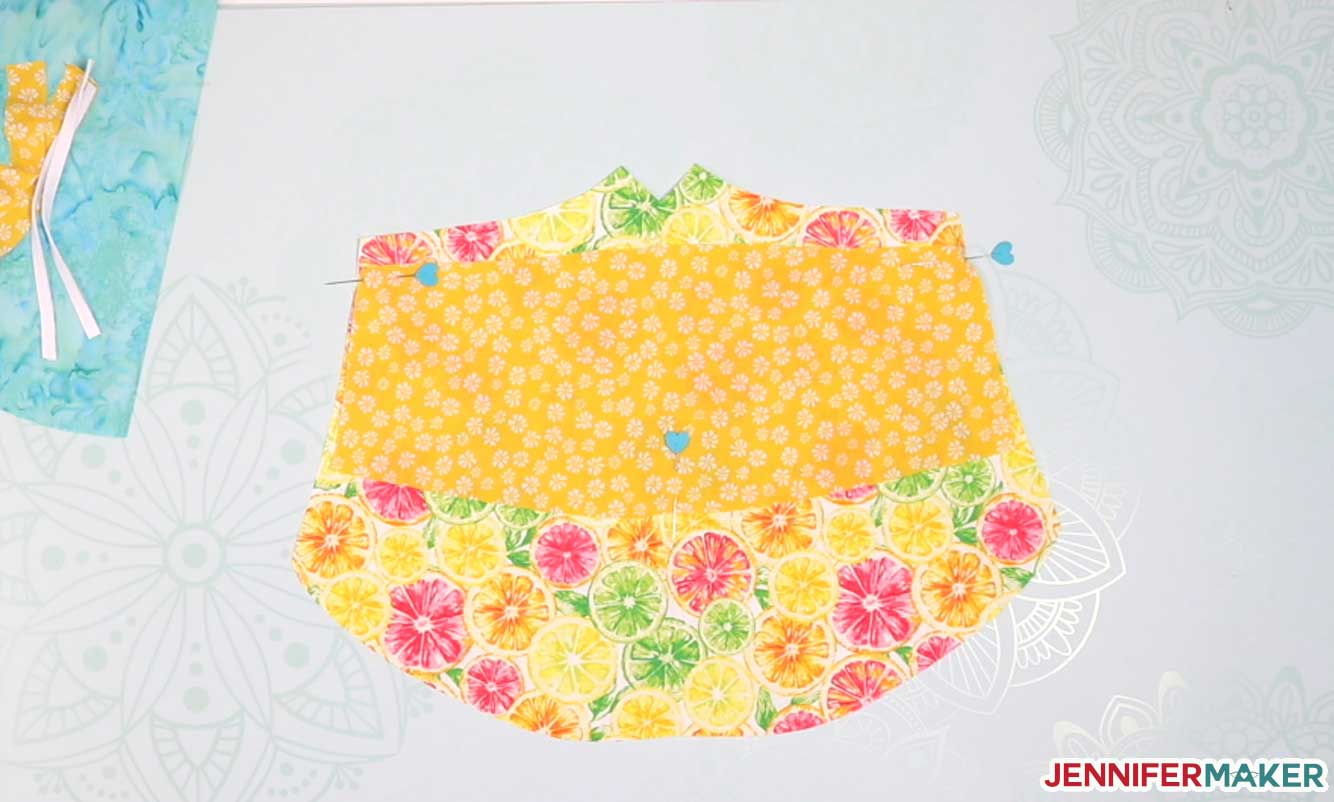
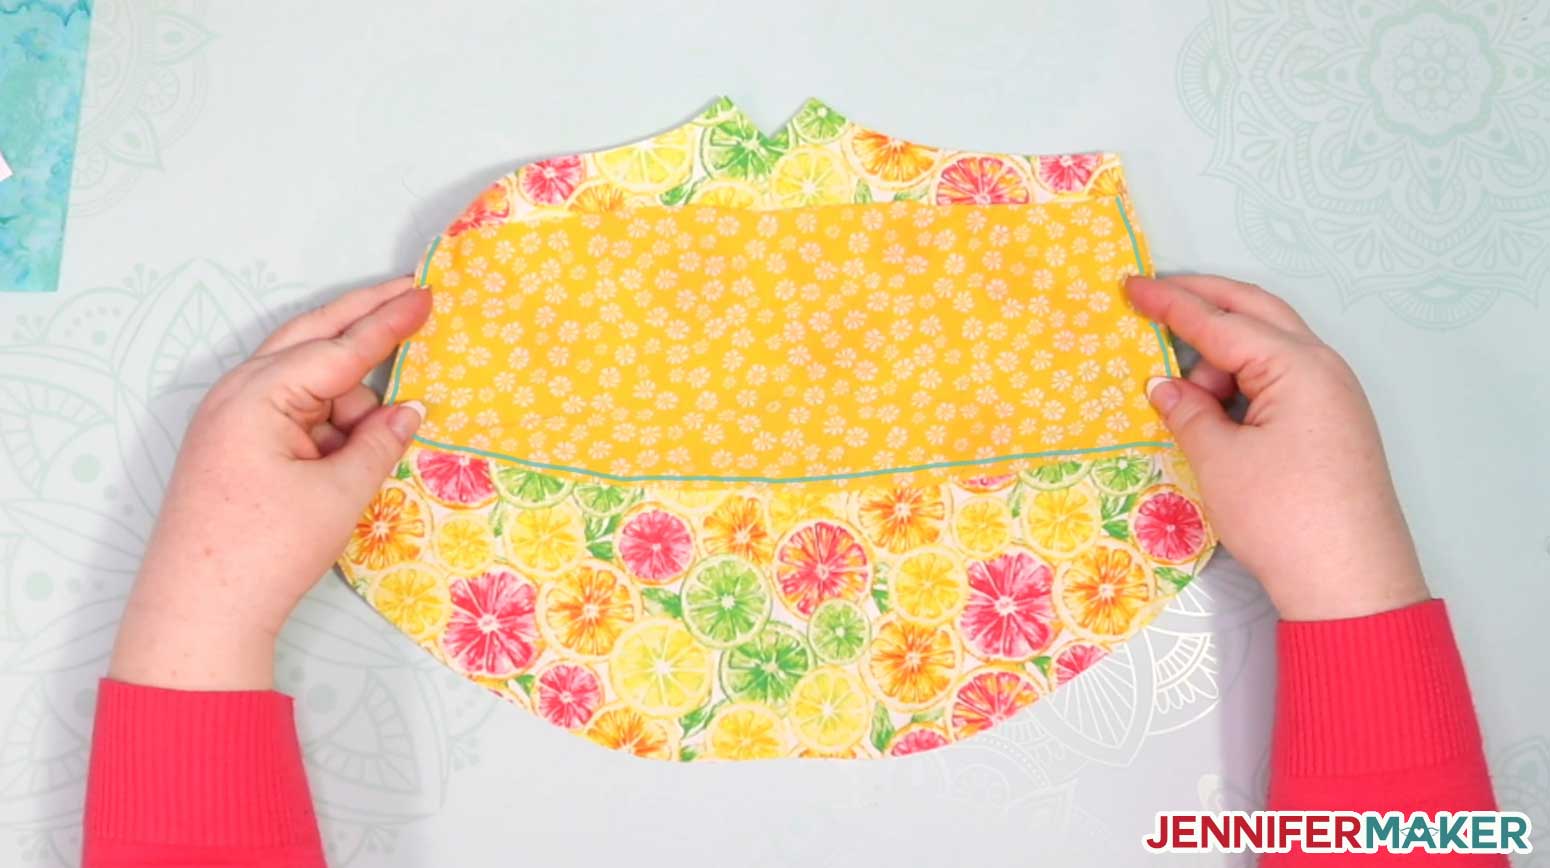
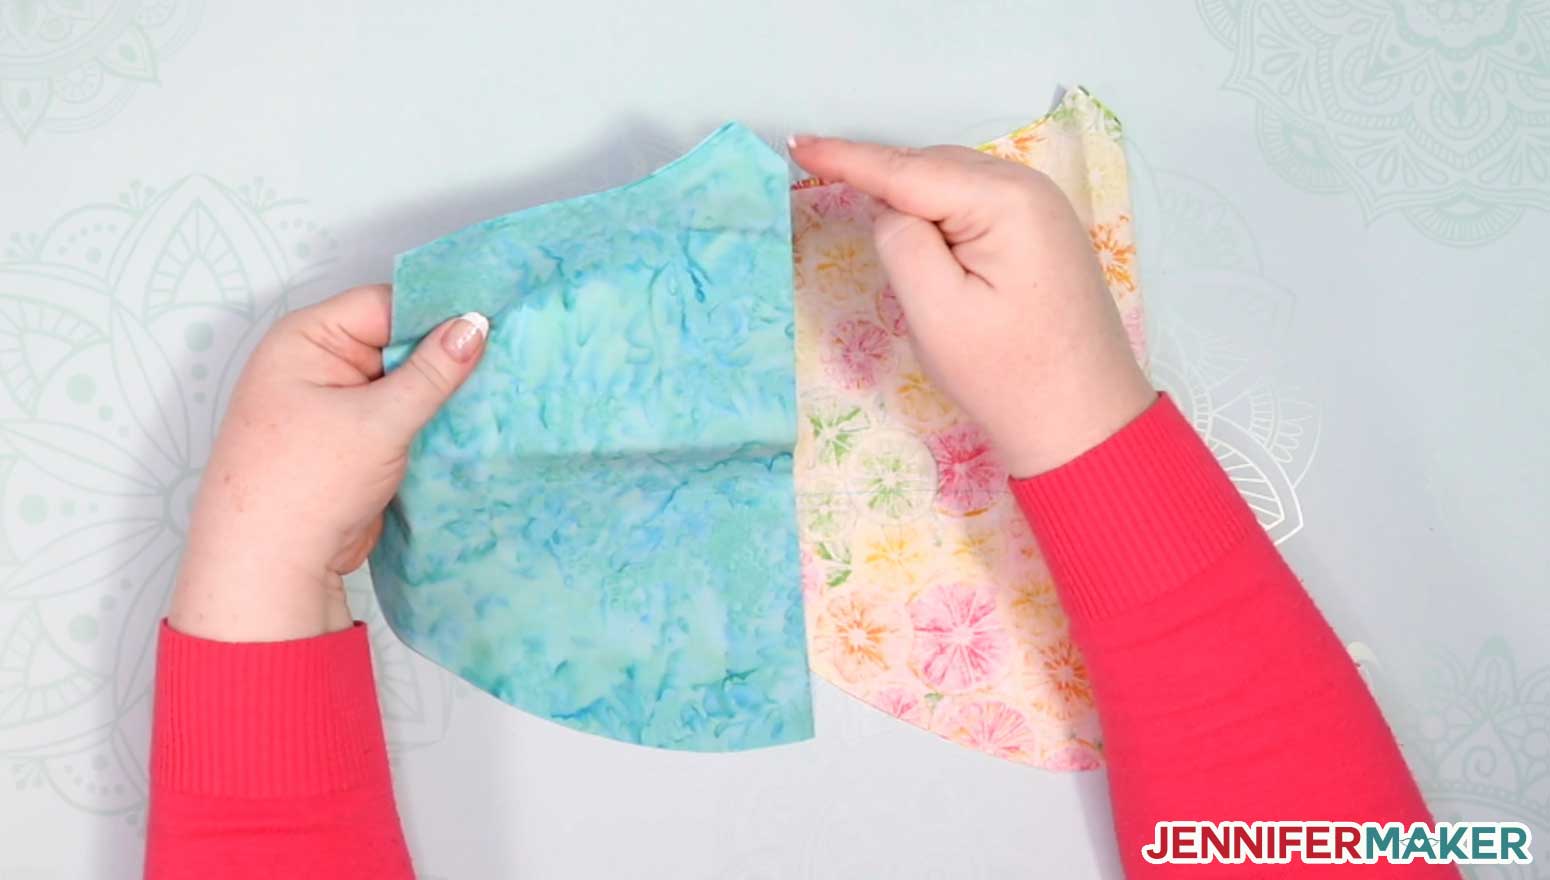
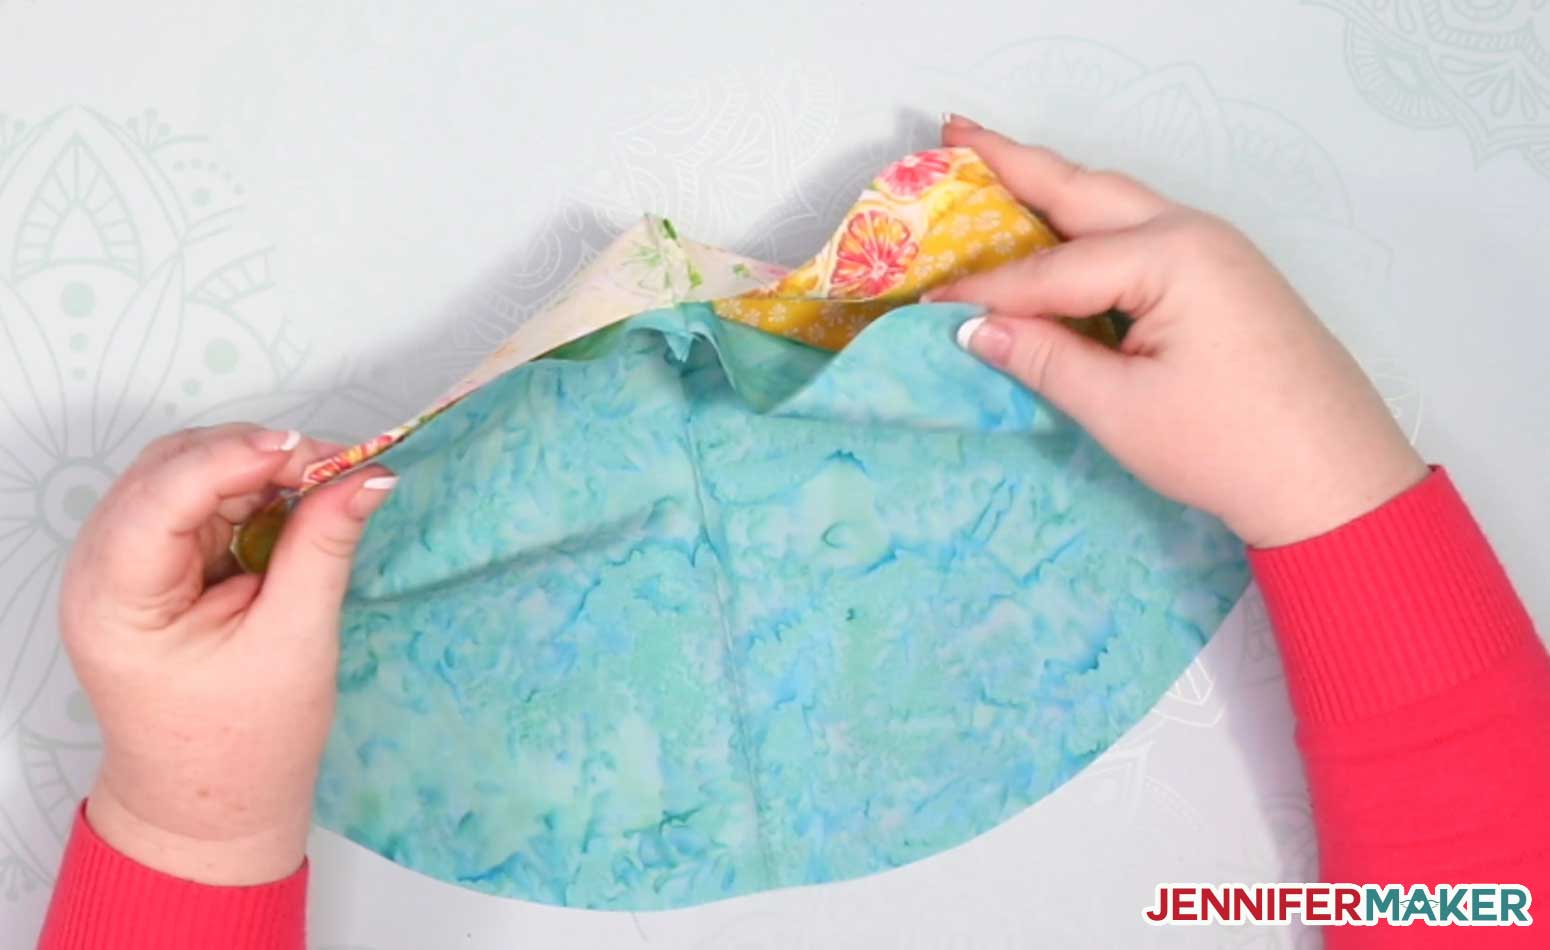
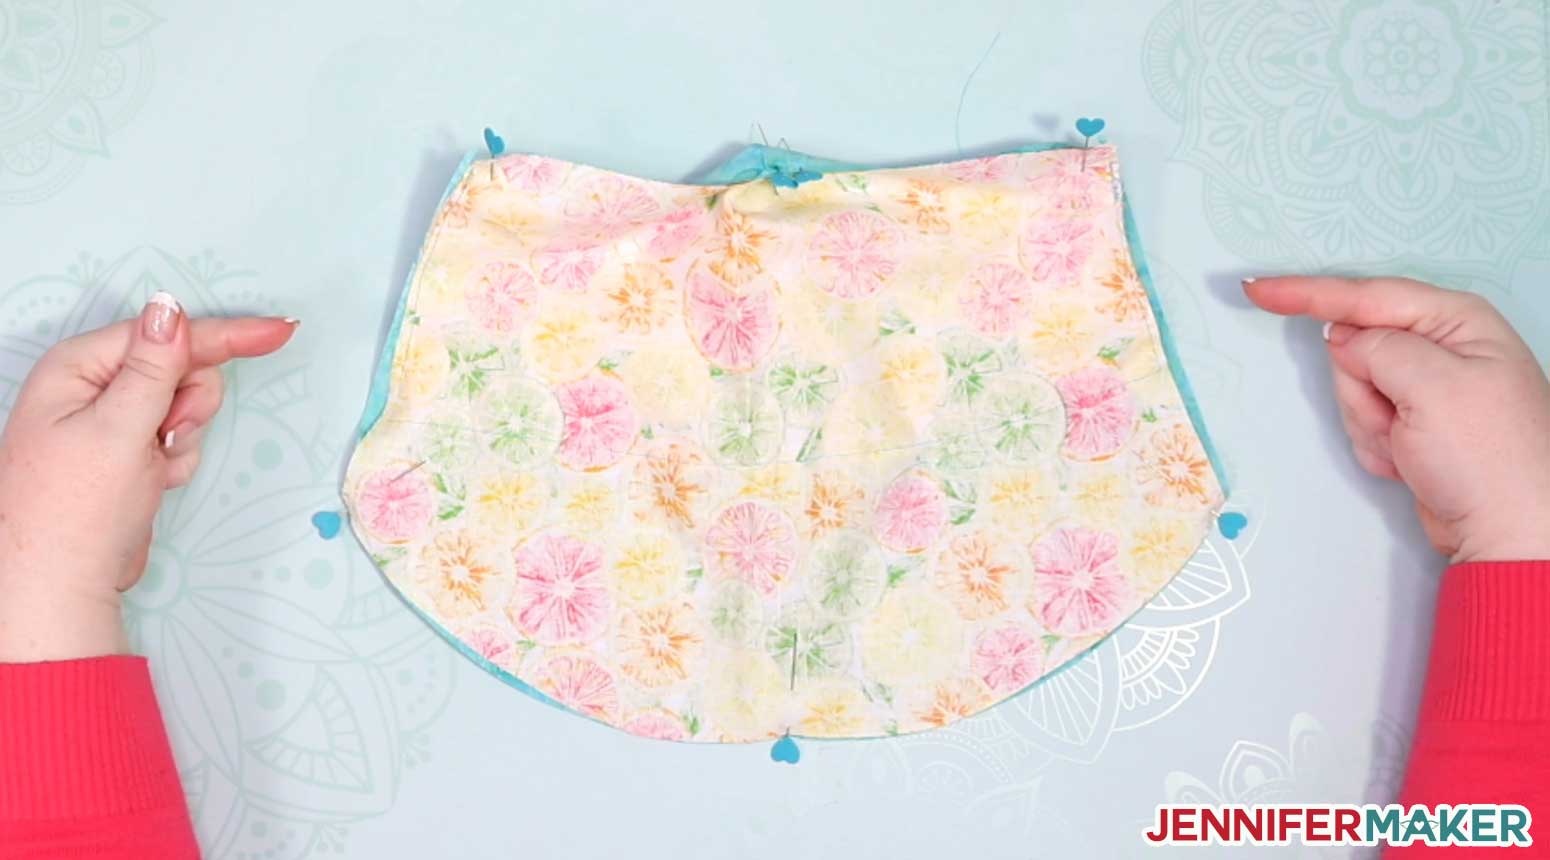
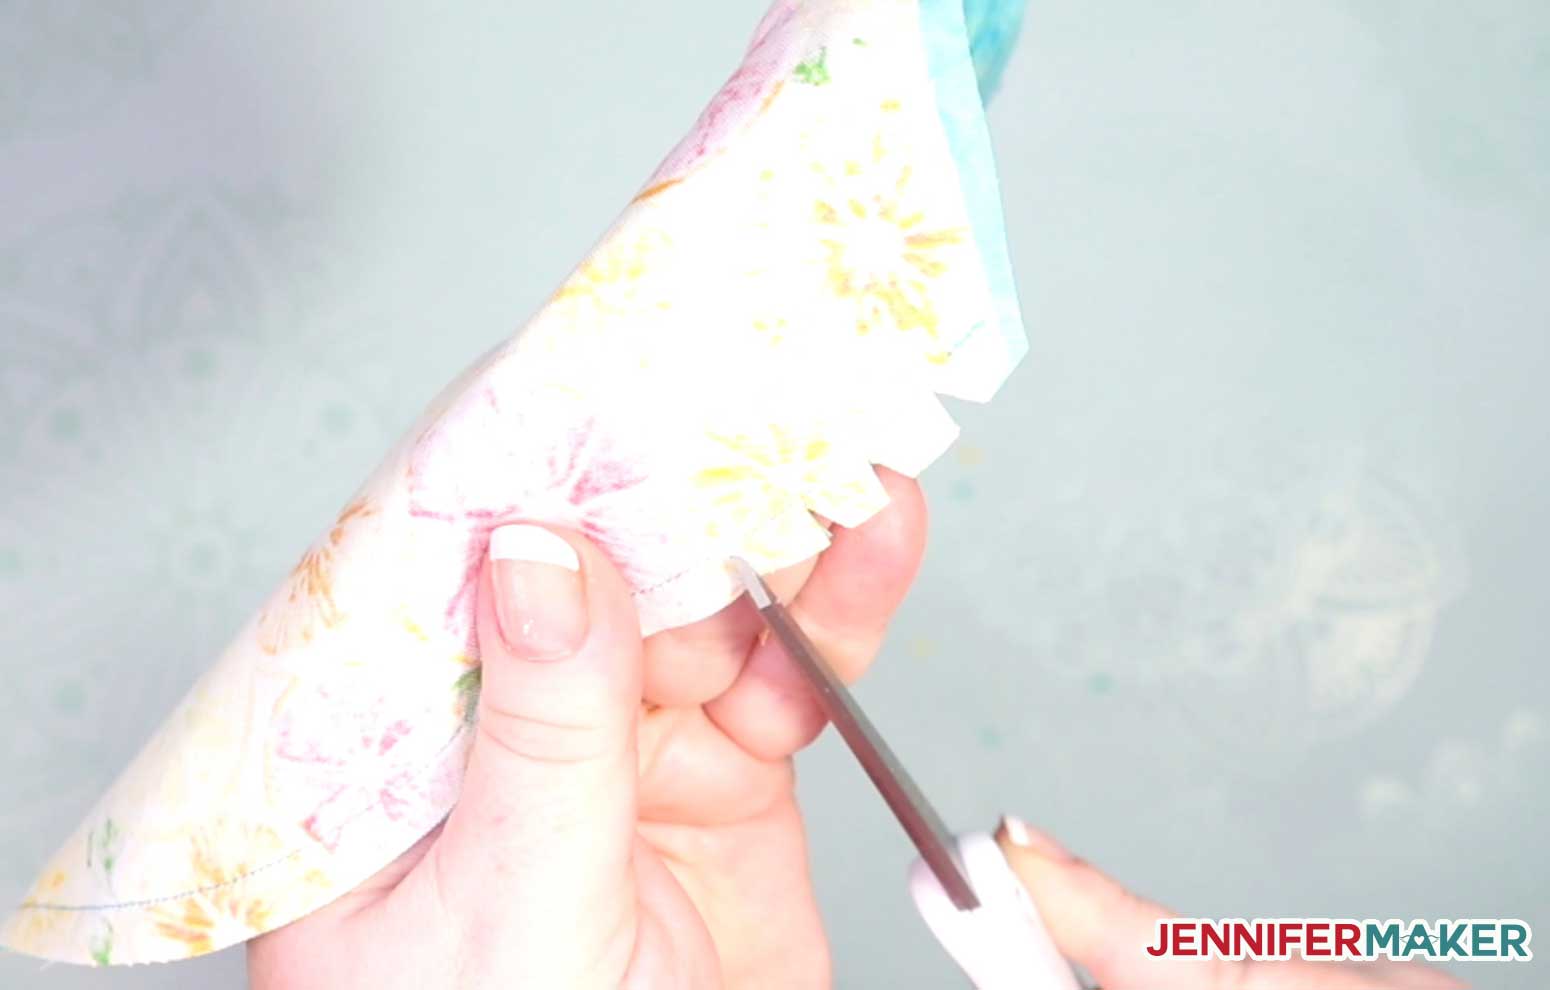
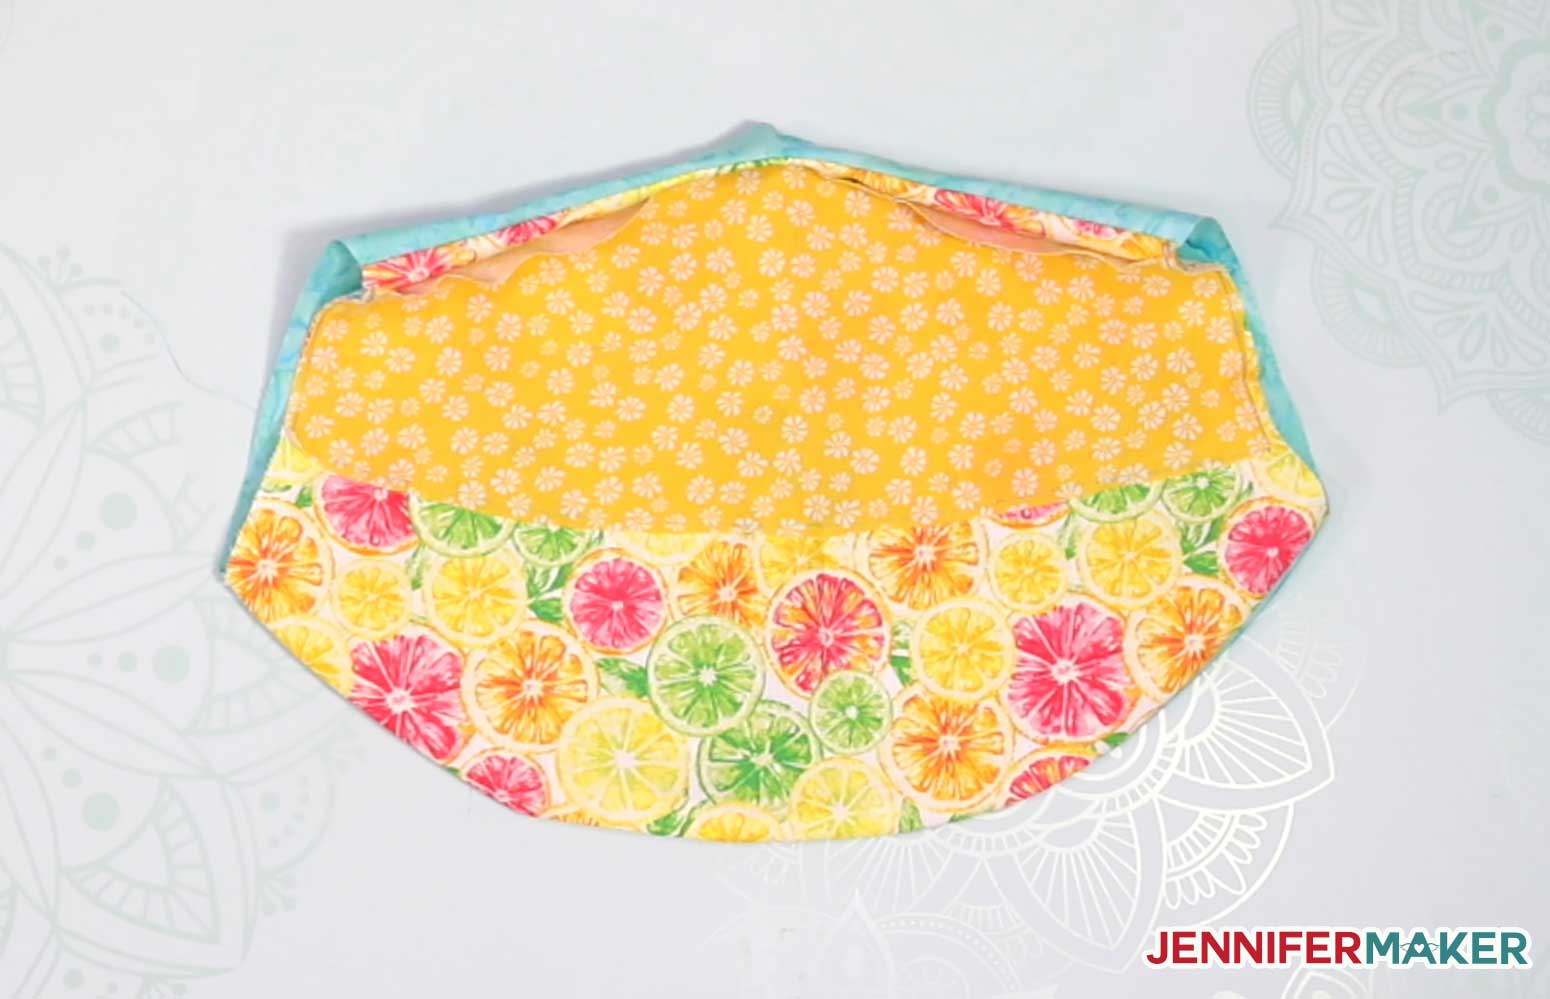
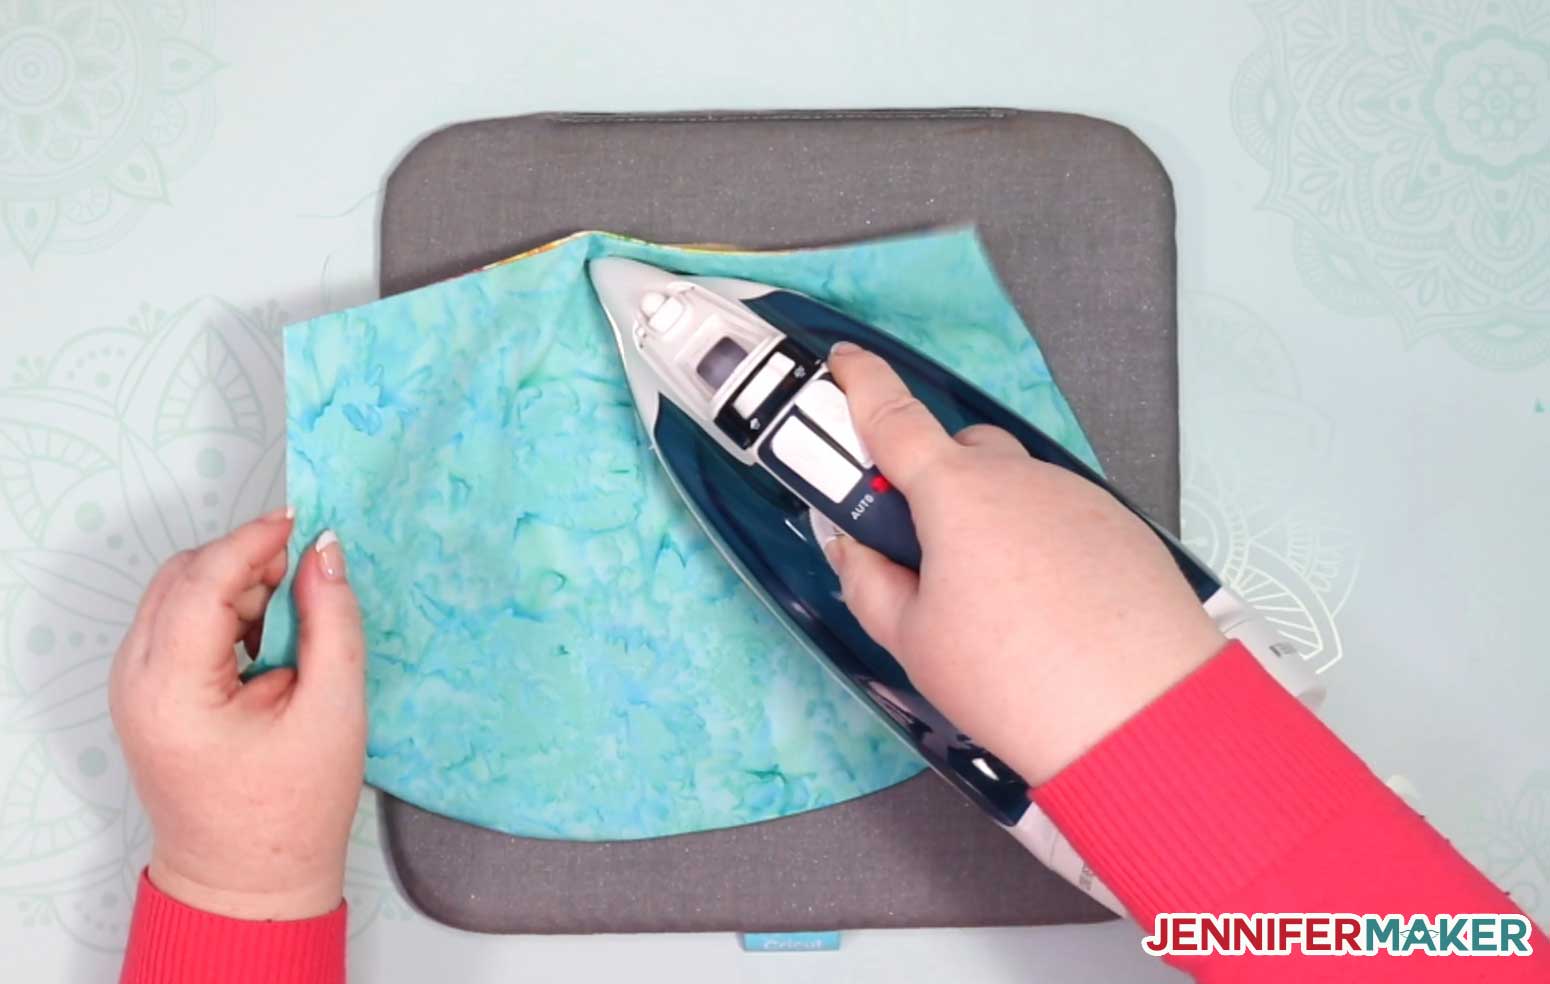
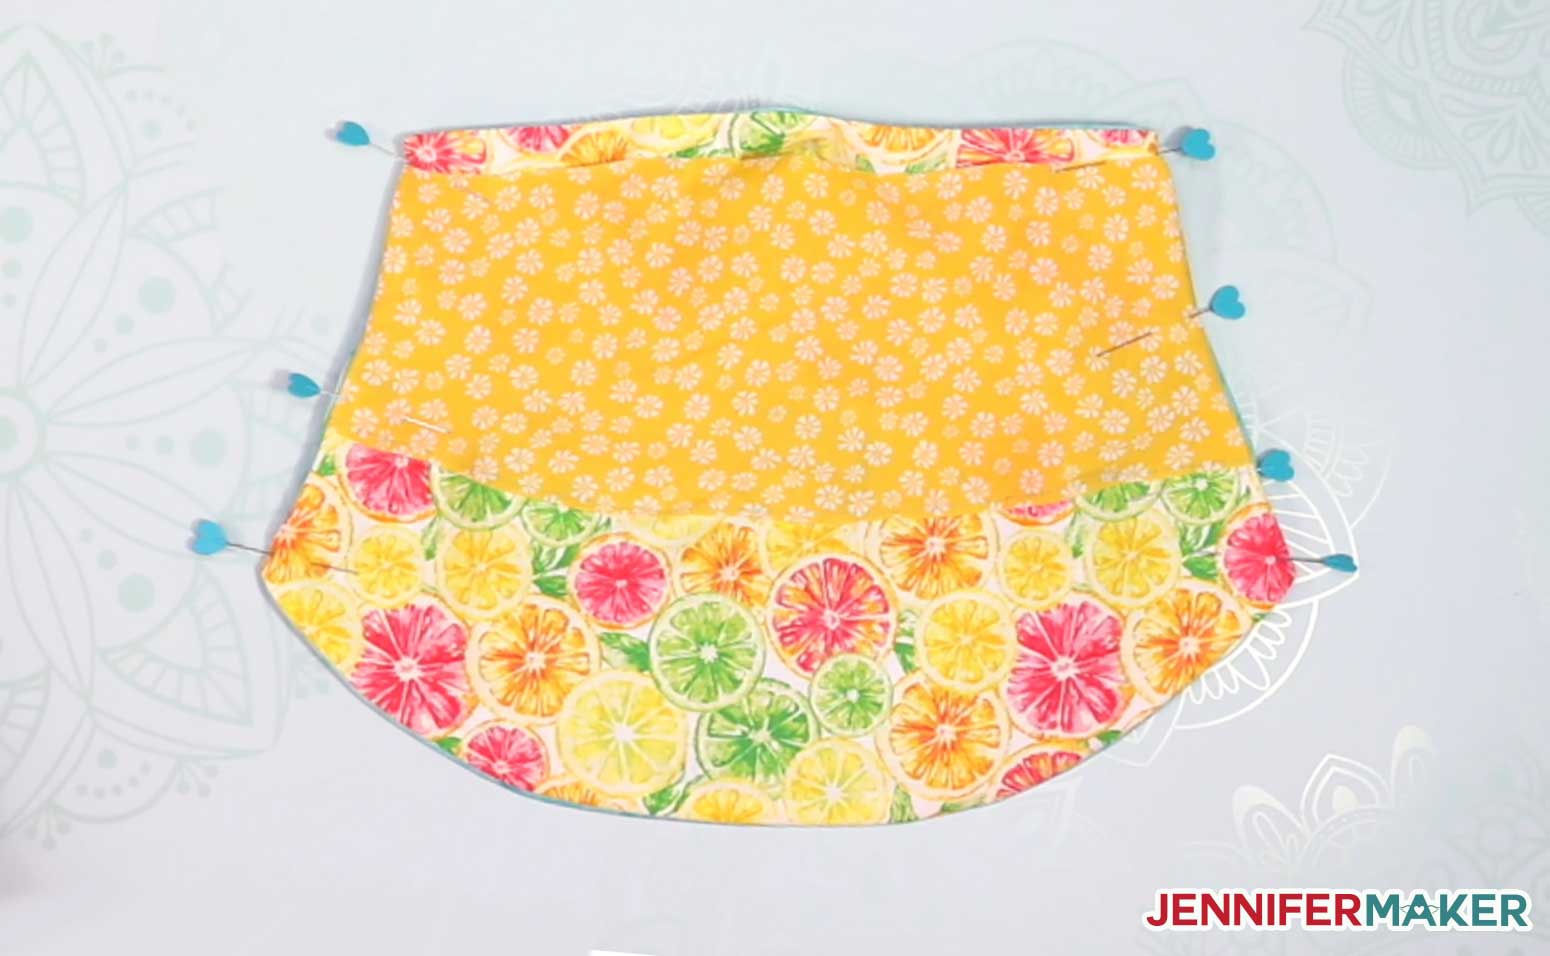
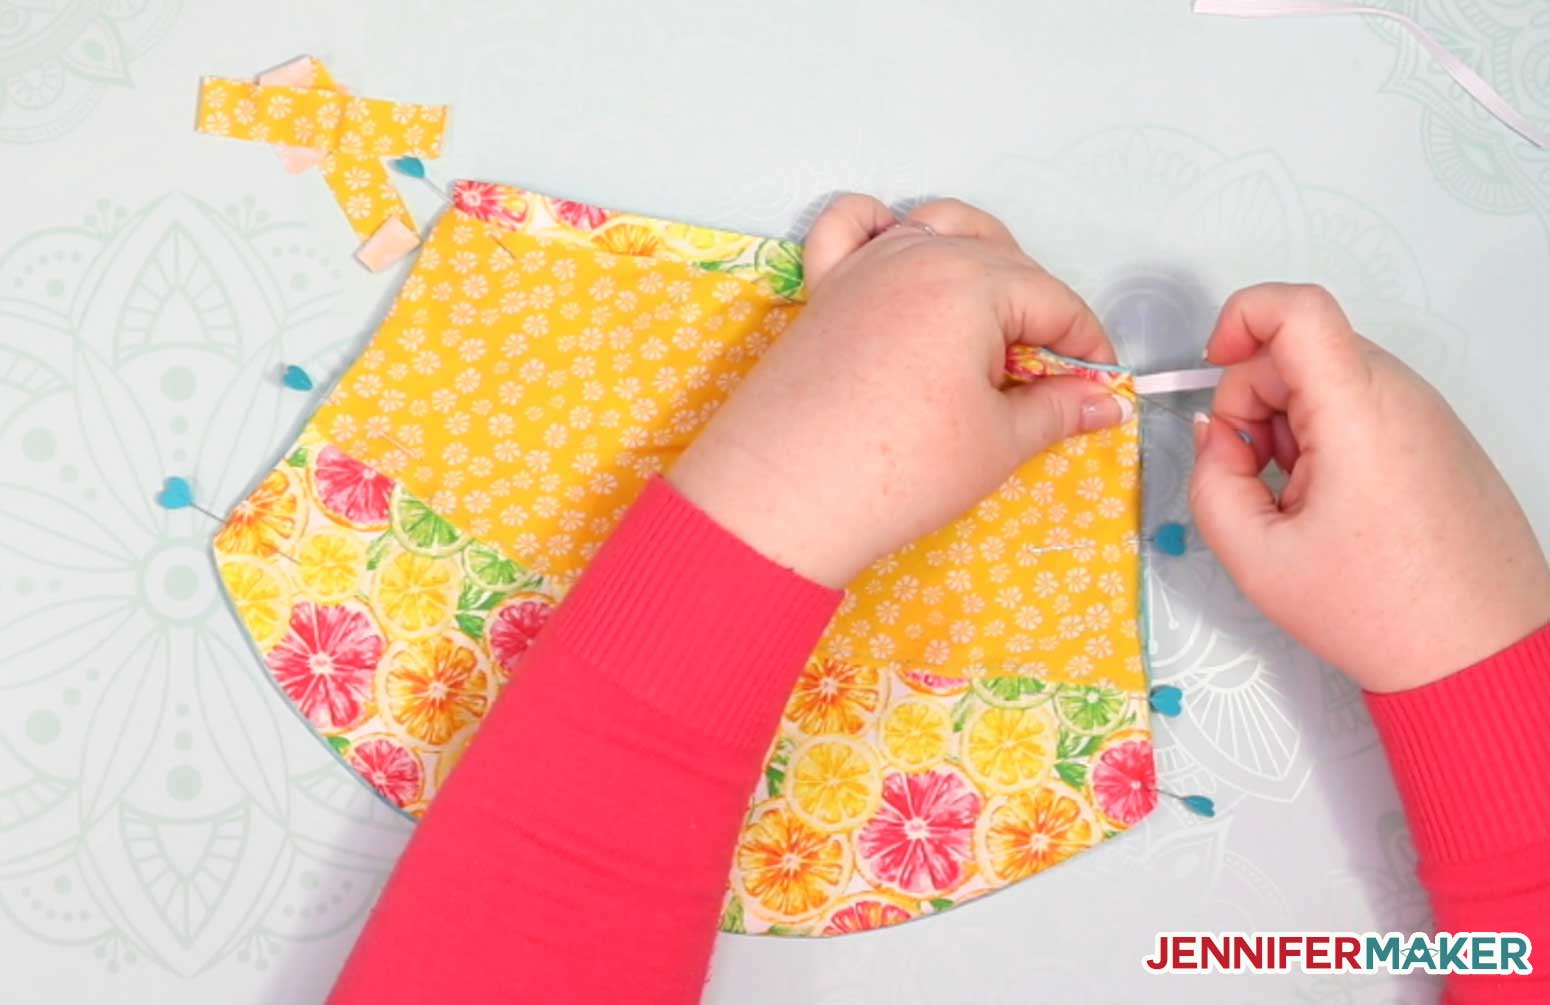
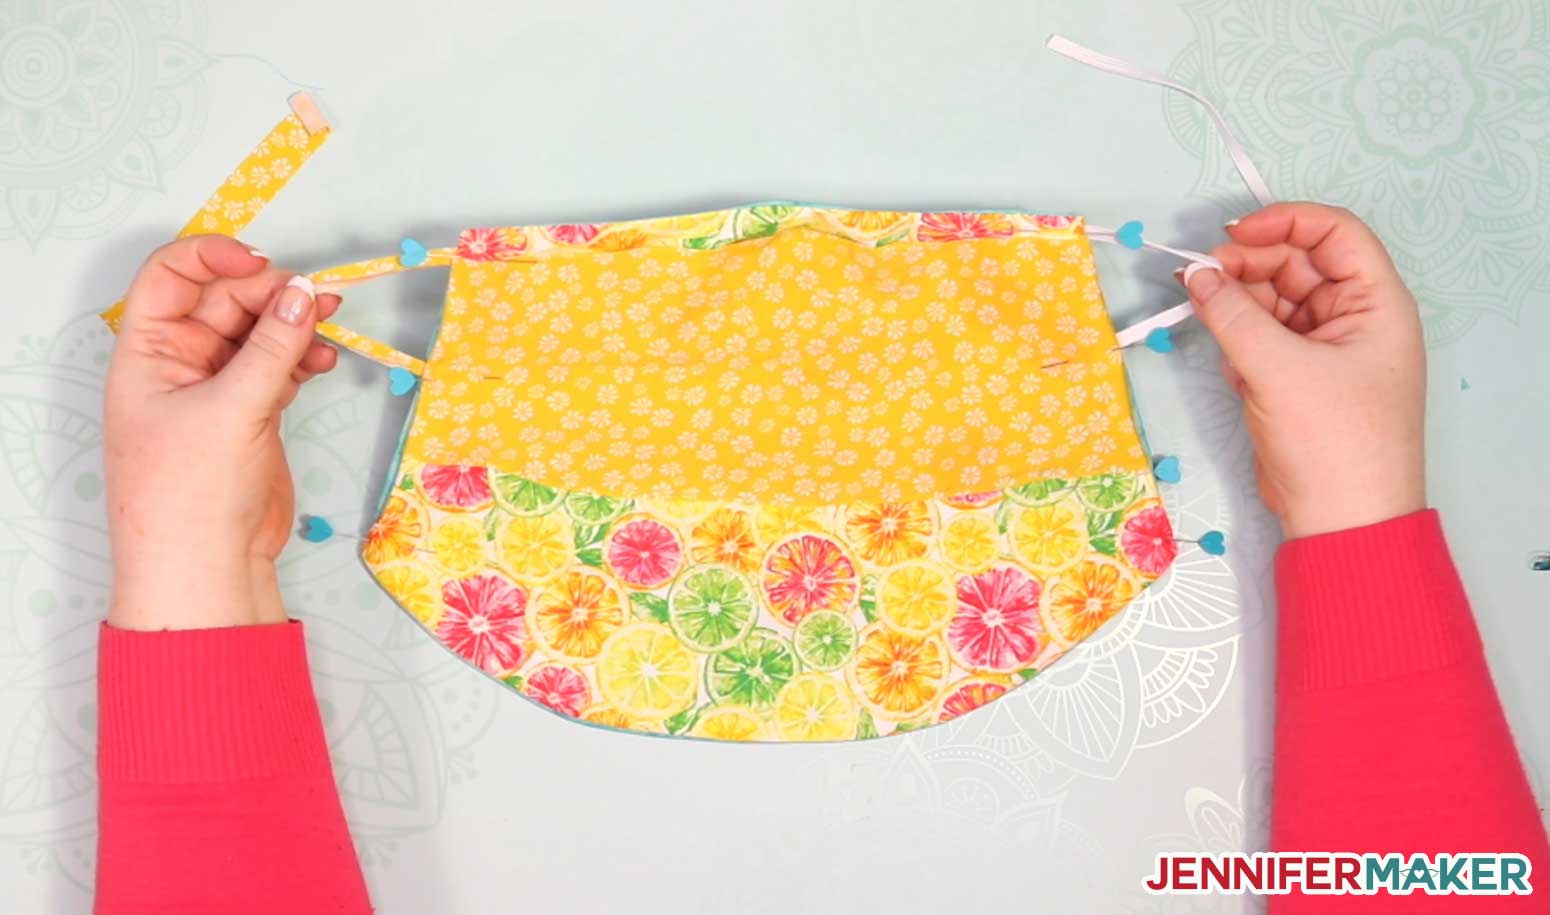
Step-by-step directions to make an easy and cool veil face mask with ear loops. This type of face mask covers the lower half of your face and the front of your neck but leaves the back of your neck free. It's a very pretty and feminine style of face mask, and even offers some sun protection! Perfect for hot weather! Design #225 which is my free DIY veil face mask pattern comes in several formats. You can get a printable PDF for cutting by hand, or an SVG cut file for cutting with a Cricut or another cutting machine. Download the DIY veil face mask pattern from my free resource library (get the password to the library in the form at the bottom of this post), or click here! Here's what the Veil Mask PDF pattern looks like printed out: Here’s what the veil face mask SVG cut file will look like once uploaded to Cricut Design Space: Tip: If you’re not sure how to upload an SVG cut file to Cricut Design Space, watch this helpful video training series I made. If you’re on an iPhone or iPad, here’s how to download and upload SVG files to the Cricut Design Space app. I recommend you use two different colors and/or patterns of fabric to make your veil face mask, that way you always know which side is the outside and which is the inside. You don't want to accidentally put the outside layer of the face mask against your mouth. For this tutorial, I'm using a blue batik 100% cotton fabric as the outside layer and a yellow citrus pattern cotton fabric as the inner layer. Tip: Pay attention to the fabric grain and pattern direction noted on the printed pattern. If you're cutting the veil face mask by hand, just print out the printable PDF, cut out each pattern piece as directed, and use it to cut your fabric. Note that your fabric is folded in half before cutting the mask and filter layers If you decide to cut ear loops, these need to be cut from stretchy knit cotton, like interlock or even an old T-shirt. Note: I'm using my DIY pattern weights to hold my pattern in place while I cut my fabric in the above photo. Tip: If you plan to make a LOT of these veil face masks, print out your patterns on cardstock for tracing! Be sure to cut two layers of cotton fabric! If you're cutting this face mask on a Cricut Maker: Place your fabric on a pink FabricGrip cutting mat. Load your rotary blade and fabric marker into your Cricut machine, load your mat, and press the flashing button to begin your cut. I cut T-shirt material on the "Pima Cotton" setting and woven cotton fabric on the "Cotton" setting. If you're cutting on a Cricut Explore, you must first bond your fabric first. To bond your fabric, cut a piece of freezer paper the same size as your material and attach its shiny side to the wrong side of your fabric by pressing with an EasyPress or iron for 30 seconds at 350°F. Once your fabric is bonded, place the bonded fabric freezer paper side DOWN on your cutting mat (you can use the pink mat or a green mat), load your regular fine point or bonded fabric blade in (both will work), put in your Cricut fabric marker (optional), load your mat, and press the flashing button to begin your cut. I cut on the "Fusible Fabric" material setting. When done with your cut, remove the cut pieces from the mat and peel off the freezer paper. If you want to add the filter pocket to your veil face mask, cut out a piece of knit or lyocell fabric with the filter pocket pattern. I recommend 100% cotton knit fabric for this pocket because it is soft and the edges will not fray. Put the filter pocket on top of the inside layer of your veil face mask, with the top edge of the filter pocket one-half inch from the top edge of the veil. Make sure the wrong side of your pocket is against the right side of your inner layer. Pin in place. Sew the filter pocket to the inside layer of the veil face mask along the two edges and bottom at 1/4" seam allowance with a straight stitch, leaving the top opening (the side closest to the edge) open. Be sure to do a backstitch at the start and end of your line of sewing to keep your pocket secure. Fold the inner layer of your veil face mask in half, right sides together, and stitch the dart at the top closed with a 3/8" seam allowance Repeat with the outer layer. Clip the end of both dart seams so the seam allowance can fold flat. Place your inner layer on top of the outer layer for your scarf veil face mask. Make sure the right sides (the sides with designs on it if you have any) are facing each other. If you added a pocket in Step 3, your pocket side should be facing the right side of your outer layer. Pin in place. Sew these two layers along the top edge (the edge with the dart) and along the bottom edge, but DO NOT sew up the two sides yet. Notch and clip the curved seams for a smoother look. Just be careful not to cut into any of the stitches. Turn the veil face mask right side out. Press the veil face mask along both the top and bottom seams. Tip: If you wanted to add a nose wire, this would be the time to do it. Just cut a 3-4" wire, bend the ends in, put it between the two layers at the top of the darts, then sew around it to keep it in place. I opted not to add a nose wire to mine. Fold both raw edges on the sides of the veil face mask into themselves about 3/8" and pin in place. Cut two ear loops that are 5.5 inches long each. You can cut these from 1/4" elastic, or just cut a 3/4" x 5.5" strip from knit or lyocell and fold it in upon itself to create a stretchy ear loop that works like elastic. Position one end of your ear loop at the top of the face mask side, about 3/8" into the folded seam. Pin in place. Put the other end of your ear loop about 2.5" down the side of the veil face mask, also about 3/8" into the folded seam. Also pin in place. Repeat with the ear loop on the other side of the face mask. For this tutorial, I did one ear loop with elastic and one with the knit strip just so I could compare -- I recommend you do either two elastics or two knit strips. Now sew all around the entire edge of your veil face mask with a straight stitch. Congratulations! You made an easy and cool veil face mask!!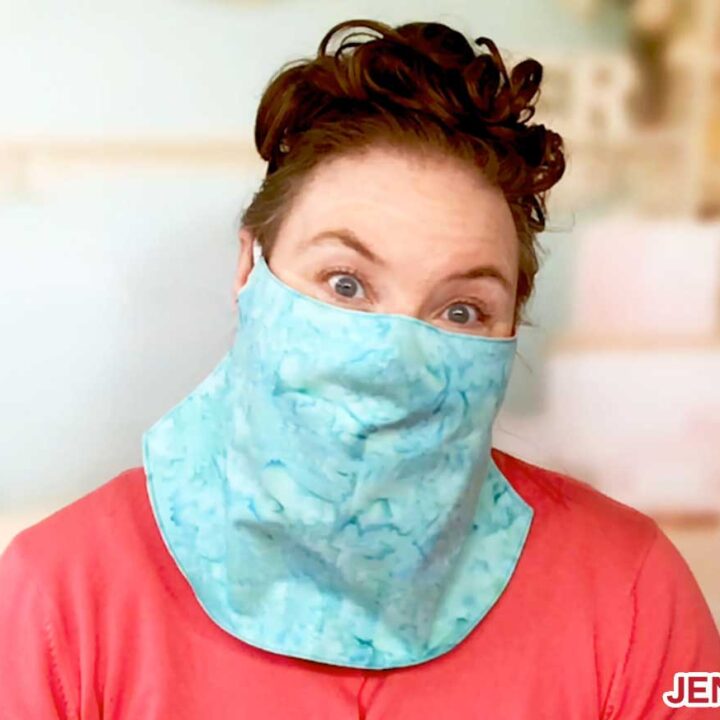
Cool Veil Face Mask
Materials
Tools
Instructions
Step 1: Get my free easy Veil Face Mask Pattern or SVG Cut File
Step 2: Cut out your Veil Face Mask pattern pieces from fabric
 .
.
Step 3: (Optional) Make a filter pocket
Step 4: Sew the darts, tops, and bottoms together
Step 5: Add the ear loops to your veil face mask


Answers to Your Questions About Making Homemade Face Masks
Q: Do both sides of the face mask need to be different fabrics, or can I use the same fabric?
A: I recommend you use different fabric colors or patterns so you can tell the inside from the outside — you don’t want to accidentally put the layer you’ve been wearing on the outside against your face.
Q: I can’t find any elastic. What can I use instead?
A: Find an old stretchy T-shirt and cut strips from it to make ear loops instead.
Q: I can’t find any pretty cotton. What can I use instead?
A: See my list of Best Fabrics for Face Masks. Your goal is to find and use closely knit and STRETCHY cotton. You can tell how close it is by holding it up to bright light — if not too much light is visible between the threads, it’s probably good.
Q: What kind of sewing machine do you recommend? I am new to sewing and want to make these scarf face masks!
A: I am a big fan of Janome sewing machines, and that is the brand I am using in this tutorial. I think they are simple to use, affordable, and long-lasting. This is a good beginner sewing machine and the same one I use in this tutorial.
Q: I need to make a veil mask for my child. Do you have a pattern that small?
A: Use the pattern marked for “Youth” (in the SVG cut file, it’s the set that’s yellow-green). Note that the CDC advises that children under the age of 2 should not wear a face covering. For more information on face masks for children, see my post that will answer all of your questions!
Q: Can I cut these veil face masks on my Cricut?
A: Yes! See the instructions under Step 2 above, and check out my tutorial on How to Cut Fabric on the Cricut.
Q: How do I wash my scarf face mask?
A: The CDC advises routinely washing your mask in a washing machine. The frequency of washing depends on your frequency of use. We wash our face masks daily after we’ve worn them.
Q: I can’t sew. Do you have a no-sew pattern?
A: Yes, we have a super easy no-sew face mask pattern here! But you could also use fabric glue instead of sewing to make the face mask shown on this page.
Read more about the CDC’s Cloth Face Mask Recommendations.
Get my free printable PDF and SVG files to make your own cool veil face mask!
Have questions? Come on over and ask in our Facebook group — everyone is welcome! We’d love to see your cool veil face masks, too! Please share them in the group or email us at [email protected].
Love,

Take a Look at My Other Face Mask Patterns and Learn More About Face Masks


Want to remember this? Save this Cool Veil Face Mask Pattern & Tutorial to your favorite Pinterest Board


I have made many styles of masks but not the veil,love it and the fancy scarf! thamks mary
Thank you, Mary! I hope you’ll share photos!
Love the mask but can not down load pattern and when I check the download file and see the mask in open and it is a.quilt pattern not a veil mask!!!
The veil face mask is located in my free resource library. I just verified and it is the correct pattern. I don’t have any quilt patterns on my website, so I’m not sure what file it was. If you still can’t locate the file, please reach out to my communications heroes at [email protected] and they’ll be happy to help!
Perfect timing! I was just complaining that I can not bear the heat under my mask anymore!!!
I made my veil mask this evening. Anxious to wear it to work tomorrow. I have to wear a mask 10 hrs a day at work…hope this keeps me cool!!
Hooray, Mimi! Happy to hear you made one! Let us know how it works out for you. 🙂
Got the face mask/veil pattern yesterday. Loved it so much I made 3 last night. And have already warned the hubby he is taking me fabric shopping!
I’m so happy to hear that you’re enjoying the pattern, Cathy!
I work in retail and often exert myself lifting heaving items. Vooming from one side of my department to the other. After trying several types of masks and changing them up 2or 3 a shift, this veil is amazing. I can wear it all day with out breaks. I tuck it lightly into my uniform polo. My first day it was 98 and humid with a heat index of 103. I was comfortable on the floor and in the warehouse. Thank you so much for this pattern. My husband has asked for one for teaching Tae Kwan Do class and giving business proposals.
I am so happy to hear that this design works for you, Jodi!
Really like this pattern; I like being able to breath again and they stay put on my nose without the fog. I did round the bottom so they don’t poke out . I am a bit short and round so did shorten for me. I am really enjoying your assortment of instructions, on so many different projects.
Thanks so much for sharing your talents.