Learn how to make beautiful holiday shaker ornaments!
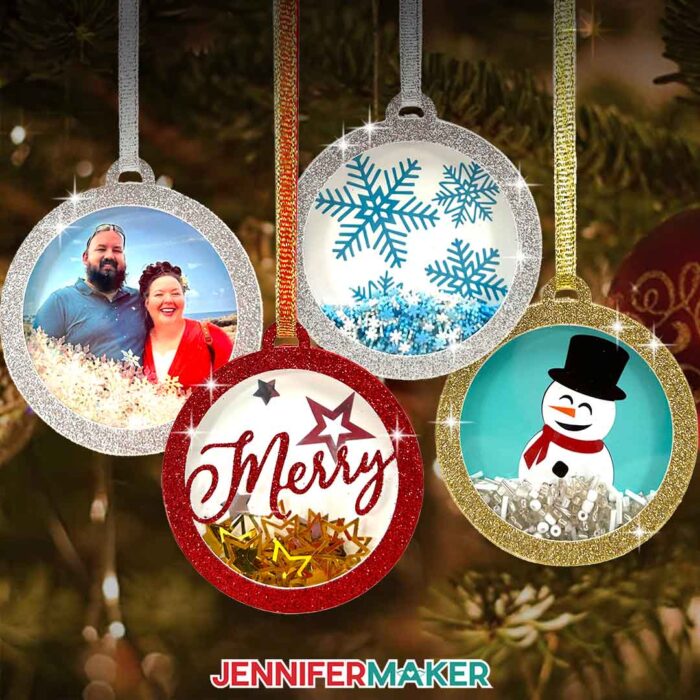
When it comes to timeless, classic holiday decor, it’s hard to beat a snow globe! In fact, when Alexa was younger, she spent SO much time creating tiny blizzards inside the glass domes and watching the snowflakes swirl around before settling back into the bottom so she could do it all over again. I wanted to design something that captured that same magic but was light enough to hang from my tree, and thus, my layered Christmas Shaker Ornament was born! Who doesn’t love a handmade craft you’re encouraged to play with? Whether you decide to keep it as a shakable holiday decoration for your own tree or send it to a loved one like one of my Shaker Cards, I know it will be a perfect addition to the holiday season!
Watch the full step-by-step video tutorial on making shaker ornaments:

These ornaments are super fun and so easy to make! I can’t wait to show you how all the layers come together to create something to spread lots of holiday joy to your friends and family. I even have a special tool to keep any stubborn shaker pieces in motion!
But first things first, you’re going to need some high-quality materials to build each layer of your Shaker Ornament, including a few sheets of sturdy cardstock, some adhesive foam tape, and a layer of acetate for your shaker’s structure. You’ll also need one or more colors of permanent vinyl to create a lovely backdrop for your ornament, as well as adhesives to bind everything together.
And of course we can’t forget to include a shaker element! There are so many fun things you can use to fill the inside of your ornament. I used tiny beads, foil stars, glittery snowflakes, and even clay fake sprinkles! Shiny rhinestones, mini pearls, and little charms would also make for some really cute ornaments.
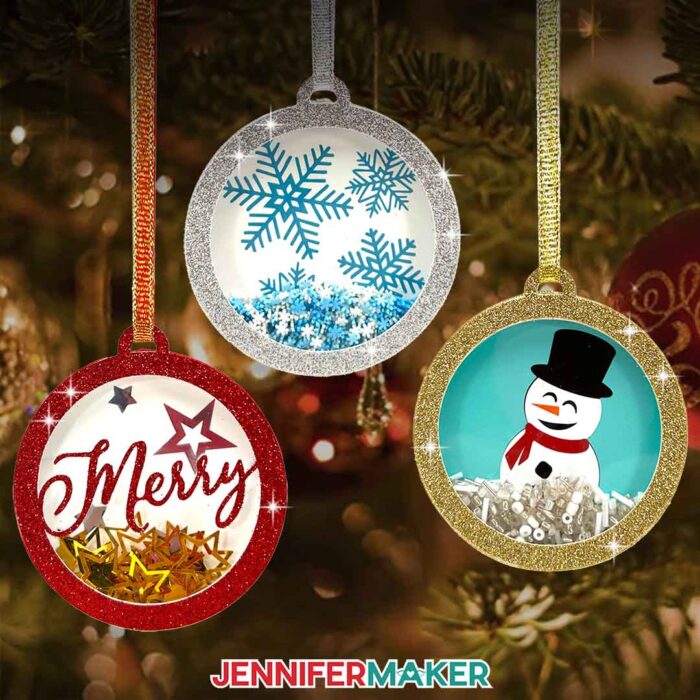
I’ll show you how to assemble a shaker ornament by starting on the bottom, or the base of the ornament, with 65 lb. cardstock, and then layering a cute vinyl design on top of it! And instead of using hard plastic layers for the ornament’s sides, I’ll teach you how to add an inner ring of adhesive foam tape to build softer walls around the center of the ornament. This creates enough space for the confetti to move around freely without worrying about any fragile pieces shattering, so every shake is super satisfying!
Once your ornament is filled with pretty confetti for the absolute best shaking experience, I’ll demonstrate how to layer cardstock and acetate with a bit of strong glue to create the top of the ornament. It’s like a small window that lets you see inside and also acts like a lid to keep every little bit of confetti inside the shaker. No hard-to-find beads or too-thin-to-see snowflakes will be flying out and spilling all over the carpet!
And as for the finishing touches, I’ll show you how I add beautiful ribbon around the outside of my ornament for a sparkly border, and how to string ribbon through the little loop on top so you can hang your ornament anywhere you want!
You can use my free designs, or I can show you how to incorporate your favorite photo in the Advance with JenniferMaker tutorial. Learn more about Advance here!
I’m so excited to teach you how to make these ornaments using a Cricut Cutting machine, a Fine-Point Blade, and a StandardGrip Machine mat. I used my Cricut Maker 3, but you can also use an original Maker, an Explore series machine, a Venture, Cricut Joy, or Cricut Joy Xtra. I’m even going to show you my best tips for layering multiple colors of vinyl, how to keep your design centered, and how to keep your ornament’s foam walls nice and secure so your confetti doesn’t escape!
Let me show you how to make shaker ornaments! This post contains some affiliate links for your convenience (which means if you make a purchase after clicking a link I will earn a small commission but it won’t cost you a penny more, there is no additional cost)! Read my full disclosure policy.
Materials to Make Shaker Ornaments
View my Amazon shopping list for the exact items I used!
- One (1) Sheet of 12″ x 12″ Silver Glitter Cardstock -OR-
- One (1) Sheet of 12″ x 12″ Red Glitter Cardstock -OR-
- One (1) Sheet of 12″ x 12″ Gold Glitter Cardstock
- One (1) Sheet of 12″ x 12″ White 65 lb Cardstock
- One (1) Sheet of 12″ x 12″ Teal 65 lb Cardstock
- One (1) Sheet of 12″ x 12″ Acetate
- White Permanent Adhesive Vinyl
- Black Permanent Adhesive Vinyl
- Orange Permanent Adhesive Vinyl
- Red Permanent Adhesive Vinyl
- Silver Adhesive Foil Vinyl
- Light Blue Permanent Adhesive Vinyl
- Cricut StandardGrip Transfer Tape
- Gold Star Confetti -OR-
- Glass Bead Variety Pack -OR-
- Polymer Clay Snowflake Sprinkles -OR-
- Snowflake Confetti
- Two (2) 13″ Lengths of 1/4″ Ribbon (for finishing)
- A way to cut your materials – I’m using the Cricut Maker 3, but you can also use the Cricut Maker, a Cricut Explore Series machine, the Cricut Venture, the Cricut Joy, or the Cricut Joy Xtra.
- Cricut Green StandardGrip Machine Mat 12″ x 12″
- Brayer
- Light-Colored Cricut Fine Point (0.4mm) Pen (I used Gemstone Blue) -OR-
- Light-Colored Cricut Joy Fine Point (0.4mm) Pen
- Spatula (for lifting delicate cuts)
- Scraper
- Scissors
- Weeding Tool
- Craft Glue (I used Bearly Art Precision Glue)
- ¼” Tall Bearly Art Adhesive Foam Strips
- High Tack Double-Sided ⅛” Craft Tape
- Measuring Tape
- Parchment Paper (for aligning the vinyl layers)
- Dryer Sheet (optional for removing static from confetti)
- Design #680 (My free SVG/PDF/DXF design files are available in my free resource library – get the password by filling out the form at the bottom of this page)

How to Make a Shaker Ornament!

Shaker Ornaments
Learn to make fun holiday shaker ornaments!
Materials
- One (1) Sheet of 12" x 12" Silver Glitter Cardstock -OR-
- One (1) Sheet of 12" x 12" Red Glitter Cardstock -OR-
- One (1) Sheet of 12" x 12" Gold Glitter Cardstock
- One (1) Sheet of 12" x 12" White 65 lb Cardstock
- One (1) Sheet of 12" x 12" Teal 65 lb Cardstock
- One (1) Sheet of 12" x 12" Acetate
- White Permanent Adhesive Vinyl
- Black Permanent Adhesive Vinyl
- Orange Permanent Adhesive Vinyl
- Red Permanent Adhesive Vinyl
- Silver Adhesive Foil Vinyl
- Light Blue Permanent Adhesive Vinyl
- Cricut StandardGrip Transfer Tape
- Gold Star Confetti -OR-
- Glass Bead Variety Pack -OR-
- Polymer Clay Snowflake Sprinkles -OR-
- Snowflake Confetti
- Two (2) 13" Lengths of 1/4" Ribbon (for finishing)
- Design #680 (My free SVG/PDF/DXF design files are available in my free resource library - get the password by filling out the form at the bottom of this page)
Tools
- A way to cut your materials - I’m using the Cricut Maker 3, but you can also use the Cricut Maker, a Cricut Explore Series machine, the Cricut Venture, the Cricut Joy, or the Cricut Joy Xtra
- Cricut Green StandardGrip Machine Mat 12" x 12"
- Brayer
- Light-Colored Cricut Fine Point (0.4mm) Pen (I used Gemstone Blue) -OR-
- Light-Colored Cricut Joy Fine Point (0.4mm) Pen
- Spatula (for lifting delicate cuts)
- Scraper
- Scissors
- Weeding Tool
- Craft Glue (I used Bearly Art Precision Glue
- ¼” Tall Bearly Art Adhesive Foam Strips
- High Tack Double-Sided ⅛” Craft Tape -OR-
- Ultra-Thin Double-Sided Permanent ⅛” Craft Tape
- Measuring Tape
- Parchment Paper (for aligning the vinyl layers)
- Dryer Sheet (optional for removing static from confetti)
Instructions
STEP 1: GET MY FREE SHAKER ORNAMENT DESIGNS
First, download my Shaker Ornaments files from my free library – look for Design #680. Alternatively, you can use the Save This Project form near the top of this post and the design link will be emailed to you.
In the SVG folder, you’ll find three Shaker Ornament designs to cut on a cutting machine: a “snowflakes” ornament, a “snowman” ornament, and a “stars” ornament. There is also a DXF folder with cut files, and a PDF folder with versions you can print and cut by hand.
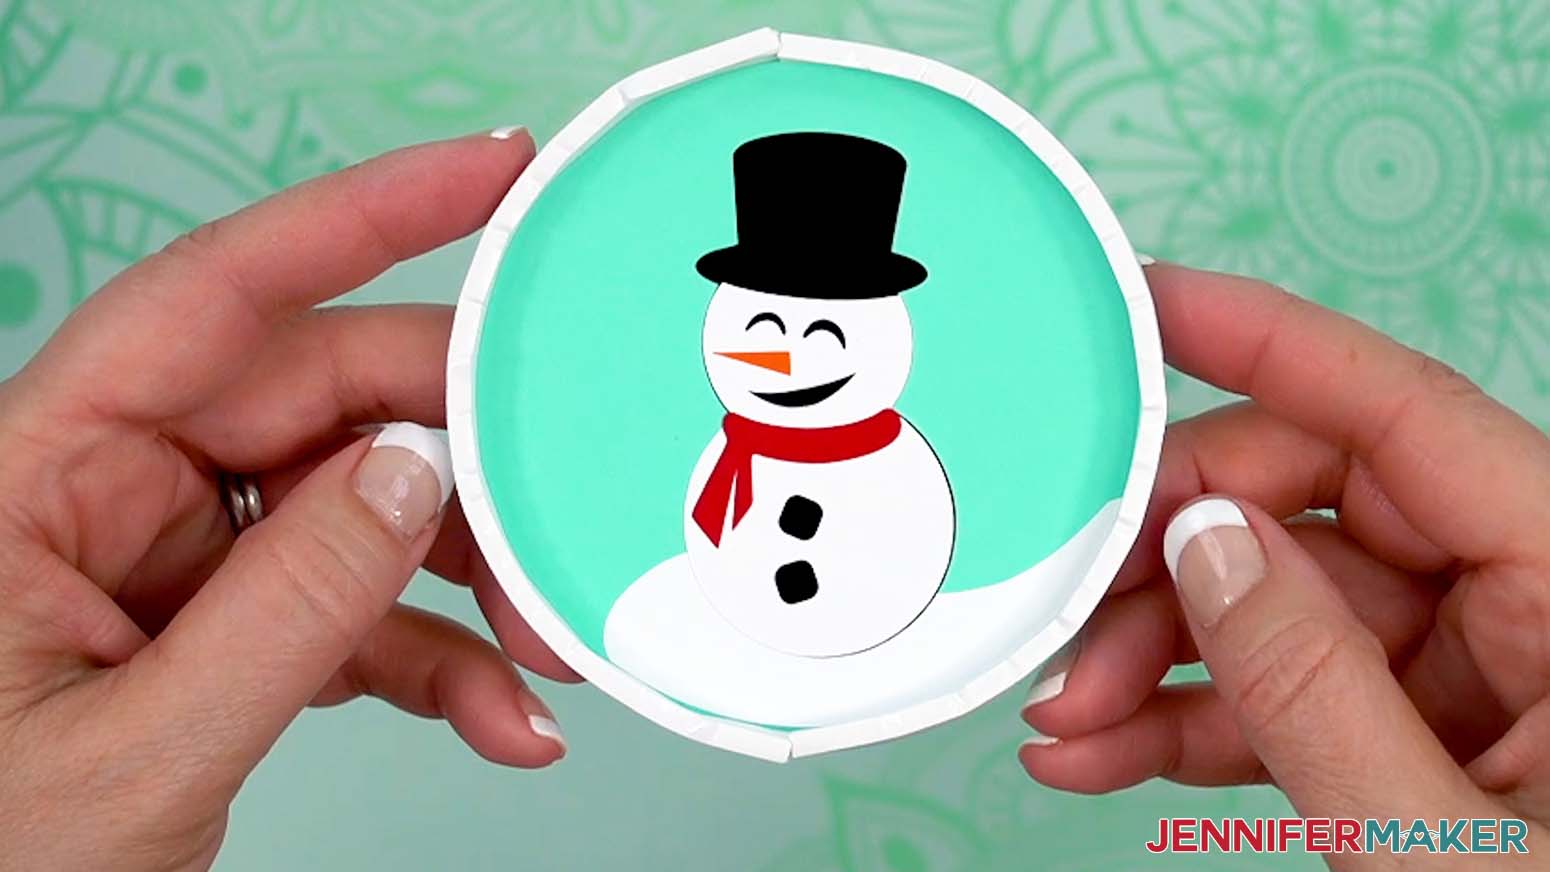
Upload the SVG file you need to Design Space to get started. I’ll demonstrate with the “Snowman” Shaker Ornament.
TIP: If you’re not sure how to upload, go to jennifermaker.com/svgs to learn how to unzip and upload SVG files.
STEP 2: PREPARE AND CUT YOUR SHAKER ORNAMENT DESIGN
CRICUT DESIGN SPACE
- In Cricut Design Space, open a blank Canvas.
NOTE: If you’re new to using Cricut Design Space, go to cricutkickoff.com for my introductory tutorial on Design Space basics. - Click “Upload” and then “Upload Image.”
- Click “Browse.”
- Select the SVG file of your choice.
NOTE: I’ll pick the “snowman” version. - Click “Open,” and then “Continue.”
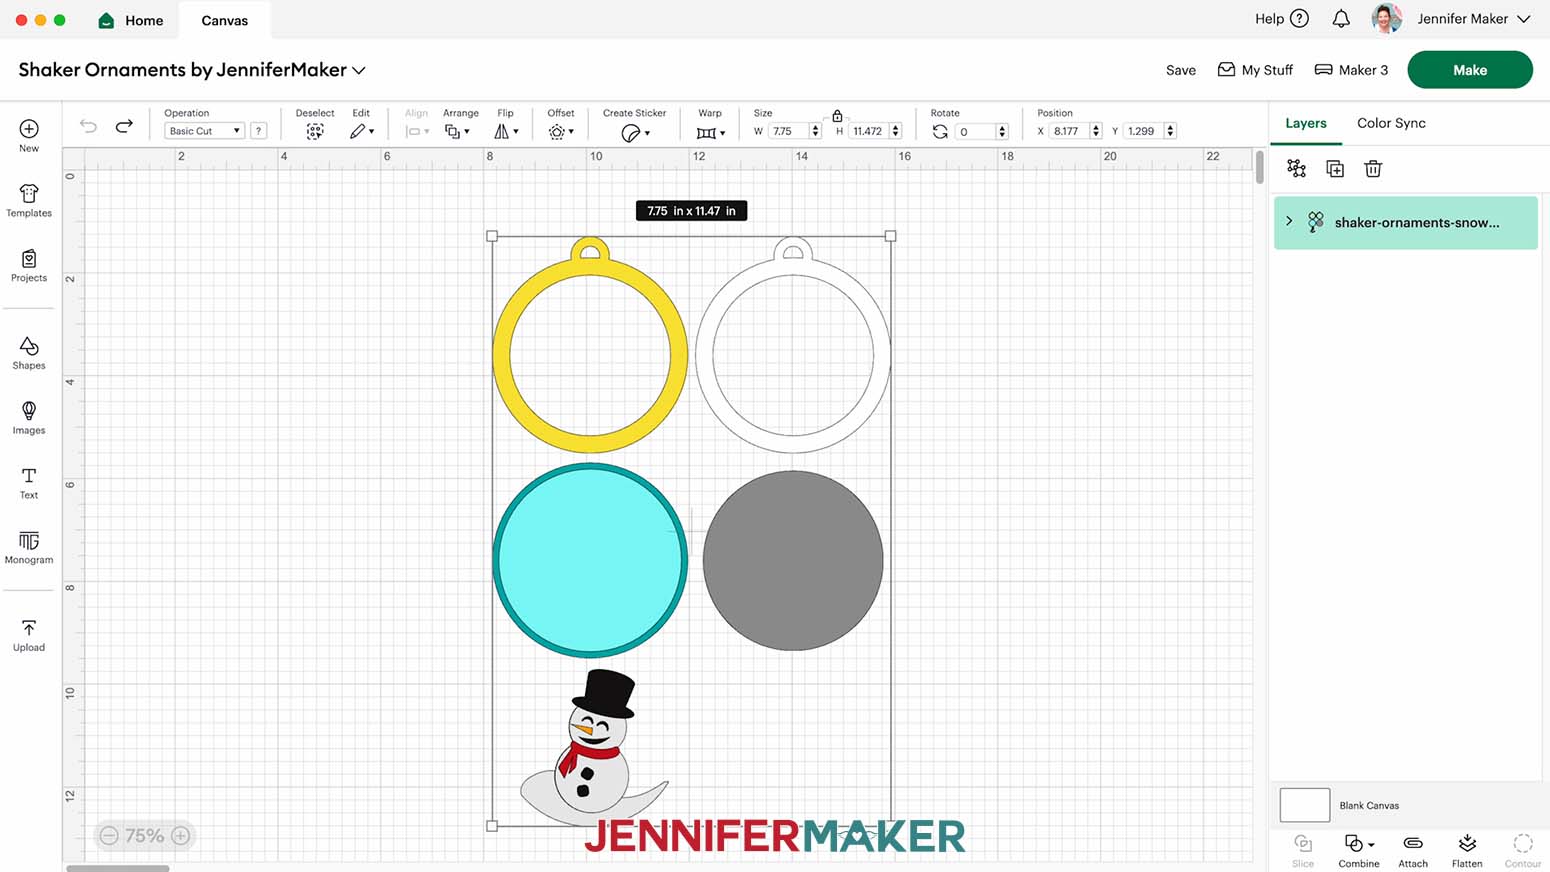
- Click “Upload” to add the design to your Canvas.
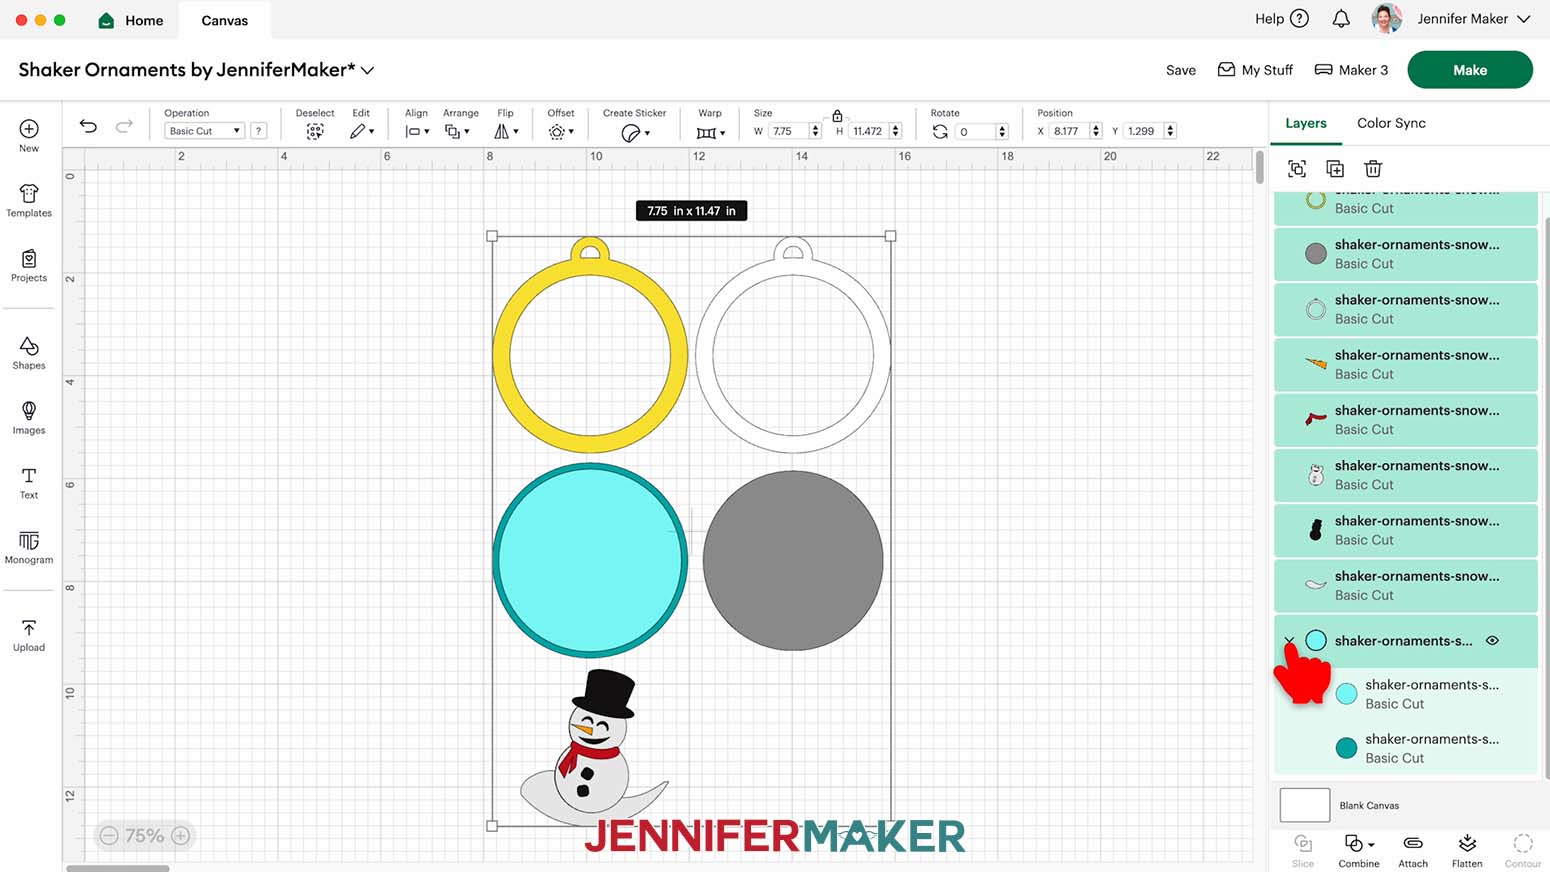
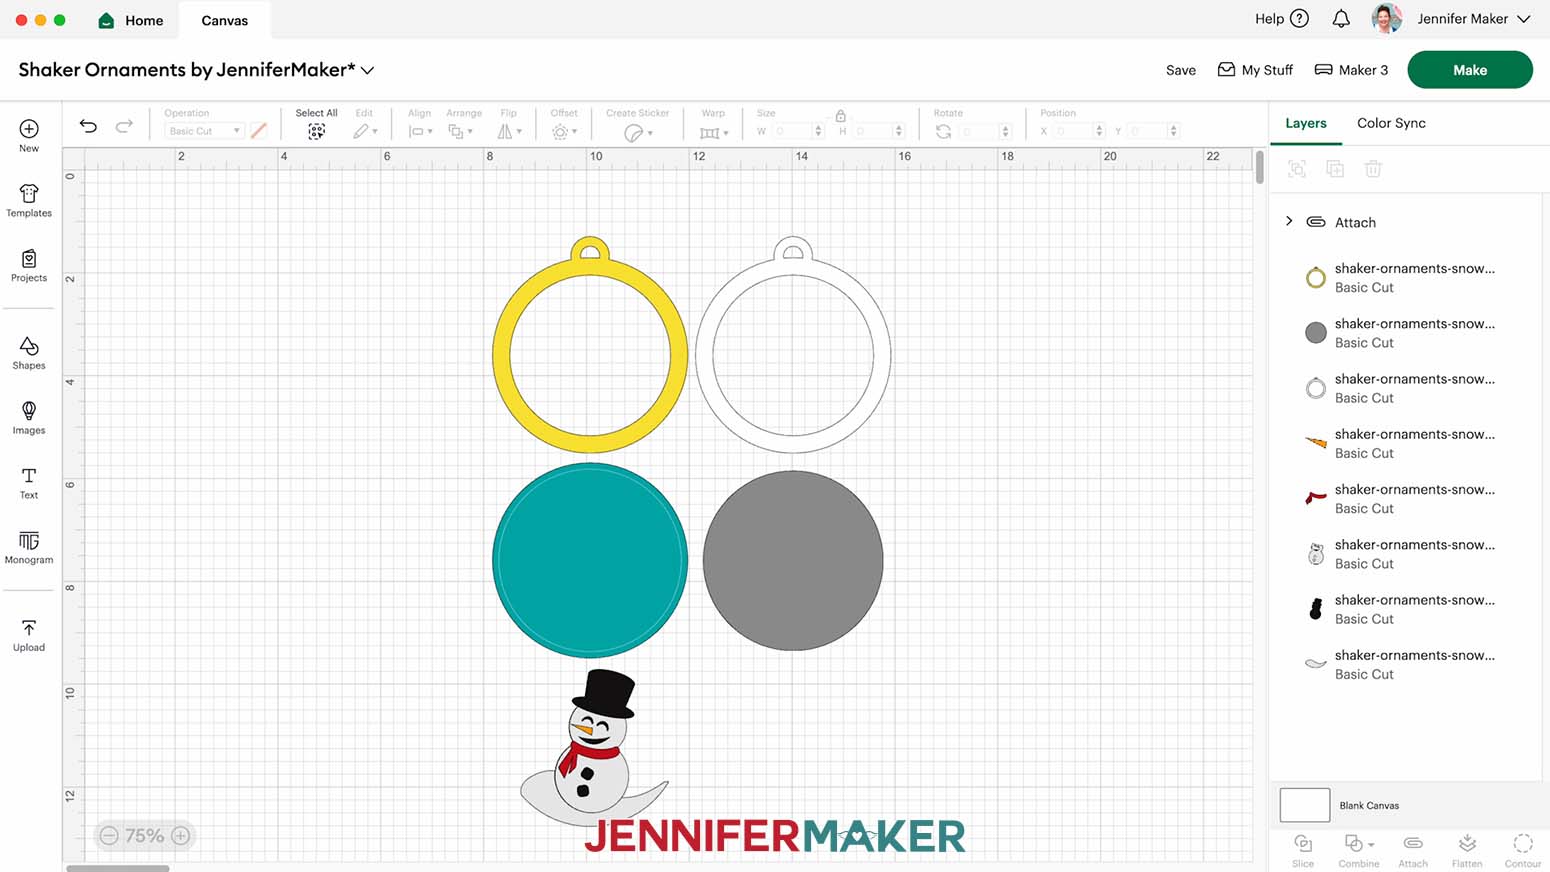
NOTE: On your Canvas you’ll have a top piece with a hanging loop to cut from glitter cardstock. There’s also a top backer piece with a hanging loop, and a bottom back piece without a loop to cut from regular cardstock.
You’ll also have a gray circle for your acetate cover piece, and decorative elements (the “snowflakes” and “stars” versions have only one decorative element) for the vinyl back design.
There is also an alignment circle to help place your vinyl design on the back piece during assembly.
- Click “Save” and give your project a name.
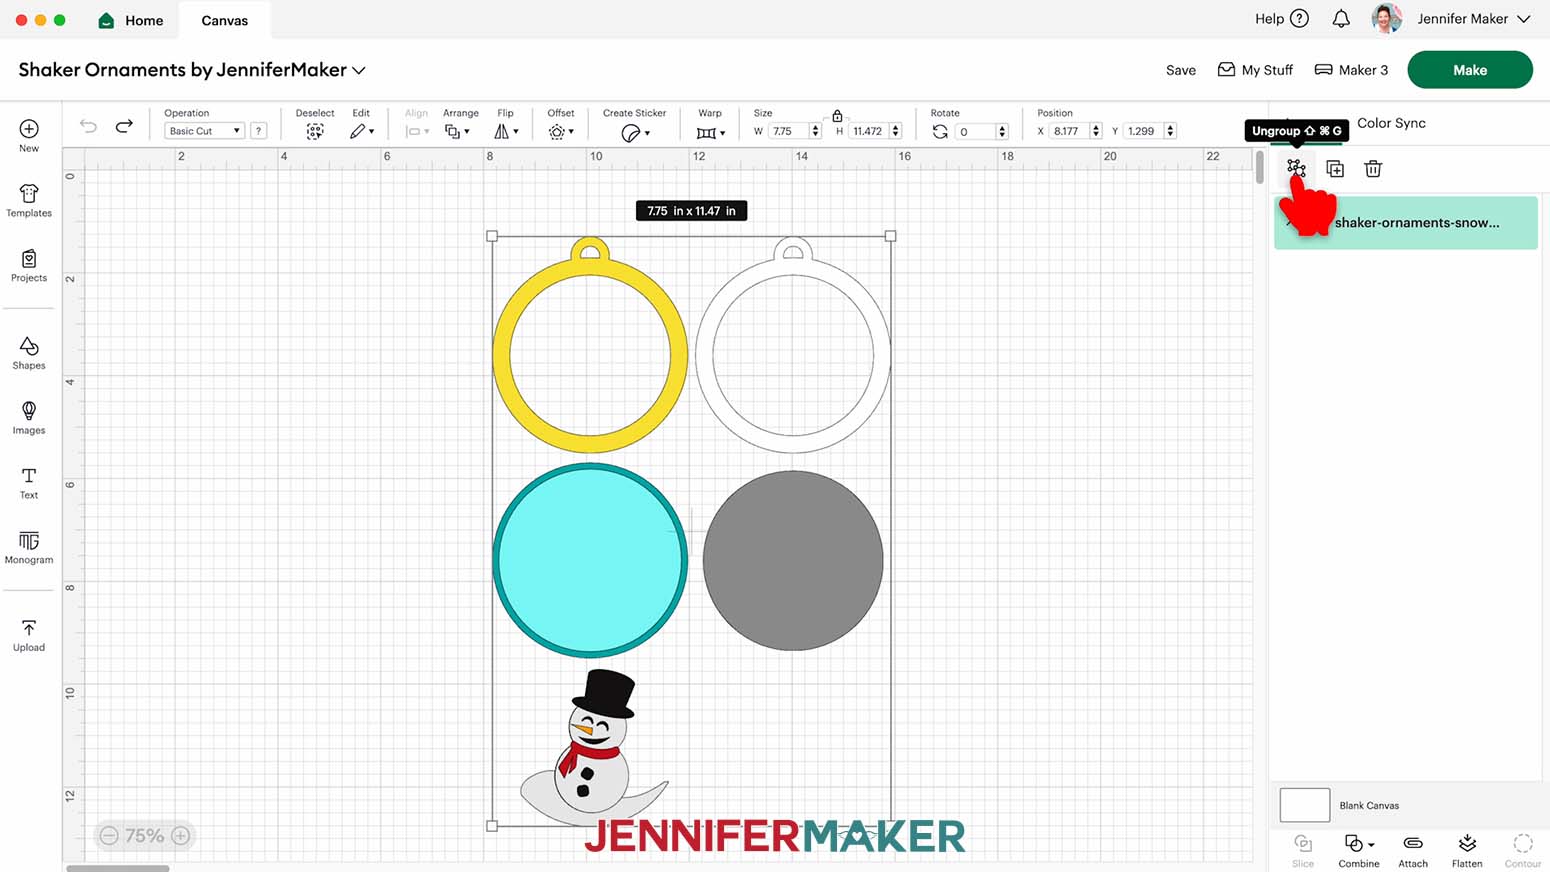
- Ungroup the design.
- In the Layers Panel, you still have one grouped layer, indicated by a small arrow. Click the arrow to expand the group and show two circle Basic Cut shapes.
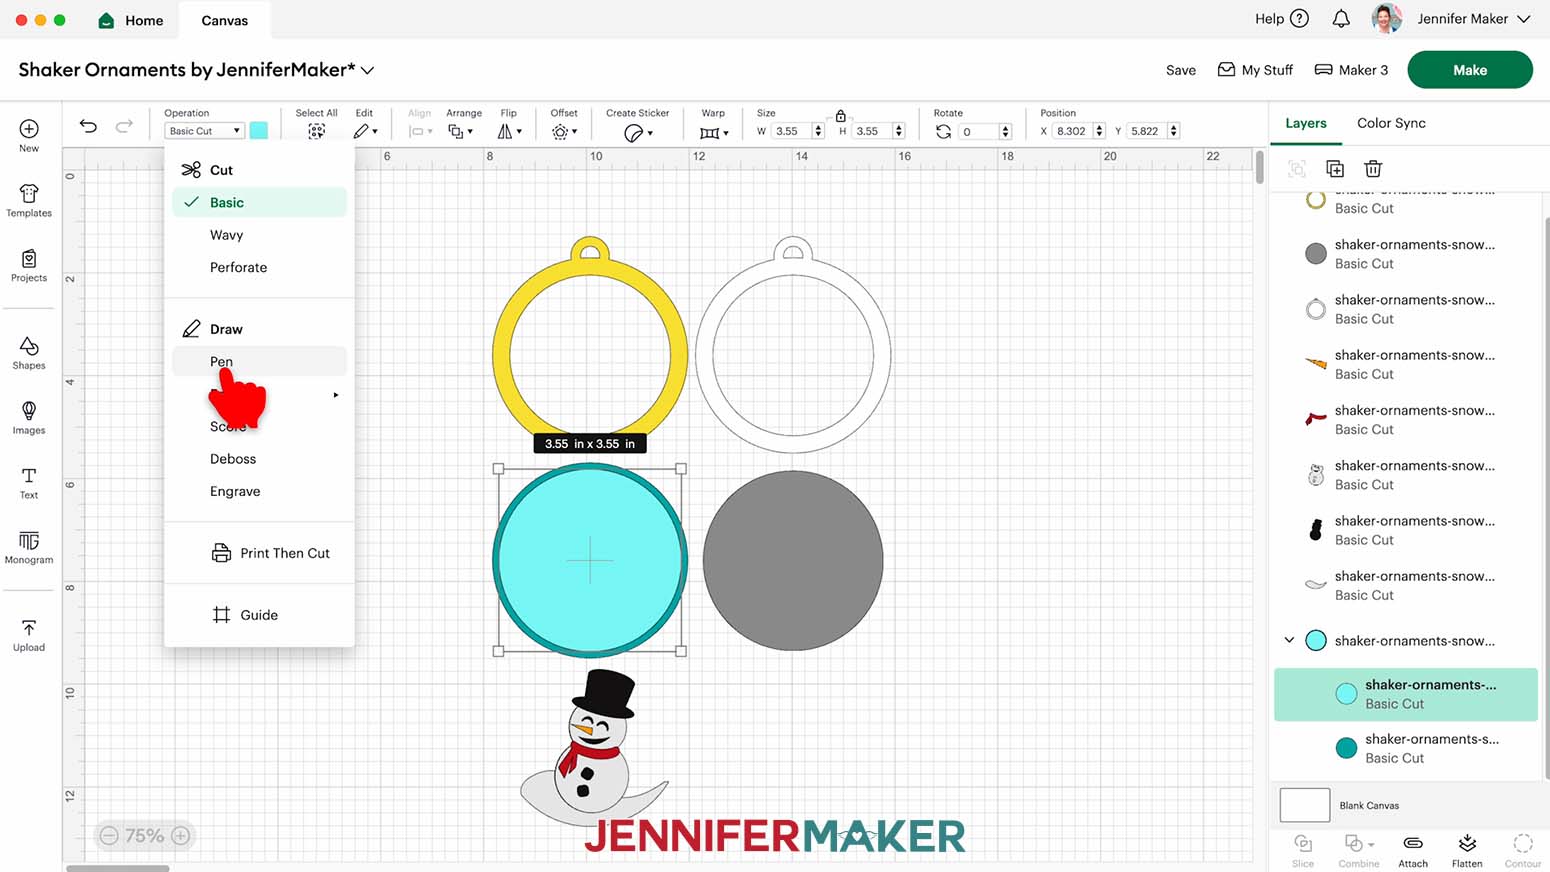
TIP: You can also click the two stacked circle shapes on your Canvas to highlight the group in the Layers Panel, and then click the arrow to expand the layers. - Select the top layer of the group in the Layers Panel that has the light teal circle cut shape.
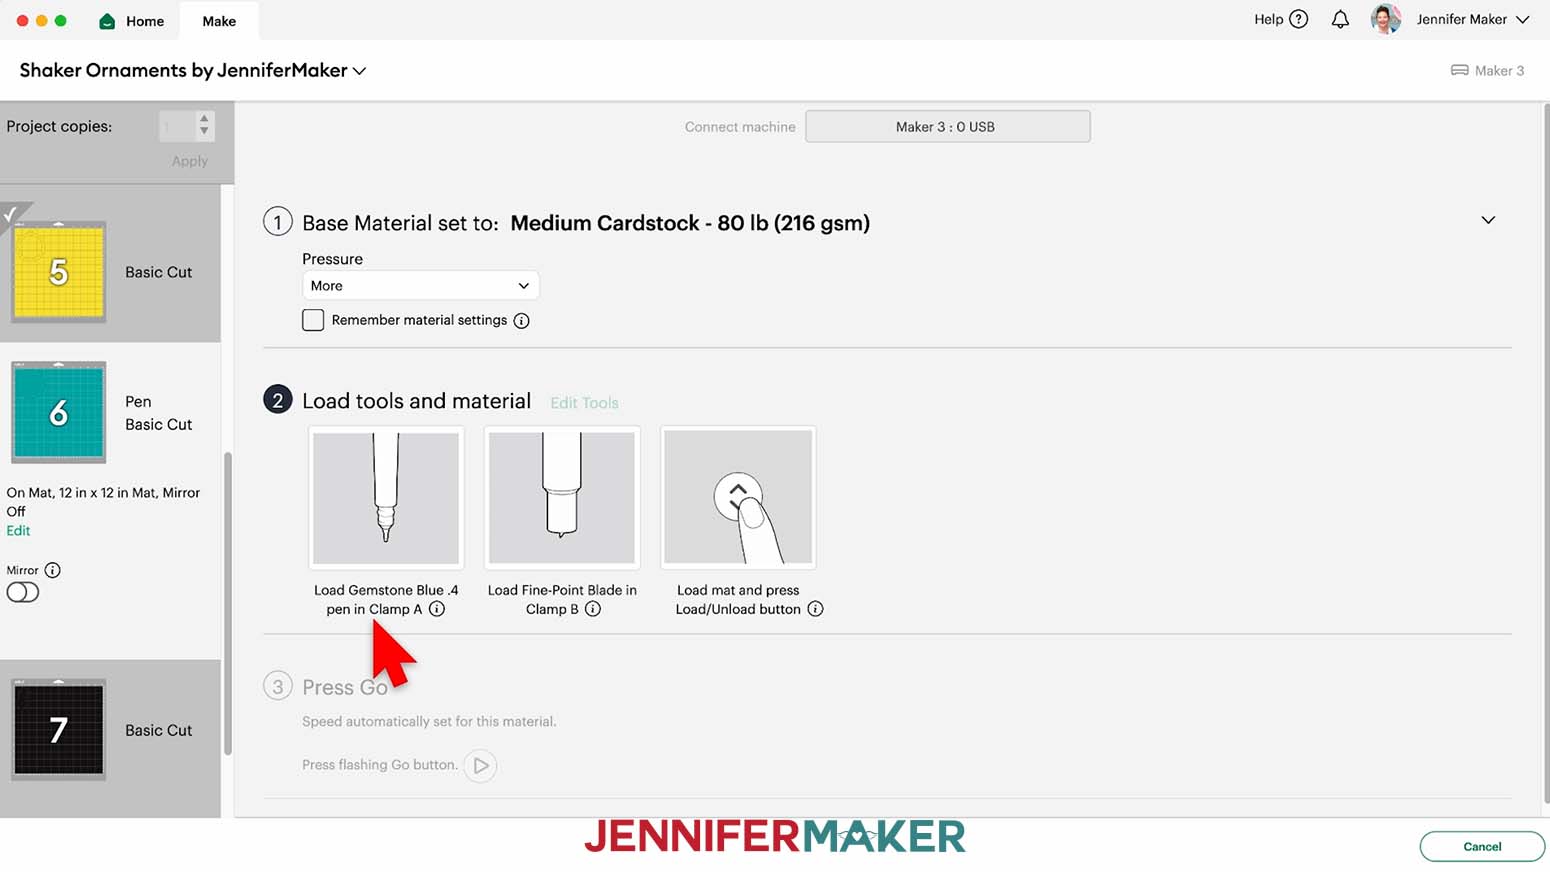
- Click on the “Operation” field and choose “Pen” from the dropdown menu so your machine knows to draw instead of cut this part of the design. This will create an alignment ring to help you line up your pieces during assembly.
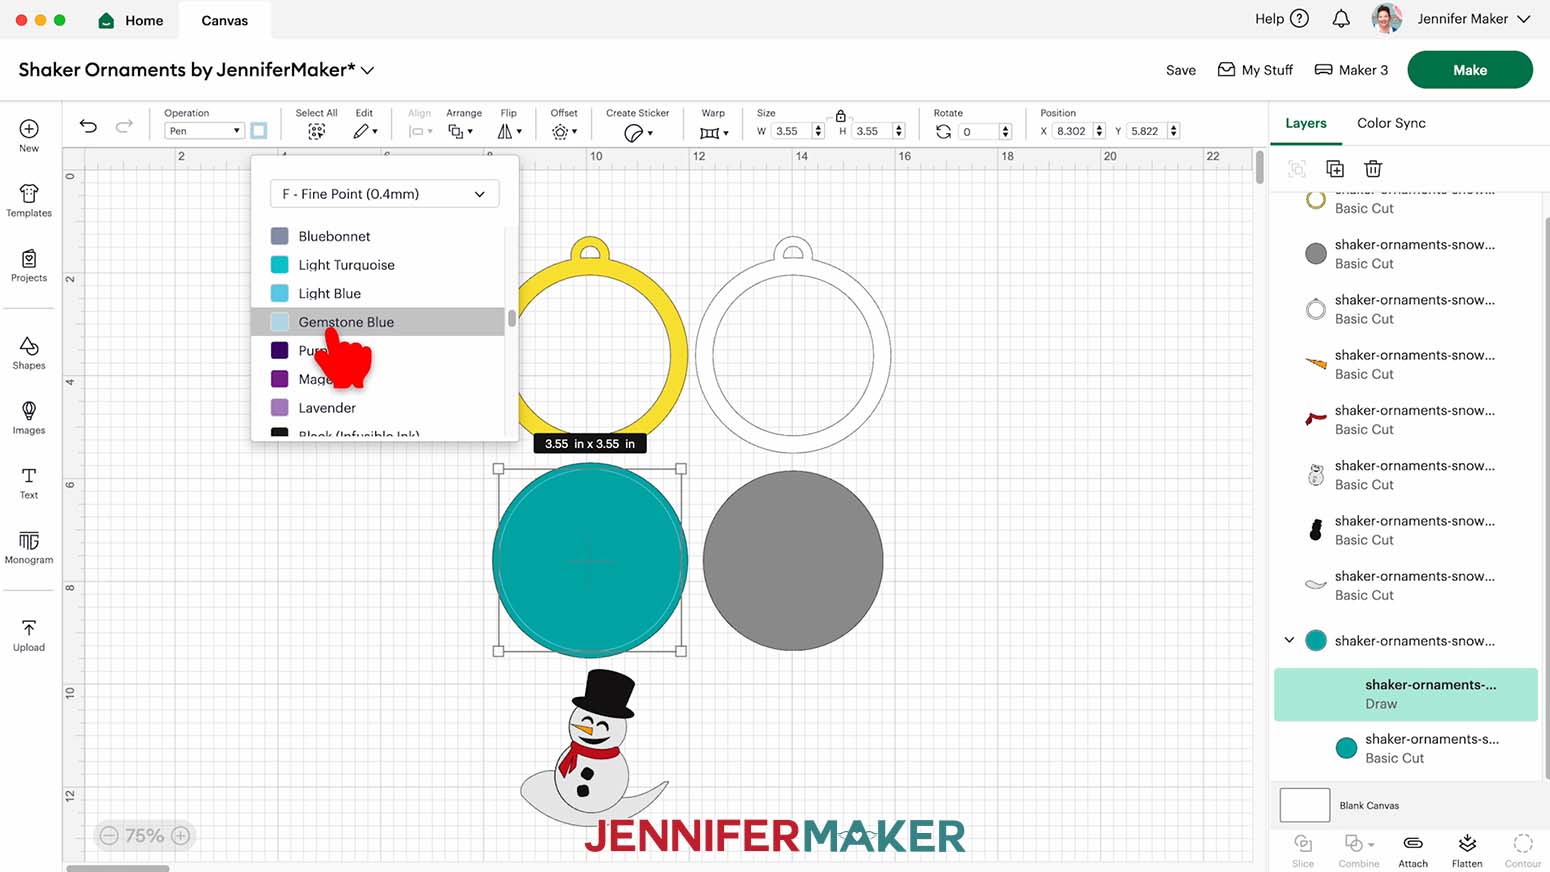
- With the “Draw” layer selected, click the Color Box next to the “Operation” menu and select the pen type and color you’d like to use.
TIP: Choose a thin pen in a lighter color so the alignment ring won’t be visible in the final assembled ornament.
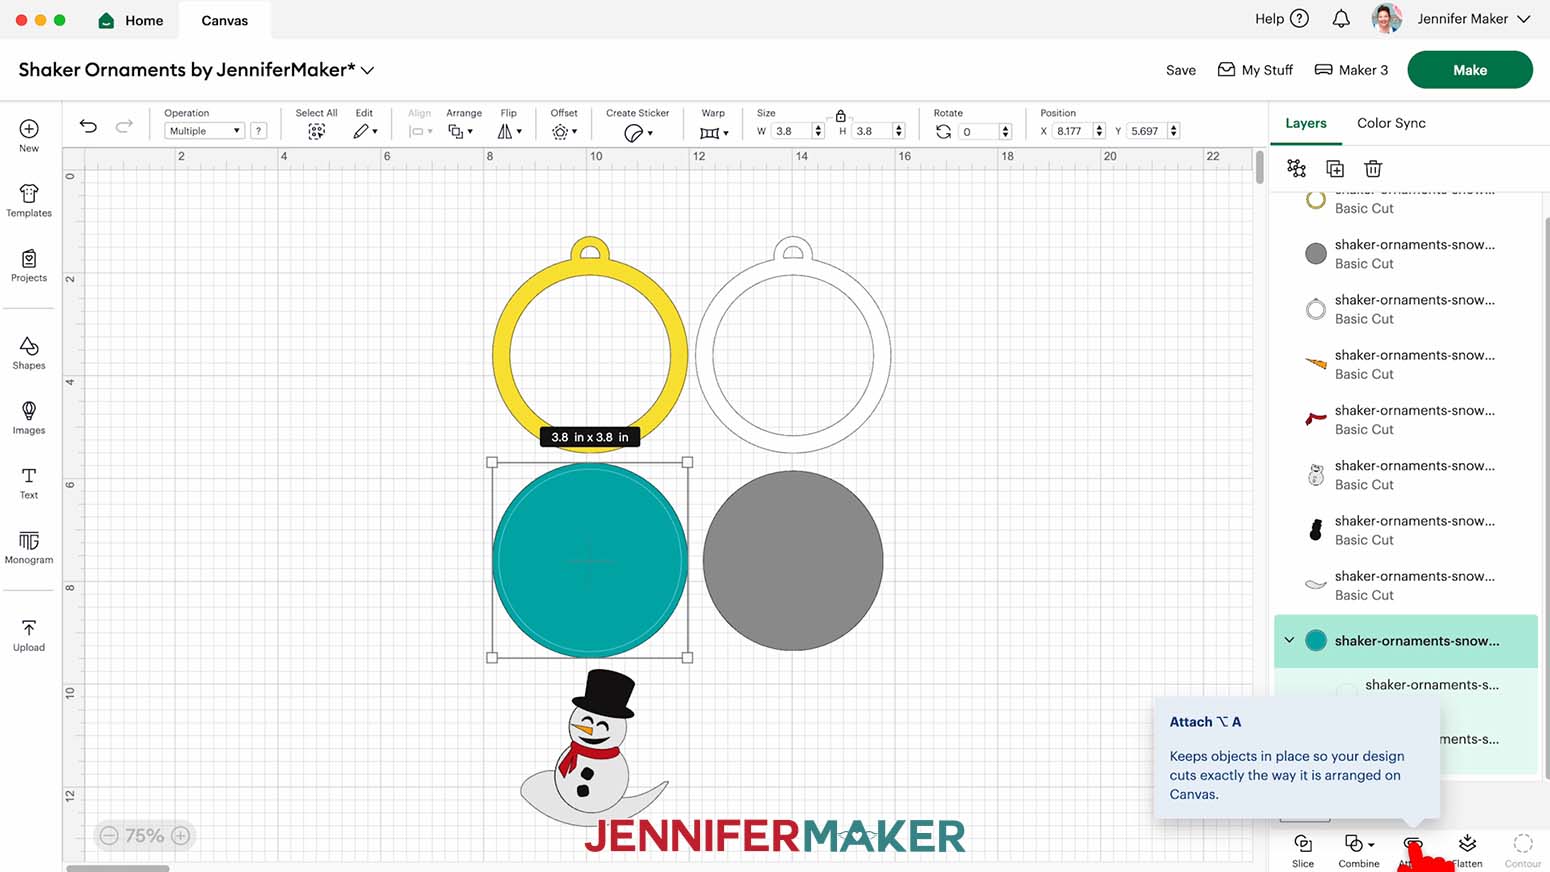
NOTE: I’ll select the Fine Point pen in the color “Gemstone Blue” for my alignment ring. - In the Layers Panel, click the layer with the arrow again to select both layers in the group, then click “Attach” to keep the alignment ring with the ornament’s bottom layer.
NOTE: The newly Attached group will jump to the top of the Layers Panel. - Your project is ready to cut!
CUTTING
- Make sure the correct machine is selected in the top right.
- Click “Make.”
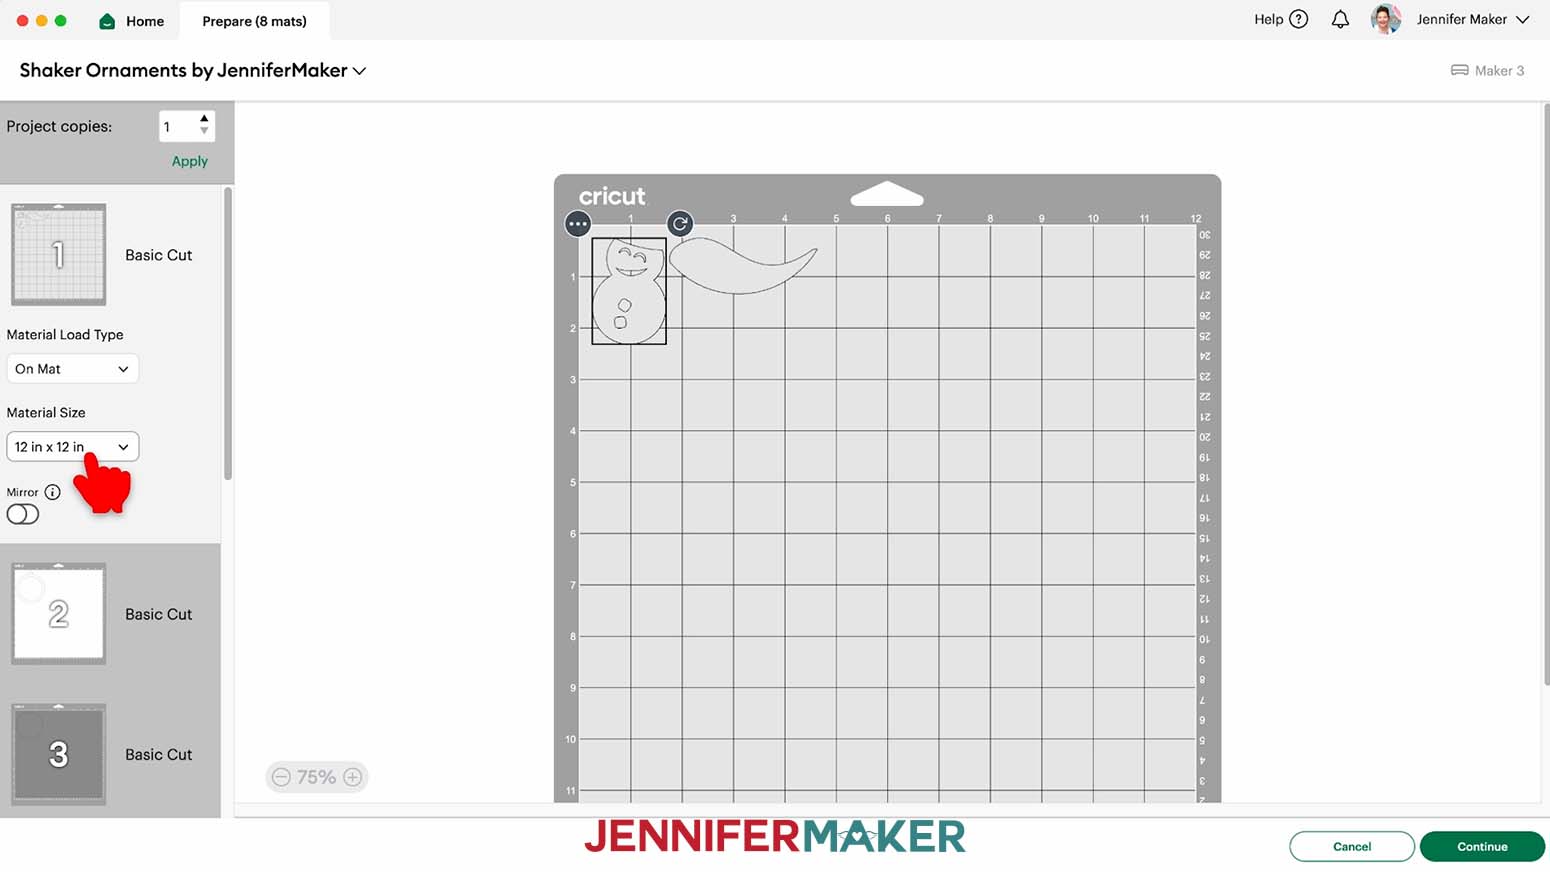
- On the Prepare screen, make sure the correct Material Size is selected for your materials.
NOTE: I’ll keep the “12 in x 12 in” size for all my mats, including my vinyl (which I’ll trim down to size).
TIP: If you see a mat with just “Pen” lines, your “Draw” layer may not have attached correctly, so click “Cancel” to go back to the Canvas to check. - Once you are satisfied with your mat layouts, select the first mat again and click “Continue.”
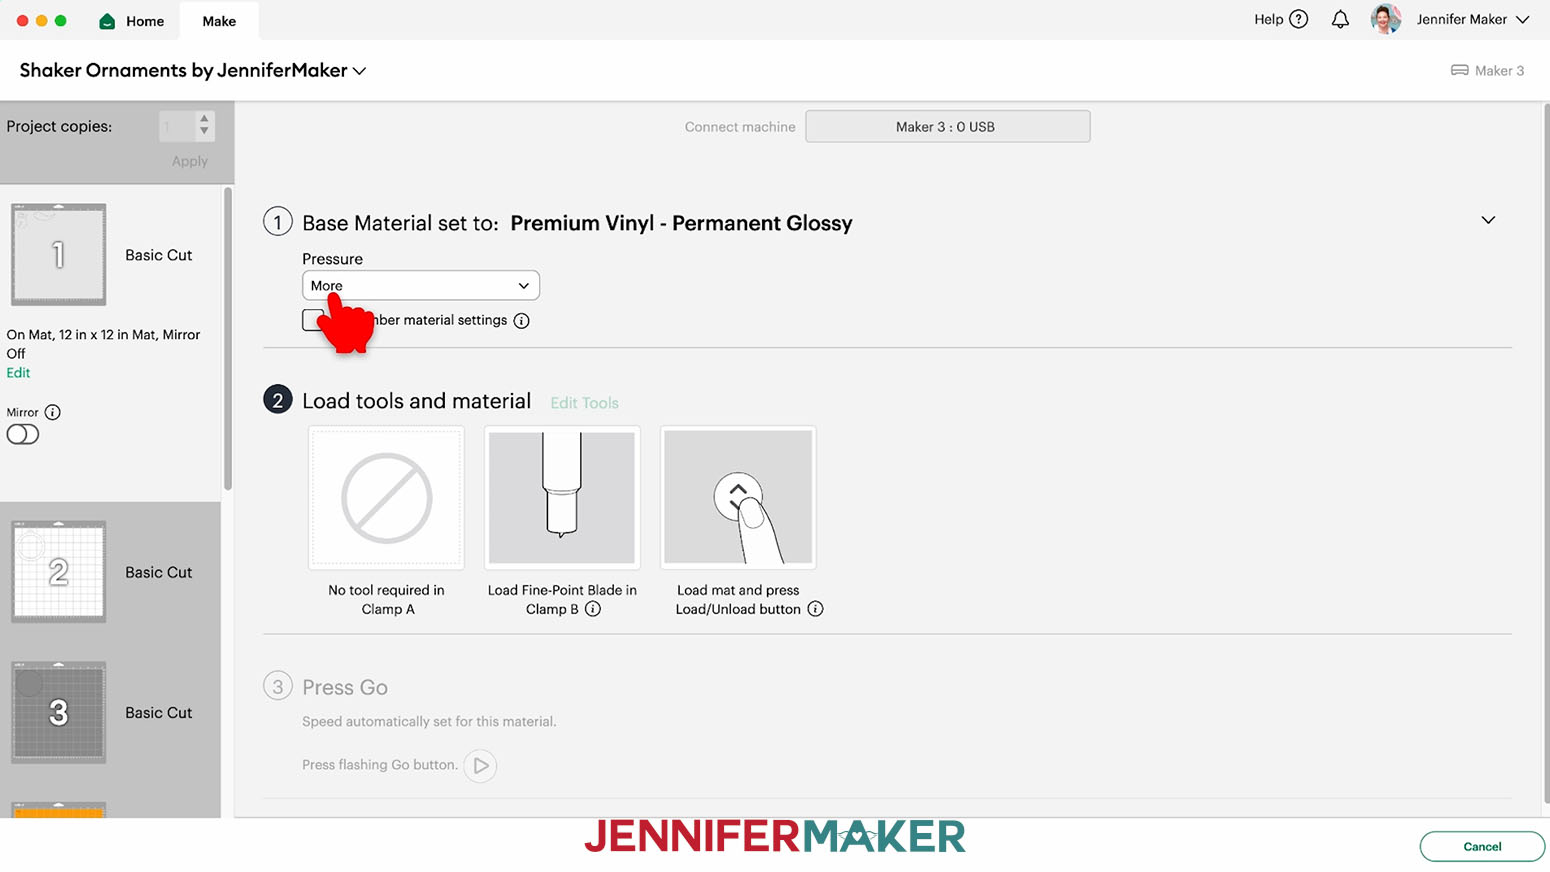
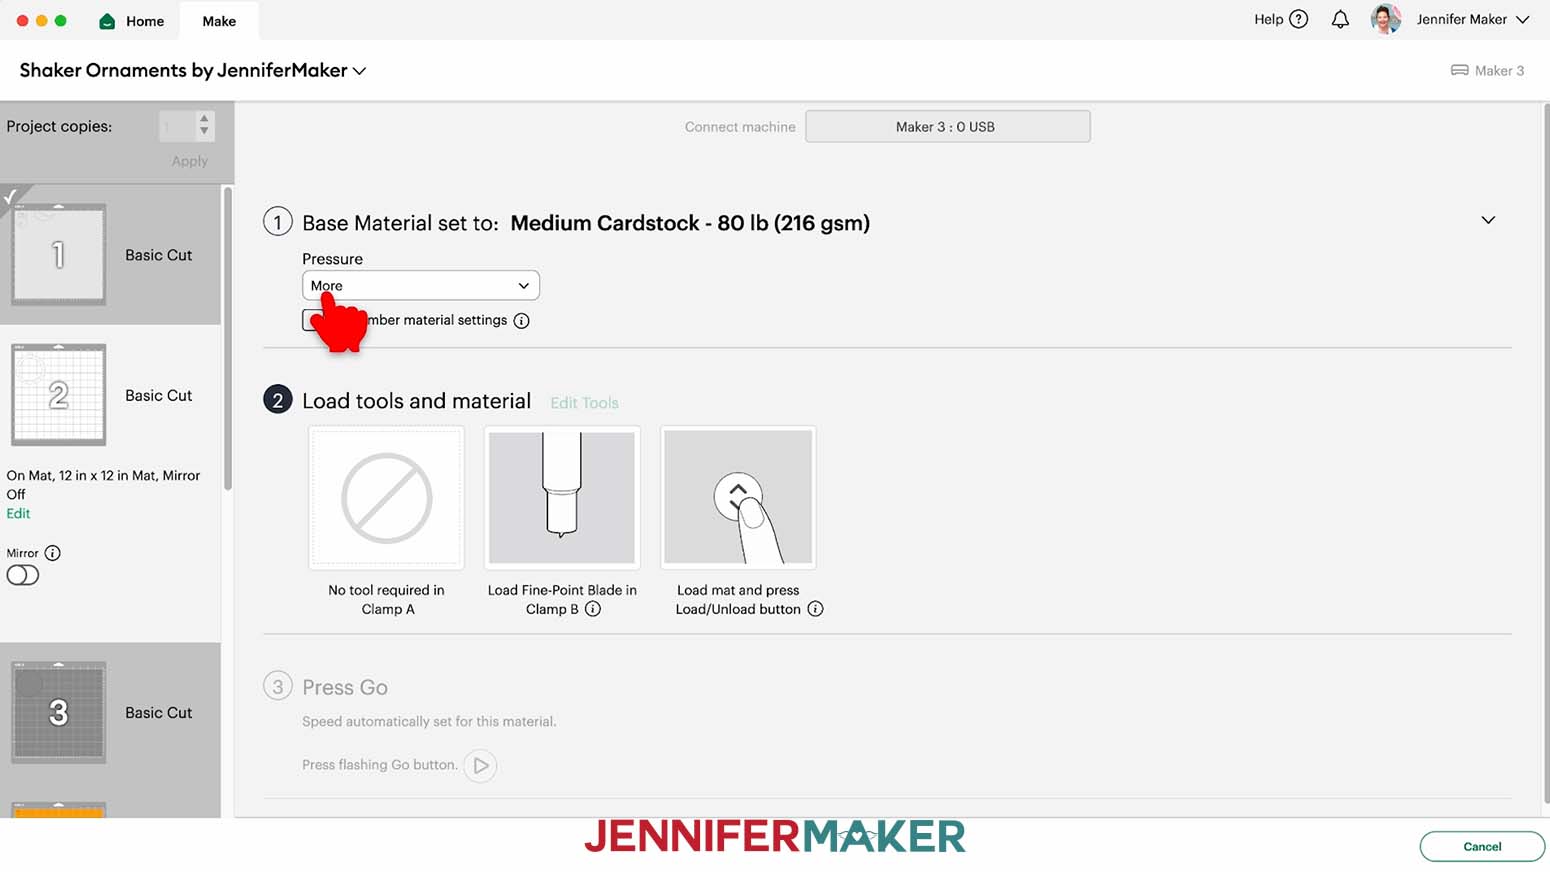
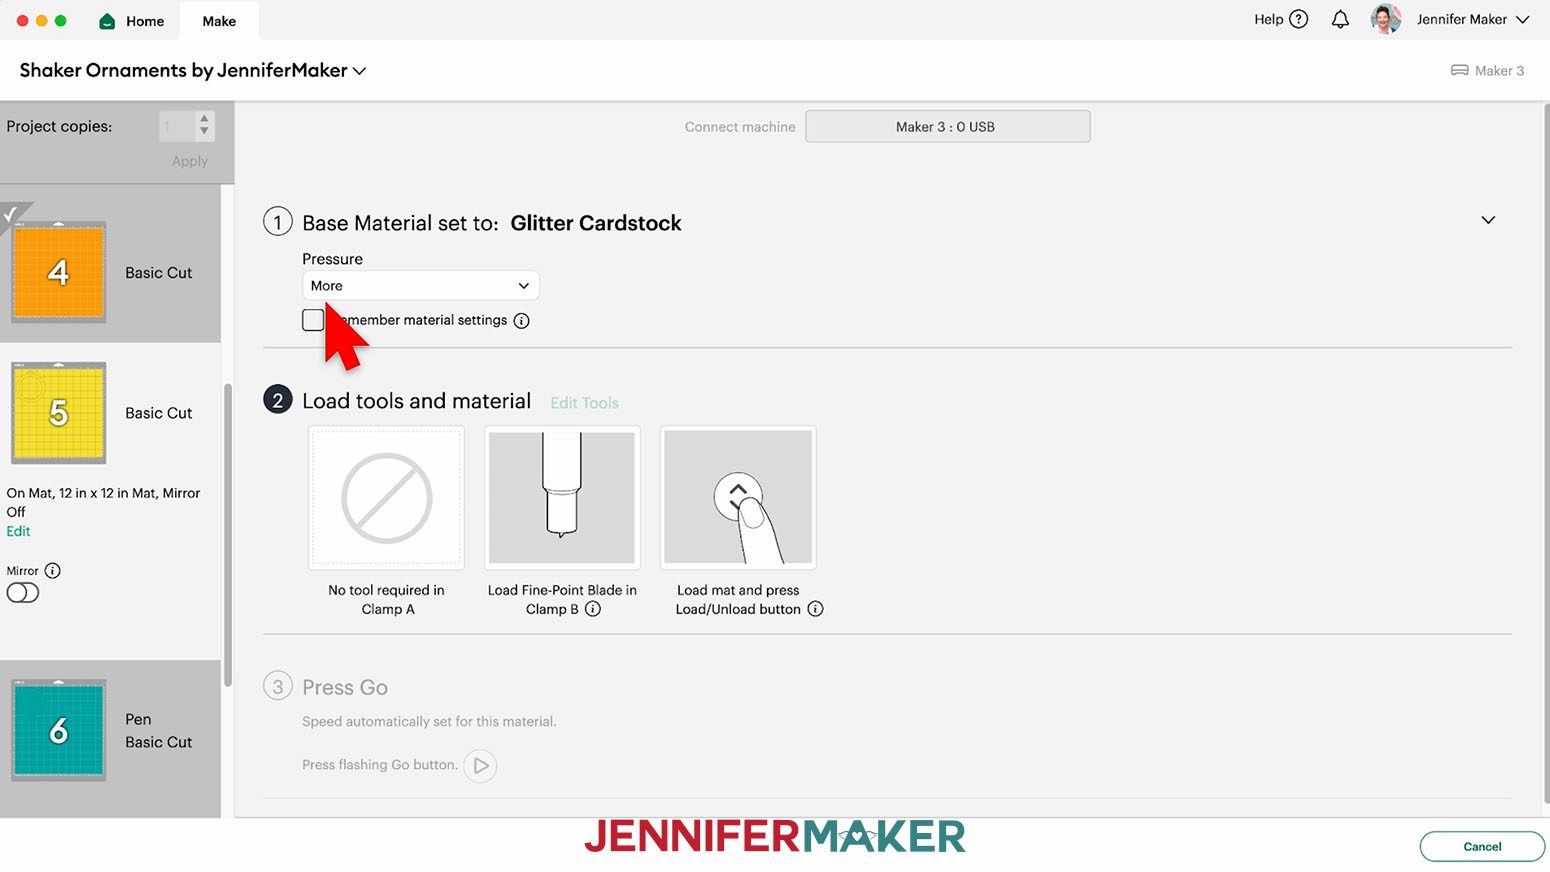
- On the Make screen, set the Base Material for your first mat. Mine is vinyl. For my vinyl mats, I’m using the “Premium Vinyl - Permanent Glossy” setting with “More” pressure.
TIP: Changing the Pressure to “More” results in a cleaner cut. - You can use a paper trimmer or scissors to trim your vinyl to cover the design area shown on the screen plus an inch or so of buffer.
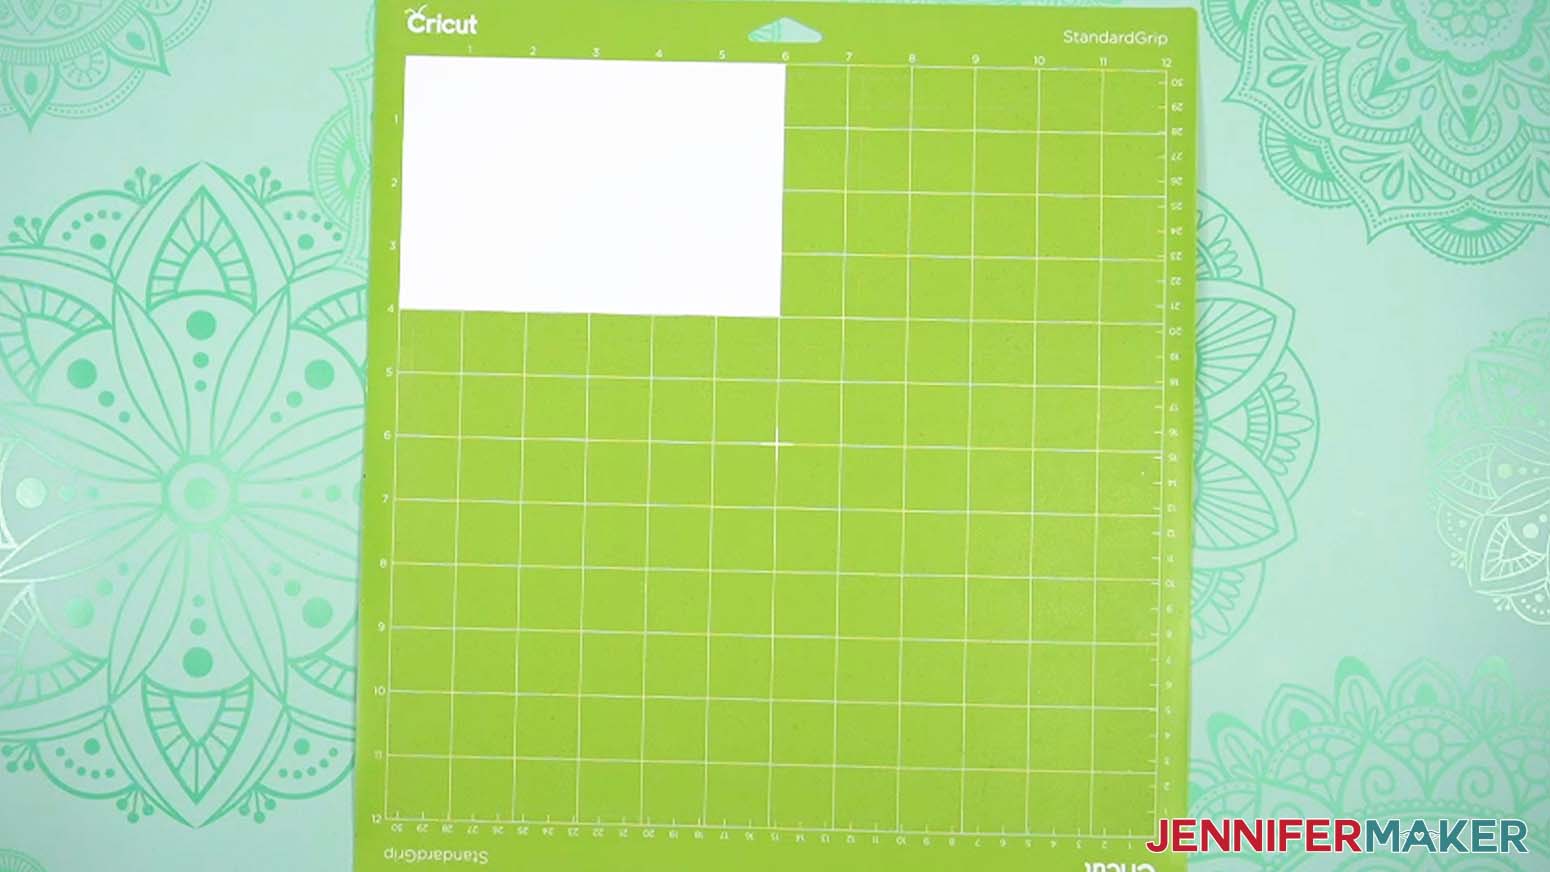
TIP: You can save smaller pieces of vinyl for other projects. - Place your vinyl shiny side up on a green StandardGrip machine mat so it covers the design area on your screen.
- Use a brayer to make sure it’s fully adhered.
- Check that your Premium Fine-Point Blade is clean and in the clamp.
- Press the flashing “Load/Unload” button to load the prepared mat into your Cricut.
- Press the flashing middle button to begin cutting.
- When it has finished cutting, don’t unload the mat right away. Gently lift a corner of the material to make sure the cuts went all the way through the material. If not, press the middle button again to make a second pass of cuts in the same spots.
NOTE: For vinyl, cuts should go all the way through the material, but not the carrier sheet.
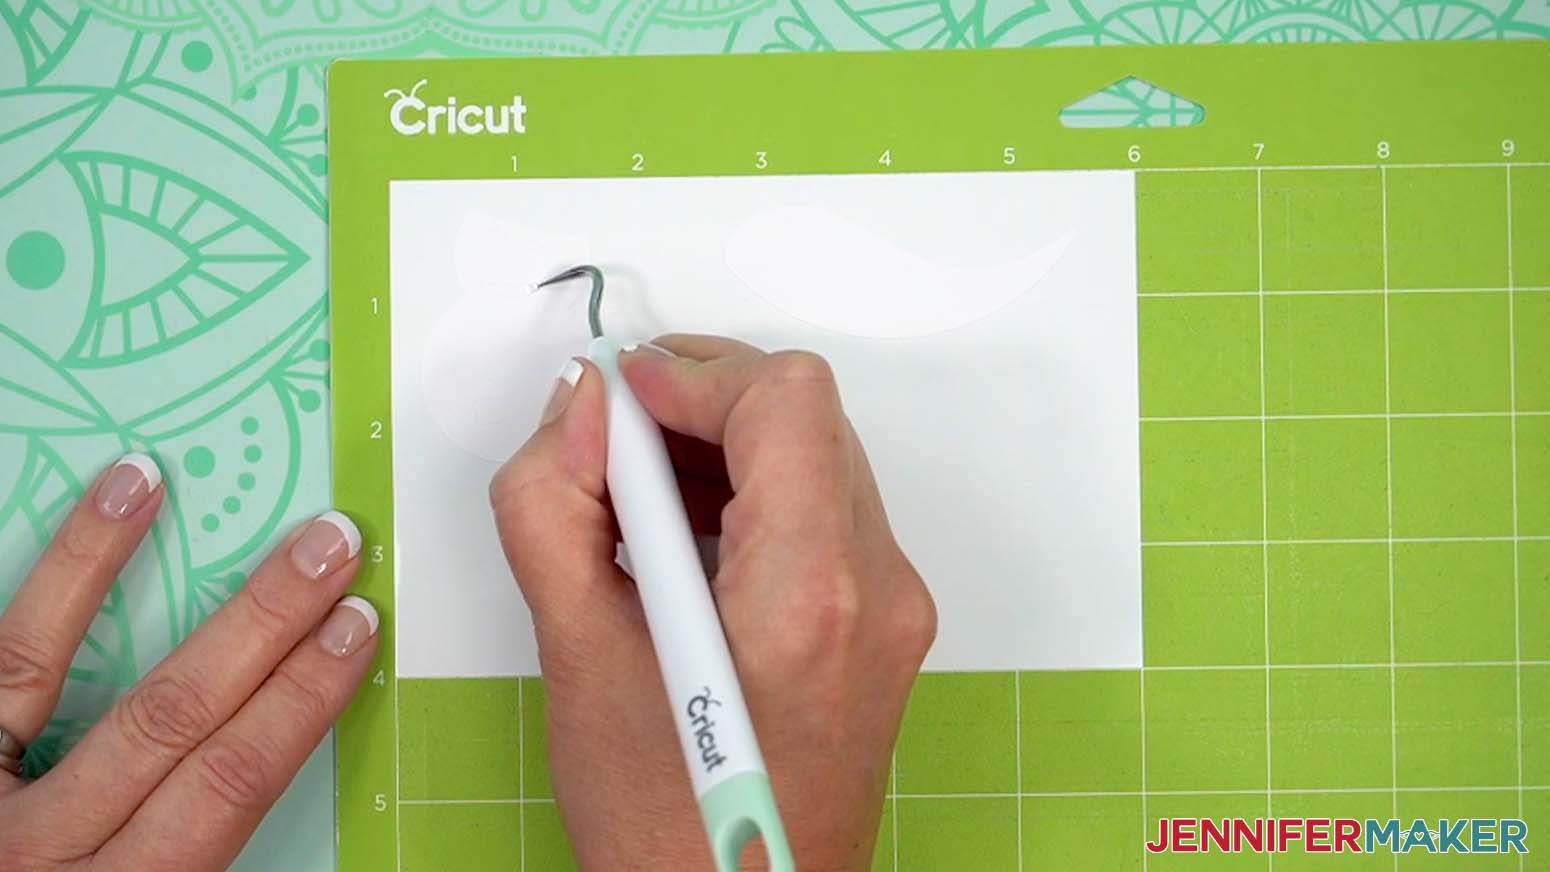
TIP: If you have any issues with your cuts, go to jennifermaker.com/cleaner-cuts. - When the cuts are complete, keep the vinyl on your mat and use your weeding tool to carefully peel away the extra background vinyl.
TIP: It can be easier to weed vinyl, especially small, detailed designs, while it is still adhered to the machine mat. - Poke your weeding tool into small sections of the design you want to remove. Gently lift the tool away from the design.
TIP: Make sure you do not pull up any pieces you want to keep! If they come up, gently pat them back in place and try again. Refer back to the Design Space screen if you’re not sure which pieces to remove. - Continue to weed until all that is left is the vinyl for your design, then flip the mat over onto your work surface, and roll it back to release the vinyl with its carrier sheet.
- For my cardstock mats, I’m using the “Medium Cardstock - 80 lb (216 gsm)” setting with “More” pressure.
- When you get to a mat with draw lines, follow the screen prompts to select and add your pen in the clamp indicated.
TIP: Remove the pen’s cap (put it on the back so you don’t lose it) and test it on scrap paper to make sure it flows well first. - Place your cardstock face up on a green StandardGrip machine mat.
- Repeat Steps 8-12 to cut your cardstock mats.
- When the cuts are complete, unload the mat, flip it over onto your work surface, and roll it back to release the cardstock.
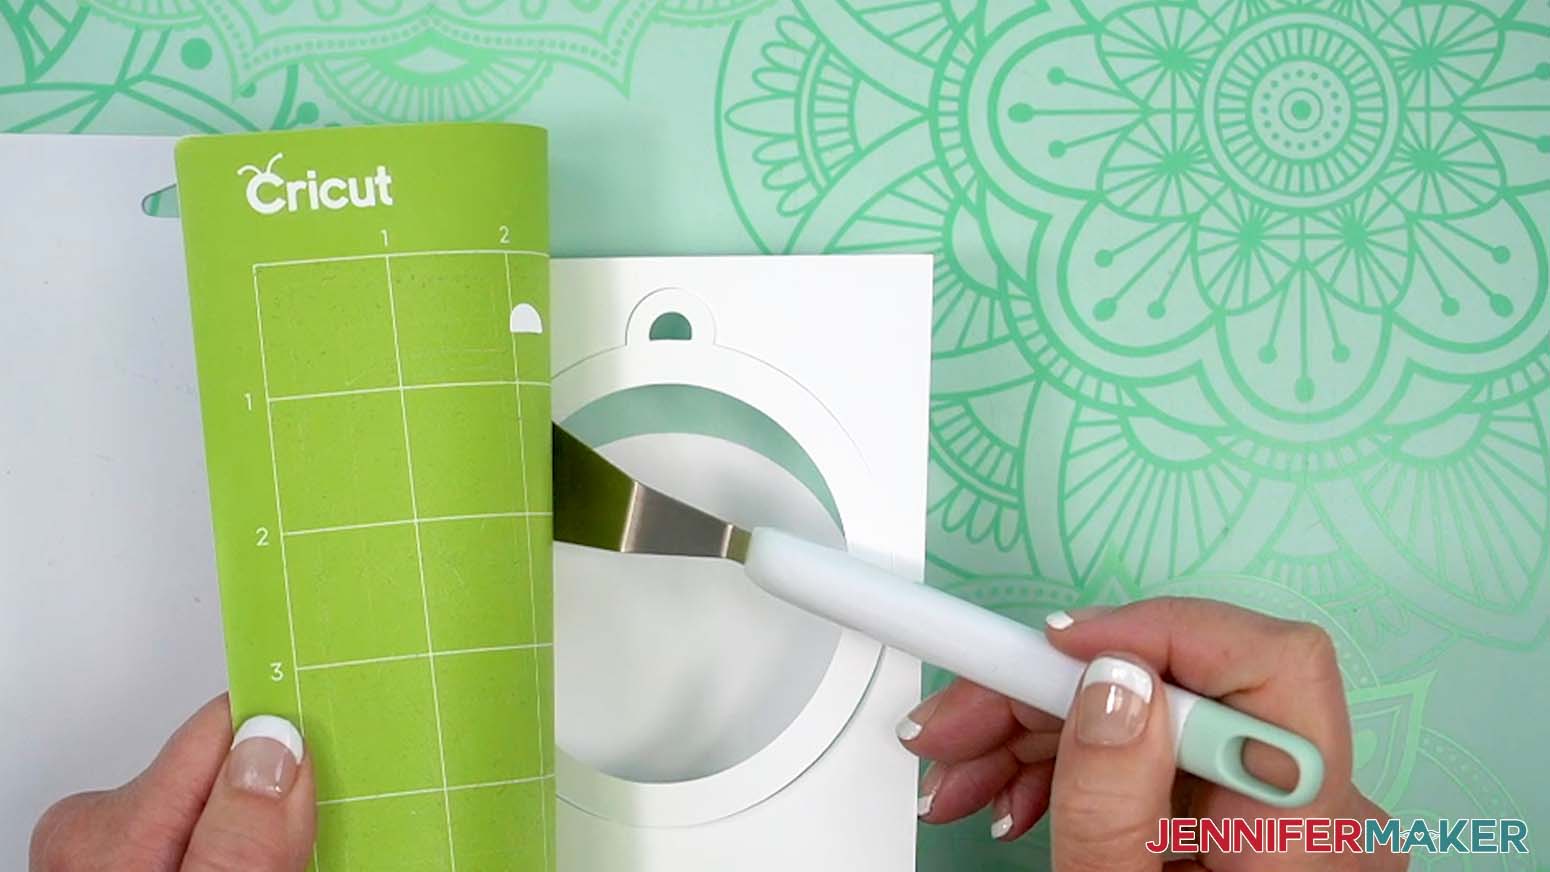
TIP: Use the spatula to help lift delicate parts (such as hanging tabs), and the weeding tool to poke out small bits of cardstock that are still attached to your cut pieces (like bits between the letters in the “stars” design). - Use a scraper tool to remove the small bits of cardstock left on your mat after you remove the cut pieces.
- The glitter cardstock mat can be cut and unloaded the same way as the regular cardstock, but remember to change its material settings to “Glitter Cardstock” with “More” pressure.
NOTE: Glitter can stick to the blade and cause trouble on your future cuts, so I recommend cleaning it after each sheet of glitter cardstock.
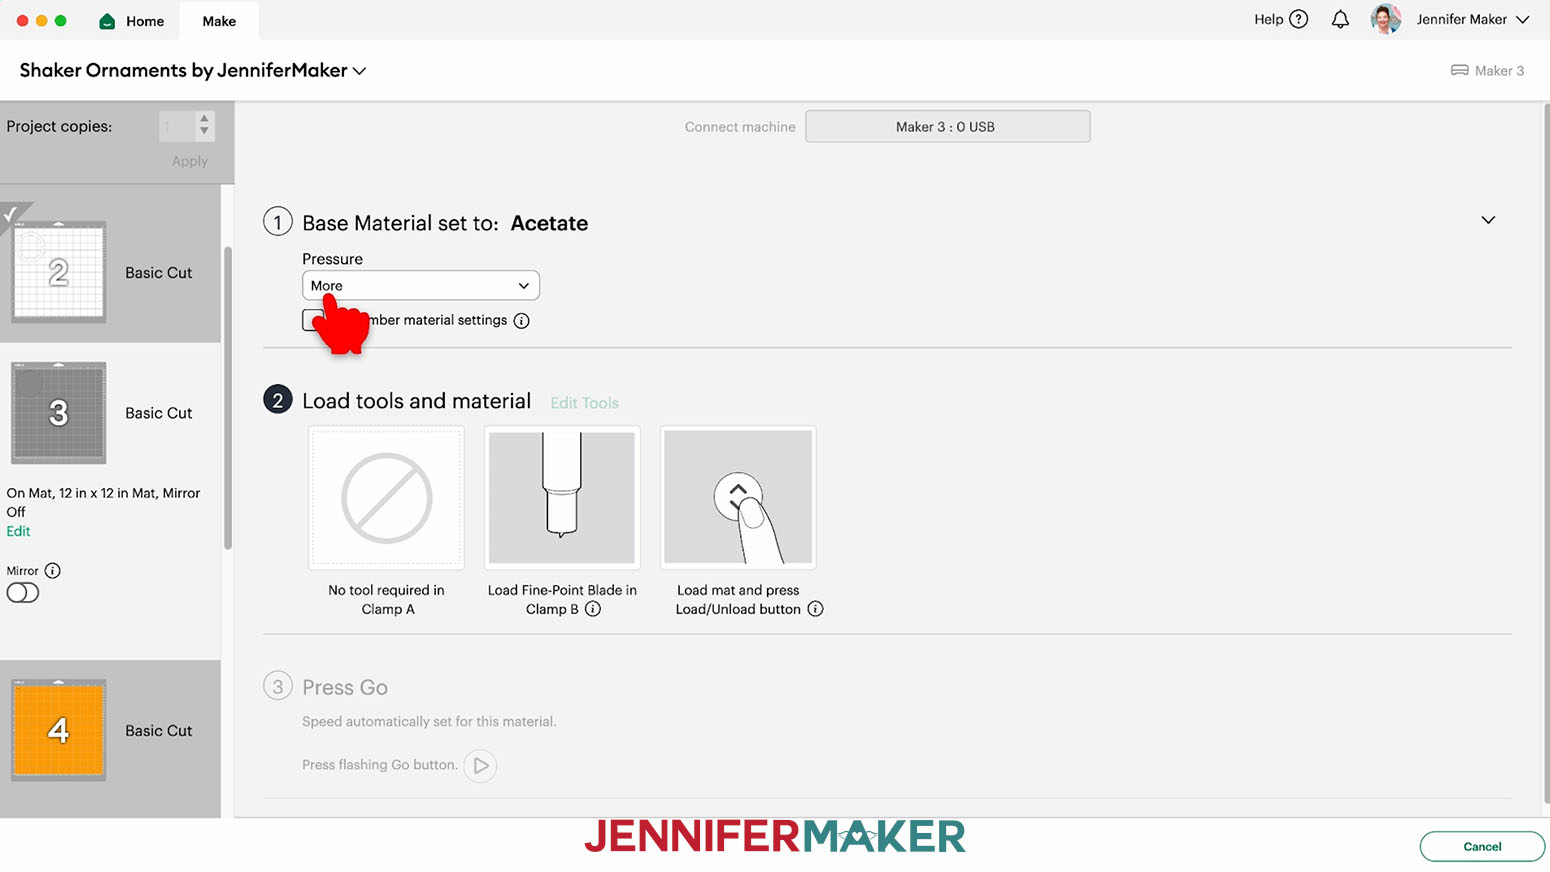
You can take the housing and blade out of the clamp, press down on the plunger, and carefully poke the blade into a ball of aluminum foil several times. You can also clean it with an alcohol wipe or a microfiber cloth with isopropyl alcohol. Be careful, it's sharp! - For your acetate mat, change your material settings in Design Space to “Acetate” with “More” pressure.
- Take the protective film off one side of the acetate only.
- Place the acetate’s side with the protective film down on a green StandardGrip machine mat to keep adhesive and scratches from damaging the material.
- Repeat Steps 8-12 to cut your acetate.
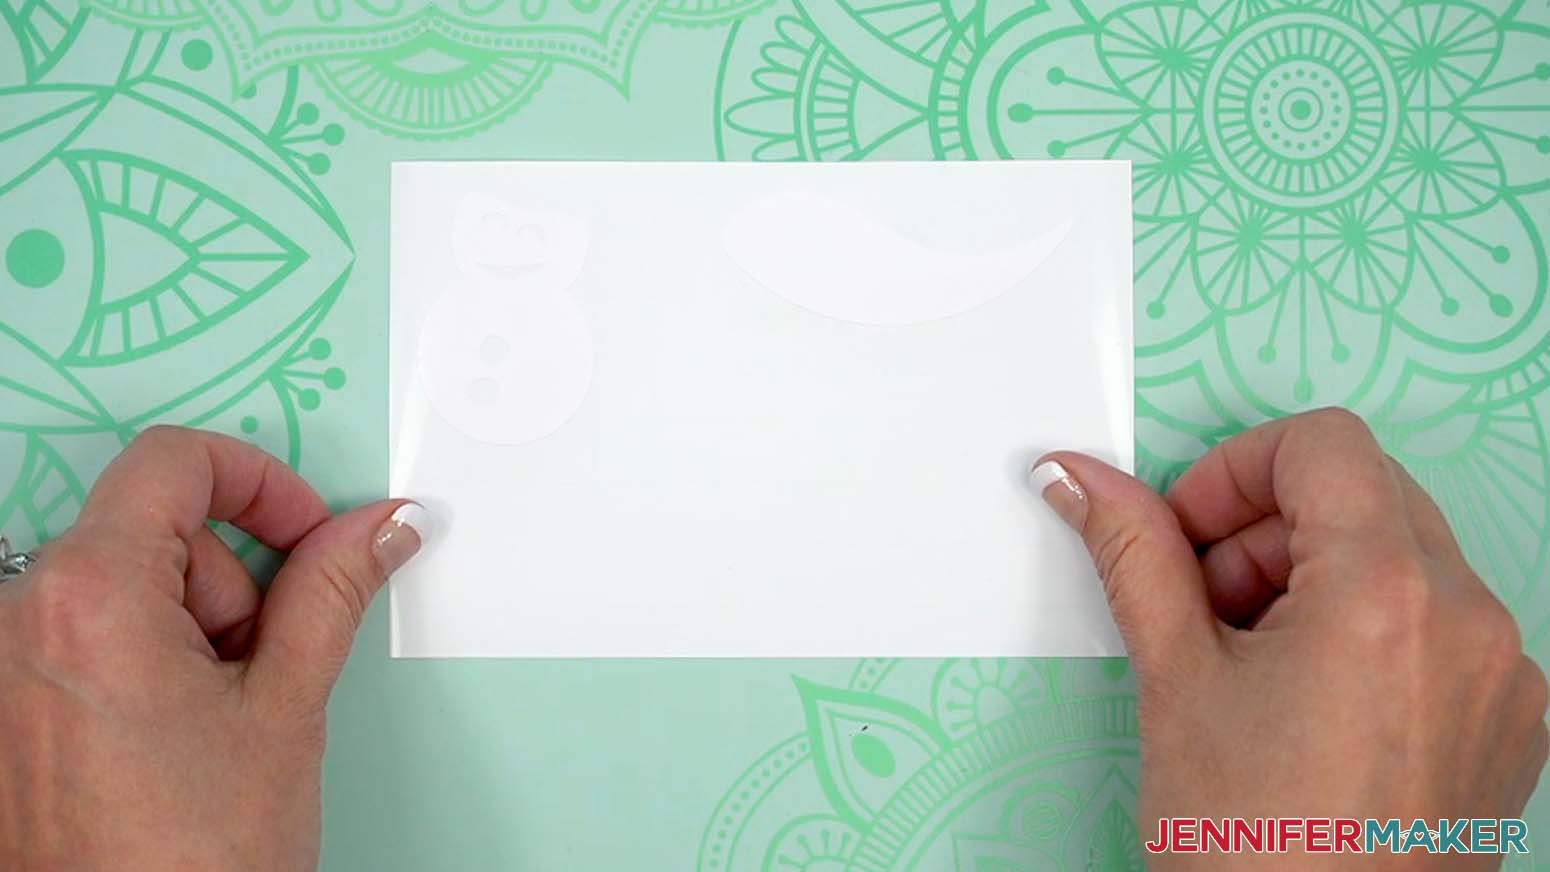
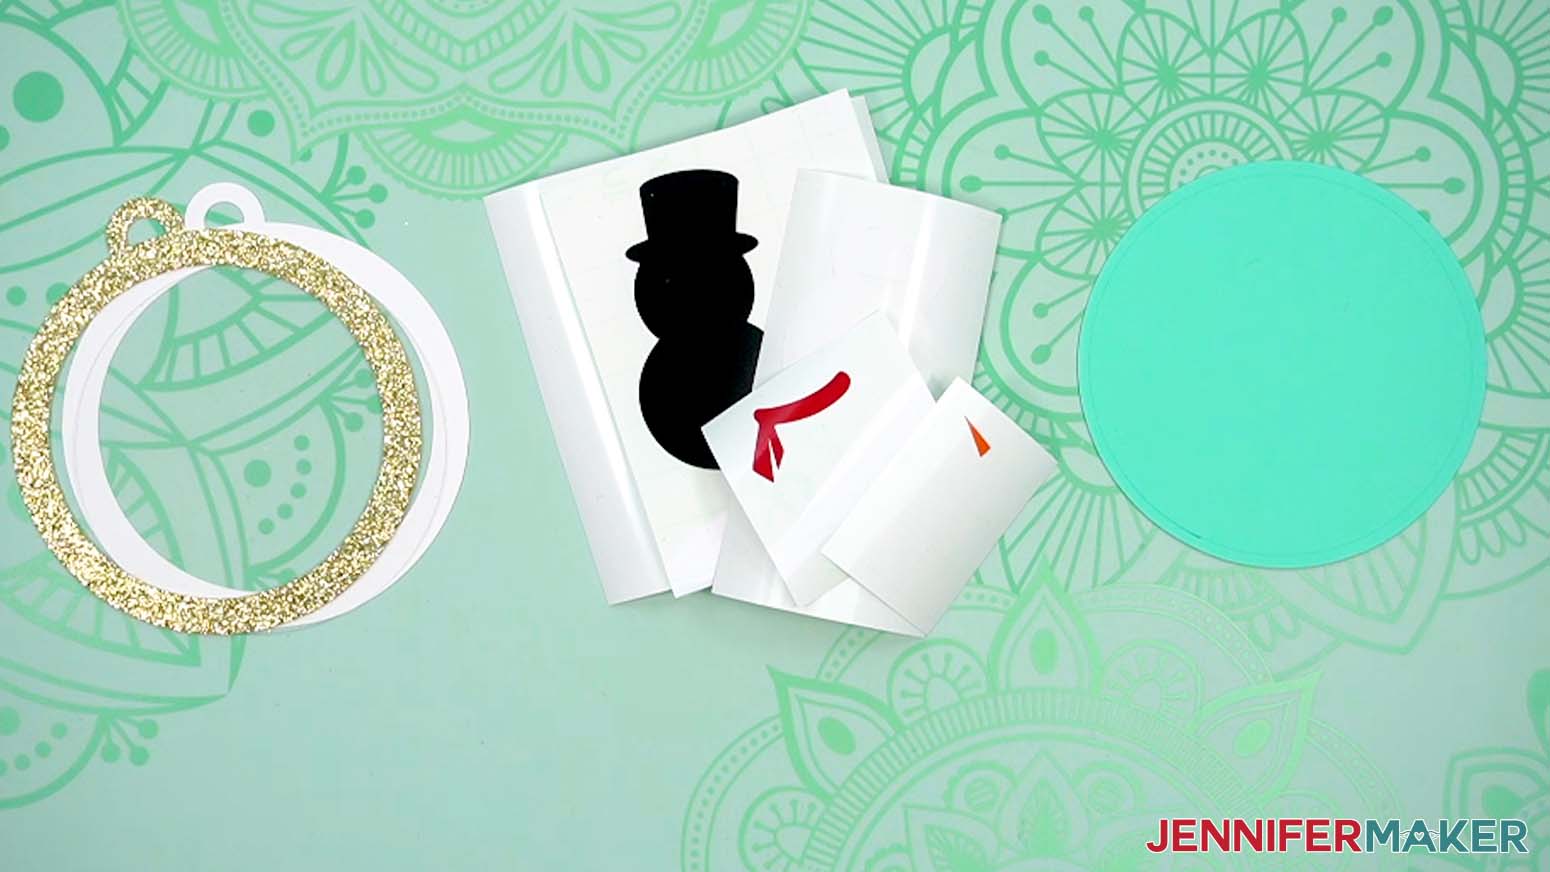
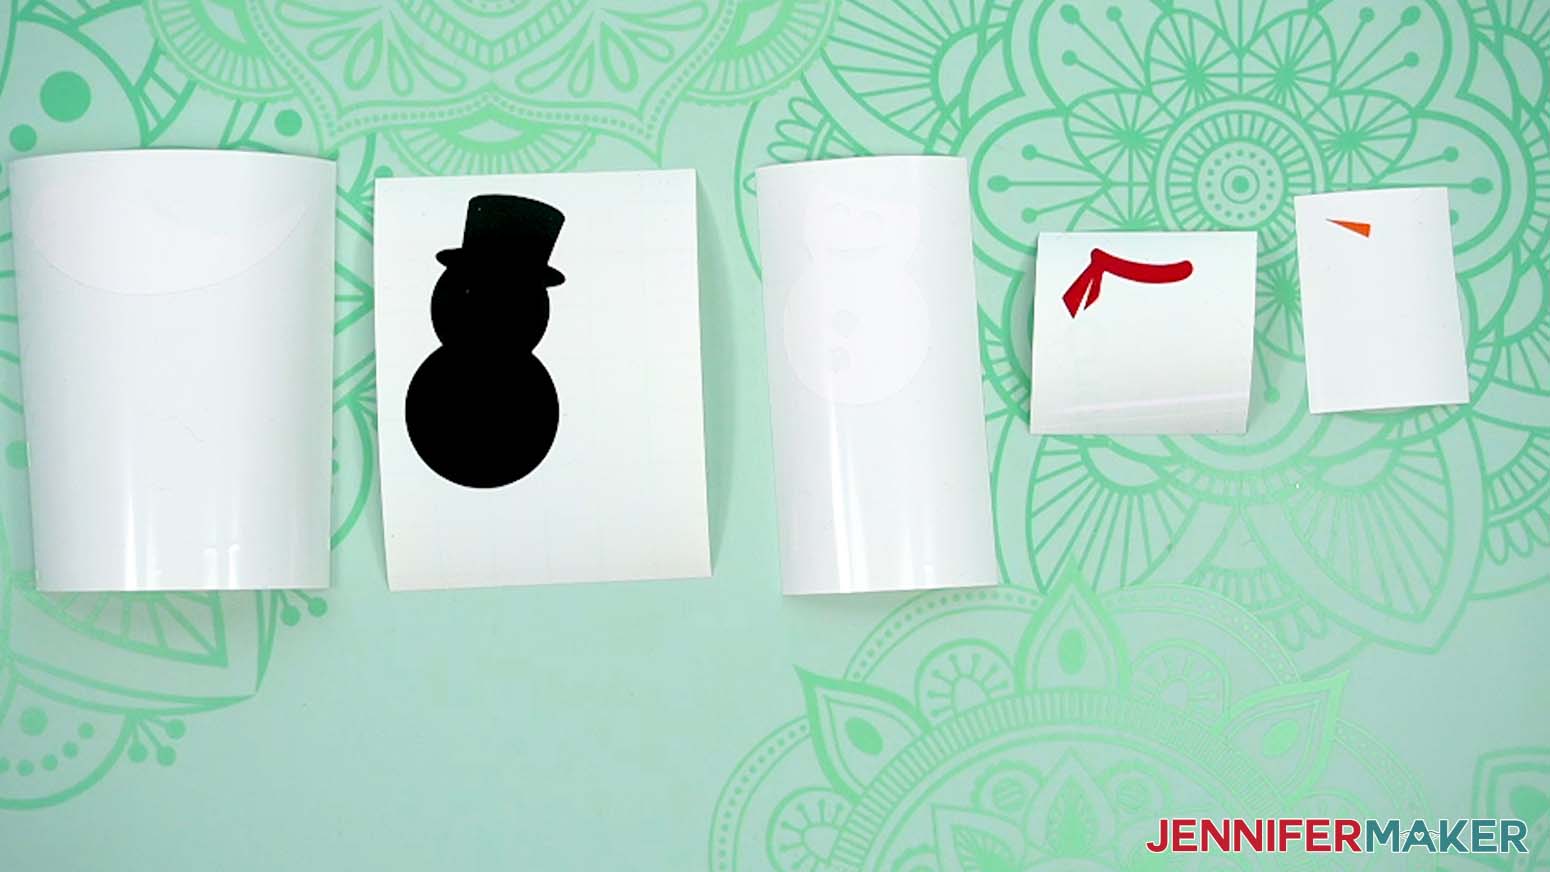
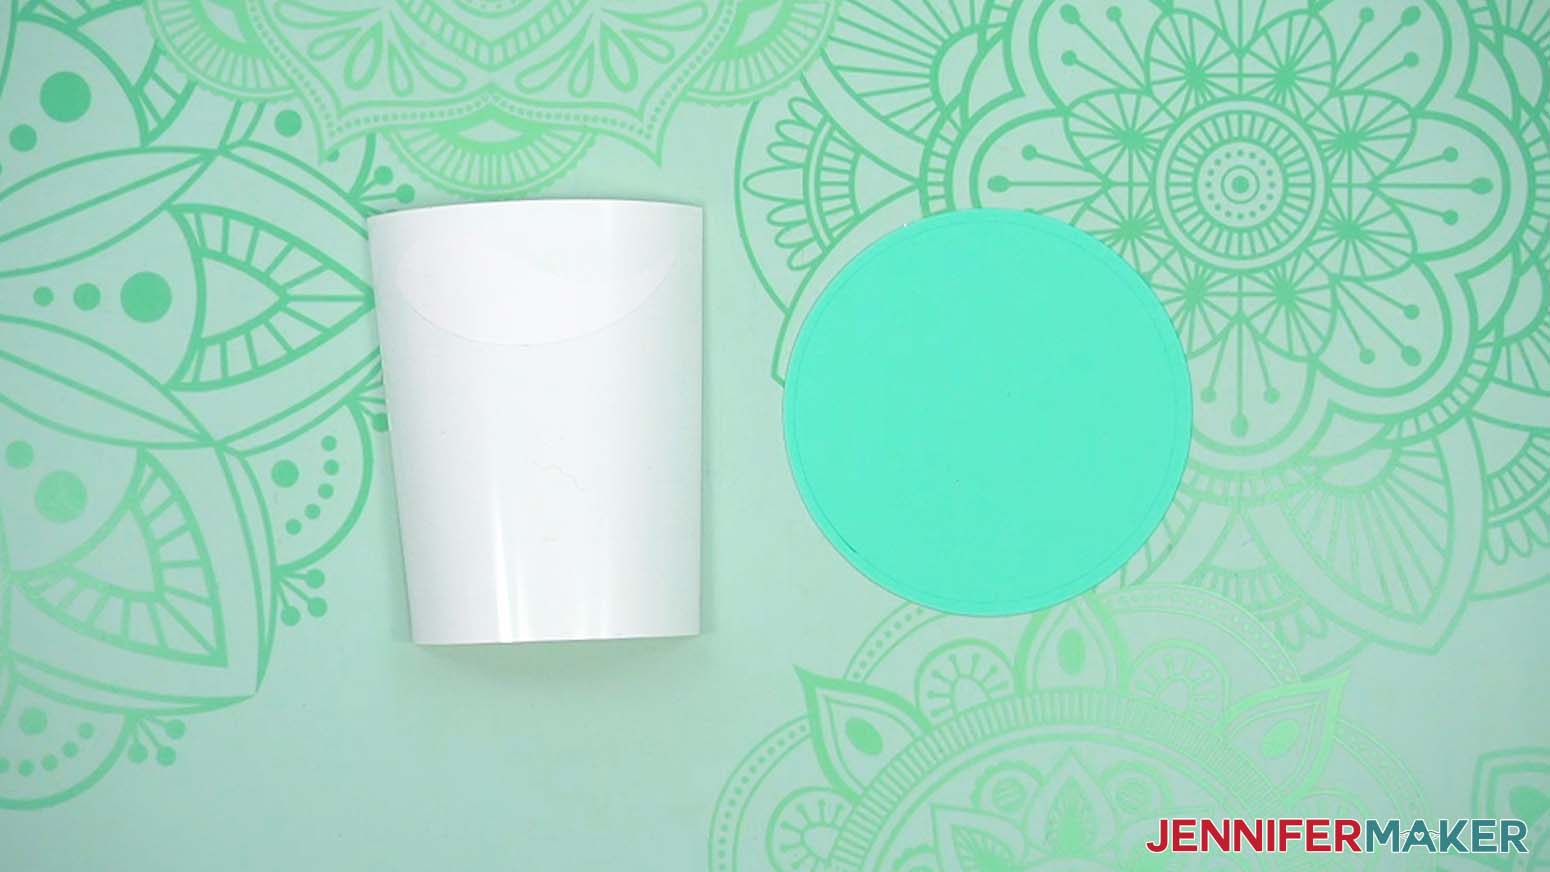
- Lay out all of the pieces face up in organized piles.
For the top: a glitter cardstock top piece, an acetate piece, and a regular cardstock top backer piece.
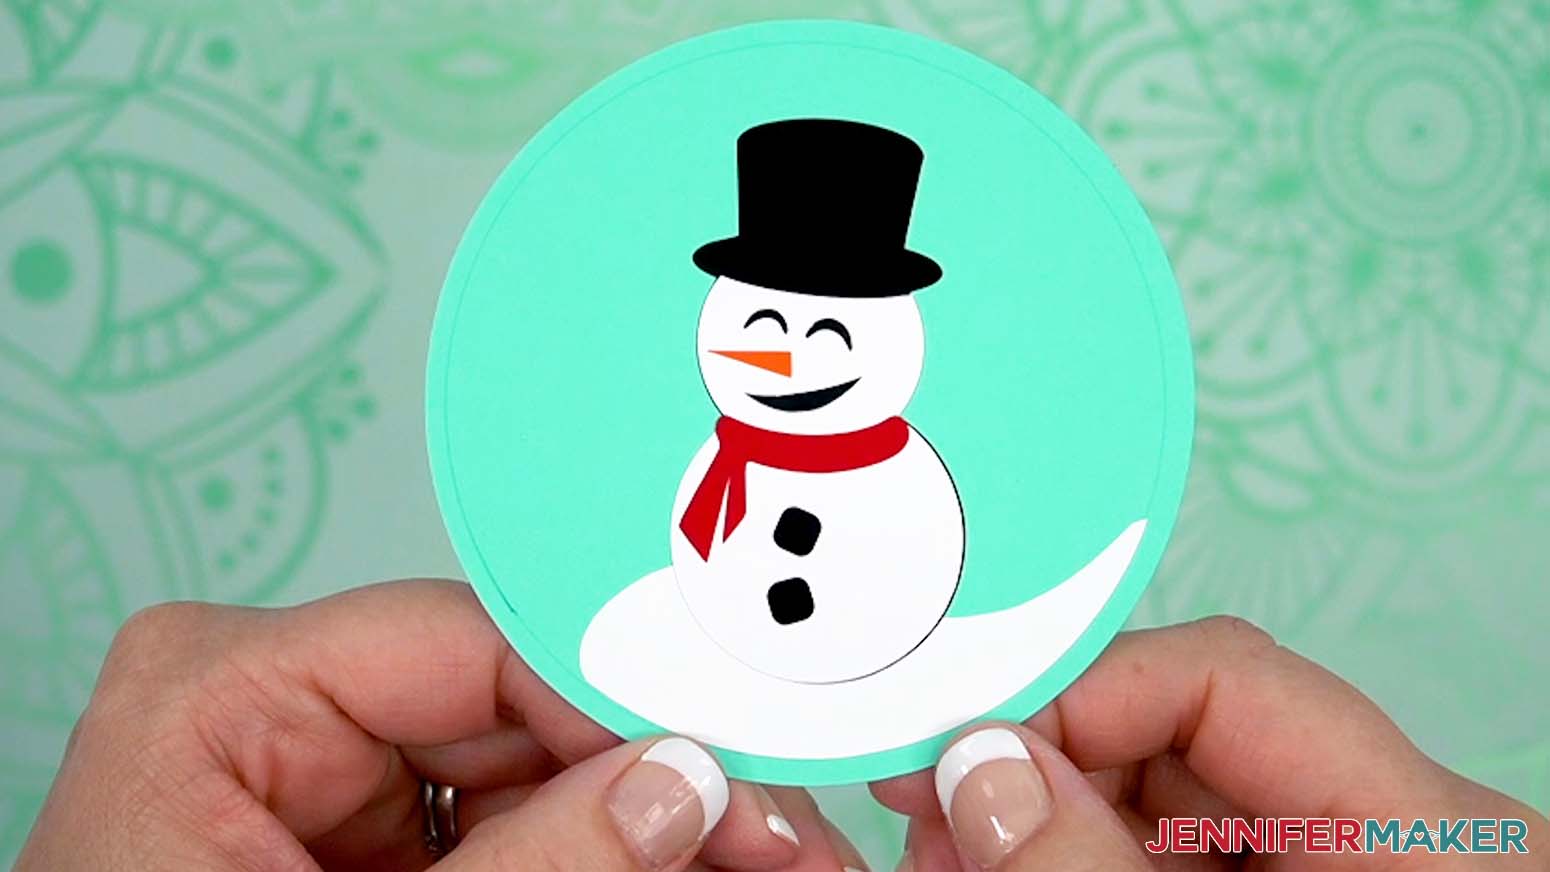
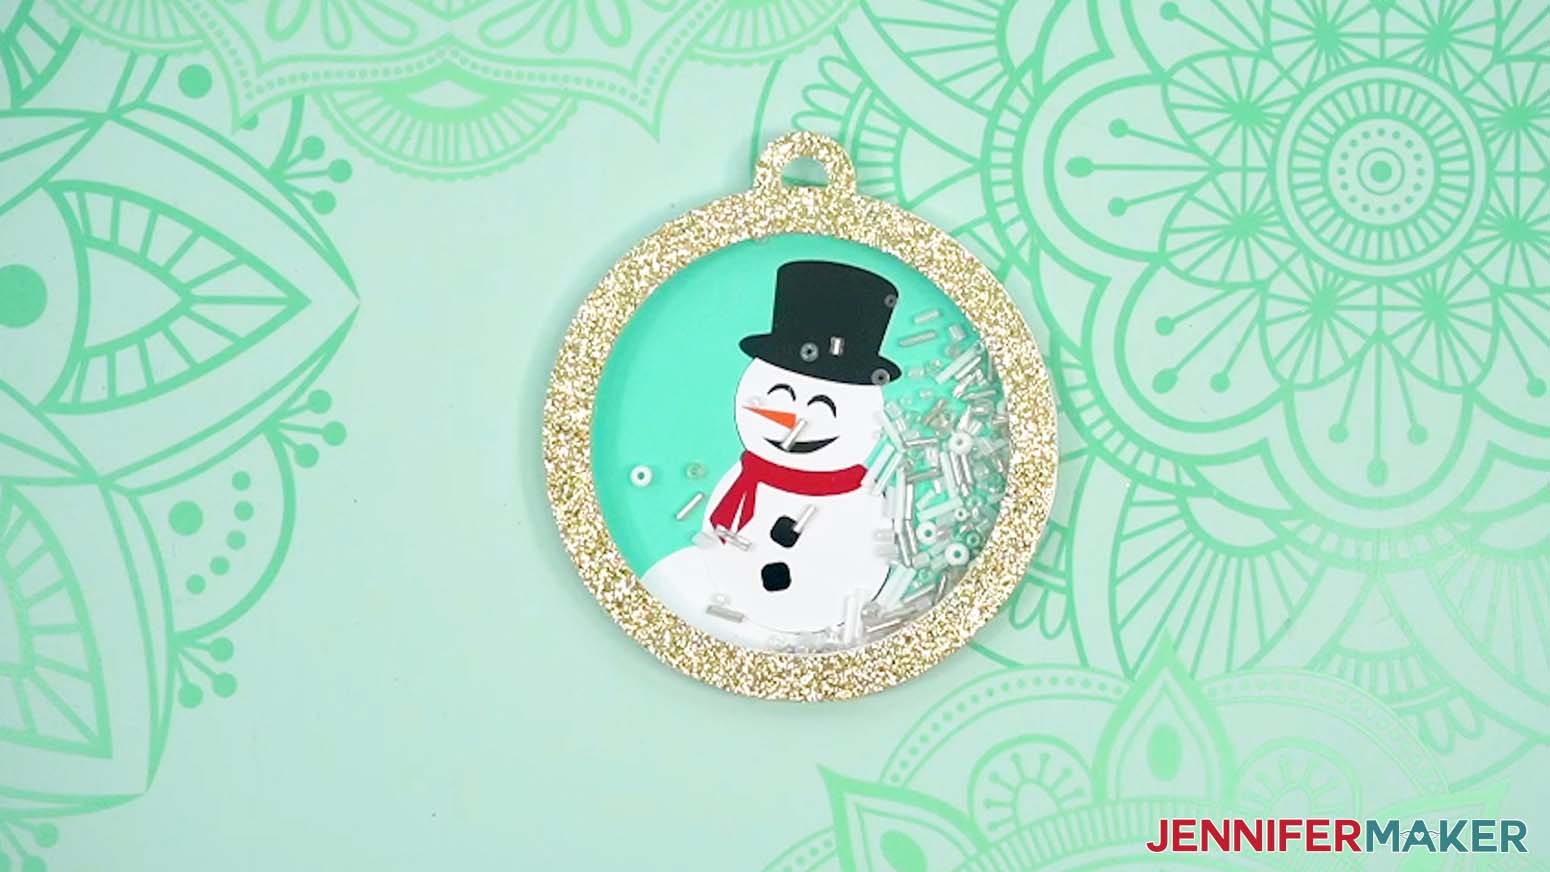
For the vinyl decal: a white snow layer, a black snowman base layer, a white snowman top layer, a red scarf piece, and an orange nose piece.
For the bottom: a regular cardstock back piece with an alignment ring drawn on.
TIP: Refer to the Design Space screen if you’re not sure about some pieces’ orientation.

STEP 3: ASSEMBLE YOUR SNOWMAN SHAKER ORNAMENT
- Stack the vinyl layers with the snow layer on the bottom, then add the black snowman base, the white snowman top, the scarf, and finish with the nose on top to make sure the design will look correct.
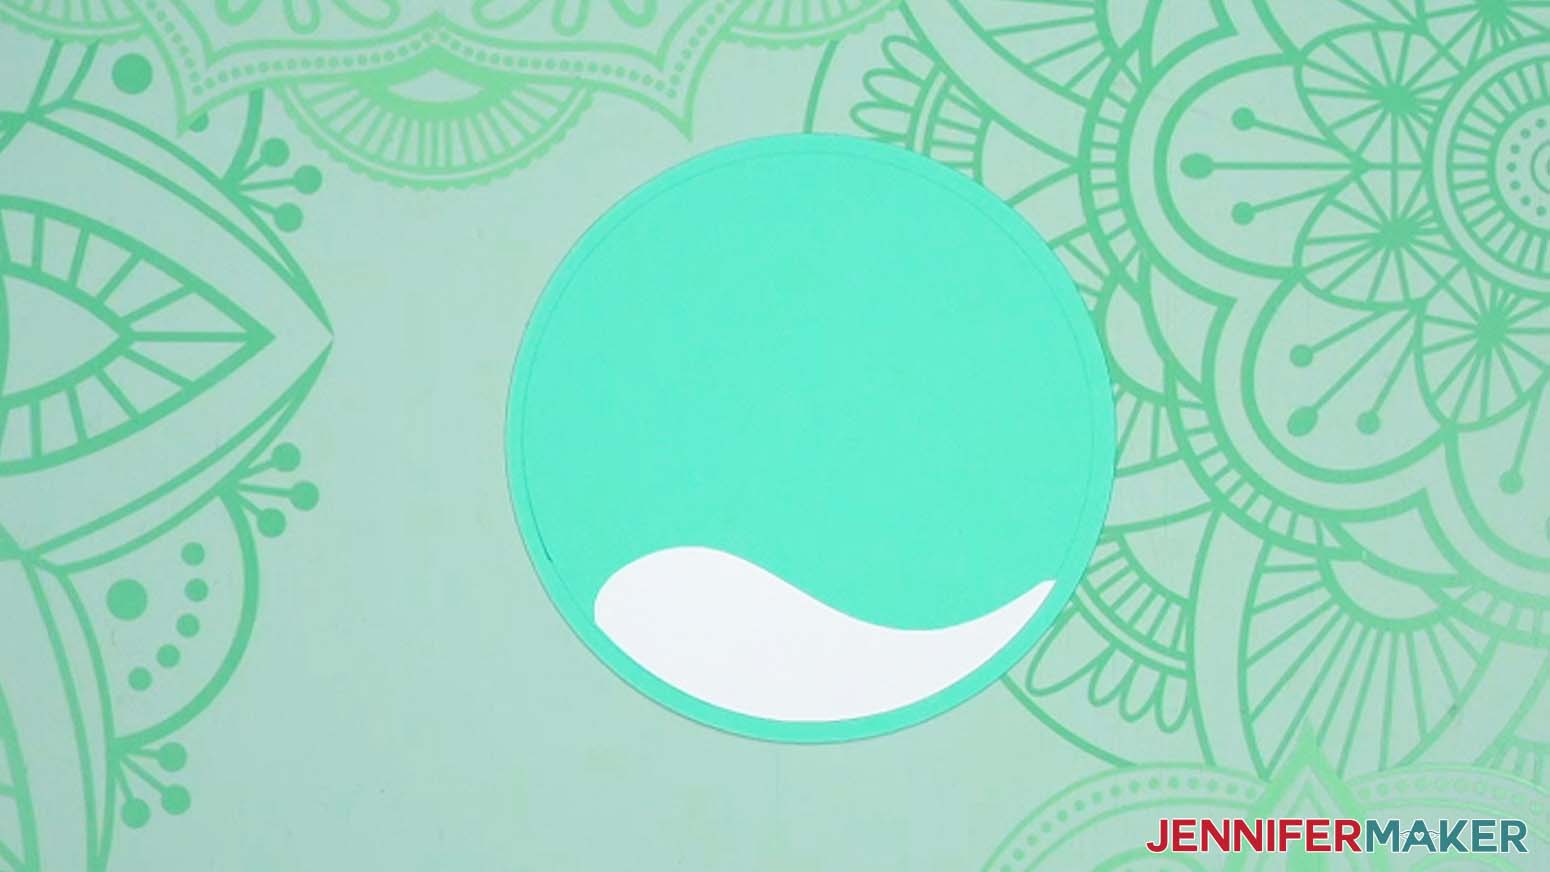
- Lay the bottom-most vinyl decal, which is the snowbank, face up on your work surface with the teal cardstock back piece next to it.
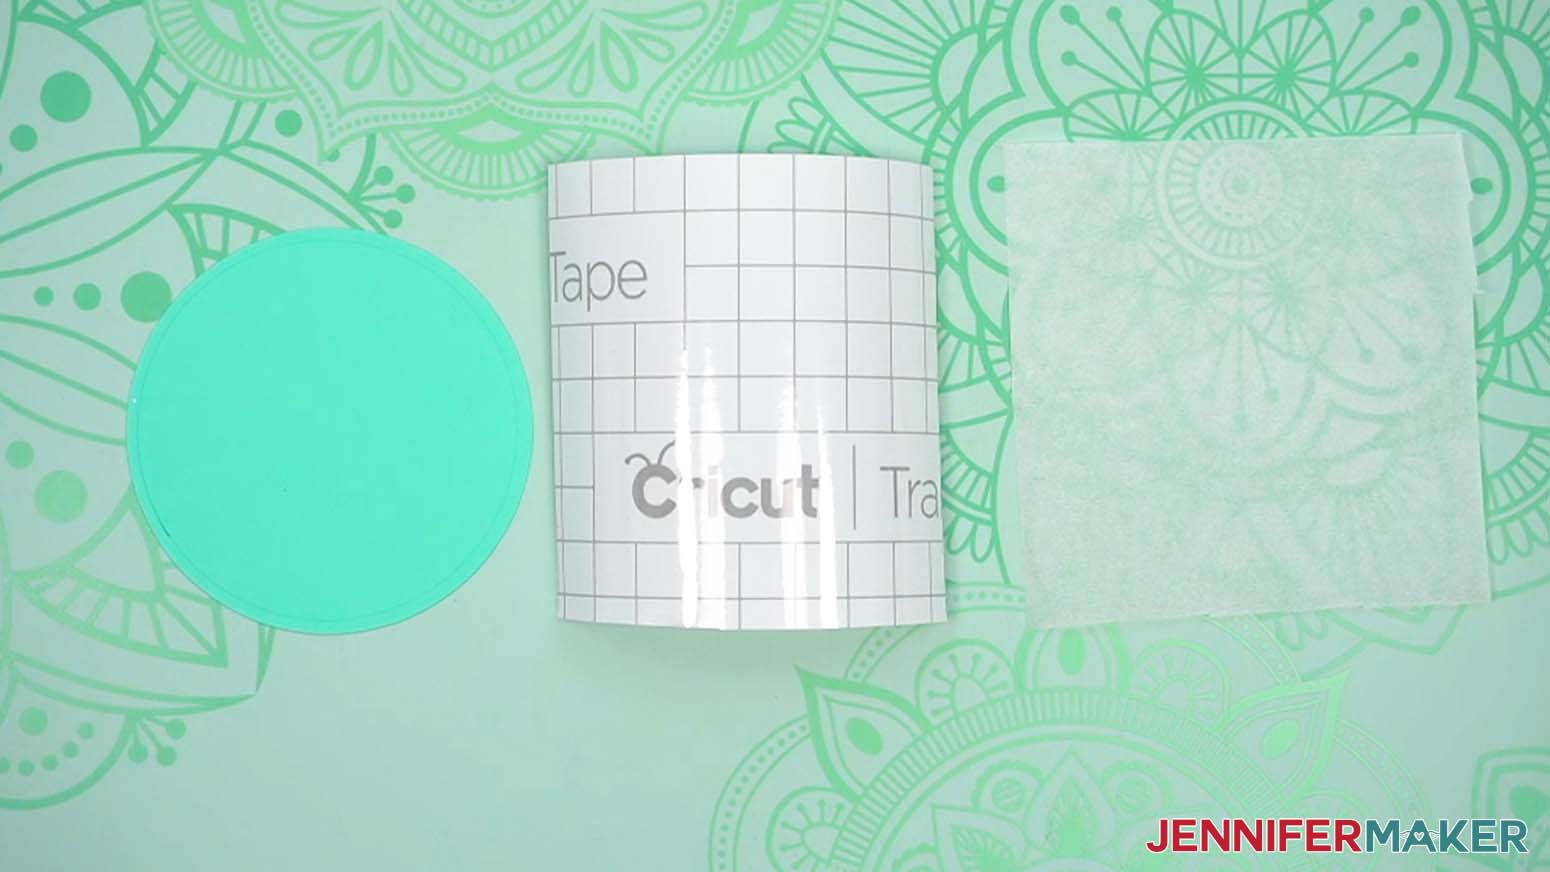
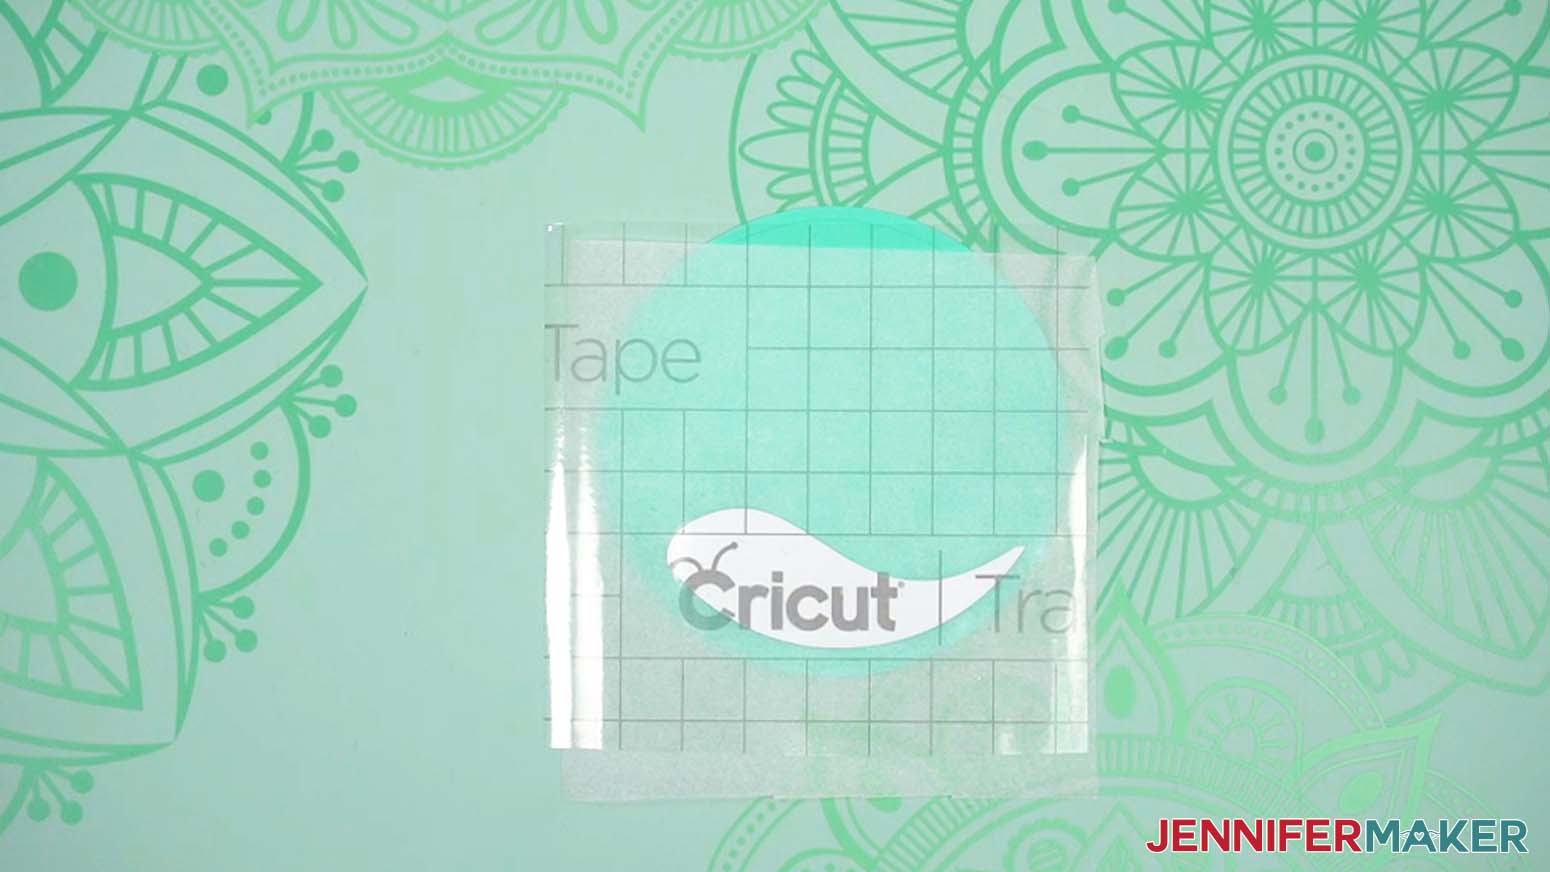
- Cut a piece of StandardGrip transfer tape and a piece of parchment paper slightly larger than the back piece.
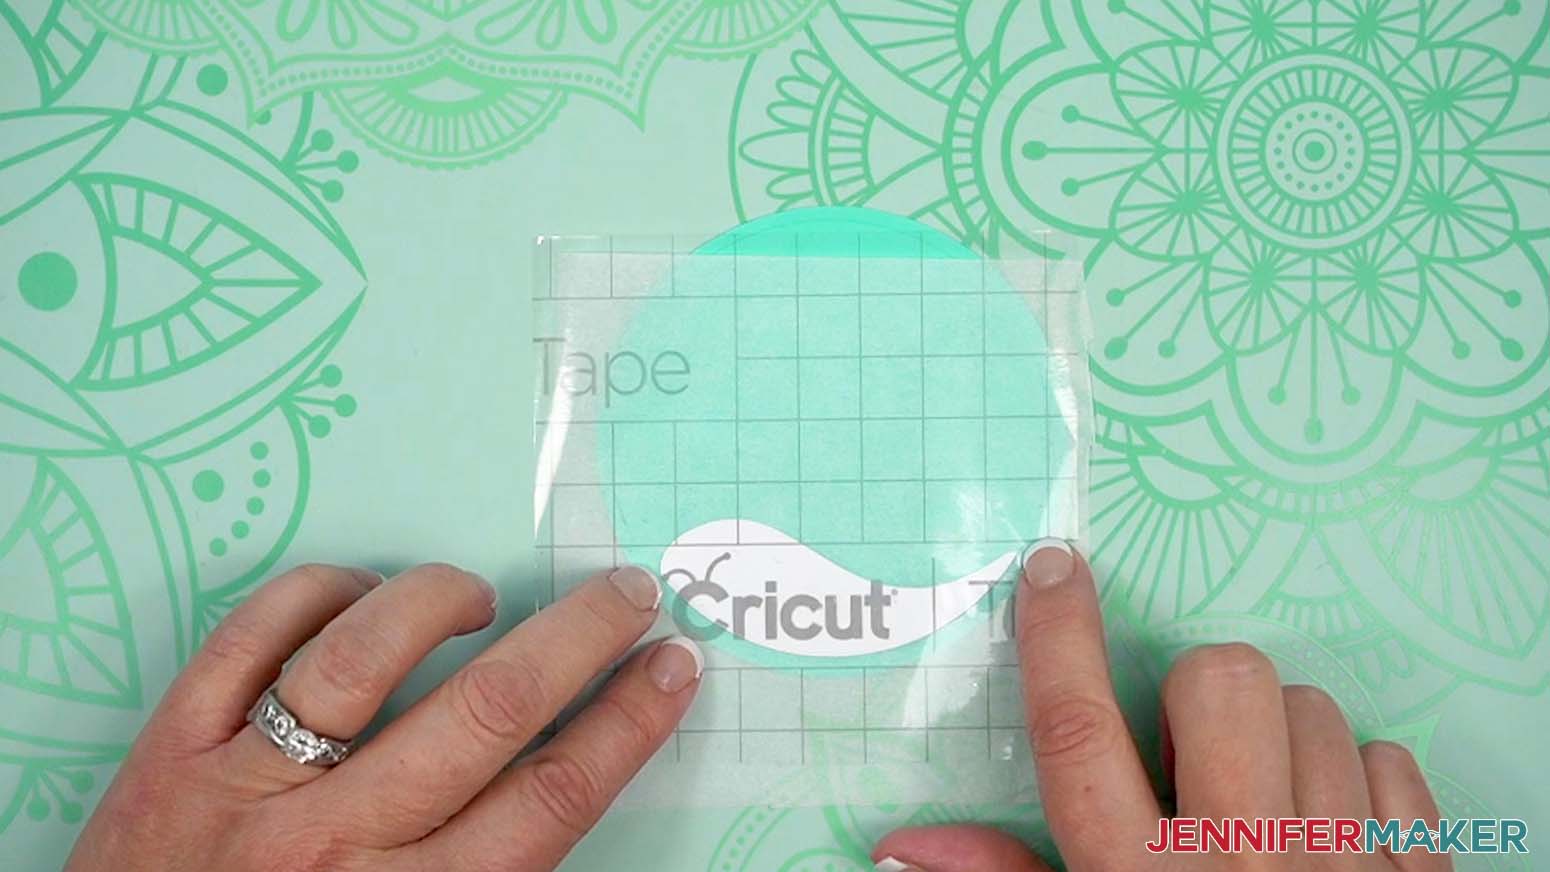
- Remove the backing from the transfer tape, then pat your fingers on its adhesive side to lessen its stickiness and prevent damage to your cardstock.
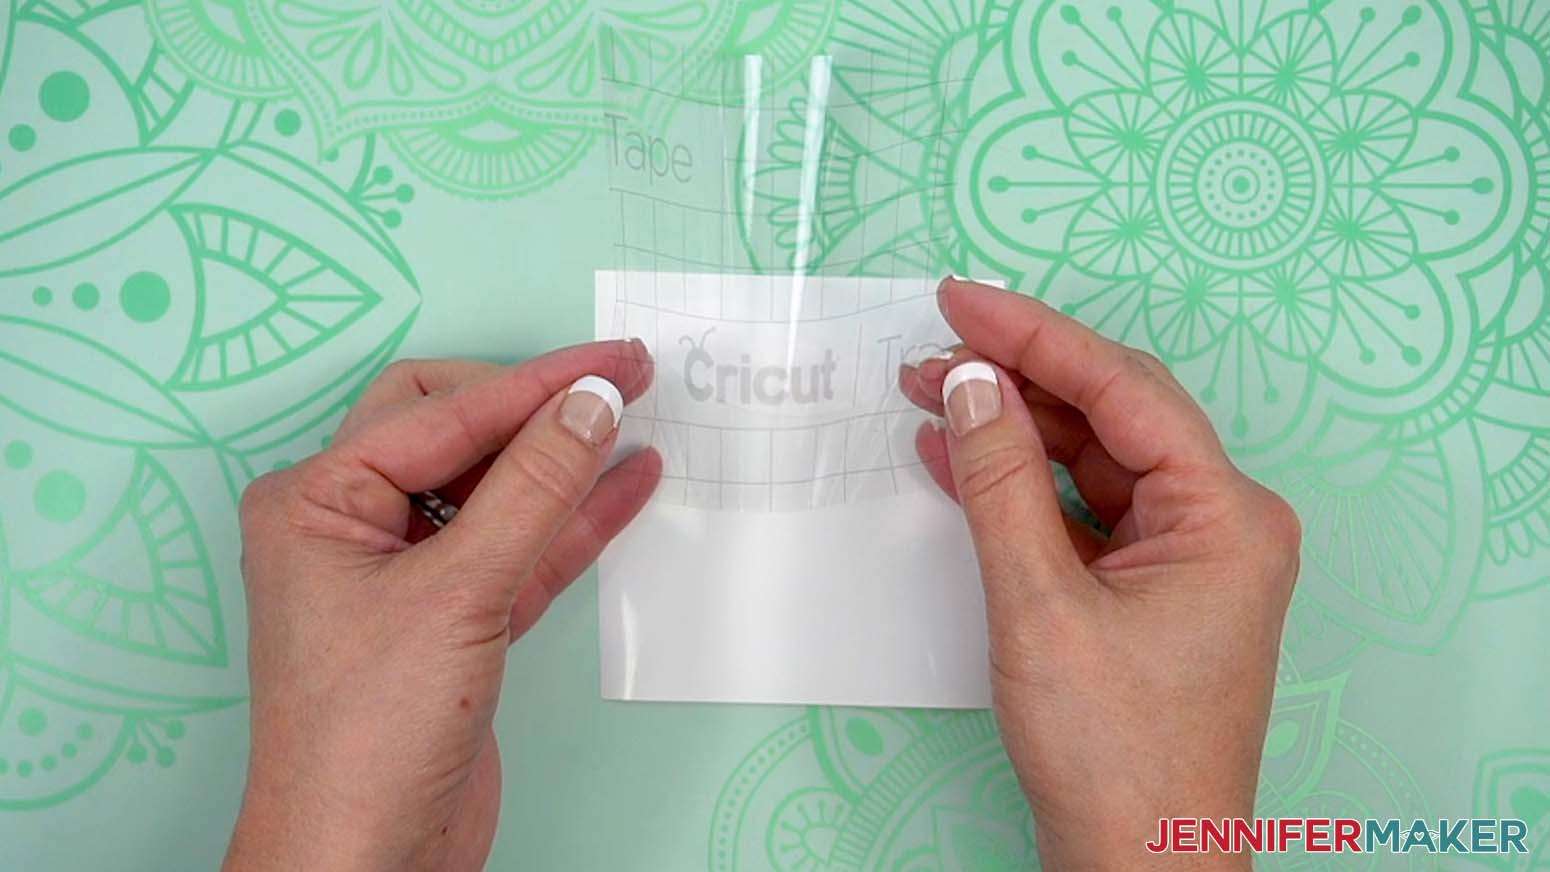
- Remove the backing from the transfer tape.
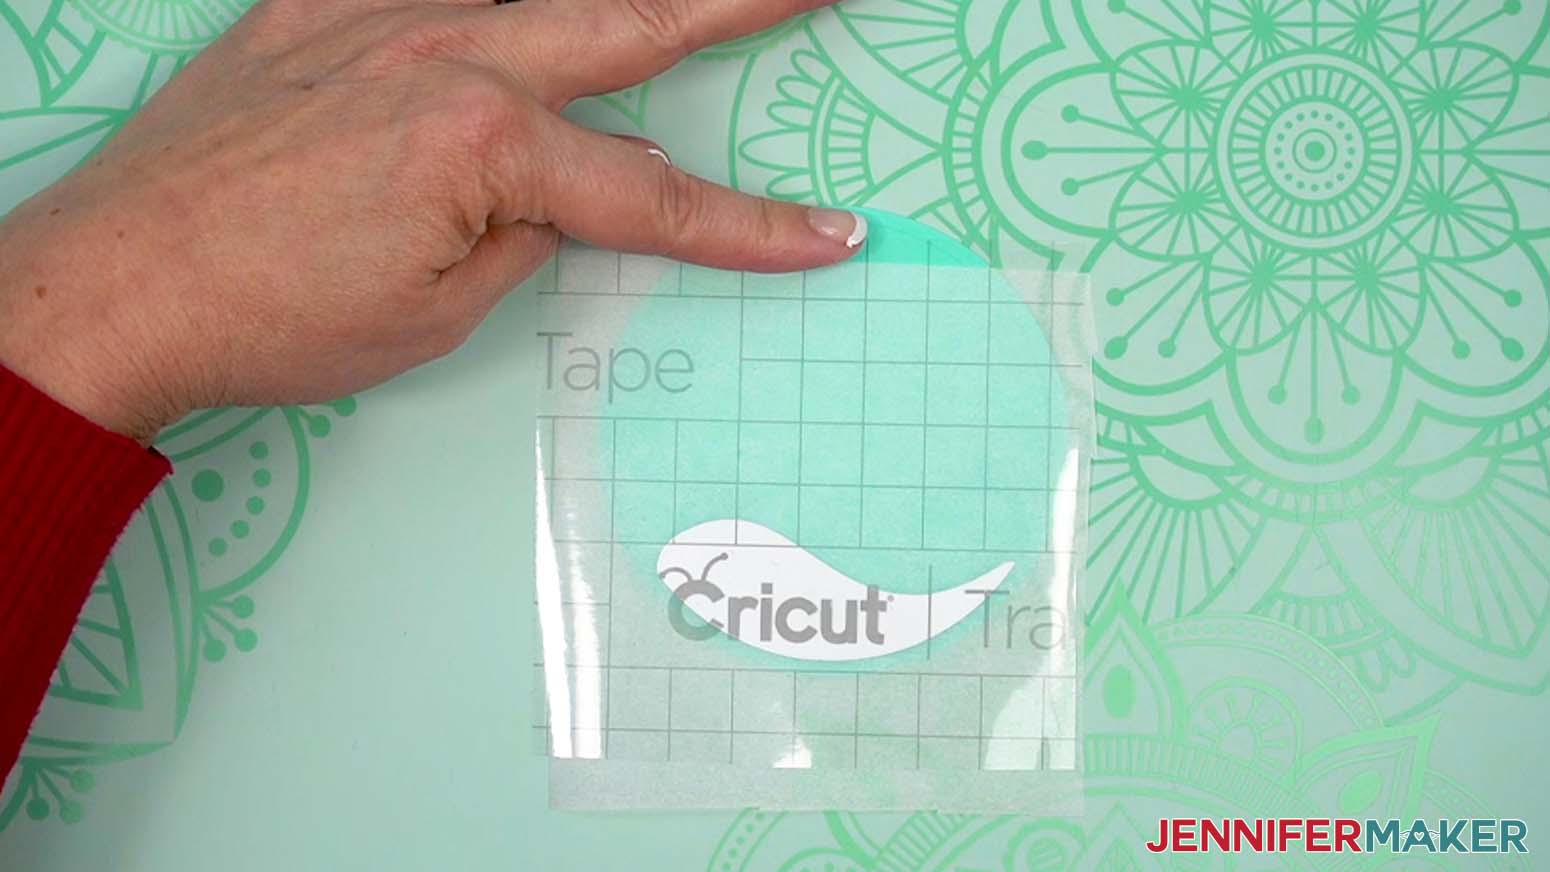
- Hold your transfer tape in the shape of a “taco,” sticky side down, then put the bottom of the “taco” onto the middle of the snowbank layer.
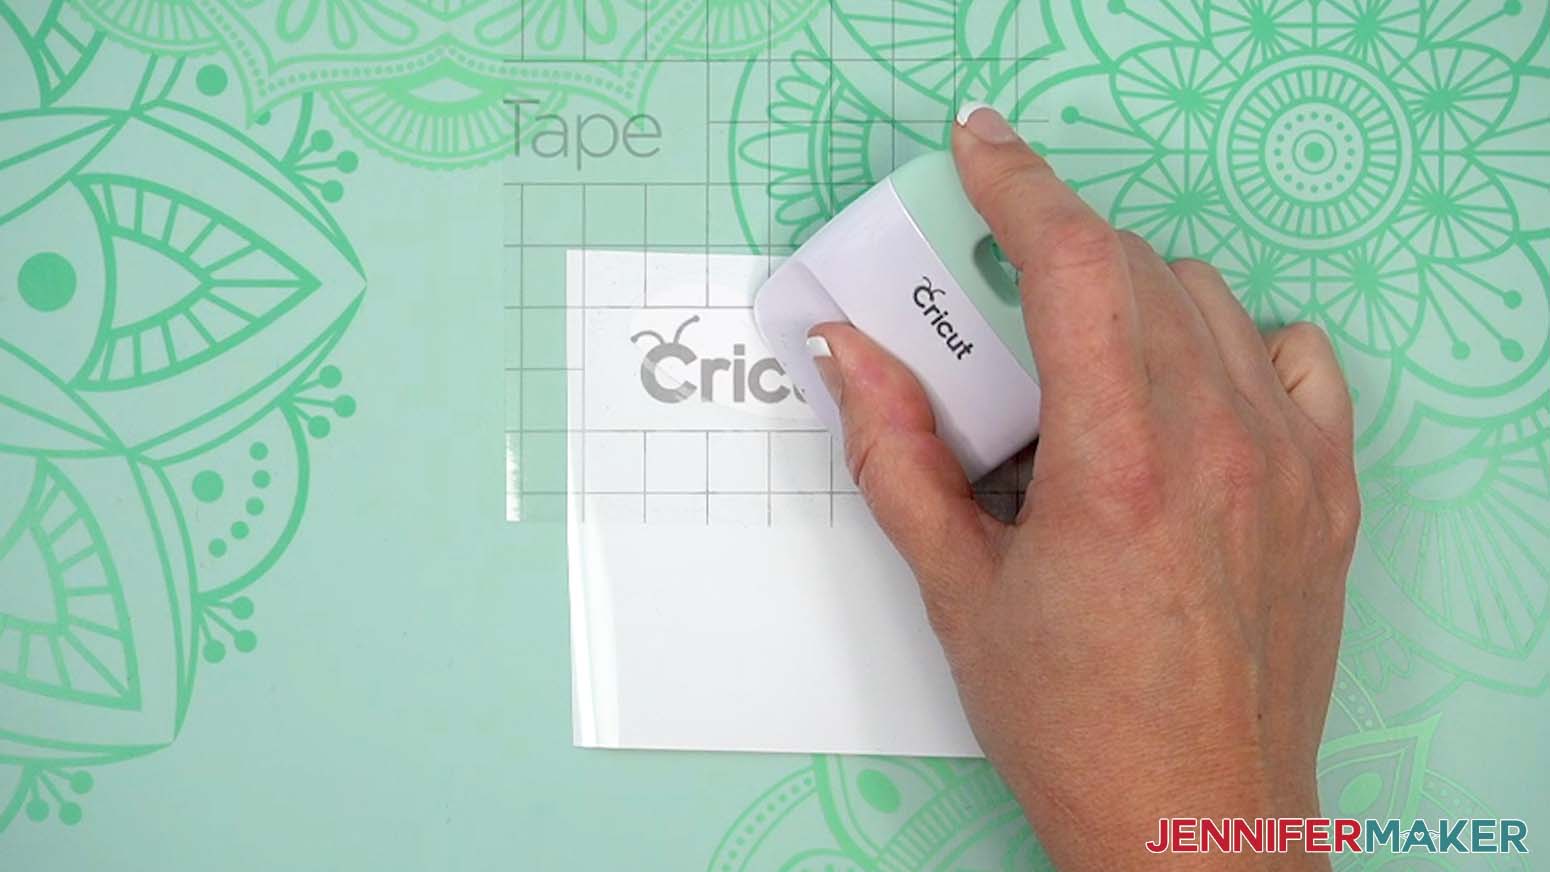
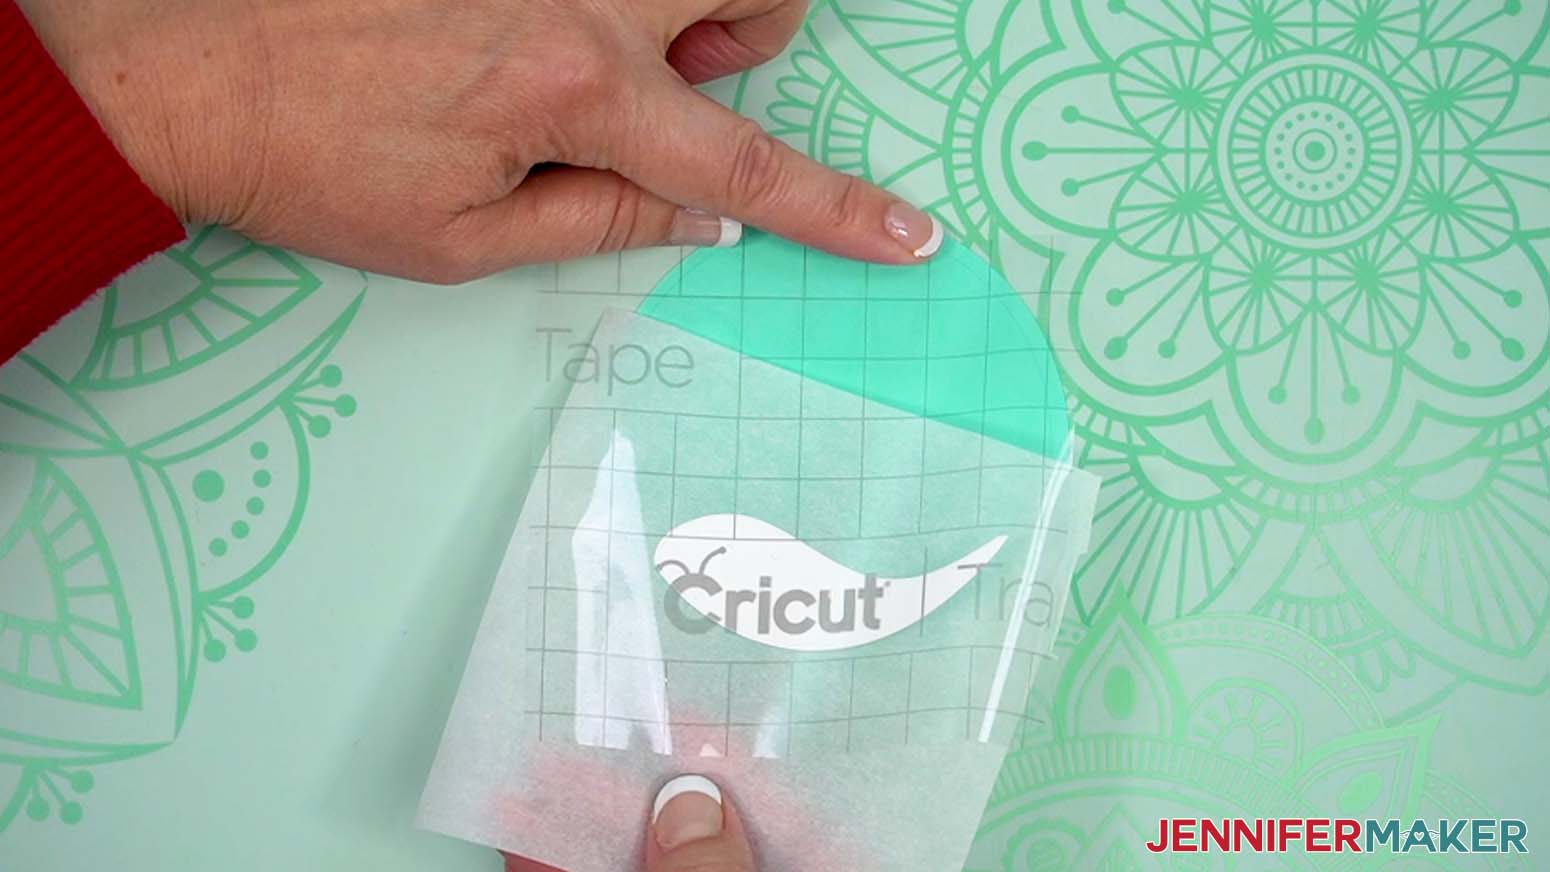
- Smooth the transfer tape over the decal from the center outward and burnish it down using the Scraper Tool.
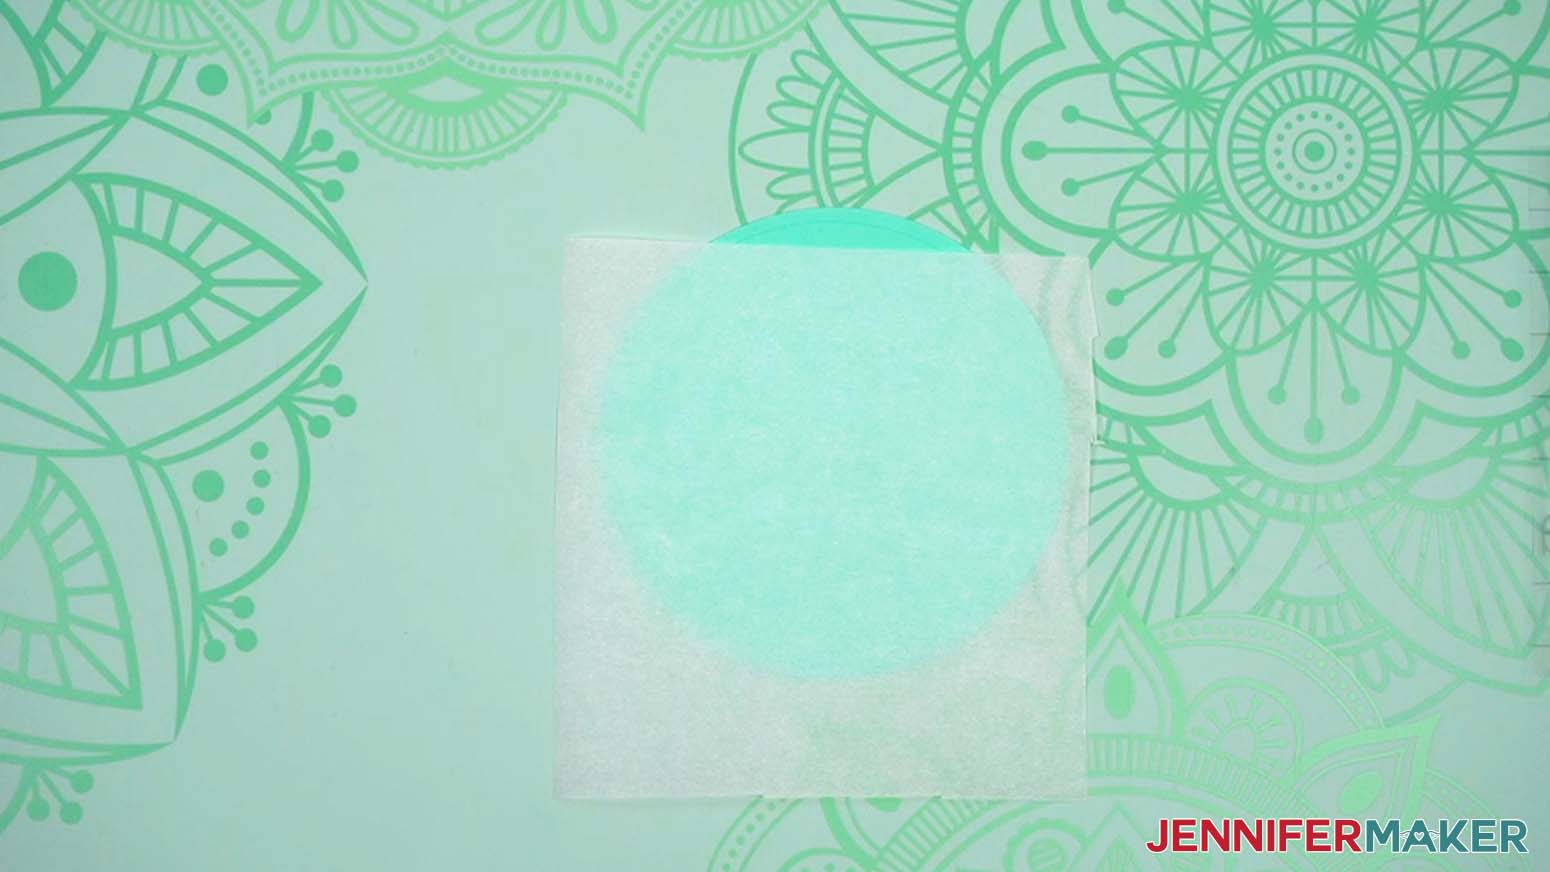
- Flip your vinyl over and burnish again, then gently peel away the backing.
- Place the parchment paper on top of the backer piece so some of the cardstock is exposed at the top.
- Gently place your first vinyl piece onto the parchment paper so the design layers align and a small area of transfer tape touches the bottom carrier sheet.
NOTE: Keeping the parchment paper in between the vinyl layers lets you position them before sticking anything together. - Adjust the top decal until the snowbank lines up with the curve of the drawn alignment ring, leaving a small area of transfer tape touching the bottom carrier sheet.
- When the layers line up, lightly press the exposed section of transfer tape onto the cardstock.
TIP: Don’t press too hard, or you’ll damage the cardstock when you lift it! - Hold the transfer tape in place with one hand, and use the other hand to lift the second layer and gently remove the parchment paper.
TIP: Continue pressing on the exposed section of transfer tape to help keep everything aligned. - Gently lower the transfer tape and vinyl layer back into place, then use your finger to burnish down only the area where the vinyl lays on the cardstock back piece.
- Peel away the transfer tape to reveal your first two combined layers!
- Prepare the same pieces of transfer tape and parchment paper to apply the snowman’s black base decal to the snowbank layer.
- Position the snowman so it’s slightly diagonal on top of the snowbank, using the drawn alignment ring to keep the vinyl elements inside the viewable area.
NOTE: For the snowman design, the snowbank is meant to line up with the curve of the drawn alignment ring. For all other designs, the vinyl elements should not be touching the alignment ring. - Repeat Steps 12-15 to apply the snowman’s base layer to the snowbank layer, then position and apply each of the remaining layers the same way.
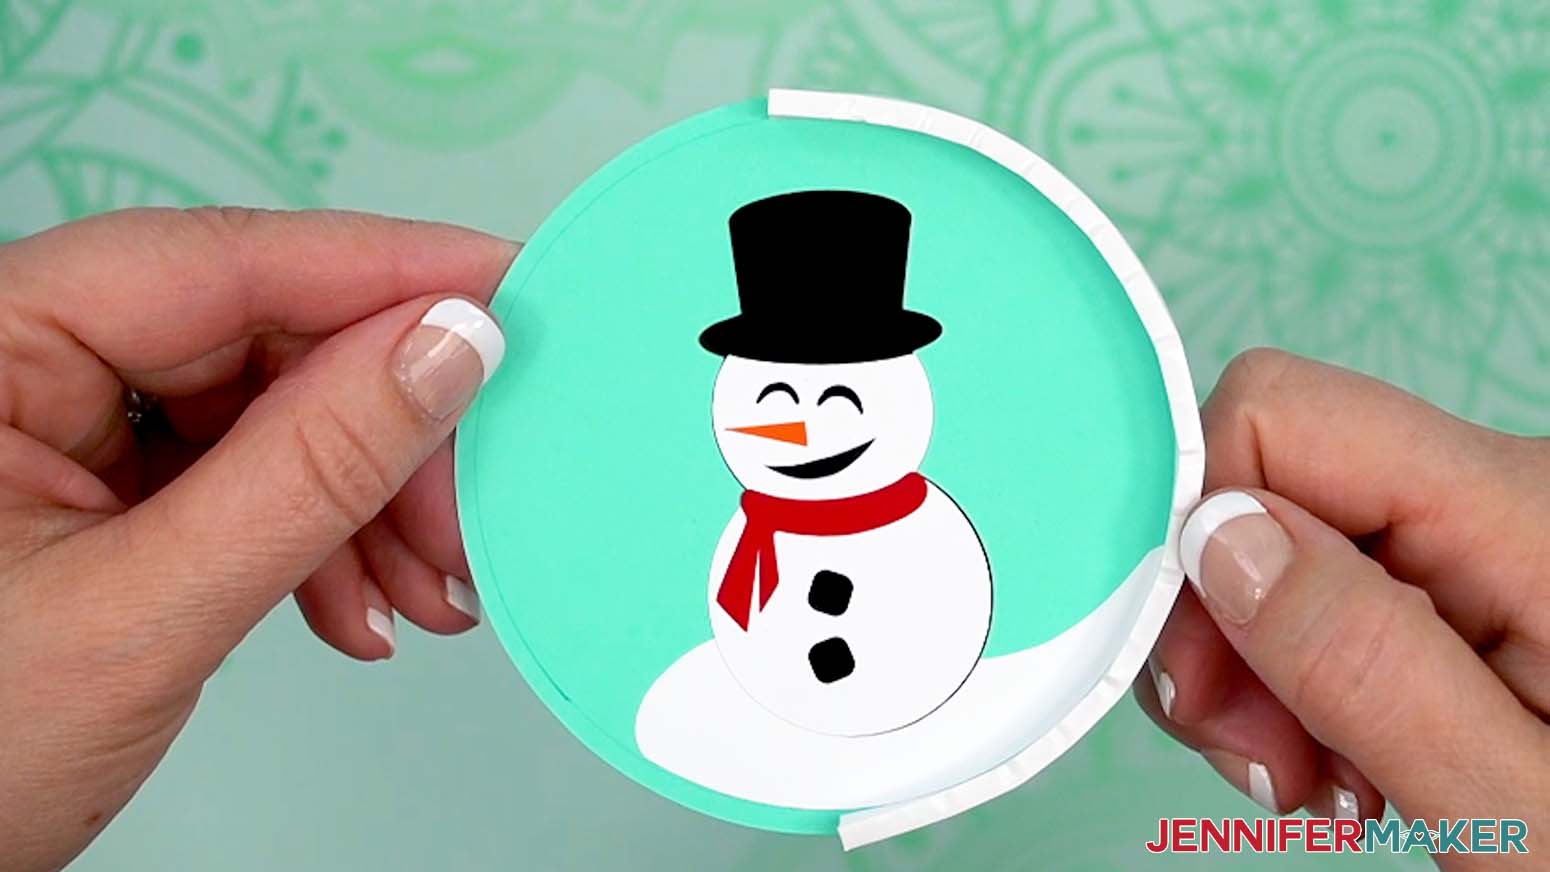
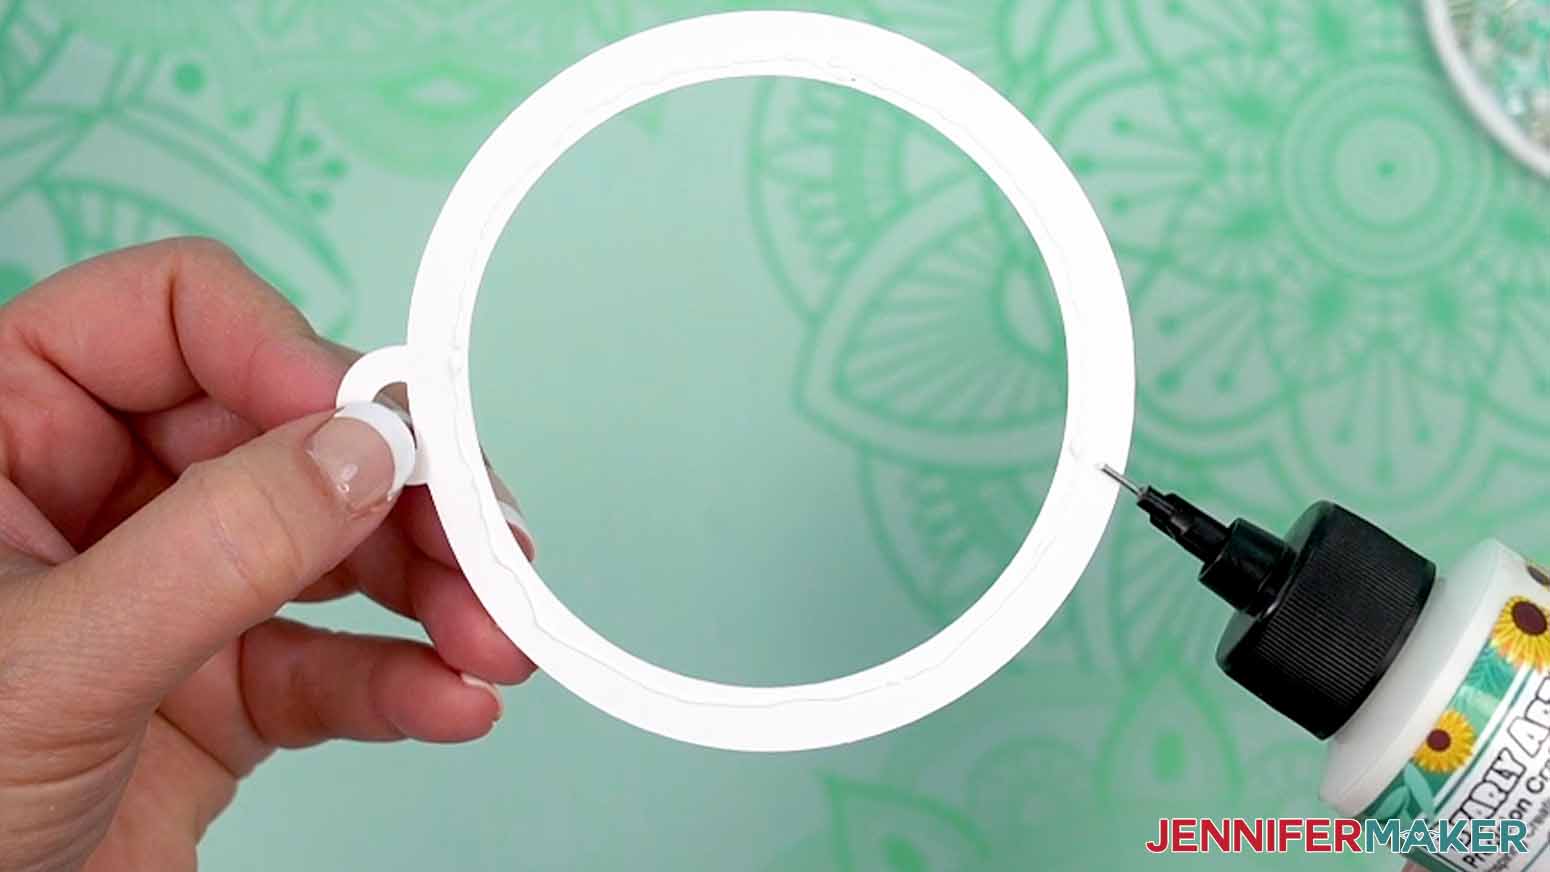
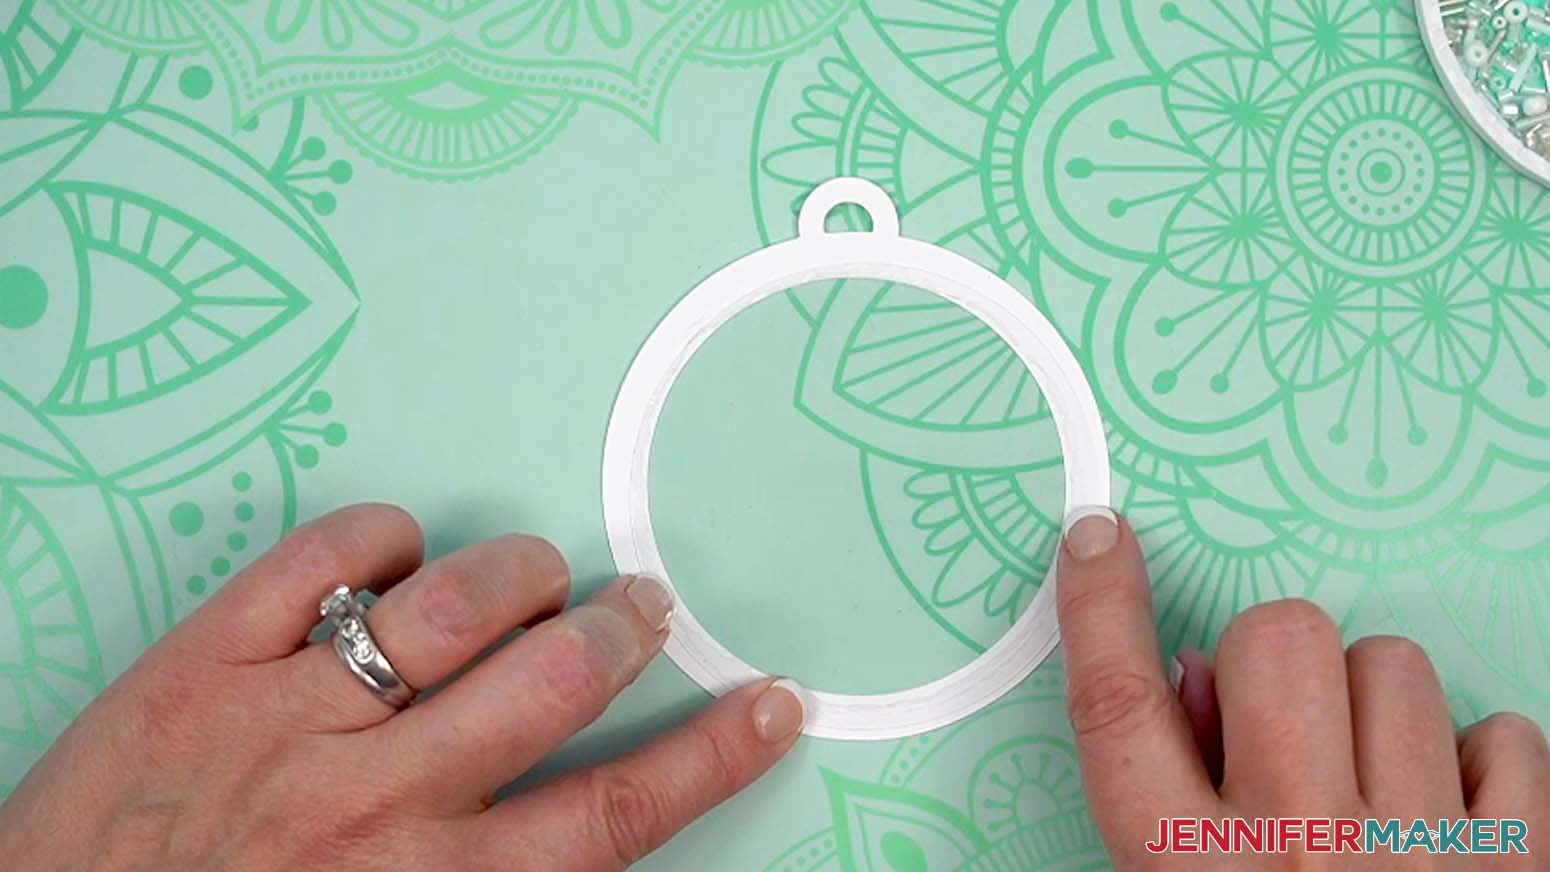
- Next, peel one strip of the ¼” adhesive foam tape from its carrier sheet and carefully adhere the sticky side flush along the edge of the cardstock background piece.
TIP: Work in small sections to make sure the adhesive sticks well and that the strip matches the curve of the cardstock shape.
NOTE: Keep the foam tape’s protective backing in place for now. - Take another strip of the ¼” adhesive foam tape, firmly attach it to one end of the adhered strip, and then adhere it flush along the rest of the cardstock piece’s edge to complete the ornament’s walls.
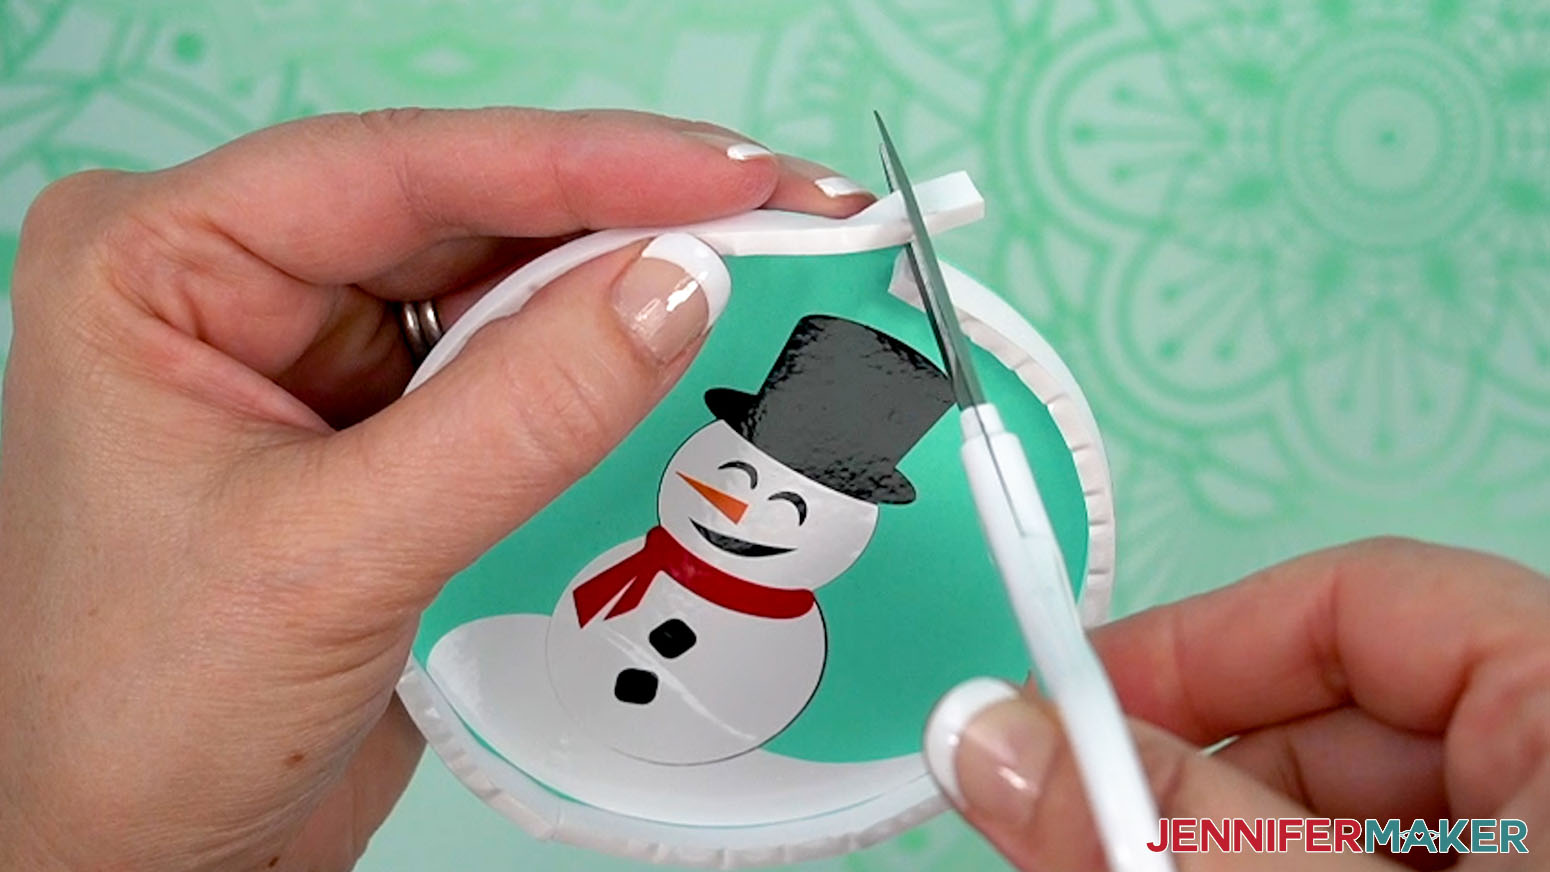
- Use scissors to trim away excess adhesive tape just past where the seam overlaps, then press the end in place.
NOTE: Cutting slightly past the overlap point allows you to seal the seam tightly. - Add the filler to the inside of your ornament. There should be enough to move around easily when shaking, but without covering too much of the background design.
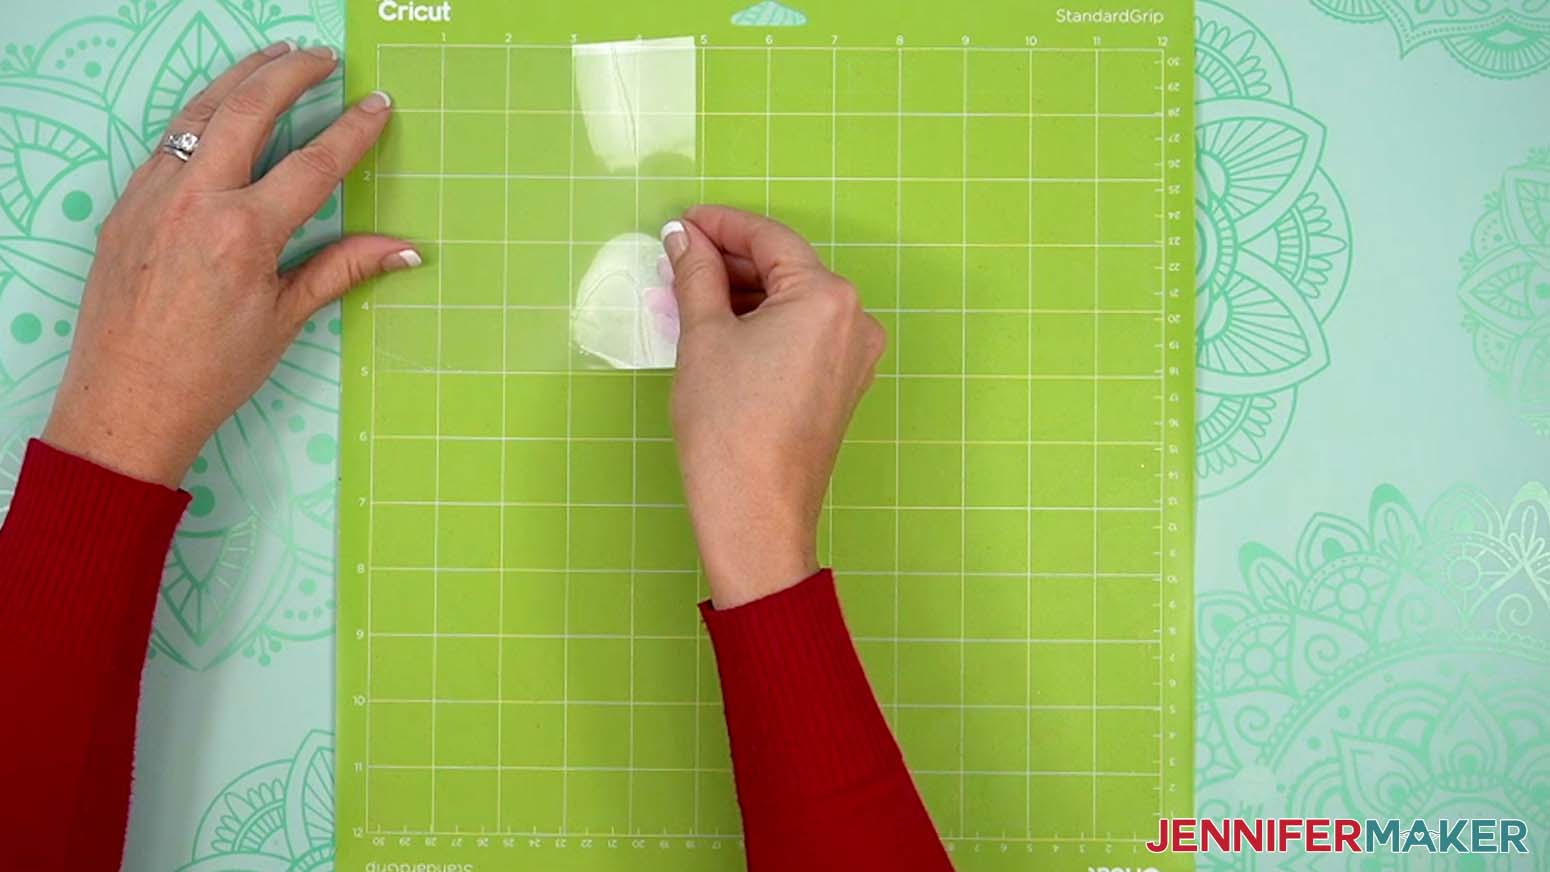
TIP: If your filler has a lot of static preventing it from moving around freely, wrap the pieces in a dryer sheet and rub them gently to remove the static before adding the filler to your ornament. - Peel the protective film from the top side of the acetate piece.
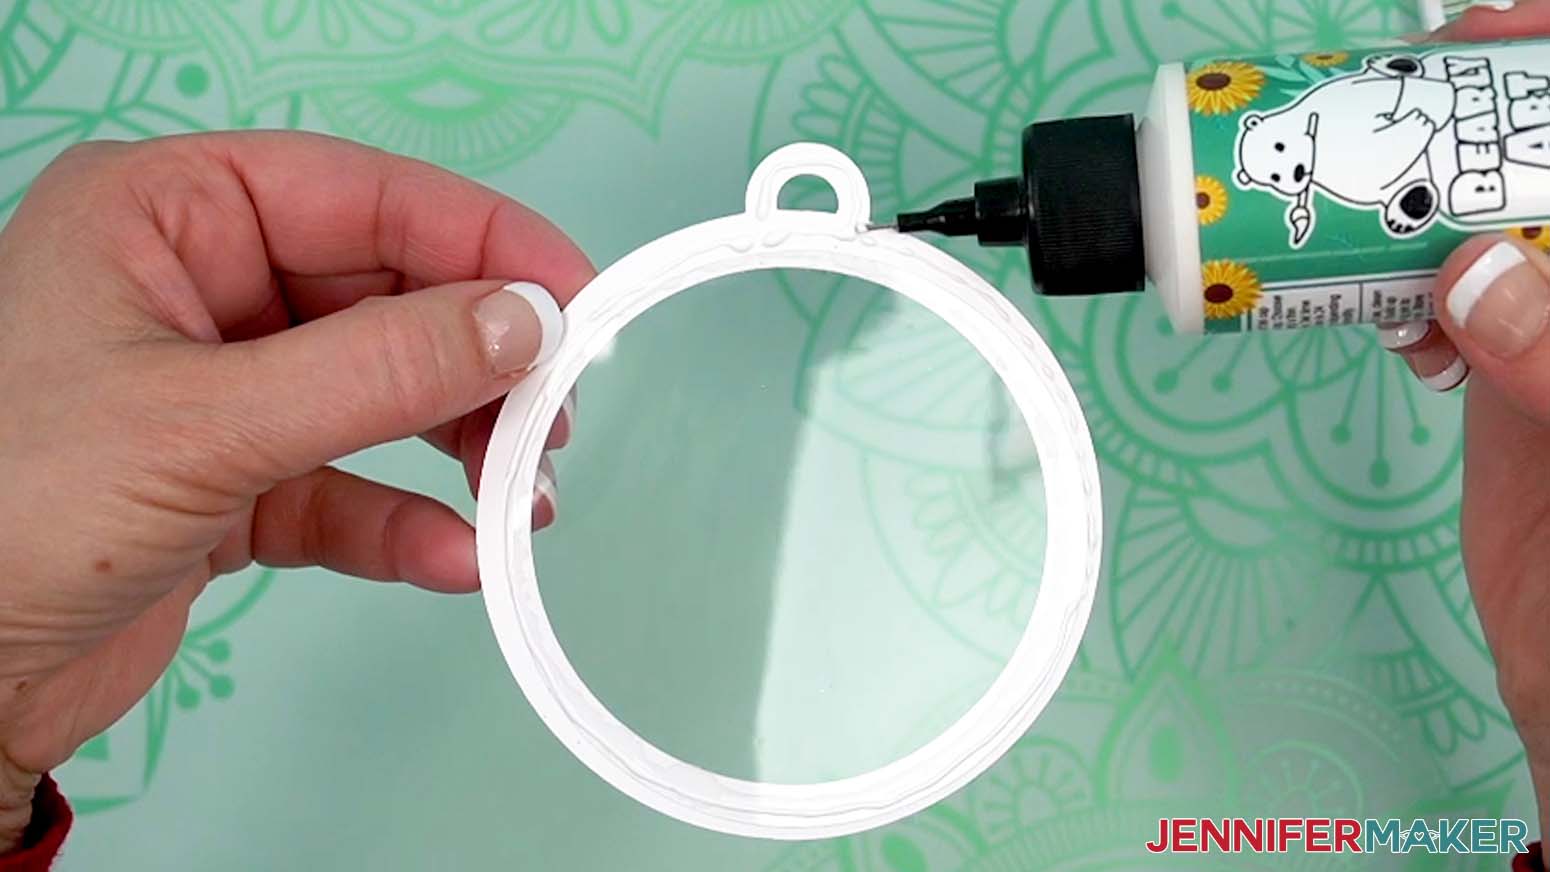
TIP: Use a weeding tool to help remove the film if needed. - Lay the top cardstock backer piece on your work surface, and add a thin line of craft glue around its inside edge.
- Center the acetate piece on the top backer piece, then press the acetate to adhere it to the backer.
- Wipe away any excess glue using your finger or a paper towel, then allow the glue to set.
- Add a thin line of craft glue around the outside edge of the acetate on the backer piece, including on the hanging loop.
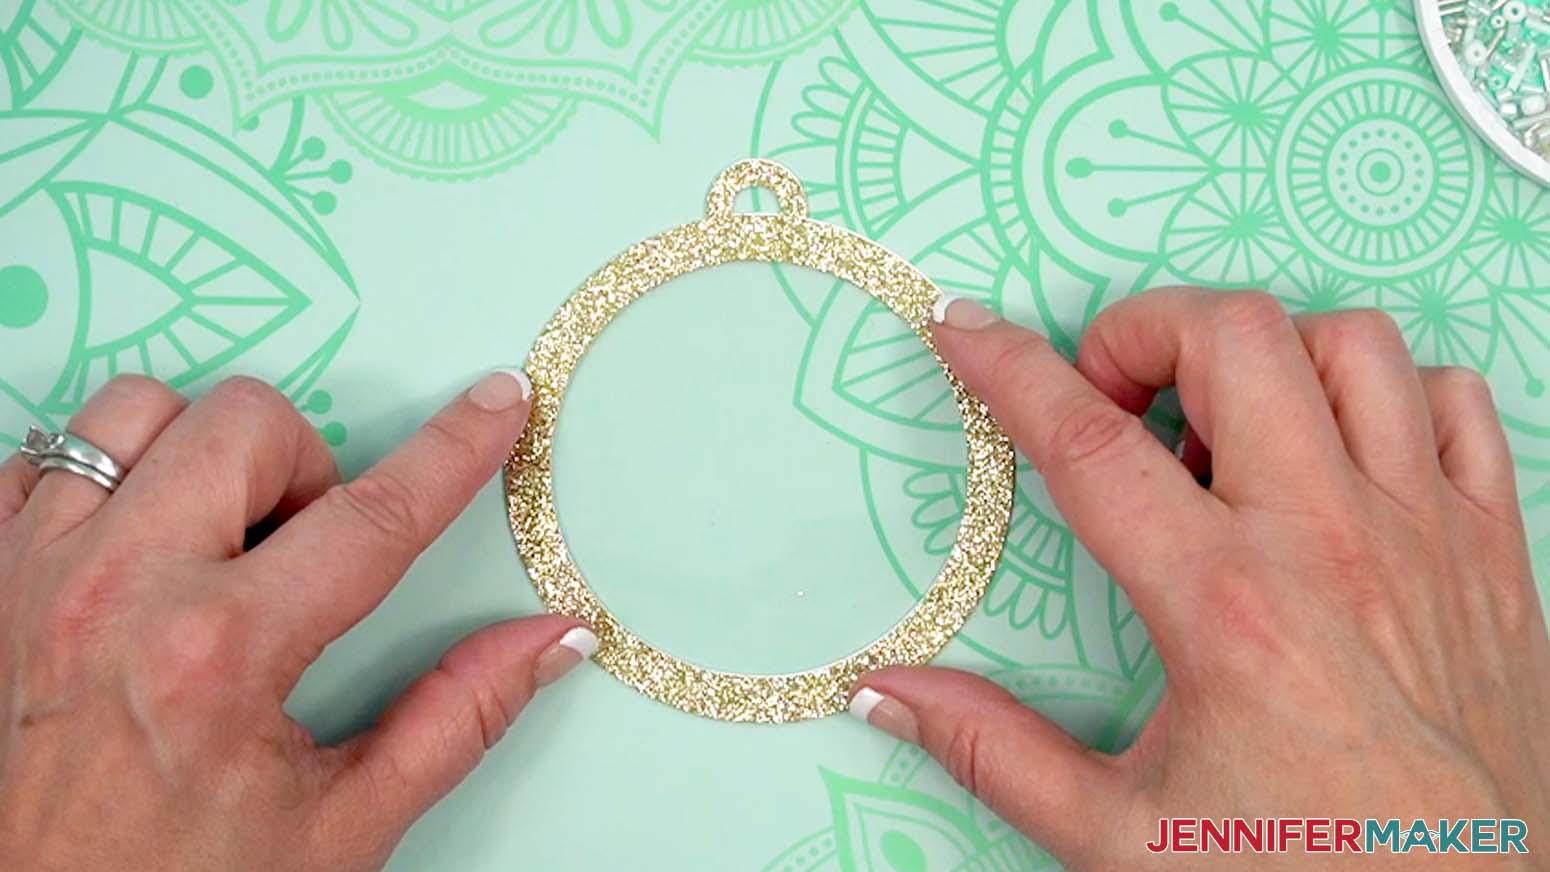
- Keeping the hanging loops aligned, center the glitter cardstock top piece on top of the acetate and the backer piece.
- Press to adhere the pieces together, and then wipe away excess glue.
- Peel the protective backing from the top of the adhesive strip forming the ornament’s walls.
- Center the assembled top piece on the adhesive strip, with the hanging loop where you want the top of the ornament to be.
NOTE: Make sure the adhesive foam strip is flush with the top piece’s edges. Push the sides in, if needed, to keep the rounded shape. - Press firmly around the ornament’s edge (not the center) to seal the top piece in place.
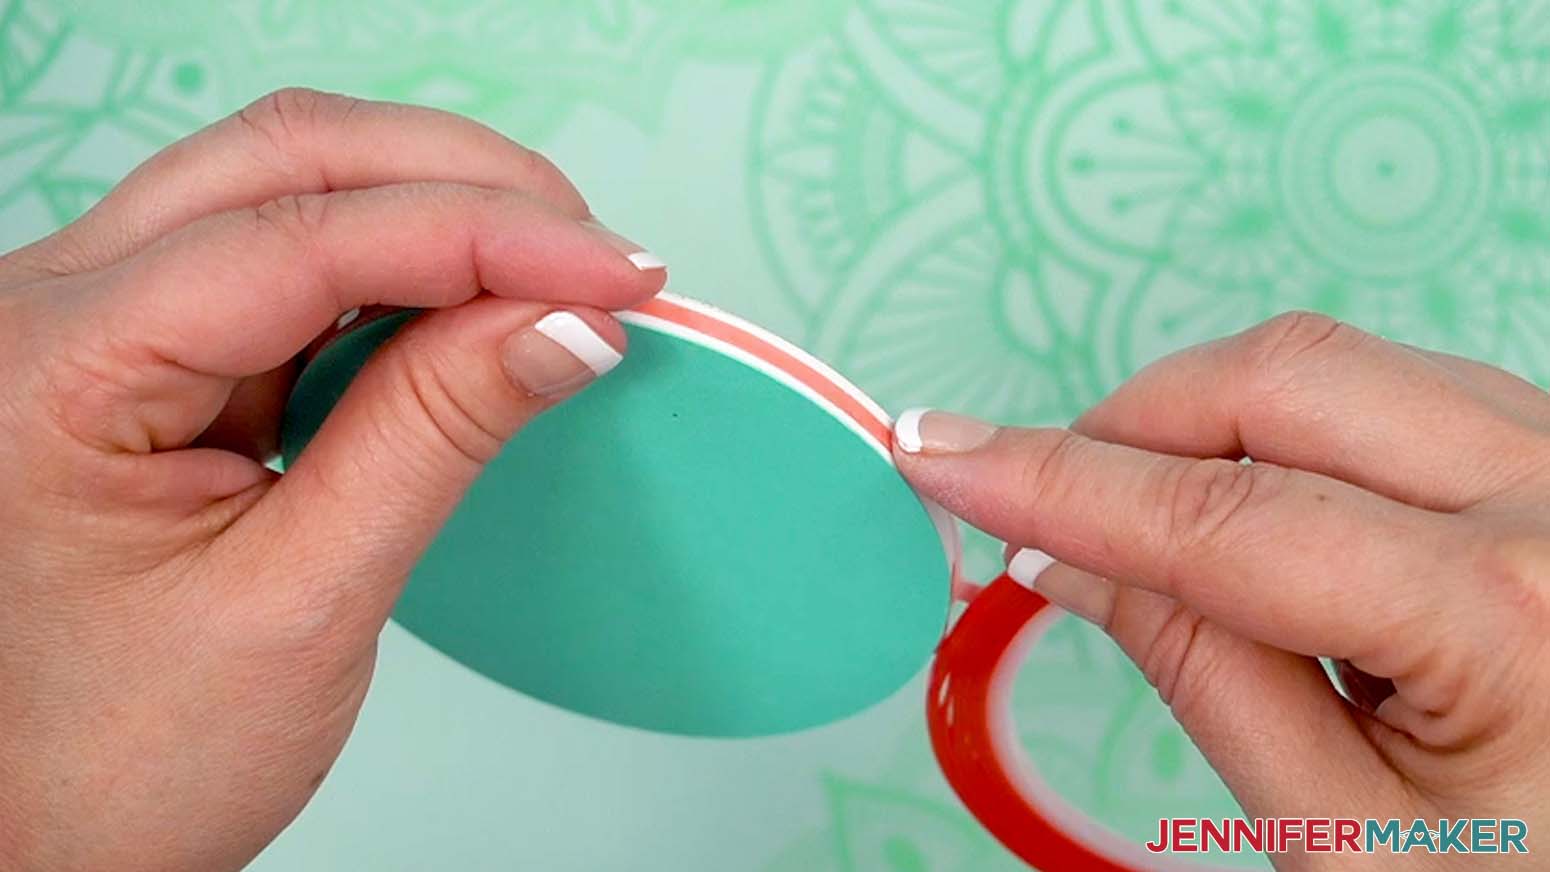
NOTE: Pressing in the center instead of the outside edge can cause the ornament to collapse. - To finish the ornament, cut a 13” length of the ¼” finishing ribbon.
- Apply the ⅛” double-sided tape all around the ornament’s outer walls.
NOTE: I like to leave the tape on its roll as I apply it to the walls for better control, and then cut at the end. - Peel the backing from the exposed side of the ⅛” tape.
TIP: A weeding tool can help lift the backing. - Press the finishing ribbon in place around the ornament’s walls, and trim away any excess ribbon overlapping at the seam.
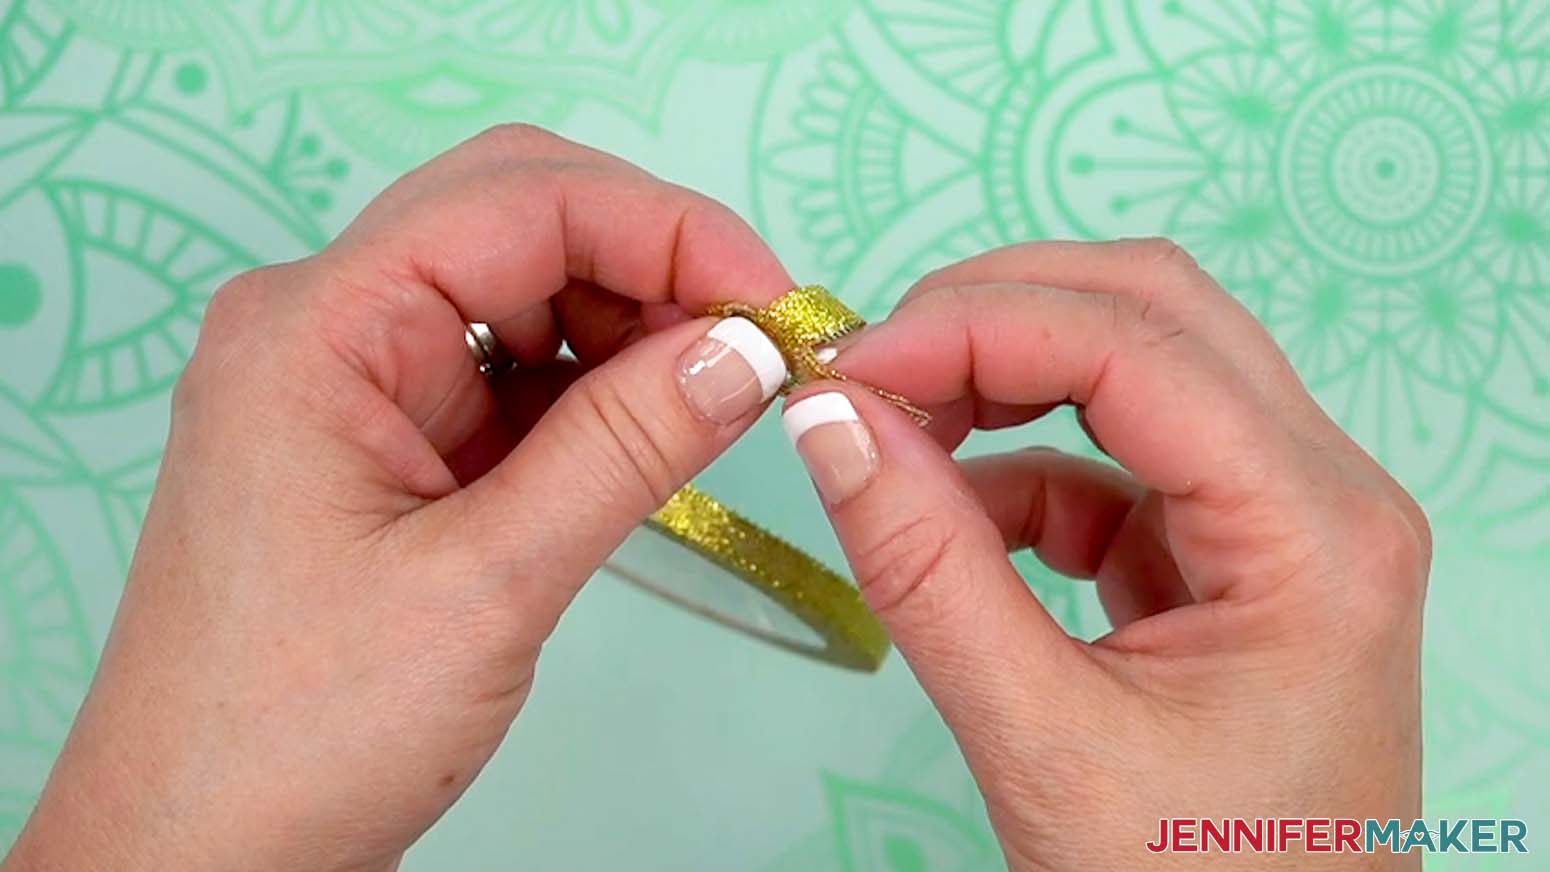
- Cut another 13” length of the finishing ribbon and slide it through the ornament’s hanging loop.
- Tie the ribbon into a knot at the ends, and then trim the ribbon’s ends on the same angle so they’re neat and free of frayed threads.


STEP 4: SHOW IT OFF
You now have a fun and festive Shaker Ornament perfect for hanging in your home or gifting to a loved one!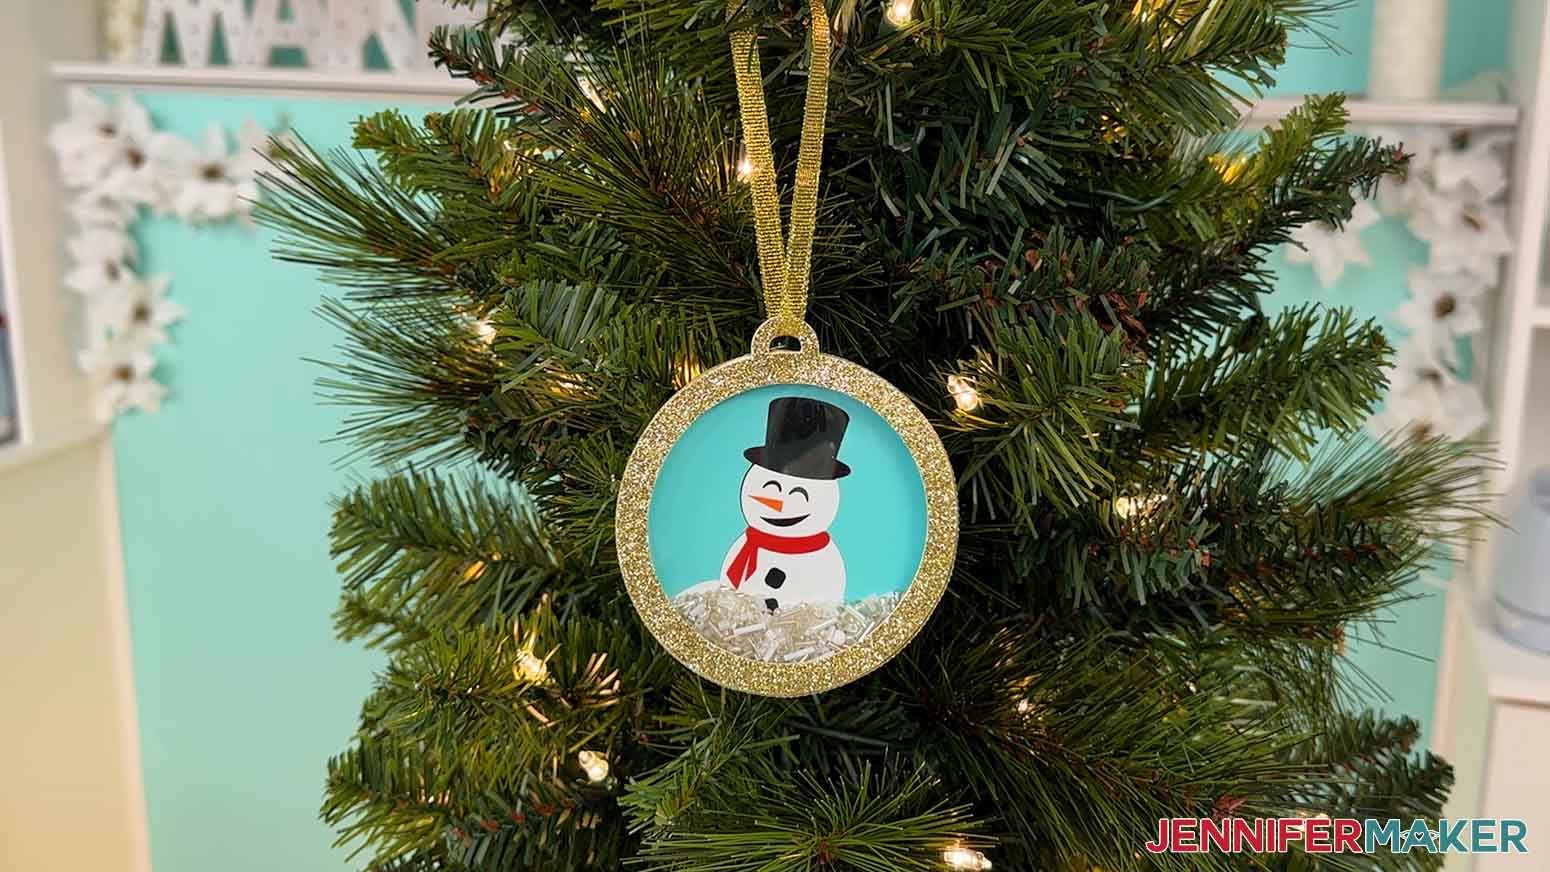
Notes
Finished Size: 3.8” W x 4.21” H x ¼” D
Fonts Used: Biosha Script, Free Alternative: Bonspire Script
Answers to Your Questions About How to Make Shaker Ornaments
Q: I want to customize the design for my shaker ornament, how can I do that?
A: You can learn how to design your own customized shaker ornament in my ADVANCE program. Learn more about ADVANCE here!
Q: Can I cut these shaker ornaments on a Cricut Joy Xtra or original Cricut Joy?
A: Yes! My free Shaker Ornament SVG designs are the perfect size for cutting on a Cricut Joy Xtra or the original Cricut Joy! No need to worry about taking your own measurements or creating your own shapes to work with the Joy–I’ve done all that for you already!
Q: What fonts did you use?
A: I used Biosha Script, but a free alternative is Bonspire Script.
Q: Do I have to use a Cricut to cut my shaker ornaments?
A: No! You can make a shaker ornament with materials that work with your equipment, or even just with scissors. We always include several versions of each free file in the free download ZIP file. If you have a Silhouette Cameo, which uses Silhouette Studio, you can use the DXF file in Silhouette Basic Edition. If you have upgraded to Silhouette Designer Edition, Designer Edition Plus, or Business, you can use the SVG format with your Silhouette machine to cut each intricate design. If you don’t have a cutting machine, you can print and then cut out my digital download PDF files, too! The ZIP archive in my resource library includes these file types and more!
Q: Help! My Cricut Design Space screen looks different from yours!
A: If you’re using the latest version of Cricut Design Space, your screen may have slight variations than the screen you see on the video tutorial. Good news: All of the same functions are there, they may just be in different spots or have new icons. Pause the video if you need, or follow along with the written tutorial. If you get stuck, ask for expert support in our Facebook group. Our group has become not just a help center, but also a vibrant community of real people and crafters! Plus, you can catch the latest news on JenniferMaker tutorials and more.
Q: Where can I find the supplies and tools to make my own shaker ornament?
A: My Shaker Ornament SVG files can be made with simple supplies you may already have in your crafting stash. I like to shop on Amazon for their free standard shipping with my Amazon Prime membership (just make sure to look for sellers with 5-star reviews and review each product page carefully to ensure that you receive high quality products). You can also find most, if not all of the supplies and tools at your local craft store.
Q: How long will it take my supplies to arrive if I have to order them?
A: Shipping time varies based on several factors, such as the availability of your item, where you live or where the manufacturer ships from, and any additional shipping options provided by the seller, but in general, if you order your supplies from a location within the United States you can generally expect a delivery date within a few days of the purchase date. There are always a few exceptions, especially around the busy holiday season, so make sure to order your supplies early!
Q: Help! How do I keep my ornament’s confetti pieces from sticking together?
A: If your confetti pieces keep sticking together, they’re likely made from a material that is prone to static. Here’s my trick: rubbing them with an anti-static dryer sheet!
Q: Can I give my shaker ornament as a gift?
A: I think these ornaments would make wonderful gifts! If you like, you could even write a personal message on the back of the ornament, or include it as an extra treat along with a gift card.
Q: Can I make and sell these shaker ornaments?
A: I love supporting creative entrepreneurs! If you want to use my designs and projects for commercial use, please familiarize yourself with my important licensing information before selling your crafts.
I do not permit sale of my digital items, but you can sell the creative goods you make with them — as long as you follow my licensing requirements. That means you cannot sell the shaker ornament SVG files, but you can sell shaker ornaments that you made with the files on platforms like Etsy.
Get my free SVG/DXF/PDF files to make shaker ornaments!
(If you do not see the signup form above, click here.)
I love seeing what you make with my designs and how you use them! Please share a photo of your shaker ornaments in our Facebook group or tag me on social media with #jennifermaker.
Love,

Want to remember this? Save this Shaker Ornaments Tutorial to your favorite Pinterest Board!