
How to make a no-sew face mask from a T-shirt or even woven cotton! This super easy pattern lets you make a well-fitting mask without sewing!
When I created my DIY face mask patterns (Design #209), thousands and thousands of you made one or many masks, especially after the CDC recommended we all wear a cloth face covering … but even more of you told me you couldn’t make it because you couldn’t sew. I listened. Then I set out to create an easy-to-make no-sew face mask pattern that was also EFFECTIVE, which to me means at least two layers of cotton and really well-fitting. It took a few tries to get it perfected, but I’m happy to now give you a beautiful and simple no-sew face mask pattern that you can make from materials you have at home … no elastic, no ties, no sewing.
Watch me make these easy no-sew face masks:
Fast & Easy 3-minute video:
Detailed “extended edition” video with Q&A session:
My no-sew face mask patterns have several awesome and important features:
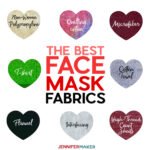
- Can be made from an old T-shirt (knit cotton) or from quilting cotton fabric (woven cotton) – click here for more fabric ideas!
- Requires no elastic or ties
- Has two layers, per the CDC’s recommendation
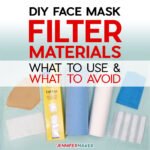
- Can accommodate a filter, if so desired
- Fits really well when you make the right size for your head (there are six sizes!)
- Can be cut on a Cricut or by hand
- Super easy to make!
There are two tricks to this no-sew mask’s awesome fit:
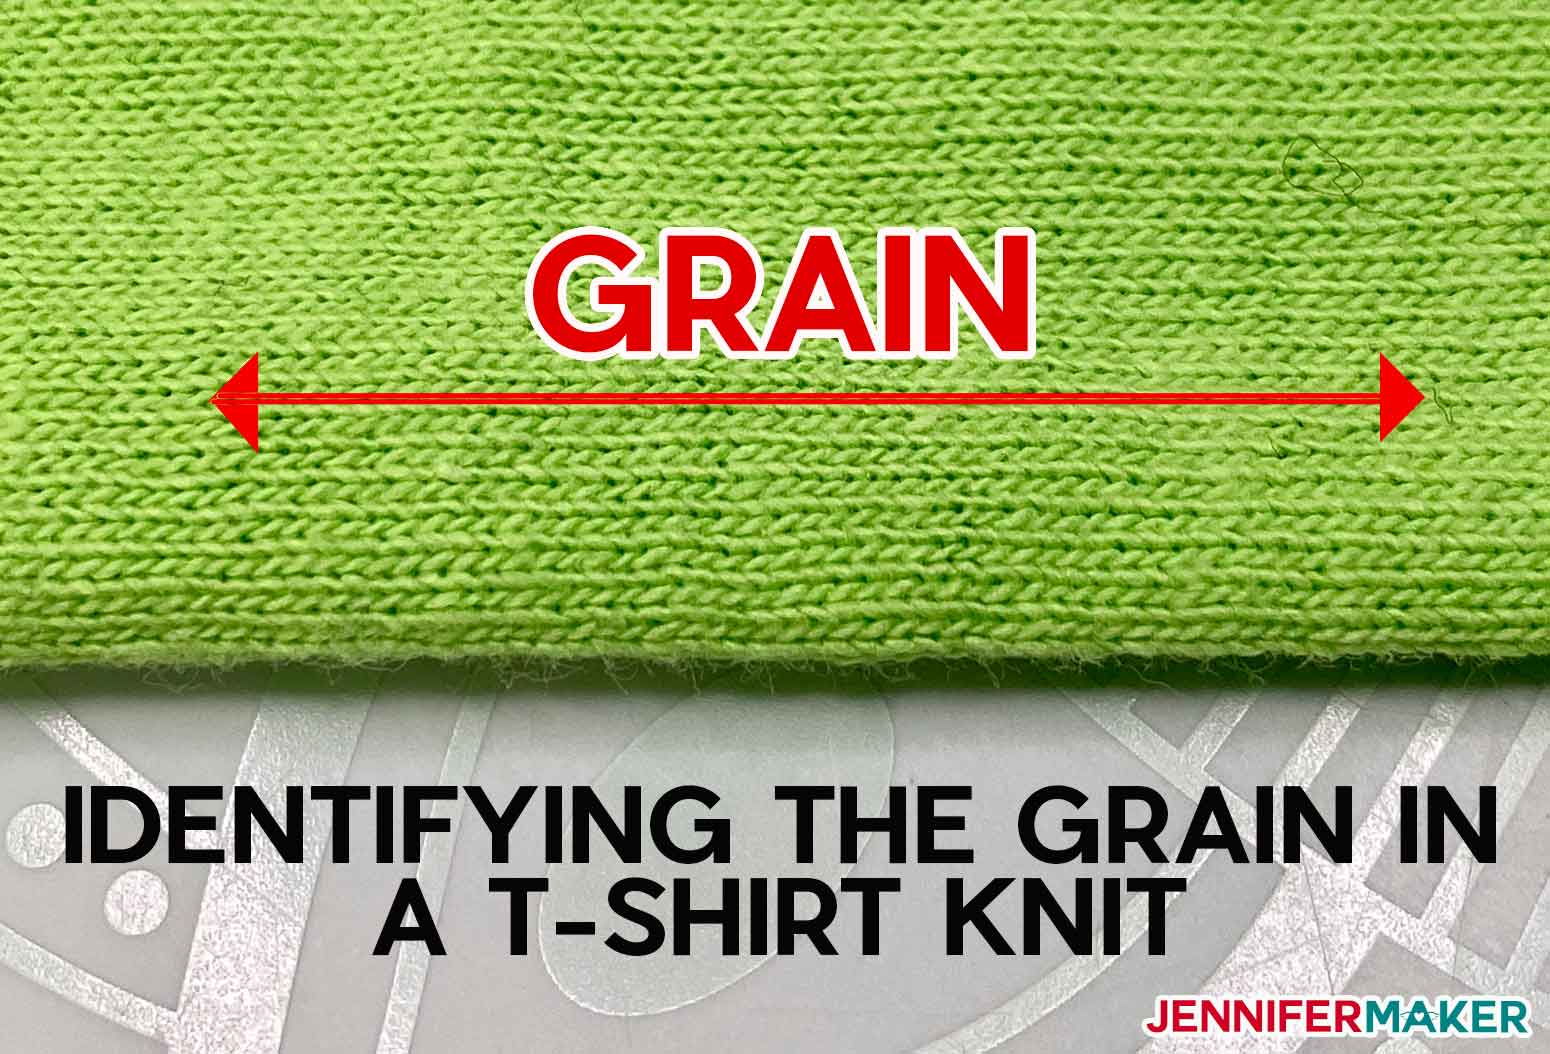
- We’re using stretchy material (like a knit T-shirt, or a woven material cut on the bias so it stretches — I explain “bias” later in this tutorial).
- We’re twisting the ear loops once before putting them over our ears to get a better fit.
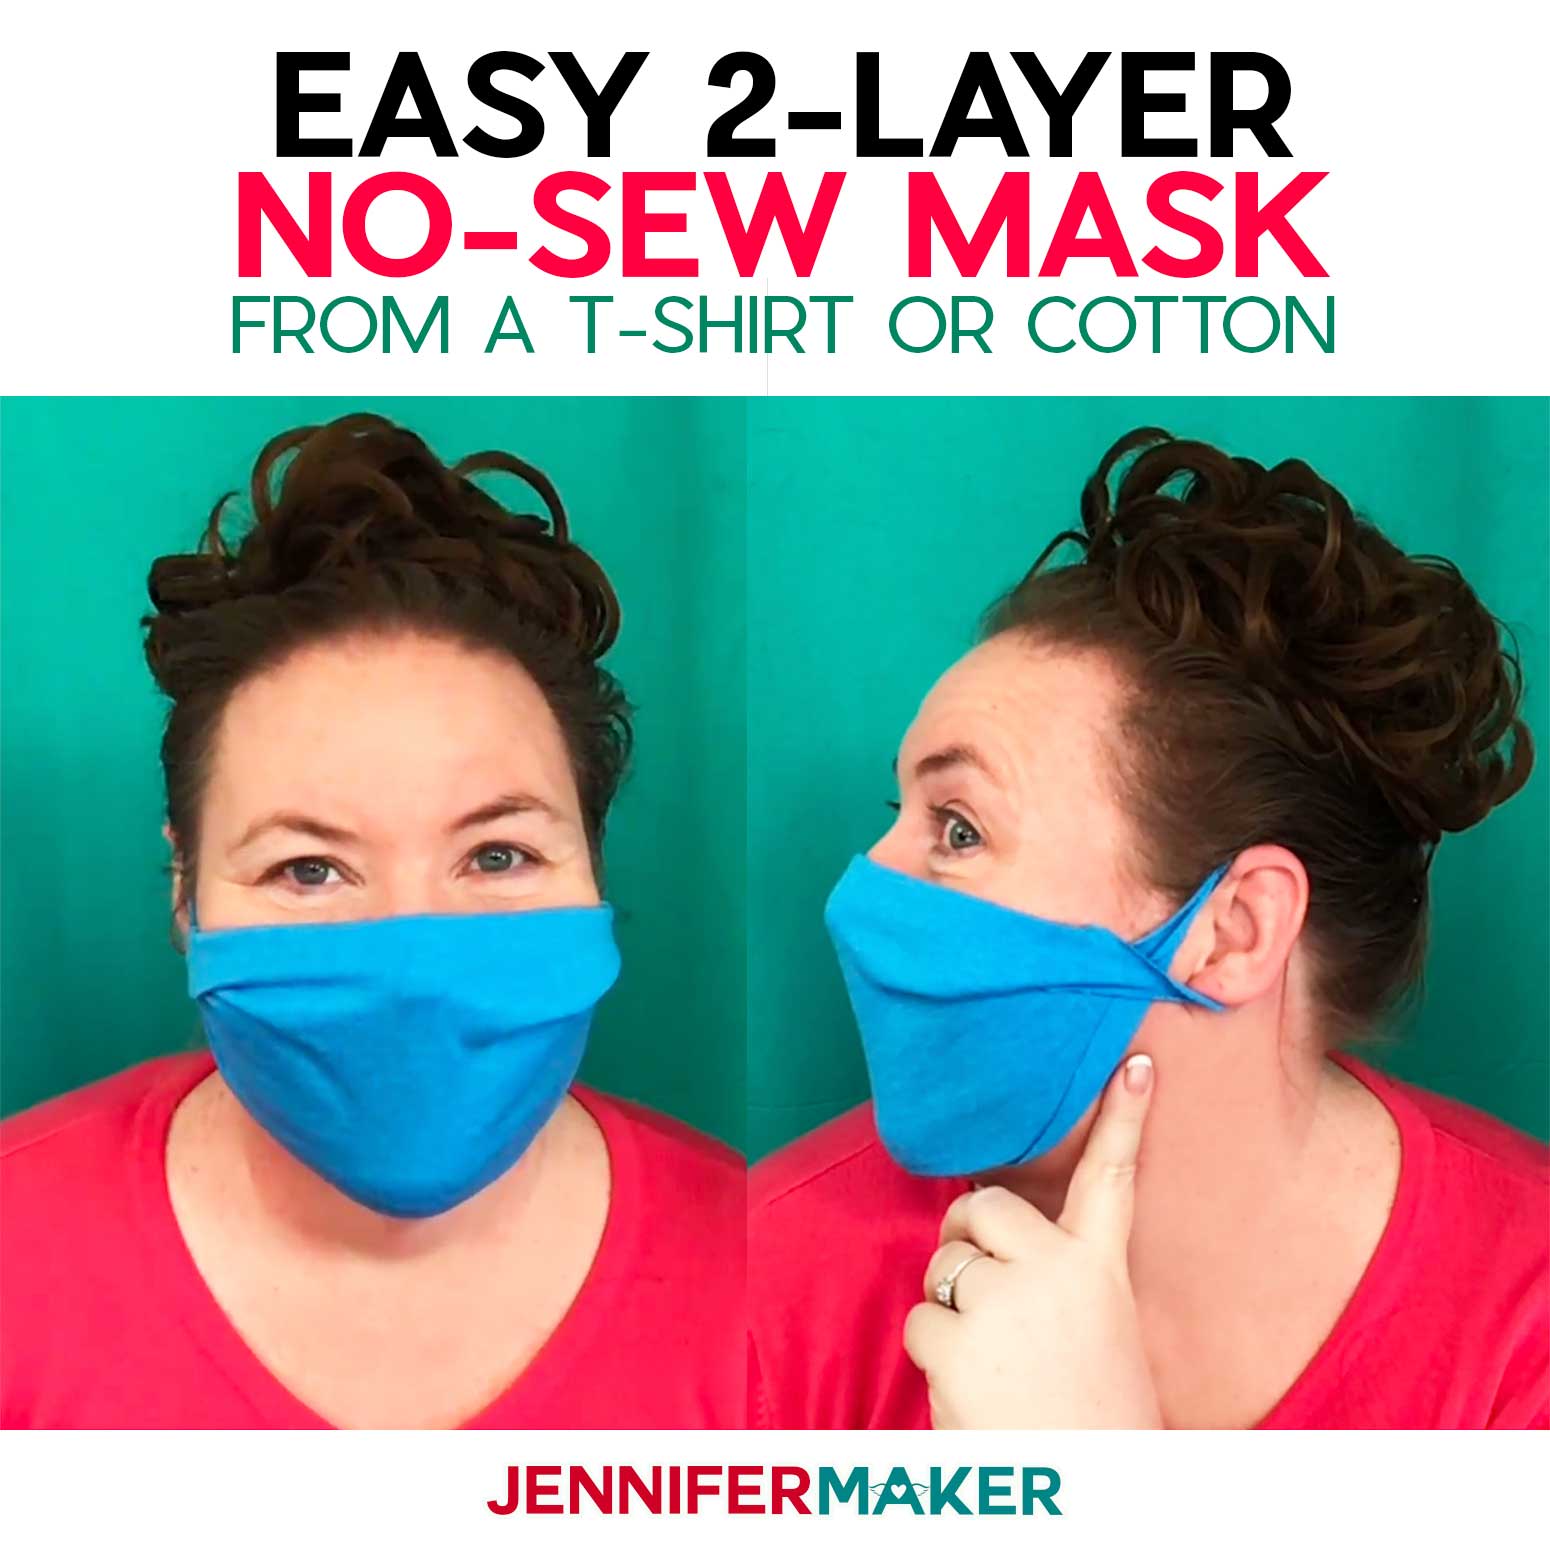
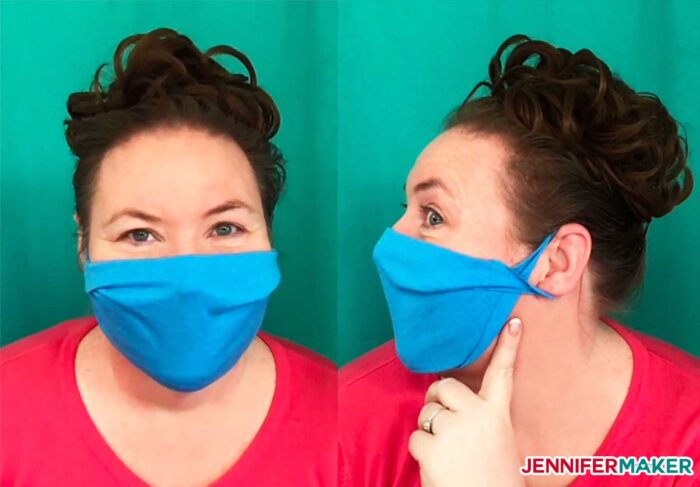
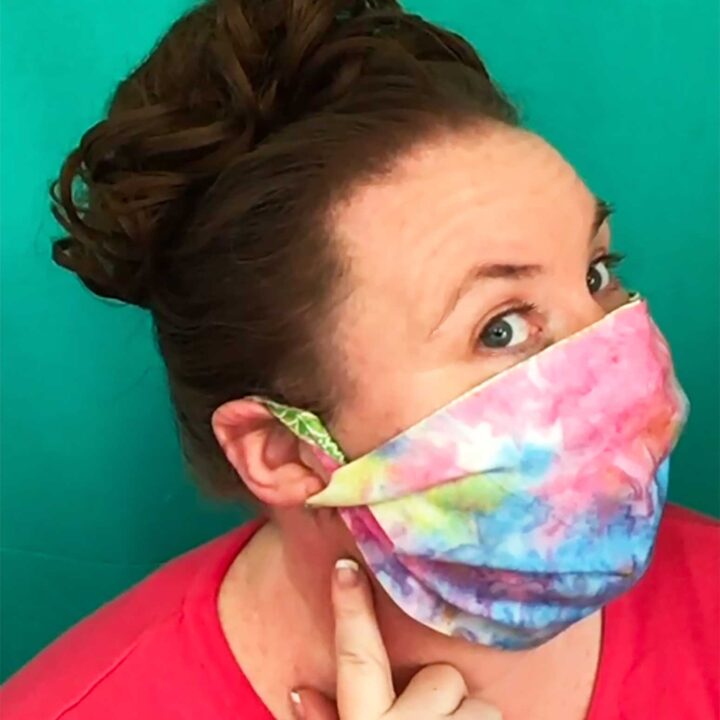
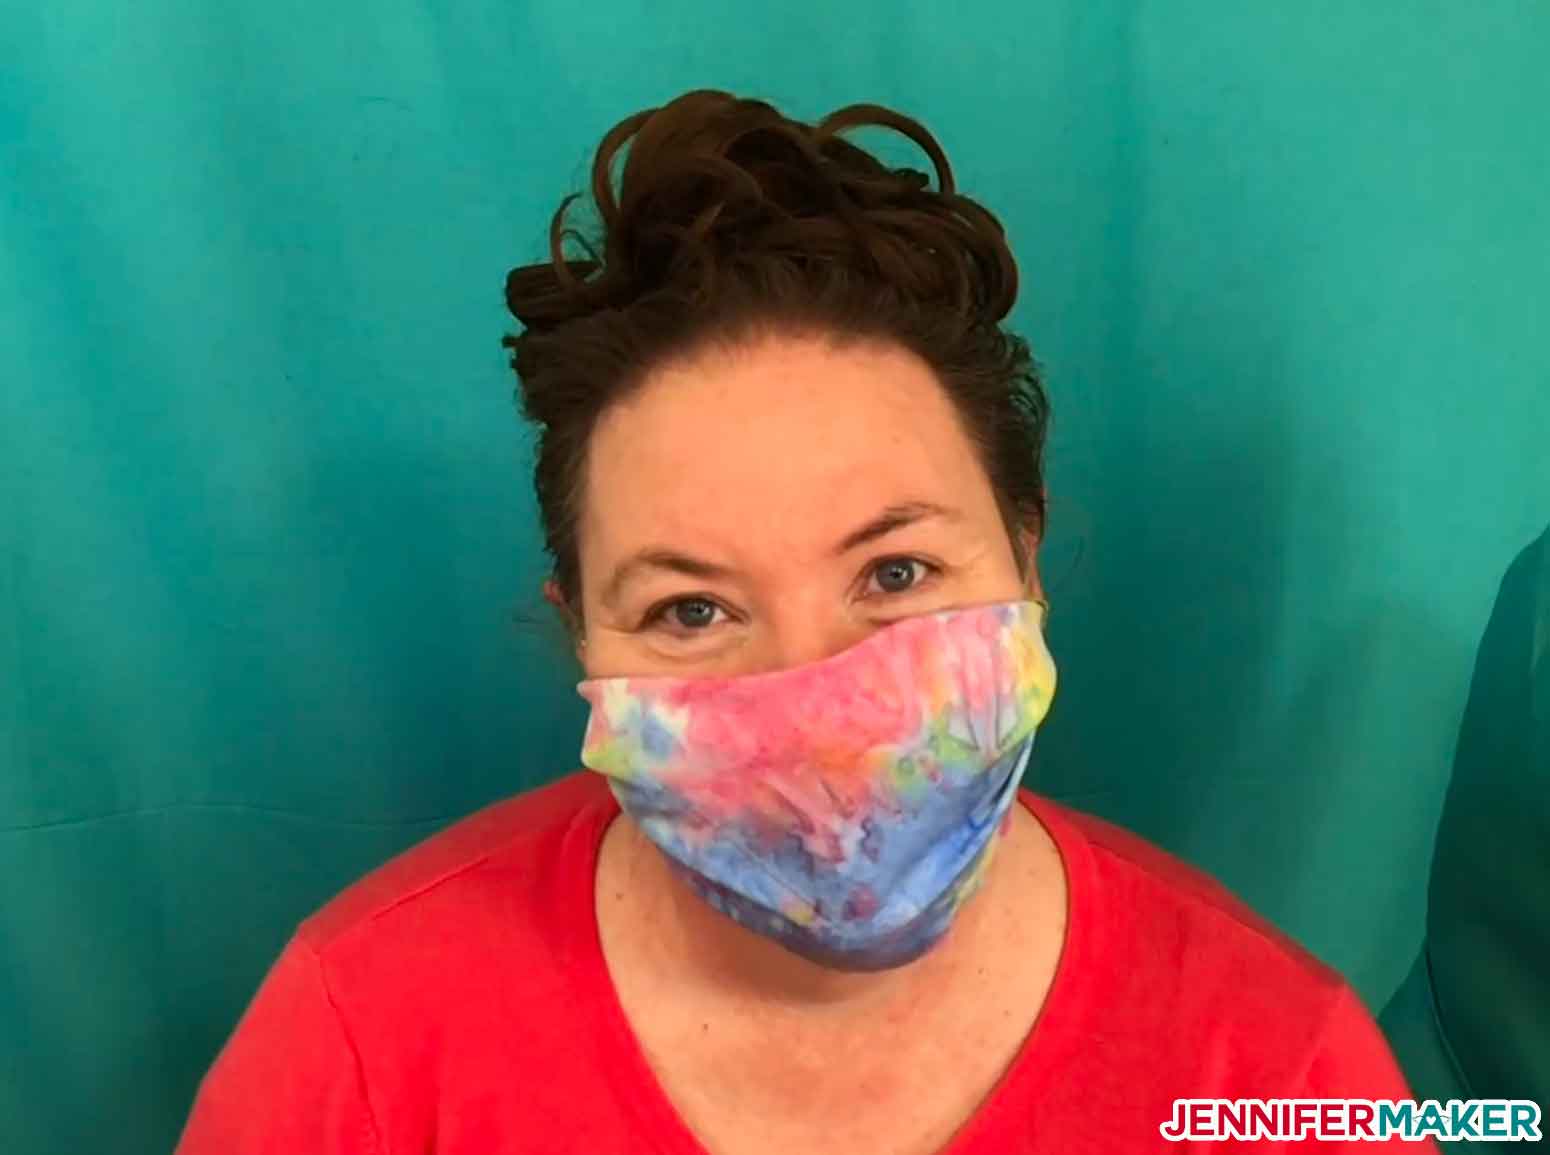
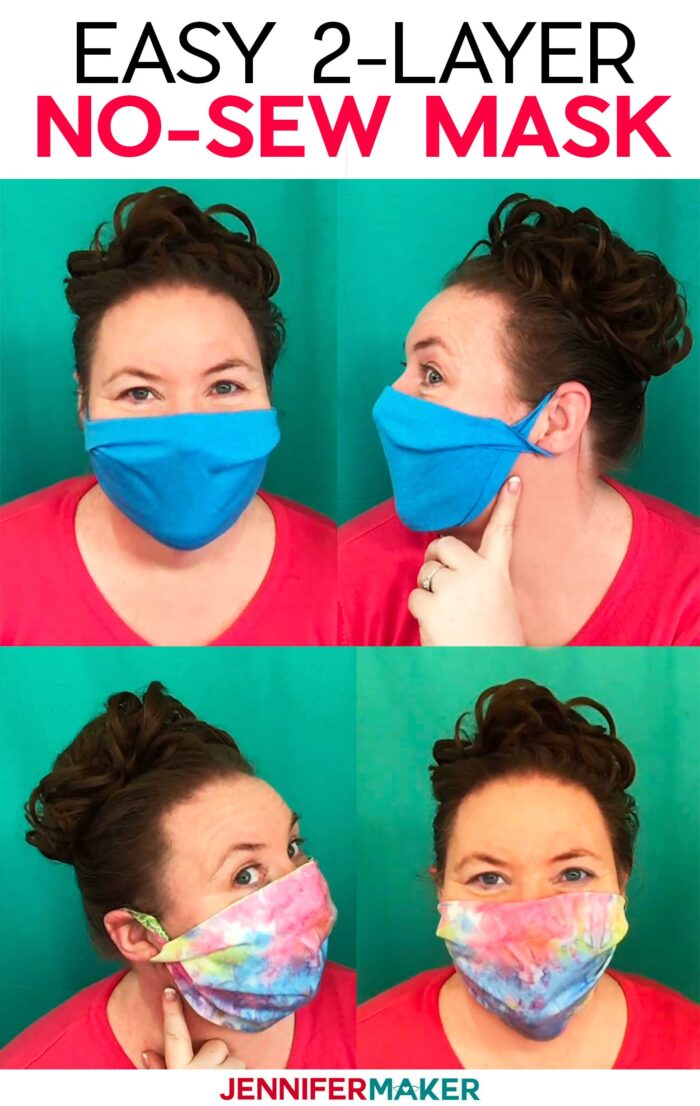
Here are photos of me in an adult medium size no-sew face mask made from a T-shirt:
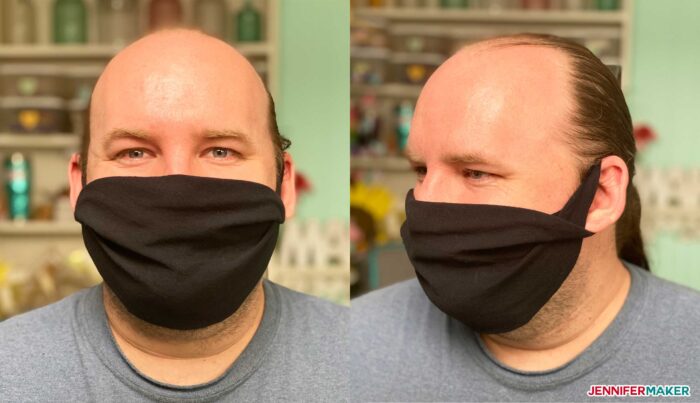
Here is Greg in a no-sew face mask made from a heavyweight black T-shirt in the adult large size (Greg’s a big guy – 6’3″ – and he has a beard):
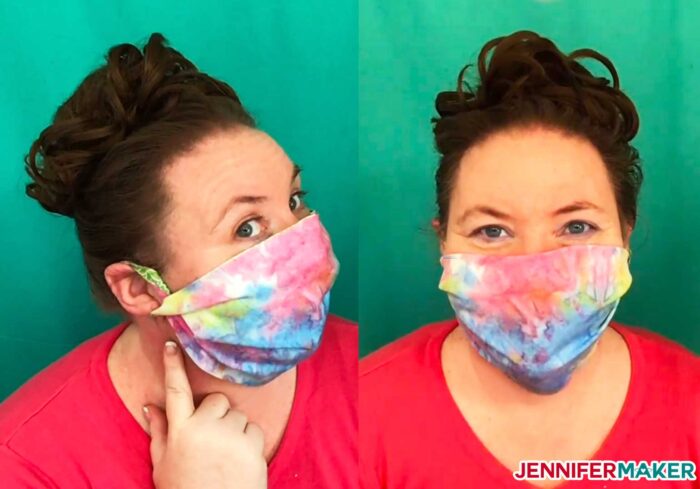
And here’s me in an adult large no-sew face mask made from two layers of 100% woven cotton (like quilting cotton). Note that this is a size adult large, as you’ll want to go up a size if you use cotton like this since it’s not as stretchy:
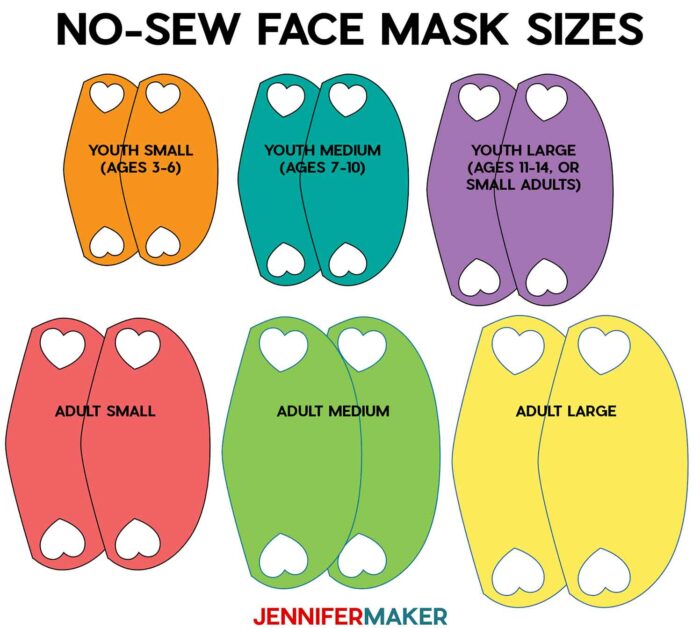
Fit is an important part of a no-sew face mask’s effectiveness, and the CDC recommends that your face mask fit snugly and comfortably against the side of your face which this design does. And my no-sew face mask pattern comes in six sizes — three youth sizes and three adult sizes.
Note: The CDC advises that children under the age of 2 should not wear a face mask.
Which Size Face Mask Should I Make?
You may need to cut a couple of different sizes until you find the right fit. To help you hone in on the right size, you can measure your head from ear to ear with a measuring tape to get a general sense of where you should start with this list:
- 8.5″-9″ – Youth Small (Knit T-Shirt) or Youth Medium (Woven Cotton)
- 9.5″-10″ – Youth Medium (Knit T-Shirt) or Youth Large (Woven Cotton)
- 10.5″-11″ – Youth Large (Knit T-Shirt) or Adult Small (Woven Cotton)
- 11.5″-12″ – Adult Small (Knit T-Shirt) or Adult Medium (Woven Cotton)
- 12.5″-13″ – Adult Medium (Knit T-Shirt) or Adult Large (Woven Cotton)
- 13.5″-14″ – Adult Large (Knit T-Shirt) or Adult Extra Large (Woven Cotton)
- 14.5″-15″ – Adult Extra Large (Knit T-Shirt) or increase the folded pattern by 1/2″ in height or increase the SVG pattern by 1″ in height (woven cotton)
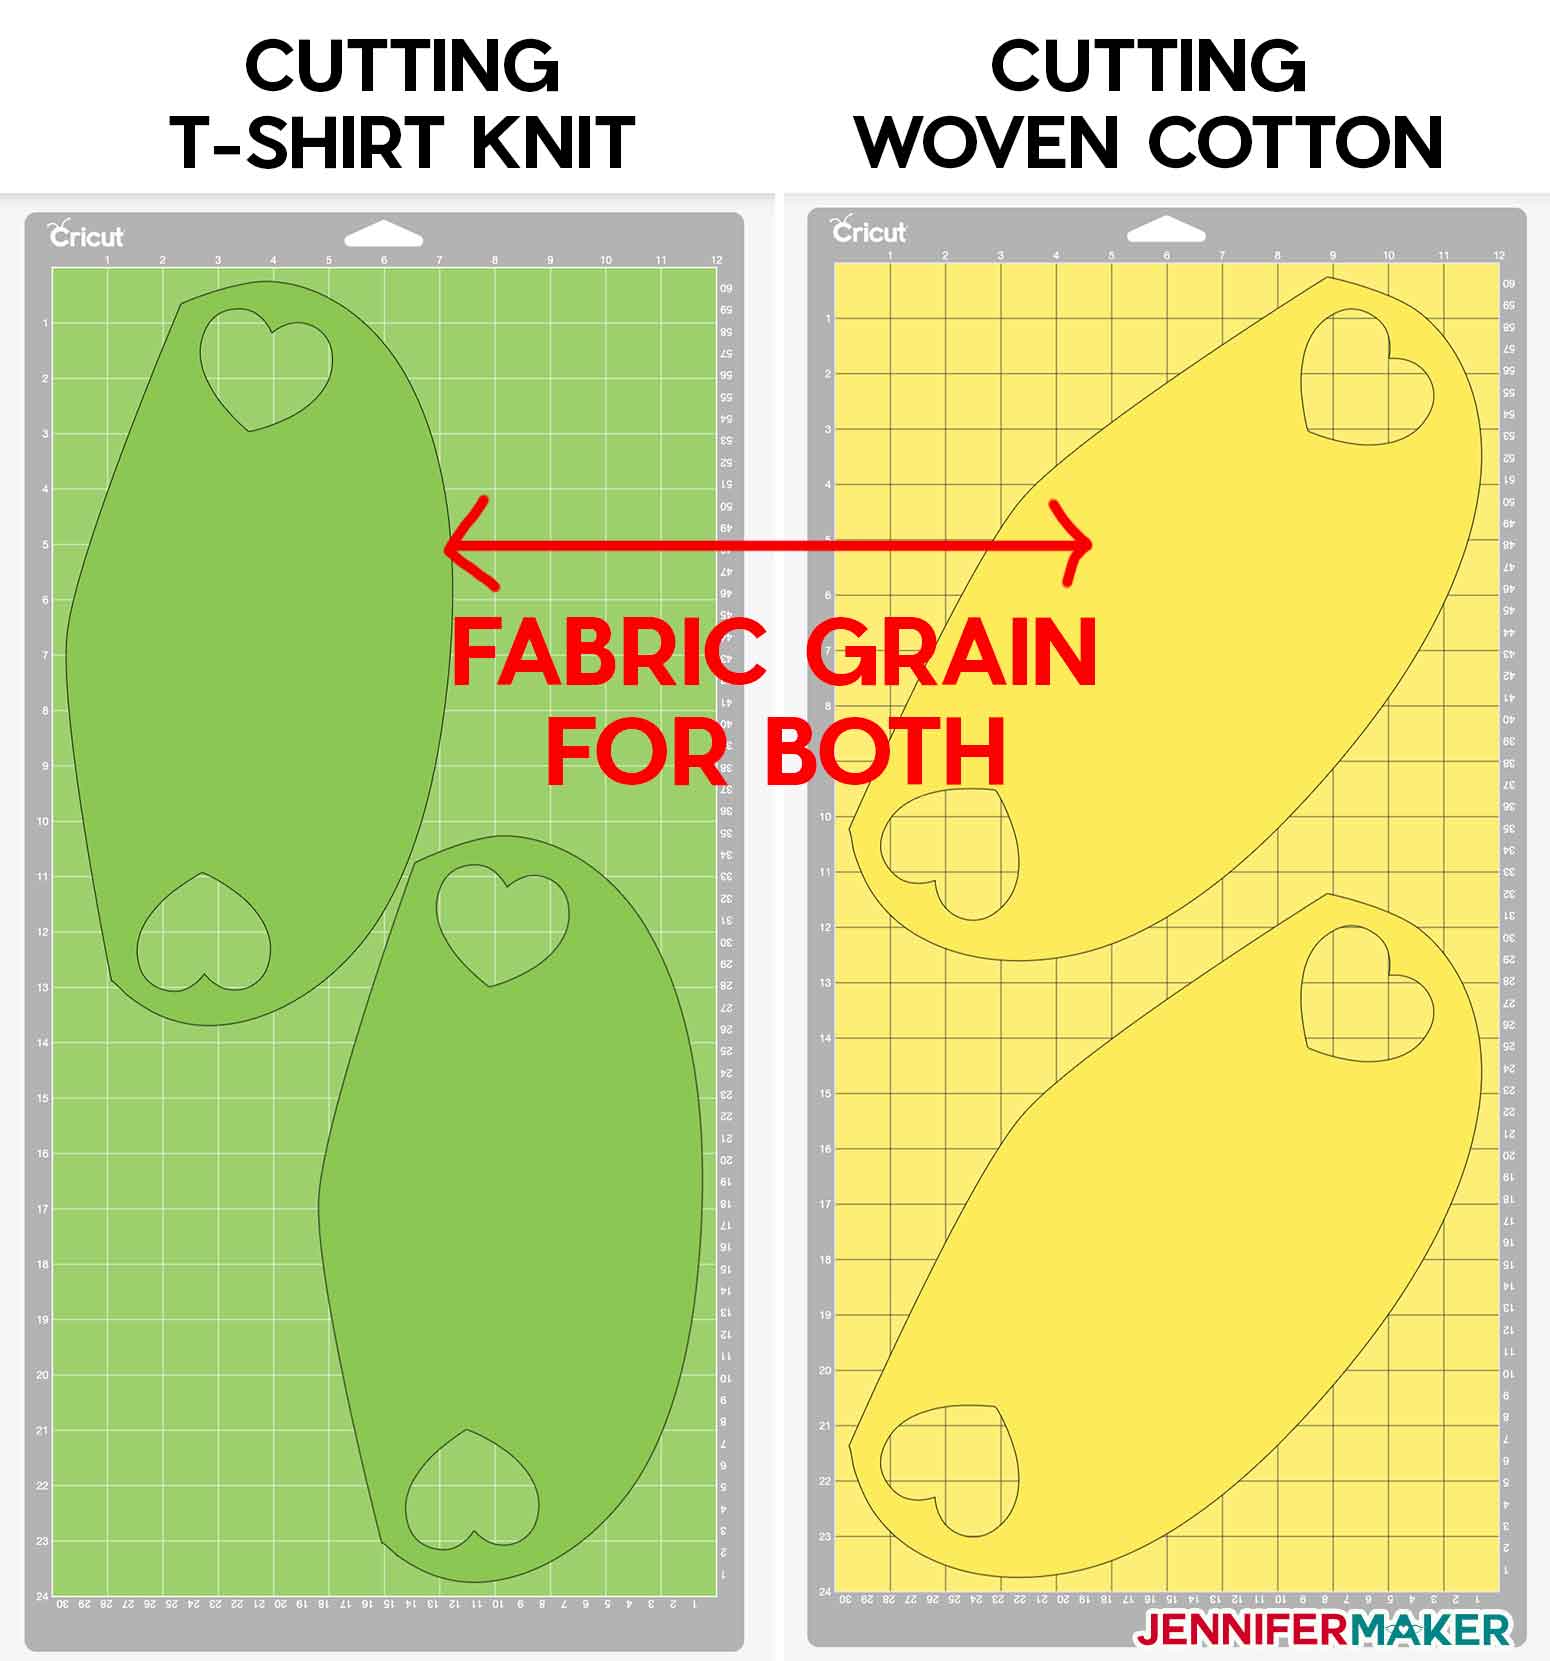
Why are knit and woven fabrics different? The secret is in the stretch and knits stretch much more than woven fabrics. That said, we’re still giving you a little stretch in your woven cotton fabric by having you cut your face mask at a 45° angle on your fabric (so it cuts on the bias). Cutting woven fabric on the bias will allow it to stretch more comfortably on your face and fit better.
Learn more about face masks and get more answers to your questions in my DIY Face Mask Guide:


Ready to make your own no-sew face masks? This step-by-step tutorial shows you how to do it. This post contains some affiliate links for your convenience (which means if you make a purchase after clicking a link I will earn a small commission but it won’t cost you a penny more)! Read my full disclosure policy.
Materials to Make No-Sew Face Masks From T-Shirts or Woven Cotton
View my Amazon shopping list with the exact items we used to make this project!
- One (1) piece of 100% cotton heavyweight T-shirt, about 12″ x 24″ — can be new or old, but should be clean (you can sterilize it by boiling it, drying it at least 104°F, or using a hot iron) — click here to see research study that shows this is the best household item to use for a DIY face mask and/or one (1) piece of 100% cotton closely and TIGHTLY woven fabric, like quilting cotton, also about 12″ x 24″ (Tip: Use a fat quarter or one of the Cricut fabric samplers)
- (Optional) Fabric glue if you want to permanently attach your two layers together
- (Optional) Something you can use as a filter — see my Face Mask Materials List for notes, effectiveness, and breathability so you can make an informed decision
- (Optional) Freezer paper (for bonding your fabric when cutting on a Cricut Explore — not needed with a Maker or hand cutting)
- (Optional) Measuring Tape
- (Optional) A piece of chalk, washable marker, fabric marker, or something else to mark your pattern if you’re cutting by hand
- (Optional) 12″ x 24″ cutting mat, like a Pink FabricGrip mat (if you’re cutting this on your Cricut Maker) or the 12″ x 24″ green StandardGrip mat if you’re cutting on your Cricut Explore)
- A way to cut your material (this tutorial covers using the Cricut Explore cutting machine and the Cricut Maker cutting machine, but you can also use scissors or a rotary blade with my printable PDF pattern)
- Design #210 – My free no-sew face mask pattern, which comes as a printable PDF pattern or as a SVG cut file. You can also get these files in my free resource library—get the password by filling out the form at the bottom of this page)
Mask Dimensions for Drawing Your Own Patterns
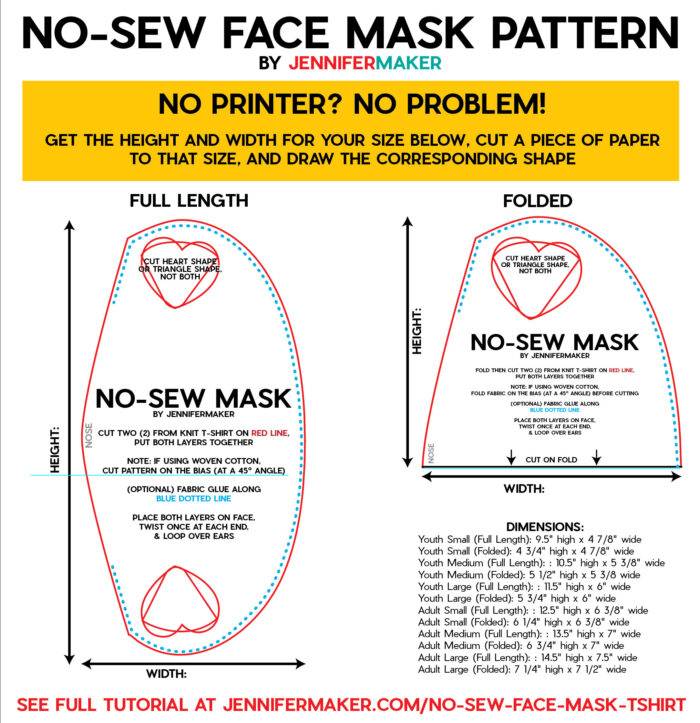
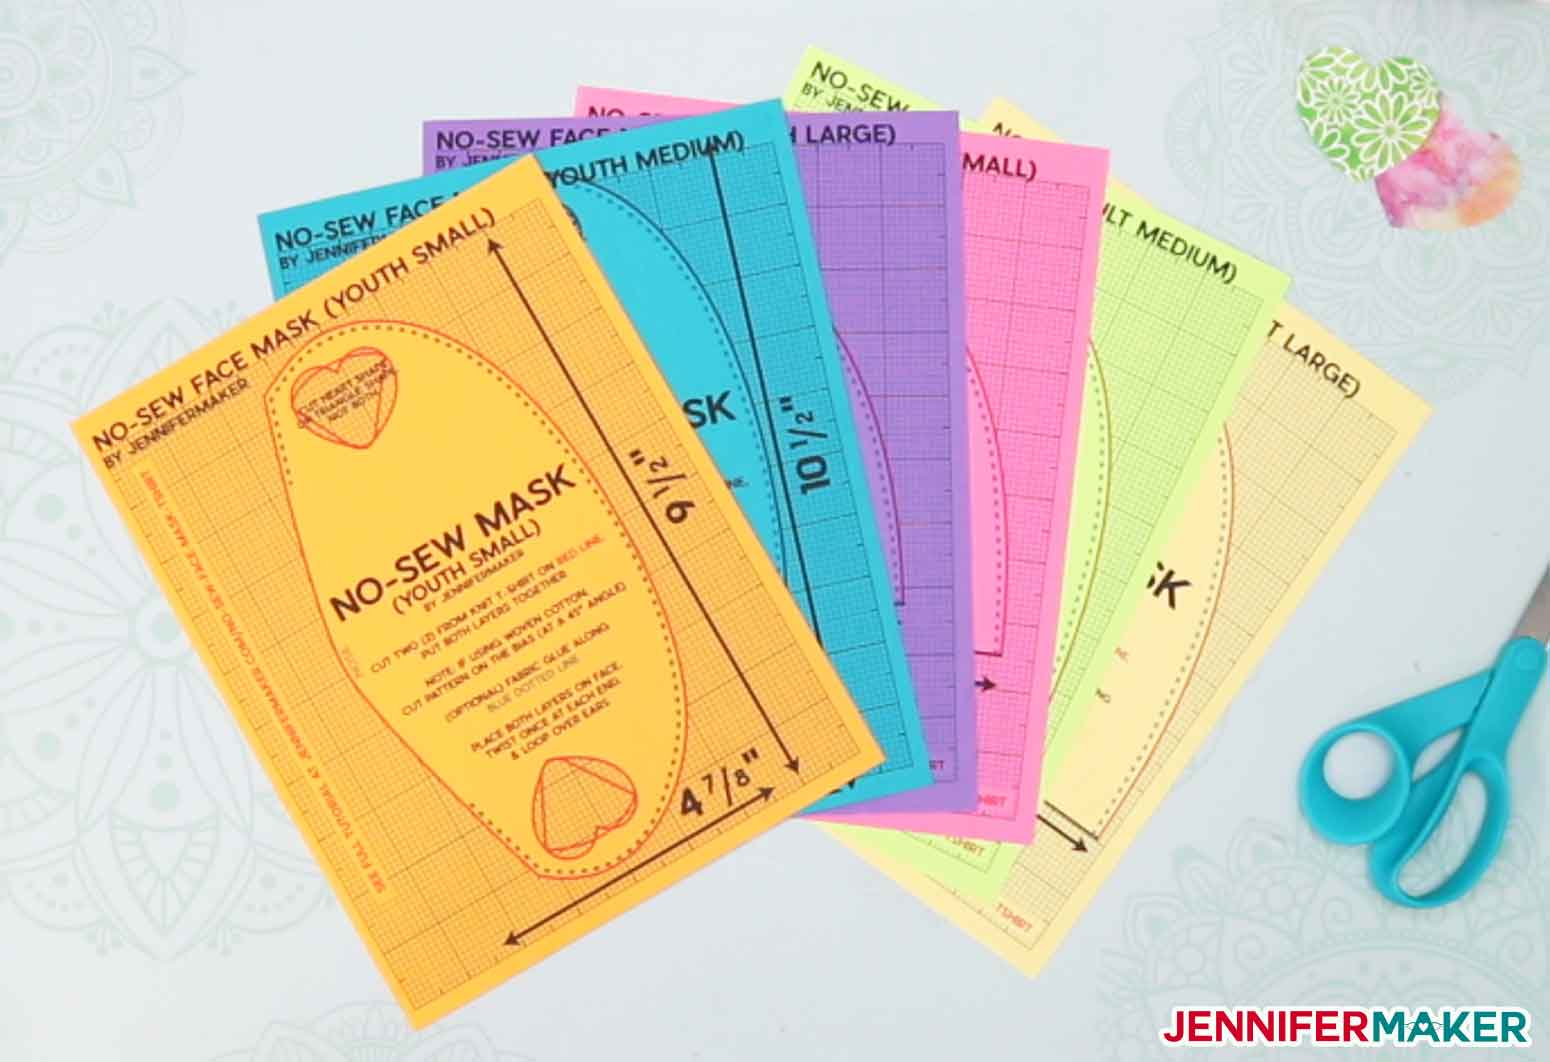
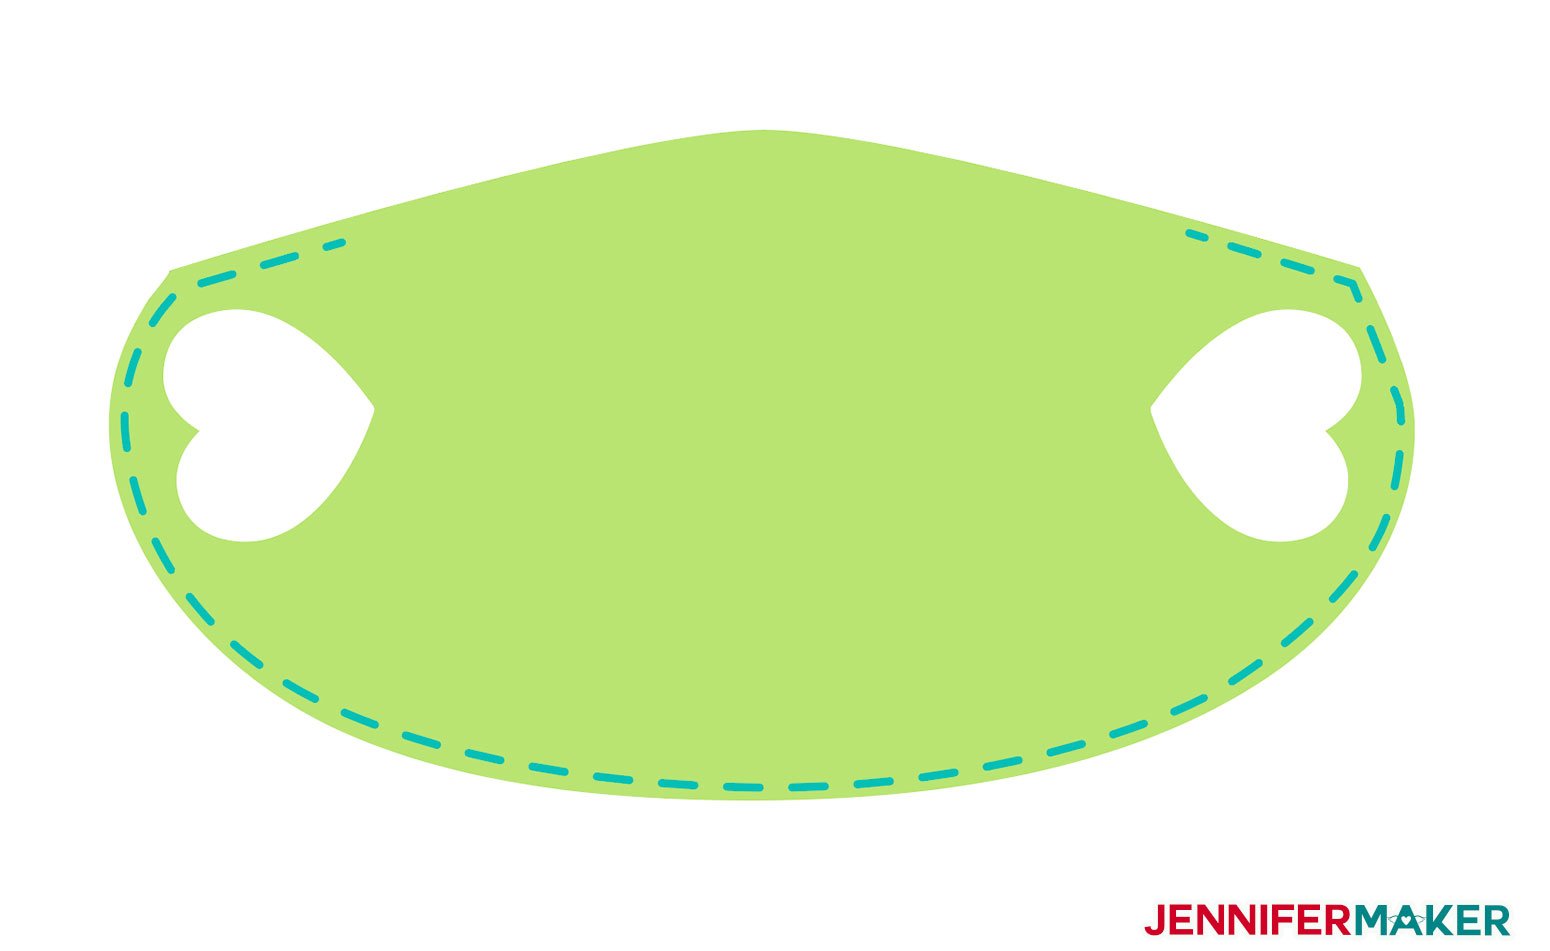
If you cannot download files for some reason, or do not have access to a printer, here are the dimensions of each mask, along with a basic generic pattern below that. Just pick the size you want, cut out a piece of paper to that size, trace the matching shape (full length or folded) onto it, and cut out.
- Youth Small: 9.5″ high x 4 7/8″ wide (full length) / 4 3/4″ high x 4 7/8″ wide (folded in half)
- Youth Medium: 10.5″ high x 5 3/8″ wide (full length) / 5 1/2″ high x 5 3/8 wide (folded in half)
- Youth Large: 11.5″ high x 6″ wide (full length) / 5 3/4″ high x 6″ wide (folded in half)
- Adult Small: 12.5″ high x 6 3/8″ wide (full length) / 6 1/4″ high x 6 3/8″ wide (folded in half)
- Adult Medium: 13.5″ high x 7″ wide (full length) / 6 3/4″ high x 7″ wide (folded in half)
- Adult Large: 14.5″ high x 7.5″ wide (full length) / 7 1/4″ high x 7 1/2″ wide (folded in half)
How to Cut and Wear the No-Sew Face Mask
The Short & Fast Directions:
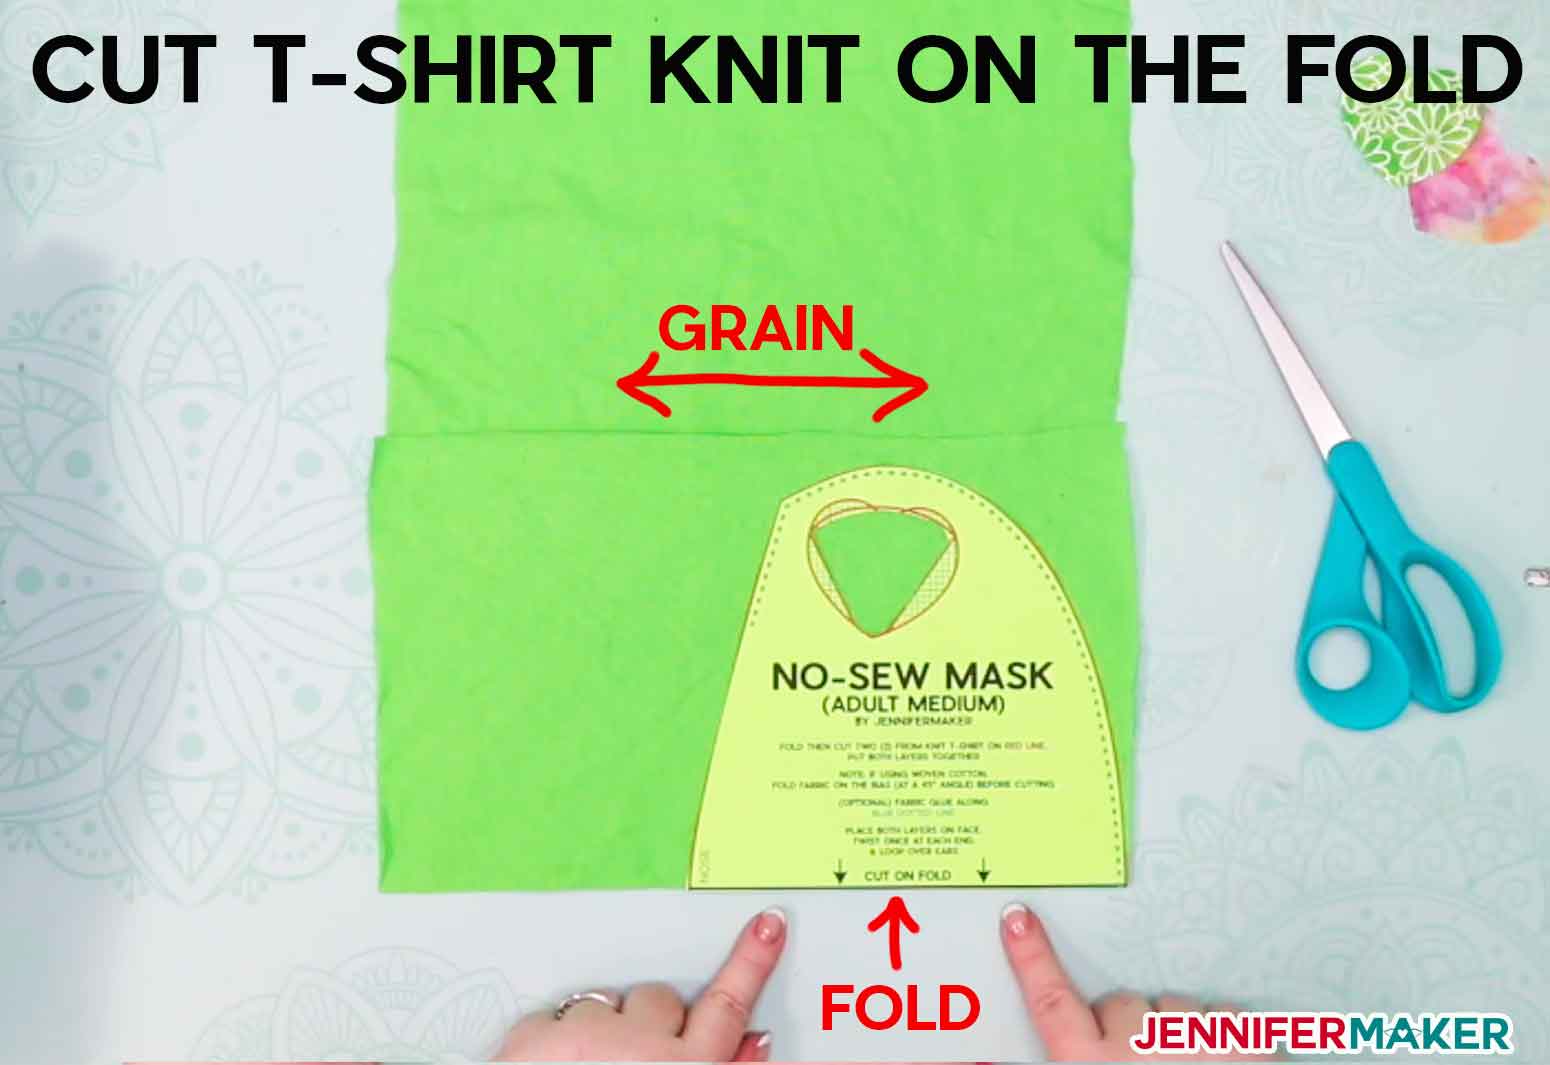
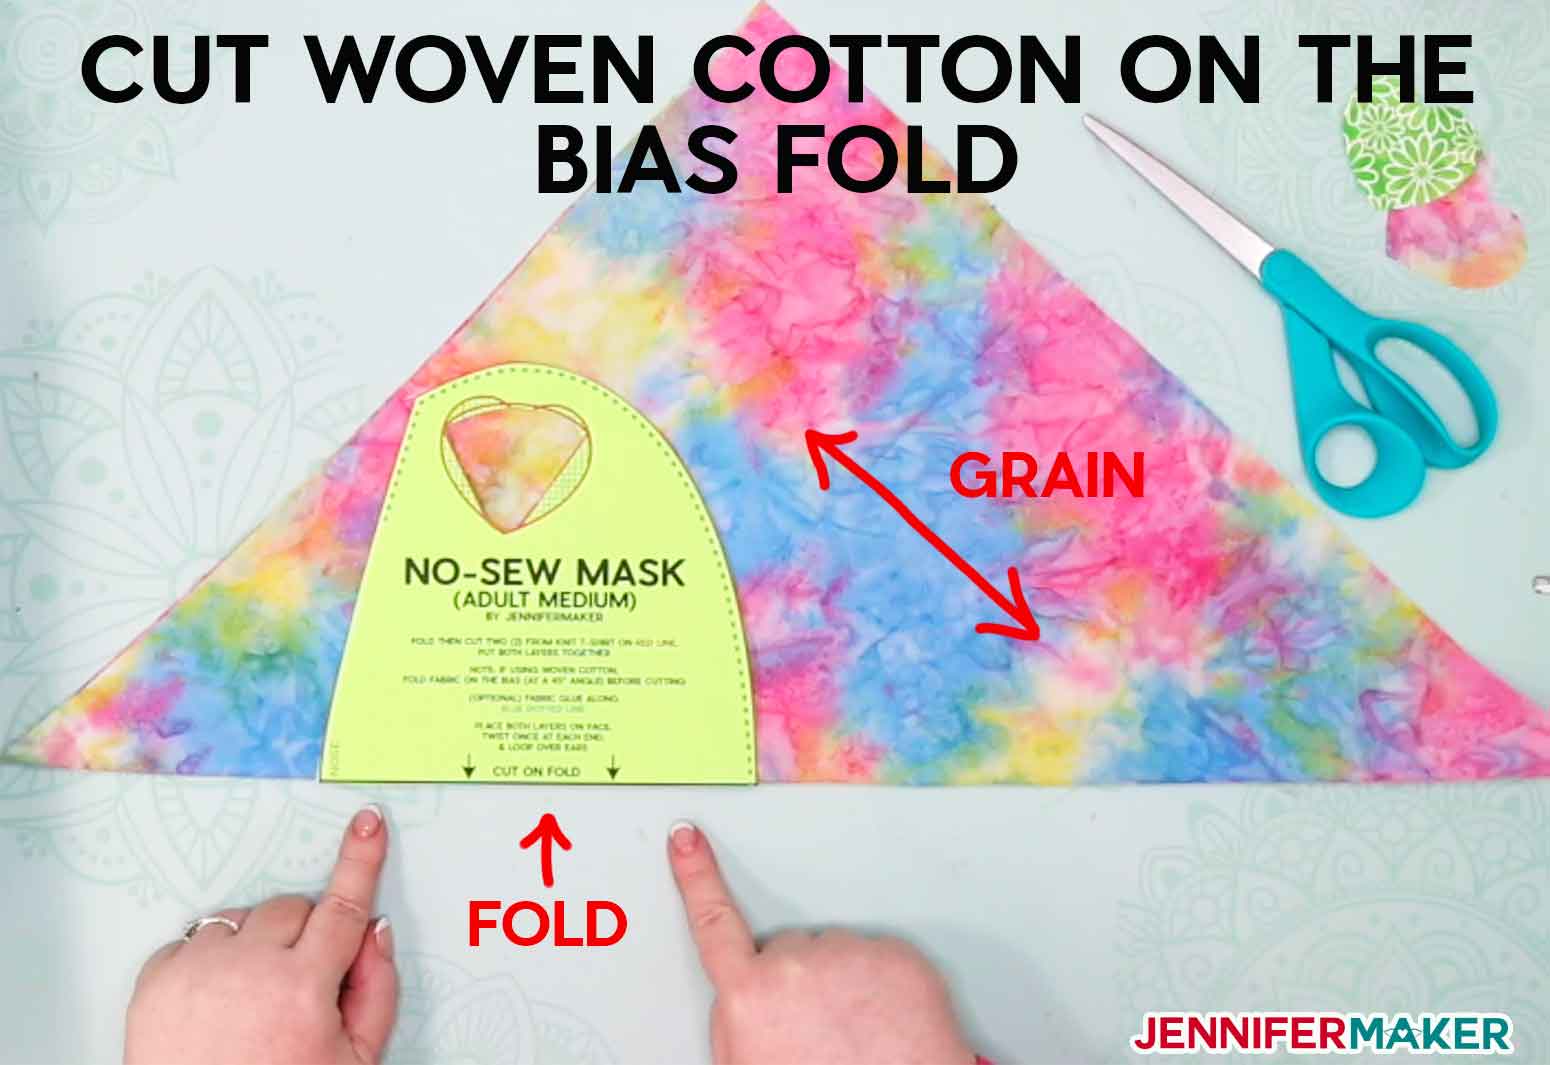
Cutting by hand? Fold your T-shirt material in half and put your pattern on the fold where it says “cut on fold,” then cut it out and unfold. Cotton needs to be folded at a 45° angle first, then the pattern placed on the fold where it says “cut on fold,” then cut it out and unfold.
Cutting by machine? Use the “knit” pattern if you use T-shirt material or another knit (which will be the most forgiving and comfortable material). Use the “woven” pattern if you use woven cotton, like quilting cotton. Also, remember you need to go up a size for woven fabrics because they stretch much less than knits.
Put your face mask on and don’t forget to twist your loops before you put them over your ears!
The Longer In-Depth Directions:
How to Make a No-Sew Face Mask From a T-Shirt or Cotton
Step-by-step photo tutorial to learn how to cut and wear an easy no-sew face mask with two layers!
Materials
- [One (1) 12" x 24" piece of a 100% cotton heavyweight T-shirt, washed (you'll need less for smaller masks)
- ]
- -OR- One (1) 12" x 24" piece of 100% cotton closely and tightly woven fabric, like quilting cotton, washed (you'll need less for smaller masks)
- (Optional) Fabric Glue
- (Optional) Something to use as a filter between your two layers
- (Optional) Freezer Paper (for bonding your fabric when cutting on a Cricut Explore -- not needed with a Cricut Maker or when cutting by scissors)
- Design #210 - My free no-sew face mask pattern, available as both a printable PDF or a cut file for your Cricut or other cutting machine
Tools
- (Optional) Measuring tape (to measure your head for mask sizing)
- (Optional) 12" x 24" cutting mat, like the Pink FabricGrip mat, Green StandardGrip mat, or Purple StrongGrip Mat
- A way to cut your fabric, like scissors, rotary cutter, or a Cricut cutting machine (you can cut this on either a Cricut Maker with the rotary cutting tool or the Cricut Explore with the premium fine-point blade)
- Scissors
- (Optional) Pins or a way to mark your fabric for cutting, like chalk or a fabric marker
Instructions
Step 1: Get my free no-sew face mask patterns
My free no-sew Face Mask Pattern (Design #210) comes in several formats for your convenience. You can get a printable PDF for cutting by hand, or an SVG/DCF cut file for cutting with a Cricut or another cutting machine that can cut fabric. My pattern collection has everything you need to make your own personal face mask without sewing. Download the No-Sew Face Mask pattern collection from my free resource library (get the password to the library in the form at the bottom of this post), or click here and I will email it to you!
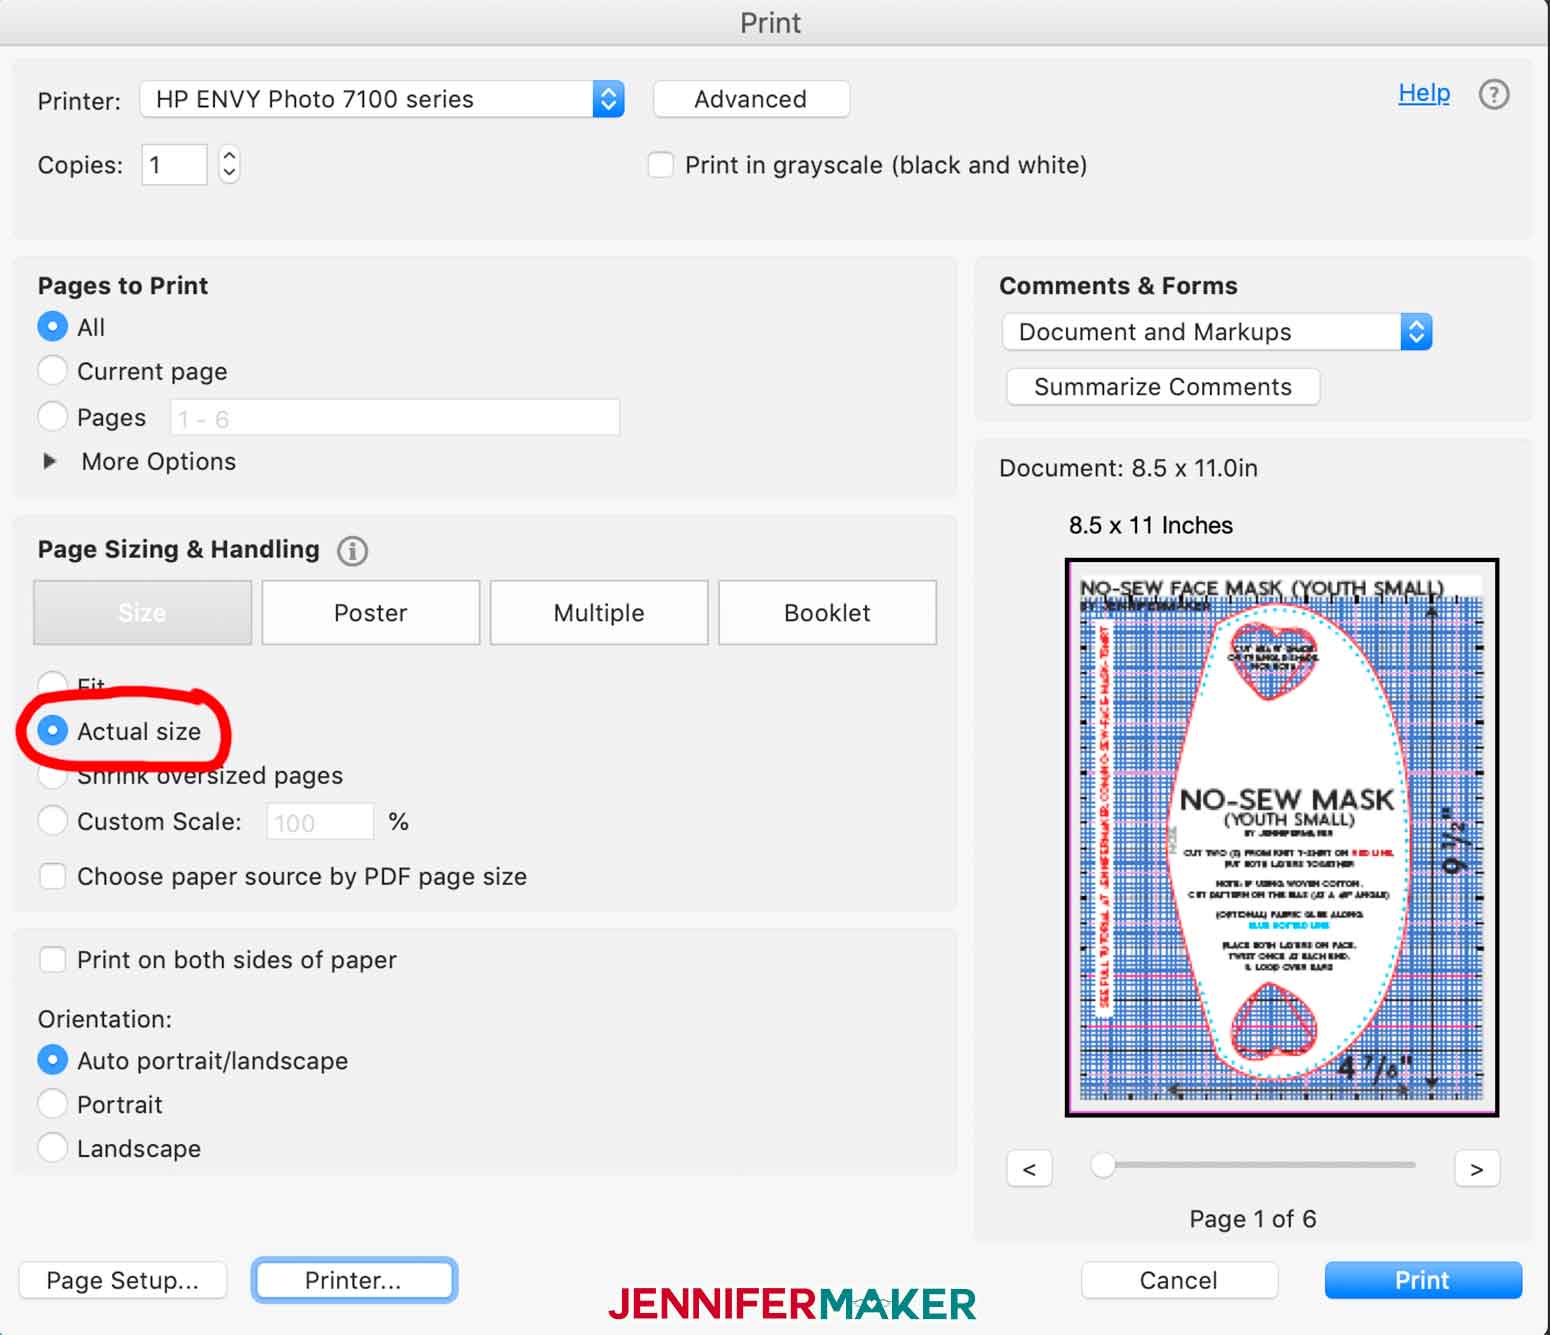
Here's what the printable PDF pattern looks like after you download and print it (be sure you print at actual size, or 100%):
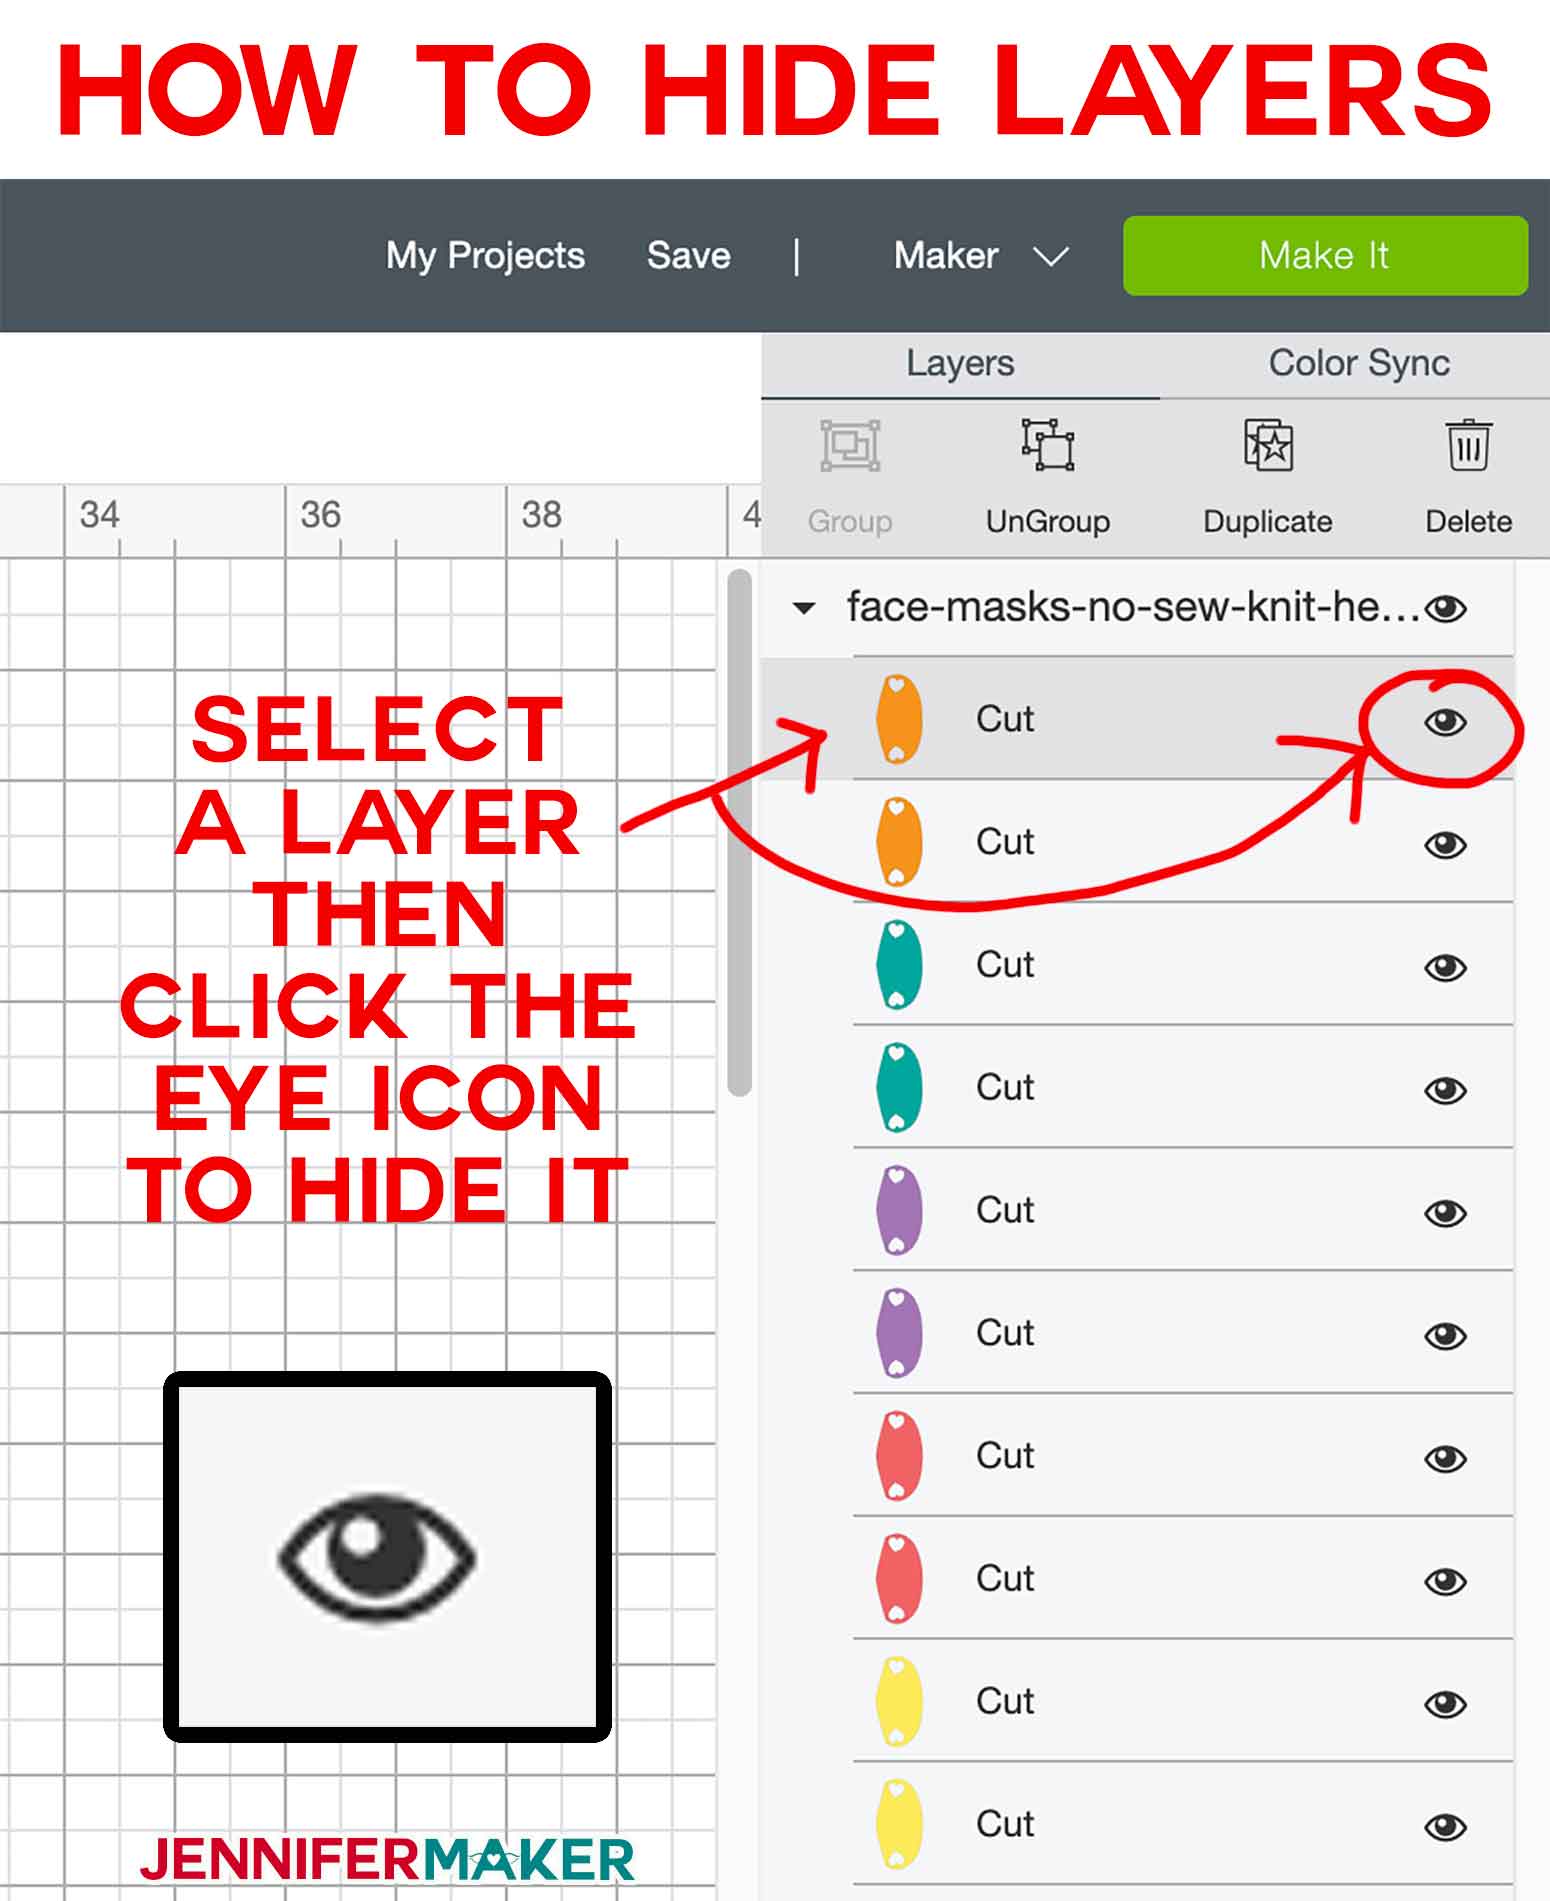
And here’s what one of the uploaded SVG cut files (the one called "face-mask-no-sew-knit-heart-jennifermaker-SVG.svg") looks like once uploaded to Cricut Design Space:

There are four different variations of the cut files -- two are for knit fabrics (like T-shirt material) and two are for woven fabrics (like quilting cotton). And each one of those comes in two ear loop styles -- one is in the shape of a heart (which is what I'm showing in this tutorial) and one is in the shape of a triangle (for anyone who doesn't want hearts). Choose the best one variation for your materials and needs.
Tip: If you’re not sure how to upload an SVG cut file to Cricut Design Space, watch this helpful video training series I made. If you’re on an iPhone or iPad, here’s how to download and upload SVG files to the Cricut Design Space app.
You don't need to do anything to the cut file in Design Space after it is uploaded other than hide the other size layers you don't plan to use. To hide layers, select it in the layers panel on the right and click the eye icon.
Step 2: Cut out your no-sew face mask pattern pieces from fabric
There are six different sizes of no-sew face masks to choose from - youth small, medium, and large and adult small, medium, and large.
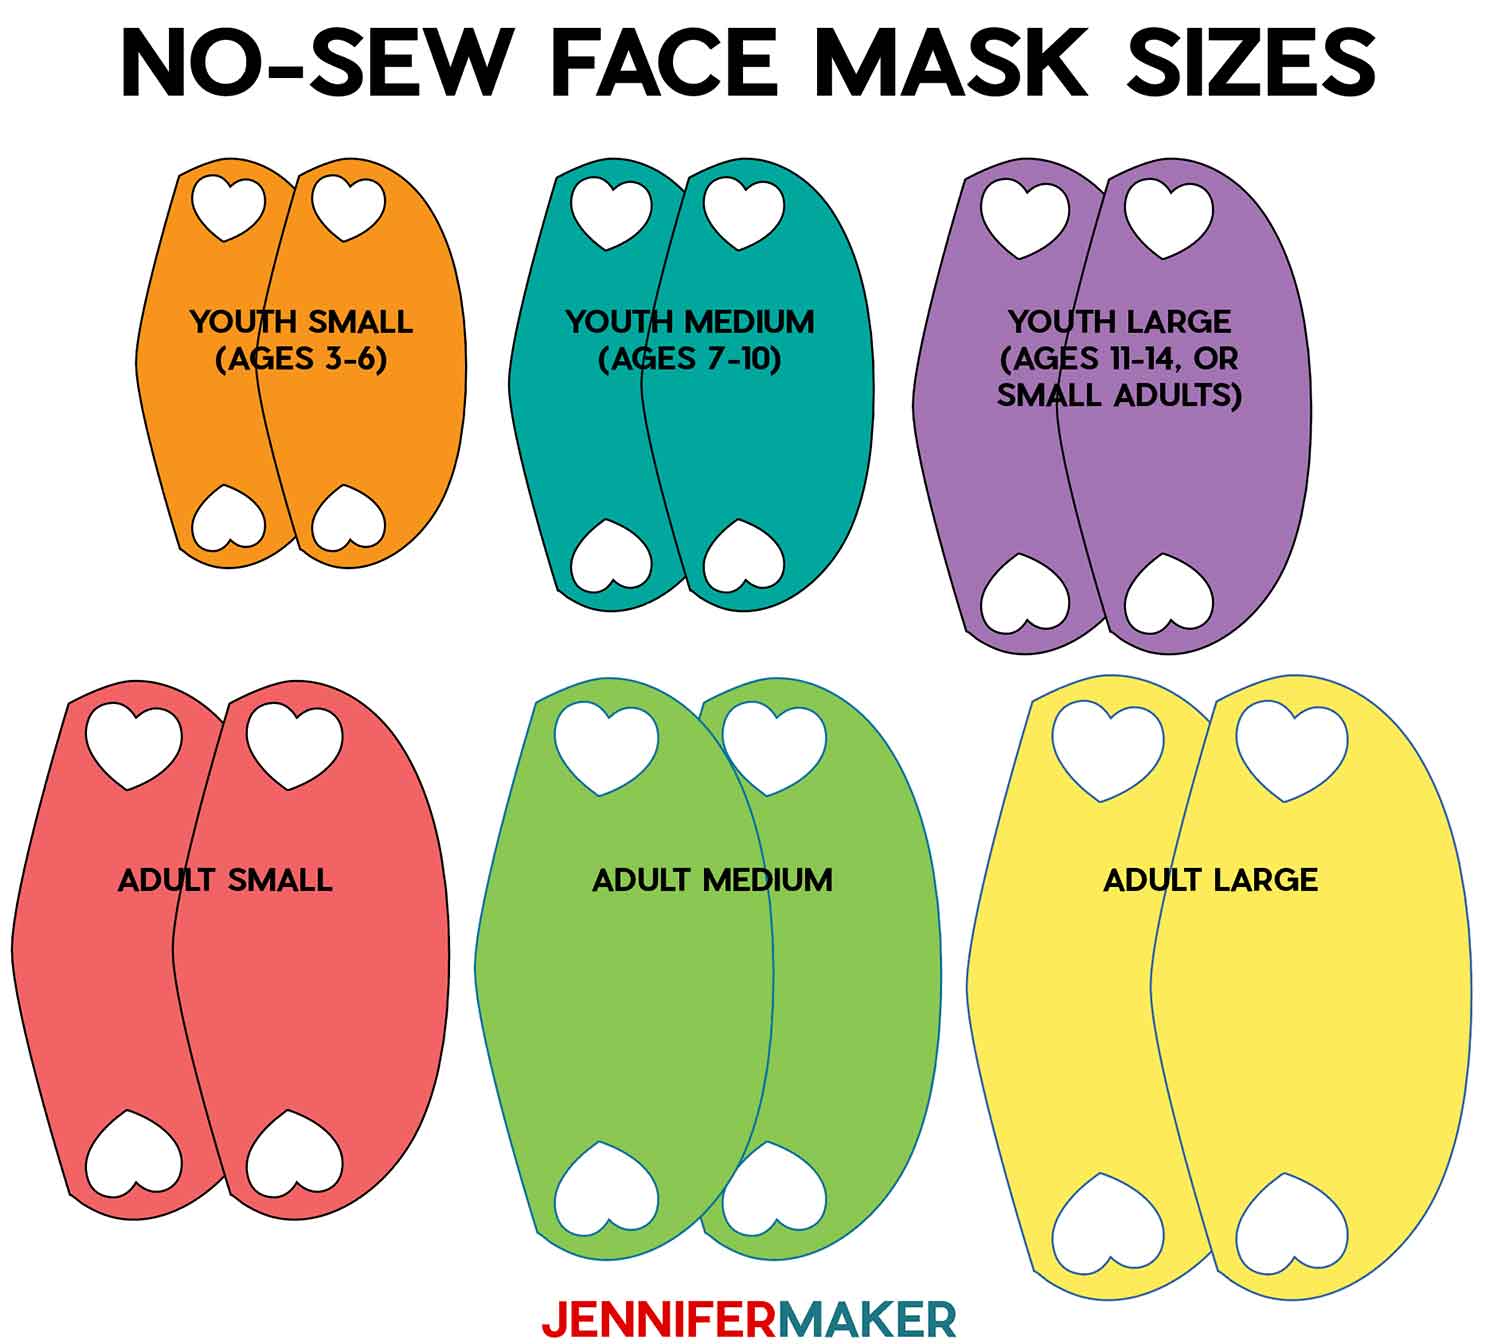
In my photos, I am wearing an adult medium T-shirt face mask and an adult large cotton face mask. (You need to go up a size usually when you use the quilting cotton.) You can measure your head from ear to ear and use these sizes to help you determine the right size to choose:
8.5"-9" - Youth Small (Knit T-Shirt) or Youth Medium (Woven Cotton)
9.5"-10" - Youth Medium (Knit T-Shirt) or Youth Large (Woven Cotton)
10.5"-11" - Youth Large (Knit T-Shirt) or Adult Small (Woven Cotton)
11.5"-12" - Adult Small (Knit T-Shirt) or Adult Medium (Woven Cotton)
12.5"-13" - Adult Medium (Knit T-Shirt) or Adult Large (Woven Cotton)
13.5"-14" - Adult Large (Knit T-Shirt) or increase the pattern by 1" in height (woven cotton)
If you're cutting this face mask by hand, begin by printing out the printable PDF pattern in the size you want. Be sure you print your pattern at "actual size" or 100% -- do not select "Fit" or "Shrink Oversized Pages" in your Print dialog box:
Tip: If you plan to make a LOT of these no-sew face masks, print out your patterns on card stock for tracing!
Next cut out the pattern from the paper, and use it to trace the patterns onto your fabric. You can trace with a piece of chalk or a washable marker. You may find it helpful to pin your fabric to your pattern while you cut it out. If your pattern says to "cut on fold," be sure to fold your fabric first (fold in half if it's a T-shirt, fold on the diagonal if it's woven cotton) and place the bottom of the pattern on the fold, then cut. Do not cut the fold itself.
Important: If you use woven cotton fabric instead of a T-shirt, be SURE to turn your pattern 45° on your fabric before tracing and cutting. This allows you to cut your no-sew face mask on the bias, which will give your cotton a bit of stretch and be more comfortable. Click here to learn more about identifying the bias of fabric.

Once you've traced the no-sew face mask shape, cut out your fabric. Ideally, you want two layers for each no-sew face mask, per the CDC guidelines.
Cutting this on a Cricut? Check out my guide on how to cut fabric on Cricut Explore or Maker!
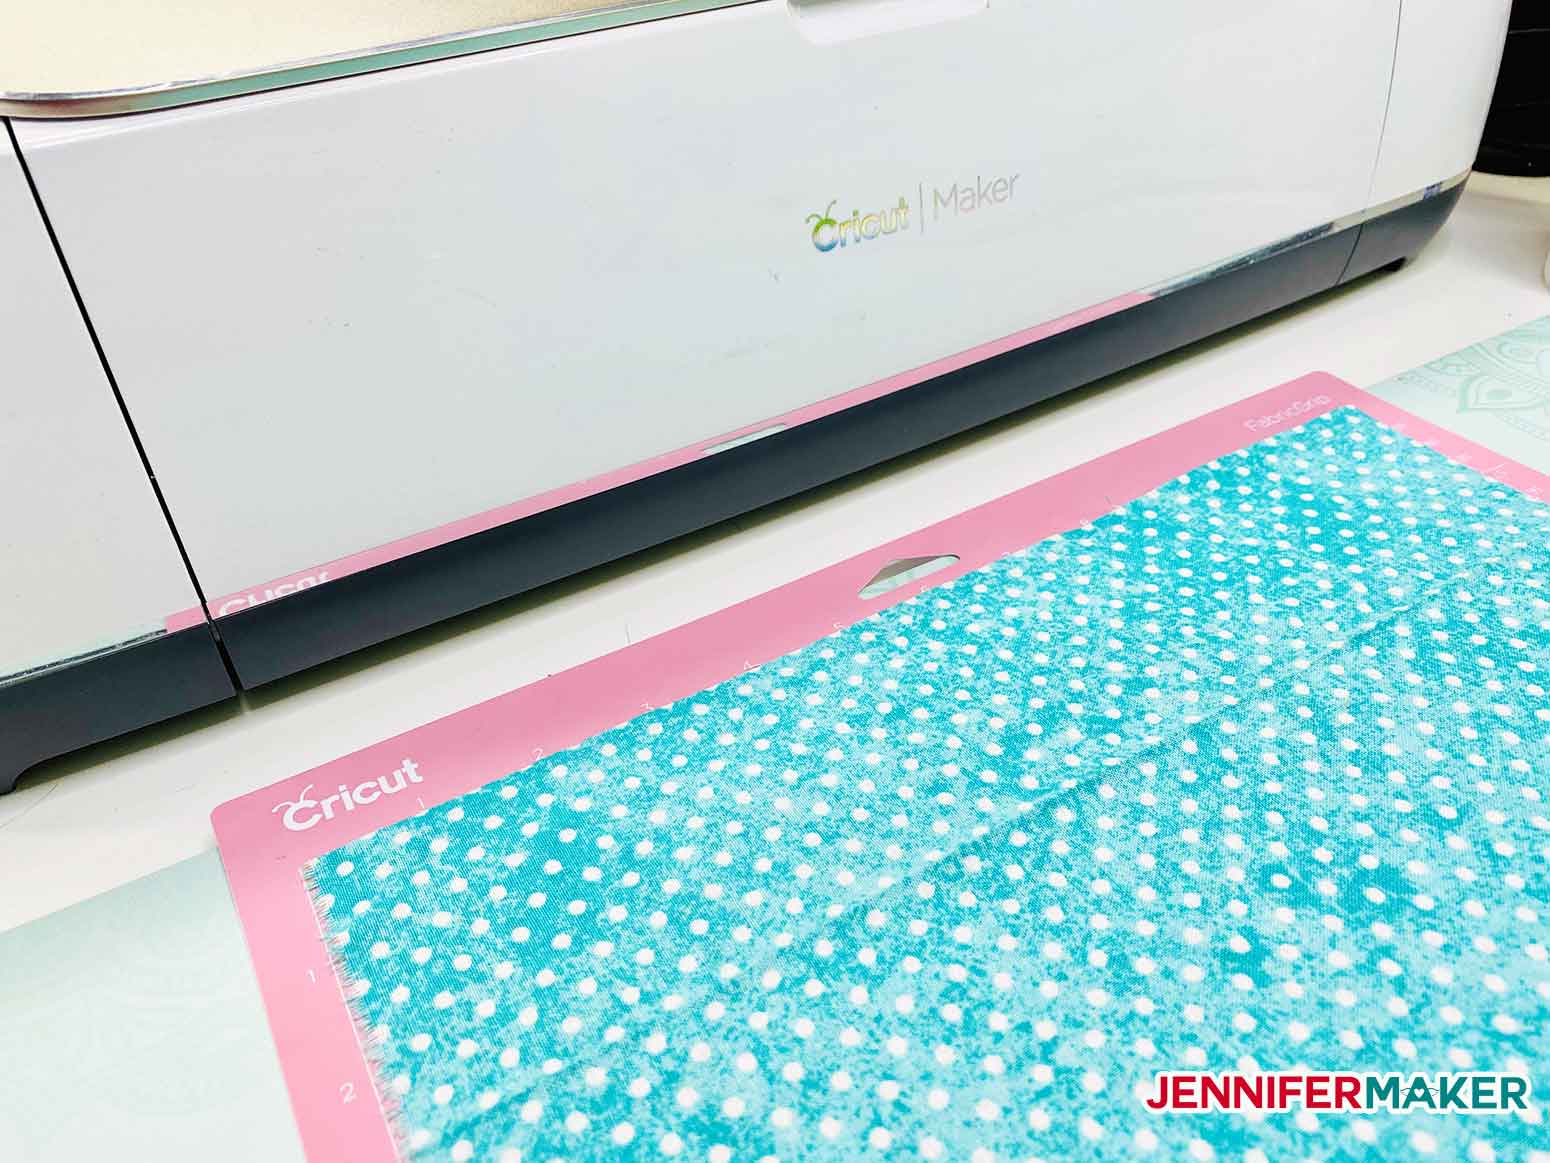
If you're cutting this face mask on a Cricut Maker: Place your fabric on a pink FabricGrip cutting mat. Load your rotary blade and fabric marker into your Cricut machine, load your mat, and press the flashing button to begin your cut. I cut T-shirt material on the "Pima Cotton" setting and woven cotton fabric on the "Cotton" setting.
Tip: You can get both layers of a face mask to fit on one 12" x 24" cutting mat if you move them to the same mat and then rotating them just a little until they fit. Move pieces by clicking on the object in the Preview screen, click the three dots in the upper left corner, choose Move Object, select another mat, then click Confirm.
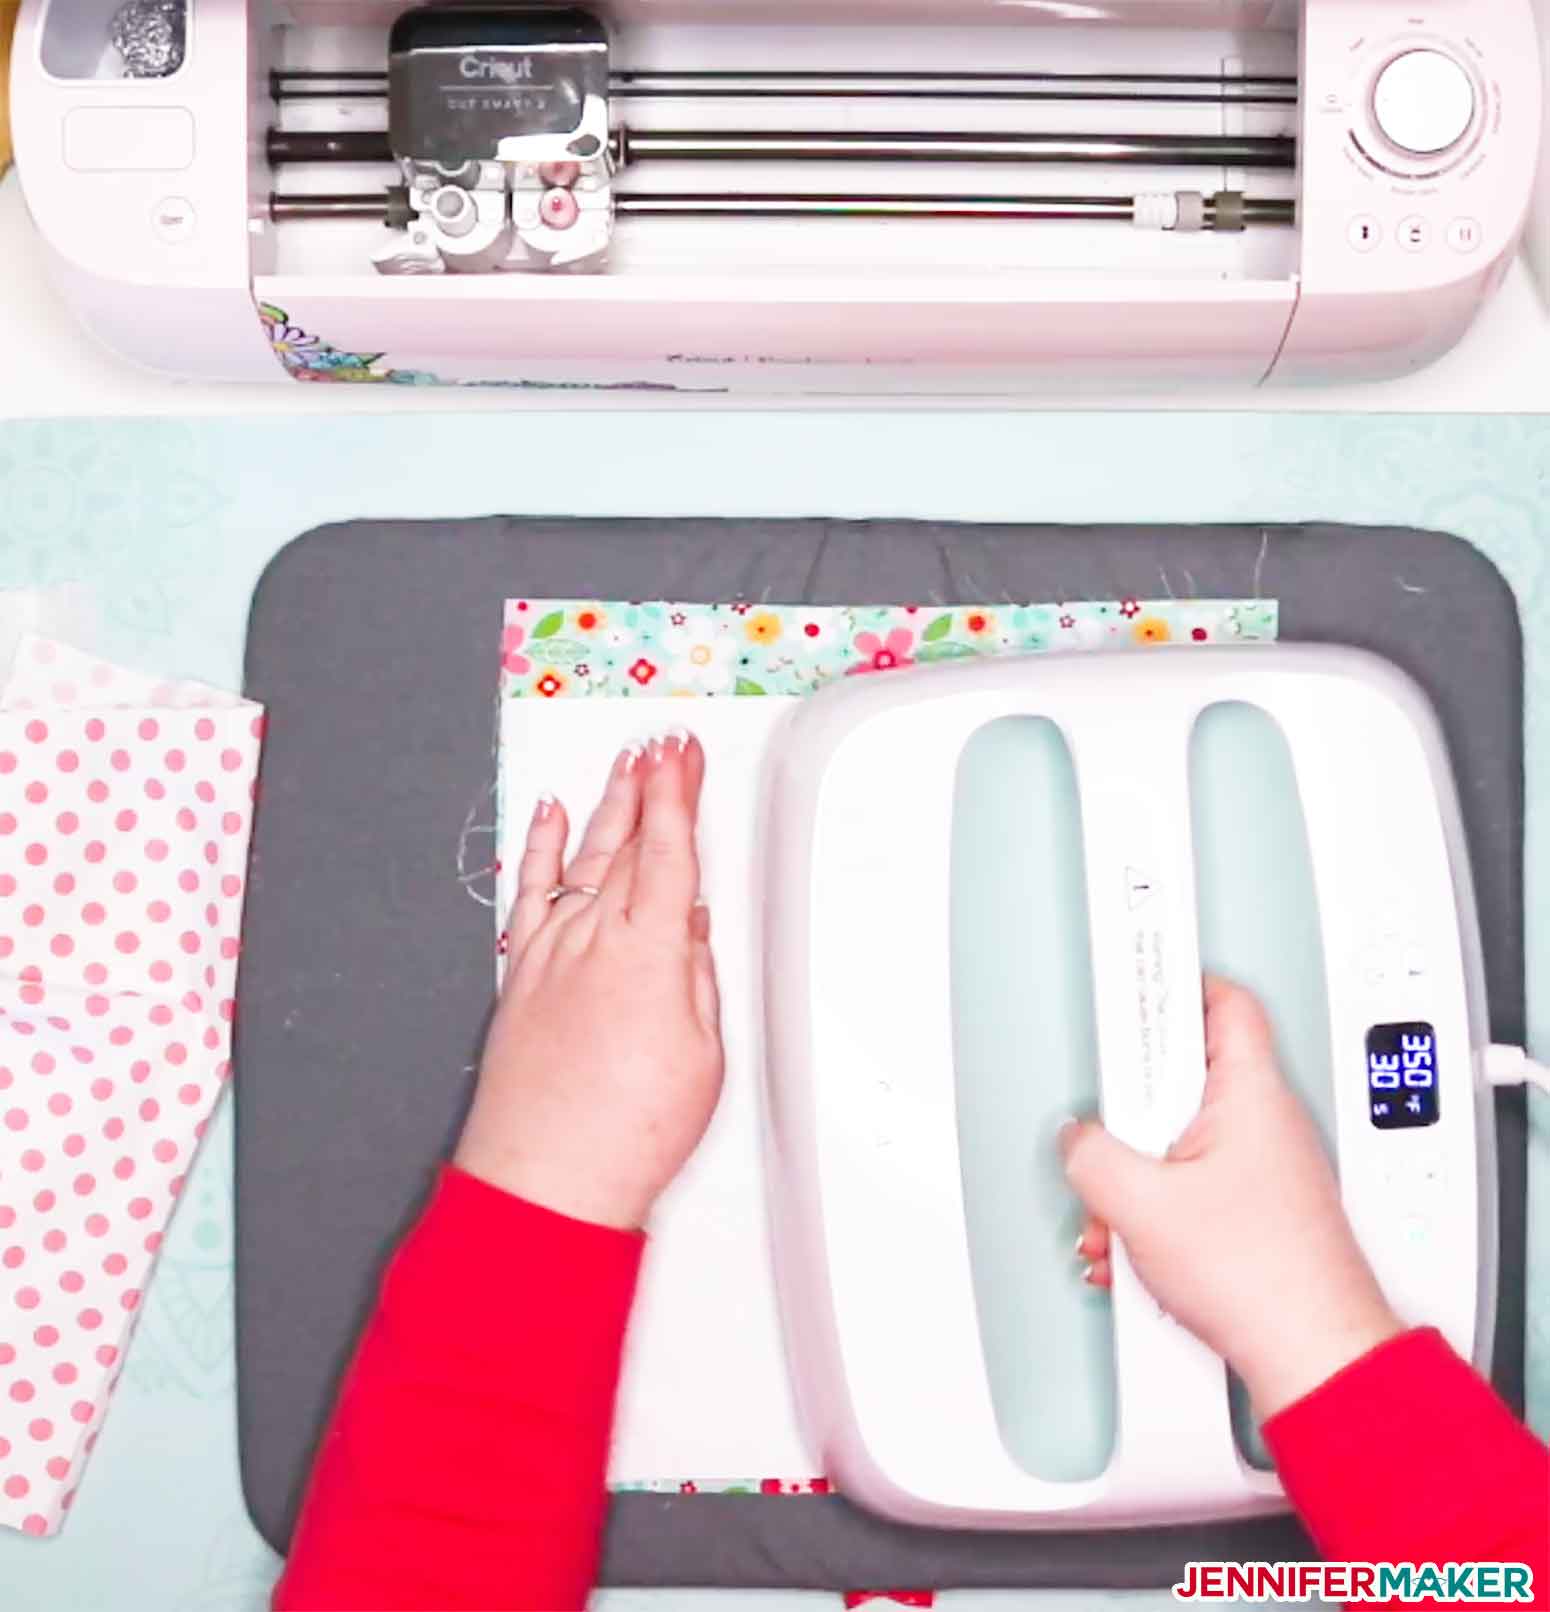
If you're cutting on a Cricut Explore, you must first bond your fabric first. To bond your fabric, cut a piece of freezer paper the same size as your material and attach its shiny side to the wrong side of your fabric by pressing with an EasyPress or iron for 30 seconds at 350°F. Once your fabric is bonded, place the bonded fabric freezer paper side DOWN on your cutting mat (you can use the pink mat or a green mat), load your regular fine point or bonded fabric blade in (both will work), put in your Cricut fabric marker (optional), load your mat, and press the flashing button to begin your cut. I cut on the "Fusible Fabric" material setting. When done with your cut, remove the cut pieces from the mat and peel off the freezer paper.
Step 3: (Optional) Attach your no-sew face mask layers together
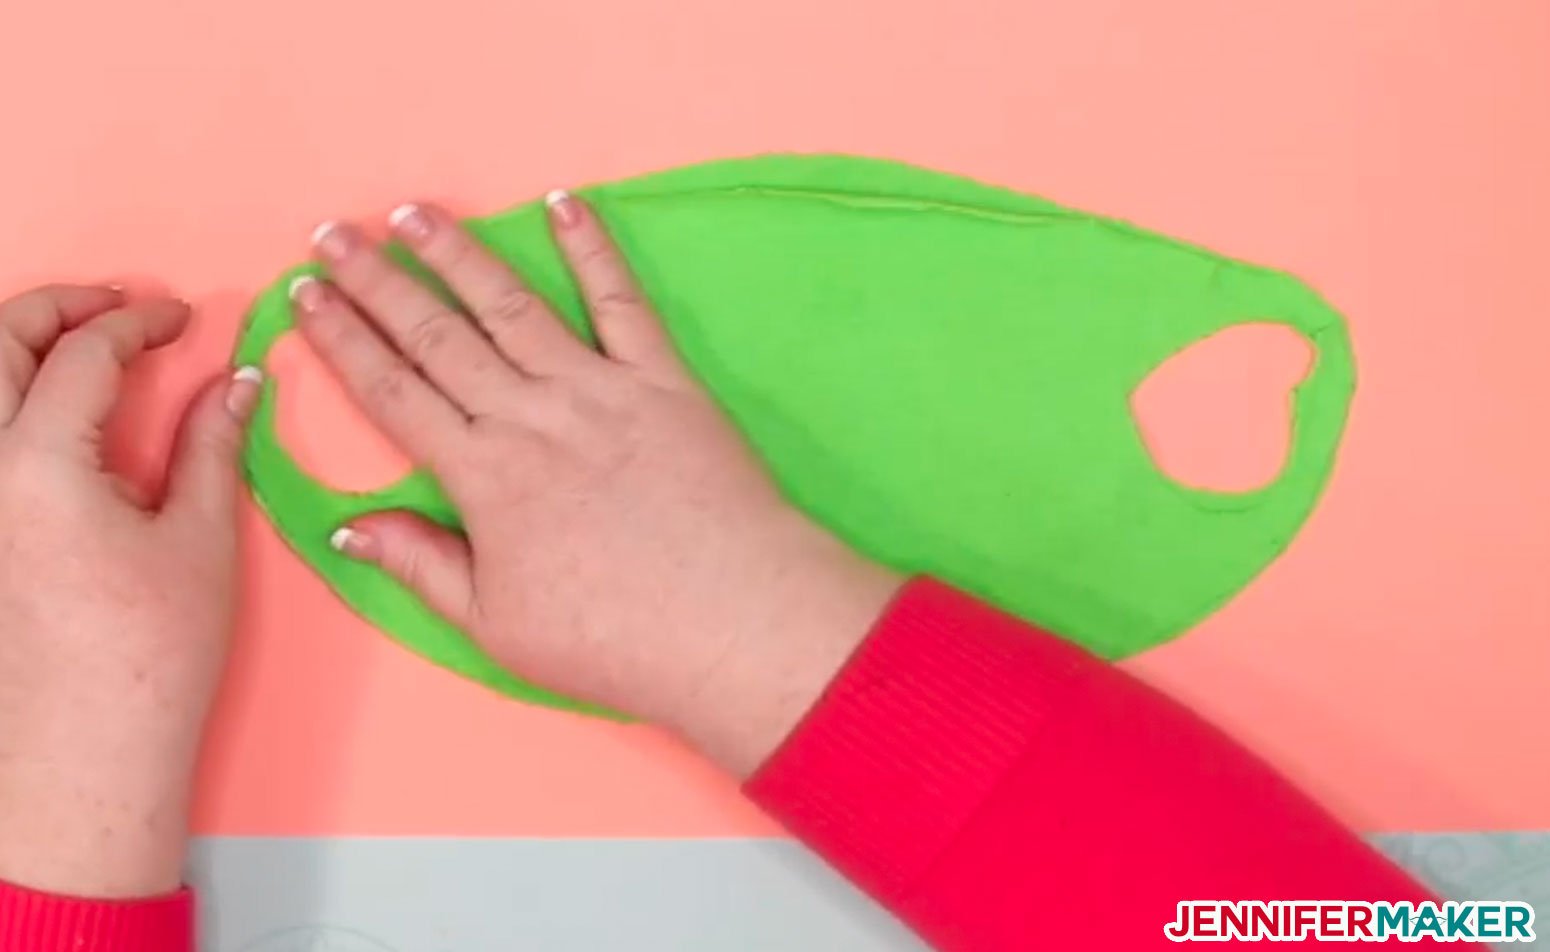
After you've finished cutting out your face mask pieces, take your fabric pieces and put one on top of the other with the nose bump at the top, like this:
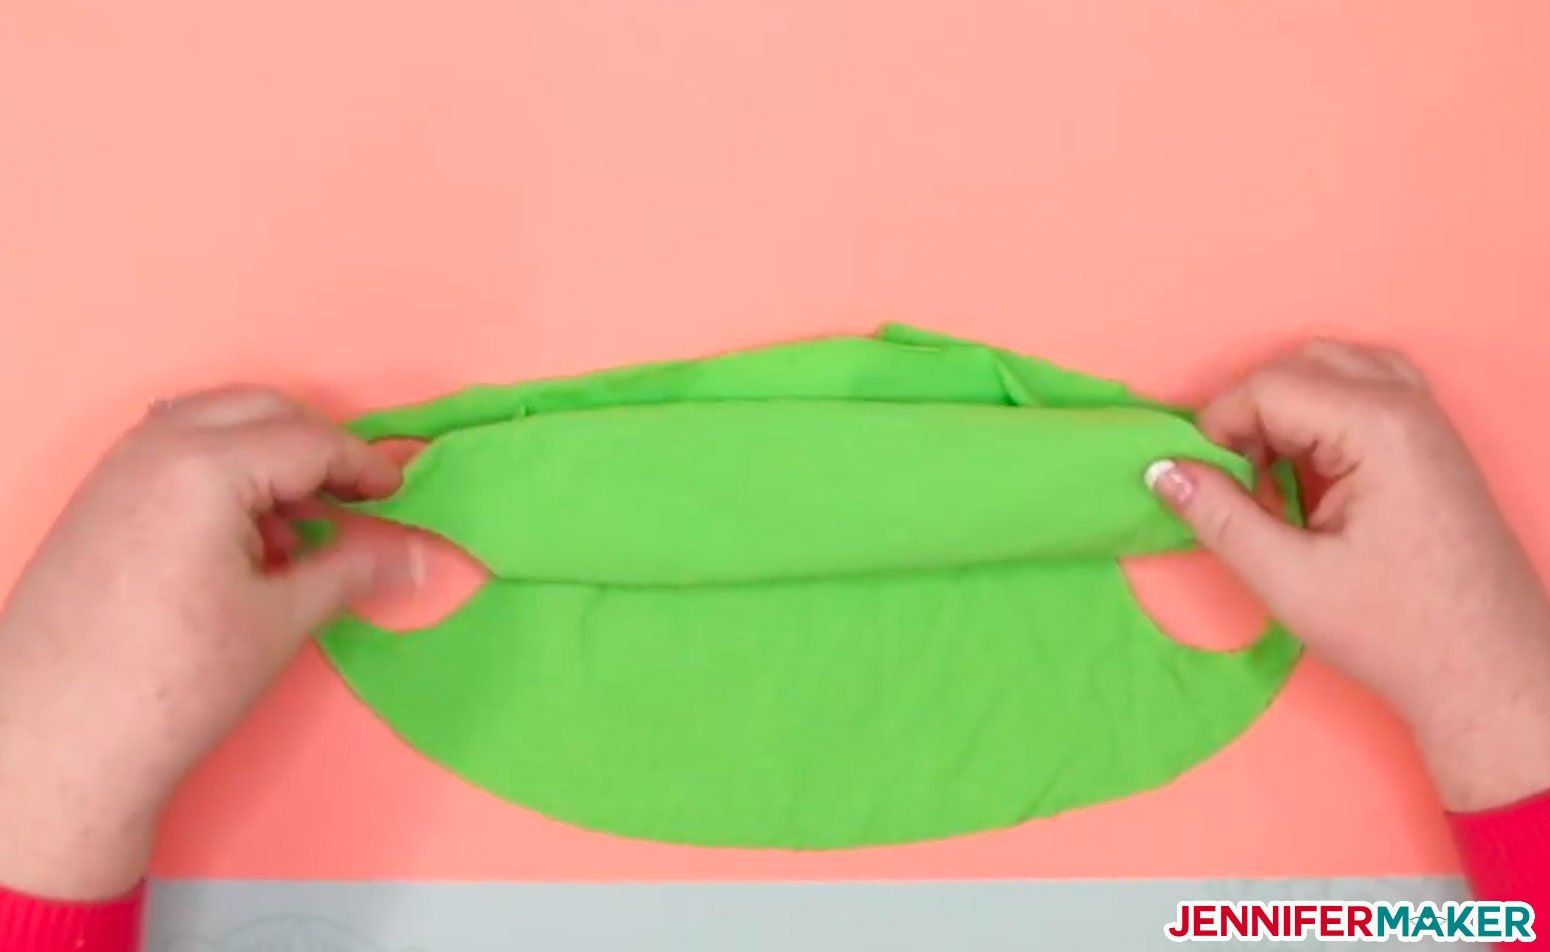
You can stop here, or you can attach the two halves together. It's not necessary to attach them as the tension will keep them together when you're wearing them, but it does make it easier to put on and take off a lot if they are attached.
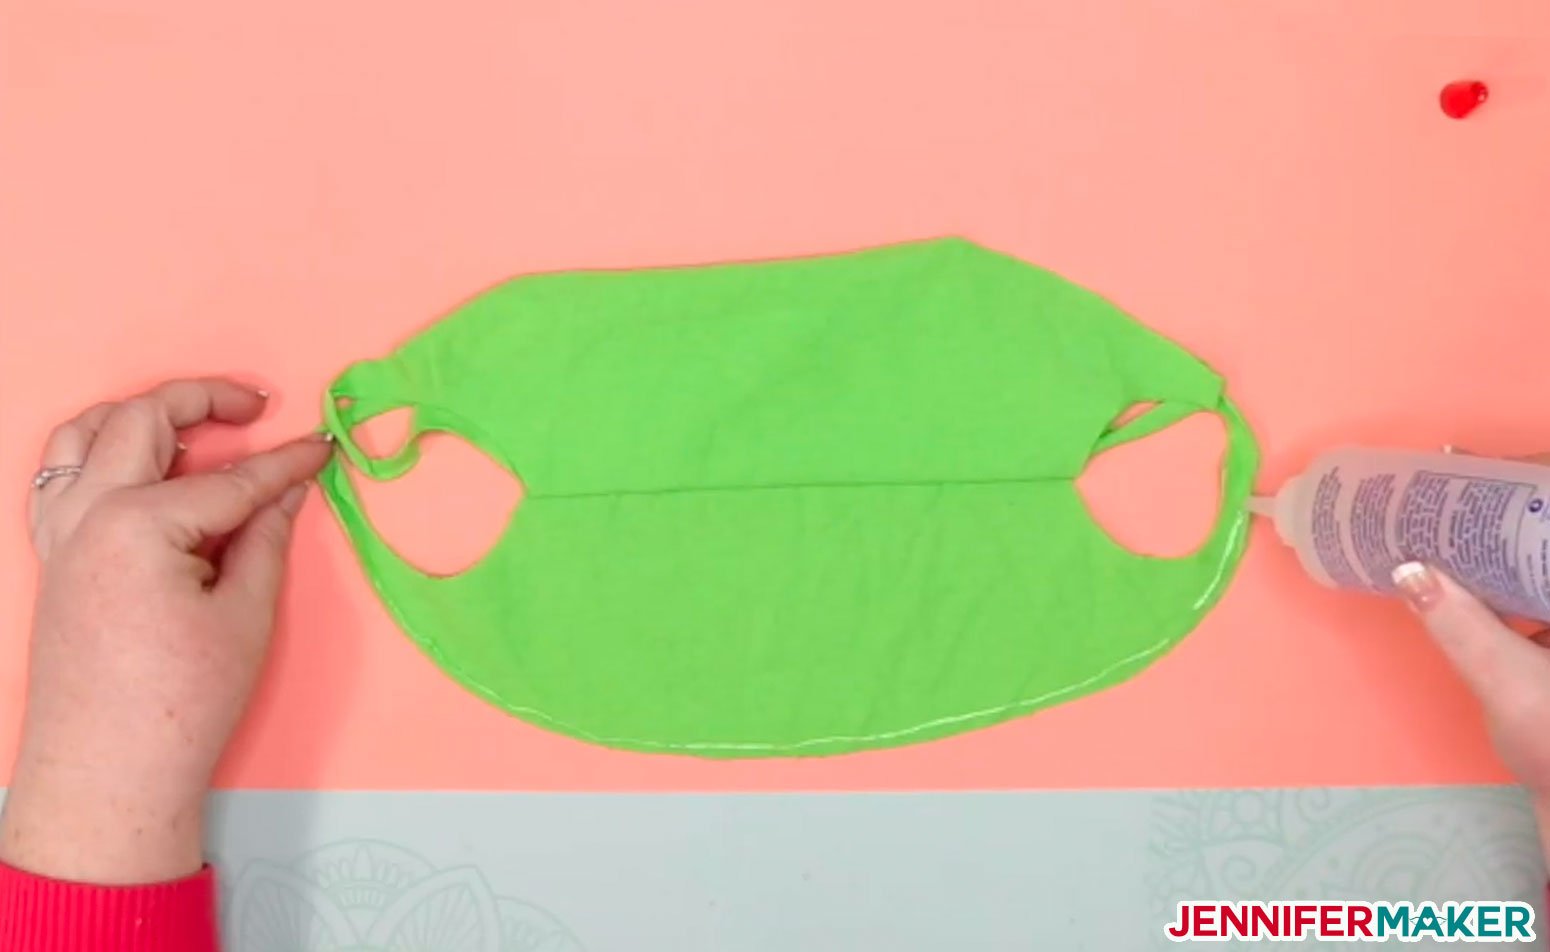
To attach your no-sew face mask layers, fold up one the bottom half of the top layer, keeping the top half in place, and put a line of fabric glue along the edge of the lower half.
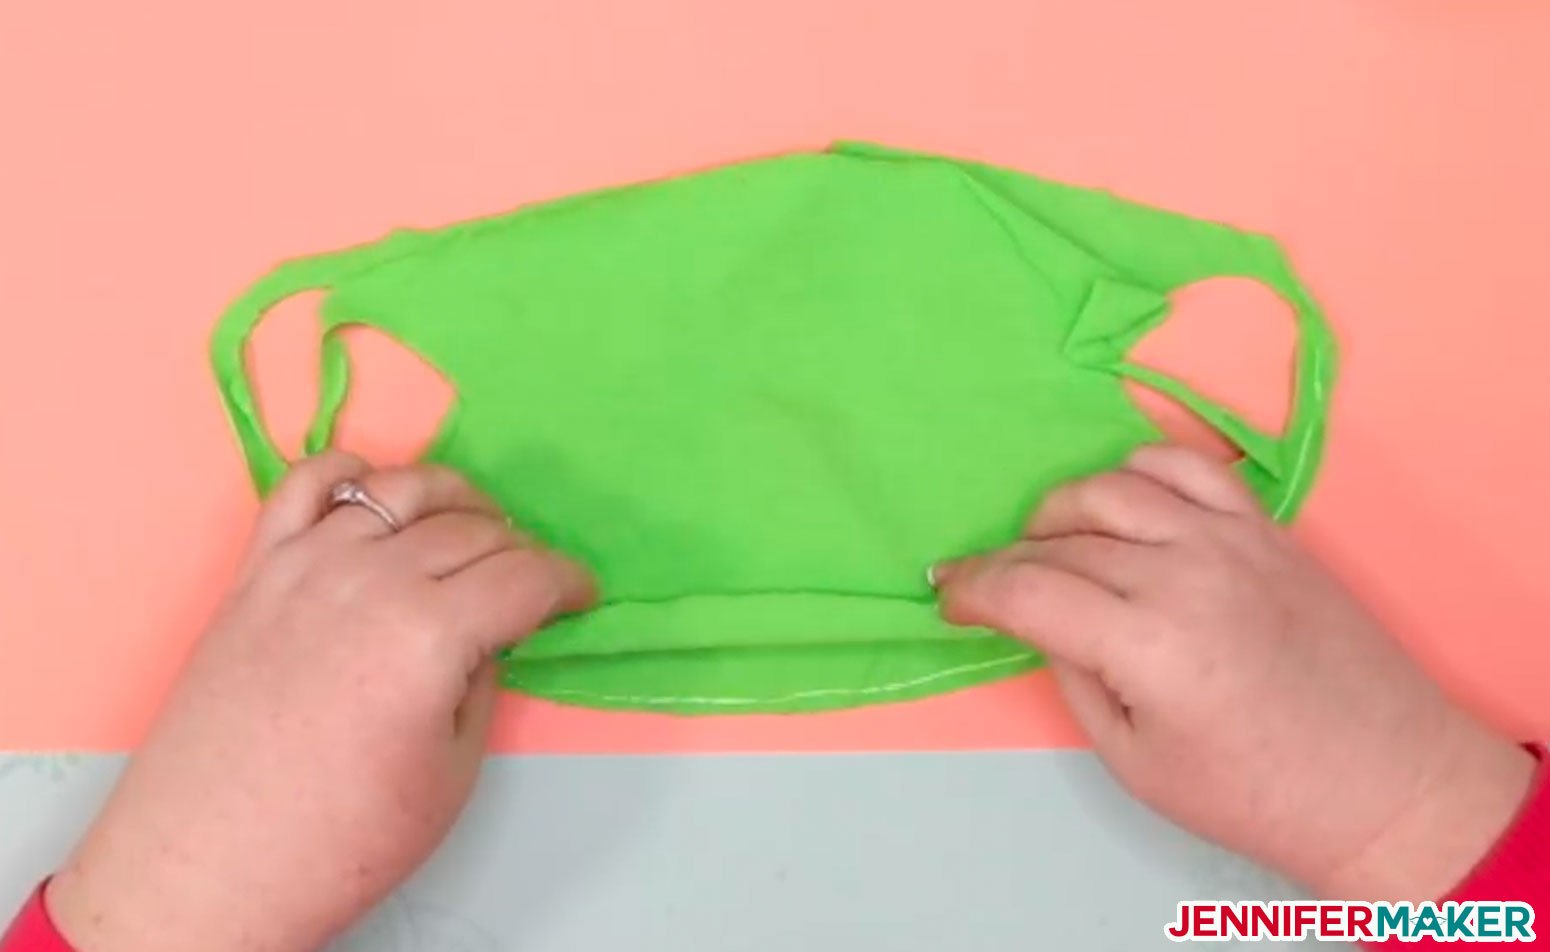
Now fold that top layer back down on top of the bottom layer and press back into place.
You can also fold down the top half of mask and put a line of glue at each side. I recommend leaving the top unglued in case you decide to insert a filter.
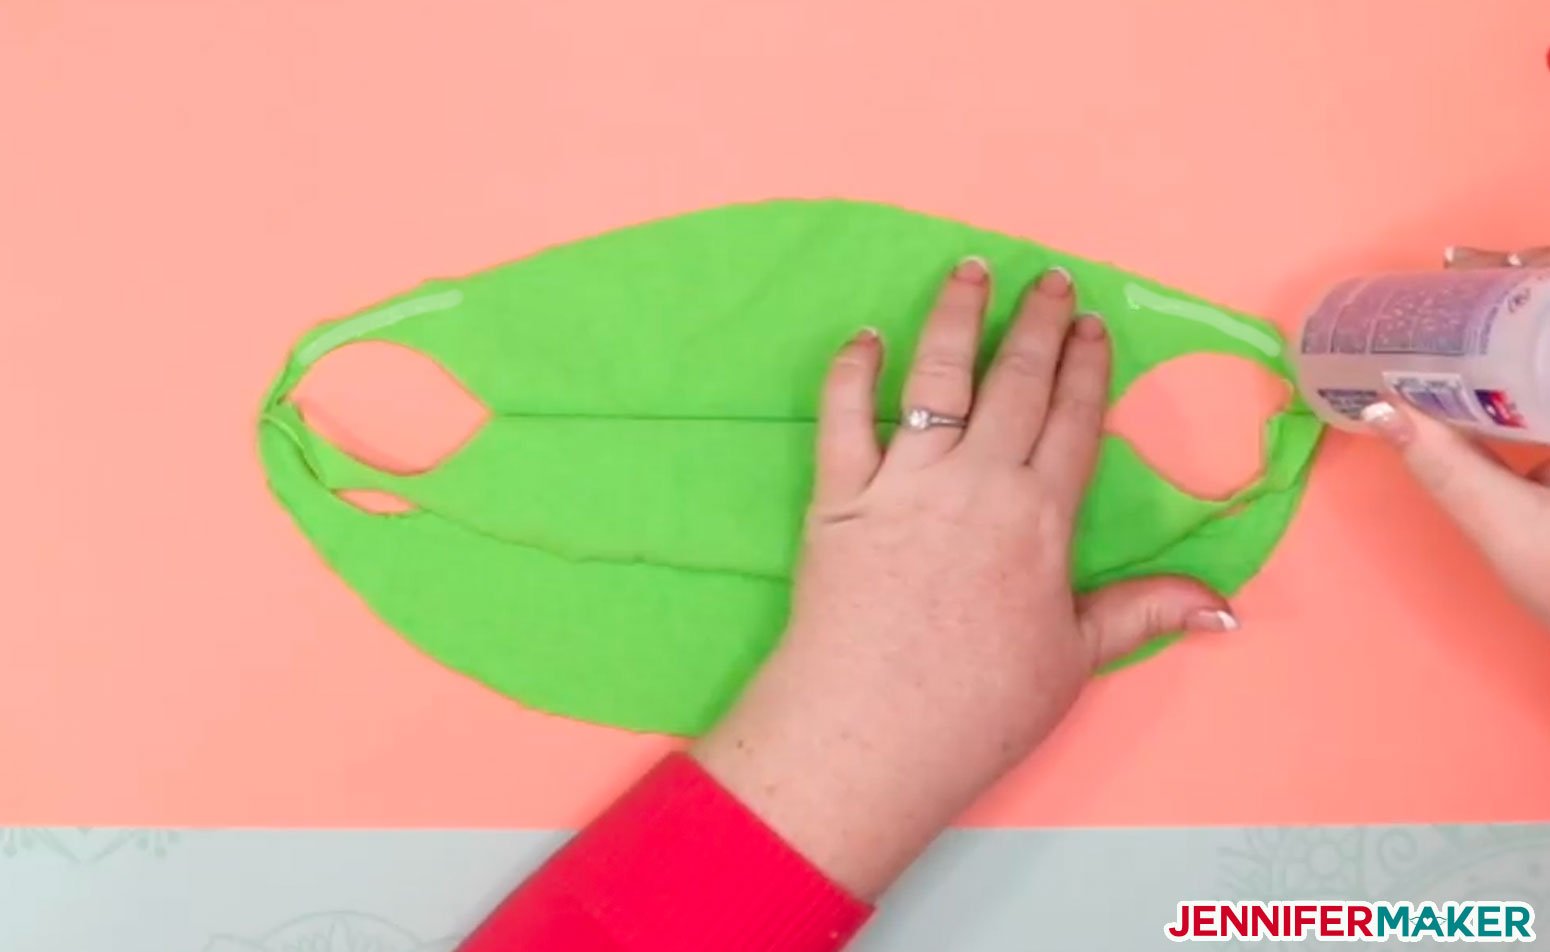
With the glue in place, fold the top layer back up and press back into place.
That's it! (Of course, if you have a sewing machine, you could just sew these instead, and it would be super easy. Just sew along the blue dashed line you see here:
Step 4: Wear your no-sew face mask!
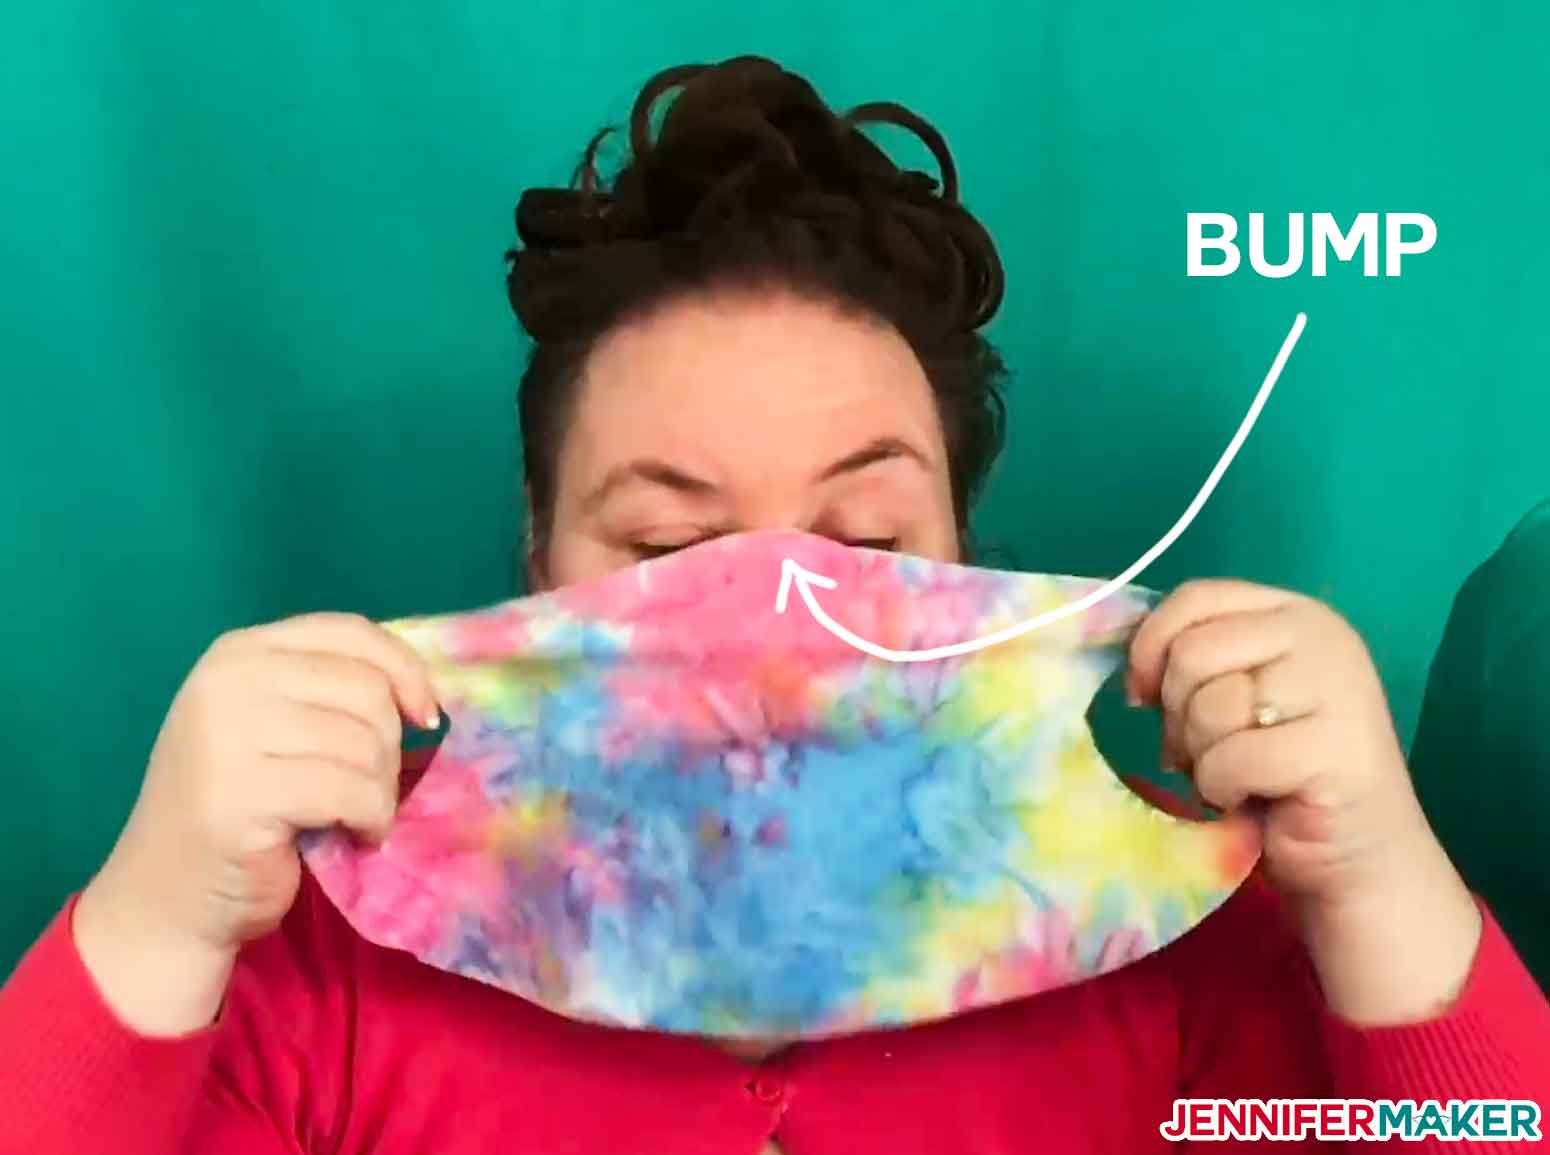
To put your no-sew face mask on, first locate the bump on one long edge —the bump is where your nose goes. If you glued your face mask, the bump is on the edge that is not glued. Put your fingers through the ear loops on either side and hold the mask up to your face with this bump pointing up.
Now twist one ear loop once and slip it over one ear.
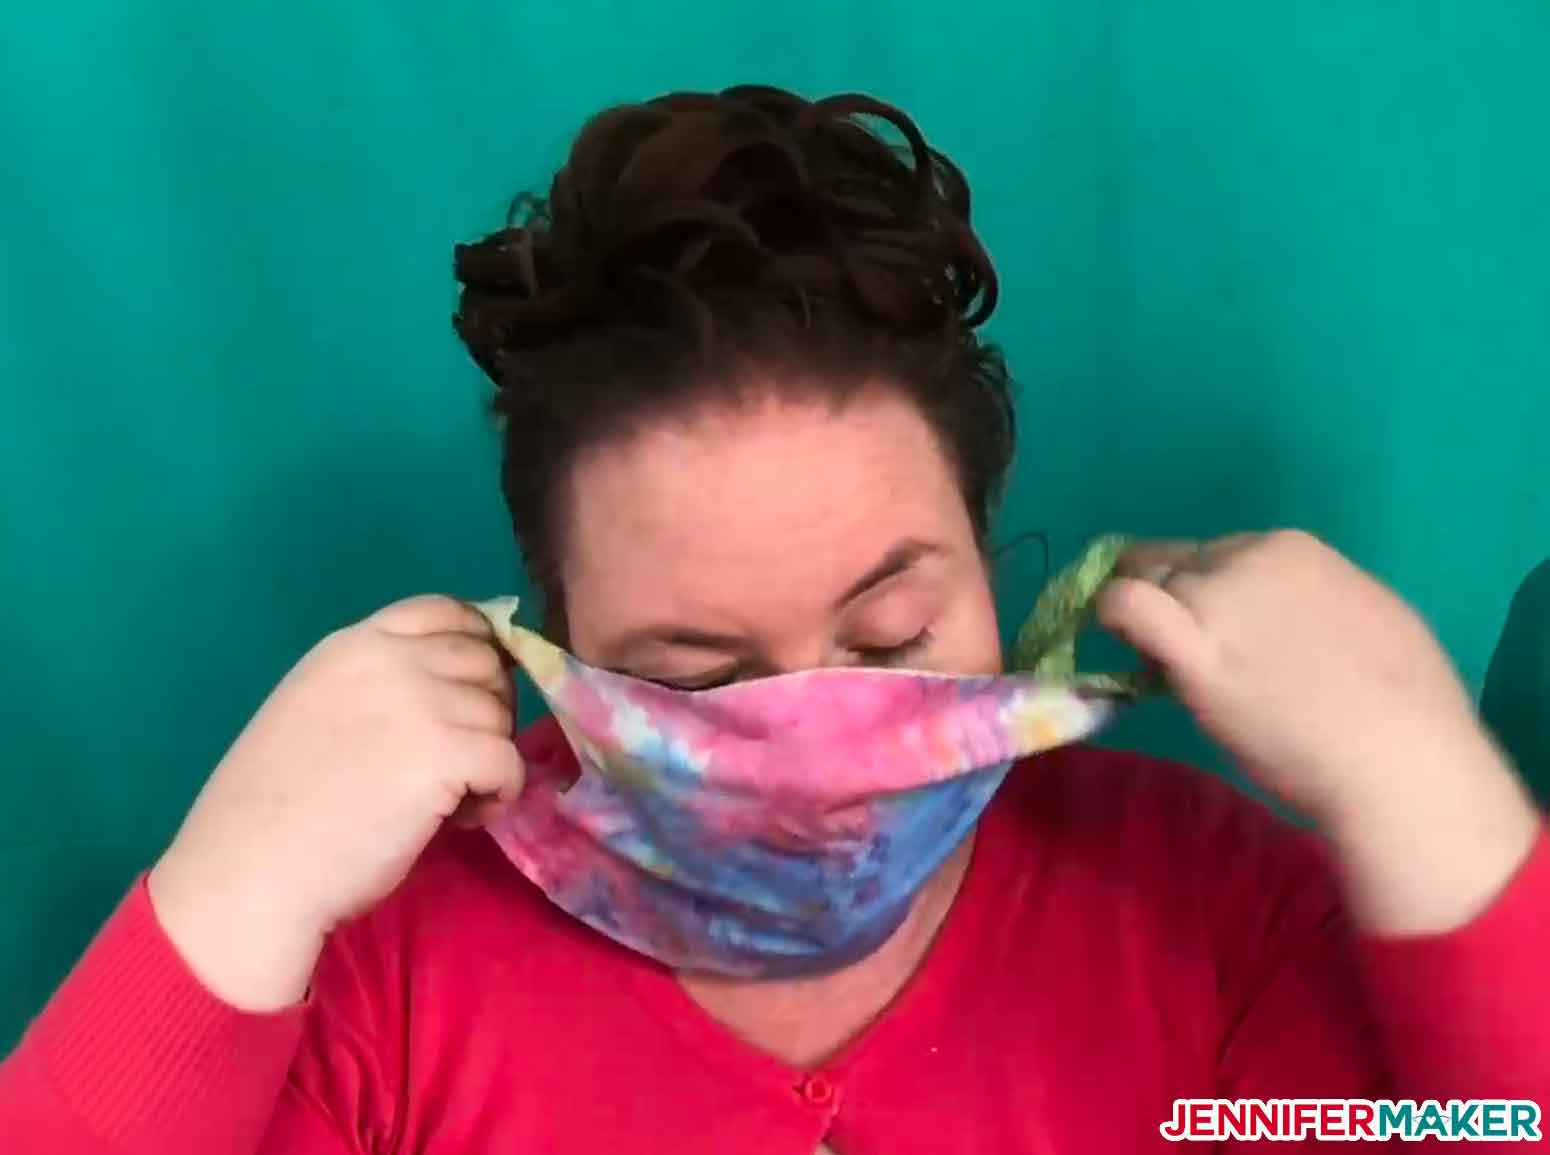
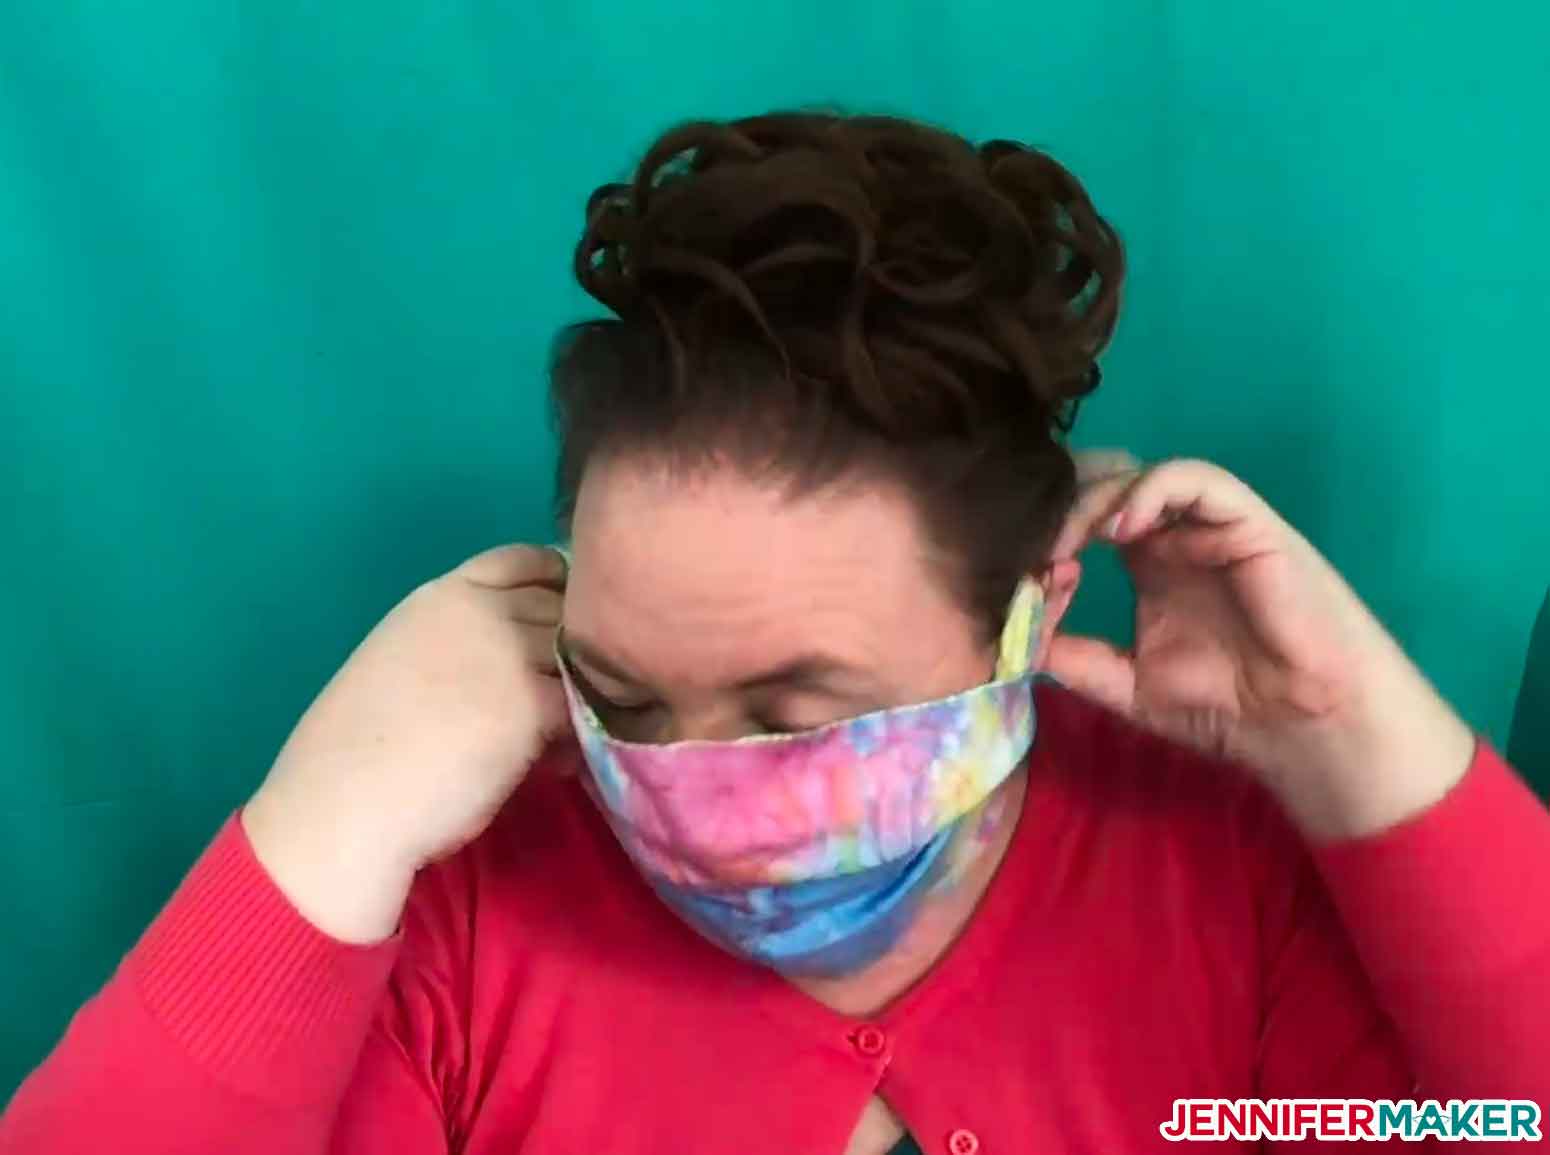
Then twist and slip the other loop over the other ear.
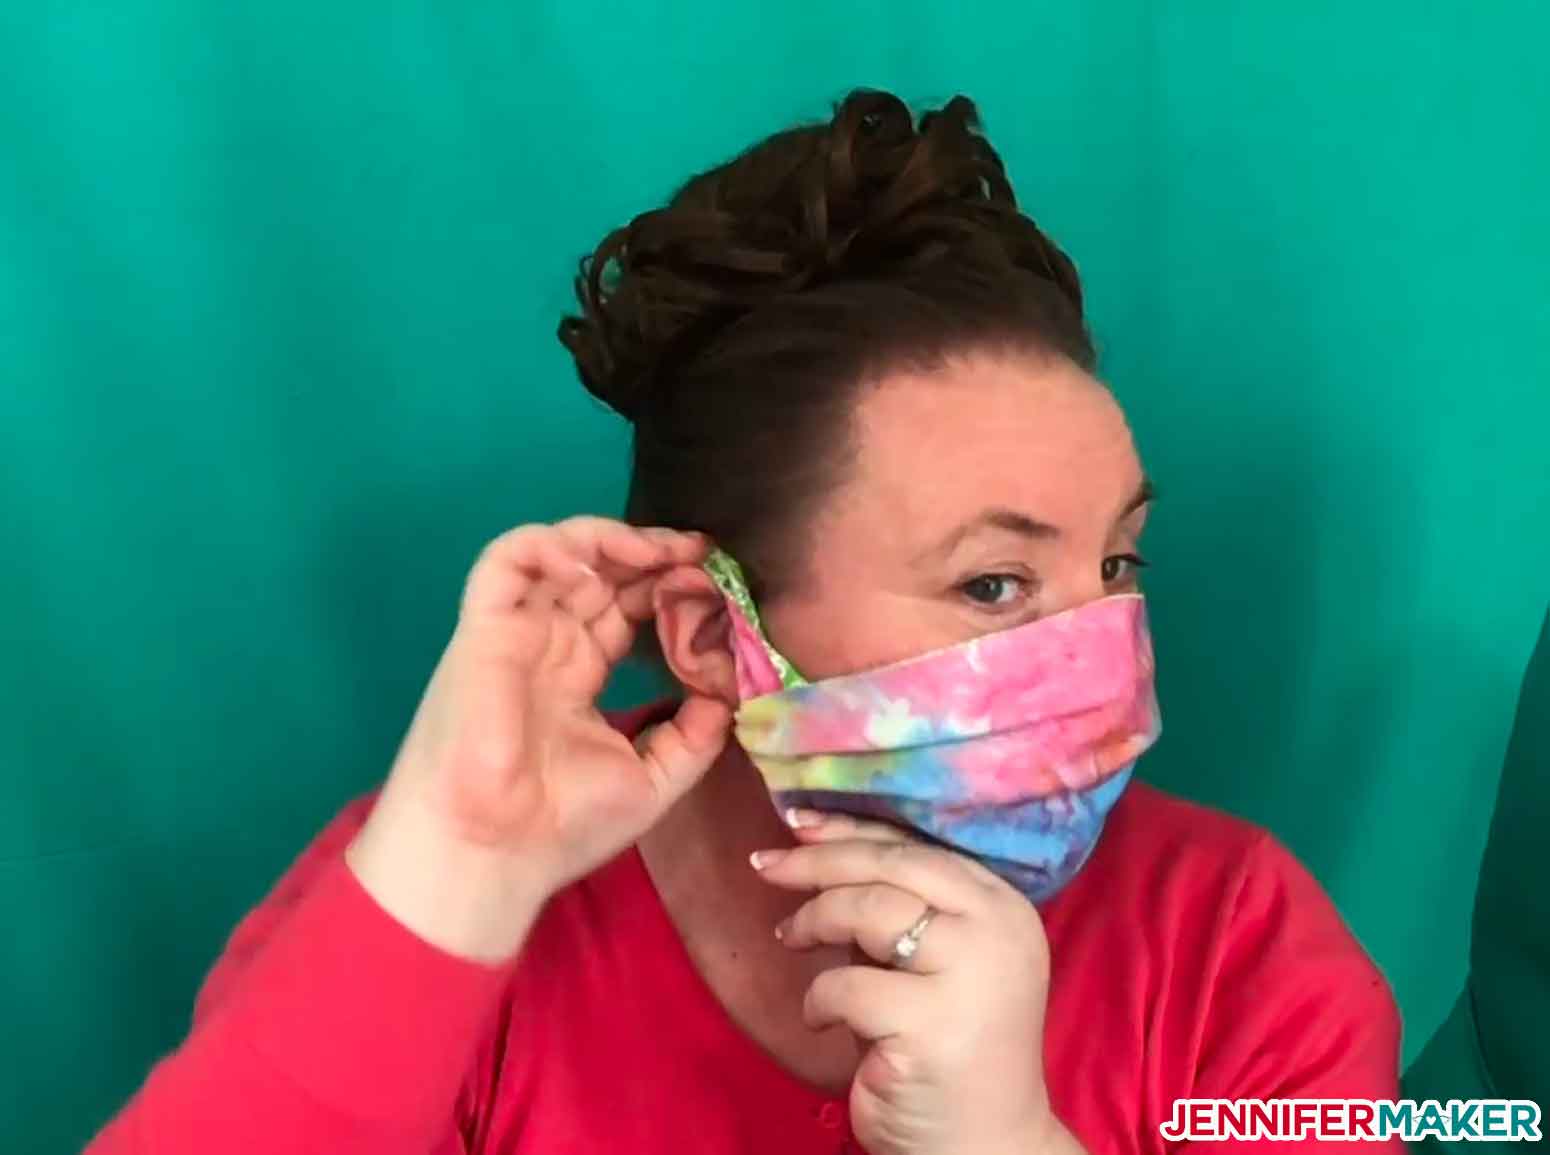
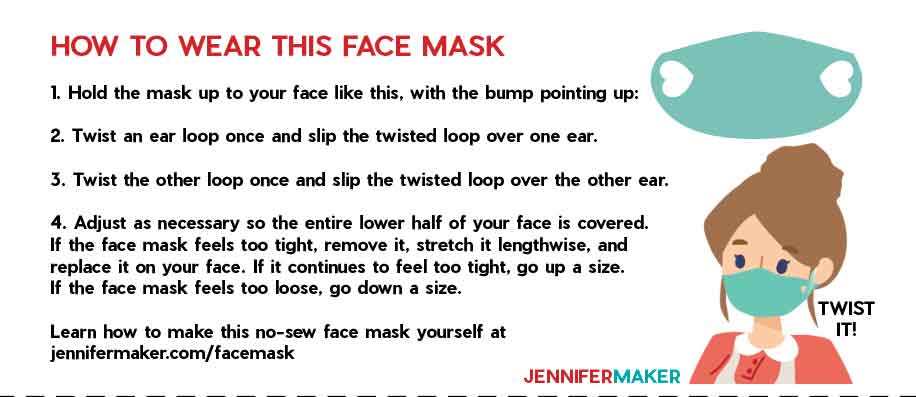
Adjust as necessary so the entire lower half of your face is covered.
If the face mask feels too tight, remove it, stretch it lengthwise, and replace it on your face. If it continues to feel too tight, go up a size.
If the face mask feels too loose, go down a size.
Notes
Because I know many of you are making these masks for others, I prepared a printable card you can include with your face mask that explains how to wear this it, since this no-sew face mask isn't as obvious as other face masks. Look for this printable card in the PDF Files folder of my pattern download file.
Answers to Your Questions about Making No-Sew Face Masks
Q: I don’t have a printer. What do I do?
A: Use our generic pattern posted earlier in this post to draw your own pattern on a piece of paper.
Q: I request the pattern, but it doesn’t show up. What do I do?
A: Check your spam or junk folders. If it still doesn’t arrive, you can either use the generic pattern and draw your own or email us at [email protected] for assistance.
Q: I downloaded the pattern, but nothing happens. Where is it?
A: The download goes to your Downloads folder on your computer or laptop, or to the “Files” area on your iPhone or iPad. If when you download it on your iPhone or iPad, it seems to take you to some random page on your browser, don’t worry — it’s simply using your browser to download and showing you whatever was open in your browser at the time. The file downloaded — go look in your Files app on your phone. To unzip and see files on an iPad or iPhone, tap open the Files app, tap on Browse in the lower right corner, locate and tap the file you download, and then you can see inside and access the zip file contents.
Q: I downloaded the PDF pattern, but how do I save it?
A: Once you download the PDF pattern, it should display for you in a new tab or window in your browser. To SAVE this pattern on your computer, go to File > Save Page As and choose a location on your computer. To SAVE this pattern on your iPhone or iPad, press the share icon (it looks like a square with an up arrow) at the bottom of your screen then press Save to Files.
Q: I don’t have a T-shirt or cotton fabric. Can I use an old pair of jeans?
A: 100% cotton jeans probably won’t stretch well enough. How about an old sheet instead? Get more face mask fabric ideas here.
Q: Should each layer of the no-sew face mask be different colors/patterns/fabrics, or can I use the same one?
A: I recommend they be different colors or patterns so the wearer can tell which is outside and which is inside. We don’t want them to accidentally put the side they’d be wearing on the outside against their face.
Q: Do I have to cut and wear two layers?
A: Two layers are the CDC’s recommendation, and my research indicates that two layers are more effective than one. But you work with what you have — one layer is still better than no layers.
Q: Do I have to cut the material on my Cricut?
A: Nope! If you’re only cutting out one face mask, you’ll probably like using a Cricut (if you have one). If you are making more than one face mask, you’ll find it faster to print out the printable PDF pattern from cardstock and cut out multiple layers of fabric using a rotary cutter.
Q: I don’t have freezer paper, but I really want to cut fabric on my Cricut Explore. Can I use wax paper or parchment paper instead?
A: No. Using wax paper will leave a waxy residue on your fabric that will be hard to get out. And using parchment paper will do nothing—it will not stick to your fabric. You need to either use freezer paper or another bonding material, such as Wonder Under. (Tip: In the UK, freezer paper is known as greaseproof paper).
Q: What settings do I use when I cut the fabric on my Cricut Explore?
A: I used “Fusible Fabric” with my regular fine point blade.
Q: What if I need a larger size than your “large” mask?
A: If you’re cutting by hand, the PDF now has an extra-large pattern in it. If you need something bigger than this, print the extra-large pattern at 110% then cut. If you’re cutting on the Cricut, upload the SVG, hide everything but one of the large yellow masks, and change its height to 15 or 15.5″, then duplicate so you have two layers. Note that you’ll only be able to fit layers on one 12″ x 24″ mask if you rotate each mask piece, so that’s only appropriate for the woven material.
Q: If I glue my face mask, how long should I wait before washing?
A: If you use fabric glue, you should wait 24 hours before washing the face mask.
Q: Can I sew my mask or add a wire for my nose?
A: You can sew your face mask and use a wire if you’d like. We wanted to keep this mask fast and easy so we didn’t include that in the design. You can take a look at our DIY Face Mask tutorial for helpful information on sewing a mask.
Q: If I am cutting bonded fabric on my Explore Air do I put the freezer paper or the fabric side down?
A: If you are cutting bonded fabric, place the bonded fabric freezer paper side DOWN on your cutting mat (you can use the pink mat or a green mat).
Q: My glasses keep fogging up when I wear my mask, what can I do to prevent this?
A: If you wear glasses, put a little shaving cream on them and then let it dry to reduce fogging.
Q: Should everyone wear a face mask?
A: No. Per the CDC, children under the age of 2, people with trouble breathing, and anybody unable to remove a mask unassisted should not wear a face mask. For more information on face masks for children, see my post that will answer all of your questions!
Q: How do I wash my mask?
A: The CDC advises that regular washing in a washing machine should suffice. Do not microwave it.
Q: Can I use fabric from my stash even if it isn’t 100% cotton?
A: When picking a fabric for your cloth face mask you want to make sure that you can breathe through it without any restriction, you can get it to fit snugly and comfortably and it can be machine washed and dried without it changing shape. That said, you also want it to be closely and tightly woven — one way to test if your material is closed enough is to put it up to your mouth and try to blow out a candle through it. If you can’t blow out a candle but can breathe through it well, you’ve got a winner. Read more about face mask recommendations from the CDC.
Q: What about… ?
A: Get more answers to your questions in my DIY Face Mask Guide.
Get my free printable PDF and SVG files to make your own no-sew face mask!
Have questions? Come on over and ask in our Facebook group — everyone is welcome! We’d love to see your no-sew face masks, too! Please share them in the group or email us at [email protected].
Prefer to make a face mask that doesn’t cling so much to your face and has strings? Check out my DIY Face Mask Patterns! I also have a Gaiter Face Mask pattern and a Veil Face Mask Pattern
Love,

Take a Look at My Other Face Mask Patterns and Learn More About Face Masks


Want to remember this? Save this No-Sew Face Mask From a T-Shirt tutorial to your favorite Pinterest Board


You are correct that it is important to know what the contents of any filter material is. At this time we are not recommending the HEPA filter. You can read our DIY Face Mask Filter Materials post for our review and research we’ve found for filter materials https://jennifermaker.com/diy-face-mask-filter-materials/
I clicked on for a free pattern and I never got the email
Please check your spam or promotions folders/tabs. Sometimes mail software will send our emails into junk folders. If you still can’t locate it, please contact us at [email protected] and we’ll be happy to help you get the pattern!
I did, several times. I just am not getting it.
Jennifer I knew if I waited long enough you would come up with AN AMAZING NO SEW FACE MASK. Variable sizes, thorough instructions, and so so easy! The masks fit beautifully. Thank you for all that you do! Follower and fan for life!
That’s SO wonderful to hear, and I’m very glad the masks fit!
I just love your no sew mask. Know I can make for all the family
Thank you
it worked so well
THANKS SO MUCH!!! This is perfect! I can sew BUT I have RA,LUPUS and so on… mv hands and fingers make it almost impossible to sew nicely now… Love these!!
Thank You so very much! And Bless Your Heart! I have been sewing them the old-fashioned way. I haven’t had a sewing machine in over 20+years (about that long). My fingers are showing the effort for sure. Your No Sew Face Mask is a blessing. Thank You so very much again!
This is MUCH better than the others. Easier, faster, less mess, everything! I use the PDFs because all I have is either a 20-year-old sewing machine or my hands (and I’m in my 60s, so the hands are wearing out quickly from arthritis). I have loads of t-shirts I’d been saving, so this works perfectly. The other face masks are great, and I did make a couple regular type (rectangle) and a couple of the fitted (out of cute fabric I’ve had around for 20-30 years), but elastic is at a premium now and we don’t like ties. THANK YOU for coming up with this alternative no-sew version. I needed something for myself and my disabled husband because of our ages and we both have multiple medical issues, so if we have to go out (which I try not to), these will help! Blessings to you, hon! ❤️
THANK YOU SO MUCH FOR THIS !!!
You are a genius!!! Thank you so much for this. I hope you get credit when this becomes the go-to method. Thank you for thinking of us.
Thank you, Gina!
We’re all doing what we can, and I hope this helps to get masks for everyone!
Thank you so much !! You Rock!!
Its perfect Thank you
Awesome thanks! As a single male the only bandanna I could find was my dog’s, which was pink and said princess on it. With no sewing skills, fabric laying around, or elastic other than my underwear I was at a loss. But with your post, one sacrificial t-shirt, and some scissors I was in business. Now I just need to figure out how to prevent it from fogging up my glasses.
I opened up a paperclip (like to form a hook) and glued it (between the two layers of fabric) to the nose area of the mask. Put the mask on and pinch the paperclip to keep the mask snug around your nose.
We can’t thank you enough for the patterns and video tutorial on how to make these. I have 5 living in my house and these are awesome!
Thank you so much for sharing! This was the perfect solution for an unexpected run to the outside world today before the sewn masks I had ordered arrived,
These are wonderful! They fit the best and SO easy to make!
Thank you so much for this! Excellent tutorial and patterns.
My husband and I live in a metropolitan area and must take our active dog for several walks a day. We’re in our 60s so masking is recommended, and required in our grocery stores. We were using 6 folded bandanas with rubber band ear loops each day. Not sustainable over a long time… Finding your pattern was the perfect solution.
For the Adult Large, I make 3 sets of masks out of each size large t-shirt—1 set along the upper front half of the shirt which often includes a design, and the other 2 sets along the side edges. Don’t forget to utilize the sleeves and leftover fabric to cut 5″x5″ squares to place between the masks for extra filtration.
Mix and match t-shirt pieces. Having a contrasting color helps for remembering which side was against your face if the mask comes off for any reason. Best of all, just toss everything in the wash when used!
Stay well and be safe everyone!
Thank you very very much ! Kisses from Brasil.
Wonderful so easy and fast, now everyone can make one to wear! Thank You so much
This was so easy! I used tin foil to sharpen my kitchen scissors and cut up an old maternity shirt. I also used an old onesie to make a one layer mask for my 5 year old (just for play). I wish I could post pictures. Thank you!
This is great! One addition I made was to place a couple flat twist ties at the nose area on the inside of the front side and placed a small piece of material over it. This allows us to get a better fit around the nose.
Thank you, Jennifer. Using your pattern on a cut-up T-shirt was very easy to do. I just made two masks in a few minutes.
WHY couldn’t I have found this last week when I spent about 5 hours making 8 masks with my sewing machine and elastic!!! This is so great. I do like the ones I made “the hard way” but your design would have saved me SO much time!! Thank you so much for coming up with this and sharing it.
Thank you sooooo much for sharing this mask. It is a safe and soft alternative for my kids.. I really appreciate that you also offered the template free. Bless you!
Stay safe and look forward to other great ideas
M. Beverly
You’re welcome!
Thank you so much!! So great! This was PERFECT! I don’t sew, and this was so easy to make – and it actually turned out! Thanks for the great tutorial!! Shared on FB for other non-sewing friends. God bless!
I just made two from cotton remnants. Work great! Thanks so much for sharing!
nice
Thank you! This is genius!
Hey,
Thank you for sharing the information about It. I learned a lot from it. I appreciate you the detail you went into it. I am grateful for the amount of time and effort you put into this helping us. Your insights and summary are beneficial.
Regards
Sonia Sharma
THESE NO SEW MAKES ARE “SEW” MICE & EASY
How can I get the pattern for your no sew t shirt face mask?
Near the top of this blog post, we have a yellow graphic that reads “Get the free face mask PDF patterns” with an image of scissors, click on that and a box will pop up for you to enter your name and email address. If you have pop-ups disabled then you might not be able to see the box. If that’s the case, scroll to the bottom of the post and you’ll see a box after the FAQs that reads “GET MY FREE PRINTABLE PDF AND SVG FILES TO MAKE YOUR OWN NO-SEW FACE MASK!” Type your name and email in there and click the button that is labeled “Yes, Please send the pattern!”
You are a legend! This is so clever! THANK YOU!!!
Thank you so much! I just unearthed my sewing machine (haven’t used it for at least 10 years) and have started to sew again, but need to make a LOT of masks for my husband’s students. This easy pattern will make it simple and cost effective since I can use t-shirts!
You explained this sooo well. Even my 11 year old daughter had no problems figuring this out. Thank you for this great idea!
Thank you, Carolyn! I’m so happy to hear your daughter made one, too!
I had no idea how much fun making your no-sew face mask would be! I must have made over a dozen in different sizes and colors from all my unworn t-shirts. Thank you Jennifer for your thorough instructions.
I love the cricut and must invest in one 😉
I’m so happy to hear you like the design! You can also join our free Cricut giveaway. You can always find the most recent giveaway at https://jennifermaker.com/cricutgiveaway/.