Learn how to make easy Pull Tab Gift Tags for the holidays!
The holidays are almost here, so it’s time to get your gifts in order. I don’t just mean the presents themselves — I’m talking about gift wrap, bows, and of course – gift tags! While wrap and bags keep the present a secret, how do you deal with prying eyes when it comes to the “To” and “From” on the tag? My Pull Tab Gift Tags solve this problem because they prevent peeking! But how?
Wrapping Paper and bags hide the gift inside, but sometimes it’s fun to keep everything a mystery! These cute tags are designed so you can’t tell who they’re for – OR from – until you pull the strip on the perforated lines — kind of like a zipper. There will be no more peeking this holiday season with these fun gift tags!
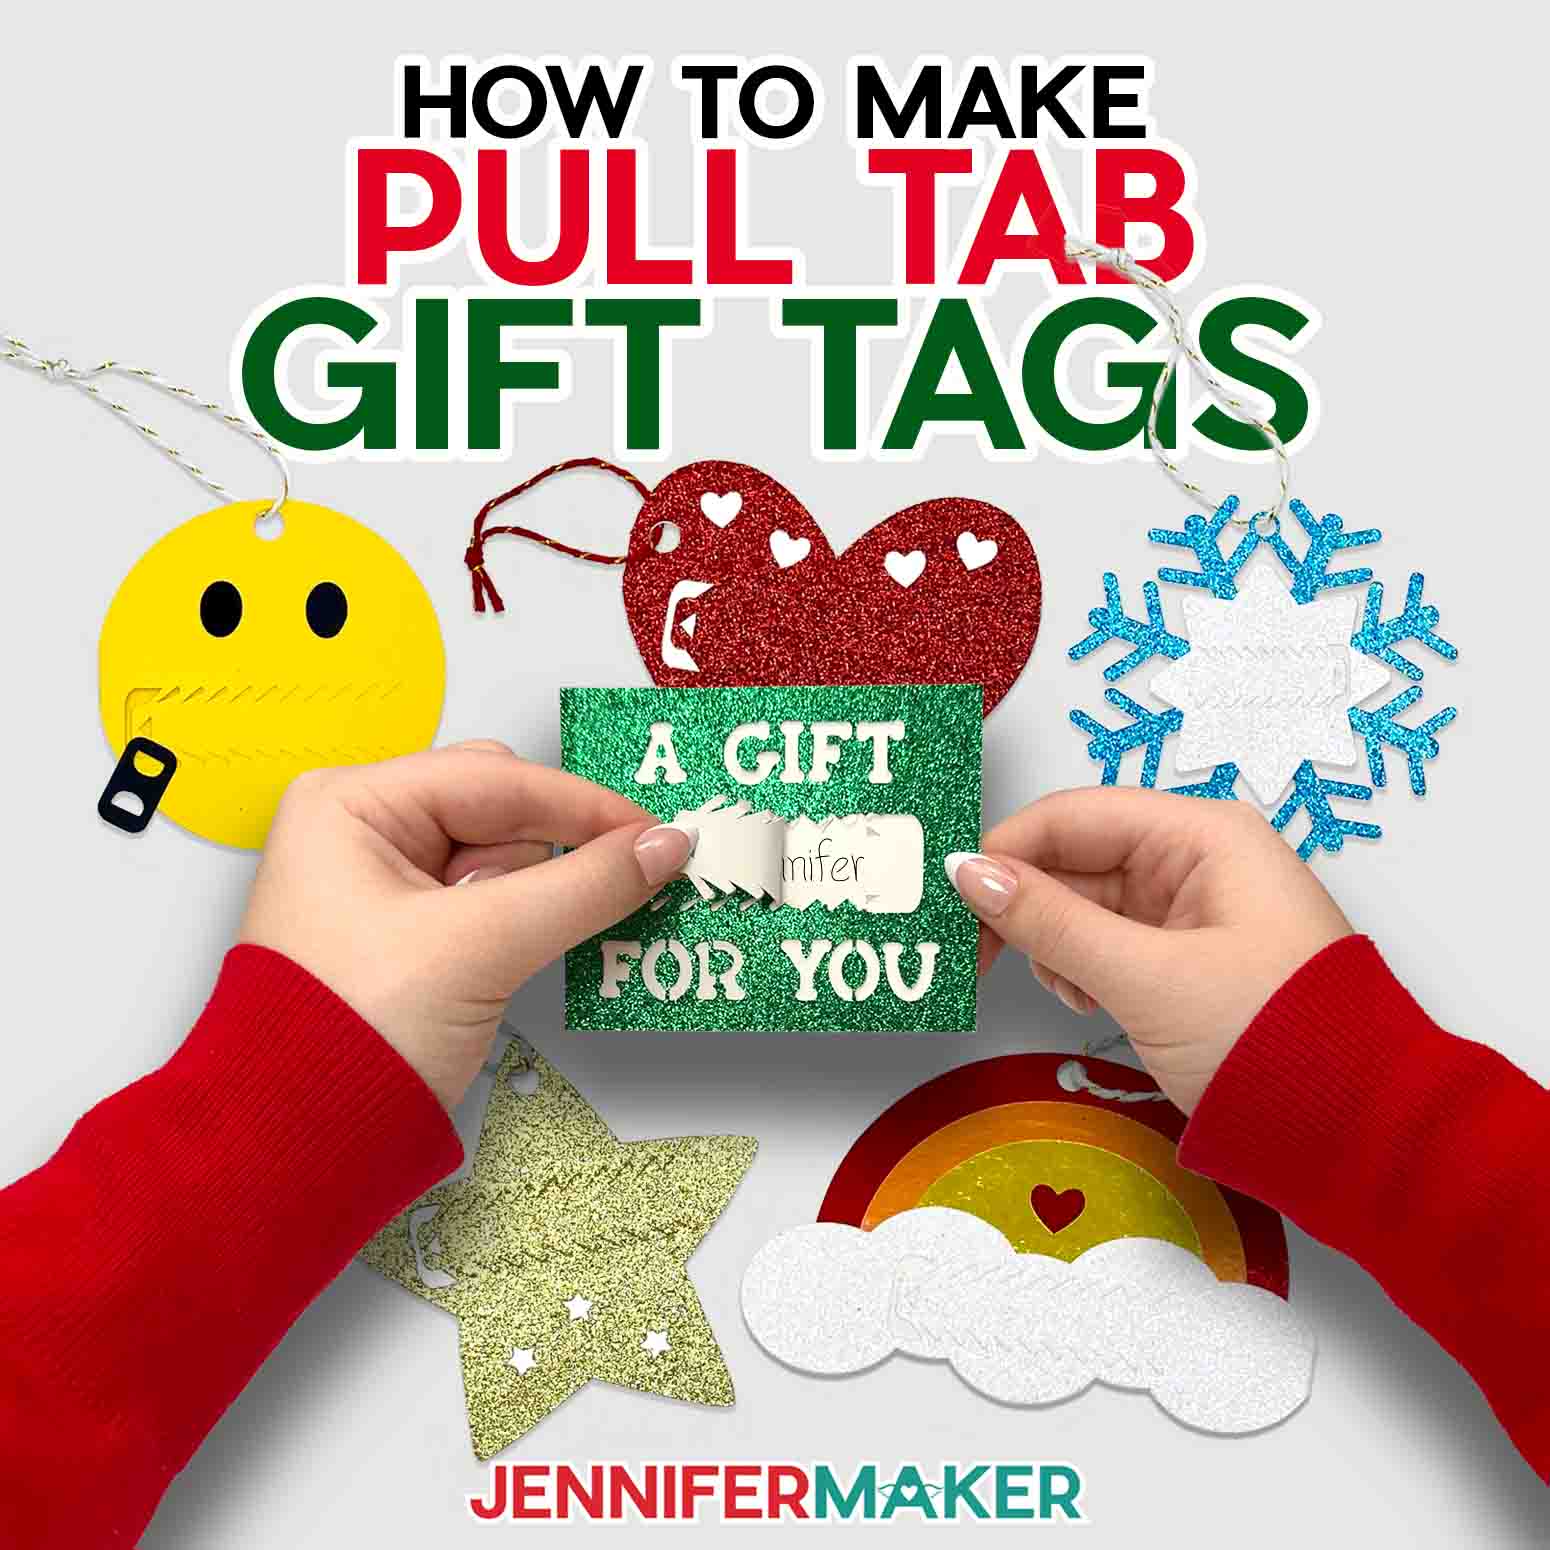

We’ve made some sneaky gift tags like these before, but our crafting community has been asking for some fun new designs. So, I made a whole new collection for you this year!
Just like the last batch of tags, these are super easy to make. So easy in fact, that you can handwrite your messages, but I’ll also show you how to use your Cricut to write them for you! Learn more about choosing a good Cricut writing font in this tutorial.

You can cut your materials by hand, of course – but it’s much easier to cut them with the help of a cutting machine like a Cricut. I’m using the Cricut Maker 3 but you can also use the Maker, Explore series, Venture and Joy Xtra. Or another machine that uses cutting files.
To make my pull tab gift tags, you’ll need some cardstock. What kind? That’s up to you! I used 65 lb cardstock in several different colors and types — like glitter! You can also use metallic, or even patterned cardstock, too.

You might be thinking, “How can you write on glitter cardstock if it has to be cut glitter side up?” Don’t worry! Glitter, foil, and other specialty cardstocks are a little different to work with, but I’ve got a workaround in Cricut Design Space.
I’ve even got a trick to save materials that I’ll show you, too!

You’ll also need some craft glue to assemble your tear-away gift tags, along with some twine to hang them and a few other supplies and tools you can find in my materials list for this tutorial.
Now there’ll be no more snooping under the tree for whose gift is whose! I think the mystery and anticipation makes gift giving – and receiving – even MORE exciting. Use them for Christmas gifts under the tree, or for Secret Santa and White Elephant gift exchanges. My pull tab gift tags are sure to be a hit with all your lucky gift recipients all year long!

Let me show you how easy it is to make these pull tab gift tags! This post contains some affiliate links for your convenience (which means if you make a purchase after clicking a link I will earn a small commission but it won’t cost you a penny more)! Read my full disclosure policy.
Materials to Make Pull Tab Gift Tags
View my Amazon shopping list with the exact items we used to make this project
- 12” x 12” 65 lb. Cardstock
- Cricut Glitter Cardstock Classics Sampler
- Cricut Glitter Cardstock Brights Sampler
- Optional: Pattern Cardstock
- Optional: Recollections Foil Cardstock
- A way to cut your cardstock: I’m using the Cricut Maker 3 but you can also use the Maker, Explore series, Venture and Joy Xtra for this project!
- Cricut Green StandardGrip Machine Mat 12″ x 12″
- Brayer
- Scraper
- Weeding Tool
- Craft Glue – I used Bearly Art Precision Glue
- Twine
- Design #560 (My free SVG/PDF/DXF design files are available in my free resource library – get the password by filling out the form at the bottom of this page)

How to Make Your Own Pull Tab Gift Tags

Pull-Tab Gift Tags
Learn how to make a pull-tab gift tag for any occasion!
Materials
- One (1) Sheet of 12” x 12” 65 lb. Cardstock
- Cricut Glitter Cardstock Classics Sampler
- Cricut Glitter Cardstock Brights Sampler
- Recollections Foil Cardstock
- Twine
- Cricut Fine-Point 0.4mm Black Pen
- Design #560 (My free PNG/PDF design files are available in my free resource library – get the password by filling out the form at the bottom of this page)
Tools
- I’m using the Cricut Maker 3 but you can also use the Maker, Explore series, Venture and Joy Xtra for this project!
- Cricut Green StandardGrip Machine Mat, 12" x 12"
- Brayer
- Scraper
- Weeding Tool
- Bearly Art Precision Craft Glue
- Scissors
- Portable Trimmer (optional if you want to trim cardstock and cut multiple colors on one mat)
Instructions
STEP 1: GET MY FREE PULL-TAB GIFT TAG DESIGNS
First, download my Pull-Tab Gift Tags designs from my free library – look for Design #560. Alternatively, you can use the Save This Project form near the top of this post and the design link will be emailed to you.
TIP: If you’re not sure how to upload, go to jennifermaker.com/svgs to learn how to unzip and upload SVG files.
I’m using a Cricut Maker 3, but you can use a regular Maker, and Explore series machine, Cricut Venture, Cricut Joy, and Joy Xtra, or another cutting machine that works with SVGs.
STEP 2: UPLOAD AND PERSONALIZE YOUR PULL-TAB GIFT TAGS
1. Open Cricut Design Space and click “New Project.”
2. Click “Upload” and then “Upload Image.”
3. Click “Browse.”
4. Select the SVG collection file.
5. On the Prepare to Upload screen, it will say “Cut image” with the design preview.
6. Click “Upload.”
7. Find your design in Recent Uploads and add it to the Canvas.
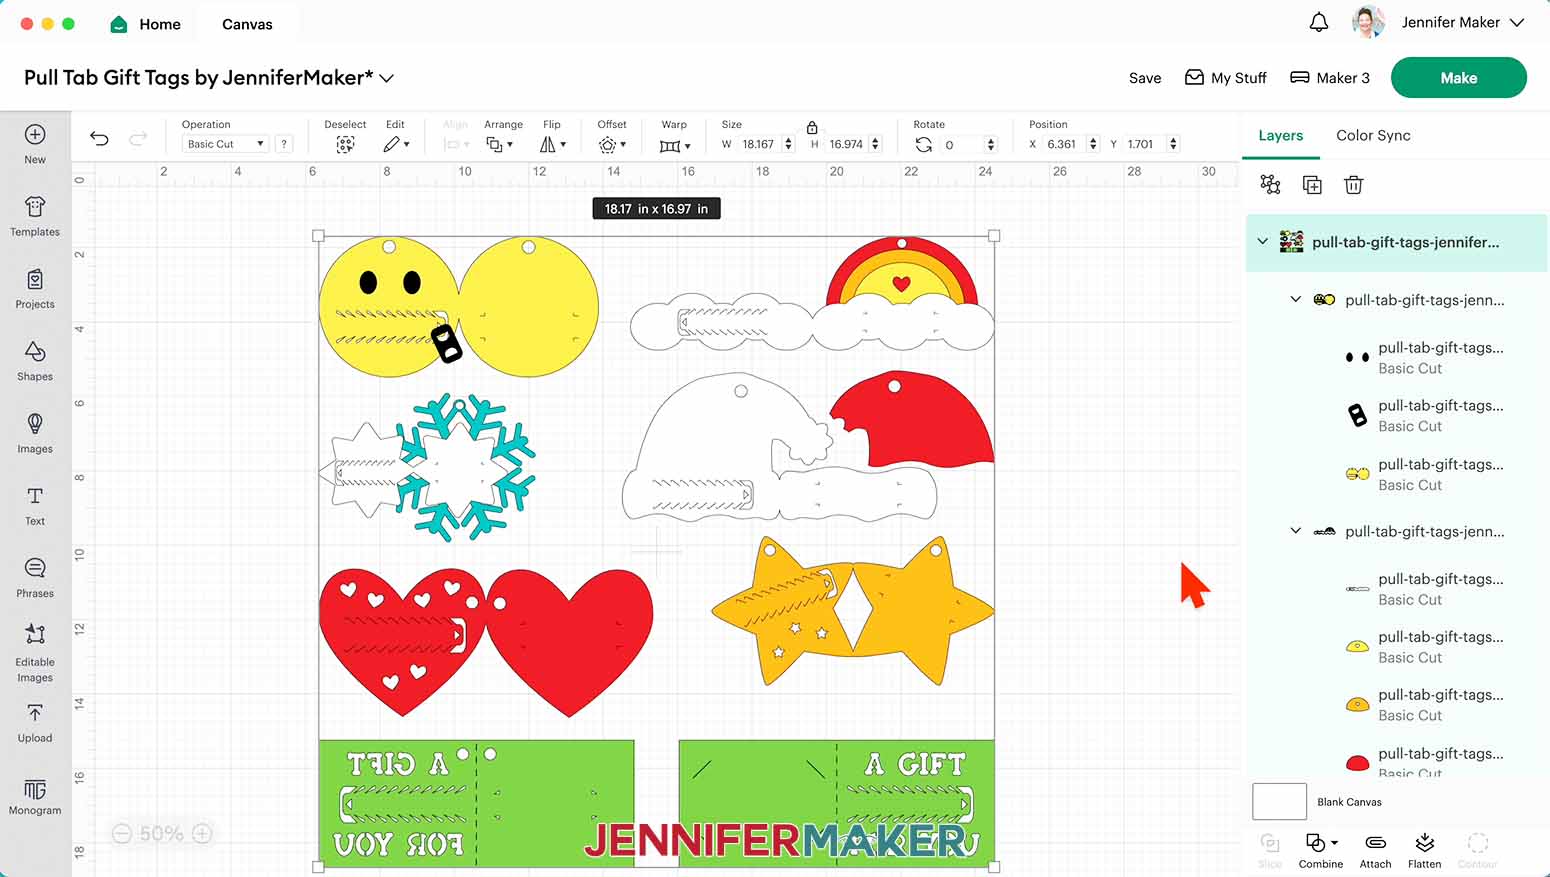
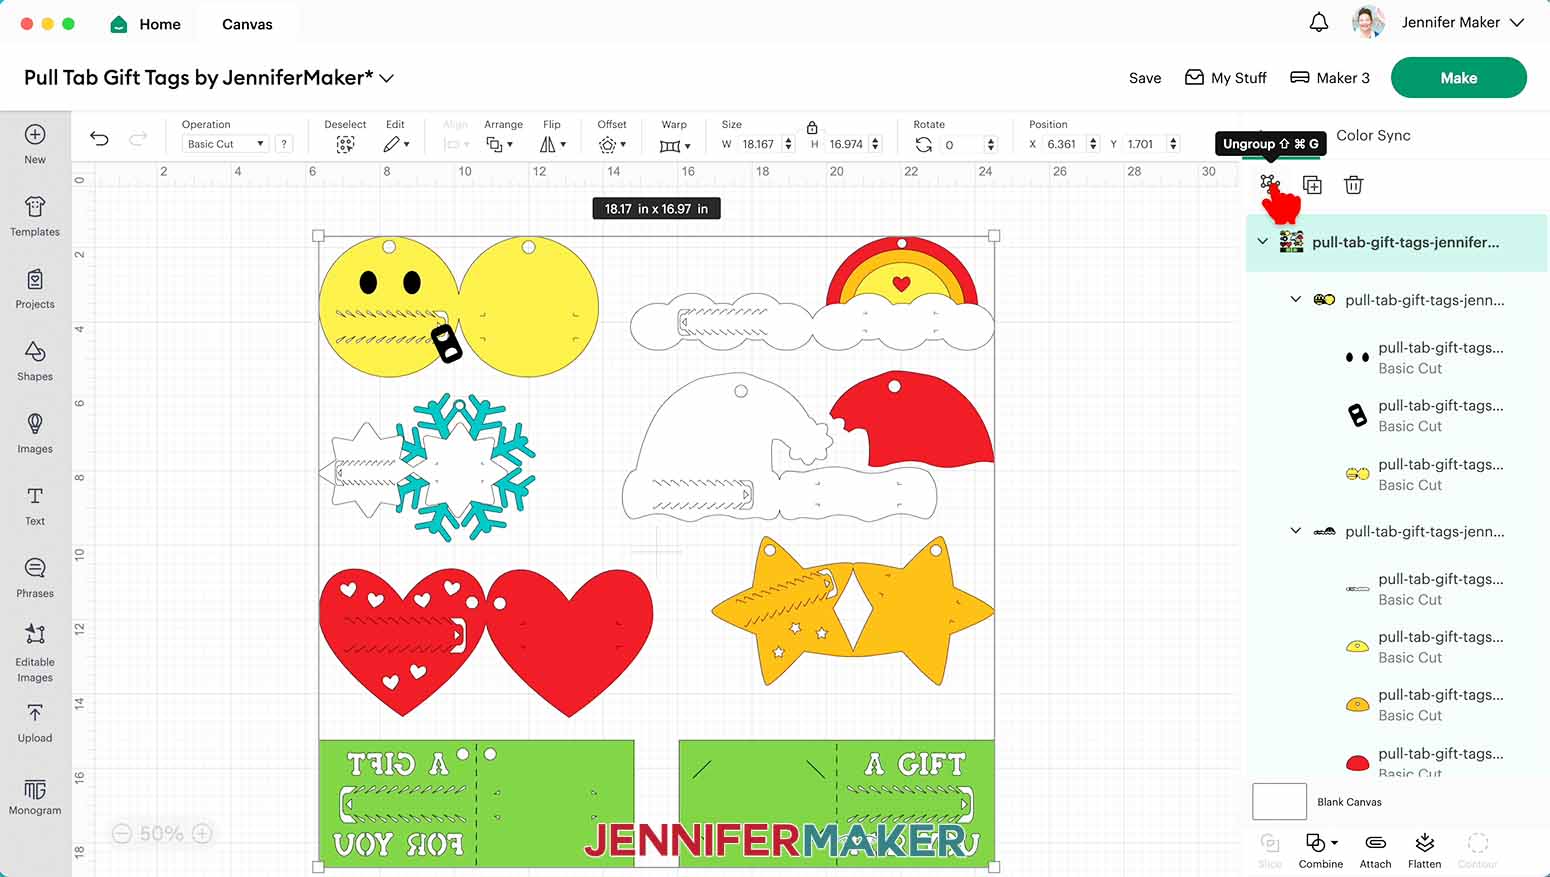
8. Select the entire design and click the “Ungroup” icon.
9. Click to select any designs you don’t want to make and delete them.
10. Click the minus (-) in the lower left corner to zoom out.
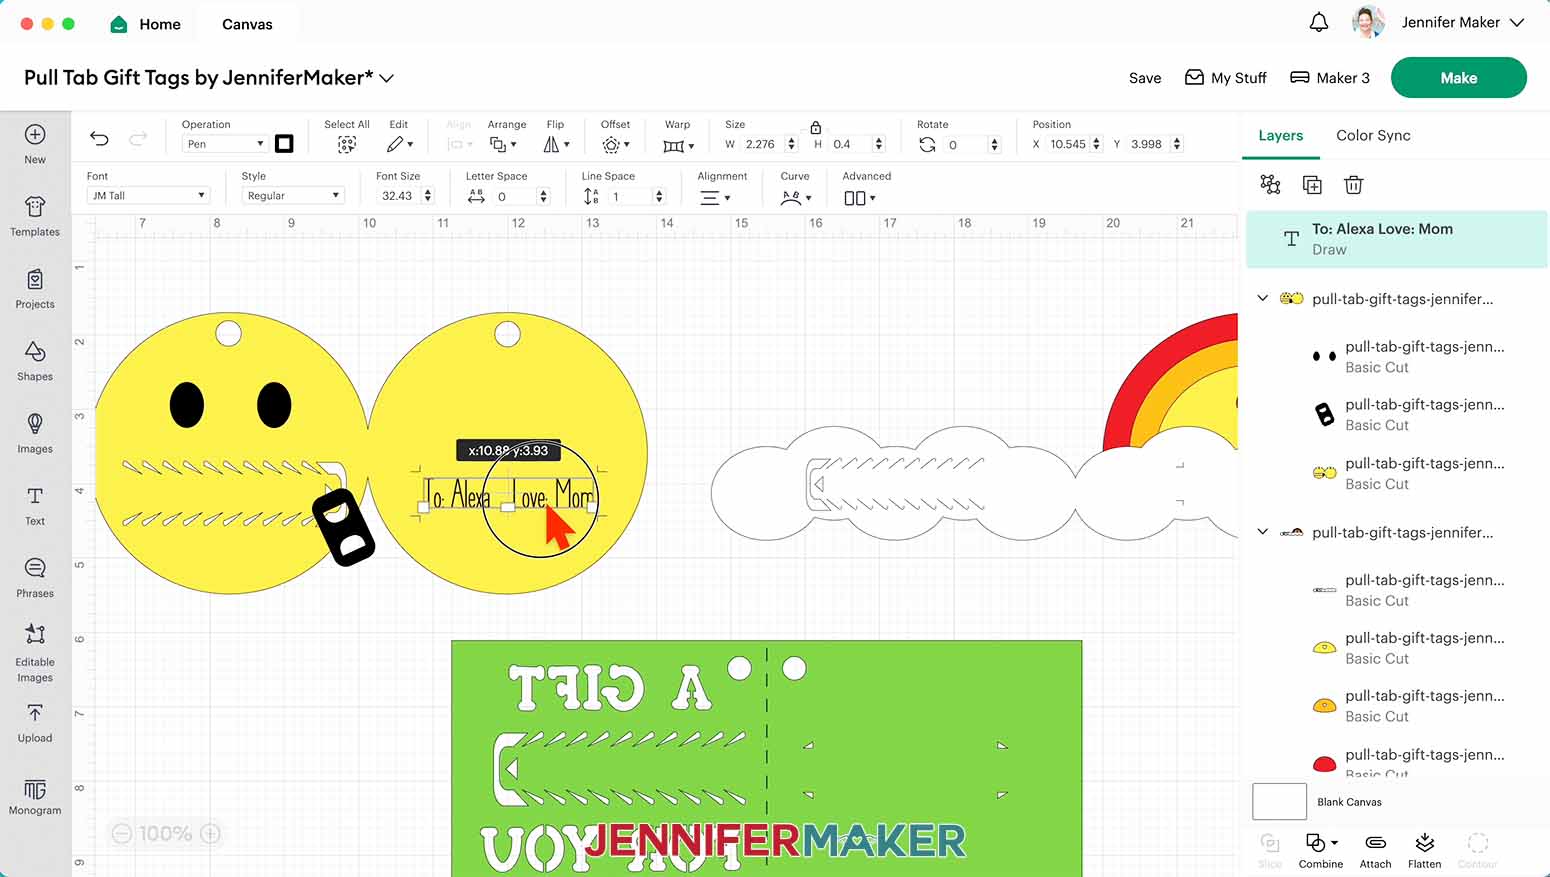
11. If you want to handwrite your personalizations, you can skip to Step 3.
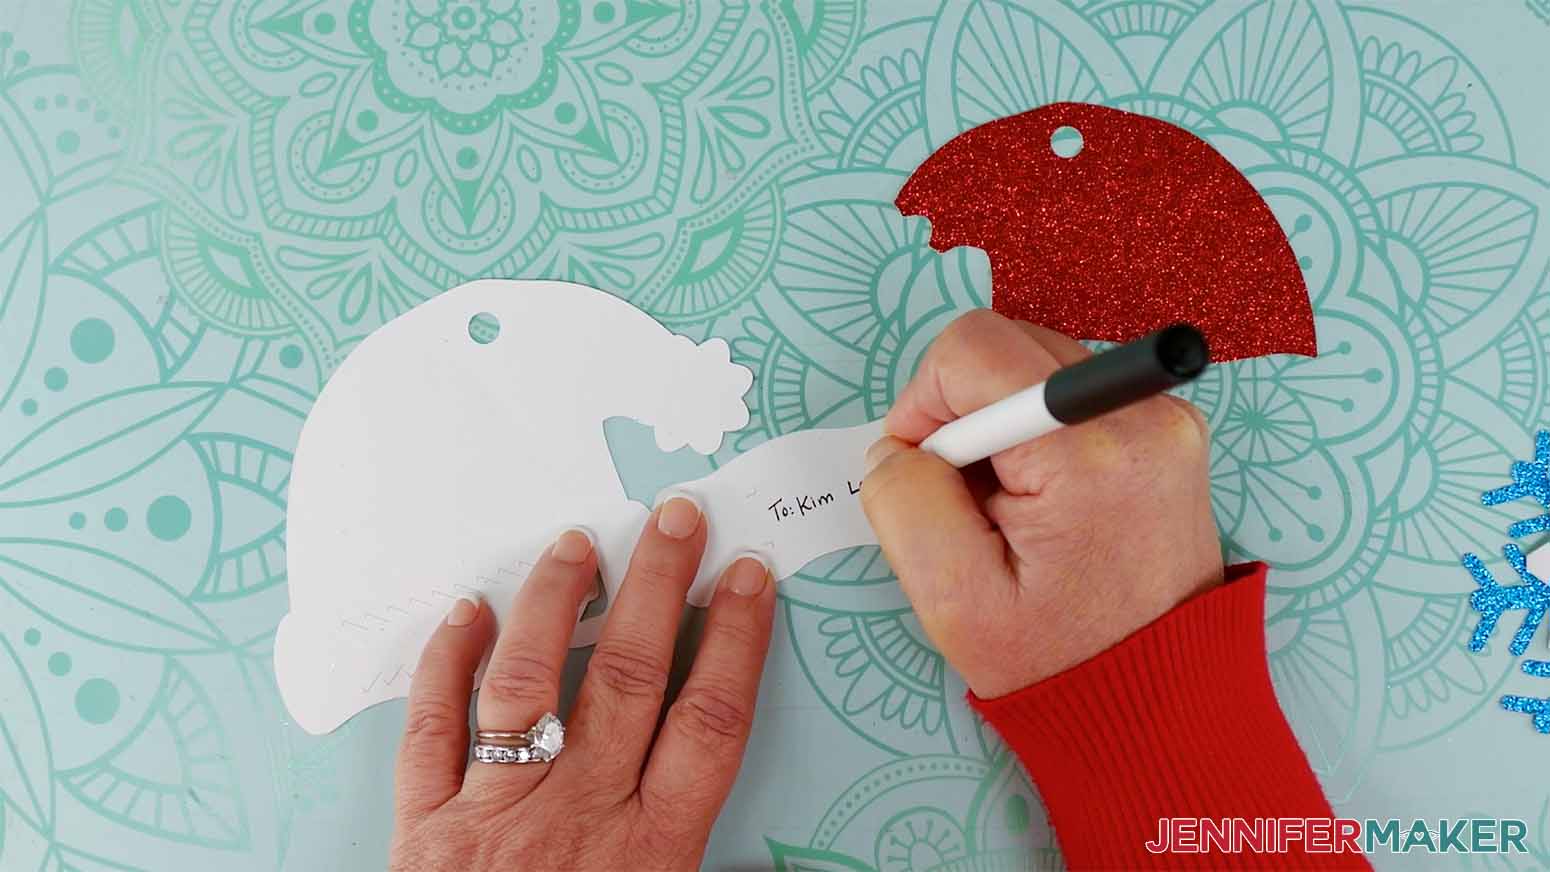
12. The gift tags have small “L” cut lines on them, opposite the pull tab. This is a guide for the space you need to write within to be visible when the tag is assembled.
13. To write with the Cricut, click the Text icon on the left of the canvas.
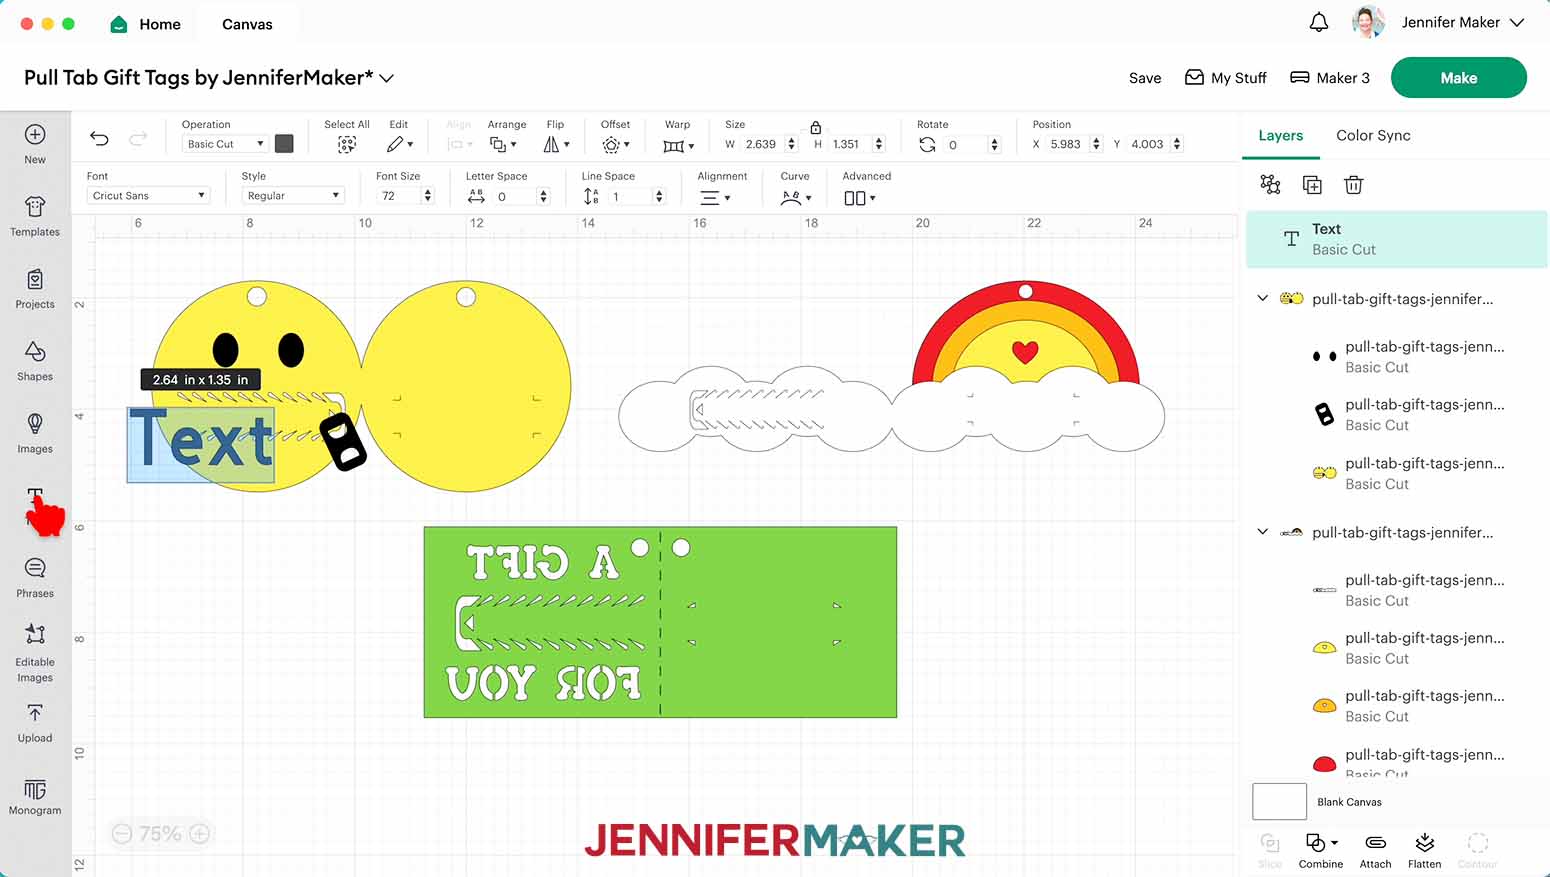
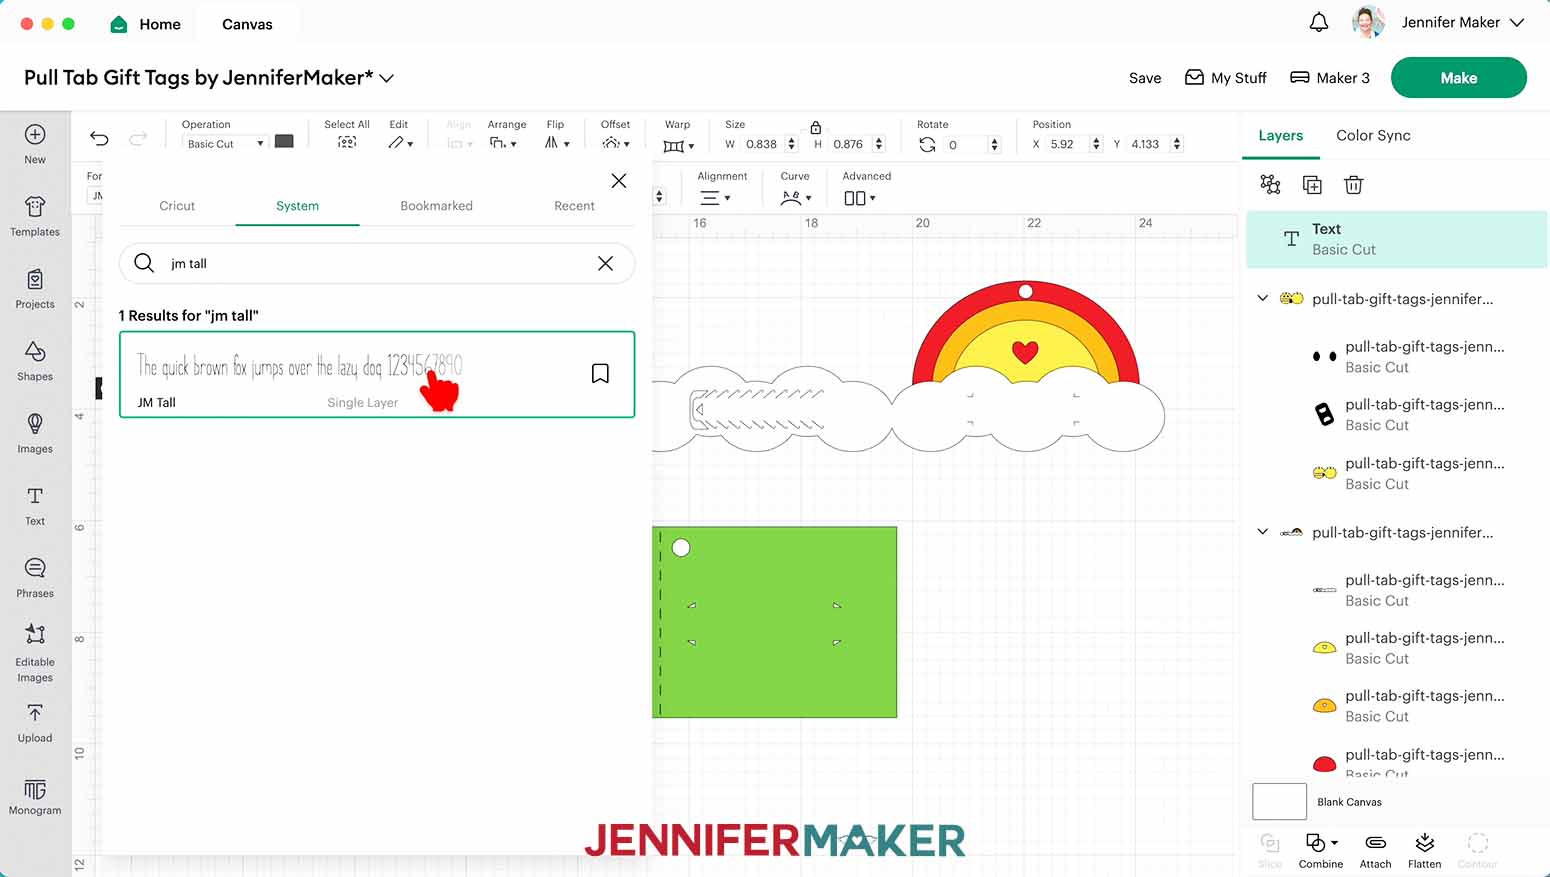
14. Click on the Font dropdown arrow and search for the writing style font that you want to use.
15. I’m going to use JM Tall (which is under System since I downloaded it) but you can use any font you’d like.
TIP: If you need help downloading and installing fonts to use in Cricut Design Space, check out this helpful tutorial.
16. Click the “X” to close the font menu.
17. With the text layer selected, click on the Operation dropdown menu and select “Pen.”
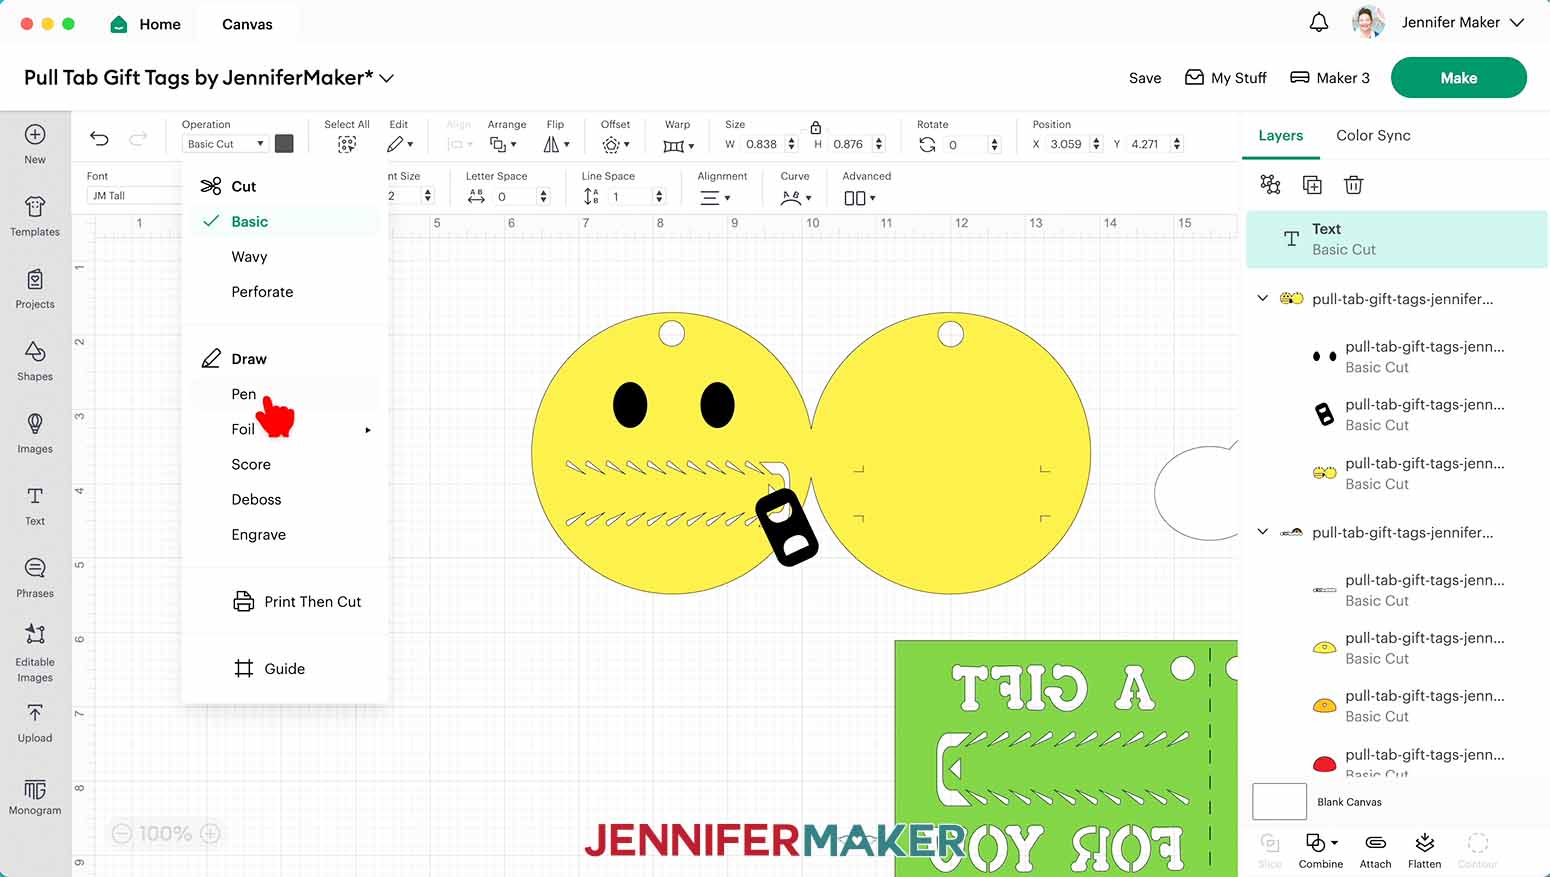
18. I’ll leave my pen color at Fine Point 0.4mm Black but if you want to change the color or pen type, click the color square next to the operation menu to make your selections.
19. Double-click on the text layer to edit the text and type your first personalization.
NOTE: The gift tag spacing is small and for my personalization, it fits best on one line.
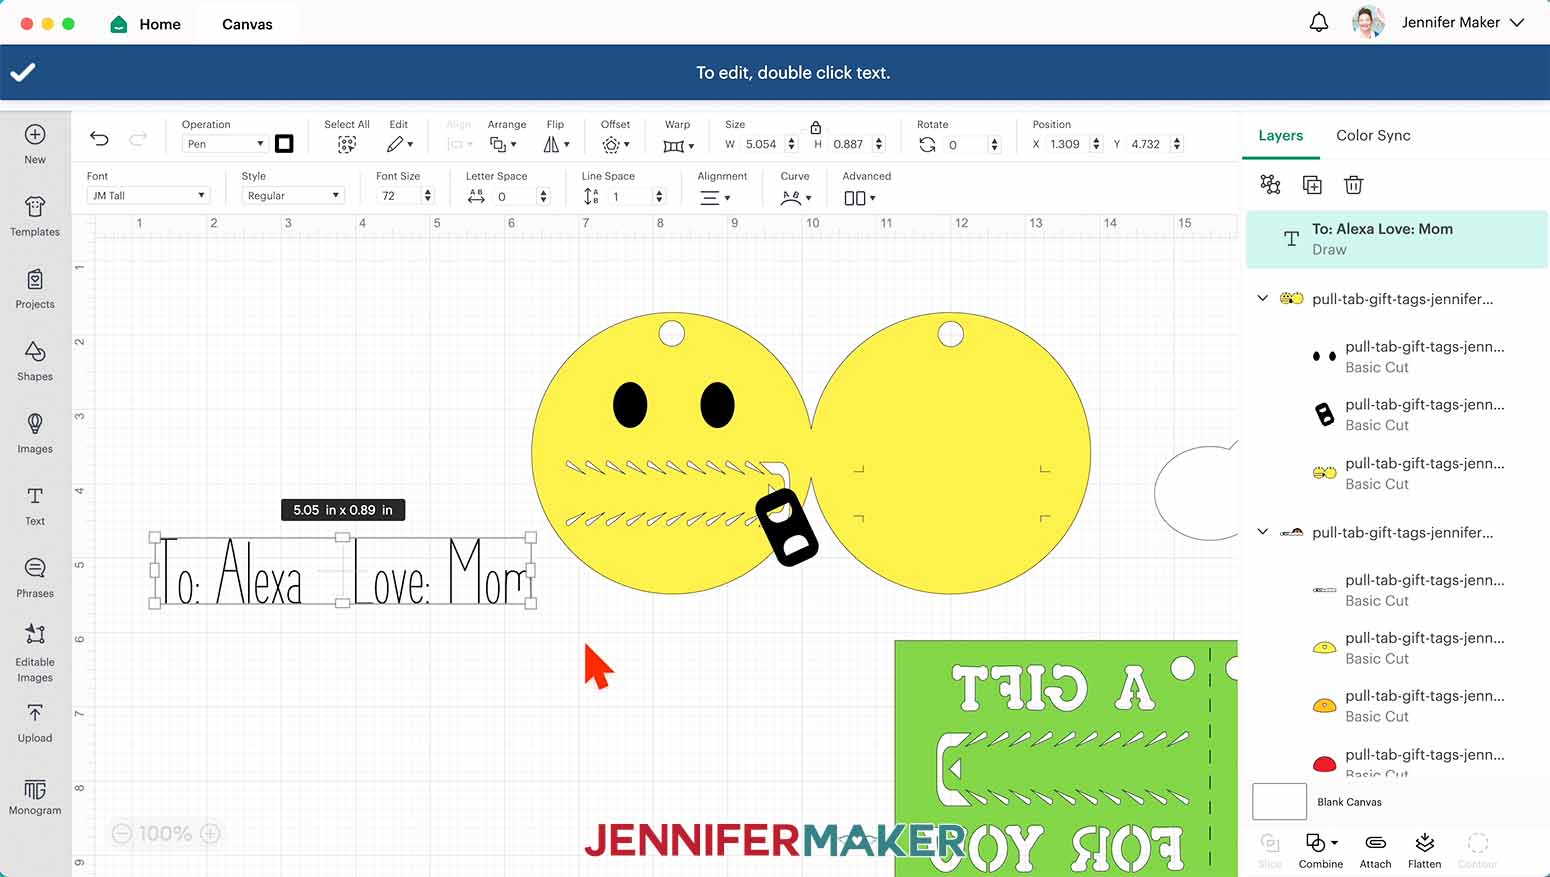
20. Click anywhere on a blank area of the canvas to exit editing mode.
21. Click and drag the text layer over the gift tag you want to make. I’ll put it on the emoji.
22. Select the text layer and click and drag the corner handle to resize the text.
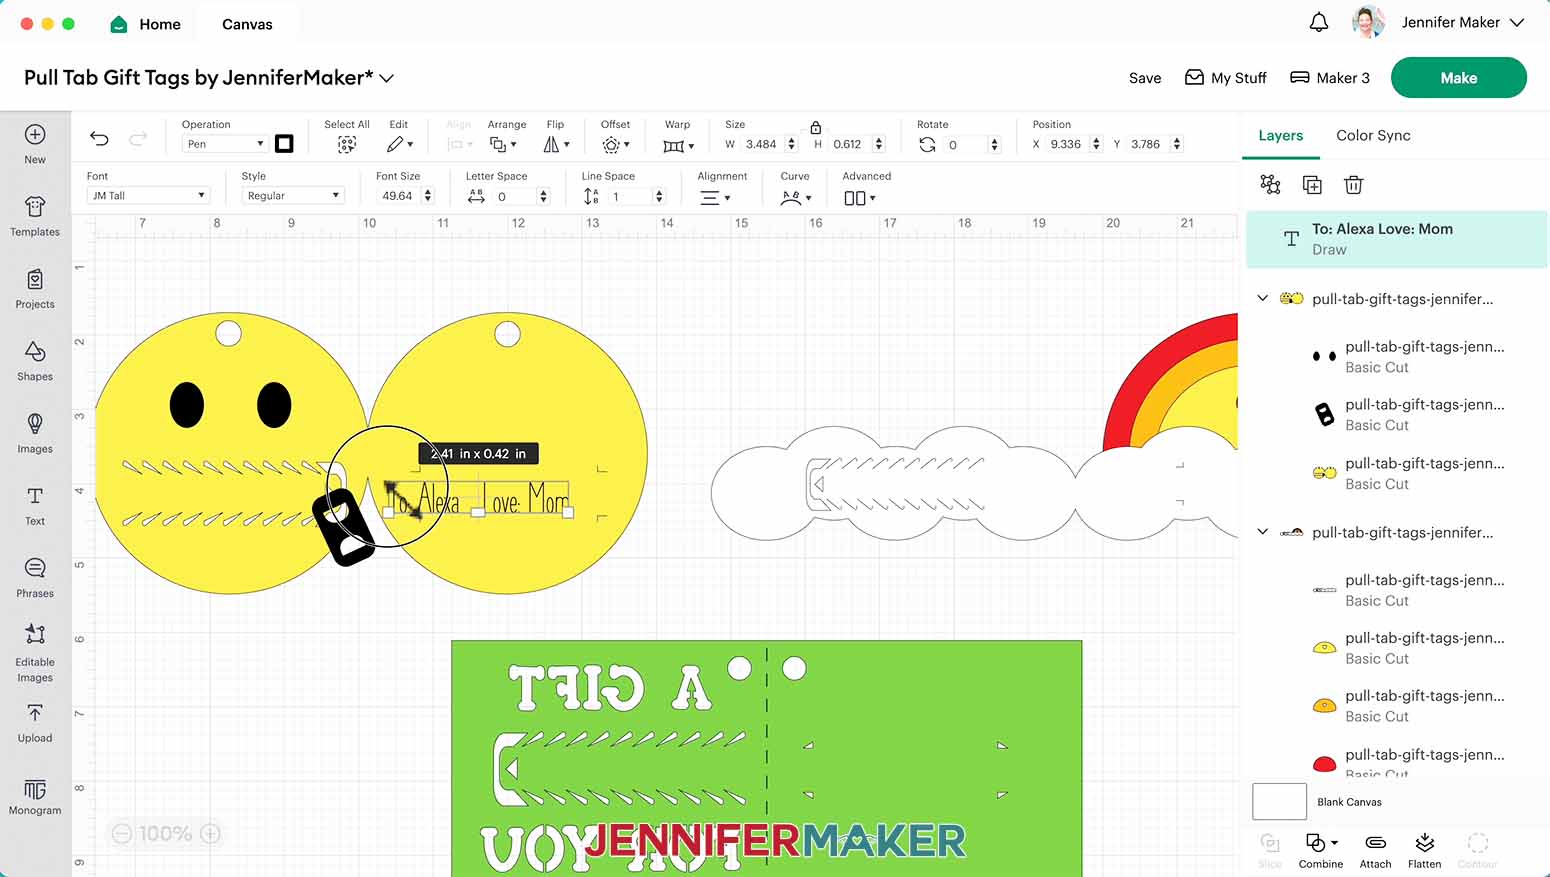
23. Position the text within the “L” marks on the gift tag.
24. If the tag has multiple layers, select it in the Layers panel and click the “Ungroup” icon.
25. Press and hold the Shift key to select the gift tag base and the text layer. Click “Attach.”
NOTE: The eyes and zipper handle may disappear behind the yellow tag but don’t worry, select them and use "Arrange" "Bring to Front" to show them again.

26. Repeat steps 13-25 for any additional tags you wish to write on with the Cricut.
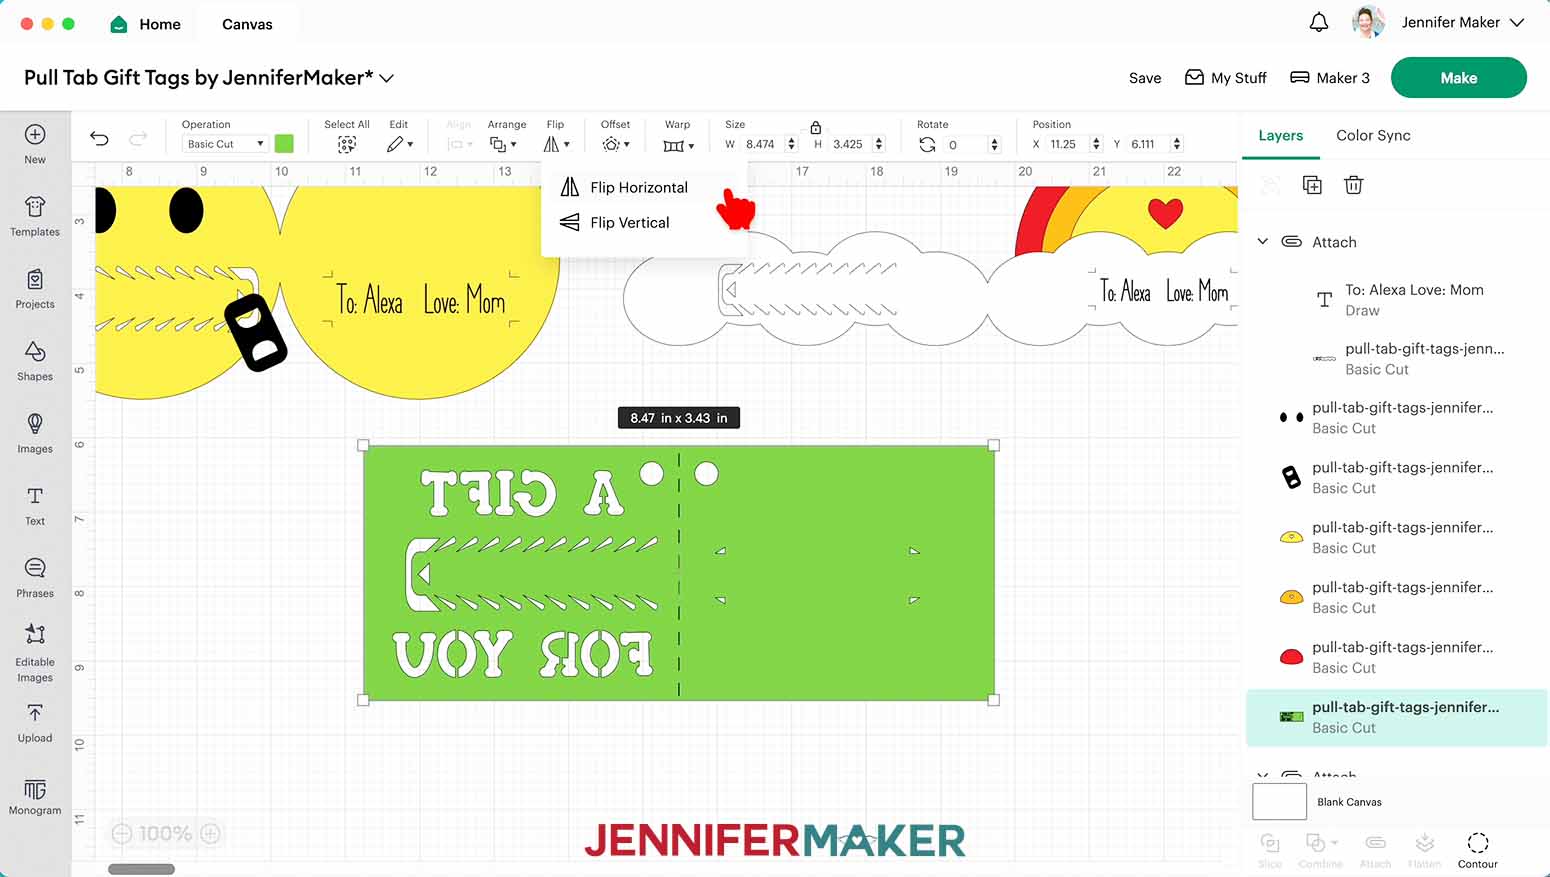
27. If you want to make the rectangle gift tag using glitter or foil cardstock, select it, then click the “Flip” menu and choose “Flip Horizontal.” You can handwrite the message after cutting.
STEP 3: PREPARE AND CUT YOUR PULL-TAB GIFT TAG DESIGNS
1. When your tags are all prepared, click “Make” in the upper right corner.
2. If prompted, click “On Mat,” choose your mat size, and click “Confirm.”
3. On the Prepare screen, make sure all of your text is attached to the gift tags.
4. If you are using a different size material, make sure to click on the mat and select the appropriate size from the dropdown menu.

5. When all materials are set, click back on the first mat and click “Continue.”
6. For the material settings, I will use: “Medium Cardstock - 80 lb.” with “More” pressure for all of the plain cardstock layers. I will use “Glitter Cardstock” with “More” Pressure for the glitter layers. If you use foil cardstock, use “Holographic Cardstock” with “More” pressure.

7. Place your cardstock face-up on a green Standard Grip machine mat
8. Use a brayer to adhere the cardstock to the machine mat.
9. Check that your Fine-Point Blade is clean and in the clamp.
10. If you personalized your gift tag with a writing font, follow the prompts to insert your pen in the clamp.
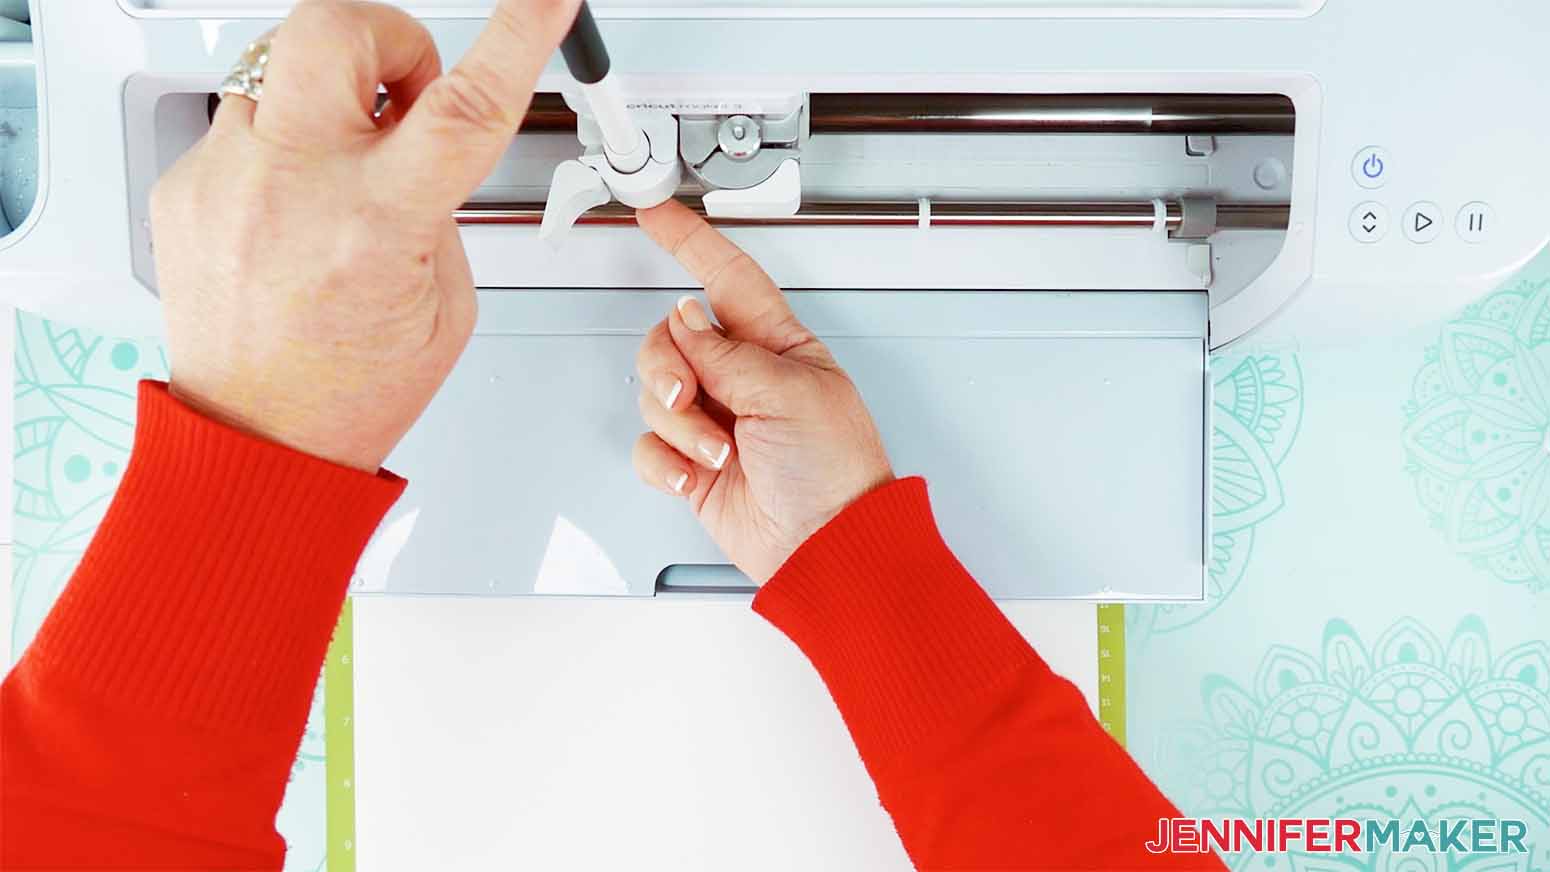
11. Press the flashing “Load/Unload” button to load the prepared mat into your Cricut.
12. Press the flashing “Go” button to begin cutting.
TIP: When it has finished cutting, keep the mat loaded and gently lift a corner to make sure the cuts went all the way through the cardstock. If not, press the “Go” button again to make another cut in the same design.
13. When the cut is complete, unload the mat, flip it over onto your work surface, and roll it back to release the paper. Be careful removing the zipper parts, they can tear coming off the mat.

14. Repeat steps 6-13 for any remaining mats.
STEP 4: ASSEMBLE YOUR PULL-TAB GIFT TAGS
If you didn’t personalize your gift tag with your Cricut, now is the time to write in your gift tag. Remember to stay within the “L” marks.

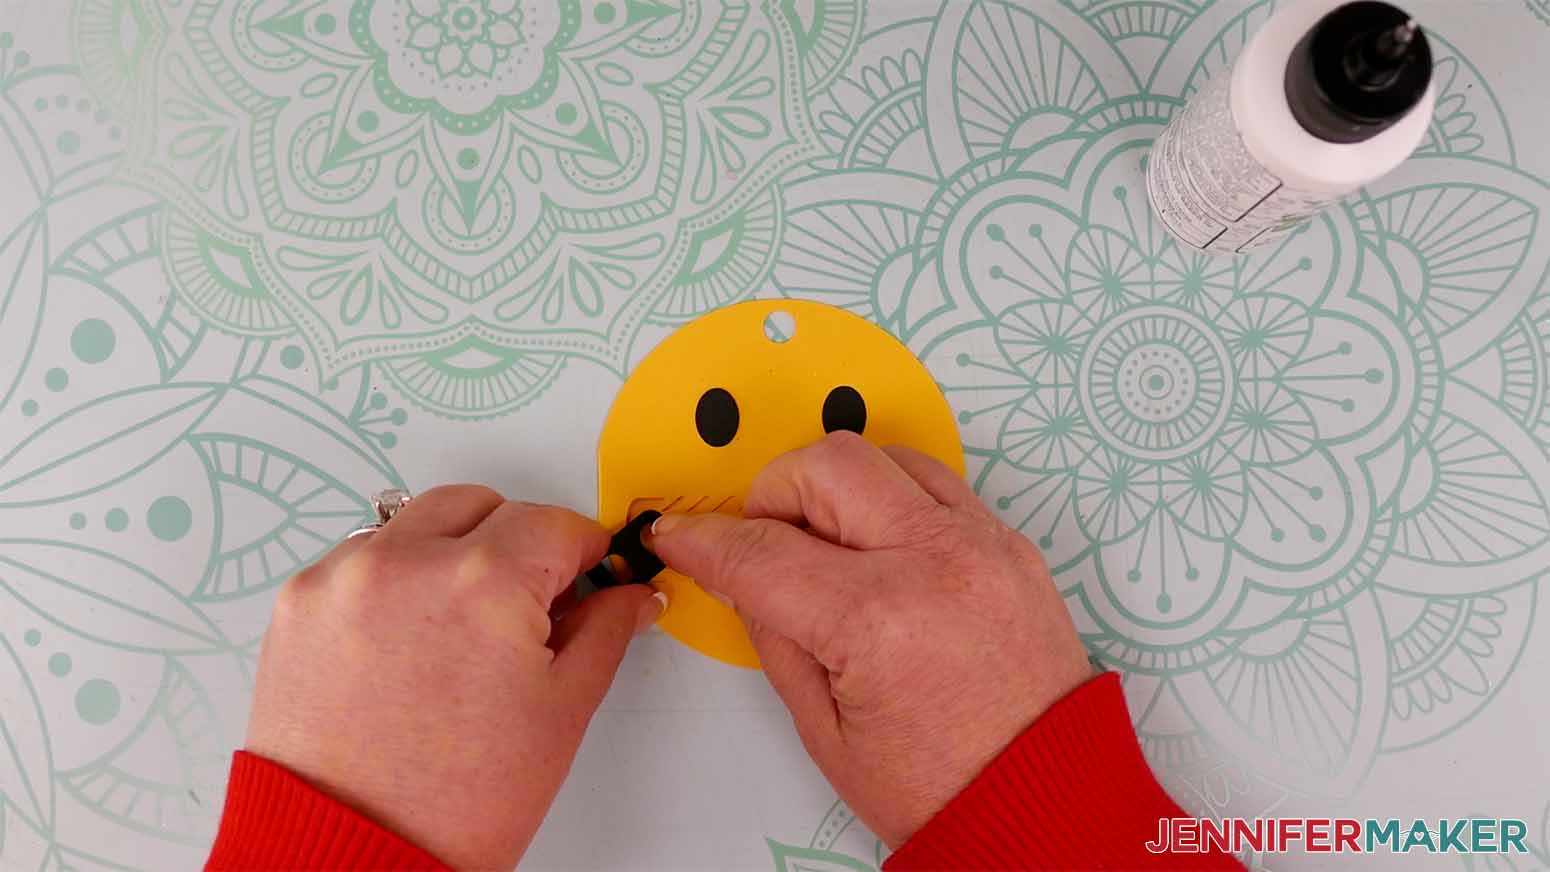
EMOJI GIFT TAG
1. Apply a thin layer of glue on the inside trim of the gift tag and press it closed.
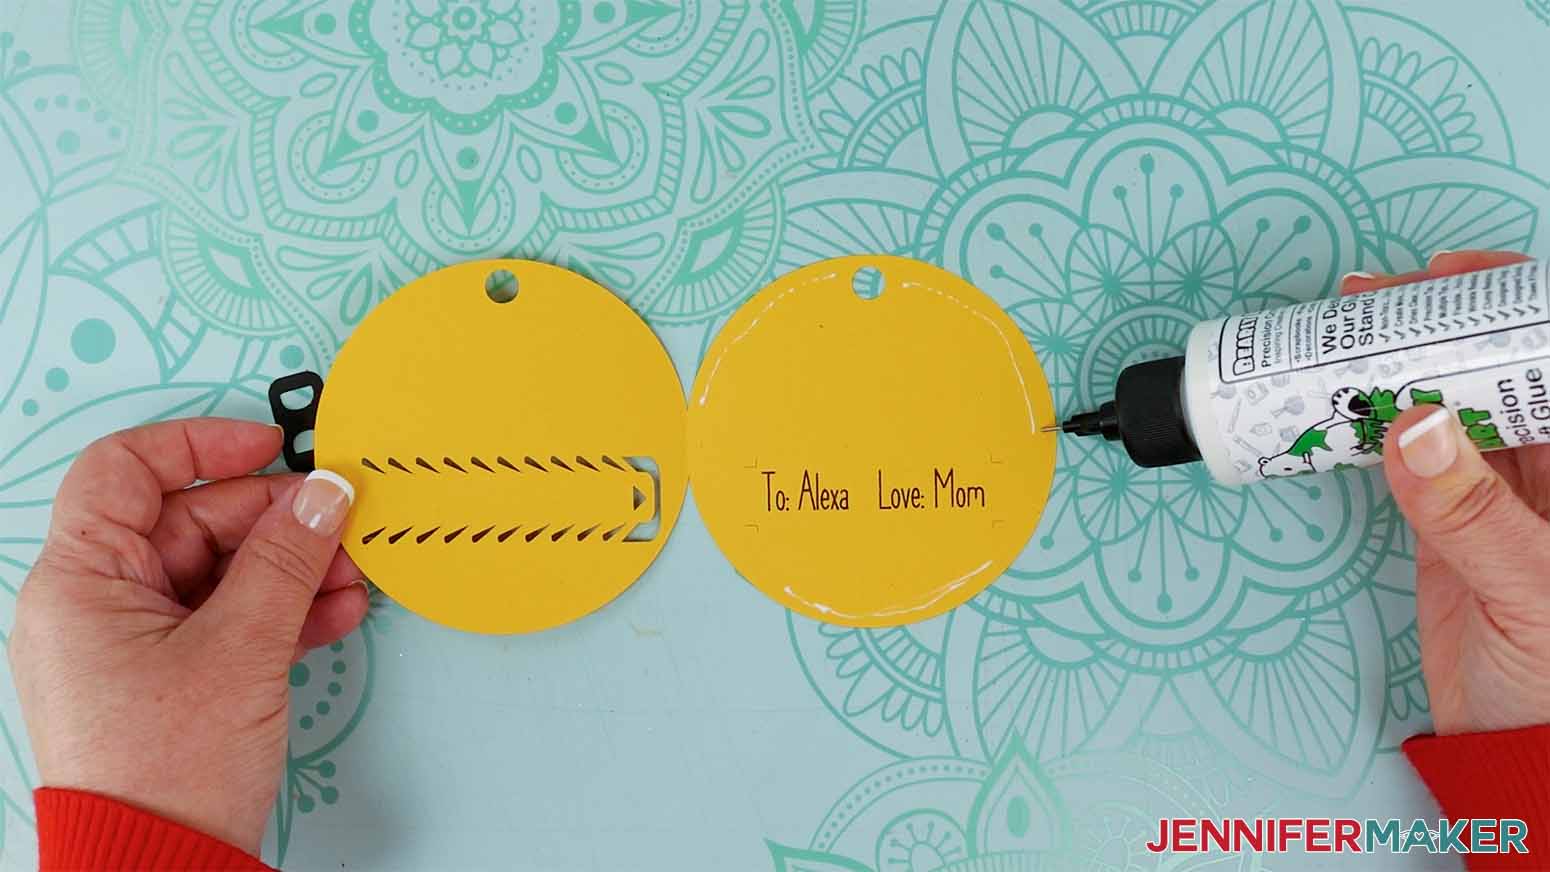
2. Hold the gift tag closed for a few seconds to adhere the glue.
3. Apply and glue any additional layers to the gift tag, like the eyes and zipper on the emoji gift tag.
4. Cut a piece of twine about 4-5” in length.
5. String the twine through the hole of the gift tag and secure it with a knot.

6. Your gift tag is complete!
RAINBOW
1. Apply a thin layer of glue to the back of the yellow top rainbow layer.
2. Align the hearts and press the yellow layer to the orange layer.
3. Apply a thin layer of glue to the back of the orange middle rainbow layer.
4. Press the yellow and orange layers to the red rainbow layer.
5. Apply a thin layer of glue around the inside edge of the cloud layer.
6. Press it closed to secure the tag.
7. Apply glue to the back of the cloud and press it to the rainbow.
8. Cut a piece of twine about 4-5” in length.
9. String the twine through the hole of the gift bag and secure it with a knot.
10. Your gift tag is complete!
SNOWFLAKE
1. Apply a thin layer of glue around the inside edges of the white star snowflake layer.

2. Press the white star closed.
3. Apply glue to the center of the blue snowflake piece.
4. Press the white star tag on the center of the snowflake.

TIP: Pay close attention to the positioning of the twine insert to assemble the gift tag in the correct orientation.
5. Cut a piece of twine about 4-5” in length.
6. String the twine through the hold of the gift bag and secure it with a knot.
7. Your gift tag is complete!
SANTA HAT TAG
1. With your message inside of the small hat cuff within the L shapes.
2. Add glue to the edges of the hat cuff piece, avoiding the pull tab and writing.
3. Fold it shut, and place it face up so the smaller cuff section is on the bottom.
4. Then add the red hat piece to the front so it’s centered.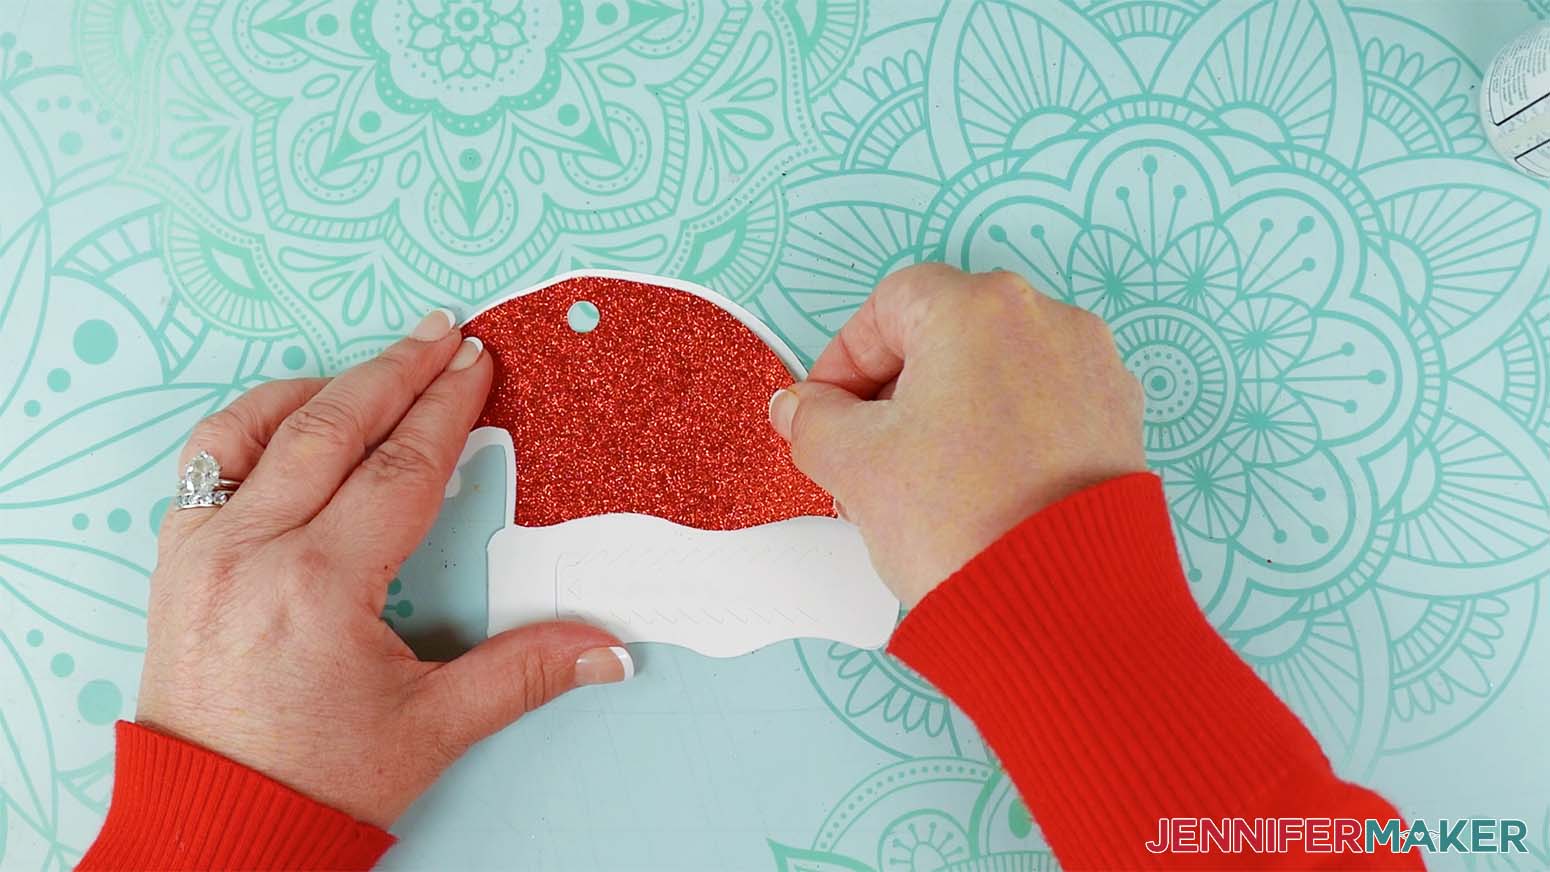
GIFT CARD ENVELOPE
1. Insert the gift tag into the cut slots in the corners of the gift tag.
2. Apply glue around the edges of the inside of the cardstock.
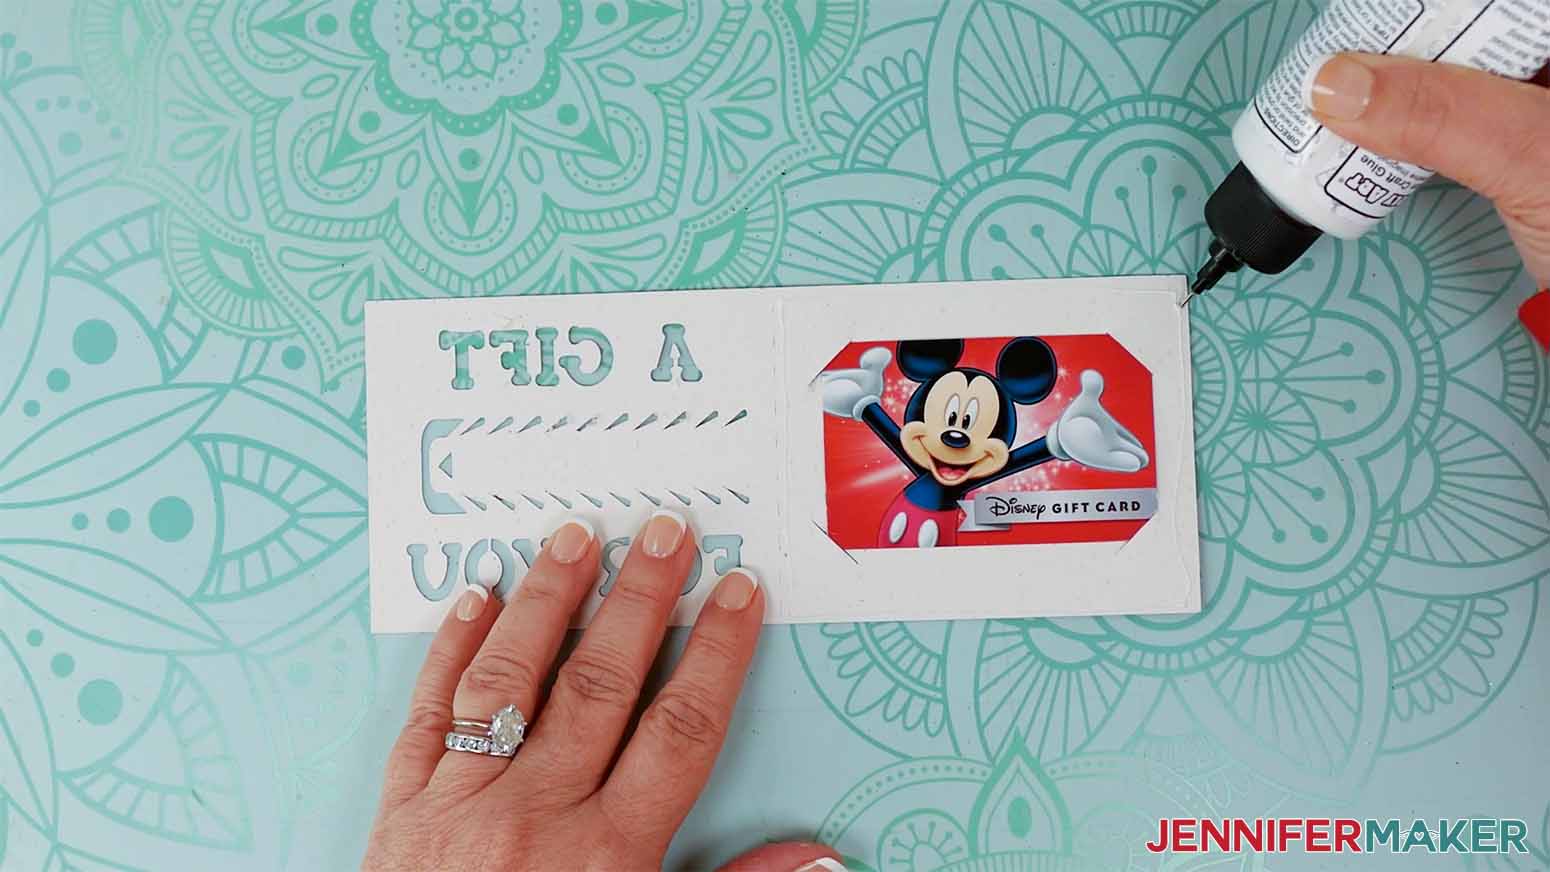
3. Press the gift card envelope closed.
4. Your gift card holder is complete!
STEP 5: SHOW IT OFF
Here are what my personalized pull-tab gift tags look like! I can’t wait to see what you
create!

Notes
The finished size of the gift tags is under 4".
Answers to Your Questions About Making Pull Tab Gift Tags
Q: How do you make your own tags? Can a Cricut make gift tags?
A: A Cricut can be a huge help when it comes to making gift tags! Follow this tutorial, or read on for links to more gift tag projects you can make with (or without) a Cricut or other cutting machine. With some practice, you can even learn to create pull-tab shapes tags of your own unique design!
Q: What do I need to make gift tags on Cricut?
A: First, you’ll need some cardstock. You can make bright gift tags using neon colors, glitter, and foil, or use more muted tones like brown kraft paper. You can create tags to fit a certain holiday aesthetic, or personalize them for each individual on your gift list. Next, you’ll need a Cricut cutting machine (any model except the original Joy will work for this project) and some basic Cricut accessories. Add a pen, some glue, and a bit of twine and you’re good to go! Check out the materials list in this post to get a full list and details.
Q: How do I write on tags with Cricut?
A: When making your own diy christmas gift tags on a Cricut, it’s super fun to have the Cricut write your “to” and “from,” too! Simply set your text layer to “Draw” in the Operation menu, then “Attach” the text layer to the layer you’d like it written on. Then, insert a Cricut pen (or another pen that’s compatible) into the clamp when prompted! That’s it!
Q: Can you show me how to make easy gift tags?
A: There are a lot of fun gift tags that are even easier than these. You can make sticky Adhesive Gift Tags, or easy Foiled Tags, Got a Joy? Make Cricut Joy Gift Tags with Foil! And these reusable Chalk Board Tags are a great idea that doesn’t even require a Cricut.
Q: How do you attach a gift tag to a ribbon?
A: All of my gift tag designs comes with a hole to string a ribbon, string, or piece of twine through. Simply string it through and knot both ends together. Then hang the string off the gift’s bow or tape it onto the present.
Q: How do you attach a gift tag to a present without ribbon?
A: If you don’t have ribbon, twine, jute strings, or anything else to hang your gift tags on a present, there are other options. Simply use tape, glue, or even a glue dot to adhere your tags to their packages.
Q: What can I use instead of gift tags?
A: Using a homemade paper ornament instead of a gift tag is a fun way to include an extra goody with your present! My Snow Globe Ornament design even has a place on the front to include a recipient’s name.
Get my free SVG files to create a Pull Tab Gift Tags
I love seeing what you make with my designs and how you use them! Please share a photo of your Pull Tab Gift Tags in our Facebook group or tag me on social media with #jennifermaker.
Love,

Want to remember this? Save this Pull Tab Gift Tags Tutorial to your favorite Pinterest Board!