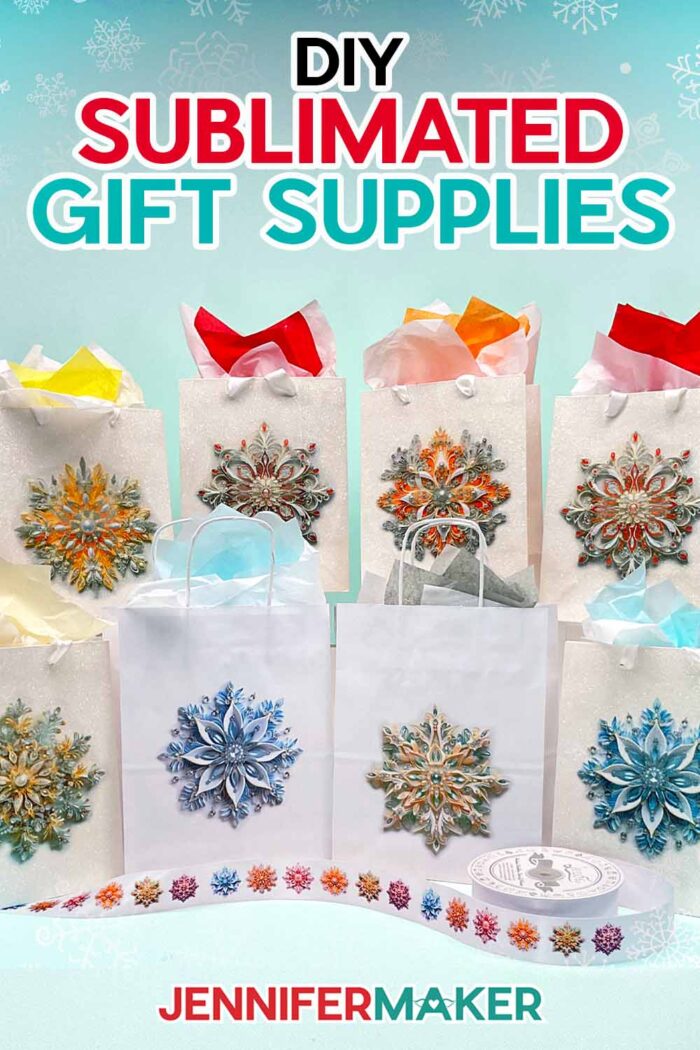
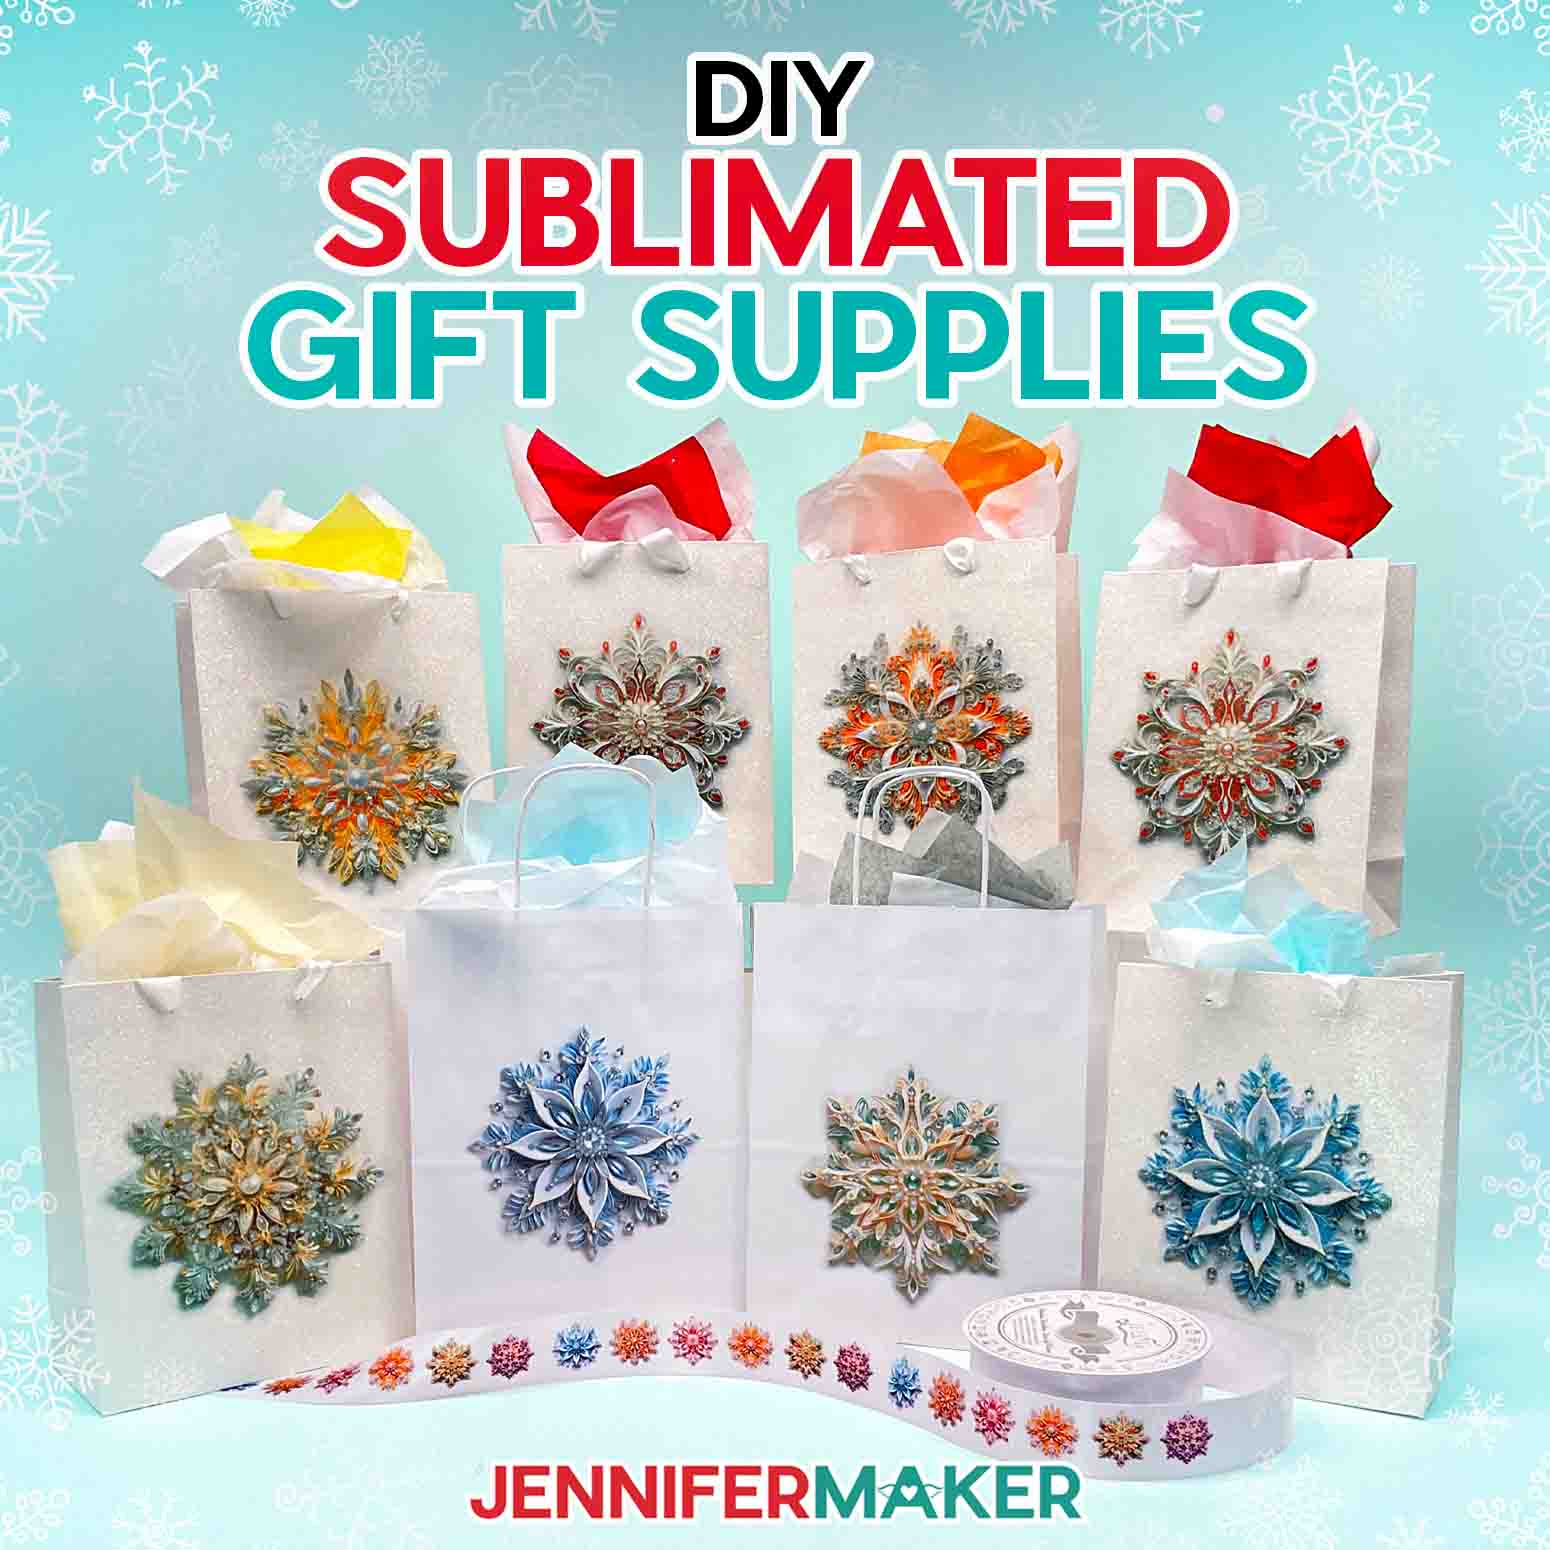
Learn how to make custom ribbon and gift bags!
Imagine creating a gift bag as personalized as the present inside it, decorated with a ribbon you decorated yourself. It’s possible, but how? The answer is sublimation! I absolutely love the personalization opportunities of sublimating, and the possibilities are literally endless. In this tutorial, I’ll show you how to make custom sublimation gift supplies by taking your (or your giftee’s) favorite designs! I’ll walk you through sublimating them right onto gift bags and ribbon — as long as they’re made of the right material. But how do you know if it’s made of the right stuff?
Want to save this project? Enter your email below and we’ll send the project straight to your inbox.
Sublimation uses a special ink that can then be transferred to another object that is made of (or coated with) a polymer or polyester. First, you print a design with a sublimation printer. Then you use high temperatures and pressure from a heat press to permanently transfer the ink onto the polymer surface. Some common sublimation blanks are high polyester fabrics like certain t-shirts, socks, bags, and garden flags, tumblers, water bottles, and coffee mugs that have a polymer coating, coated ceramic tiles, and so much more.
“But Jennifer, gift bags are made of paper!” That’s true, but today we’ll find out if you can sublimate designs on ribbon, glitter gift bags, and paper gift bags … with a little bit of preparation.
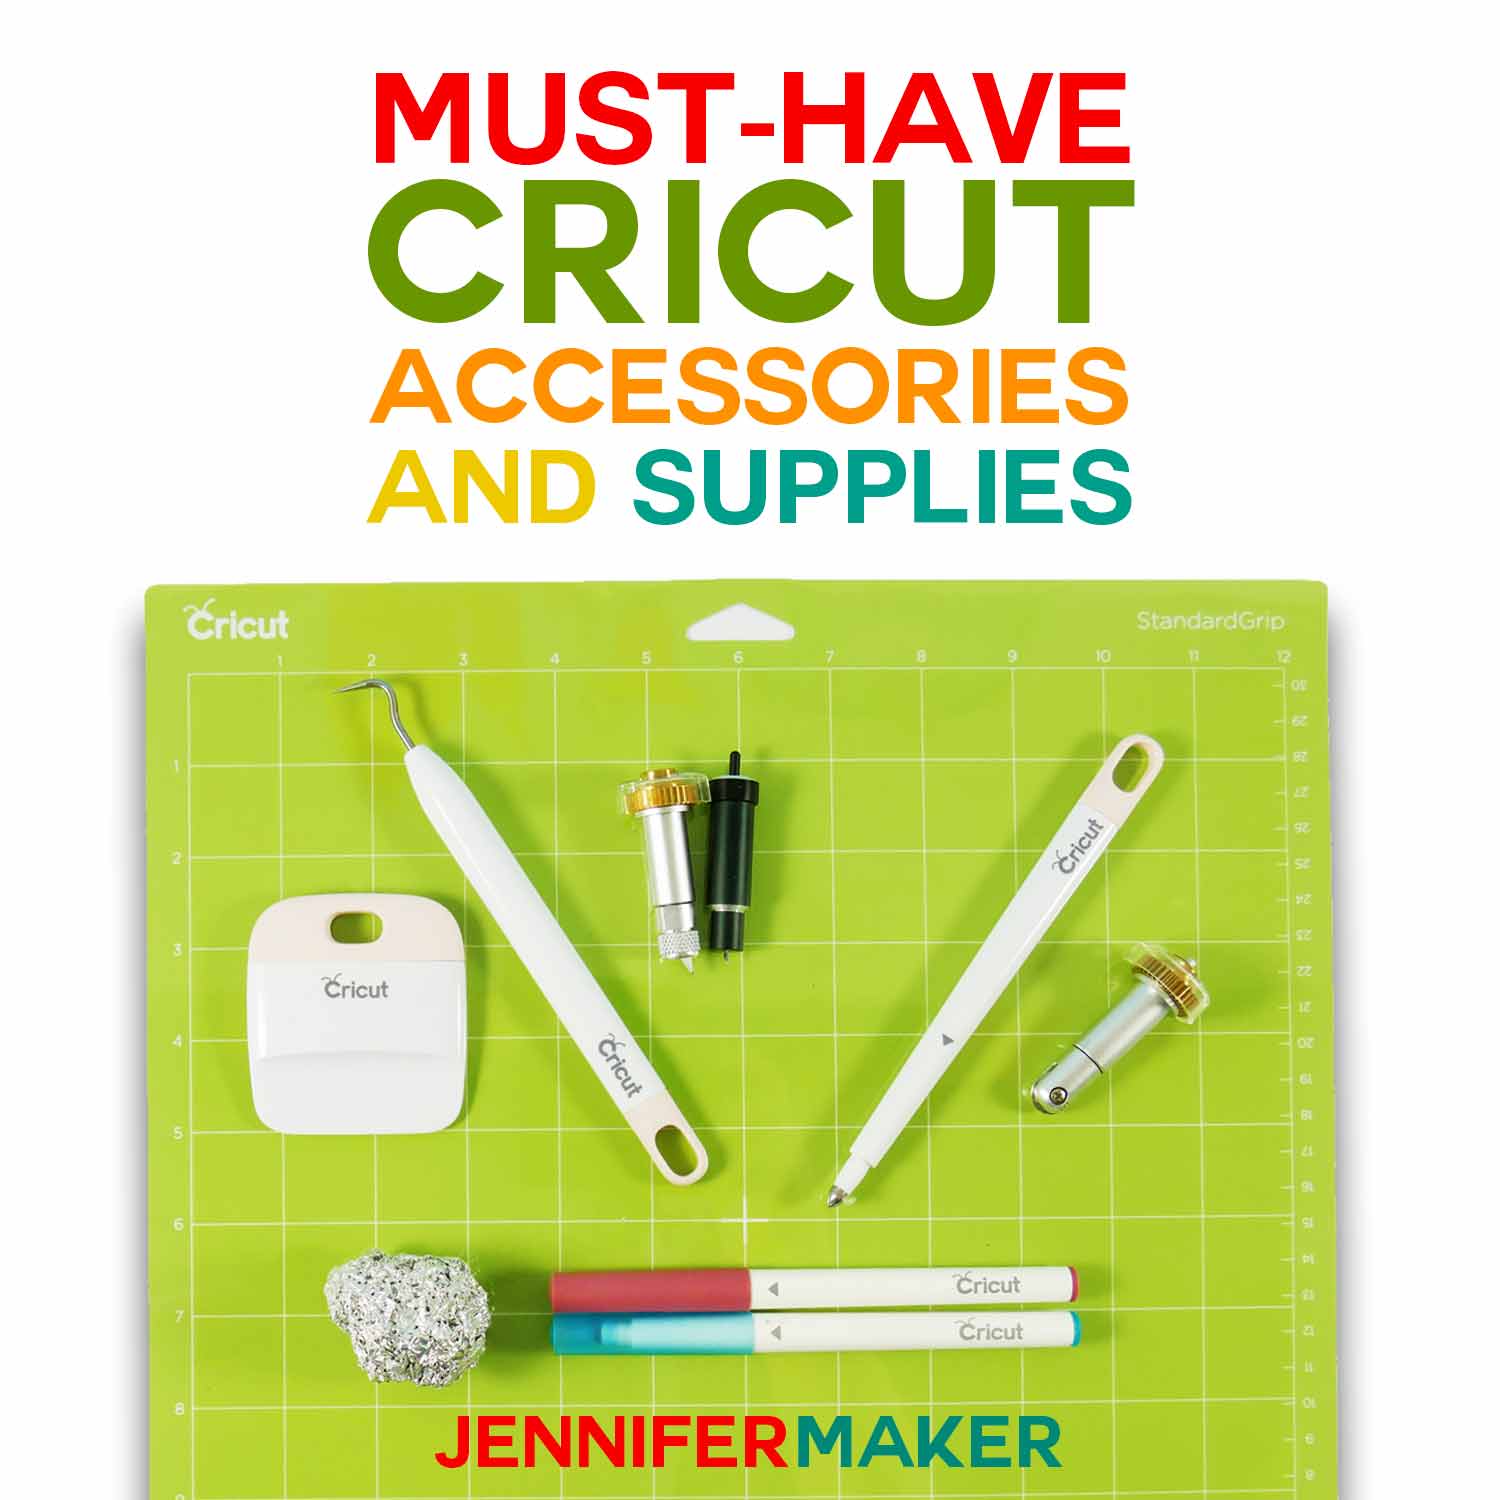
To make these and other dye sublimation projects, you’ll need a few key sublimation supplies. First you’ll need a sublimation printer filled with sublimation ink. Regular inkjet printers can’t print sublimation designs, unless the inkjet printer was converted to use sublimation ink when it was still new and unused. You’ll also need a heat press, 8.5″ x 11″ size sublimation papers, white cardstock, uncoated butcher paper, heat-resistant tape, and a few other supplies you can find in my materials list.
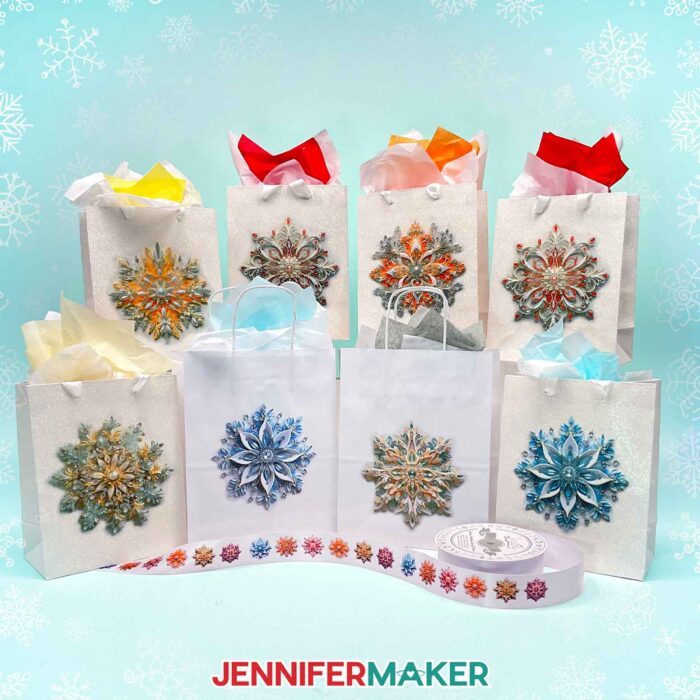
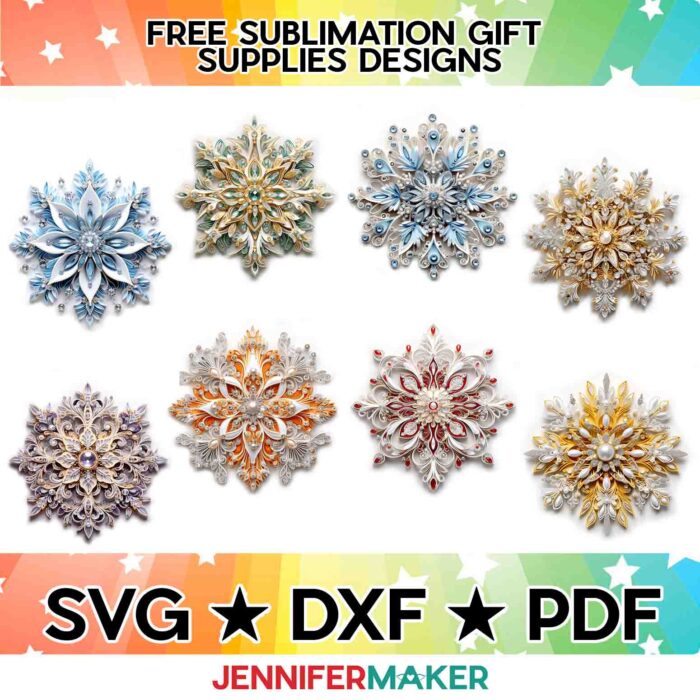
You’ll also need some designs to sublimate! I’ve created a collection of beautifully ornate snowflake designs using an AI art generator and Photoshop. Curious about making your own AI-assisted art? You can learn more about the process (and the ethics involved) in my AI Art Design Workshop. For this project, you can use my free snowflake designs or use your own.
First, I’ll demonstrate how to sublimate ribbon. It’s the perfect finishing touch for a gift, and with some practice, you can create your own one-of-a-kind spools of ribbon to use on gifts and crafts. You’ll need a roll of white, 100% polyester ribbon to start. Measure the width of the ribbon — I recommend sublimating ribbon that is no smaller than 1.5″ wide, which will include about 1” of decorating space. I don’t recommend sizing intricate designs like my snowflakes down much more than that. I’ll guide you through how to use Google Docs to size and print your sublimation designs.
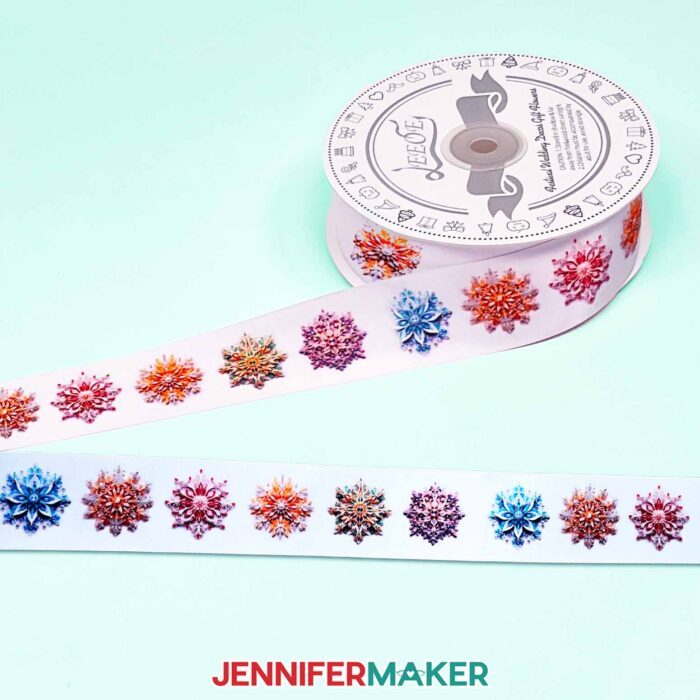
We’ll duplicate the snowflake designs until we’ve got a full page of them, which will allow us to sublimate about 85” of ribbon. That’s seven feet! If you want to make more than that, just print more copies of your snowflake-filled page. Next comes printing. If you need a refresher on sublimation printing, refer to my Sublimation T-Shirts for Beginners tutorial.
Before you do any sublimation project, you should make sure you have good ventilation. Sublimation fumes are strong, and you should avoid them. Open a window and turn on a fan to dissipate the fumes.
Next I’ll show you how to trim the printed designs on the sublimation paper then press the design onto the ribbon with my Cricut EasyPress. As you’re pressing, make sure to use fresh pieces of butcher paper and cardstock to avoid transferring any rogue ink to the new sections of the ribbon that you’re sublimating. Since the ribbon is so much smaller than most sublimation projects, you can use the edge of the cardstock and butcher paper to catch the ink, then cut off the used section to start fresh on the next press!
When your ribbon is finished, you can use it to tie up a wrapped present, or even make tied bows to decorate your sublimated gift bags. I have several bow tutorials for you to try!
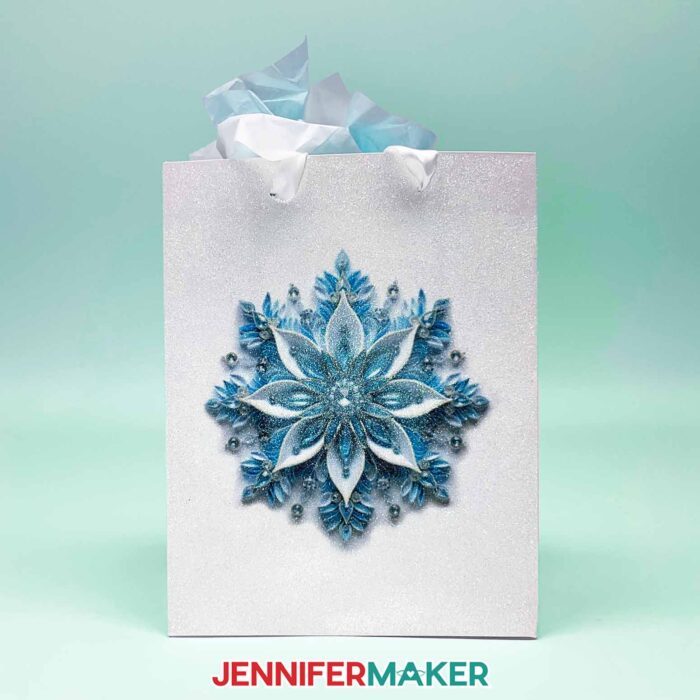
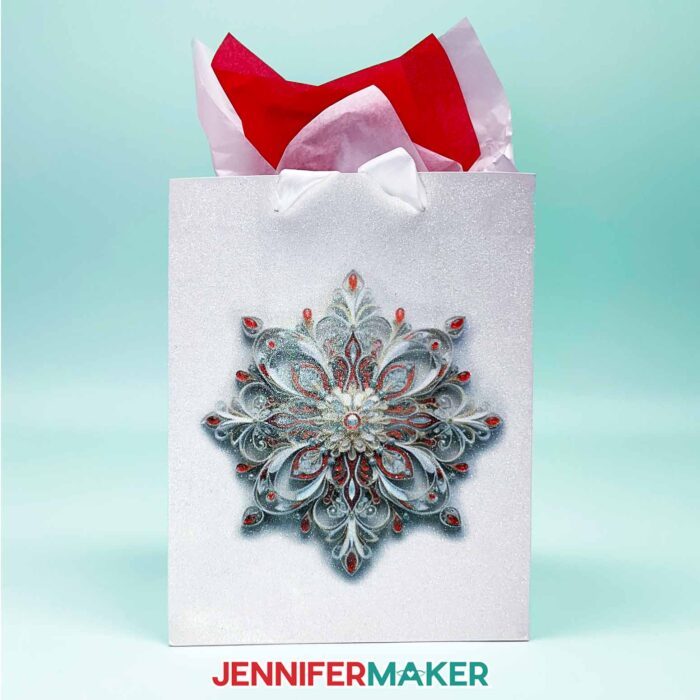
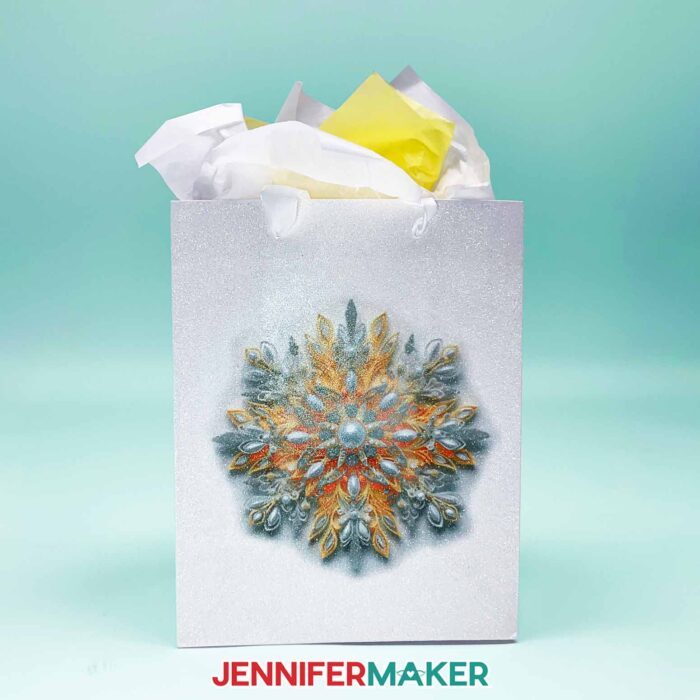
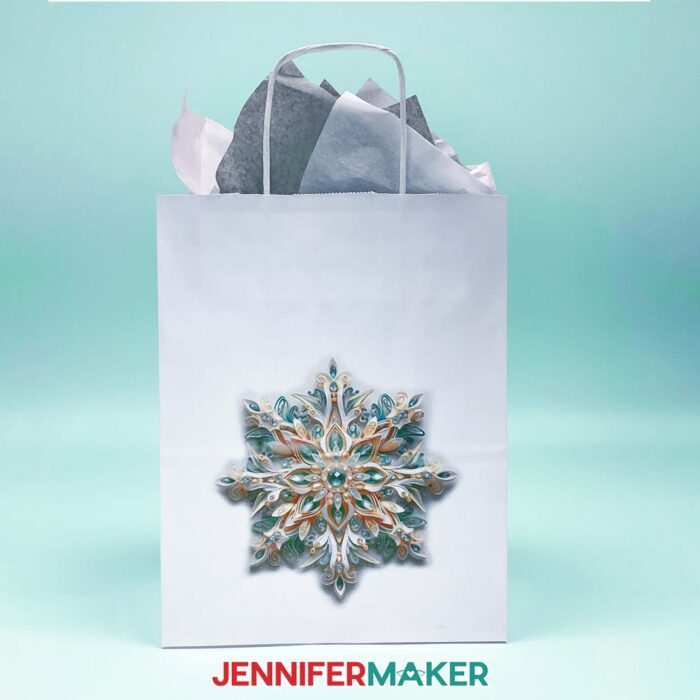
Speaking of sublimated gift bags, let’s try to sublimate a glittery one! You can sublimate glitter vinyl, so why not try glitter-coated paper?
When I was looking for supplies for this project, I found cute gift bags with white glitter on white paper. Let’s see if it works! First, check the bag over to make sure it’s in good shape with no tears or major issues. When I did my testing, I found it was easiest to sublimate on the large front section that hasn’t been folded.
Next we need to consider the bag’s handles, which can get in the way of a nice, smooth press of your sublimation design. For best results, I highly recommend you remove the handles on your bag … if you can.
If your bags have attached handles, though, that can present some potential problems. If you place the design close to the handles and need to apply the heat right over them, the heated glue might end up showing through the bag. That can look messy, and not something you’ll want to gift. I’ll share my best tips on avoiding mishaps like this, and how to work around the handles if they won’t come off!

Speaking of melting glue, some of the assembly adhesive may melt during heat pressing. Once your bag cools off, carefully open it up and pull apart any spots that shouldn’t be sticking together. If any of the seams come undone, you can use good quality craft glue to re-glue them. I’ve got just the stuff in my materials list! Then, if you took your handles off, you can put them back on.
So, how did the sublimated glitter gift bag turn out? Watch my video tutorial to find out!
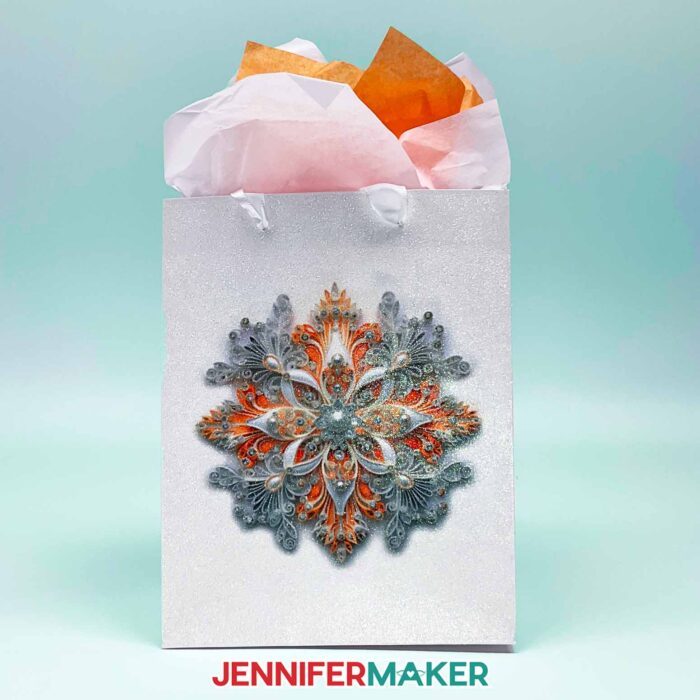
Not everyone is into glitter, and that’s ok. Let’s try out a plain paper bag. But wait … how will THAT work if it’s not coated with a sublimatable material like glitter? Matte enamel clear coat, that’s how!
I’ve heard that adding the enamel clear coat is a great way to make materials like paper gift bags sublimatable, as well as other surfaces that won’t need to be washed. For safety, be sure to use the spray enamel in a well-ventilated area — ideally outside. Let the bag sit for 30 minutes until it feels dry and not sticky.
Then I’ll show you how to sublimate it, and we can compare our results to the glitter bag.
Already got a great gift? Maybe it’s even one you made yourself! Need a beautiful, custom gift bag to put it in? Creating your own sublimation gift supplies is a fun and easy way to impress your lucky recipient! For sublimation gift ideas, check out my 100+ Free Sublimation Designs.
Ready to make sublimation gift supplies? This post contains some affiliate links for your convenience (which means if you make a purchase after clicking a link I will earn a small commission but it won’t cost you a penny more)! Read my full disclosure policy.
Materials and Tools to Make Sublimation Gift Supplies
View my Amazon shopping list with the exact items we used to make this project
- White Polyester Ribbon 1.5″ wide
- White Glitter Gift Bags, 9″ x 7″ (this might take you to gold bags because the white bags I used are out of stock, sorry! Keep checking in case they restock, but I’ll share an updated link as soon as I find a good alternative!)
- White Paper Gift Bags, 8″ x 10″
- Matte-Clear Enamel Spray Paint – for plain paper gift bag
- A-SUB Sublimation Paper 8.5″ x 11″
- Sublimation Printer – I used a converted Epson EcoTank ET-4700 Inkjet Printer
- Compatible Sublimation Ink
- Cricut EasyPress 12″ x 10″ -OR- Cricut AutoPress
- Cricut EasyPress Mat 12″ x 12″
- White, uncoated Butcher Paper – to protect your press
- 12″ x 12″ White Cardstock – to protect pressing area
- Scissors
- Heat Resistant Tape
- Lint Roller
- Fan – for ventilation during sublimating
- Bearly Art Precision Glue – to reattach bag seams if they melt
- Measuring Tape
- Paper Trimmer – for ribbon designs
- Large piece of cardboard for Spray Enamel – for plain paper bag
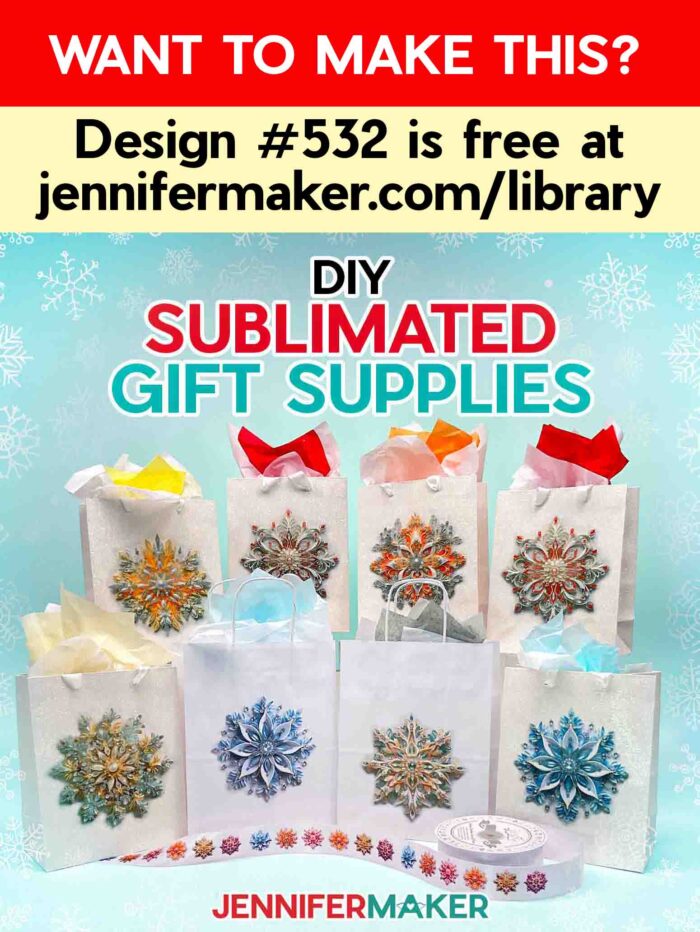
- Design #532 – My free SVG/PDF/DXF design files available in my free resource library (get the password by filling out the form at the bottom of this page)
How to Make Your Own Sublimation Gift Supplies
The detailed step-by-step assembly video on how to make sublimation gift supplies debuted during Maker Academy Weekend 2023, held online November 1-5, 2023. Get an on-demand pass to watch all 30+ workshops, each with a printable handbook, transcript, audio file, design files, and support with a VIP pass below:

Answers to Your Questions About How to Make Sublimation Gift Supplies
Q: Where is your tutorial for this project?
These gift bags and ribbons are a special project we made for our free Maker Academy Weekend 2023 event! A complete and detailed step-by-step video premiered during the event November 1-5, 2023 — this tutorial video was available to watch for free for 24 hours only during the event. If you missed it, you can get access to the full video, the 24-page printable handbook that details how to make this beautiful project with a VIP Pass to Maker Academy Weekend 2023, which comes with other perks and bonuses, too!
Q: What accessories do you need for sublimation?
A. Standard sublimation supplies first include a sublimation printer filled with compatible ink, plus sublimation paper to create your sublimation prints, some white cardstock, butcher paper, heat-resistant tape, scissors, a lint roller, and of course a heat press.
Q. What items can you make with sublimation?
A: There are so many things you can make with sublimation, I couldn’t list them all here if I tried! Aside from blanks specifically designed to accept sublimation ink, there are tons of options you can use (with a little preparation) from online stores, craft supplies stores, and even places like Dollar Tree. Look through my blog for inspiration!
Q. What kind of bags can you sublimate on?
A. With the right preparation, you can sublimate onto polyester bags, cotton/poly blend bags, burlap bags, glitter gift bags, paper gift bags with matte-clear enamel spray, and many other materials. You can even use sublimation vinyl to apply a sublimation design to virtually any kind of fabric. Where there’s a will, there’s a way!
Q. What other gift supplies can I make?
A. Beyond sublimation gift supplies, I’ve got lots of tutorials to make your own unique handmade gift bags and more, like my gift boxes, cardstock gift bags, mug gift boxes, easy gift boxes, wine gift bags, paper gift bows, coffee cup gift card holder, gift tags, pull-tab gift tags, treat boxes, “impossible” gift box, money cake, and SO many more on my blog!
Get my free PNG files to create these gift supplies!
(If you do not see the signup form above, click here.)
I SO hope you’ll make projects using our sublimation snowflakes! Please share a photo of your sublimation gift supplies in our Facebook group or tag me on social media with #jennifermaker.
Love,
Want to remember this? Save this Sublimation Gift Supplies tutorial to your favorite Pinterest Board!