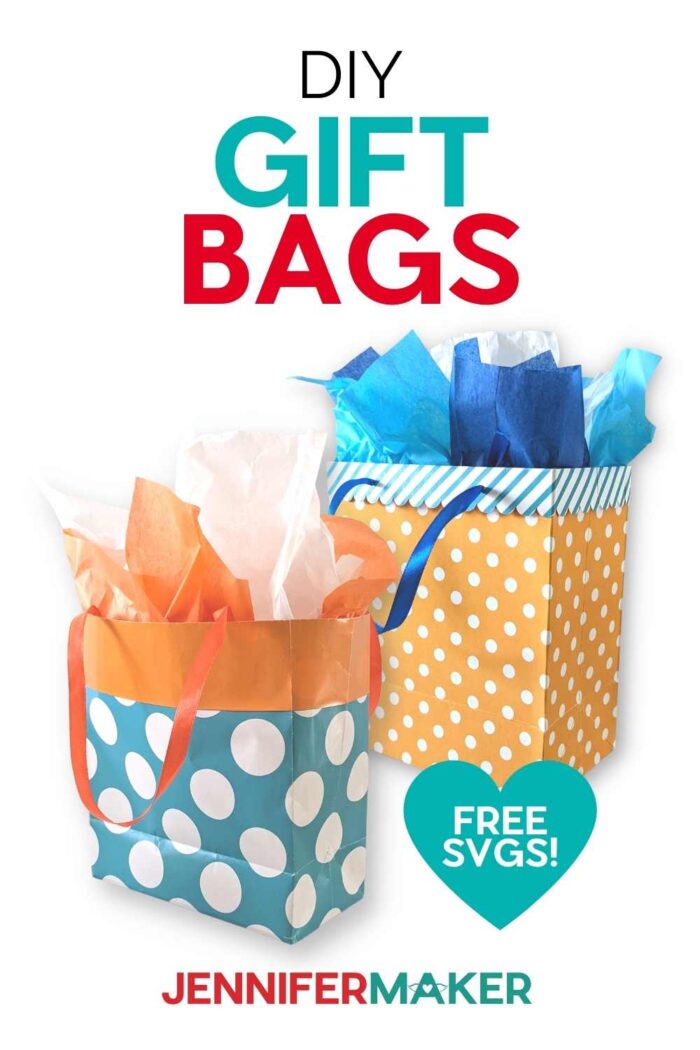
Learn how to make a customizable DIY Gift Bag for every occasion!
Have you ever searched a store for the perfect gift bag? Well, in the time it takes to drive to the store and look through the uninspiring options, I’ll show you how to make the perfect gift bag at home! You can add your recipient’s name, match it to gift boxes, or showcase some of your favorite cardstock on these pretty gift bags. And make an envelope to match! I’ve included a simple cardstock bag and one with extra features for truly special events. Don’t have a Cricut? No problem! I’ll show you how to make a DIY gift bag out of wrapping paper by hand!
Watch the full step-by-step tutorial video on how to make a DIY Gift Bag on my YouTube channel:

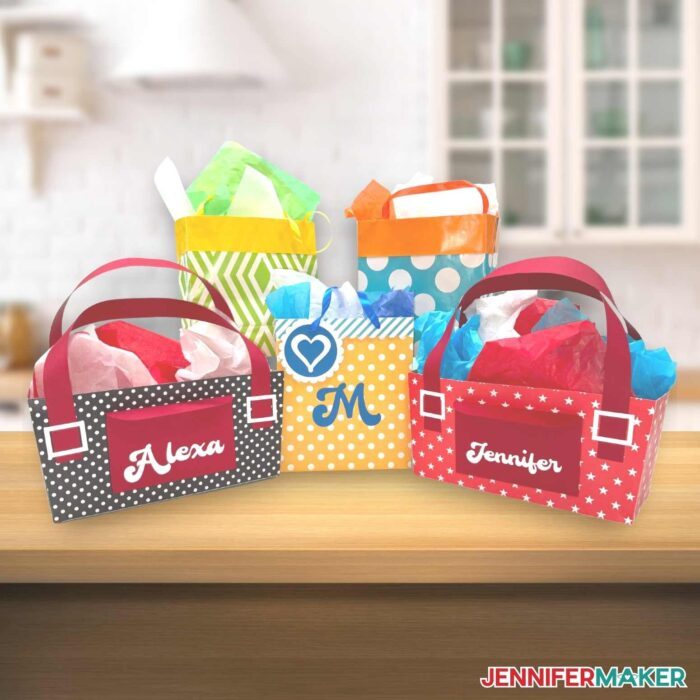
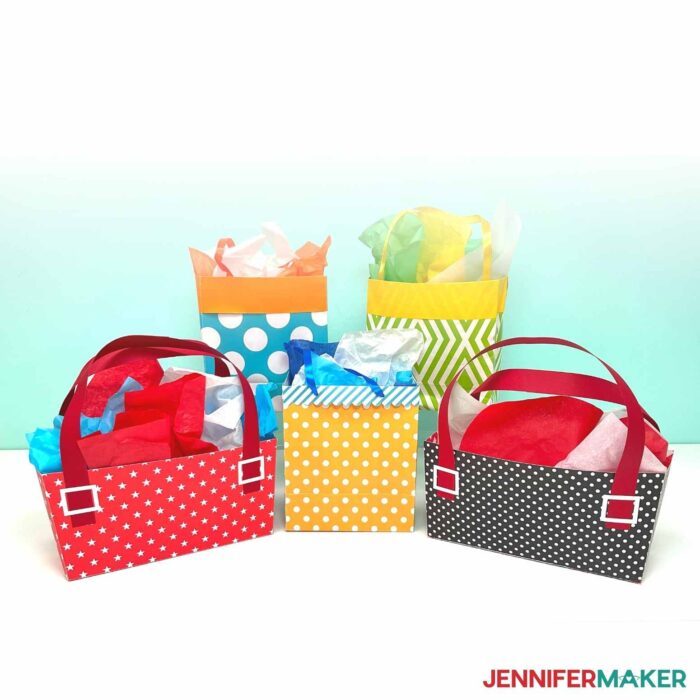
These DIY gift bag designs are the perfect solution to dress up any present. I love that you can adjust the colors to fit a holiday, event, or the person you’re celebrating! Even better, they don’t take many materials and come together quickly. And they even fold to store flat, so you can make several homemade gift bags in an afternoon to have at the ready.
The wrapping paper DIY gift bag is a perfect way to highlight special holiday paper, or match oddly-shaped presents you’re giving as a group. A puzzle is easy to wrap, but the hot chocolate and candy to go with it? Small gifts are the perfect opportunity for a DIY paper gift bag!
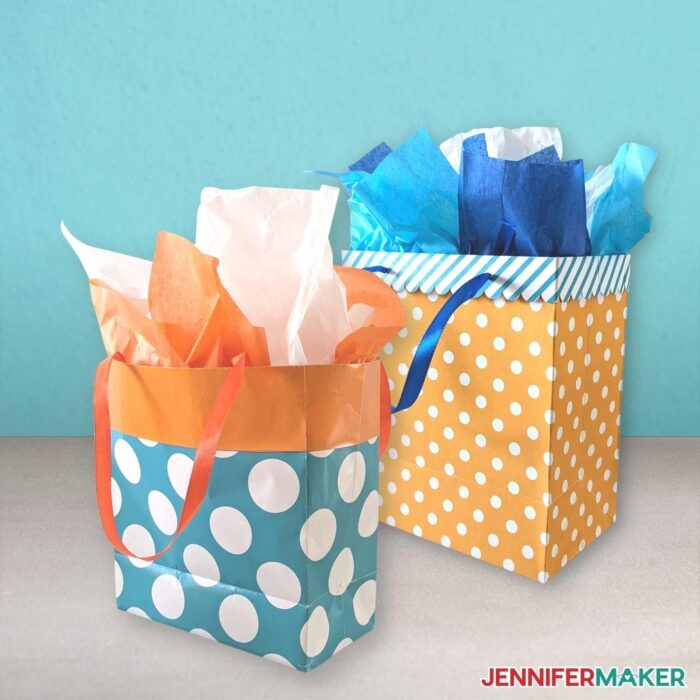
The simple cardstock version is an easy way to use that special paper you’ve been saving for just the right project. And with the decorative flap at the top of the bag, double-sided cardstock will really shine!
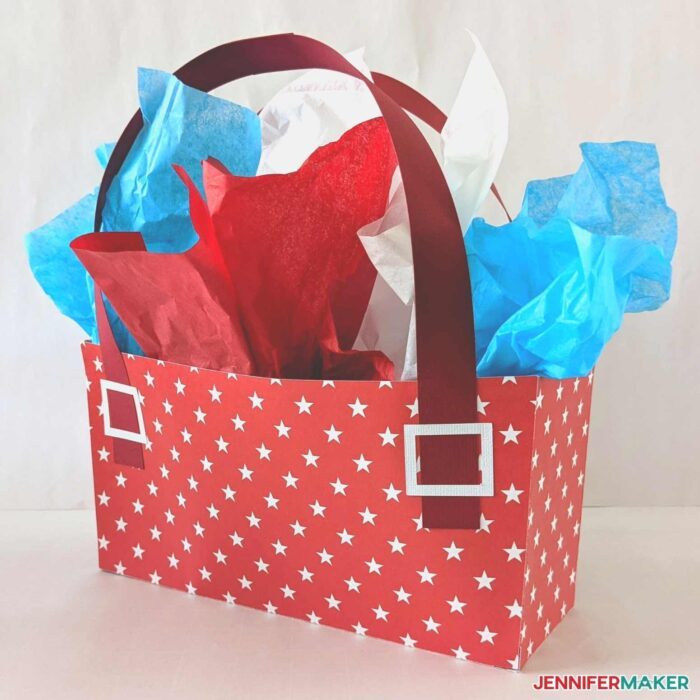
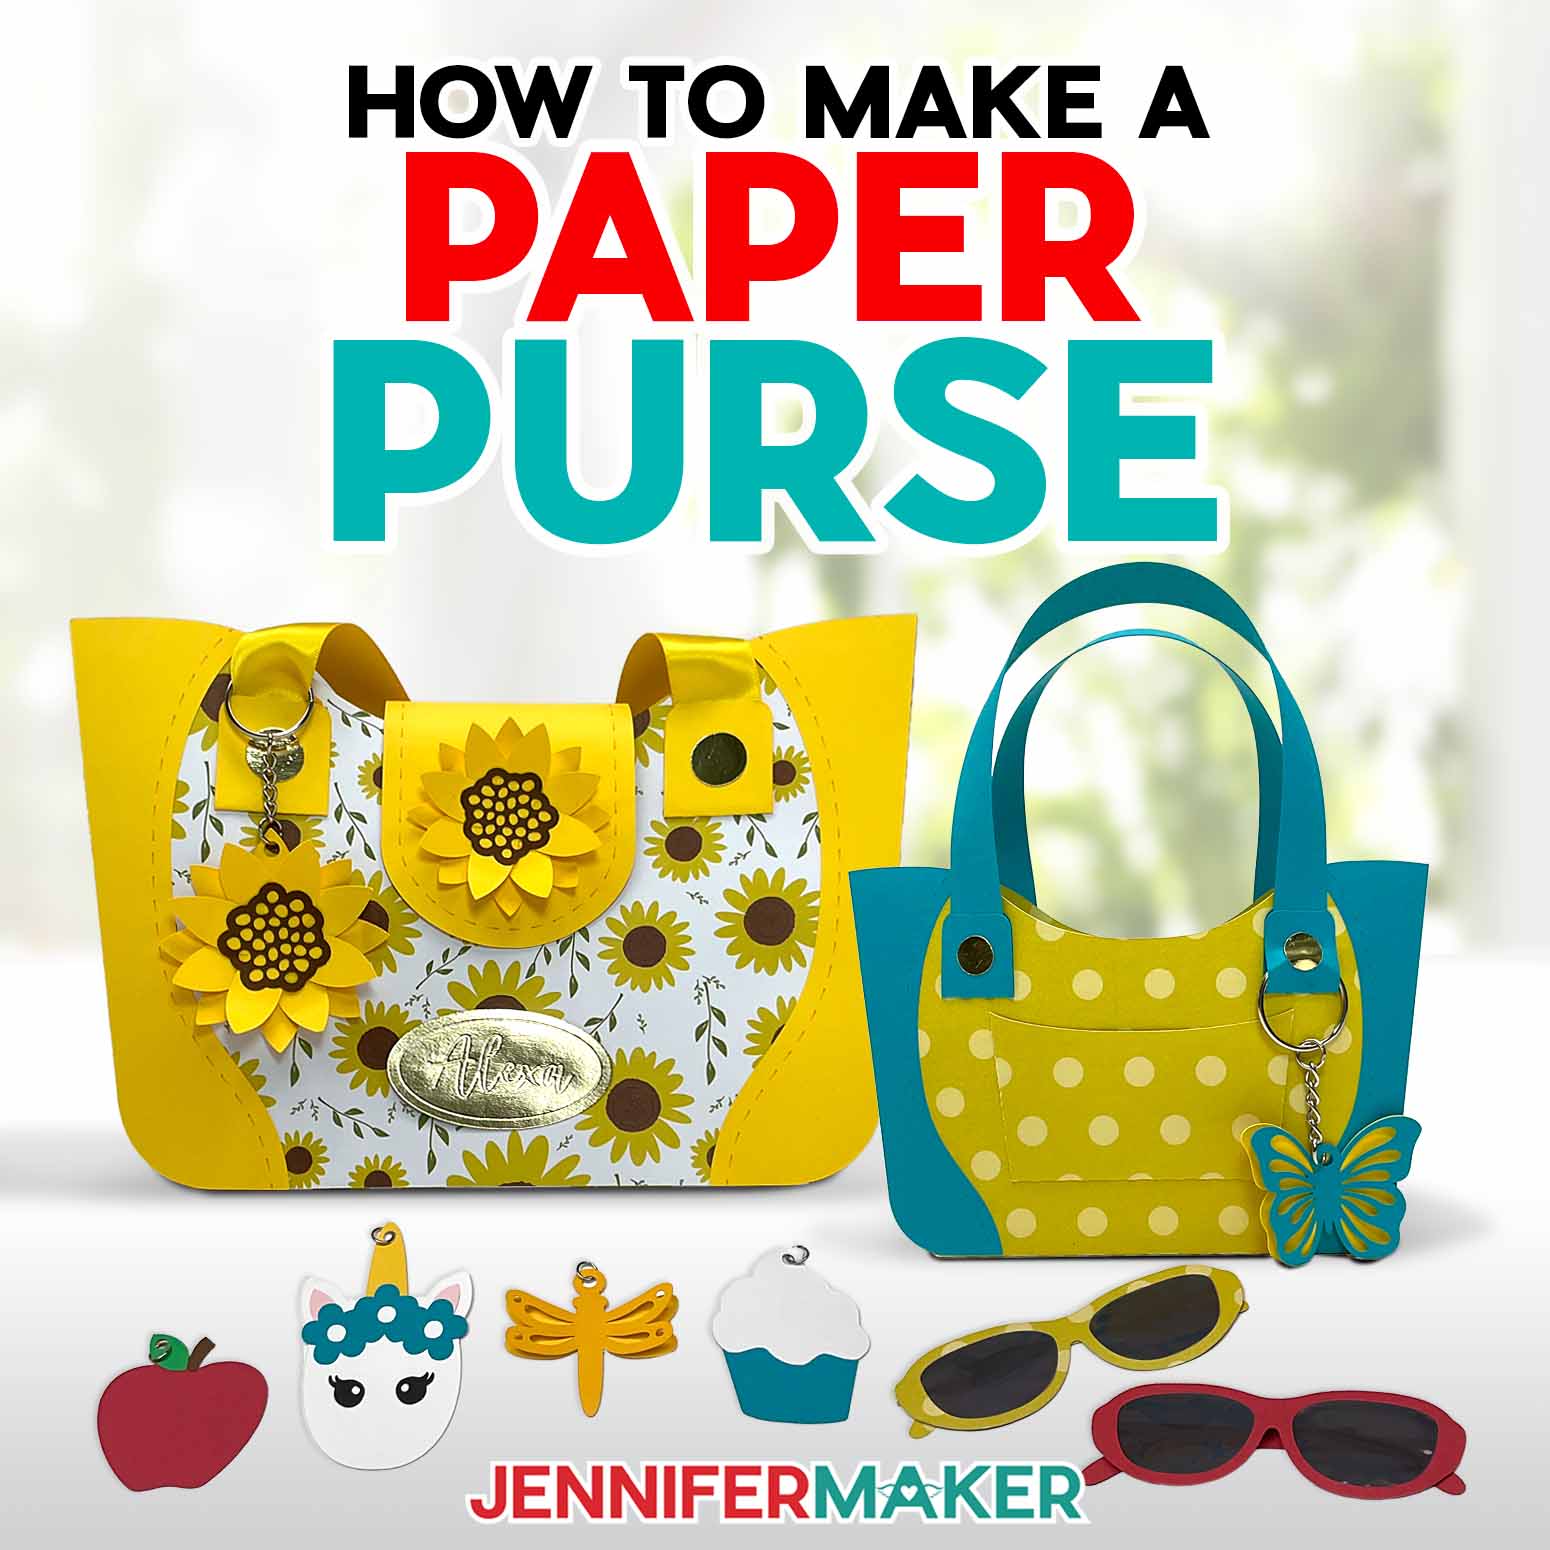
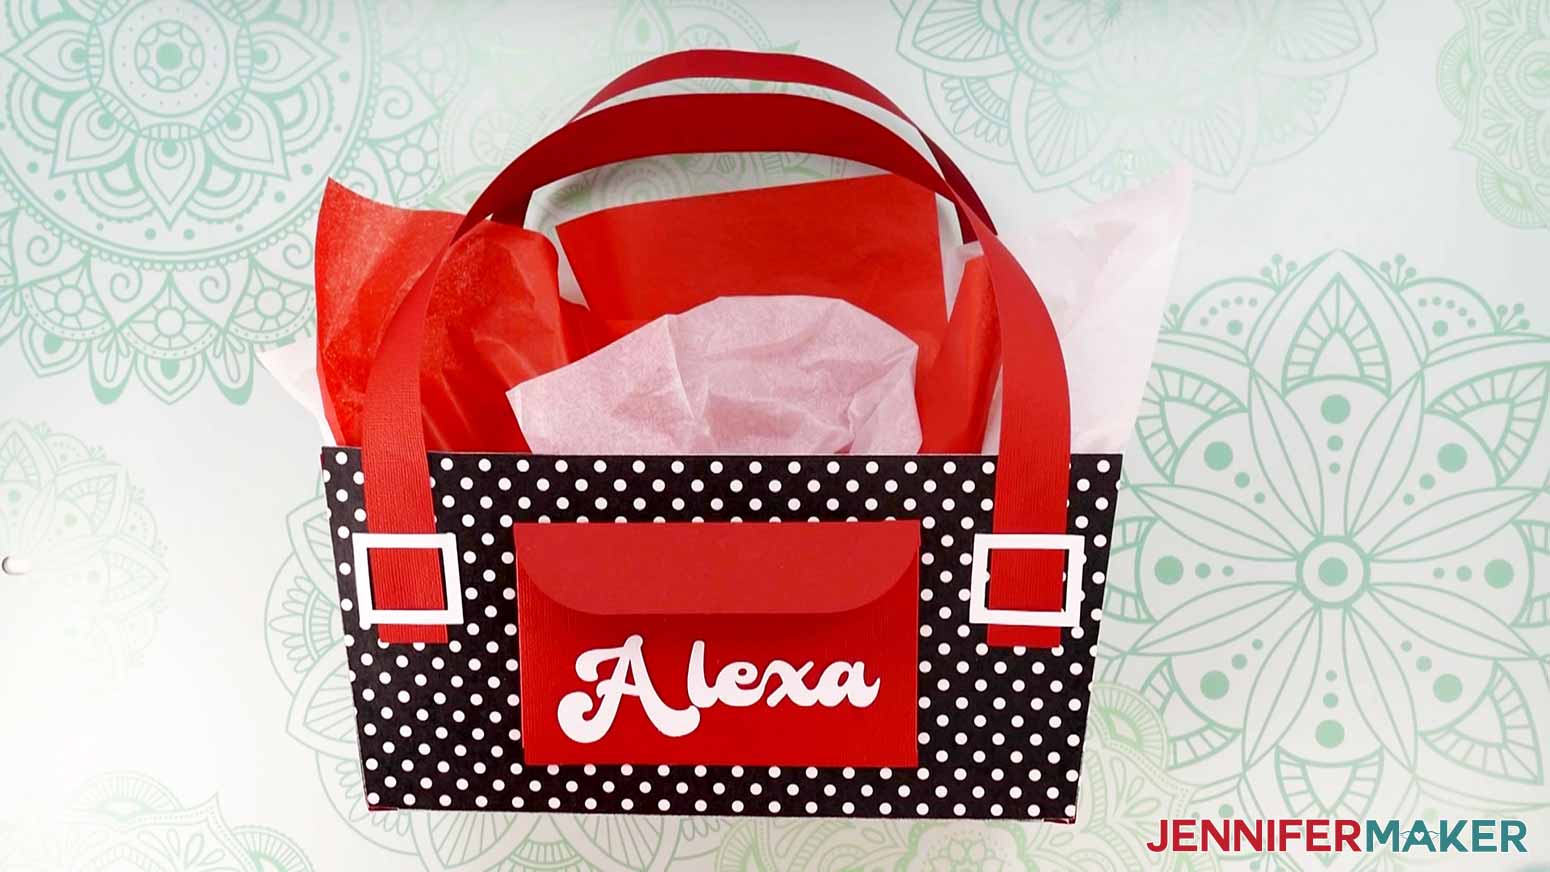
And my purse-inspired DIY gift bag has details to set it apart from average store-bought paper bags. For added flair, make the buckles in in metallic cardstock!
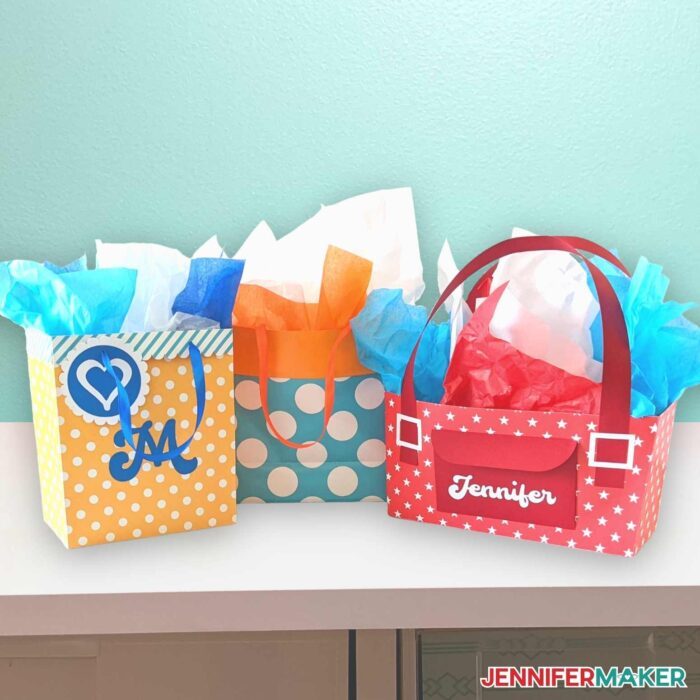
Plus, I’ll share some fun personal touches in the full video tutorial! I have some great ideas for a gift tag and a pocket that’s the perfect size for a greeting card. Of course, you can also make a card to match your DIY gift bag. Yes, you can make a custom gift set for a fraction of the cost of fancy ones from the store!
Like I said, the materials and tools to make your own gift bags are simple! You really just need a few sheets of paper, good craft glue, and a way to cut your paper.
For the wrapping paper bag, I used double-sided paper so the inside of the bag and flap at the top edge would really stand out. And a bit of pretty ribbon makes the perfect handles. This one doesn’t even require a Cricut. A ruler, pencil, and sharp scissors did the trick for me!
My two cardstock DIY gift bag ideas also feature double-sided colored paper. I used 65 and 80 lb cardstock in various patterns and textures in my testing and loved all of the combinations! I’ll also show you how to make ribbon or cardstock handles. The details on the purse-inspired bag will make it really stand out at any party.
I cut the cardstock DIY gift bag designs on my Cricut Maker 3, but you can use any machine with a Fine-Point Blade. That includes the Joy, with just a bit of resizing!
These adorable gift bags are perfect for lighter objects, but I’ll also show you how to add a piece of cardboard to the bottom of the bag to make them hold more. See the full instructions down below for all my best tips and tricks!
Ready to make a DIY Gift Bag? I’m super excited to show you how! This post contains some affiliate links for your convenience (which means if you make a purchase after clicking a link I will earn a small commission but it won’t cost you a penny more)! Read my full disclosure policy.
Materials to Make a DIY Gift Bag in Three Ways
View my Amazon shopping list with the exact items we used to make this project!
- Good-quality Wrapping Paper for the bag without a cutting machine
- Two (2) Sheets of 12″ x 12″ Patterned Cardstock for either cardstock bag
- Two (2) Sheets of 12″ x 12″ Textured Cardstock — I used two different colors for the accents on my bags. I also used this paper for the handles on my purse-shaped bag.
- Ribbon — for the handles on wrapping paper bag and custom Cricut gift bag
- Thick cardstock or cardboard – optional, to reinforce the bottoms
- A method to cut your cardstock — I used the amazing Cricut Maker 3 but you can also use the Cricut Maker, Cricut Explore 3, the Cricut Explore machines, or even the Joy for smaller bags.
- Cricut Green StandardGrip Machine Mat 12″ x 12″
- Craft Glue — I used Bearly Art Precision Craft Glue
- 24″ Ruler and pencil
- Scissors — to cut your wrapping paper and ribbon
- Scraper, Spatula, Brayer
- Scoring Stylus — optional, for the files with score lines
- Brenson Charlotte font
- Design #390 — My free SVG/PDF/DXF cut files (available in my free resource library — get the password by filling out the form at the bottom of this page)

How to Make a DIY Gift Bag

DIY Gift Bag
Learn how to make easy DIY gift bags with and without a Cricut.
Materials
- Good-quality Wrapping Paper -OR-
- Two (2) Sheets of 12" x 12" Pattern Cardstock
- 12" x 12" Textured Cardstock — I used two different colors for the accents on my bags. I also used this paper for the handles on my purse-shaped bag.
- Ribbon
- Tissue Paper
- Thick Cardstock or Cardboard — optional, to reinforce the bag bottoms
- Design #390 – My free template (available in my free resource library—get the password at the bottom of this post)
Tools
- A method to cut your cardstock — I used the amazing Cricut Maker 3 but you can also use the Cricut Maker, Cricut Explore 3, the Cricut Explore machines, or even the Joy for smaller bags.
- Cricut Green StandardGrip Machine Mat 12" x 12"
- Craft Glue — I used Bearly Art Precision Craft Glue
- 24" Ruler — to measure your wrapping paper and ribbon
- Pencil — to draw guidelines on your wrapping paper
- Scissors — to cut your wrapping paper and ribbon
- Scraper
- Spatula
- Brayer
- Scoring Stylus — optional, for the files with score lines
- Brenson Charlotte font - optional
Instructions
In this tutorial I'm going to show you three ways to make a cute DIY Gift Bag: one using wrapping paper, a simple bag cut on a Cricut, and a purse-shaped bag cut on a Cricut.
Wrapping Paper Gift Bag
STEP 1: SELECT AND CUT PAPER TO SIZE
When choosing your wrapping paper, you’ll want to use a good quality paper that’s heavier than standard paper to help make sure your bag is sturdy and durable. The one linked in my materials list worked well for me. If you want a bag with a folded flap at the top like mine, you’ll want to use paper with color on both sides as well.
The size you’ll need to cut your piece of wrapping paper will depend on the size of bag you want to make. I’m making a bag approximately 7.25” wide by 7.75” tall by 3.75” deep, with a folded 2” flap at the top, showing the opposite side of the paper. If you don’t want a flap at the top, just subtract 2” from the height measurement.
If your wrapping paper has guidelines on one side, use them to measure and cut a piece 22.5” wide by 12” tall. If not, use a long ruler and pencil to create guidelines and cut the paper to size. Your piece of paper doesn’t have to be the exact same size as mine. Just keep in mind that the width of your piece will affect how wide your finished bag can be and the height will affect how tall it is. You can also choose to make your flap longer or shorter depending on the look you’re going for.
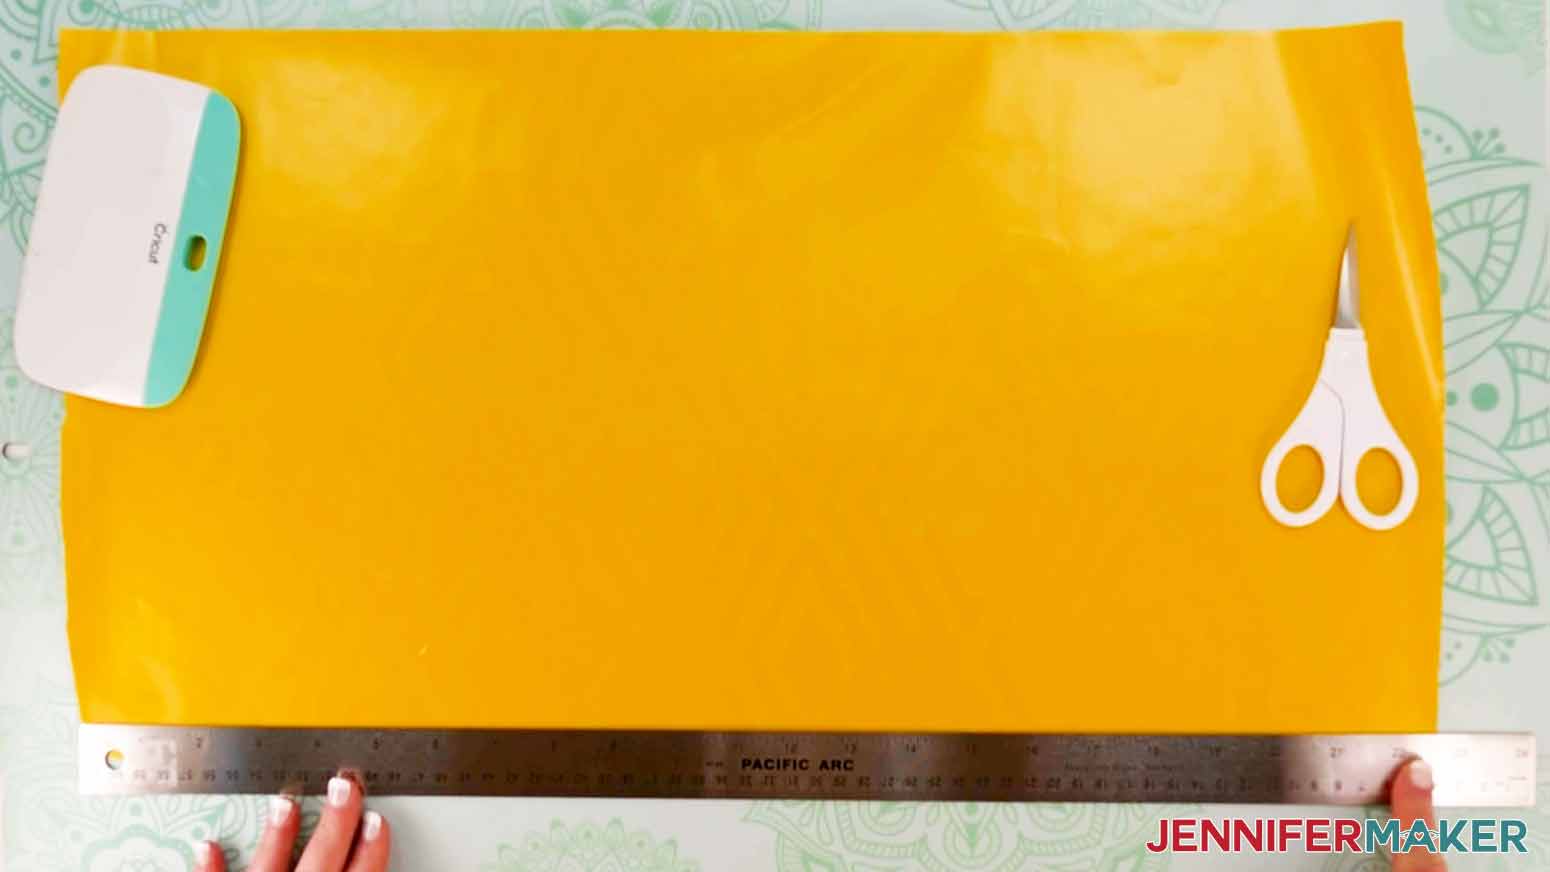
TIP: If your paper curls while you’re measuring and cutting, put paper weights or other heavy objects at its corners to hold it down.
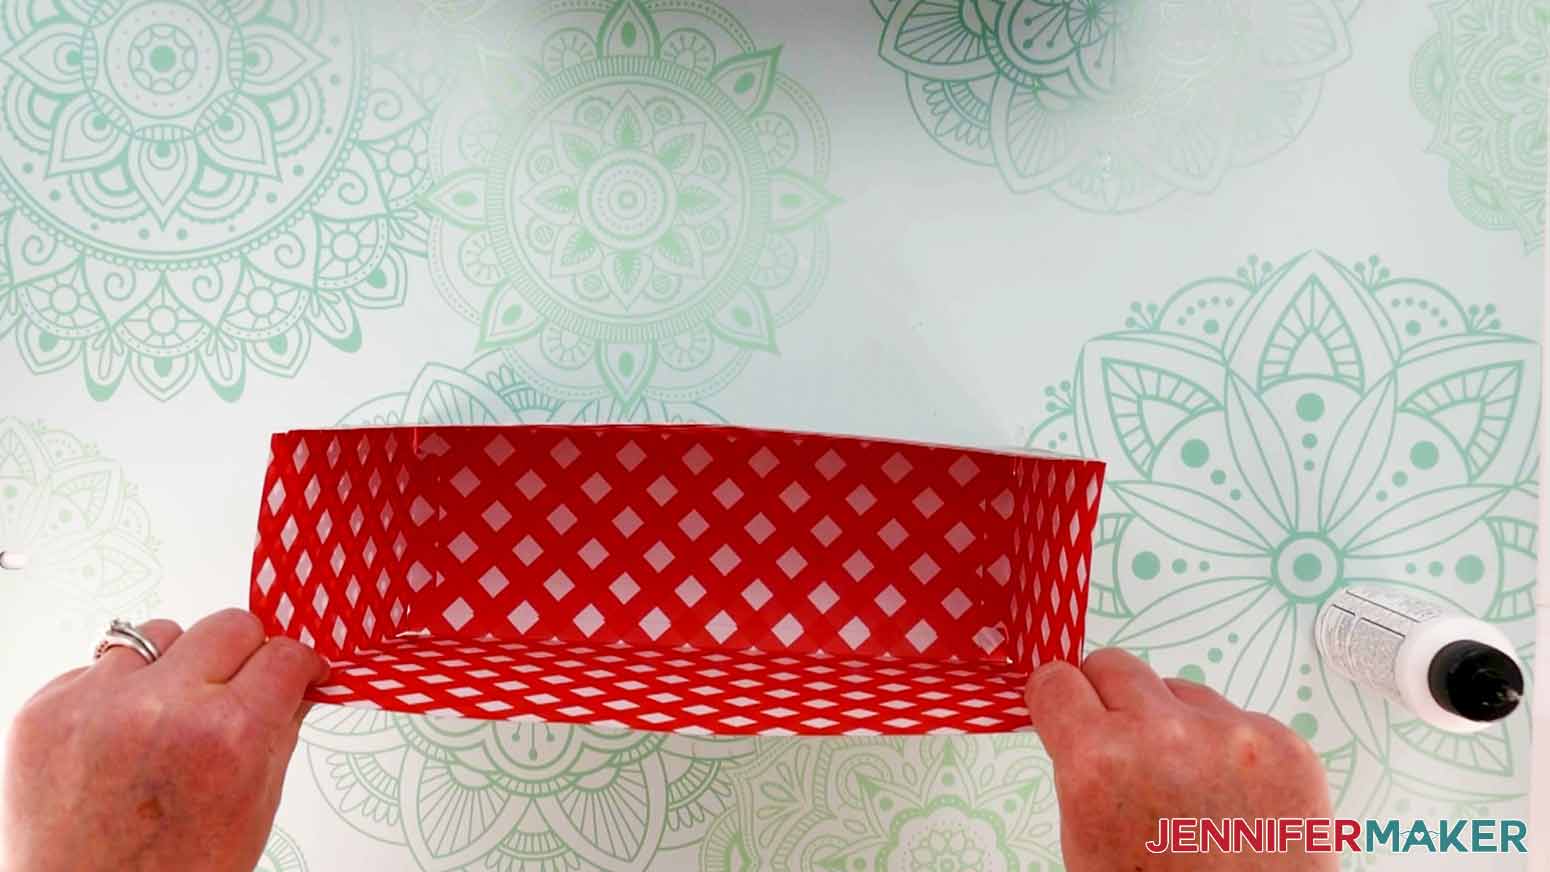
STEP 2: FOLD BAG SIDES AND FLAP
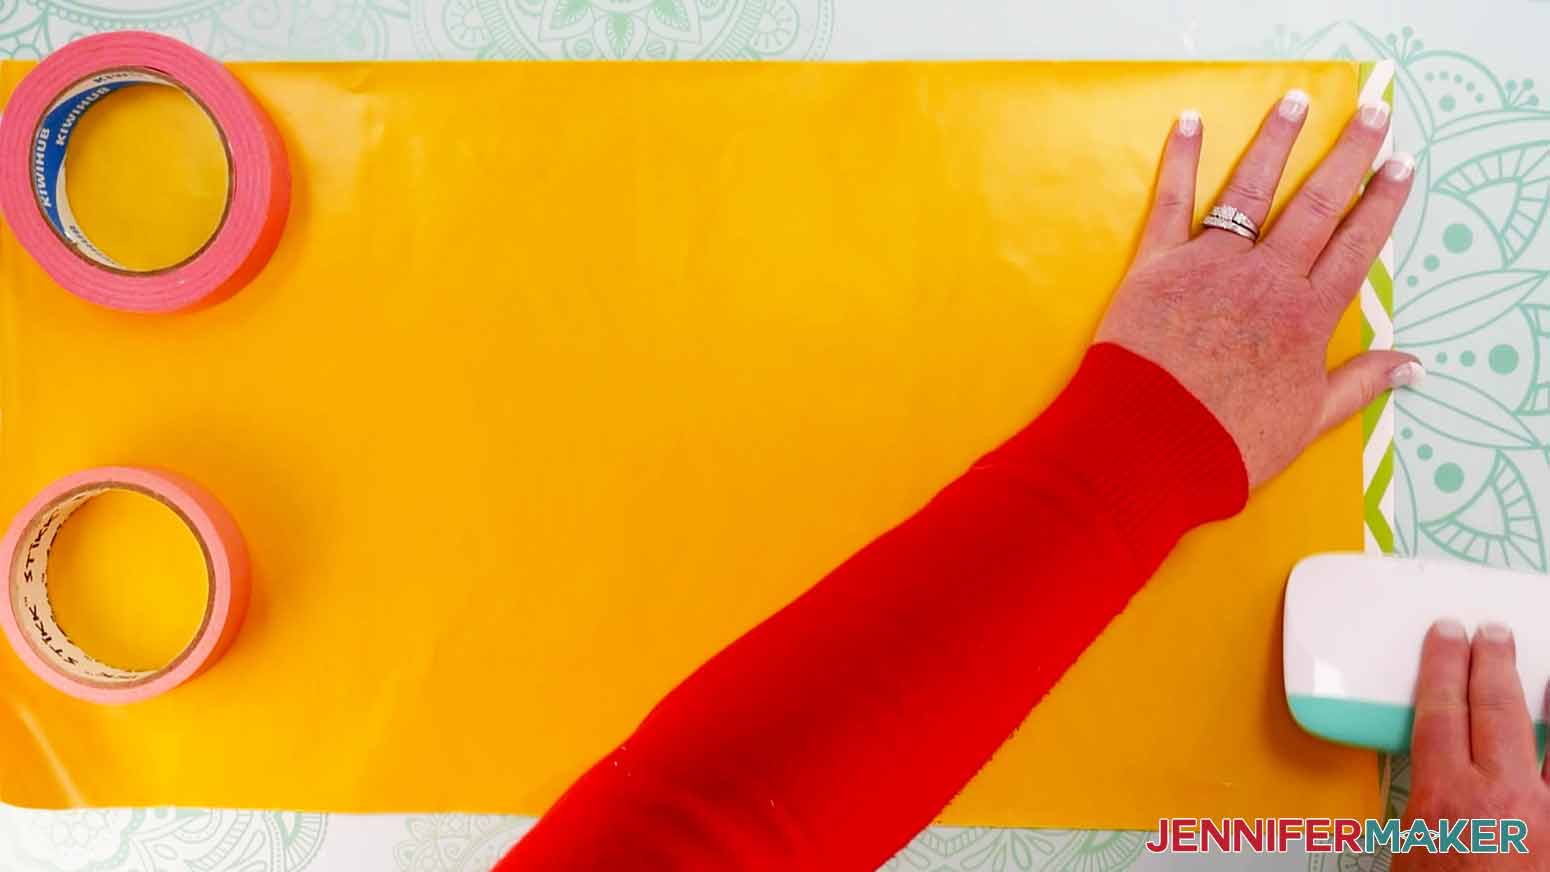
Place your paper face down on a flat surface with the longer sides running horizontally. Use your ruler to make several marks .5” in from the short right edge. Place the ruler’s right edge on the marks to draw a straight line, and fold the paper over the edge making a .5” tab. The tab is where we’ll add glue to join the bag’s sides in a few steps.
TIP: If your wrapping paper is sturdy enough, use your scraper tool to crease your edges for the sharpest results!
With the tab still creased in, fold it to meet the left edge. If the edges are uneven, trim the excess off of the unfolded edge. Unfold, creating a central vertical line. Flip your paper over so the side you want on the bag’s exterior faces up. Make sure your tab is to the right, but unfold it for now.
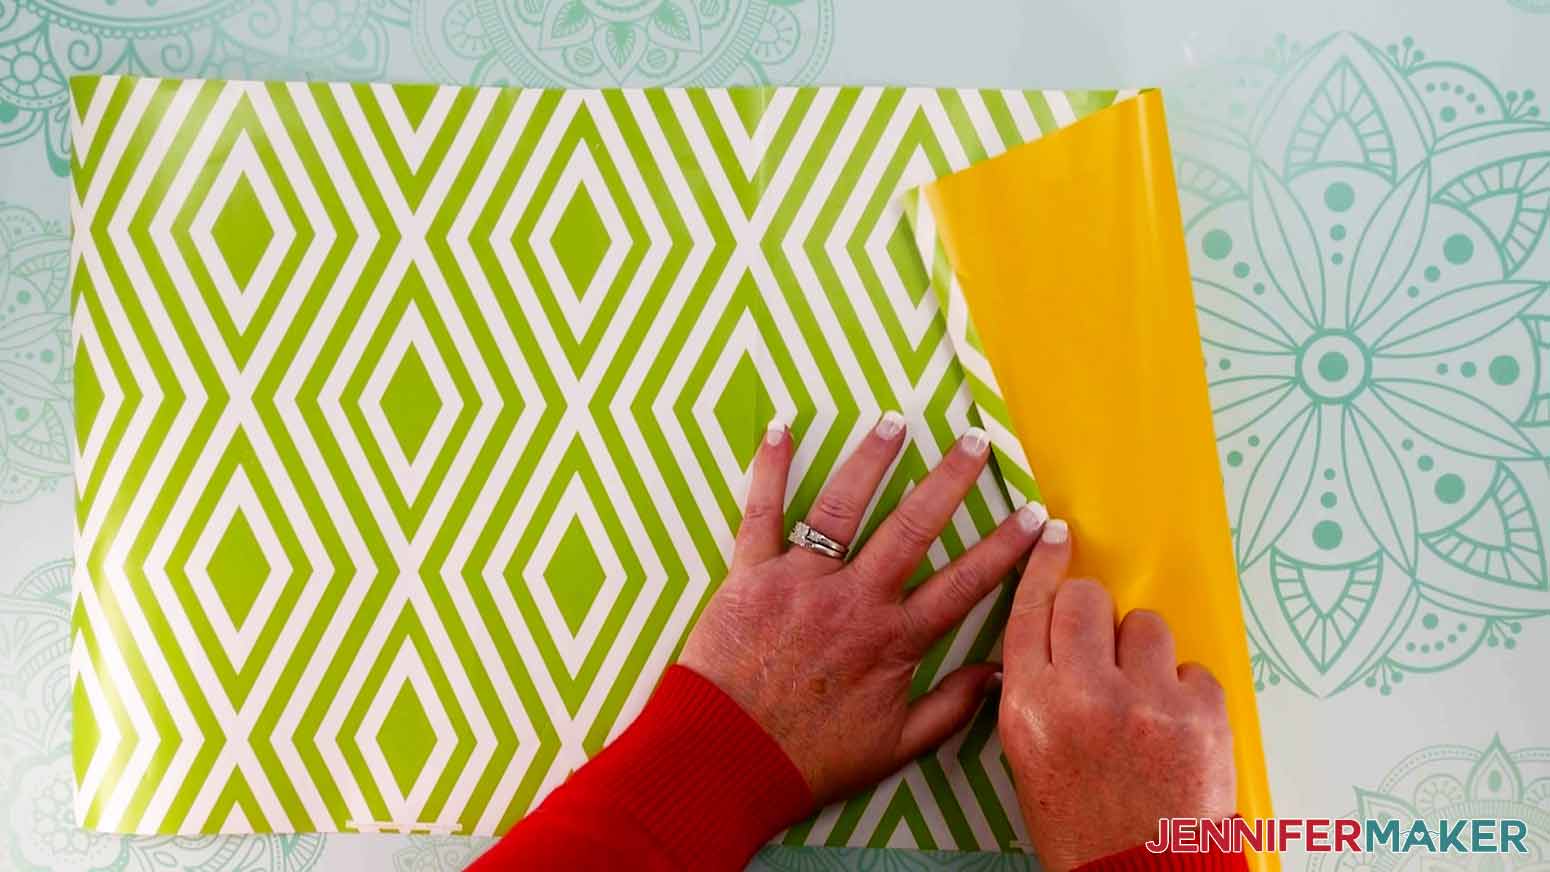
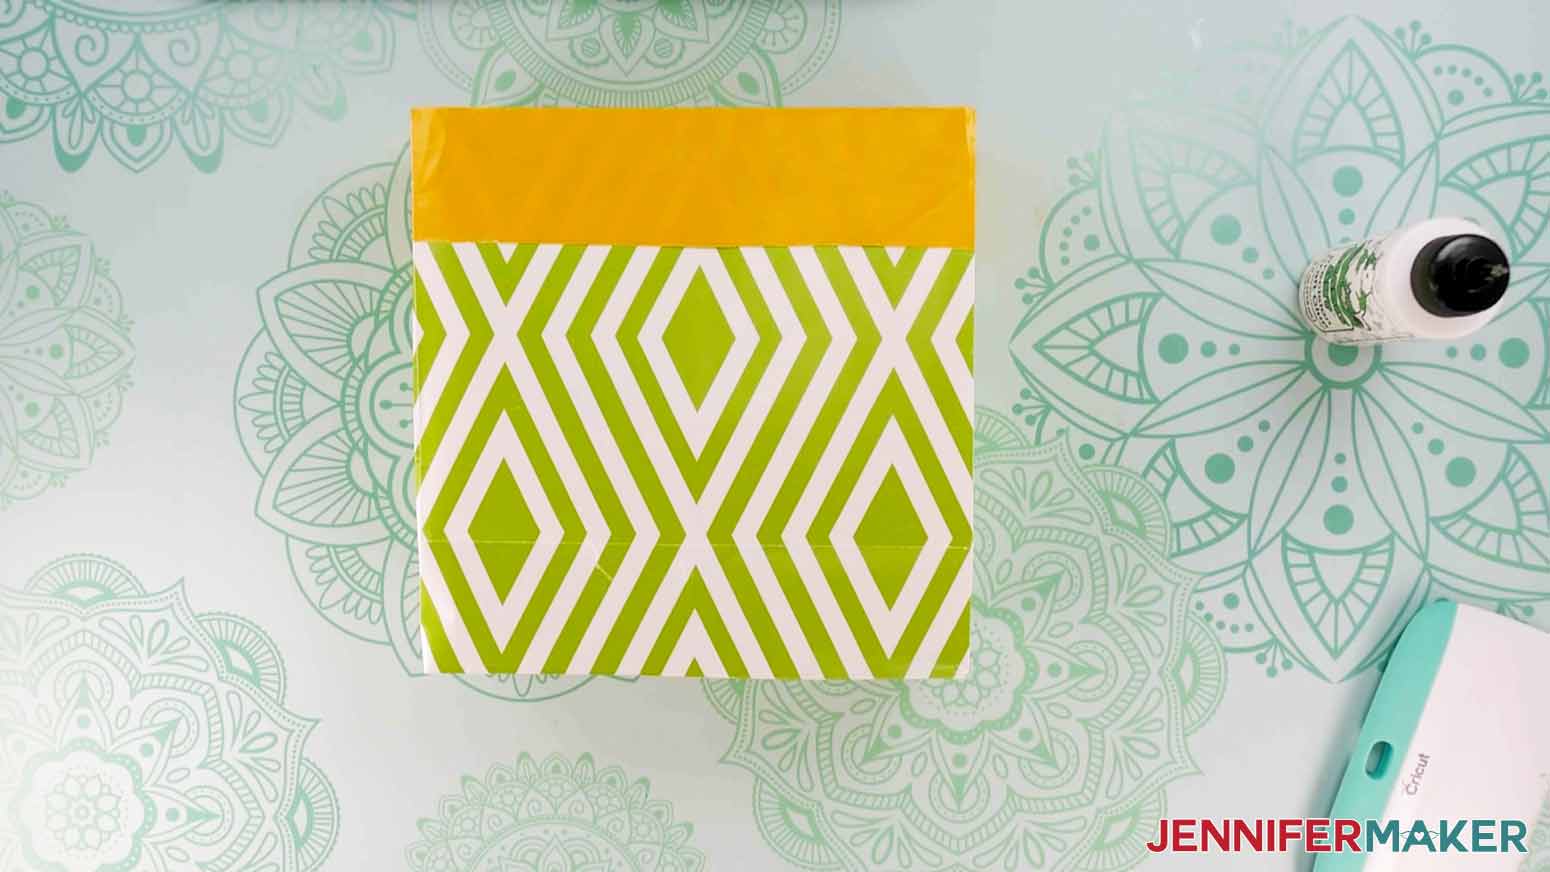
Next, let’s fold over our top flap. If your bag won’t have a flap, you can skip this step. Use your ruler to mark 2” down from the top edge at several points, then connect them with a straight line. Place the ruler’s edge on the line and fold the paper down. The bag is now 10” tall and 2” of the interior paper will show at the top. Add some glue under the flap’s side edges to help it lie flat.
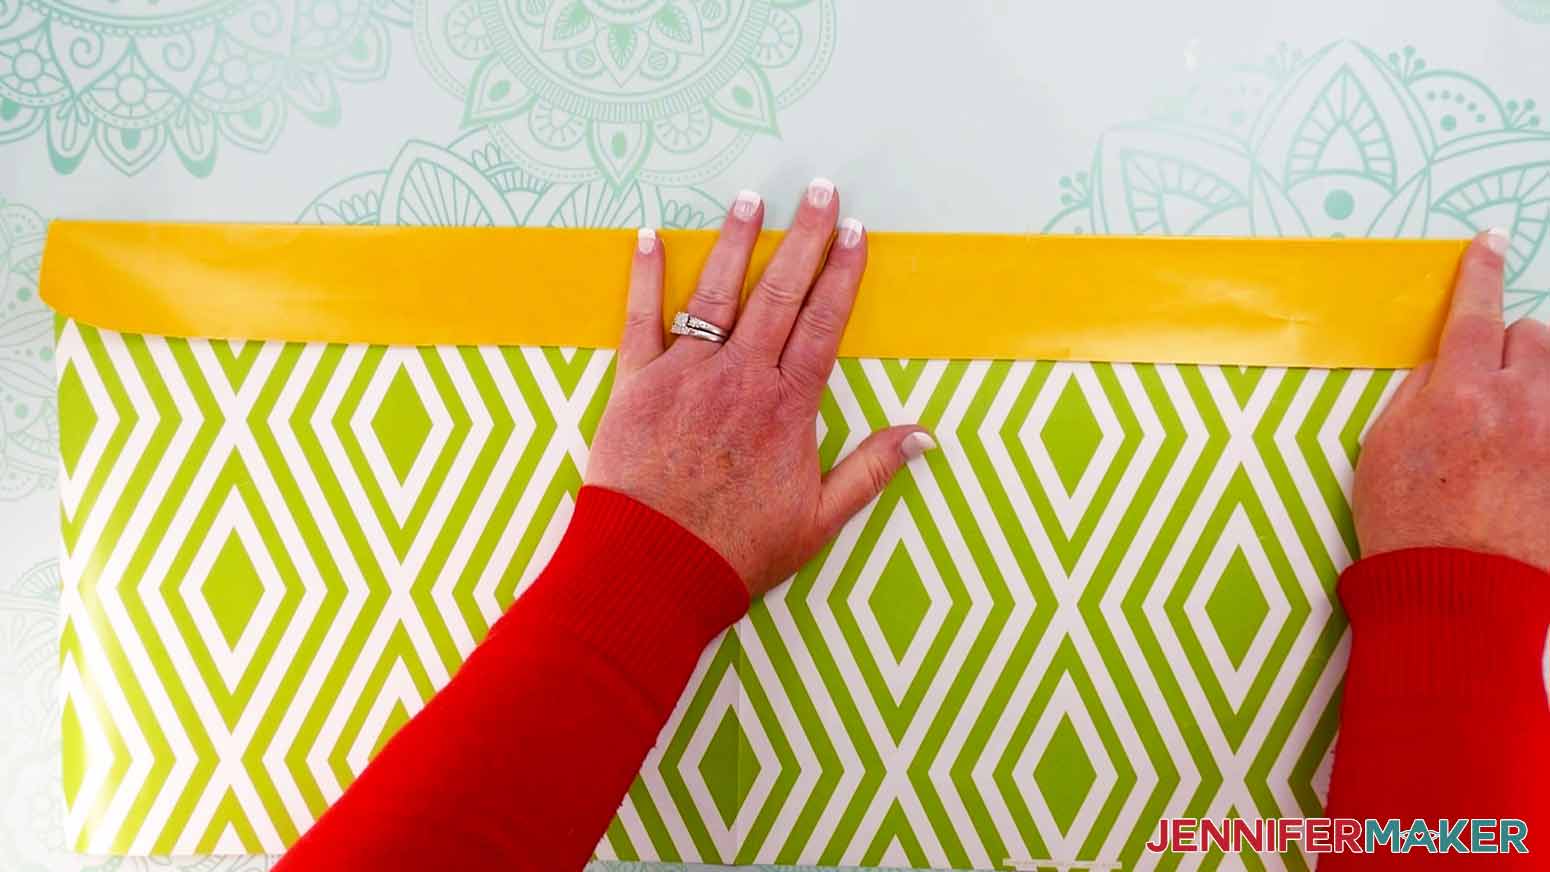
Flip the paper over so the short tab is to the left. Place a line of glue along the tab, then fold the other short edge to cover it. Make sure your edges are aligned and the tab on your flap is folded under and glued as well. Hold the paper in place until the glue sets.
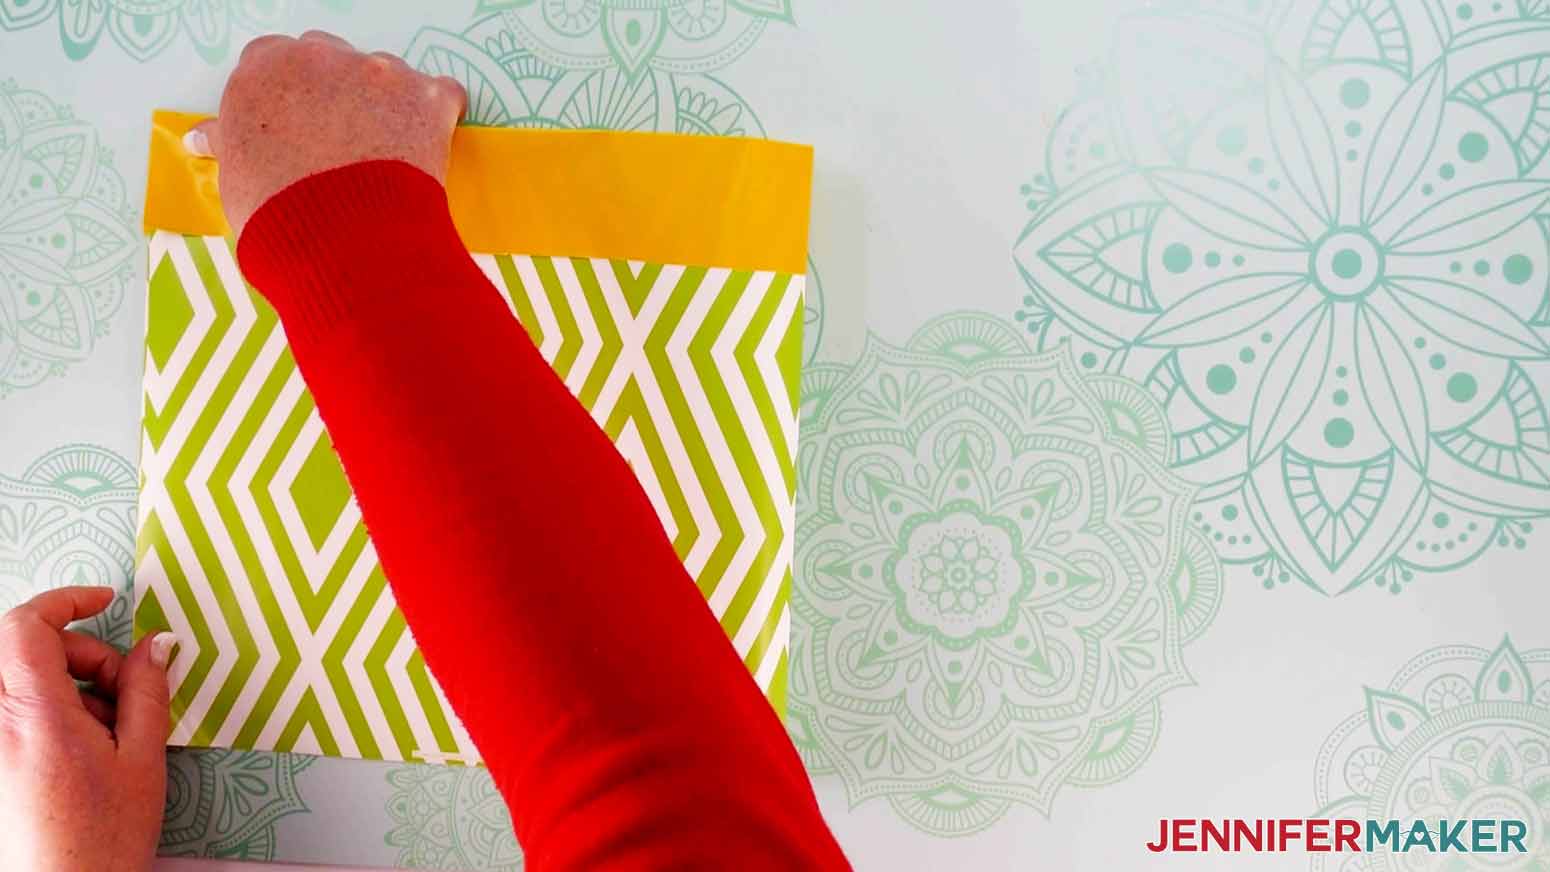
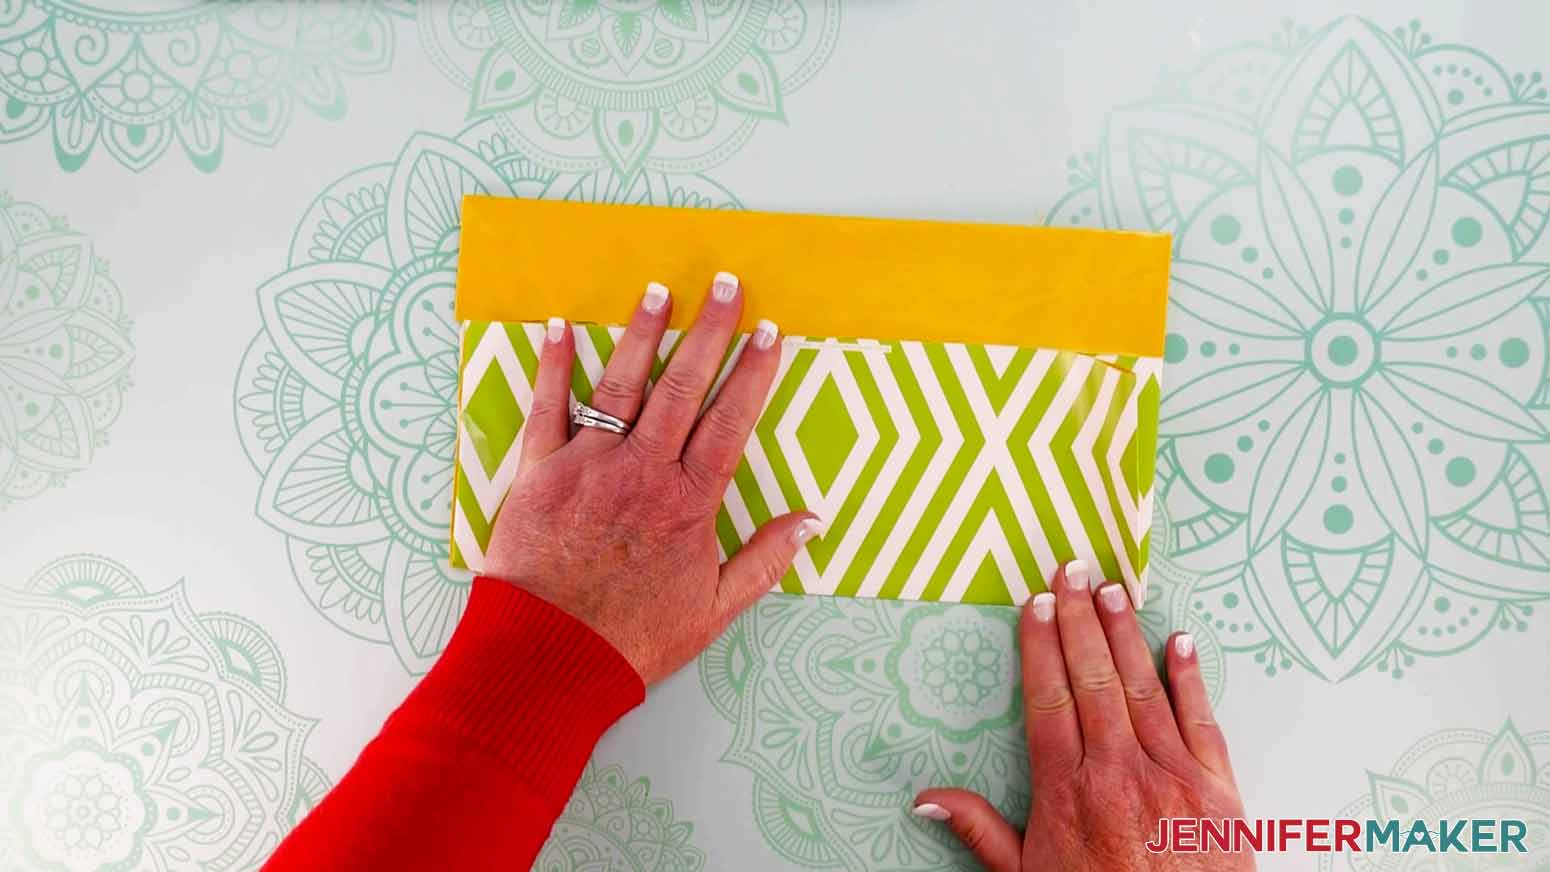
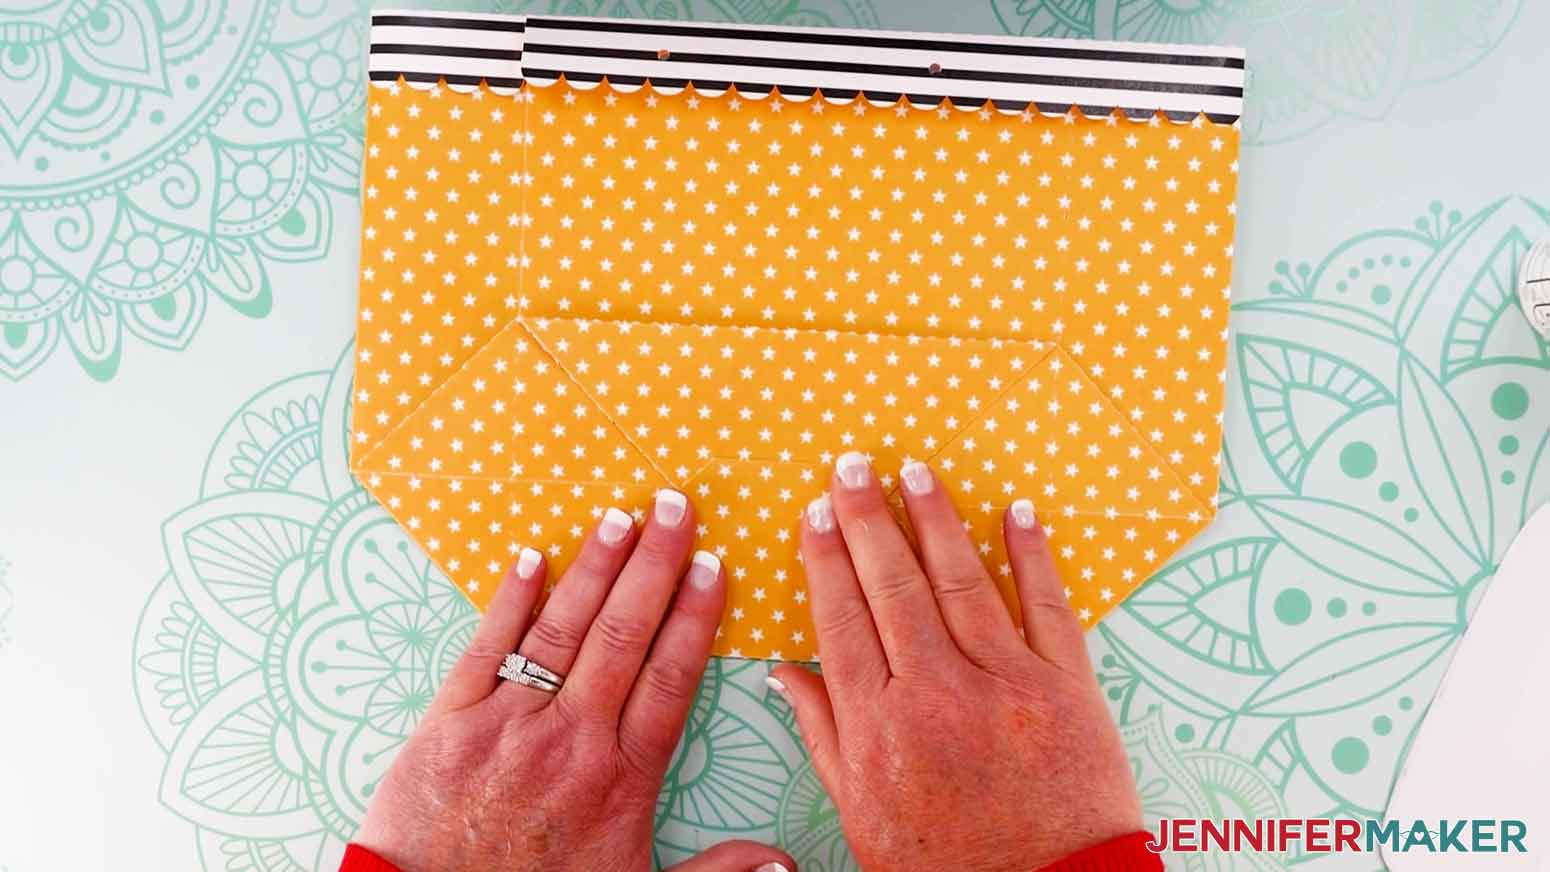
STEP 3: FOLD AND GLUE THE BOTTOM
Fold the bottom of your paper up so that the top of it aligns with the bottom of your flap – this fold will be about 4” tall. Make sure your sides are aligned to help create a nice, straight crease, then unfold. If your bag doesn’t have a flap, fold the bottom up so its height is just about equal to the height of the remaining top section.
Now unfold that part and push the two sides of that bottom section in toward each other. Flatten those sides against your work surface to create two triangles, one on the left side and one on the right side. If you are familiar with Origami, this technique is what is known as a squash fold. The triangles will be the same color as the outside of your bag. Make sure all three corners of each of your triangles are nice and sharp and then make creases along your folds.
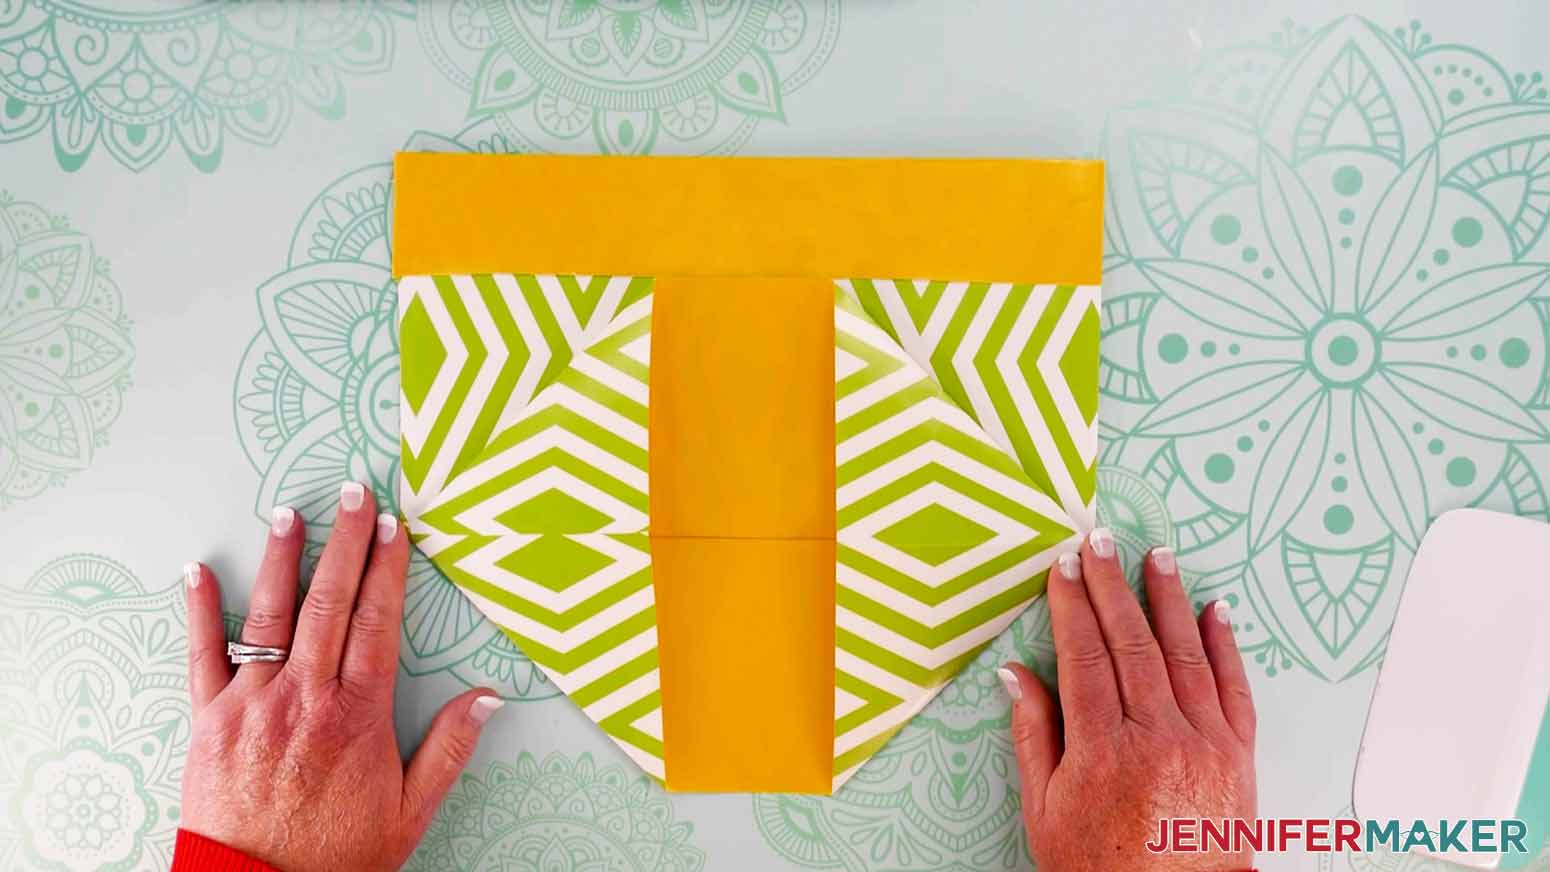
Next, fold the top part of this bottom section down so its edge lands .25” below below the middle crease on the bottom of your bag.
Fold the bottom section up and overlap it with the top section’s open end by about .5”. You will now see two diamond shapes to the left and right of your two bottom flaps.
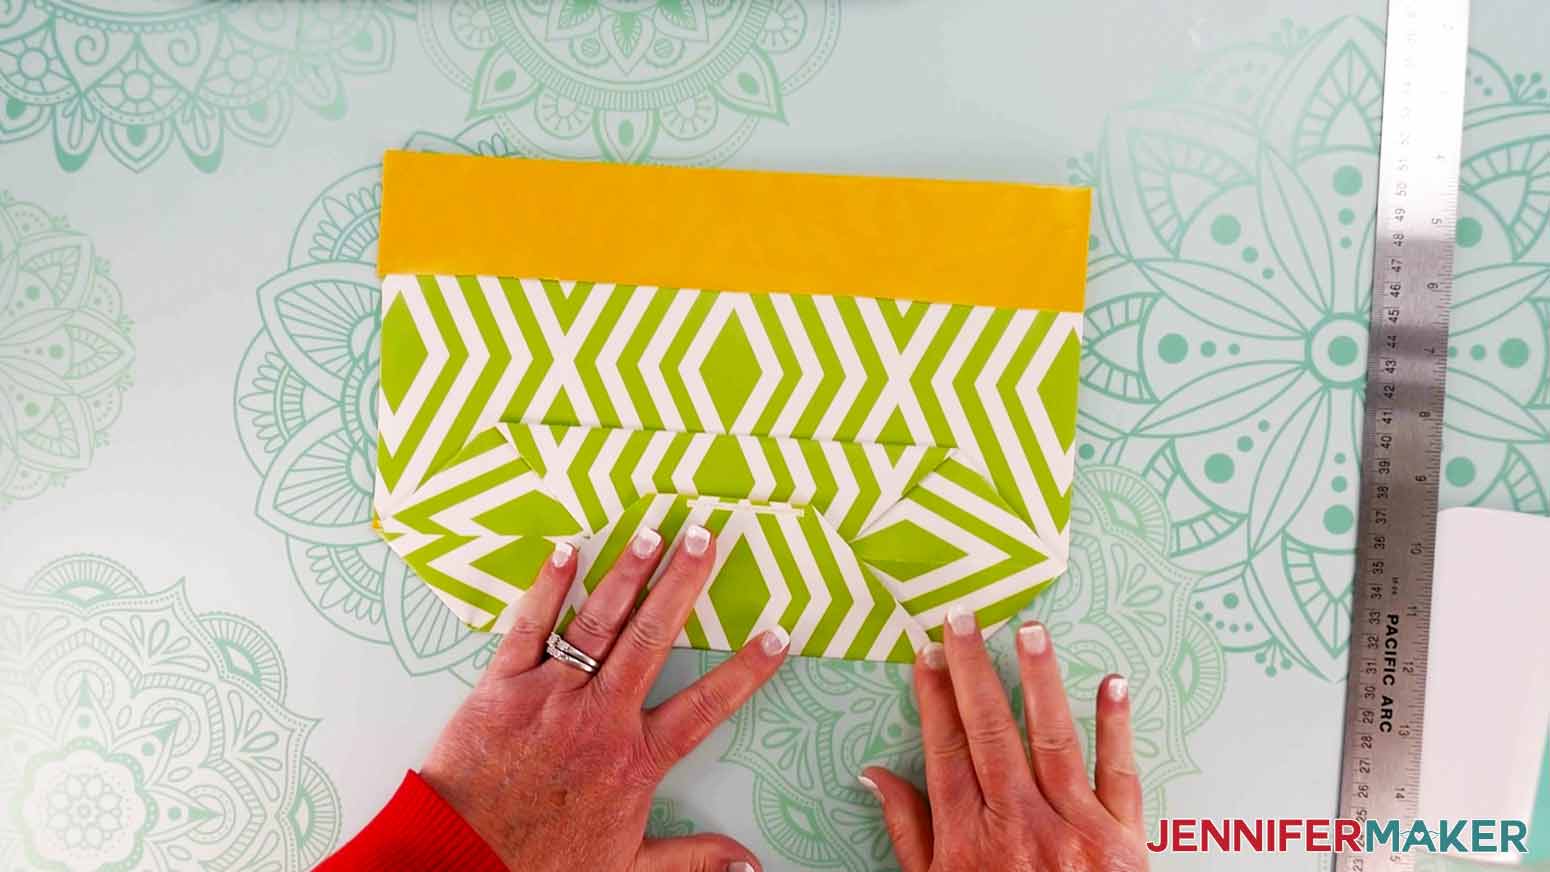
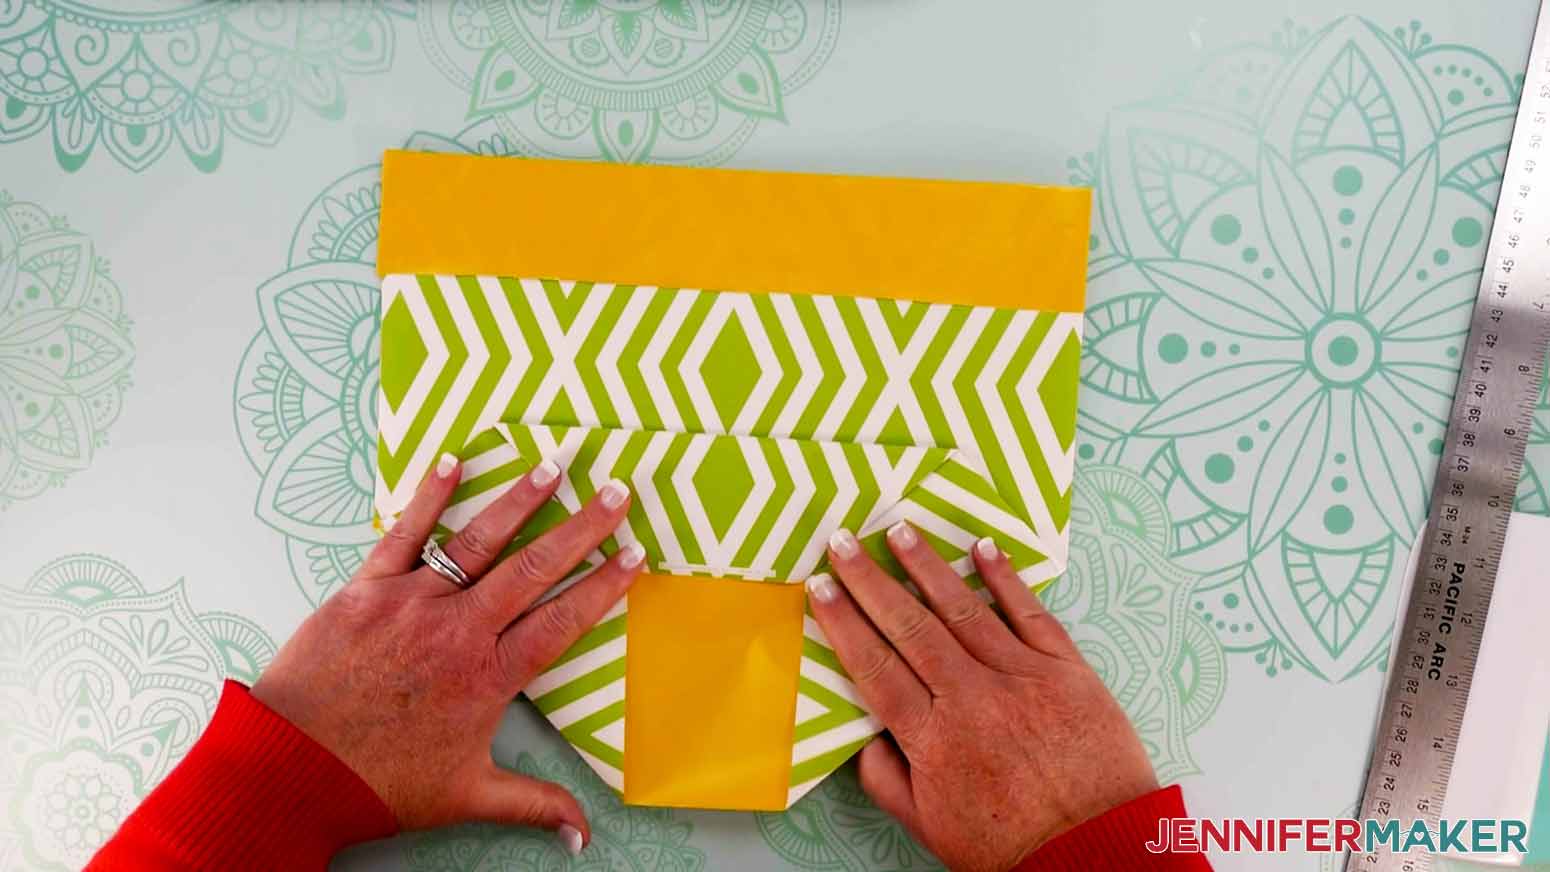
Unfold the flaps we just made and apply glue to the four outer triangles. Make sure you don’t apply any glue to the center portion underneath the flaps, as this is actually the inside of your bag, and you don’t want to glue the bottom to the inside! Fold the top section down, then add a thin line of glue where the bottom flap will overlap its edge. Fold up the lower flap and hold it in place until it sets.
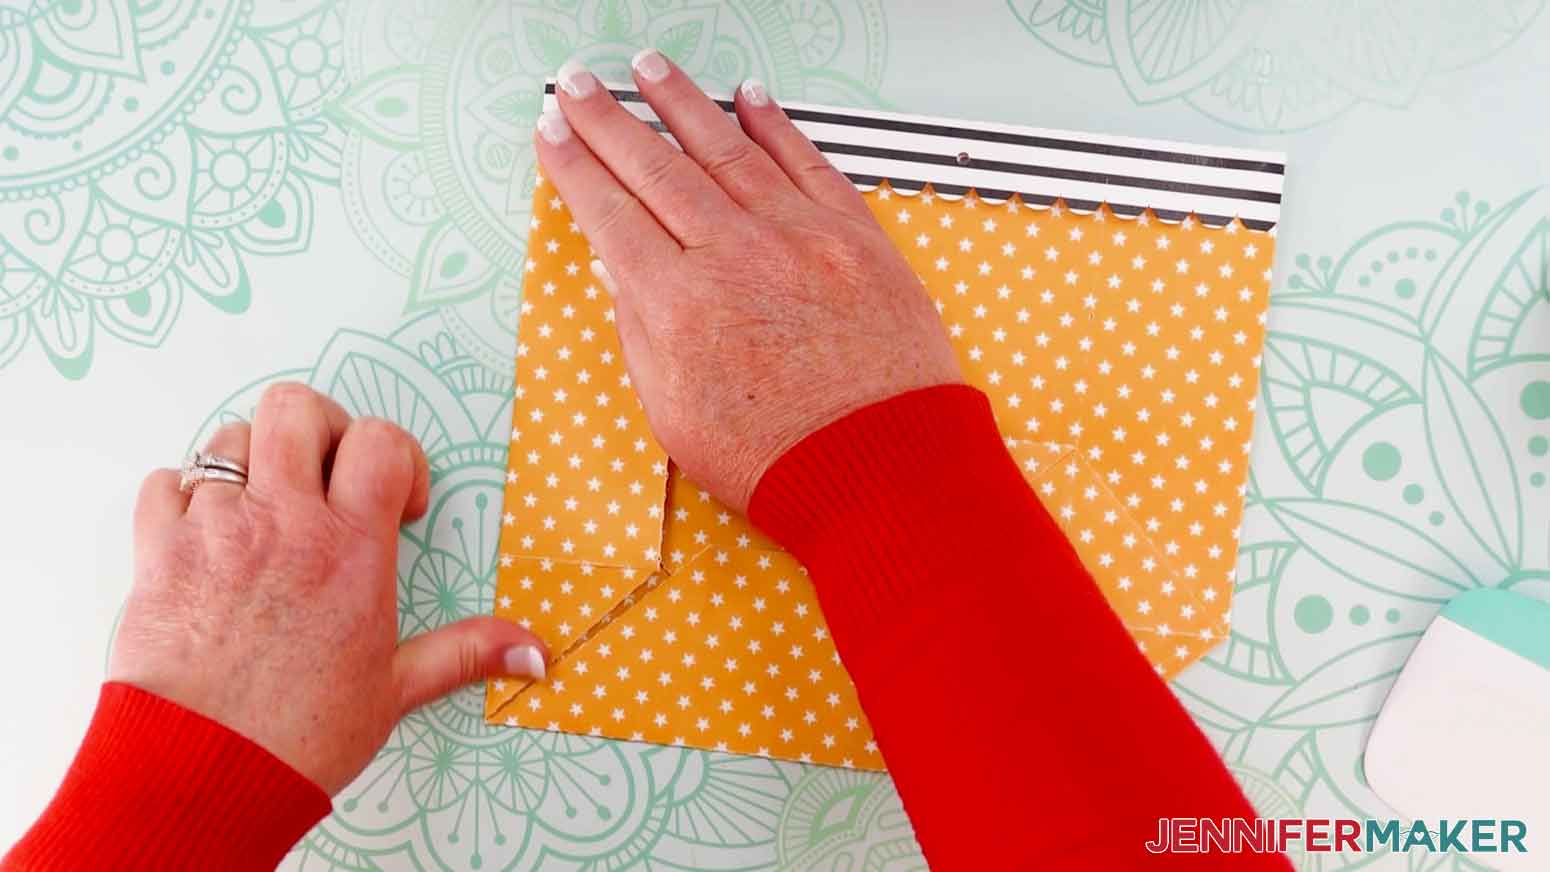
STEP 4: FOLD AND SHAPE YOUR GIFT BAG
The next step is to fold the left and right sides of your bag inward. Pay attention to the angled edge at the bottom of each of these side flaps. Align these with the angled sides on the left and right of your bottom flap. Once your angled edges are just touching, you should have a nice, sharp corner at the bottom left and bottom right of your bag. My folded side flaps were a bit less than 2” wide. Once your side flaps are positioned correctly, crease your folds really well.
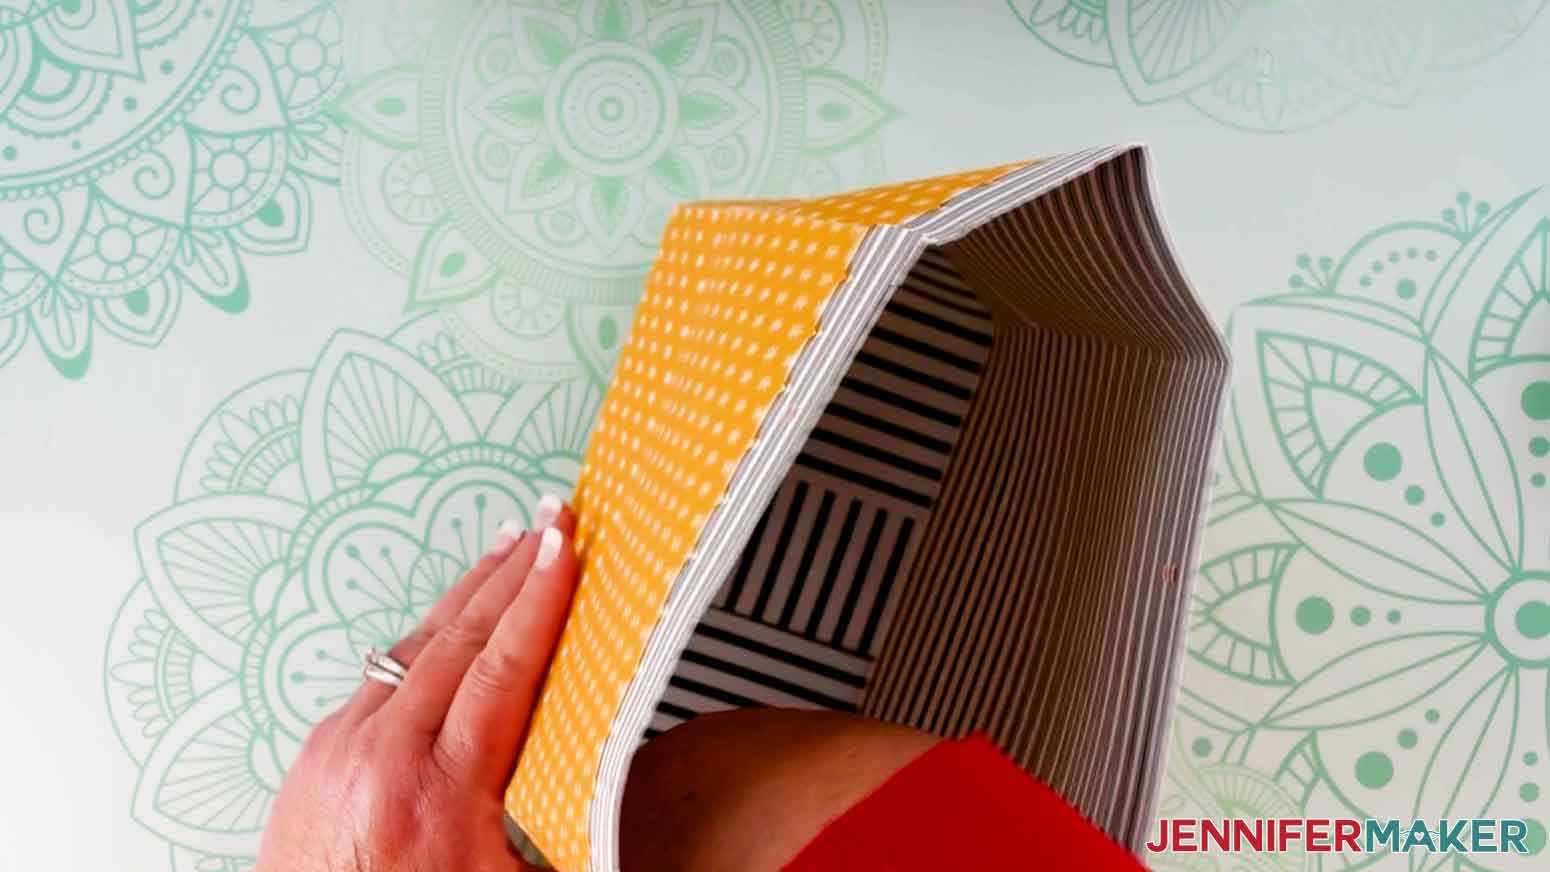
Now you’re done folding! It’s time to create the final shape of our bag.
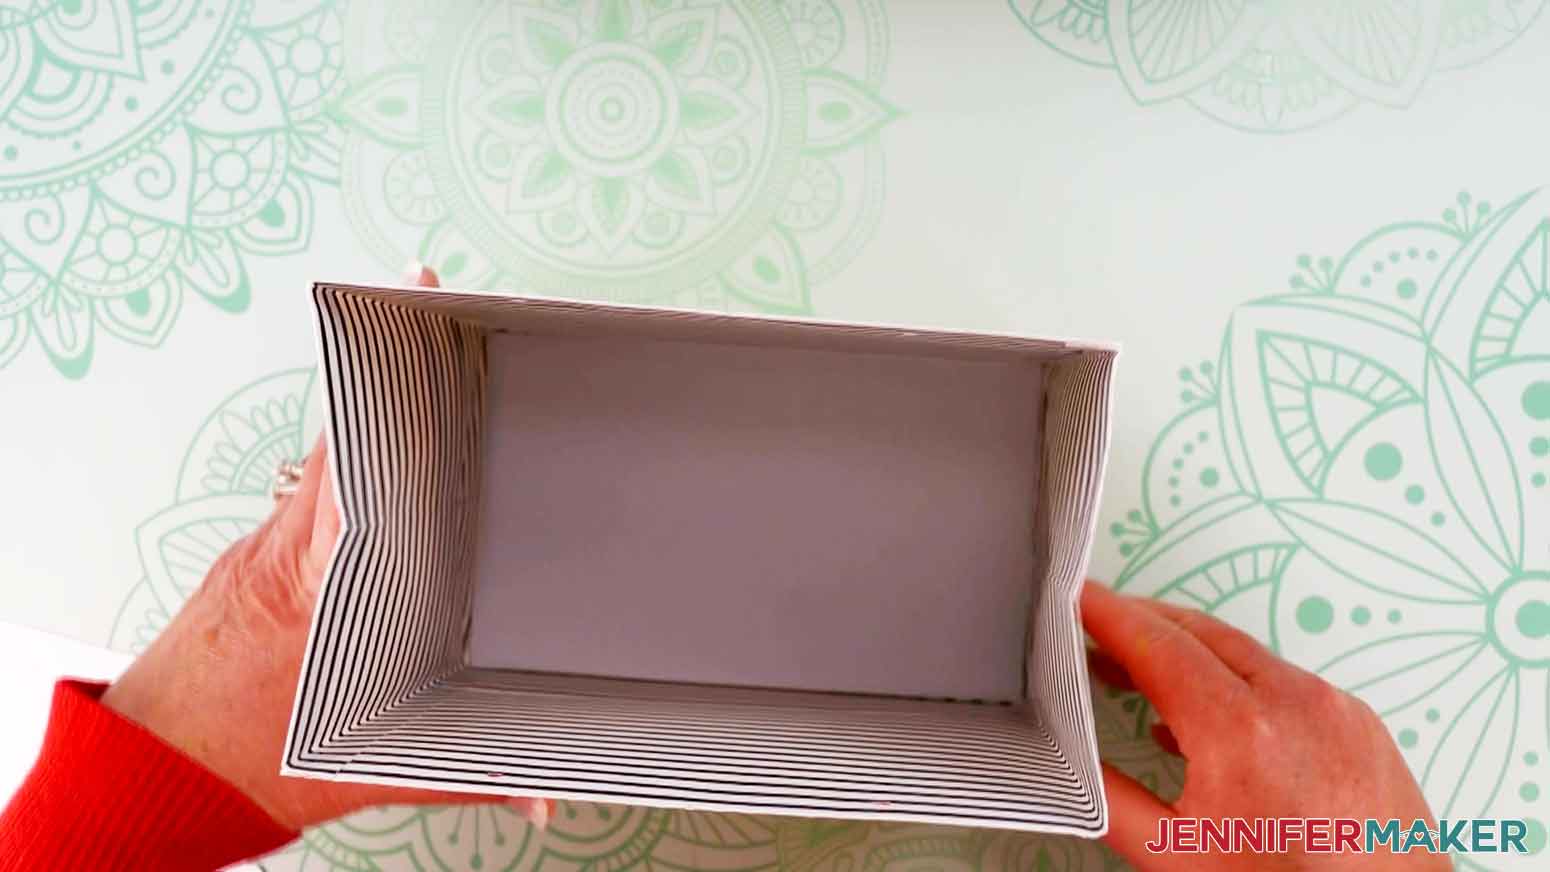
Put one hand inside your bag from the top and very carefully push down on the bottom to open up the bag. You may have to push on it from a few different spots to get the bottom completely flat. Go slowly and keep trying until your bottom is flat enough to sit on your work surface.
TIP: It helps to fold the bag in the opposite direction along the creases, especially at the bottom. This will encourage it to open outward rather than inward.
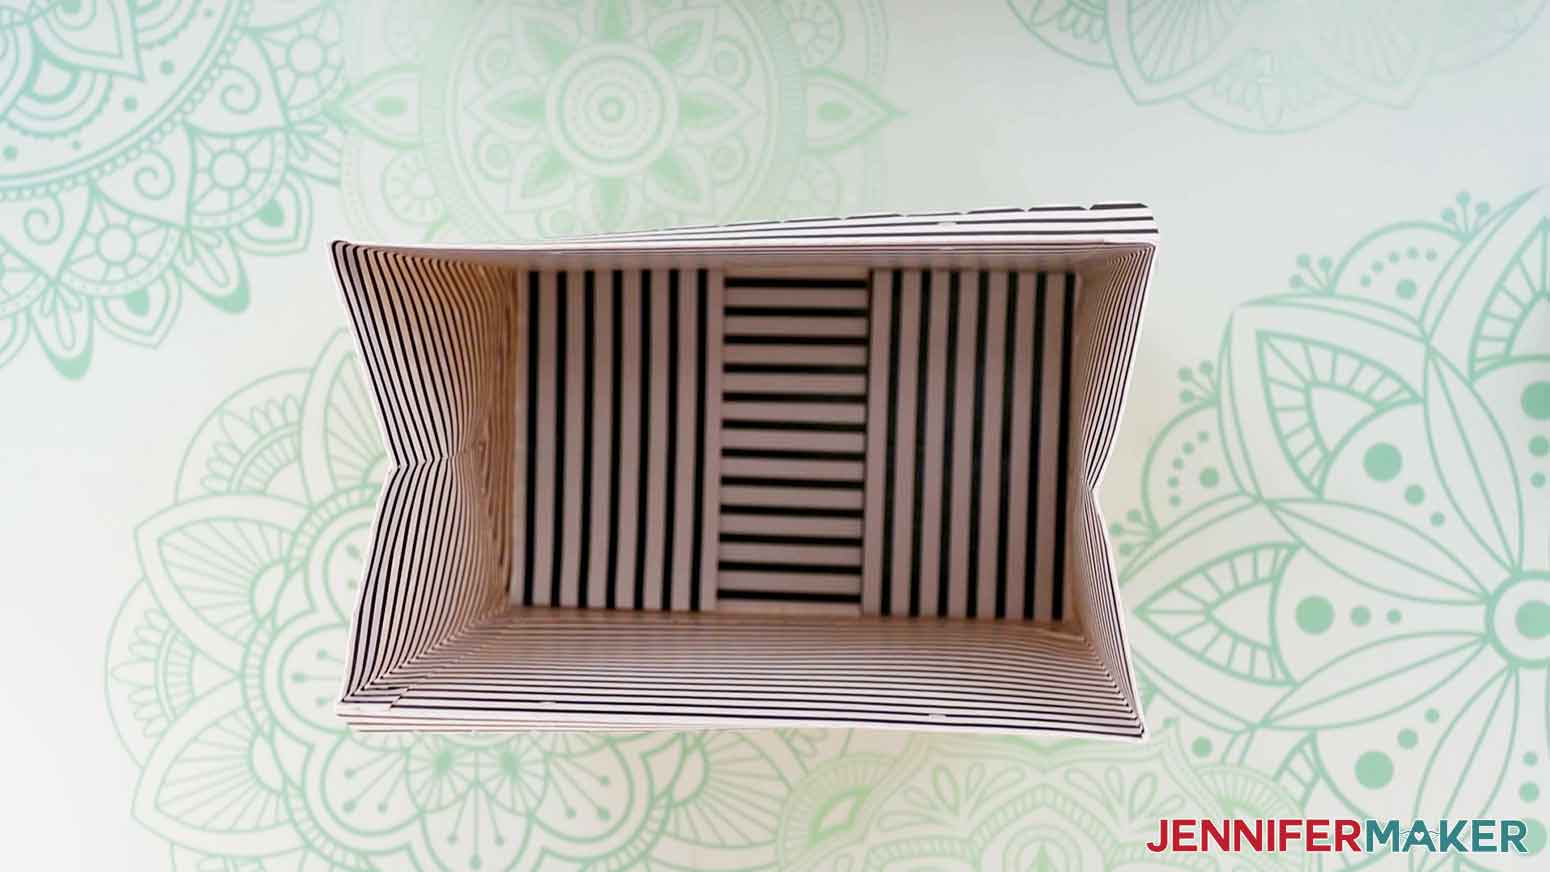
Now fold the middle crease on both sides of your bag inward, and make sure all four edges of your bag are neatly creased and folded outward. When you’re done, your bottom and sides will be nice and square, and your bag will have the shape of a gift bag you’d buy from the store!
STEP 5: CUT AND ATTACH THE HANDLES
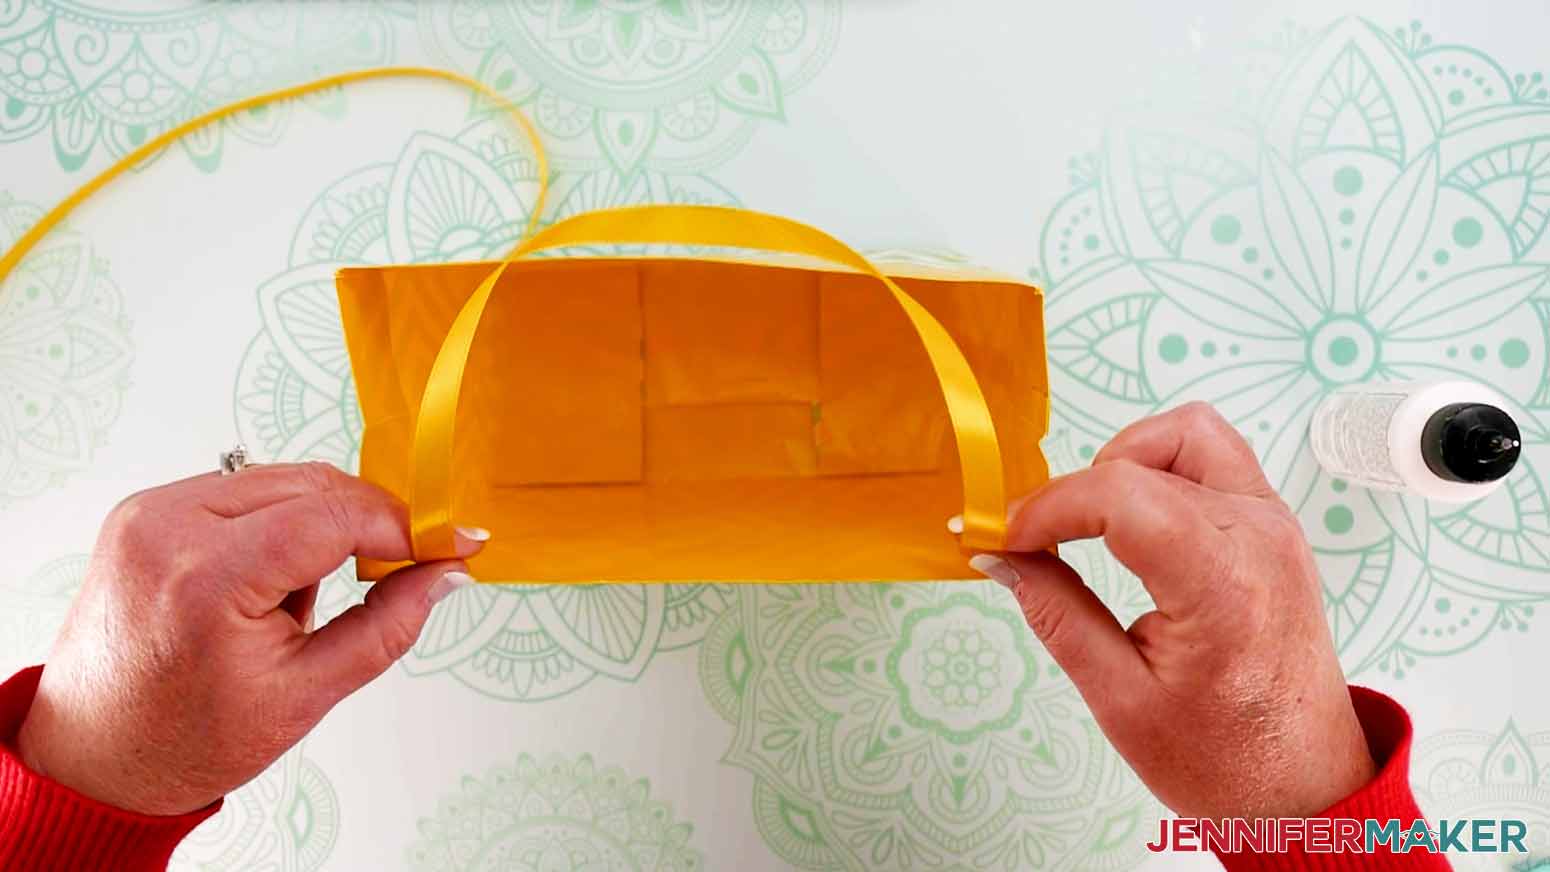
You’re almost done with your bag! The last step is to add your handles. Cut two 16” pieces of ribbon.
Put a small line of glue at each end of one of the ribbons and attach those ends to the inside top of your bag on one side. I placed mine about 1.5” from each edge and about 1” from the top. Now do the same thing with your other ribbon on the opposite side of your bag. Make sure to hold the ribbon in place until the glue is set.
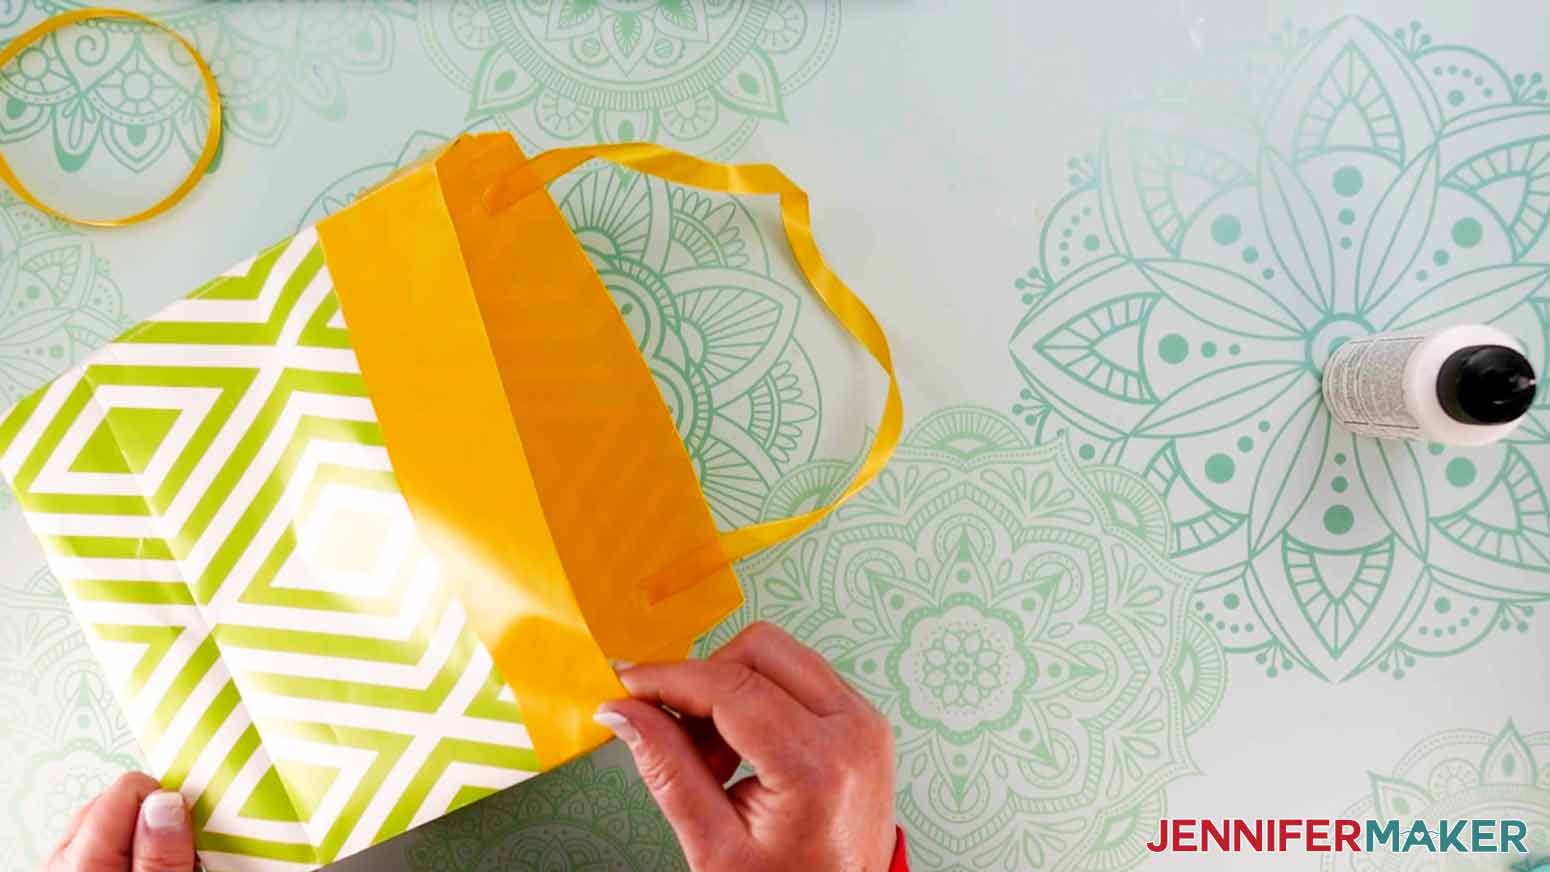
Your bag now has handles! If you’d like, you can cut two long strips of wrapping paper about 7” x 2” to glue over the top of your ribbon ends on the inside of your bag. These will help secure the handles and will give the inside of your bag that extra finishing touch.
TIP: If you want to place anything heavy in your bag, it’s a good idea to reinforce the bottom of it with a piece of thick cardstock or cardboard so your item doesn’t fall through. If you made your bag the same size as mine, you’ll want to cut your cardstock or cardboard to approximately 7.125” wide by 3.75” tall.
NOTE: I found that my finished wrapping paper bag could only hold items up to 4 lbs in weight. Wrapping paper isn’t as heavy as cardstock and isn’t able to withstand too much weight.
Cardstock Gift Bag Using a Cricut
STEP 1: GET MY FREE DIY GIFT BAG SVG FILES
First, download my DIY Gift Bag SVG/DXF/PDF files from my free resource library. It's Design #390. There are several design options in the folder. You’ll want to use one of the two files for the regular gift bag. One uses a scoring tool to create crease lines, while the other uses dashed cut lines made with the Fine-Point Blade to create the crease lines. I'm going to make the no-score version. You can follow along, or use the score version and reference the directions for the purse gift bag below, which uses them. Upload the SVG file to Cricut Design Space and add it to your Canvas.
TIP: If you are not sure how to upload an SVG cut file to Cricut Design Space, watch this helpful video training series I made. If you are on an iPad or iPhone, here is how to download and upload SVG files to the Cricut Design Space app.
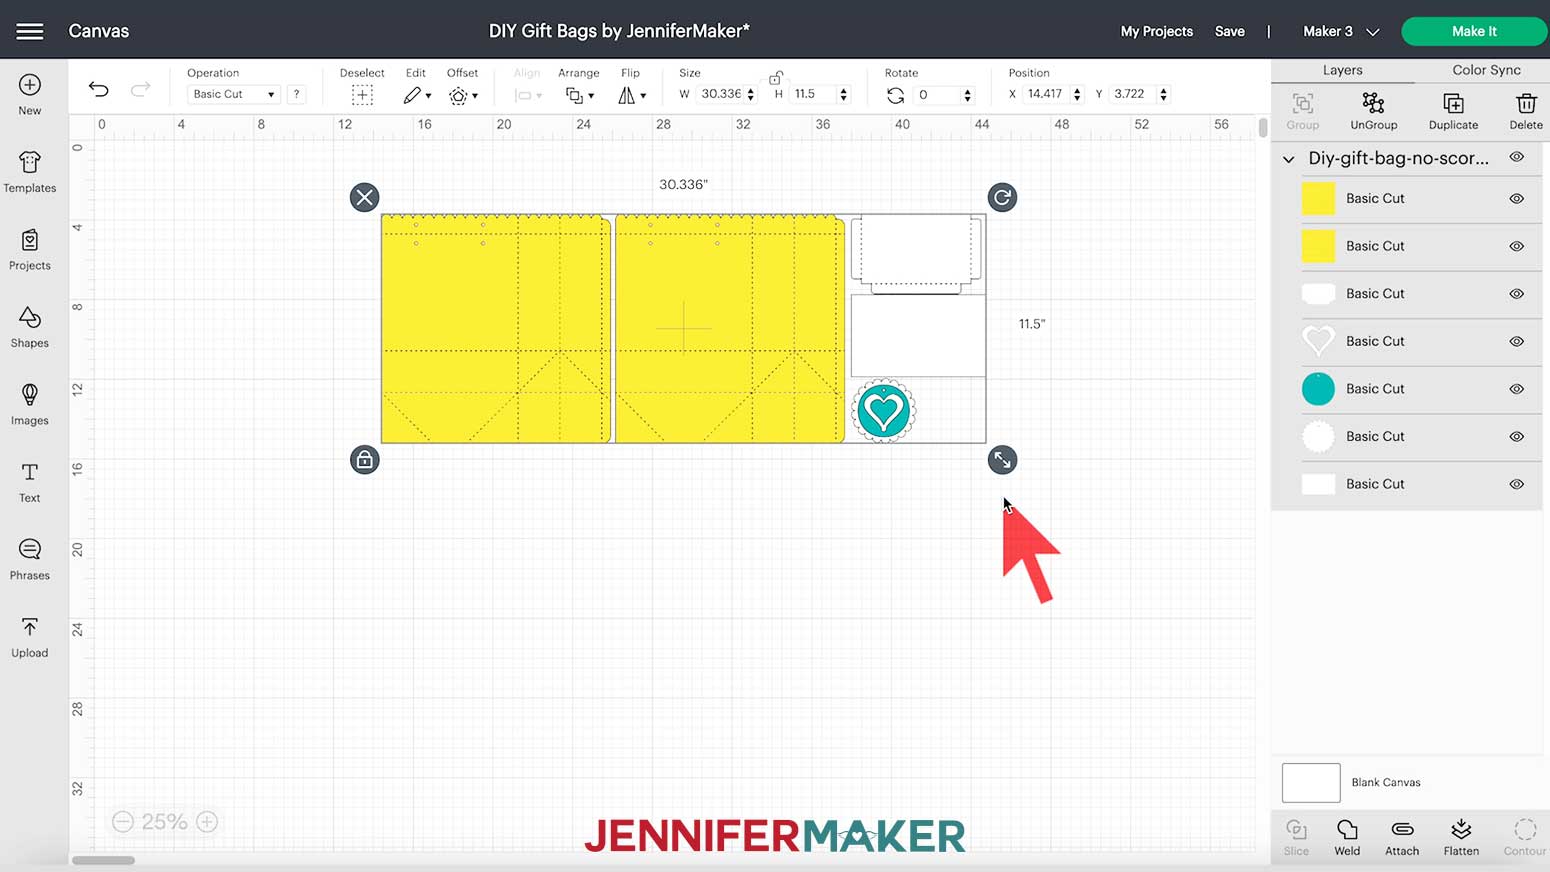
This is what my DIY Gift Bag SVG file with dashed cut lines looks like on my Canvas. You can zoom out to see the entire design by clicking on the minus (-) sign in the lower left.
STEP 2: PREPARE YOUR DESIGN FOR CUTTING
This design is sized to make a gift bag approximately 7” wide by 8” tall by 4.25” deep. If you want to make a different size, the bag can be made smaller. Going bigger would require gluing paper together for the front, so I don't recommend it. Click and drag the resize icon in the lower right hand corner of the design's bounding box. Then, click on one of the yellow pieces in the Layers panel and check the width at the top to see the new size. You can also use the Canvas grid lines to get an idea of the height.
NOTE: When resizing, remember to keep the Lock icon locked to maintain the design proportions!
If you need help resizing an SVG in Cricut Design Space, you can check out my resizing guide where I explain exactly what you need to do to resize any design to fit your needs.
To add a name or an initial, click the Text icon on the left menu to add a box with "Text" in it to the Canvas. Without clicking anything else, type in what you want. I added “M” for “Maker.” Then, click the box that says "Cricut Sans" under Font in the top menu to see your font options.
TIP: If you need help filtering and finding the best fonts, get my Cricut Font Finder cheat sheet!
Scroll through and click a font name to see how your text looks until you find one you like. If you click off of your text, click it to change the font or double-click to change the text. Make sure your font choice doesn't have a price next to it to avoid a charge when you go to cut the design. I used Brenson Charlotte, which you can purchase from FontBundles.net, but use the font you like best.
With your text selected, change the size to roughly 2.5” tall so it fits nicely on the front of your bag. Then, click the box next to Basic Cut to change its color to match the circle on your Canvas. Now, the text matches the bag’s inside color, which reduces the mats to cut.
We're finished on the Canvas!
Check that you have the right machine selected at the top right and click "Make It." If prompted, click "On Mat" and "Continue."
You should see four mats on your Prepare screen. Click “Continue.”
Under “Set Base Material,” select "Medium Cardstock - 80 lb (216 gsm),” change Pressure to "More," and click "Remember Material Settings" if you're using the same weight of paper for each mat as I am.
If you run into any issues cutting your materials check out my Cricut Tips & Tricks for Cleaner Cuts.
STEP 3: CUT YOUR GIFT BAG DESIGN
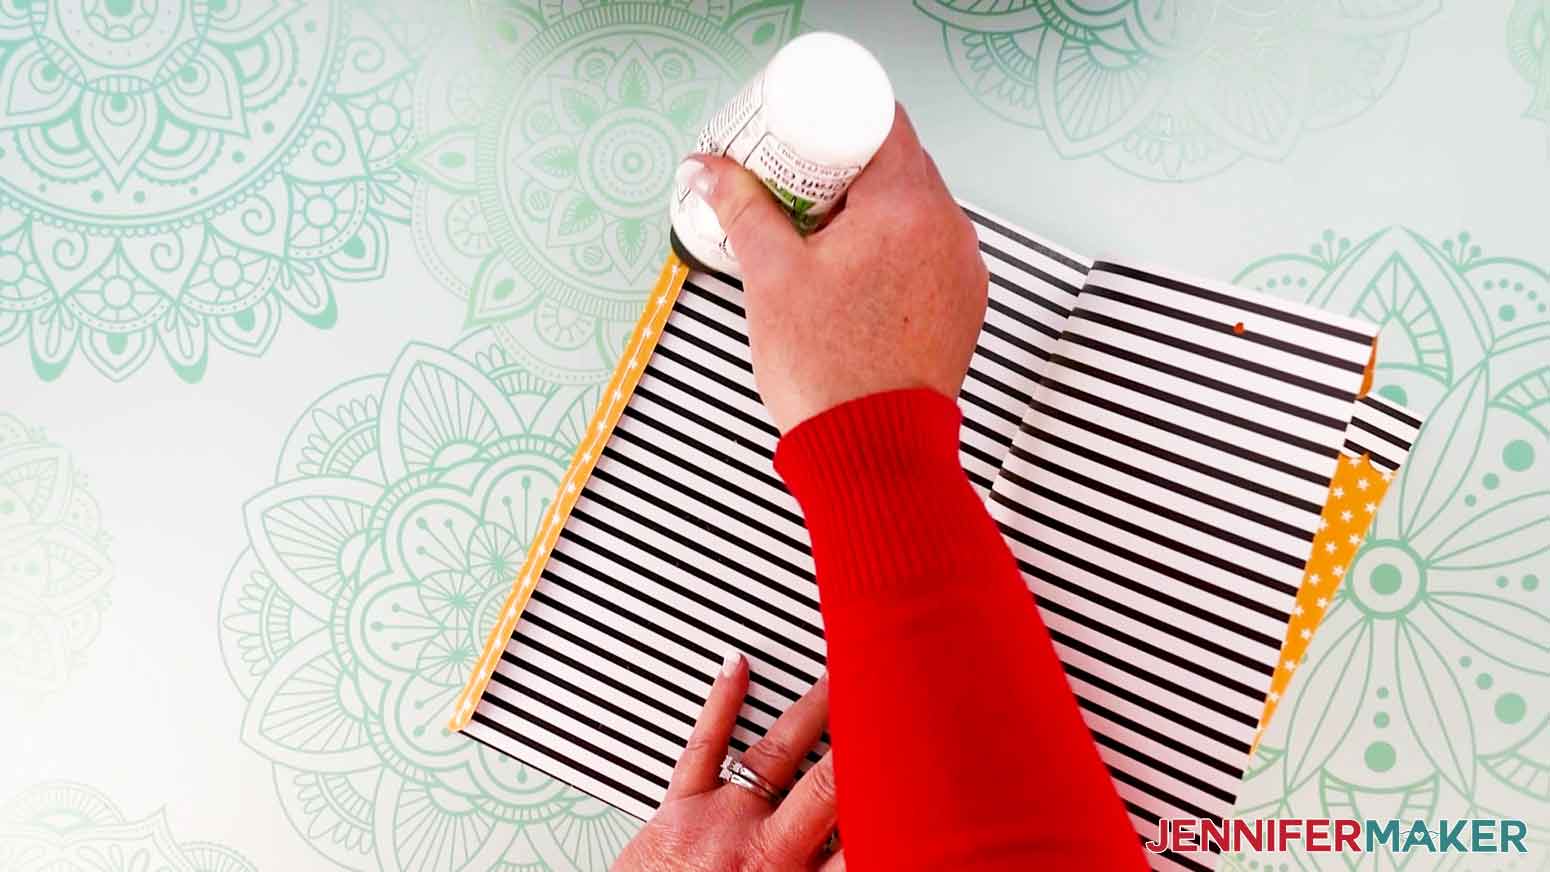
Place your first mat's cardstock on a green Cricut StandardGrip Machine Mat. If you’re using double-sided or patterned cardstock, place the exterior face up. Use a brayer to adhere it well. Load your mat and press your machine's Go button.
Once the mat is finished, unload it, flip it over on your workspace, and gently roll a corner back to release the cardstock. This helps prevent curling and ripping.
Complete the process for the rest of the mats, making sure to select the correct color cardstock for each mat according to the Make screen.
TIP: When removing smaller pieces from your mat, it may help to use the spatula to gently lift them so they don’t tear.
STEP 4: ASSEMBLE YOUR CARDSTOCK GIFT BAG
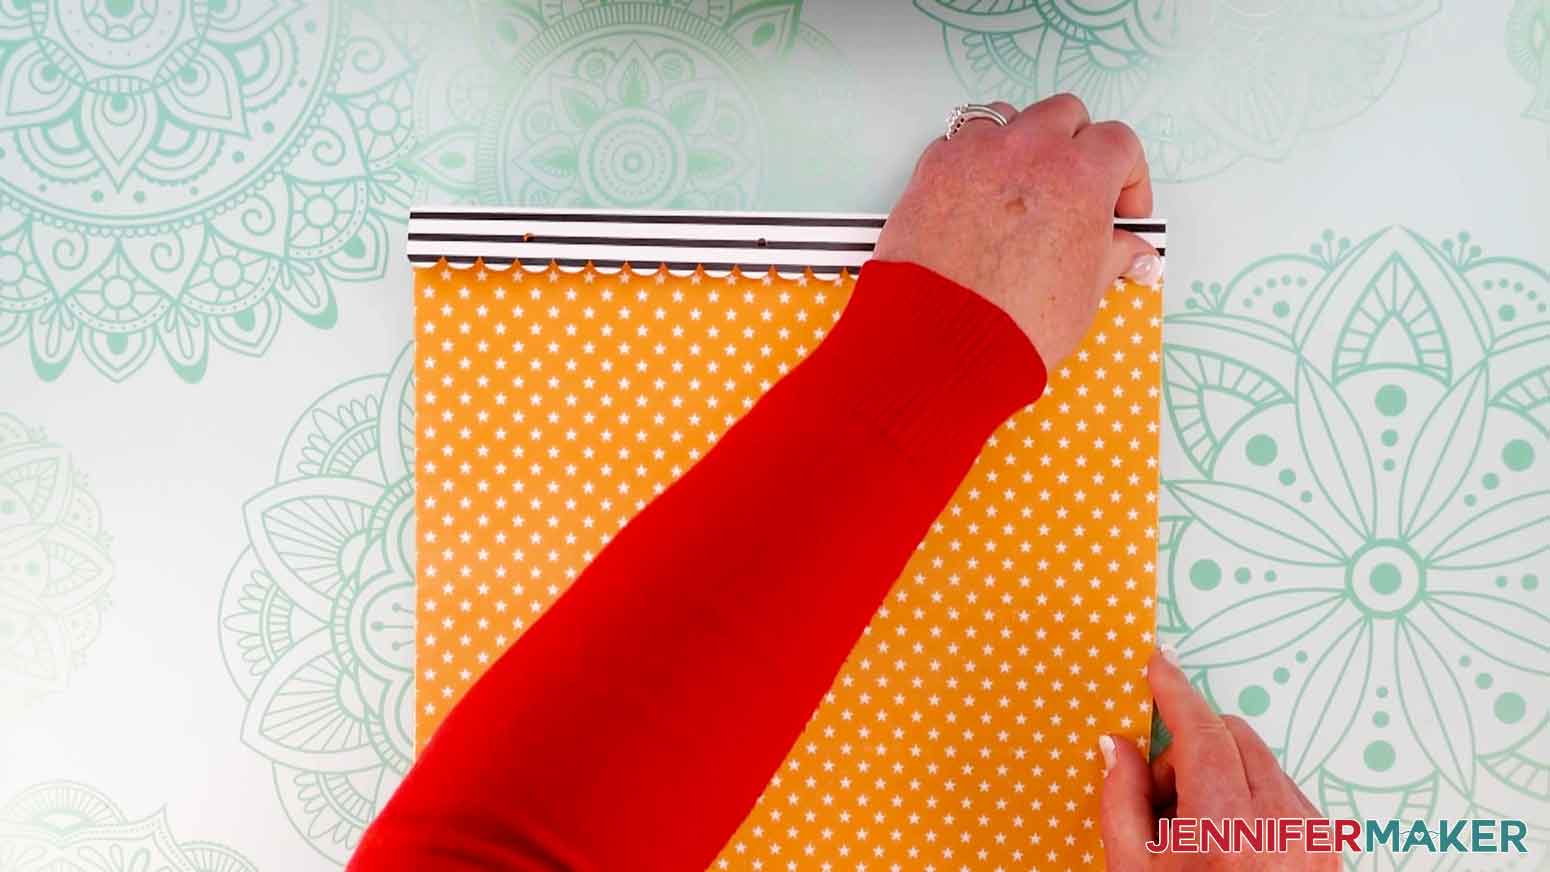
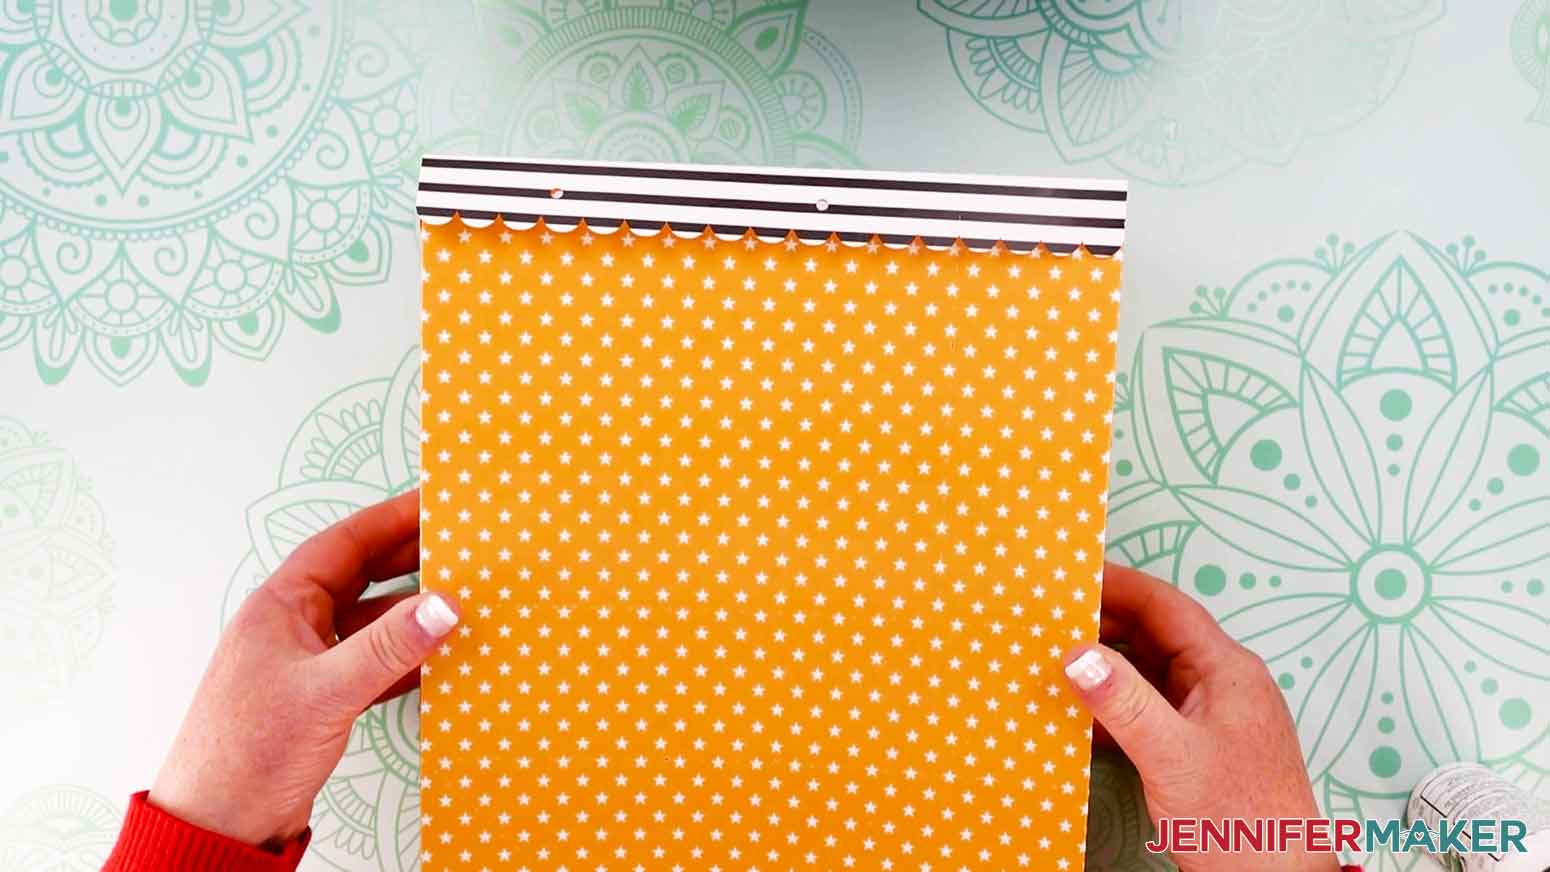
Take your two patterned pieces and lay them in front of you with the exterior face up and the scallops at the top.
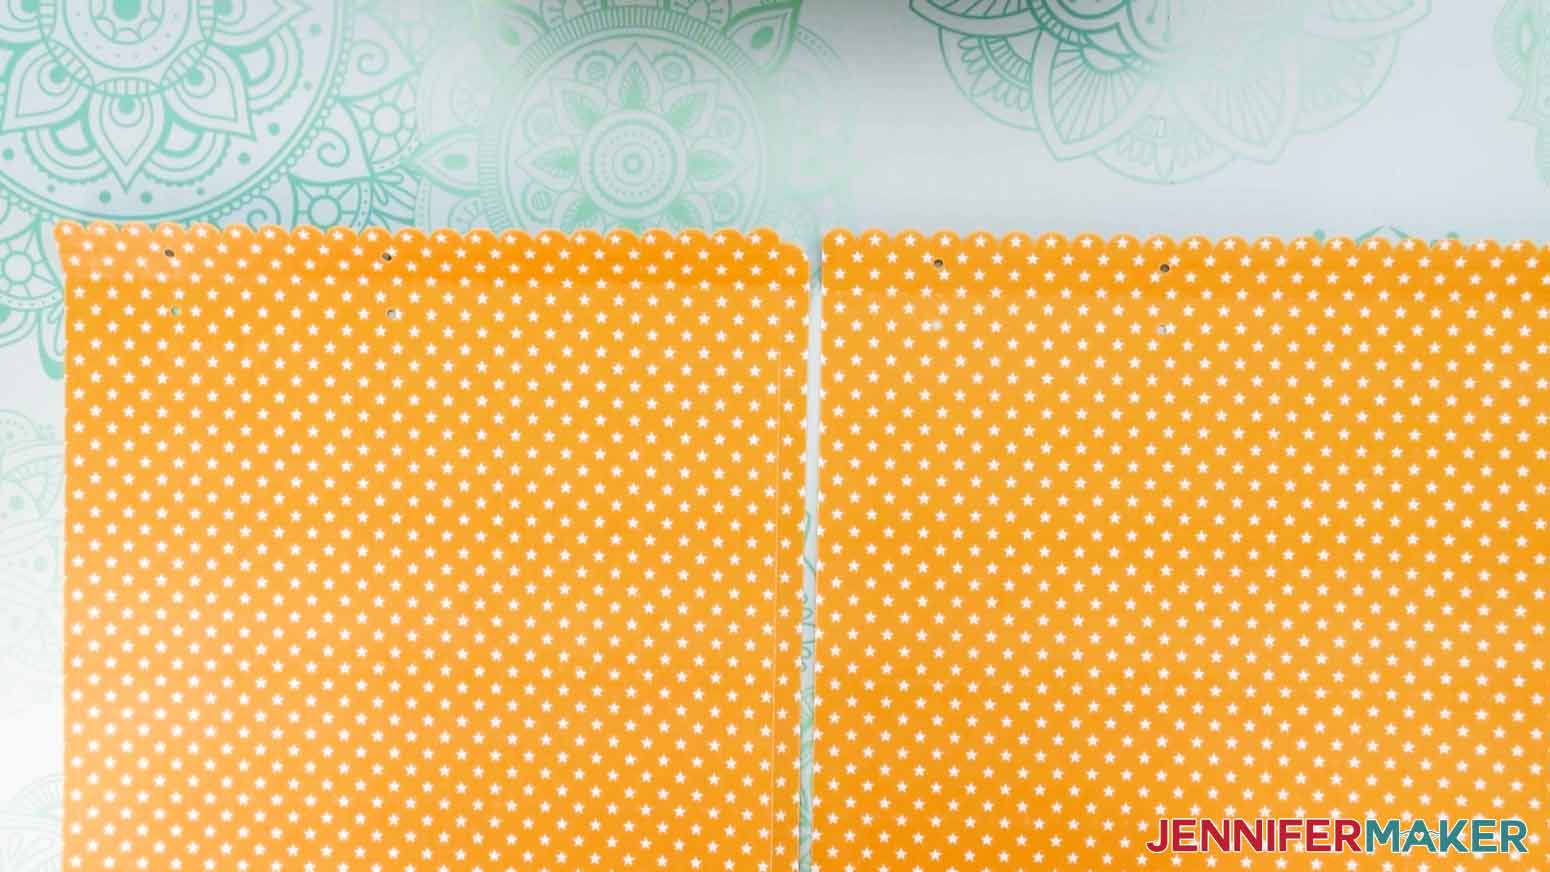
Fold the top section with the scallops down along the topmost horizontal crease to show the interior.
TIP: Use your ruler as a guide to help get a nice, straight fold. Position the top of your ruler along the crease on your cardstock and fold down along the edge of the tool.
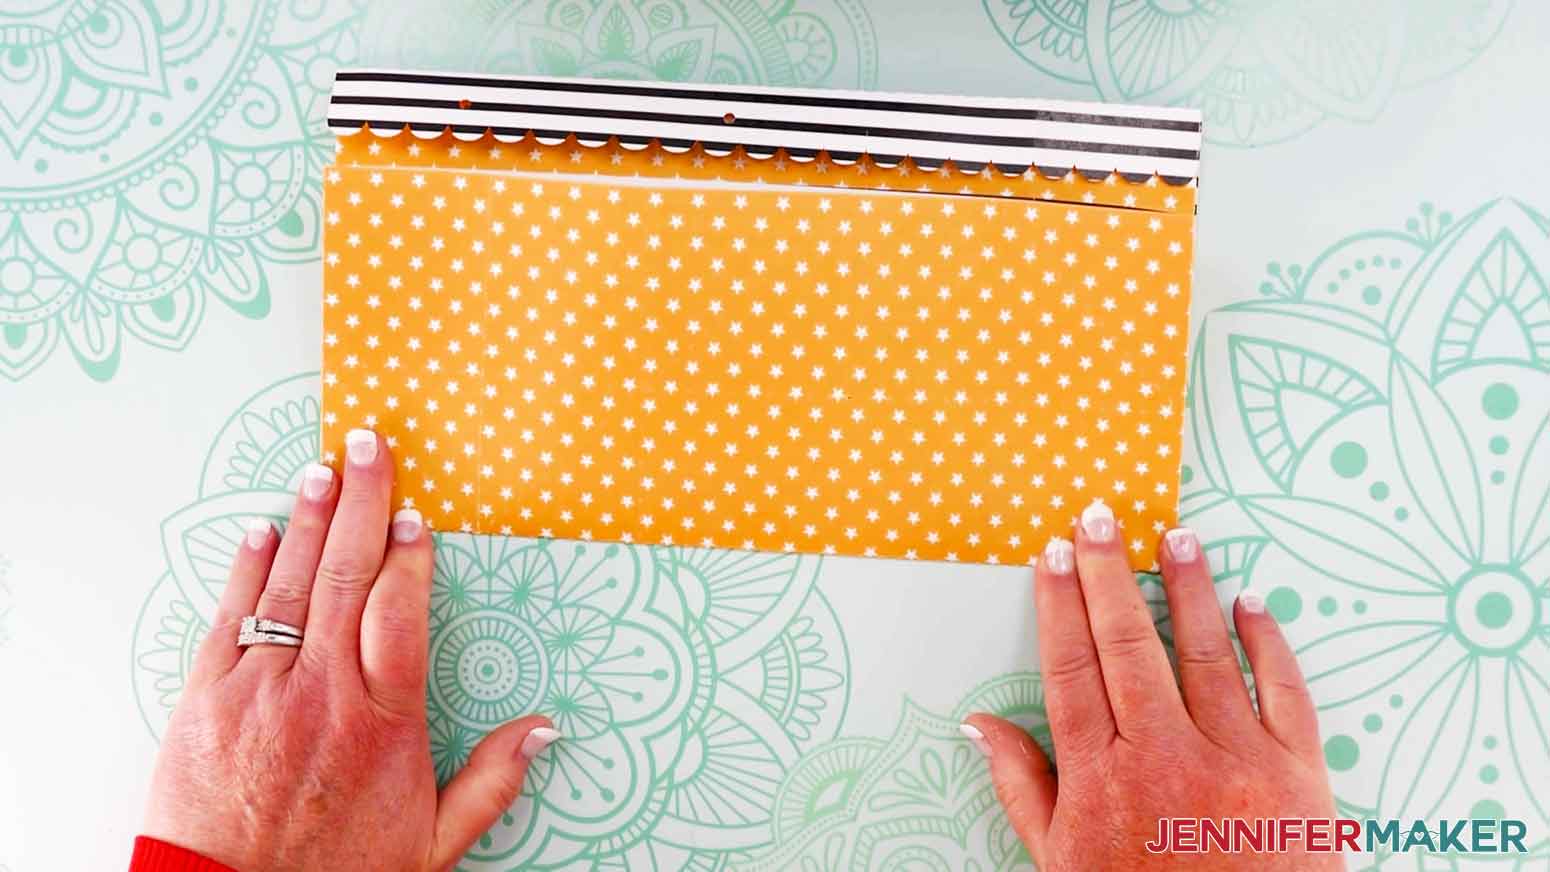
Now, fold the tab on the right side of both pieces under. Flip both pieces over. Apply a thin line of glue along one of the tabs on the side with your front pattern and adhere it to the unfolded edge of the opposite piece.
Once the glue is dry, apply a thin line of glue along the remaining tab (again on the side with the front pattern) and adhere it to the inside edge of the unattached side, creating a closed shape.
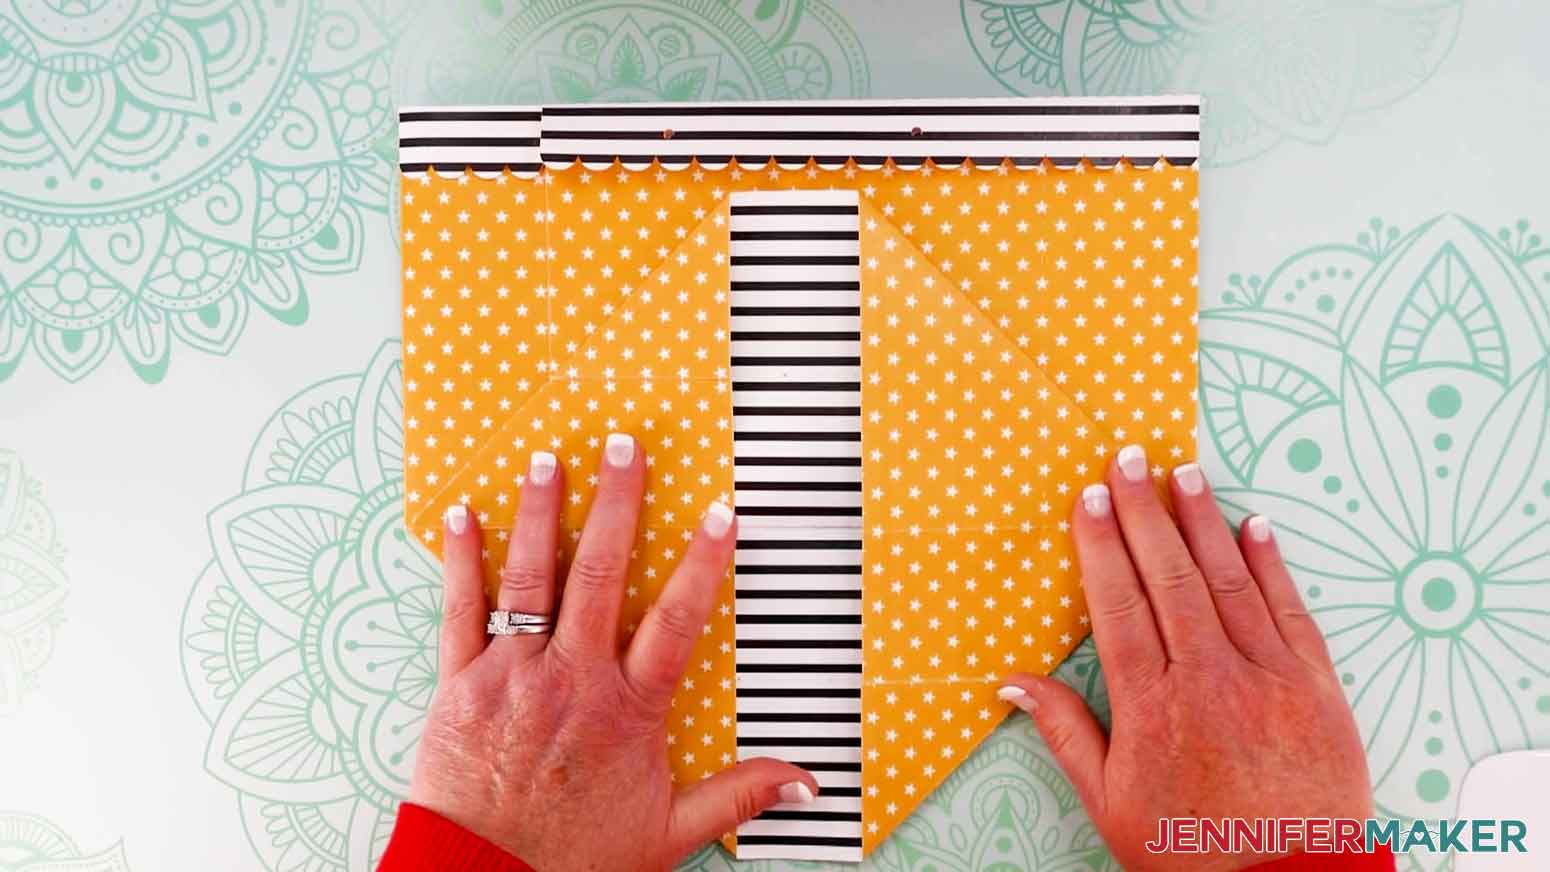
Next, with your bag lying flat on your work surface and the scallops at the top, find the vertical fold line directly to the left of the right hand side of your bag. Fold outward along this line. Flip your bag over and do the same thing on the other side. Your bag will naturally want to fold along this line and will pop up into a 3D rectangle!
Flatten your bag again, making sure you have one vertical crease showing on the left and one on the right (all your dashed cut lines will make a symmetrical pattern when it’s positioned correctly). Now fold the bottom up along the horizontal fold line closest to the top of the bag (this is the line just below the center of your piece of cardstock). Unfold it after you’ve created a crease in that spot.
TIP: Using your scraper tool can help to create nice, sharp creases along your folds.
Push the two sides of that bottom section in toward each other along the diagonal fold lines. Flatten those sides against your work surface to create two triangles, one on the left side and one on the right side. They’re the same color as the bag’s outside. Make sure the triangles’ corners are sharp and then crease them with the scraper.
TIP: Go slowly and be patient when folding this part. You may find that you need to gently crease the edges of your cardstock along the diagonal score lines to encourage it to fold where it needs to.
Next, fold the top section down along the topmost horizontal fold line. Its open end will overlap the center just a bit. Fold the bottom section up along the bottom horizontal fold line so it overlaps the top section’s open end.
Unfold the flaps we just made and apply glue to the four outer triangles. Make sure you don’t apply any glue to the center portion underneath the flaps, as this is actually the inside of your bag, and you don’t want to glue the bottom to the inside! Fold the top section down, then add a thin line of glue where the bottom flap will overlap its edge. Fold up the lower flap and hold it in place until it sets.
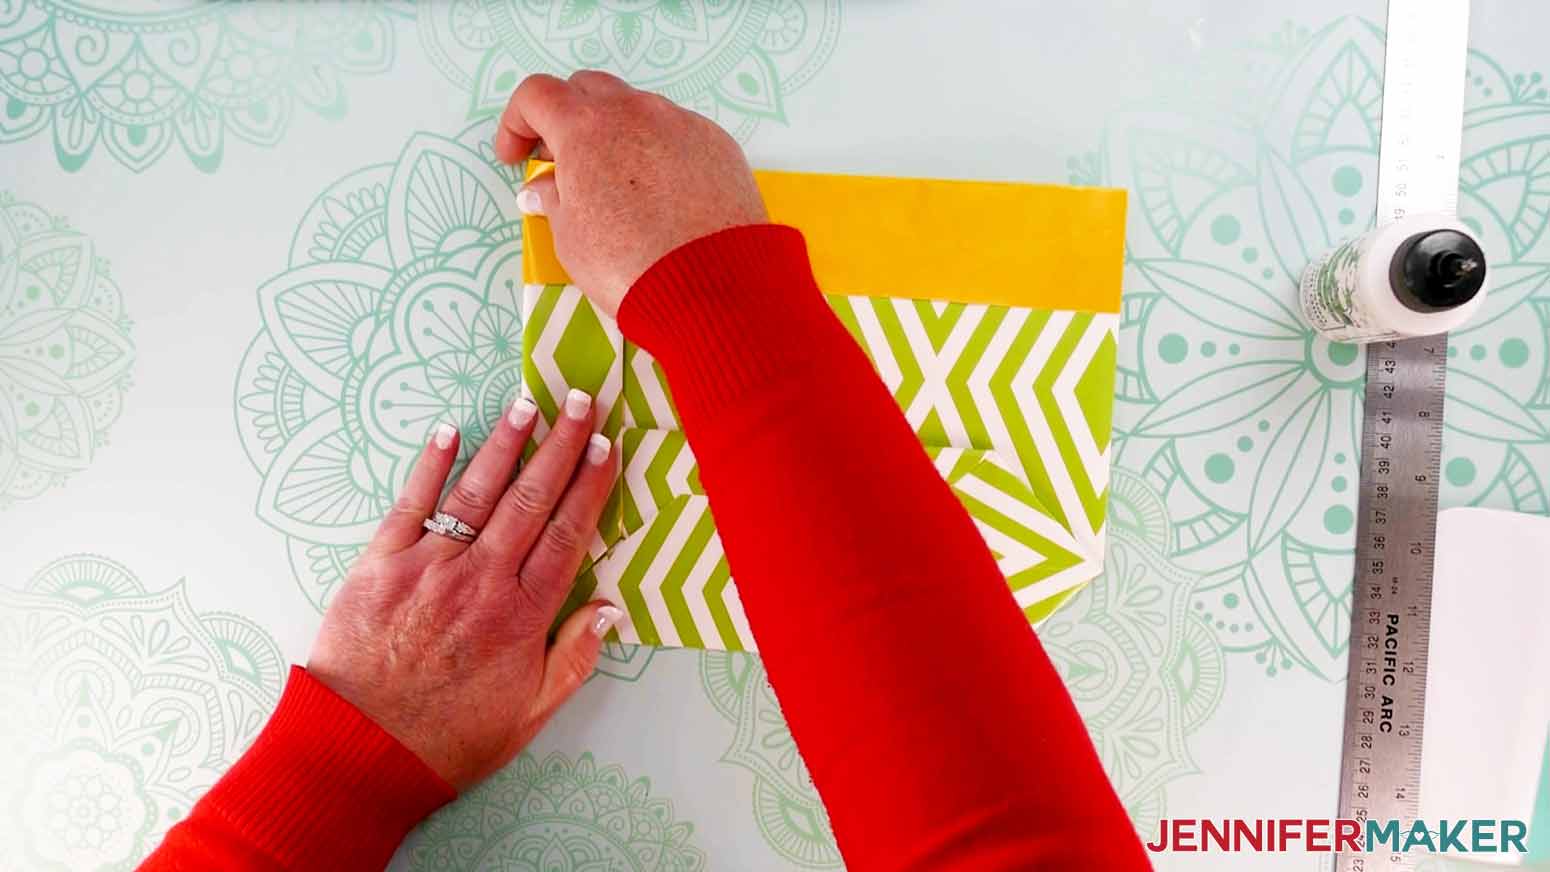
The next step is to fold the left and right sides of your bag inward along the two vertical fold lines. When folded correctly, the angled edges at the bottom of each of the side flaps will just be touching the angled sides on the left and right of your bottom flap. You should have a nice, sharp corner at the bottom left and bottom right of your bag. Once your side flaps are folded correctly, crease your folds really well with your scraper tool.
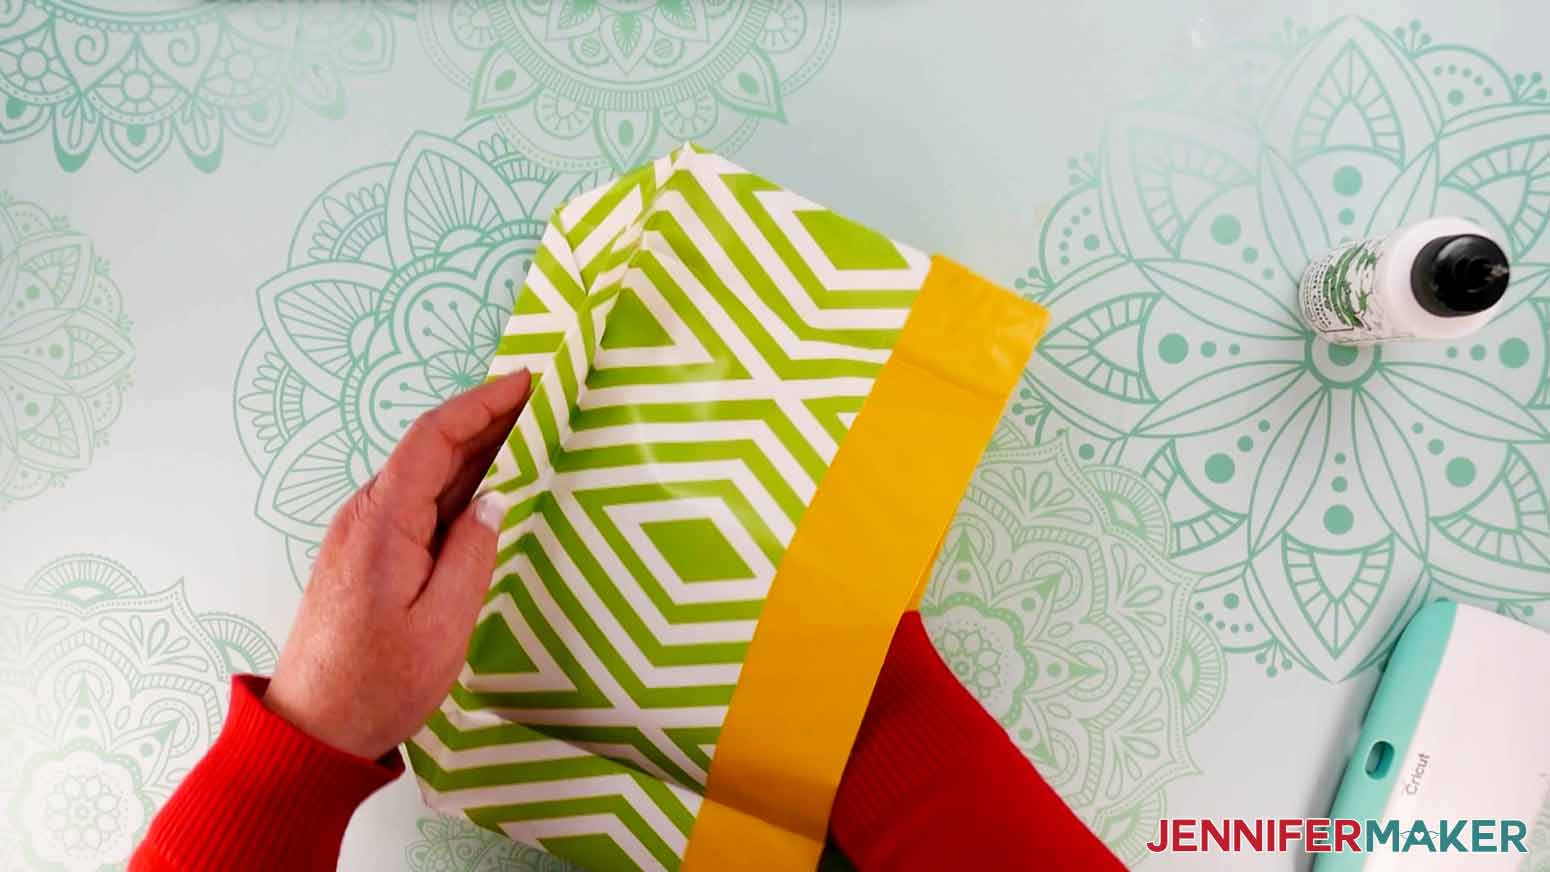
Now you’re done folding! It’s time to create the final shape of our bag.
Put one hand inside your bag from the top and very carefully push down on the bottom of it to open up the bag. You may have to push on it from a few different spots to get the bottom completely flat. Go slowly and keep trying until your bottom is flat enough to be set down on your work surface.
TIP: It helps to fold the bag in the opposite direction along the creases, especially at the bottom. This will encourage it to open outward rather than inward.
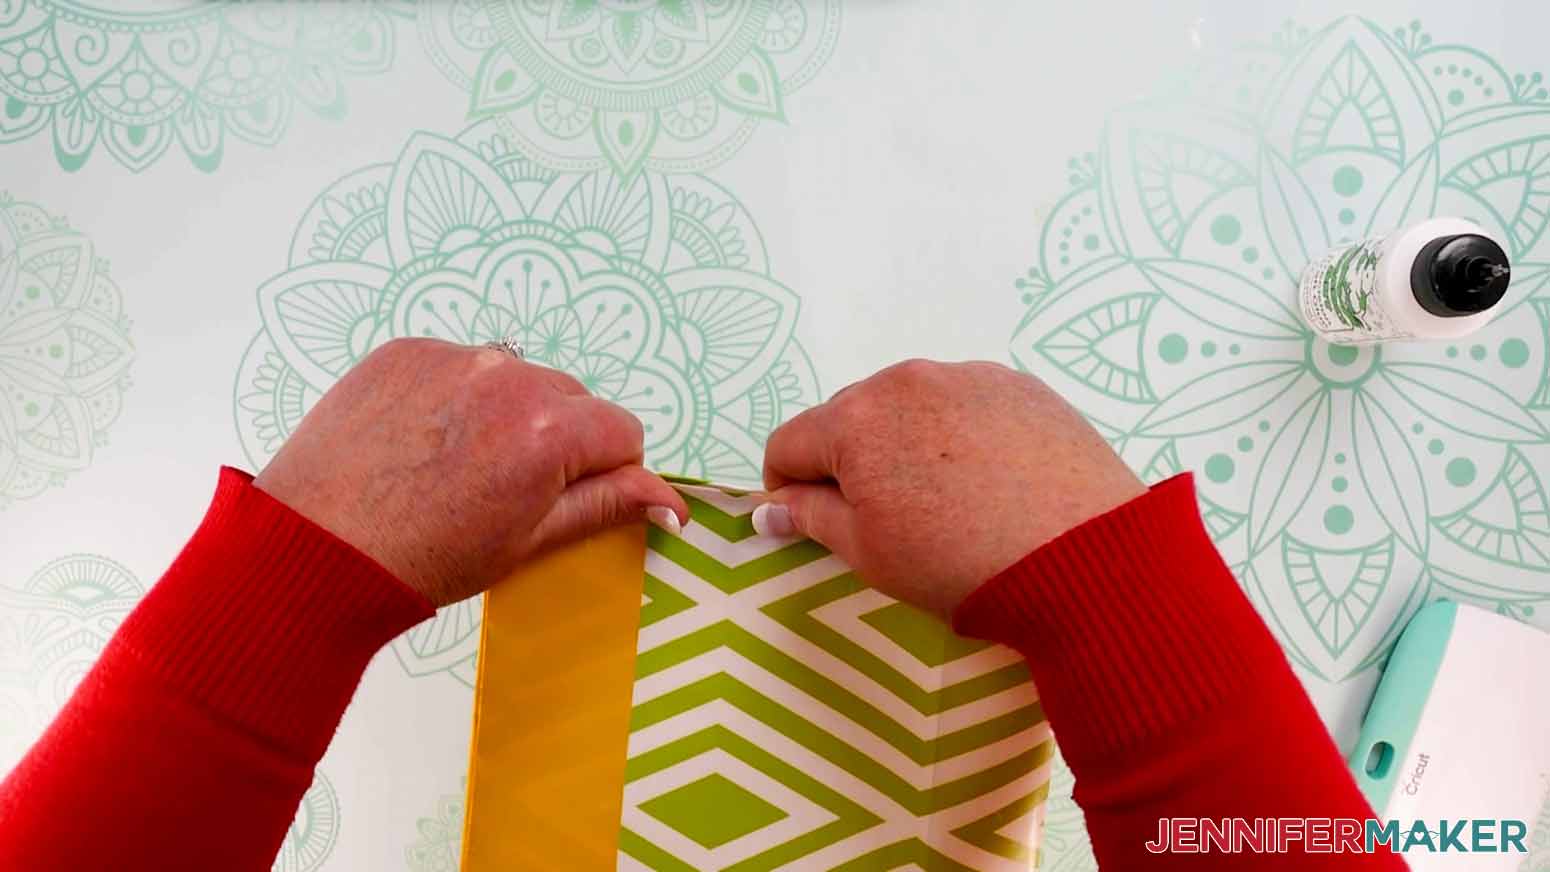
Now fold the middle crease on both sides of your bag inward, and make sure all four edges of your bag are neatly creased and folded outward. When you’re done, your bottom and sides will be nice and square, and your bag will have the shape of a gift bag you’d buy from the store!
NOTE: If the open edges of your flap aren’t lying flat against your bag, you may want to glue them down now.
STEP 5: ATTACH THE DETAILS
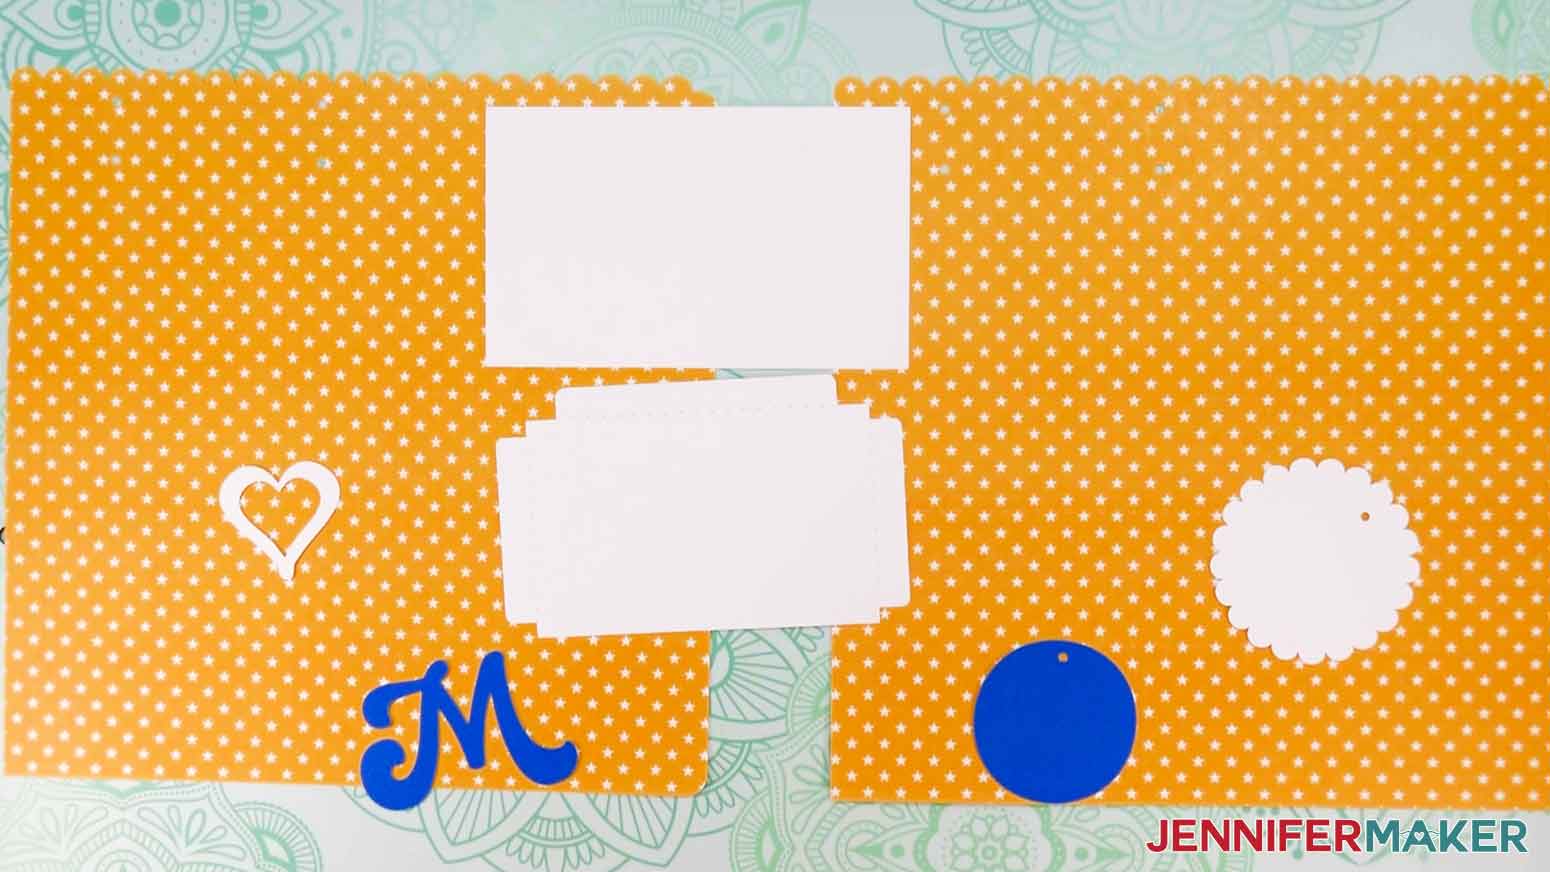
Gather your remaining pieces. You’ll have one rectangular piece, one circle with scalloped edges, a plain circle, a heart-shaped piece, a letter (if you made one), and a rectangular piece with tabs on three sides.
Place the rectangular piece into the bottom of your bag to help reinforce it in case you want to place heavier items inside.
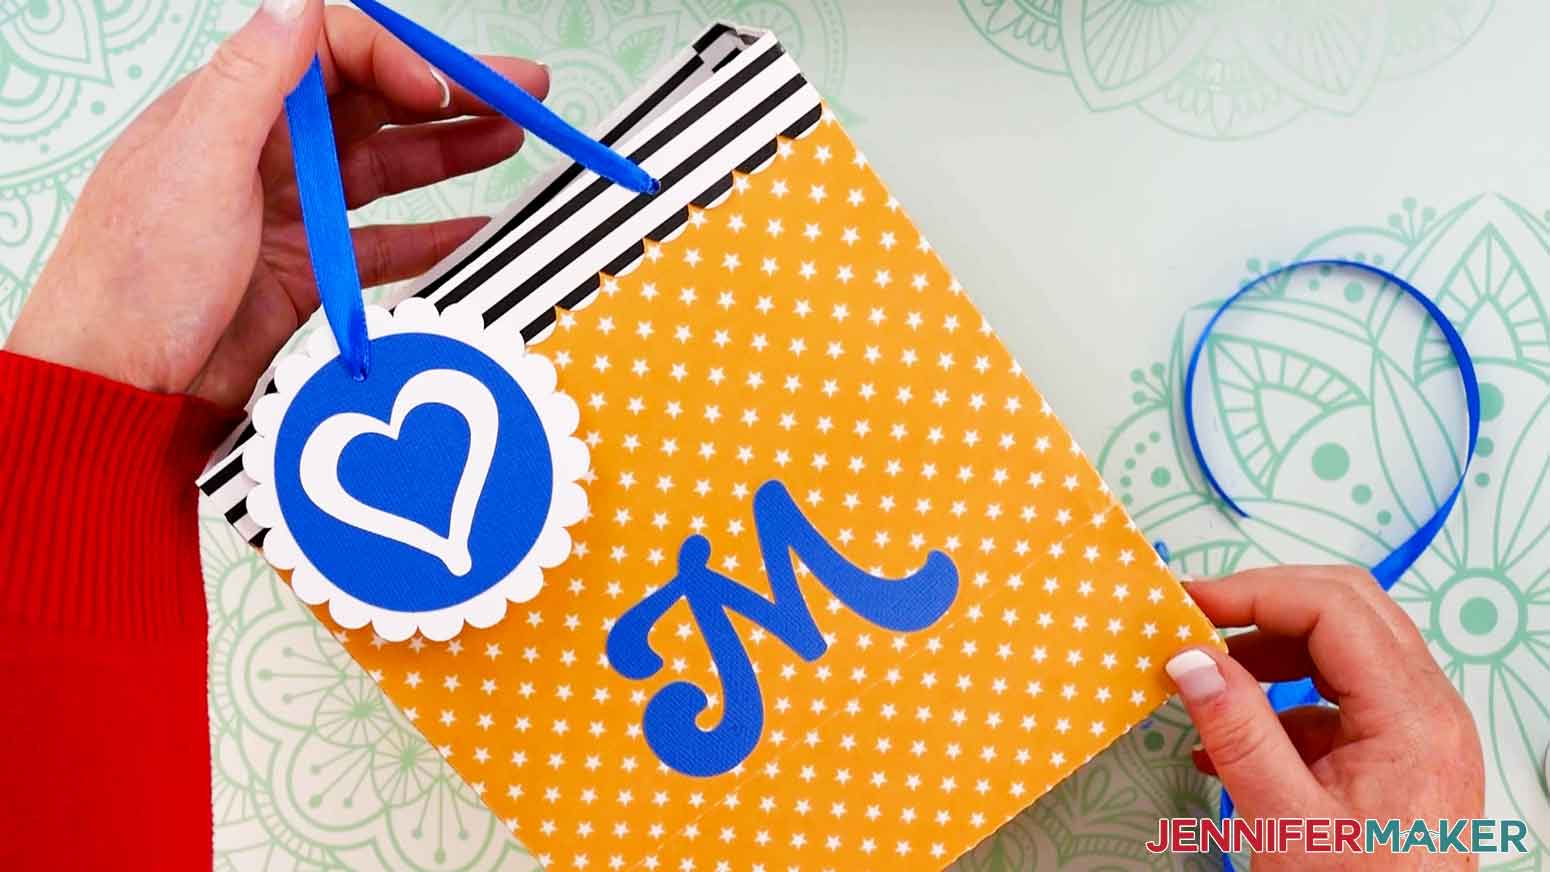
For the tag, gather the circular piece with scalloped edges, the plain circular piece, and the heart-shaped piece. Apply glue to the back of your circular piece and place it on top of your scalloped piece, making sure the two small holes are aligned and the top piece is centered on the bottom piece. Now apply glue to the back of your heart-shaped piece and place it in the center of your tag directly on top of the circular piece.

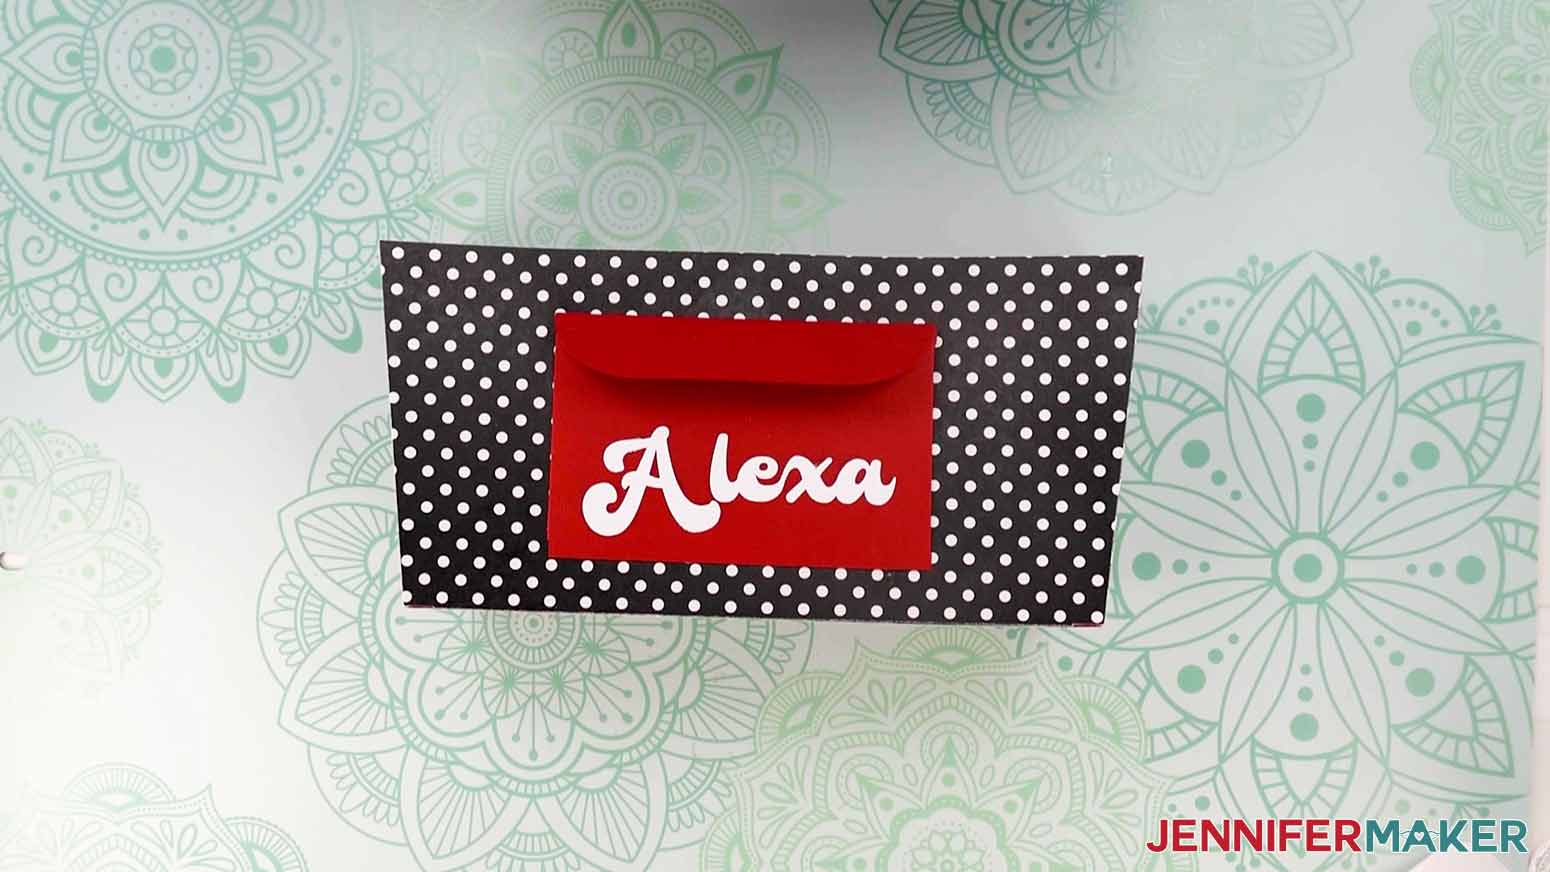
If you added a monogram, apply glue to the back and center it on one of the flat sides of your bag. Make sure your letter doesn’t overlap the crease that’s about 2” from the bottom of your bag, so you can still fold the bag flat. Press until it dries. It should look similar to mine.

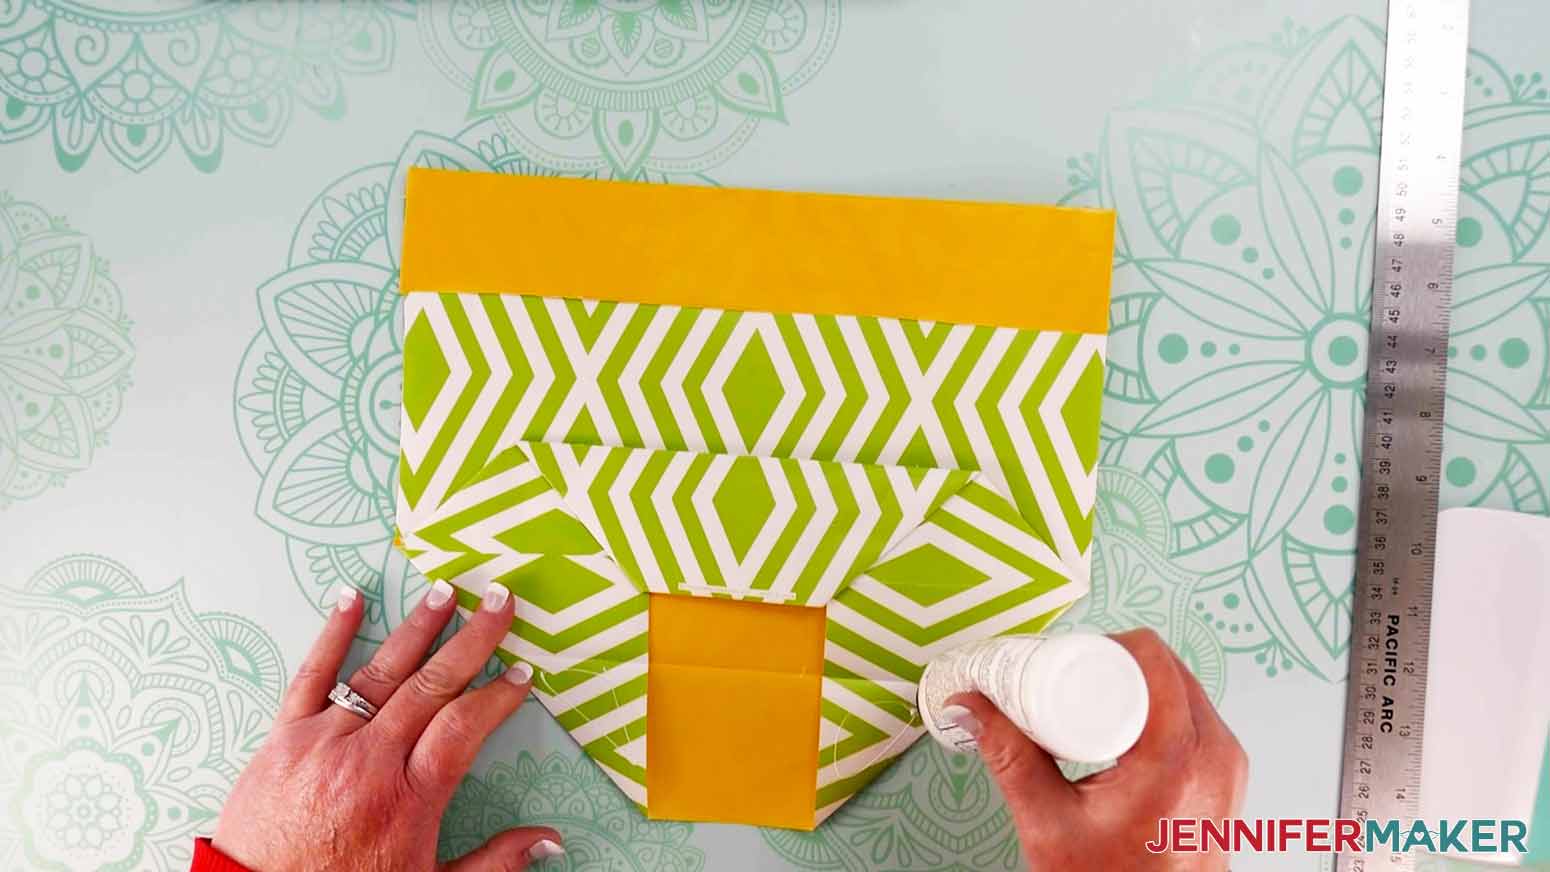
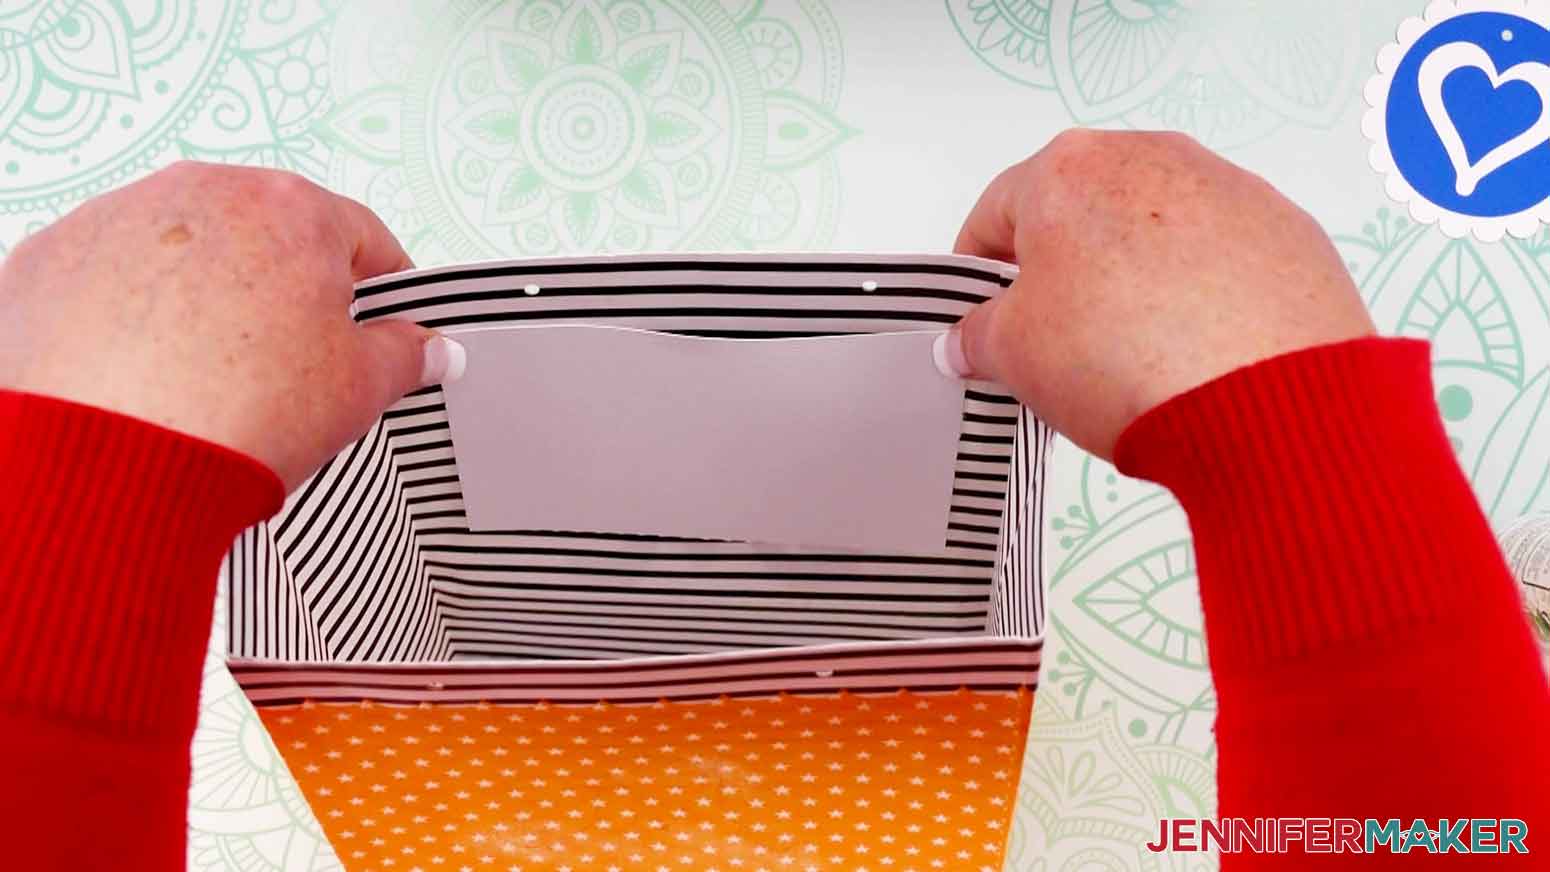
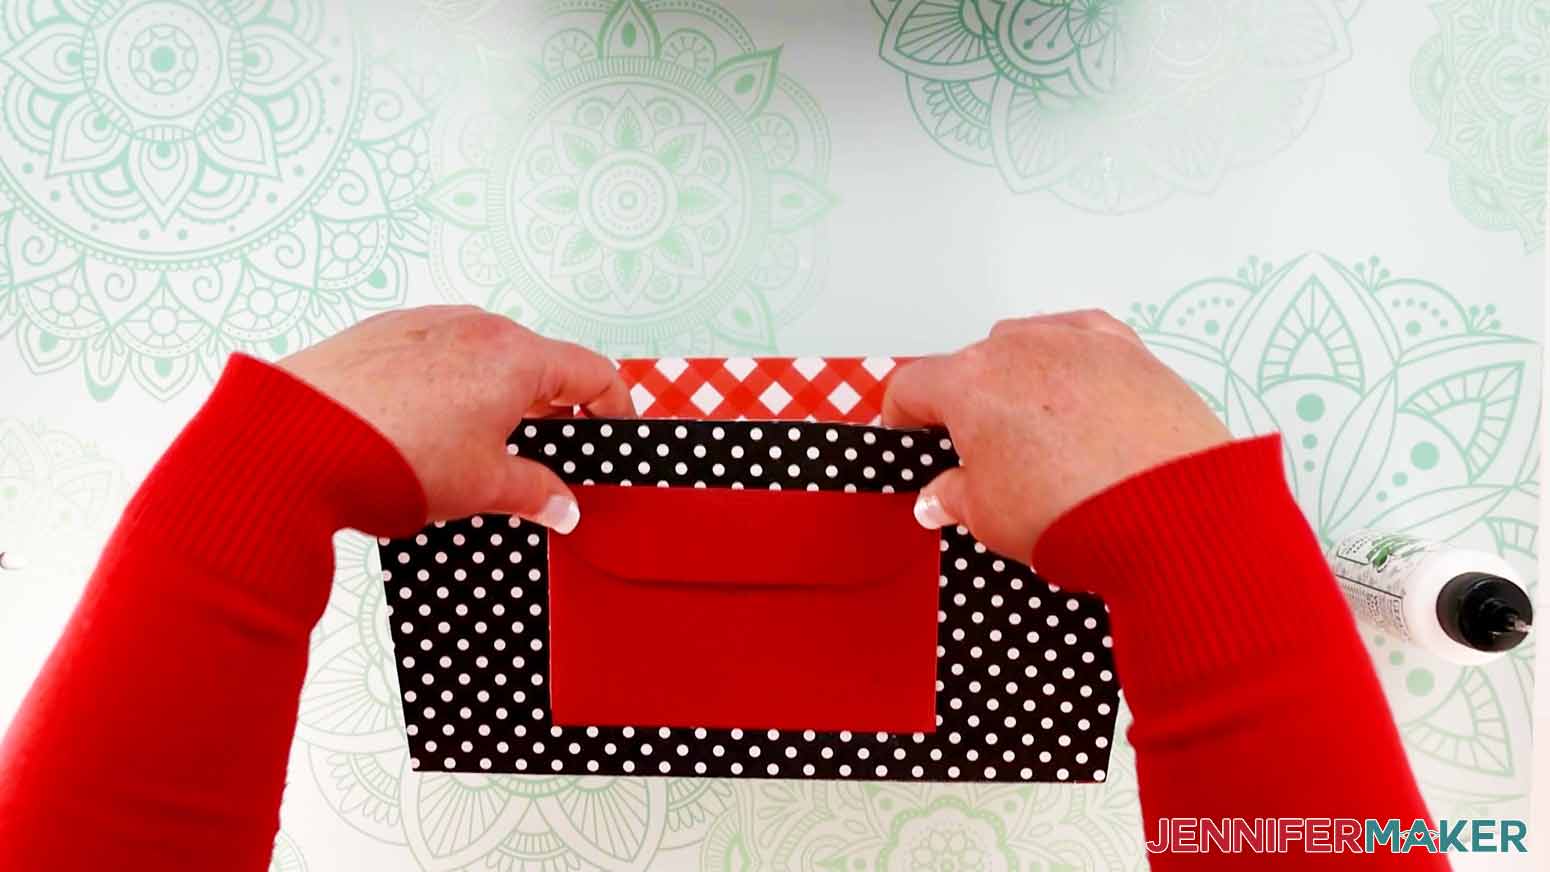
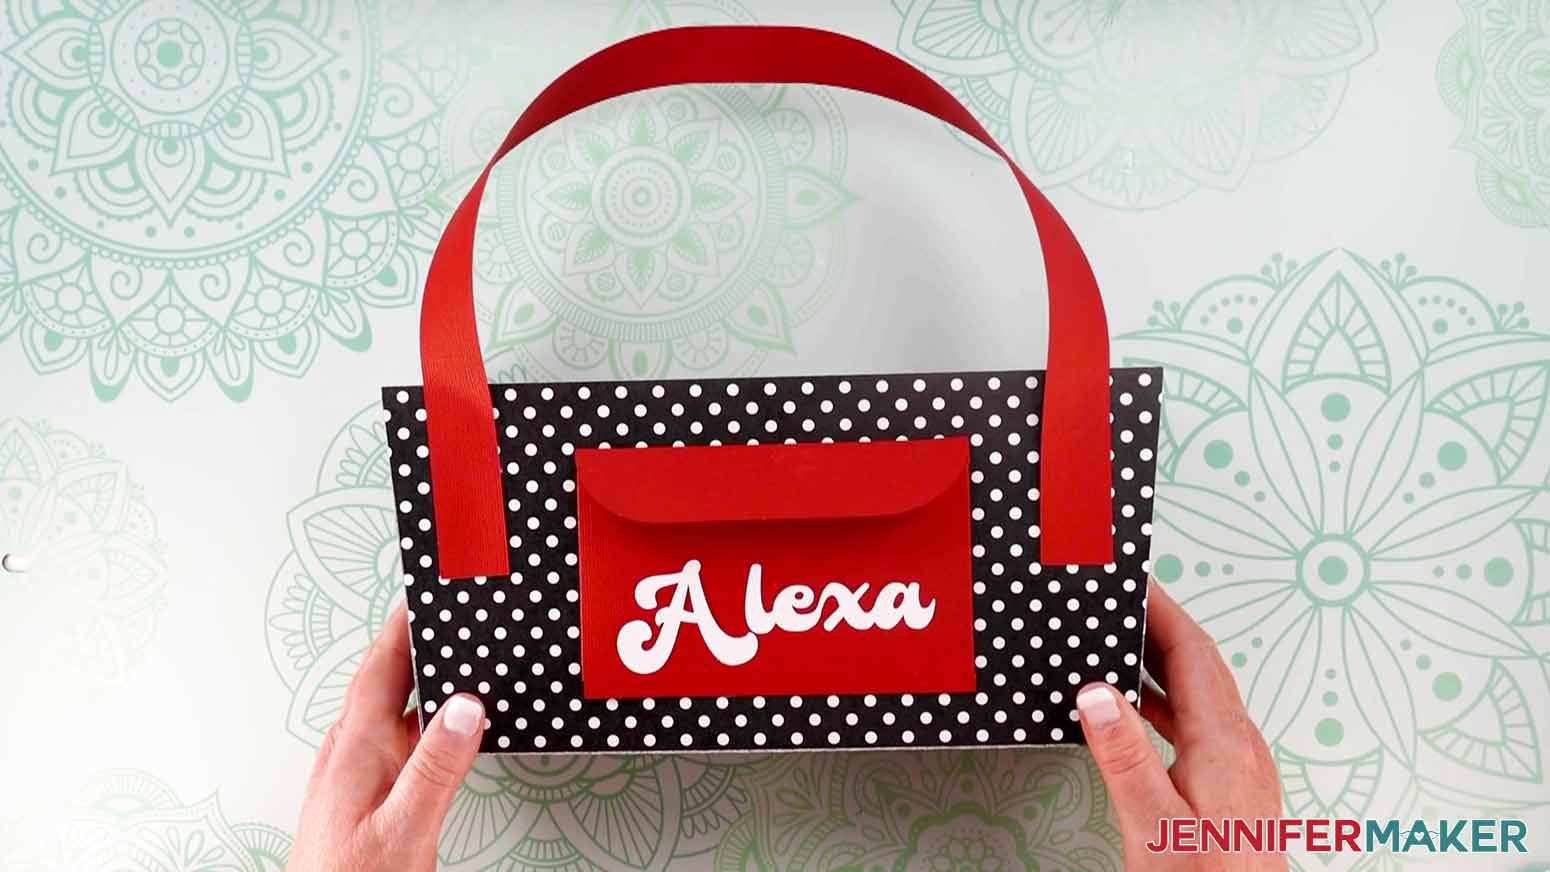
Now let’s add our pocket to the inside of our bag so we can use it to store things like a greeting card, gift card, or gift receipt. It's sized perfectly to fit an A7 sized envelope for a standard 5" x 7" greeting card. Take the remaining rectangular piece with tabs along three of the edges and fold those tabs under, using your ruler as a guide and your scraper tool to help with creasing if needed.

Apply a thin line of glue to all three tabs and place the pocket piece inside your bag, with the tabs facing the front panel of the bag. Make sure the open end without a tab is facing up and the pocket doesn’t overlap the two small holes at the top of your bag. I positioned the top of my pocket about an inch from the top of my bag. Once your pocket is centered, press down to adhere it. Hold it in place until the glue sets.
TIP: It helps to lay the front of your bag flat against your work surface so you can press down with enough pressure.
You’re almost done with your bag! The last step is to add your handles. Cut two 16” pieces of ribbon.
Insert an end of one of your ribbons into one of the small holes on the front of your bag. Tie a double knot at the end of the ribbon on the inside of your bag so it doesn’t slip back out of the hole. Now take your gift tag and slide the loose end of the ribbon through its hole from the front to the back. Finally, slide the ribbon through the other small hole on the front of your bag and tie a double knot at the end inside the bag to secure it.
Now do the same thing with your other ribbon on the back side of your bag. You won’t need to add a gift tag on this side, so you can skip that part.
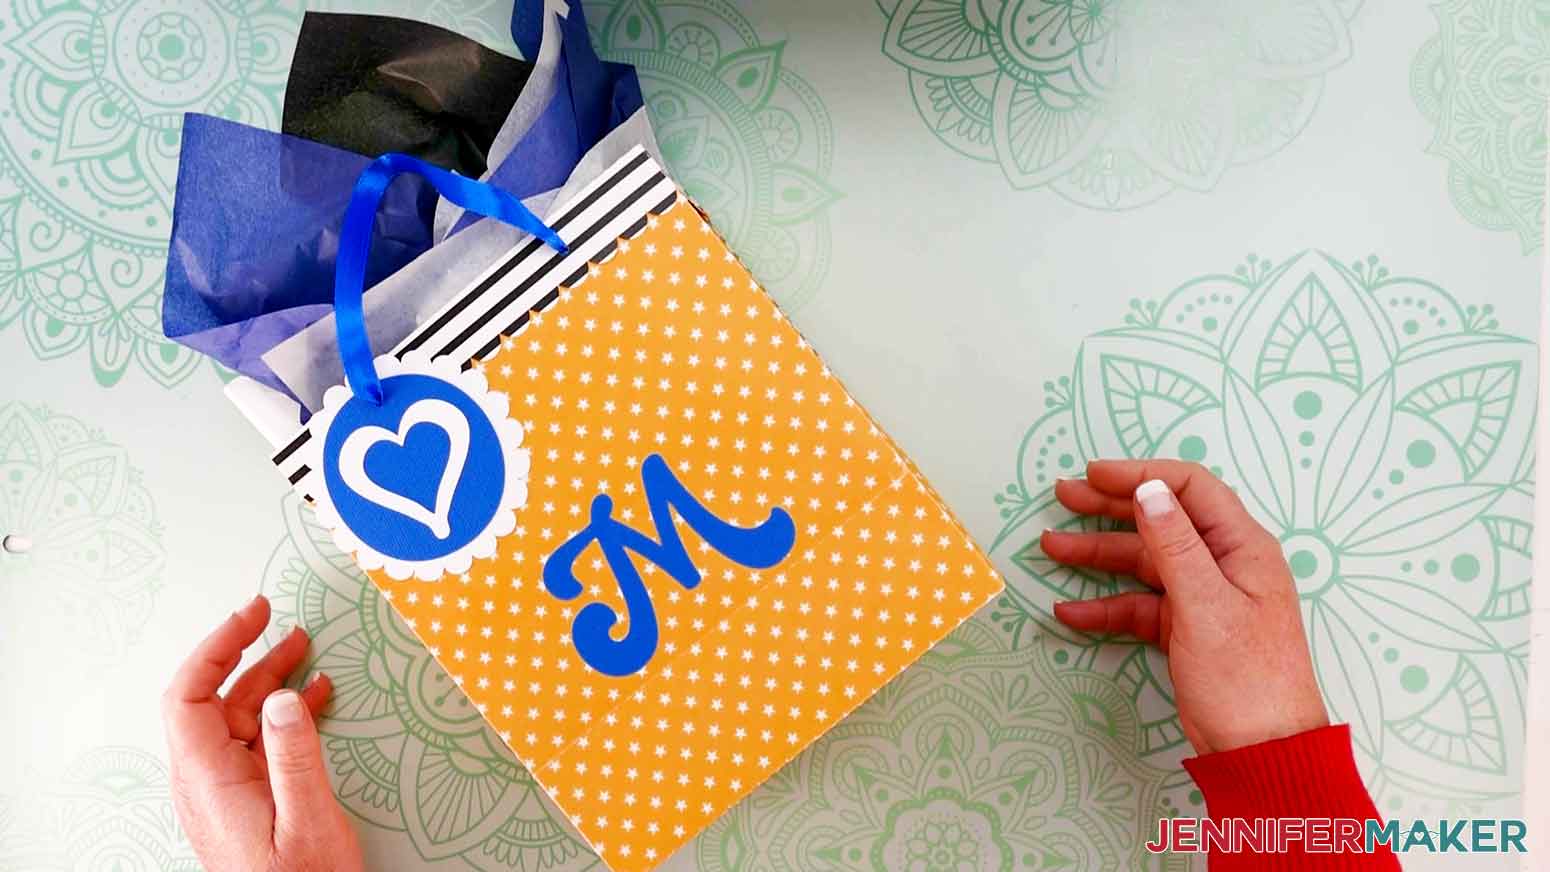
That’s it! You’ve created a custom cardstock gift bag with a cute tag and a handy pocket for storing small items.
NOTE: I found that my finished cardstock DIY gift bag could hold items up to 6.5 lbs. I don’t recommend placing anything heavier than that in your finished bag to avoid ripping it.
Purse-Shaped Gift Bag Cut With a Cricut
STEP 1: GET MY FREE DIY GIFT BAG SVG FILES
If you haven't already, download my DIY Gift Bag SVG/DXF/PDF files from my free resource library. It's Design #390. I’m going to make the score lines version of the purse bag. If you want to use the dashed cut line version, use that file and follow the preparation steps for the previous bag. Upload the SVG file to Cricut Design Space and add it to your Canvas.
This is what my DIY Gift Bag Purse SVG file looks like on my Canvas. You can zoom out to see the entire design by clicking on the minus (-) sign in the lower left.

STEP 2: PREPARE YOUR PURSE DESIGN FOR CUTTING
This design is sized to make a purse-shaped gift bag that is approximately 11” wide by 12” tall by 3.5” deep. If you want to make a different size, the bag can be made smaller. Going bigger would require gluing paper together for the front, so I don't recommend it. Click and drag the resize icon in the lower right hand corner of the design's bounding box. Then, click on one of the yellow pieces in the Layers panel and check the width at the top to see the new size. You can also use the Canvas grid lines to get an idea of the height by looking to the left of the top shape.
NOTE: When resizing, remember to keep the Lock icon locked to maintain the design proportions!
First, separate the pieces on your Canvas by clicking “UnGroup” at the top of the Layers Panel. Your screen should look similar to mine.
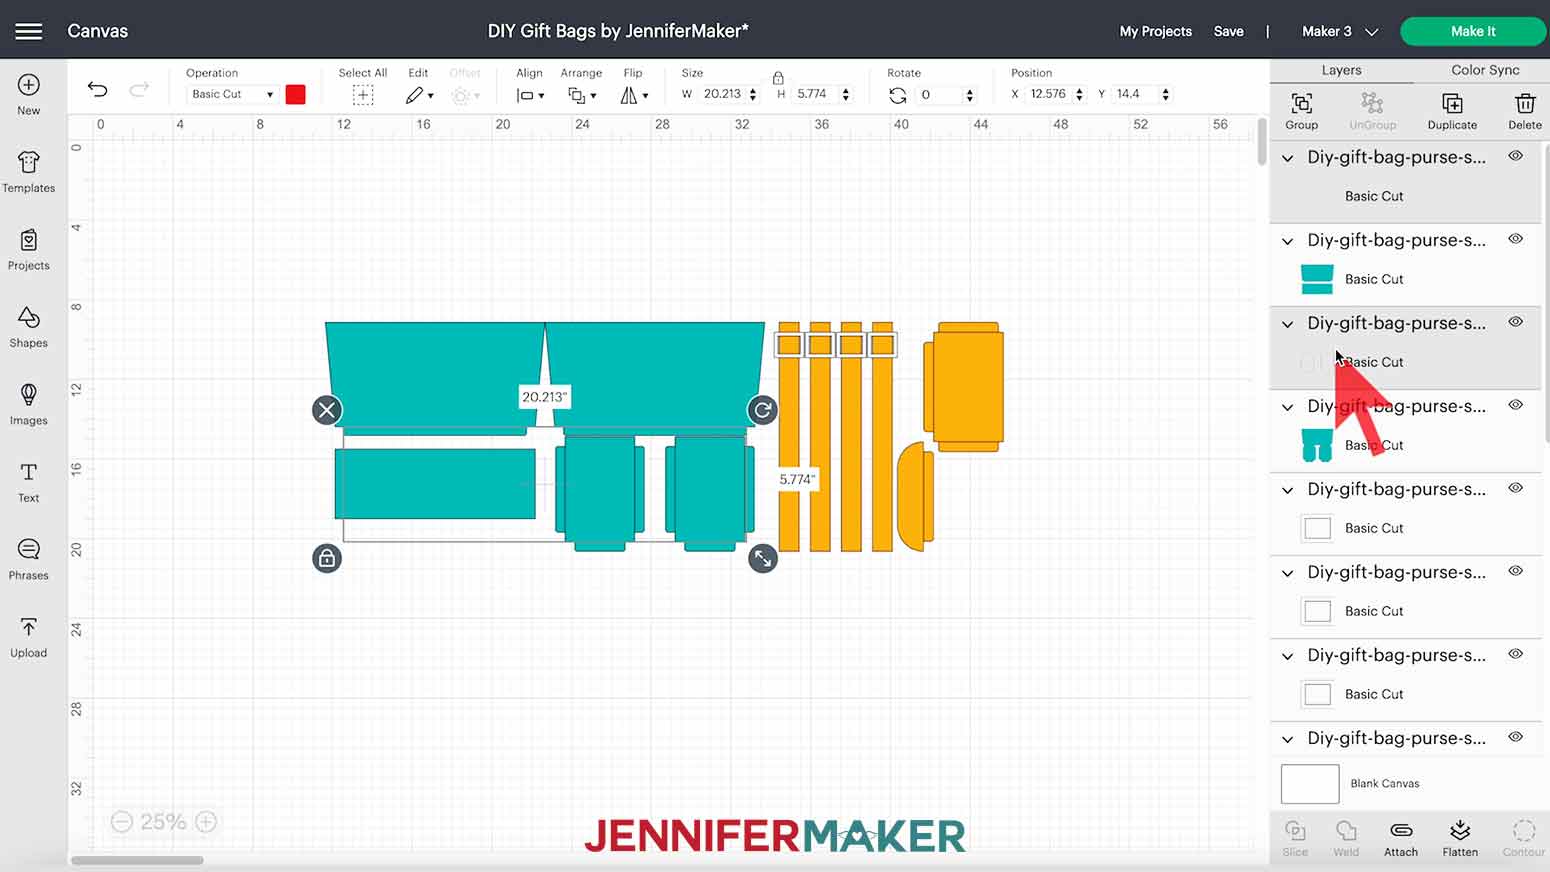
NOTE: After ungrouping, you might notice that some pieces remain on the same Layer. Don’t worry, this is how it’s supposed to look! I purposely designed it this way to save on materials and cutting time. Keeping these pieces attached tells our machine to cut them on just two pieces of 12” x 12” cardstock, as opposed to three.
We need the Cricut to add Score Lines in the correct spots to fold the bag. My file includes them, but Design Space requires a few steps to get them perfect.
Hold down Shift and click the four layers with faint lines and no shapes in the Layers Panel. With the layers selected, make sure the color swatch in your top menu panel is red (I’ve made the score lines red so they’re easy to distinguish from everything else). If it’s not, you may have accidentally selected another layer. Just click off of the design and try again.
With the correct layers selected, click "Basic Cut" under Operation and select "Score." The lines are now dashed to indicate the machine will score instead of cut them.
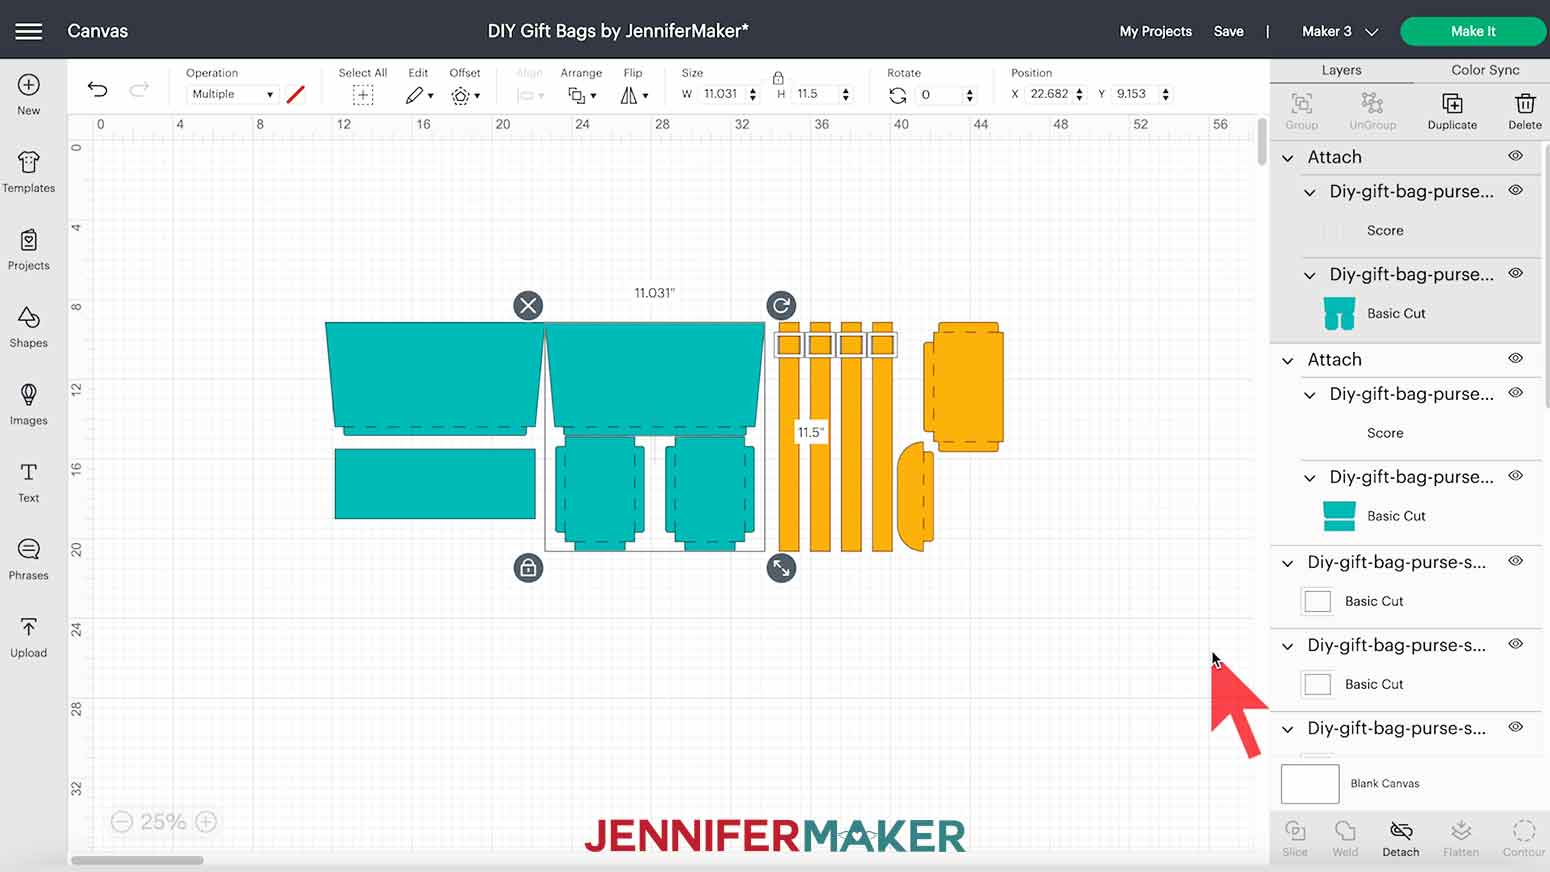
If we don't Attach the scores to their correct layers, the lines will appear by themselves on a separate mat on our Prepare screen.
Click and drag a bounding box around the leftmost bag shape and the leftmost score lines. Click “Attach” at the bottom of the Layers Panel. Repeat for the other bag shape and pocket pieces. Now your Canvas should look similar to mine.
If you’d like to customize your purse gift bag with a name or word like I did, click the Text icon on the left. A box with "Text" highlighted in it will appear on the Canvas. Without clicking anything else, type in what you want. I’m going to type the name “Alexa.” Then, click the box that says "Cricut Sans" under Font in the top menu to see your font options.
Scroll through and click a font name to see how your name looks until you find one you like. If you click off of your name, click it to change the font or double-click to type in a new name. Make sure your font choice doesn't have a price next to it to avoid a charge when you go to cut the design. I’m going to use the font Brenson Charlotte, which you can purchase from FontBundles.net, but use the font you like best.
With your text selected, resize it to be no more than 4.25” wide so it fits nicely on the front of your pocket. Then, change the color to match the four buckles. This way, they’ll cut from the same mat.

Now, we're finished on the Canvas!
Check that you have the correct machine selected at the top right and click "Make It." If prompted, click "On Mat" and "Continue."
You should see four mats on your Prepare screen. If not, hit "Cancel" and try to Attach the Score lines again. Click “Continue.”
Under “Set Base Material,” select "Medium Cardstock - 80 lb (216 gsm),” change Pressure to "More," and click "Remember Material Settings" if you're using the same weight of paper for each mat as I am.
Some mats will need a scoring tool, so watch for those prompts. The machine defaults to a Single Scoring Wheel, but I use a Scoring Stylus to avoid swapping tools. Click "Edit Tools," select "Scoring Stylus" under Score, and click "Apply." Place your Scoring Stylus in Clamp A and make sure your Cricut Standard Fine-Point Blade is in Clamp B and is clean.
STEP 3: CUT YOUR PURSE DESIGN
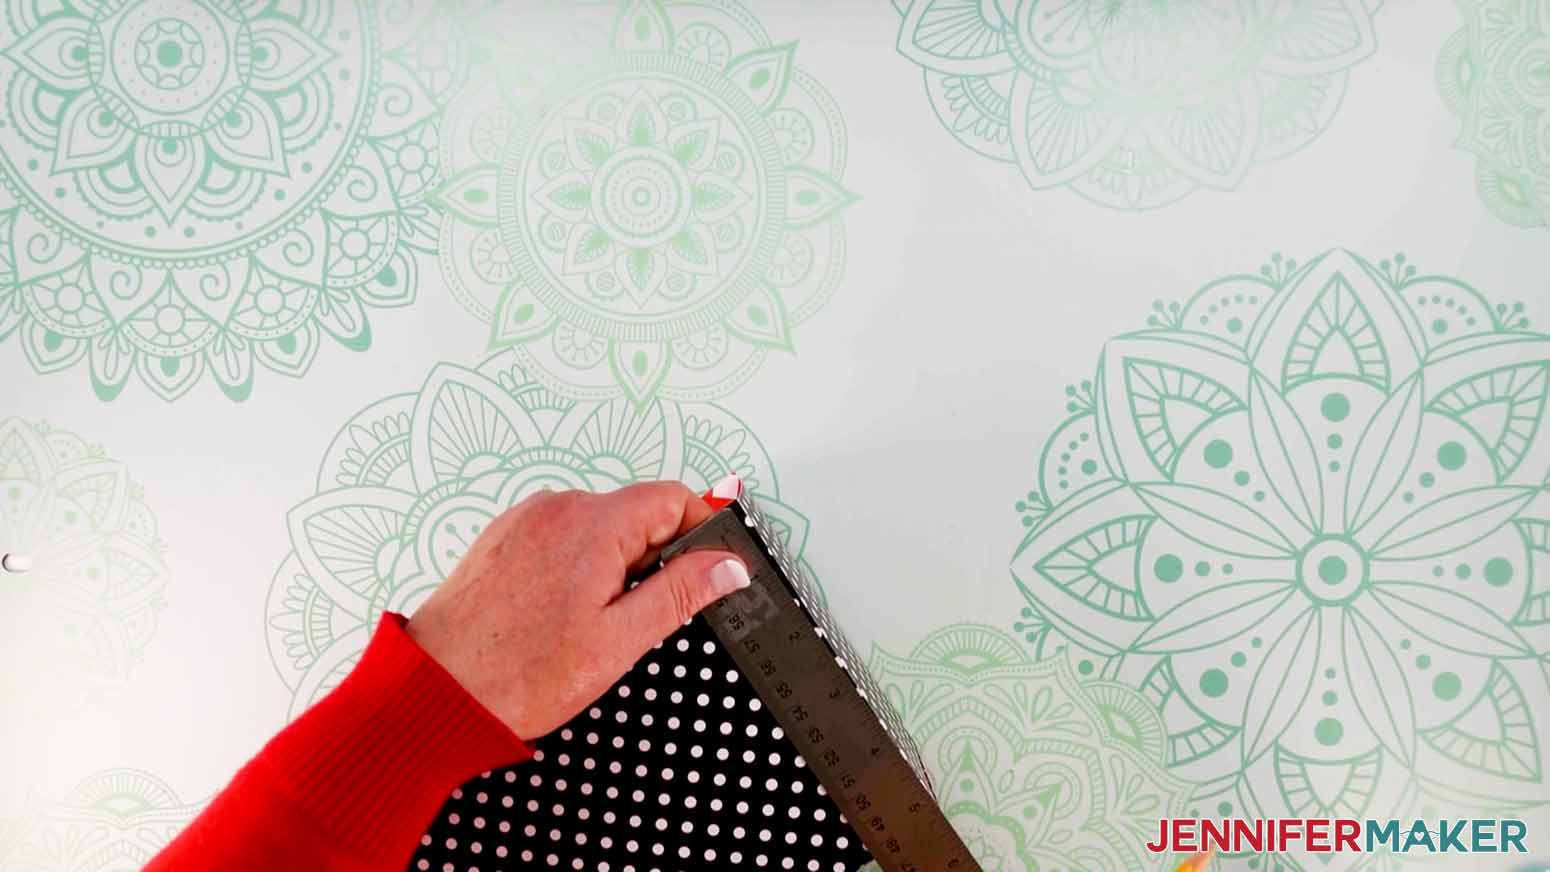
Place your first mat's cardstock on a green Cricut StandardGrip Machine Mat. Make sure the pattern you want on the outside of your bag is face up. Use a brayer to adhere it well. Load your mat and press your machine's Go button.
Once the cut is finished, unload it, flip it over on your workspace, and gently roll a corner back to release the cardstock. This helps prevent curling and ripping.
Complete the process for the rest of the mats, making sure to select the correct color cardstock for each mat according to what is shown on the Make screen.
TIP: When removing smaller pieces from your mat, such as the buckles, it may help to use the spatula to gently lift them so they don’t tear.
NOTE: If you’re using a word with a lowercase “i” or an unattached letter, be sure to remove and save all those pieces before discarding your scraps.
If you run into any issues cutting your materials check out my Cricut Tips & Tricks for Cleaner Cuts.
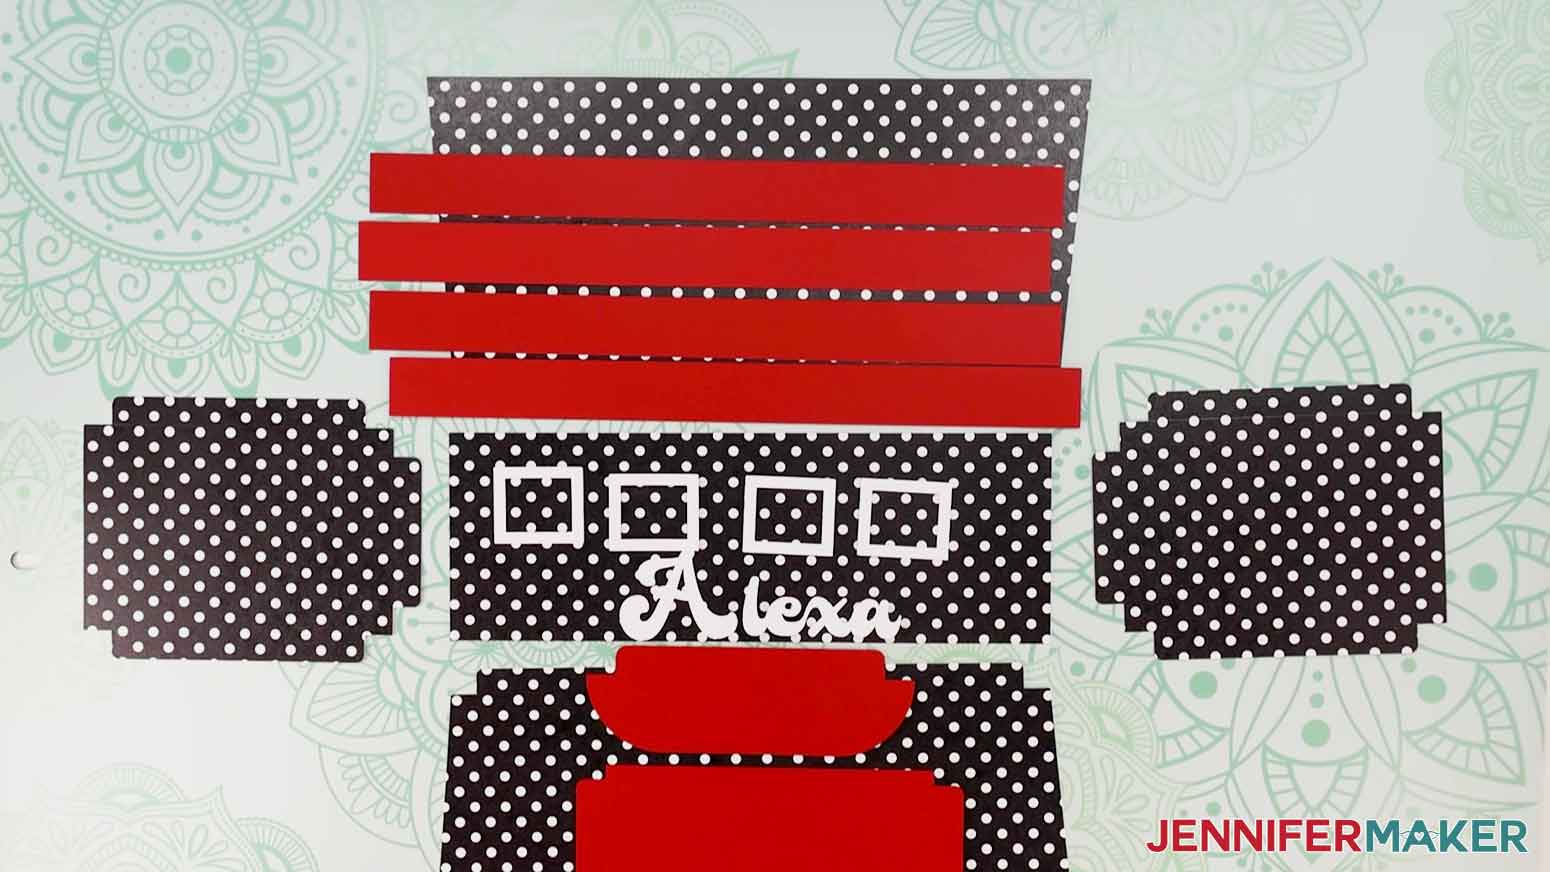
STEP 4: ASSEMBLE YOUR PURSE-SHAPED GIFT BAG
Take your four largest tabbed pieces with and lay them in front of you with the interior pattern face up.
Fold along all eight Score lines and crease them really well. You should see the exterior pattern on the tabs.

TIP: Use your ruler as a guide to help get nice, straight folds. Just position the edge of your ruler along the scored or dashed lines on your cardstock and fold up along the edge of the ruler. You can also use your scraper tool to help create nice, sharp creases along your folds.
Now find the bottom of your purse, the large rectangular piece without scores. Place it in the center of your work surface.
Apply a thin line of glue along the tabs of the large front and back pieces of your purse. Adhere these tabs to the bottom piece along its two long edges on the side with your inside pattern. Make sure the edges are aligned.
Next, apply a thin line of glue along the bottom tab of your two side pieces. These are the shortest tabs on each of your two remaining pieces in front of you. Adhere these tabs to the bottom of your purse along its two short edges on the side with your inside pattern. Now all five pieces in front of you should be attached.
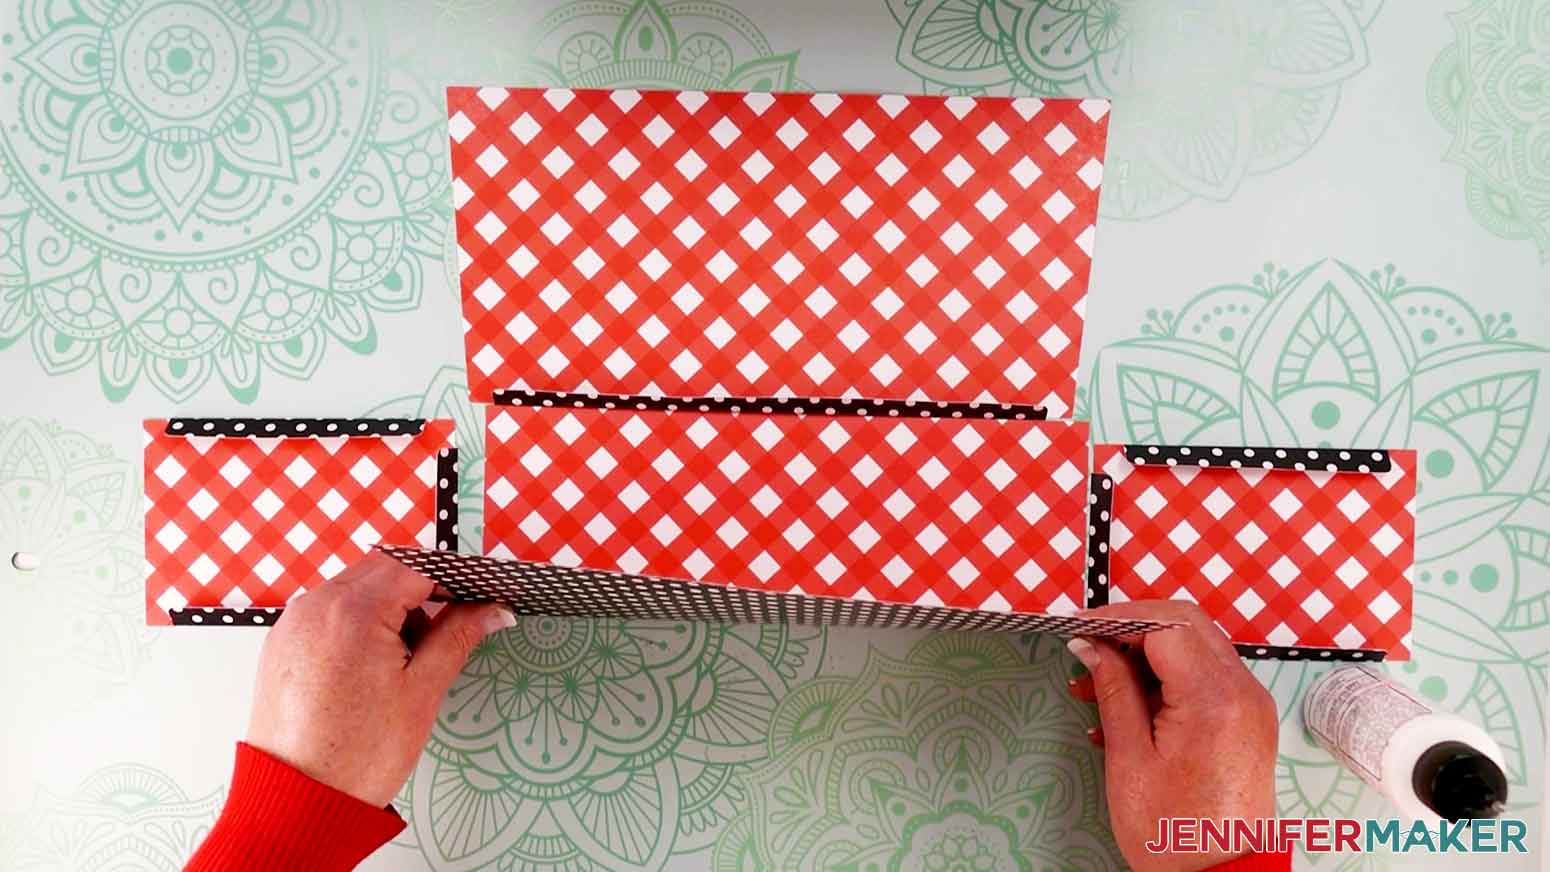
Once the glue is dry on these first tabs, we’ll attach our pocket to the front of our bag. Find the rectangular piece with tabs on three edges. Fold in all three tabs.
Next, flip your project over so the exterior pattern is face up. Apply a thin line of glue to each of the three tabs on your pocket and position it over the center of one of the longer sides of your bag. This will be the front. Make sure the opening is at the top. Press down on all three tabs to adhere the pocket to the outside.
Now let’s attach the pocket flap right above it. Find the remaining piece with rounded edges and a single tab along the top. Fold the tab over and apply a line of glue along it. Make sure the side with the glue is facing your bag and lower it down just inside the top of your pocket. Align the left and right edges with your pocket edges and press down to adhere it. Make sure you can open and close the flap easily once it’s adhered.
If you added a name or word, apply glue to the back and center it on the pocket, taking the flap into account.
NOTE: Don’t forget to glue and attach any smaller or unconnected pieces!
Now, flip your bag back over so the inside pattern shows. Add a line of glue along one of the remaining tabs of a side piece. Lift up both this side piece and the front or back piece adjacent to the glued tab. Press the tab along the open edge next to it to adhere it to the inside of the purse. Allow the glue to dry, then repeat for the remaining tabs until your bag takes shape!
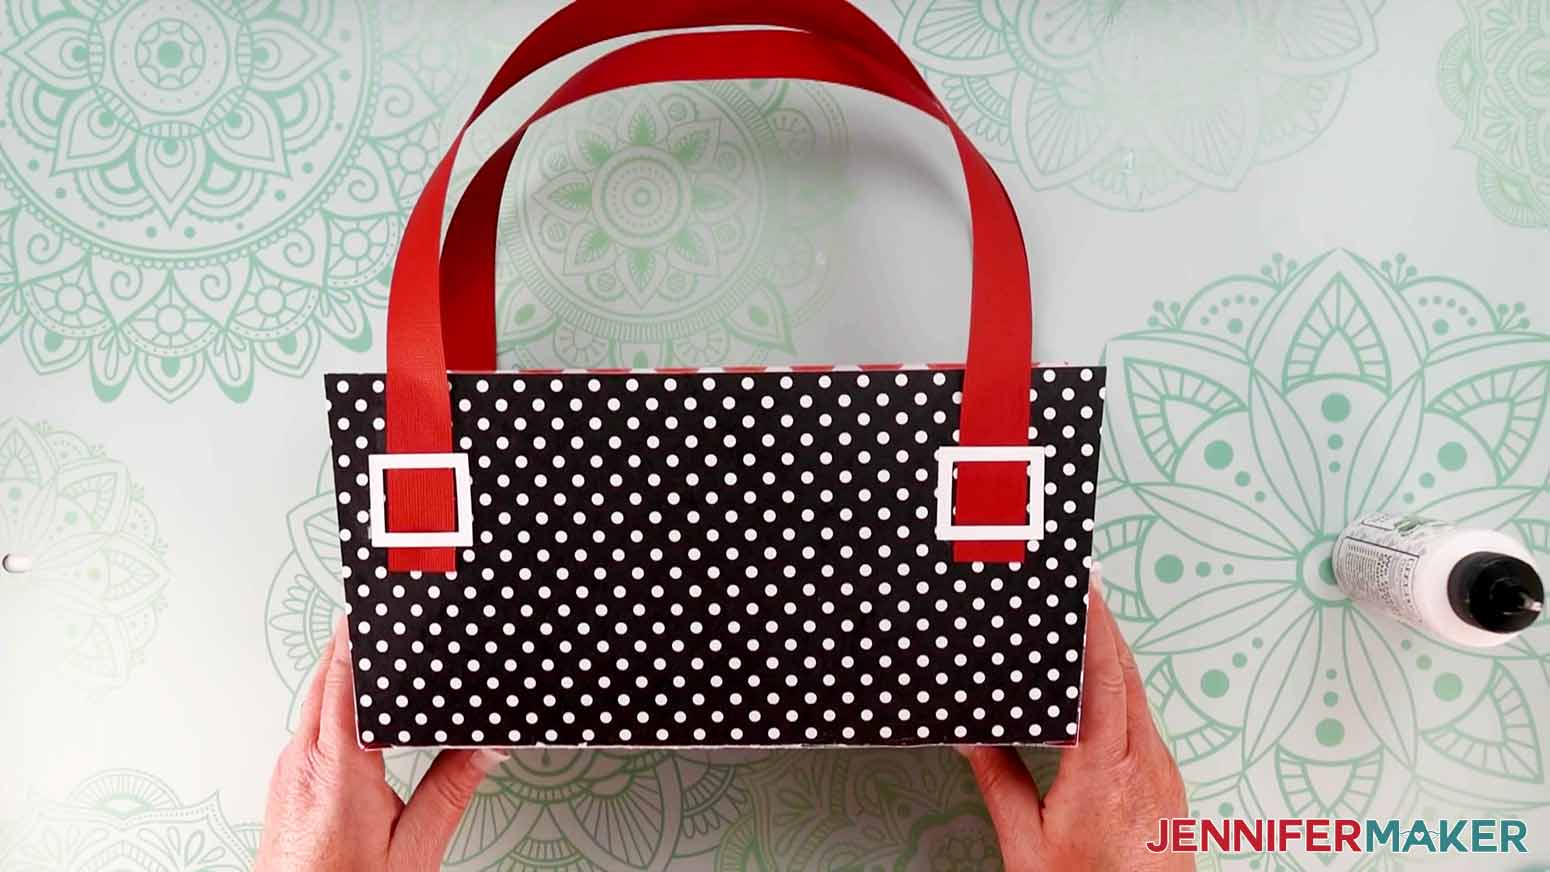
When you’re done, the shape of your bag should look similar to mine.
STEP 5: ATTACH THE PURSE HANDLES AND EMBELLISHMENTS
Find the four rectangular strips, which we’ll glue together to make the handles. Apply glue along one of the short ends about 1.5” from the edge. Overlap the short edge of another rectangular strip on top of the glue to adhere the two pieces together, creating one long piece about 21.5” long. Repeat for the other rectangles and let dry.
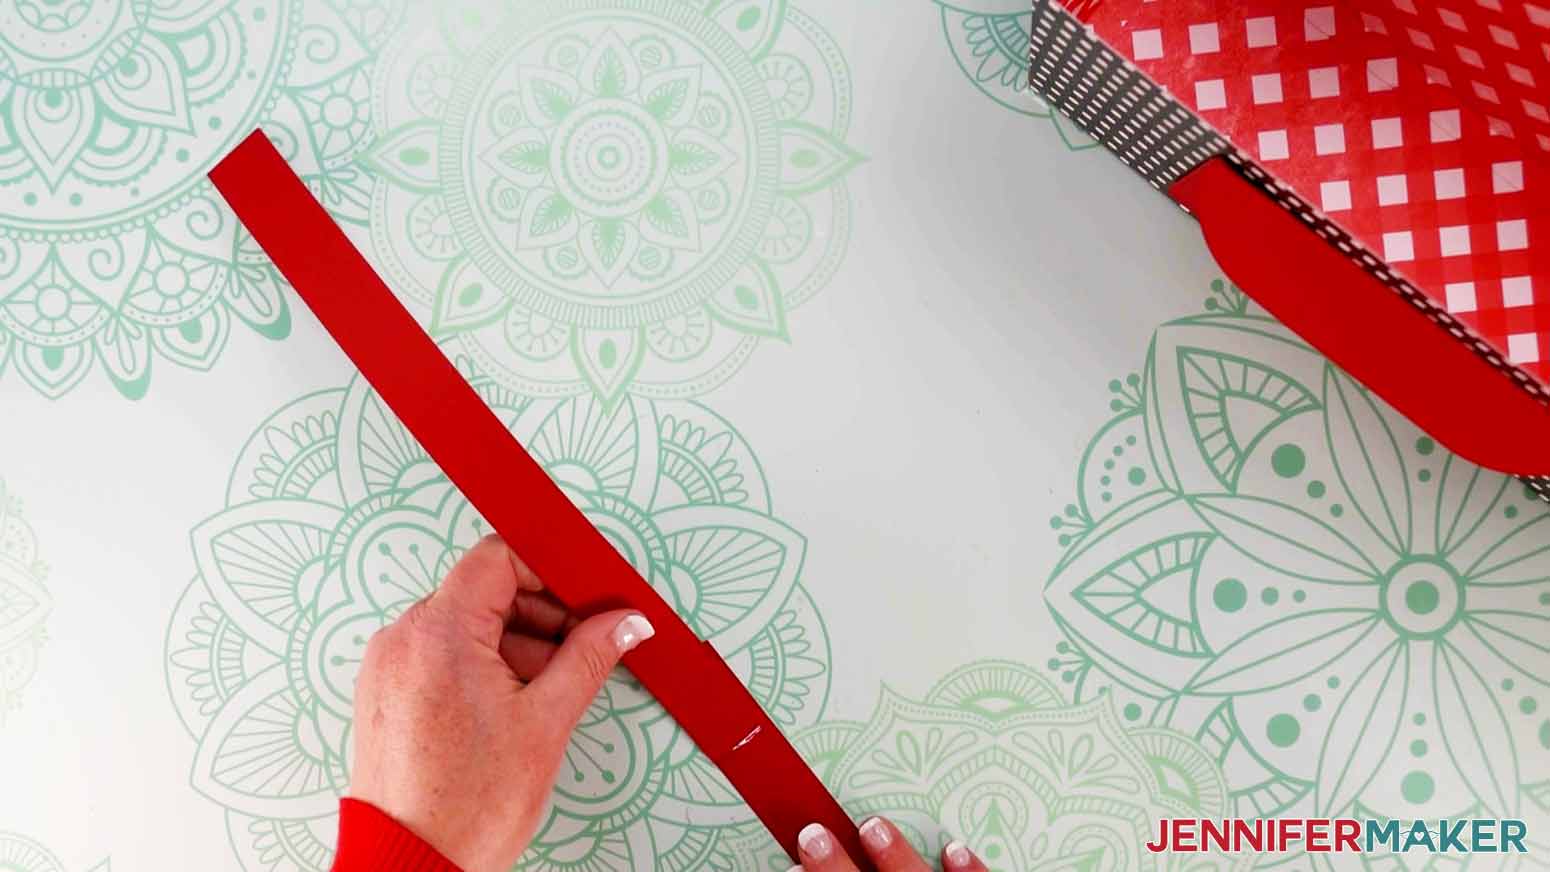
Apply glue to one handle’s end, about 2.5” from the edge. Position this end between the left edge of the front of your purse and the left edge of your pocket. Make sure the long edge of the handle is parallel with the left edge of your pocket, and then press to adhere it. Hold it in place until the glue sets.
Repeat for the handle’s other end, making sure to apply the glue to the same side of the paper. Make sure the bottom of this end of the handle lines up with the other side.
Attach your second handle to the back of our bag using the same process as above. Make sure you position this handle the same distance from the left and right edges of your bag. Compare it to your front handle and make sure the straps are placed just as far down on the bag.
TIP: To make sure you glue your handle to the back of your bag in the same spots as your handle on the front, it helps to measure the distance from the top and sides of the bag edges to the bottom corners of your front handle ends and make a small pencil mark in those same spots on the back of your bag. Use those marks to align your handle ends as you glue them down.
Next apply the buckles to the front of the bag. Apply glue to the back of two of them and place them on the left and right sides of the handle. Make sure they’re nice and straight before pressing down to adhere them.
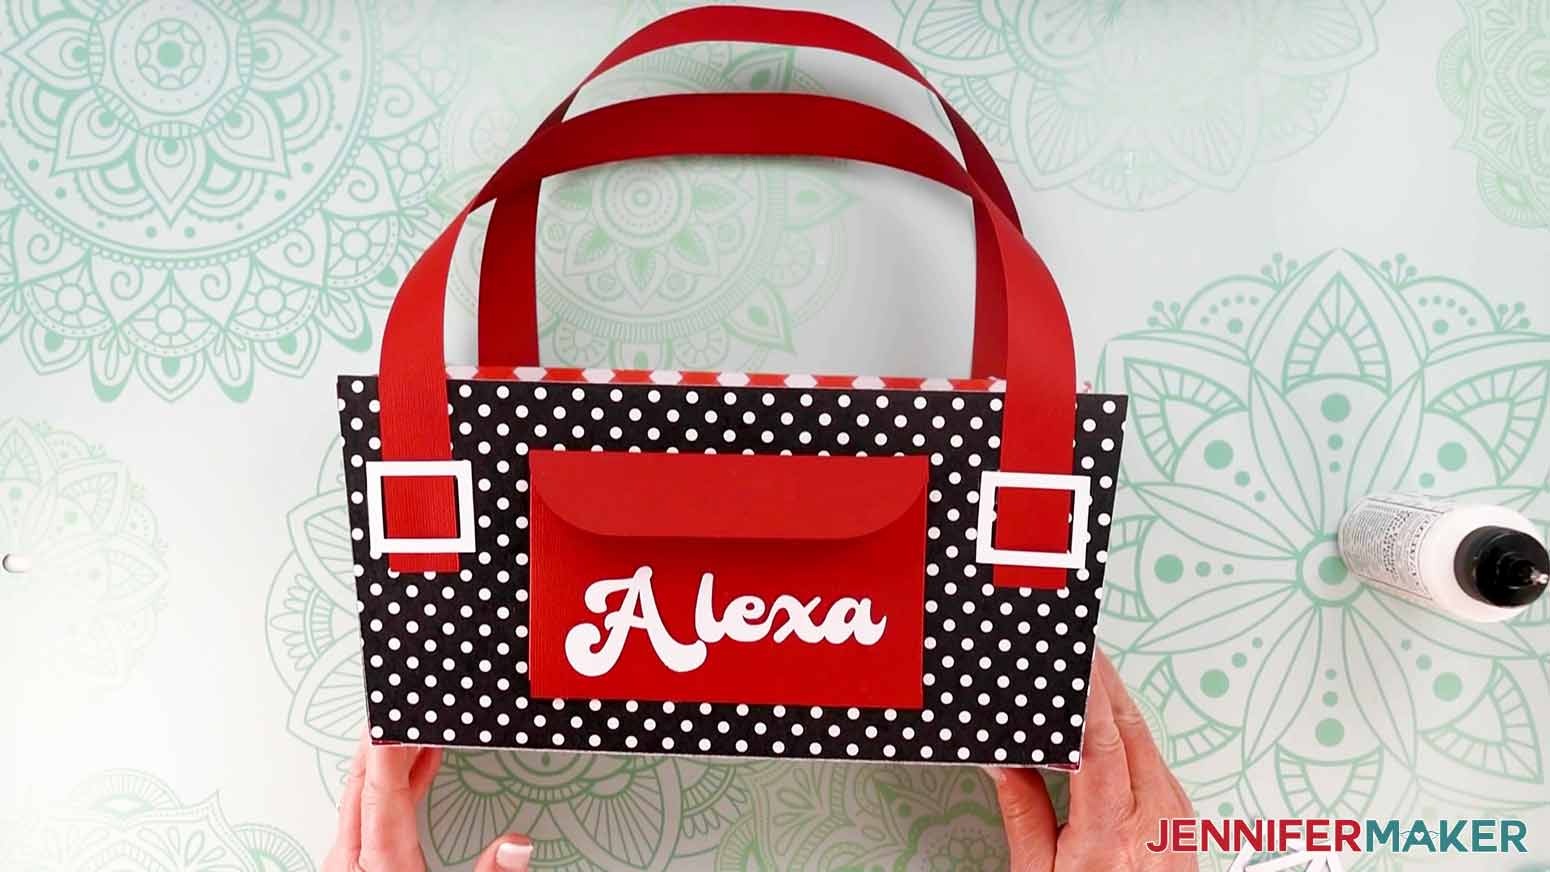
Attach the other two buckles using the same process as above. When you’re finished, the back of your bag should look similar to mine.
That’s it! You’ve created a cute DIY gift bag shaped like a purse with a handy pocket for storing small items. I just love all the little details!
TIP: If you want to place anything heavy in your bag, it’s a good idea to reinforce the bottom of it with a piece of thick cardstock or cardboard so your item doesn’t fall through. If you made your bag the same size as mine, you’ll want to cut your cardstock or cardboard to approximately 10” wide by 3.5” tall (the same size as the bottom piece of your bag).
NOTE: I found that my finished cardstock purse-shaped gift bag could hold items up to 6.5 lbs. I don’t recommend placing anything heavier than that in your finished bag to avoid ripping it.
STEP 6: SHOW THEM OFF
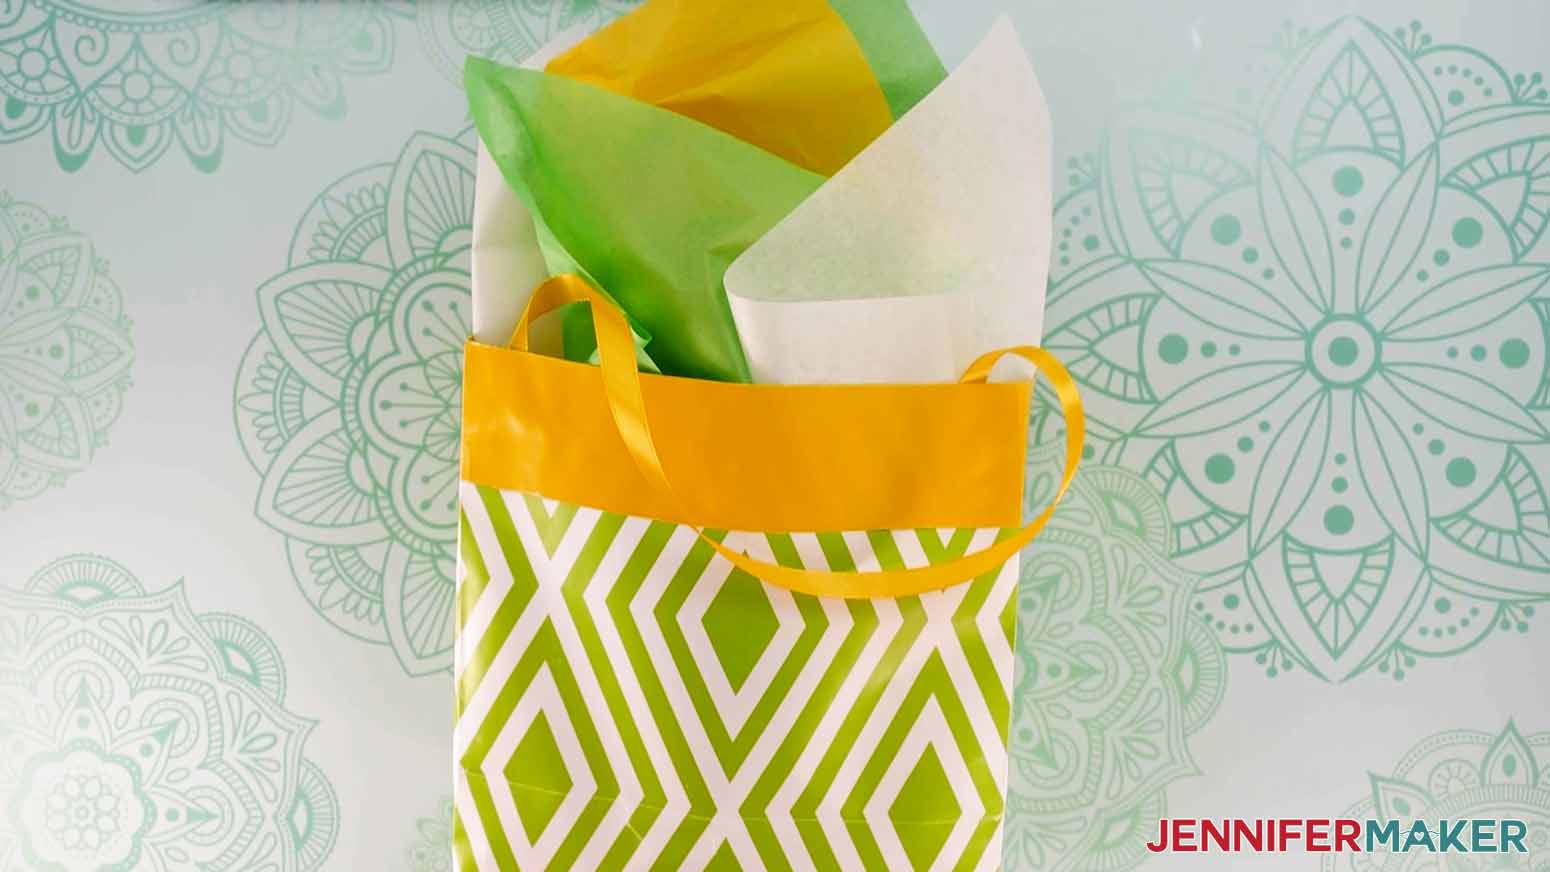
You’re done! You now have a DIY gift bag — or several of them! — that is not only super cute but also functional. And it was so easy to make, right? Here’s what all of my finished bags look like. I just love how fun they are!
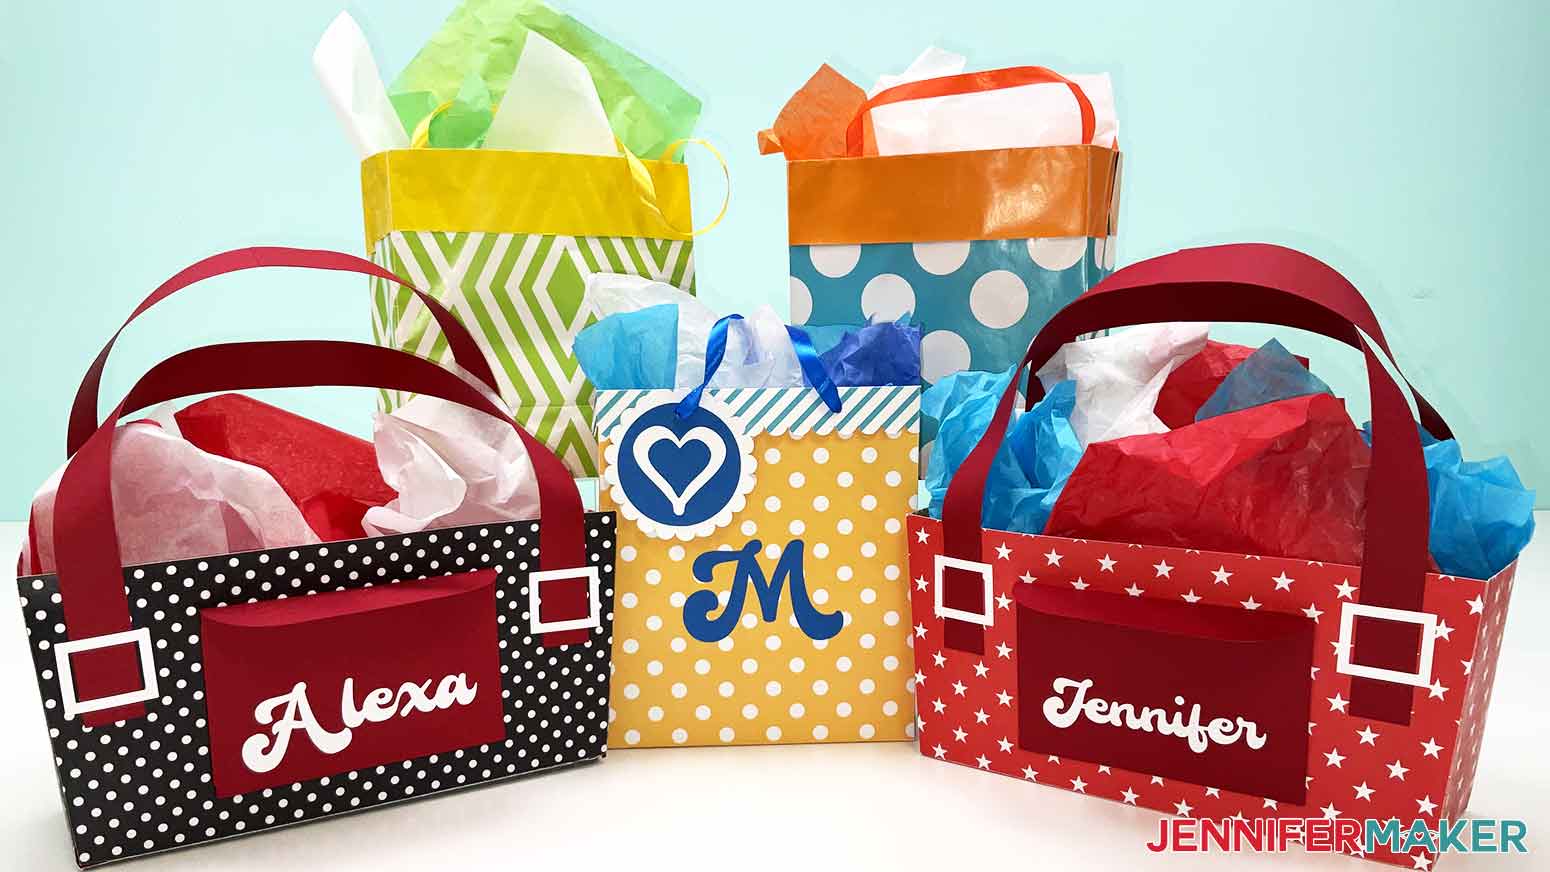

You can use your handmade bags to gift special items to friends or family members and impress them with your creative skills. They’ll love that you went the extra mile to customize a bag just for them!
Notes
Wrapping Paper Gift Bag Finished Size: 7.25" wide by 7.75" tall by 3.75" deep
Cricut Gift Bag Finished Size: 7" wide by 8" tall by 4.25" deep
Purse-Shaped Gift Bag Finished Size: 11" wide by 12" tall by 3.5" deep
Font Used: Brenson Charlotte
Questions About How to Make a DIY Gift Bag
How do you make a simple gift bag?
Making a handmade gift bag is really quite simple! All it takes is wrapping paper, glue, and scissors. You can follow my instructions to learn how!
What can I use instead of a gift bag?
There are so many easy crafts to use in place of a gift bag, especially if you have a cutting machine! You can adjust my wine bag design, my purse gift bag, or use any of my cute box projects.
How do you make gift wrap bags?
Making a DIY gift bag with gift wrapping is actually super easy. I’ve shared all the steps in my video and written tutorial above!
What material is used for gift bags?
You can use any type of paper as long as it’s strong enough to crease and hold some small gifts. I’ve seen bags made out of old maps from the thrift store, scrapbook paper, and so many more kinds! I’d love to see your experiments with new papers!
What is the best paper to use for this project?
We used 65 and 80 lb cardstock to make the bags flexible but sturdy enough to
How should I decorate my DIY Gift Bag?
You can make your own paper gift bag with any style or details you like! I’ve included steps for adding an initial or name to the front of the bag or gift tag, but you can get really creative!
How can I custom design my own bag in unique dimensions?
Join my ADVANCE program for a masterclass on how to make your own custom gift bags!
Get my free SVG files for the DIY Gift Bag Projects!
Now, I’d love to see your DIY gift bag projects! If you make bags with these designs, please share a photo in our Facebook group, email it to me at [email protected], or tag me on social media with #jennifermaker.
Love,

Want to remember this? Save the DIY Gift Bag Tutorial to your favorite Pinterest Board!