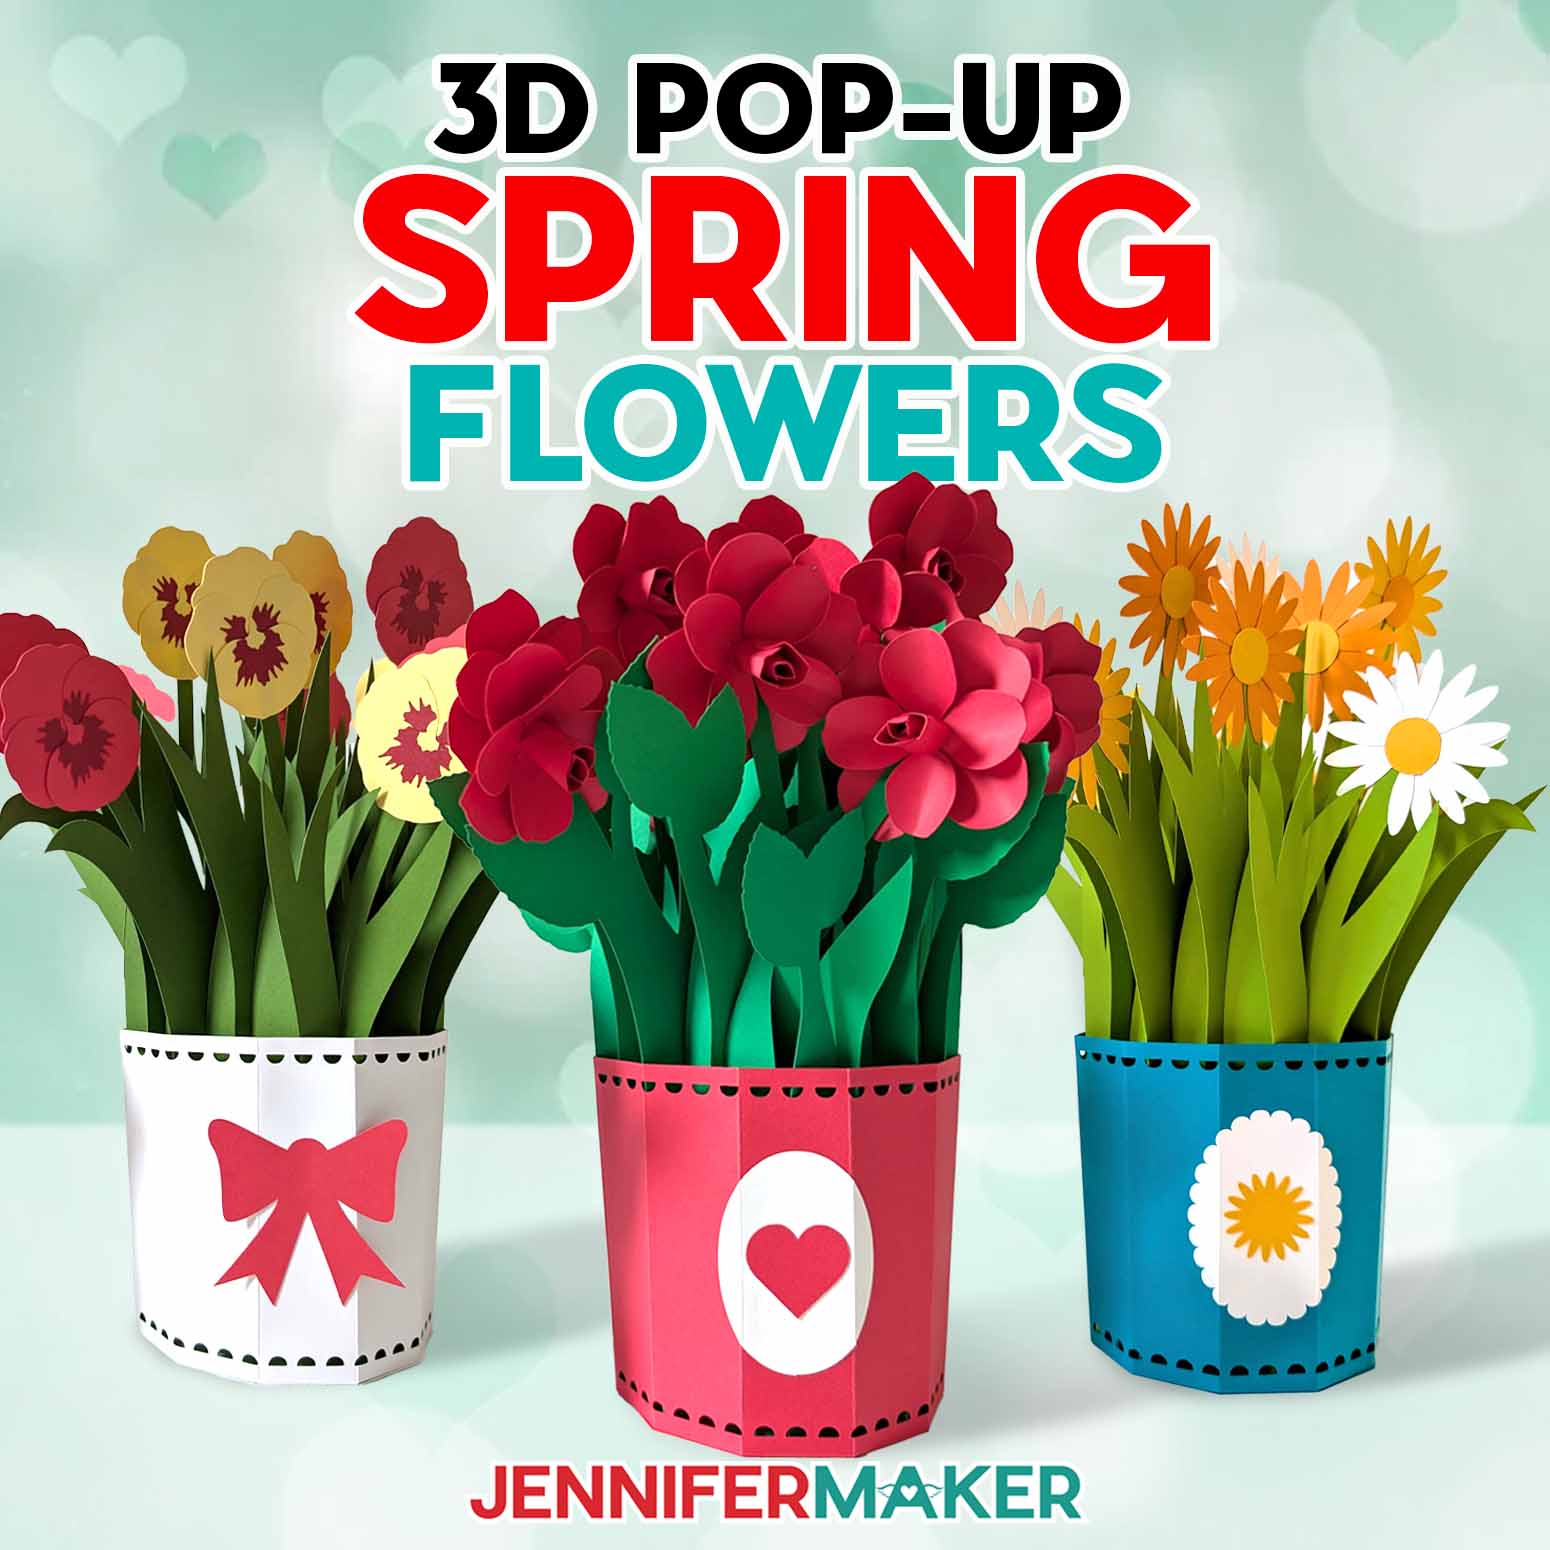
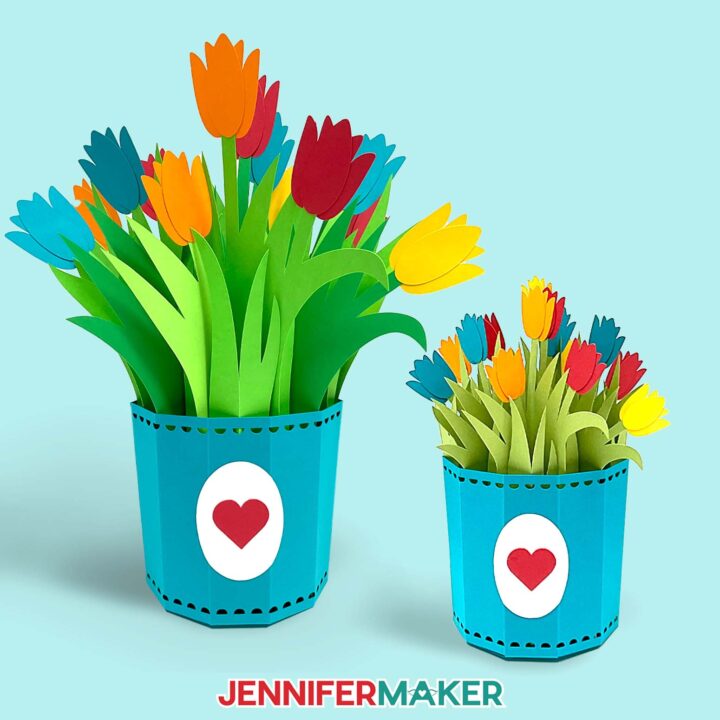
Learn how to bloom beautiful cards with 3D pop-up Spring flowers!
Spring in Michigan is nothing short of magical. After a long, cold winter, seeing the first sprouts poking through the thawing soil can remind us that warmer days are on the way. I am so ready! It’s still a little early for blooms here at Maker Farm — so let’s make our own springtime magic with a cheerful bouquet of 3D Pop-Up Spring Flowers! Whether it’s to celebrate a special day, send good luck, or “just because,” these delightful freestanding flower cards are the perfect way to send the beauty of Spring to someone special. Note: The pansy and daisy flowers are layered following how they look on the Cricut Design Space Canvas and assemble like the flowers in the original video linked below. The roses have written instructions below the main tutorial.

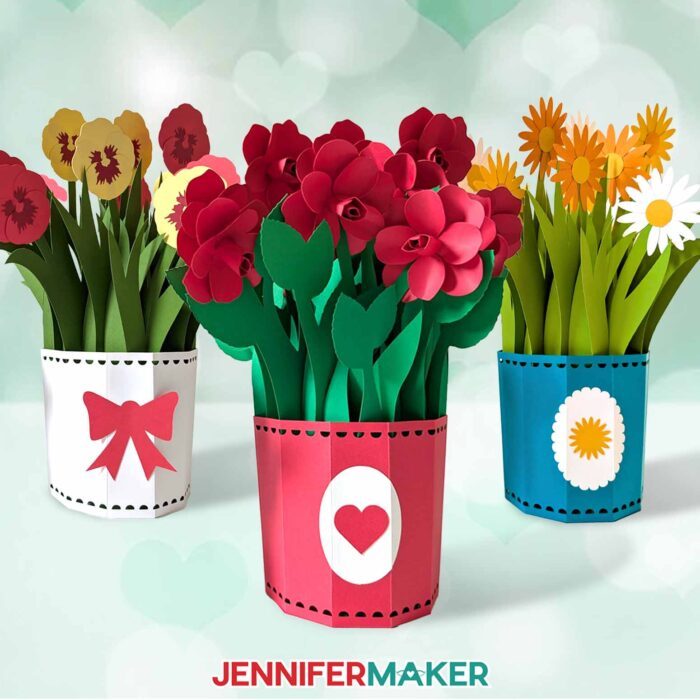
These cards are such a fun mix of creativity and clever design, with paper flowers that seem to pop to life! Picture giving someone a gorgeous card that’s beyond a typical store-bought one — a special keepsake they can display! Whether it’s for Mother’s Day, Valentine’s Day, or a birthday, these flower vase pop-up cards are delightful for any springtime occasion you want to celebrate. They may look fancy, but they’re super simple — with the right tools and my free SVG design files.
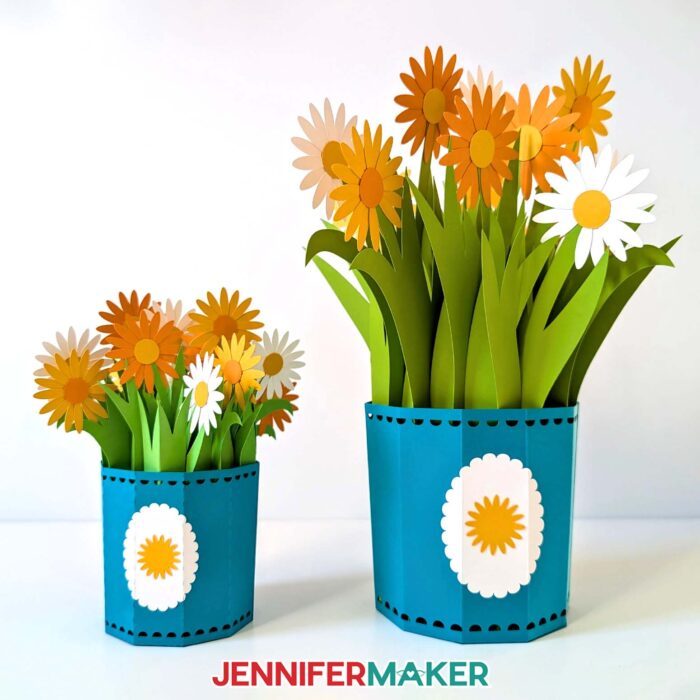
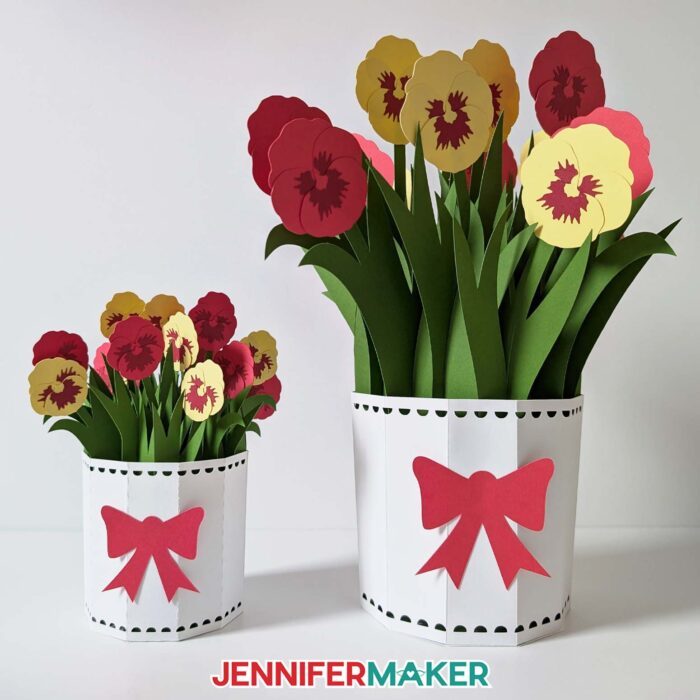
Speaking of my new designs, aren’t they beautiful? I’ve created new Daisy, Pansy, and Rose designs for you to add to your floral arrangement. They come together just like my original pop-up flower bouquets. I think the daisy flower card is my favorite — I just love the mix of colors with the matching decorated vase!
You can cut the pop-up cards by hand, but it’s much easier to cut them with a cutting machine. Using a cutting machine helps you to cut the pieces of your pop-up card precisely, so it opens and stands the way it’s supposed to! I’ll show you how to use a Cricut pen to add little guiding marks to the pieces to help you assemble the perfect card. Once the card is finished, the marks are hidden, leaving your paper flowers free to shine! Check the materials list below for some other Cricut tools you’ll need to help cut your cards.
The small and large versions of the files can be cut on full-size cutting machines like the Cricut Maker 4, Cricut Maker 3, original Maker, a Cricut Explore series machine, or the Cricut Venture. If you have one of these machines, you can use a scoring tool like a scoring stylus or single scoring wheel with the “score” versions of the designs to add the fold lines.
The small versions can also be cut on the Cricut Joy Xtra or original Cricut Joy. Those machines don’t have scoring capabilities, so use the small, “no-score” versions of the files in the “For Joy Users” folder.
I used 65 lb. solid core cardstock for my pieces. I recommend using solid-core cardstock that is the same color on the front, back, and between. That means, when it’s cut, you won’t see white edges on your pieces.
The video tutorial at the top of this page will show you how to assemble your pop-up flower card. Look at your Canvas in Cricut Design Space for help when layering the flower pieces, and then positioning them on the green foliage.
The daisy and pansy bouquets fold flat and can be sent through the mail, too! The rose blooms don’t fold flat enough for shipping in an envelope, but they’re wonderful to gift someone in person!
The large daisy and pansy bouquets collapse to about 9″ x 12.5″ and fit in a standard Priority Mail flat rate envelope. The small bouquets fold flat to about 5″ x 7.125″ and fit in an A7 envelope, which you can make with the help of my DIY envelope tutorial. You can create your own perfectly-sized blank envelope, and even have the machine address it for you.
There’s plenty of space on the vase for some heartfelt written words, or you can write a brief message on one (or all) of the flowers!
What I really love about each paper floral arrangement is how versatile they are. They’re perfect for so many special events! You can say “happy birthday,” send best wishes, or brighten someone’s special day with a flower greeting card you made yourself. They’re just right for a thoughtful Mother’s Day card, a timeless Valentine’s Day gift with red or pink blooms, or even as a wedding card. Coordinate the colors with the bride’s bouquet!
These 3D pop-up bouquets are a great way to make your own spring magic! Put a personal touch on each flower card with vibrant color, or mix and match your blooms for a custom bouquet. Let’s gather our tools and supplies, download my free SVG file, and create some springtime joy together with fun and colorful paper flowers!

Let me show you how to make an impressive flower bouquet with 3D pop-up Spring flowers! This post contains some affiliate links for your convenience (which means if you make a purchase after clicking a link I will earn a small commission but it won’t cost you a penny more, there is no additional cost)! Read my full disclosure policy.
Materials to Make 3D Pop-Up Spring Flowers
View my Amazon shopping list for the exact items I used!
- Two to Eight (2-8) Sheets of 8.5″ x 11″ or 12″ x 12″ 65 lb. Solid Green Cardstock (for foliage pieces)
- Five (5) Sheets of 8.5″ x 11″ or 12″ x 12″ 65 lb. Solid Core Cardstock (any colors for flowers and accent pieces) (alternative)
- One to Two (1-2) Sheets of 8.5″ x 11″ or 12″ x 12″ 65 lb. Cardstock (any color for vase pieces – I used teal)
-
A way to cut your cardstock – I’m using the Cricut Maker 3, but you can also use another Maker, a Cricut Explore series machine, the Cricut Venture, or a Cricut Joy series machine
-
Craft Glue (I used Bearly Art Precision Glue)
-
Scoring Stylus (optional for files with score lines) -OR-
-
Single Scoring Wheel (optional for files with score lines)
-
Cricut Fine Point Pen (for drawing assembly details)
-
Weeding Tool (for popping out small cutouts from intricate areas)
-
Tweezers (optional for securing just a few spots)
-
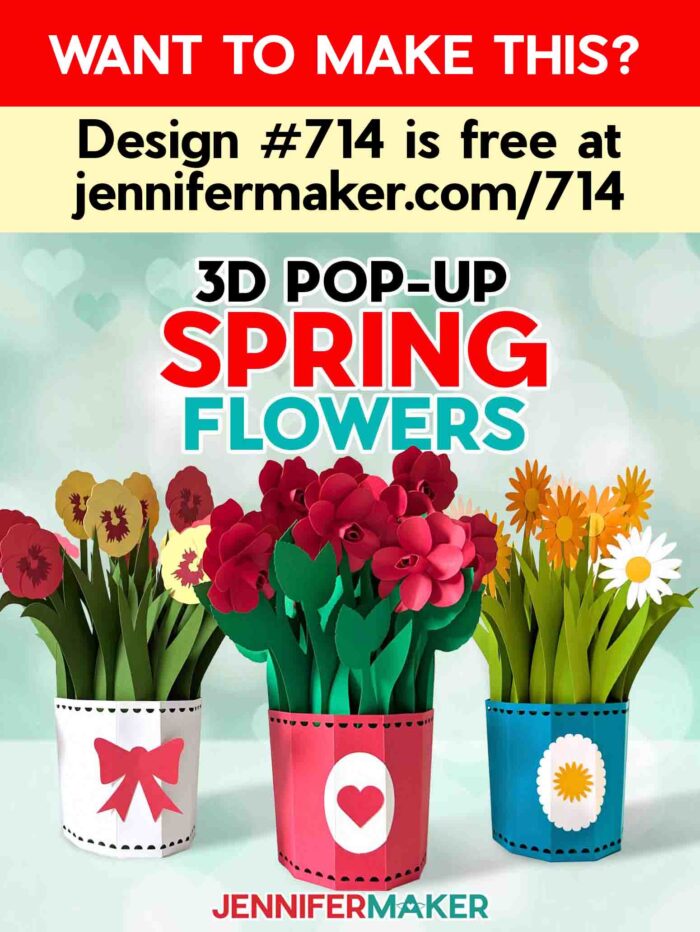
Design #714 (My free SVG/DXF/PDF design files are available in my free resource library – get the password by filling out the form at the bottom of this page
How to Make a 3D Spring Flowers Pop-Up Card!
3D Pop-Up Flower Bouquet
Make an impressive 3D pop-up flower bouquet out of cardstock to mail to a friend or family member!
Materials
- Two to Eight (2-8) Sheets of 8.5" x 11" or 12" x 12" 65 lb. Solid Core Green Cardstock (for foliage pieces)
- Five (5) Sheets of 8.5" x 11" or 12" x 12" 65 lb. Solid Core Cardstock (any colors for tulip and accent pieces - I used one (1) sheet of yellow, one (1) sheet of orange, one (1) sheet of red, one (1) sheet of teal, and one (1) sheet of white)
- One to Two (1-2) Sheets of 8.5" x 11" or 12" x 12" 65 lb. Cardstock (any color for vase pieces - I used this 12" x 12" Teal pack)
- Design #608 (My free SVG/PDF/DXF design files are available in my free resource library - get the password by filling out the form at the bottom of this page)
Tools
- A way to cut your cardstock - I’m using the Cricut Maker 3, but you can also use the original Maker, the Explore series machines, the Venture, the Joy Xtra, or the Joy
- Cricut Green StandardGrip Machine Mat 12" x 12"
- Scoring Stylus (optional for files with score lines) -OR-
- Single Scoring Wheel (optional for files with score lines)
- Black or Dark-Colored Cricut Fine Point Pen (for writing letters on foliage pieces)
- Craft Glue (I used Bearly Art Precision Glue)
- Brayer
- Spatula
- Scraper
- Weeding Tool (for popping out small cutouts from intricate areas)
- Tweezers (optional)
Instructions
STEP 1: GET MY FREE 3D POP-UP FLOWER BOUQUET DESIGNS
Download my 3D Pop-Up Flower Bouquet designs from my free library – look for Design #608.
NOTE: Alternatively, you can use the Save This Project form near the top of this post and the design link will be emailed to you.
TIP: If you’re not sure how to download, unzip, or upload design files, go to jennifermaker.com/svgs to learn how.
Unzip the downloaded folder.
There are four design files in the SVG folder. There are score versions of each of the large and small bouquets for use with a scoring tool, and no-score versions of each with dashed cut lines to create the foldable creases.
There is also a DXF folder with cut files, and a PDF folder with versions you can cut by hand.
In this tutorial, I will show you how to prepare and assemble the large ”no-score” pop-up bouquet SVG with a Cricut Maker 3. The steps for the small bouquet are the same. Remember, if you’re using a Joy or Joy Xtra, they do not have scoring capability.
If you want to use a score version, see my paper purse tutorial for steps to adjust score lines.
STEP 2: PREPARE AND CUT YOUR 3D POP-UP BOUQUET DESIGN
CRICUT DESIGN SPACE
- Open Cricut Design Space and click “New Project.”
- Click “Upload” and then “Upload Image.”
- Click “Browse.”
- Select the bouquet SVG file of your choice. I’m using the large version without score lines.
- On the Prepare to Upload screen, it will say “Cut Image” with the design preview.
- Click “Upload.”
- Select the bouquet design in Recent Uploads and add it to the canvas.
- Zoom out so you can see everything.
NOTE: There are vase, foliage, and flower elements in the design. The foliage pieces include letters we’ll have the Cricut draw on to help with assembly.
- Ungroup the design.
NOTE: I don’t recommend resizing the design because it won’t fit as easily in a standard envelope. - In the Layers Panel, click the eight foliage layers with small arrows to expand them.
NOTE: The flower heads are grouped, too, but you don’t need to expand them unless you want to adjust their colors. - In each expanded layer, click on the top layer of each group, which will be a letter. The color swatch at the top of the canvas will be black for those layers.
- Change the “Operation” for those layers to “Pen.”
- Click the Color Box next to the “Operation” menu and select the pen type and color you’d like to use. I recommend using a Fine Point pen, but the letters won’t be visible once the bouquet is assembled.
- For each expanded group, select the entire grouped layer, then click “Attach.”
NOTE: The newly Attached group will jump to the top of the Layers Panel. - Go down the Layers Panel, attaching the other seven foliage and writing Layers one at a time.
- If you want to change any of the flower colors, select them on the Canvas and use the Color Box next to “Operation” to pick a new color option.
- Your bouquet pieces are ready to cut!


CUTTING
- Select the correct machine from the top right drop-down menu.
- Click “Make.”
- On the Prepare screen, you should have 13 mats for the large bouquet if you're using the same colors as me.
TIP: If you see a white mat with just writing, one or more of your pen layers may not have attached correctly, so go back to the Canvas to check. - Change the Material Size for each mat to match your cardstock if needed.
- Once you’ve checked everything, select the first mat again and click “Continue.”
- On the “Make” screen, click “Browse All Materials.”
- Search for and select the “Medium Cardstock - 80 lb (216 gsm)” setting.
- Select “More” for the Pressure.
- Since the rest of the mats are the same cardstock weight, click the “Remember material settings” box to save time between cuts.
- Place the first sheet of cardstock face up on a green StandardGrip machine mat.
- Roll a brayer across the cardstock to adhere the cardstock to the mat well.
- Check that your Premium Fine-Point Blade is clean and in the clamp.
- Insert your Cricut Fine-Point pen into the correct clamp when prompted.
TIP: Remove the pen’s cap (put it on the back so you don’t lose it) and test it on scrap cardstock to make sure it flows well first. - Press the flashing button to load the prepared mat into your Cricut.
- Press the flashing “Go” button to begin cutting.
- When the machine stops cutting, don’t unload the mat right away. Gently lift a corner of the cardstock to make sure the cuts went all the way through. If not, press the “Go” button again to make another cut pass in the same spots.
- When the cuts are all the way through, unload the mat.
TIP: If you have any issues with your cuts, go to jennifermaker.com/cleaner-cuts. - Flip the mat over onto your work surface and gently pull the mat away from the cardstock.
- Repeat steps 10-18 for the rest of the mats.
TIP: Design Space might not remember your tool choices between mats, so always check that they’re correct. - Here are all my cut pieces face up.


STEP 3: ASSEMBLE YOUR 3D POP-UP BOUQUET
ASSEMBLE THE VASE
- There are three pieces for the vase and two pieces for the vase label.
- Fold all the crease lines on each of the vase pieces in the same direction, finishing with the tabs.
TIP: You can use a scraper tool or your fingernail to make each fold crisp. - Place the rectangular vase pieces face up with the long tabs facing the same direction and the short tabs at the bottom.
- Add craft glue on the outside of one rectangle’s long side tab.
- Press the smooth side edge of the other rectangle against the long tab with glue.
- Add glue to the outside of the other long tab.
- Bring the other rectangle’s smooth short edge to meet the second glued tab.
- Make sure the edges are smooth and press it in place to make a cylinder vase shape.
- Grab the vase’s oval label piece and fold back along the crease lines.
- Flatten your vase so that the bottom short tabs are in the center of the back and front.
- Add glue to the back of the vase label. Be sure to add glue to the center and both folds.
NOTE: The back is the side with folded parts pointed toward you. - Center the label vertically on the vase, then line up the creases of the label and the creases of the vase. Press the label down onto the vase.
NOTE: This will be the front of the vase. - Glue the heart to the center of the label.
- Add glue to the outside of the front-facing bottom tab.
- Hold the bottom octagonal vase piece so that the crease is horizontal, then press the top edge of the piece against the glued tab. Make sure the edge of the octagonal piece is aligned with the tab’s crease before the glue dries.
- Turn your assembled vase over so that the label side is face down.
- Add glue to the face of the last short tab.
- Fold along the crease of the bottom octagonal piece so that it looks like a hard taco.
- Press the lined-up edge of the bottom piece against the tab with glue.
- Make sure all of the glued pieces are dry, then pop your vase oven. Your vase is finished!


ASSEMBLE THE TULIPS
- Place Foliage Pieces C, D, E, F, G, and H and the tulip pieces face up.
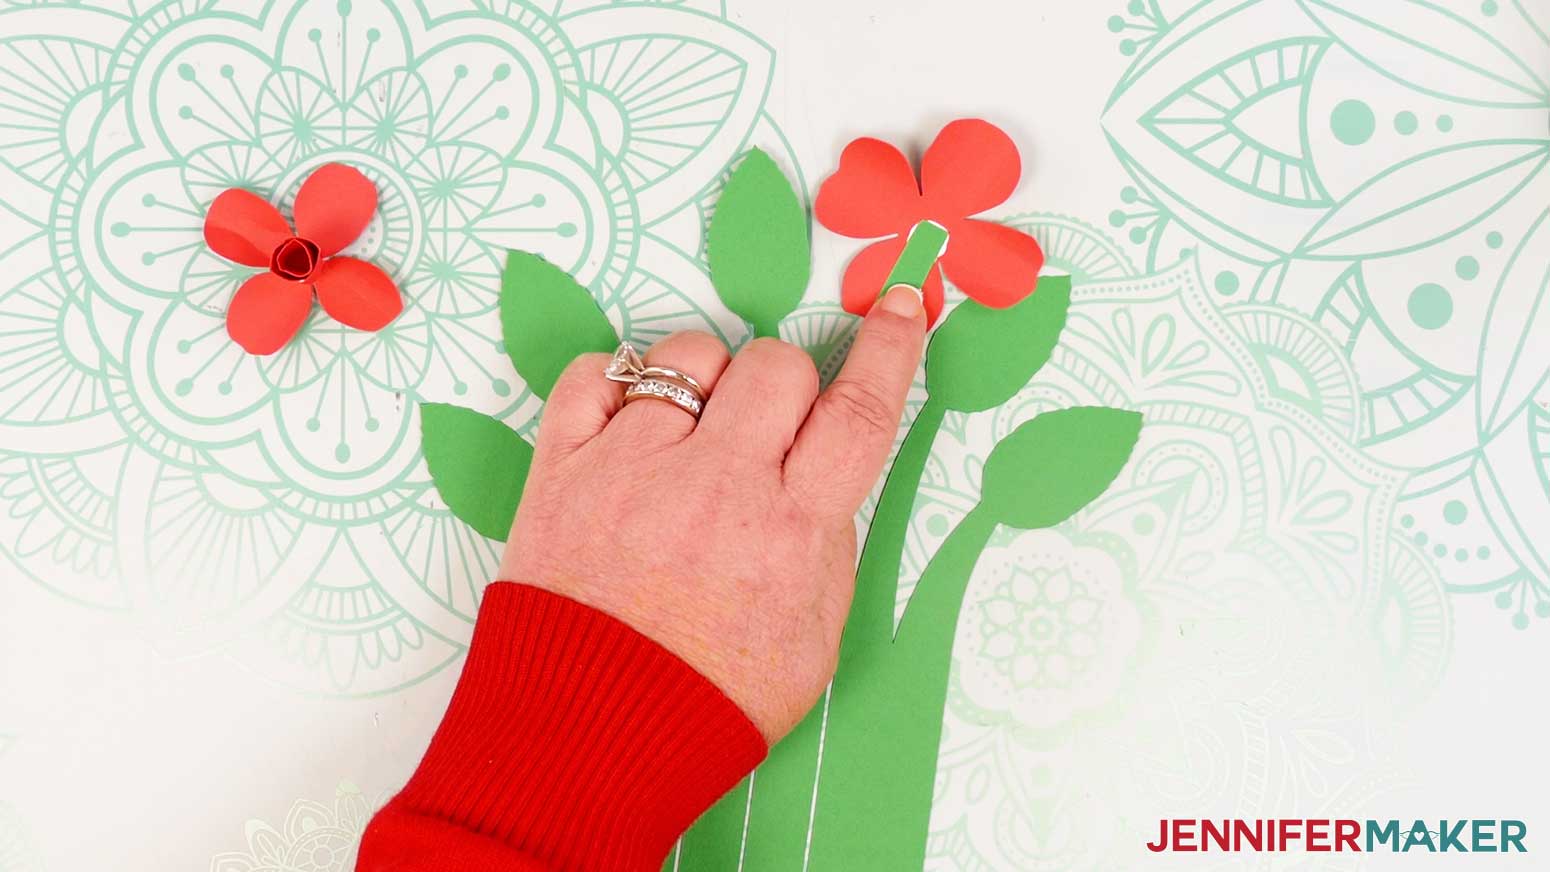
NOTE: Each tulip has two parts: the back piece that looks like a full tulip flower, and the single-petal front piece. The drawn letters are on the front side of the foliage pieces. - Look at each foliage piece to find the flower stems, which are straight across the tops and don’t look like the rest of the leaf pieces. This is where you’ll place tulip flowers with the larger section in back and the smaller petal in front.
NOTE: You can refer to Design Space to see which tulip colors I placed on the different stems, or you can place them in a different order if you’d like your bouquet to look different than mine. - Pick a tulip and corresponding stem to start with. Add a line of glue from the center bottom to the center middle of the back tulip piece.
- Slide the back tulip piece underneath the stem so that the stem is about halfway up the flower. Press down to adhere it to the glue.
- Pick up the matching single-petal tulip piece and add a line of glue to the back.
- Press the petal glue-side down on top of the stem. Make sure the petal is centered and its top sticks up a little above the back tulip piece.
- Repeat steps 3-6 for all of the tulips and foliage stems.


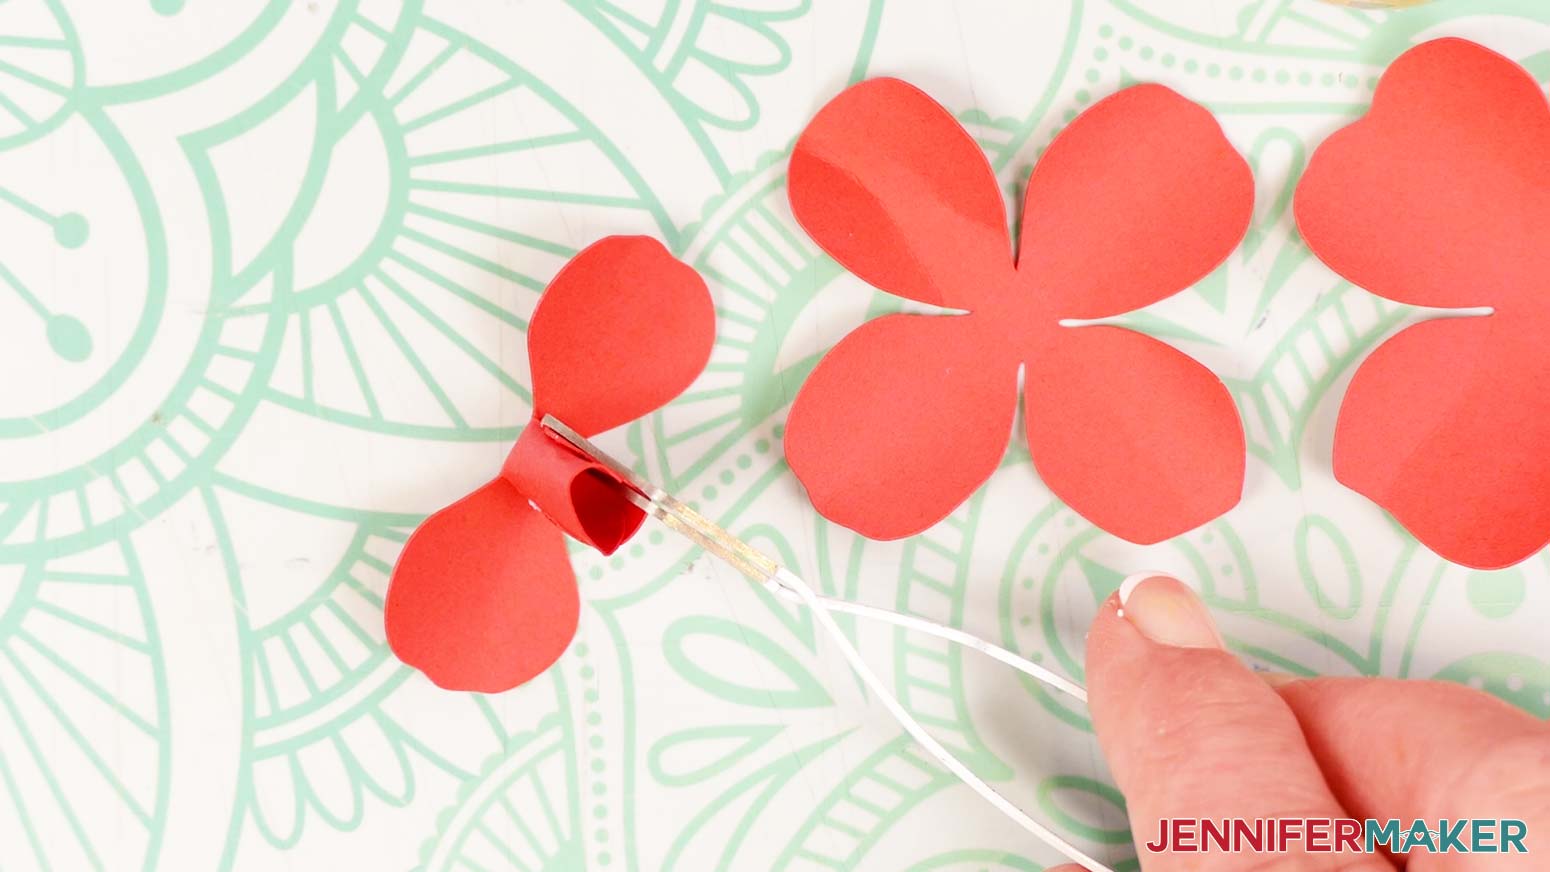
VARIATION: ASSEMBLE THE 3D ROSES
- Place Foliage Pieces C, D, E, F, G, and H and the rose pieces face up.
NOTE: Each rose has three parts: the smallest piece for the front, the second smallest for the middle, and the largest piece for the back. - Look at each foliage piece to find the flower stems, which are straight across the tops and don’t look like the rest of the leaf pieces. This is where you’ll place the assembled roses.
- Use your fingers or a thin cylindrical object, such as a pen, to curve the edges of all the rose petals upward to give them some definition.
- To make a flower, grab one rose piece of each size.
- Take the smallest rose piece and apply a small amount of glue to the underside edge of one of the petals.
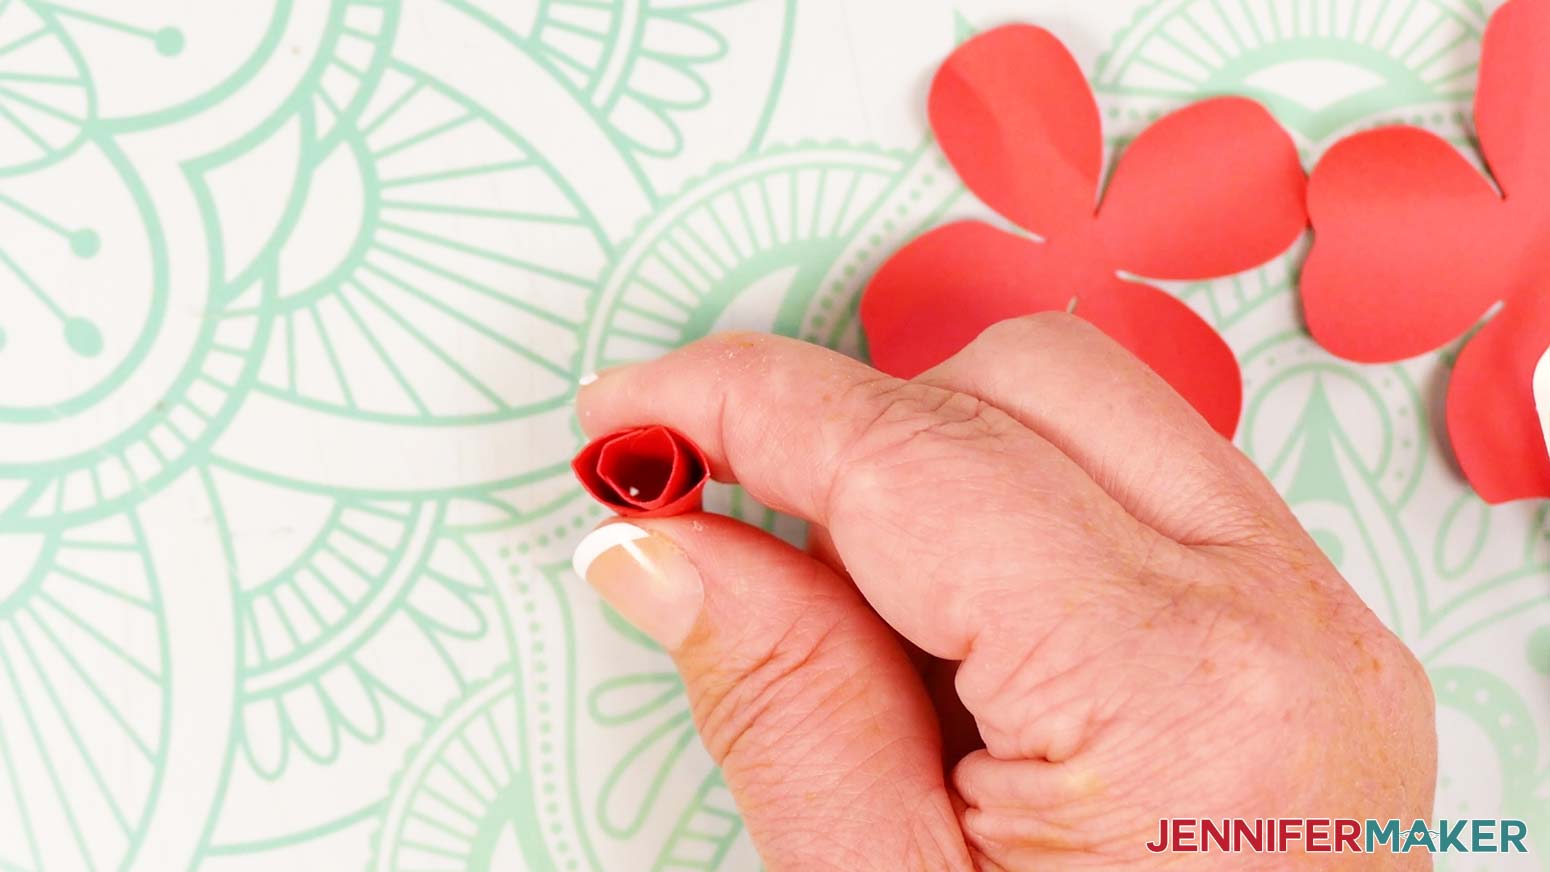
- Fold it up toward the center, then take the petal directly across from it, and curl them around each other. Leave a small amount of space between the curled petals, and hold them in place until the glue sets.
- Now glue the other two petals up and around the first two, but don’t do it too tightly — leave a small amount of space between each petal as you glue it to make the rose bud look more realistic.
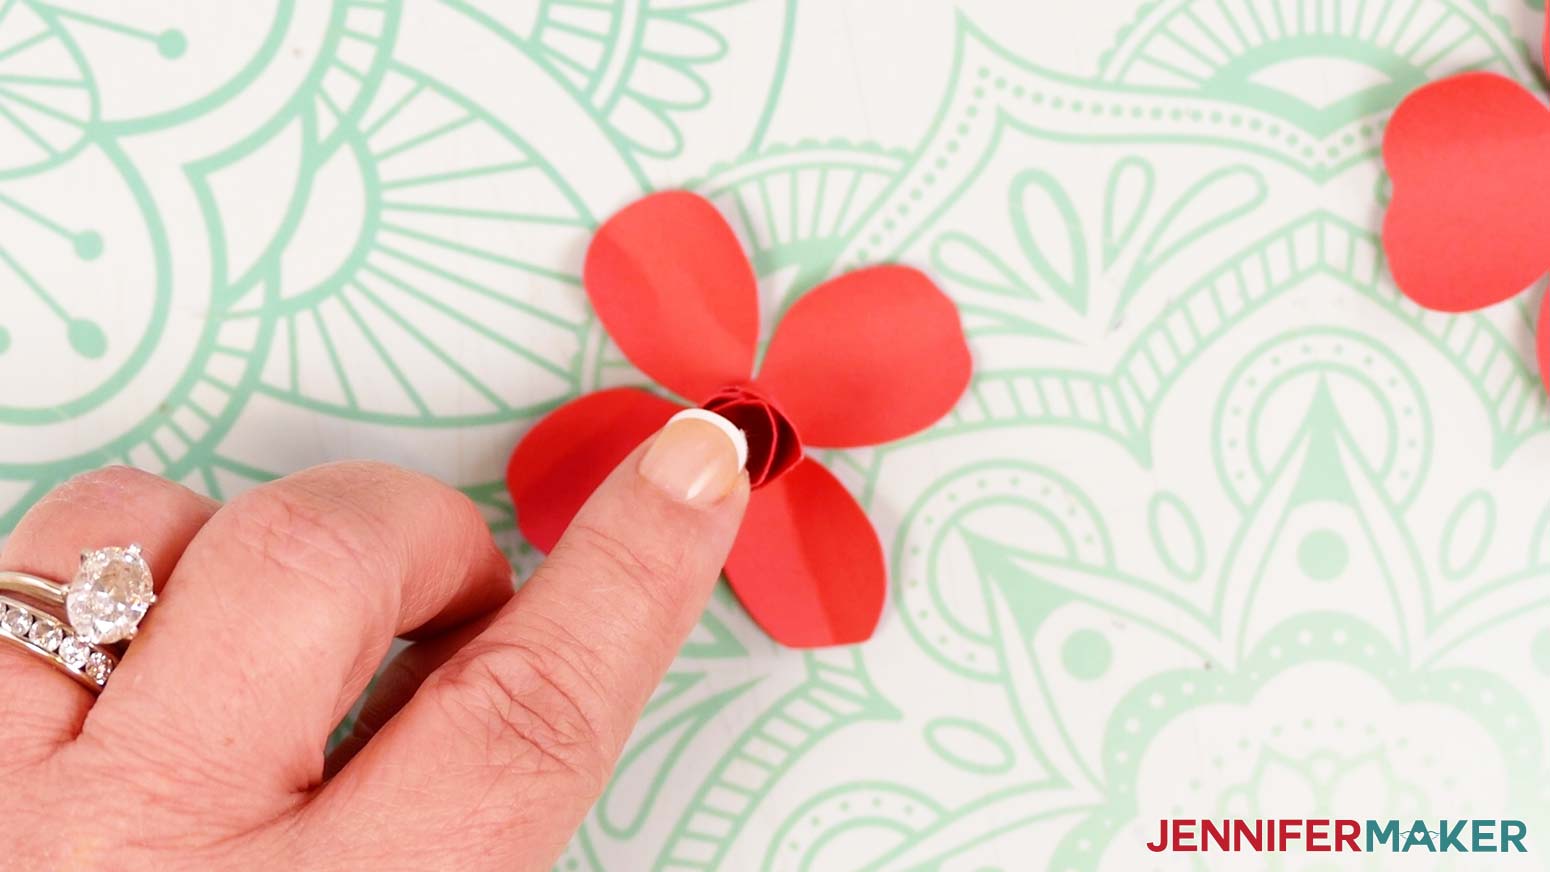
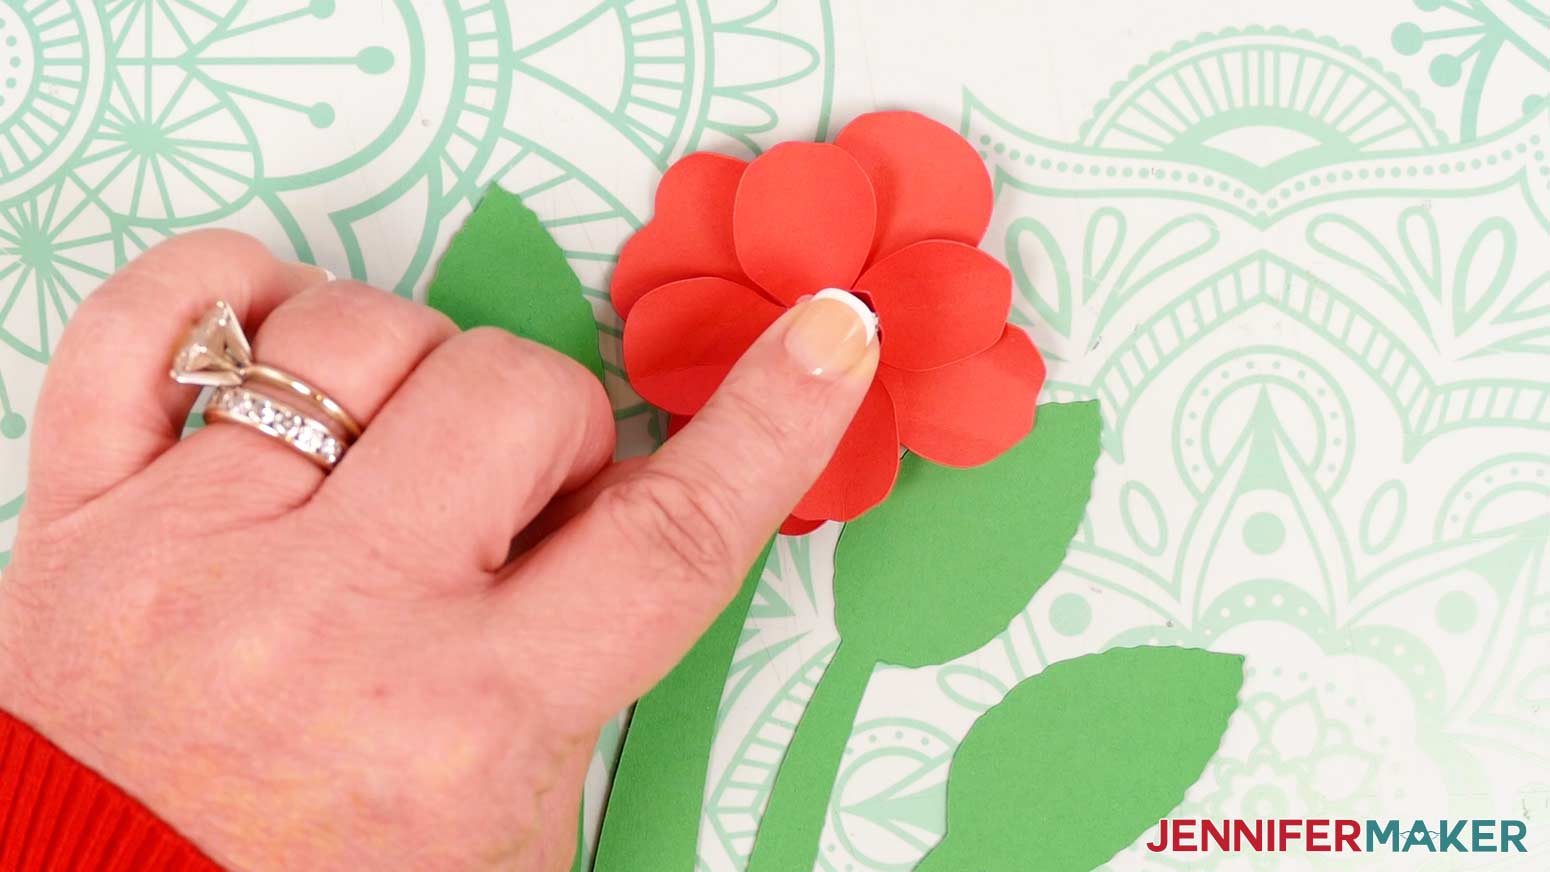
- Lay the middle rose piece (the second smallest one) with the curved petals face up.
- Add a dot of glue to the bottom of the rose bud, then place it onto the center of the middle rose piece.
- Lay the back rose piece (the largest one) with the curved petals face up, and add a dot of glue to the center.
- Choose a stem, and slide the back rose piece underneath it so that the stem’s top is in the center of the flower. Press down to adhere the pieces.
- Pick up the assembled front rose piece and add a dot of glue to the back center.
- Center the assembled rose piece over the stem and back piece, rotated slightly so all eight petals are visible, then press it down on top of the stem.
- Repeat steps 4-13 for all of the roses and foliage stems.
ADD THE FLOWERS TO THE VASE
- Fold along the crease lines on Foliage Pieces A and B.
NOTE: There is a fold along the center and one next to each tab. Fold all three in the same direction. - Slot the left tab of Foliage Piece B into the right tab of Foliage Piece A so the tabs are on the inside.
TIP: Make sure the slots go together completely so the bottom edges are flush. - Slot the two remaining tabs together to form a square grass-looking piece.
- If you’d like to make these joints sturdier, lift up the cardstock above each tab, add glue to the tab, then press down.
NOTE: Don’t add glue to any of the other joints because the bouquet won’t fold correctly.
TIP: Some of the tabs are easier to access from the inside of the square. - Stack the lettered foliage pieces in alphabetical order, because that’s the order we’ll assemble them in.
- Grab Foliage Piece C and lower it onto the foliage square so its two slits slide into the middle space between the leaves.
NOTE: Make sure the bottom of piece C goes all the way to the bottom of the slots in the foliage square. - Turn the foliage square so the tulip on Foliage Piece C faces you.
- Slot Foliage Piece D into the center of the foliage square so it’s perpendicular to Foliage Piece C and its three slits align with the three middle openings.
NOTE: Look inside the bottom to make sure Piece D has completely slotted with Piece C. - With Piece C (the piece with only one tulip) still facing you, lower Foliage Piece E in front of C and align its three slits with the three openings on Pieces A, D, and B.
- Slot Foliage Piece F behind Piece C the same way.
- Turn the foliage square so the tulips of Foliage Piece D are facing you.
TIP: If you lose track of which Foliage Piece is which, look at the bottom to check the letter. - Slot Foliage Piece G in front of Foliage Piece D. Be patient and take your time when doing this, because Piece G has five slits and there are a lot of pieces to align.
TIP: I aligned an outer slit first, then worked my way across Piece G, aligning the other four slits with their corresponding openings one at a time. - Slot Foliage Piece H into the last five openings. Again, take your time so you don’t rip any cardstock as you align all five slits.
TIP: For this piece, I aligned the outer slits one at a time, made sure the flowers were out of the way, then slid the middle slits into place. - Pick up your assembled flower and foliage pieces and look at them from the bottom. It should look like a grid with sixteen squares.
NOTE: If there are any spots that aren’t squares, some of the slits might be misaligned and the bouquet won’t fold correctly. Undo the joints and try again. - Fold the whole bouquet from the corners so that it flattens.
NOTE: Depending on how you fold the bouquet, you’ll see different views, so play around to see which you like best. - Flatten your vase so that the heart label is on the front.
- Insert your flattened bouquet into the top of the vase and push it down until the bottom of the foliage touches the bottom edge of the side of the vase.
- Push from the sides of the flat vase and watch your bouquet pop open!


STEP 4: FINISH YOUR 3D POP-UP BOUQUET
- To fold your bouquet flat so it fits in an envelope, position the bouquet so that one corner is facing you.
- You can choose to fold it one of two ways. Each way will show you a different view of the flowers. The first way to fold it is to press in at the corners to the left and right of you to flatten the bouquet.
- The other way to fold the bouquet is to press in at the corners facing toward you and away from you to flatten the bouquet.
- Flatten the vase so that the label is centered on the front and the bottom looks like a taco.
NOTE: You can also remove the bouquet from the vase and flatten both separately. - Slide your flattened bouquet inside a standard flat-rate envelope and send it to a friend!
If you made the Joy version, you can slide the flattened bouquet into a standard A7 sized envelope! - When your recipient gets the bouquet, they just have to push in on the flat vase’s sides to pop open the bouquet!


STEP 5: SHOW IT OFF!
Display your finished 3D pop-up flower bouquet, or press from the front and back to flatten it so that you can put it into an envelope and send it to your favorite person!

Notes
Small Joy-Size Bouquet
Finished Size: Approximately 3"W x 6"H x 2.75"D (5”W x 7.125”H when flattened)
Can be mailed in standard 5” x 7” (A7) greeting card envelope
Large Bouquet
Finished Size: Approximately 9"W x 10.5"H x 8"D (9"W x 12.5"H when flattened)
Can be mailed in standard flat rate envelope (size 12.5” x 9.5”)
Answers to Your Questions About Making Floral Pop-Up Cards
Q: I want step-by-step directions with photos of assembling the rose design. How do I get those?
A: You can get full details and step-by-step photo instructions for assembling the rose design in my ADVANCE program. Learn more about ADVANCE here!
Q: Can you show me step-by-step how to make a pop-up card of flowers?
A: The video tutorial at the top of this page will show you how to prepare, cut, and assemble a pop-up flower card for a special occasion. Reference your Canvas in Cricut Design Space for help layering the flower pieces and positioning them on the green foliage.
Q: What paper is best for making paper flowers and cards?
A: When making a 3D Pop-Up Flower Bouquet, I recommend using high quality 65 pound cardstock. It’s durable and strong, but easy to fold and curve into the shapes necessary to build the vase and flowers. If you don’t have fitting local retail stores, there are many cardstock sources online, like Amazon.
Q. Do I have to use a Cricut?
A: No! In my free download file, I’ve included a PDF you can print and use as a template to cut your cardstock pieces. There are files to work with different cutting machines, too. If you have a Silhouette Cameo, which uses Silhouette Studio, you can use the DXF cut files in Silhouette Basic Edition. If you have upgraded to Silhouette Designer Edition, Designer Edition Plus, or Business, you can use the SVG file. A Brother ScanNCut works, too,
Q: Where can I find the supplies and tools to make 3D pop-up Spring flowers?
A: My pop up cards SVG files can be made with simple supplies you may already have in your crafting stash. I like to shop on Amazon for their free shipping and quick delivery time with my Amazon Prime membership (just make sure to look for sellers with 5-star reviews, carefully review product information, and check out the product preview). You can also find most, if not all of the supplies and tools at your local craft store — sometimes even at a cheaper regular price or sale price — so be sure to check for current sales as you continue shopping for supplies.
Q: Help! My Cricut Design Space screen looks different than yours!
A: If you’re using the latest version of Cricut Design Space, your screen may have slight variations than the screen you see on the video tutorial. Good news: All of the same functions are there, they may just be in different spots or have new icons. Pause the video if you need, or follow along with the written tutorial. If you get stuck, ask for expert support in our Facebook group. Our group has become not just a help center, but also a vibrant community of real people and crafters! Plus, you can catch the latest news on JenniferMaker tutorials and more.
Q: Can I make and sell these cards with 3D pop-up Spring flowers?
A: I love supporting creative entrepreneurs! If you want to use my designs and projects for commercial use, please familiarize yourself with my important licensing information before selling your crafts.
I do not permit sale of my digital items, but you can sell the creative goods you make with them — as long as you follow my licensing requirements. That means you cannot sell the bouquet SVG files, but you can sell cards that you made with the files within the guidelines linked above.
Q: How do I know if my design is the right size?
A: Not sure if your design is uploading at the correct size or aspect ratio? If you are using Cricut Design Space Beta for Desktop, try switching to the Live version as this has worked in our testing. Here are the dimensions you should see for each design on your Canvas:
- 3d-pop-up-roses-small-score-jennifermaker-SVG: 14.12″ x 21.2″
- 3d-pop-up-roses-small-no-score-jennifermaker-SVG: 14.12″ x 21.2″
- 3d-pop-up-roses-large-score-jennifermaker-SVG: 24.49″ x 33.9″
- 3d-pop-up-roses-large-noscore-jennifermaker-SVG: 24.49″ x 33.91″
- 3d-pop-up-pansies-small-score-jennifermaker-SVG: 12.48″ x 19.25″
- 3d-pop-up-pansies-small-no-score-jennifermaker-SVG: 12.48″ x 19.26″
- 3d-pop-up-pansies-large-score-jennifermaker-SVG: 23.26″ x 33.88″
- 3d-pop-up-pansies-large-noscore-jennifermaker-SVG: 23.26″ x 33.89″
- 3d-pop-up-daisies-small-score-jennifermaker-SVG: 12.73″ x 19.67″
- 3d-pop-up-daisies-small-no-score-jennifermaker-SVG: 12.73″ x 19.67″
- 3d-pop-up-daisies-large-score-jennifermaker-SVG: 23.39″ x 33.88″
- 3d-pop-up-daisies-large-score-jennifermaker-SVG: 23.39″ x 33.89
If you need help resizing your design, open my Resizing Guide in a new window.
Q: Do you have other pop-up cards I can make?
A: If you liked these pop up cards, check out these other pop-up projects for more ideas:
- Original 3D Pop-Up Flower Bouquet
- Pop-Up Letter Card
- Flying Butterfly Card
- Pop-Up Apple Tree Card
- Hot Air Balloon Pop-Up Birthday Card
- Pop-Up Cake Birthday Card (change the colors for a wedding!)
- Grill Pop-Up Card
- Holiday Manor Pop-Up Card
- Winter Pop-Up Card
Get my free SVG/DXF/PDF files to make 3D pop-up Spring flowers!
(If you do not see the signup form above, click here.)
I love seeing what you make with my designs and how you use them! Please share a photo of your 3D pop-up Spring flowers in our Facebook group or tag me on social media with #jennifermaker.
Love,

Want to remember this? Save this 3D Pop-Up Spring Flowers tutorial to your favorite Pinterest Board!