

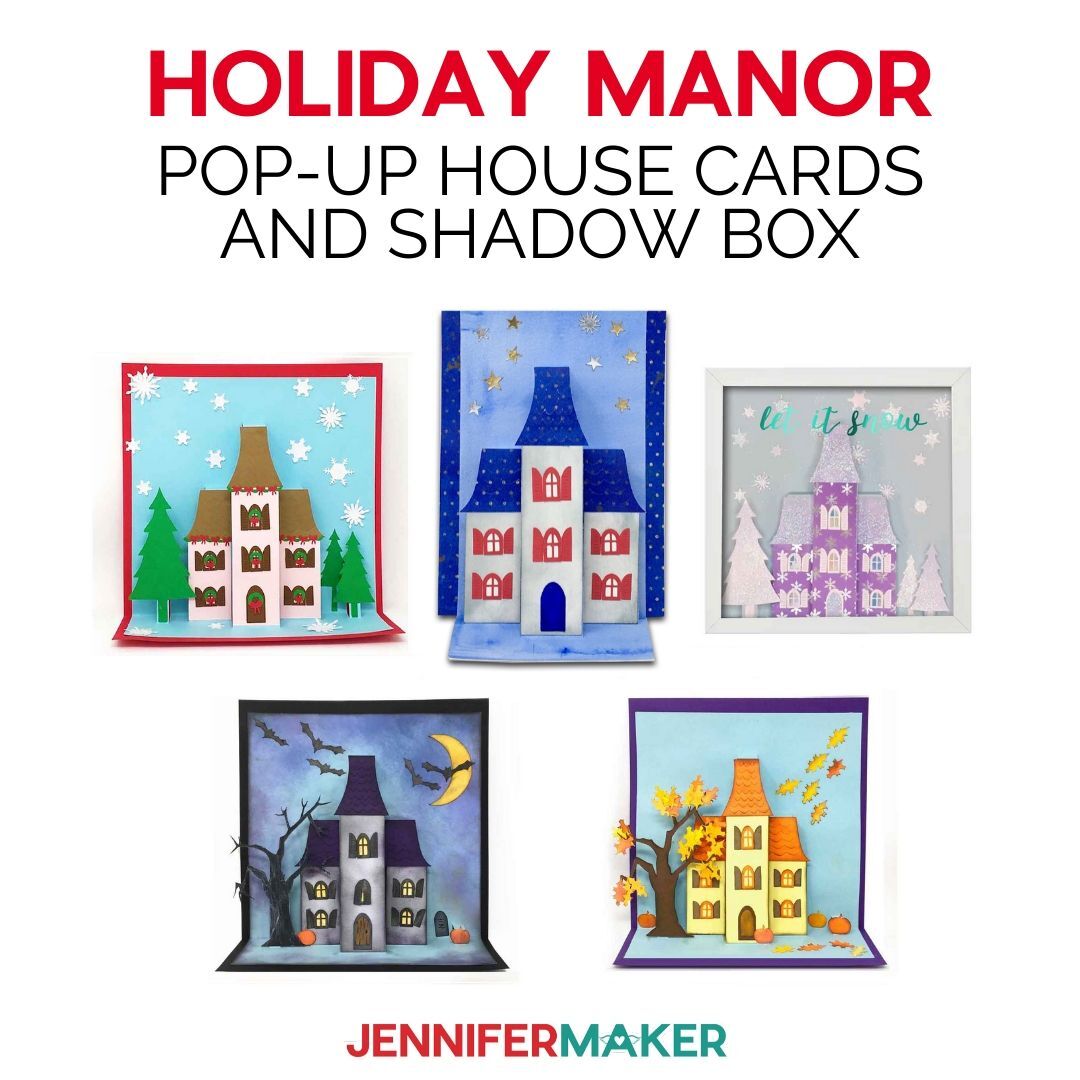
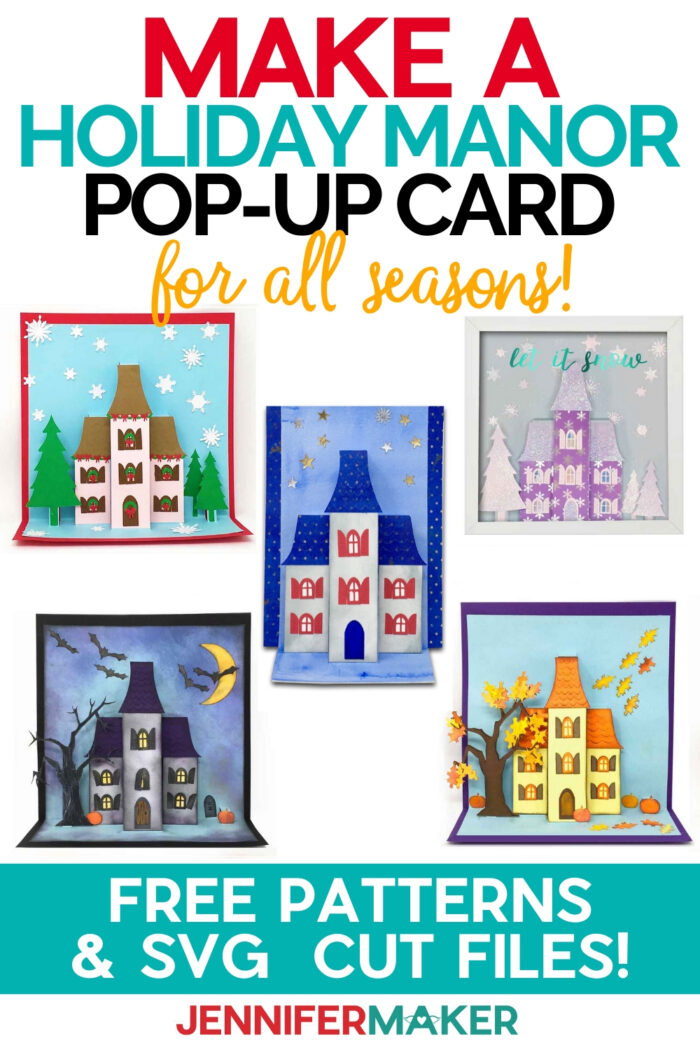
Learn how to make pop up house cards that you can decorate for Halloween, fall, Christmas, and now Fourth of July … the Holiday Manor! This step-by-step tutorial shows you everything you need to recreate this fun little house card.
As many of you know, I have a popular course called CUT ABOVE SVG Design in which I teach my fellow crafters how to do what I do — namely, how to create, design, and share designs as SVG cut files for projects! One of my star students, Lucy Foxworth, is doing just that, designing amazing creations and sharing the SVG cut files freely with others on her own blog. Last spring she made us an adorable paper fairy house that was a big hit! This time around, she’s showing us how to make pop up house cards that work for summertime, Halloween, fall/autumn, or Christmas! She calls it the Holiday Manor, and which holiday it looks like all depends on how you decorate it. So fun! Take it away, Lucy!
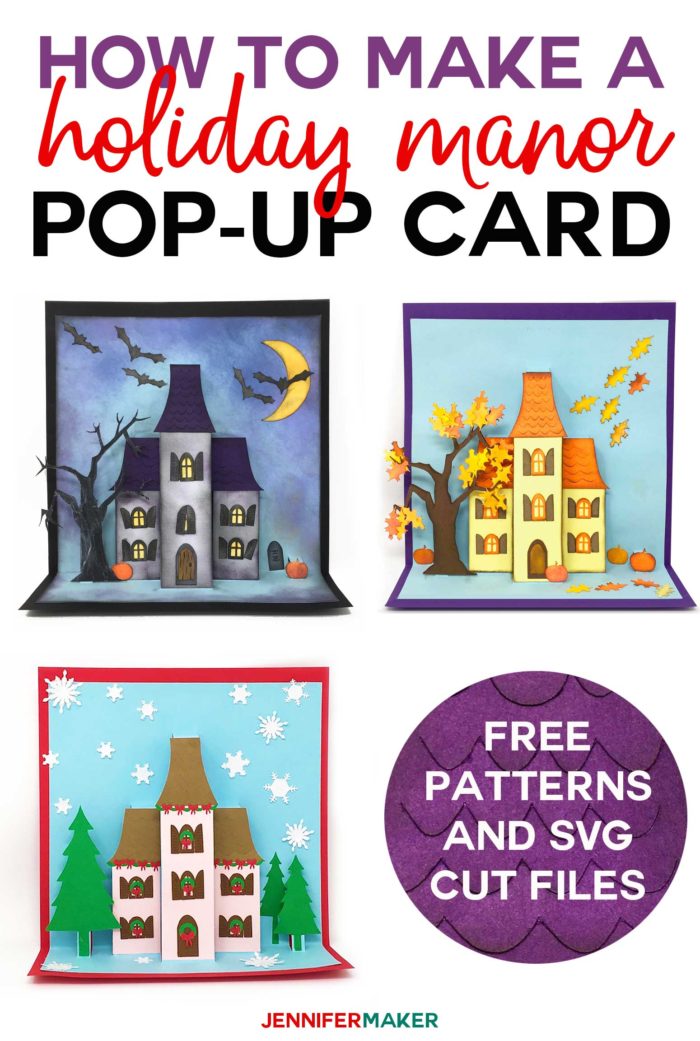
My friend Jennifer recently asked me if I could make and share a Halloween project here. Yes! I am honored to make a project for Jennifer’s readers. After I agreed I came up with this cute Holiday Manor pop-up house card that you can customize easily for more than one holiday — make it for Halloween, Thanksgiving (or just autumn), Christmas, and now a summertime patriotic version has been added! So read on to learn how to make your own Holiday Manor Pop-up House Card AND to get the free cut file and pattern!
Ready to make Pop-Up House Cards? Let’s do this! This post contains some affiliate links for your convenience (which means if you make a purchase after clicking a link I will earn a small commission)! Read my full disclosure policy.
Materials Needed to Make Pop Up House Cards for Fall & Winter Holidays
-
- 65 lb. or 80 lb. 8.b” x 11″ cardstock – I used grey, black, purple, light blue, dark yellow, light yellow, orange(for the Halloween Manor); orange, darker orange, light yellow, dark yellow, brown, purple (for the fall manor), and pink, light brown, dark brown, red, green, blue (for the Christmas manor) — note that for the Winter Shadow Box, we used Icicle Blues, Northern Lights, and white shimmer paper with white glitter)
- Tacky glue (For this project I used a relatively thin PVA glue with a narrow tip so I could attach tiny pieces easily.)
- Blending tool and distress inks to shade the edges of cardstock and glitter (optional)
- A way to cut your paper (I used the amazing Cricut, but you can use another cutting machine or even scissors)
- The free pop-up house card templates (available in Lucy’s free resource library — get the password toward the bottom of this post)
- Design #157 – The patriotic Fourth of July House is available in the Jennifermaker Resource Library.
How to Make Pop-Up House Cards (the “Holiday Manors”)
Step 1: Get the Pop Up House Card Pattern
If you’d like to use the free Pop Up House Card templates shown in this tutorial, you can get the Halloween, fall and Christmas version FREE in the PaperGlitterGlue free resource library (get the password for it toward the bottom of this page). Please note this is in the resource library on PaperGlitterGlue.com, not here on JenniferMaker.com Don’t forget to unzip it.
The patriotic Fourth of July version is available here in the JenniferMaker Resource Library.
Step 2: Cut Out Your Pop Up House Cards from cardstock
You can cut these pop-up house cards by hand or with a cutting machine like a Cricut. If you use a cutting machine (as I did), just upload the file to your design software.
NOTE: If you’re not sure how to upload an SVG file to Cricut Design Space, or you’re having issues (such as getting a message that says “unsupported file”), please watch my free training series, SVGs Made Simple. It will help you SO much!
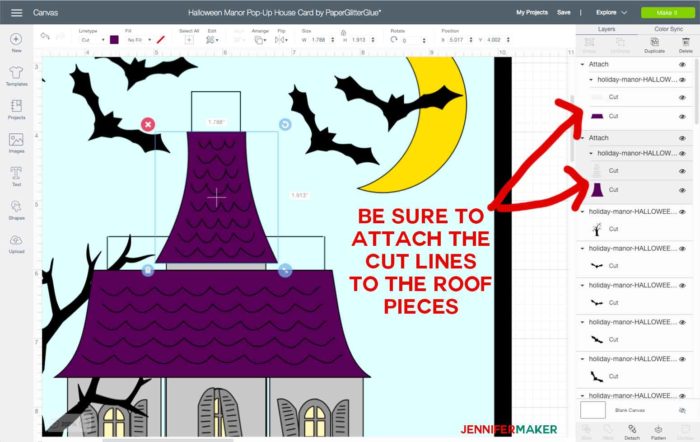
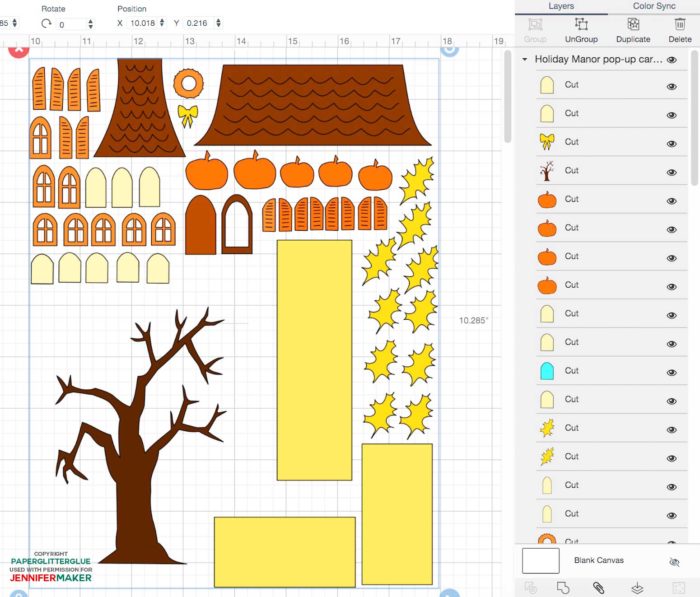
Here’s what the Halloween Manor pop-up house card files look like uploaded to Cricut Design Space:
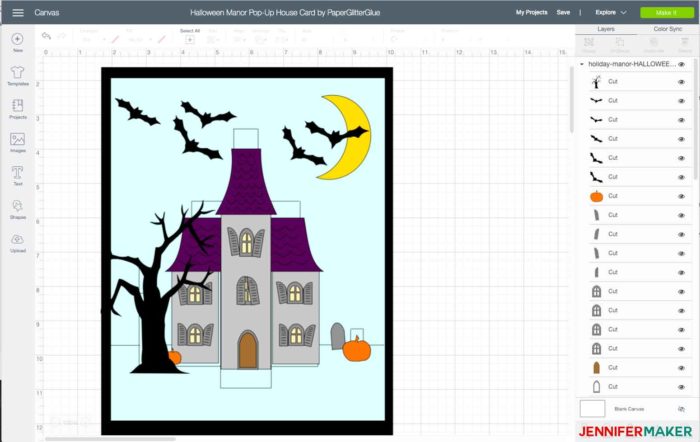
Note that the only score lines are the horizontal lines which are all grouped together. Be sure to change these lines from “Cut” to “Score” in the Linetype menu and then click attach in Design Space. (If you’re not sure how to change and set score lines, check out this Scoring Guide). All the vertical lines are cut lines so you can leave them alone.
The outline of the card is a little smaller than 8.5″ x 11″ so you can glue it to a background piece.
Then be sure to attach the score lines before you cut out the pop-up back piece.
To give dimension to the paper manor roof, I added some cut lines that you can distress with inks or paint or for the Christmas house with glitter. So all you have to do is attach the cut lines to the manor roof. Here’s how that looks in the Cricut Design Space.
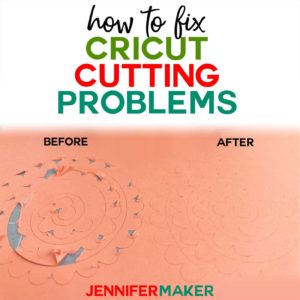
Note from Jennifer: If you cut out the Christmas Manor pop-up card, be aware that the snowflakes are very detailed and thus will take a long time to cut. Also, make sure you’re using a sticky mat (I recommend green StandardGrip for this) and your blade is clean — if you have any problems, check out this guide to Cricut Cutting Problems: Tips for Clean Cuts!
Step 3: Assemble and Glue Your Pop Up House Card
Now it’s time to put everything together! Here is an overview of the basic steps to assemble the pop-up house card!
- Cut out the pattern pieces for the house and the card background
- Decorate the house pieces – glue yellow background to windows, then glue windows, shutters, door to the main body of the house
- Score and fold the pop-up card background. But first, distress the background if you like that effect
- Make the support background
- Glue house pieces to card support background
- Glue roof details to the house – front tower roof piece and house roof
- Next glue additional details to the card – garland to the Christmas house, decorated trees, pumpkins, leaves, snowflakes, even glitter if desired
- And finally, glue the finished card to the scored back support piece
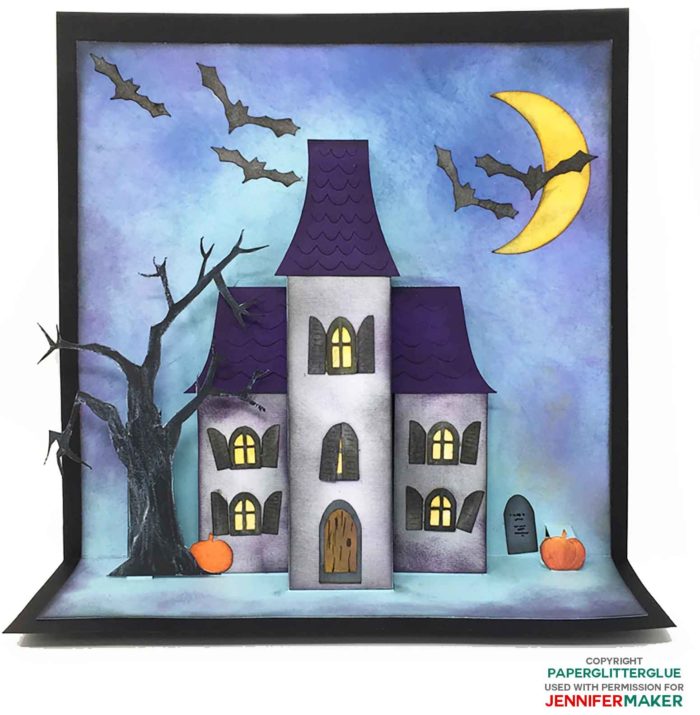
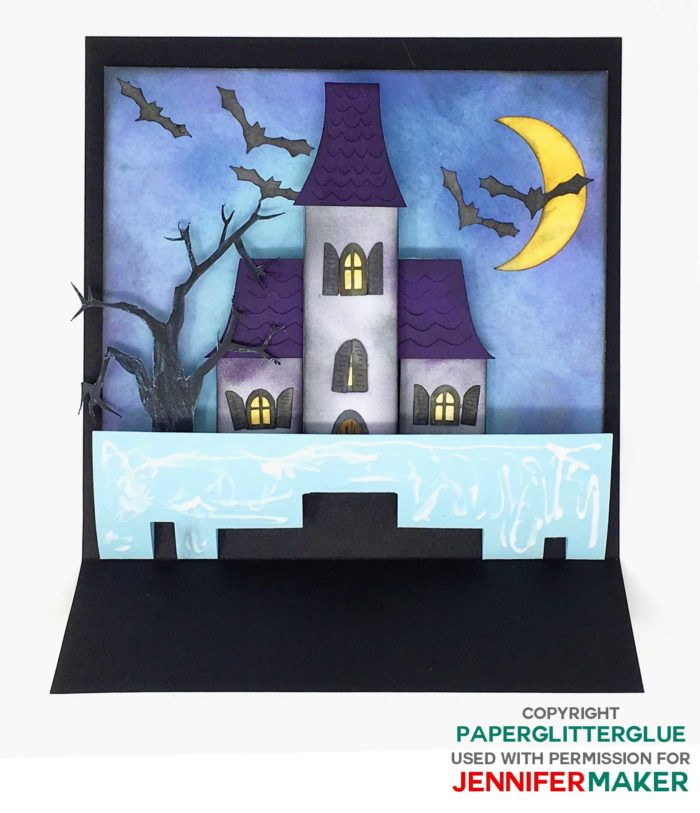
Now let’s look at this in detail. First, I’ll show you how to make Halloween Manor house card, then go over the differences in decorating the Autumn and Christmas Manor house pop-up cards. Here’s what the Halloween Manor pop-up house card looks like when it’s all assembled:
Step 4: Decorate the House Pieces (Optional)
This is an optional step that I used on the Halloween house. To give more of a spooky, aged distressed vibe to the Halloween Manor house, I edged all of the pieces with either black or purple Distress ink.
Windows and Shutters
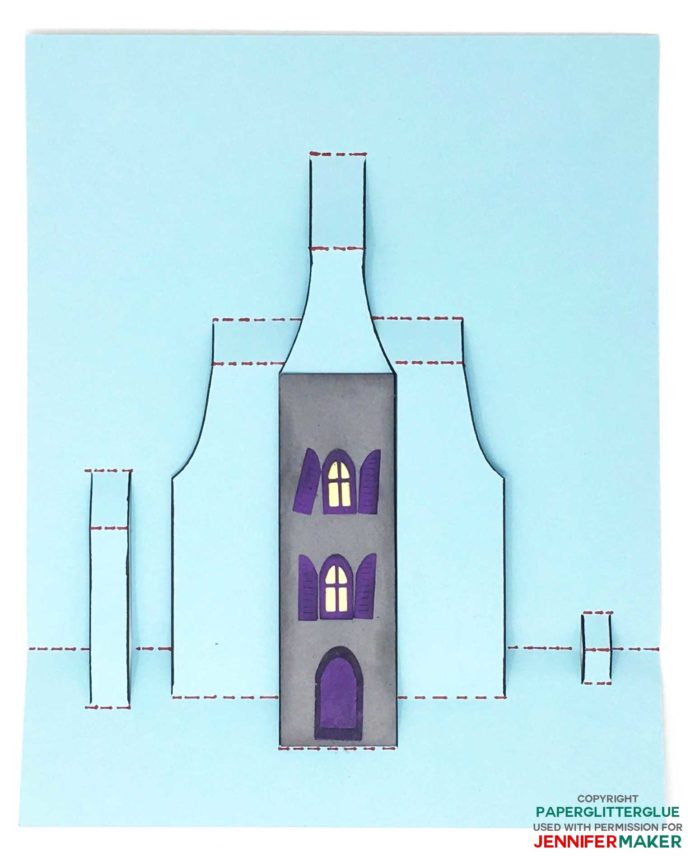
First glue the light color yellow background to the back of the front tower windows. Then glue the two windows to the center of the front tower. Glue shutters to each side of the windows or cover up the window with the shutters. You can glue them on crooked or straight – whatever suits your design sense.
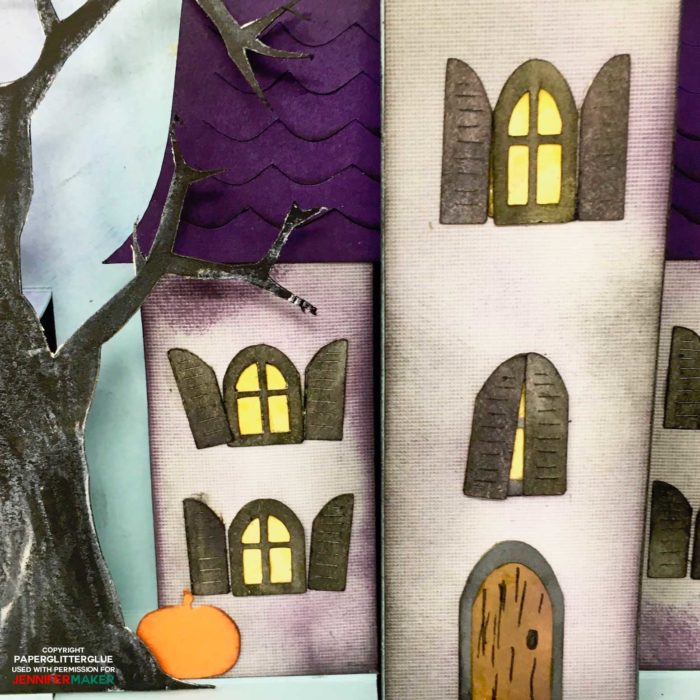
Then make the side windows the same way and glue on the house.
Front Door
I used a different brown for the inside of the door compared to door frame. In addition, I drew a few streaks for wood grain and a door knob.
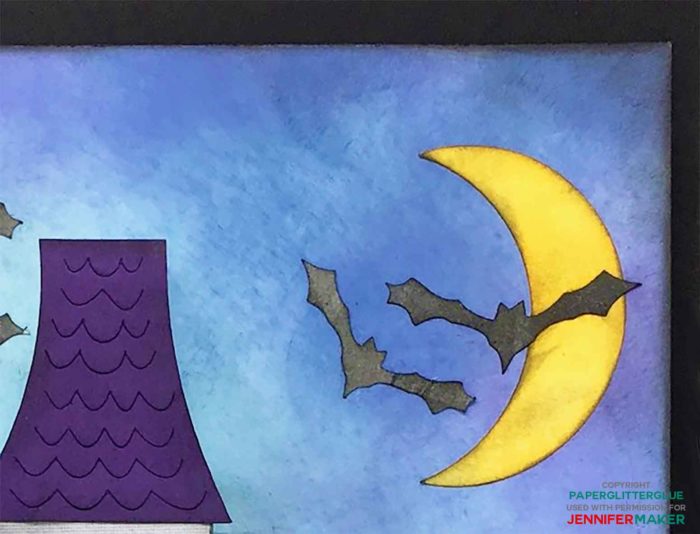
Pumpkins, Moon, Leaves, and Moon
You don’t have to do anything special to the pumpkins or the other elements, but I did distress the edges with a darker ink or black to make them pop a little more. See how that little bit of black and orange on the edge of the moon gives it some dimension.
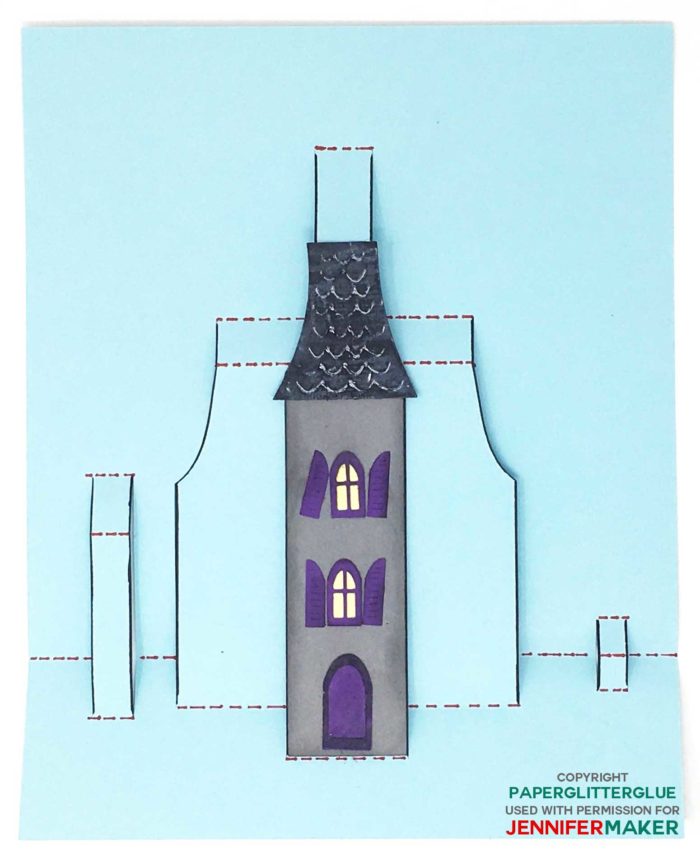
Manor Roof
Again, you don’t have to do anything to the manor roof, but I think edging the purple roof with a black adds depth. Also I edged the cut roof scalloped edges a bit too.
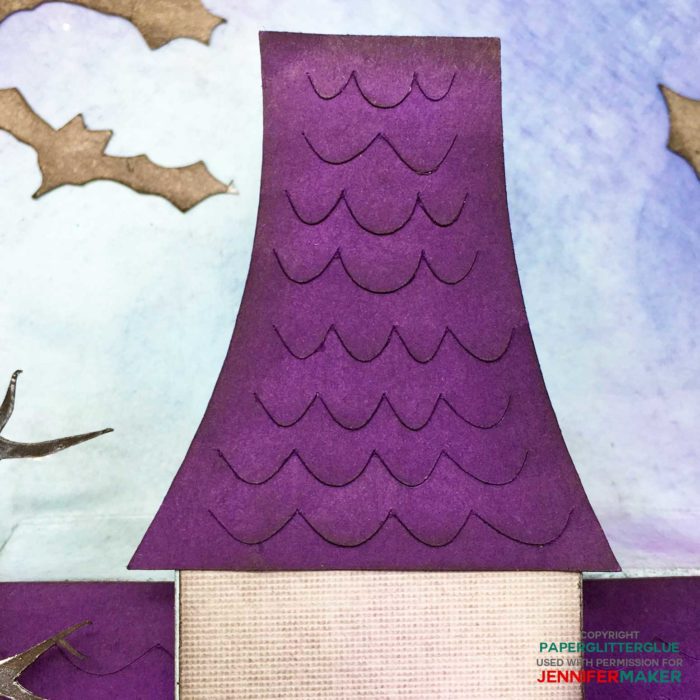
When you glue the roof on the house, note that each roof piece is slightly larger than the base of the pop-up card it attaches to.
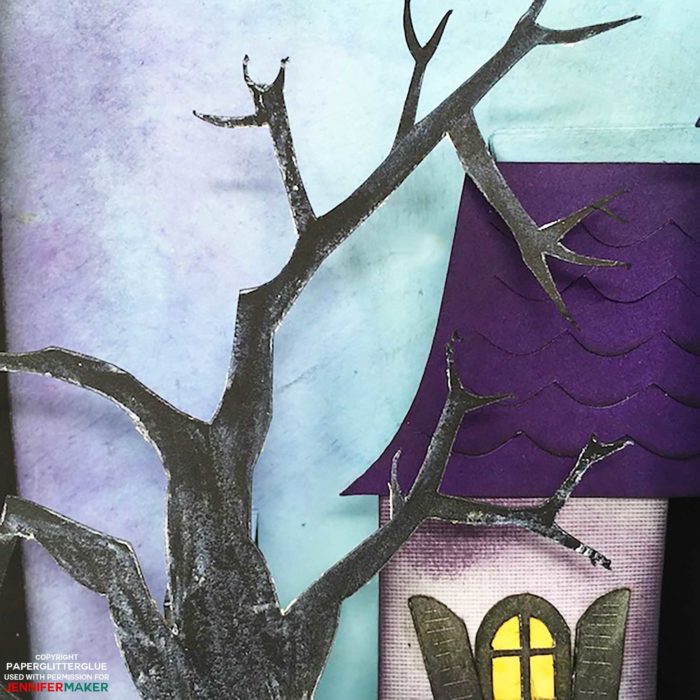
Spooky Tree
You can glue leaves to the spooky tree or leave the branches black. Or even streak some white on the tree.
Step 5: Score and Fold the pop-up house card
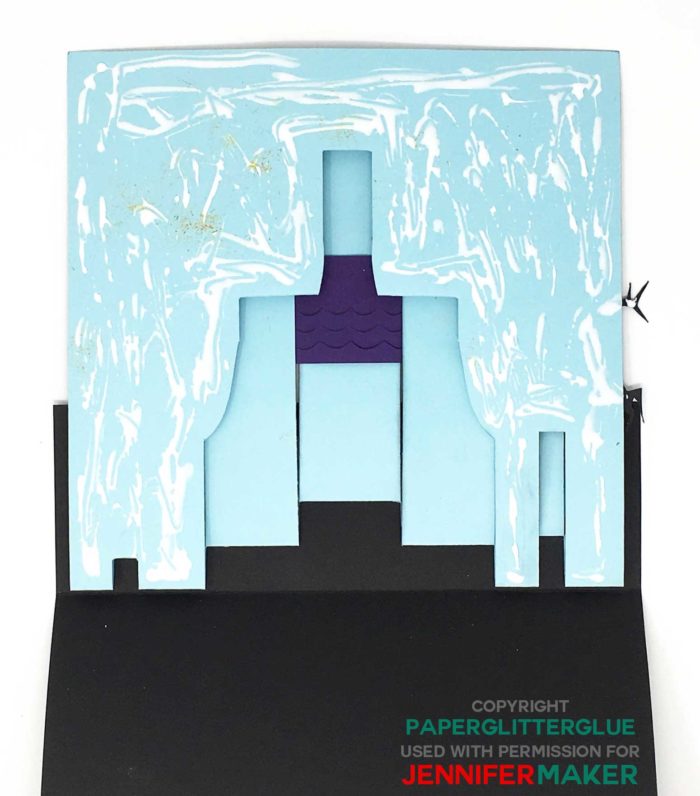
For the pop-up background, you have some options – colored cardstock or patterned paper or distressed paper like you see on the Halloween house card. I colored light blue cardstock with some Tim Holtz purple and blue distress inks leaving the paper lighter in the middle. To me it looks pretty spooky and frames the Manor better. If you decide to distress the paper, it’s easier to do it before you fold the score lines.
You can see the fold lines a little better where I outlined them in red.
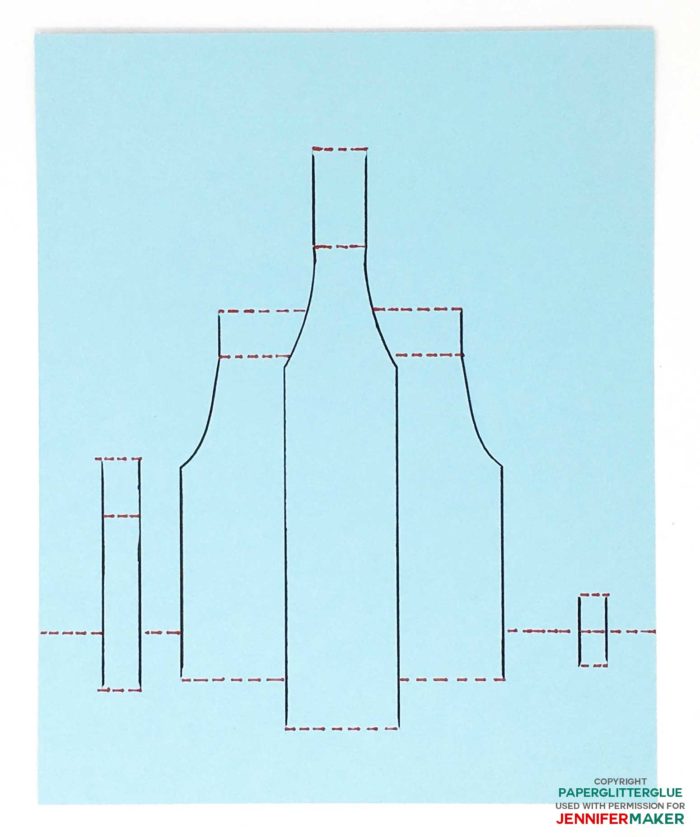
See how the folds look below on one of the prototype card pieces. Just kind of pinch the fold lines between your fingers to make the pop-up creases.
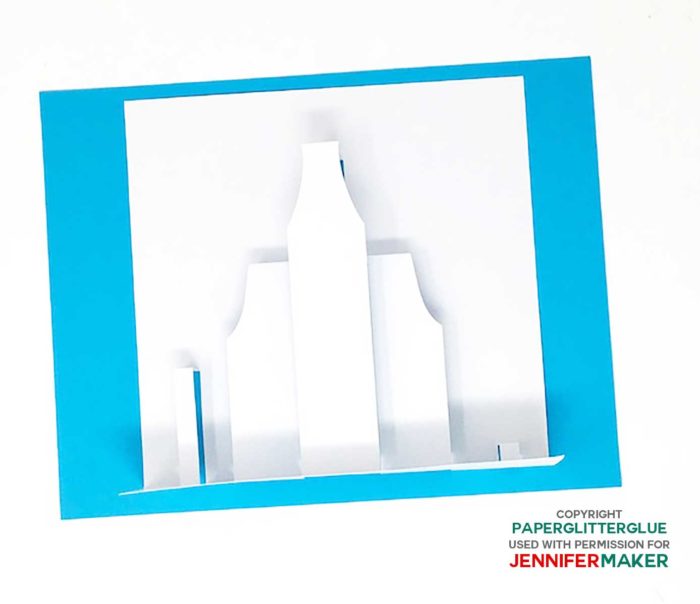
Step 6: Glue the Holiday Manor house pieces to Pop-Up Card Background
Glue the main body of the house pieces to the pop-up card. Make sure you can fold the card easily when the house pieces are in the place.
Glue the Roof Pieces to the Manor House
The roof pieces are a little larger than the background roof part of the card. Glue the front tower roof to overlap the tower house piece. Then glue the longer roof piece on both sides of the house behind the front tower. It’s made as one piece to give a little better structure to the house itself.
Next Glue the Decorative Pieces to the Card
After you have the house structure in place, you can glue the decorative pieces in place such as the spooky tree, pumpkins, moon, and bats.
Make the Support Background
And there is an additional background paper that requires just one score line. This piece of cardstock supports the entire card.
Now score your background paper at 2.75 inches across the narrower side of the 8.5″ x 11″ card. See below.
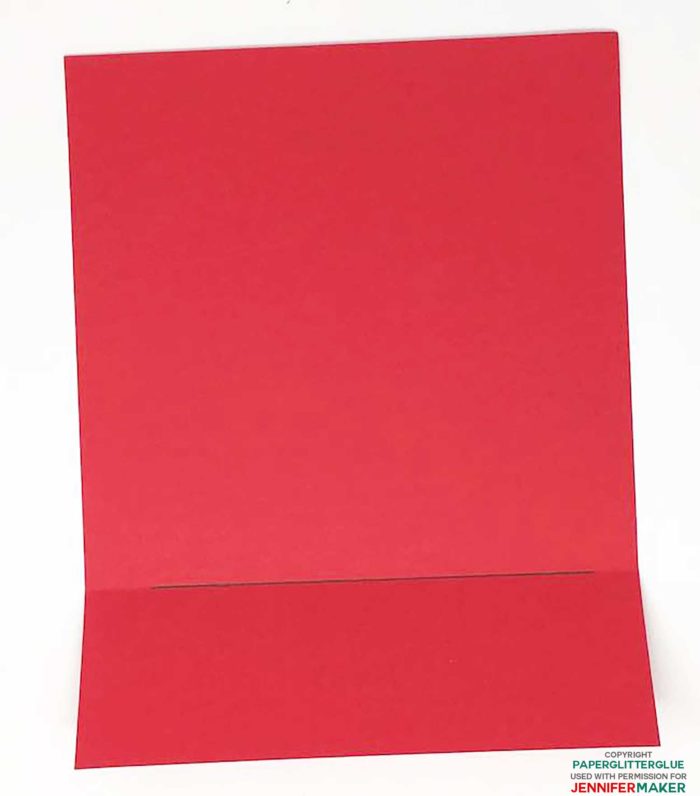
Fold it at the score line.
Finally, Glue Your Finished Card to the Support Background
Test to make sure your house pop-ups when you put it on top of the background piece.
Then center your card on the background piece. And finally adhere your pop-up card to the background, apply glue or double-sided tape around the area that is flat – meaning the part that is not folded forward. I glued the short bottom side first because it was easier to adjust the card if it is not centered properly.
Then glue the top part of the card to the background support cardstock.
You can decorate the back of the card with a Happy Halloween or another sentiment if you like.
Now here are details about making the other seasonal Holiday Manor Pop-Up Cards
Thanksgiving Holiday or Autumn Manor Pattern
Here are the colored paper pieces for this Fall Manor Pop-up card.
There is a fall wreath for this house door along with leaves to decorate the tree. For the Autumn card, I cut out a lot more leaves in several fall colors. Once again, a little blue window was hiding behind one window in my design software. It has been fixed on your cut file.
Again, be sure to attach the scalloped shingle cut lines to the roof pieces before you cut the roof out.
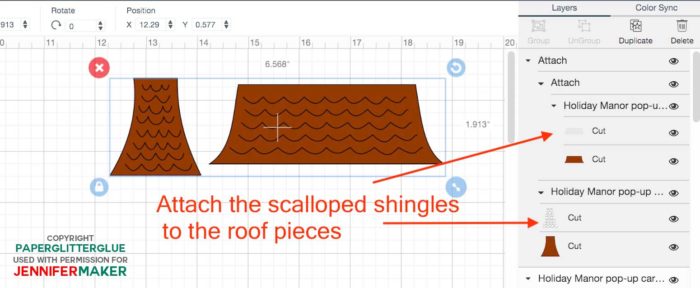
That’s really the only thing you have to remember to do in Design Space when you cut out the house pieces.
Glue Autumn design elements to your Fall Manor House
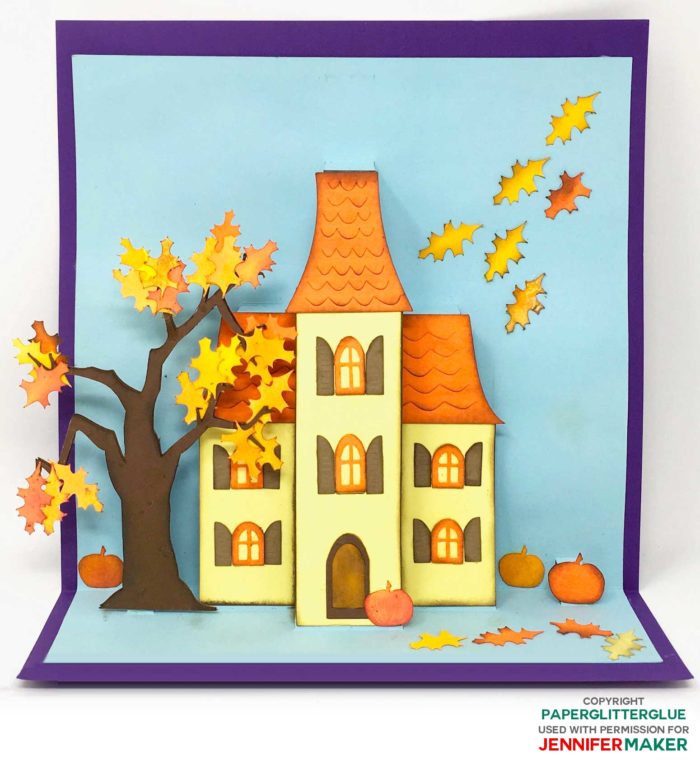
First, glue the leaves to the branches of the tree.
When the leaves are dry on the tree, glue the tree to the side pop-up support.
Add pumpkins.
I glued some leaves to the sky to mimic the wind blowing.
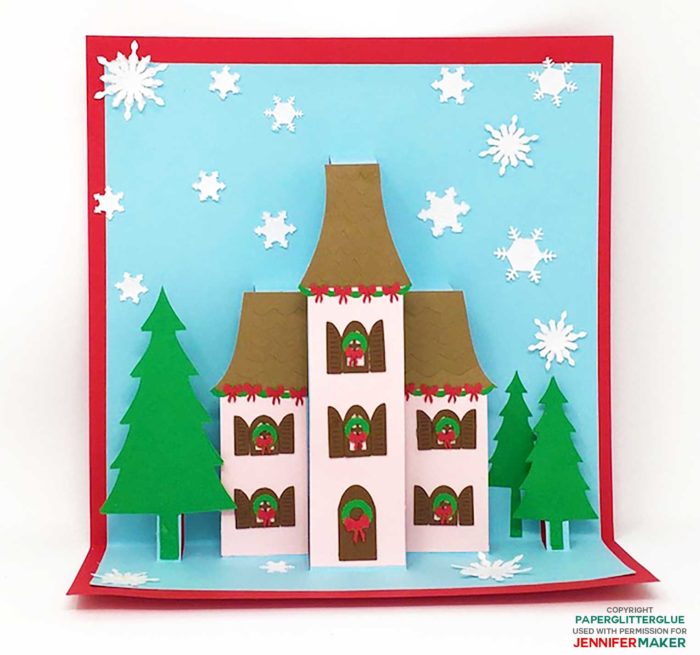
Christmas Holiday Manor Pop-Up Card
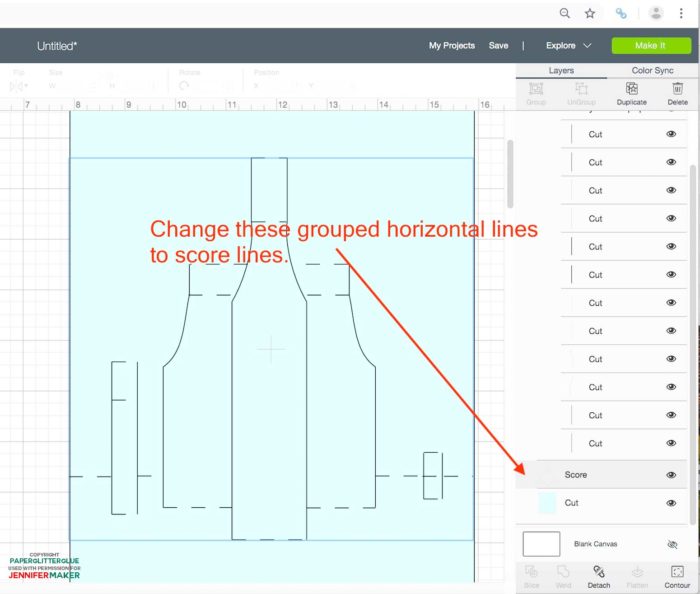
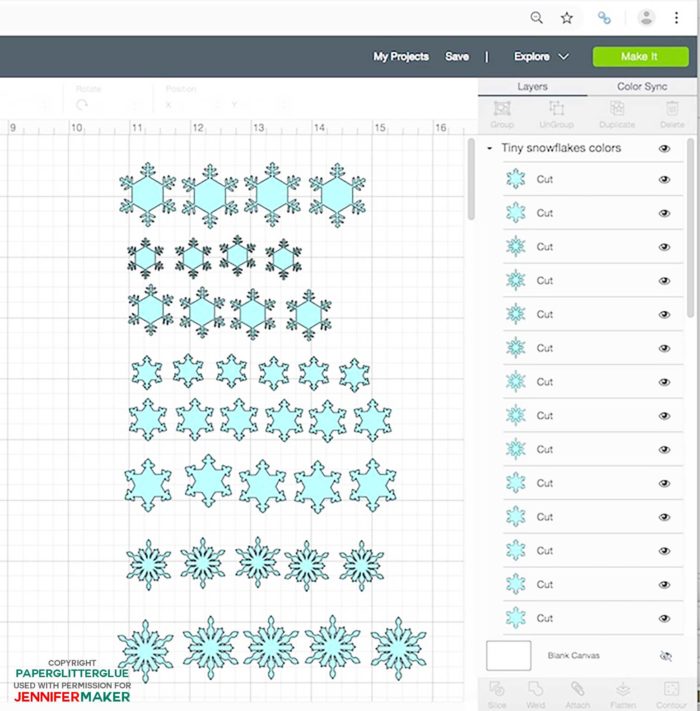
Here is the way the Christmas version of the Holiday House looks in Cricut’s Design Space. Remember to ungroup and attach the scalloped lines to the two roof pieces before you cut it out.

To decorate the Christmas house, there are wreaths with bows for each of the windows and the door. And there are garlands for decorating the house or the trees. When you add the trees to the card, glue the trunk on first, then glue the tree on top of that. The trunk makes the pop-up piece a little stronger to support the tree better.
Here are the snowflakes that you can use to decorate your Christmas card. They cut out beautifully on the Cricut, but it does take some time to cut out all these snowflakes. You don’t really need that many snowflakes so you can delete some if you are in a hurry.
Fourth of July Pattern
Here is what the completed Fourth of July version looks like.
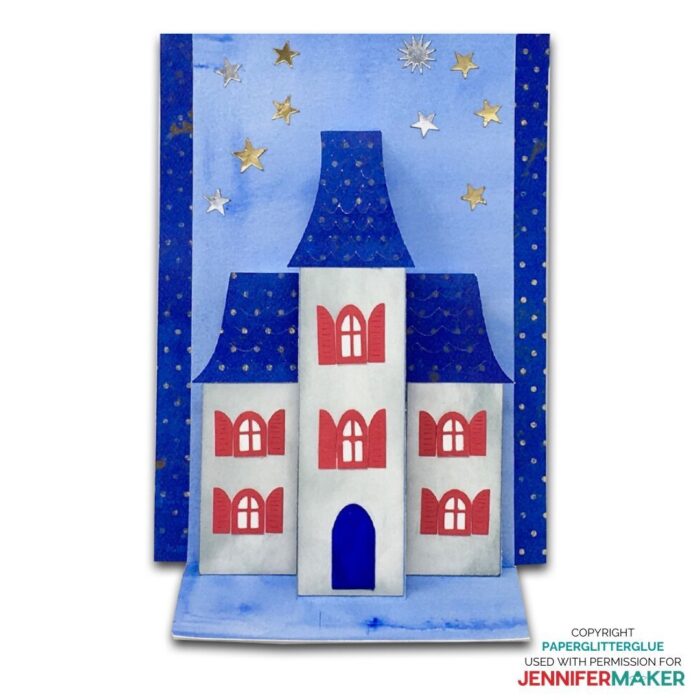
This delightful pop-up house card fits perfectly in a 6″ x 9″ envelope. You can download the file in my Resource Library.
For directions on how to complete the Fourth of July card, please refer to Paper Glitter Glue for the step-by-step directions.
So that’s how you make the Holiday Manor. It’s pretty big for a card, but it also makes a great home decor item. I had lots of fun designing and making this project. I hope you do too.
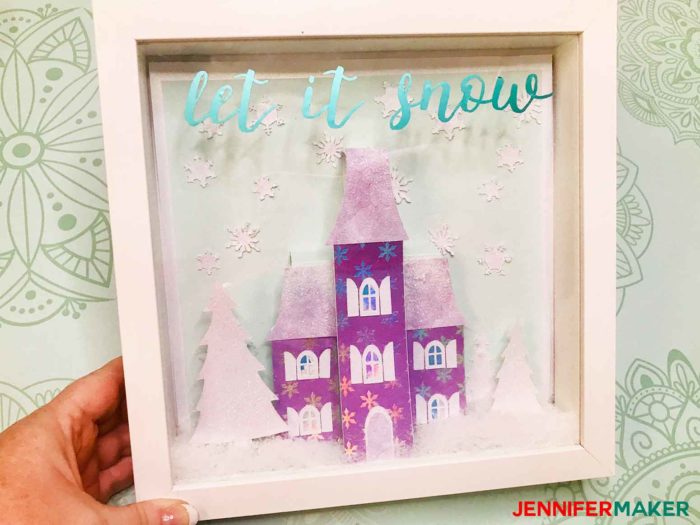
Jennifer’s Note: I made Lucy’s awesome Holiday Manor and created a winter shadowbox from mine! Look at how adorable this turned out!
Get the free Pop Up House Card SVG Files and Template FREE!
Download Lucy’s free DIY fairy house SVG files and PDF template by subscribing (free) below to get the password to Lucy’s personal resource library.
Love,

Want to remember this? Save the Pop Up House Card Tutorial to your favorite Pinterest board!

Merci Jennifer
For your kindness to give us this beautiful project right in time for the hollidays.
Can’t wait to start on these, I’m having so much fun! Thank You!