Learn how to make layered vinyl phone cases with your cutting machine!
If you’re like me, you’re never too far from your smartphone. It’s amazing how we carry almost all the knowledge in the world in our pockets! Plus mobile phones are how Greg, Alexa, and I stay in touch throughout the day. And I just love how cell phones have become another way for us to show off our own individual styles! There are lots of phone cases to choose from, but I have so much more fun making my own phone cases! That way, I can choose all my own colors and designs. If you’re not sure how to make phone cases, today I’ll show you the best way to layer multiple colors of vinyl to decorate your very own phone case, no matter what phone you have!
Watch the full step-by-step video tutorial on how to make phone cases:


It’s no secret that technology is constantly evolving at top speed, with new phone models arriving every day. And there’s only one thing to do when I purchase a new phone model – make a new case to match! So I had to come up with the easiest way to keep my phone case designs current. I really love the look and feel of bright, vibrant vinyl, but sometimes it’s difficult to get the designs to fit just right. I do love a good challenge, and after some rigorous testing, I’m excited to share how to adapt my vinyl designs to fit any phone case in just a few easy steps!
First, I’ll show you how to measure your phone case’s dimensions to maximize your design area. We’ll work around the important parts of your phone, like the camera lens, so you can apply this technique to many different styles of phone cases. For the next step, I’ll show you how to optimize my original design to fit all types of phone cases and cut them with a Cricut. Then I’ll teach you my step-by-step process for aligning and layering vinyl designs on hard cases. And for the (optional) last step, I’ll demonstrate two different ways to seal your vinyl design to make it extra long-lasting.

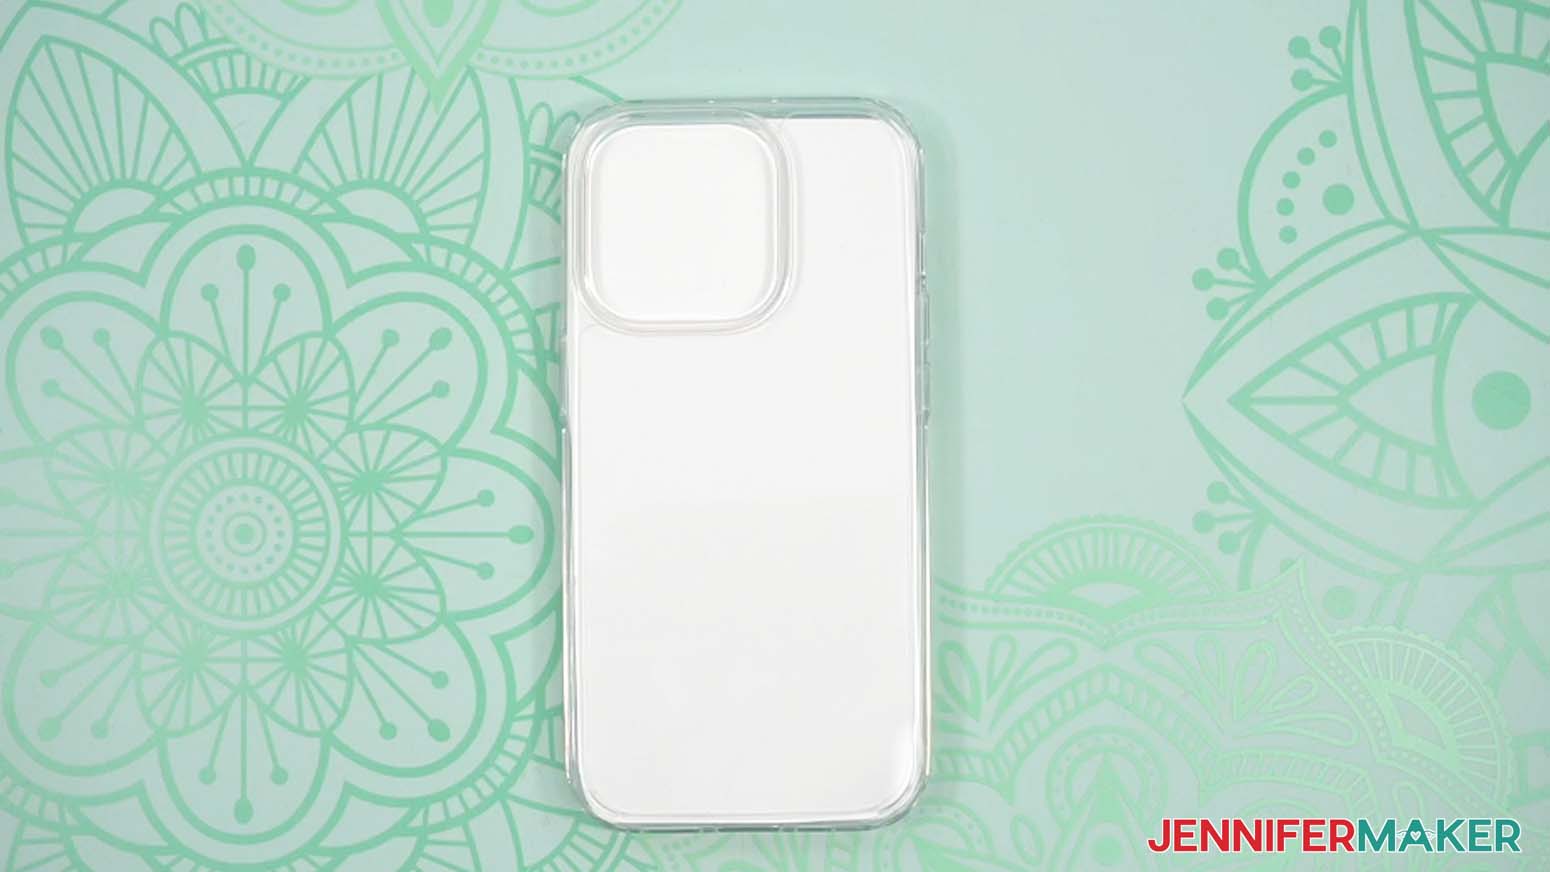
To start off, you’ll need a phone case that fits your smartphone model. I’ll be demonstrating how to make phone cases with an iPhone 14 Pro clear phone case. But you can also use a Samsung Galaxy S case or any other type of phone case that fits your model. Just make sure it’s made of a material that vinyl can stick to. I don’t recommend using a silicone case–the surface is just too slippery for the vinyl to adhere to. But vinyl does bond well with plastic phone cases, making it the optimal choice for this project.
And of course you’ll need a design, so I have three designs with encouraging sentiments for you to use with your cases. Here’s the best part: all of my designs can be easily resized to fit your phone case! I’ll teach you how to plug in your phone’s dimensions to make a guide in Cricut Design Space. Guides are a great way to keep your design from being too big or too small!
Then you’ll need permanent vinyl in some fun colors! You have a range of options available for a truly unique case, so choose your favorites for the best visual appeal. You’ll also need a cutting machine and some basic vinyl crafting supplies, as well as parchment paper for layering. I used my Cricut Maker 3, but you can use an original Maker, an Explore series machine, a Venture, a Cricut Joy, or a Cricut Joy Xtra. You’ll also want to use a Fine-Point Blade for clean cuts and green StandardGrip machine mat. A weeding tool will help with weeding, especially some of the designs’ tiny pieces.
If your cutting machine uses DXF files, they’re in the free download, too! You can also use the included PDF files to cut them by hand, but the machine can do a lot of the hard work for you. And I’ll show you how to utilize your machine mat’s corners to cut up to four colors of vinyl in one pass!
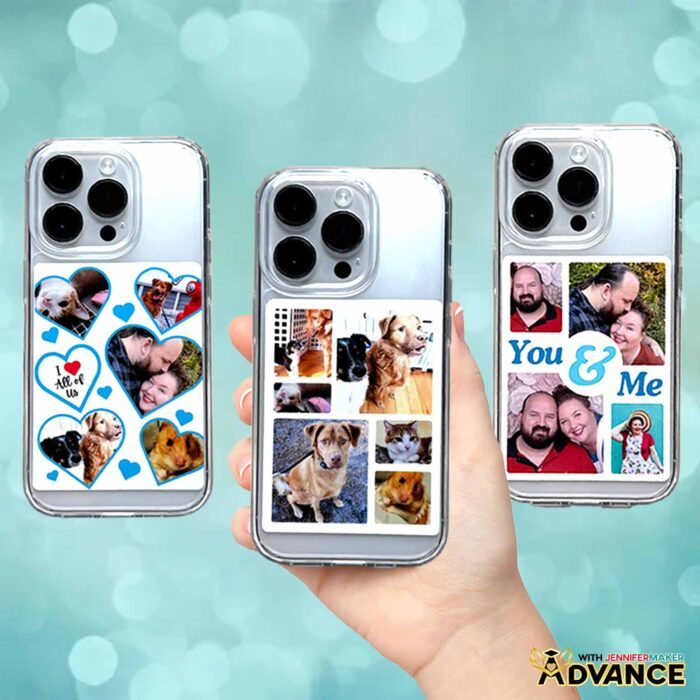
And if you’re interested in creating your own custom phone cases, I have three collage-style templates (for Canva) you can use for your own phone case designs in my Advance membership library. These custom case designs are a great way to show off your favorite photos. Learn how to create your custom phone case design through ADVANCE with JenniferMaker!
Finally, you’ll need a small brush and some Mod Podge or a sealing spray if you want to add a durable finish to your phone case. Vinyl can wear out quickly with lots of handling, so if you frequently use your smartphone, I recommend going the extra mile here. Once your vinyl is set, your phone case is ready to go! Just pop your phone in and show off your new design every time you text, call, or search for the answers to your questions!
Let me show you how to make phone cases! This post contains some affiliate links for your convenience (which means if you make a purchase after clicking a link I will earn a small commission but it won’t cost you a penny more, there is no additional cost)! Read my full disclosure policy.
Materials to Make Phone Cases
View my Amazon shopping list for the exact items I used!
- Clear Plastic Phone Case (not silicone) – I’ll show you how to fit the designs to an iPhone 14 Pro case -OR-
- iPhone 14 Pro Max case -OR-
- Samsung Galaxy S24 case
- Six (6) Sheets of 12″ x 12″ Value Vinyl (I Used Black, Red, Yellow, Orange, Teal, and Green)
- StandardGrip Transfer Tape
- Parchment Paper
- Mod Podge -OR-
- Clear Coat Spray
- A way to cut your vinyl – I’m using the Cricut Maker 3, but you can also use the original Maker, an Explore Series machine, the Cricut Venture, or a Joy series machine.
- Cricut Green StandardGrip Machine Mat 12″ x 12″
- Brayer
- Scraper
- Weeding Tool
- Tweezers (Optional)
- Measuring Tape
- Isopropyl Alcohol
- Lint-free Cloth
- Scissors

How to Make Phone Cases!

Phone Cases
Learn how to make phone cases of any size by layering vinyl!
Materials
- Clear Plastic Phone Case (not silicone) - I’ll show you how to fit the designs to an iPhone 14 Pro case -OR-
- iPhone 14 Pro Max case -OR-
- Samsung Galaxy S24 case
- Six (6) Sheets of 12" x 12" Cricut Value Permanent Vinyl (I used Black, Red, Yellow, Orange, Teal, and Green)
- StandardGrip Transfer Tape
- Parchment Paper
- Mod Podge -OR-
- Clear Coat Spray
- Design #687 (My free SVG/PDF/DXF design files are available in my free resource library - get the password by filling out the form at the bottom of this page)
Tools
- A way to cut your vinyl - I’m using the Cricut Maker 3, but you can also use the original Maker, an Explore Series machine, the Cricut Venture, or even the Cricut Joy or Joy Xtra
- Cricut Green StandardGrip Machine Mat 12" x 12"
- Brayer
- Scraper
- Weeding Tool
- Scissors
- Tweezers (Optional)
- Measuring Tape
- Isopropyl Alcohol -AND-
- Lint-Free Cloth
Instructions
STEP 1: GET MY FREE PHONE CASE FILES
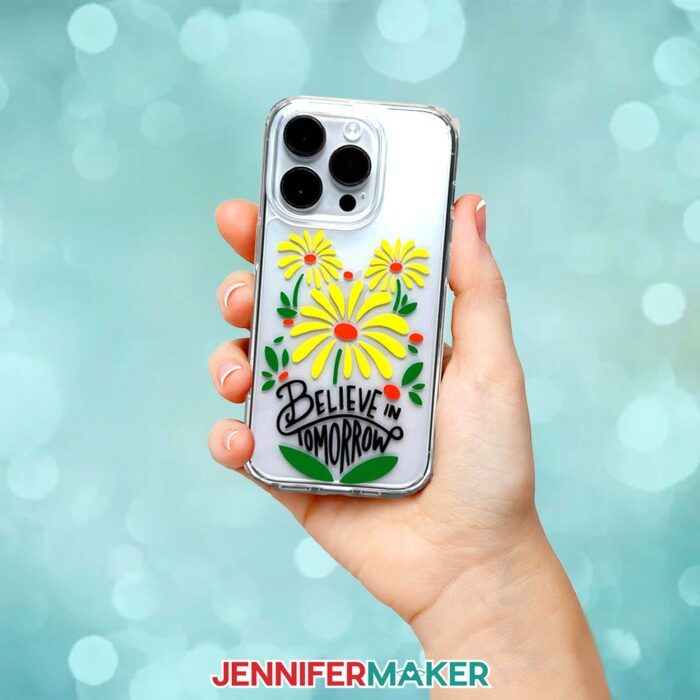
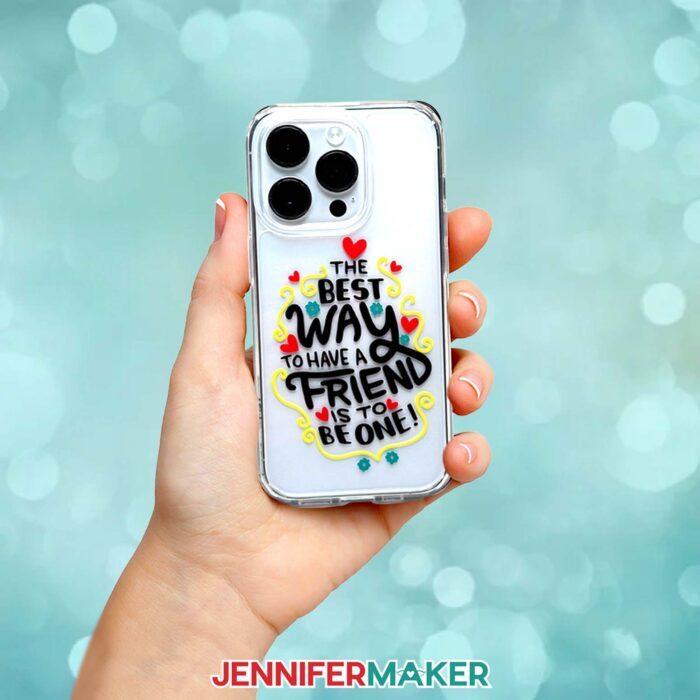
First, download my Phone Cases designs from my free library – look for Design #687. Alternatively, you can use the Save This Project form near the top of this post and the design link will be emailed to you.
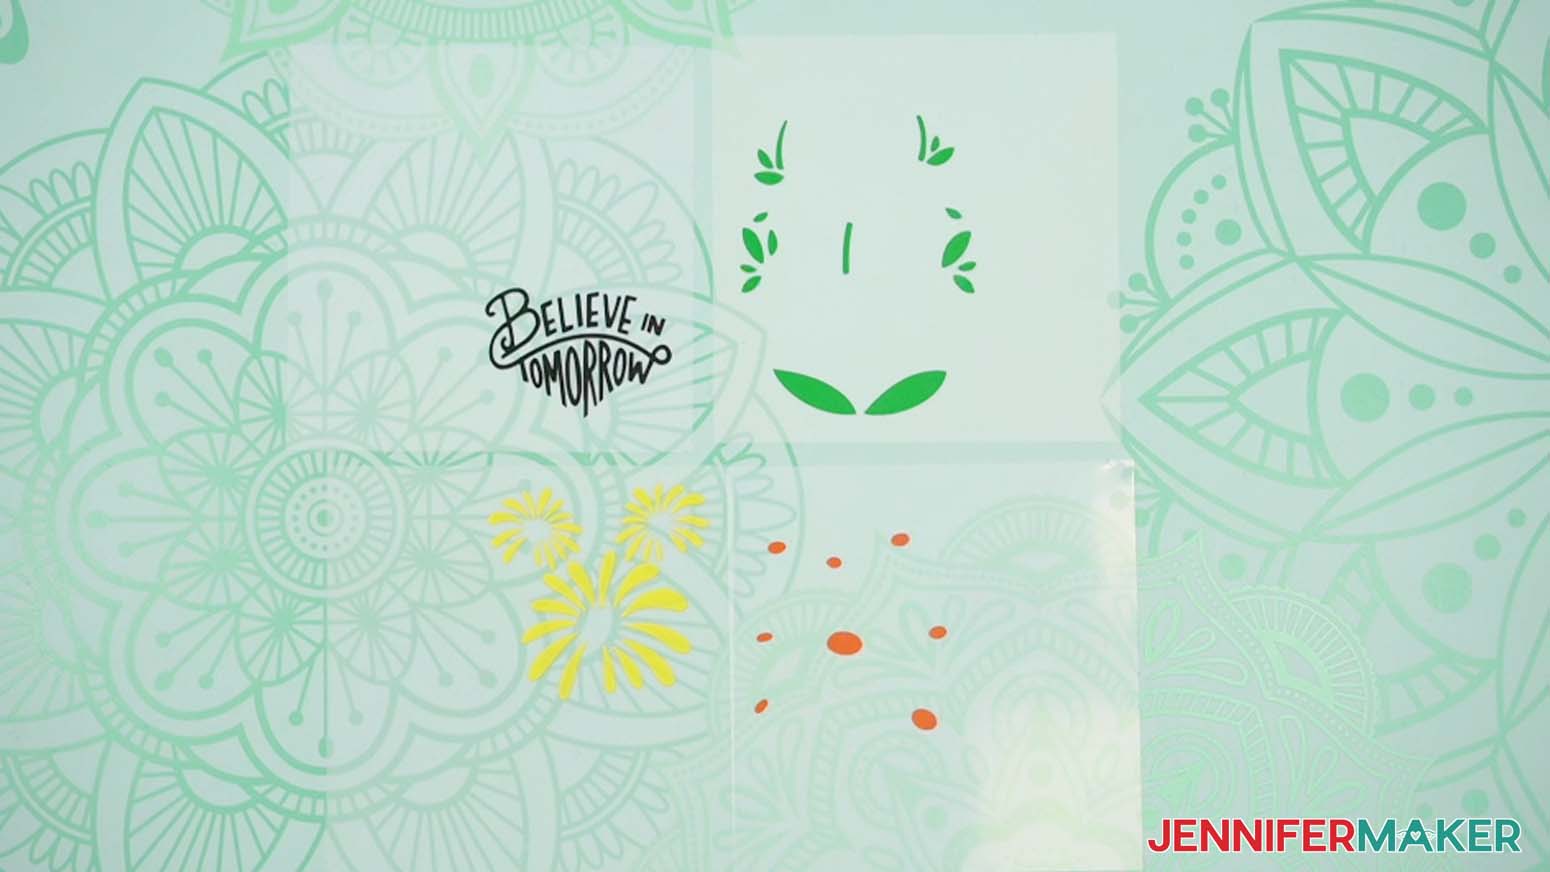
In the SVG folder, you’ll find three done-for-you “tomorrow,” “best day,” and “friend” designs. There is also a DXF folder with cut files, and a PDF folder with versions you can print and cut by hand.
I’ll show you how to size the designs to fit any phone case model, as well as how to cut and apply the layered vinyl designs to your plastic phone case (I do not recommend using silicone cases for this project). I’ll also show you how to seal your designs to your phone using Mod Podge or a sealing spray to protect the vinyl.
TIP: If you’re not sure how to download zip files and upload designs, go to jennifermaker.com/svgs.
STEP 2: PREPARE YOUR PHONE CASE DESIGN
MEASURE YOUR PHONE CASE’S DESIGN AREA
- Check your phone case for any protective films. Leave them in place for now to reduce smudges and fingerprints while handling the case.
- Lay the phone case down with its back side up.
- To make application easy, locate the part of your phone case that has the most rectangular surface area. This area should be free of cutouts and important spots you don’t want covered by vinyl.
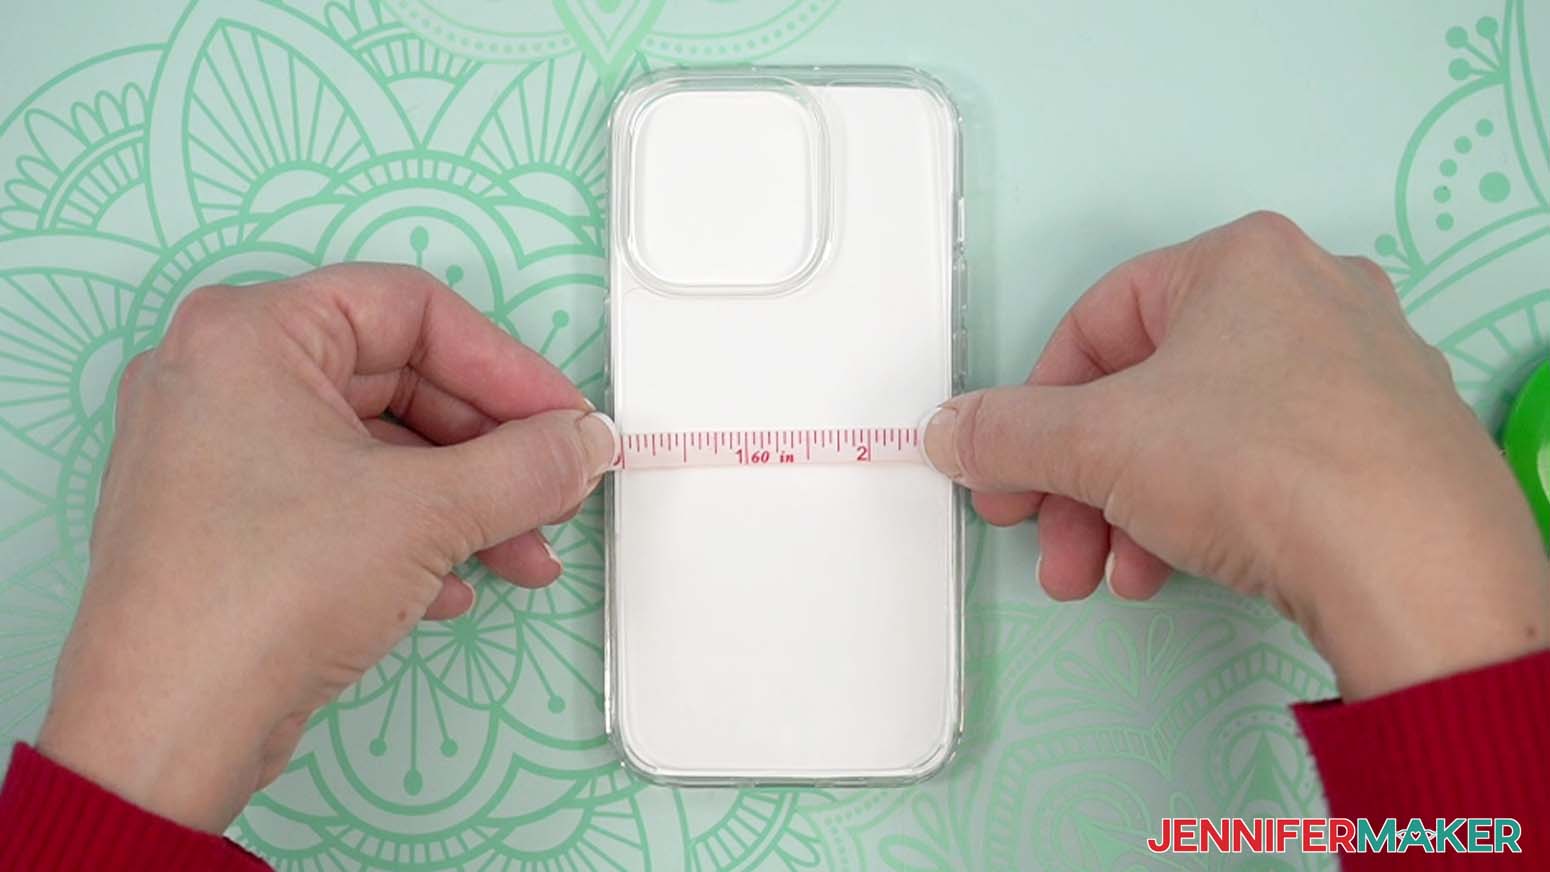
NOTE: Vinyl and a phone case won’t interfere with wireless charging. - Using a measuring tape or ruler, measure the design area between the phone case’s inner left and right sides to find your maximum width.
- Subtract ¼” from the width and record it on a piece of scrap paper.
NOTE: Adjusting the width this way ensures that your design fits completely on the back of the case.
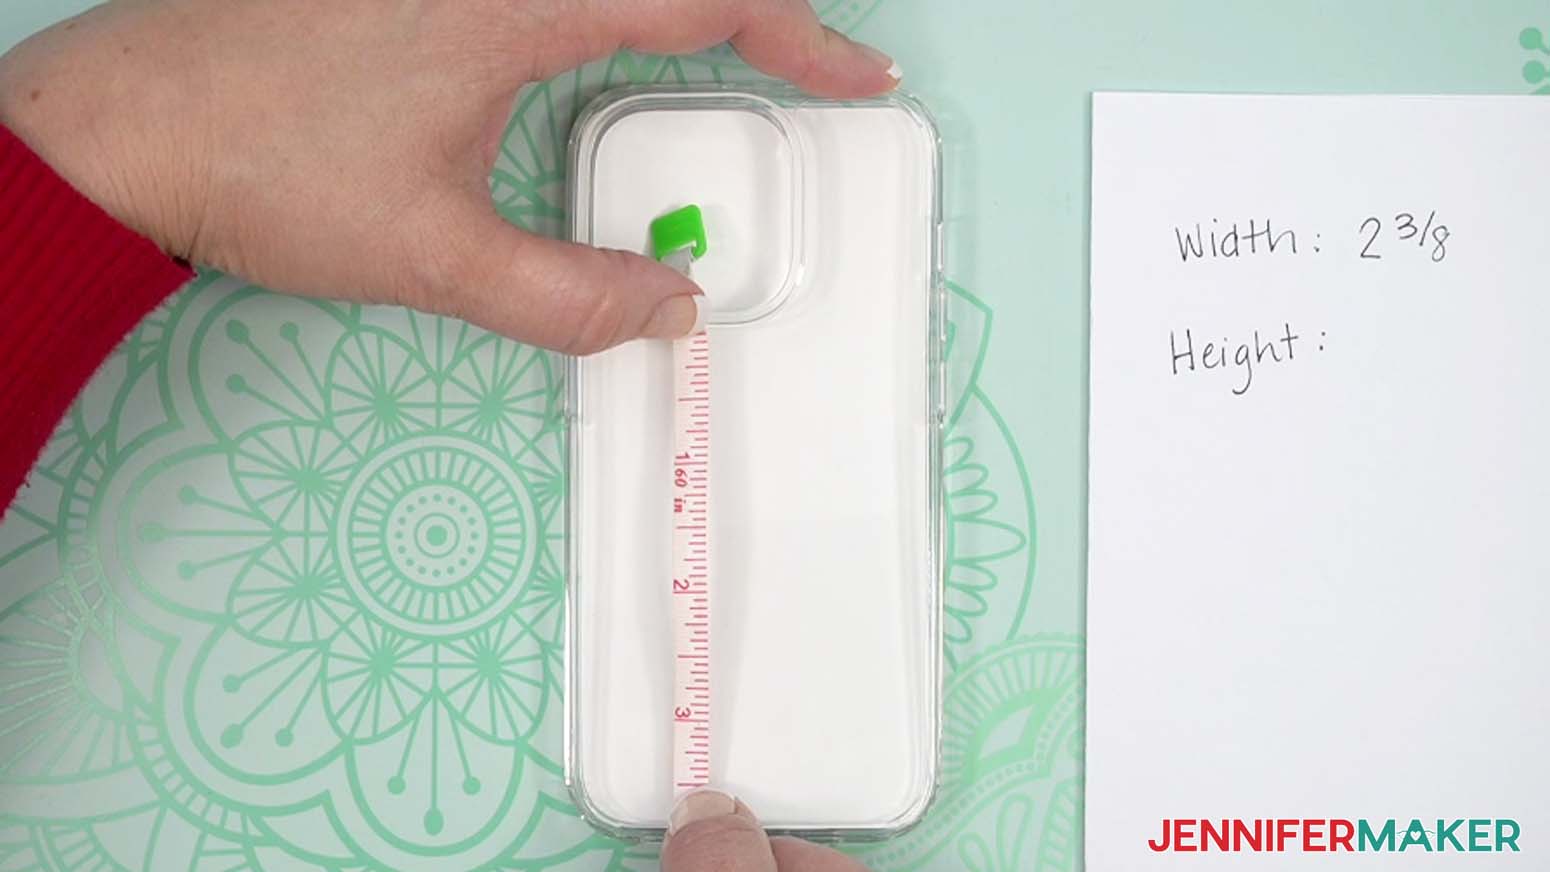
- Then measure the design area between the phone case’s top and bottom edges to find your design area’s maximum height. Subtract ¼” from this measurement and record it as well.
NOTE: This is likely the area from the bottom of your phone case up to the cutout area for your phone’s camera.
CRICUT DESIGN SPACE
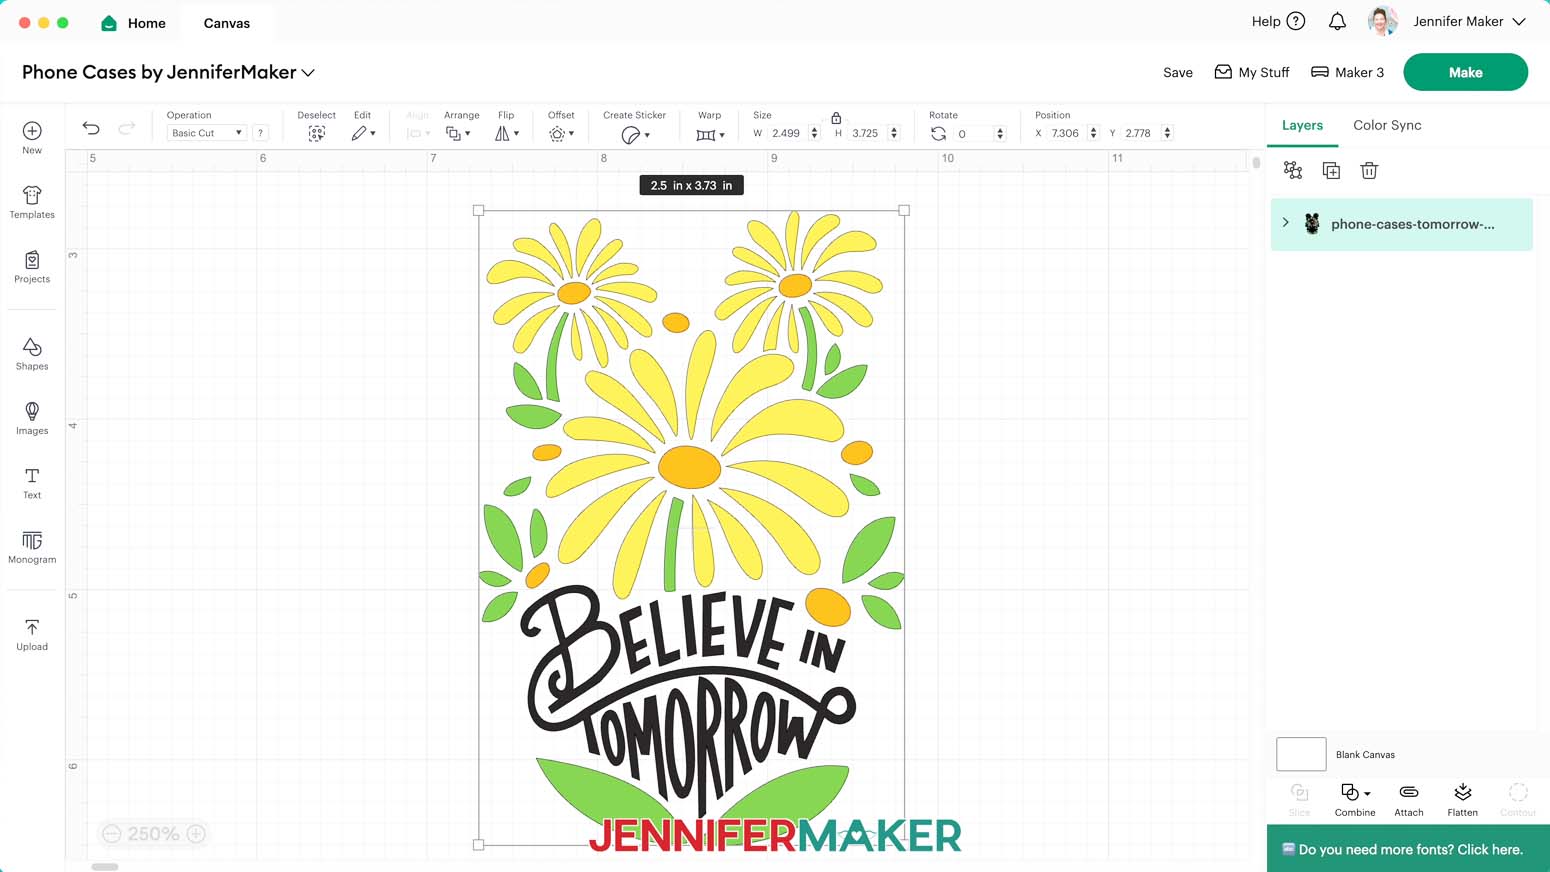
- In Cricut Design Space, open a blank Canvas.
NOTE: If you’re new to using Cricut Design Space, go to cricutkickoff.com for my introductory tutorial on Design Space basics. - Click “Upload” and then “Upload Image.”
- Click “Browse.”
- Select the SVG design file of your choice.
NOTE: I’ll demonstrate with the “tomorrow” design, but the “best day” and “friend” designs follow the same process. - Click “Open,” and then “Continue.”
- Click “Upload” to add the design to your Canvas.
- Click “Save” and give your project a name.
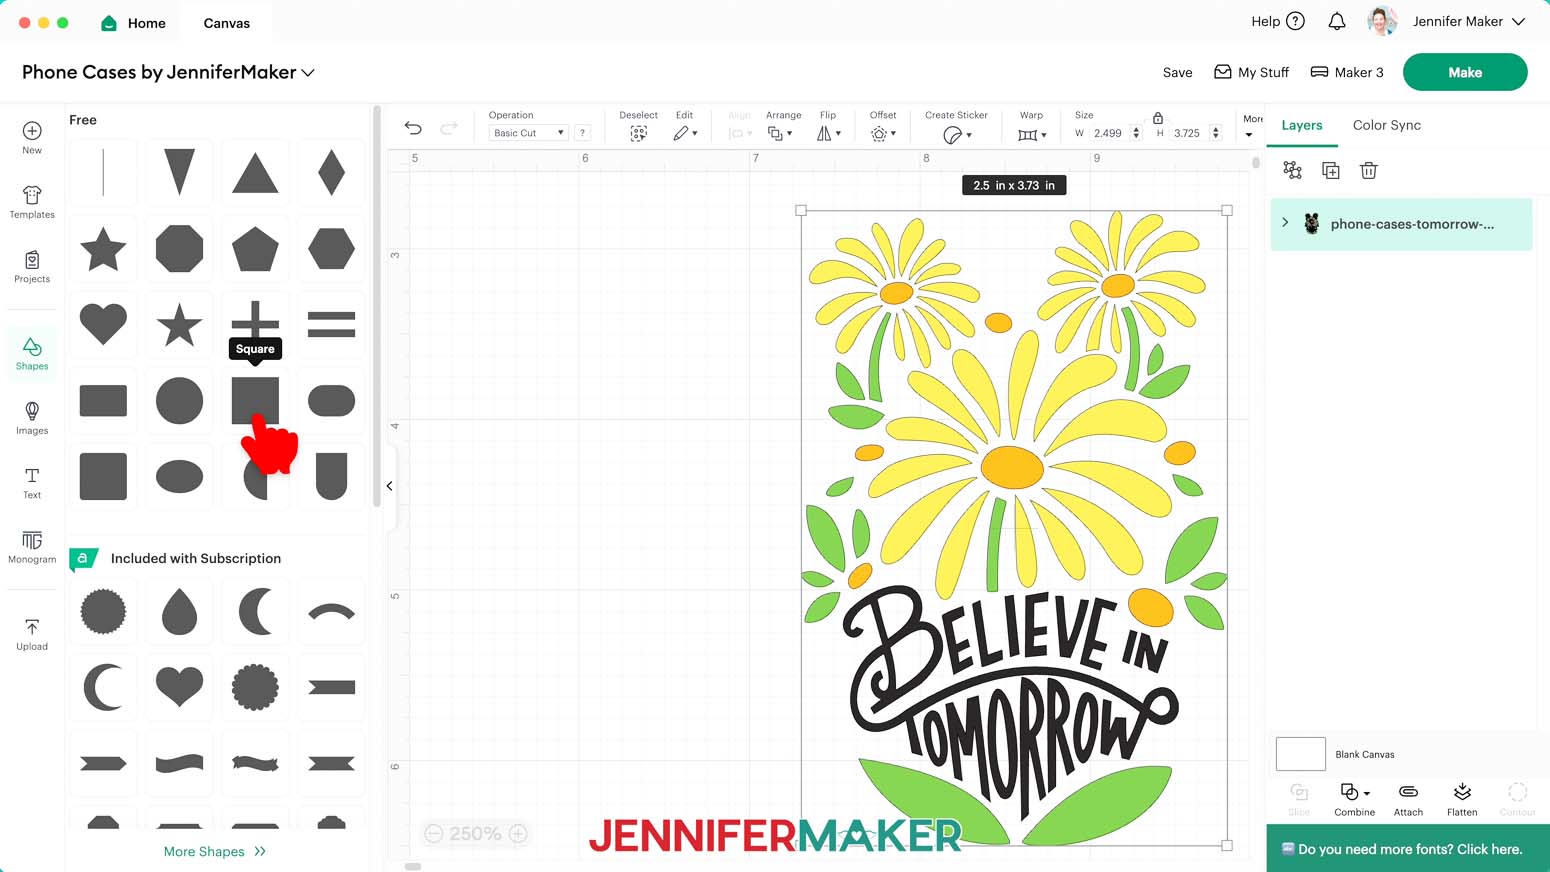
- To create a visual guide with your phone case’s specific design area, click on the “Shapes” icon and add a free “Square” shape to the Canvas.
- Click the small arrow on the “Shapes” tray to close it.
- Select the square and click the “Lock” icon in the Size menu to unlock the shape’s proportions.
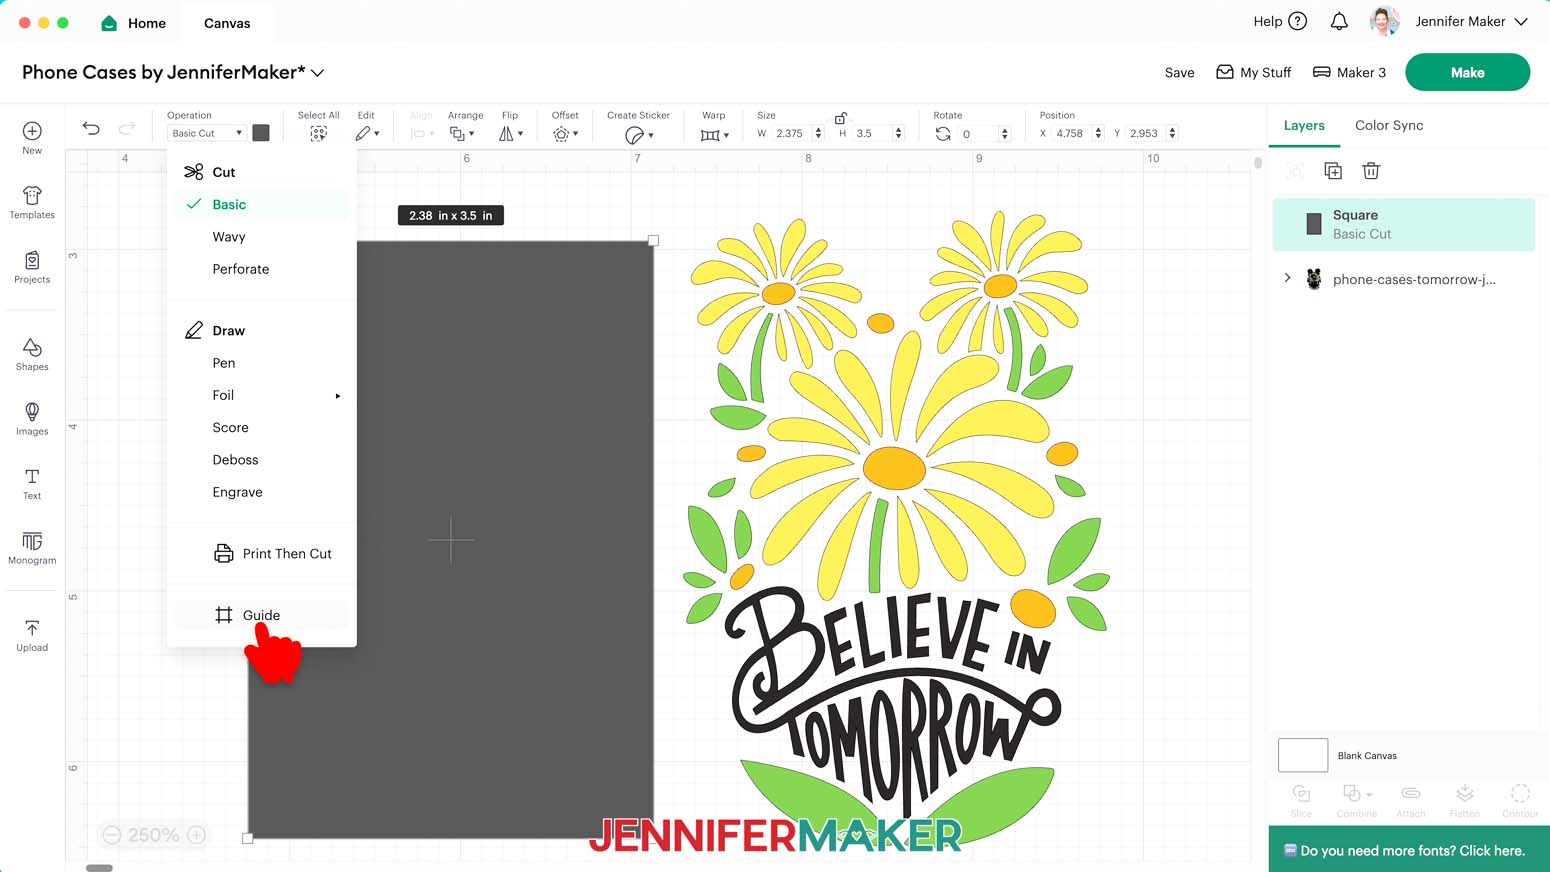
- In the “Width (W)” field, enter your phone case’s width (which you recorded in the previous section).
- In the “Height (H)” field, enter your phone case’s height (which you recorded in the previous section).
- Make sure the shape is selected, then click on the “Operation” dropdown and select “Guide” to make it a see-through outline.
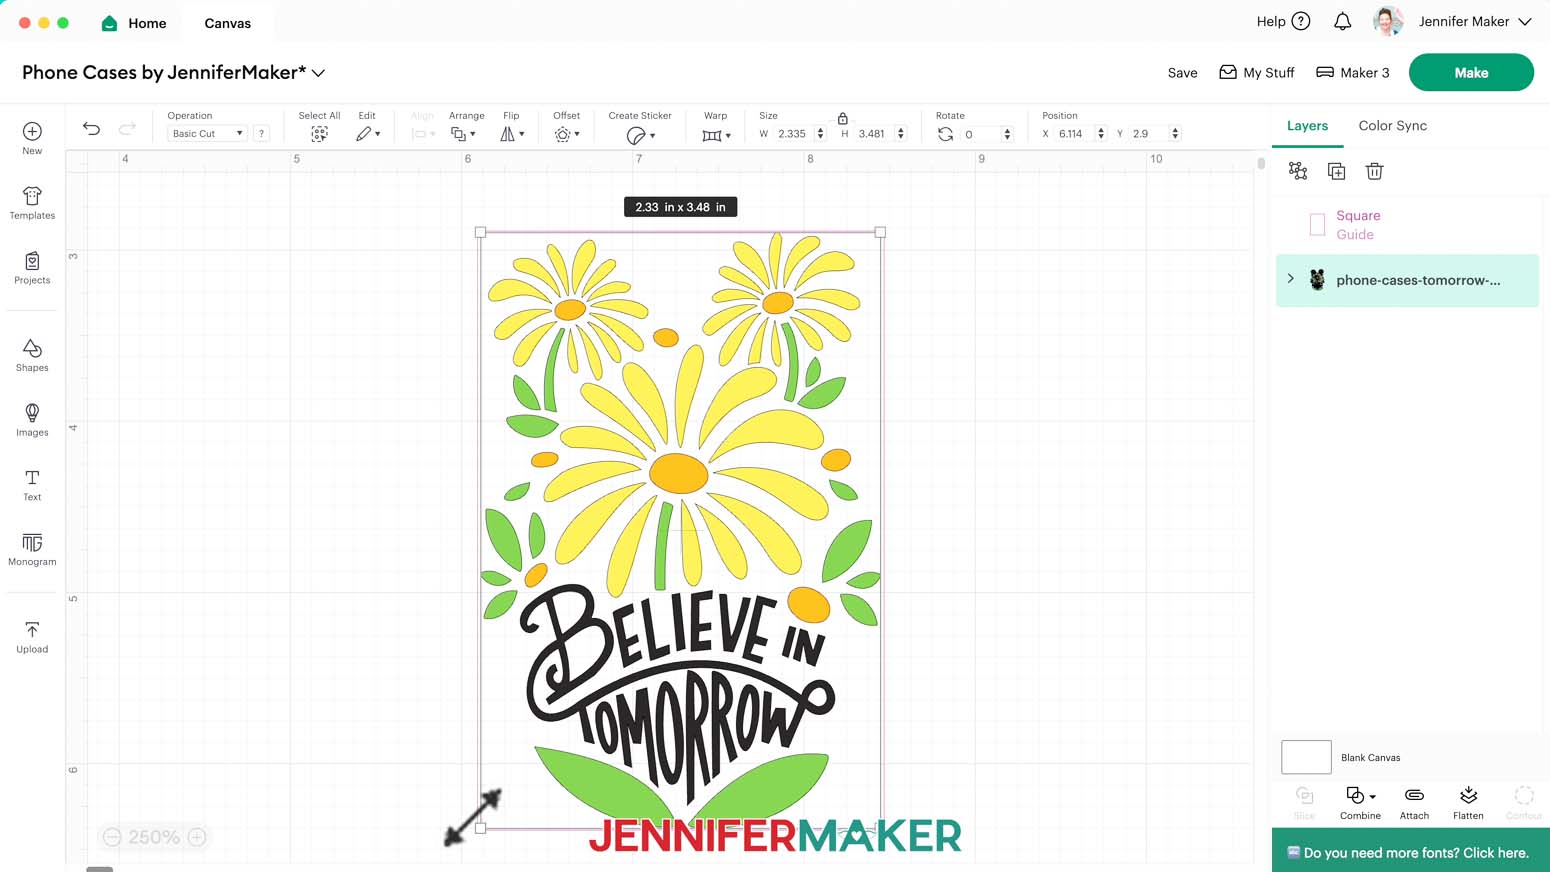
NOTE: The guide frame will appear as pink on your Canvas and in the Layers Panel, but it won’t show up in your final design. - Drag a bounding box over both the design and the guide, then click “Align” and “Center” to see how the design currently fits inside the guide.
- If you need to resize the design to fit, select just the design layer, keep the “Lock” icon closed, and drag the corners of the bounding box so the design fits inside the pink outline as desired.
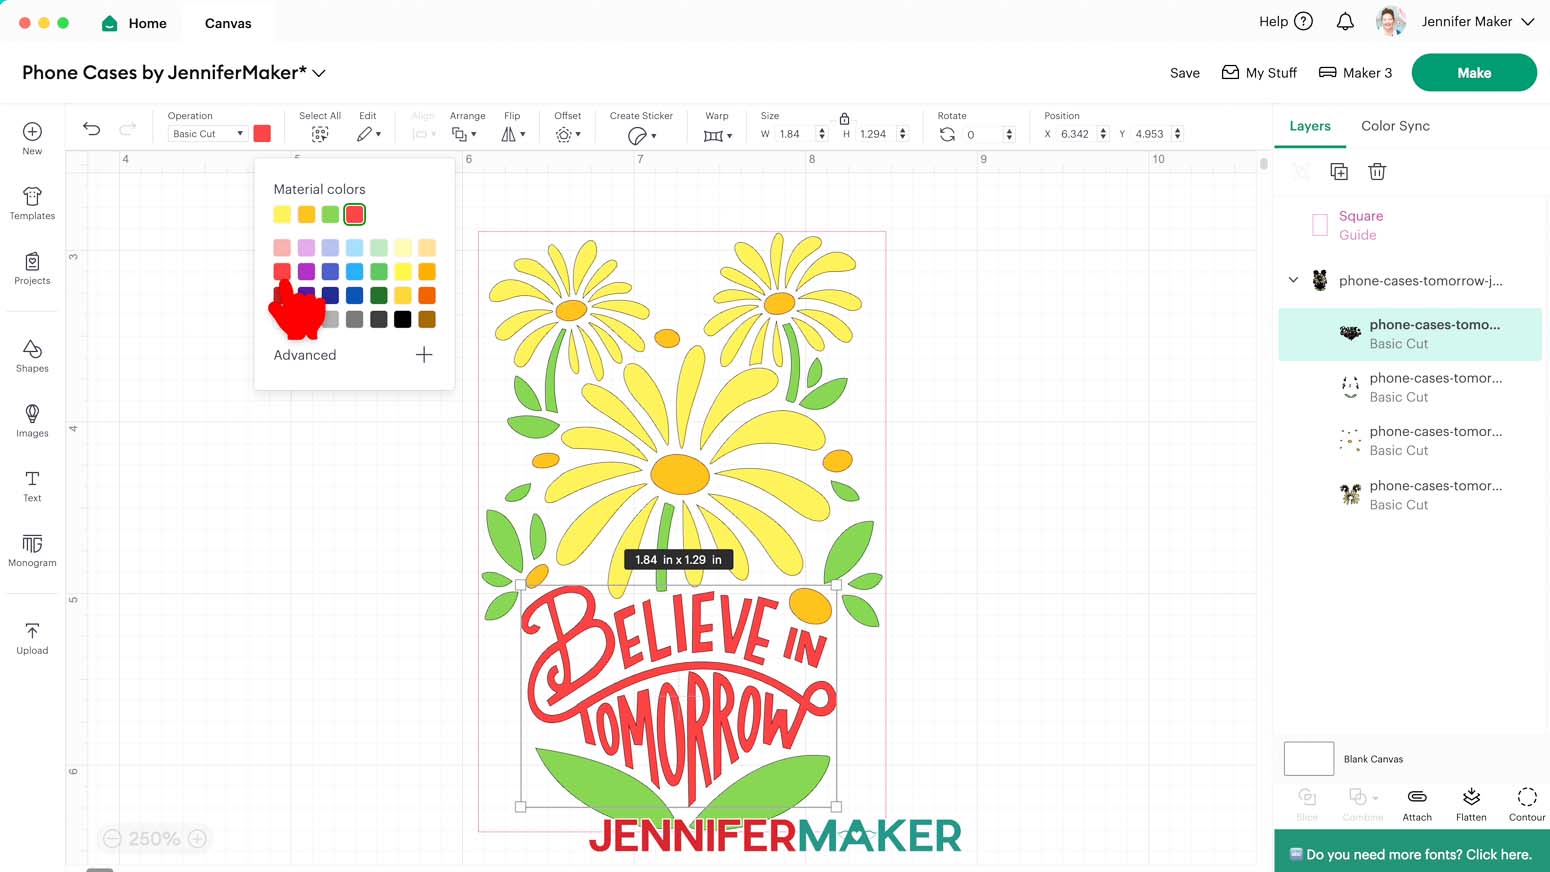
- If you’d like to change the design’s colors to match the vinyl you plan to use, in the Layers Panel, click the small arrow beside the design’s grouped layer to reveal the design’s individual layers.
- Select just the layer you’d like to change, then click the Color Box next to “Operation” to choose an appropriate option. Do the same for any other layers you’d like to recolor.
- And now you’re ready to cut!

CUTTING
- Make sure the correct machine is selected in the top right.
- Click “Make.”
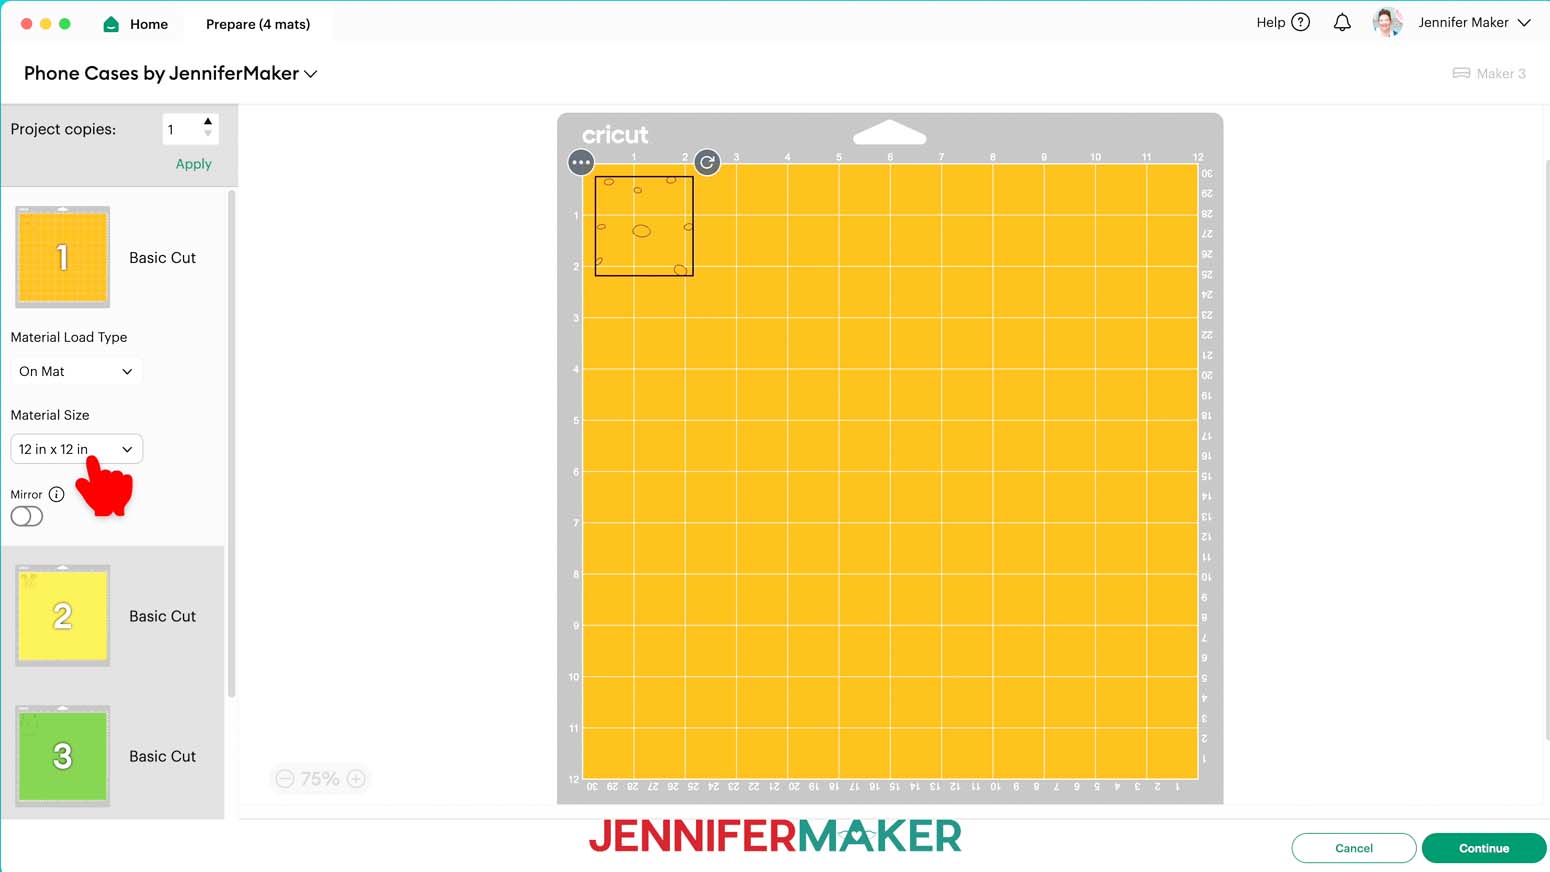
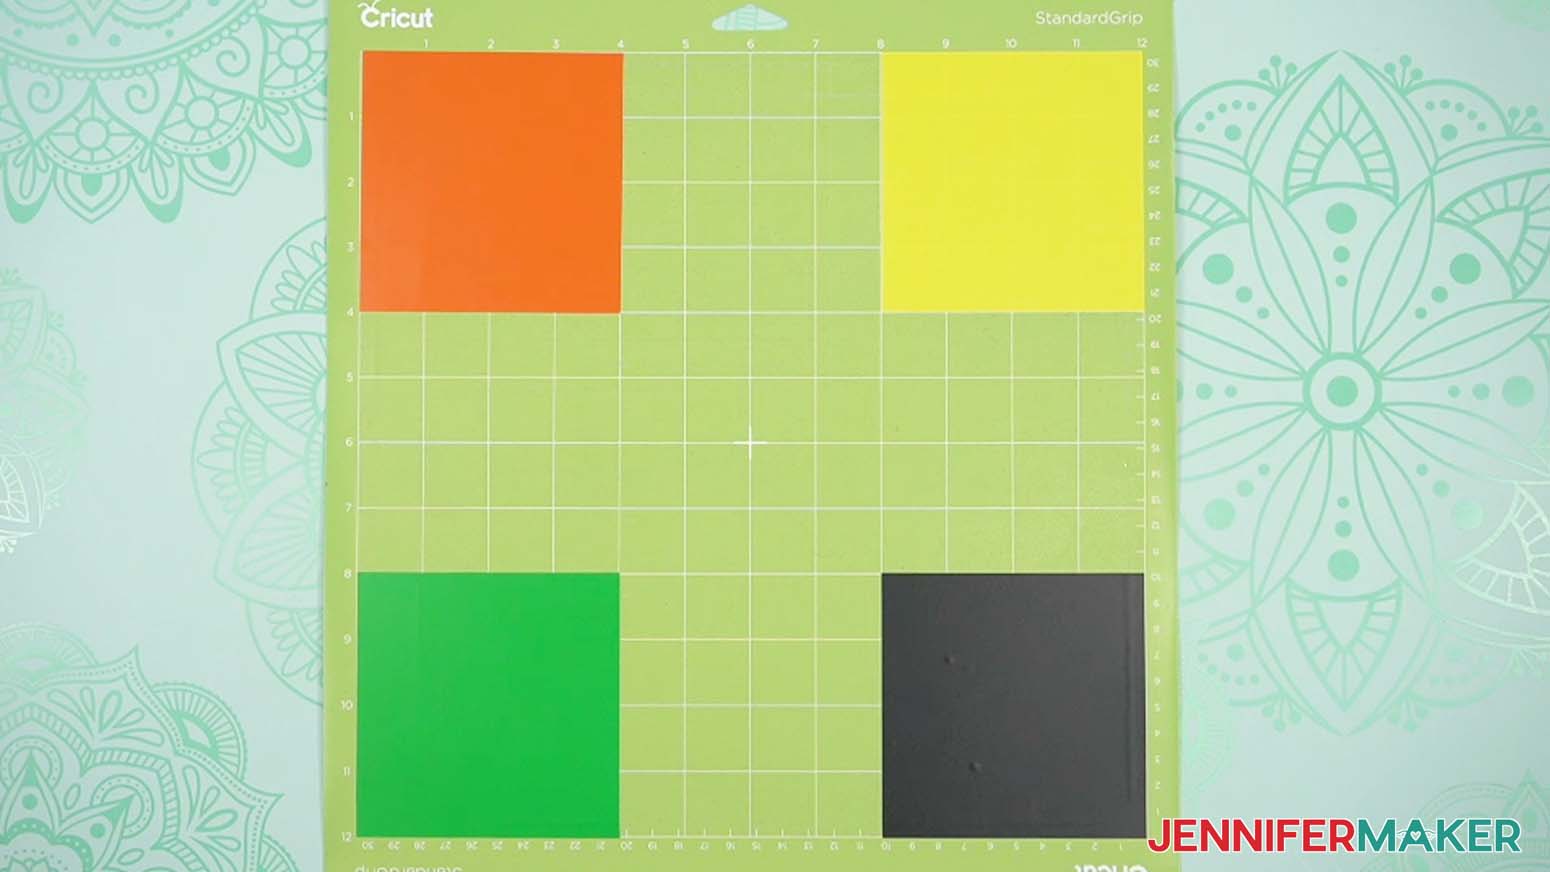
- On the Prepare screen, since we have a few small Basic Cut layers, let’s save some time by combining all our layers onto Mat 1.
- First, note the intended colors of each mat so you know which color vinyl to use for each object.
- Click Mat 1 and select the 12” x 12” size so that the Cricut knows you want to use the entire machine mat area.
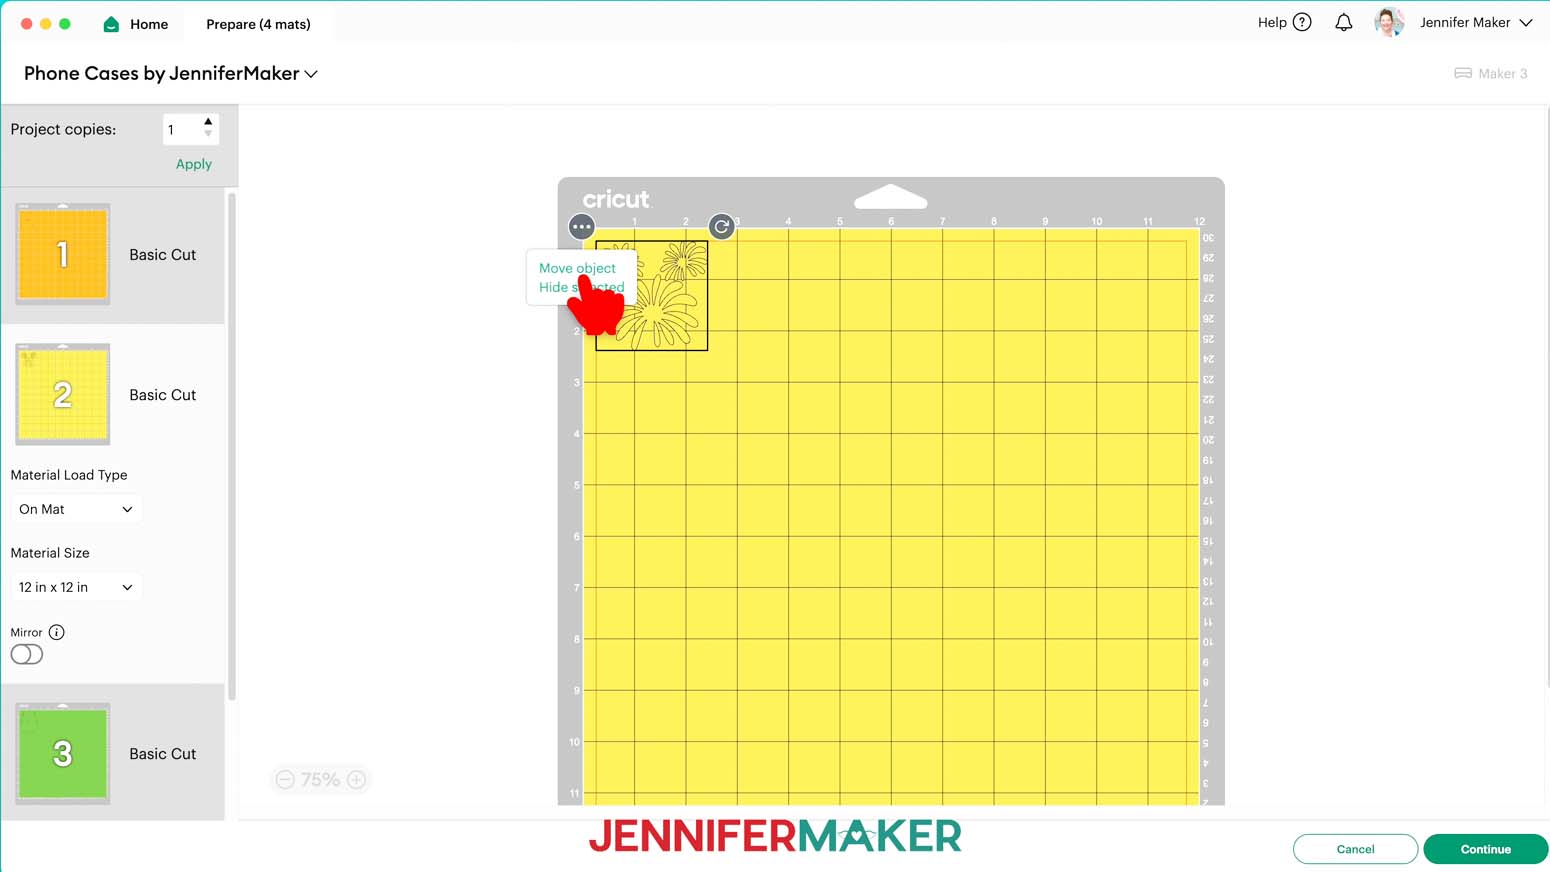
- Select Mat 2, then click the three dots in the top left corner of the shape and select “Move Object.”
- On the “Move Object” pop-up window, select your first mat and click “Confirm” to move the second layer onto Mat 1.
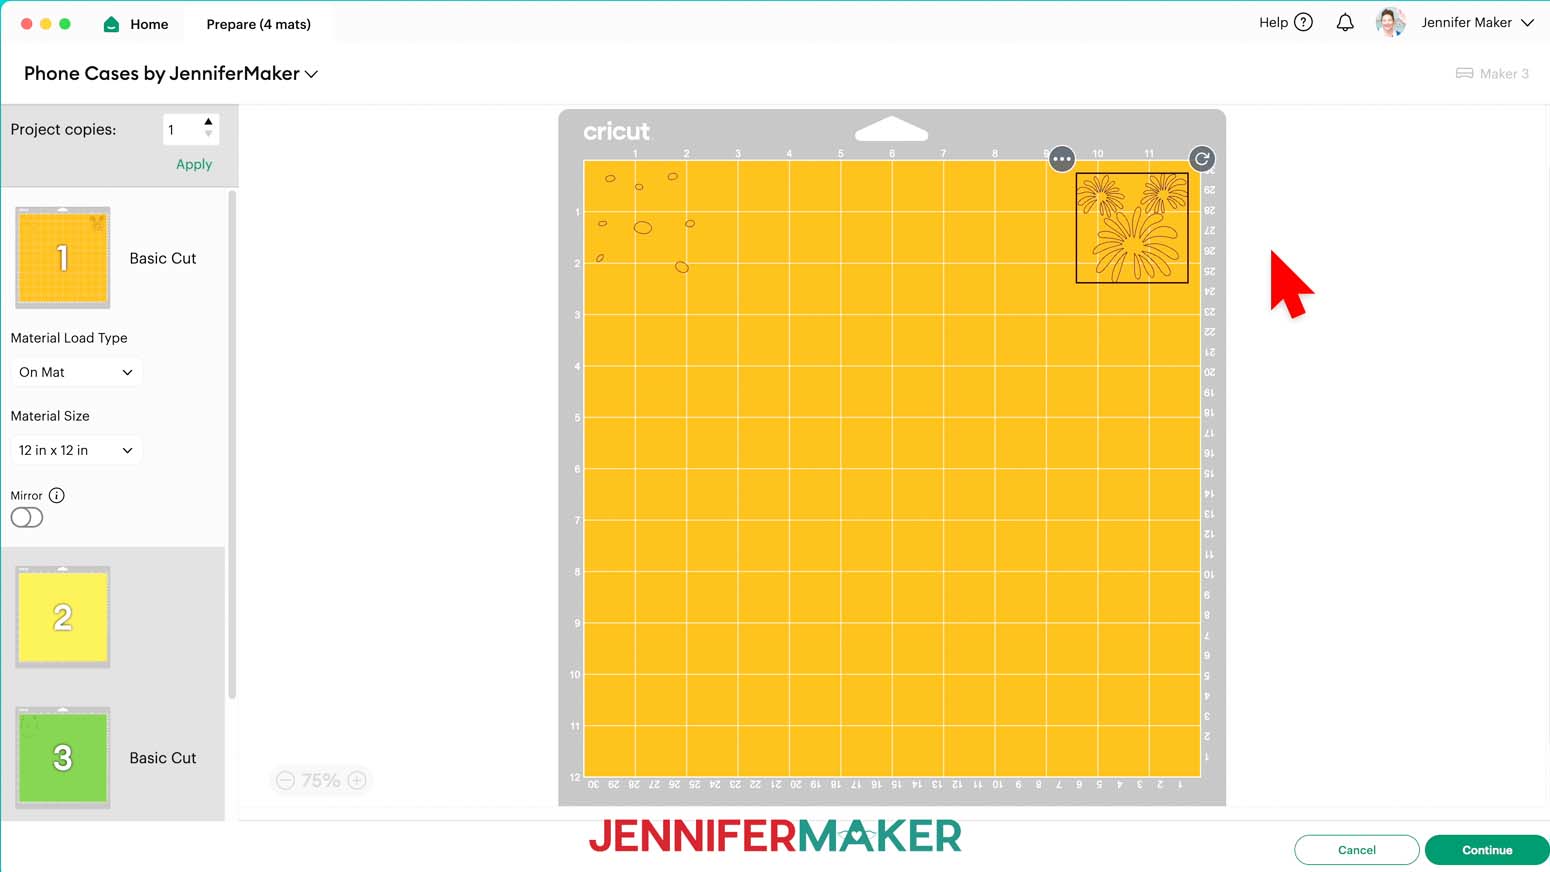
- Back on Mat 1, click the object you just moved, and drag it to the top right corner of the mat.
- Click on Mat 3 and repeat Steps 6-8 to move that layer into the bottom left corner of your mat.
- Then do the same to move the object from Mat 4 to the bottom right corner of Mat 1.
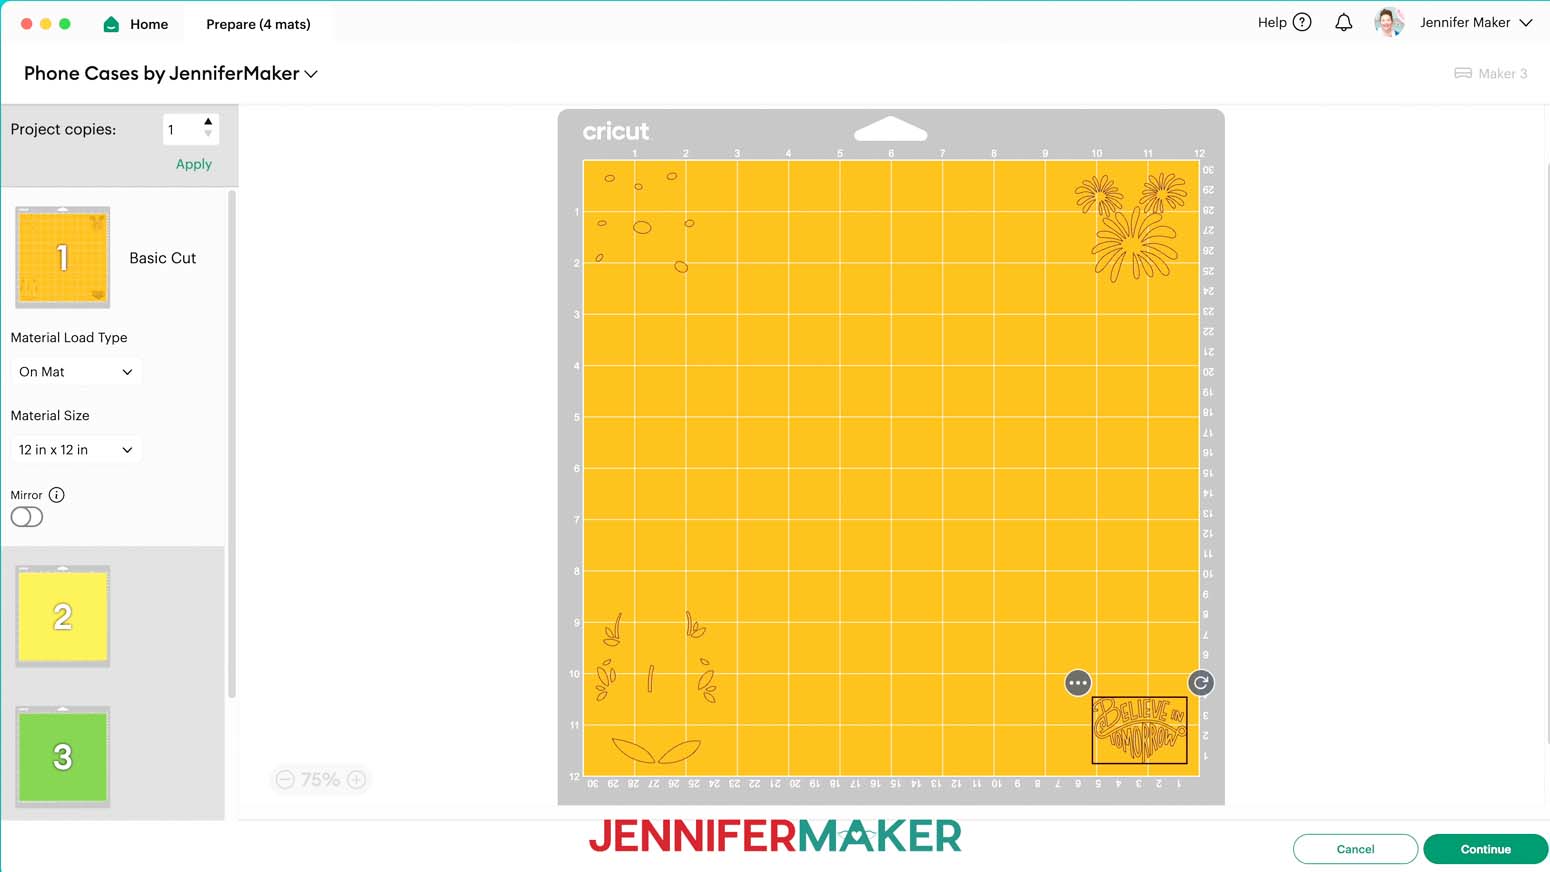
- Once your pieces are in place on Mat 1, use the on-screen grid to determine how large your top left piece of vinyl needs to be to cover the entire object, plus an inch or so around it.
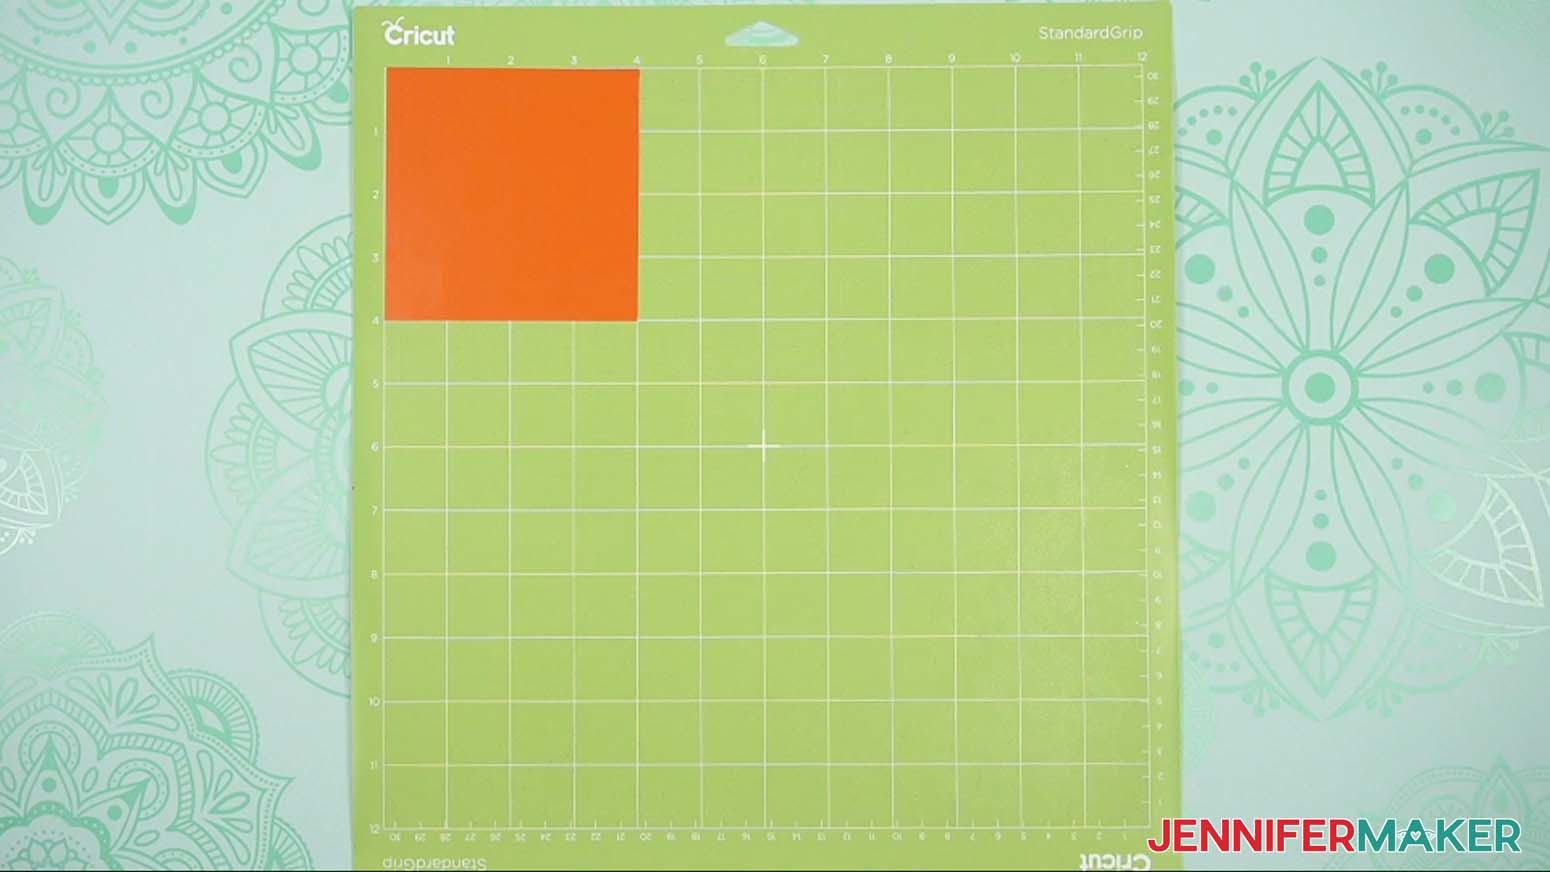
NOTE: Each grid box is one inch. My first piece needs to be about 4” wide and 4” tall to cover the whole design. - Use a paper trimmer or scissors to trim that layer’s vinyl down to size.
NOTE: Mine is the orange layer, so I’ll cut a 4” x 4” inch piece of orange vinyl.
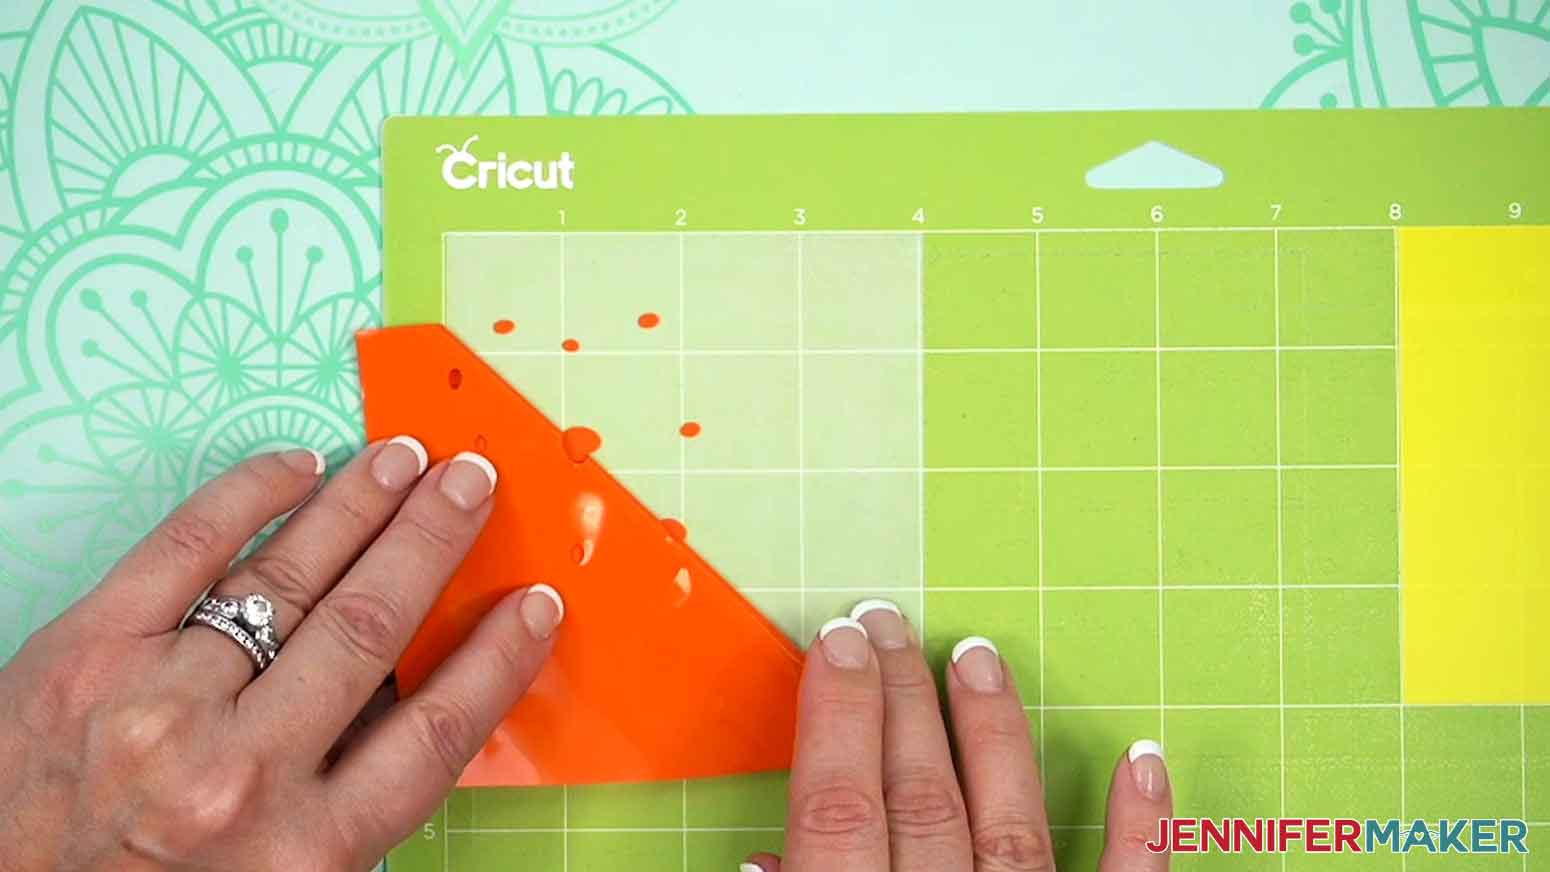
TIP: Trimming your vinyl closer to size allows you to save vinyl for other projects. - Place your first vinyl piece matte-side-up in the top left corner of a green StandardGrip machine mat so it covers the corresponding design area on your screen, and use a brayer to adhere it well.
NOTE: I’ll place mine in the 4” x 4” top left corner of my mat. - Repeat Steps 11-13 for the remaining vinyl pieces, making sure to place the right color of vinyl in each corner without any overlapping vinyl, and to brayer each down well.
- In Cricut Design Space, select Mat 1 since it has all the objects, then click “Continue.”
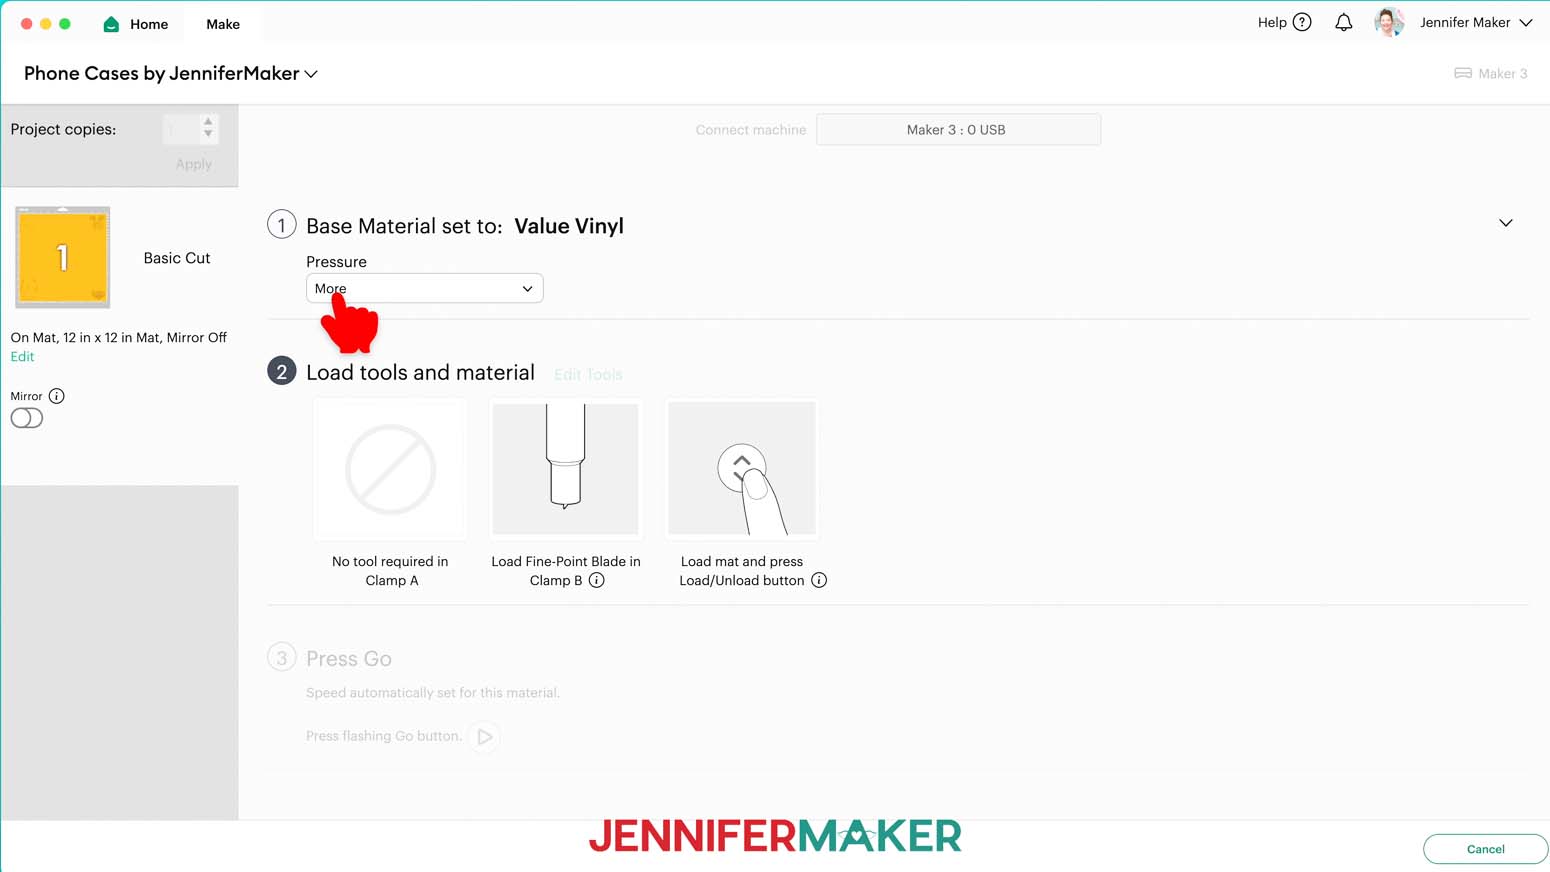
NOTE: Since your pieces are condensed into one mat, the empty mats won’t show up on the next screen. - On the Make screen, set the Base Material for your mat. I’m using the “Value Vinyl” setting with “More” Pressure for everything.
NOTE: If you don’t see “Value Vinyl” in your list, click on “Browse All Materials,” type in “Glossy” and select the “Value Vinyl” option.
TIP: Changing the Pressure to “More” results in a cleaner cut. - Check that your Premium Fine-Point Blade is clean and in the clamp.
- Press the flashing “Load/Unload” button to load the prepared mat into your Cricut.
- Press the flashing middle button to begin cutting.
- When your vinyl has finished cutting, don’t unload the mat right away. Gently lift a corner of the material to make sure the cuts went all the way through. If not, press the middle button again to make a second pass of cuts in the same spots.
NOTE: Cuts should go through the material, but not the carrier sheet.
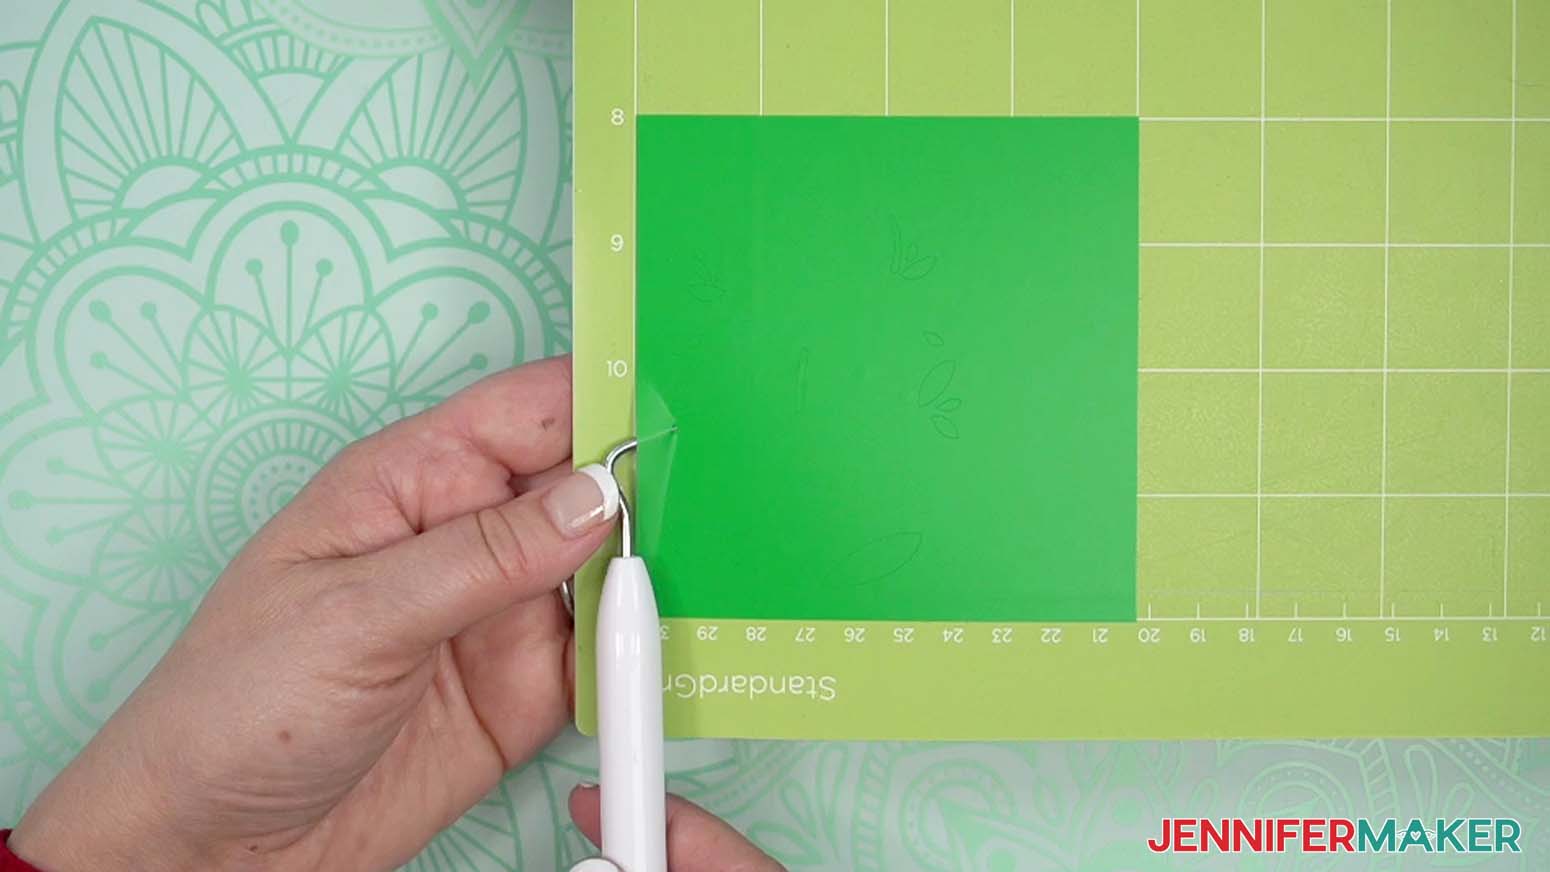
TIP: If you have any issues with your cuts, go to jennifermaker.com/cleaner-cuts. - When the cuts are complete, unload the mat, and lay it face-up on your work surface.
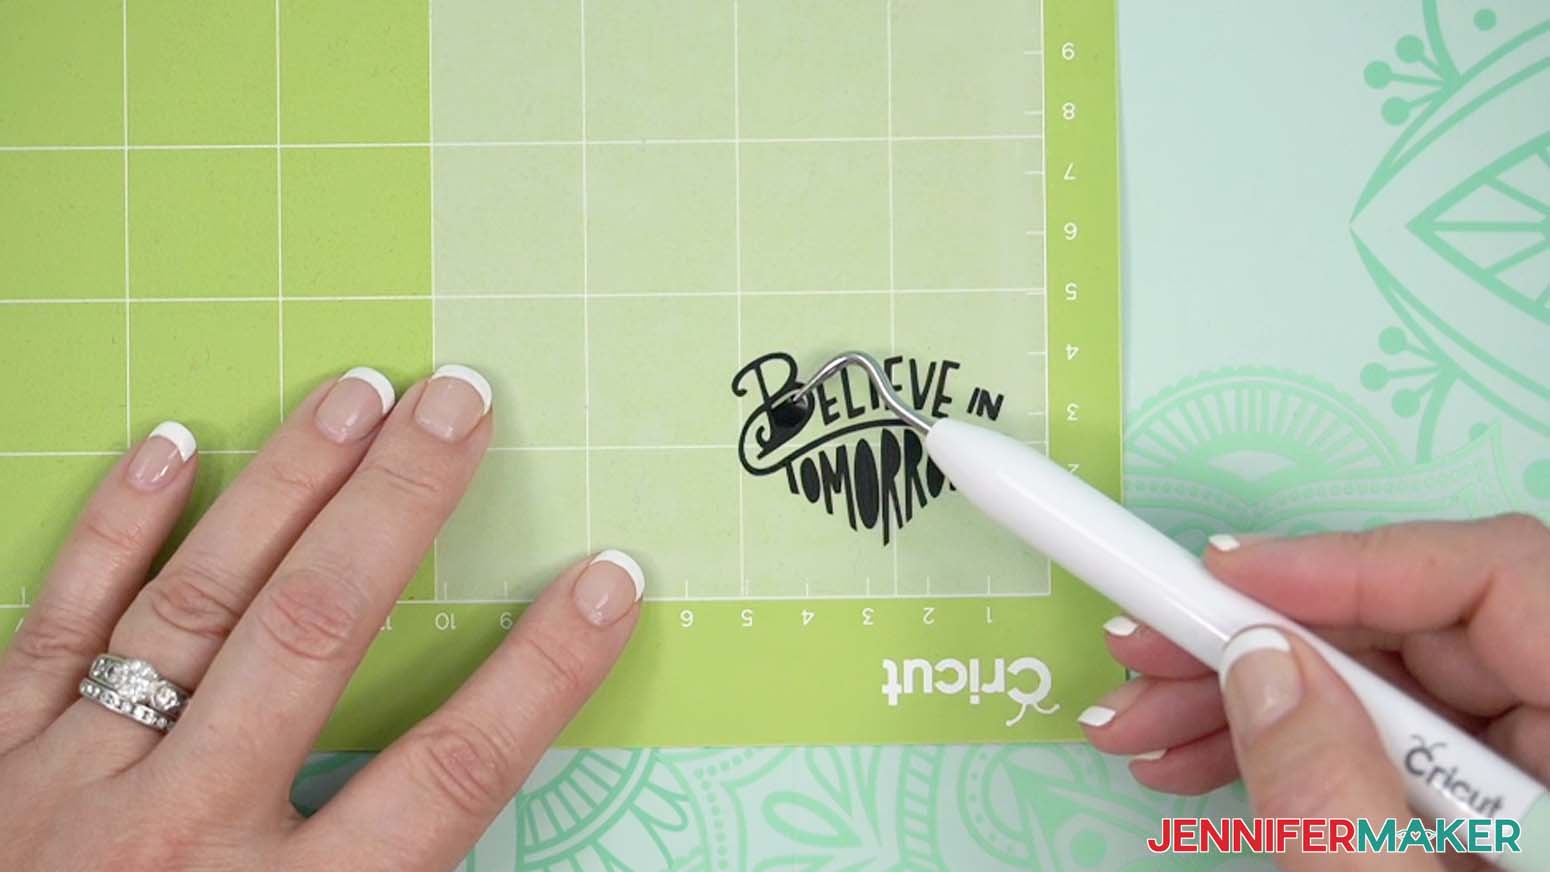
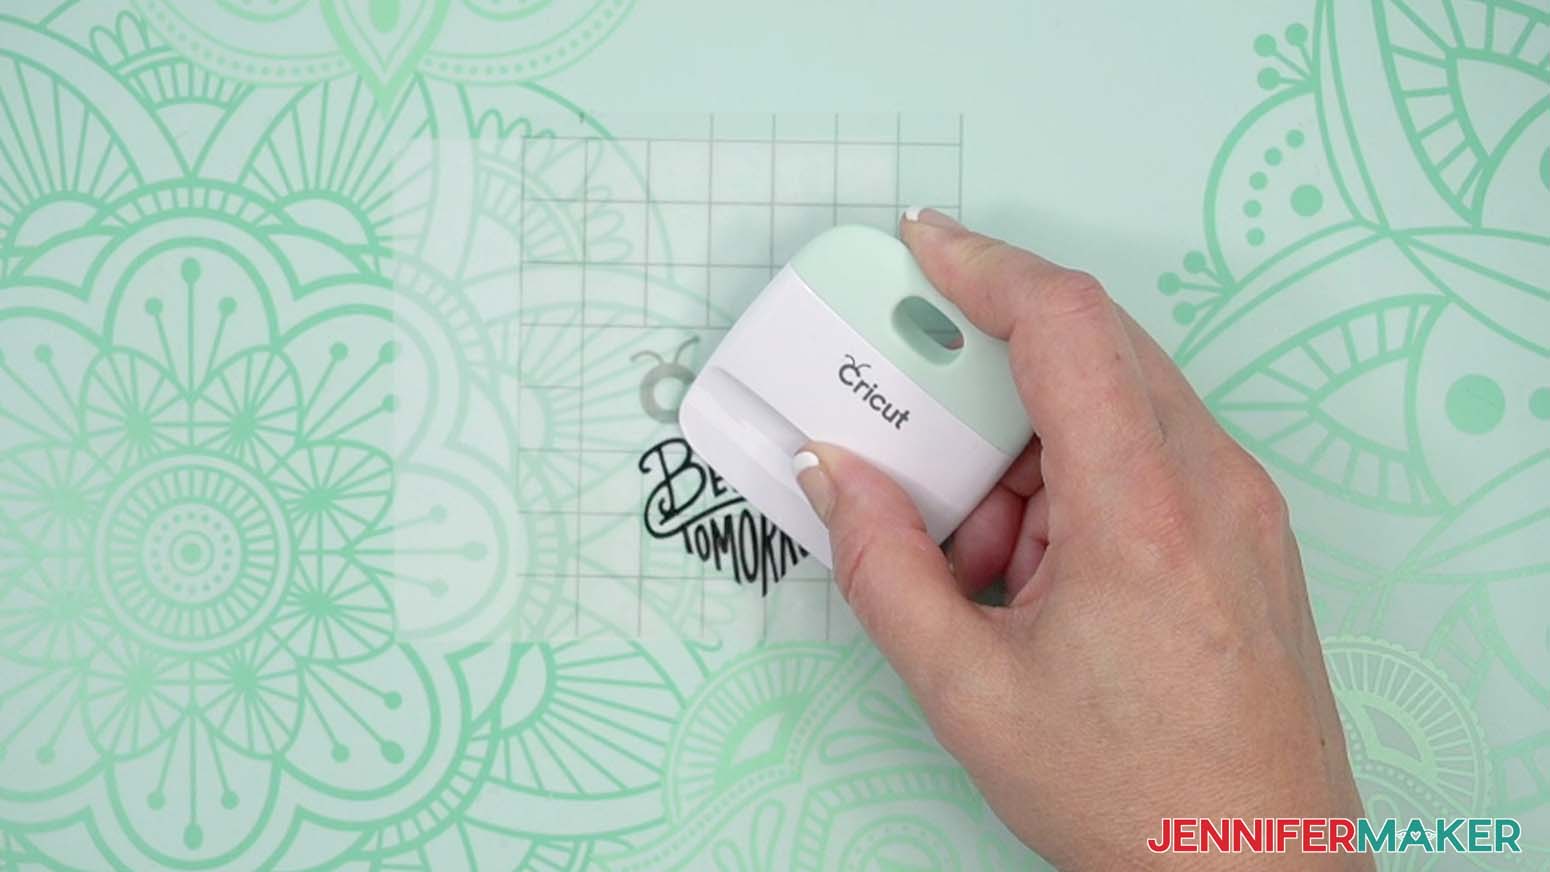
TIP: It can be easier to weed vinyl, especially small, detailed designs, while it is adhered to the machine mat. - I like to work from larger to smaller sections during weeding, so use your weeding tool to carefully peel away the extra background vinyl.
- Poke your weeding tool into small sections of the design you want to remove – such as the insides of letters – and gently lift the tool away from the design to weed them out.
TIP: Make sure you do not pull up any pieces you want to keep! If they come up, gently pat them back in place and try again. Refer back to the Design Space screen if you’re not sure which pieces to remove. - Continue to weed until all that is left is the vinyl for each of your decals. Then flip over your mat and roll it back to release the vinyl at the corners and remove them.
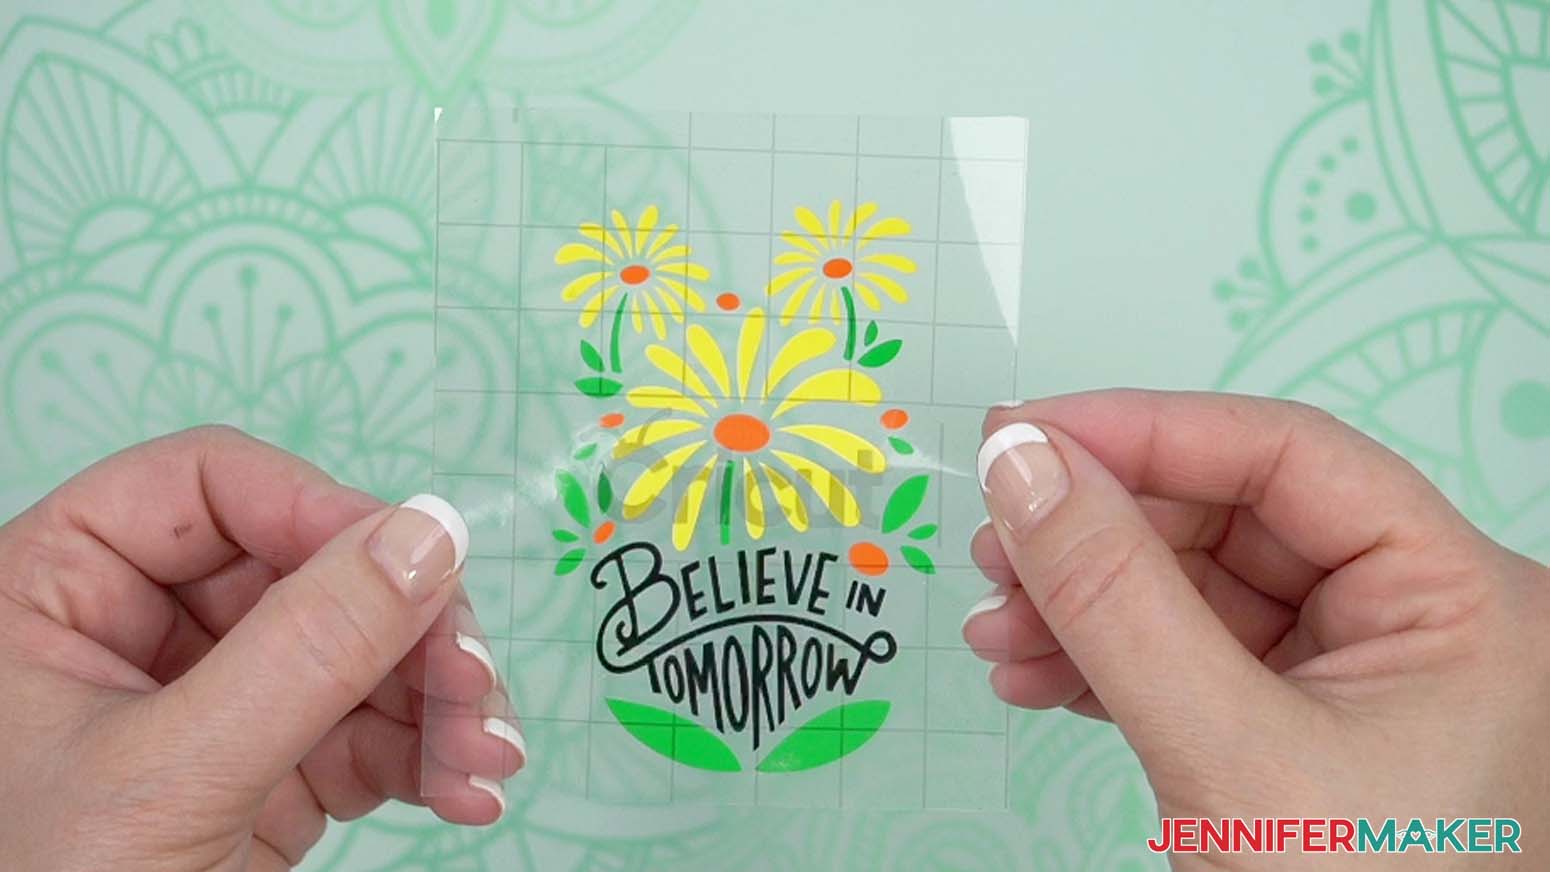
- Once everything is cut and weeded, stack your decals face up, starting at the bottom with the layer that has the most of your design’s edge pieces and working your way up.
NOTE: Refer back to your Design Space Canvas if you’re unsure of any pieces’ orientation.
STEP 3: APPLY THE DECAL TO THE OUTSIDE OF YOUR PHONE CASE
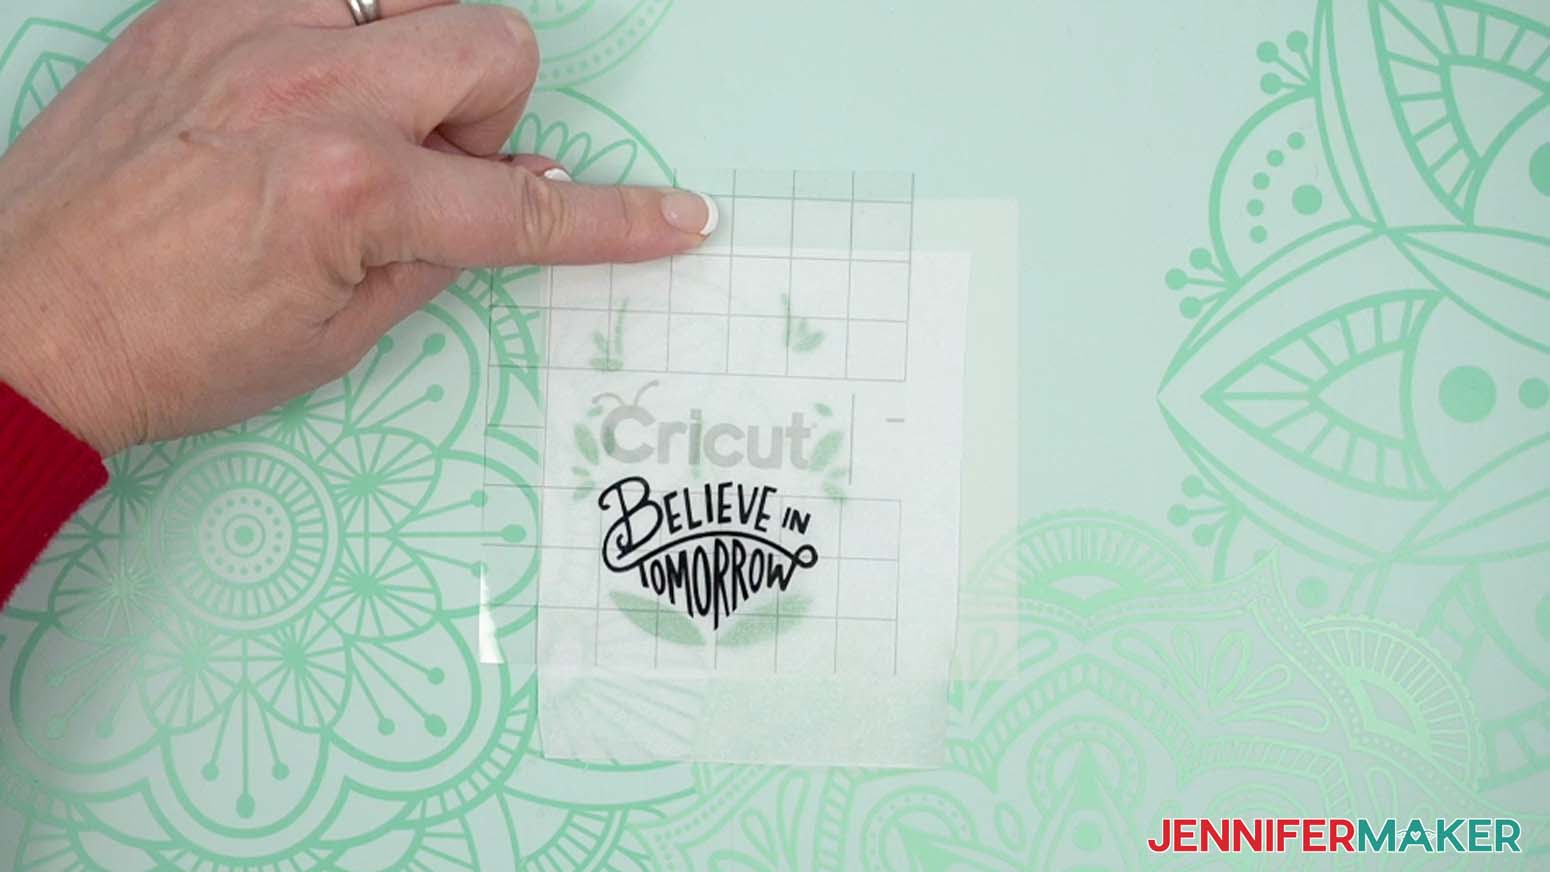
- Lay your design’s bottom-most vinyl decal face-up on your work surface with the next layer face-up beside it.
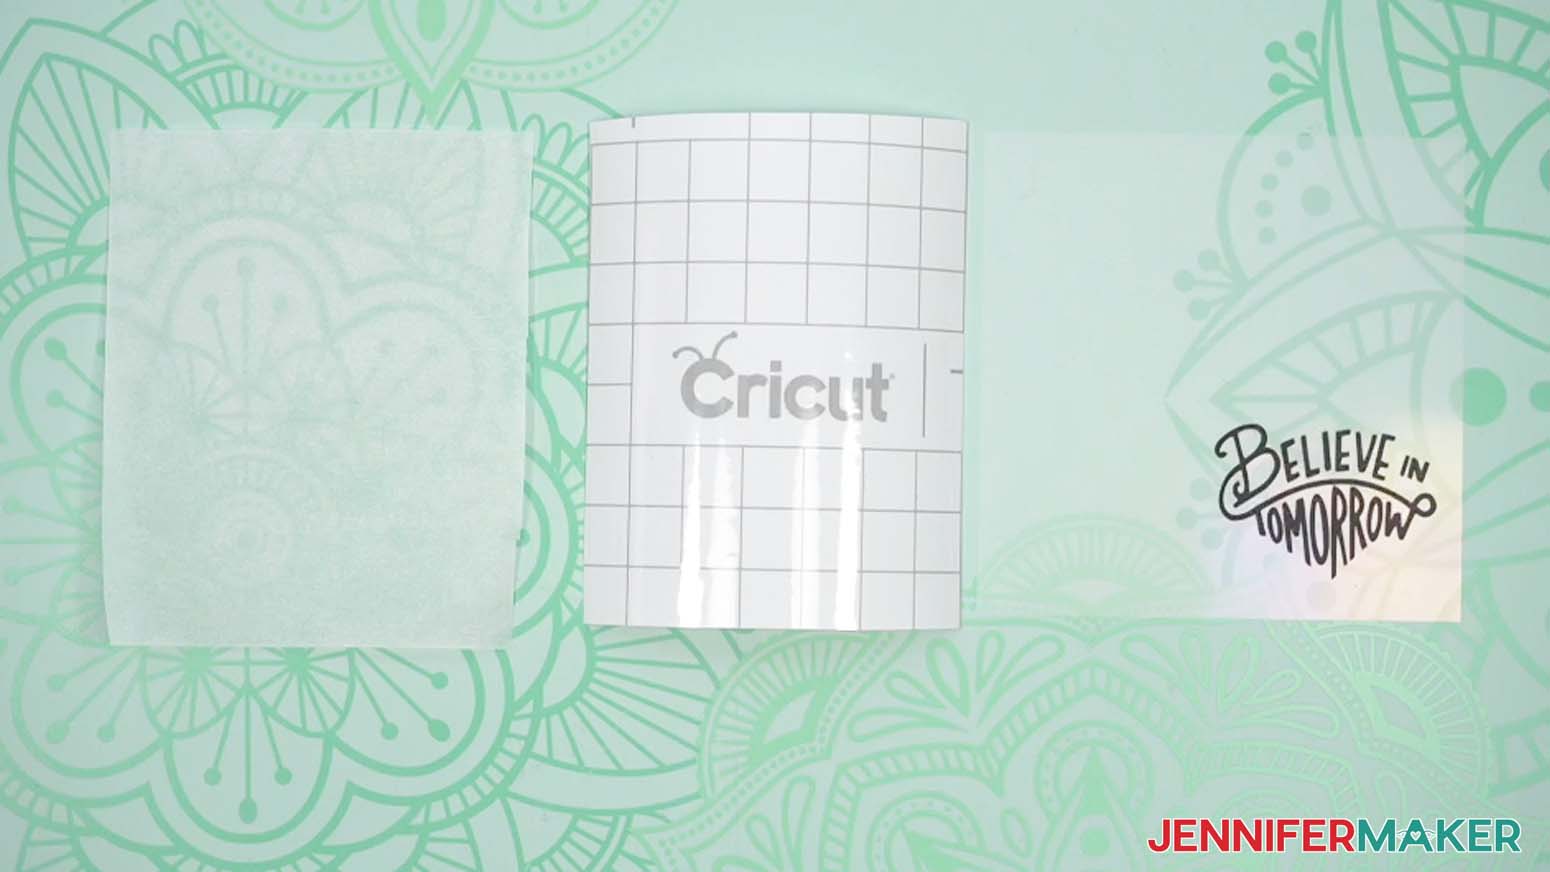
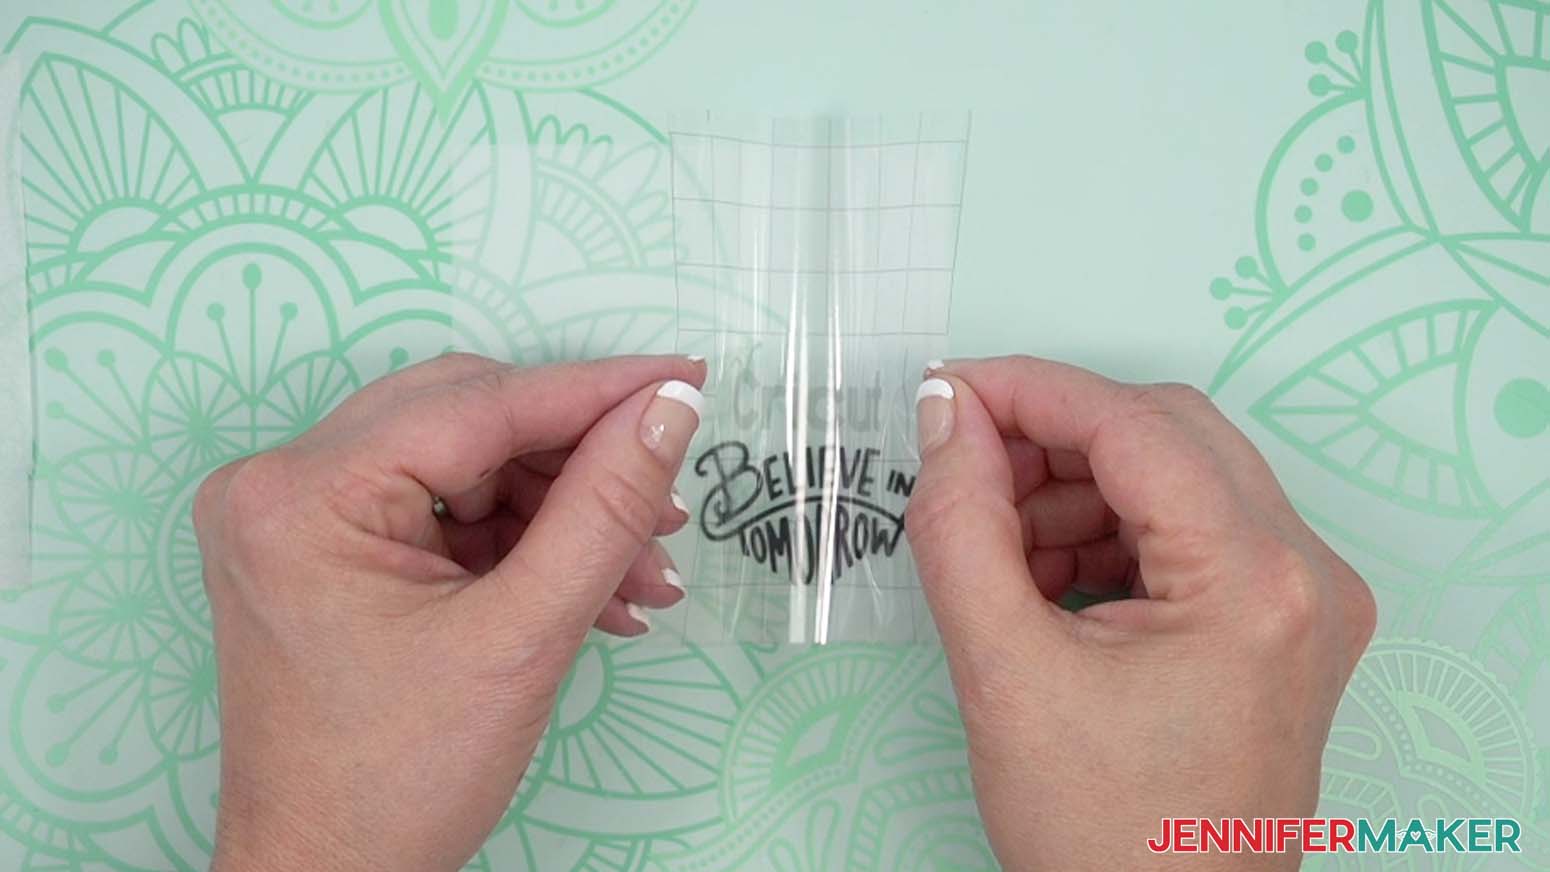
NOTE: I’ll start with the black text layer. - Cut a piece of StandardGrip transfer tape and a piece of parchment paper just larger than the decal.
- Remove the backing from the transfer tape.
- Hold your transfer tape in the shape of a “taco,” sticky-side-down, then put the bottom of the “taco” onto the first vinyl layer.
- Smooth the transfer tape over the decal from the center outward and burnish it down using the Scraper Tool.
- Flip your vinyl over and burnish again, then gently peel away the backing.
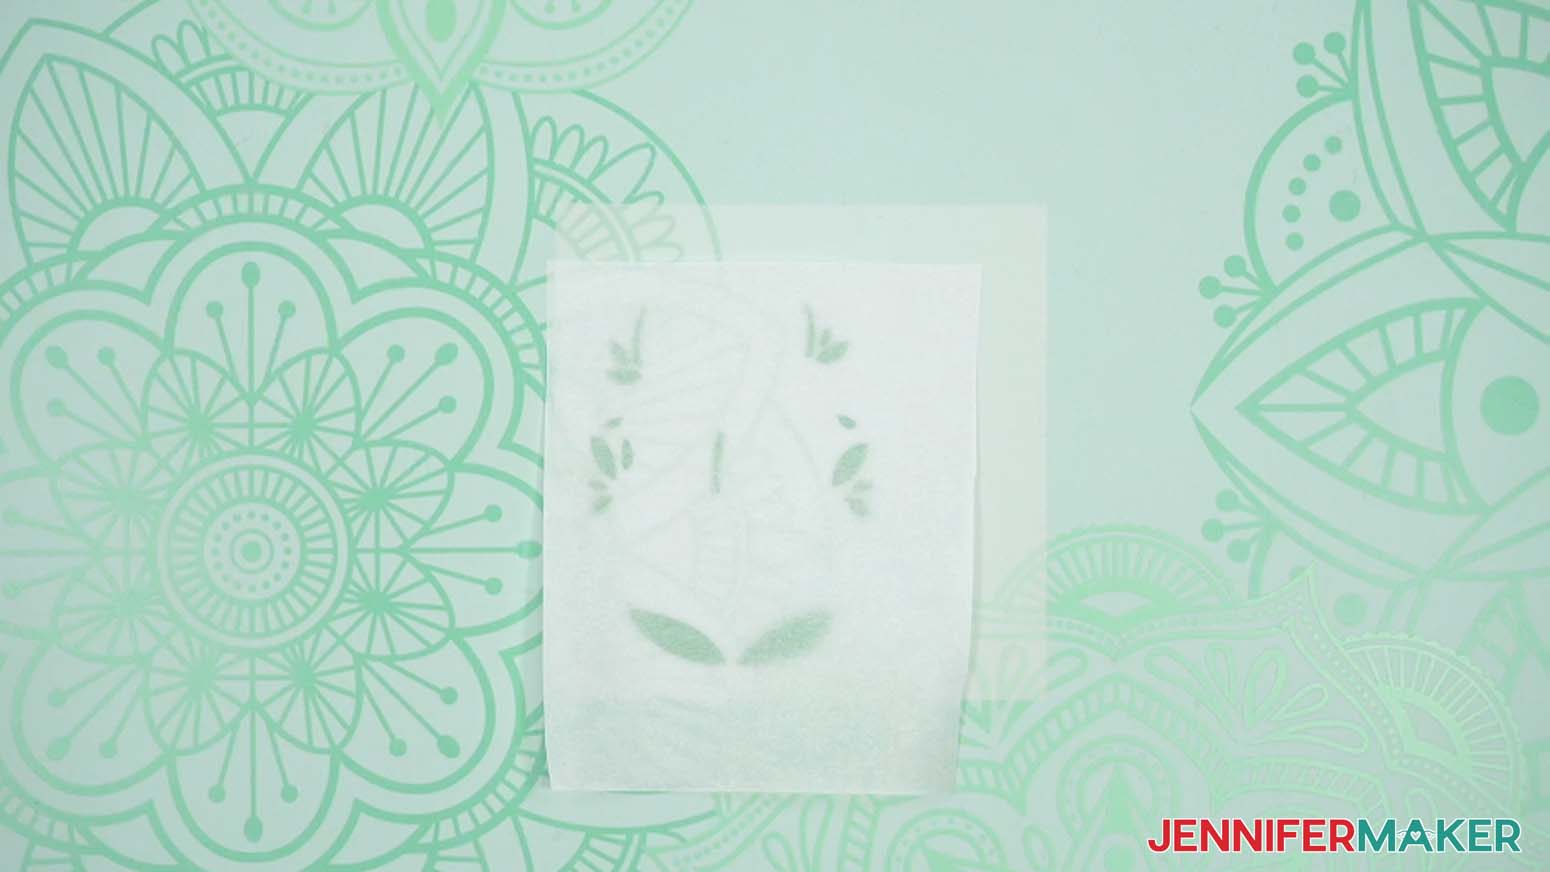
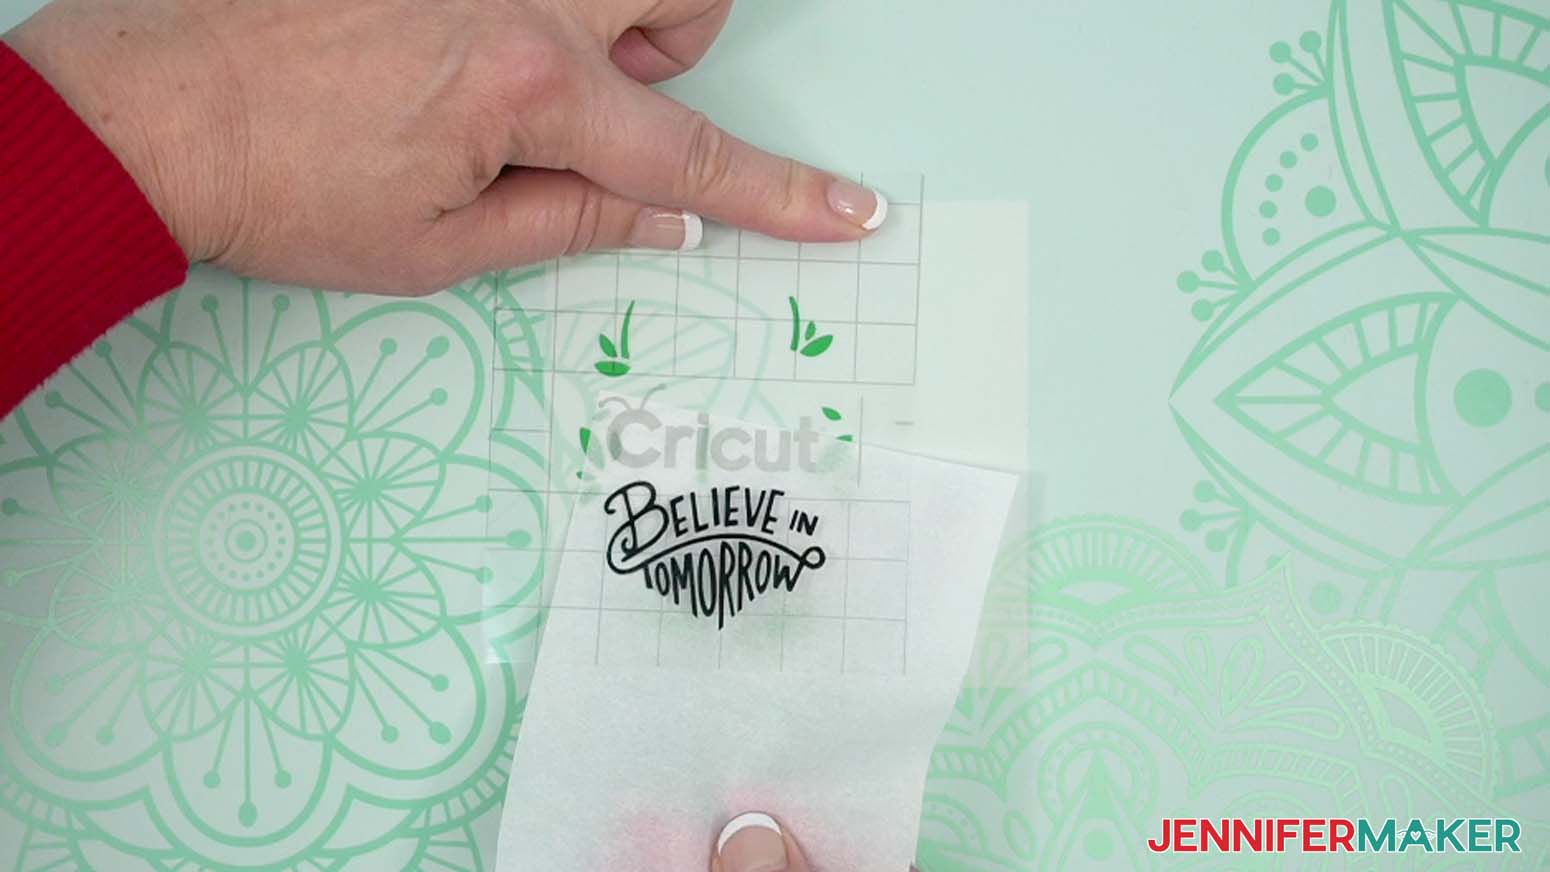
- Place the parchment paper on top of the next vinyl layer so some of its carrier sheet is exposed at the top.
- Gently place your first vinyl piece onto the parchment paper so the design layers align and a small area of transfer tape touches the bottom carrier sheet.
NOTE: Keeping the parchment paper in between the vinyl layers lets you position them before sticking anything together. - When the layers line up, press the exposed section of transfer tape onto the bottom carrier sheet.
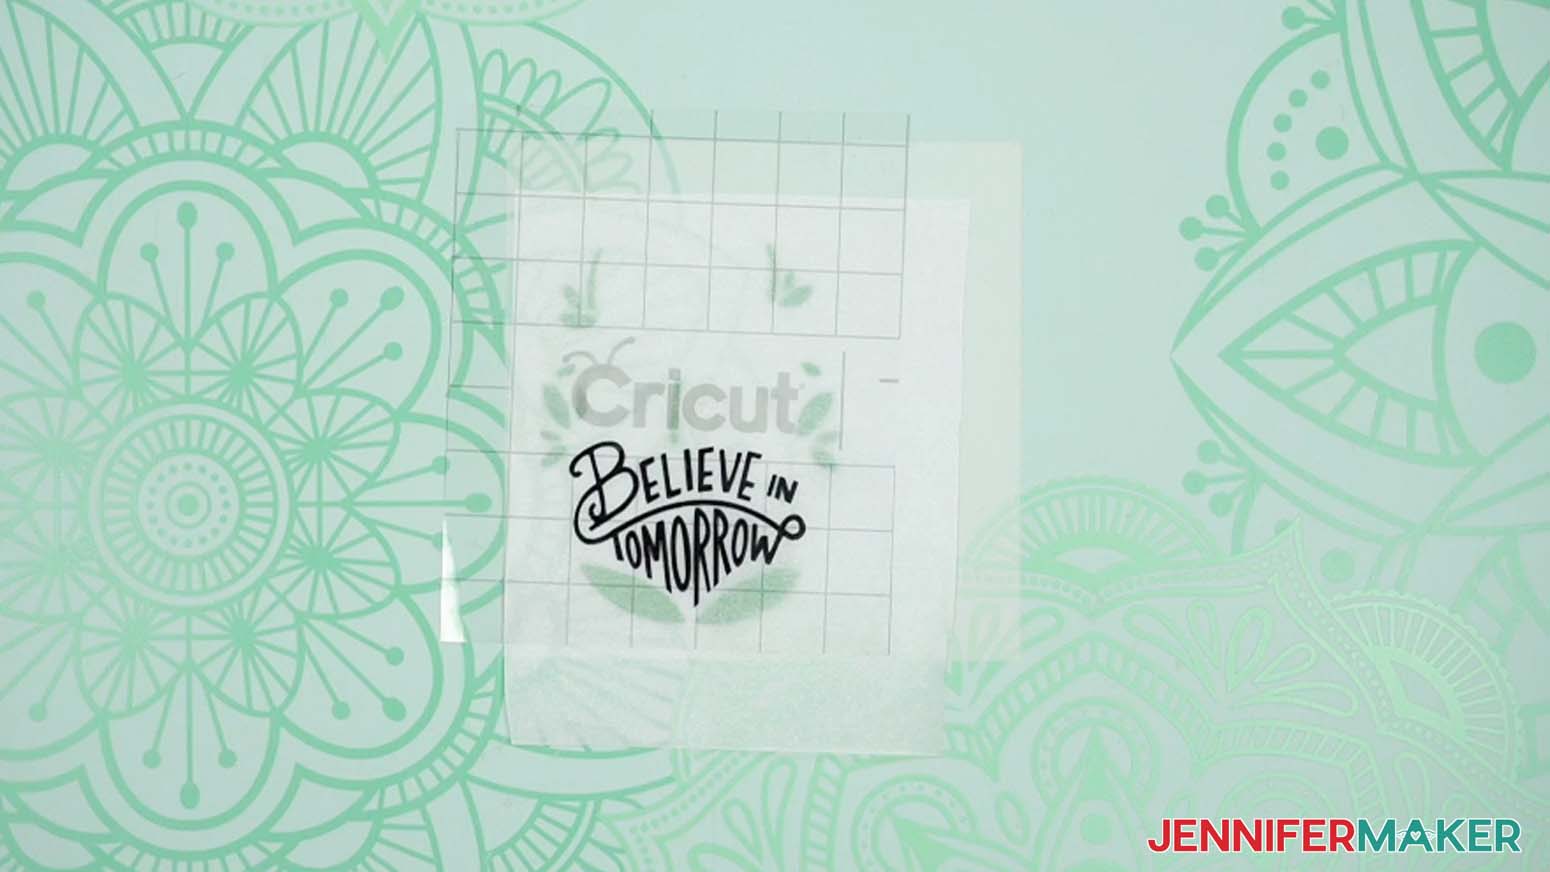
- Hold the transfer tape in place with one hand, and use the other hand to lift the top layer and gently remove the parchment paper.
TIP: Continue pressing on the exposed section of transfer tape to help keep everything aligned. - Gently lower the transfer tape and first layer back into place, then use your Scraper to burnish the tape onto the bottom layer.
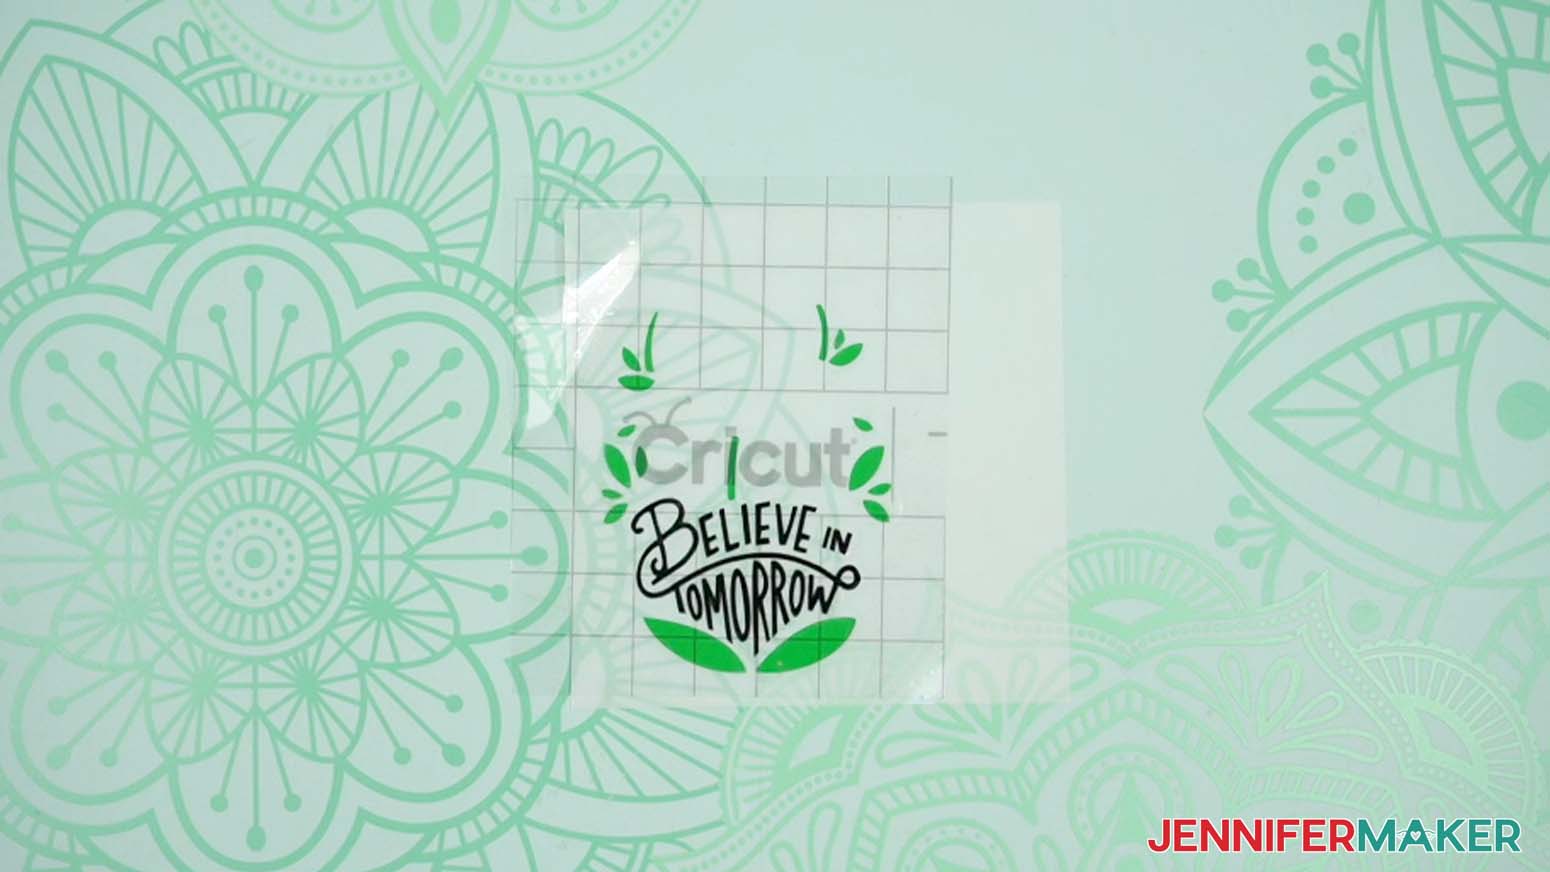
- Peel away the transfer tape to see your first two combined layers!
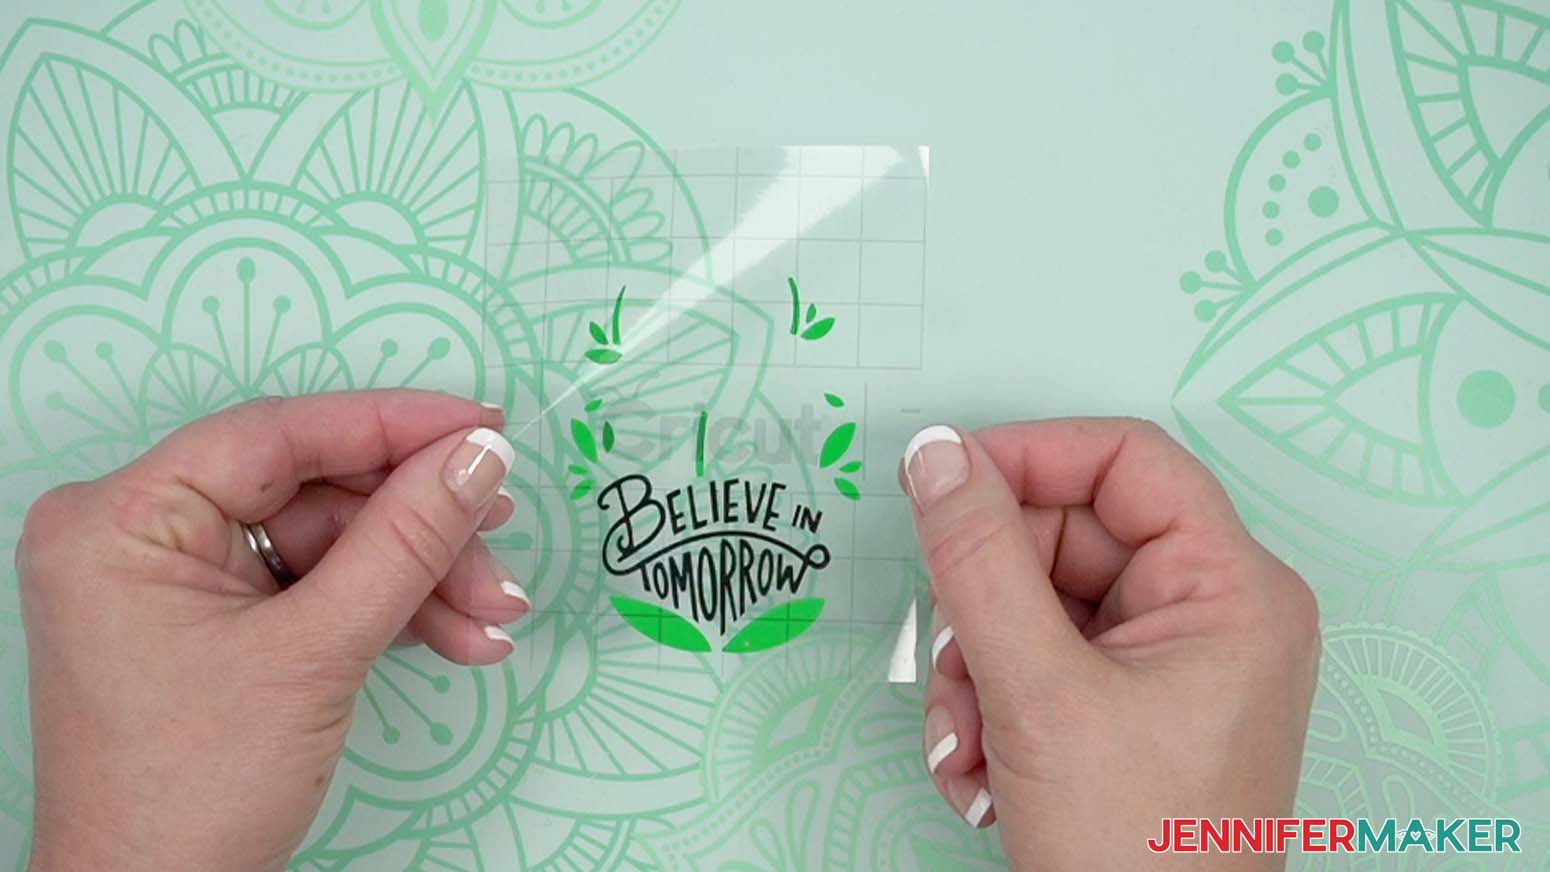
- Repeat Steps 2-12 until all the layers of your design are in place on the transfer tape.
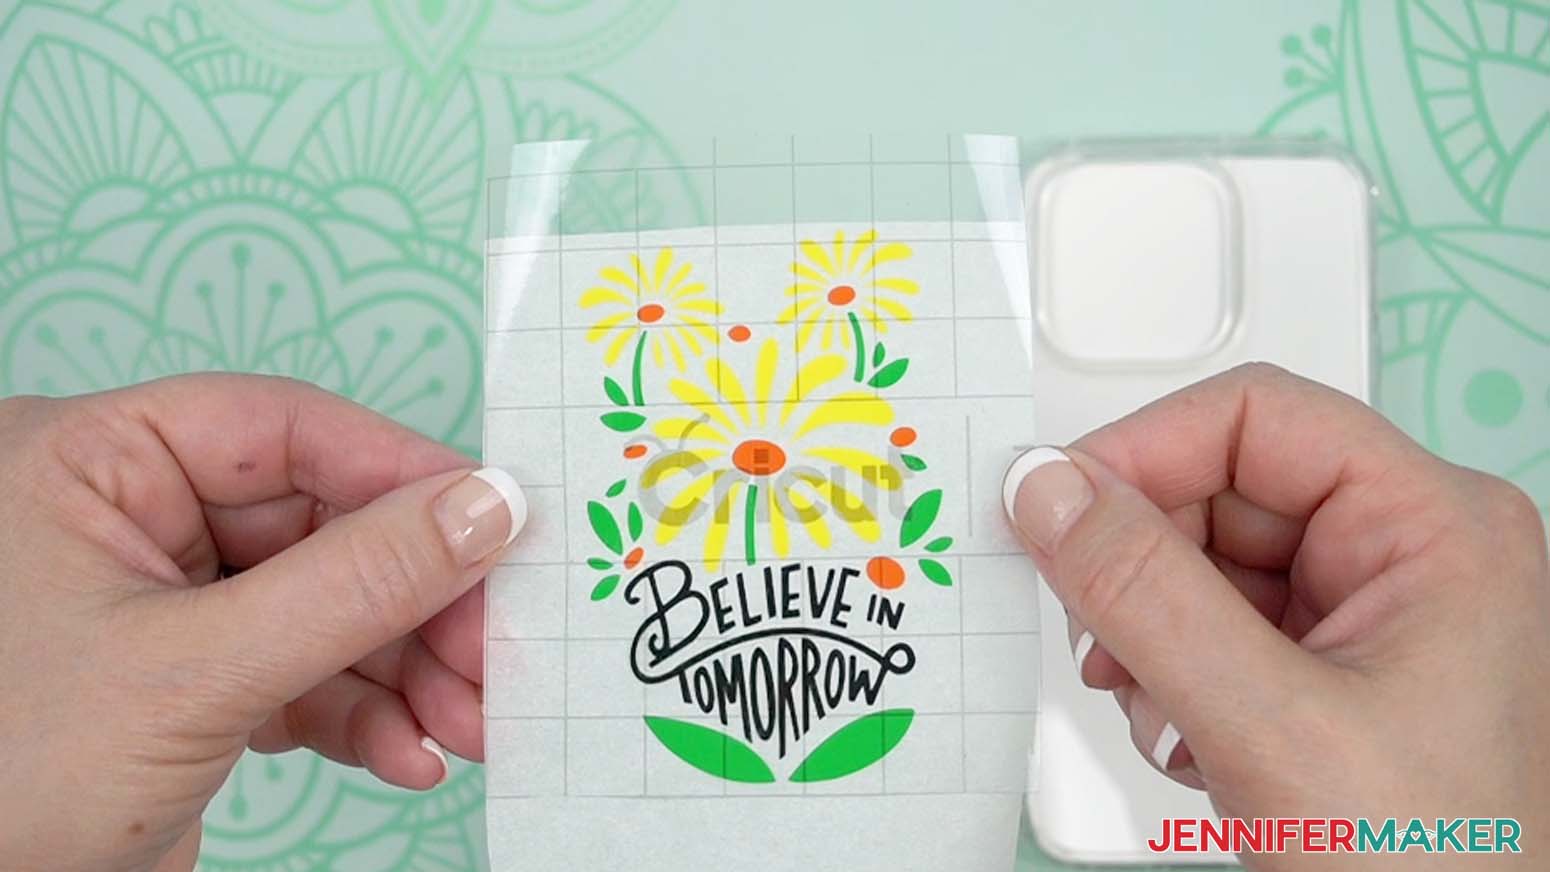
IMPORTANT: If your phone case has a protective cover on it, remove it now so you can adhere your design directly to the plastic. - Lay the phone case on your work surface flat-side-up with the camera’s cutout area at the top.
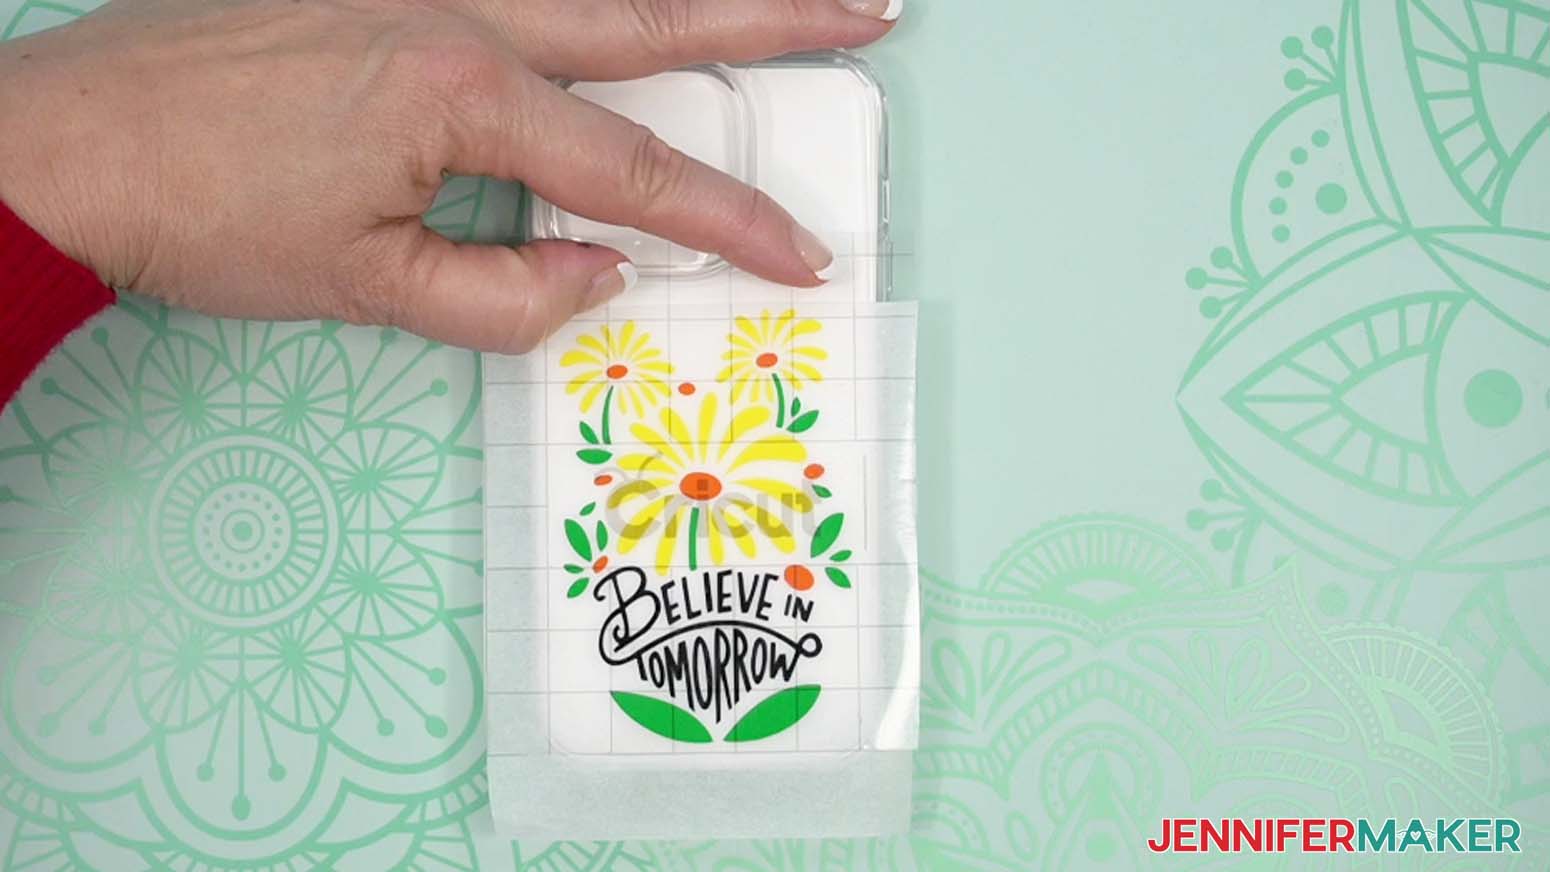
- Gently lay your design on the parchment paper with a small section of transfer tape exposed to help you position the design.
- Align your design on your phone case, and press down on the exposed section of transfer tape to hold it in position.
- Gently remove the parchment paper, then use your Scraper Tool to press the vinyl onto your phone case. Start in the center of the vinyl and burnish outward to remove bubbles and wrinkles.
- Carefully peel back the transfer tape to reveal your layered vinyl design on your phone case.
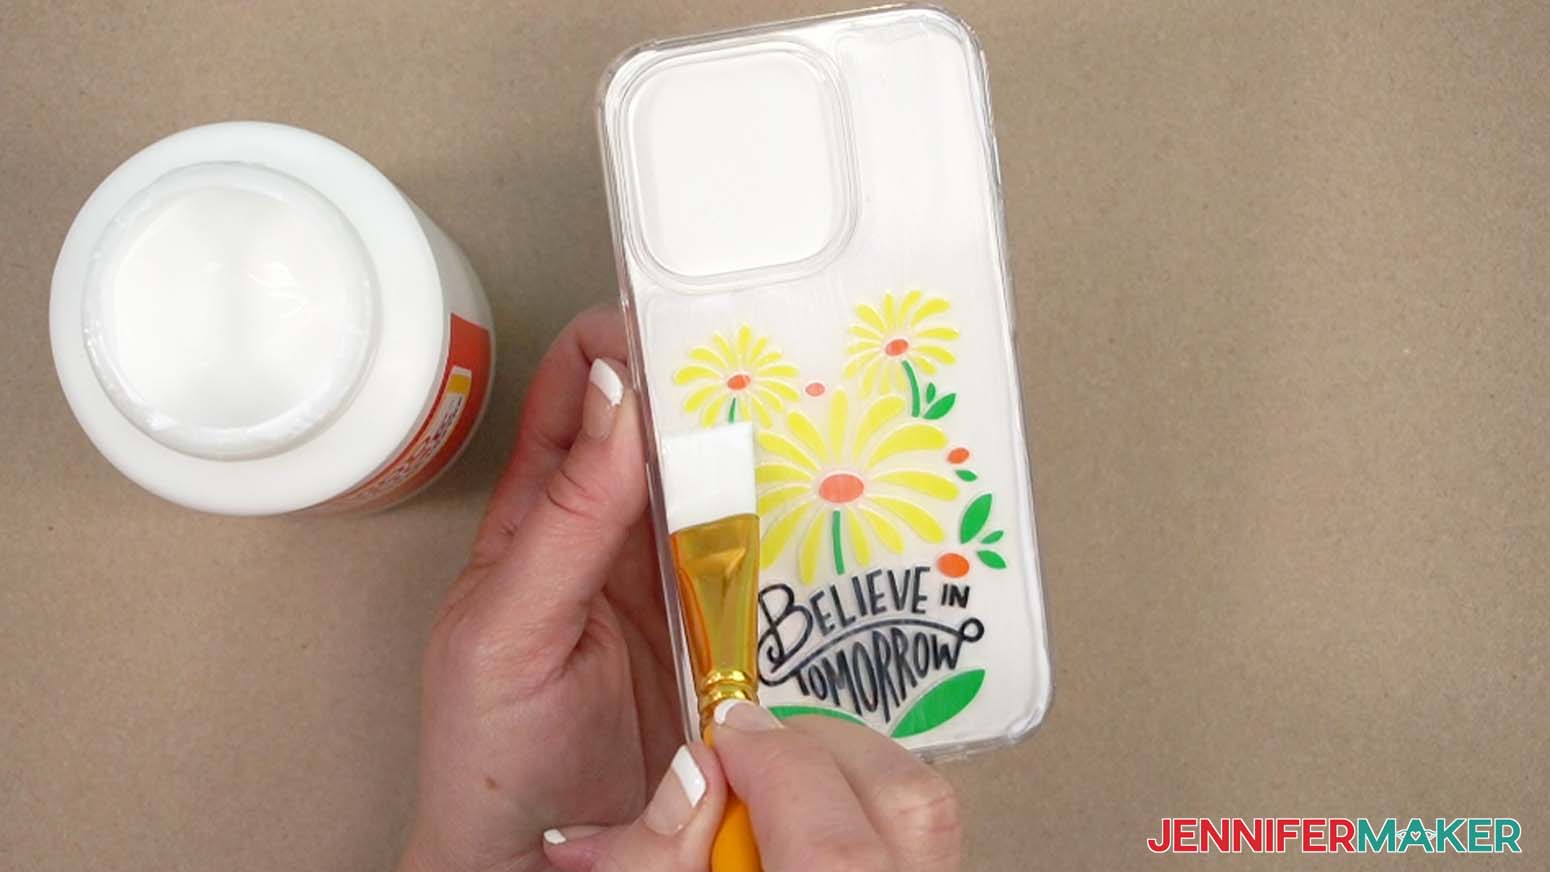
OPTIONAL: SEAL YOUR PHONE CASE’S EXTERIOR
OPTION 1: SEAL WITH MOD PODGE
- Once your vinyl decal is in place, use a lint-free cloth to wipe down your phone case and make sure it is free of any smudges or fingerprints.
- Use a bristle paint brush to apply a small amount of Mod Podge to your phone case.
TIP: You can use any type of Mod Podge to seal your phone cases, including matte, satin, glossy, glitter, or even glow-in-the-dark! - Brushing in one direction across its surface, completely cover your case with an even layer of Mod Podge to fully protect the vinyl.
- Allow at least 20 minutes for the Mod Podge to dry to the touch, and 24 hours for a full cure.
OPTION 2: SEAL WITH SPRAY SEALANT
- After applying your vinyl design, use a lint-free cloth to wipe down your phone case and make sure it is free of any smudges or fingerprints.
- In a well-ventilated area, follow the manufacturer’s safety instructions to evenly spray several thin layers of sealant on the phone case.
NOTE: Four layers worked well for mine. - Allow at least 10 minutes for the spray sealant to dry to the touch, and one to five hours for a full cure.
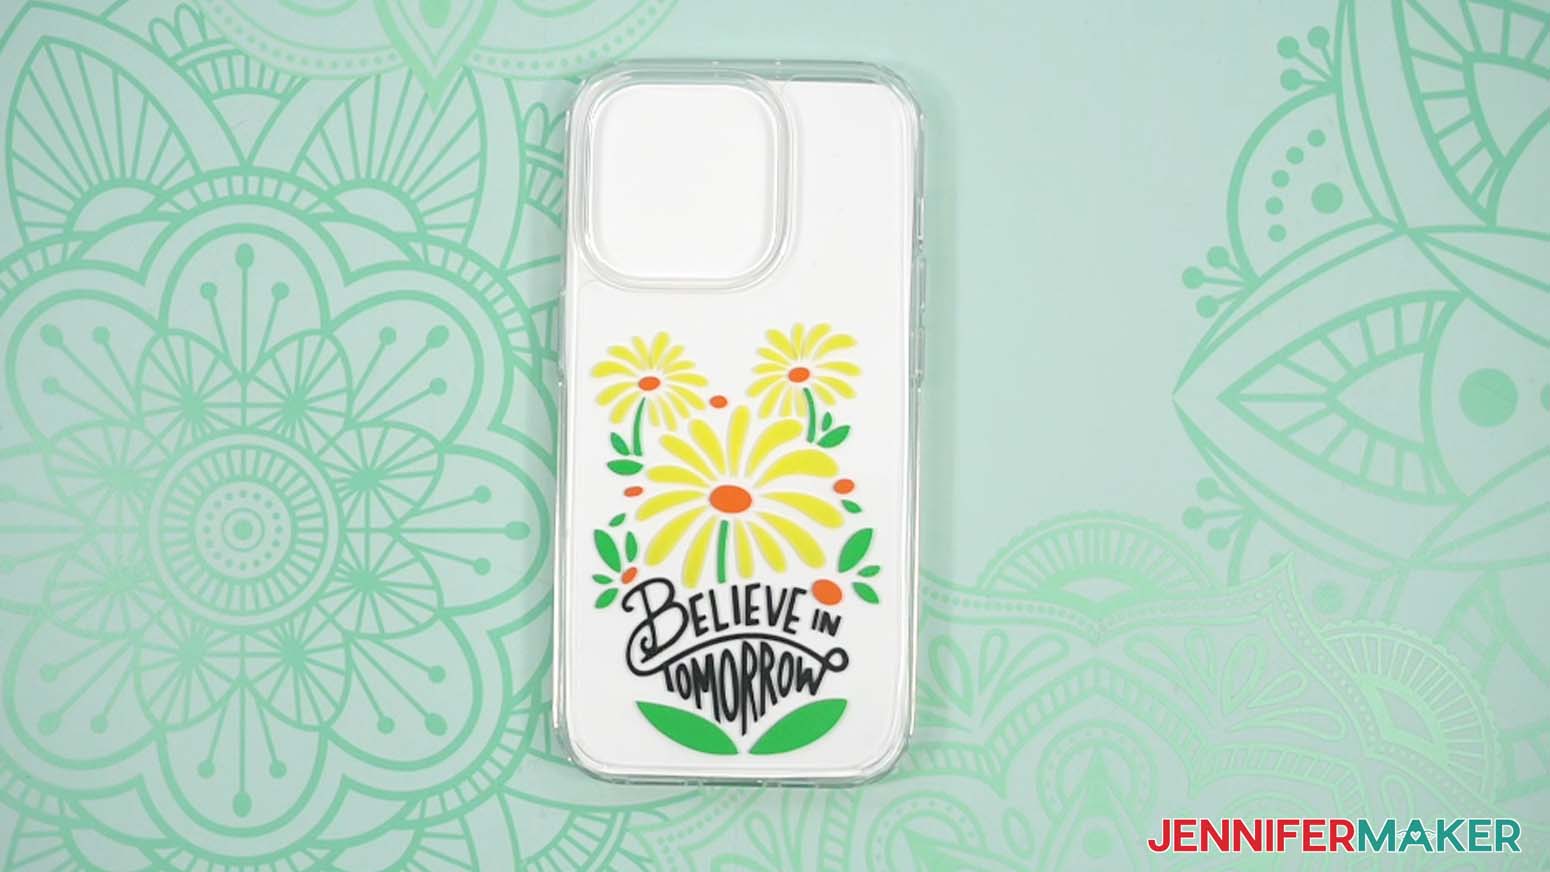
STEP 4: SHOW IT OFF
Here is what my finished phone case looks like! Now you can pop your phone into its case and enjoy its new layered design!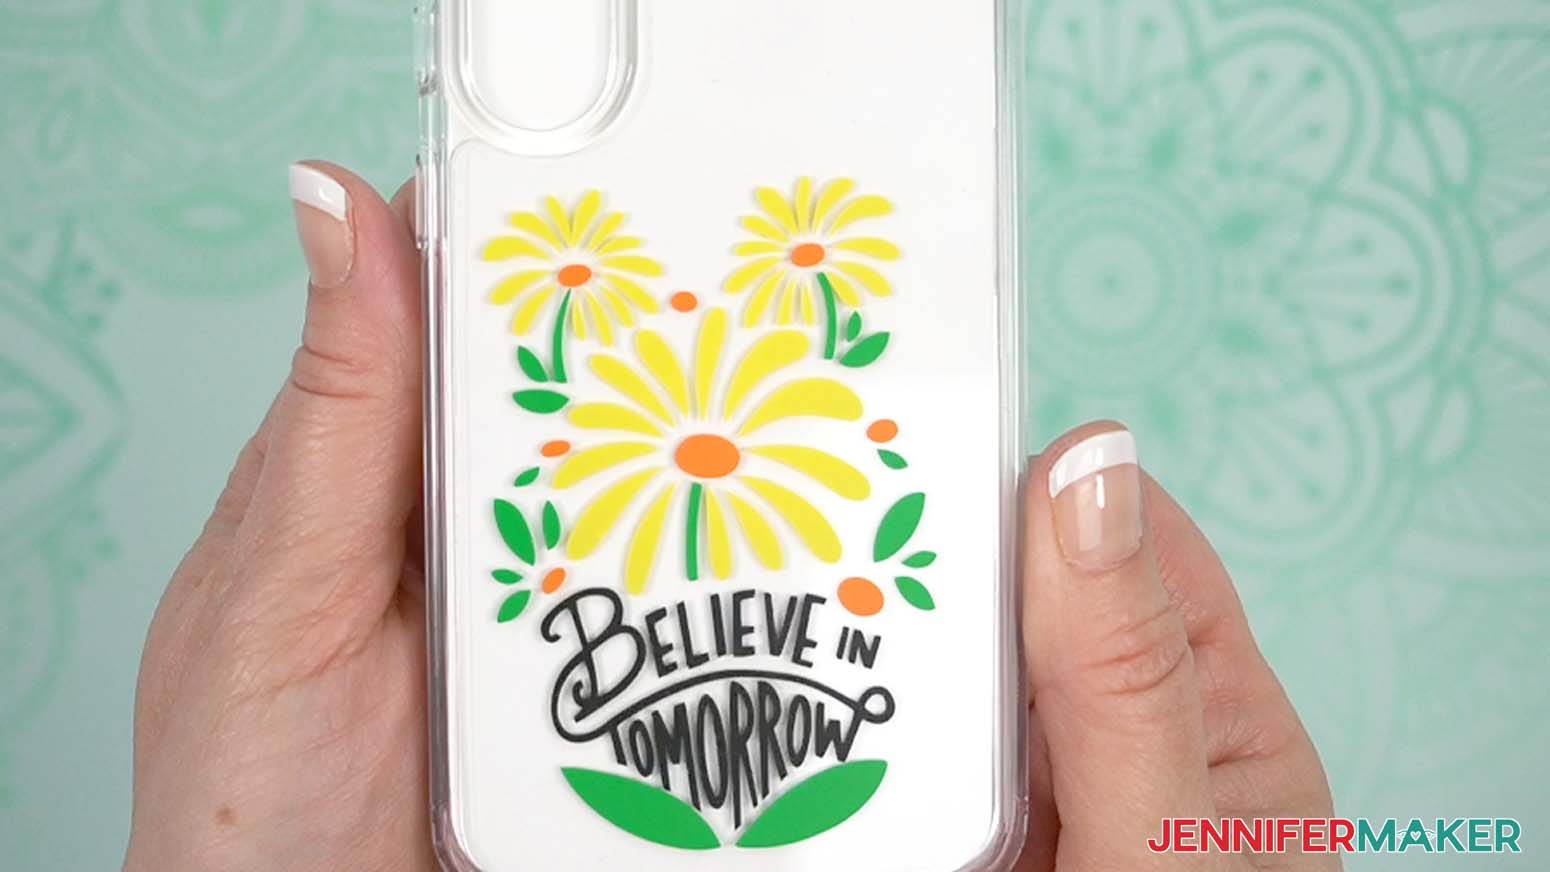
Notes
Finished Case Sizes:
iPhone 14 Pro: 3” x 6”
iPhone 14 Pro Max: 3.25” x 6.5”
Fonts Used: Hand drawn
Care Instructions: Wipe clean with a lint-free cloth.
Answers to Your Questions About How to Make Phone Cases
Q: I want a different design. How do I design my own custom phone case?
A: You can learn how to design your own customized phone case with photos using Canva in my ADVANCE program. Learn more about ADVANCE here!
Q: Can I cut these phone case SVG pieces on a Cricut Joy Xtra or original Cricut Joy?
A: Yes, you can! The phone case design SVG pieces in my free download file can be cut by any Cricut machine including the Joy and Joy Xtra.
Q: Do I have to use a Cricut to cut my phone case designs?
A: No! You can make a phone case from vinyl that works with your equipment, or even just with scissors. We always include several versions of each free file in the free download ZIP file. If you have a Silhouette Cameo, which uses Silhouette Studio, you can use the DXF file in Silhouette Basic Edition. If you have upgraded to Silhouette Designer Edition, Designer Edition Plus, or Business, you can use the SVG format with your Silhouette machine to cut each intricate design. If you don’t have a cutting machine, you can print and then cut out my digital download PDF files, it will just take quite a while! The ZIP archive in my resource library includes these file types and more!
Q: Help! My Cricut Design Space screen looks different from yours!
A: If you’re using the latest version of Cricut Design Space, your screen may have slight variations than the screen you see on the video tutorial. Good news: All of the same functions are there, they may just be in different spots or have new icons. Pause the video if you need, or follow along with the written tutorial. If you get stuck, ask for expert support in our Facebook group. Our group has become not just a help center, but also a vibrant community of real people and crafters! Plus, you can catch the latest news on JenniferMaker tutorials and more.
Q: Can I make and sell these vinyl phone cases designs?
A: I love supporting creative entrepreneurs! If you have your own phone case business and want to use my designs and projects for commercial use, please familiarize yourself with my important licensing information before selling your crafts.
I do not permit sale of my digital items, but you can sell the creative goods you make with them — as long as you follow my licensing requirements. That means you cannot sell the phone case design SVG files, but you can sell a custom iPhone case that you made with the files on platforms like Etsy or wherever you host your custom phone case business.
Q: Where can I find the supplies and tools to make my own phone case?
A: My phone cases SVG files can be made with simple supplies you may already have in your crafting stash. I like to shop Amazon’s online store for their free standard shipping with my Amazon Prime membership (just make sure to look for sellers with 5-star reviews and review each product page carefully to ensure that you receive high quality products). If you can’t find what you’re looking for in an online shop, you can also find most, if not all of the supplies and tools at your local craft store.
Q: What style of phone do your phone case designs work best with? Will your designs work on an iPhone X, a Google Pixel, a Samsung phone, etc.?
A: My phone case files have been designed so you can customize them to fit any style of phone case. That means they’ll work whether you have an iPhone case, a Samsung case, or any other case for a particular phone model.
Q: How do I make a phone case at home?
A: You can make a phone case at home with just a few easy supplies you might already have on hand! I made mine using my Cricut cutting machine and some permanent vinyl.
Q: Are phone cases easy to make?
A: Yes, phone cases are easy to make, especially if you follow the tutorial for my phone cases download. I’ll show you how to make phone cases easily with my step-by-step process for measuring, designing, cutting, and layering the vinyl to make your phone case.
Q: What is the best material to make a cell phone case out of?
A: I’ve found the best material to make a cell phone case out of is permanent vinyl on a plastic phone case. Vinyl doesn’t stick well to silicone cases, so I’d avoid them.
Q: How do I start a DIY phone case business?
A: If you’re interested in selling your homemade crafts, I wrote The Maker Marketplace Handbook just for you! This book teaches everything you need to know about starting your own business, including how to price and market your phone cases and how to evaluate your business along the way!
Get my free SVG/DXF/PDF files to make phone cases!
(If you do not see the signup form above, click here.)
I love seeing what you make with my designs and how you use them! Please share a photo of your phone cases in our Facebook group or tag me on social media with #jennifermaker.
Love,

Want to remember this? Save this Tutorial on How To Make Phone Cases to your favorite Pinterest Board!