Learn how to make a door corner topper to decorate your doorway!
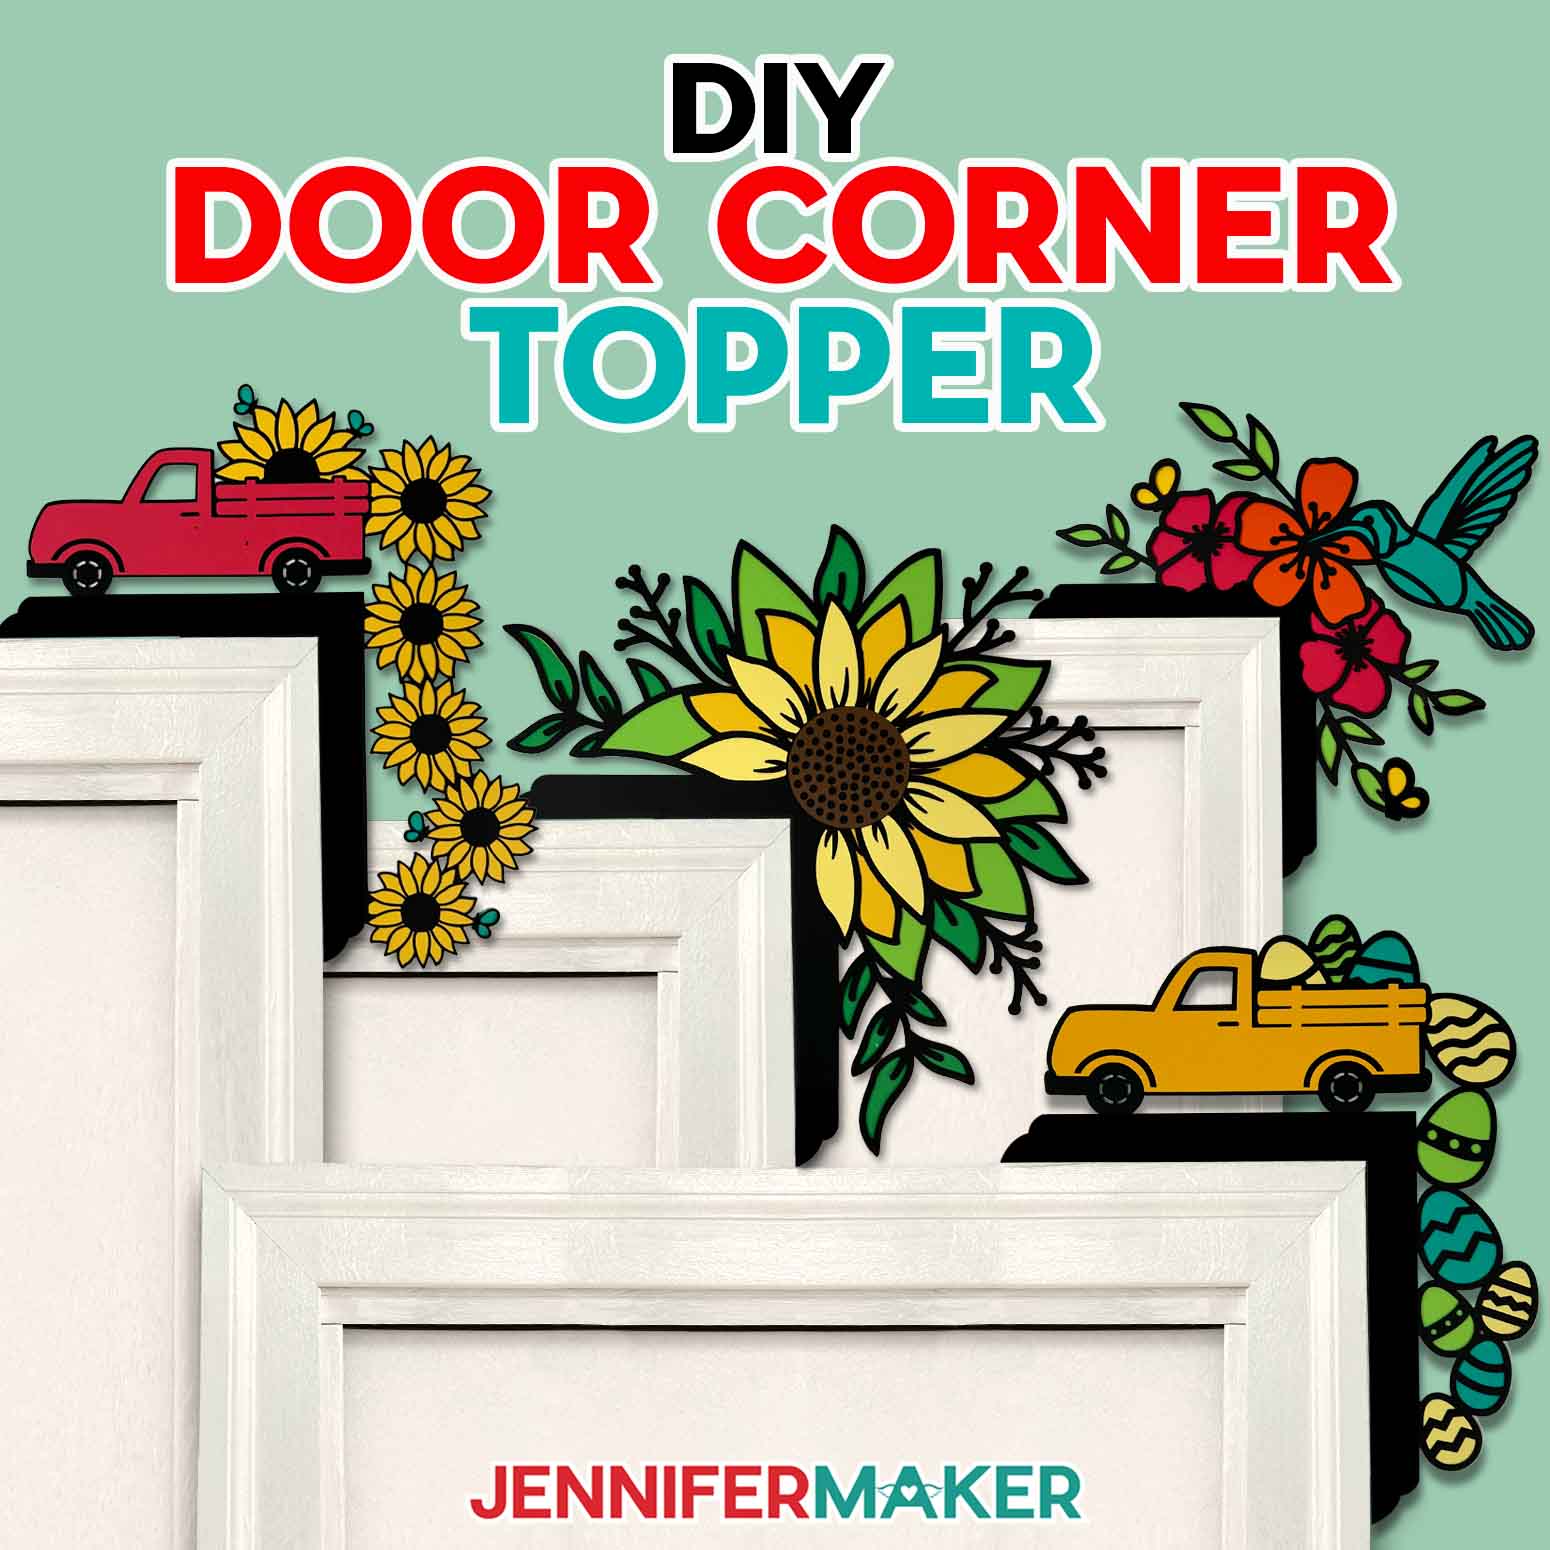
Who says door corners have to be boring? This delightful project brings a festive touch to an often-overlooked area of your home! With a Cricut cutting machine and some colorful cardstock, you can create charming DIY Door Corner Topper designs that celebrate the joy of spring. Whether you’re drawn to a bright sunflower, a fluttering hummingbird, or a vintage truck spilling over with Easter eggs, these designs are the perfect addition to your spring holiday setup!
Watch the full step-by-step video tutorial on how to make a door corner topper:

I’ve created three fun DIY door corner topper designs you can make to add a dash of whimsy to areas that don’t usually get much attention. The sunflower is a more timeless design, making it a versatile choice that can stay up long past when the season ends. Meanwhile, the hummingbird and truck with Easter eggs door topper signs bring the festive spirit of spring indoors, making them great for themed parties or as part of your Easter holiday decor.

Cutting the layers from premium quality materials with a cutting machine ensures exact cuts and a precise assembly. I demonstrate with my Cricut Maker 3, but the files can be cut on any Maker series or Explore series machine, the Cricut Venture, or they can be resized to fit the Cricut Joy Xtra. They are a little too detailed to cut small enough to fit on the original Cricut Joy.
Once all the layers are ready, assembling them is easy peasy. I’ll show you how each design comes together using my favorite craft glue to attach the layers. The result? A three-dimensional masterpiece ready to add a touch of creativity to many different spaces.

Installing your new decoration is simple — simply attach the topper to a smooth surface above a door corner using adhesive putty or Command strips. This allows for easy removal and repositioning, so you can switch up your decor whenever inspiration strikes!
Looking for more creative uses for these DIY door corner topper designs? Make and attach a smaller version to a photo for a fun and seasonal picture frame decoration! These door corner decors also make an ideal housewarming gift for someone who appreciates handmade items — they’ll showcase both your craftsmanship AND your good taste!

If you’re ready to make these charming frame decors a cherished part of your home decor collection, get the full details in my step-by-step video tutorial, or follow the text-based tutorial with photos below. With just a few easy steps, you’ll have a pretty decoration that makes your home feel even more welcoming with a festive touch!
Would you like to customize your own DIY door corner topper design? I have a workshop just for you in my ADVANCE program. Learn more about ADVANCE with JenniferMaker here!

Let me show you how to make a DIY door corner topper! This post contains some affiliate links for your convenience (which means if you make a purchase after clicking a link I will earn a small commission but it won’t cost you a penny more, there is no additional cost)! Read my full disclosure policy.
Materials to Make a DIY Door Corner Topper
View my papercraft Amazon shopping list for several of the items I used!
- Five to Six (5-6) Sheets of 12″ x 12″ 65 lb. Cardstock (in various colors) -AND-
- One (1) Sheet of 12″ x 12″ 65 lb. Teal Cardstock (optional for Truck and Hummingbird designs)
- A way to cut your materials – I’m using the Cricut Maker 3, but you can also use a Cricut Maker series, a Cricut Explore series machine, the Cricut Venture, or even the Cricut Joy Xtra
- Cricut Green StandardGrip Machine Mat 12″ x 12”
- Weeding Tool
- Scraper
- Spatula
- Brayer
- Measuring Tape
- Craft Glue (I used Bearly Art Precision Craft Glue)
- Paper Towel (optional to wipe away glue)
- Blu-Tack Reusable Adhesive -OR-
- Command Strips – small (optional for attaching topper to wall)

How to Make a DIY Door Corner Topper!

DIY Door Corner Topper
Learn how to make a DIY Door Corner Topper decoration with a Cricut!
Materials
- Five to Six (5-6) Sheets of 12" x 12" 65 lb. Cardstock (in various colors) -AND-
- One (1) Sheet of 12" x 12" 65 lb. Teal Cardstock (optional for Truck and Hummingbird designs)
- Blu-Tack Reusable Adhesive -OR-
- Command Strips (small) (optional for attaching topper to wall)
- Design #719 (My free SVG/PDF/DXF design files are available in my free resource library - get the password by filling out the form at the bottom of this page)
Tools
- A way to cut your materials - I’m using the Cricut Maker 3, but you can also use the Cricut Maker, a Cricut Explore Series machine, or the Cricut Venture
- Cricut Green StandardGrip Machine Mat 12" x 12”
- Brayer
- Weeding Tool
- Scraper
- Spatula
- Craft Glue - I used Bearly Art Precision Craft Glue
- Paper Towel (optional to wipe away glue)
Instructions
STEP 1: GET MY FREE DIY DOOR CORNER TOPPER DESIGNS
First, download my DIY Door Corner Topper designs from my free library – look for Design #719. Alternatively, you can use the Save This Project form near the top of this post and the design link will be emailed to you.
The designs are sized to be cut on a Cricut Maker, Maker 3, Explore 3, Explore Air 2, and Venture cutting machines. The designs can be resized, but make sure they are under 11.5” tall or wide so they can be cut from 12” x 12” cardstock. You can resize the designs to cut on a Cricut Joy Xtra, but they are too intricate for a Cricut Joy.
The SVG and DXF folders contain three door corner topper designs. There’s a Hummingbird, a Sunflower, and a Truck with Easter eggs.
TIP: If you’re not sure how to download zip files and upload designs, go to jennifermaker.com/svgs.
STEP 2: PREPARE AND CUT YOUR DIY DOOR CORNER TOPPER DESIGNS
CRICUT DESIGN SPACE
- In Cricut Design Space on a blank Canvas, click “Upload.”
- Click “Upload Image.”
- Click “Browse.”
- Find and select the SVG of your choice from the main SVG folder.
NOTE: I’ll demonstrate with the Sunflower design. - Click “Open” and then “Continue.”
- Click “Upload” to add the design to your Canvas.

NOTE: If you want the design to fit a left doorway corner, select the design, click “Flip,” and select “Flip Horizontal.” - Click “Save” and give your project a name.
- “Ungroup” the design.
- If you want to use different color cardstock for the pieces, select the appropriate layer in the Layers Panel and use the Color Box at the top to adjust it.
- Your door corner topper is ready to cut! Make sure the correct machine is selected in the top right, then click “Make.”
- On the Prepare screen, make sure the correct Material Size is selected for each of your materials.
- Select the first mat again and click “Continue.”


CUTTING
- On the Make screen, I used the “Medium Cardstock - 80 lb (216 gsm)” setting with “More” Pressure for 65 lb. cardstock.
- Place your first mat’s material pretty-side up on a green StandardGrip machine mat.
- Use a brayer to make sure it’s fully adhered.
- Check that your Premium Fine-Point Blade is clean and in the correct clamp.
- Press the flashing “Load/Unload” button to load the prepared mat into your Cricut.
- Press the flashing middle button to begin cutting.
- Before unloading the mat, use your weeding tool to peel back a corner of the material to make sure the cut went all the way through. If it didn’t, smooth the material back down into place and press the middle button again for another pass.
- Once the material is cut all the way through, unload the mat, flip it over onto your work surface, and roll it back to release the material.
TIP: If you have any issues with your cuts, check out my Intricate Cuts tutorial. - Follow steps 2-8 to continue cutting the rest of your mats.
NOTE: If your design has a small design element (the Sunflower’s circle and the Truck’s top layer), make sure to keep track of it.
TIP: Use a small scraper tool to push any leftover bits of material off of your mat between cuts. - If any stubborn cardstock stays attached to the tiny holes on the door topper pieces, use a weeding tool to carefully poke them out.


STEP 3: ASSEMBLE YOUR DIY DOOR CORNER TOPPER
I’ll demonstrate with the Sunflower, but the Hummingbird and Truck designs follow the same steps – with a couple of exceptions I have noted.
- Using your Canvas in Cricut Design Space as reference, place the layers in the correct order, facing up.
NOTE: The Sunflower door corner topper has six layers. If your colors match the ones I used, the dark green piece goes in back, with the light green piece over it, the darker yellow piece over that, then the lighter yellow piece, the black piece, then finally the small brown circle piece on top. - Set the small circle piece aside, then turn the stack of larger layers over so the backmost piece is on top.
- Pick up the backmost piece, and as if you’re opening a book, turn it over and place it face up next to the layer underneath.
- Apply craft glue to the back of the next layer on top of the stack. Be sure to apply glue on the thin cutout areas.
TIP: Add small dots of glue to the thinnest areas to avoid seepage. - Pick up the glued layer and turn it glue-side down.
- Use the L-shaped door support piece as a guide to line up the edges on the glued layer with the edges on the last piece you flipped over. Be sure the edges of all areas are aligned and flush before the glue dries.
- Press the layers together over the entire design to adhere them, paying special attention to the thin cut areas.
TIP: If any glue seeps out from the edges or from underneath the cutouts, quickly wipe it away with a finger or paper towel. - Repeat steps 3-7 with the next two layers, in order.
- Apply craft glue to the back of the black piece. Avoid adding glue to the back of the four small berry branches because they do not attach to a layer underneath.
- Pick up the black layer and turn it glue-side down.
- Use the L-shaped corner piece as a guide to line up the edges on the glued layer with the edges on the last piece you flipped over. Be sure the edges of all areas are aligned and flush before the glue dries.
- Grab the final top layer, which is the center of the Sunflower. Apply small dots of craft glue to the back, avoiding the cutouts.
- Turn the piece glue-side down and center it over the solid circular area on the black piece.
- Press to adhere the Sunflower center piece to the stack and complete your door corner topper.


VARIATION: HUMMINGBIRD DESIGN
Order of layers: There are six layers. If your colors match the ones I used, the green piece goes in back, with the yellow piece over it, the red piece over that, then the orange piece, the blue piece, then finally the black piece on top.

VARIATION: TRUCK DESIGN
Order of layers: There are five layers. If your colors match the ones I used, the green piece goes in back, with the blue piece over it, the yellow piece over that, then the black piece, then finally the small orange truck piece on top.
- Follow the directions in "STEP 3: ASSEMBLE YOUR DIY DOOR CORNER TOPPER" to assemble the four larger layers.
- Apply glue to the back of the small truck piece, avoiding the cutouts.
- Turn it glue-side down and center it within the previous layer’s edges and window cutouts. Press to adhere it.

STEP 4: SHOW IT OFF!
Here are my finished DIY door corner toppers!

Use removable adhesive to attach your door corner topper to the corner of a doorway or picture frame.

Notes
Finished door corner topper measurements:
Hummingbird: 11.49” x 10.41”
Sunflower: 10.91” x 11.5”
Easter Egg Truck: 8” x 9.34”
Answers to Your Questions About How to Make a DIY Door Corner Topper
Q: I want to customize my own door corner topper. How do I do that?
A: You can learn how to make a customized door corner topper in my ADVANCE program. Learn more about ADVANCE here!

Q: What is a door topper?
A: A DIY door corner topper is a decorative piece of art intended to decorate the outside of a 90 degree doorway corner.
Q: What kind of paper do I use?
A: I used 65 lb. cardstock for my door corner signs, but you can use 80 or 100 lb. cardstock as well — just be sure to adjust your cut settings for each type of material. I don’t recommend using lighter cardstock because your topper may be too flimsy to hold its shape when hung, or may ripple when glued.
Q: Can I cut a door frame topper out of wood instead?
A: You can use my SVG or DXF files to make layered wooden door toppers using a Cricut knife blade, Glowforge, or another machine that can cut wood!
Q: How do I attach the layers of the topper?
A: I recommend attaching the cardstock layers of your DIY door corner topper with a high-quality craft glue (my favorite is Bearly Art Precision Craft Glue).
Q: How to I attach the topper to a wall?
A: Some adhesive putty (like Blue-Tack) or adhesive strips (like Command Strips) is the perfect way to attach your DIY door corner topper to the wall above your door. Using removable adhesive means you can move your toppers around or swap them out without damaging them or your wall.
Q: How can I make my DIY door corner topper more unique?
A: Feel free to customize your door corner topper however you wish! Cut it from different types of cardstock, patterned paper, or dress it up with acrylic paint, stickers, feathers, or other craft supplies. You can even turn up the sparkle with a rhinestone door topper for an especially festive occasion during this spring holiday season!
Q: Help! My Cricut Design Space screen looks different than yours!
A: If you’re using the latest version of Cricut Design Space, your screen may have slight variations than the screen you see on the video tutorial. Good news: All of the same functions are there, they may just be in different spots or have new icons. Pause the video if you need, or follow along with the written tutorial. If you get stuck, ask for expert support in our Facebook group. Our group is a fun and friendly place to share your projects, ask questions, and find inspiration! Plus, you can catch the latest news on JenniferMaker projects, files, tutorials and more.
Q: Can I make and sell my door corner toppers?
A: I love supporting creative entrepreneurs! If you want to use my designs and projects for commercial use, please familiarize yourself with my important licensing information before selling your crafts.
I do not permit sale of my digital items, but you can sell the creative goods you make with them — as long as you follow my licensing requirements. That means you cannot sell the door corner topper SVG, PDF, or DXF files, but you can sell door corner toppers that you made with the files within the guidelines linked above.
Q: How do I know if my design is the right size?
A: Not sure if your design is uploading at the correct size or aspect ratio? If you are using Cricut Design Space Beta for Desktop, try switching to the Live version as this has worked in our testing. Here are the dimensions you should see for each design on your Canvas:
-
door-corner-topper-hummingbird-jennifermaker-SVG: 11.49″ x 10.77″
- door-corner-topper-sunflower-jennifermaker-SVG: 10.88″ x 11.49″
- door-corner-topper-truck-jennifermaker-SVG: 8.77″ x 10.08″
- door-corner-topper-toolkit-jennifermaker-SVG: 11.96″ x 11.92″
If you need help resizing your design, open my Resizing Guide in a new window.
Q: Can I resize the door corner topper SVGs?
A: Yes, you can resize the SVGs in my free download to various sizes that work best for you. I don’t recommend sizing them a lot smaller because they will be very tiny and hard to cut, but you can size them small enough to cut on 8.5″ x 11″ material.
Q: How do I beautify my door? Do you have other door decor I can make?
A: I have lots of fun wreath and door hanger projects for you to try! Check out a few of my favorites that will look lovely hanging on doors, inside or out:
- Paper Butterfly Wreath
- Spring Suncatcher Window Clings
- DIY Wood Door Hangers
- Rainbow of Hearts Window Decoration
- Giant Paper Sunflower
Get my free SVG/DXF/PDF files to make a DIY door corner topper!
(If you do not see the signup form above, click here.)
I love seeing what you make with my designs and how you use them! Please share a photo of your DIY door corner topper in our Facebook group or tag me on social media with #jennifermaker.
Love,

Want to remember this? Save this DIY Door Corner Topper tutorial to your favorite Pinterest Board!