Learn how to make a pop-up letter card with fun messages!
Cards are some of the most popular Cricut crafting projects and I think it’s for good reason! Nothing beats a cute homemade card, and they’re so easy to make with the help of a cutting machine. I’ll show you how to combine careful cuts and creases to make a pop-up letter card where your message will pop off of the page!
Watch the full step-by-step video tutorial on making a pop up letter card:


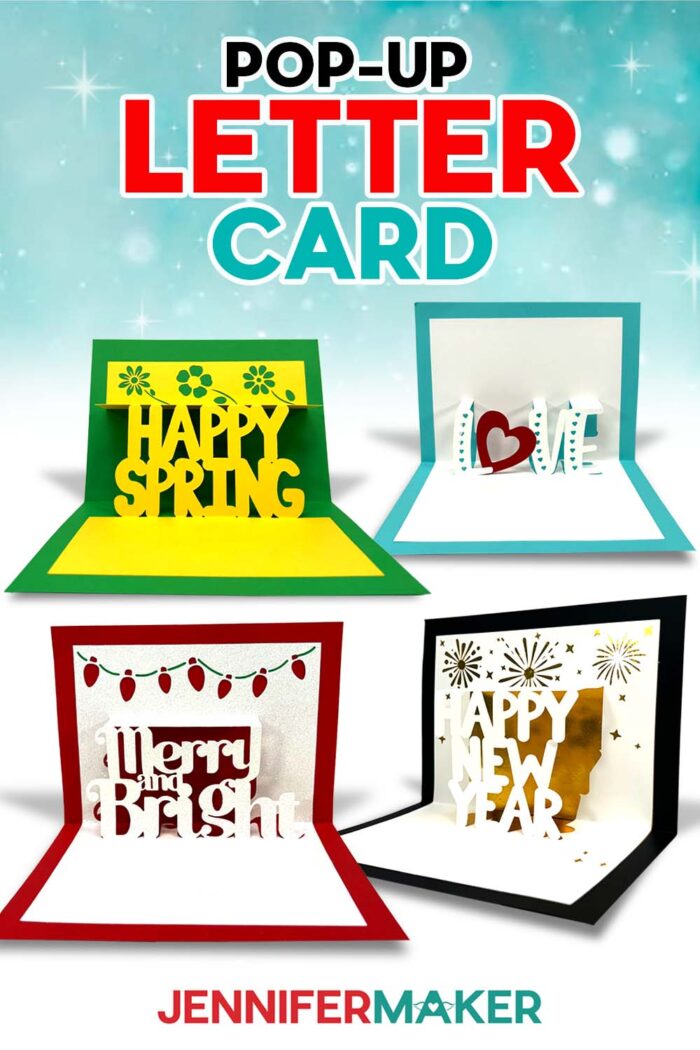
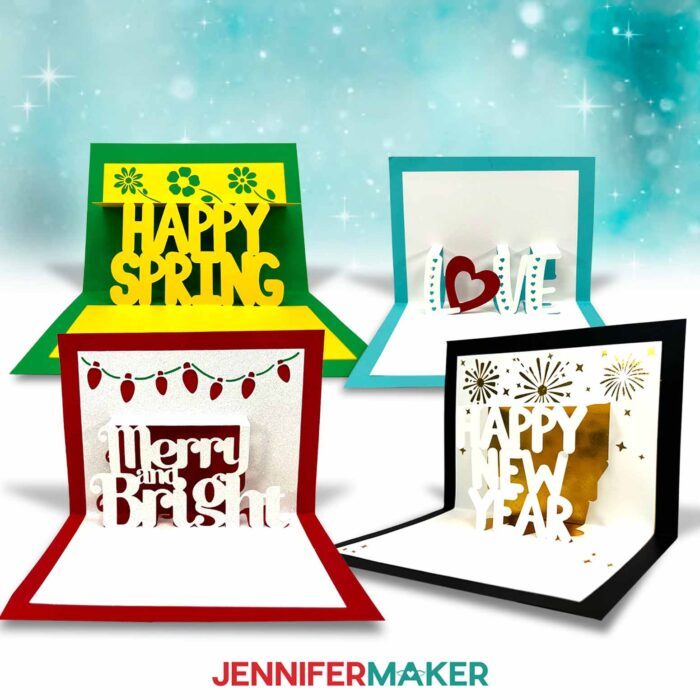
Though we often start projects with plain ol’ flat cardstock, it’s so easy to transform this everyday material into an exciting paper project that springs to life. You just can’t go wrong with a fun and easy 3D handcraft! These Pop-Up Letter Cards are no exception. And since a popup card is a perfect, thoughtful gift for many different occasions, I have three unique designs that your friends and family are sure to enjoy! Each memorable card is a great way to show your long distance loved ones that you’re thinking of them.
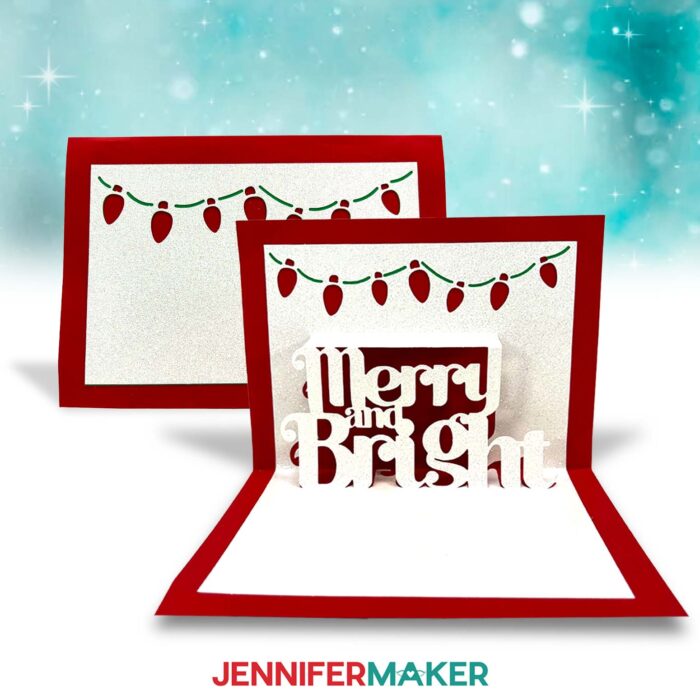
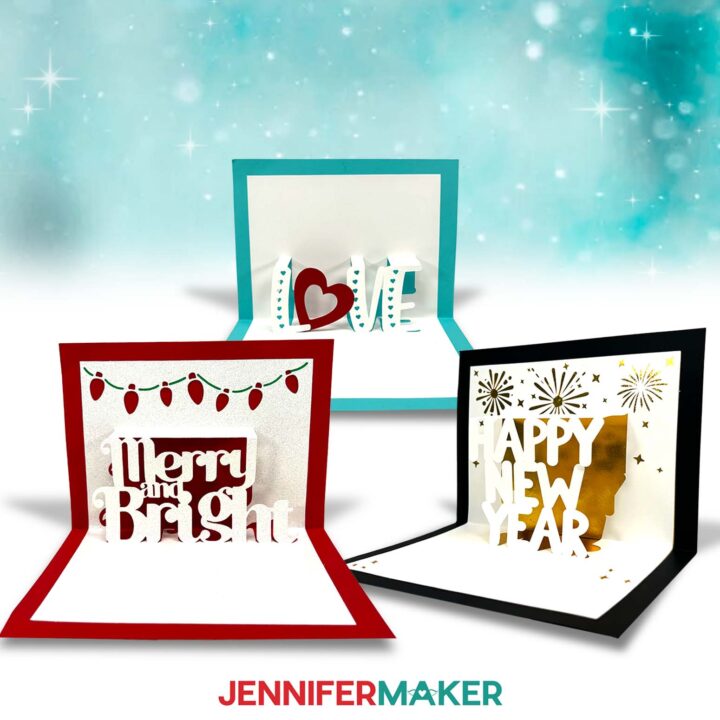
My Merry and Bright design looks like a mantel decorated for winter holidays, complete with a string of lights! The glitter cardstock I used really makes it twinkle like a fresh snowfall. What a beautiful way to spread some cheer!
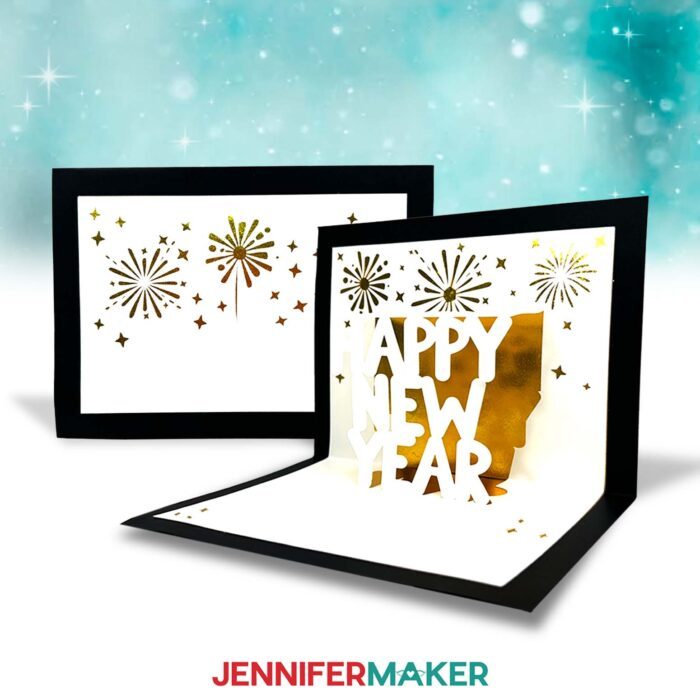
Or, celebrate the start of a splendid year with my Happy New Year pop up letter card. I love how the fireworks frame the sentiment! And did you know that gold on New Years stands for good fortune, wealth, and prosperity for the New Year? So this gold foil cardstock is the perfect accent!
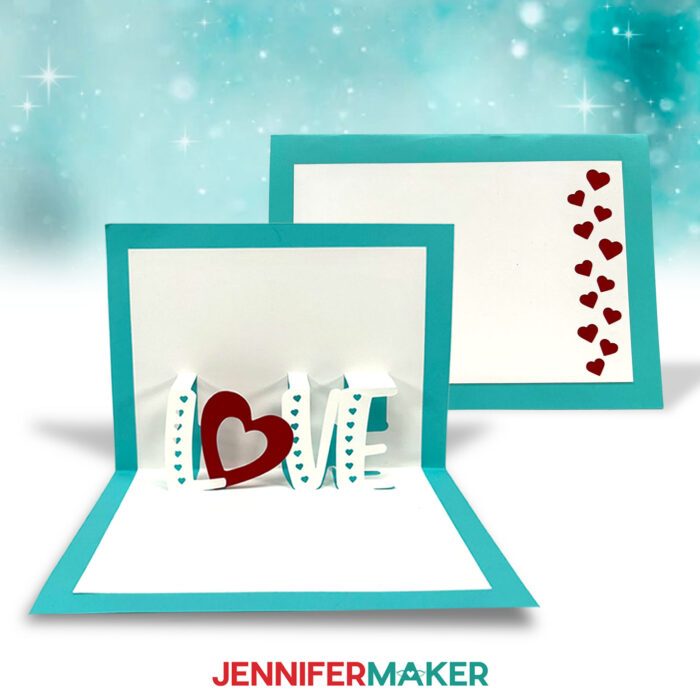
And for Valentine’s Day or just a general gift, my Love design is sure to put a smile on your loved one’s face no matter the season. I used regular cardstock for my Love card, but you can use glitter or foil cardstock for this one too, if you like.
And don’t worry, I’ll share the cut settings that gave me the best results for all three kinds of cardstock! I’ll also go over the differences between “score” versus “no-score” files. That way, you’ll know how to create the best crease lines for your cardstock based on your tools and equipment. Plus, I’ll teach you how to get the folds exactly right so your card’s message pops up every time it’s opened!
Making a pop up letter card can seem intimidating at first, but I just know you can do it! I’ll teach you how to cut and assemble your card with decorative accents on the outside, and a beautiful pop-up message on the inside. All you need is the right kind of paper and the right kind of glue. Heavy cardstock might be too difficult to fold, and construction paper will be too flimsy, so 65 lb cardstock should do the trick! And, as always, I have my favorite Bearly Art craft glue on hand to keep it all together.
Now, getting the cuts just right is super important for even simple pop-up cards like these. You want the card to be able to fold, and you want your letters to pop when you open the card. That’s why I used a Cricut Cutting machine, a Fine-Point Blade, and a StandardGrip Machine mat to cut my cards. I used my Cricut Maker 3, but you can also use an original Maker, an Explore series machine, a Venture, or a Cricut Joy Xtra.
You can even use a Cricut Joy with the special designs I made for the smaller machines! The Joy versions will be smaller, but they’re super adorable! If you try to send them through the mail in a matching envelope, they might not get delivered correctly, so I recommend hand delivery!
If you use a different cutting machine, I provide DXF file versions of all my designs so you can still make a pop up letter card without a Cricut. I also include PDF files that you can print and cut by hand, but I like letting my machine do all the work to make sure my cuts are as precise as possible.
And if you want to learn how to create a custom pop up letter card with your own design like my Happy Spring example, I can show you how in my ADVANCE with JenniferMaker membership program!
If you plan to score your cards to make the crease lines for your pop up letter card, you’ll also want the proper tool for your machine and material, such as a single scoring wheel or a scoring stylus. Or you can use your cutting machine to create crease lines using a Fine-Point Blade! Not sure which tools work with your Cricut model? I cover all that in my step-by-step video, too.
Let me show you how to make a pop-up letter card! This post contains some affiliate links for your convenience (which means if you make a purchase after clicking a link I will earn a small commission but it won’t cost you a penny more, there is no additional cost)! Read my full disclosure policy.
Materials to Make A Pop Up Letter Card
View my Amazon shopping list for the exact items I used!
- One (1) Sheet of Green Palette 12″ x 12″ 65 lb Cardstock
- One (1) Sheet of Red Palette 12″ x 12″ 65 lb Cardstock
- One (1) Sheet of Teal Palette 12″ x 12″ 65 lb Cardstock
- One (1) Sheet of White 12″ x 12″ 65 lb Cardstock
- One (1) Sheet of Black 12″ x 12″ 65 lb Cardstock
- One (1) Sheet of White Glitter 12″ x 12″ Cardstock
- Two (2) Sheets of Gold Foil 8.5″ x 11″ 65 lb Cardstock
- A way to cut your materials – I’m using the Cricut Maker 3, but you can also use the Cricut Maker, a Cricut Explore Series machine, the Cricut Venture, the Cricut Joy Xtra, or even the Cricut Joy
- Cricut Green StandardGrip Machine Mat 12” x 12”
- Craft Glue (I used Bearly Art Precision Glue)
- Brayer
- Spatula
- Scraper
- Weeding Tool (for popping out small cutouts from intricate areas)
- Scoring Stylus (optional for files with score lines) – OR –
- Single Scoring Wheel (optional for files with score lines)
How to Make A Pop Up Letter Card
Pop Up Letter Card
Learn to make a Pop Up Letter Card with a variety of eye-catching materials and designs!
Materials
- One (1) Sheet of Green Palette 12" x 12" 65 lb Cardstock
- One (1) Sheet of Red 12" x 12" 65 lb Cardstock
- One (1) Sheet of Teal Palette 12" x 12" 65 lb Cardstock
- One (1) Sheet of White 12" x 12" 65 lb Cardstock
- One (1) Sheet of Black 12" x 12" 65 lb Cardstock
- One (1) Sheet of White Glitter 12" x 12" Cardstock
- Two (2) Sheets of Gold Foil 8.5" x 11" 65 lb Cardstock
- Design #683 (My free SVG/PDF/DXF design files are available in my free resource library - get the password by filling out the form at the bottom of this page)
Tools
- A way to cut your cardstock - I’m using the Cricut Maker 3, but you can also use the Cricut Maker, a Cricut Explore Series machine, the Cricut Venture, the Cricut Joy, or the Cricut Joy Xtra
- Cricut Green StandardGrip Machine Mat 12" x 12"
- Craft Glue (I used Bearly Art Precision Glue)
- Brayer
- Spatula
- Scraper
- Weeding Tool (for popping out small cutouts from intricate areas)
- Scoring Stylus (optional for files with score lines) -OR-
- Single Scoring Wheel (optional for files with score lines)
Instructions
STEP 1: GET MY FREE POP UP LETTER CARD DESIGNS
First, download my Pop Up Letter Card files from my free library – look for Design #683. Alternatively, you can use the Save This Project form near the top of this post and the design link will be emailed to you.
In the SVG folder, you’ll find “score” and “no-score” versions for all three variations of my design to cut on a cutting machine. Score versions are for use with a scoring tool, while the no-score versions can be used without a scoring tool, or if you prefer dashed cut lines instead of scores.
There is also a DXF folder with cut files, and a PDF folder with versions you can print and cut by hand.
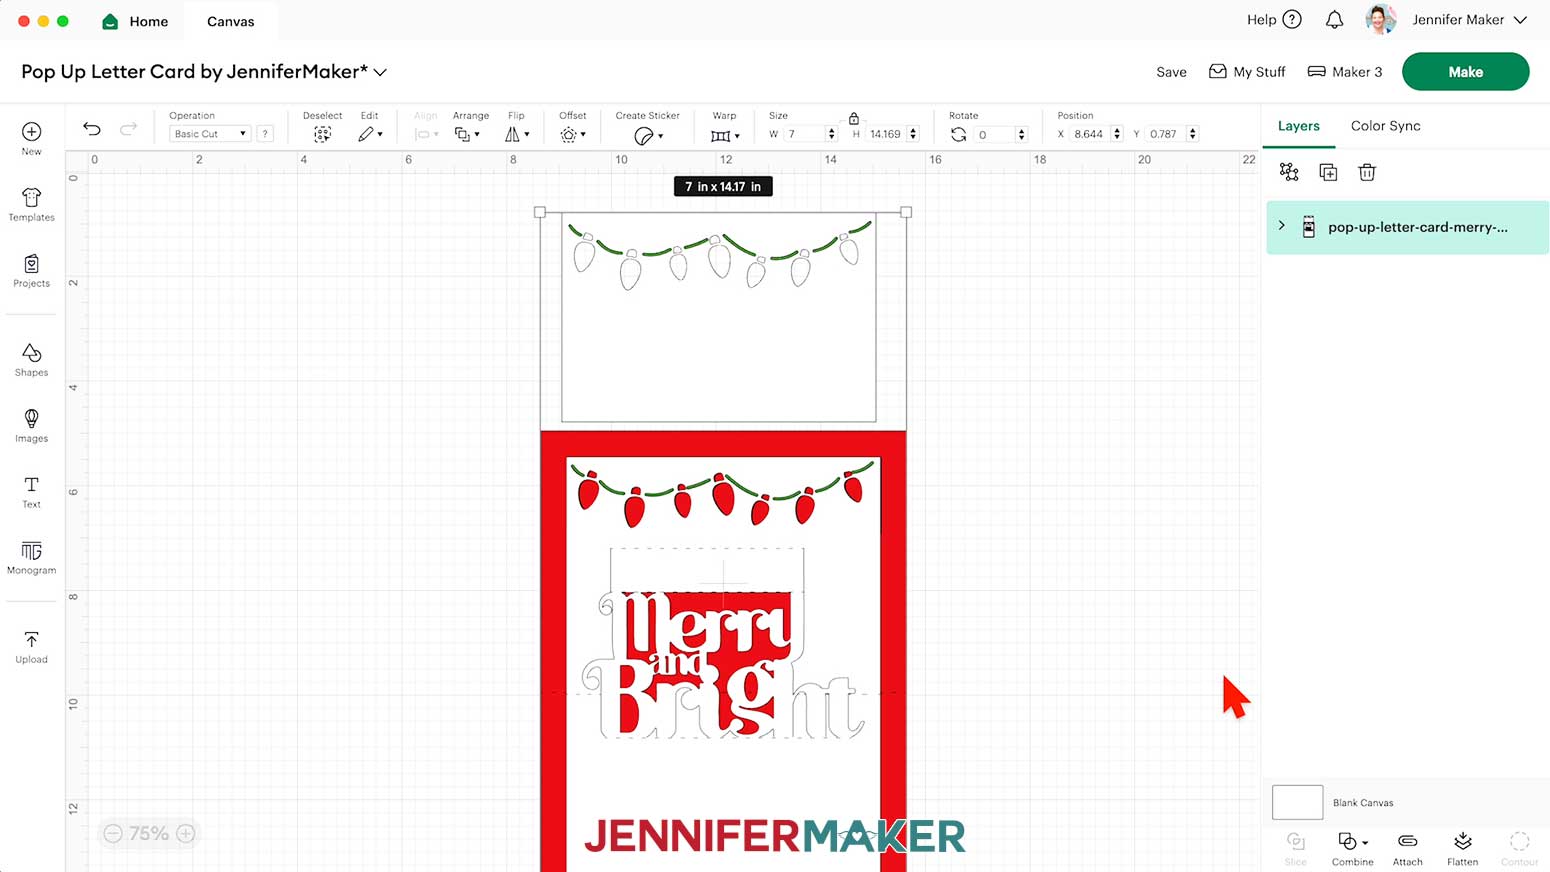
Upload the SVG file you need to Design Space to get started. I’ll show you how to prepare the “score” version of the “love” design since scoring works well on regular cardstock.
I’ll also demonstrate using the “no-score” version of the “merry” design since dashed cut lines are easier to see on glitter cardstock than score lines.
TIP: If you’re not sure how to upload, go to jennifermaker.com/svgs to learn how to unzip and upload SVG files.
STEP 2: PREPARE AND CUT YOUR POP UP LETTER CARD DESIGN
OPTION 1: SCORING LINES WITH REGULAR CARDSTOCK
CRICUT DESIGN SPACE
- In Cricut Design Space, open a blank Canvas.
NOTE: If you’re new to using Cricut Design Space, go to cricutkickoff.com for my introductory tutorial on Design Space basics. - Click “Upload” and then “Upload Image.”
- Click “Browse.”
- Select the SVG you want to use.
NOTE: I’ll pick the “score” version of the “love” design. - Click “Open,” and then “Continue.”
- Click “Upload” to add the design to your Canvas.
NOTE: If your project uploads differently than is shown on this page (with the layers stacked on top of each other vs spread out), this is intentional to make sure your design does not change sizes on you. If you prefer to use the unstacked version of the design files, upload one of the files in the “Unstacked” folder and then make sure your layers match these dimensions:
pop-up-letter-card-love-no-score-jennifermaker-SVG: 7" x 11.76"
pop-up-letter-card-love-score-jennifermaker-SVG: 7" x 11.76"
pop-up-letter-card-merry-no-score-jennifermaker-SVG: 7" x 11.76"
pop-up-letter-card-merry-no-score-jennifermaker-SVG: 7" x 11.76"
pop-up-letter-card-year-no-score-jennifermaker-SVG: 7" x 11.76"
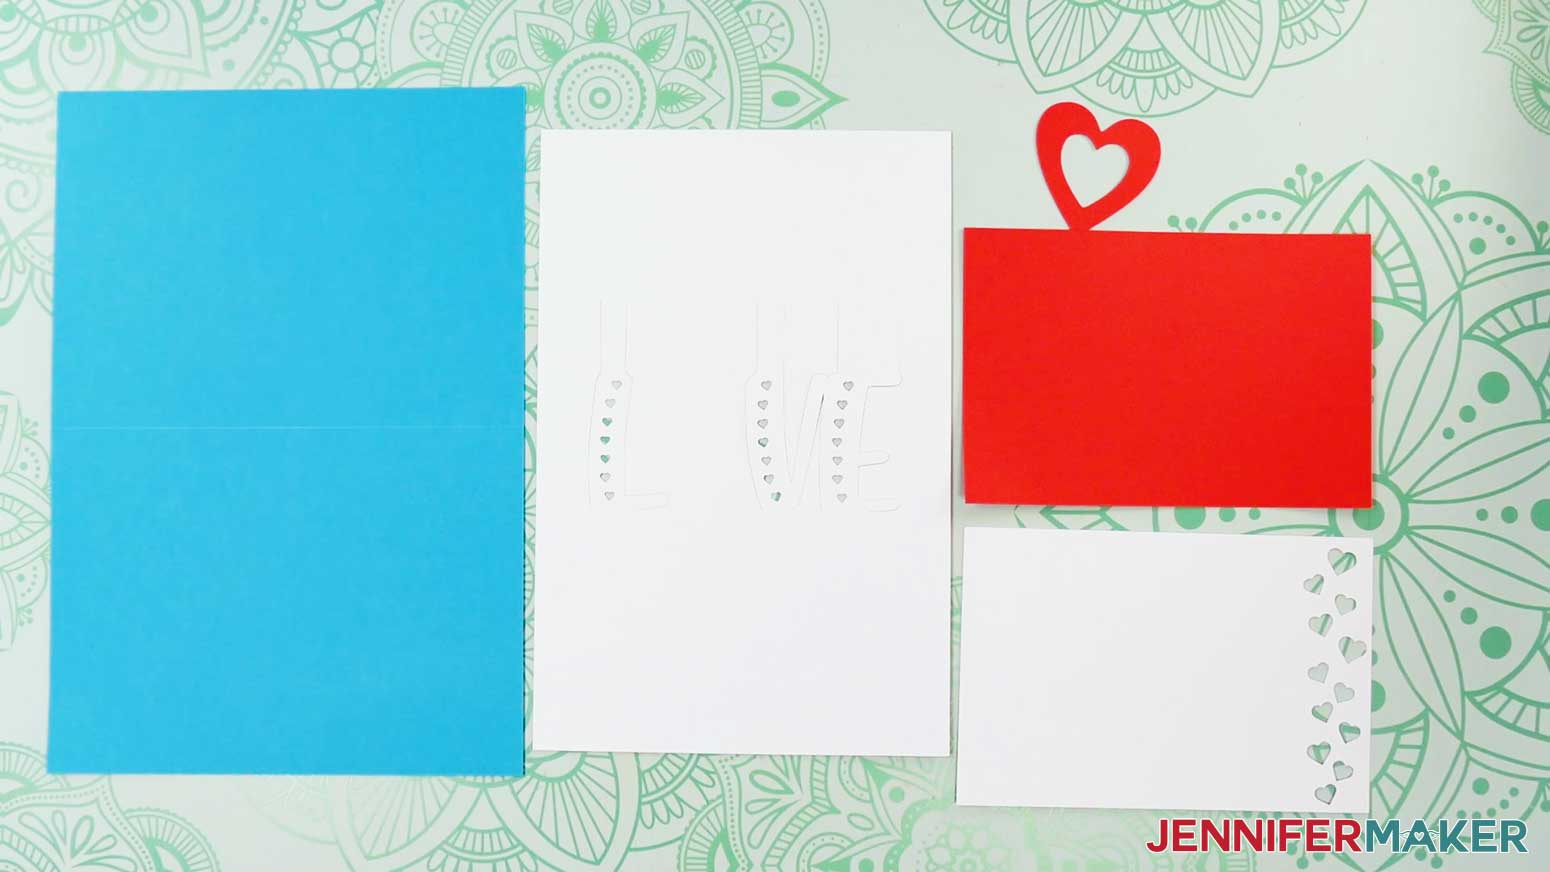
pop-up-letter-card-year-no-score-jennifermaker-SVG: 7" x 11.76" - The large white piece will be the inner liner, the small white piece will be the front panel piece, the colored piece of the same size will be the front panel liner, and the large colored piece is the main card piece.

- Click “Save” and give your project a name.
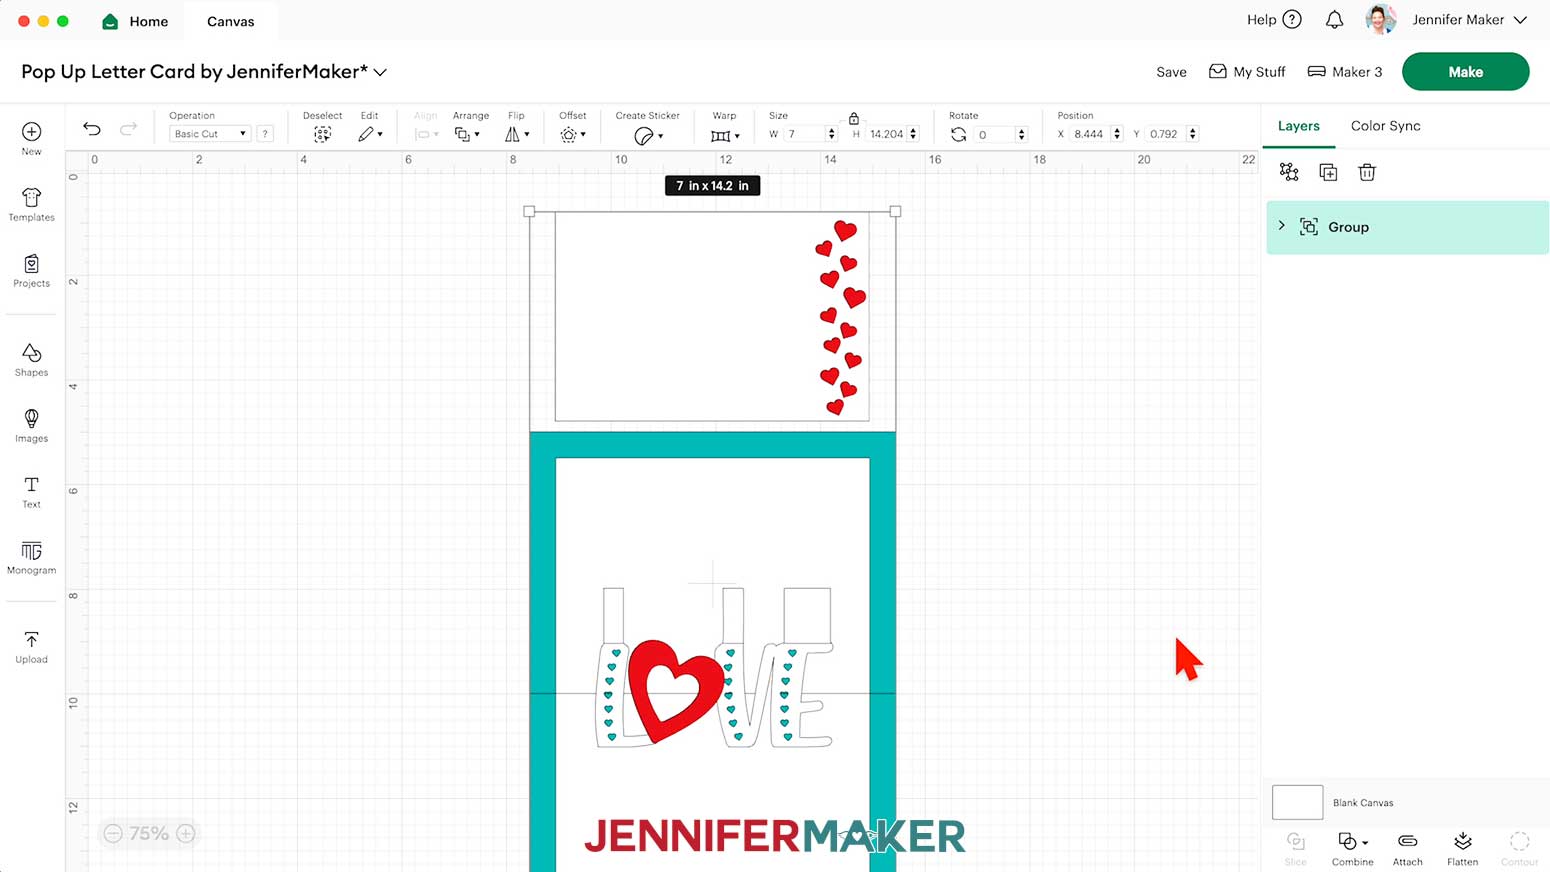
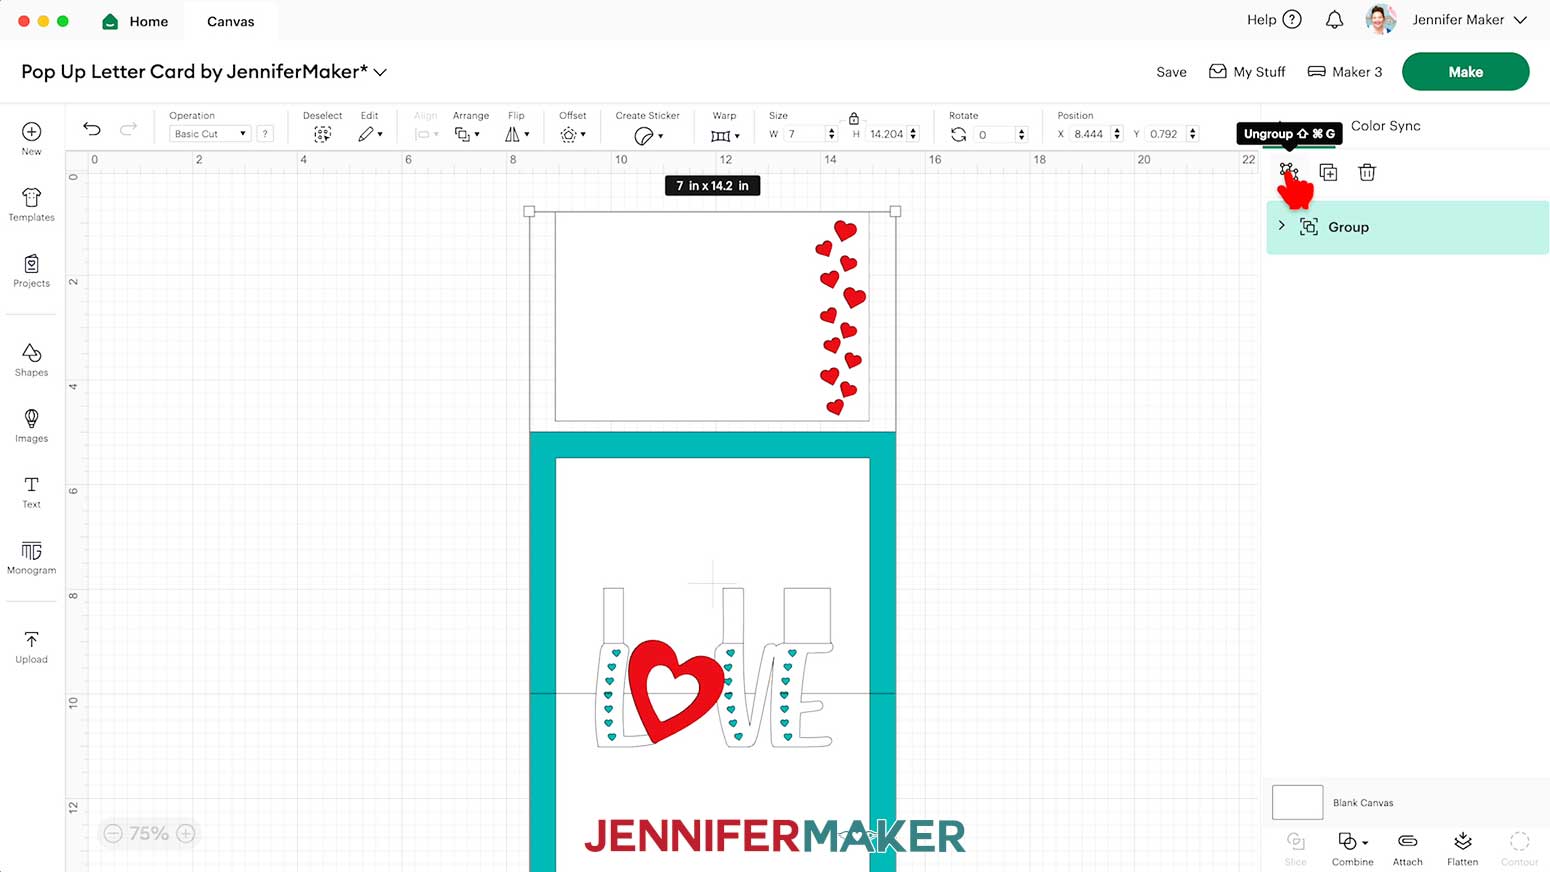
- Ungroup the design and spread the pieces out.
- In the Layers Panel, there are still two grouped layers indicated by a small arrow.
NOTE: We need to adjust these groups to make sure the score lines are drawn onto the cardstock pieces correctly. - In the Layers panel, click the small arrows to expand both groups and show their layers.
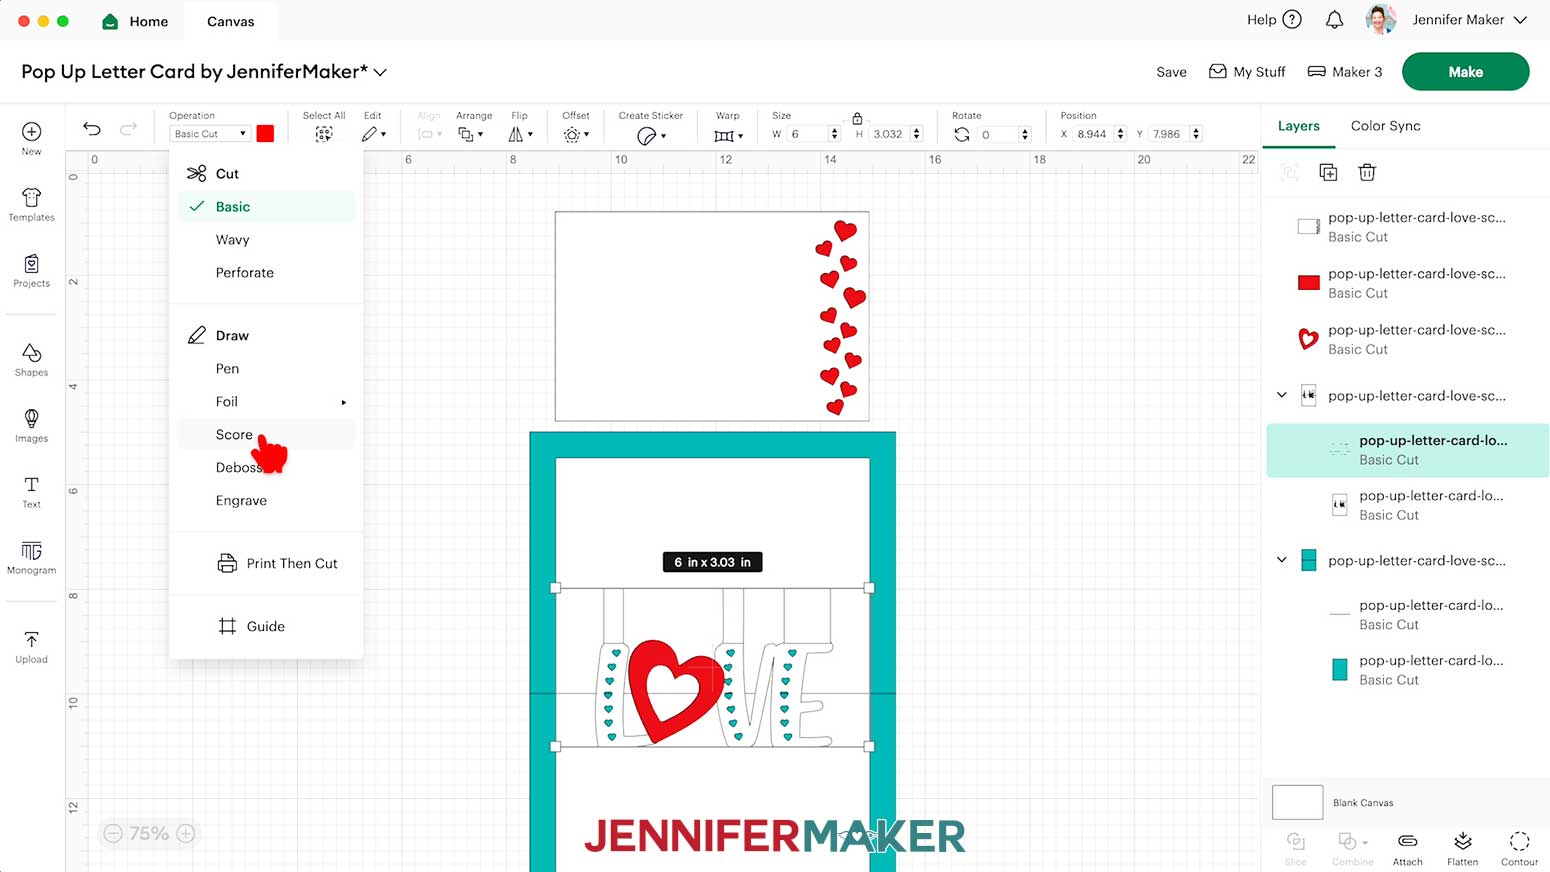
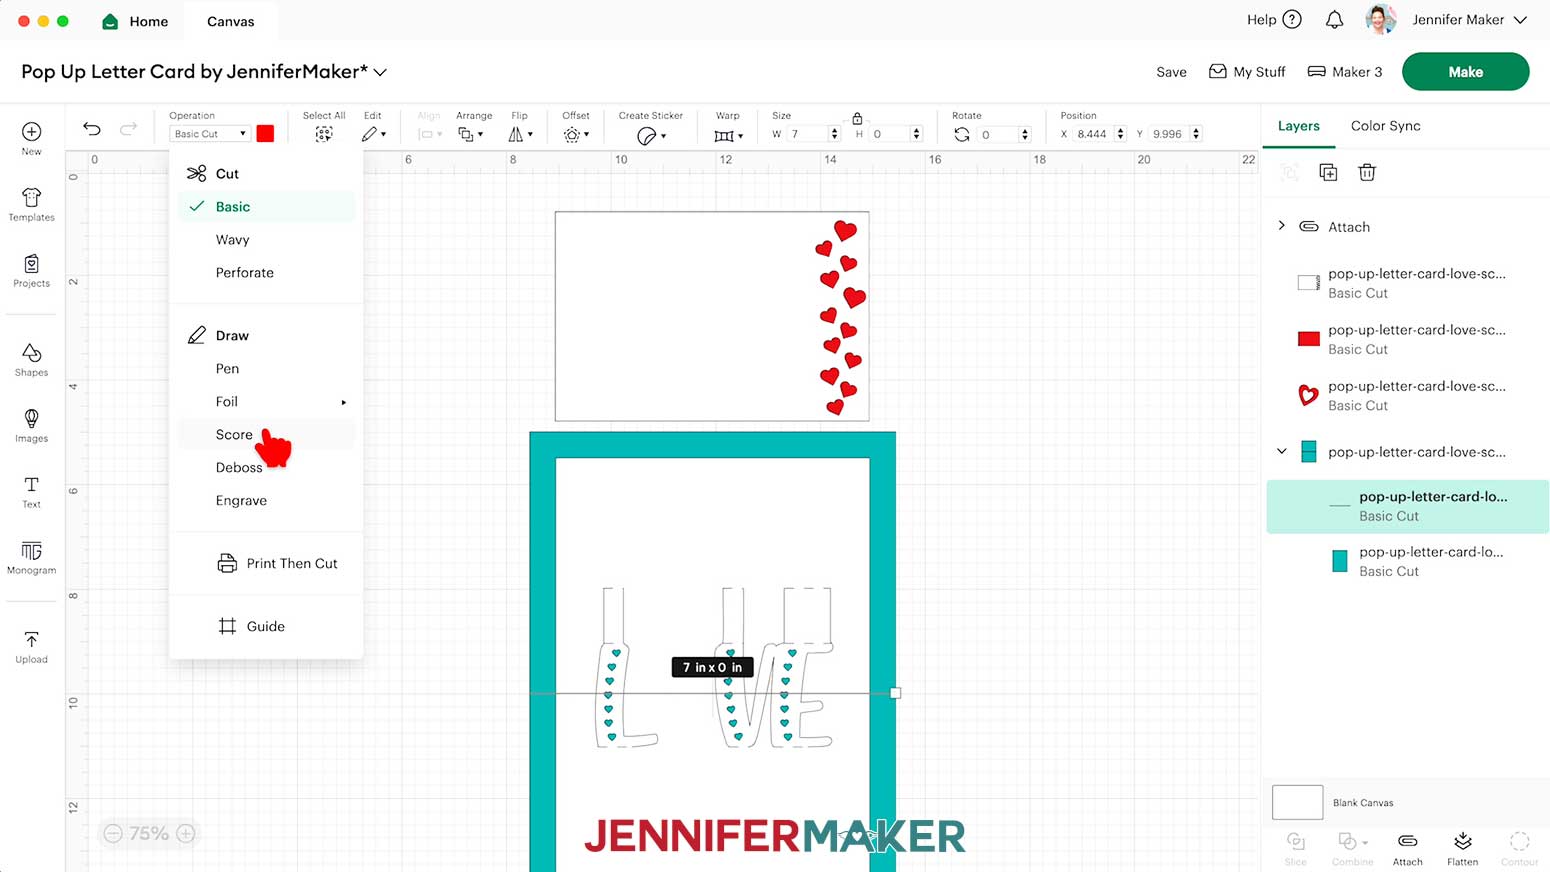
- Find the group that has your sentiment cut shape and some solid lines.
- Select the layer with the solid lines and change its “Operation” to “Score” so the Cricut knows to make the crease lines where your sentiment piece will be folded.
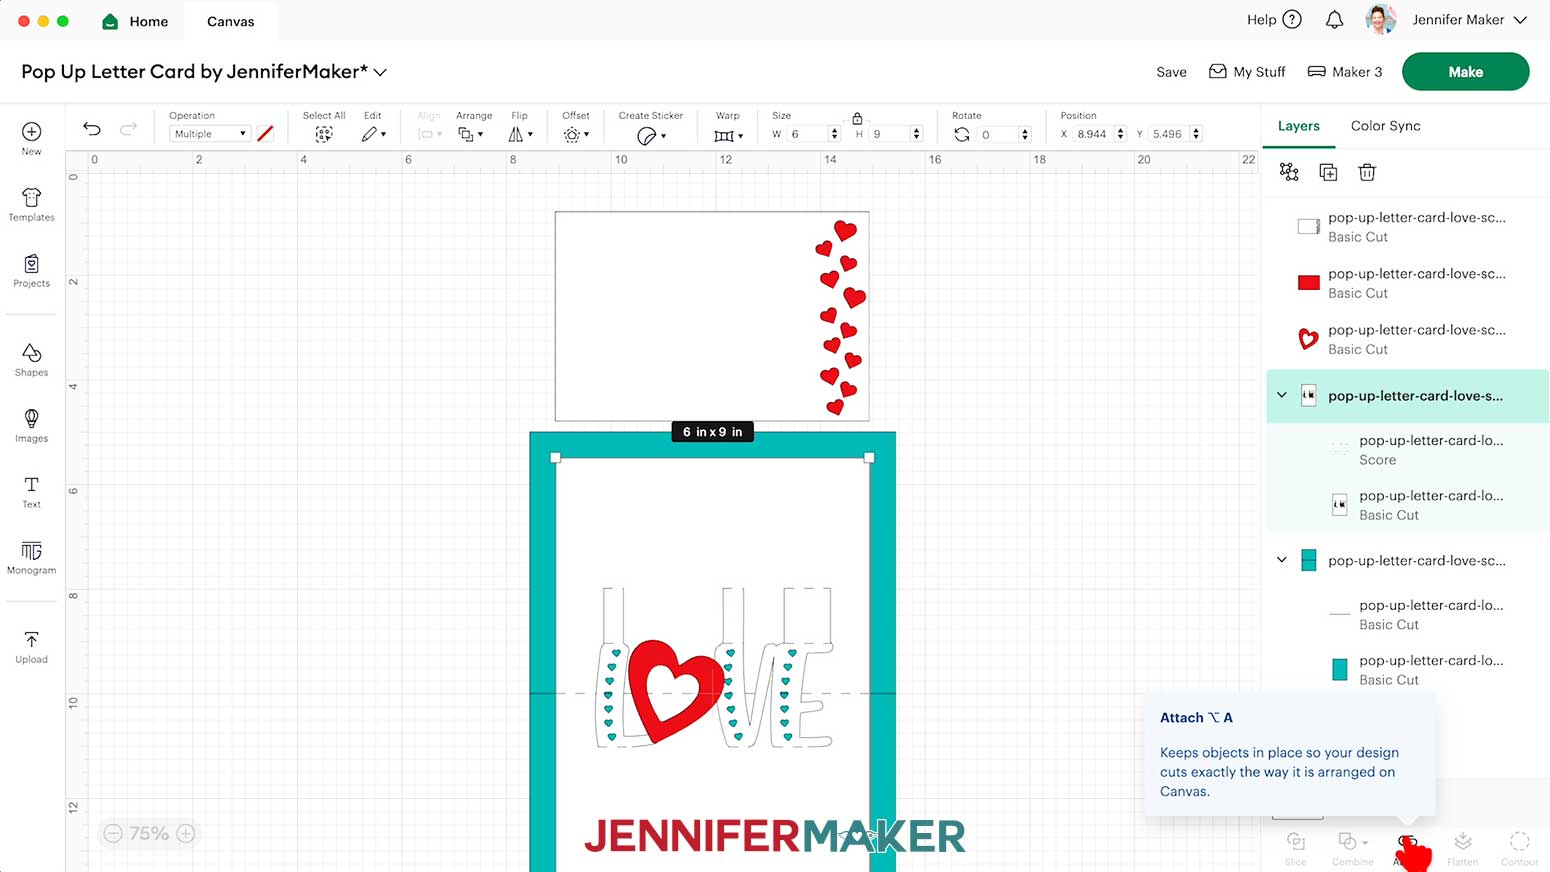
NOTE: The score lines for this project are red, which is how I indicate lines that will be scores. - Click the Group layer with the arrow to select both layers in this group, then click “Attach” to keep your crease lines with your cut shape.
NOTE: The newly Attached group will jump to the top of the Layers Panel. - Repeat Steps 12-13 for the group with your main card piece to change the solid line to “Score” and Attach it to the card’s cut shape.
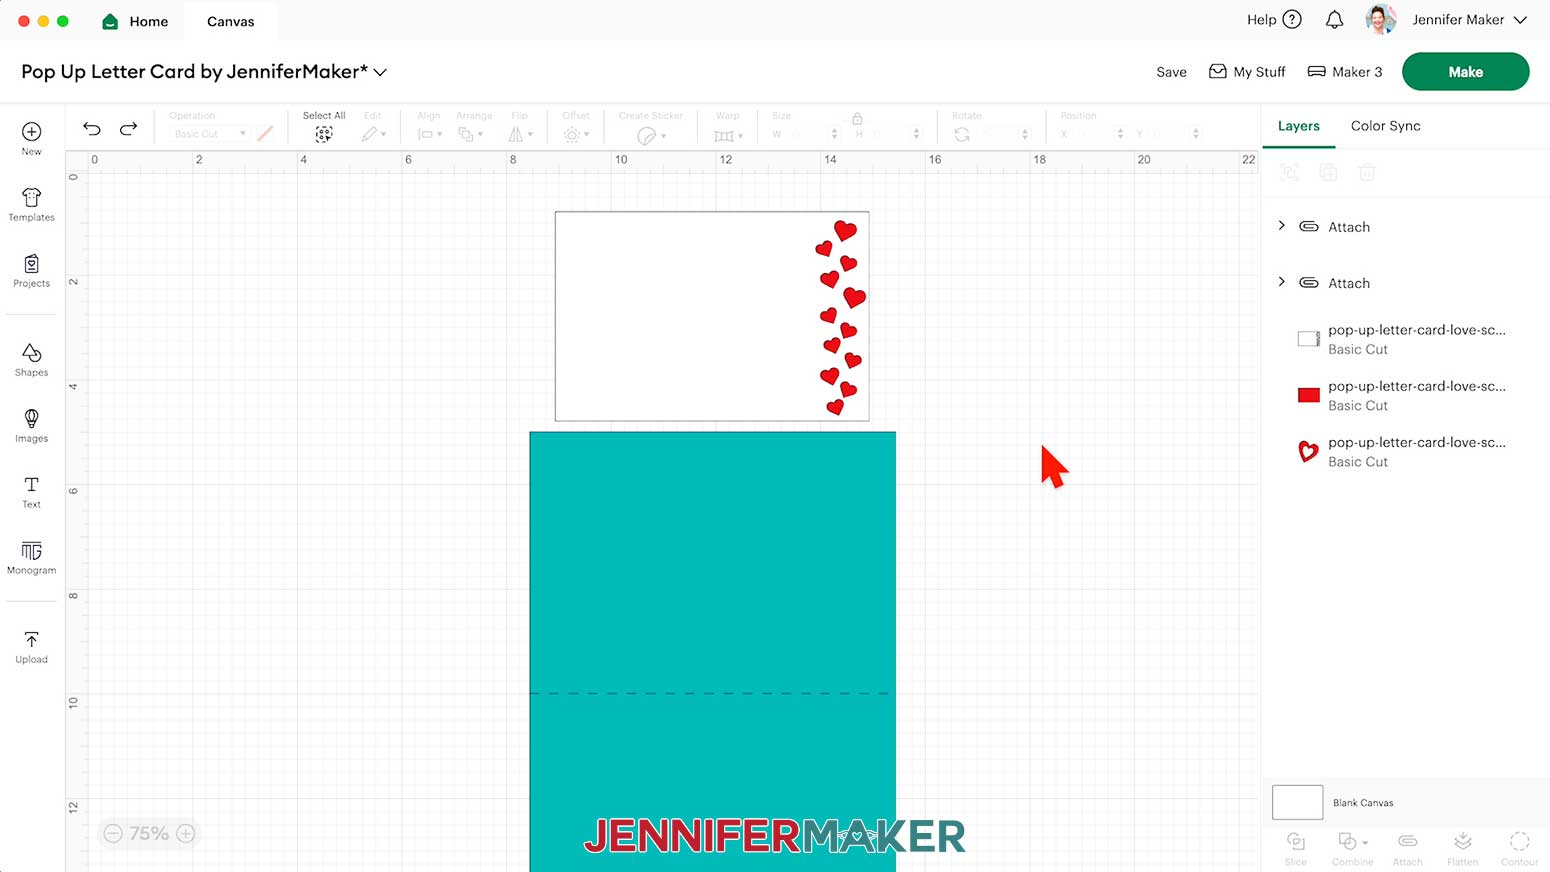
- Your project is ready to cut!
NOTE: If you’d like to match any pieces to the color of cardstock you’ll use, click the icon to “Ungroup” the design, select the piece you want to change, and then use the Color Box to choose an option.
CUTTING
- Make sure the correct machine is selected in the top right.
- Click “Make.”
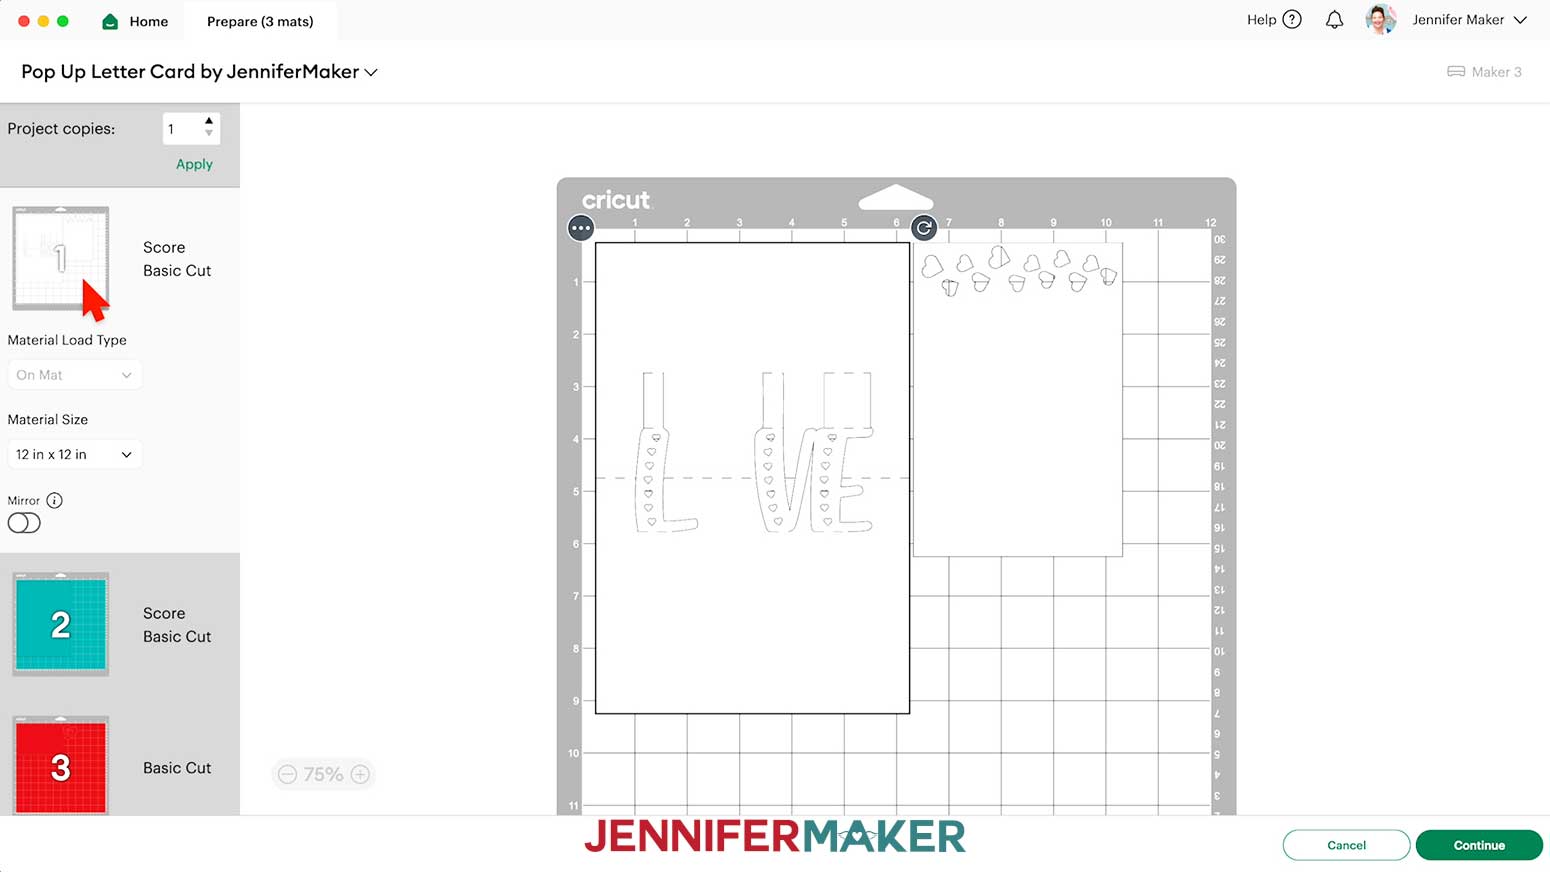
- On the Prepare screen, make sure the correct Material Size is selected for your mats.
- Make sure your Score layers are properly attached to their cardstock Cut layers.
TIP: If you see a mat with just lines, one or more of your score layers may not have attached correctly, so click on “Cancel” to return to the Canvas to check. - Once you are satisfied with your mat layouts, select the first mat again and click “Continue.”
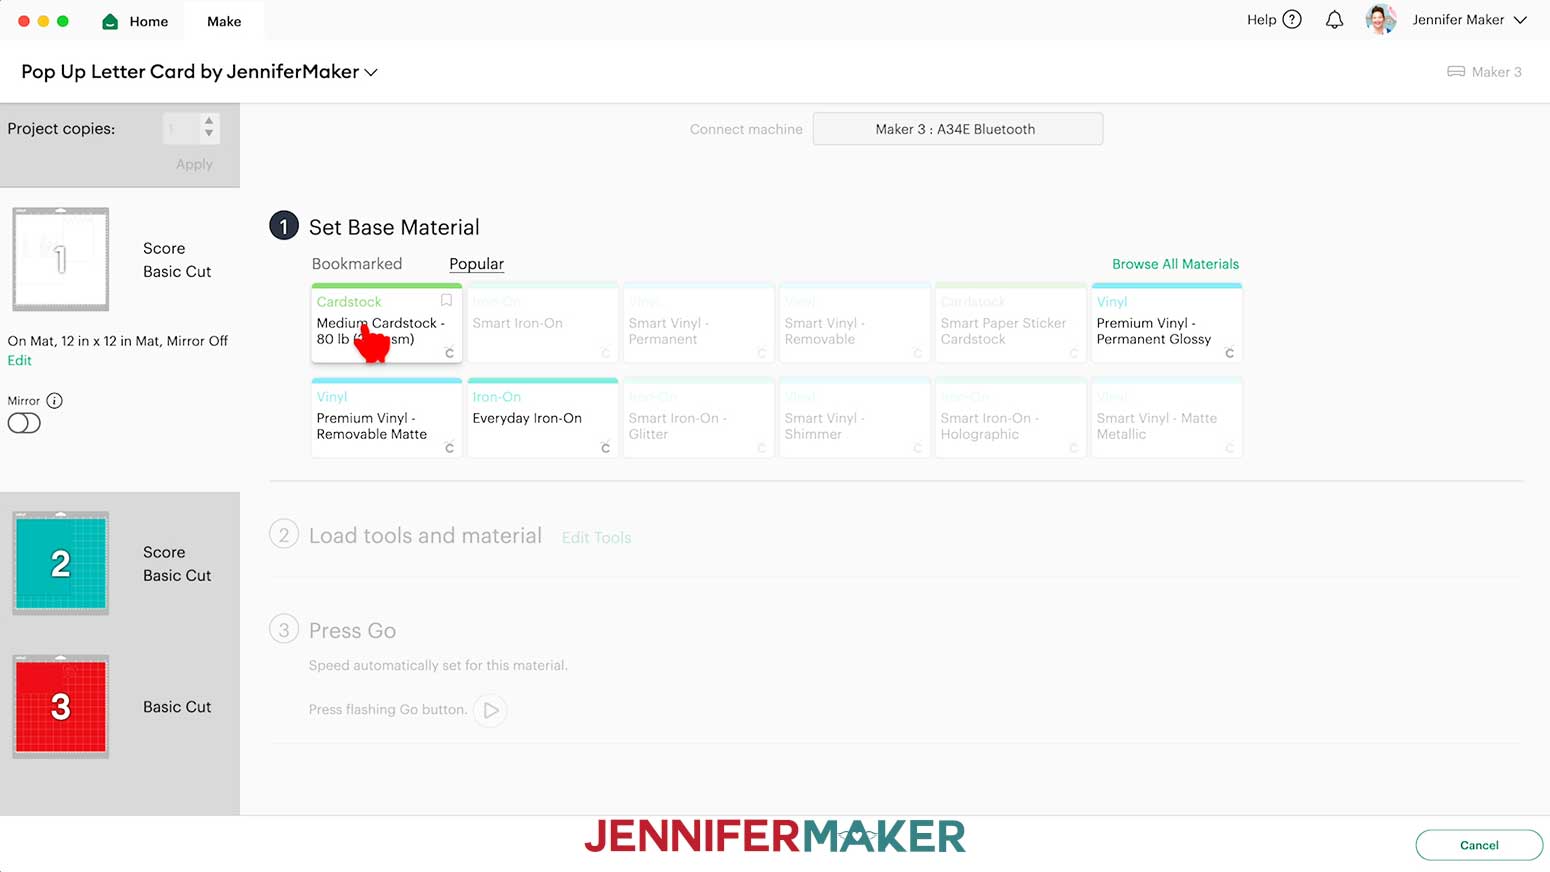
- On the Make screen, set the Base Material for your first mat. I’ll use the “Medium Cardstock - 80 lb (216 gsm)” setting.
NOTE: If you’re having trouble cutting the “Happy New Year” design using the “Medium Cardstock” setting, try using the “Cardstock (for Intricate Cuts)” setting instead.
NOTE: You can also use these settings to cut the liner pieces from metallic cardstock for the “Happy New Year” version of the design.
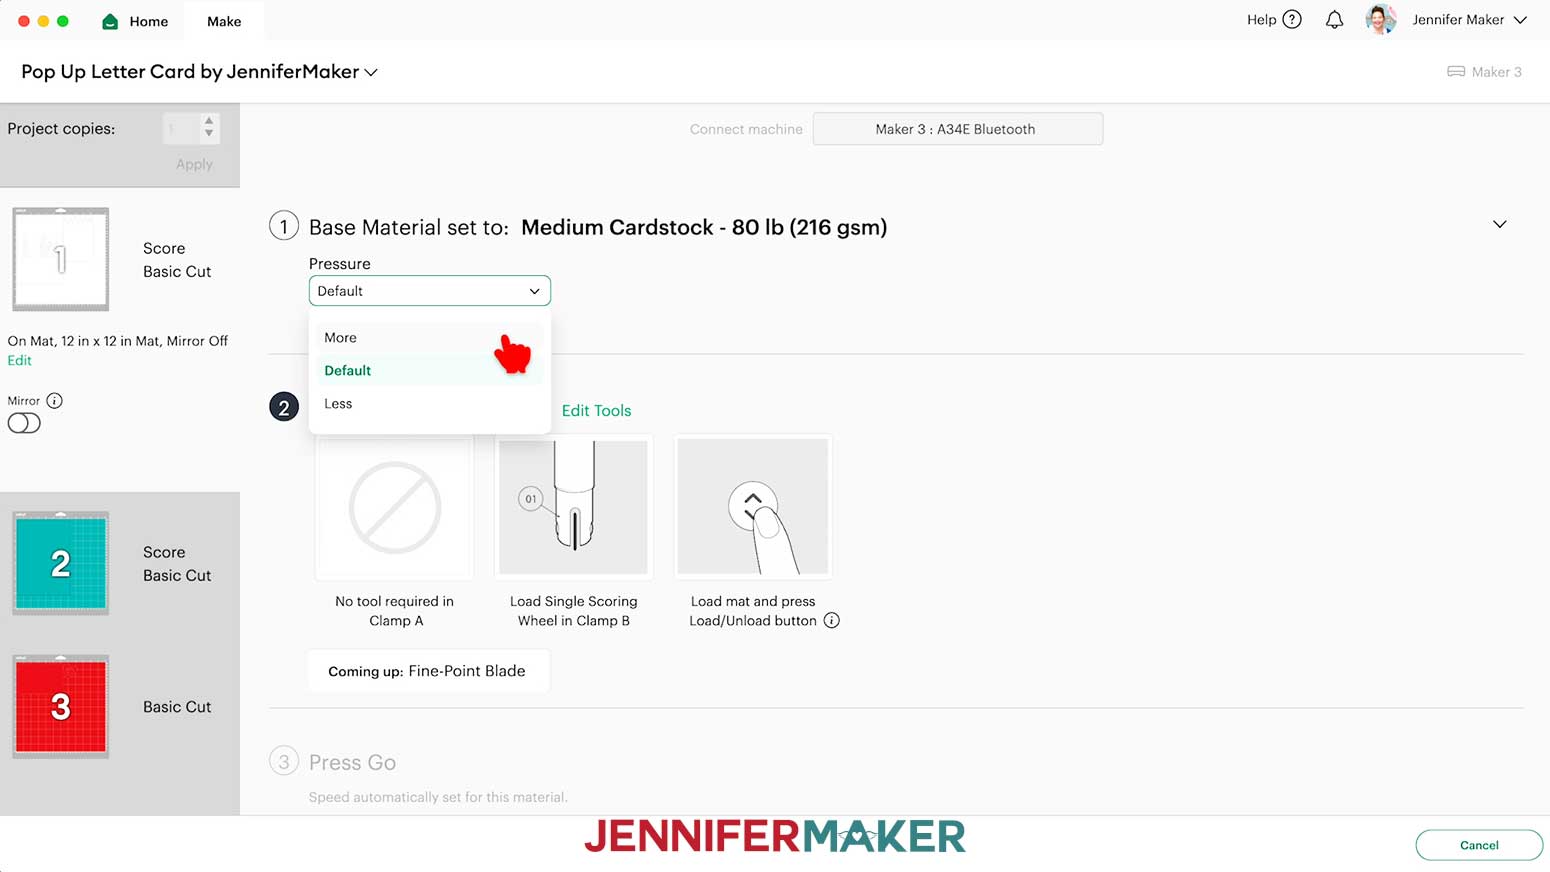
TIP: After you set the material for a mat color, you can check the “Remember Material Settings” box to save time between mats using the same material. - Change the pressure to “More.”
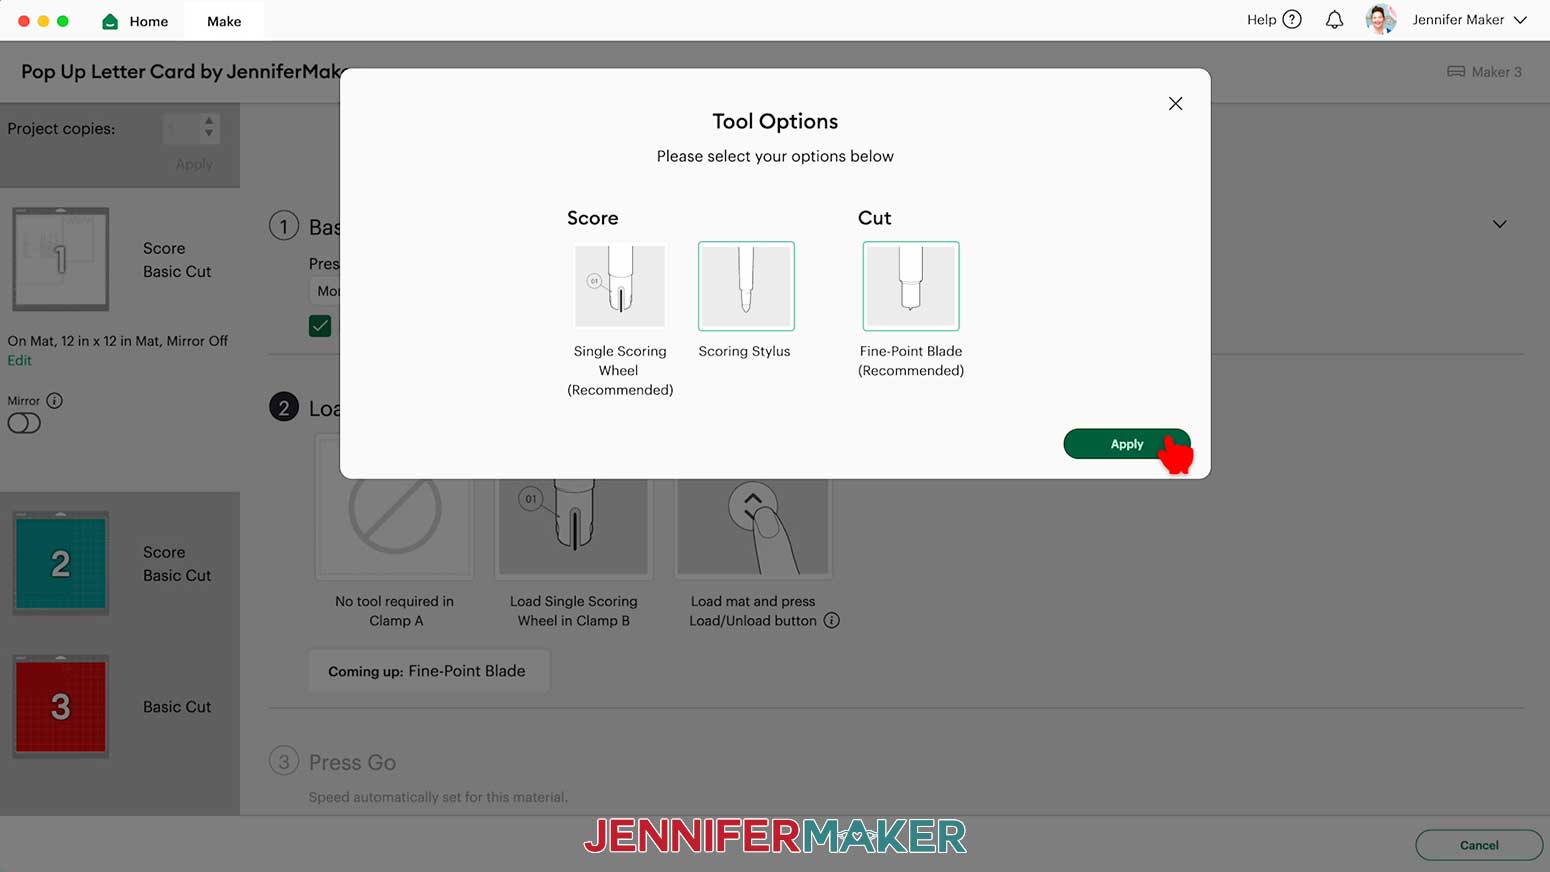
TIP: Changing the Pressure to “More” results in a cleaner cut. - For mats with score lines, follow the screen prompts to load your tools in the order indicated.
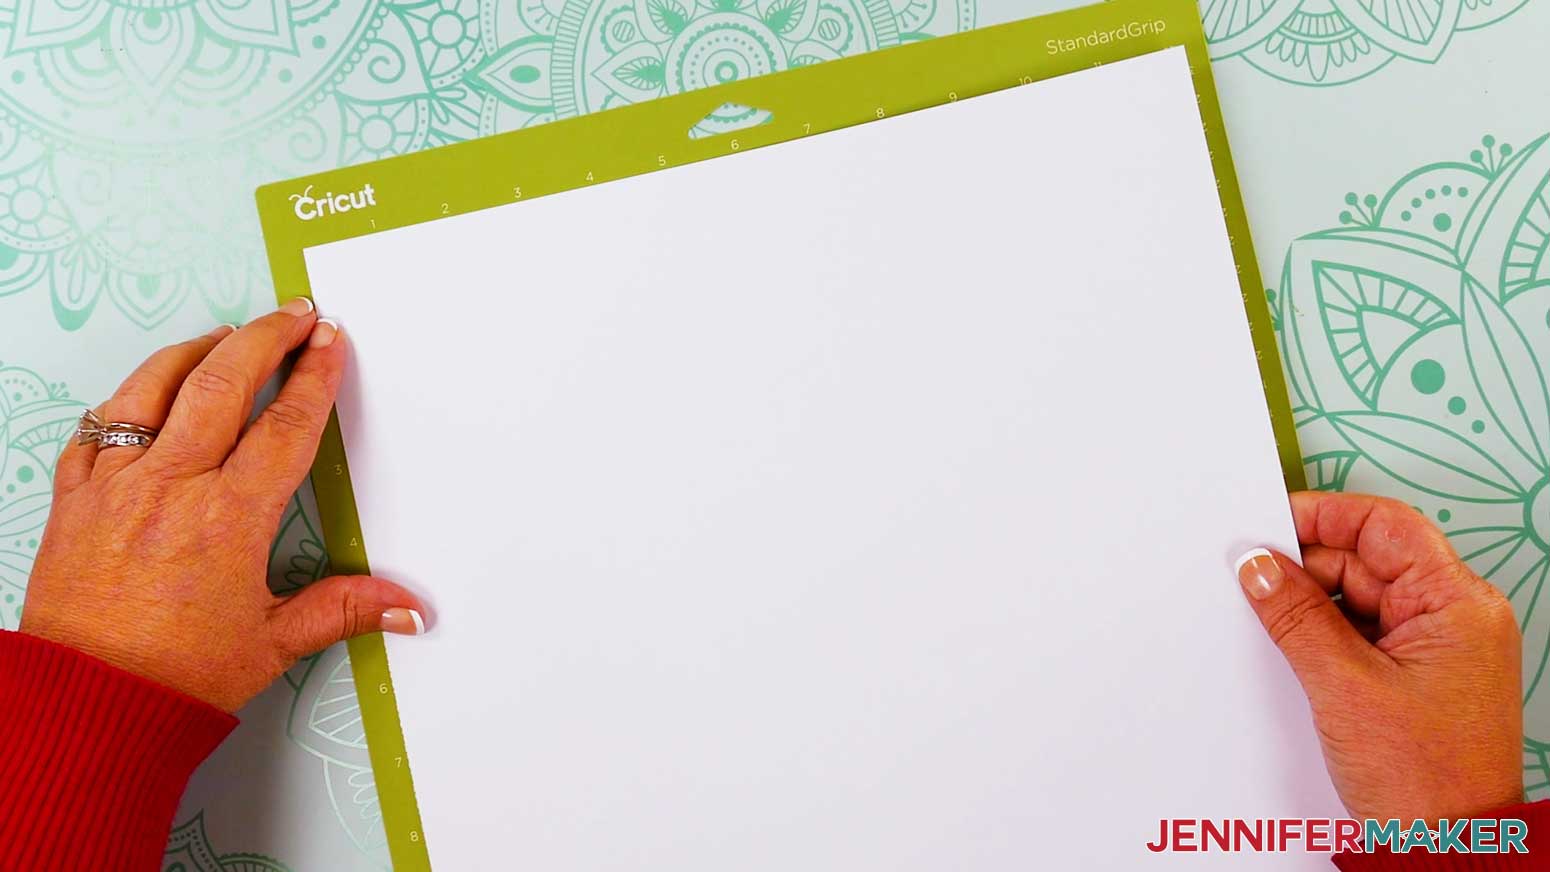
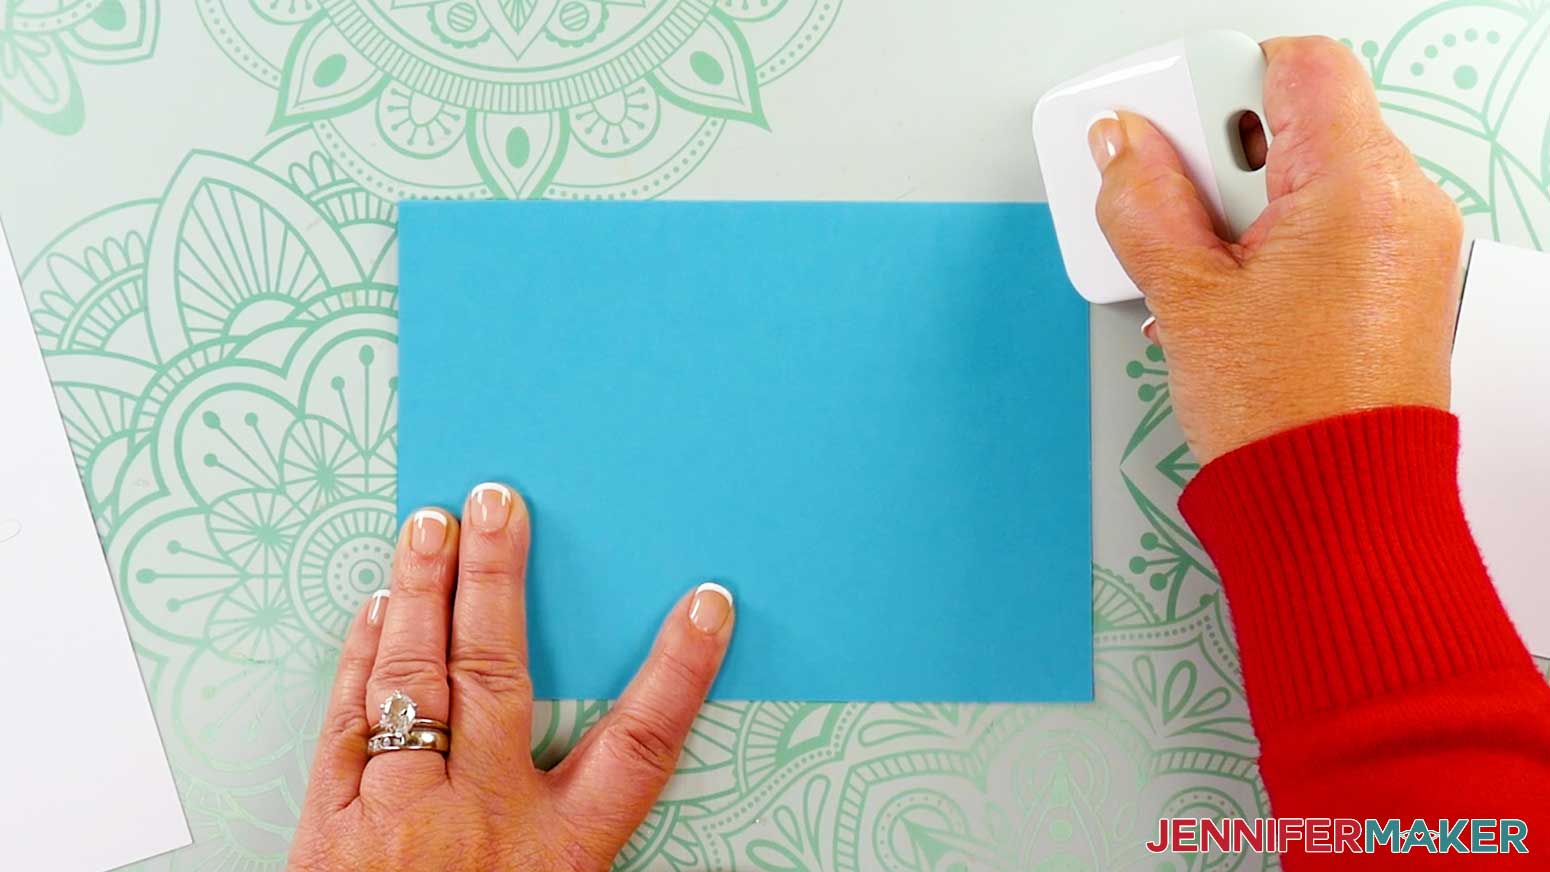
NOTE: I’ll click “Edit Tools” and select the Scoring Stylus so I can load both the scoring tool and my blade at the same time. You can also use a Scoring Wheel. - Place your cardstock face up on a green StandardGrip machine mat.
- Use a brayer to make sure it’s fully adhered.
- Check that your Premium Fine-Point Blade is clean and in the clamp.
- Press the flashing “Load/Unload” button to load the prepared mat into your Cricut.
- Press the flashing “Go” button to begin cutting.
- When it has finished cutting, don’t unload the mat right away. Gently lift a corner of the material to make sure the cuts went all the way through. If not, press the “Go” button again to make a second pass of cuts in the same spots.
- When the cuts are complete, unload the mat, flip it over onto your work surface, and roll it back to release the cardstock.
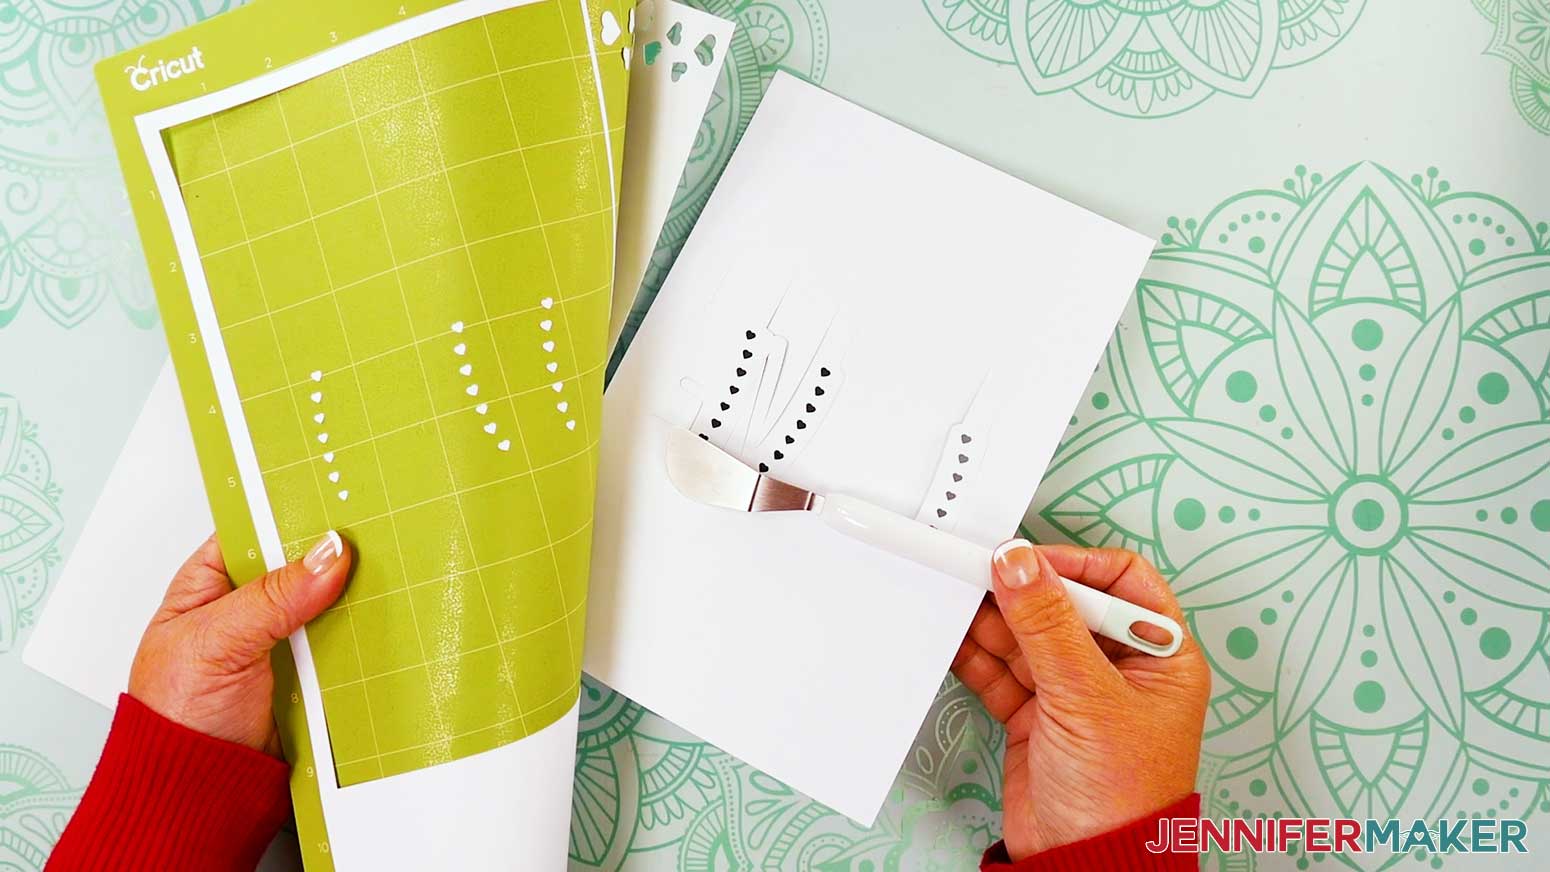
TIP: Use the spatula to help lift delicate parts, and your weeding tool to poke out small bits of cardstock that may have been left behind. If you have any issues with your cuts, go to jennifermaker.com/cleaner-cuts. - Use a scraper tool to remove the small bits left on your mat after you remove the cut pieces.
- Then follow the same steps to load, cut, and unload your remaining mats.
- Lay out all of the cut pieces face up.
TIP: Refer to the Design Space screen if you’re not sure about some pieces’ orientation.
OPTION 2: DASHED LINES WITH GLITTER CARDSTOCK
CRICUT DESIGN SPACE
- In Cricut Design Space, open a blank Canvas.
- Click “Upload” and then “Upload Image.”
- Click “Browse.”
- Select the SVG you want to use.
NOTE: I’ll pick the “no-score” version of the “merry” design. - Click “Open,” and then “Continue.”
- Click “Upload” to add the design to your Canvas.
NOTE: This design has a front panel piece with an accent liner, a sentiment piece with an accent strip, and a main card piece. - Click “Save” and give your project a name.
- Your project is ready to cut as is!
NOTE: If you’d like to match any pieces to the color of cardstock you’ll use, click the icon to “Ungroup” the design, select the piece you want to change, and then use the Color Box to choose an option.
CUTTING
Follow the same steps from the “CUTTING” section of the “OPTION 1: SCORING LINES WITH REGULAR CARDSTOCK” section to cut your “no-score” version, noting the following differences:
- When using the dashed cut line version, you won’t see the Scoring Tool prompts.
- When you prepare your first mat, you will need to use the “Glitter Cardstock” setting, and change the pressure to “More.”
NOTE: Since glitter can stick to the blade and cause trouble on your future cuts, I recommend cleaning your blade after each sheet of glitter cardstock.
You can take the housing and blade out of the clamp, press down on the plunger, and carefully poke the blade into a ball of aluminum foil several times. You can also clean it with a lint-free cloth and isopropyl alcohol, or use an alcohol wipe. However you choose clean your blade, be careful – it's sharp!
STEP 3: ASSEMBLE YOUR POP UP CARD
VARIATION 1: “LOVE” POP UP CARD WITH REGULAR CARDSTOCK
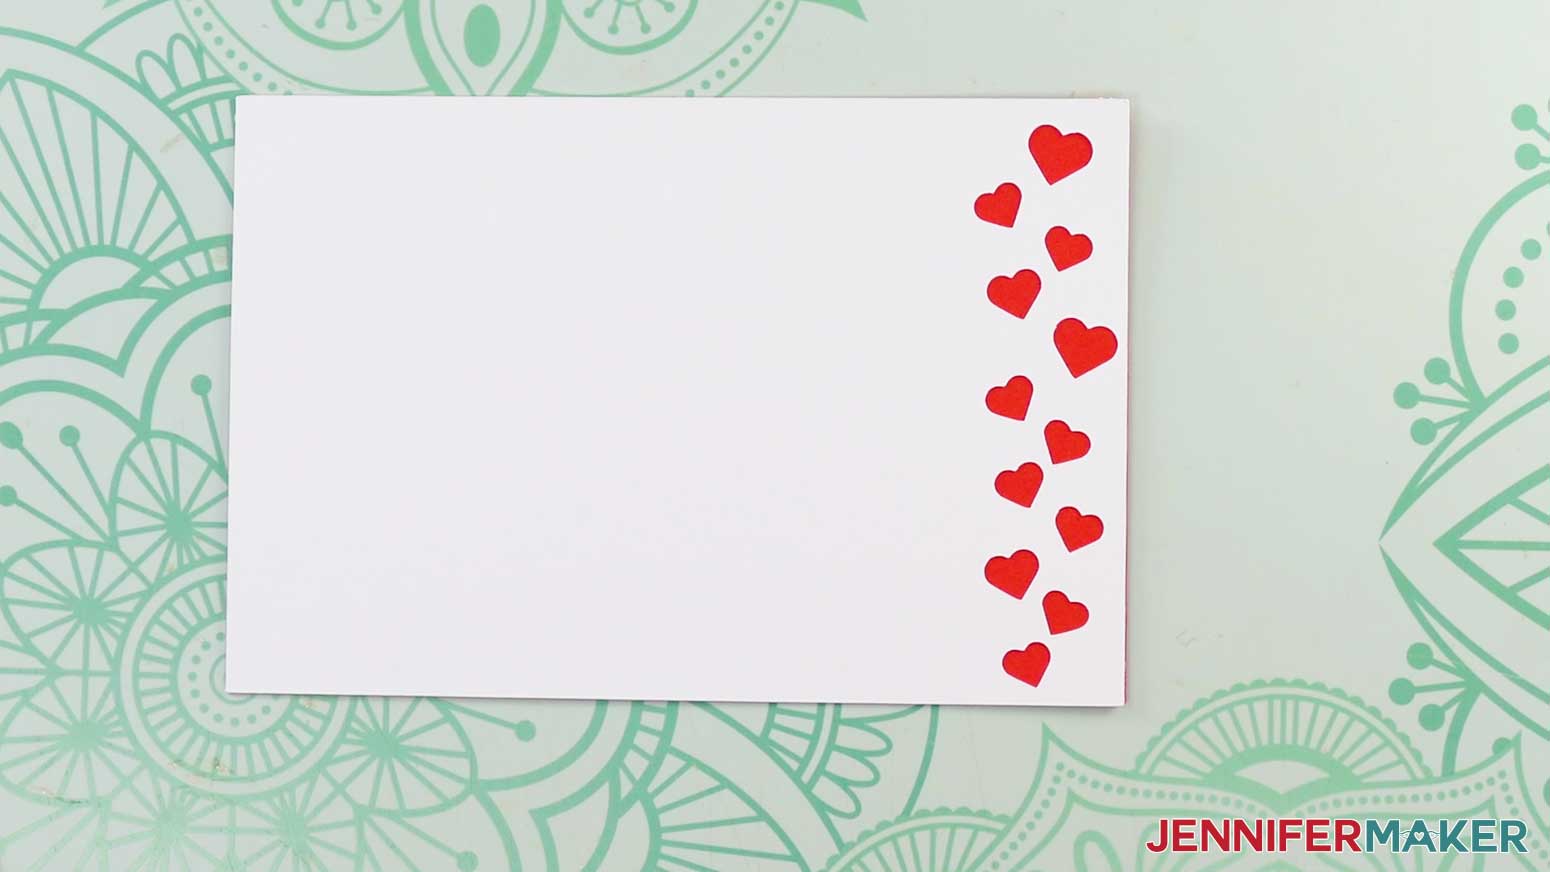
- Lay the small front panel piece face down, with the hearts on the left.
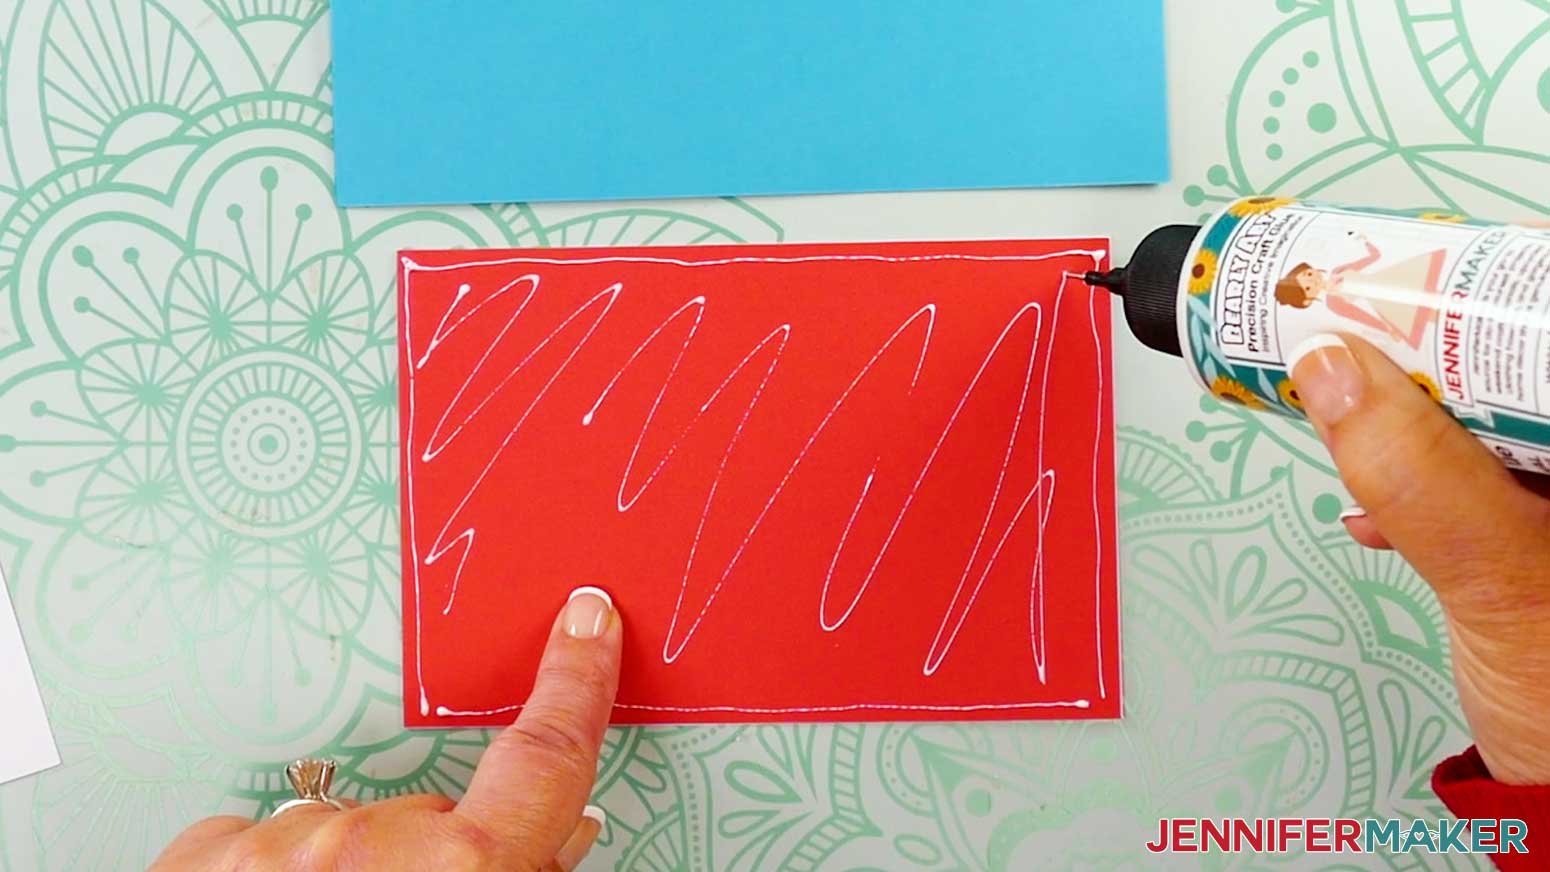
- Using the precision tip of your Bearly Art craft glue, apply thin lines of glue all over the back of the front panel.
- Place the accent liner on the panel, making sure to line up the edges.
- Press down and smooth to adhere.
TIP: Use a brayer to make sure the pieces are flat and secure. - Flip the panel face up, and use your finger or a paper towel to wipe away any excess bits of glue.
- Lay the main card piece with the center crease line face up, then fold the top half down along the crease.
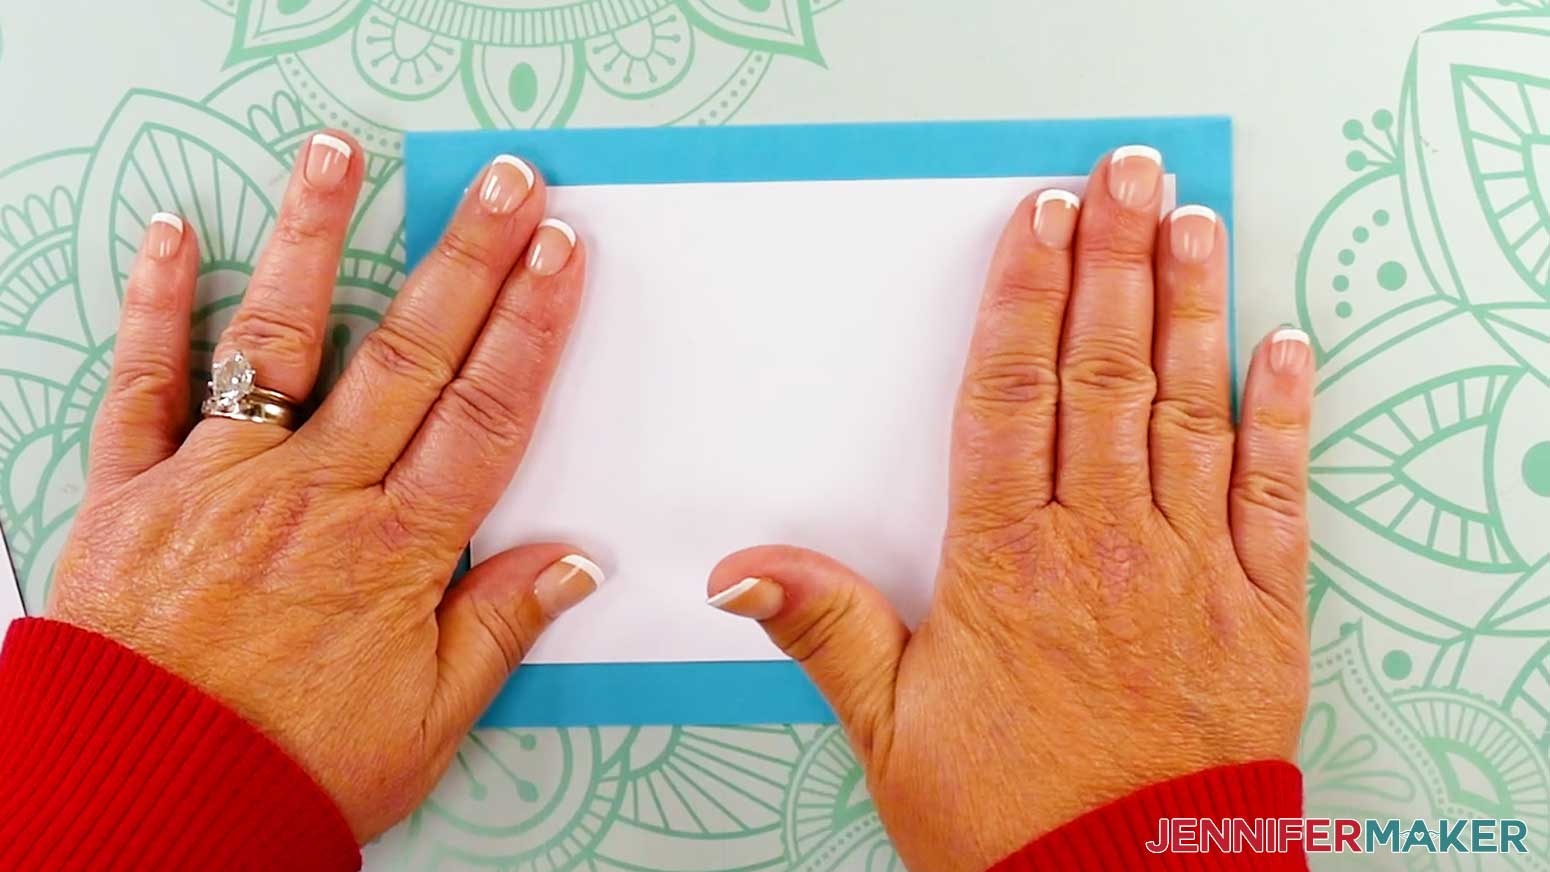
TIP: Run a Scraper Tool along edges and crease lines to help sharpen your card’s folds. - Flip the front panel face down, then add craft glue all over the back.
- Flip the panel face up, and center it on the card’s front section, keeping the cutouts oriented correctly.
- Press down into place and smooth to adhere, then set aside.
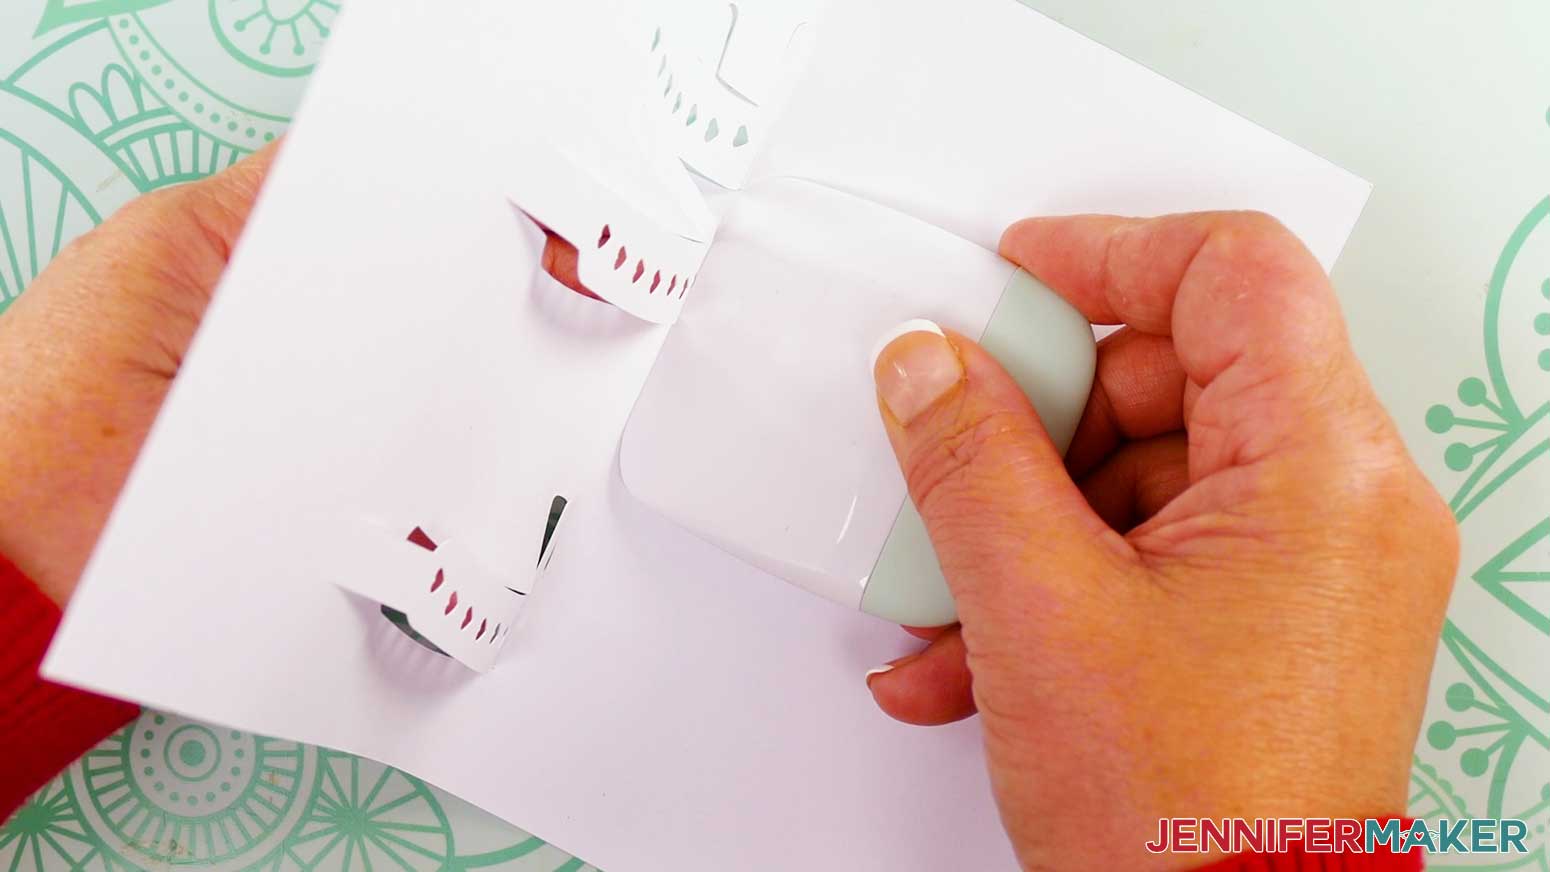
- Flip the sentiment piece face up.
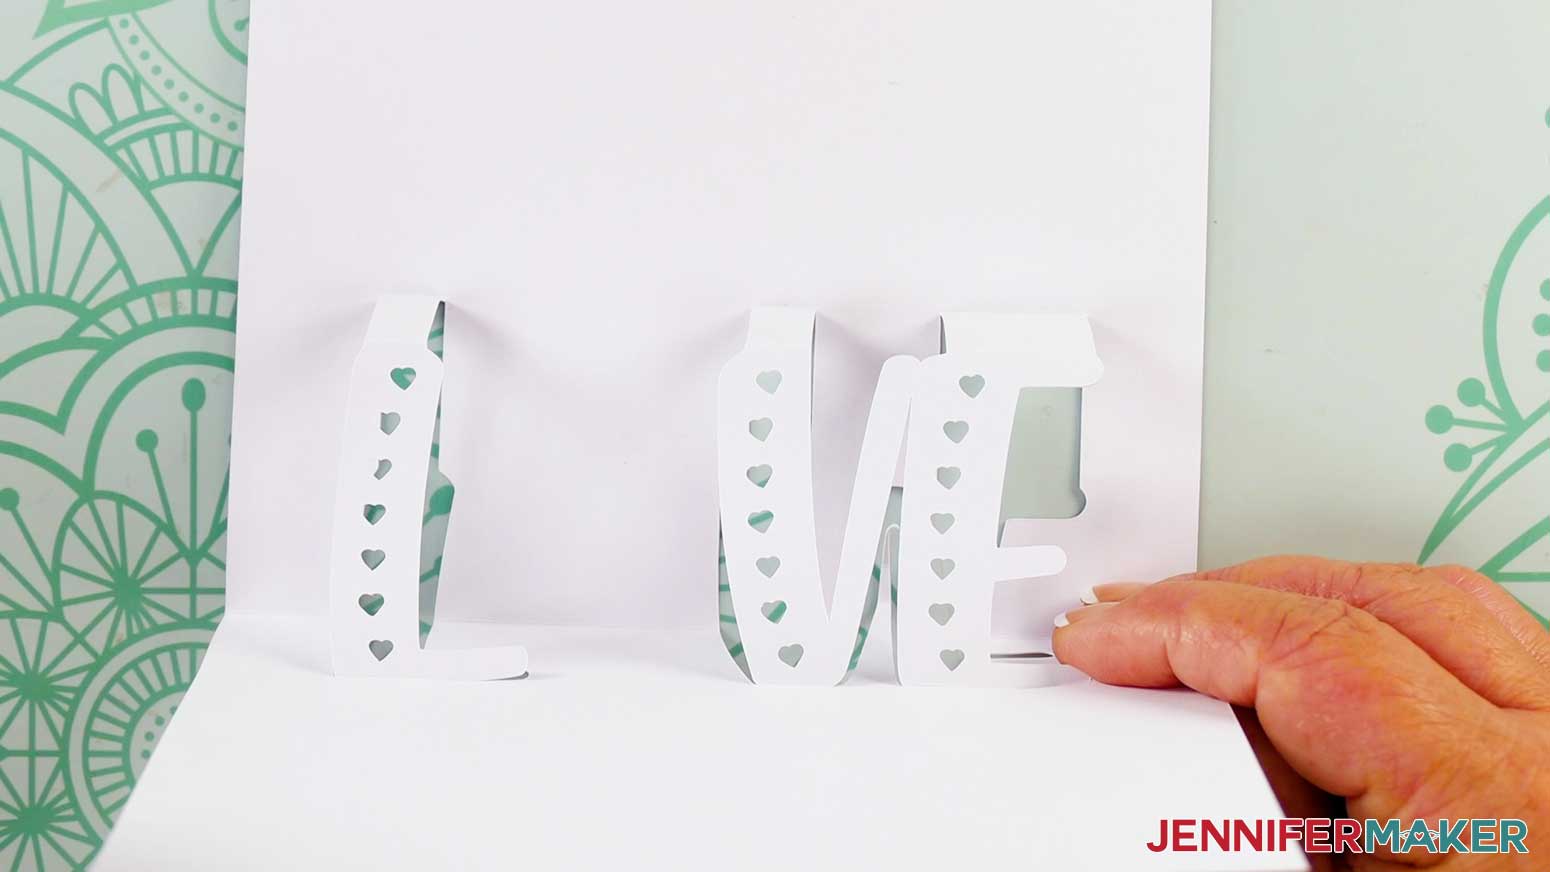
- Letter by letter, carefully fold the bottom row of letters forward along the crease line to form a valley fold, leaving the sections between the letters unfolded.
- Mountain fold the top row of letters forward along the crease line so they form a peak at the ridge.
- Make a valley fold inward along the crease line where the piece attached to the letters meets the card.
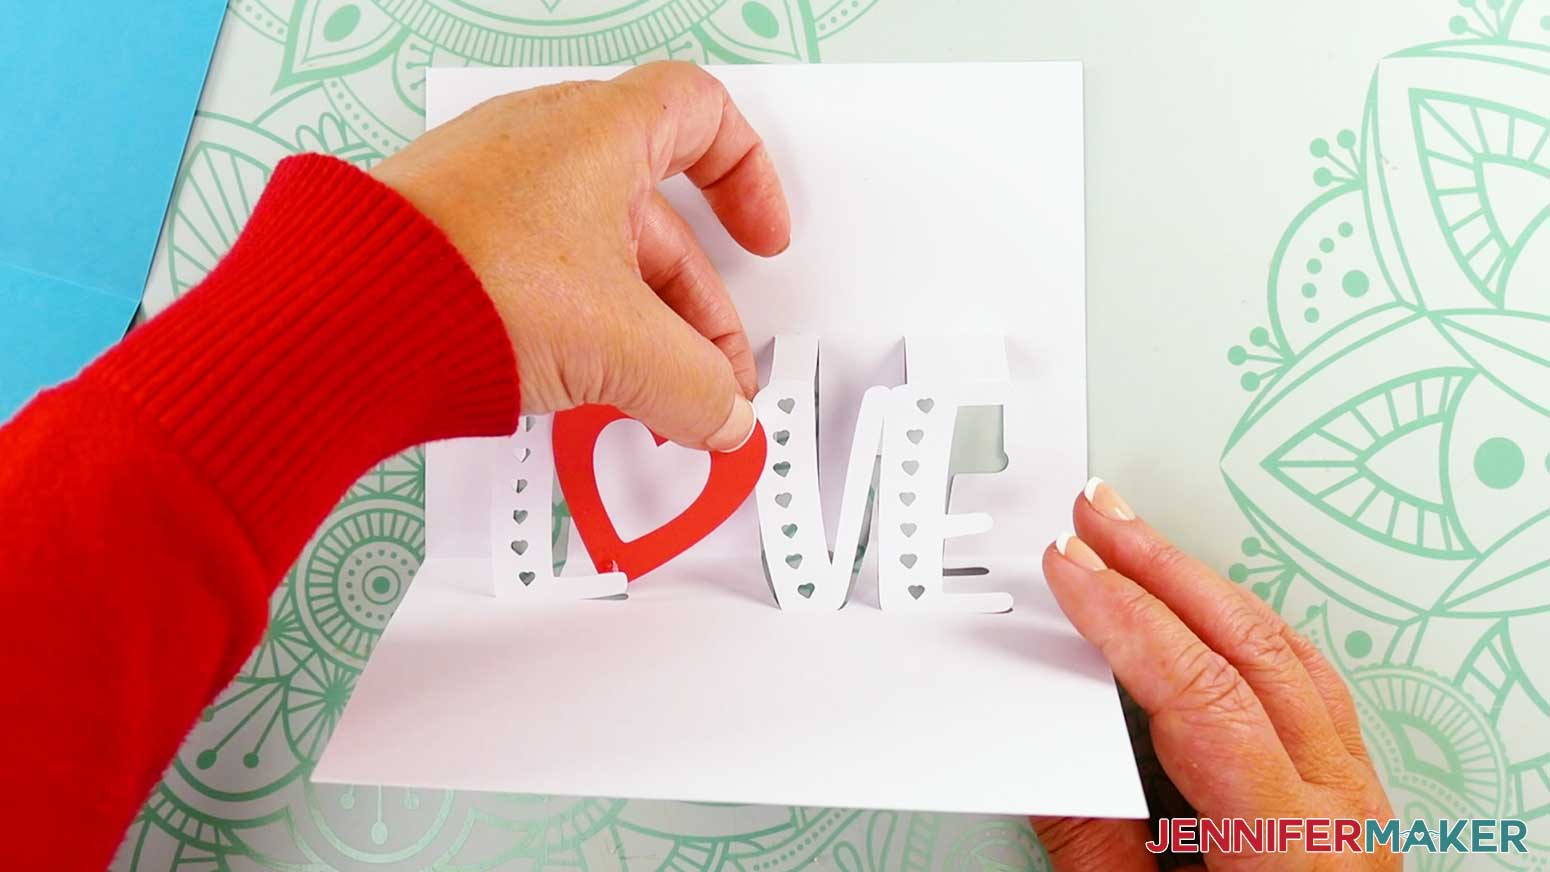
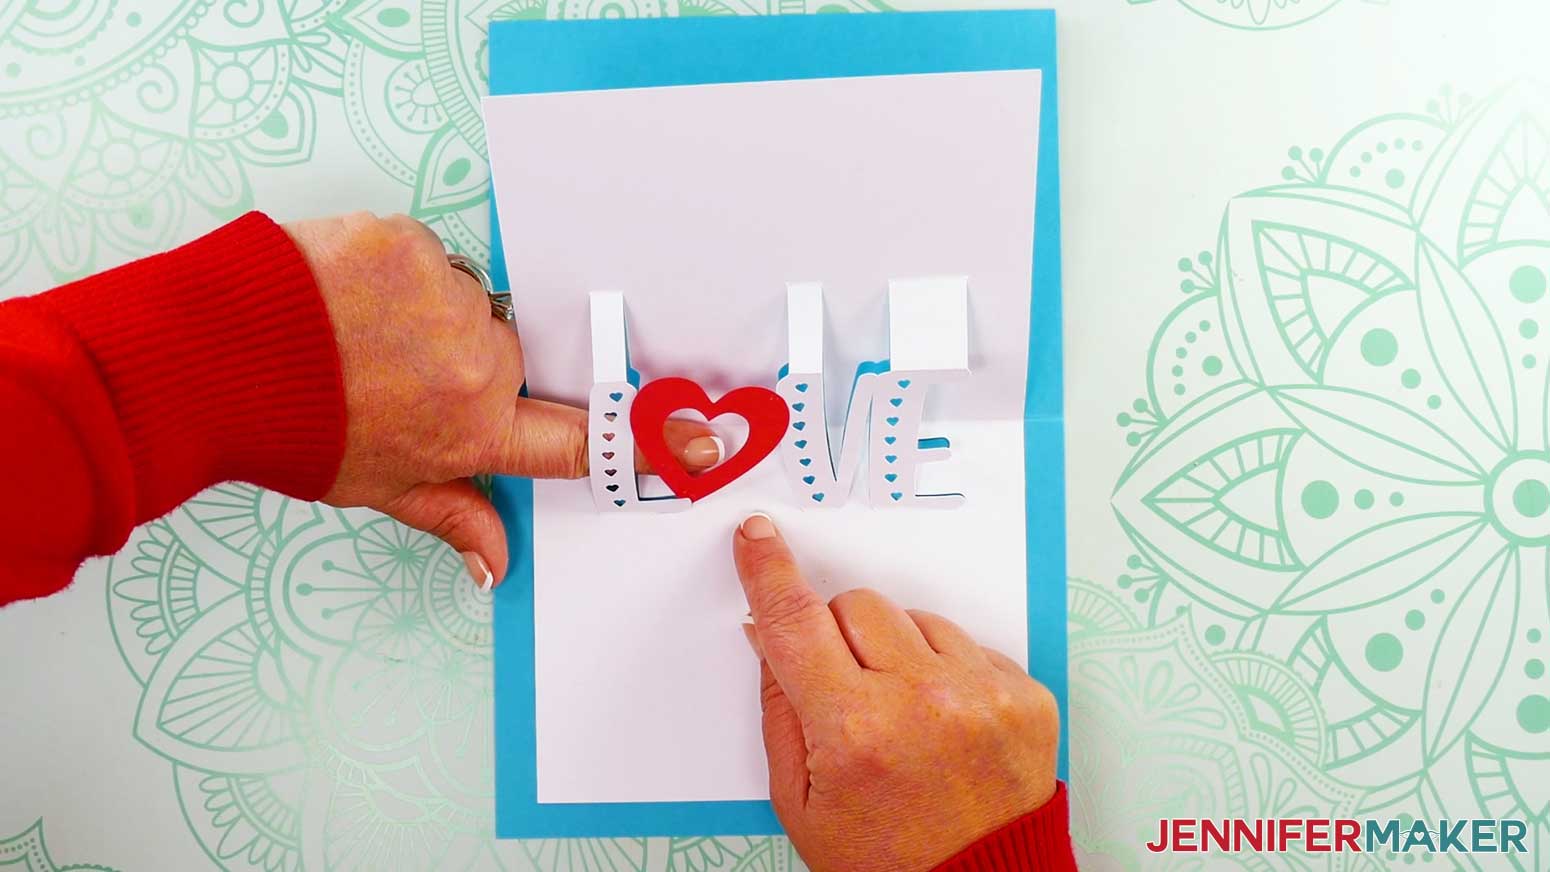
- Glue the heart piece to the letters, connecting the heart’s pointy bottom to the back of the L’s horizontal stroke, and the heart’s right curved side to the front of the V’s left vertical stroke.
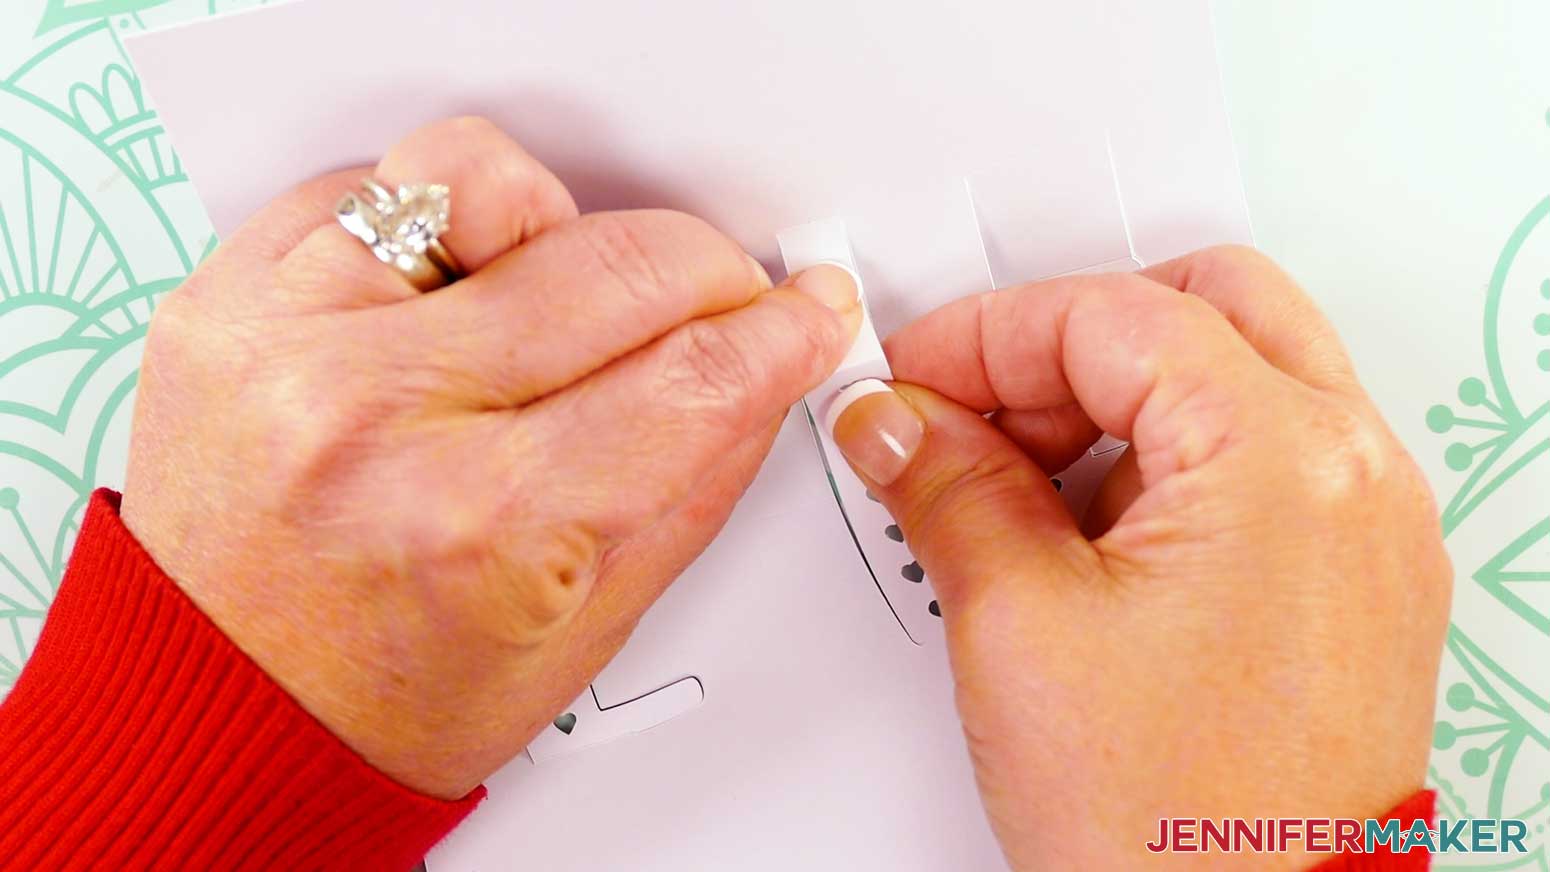
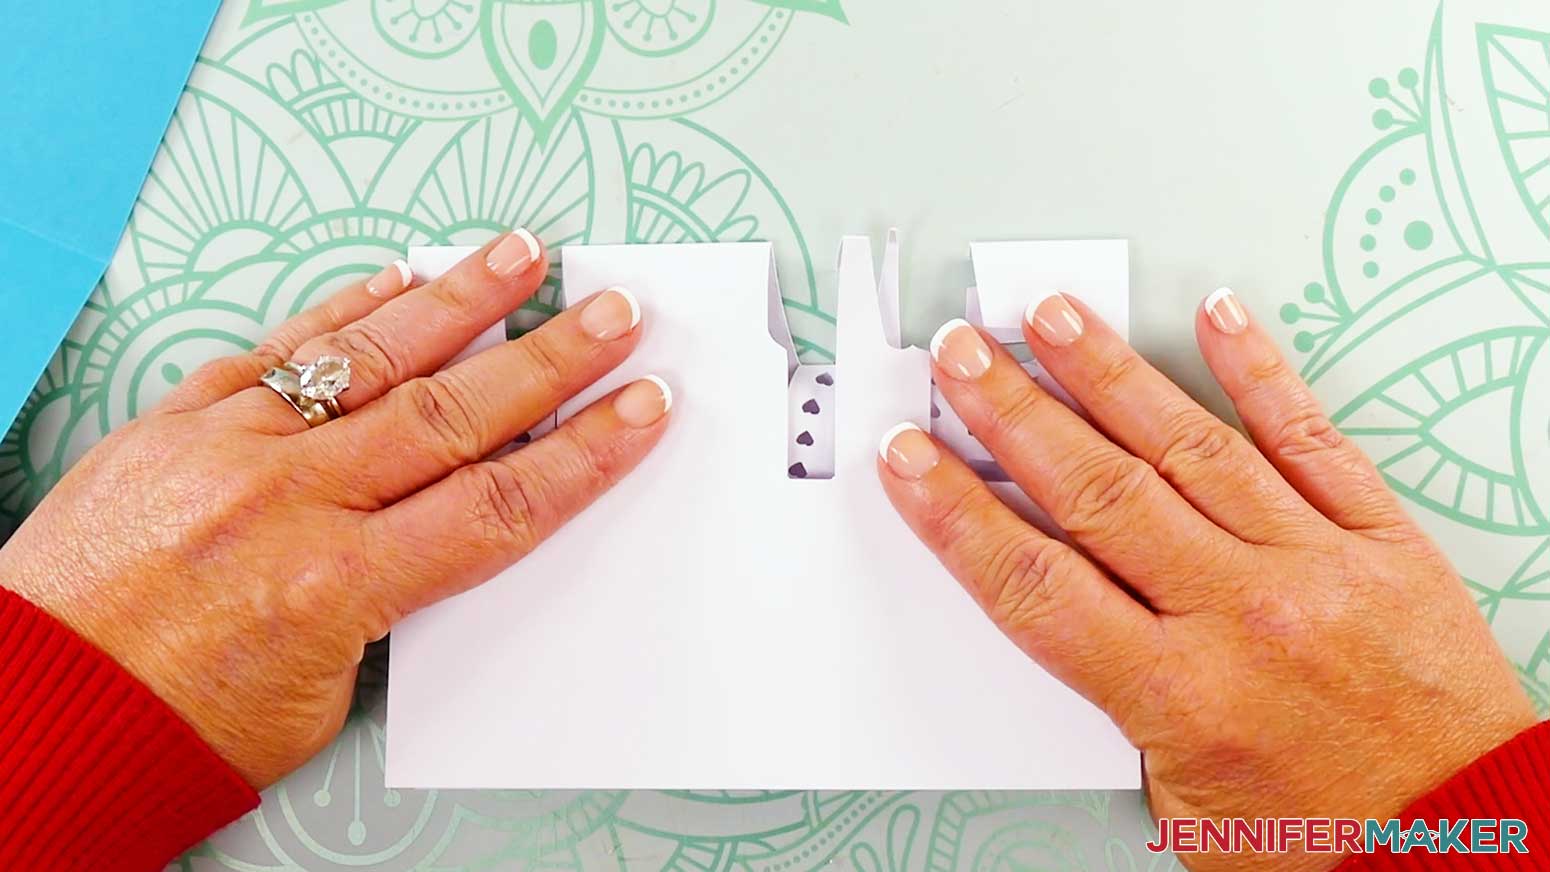
NOTE: Refer back to your Design Space Canvas if you’re unsure about placement. - Fold the entire sentiment piece in half inward along its center crease line.
NOTE: The section of the sentiment attached to the top row of letters should fold upward into a mountain fold. - Unfold, and lay the sentiment piece face down.
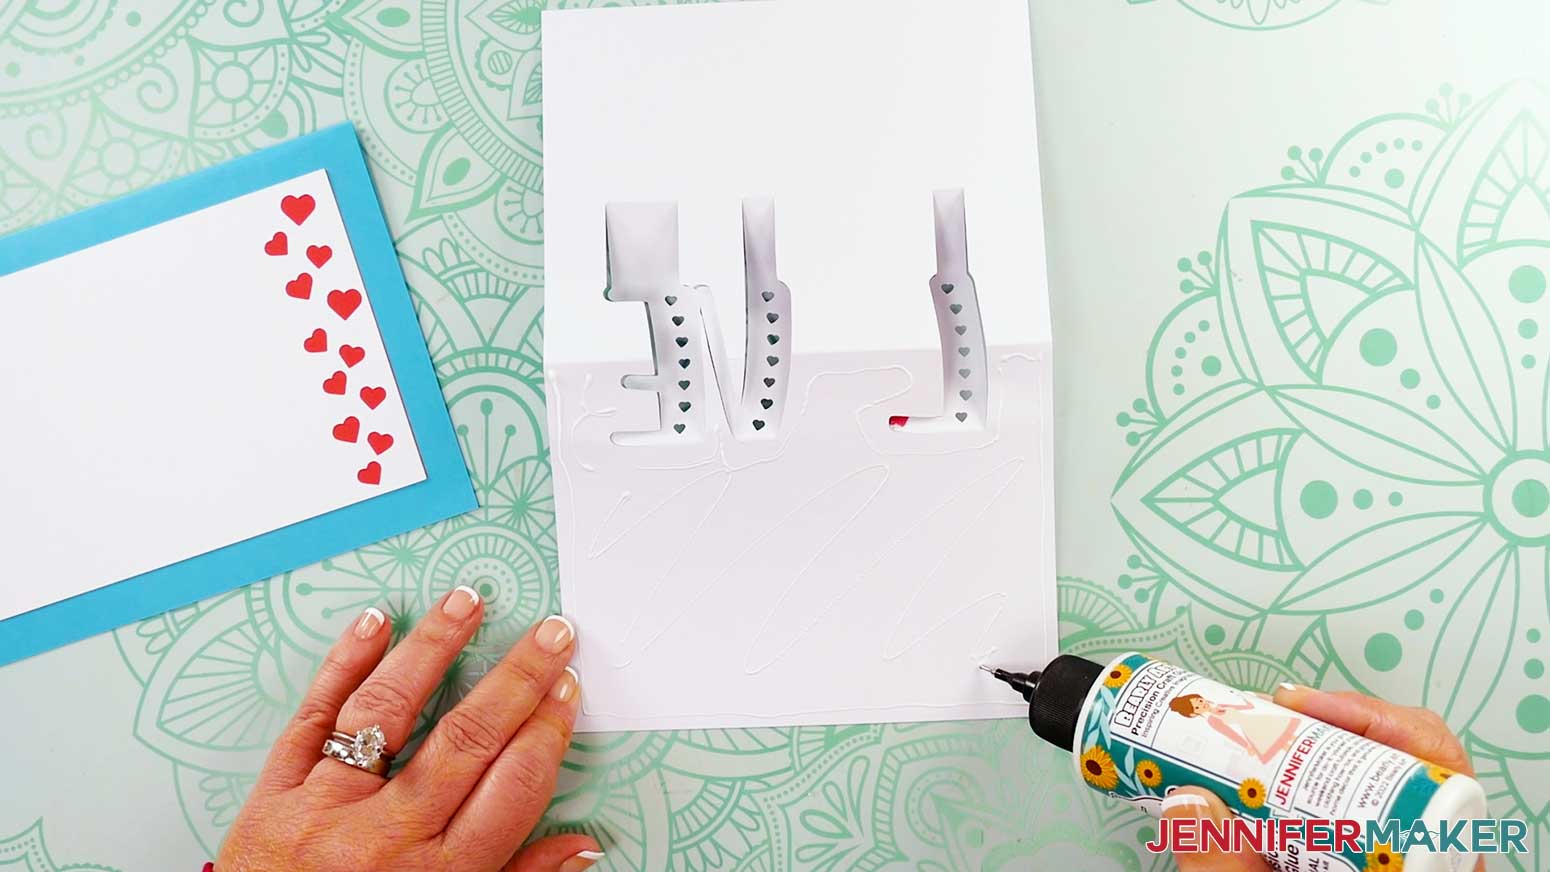
- Apply craft glue to the bottom portion of the sentiment, including the small areas between or around the letters, but NOT the letters themselves.
- Center the sentiment on the card’s inner bottom half, aligning its center crease lines with the main card’s center crease lines.
- Press down and smooth to adhere.
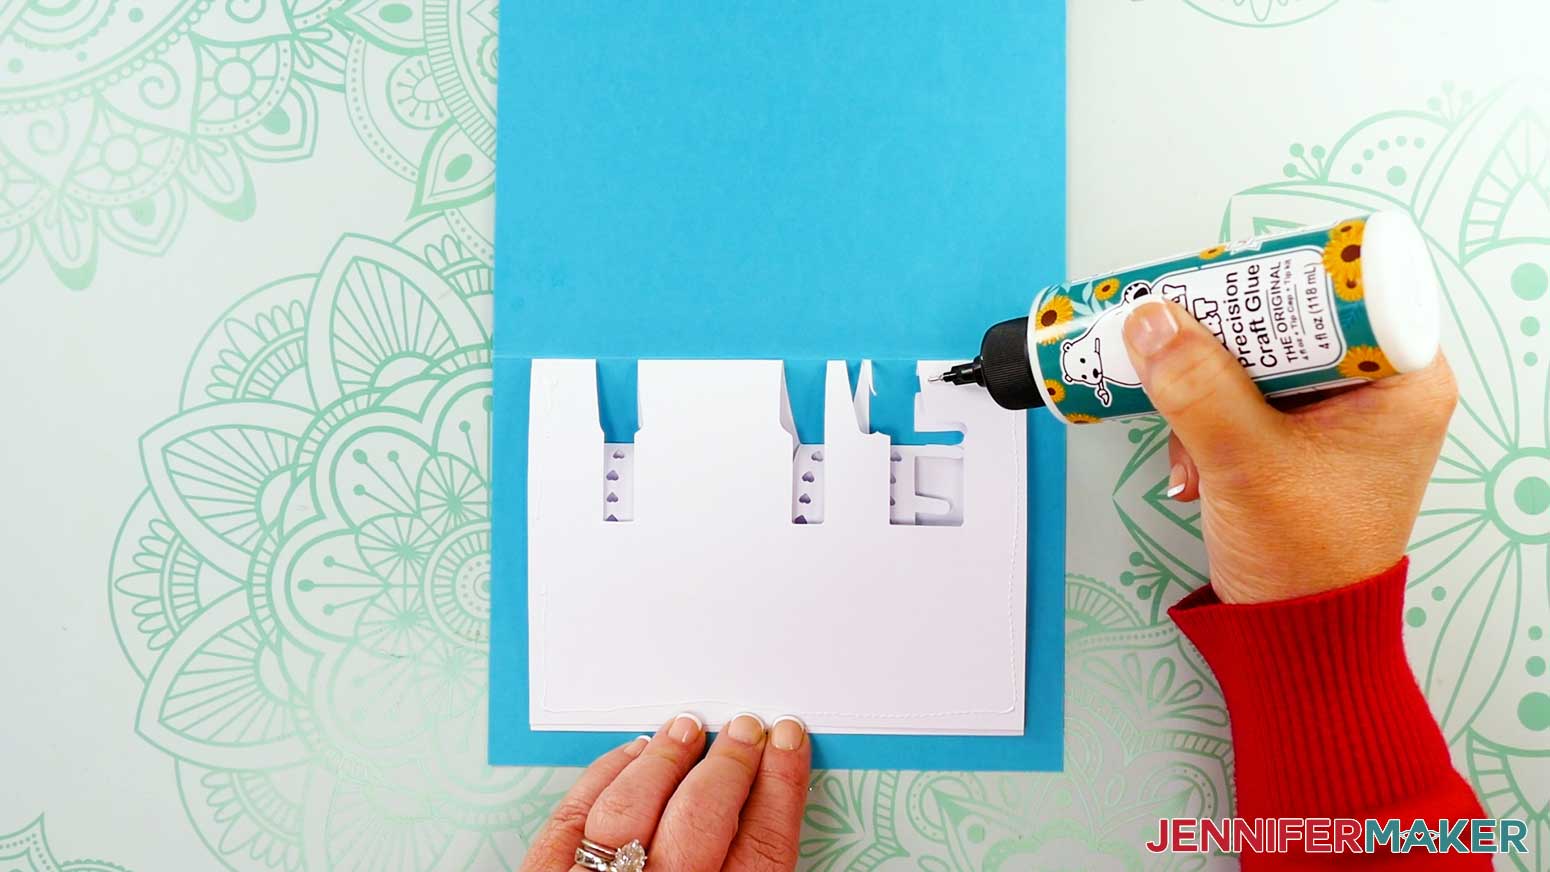
TIP: Make sure the small parts between the letters stick to the card. - Fold down the top half of the sentiment and the card to reinforce the sentiment’s creases, then open the card again.
- Apply craft glue to the back of the sentiment’s top half.
TIP: Make sure to get the top liner part as well. - Fold the sentiment piece down onto the top half of the card, then press to adhere.
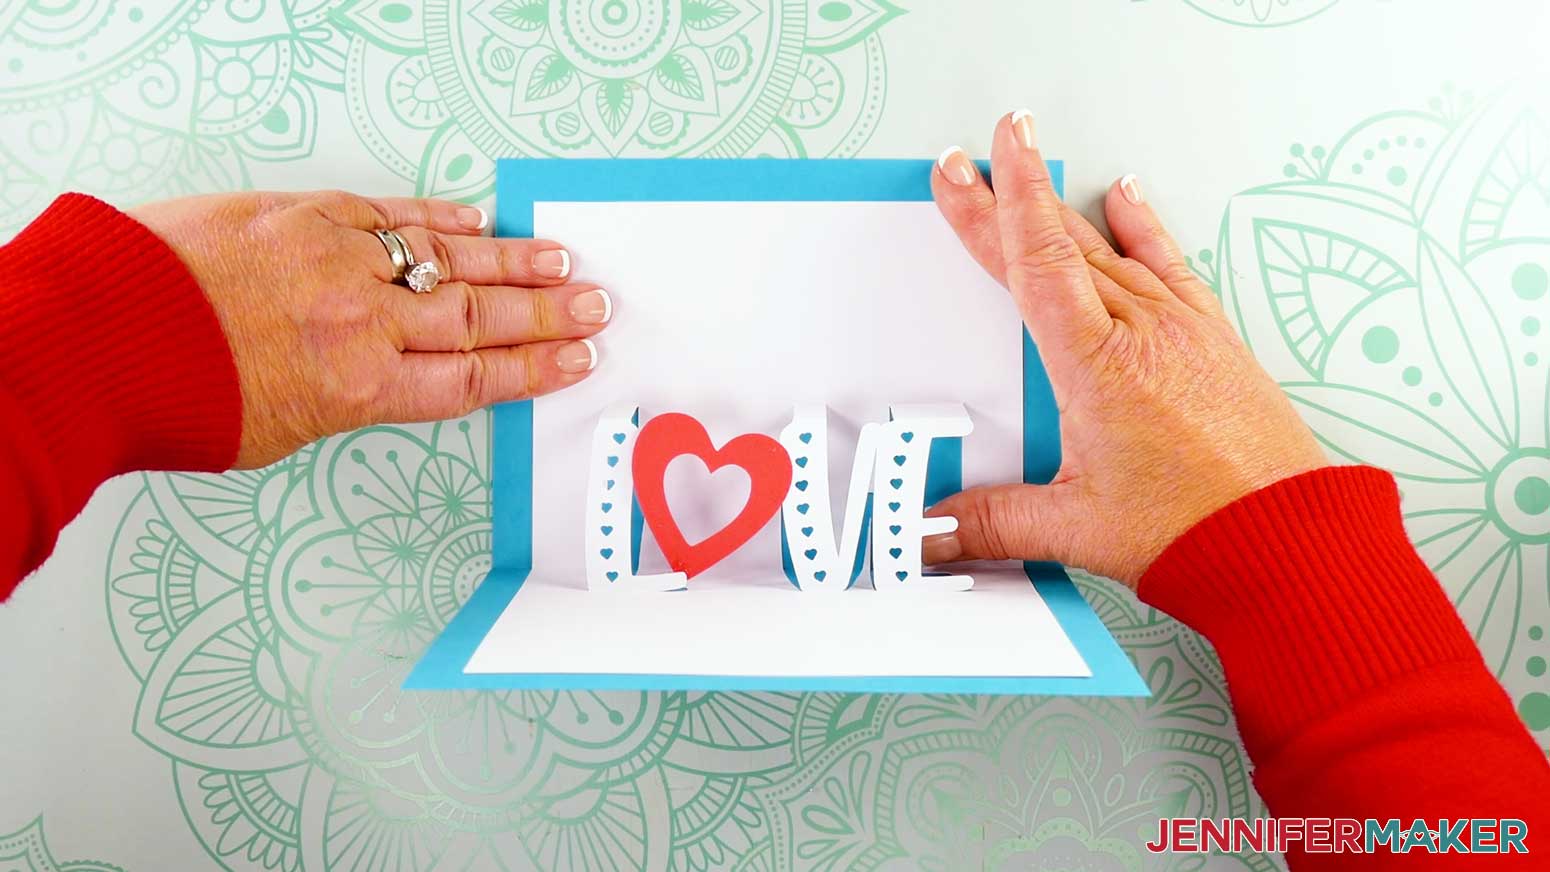
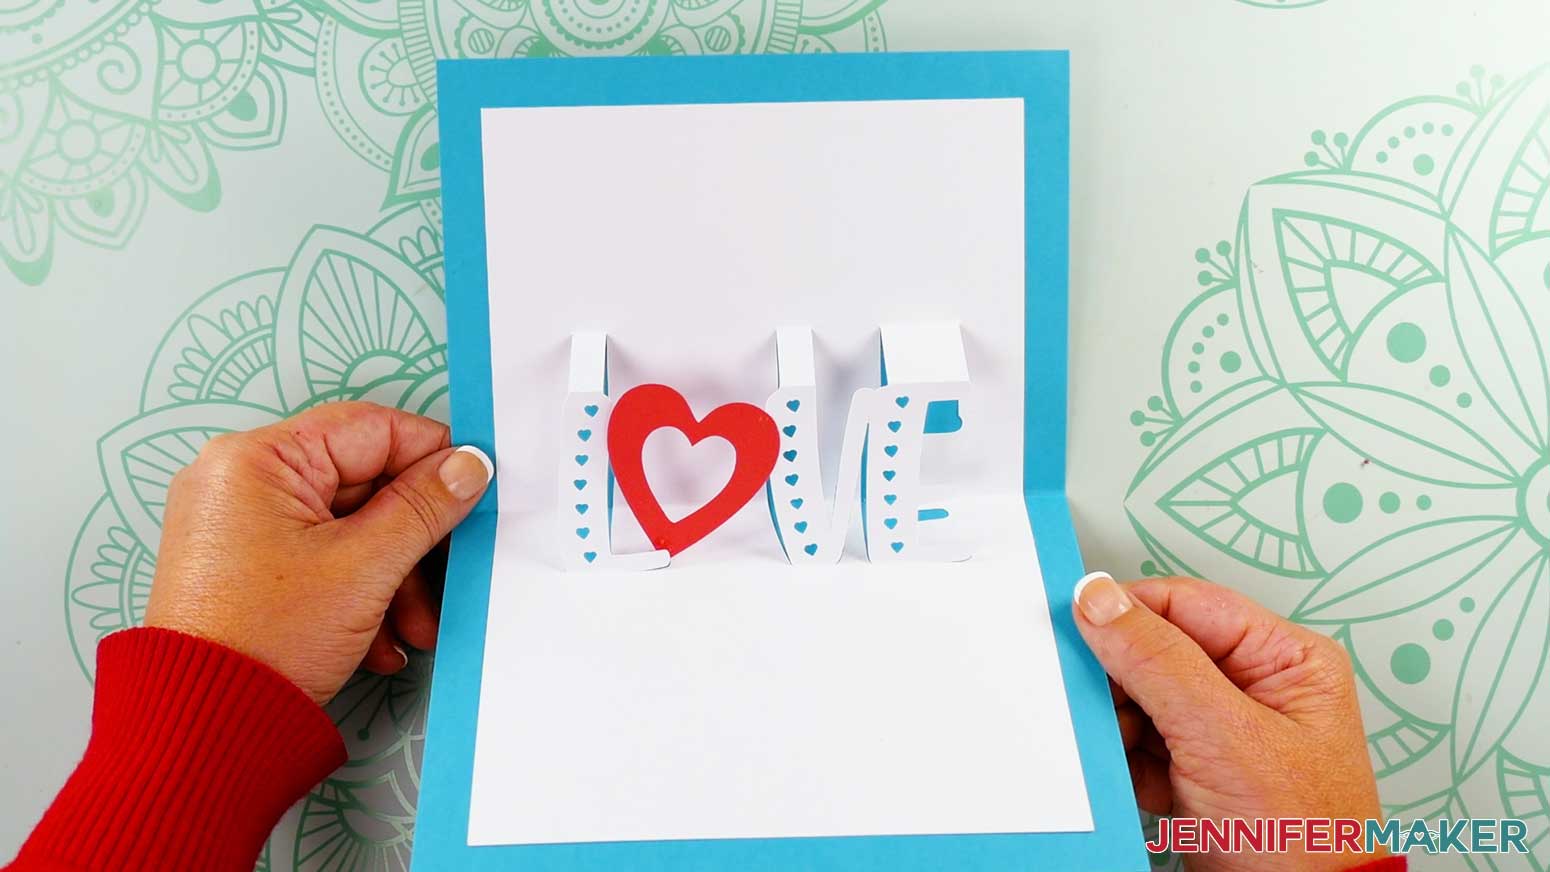
- Your “Love” pop up letter card is ready!

VARIATION 2: “MERRY AND BRIGHT” POP UP CARD WITH GLITTER CARDSTOCK
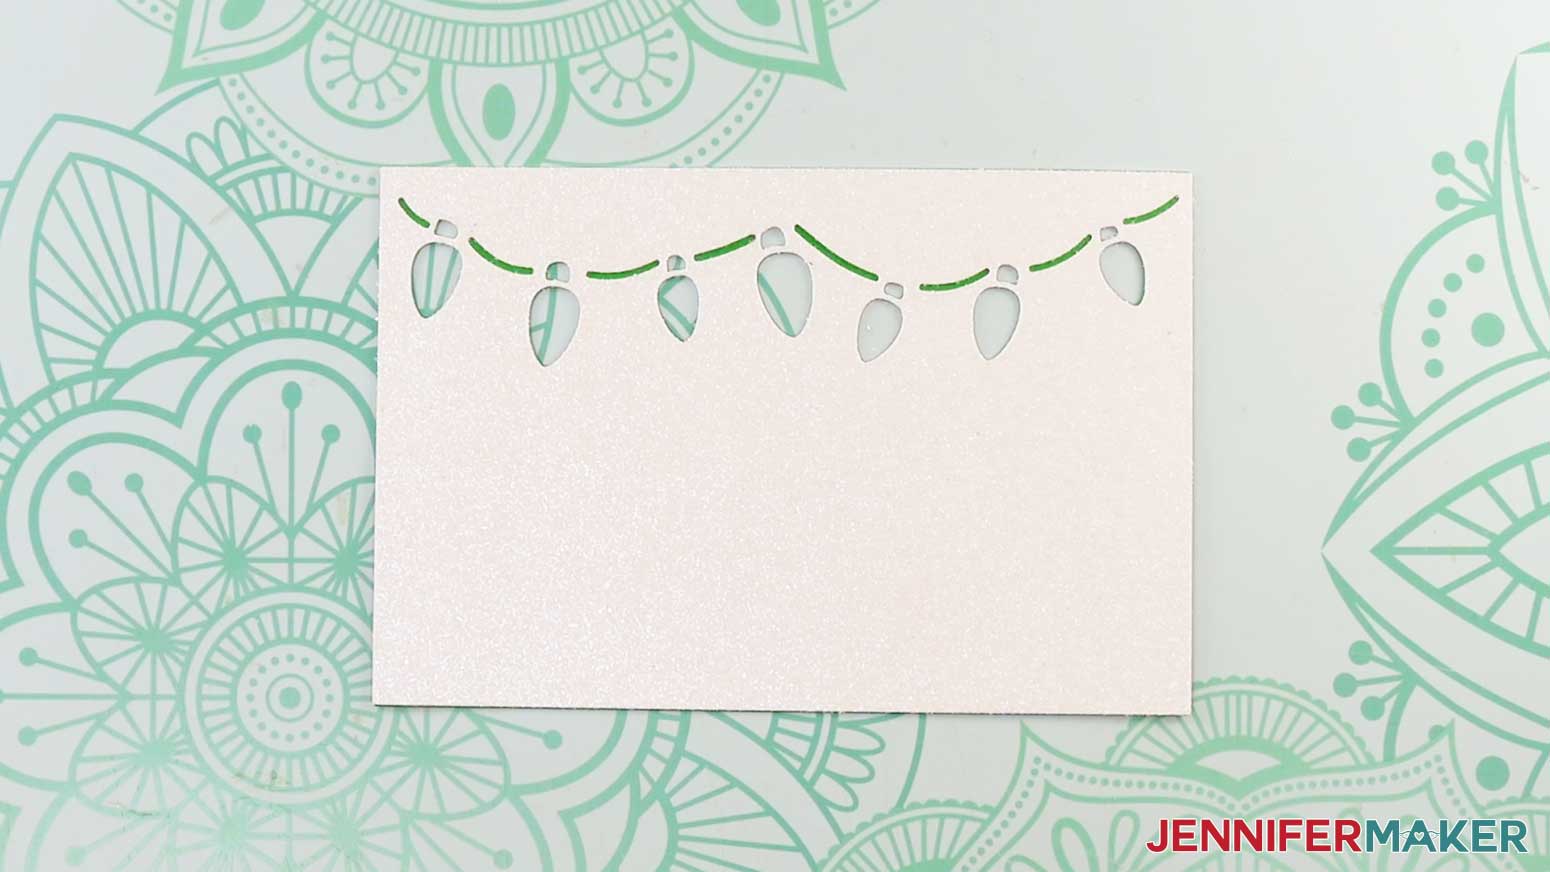
- Lay the front panel piece glitter side down in front of you.
- Lay the accent liner on top of the panel to make sure the holiday light cutout portions align.
NOTE: If the cutout portions don’t align, flip the liner over. - Move the liner to the side, keeping it oriented properly.
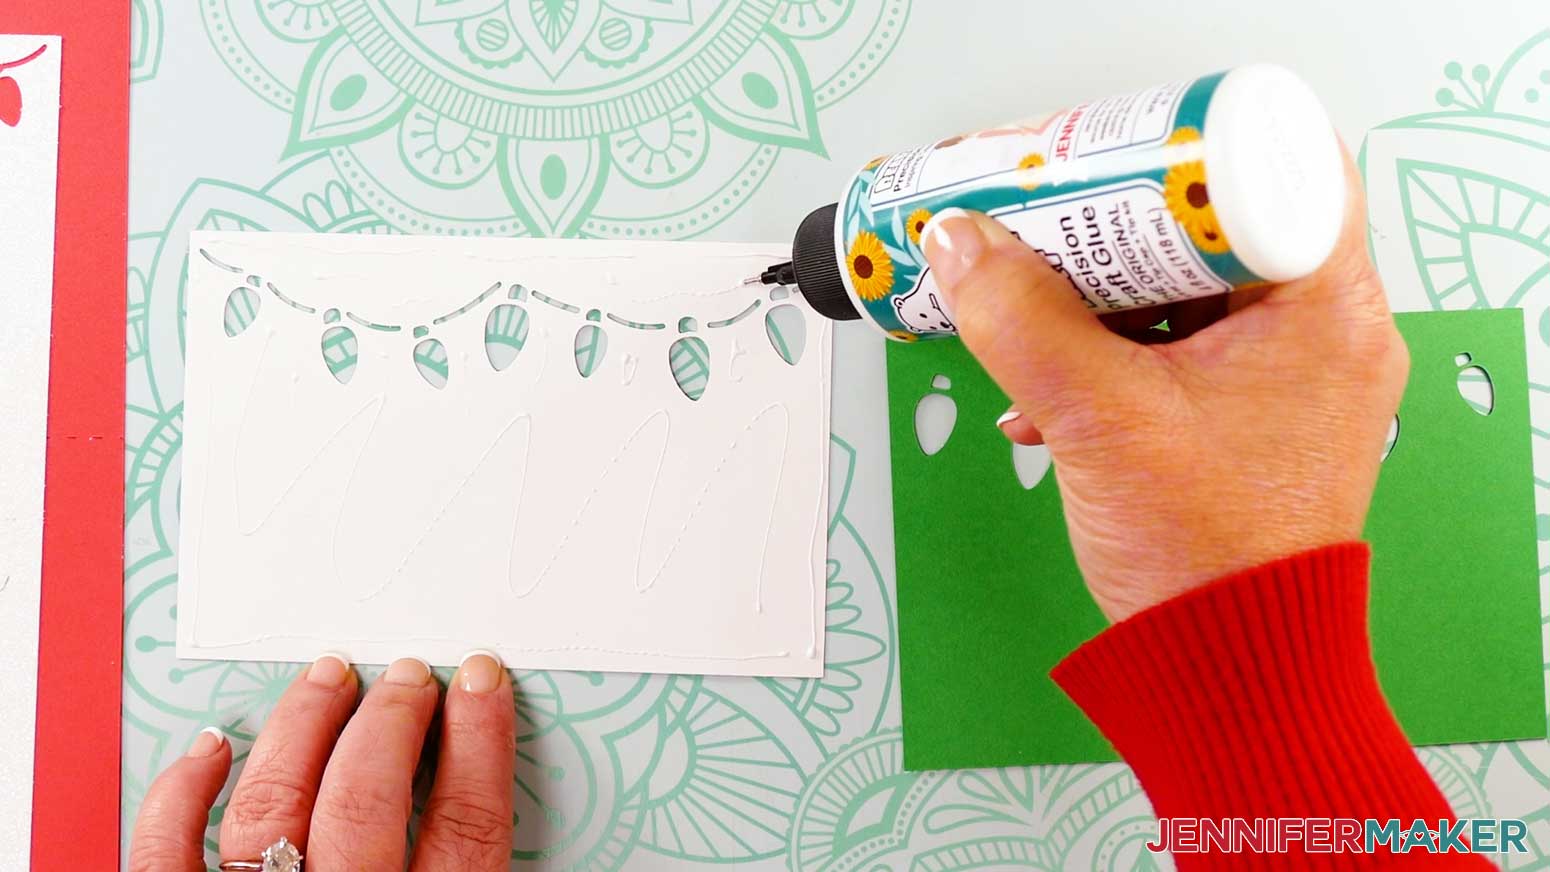
- Using the precision tip of your Bearly Art craft glue, apply thin lines of glue all over the back of the front panel.
- Place the accent liner back on top of the panel, making sure to line up the edges and the cutout pieces.
- Press down and smooth to adhere.
TIP: Use a brayer to help keep the pieces flat and secure. - Flip the panel face up, and use your finger or a paper towel to wipe away any excess bits of glue.
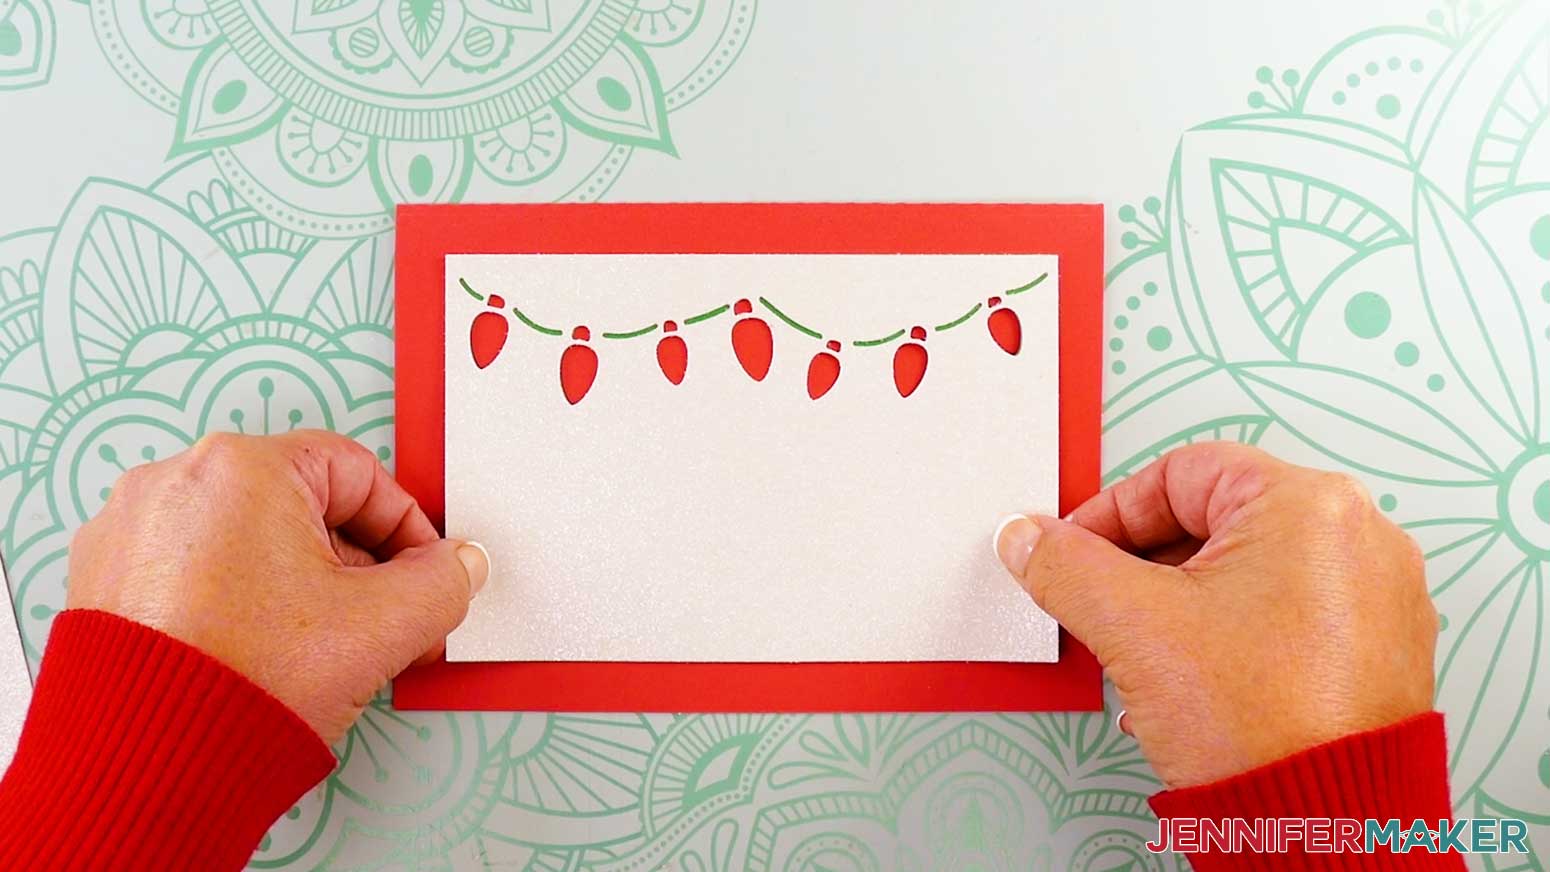
- Then follow Steps 6-9 of the “LOVE” Assembly section to glue the front panel to your card.
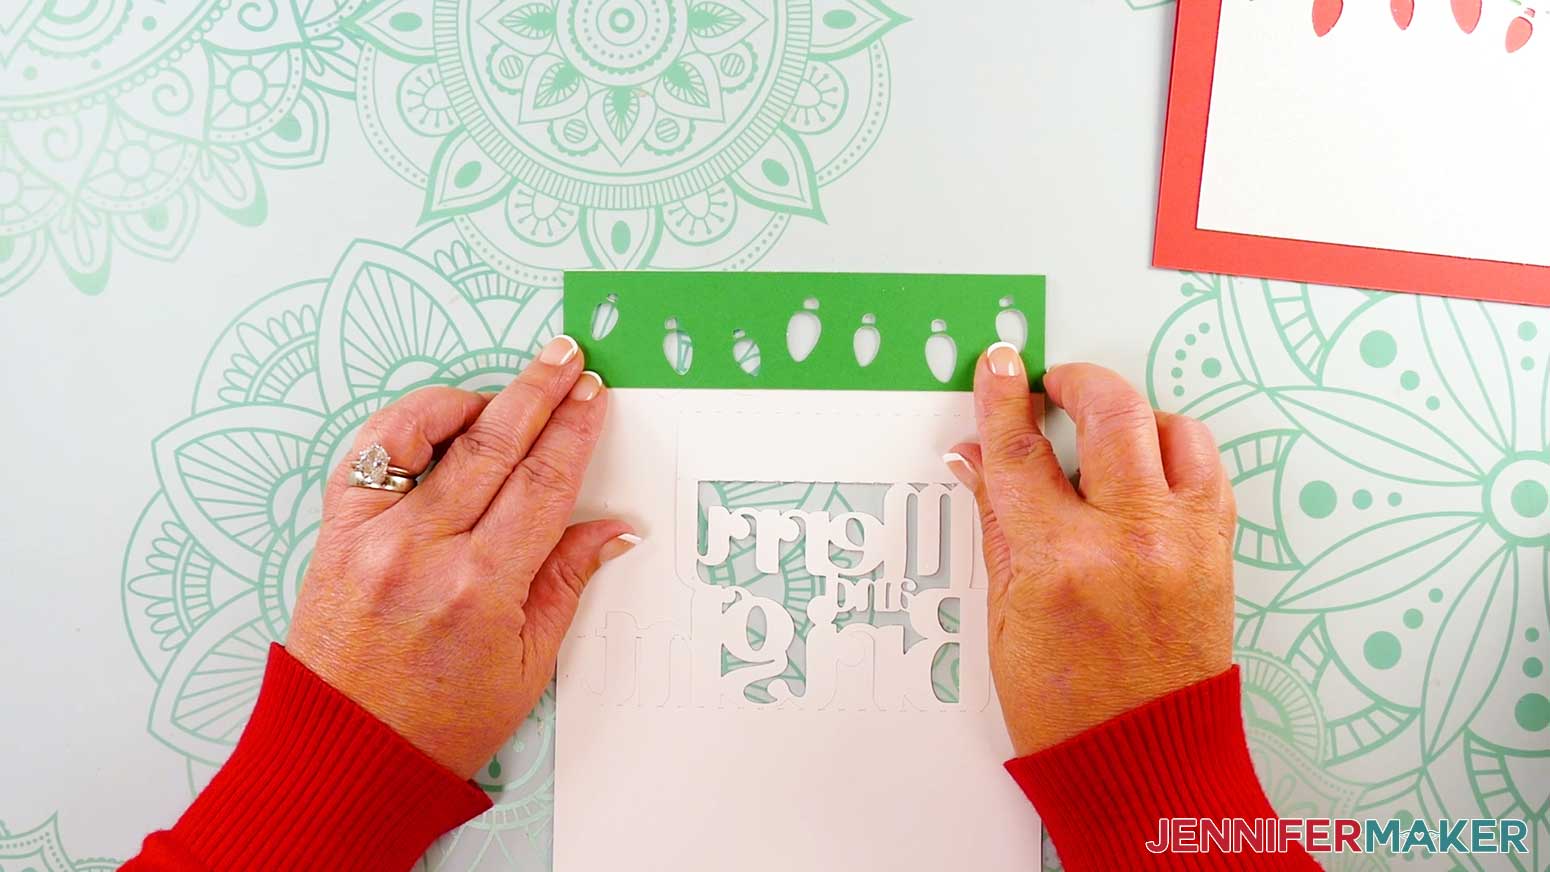
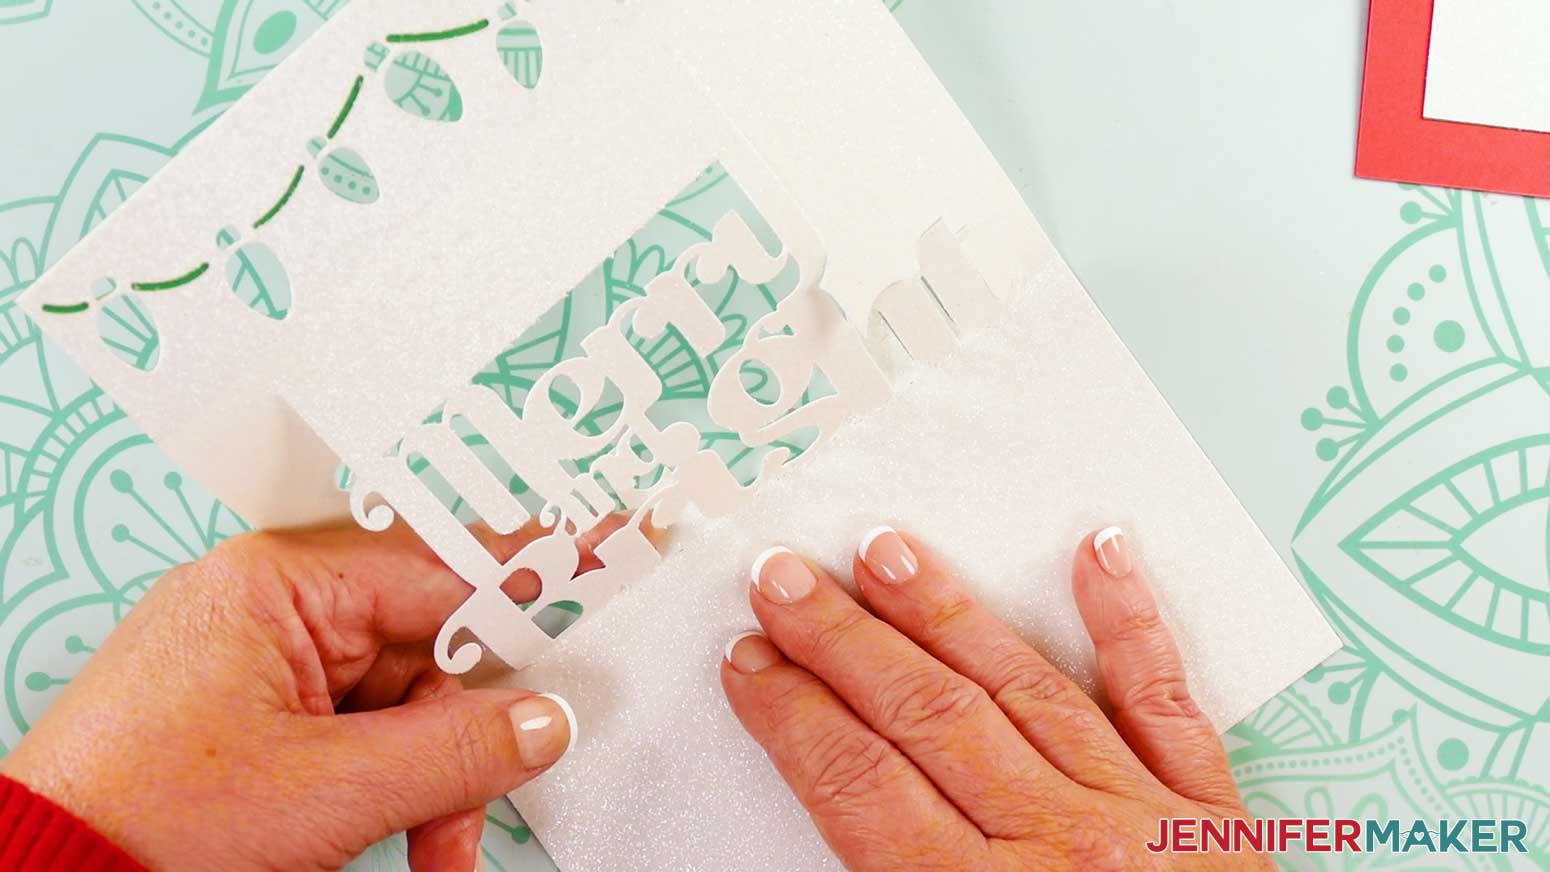
- Next, lay the sentiment piece glitter side down.
- Place the top accent strip on the sentiment piece to make sure the holiday light cutouts align.
- Flip up the accent strip, then apply glue to the back of the sentiment piece where the strip will go.
- Flip the strip back down into position over the cutouts, then press and smooth to adhere.
- Flip the sentiment piece glitter side up.
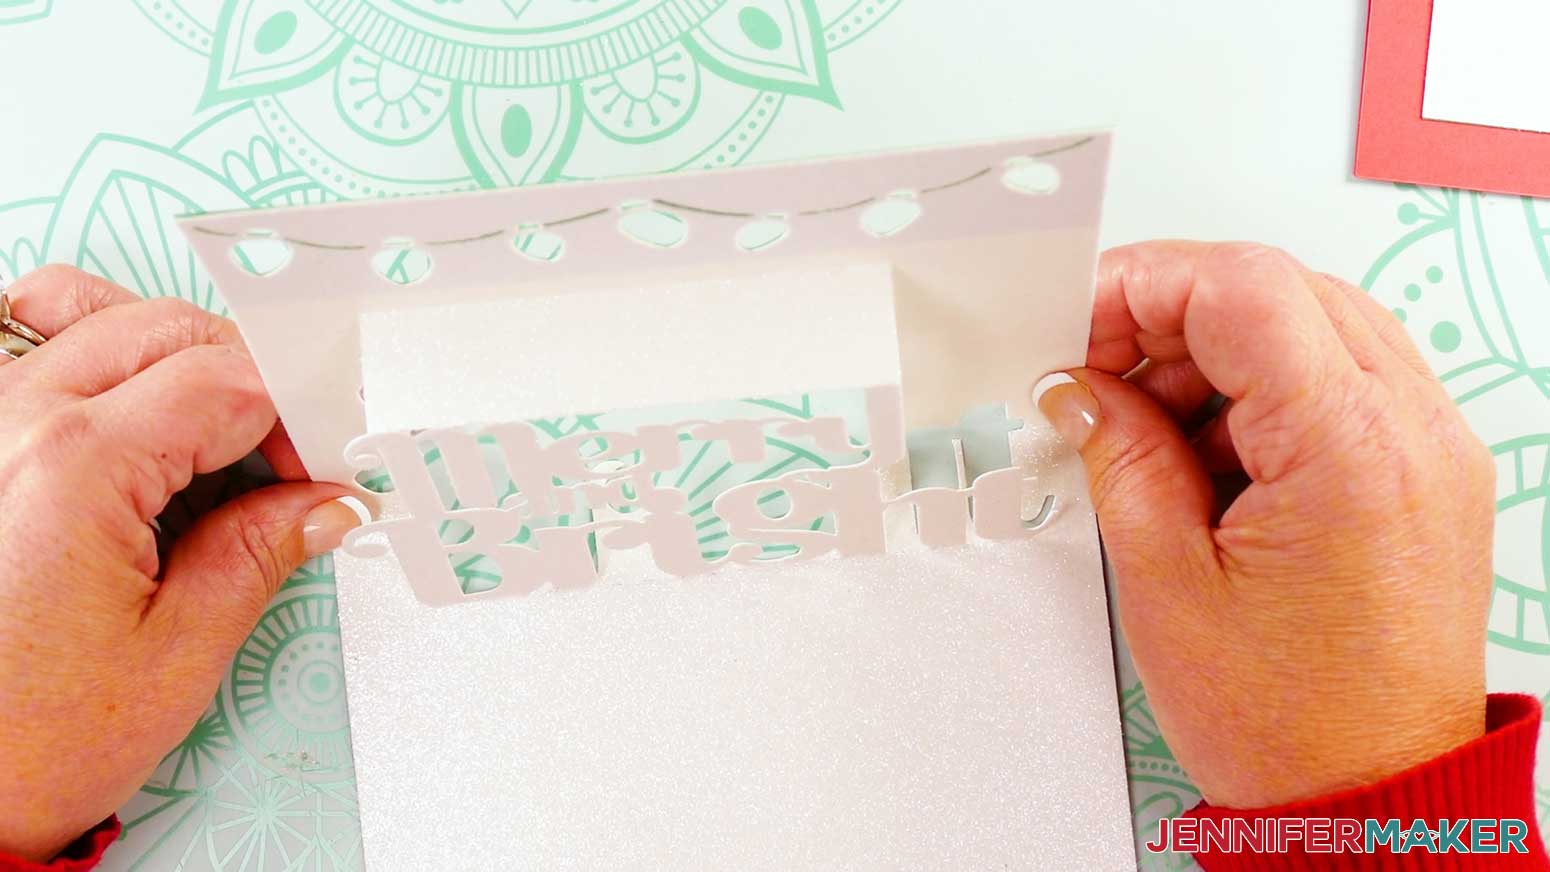
- Then follow Steps 11-13 of the “LOVE” Assembly section to fold the sentiment piece’s letters forward.
- Follow Steps 15-22 of the “LOVE” Assembly section to glue the sentiment piece to the inside of the card.
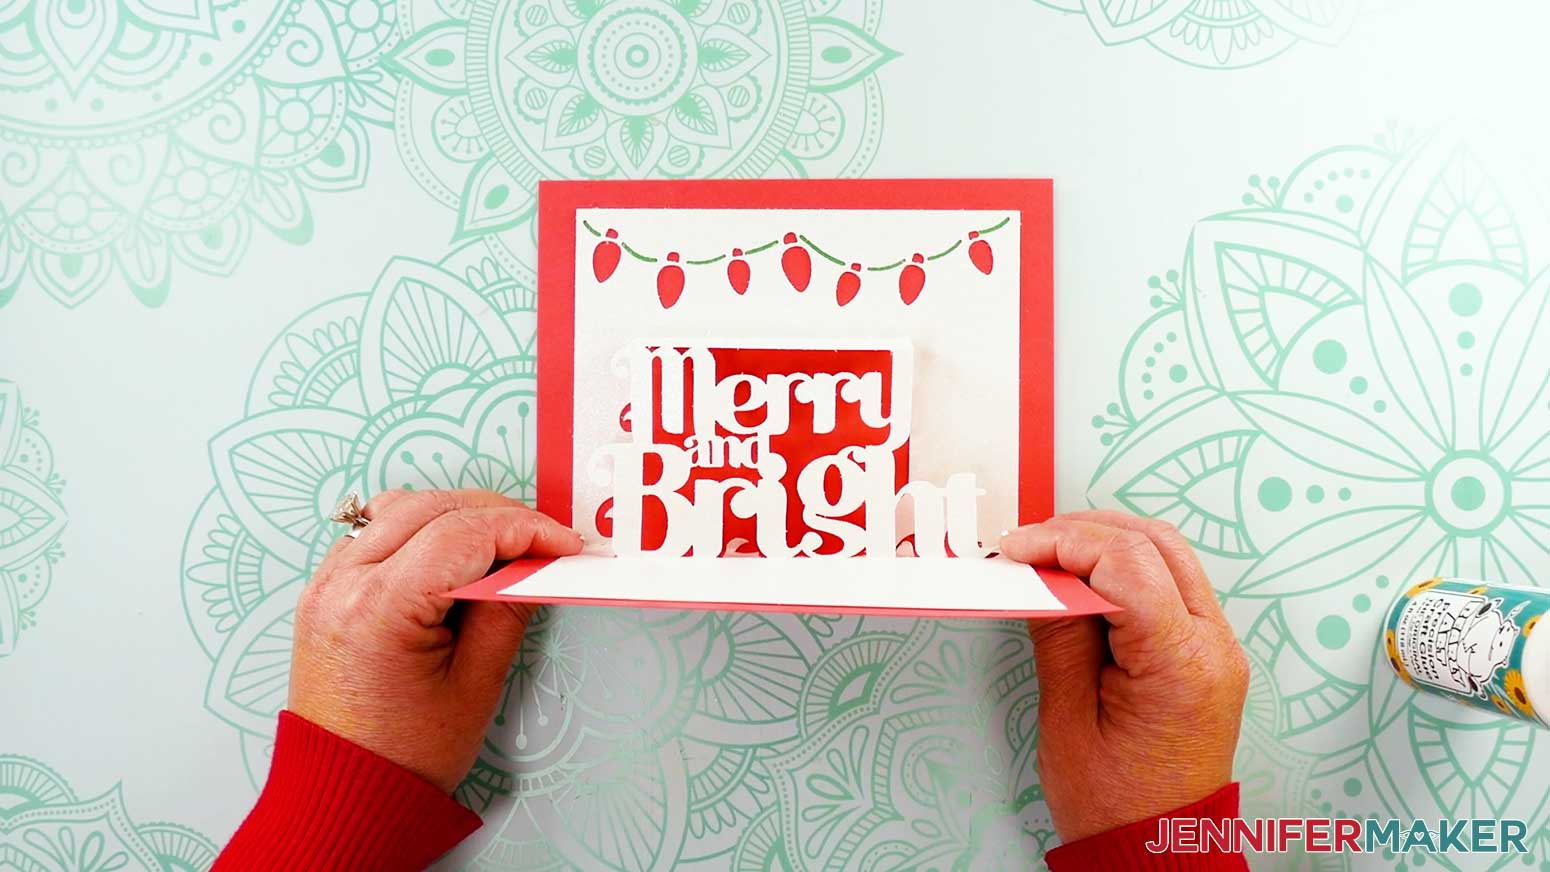
- Your “Merry and Bright” pop up letter card is ready!
VARIATION 3: “HAPPY NEW YEAR” POP UP CARD WITH FOIL CARDSTOCK
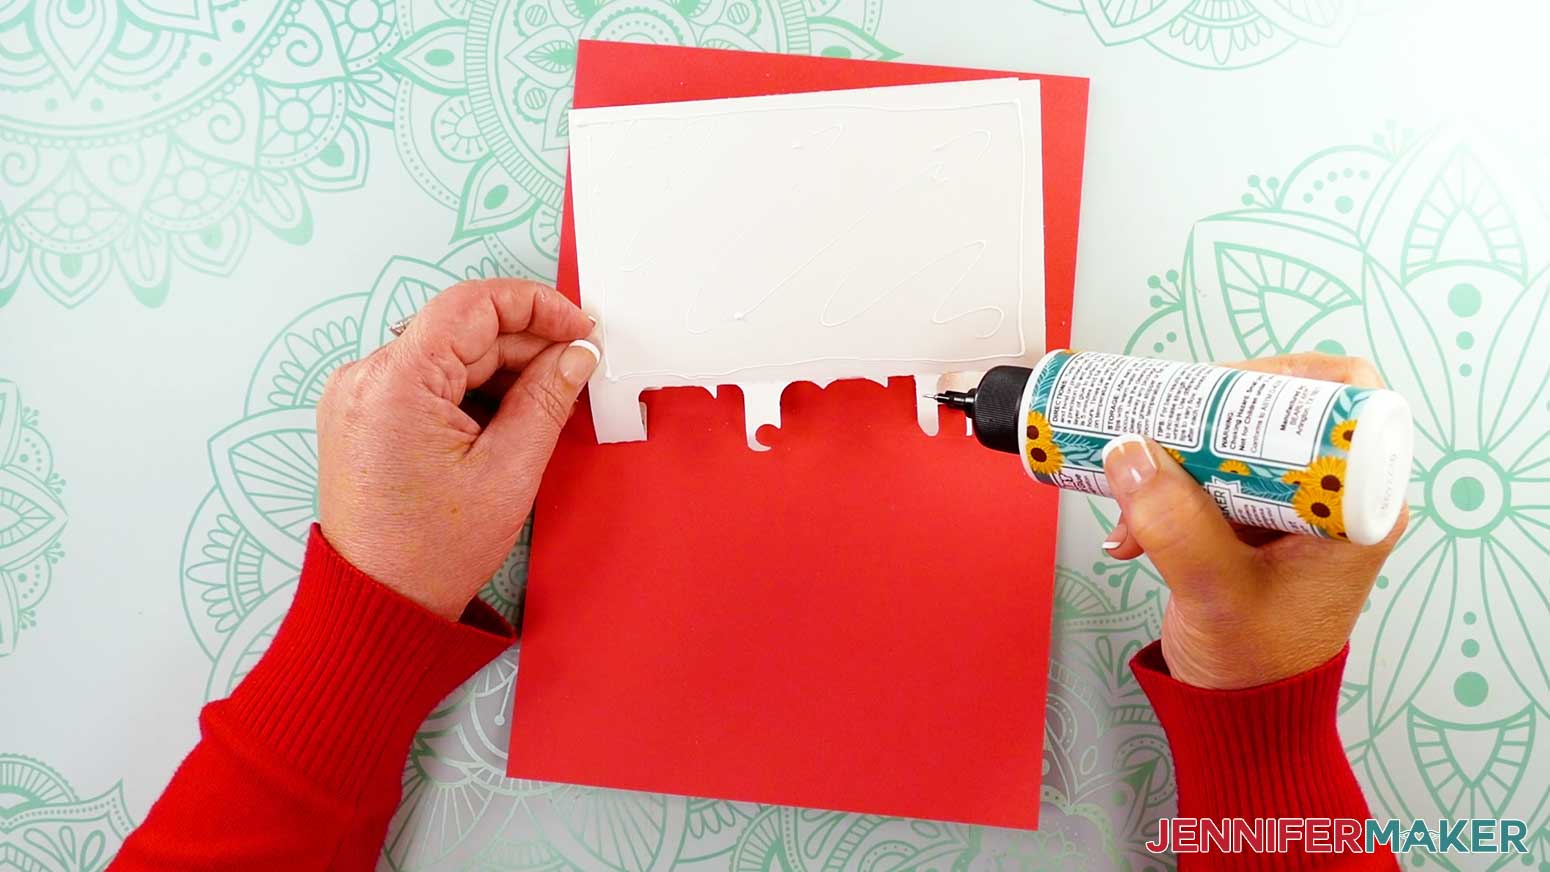
- Follow Steps 1-9 from the “LOVE” Assembly section to adhere the front panel and accent liner to the card’s front.
- Take one of the inside foil liner pieces and lay it shiny side down.
- Apply glue craft glue all over the back of the foil liner.
- Flip the liner over and center it on the main card’s inside bottom half, close to (but not over) the crease line.
- Press down and smooth to adhere.
TIP: Use a Brayer tool to make sure the pieces are flat and secure. - Then repeat Steps 2-5 to apply the second liner to the main card’s top half.
- Follow Steps 10-13 from the “LOVE” Assembly section to fold your sentiment piece’s letters forward.
TIP: Pay extra attention to the thin parts of the fireworks cutout areas to be sure they are folded and positioned properly. - Then follow Steps 15-22 from the “LOVE” Assembly section to glue your sentiment piece to the inside of your card.
- Your “Happy New Year” pop up letter card is ready!
STEP 4: SHOW IT OFF
You now have one or more impressive pop up cards to show off!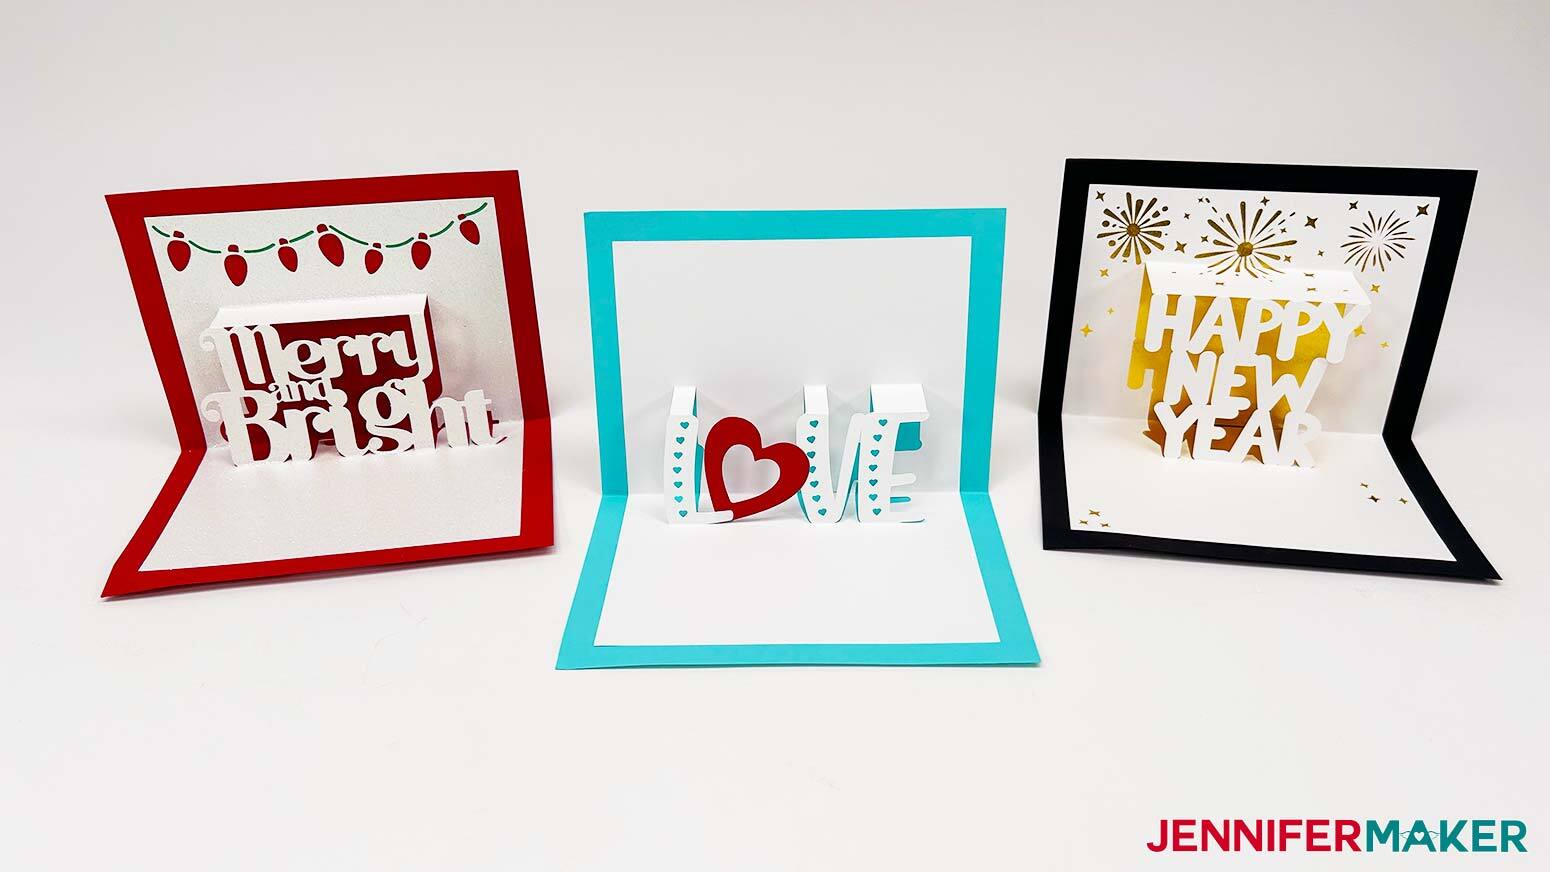
Notes
Finished Size:
Full Design: 7” x 5” Folded, for size A7 envelopes.
Joy Design: 3" x 4.25" Folded, for delivering in person!
Fonts:
JM Block Caps
Hello November, Free Alternative: Justine
Quacker, Free Alternative: Quacker for personal use ONLY
Answers to Your Questions About How to Make A Pop Up Letter Card
Q: How can I design my own pop up letter card?
A: You can learn how to design your own pop up letter card in my ADVANCE program. Learn more about ADVANCE with JenniferMaker here!
Q: Can I cut these pop up letter card SVG pieces on a Cricut Joy Xtra or original Cricut Joy?
A: Yes, I’ve included files for the big machines and versions made just for the Joy that make smaller versions! Just remember that the Joy version might be too small to send in the mail, so it might be better to hand deliver it!
Q: How do I know if my design uploaded at the correct size?
A: You can make sure your dimensions match mine after uploading your files:
- pop-up-letter-card-love-no-score-jennifermaker-SVG: 7″ x 11.76″
- pop-up-letter-card-love-score-jennifermaker-SVG: 7″ x 11.76″
- pop-up-letter-card-merry-no-score-jennifermaker-SVG: 7″ x 11.76″
- pop-up-letter-card-merry-no-score-jennifermaker-SVG: 7″ x 11.76″
- pop-up-letter-card-year-no-score-jennifermaker-SVG: 7″ x 11.76″
- pop-up-letter-card-year-no-score-jennifermaker-SVG: 7″ x 11.76″
If your projects are not coming in at the right size, try uninstalling and re-installing Cricut Design Space. If you need help resizing your design, please see our Resizing Guide.
Q: Do I have to use a Cricut to cut my pop up letter card SVG pieces?
A: No! You can make a greeting card from paper or card stock that works with your equipment, or even just with scissors. We always include several versions of each free file in the free download ZIP file. If you have a Silhouette Cameo, which uses Silhouette Studio, you can use the DXF file in Silhouette Basic Edition. If you have upgraded to Silhouette Designer Edition, Designer Edition Plus, or Business, you can use the SVG format with your Silhouette machine to cut each intricate design. If you don’t have a cutting machine, you can print and then cut out my digital download PDF files, too! The ZIP archive in my resource library includes these file types and more!
Q: Help! My Cricut Design Space screen looks different than yours!
A: If you’re using the latest version of Cricut Design Space, your screen may have slight variations than the screen you see on the video tutorial. Good news: All of the same functions are there, they may just be in different spots or have new icons. Pause the video if you need, or follow along with the written tutorial. If you get stuck, ask for expert support in our Facebook group. Our group has become not just a help center, but also a vibrant community of real people and crafters! Plus, you can catch the latest news on JenniferMaker tutorials and more.
Q: Can I make and sell these pop up letter card designs?
A: I love supporting creative entrepreneurs! If you want to use my designs and projects for commercial use, please familiarize yourself with my important licensing information before selling your crafts.
I do not permit sale of my digital items, but you can sell the creative goods you make with them — as long as you follow my licensing requirements. That means you cannot sell the pop-up letter card SVG files, but you can sell cards that you made with the files within the guidelines linked above.
Q: What is a pop up greeting card?
A: A pop up greeting card is a three dimensional card that “pops up” when you open it! It’s a 3D card rather than a simple flat card. It can have pop up pictures or words–whatever you want to create!
Q: Do you have other easy card designs?
A: Yes, I love making cards and sharing them with you! Here are some of my favorite handmade pieces, which you can adjust as needed for multi-occasional use:
- Side edge cards with nature themes
- Cute animal Cricut card designs
- Christmas side edge cards
- Homemade greeting cards with houses
Q: What fonts did you use?
A: I used the following fonts in my pop up card designs:
- JM Block Caps
- Hello November, Free Alternative: Justine
- Quacker, Free Alternative: Quacker for personal use ONLY
Get my free SVG/DXF/PDF files to make a pop-up letter card!
(If you do not see the signup form above, click here.)
I love seeing what you make with my designs and how you use them! Please share a photo of your pop-up letter card in our Facebook group or tag me on social media with #jennifermaker.
Love,

Want to remember this? Save this Pop Up Letter Card Tutorial to your favorite Pinterest Board!