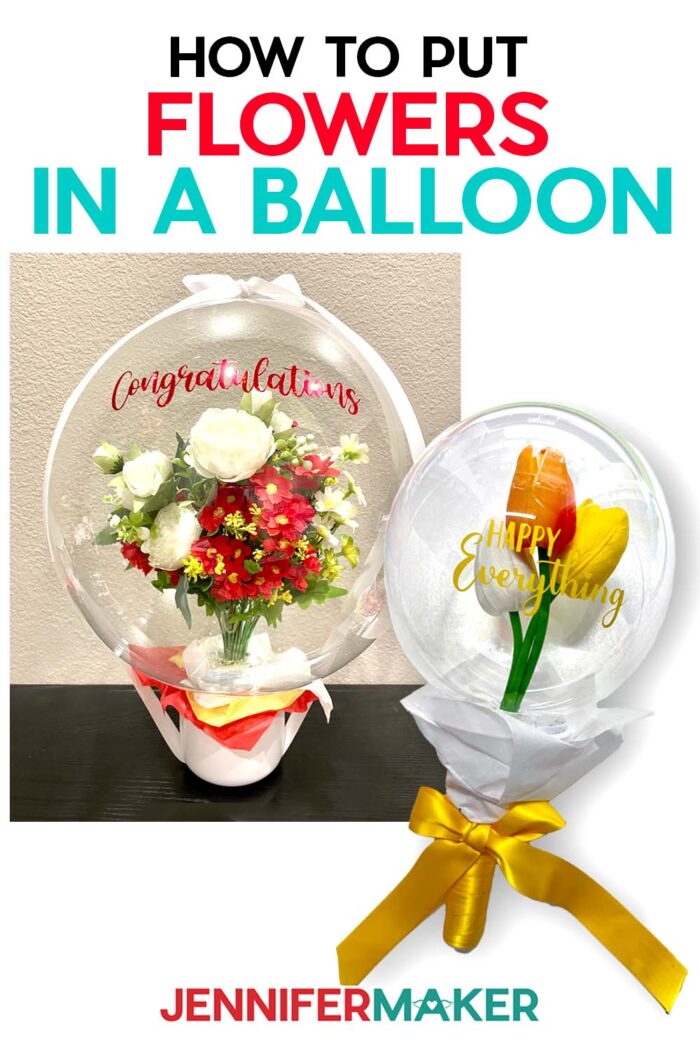
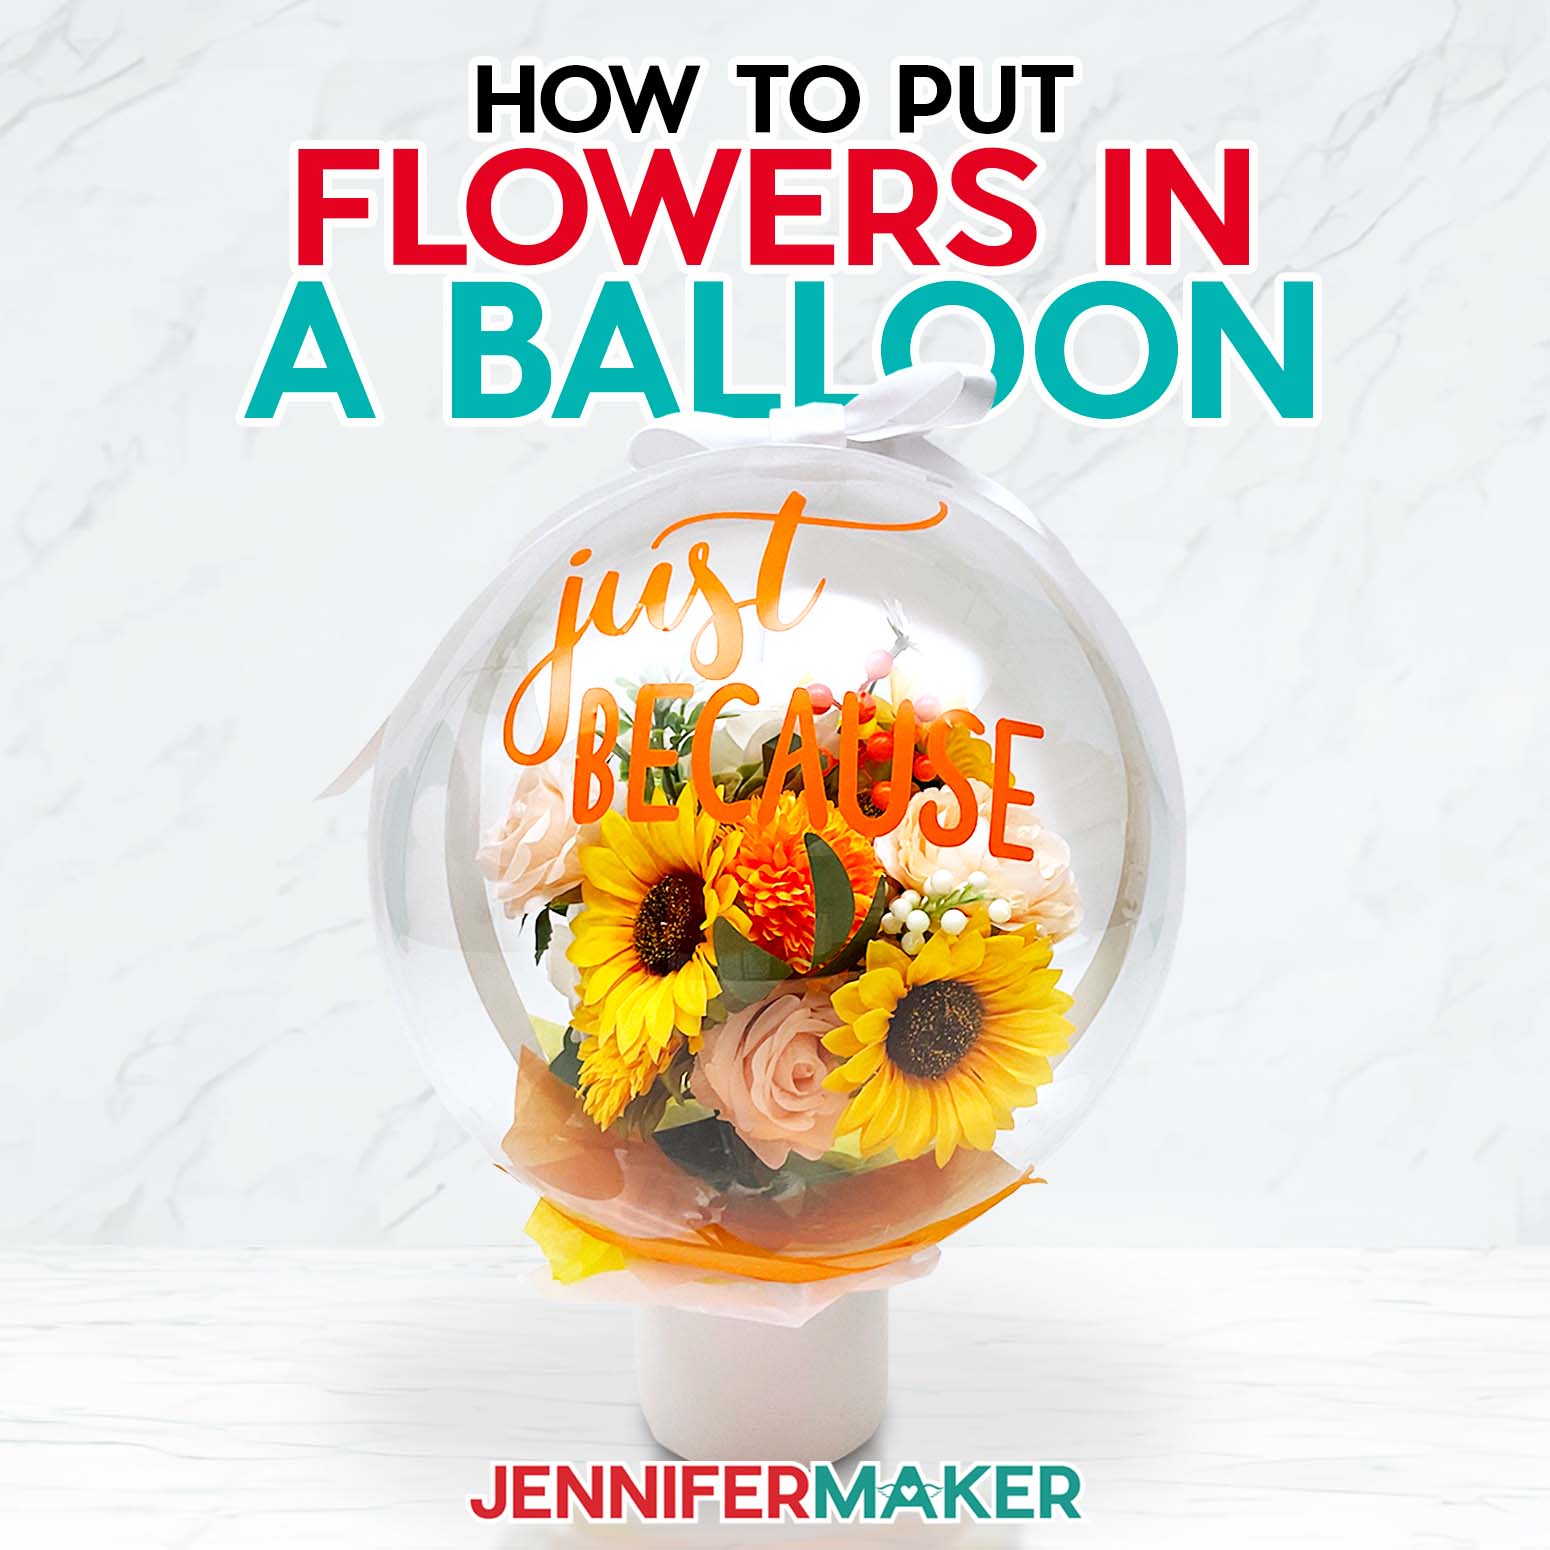
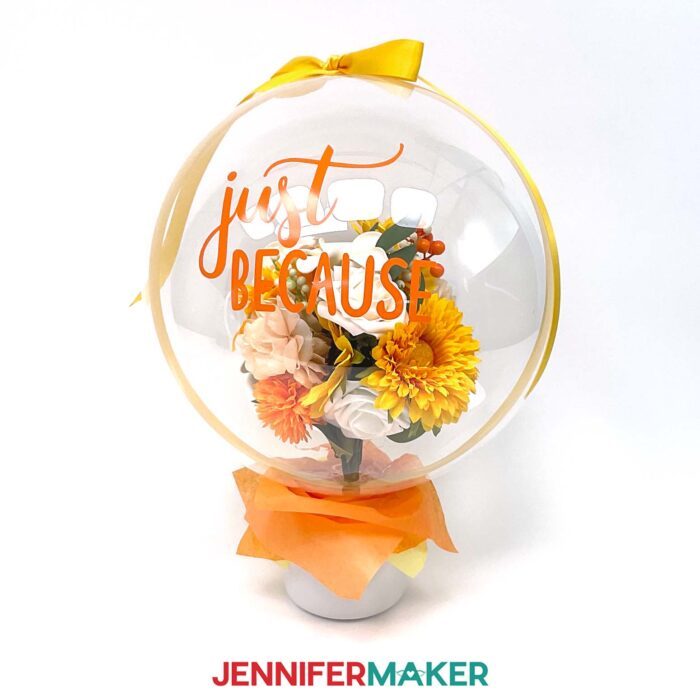
Learn how to make a balloon flower bouquet for your next event!
Whether the goal is a really fun gift or making a big impression at your next occasion, a balloon flower bouquet checks the boxes! These are a super fun way to display a special design or theme, but can be tricky to execute. Happily for you, I’ve done lots of tests with this project, and can’t wait to share all my best tips and tricks for making next level balloon bouquets for happy birthdays, special events, and last-minute gifts!

First I’ll show you how to make a fun balloon bouquet that can be held and carried around. I’ll walk you through how to prepare your Bobo balloon, how to choose the right flowers, and how insert them into the balloon — without popping it! Hint: Floral tape on your stems helps keep them together and makes them less sharp! Floral tape not sticky? Try stretching it — it activates the adhesive.
When you’re done, you’ll have a super cute arrangement that rivals your typical flower delivery.

Then I’ll show you how to make a large tabletop balloon flower bouquet. This one is different than the handheld one because the bouquet is much bigger. We’ll use a ceramic box or similar container for the base, and fill a 24″ Bobo balloon with flowers. But how do get so many flowers inside the balloon? Watch the tutorial to find out!
You’ll need some basic tools and materials like permanent adhesive vinyl to decorate the balloon — and a Cricut to cut it. You’ll also need a Bobo balloon, some artificial flowers, and an air pump (manual if you’re making the handheld bouquet, electric if you’re opting for the big tabletop one). If you’re making the big version, you’ll also need a heat sealer. I’ll explain why in the tutorial.

It’ll be so fun to see your special someone receive their birthday flowers balloon bouquet. Or, to celebrate over special anniversary flowers taken to a higher level! They make a great gift for anyone’s special day!
Ready to learn how to make a super cool balloon flower bouquet? This post contains some affiliate links for your convenience (which means if you make a purchase after clicking a link I will earn a small commission but it won’t cost you a penny more)! Read my full disclosure policy.
Materials And Tools to Make a Balloon Flower Bouquet
See my full and complete Amazon shopping list for the exact items used in this project!
- One (1) Transparent Bobo Balloon – 24″ for Free Standing -OR- 10″ for Hand Held
- Artificial Floral Bouquet – OR- Artificial Tulips
- Heavy Duty Wire Cutters
- Two to Four (2-4) Zip Ties
- One (1) 260 Long Balloon
- Electrical Tape
- Floral Tape
- 2-3 Sheets of Tissue Paper
- Mesh Floral Nets (for inserting flowers through balloon neck)
- Balloon Cups & Sticks (for Hand Held Bouquet)
- Bouquet Handle (for Hand Held Bouquet)
- 4″ White Ceramic Pot (for Free Standing Bouquet)
- Floral Foam (for Free Standing Bouquet)
- 1″ White Satin Ribbon (up to about 48″ long) -OR- 1″ Yellow Satin Ribbon (up to about 48″ long) – OR- 1″ Aqua Blue (Teal) Satin Ribbon (up to about 48″ long)
- Medium Zots
- Hand Held Balloon Pump (for Hand Held Bouquet) -OR- Electric Balloon Pump (for Free Standing Bouquet)
- Heat Sealer (for Free Standing Bouquet)
- Hot Glue Gun & Glue Sticks (for Hand Held Bouquet)
- Silicone Finger Protectors (optional for use with hot glue)
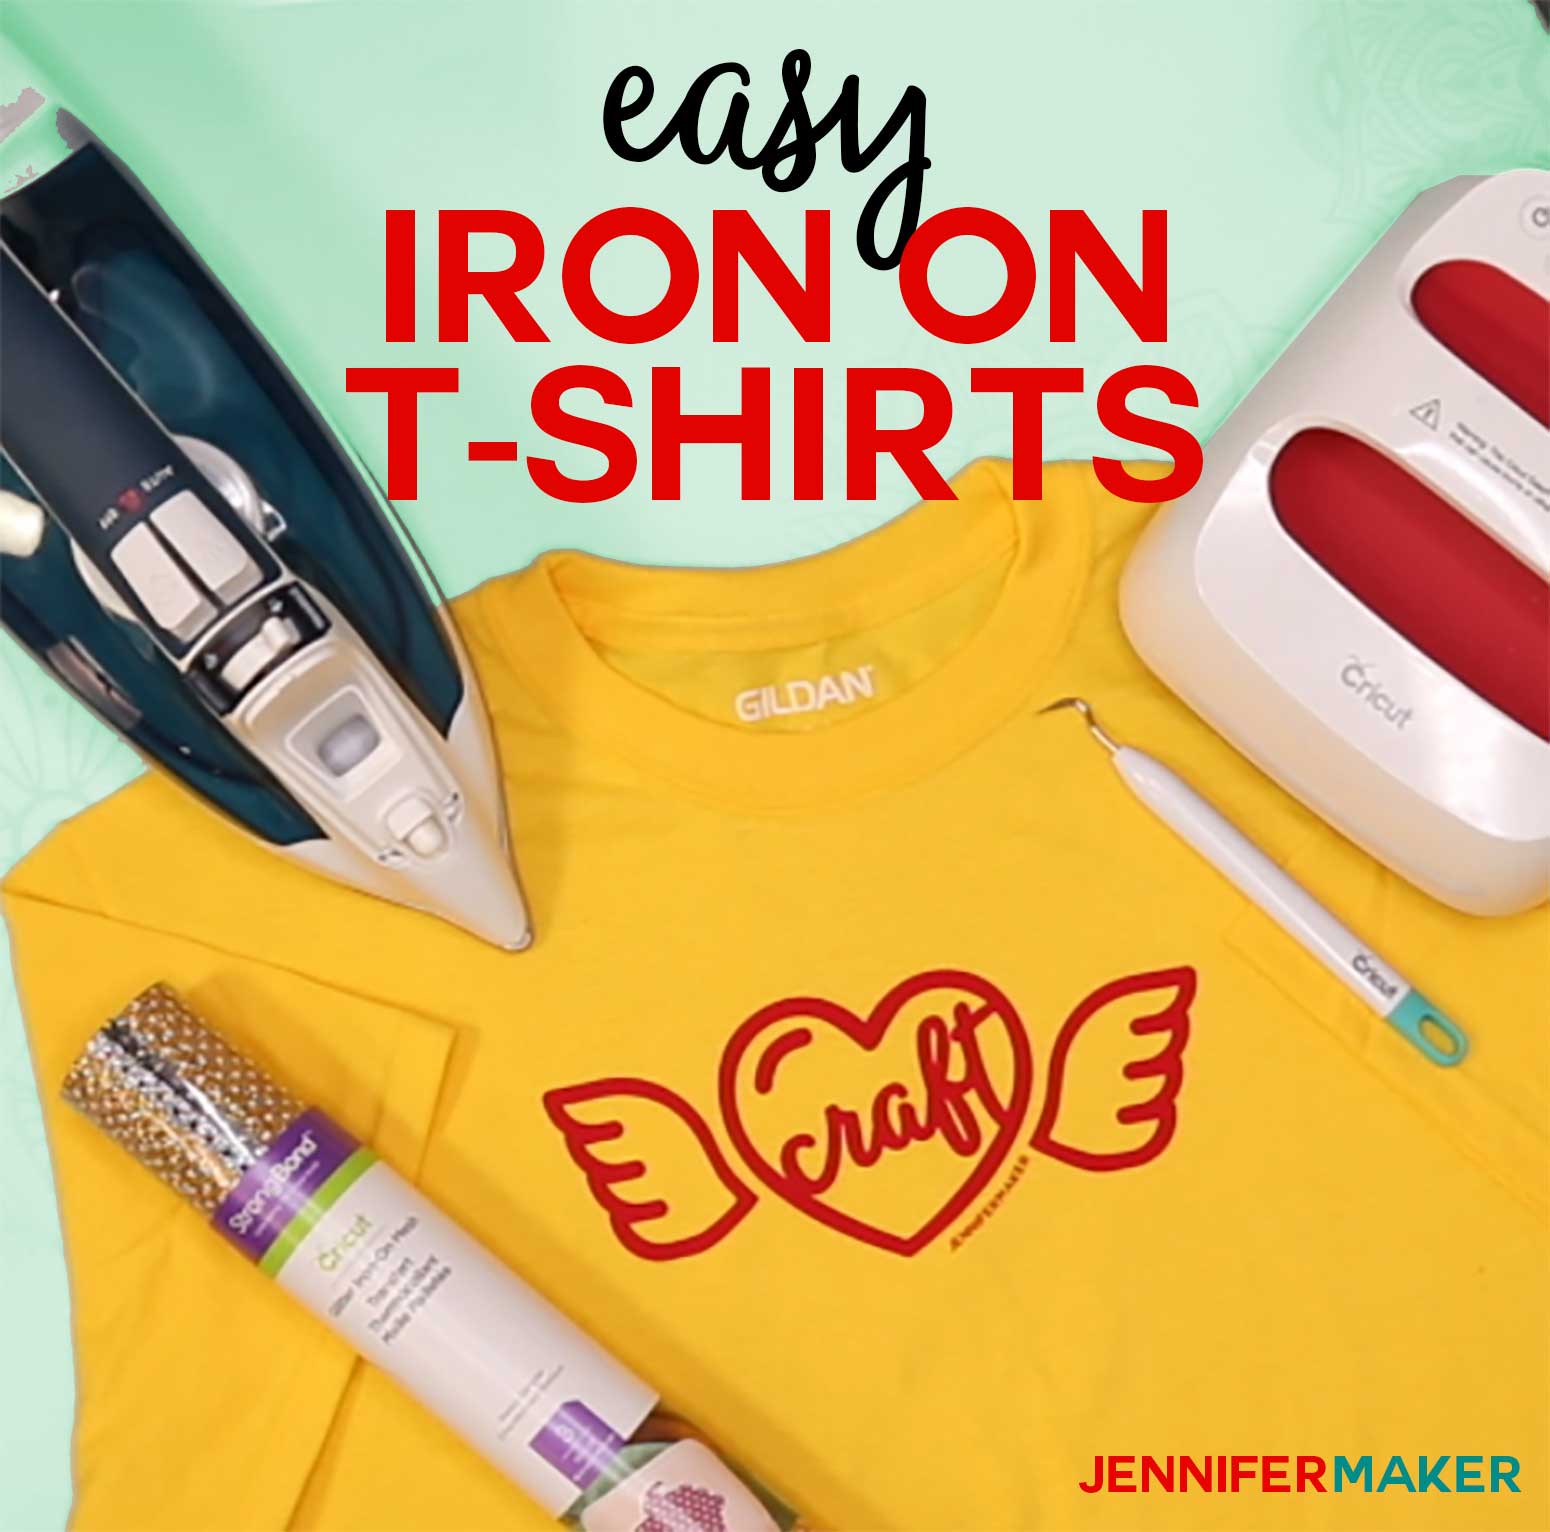
- Permanent Vinyl (any color for sentiment)
- StandardGrip Transfer Tape
- A method to cut your vinyl, I used the amazing Cricut Maker 3 but you can also use a Cricut Maker series, Cricut Explore series, Venture, or a Cricut Joy series machine
- Cricut StandardGrip 12″ x 12″ Machine Mat
- Brayer
- Weeding Tool
- Small Scraper
- Scissors
- Painter’s Tape
- Design #505 – My free designs (available in my free resource library—get the password at the bottom of this post)
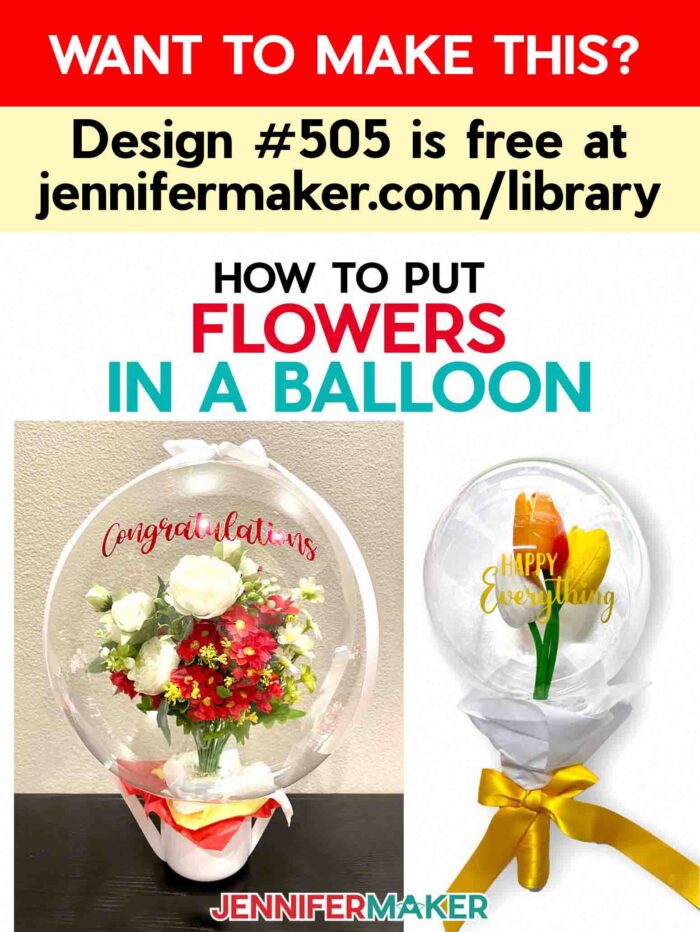
How to Make a Balloon Flower Bouquet!
Flower Balloon Bouquet
Learn how to create a beautiful flower balloon bouquet for any occasion!
Materials
- [One (1) Transparent Bobo Balloon - 24" for Free Standing -OR-
- One (1) Transparent Bobo Balloon - 10" for Hand Held
- Artificial Floral Bouquet - OR-
- Artificial Tulips
- Two to Four (2-4) Zip Ties
- Electrical Tape
- Floral Tape
- One (1) 260 Long Balloon
- Mesh Floral Nets (for Inserting Flowers through Balloon Neck)
- Balloon Cups & Sticks (for Hand Held Bouquet)
- Bouquet Handle (for Hand Held Balloon)
- 4" White Ceramic Pot (for Free Standing Bouquet)
- Floral Foam (for Free Standing Bouquet)
- 2-3 Sheets of Tissue Paper
- 1" White Satin Ribbon (Up to About 48" Long) -OR-
- 1" Yellow Satin Ribbon (Up to About 48" Long) - OR-
- 1" Aqua Blue (Teal) Satin Ribbon (Up to About 48" Long)
- Medium Zots
- Permanent Vinyl (Any Color for Sentiment)
- StandardGrip Transfer Tape
- Design #505 – My free designs (available in my free resource library—get the password at the bottom of this post)
Tools
- A method to cut your vinyl, I used the amazing Cricut Maker 3 but you can also use the Cricut Maker, Cricut Explore series, or the Cricut Joy.
- Cricut StandardGrip 12" x 12" Machine Mat]
- Brayer
- Weeding Tool
- Heavy Duty Wire Cutters
- Hand Held Balloon Pump -OR-
- Electric Balloon Pump
- Heat Sealer (for Free Standing Bouquet)
- Scissors
- Hot Glue Gun & Glue Sticks (for Hand Held Bouquet)
- Painter's Tape
- Small Scraper
- Silicone Finger Protectors (Optional for Use with Hot Glue)
Instructions
IMPORTANT: This project uses latex balloons, which some people are allergic to. Please check with the recipient before gifting items involving latex to be safe! If the latex will be an issue, I recommend adding a custom vinyl design to mylar balloons.
STEP 1: GET MY FREE FLOWER BALLOON BOUQUET SENTIMENTS SVG FILES
First, download my Flower Balloon Bouquet designs from my free resource library – look for Design #505. Alternatively, you can use the Save This Project form near the top of this post and the design link will be emailed to you.
TIP: If you're not sure how to upload, go to jennifermaker.com/svgs to learn how to unzip and upload SVG files.
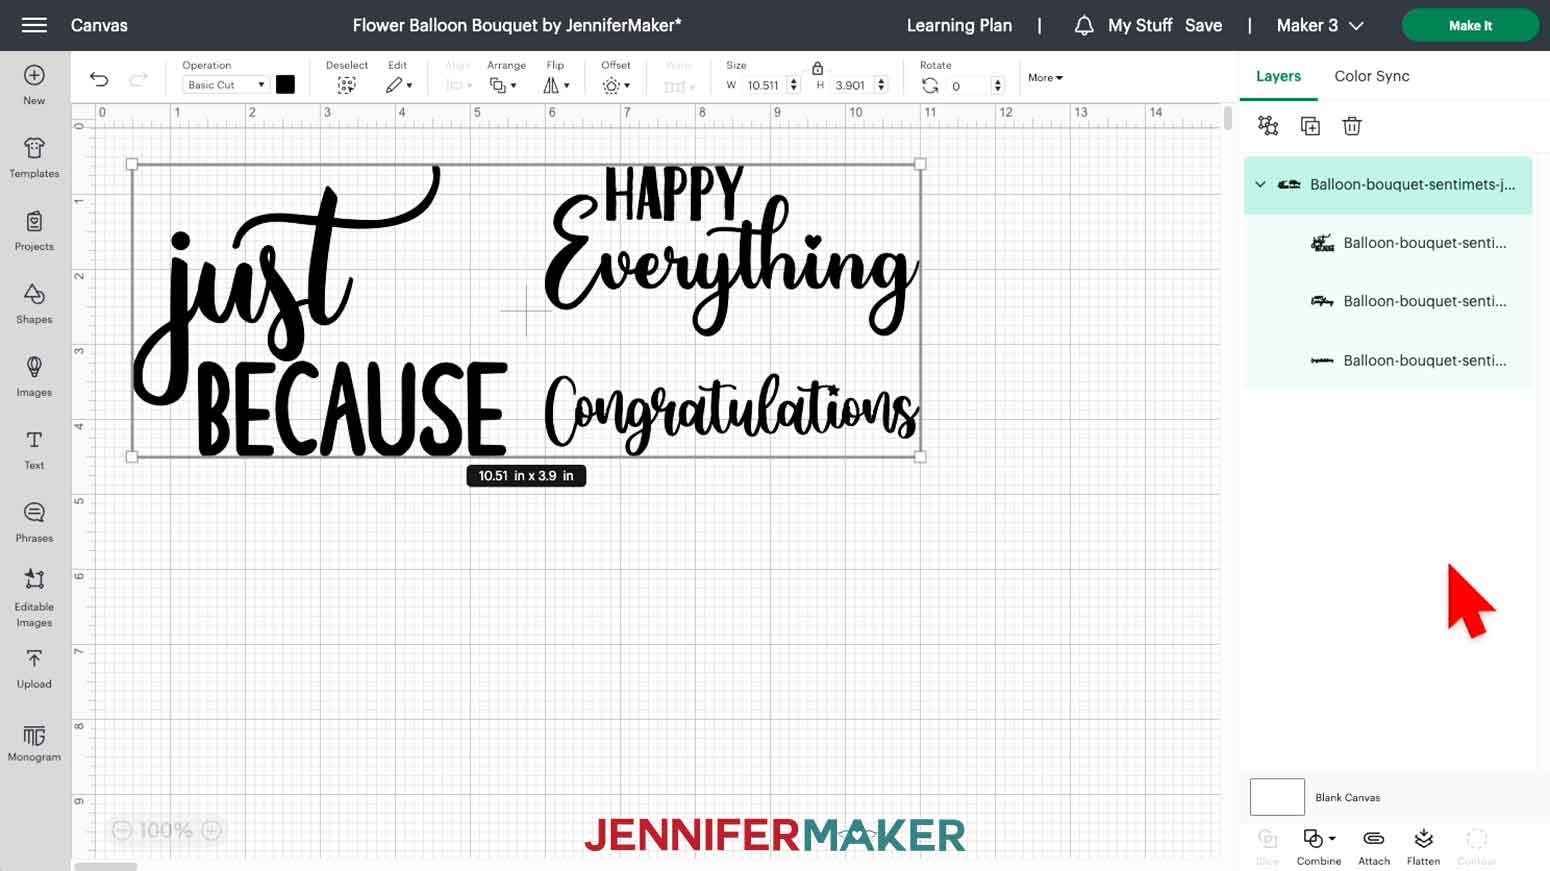
There are three sentiment options in the folder. Upload your chosen SVG file to Cricut Design Space and add it to your Canvas.
This is what my Floral Balloon Bouquet SVG file looks like on my Canvas.
STEP 2: SIZE AND CUT YOUR FLOWER BALLOON BOUQUET SENTIMENT
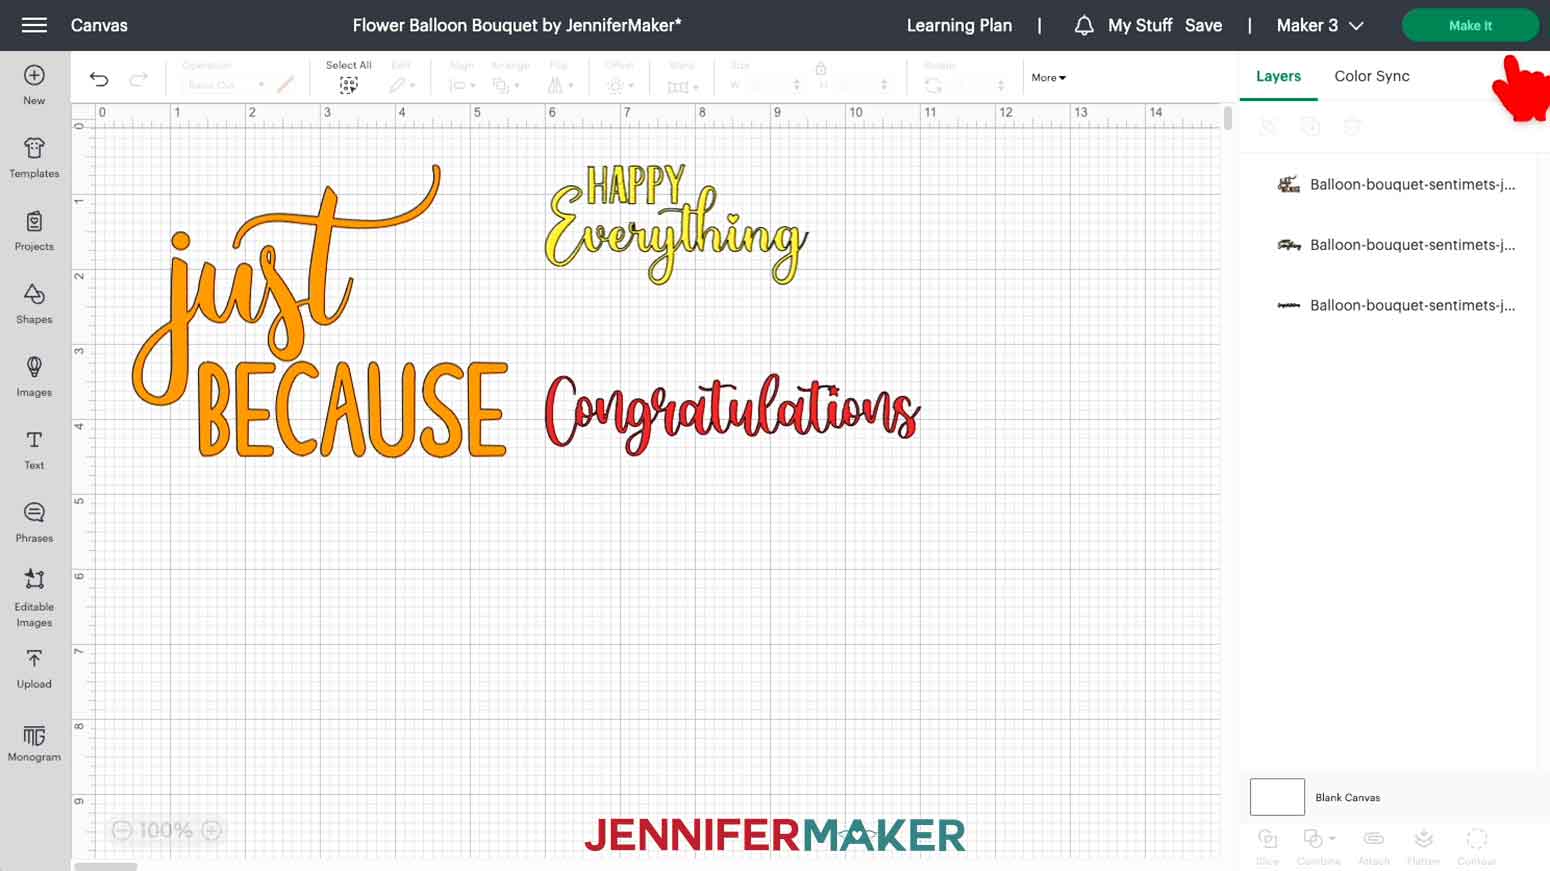
If you are choosing to use one of my sentiments, you'll want to make sure it is sized correctly for the type of balloon bouquet you're assembling. You can also create any personalized sentiment. Today, I'm going to create a large bouquet with "Just Because" and a small bouquet with "Happy Everything."
First, click the Ungroup icon above the layers panel to separate the designs.

Click on the sentiments you are not using to select them and click the trash can icon above the Layers panel to delete them.
The sentiments are sized at 5" wide for the large bouquets. If you are making a smaller balloon bouquet, click on the sentiment to select it and change the width to 3.5". You can click and drag the corner to resize it or enter the dimensions at the top of the canvas in the size field. Just make sure to keep the lock icon closed to maintain the design proportions.
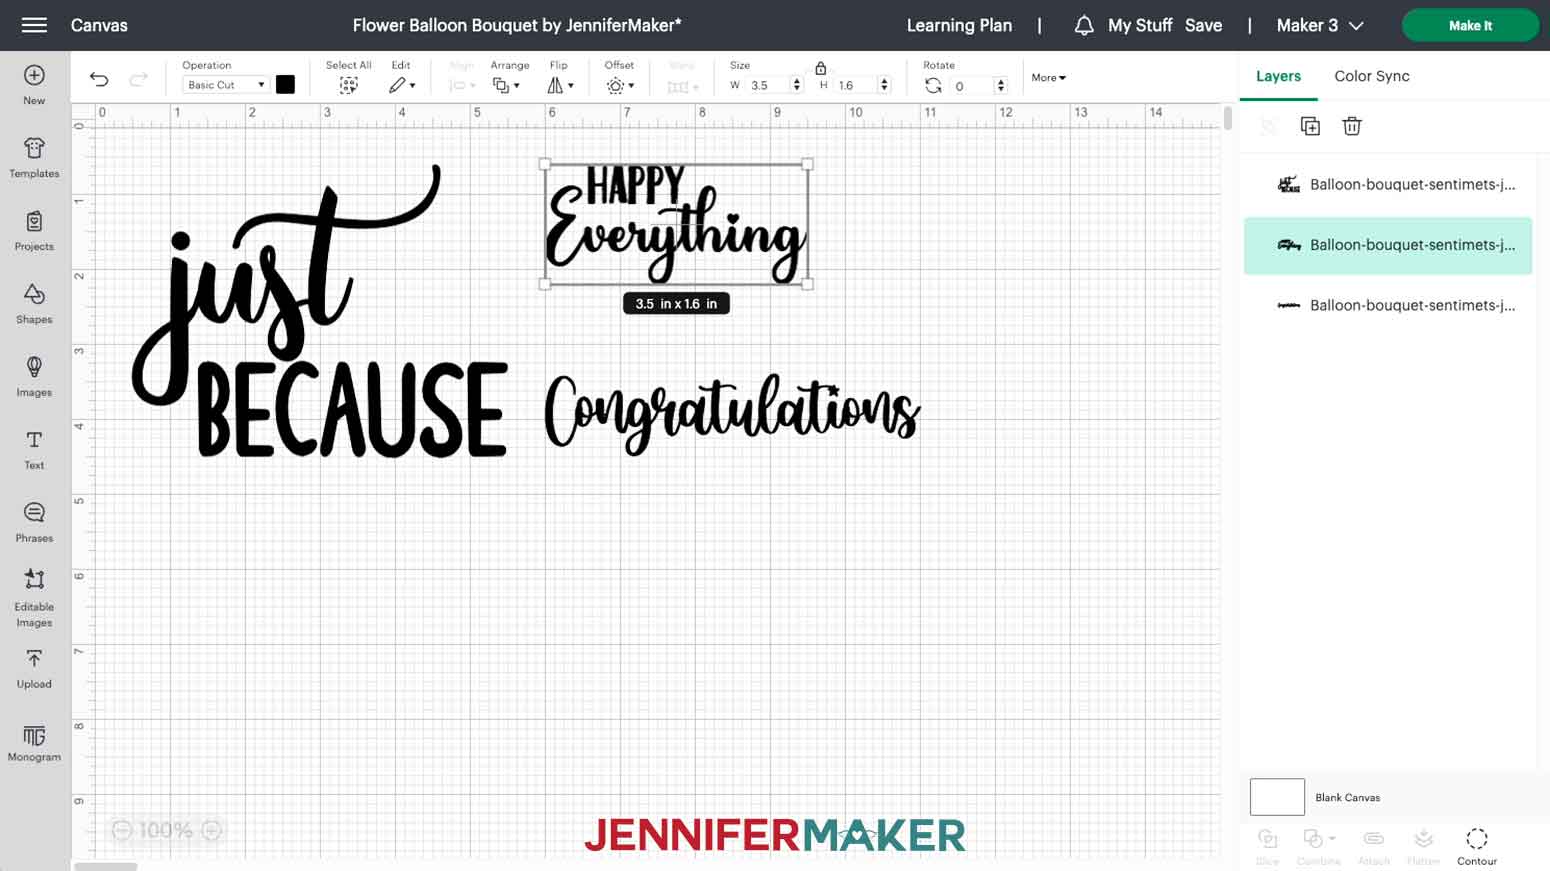
NOTE: If you'd like to create your own sentiment, just make sure to stick to these sizing suggestions. Change the width to 5" for a large bouquet and 3.5" for a small bouquet.
Lastly, since I'm making two designs, I need to change the colors so that they cut on separate mats. I'm going to cut the "Just Because" sentiment on orange vinyl. Click on "Just Because" to select it and then click on the color menu to select orange.
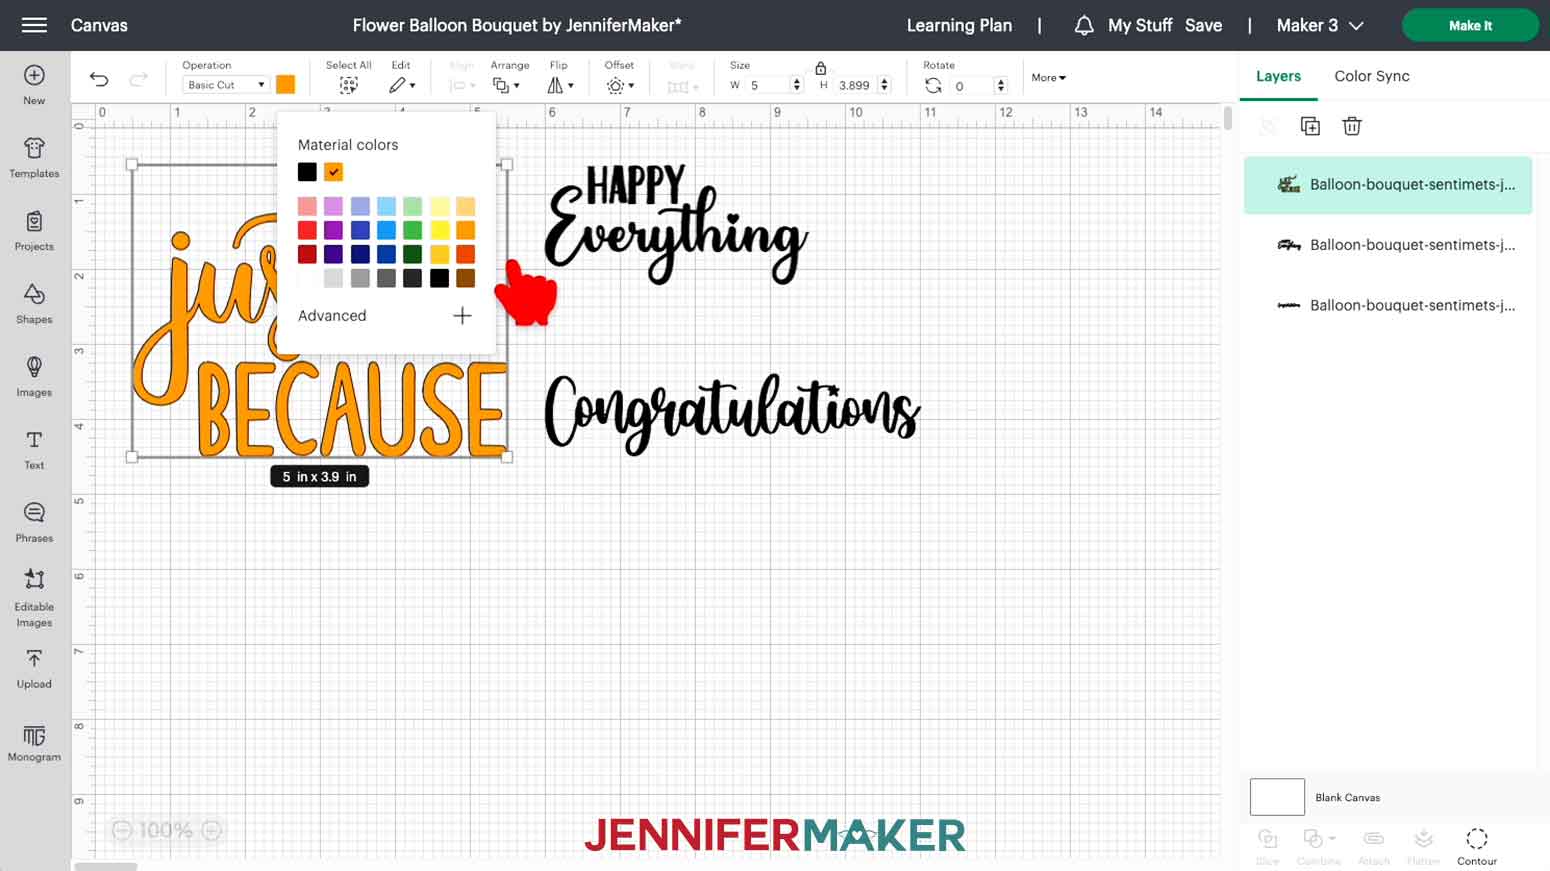
I could leave the second as black and it will still cut on a second mat, but I'm going to change it to yellow to match my vinyl.
Now we're ready to cut. Make sure the correct machine is selected in the upper right corner and click "Make It."
If prompted, select "On Mat" and "12" x 12" mat."
We don't need to make any changes on the Prepare screen but take note of the size of vinyl you will need to prepare for each color. For the "Just Because" sentiment in orange, I will need a piece of vinyl that is 7" wide and 6" tall. For the "Happy Everything" sentiment, I will need a piece of yellow vinyl that is 4" wide and 2" tall.
Click "Continue" in the lower right corner.
Under "Set Base Material," choose "Premium Vinyl - Permanent Glossy," for permanent vinyl. Make sure your Cricut Fine-Point Blade is clean and loaded in Clamp B. I always change my Pressure to "More" for a cleaner cut.
Put your vinyl shiny side up on your machine mat, making sure it covers the design area visible on your screen.
TIP: To see your design placement larger, click "Edit" below the mat thumbnail and "Done" when you're ready.
Use a brayer to get the vinyl as smooth as possible on your mat.
Press the flashing arrows to load the machine mat with your first color. Press the flashing button to begin cutting.
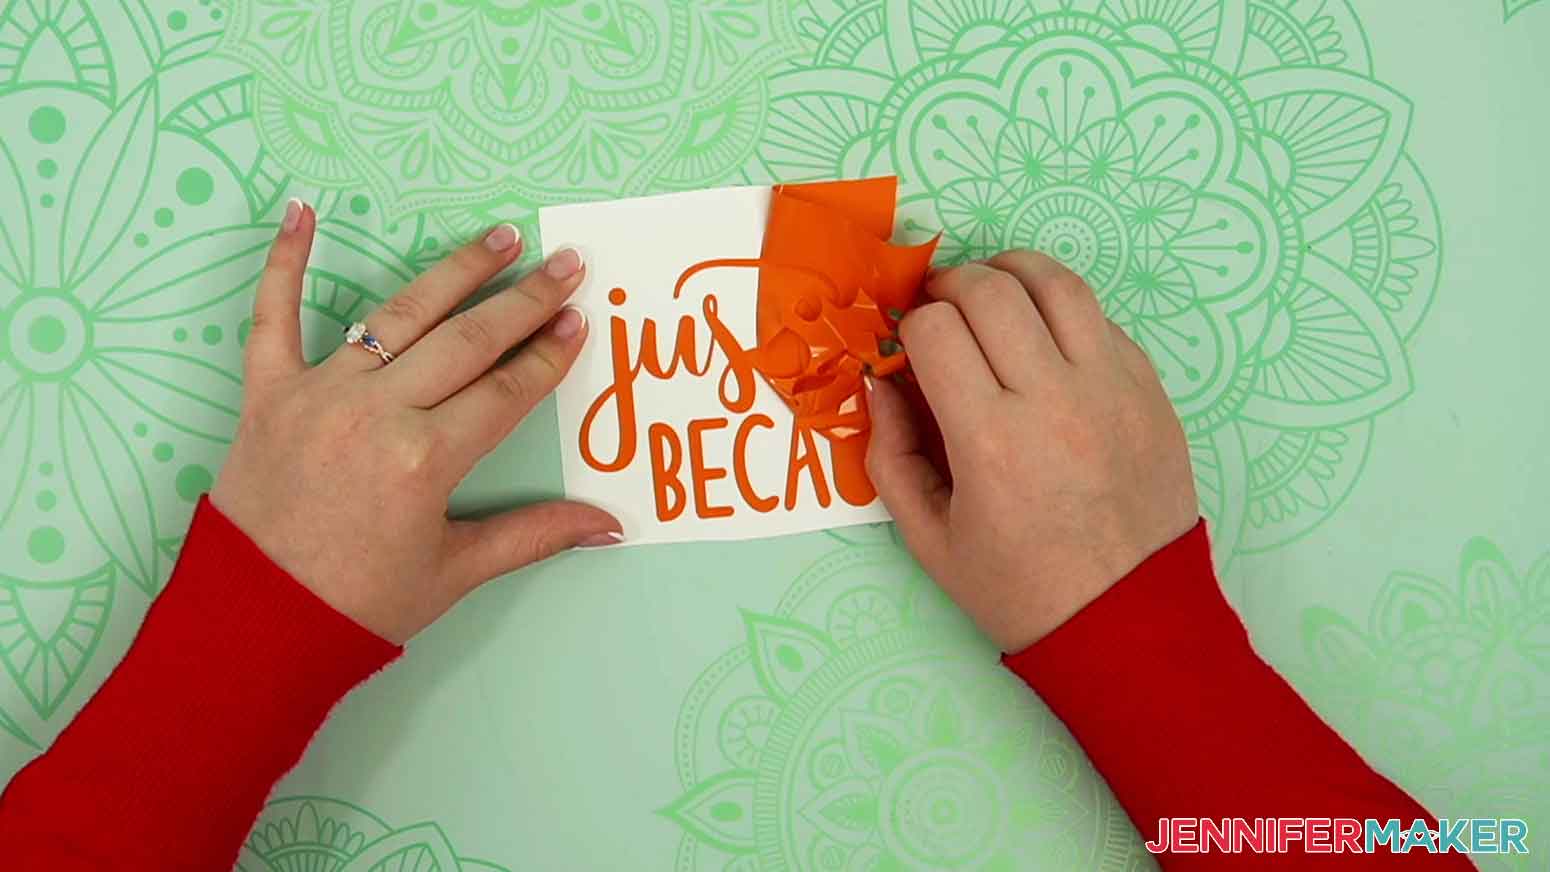
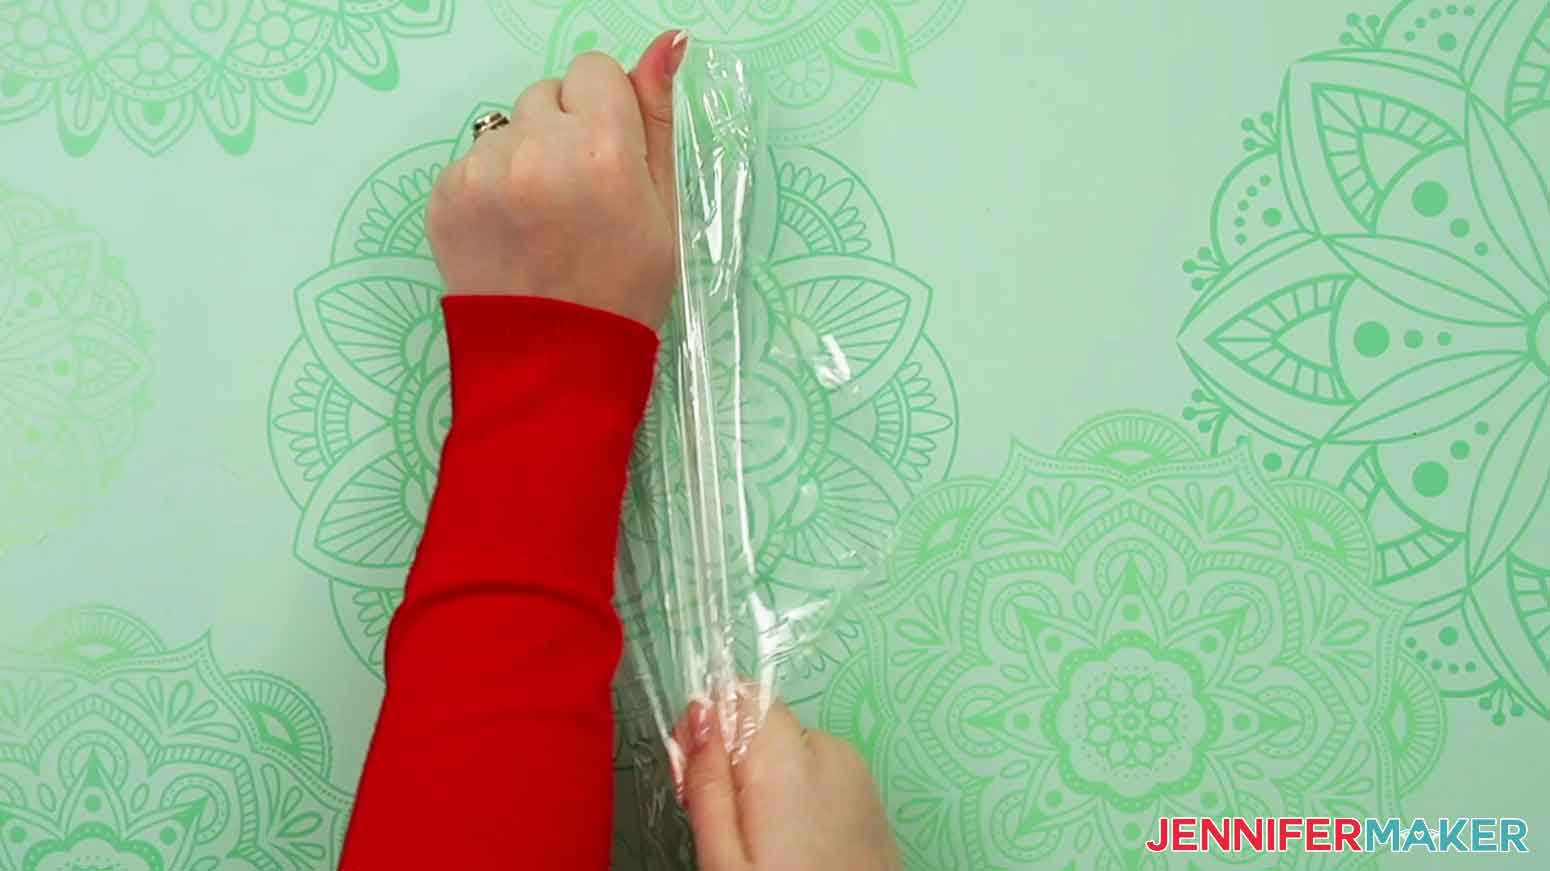
When the cut is complete, unload that mat, flip it over on your workspace, and gently bend it to release the vinyl and its carrier sheet, keeping the design as flat as possible. If you are cutting more than one color of vinyl, load your next layer, making sure to follow the order shown on your screen. Continue until all of your vinyl is cut.
Use a weeding tool to remove all excess vinyl around the sentiment. Remember to get those small bits inside any closed letters.
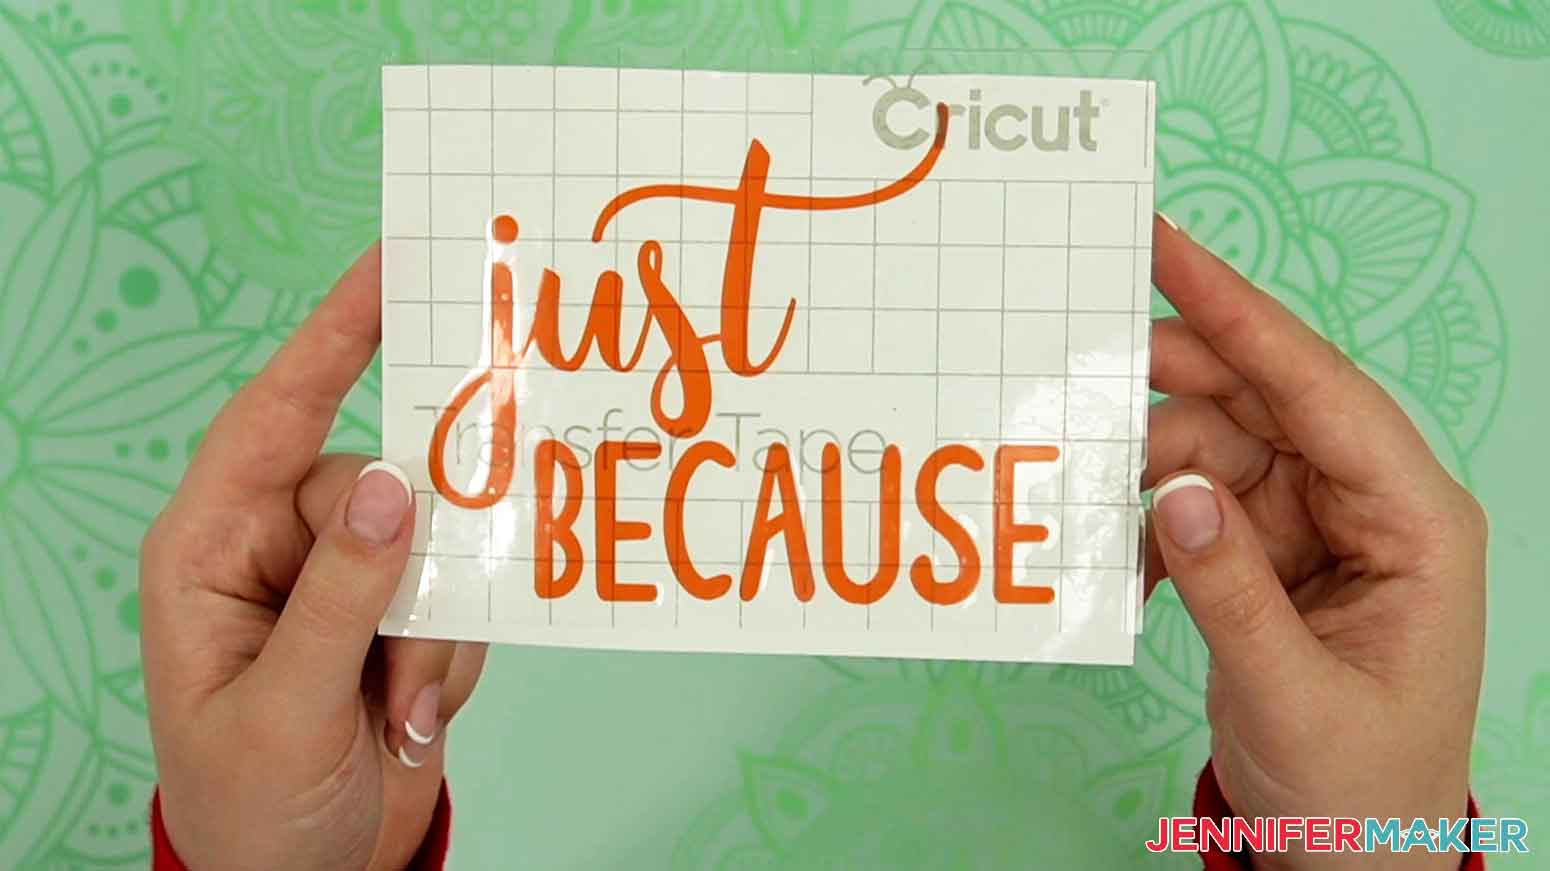
Cut a piece of transfer tape slightly larger than the sentiment. Peel away the backing and fold up the sides of the transfer tape so that it looks like a taco. Place the bottom of the "taco" over the center of the vinyl. Use a scraper tool to best adhere the vinyl to the transfer tape.
Set the vinyl aside for now while we prepare the flower balloon bouquets.
STEP 3: ASSEMBLE YOUR FLOWER BALLOON BOUQUETS
I am going to show you how to make both the smaller handheld version and the larger tabletop version. The smaller version only requires a manual hand pump. The larger version requires a heat sealer and an electric air pump.
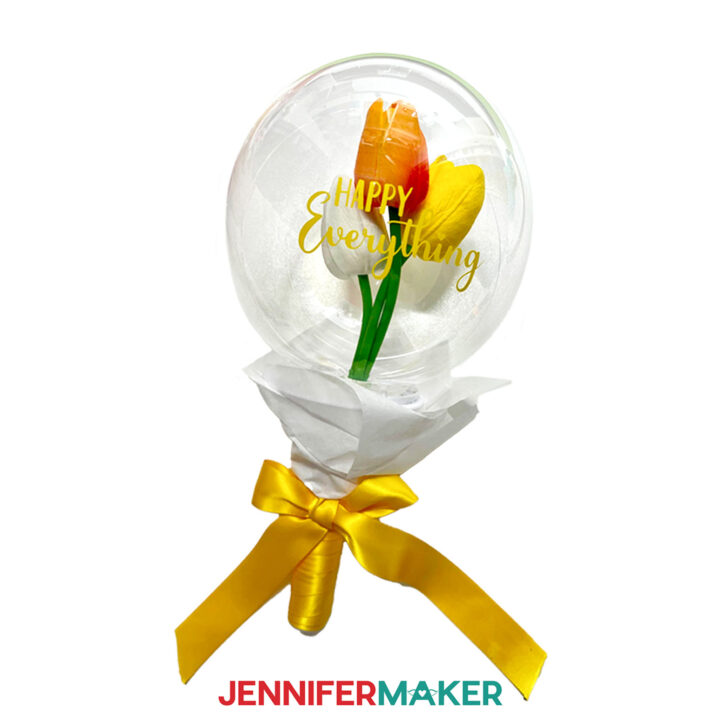
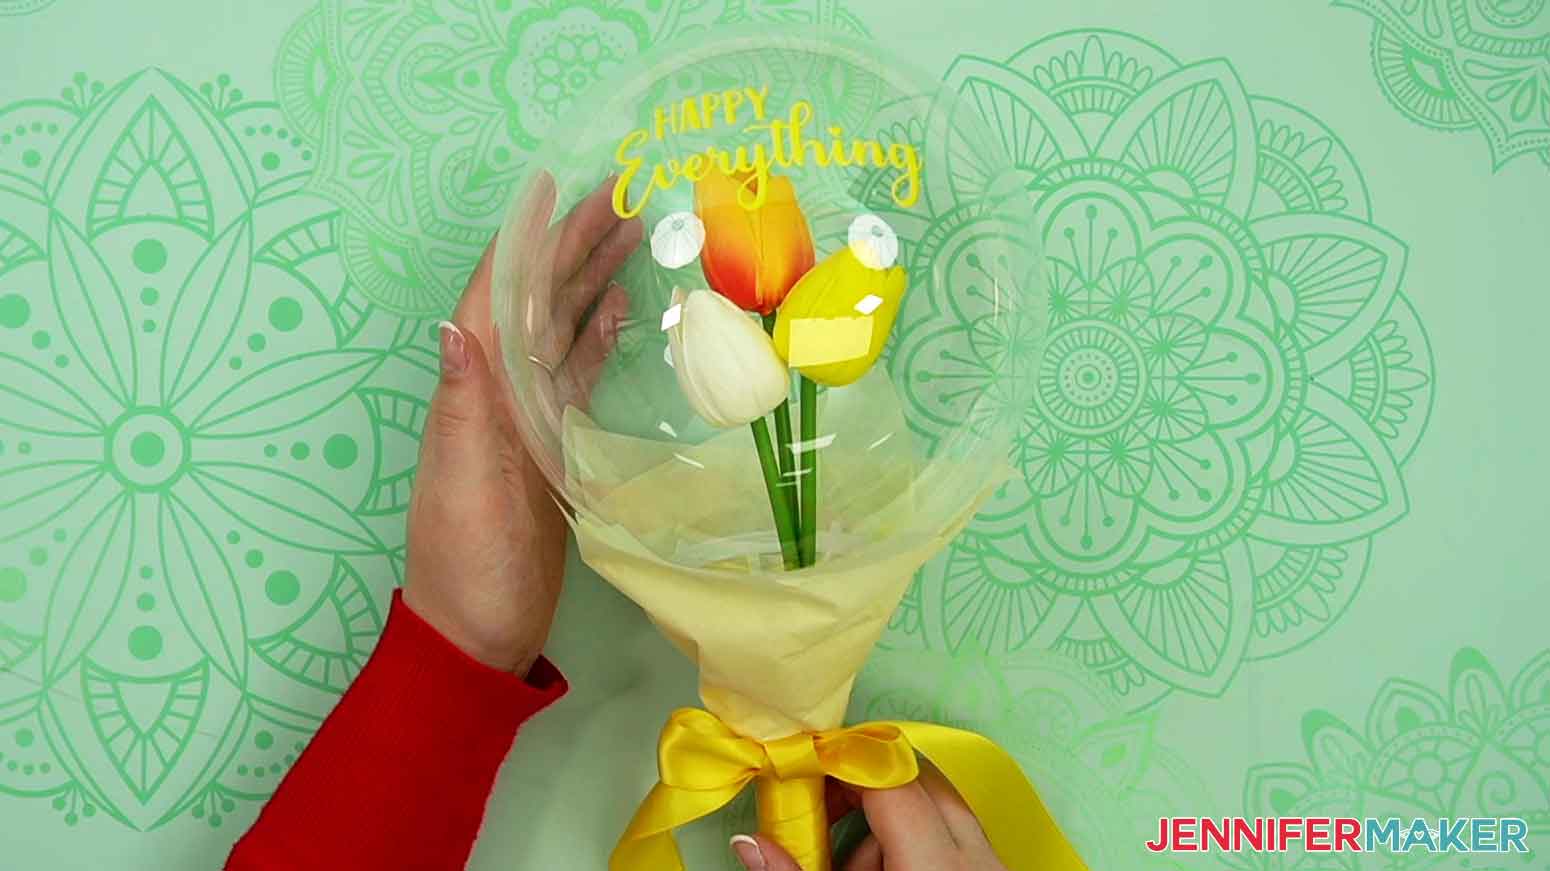
HANDHELD FLOWER BALLOON BOUQUET
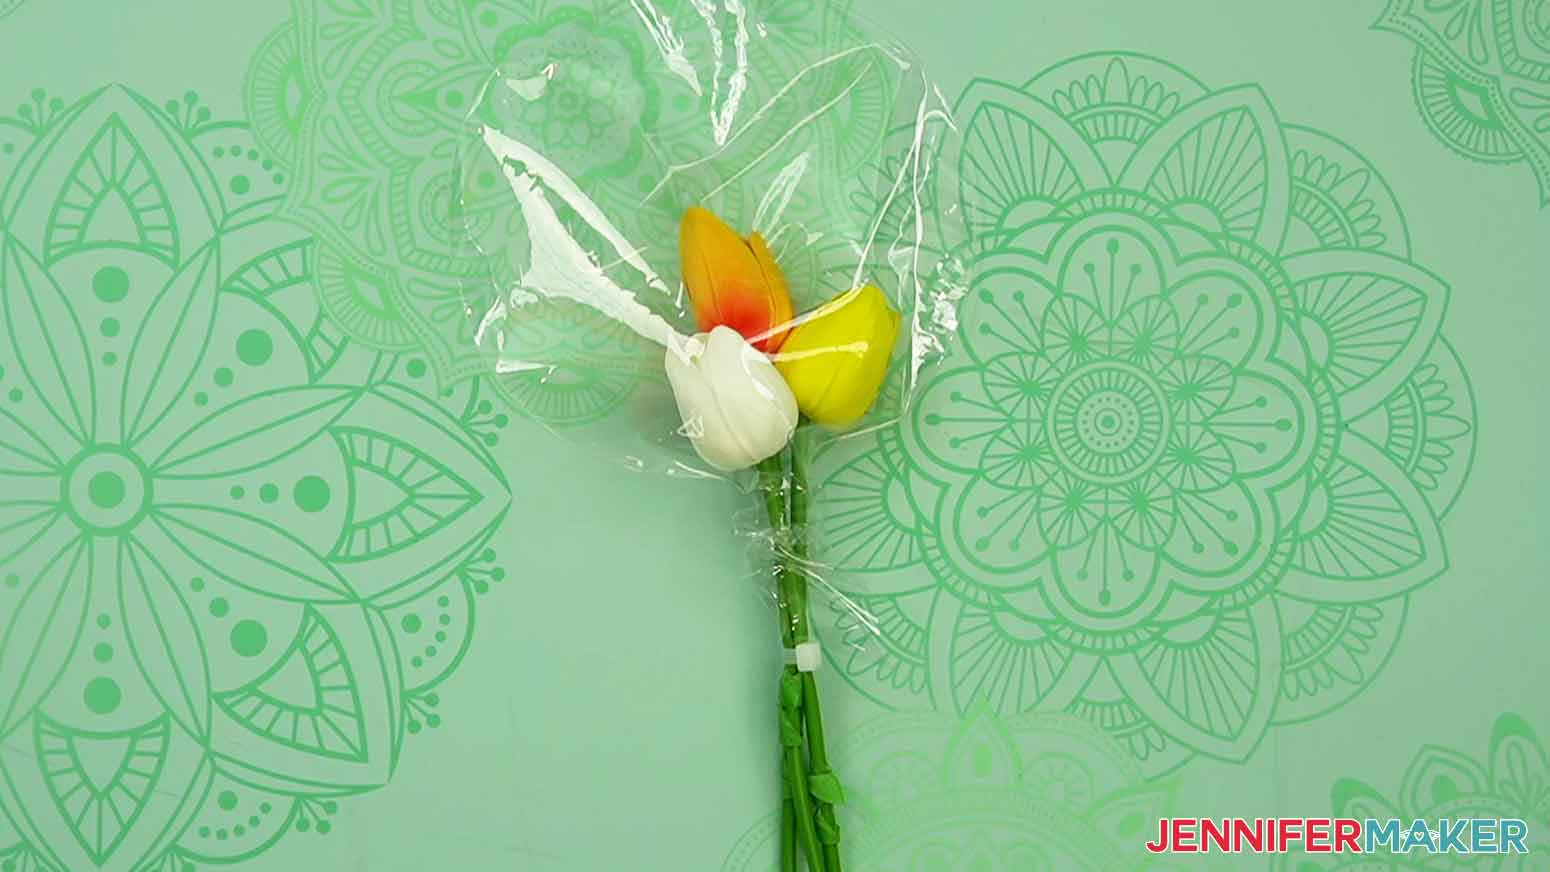
The trick to this bouquet is to select slender flowers, like tulips. That's what I'm going to use for this tutorial. Wider faux flowers will be more challenging to fit through the neck of the balloon.
Let's begin by taking a 10" Bobo balloon and stretching the seam and the neck of the balloon.
Use the manual pump to also stretch it out. Insert the tip of the pump into the neck of the balloon and pump it to inflate it. Repeat this two or three times. This helps stretch the balloon from the inside.
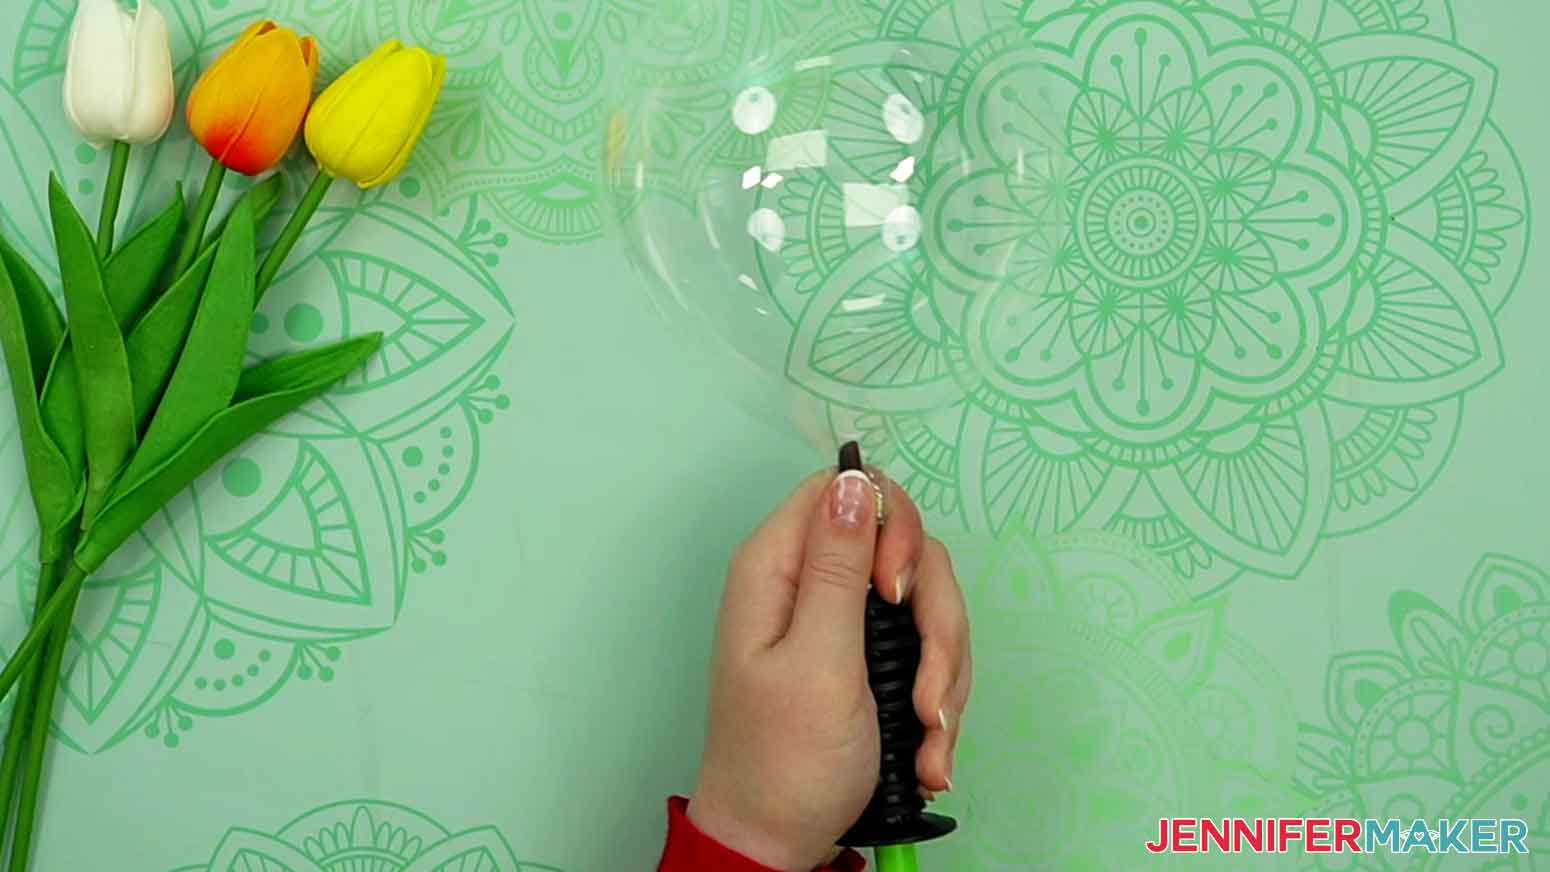
Also, be sure to tug the neck of the balloon to stretch it out. This will help us make sure we have enough room to fit the stem and knot.
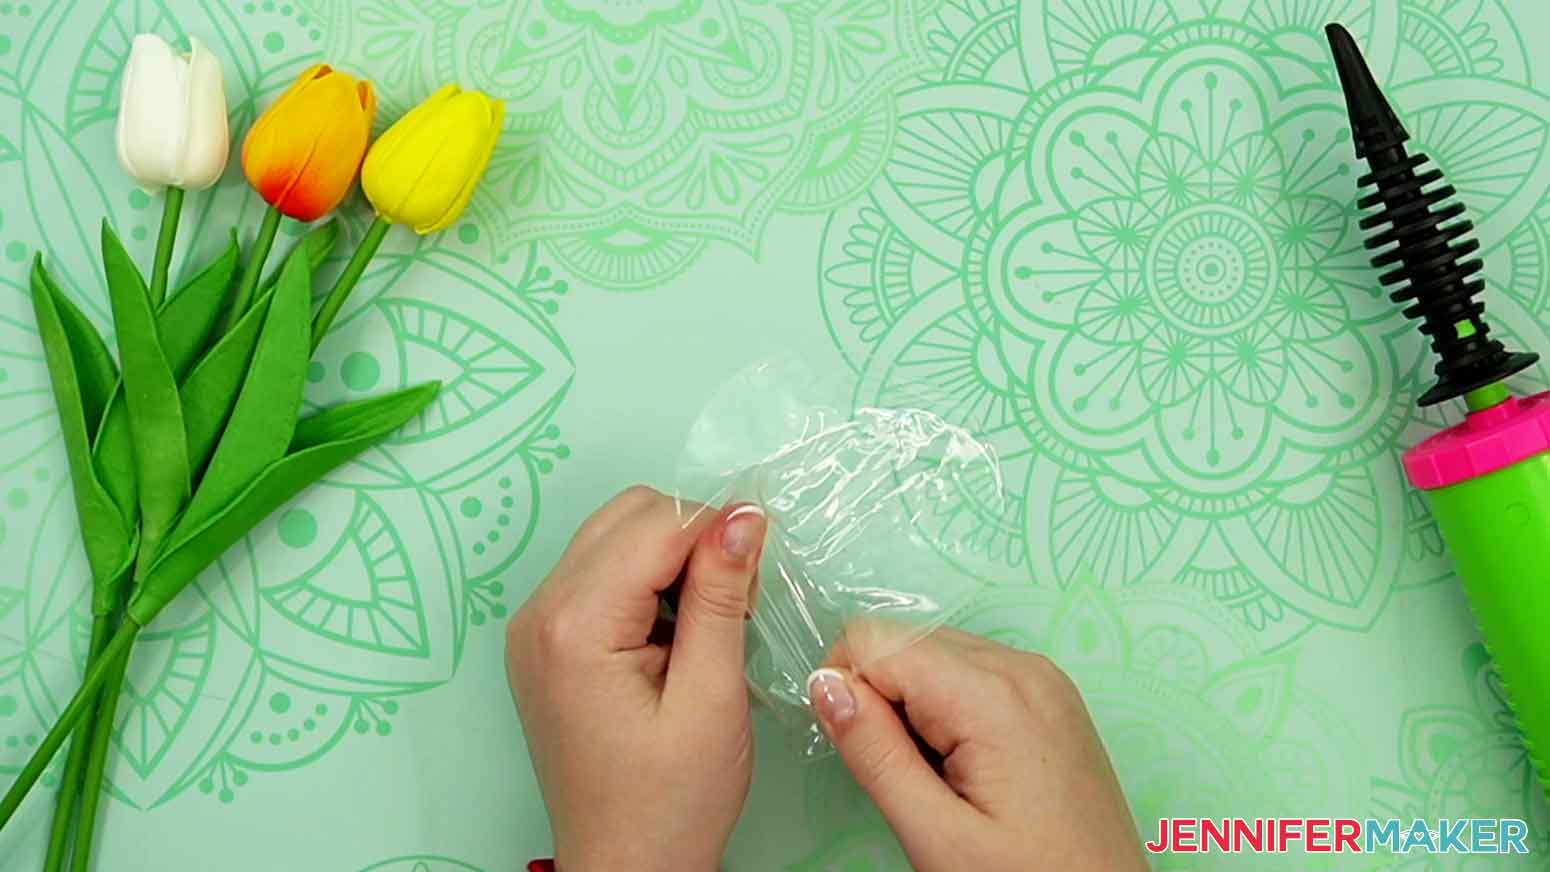
Slide a tulip inside a floral mesh wrap. Insert the edge of the wrap into the neck of the balloon and gently work the flower into the balloon with the stem hanging out.
TIP: If you are using the same tulips as me, I found that these are very durable. It helped to slightly fold the tulip in half to slide it in easier.

Once the tulip is inside, grab the bottom edge of the floral mesh wrap and pull it out of the balloon.
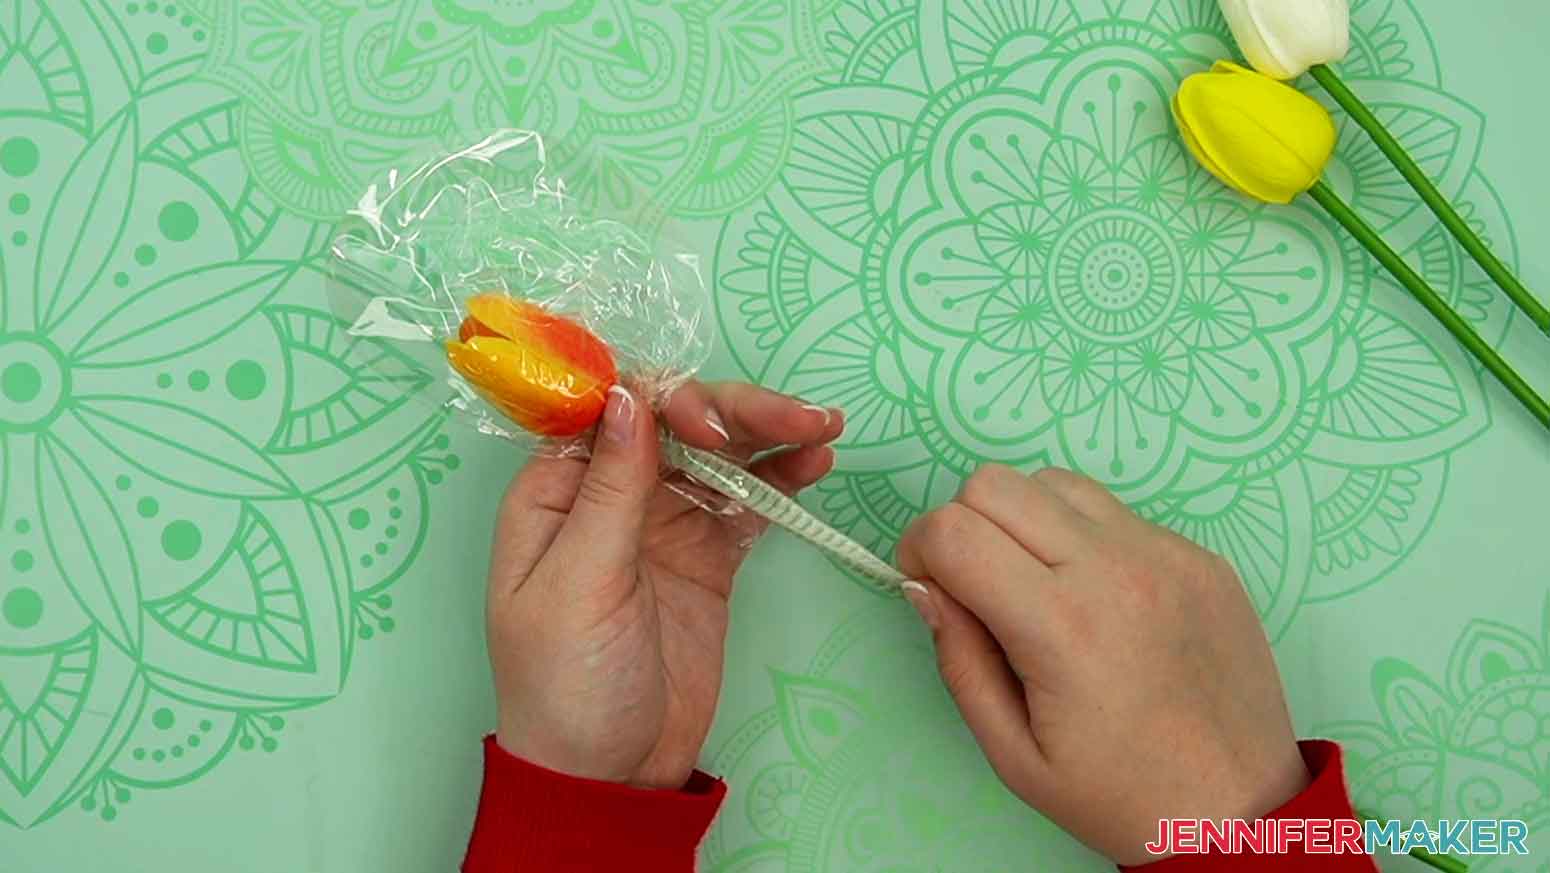
Wrap the second tulip. You can reuse the mesh wraps. Insert the flower into the balloon and remove the mesh wrap.
Repeat for the third flower. I stopped at three but feel free to try more if you'd like. It can get a little snug in the balloon neck as you add the stems.
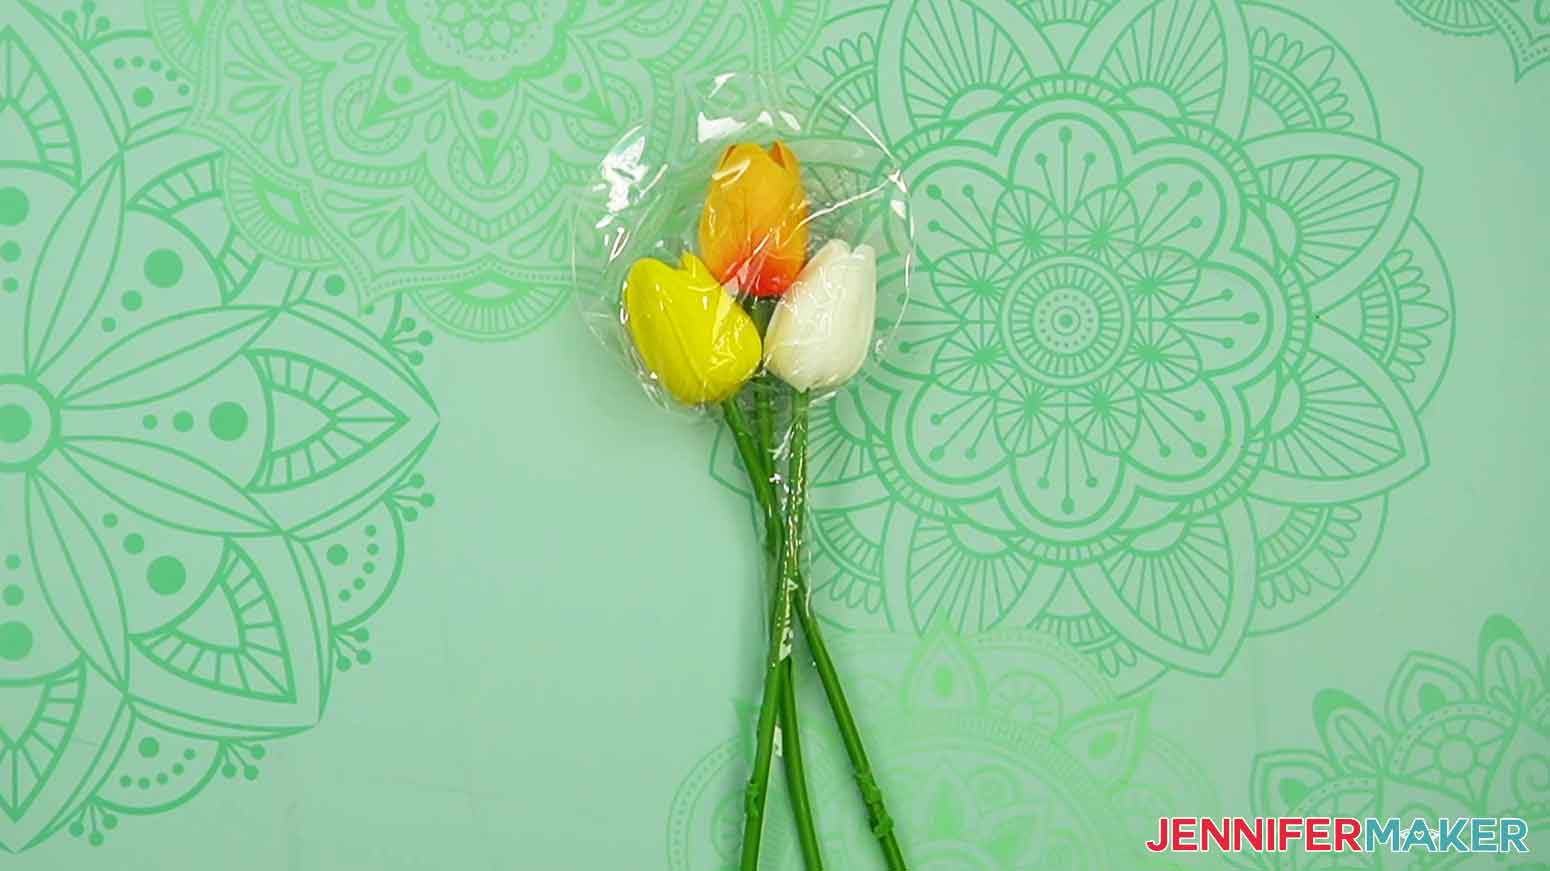
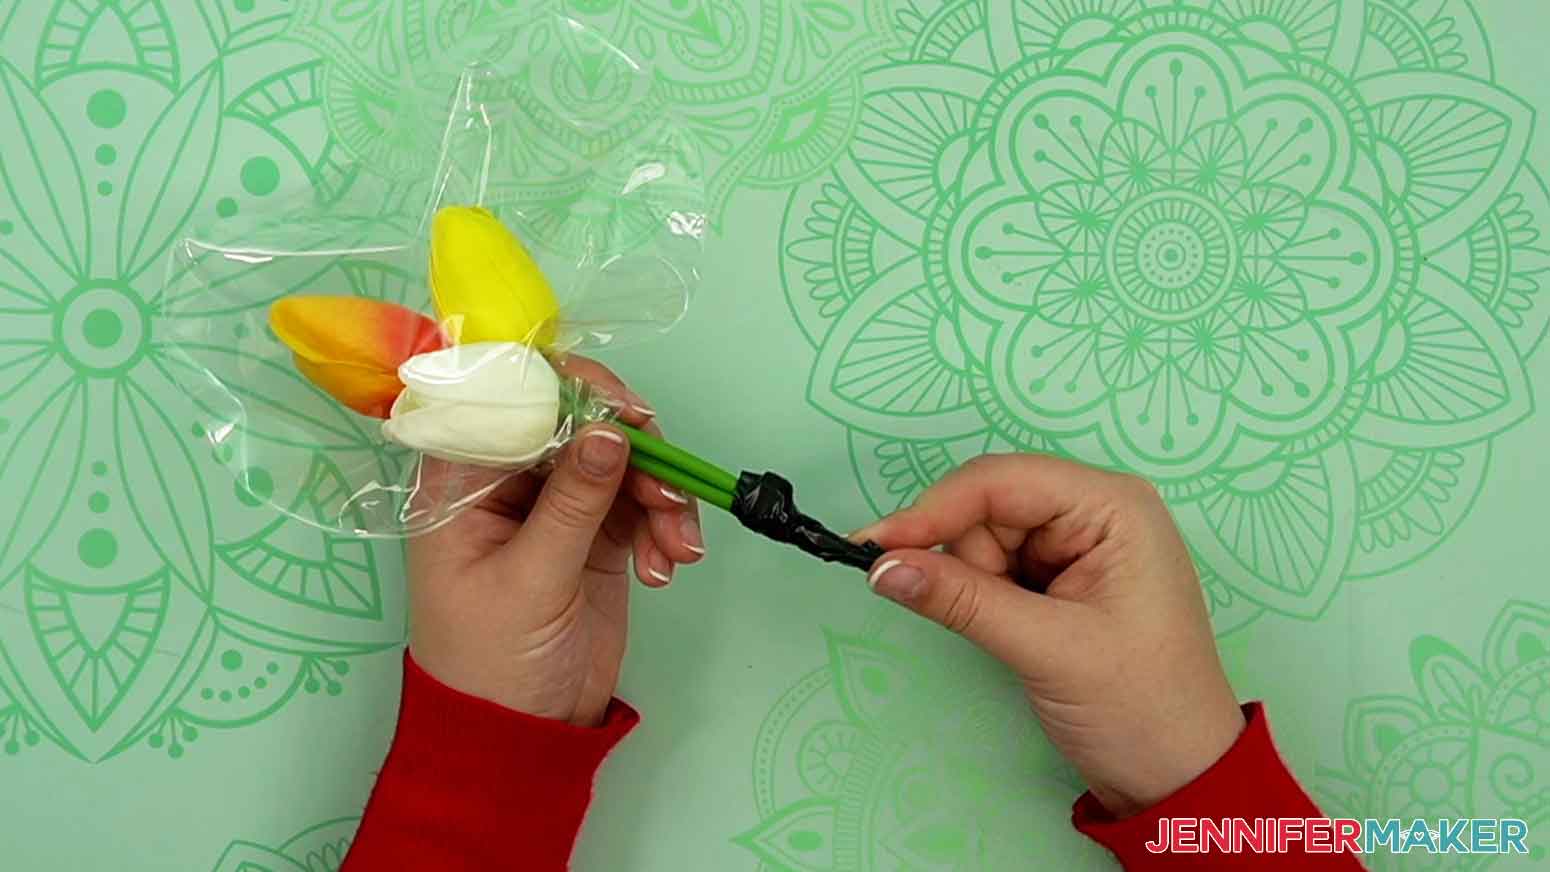
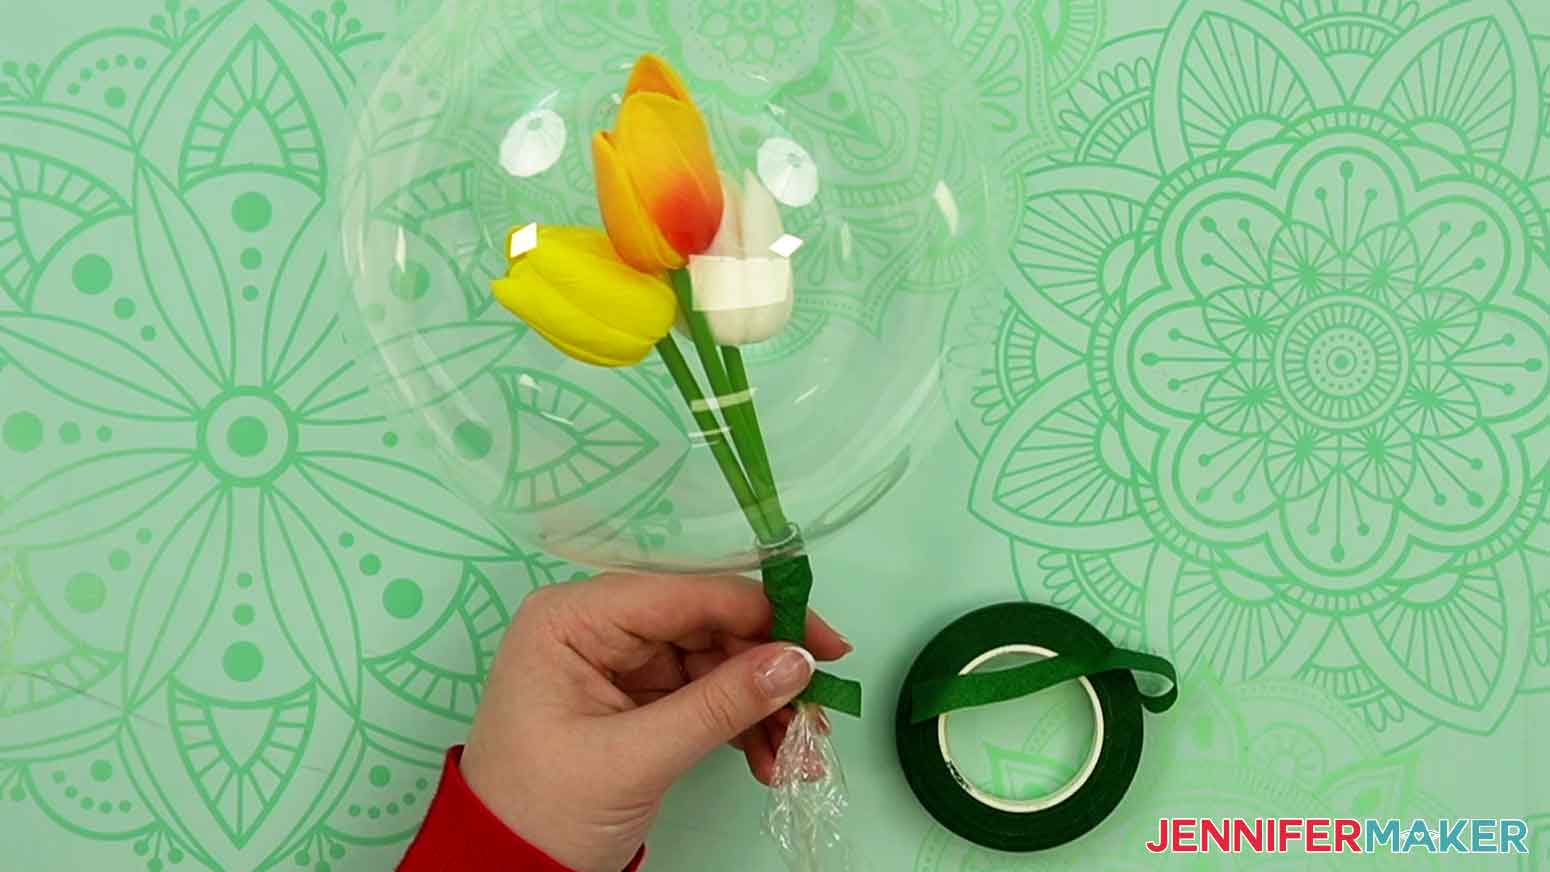
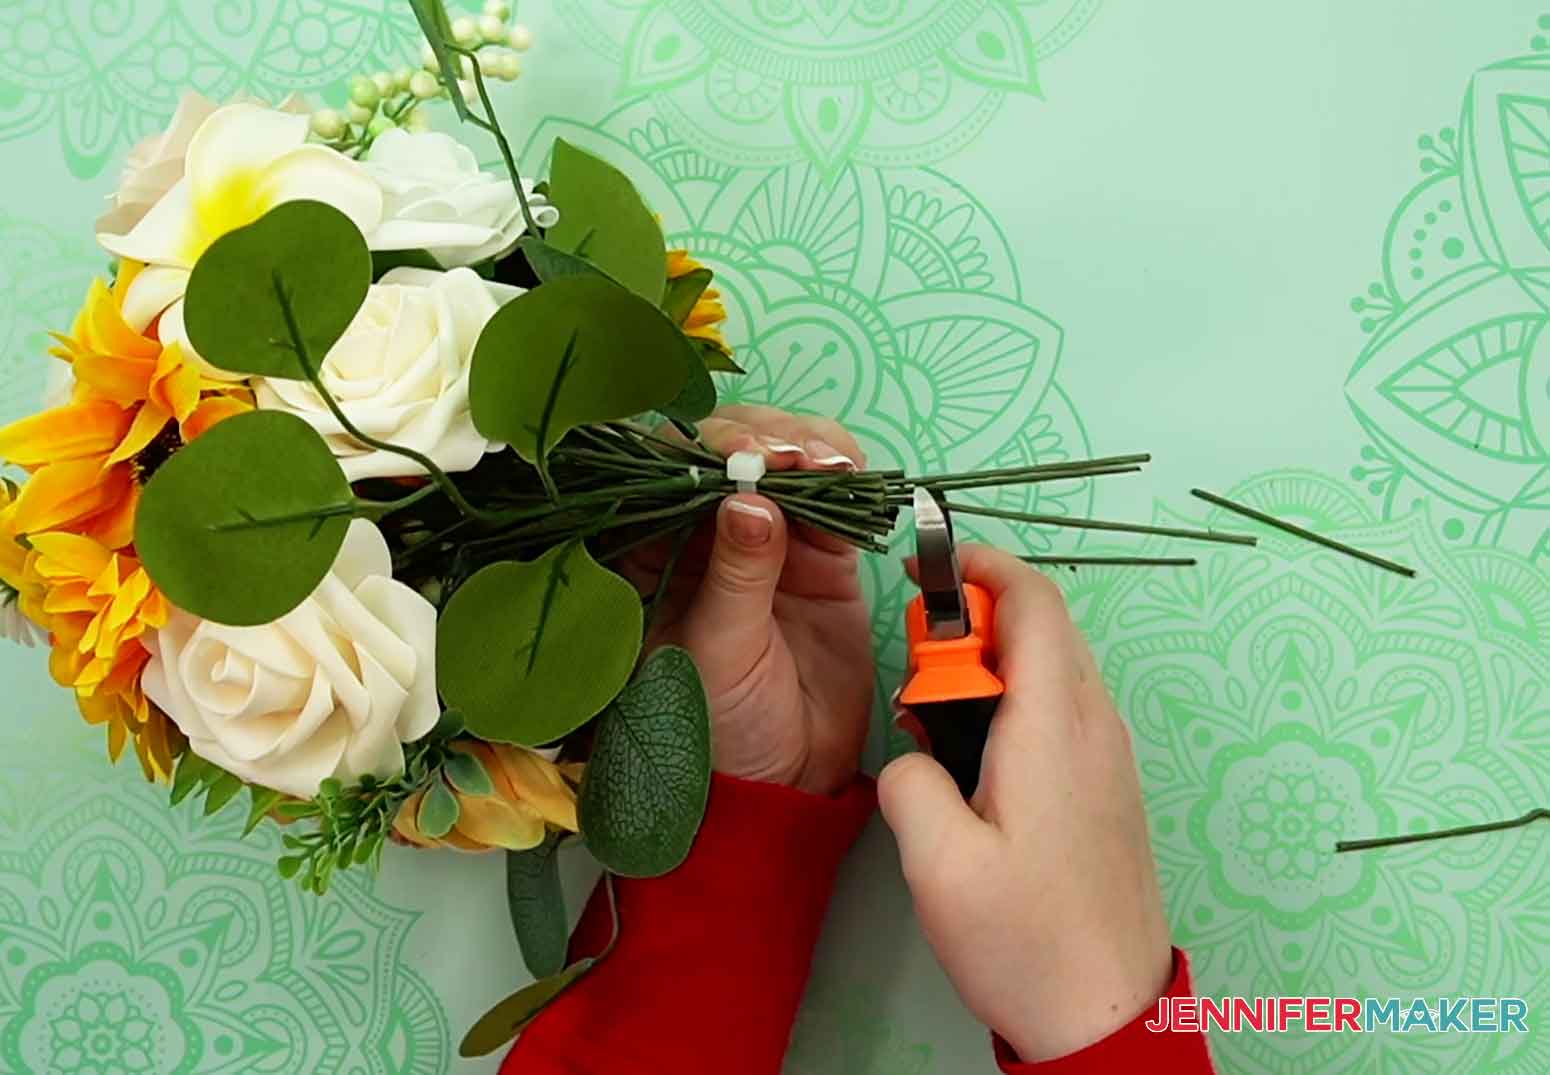
Once our flowers are all inserted inside the Bobo balloon, we'll secure the stems and trim them down. We're going to secure them with a zip tie to prevent movement once the balloon is tied. We need to secure the zip tie around where the base of the stems will be in the balloon.
Stagger the stems to give the flowers different heights. Take a zip tie and tighten it around all of the stems. Use the heavy-duty wire cutters to trim the excess pull piece.
Now we'll trim down the stems. This is a very important step. One stem needs to be kept a little longer than the rest so that it will fit inside the balloon cup for a more solid connection to the handle.
Cut down two stems to the base of the zip tie. Leave the one longer stem with about an inch of length from the base of the zip tie.

The zip tie and stem tips are very sharp so we need to wrap them to protect the balloon. Start just above the zip tie and wrap electrical tape around the zip tie and stem bottoms to cover any sharp pieces.
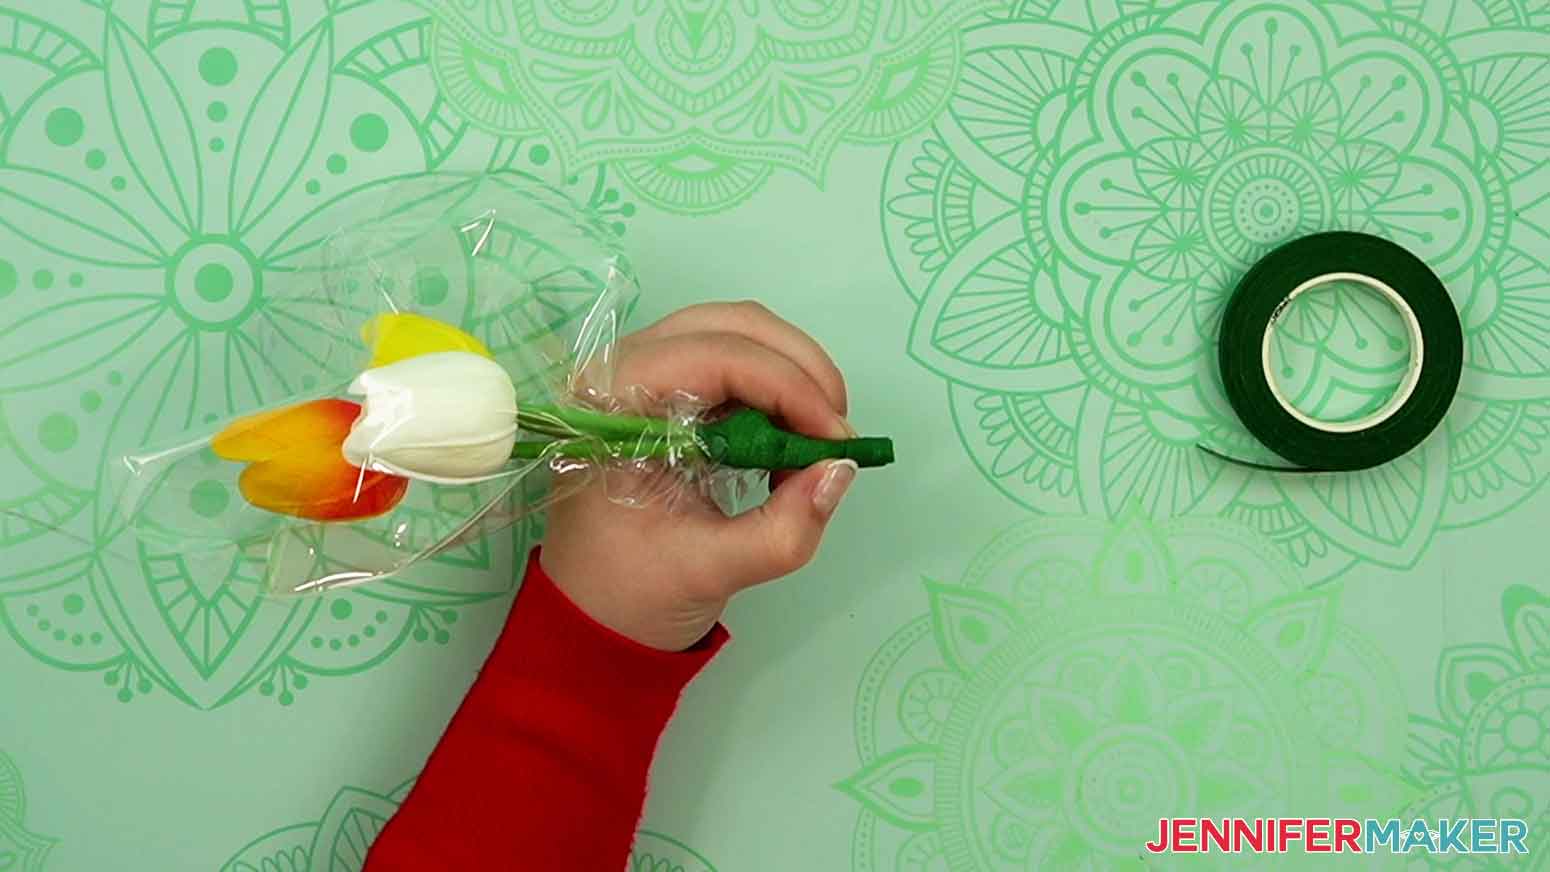
After the electrical tape is in place, I'm going to cover it with some floral tape. This is an optional step since most of the stem will be hidden.
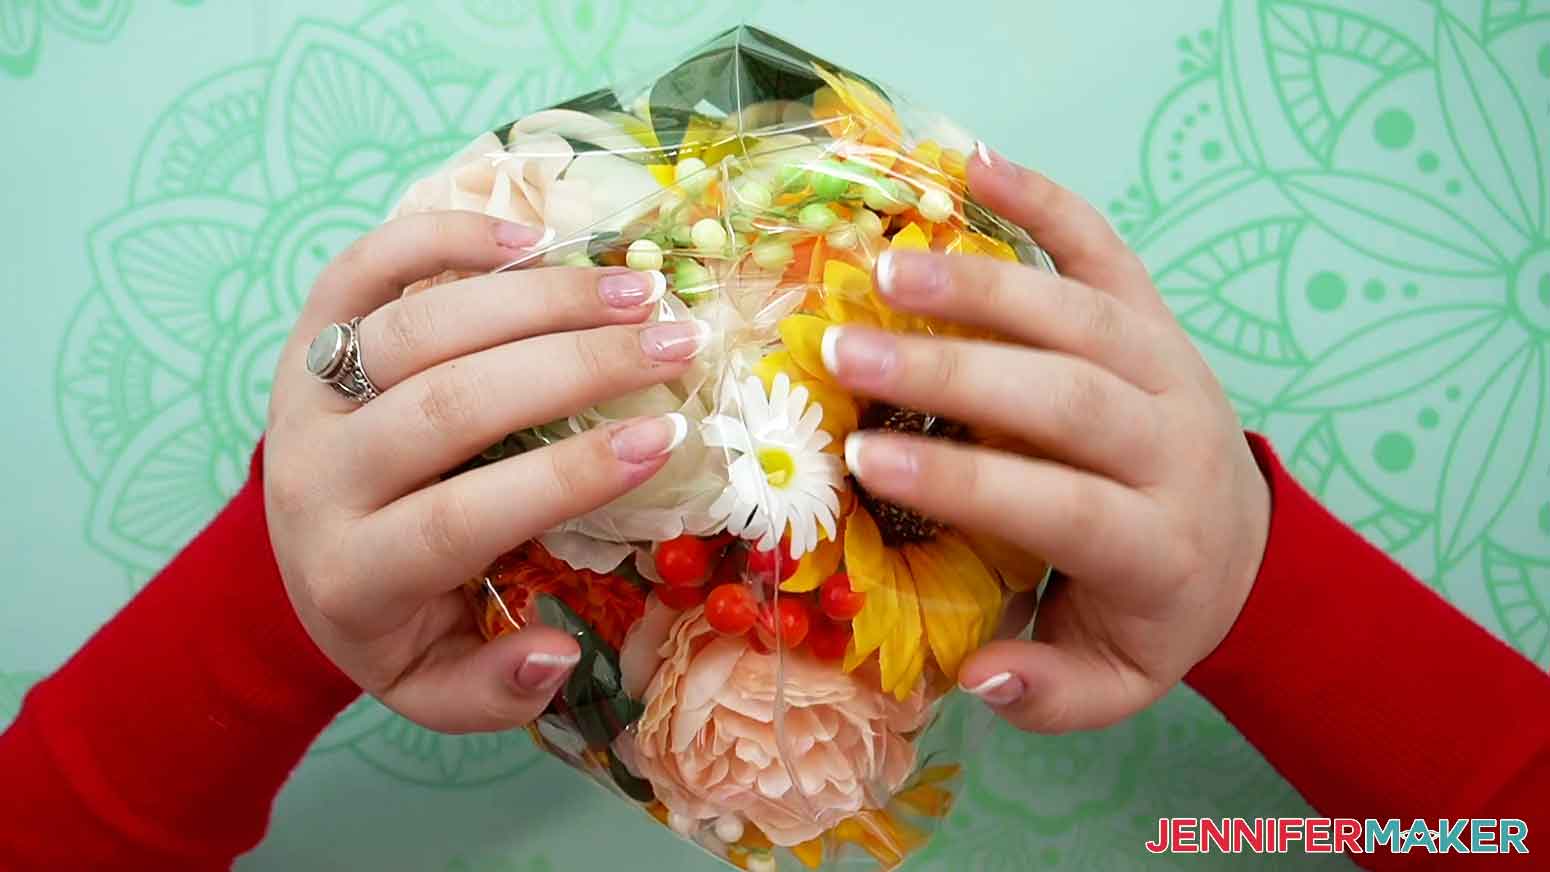
Now the stems should be smooth, and it is time to inflate the balloon! Insert the end of the pump into the neck of the balloon. Pull the balloon down around the stem as much as the flowers will allow. Inflate the balloon.

Inflate the balloon slightly larger than your desired finished size. Be careful not to over-inflate! Remove the pump and tie the end of the balloon as close as you can to the bottom of the neck. It is okay to let go of the flowers while securing the balloon. The flowers and stems will be completely inside the balloon when tying the knot.

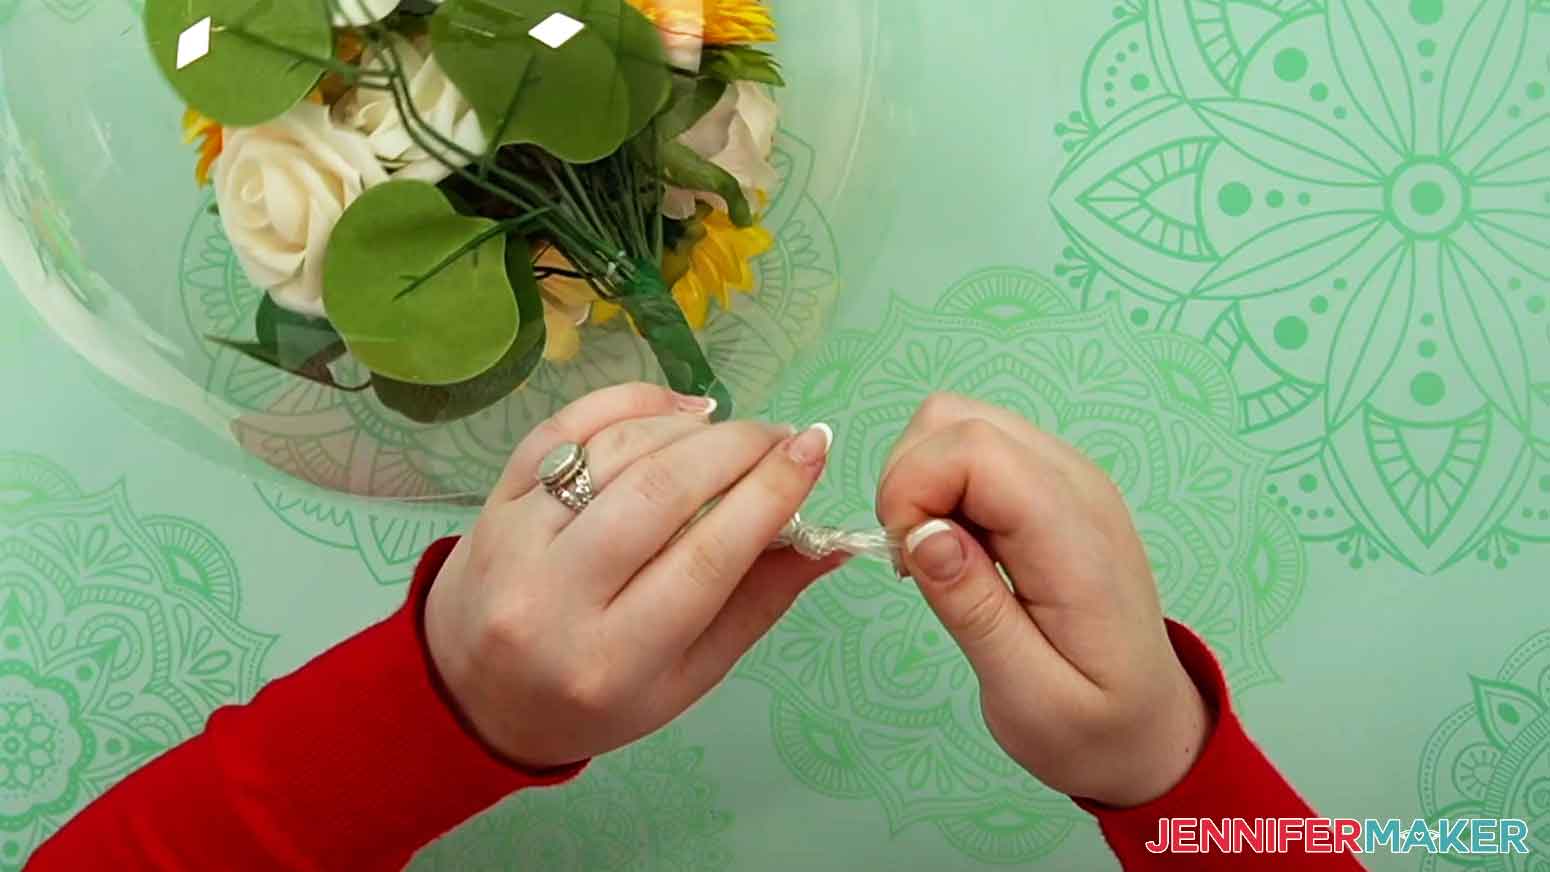
Before we secure the flowers, grab one of the 260 balloons. These are the long, skinny ones you may have seen balloon animals made out of. They help provide a tight seal around the neck of the balloon.
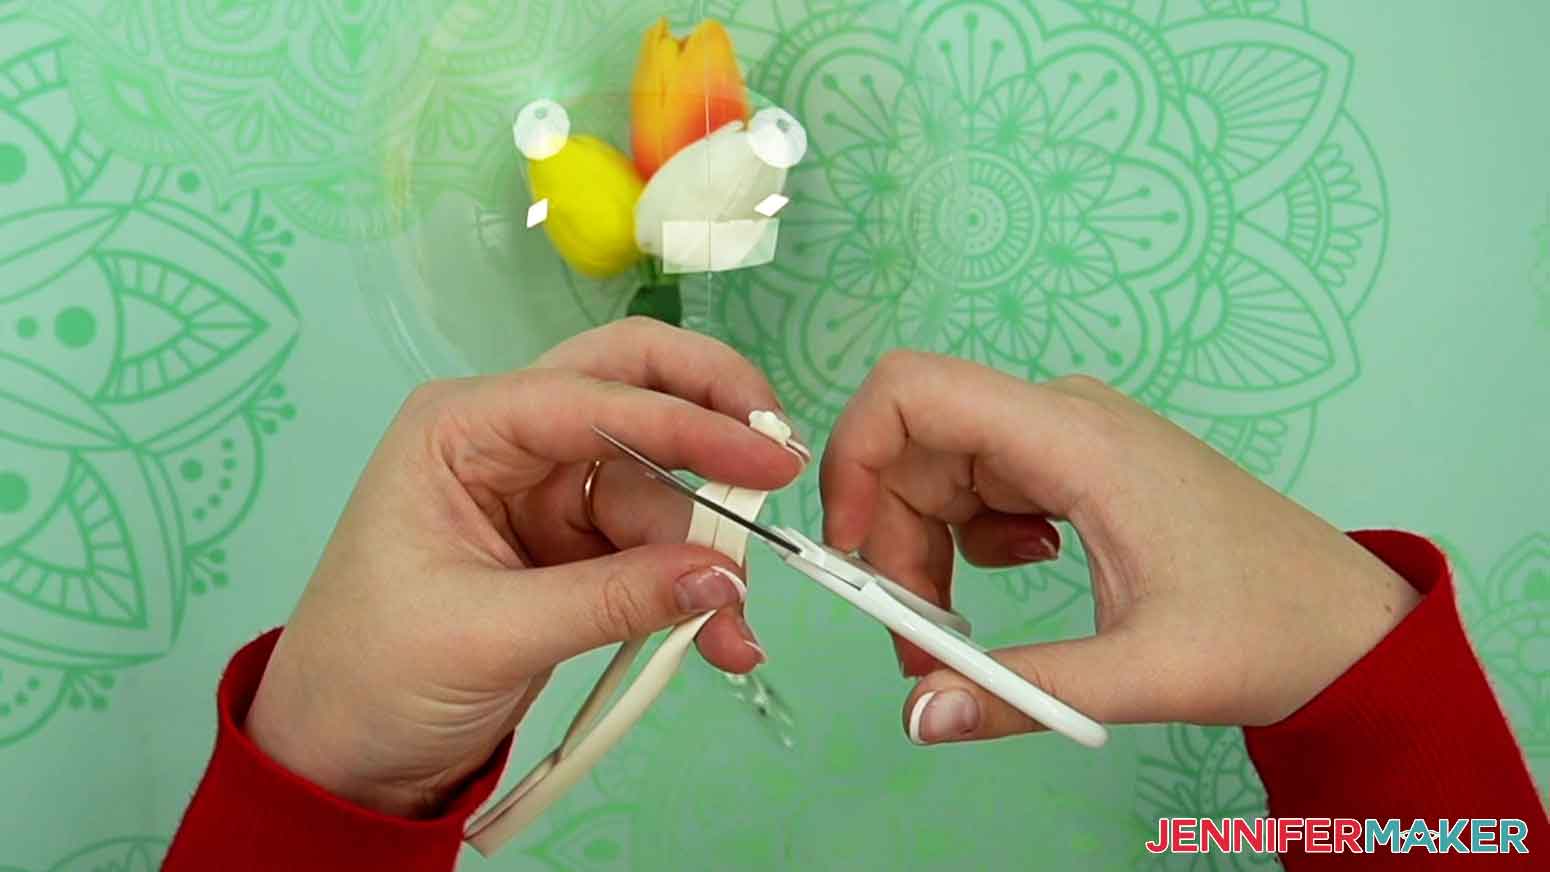
Cut off both the rimmed edge and closed tip of the 260 balloon.
Gently shake the Bobo balloon until the stem is in the neck of the balloon. Pull it into place and wrap the 260 balloon around the neck of the balloon and stem, just above the zip tie bump.

Trim off the excess edges of the 260 balloon.
You can optionally wrap floral tape around the 260 balloon to keep the green stem consistency.
Now let's attach the balloon to a balloon cup. Insert the end of the balloon into the balloon cup and pull it through. If you have a long enough tail, you can wrap it around the side support of the balloon cup. If not, don't worry. Also push the long stem section into the center of the balloon cup so that the base of the zip tie bump rests against the balloon cup.
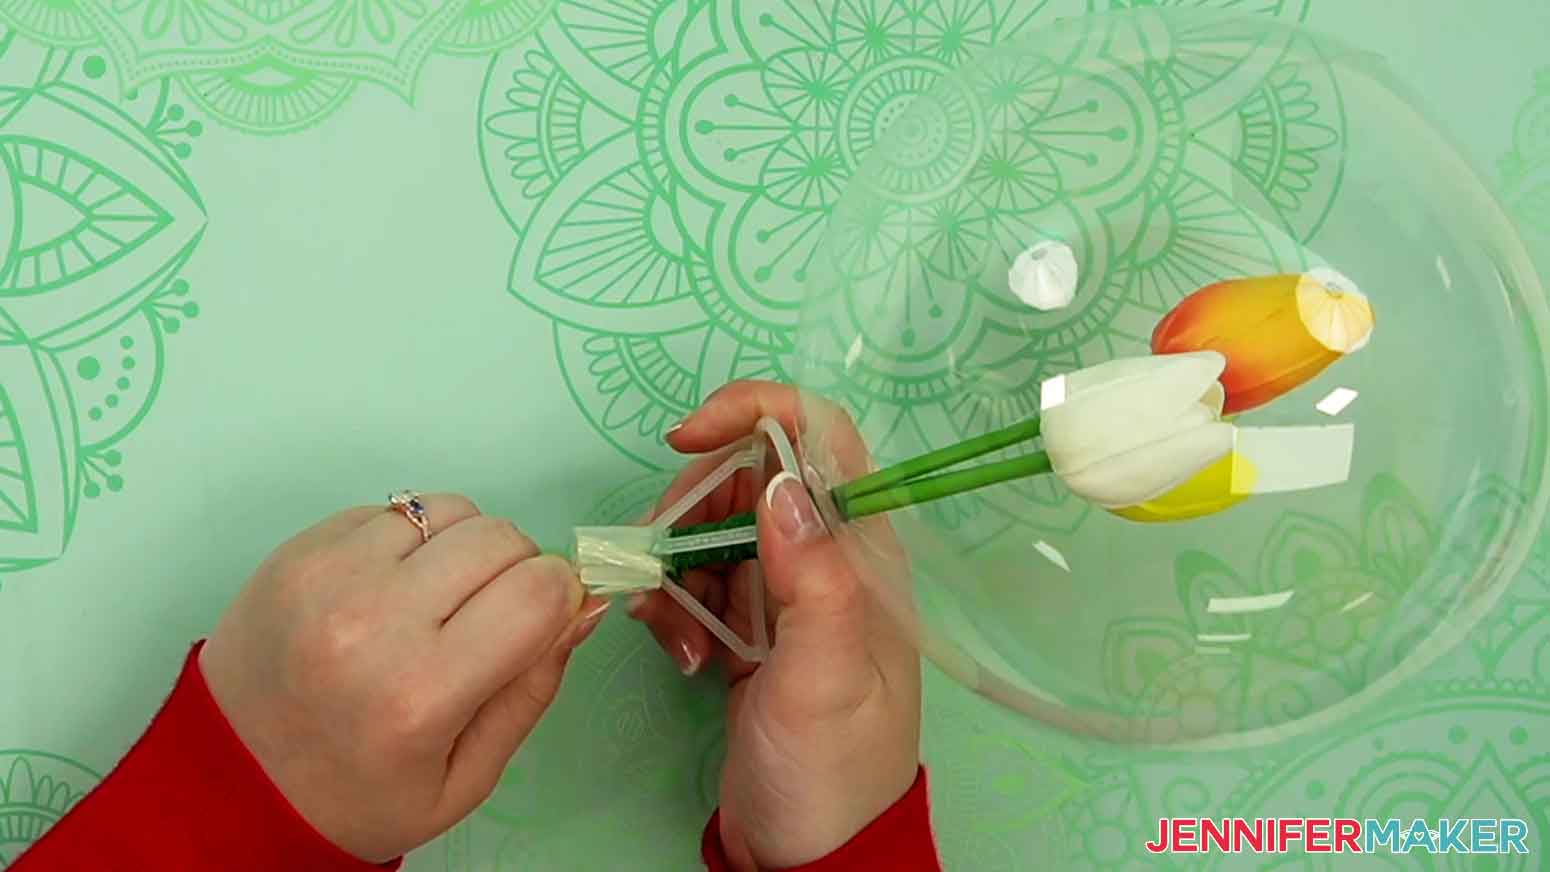
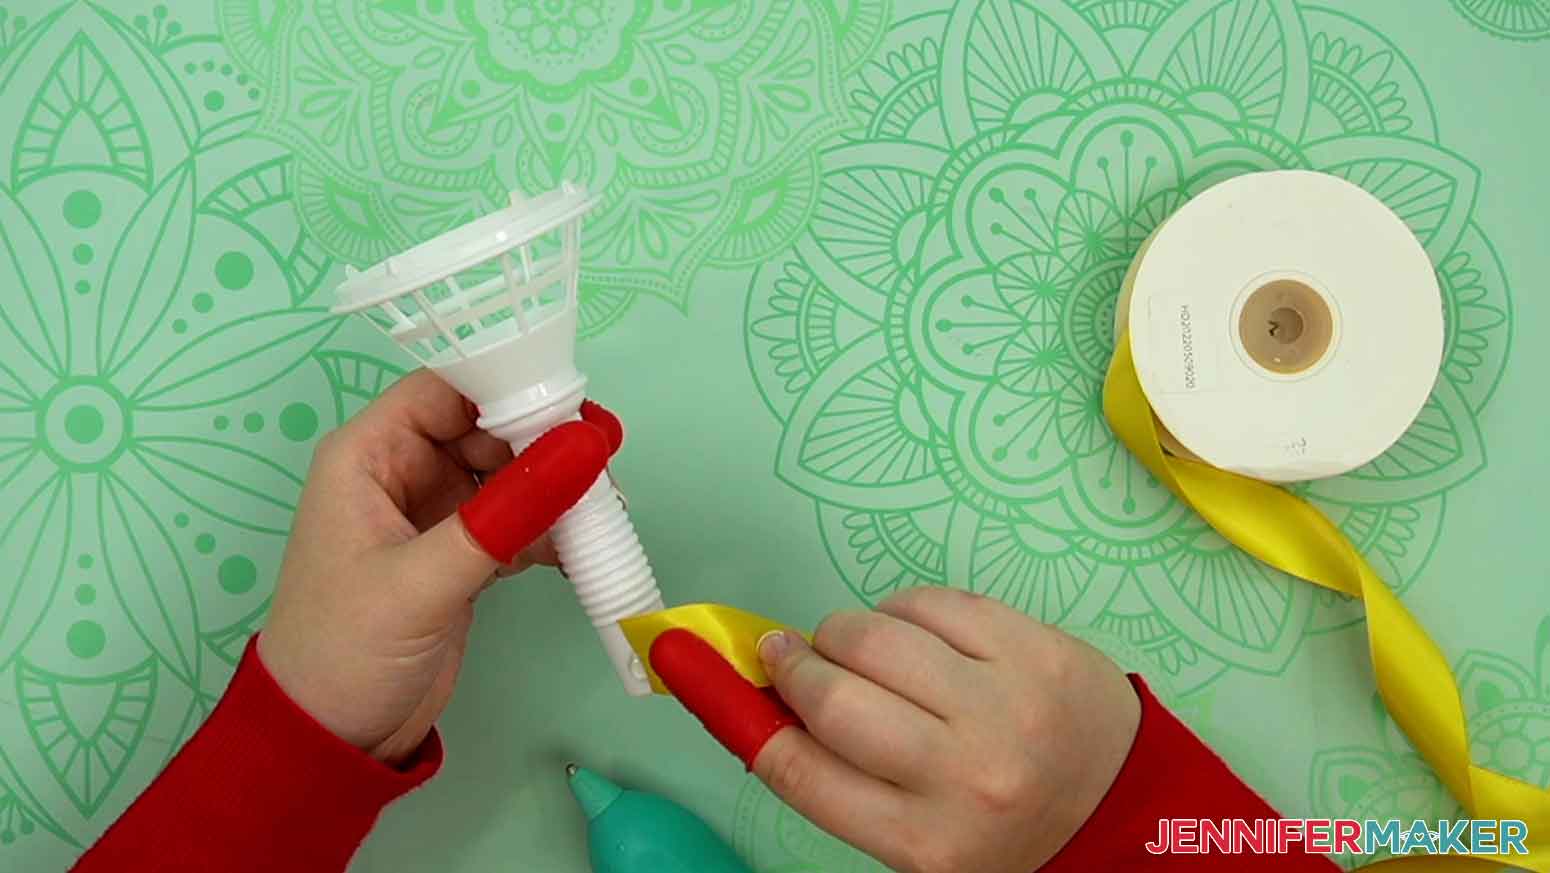
Insert the balloon stick into the bottom of the cup.
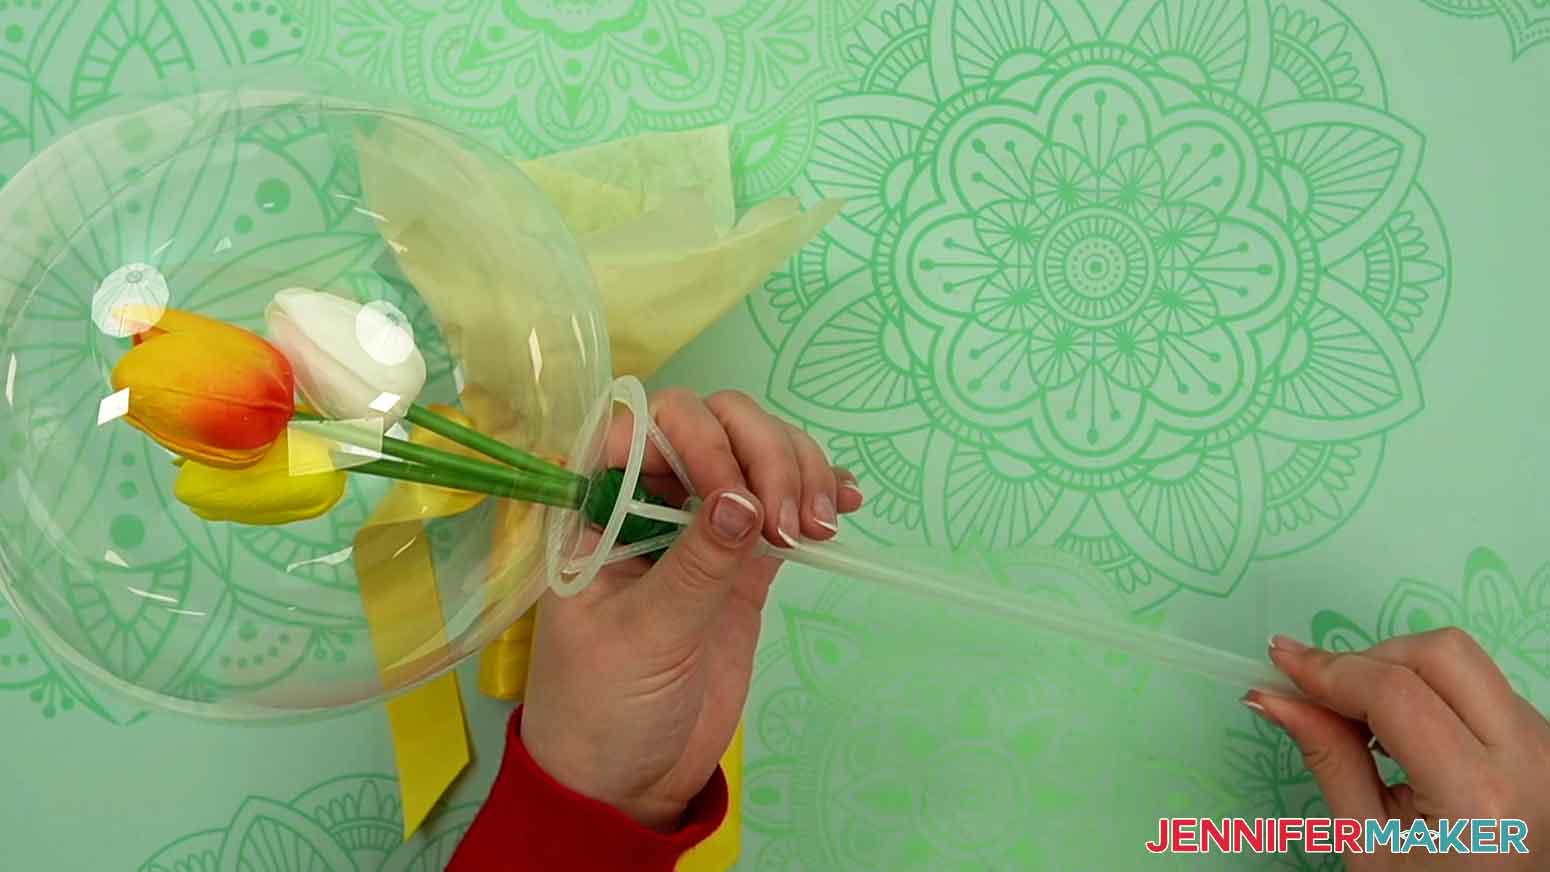
Now we need to cut down the stick to fit inside of our bouquet handle. If the handle has a topper or foam, go ahead and remove those pieces. We won't need them for this project.
Hold up the handle next to the stick to visually measure the two. Cut the balloon stick just a tiny bit shorter than the length that will fit inside the handle.
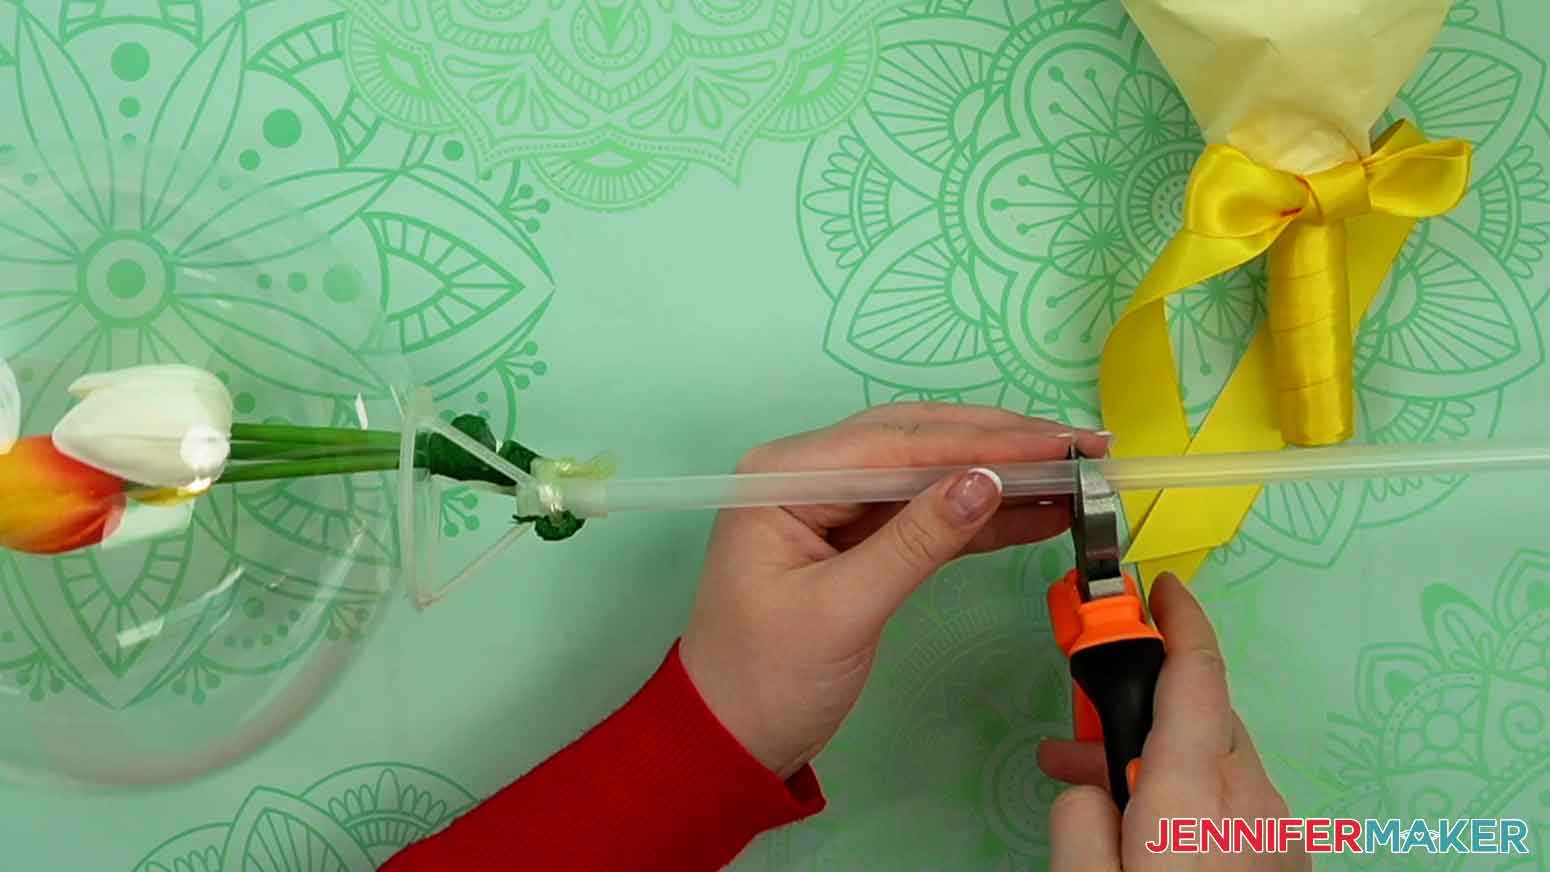
You can now place the stick inside the handle to check your balloon stick length. Continue to trim the balloon stick and recheck as necessary. You want the balloon to sit just above the rim of the handle.
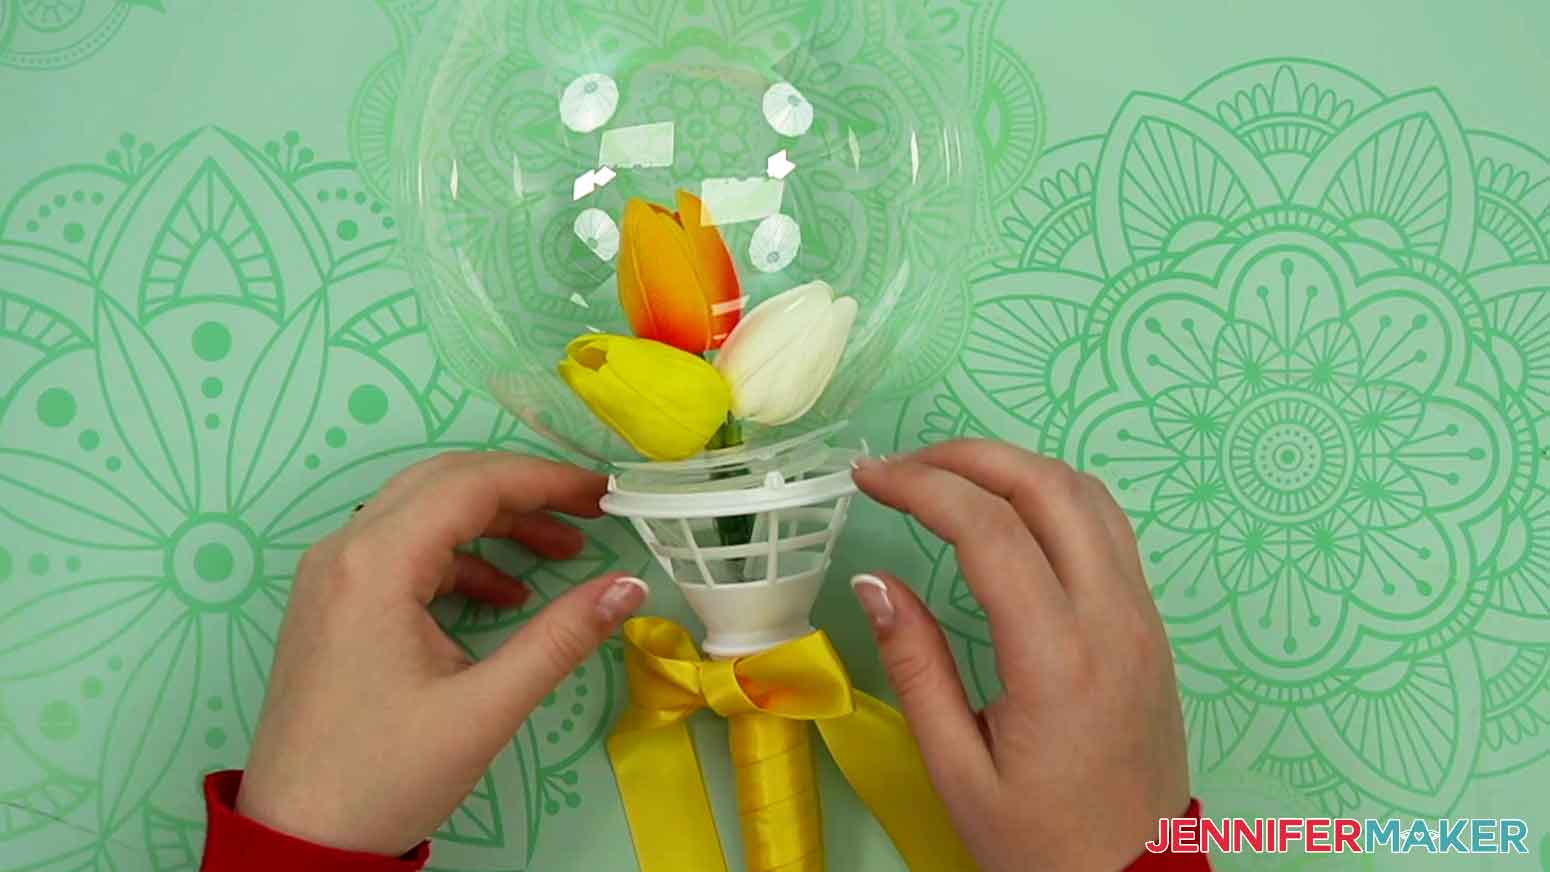
Once the balloon stick length is good, set the balloon aside. We're going to wrap the handle with ribbon before attaching the balloon.
Plug in and heat your hot glue gun. Before placing your hands near the hot glue, I recommend protecting your finger tips with silicone finger protectors. Place a small dab of hot glue along the bouquet handle. Press the end of the ribbon on to the bottom of the bouquet handle.
Wrap the ribbon up the handle. Cut it and glue the edge once you reach the top of the handle, leaving the cage section open.

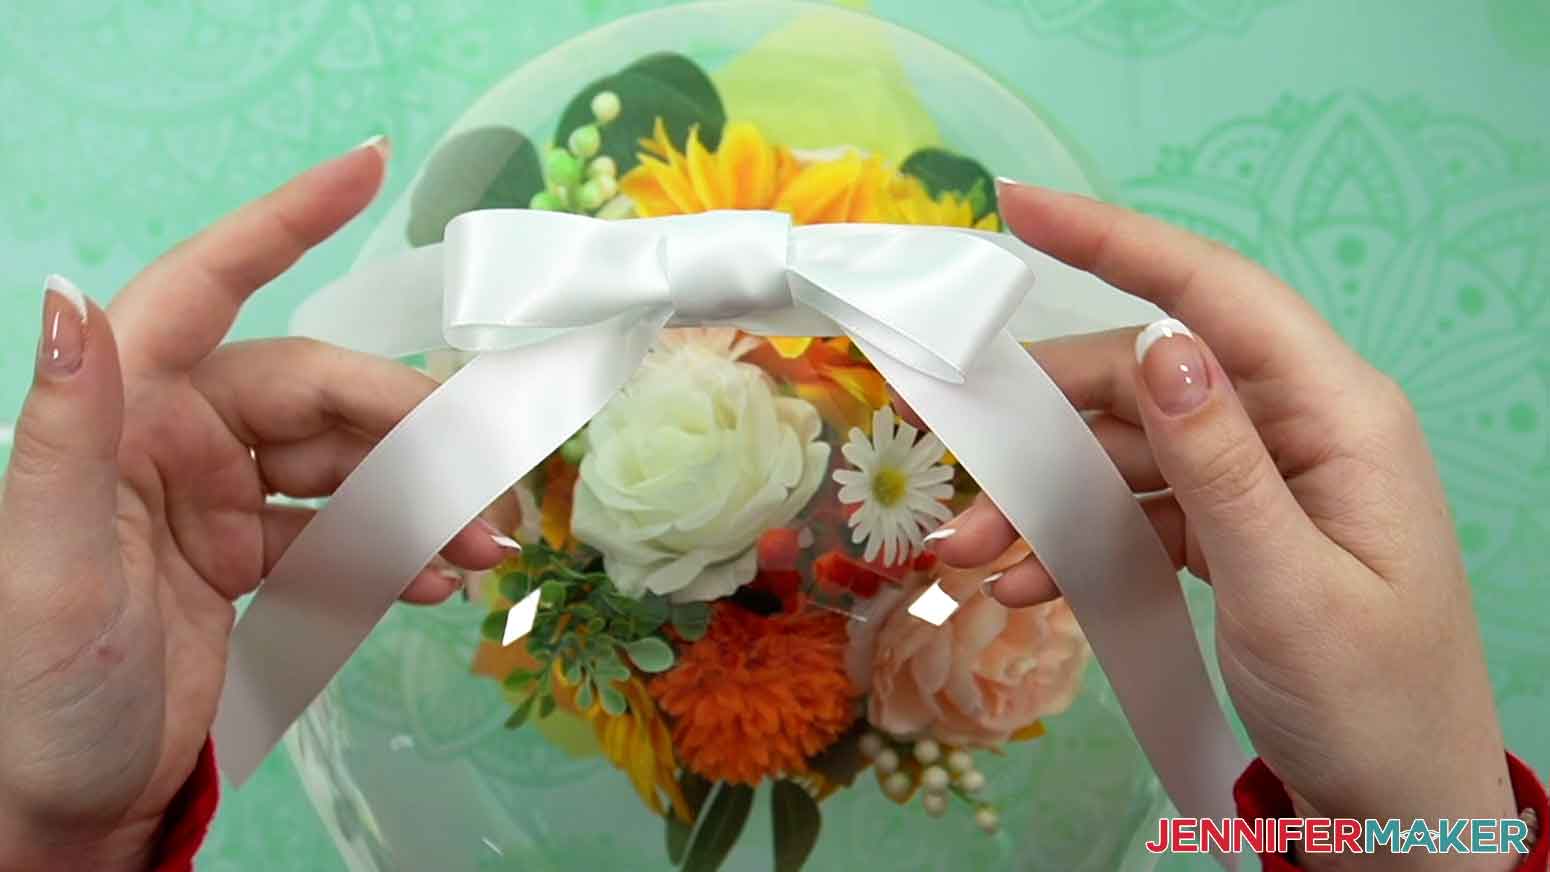
Cut off another section of ribbon and make a simple bow to attach to the handle.
Apply a dab of hot glue to the back of the bow and attach it to the handle.

Now, back to the balloon. Apply several clicks of hot glue into the bottom of the handle so there is enough for the stick to adhere to. Insert the balloon stick into the handle and hold it in place for a few moments to dry.
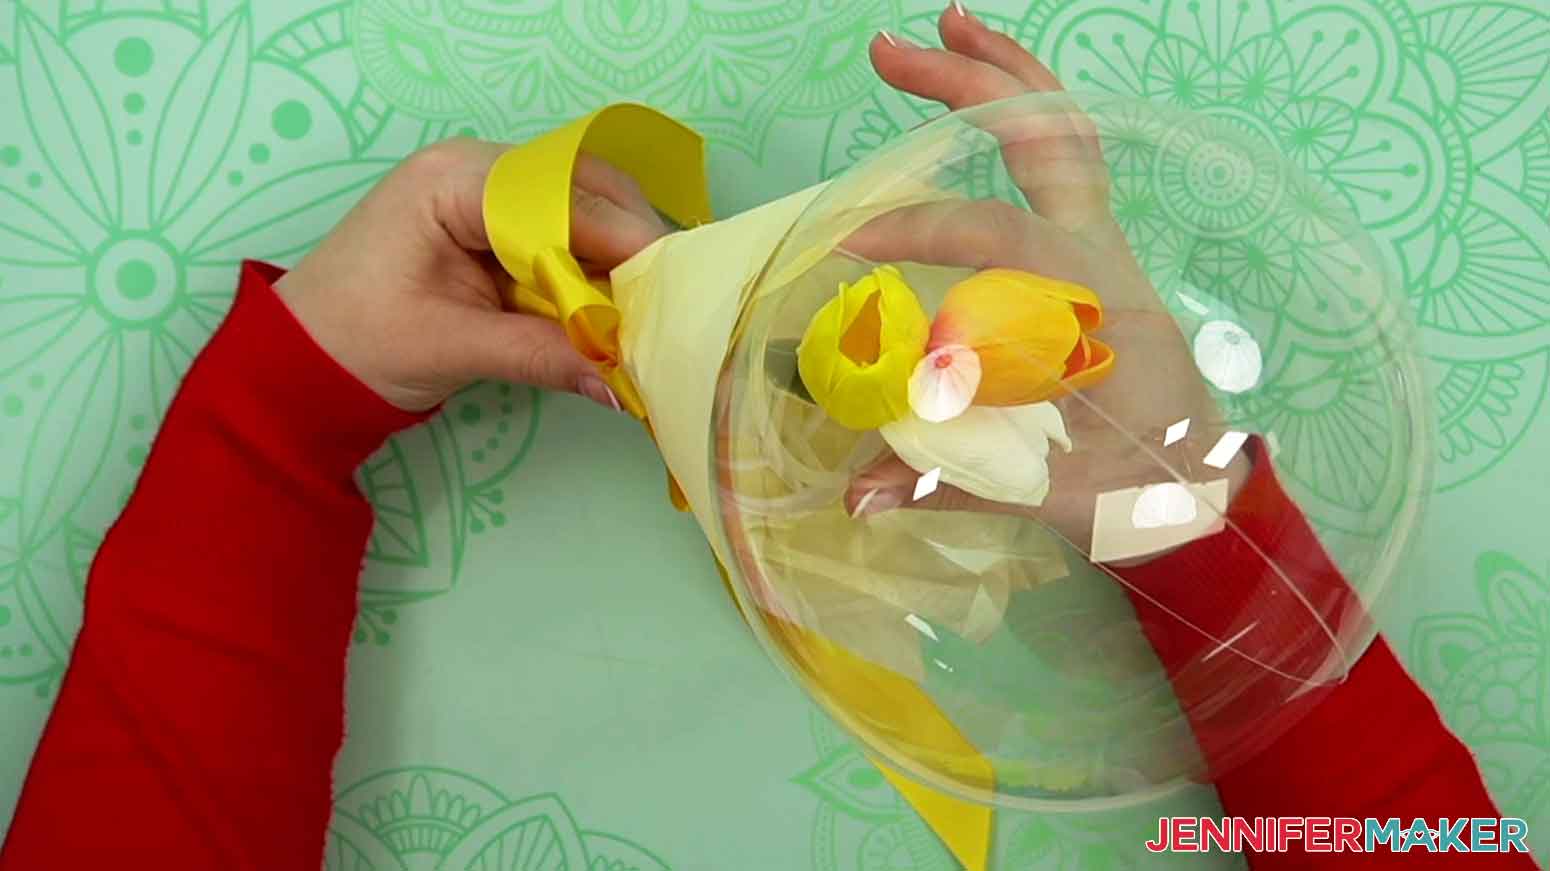
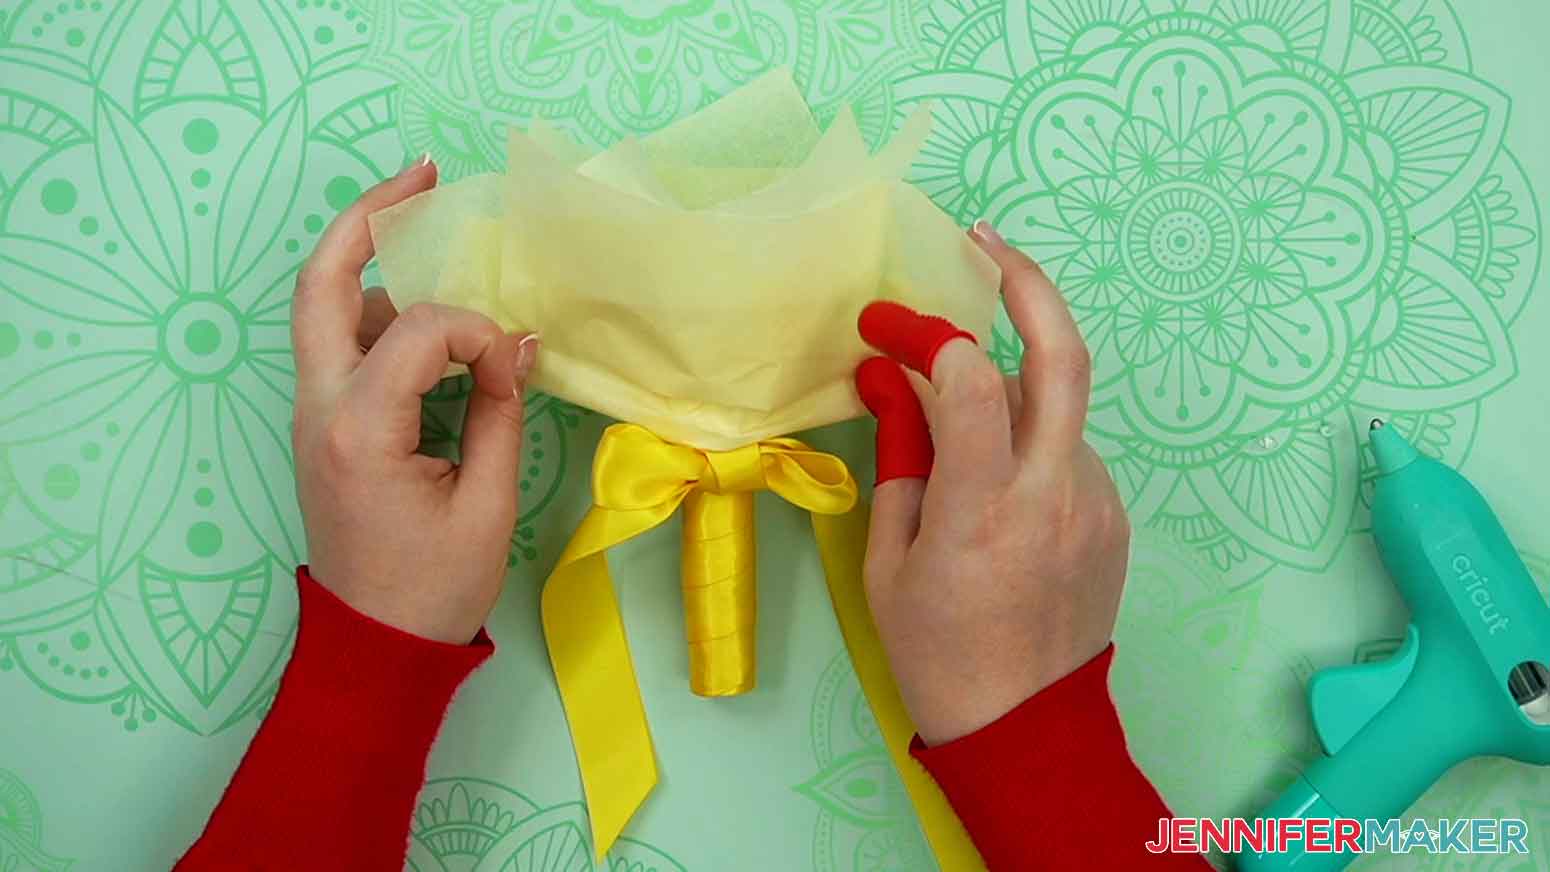
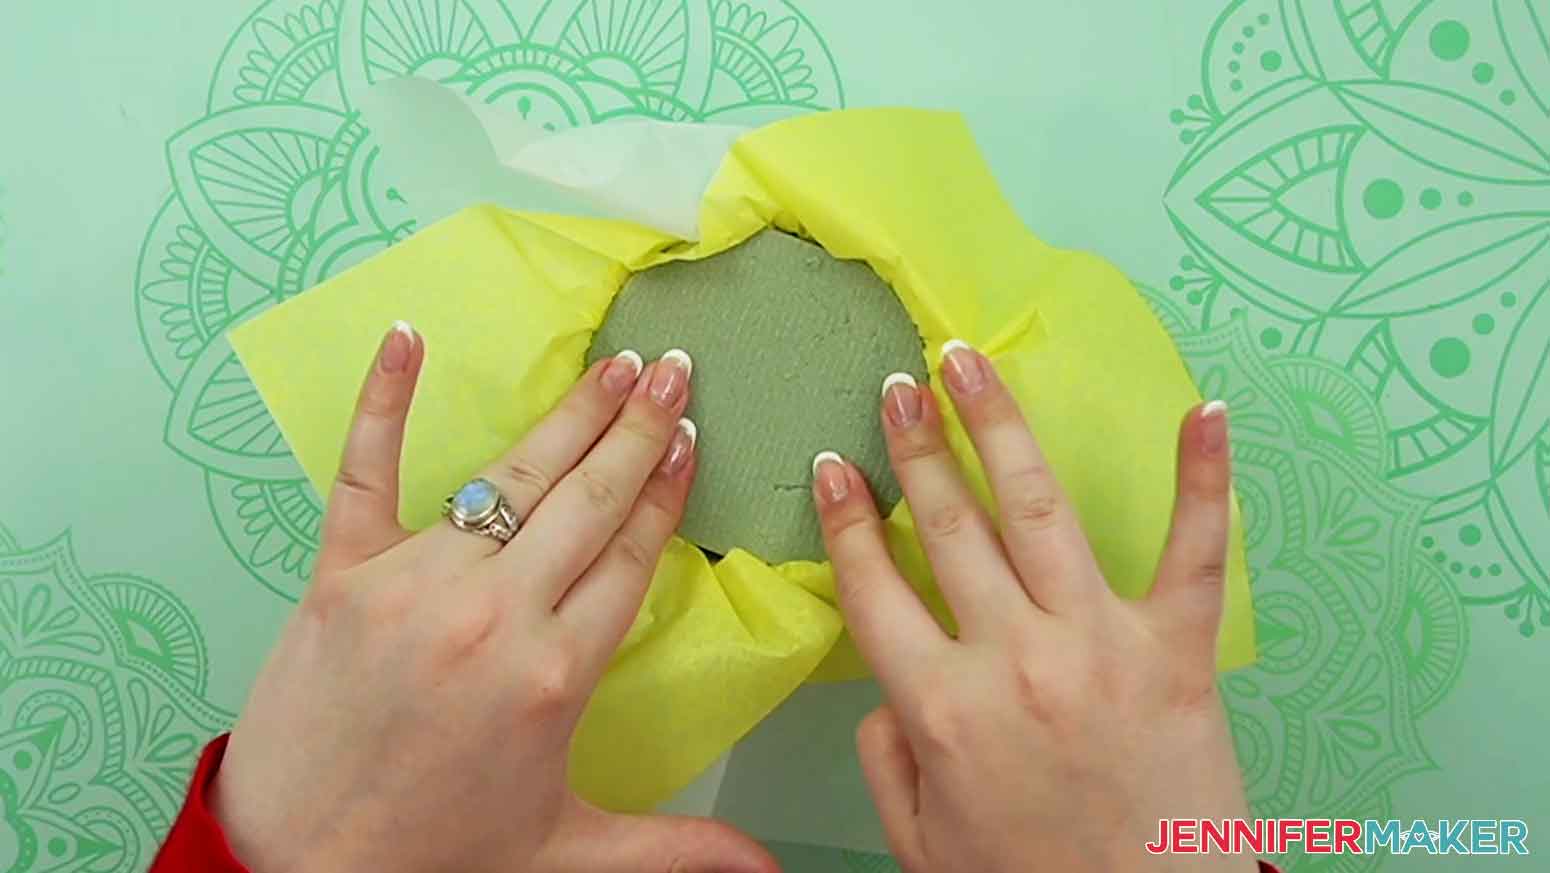
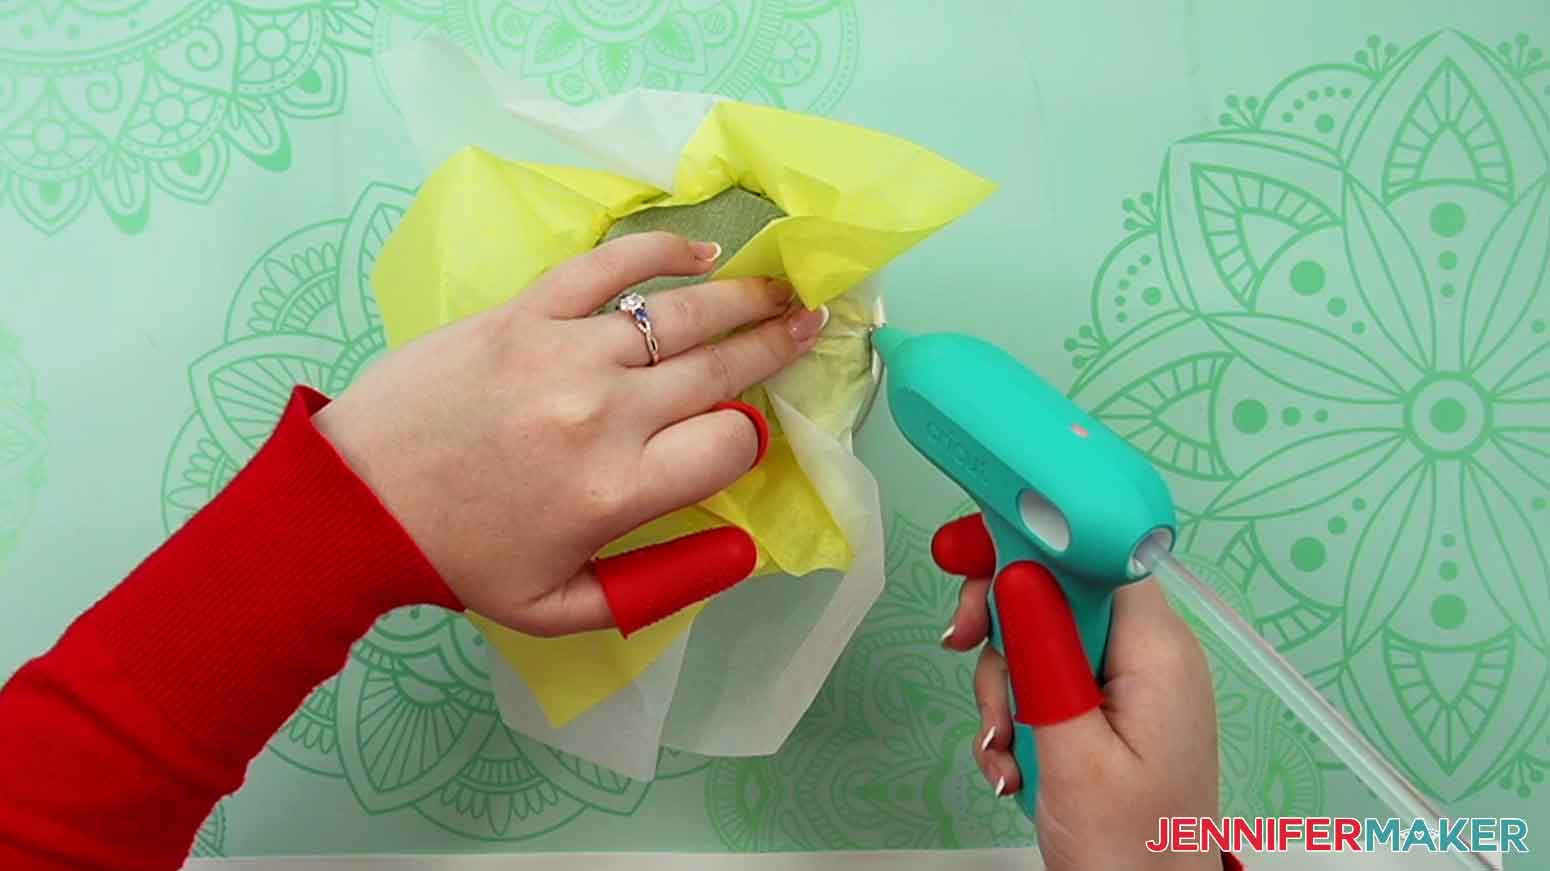
Once the stick is stable, let's wrap a small bit of tissue paper around the cage part of the handle. This will hide the assembly pieces and add elegance to the finished product. A few small dots of hot glue work great to hold the tissue paper in place.
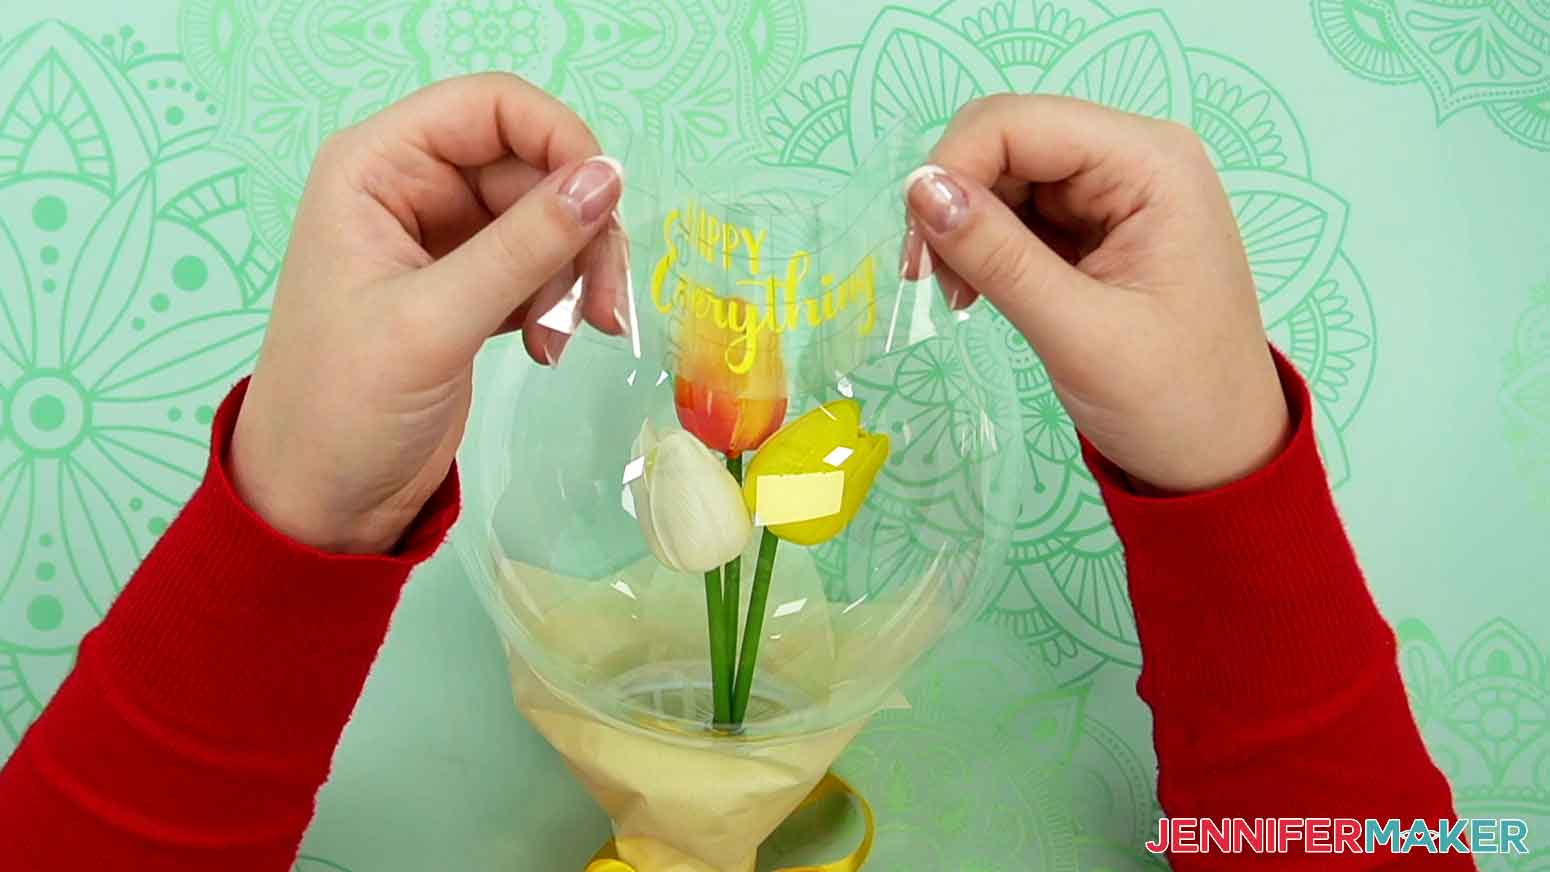
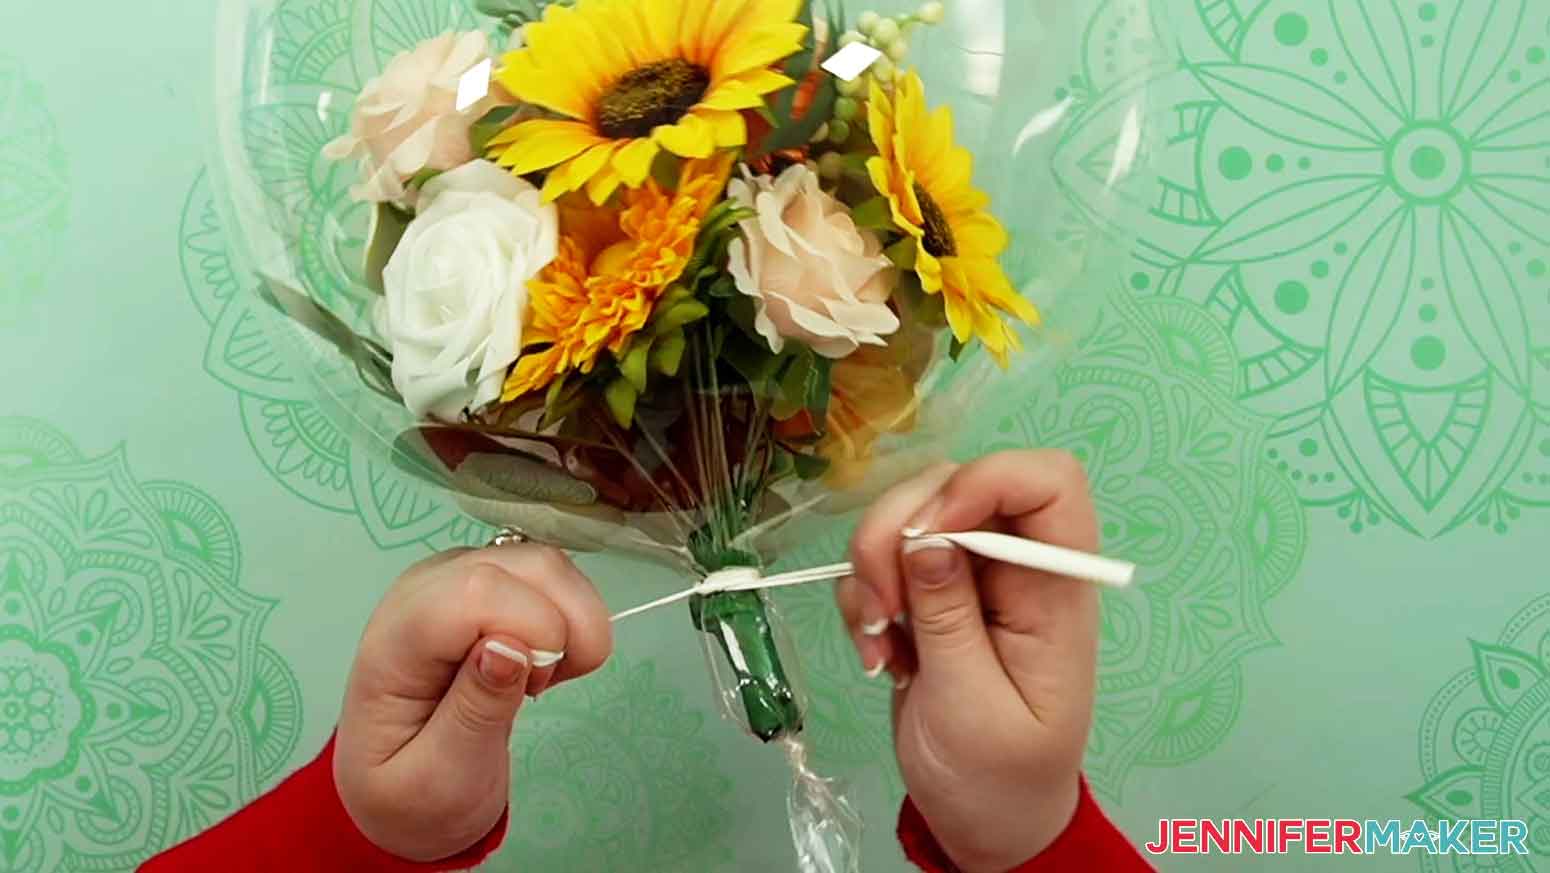
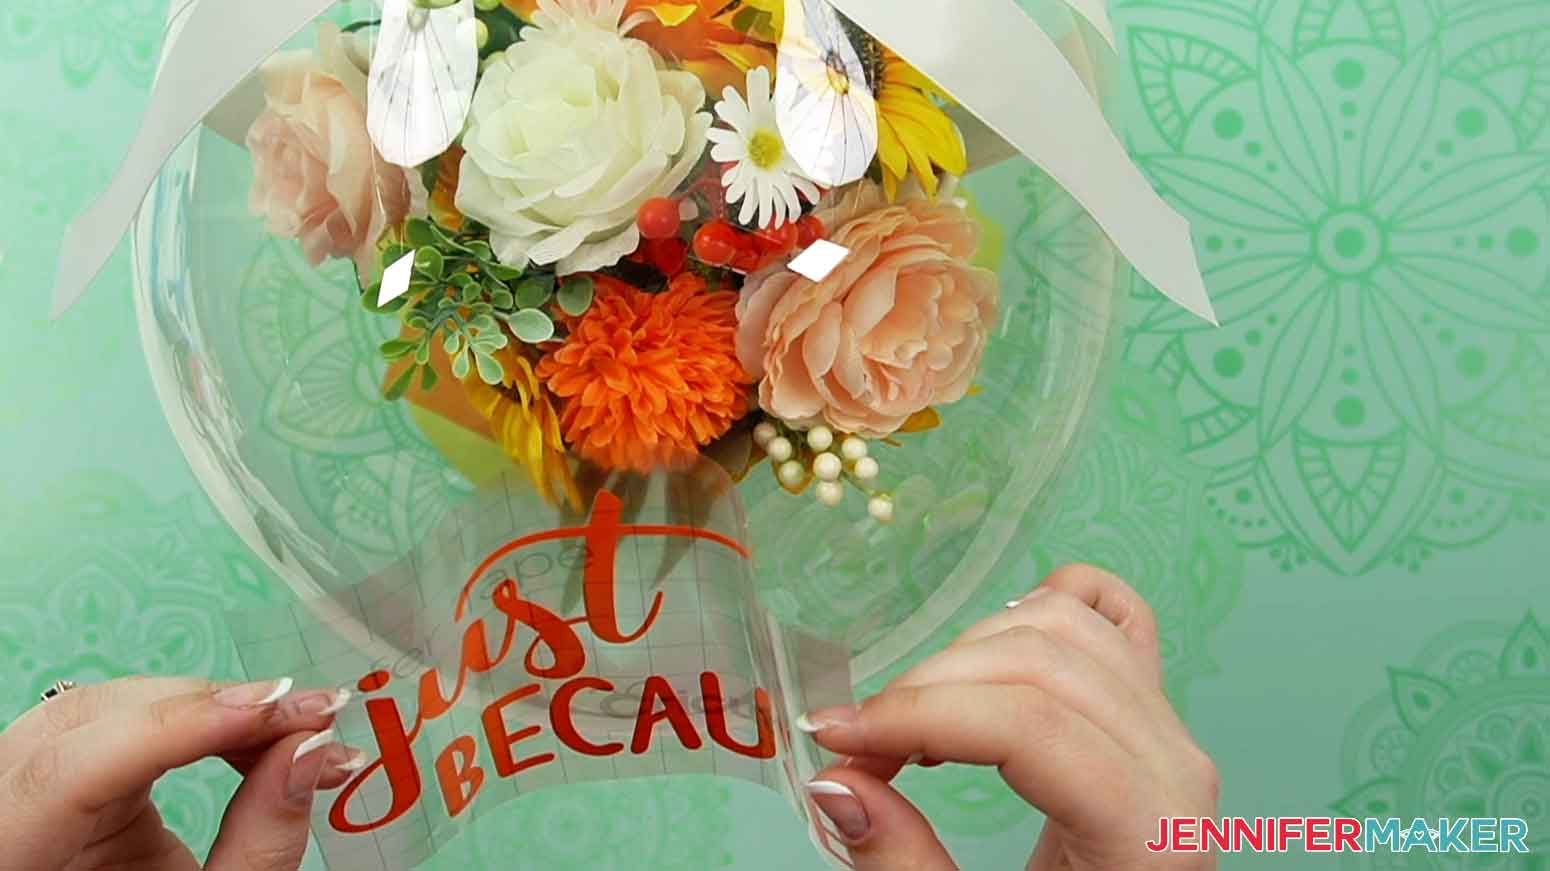
Lastly, let's apply the vinyl sentiment to the balloon. It helps to stabilize the balloon by resting it on a roll of painter's tape. Peel away the vinyl backing and fold up the edges like a taco shape. We're going to apply it about halfway between the balloon center and balloon top. Lower the center of the vinyl to the balloon and press down the sides into place. Gently peel up and remove the transfer tape.
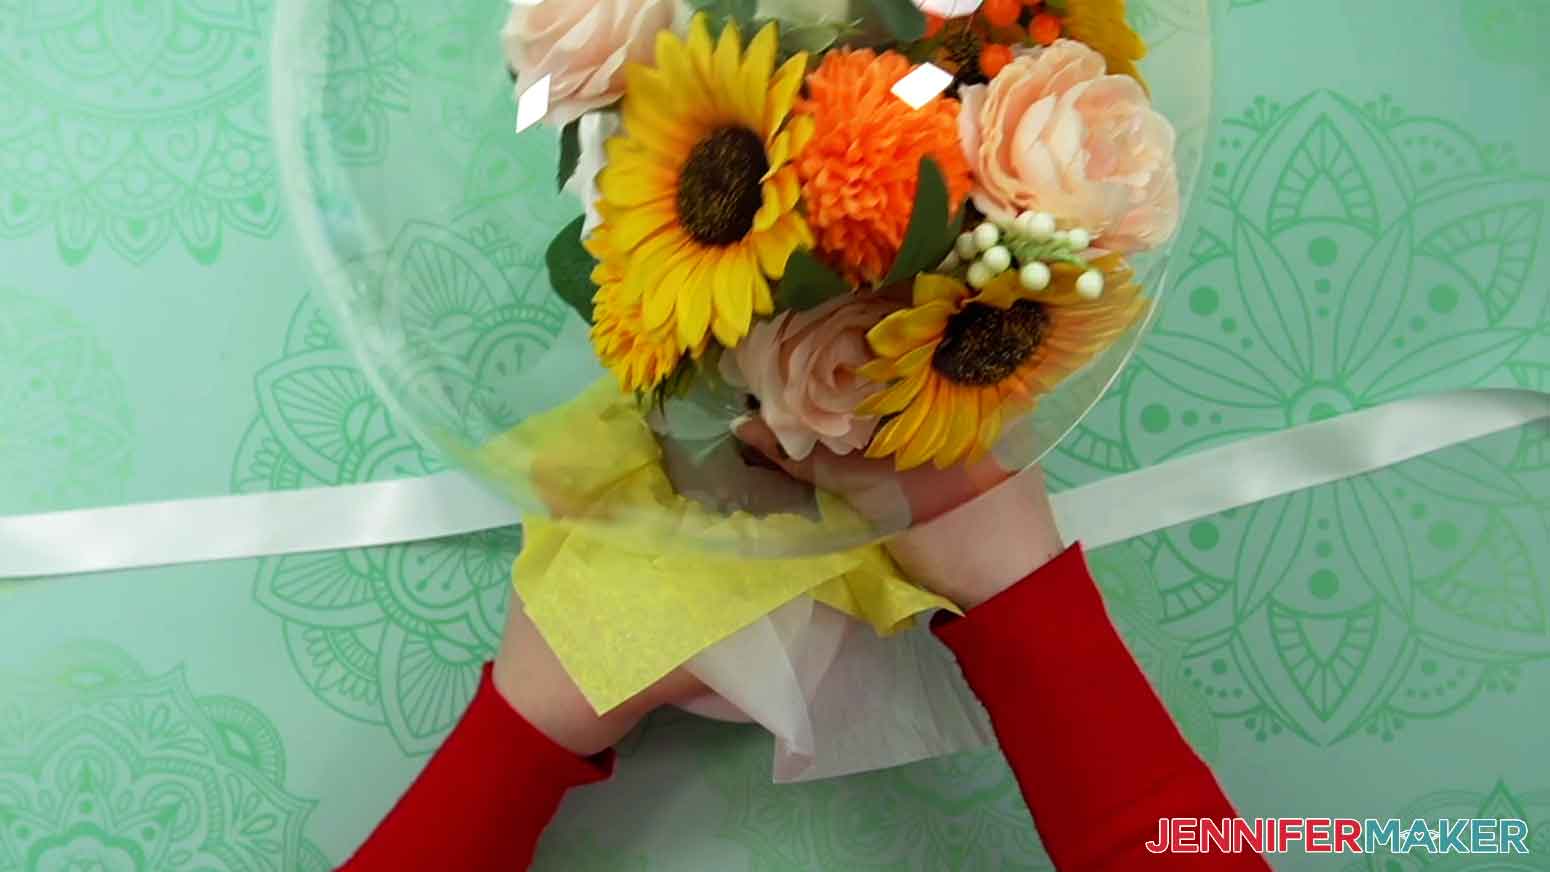
Your handheld balloon bouquet is complete!
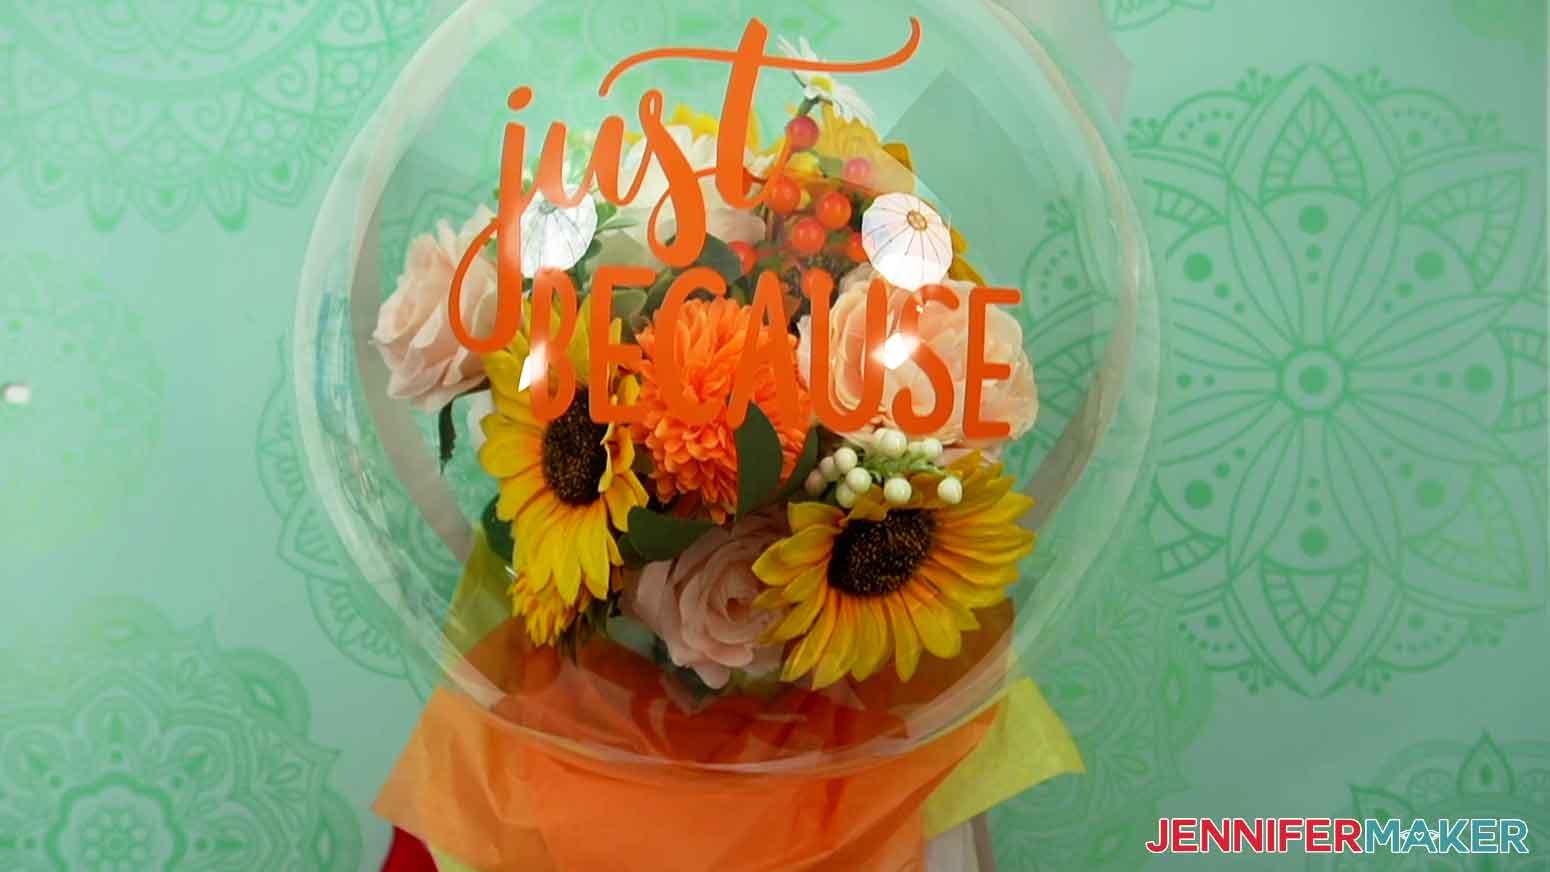
FREE STANDING FLOWER BALLOON BOUQUET
First, let's stretch out our 24" Bobo balloon. Tug at the seam and neck of the balloon to stretch it out. Start on one side and use both hands to pull at the seam. The balloons are durable so use a little force to help it stretch. Make sure to pull down at the neck of the balloon as well. A stretched, longer balloon neck will give us more room to work with when securing the flowers and knot.
Use either the hand pump or the electric pump to inflate the balloon. This helps to stretch it from the inside. When inflating the balloon, check that the balloon seam stays centered while inflated. Some of the balloons I tested had the seam off-centered. For this assembly, we want to make sure to use a balloon with a consistent center seam.

Use your scissors to make a small cut close to the top seam of the balloon. Continue to cut along the seam to create about a 4" opening.
The floral bouquet I'm using comes in separate pieces. If necessary, assemble your bouquet.

Zip tie the base of the stems to hold the bouquet pieces in place.
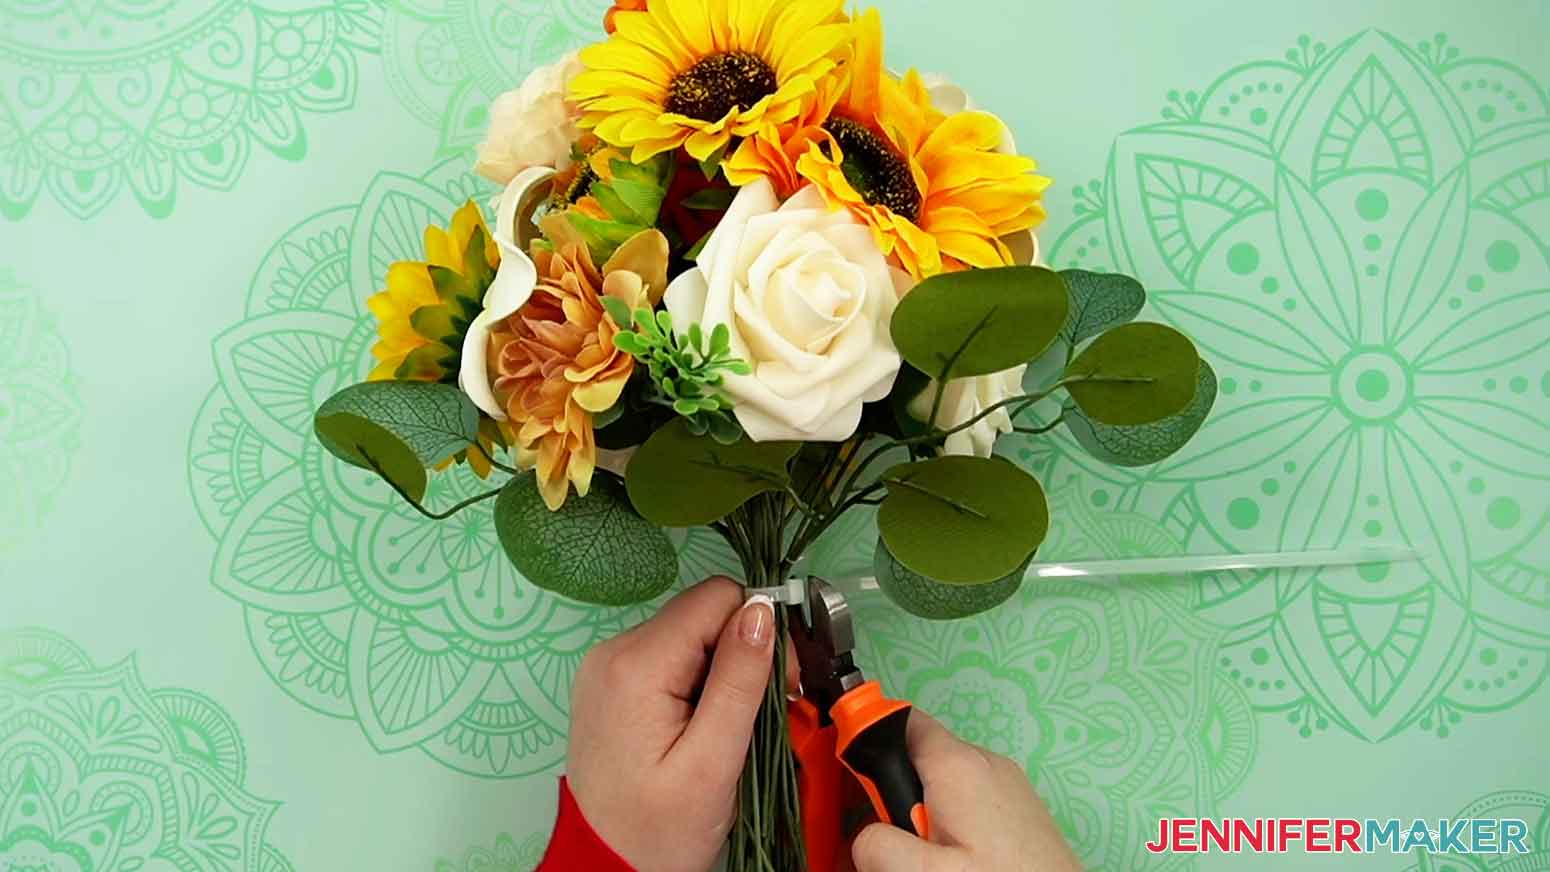
Now we need to trim the stems of the bouquet. Unlike the handheld version, we will keep the stem lengths consistent. Use the wire cutters to trim down the excess stems. Leave about 1" on all of the stems beyond the zip tie.
Just like with the handheld bouquet, we're going to use electrical tape to wrap the stems and zip tie.

Insert the bouquet into the balloon opening you created earlier. Slowly rotate the bouquet to work the balloon up and over each of the flowers until the entire bouquet is inside the balloon.
TIP: If you get stuck and just can not get the pieces into the balloon, it is okay to carefully cut along the seam to expand the opening.

Start at one edge of the open seam and place it in the sealer. Press down for just a second to reseal that section of balloon.
Time to inflate the balloon and check for leaks. Place the neck of the balloon over the electric pump and inflate it. When it is about 75% inflated, remove it from the pump and hold the balloon neck closed tightly. Slowly hover your hand and ear over the seam to check for any leaks. If you feel or hear air coming through the sealed seam, place that section into the sealer again to reinforce the area.
When you no longer hear or feel any leaks, inflate the balloon again. This time, inflate it to the full size you want your balloon to be. Tie the end of the balloon as close to the bottom of the neck as possible.
Before we secure the flowers, prepare one of the 260 balloons. These are the long skinny ones you may have seen balloon animals made out of. They help provide a tight seal around the neck of the balloon. Cut off both the rimmed edge and closed tip of the 260 balloon. See the handheld photos above if needed.
If the bouquet stem is not in the neck of the balloon, gently shake the Bobo balloon until the stem is in the neck of the balloon. Pull it into place and wrap the 260 balloon around the neck of the balloon and stem, just above the zip tie bump.
Trim off the excess edges of the 260 balloon.
You can optionally wrap floral tape around the 260 balloon to keep the green stem consistency.

Now let's prepare the base of the flower balloon bouquet.
The floral foam I'm using is larger than the vase. I'm going to turn the vase upside down and press it down on the floral foam. This gets us a perfectly sized piece inside the vase.
There are two ways to attach the ribbon to the pot. You can glue the ends inside the pot or just wrap the ribbon around the bottom of the pot. If you want the ribbon glued to the pot, cut two pieces of satin ribbon about 20" long. Use hot glue to attach the ends across from each other on the inner side of the pot.
Grab the balloon bouquet and align the seam to the glued ribbon. Insert the stem into the center of the floral foam. Press the stem into the foam as much as possible. The more you are able to insert the stem, the more stable the balloon will be in the base.
Pull the ribbon up the sides of the balloon and secure them at the top with some glue dots. I used Zots in size Medium. The ribbon should just slightly overlap at the top of the balloon. Cut any excess ribbon.
If you are just wrapping the ribbon around the bottom of the pot, secure one end at the top of the balloon with a glue dot. Gently wrap the ribbon down the balloon and around the bottom of the vase. Secure the other end back at the top with a glue dot.
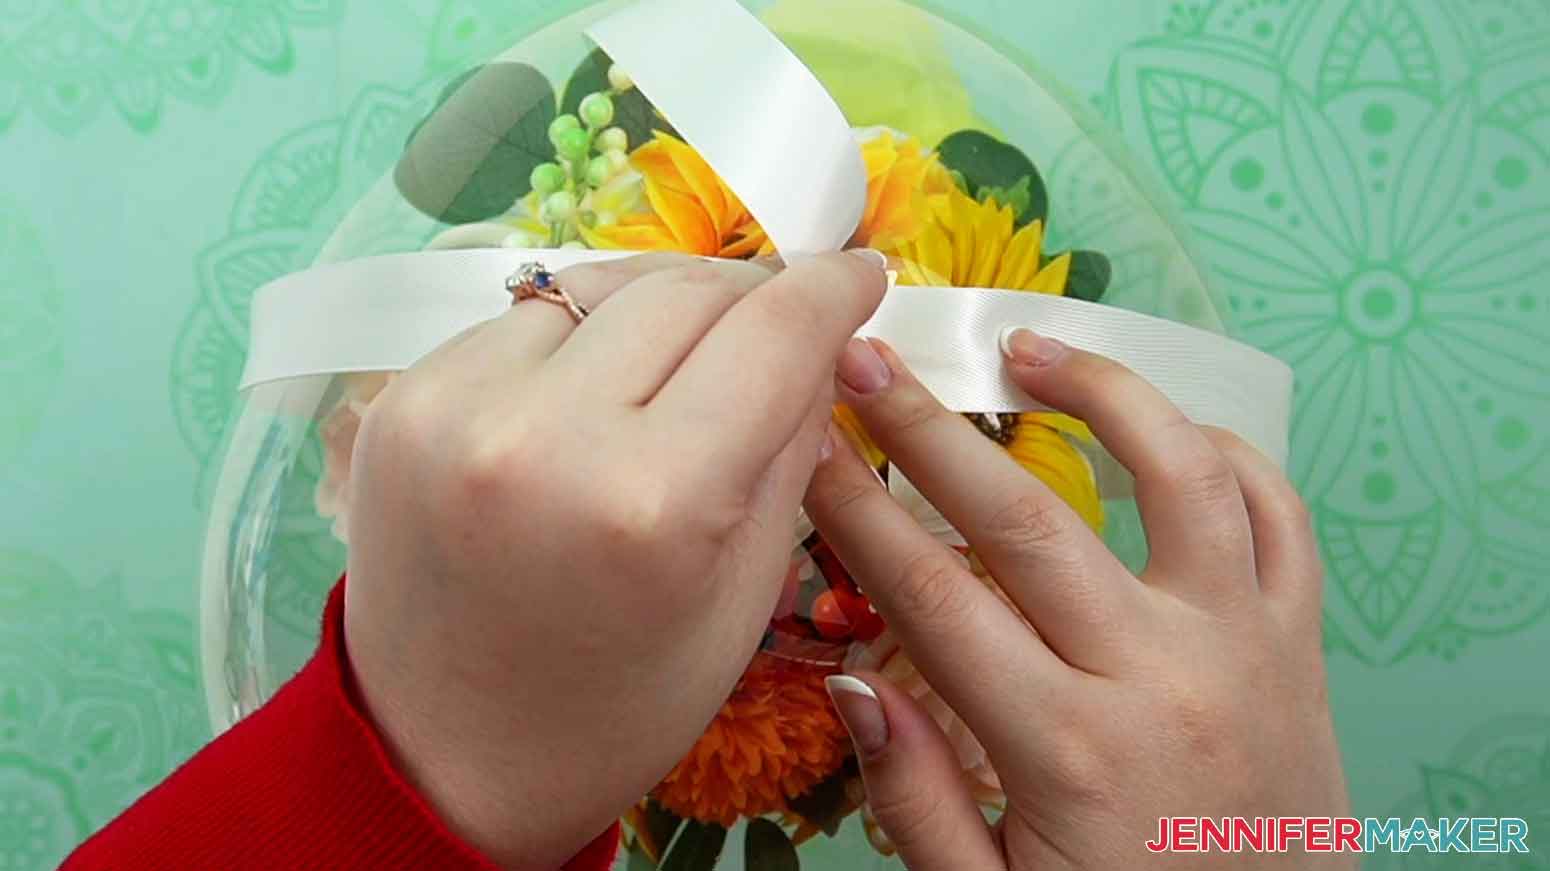
Cut a separate piece of ribbon and tie a bow to attach to the top of the balloon.
Lastly, let's apply the vinyl sentiment to the balloon. Peel away the vinyl backing and fold up the edges of the decal like a taco shape. We're going to apply it about halfway between the balloon center and balloon top.
Place the center of the decal onto the balloon in your desired location. Use your fingers to gently press from the center of the decal to the outer edges to secure them to the balloon.Gently peel up and remove the transfer tape. If necessary, gently use a small scraper to help burnish any areas of the decal that are having trouble sticking.
Your tabletop balloon bouquet is complete!
STEP 4: SHOW IT OFF
Here are my complete flower balloon bouquets.
I can't wait to see your variations! Once you learn how to reseal the balloons, you can get creative and put other fun things inside. These make for great customizable gifts with a big wow factor! (Just make sure to prepare your free-standing balloon bouquet the same day for best results.)
Notes
The resealed balloons may deflate quicker than standard balloons. For the best result, prepare your flower bouquet the same day.
Typefaces used: Just Because - Farm Dream and Goldie Rainbow / Free Alternatives for Personal Use: Skinny Flower and Goldie Rainbow
Happy Everything - Caferus and Hey Lover / Free Alternatives for Personal Use: Sunday Best and Hey Lover
Congratulations - Goldie Rainbow / Free Alternative for Personal Use: Goldie Rainbow
Answers to Your Questions About How to Make a Balloon Flower Bouquet
Q: How do you make a balloon bouquet?
A: I recommend following this tutorial! I’ll show you everything you need to know about making your own beautiful balloon bouquet — both a large tabletop version as well as a smaller handheld version.
Q: What can you put in a Bobo balloon? Can you put sweets in a balloon?
A: You can put lots of things into a Bobo balloon! You can fill them with things like candy, teddy bears, or even fresh flowers (I recommend cutting your balloon and resealing as they’re quite fragile). You can even fill a Bobo balloon with colorful latex balloons like I did in this tutorial! Add glitter, confetti, feathers, small glowsticks, or other smell decorative items of a similar theme — have fun with it!
Q. Help! My floral tape isn’t sticking!
A: Try giving your floral tape a bit of a stretch as you wrap it around your flower stems. Stretching the tape activates the adhesive, giving you stickier tape and much better results.
Q: How long do balloon bouquets last?
A: Your results may vary but I highly recommend inflating your balloon bouquet on the day of your special occasion. Temperature and other factors can cause your balloon to deflate over time, and your balloon will look its best if you blow it up the day of. You can assemble it in advance, though. Just add the air and seal it up on the day of your event.
Q: What is a Bobo balloon? How do you put stuff in a Bobo balloon?
A: A Bobo balloon is a clear latex balloon with an opening big enough to insert small items inside for decoration or gifting. Rather than deciding between a bouquet of flowers and a bunch of happy birthday balloons, combine the two into the perfect gift: a beautiful, custom-made birthday balloon bouquet! Cover the outside with your custom designs made of vinyl — or use mine!
Q: How do you put a teddy bear in a balloon?
A: For large gift items like plush toys, bigger bouquets, or certain kinds of flowers, don’t try to insert them through the opening of the balloon! Instead, you can cut the seam of the balloon to insert it inside, even on the small handheld version. Then you can close the opening back up with a heat sealer tool. I show you every step right here in this tutorial.
Get my free SVG files for Sentiments for Your Balloon Flower Bouquet!
I’d love to see YOUR amazing balloon flower bouquet creations! Please share a photo in our Facebook group or tag me on social media with #jennifermaker.
Love,

Want to remember this? Save this tutorial on How to Make a Balloon Flower Bouquet to your favorite Pinterest Board!