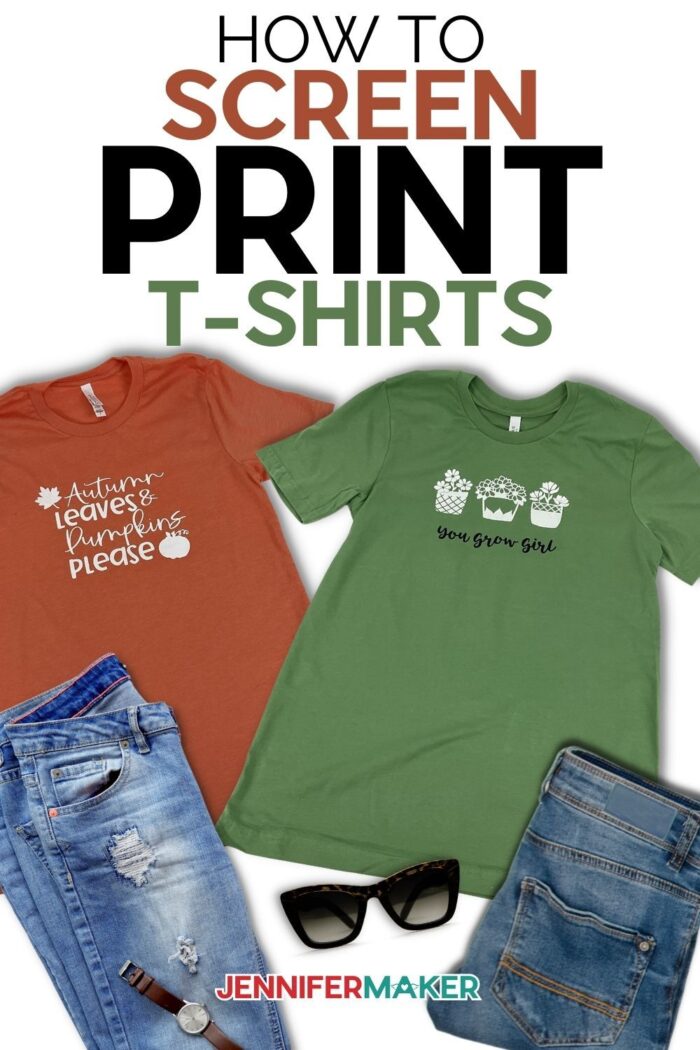
Ever want to make your own custom shirt? I am going to show you a fun way to make them yourself using a screening print process!
Screen printing is so fun and can be done on many different materials, but the most common material used is T-shirts. Screen printed shirts last as long as the shirt, so they are a great option for something you want to keep around for a long time. Have you ever wondered how to do screen printing with your Cricut? This is such a fun project, you will want to make screen print T-shirts for all occasions!

Why pay a lot more than you need to when you can create these beautiful screen printed shirts all on your own. And best of all, they are personalized with a quote that you like, and the size you desire.
Here is what we will need to make these shirts. Of course we will need a plain T-shirt. You can really use any blank T-shirt you like, but my favorite brand is Bella + Canvas. It’s really soft, made of 100% combed cotton, and true to size.
You will also need a silk screen, fabric ink, and Cricut premium vinyl to get the design onto your shirt. You’ll need to keep some transfer tape in hand for transferring your design as well.
Be sure to have some butcher paper as well or you can use a drop cloth to protect your surface. We’ll be using a bristle paint brush to add ink to the silk screen and a toothbrush for cleaning.
We’ll also need some disposable gloves for protection, Green cutting mat, scraper, weeding tool, Cricut EasyPress and mat, but you can also use a household hot iron and a towel if you don’t have an EasyPress. Last, but not least, we’ll be using the amazing Cricut Cutting Machine.
A DIY screen printing project might seem like a pretty difficult project but in actuality, the screen printing process is pretty simple as long as you follow along with the steps. These t shirts make for a great way to make some matching shirts or even create some last minute family reunion shirts!
Another great use of these shirts is making them for a special event you might have or as a personalized shirt for a gift. One thing to remember is that 100% cotton shirts are better for screen printing but you can screen print on almost anything but 100% nylon and 100% polyester. Isn’t that cool?
Use your own T-shirt or get a bulk of different shirts to experiment with using this fun project. I love how these turned out and think that they are perfect for everyday use!
Here’s a supply list of what you need to make screen printed shirts! This post contains some affiliate links for your convenience (which means if you make a purchase after clicking a link I will earn a small commission but it won’t cost you a penny more)! Read my full disclosure policy.
Materials to Make Screen Printed T-Shirts
View my Amazon shopping list with the exact items we used to make this project
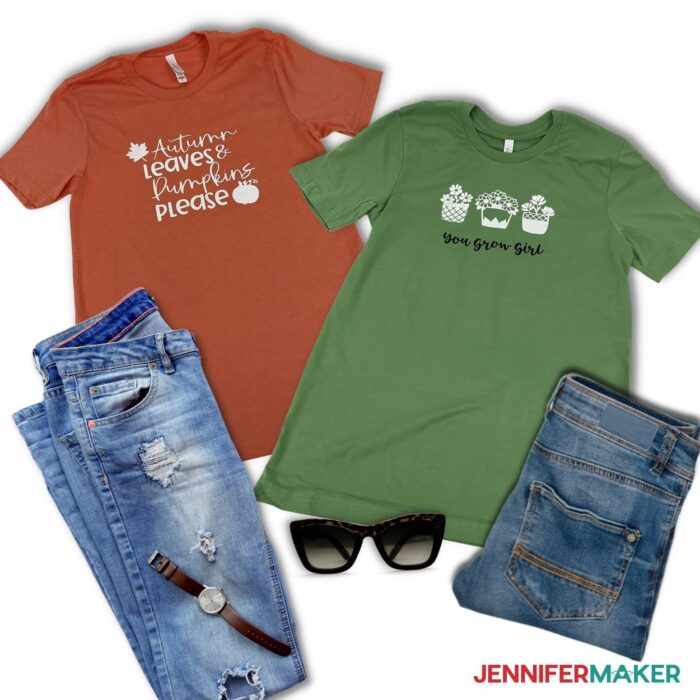
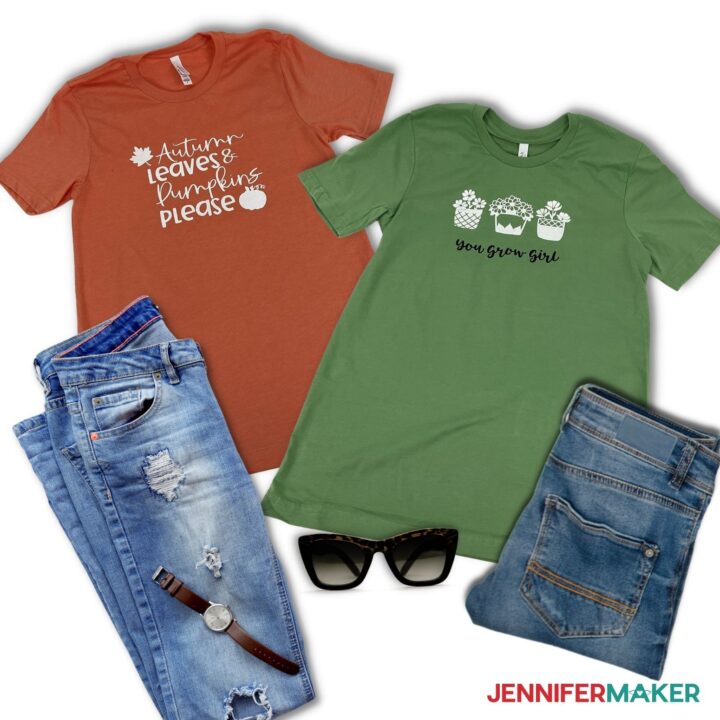
- T-shirt (I used a Bella+Canvas Shirt in Heather Orange and Leaf)
- Silk Screen Kit
- Speedball Ink (White and Black)
- Premium Vinyl (any color)
- Transfer Tape (Standard Grip)
- Butcher Paper OR Drop cloth
- Disposable Gloves
- (Optional) Fonts (I used Falling Leaves, Girl Crush, Tingler Script)
- Green StandardGrip Machine Mat
- XL Scraper Tool
- Weeding Tool
- Bristle Paint Brush (or something to add paint onto the screen)
- Toothbrush (for cleaning)
- Cricut EasyPress 2
- Cricut EasyPress Mat (12″ x 12″)
- A method to cut your vinyl – I used the amazing Cricut Maker but you can also use the Cricut Explore
- Design #324 – My free SVG/PDF/DXF design files are available in my free resource library (get the password by filling out the form at the bottom of this page)
How to Make Your Own DIY Screen Printed T-Shirts
The detailed step-by-step assembly video on how to create these personalized vinyl letter decals was broadcast during Maker Academy Weekend 2021. Get a pass to watch all 20+ workshops, each with a printable handbook, transcript, audio files, design files, and support with a VIP pass below:

Silk Screen Shirt
Ever want to make your own custom shirt? I am going to show you a fun way to make them yourself using a silk screening print process!
Materials
- Here is a shopping list of the actual items I used to create this project! This list contains affiliate links. As an Amazon Associate I earn from qualifying purchases.
- Bella+Canvas Shirt - Heather Orange
- Bella+Canvas Shirt - Leaf
- Silk Screen Kit
- Speedball Ink - White
- Speedball Ink - Black
- Cricut Premium Vinyl (any color)
- Cricut Transfer Tape (Standard Grip)
- Butcher Paper (can use instead of the drop cloth)
- Drop cloth
- Pink Disposable Gloves
- Falling Leaves by FontBundles.net
- Girl Crush by FontBundles.net
- Tingler Script by FontBundles.net
Tools
- A method to cut your vinyl, I used the amazing Cricut Maker 3 but you could also use any Cricut Maker, Explore, or Joy.
- Cricut Green StandardGrip Machine Mat 12" x 12"
- Cricut XL Scraper Tool
- Cricut Weeding Tool
- Bristle Paint Brush (or something to add paint onto the screen)
- Toothbrush (for cleaning)
- Cricut EasyPress 2
- Cricut EasyPress Mat (12" x 12")
Instructions
STEP 1: GET MY FREE SILK SCREEN SHIRT STENCIL DESIGNS
First, download my Screen Printed Shirt designs from my library – look for Design #324.
TIP: If you are not sure how to upload an SVG cut file to Cricut Design Space, watch this helpful video training series I made. If you are on an iPad or iPhone, here is how to download and upload SVG files to the Cricut Design Space app.
Once uploaded to Cricut Design Space, zoom out to see the whole design.
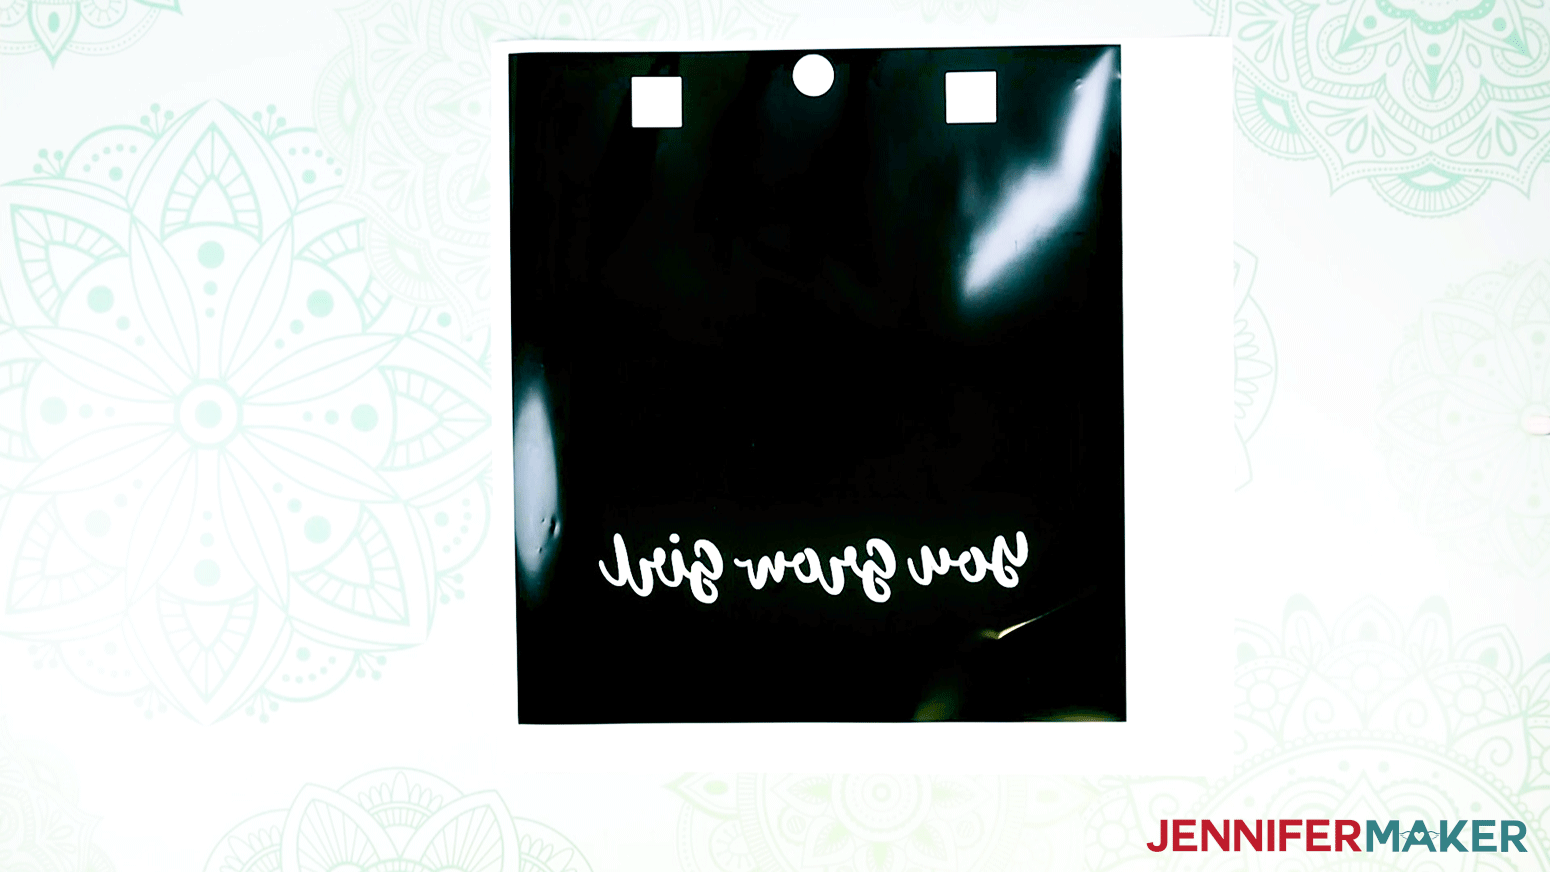
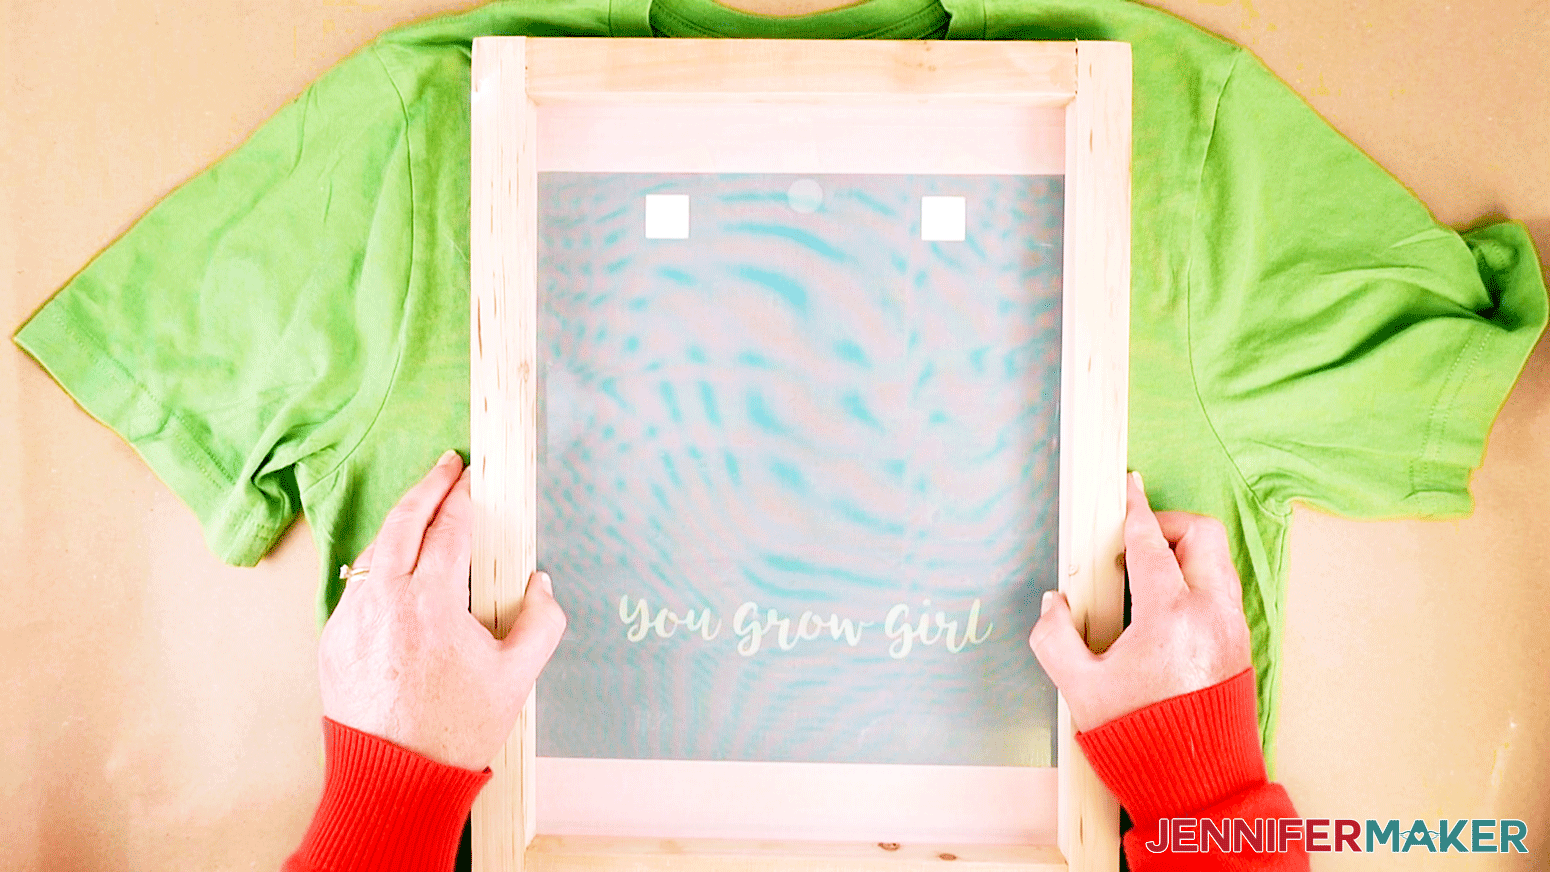
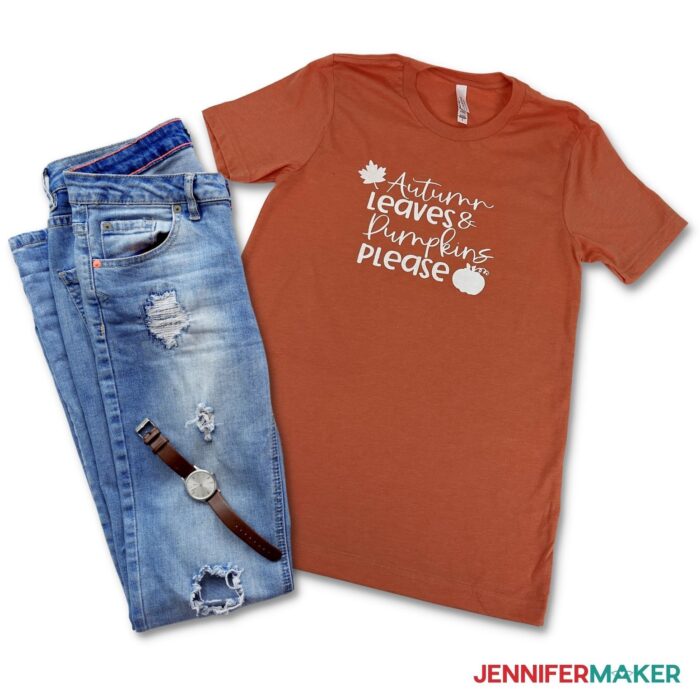
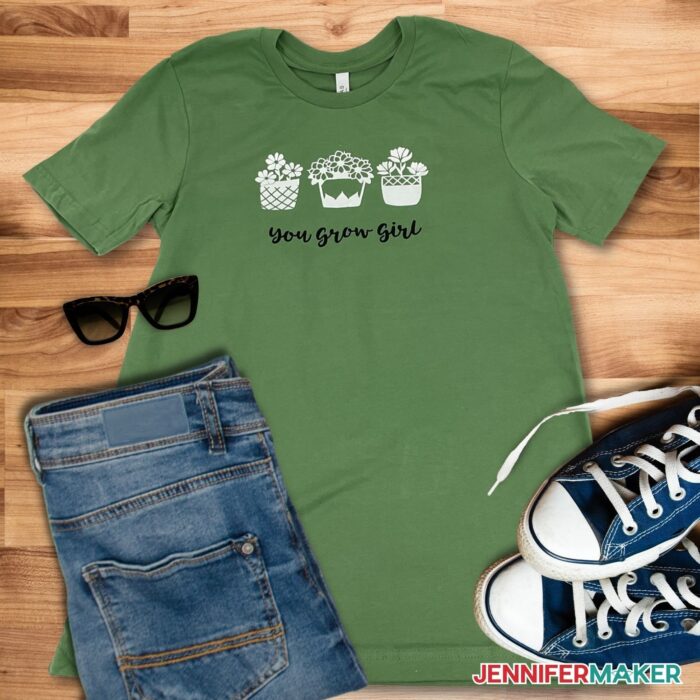
I have two shirt stencil designs for you to choose from—a single color design, and a two-color design. The first one in yellow is the “Autumn Leaves” design. The second two in green make up the two-color design. The small green circles you see here go with that design as well.
Now, I am going to show you how to make both stencil designs. If you would like to make only one design click the design layer you do not want and select the delete button at the top right corner of your screen.
I am using the Cricut Maker 3 for this tutorial, but you can use any Cricut cutting machine except the Cricut Joy to make these awesome shirts.
Once you’ve chosen your design, click on “Make It” in the top right corner.
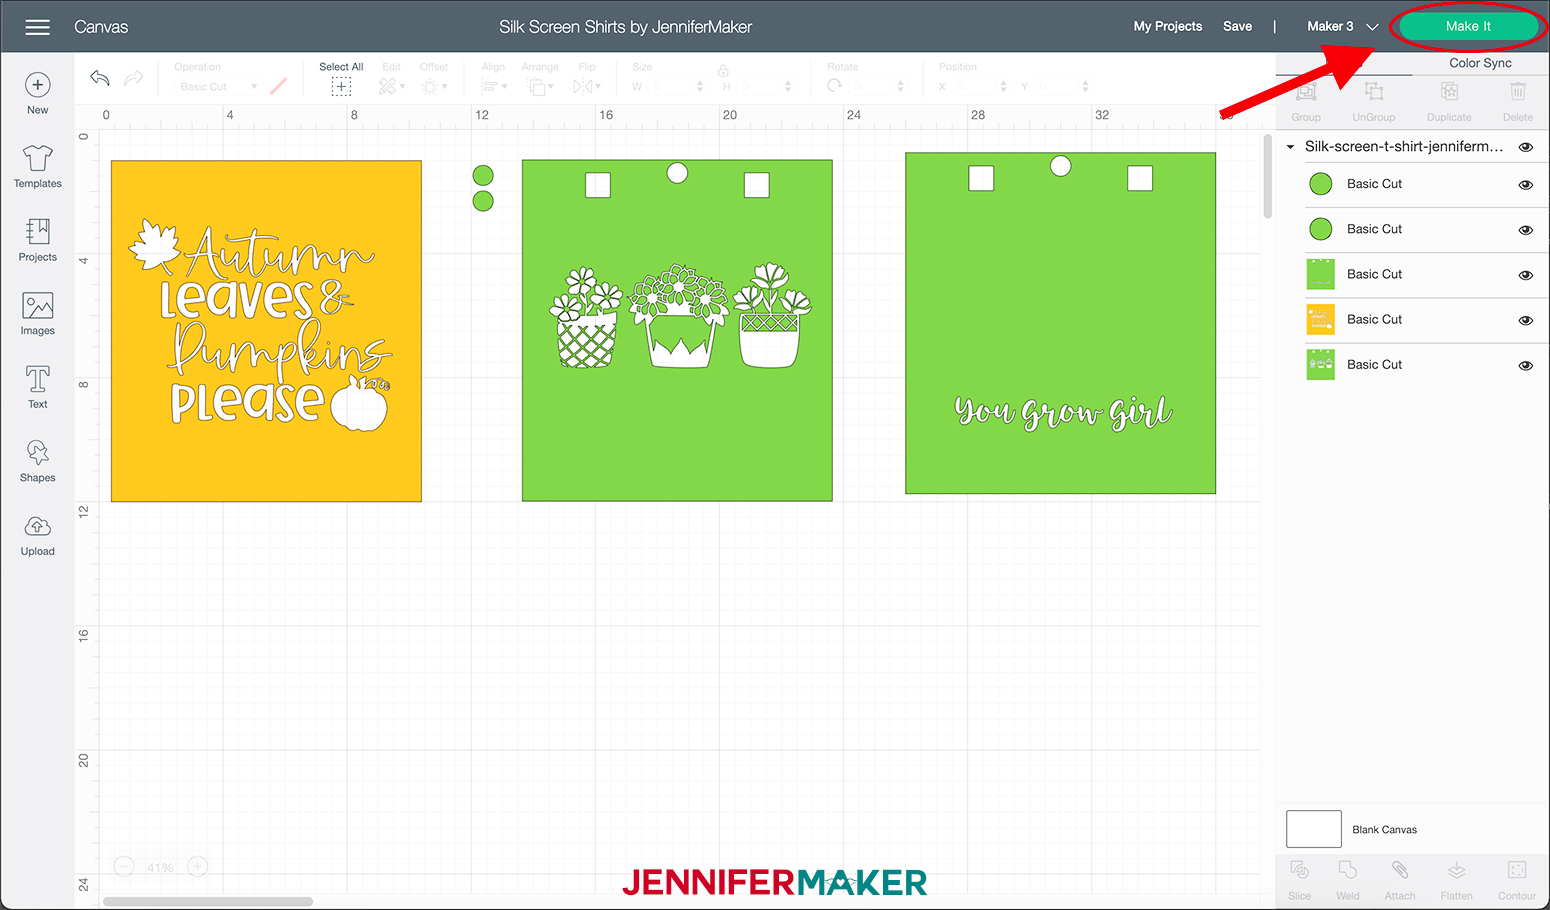
If prompted click "On Mat" and click “Done.”
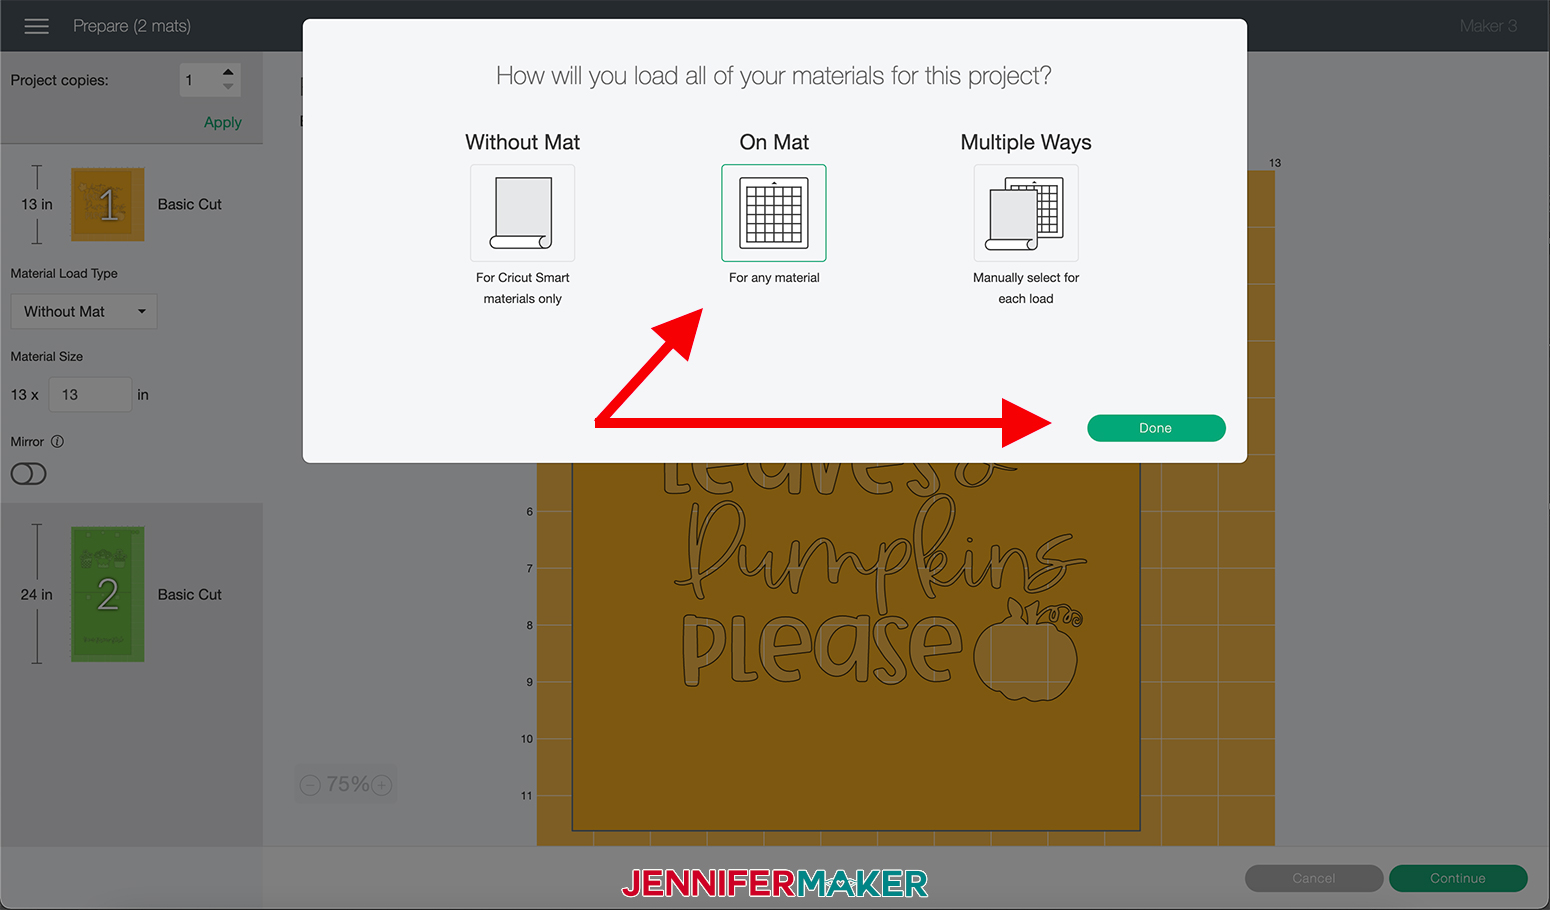
Next, toggle the mirror button on each mat. All silk screen stencil designs should be mirrored.
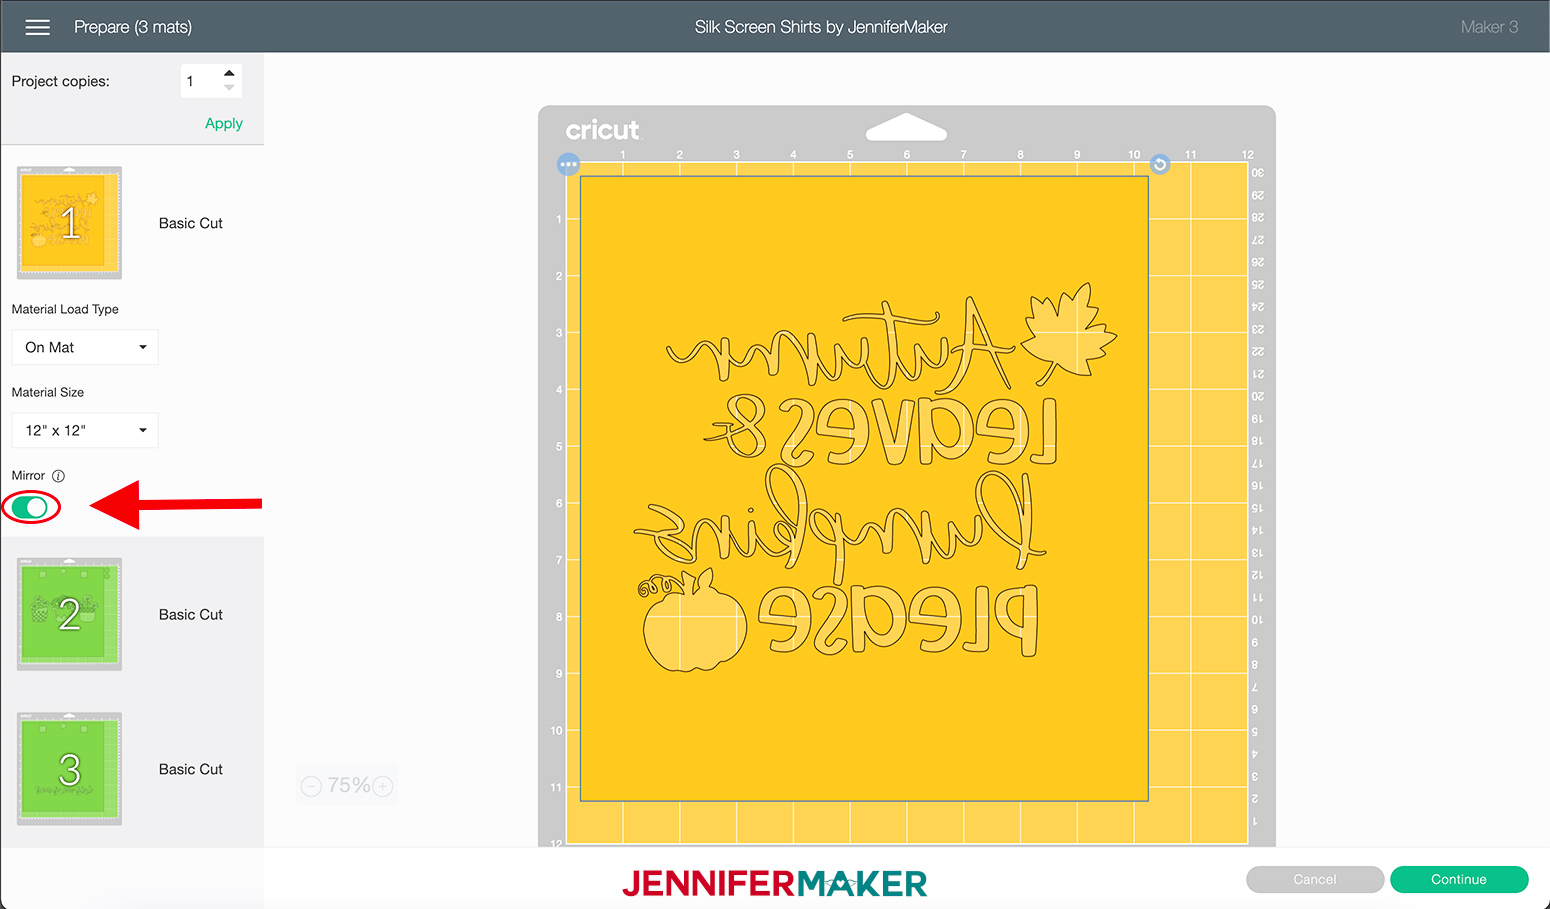
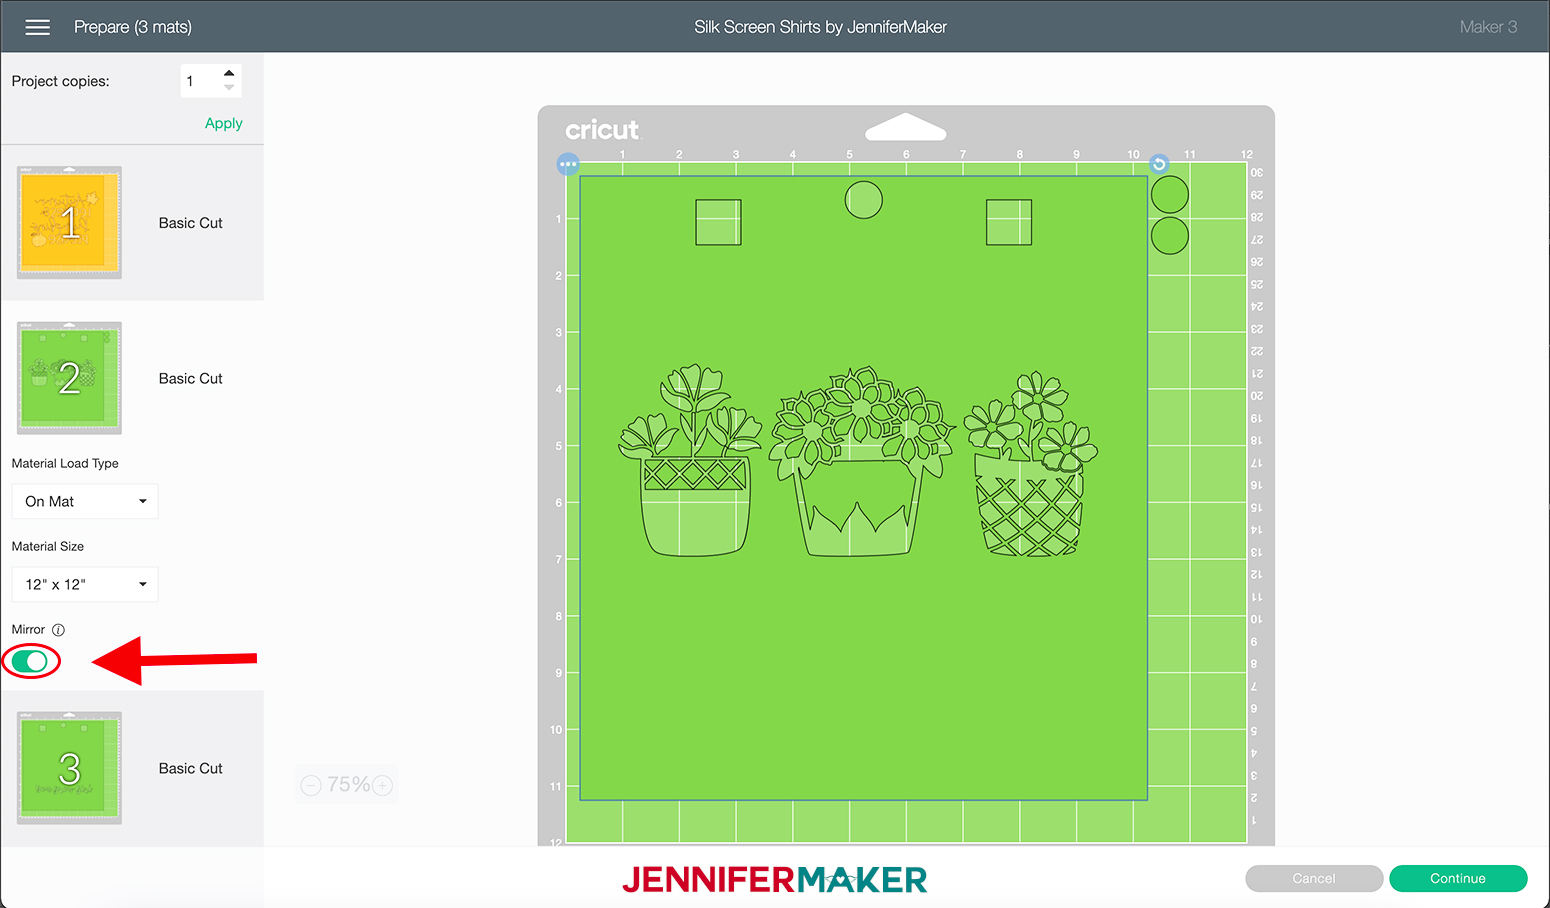
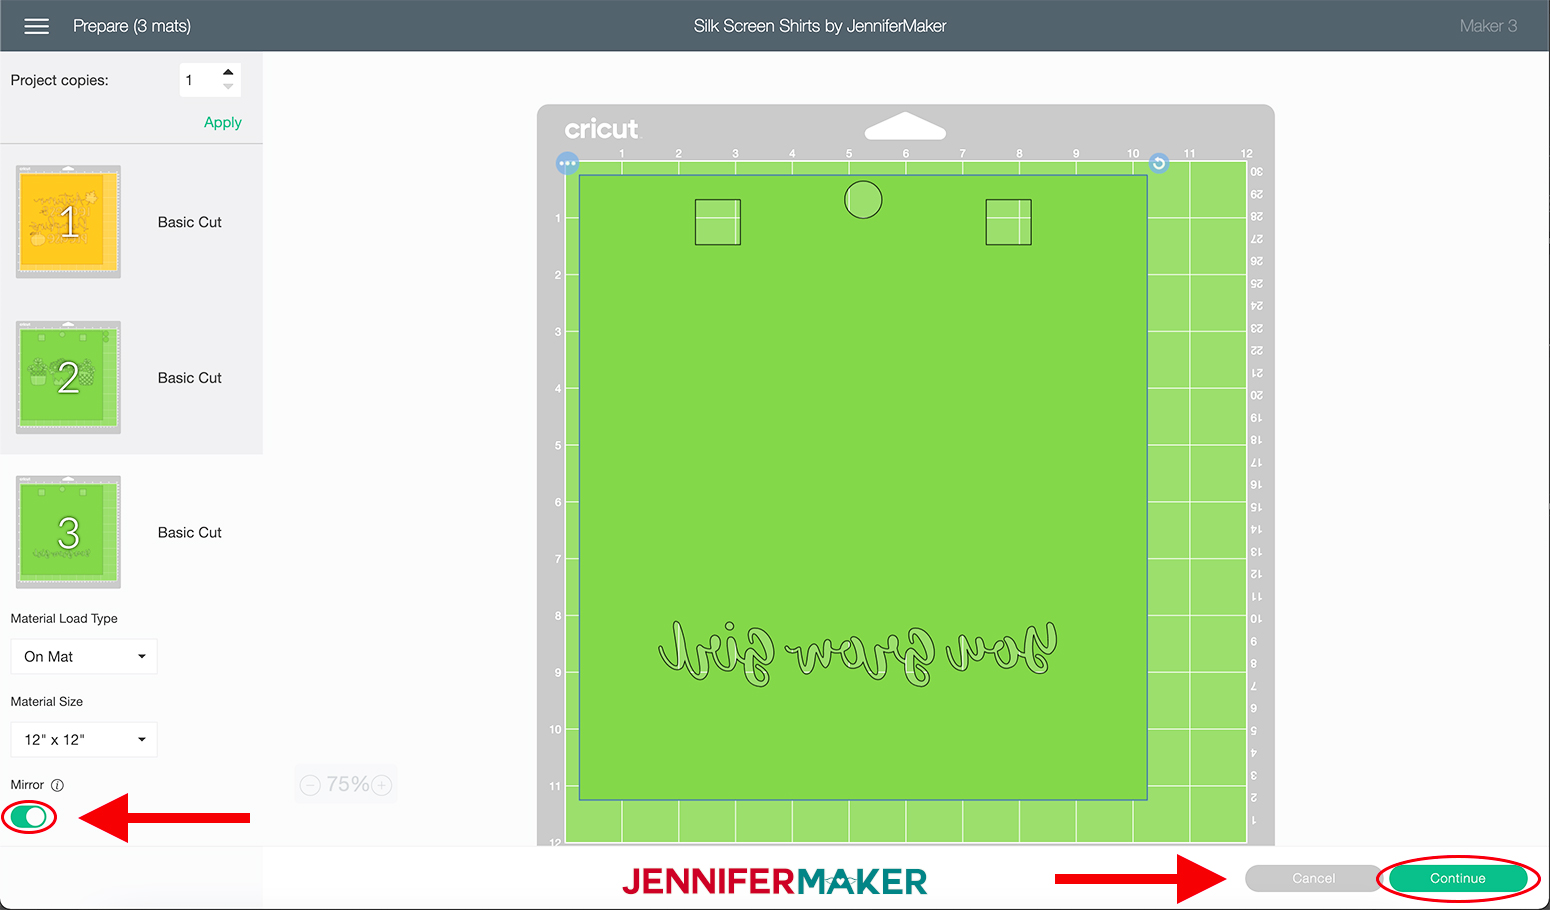
Once all your mats are mirrored, click “Continue” in the lower right corner.
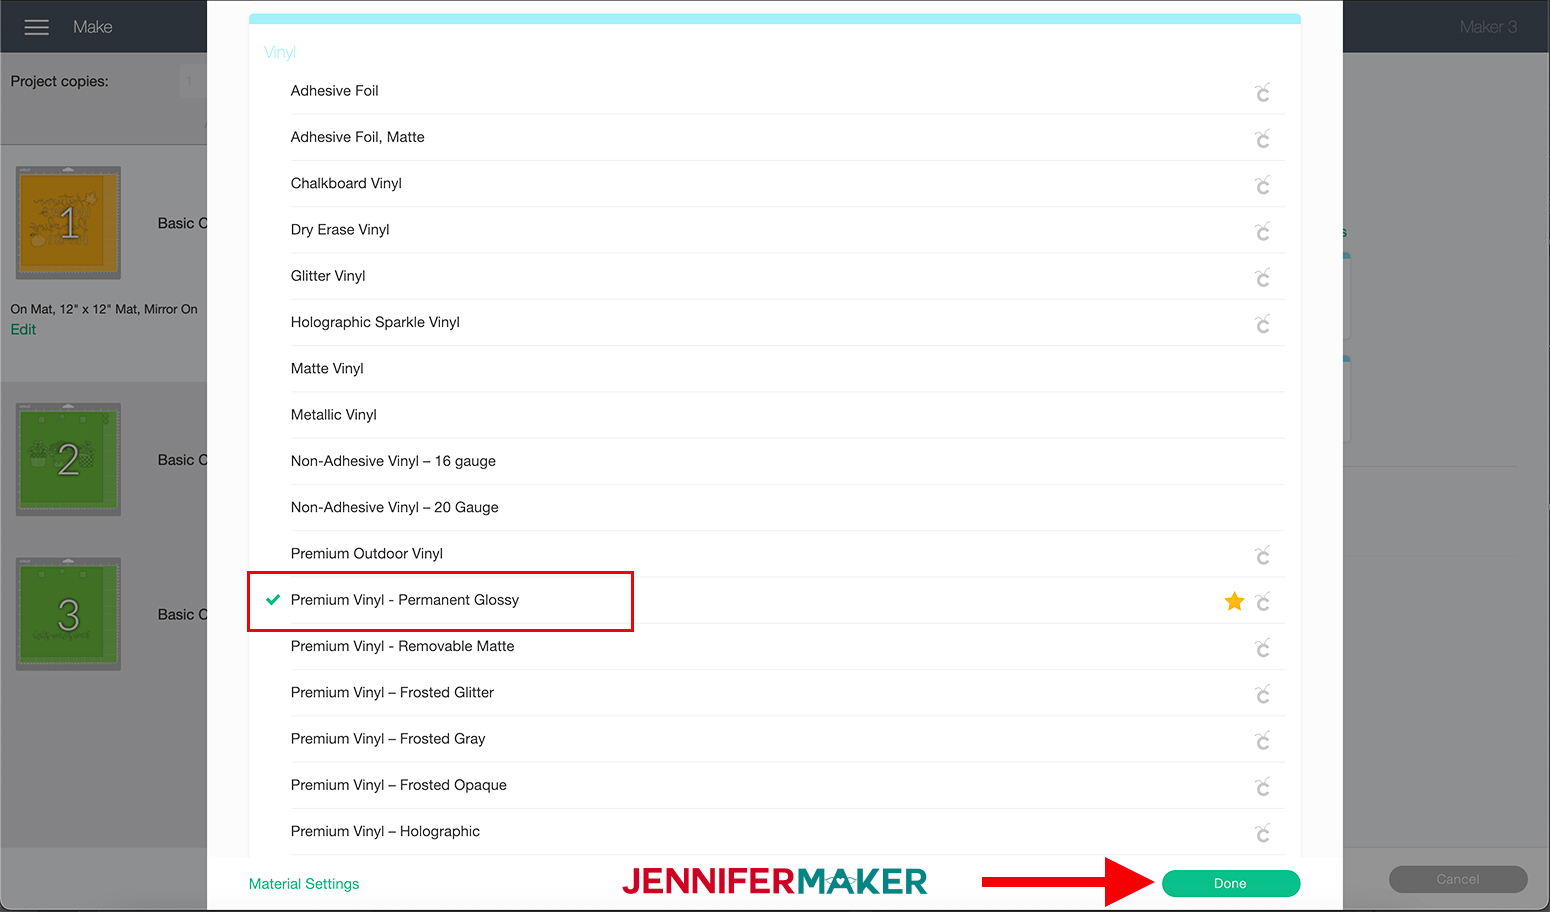
Now, we are going to select our materials for our stencils, click the "Browse All Materials" button on the right side of the screen.
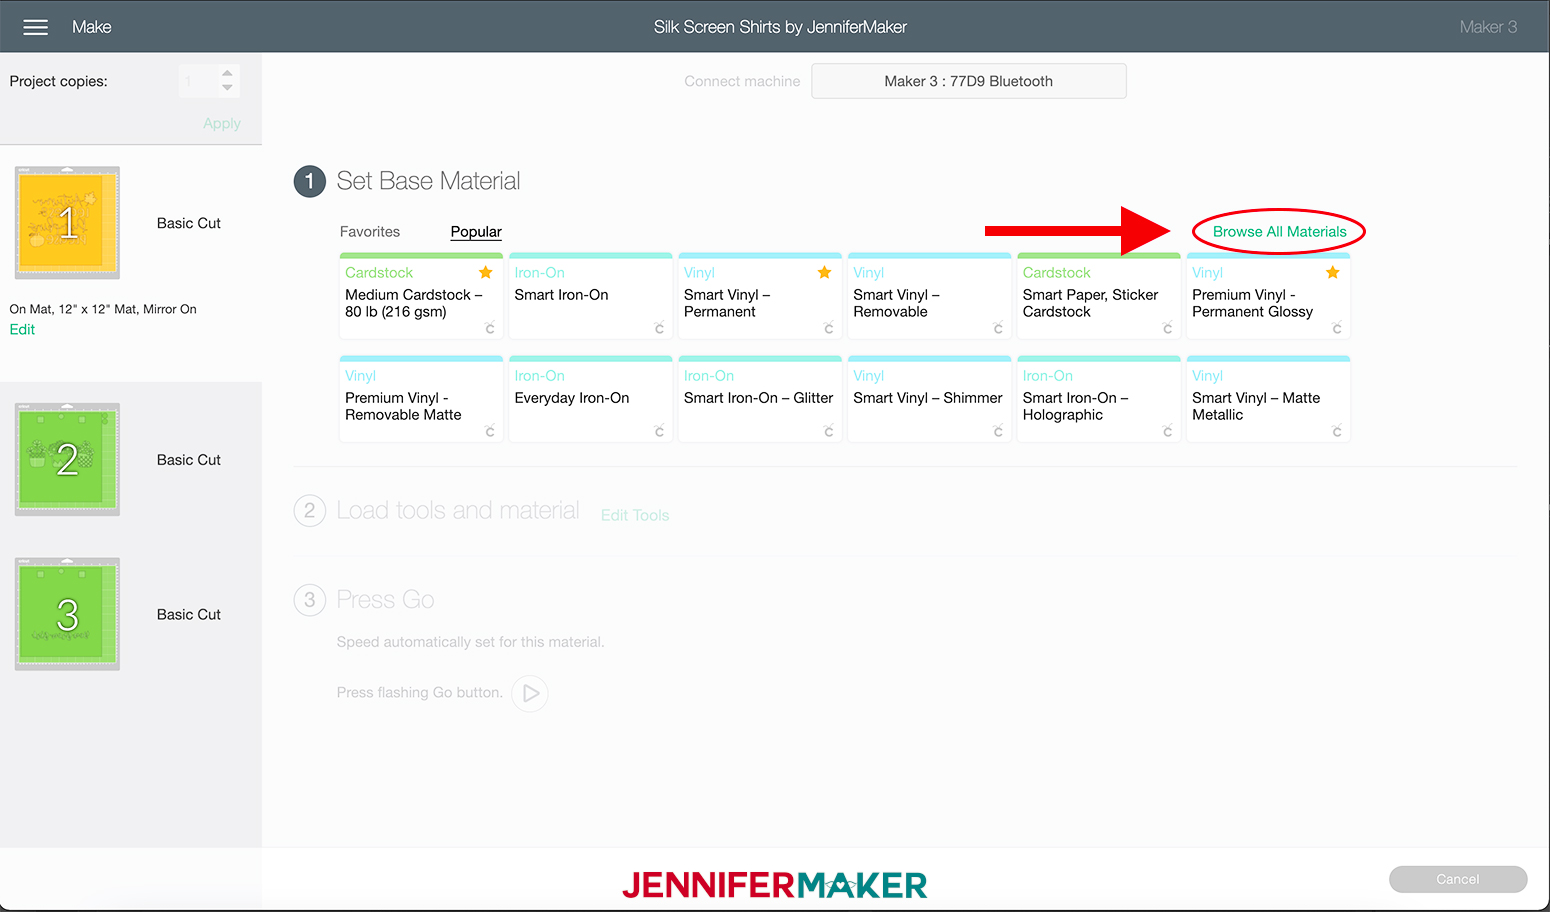
Now, select "Premium Vinyl - Permanent Glossy" from the menu under the Vinyl section and click "Done."
NOTE: You do not need to use “More Pressure” with the Maker 3, however, all machines are different. I usually select “More” pressure for most of my materials, but again it’s all dependent on your particular cutting machine. You may or may not need the extra pressure.
Next, place premium adhesive vinyl onto a Green StandardGrip Mat (12" x 12") with the pretty side up. Then load it into your Cricut and press the flashing button to begin cutting.
When your cut is finished, unload your mat from your Cricut with the Unload button.
Remove the vinyl from the mat by flipping the mat over and peeling the mat away from the vinyl. This prevents the vinyl from curling.
Repeat these last few steps for each mat.
Now it’s time to remove all of the excess vinyl from the design, which is called weeding.
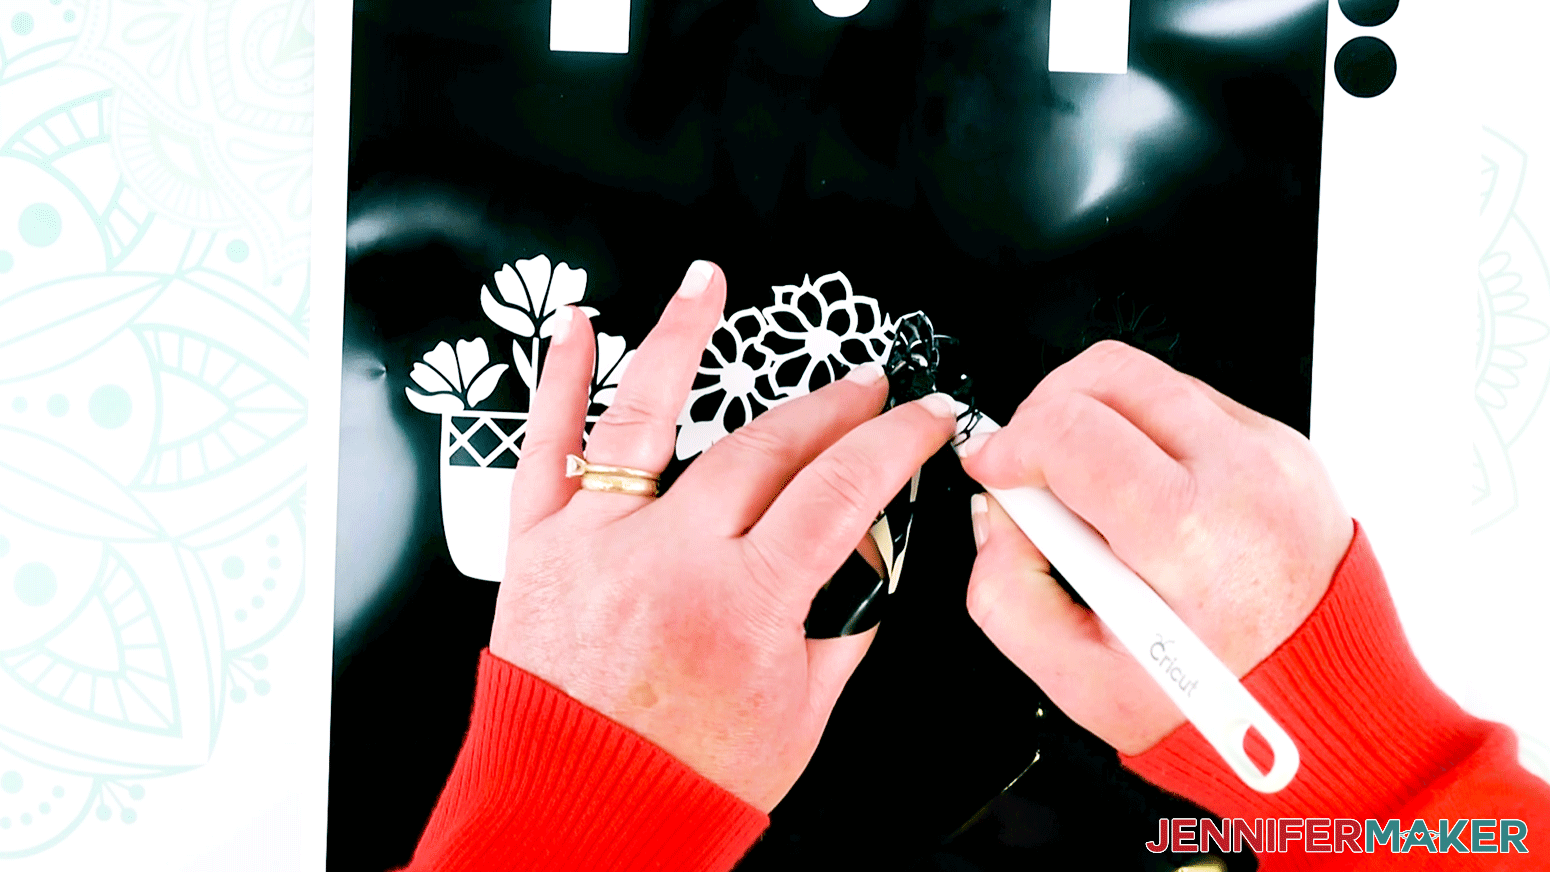
IMPORTANT: When weeding vinyl for a stencil, it’s very important that you remove only the parts that you want to PAINT, which are usually your letters and images. Be sure to leave everything else. This is opposite from how you’d weed vinyl for other projects, so pay careful attention to this.
Here are what my designs look like when they are completely weeded.
Now that you have your stencils prepped, I am going to show you two techniques for screen printing your designs.
First I am going to make the Fall Design using just one color of ink. If this is your first time silk screening, I recommend you try this one first!
After our single color shirt, I will make the Plant Design using two colors!
STEP 2: PREPARE YOUR SILK SCREEN
FALL DESIGN
First, protect your work surface with a Drop Cloth, Butcher Paper, or some type of covering. You may also want to wear gloves and a set of clothes that you wouldn't mind getting a little paint on as this project can be a little messy.
Now we are going to take the stencil and transfer it to the Silk Screen.
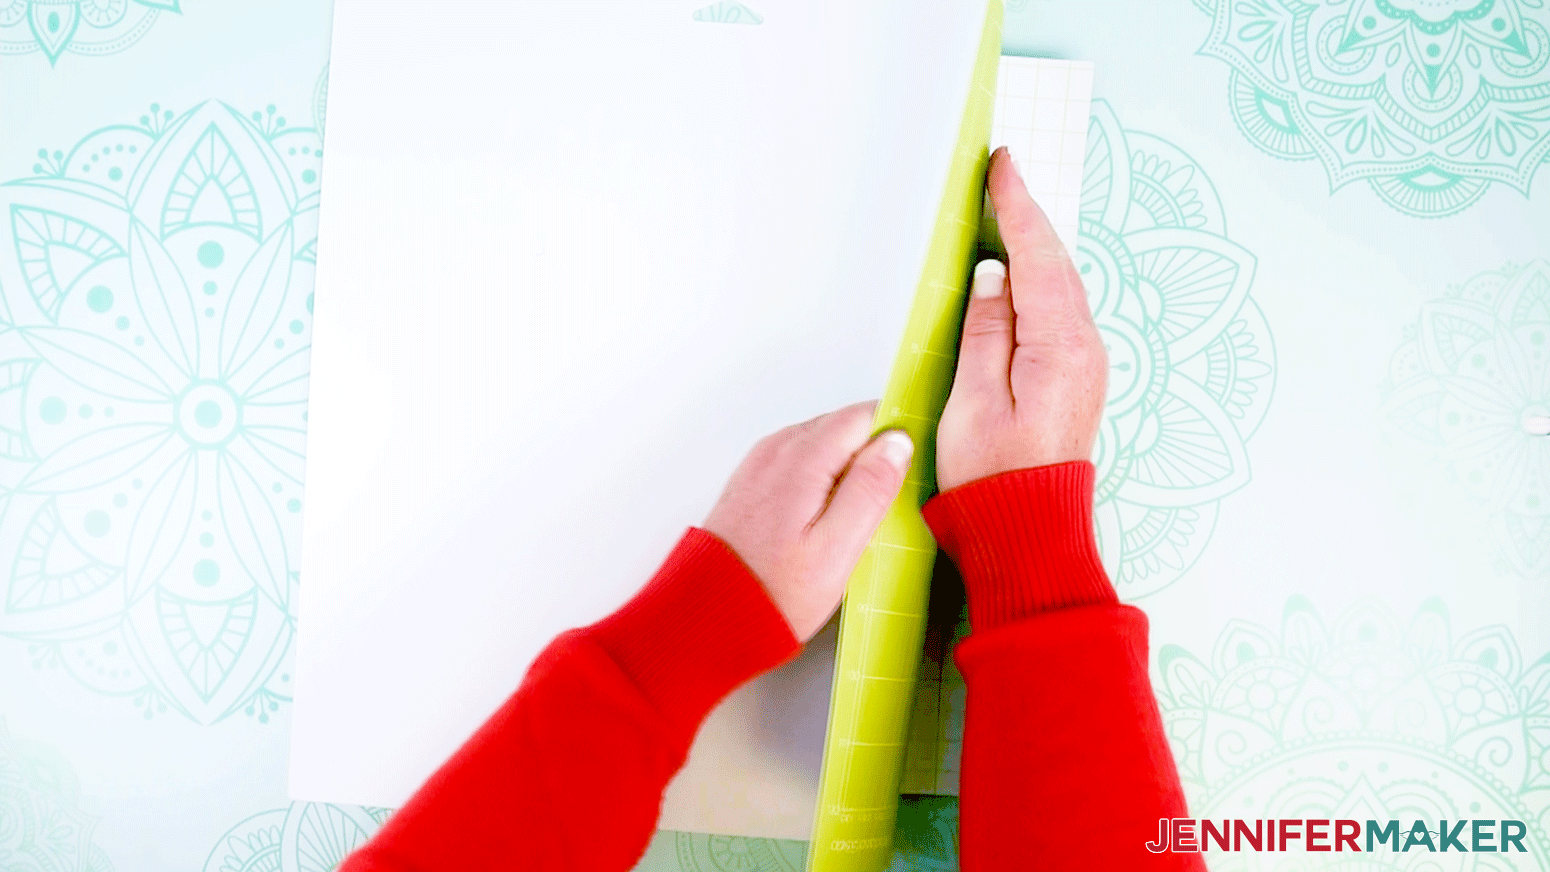
To do this first, cut a piece of transfer tape the same size as your design. Remove the backing from the transfer tape.
TIP: I recommend you reduce the tack on your transfer tape first by sticking it to your shirt or a paper towel -- this will make it less sticky and easier to remove when you put it on your canvas.
Next, apply the transfer tape to your vinyl decal by holding the transfer tape in the shape of a taco, then putting the bottom of your “taco” onto the middle of your stencil. Smooth the tape over the decal from the center outward using the XL Scraper tool.

Gently lift the transfer tape bringing the design with it. If the vinyl does not stick to the transfer tape, place the transfer tape back down and burnish it with the XL Scraper Tool again.
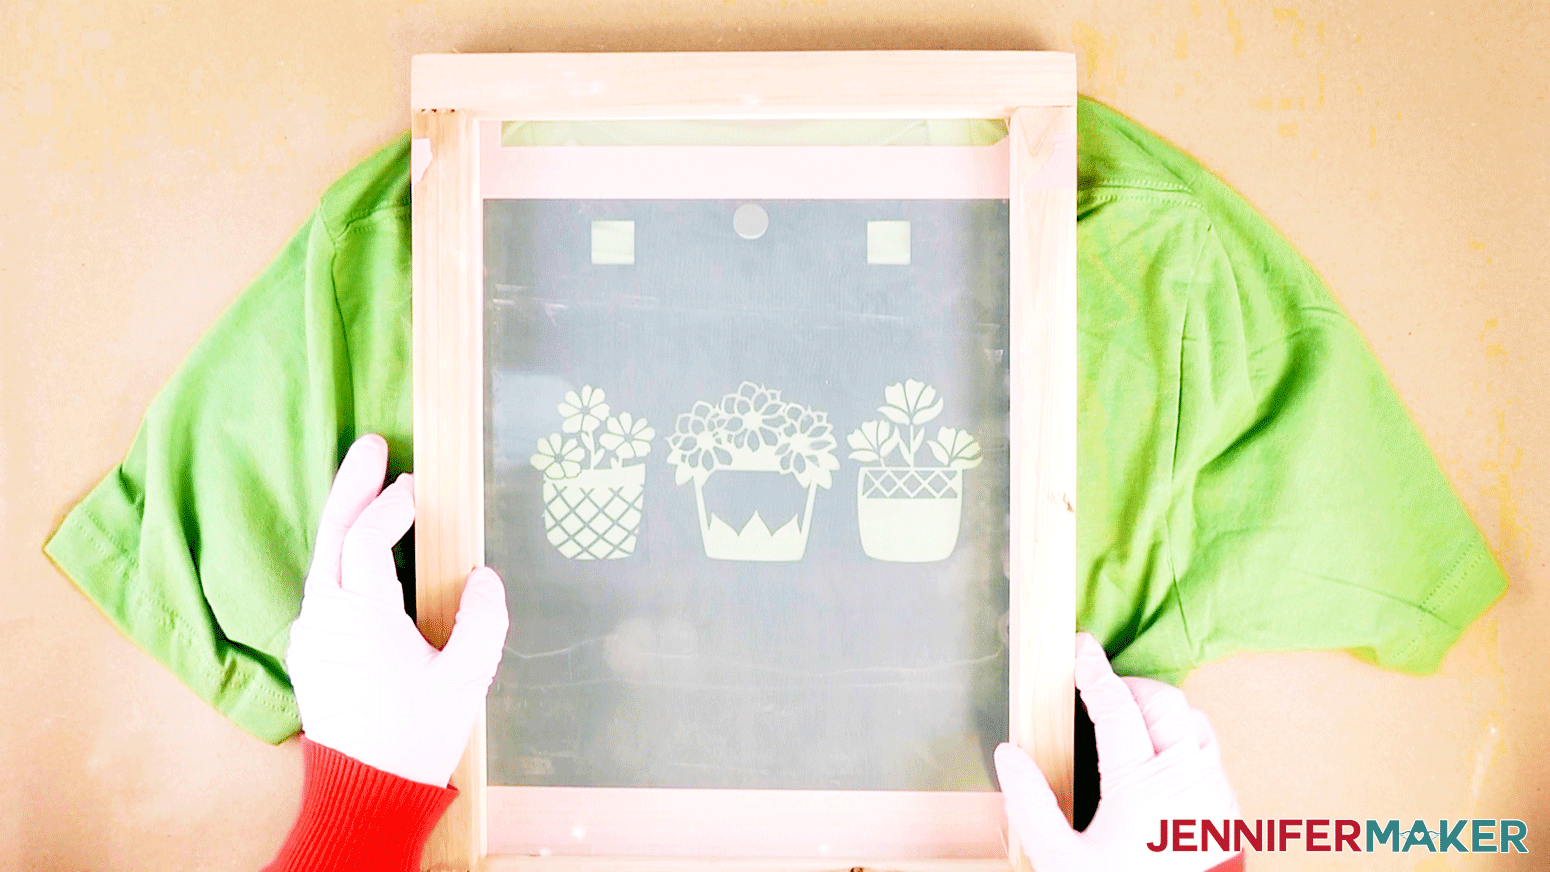
Next place the stencil on the backside of the Silk Screen. This is the side that the Silk Screen is flush against the frame.
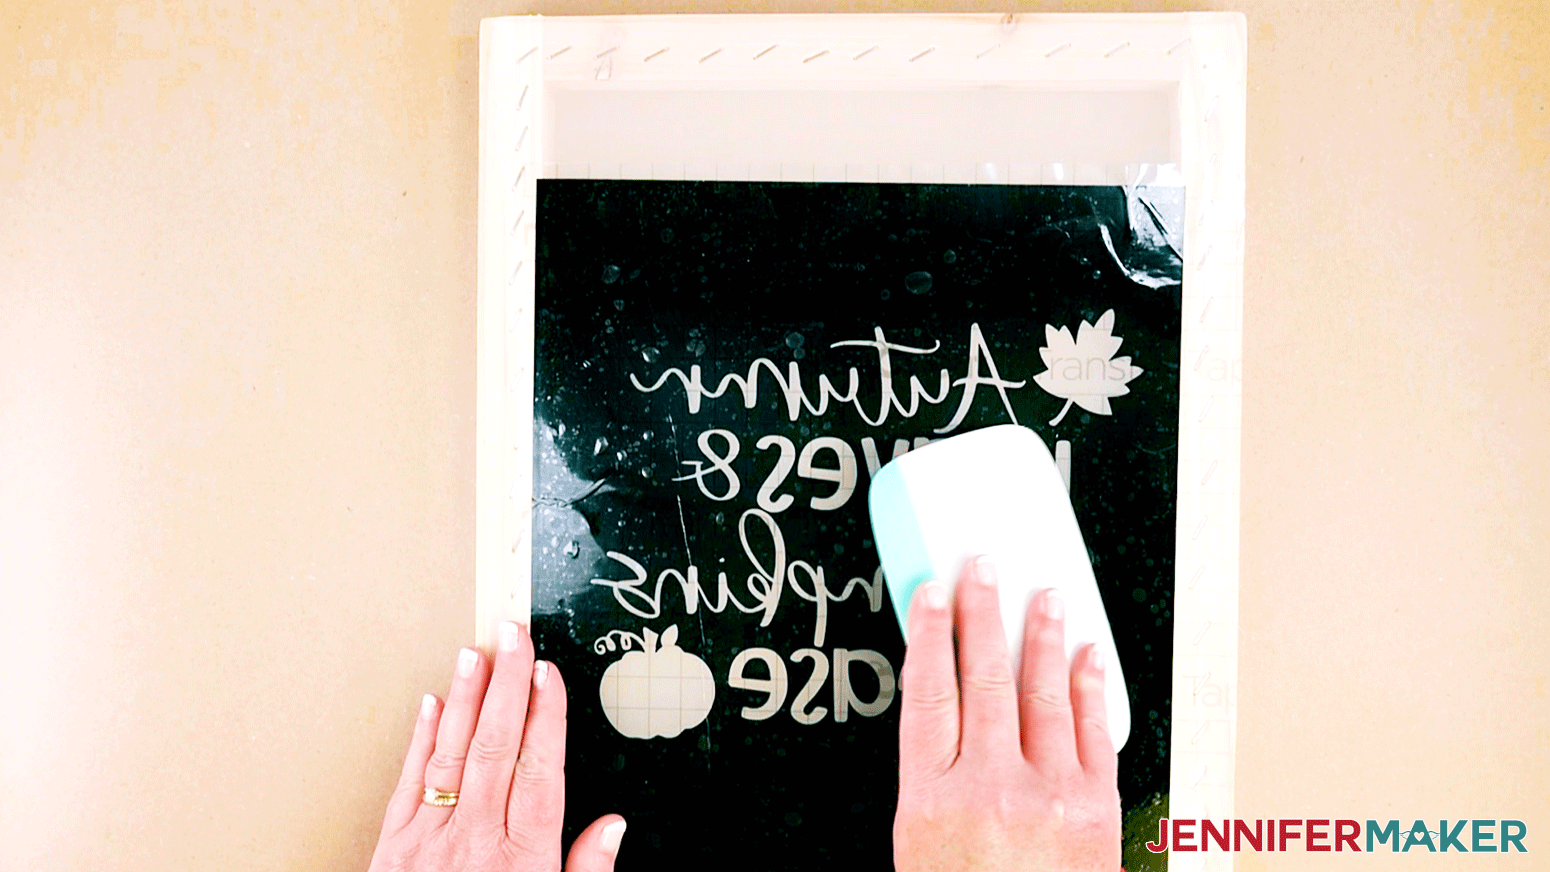
Now flip the screen over so the front side is facing you. Burnish the design onto the screen with the XL Scraper Tool.
Next, flip the screen back over and remove the transfer tape.
NOTE: The transfer tape is hard to take off so start at one corner and peel a little transfer tape off and put your thumb or hand down on the vinyl and start pulling the transfer tape off on an angle. Watch your vinyl to make sure it continues to stick to the screen and not the transfer tape. If the vinyl does not stay on the screen place the transfer tape back down and burnish it with the XL Scraper Tool again.
Once the transfer tape is off, flip the screen over again, and burnish the design onto the screen using the XL Scraper Tool.
On the backside of the screen, add painter’s tape or masking tape to the top and bottom of the Silk Screen to cover the bare areas. Be sure to overlap the tape so that the ink does not seep through.

Now we are going to set the Silk Screen aside for now. We will come back to this later.
STEP 3: PREPARE YOUR SHIRT
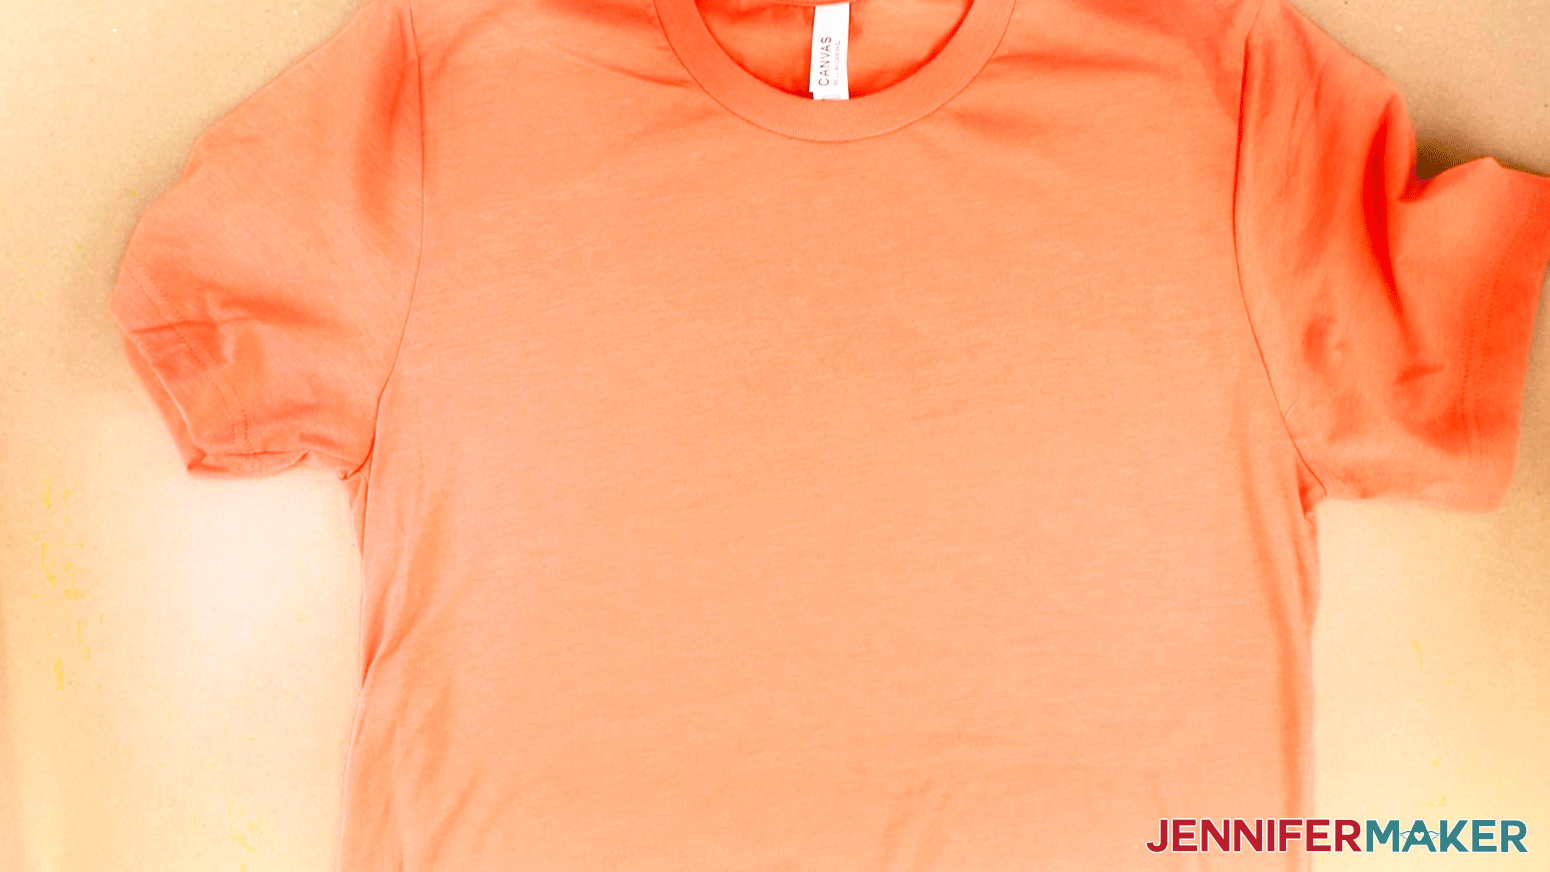
Next, we are going to take our shirt and place it in front of us. You can use any type of shirt. I like Bella+Canvas shirts, which is what I have here in Heather Orange.
NOTE: You can put a piece of cardstock inside the shirt for extra structure. This can also be used to catch any Ink bleeding through the shirt. I had no issue with Ink bleeding through the shirts but that may not be the case with all Screen Printing Inks or shirts.
NOTE: 100% Cotton shirts are better for screen printing but you can screen print on almost anything but nylon and 100% polyester. Isn't that cool!
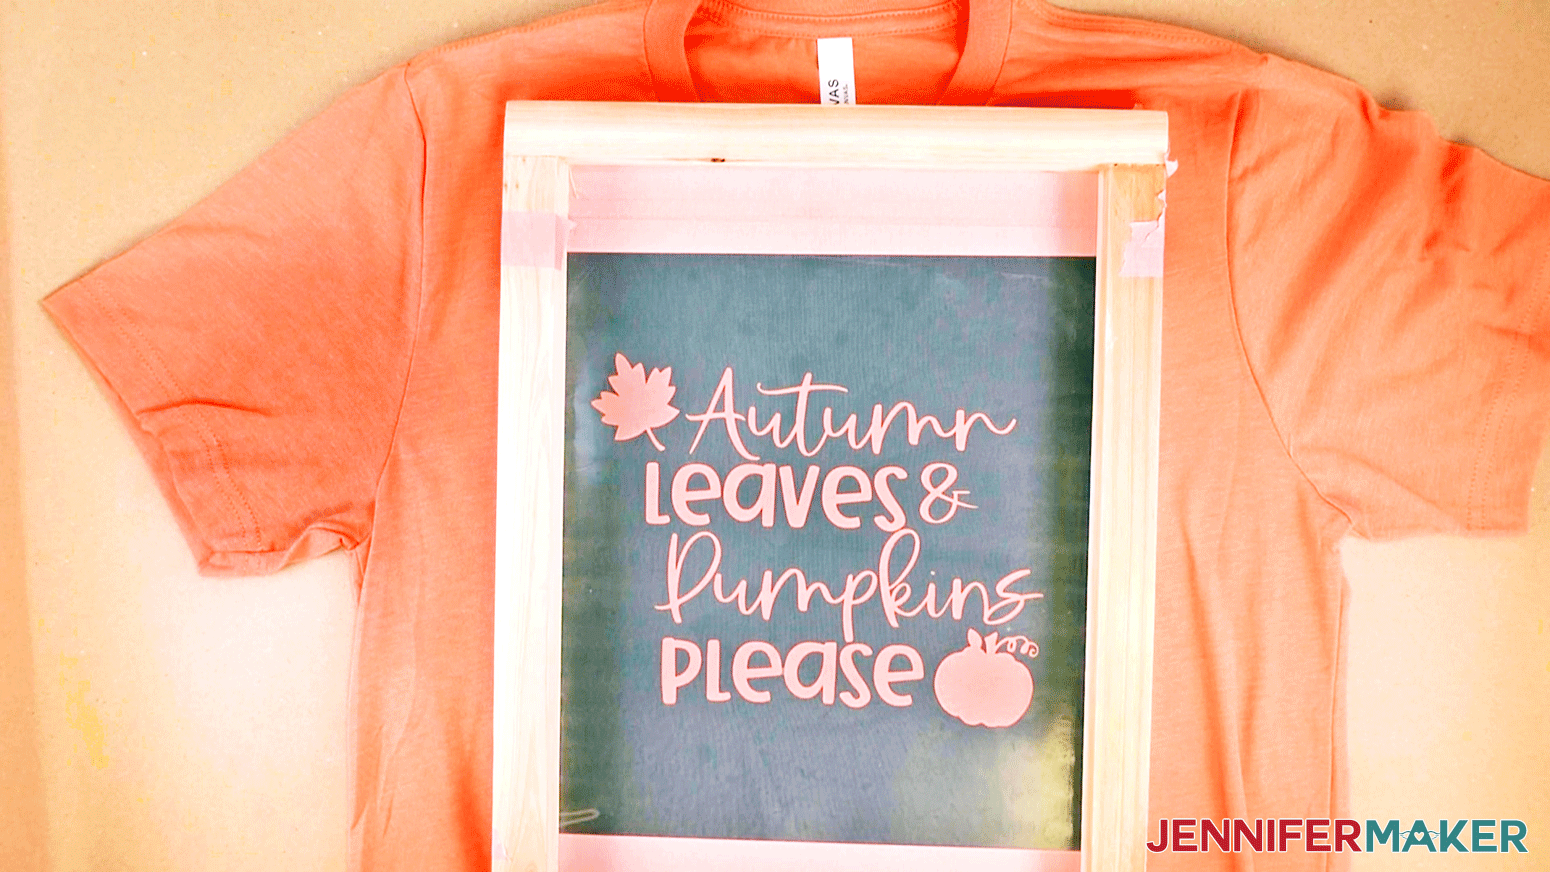
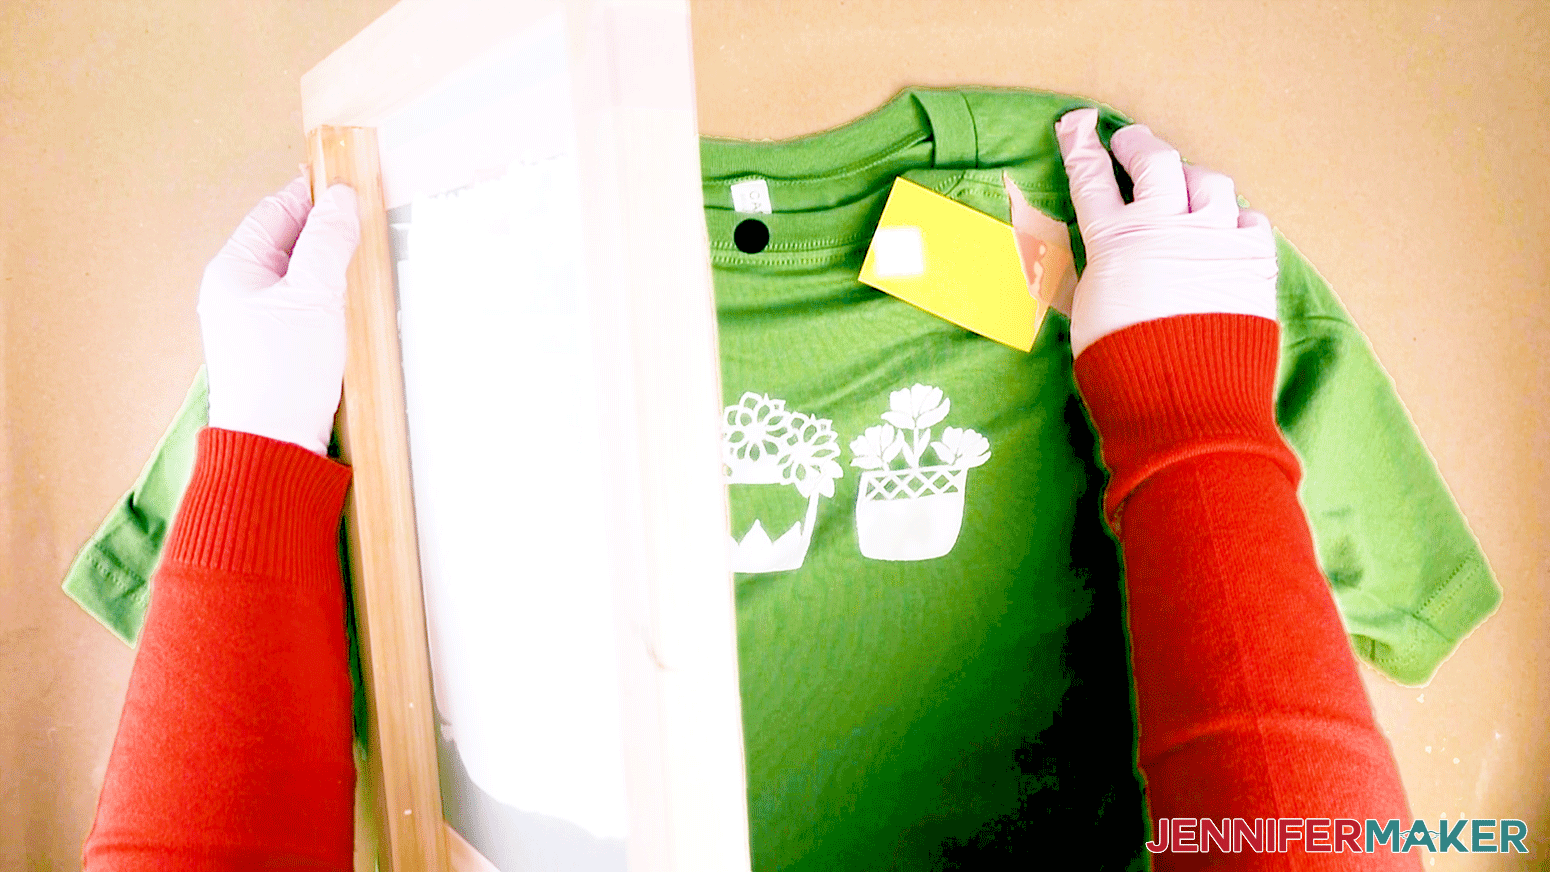
Now, we are going to pick up our silk Screen again and place it down on the shirt where you would like the design to be. I am placing the inside edge of the wooden frame at the top edge of the collar.
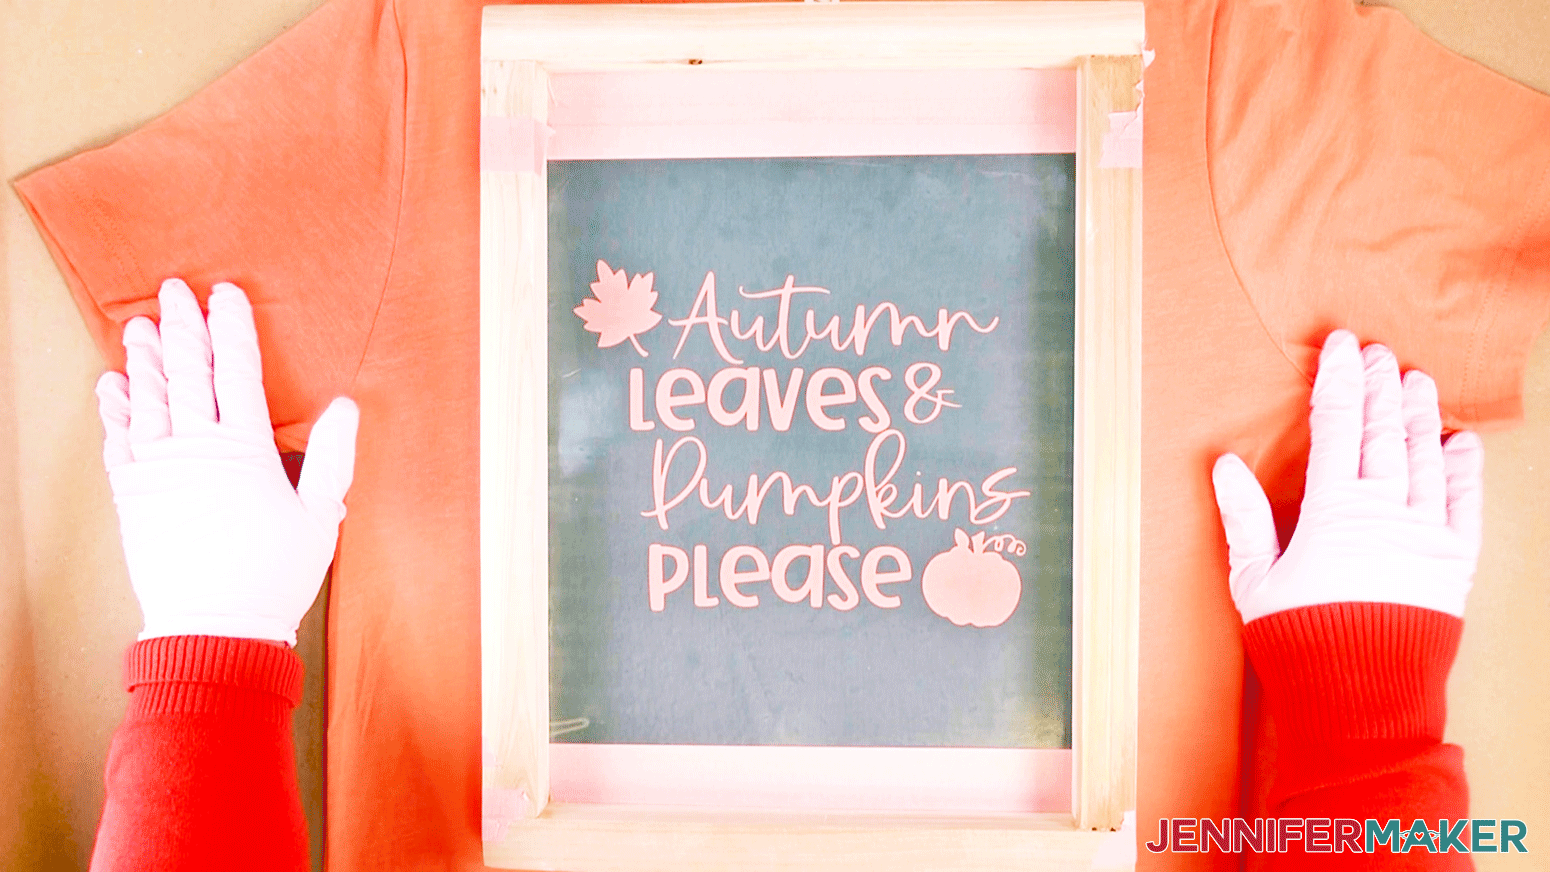
NOTE: Set the Silk Screen down with the backside (the side with the vinyl) against the shirt. There should be barely any gap between the shirt and the screen.
STEP 4: PRINT YOUR SHIRT
Now the fun part!
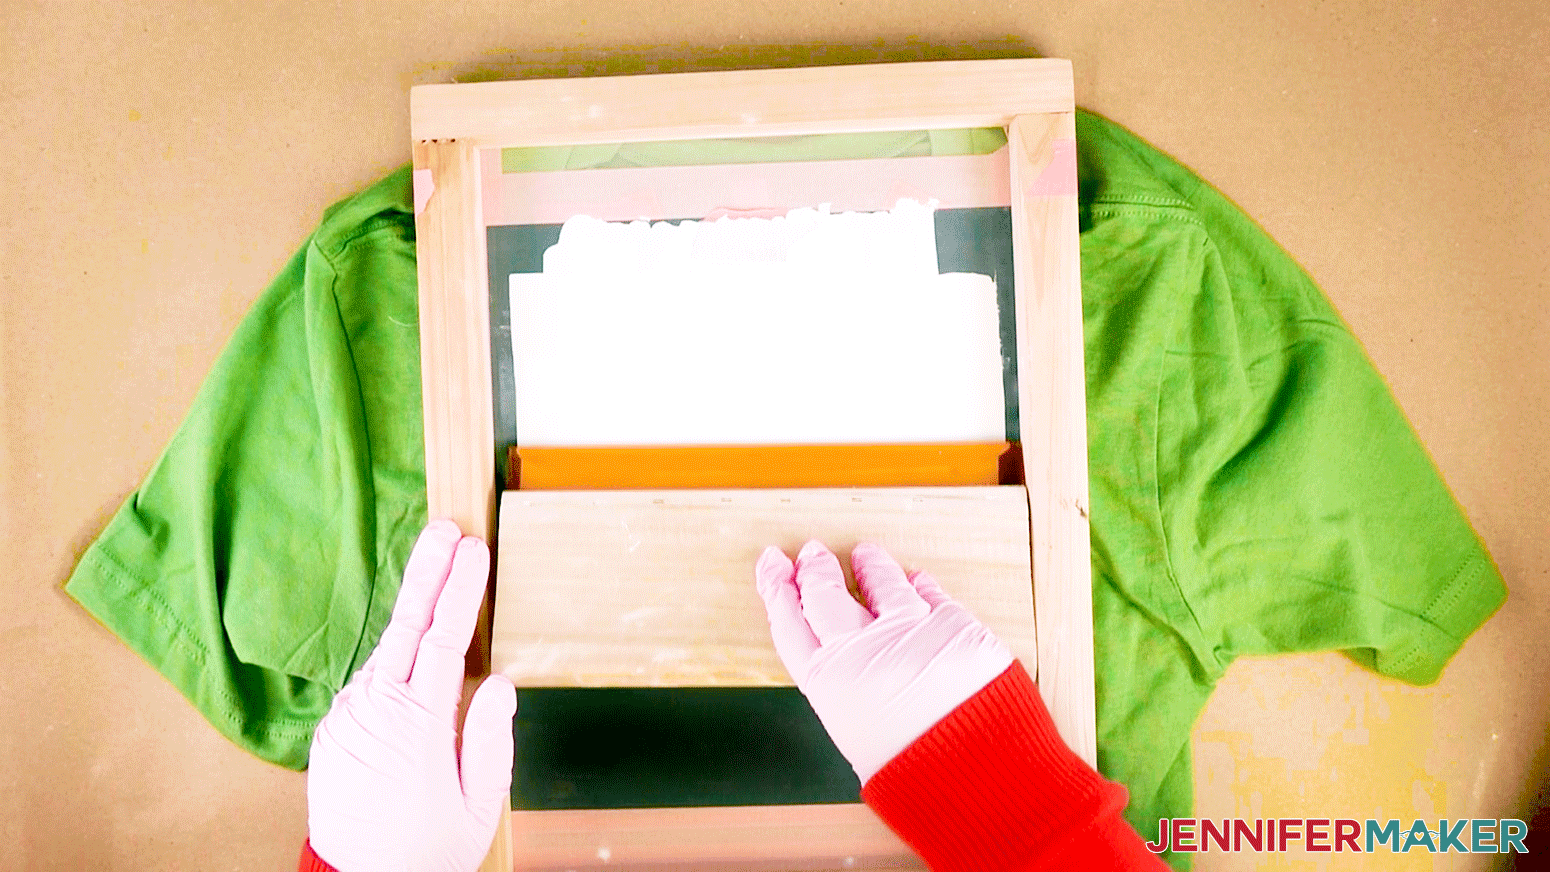
Using a paintbrush or stick, add the Speedball Ink onto the Silk Screen just above the design.
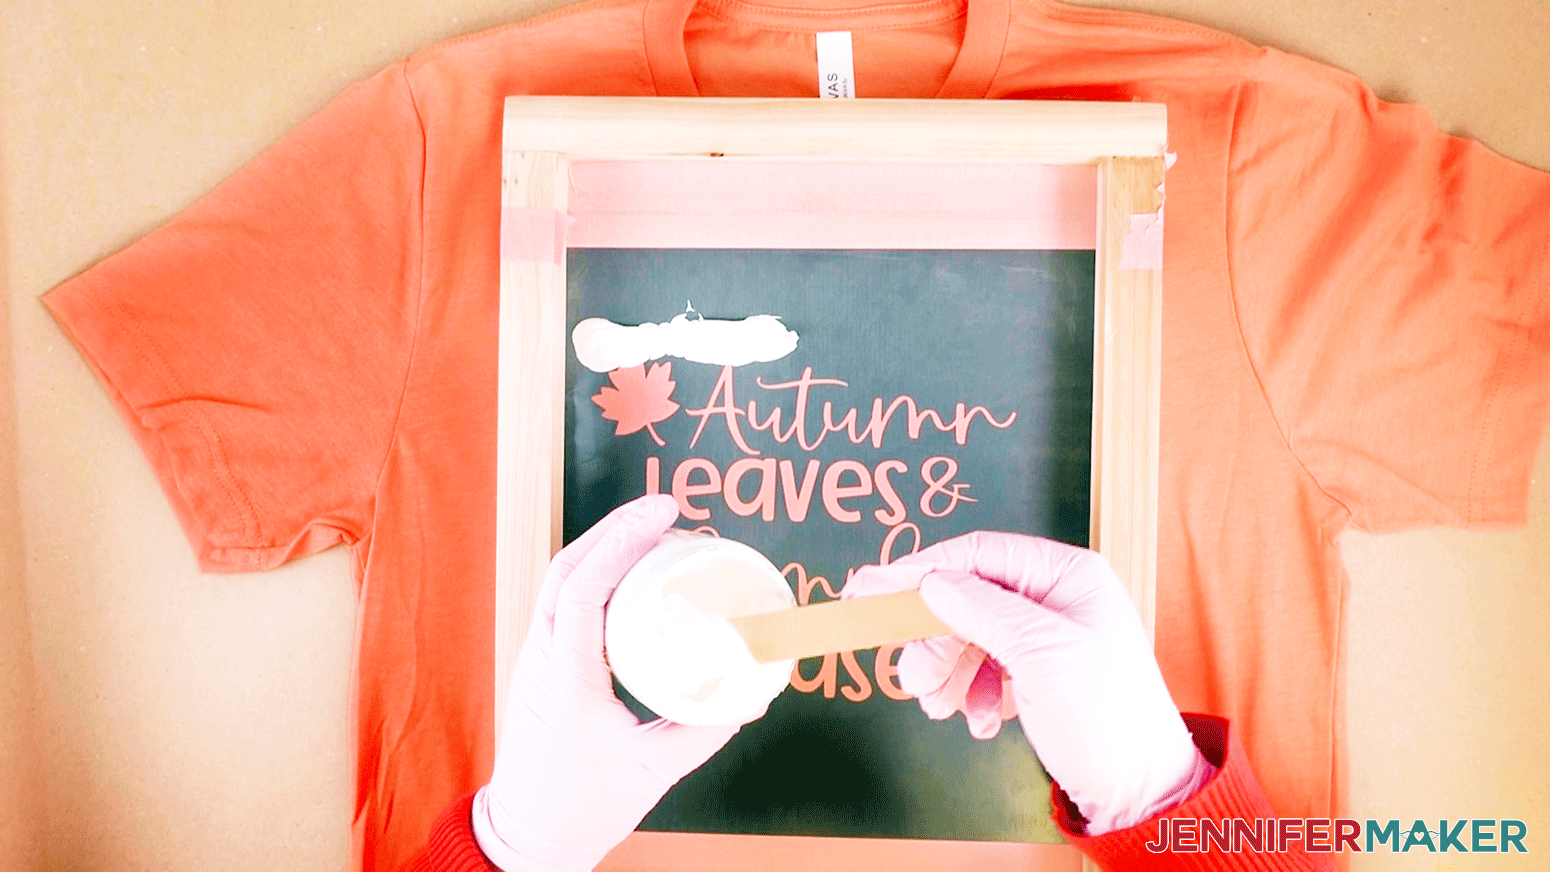
NOTE: More is better than not enough. You can always reuse the extra Ink.
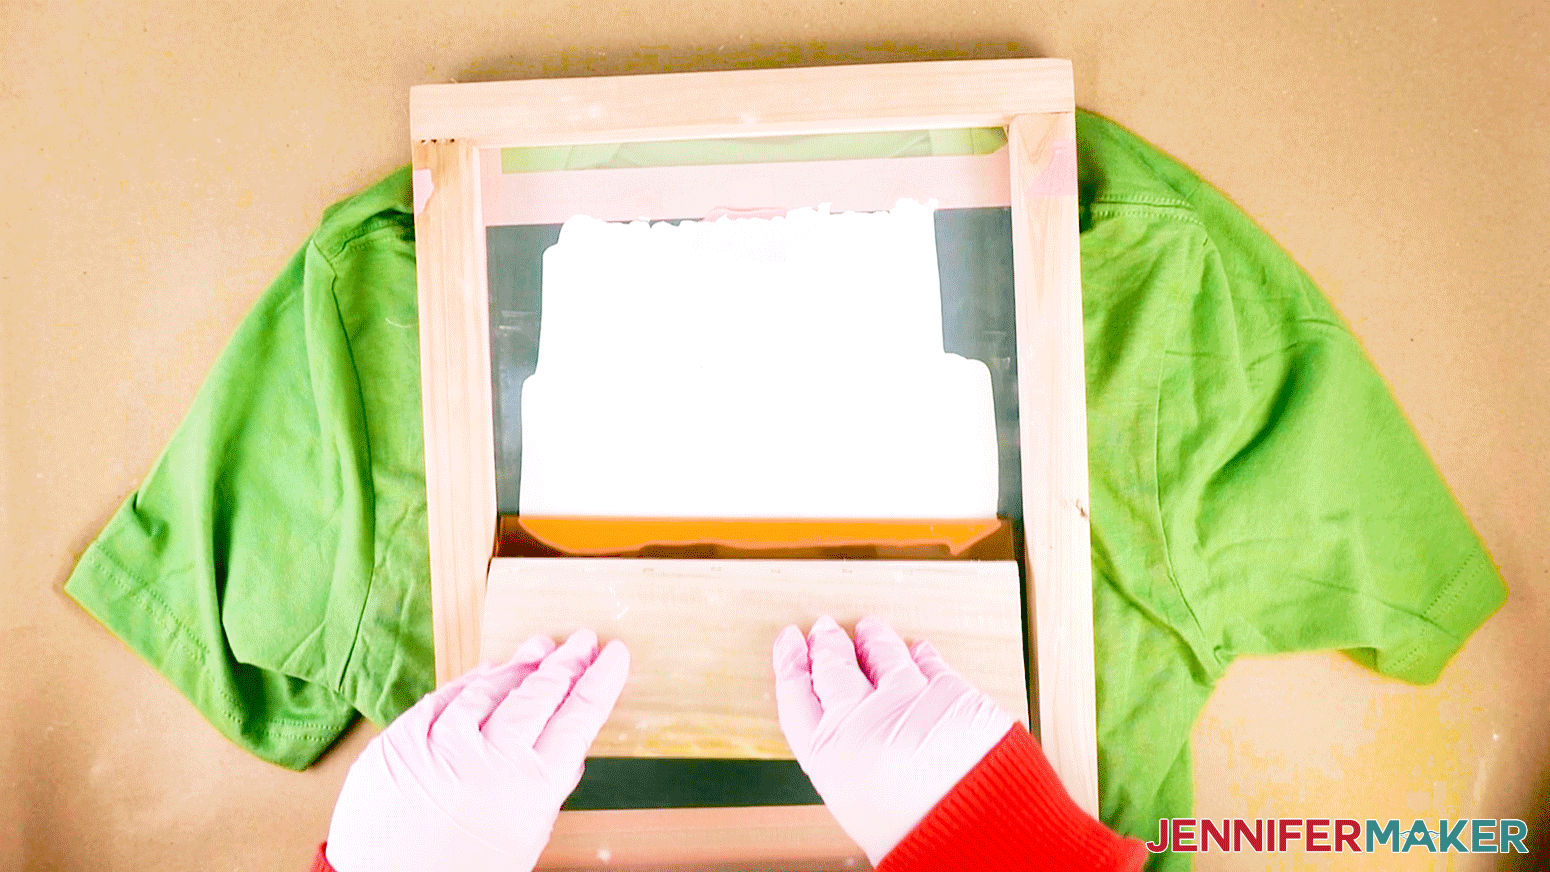
Then use your squeegee from the kit to coat the design in a thick layer of Speedball Ink from top to bottom.
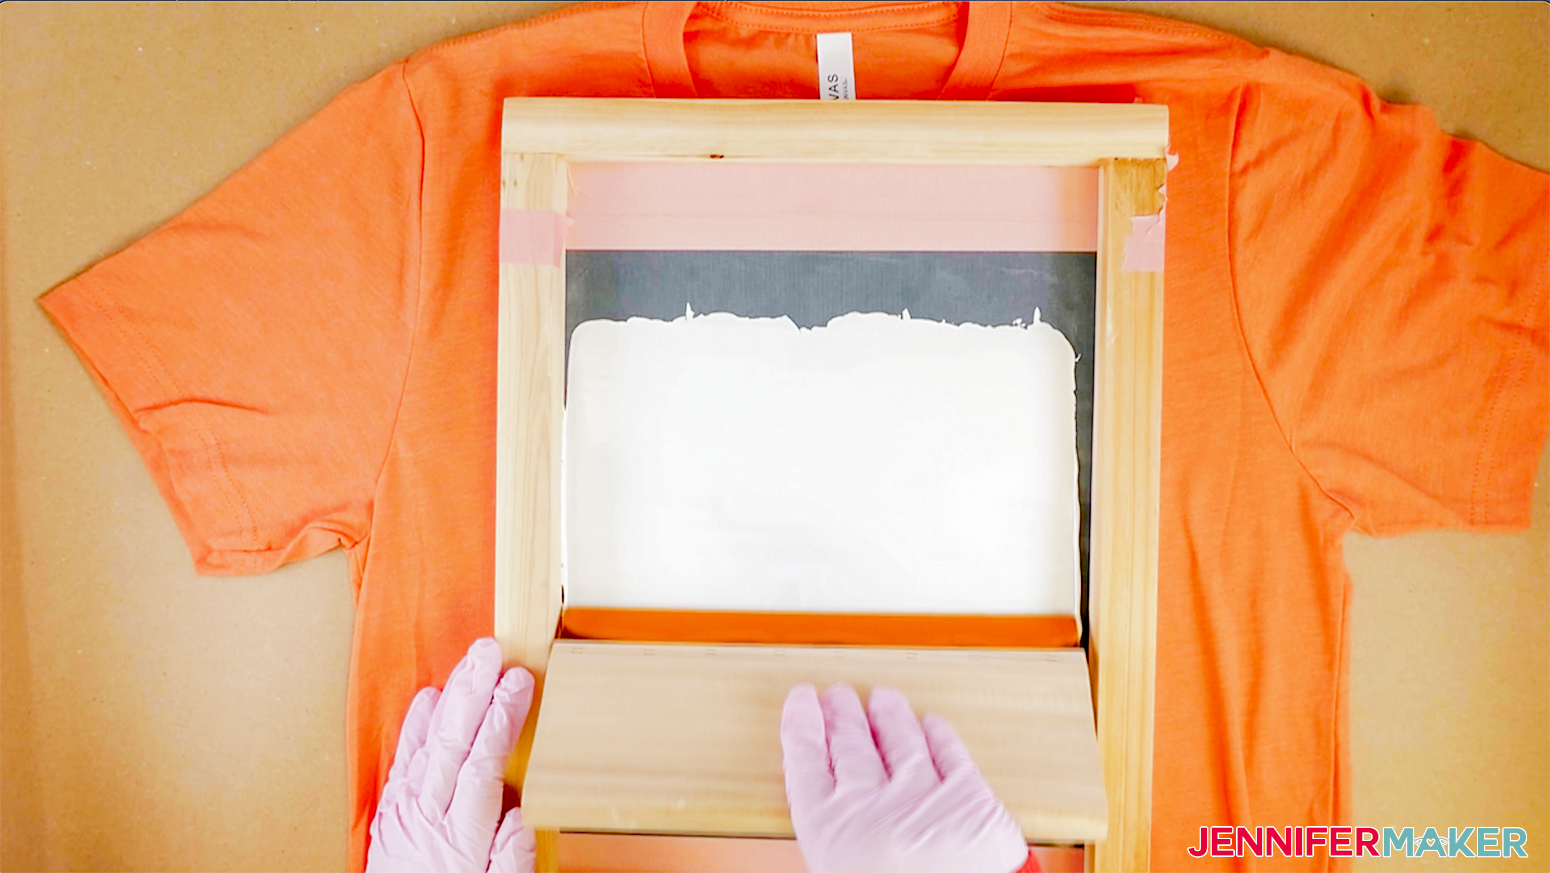
Next, go back to the top and press firmly while squeegeeing down to the bottom.
DO NOT use an extreme amount of pressure or not enough pressure. Too much pressure will cause bleeding. Not enough pressure and the paint will not go through the screen and the design won't be there when you lift the screen.
Now scoop up some of the excess Ink that is on the bottom, bring it to the top, and squeegee again.
Repeat this a few times.
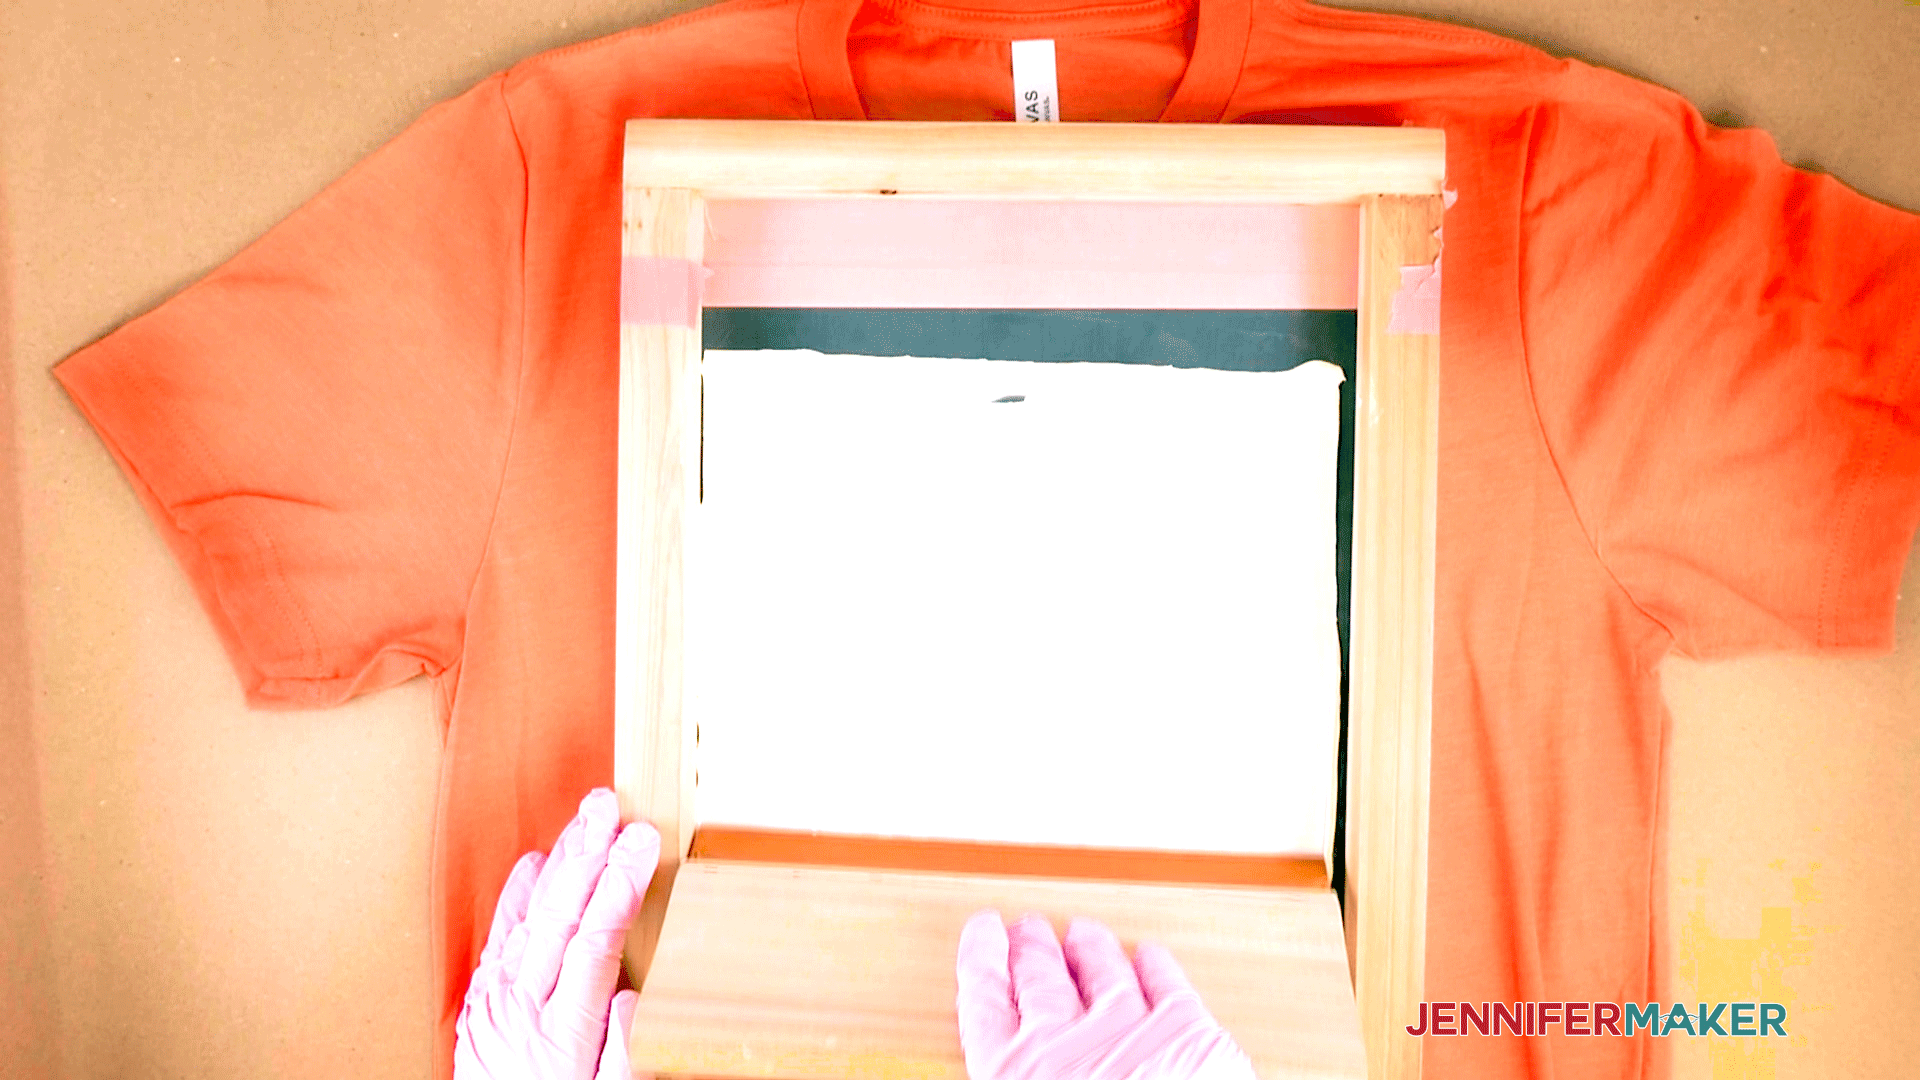
IMPORTANT: Make sure to get all areas of the design thoroughly coated.
Once you have finished squeegeeing hold down the top of the shirt and slowly lift the top of the Silk Screen off of the shirt.
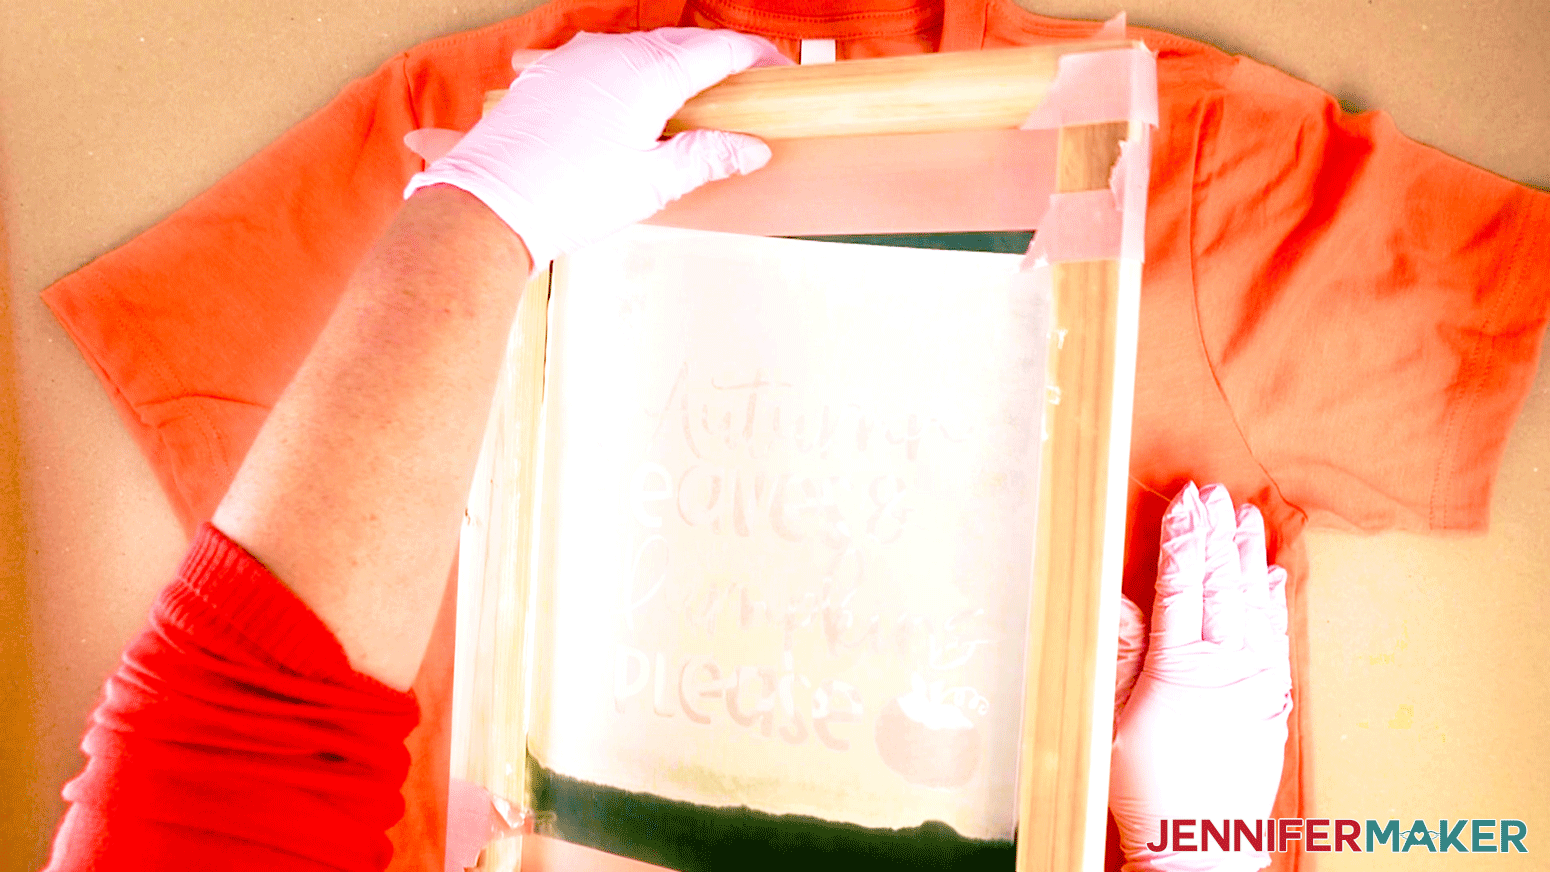
NOTE: If you see the paint staying on the screen as you take it off, and your shirt has NOT moved you can place it down and squeegee again.
If you have more shirts you want to do with the same design set up the Shirts beforehand and Repeat the squeegee steps (STEP 3) for each one. Make sure you do not let the Ink dry between Shirts.
STEP 5: CLEAN UP
IMPORTANT: Do not let the Ink dry on the Silk Screen, this will not allow paint through the screen and ruin other designs you make.
After you have finished Screen Printing take your Screen, Paintbrush, and squeegee to a sink or outside to use a hose. Rinse off the Ink from the Silk Screen first. Once you have a decent amount of the Ink off, peel the vinyl and masking tape off the back and throw it away.

Take a soft or medium bristled toothbrush and scrub the screen, rinsing it with water every once in a while. The outline of the design should come off with some scrubbing.
BE CAREFUL not to rub too hard causing a dent in the screen.
Now rinse off the rest of your supplies.
Set your supplies out to dry thoroughly before starting another project. Mine took 40 minutes in the sun on a non-humid day and two hours with a fan in the house.
Dry time for the shirt can take anywhere from 40 mins to a few days depending on conditions.
PLANT DESIGN
For this design, I am going to show you how to Screen Print using two colors!
First, put down a drop cloth or parchment paper to cover your work area.
Start with the flowerpot stencil and follow the same instructions for placing the Design onto the Silk Screen as we did in STEP 2 of FALL DESIGN.
Now we are going to take our shirt and place it in front of us. I am using a Bella+Canvas shirt in Leaf green for this design.
Next, we are going to place the Silk Screen down on the shirt where you would like the design to be.
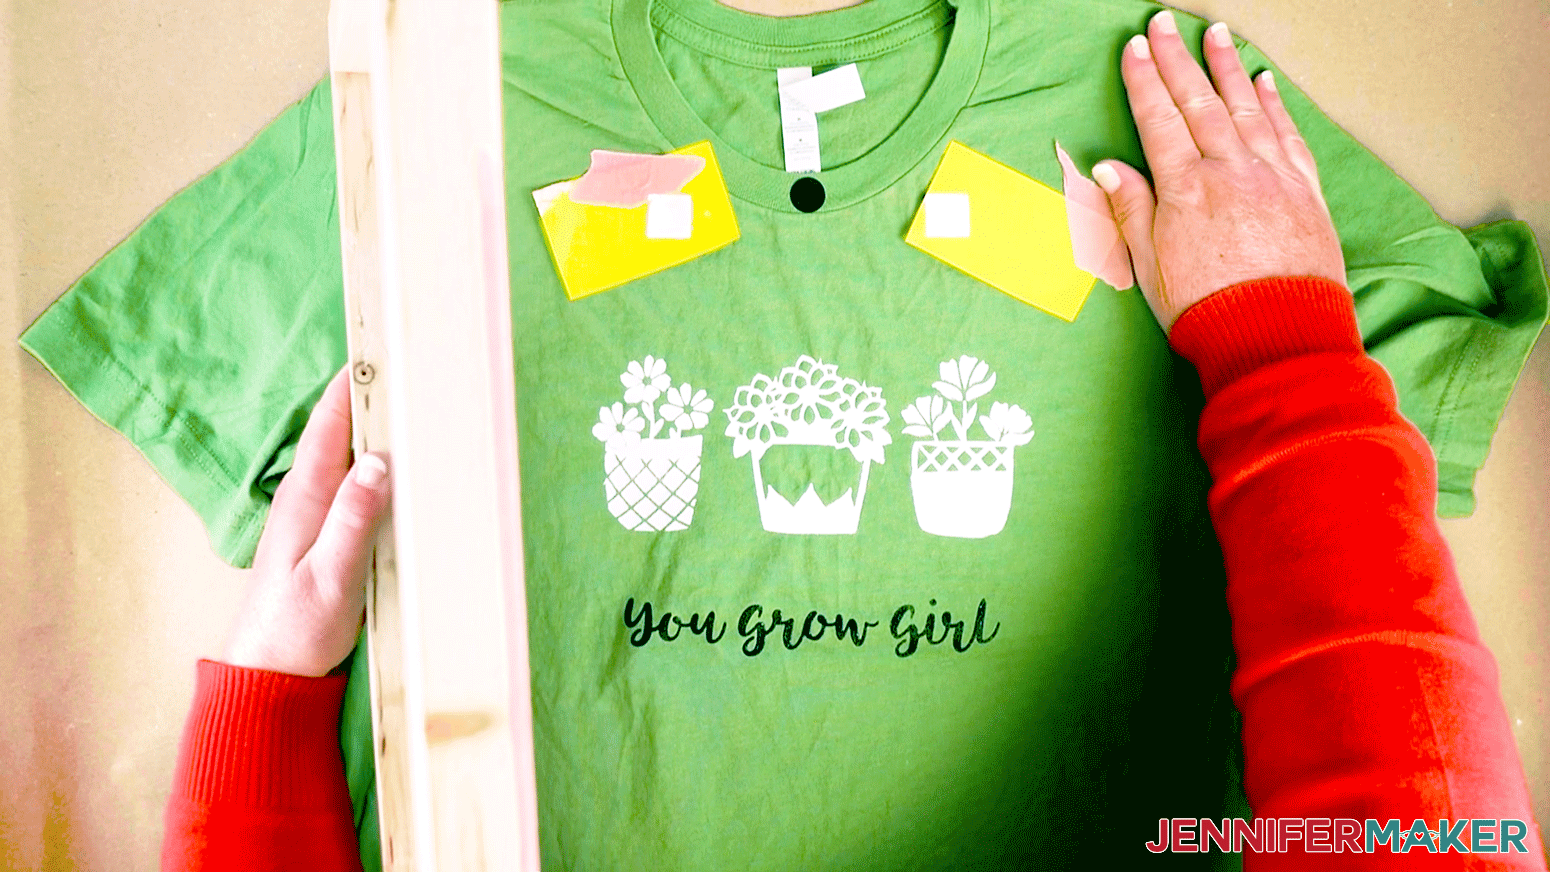
I am placing one of my vinyl circles in the center of the collar of my shirt to help center the design.
Now Place the screen down so that the circle on the shirt lines up with the circular hole in the design.
Now place two small pieces of paper between the Silk Screen and the shirt so that you can see the paper through the two square holes in the top of the stencil. Using painter’s tape or masking tape secure the paper to the shirt.
NOTE: If using white Ink like I am, do not use a white piece of paper for this step as we are going to add our Ink to these papers to help align our design for the next color.
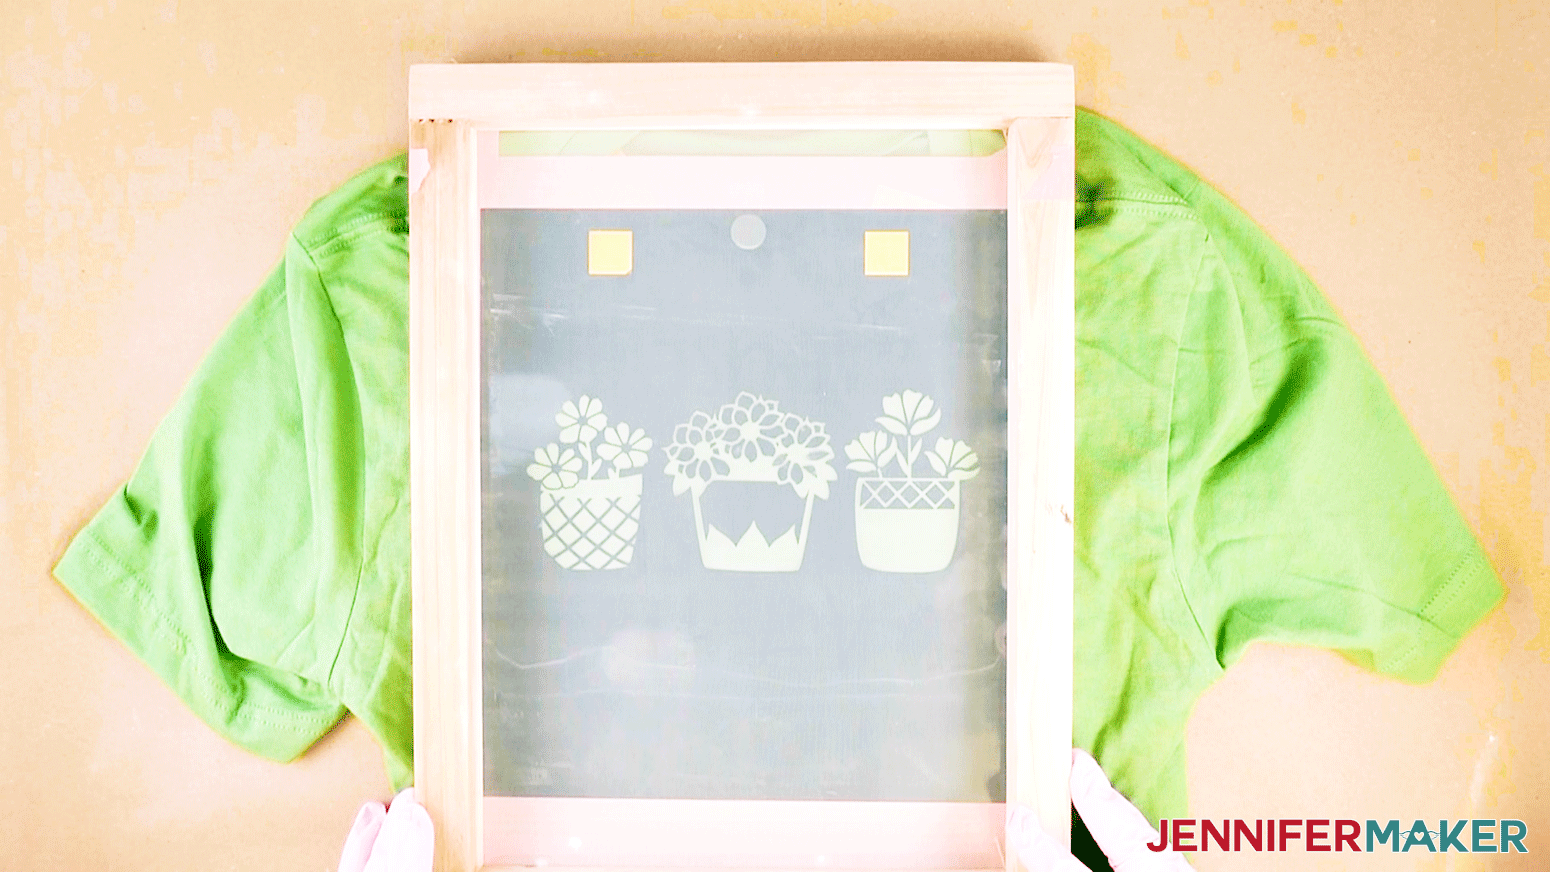
Next, place a piece of tape over the circle at the top of the design.
Now, it is time for the fun part!
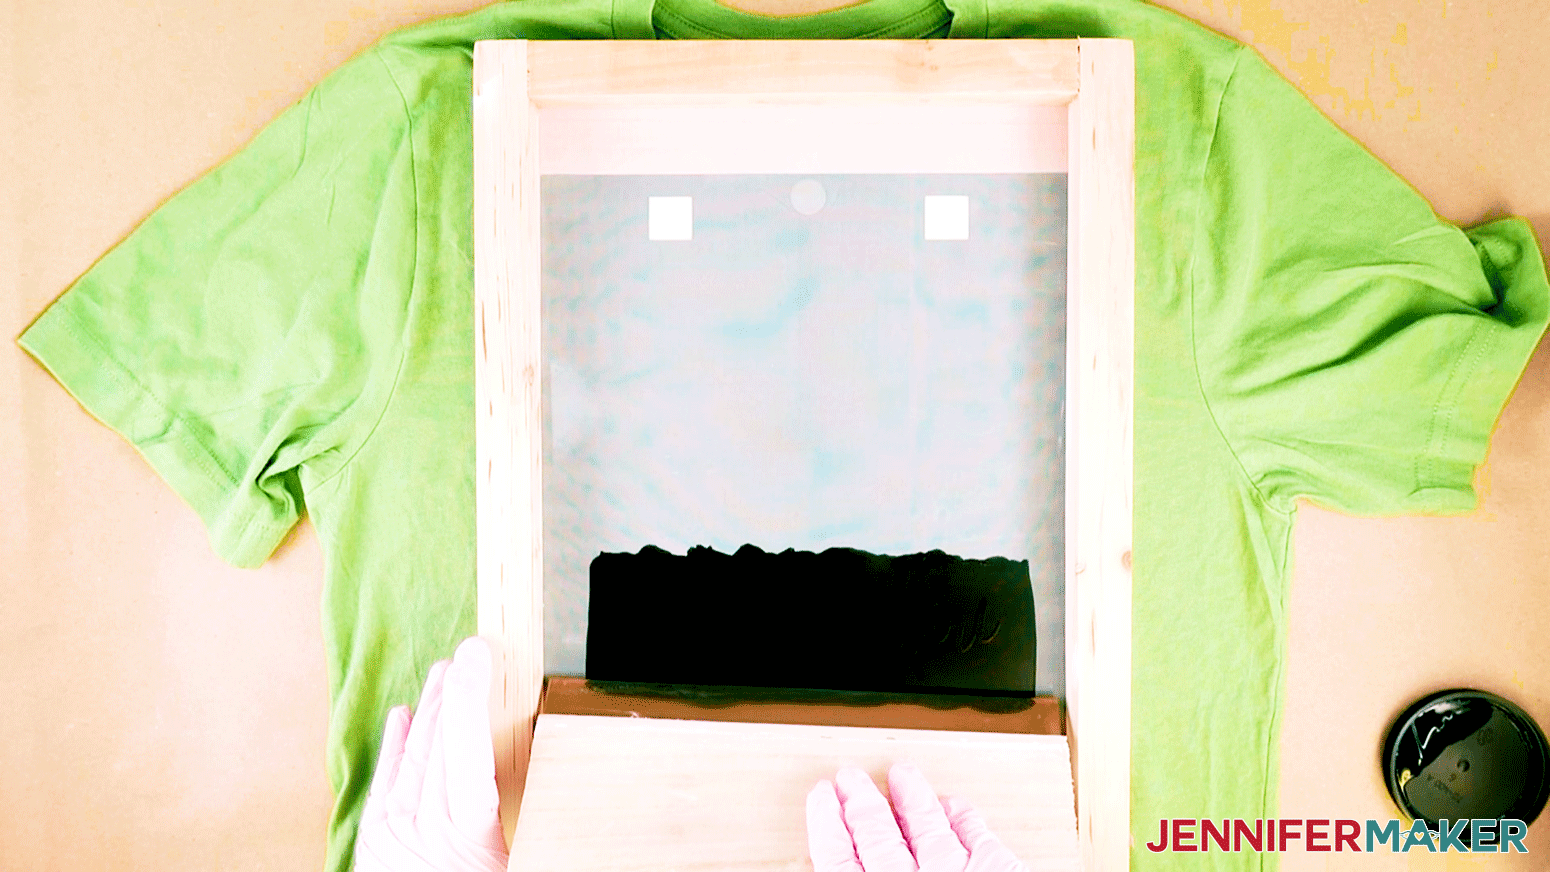
Using a paintbrush dollop Speedball Ink onto the Silk Screen just above the square holes.
Also, add a decent amount of Ink across the Silk Screen right above the design.
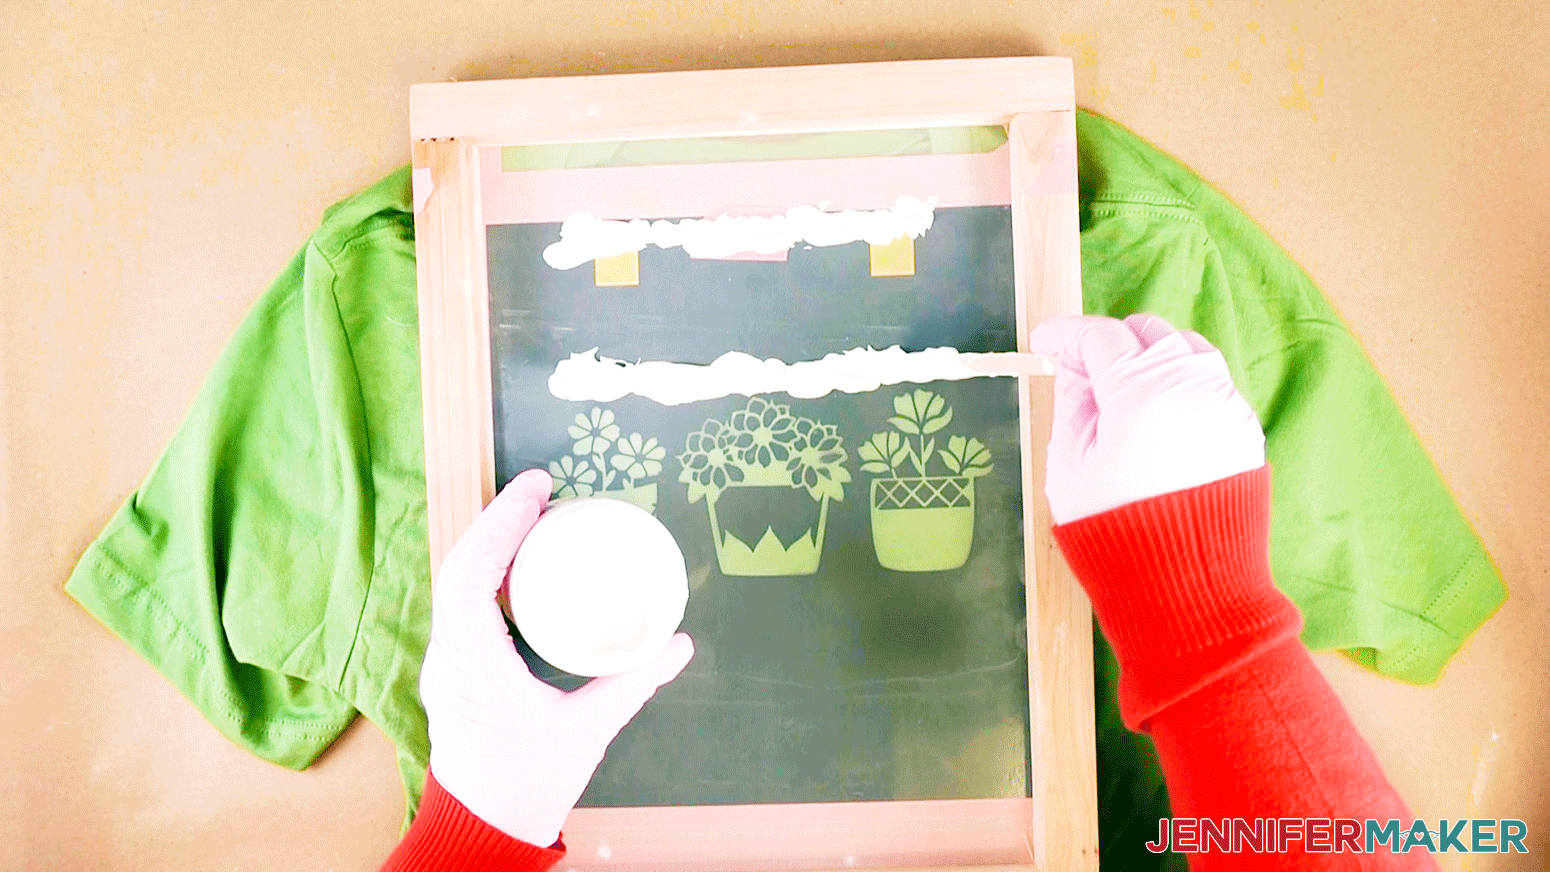
NOTE: More is better than not enough Ink.
Then use your squeegee from the kit to coat the design in a thick layer of Speedball Ink from top to bottom, including the squares.
Next, go back to the top and press firmly while squeegeeing down to the bottom.
DO NOT use an extreme amount of pressure or not enough pressure. Too much pressure will cause bleeding. Not enough pressure and the paint will not go through the screen and the design won't be there when you lift the screen.
Now, scoop up some of the excess Ink that is on the bottom, bring it to the top, and squeegee again.
NOTE: You do not need to include the squares in this process after the first round.
Repeat this step a few times.
IMPORTANT: Make sure to get all areas of the design thoroughly coated.
Once you have finished hold down the top of the shirt slowly lift the top of the Silk Screen off of the shirt.
IMPORTANT: Do not let the Ink dry on the Silk Screen.
After you have finished Screen Printing take your Screen, Paintbrush, and squeegee to a sink or outside to use a hose. Rinse off the Ink from the screen first. Once you have a decent amount of the Ink off, peel the vinyl and masking tape off the back and throw it away.
Take a soft or medium bristled toothbrush and scrub the screen, every once in a while rinsing it with water. the outline of the design should come off with some scrubbing.
BE CAREFUL not to rub too hard, causing a dent in the screen.
Now rinse off the rest of your supplies.
Set your supplies out to dry thoroughly before going on to the next color. Mine took 40 minutes in the sun on a non-humid day and two hours with a fan in the house.
Dry time for the shirt can take anywhere from 40 mins to a few days.
Now that your Screen is washed and dried and your shirt has fully dried, add the stencil to the back of the Silk Screen as we did before (see STEP 2 of FALL DESIGN).
Now line up the circle hole with the circle on your shirt and align the painted squares with the square holes on the stencil.
Next, add your second color just above the saying.
Then use your squeegee from the kit to coat the design in a thick layer of Speedball Ink from top to bottom.
Next, go back to the top and press firmly while squeegeeing down to the bottom.
DO NOT use an extreme amount of pressure or not enough pressure. Too much pressure will cause bleeding. Not enough pressure and the paint will not go through the screen and the design won't be there when you lift the screen.

Now scoop up some of the excess Ink that is on the bottom, bring it to the top, and squeegee again.
Repeat this a few times.
IMPORTANT: Make sure to get all areas of the design thoroughly coated.
Once you have finished squeegeeing hold down the top of the shirt and slowly lift the top of the Silk Screen off of the shirt.
After you have finished Screen Printing take your Screen, Paintbrush, and squeegee to a sink or outside to use a hose. Rinse off the Ink from the Silk Screen first. Once you have a decent amount of the Ink off, peel the vinyl and masking tape off the back and throw it away.
 Take a soft or medium bristled toothbrush and scrub the screen, rinsing it with water every once in a while. The outline of the design should come off with some scrubbing.
Now rinse off the rest of your supplies.
Set your supplies out to dry thoroughly before starting another project.
Dry time for the shirt can take anywhere from 40 mins to a few days depending on conditions.
A few days after making your custom shirt, heat press the design with a Cricut EasyPress 2 at 320 degrees for 40 seconds. The Ink on your shirt has to be completely dry for 24-48 hours in order to do this step.
This step seals the Ink for washing.
Notes
Finished Project Size:
Fall Design: 8.5" x 7 inch design.
Plant Design: 8.5 x 6 inch design.
Fonts used:
Falling Leaves by FontBundles.net
Girl Crush by FontBundles.net
Tingler Script by FontBundles.net
It’s always great to learn a new skill and I must say, this is one that I will probably be using a lot more often in the future. I mean, I think these turned out pretty great if I do say so myself!
Gift these to a friend or have a get together to make your very own custom screen printed T-shirts. Whatever you decide to do, I’m sure they will turn out pretty great. Which one is your favorite?
Answers to Your Questions About How to Make DIY Screen Printed T-Shirts
Q: Where is your video tutorial for this silk screened project?
This is a special project we made for our free Maker Academy Weekend event! A complete and detailed step-by-step video premiered during the event November 4-7, 2021. Get access to the workshop video and printable workbook with a VIP Pass to Maker Academy Weekend 2021, which comes with other perks and bonuses, too!
Q: What kind of T-shirts work best for screen printing?
Any shirt except ones made of 100% nylon or 100% polyester. I recommend a 100% cotton for softness and comfort.
Get the free designs for my Silk Screened T-Shirts!
I love seeing what you make with my designs and how you use them! Please share a photo of your shirts in our Facebook group or tag me on social media with #jennifermaker.
Love,

Want to remember this? Save this DIY Screen Printed T-Shirts Tutorial to your favorite Pinterest Board!