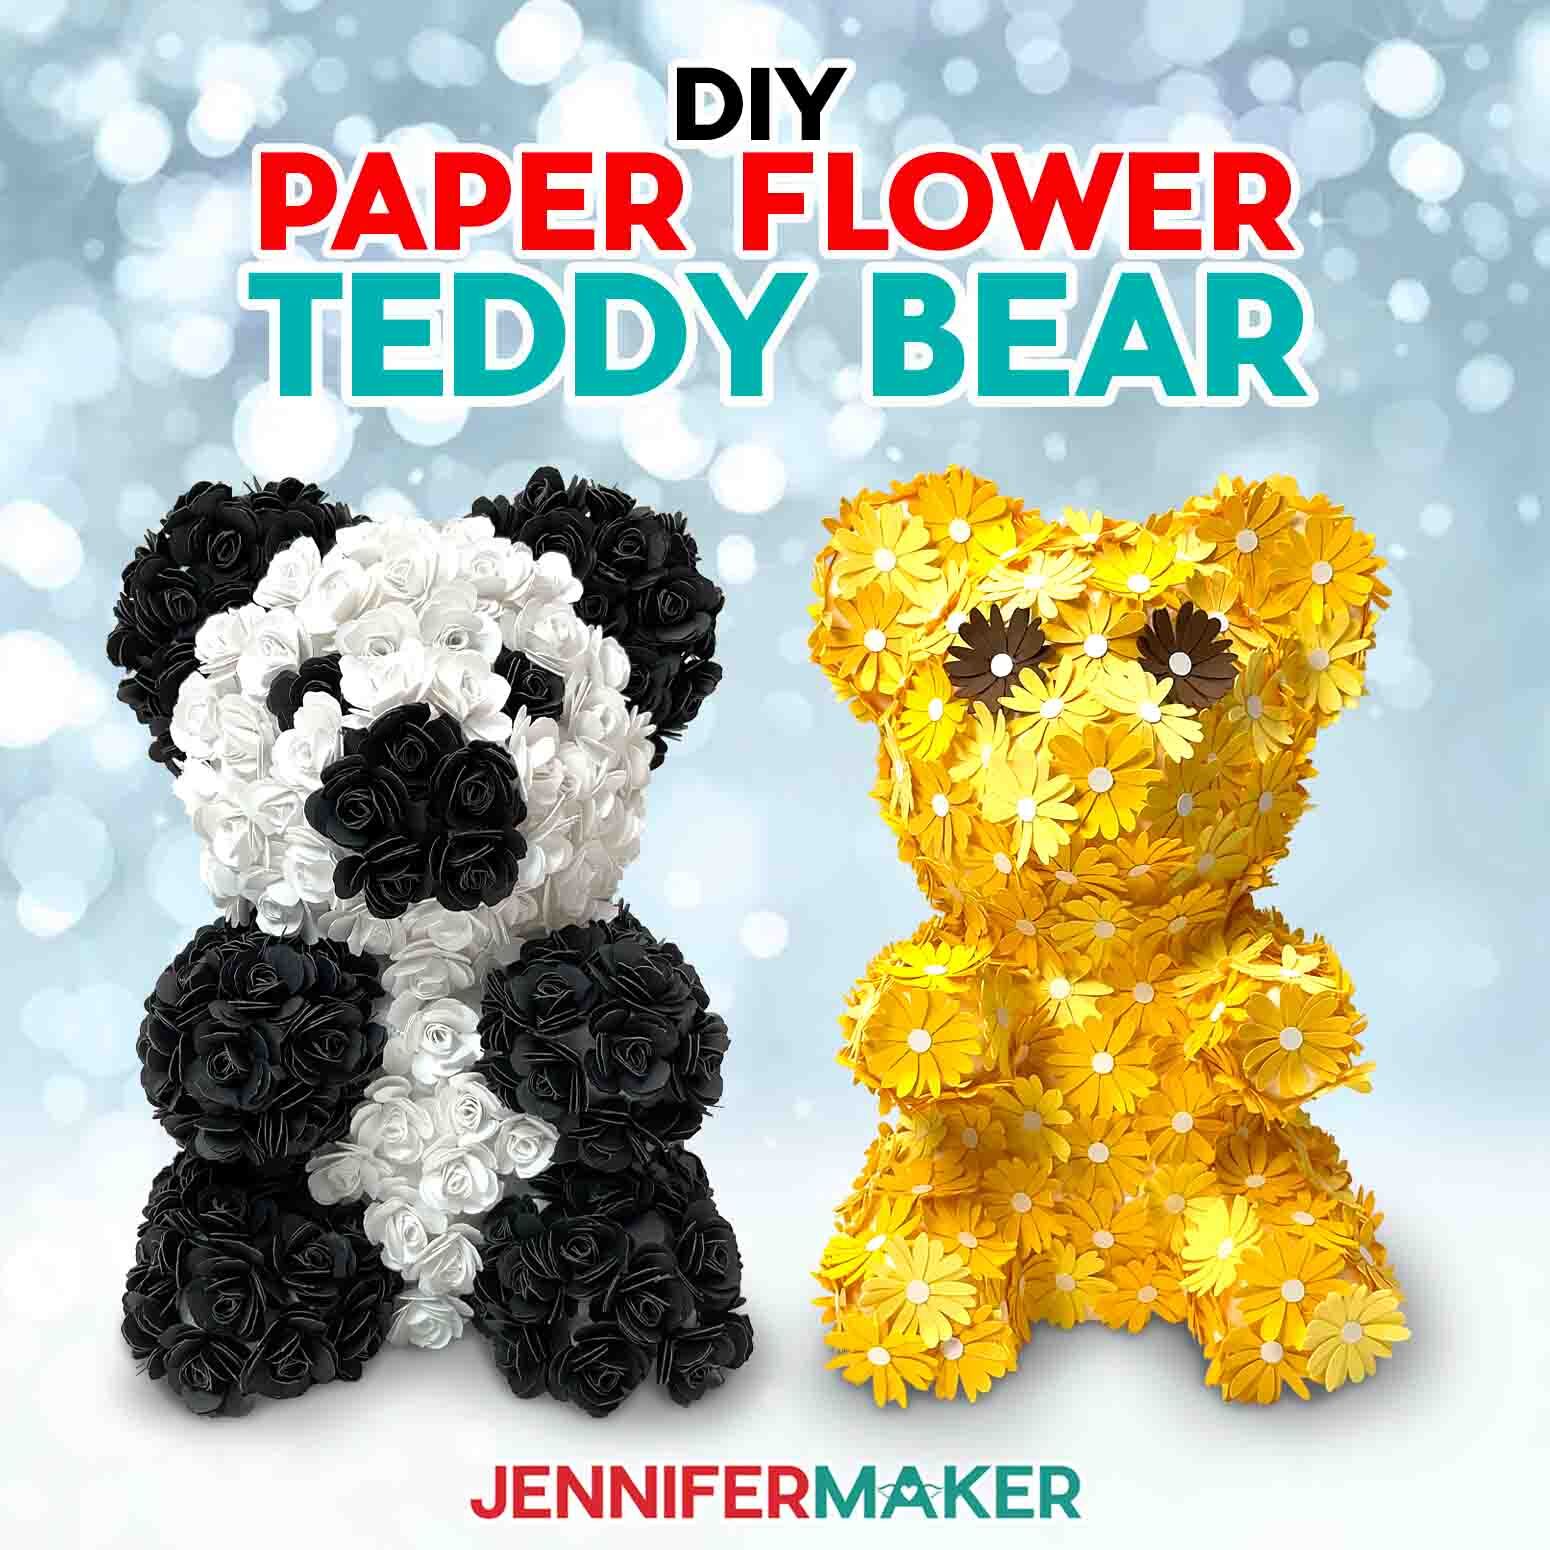
Learn how to make a flower teddy bear with the paper flower and colors you love!
I love making paper flowers! They’re some of my favorite crafts and I love the repetitive nature of assembling a bunch for a new project. It feels very meditative to me! That came in handy when making my new flower teddy bear designs, because they take A LOT of flowers! I’ll show you how to plan out your project, assemble rolled paper roses and a new layered daisy design, and how to stick them to the styrofoam base of your choosing!
Watch the full step-by-step tutorial on how to make a flower teddy bear!

Real roses and daisies are lovely, but this project can stand the test of time! Paper flowers add a touch of elegance to craft projects, and the best part? They last virtually forever — unlike fresh flowers. That makes them the ideal gift or a lovely decoration for so many occasions like a wedding anniversary, celebrating a new baby, or even graduation gift.

A soft teddy bear is certainly a cute gift, but a bear made of flowers is especially beautiful. In this tutorial, I’ll show you how to make an adorable panda with rolled roses, as well as a cute and easy daisy bear. If you haven’t made paper flowers before, get ready for your new favorite paper craft.

Plus, after you learn my tips for creating paper flowers and decorating the foam rose bear (or daisy bear), you’ll be able to use the same skills to decorate all sorts of things with beautiful paper blooms! Be sure to watch the video tutorial for my super useful hack if you have a different base — I’ll show you how to plan it out with removable vinyl.
I made two versions of the bear so you can choose which one is your favorite. You’ll start with a styrofoam base (I chose an 8″ bear because it’s so cute!) then customize it with your choice of flowers, in whichever colors you like. There are lots of styrofoam bases out there, like other animals, letters, geometric forms, and more! The directions in this tutorial work great no matter which shape base you choose.

The panda is covered in black and white rolled paper roses. I think it’s absolutely adorable, but paper roses take a lot of rolling and hot gluing — not to mention time! To get a nice finished look, the roses have to be really consistent — which might be tough if you’re a first-time rose roller. My tip? Try rolling some practice roses before committing to an entire bear’s worth!

If the rose bear feels a bit daunting, I’ve made a simpler daisy design, too. Rather than rolling them, you simply cut and layer them with craft glue! While they’ll still take a while to cut on your cutting machine, they take less time (and effort) to attach to the bear form. They’re delicate, though, so be extra careful when removing them from your machine mat.

Not into the rose OR the daisy, but still want a cute flower teddy bear? The red bear is an example of a project you can design yourself in my ADVANCE program. It uses flowers that I designed right in Cricut Design Space (I cannot share the Design Space project link as it contains uploaded elements). But this is something you can easily make in my ADVANCE program! Learn more about ADVANCE here!

No matter which flower you pick (hehe, get it?), be sure to use high quality, solid-core cardstock. If your cardstock isn’t solid-core, you’ll see the white inside the paper along the edge of each and every flower. It’s not a great look, and solid-core gives a much more finished appearance.

Quality counts too. I’ve tested the cardstocks in my materials list, and have found they cut much more consistently than some budget brands I’ve tried. If you’ve been crafting for a while, you’ve probably experienced some wasted time, wasted money, and some frustration due to subpar materials. High-quality material makes a difference. I used 65 pound cardstock in a variety of colors to make my paper flower designs. It’s sturdy, but flexible enough to easily roll into flower shapes.

My free download has SVG and DXF files you can use with any Cricut (even the tiny but mighty Cricut Joy), and other kinds of cutting machines. I’ve also included a PDF in case you don’t have a cutting machine and will be hand-cutting your flowers. I used my Cricut Maker 3 to cut mine, but this was an all-day project even with its help! Save it for a rainy day that needs some color.
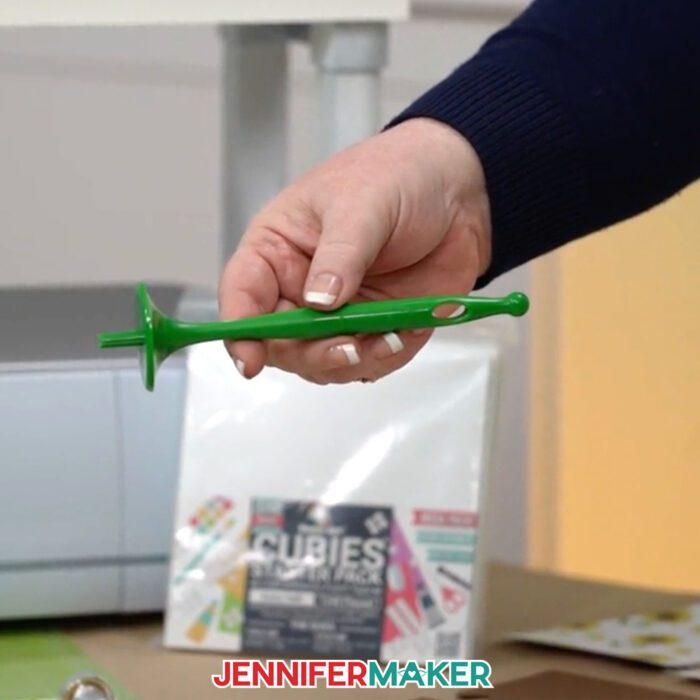
If you’re new to rolling flowers, you might wonder how to get nice, even rolls that look consistent. I’ll show you how to use one of my favorite paper crafting tools, the Flowtool! I love how easy it is to use (it’s been a game-changer for my rolled flowers), but you can also use a quilling tool or tweezers. I definitely recommend using some kind of rolling tool — your hands will thank you.

When I was testing different methods of sticking the flowers to the styrofoam bear, I found that I liked clear glue dots best because they’re really strong and not messy at all. You’ll need a LOT of them, though! And I know what you’re thinking — why not just use hot glue since you’re already using it to roll the flowers? Not only is hot glue not safe to use with styrofoam, it will actually melt it. You don’t want that! If you need to ship the bear or it might get jostled, I have used pins to hold paper flowers onto styrofoam with good results.

Paper flower projects like this cute teddy bear made of roses and his adorable daisy-adorned friend make a perfect gift for springtime, or for celebrating special moments! Just change the color scheme of your arrangement to create a flower bear in the recipient’s favorite colors or overall theme.

One major perk: Not only do paper flowers never die, they you can create them at more affordable prices than an actual bouquet of flowers. Skip the expensive flower bouquet and make a Valentine’s Day gift with red or pink roses, a wedding gift or decoration with white roses, or create a unique gift to say “happy birthday.” They’re the best gift for someone who loves flowers, and a beautiful way to decorate for spring. Plus, which mom wouldn’t love one of these adorable teddy bears as the perfect present for Mother’s Day?

Making a project like this will be a big accomplishment, and when someone tells you how amazing it is you can proudly say: “Thanks, I made it!”
Let me show you how to make a flower teddy bear! This post contains some affiliate links for your convenience (which means if you make a purchase after clicking a link I will earn a small commission but it won’t cost you a penny more, there is no additional cost)! Read my full disclosure policy.
Materials to Make a Flower Teddy Bear
View my Amazon shopping list for the exact items I used!
For the Rolled Rose Panda, I used:
- White 12″ x 12″ 65 lb. Cardstock (alternative)-AND-
- Black 12″ x 12″ 65 lb. Cardstock
- Hot Glue Gun & Glue Sticks -AND-
- Silicone Finger Protectors
- Flowtool, or a quilling tool, optional but very helpful for rolled roses
For the Daisy Bear, I used
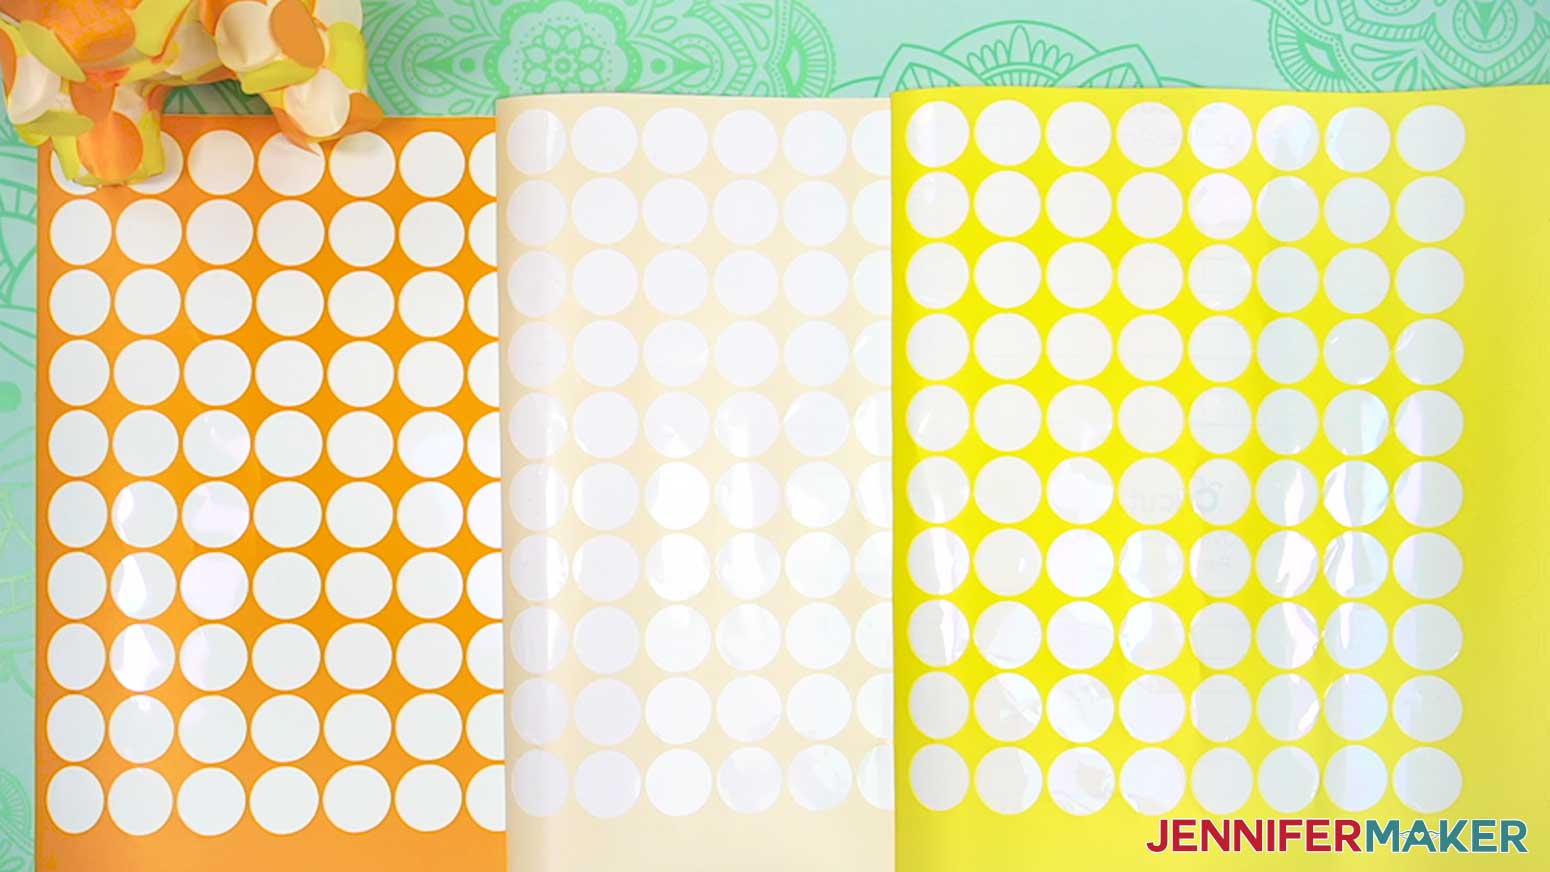
- Orange & Yellow Pallete 12″ x 12″ 65 lb. Cardstock (alternative)(I used three yellows and white)
- Brown Cardstock (for the eyes)
- Bearly Art Craft Glue
For both, I used:
- Styrofoam Bear, 8″ tall
- Removable Vinyl (optional for planning any color, or use the colors for your bear)
- A way to cut your materials – I’m using the Cricut Maker 3, but you can also use the Maker, Cricut Explore series machines, Venture, or the Joy Xtra
- Cricut Green StandardGrip Machine Mat 12″ x 12″
- Cricut Blue LightGrip Machine Mat 12″ x 12” (Optional, if the green is too sticky)
- Brayer
- Spatula
- Scraper
- Weeding Tool (optional for popping out small pieces from intricate areas)
- Tweezers (optional)
- Medium Zots glue dots
- Tape measure
- Design #606 (My free SVG/PDF/DXF design files are available in my free resource library – get the password by filling out the form at the bottom of this page)

How to Make a Flower Teddy Bear

Flower Teddy Bear
Learn how to make a flower teddy bear with rolled paper roses or layered paper daisies!
Materials
- One (1) 8” Styrofoam Teddy Bear
- Eight (8) Sheets of 12" x 12" 65 lb. Black Cardstock (for Rose Panda) -AND-
- Seven (7) Sheets of 12" x 12" 65 lb. White Cardstock (for Rose Panda -OR-
- Six to Eight (6-8) Sheets of 12” x 12” 65 lb. Colored Cardstock (for Daisies) - I used three shades of yellow
- One (1) Sheet of 8.5” x 11” 65lb. Brown Cardstock (for Daisy Bear Eyes)
- ⅜” Medium Zots Glue Dots
- Cricut Removable Vinyl (Optional for planning circles, use one color for each color flower you plan to use)
- Design #606 (My free SVG/PDF/DXF design files are available in my free resource library - get the password by filling out the form at the bottom of this page)
Tools
- A way to cut your materials - I’m using the Cricut Maker 3, but you can also use the Cricut Maker, a Cricut Explore Series machine, the Cricut Venture, the Cricut Joy Xtra, or the Joy
- Cricut Green StandardGrip Machine Mat 12" x 12” -OR-
- Cricut Blue LightGrip Machine Mat 12" x 12”
- Brayer
- Flowtool or Quilling Tool (for rolled roses)
- Spatula
- Scraper
- Weeding Tool
- Craft Glue (I used Bearly Art Precision Glue)
- Hot Glue Gun & Glue Sticks (for the rolled flowers)
- Silicone Finger Protectors (for the rolled flowers)
- Tweezers (Optional)
- Ruler (optional to measure flowers for consistency and planning)
Instructions
STEP 1: GET MY FREE FLOWER TEDDY BEAR DESIGNS
First, download my Flower Teddy Bear designs from my free library – look for Design #606. Alternatively, you can use the Save This Project form near the top of this post and the design link will be emailed to you.
There are two design files in the SVG folder: one is a rolled rose and the other is a layered daisy.
There is also a DXF folder with cut files and a PDF folder with versions you can cut by hand.
In this tutorial, I will show you how to estimate the number of flowers needed to cover a styrofoam shape, like my bear, then cut and assemble the two project variations efficiently. I’m using a Cricut Maker 3, but the files can be cut on any Cricut or other cutting machine.
TIP: If you’re not sure how to upload, go to jennifermaker.com/svgs to learn how to unzip and upload SVG files.
NOTE: I’ve included a rolled rose design and a layered daisy, which takes less time to prepare and assemble. If you’re deciding which design to use, or how to estimate the time and materials needed, follow the Planning Steps before continuing with a project.
OPTIONAL: PLAN YOUR FLOWER TEDDY BEAR
NOTE: I’ll show you how many flowers you’ll need to make the two examples, but if you want to use a different base, flower design, or play with color schemes, here’s how I planned mine using removable adhesive vinyl.
- Make a few of the flowers you like in slightly different sizes (some of my other flower designs would work well!) and pick the one that looks best on your styrofoam shape.
- Measure the flower to get its diameter.
NOTE: Most paper flowers are circles in shape. - Open a blank Cricut Design Space Canvas.
- Click the shapes icon and select the free circle to add it to the Canvas.

- With the Lock icon closed to maintain the proportions, change the circle’s width to match your flower.
NOTE: Different style flowers will cover the bases in slightly different ways. My flat layered daisies are 1” wide and their shape created pretty even coverage. My rolled paper roses were 1.25” wide, but their shape allowed more of the base color to show in between them, so I used 1” circles and planned to place the flowers more densely to fill everything in. - If you want to use more than one color, click “Duplicate” to make the number you’re considering.
- One at a time, use the Color Box next to the “Operation” menu to set each circle to the colors you want.
- Make sure the correct machine is selected.
- Click “Make.”
- On the Prepare screen, make sure the correct Material Size is selected to match your vinyl. I’m using 12” x 12” sheets.
- Under “Project copies” set the number to how many you think will fit on one sheet of a single color and click “Apply.”
NOTE: If you’re using 1” circles, you can fit 100 on a 12” x 12” sheet of material, or 63 on material that is 8.5” x 11.” - If you think you’ll need more than that amount of your circle to plan the project, adjust the “Project copies” to be a multiple of the number to use the materials effectively.
- Change the Material Size for your other colors, too.
- Click back on the first mat and click “Continue.”
- On the Make screen, set the Base Material for your mat. I used the “Premium Vinyl - Removable Matte” setting with “More” Pressure, but you may need to experiment as all machines can cut differently.
- Place your vinyl shiny up on a green StandardGrip machine mat.
- Use a brayer to make sure it’s fully adhered.
- Check that your Premium Fine-Point Blade is clean and in the clamp.
- Press the flashing “Load/Unload” button to load the prepared mat into your Cricut.
- Press the flashing “Go” button to begin cutting.
TIP: If you have any issues with your cuts, go to jennifermaker.com/cleaner-cuts. - When the machine stops cutting, unload the mat.
- Use the same steps to cut your other colors.
- Once all the circles are cut, treat them like stickers to cover your styrofoam shape in the color scheme you want.
NOTE: I overlapped my circles to make sure my flowers would fully cover the styrofoam. This also increased my estimate of flowers needed, giving me a buffer in case I estimated low or damaged some flowers. - When the shape is covered, look at the sheets for each color and count the stickers you used.
NOTE: Since the circles are in consistent rows and columns, you can use multiplication rather than counting one by one. Or if it’s easier, count the remaining stickers and subtract that from the number you started with.


OPTION 1: ROLLED ROSES FLOWER TEDDY BEAR
STEP 2: PREPARE AND CUT YOUR ROSES
NOTE: I recommend making some test flowers to check your cut settings and make sure that the finished rolled roses are proportionate to your styrofoam shape.
CRICUT DESIGN SPACE
- Open Cricut Design Space and click “New Project.”
- Click “Upload” and then “Upload Image.”
- Click “Browse.”
- Select the rose SVG file.
- On the Prepare to Upload screen, it will say “Cut Image” with the design preview.
- Click “Upload.”
- Find your design in Recent Uploads and add it to the Canvas.
NOTE: Finished rolled paper flowers can vary in size depending on the cardstock and rolling technique you use. Mine were about 1.25” in diameter when cut at this size and proportionate to the teddy bear in my materials list.
TIP: Don’t worry about duplicating the design now. You can easily tell the Cricut how many copies of the flower to cut on the next screen, and can see how many will fit on your cardstock. - If you’d like, use the Color Box to change the flower’s color to match your cardstock.
NOTE: To make my panda, I needed about 150 black roses and 140 white roses, but your amounts may vary. - Click “Save” and give your project a title.
- Click “Save” to return to the Canvas.

CUTTING
- Make sure the correct machine is selected in the top right.
- Click “Make.”
- If prompted, click “On Mat,” choose your mat size, and click “Confirm.”
- On the Prepare screen, make sure the correct Material Size is selected for your materials.
- Under “Project copies,” change the number to however many roses you want to cut right now and click “Apply” to see how they’ll fit on the material.
NOTE: I fit 20 copies of the rose on a sheet of 12” x 12” cardstock, and found that working on that many flowers at a time was easier than preparing everything all at once. When planning your flower numbers, working in multiples of the amount that fit on one mat helps. - Click “Continue.”
- On the Make screen, set the Base Material for your mat. I used the “Medium Cardstock - 80 lb (216 gsm)” setting with “More” Pressure, but you may need to experiment as all machines can cut differently.
- Place your cardstock face up on a green StandardGrip machine mat.
TIP: If your mat is too sticky and the cut flowers don’t lift without damage, try a blue LightGrip machine mat. - Use a brayer to make sure it’s fully adhered.
- Check that your Premium Fine-Point Blade is clean and in the clamp.
- Press the flashing “Load/Unload” button to load the prepared mat into your Cricut.
NOTE: To help with planning, time how long it takes to cut this amount of roses, remove them from the mat, and roll them. Then, you can multiply that time by the amount of flowers you estimate needing in the Planning steps. - Press the flashing “Go” button to begin cutting.
TIP: If you have any issues with your cuts, go to jennifermaker.com/cleaner-cuts. - When the machine stops cutting, don’t unload the mat right away. Gently lift a corner of the cardstock to make sure the cuts went all the way through. If not, press the “Go” button again to make another cut pass in the same spots.
- When the cuts are all the way through, unload the mat.
- Flip the mat over onto your work surface, and roll it back to release the excess paper around the flowers.
TIP: Use the spatula to help lift delicate parts, and your weeding tool to separate any cardstock that is still connected to the flowers. - Gently glide your spatula under a rose, working around the spiral to lift it from the mat.
TIP: Your weeding tool can help, too. - Remove the rest of the roses the same way.
- Place the flowers face up as they come off the mat.
- Use a scraper tool to remove any small bits left on your mat because they can interfere with future cuts.


STEP 3: ROLL ROSES FOR YOUR FLOWER TEDDY BEAR
- Plug in your hot glue gun and have your finger protectors ready.
- Put the loose end of a flower spiral in the rolling tool’s spindle slot.
NOTE: I’m using a Flowtool, but you can also use a regular quilling tool. - While keeping the flower’s end in place, roll the tool toward you so the spiral begins winding around the spindle and itself.
- Continue rolling your paper, keeping the bottom edges aligned with one another as best you can.
TIP: If you’re using the Flowtool, the platform around the spindle helps keep the bottom edges aligned. - When almost the entire spiral is rolled around the spindle, hold the flower lightly and remove the tool.
TIP: If you hold the flower tightly, it will be hard to remove the tool. Relax your grip on the spiral a little to let the tool come loose and allow the flower to unfurl just a little. - Roll the rest of the spiral around the flower and fold up the circle to touch the bottom edge.
- Adjust the flower until the spiral’s bottom edges cover most of the bottom circle.
TIP: If the flower doesn’t seem to unfurl as you would expect, it may be that one of the separate petals is caught on another petal — gently separate it. - If you like, unwind the center to open the flower up more.
TIP: Your weeding tool or tweezers can help you loosen the middle while keeping the rest of the flower together. - Put on your finger protectors.
- Add hot glue to the base circle and press it against the bottom edges of the flower petals to set it.
- Hold the circle in place to let the glue dry.
- Use your fingers, Flowtool, or other tool to roll the edges of your petals outward to make it more realistic and wider.
- Roll the rest of the flowers, keeping the size as consistent as possible.
TIP: Remember, I recommend working in batches, so when you’re ready to cut more roses, repeat the Design Space steps to cut another sheet of 20 roses in the color you need.


STEP 4: ASSEMBLE YOUR ROSE FLOWER TEDDY BEAR
NOTE: Once all the roses are ready, check the styrofoam shape for major blemishes. The flowers will hide discolorations or scuffs, but if the base is misshapen due to being compressed or another issue, that will impact the final result.
- For the panda, I started with the black roses, but you can try other approaches depending on the base shape and project style you’re making. The best approach to fill in white spots between the flowers depends on the design you used, but most can be slightly fluffed or adjusted at the end.
- Gently press the bottom of a rose to a sticky glue dot so the adhesive transfers to the cardstock.
TIP: If you’re using very small flowers, gently rolling the glue dot into a line can make them easier to hide. - Carefully press dark flowers into place on the eyes on the base if you’d like them to stand out.
NOTE: The eye placement is very important to make a recognizable shape, so make sure they’re even!
TIP: If the placement doesn’t look quite right, you should be able to gently remove the flower and glue dot and try again. - For the ears, add a few dark roses to fill the front of each ear.
NOTE: I added five roses to the front of each ear. - Then add dark roses along the ears’ upper curves, starting and stopping where the ears become the head.
- Add a few dark roses to the front surface of the nose and snout.
TIP: Make sure there will be enough space to add at least one line of white roses between the eyes and nose roses. - For the arms, press a dark rose to the flat surface of each paw, then add more around it to spread back toward the body until you reach the vertical seam.
- Add roses to the legs the same way, but leave the bottom uncovered so the bear can sit flat.
- Now continue with the black roses on the backside, starting with the back of each ear. Remember, you can fluff out the petals to cover up any blank spots as you move along.
- Once those are filled in, move to the tail. Place one black rose in the center and then add a circle of matching roses around it.
- Make sure the tail flowers won’t interfere with the bear sitting on a flat surface.
- Then, start adding the white roses. I started on the front, filling in all the areas around the ears, eyes and nose.
TIP: Don’t worry if a flower pops off while you’re moving the bear around. Just press it back in place. - Then carefully turn the panda around and use the white roses to fill in the back of the head and body.
TIP: I worked in rows to get the best coverage. - Once the back is all set, use the remaining roses to fill in the panda’s front belly and all the nooks and crannies around the front arm and leg areas.
- When you think you have enough flowers covering the base, look everything over to see if there are bare spots. Either carefully add a rose of the correct color to fill it, or gently flatten out the surrounding petals to help cover the styrofoam. You can also slightly rotate the roses in place because the glue dots are not permanent, just make sure to press them down to make the connection stronger after adjusting a flower.


OPTION 2: LAYERED PAPER DAISIES FLOWER TEDDY BEAR
STEP 2: PREPARE AND CUT YOUR DAISIES
CRICUT DESIGN SPACE
- Open Cricut Design Space and click “New Project.”
- Click “Upload” and then “Upload Image.”
- Click “Browse.”
- Select the daisy SVG file.
- On the Prepare to Upload screen, it will say “Cut Image” with the design preview.
- Click “Upload.”
- Find your design in Recent Uploads and add it to the Canvas.
NOTE: This size of daisies are proportionate to the teddy bear in my materials list, but if you want to make them slightly larger, remember to keep the Lock icon closed to maintain their proportions. - Don’t “Ungroup” the design.
- Click “Save” and give your project a title.
- Click “Save” to return to the Canvas.
- Decide how many color variations or combinations you would like to make and use “Duplicate” to create that many daisies.
NOTE: I made three color variations, but since the daisies are very delicate, it’s a good idea to cut some extra. At the original size, the petals for 50 daisies (100 petal layers) will fit on a 12” x 12” piece of cardstock. - Drag the copies apart to work with them separately.
NOTE: The daisies’ layers look similar, but they are slightly different, just like how real petals look close up. You can use different approaches to setting their colors, but I made an equal amount of flowers in three colors. - Leave the first daisy’s colors as they are.
- Select the second daisy and click the arrow in the Layers Panel to expand the group.
- Press and hold the Shift key and select both petal layers.
- Click on the Color Box next to “Operation” and select a second petal color.
- If you want the center to be a different color, select it in the Layers panel and change the color in the Color menu.
- Repeat steps 14-17 for the remaining daisies.
NOTE: If you want to add a different color of daisies for the eyes, it’s easier to set that up on the next screen.


CUTTING
- Make sure the correct machine is selected in the top right.
- Click “Make.”
- If prompted, click “On Mat,” choose your mat size, and click “Confirm.”
- On the Prepare screen, make sure the correct Material Size is selected for your materials.
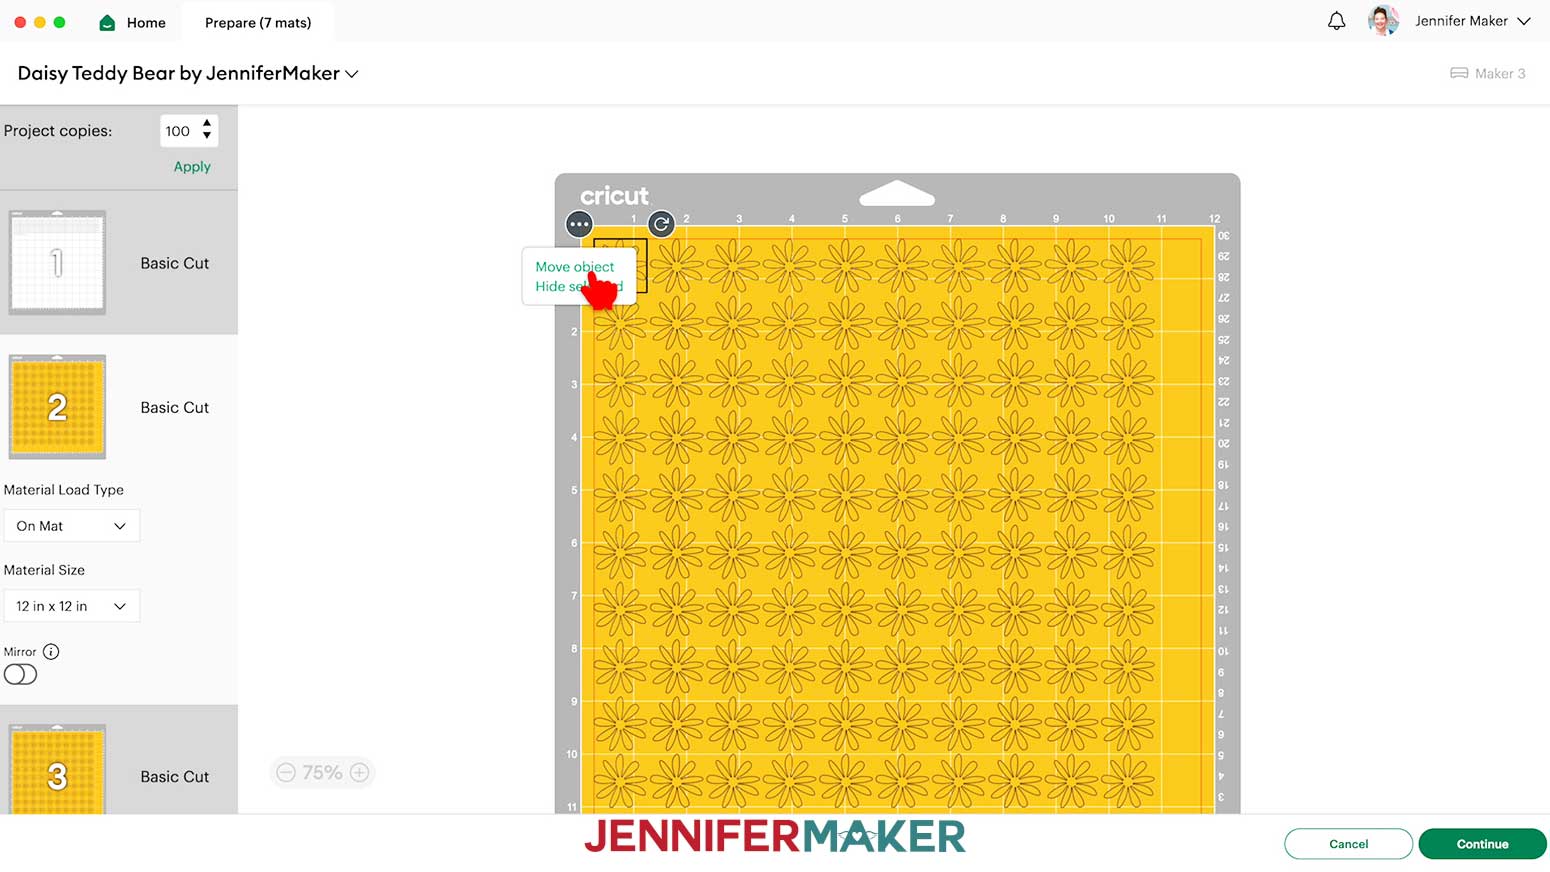
- Under “Project copies,” change the number to the number you need of each color and click “Apply” to see how they’ll fit on the material.
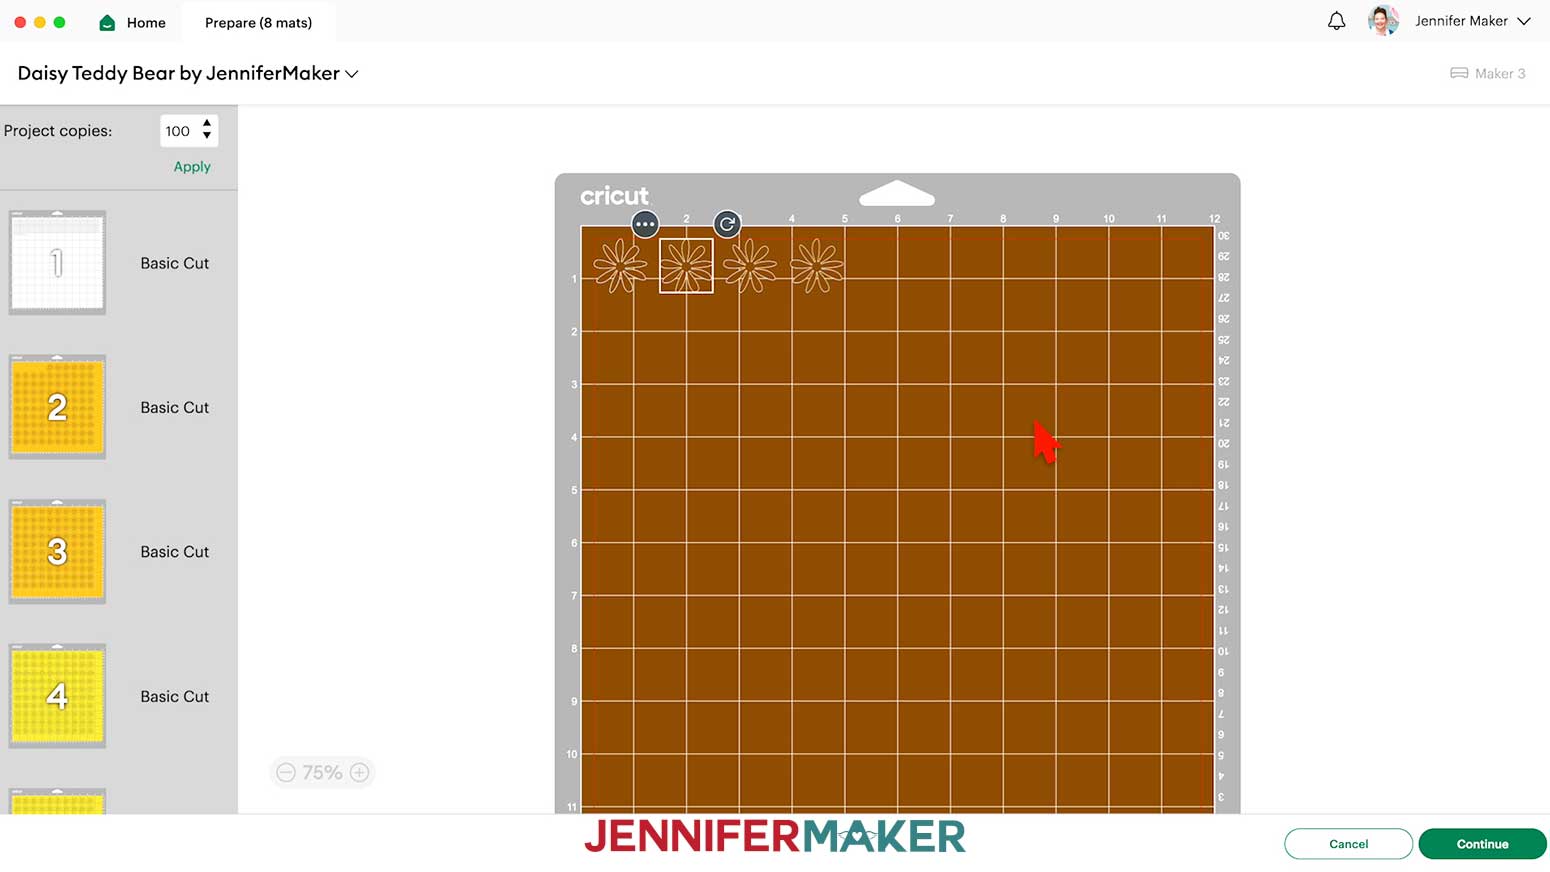
NOTE: I estimated that I’d need about 230 daisies to cover the bear. Dividing that by three (since I’m using three flower colors) I cut 100 of each, which includes extras in case any are damaged. I fit 100 petal layers on a sheet of 12” x 12” cardstock, so you can either cut close to the amount you need, or use a multiple of 50 to use all of the cardstock and have extras. - To make brown eyes like I did, click a petal layer and click the icon with three dots.
- Select “Move object” from the pop-up.
- Click “New” in the pop-up window.
- Select brown for the mat color, then click “Confirm.”
- The petal layer will show up on a new brown mat.
- Repeat steps 6-9 to move three more petal layers from the original mat to the brown mat, dragging them apart so they cut without overlapping.
- Select the first mat and click “Continue.”
- On the Make screen, start with a flower mat and set the Base Material for your mat. I used the “Medium Cardstock - 80 lb (216 gsm)” setting with “More” Pressure, but you may need to experiment as all machines can cut differently.
- Place the first cardstock color face up on a green StandardGrip machine mat.
- Use a brayer to make sure it’s fully adhered.
- Check that your Premium Fine-Point Blade is clean and in the clamp.
- Press the flashing “Load/Unload” button to load the prepared mat into your Cricut.
- Press the flashing “Go” button to begin cutting.
TIP: If you have any issues with your cuts, go to jennifermaker.com/cleaner-cuts. - When the machine stops cutting, don’t unload the mat right away. Gently lift a corner of the cardstock to make sure the cuts went all the way through. If not, press the "Go" button again to make another cut pass in the same spots.
- When the cuts are all the way through, unload the mat.
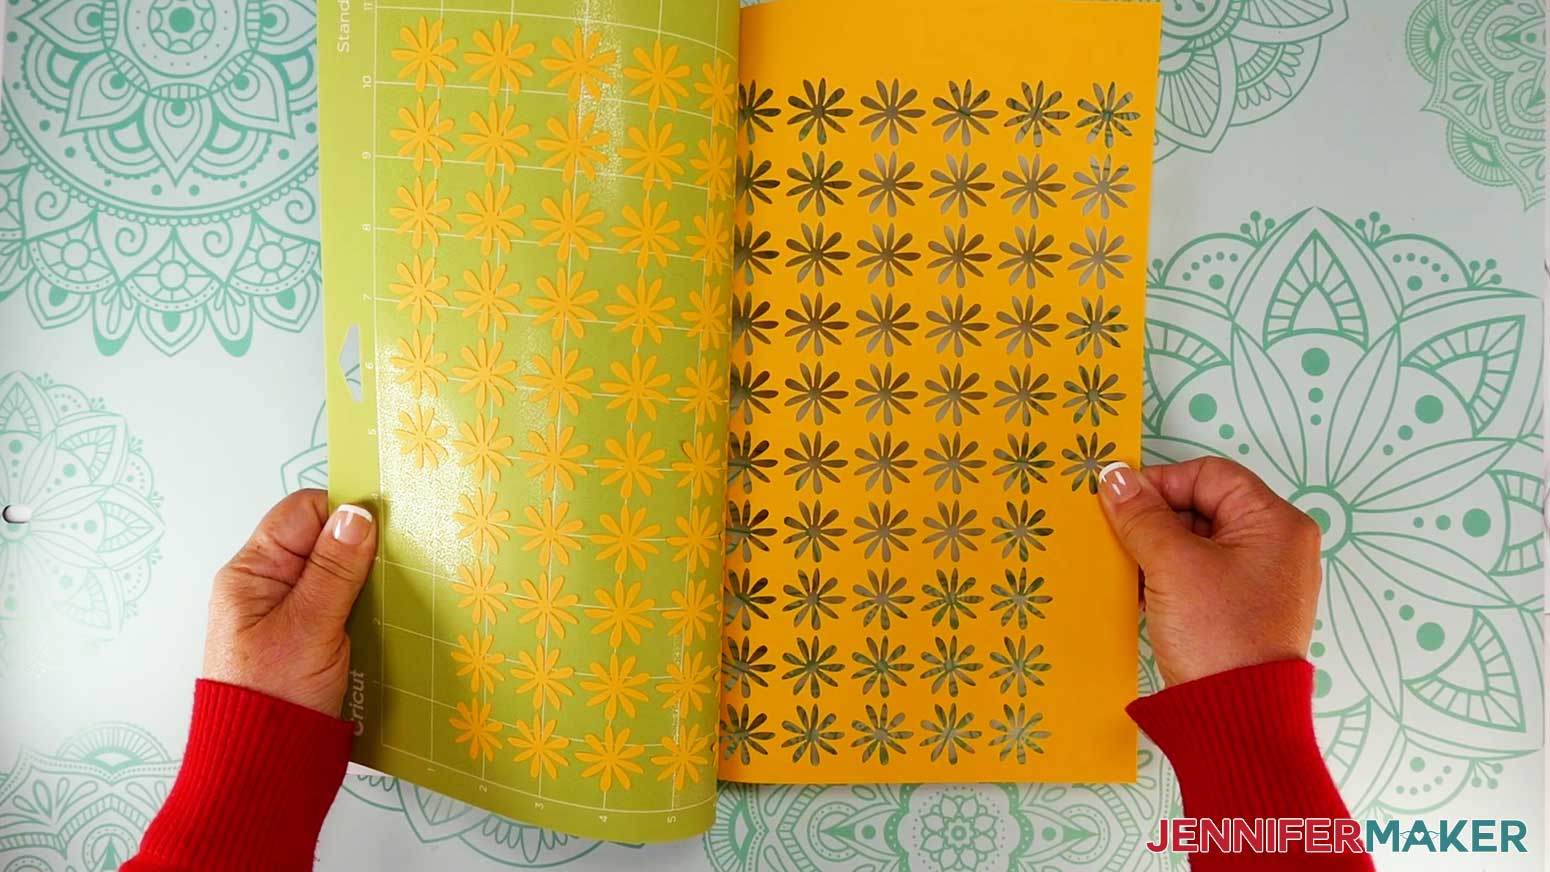
- The paper flowers are delicate and can get damaged coming off the mat, so take your time. Flip the mat over onto your work surface, and roll it back to release the excess paper around the flowers.
TIP: Use the spatula to help lift delicate parts, and your weeding tool to separate any cardstock that is still connected to the flowers. - Gently glide your spatula under a petal layer to lift it from the mat.
TIP: Your weeding tool can help, too. - Remove the other flowers the same way and place them face up in stacks by color.
- Use a scraper tool to remove the small bits left on your mat after you remove the cut pieces.
- Continue preparing, cutting, and carefully stacking the rest of your daisy pieces.


STEP 3: ASSEMBLE DAISIES FOR YOUR FLOWER TEDDY BEAR
NOTE: I recommend assembling all the flowers before you begin attaching them to the styrofoam.
- Layer two petal pieces of the same color and rotate or flip them until the petals fill in consistently around the middle.
TIP: Remember, natural flowers aren’t perfect and yours don’t need to be!
They will cover the styrofoam better if the petals are staggered, though. - Gently hold the middle down and lift the petals to give them some dimension.
TIP: You can use your fingernails to gently curl the petals. - Add a dot of craft glue to the top middle of the flower you want to use for the bottom layer.
- Place the other layer on top so the middles align but the petals are staggered and curve up the same way.
- Glue a middle dot in a contrasting color on top in the middle and hold it to set.
- You can very carefully shape or adjust the petals, just don’t tear them off of the center.
- Continue layering and gluing your daisies until you have the approximate amount needed to cover your bear, including several extras in case any tear.


STEP 4: ASSEMBLE YOUR DAISY FLOWER TEDDY BEAR
NOTE: Once all the daisies are ready, check the styrofoam shape for major blemishes. The flowers will hide discolorations or scuffs, but if the base is misshapen due to being compressed or another issue, that will impact the final result.
- For the multicolored bear, I started with the brown daisies for the eyes.
- Gently press the bottom of a daisy to a sticky glue dot so the adhesive transfers to the cardstock.
TIP: If you’re using very small flowers, gently rolling the glue dot into a line can make them easier to hide. - Carefully press the brown flowers for the eyes into place on the base if you’d like them to stand out.
NOTE: The eye placement is very important to make a recognizable shape, so make sure they’re even!
TIP: If the placement doesn’t look quite right, you should be able to gently remove the flower and glue dot and try again. If any styrofoam lifts, it will get covered by flowers. - For the ears, add a few different daisies to fill the front of each ear.
NOTE: I added three daisies to the front of each ear. - Then add daisies along the ears’ upper curves, starting and stopping where the ears become the head.
- Add a few daisies in different colors to the front surface and sides of the nose and snout.
NOTE: You can add daisies in different patterns depending on your color choices and the look you want, but I tried to vary mine so no matching flowers touched. - Starting at the top seam on the bear’s head, fill in the spaces between the grouped flowers, using different colors to avoid color pooling.
NOTE: If there’s a spot you’re struggling to fill, come back to it after adding the rest of the flowers so you can adjust everything all together. - Carefully turn the bear around to see the back surface.
TIP: Don’t worry if a flower pops off while you’re moving the bear around. Just press it back in place. - Add a few daisies to the back of each ear, moving from the top line to where the ear smooths out to become the head.
- Starting back up at the top, use different daisies to fill in the rest of the bear’s back.
NOTE: I added daisies in lines to fill the large flat spaces, again picking different colors to avoid color pooling. - When you think you have enough flowers covering the base, look everything over to see if there are bare spots. Either carefully add another daisy to fill it, or gently flatten out the surrounding petals to help cover the styrofoam. You can also slightly rotate the daisies in place because the glue dots are not permanent, but they’re more likely to tear than the roses are. Make sure to press them down to make the connection stronger after adjusting a flower.


STEP 5: SHOW IT OFF
Here are both finished bears!
The rose panda took an estimated 150 black roses and 140 white roses.
The layered daisy bear took about 230 flowers.
If you want a faster project that takes less paper and is easier to have someone help you with, I recommend the daisy bear because there is less size variation in the flowers than the rose style.
Notes
Finished Size of Bear
8" x 5" x 5"
Answers to Your Questions About How to Make a Flower Teddy Bear
Q: Where is the tutorial to design a custom rolled paper flower?
A: The custom rolled paper flower is not part of this tutorial — it’s an example of the custom projects you can design yourself in my ADVANCE program. The flowers on the red bear were created from scratch right in Cricut Design Space. But this is something you can easily make in my ADVANCE program! Learn more about ADVANCE here!
Q: What kind of paper do I use for the SVG cut file?
A: I recommend using 65 lb cardstock to make rolled paper flowers — it’s your choice which different colors and textures you want to use. If you use white cardstock, the glue might be a little hard to see so work in a well-lit area.
Q. Do I have to use a Cricut?
A: It’s certainly much quicker and easier to use a cutting machine to make all these flowers, but I know not everyone has one. My capable design staff and I always include several versions of each digital item. If you have a Silhouette Cameo, which uses Silhouette Studio, you can use the DXF cut files in Silhouette Basic Edition. If you have upgraded to Silhouette Designer Edition, Designer Edition Plus, or Business, you can use the SVG file. A Brother ScanNCut works, too, If you don’t have a cutting machine, you can print and then cut out my digital download PDF file, too, and then use scissors or a craft knife to cut out your pieces. The ZIP file in my resource library includes these file types and more! And good news, you can also use Cricut cut files and Design Space on a mobile device. Just make sure you have the latest version of the app.
Q: My cardstock keeps ripping on the intricate cuts. What can I do?
A: Be sure you’re using a clean and sticky machine mat, good-quality cardstock sheets, and a clean blade. See my Cricut Cutting Problems post for all the tips I use to get clean cuts every time.
Q: Can I cut this project on a Cricut Joy?
A: Absolutely! Both the daisies and the rolled roses are small enough to fit on an original Cricut Joy cutting machine, making it the perfect choice for a special gift you can craft anywhere.
Q: Can you use hot glue on styrofoam?
A: No, hot glue can melt styrofoam and is not a safe combination to use.
Q: How can I make the flowers stay on the flower teddy bear for shipping?
A: If your bear might get jostled, you can stick each flower on using long pins with plain or decorated tops!
Q: What’s the easiest way to make a rolled paper flower?
A: I always use a quilling tool to make paper flowers. You can use tweezers or a homemade tool, but I found a better way: The Flowtool. I really like the Flowtool because it keeps the bottom edge of the cardstock aligned, which can be tough when rolling flowers for projects like a perfect rose bear! It’s a great gift for any crafter!
Get my free SVG files to make a flower teddy bear!
I love seeing what you make with my designs and how you use them! Please share a photo of your flower teddy bear in our Facebook group or tag me on social media with #jennifermaker.
Love,

Want to remember this? Save this Tutorial on How to Make a Flower Teddy Bear to your favorite Pinterest Board!