Make a beautiful round door sign quickly and inexpensively from a Dollar Tree charger plate!
We’ve made a lot of DIY door hangers this year, and they are SO fun! One of the biggest issues I hear is how hard — or expensive — the wood door rounds can be. Plus, they usually need sanding, painting, staining, or sealing, which means door hangers are not usually quick projects. So I want to share a way to make a FAST and INEXPENSIVE round door sign for under $10 using basic things from Dollar Tree! These make great home decor and affordable gifts, without looking like you got it on the cheap.
Watch the step-by-step video tutorial for this fun holiday home decor project:

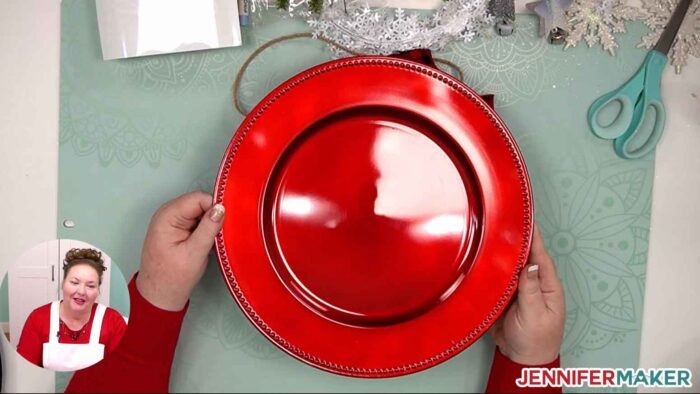
We’ll start with one a $1 charger plates from the Dollar Tree — you can get them in a lot of different colors and styles. My favorite is this gorgeous red one — it looks SO good!
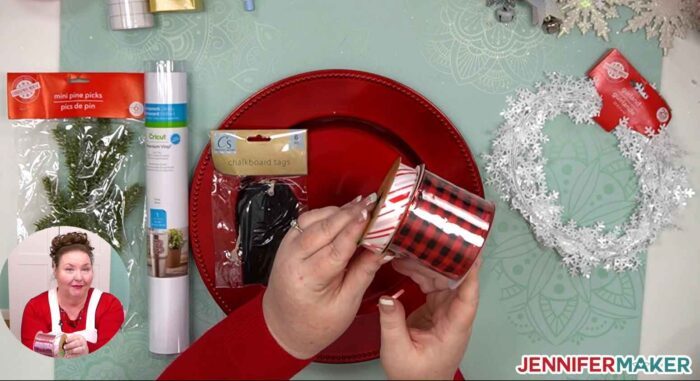
Then we need some vinyl to personalize it. While Dollar Tree does sell vinyl, it’s not my favorite and I’m going to use Cricut Premium Vinyl instead — it’s cuts better, weeds easier, and goes on a lot better. But we only need about six inches of vinyl, so it’s still not expensive.
You also need a way to transfer your vinyl to your dollar store charger. When I first did it using regular transfer tape, it took some of the paint off the charger. So instead I recommend you use the alternate painter’s tape method, and I’ll show you exactly how to do that. You can get painters tape at Dollar Tree, too!
Then we’ll decorate the round door sign with some of the super cute decorations I found at Dollar Tree — I’m using the pine bough picks, wired ribbon, narrow ribbon, and this pretty snowflake garland. You can go even further by adding things like chalkboard tags ornaments, too!
And I’m going to show you how to make the easiest and prettiest bow for your round door sign — a pom pom bow — using one roll of the Dollar Tree ribbon. For this, you’ll also want a pair of scissors, a hot glue gun, and some glue sticks!
And, of course, you need a way to cut your vinyl. You could use a craft knife, but the easiest way is to a Cricut cutting machine, and for that we’ll use the green standard grip machine mat, a scraper, and a weeding tool.
The only other thing you need to make this easy round door sign is a design, and I’ve prepared a number of free designs for you, including the cute “Let It Snow” design you see here!

Let me show you how easy it is to make this easy round door sign project with my free SVGs! This post contains some affiliate links for your convenience (which means if you make a purchase after clicking a link I will earn a small commission but it won’t cost you a penny more)! Read my full disclosure policy.
Materials to Make a Easy Round Door Sign for Under $10
View my Amazon shopping list with the TOOLS I used to make this project (all supplies except my vinyl came from Dollar Tree)
- 1 charger plate (I used a red charger, but they also have silver, gold, and faux wood)
- Permanent adhesive vinyl (I used a 5″ x 12″ piece of white vinyl)
- Wide wired ribbon and/or narrow ribbon
- Transfer tape or painter’s tape
- Decorations, such as chalkboard tags, snowflake ornaments, garland, greenery, etc.
- Glue gun and hot glue
- A way to cut your vinyl – I used the Cricut Maker but you can also use the Cricut Joy, original Cricut Maker, or any of the Explore Series machines, or just cut by hand with scissors or a craft knife
- Green Standard Grip machine mat
- XL Scraper
- Weeding Tool
- Design #346 – My free round door sign SVG/DXF/PDF design files are available in my free resource library – get the password by filling out the form at the bottom of this page
How to Make Your Own Easy Round Door Sign
Learn how to make easy round door hangers from dollar store charger plates! Download my round door sign designs from my resource library — it's design #346. TIP: If you are not sure how to upload an SVG cut file to Cricut Design Space, watch this helpful video training series I made. If you are on an iPad or iPhone, here is how to download and upload SVG files to the Cricut Design Space app. If you are using a different size charger, I recommend making a circle (as a template) and size it to the dimensions of your charger. In Design Space, click on Shapes and then Circle. Keep your circle locked and change the dimensions by either dragging the two arrows in the lower right or changing the dimensions at the top of the screen to match the size of your charger or round sign. You can then place the design you want over the circle to see how much you need to resize. I recommend keeping your images locked so the ratios remain the same as you use the resize handle to resize the designs. TIP: If your circle is covering your design, select the circle, click "Arrange" and then select "Send to Back." MAKE IT: Once you have you design sized correctly for your sign, you can hide or delete your circle and click "Make It." If you are using Smart Vinyl on a Cricut Maker 3 or Explore 3, select "Without Mat" and then measure and cut your Smart Vinyl according to the measurements on the screen. If using Cricut Premium Permanent Vinyl, select “On Mat” and place your permanent vinyl on a Green StandardGrip 12" x 12" cutting mat. Click "Continue" and select your material, either Smart Vinyl-Permanent or Premium Vinyl. I recommend changing the pressure setting to "More." Load your material and click "Go!" Once your design is finished cutting, unload your mat. I like to keep my vinyl on the mat when I weed to keep it from moving around. Now use your weeding tool to peel away all of the excess vinyl. Make sure to remove all the centers in the letters…these are also referred to as “counters.” Rather than using Cricut transfer tape, which is sticky and can peel up the paint on the Dollar Tree charger, I recommend you use my painter's tape transfer method instead. To do this, just place full lengths of painter's tape over your weeded vinyl, overlapping each length as you go. Then trim the edges! Use your scraper tool to burnish the front of your design to your painter's tape. Then flip over your mat and remove everything by gently pulling the mat away from the design. Now use your scraper tool again to burnish your design from the back to make sure it adheres to the transfer tape. Gently peel away the backing of your permanent vinyl. If any pieces of vinyl do not stick to the transfer tape, you can use your scraper to burnish that area again. Once your backing is removed, gently fold your transfer tape into the taco shape again and align your vinyl with your red charger plate. Press the center of the "taco" onto the sign and gently spread the design from the center moving to the outer edge. Use your scraper tool to burnish your vinyl to the sign. Gently peel away your transfer tape. Have your scraper handy to reburnish any areas that may lift as you remove the transfer tape. Once you've removed your transfer tape, you may notice small air bubbles in your vinyl. No one will likely notice these but I understand if you want to get them out. I have two tips for you to try! Second, you can use a straight pin to pop the bubble and then burnish the vinyl towards the hole you made to smooth it out. Add some greenery and garland to suit your taste! I found it easiest to arrange them first, then tie the pine boughs and garland together with wire to keep everything in place. Once that once done, I hot glued the arrangement to the top of the round door sign. Bows can be tricky but using wired ribbon helps create great bows. You can make a really easy pom pom bow -- watch the video to see exactly how to do it! NOTE: If you choose to add a second bow, you will want to reference your first bow and make it either slightly larger or slightly smaller so they compliment each other. You're almost done! You just need a hanger! Cut a piece of ribbon about 18" long and hot glue it to the underside of the plate. I recommend hot gluing it in many points to strengthen it as much as possible! And that's it! Enjoy your easy, pretty round door sign! The "Let it Snow" design is hand lettered, not a font. As an Amazon Associate and member of other affiliate programs, I earn from qualifying purchases.
Round Door Sign
Materials
Tools
Instructions
STEP 1: Get the Free Sign Designs
STEP 2: Cut Your Vinyl
STEP 3: WEED YOUR VINYL
Step 4: Apply Your Vinyl
First, you can use your scraper and try to reburnish the area to smooth out the bubbles.STEP 5: DECORATE YOUR ROUND DOOR SIGN
Step 6: Tie & Add an Easy Bow
Step 7: Add a Hanger
Notes
Recommended Products

Answers to Your Questions About How to Round Door Sign with a Charger
I can’t find any charger plates at the Dollar Tree. What can I use instead?
Charger plates are available all over the place. Here are some red chargers on Amazon that would work great. You can also just get wood rounds and paint them—here’s a tutorial for that!
What’s the best transfer tape for this project?
I recommend a low-tack transfer tape, such as painter’s tape. I do not recommend standard grip transfer tape as it can take paint off the Dollar Tree charger.
Get my free SVG files to create a beautiful round door sign from a Dollar Tree charger!
I love seeing what you make with my designs and how you use them! Please share a photo of your charger projects in our Facebook group or tag me on social media with #jennifermaker.
Love,

Want to remember this? Save this Dollar Tree Round Door Sign Tutorial to your favorite Pinterest Board!