Learn how to make better sublimation tumblers than EVER with my most valuable tips!
There’s something magical about peeling away that last strip of heat-resistant tape and revealing a tumbler covered in vibrant colors. I still remember the first time I tried it. I had my brand-new sublimation printer, a stack of sublimation paper, and a blank tumbler. I couldn’t wait to decorate my new favorite cup! I followed the steps, put it in my convection oven, and waited. When I finally pulled it out, I found white spots, a crooked seam, and my design was blurry! That’s when I realized that to truly make better sublimation tumblers, I needed to master the little details.
Watch the full step-by-step tutorial on how to make better sublimation tumblers:

Now, after years of experimenting, I’ve gathered my best tricks that can make a huge difference in your sublimation process. Whether you use a tumbler press or convection oven, these tips will help you get the best results each time!
Tip 1: Measure Your Tumbler
The first step toward a perfect wrap is getting the size right. Even if you’ve downloaded a PNG file or design template, it’s always a good idea to measure your tumbler’s circumference and height. A soft tape measure works best. Wrap it around the middle for the width, then measure from top to bottom. You can see exactly how I do this in the tutorial video! Getting the correct size ensures your full wrap design covers the entire tumbler without leaving gaps or stretching awkwardly.

Tip 2: Make Your Text the Right Size
Text that looks perfect on your computer screen may not work as well on a curved surface. If your message is too wide, it will start disappearing around the sides, making it hard to read from the front. On a standard 20 oz tumbler, I recommend that you keep your main text within three inches in width. This simple adjustment makes your sublimated tumblers look more professional and polished. You can see lots more in the tutorial video!
Tip 3: Use the Best Print Settings
Your printer settings are more important than you might think. For high quality results, select the best print quality your sublimation printer offers, and choose a matte presentation paper setting to ensure the sublimation ink is applied evenly for accurate, vibrant colors after you press.
Tip 4: Mirror Your Image
One of the most common beginner mistakes is forgetting to mirror the design. If you don’t mirror your image, any text or directional images will transfer backwards! In your printer settings, look for “Mirror” or “Flip Horizontally.” Be sure to hop into the tutorial video so you don’t miss this trick. It’s a super small step, but it’s the best way to make sure your sublimated tumbler turns out exactly how you imagined.
Tip 5: Double-Check Your Print’s Orientation
Before you tape your print onto the blank tumbler, make sure the top of the design is oriented at the top of the tumbler. This sounds simple, but it’s an easy thing to overlook when you’re in the middle of preparing multiple sublimation projects. Checking orientation now will save you from the frustration of an upside-down image!
Tip 6: Use the Best Tape for the Job
Did you know that not all heat-resistant tape is created equal? The right materials here can prevent problems later. For tumblers without overlapping seams, blue heat-resistant tape works well. For overlapping seams, yellow heat-resistant tape is thinner, more flexible, and less likely to leave dark lines on the sublimated design. You can see both kinds of tape in action in my tutorial video. Always use heat-resistant tape rated for high temperature use (not regular craft tape or cellophane tape!) so it holds up during the heating process.
Tip 7: Pay Attention to Your Seam
The seam is often the trickiest part of creating sublimation tumblers. A slight misalignment or wrong taping technique can leave you with a visible line. For a clean finish, overlap your design slightly to avoid a white gap, but place a strip of tape on the back of one seam edge to prevent a dark overlap. Don’t tape under the printed area, as it can block ink from transferring. Press down firmly along the seam with a scraper or fingernail to push the ink more firmly against the tumbler’s sublimation coating. This part is much easier to demonstrate in the video tutorial, so be sure to watch along!
Tip 8: Secure your print tightly
Loose wraps are one of the main causes of faded or uneven transfers. Make sure your sublimation paper fits snugly against the entire tumbler. Use a clamp, pull your tape tightly across the seam, and seal both the top and bottom edges. Press the tape down with a scraper to remove air pockets. Some crafters also use shrink wrap sleeves for extra pressure before heating in sublimation ovens or a tumbler heat press.
Tip 9: Rotate your tumbler during heating
If you’re using a convection oven or other sublimation ovens, rotating your tumbler halfway through the heating time helps prevent hot spots. Uneven temperature settings can lead to scorching on one side and faded areas on the other. Wear heat-resistant gloves, flip the tumbler at the right time, then let it finish heating evenly for the best results.
After I walk you through these nine tumbler tips in the video, I’ll show you how to put them into practice by making a message tumbler from start to finish. You’ll see exactly how I size the text, line up the design, and wrap it around the tumbler while applying each trick along the way. That way, you don’t just hear the tips, you get to watch them in action on a real craft you can make yourself! It’s the perfect way to turn your practice into a meaningful project, whether you’re making a motivational cup for yourself or a heartfelt gift for someone special.
Want to learn how to design a customized message tumbler? I’ll show you how to add your own inspirational quote to a tumbler design in my Advance with JenniferMaker program! Plus, you’ll have access to my personal collection of images and design elements in your member library that you can sublimate onto tumblers and other custom design projects! Click here to learn more about the Advance program!

Every time I see those vibrant colors pop against the smooth finish, I remember why tumblers are one of my favorite parts of sublimation. They’re practical, beautiful, and open up endless unique design possibilities. With the right materials, tools, and my easy tips, you’ll find which different techniques work for you, so you can create sublimated tumblers that are as durable as they are stunning.
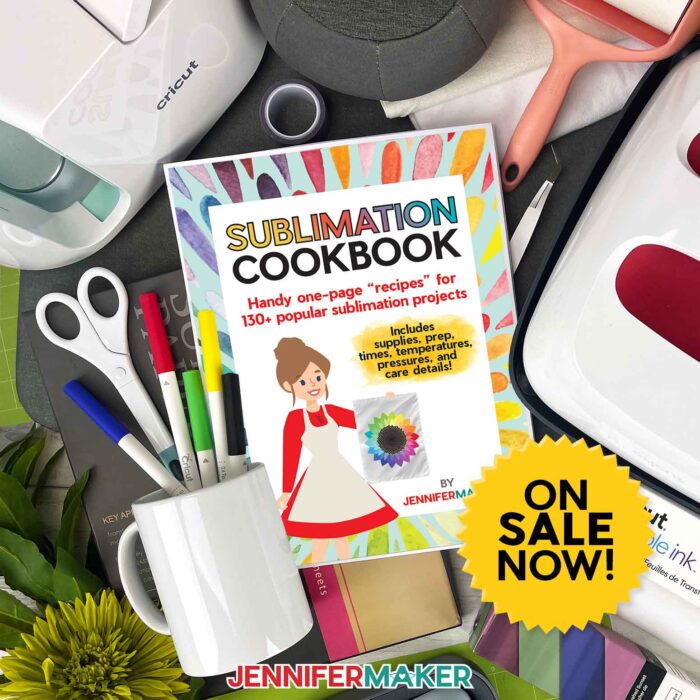
For even more tips and tricks for sublimation success, check out my Sublimation Cookbook. It’s packed with loads of information to help you achieve great results consistently, including recommended time, temperature, and pressure settings for tons of unique materials.
Want to learn how to make better sublimation tumblers? Let me show you how fun and easy it can be! This post contains some affiliate links for your convenience (which means if you make a purchase after clicking a link I will earn a small commission but it won’t cost you a penny more)! Read my full disclosure policy.
Materials to Sublimate a Message Tumbler
View my Amazon shopping list with the exact items I used.
- One (1) 20 oz. Straight Side Skinny Sublimation Tumbler
- One (1) Sheet of 8.5” x 11” A-Sub Sublimation Paper 105g -OR-
- One (1) Sheet of 8.5” x 11” A-Sub Sublimation Paper 125g
- Sublimation Printer – I used a converted Epson EcoTank ET-2800 Printer
- Sublimation Ink
- Convection Oven
- Silicone Baking Mat
- Oven Thermometer
- Fan (for ventilation)
- Heat-Resistant Gloves
- 10mm Yellow Heat-Resistant Tape -OR-
- 20mm Blue Heat Resistant Tape
- Looped Tape Measure
- Scissors
- Paper Trimmer
- Scraper
- 5” x 10” Heat Shrink Wrap Sleeves (if tumblers don’t come with them)
- Heat Gun
- Isopropyl Alcohol -AND-
- Lint Free Cloth
- Tumbler Clamp
- Cooling Rack
- OPTIONAL: Tumbler Cradle
- OPTIONAL: Cricut BrightPad Go
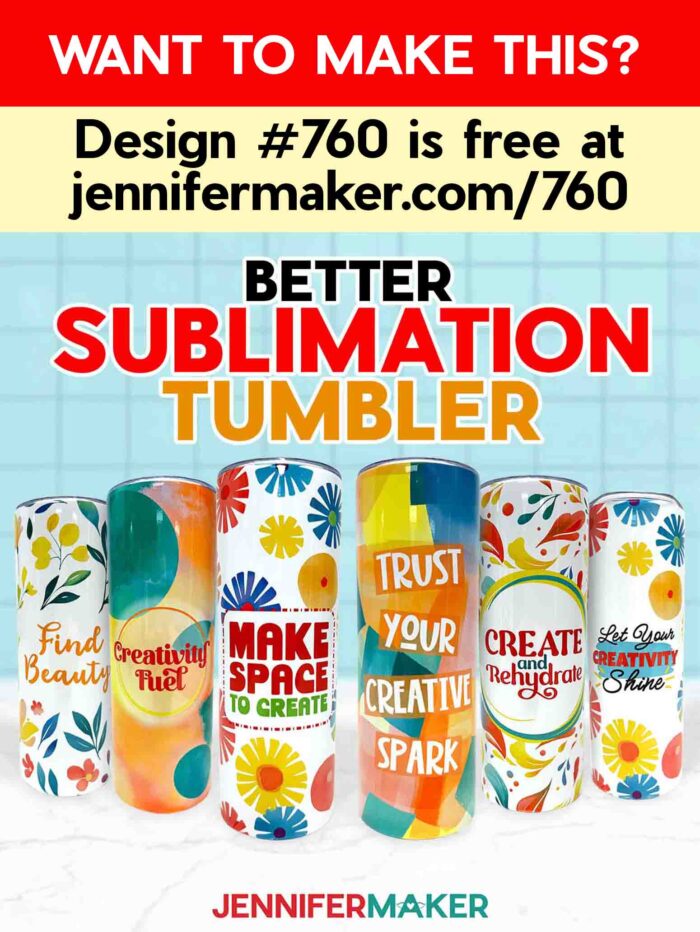
- Design #760 (My free PNG design files are available in my free library – get the password by filling out the form at the bottom of this page)
How to Make Better Sublimation Tumblers
Make Better Sublimation Tumblers
Learn how to make better sublimation tumblers!
Materials
- One (1) 20 oz. Straight Side Skinny Sublimation Tumbler
- One (1) Sheet of 8.5” x 11” A-Sub Sublimation Paper 105g -OR-
- One (1) Sheet of 8.5” x 11” A-Sub Sublimation Paper 125g
- Design #760 (My free PNG design files are available in my free resource library - get the password by filling out the form at the bottom of this page)
Tools
- Sublimation Printer - I used a converted Epson EcoTank ET-2800 Printer
- Sublimation Ink
- Convection Oven
- Silicone Baking Mat
- Oven Thermometer
- Fan (for ventilation)
- Heat-Resistant Gloves
- 10mm Yellow Heat-Resistant Tape -OR-
- 20mm Blue Heat Resistant Tape
- Looped Tape Measure
- Scissors
- Paper Trimmer
- Scraper
- 5” x 10” Heat Shrink Wrap Sleeves (if tumblers don't come with them)
- Heat Gun
- Isopropyl Alcohol -AND-
- Lint Free Cloth
- Tumbler Clamp
- Cooling Rack
- OPTIONAL: Tumbler Cradle
- OPTIONAL: Cricut BrightPad Go
Instructions
STEP 1: GET MY FREE MESSAGE TUMBLER DESIGNS
First, download my Make Better Sublimation Tumblers files from my free library – look for Design #760. Alternatively, you can use the Save This Project form near the top of this post and the design link will be emailed to you.
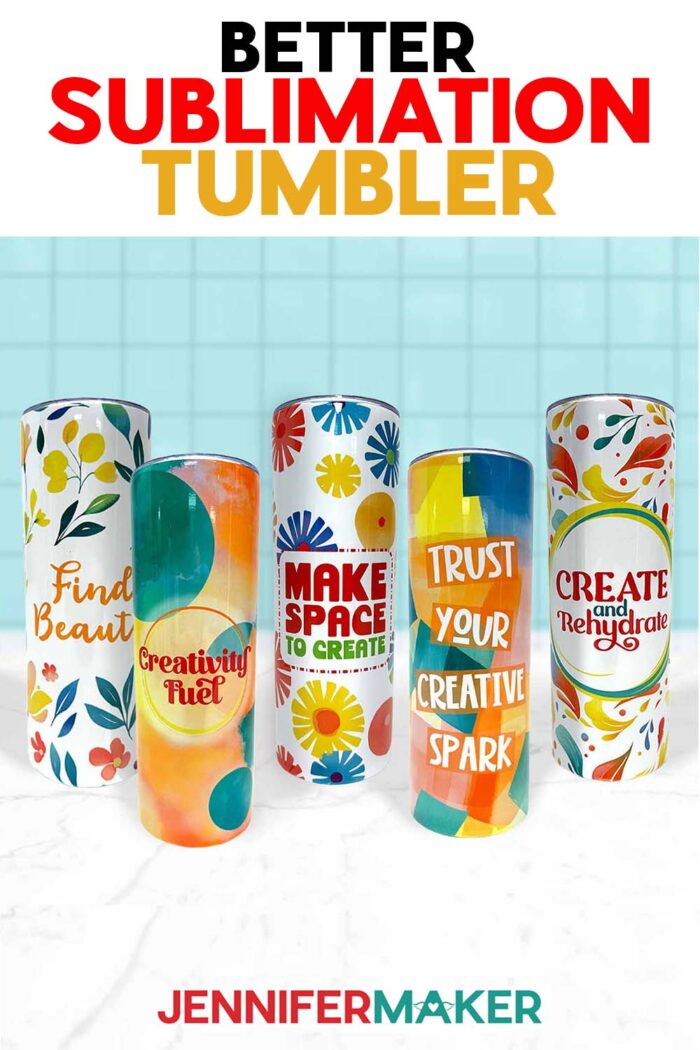
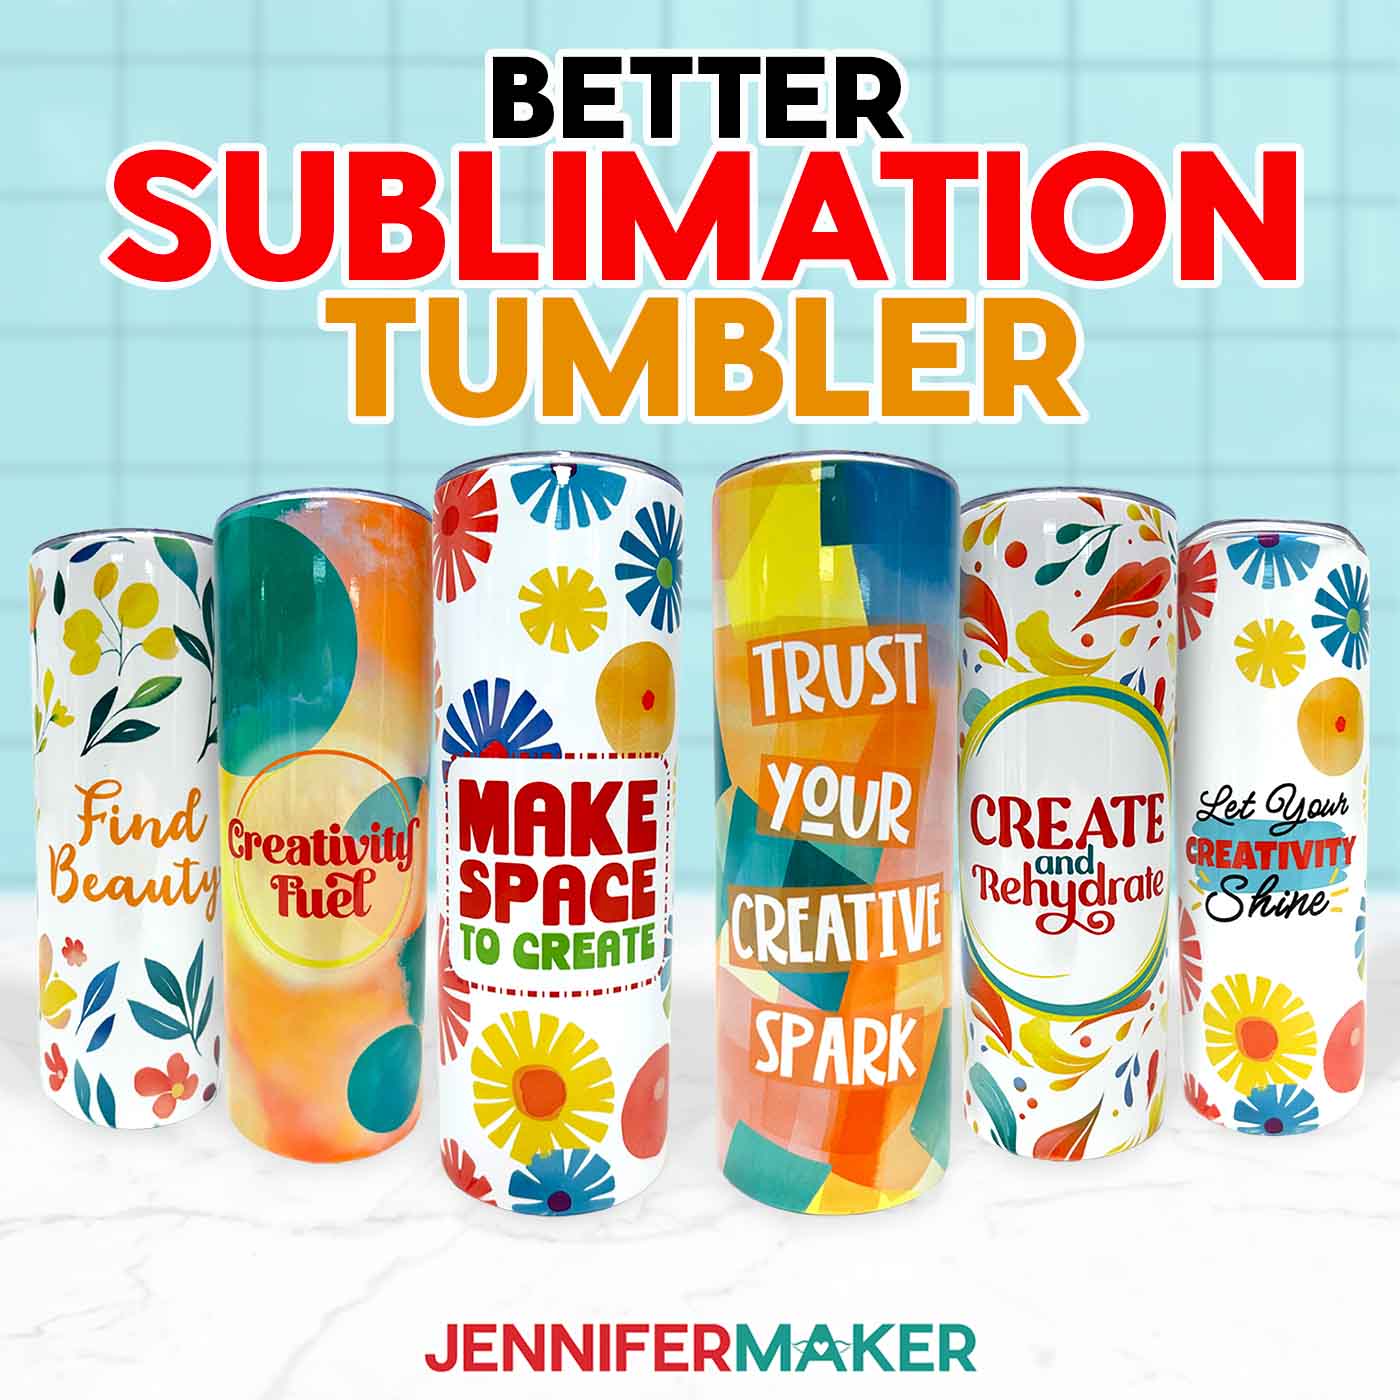
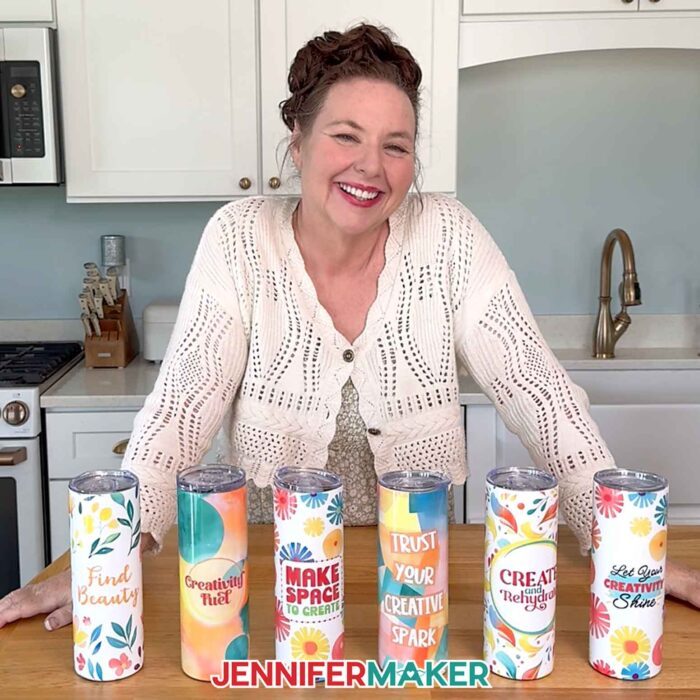
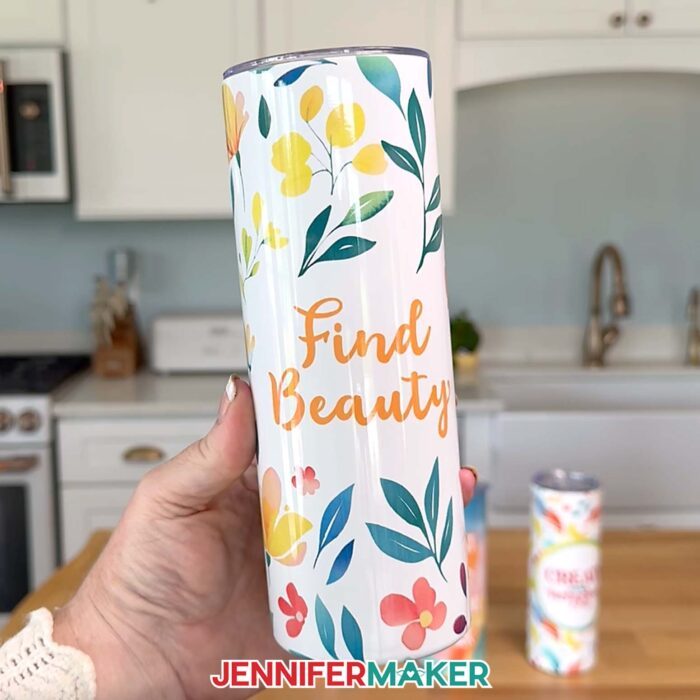
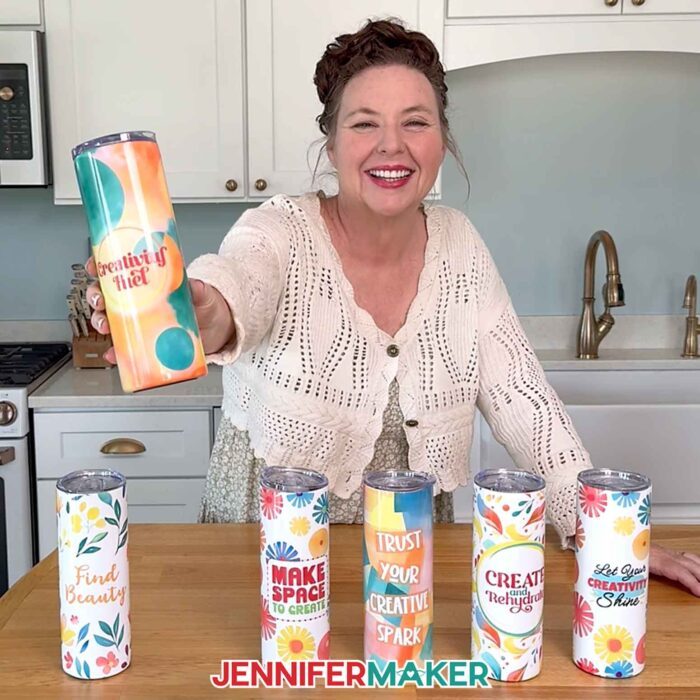
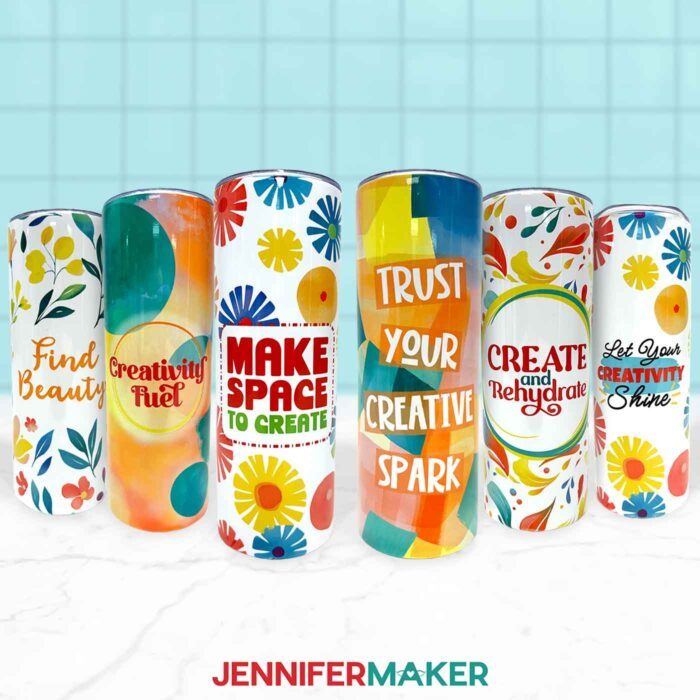
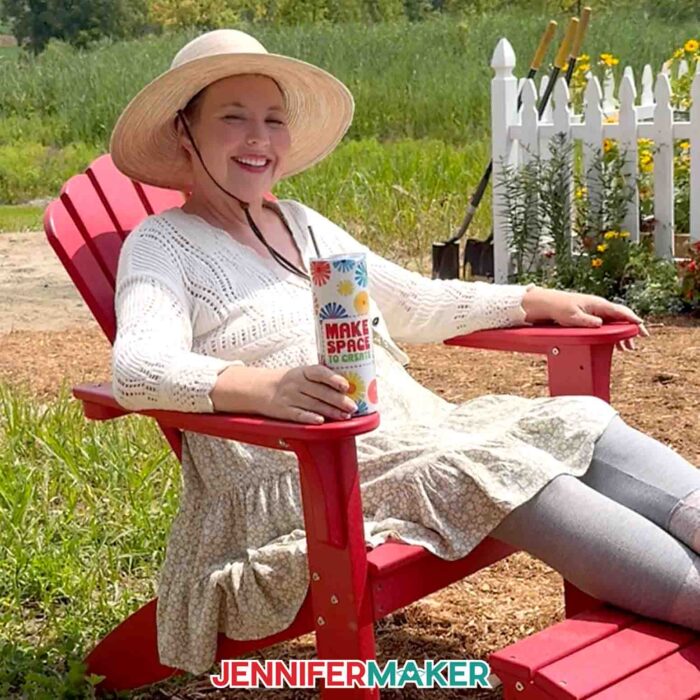
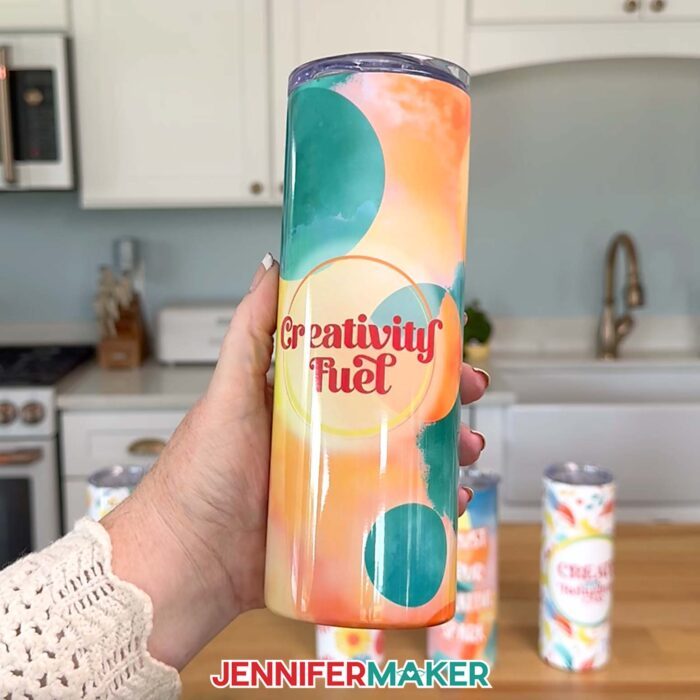
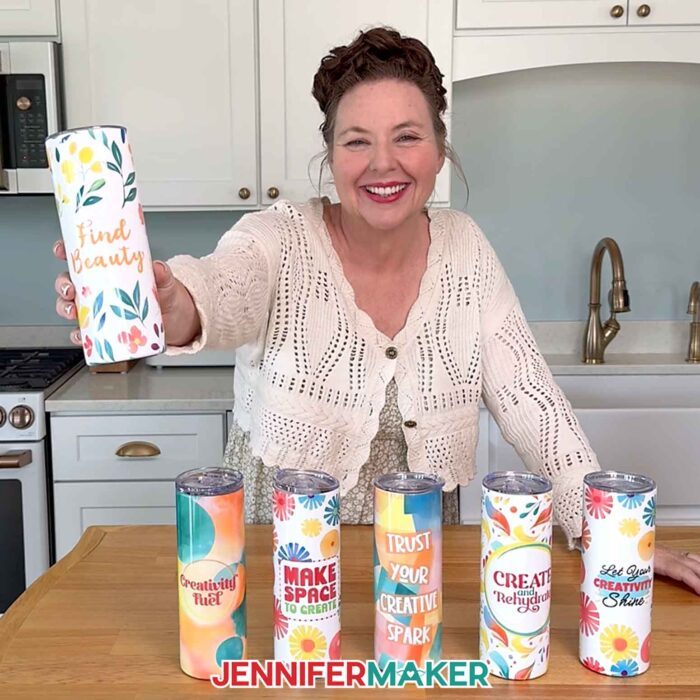
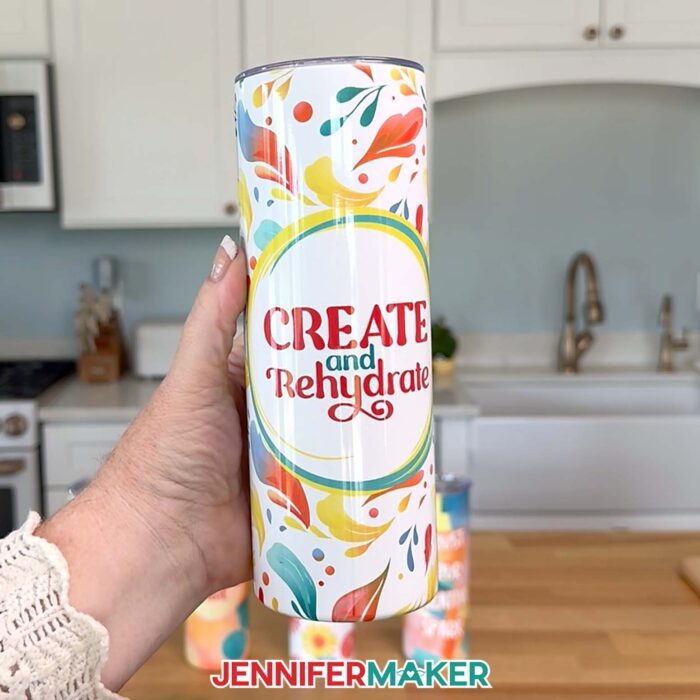
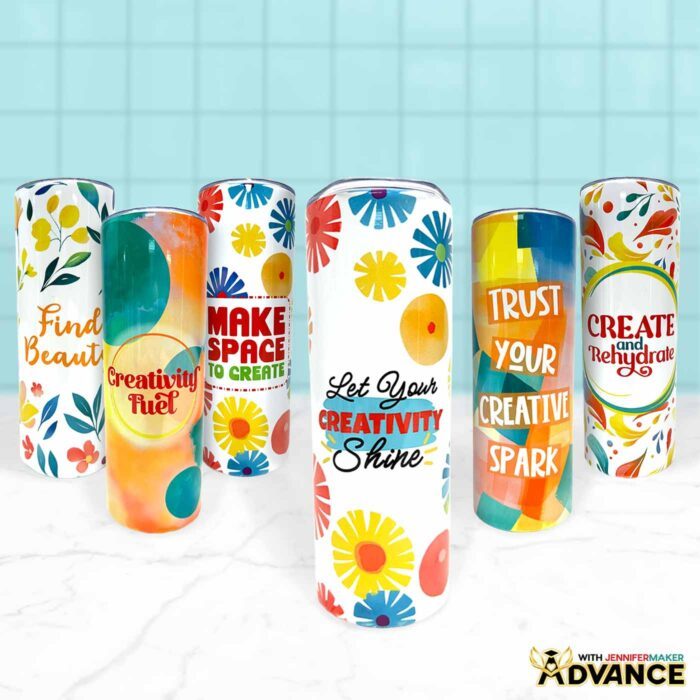
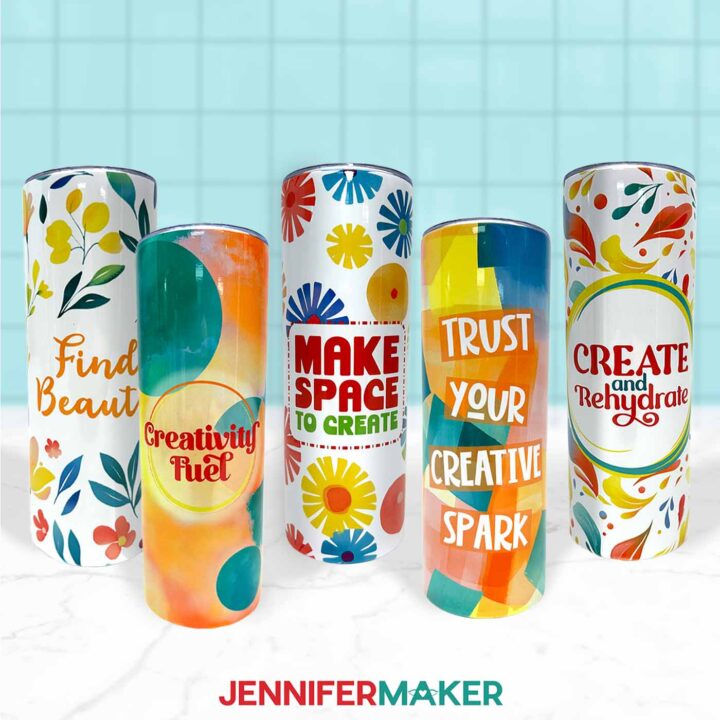
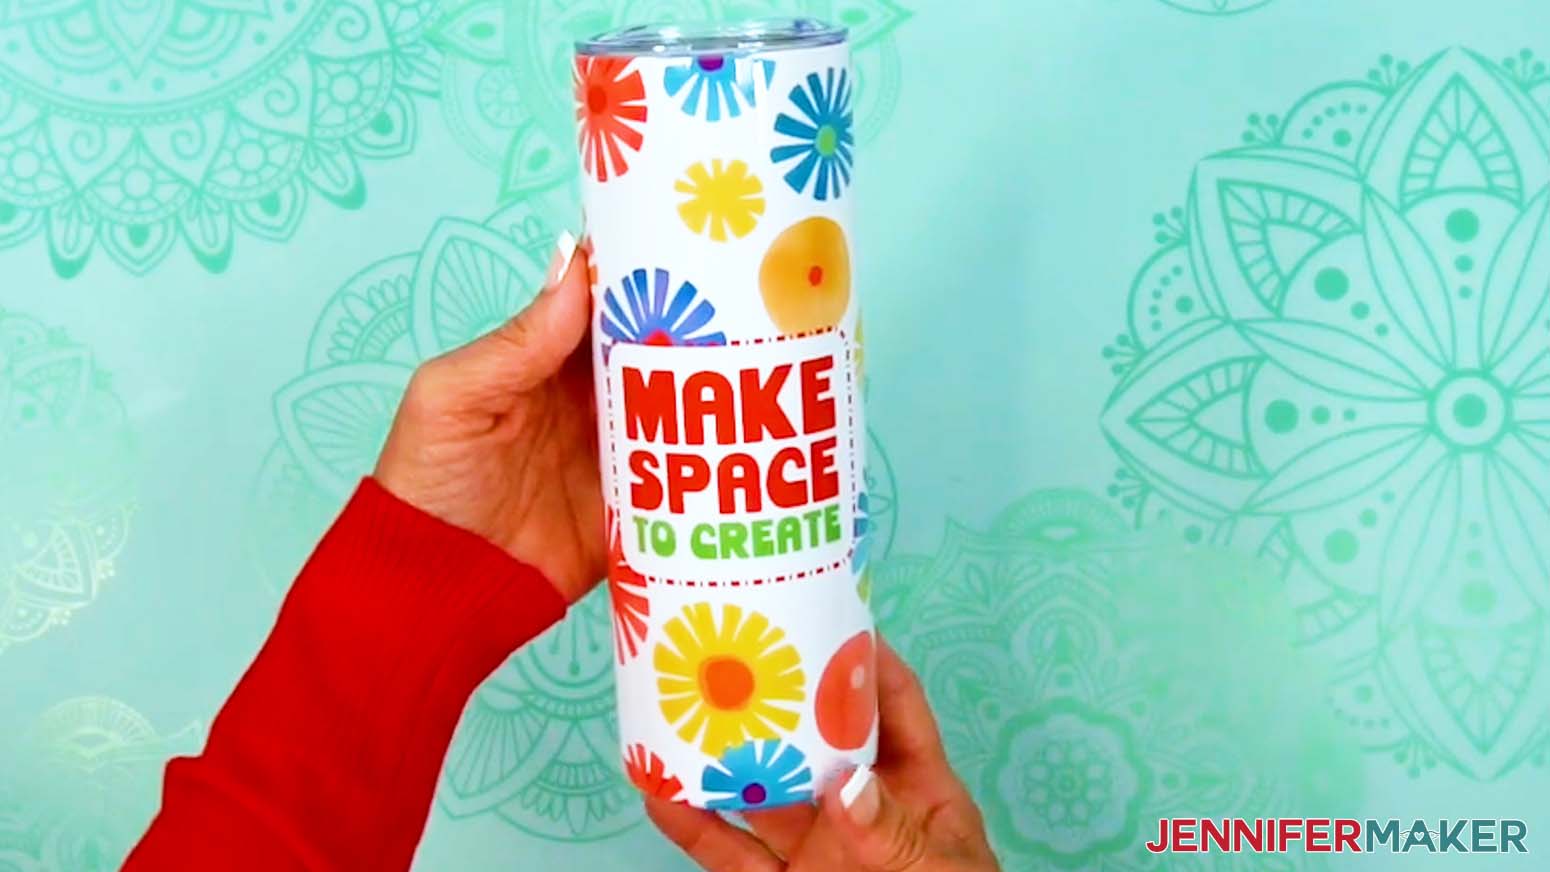
In the PNG folder, you’ll find five tumbler wrap designs with phrases to inspire your creativity: “Find Beauty,” “Creativity Fuel,” “Create and Rehydrate,” “Make Space to Create,” and “Trust Your Creative Spark.” I made these designs with the help of AI art generation and adjusted them with image editing software.
I’ll show you how to use these files to print a sublimation wrap and apply it to a 20 oz. straight-side skinny tumbler like the one in my materials list.
TIP: If you’re not sure how to upload, go to jennifermaker.com/svgs to learn how to unzip and upload PNG files.
STEP 2: MEASURE YOUR TUMBLER’S DESIGN AREA
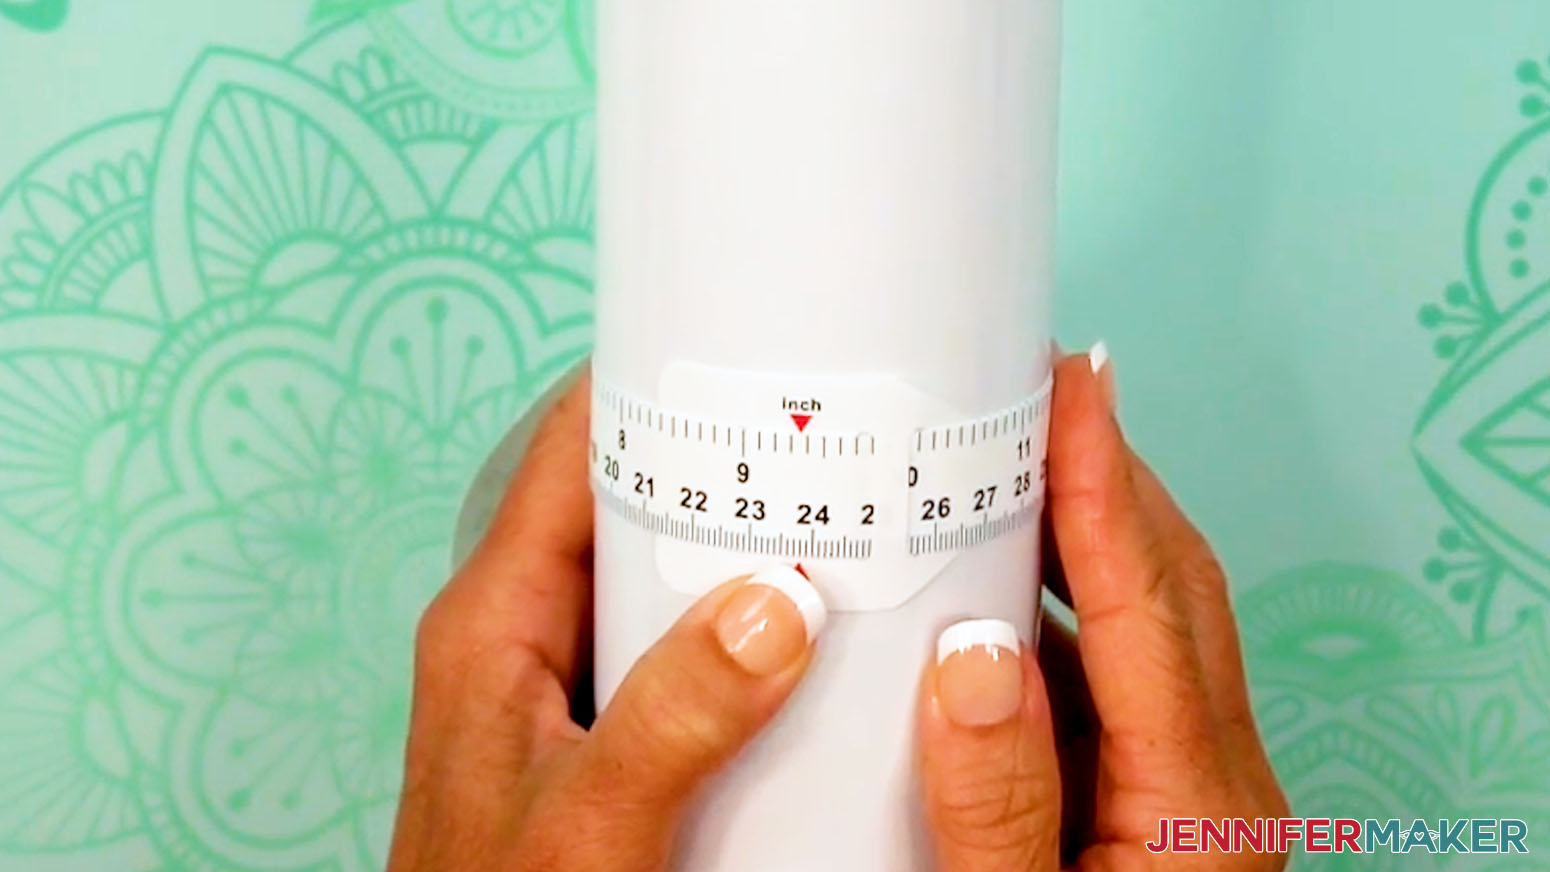
- Use the looped measuring tape to find the tumbler’s circumference to get the wrap’s width. Record your measurement on a piece of scrap paper.
NOTE: The tumbler in my list is 9.37” around.
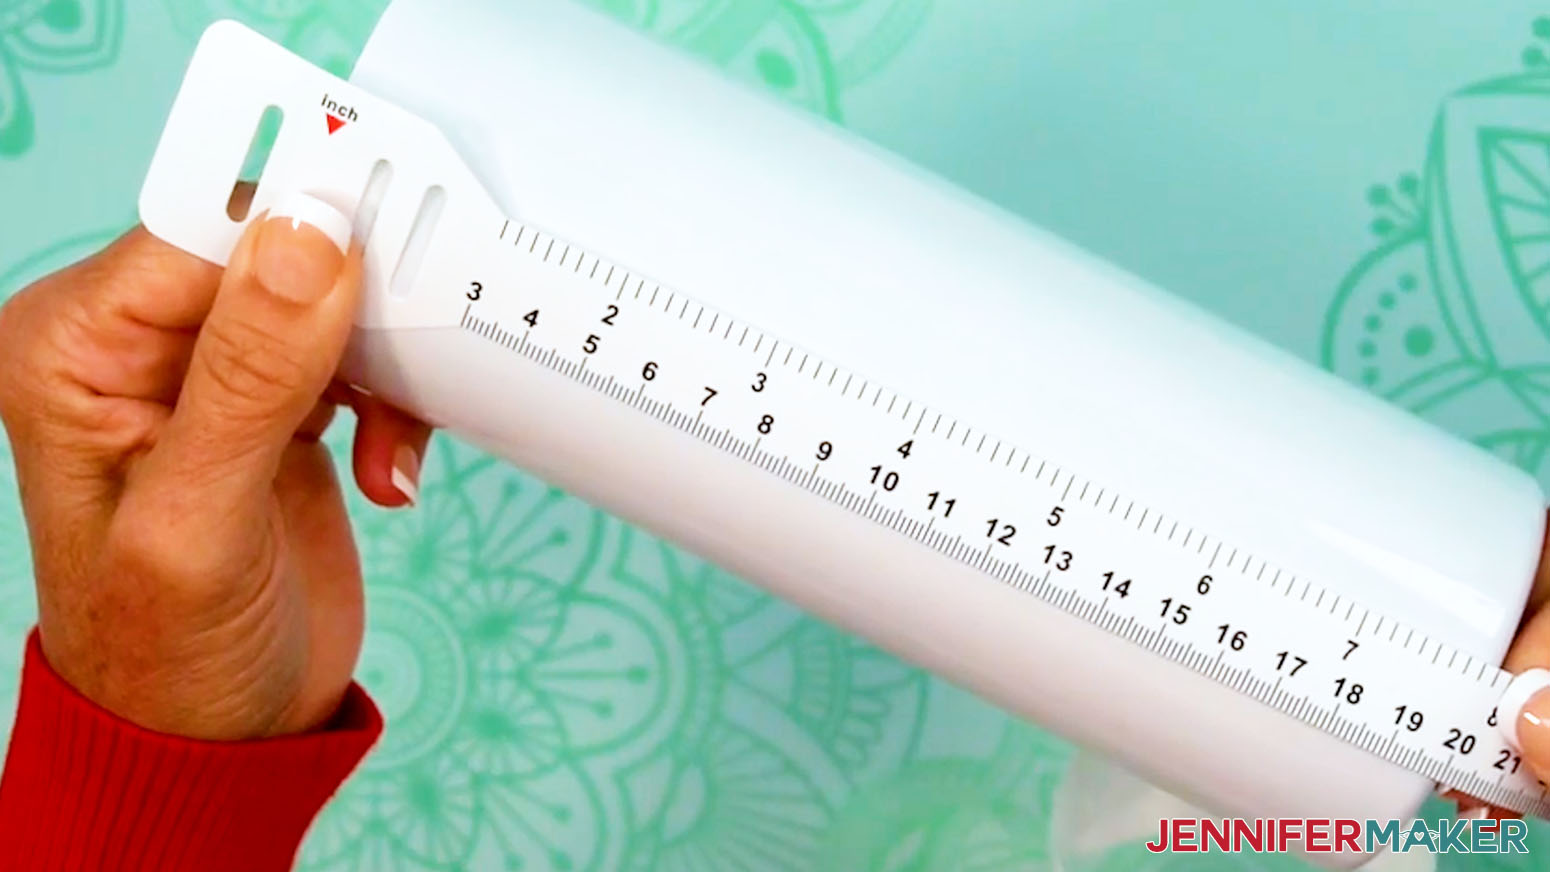
- Then measure the tumbler’s height to see how tall the wrap should be. If your tumbler is indented at the top and bottom, only measure the straight edge. Record this measurement, as well.
NOTE: The sublimation area for my tumbler is 7.9” high.
STEP 3: PRINT YOUR TUMBLER’S SUBLIMATION DESIGN
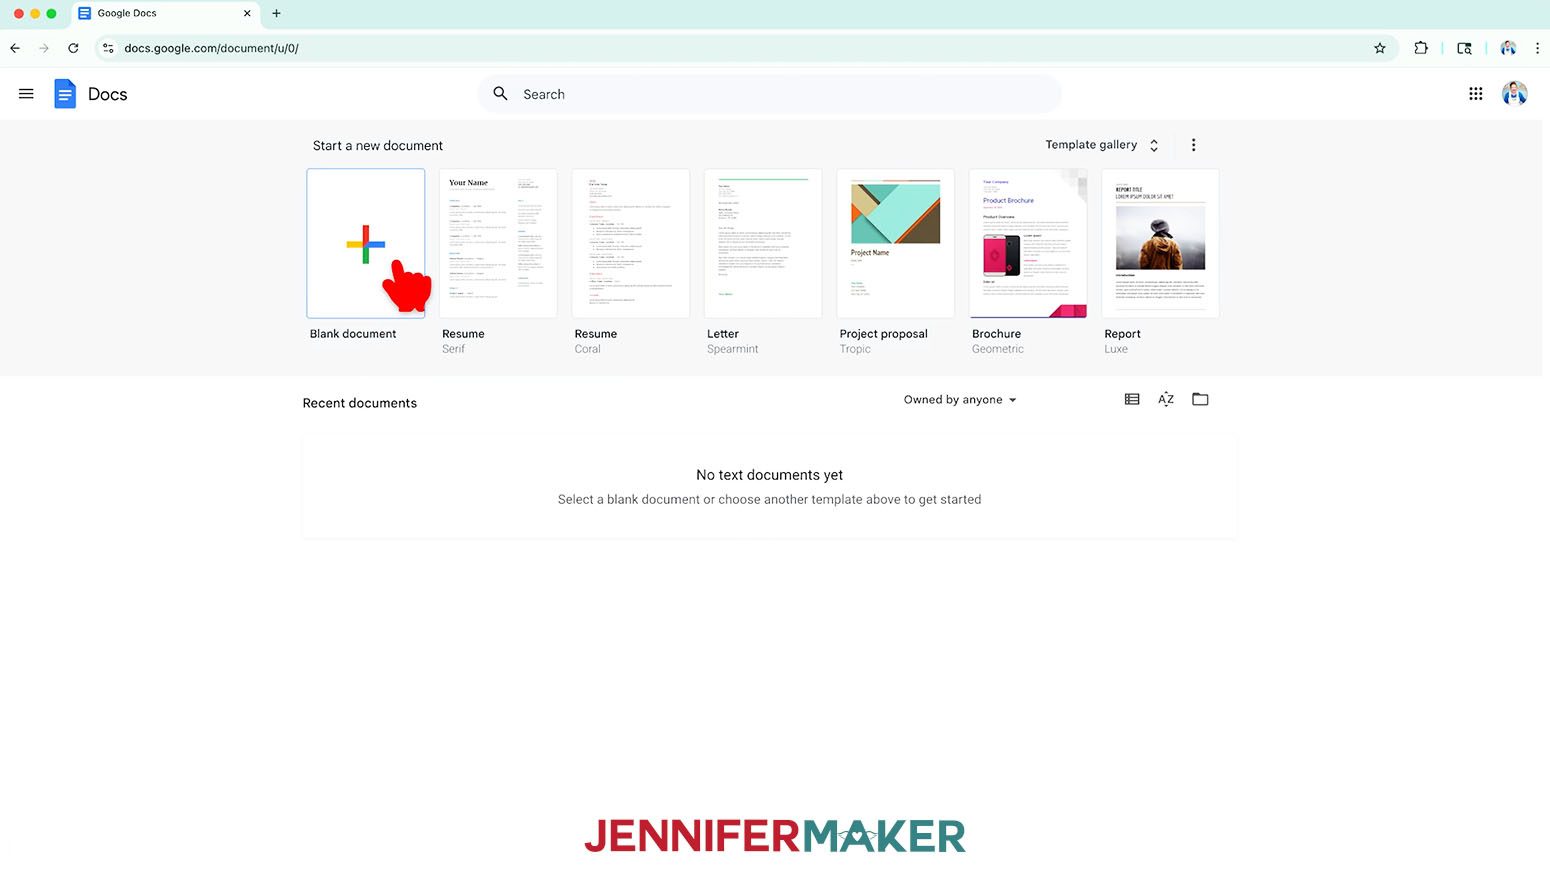
- Open Google Docs in the Google Chrome web browser on your computer.
NOTE: You will need a free Google account to use the free Google Docs software.
TIP: You can also download and open the Google Docs app, but you won’t be able to install or access any printer profiles from a mobile device, and you’ll also have limited access to features, so I do not recommend it on a mobile device. - Click “Blank document” at the top left to open a new document.
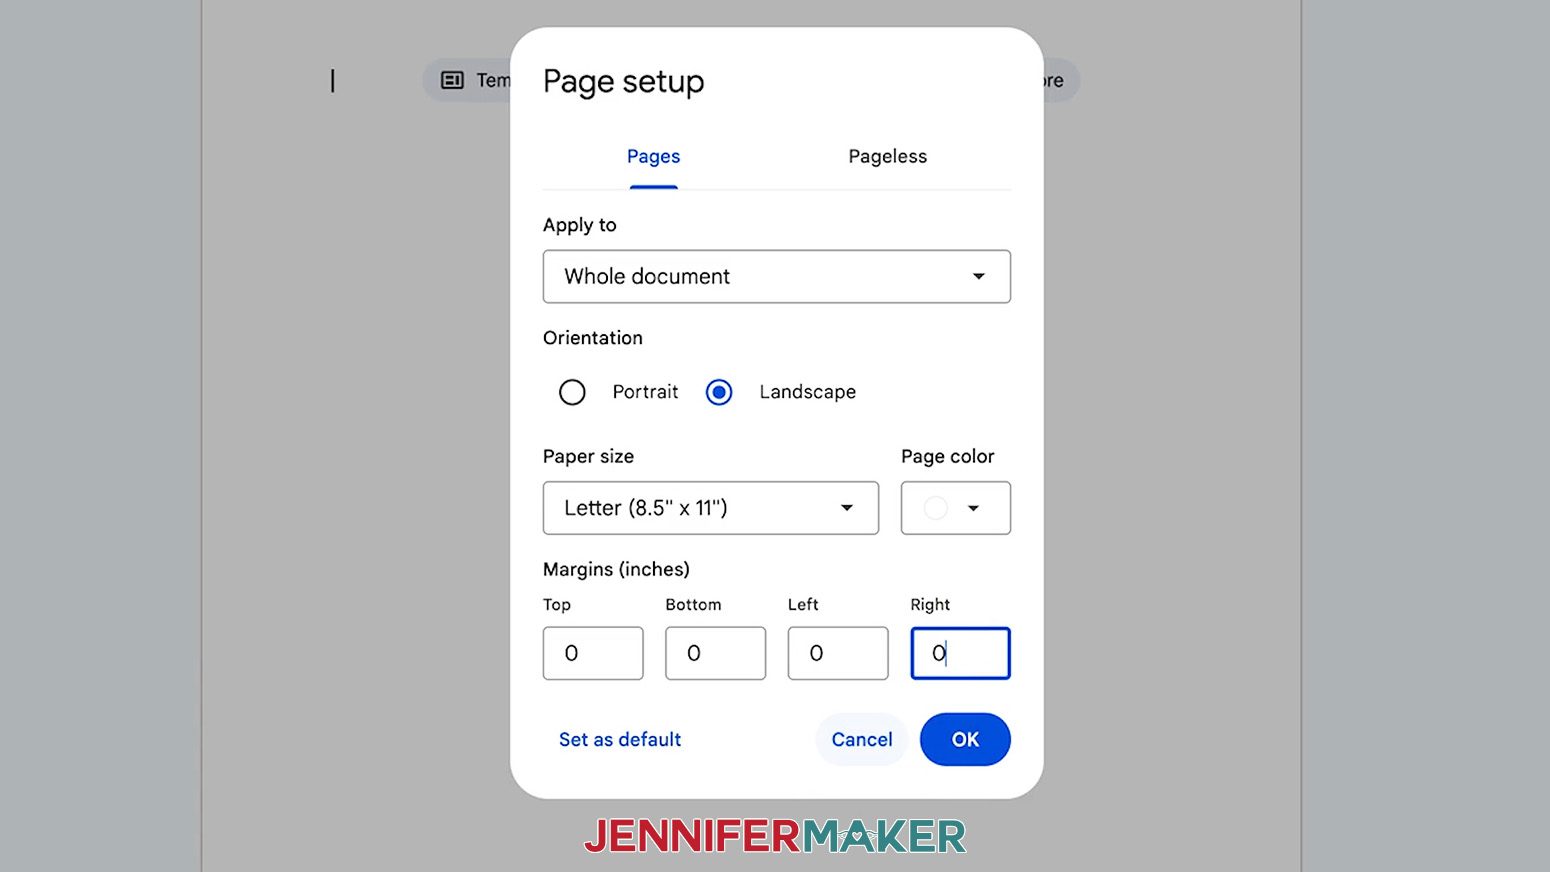
- Go to the File menu and select “Page setup.”
- Select the bubble next to “Landscape” to better fit the wrap’s orientation.
- Change your Paper Size to match your sublimation paper size. I’m using 8.5” x 11” or letter-size paper.
- Change your margins to “0” to use more of the page.
- Click “OK” to apply the settings.
- Click the area that says “Untitled document” at the top and type a name for the file.
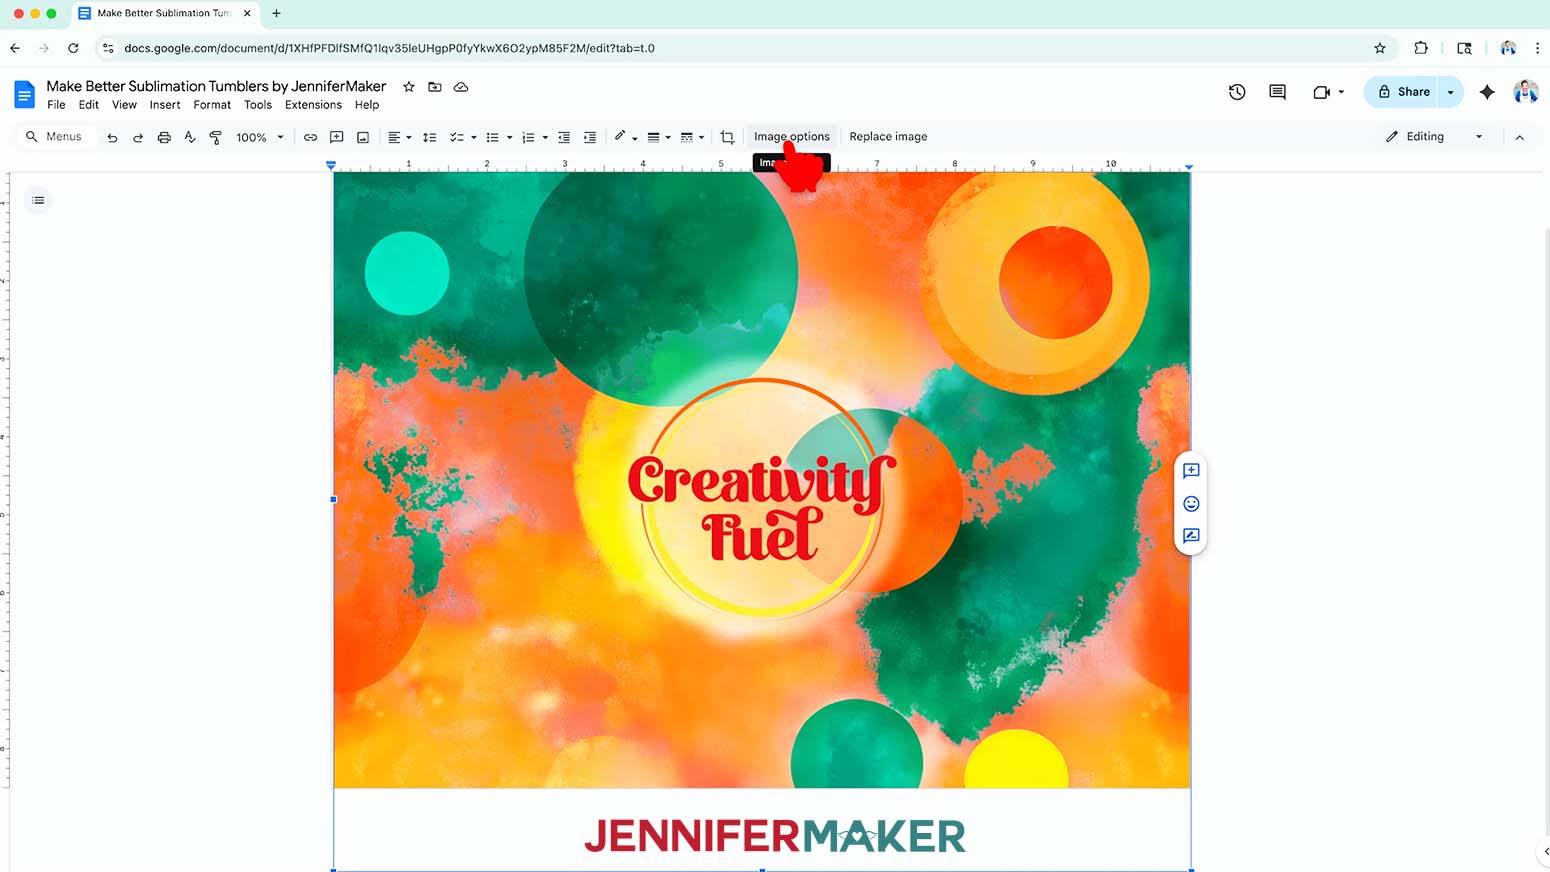
- Go to the Insert menu, select “Image,” and select “Upload from Computer.”
- Select the PNG file with your sublimation design.
TIP: You’ll most likely find it in your Downloads folder.
NOTE: I’ll demonstrate with the “fuel” design. - Click “Open” to add the image to your document.
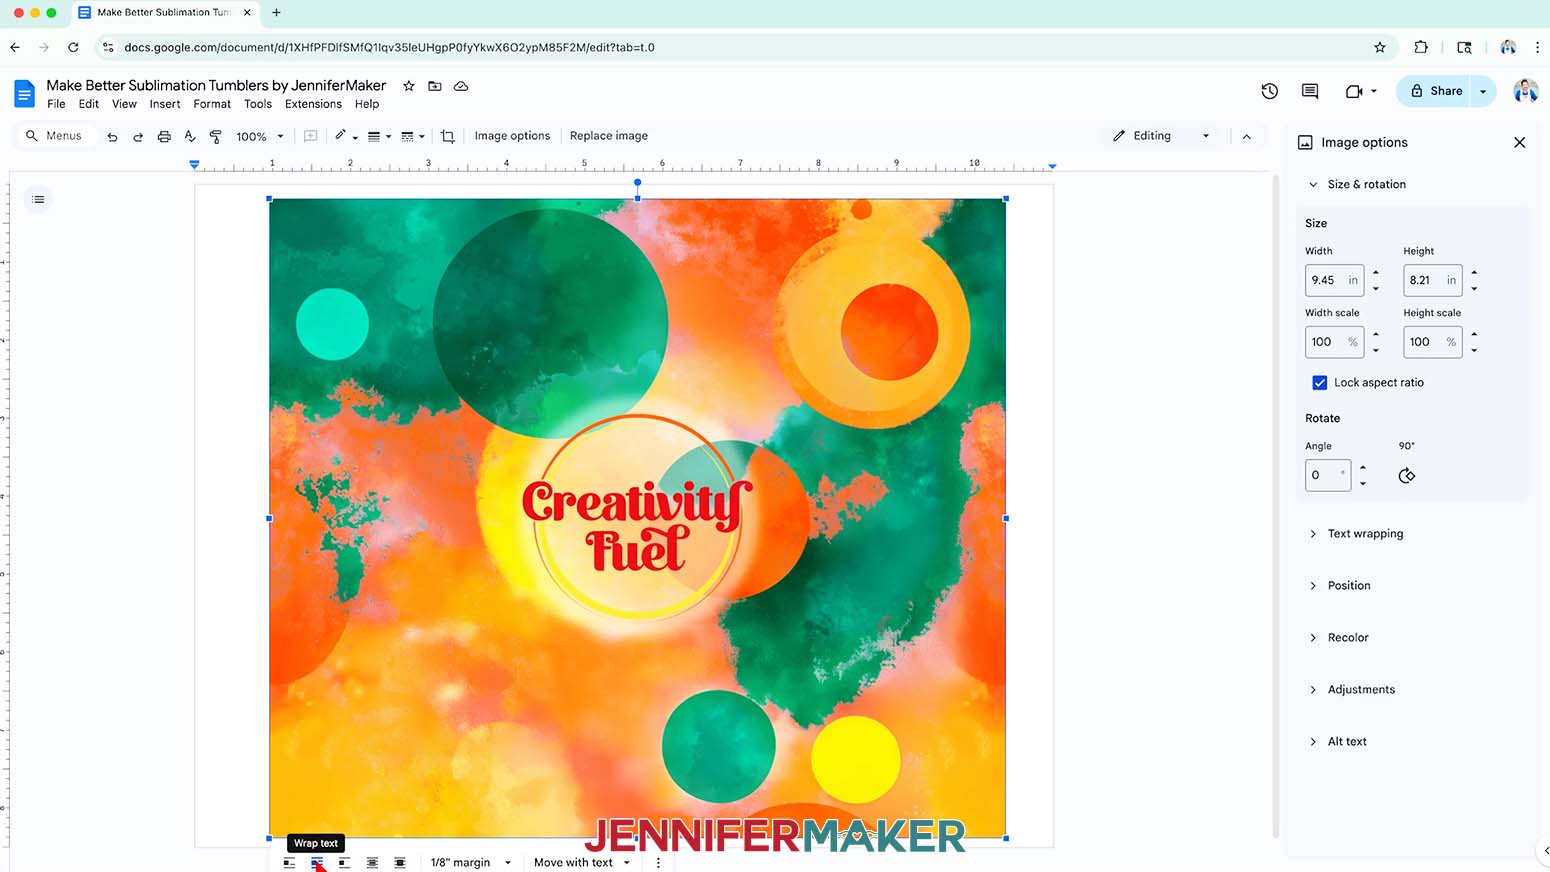
- Click “Image Options” at the top of the canvas.
NOTE: You can also open the menu by going to “Format,” “Image,” and “Image Options.” - Select “Size & Rotation.”
- Keep the “Lock aspect ratio” box checked to maintain the design’s proportions.
- Change the “Width” field to be slightly larger than the circumference you recorded earlier.
NOTE: Since my blank is 9.37” in circumference, I’ll make my design’s width 9.45”. - The “Height” field will automatically adjust proportionately.
NOTE: If you use a different tumbler than the one in my list, the adjusted height may be shorter than the height of your tumbler’s sublimation area. If so, you can increase the width slightly to make sure your print covers your entire tumbler, but the design elements may no longer fit correctly along the seam. - Click the image and select the “Wrap text” icon from the menu that appears below it.
NOTE: This setting lets you move the design anywhere on the page. - Click and drag the image to the center of your page, as that ensures it won’t get cut off at the edges.
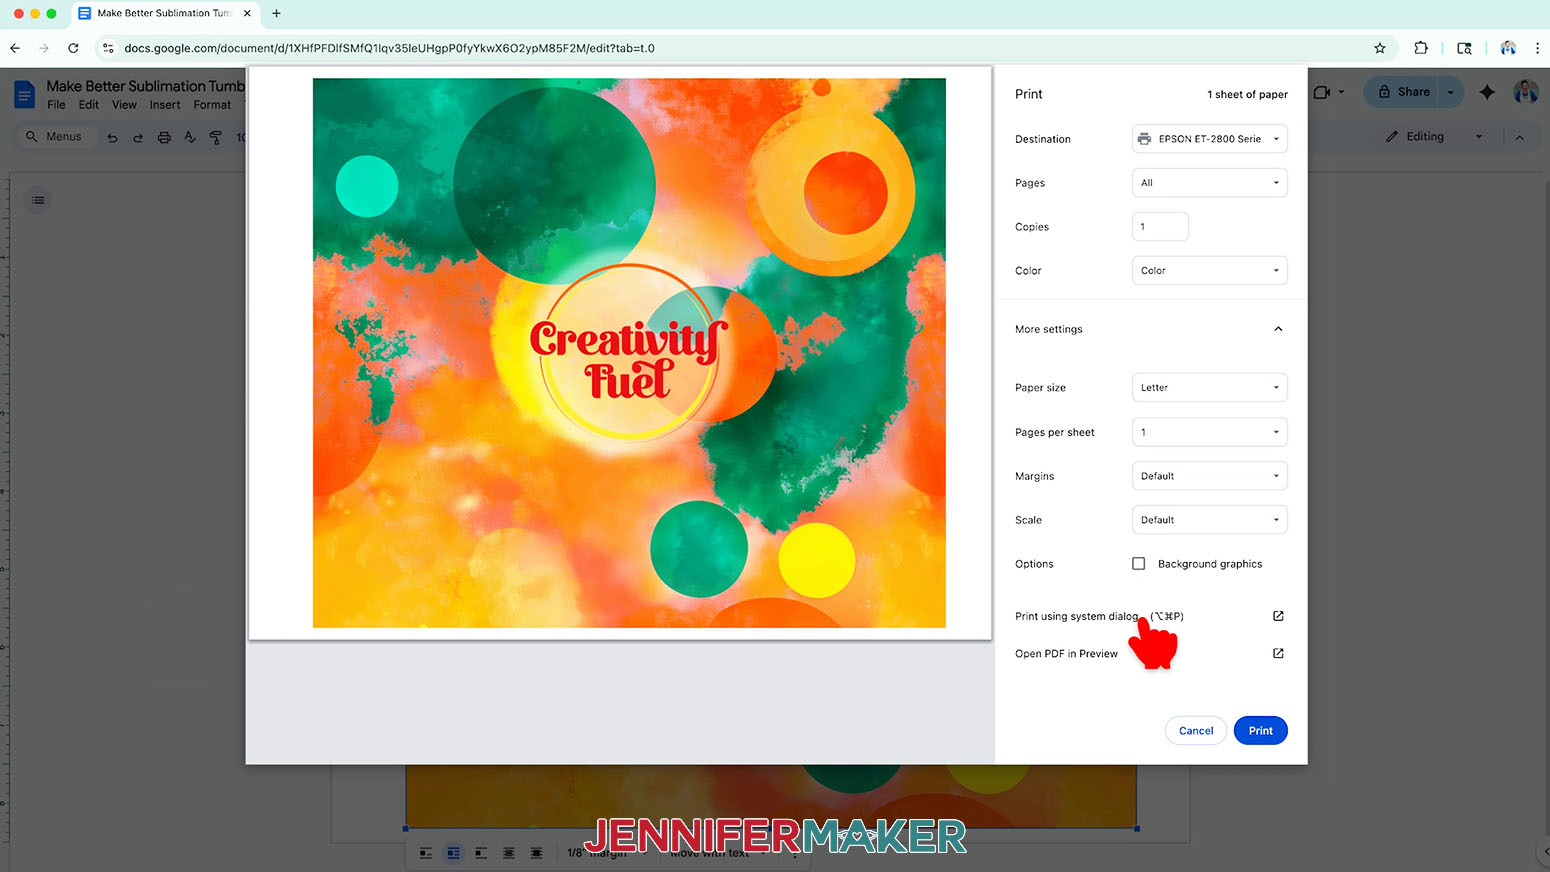
- Go to the File menu and choose “Print.”
- Select your sublimation printer under “Destination.”
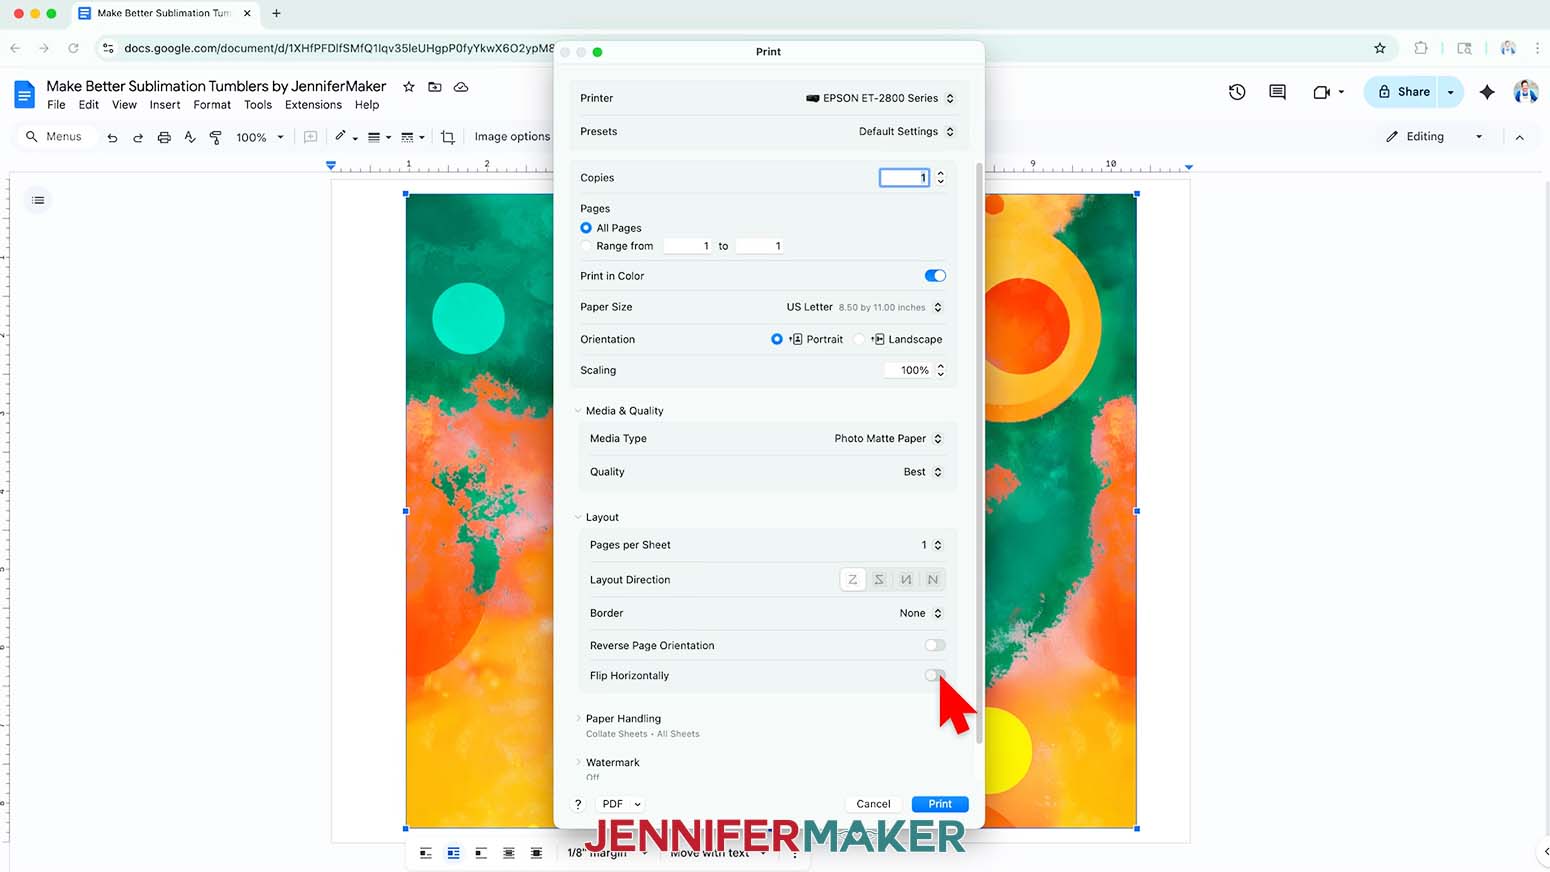
- Click the arrow beside “More Settings,” and then click “Print Using System Dialog.”
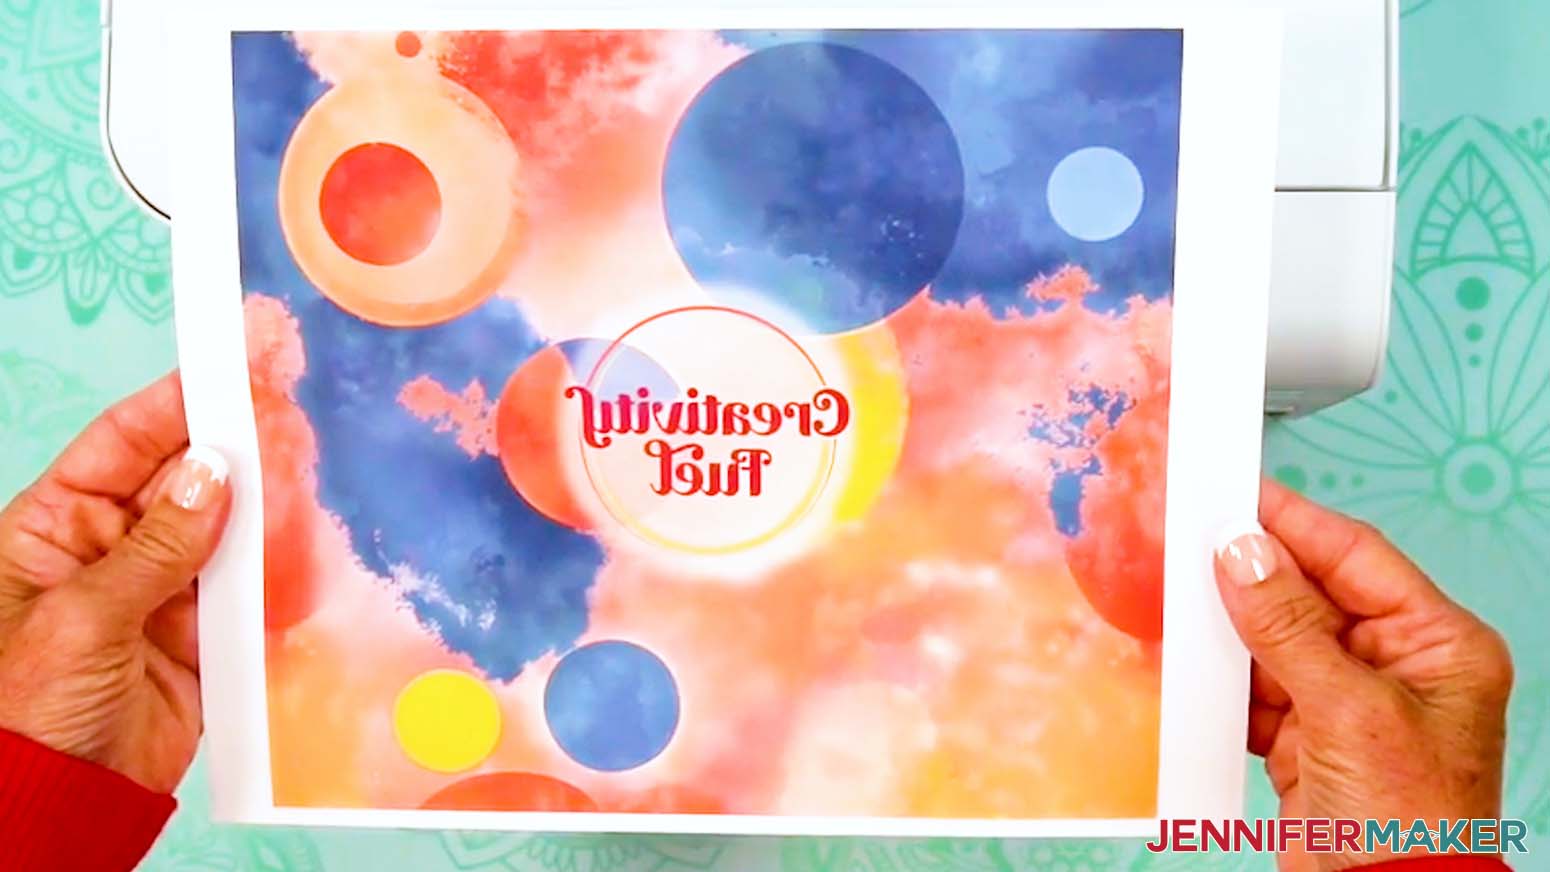
- Your print menu may look different. Just make sure that you “Mirror” the image and select the highest quality matte paper setting. Double-check the sublimation printer and paper size settings to make sure they are correct.
NOTE: The “Mirror” option is sometimes labeled as “Flip Horizontally.” If you’re having trouble finding these options, they are sometimes found under a “Layout” section or tab. - Load a sheet of sublimation paper correctly into your sublimation printer.
NOTE: Check the packaging for information on how to load the paper. - Click “Print.”
- Allow the print to dry before handling it, as the ink can smear.
NOTE: The printed design will appear lighter before pressing. - Your print is ready to apply to your tumbler!


STEP 4: SECURE THE PRINT TO YOUR TUMBLER
PREPARE A DESIGN WITH A CONTINUOUS BACKGROUND
- To prepare a design with a continuous, fully colored background (with a blended seam) for sublimation, lay the printed design face down on your work surface.
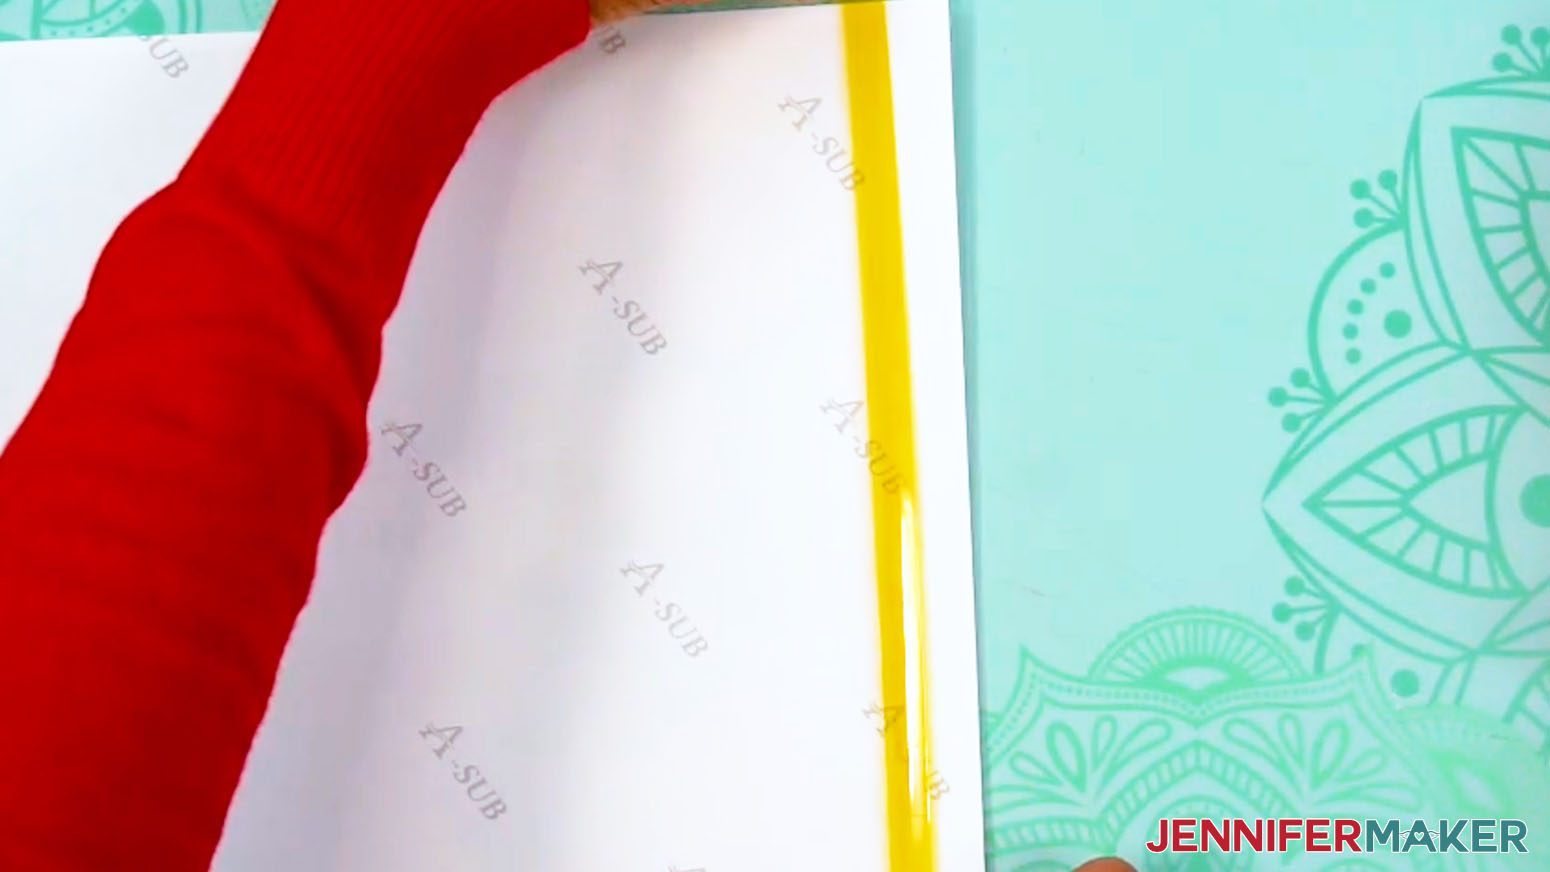
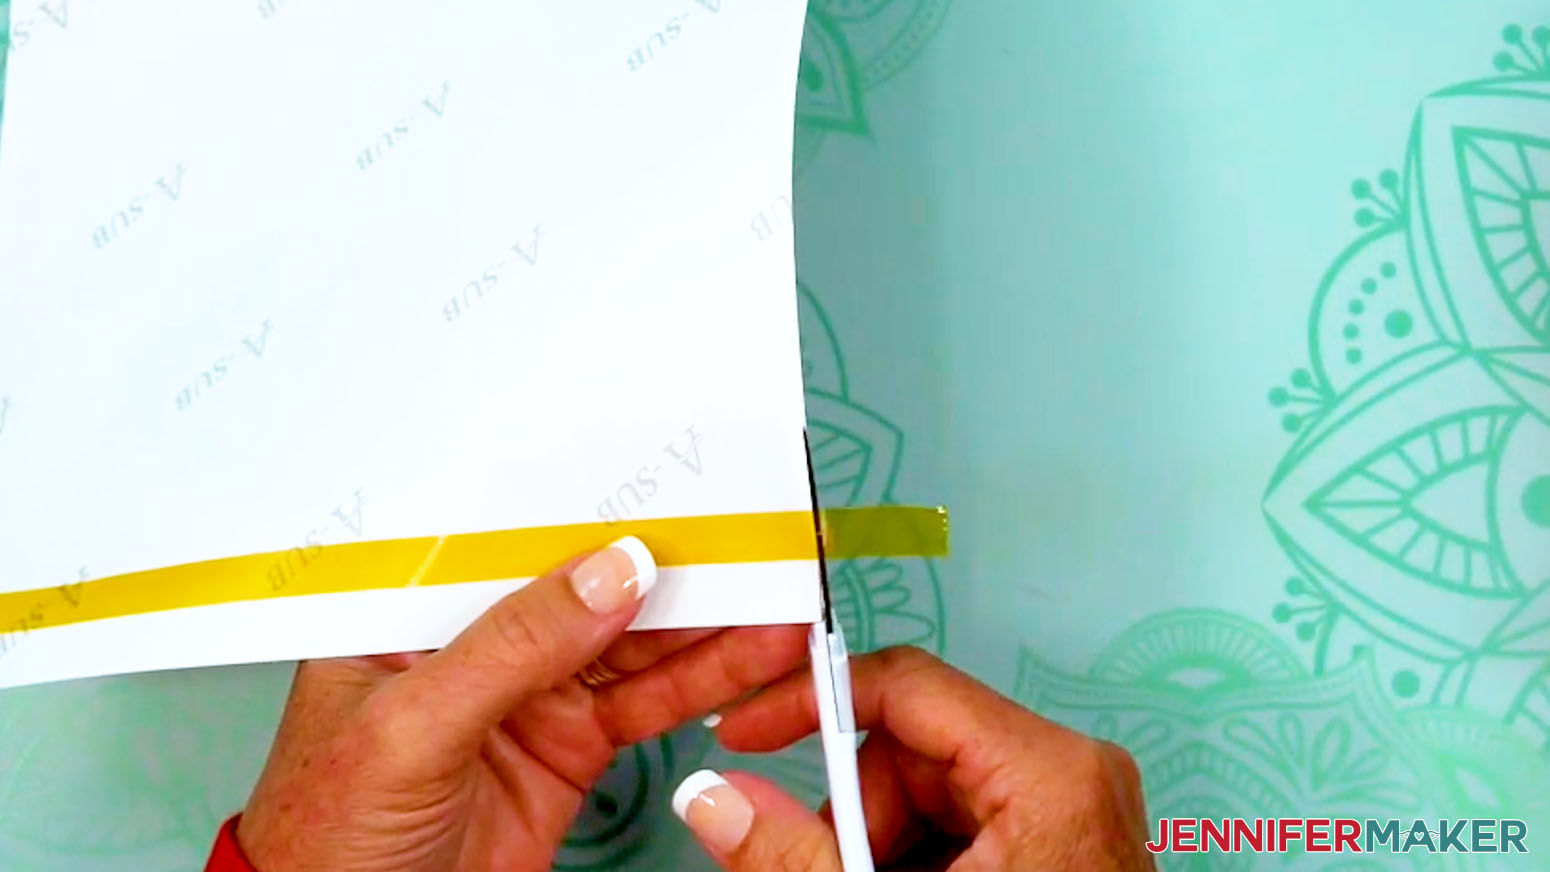
- Place a long strip of heat-resistant tape along a vertical seam edge so it covers about 1/4” of the print’s edge.
NOTE: This strip of tape will help prevent dark edges on your tumbler where the seam overlaps.
TIP: Use a Cricut Brightpad or lightbox to make the edge of the print easier to see. - Use scissors to trim away excess tape on the top and bottom sides.
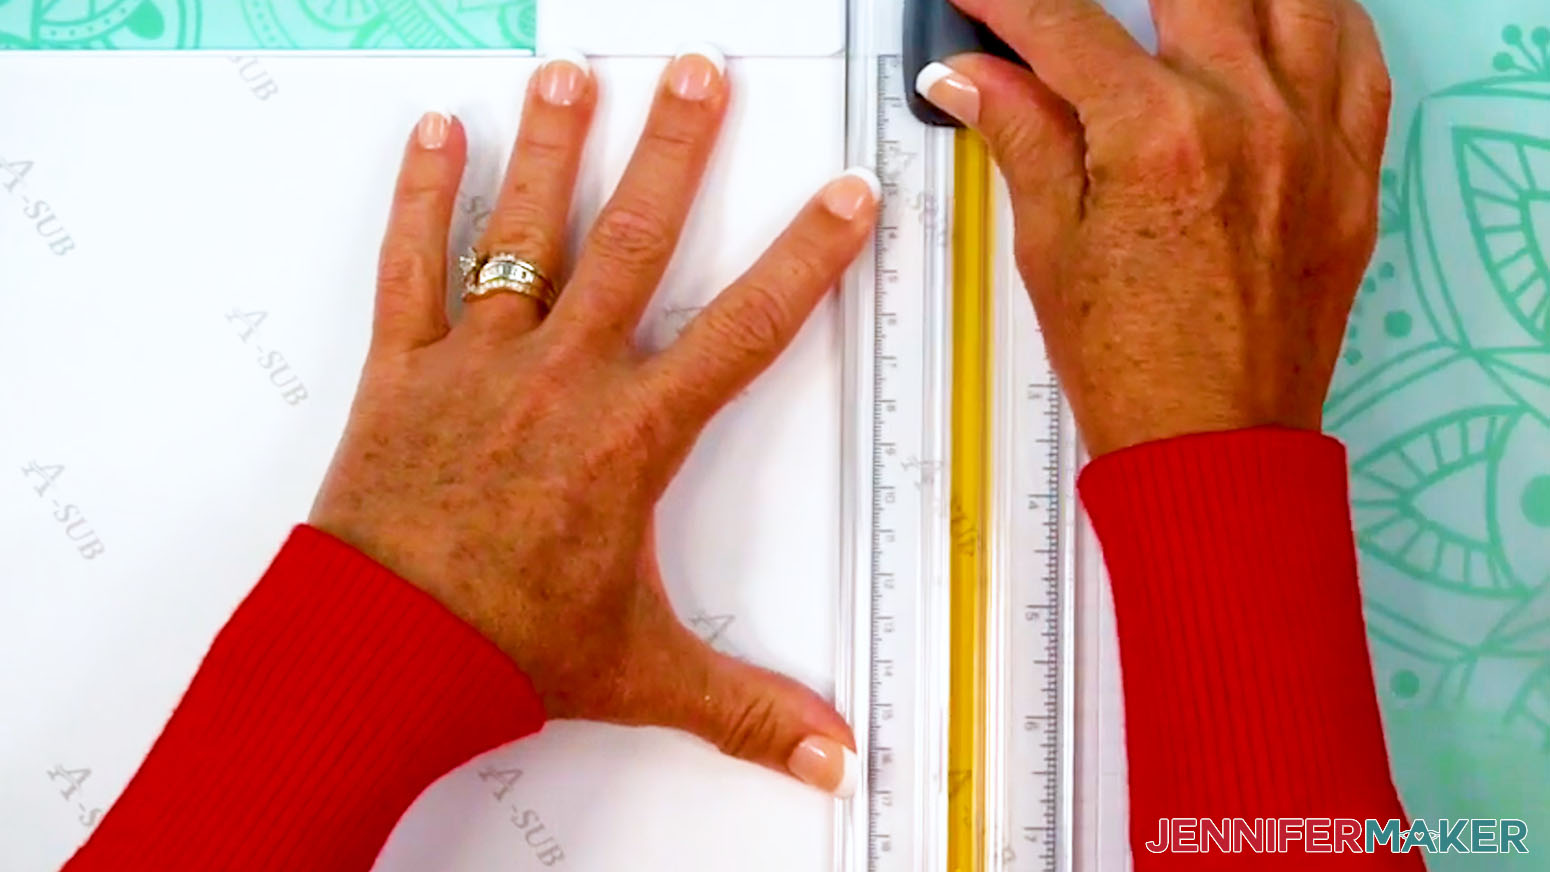
- Use a paper trimmer to cut the taped seam edge right along the print so no white is remaining at the edge.
TIP: Don’t trim away too much of the print or you won’t be able to overlap the seam, resulting in a white line on your design.
NOTE: Don’t get your fingers near the blade! - Use the paper trimmer to cut away excess white paper along the other seam edge and the top edge of the print.
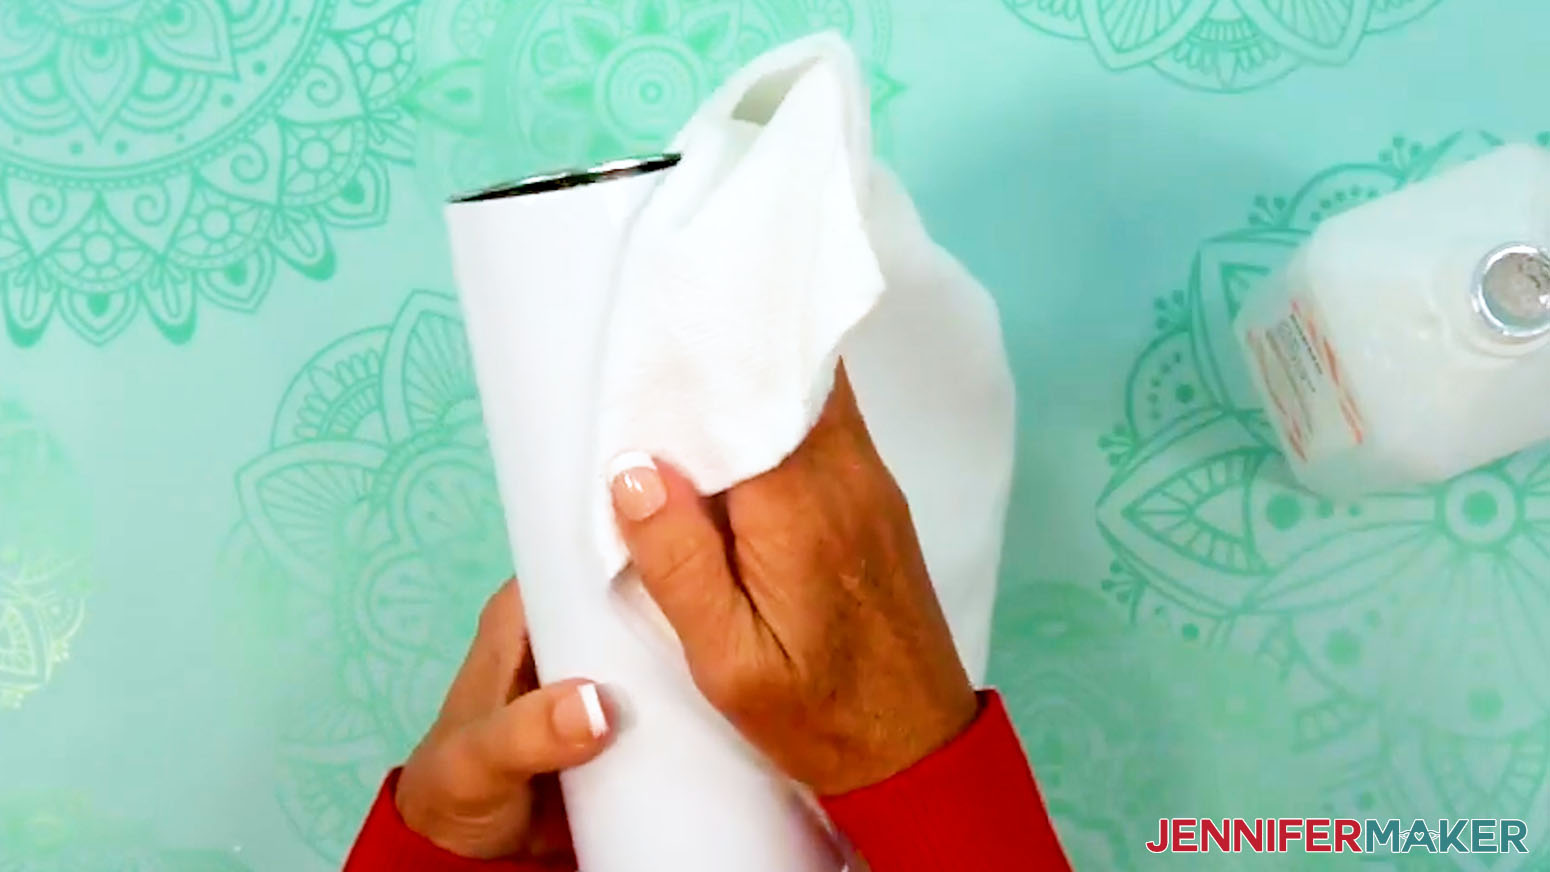
TIP: Leaving extra paper at the bottom of the print makes it easier to tape later. - Clean your tumbler with a lint-free cloth and rubbing alcohol to remove debris or skin oils and let it dry.
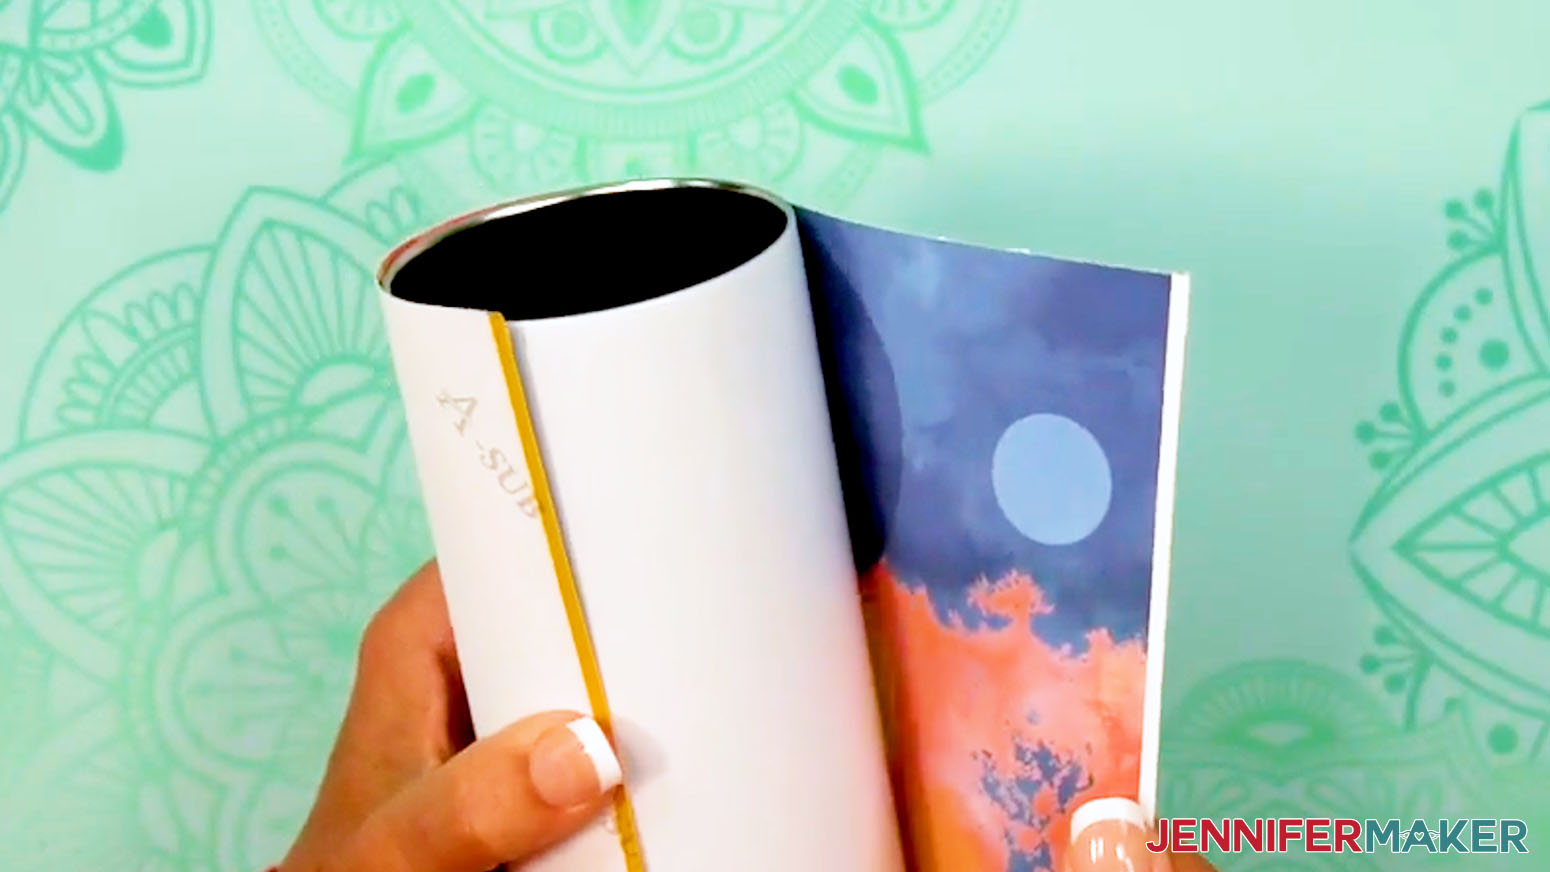
- Wrap the design around the tumbler with the ink facing in and with the elements oriented correctly. If your design has text, make sure it’s facing the top of the tumbler.
TIP: Try not to touch your clean tumbler or the print to avoid smudging or damaging the ink. - Align the trimmed top and bottom edges so the design is straight.
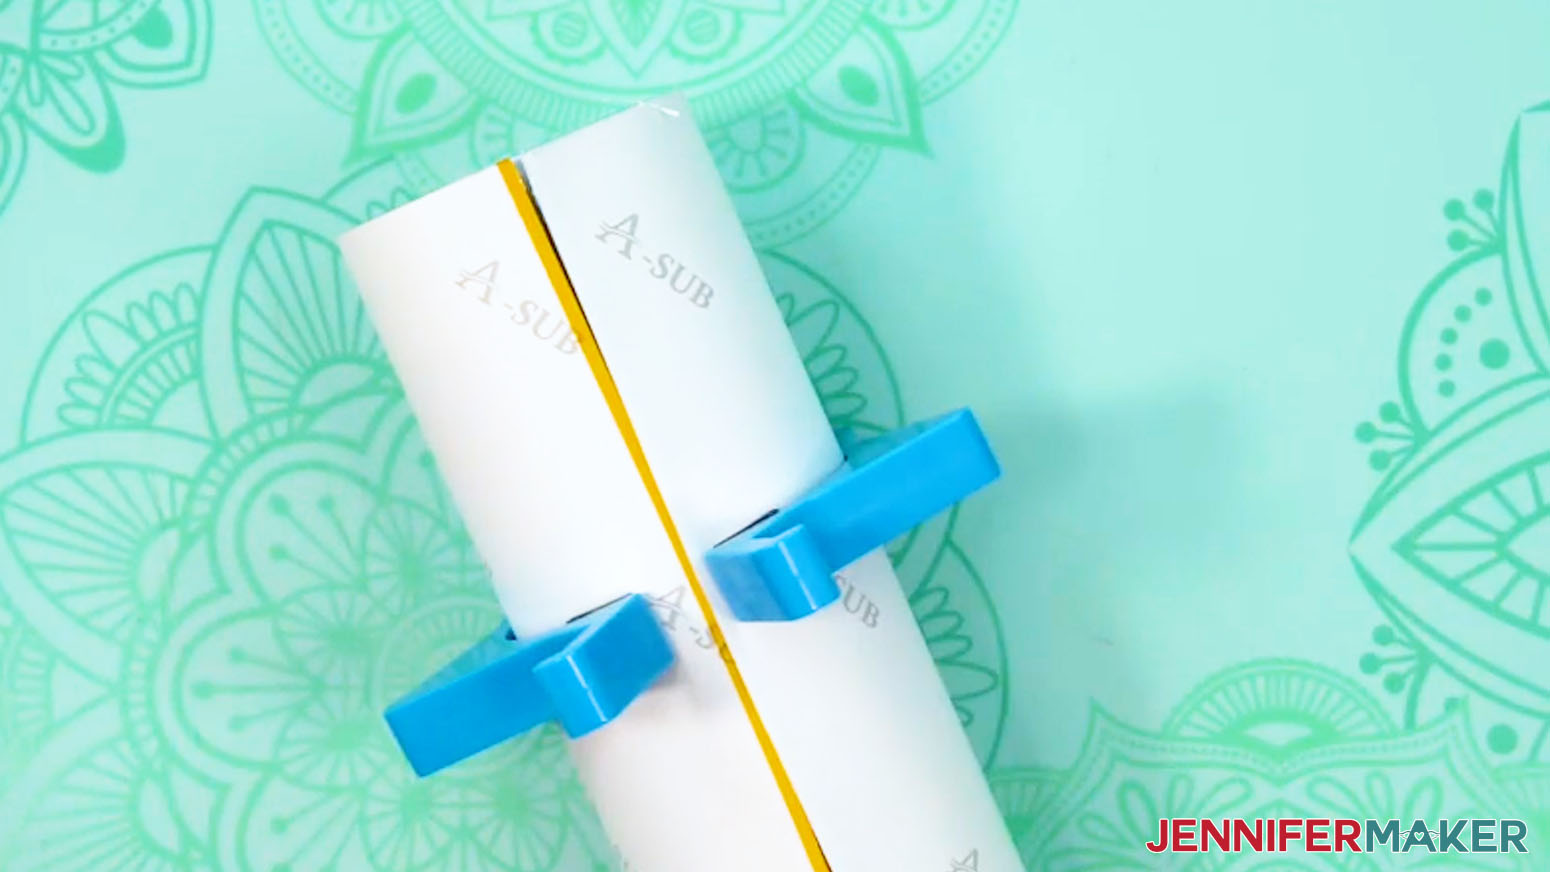
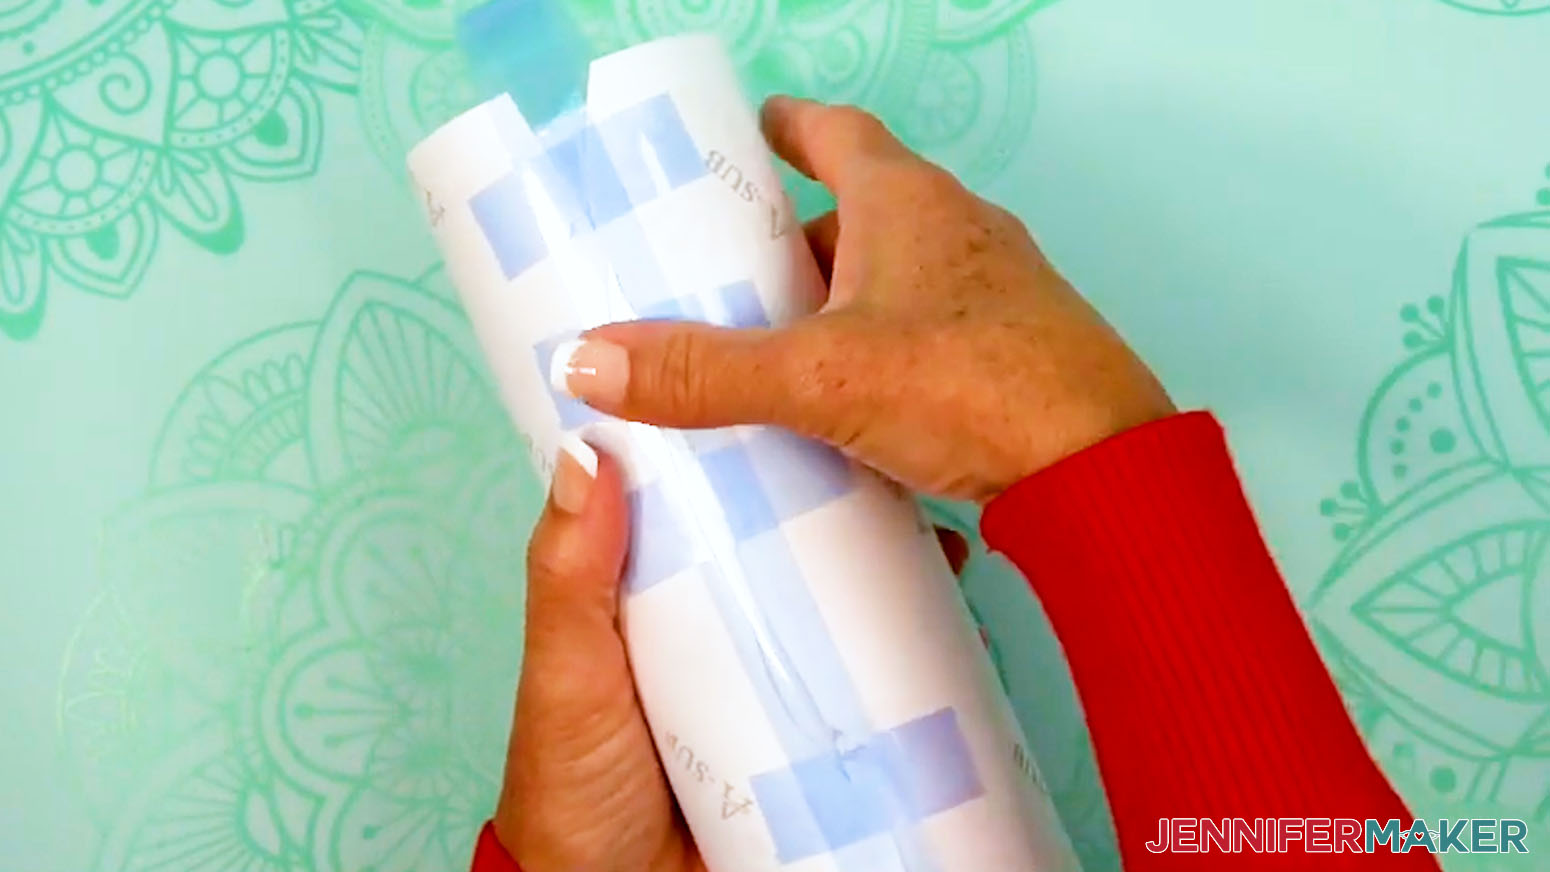
- Wrap the print tightly against the tumbler. Use a tumbler clamp to hold the print in place.
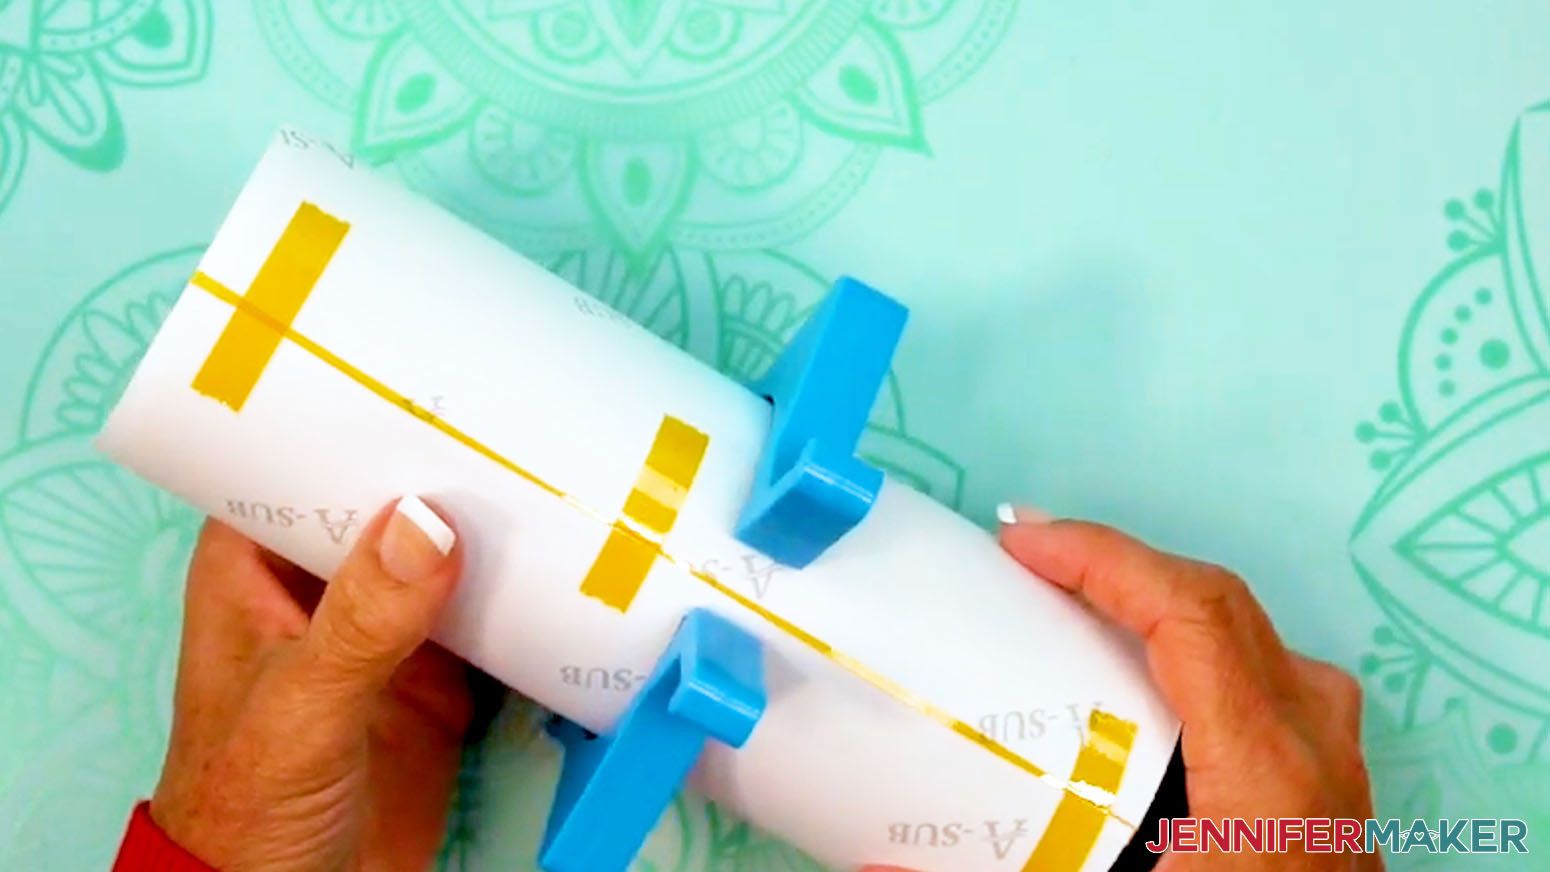
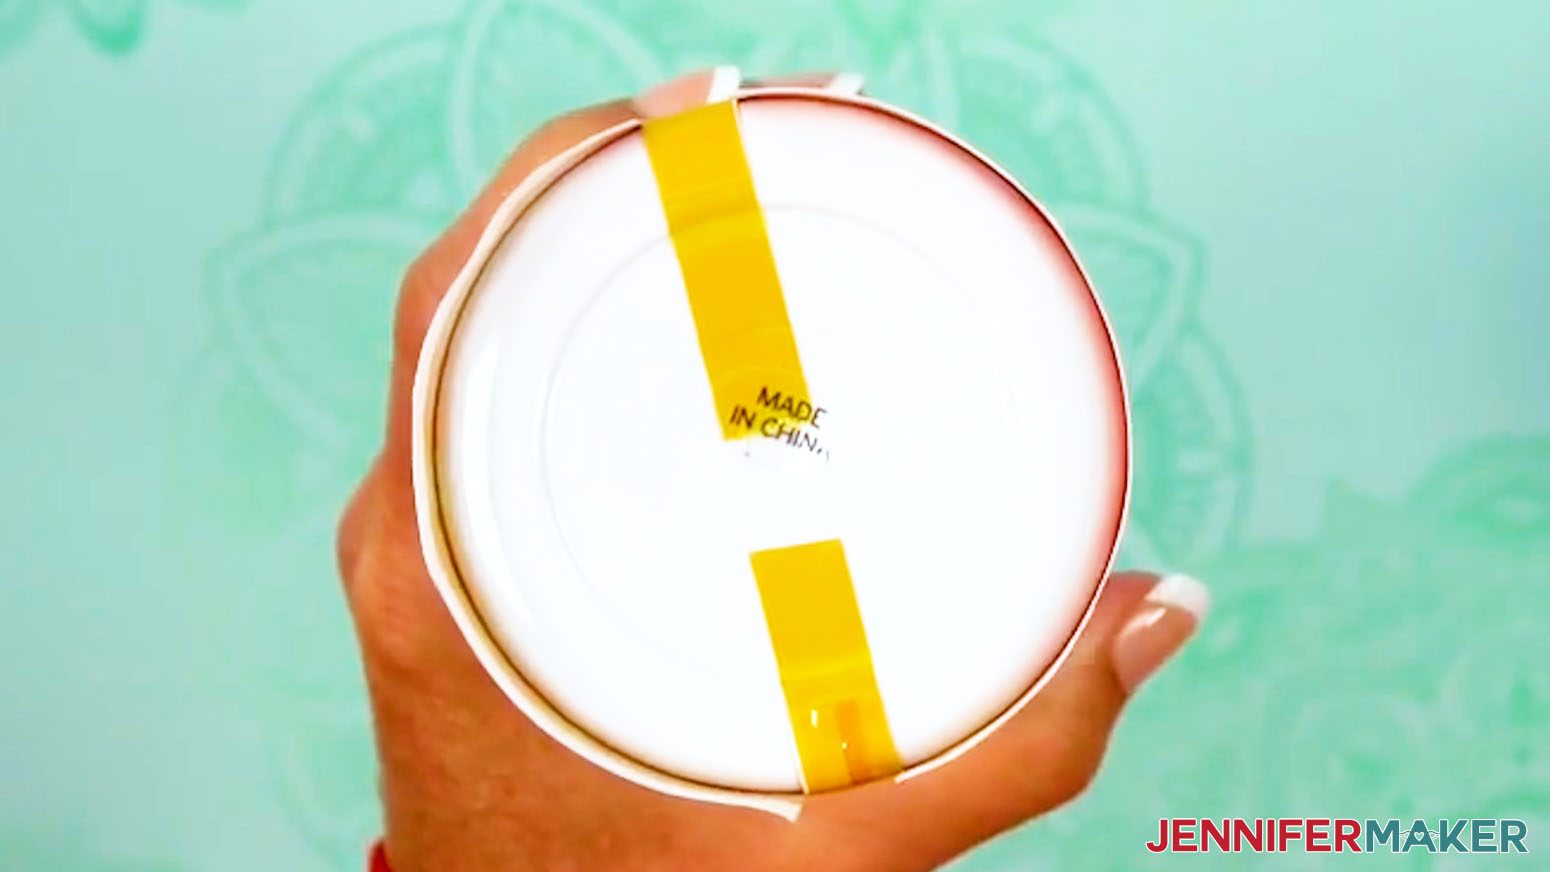
- Lay the tumbler on its side horizontally and place a piece of heat-resistant tape securely on the untaped seam edge near the middle.
- Don't let the tape touch the other edge of the print or the tumbler yet.
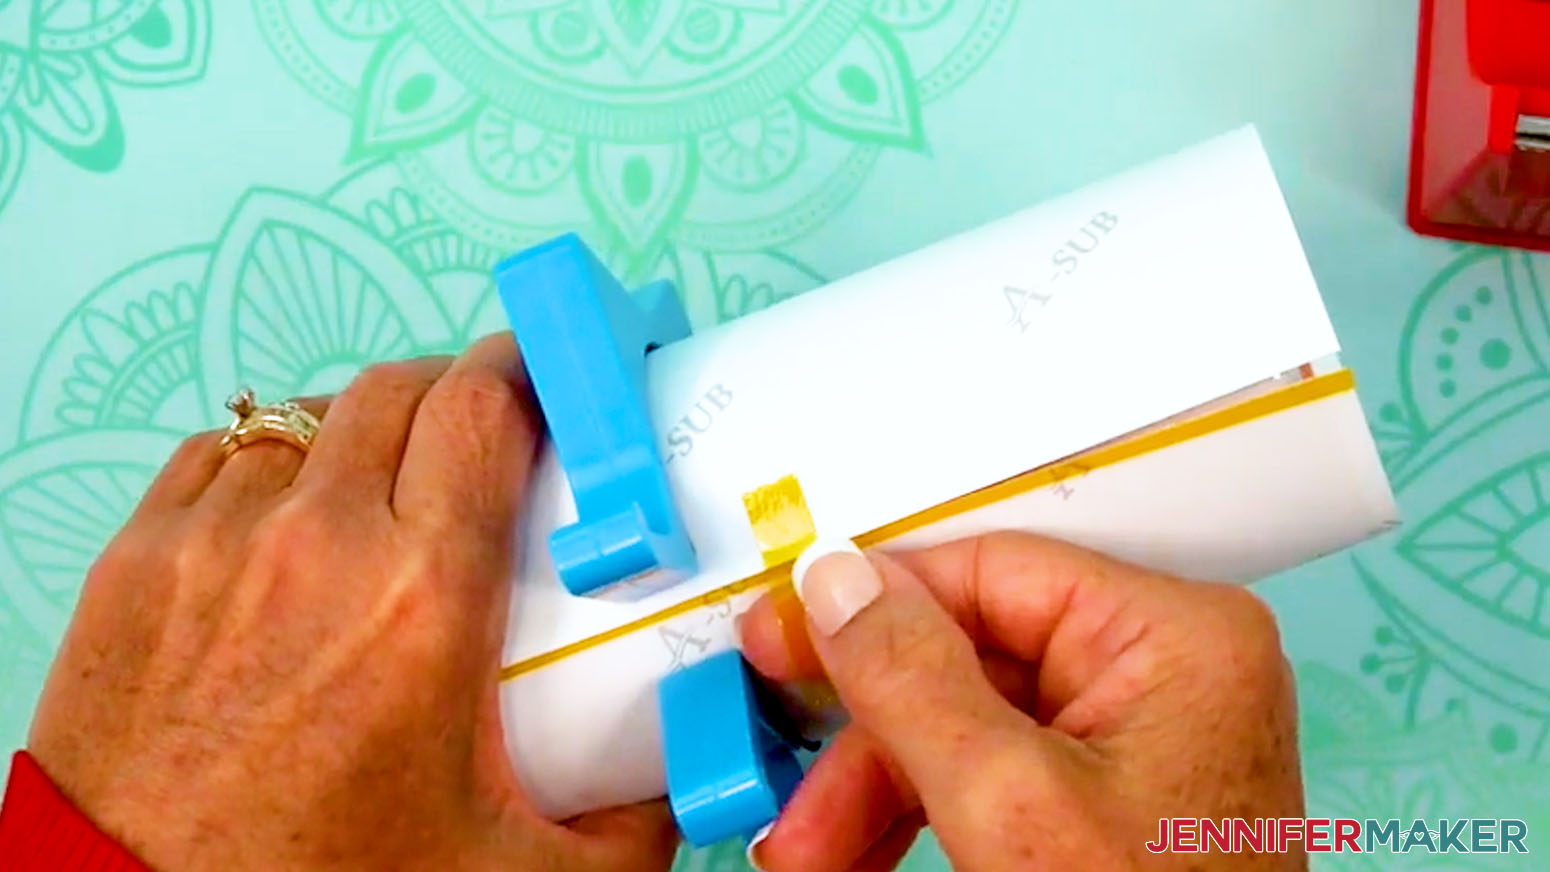
NOTE: I recommend using the yellow heat-resistant tape in my supplies because it’s thinner and narrower than the blue tape, leading to fewer issues at the seam. It’s also stretchier and easier to apply to the top and bottom of the tumbler. - Pull the loose section of the tape to wrap the print as tight as possible, with the untaped edge overlapping the taped edge.
NOTE: Taping the wrap down tightly and avoiding wrinkles or air pockets will help prevent inconsistencies during sublimation. - Then press the tape across the seam, onto the back of the taped edge.
- Use short strips of heat-resistant tape on the top and bottom edges of the print to pull the paper tightly around the tumbler and secure it.
- Then secure the wrap with short pieces of tape between the middle and the top edge, and the middle and the bottom edge.
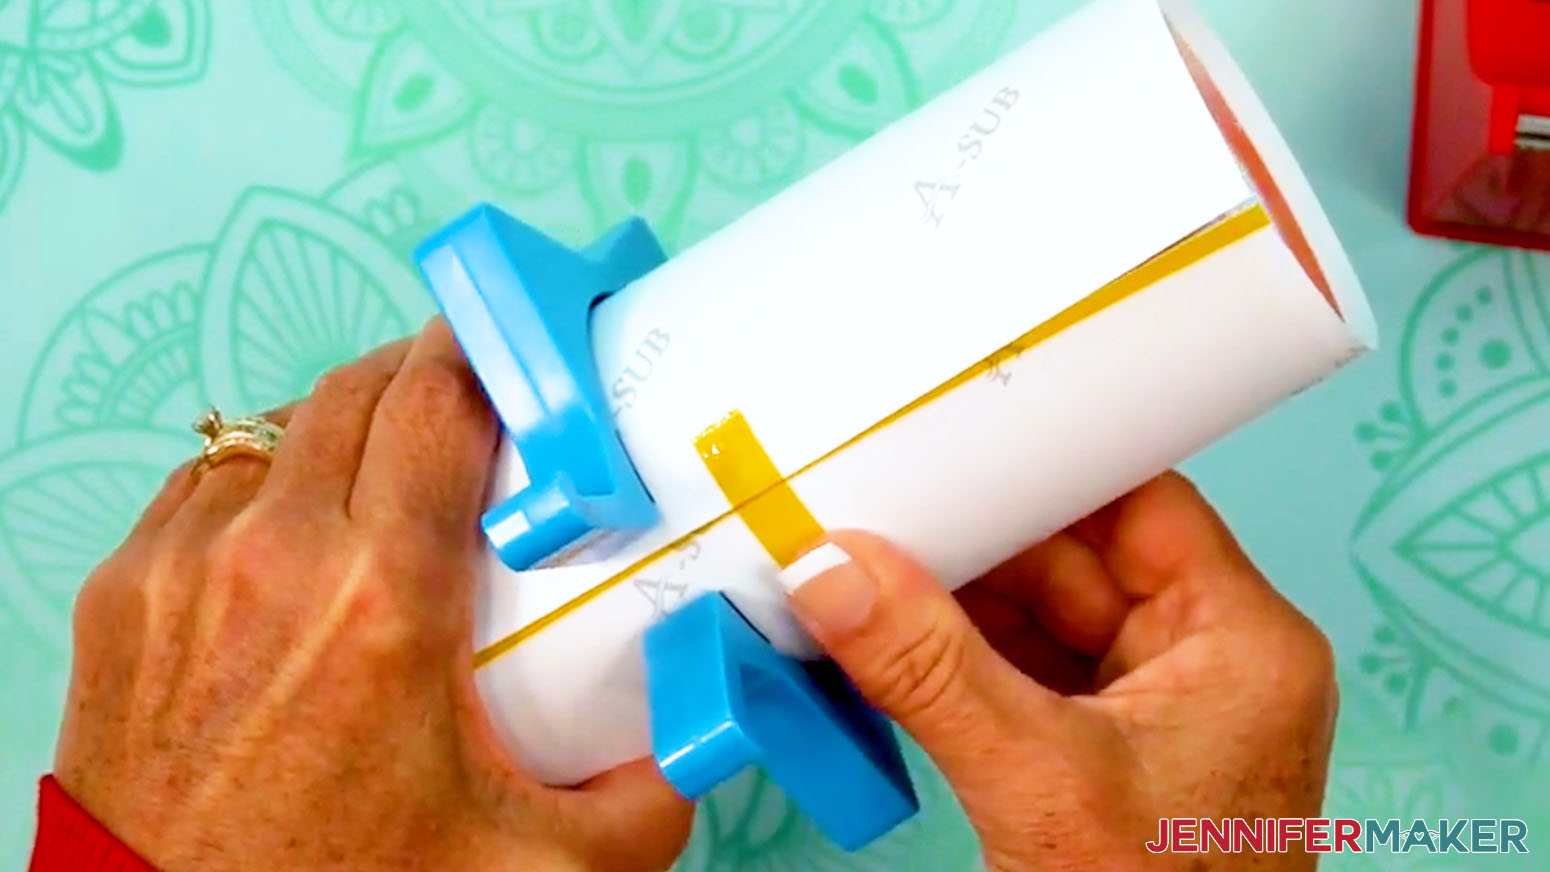
- Remove the tumbler clamp.
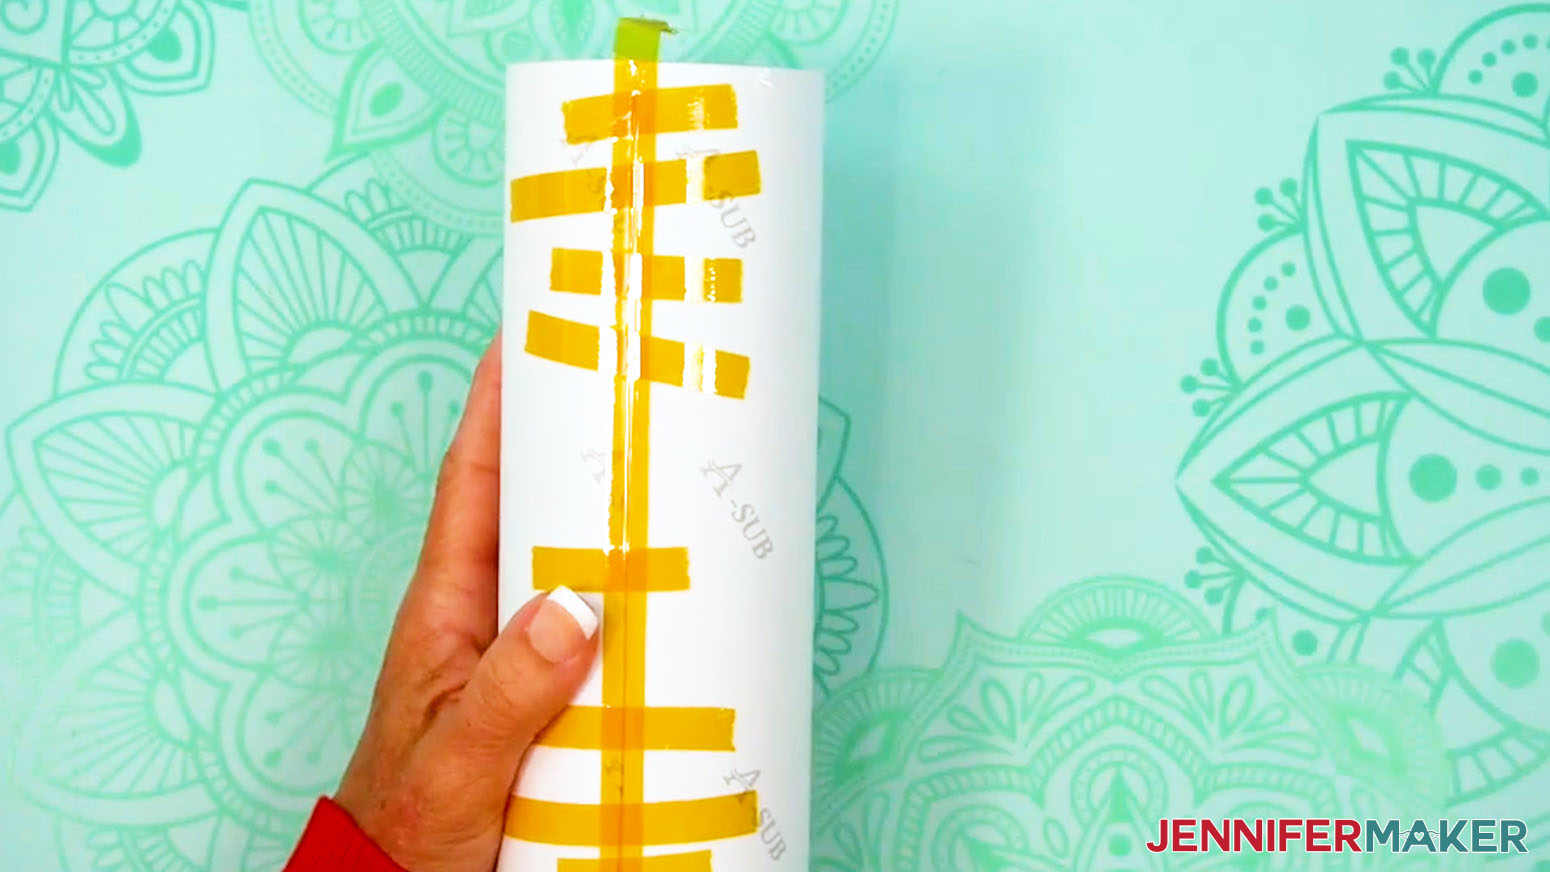
- Apply a long piece of heat-resistant tape along the seam from top to bottom, allowing excess tape on both ends.
- Use your Scraper to press the tape down tightly from the center outward to seal the seam.
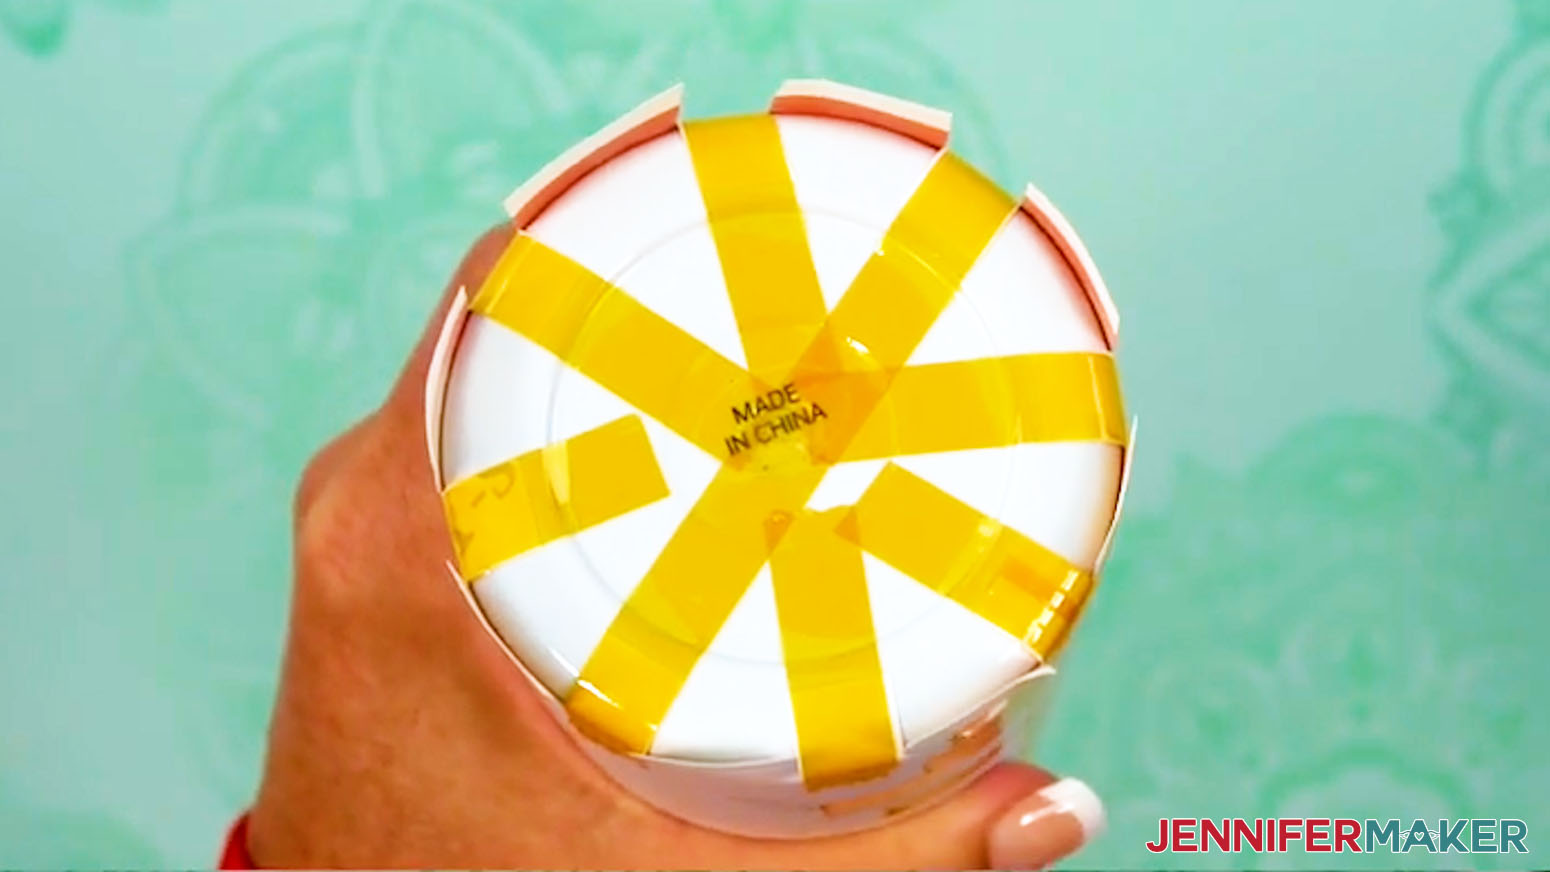
- Thinking of it like a compass, hold the tumbler so the bottom is facing you and the excess tape is in the North position at the top.
NOTE: Avoid setting the opposite end on your work surface so you don’t bunch up the loose tape! - Use scissors to trim the print along the excess tape’s sides.
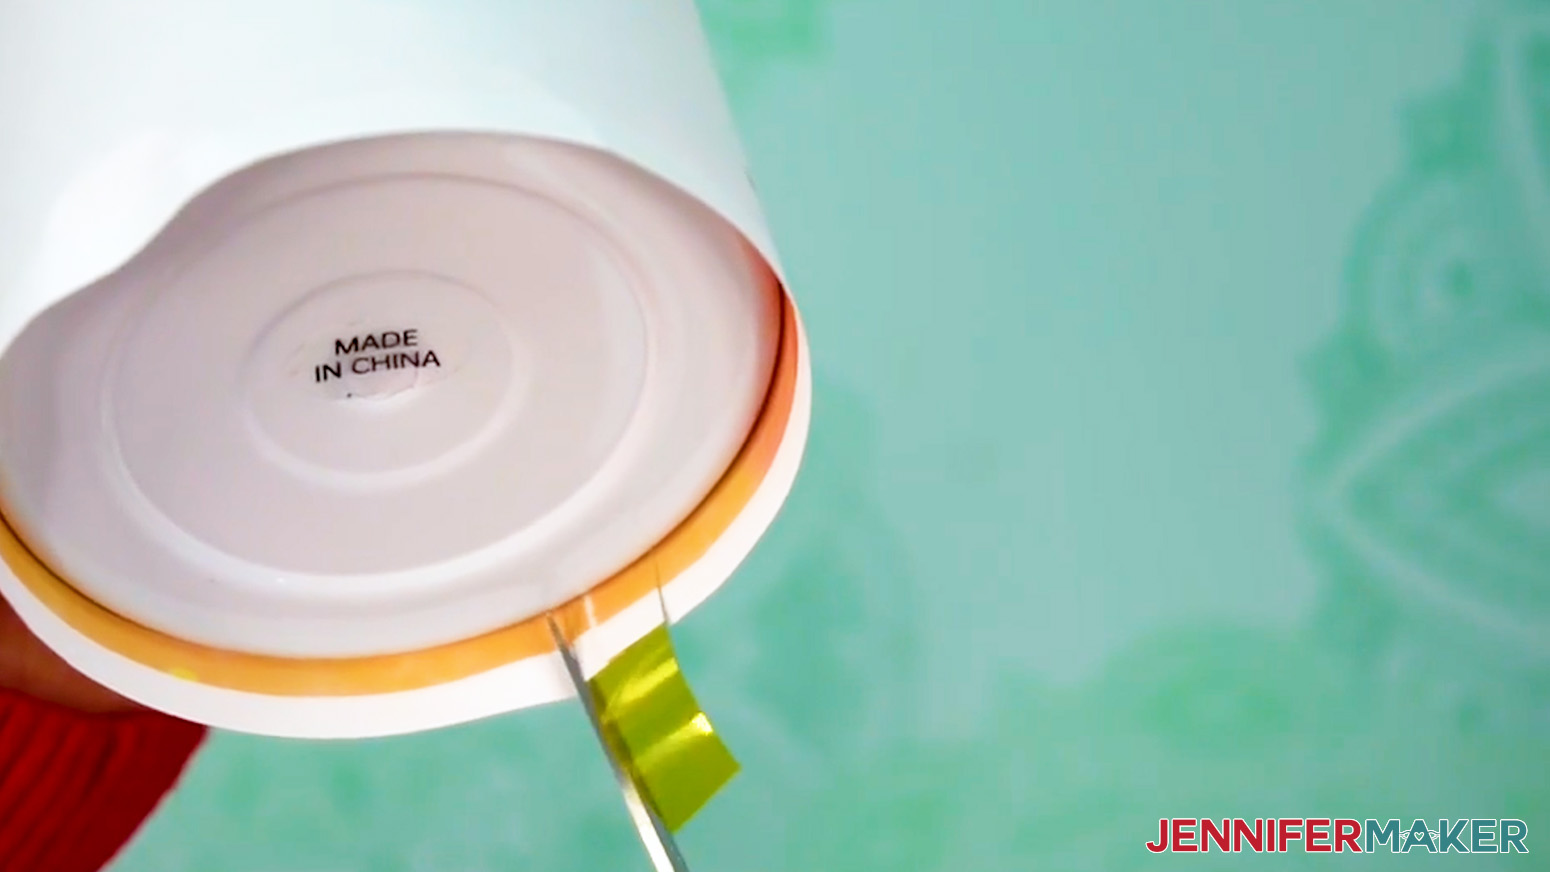
- Pull the excess tape and trimmed area of the print tightly toward the tumbler’s bottom center.
- Press the tape firmly onto the tumbler, making sure there are no air bubbles between the tape and the tumbler.
TIP: Use a scraper tool to press out bubbles if needed. - Rotate the tumbler and add a strip of tape to the South side of the tumbler’s bottom, allowing excess tape on the free end.
NOTE: This extra taping helps ensure even coverage at the ends. - Repeat Steps 20-22 to secure the South piece of tape to the tumbler.
- Then secure the East and West sides of the tumbler’s bottom, as well as all of the intermediate positions between the taped sides, for a total of eight pieces of tape.
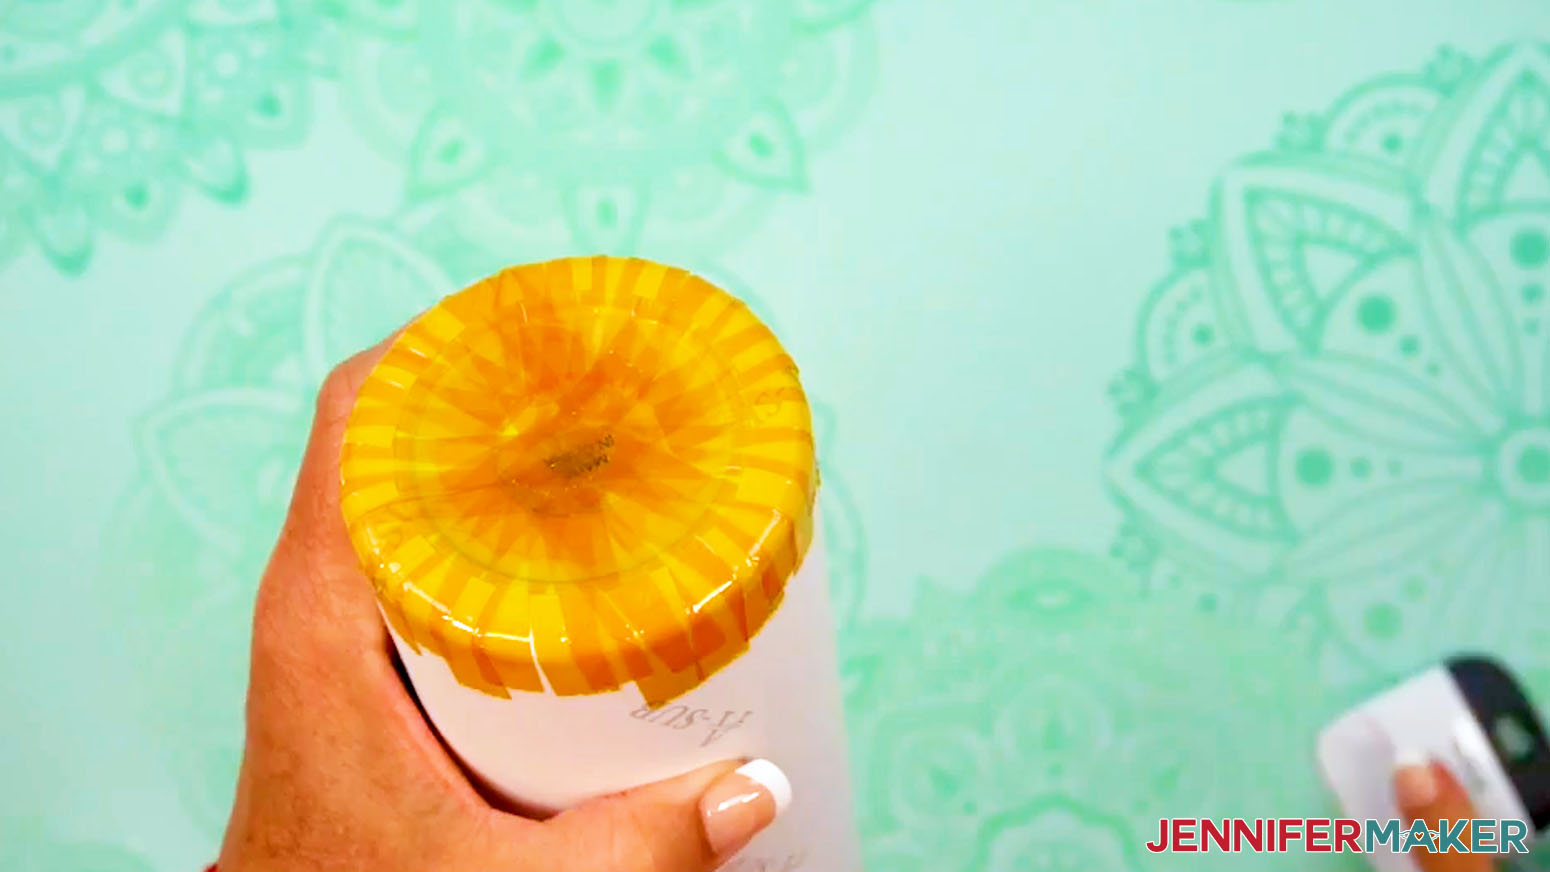
- Now there are eight tabs remaining between the pieces of tape. Use scissors to cut each of these tabs down the middle, making a total of sixteen tabs.
- Using the same method as above, secure each of these sixteen tabs to the tumbler’s bottom with heat-resistant tape.
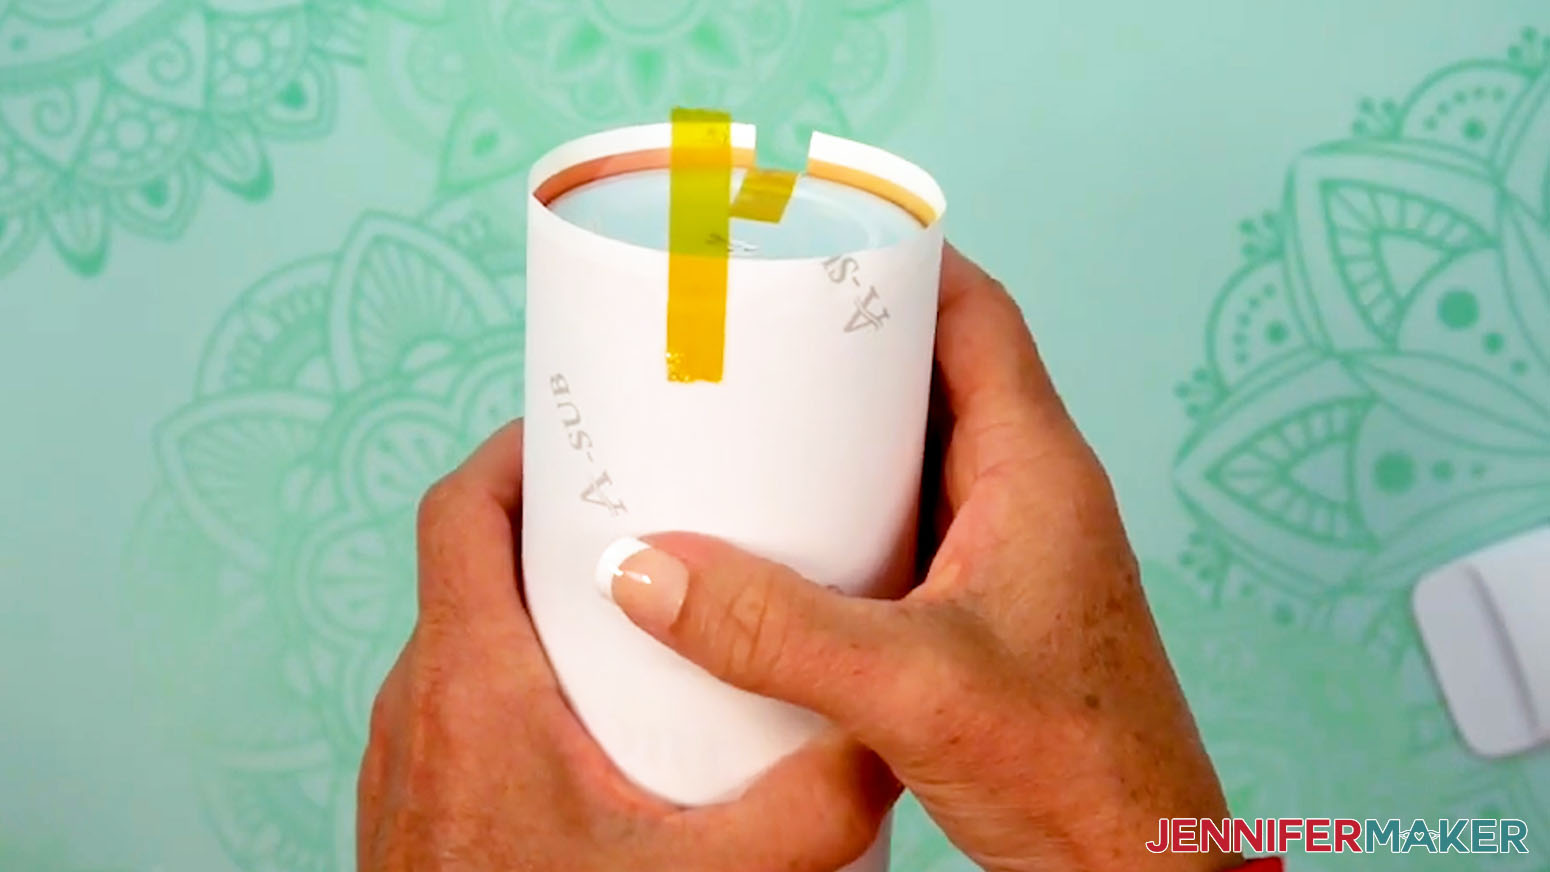
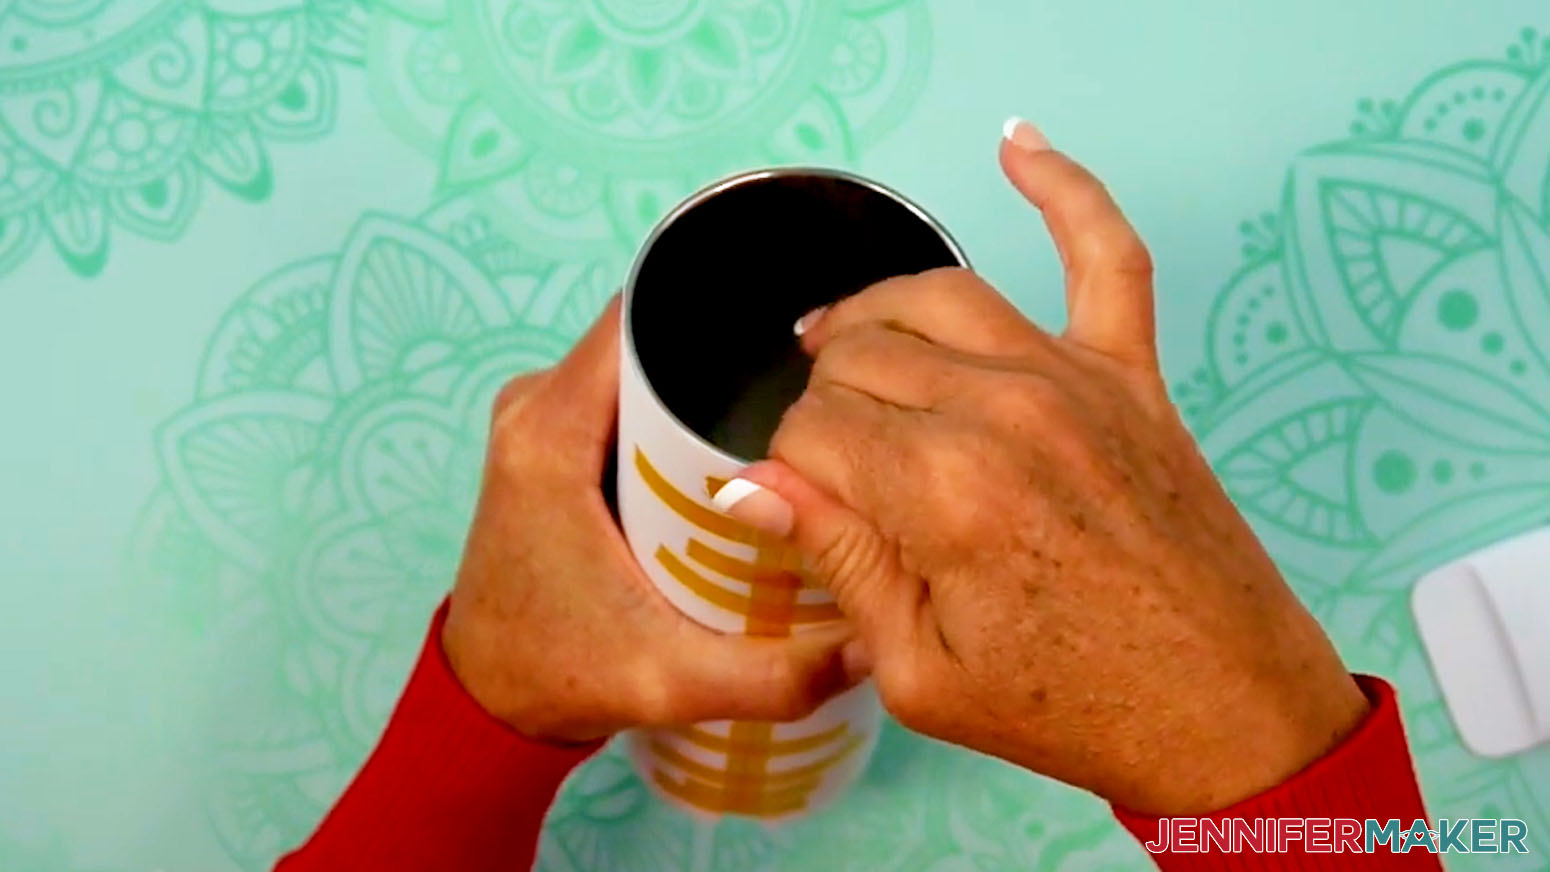
- To secure the top of your tumbler, pull the excess tape from the seam over the edge and press it to the inside of the tumbler.
TIP: The tape is a little stretchy, but that’s okay! Stretching helps secure the tape tightly around the tumbler’s top edge. - Then add and secure heat-resistant tape in the cardinal directions, intermediate directions, and all around the tumbler’s top edge, similar to the way you taped the bottom.
- Use your scraper tool to go over all areas of tape to make sure there are no air bubbles.
- Your tumbler is ready to shrink wrap and sublimate!


PREPARE A DESIGN WITHOUT A CONTINUOUS BACKGROUND
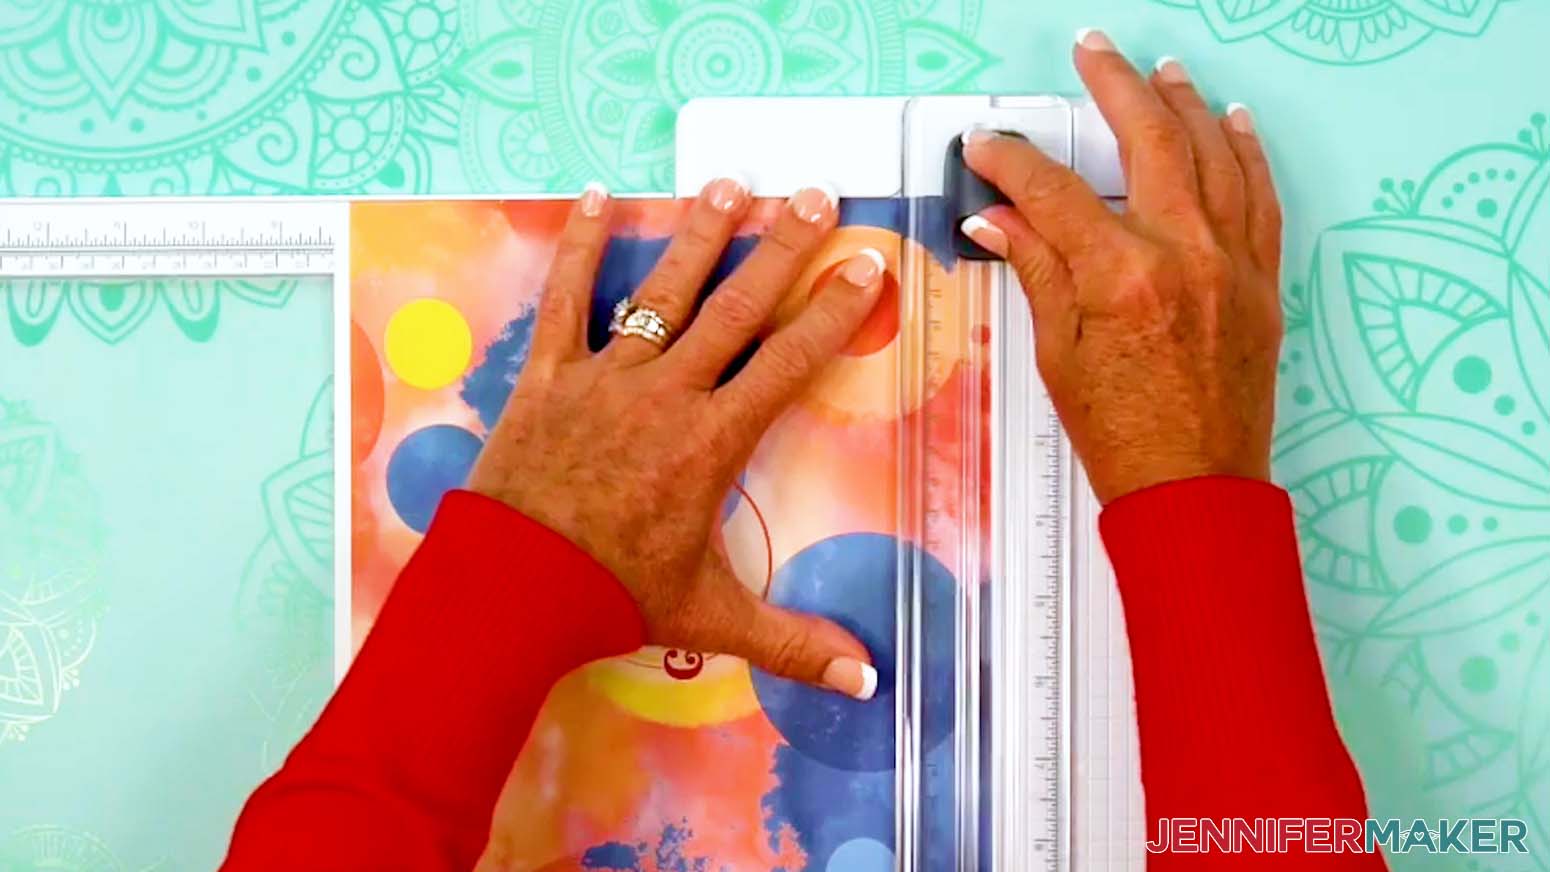
- To prepare a design without a continuous-colored background (such as separate design elements on a white background), use a paper trimmer to cut away excess white paper along the seam edges and the top edge of the print.
NOTE: Don’t get your fingers near the blade!
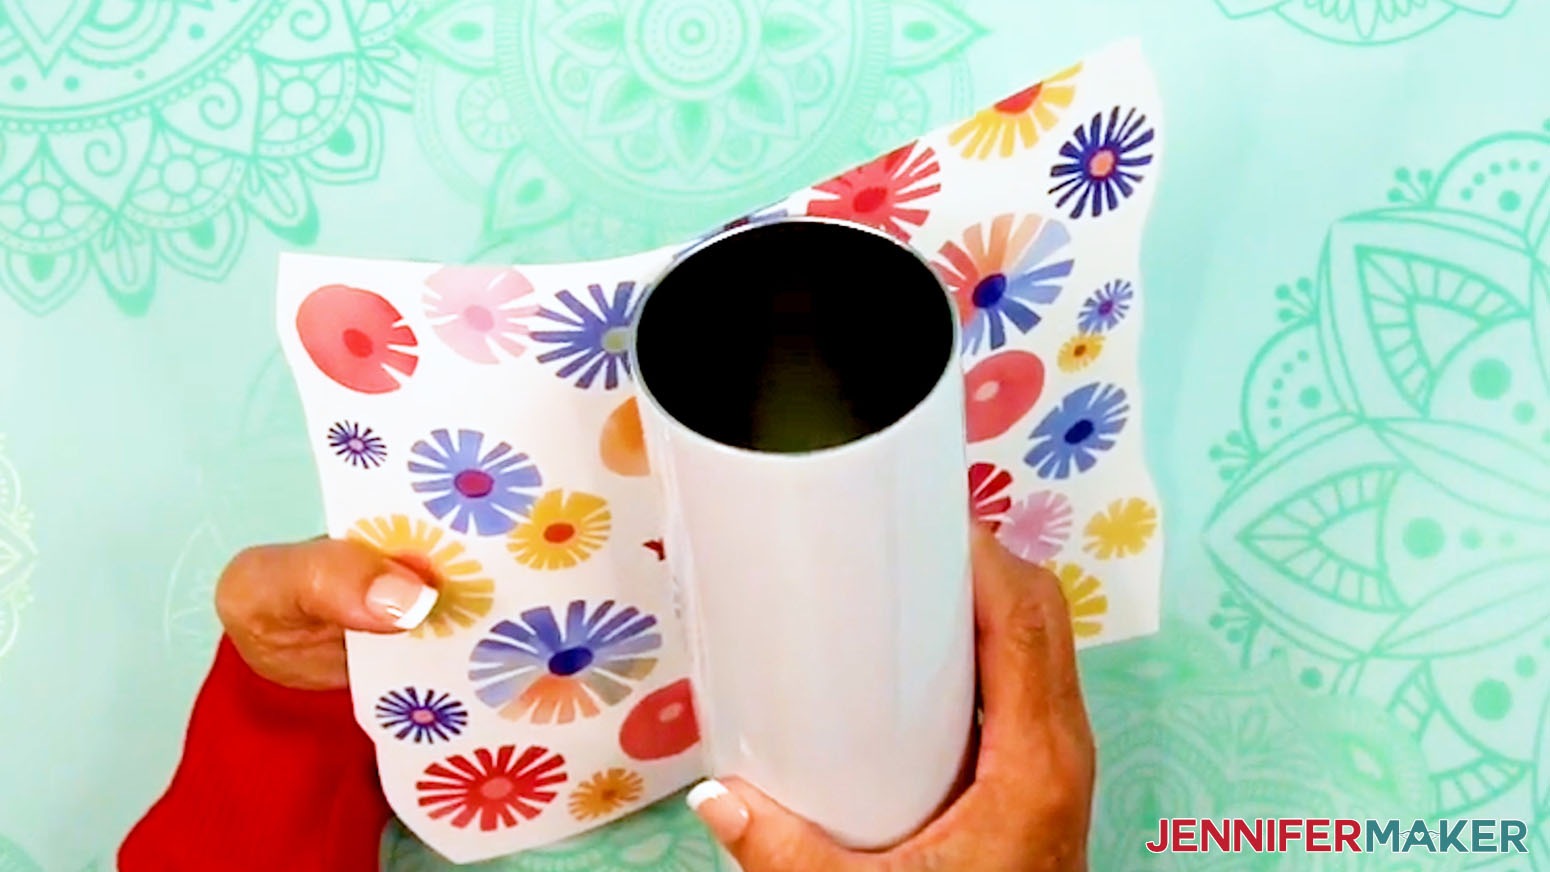
TIP: Leaving extra paper at the bottom of the print makes it easier to tape later. - Wrap your print around your tumbler and look for areas where the seam edges overlap with design elements.
- Then use scissors to trim excess paper away so seam edges and elements no longer overlap, but white paper is still visible around the printed elements.
NOTE: I’ll trim away excess paper near the flowers on both seam edges of my print. - Clean your tumbler with a lint-free cloth and rubbing alcohol to remove debris or skin oils and let it dry.
TIP: Try not to touch your clean tumbler or the print to avoid smudging or damaging ink. - Wrap the design around the tumbler with the ink facing in and with the elements oriented correctly. If your design has text, make sure it’s facing the top of the tumbler.
NOTE: If excess paper overlaps any printed areas of the design, use scissors to trim away the excess paper and wrap the print again. - Align the trimmed top and bottom edges so the design is straight.
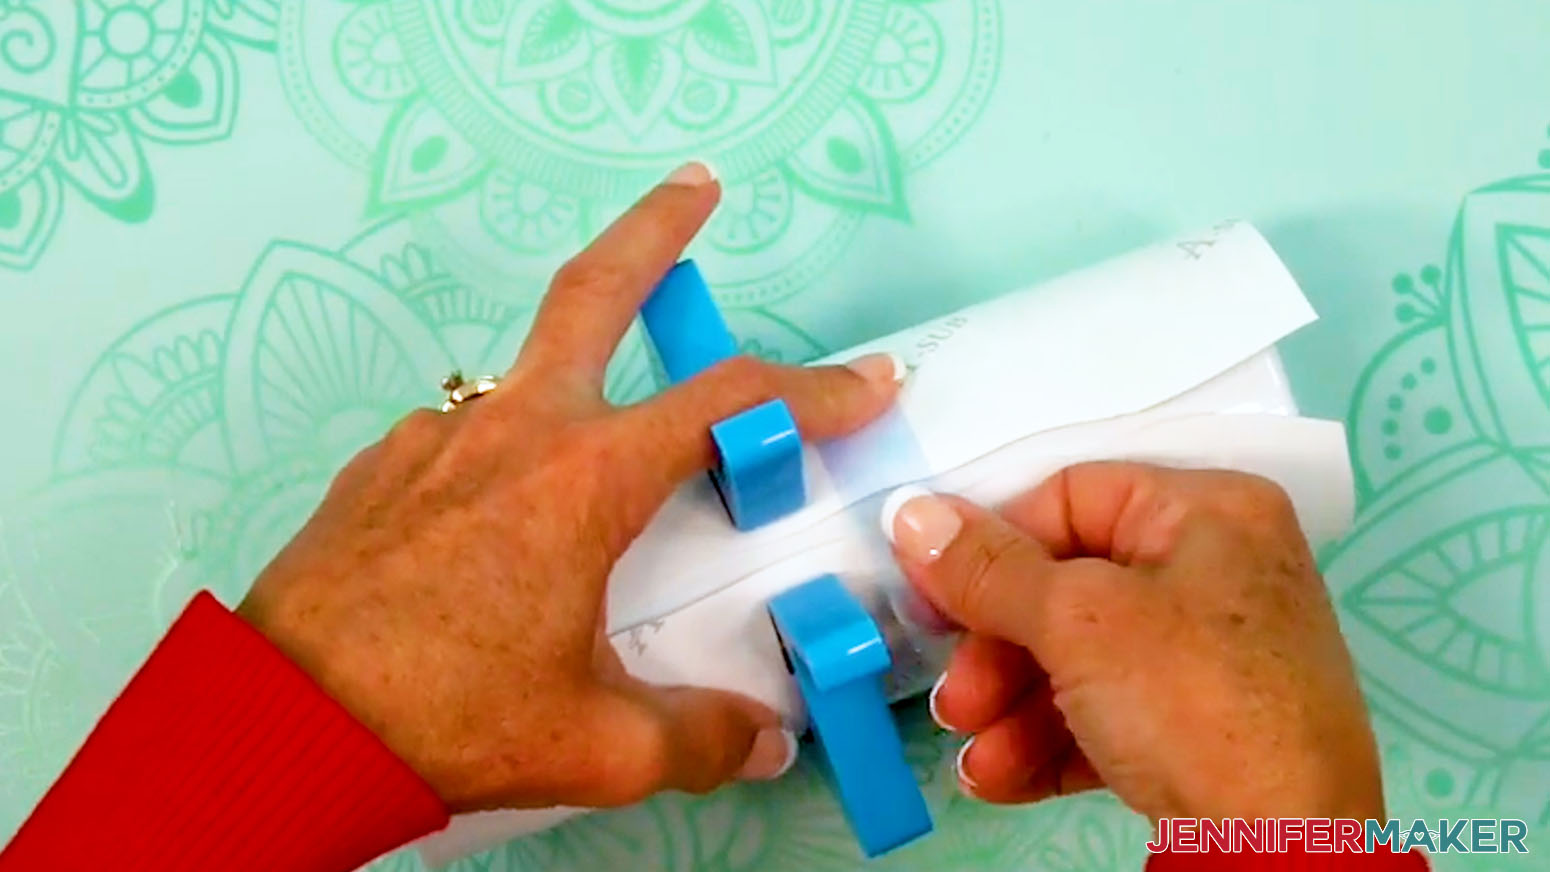
- Wrap the print tightly against the tumbler.
TIP: Use a tumbler clamp to hold the print in place. - Lay the tumbler on its side horizontally and place a piece of heat-resistant tape securely on one seam edge near the middle. Don't let the tape touch the other edge of the print or the tumbler yet.
NOTE: Taping the wrap down tightly and avoiding wrinkles or air pockets will help prevent inconsistencies during sublimation. - Use one hand to hold the other edge tight against the tumbler.
- Pull the loose section of the tape to wrap the print as tight as possible, then press the tape in place across the seam.
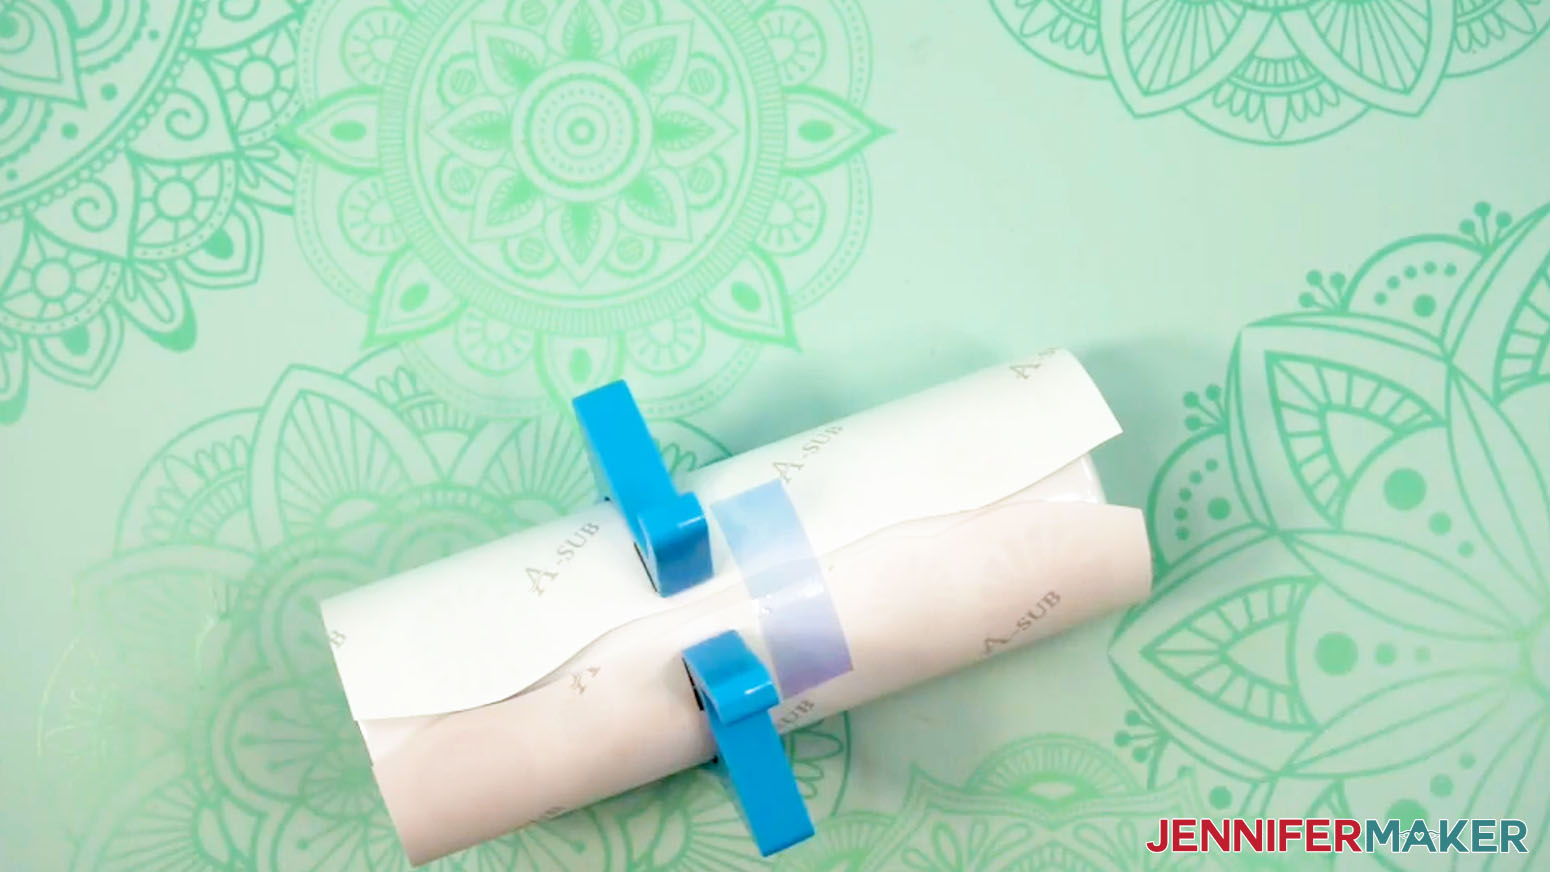
NOTE: Taping the wrap down tightly and avoiding wrinkles or air pockets will help prevent inconsistencies during sublimation. - Working from the center out, apply short strips of heat-resistant tape across the seam from top to bottom, leaving about an inch between each piece.
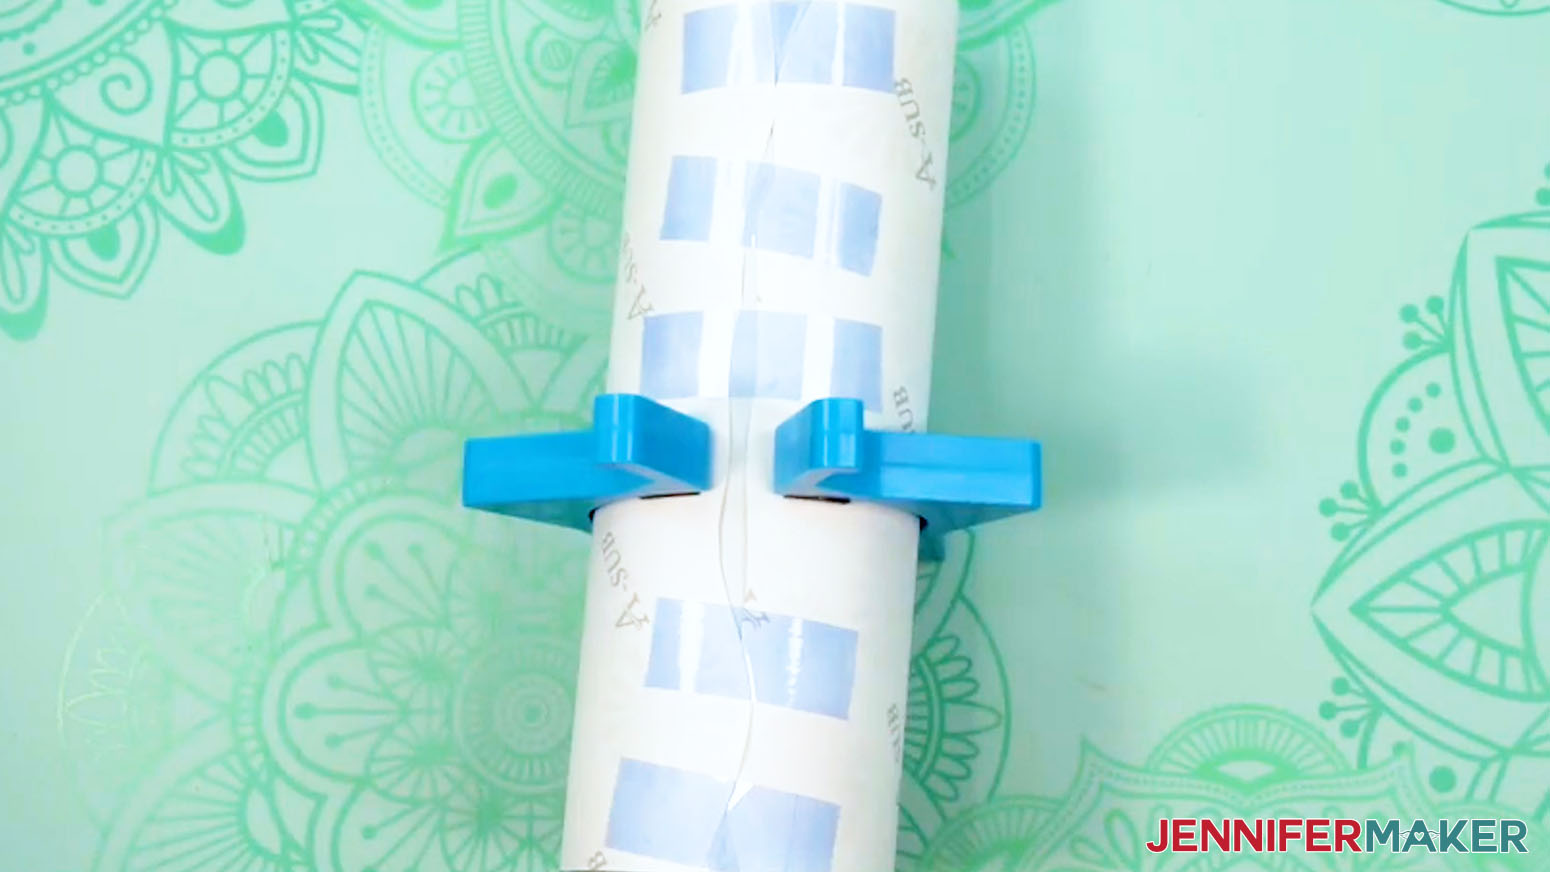
- Apply a long piece of heat-resistant tape along the seam from top lip to bottom, allowing excess tape on both ends.
- Use your Scraper to press the tape down tightly from the center outward to seal the seam.
- Repeat Steps 19-31 from the “PREPARE A DESIGN WITH A CONTINUOUS BACKGROUND” section to tape the top and bottom of your tumbler.
STEP 5: SHRINK WRAP AND SUBLIMATE YOUR TUMBLER
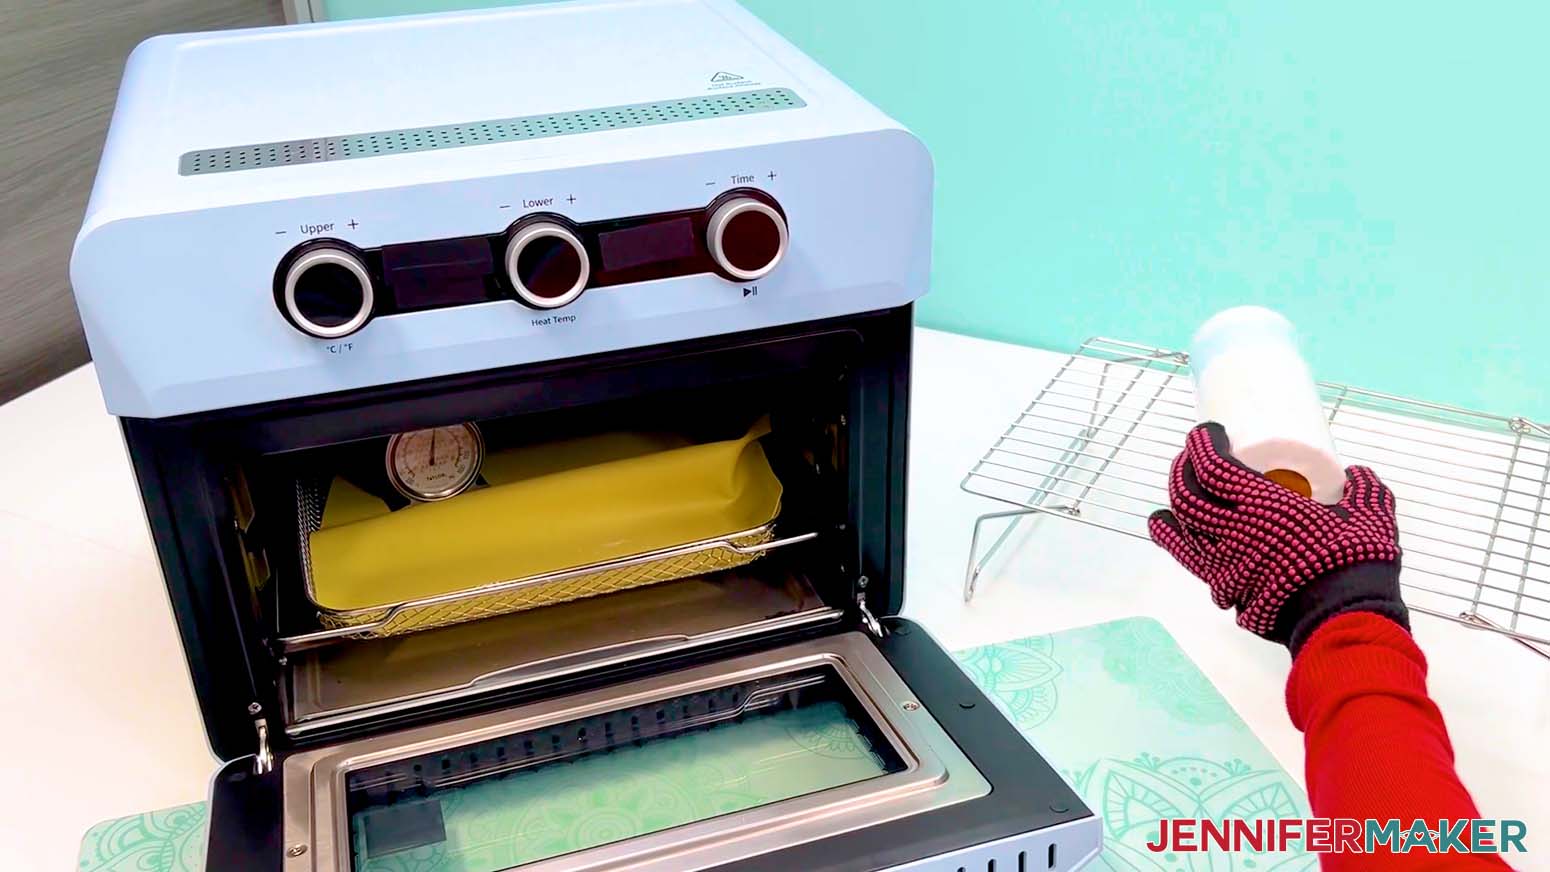
IMPORTANT: Before sublimating, open a window and turn on your fan to improve your ventilation.
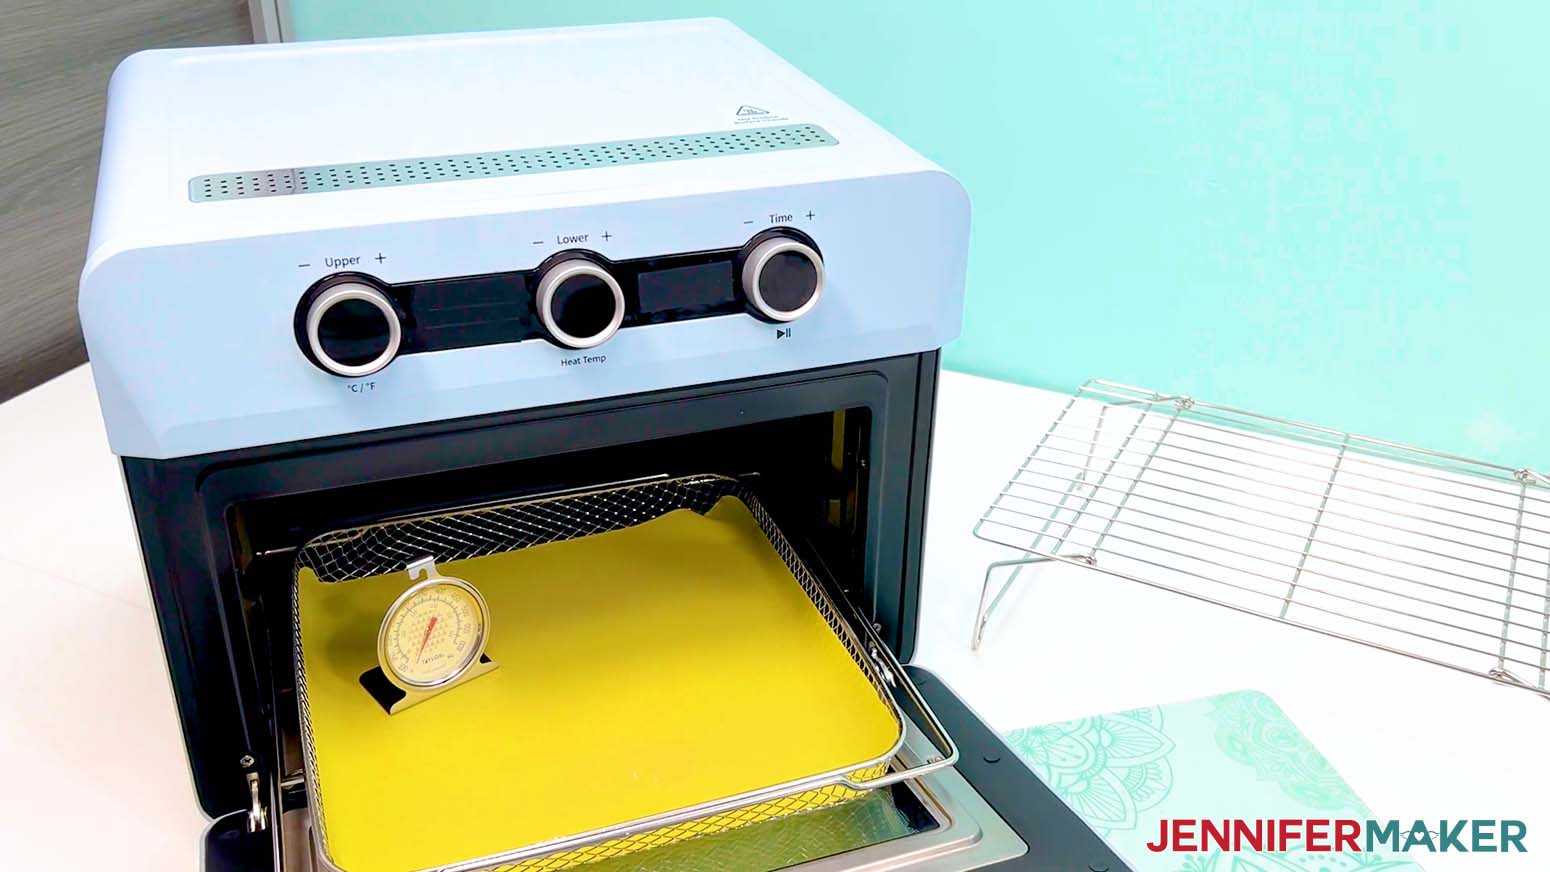
- Place a silicone baking mat onto the sublimation convection oven’s wire tray.
TIP: This will keep the tumbler from rolling later. - Place an oven thermometer in the center to make sure the temperature is correct.
- Preheat your convection oven to 375°F (191°C).
TIP: I’ll use the settings that I’ve found work the best for this type of project, but if you’re not sure where to start, check out my Sublimation Cookbook to get time and temperature settings for tons of sublimation projects!
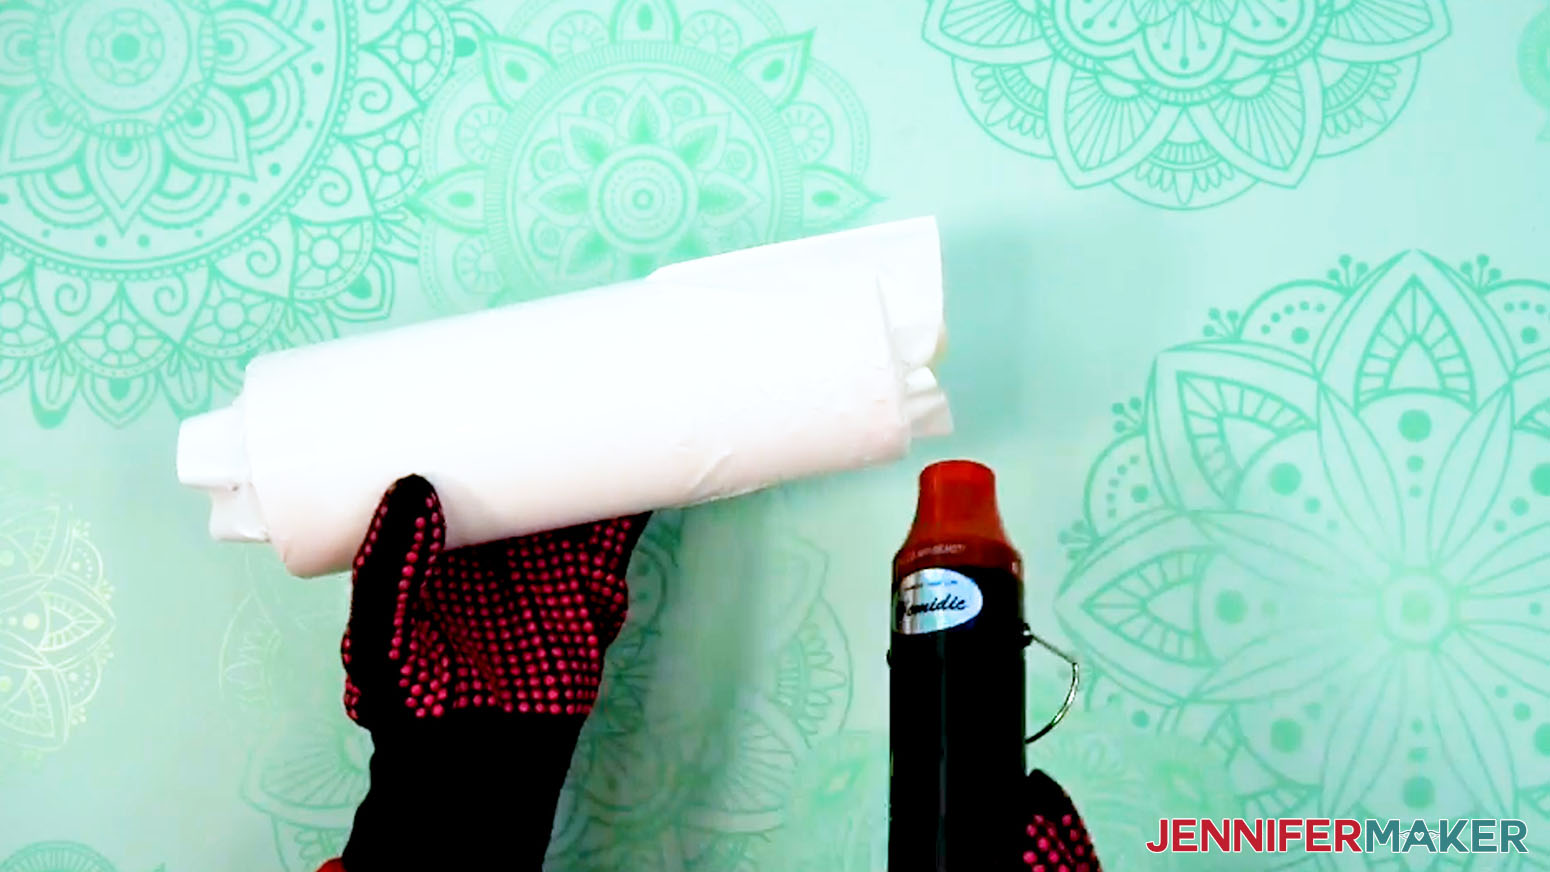
NOTE: If your tumbler is a different brand from the one in my list, check the manufacturer’s heating instructions to find the best temperature setting for your tumbler. - Grab a shrink wrap tube that is the right size for your tumbler.
NOTE: Some sublimation tumblers come with shrink-wrap tubes, but not all do. If you order the tubes separately, make sure they’re the right size for your tumbler. - Open the shrink wrap tube and pull it over your tumbler.
- Put on your heat-resistant gloves.
- Turn your heat gun to a low setting and slowly heat the wrap until it conforms to the tumbler.
NOTE: Try not to focus your heat on one area for a long period of time to avoid starting the sublimation process prematurely. - Smooth out the majority of the wrinkles, but don’t make the wrap too tight or it will pull apart in the oven.
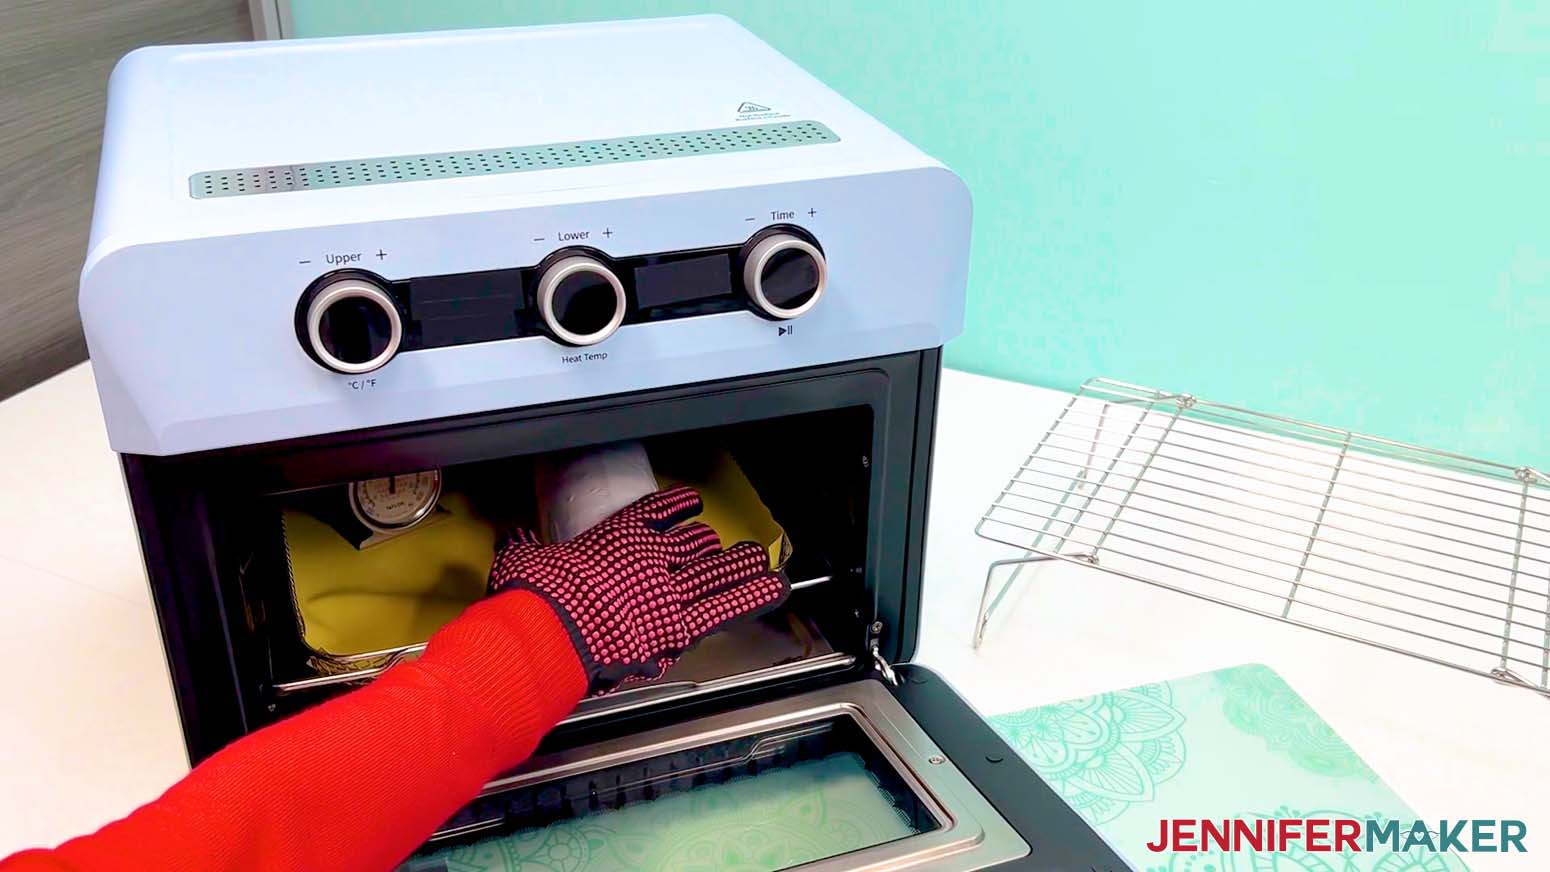
- Allow the tumbler to cool before putting it in the oven.
- Once the tumbler is cool and the oven is at the correct temperature, lay the prepared tumbler horizontally on the silicone baking mat.
TIP: Keep your gloves on, the oven is hot!
NOTE: I recommend baking only one tumbler at a time to avoid issues like uneven heating or shrink-wrap sticking together. - Bake the tumbler for six minutes, rotating once halfway through with your gloves on.
NOTE: This helps even out the heat on the tumbler. - After six minutes, the tumbler will be VERY hot. With your gloves on, carefully take it out of the oven and let it rest on a cooling rack for one to two minutes until it’s safer to handle.
- While the tumbler is still warm, carefully peel away the shrink-wrap, tape, and sublimation paper to reveal your design!
STEP 6: SHOW IT OFF
You now have a fun design sublimated on a 20 oz. tumbler!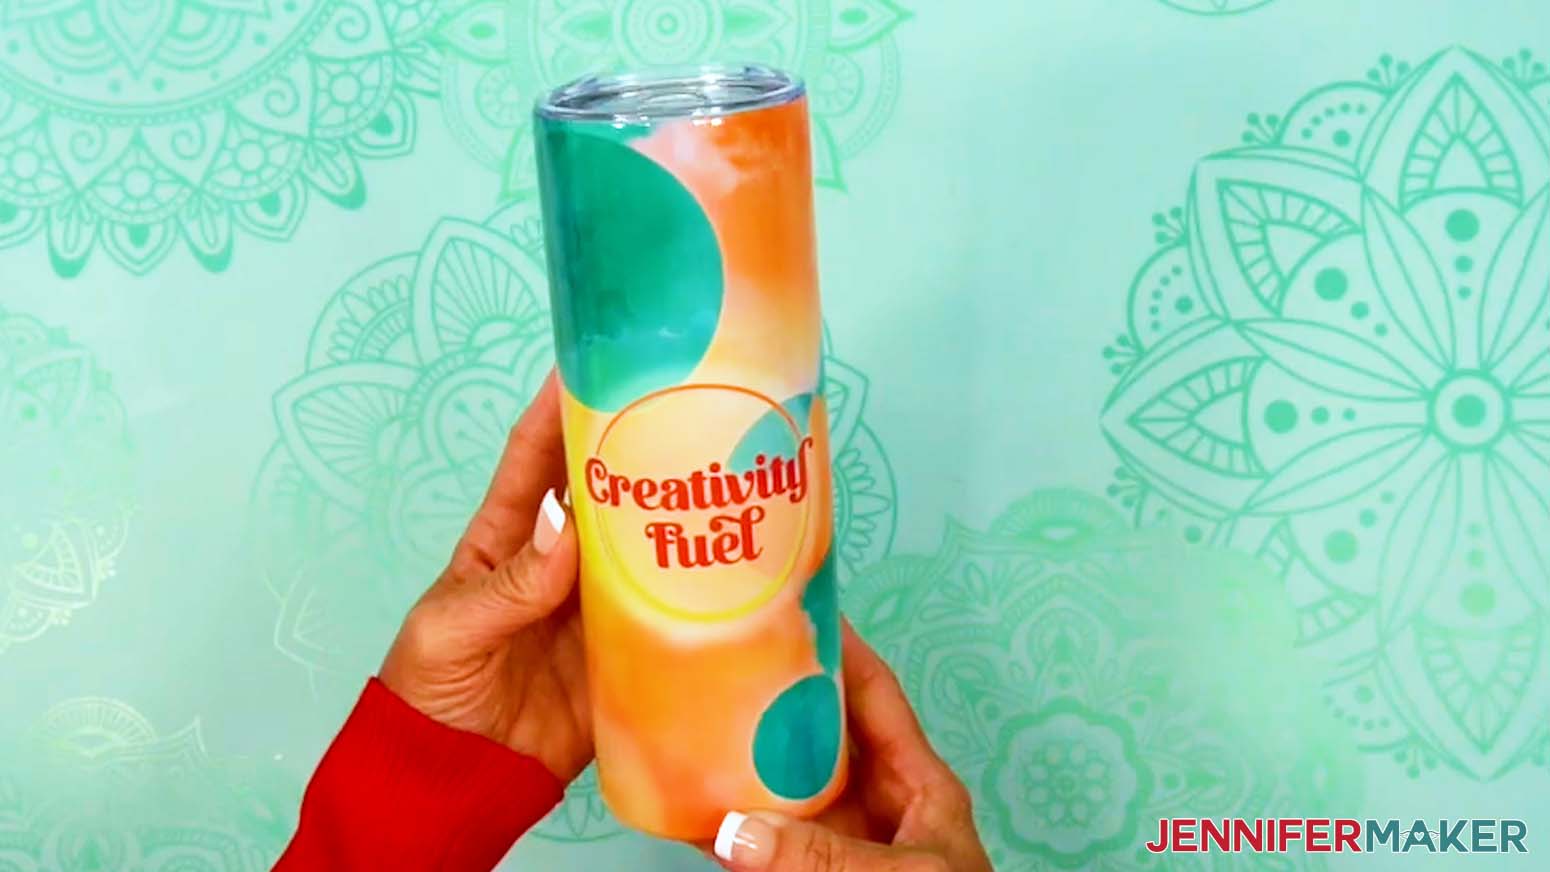
Notes
Finished Size:
Print Size: 9.45” x 8.21”
Tumbler Size: 9.37” x 7.9”
Typefaces Used:
Rehydrate: Foghe (Free Alternative: Londona)
Space: Brenson Charlotte Sans (Free Alternative: Sunshine Formula)
Beauty: Floristy Calligraphy (Free Alternative: Floristy Calligraphy - Free For Personal Use Only)
Spark: Wonderful Display Font (Free Alternate: Bestoom)
Fuel: Quacker (Free Alternative: Quacker - Free For Personal Use Only)
Care Instructions: Hand wash with gentle soap, warm water, and soft cloth. Allow to air dry.
Answers to Your Questions About How to Make Better Sublimation Tumblers
Q: Is there a way to sublimate a tumbler with a custom message?
A: You can learn how to create a custom message design for a sublimated tumbler in my ADVANCE program. Learn more about ADVANCE here!
Q: Why do my sublimation tumblers look dull?
A: Some popular cups like YETI tumblers don’t have the special poly coating needed for sublimation, so the ink won’t stick properly. To get those bright, permanent results, make sure to use tumblers that are made just for sublimation.
Q: How do I get the best sublimation results?
A: Practice, and pay attention to details! For example, dull designs usually mean the heat, time, or pressure wasn’t quite right, or the tumbler didn’t have the right coating. Double-check your supplies and settings for the best color pop.
Q: Can you wash sublimation tumblers in the dishwasher?
Q: How long do you leave a sublimation tumbler in the oven?
A: Follow the video tutorial to find my recommended time and temperature settings for sublimating tumblers.
Q: Where do I find sublimation tumbler designs?
A: You can use any of the images included in the project files, or find more in my library! You can also use your own photos and designs, images created through AI generators as long as you follow the tool’s guidelines, graphics from Canva or other online sources depending on usage requirements, or stock photos for your tumbler. If you want to take your designs further, I share online resources and best practices so you can get better results when designing and sublimating in my Advance program!
Q: Can you use a heat gun to sublimate on tumblers?
A: A heat gun sounds handy, but it just can’t provide the even, consistent heat sublimation needs. Although I use a heat gun on the shrink wrap, you’ll get much better sublimation results with a convection oven or a tumbler press.
Q: Are sublimation fumes toxic?
A: Sublimation ink does release fumes, so it’s always smart to work in a well-ventilated space. And for safety, never use the same oven you cook food in for sublimation projects.
Q: Can you reuse a sublimation print?
A: Though it may look like there’s ink left on your sublimation transfer paper after pressing, there’s not actually enough to create another press. You can try to reuse your sublimation prints, but your second attempt will probably look super faded and not the way you expect.
Q: Can you sublimate a YETI tumbler?
A: YETI tumblers don’t have the special polymer coating needed for sublimation, so the ink won’t infuse properly into the material. To get those bright, permanent results, make sure to use tumblers that are made just for sublimation.
Q: Can a Cricut do sublimation printing?
A: While a Cricut cutting machine can be useful in some sublimation projects, it does not sublimate or print sublimation ink. However, you can use a Cricut and Infusible Ink pens to draw designs onto paper, which can be sublimated, or use a Cricut to cut SVG designs out of Infusible Ink transfer sheets. If you want to sublimate your tumbler with printed designs, you’ll need a sublimation printer, a crafting oven or tumbler press, and other tools and materials you can find above in my materials list.
Q: Can I make and sell sublimated tumblers?
A: If you want to use my designs and projects for commercial use, please familiarize yourself with my important licensing information before selling your crafts.
Get my free PNG files to sublimate message tumblers and more!
(If you do not see the signup form above, click here.)
I love seeing your sublimated projects, and how you use them! Once you’ve learned how to make your own sublimation tumbler, inspire others and share a photo of your tumbler project in our Facebook group or tag me on social media with #jennifermaker.
Love,

Want to remember this? Save this How To Make Better Sublimation Tumblers Tutorial to your favorite Pinterest Board!