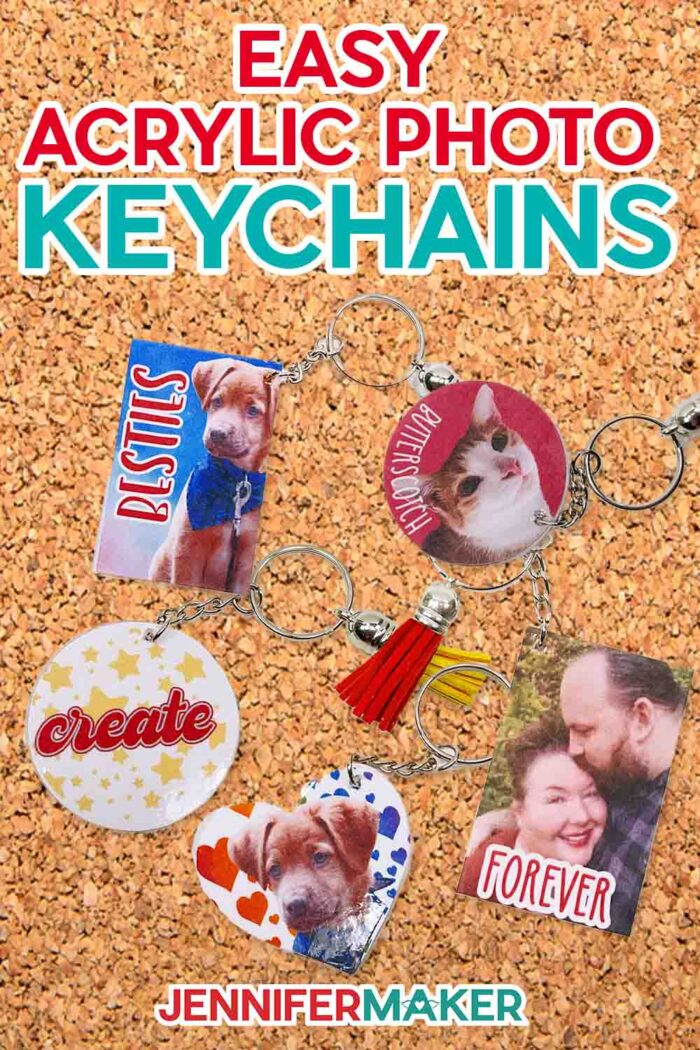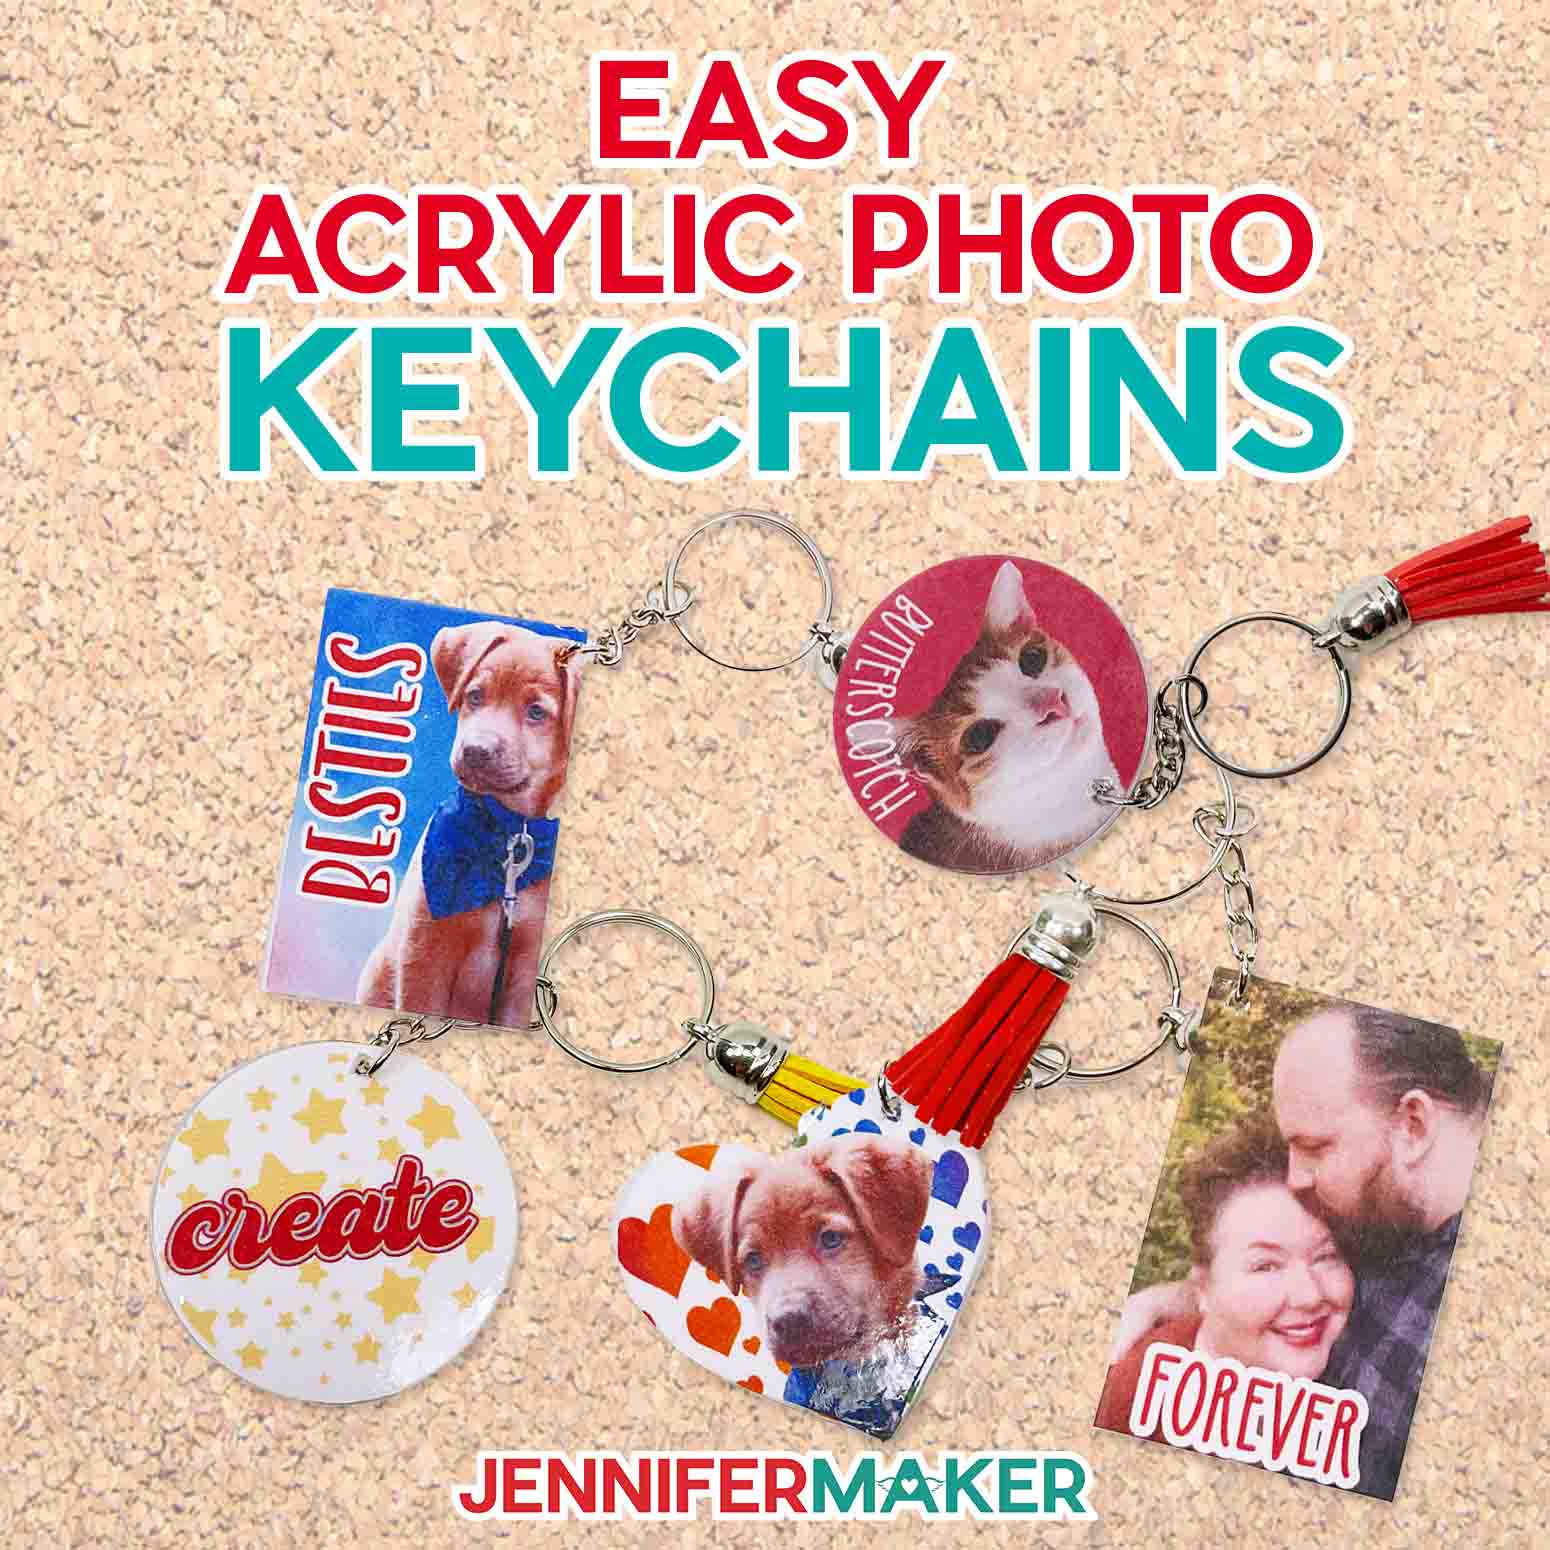
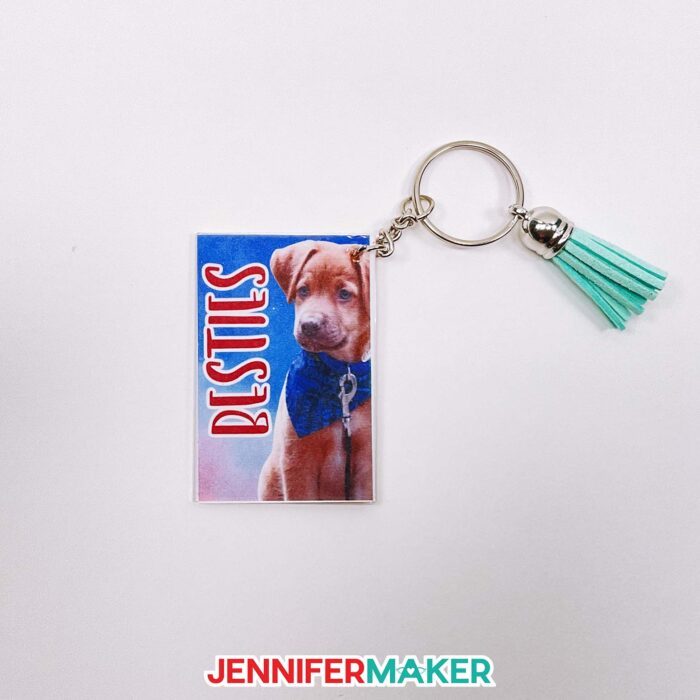
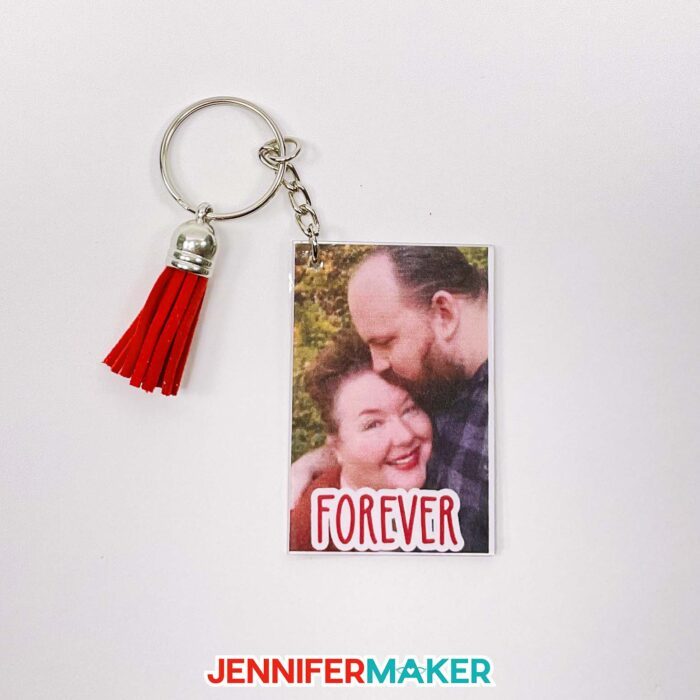
Learn how to make DIY photo keychain projects with your own images in any shape!
I really love simple projects that are both fun and functional, like custom keychains! And these DIY photo keychain crafts are a great way to keep your favorite photos with you all the time. They make great gifts and come together very quickly matter of minutes using Cricut’s Print then Cut feature and a few simple materials. I’ll even show you how to perfectly size and cut your photo for shape acrylic keychain!
Watch the full step-by-step DIY photo keychain tutorial!

 What is the Merry Maker Mingle? This is an annual tradition here at JenniferMaker! Every day for the first 25 days of December, we gift you with a brand new project, design, tutorial, and video for something YOU asked us to make. On top of that, we host a giveaway with 25 days of prizes. Some of the amazing prizes are Cricut cutting machines, sewing machines, gift cards, and beautiful print editions of our popular Cricut Coach Playbook. You can even earn bonus entries for sharing photos of the daily projects! Click here to learn more about the Merry Maker Mingle!
A DIY photo keychain is a great personalized gift, even if you’re short on time!
If you use the keychains from my materials list, they match perfectly with the templates in the free download. All you have to do is pick your own photos and follow my directions! I’ve also included PNGs to use as backgrounds, SVG patterns, and a collection of words and phrases you can incorporate. We’ll also use the text tool to play with an initial design.
But don’t worry if you’re using a different keychain. I’ll share how to Print then Cut your designs at the perfect shape and correct size to fit! You’ll need a ruler or tape measure to check the dimensions. I’ll show you a fun way to prepare for unique keychain ring shapes using some dark cardstock, a camera, and some tools in Cricut Design Space!
The materials and tools are also really simple. Instead of adding adhesive to the back of the photo on photo paper, I tried printable labels and vinyl so it’s easy to stick to the acrylic blanks. And instead of a liquid sealer, I tested out a few brands of clear adhesive vinyl to protect the front of the key ring. I’ll share my recommendations for both in the video!
I cut everything on my Cricut Maker 3, but you can use any Cricut machine to cut out the SVG elements. If you want to use Print then Cut for a photo, you will need to use a Maker, Explore, or Cricut Explore Air since the Joy does not have that feature. You’ll need a green StandardGrip machine mat, a brayer, scraper, x-acto knife, and rubbing alcohol and coffee filters.
It’s also a good idea to calibrate your Cricut before any Print then Cut project, so a blue LightGrip mat and some printer paper is good to have on hand. I used my HP ENVY Photo 7155 to print my DIY photo keychain images.
I love all the ways to dress up a DIY photo keychain, too! Tassels are easy ways to add some flourish, so I’ll show you how to put all the pieces together with some pliers.
DIY photo keychains make perfect Mother’s Day gifts, and I know many people who’d love one as a Father’s day gift! Or, make a matching set to celebrate your best friends — human or animal! They really are a perfect gift!
Let me show you how easy it is to make your own DIY photo keychain! This post contains some affiliate links for your convenience (which means if you make a purchase after clicking a link I will earn a small commission but it won’t cost you a penny more)! Read my full disclosure policy.
Materials to Make a DIY Photo Keychain
View my Amazon shopping list with the exact items we used to make this project
- Acrylic Photo Frame Keyrings
- Color Printing Labels -OR
- Printable Vinyl Sticker Paper
- Transparent Adhesive Craft Vinyl -OR-
- Cricut Transparent Vinyl
- Blue LightGrip Mat 12″ x 12″ and 8.5″ x 11″ printer paper – optional for printer calibration
- A method to print and cut your material, I used the amazing Cricut Maker 3 but you can use any Cricut with a Premium Fine-Point blade
- Inkjet home Printer – I used my HP ENVY Photo
- Cricut Green StandardGrip Mat, 12″ x 12″
- Brayer
- Scraper
- Pliers – to feed the key ring findings through the small hole in the acrylic blank
- Ruler
- Rubbing Alcohol
- Coffee Filters
- Craft knife or x-acto knife
- Scrap dark cardstock and a camera with the ability to upload photos to Cricut Design Space- optional if you’re working with a very different keychain shape
- Design #459 – My free SVG/PDF/DXF design files available in my free resource library (get the password by filling out the form at the bottom of this page)
How to Make a DIY Photo Keychain
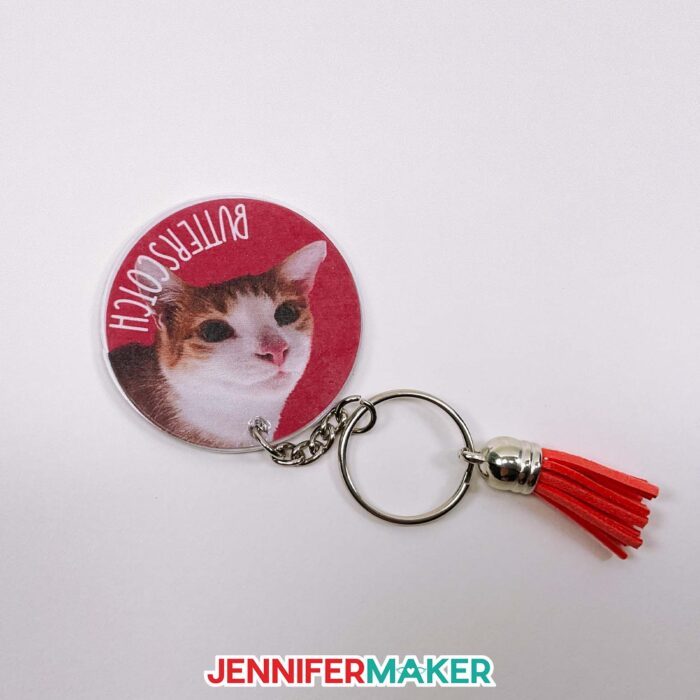
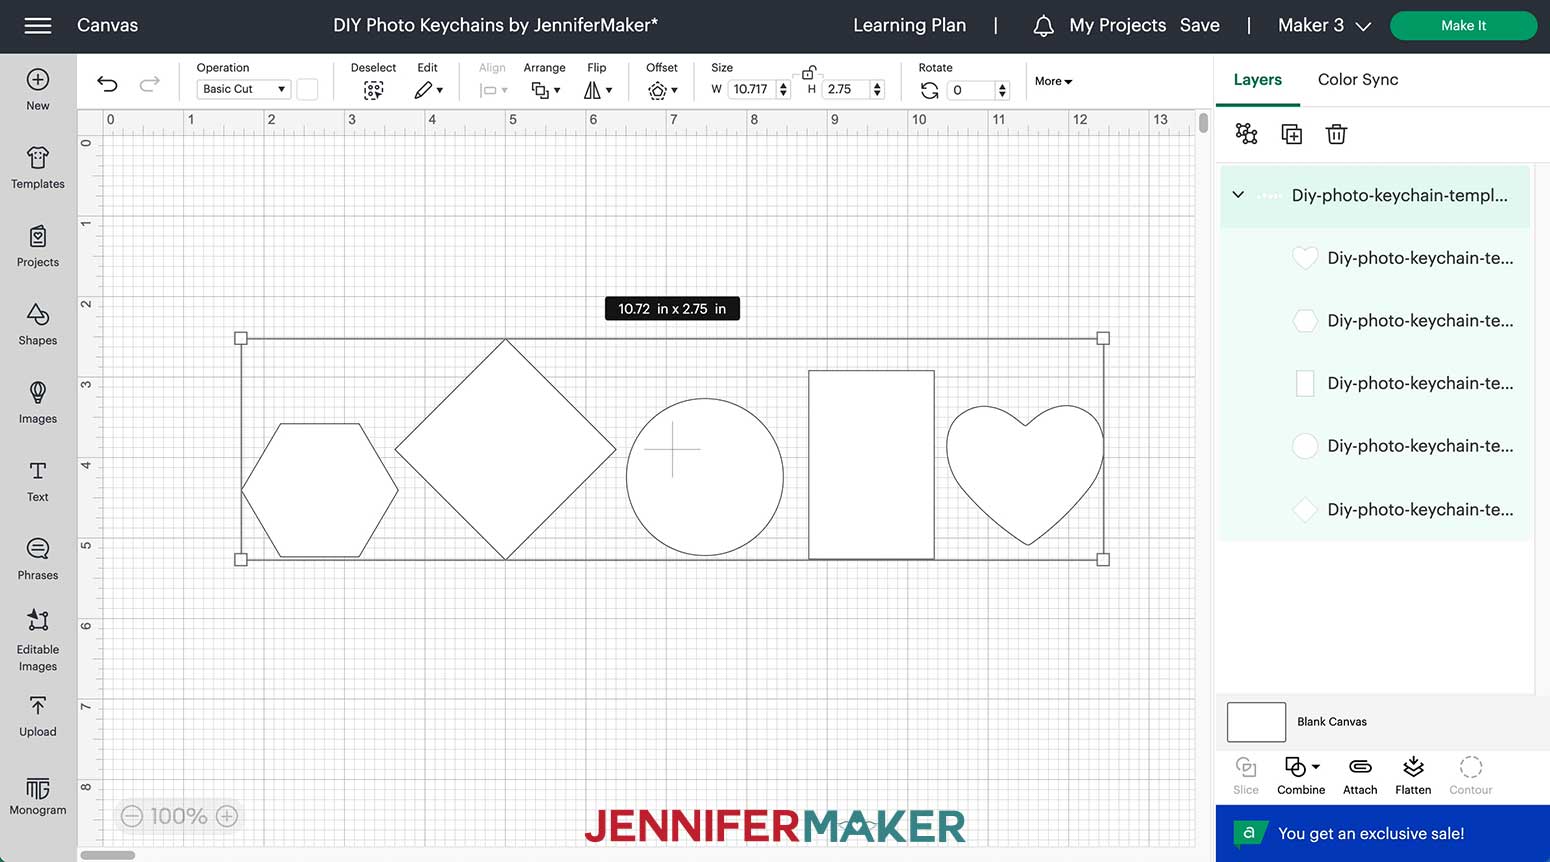
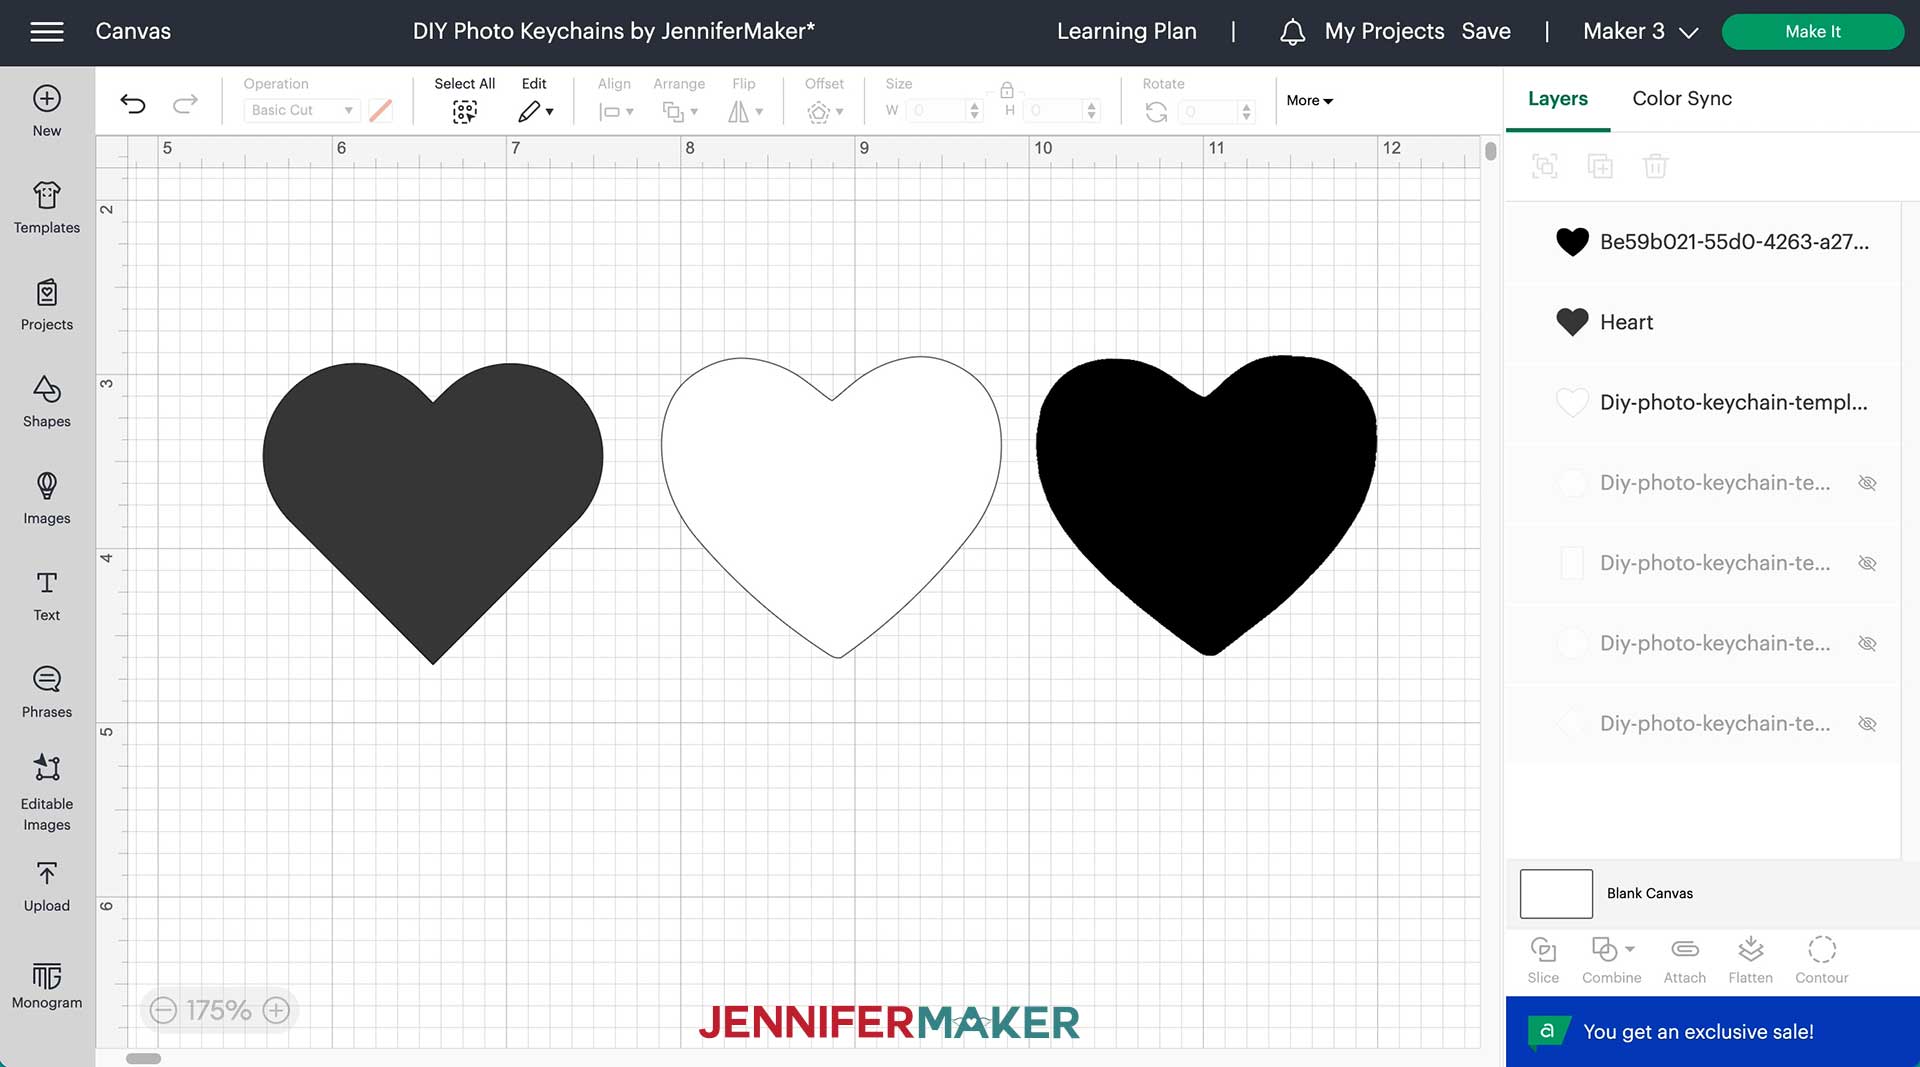
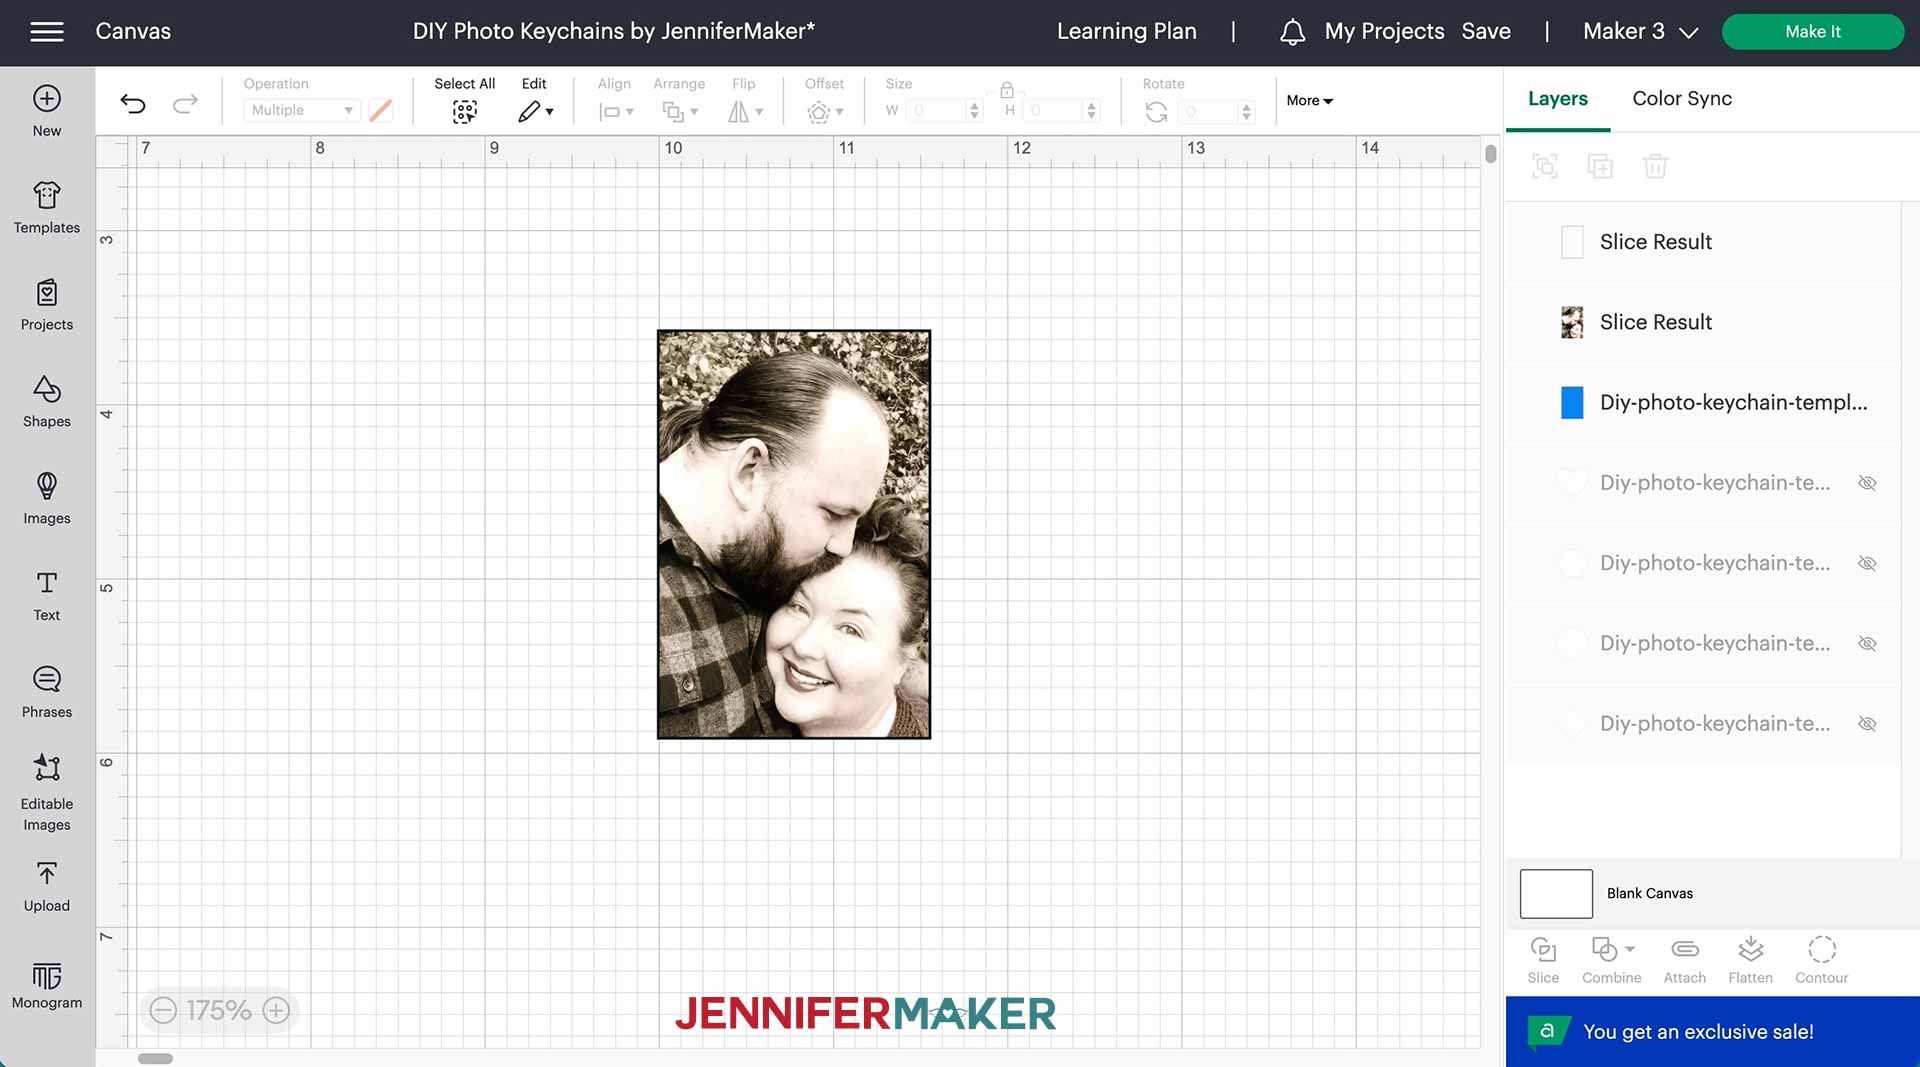
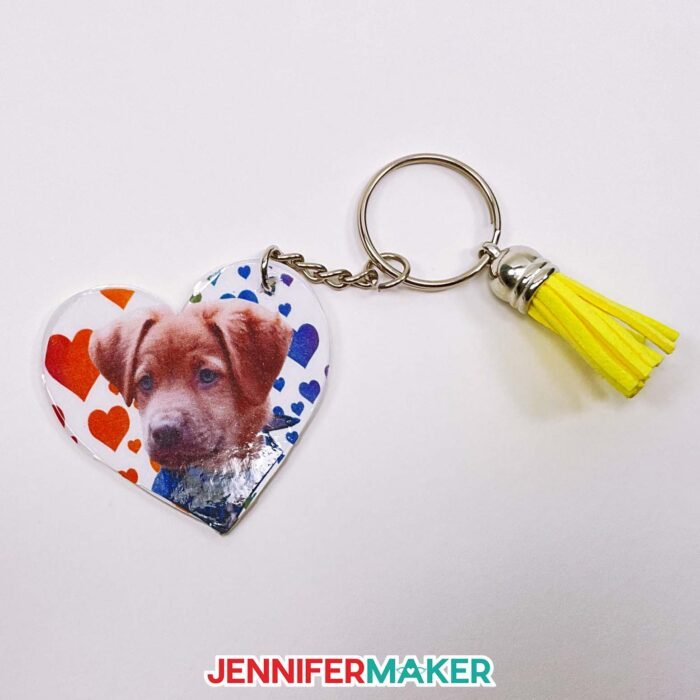
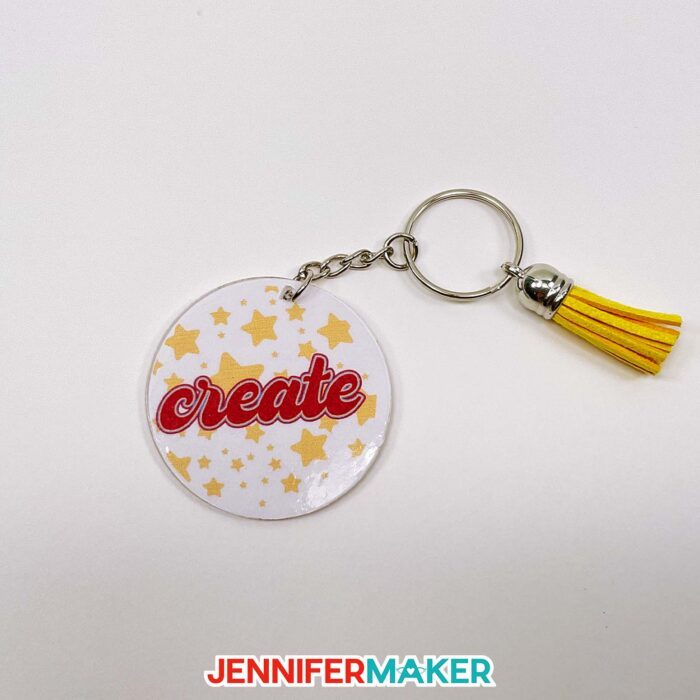
Learn how to make and personalize photo keychains for all the awesome people in your life. First, download my DIY Photo Keychain SVG/PNG files from my free resource library. Its Design #459 The download has folders for SVGs and PNGs. The SVGs include: The PNGs include several more colorful backgrounds I'm happy to share with you! They work differently than the SVGs, but we'll go over that. I'll show you how to use PNGs, SVGs, and your own photos in Cricut Design Space with a Cricut. The biggest step is getting the correct shape to fit your keychain, so we'll start there. NOTE: It's always a good idea to calibrate your printer before a new Print then Cut project. Follow the steps in my DIY Money Holder tutorial before you begin. Octagon, Square/Diamond, Circle, Rectangle, or Heart Keychains from the Material List If you are using a keychain from the material list, upload the "templates" SVG to Cricut Design Space and add it to your Canvas. If you are not sure how to upload an SVG cut file to Cricut Design Space, watch this helpful video training series I made. Here is how they look on my Canvas Ungroup the designs and hide the shapes you don't need -- I'll keep the rectangle -- then go to Step 3. Different Keychain Shapes Don't worry, there are ways to use other blanks! Option 1: Use a Similar Shape (Easy) If the shape is similar to one in my free file or an option from the free section under Shapes, we can use that as a starting point. Let's use the heart as an example. I'll pick a heart from the free Shapes section and we'll adjust it to fit the keychain we have. photo-keychain-select-heart-shape Then, measure your plastic shape's height and width. Mine is 1.95" wide and 1.73" tall. The details matter here. Back in Design Space, adjust the size of the shape so it matches your measurements. If you want to try a few different versions with varying dimensions to experiment, Duplicate the shape and change the dimensions again. Then, cut a test sheet using extra cardstock. Compare the shapes to the keychain (remember which is which!) and pick the best one to use for your photo. Option 2: Take a Picture (Advanced) If you still can't get a good fit, there's another way! Leave the protective film on the keychain and take a picture of it from above on dark cardstock. Upload the photo to Cricut Design Space as a Complex Image fro Print then Cut. On the background remover screen, use the manual tools (or automatic if you have a Cricut Access subscription) to leave just the keychain shape. For tips on removing the background, see the Handwriting to Cricut tutorial. Once the shape looks right, click Apply & Continue. Then pick Cut Image to add the keychain shape to your Canvas. With the lock icon closed to maintain the shape's proportions, adjust the dimensions to fit your keychain. Once you have a shape picked, you can start decorating! I'll use the rectangle and a photo and Greg and Me. Upload the image you want to use as a Complex Image. You can remove some of the background, or leave it as is. Select the Print then Cut image on the final screen, then add it to your Canvas. Create a duplicate of the acrylic blank template and change the color to blue. This will be the transparent vinyl that covers the image on the keychain. Drag that out of the way. Select the original shape and change the Operation from Basic Cut to Pen so you can see the outline. Click Arrange and bring the template to the front. Drag it over the image, roughly covering the part you want to use. Select the image and--with the lock icon closed to maintain its proportions--click and drag a corner of the bounding box until the part of the photo you want on the keychain is the right size. Make sure the drawn shape isn't chopping off anything important! Drag a bounding box around the image and the shape and click Slice. Delete the leftover photo elements from the Slice, and hide the rectangle template in case you need it again. Now your photo is the right shape! You can Print then Cut it now, or add some optional details. I'll show you how I added a photo of my dog Hunter to the heart even though the shapes don't match up well. Adding my background PNGs or SVGs to sliced photos with the background removed (or keychains with words instead of images) is easy! This is a great way to make an image fill the space of a keychain that is a different shape. Upload the PNG you like as a Complex Image. I'm going to use the shades of blue PNG. Don't worry about the background. Pick the Print then Cut image then add it to your Canvas. PNGs often show up much larger on the Canvas. Don't worry, you can size it down or just use a small section and hide or delete the extra. Create two duplicates of the acrylic blank template you're using and change the color of one to blue. This will be the transparent vinyl that covers the image on the keychain. Drag that out of the way. Select your original keychain shape and turn the Operation to Pen again so you can see through it. Bring it to the front and drag it over the area you want to use from the PNG. You can resize the PNG if you'd like to play with what will show on the keychain. When you're happy, select both layers and click Slice. Delete the Results other than the shaped section of the background and the template. Now you can use this as the background for an image with blank space, or add text or a sentiment on top and flatten them to create a custom design! I'll upload my Hunter image for Print then Cut and use the automatic background remover. I only want to use his head, so don't worry if other parts of the image look funny. Add it to your Canvas. Select the image and--with the lock icon closed to maintain its proportions--click and drag a corner of the bounding box until the part of the photo you want on the keychain is the right size. I'm going to resize this photo to approximately 3 inches in height. Bring the template to the front again and drag it into position to check. Make sure the drawn shape isn't chopping off anything important! When you're happy, select both layers and click Slice. Delete the unneeded photo parts and hide the template. This wouldn't fill the keychain shape, so drag the shaped photo so it lines up with the background we created in the correct shape. Better! Select both and click Flatten so they will Print then Cut together. You can create a design from scratch using my elements and some text, too! I'll show you how to make an initial keychain to fit the round shape. Click your circle template and make two Duplicates to work with. Change the color of one to blue. This will be the transparent vinyl that covers the image on the keychain. The other white one will be the background for our keychain. I'll use the Text menu to add an A for Alexa in Wellona Script, which you can purchase from FontBundles.net. You can use any font you'd like, just remember to look under System if you're using one you downloaded. Resize the letter to fit on the keychain and drag it to the shape to check. I'll change the color to red using the color box. Adding an Offset helps the initial pop! To do so, click Offset and change the size to .024 with curves and click Apply. The Offset is automatically black, so click the layer and change the color if you'd like. I'll make mine orange since it's printing on a white background. Select the background circle and both letter layers, then click Flatten so they print and cut together. Variation: Multicolor Initial You can also combine an initial and any of my backgrounds for a different look! I'll slice Greg's initial out of one of the included background PNGs. I'll make a diamond shaped keychain for myself using the orange and red PNG. Click your diamond template and make two Duplicates to work with. Change the color of one to blue. This will be the transparent vinyl that covers the image on the keychain. The other white one diamond I will change the color to black using the color box. I'll use the Text menu to add a G in Wellona Script, which you can purchase from FontBundles.net. You can use any font you'd like, just remember to look under System if you're using one you downloaded. Resize the letter to fit on the keychain, double check by dragging it over the black diamond shape. Once it's a good size, move the G over the PNG so that we can slice out a colorful letter. Change the Operation of the letter from Basic Cut to Pen so you can see the outline. Now adjust the PNG to get the colors you want under the initial, I've resized my PNG down to 1.7'' on my canvas to get those most color variation. Drag out a bounding box selecting both the letter and the PNG and click Slice. Delete the letter outline and the leftover PNG background, so that only a multicolored letter remains. I also included some sentiments you can use in the SVG file. Add that file to the Canvas and ungroup the collection and hide anything you don't want to use. I'll leave the "love" design. I'll change the color to red and add a small .03 offset and drag the phrase on top of my black diamond and resize it as needed with the lock icon closed. I'm also going to set the offset color to white so it'll stand out against the black background I selected. Since this is all going to be printed, the sky is the limit, use any color you'd like. Zoom in to ensure your text is placed exactly where you want it and when you're ready, hold Shift to select the shape, initial, and the sentiment, then click Flatten below the Layers Panel. When you're ready, make sure you have a Print then Cut layer and a matching blue layer for each keychain you want to make. Hide everything else so you don't print or cut them by accident. Select the correct machine -- I'm using a Maker 3 -- and click Make It! If prompted, pick "On Mat" and "12" x 12" in the pop up. On the Prepare screen, make sure your Print then Cut images are on a white mat with black marks. The Cricut will have the printer print everything on that mat and then use the marks to cut in the correct spots. The Material Size should say 8.5" x 11". On the blue mat, you should have an equal number of keychain shapes as your printable images. We'll cut these out of transparent adhesive vinyl. The Material Size should say 12" x 12". Click Continue. Click the green Send to Printer button to open the Print Setup window. Make sure your printer is listed and the sliders next to "Add Bleed" (a small border around each image that allows for more precise cutting) and "Use System Dialog" are green. Then click Print. The print screen for your printer will appear, but it might be hidden behind Design Space. Minimize your Cricut window to see the print settings. Your window will look different depending on your computer and printer. Make sure your printer is listed in the window. Set the paper type to photo and the print quality to the highest available. Put your sticker paper or printable label paper in the printer. I tried several options and will share the results at the end. Press Print. Place your printed sheet on your green StandardGrip machine mat like it is on the screen and use a brayer to make sure it's fully adhered. Material Settings Check that your Fine-Point Blade is clean and in Clamp B. Then, load the mat into the machine and press the flashing button to cut your design. When the cut is finished, unload the mat, flip it over, and roll it back to release the paper. This helps prevent the material from curling and ripping. Unload the mat, flip it over, and roll it back to release the vinyl. Then trim your shapes apart and remove the excess vinyl around each. Remove the protective film and prepare the Acrylic Keychain Blanks with rubbing alcohol to remove and dust or oils. Carefully peel up the matching image like a sticker. Line up the edge of the image with the keychain blank and smooth down with your fingers or brayer. Using jewelry pliers, twist the jump ring through the hole in the keychain and attach the metal chain. Close the jump ring and thread the tassel onto the keyring. These make great gifts!
DIY Photo Keychains
Materials
Tools
Instructions
STEP 1: GET MY FREE DIY PHOTO KEYCHAIN FILES
STEP 2: PREPARE YOUR SHAPE
![]()
STEP 3: PREPARE YOUR DESIGN

Variation: Add a Background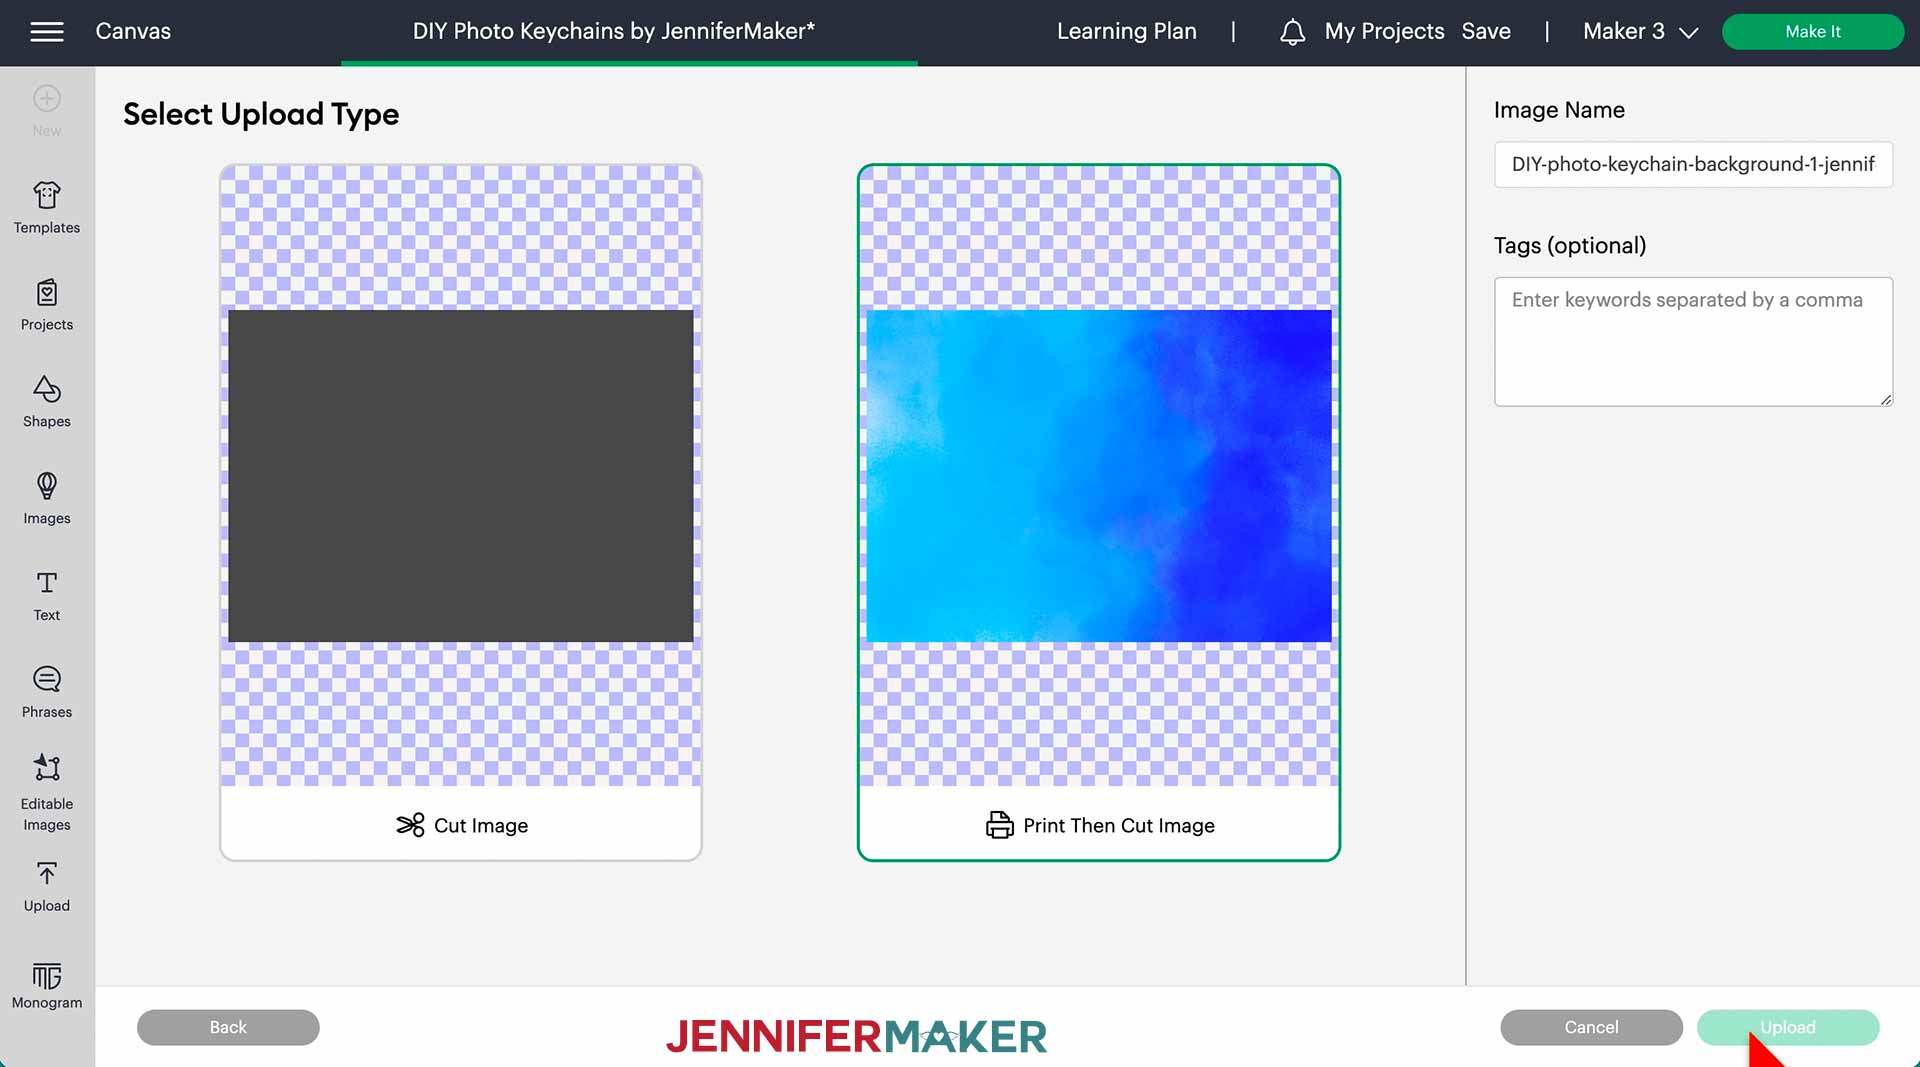
Variation: Add Custom Text
Make sure the G is in front by using the arrange button
Move the G back on top of the black diamond on your canvas. You may be tempted to use align to center your design, however in this case it works best if you eyeball it.STEP 4: PRINT THEN CUT YOUR KEYCHAIN DESIGNS AND PROTECTIVE VINYL
If you have any questions about print then cut please see my Gingerbread Village tutorial.
After your keychain designs have printed, let the sheet dry to avoid any smears during the cutting process.
Then, place your transparent vinyl shiny side up on the same mat and cut the protective shapes using the Premium Vinyl setting and More Pressure.
If you're having cutting problems, here are some tips!STEP 5: ASSEMBLE AND FINISH
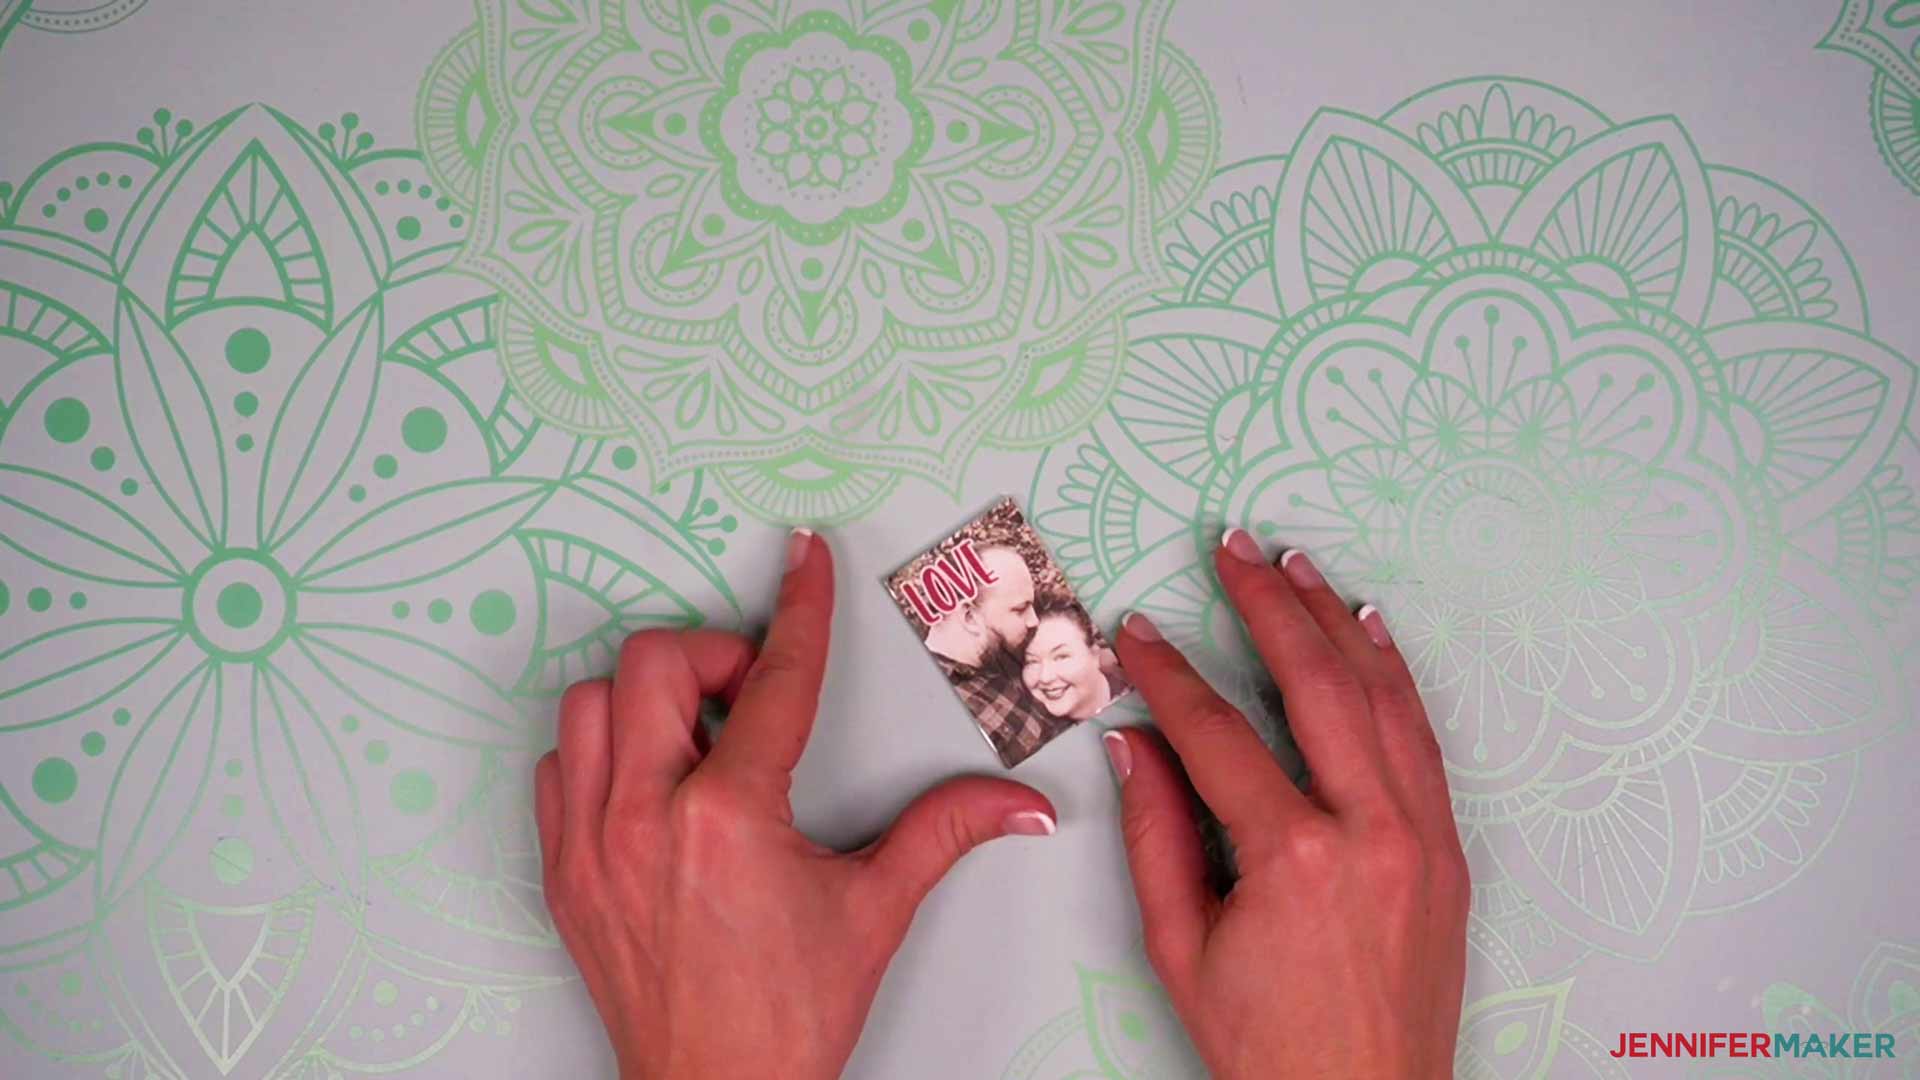
Repeat the process with transparent vinyl, keeping the orientation of the image the same on both sides. Using a craft knife, poke a hole through the vinyl for the keychain hardware.Step 6. Show it off
Notes
Answers to Your Questions About Making a DIY Photo Keychain
Q: How do I make a photo keychain at home?
A: Using a Cricut to add Print then Cut photos to acrylic keychain blanks is my favorite way to make a DIY photo keychain. If you’d like to try another approach, see my video tutorial on making custom shrinky dinks into keychains using shrink plastic!
Q: How do I add photos to keychain?
A: You can print images on printable adhesive vinyl or labels to add them a a key chain blank!
Q: How do I seal a photo keychain?
A: I used clear adhesive vinyl to seal my keychains, but you can also use mod podge.
Q: How do I make a photo keychain with Cricut?
A: I prefer to use the Print then Cut tool to cut images to the perfect shape and size for a DIY photo keychain. If you don’t have a printer, you could also use a Cricut to cut photos to the correct shape and then secure them to the blank with layers of mod podge.
Q: What size is a picture keychain?
A: There are all kinds of keychain blanks available, but the ones I chose are roughly 2″ square.
Q: How do you attach vinyl to keychain?
A: I removed the vinyl’s backing and then used my taco method to line up the middle on the keychain blank before smoothing down the sides.
Q: Can I cut this project on a Cricut Joy?
A: Yes, the SVG designs are small enough to fit on the Cricut Joy machine mat.
Q: What is Merry Maker Mingle?
A: Each day in December leading to Christmas, I present you with a brand new “gift” — a project to craft, make, or do. You can make these projects on a Cricut cutting machine or by hand if you don’t have one. Most of our Merry Maker Mingle projects will come with a fun video with yours truly, a step-by-step printable photo tutorial, and a free pattern/SVG cut file. Sign up for my special email list to get daily updates and prizes!
Get my free SVG files to create a DIY photo keychain!
I love seeing what you make with my designs and how you use them! Please share a photo of your DIY photo keychain in our Facebook group or tag me on social media with #jennifermaker.
Love,

Want to remember this? Save this DIY Photo Keychain Tutorial to your favorite Pinterest Board!