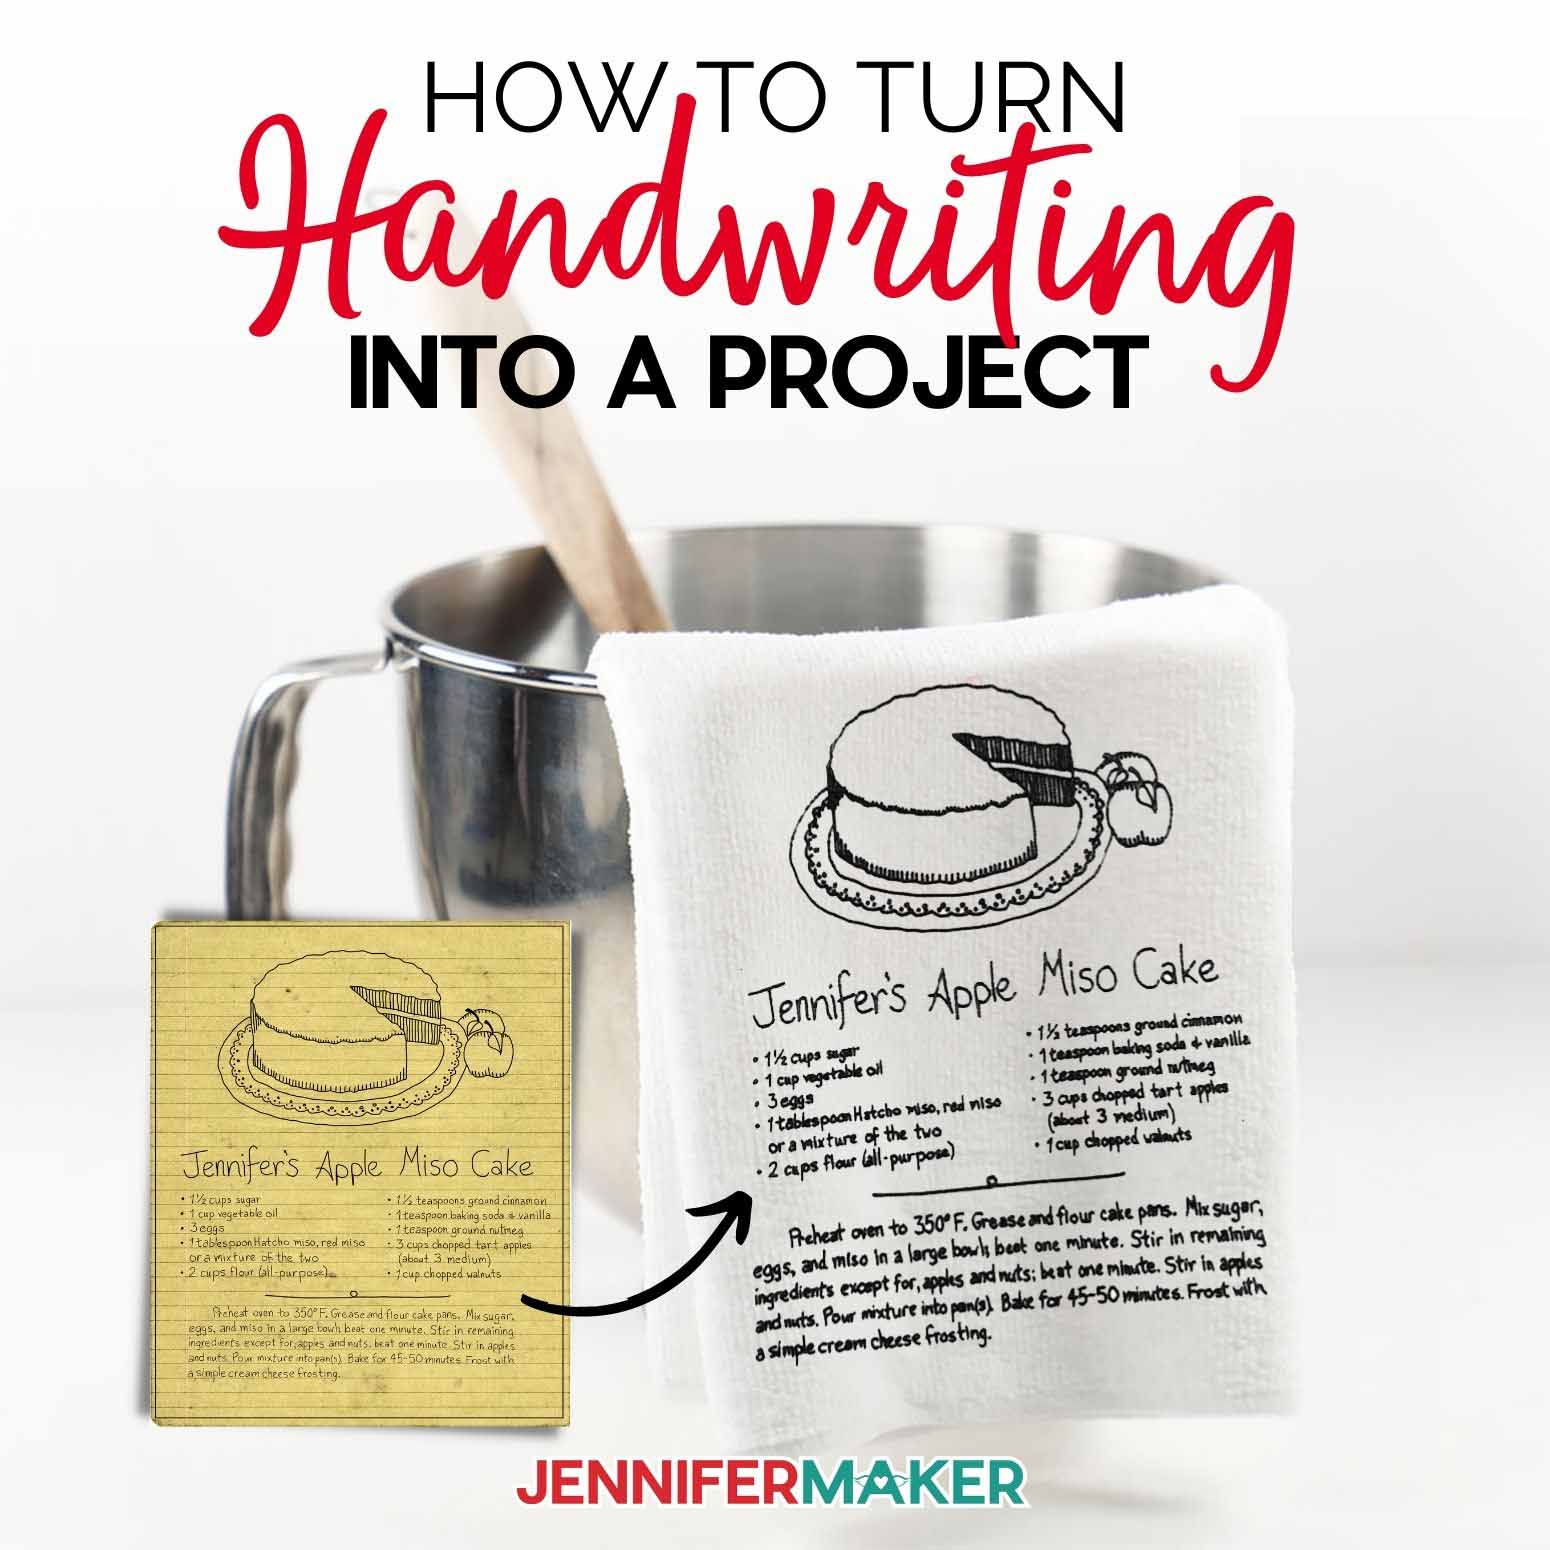
Learn how to import handwriting into Cricut Design Space and convert it into a pen, foil or engraved project!
Do you have a special letter or old recipe that means the world to you? Something handwritten by a friend, a family member or maybe your Grandma that you hold very near and dear to your heart? I feel like we all have something like that. I’m going to show you how to turn that special memory into a beautiful keepsake like a pretty foiled bookmark or an Infusible Ink tea towel. Once you know how to do this, you’ll be amazed at all the handwriting to Cricut projects you can make!
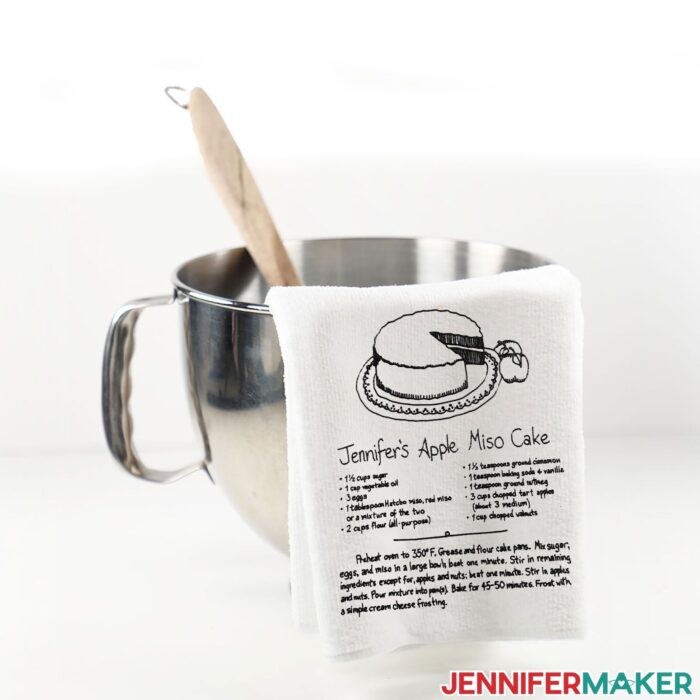
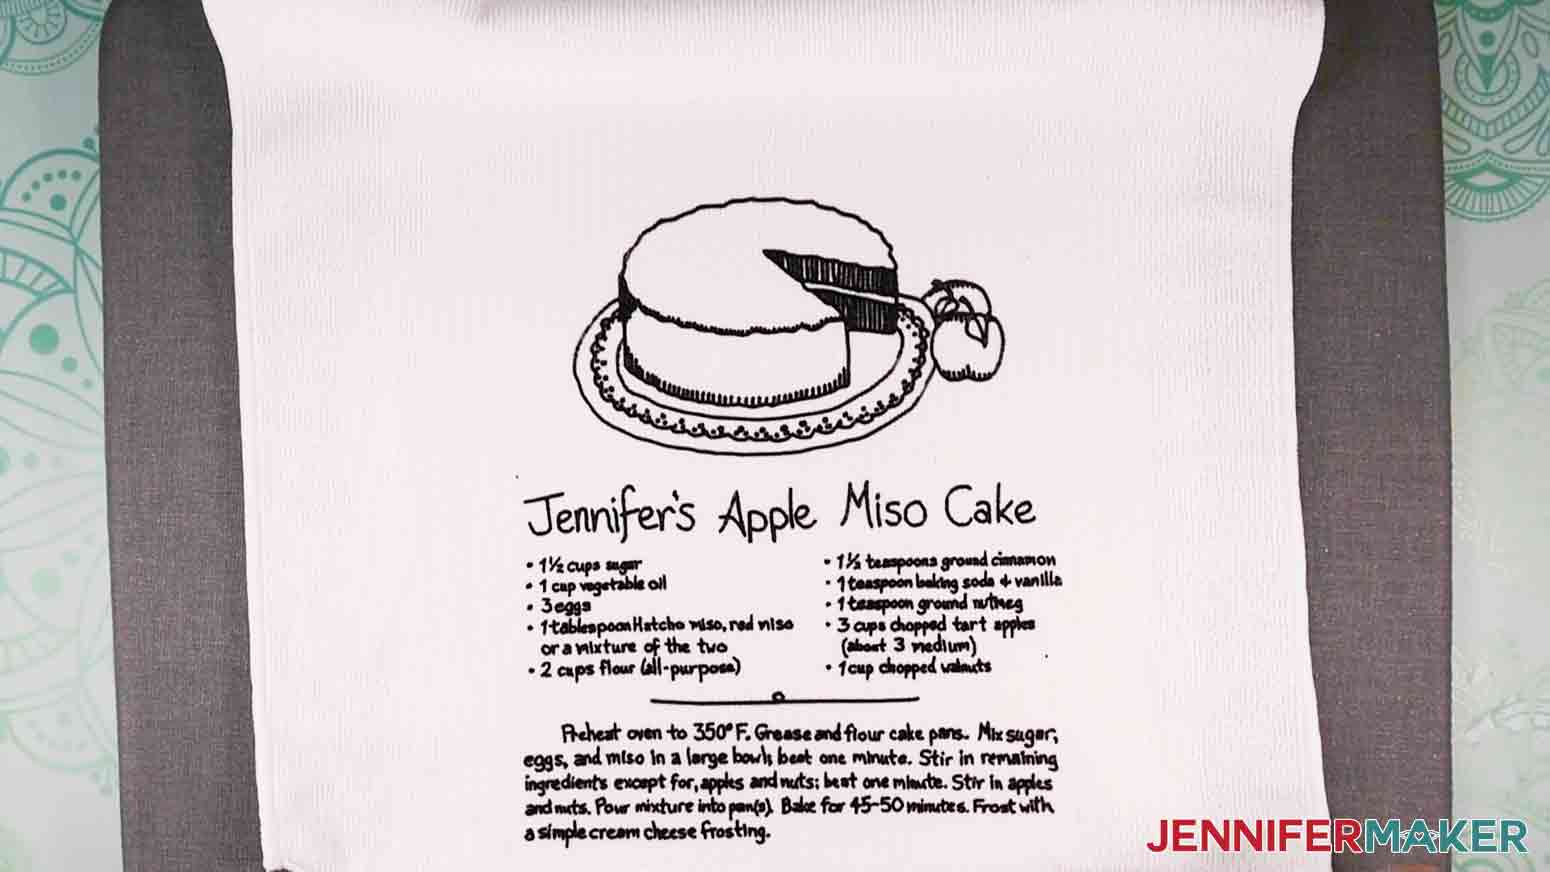
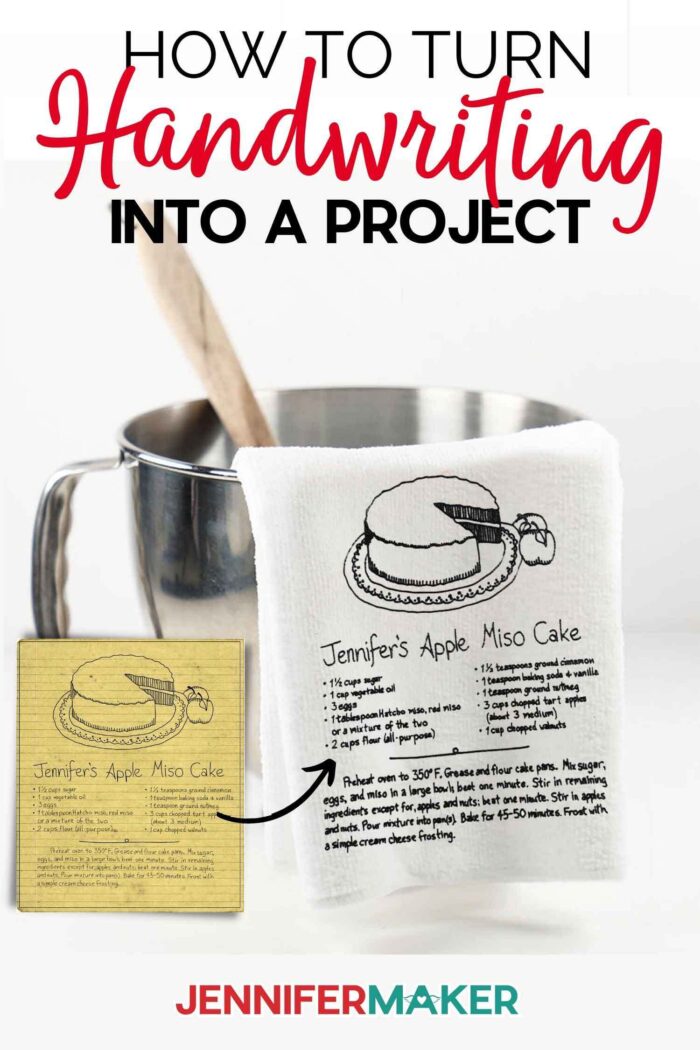
I’m SO excited about this project! I was able to turn my handwritten apple cake recipe into a towel that I can give to my daughter Alexa so she always has the recipe. I absolutely love how this turned out and am so excited to share how I did it with you.
So here’s a look at what we’ll need to make these handwritten heartfelt treasures.
For the tea towel I’m using Infusible Ink, so that means we need to use sublimation tea towels. Using Infusible Ink means we can actually use these tea towels without worrying about vinyl. We’ll also need infusible ink pens, laser paper, butcher paper and a Cricut Easy Press plus heat pad to transfer our design. And of course we will need our Cricut cutting machine and machine mats.
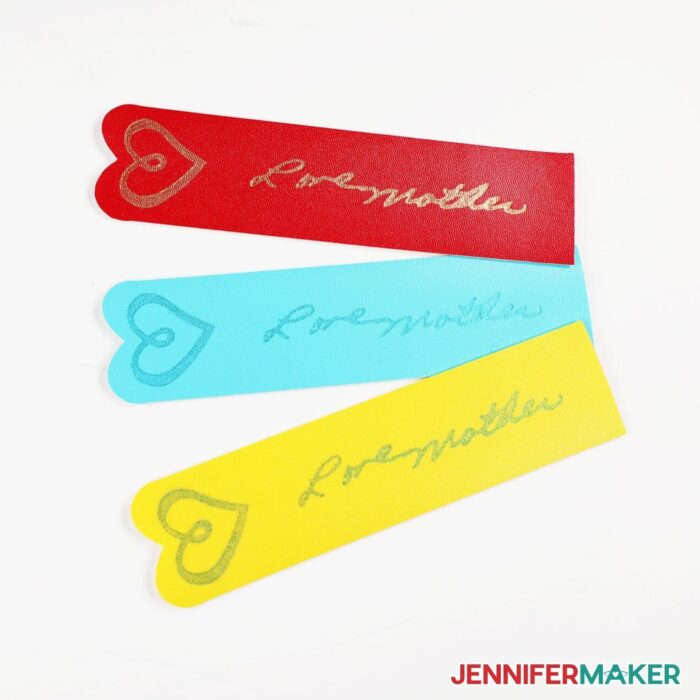
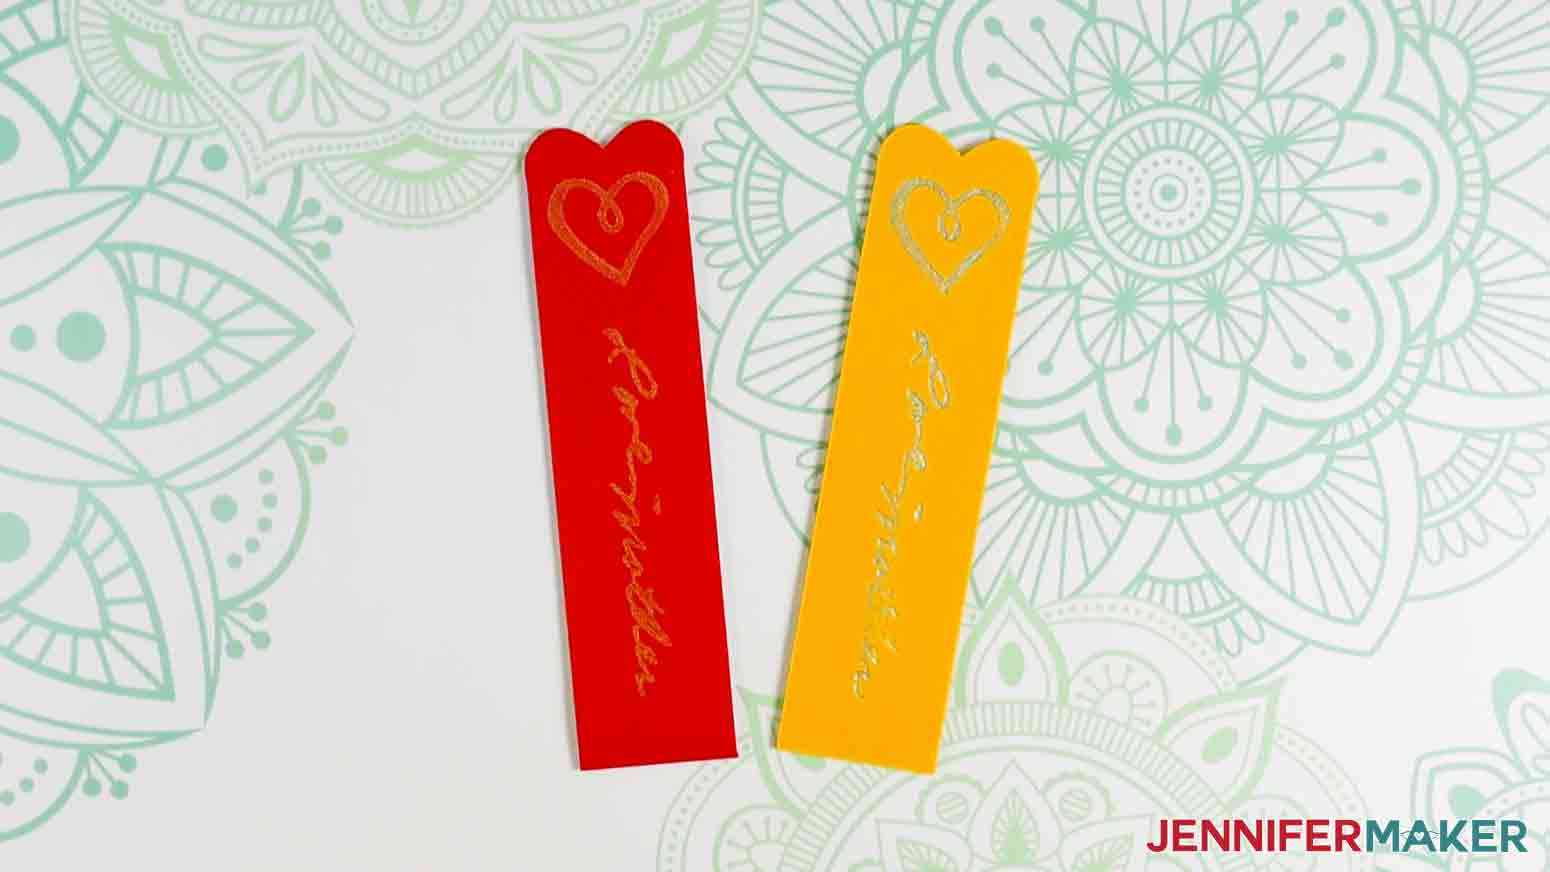
For the bookmark I’m going to use faux leather and some really pretty metallic and jewel-toned foil transfer sheets. We will use the Cricut Foil Tool to apply the foil on the bookmark.
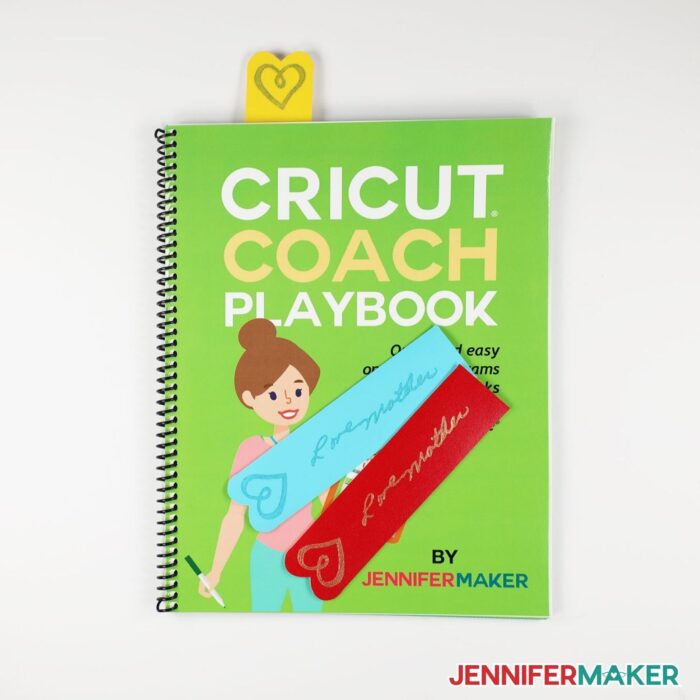
I foiled this faux leather bookmark with a phrase written by my grandmother to my mother. I just love how easy it is to turn something so special into something I can use in my everyday life. It means the world to me that I can keep her memory alive for my mother and me by creating sentimental projects like these.
Turn your significant other’s handwritten note into something you can hold onto forever, or create a fun project with a child’s handwriting. The possibilities are endless when it comes to turning handwriting into a Cricut project.
I really love how these turned out and they always manage to put a smile on my face.
This project uses a hatchfill to fill in the design, meaning your design appears big and bold rather than just an outline. You can use this technique to draw, foil, or engrave projects with your Cricut!
Here’s a supply list of what you need to make handwriting to Cricut projects! This post contains some affiliate links for your convenience (which means if you make a purchase after clicking a link I will earn a small commission but it won’t cost you a penny more)! Read my full disclosure policy.
Materials to Make Handwriting to Cricut Projects
View my Amazon shopping list with the exact items we used to make this project
- Sublimation Blank Tea Towels (if those are out of stock, try these or these)
- Cricut Infusible Pens 0.4mm
- Laser Paper
- Heat Resistant Tape
- Butcher Paper
- Smooth Faux Leather
- Cricut Strong Grip Transfer Tape
- Metallic Foil Transfer Sampler 4″ x 6″
- Jewel Foil Transfer Sampler 4″ x 6″
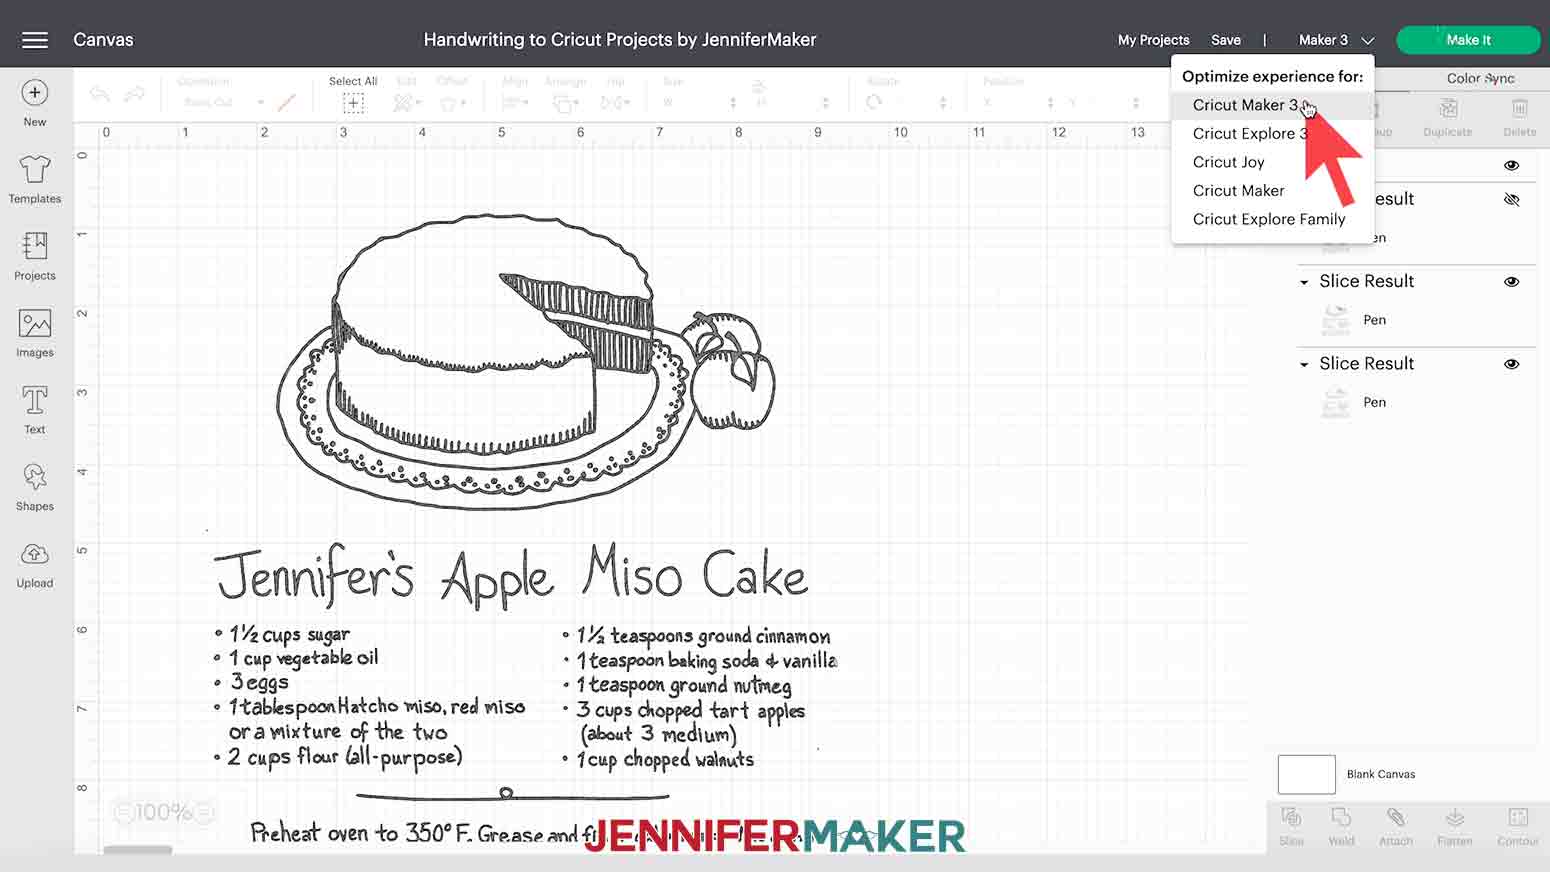
- A method to draw, foil, or engrave, I used the amazing Cricut Maker 3 but you can also use the Cricut Maker, Cricut Explore 3, the Cricut Explore, or the Cricut Joy (Joy and Explore work for drawing and foiling only)
- Cricut EasyPress
- Heat Pad
- Lint Roller
- Foil Transfer Tool for Maker or Explore
- Foil Transfer Tool for Joy
- Blue LightGrip Cutting Mat 12″ x 12″
- Green StandardGrip Cutting Mat 12″ x 12″
- Green StandardGrip Cutting Mat for Joy 4.5″ x 6.5″
- Design #331 – My free SVG/PDF/DXF design files are available in my free resource library (get the password by filling out the form at the bottom of this page)
How to Make Your Own Handwriting to Cricut Projects
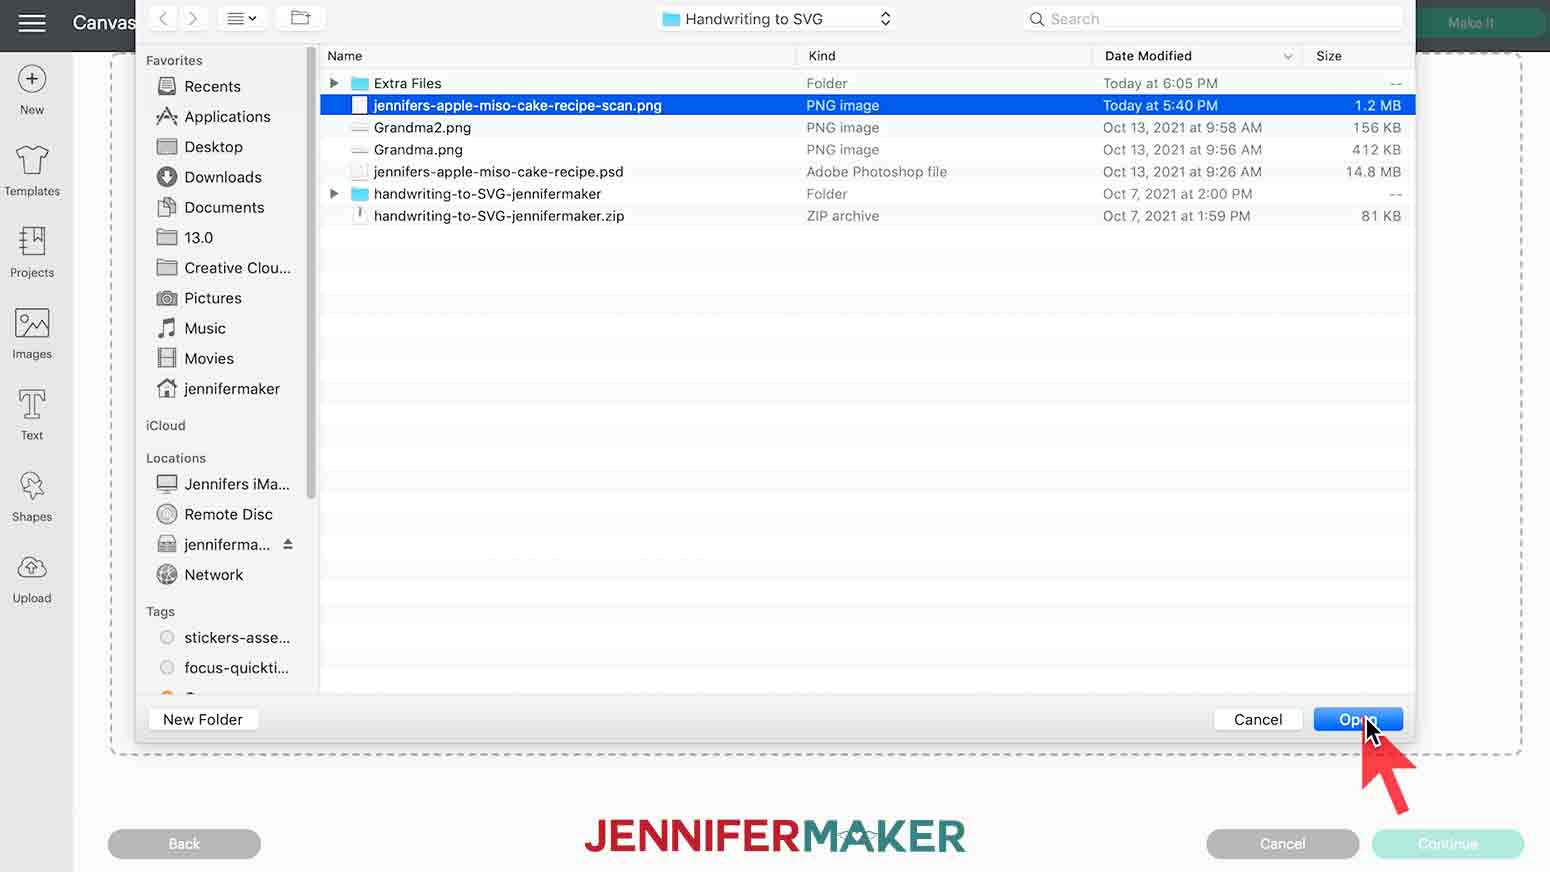
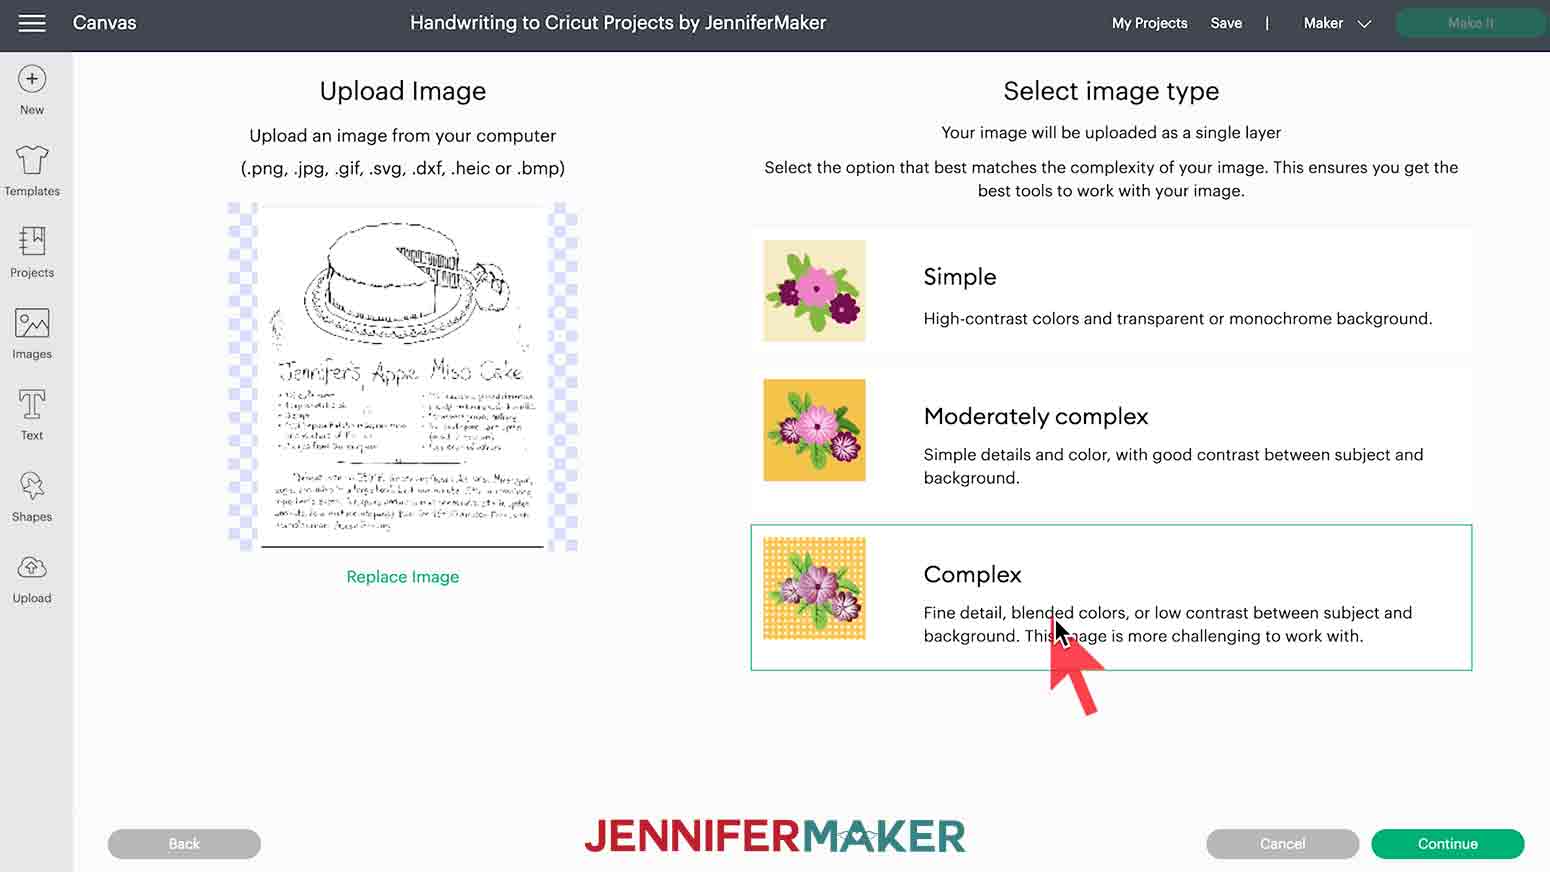
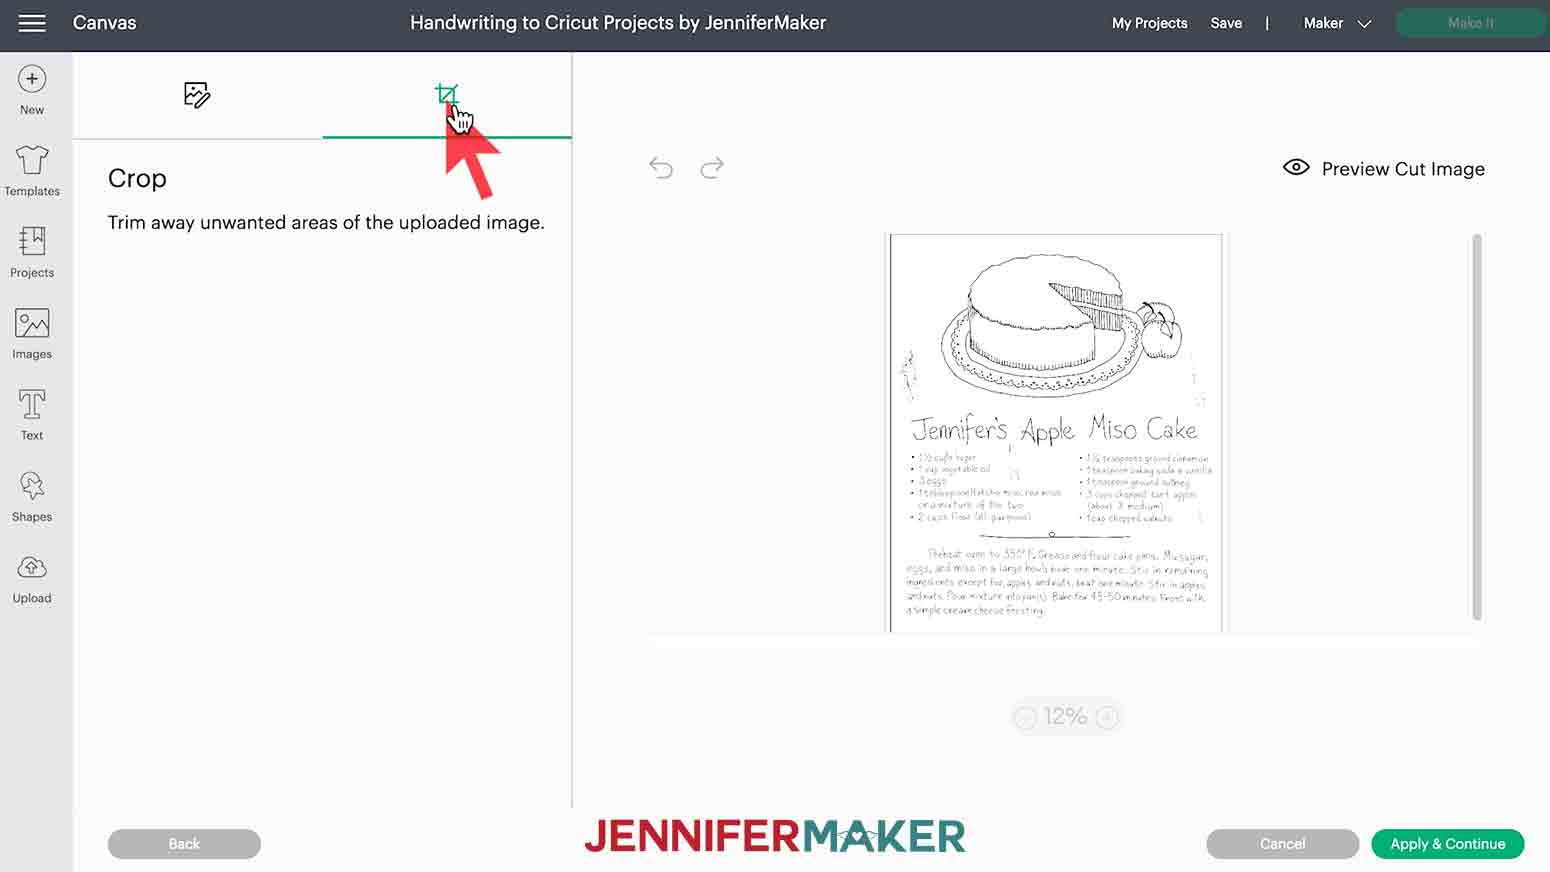
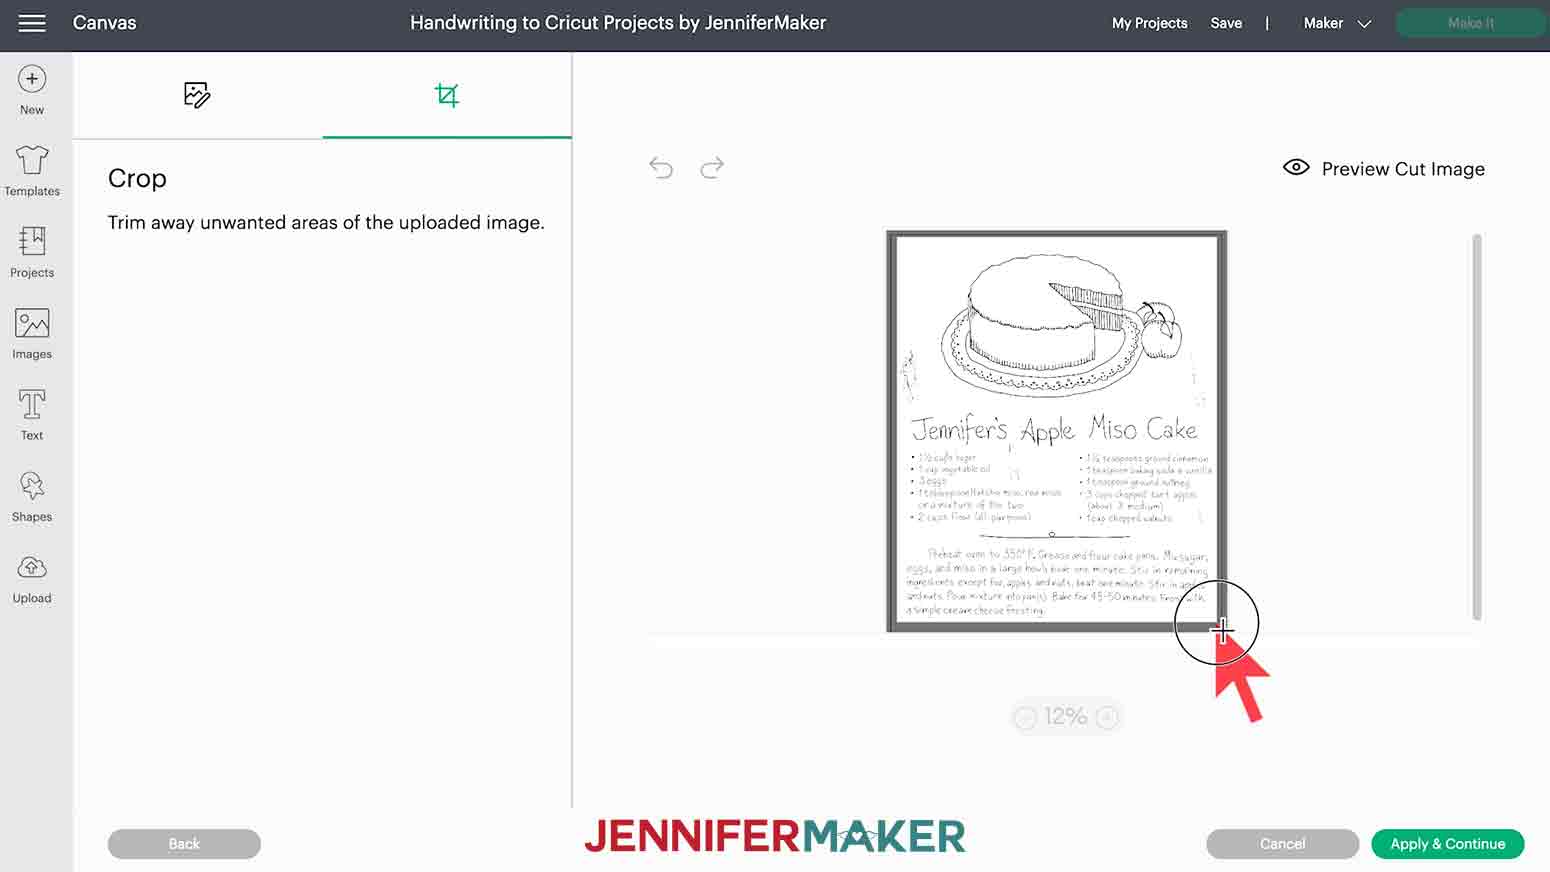
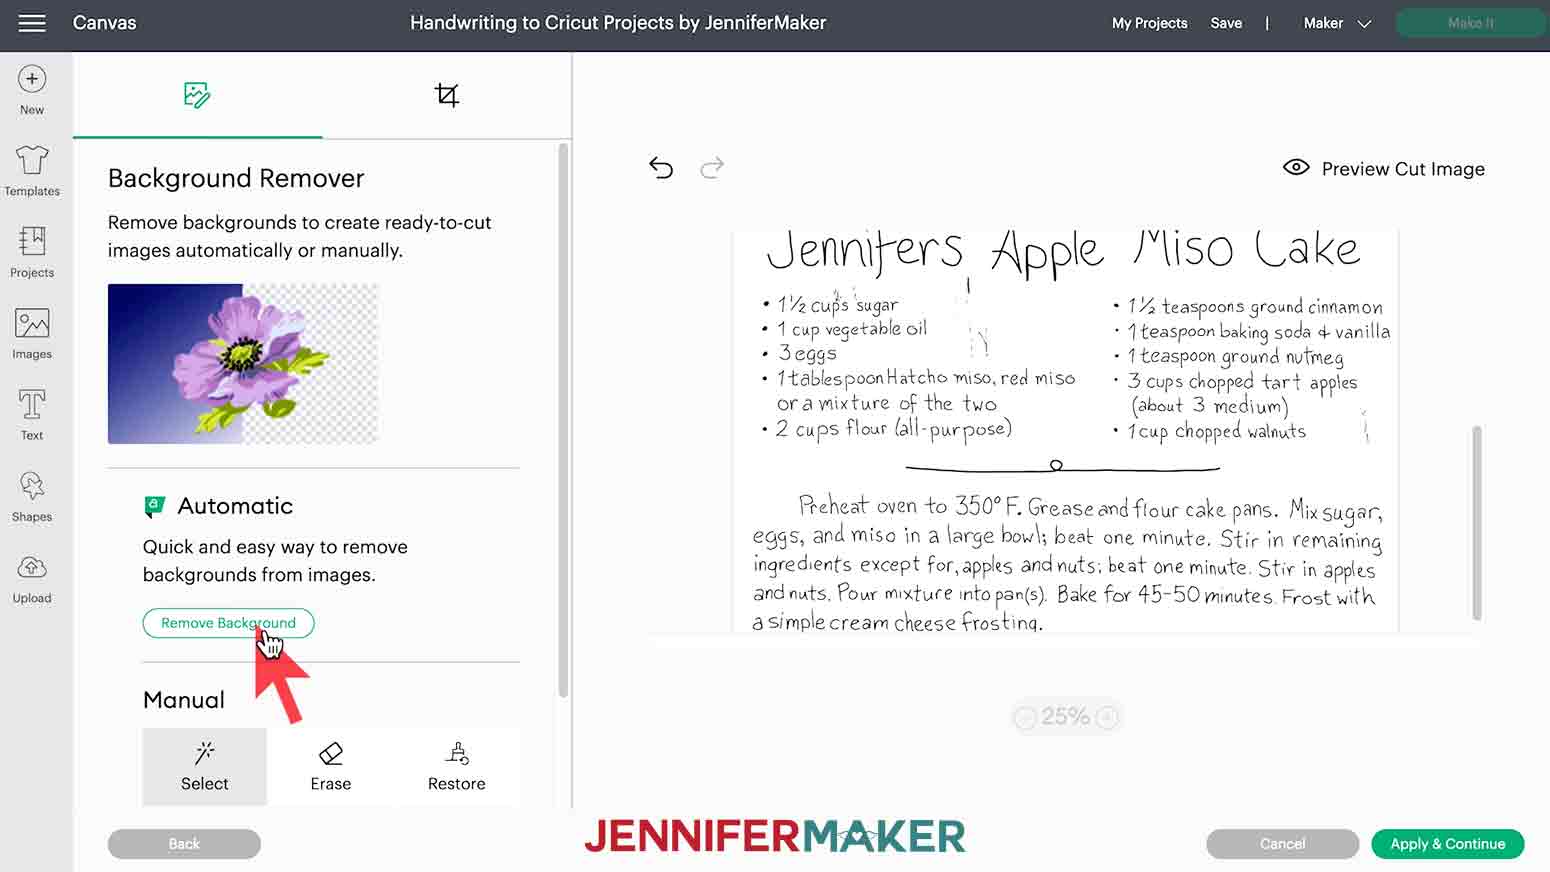
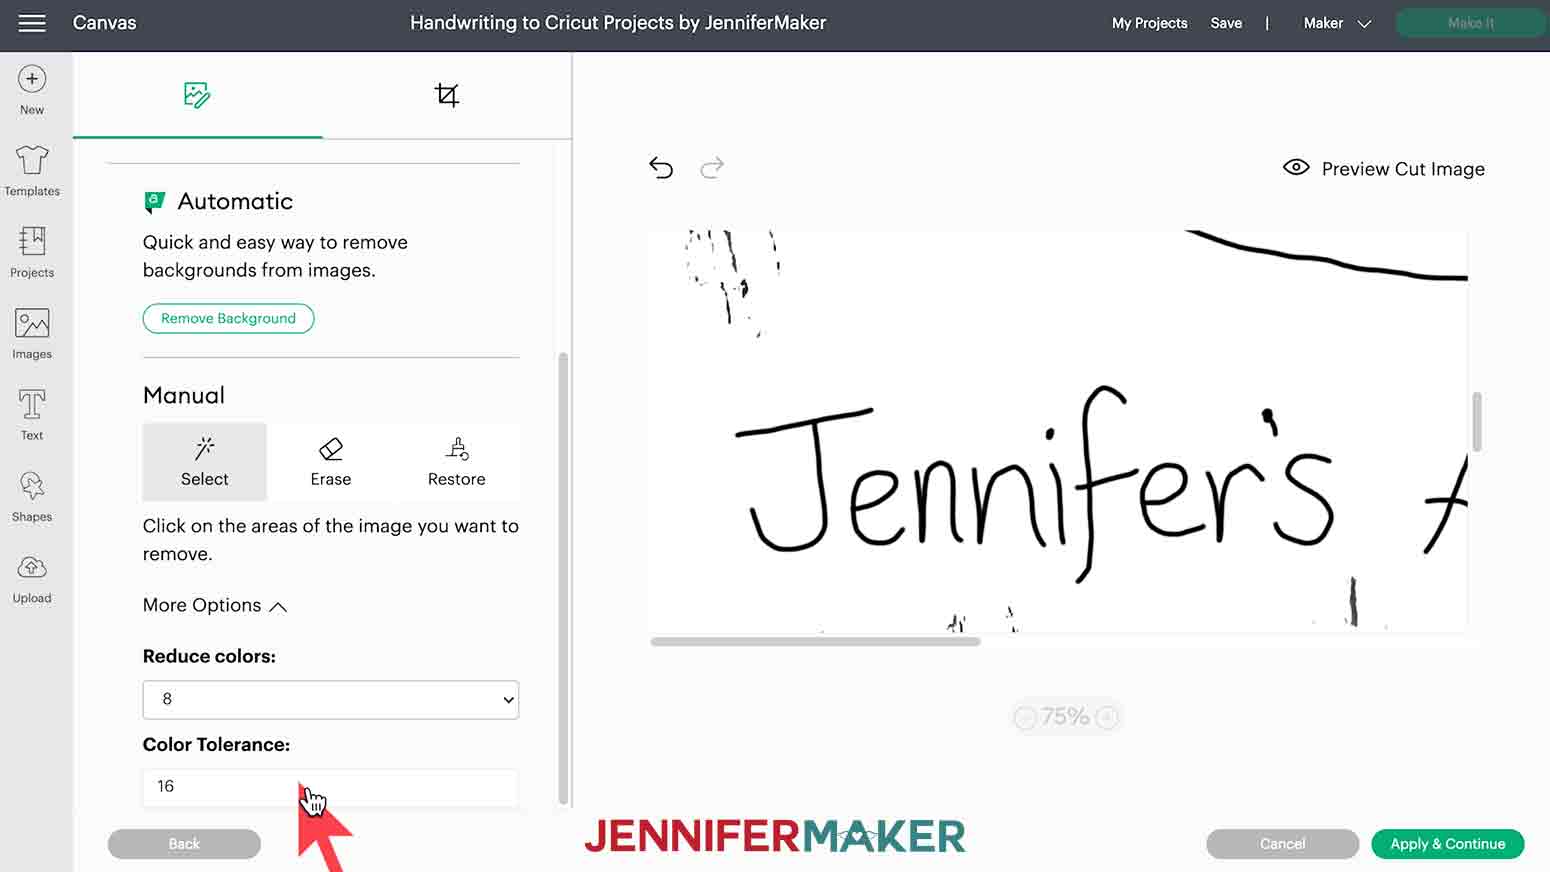
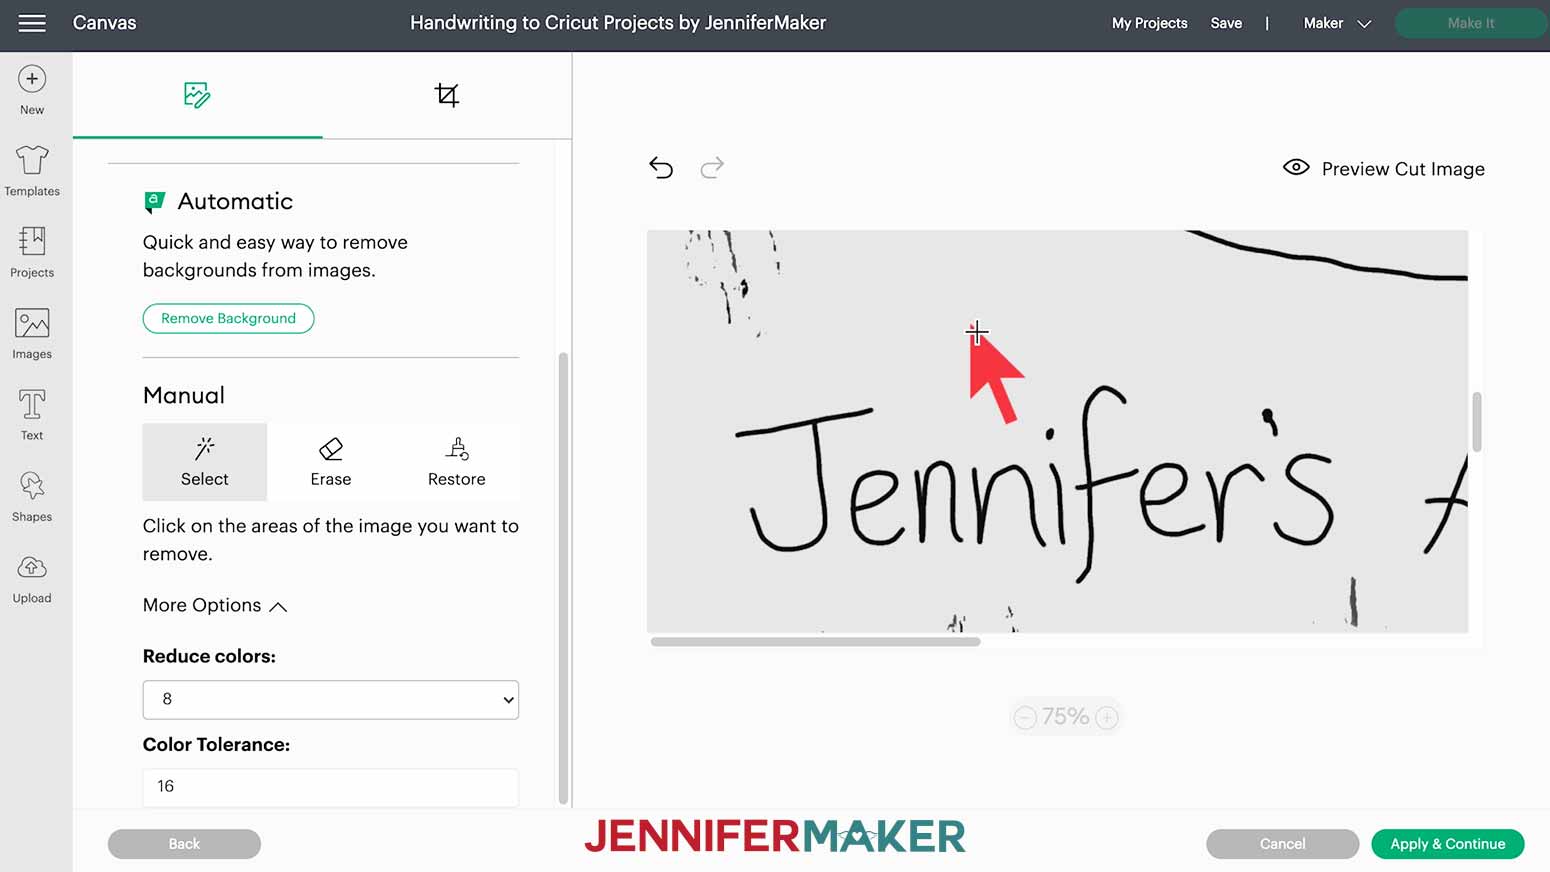
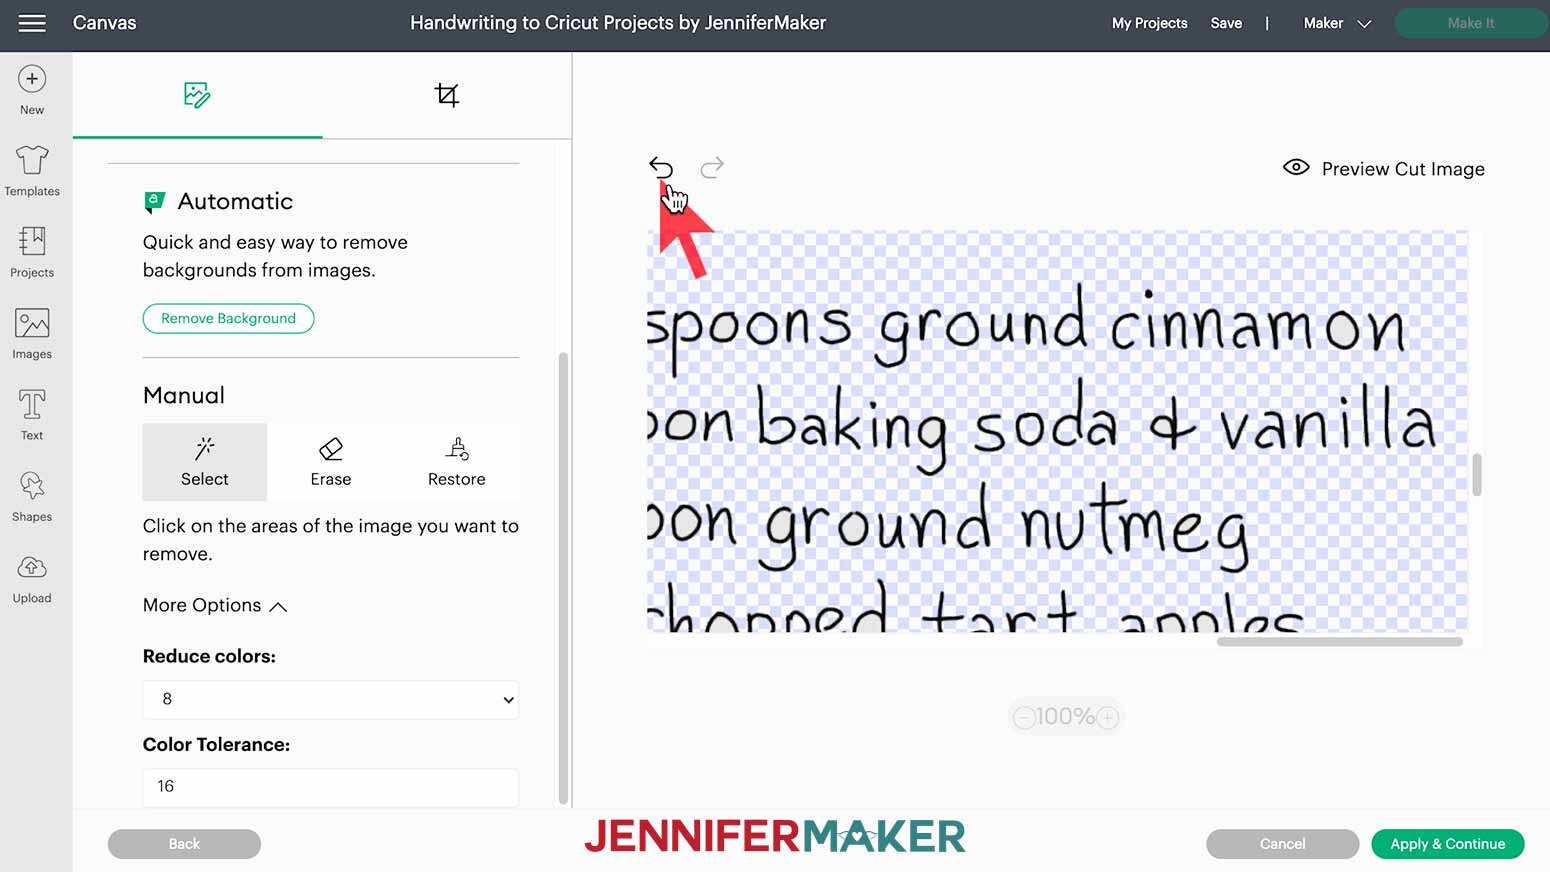
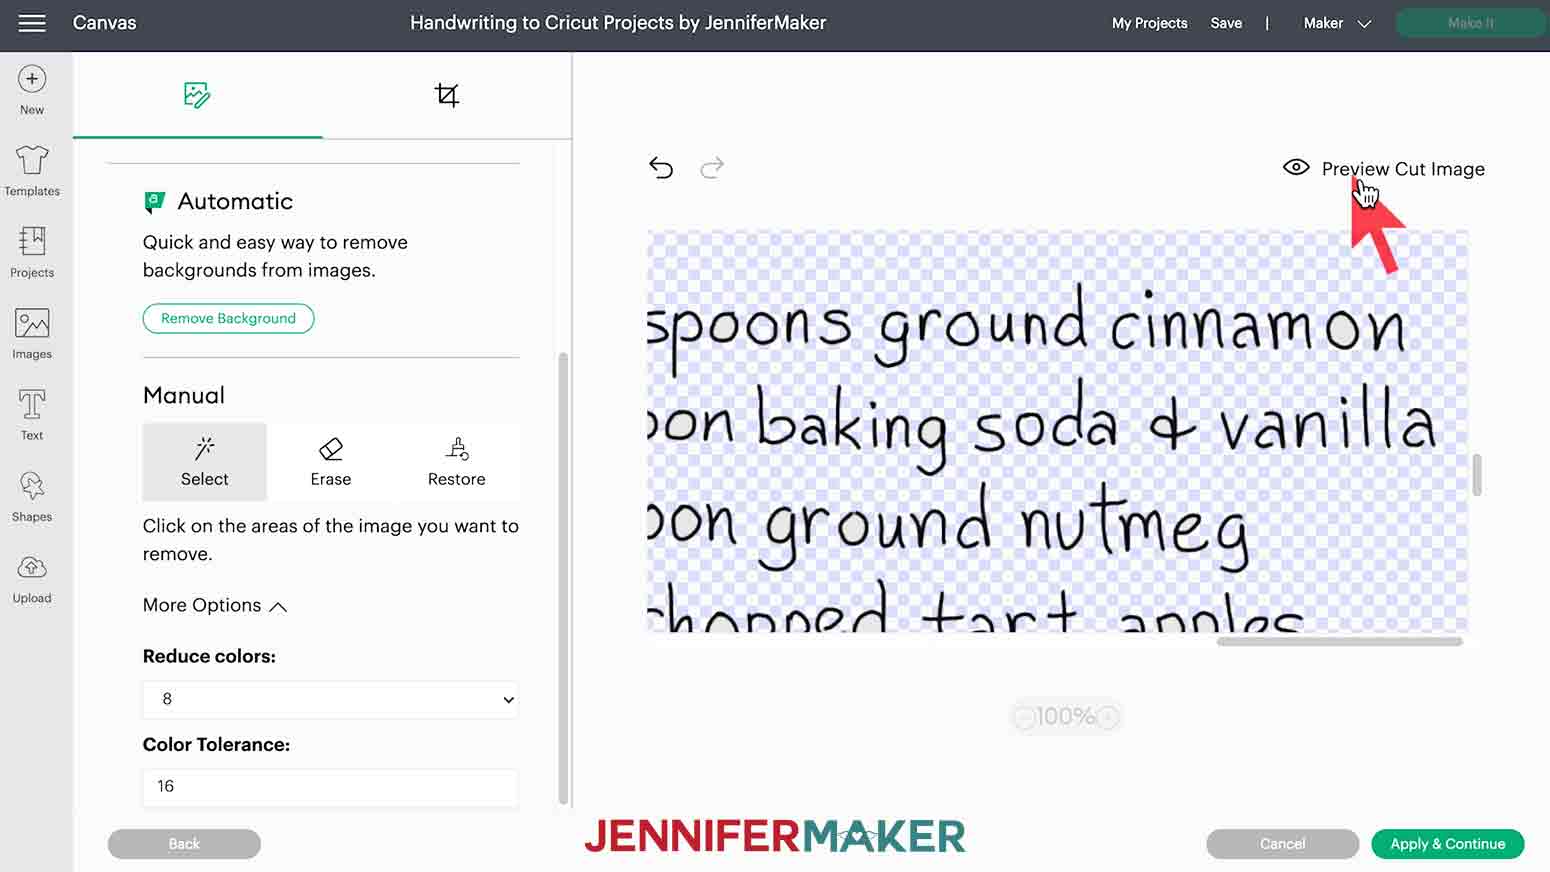
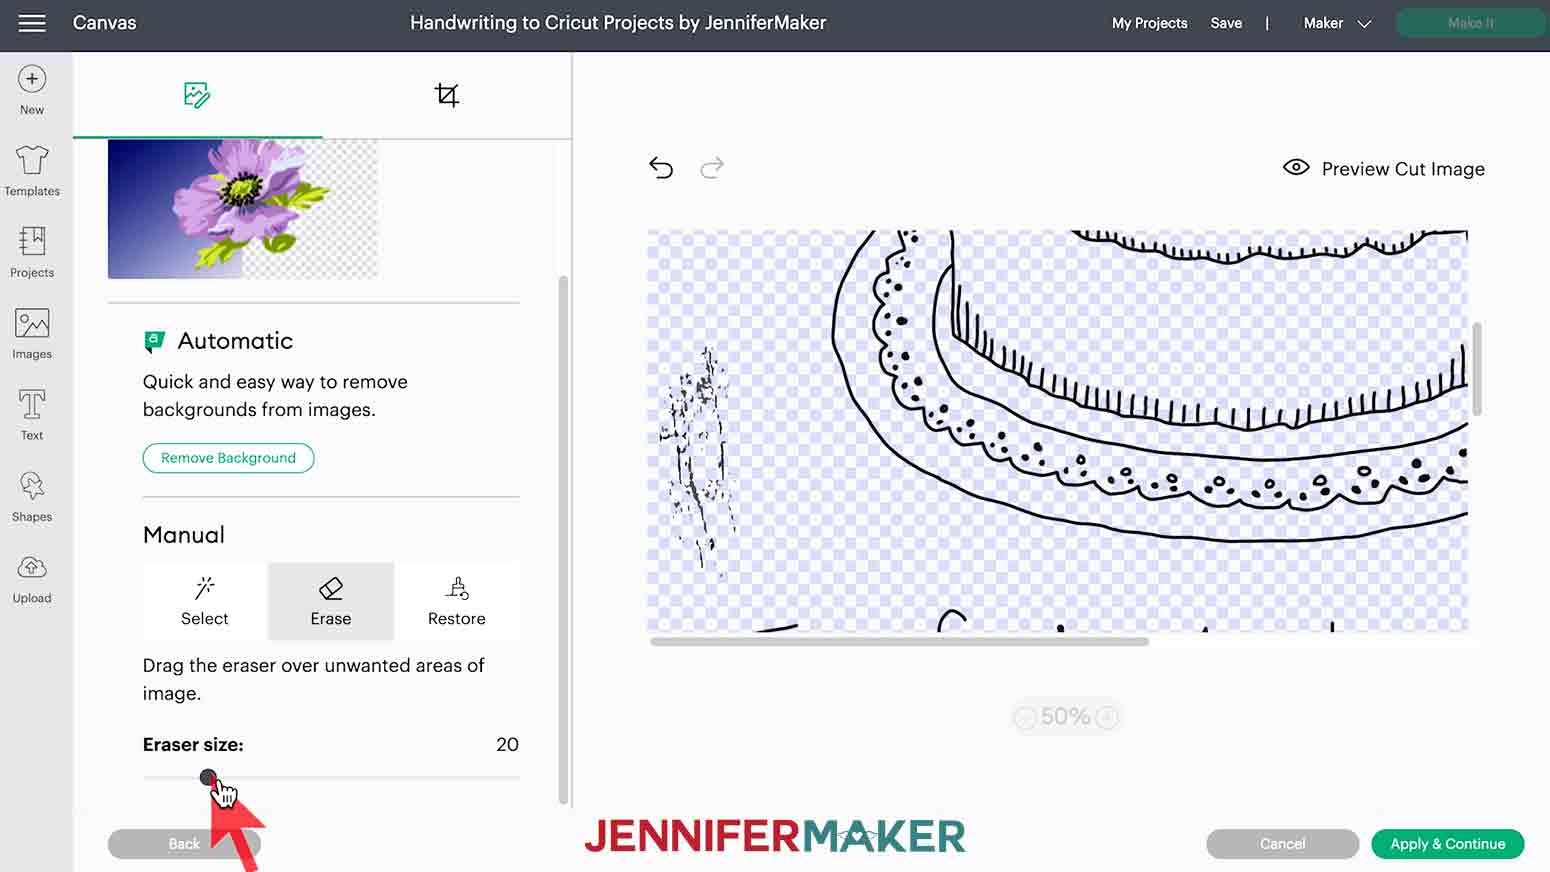
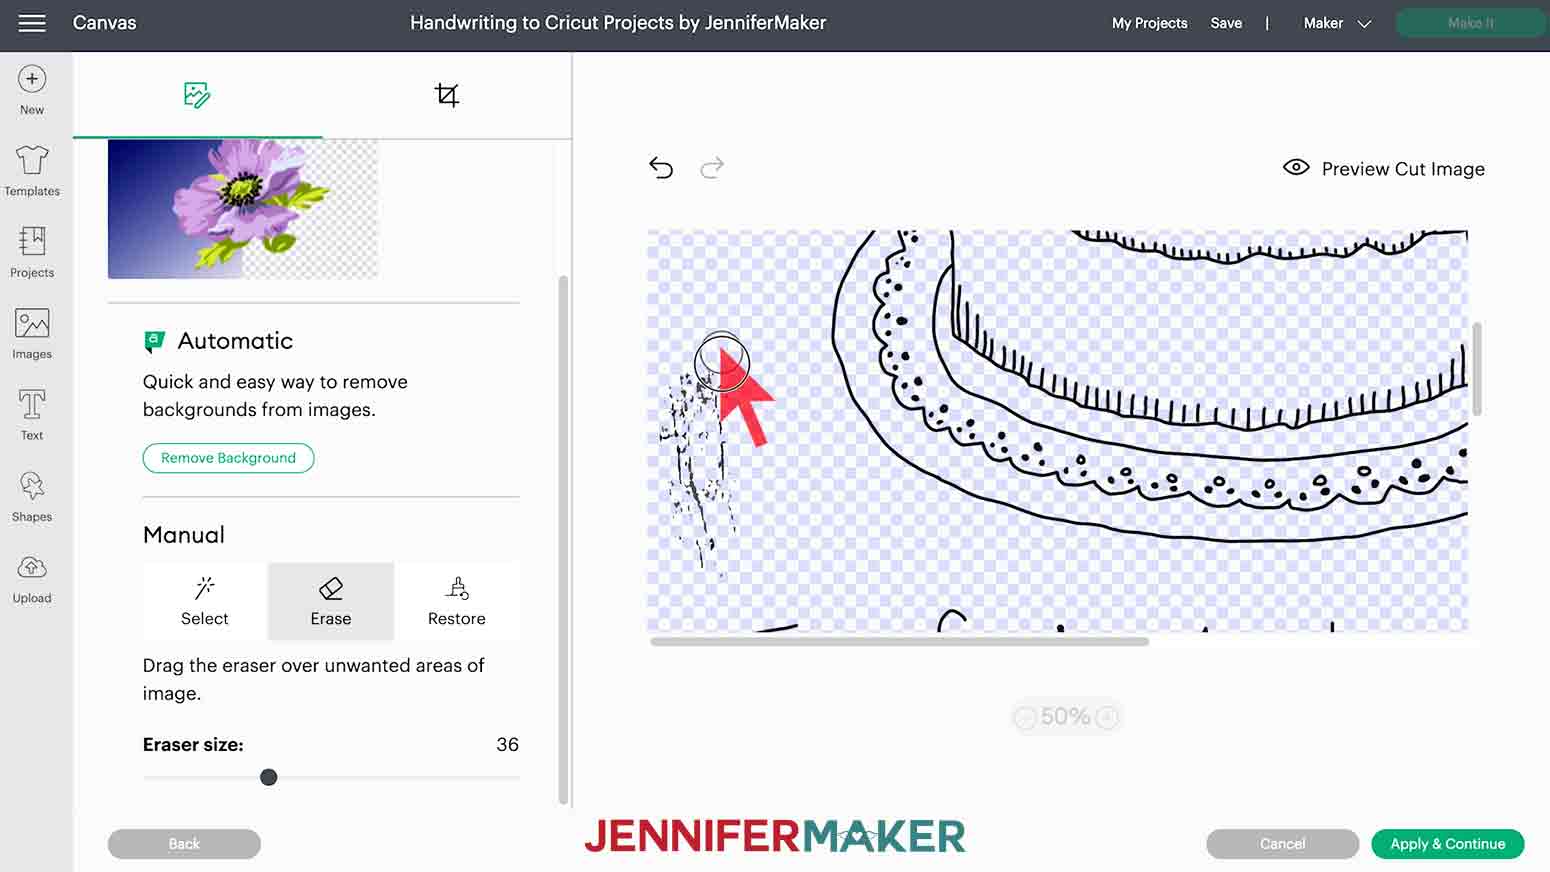
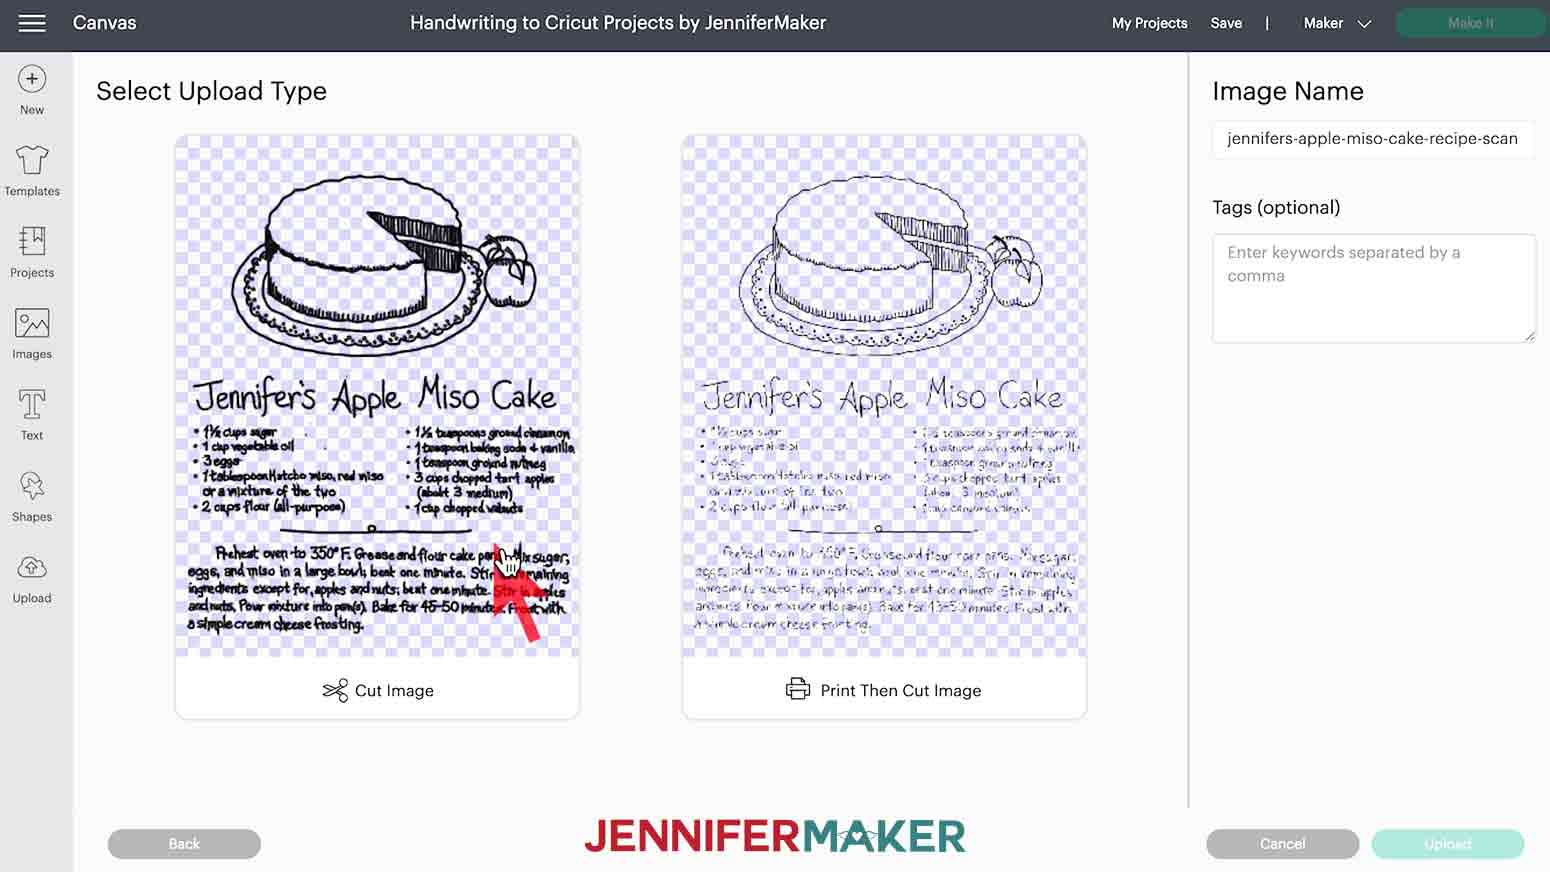
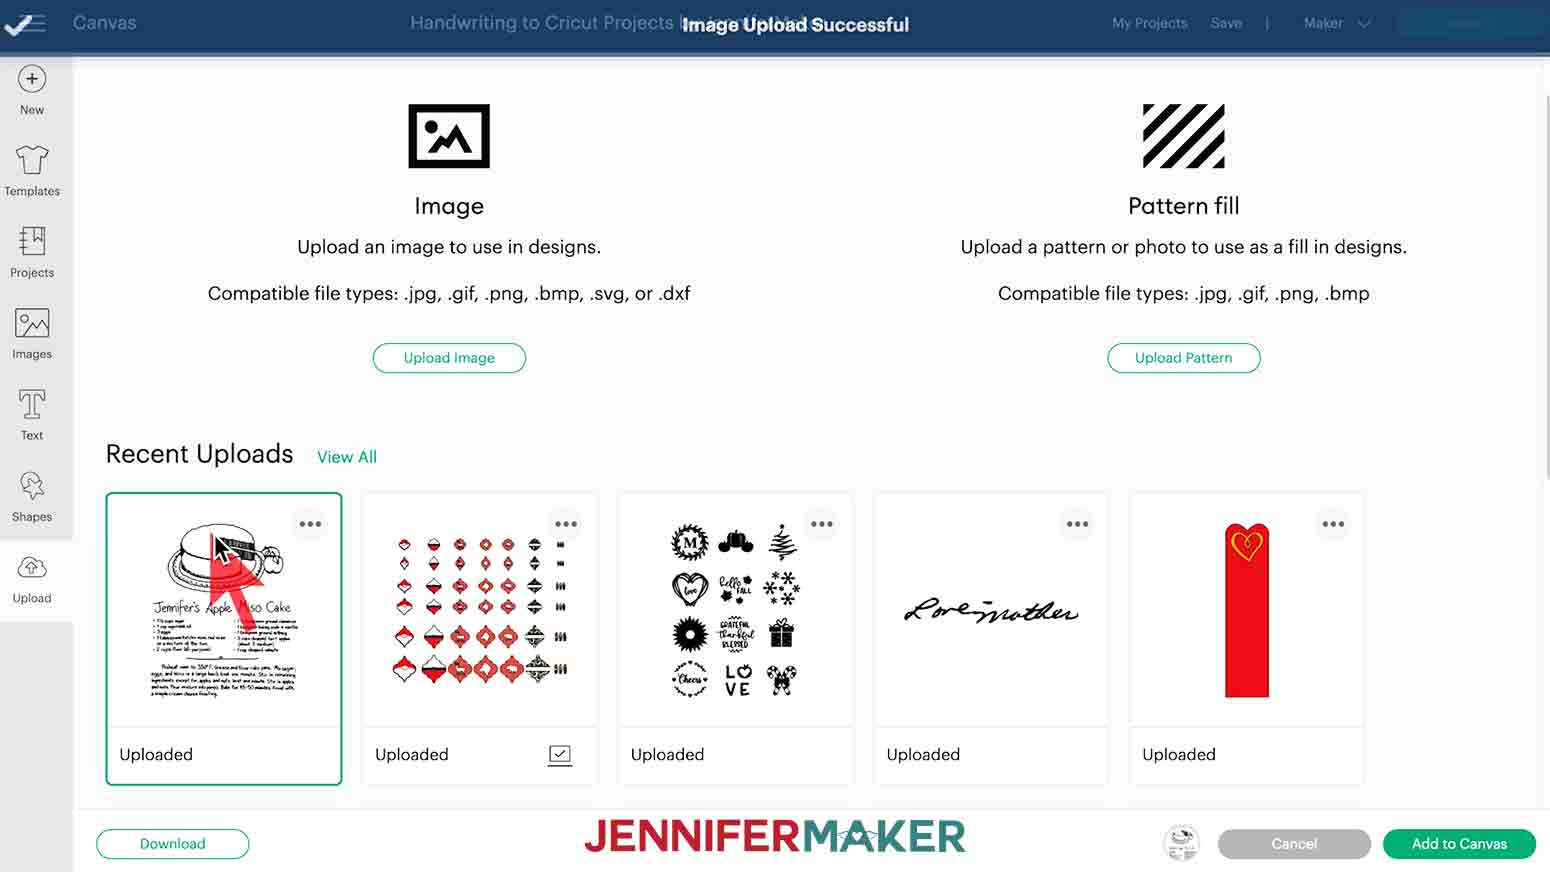
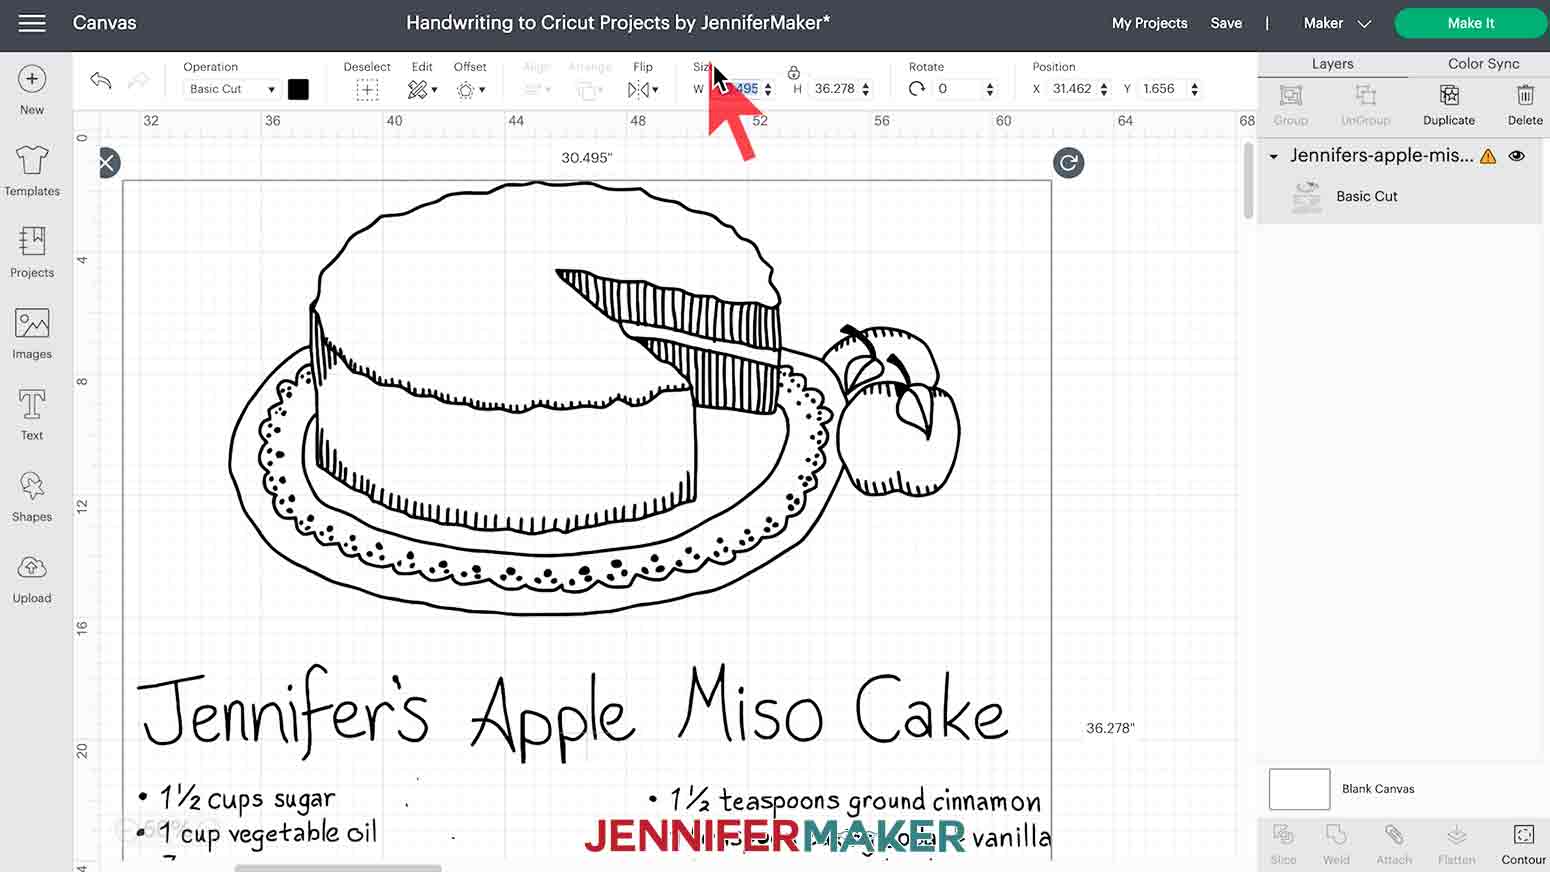
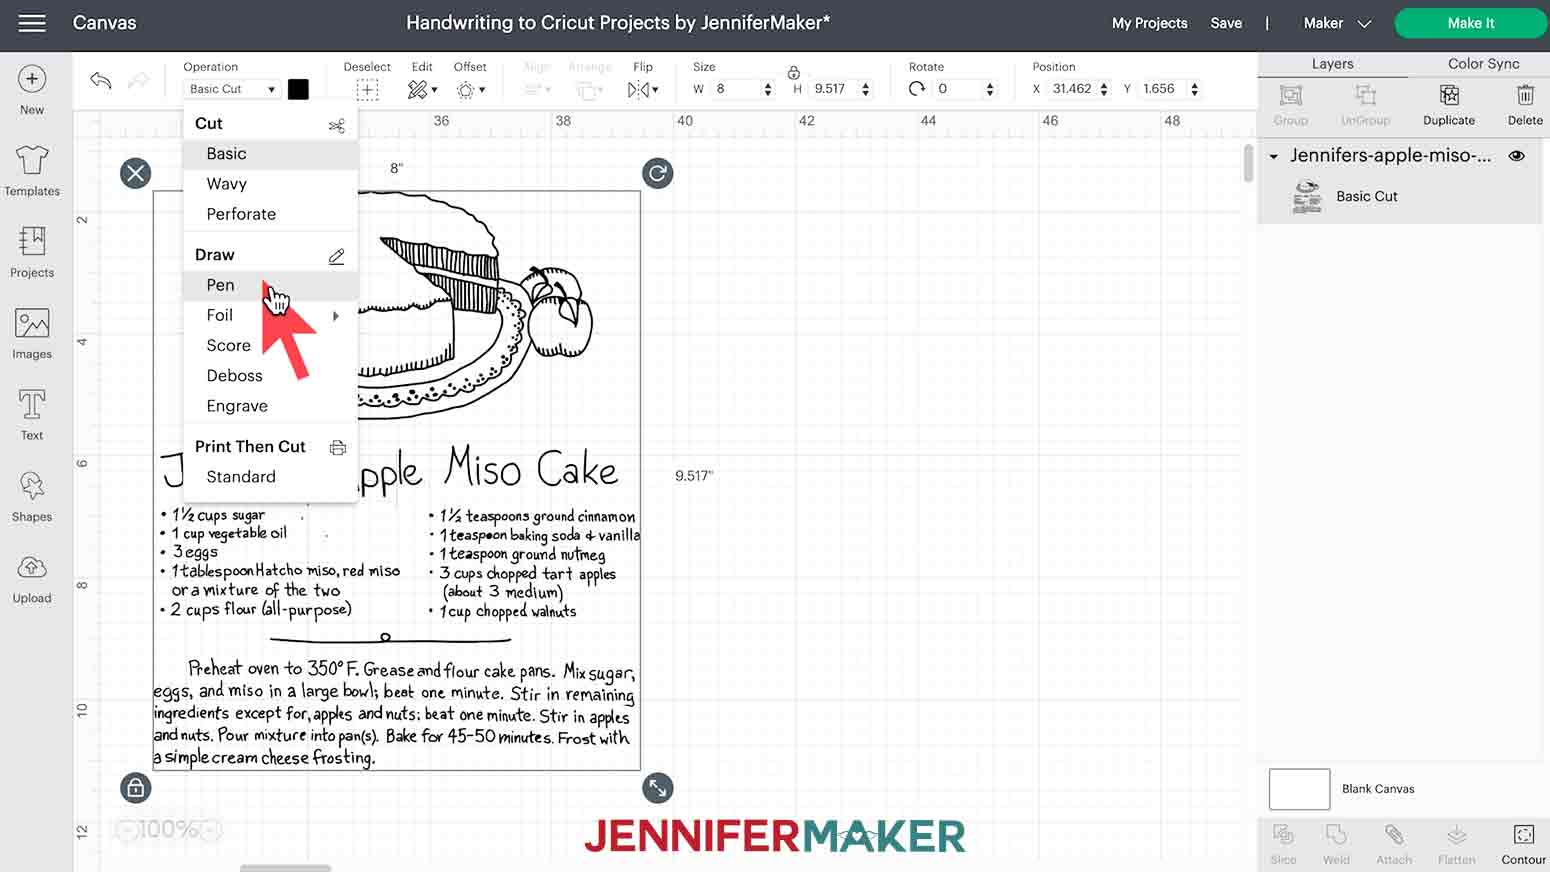
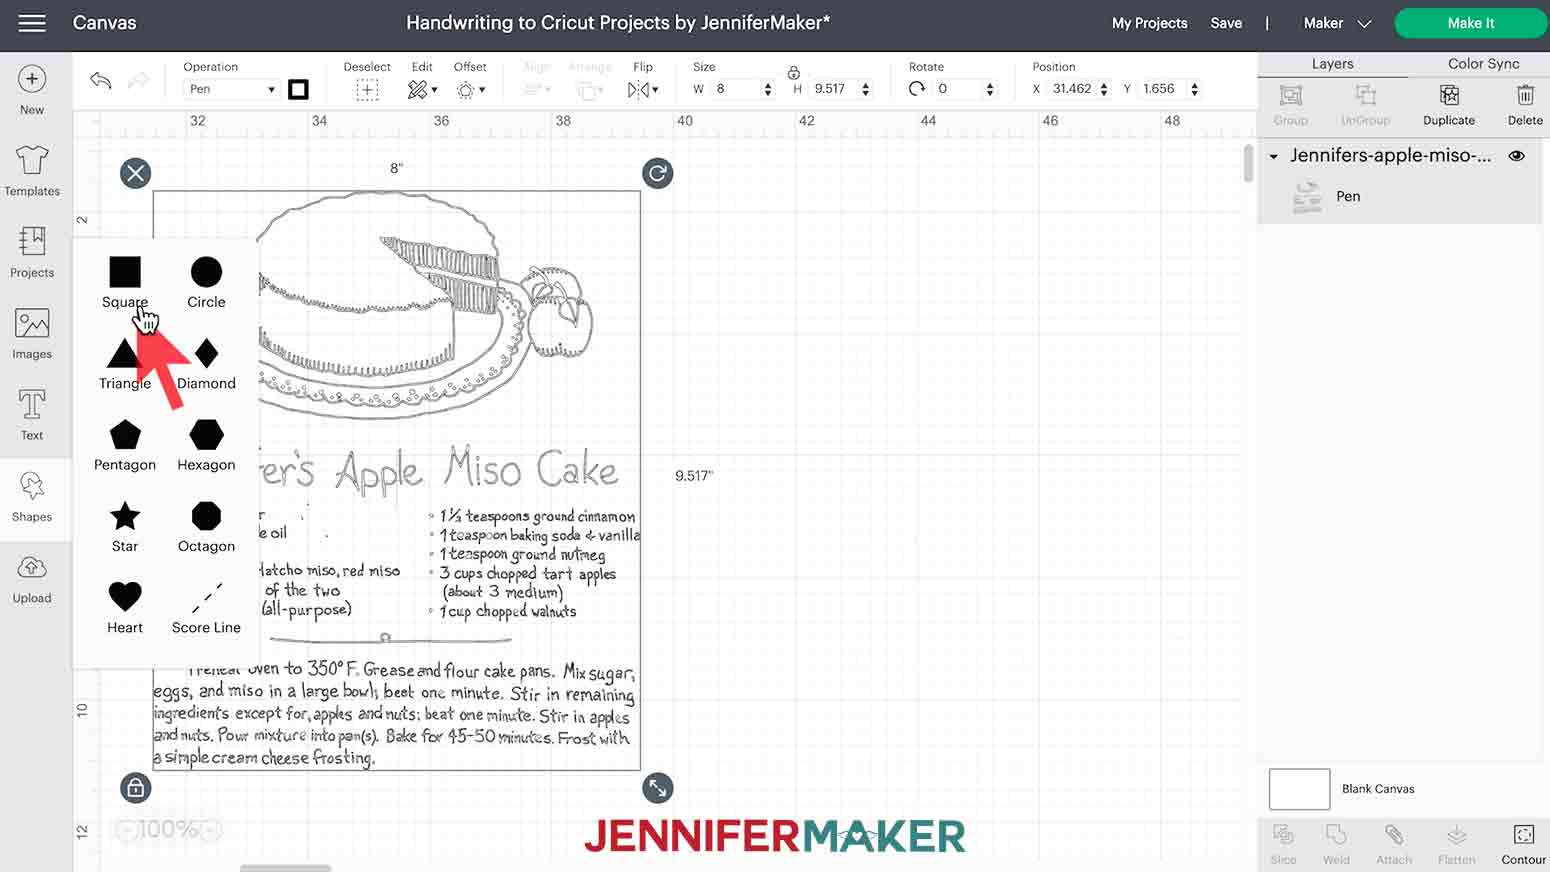
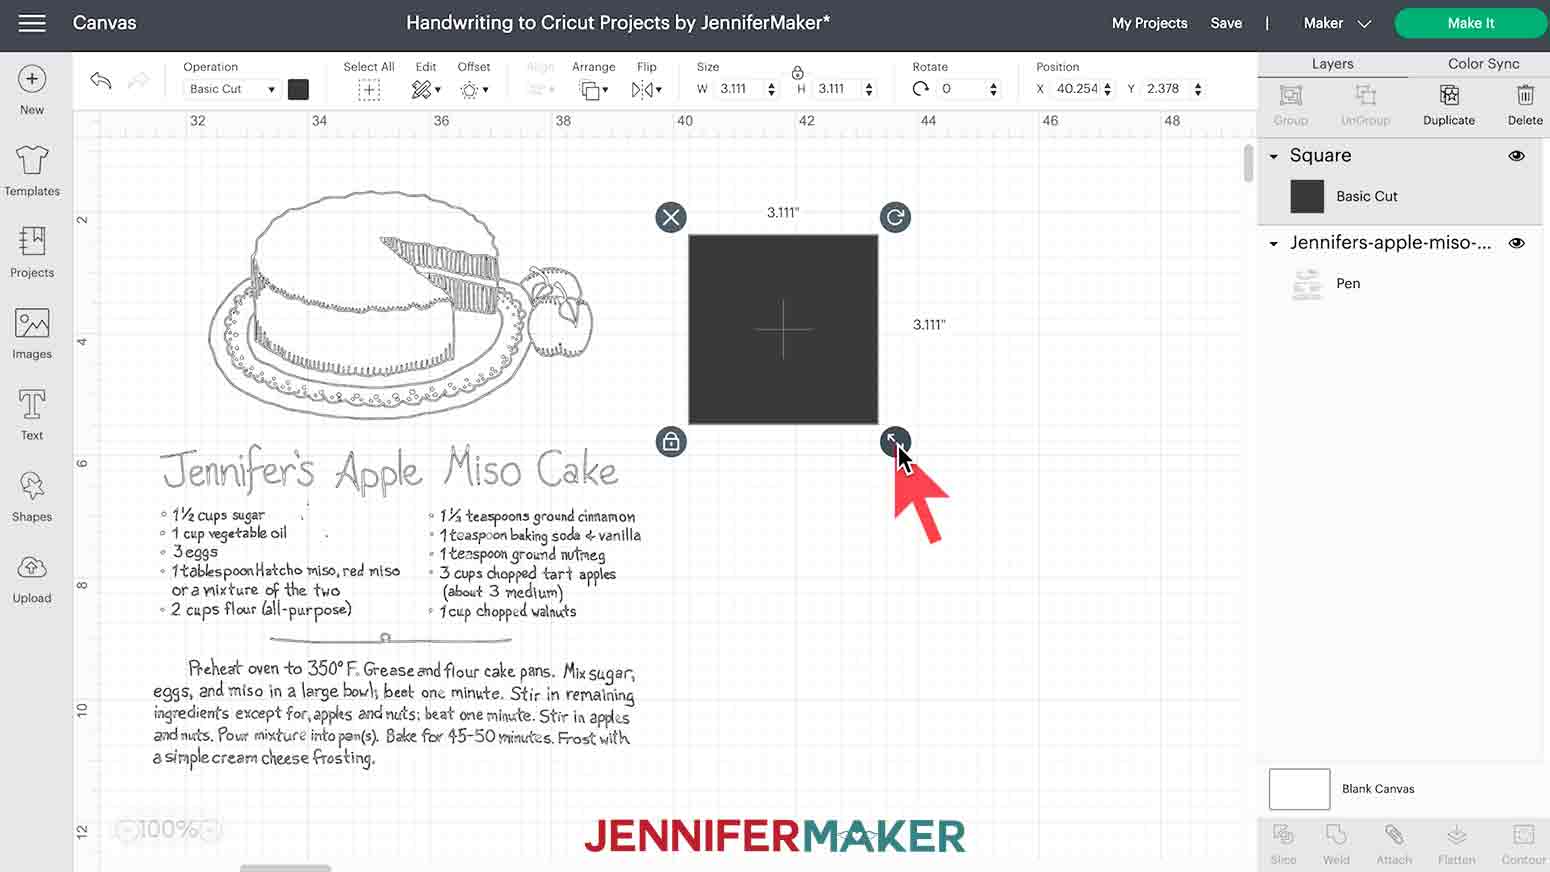
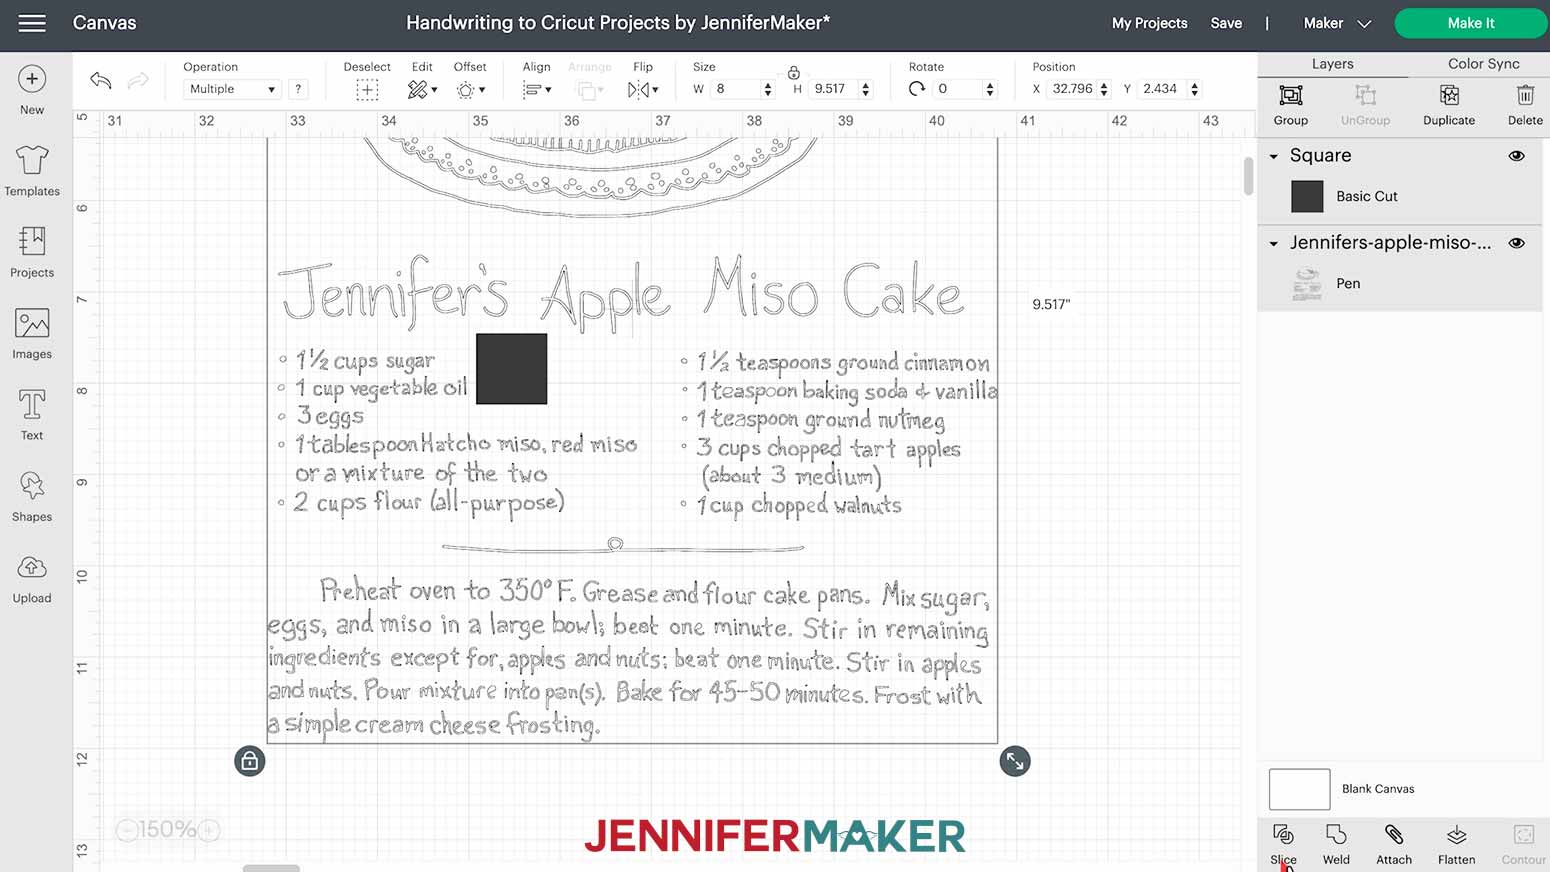
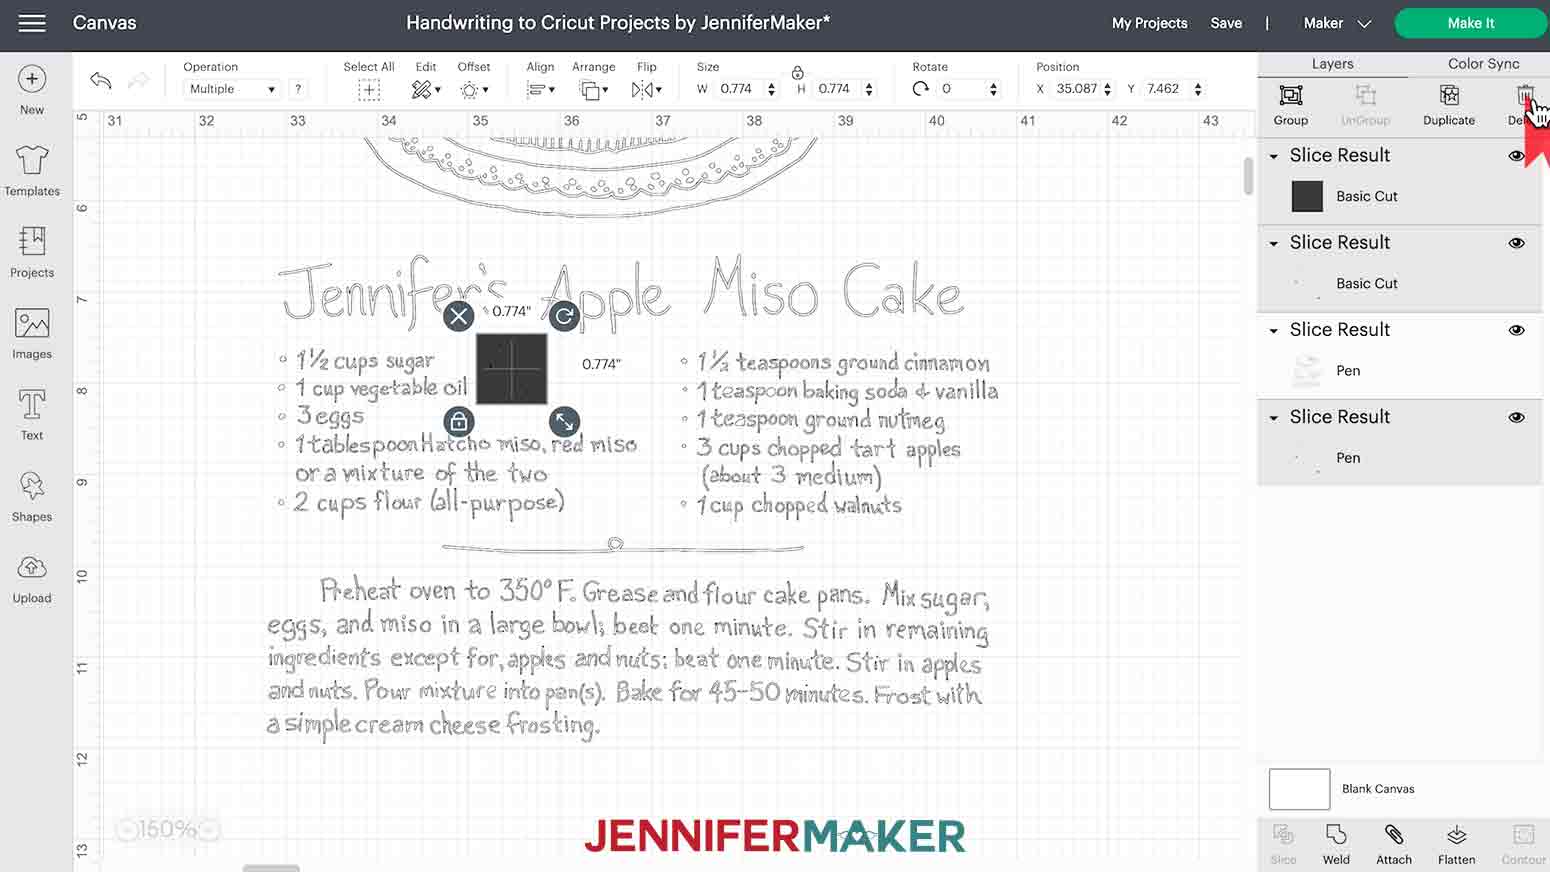
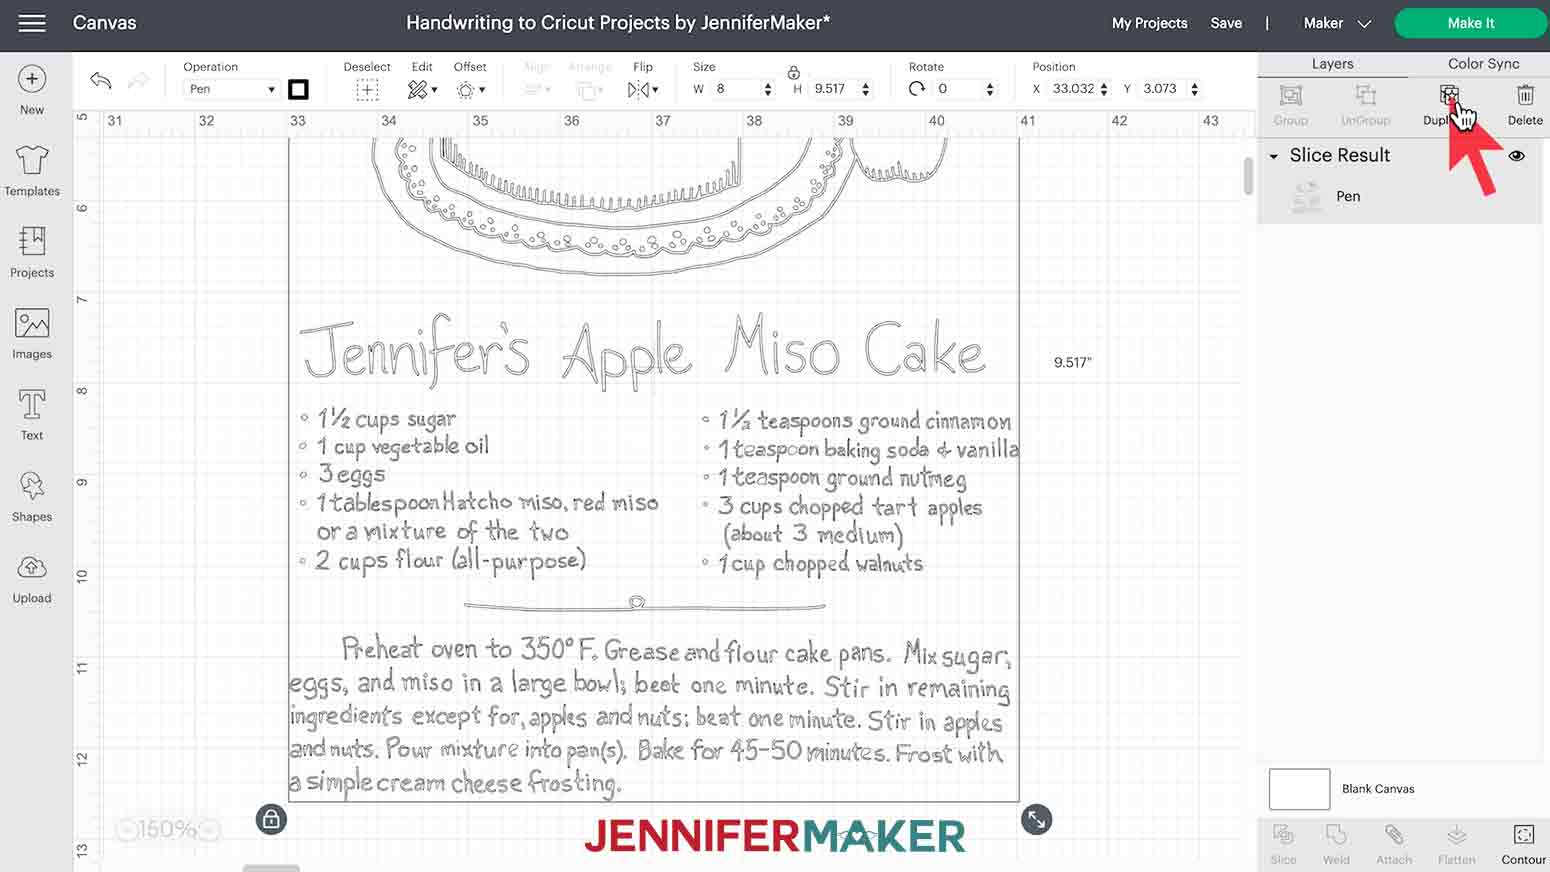
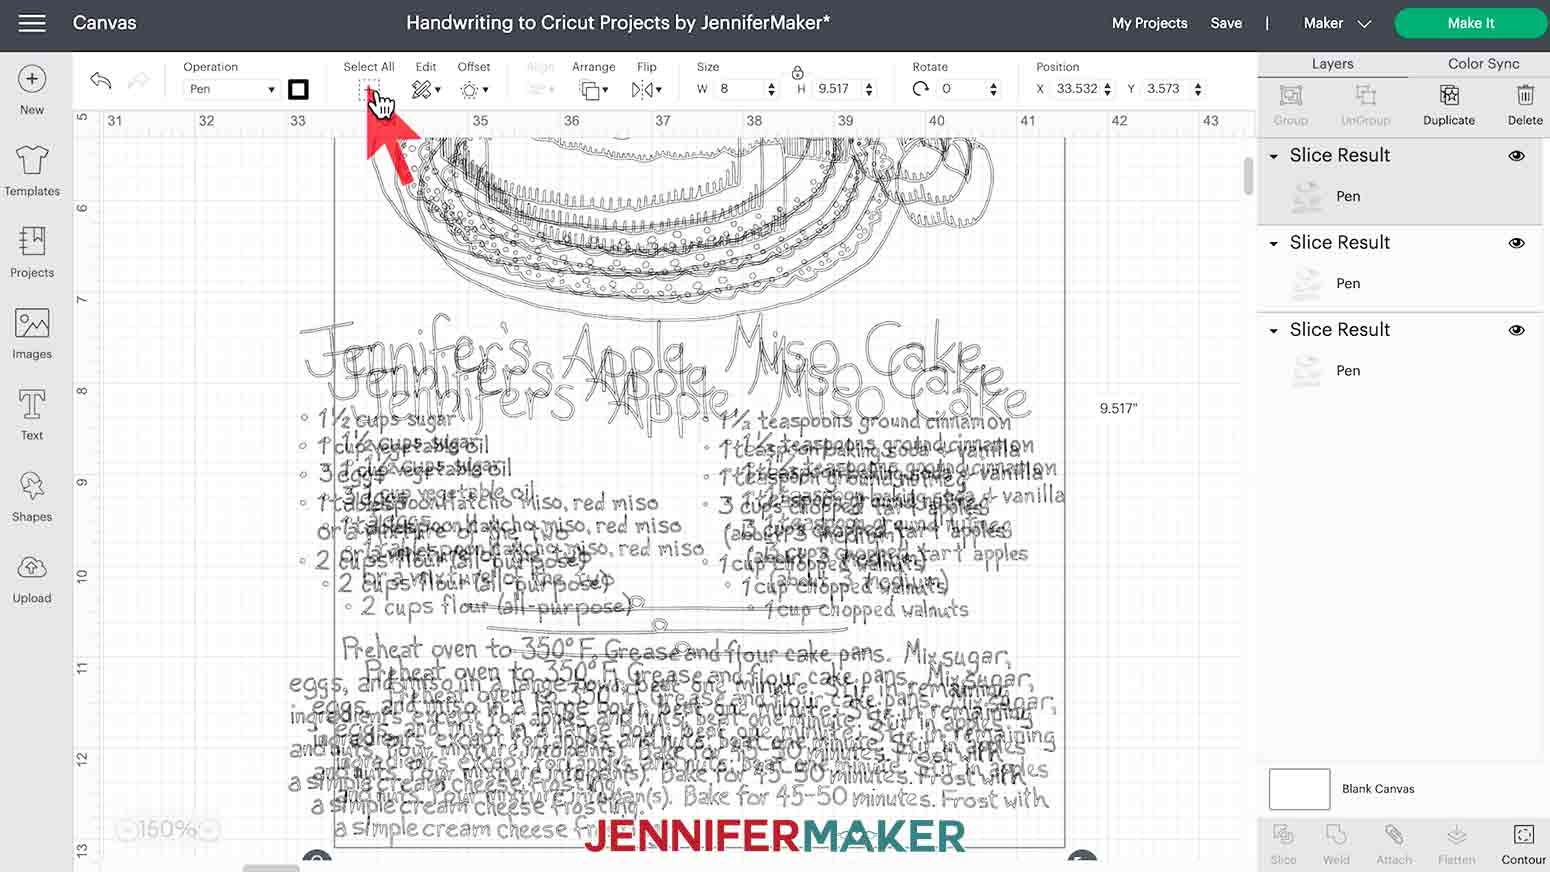
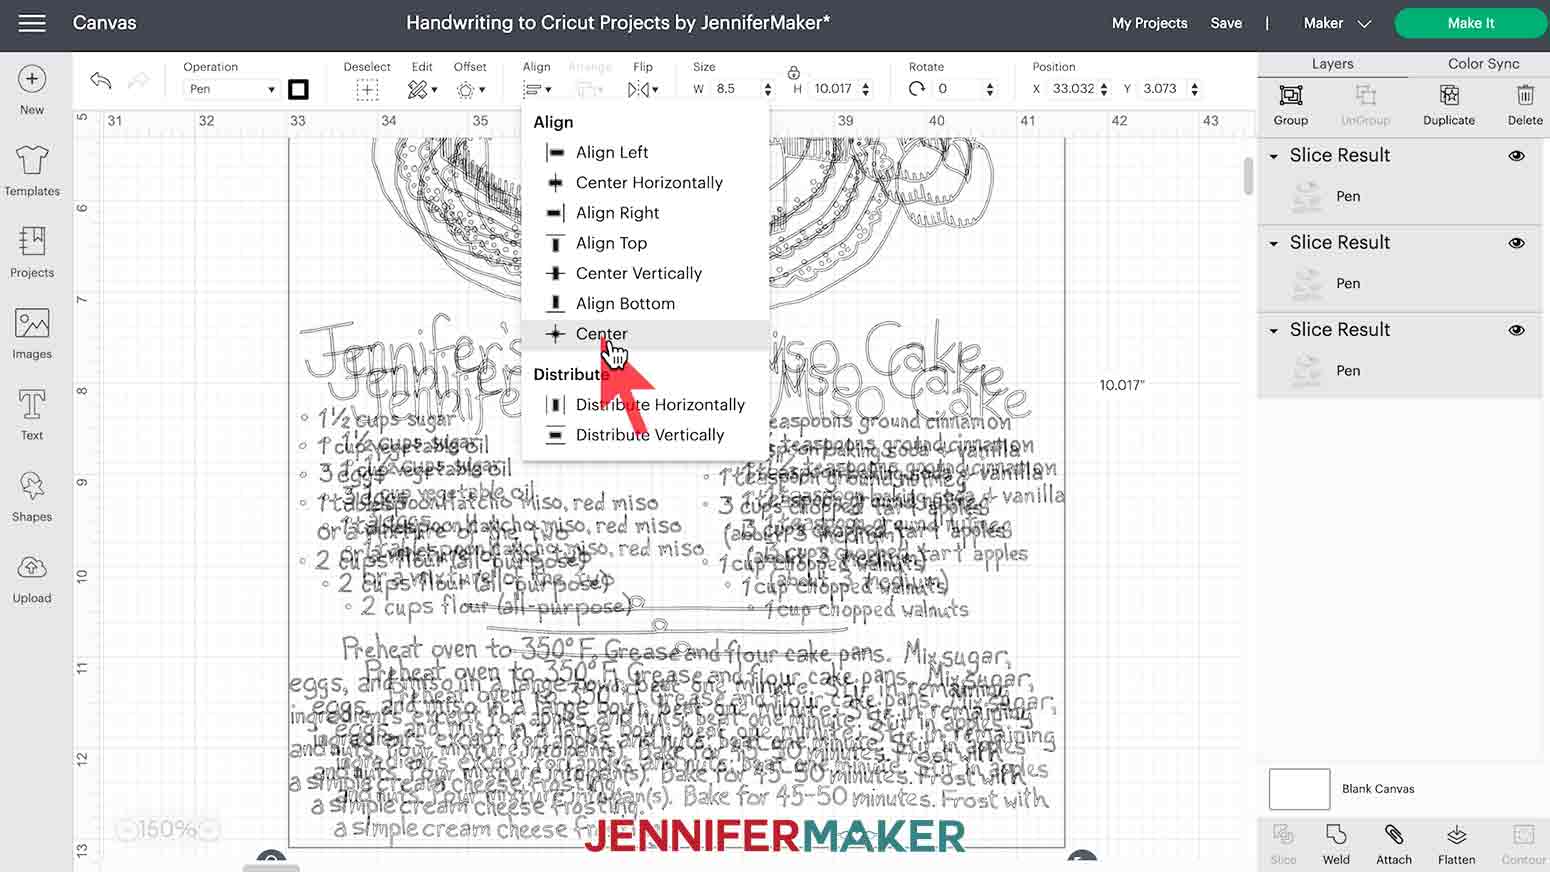
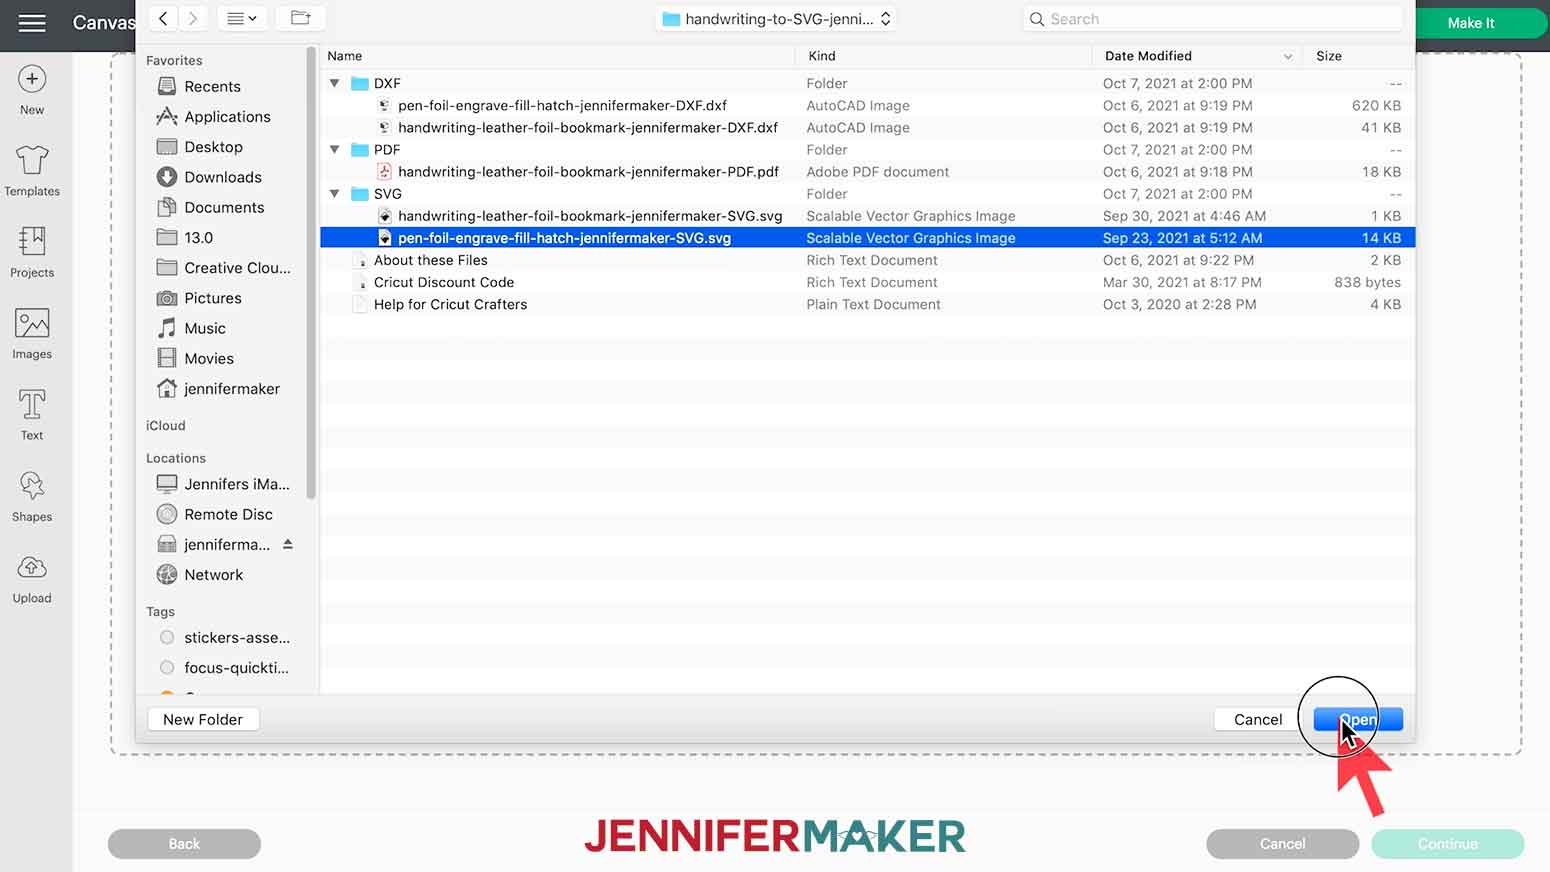
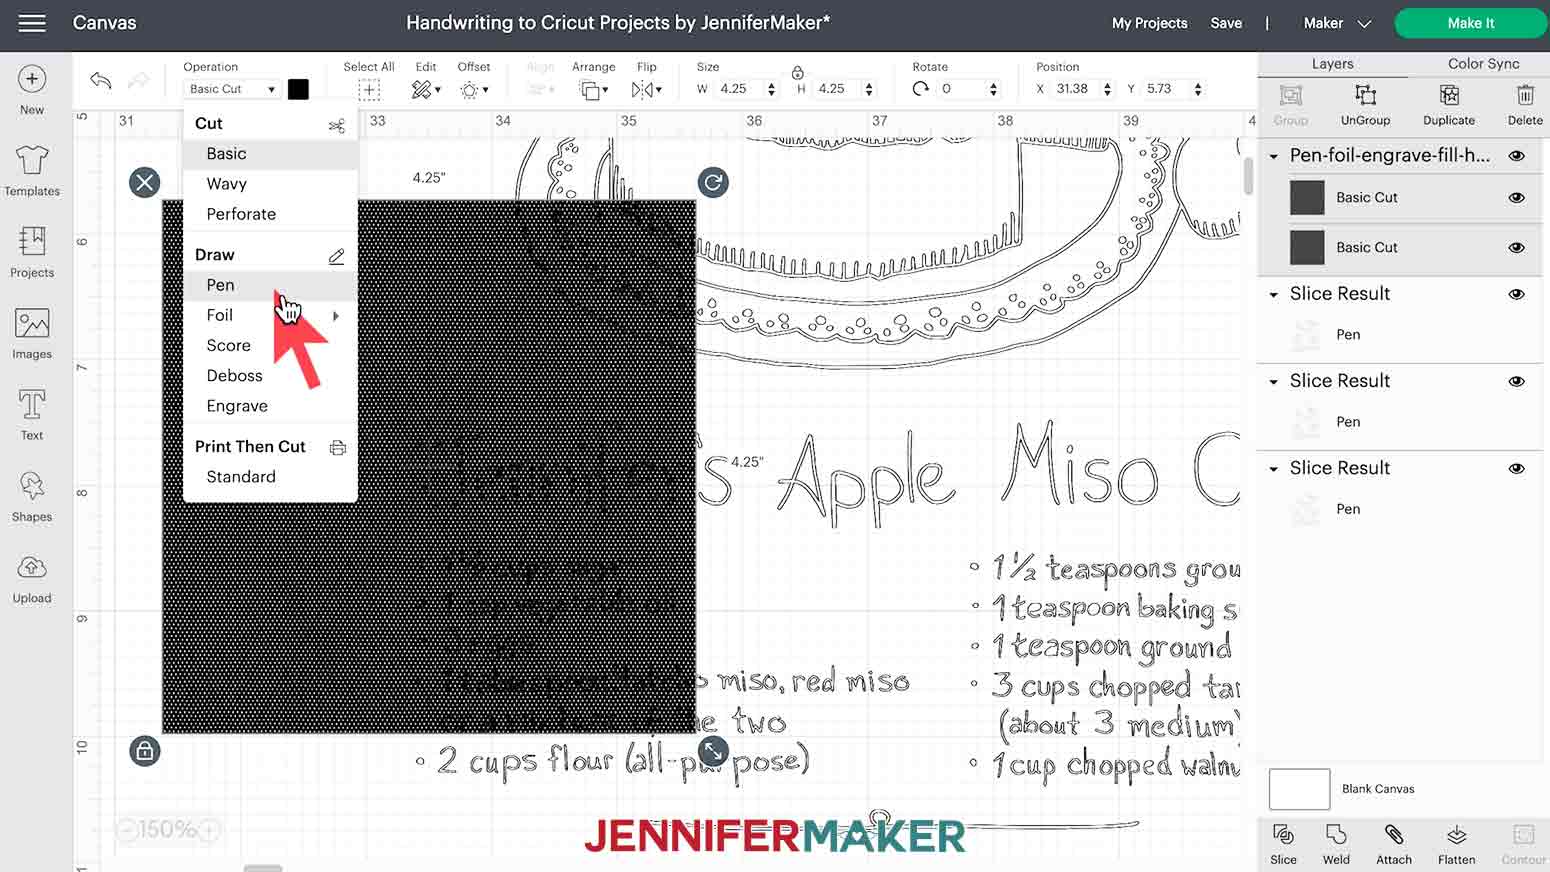
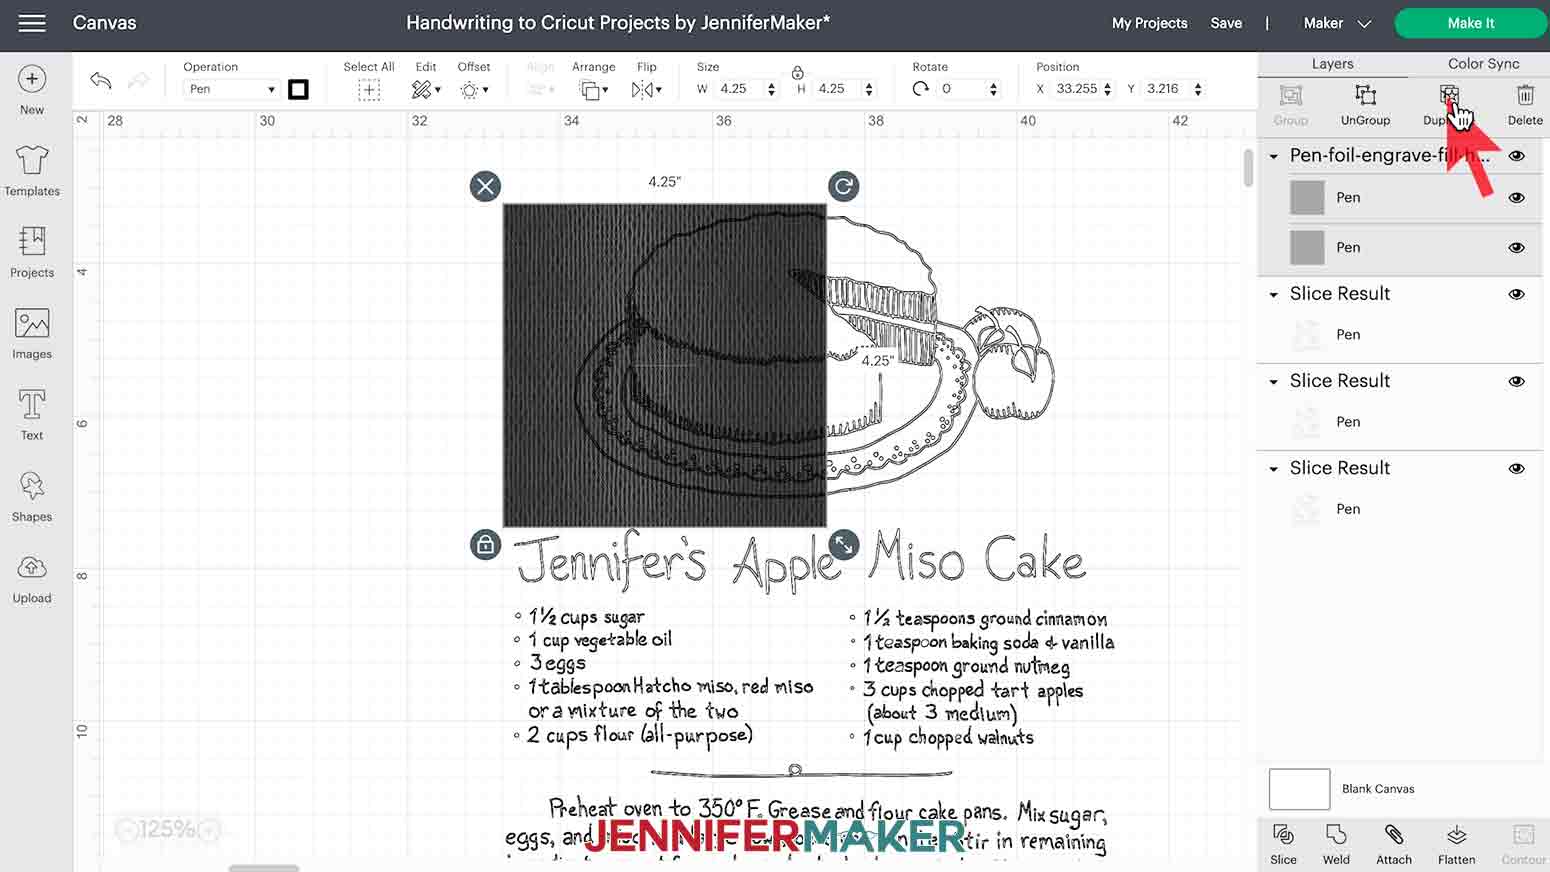
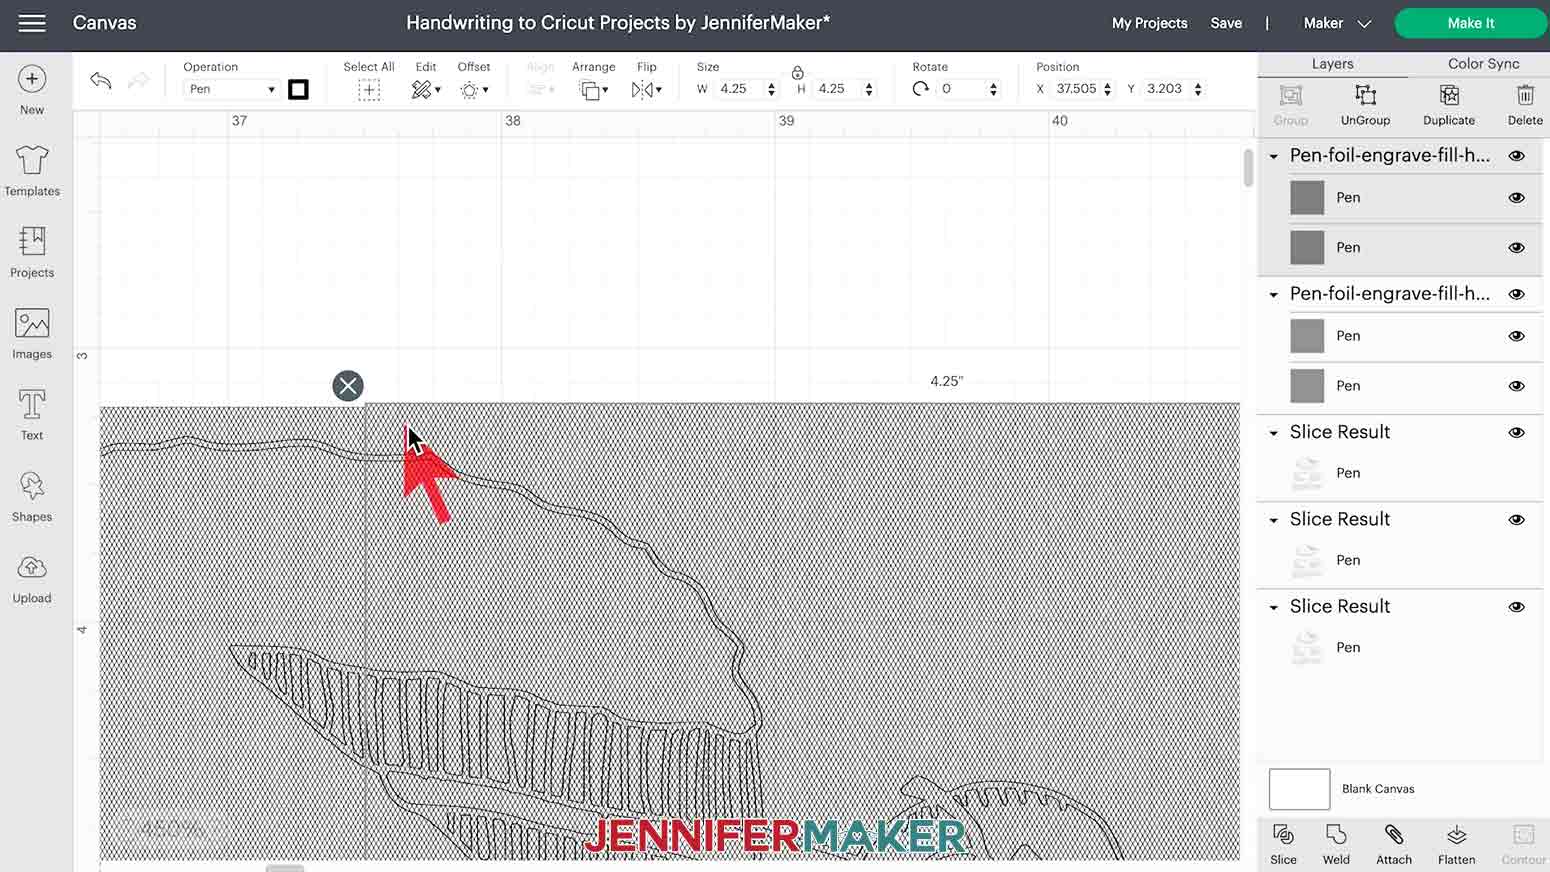
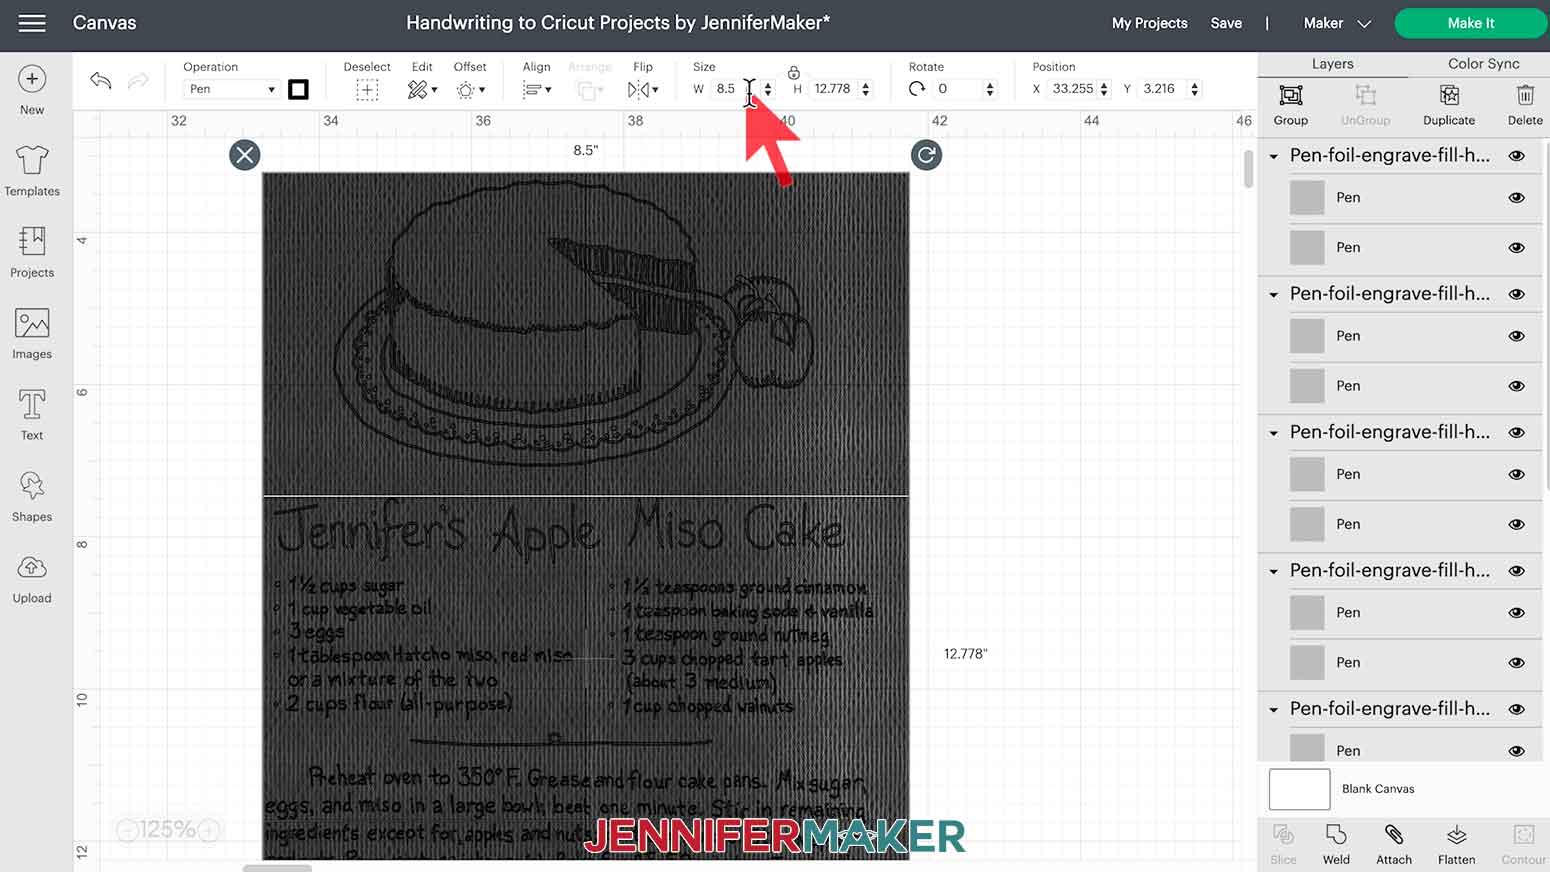
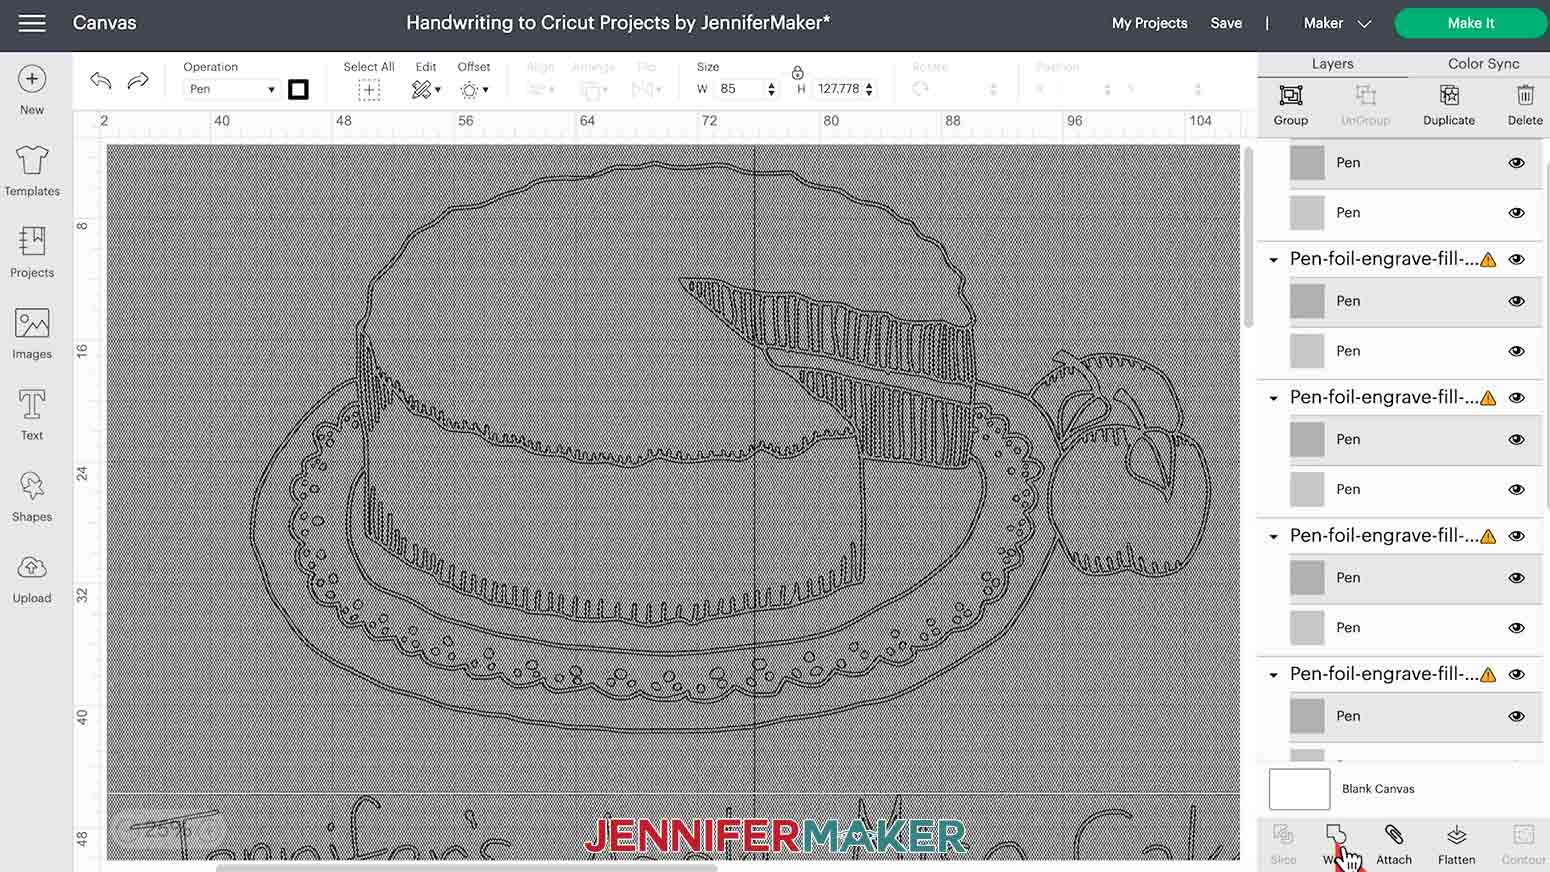
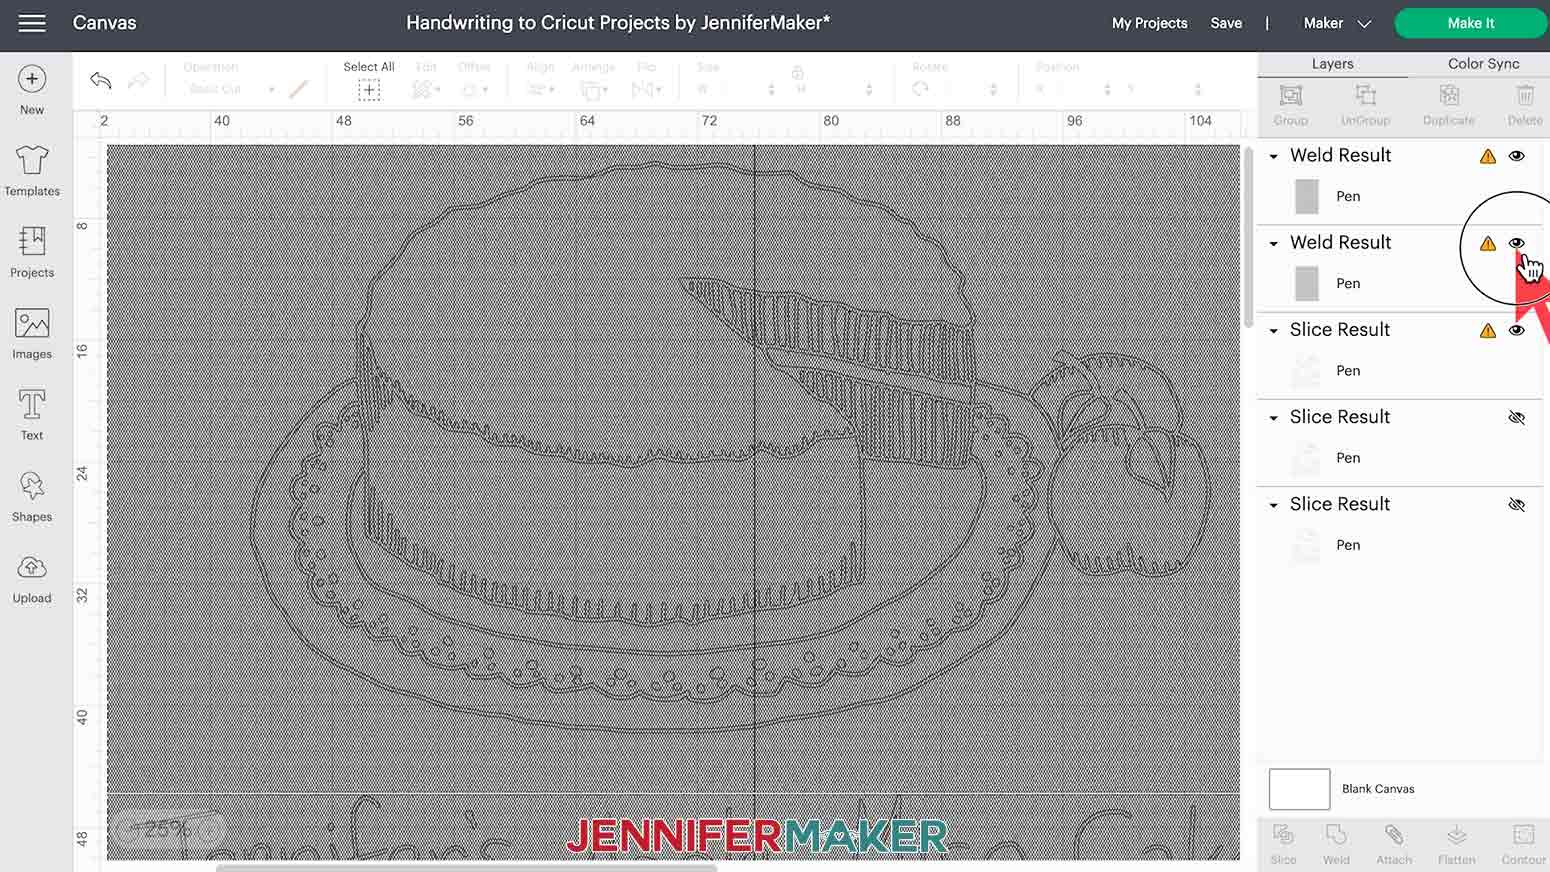
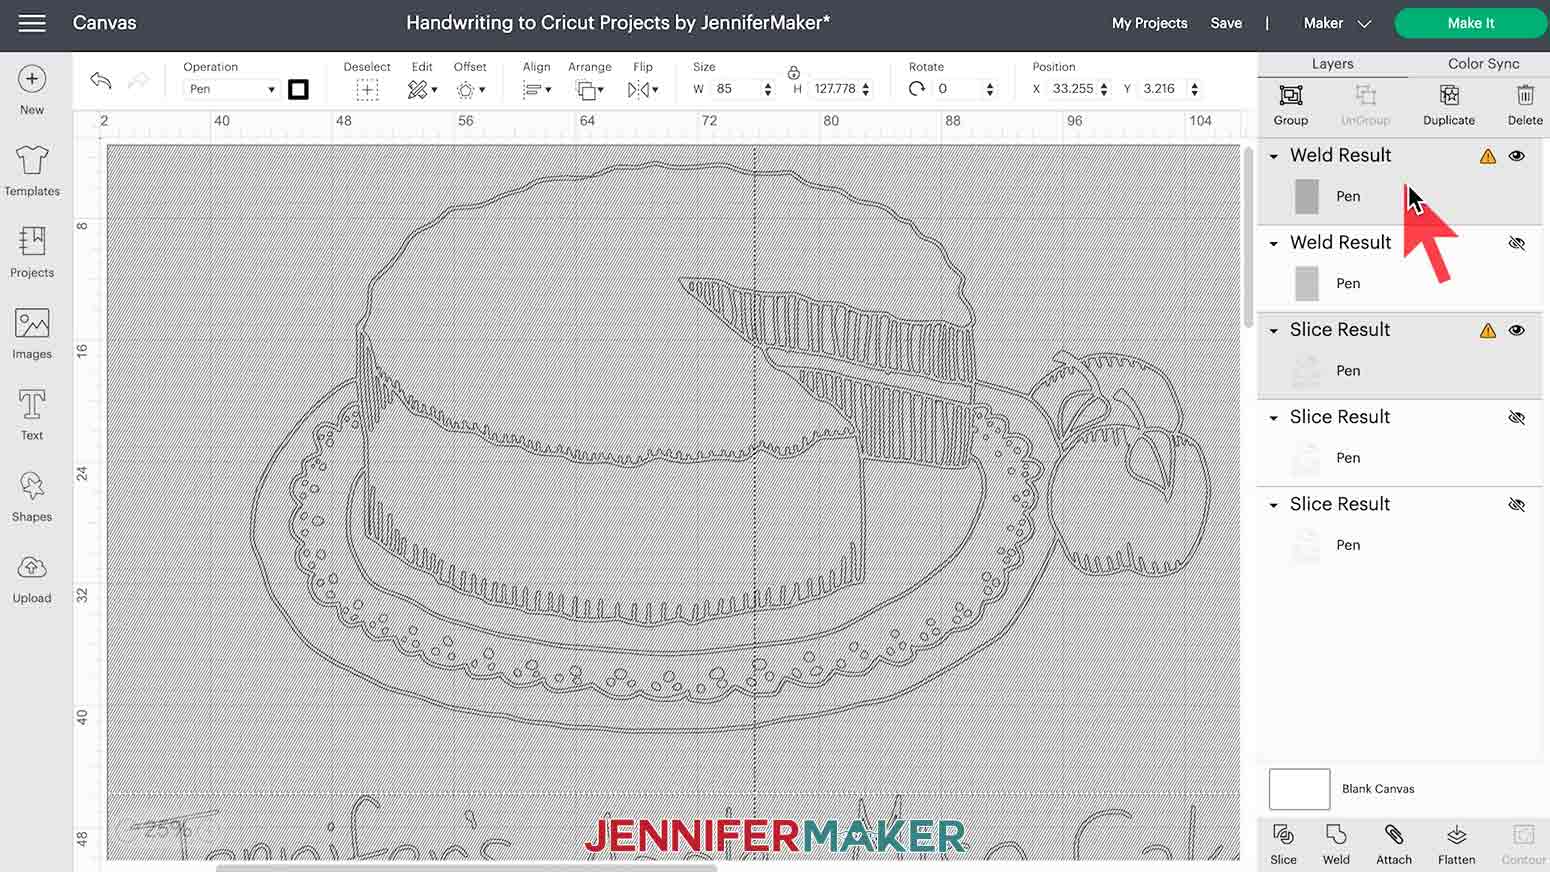
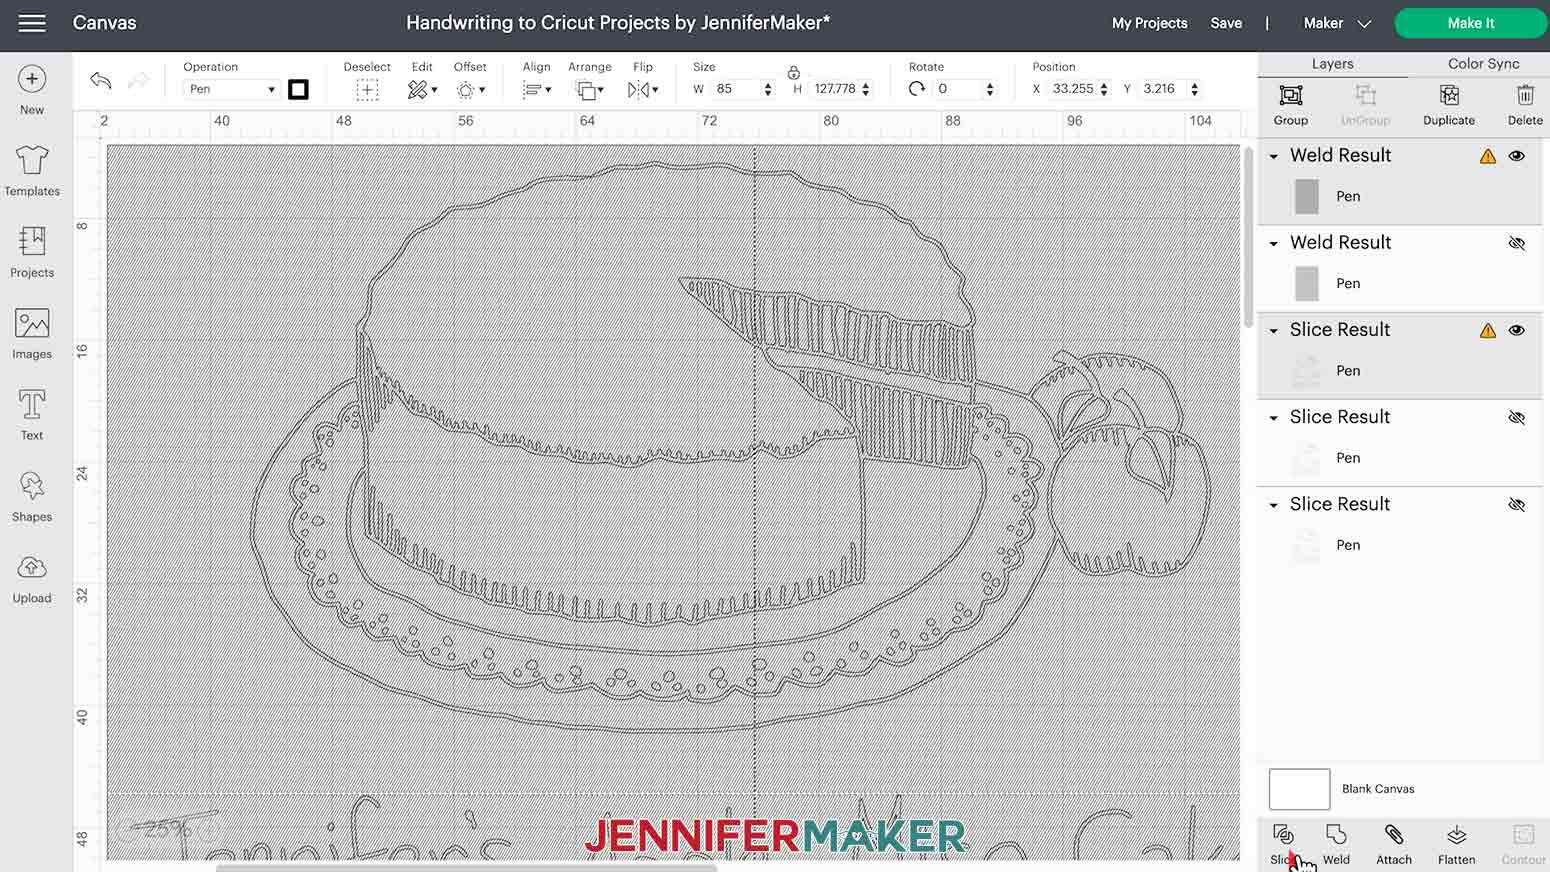
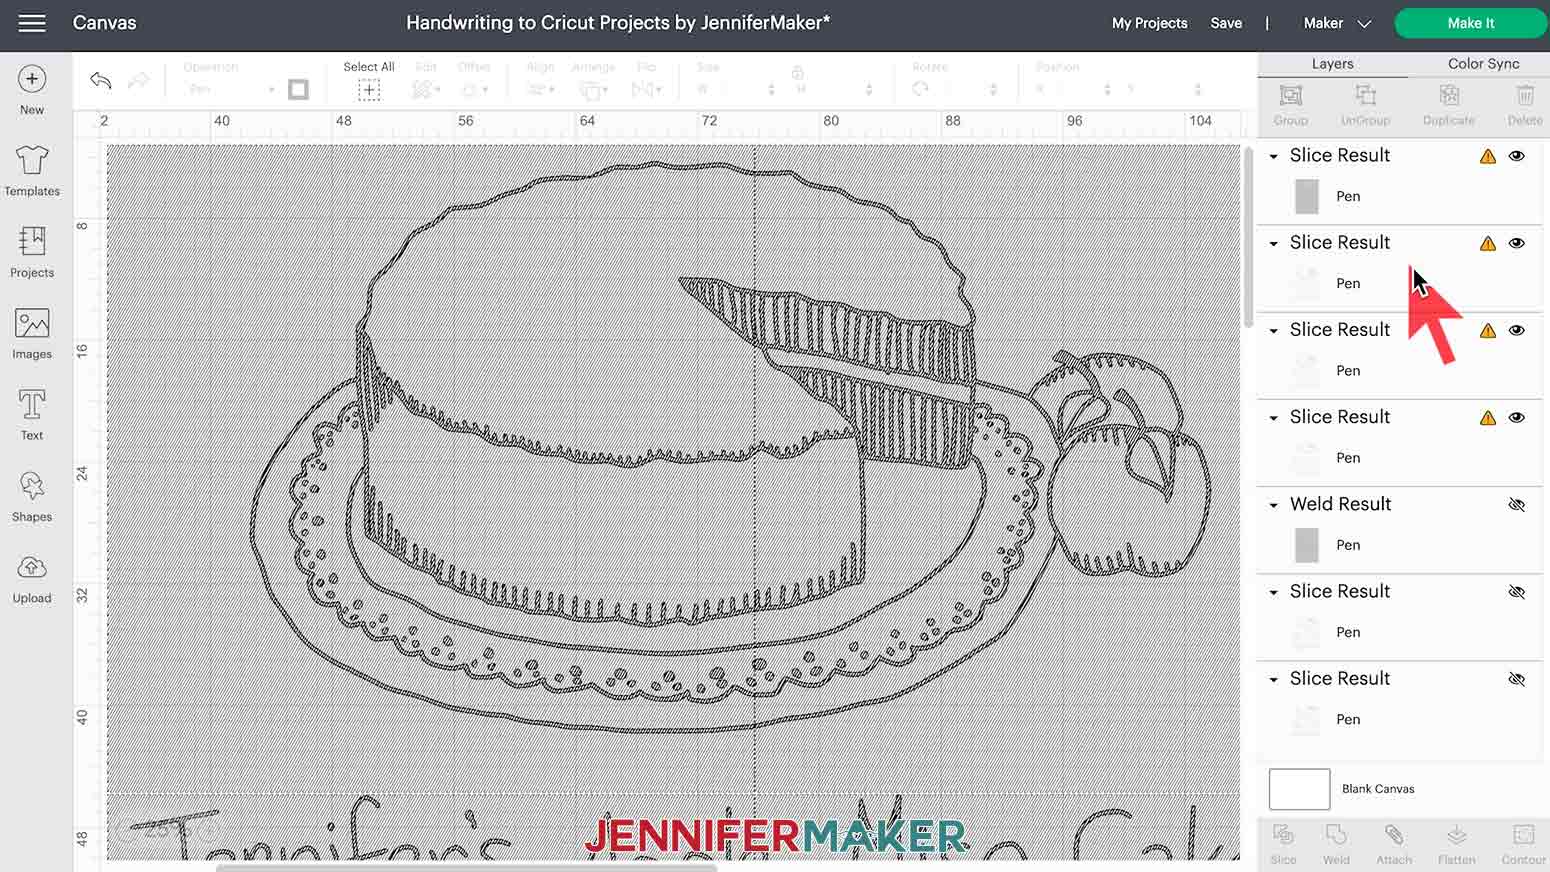
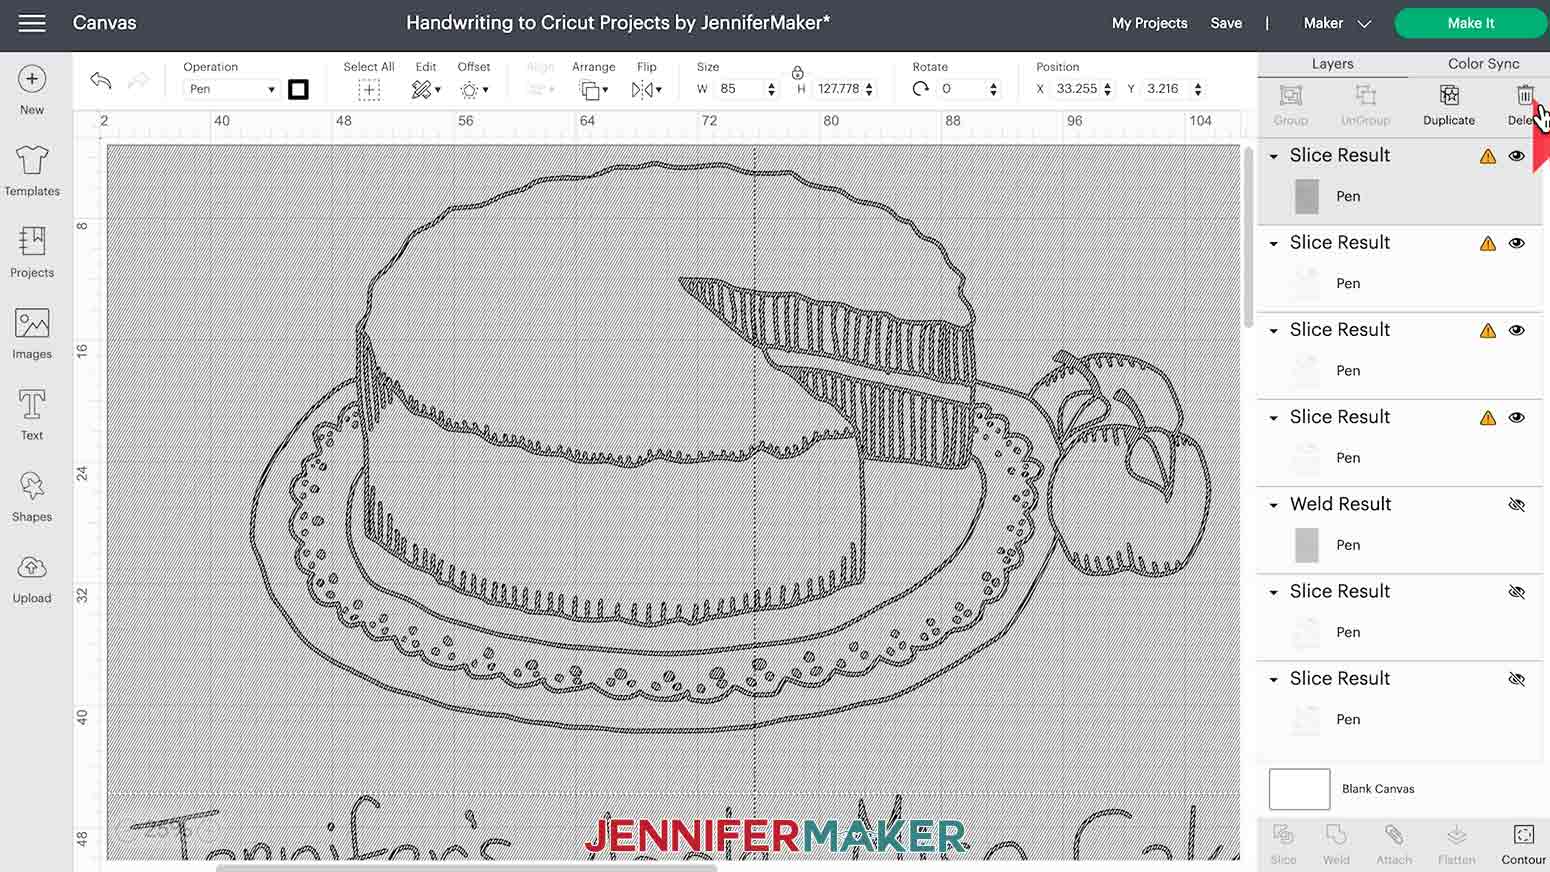
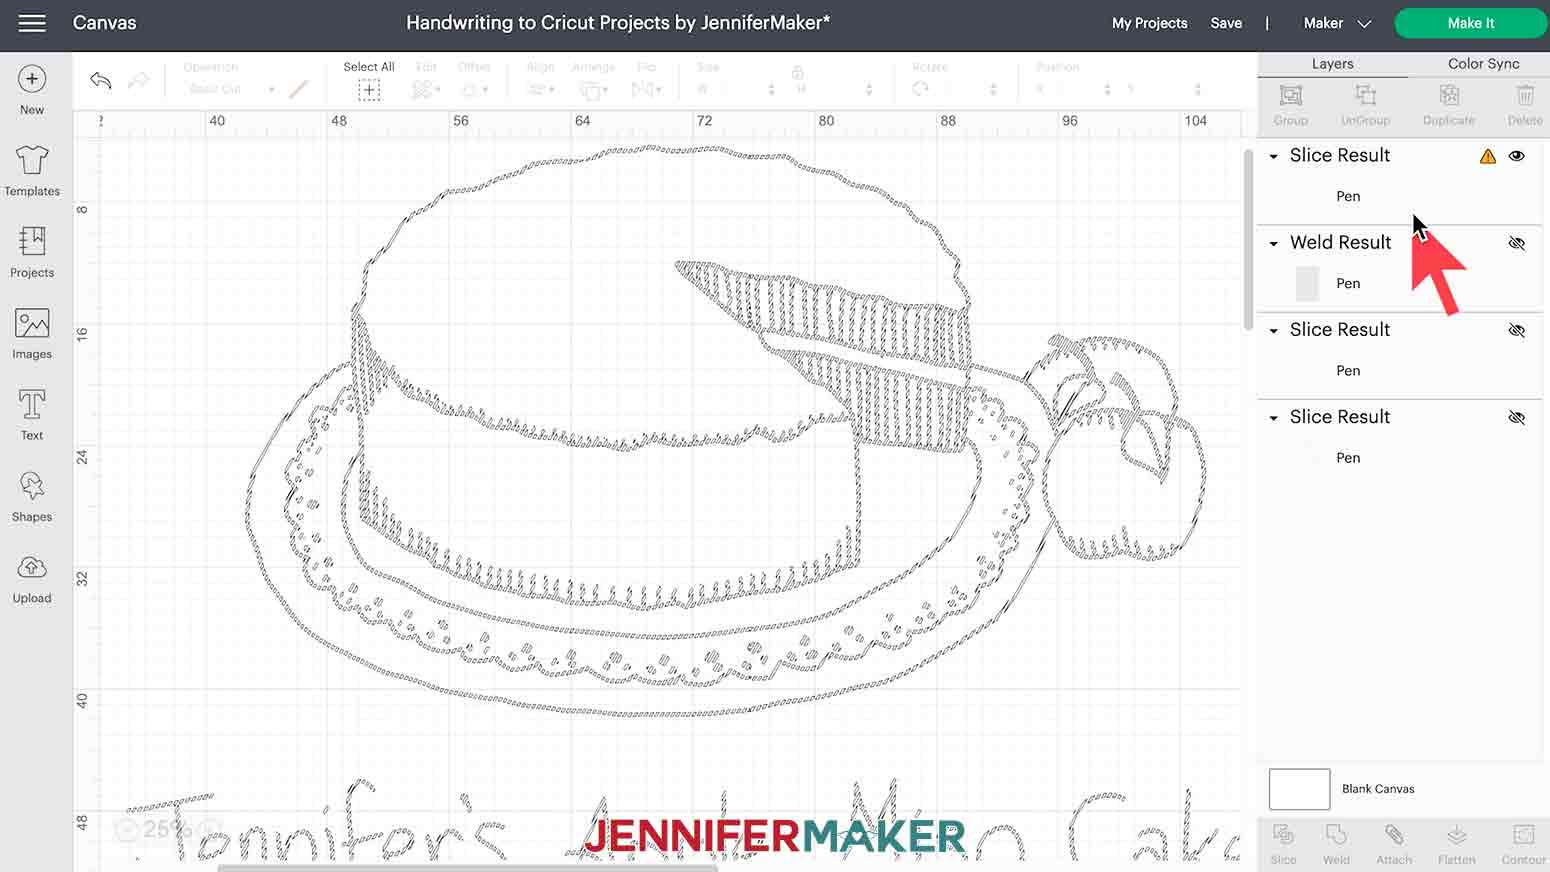
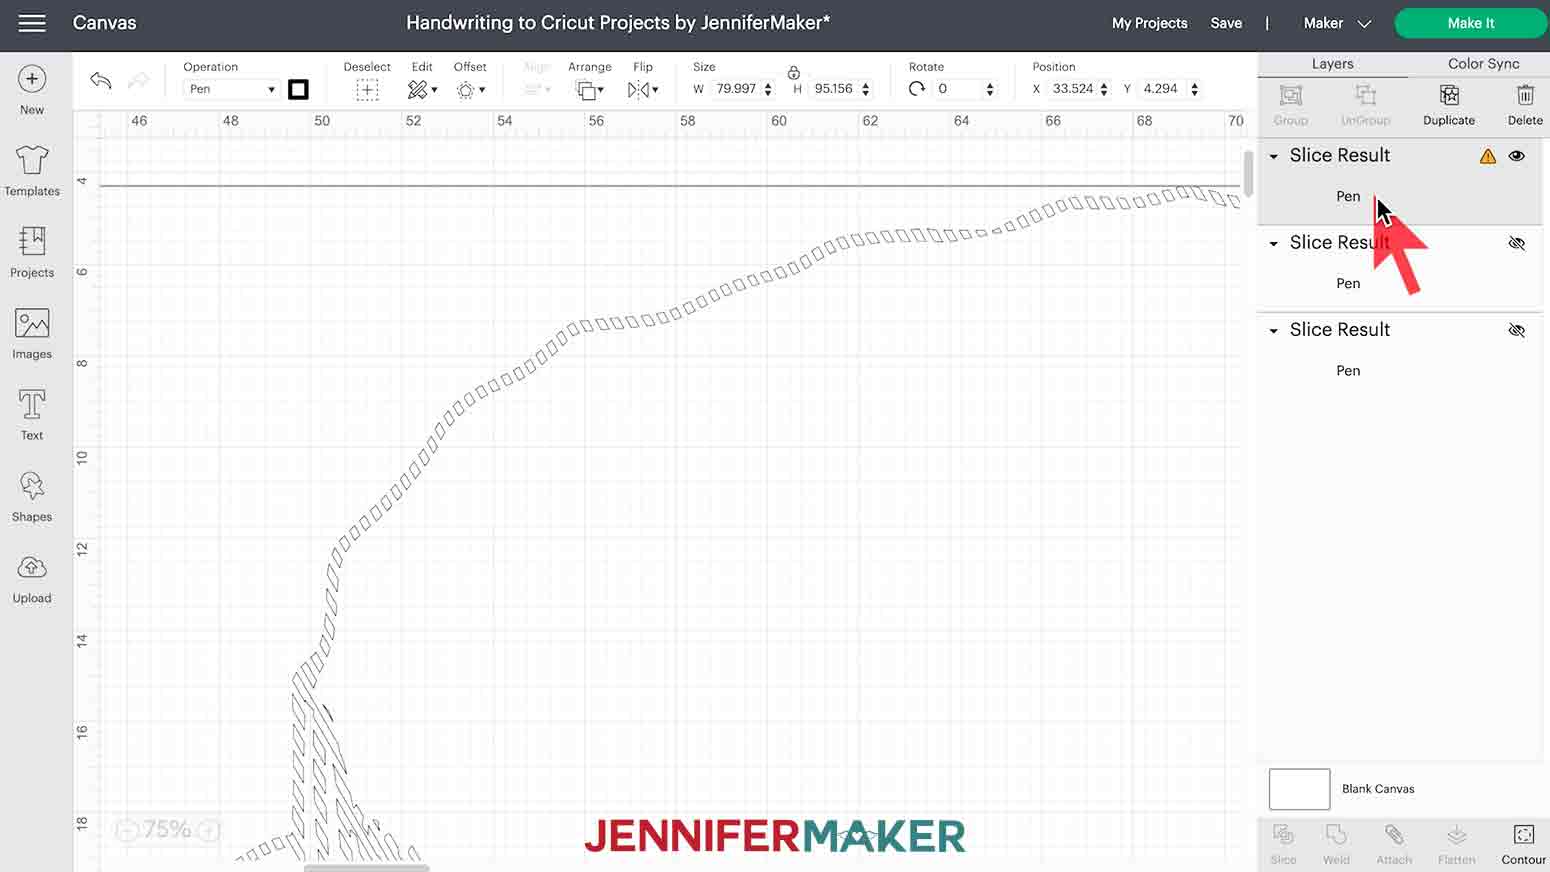
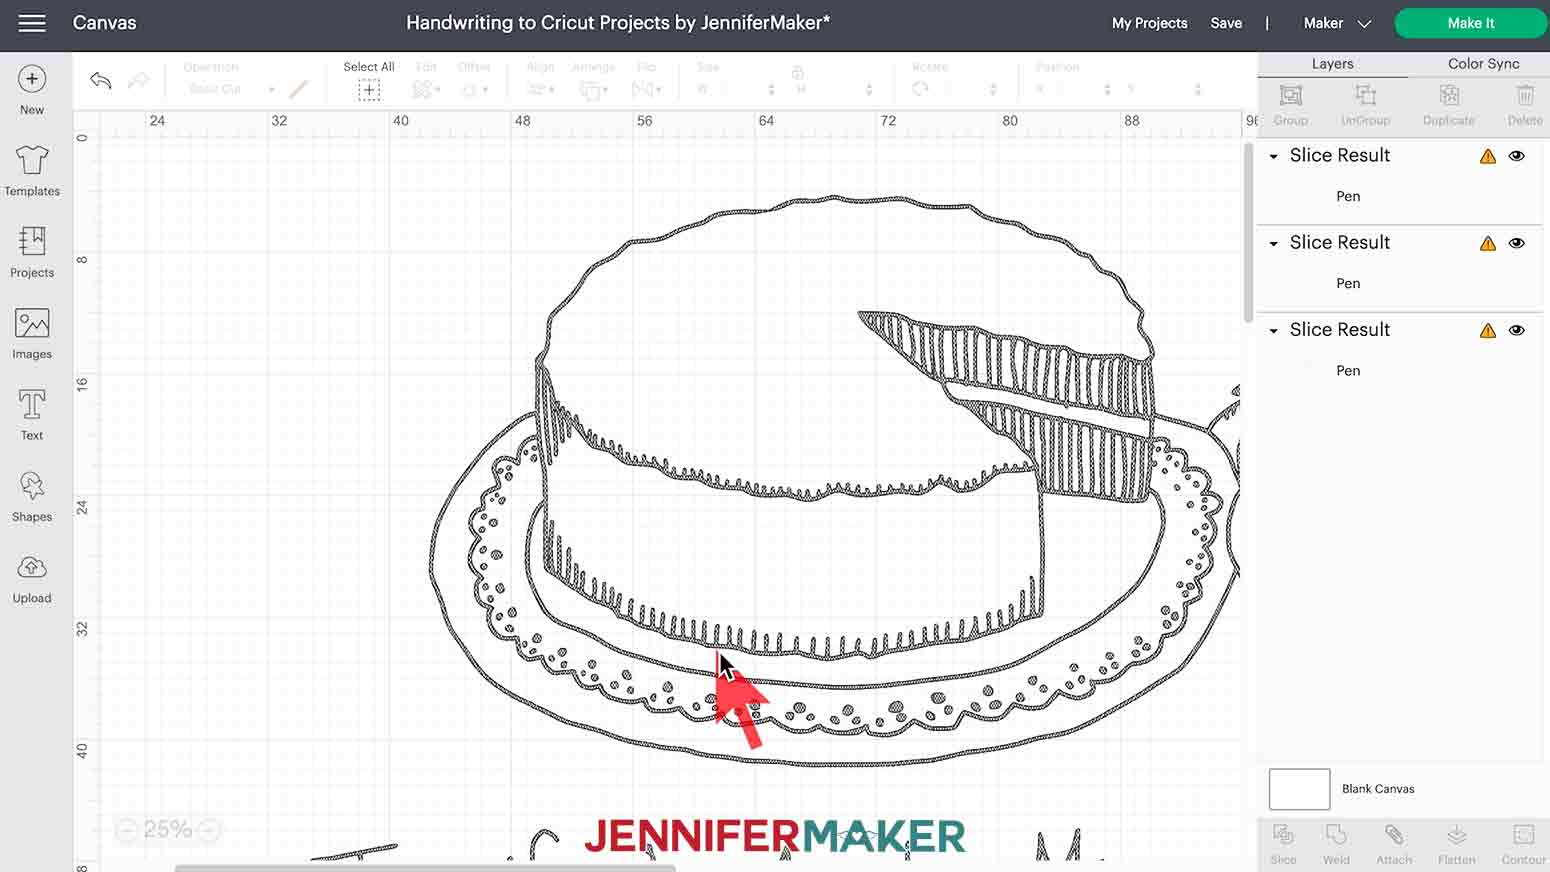
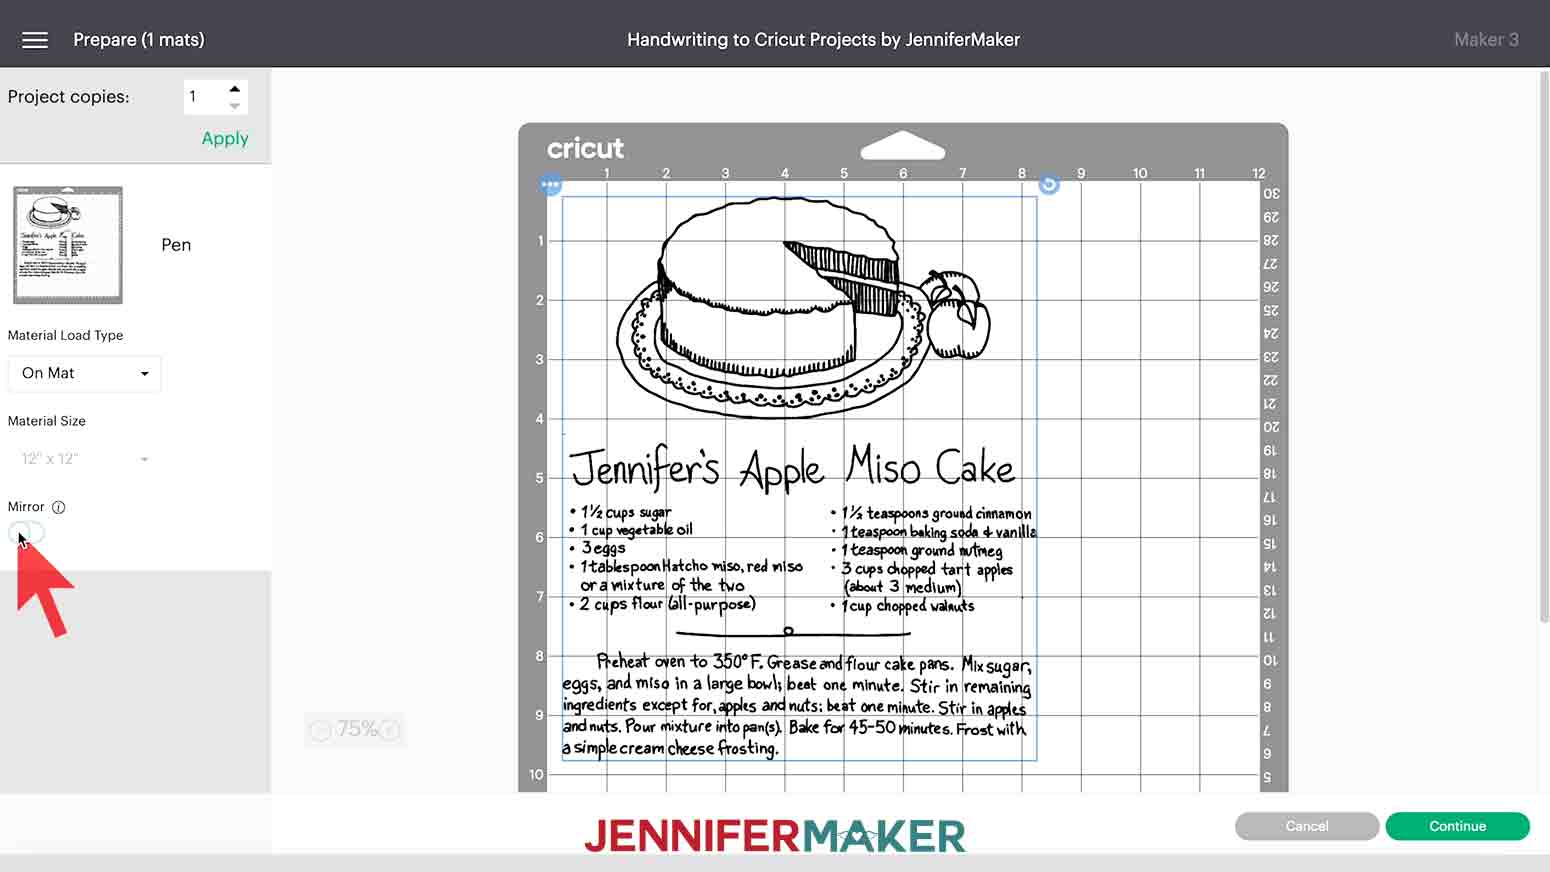
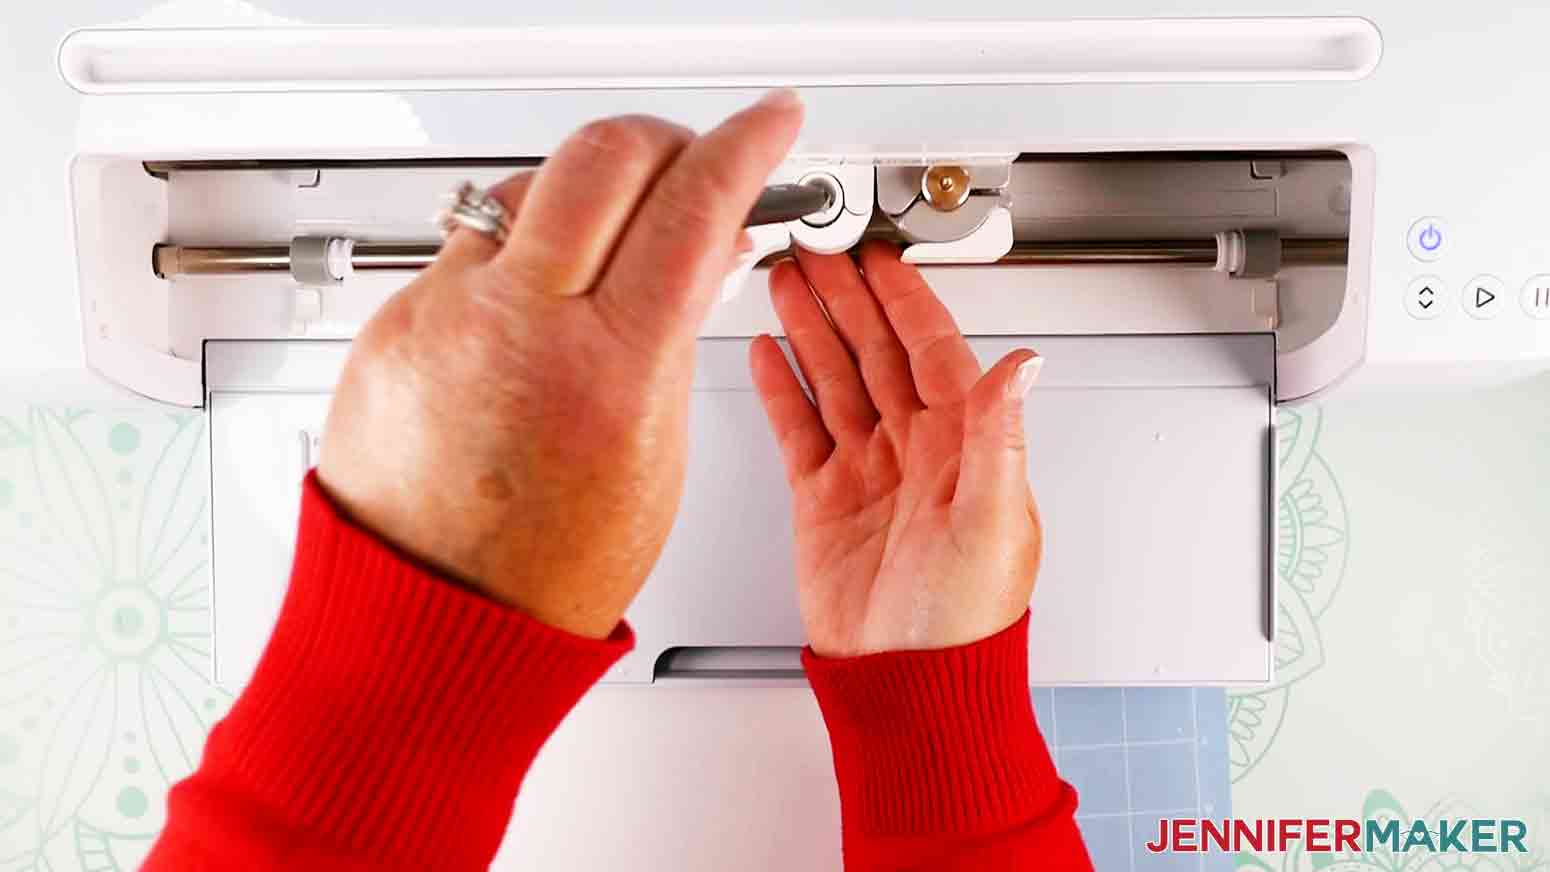
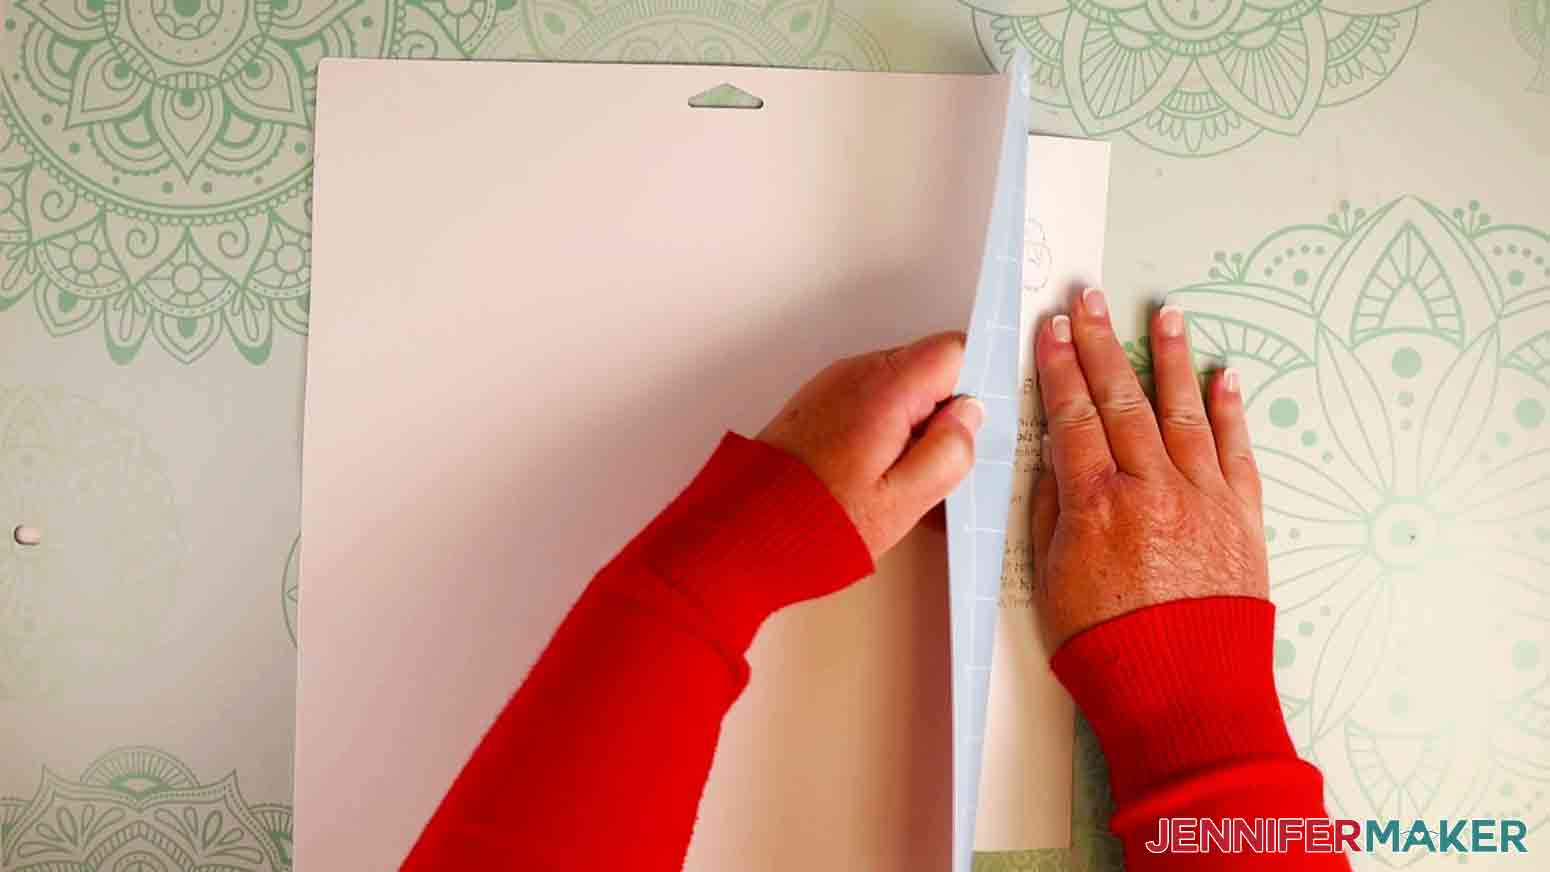
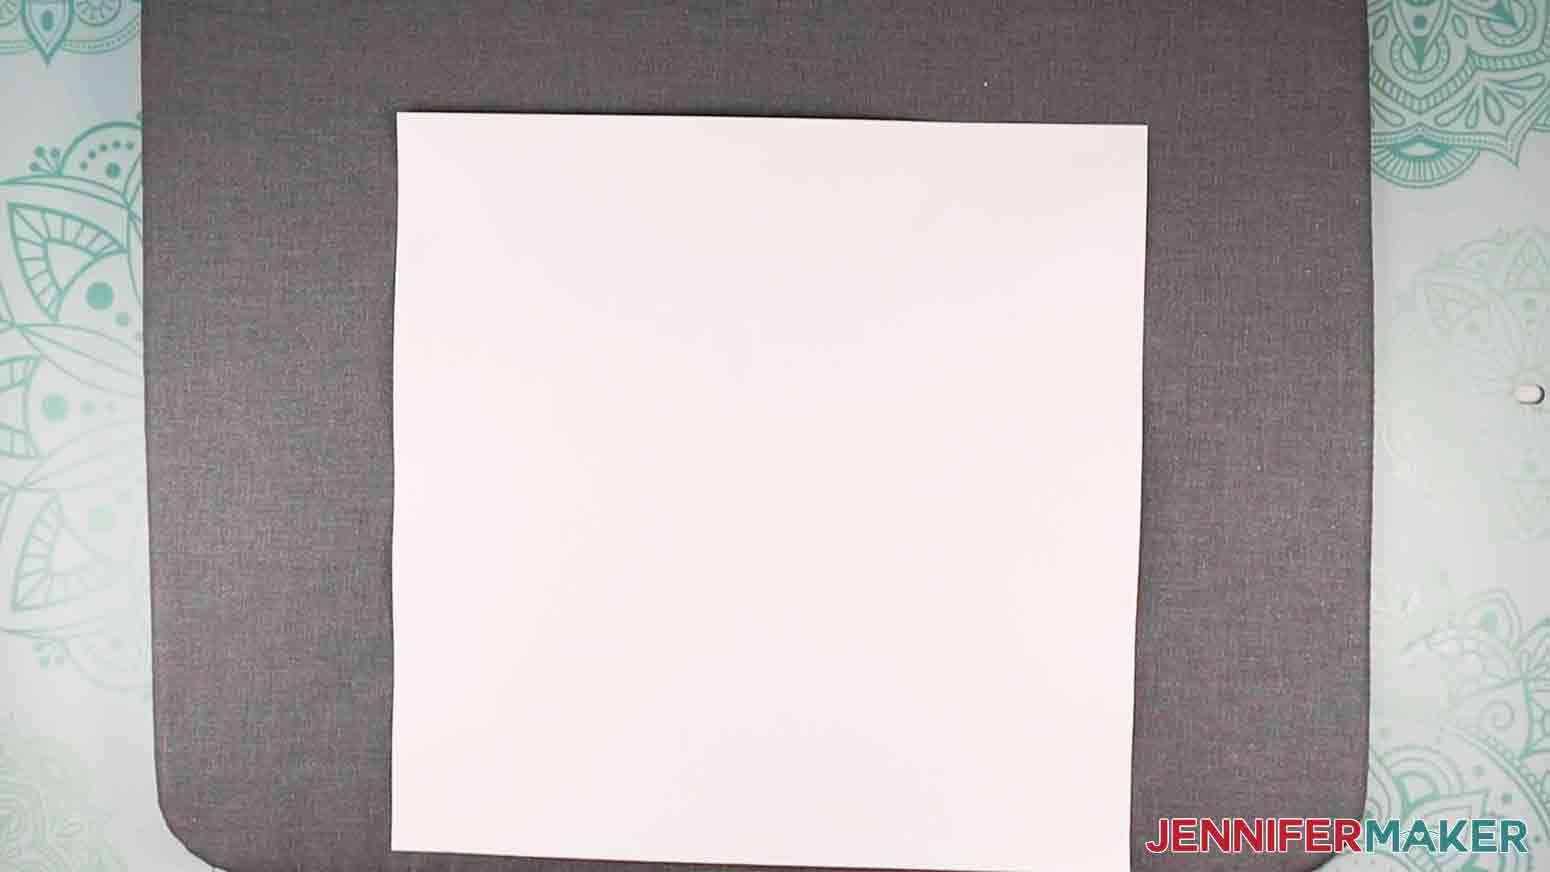
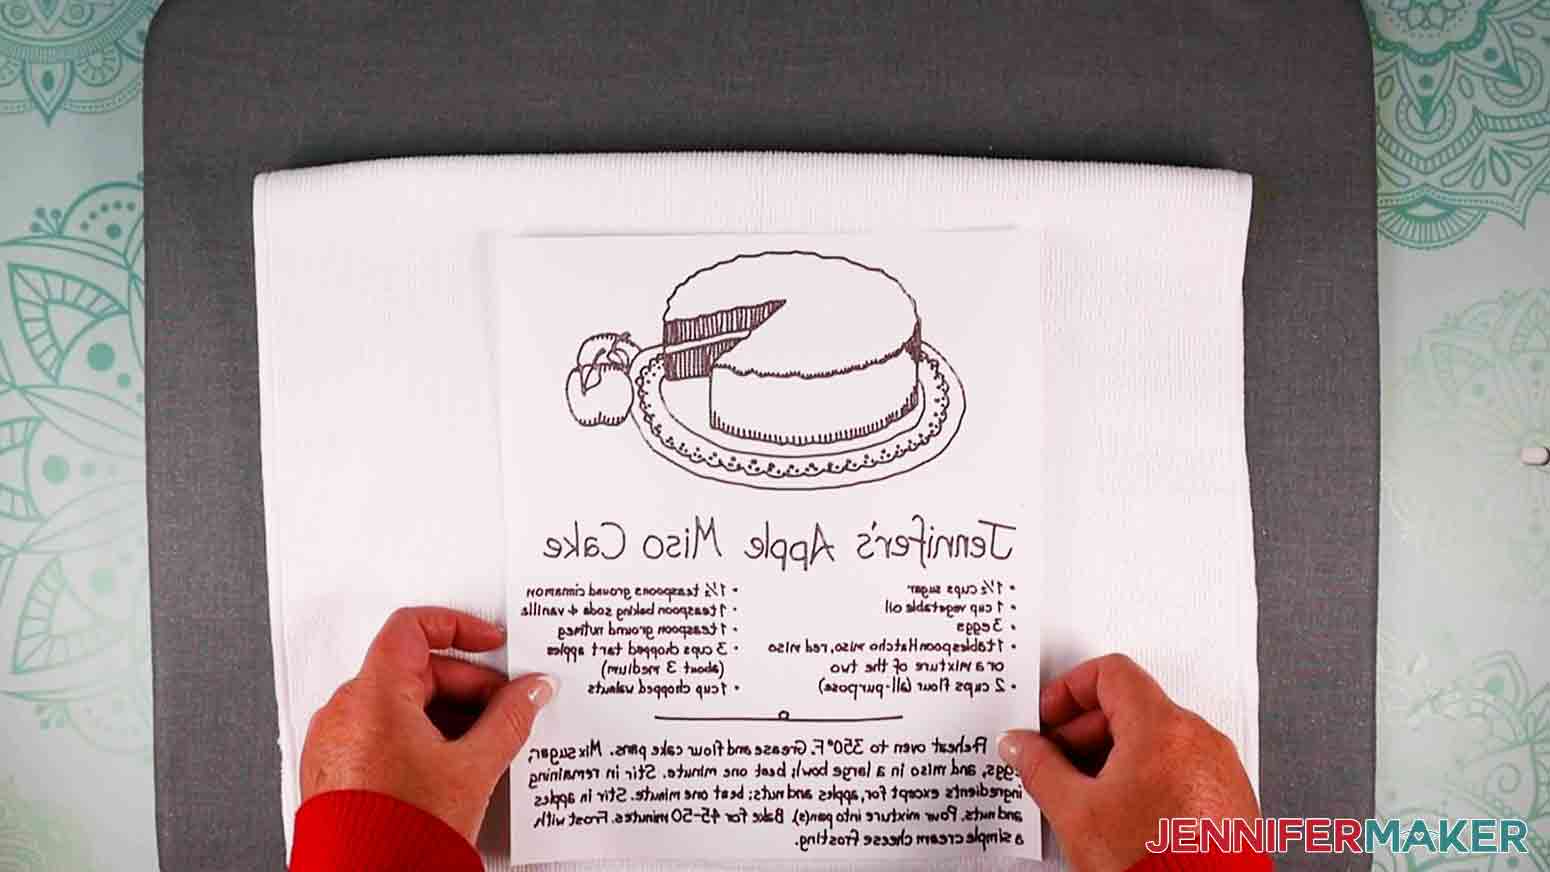
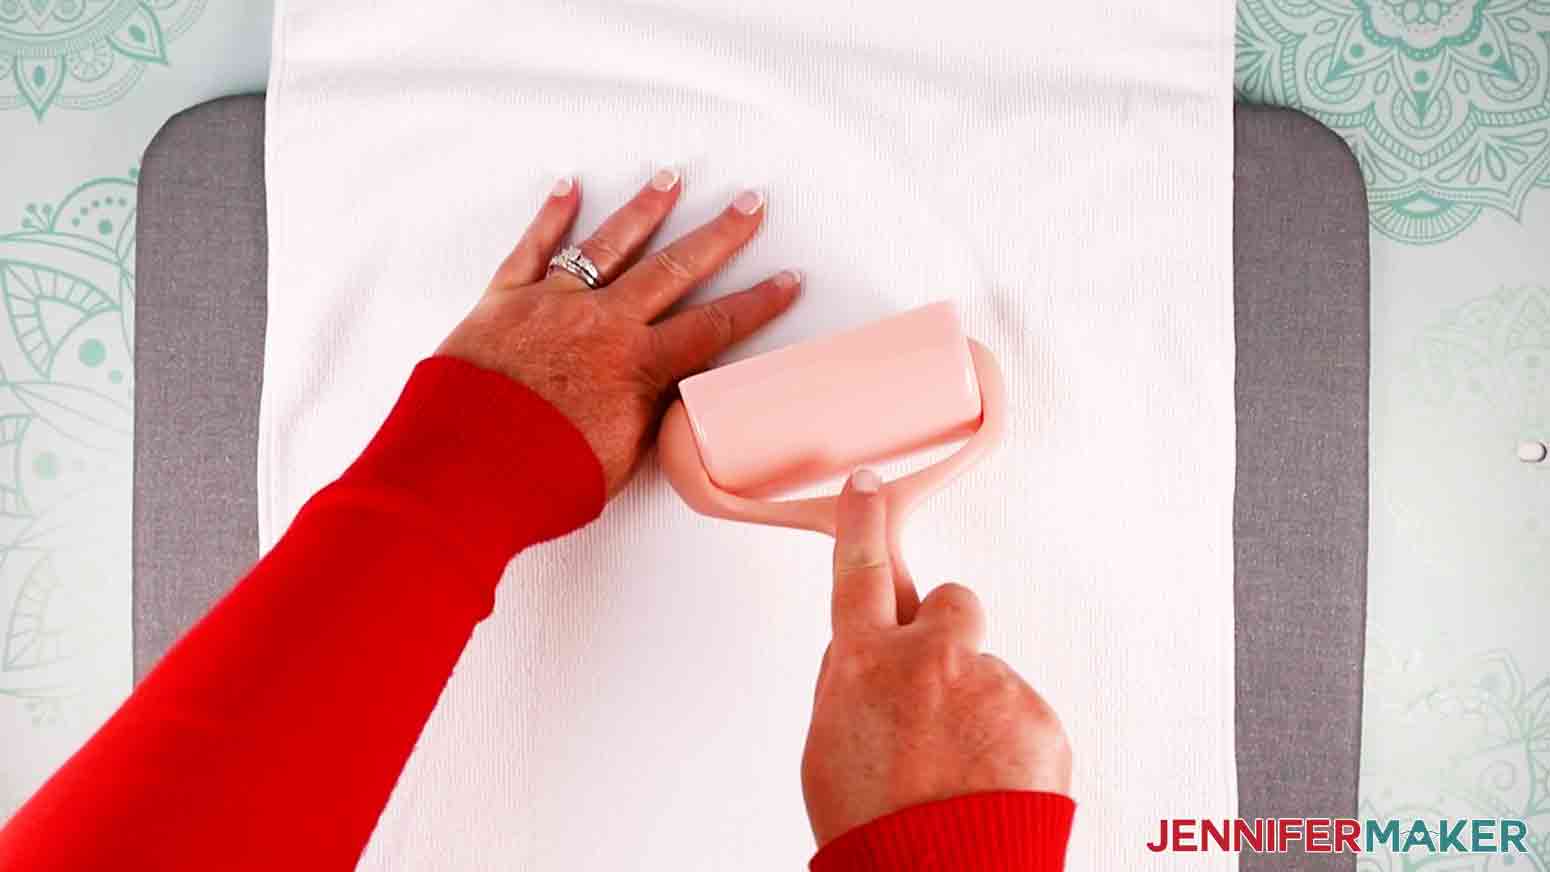
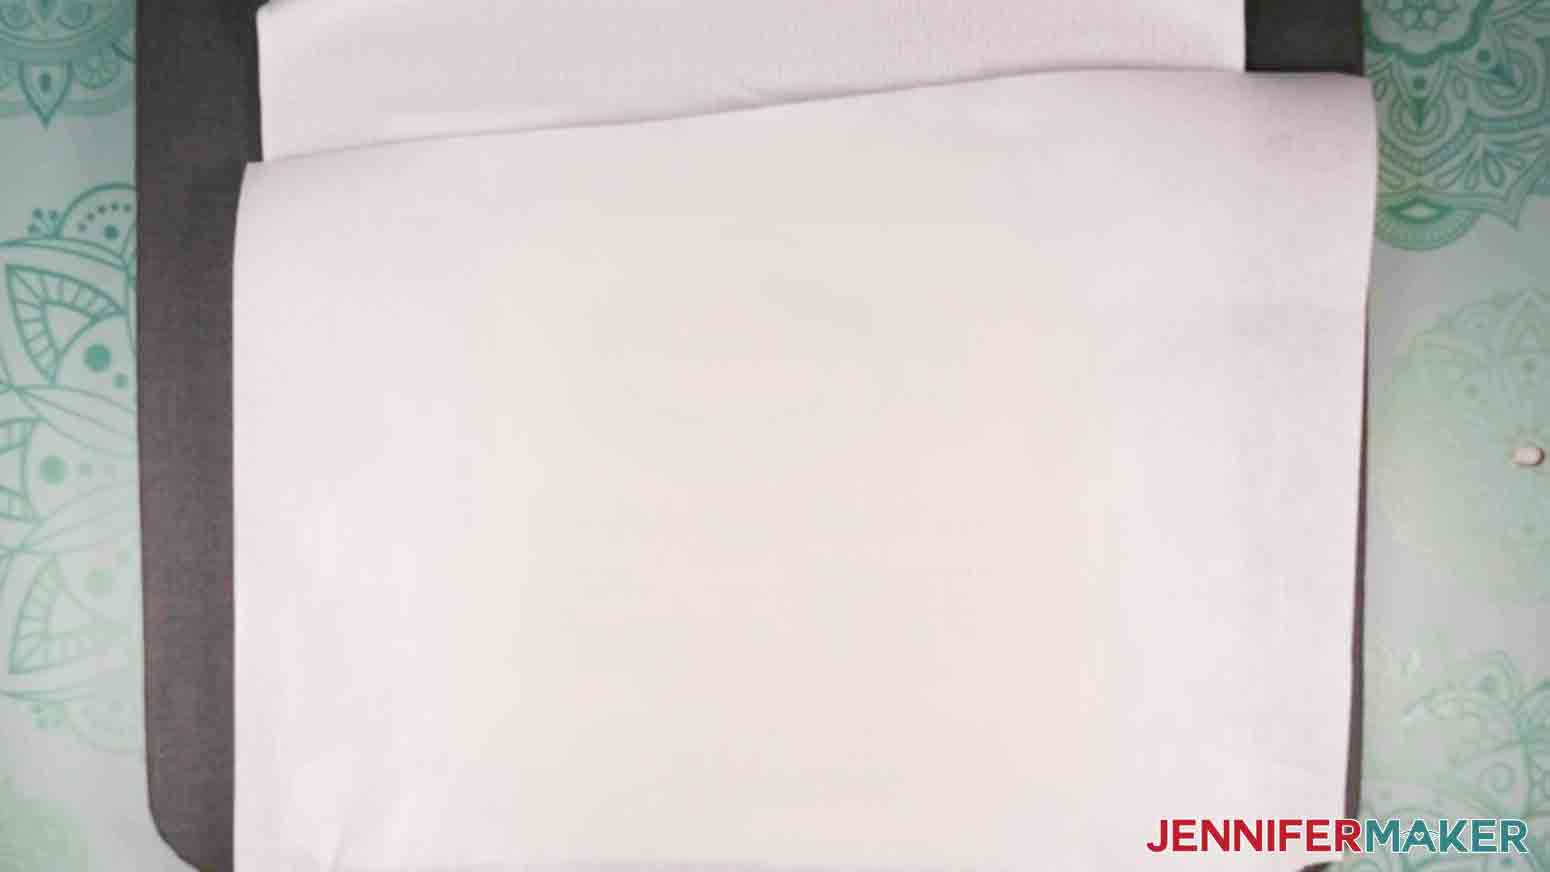
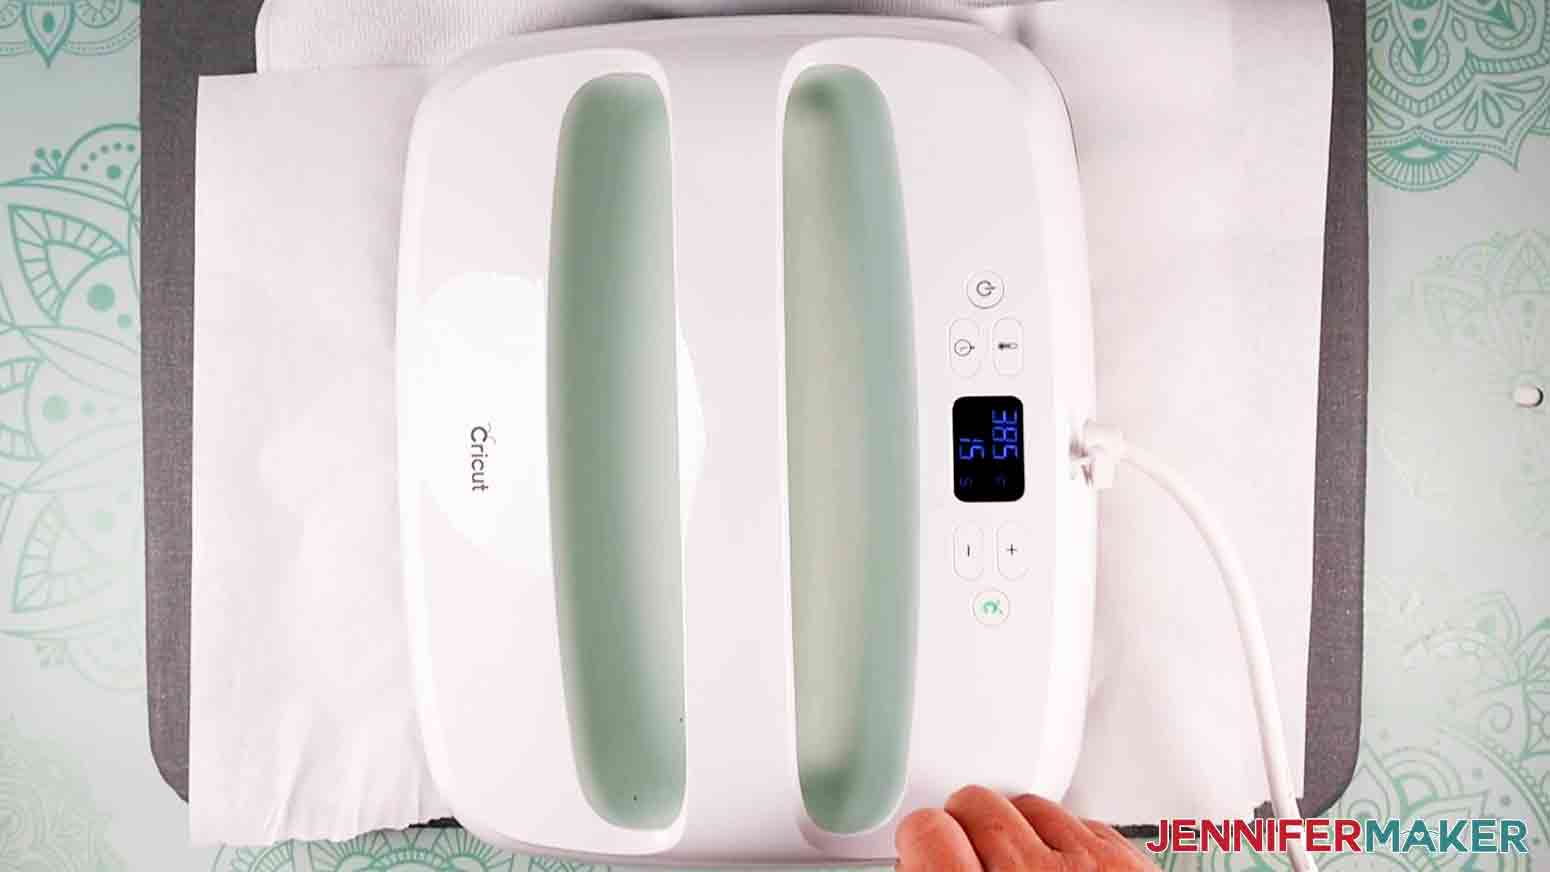
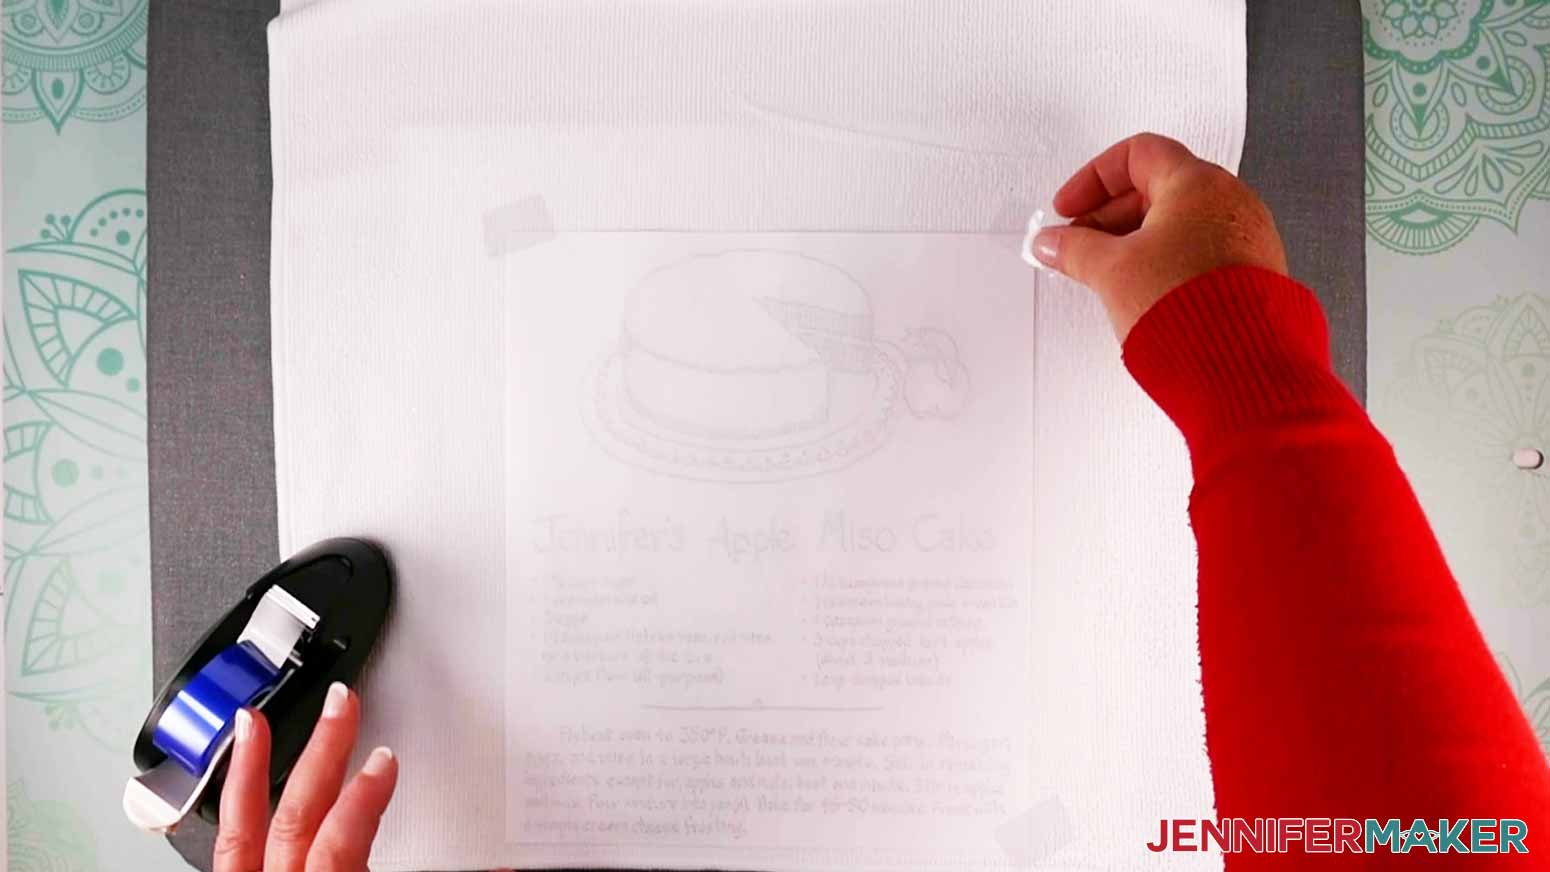
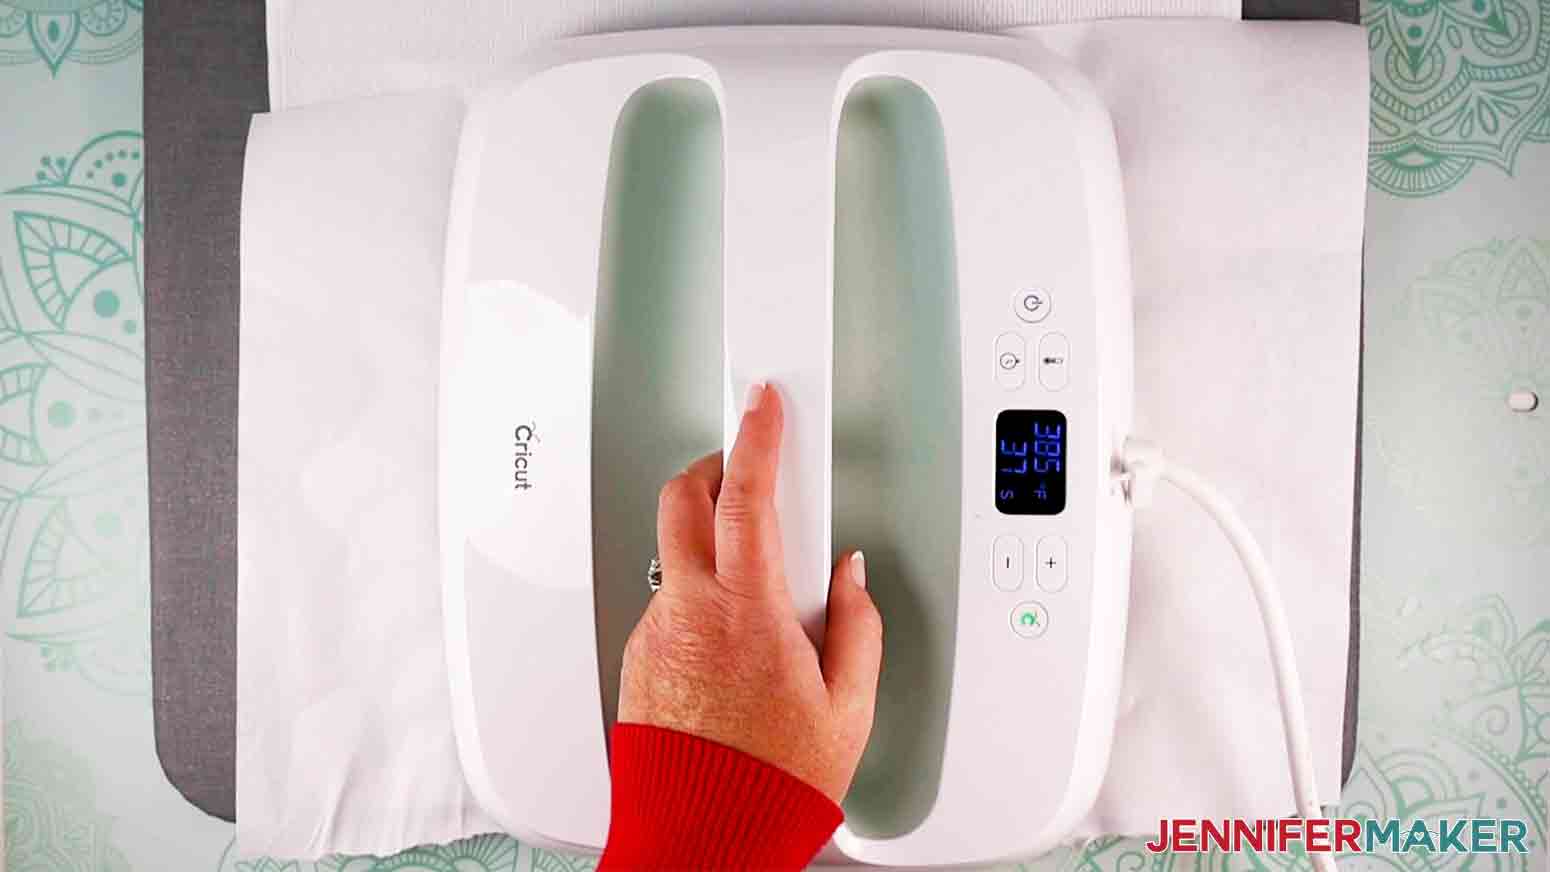
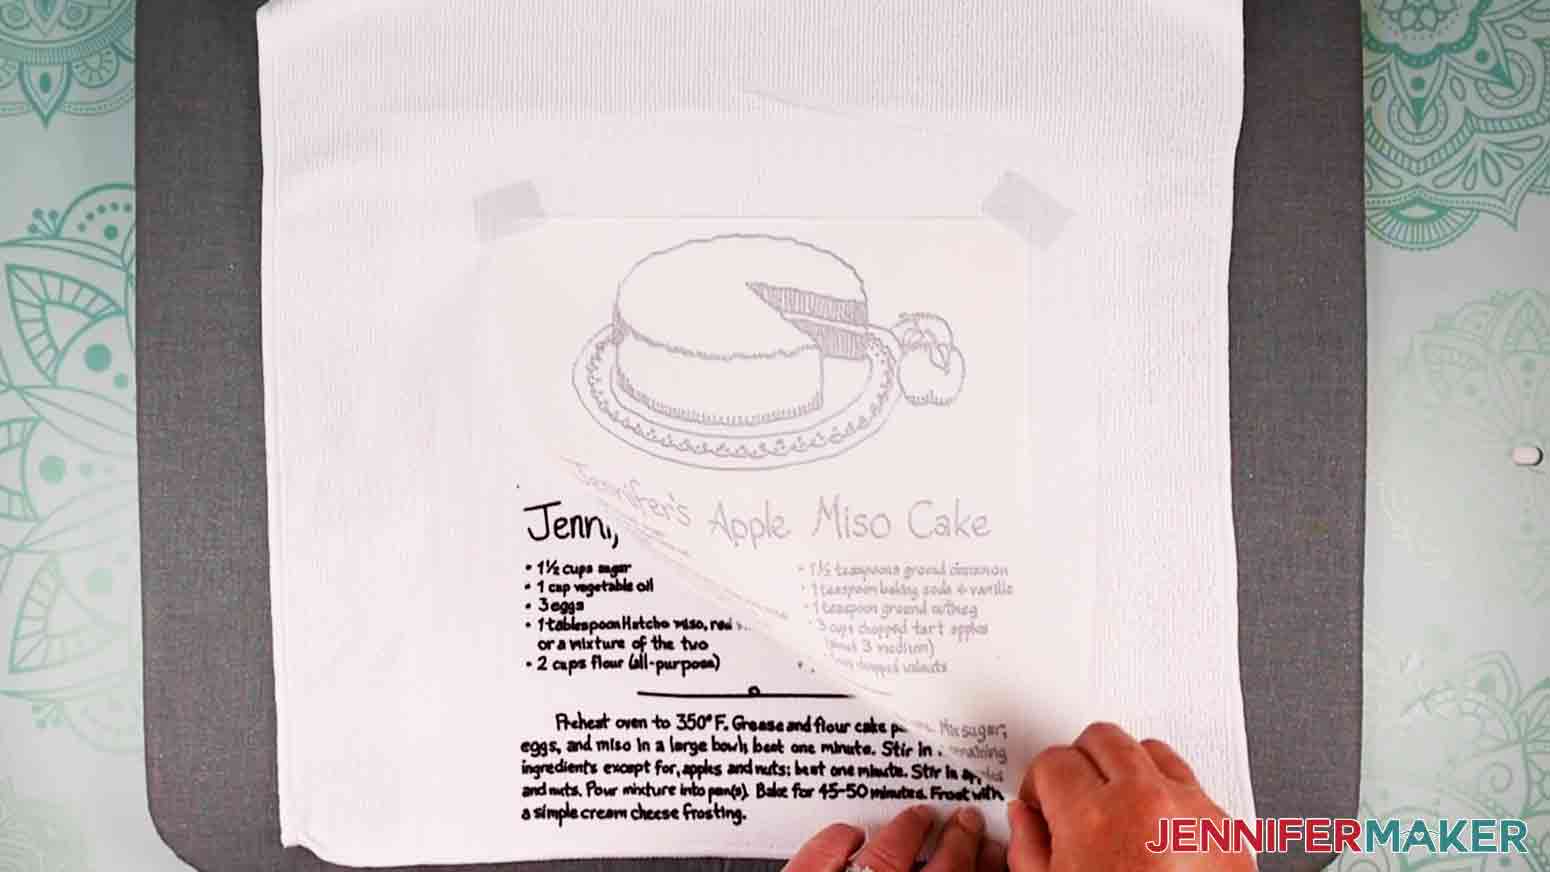
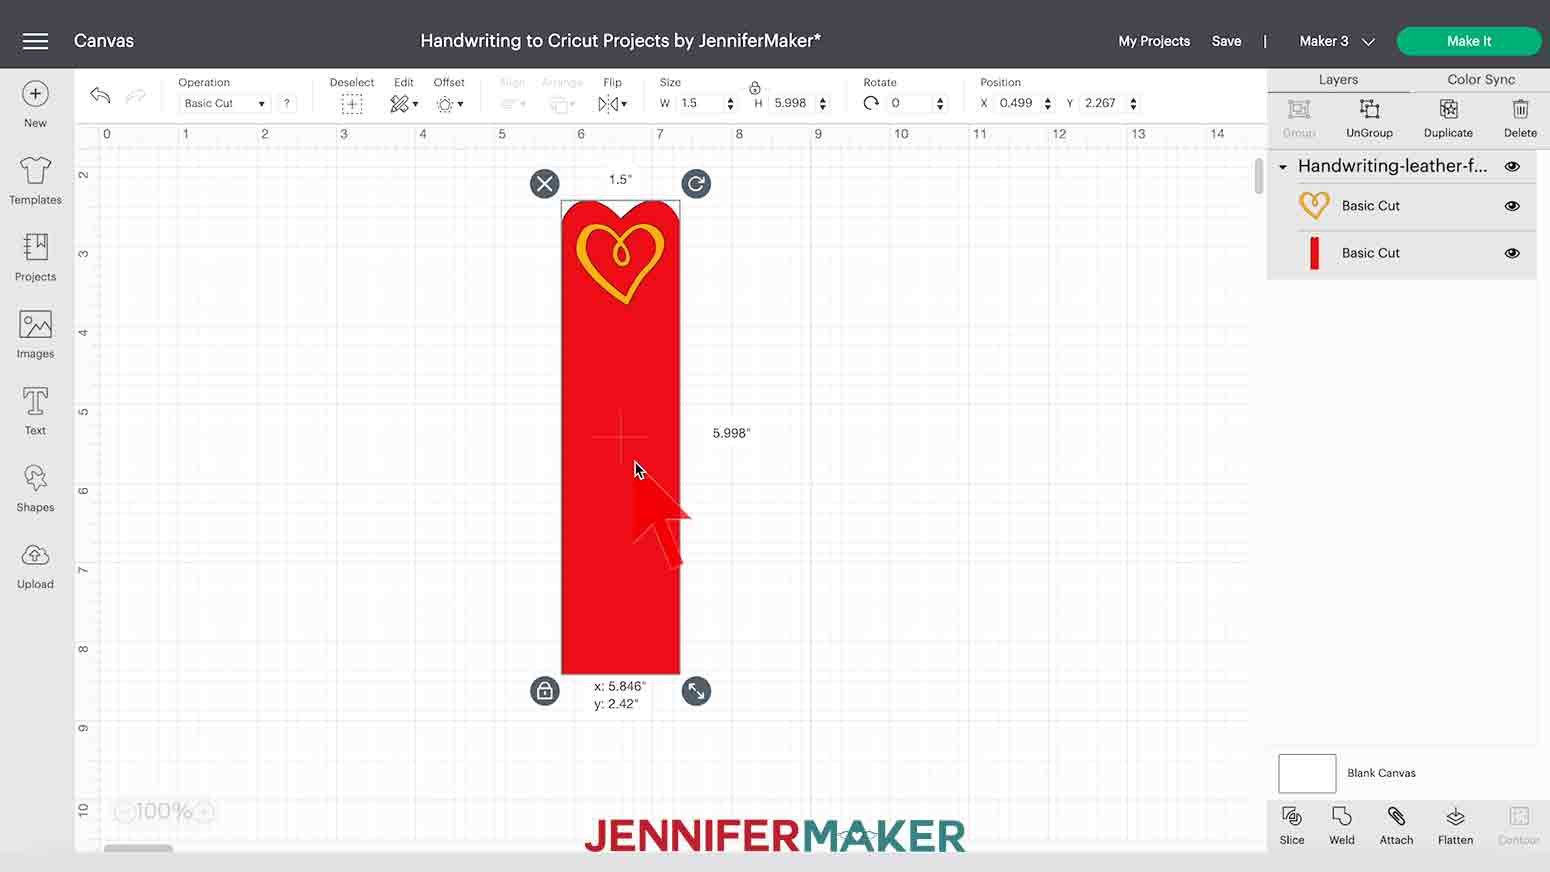
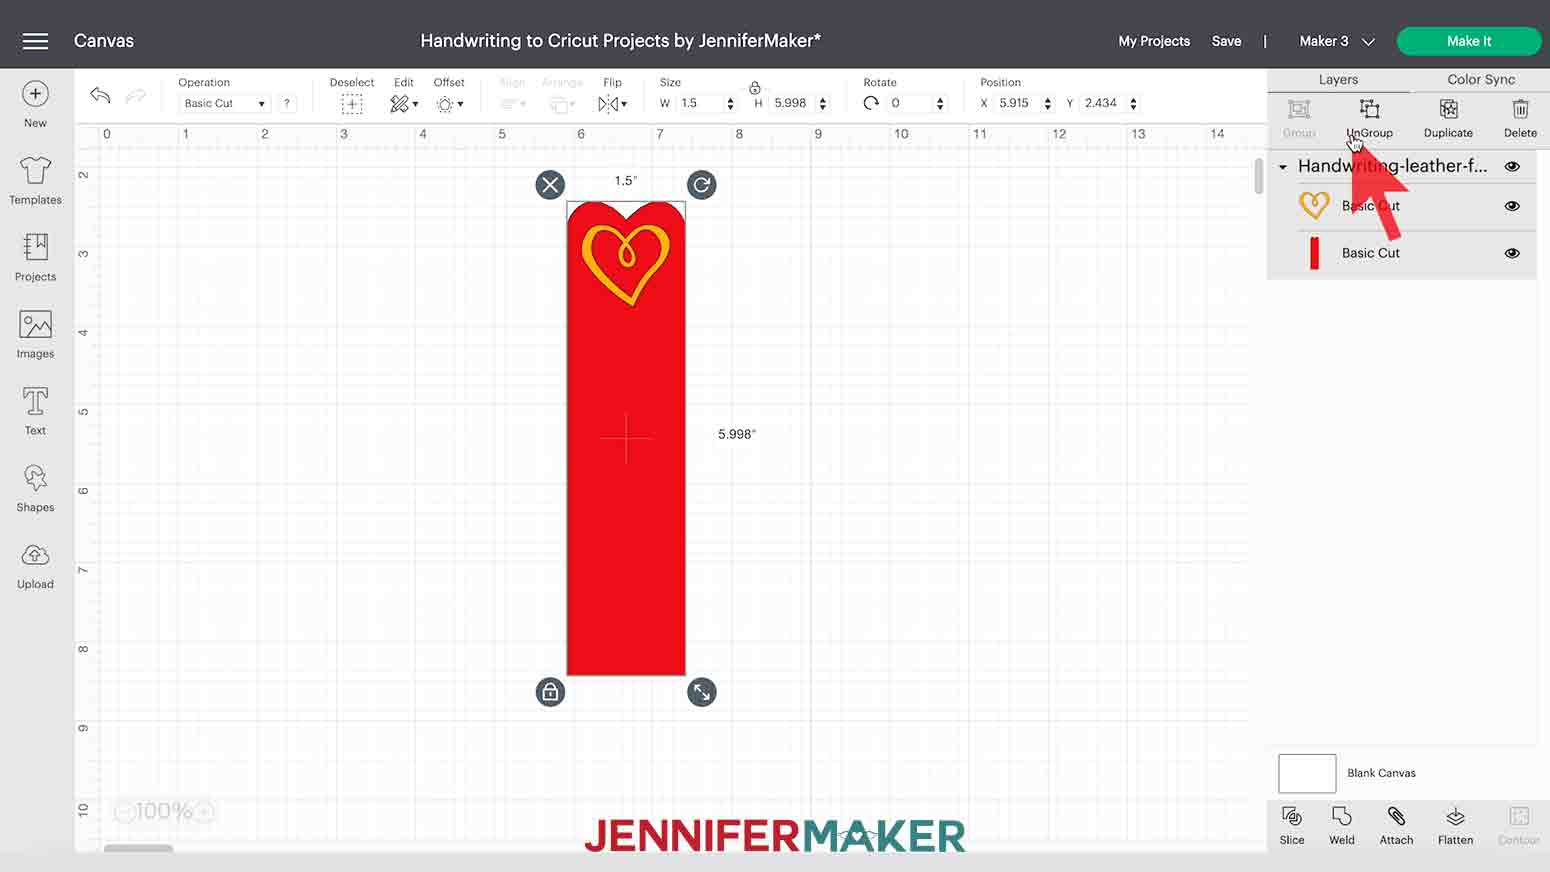
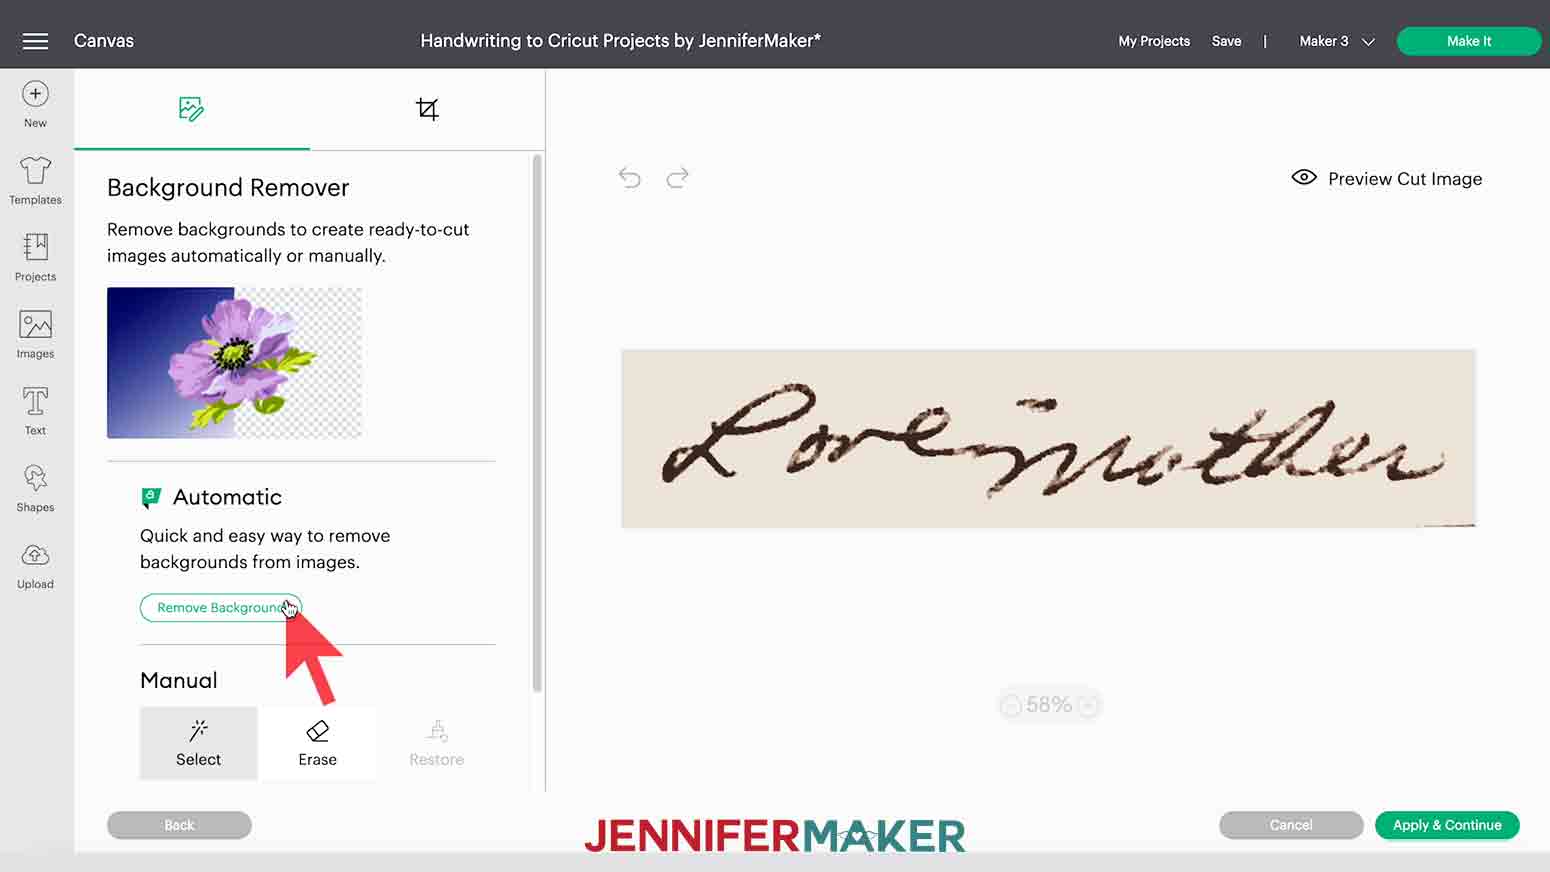
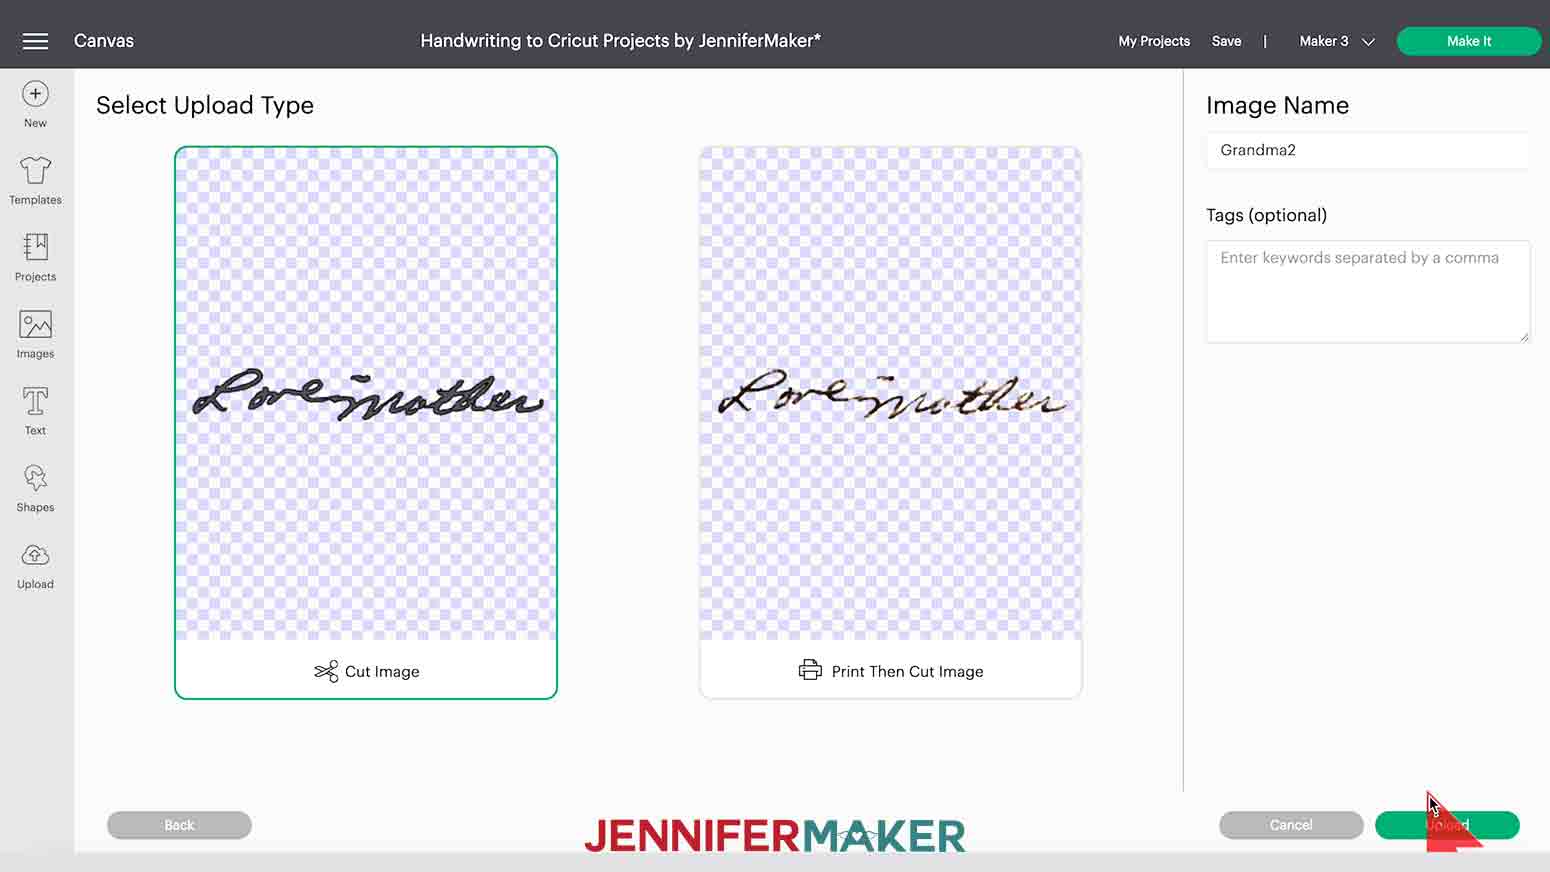
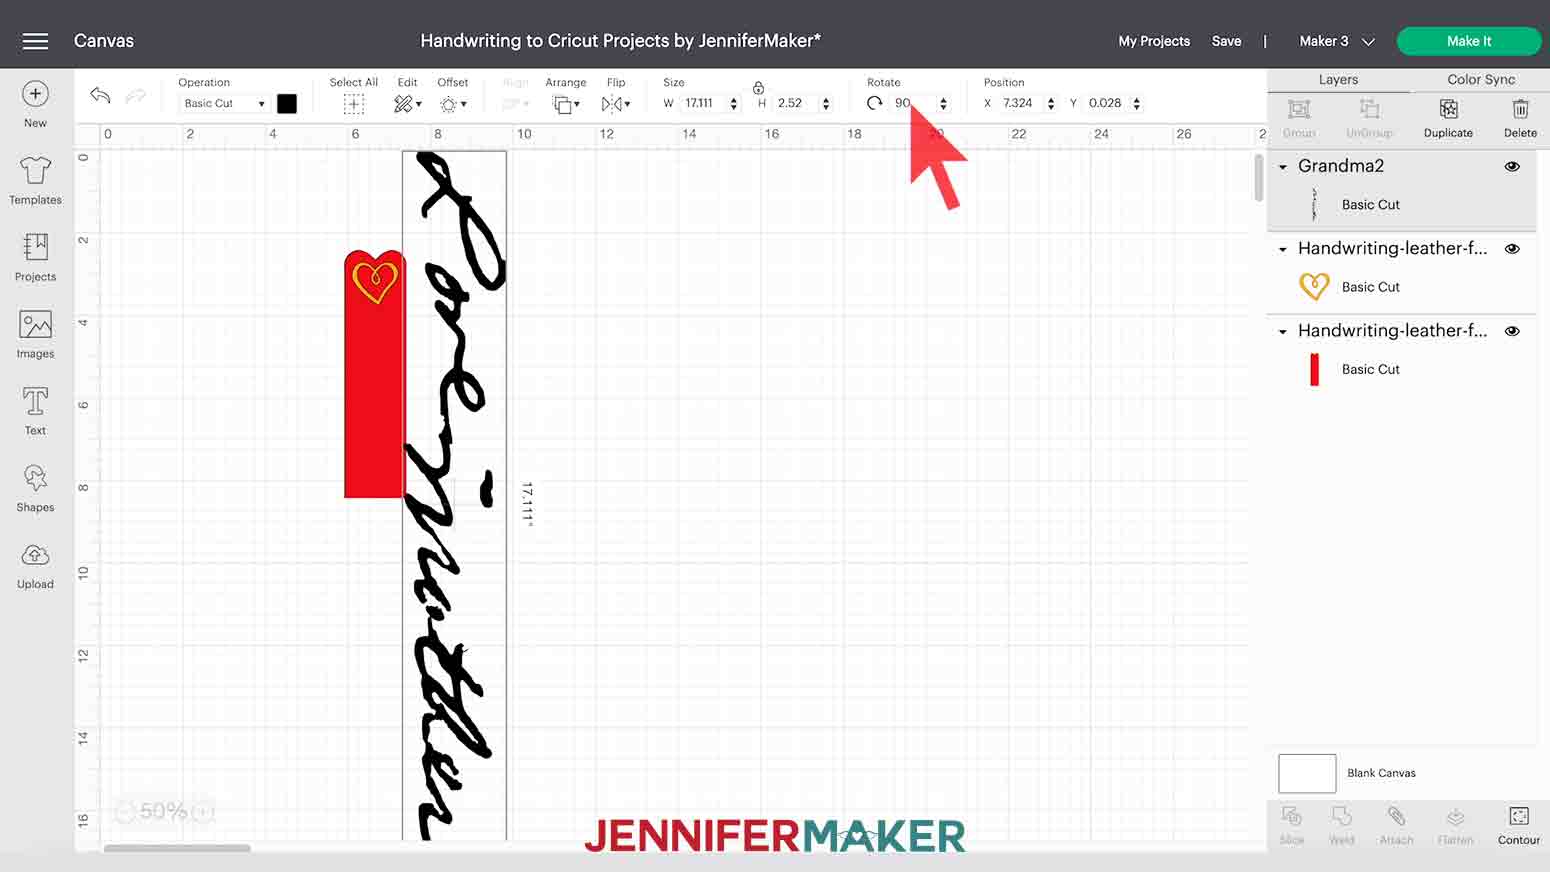
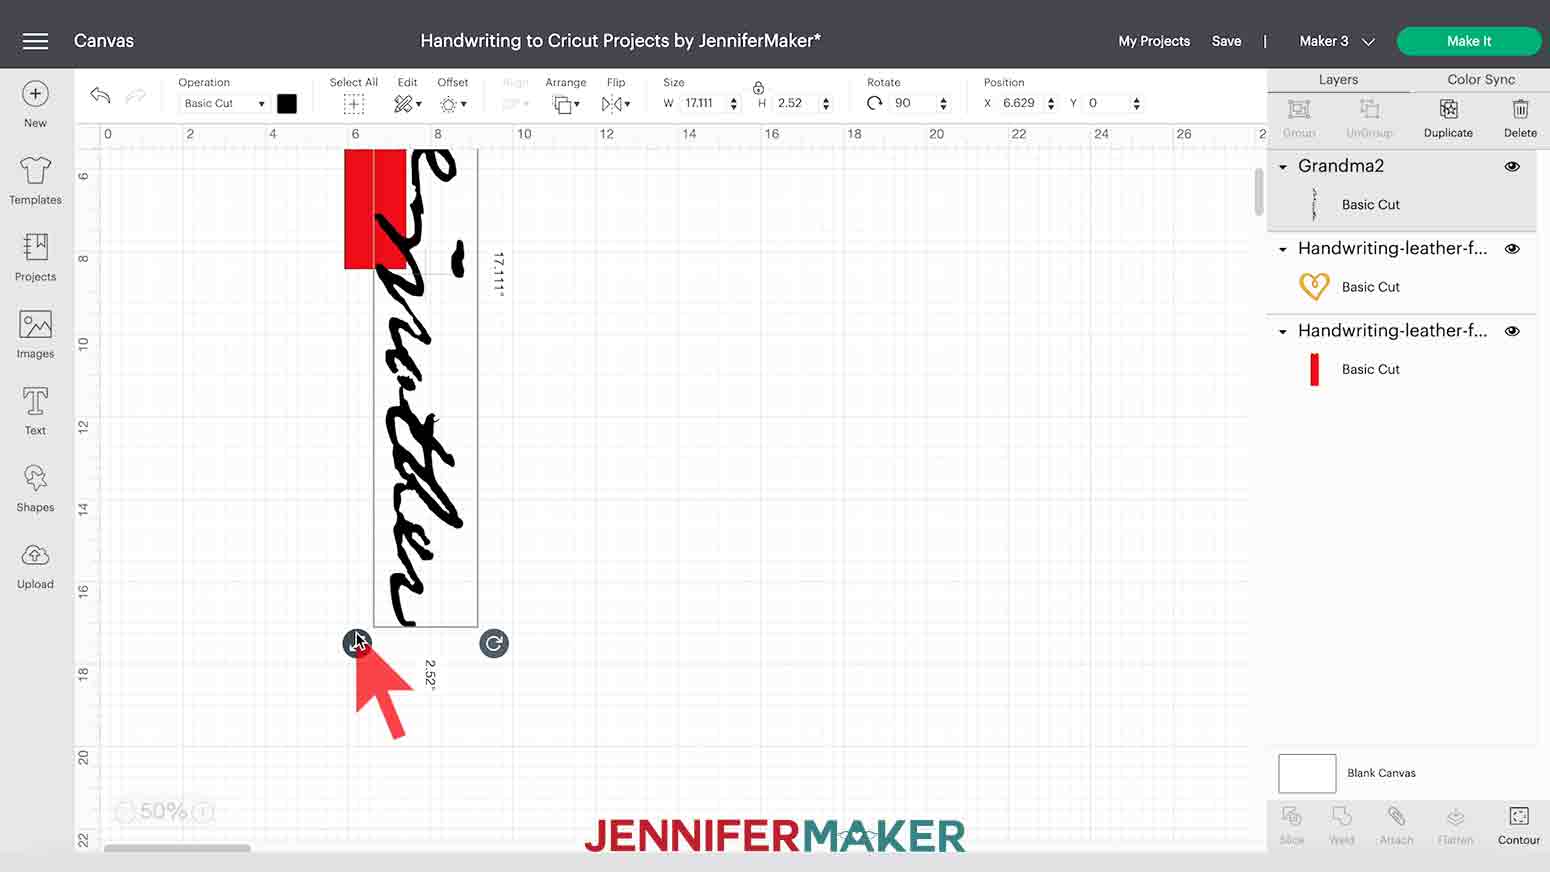
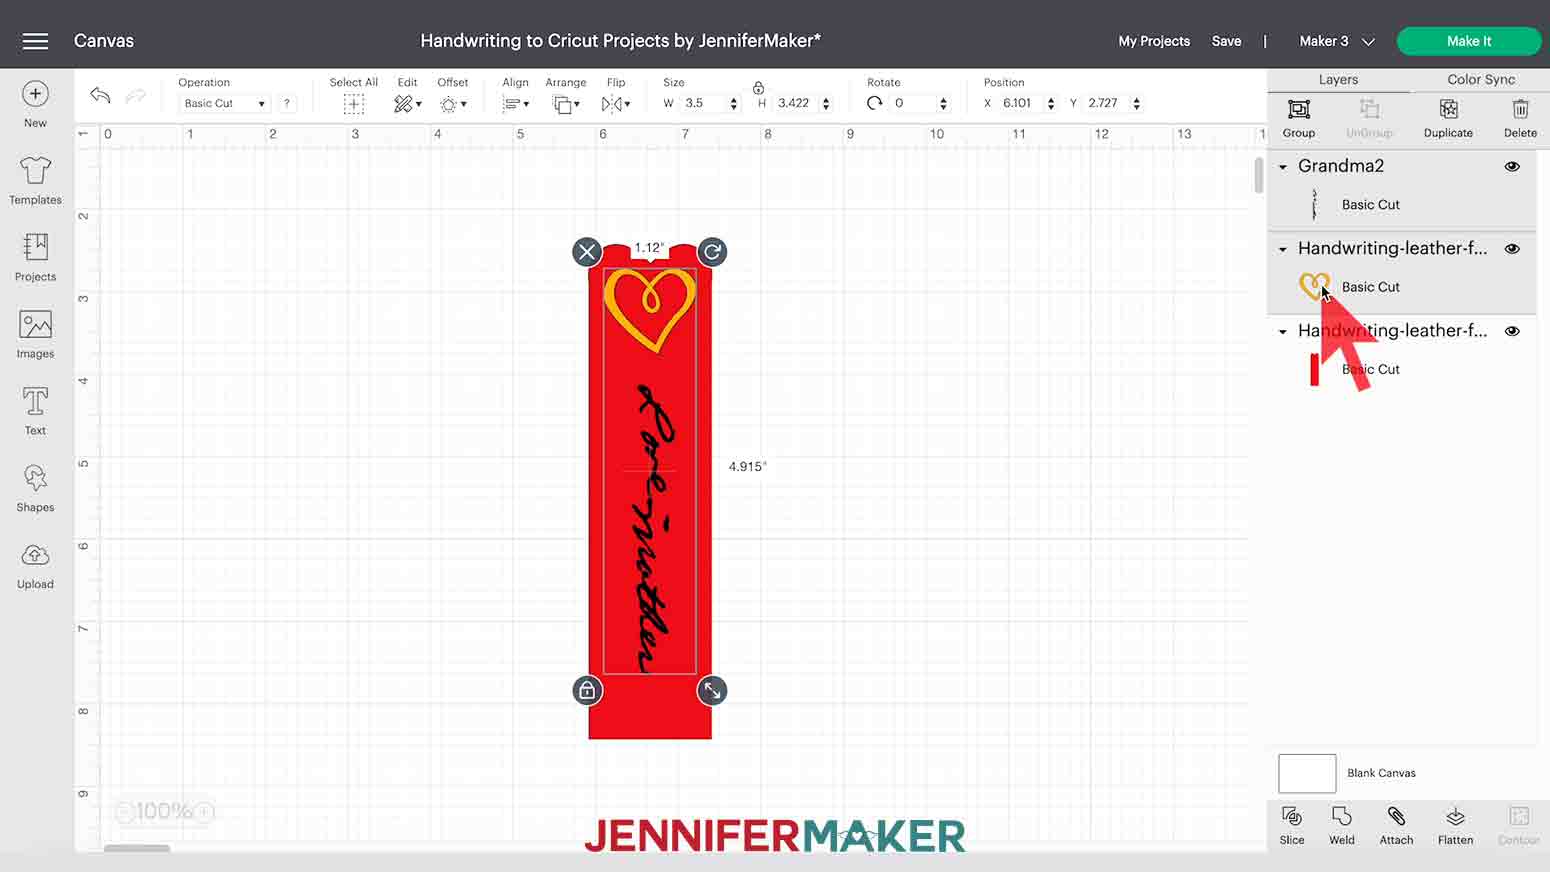
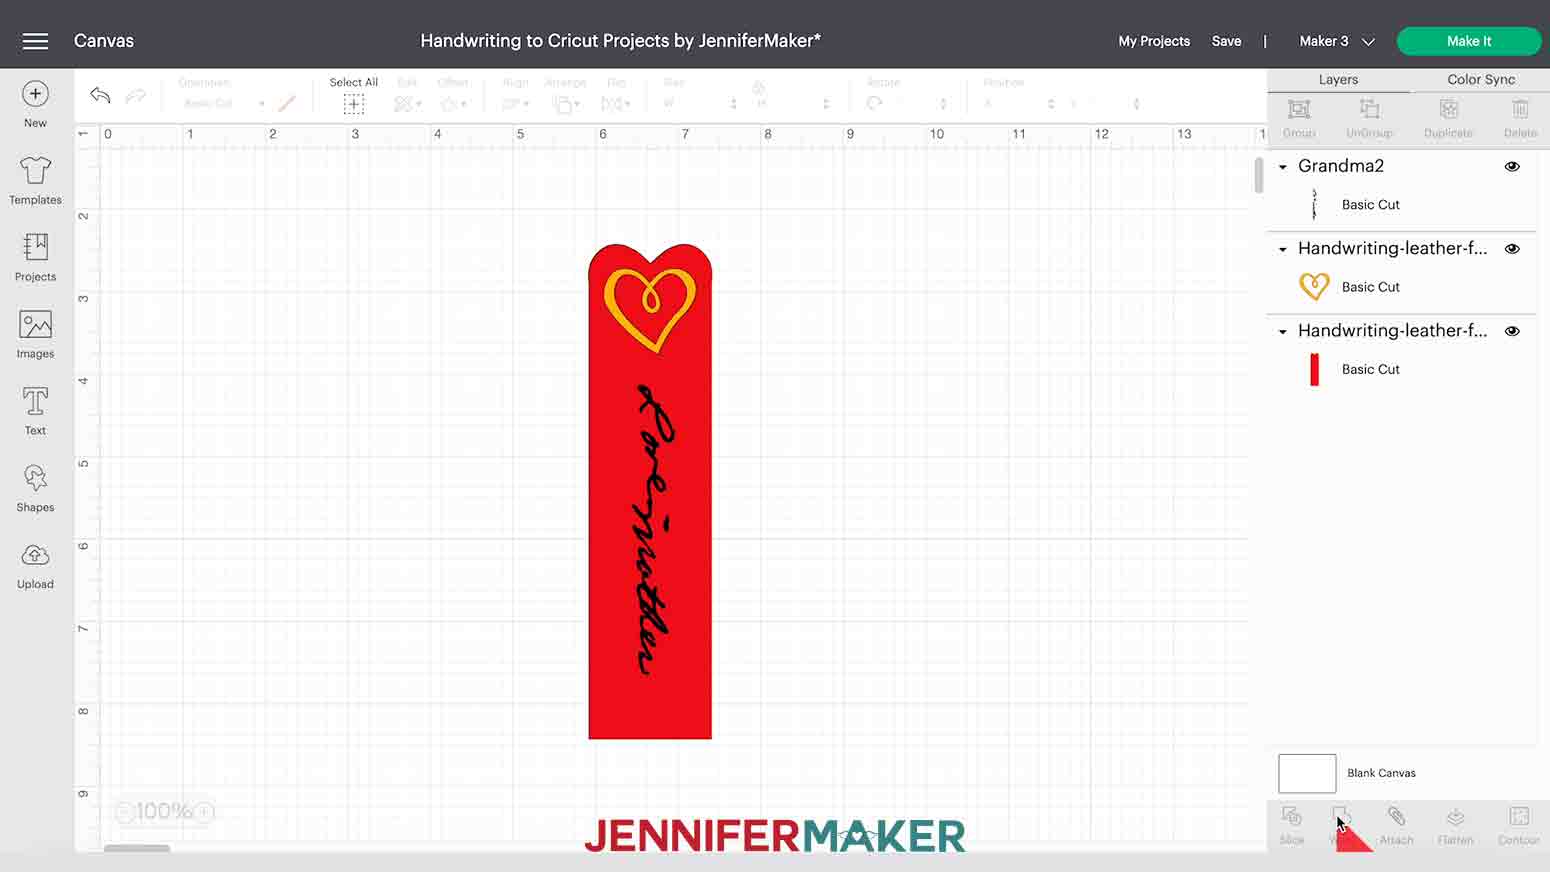
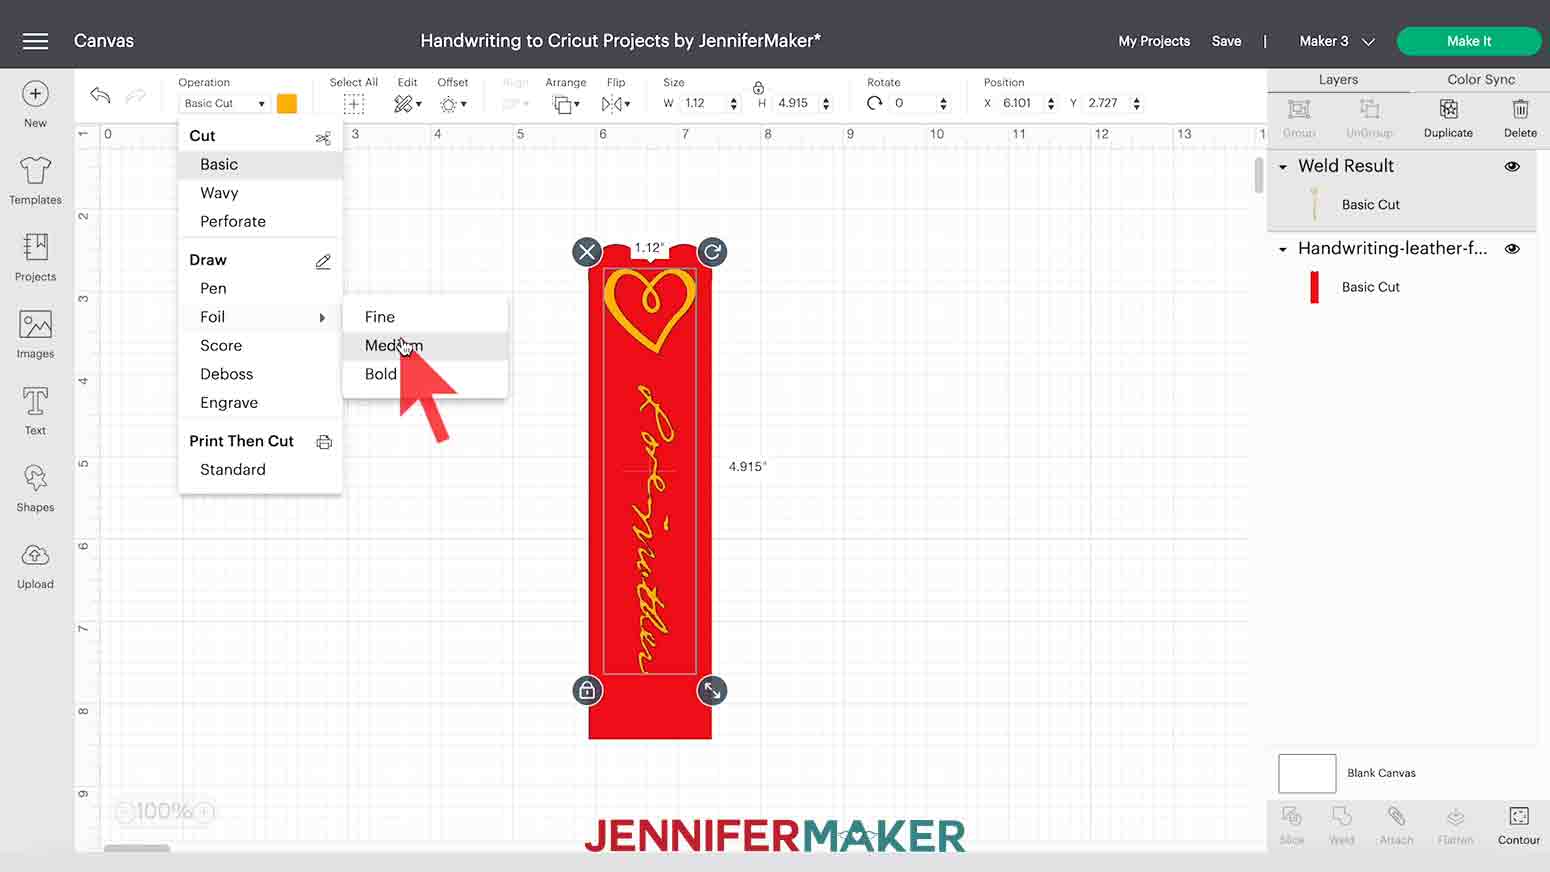
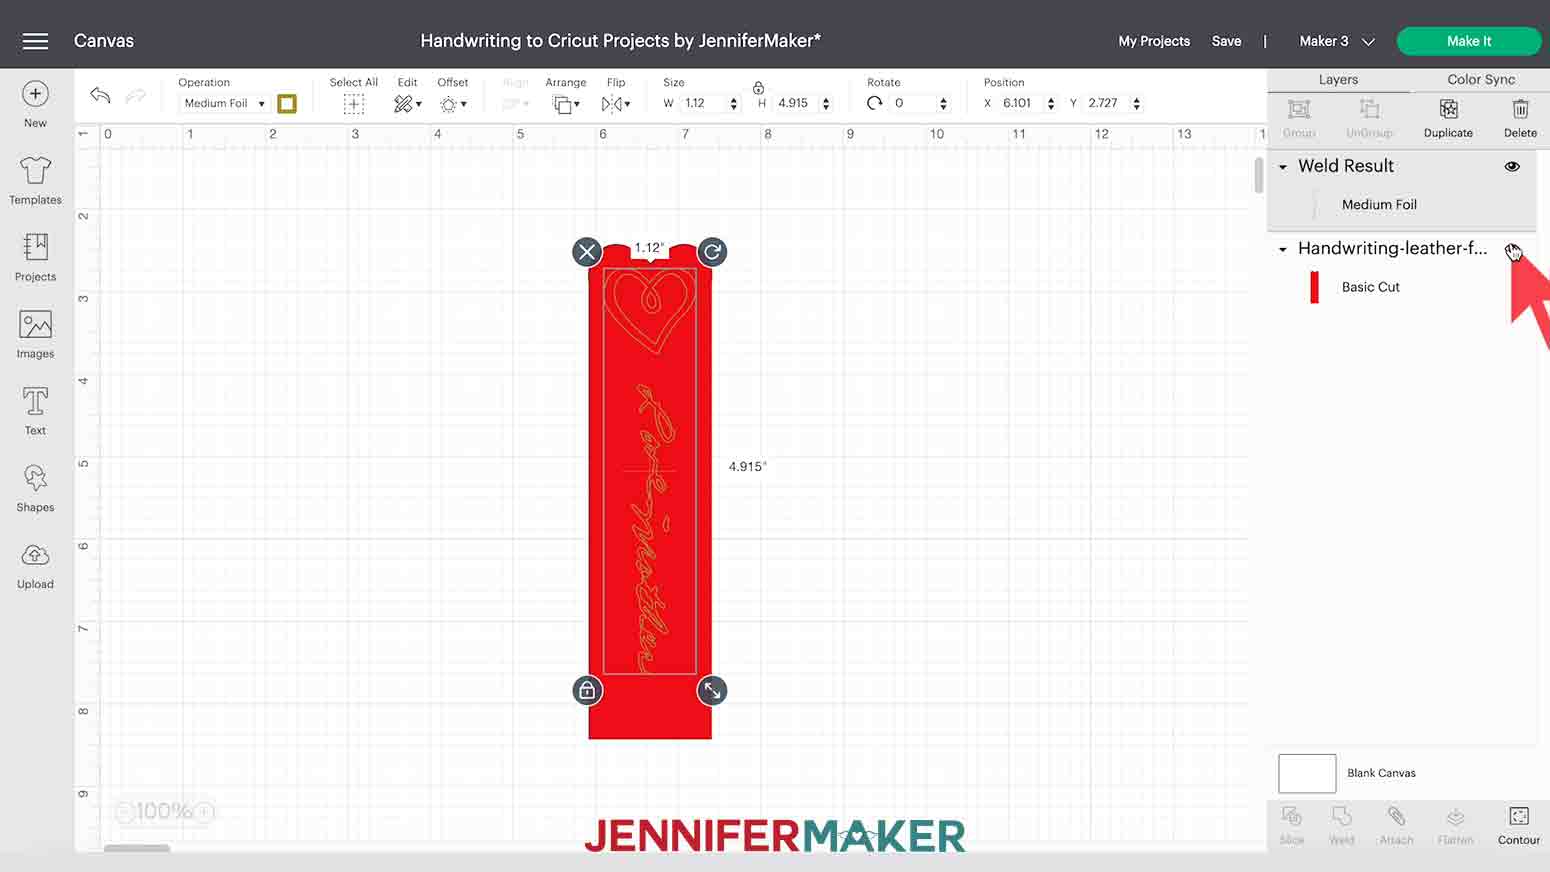
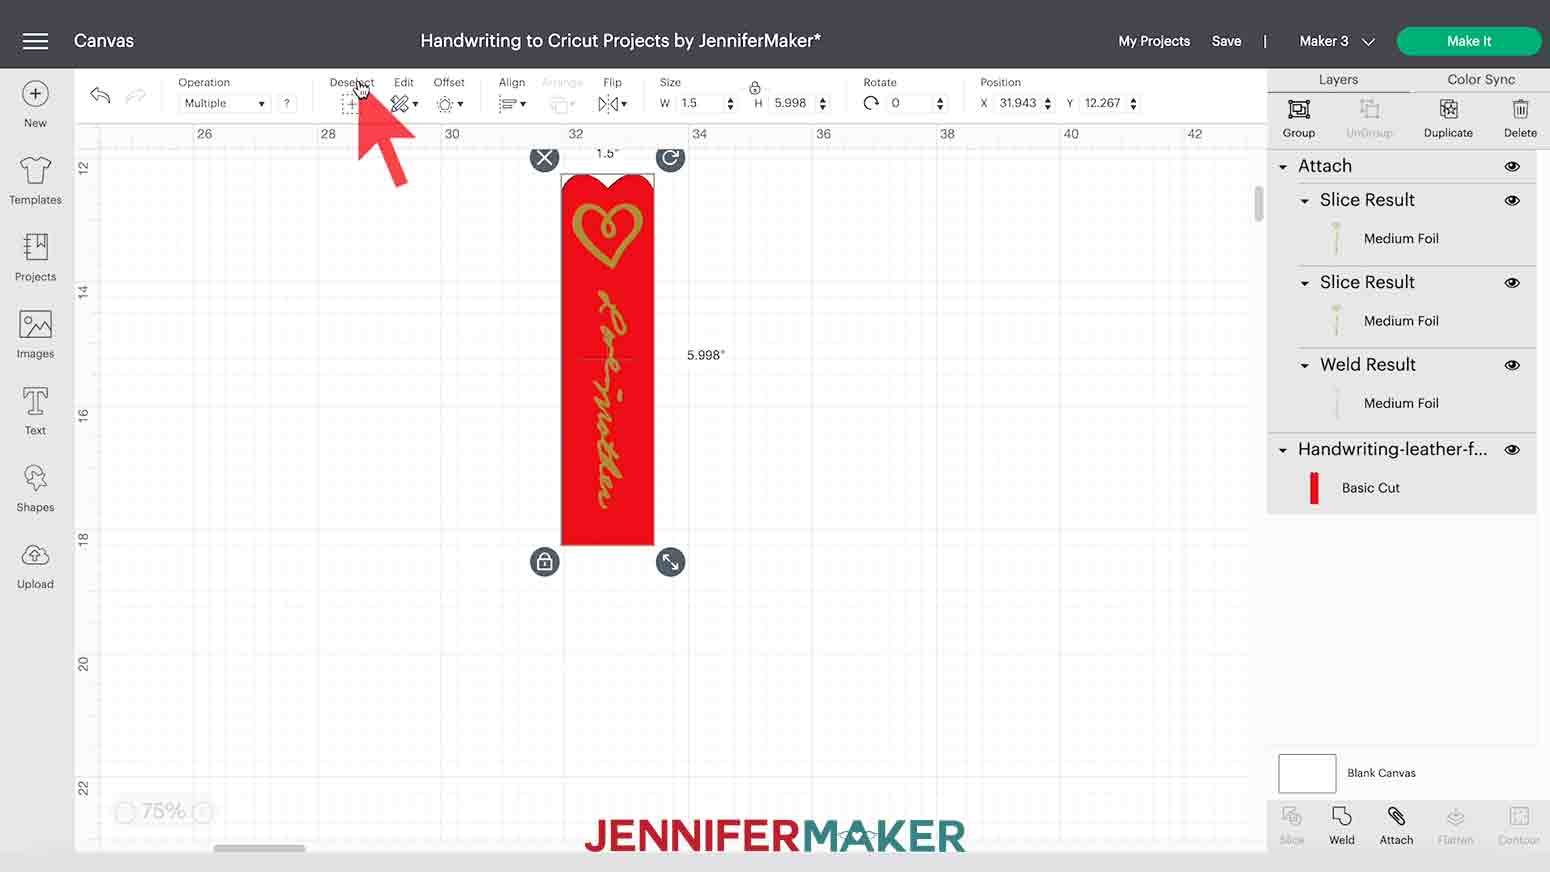
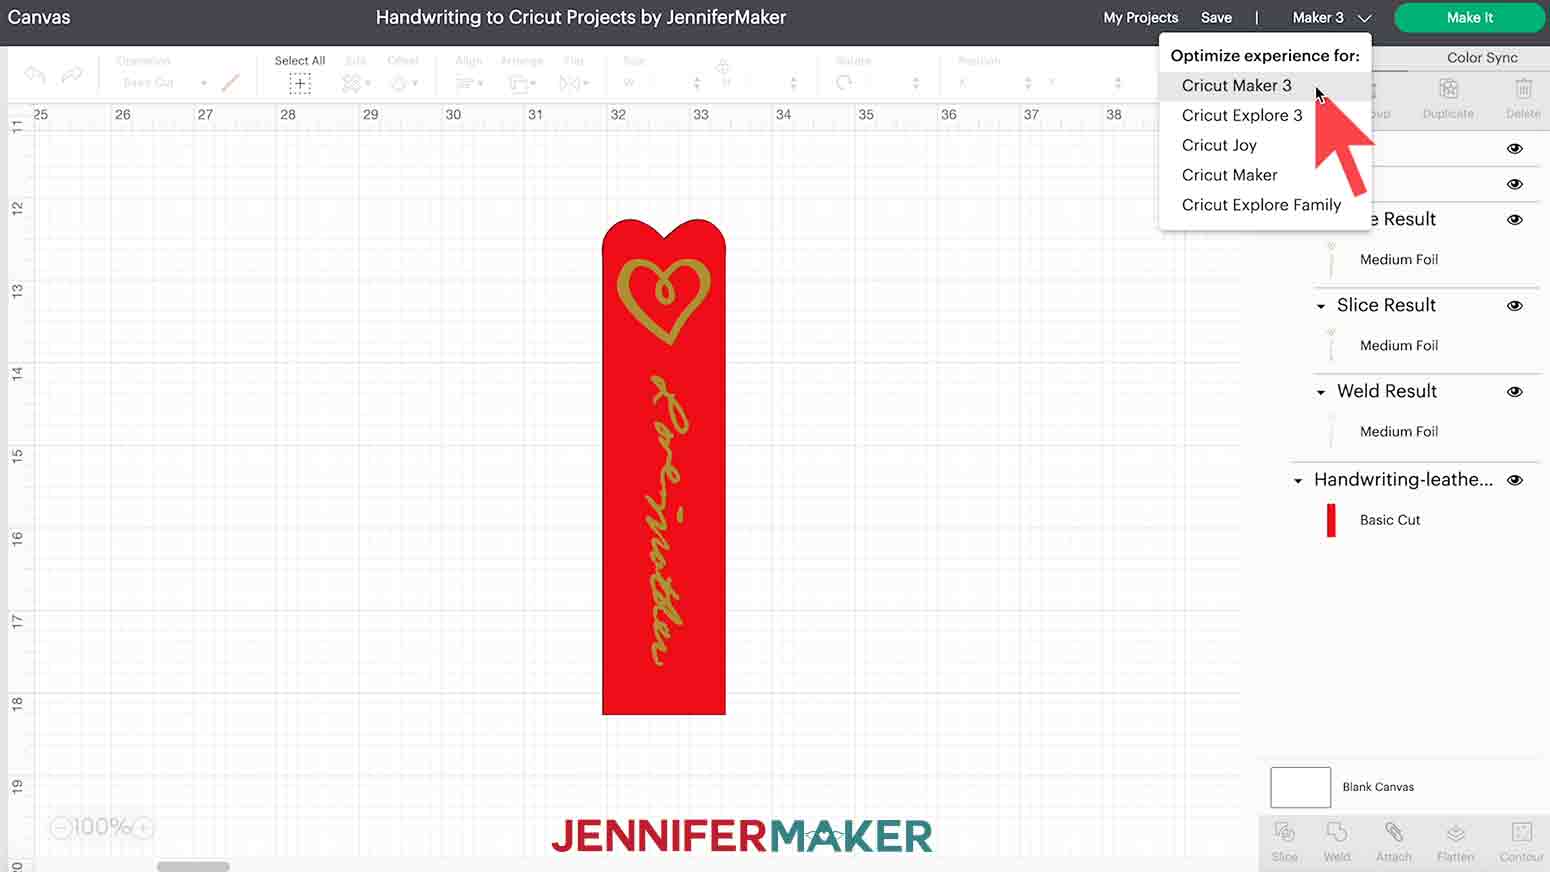
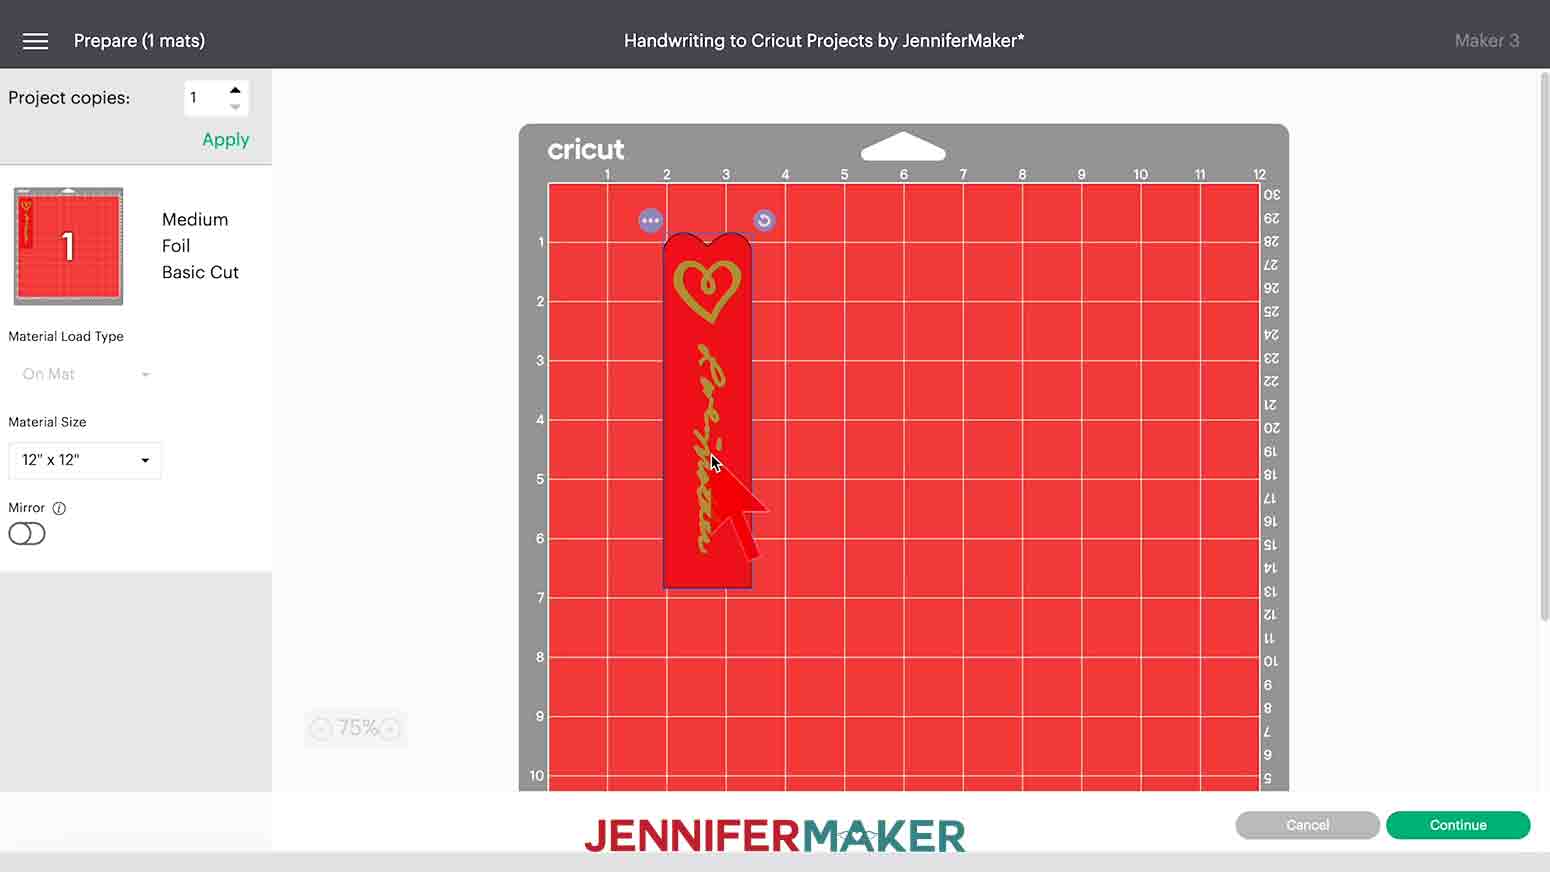
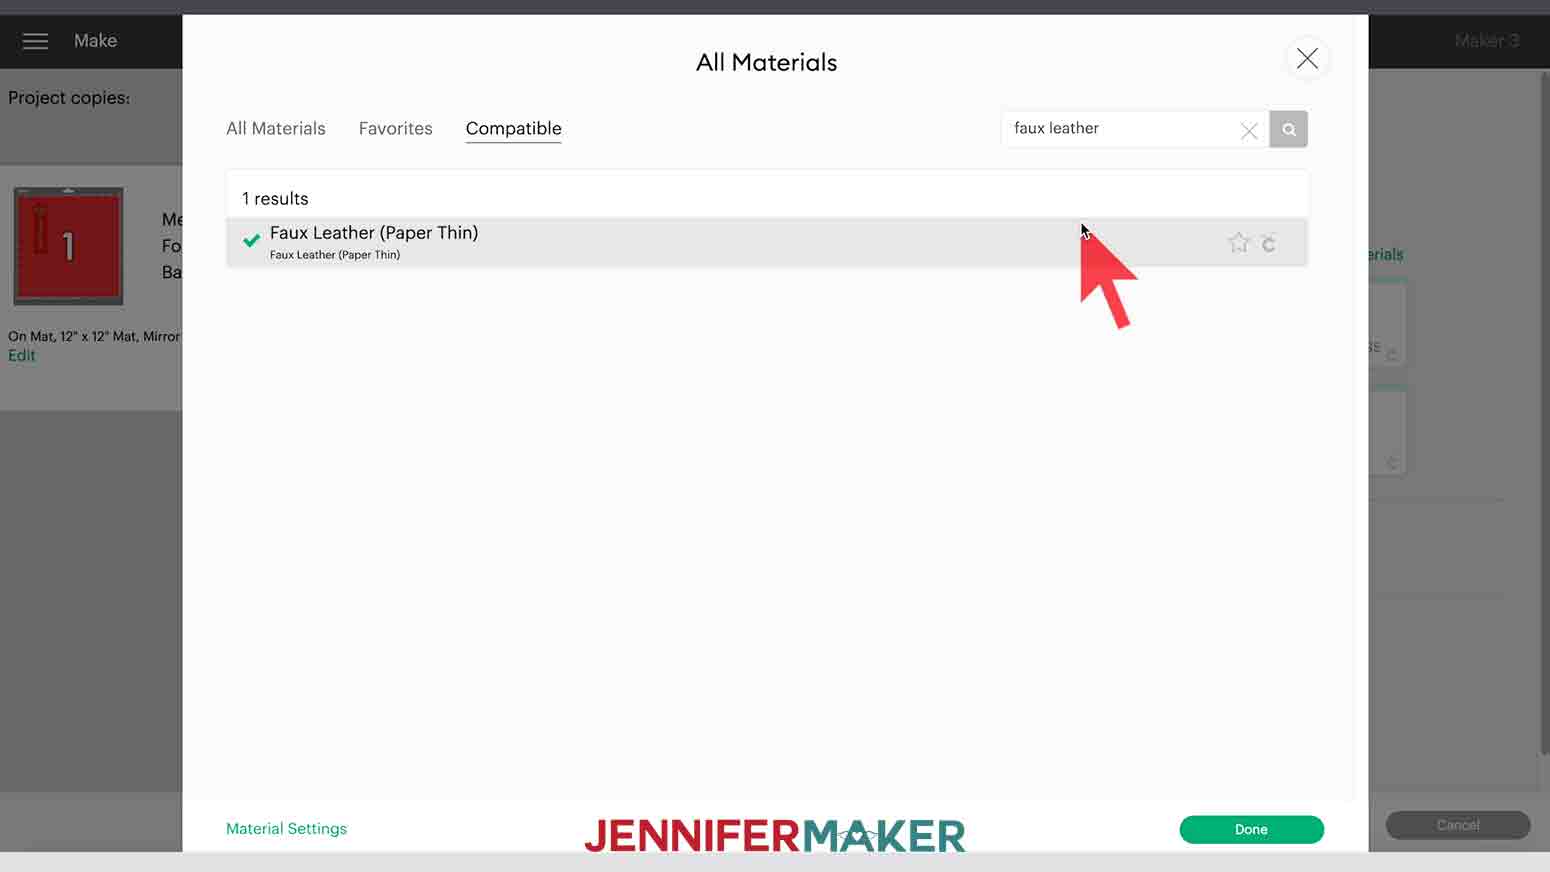
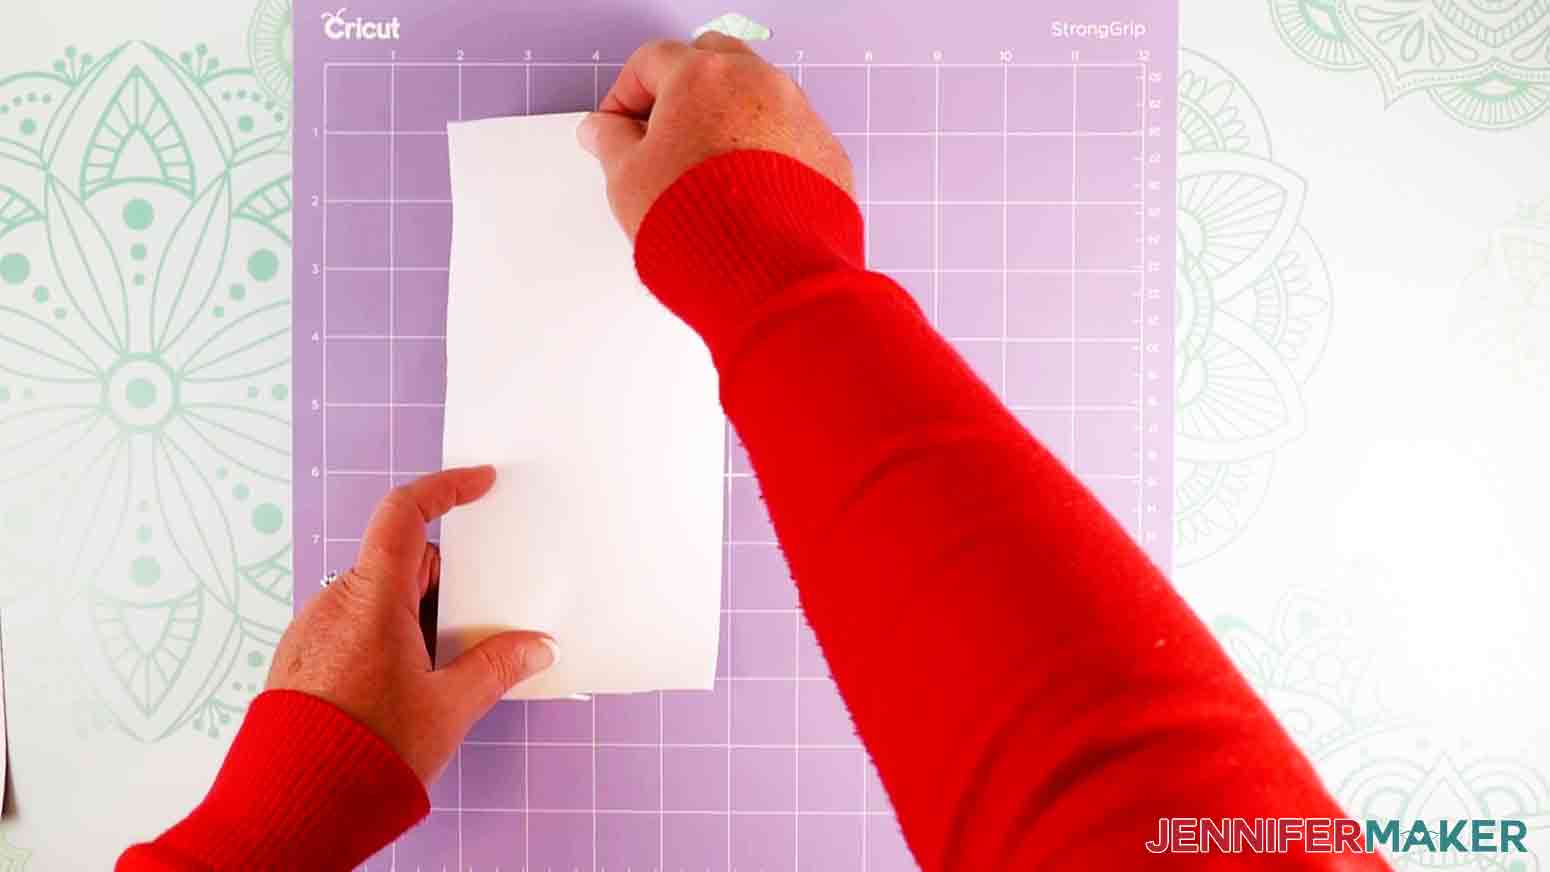
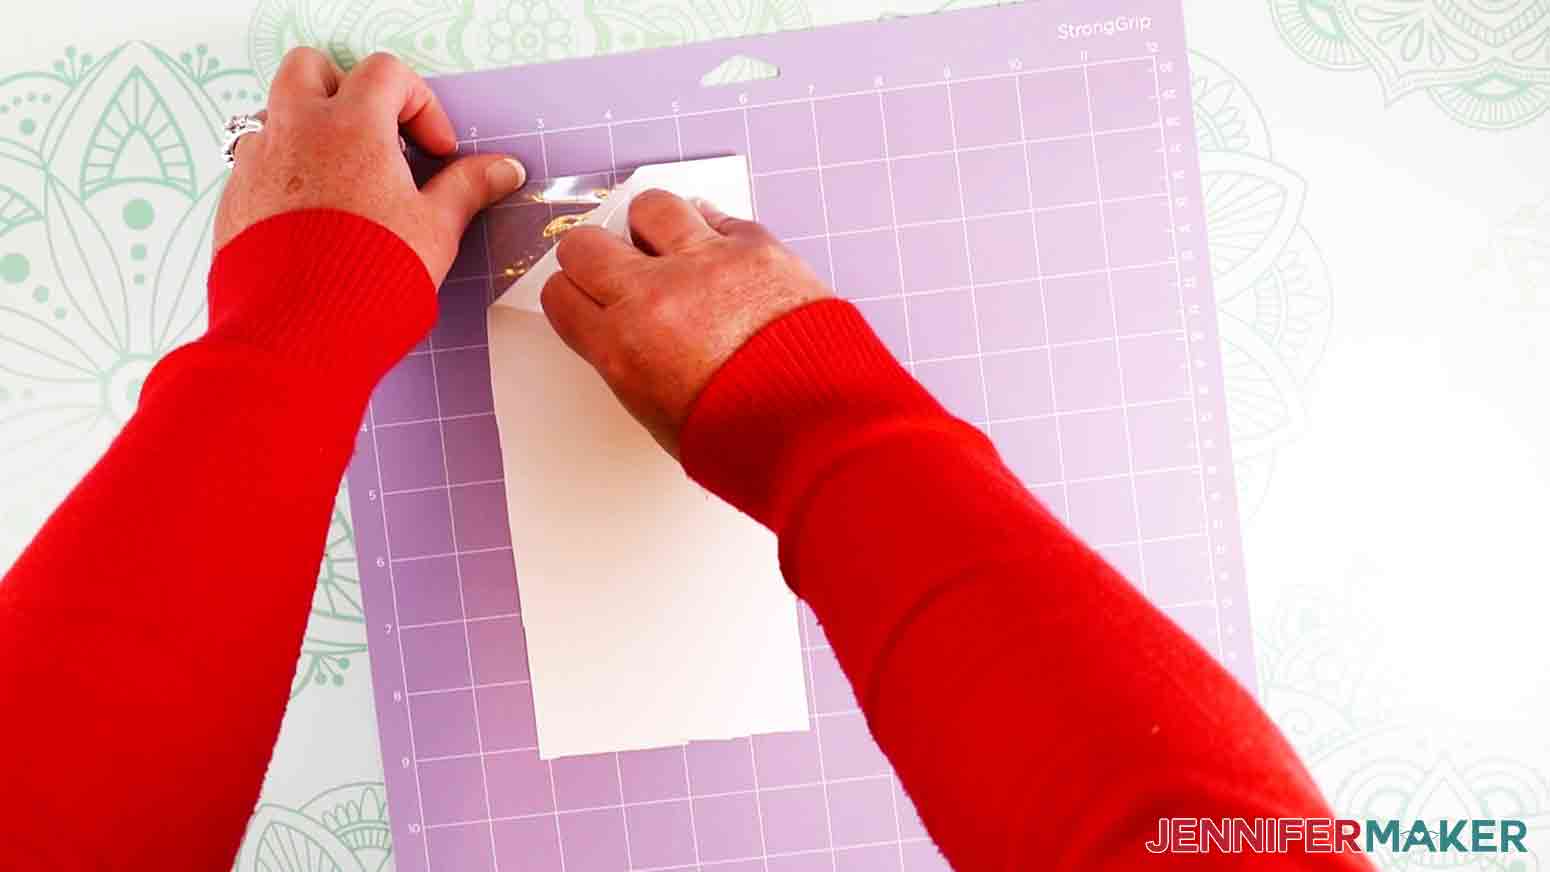
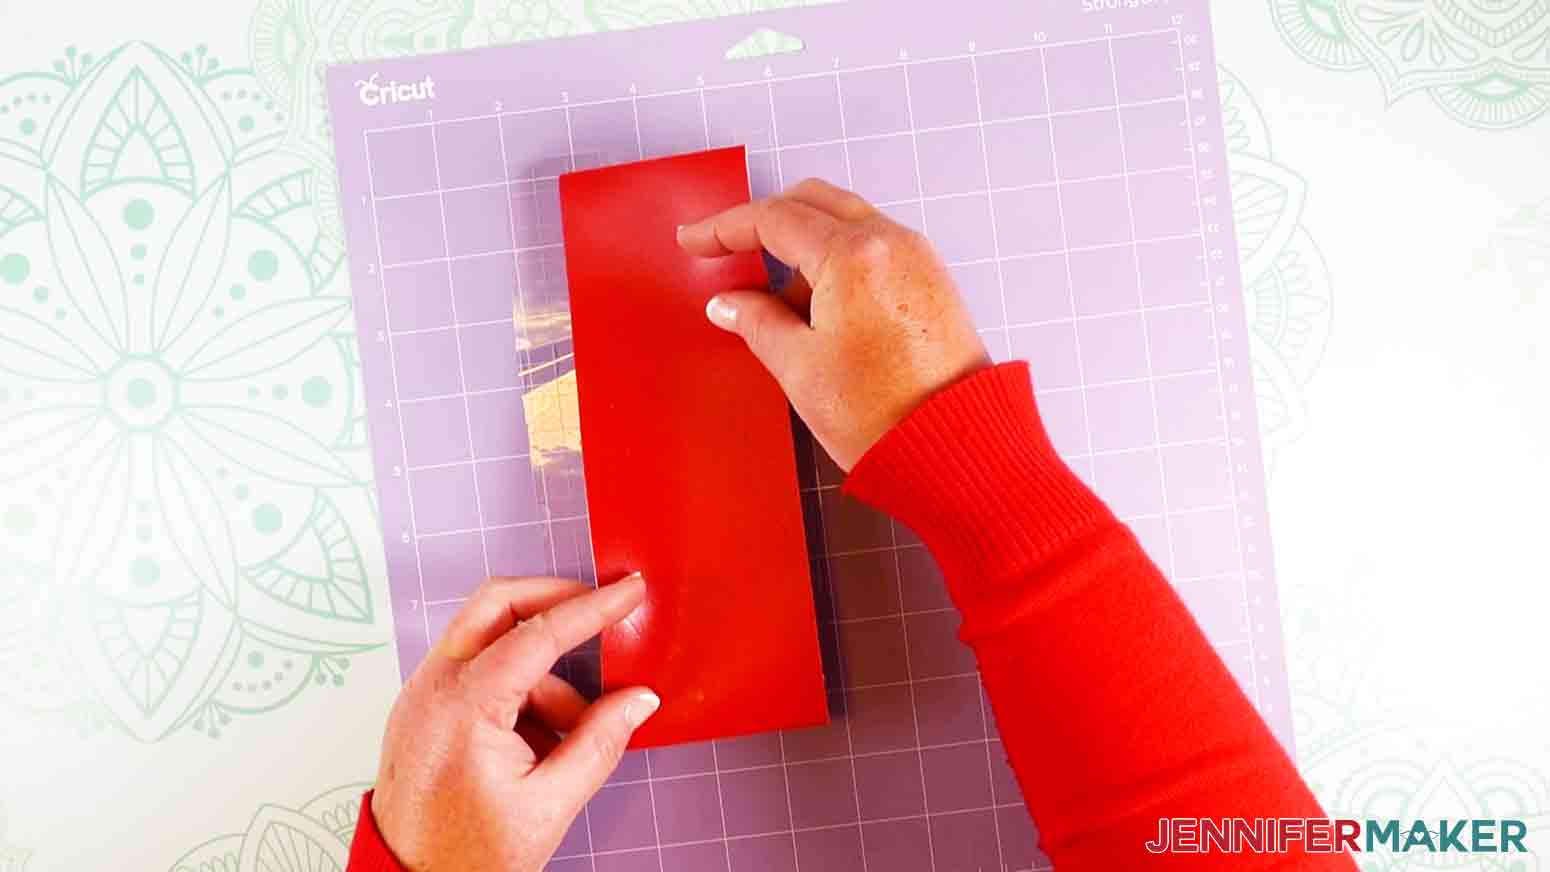
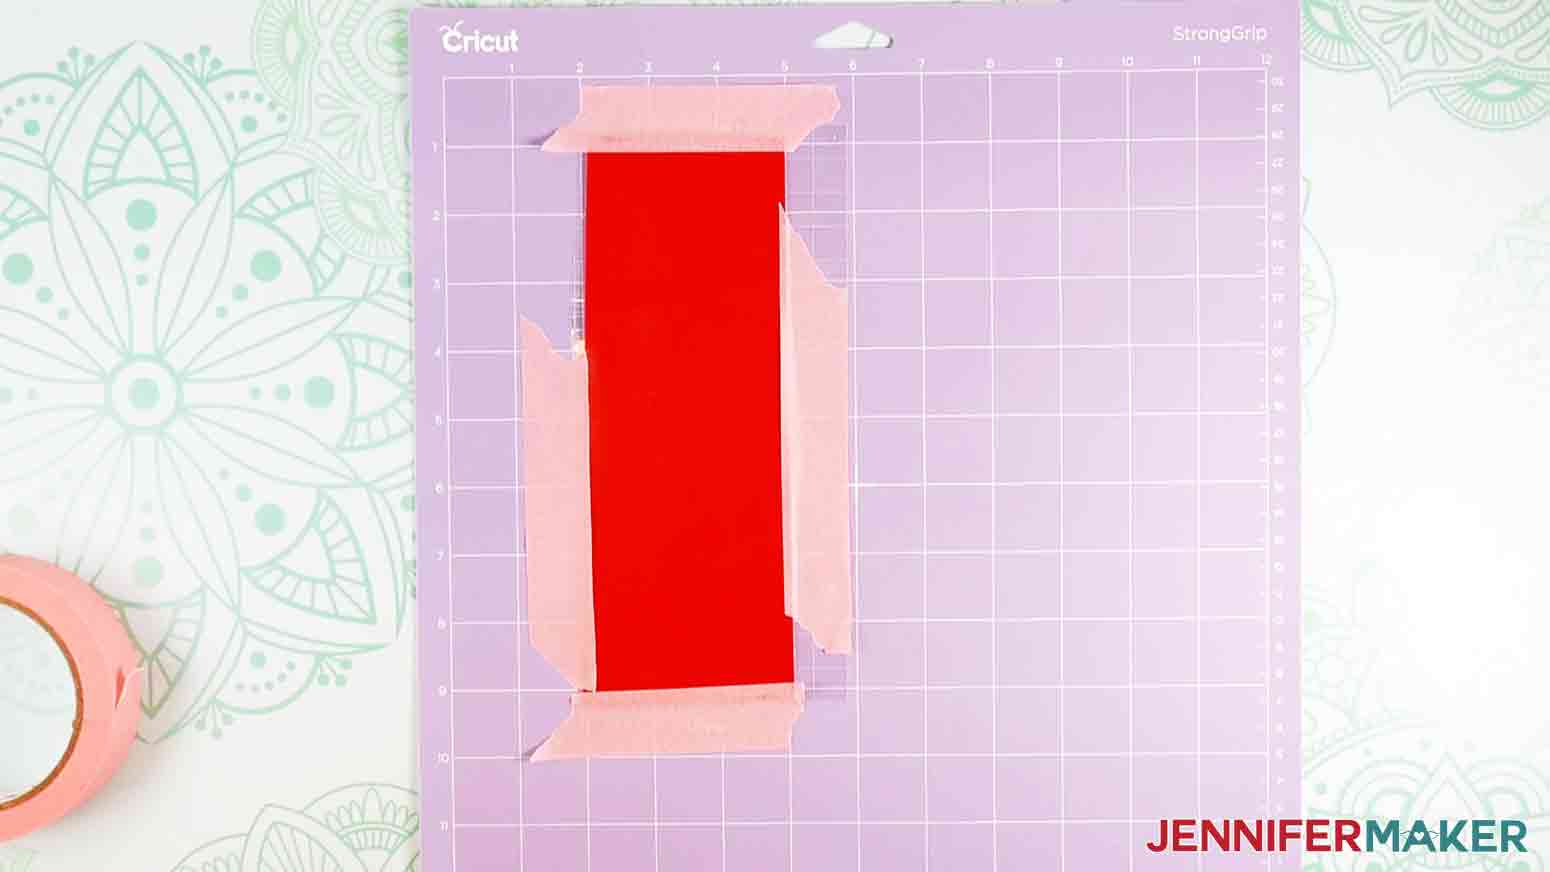
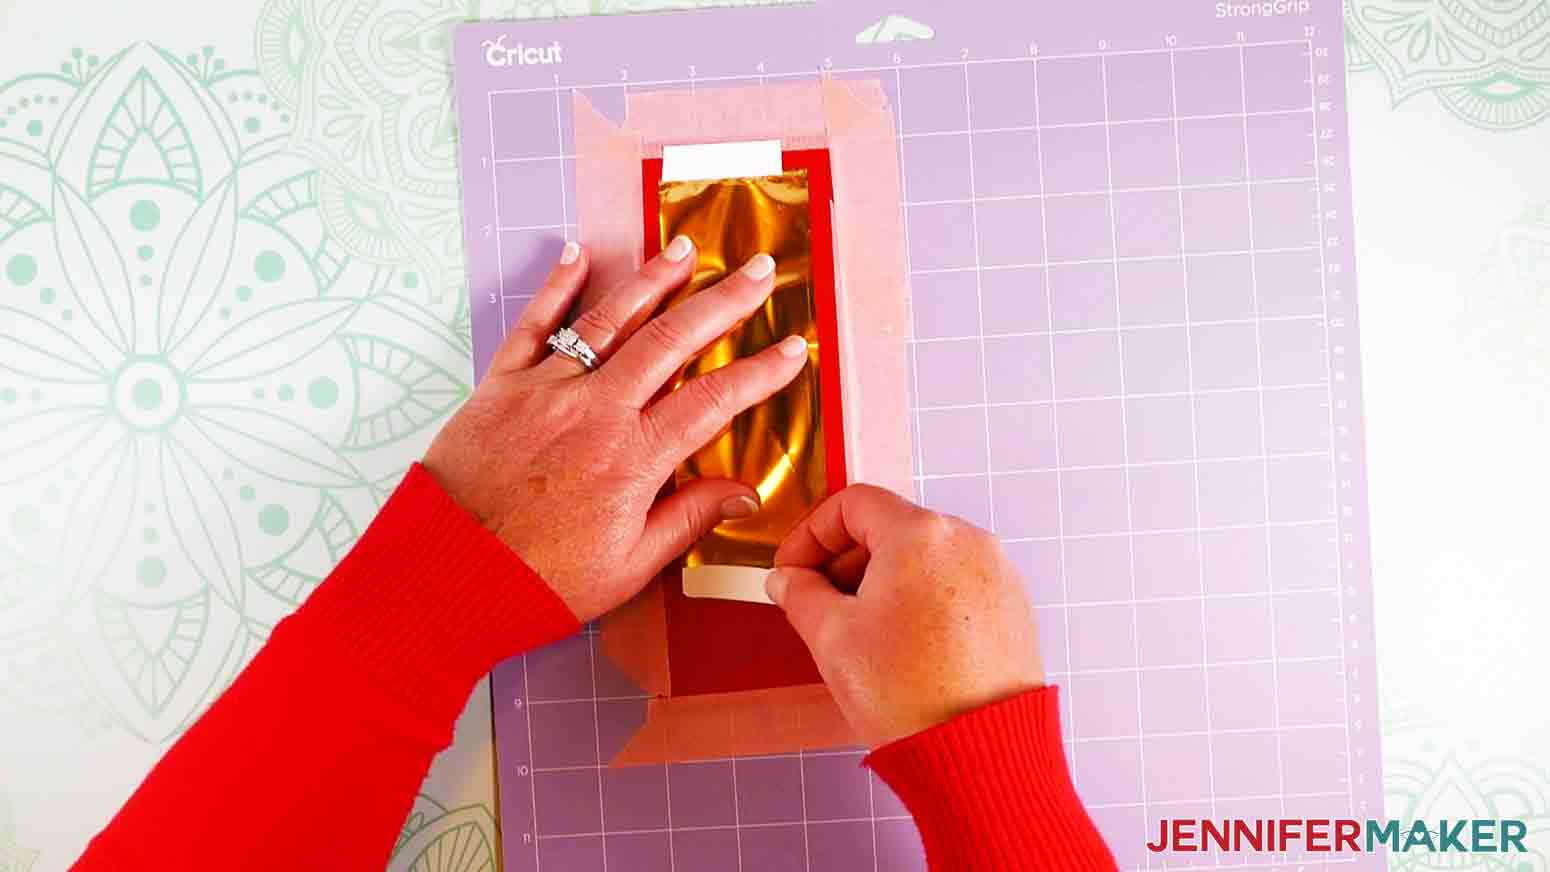
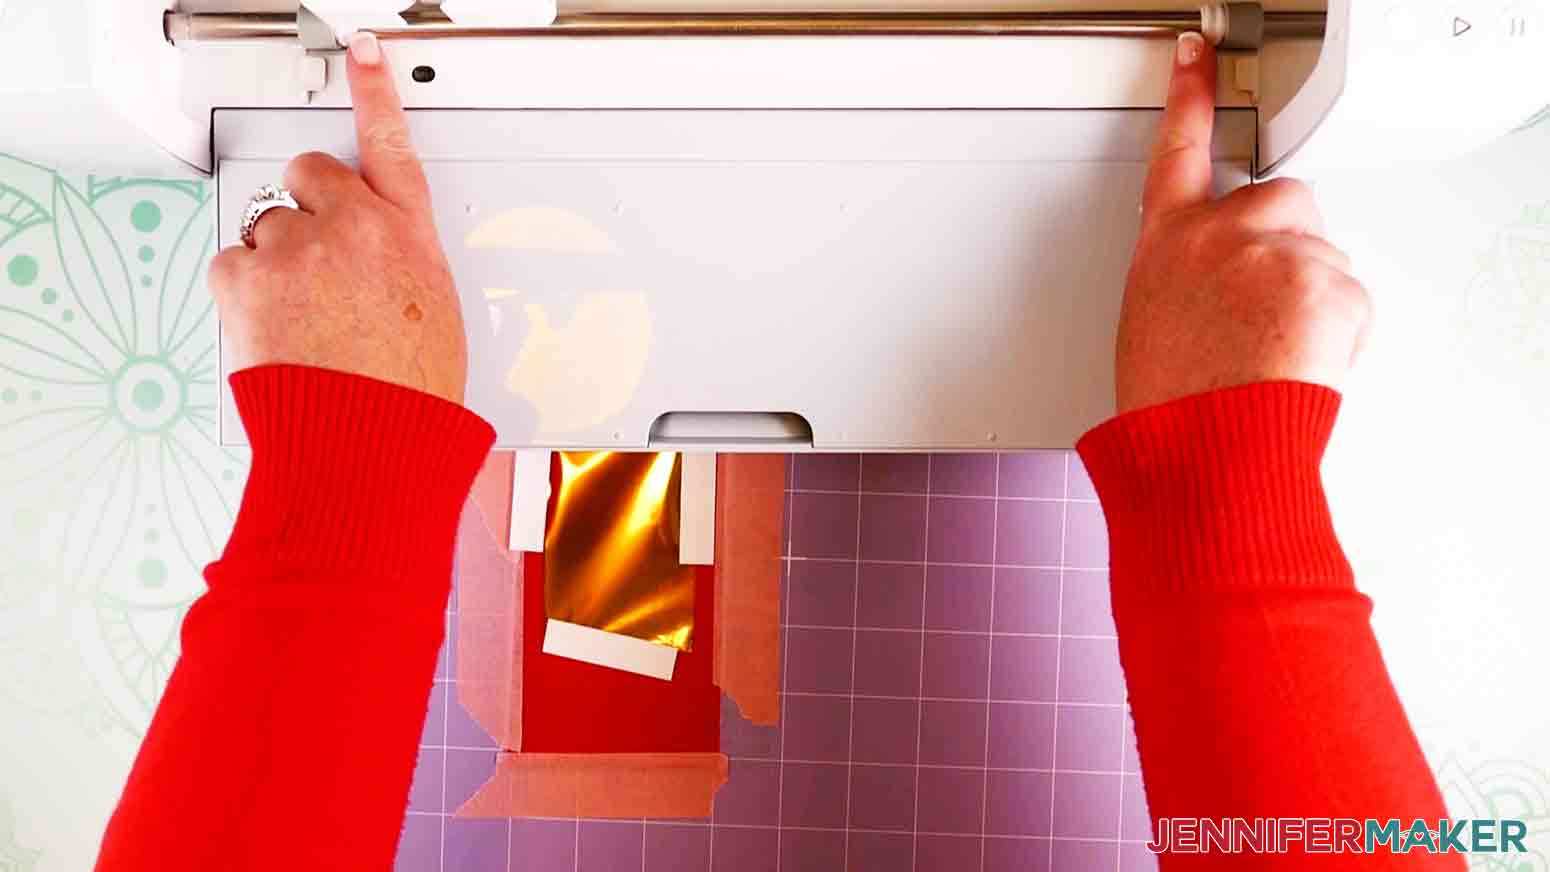
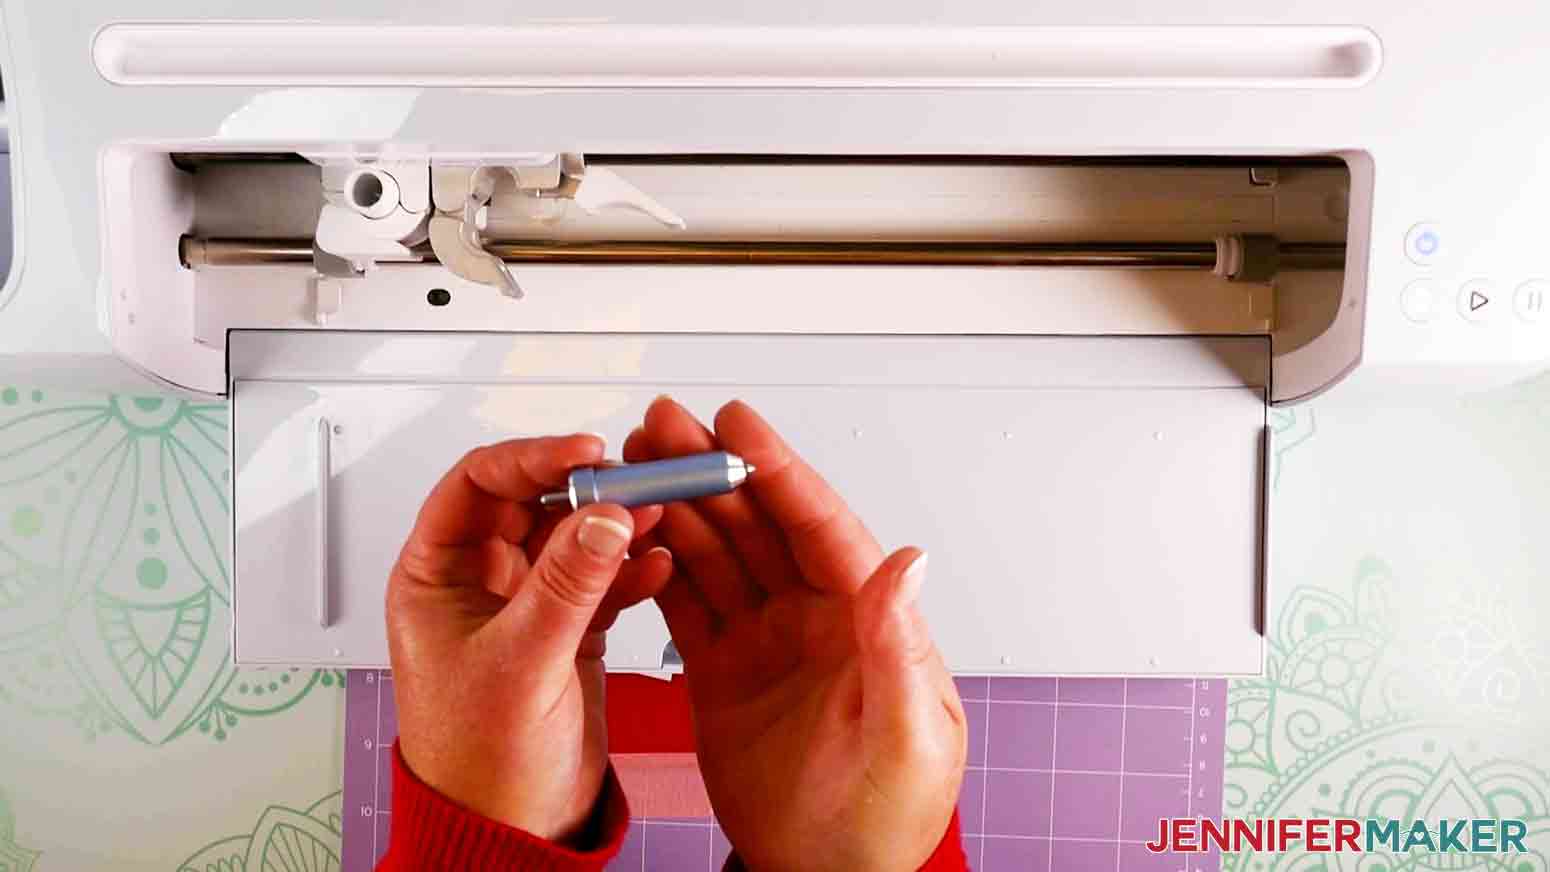
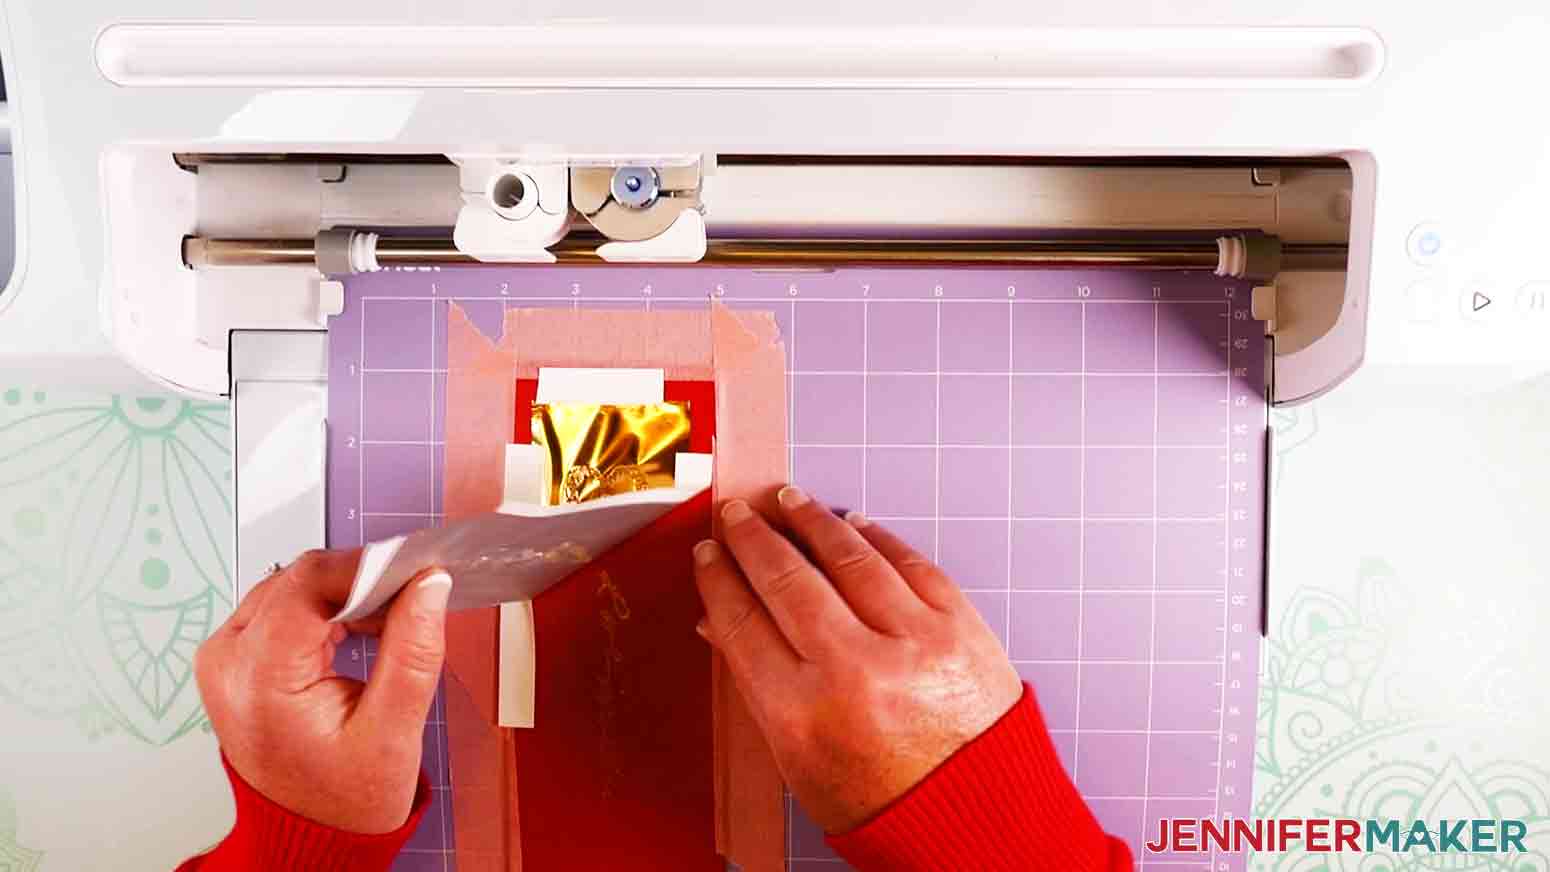
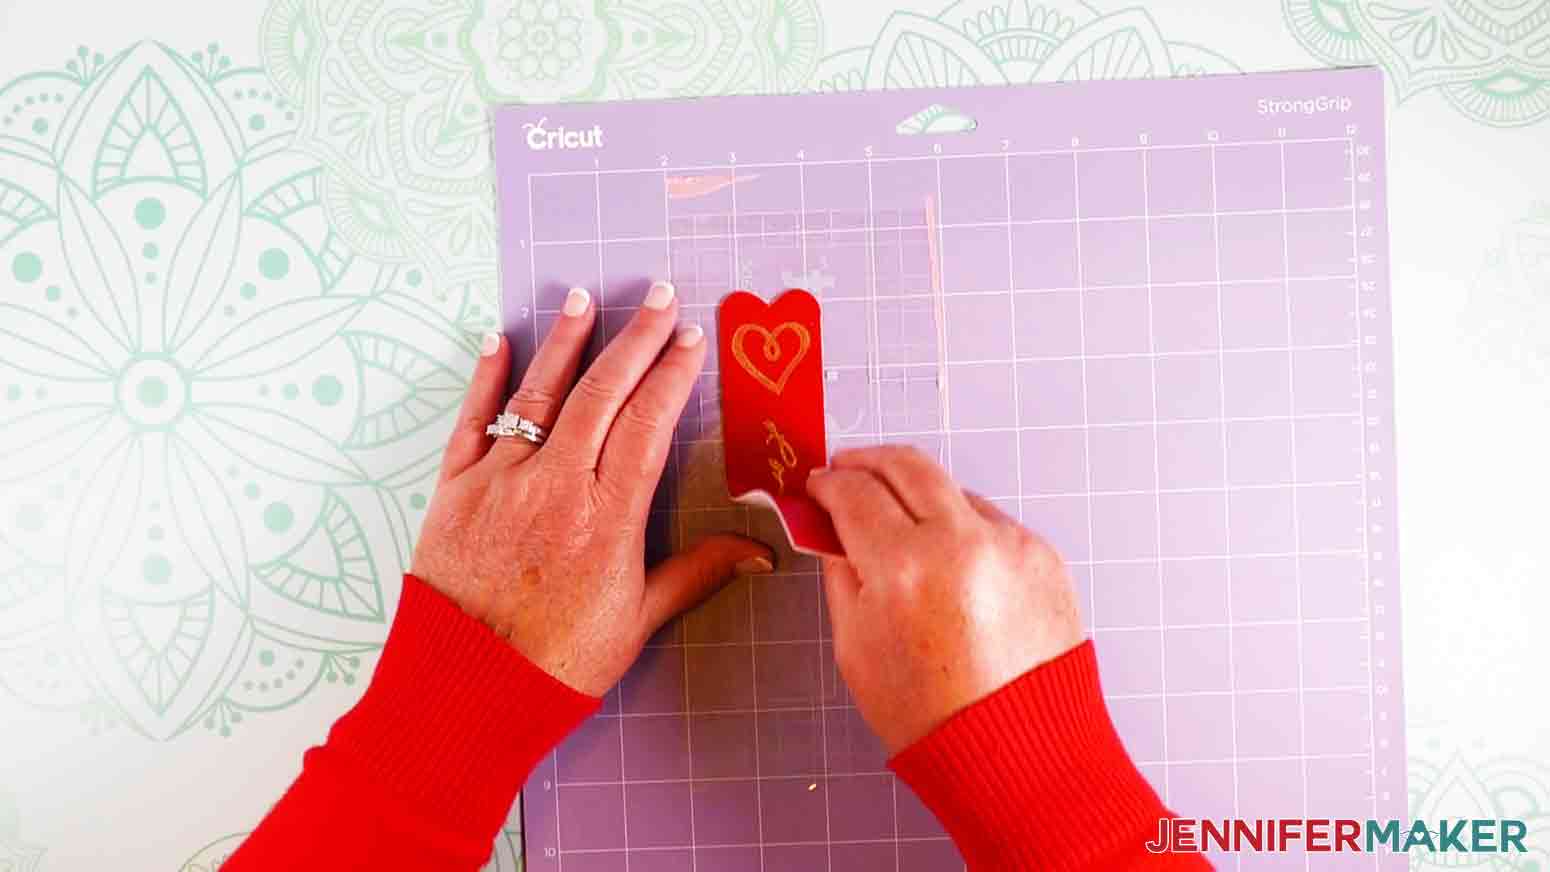
Learn how to import handwriting into Cricut Design Space and convert it into a foiled or infusible ink project! Open a new canvas and click on “Upload” and then "Upload Image." "Browse" until you find your handwriting sample, which should be a scanned picture. It can be a PNG, JPG, GIF, HEIC or BMP. The handwritten recipe I selected is a JPG. Click "Open." If your image is black and white, choose “Simple.” If you have any details, you may want to select “Moderately complex” or “Complex.” You can switch between them to determine which may work best for you. I chose “Complex.” Click “Continue.” First, crop your image if you need to. To do this, click on the “Crop” tool (the square with the line through it) in the top bar and then click and drag a box around all the parts you want to keep. My recipe had a black border that I removed. If you cropped your image, switch back to the "Background Remover" tab by clicking on the left icon on the top bar (the picture with a pen). Now let’s remove the background of the image. There are a few ways to do this. The first and easiest way, which is the Automatic feature, is only available to Cricut Access members. Cricut Access is an optional subscription plan that gives you access to images, fonts, projects and other discounts. NOTE: If you don’t have Cricut Access you will still see this feature and be able to use it, however a watermark will appear over your image. To use the Automatic feature simply click on the “Remove Background” button under “Automatic.” This might take a few moments, but when it’s done you will see the background is gone. You should only see the part of the image you want to use, your subject, over what looks like a blue and white checkerboard, which means the it's transparent. If there are parts that didn’t get removed you can use the magic wand or eraser tool to clean up those areas. If not, then your image is ready to go. If you don't have a Cricut Access subscription, if your image is somewhat detailed, or if you just want to manually remove the background, you can use the magic wand and eraser tools under "Manual" instead. You may need to scroll down a bit to see those tools. So let's click "Revert" to go back to our original image and let me show you the "Manual" method to remove the background of my cake recipe because in my tests it gave me better results in the detailed areas of the image. To manually remove the background, with the "Magic Wand" selected click on "Options." This allows you to select a certain number of colors in your image which can help you remove larger areas all at one time. For my image, I used the default settings “Reduce colors: 8 and Color tolerance: 16.” You’ll want to play around with the numbers and choose the best combination based on the results you see in the preview on the right side of your screen. Still with the wand tool selected, use it to click on the areas of the background you want to remove, such as the main background, the parts inside your letters and any other random background parts that are visible. I had to click multiple times in areas all around my written recipe and the cake drawing until I was pretty happy with the results. The blue and white checkerboard is the area that is removed. TIP: Zoom in and out as needed to do detail work by clicking on the “-“ and "+" magnifying glass under your image. If you make a mistake and remove the wrong part, just click on the "Undo" button, which is the left-facing arrow at the top of your preview image. You can click the “Preview Cut Image” button above your image to see how it would be cut out. Pay special attention to all the little centers of the letters. If any letters look solid where there should be transparent holes, you need to keep removing the background. On my image, I also paid special attention to the details on the cake drawing. TIP: Remember to zoom in to do any detailed work! Continue clicking areas with the wand until you remove everything you want. But sometimes this doesn’t do the trick. In this case, click on the “Erase” tool and change the eraser size if you need to by dragging the slider. It can be resized to get all the little bits left behind or you can use it to erase larger portions. Click and drag your mouse over the parts of the image you want to erase. I zoomed in so I could see all the dust and specks that were left. There were a lot of specks I otherwise couldn't see! TIP: If you aren't happy with your results, you can click the "Restore" button under "Manual." This will revert your image to your original uploaded version. Click this only if you want to start over. When you're all done removing the background, click the “Apply & Continue” button at the bottom. You’ll be prompted to “Select Upload Type.” Select “Cut Image,” change the file name if you want, and click “Upload.” Now, select your new image that is in your “Recent Uploads” list and click “Add to Canvas.” Your image may import quite large, depending on the resolution of your original file. Change the size to the size you’d like your final image to be. I changed mine to 8” wide in the “Size” W (width) box in the top menu. The height automatically changed to a little over 9” because I have the lock icon locked or closed. This size image works well on a folded 15.5" x 23" tea towel. Change the “Operation” linetype of your handwriting image from "Basic Cut" to “Pen” in the menu at the top. Once your design is on the canvas, you may find that you missed cleaning up some areas. If you have stray debris you can easily remove them. Click on “Shapes” on the left toolbar and select the square. A square is added to the canvas. Drag the resizing handle in the lower right corner of the square to change the size to something really small such as 0.25” or less, depending on the size of the extraneous marks you want to remove. Mine were just dust marks so they were really small. Position the square over the debris. Next, click and drag over both the square and your handwriting sample on the canvas to select both of them. Click the “Slice” button at the bottom of the layers panel on the right side of your canvas. You will end up with four layers in the layers panel. Delete each of the two small pieces plus the layer showing the big box by holding the Shift key while selecting them and then clicking on "Delete" at the top of the layers panel. You will be left with your handwriting sample but with the debris removed. Repeat this method of slicing out debris until your image is clean. When you're done cleaning up the image, you should have only a single handwriting layer in your layers panel -- the handwriting sample set as "Pen." TIP: At this point, make sure your image is still the size you want. After slicing out the extra parts, I had to adjust mine back to 8" wide again. Click on your handwriting layer to select it if it's not already. Then click “Duplicate” at the top of the layers panel twice so you have THREE identical layers. I will explain more on this a bit later. Click on the “Select All” button on the top menu bar to select all the layers. Click on “Align” and then “Center” in the top menu bar. This stacks them all directly on top of each other on the canvas. Now, download my crosshatch fill design from my free resource library -- it's design #331. Upload it to the canvas. TIP: If you are not sure how to upload an SVG cut file to Cricut Design Space, watch this helpful video training series I made. If you are on an iPad or iPhone, here is how to download and upload SVG files to the Cricut Design Space app. This is what my crosshatch fill SVG file looks like when it is uploaded to Cricut Design Space. This crosshatch fill consists of two layers containing diagonal lines going in opposite directions. You can use this crosshatch design to fill your handwriting sample so it will look filled in when you use your Cricut machine to draw, foil or engrave it. Otherwise, without the crosshatch fill, your handwriting sample will only be an outline. Once you have the crosshatch design uploaded, change the “Operation” linetype of the group to “Pen.” Drag the crosshatch fill group over your handwriting layers. If the hatch design doesn’t completely cover your handwriting sample, simply duplicate the group by clicking on the “Duplicate” button on the top of the layers panel. Move the duplicated group over so it is next to the original crosshatch layers on the canvas. IMPORTANT: Zoom in really close to make sure they are touching but not overlapping. If you need to, repeat duplicating and moving the hatch layers until your entire sample is covered. Mine took four duplicated groups of the crosshatch fill to cover the entire cake drawing and recipe. Once you have the edges of the crosshatch fill layers touching but not overlapping, click on “Select All” in the top menu bar to select all your layers. With everything selected, go to the “Size” section in the top menu. Make sure the lock is locked so everything resizes proportionally. Multiply the size by 10. In my case, all the layers selected together measured 8.5” wide so I changed this size to 85”. The height automatically adjusts proportionally. Now, select the TOP layer of each hatch group by holding down the Shift key while selecting them in the layers panel. Click “Weld” at the bottom of the panel. The four layers merge into one and get moved to the top of the layer panel. Now select the remaining four hatch layers (below the top layer) and “Weld” those the same way. Now you are back to having two layers again for the crosshatch, but now they cover your entire handwriting image. The layers will be huge and you will be able to see all the hatches clearly. Don’t worry about the error icons next to each layer, we will change the sizes back down later after we fill our handwriting sample with the hatches -- this step just helps us get a really clean crosshatch fill. Now, hide two of the three handwriting layers by clicking on the eyeball icon on those layers. We will use them later. Also, hide one of the two hatch layers. Shift-click to select the one remaining visible handwriting layer and the one remaining visible hatch line layer. Click “Slice” at the bottom of the layers panel. You may need to wait while Design Space thinks and processes the task. Once Design Space is done Slicing, you will end up with four visible layers. Click on the layer that looks like a box and click "Delete." Then look at each of the remaining layers by toggling the eyeballs on and off. Choose the one that looks best to you. Delete the other two. You should be left with one visible layer, which is your handwriting sample filled with diagonal lines. TIP: You may need to zoom out and move your canvas over to see your filled image. Hide that layer. Now, repeat the process with the other hatch fill layer and another handwriting layer. So, show one of the remaining original handwriting sample layers by clicking on the eyeball. Also show the other hatch line layer. You have two layers showing now, a handwriting layer and the other diagonal hatch line. Shift-click to select both in the layers panel. Click “Slice.” When Design Space is done processing, you’ll have four visible layers. Again, delete the three you don’t want. You will now have one visible layer which is your handwriting sample with diagonal lines, but going the opposite direction as your first sliced layer. Toggle all your eyeballs on so you can see all the layers on the canvas. Your layers should all be aligned perfectly and your handwriting outline should be filled with a crosshatch. These are the three layers you will have: one outline, one filled with right-hand diagonal lines, and one filled with left-hand diagonal lines. TIP: If your layers are somehow not aligned correctly go ahead and re-center them. Click on “Select All” in the top menu bar, then “Align” and select “Center.” This is what my outline layer looks like. This is what my left-hand diagonal layer looks like. This is what my right-hand diagonal layer looks like. And, this is what my recipe looks like with all three together. With all three layers selected, click on “Attach” at the bottom of the layers panel. To change the “Size” back to your original size, divide the new width by 10. I changed my recipe back to 8”. Now we're ready to draw these with Infusible Inks! Select your Cricut Machine and click “Make It.” When prompted to Prepare Mats, make sure to select MIRROR on the left column. This is important! Click “Continue” and select Laser Copy Paper as your material with “Default Pressure.” Place an Infusible Ink Pen (0.4mm) the color of your choosing into Clamp A until it snaps into place. Place a single sheet of letter-sized laser copy paper on your blue LightGrip Mat corresponding to the area on the mat where your recipe will be drawn, and load it into your Cricut. Click the Start button. Your image may take a while to draw. I recommend you try a couple different things. First, try drawing the image with the complete crosshatch (both diagonal lines). This will take the longest. Second, you may try hiding one of the diagonal line layers (by clicking the eyeball on that layer) and drawing the handwriting sample with only ONE diagonal. This may be plenty of fill for your taste and takes half the time to draw. How it turns out sometimes depends upon your writing sample, the size of your image, and lots of other factors. TIP: I always keep the outline layer turned on to draw that layer, regardless of how many of the crosshatch layers I choose to draw. I decided to do my recipe with just one diagonal layer of crosshatch, which took 30 minutes to draw. I actually didn’t notice much of a difference between one or two hatch lines when drawing it with Infusible Ink Pens. However, I probably would have wanted to use the full crosshatch if foiling or engraving). Experiment and see what you like best! But you have the complete range of options with the SVG I provided. When your handwriting sample is done drawing, unload your mat and flip it over. Carefully peel off your laser paper, being careful not to tear the paper. To transfer your inked handwriting sample to your tea towel (or another Infusible Ink compatible blank) use a Cricut EasyPress or heat press. TIP: If you are using a Cricut EasyPress, refer to the Cricut EasyPress Interactive Quick Reference Guide which will tell you how to prep your material and EasyPress, how to apply it, and how to care for the finished product. This takes the guesswork out of the process. Place an EasyPress Mat on your work surface and cover it with a piece of white 80# cardstock OR four pieces of butcher paper. Trim your laser paper down if necessary, and figure out where you’d like it to be transferred onto your tea towel. I want my recipe to be centered on the front of my towel when it is folded in thirds, so this is where I placed it. Remove the infusible ink recipe and set it aside. Center the section of tea towel where you will be transferring the ink recipe on your EasyPress Mat. Lint roll the entire section to remove any debris and lint. Cover the tea towel with a piece of butcher paper larger than the size of your EasyPress heat plate. Heat up your EasyPress to 385º. Press to preheat the towel section where you will be transferring your recipe for 15 seconds. Remove the top layer of butcher paper. Now, take your Infusible Ink recipe drawing and place it FACEDOWN on the tea towel (so the inked side is facing the towel). Make sure the words will be facing the correct direction after it is pressed (so it is not upside down!) and that it is nice and straight. Tape the corners down with Heat Resistant Tape so your paper stays in position, avoiding the image area. Cover the entire area you will be pressing with the butcher paper again. Now, apply heat for 40 seconds using light pressure, which means a hand just resting on your EasyPress and not pushing down. When done, lift up the EasyPress and place it in its holder. Remove the butcher paper and let your recipe cool until it is just warm, about 5 minutes. TIP: If you move it before it cools, the ink may mess up and look ghosted or marbled. Once cool, slowly remove the tape and laser paper. Fold your tea towel and you’re all done! I also made a faux leather bookmark foiled with a sentiment written by my grandmother. I’ll show you how to use handwriting to foil on leather, but to learn more about foiling, check out my Cricut Foil Transfer Ultimate Guide blog post. Start by importing my bookmark SVG. Click on “Ungroup” at the top of the layers panel so the bookmark and heart layers are no longer grouped. Once it's ungrouped, also upload and clean up your handwriting sample the same way you did in Step 1 above. For this handwriting sample, I used the "Automatic" background remover and then used the magic wand and eraser to clean up the image a little bit more. Once it’s uploaded onto your canvas and the background is cleaned up, this is what you will see, but with your handwriting sample instead. With your handwriting sample selected, rotate it so it fits vertically on the bookmark. Do this by entering 90 in the "Rotate" box located in the top menu bar. Click and drag your handwriting sample on the canvas to place it over the bookmark. Then click and drag the resizing handle (which will be on the lower left corner of your image box if you rotated it 90 degrees) inward to make it smaller so it fits on the bookmark. In the layers panel, Shift-click to select both your handwriting sample and the heart layer. Click “Weld.” Change the “Operation” linetype to “Medium Foil” by going to "Foil" and then selecting "Medium." Hide your "Basic Cut" bookmark layer by clicking on the eyeball icon next to that layer in the layers panel. Now, go through the process to fill your welded handwriting and heart layer with the crosshatch fill exactly like you did in Step 2 above, except this time set your “Operation” linetype to “Medium Foil” instead of "Pen." Once your handwriting and heart layer is filled with crosshatching -- and the layers are all attached together and resized back down -- unhide the "Basic Cut" bookmark layer so you see everything on your canvas. Make sure everything is still positioned correctly on the bookmark and reposition anything if necessary. This is what my canvas looks like. Click on "Select All" to select both layers -- the "Medium Foil" crosshatch filled handwriting/heart layer and the "Basic Cut" bookmark layer. Click "Attach." Now you’re ready to foil and cut out the bookmark. Select the Cricut machine you’d like to use. I used the Maker 3. Click “Make It” and “Continue” and you will be taken to the mat screen. Move your bookmark downward on your mat. You do NOT want your foiled area aligned at the top of the mat. This is important because we will need space to remove the foil later before we cut out the leather, and we will not be able to remove the mat from the Cricut to do this. I centered mine on the mat. TIP: If you are using a Cricut Joy, move the bookmark downward on your mat as far as it will go. Click “Continue.” On the next screen, set your base material to Faux Leather (Paper Thin) with Pressure set to “Default.” TIP: If you are using a Cricut Joy select Heavy Cardstock 100lb with More Pressure. To prepare your mat, first cut a piece of faux leather generously bigger than you’ll need using scissors. The design is 1.5” x 6” so I used a piece of faux leather that is 3” x 8” which means I had plenty of extra material to tape it to my mat. Cut a piece of StrongGrip Transfer Tape the same size as your leather. Put the transfer tape white paper side UP on a purple StrongGrip Mat to correspond with where you need to place your leather. The faux leather leaves behind messy fibers, and the transfer tape will protect your mat so it’s easier to keep clean. TIP: If you are using a Cricut Joy, you can use a 4.5” x 6.5” green StandardGrip Joy Mat instead. Remove the backing sheet from the transfer tape to reveal the sticky side. Place your faux leather dull side DOWN. You want the shiny side up so you can foil on the good side. Tape down the edges of the leather with painter’s tape. Place a piece of foil dull side DOWN on top of the faux leather. You want the shiny side facing up. Use the tape that came with your foil to tape all the edges of the foil down to the leather. I used a piece of foil that was cut down to 2” x 6” since this would comfortably cover all my foiled areas, but also allow enough space to tape the foil down to the leather (and not the painter’s tape). IMPORTANT: Be sure the tape does not cover any of the areas that will be foiled. Also, try to avoid wrinkles in the foil. Keep it nice and smooth while placing the tape down. The tape should be adhered to the leather and NOT the painter’s tape. Make sure your white star wheels on your Cricut are pushed off to the side so they won’t touch your leather or foil. Place your medium tip into the Foil Transfer Tool by pressing the top button on the housing and pushing the tip in from the bottom. Then load the Foil Transfer Tool into Clamp B. Now we’re ready to start foiling! Load the mat into the machine and click the Start button. When your Cricut is done foiling, carefully remove the foil and tape WITHOUT unloading the mat. TIP: You can reuse the tape strips, but not the foil. You will be prompted to remove the Foil Transfer Tool and insert the Fine Tip Blade into Clamp B. Press the Start button again to cut. When done, check to make sure the faux leather is cut all the way through before unloading the mat. TIP: If you need to recut the leather, press the Start button again without unloading the mat. It will prompt you to insert the Foil Transfer Tool and refoil the bookmark, but just leave the clamp empty. Your machine will go through the motions but not actually foil. When prompted, load Clamp B with the Fine Point Blade and press the Start button to recut the bookmark. Remove the leather from the transfer tape, and then remove the transfer tape from the mat. Our beautifully foiled bookmark is complete! The final size of the book mark is 1.5" x 6" The final size of the tea towel is 15.5" x 23" Care Instructions for Infusible Ink on a Towel: As an Amazon Associate and member of other affiliate programs, I earn from qualifying purchases.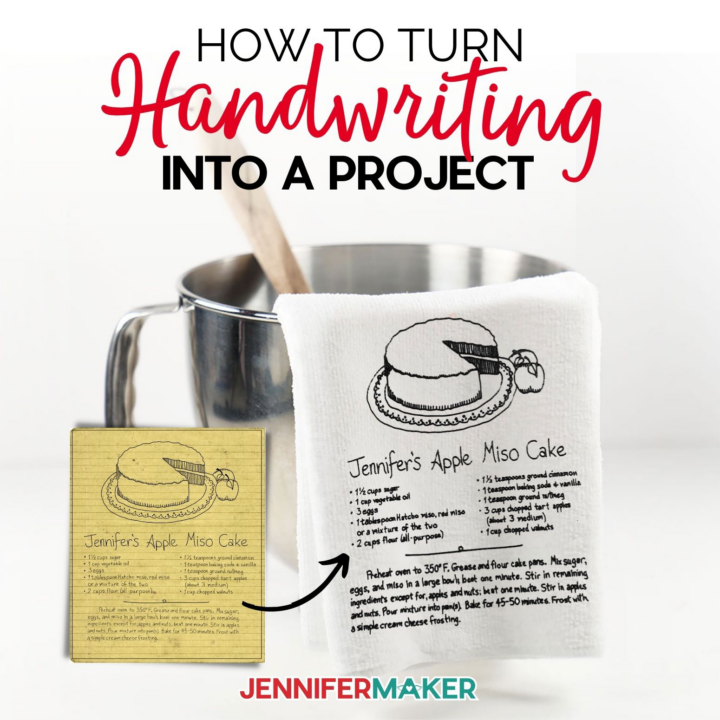
How to Put Handwriting in a Cricut Project
Materials
Tools
Instructions
STEP 1: Import and Remove Background of Handwriting Sample in Design Space
STEP 2: Fill Handwriting with Crosshatch in Design Space
Step 3: Transferring Infusible Ink to a Tea Towel
Step 4: Using Filled Handwriting to Foil on Faux Leather
TIP: If you need to, use the "Zoom" buttons at the bottom left of the canvas to zoom out so you can see everything on your canvas.Notes
Your towel can be washed with cold water and mild detergent. Tumble dry low or line dry. Do not use fabric softener, dryer sheets or bleach.Recommended Products
The detailed step-by-step assembly video on how to create handwriting projects is part of Maker Academy Weekend 2021. Get a pass to watch all 20+ workshops, each with a printable handbook, transcript, audio files, design files, and support with a VIP pass below:
Didn’t this tea towel turn out beautiful?! I’m really impressed with how good it came out and it’s something I can pass down to my daughter. Gifts like these are the ones that are cherished throughout the generations and I’m so happy to have made something like it.
Have a special recipe that everyone’s always asking about? Gift them a tea towel just like this one and give two gifts in one! Or, write a special note to someone and place it somewhere where they can keep it forever.
Answers to Your Questions About How to Make Handwriting to Cricut Projects
Q: Where is your video for this project?
This is a special project we made for our free Maker Academy Weekend 2021 event! A complete and detailed step-by-step video premieres during the event November 4-7, 2021 — specifically, this tutorial video was available to watch for free for 24 hours beginning November 7 at 5:00 pm ET! You can get access to the video, the 15-page printable handbook that details how to make this beautiful project if you get a VIP Pass to Maker Academy Weekend, which comes with other perks and bonuses, too!
Q: How did you fill in the letters of your design when you drew and foiled it?
We used a hatchfill! Watch our workshop video (see above) for all the details!
Get my free SVG files to turn your handwriting into a Cricut project!
I love seeing what you make with my designs and how you use them! Please share a photo of your handwriting to Cricut projects in our Facebook group or tag me on social media with #jennifermaker.
Love,

