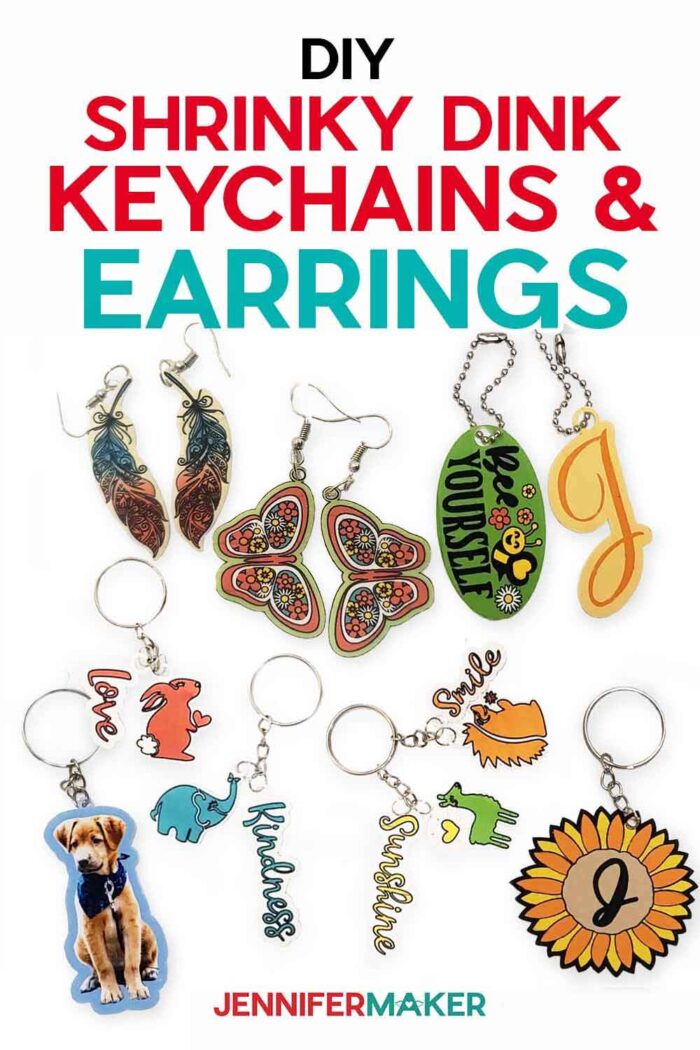
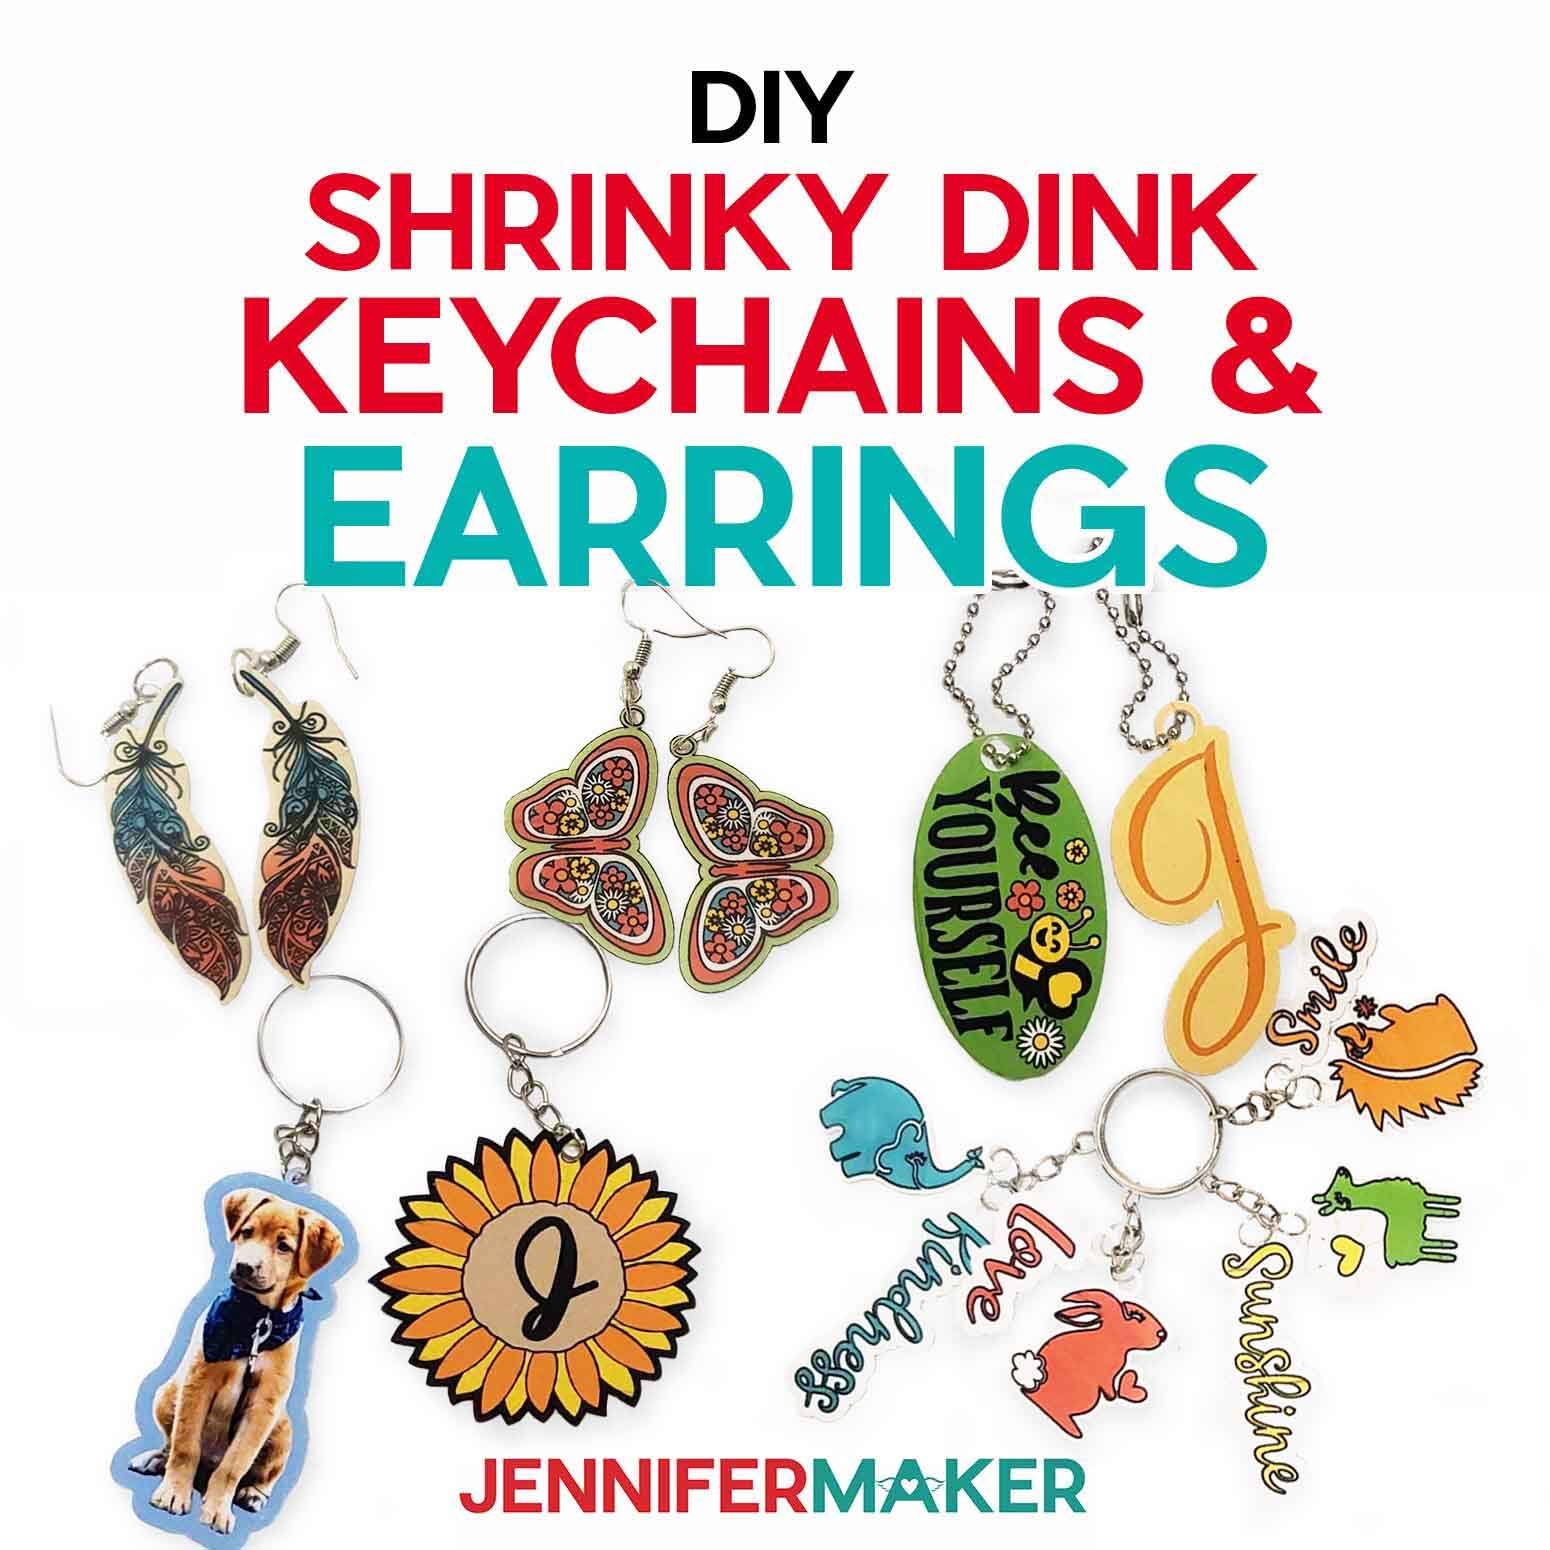
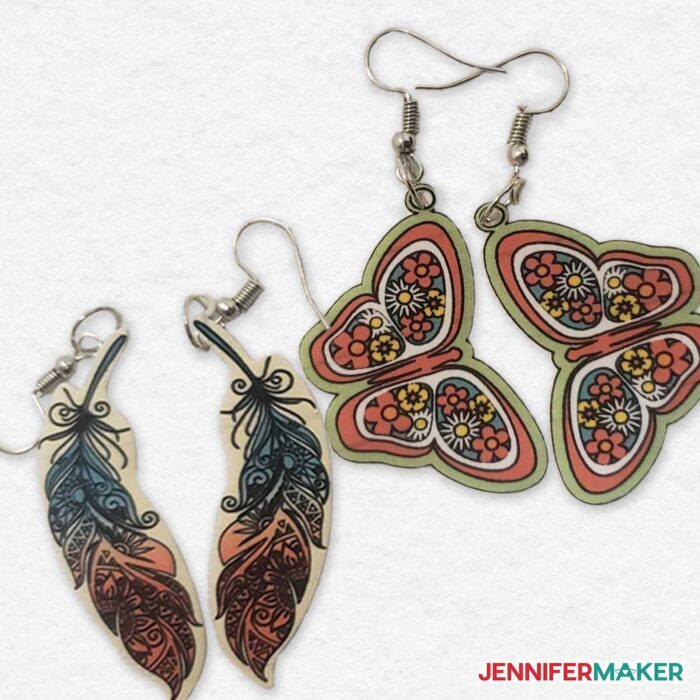
Learn how to make DIY shrinky dinks for keychains or jewelry!
Have you seen a craft that just looks like magic? If not, try these DIY shrinky dinks projects and you can say you have! Making them by hand is fun, but a Cricut and Cricut Design Space tools make them so much easier, as long as you get the settings right. I’ll show you that, and how Print then Cut can level up your plastic projects. The results I got with photos are stunning! It took a lot of testing materials and techniques, so let me save you time and money with this tutorial for these plastic charm earrings and keychains — they’re not the same as stickers!
Watch the full step-by-step DIY shrinky dinks tutorial!

In reality, shrinky dinks are more methodical than magical! It took a lot of testing, but I’ve found some great techniques to get the best results, with or without a Cricut. It all comes down to sizing, shrink plastic material quality, and cut settings.
One of the most important steps of a successful DIY shrinky dink project is getting the sizing correct for your plastic shapes. It’s too easy to guess wrong and pull projects that are too tiny or too big out of the oven! To save you time and material (that means money!) I’ll show you exactly how to prepare my free SVG and PNG designs or photos in Cricut Design Space. The original size might seem huge, but it’s the only way to go. You can use the same steps for your own designs!
As a handy bonus, I’ve included a set of measuring squares for your projects. I’ll show you how to use them to perfectly size your DIY shrinky dink keychains and jewelry.
Cutting the shrink plastic also took some extra testing, so I’ll share the custom material setting I used to get clean cuts every time. But remember, every machine cuts a bit differently, so try my settings on a test and adjust yours if needed.
I tried several brands of shrink plastic with both Print then Cut and hand-colored designs. Some certainly worked better than others, so stay tuned to the end of the video for my recommendations. I was really surprised by our results!
In addition to the printable types, shrink plastic comes in completely clear sheets and frosted styles. Unfortunately, they don’t hold inkjet ink, but you can color on them using permanent markers or colored pencils. Just make sure to follow the package’s directions! You can use your Cricut to cut out the shapes you want or even draw designs to color using a Cricut pen, though. You can use my free outline files to see how they work, and then make your own designs!
I cut everything on my Cricut Maker 3, but you can use any Cricut machine to cut the DIY shrinky dinks. If you want to use Print then Cut, you will need to use a Maker or Explore, since the Joy does not have that feature. You’ll need a green StandardGrip machine mat, a Cricut Pen if you’d like to draw designs, and a brayer.
Once the DIY shrinky dinks are cut, I’ll show you my best tips for perfectly shrinking your keychains or jewelry in an oven. I used a small convection oven with an included sheet pan, but since shrinky plastic sheet is non-toxic, you can use your home oven with a cookie sheet. The temperature is low enough that harmful chemicals aren’t released, but make sure to follow my settings! We’ll also need parchment paper and heat-resistant gloves (oven mitts work, too!) to craft safely.
Then, I’ll show you how to finish the projects using a heavy items to flatten the plastic and help them stay bright using an acrylic spray sealant. We’ll also look at compatible findings for your designs! Depending on what you’re making, keychain rings, earring backs or hooks, and a single hole punch will be helpful.
Let me show you how easy it is to make DIY shrinky dink plastic charms! This post contains some affiliate links for your convenience (which means if you make a purchase after clicking a link I will earn a small commission but it won’t cost you a penny more)! Read my full disclosure policy.
Materials to Make DIY Shrinky Dinks
View my Amazon shopping list with the exact items we used to make this project
- 8.5″ x 11″ Printable Shrinky Dink Sheets or or A4 Size Printable Shrink Plastic Sheets, especially if you want to Print then Cut designs with an Inkjet Printer -OR-
- 7.9″ x 5.7″ Frosted Shrinky Dink Plastic Sheet or 8″ x 10″ Shrinky Dinks Clear Shrink Material if you want to cut the designs with the Cricut and color them in by hand with Colored Pencils, or Permanent Markers like Sharpies
- A method to cut your material, I used the amazing Cricut Maker 3 but you can also use a Cricut Maker series, Explore series, Joy series, or Cricut Venture
- Cricut Green StandardGrip Machine Mat 12” x 12″
- Brayer
- Cricut Pen if you want to draw with your Cricut
- I formerly used an Oster Convection Oven (see my safety update below) but you can use a PYD Life Craft Oven or your toaster oven or home oven with a Baking Sheet
- Heat Resistant Gloves or Oven Mitts
- Something heavy and heat resistant to press the Shrinky Dinks while they cool – I used my unheated EasyPress 2!
- Sheet of Parchment Paper to go on the baking tray
- Acrylic Sealing Spray
- Keychain Ring, Earring Hooks, or other findings appropriate for your projects, like a jump ring for a zipper pull!
- Single Hole Puncher for making your own hanging openings
- Design #452 – My free SVG/PDF/DXF design files available in my free resource library – get the password by filling out the form at the bottom of this page
How to Make DIY Shrinky Dinks for Key Chains or Jewelry

DIY Shrinky DInks
Learn to print, cut, and bake your own Shrinky Dink keychains and earrings.
Materials
- 8.5x11 Printable Shrink Material -Or-
- A4 Size Printable Shrink Material -Or-
- Frosted Shrink Material (not printable, but great for drawing and then cutting with your Cricut or for cutting only) -Or-
- Shrinky Dinks Clear Shrink Material (not printable, but useful for cutting shapes to color in)
- Design #452 (My free SVG/PDF/DXF design files available in my free resource library - get the password by filling out the form at the bottom of this page)
Tools
- A method to cut your material, I used the amazing Cricut Maker 3 but you can also use the Cricut Maker, Cricut Explore 3, the Cricut Explore, or the Cricut Joy (if you are only cutting the plastic sheets) — you can use the standard fine point blade for this project
- Cricut Green StandardGrip Machine Mat 12” x 12
- Inkjet Printer - I used my HP ENVY Photo 7155 if you want to Print then Cut
- Brayer
- Oven or Craft Purposed Convection Oven
- Baking Sheet - If you use a full sized oven
- Heat Resistant Gloves - Or - Oven Mitts
- Something heavy and heat resistant to press the Shrinky Dinks while they cool - I used my unheated EasyPress 2!
- Parchment Paper
- Acrylic Sealing Spray
- Keychain Rings
- Earring Backs
- Single Hole Punch for making your own hanging openings
- Cricut Pen if you want to draw with your Cricut
- Colored Pencils - Or -
- Permanent Markers if you are coloring your own instead of printing
Instructions
STEP 1: GET MY FREE SHRINKY DINKS DESIGN FILES
First, download my Shrinky Dinks PNG/SVG/DXF/PDF files from my free resource library. It's Design #452.
Several types of shrink plastics are available, from clear plastic to frosted to printable. You can use the SVG files to make Draw Then Cut patterns and the PDF document to create your own coloring page templates to use with different types of shrink plastics, but I'll show you how to use the PNG files with the Print Then Cut function of your Cricut on printable shrink plastic.
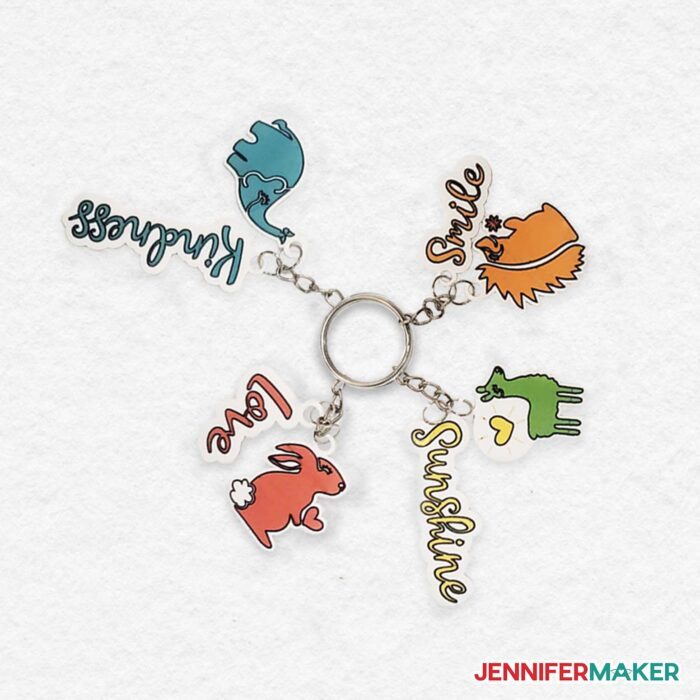
The PNG file options include two pairs of earrings, two keychains, and a set of small animal and word charms suitable for keychains or earrings. All the images are available in both color and black and white versions so you can print ready to make files, or have the option of coloring in your own.
I’ve also included a set of measuring squares you can use to make “reference keychains” to check the amount of shrink before using new materials.
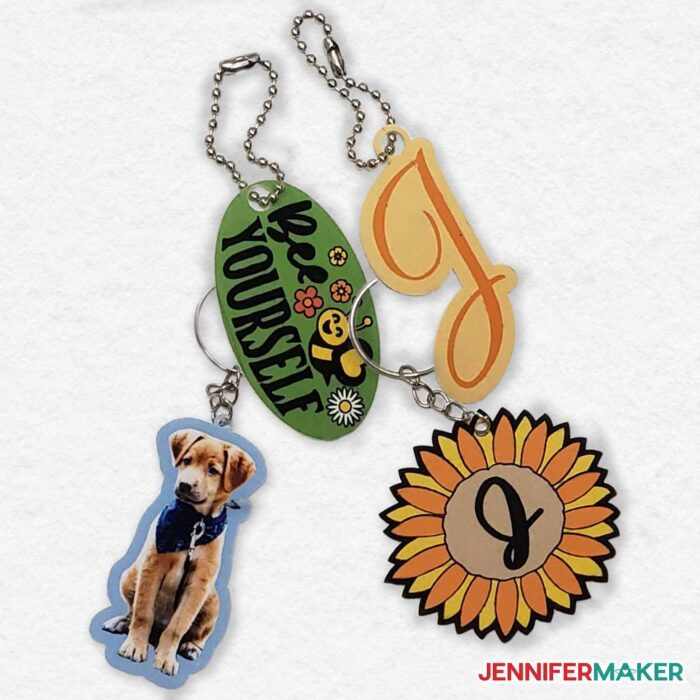
First, I will show you how to make the sunflower keychain PNG. Then, I’ll show you how to make your own initial keychains and even turn a favorite photograph into a keychain! These all use printable shrink material.
STEP 2: PREPARE THE DESIGN FILE
Sunflower Keychain
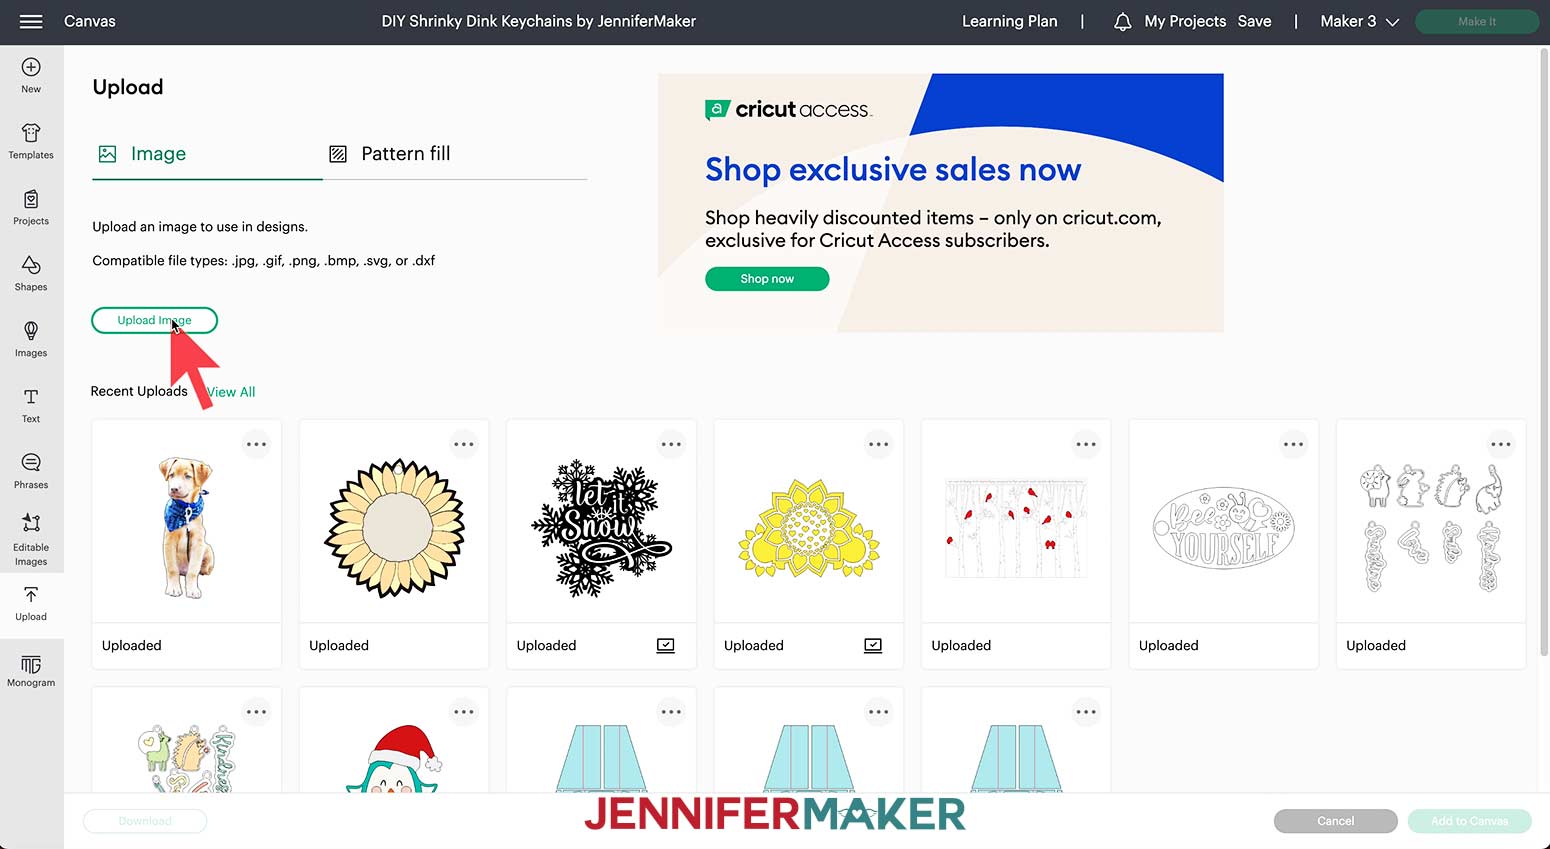
First, upload the PNG of the sunflower to Design Space. To do so, click “Upload” on the bottom left of the menu next to your canvas, then click “Upload Image.”
Next click “Browse” and select the sunflower PNG file. A Select Image Type menu will appear along with a preview of the sunflower on the left side of the screen.
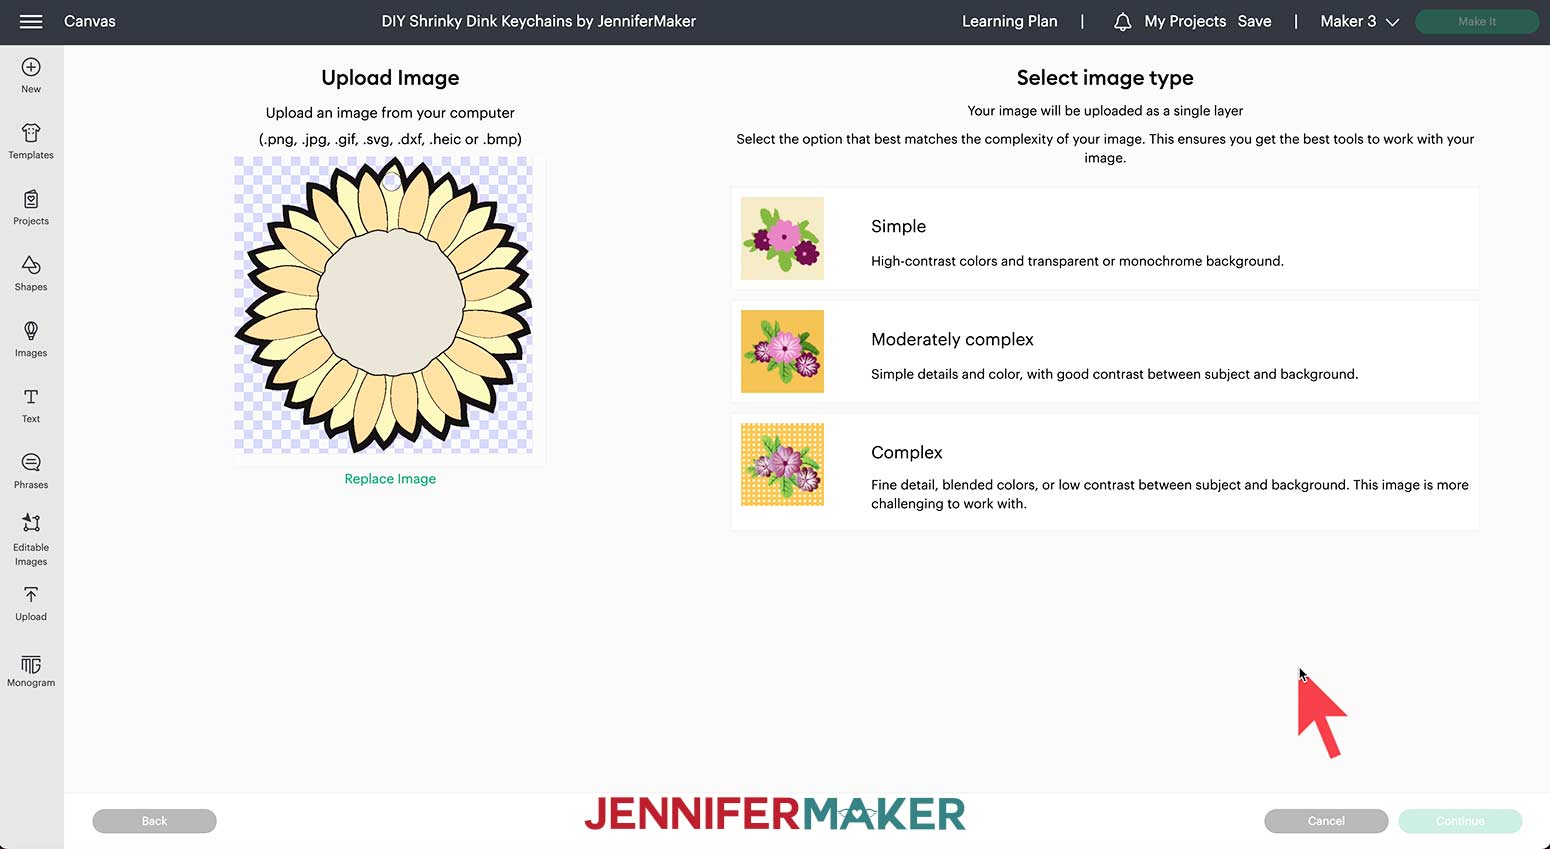
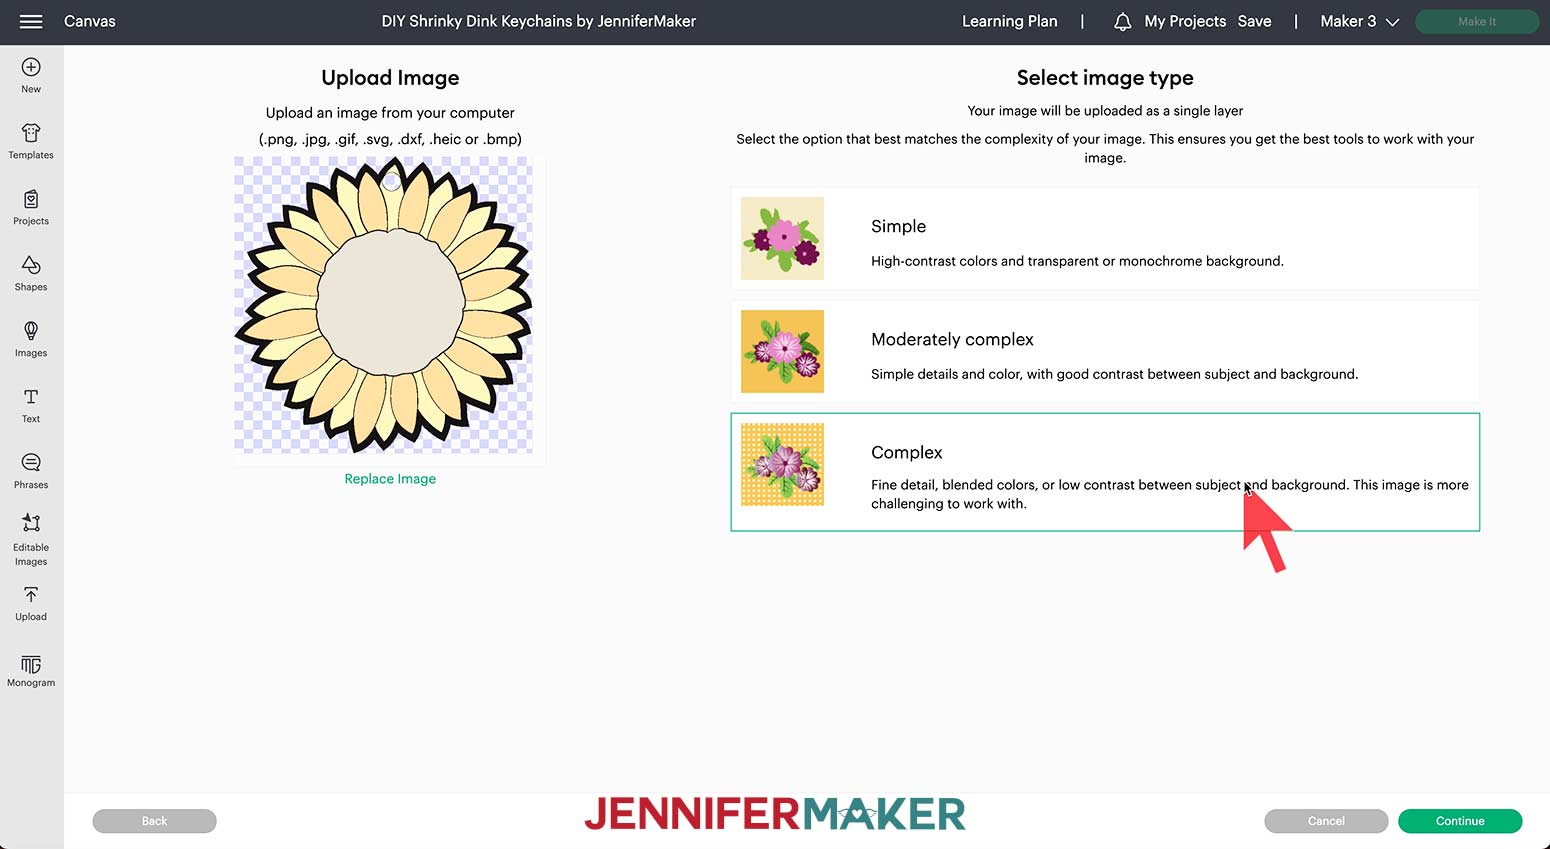
My designs are rather simple, but I still like to select the “Complex” option to make sure to preserve the colors. Choosing the “Simple” option can sometimes result in color changes you aren’t expecting. Click “Continue.”
Next, you can use the tools on the left to remove the background from your image if needed. I have saved my files with transparent backgrounds, so this step isn’t necessary for the sunflower design. Click “Apply & Continue.”
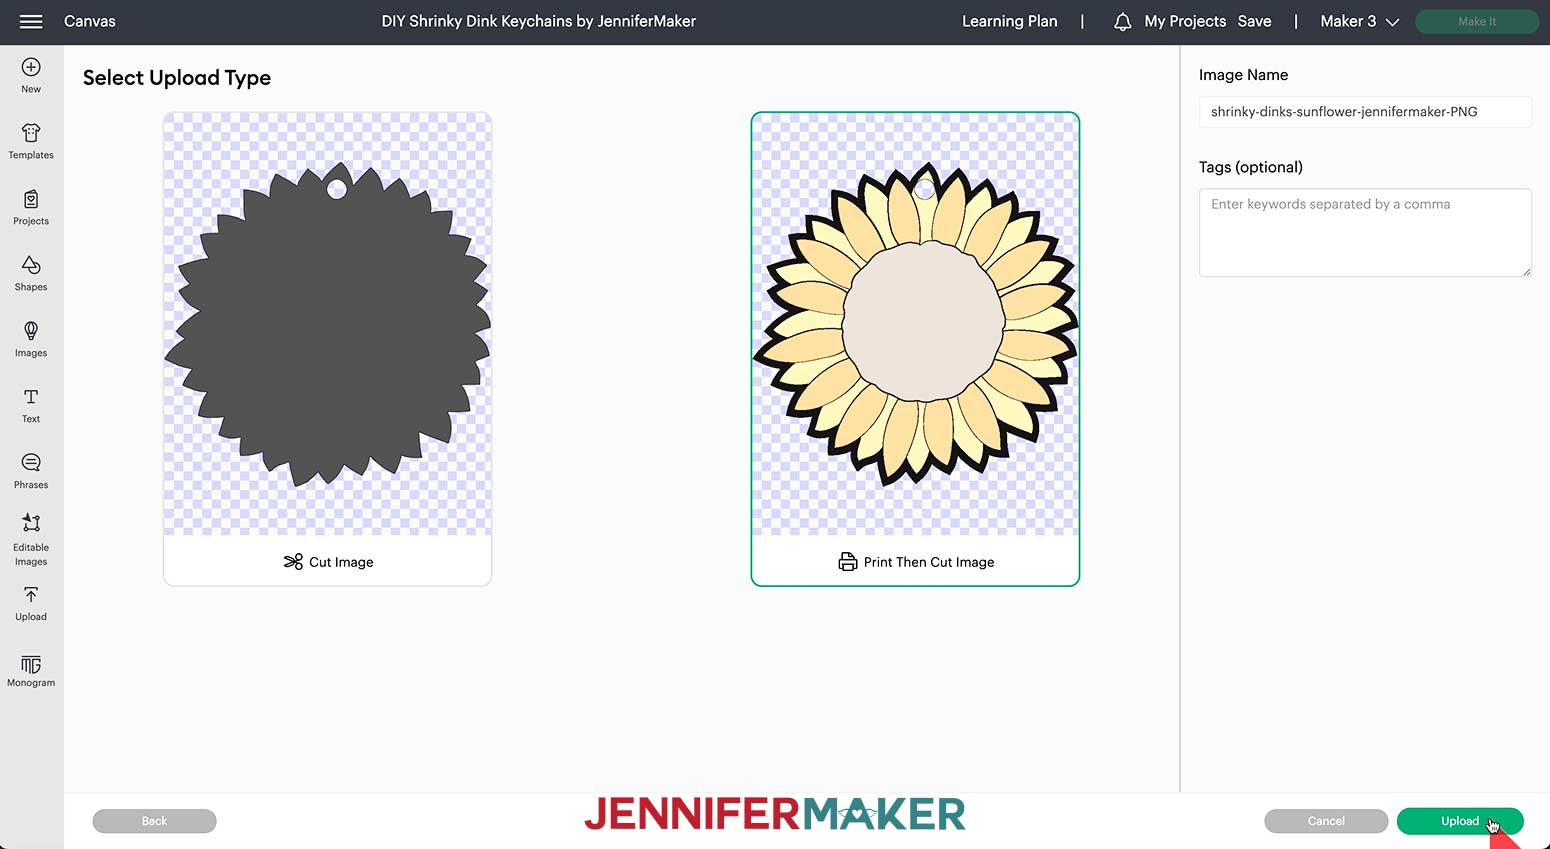
Design Space will now show you two images: the one on the left is the outline of the image, the one on the right is the Print Then Cut Image we need to use. You can double-check the outline version to ensure all the cut areas are in the right place. Then select the Print Then Cut version, and click “Upload.”
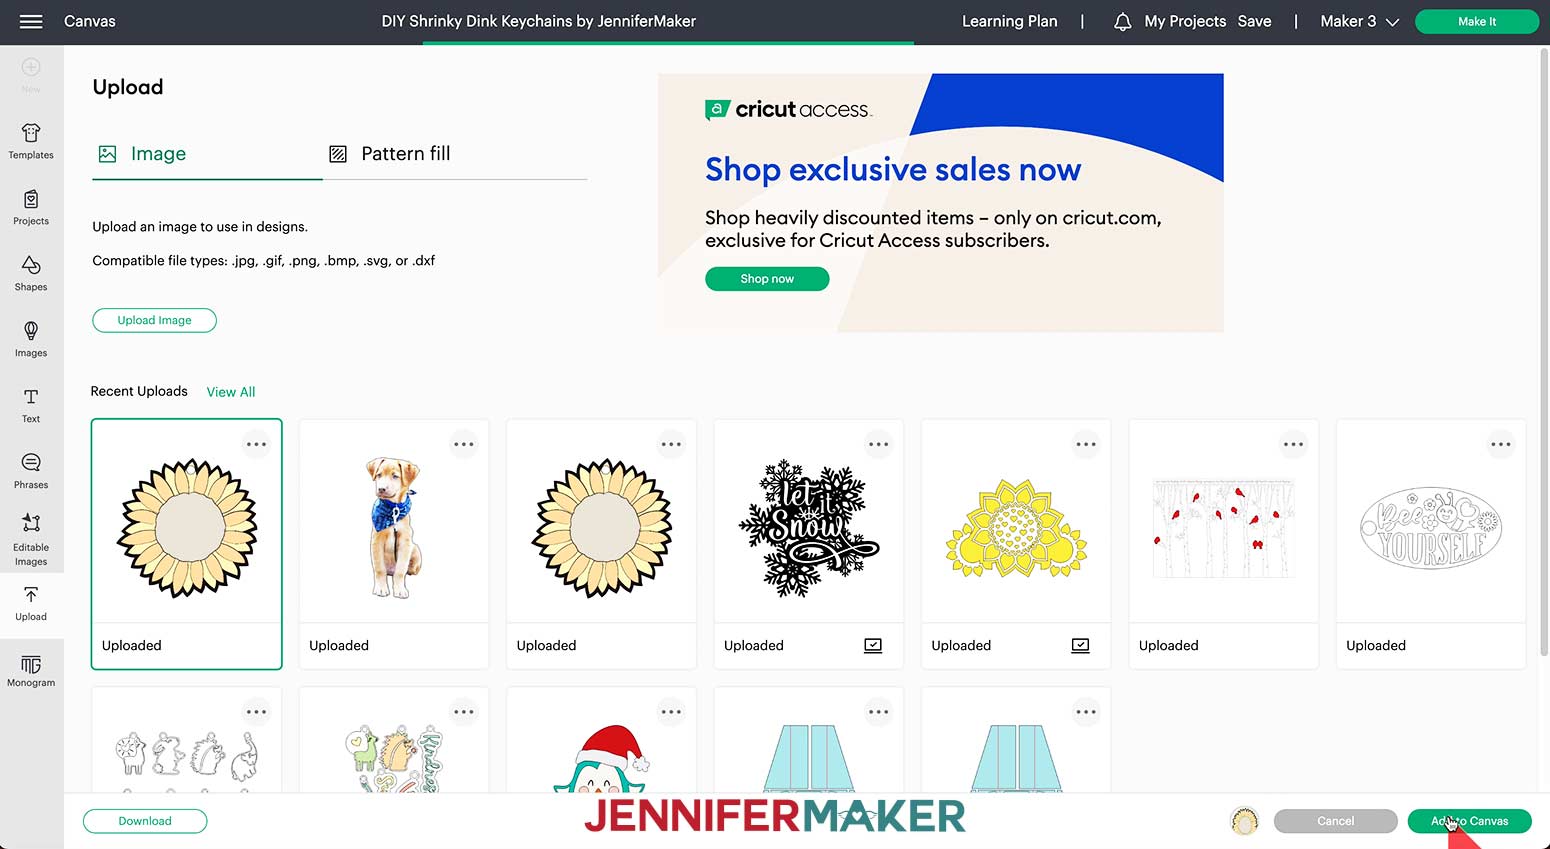
To add the image of the sunflower to your canvas, select the image in the preview area, then select "Add to Canvas."
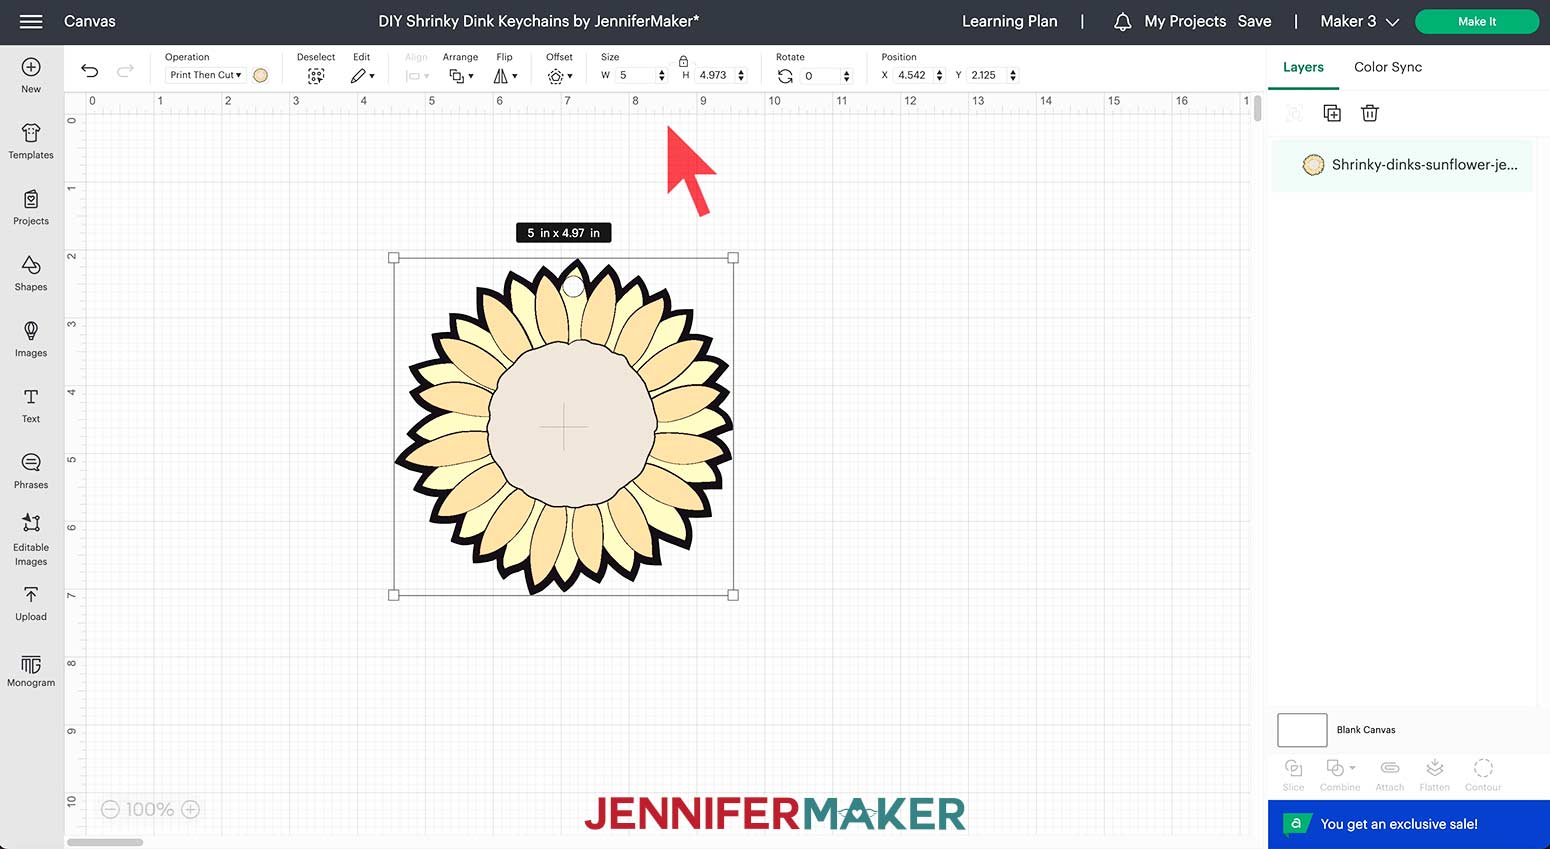
Here is how the sunflower image looks on my canvas.

Most shrink material will shrink somewhere between 1/3 to ½ the original size (depending on brand and type). I want to make a keychain that will be approximately 2.25” to 2.5” inches, so I will make the size of my sunflower 5”.
To change the size of the sunflower, click on the sunflower and make sure the lock icon is closed above the size box above the Canvas. Enter a “5” into the width box to resize the image.
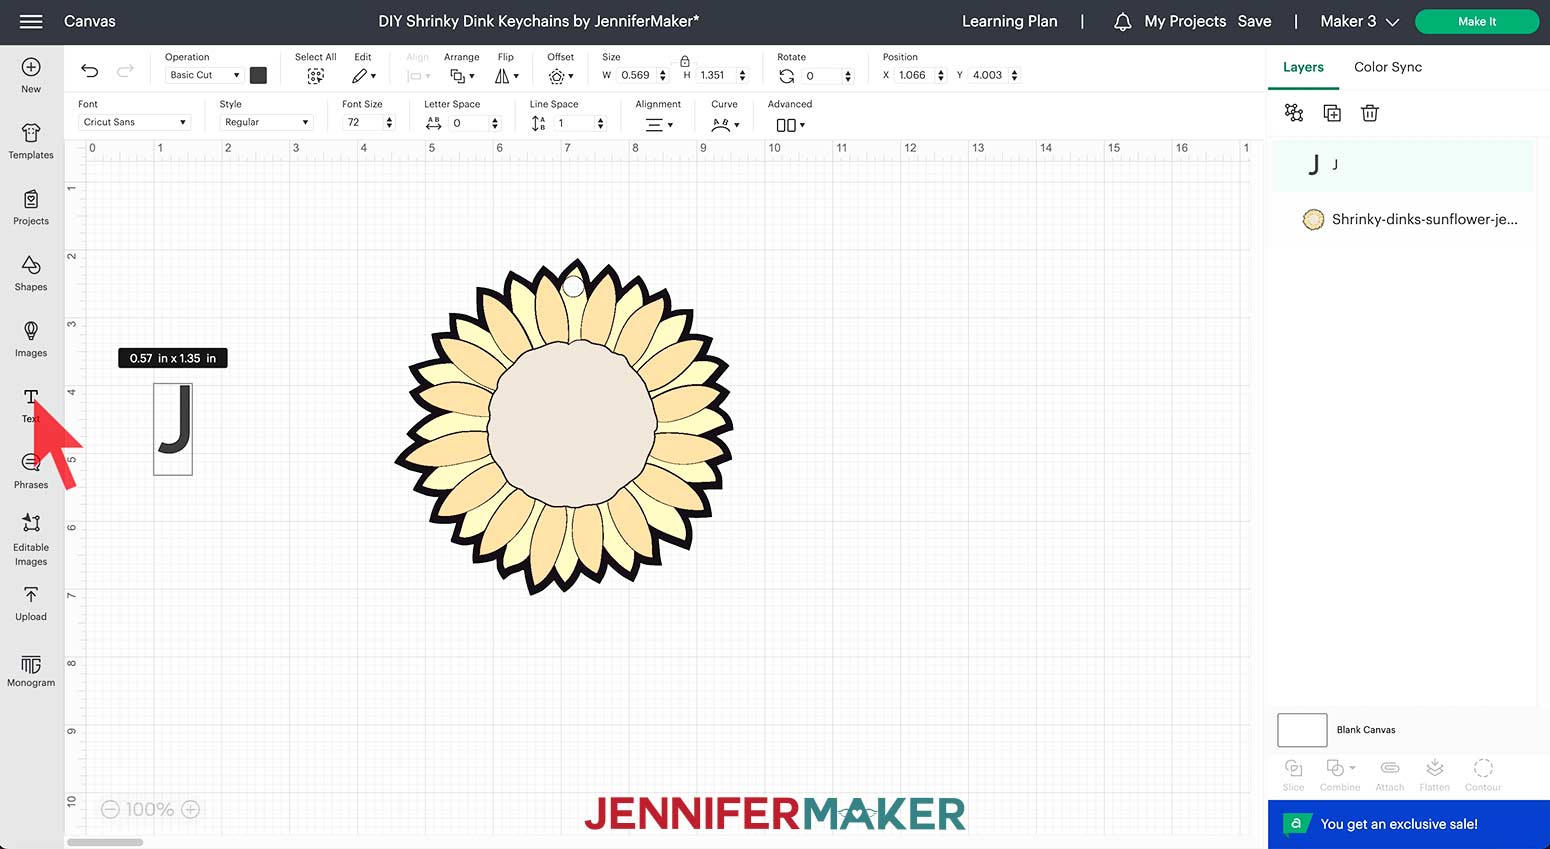
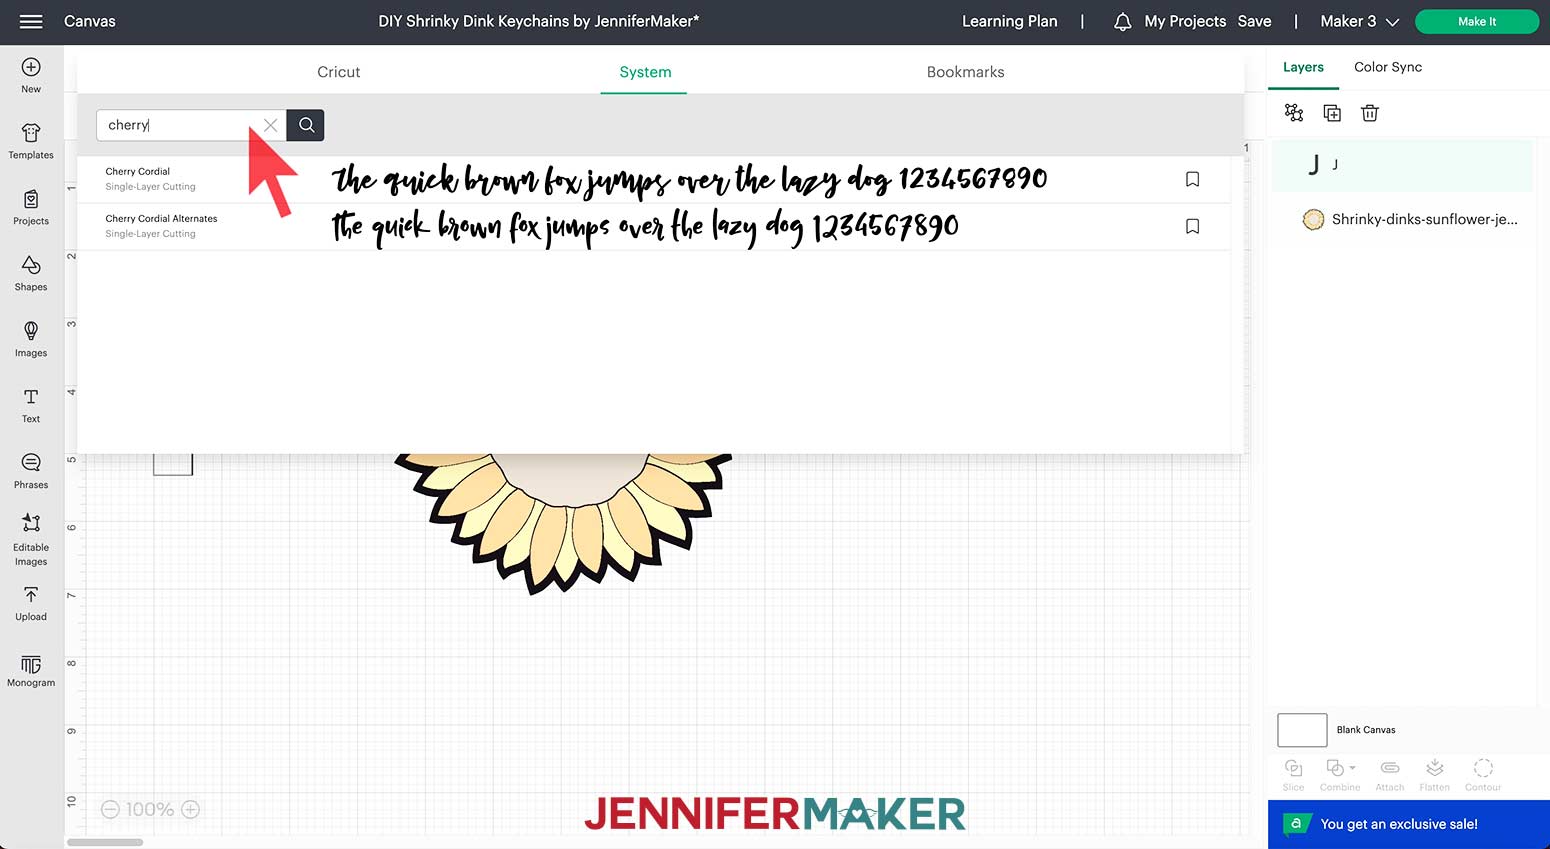
Now that the image is the correct size, we can customize the sunflower keychain by adding an initial! Click “Text” on the menu to the left of the Canvas. Type the initial you’d like to use. I’ll use a “J”.
With the letter still selected, click the box under the “Font” heading. I want to use a font I have saved on my computer, so I’ll select “System” and type the name of the font in the search box. (If you want to use a font supplied by Cricut, simply scroll through the available fonts instead.) I’m going to use the font “Cherry Cordial” for my letter “J.” You can purchase the front from Font Bundles.
My “J” has now changed to the proper font, so I will resize it to fit the center of the sunflower. You can resize the text by clicking on the letter and selecting one of the corner white boxes surrounding the letter with your mouse. While holding the mouse button down pull away from the letter to size it up or move toward the letter to size it down. I’ll resize my letter and move it to the center of the sunflower.
The sunflower is almost ready! The last step is to select both the sunflower and the letter by clicking and dragging a box over top of both. Once they are both selected, click “Flatten” on the lower right menu to turn the selection into a Print Then Cut group!
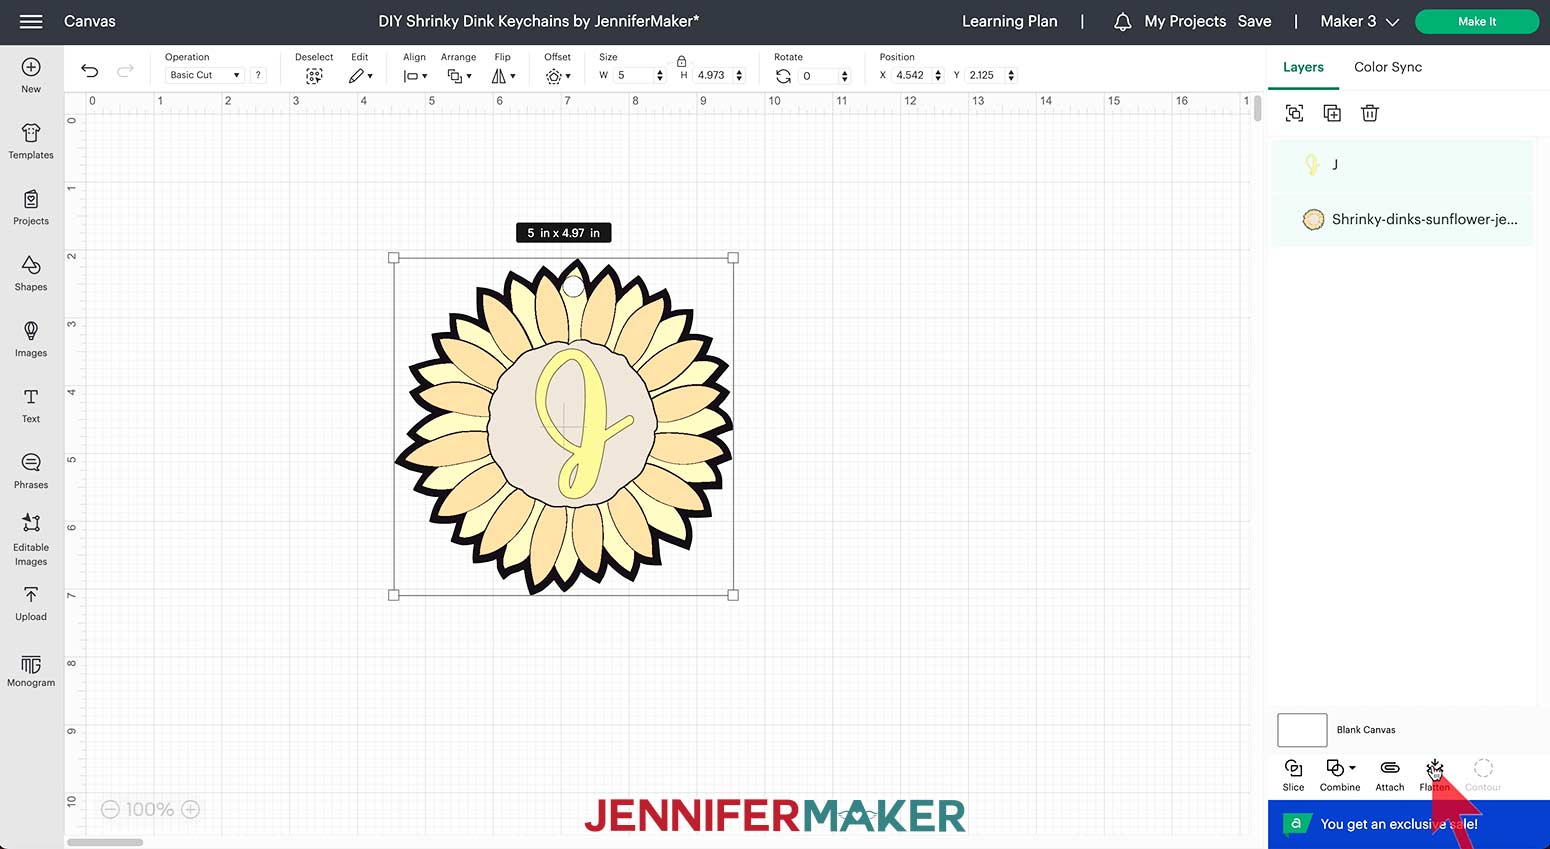
TIP: If you flatten an image and realize you need to make changes, the “Flatten” button turns into an “Unflatten” button so you can easily edit your work!
Custom Initial Keychain
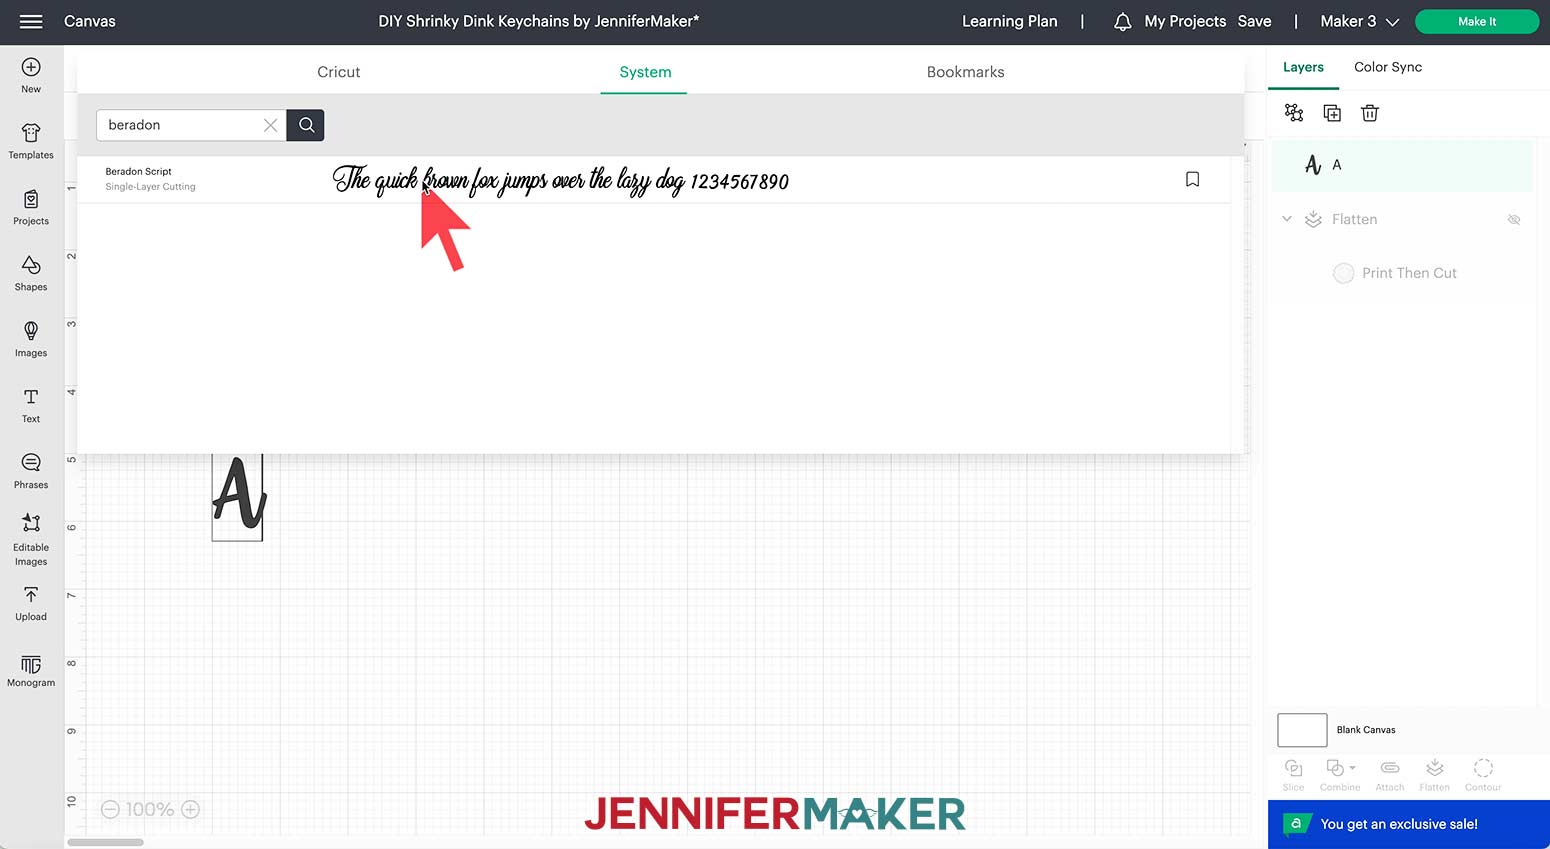
To make an initial keychain from scratch in Design Space, start by clicking the “Text” button, typing your initial, and choosing a font just like the steps for the sunflower. I’m making a letter “J” with the font Beradon Script that I have saved to my computer.
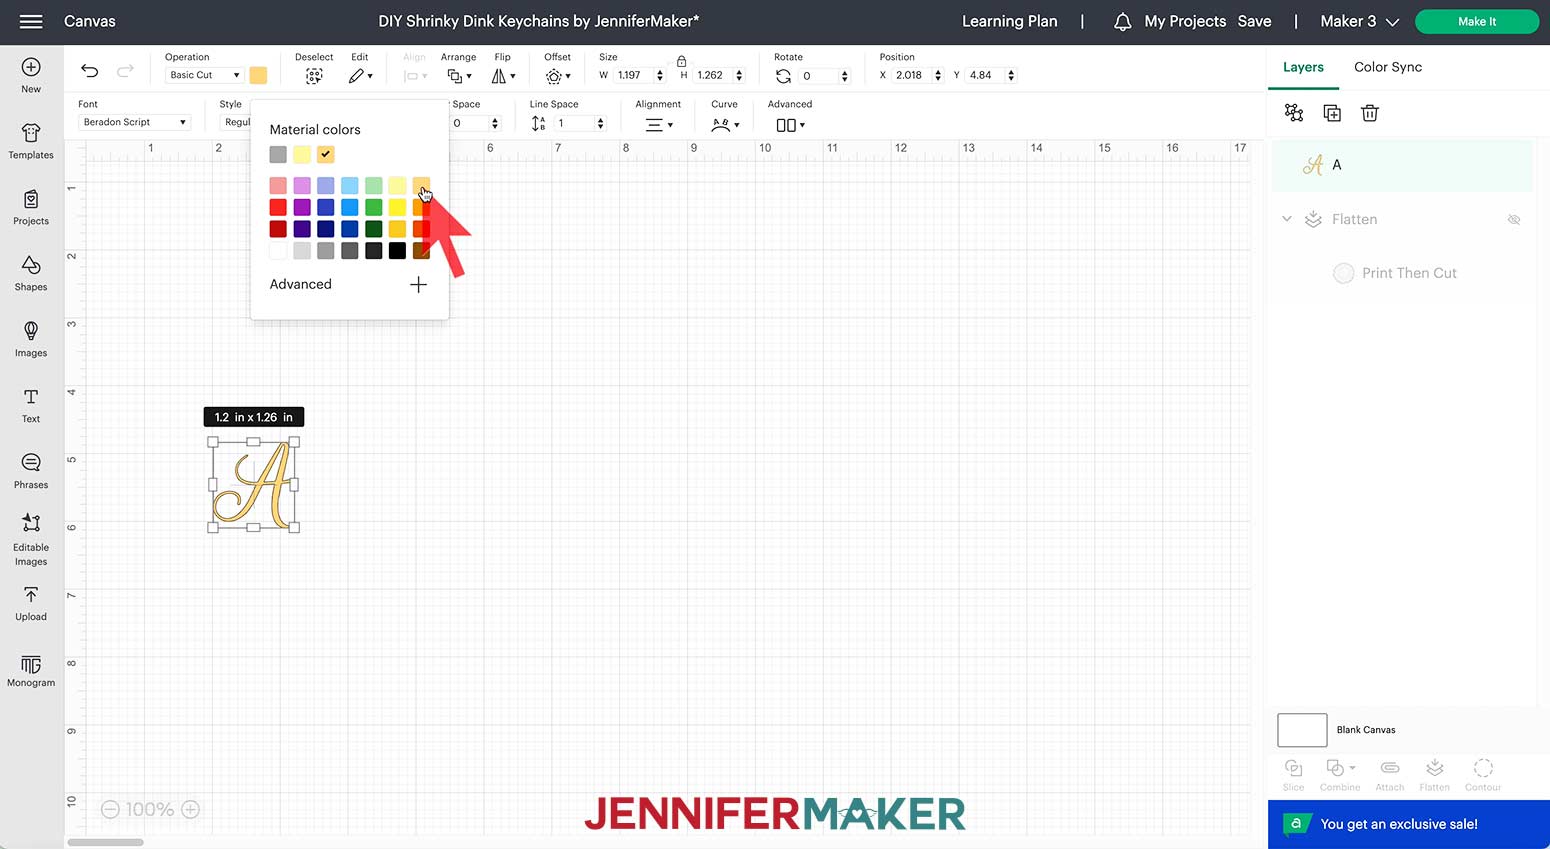
Choose a color for your initial by clicking on the color box next to the “Operation” drop down menu. When choosing colors for shrink plastics, be sure to choose a very pale color. Colors used on shrink plastic darken considerably when the plastic is baked. I’ve chosen a pale orange color.
To make the initial a little wider to make a sturdier keychain, we can add a border using the “Offset” function. Click the letter, then click “Offset”. Use a rounded corner and drag the slider to find a pleasing amount of border. I chose 0.125”.
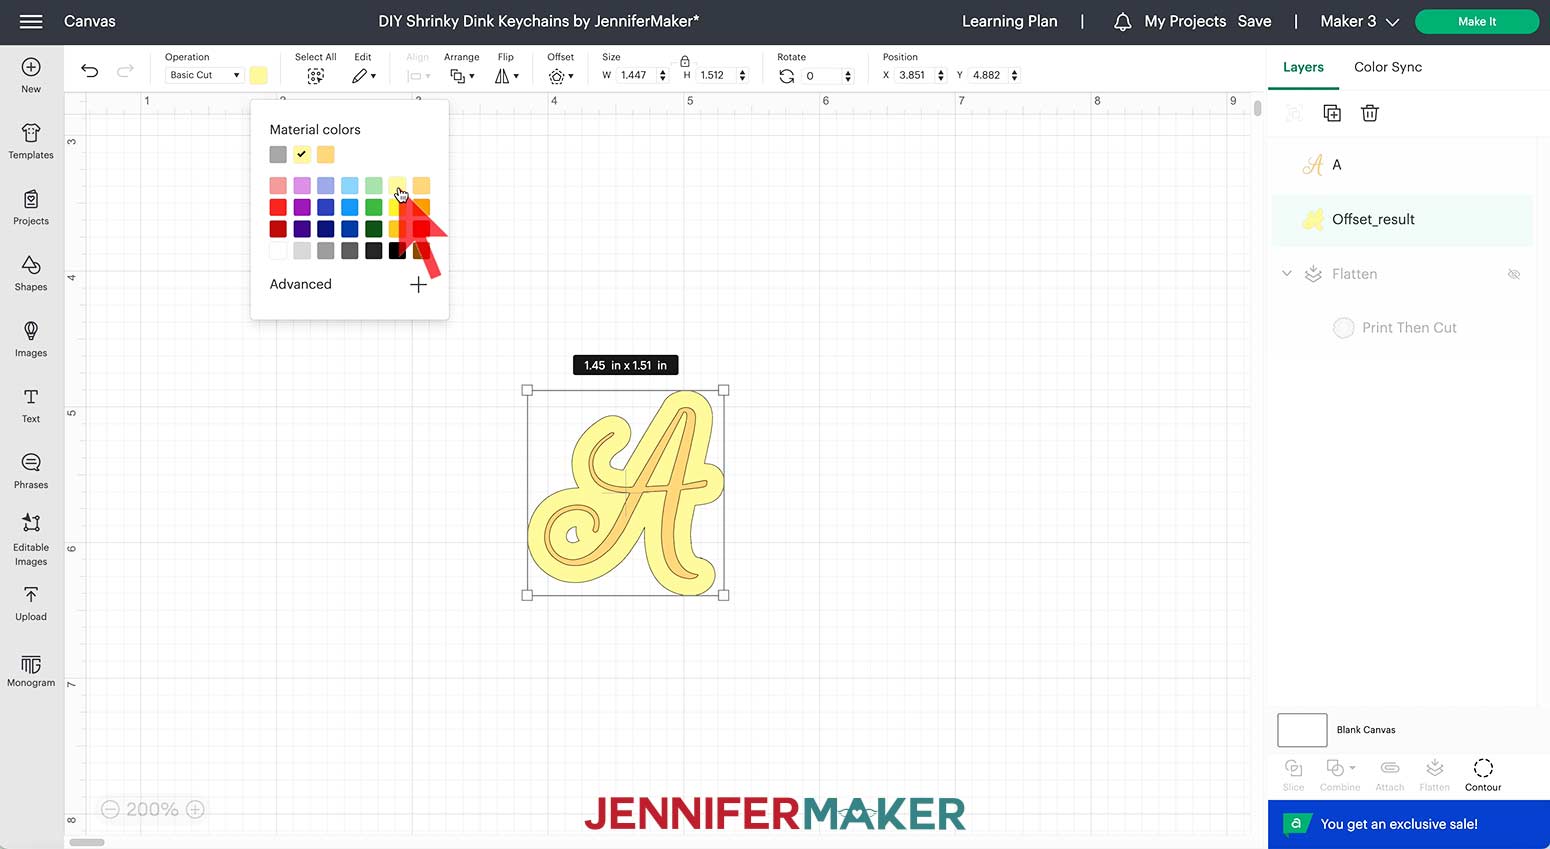
Select only the offset layer and choose a color for it. I chose a pale yellow to compliment the orange.
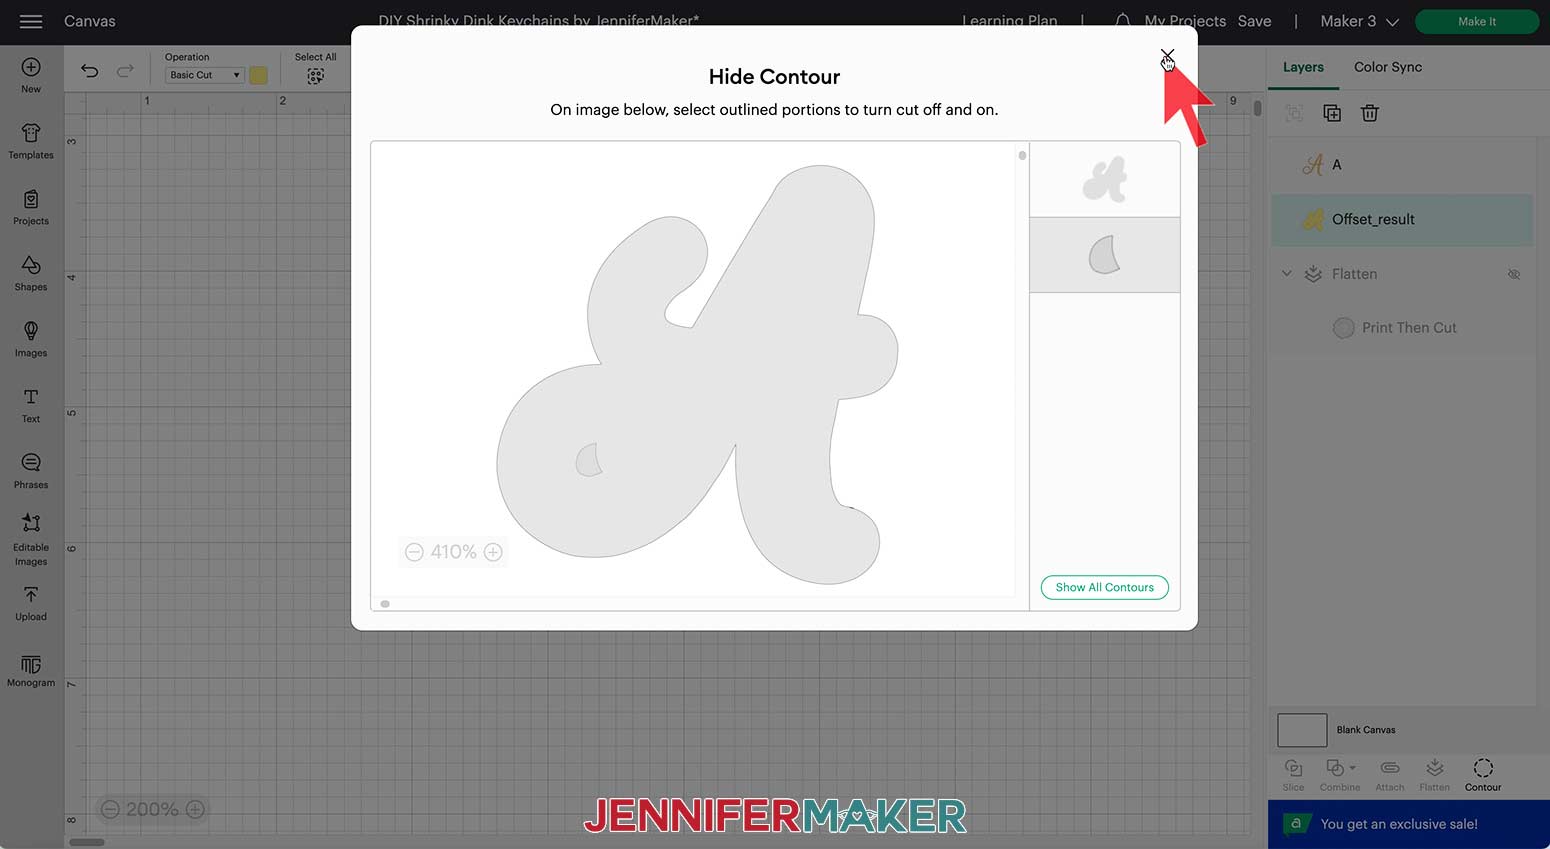
Check your letter to make sure there are no empty spots inside that you do not want to be cut. I have a small interior empty spot inside my “J” that I don’t want to leave inside the keychain. The easiest way to remove any spots is to click on the offset layer, click “Contour” on the lower right, then click the spots to remove them. Click the “X” in the upper right of the window after selecting all the openings you wish to close.
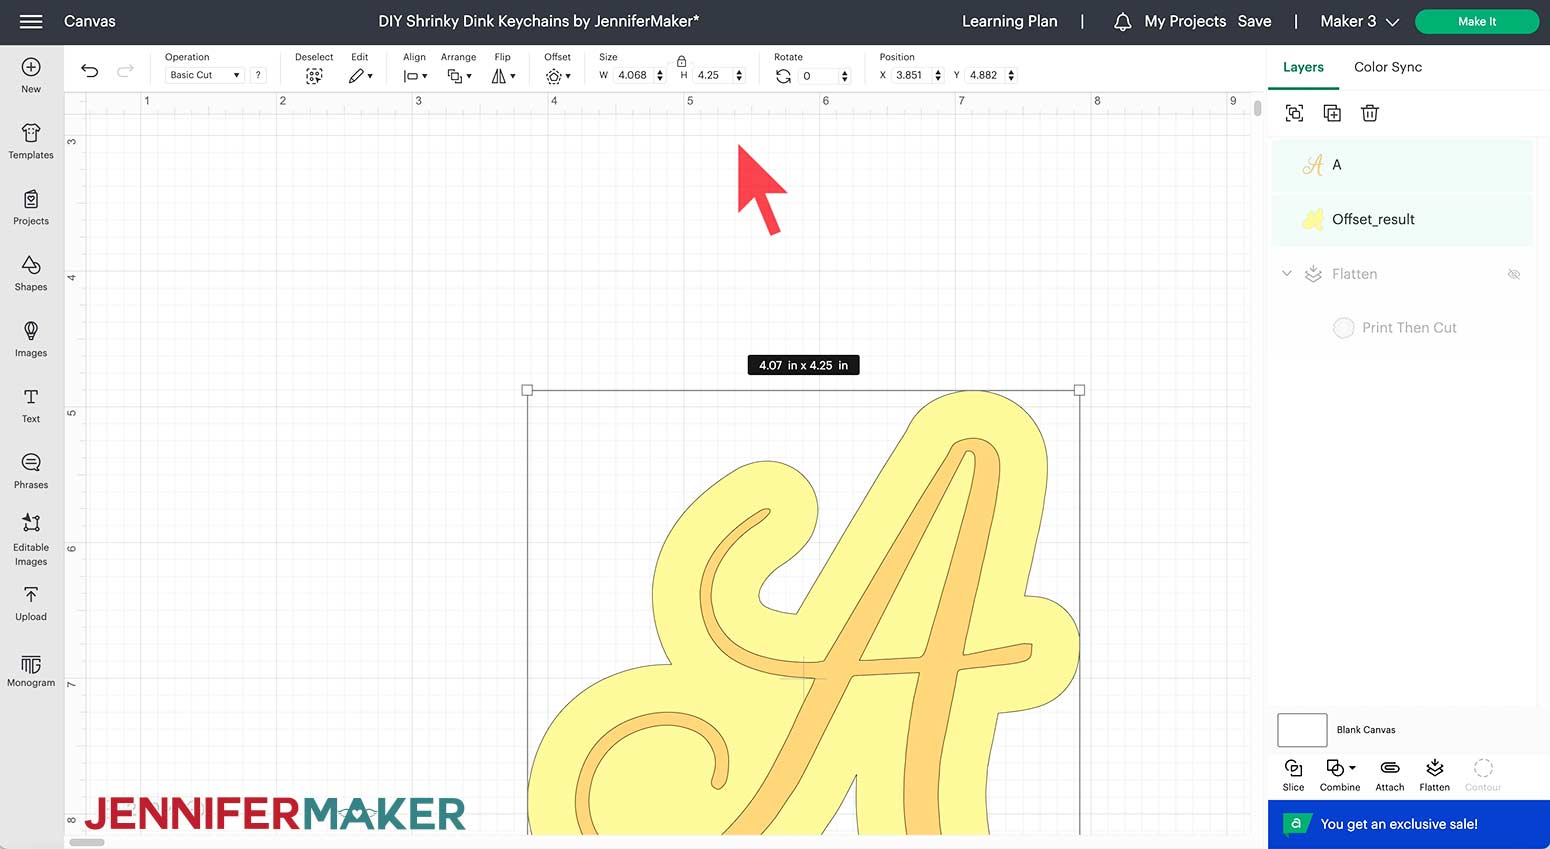
It’s time to resize the letter so that it will print and cut to a large enough size to make a good-sized keychain when shrunk in the oven. Select both the letter and the offset layer before resizing. I’ve resized my letter “J” to 4.25” high.
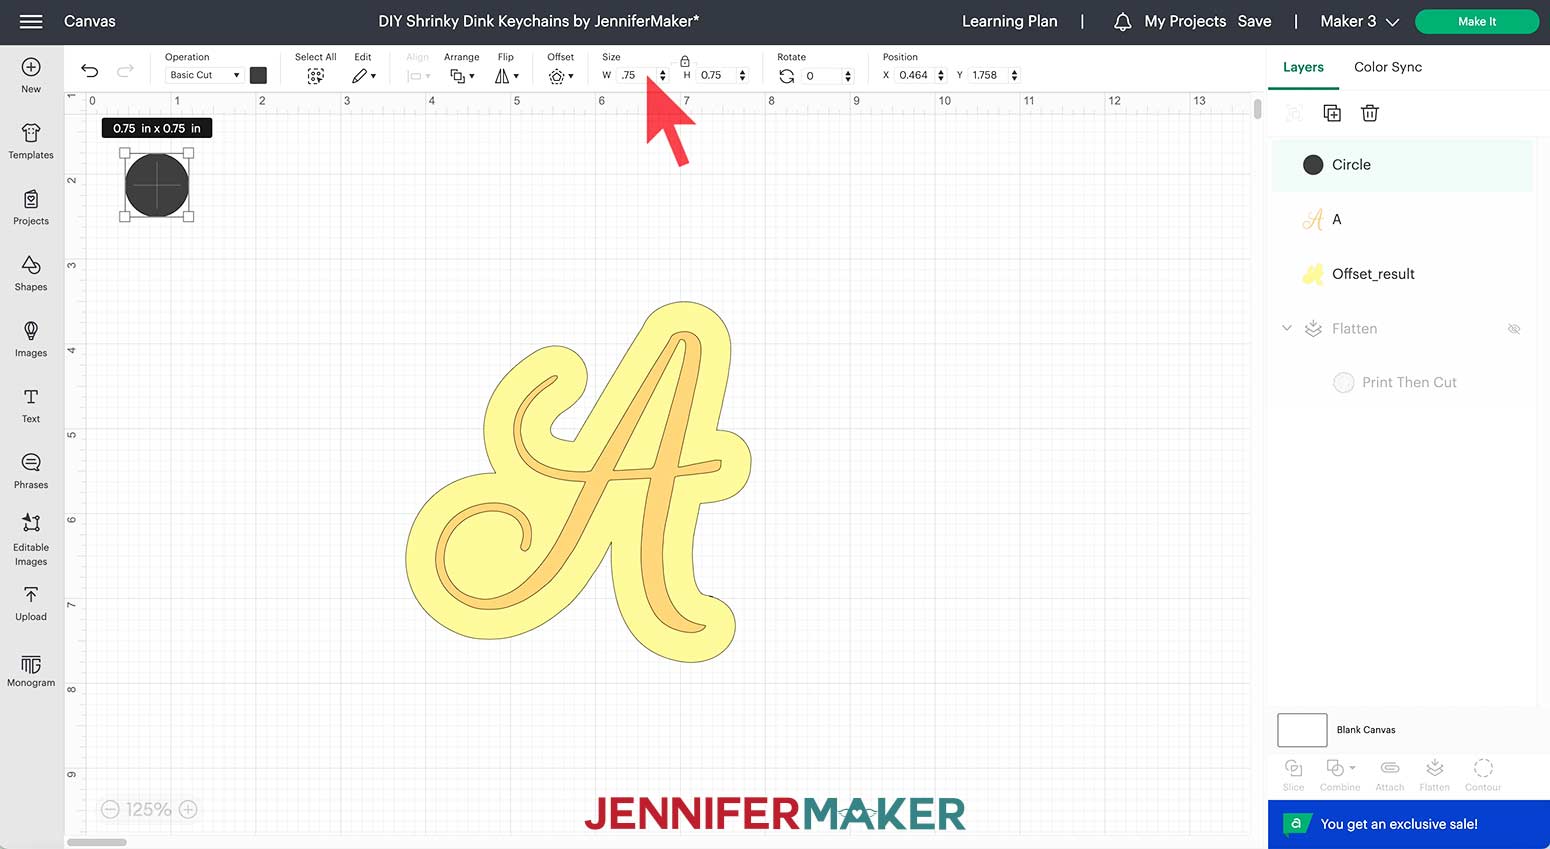
Now we need to add a circle for the keyring or keychain to loop through. Remember that holes shrink in size as the material bakes, so do not use a starting hole any smaller than .25” or you will likely not be able to use it!
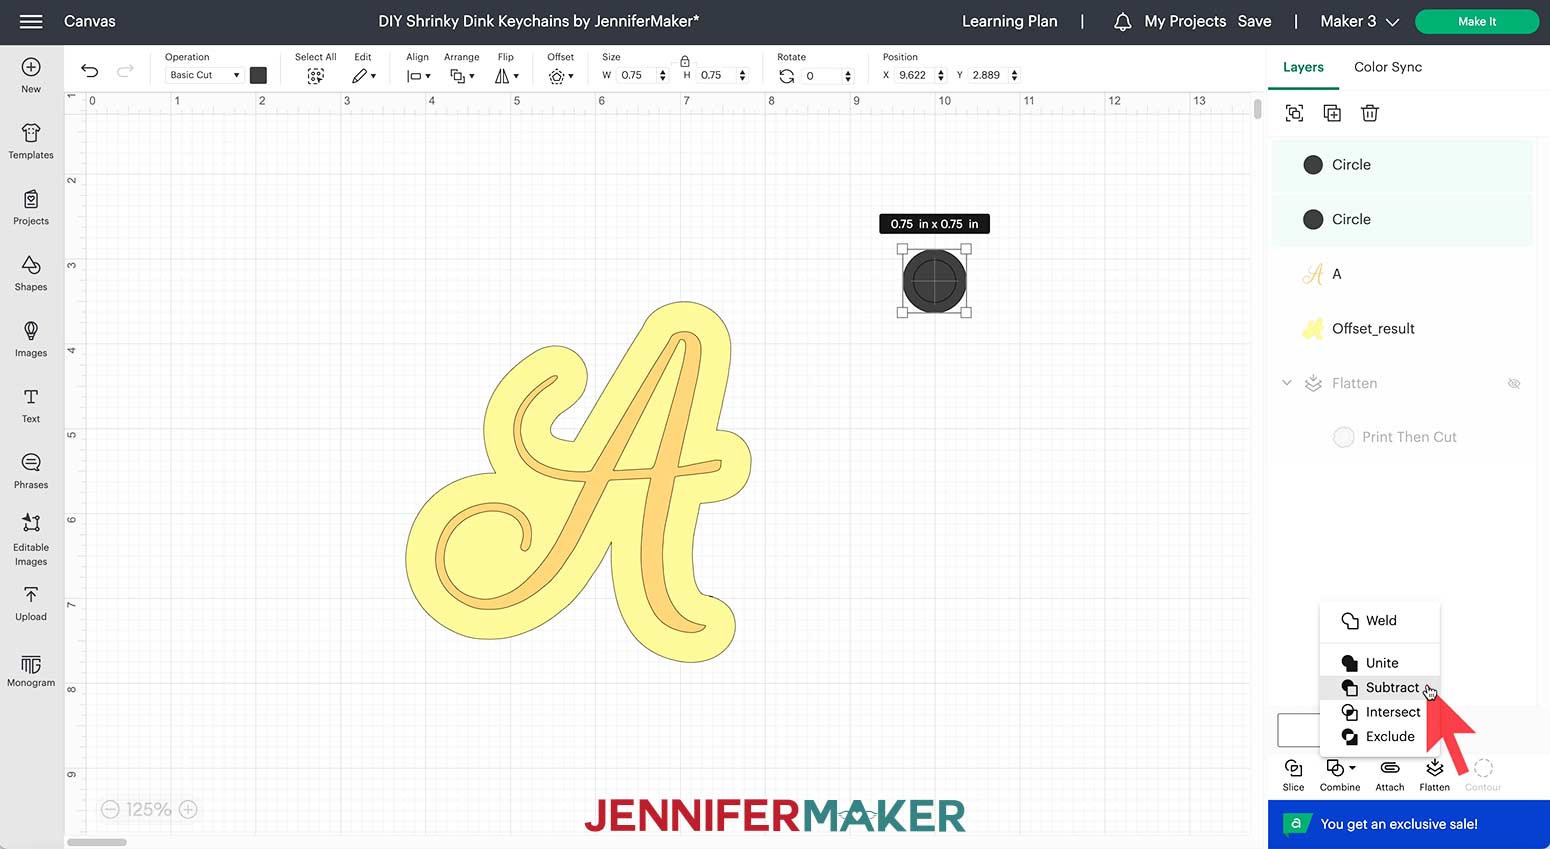
I’m going to make a decent size hole so I can either use a keychain loop directly through the hole or use a jump ring to attach it to a keychain link. To add a circle to your Canvas, click the Shapes icon and pick a circle to add it to the Canvas. With the circle selected and the lock icon closed, change the size to .75” to make the outer edge of the hole.
Click "Duplicate" to make another circle slightly smaller to form the inside of the circle. I’m going to make my inner circle .5”. Select both circles and click “Align” then “Center”.
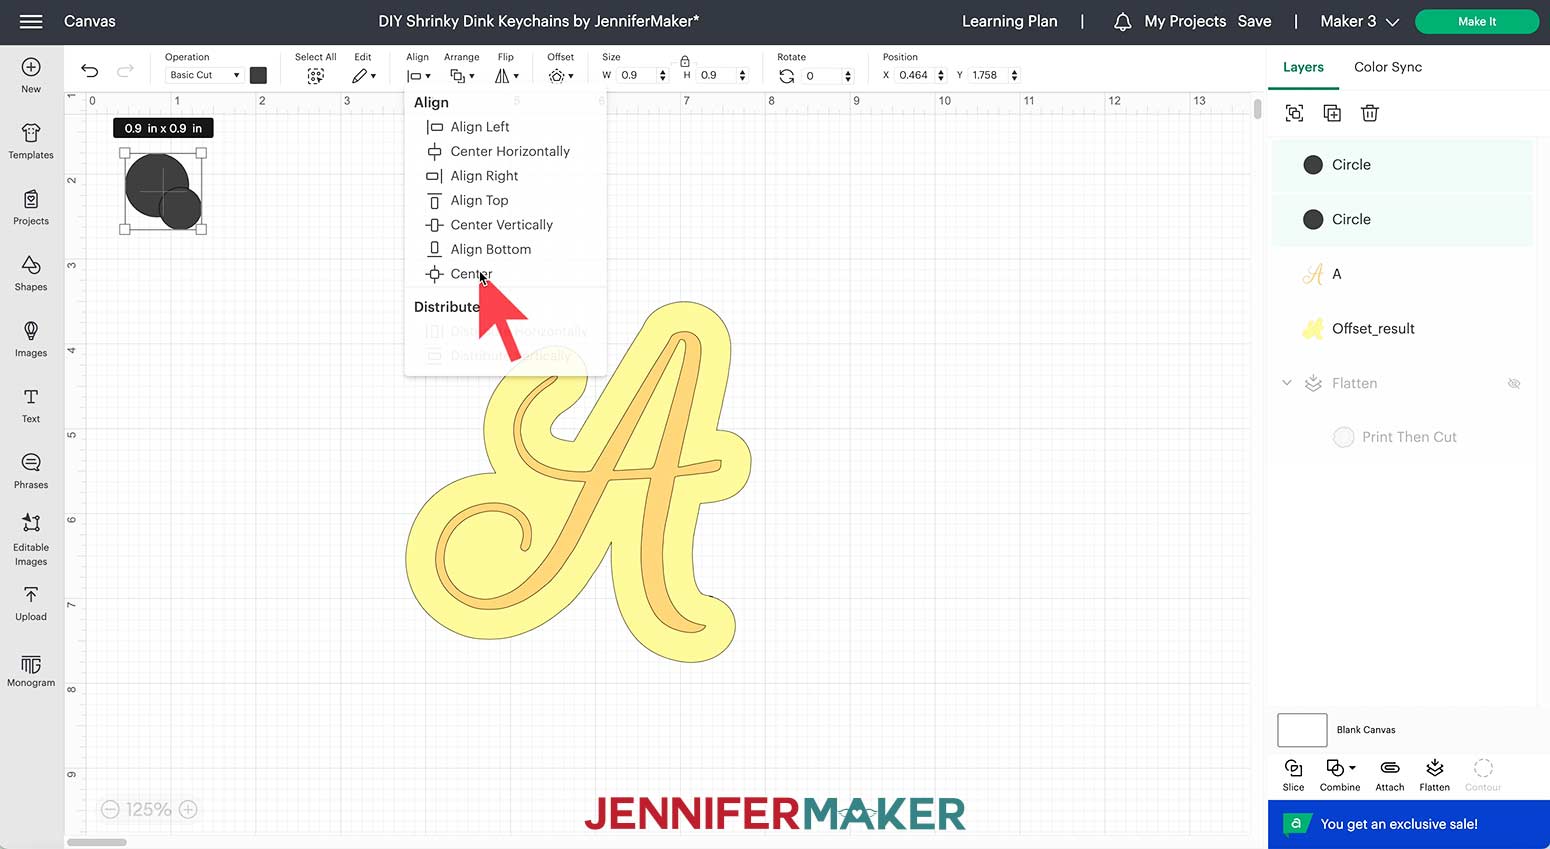
With both circles still selected, choose “Combine” on the lower right, then click “Subtract”. This cuts the center circle out of the larger circle to create the hole for the keyring.
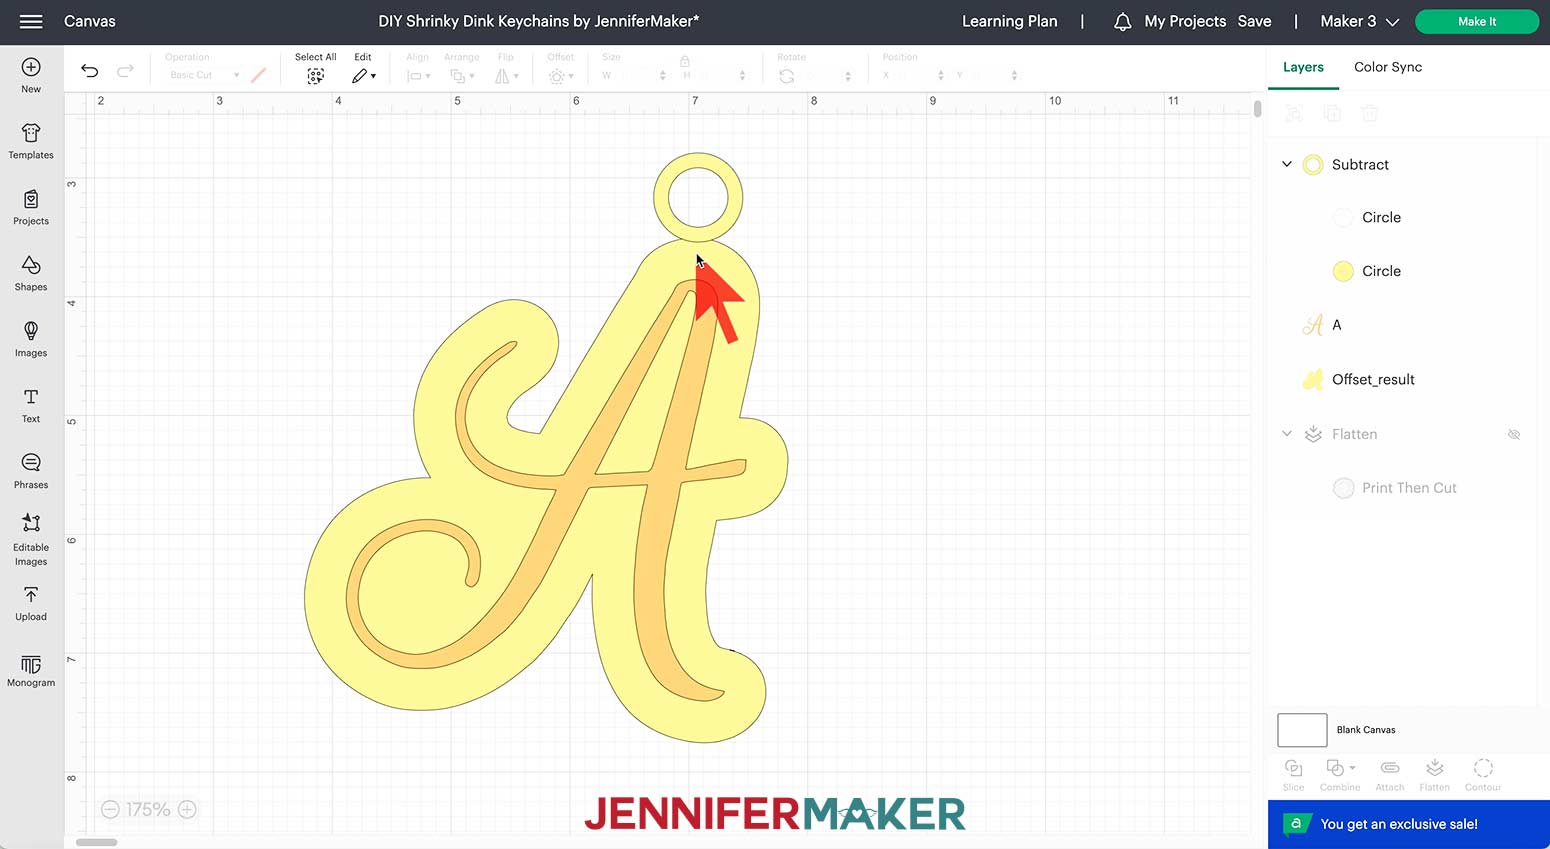
Change the color of the circle to match the outer layer of the initial, then move the circle to a point on the initial where you’d like to attach the letter to the keyring. I’m adding my hole to the top of the “J”. Make sure the circle overlaps the edge of the initial enough to be sturdy when the final project is cut.
Select both the circle and the offset layer of the initial. Click “Combine” then “Unite” to join the circle to the offset layer.
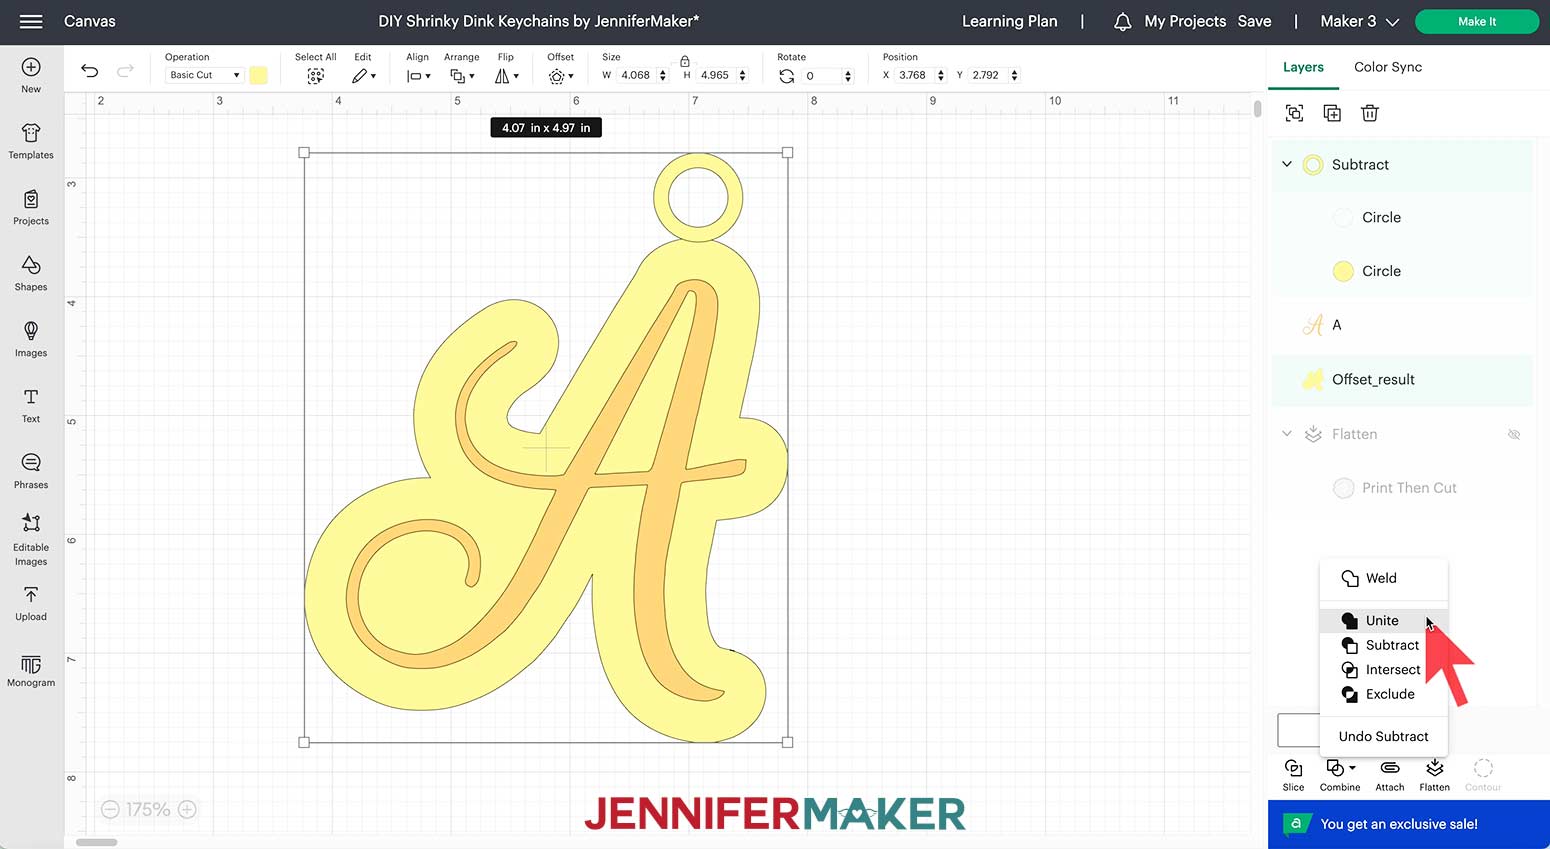
The offset layer of the initial and the circle are now combined as one piece and will move to the top. Right-click on the layer and select “Send To Back” to see the layers in the correct order again.
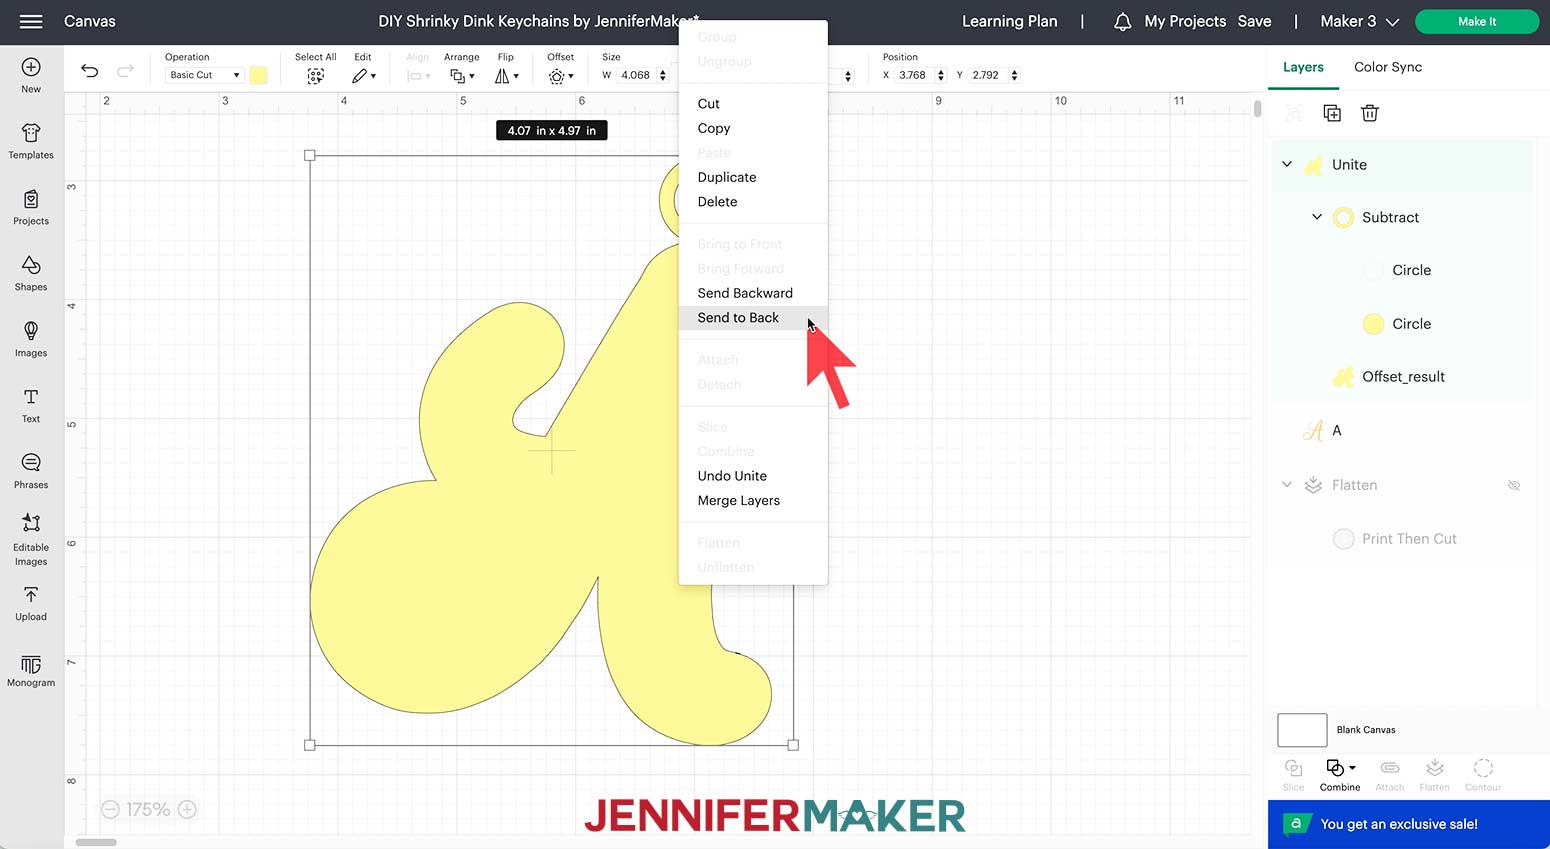
Select both the offset layer and the original initial letter and click “Flatten” on the lower right.
Your letter is now ready to cut!
Photograph Keychain
To make a photograph keychain, first, make sure the photo you wish to use is very light. If it is not, the image will be too dark to see when the plastic shrinks to its final size. If you need to lighten an image, do so with photo editing software before uploading it to Design Space as you cannot make the necessary color changes in Design Space.
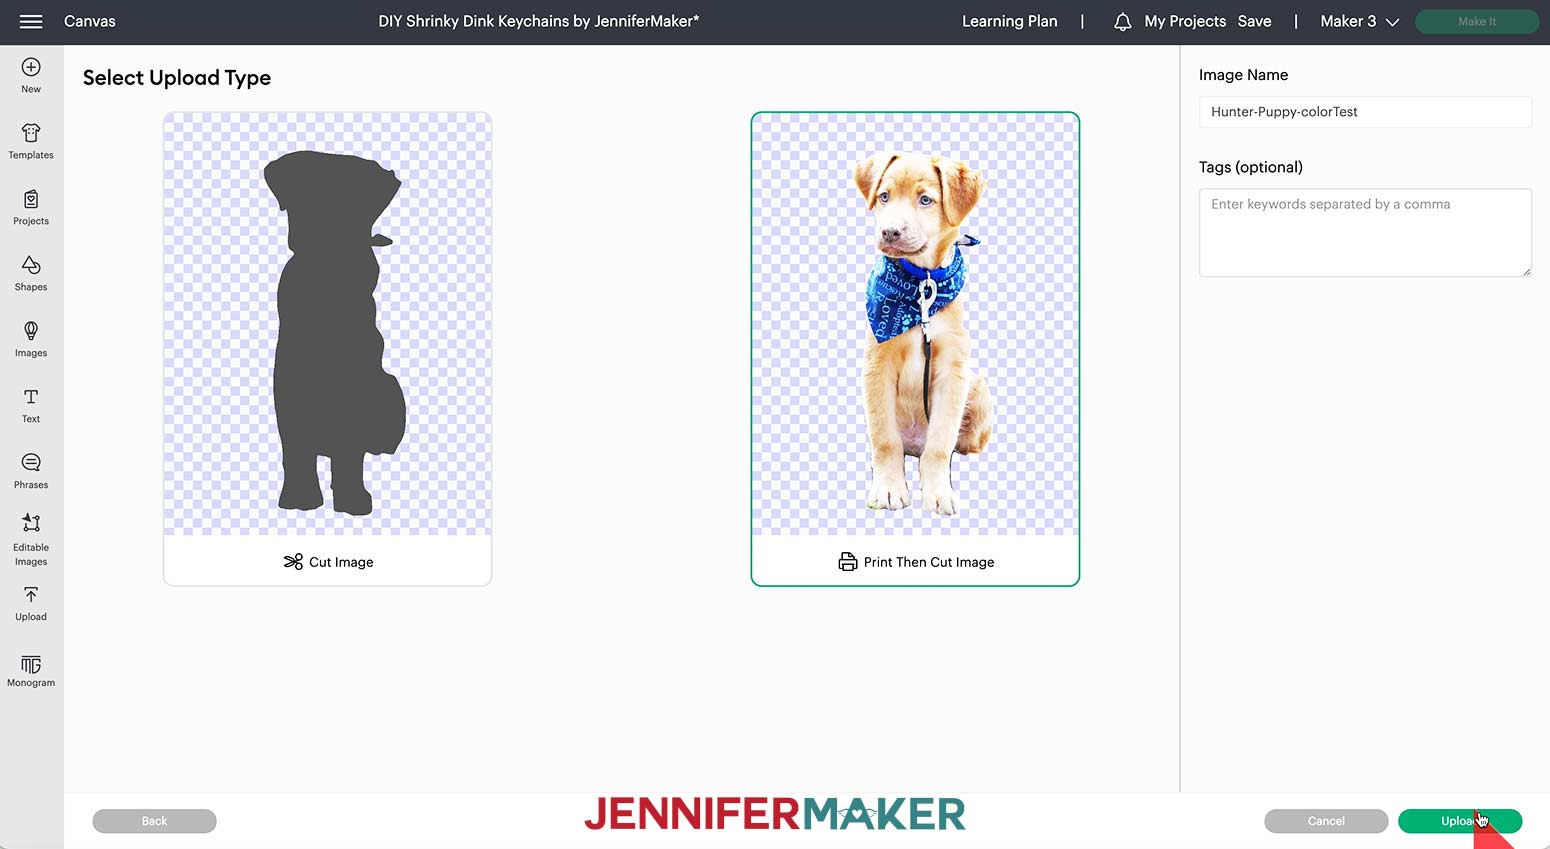
Once the image is ready, bring it in to Design Space just like we did with the sunflower. Click “Upload” then “Upload Image” to get started. Browse to your image to bring it to the “Select Image Type” menu. I’m using a photo of Hunter as a puppy for my keychain that I’ve already brightened in Photoshop.
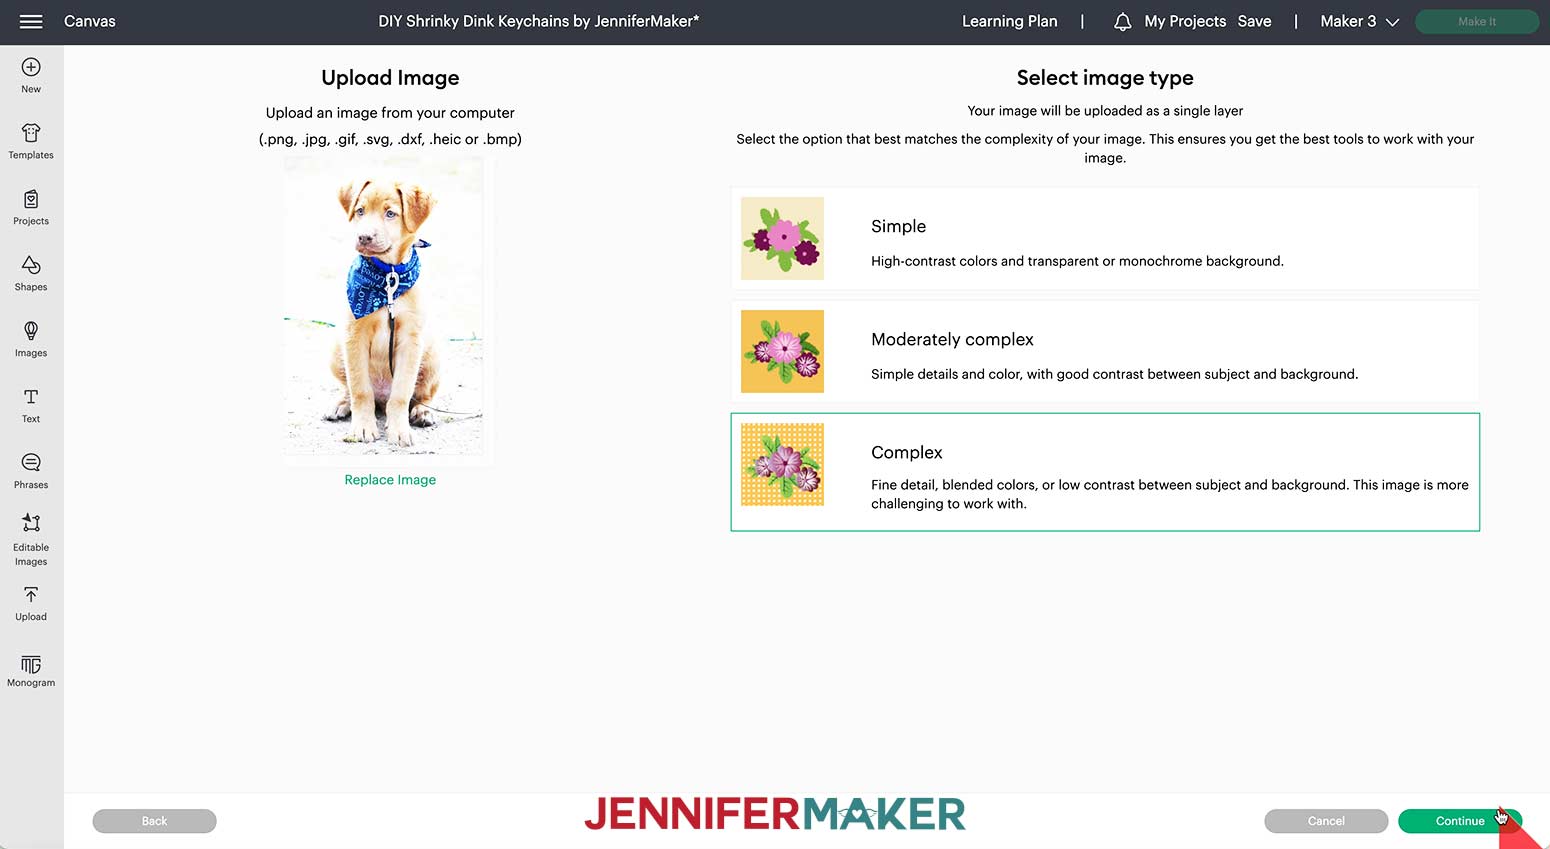
Choose “Complex” then “Continue.”
Now use the tools on the left to remove the background. Click “Remove Background” to get a quick start, then, if too much background was removed and took some of your image with it, click the "Restore” tool and move it around the image to return bits of the photo.
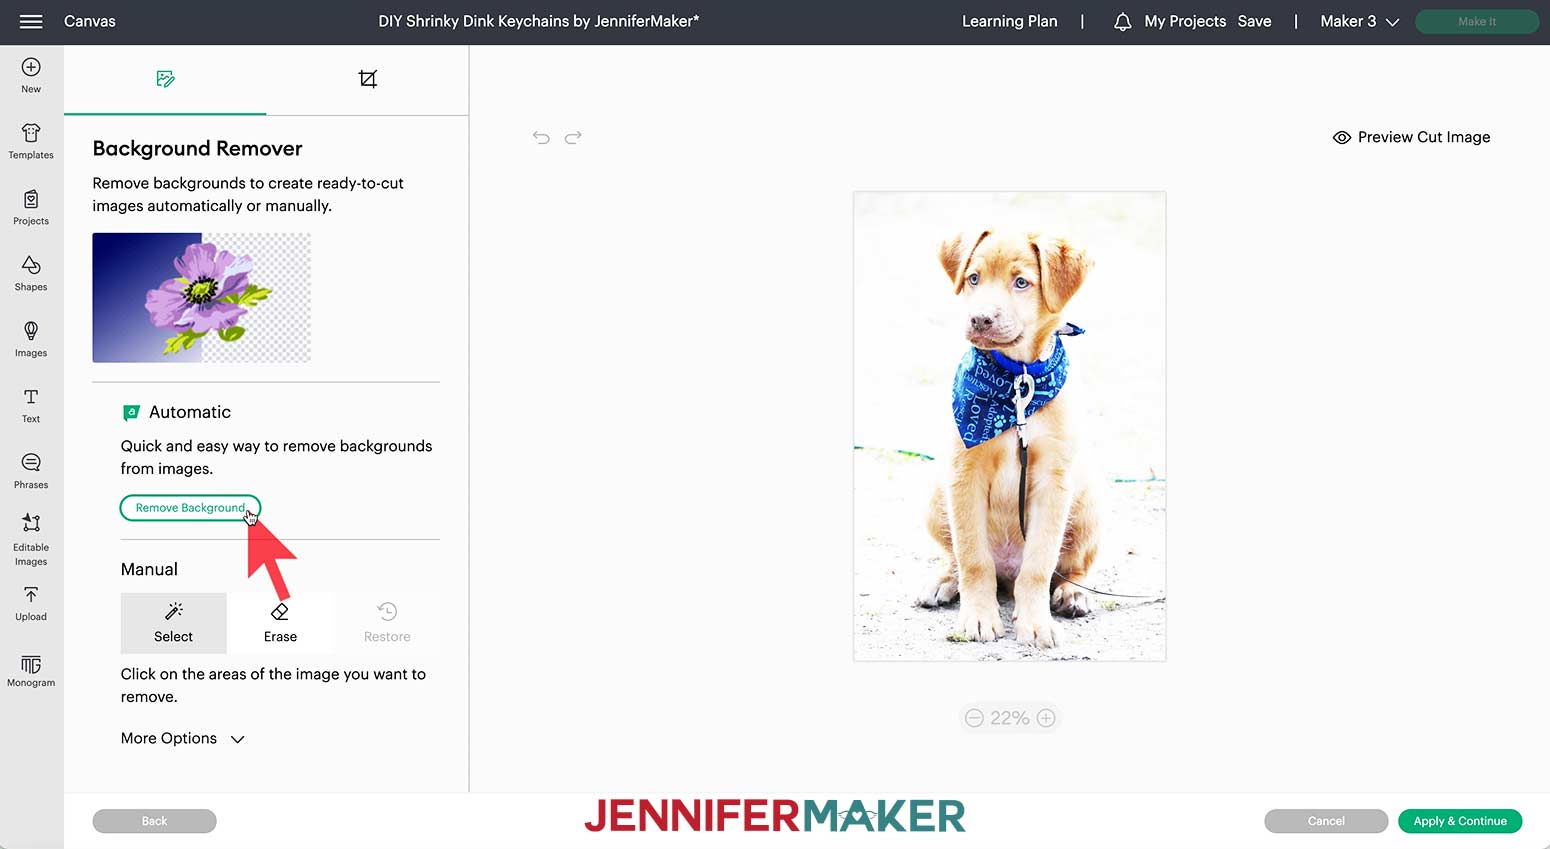
Once the background is removed, click “Apply & Continue.”
It’s important to check the “Cut Image” version of the file on the left hand side of the screen. If there are any spots missing inside your final image, or some of the background is still visible, your image will cut in places you won’t want it to when you send the photo to your Cricut. If you need to, select “Back” to use the “Restore” or “Erase” tools to continue to refine your image.
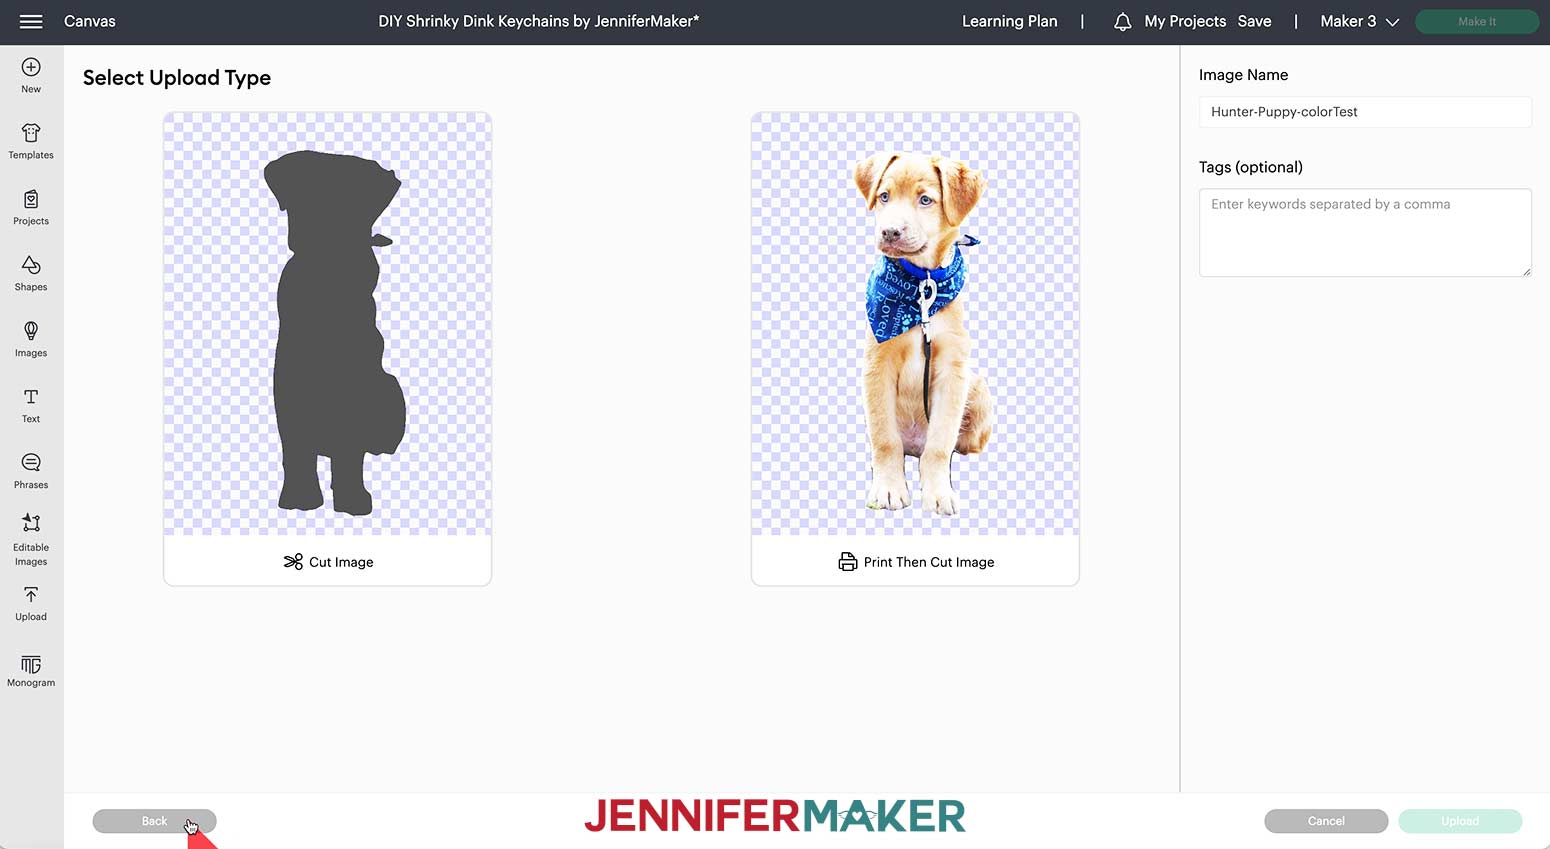
Once you are satisfied with your image shape, select the “Print Then Cut” version and click “Upload”.
On the preview screen, select the image you just added and then click “Add to Canvas.”
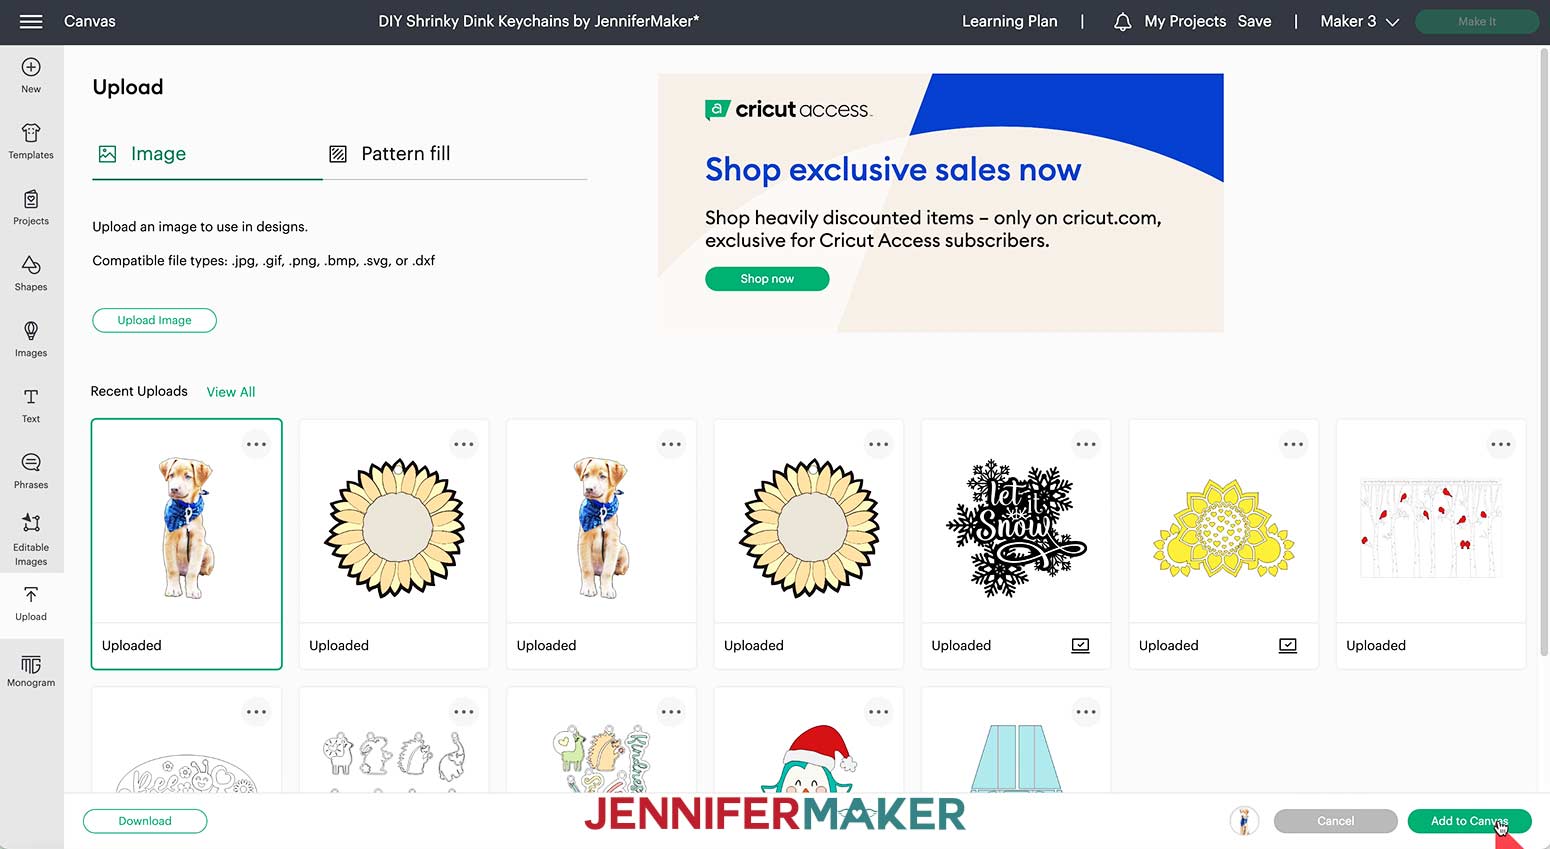
The photo is now on the canvas, but it is likely far too big depending on the way the image was saved. Resize the image to approximately 5” in height to get a nice size keychain with most shrink materials.

Once the photo is sized correctly, add the offset layer and the hole in the exact same way as the initial above.
Select all the layers of the photo and offset and click “Flatten.”
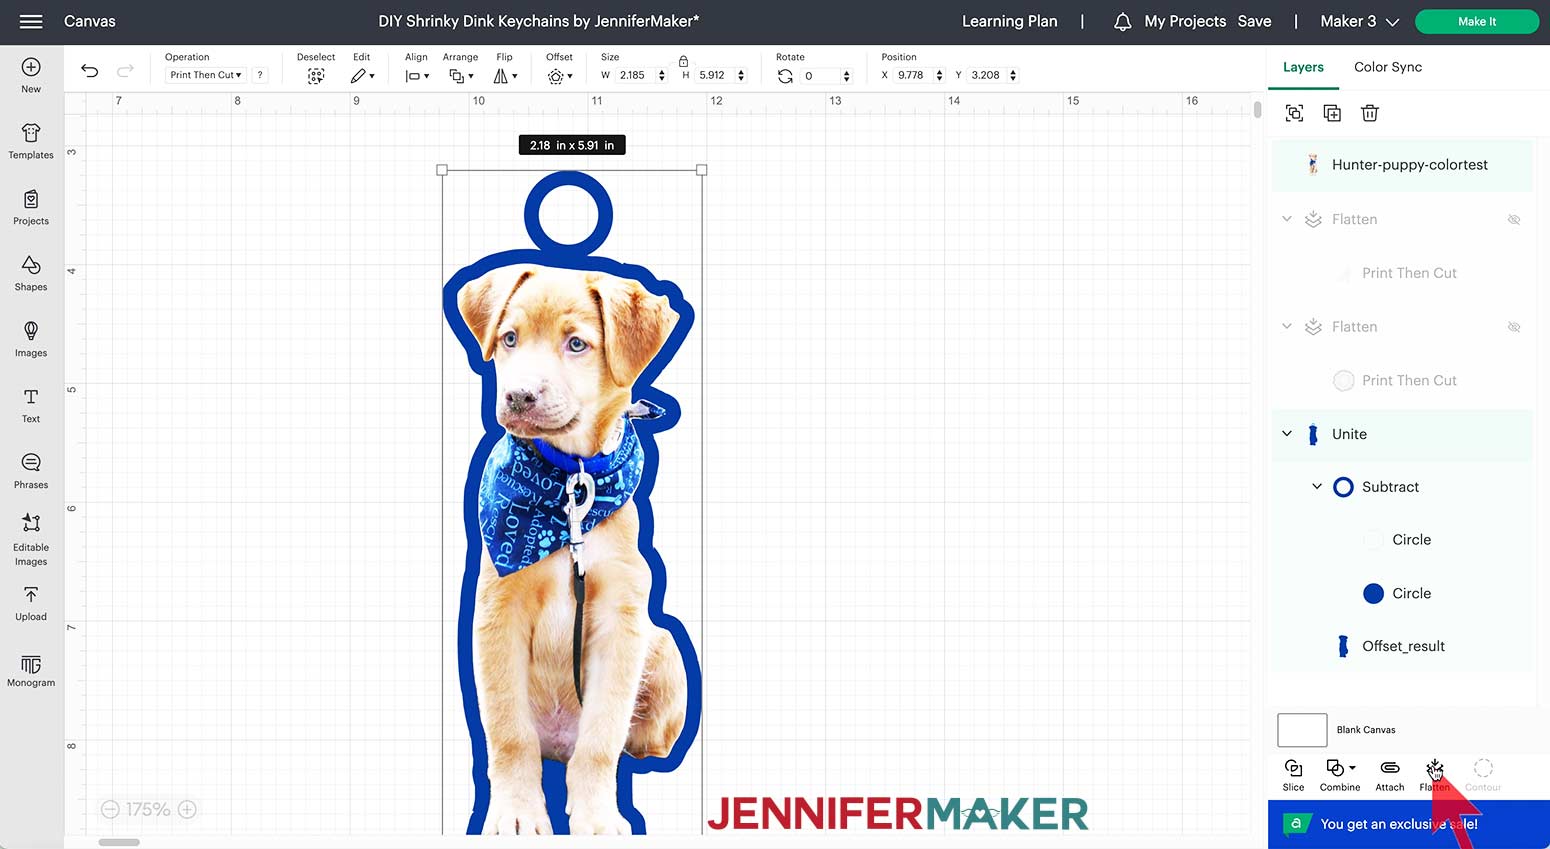
Your photo is now ready to print!
STEP 3: PRINT THEN CUT THE SHRINKY DINKS
Check that the right machine is listed in the top corner, then click "Make It!"
Your designs will appear on mats with extra border markers around them. The Cricut will use the border markers to know where to cut when the images are loaded.

Make sure the correct Material Size is selected for each mat. It should be the same size as the printable shrink plastic you are using. I used size 8.5x11 for my project.
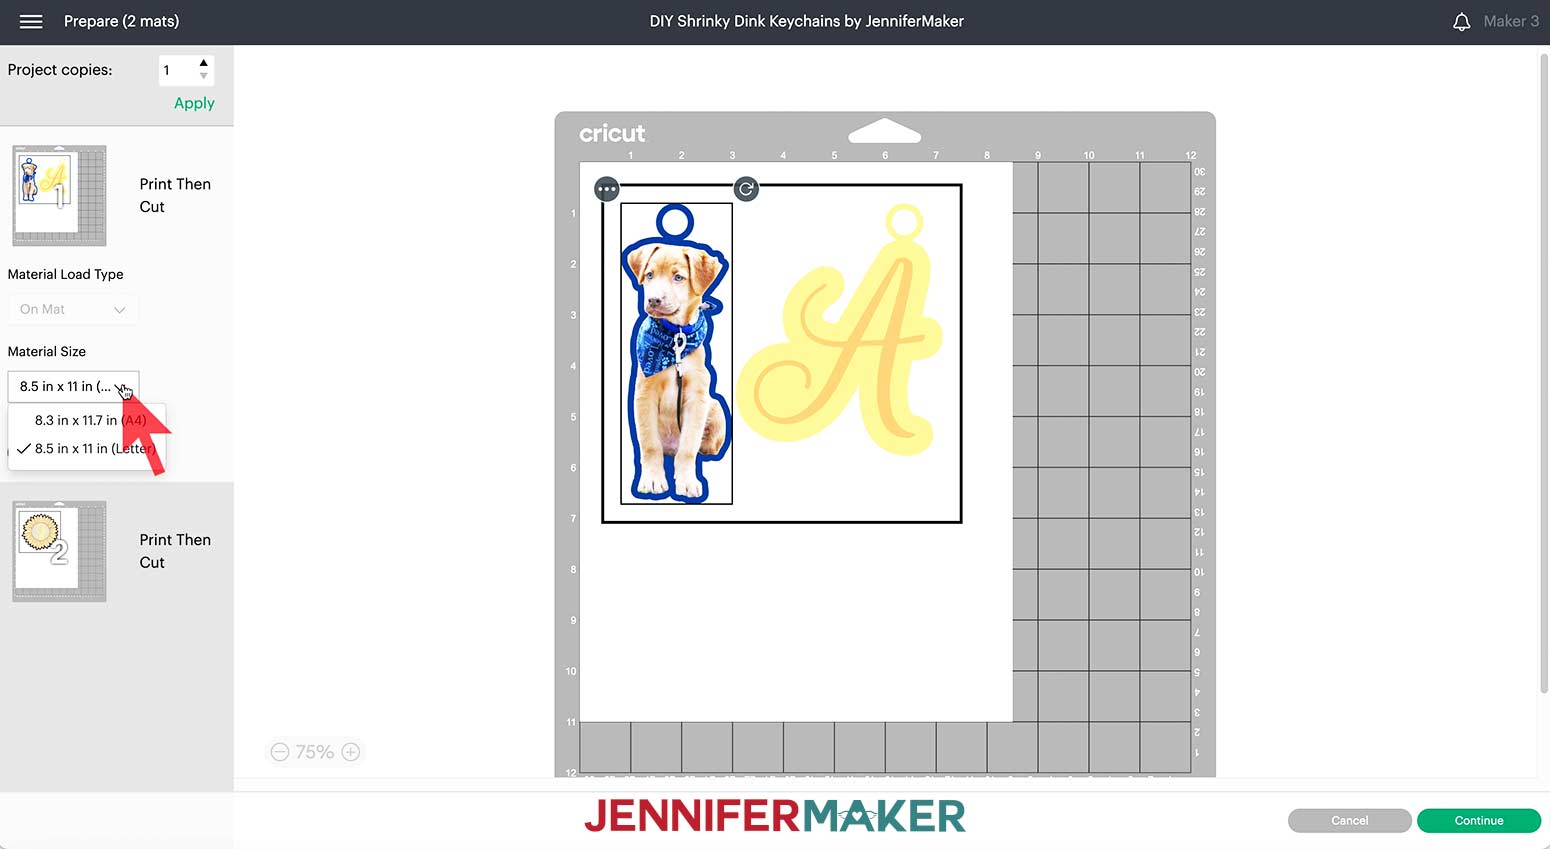
Leave “Mirror” turned off and click “Continue”
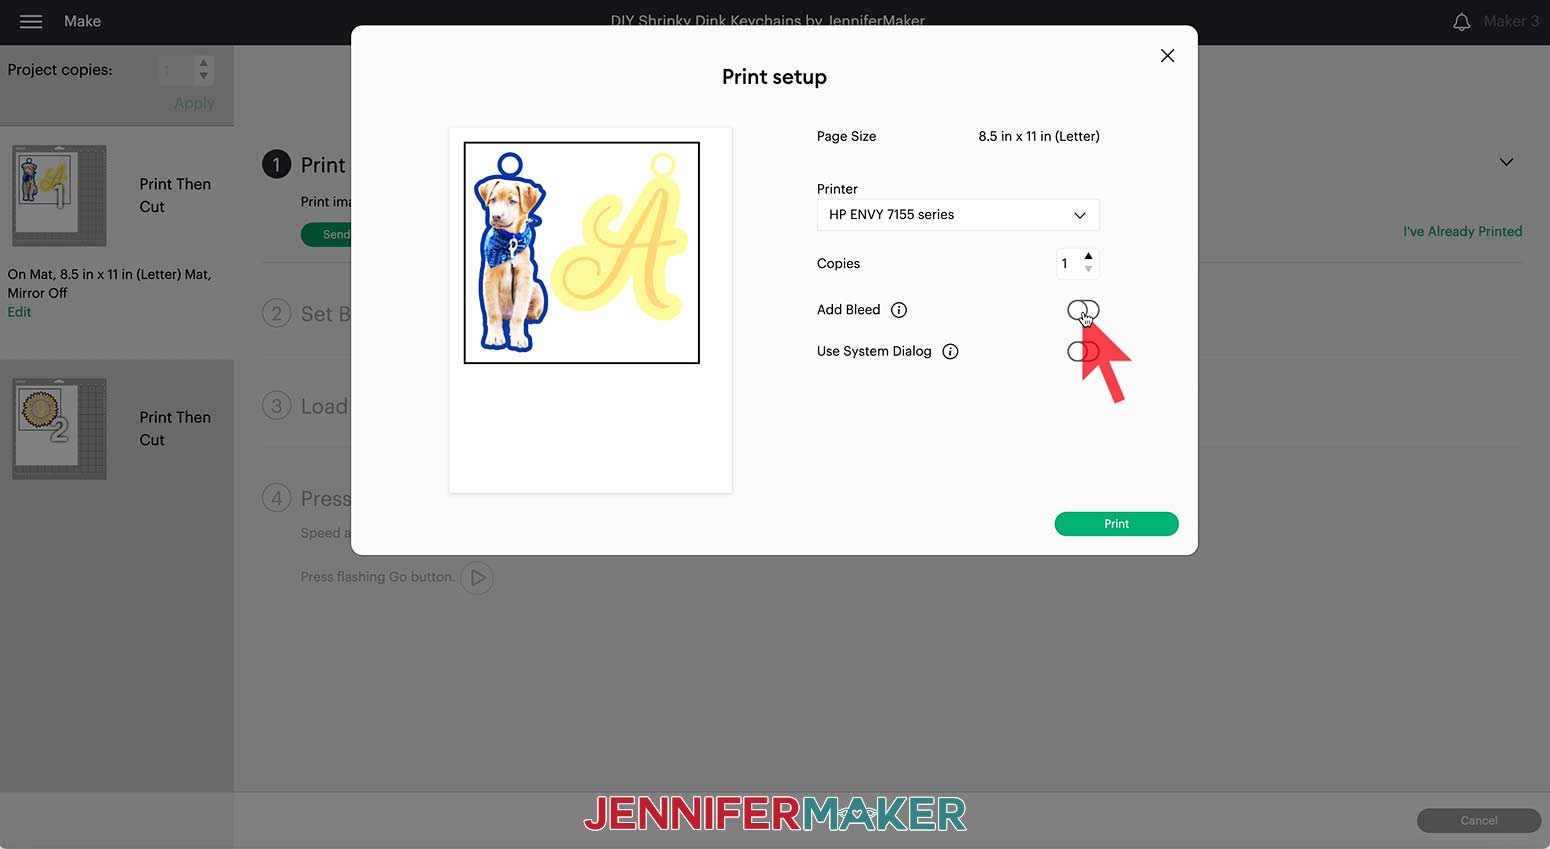
Click “Send to Printer”. A Print Setup box will open to allow you to make some choices about how to print your mats. Make sure the correct printer is selected, the correct number of copies you wish to print are entered, and the “Add Bleed” setting is turned off. Unless you want to make changes to the way a page prints in your printer’s own print menu, also leave “Use System Dialog” turned off.
Before clicking “Print”, make sure the printable plastic sheet is loaded into your printer correctly. The plastic is shiny on one side and somewhat dull on the other. Make sure the dull side is the side on which the ink will be placed. (If you print to the wrong side, the ink will never dry and it will make a big mess!)
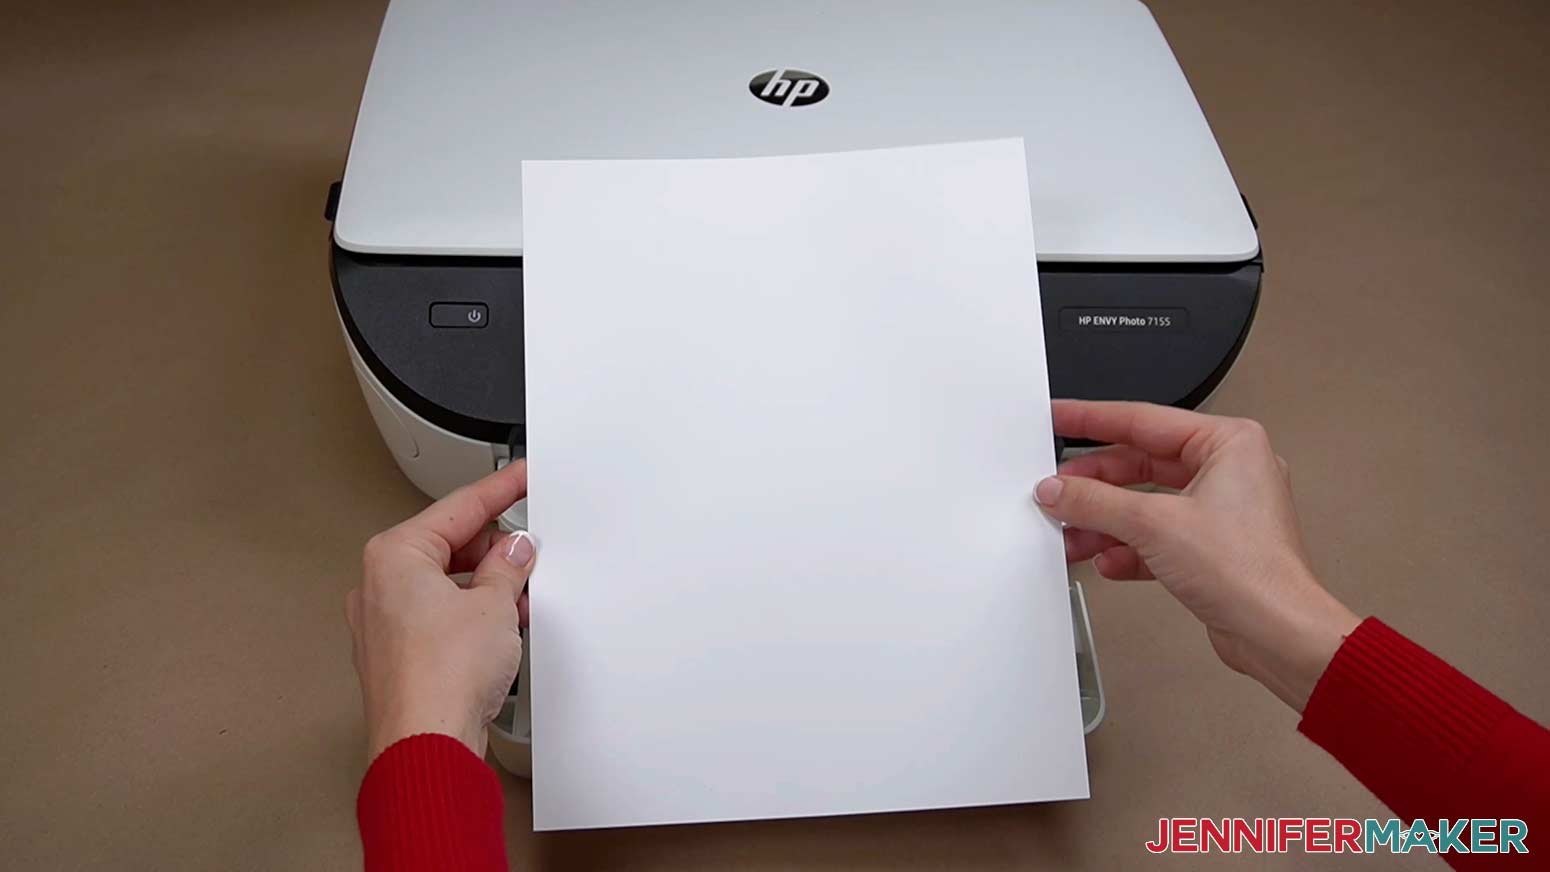
Also, if your printer has a special load slot for thicker materials, it is best to use it as the plastic sheets are a bit stiff when running through the printer.
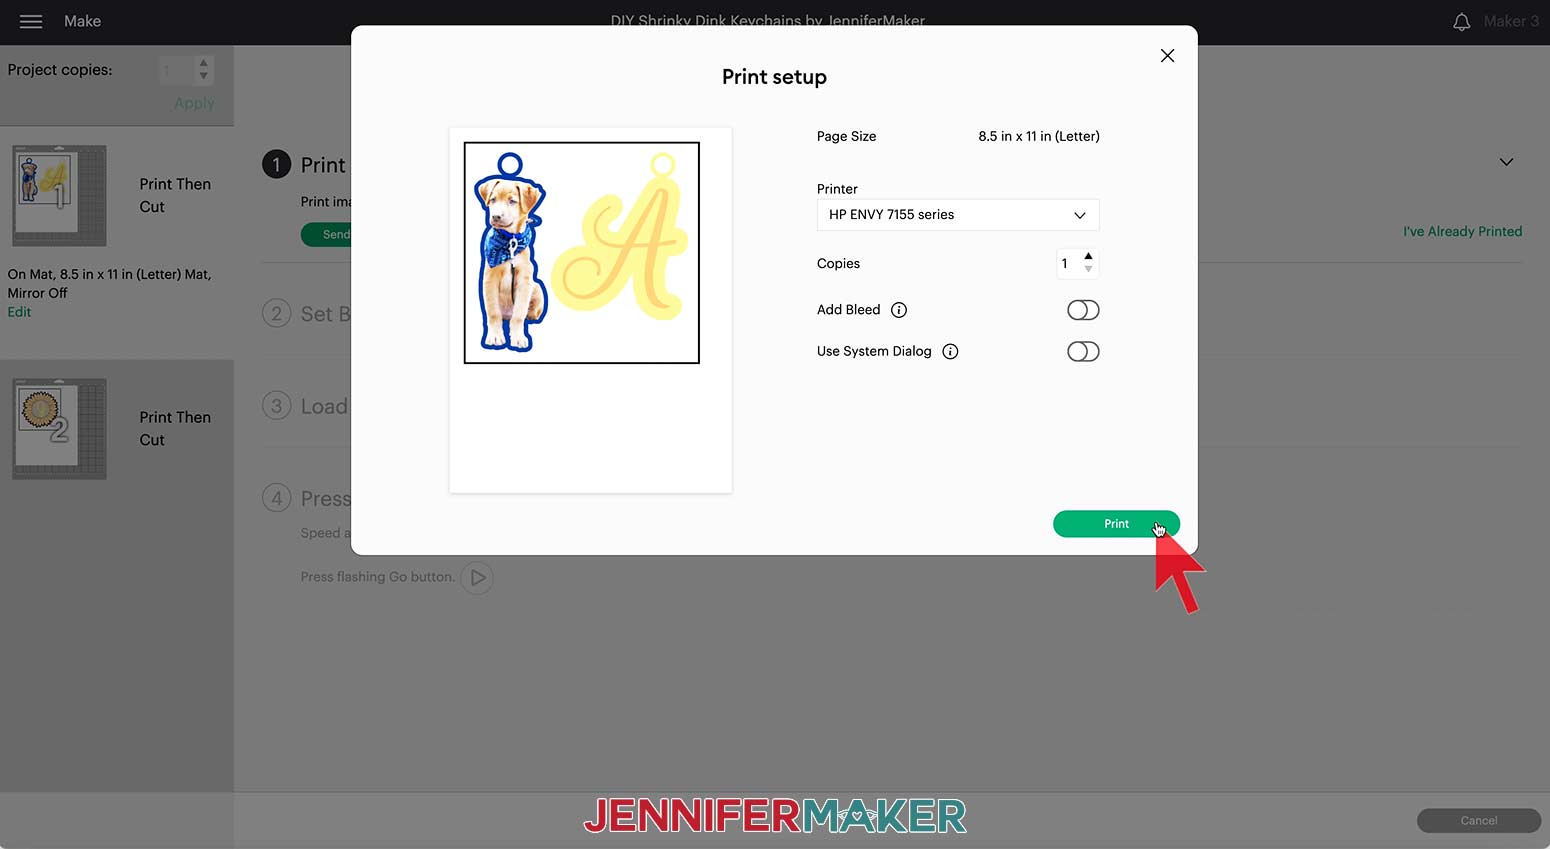
Click “Print”
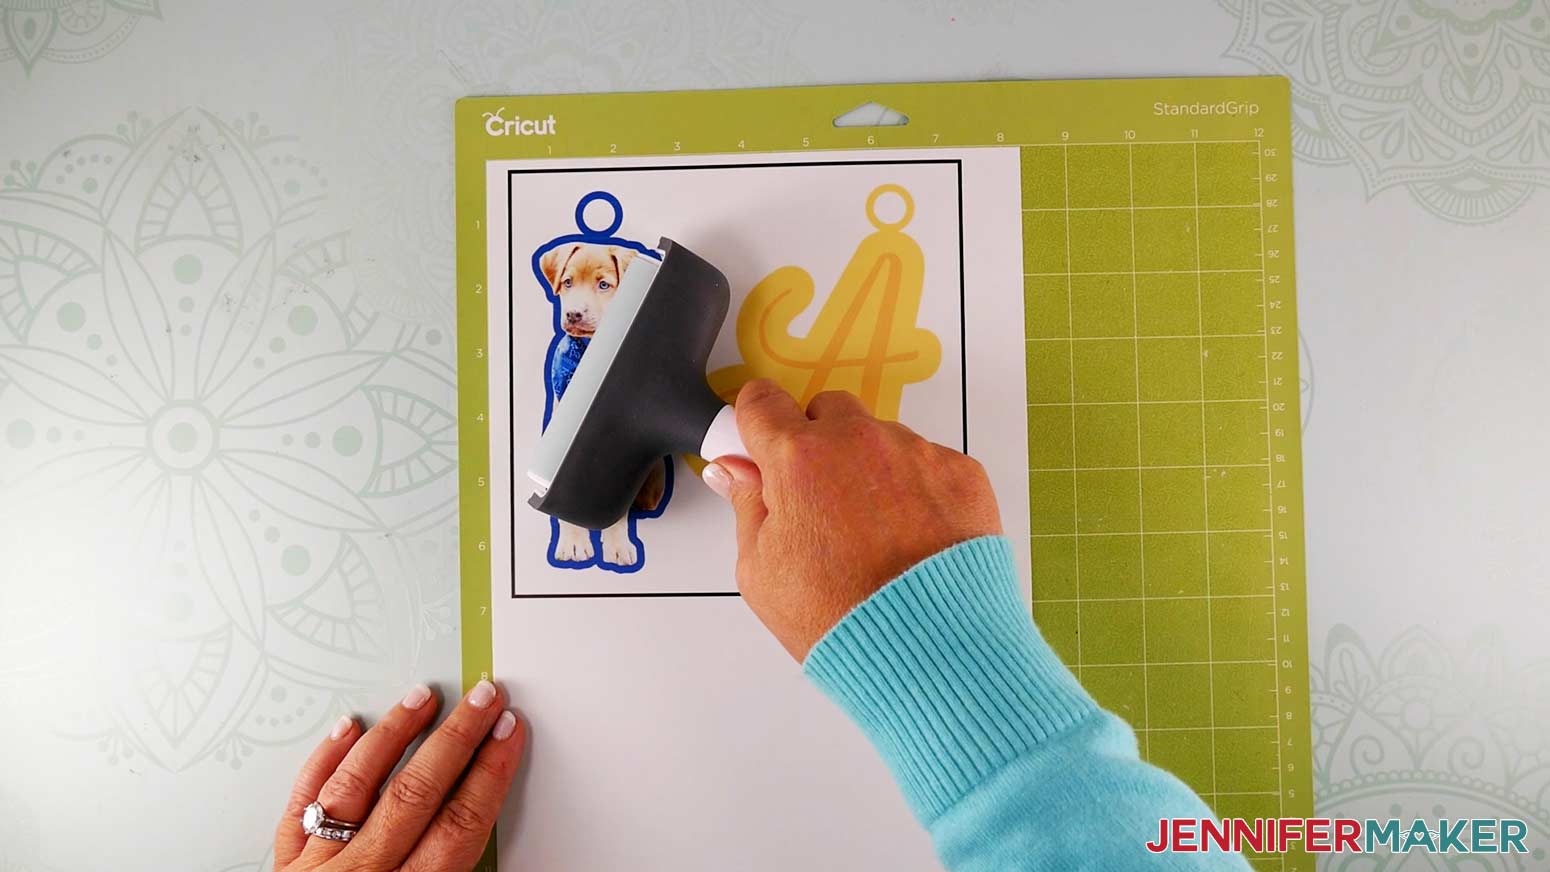
Your mat will print to your printer. Once the print is complete, let it sit for a moment to make sure the ink dries thoroughly. Place the shrink plastic with the print side up on your green StandardGrip mat and make sure it has adhered well by pressing it with your brayer.
Before loading the cutting mat into the Cricut, select the correct cut setting. I tried several different cut settings for the printable plastic and found I needed to make a custom material cut setting to get the best results. Don’t worry, I’ll show you how! These settings worked for my machine, but each one is different, make sure to test a cut file just in case.
Click "Browse All Materials," then "Material Settings." Scroll all the way to the bottom of the listed materials and click the green button labeled "Add New Material."
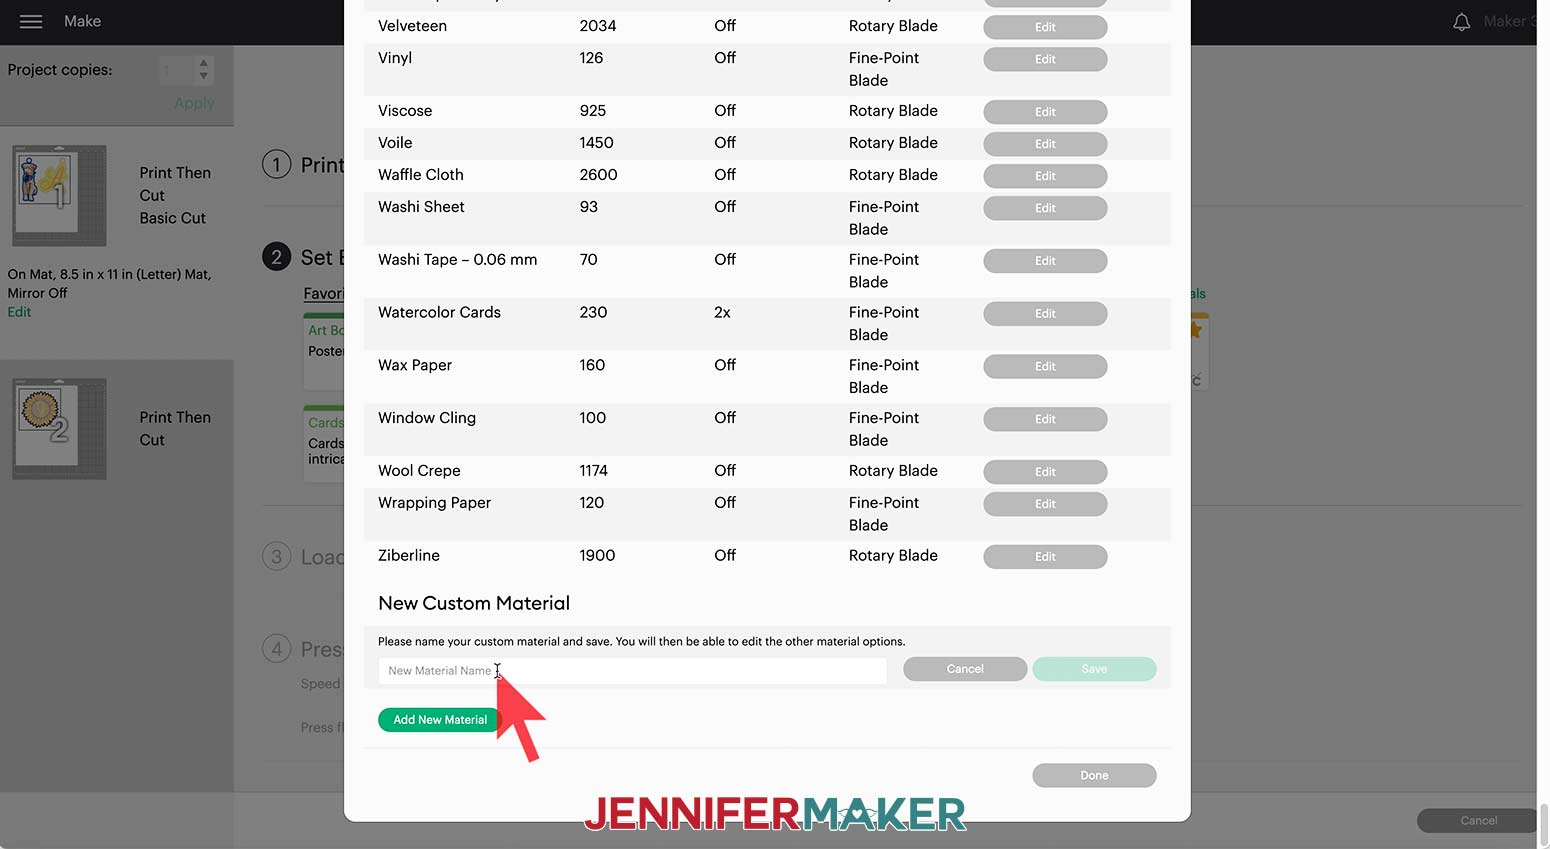
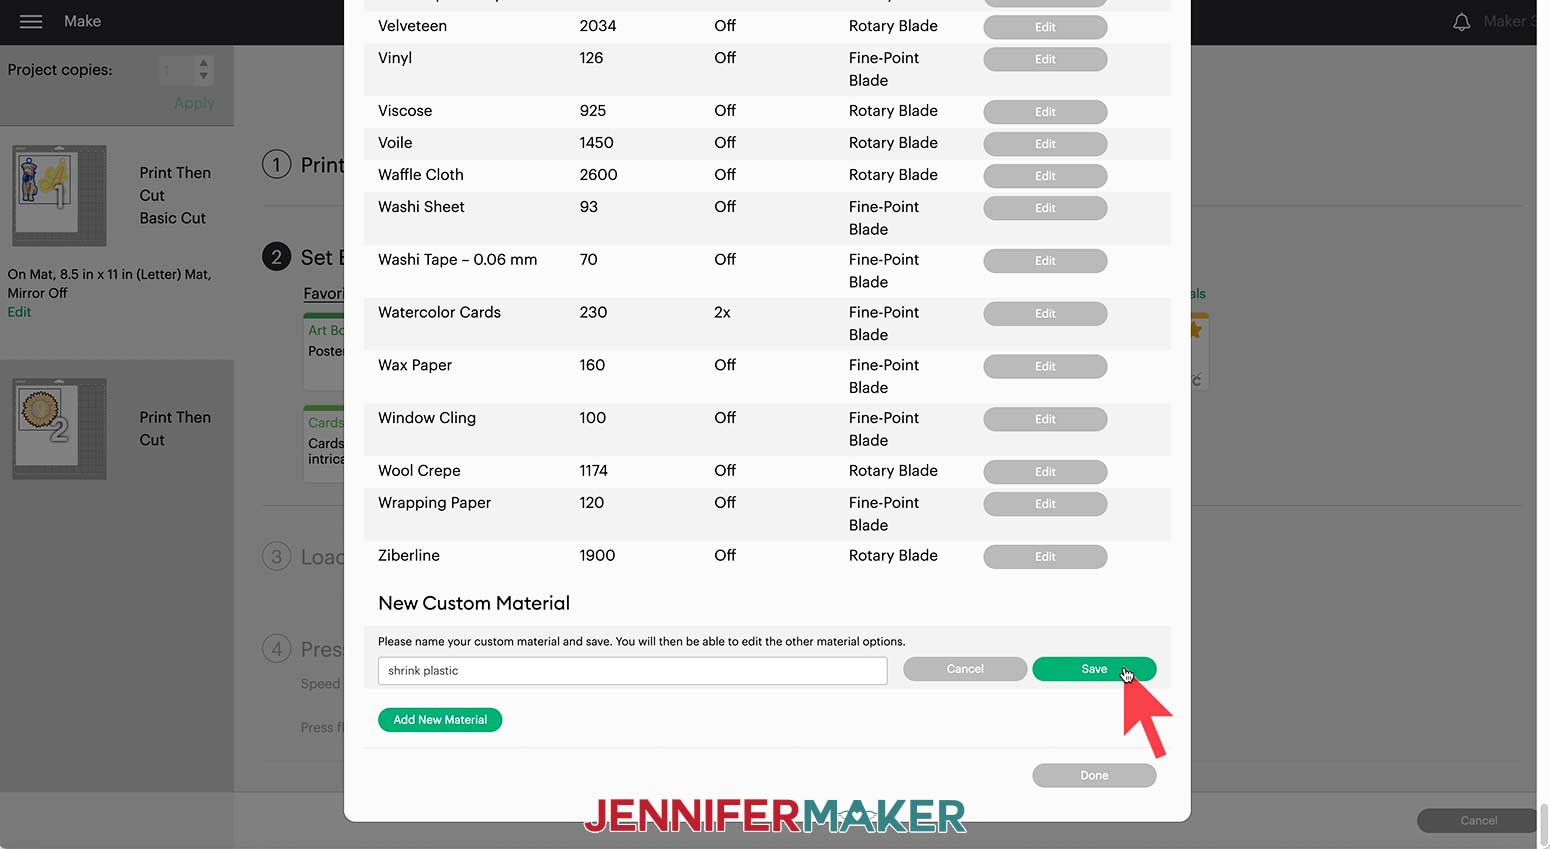
Next, type a label for your new material setting. I used "Shrink Plastic" as my title. Click "Save."
The list will now scroll back to your new material to allow you to input custom cut settings. I used "310" for the pressure using the slider and "3x" for the cut under Multi-cut. The Fine-Point Blade is already selected so I left that in place. Click "Save."
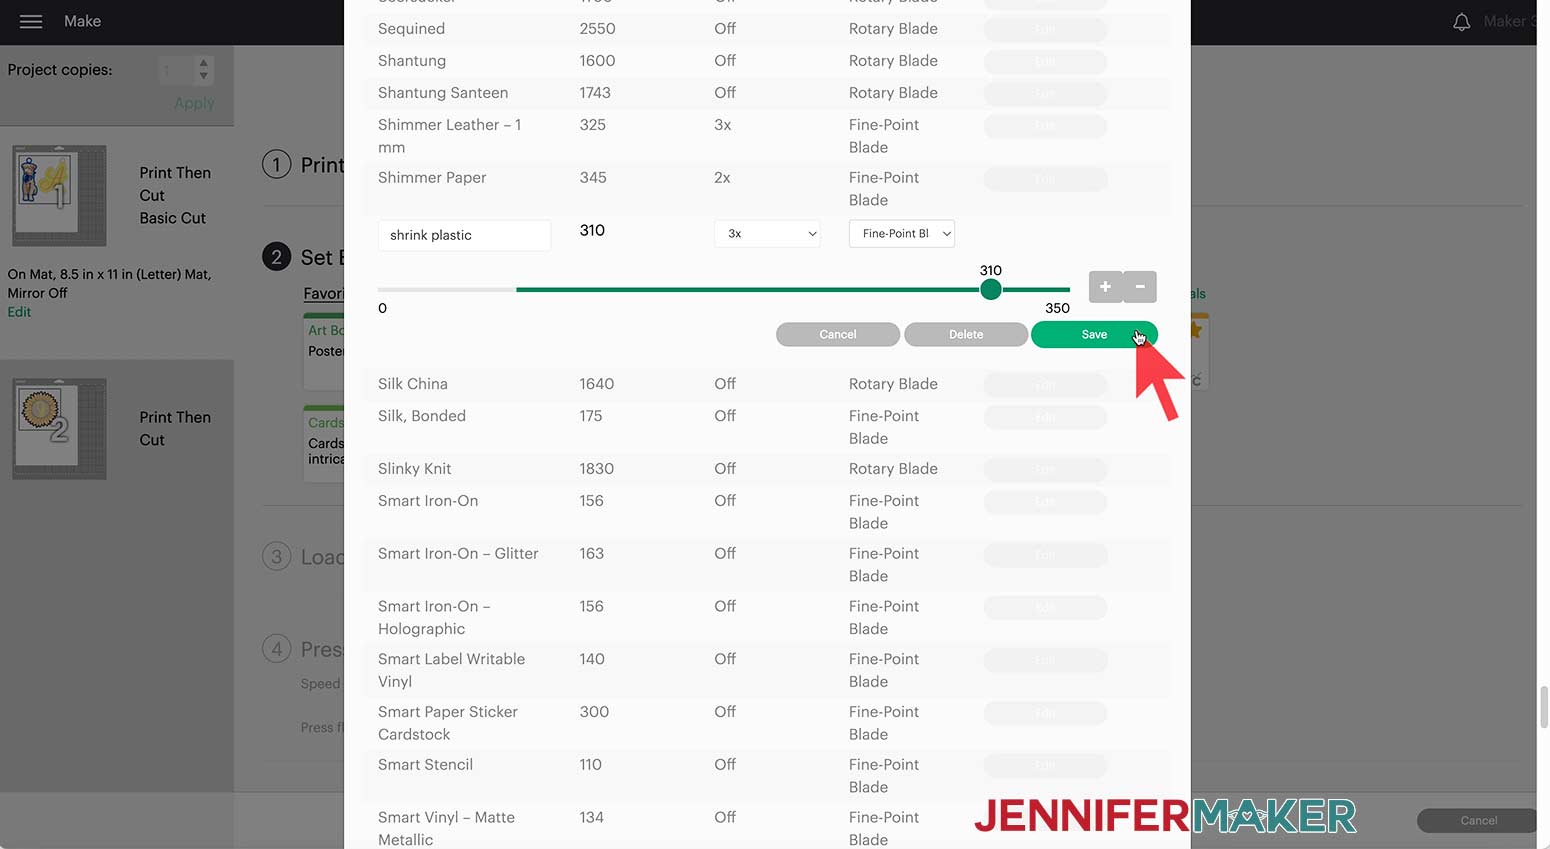
Click the “X” to close the Custom Materials window.
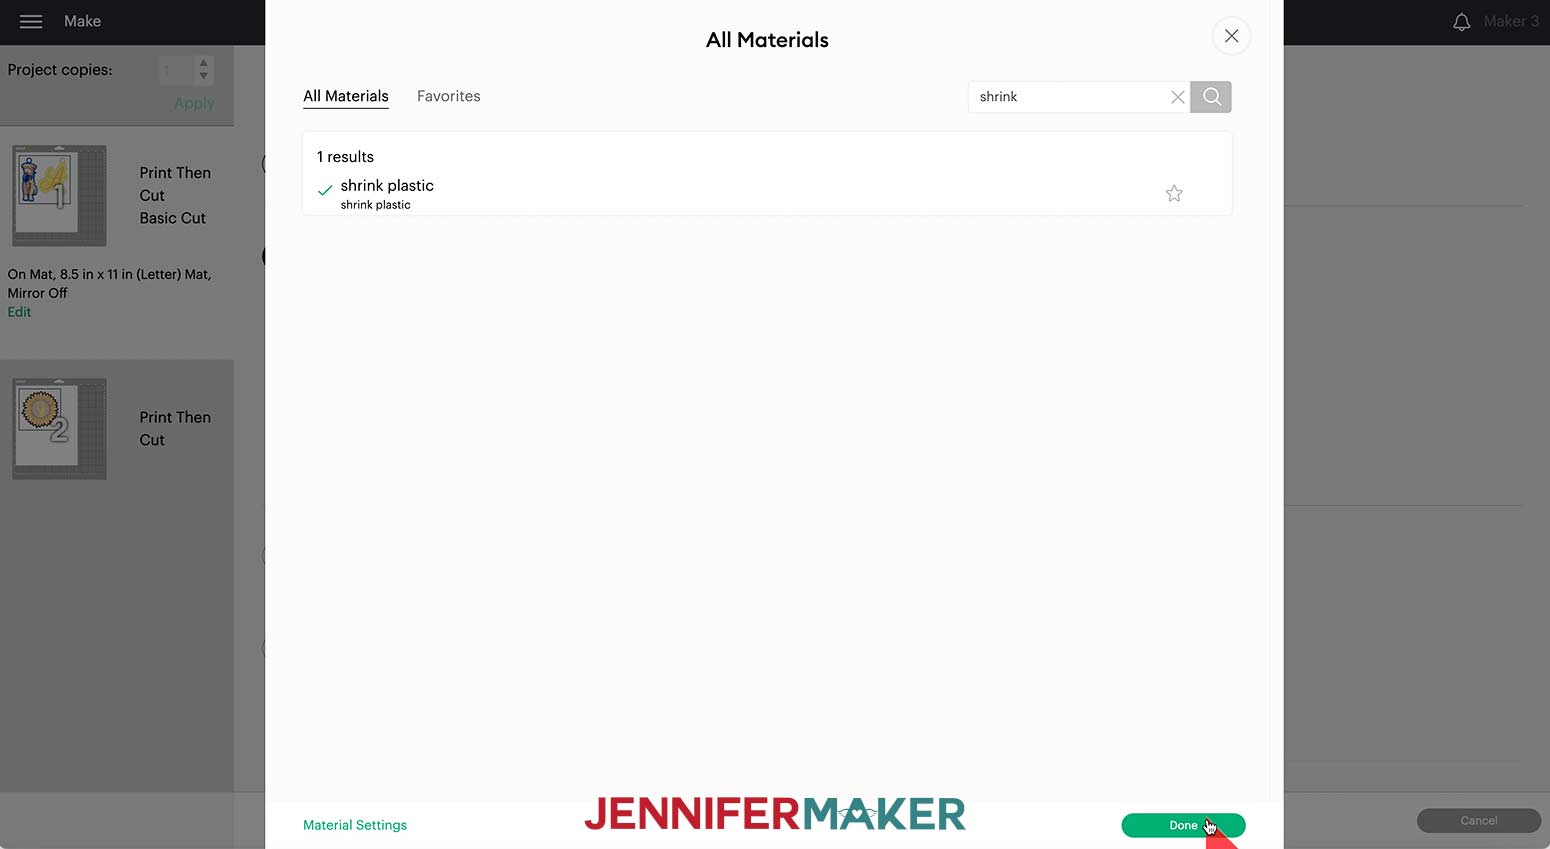
Now, select the new material from the material list by clicking "Browse Materials" and changing the Categories drop-down menu to "My Materials."
Select "Shrink Plastic" and click "Done."
Select "More" Pressure.
Load the mat into your Cricut and press the flashing button to begin.
TIP: If you run into any issues cutting your materials, check out my Cricut Tips & Tricks for Cleaner Cuts.
Once the cutting is complete, and before unloading your mat, check to see if the cut went all the way through. If not, press start for another pass.
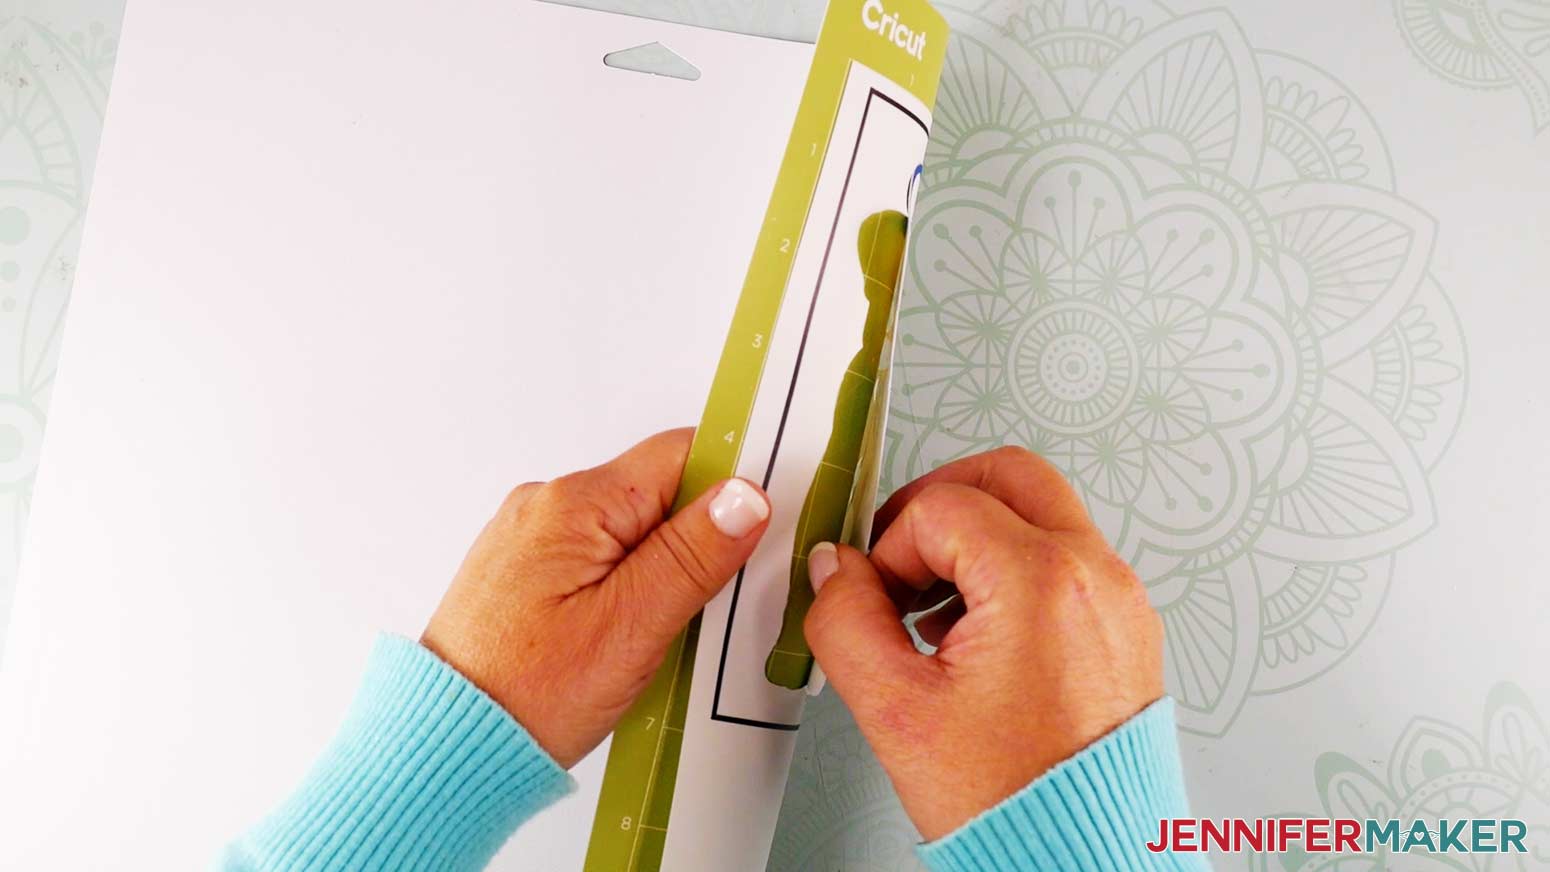
After the cutting is complete, remove the shrink plastic from the mat by flipping the mat over and rolling it away from the plastic. Take your time with this so you don’t accidentally tear the plastic.
Continue to print, load, cut, and remove mats until all the pieces are cut and ready to shrink. Always be sure you put the correct printed sheet to match the mat on the screen!
STEP 4: SHRINK YOUR PLASTIC
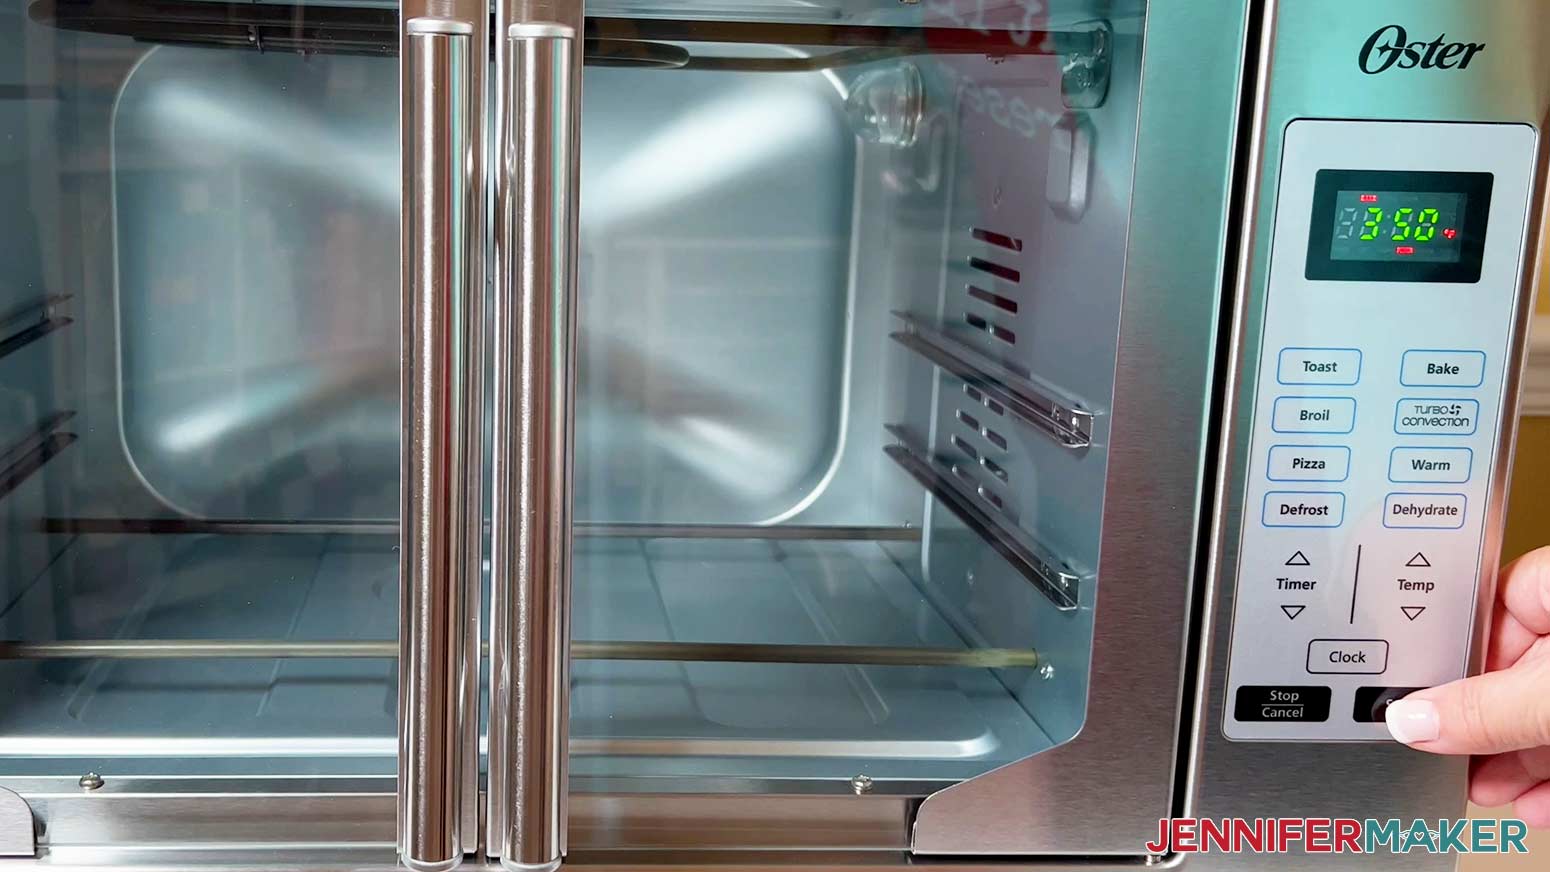
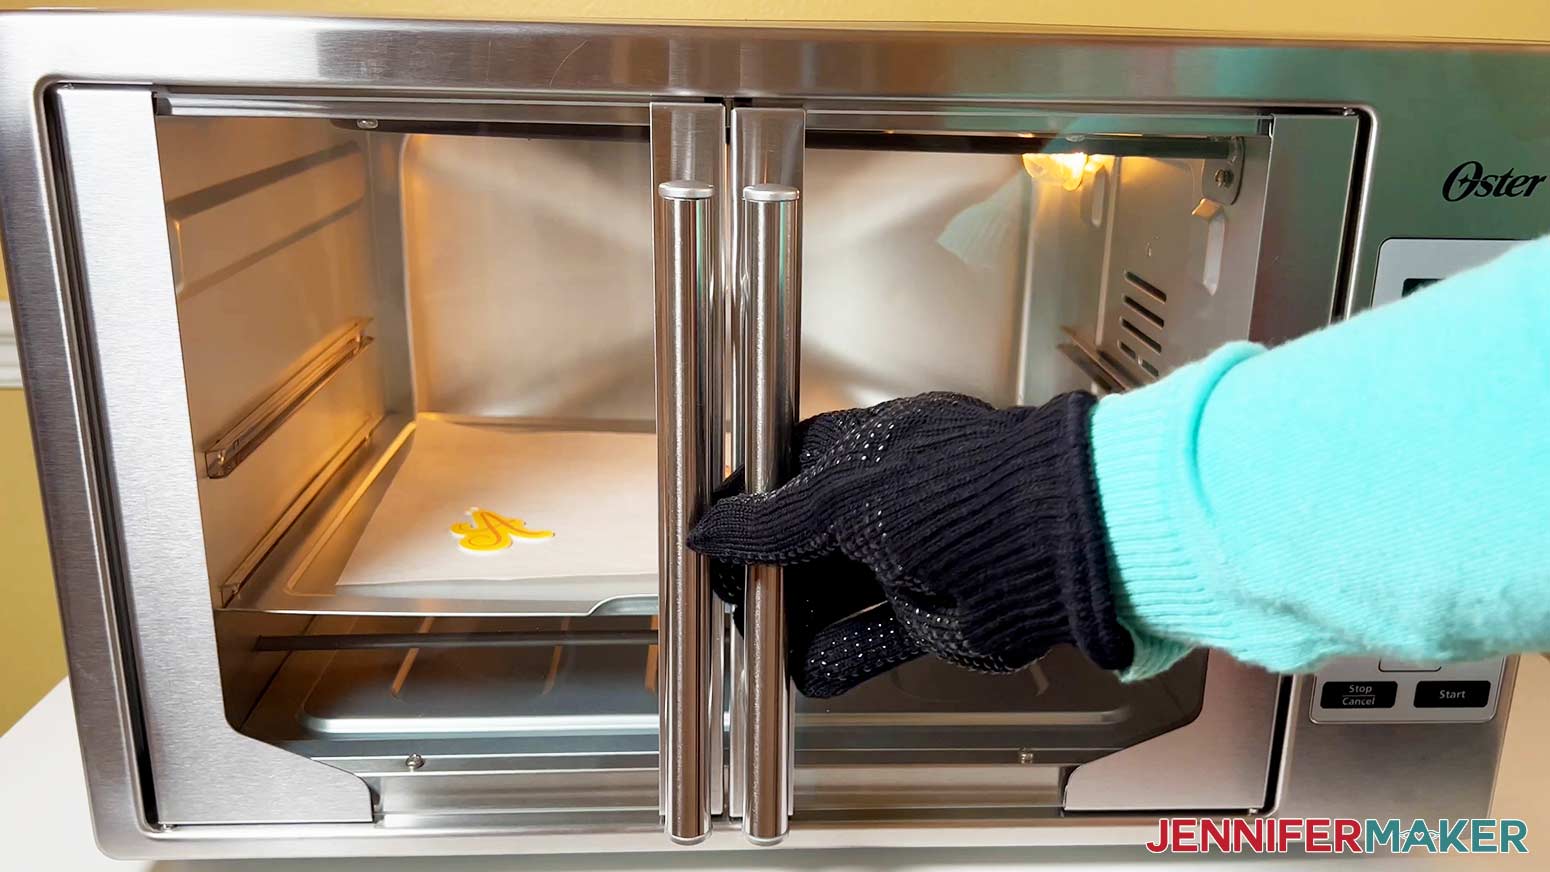
Heat your oven to the temperature recommended by the instructions included with your shrink plastic. You can use a toaster oven, convection oven, or standard oven for baking the shrinky dinks.
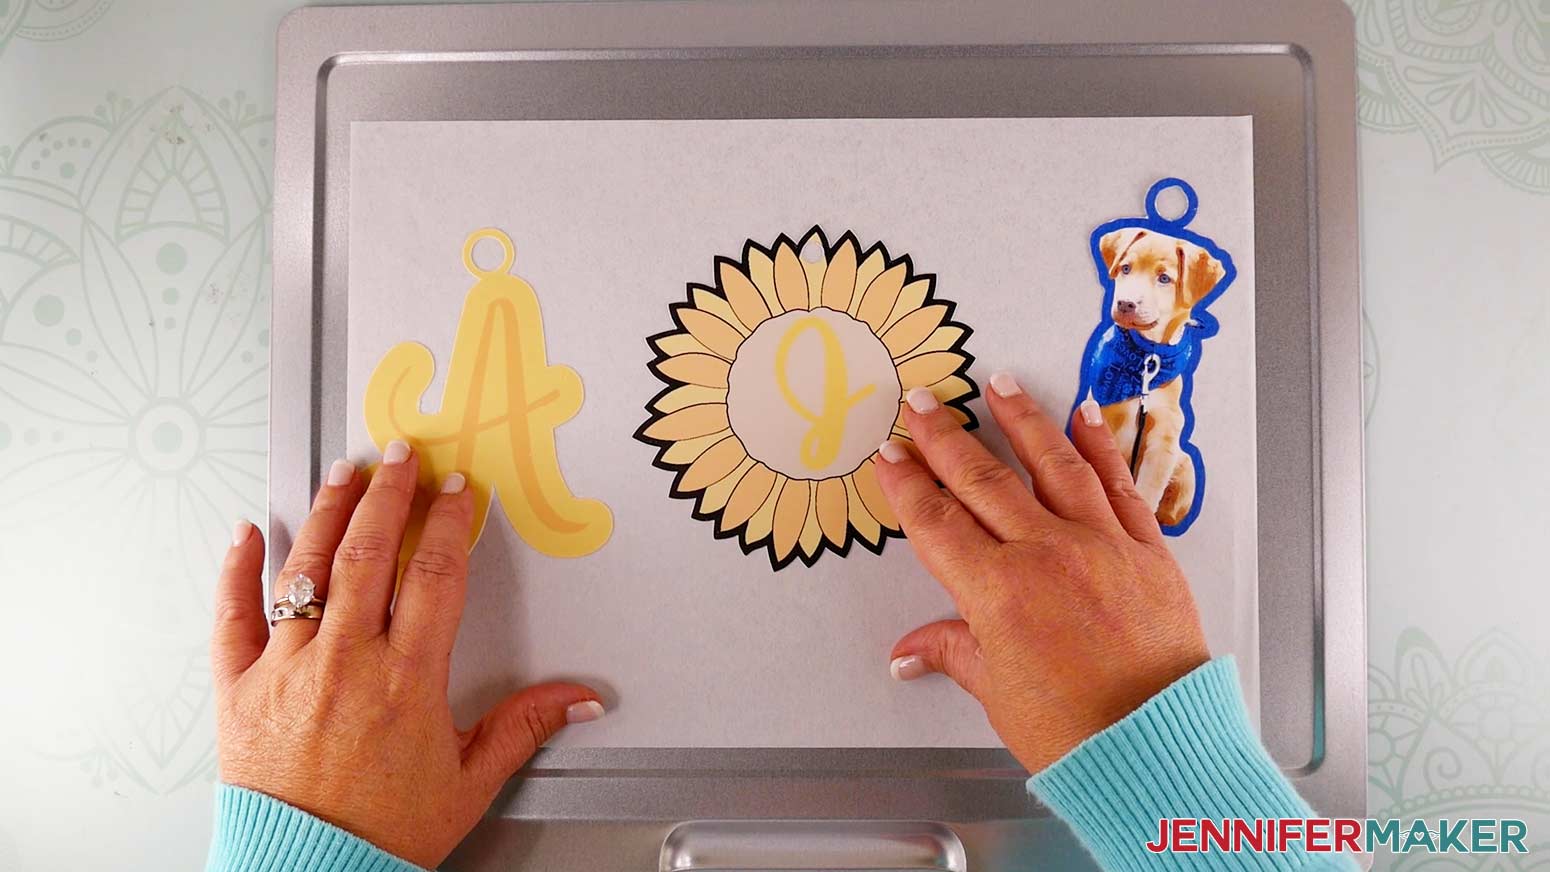
Line a pan with parchment paper and place your shrinky dinks color side up on the parchment. Leave plenty of room between them as they tend to move around while they are shrinking. If they touch each other, it is difficult (if not impossible!) to separate them after they shrink.
After the oven is heated, place the pan inside and set a timer based on the recommended time listed on the packaging. It’s fun to watch the plastic move and shrink as it heats up.
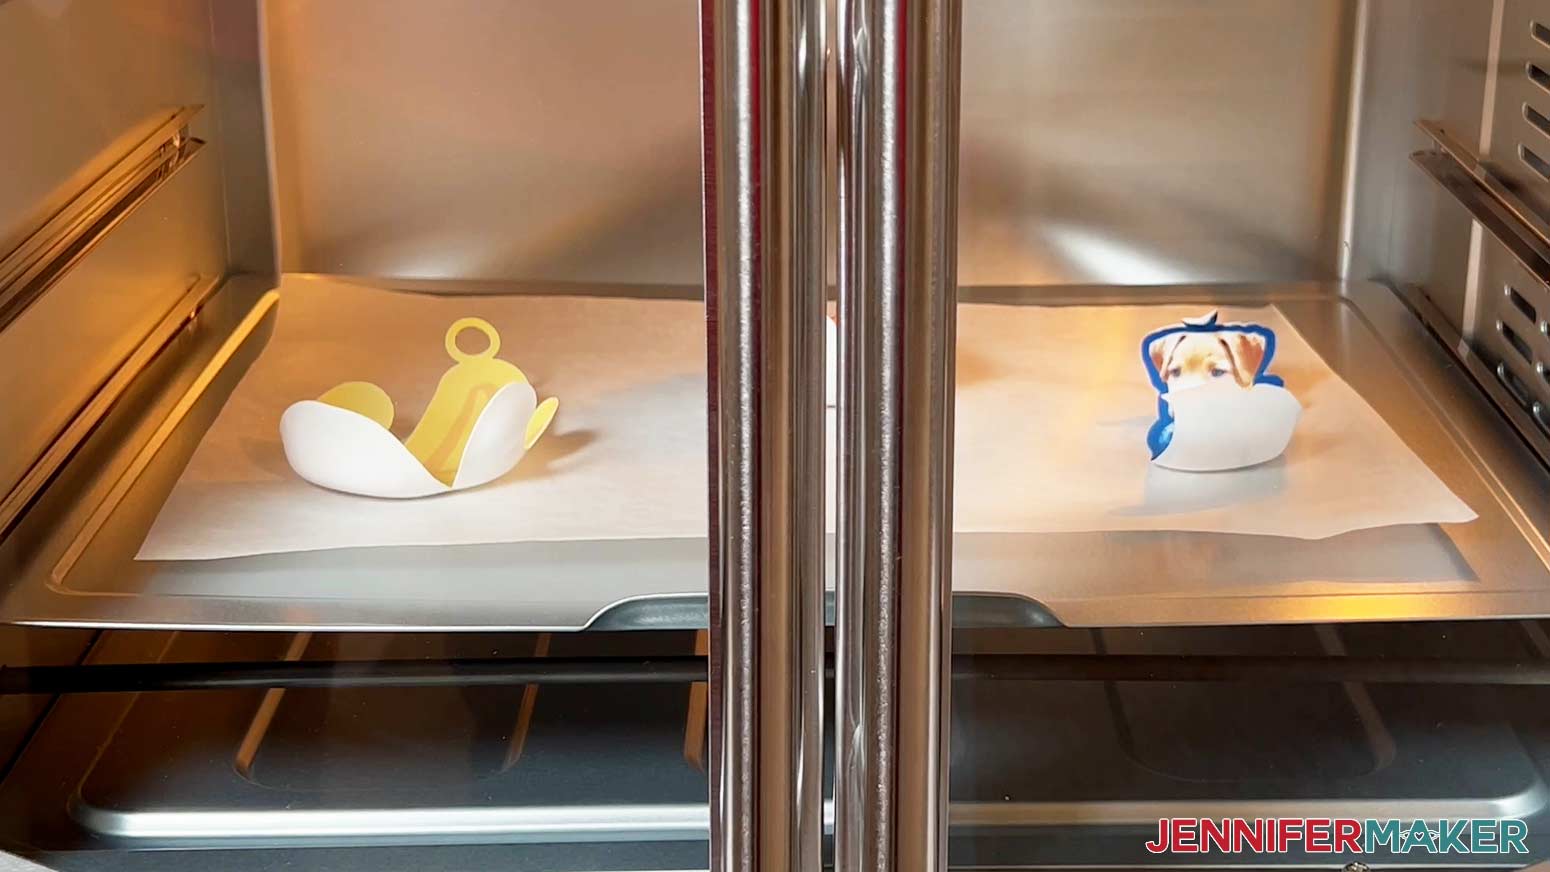
Once the shrinky dinks have reached the time limit, they should be reduced in size and be mostly flat.
Remove the shrinky dinks from the oven (remember to wear oven-safe gloves or mitts!), quickly place another piece of parchment on top of them to protect the surface, then lay something heavy on top like a book (I used my unheated Easy Press!). The weight will help the shrinky dinks cool and harden into a flat shape. You can let them cool without this step, but you may not have completely flat shrinky dinks.
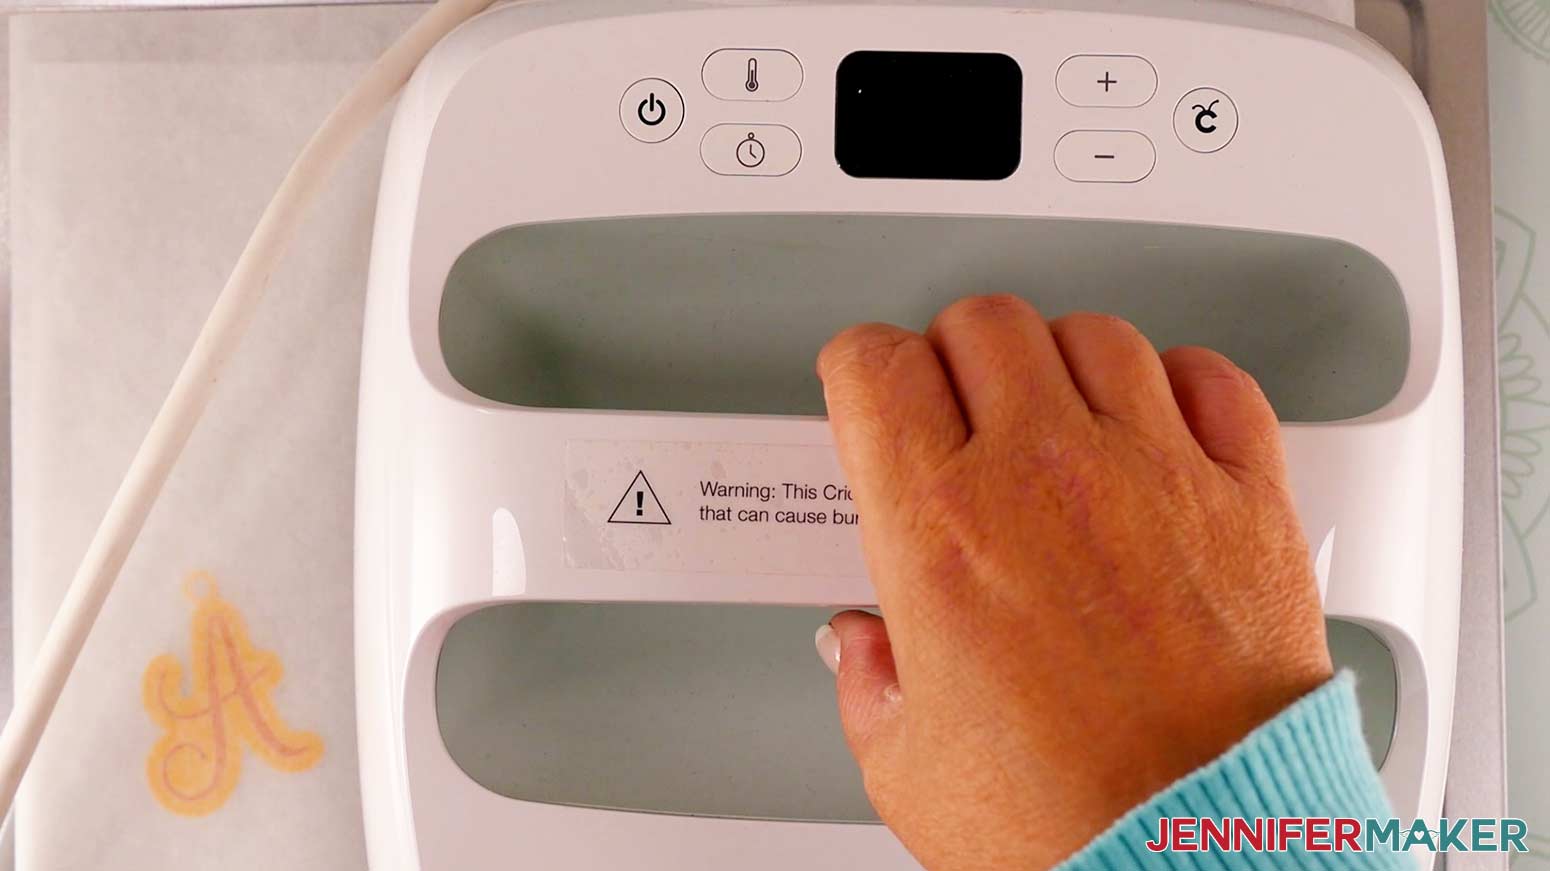
Wait just a couple of minutes for the plastic to cool, then remove the weight and parchment to reveal your final product!
To protect the art on the plastic, use a clear acrylic spray to coat the shrinky dinks before using them.
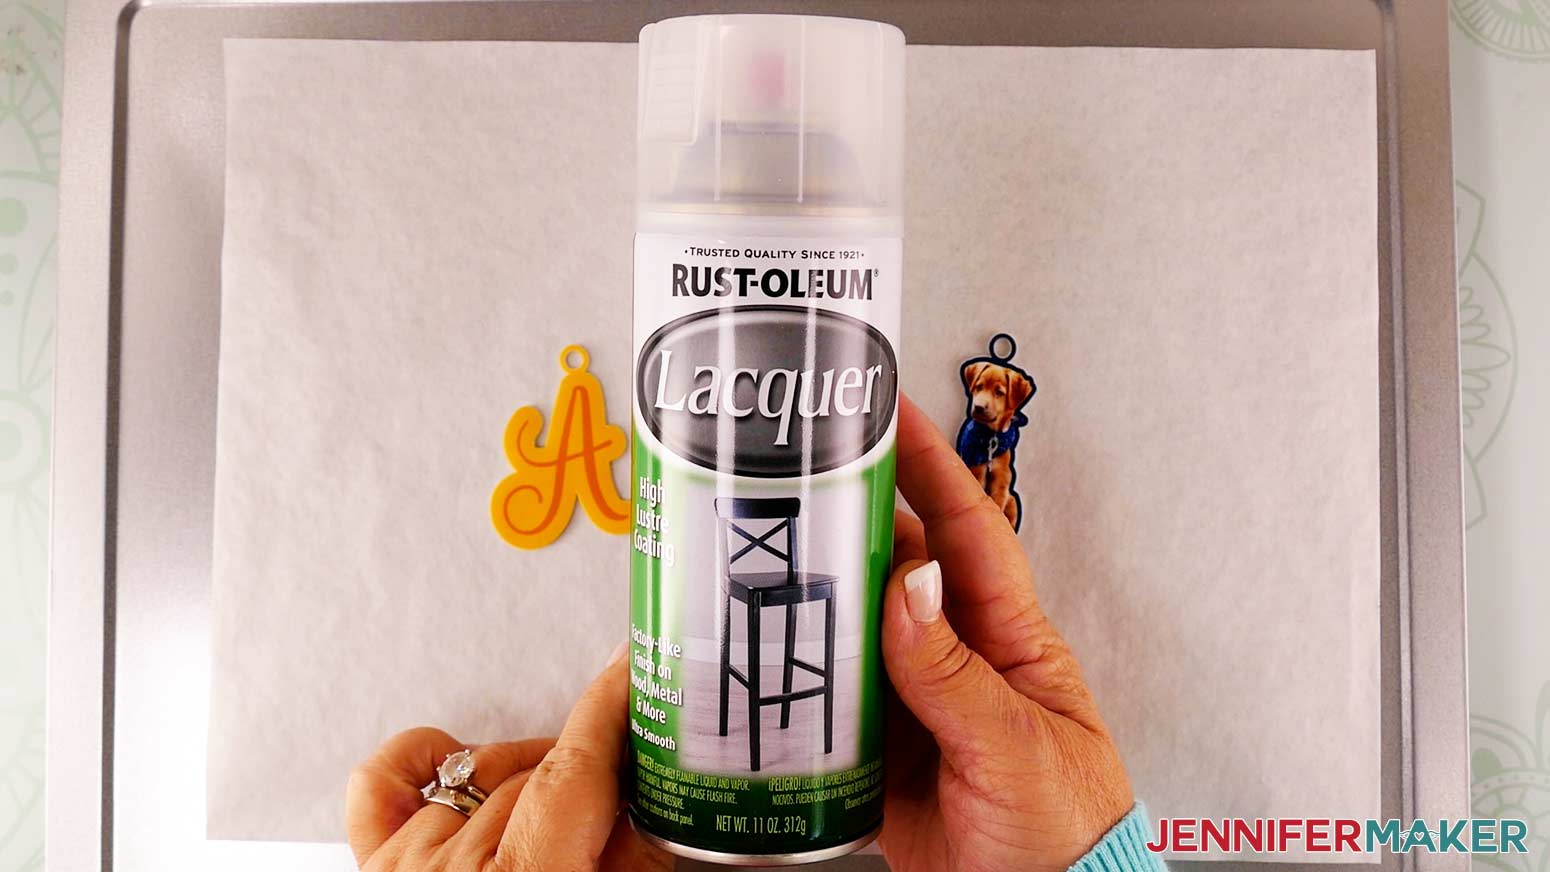
Add some keychain hoops or earring hooks and your shrinky dinks are ready to go!
Alternative Materials
Shrink plastic also comes in completely clear and frosted styles. These will not hold inkjet ink, but you can color them according to the package directions with markers and/or colored pencils. They can be cut just like printable plastic and you can even use the Cricut pen to draw lines on top that you can then color in. You can also use the outline files to cut out just the shapes for you before coloring them in.
A quick safety note:
Placing shrink plastic in the oven is safe because of the low temperatures at which they are shrunk. They do not release toxins like dioxin at these low temperatures. Some crafters like to use clear plastic sourced from things like food packaging. If you
choose to do so, you must look for a “6” that has been stamped or shaped into the plastic. Only polystyrene (plastic) with this designation is safe to shrink in the oven.
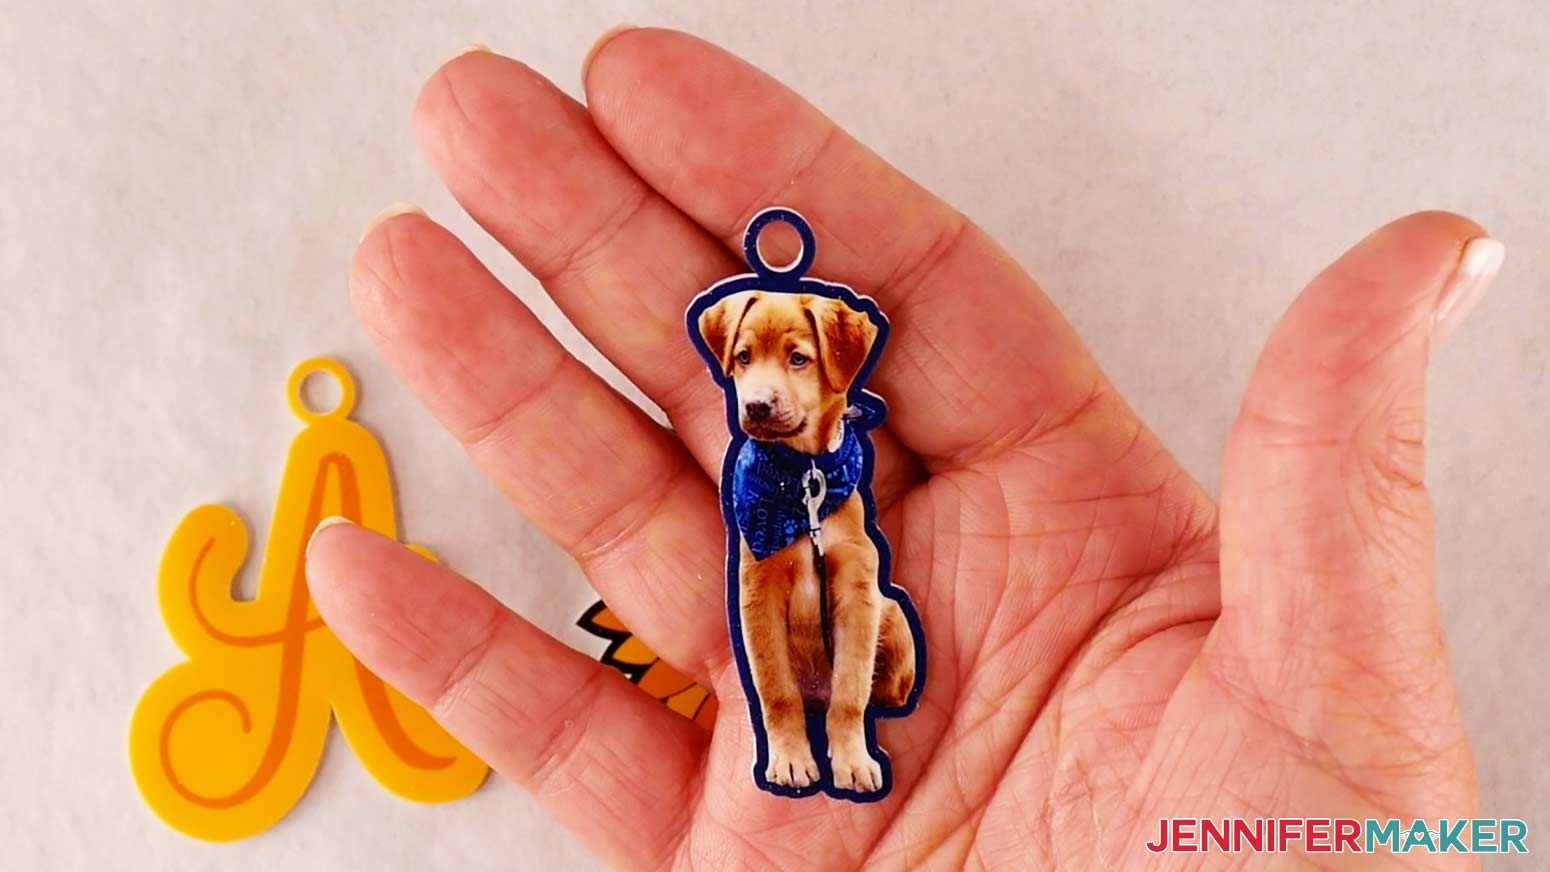
STEP 5: SHOW IT OFF!
You can make all kinds of fun durable items with shrink plastics. Keychains and earrings make great fashion statements and gifts for your friends!

Notes
Finished sizes of each piece can vary, but are (on average) 2 - 4 inches for a typical Shrinky Dink.
Fonts Used:
Sunflower Keychain & Bee Yourself Keychain: Cherry Cordial
Bee Yourself Keychain: Corisa Clean
Animal Charm Words: Beachwood
Initial Keychain: Beradon Script
Shrink Guides: Relief SingleLine Outline Regular
Answers to Your Questions About Making DIY Shrinky Dinks
Q: What kind of plastic can I use to make Shrinky Dinks?
A: The best plastic to use for DIY shrinky dinks is the material created specifically to use with this coloring and heat shrinking technique. I’ve listed several options in the materials list.
Q: What can I use instead of shrinky dink paper?
Some crafters have reported good results making plastic charms with clear containers like from takeout food. I didn’t try it, but if you do, look for a “6” that has been stamped or shaped into the plastic. That is the only recycled plastic safe to use when making your own shrinky dinks.
Q: Can you use #5 plastic for Shrinky Dinks?
A: No, if you use recycled plastic, please only use material with a “6” that has been stamped or shaped into the plastic. Only polystyrene (plastic) with this designation is safe to shrink in the oven. Some take out containers are the safe kind to use.
Q: Can you make your own shrink plastic?
A: You can use clear plastic stamped with a 6 for your shrinky dink crafts if you don’t want to use traditional shrinky dink plastic.
Q: Do you need special plastic for Shrinky Dinks?
A: While I only tried plastic made specifically for shrinky dinks since the plastic shrinks safely and uniformly, you can also try clear plastic containers with a 6 on the surface.
Q: How do you keep the color in Shrinky Dinks?
A: I sprayed clear sealant on my shrink dinks to preserve the color on the shrink plastic sheet.
Q: Can you seal Shrinky Dinks with nail polish?
A: Nail polish can turn your shrinky dinks yellow eventually.
Q: Can I cut this project on a Cricut Joy?
A: Yes, the smaller designs are small enough to fit on the Cricut Joy machine mat, but you can’t use Print then Cut with the smaller machine.
Q: How do I heat shrinky dinks?
A: September 2025 UPDATE: In the past, I have mentioned countertop ovens as suitable heating equipment options, including some by Oster. If you purchased an Oster Convection Oven, 8-in-1 Countertop Toaster Oven, XL, Stainless Steel French Door, please stop using it immediately and review the Consumer Product Safety Commission’s safety alert for information on what you should do and where you can seek assistance to continue using the oven safely. I recommend a PYD Life Craft Oven.
Q: What is Merry Maker Mingle?
A: Each day in December leading to Christmas, I present you with a brand new “gift” — a project to craft, make, or do. You can make these projects on a Cricut cutting machine or by hand if you don’t have one. Most of our Merry Maker Mingle projects will come with a fun video with yours truly, a step-by-step printable photo tutorial, and a free pattern/SVG cut file. Sign up to get daily updates and prizes! It’s so much fun!
Get my free SVG files to create DIY shrinky dinks!
I love seeing what you make with my designs and how you use them with your fun ideas! Please share a photo of your DIY shrinky dinks in our Facebook group or tag me on social media with #jennifermaker.
Love,

Want to remember this? Save this DIY Shrinky Dinks Tutorial to your favorite Pinterest Board!