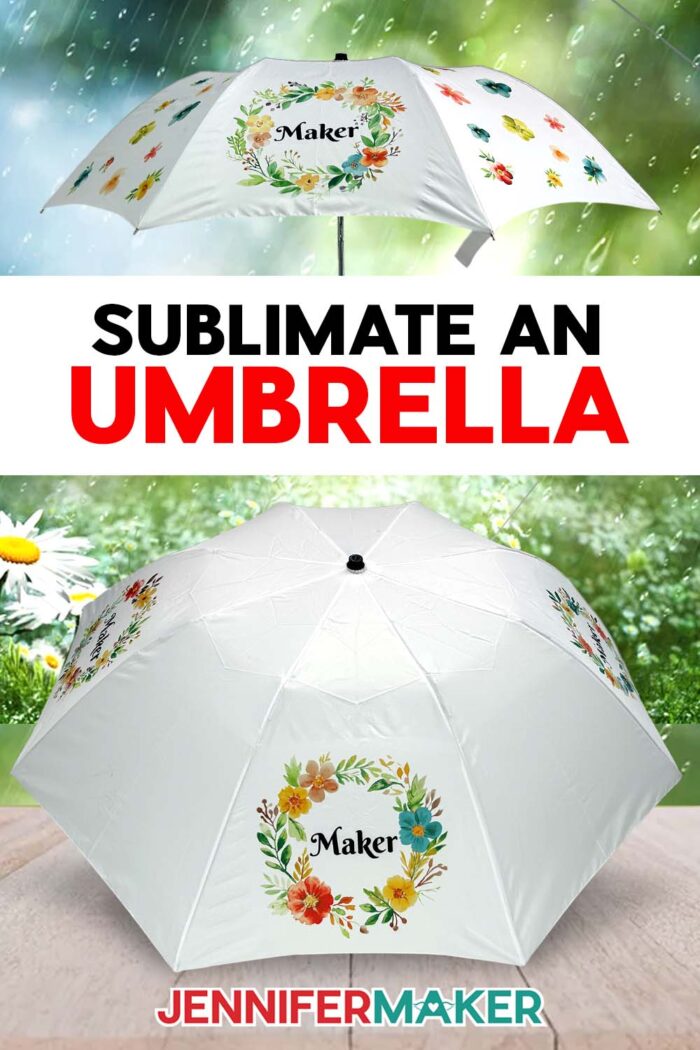
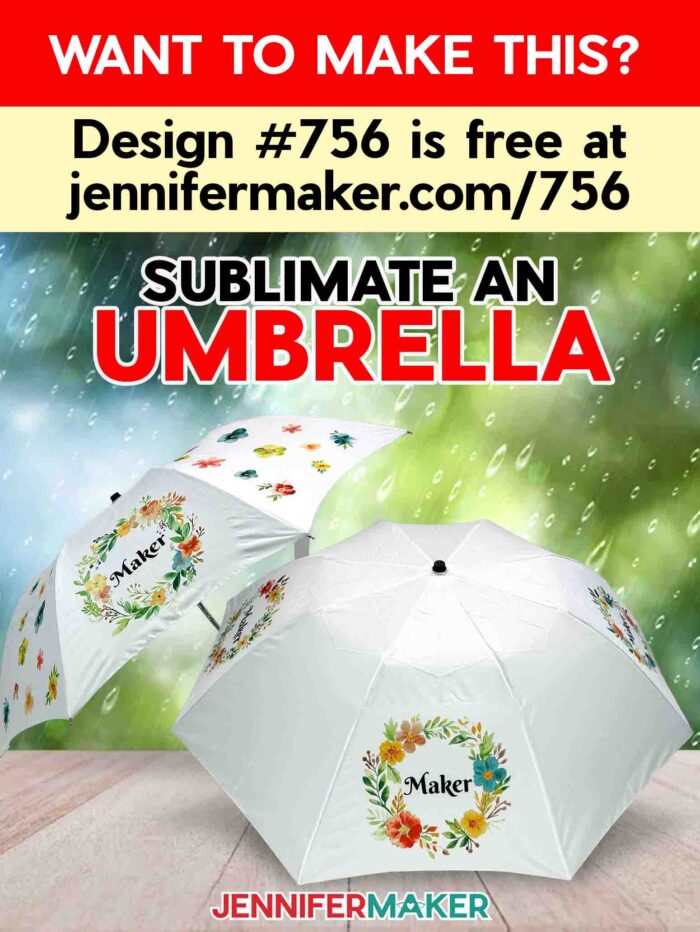
Learn how to sublimate an umbrella for a cheerful splash of color on gray days!
Have a boring accessory? If you CAN personalize it, why not do it?! After all, it’s fun, it’s yours, and what’s better than letting your creativity shine on the gloomiest rainy day? Imagine stepping outside on a drizzly morning with a bright, happy umbrella covered in designs you picked yourself. Now, every sprinkle is a reason to smile! But sublimating an umbrella isn’t exactly like pressing a flat T-shirt. It’s curved, it’s awkward, and learning how to sublimate an umbrella might feel intimidating. But, can you do it? Bet your bottom dollar, you can!
Watch the full step-by-step tutorial on how to sublimate an umbrella:

If you’re like me and get that warm fuzzy feeling using your crafts in daily life, this will quickly become one of your favorite sublimation projects. Don’t let the curves of an umbrella intimidate you!

Here’s the scoop: sublimation works best on white umbrellas made from polyester, which is perfect because they’re pretty easy to find online. I’ve linked the one I used in my materials list below. You’ll also want to use a handheld heat press machine that you can maneuver around the curved panels of your umbrella, like a Cricut EasyPress, so you get evenly-applied heat when sublimating your designs. I tried a traditional clamshell style press (a Cricut Auto Press), and it didn’t work well with the curves of the umbrella.
Once your design is placed, secure it with heat-resistant tape so it stays put and doesn’t shift when you press it down with your heat press. Trust me, I learned this the hard way when one of my first designs slipped and left a blurred result. Oops! But even with the mistake, I still love it because of its handmade touch. Not to mention, the umbrella still works just as well.

To print my sublimation design, I used my converted Epson EcoTank printer filled with Hiipoo sublimation inks. I printed my design on A-SUB sublimation paper, then trimmed each section to match my umbrella’s panels. I’ll show you exactly how I did it in the tutorial video.
Make sure you have room to spread out for this project. Place your pressing mat on a large, flat surface where you will be able to maneuver the open umbrella and press it safely and with plenty of space. When pressing, remember that slow and steady wins the race! For best results, I pressed one panel at a time, and was careful not to touch the hot metal ribs of the umbrella until they cooled off.
If your blank is different from the polyester umbrellas in my materials list, check out my Sublimation Cookbook. It’s packed with loads of information to help you achieve great results consistently, including recommended time, temperature, and pressure settings for tons of unique materials.
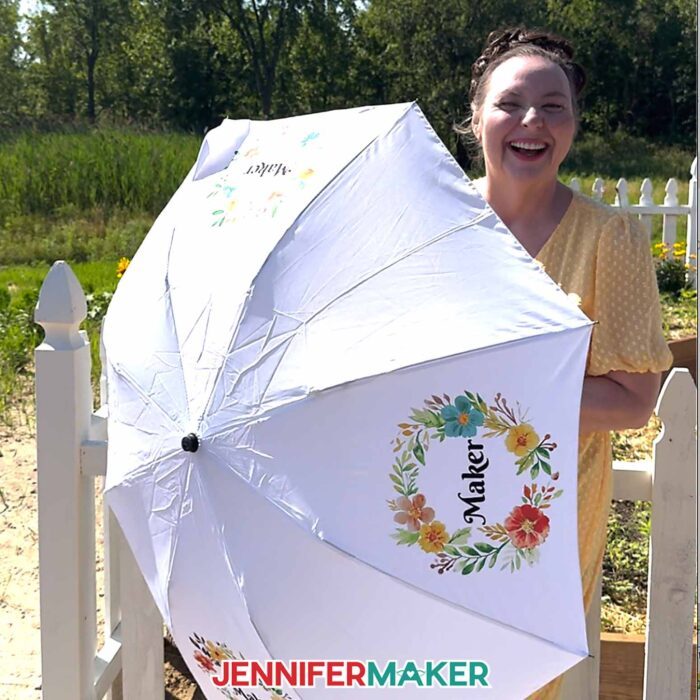
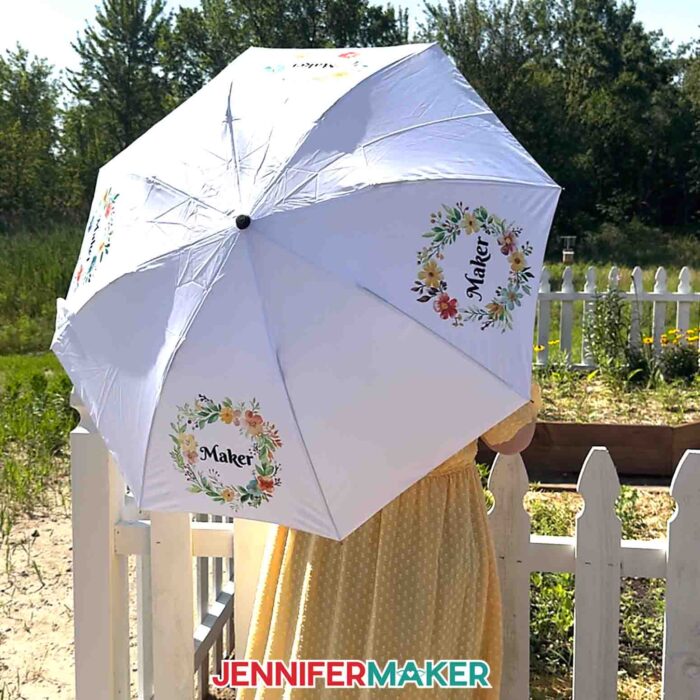
It’s such a wonderful feeling to see your design come alive on something that will brighten an otherwise gloomy day! Or, protect you from the sun on a bright one!
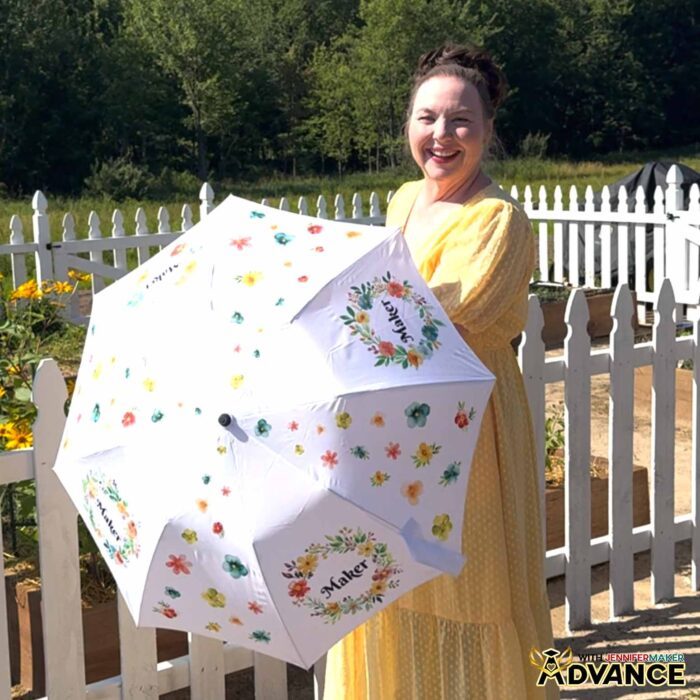
Want to learn how to sublimate an umbrella all over? I’ll show you how to design and sublimate a cascade of flowers on an umbrella in my Advance with JenniferMaker program! Plus, you’ll have access to my personal collection of images and design elements in your member library that you can sublimate onto umbrellas and other custom design projects! Click here to learn more about the Advance program!
So, if you’ve been hesitant about trying something a little different, let this be your gentle nudge to go for it. Your umbrella doesn’t have to be boring, and you don’t have to wait for a sunny day to show off a cheerful accessory you made yourself.
Want to learn how to sublimate an umbrella? Let me show you how fun and easy it can be! This post contains some affiliate links for your convenience (which means if you make a purchase after clicking a link I will earn a small commission but it won’t cost you a penny more)! Read my full disclosure policy.
Materials to Sublimate an Umbrella
View my Amazon shopping list with the exact items I used.
- White Polyester Umbrella (42″) (alternative #1, alternative #2)
- Four (4) Sheets of 8.5” x 11” A-Sub Sublimation Paper 125g
- 12” x 12” White Cardstock
- White Uncoated Butcher Paper
- Sublimation Printer – I used a converted Epson EcoTank ET-2800 Inkjet Printer
- Sublimation Ink
- Heat Press – I used the 9” x 9” Cricut EasyPress 3
- Cricut EasyPress Mat
- Heat-Resistant Tape
- Heat-Resistant Gloves
- Lint Roller
- Fan (for ventilation)
- Scissors -OR-
- Paper Trimmer
- Measuring Tape
- Flashlight (optional)
- Design #756 (My free PNG design files are available in my free library – get the password by filling out the form at the bottom of this page)
How to Sublimate an Umbrella
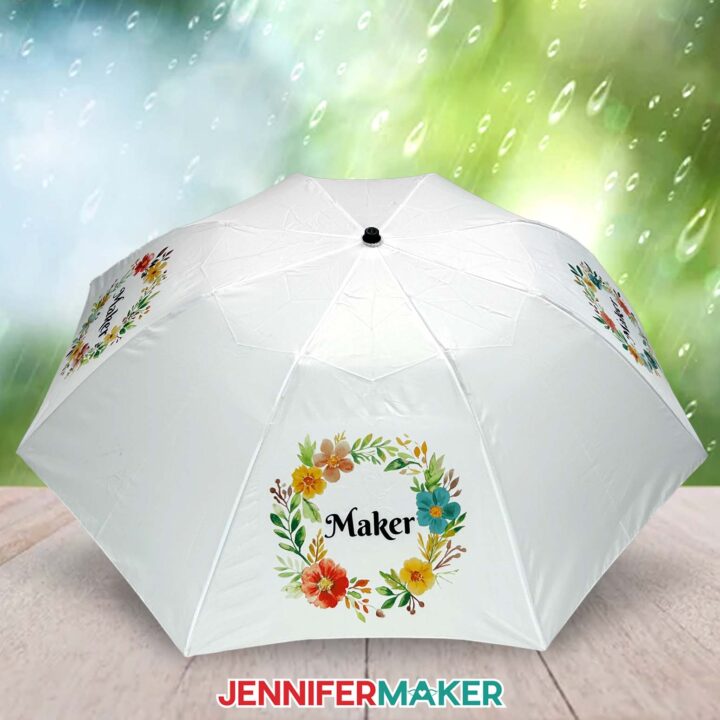
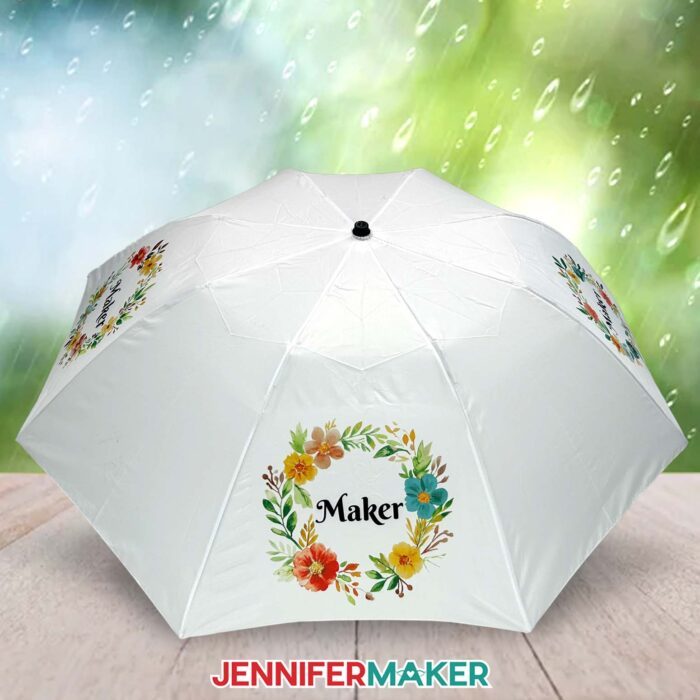
Sublimate An Umbrella
Learn how to sublimate an umbrella!
Materials
- One (1) 42" White 100% Polyester Umbrella
- One (1) Sheet of 8.5” x 11” A-Sub Sublimation Paper 125g for each panel you want to decorate
- 12” x 12” White Cardstock
- White Uncoated Butcher Paper
- Design #756 (My free PNG design files are available in my free resource library - get the password by filling out the form at the bottom of this page)
Tools
- Sublimation Printer - I used a converted Epson EcoTank ET-2800 Inkjet Printer
- Sublimation Ink
- Heat Press - I used the 9” x 9” Cricut EasyPress 3
- Cricut EasyPress Mat
- Heat-Resistant Tape
- Heat-Resistant Gloves
- Lint Roller
- Fan (for ventilation)
- Scissors -OR-
- Paper Trimmer
- Ruler or Measuring Tape
- Lint Free Cloth
- OPTIONAL: Flashlight to help with placement
Instructions
STEP 1: GET MY FREE UMBRELLA DESIGNS
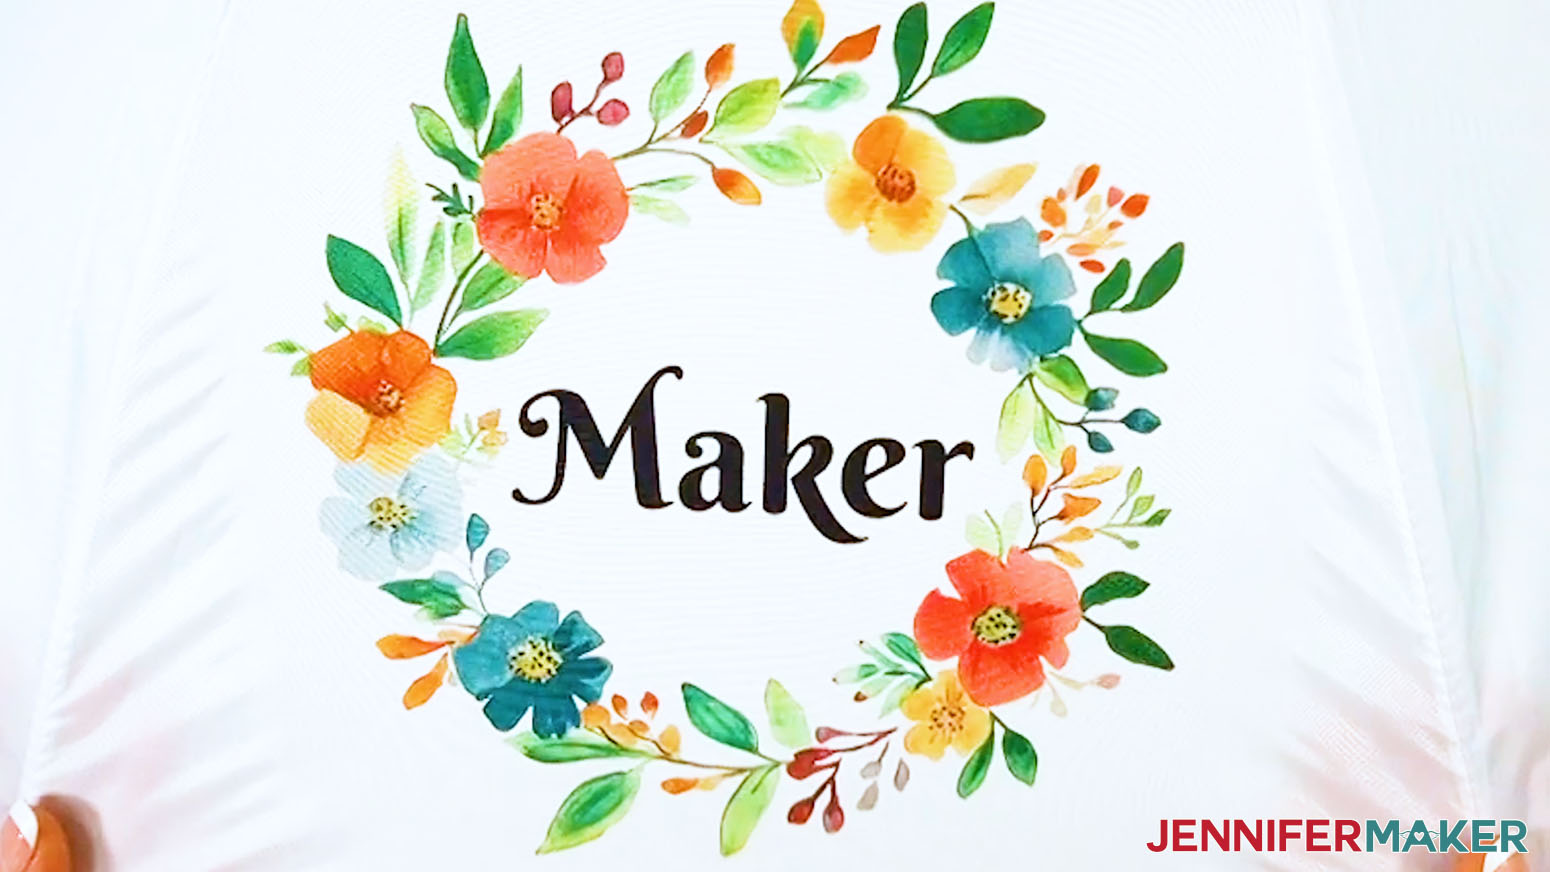
First, download my Sublimation Umbrella designs from my free library – look for Design #756. Alternatively, you can use the Save This Project form near the top of this post and the design link will be emailed to you.
In the PNG folder, you’ll find four ready-to-use wreath designs. I made the designs with the help of AI art generation and adjusted them with image editing software.
TIP: If you’re not sure how to download Zip files and upload designs, go to jennifermaker.com/svgs. The steps are similar for PNGs and Google Docs.
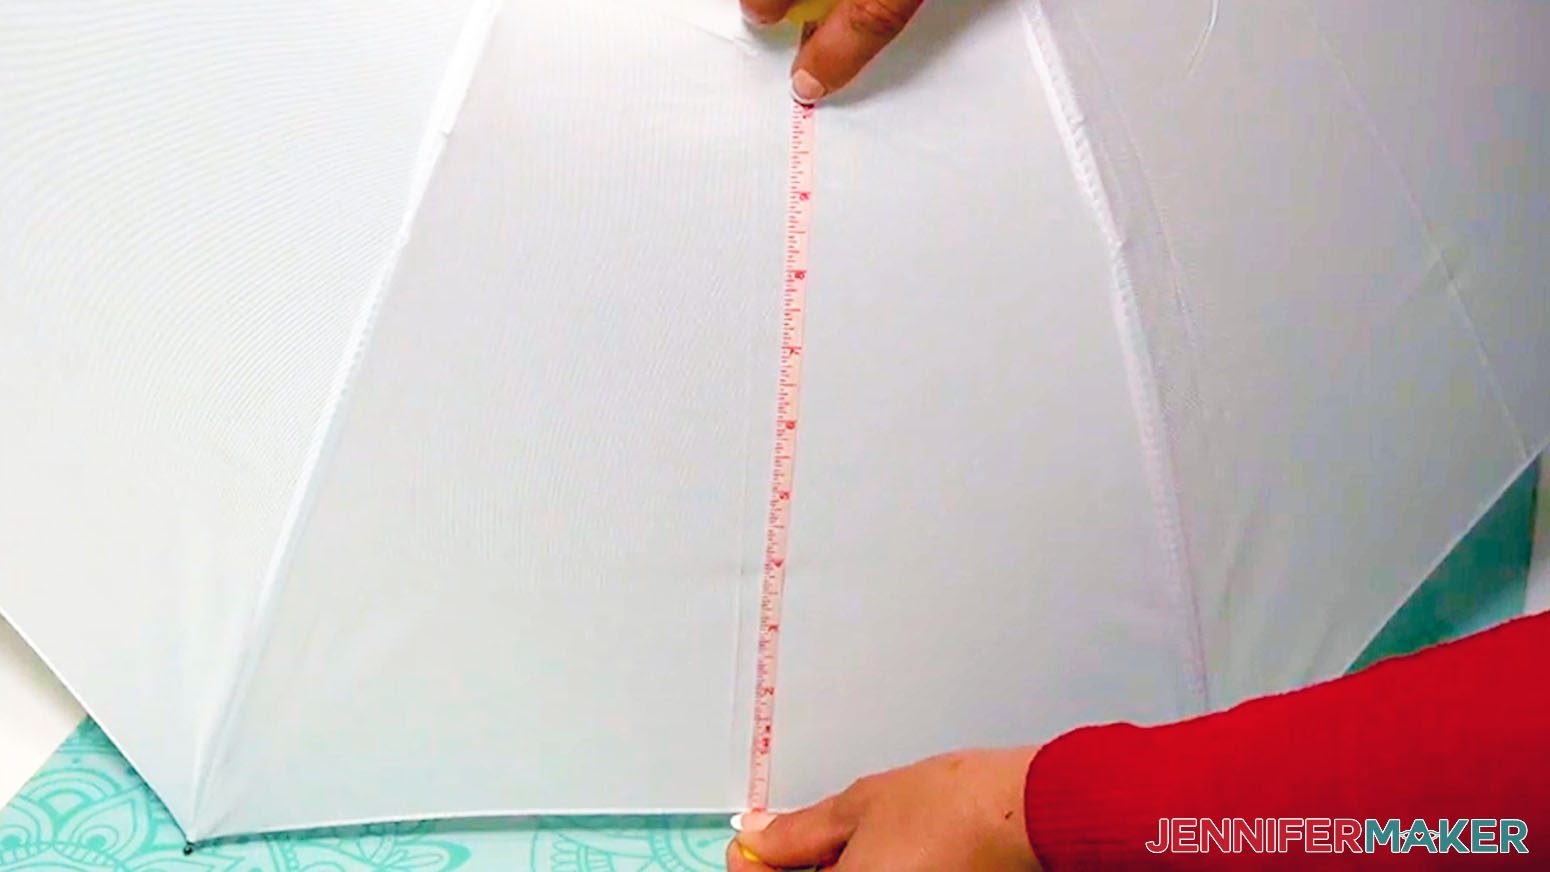
STEP 2: MEASURE YOUR UMBRELLA
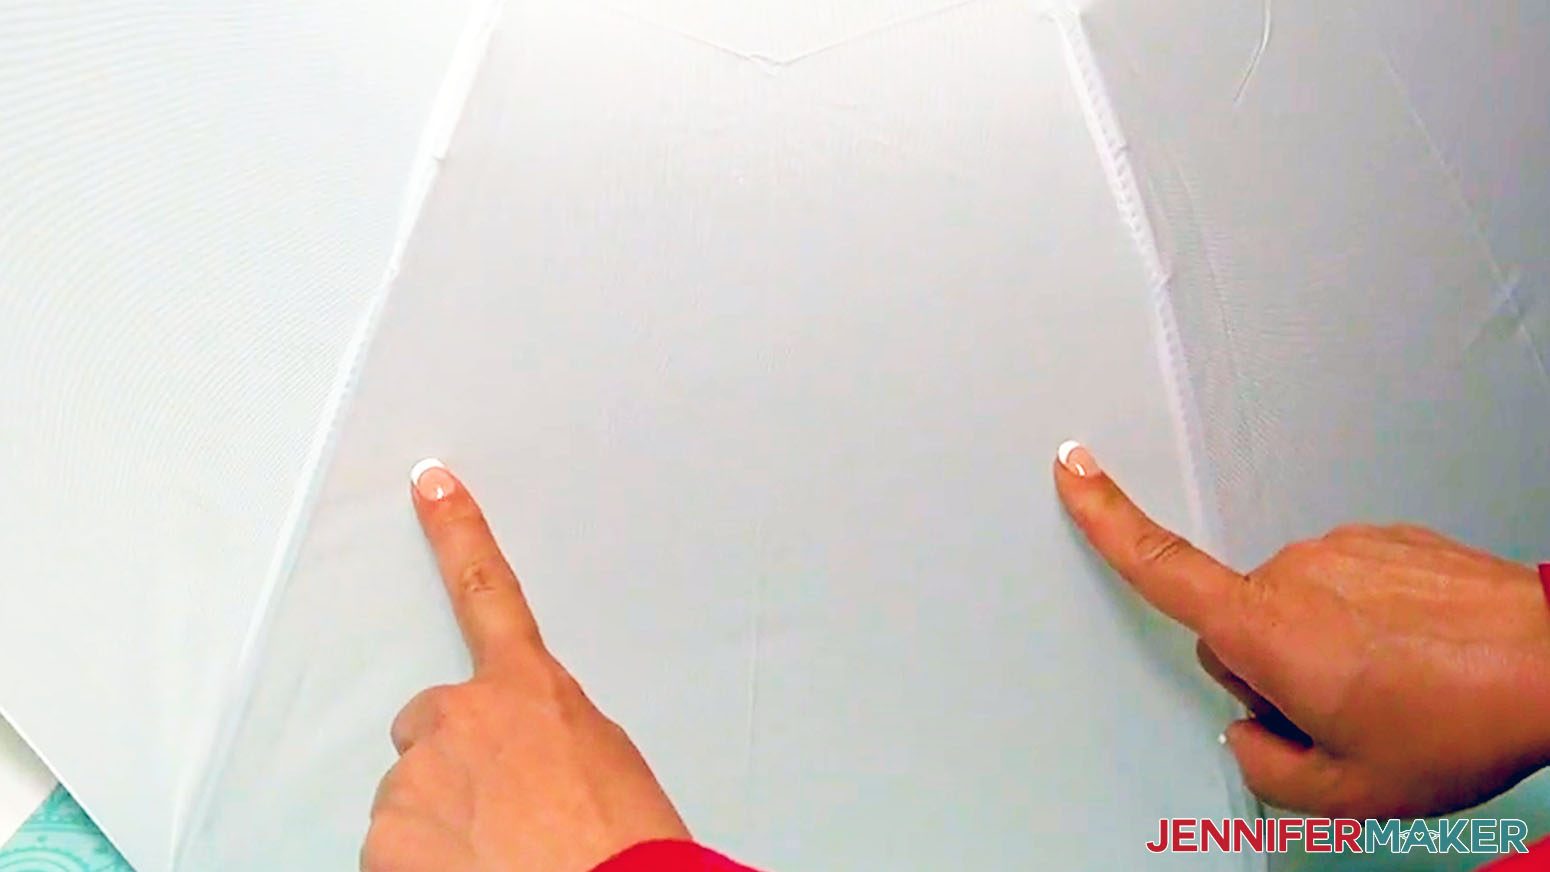
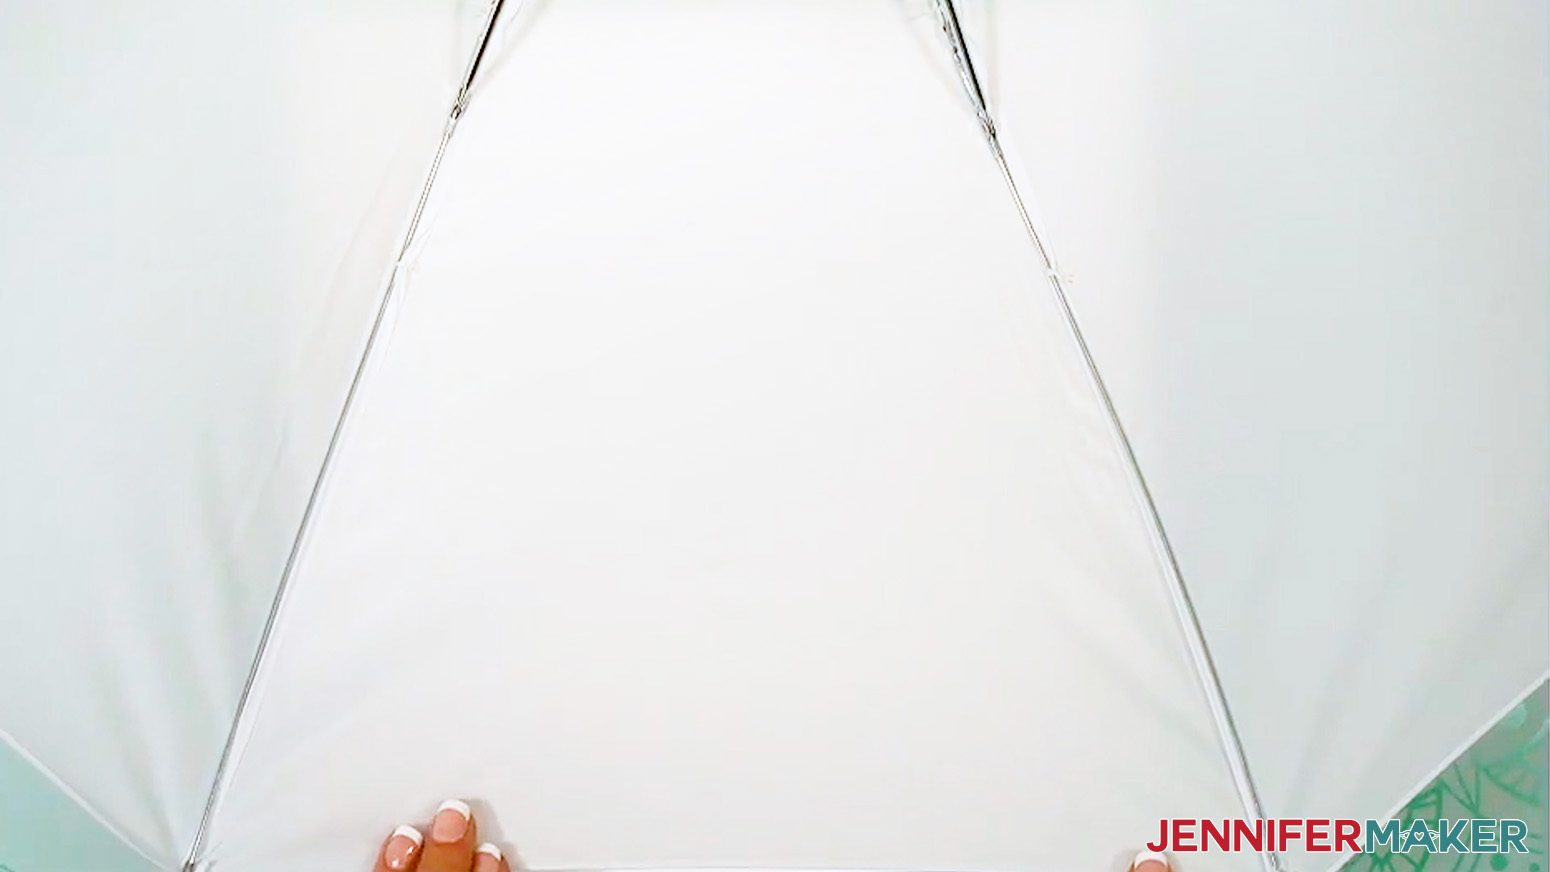
- In a clear space with enough room, open your umbrella and set it on the ground or your work surface so you can easily reach a panel between two frame pieces.
- With a tape measure, record the width where you want to place a design.
- Find the area you want to decorate and record its height from the edge to the top of the design section.
NOTE: Designs will be easiest to read if they’re on the lower section of the umbrella in the panel’s wider area. I want to keep my design within 10” of the panel’s lower edge so it won’t go far into the curve where the frame pieces get much closer together.
- Then, measure the narrowest point in the design area, and subtract 2” to leave a buffer on each side.
NOTE: The top of my design area (10” up from the bottom edge) is 10” wide, and that is the narrowest point I’m decorating, so I’ll keep the design 8” wide.
TIP: Your sizing might be different even if you use the blank I recommend, so always be sure to measure.
STEP 3: PRINT YOUR SUBLIMATION DESIGN IN GOOGLE DOCS
- Open Google Docs in the Google Chrome web browser on your computer.
NOTE: You will need a free Google account to use the free Google Docs software.
TIP: You can also download and open the Google Docs app, but you won’t be able to install or access any printer profiles from a mobile device, and you’ll also have limited access to features, so I do not recommend it on a mobile device. - Click “Blank document” at the top left to open a new document.
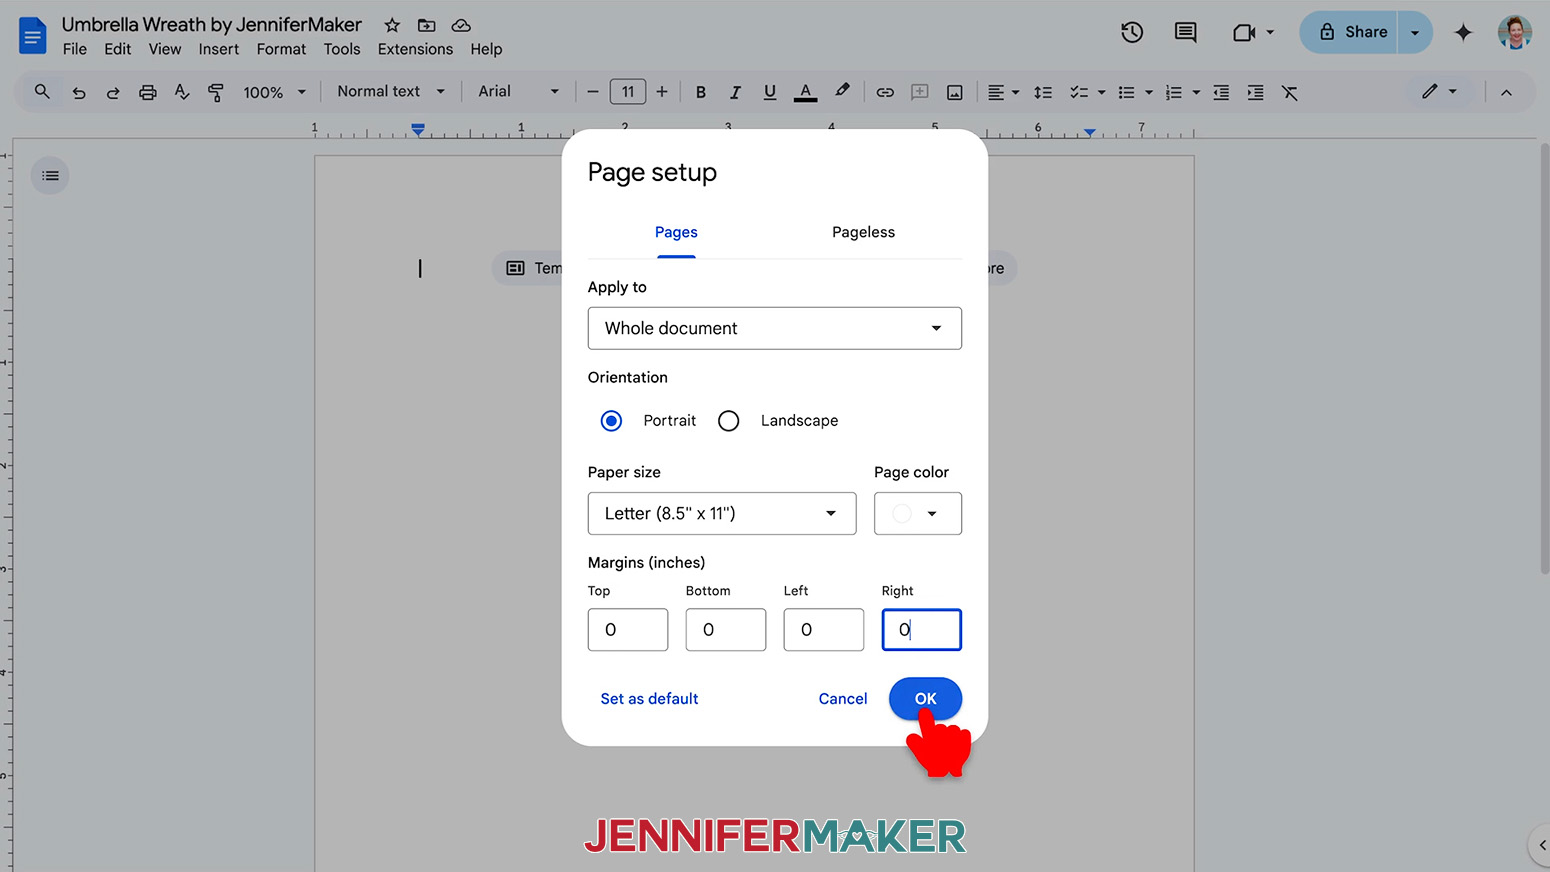
- Go to the File menu and select “Page setup.”
- Make sure the box next to “Portrait” is checked.
- Change your margins to “0” to use more of the page.
- Make sure your Paper Size matches your sublimation paper.
NOTE: I’ll set mine to 8.5” x 11” or letter-size. - Click “OK” to apply the settings.
- Click the area that says “Untitled document” at the top and type a name for the file.
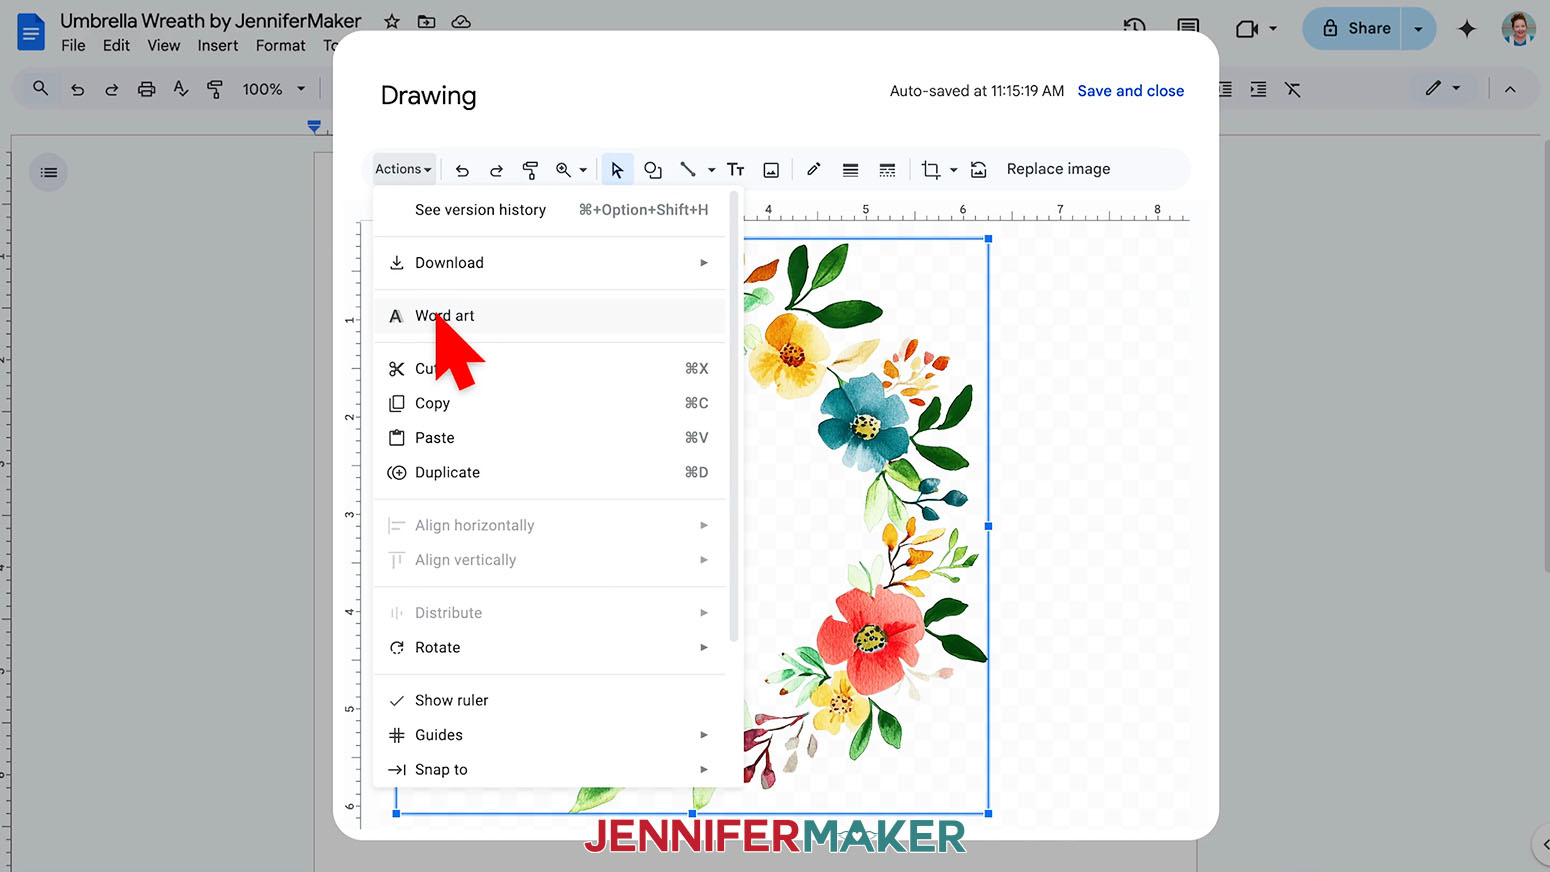
- Go to the “Insert” menu, then select “Drawing” and “New.”
- In the “Drawing” pop up window, click the “Image” icon.
- Click “Browse” and select your sublimation design.
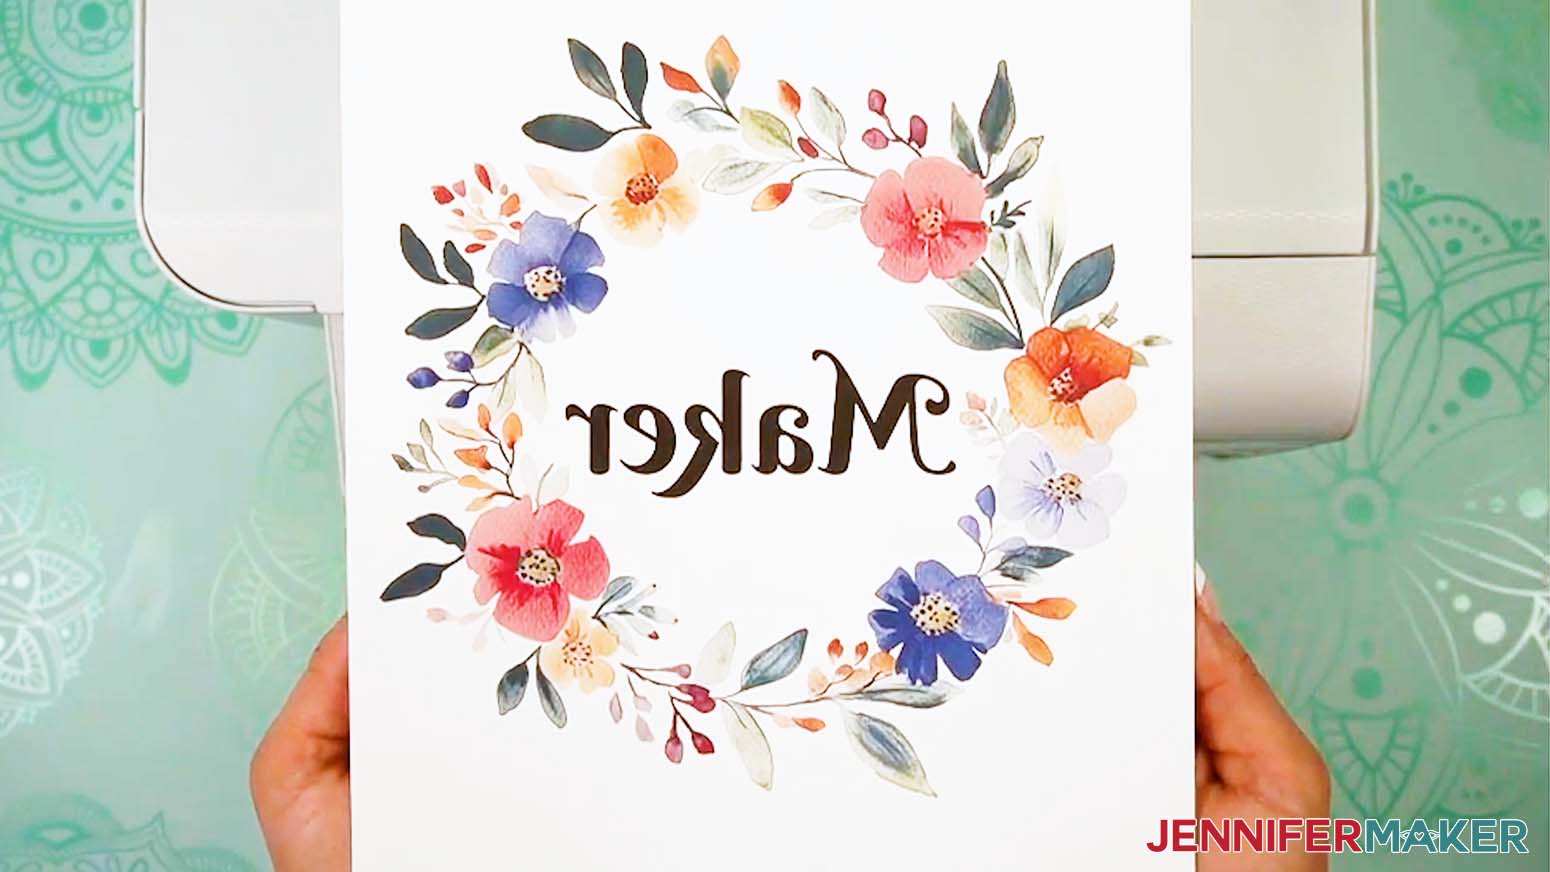
NOTE: I’ll select the first wreath PNG. - Click “Actions” to pick “Word Art.”
TIP: This tool provides more customization options than using a normal Text Box. - Type your name or message and click "Enter/Return" on your keyboard.
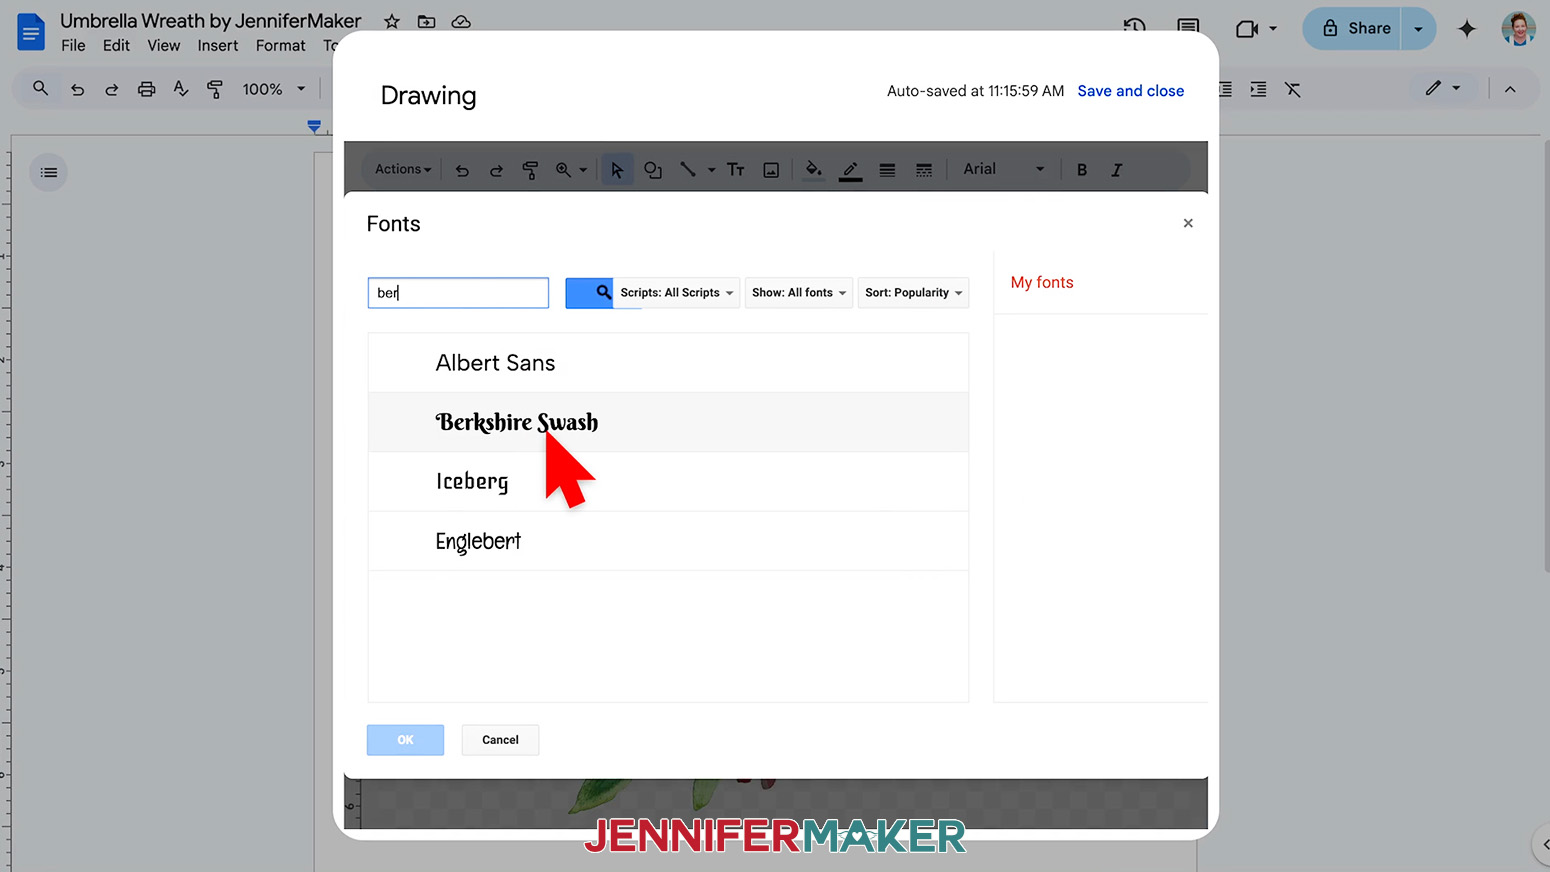
NOTE: I’ll add “Maker.” - Click the Font menu and select a Google Font you like.
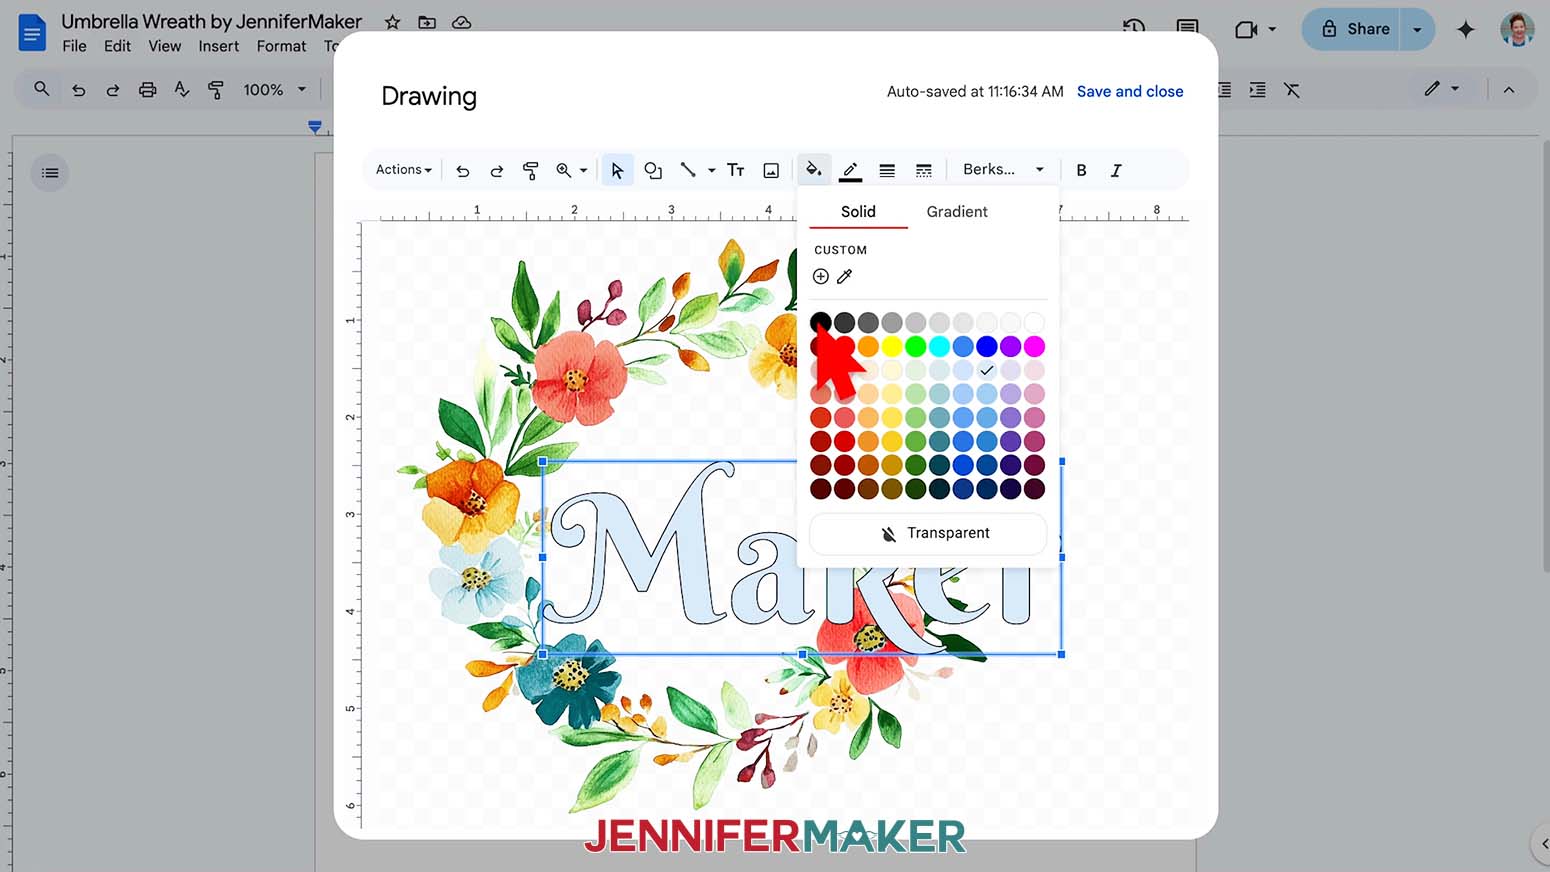
NOTE: I’m using Berkshire Swash. You can find more options by clicking “More Fonts.” - To change the fill color, click the paint bucket icon and pick a new option.
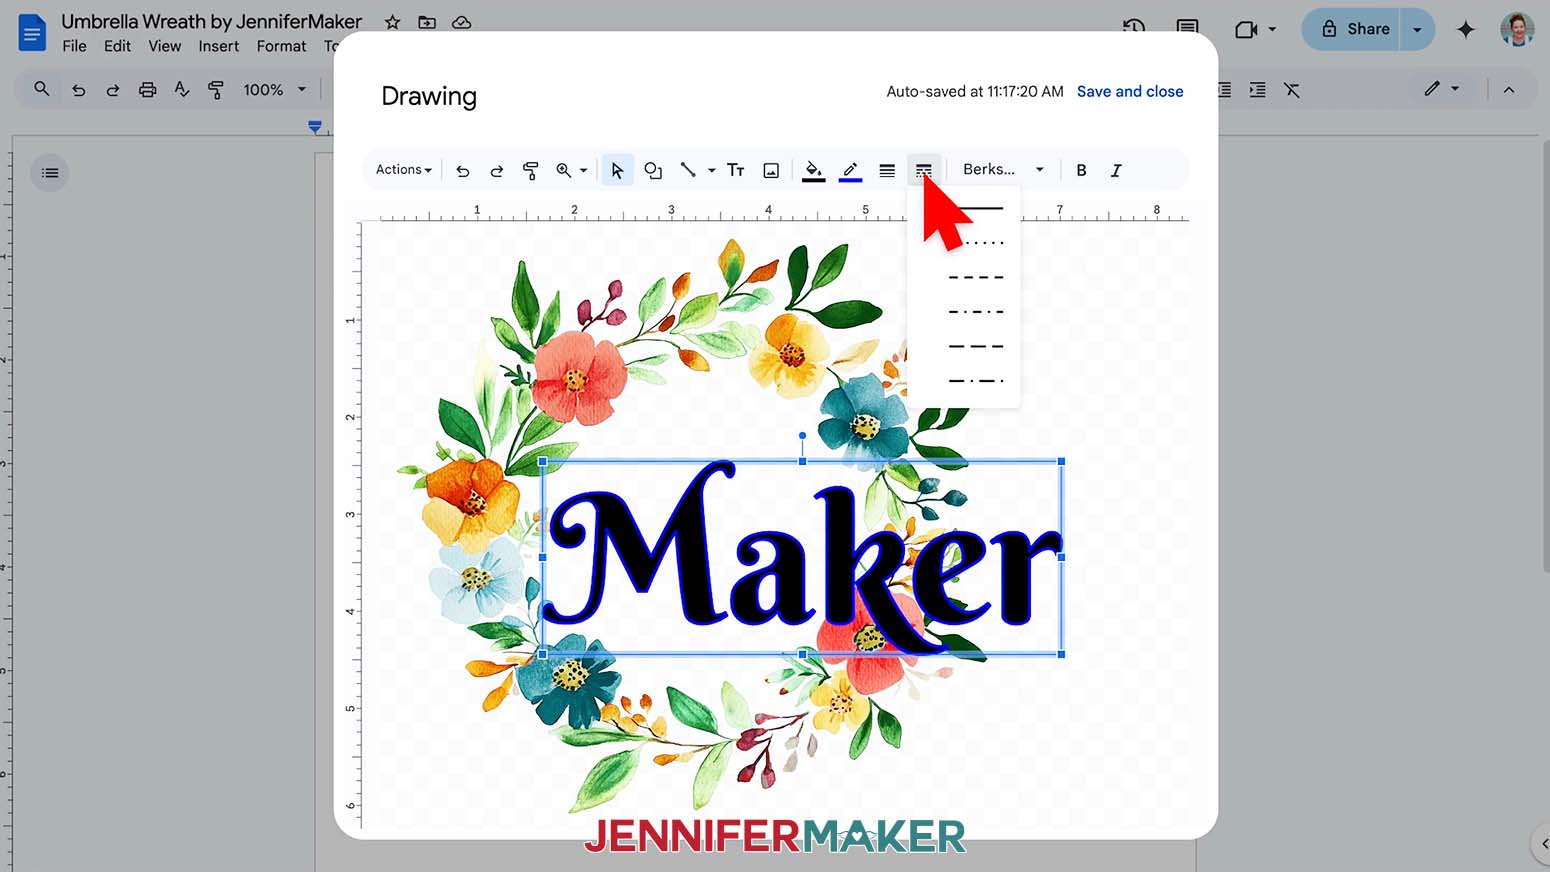
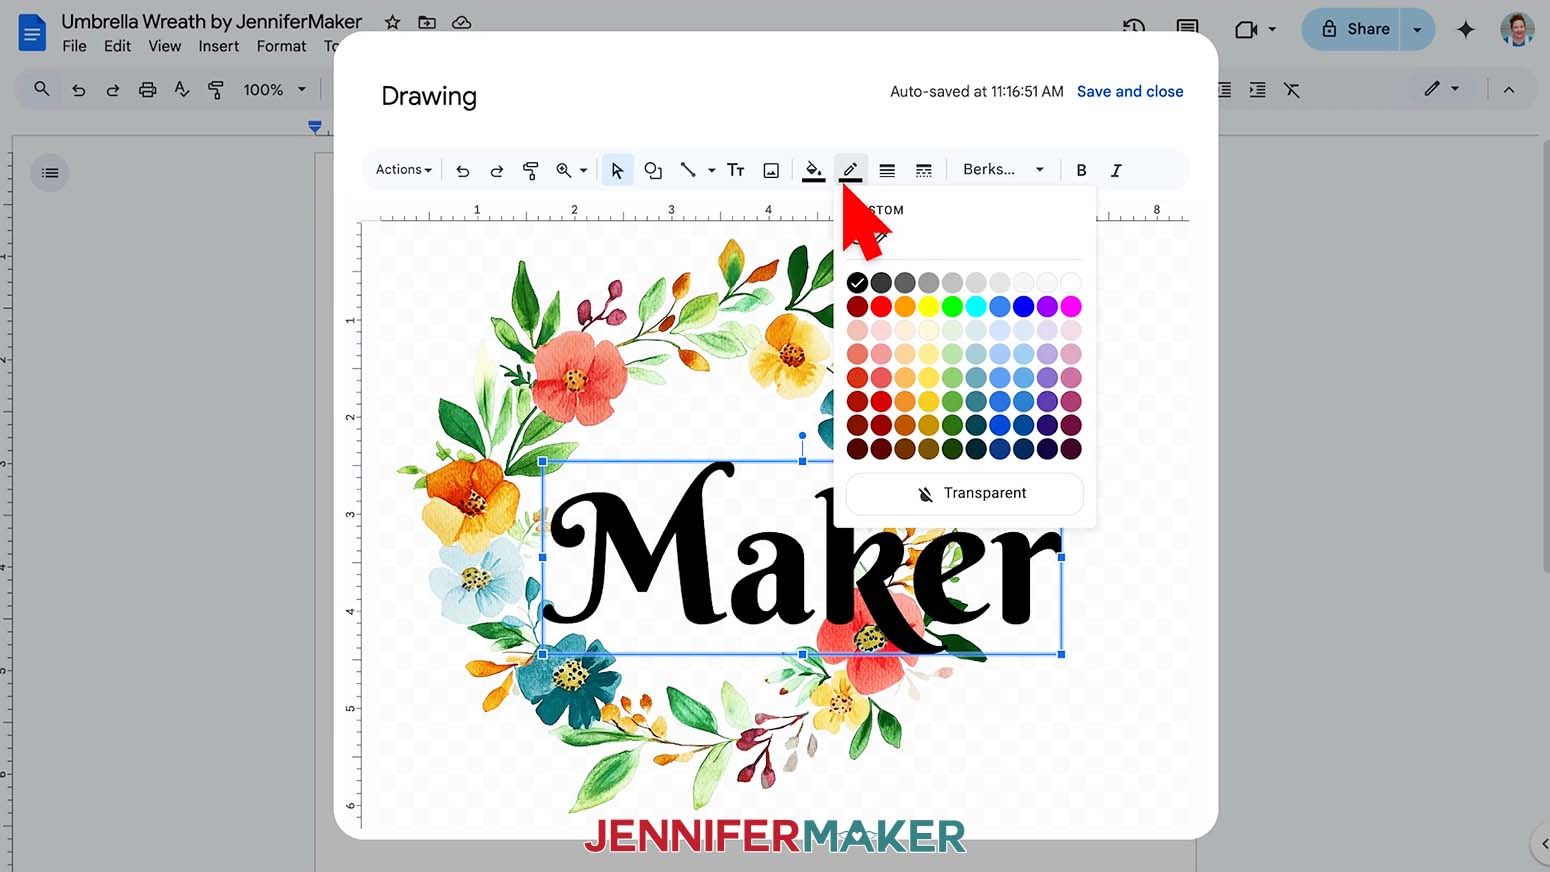
NOTE: I’ll use black. - You can also customize the border using the icons with lines.
- To adjust the border’s color, click the pencil and line icon, then pick an option, or “Transparent” to remove the outline.
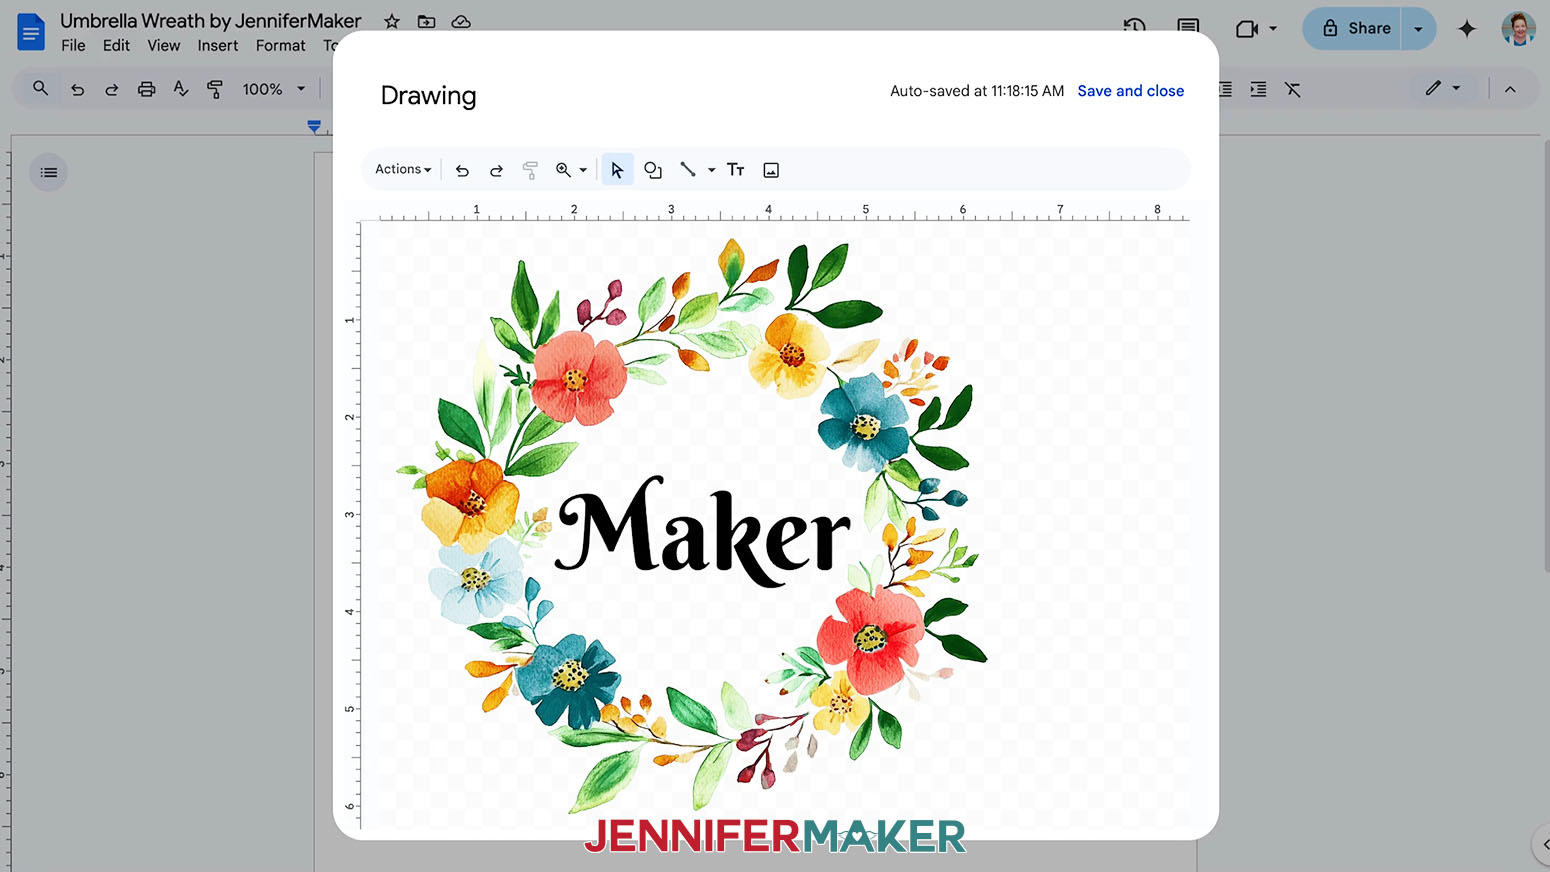
NOTE: I’ll make mine transparent so the words are a little smaller. - Then, use the text box’s corner handles to resize the word to fit in the wreath. Click and drag the text box to manually center it inside the wreath.
TIP: Since the wreath designs don’t have even edges, automatically centering won’t necessarily look correct. - Once the image looks correct, click “Save and close” to place the design into Google Docs.
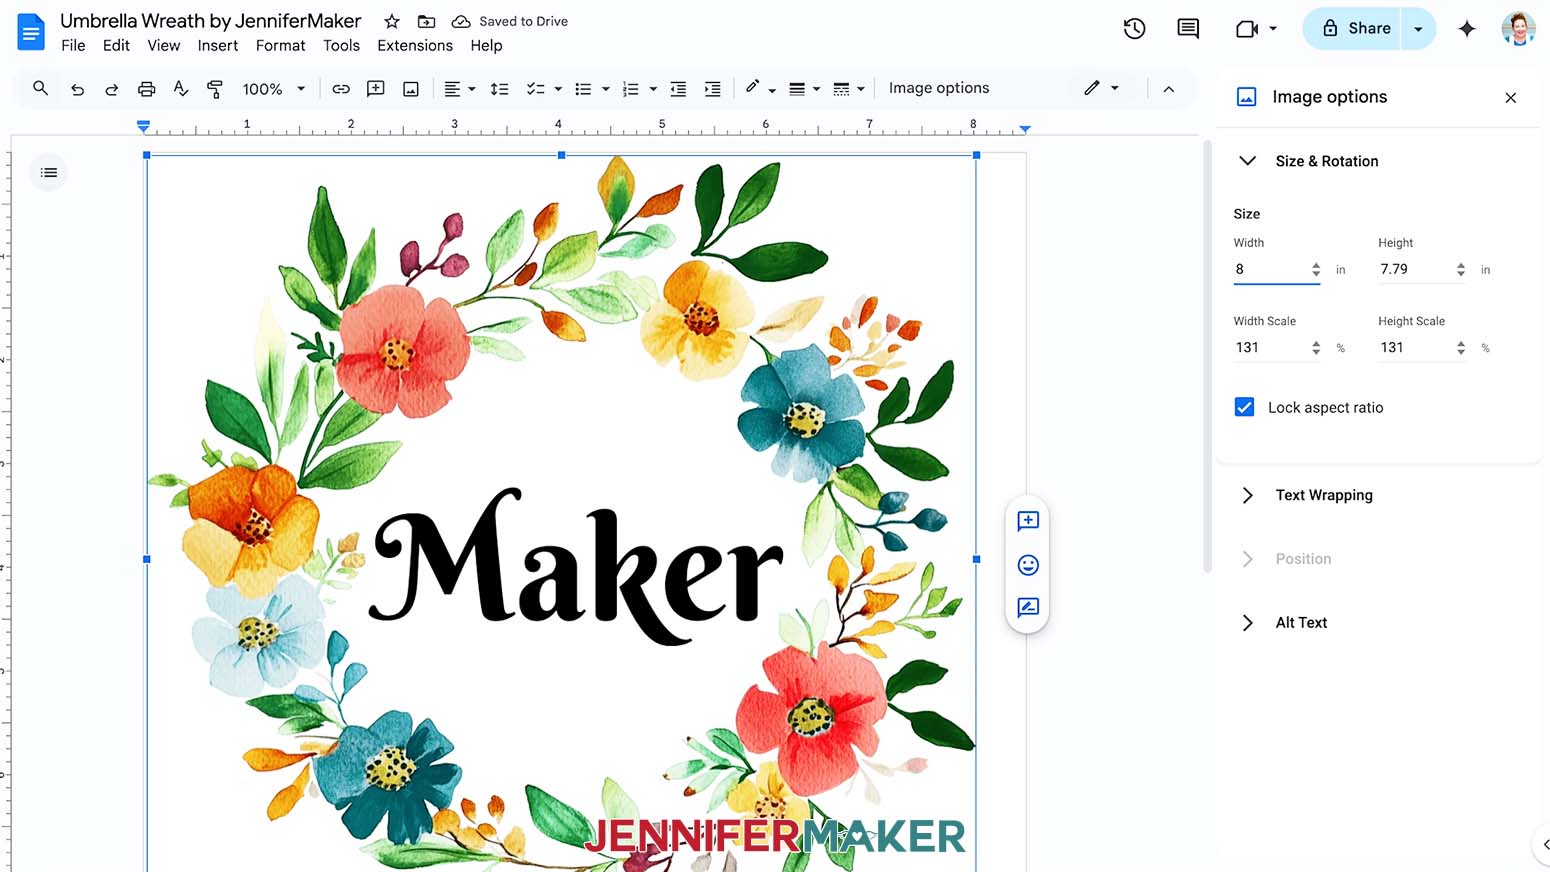
- To resize the design, click “Image Options” at the top of the canvas.
NOTE: You can also open the menu by going to “Format,” “Image,” and “Image Options.” - Select “Size & Rotation.”
- Keep the “Lock aspect ratio” box checked to maintain the design’s proportions.
- Change the “Width” field to match the design area you recorded earlier. Remember to subtract 2” to keep some space open by the frame arms!
NOTE: The panels on my umbrella look best with wreaths 8” wide. - The “Height” field will automatically adjust proportionately.
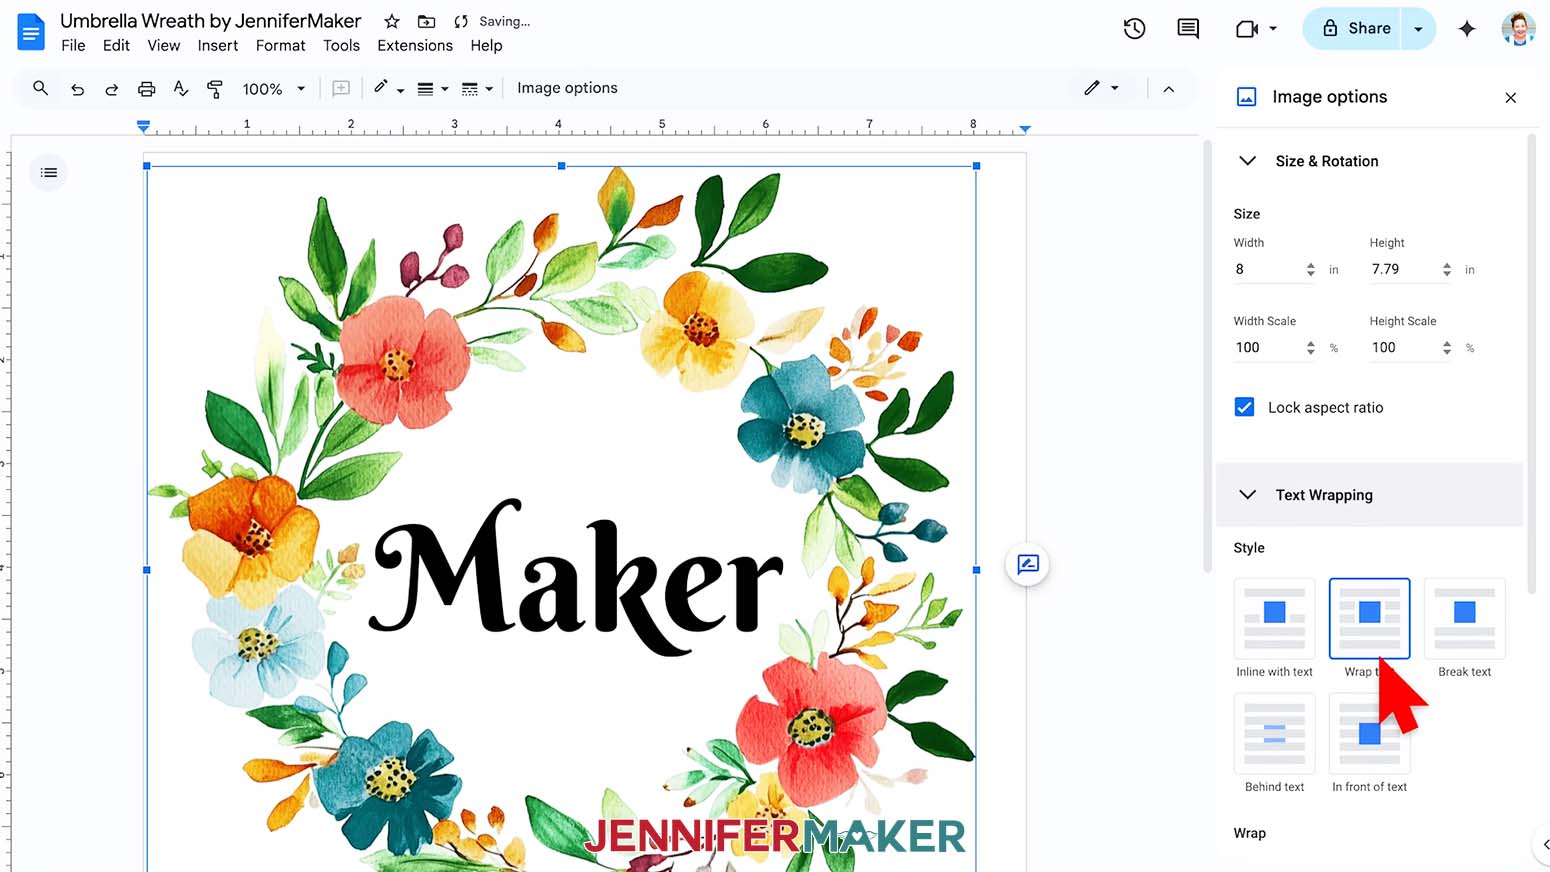
- Click the image and select the “Wrap text” icon from the menu that appears below it.
NOTE: This setting lets you move the design anywhere on the page. - Click and drag the image to the center of your page, as that ensures it won’t get cut off at the edges.
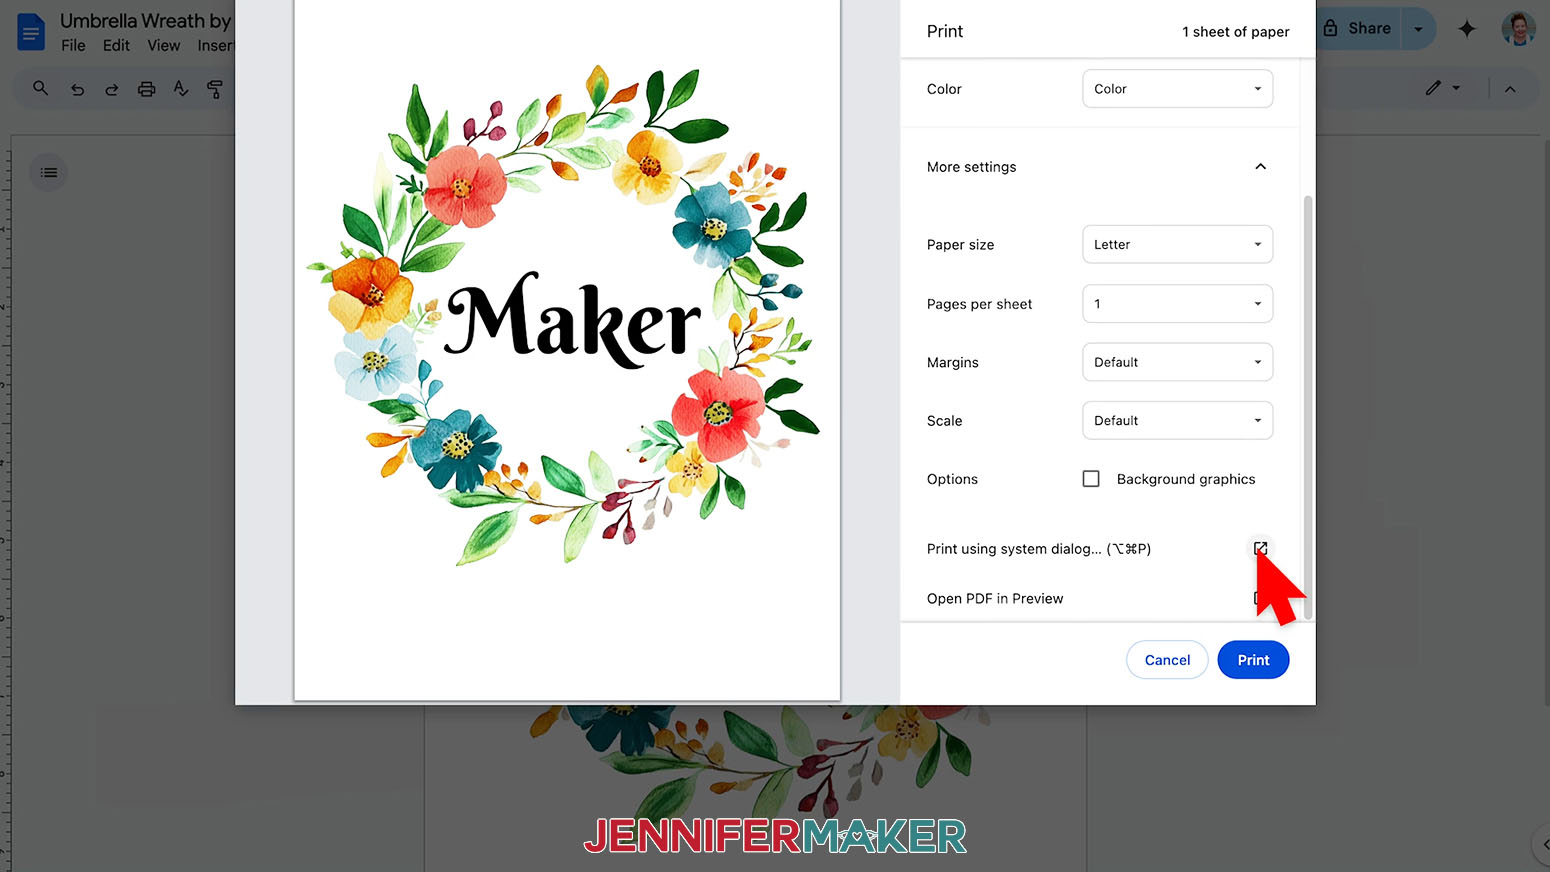
- Go to the File menu and choose “Print.”
- Select your sublimation printer under “Destination.”
- Click the arrow beside “More Settings,” and then click “Print Using System Dialog.”
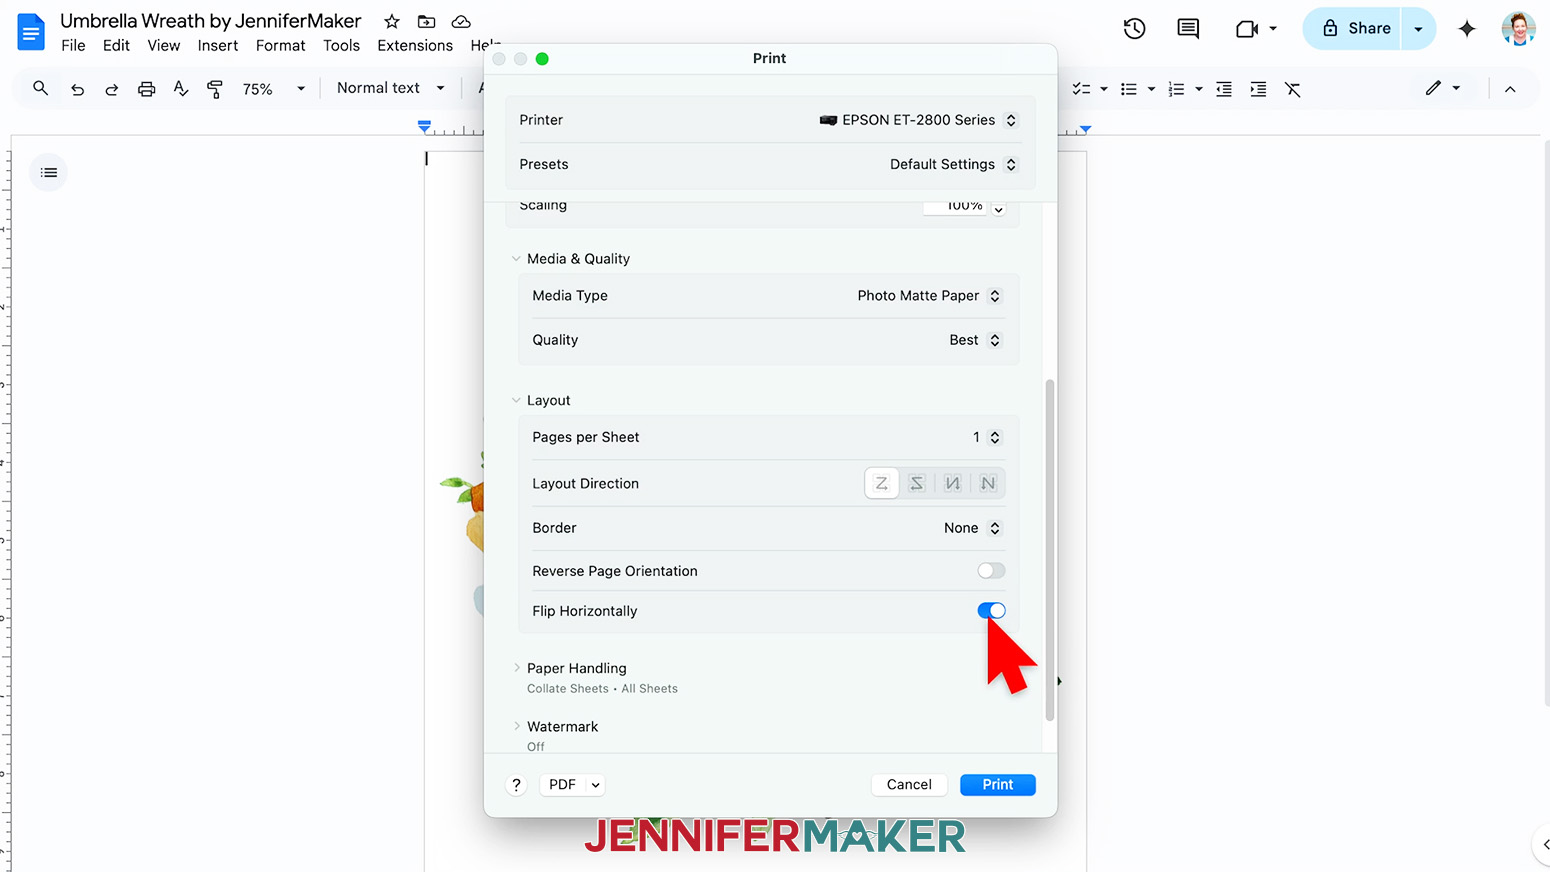
- Your print menu may look different - just make sure the sublimation printer is selected, that you “mirror” the print if you haven’t already, and select the highest quality matte paper setting.
NOTE: The “Mirror” option is sometimes labeled as “Flip Horizontally.” If you’re having trouble finding these options, they are sometimes found under a “Layout” section or tab. - Load sublimation paper correctly into your sublimation printer.
NOTE: Check the packaging for information on how to load the paper. - Click “Print.”
- Allow the print to dry before handling it, as the ink can smear.
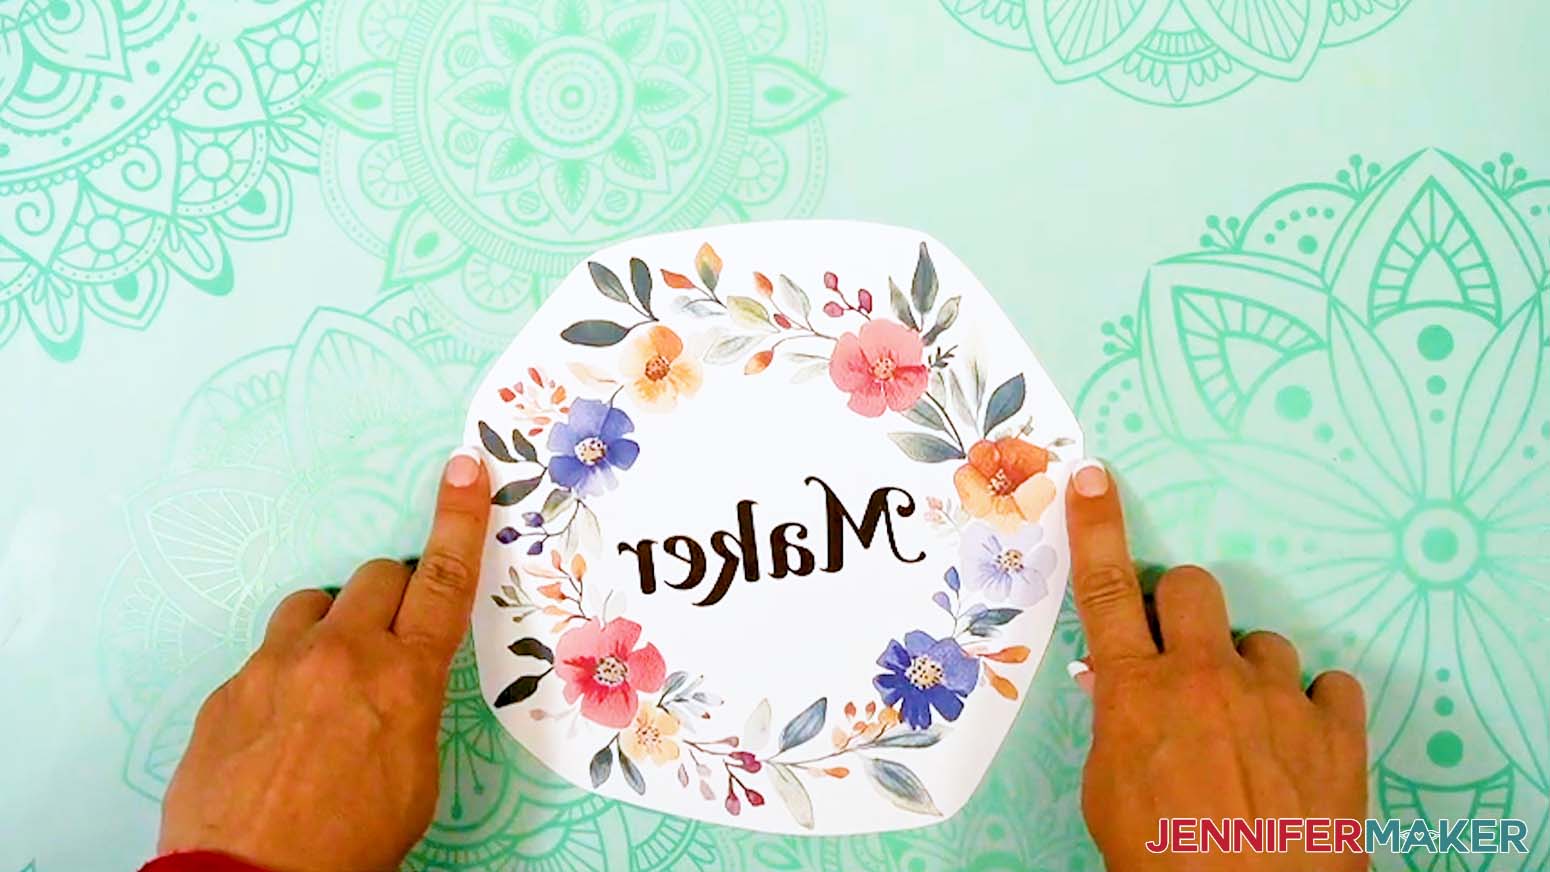
NOTE: The printed design will appear lighter before pressing. - Trim your printed design so there is about ⅛” of white around the ink’s edges.
- Your print is ready to press!
STEP 4: SUBLIMATE YOUR UMBRELLA
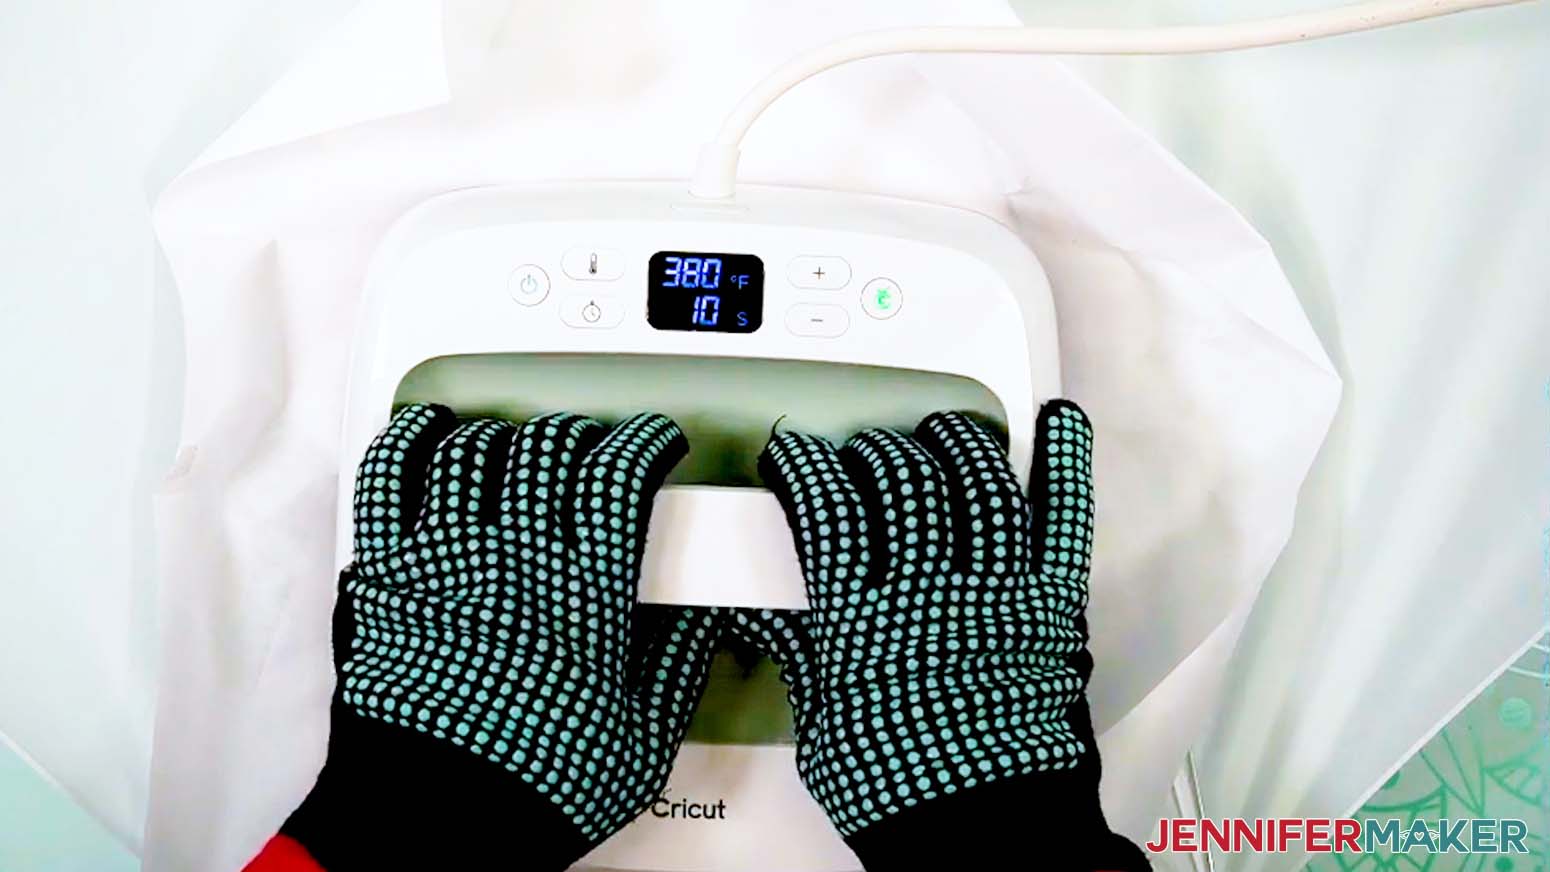
IMPORTANT: As with all sublimation projects, open a window and turn on a fan to improve your ventilation before beginning.
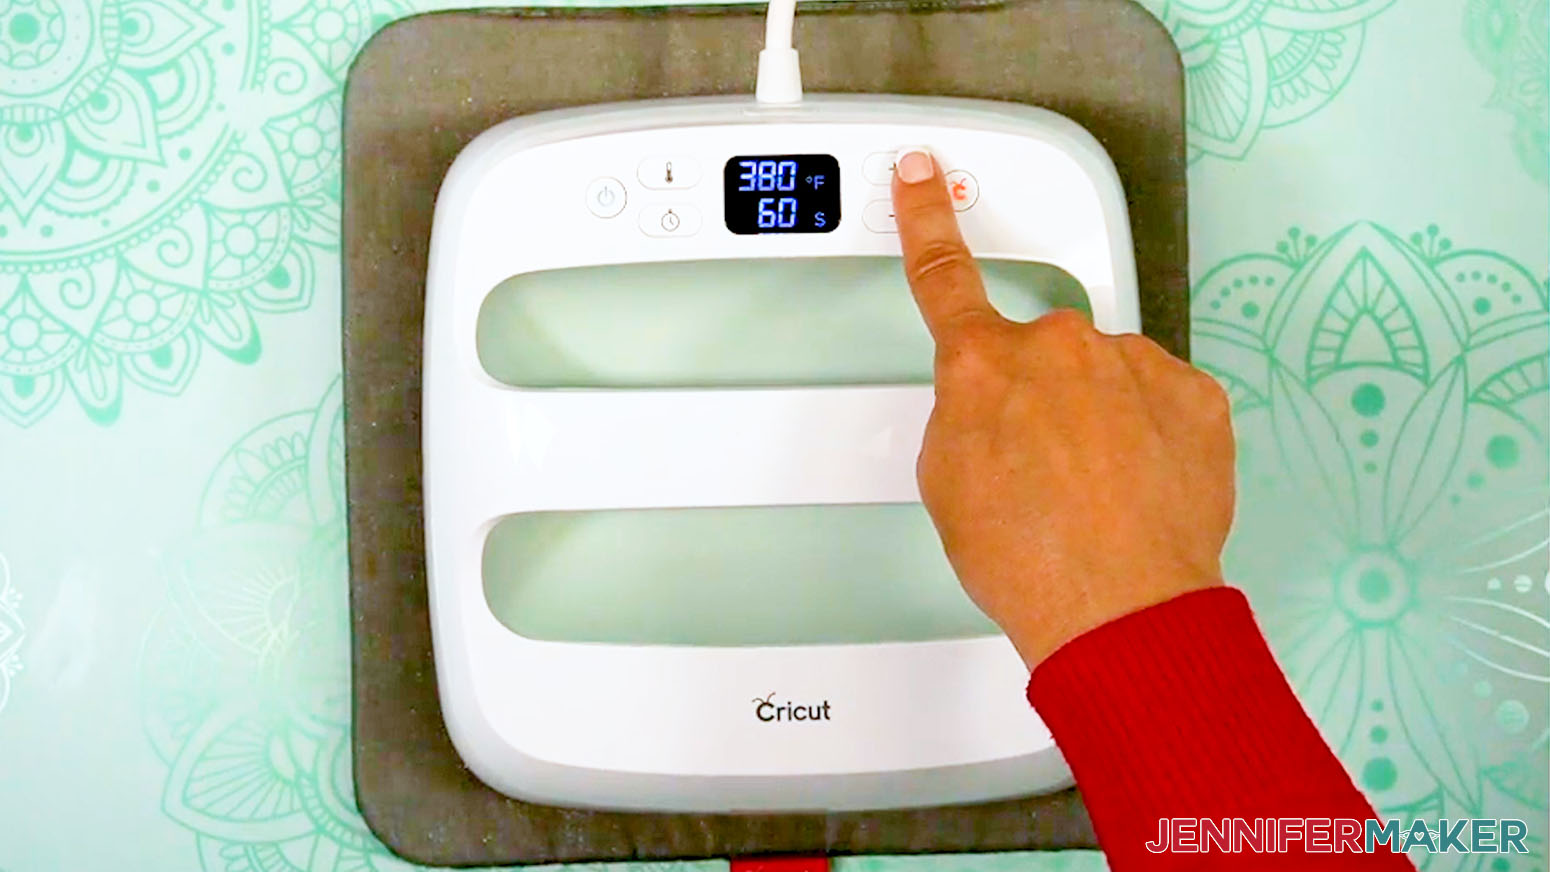
- Set the temperature of your EasyPress to 380℉ (194℃), and set the timer for 10 seconds.
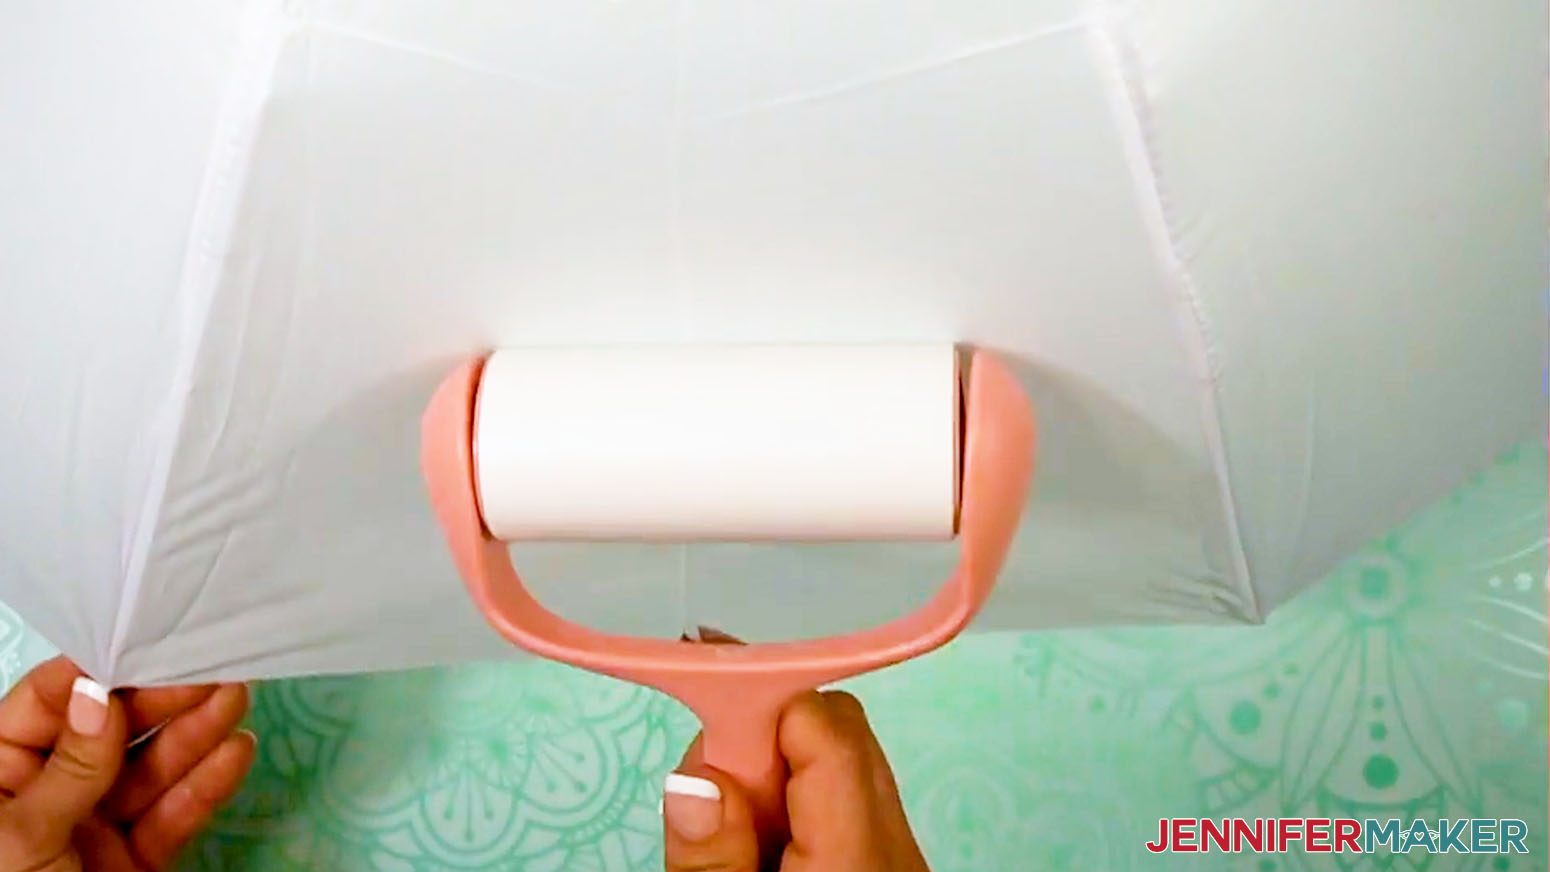
TIP: I followed the time and temperature settings for garden flags in my Sublimation Cookbook. Inside, you can find the settings for tons of other sublimation projects, too! - Use a lint roller to clean any debris from the umbrella panel on both sides.
- Place your pressing mat on a large, flat surface where you will be able to maneuver the open umbrella and press safely.
- Add clean white cardstock to the mat to protect it.
- Place the umbrella panel’s design area face down on the mat.
- Use the umbrella handle to tip the design area toward yourself so the section is flat on the pressing pad.
- Add clean white butcher paper to the panel to protect the fabric and frame from direct heat.
- With your heat-resistant gloves on, preheat the design area in sections for 10 seconds to remove moisture and wrinkles.
TIP: You can let the press go over the frame as long as you don’t press too hard and damage the joints.
TIP: The thin metal frame can heat up quickly. - Remove the press and put it back on its base safely since it’s still hot.
- Remove the butcher paper and let the fabric cool completely.
TIP: The metal frame will take longer to cool completely, so be careful and keep your gloves on for safety. - Position the umbrella so you can see the panel where you’ll place the design well.
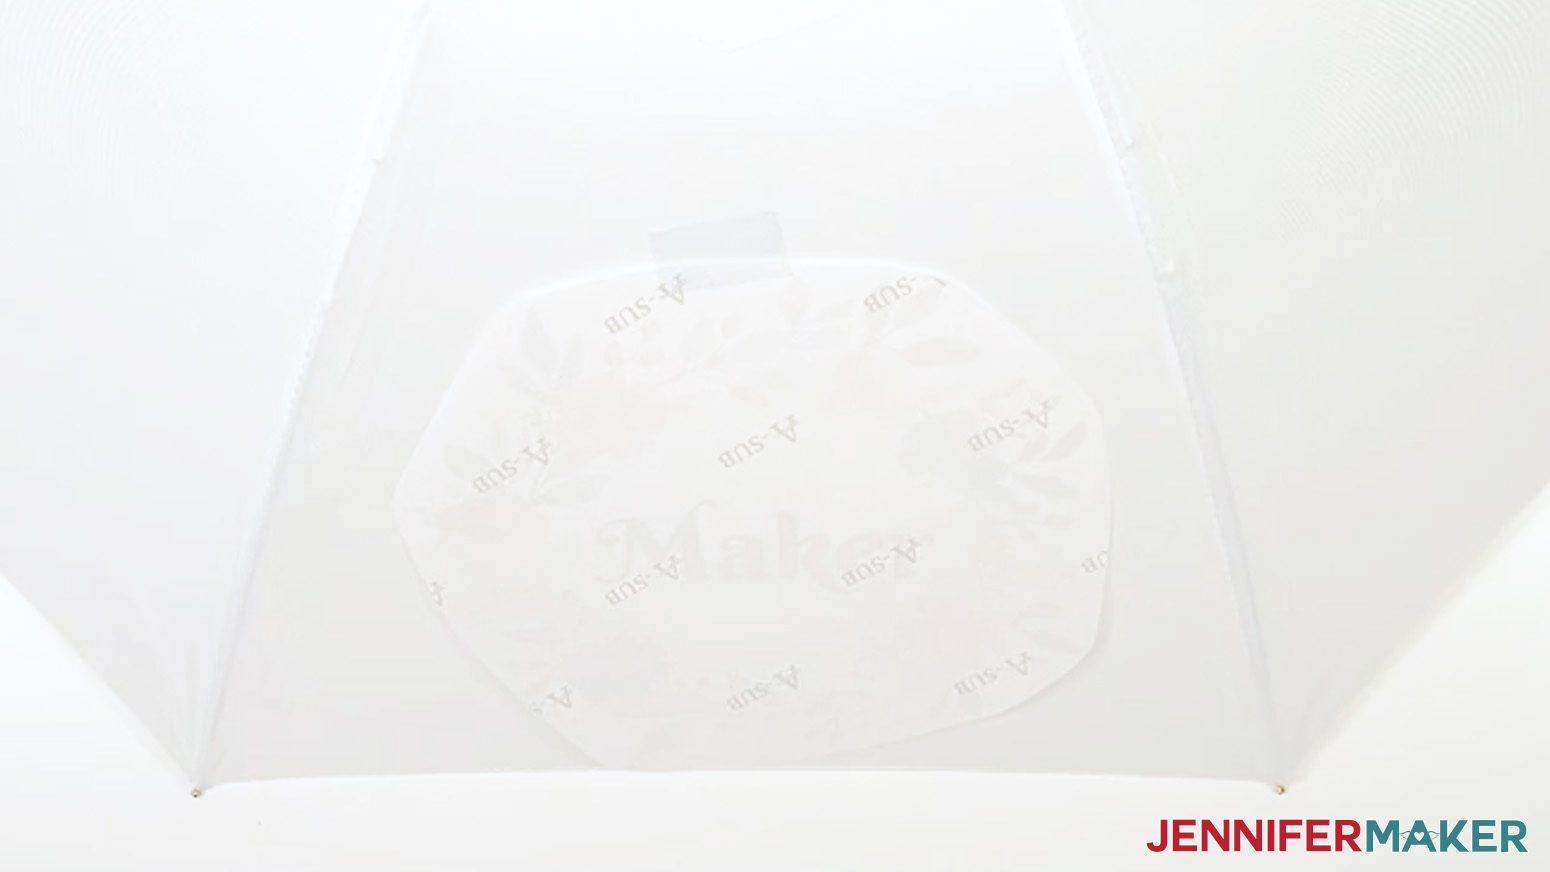
TIP: The umbrella might want to roll around, so securing the handle or asking a friend for help will make it easier. - Center the printed design face-down on the umbrella’s panel, about ¼”-½” up from the bottom and away from the frame pieces.
TIP: Since the wreath is an uneven shape, focus on centering the word instead, as the eye will be more drawn to its position.
TIP: If you’re having trouble seeing the design through the fabric, shine a flashlight up from under the umbrella to make it clearer. - Tape the top middle edge of the design, avoiding the ink.
- Gently smooth the design straight down from the tape to the bottom middle so the paper is flush against the fabric. Tape the bottom edge.
- Tape the side edges the same way.
- Place one hand on either side of the umbrella and gently press the tape into position from both surfaces.
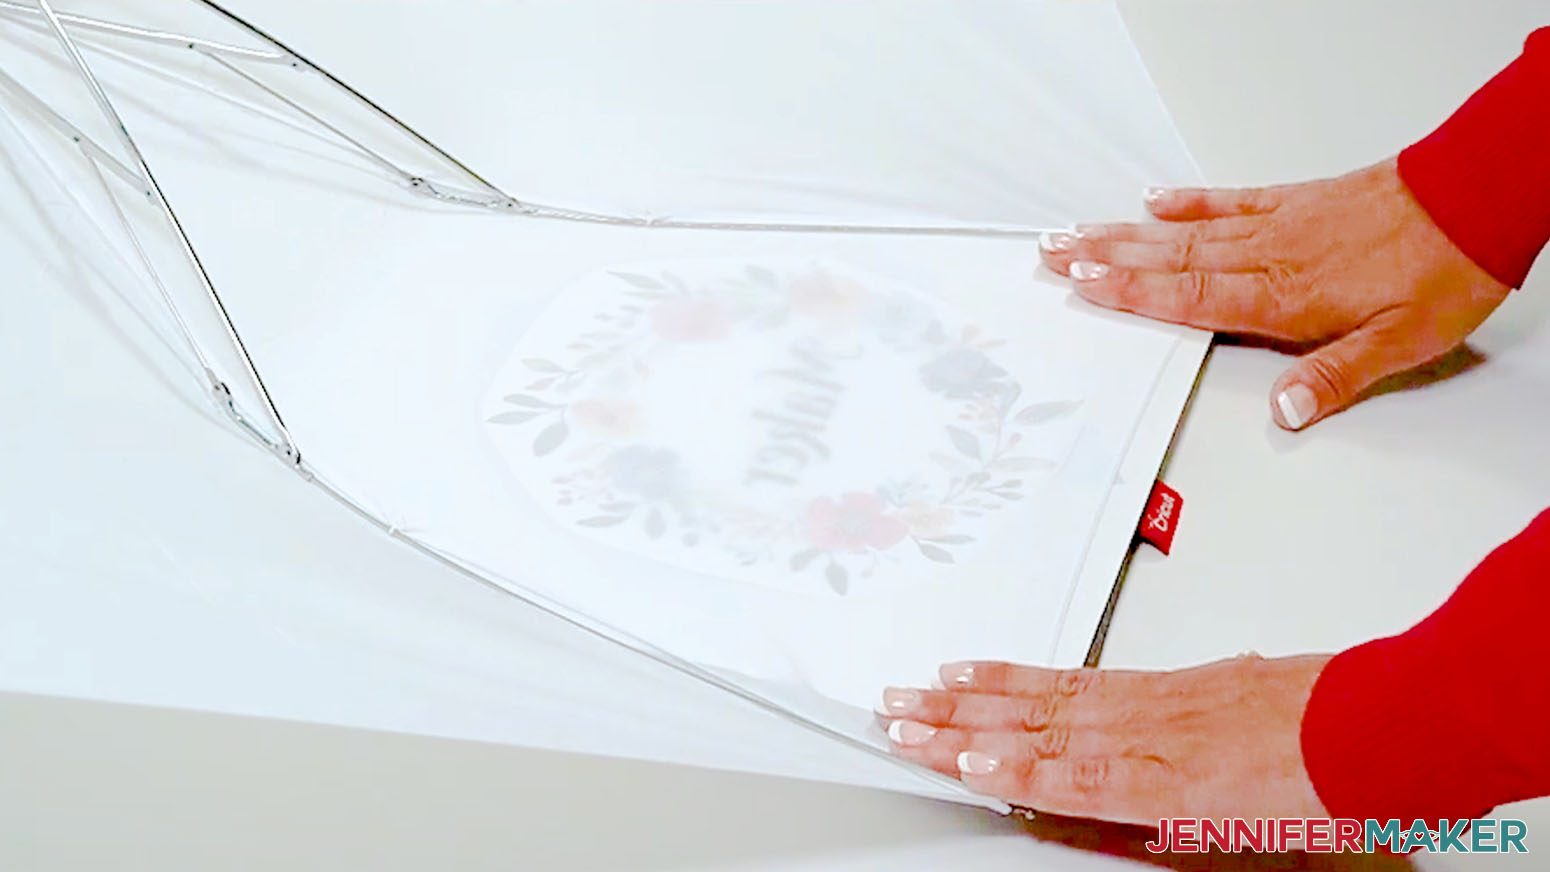
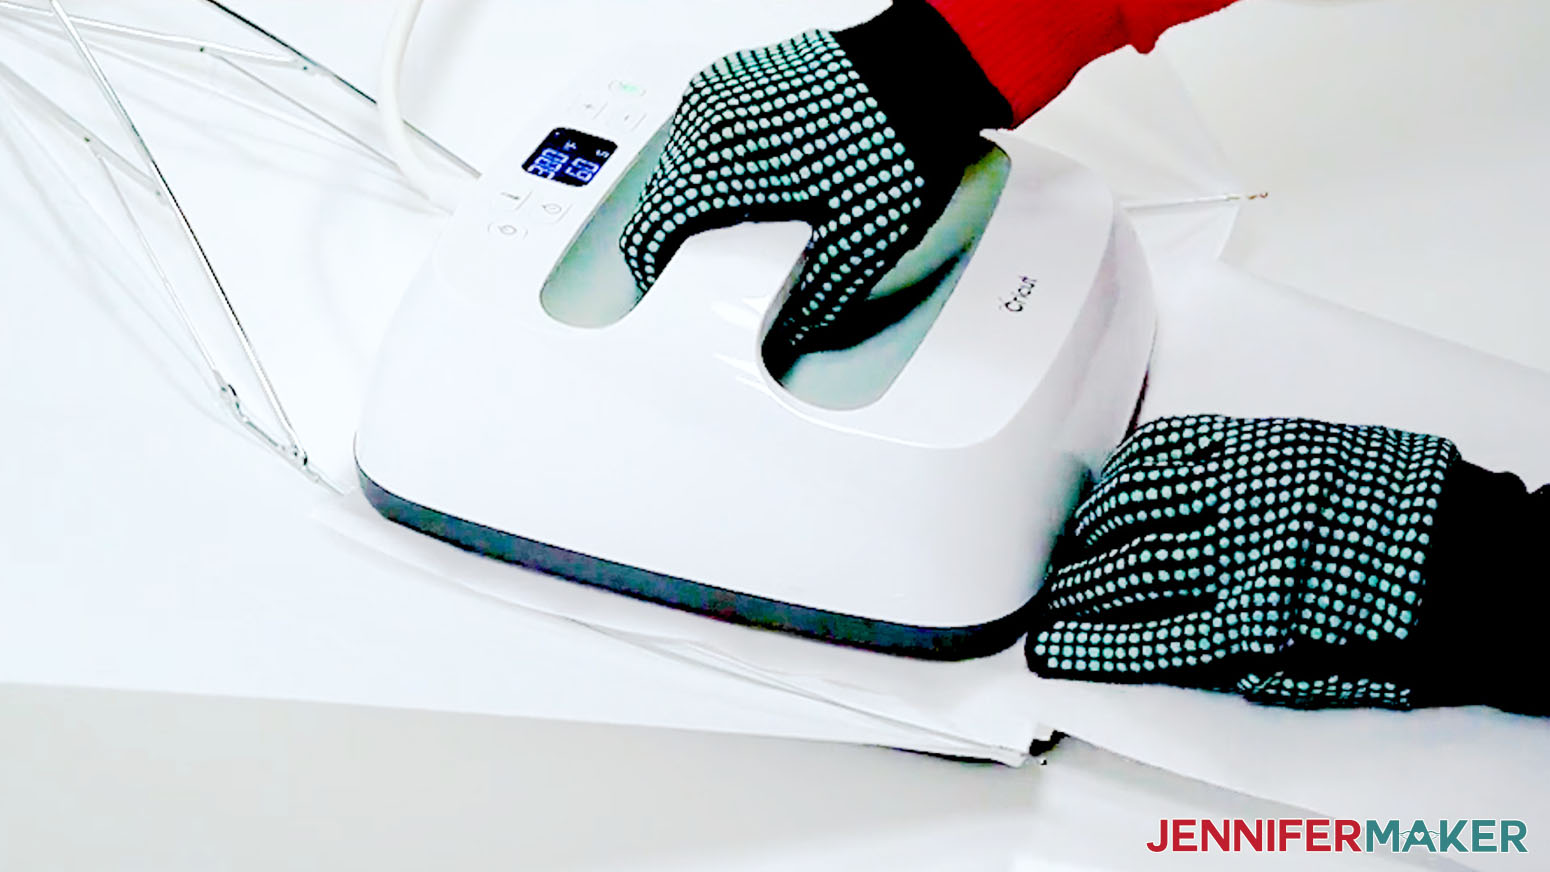
TIP: The slick fabric can resist the tape a little, so take your time securing the design. - Position the umbrella design side down so the inside of the umbrella is facing up and resting on the protected pressing mat.
TIP: If your design is larger than the pressing mat, protect the area below it with extra white cardstock to catch any excess ink. - Place a fresh piece of white uncoated butcher paper on your project to completely cover it.
- Make sure the temperature of your EasyPress is at 380℉ (194℃), and the timer is set for 60 seconds.
- Cover the entire area of your panel design with the EasyPress and hold it in place with medium pressure for 60 seconds.
TIP: Keep the umbrella still by holding the handle with one hand, but try to keep pressure even on both sides of the press for best results. - When the time is up, hold the umbrella handle still with the panel on the pressing mat so the hot frame can’t roll into you.
- Then, lift the EasyPress straight up to avoid ghosting.
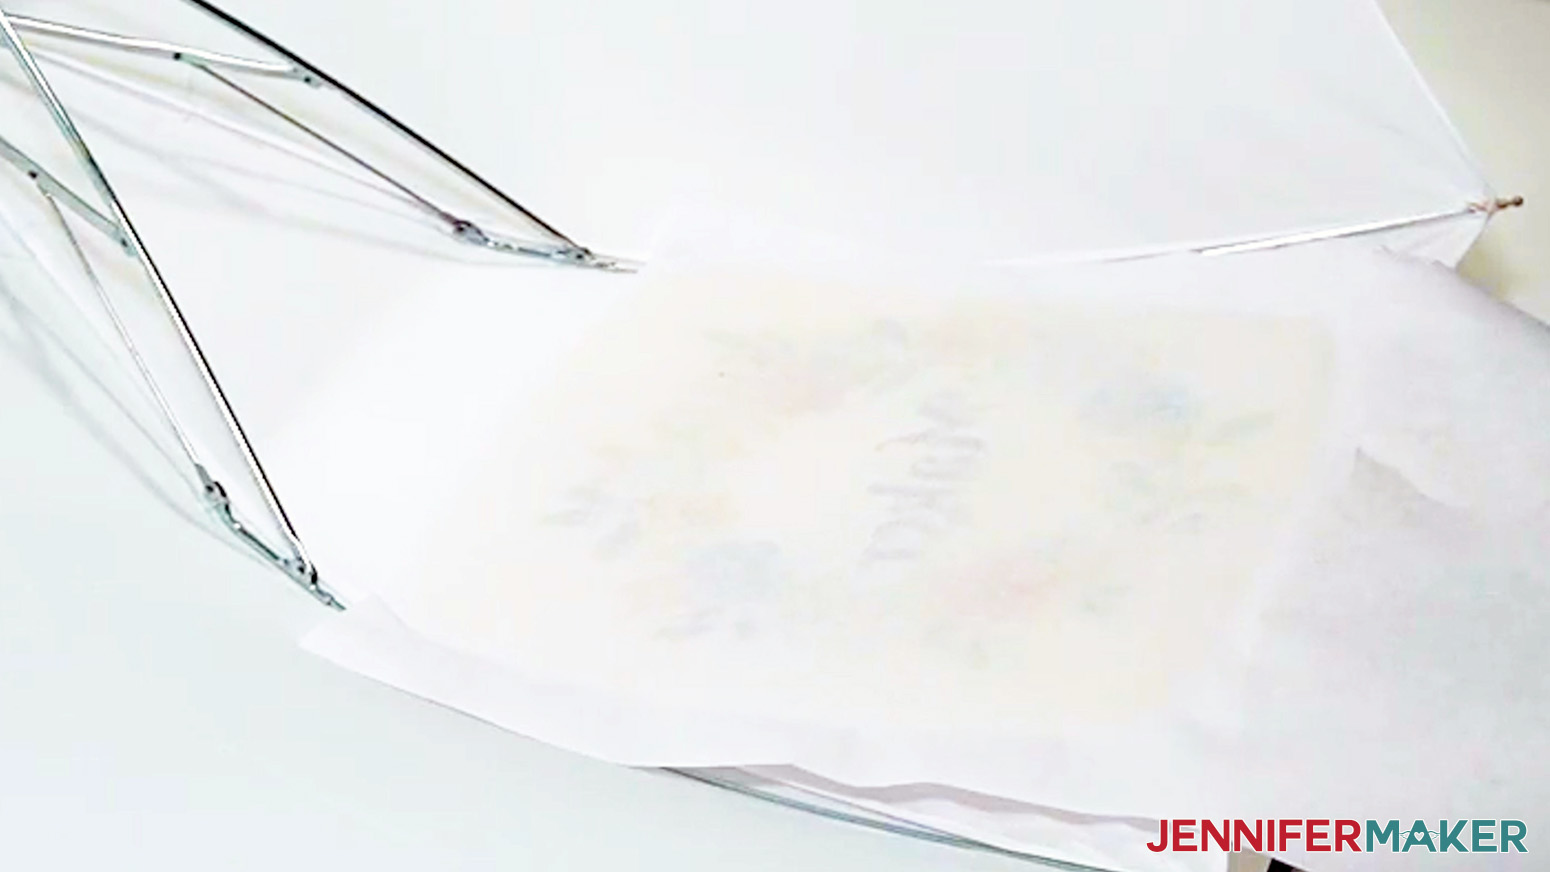
- Let the project cool for 10 seconds, then remove the butcher paper.
- The metal will still be warm, so carefully turn the umbrella to see the outer surface.
- Then, remove the tape and design paper.
TIP: The heat-resistant tape doesn't stick to the umbrella fabric well after heating, so the printed paper will likely be left behind on the table after the umbrella is pressed and lifted. - Your sublimated umbrella is ready, or you can use the same steps to decorate another panel!

STEP 5: SHOW IT OFF
You now have a decorated umbrella you can use for years!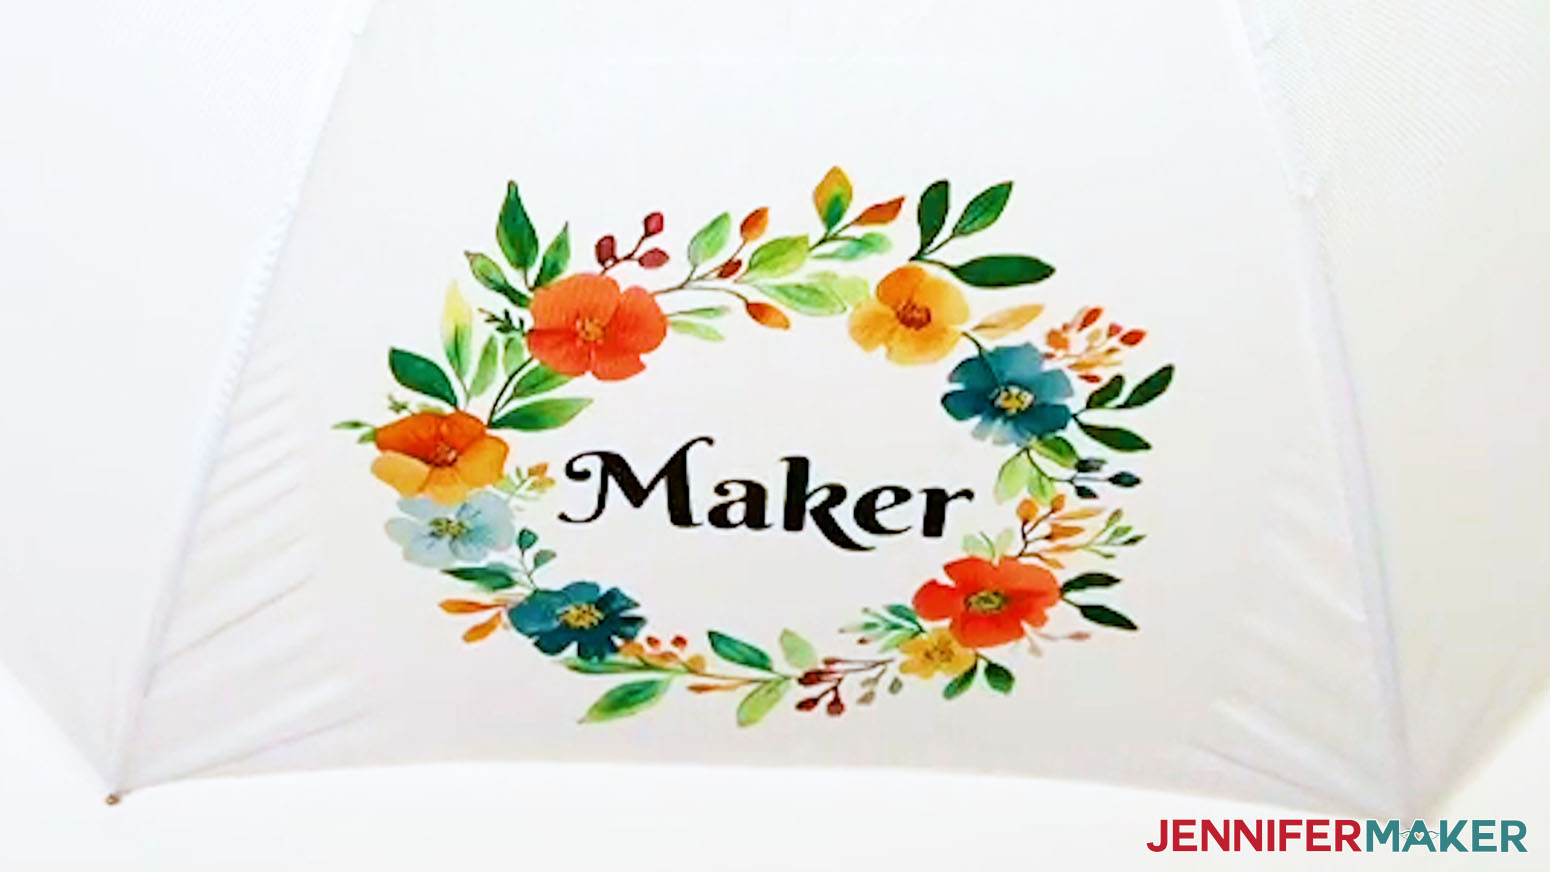
Notes
Print Sizes:
Wreaths: 8" wide, all range in height from 7.78" - 8.23"
Umbrella Blank Size:
Umbrella with a 42" arc (38" diameter) - folds down to 16" length
Font Used:
Google Free Font: Berkshire Swash
Care: To wash, use warm water, mild soap, and a soft cloth. Allow to air dry.
Answers to Your Questions About How to Sublimate an Umbrella
Q: Is there a way to sublimate the whole umbrella?
A: You can learn how to create your own cascading designs to sublimate on an umbrella in my ADVANCE program. Learn more about ADVANCE here!
Q: Can you sublimate on an umbrella?
A: Absolutely! In this tutorial, I teach you how to sublimate onto a white, polyester umbrella. Check out the video, or craft along with my printable written tutorial (with photos) above!
Q: Can you heat press on an umbrella?
A: You can, with the right temperatures and times! Be sure to check out my tutorial to learn how to safely use a heat press to sublimate an umbrella.
Q: Does sublimation hold up outside?
Q: How do I find more images for my umbrella?
A: You can use any of the images included in the project files, or find more in my library! You can also use your own photos and designs, images created through AI generators as long as you follow the tool’s guidelines, graphics from Canva or other online sources depending on usage requirements, or stock photos for your umbrella. If you want to take your designs further, I share online resources and best practices so you can get better results when designing and sublimating in my Advance program!
Q: How long do you press an umbrella?
A: Just follow the tutorial with my free files to learn what times and temperatures work when learning how to sublimate umbrellas!
Q: Can you use sublimation paper twice?
A: Though it may look like there’s ink left on your sublimation transfer paper after pressing, there’s not actually enough to create another press. You can try to reuse your sublimation prints, but your second attempt will probably look super faded and not the way you expect.
Q: Can a Cricut do sublimation printing?
A: While a Cricut cutting machine can be useful in some sublimation projects, it does not sublimate or print sublimation ink. However, you can use a Cricut and Infusible Ink pens to draw designs onto paper, which can be sublimated, or use a Cricut to cut SVG designs out of Infusible Ink transfer sheets. If you want to sublimate your umbrella with printed designs, you’ll need a sublimation printer, a heat press, and other tools and materials you can find above in my materials list.
Q: Can I make and sell sublimated umbrellas?
A: If you want to use my designs and projects for commercial use, please familiarize yourself with my important licensing information before selling your crafts.
Get my free PNG files to sublimate umbrellas and more!
(If you do not see the signup form above, click here.)
I love seeing your sublimated projects, and how you use them! Once you’ve learned how to make your own sublimation umbrella, inspire others and share a photo of your umbrella project in our Facebook group or tag me on social media with #jennifermaker.
Love,

Want to remember this? Save this How To Sublimate An Umbrella Tutorial to your favorite Pinterest Board!