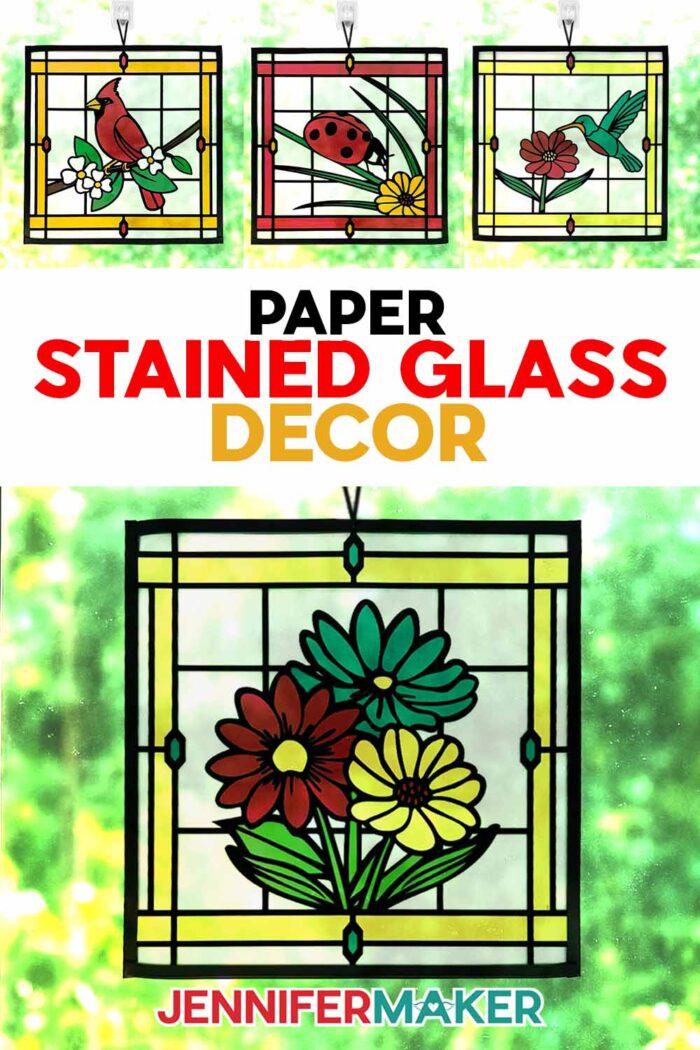
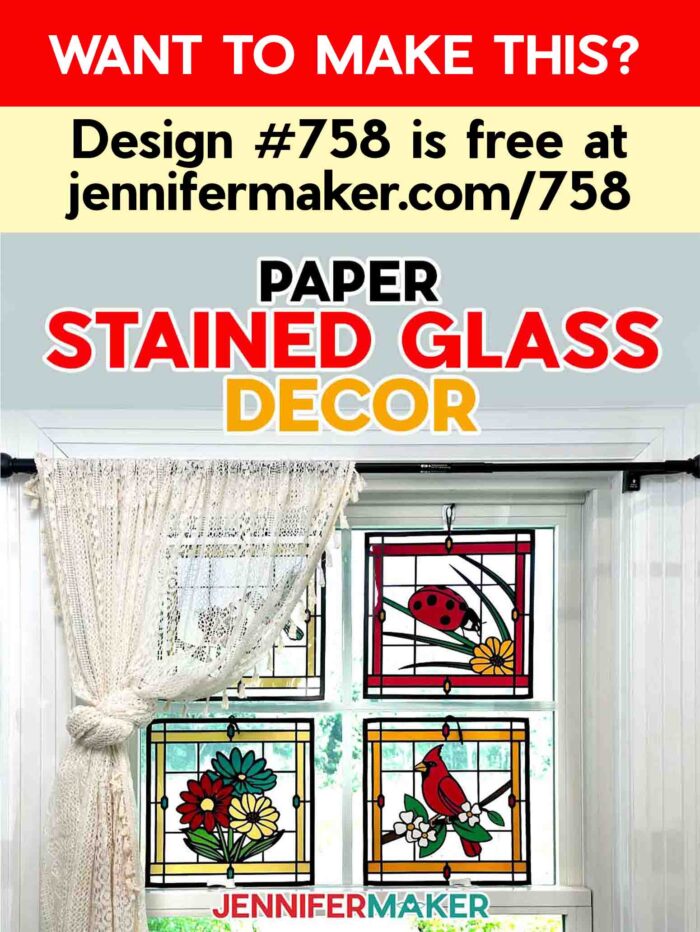
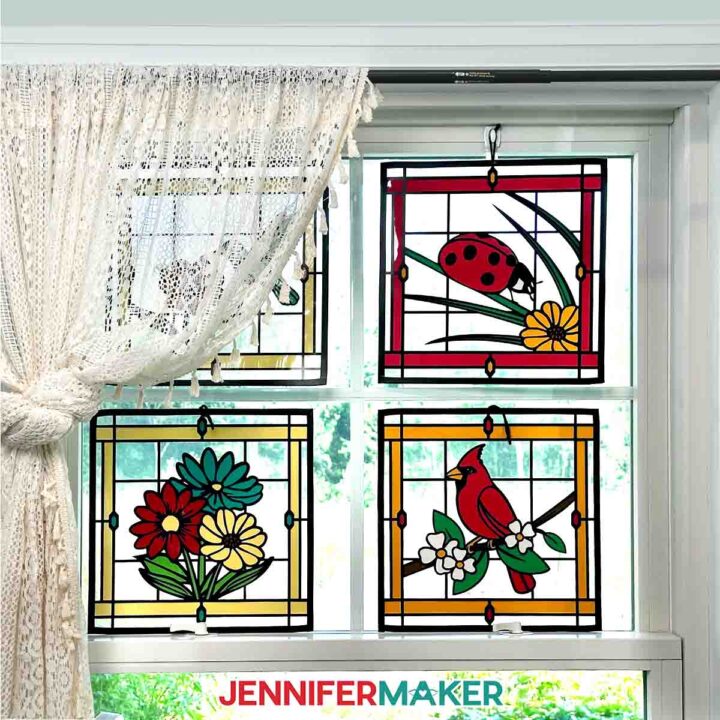
Learn how to make beautiful faux stained glass using paper, acetate, and vinyl!
Many crafters love the look of stained glass with its radiant colors, intricate designs, and the way light shines through each unique design, right? But traditional stained glass comes with a few challenges: sharp edges, heavy materials, open flames, and a lot of delicate assembly. Even when working with stained glass-inspired papercrafts, the designs can be so intricate and fragile that they’re tedious to cut and remove from the mat. That’s exactly why I created this project! It’s a much simpler and more beginner-friendly way to make beautiful stained glass using paper, vinyl, acetate, and tape.
See the full step-by-step video tutorial on how to make stained glass using paper:

First, I want to give credit where it’s due! This idea was originally inspired by designer Cindy Duke, who has popularized these gorgeous stained glass paper projects in recent years. Her work is absolutely stunning! If you’d like to explore more of her designs, just search Cricut Design Space for her name and you’ll find her profile. While my designs come together a bit differently than Cindy’s and other versions she’s inspired, they wouldn’t exist without her beautiful glass art inspiration. Thanks, Cindy!
What makes my version beginner-friendly is how we simplify the materials and process without sacrificing the look. Instead of using black paper to form the outlines, which can be hard to cut and glue, we’ll use black adhesive vinyl. That will give us those crisp lines that mimic the leaded look in real glass projects. Detailed vinyl not only cuts cleaner than paper, but the sticky side makes it so much easier to transfer onto acetate rather than securing a paper layer.
And instead of struggling to glue down small pieces or thin strips of paper, these projects use layers of cardstock to create the design. Each layer builds up the final stained glass window design, with a layer of acetate on top to give it a glossy, glass-like finish. This project is a great way to try something new, especially if you’ve always admired stained glass but felt like it was too complicated or out of reach!
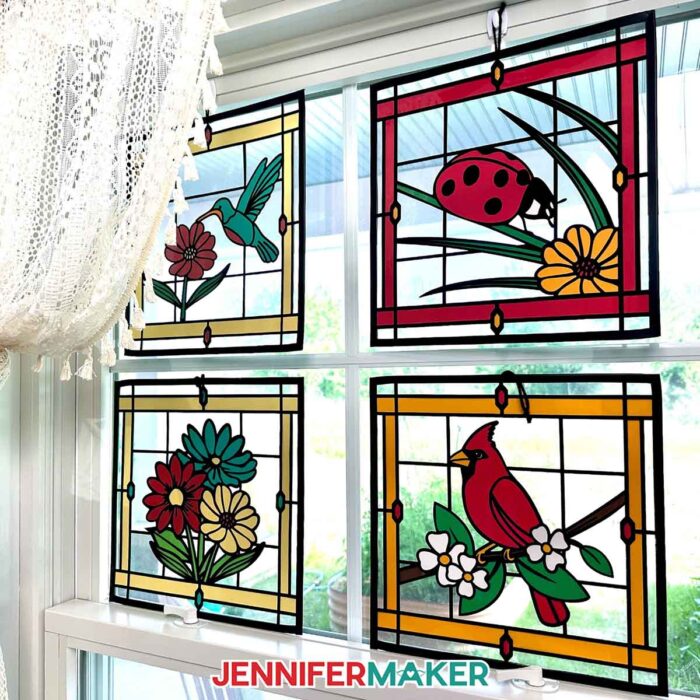
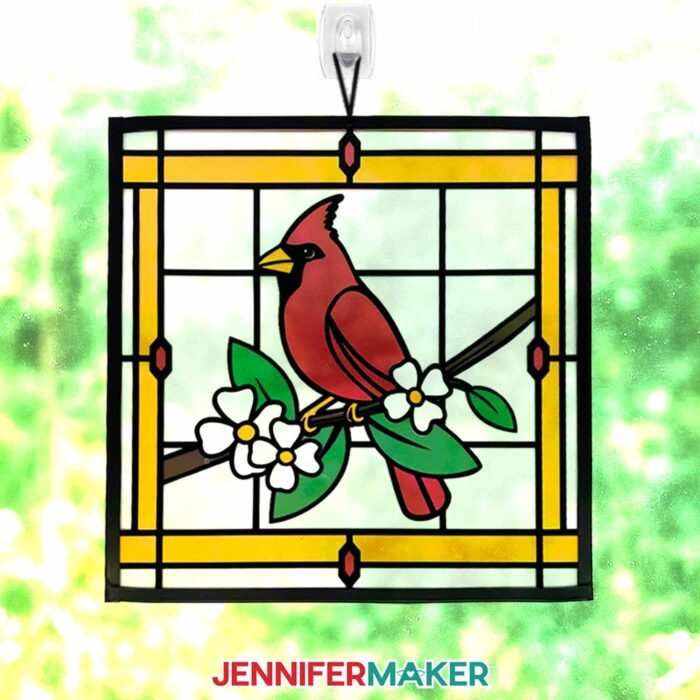
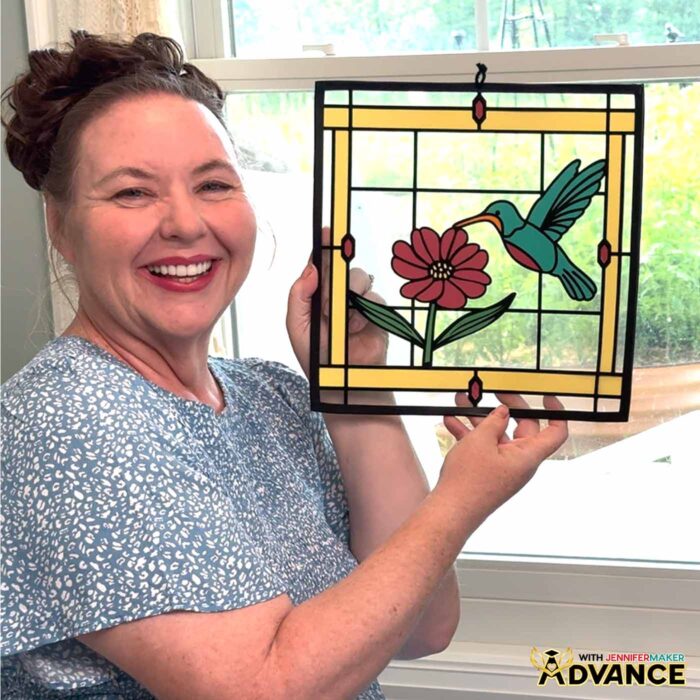
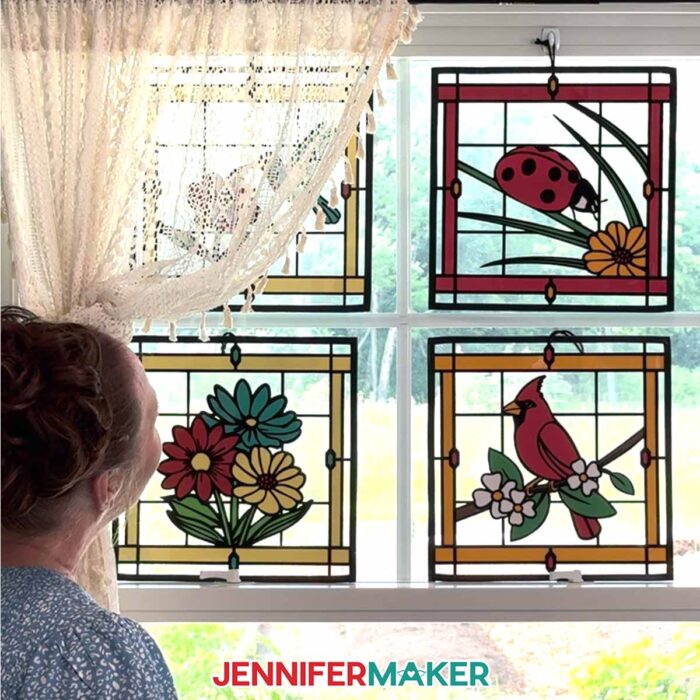
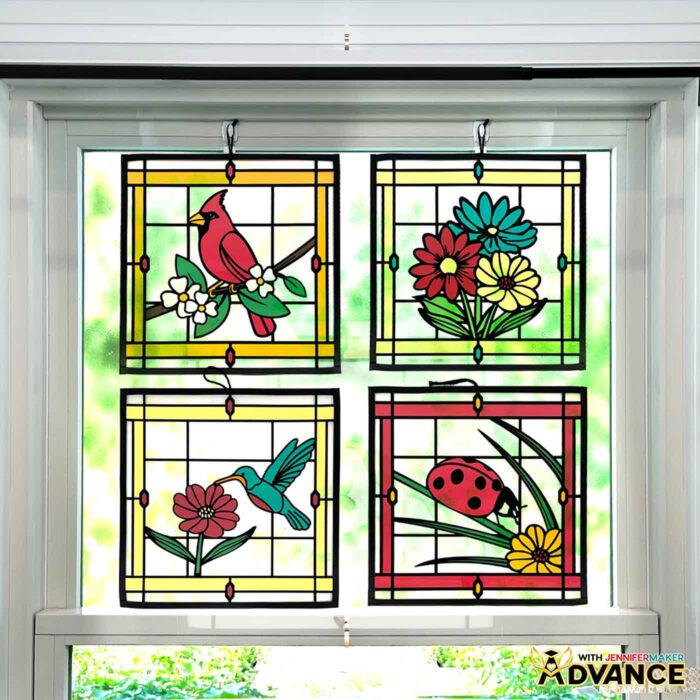
All three of my free SVG designs (a vibrant cardinal, a cheerful ladybug, and a blooming floral bouquet) were created with beginner crafters in mind. You can download them from my free library and cut on your Cricut, or use the included DXF files for other cutting machines. I even included printable PDFs for hand-cutting, so everyone can make stained glass using paper, no matter what tools you have.
In the full video tutorial, I walk you through everything step by step, from uploading the design to Cricut Design Space, to cutting your materials, to layering each piece in the right order. The fun part comes when you start seeing everything come together: how the black vinyl outlines define the image; how the layers of colorful cardstock form the design; and how the acetate gives everything a shiny, polished look. And don’t worry! Since there’s no actual glass involved, your stained glass using paper will be safe and lightweight enough to hang just about anywhere.
Because these are made with acetate, they’re also easy to clean. Just wipe them with a soft, dry cloth if they get dusty. That’s it!
Whether you’re brand new to Cricut or just looking for something pretty and relaxing to make on a weekend afternoon, my stained glass using paper project is a great way to get the look of stained glass without the hassle. It’s also a perfect introduction to Cricut crafting, especially since we’re working with multiple mats and material types! If you’ve been nervous about trying intricate designs or trying multimedia craft projects, this is the perfect place to start.
And if you’re someone who wants to take things a step further, the written tutorial includes bonus steps to create a stained glass design that looks the same from the front and back. Then, you can hang it in a window to enjoy it whether you’re inside or outside looking in!
Even better, my Advance membership includes a workshop where I teach how to design your own window! Learn more about ADVANCE with JenniferMaker here!
With the right materials and tools (I’ve included affiliate links to my favorite tools and supplies below), plus my video tutorial, making stained glass using paper is so easy!
So, are you ready? Watch the full tutorial and craft along with me!
Let me show you how to make stained glass using paper! This post contains some affiliate links for your convenience (which means if you make a purchase after clicking a link I will earn a small commission but it won’t cost you a penny more, there is no additional cost)! Read my full disclosure policy.
Materials to Make Stained Glass Using Paper
View my Amazon shopping list with the exact items I used.
- Value Permanent Vinyl (black)
- Four to Five (4-5) Sheets of 12” x 12” 65 lb. Cardstock (any colors)
- Optional: One to Two (1-2) Sheets of 12” x 12” 65 lb. Cardstock – Teal
- Two (2) Sheets of 12” x 12” Acetate
- StandardGrip Transfer Tape
- Black Yarn (for hanging)
- ¾” Black Tape (for finishing the edges)
- Cricut Green StandardGrip Machine Mat 12″ x 12″
- Brayer
- Craft Glue (I used Bearly Art Precision Glue)
- Spatula
- Weeding Tool
- XL Scraper
- Scissors
- Tweezers
- Painter’s Tape
- Paper Trimmer
- Threader -OR-
- Large-Eye Needle
- Butcher Paper (optional to cover work surface to protect acetate while working with it)
- Isopropyl Alcohol -AND-
- Lint-Free Cloth (optional for cleaning the acetate)
- Paper Towels (optional for removing excess glue)
- Self-Healing Cutting Mat (optional to protect the work surface when making the hole in the top acetate layer)
How to Make Stained Glass Using Paper!
Stained Glass Using Paper
Learn how to make beautiful faux stained glass using paper, acetate, and vinyl!
Materials
- Value Permanent Vinyl - Black
- Four to Five (4-5) Sheets of 12” x 12” 65 lb. Cardstock - Any Colors
- Optional: One to Two (1-2) Sheets of 12” x 12” 65 lb. Cardstock - Teal
- Two (2) Sheets of 12” x 12” Acetate
- StandardGrip Transfer Tape
- Black Yarn (for hanging)
- ¾” Black Tape (for finishing the edges)
- Design #758 (My free SVG/PDF/DXF design files are available in my free resource library - get the password by filling out the form at the bottom of this page)
Tools
- A way to cut your materials - I’m using the Cricut Maker 4, but you can use any Maker series machine, a Cricut Explore Series machine, or the Cricut Venture
- Cricut Green StandardGrip Machine Mat 12" x 12"
- Brayer
- Craft Glue (I used Bearly Art Precision Glue)
- Spatula
- Weeding Tool
- XL Scraper
- Scissors
- Tweezers
- Painter's Tape
- Paper Trimmer
- Threader -OR-
- Large-Eye Needle
- OPTIONAL: Butcher Paper (to cover work surface to protect acetate while working with it)
- OPTIONAL: Isopropyl Alcohol -AND-
- Lint-Free Cloth (for cleaning the acetate)
- OPTIONAL: Paper Towels (for removing excess glue)
- OPTIONAL: Self-Healing Cutting Mat (to protect the work surface when making the hole in the top acetate layer)
Instructions
STEP 1: GET MY FREE STAINED GLASS USING PAPER DESIGNS
First, download my Stained Glass Using Paper files from my free library – look for Design #758. Alternatively, you can use the Save This Project form near the top of this post and the design link will be emailed to you.
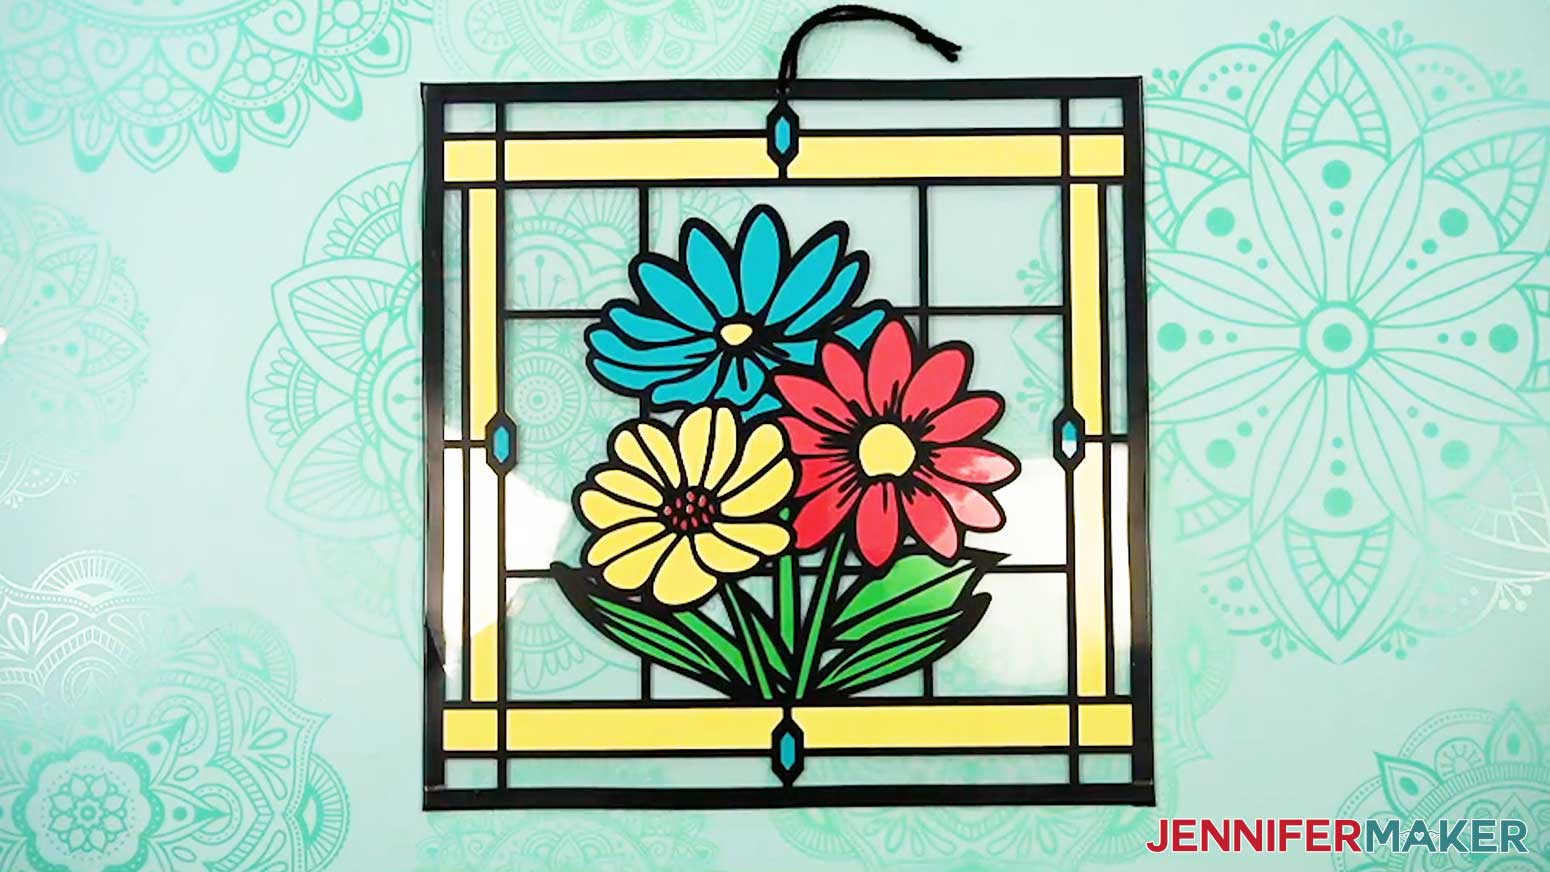
In the SVG folder, you’ll find “cardinal,” “ladybug,” and “flowers” versions of my stained glass using paper designs.
There is also a DXF folder with cut files, and a PDF folder with versions you can print and cut by hand.
These stained glass using paper designs were inspired by the work of Cindy Duke, who has popularized these gorgeous projects in recent years! To see more of Cindy's beautiful designs, you can search for her profile in Cricut Design Space.
TIP: If you’re not sure how to upload, go to jennifermaker.com/svgs to learn how to unzip and upload SVG files.
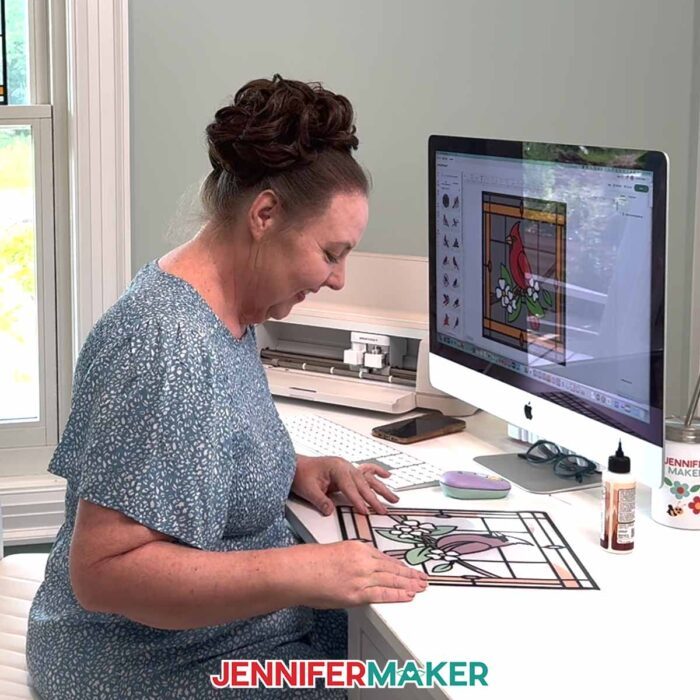
STEP 2: PREPARE AND CUT YOUR STAINED GLASS DESIGN
CRICUT DESIGN SPACE
- In Cricut Design Space, open a blank Canvas.
NOTE: If you’re new to using Cricut Design Space, go to cricutkickoff.com for my introductory tutorial on Design Space basics. - Click “Upload” and then “Upload Image.”
- Click “Browse.”
- Select the SVG file of your choice.
NOTE: I’ll pick the “flowers” version, but the steps are similar for all three designs. - Click “Open,” and then “Continue.”
- Click “Upload” to add the design to your Canvas, then use the small arrow to close the side panel.

- Click “Save” and give your project a name.
- If you’d like to reduce the size of your design, use the corner Resize handles to shrink it down.
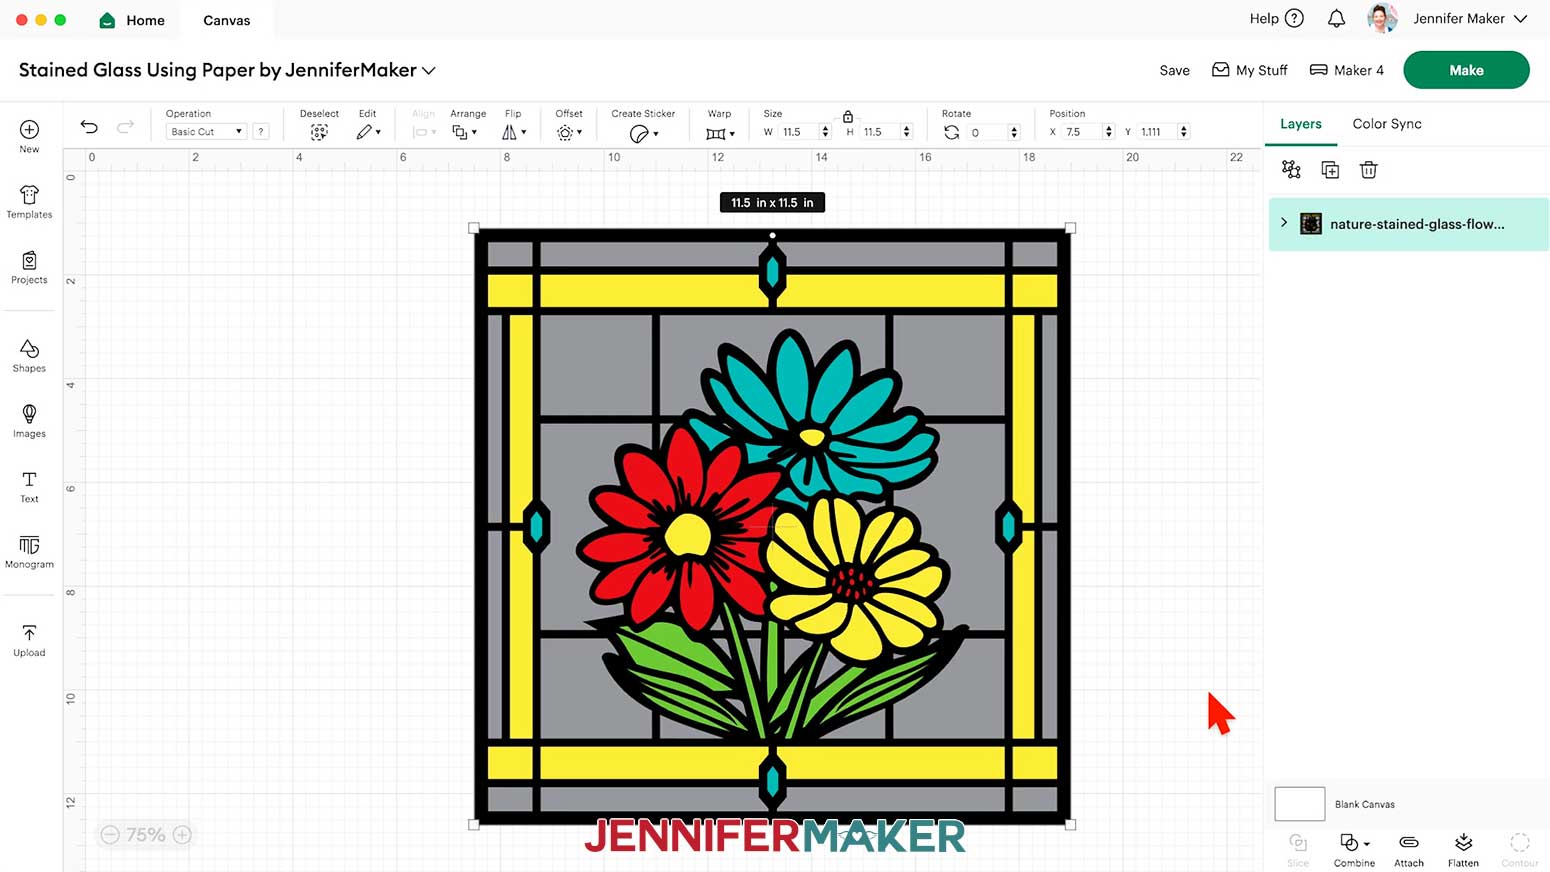
NOTE: I don’t recommend shrinking the project too much since you can lose important details! - “Ungroup” the design and spread out the pieces.
NOTE: On your Canvas, you’ll have:
- A black outline piece for your front vinyl layer
- A yellow top frame piece, a teal middle frame piece for the colored gemstones, and a green bottom frame piece with a silhouette of the centerpiece design, all of which will be cut from cardstock
- A grey square for your back acetate piece (we won’t cut the front acetate piece with our Cricut)
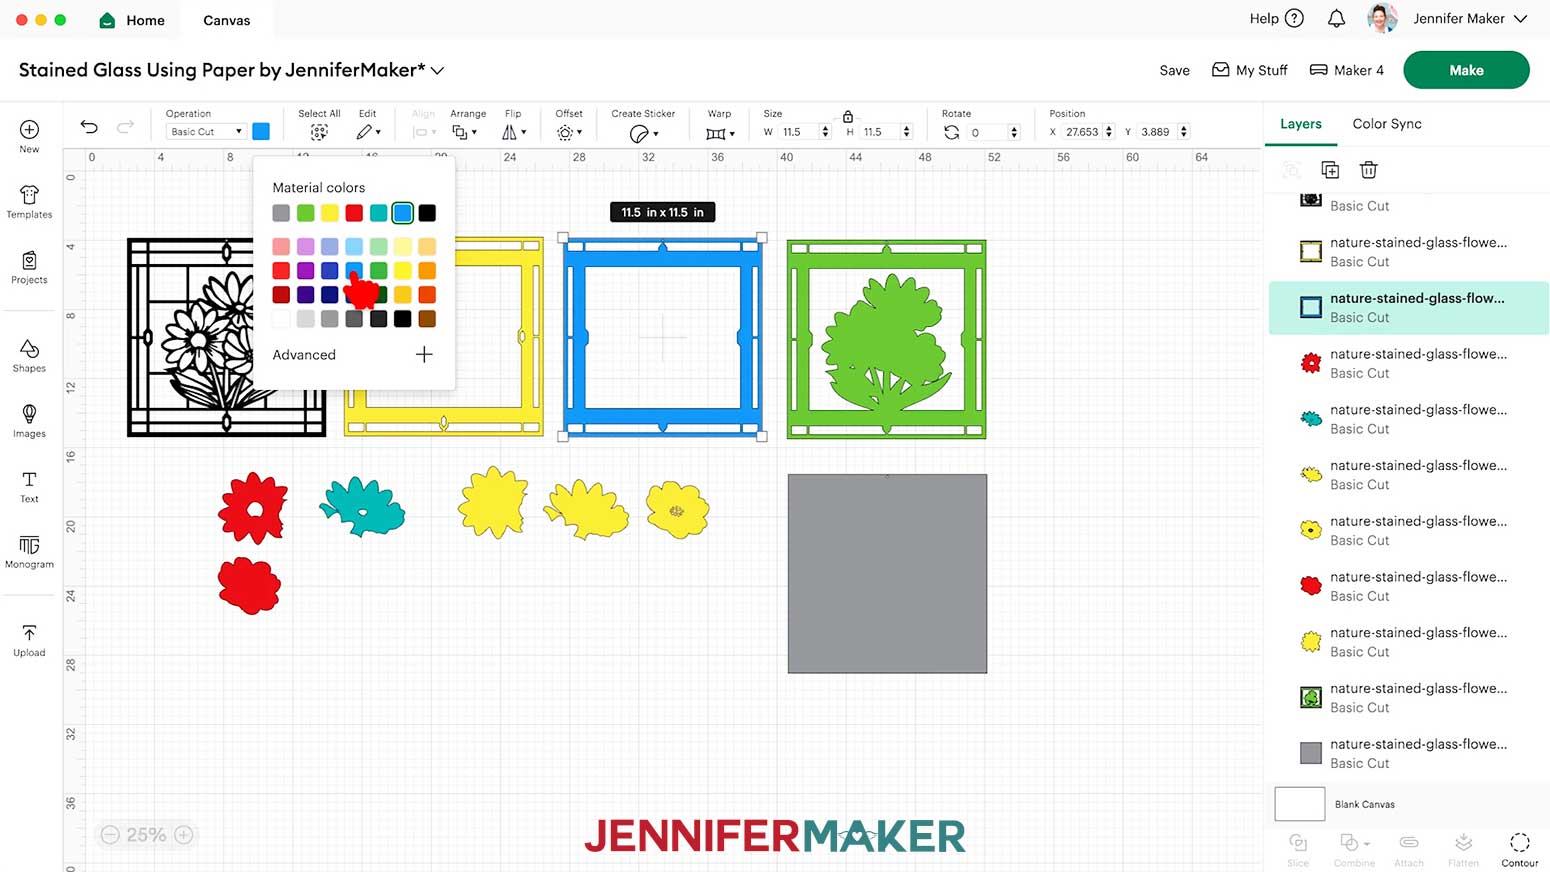
- Six flower pieces (two layers for each flower) for your design’s cardstock centerpiece - To change the color of a frame or center piece to match the cardstock you’ll cut it from, select it on your Canvas, then click the Color Box next to “Operation” and choose a new option.
- And now your layers are ready to cut!

CUTTING & WEEDING
- Make sure the correct machine is selected in the top right.
- Click “Make.”
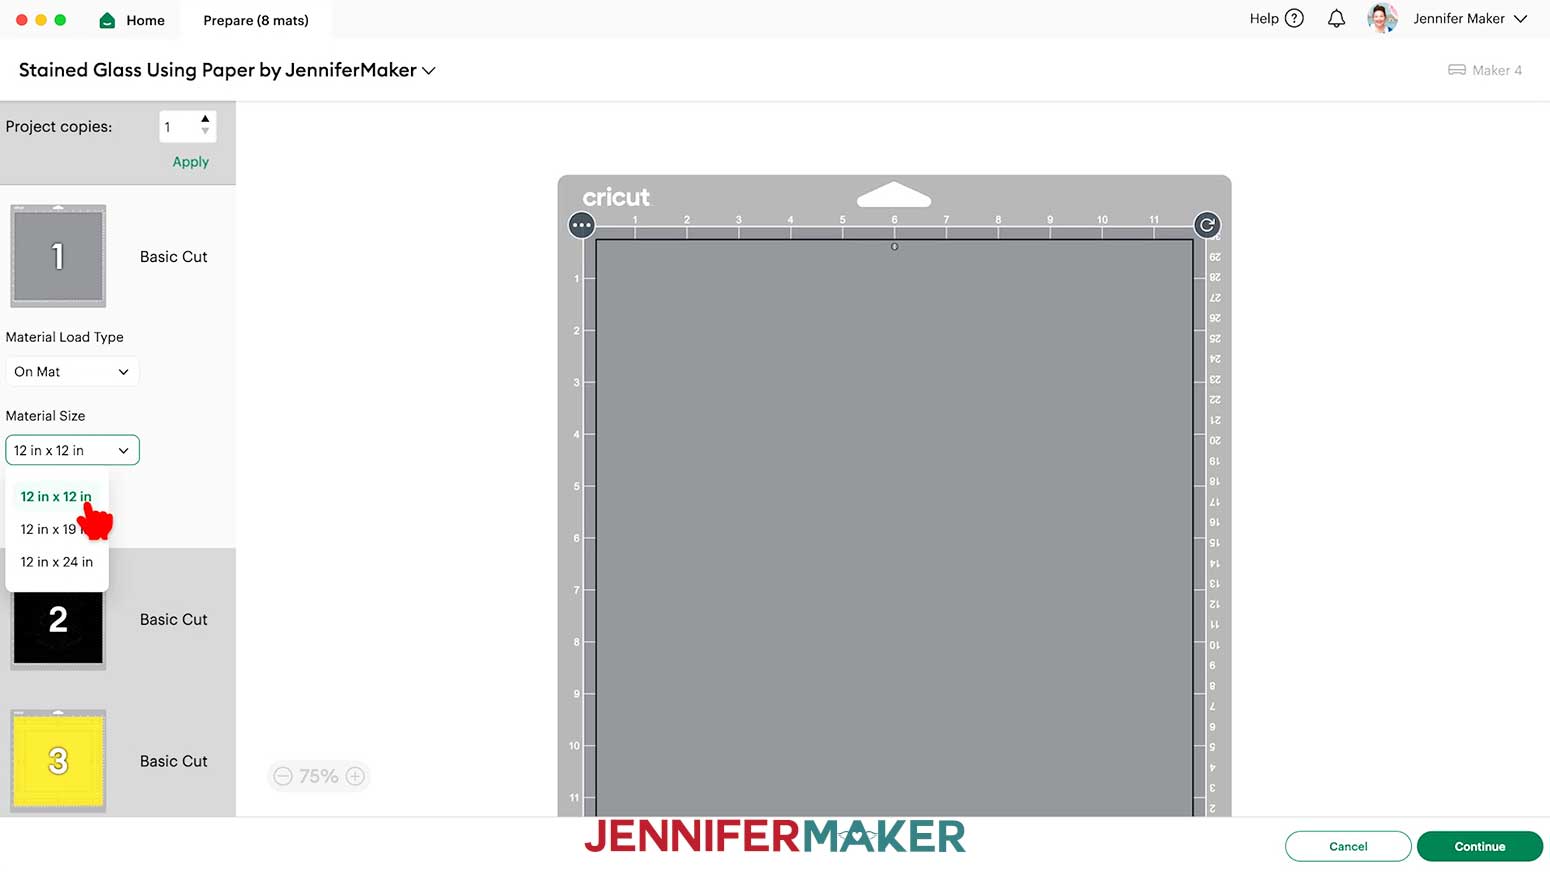
- On the Prepare screen, make sure the correct Material Size is selected for your mats.
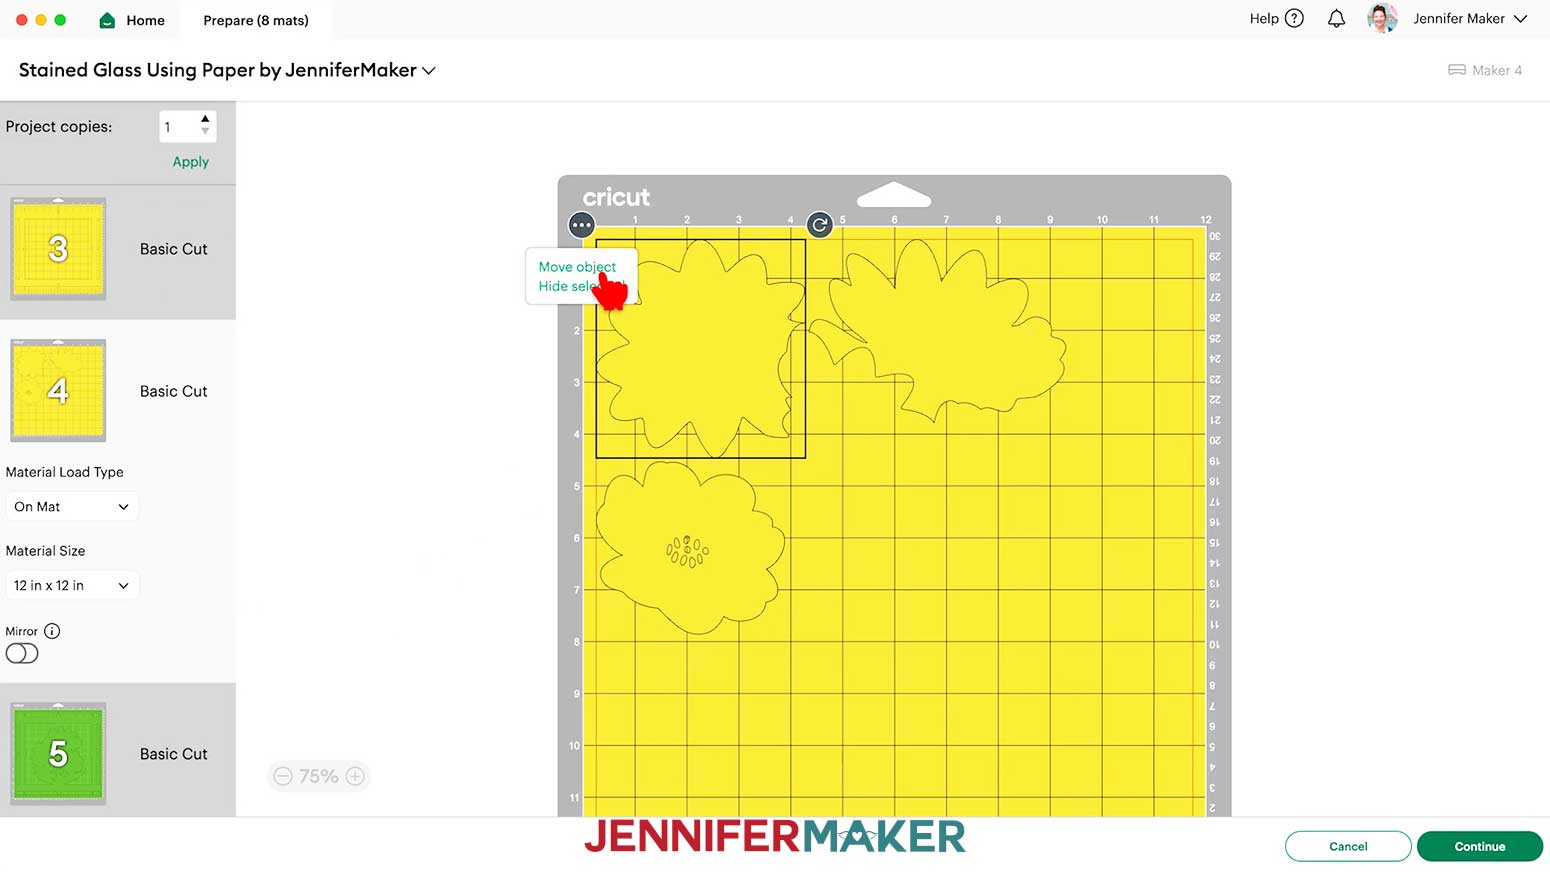
NOTE: I’ll keep the “12 in x 12 in” size for all my mats. - You can combine mats of the same color to save time and materials. Select a piece you want to move, then click the icon with three dots and select “Move object.”
- In the “Move Object” window, select a different mat of the same color with available space to reassign the object to that mat.
- Click “Confirm” to move the object to the chosen mat.
- If needed, drag the relocated object to an empty space on the mat.
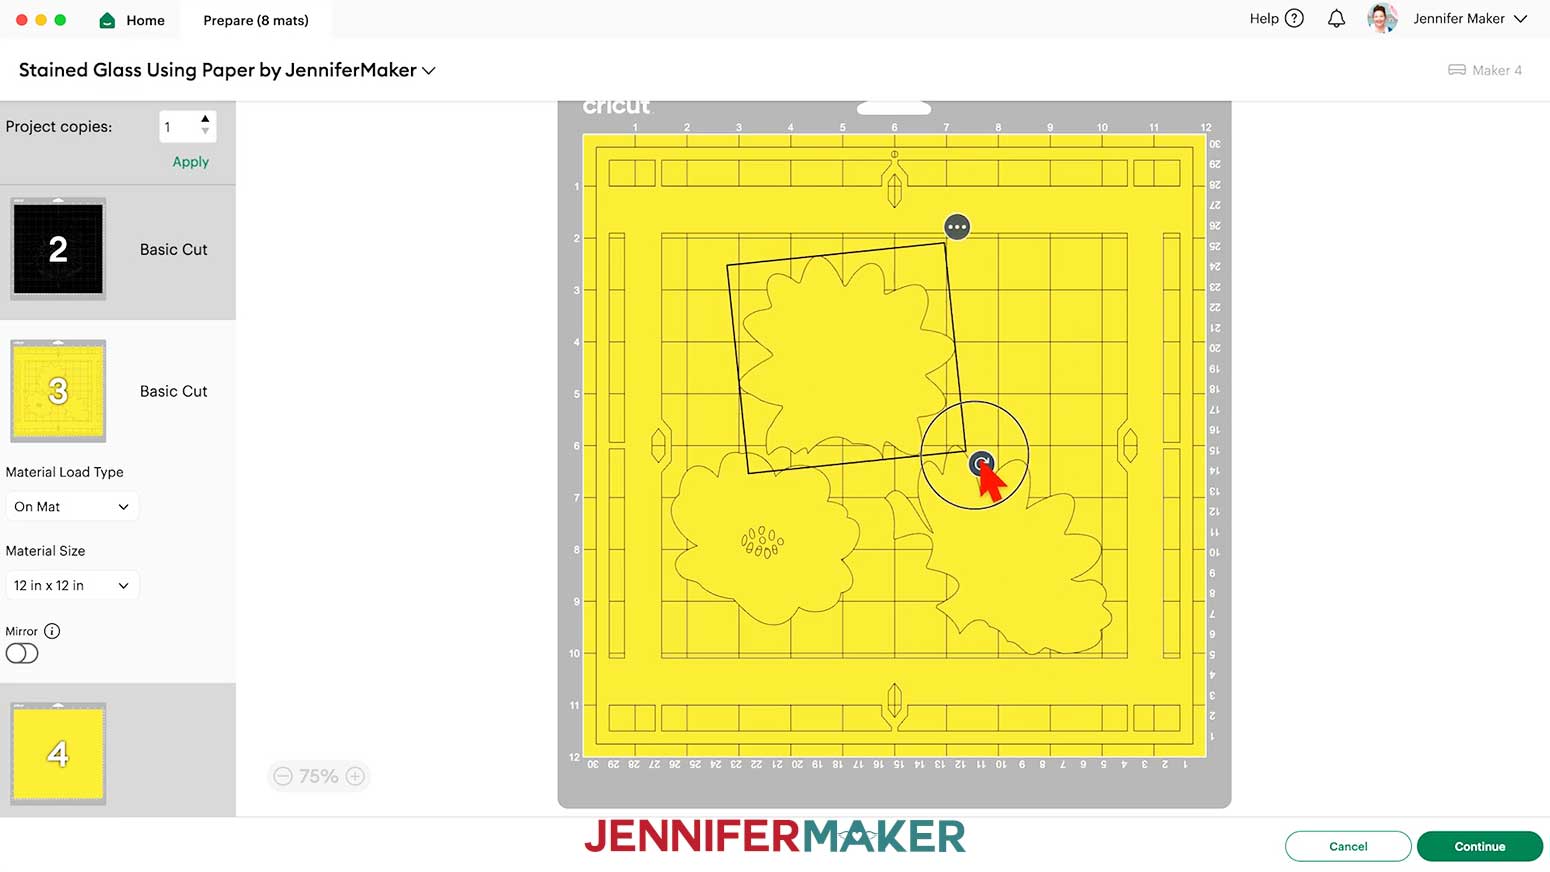
TIP: Sometimes objects overlap when moving them to a different mat. If you don't see the moved object, try dragging objects until you find the one you’ve added to the mat. - To rotate an object on a mat, click on it to select it, then use the rotation handle (the curved arrow) to adjust its orientation.
- Once you are satisfied with your mat layouts, select the first cardstock mat so it loads first on the next screen and click “Continue.”
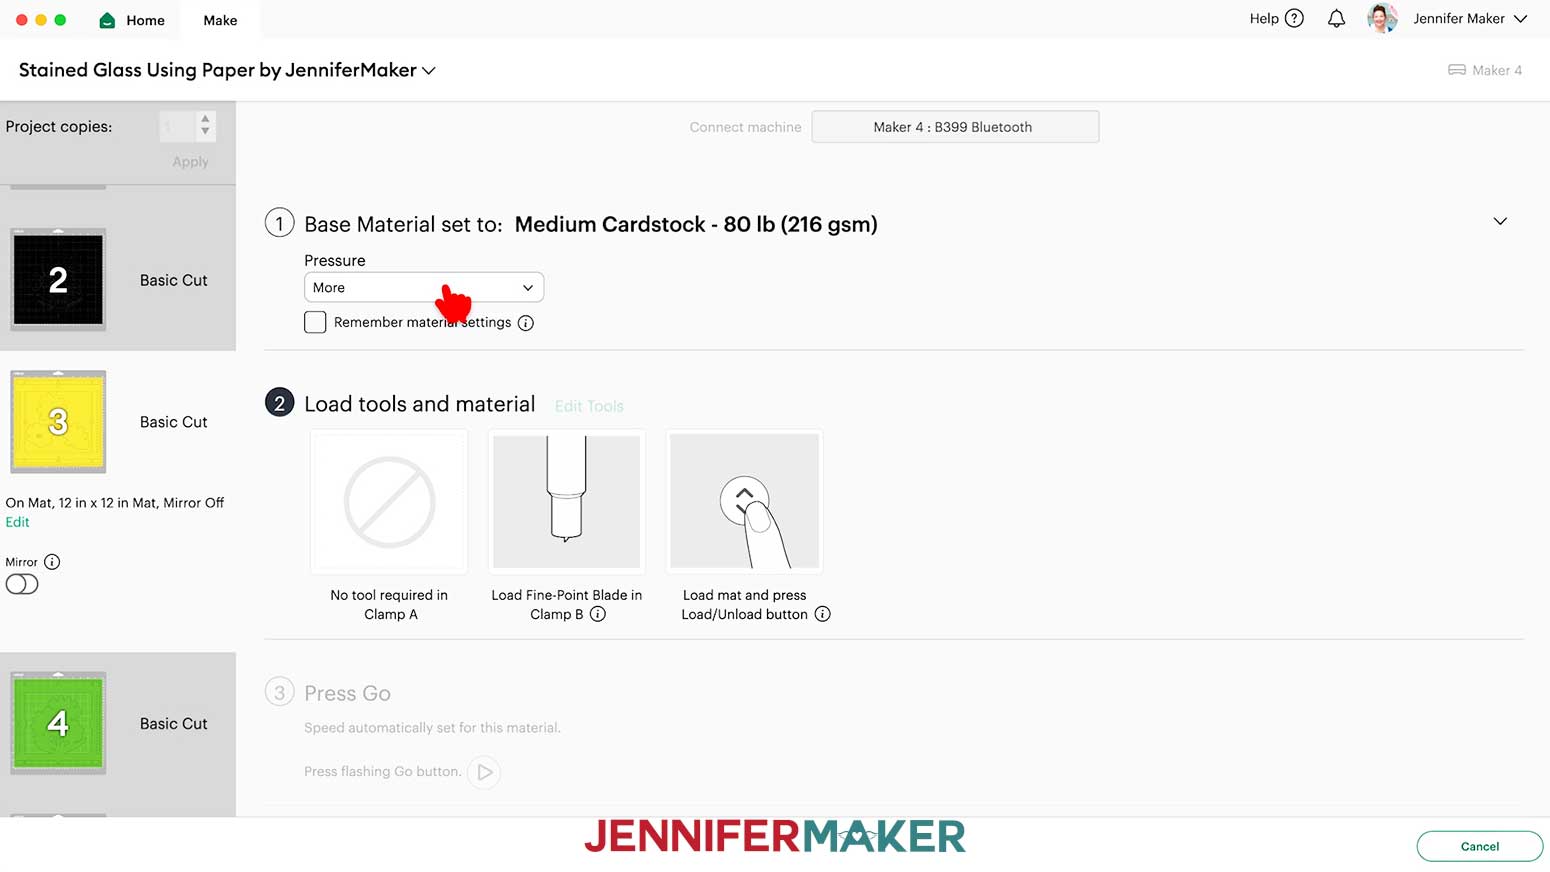
- On the Make screen, set the Base Material for your first cardstock mat. I’m using the “Medium Cardstock - 80 lb (216 gsm)” setting with “More” pressure for my 65 lb. cardstock.
TIP: Changing the Pressure to “More” results in a cleaner cut.
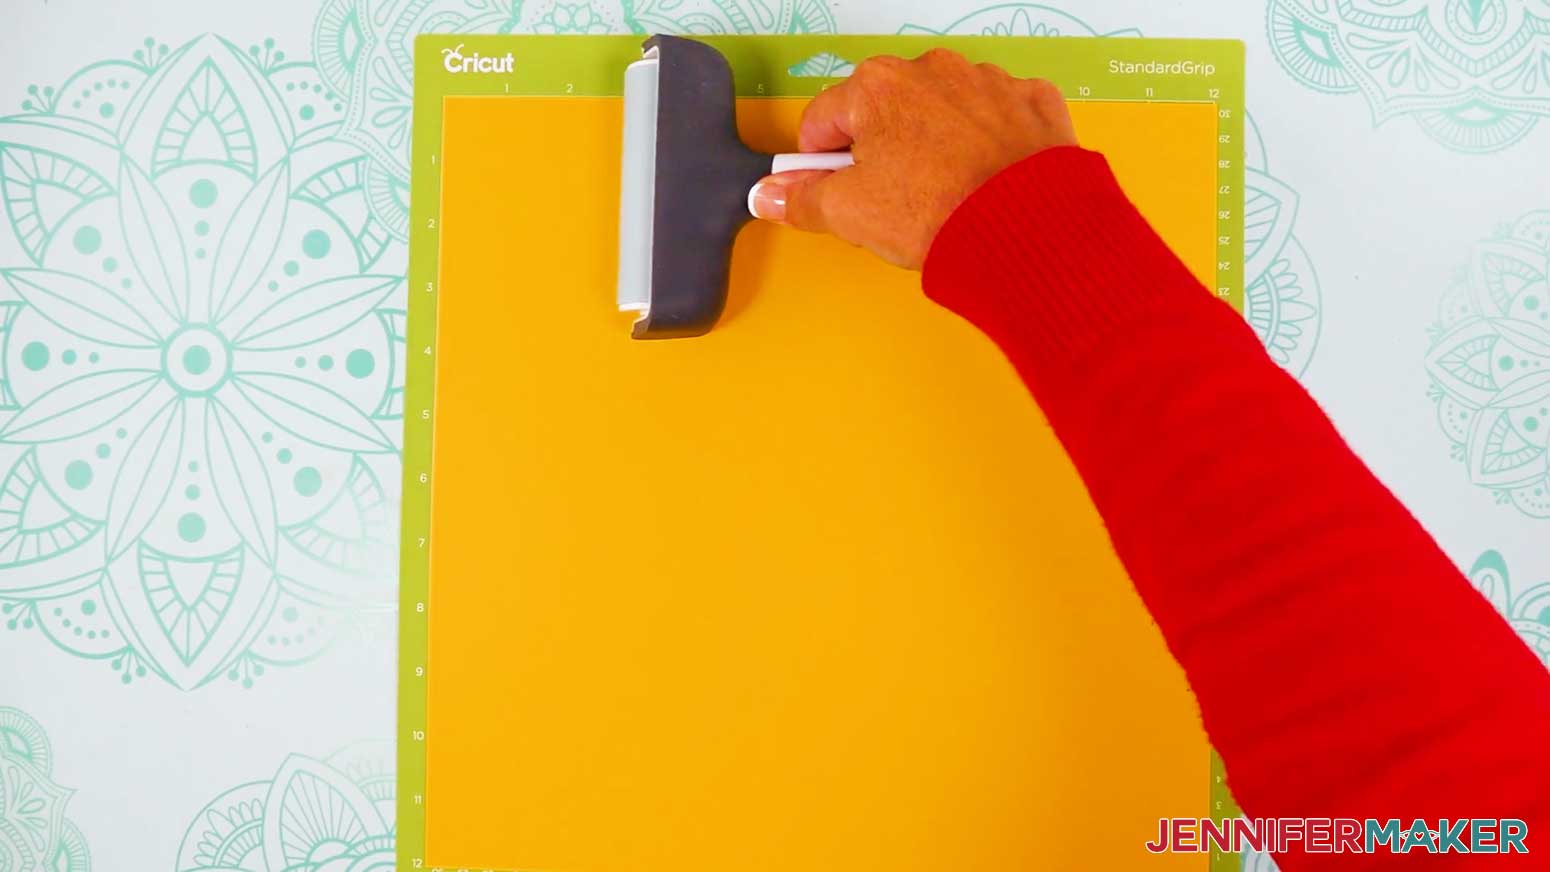
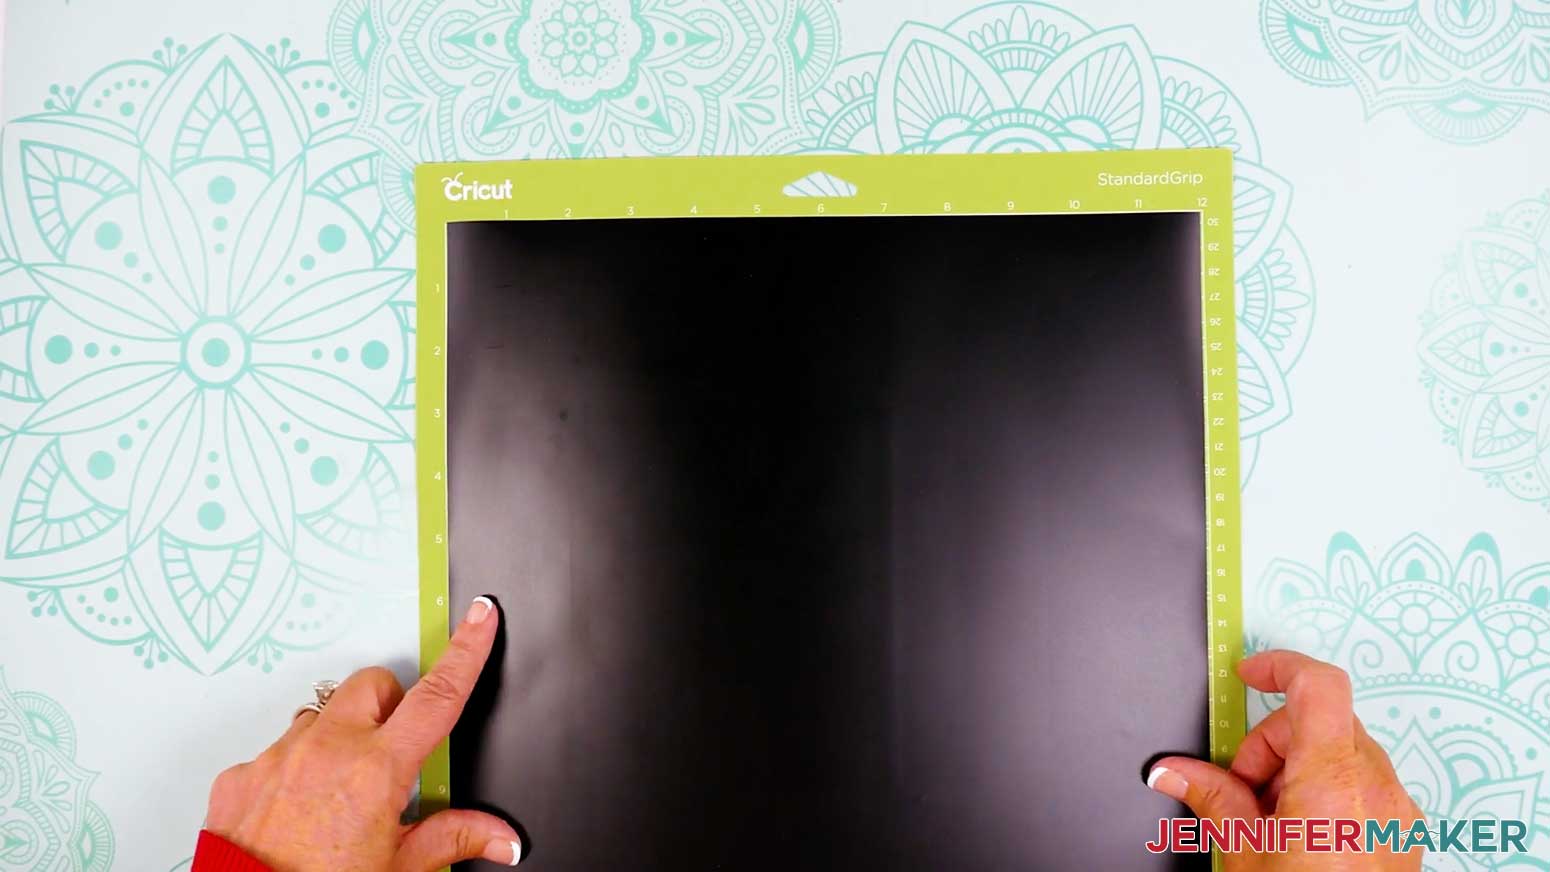
TIP: For mats that have the same material type, you can check the box for “Remember Material Settings” to save time during cutting. - Place your cardstock face up on a green StandardGrip machine mat.
- Use a brayer to make sure it’s fully adhered.
- Check that your Premium Fine-Point Blade is clean and in the clamp.
- Press the flashing “Load/Unload” button to load the prepared mat into your Cricut.
- Press the flashing middle button to begin cutting.
- When it has finished cutting, don’t unload the mat right away. Gently lift a corner of the material to make sure the cuts went all the way through the material. If not, press the middle button again to make a second pass of cuts in the same spots.
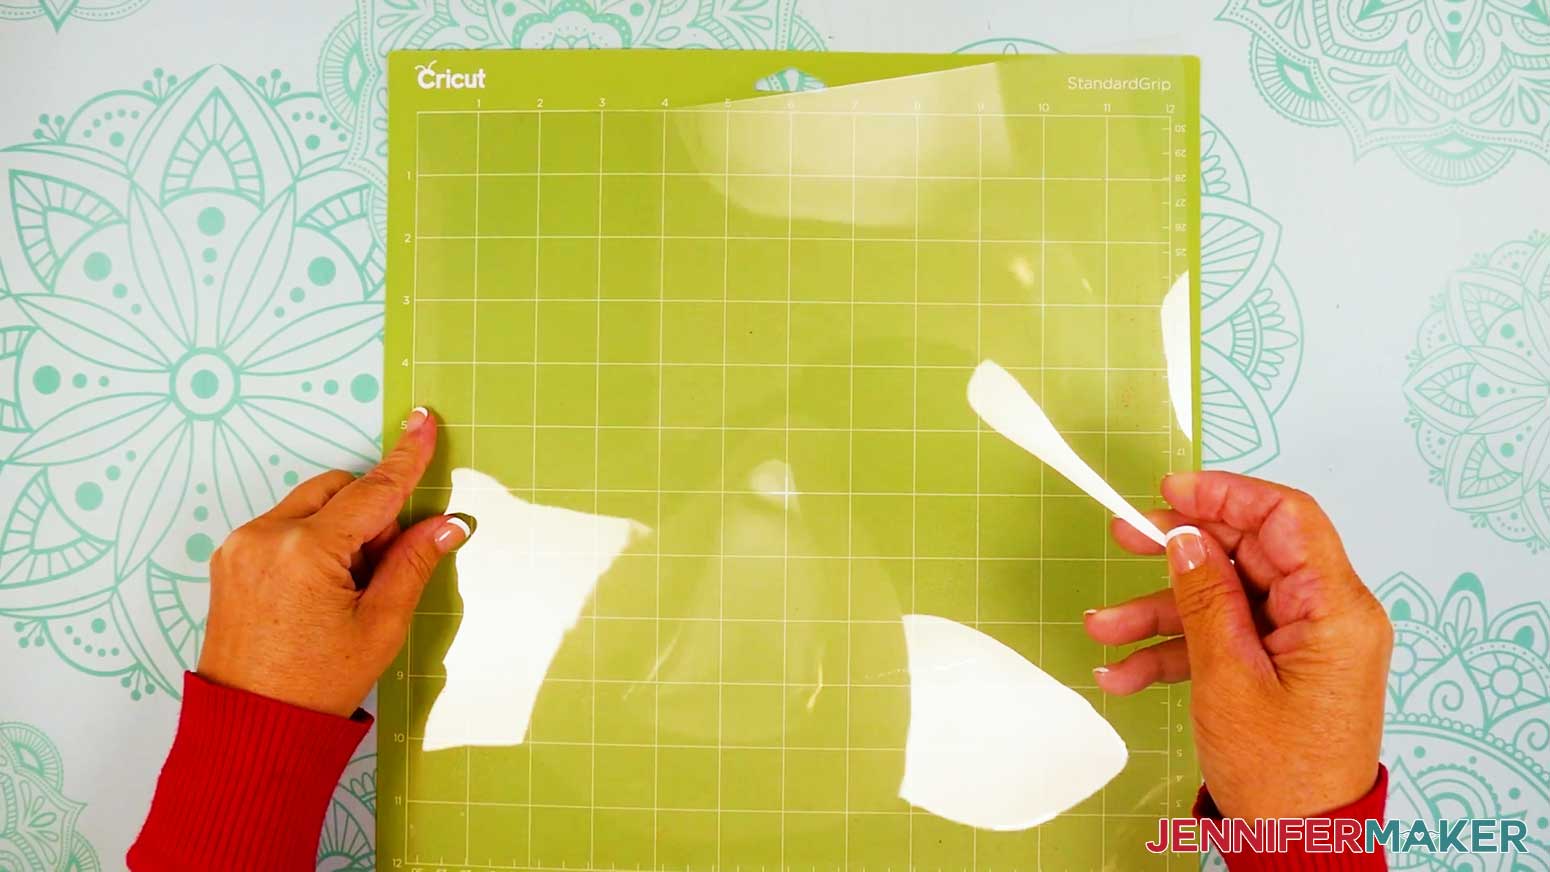
TIP: If you have any issues with your cuts, go to jennifermaker.com/cleaner-cuts. - When the cuts are complete, unload the mat, flip it over onto your work surface, and roll it back to release the cardstock.
TIP: Use the spatula to help lift delicate parts, and the weeding tool to poke out small bits of cardstock that are still attached to your cut pieces. - Use a scraper tool to remove the small bits of cardstock left on your mat after you remove the cut pieces.
- Repeat Steps 10-18 to cut the rest of your cardstock mats.
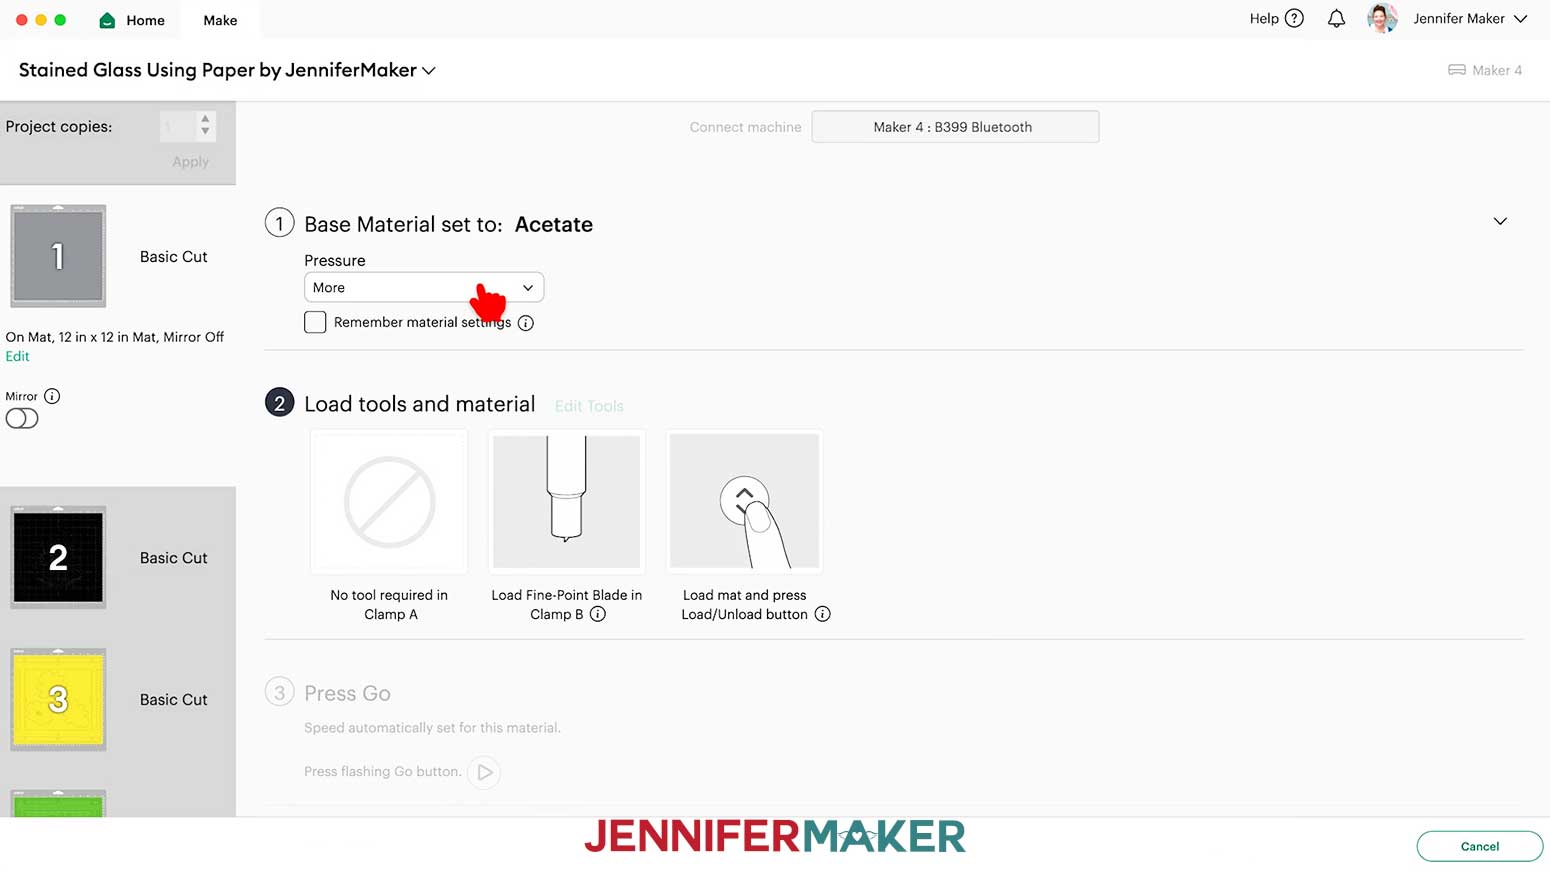
- Next, select your acetate mat (mine is grey) and change your material settings in Design Space to “Acetate” with “More” pressure.
- Take the protective film off one side of the acetate only.
- Place the acetate’s side with the protective film down on a green StandardGrip machine mat to keep adhesive and scratches from damaging the material.
- Repeat Steps 12-17 to cut your acetate.
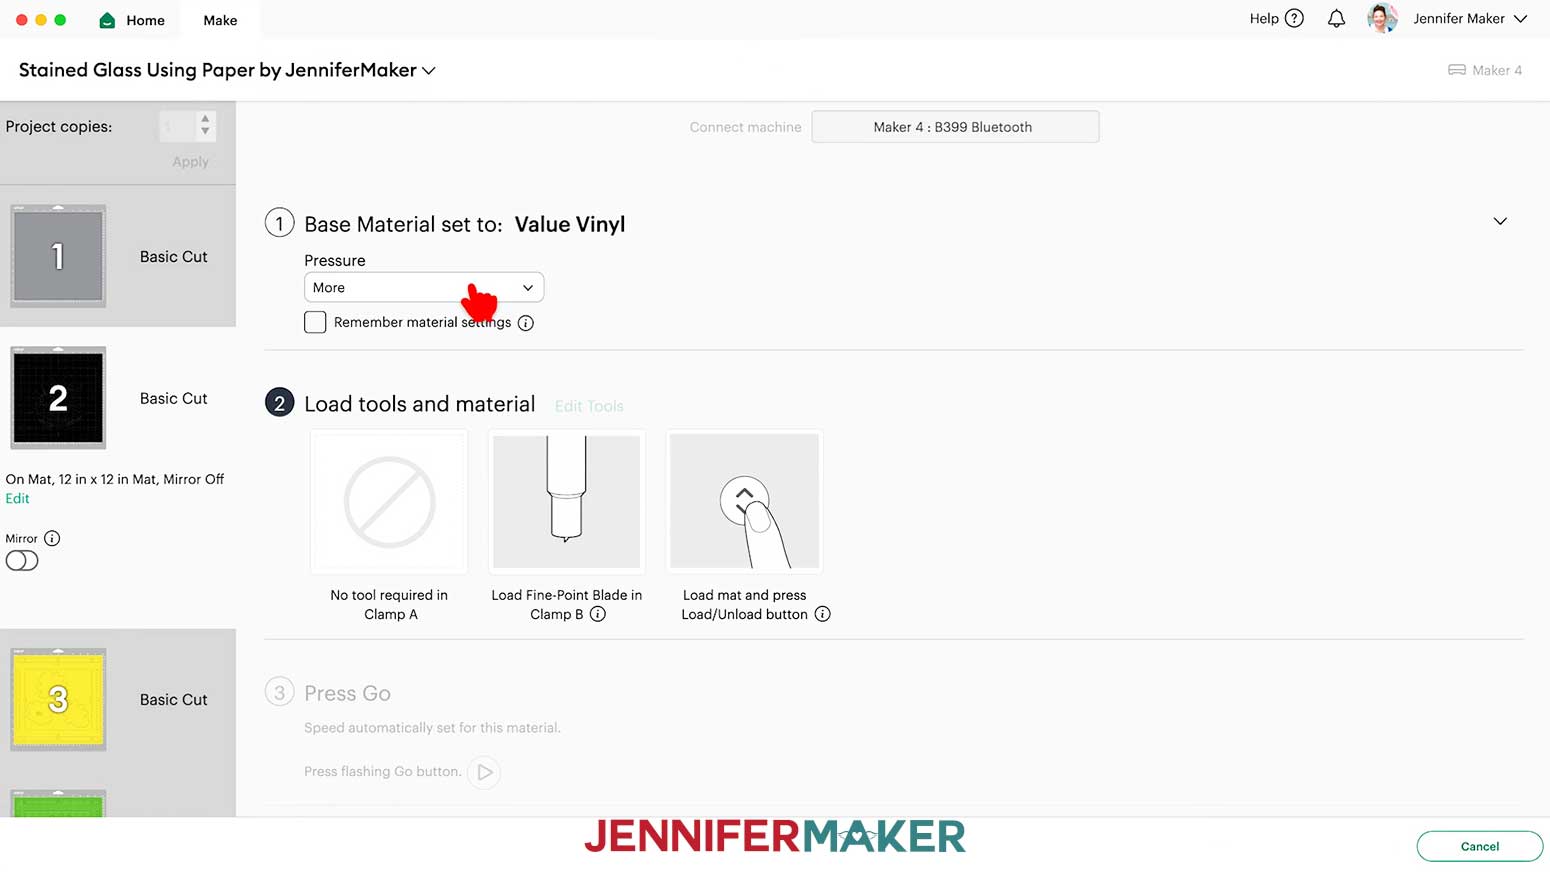
- For your vinyl mat, change your material settings to the “Value Vinyl” setting with “More” pressure.
- Use a paper trimmer or scissors to trim your vinyl down to a 12” x 12” sheet if needed.
- Place your value vinyl matte/material-side-up on a green StandardGrip machine mat so it covers the design area on your screen.
- Repeat Steps 12-16 to cut your vinyl.
NOTE: For vinyl, cuts should go all the way through the material, but not the carrier sheet. - When the cuts are complete, keep the vinyl on your mat.
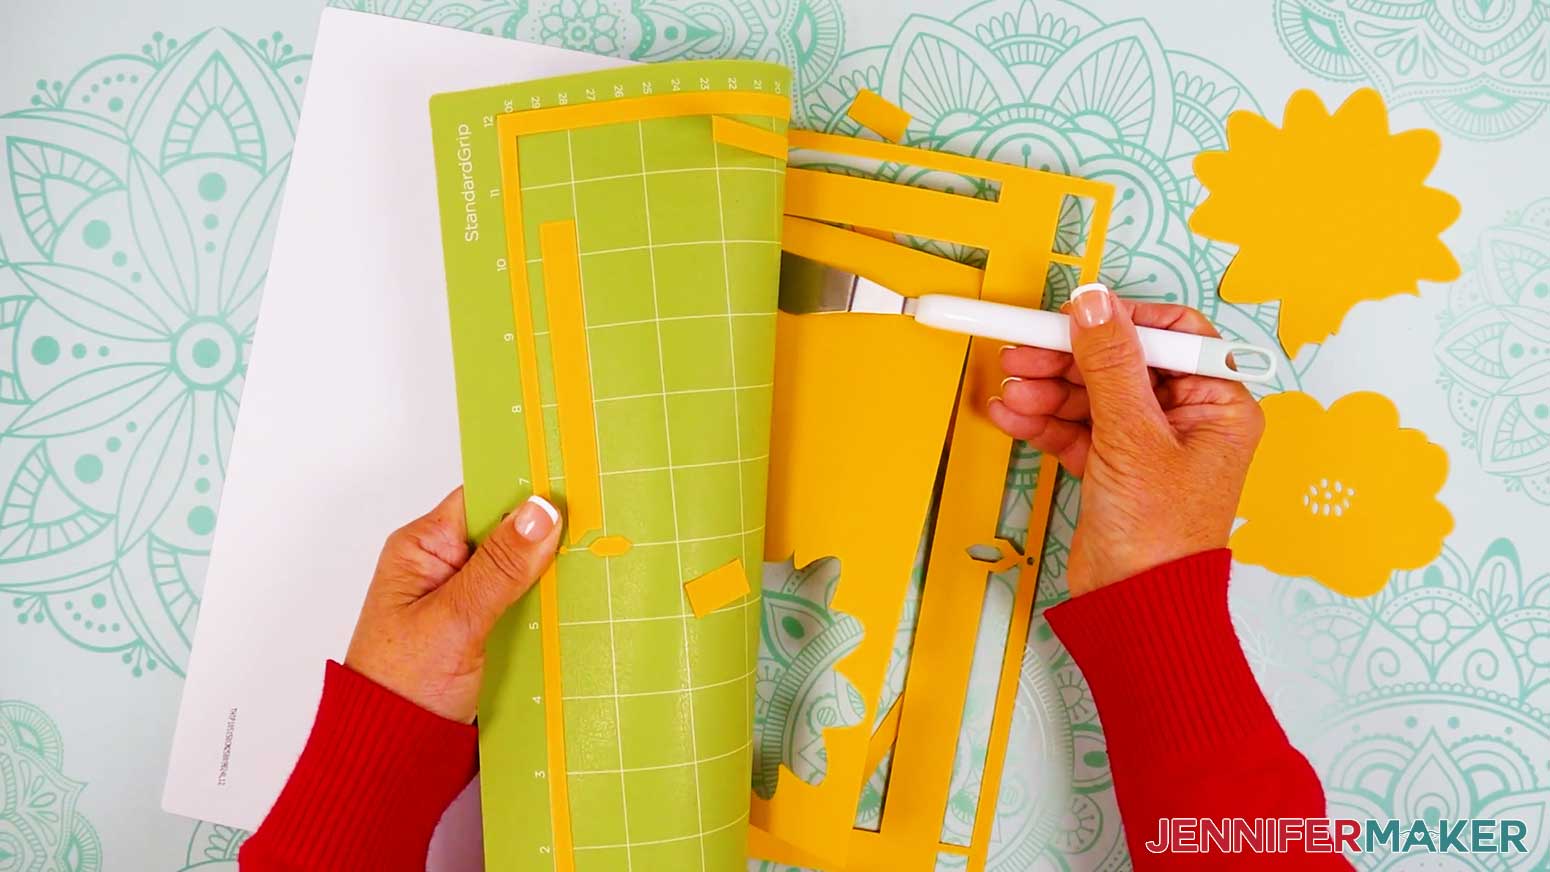
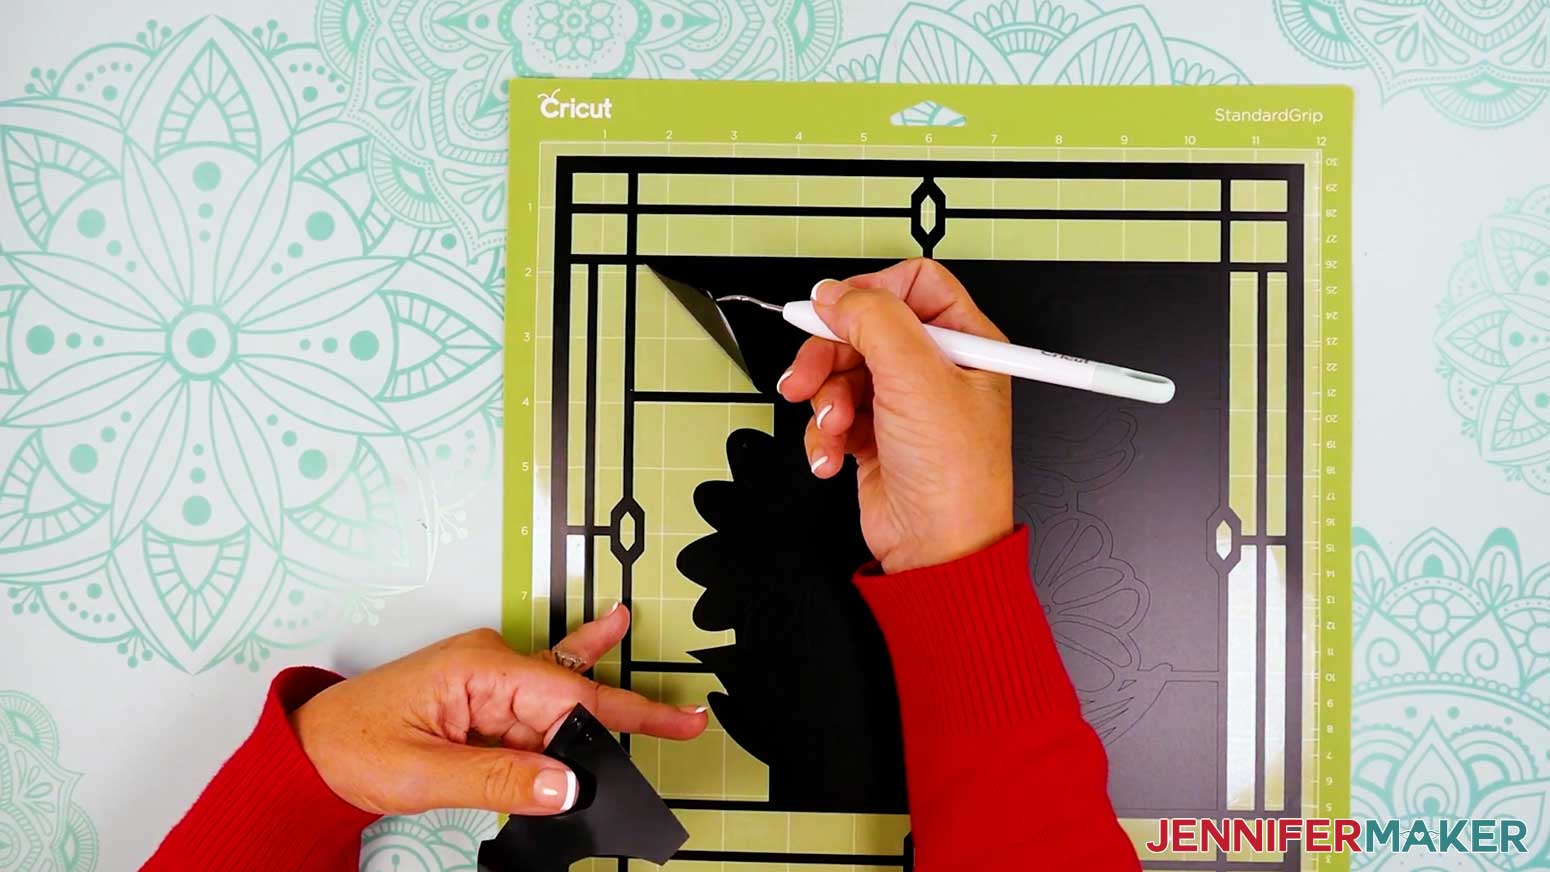
TIP: It can be easier to weed vinyl, especially small, detailed designs, while it is still adhered to the machine mat. - Use your weeding tool to carefully peel away the extra background vinyl.
- Poke your weeding tool into small sections of the vinyl you want to remove, such as the hole in the center of the design’s top edge. Gently lift the tool away from the design to remove the excess vinyl.
TIP: Make sure you do not pull up any pieces you want to keep! If they come up, gently pat them back in place and try again. Refer back to the Design Space screen if you’re not sure which pieces to remove. - Continue to weed until all that is left is the vinyl for your design, then leave the weeded decal on your machine mat.
- Next, cut a piece of StandardGrip transfer tape just larger than the vinyl decal.
- Remove the backing from the transfer tape.
- Press your transfer tape onto a cloth and peel it back up a few times to make it less sticky.
NOTE: If the transfer tape is too sticky, it will be difficult to remove from the acetate layer. - Hold your transfer tape in the shape of a “taco,” sticky side down, then center the bottom of the “taco” onto the middle of the decal.
- Smooth the transfer tape over the decal from the center outward and burnish it down using the XL Scraper Tool.
NOTE: If the transfer tape isn’t going down well using the “taco” method, you can follow Steps 1-13 in the “APPLY THE VINYL TO YOUR FRONT ACETATE LAYER” section below to use an alternate “hinge” method to apply your transfer tape. - Flip your mat over onto your work surface, and roll it back to release the transfer tape and vinyl decal.
- Lay out all of your cut pieces face up in organized piles. Keep your cardstock layers with your cut back layer of acetate. Then grab an additional sheet of uncut acetate for the front layer and keep it with your vinyl layer.
TIP: Refer to the Design Space screen if you’re not sure about some pieces’ orientation.


STEP 3: ASSEMBLE YOUR STAINED GLASS USING PAPER
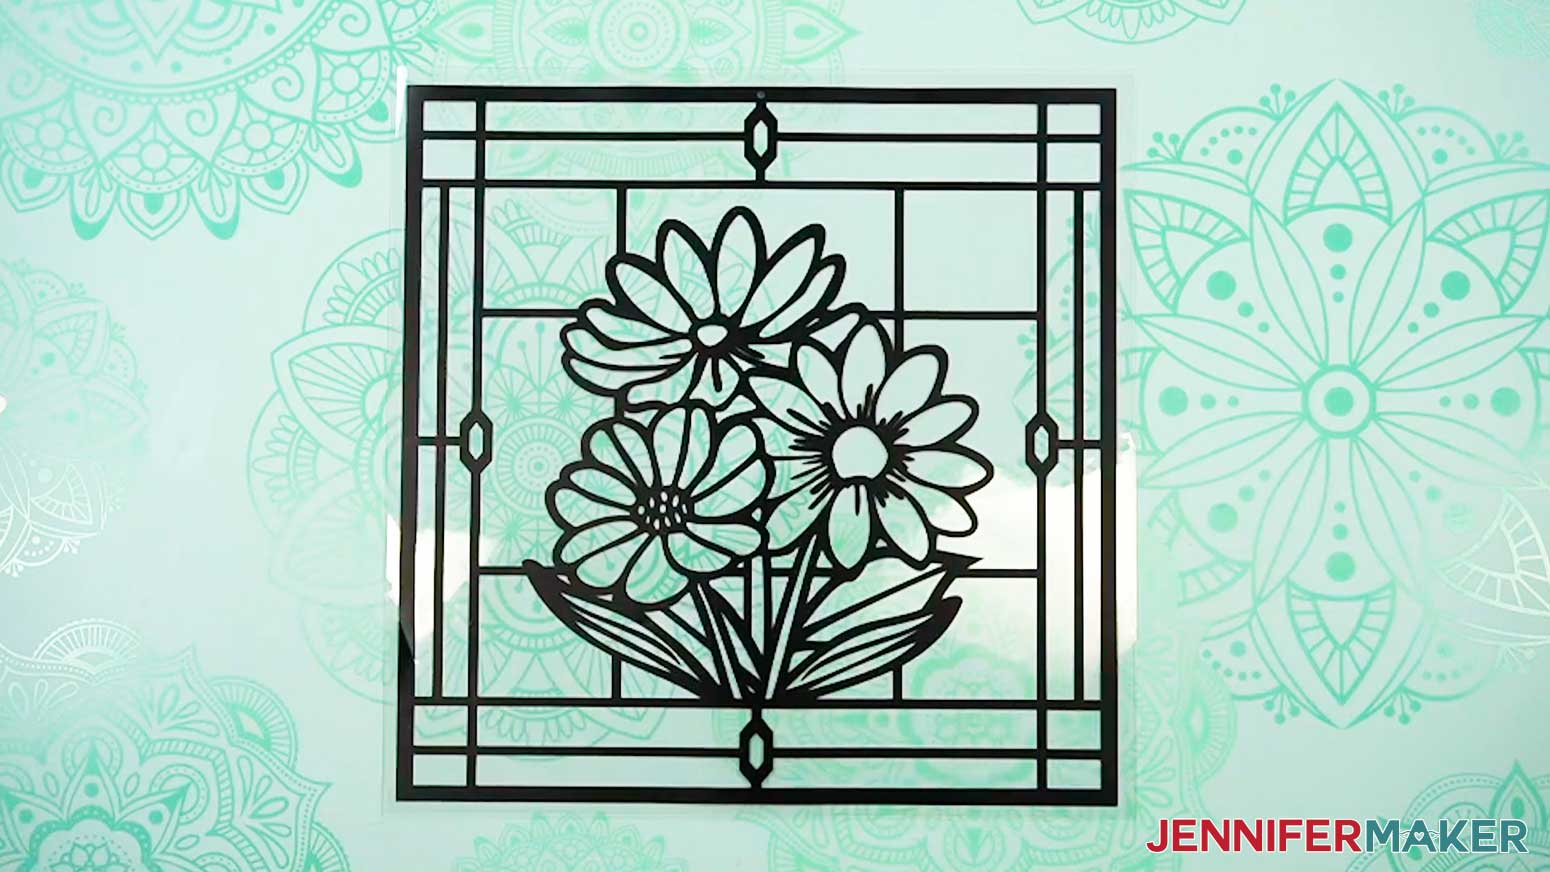
APPLY THE VINYL TO YOUR FRONT ACETATE LAYER
- Use painter’s tape to secure all four sides of your green StandardGrip machine mat to your work surface.
- Lay a full sheet of uncut acetate on the machine mat to keep the acetate from slipping and prevent damaging the material while applying the vinyl.
NOTE: The acetate sheet is slightly bigger than your vinyl design so you don’t have to perfectly align the edges. We’ll trim the excess acetate away once we apply the vinyl. - Peel the protective layer from the top side of the acetate.
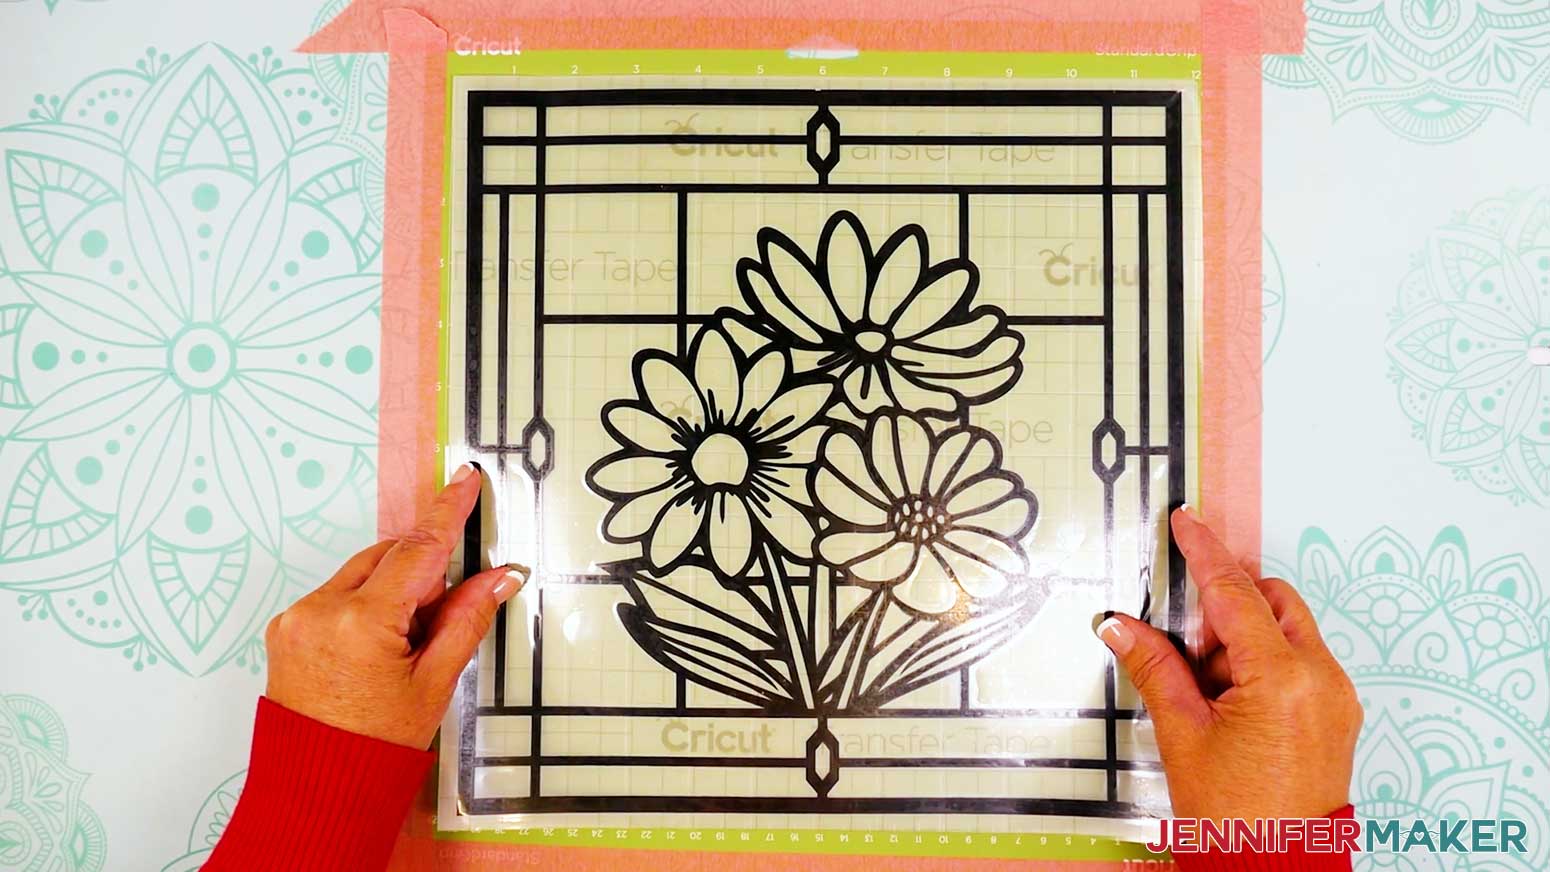
- Center your transfer tape and decal (with the carrier sheet still attached) face up on the acetate sheet.
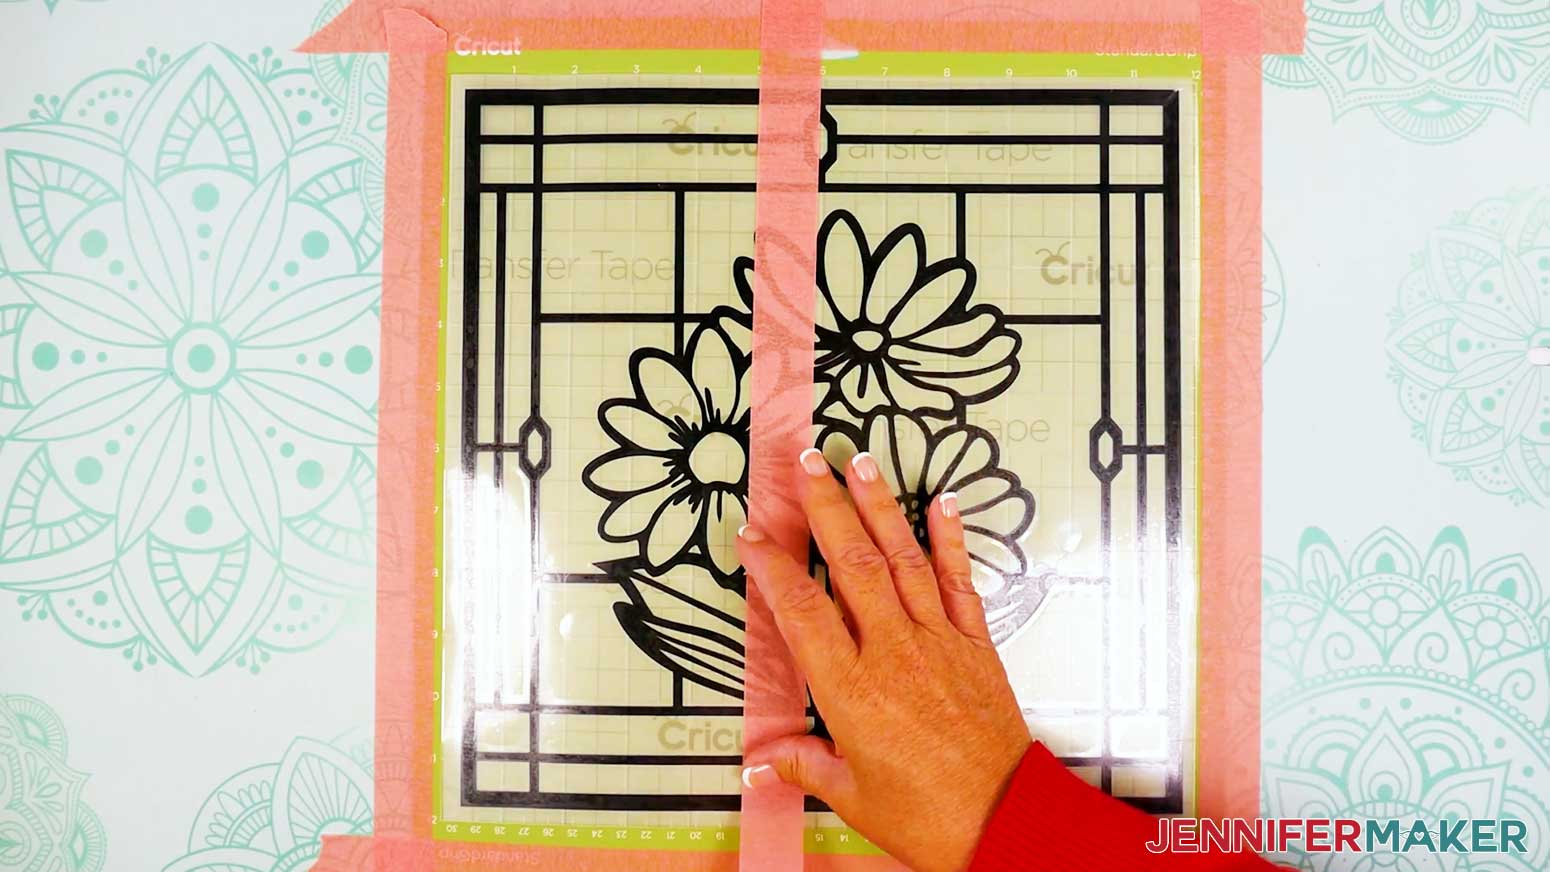
- Secure the transfer tape and decal to the mat with a strip of painter’s tape down the center to keep the design in position and create hinged sections on the left and right sides.
- Curl back the right side of the transfer tape and decal so it rests on the left side of the painter’s tape.
- Peel the vinyl carrier sheet off the right side of the decal and transfer tape.
- Use scissors to trim away the right side of the carrier sheet. Be careful not to scratch the acetate with your scissors!
- Lift up the right side of the transfer tape and hold it taut over the right side of the acetate.
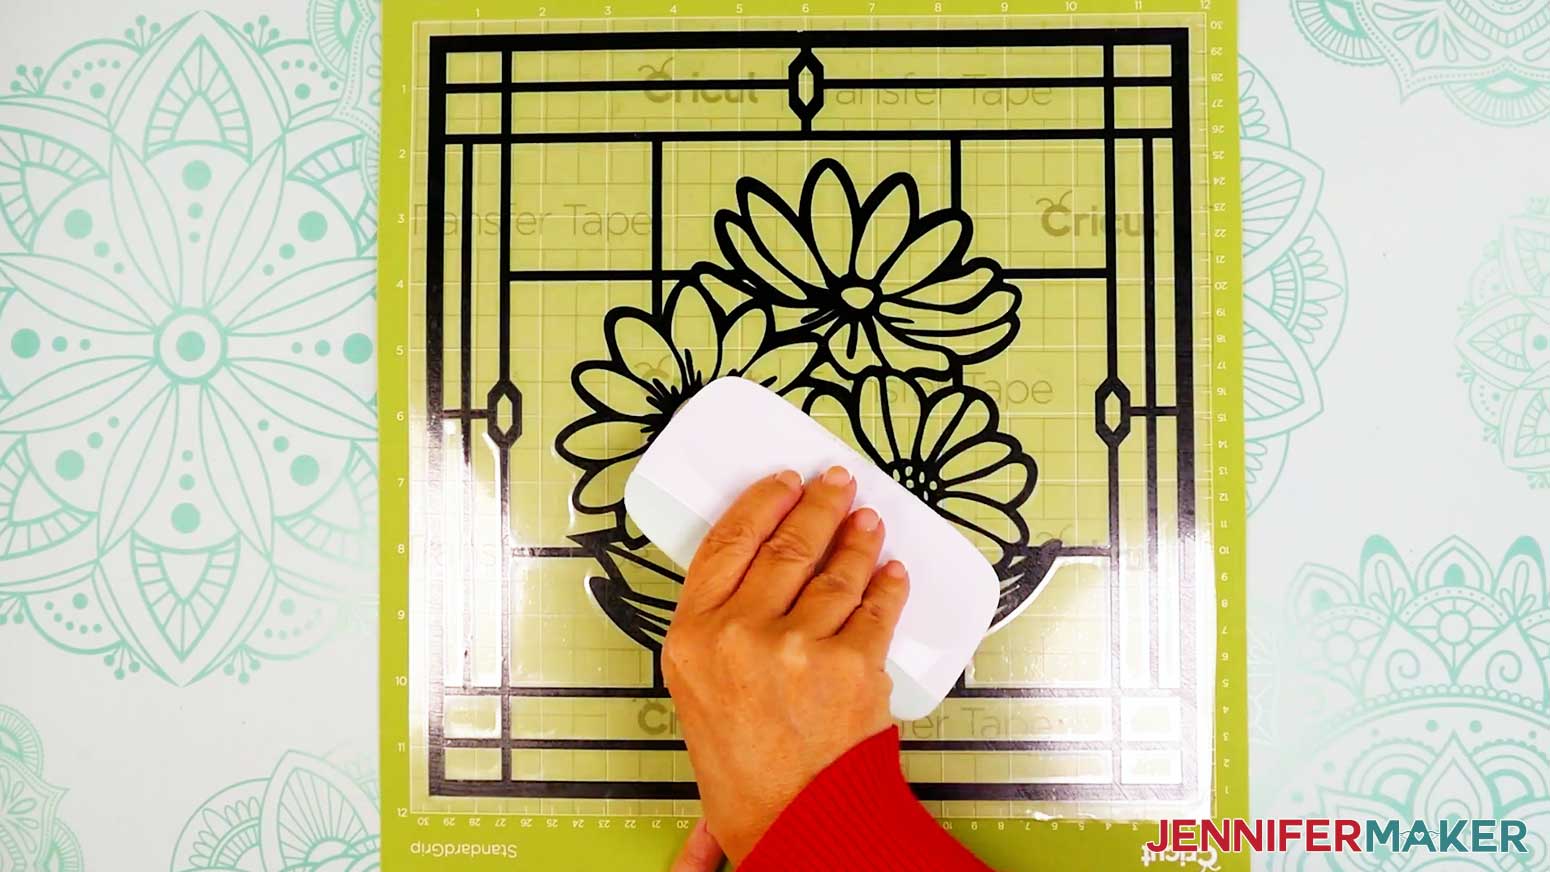
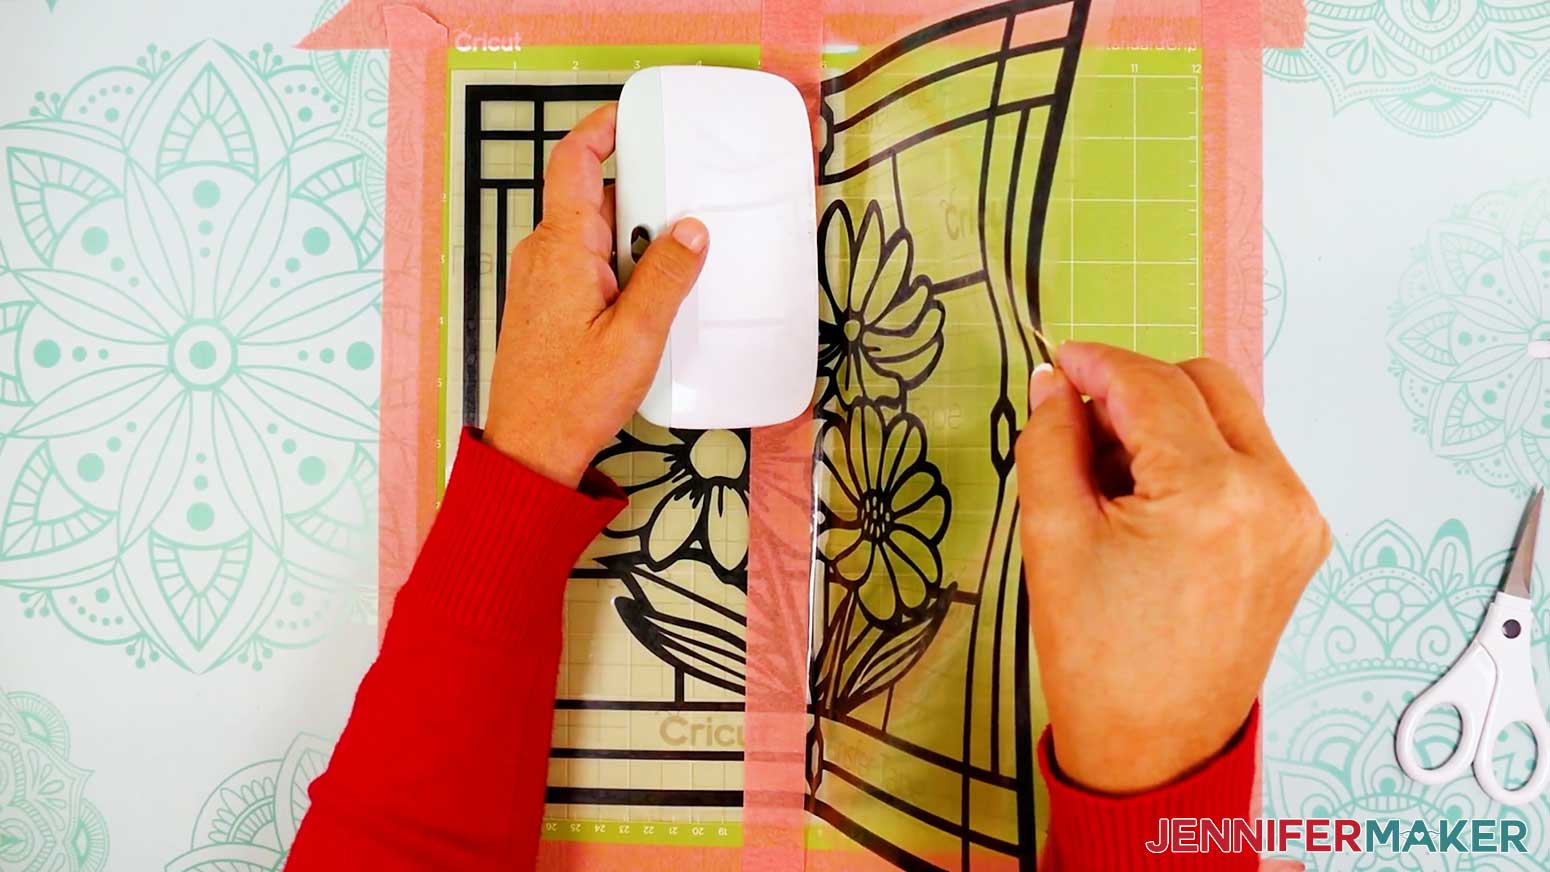
- Working in small sections from the center line of painter’s tape, use your XL Scraper Tool to gently burnish the transfer tape and decal onto the acetate sheet enough to keep the design in place.
TIP: Burnish up and down toward the edges as you move left to right across the transfer tape to help prevent bubbles. - Then, use your Scraper Tool to fully burnish the vinyl onto the acetate layer.
- Remove the strip of painter’s tape from the center.
- Then repeat Steps 6-11 to apply the left side of the vinyl from the center out.
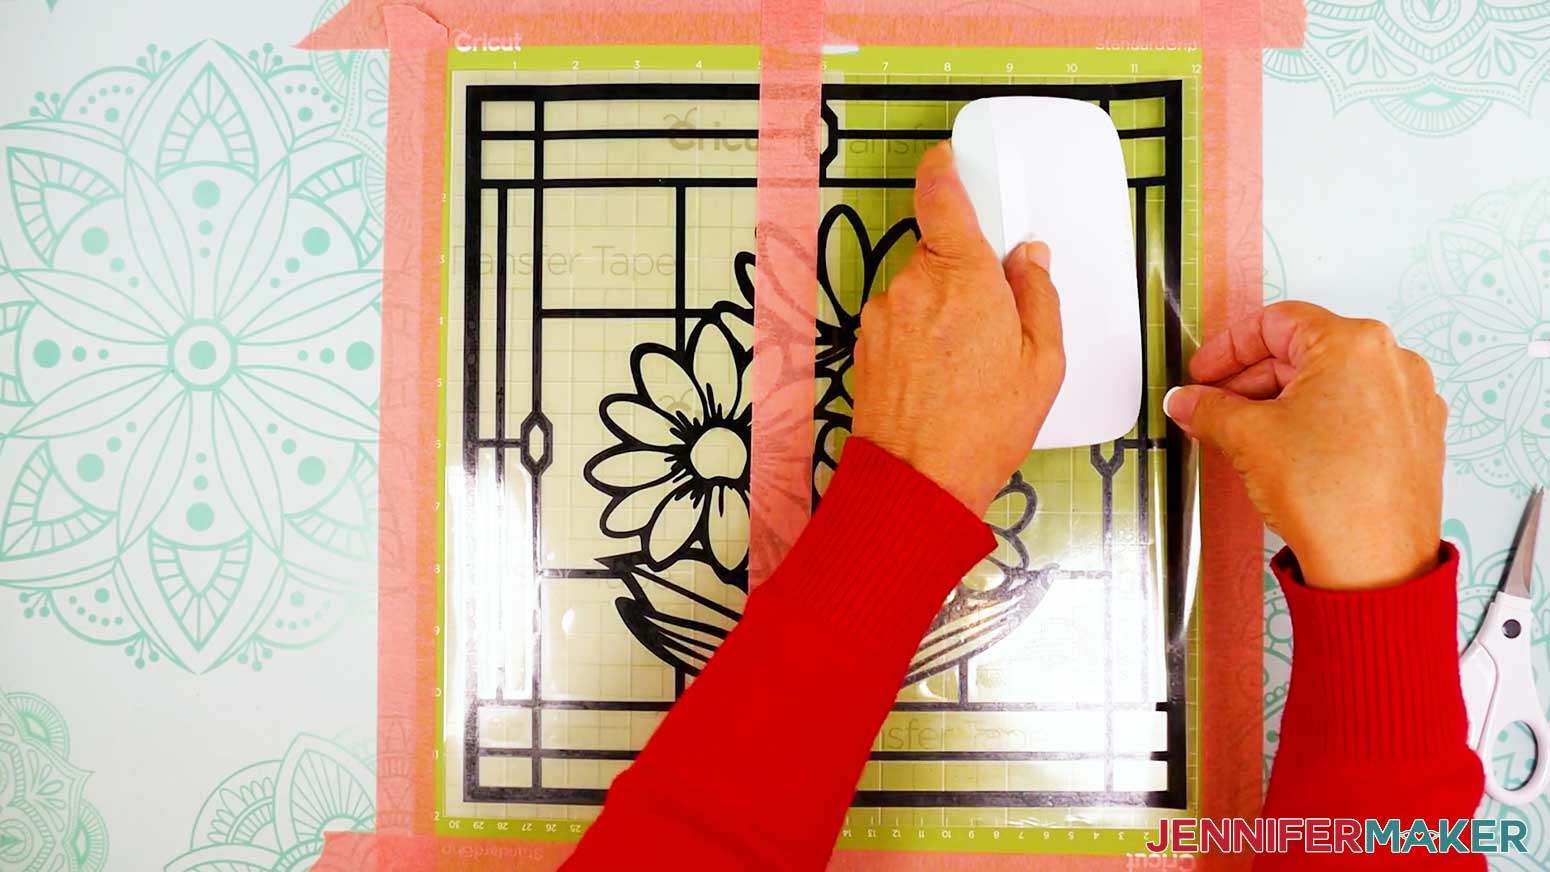
- Slowly and carefully peel away the transfer tape, leaving the vinyl design on the acetate.
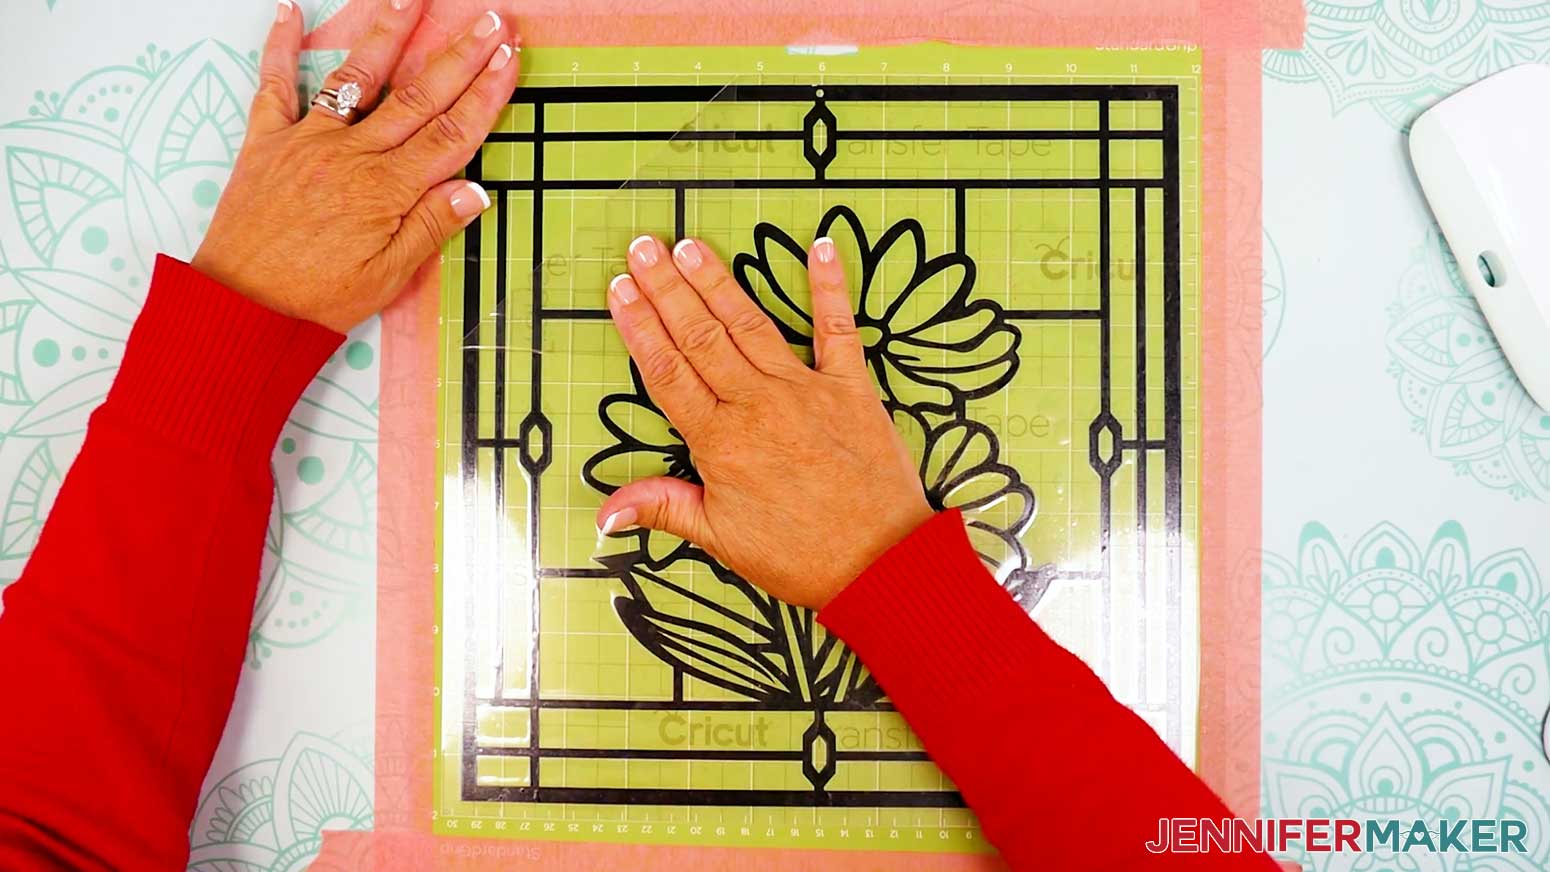
TIP: Roll the transfer tape parallel to the vinyl to prevent the vinyl from lifting off the acetate. - If there are any air bubbles between your vinyl and acetate, use your finger to push them outward and flatten the vinyl.
- Carefully remove the acetate sheet from the machine mat.
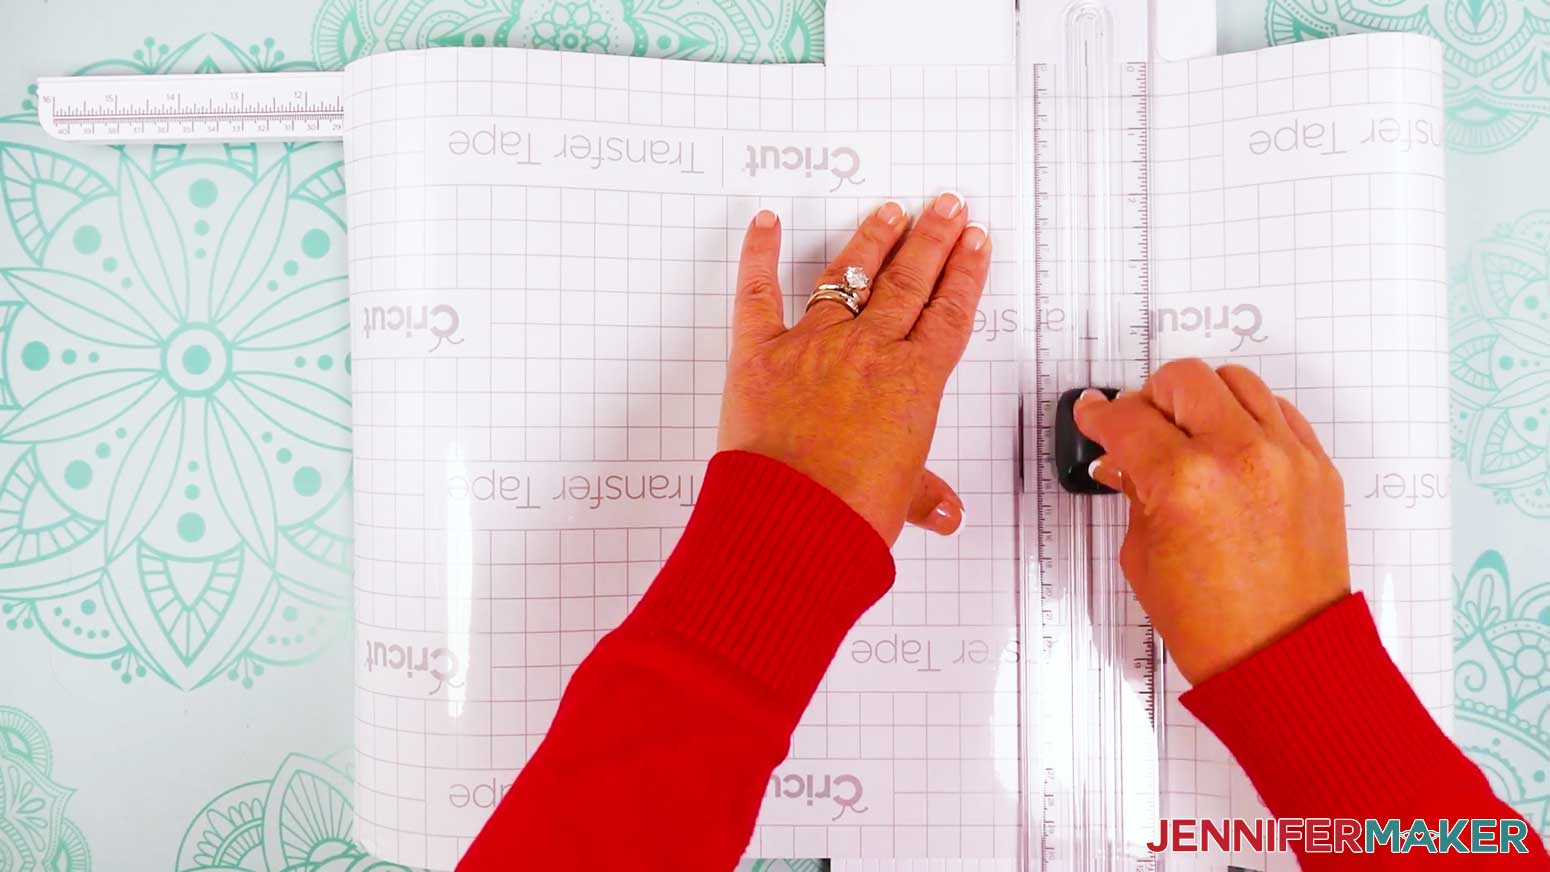
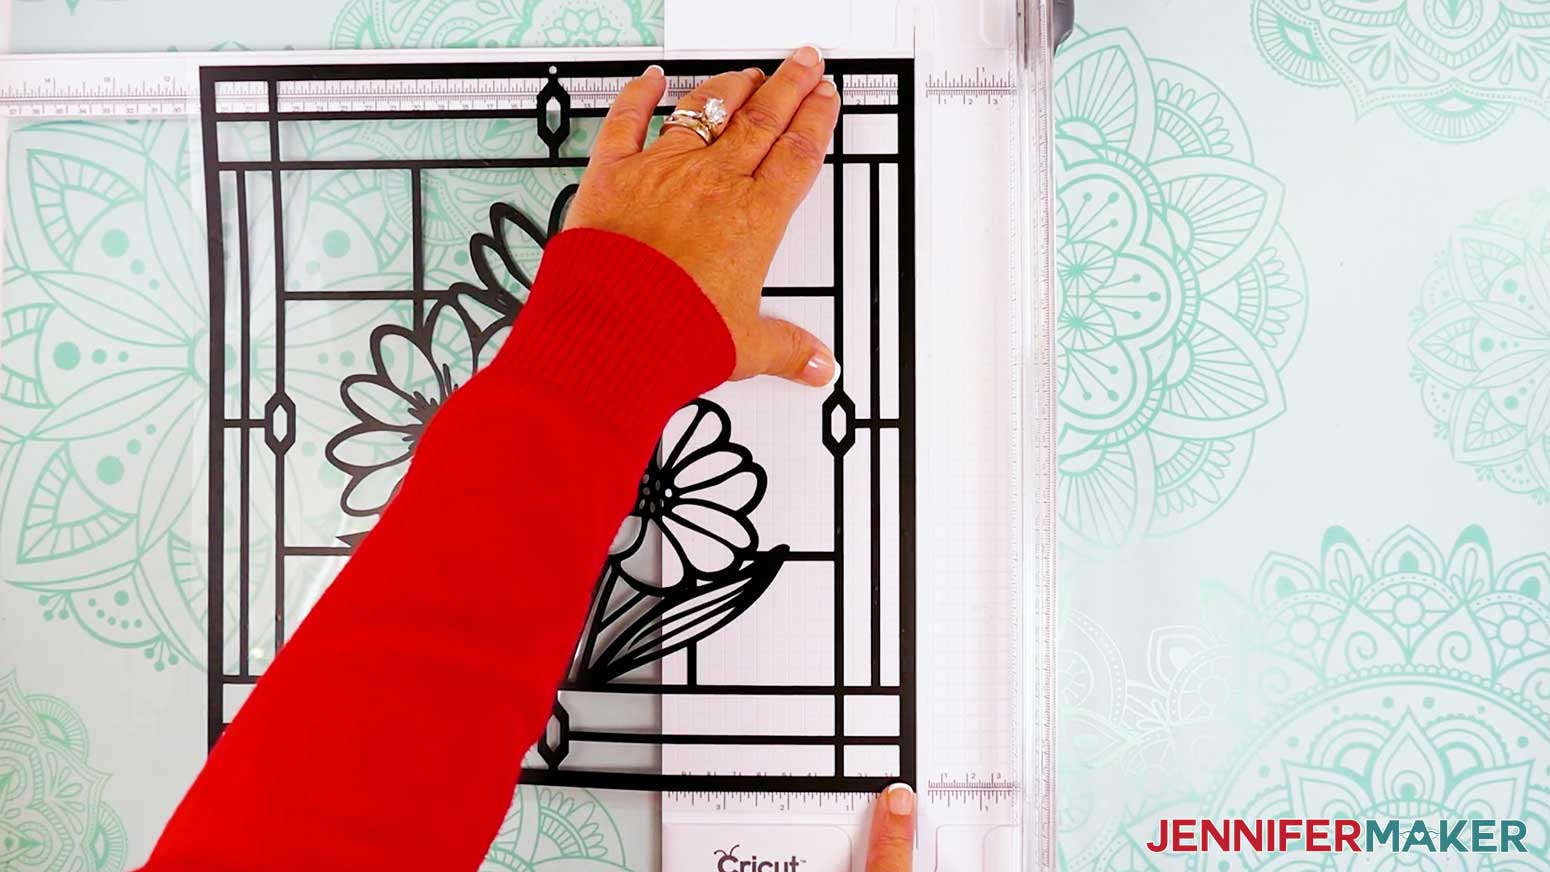
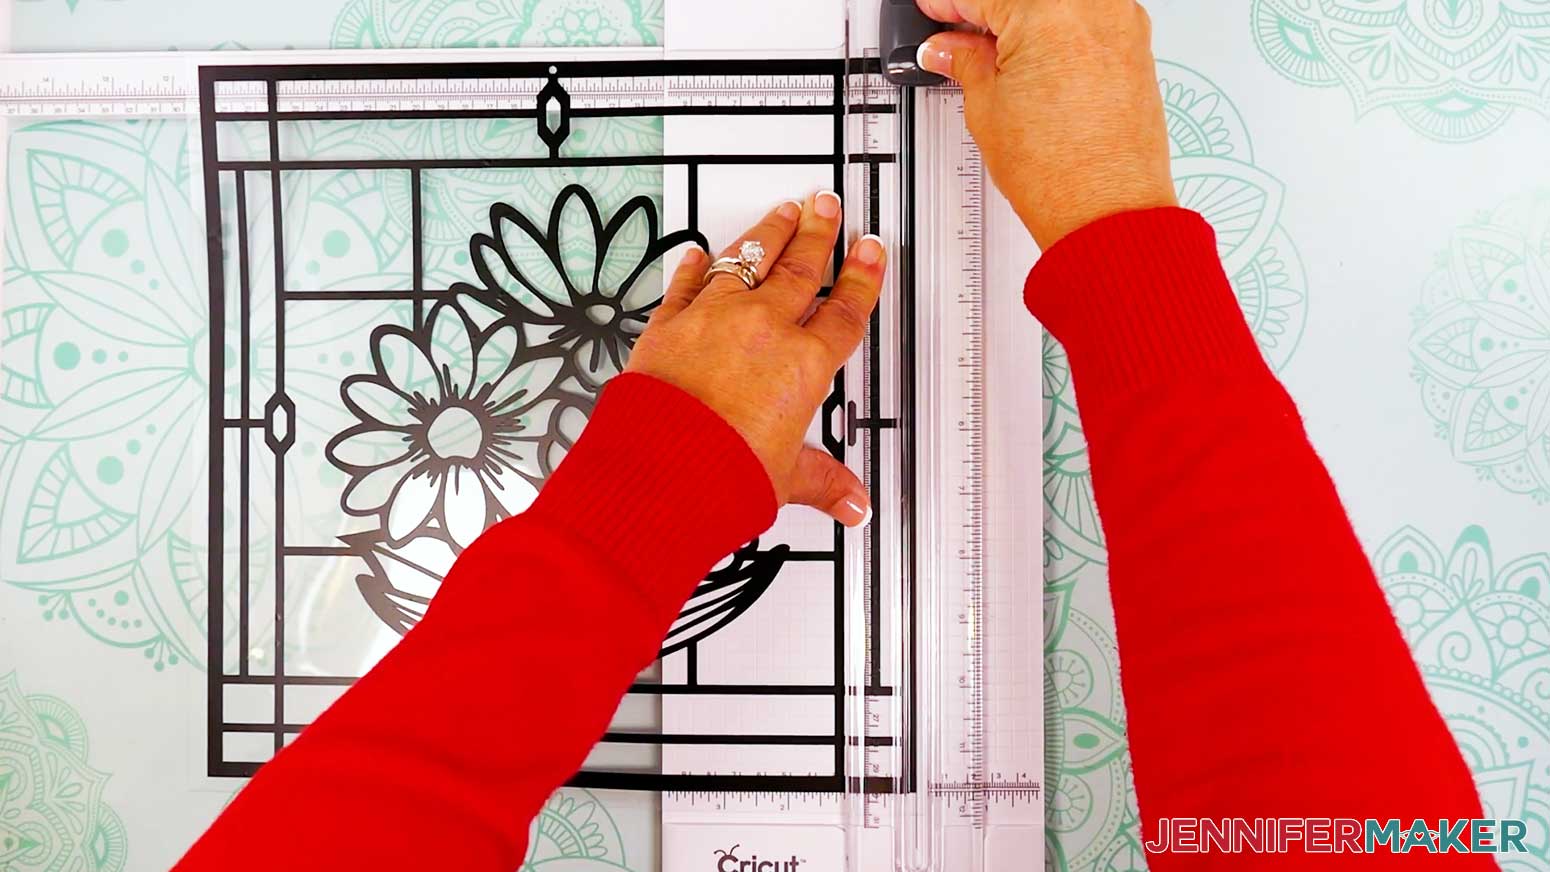
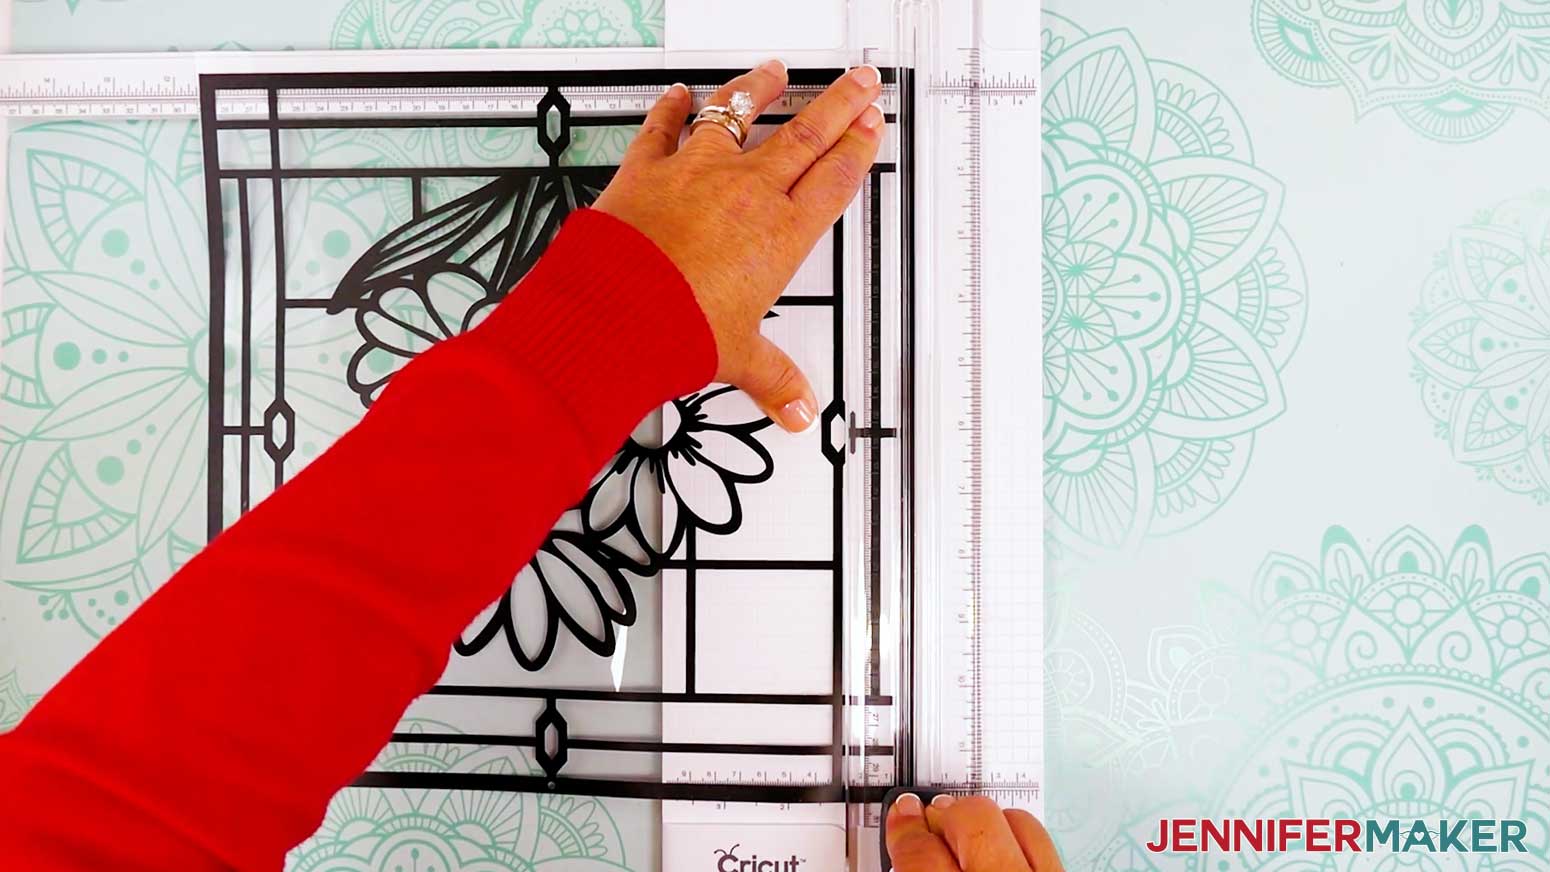
- To trim away the excess acetate, extend the guide arm on your paper trimmer.
- Lift the guide ruler.
- Place your acetate sheet face up on the trimmer’s cutting area so the first side’s edge is under the guide ruler.
- Adjust the acetate so the edge of the vinyl is lined up with the edge of the cut groove, but not over it.
- Lower the guide ruler and make sure the acetate is straight against the guide’s top edge, then make sure the cut will still be in the correct spot.
- Hold the ruler in place with one hand but keep your fingers away from the blade.
- With your other hand, bring the blade straight down in a smooth motion to make the cut.
- Repeat Steps 17-23 for the three remaining sides.
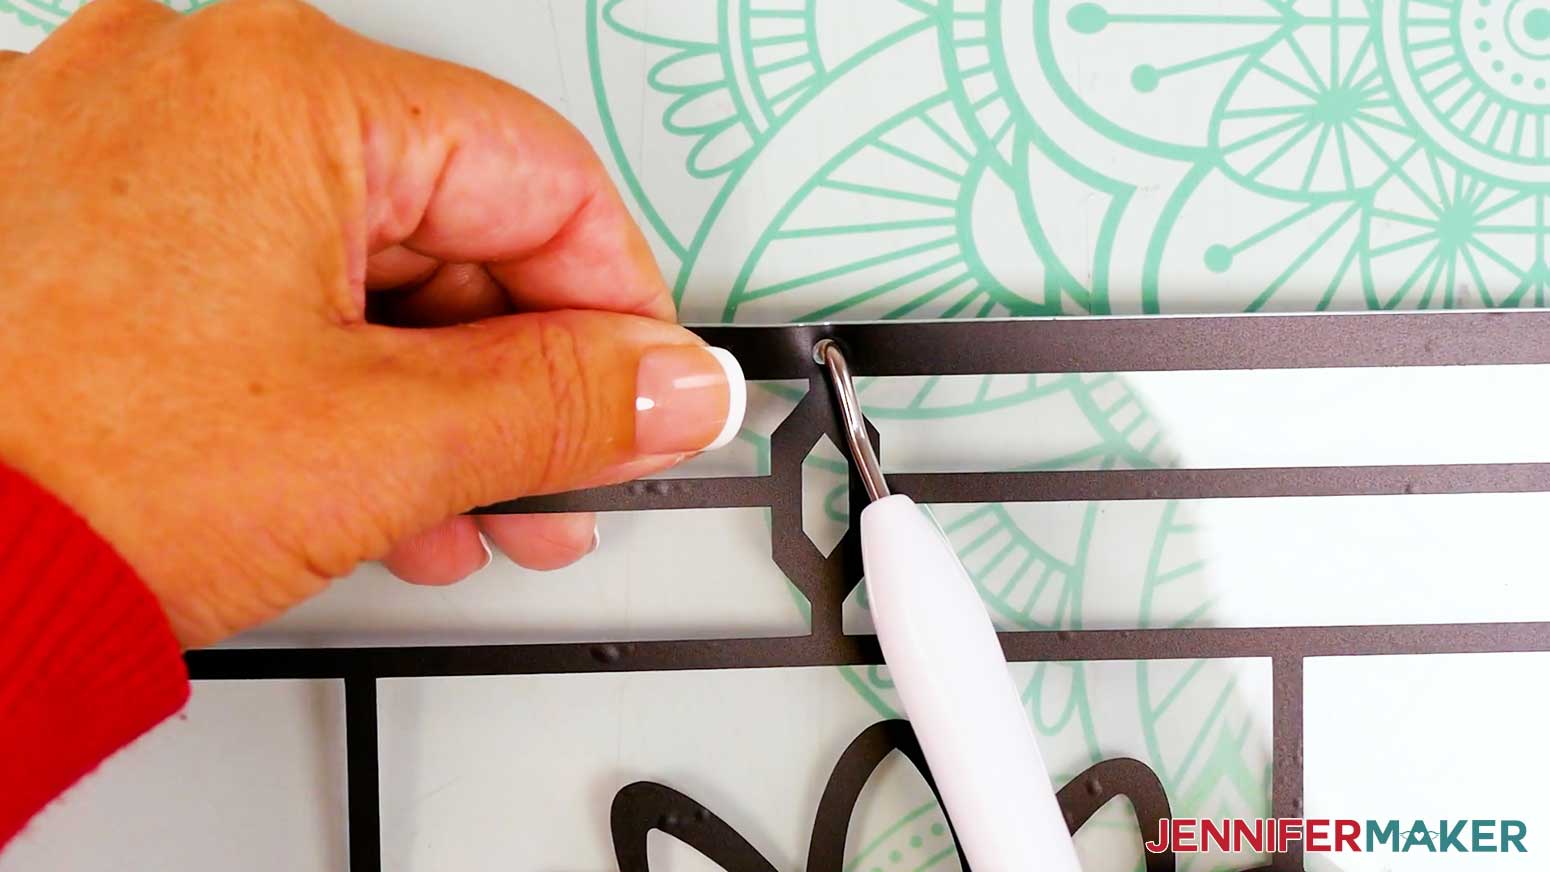
- Next, lay your project flat on a self-healing cut mat or the back of a machine mat and place the tip of your weeding tool against the acetate in the same spot as the hole in the vinyl. Carefully pull the edge of the frame upward and allow the weeding tool to poke a hole in the acetate. Be sure to keep your fingers out of the way!
- Set aside your prepared acetate front layer.

GLUE YOUR CARDSTOCK PIECES AND FRAMES
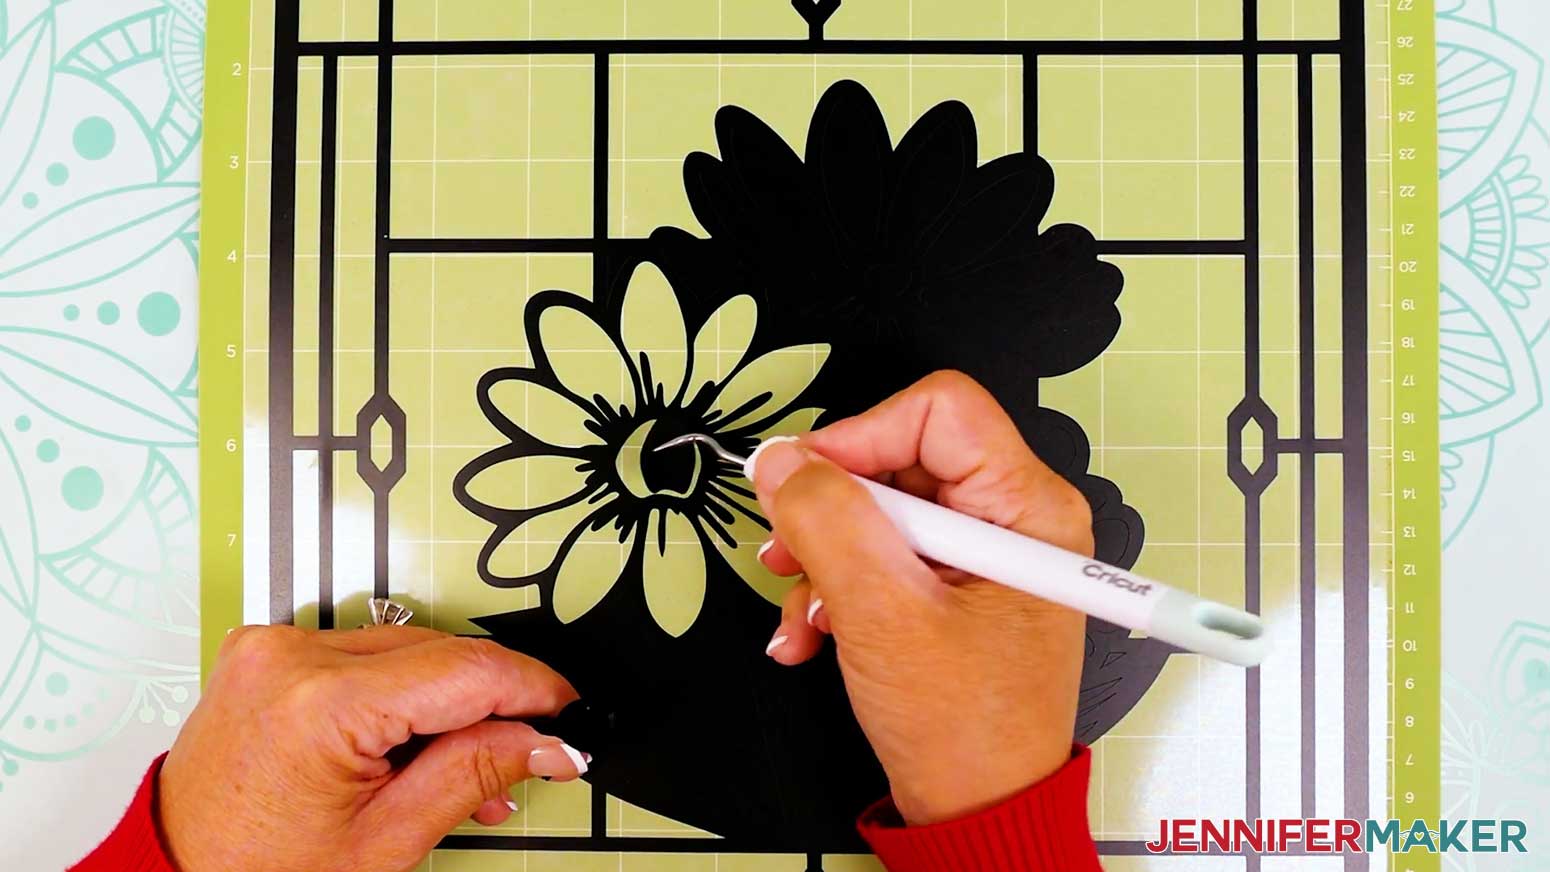
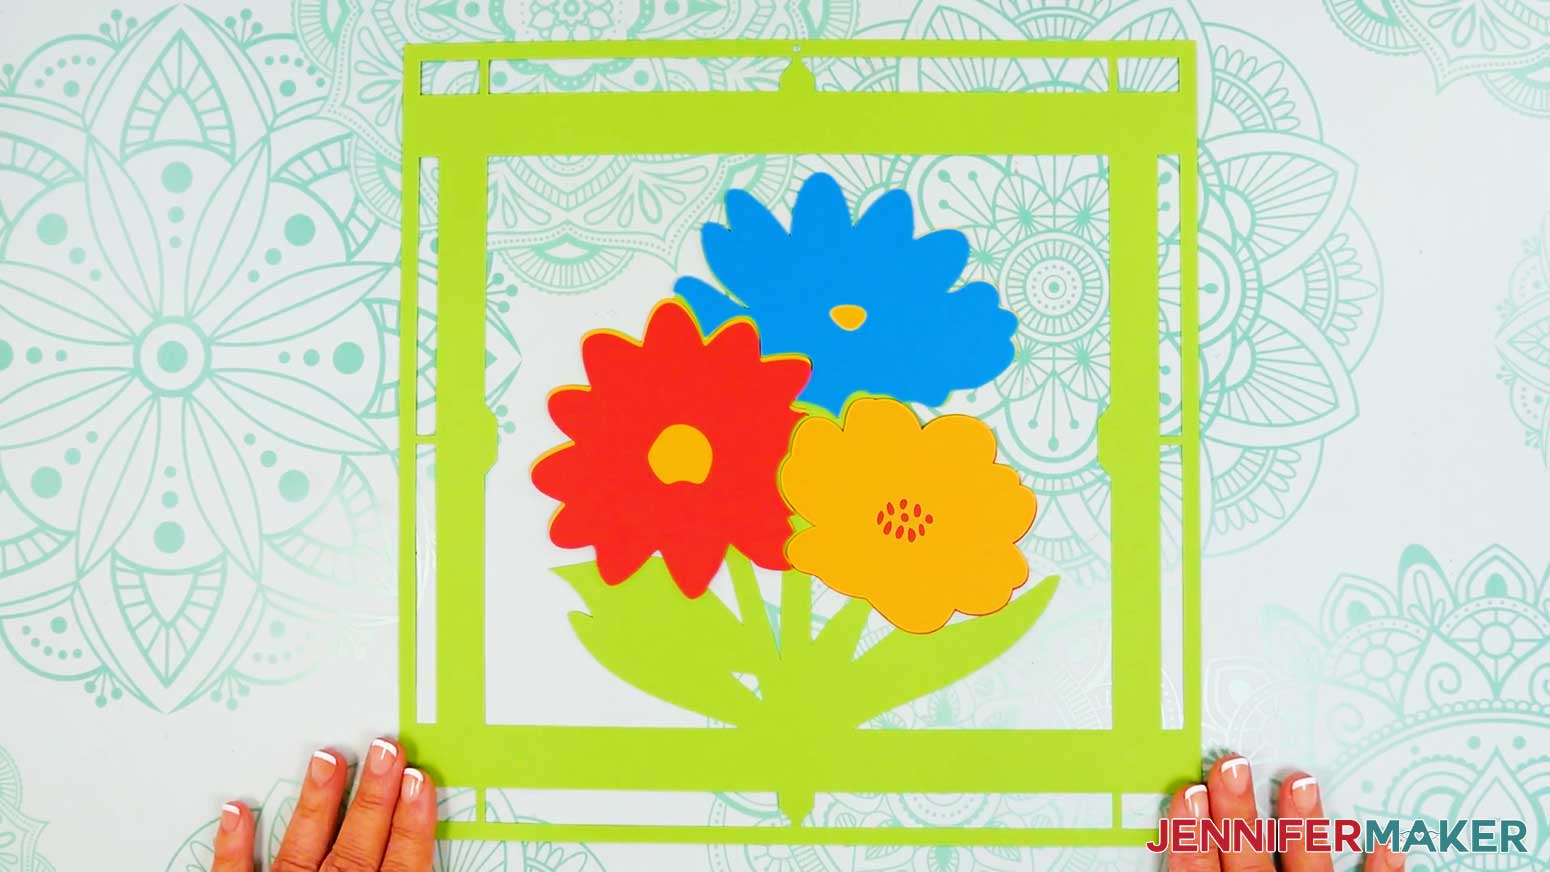
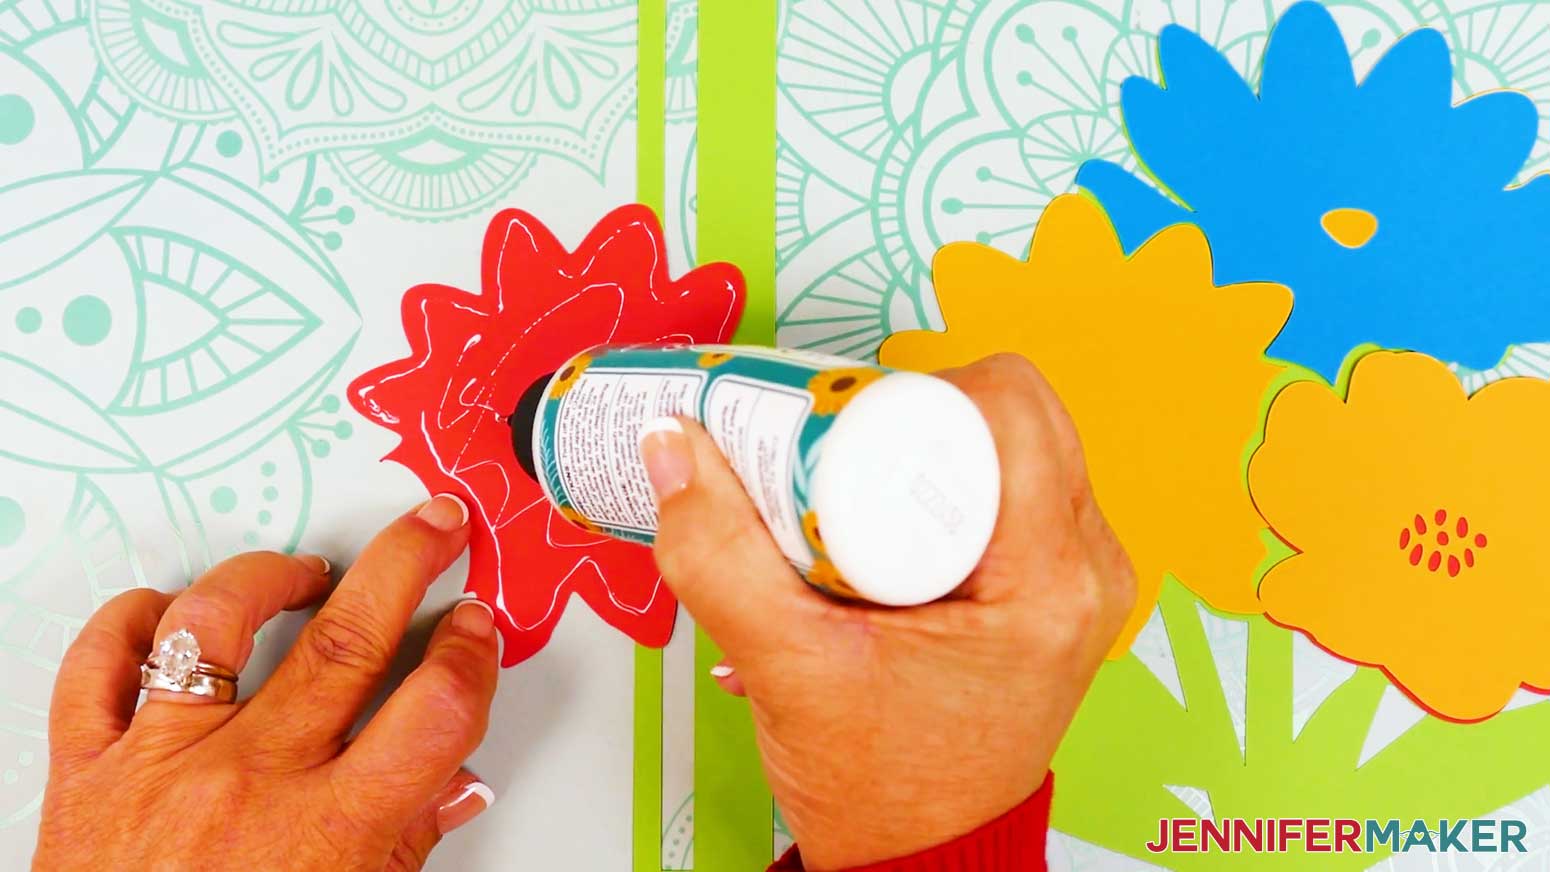
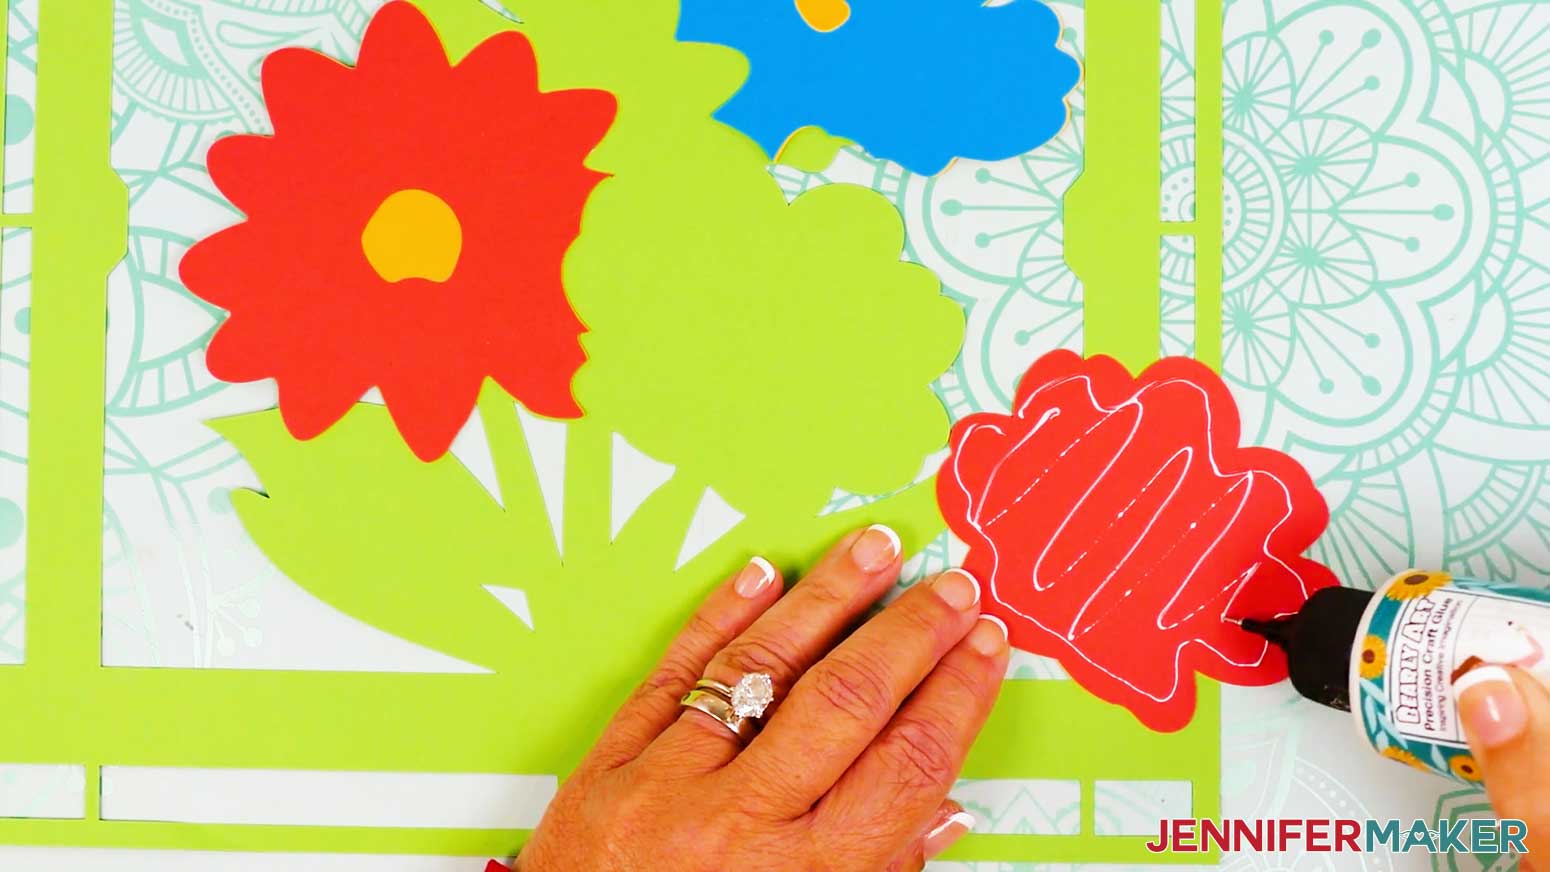
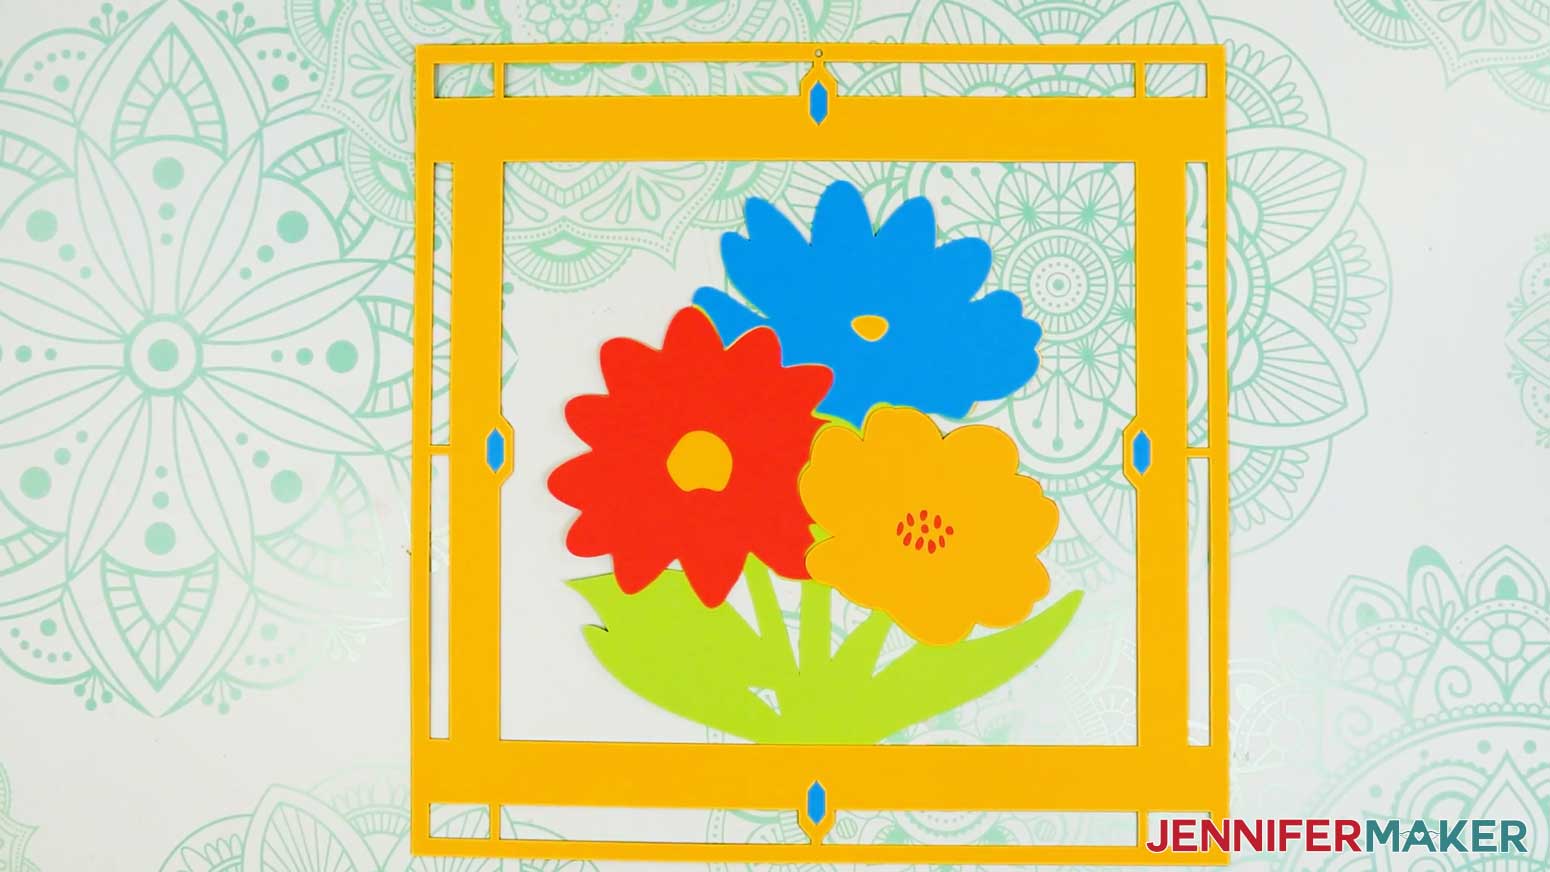
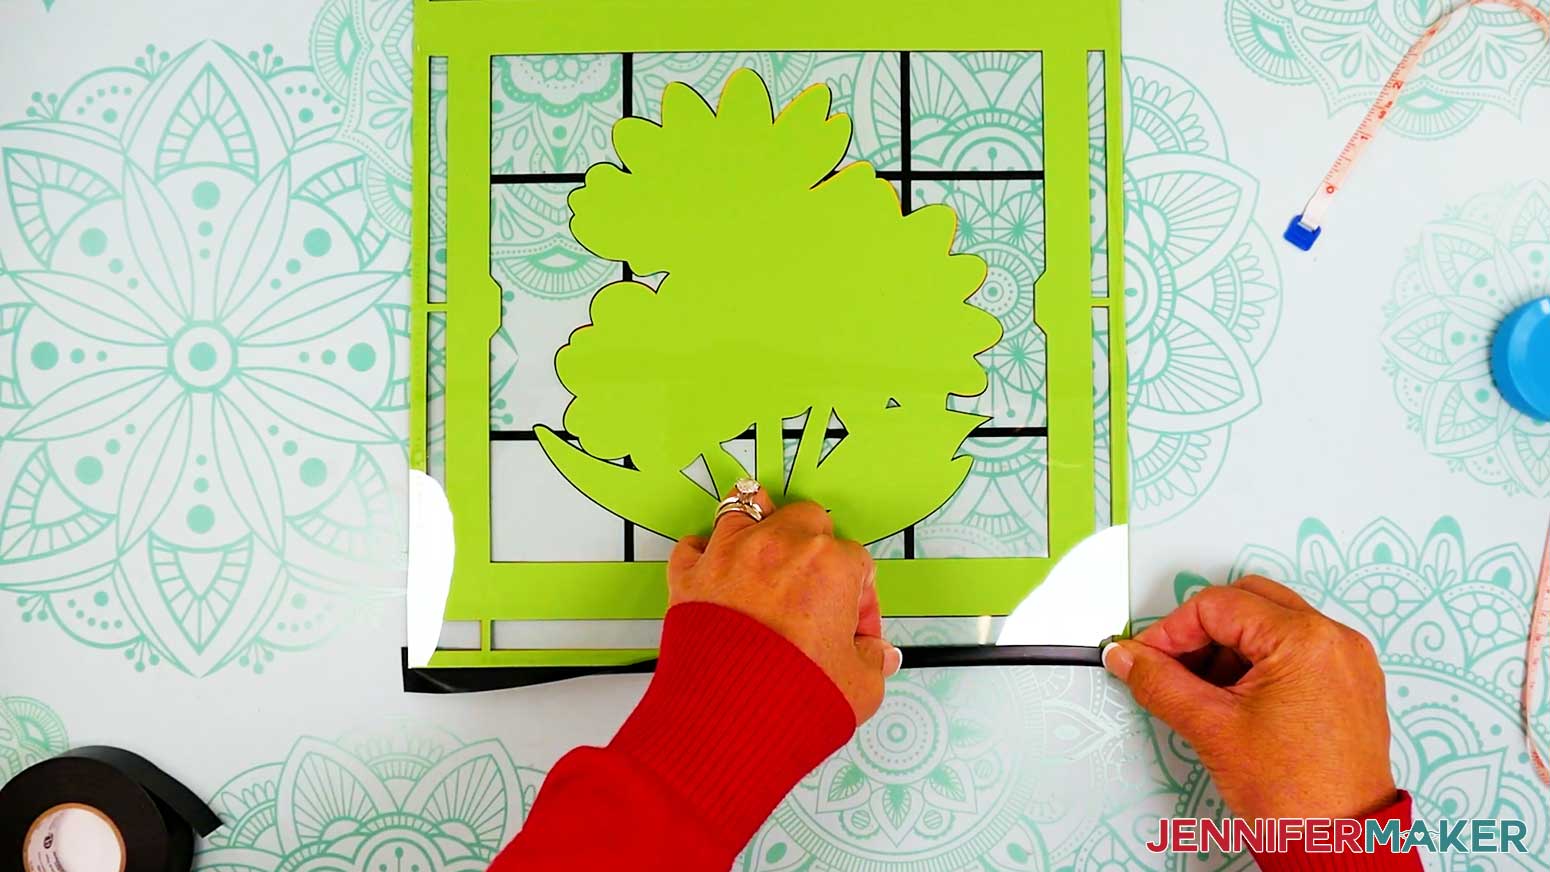
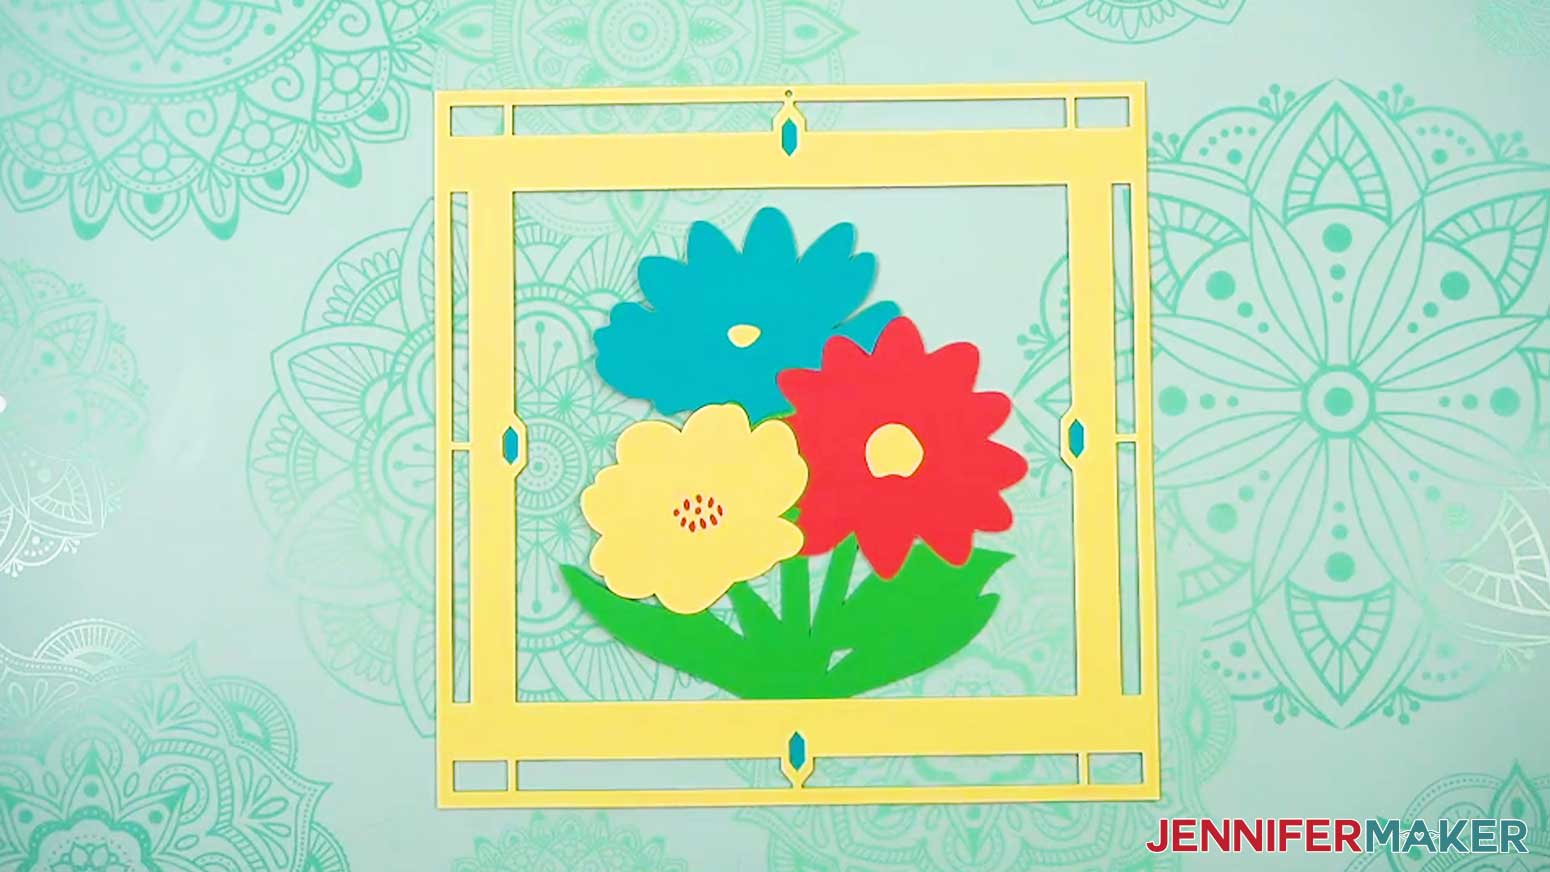
- Pair up your flower pieces into three sets, top layer on top of bottom layer.
NOTE: If you use the same colors as me, you’ll have teal on top of yellow for the top flower, red on top of yellow for the bottom left flower, and yellow on top of red for the bottom right flower. - Place the pairs into their spots on the green bottom frame to make sure everything aligns correctly.
- Take your first flower pair and flip the top piece over.
- Apply thin lines of glue all over the back of the top piece.
- Then flip it over again and place it onto the bottom piece, aligning the edges carefully.
- Press and smooth to adhere.
- Gently wipe away any excess glue with a paper towel or your finger.
- Repeat Steps 3-7 for the remaining two flower pairs.
- Place your glued flowers in their proper spots on the bottom frame, using the outside edges for alignment.
- Apply glue to the back of your first flower, then place it into position on the bottom frame, keeping the edges aligned.
- Do the same for the second and third flowers.
- Next, stack your cardstock frame layers face up from top to bottom.
NOTE: The small hole in the frame’s edge should be at the top of all three layers. - Flip the top two frame layers over onto your work surface beside the bottom layer (like you’re turning the pages of a book).
- Using your craft glue’s precision tip, add thin lines of glue to the back of the middle frame layer, making sure to apply it around the outside edge, the inner frame, and the small connecting pieces.
TIP: Work quickly but carefully to avoid letting the glue dry before applying the next layer. - Flip the middle frame layer over and align it directly onto the bottom frame layer.
NOTE: Use the frame's top hole, edges, and corners for alignment. - Press down and smooth to adhere.
- Gently wipe away any excess glue with a paper towel or your finger.
- Repeat Steps 14-17 to add the top frame layer to the middle frame layer.
NOTE: The ladybug centerpiece design goes together similarly, with two layers for each of the center pieces. Glue the red ladybug piece onto its white piece, and the orange flower onto the red flower. Then align and glue them to the bottom frame layer, and add the top and middle frames just like before.
NOTE: For the cardinal design, glue the centerpiece together, one layer at a time: green layer on the bottom, then orange layer, then white, then red on top. Then the assembled layers are glued to the bottom brown frame layer, and the rest of the frames are glued on top, one at a time.
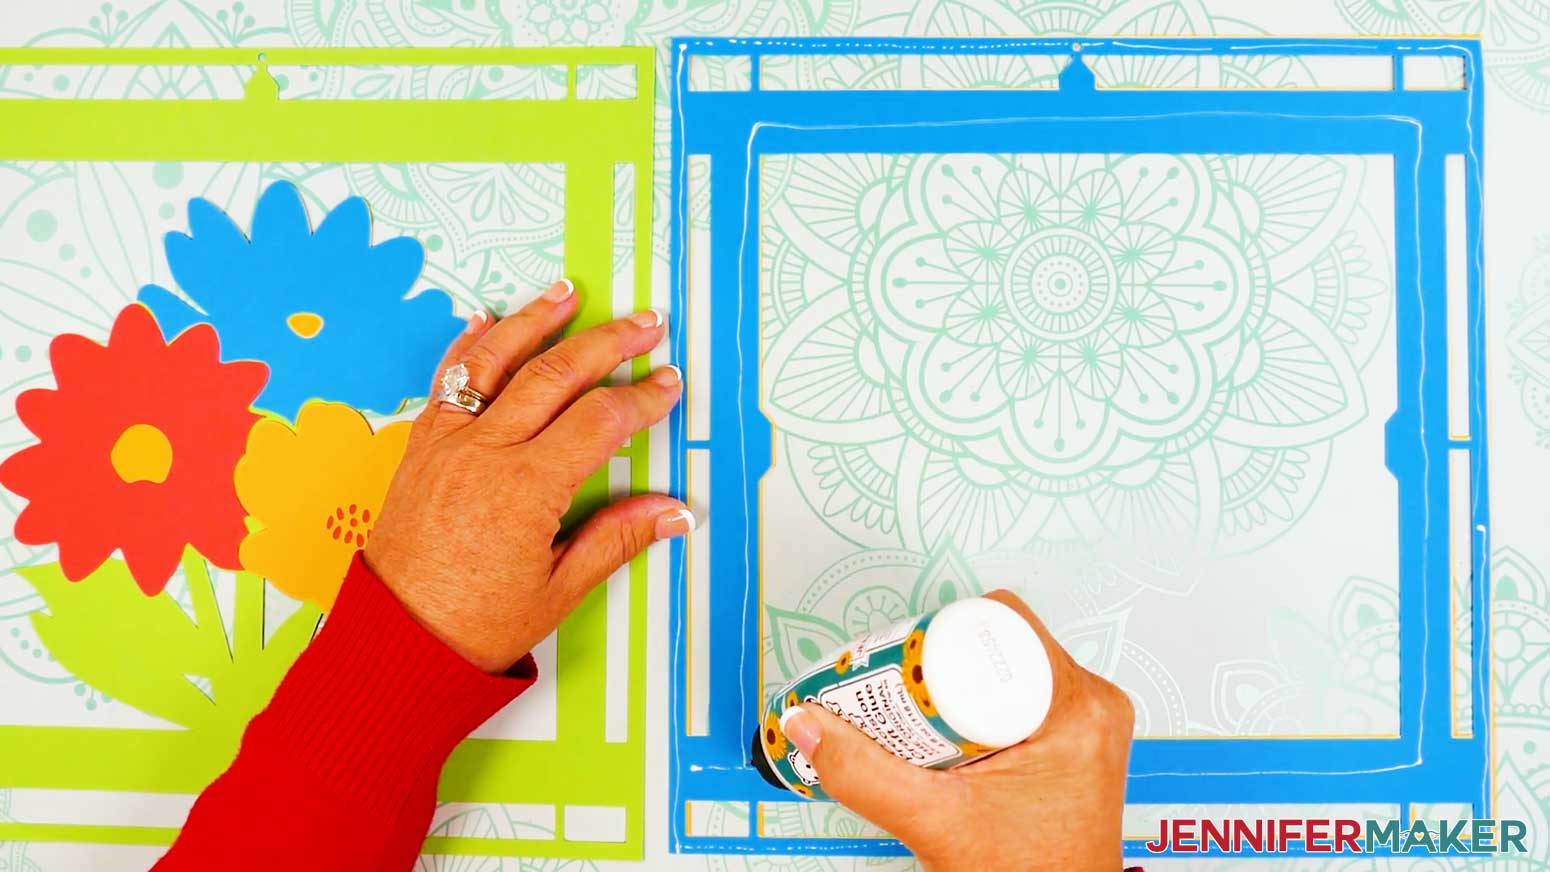
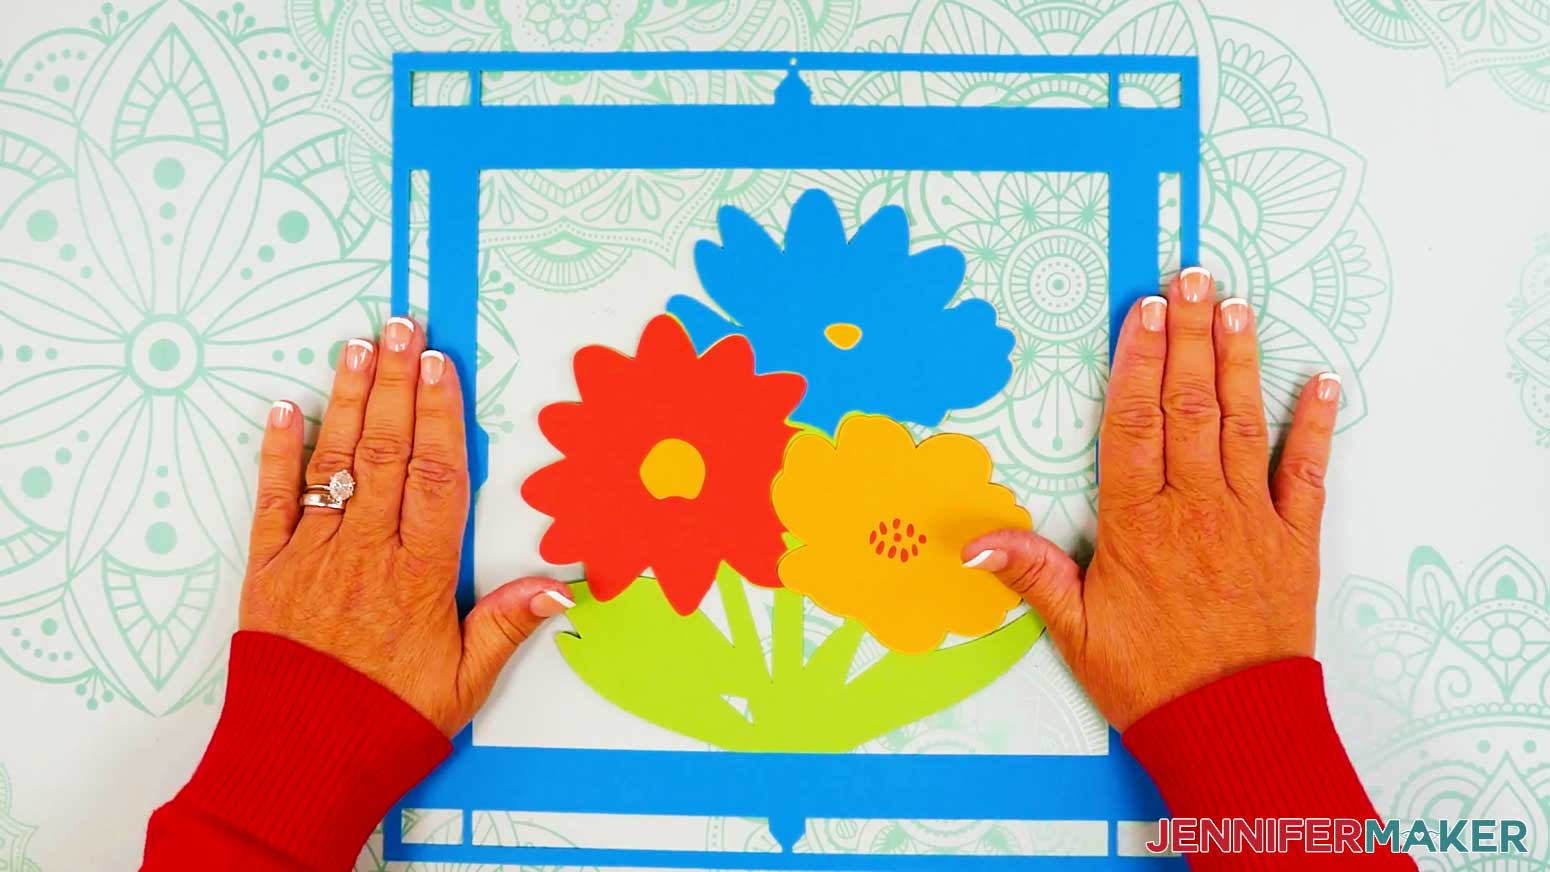
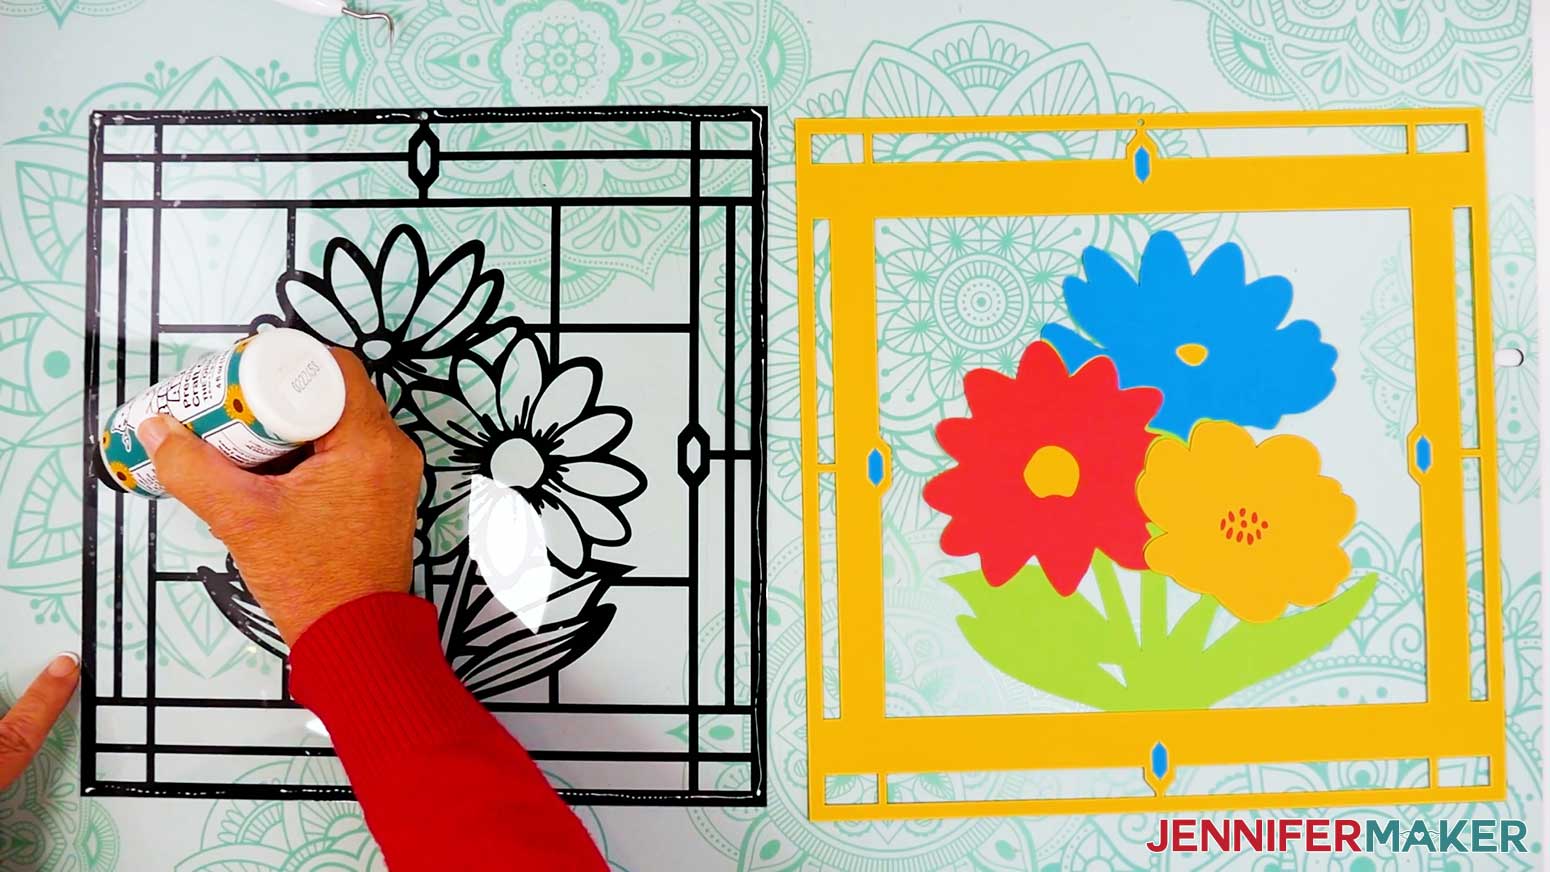
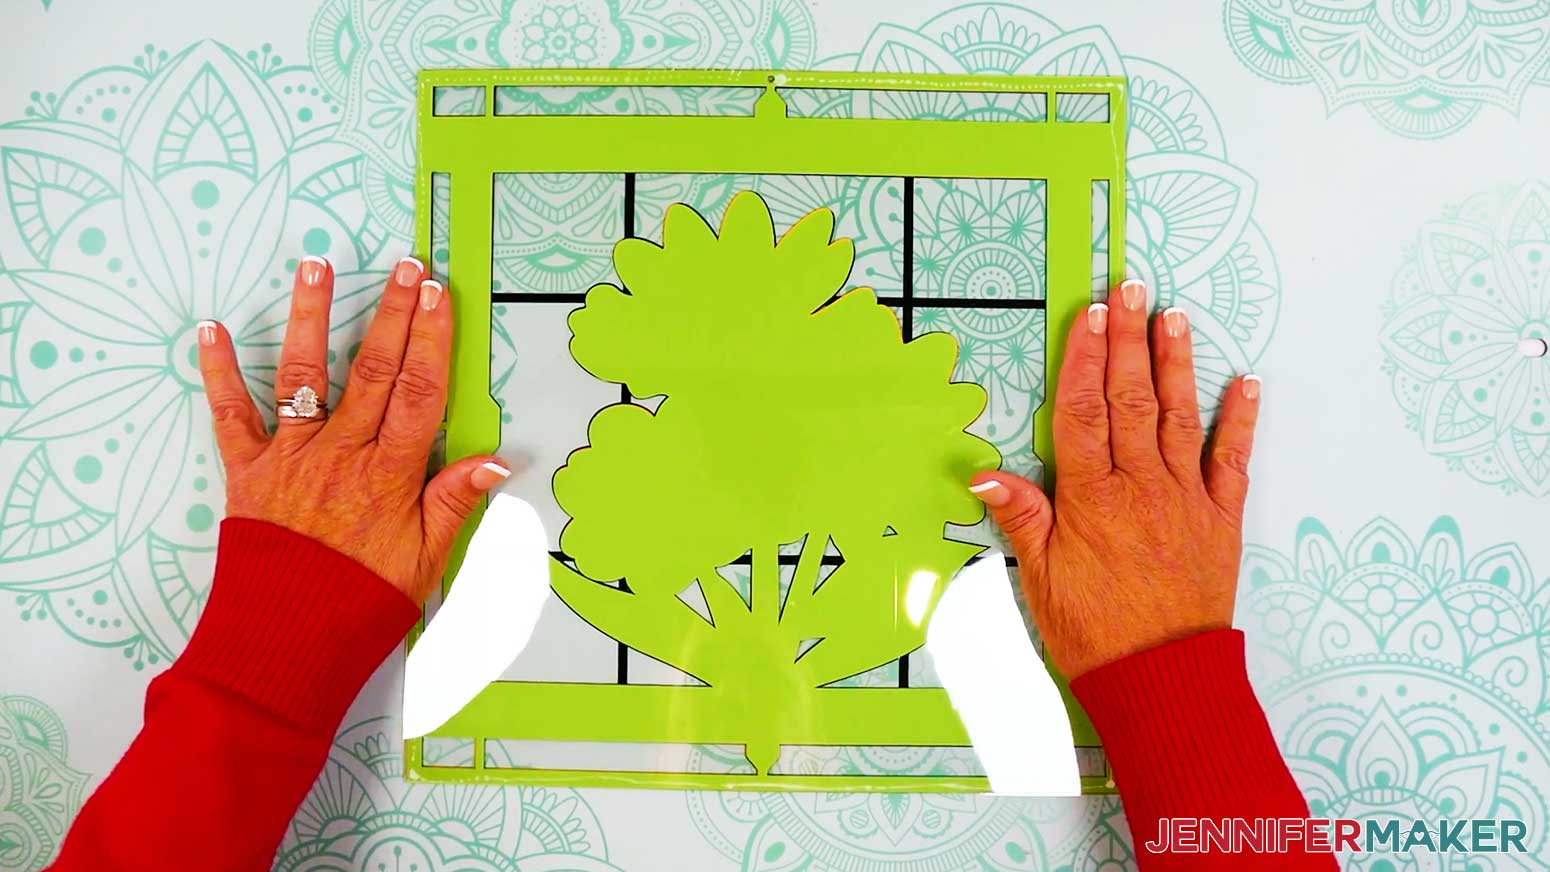
LAYER YOUR ACETATE AND CARDSTOCK PIECES
- Place your front acetate piece vinyl-side down, and your assembled cardstock layers face up beside it.
NOTE: The small hole in the frame edge should be at the top for both pieces. - Peel the protective film layer off the bottom side of the acetate.
- Working quickly but carefully, apply thin lines of glue to the acetate piece along the vinyl outlines at the frame edges, the outer edges of the centerpiece, and inside the centerpiece where the outlines are thicker.
TIP: You won’t be able to wipe away excess glue that touches the cardstock, so be careful not to apply too much! - Flip the front acetate piece over onto the cardstock assembly, carefully aligning the vinyl with the frame and centerpiece edges so the colored cardstock areas stay inside the black vinyl outlines.
NOTE: The vinyl outlines are slightly larger than the cardstock areas to make it easier to cover the edges. - Press and smooth to adhere.
- Peel any remaining protective film off of your back acetate layer.
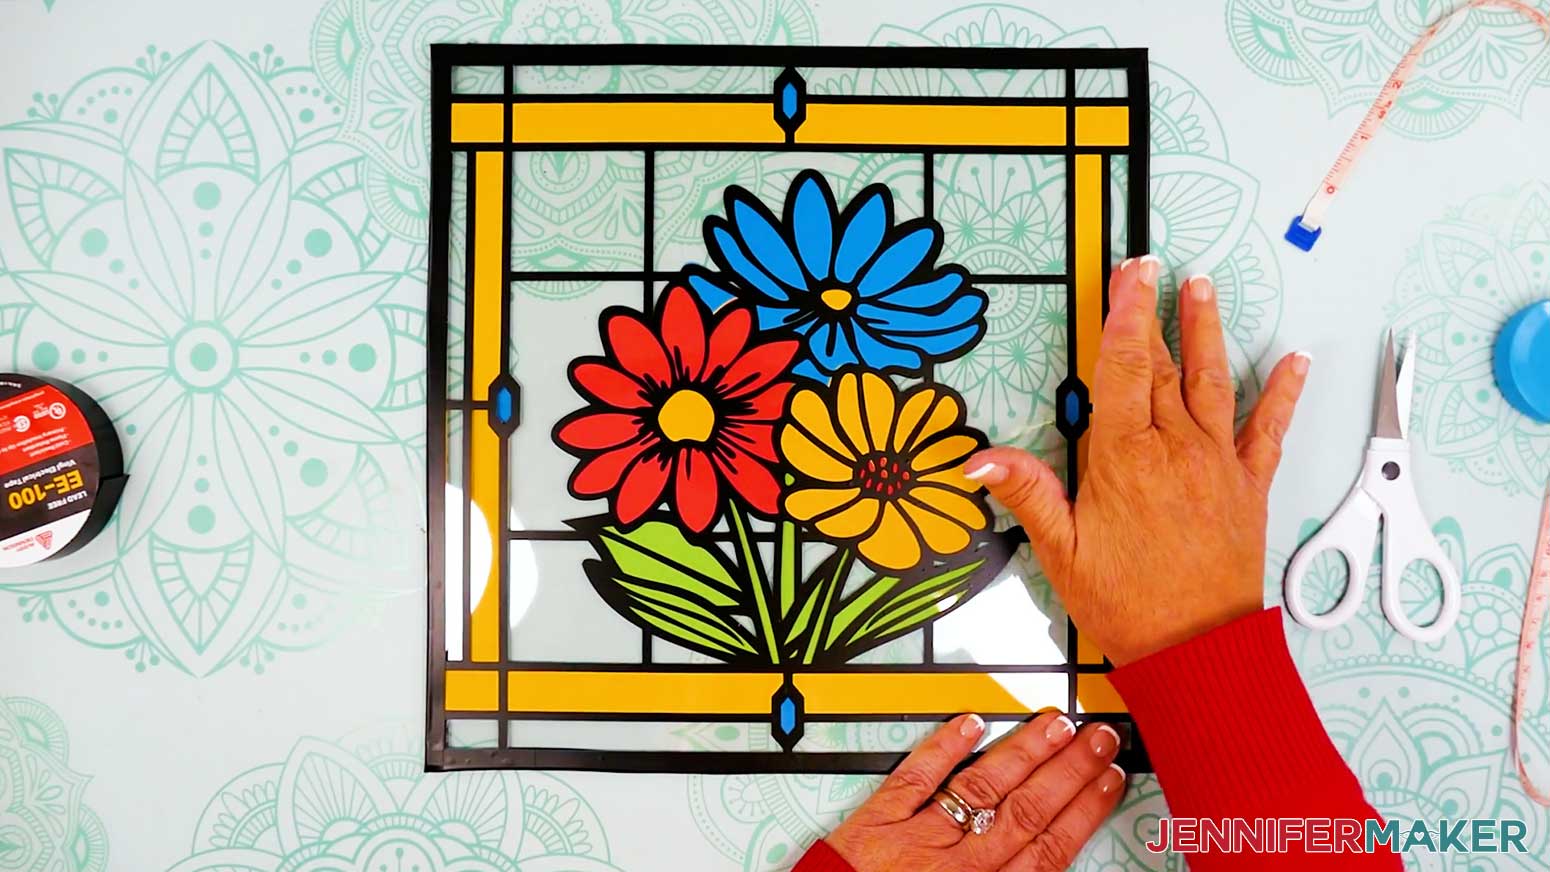
- Flip your assembled vinyl and cardstock layers face down.
- Add craft glue to the bottom cardstock layer’s outside edge only.
- Place the back acetate sheet onto the cardstock, aligning the edges.
- Press and smooth to adhere.
- Flip your project face up.
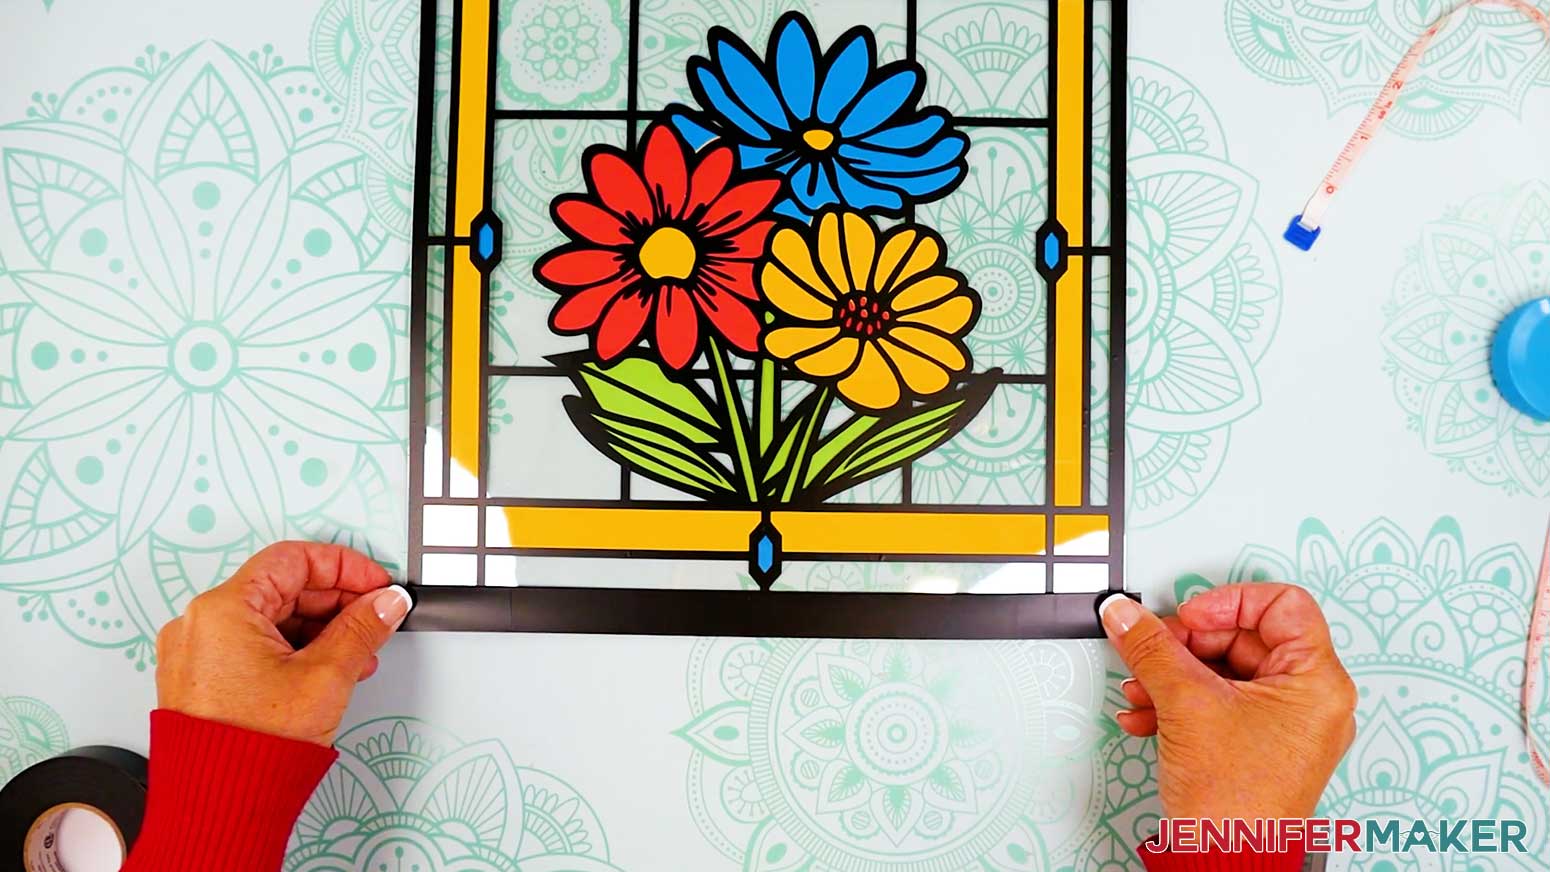
- Cut a 12” piece of finishing tape.
- Hold the tape horizontally and apply it straight across the bottom edge of your project, aligning its top edge with the vinyl’s top edge so the tape’s bottom half extends below the acetate, but doesn’t stick to your work surface.
- Flip the project face down and fold the tape’s other half onto the back of your project.
- Trim away the excess tape at the left and right edges.
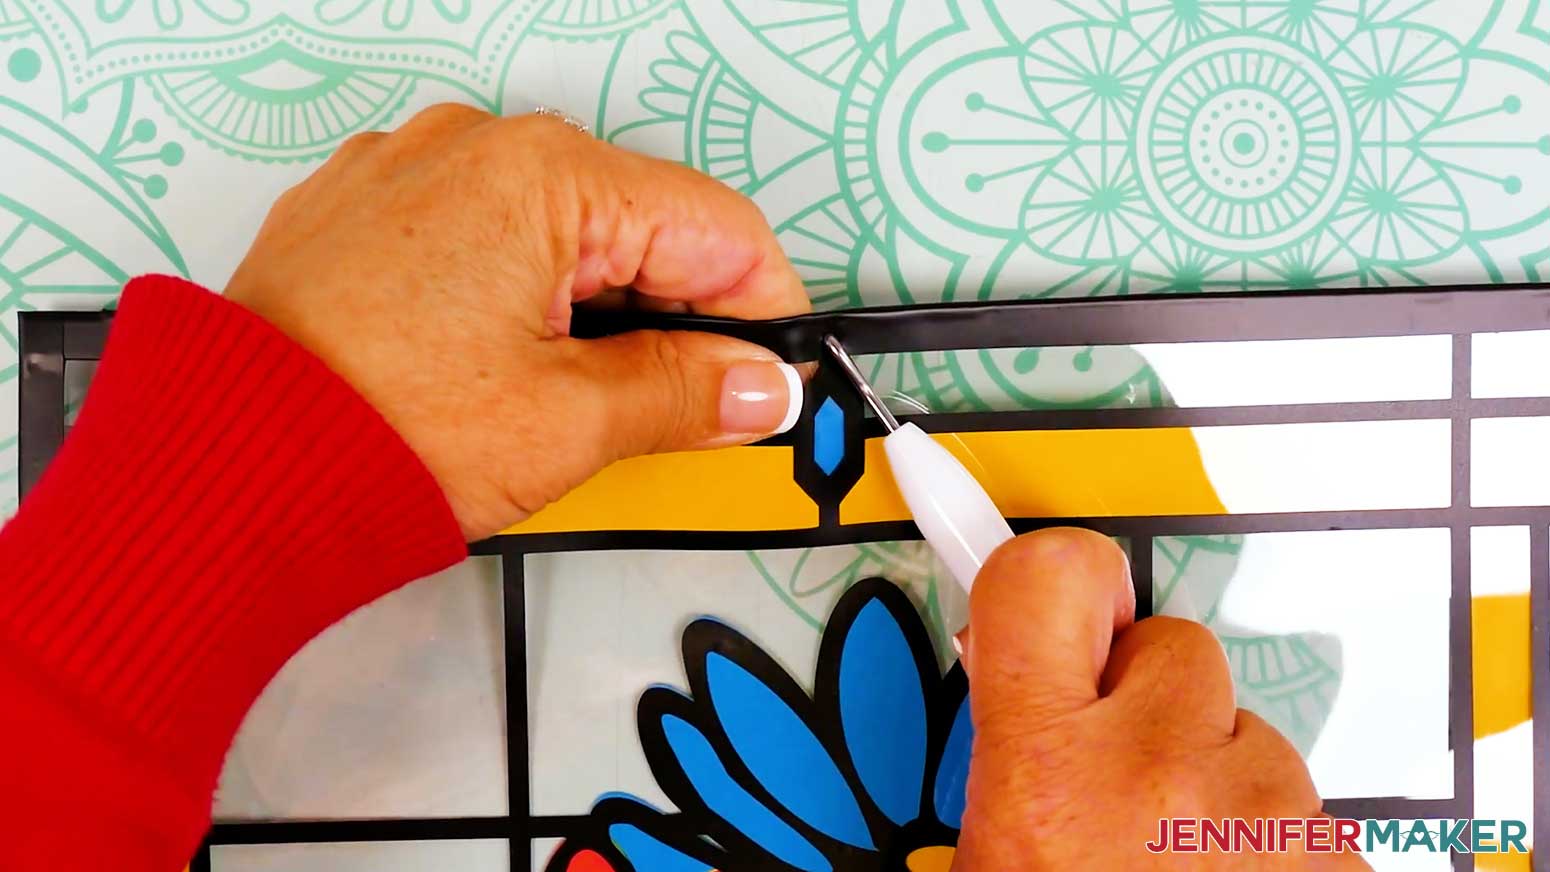
- Then repeat Steps 11-15 to apply finishing tape to your project’s top edge, then to the left and right edges, as well.
TIP: Rotate your project so the edge you’re working on is at the bottom for easier alignment! - Next, lay your project flat on a self-healing cutting mat or the back of a machine mat and place the tip of your weeding tool in the same spot as the hole you made in the acetate earlier. Carefully pull the edge of the frame upward and allow the weeding tool to poke a hole in the finishing tape. Be sure to keep your fingers out of the way!
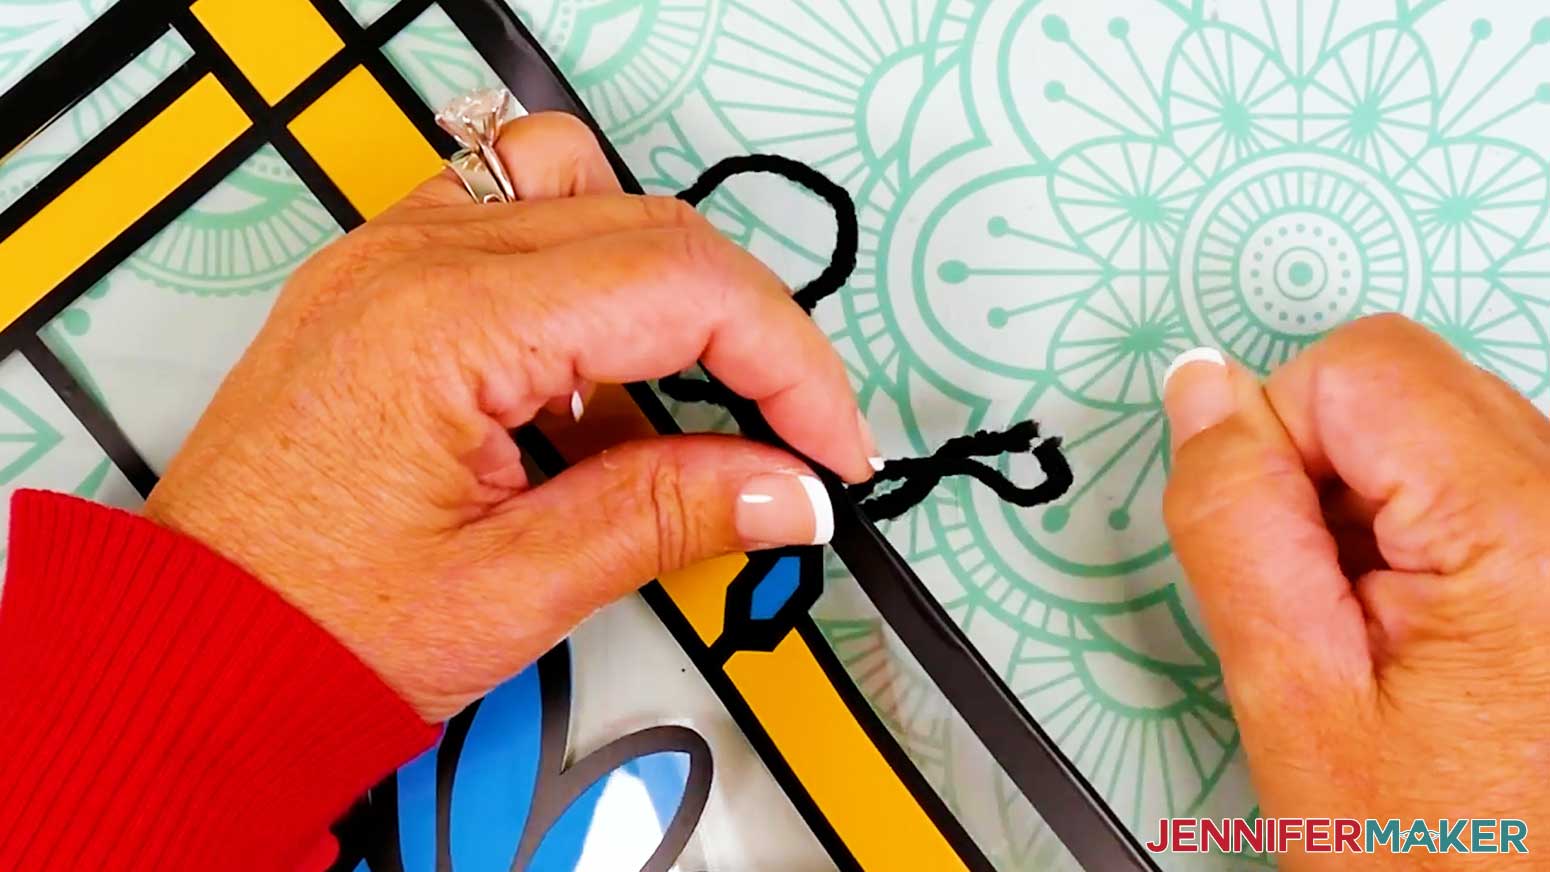
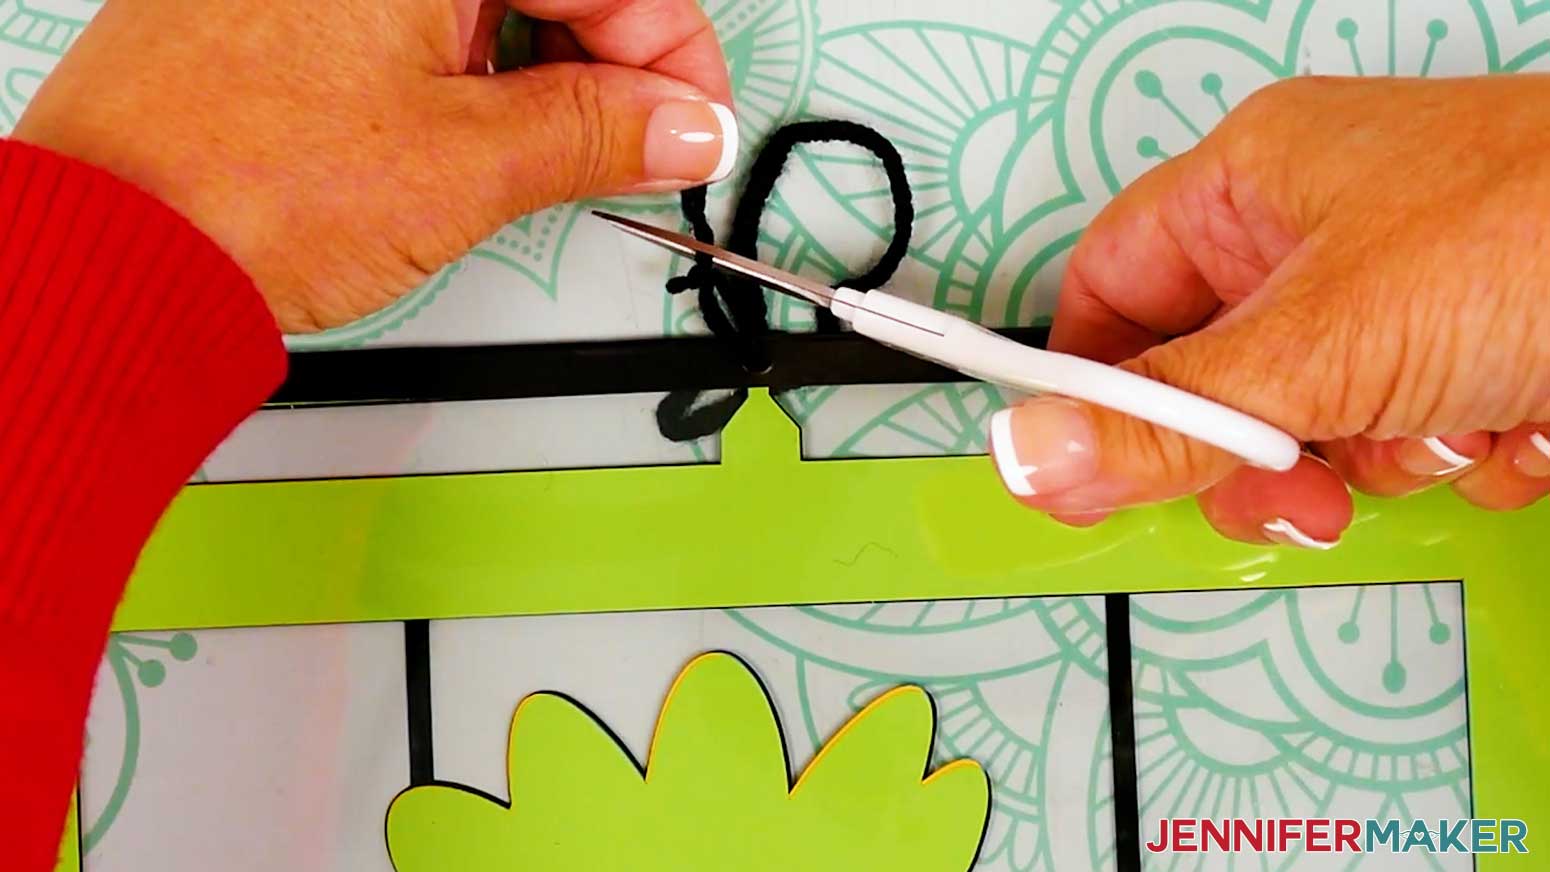
- Then cut a piece of yarn or string about 9" long.
- Insert a needle threader through your project’s hanging hole.
- Place the yarn’s end through the threader’s loop and pull the threader back through the hole, carrying the yarn with it.
- Remove the threader and tie the yarn’s ends into a knot.
- Trim away the excess yarn.
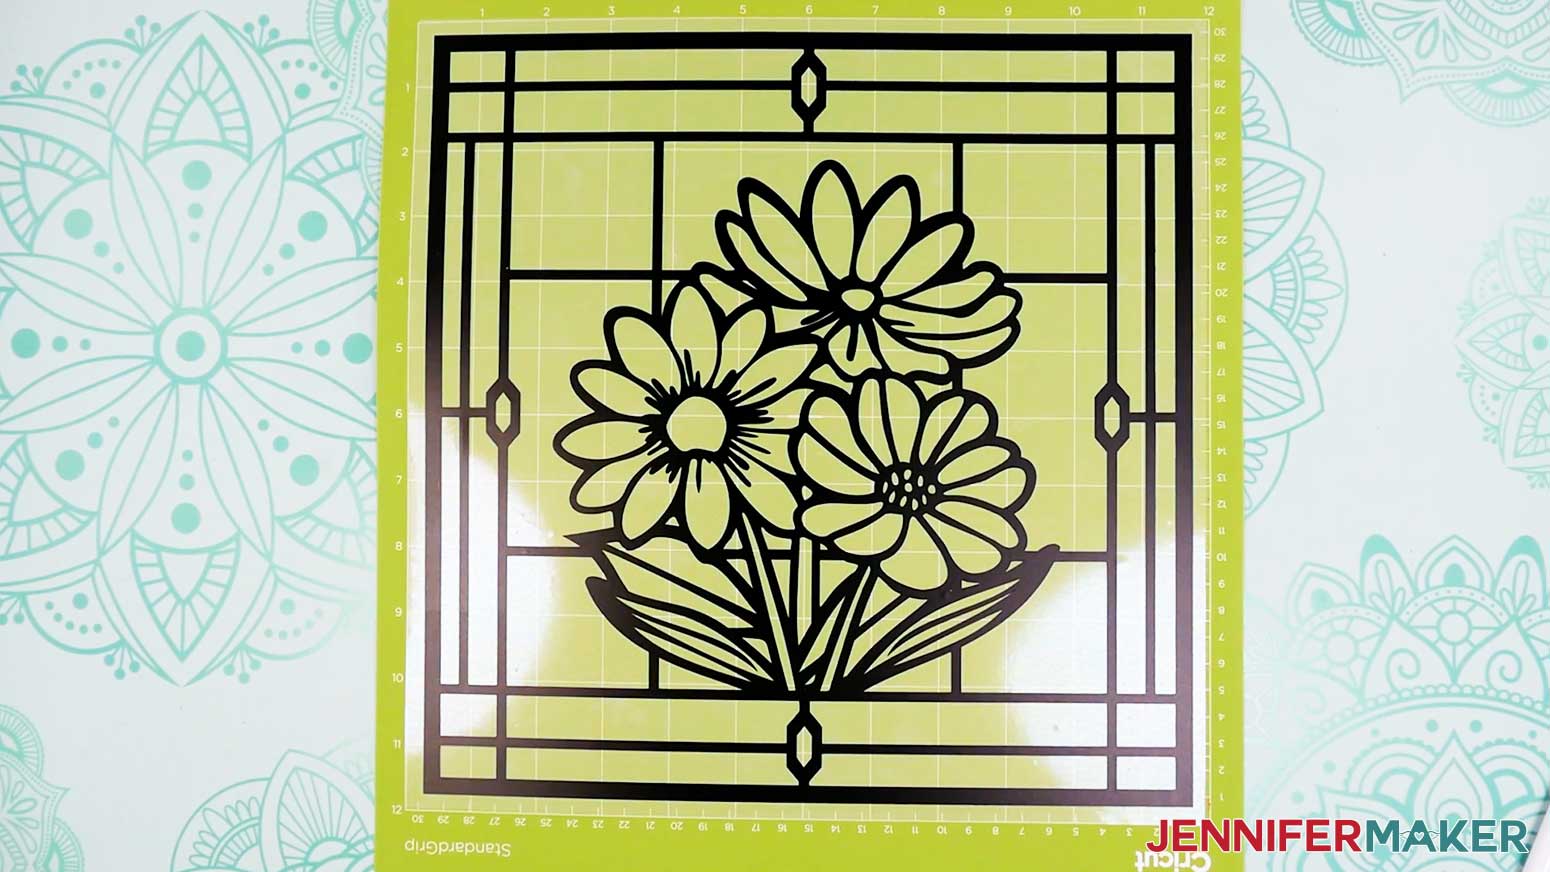
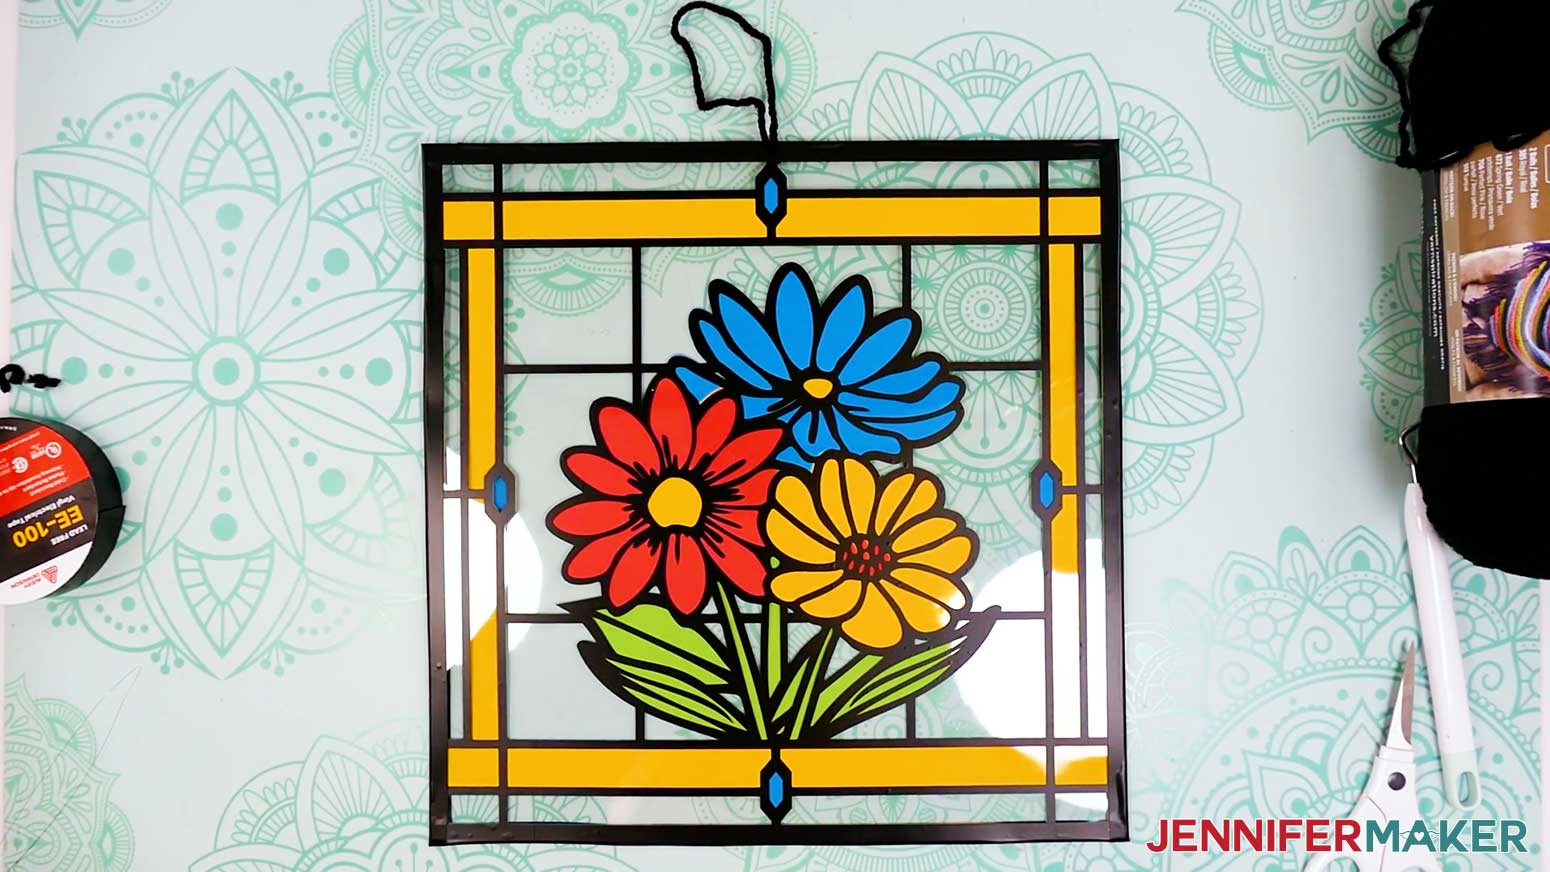
- Your project is ready!
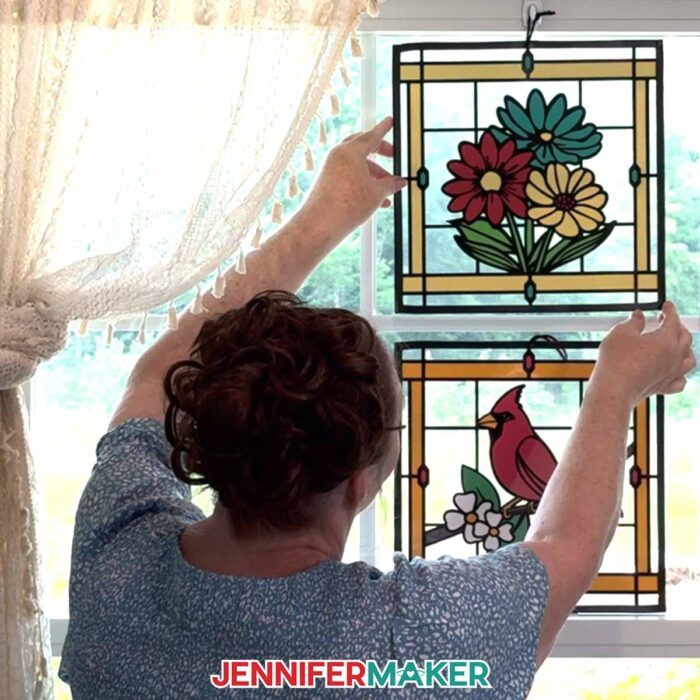
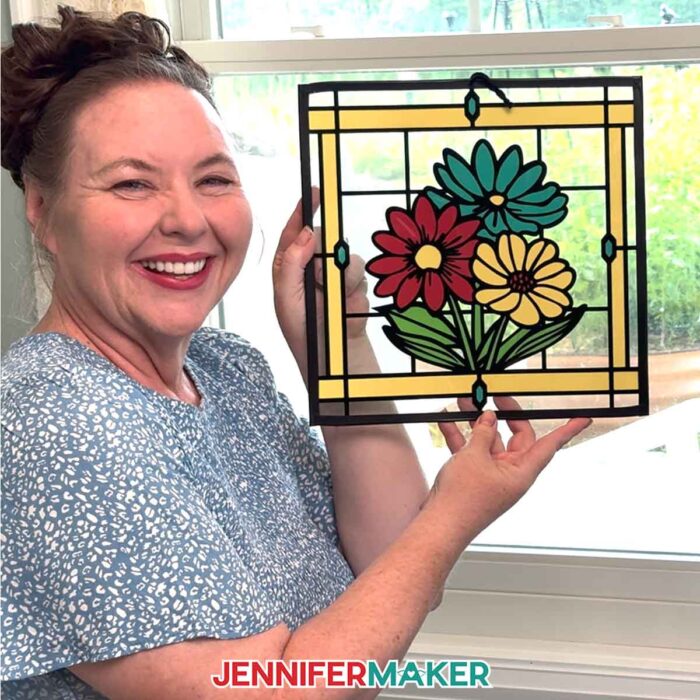
STEP 4: SHOW IT OFF
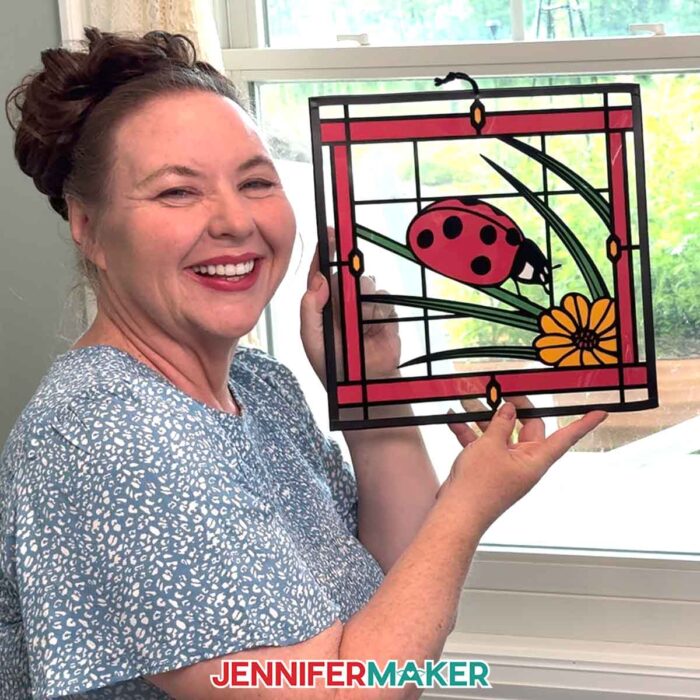
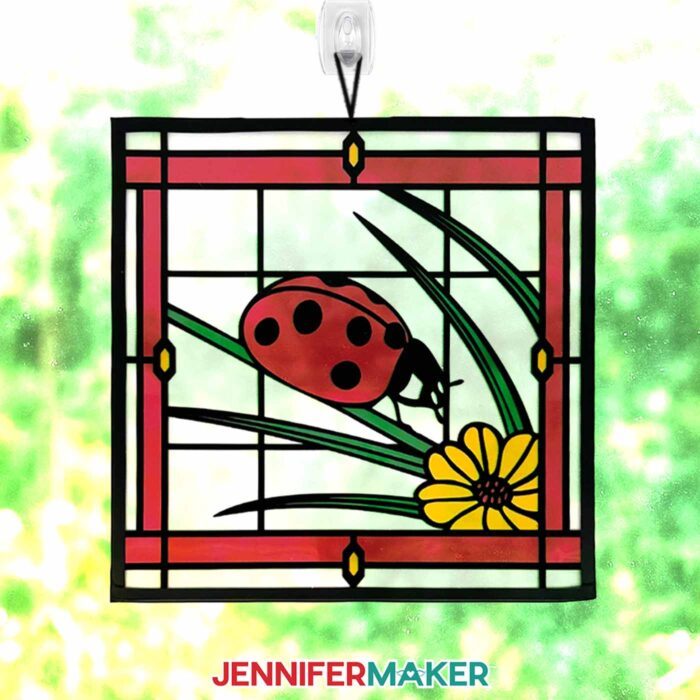
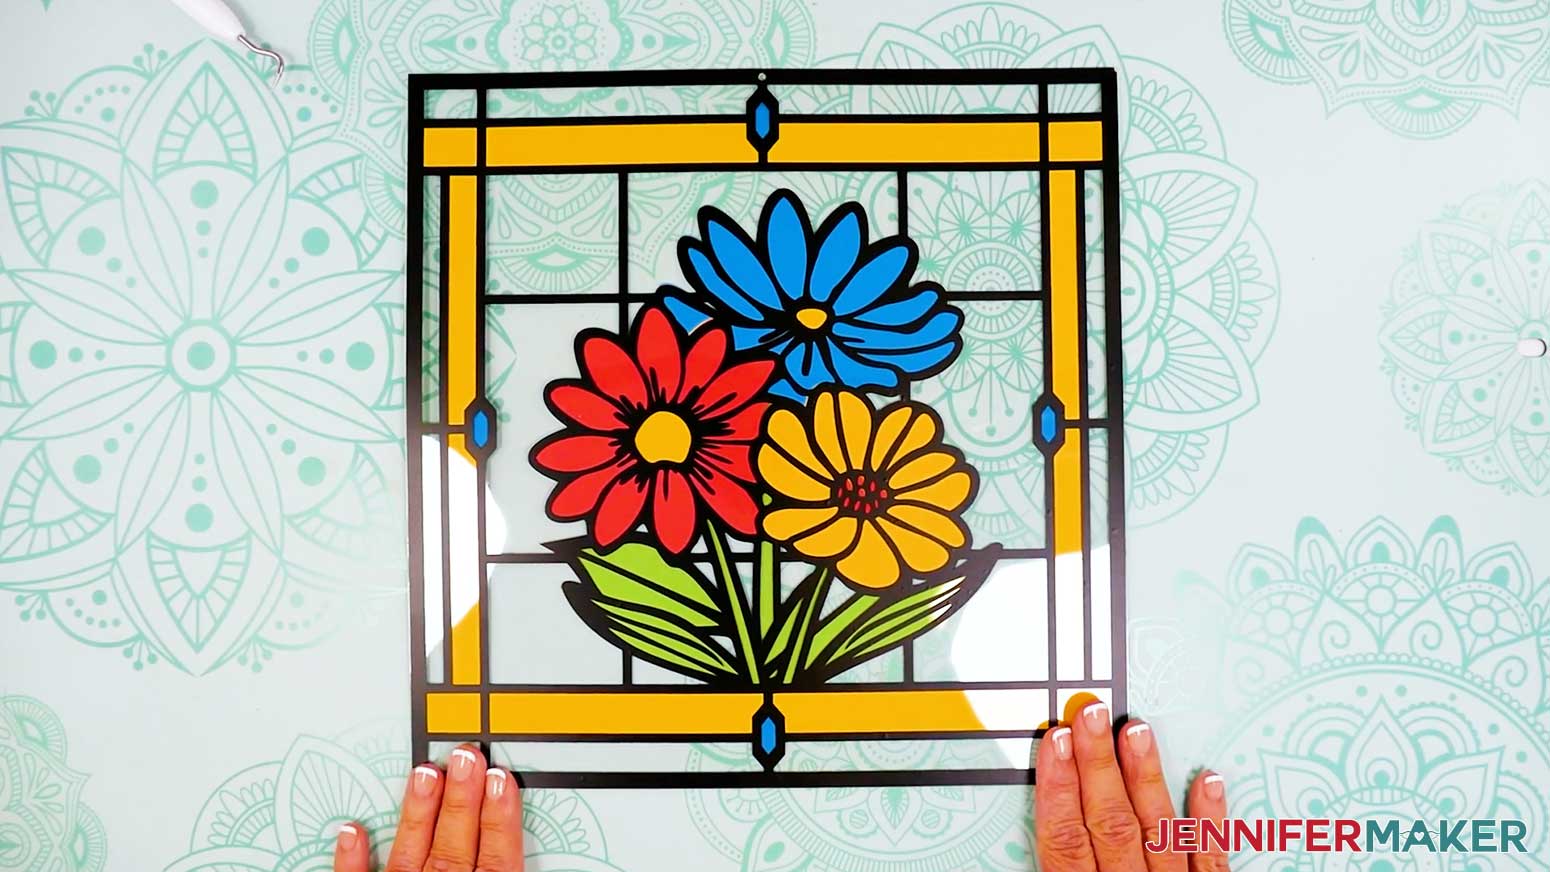
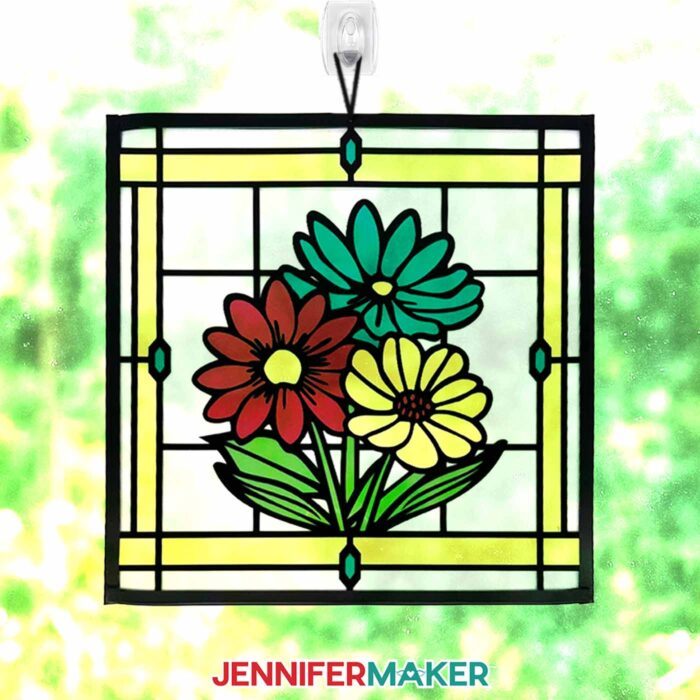
You now have impressive stained glass wall decor made from cardstock, acetate, and vinyl! Hang it in a sunny spot to get the full effect!
BONUS: MAKE YOUR STAINED GLASS TWO-SIDED
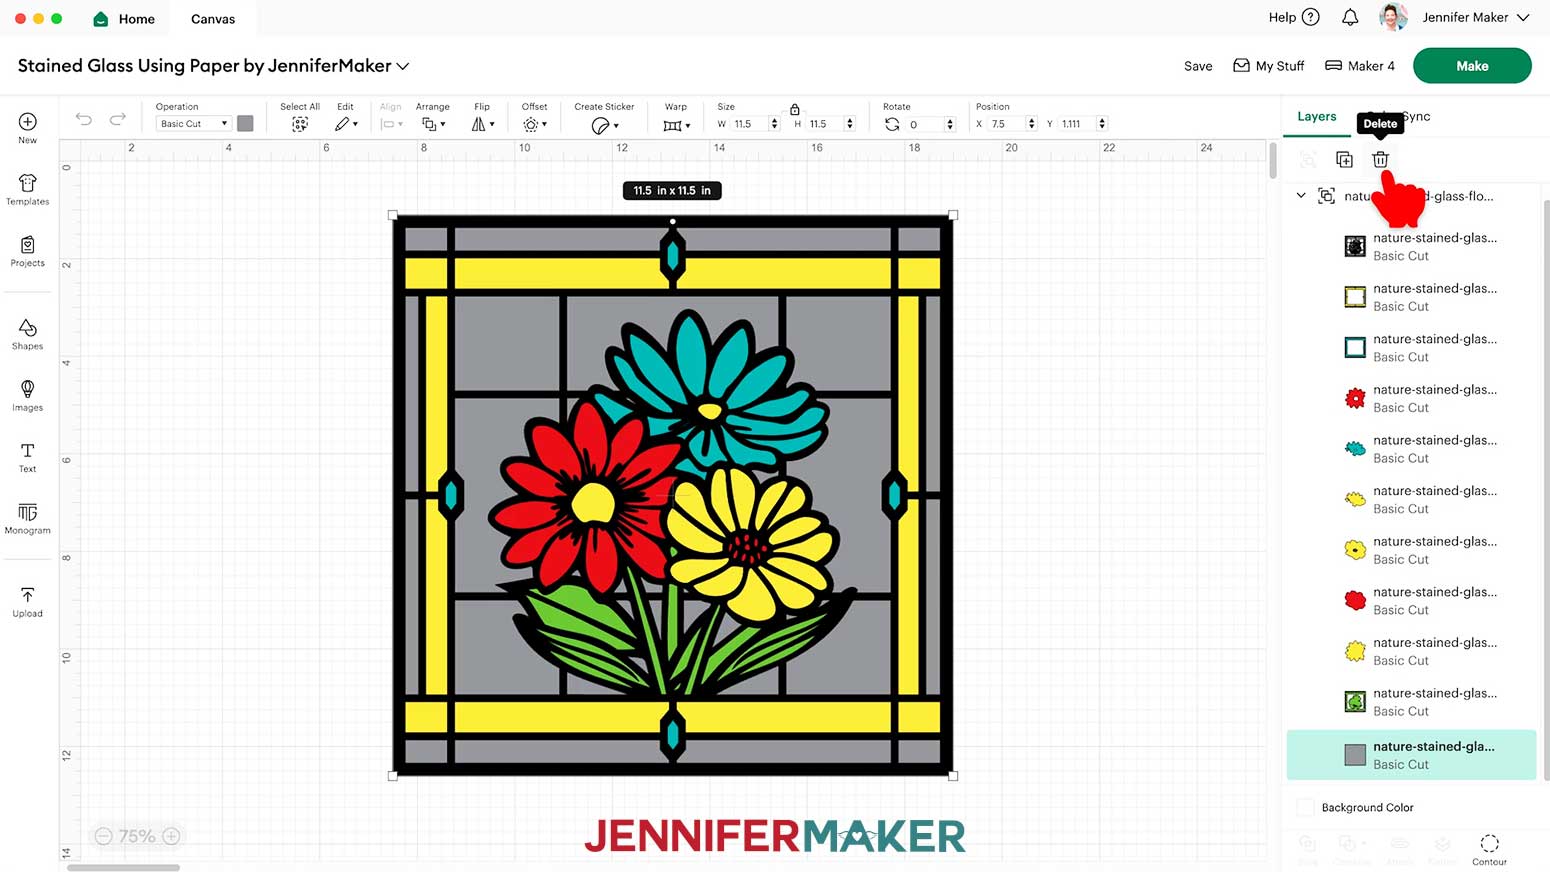
- If you'd like to make your stained glass project two-sided so it looks more like traditional stained glass, start with the design open in Cricut Design Space.
- In the Layers Panel, click the small arrow to expand the group's layers.
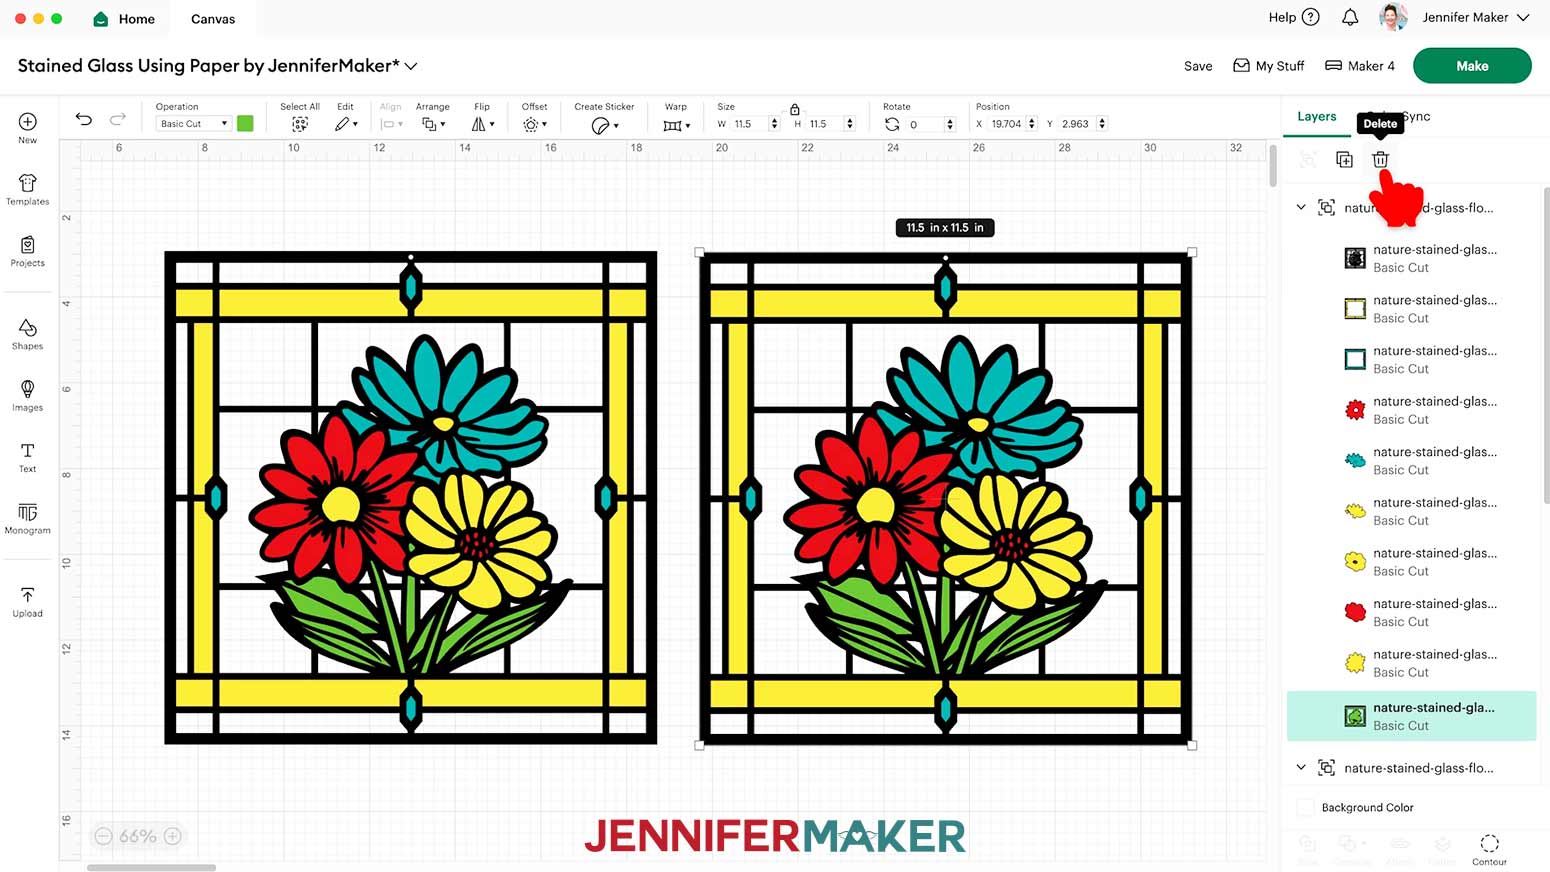
- Select the gray acetate layer and click the "Trash" icon to delete it.
- Select the top layer of the group so the entire group is selected, then click the "Duplicate" icon to make a copy of it.
- Select and delete the bottom frame layer from the duplicate group.
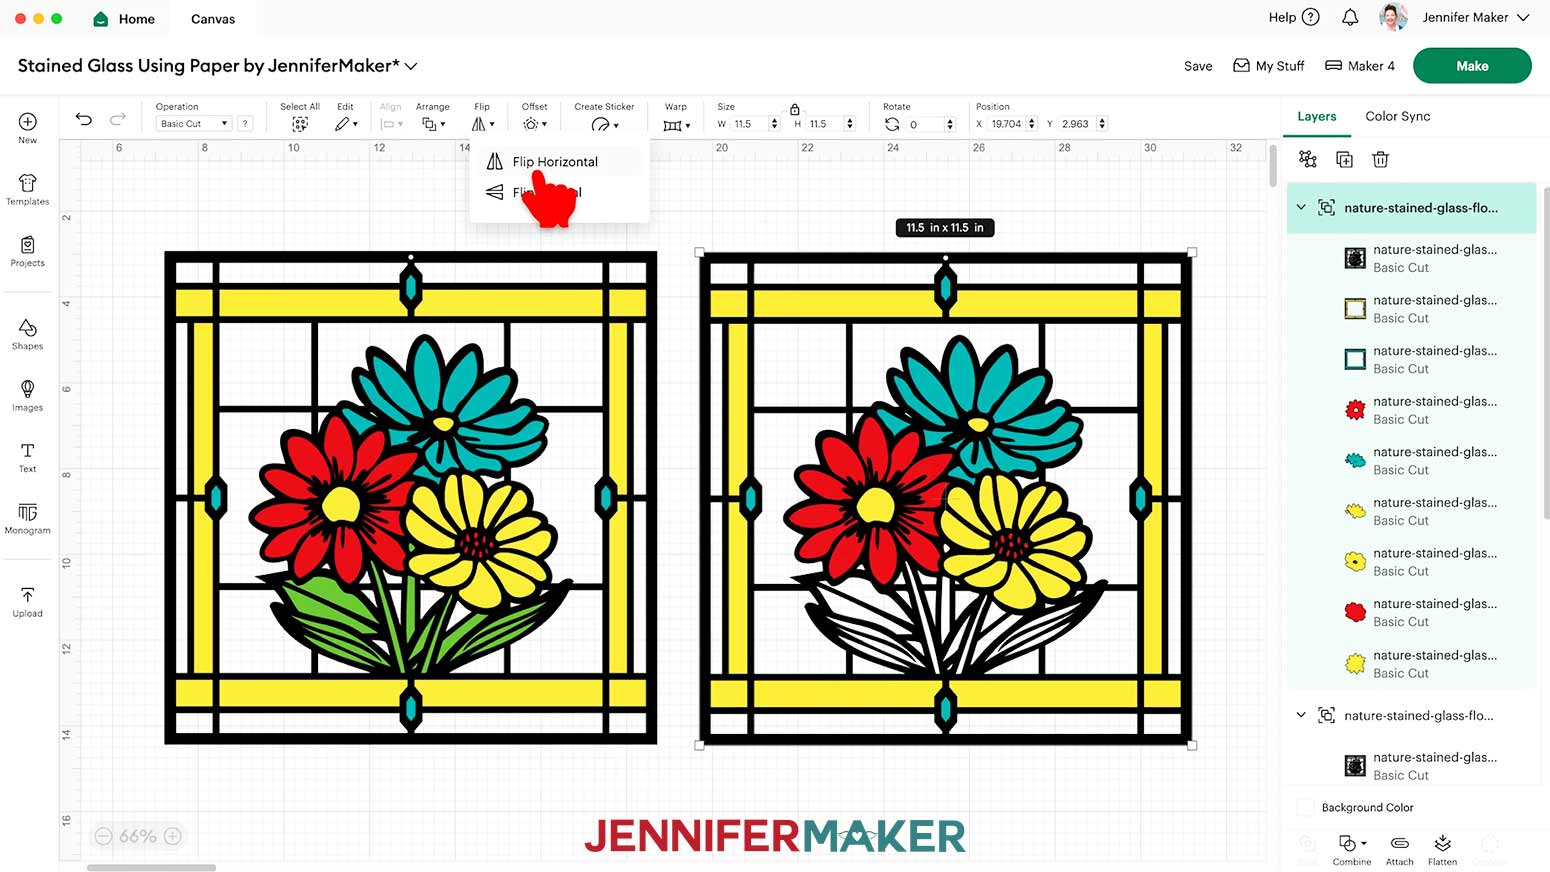
- Select the duplicate group and click "Flip" and "Flip Horizontal" to create a mirror image of the pieces for the back side.
- "Ungroup" both groups and use the Color Box to change any pieces to match the material being used as needed.
- Then follow the instructions from the "CUTTING & WEEDING" section of "STEP 2" to cut your pieces.
- Follow the steps from the "APPLY THE VINYL TO YOUR FRONT ACETATE LAYER" section of "STEP 3" to add the black vinyl outlines to your back acetate layer.
- Next, follow the steps from the "GLUE YOUR CARDSTOCK PIECES AND FRAMES" section of "STEP 3" to assemble the front-facing cardstock layers, then flip your project and follow the same directions to assemble the back-facing layers.
- Then follow the steps from the "LAYER YOUR ACETATE AND CARDSTOCK PIECES" section of "STEP 3" to glue your acetate layers to the cardstock and finish your project.
NOTE: Your back acetate sheet will have black outlines that match the back-facing cardstock layers.
Notes
Finished Size: 11.5” x 11.5” for all designs
Care: Wipe clean with a soft, dry cloth
Answers to Your Questions About Making Paper Stained Glass Projects
Q: I want to design a paper stained glass project that looks the same on both sides. Can I do that?
A: You can learn how to design a custom double-sided paper, vinyl, and acetate stained glass window in my ADVANCE program. Learn more about ADVANCE here!
Q: Can you show me how to make paper into stained glass?
A: Absolutely! My full step-by-step video tutorial above shows you exactly how to turn simple materials like cardstock, vinyl, and acetate into stunning stained glass-style art using your Cricut. It’s easy, beginner-friendly, and so much fun to make. Scroll up for my written tutorial with photos, too!
Q: What paper do you use for stained glass patterns with Cricut?
A: There are different ways to achieve similar effects, but I used 65 lb. weight cardstock in vibrant colors to create the stained glass effect. The “Medium Cardstock” setting with “More” Pressure works great for clean cuts.
Q: Is it possible to make stained glass without lead?
A: Yes, definitely! This project is a perfect example of how you can achieve that classic stained glass window look without using any lead or glass at all. Instead of lead solder lines, we use black adhesive vinyl to create bold outlines that look a lot like the real thing.
Q: What kind of vinyl do I use for this project?
A: I used permanent adhesive vinyl in black to mimic the traditional lead solder lines on my paper stained glass windows.
Q: How do I attach the pieces together?
A: You’ll use craft glue to layer your cardstock pieces, and then sandwich them between two acetate sheets. Black finishing tape seals the edges, and a bit of string or yarn lets you hang your creation in a window!
Q: Can I resize the designs?
A: Yes you can, just make sure they fit on your cutting machine mat and that you have material big enough. Don’t size them down too tiny or they’ll be hard for your Cricut to cut cleanly, especially the delicate details. I managed to make a set using my Cricut Joy with. a lot of patience and careful weeding!
Q: Can I sell paper stained glass crafts that I make?
A: I love supporting creative entrepreneurs! If you want to use my designs and projects for commercial use, please familiarize yourself with my important licensing information before selling your crafts.
I do not permit sale of my digital items, but you can sell the creative goods you make with them — as long as you follow my licensing requirements. That means you cannot sell the stained glass SVG, PDF, or DXF files, but you can sell crafts that you made with the files within the guidelines linked above.
Get my free Stained Glass Using Paper SVG designs!
(If you do not see the signup form above, click here.)
I love seeing what you make with my tutorials and how you customize them! Please share a photo of your stained glass using paper in our Facebook group or tag me on social media with #jennifermaker.
Love,

Want to remember this? Save this Stained Glass Using Paper tutorial to your favorite Pinterest Board!