Learn how to draw and cut a stacked calendar SVG with your cutting machine!
I love creating one of a kind items that I can use in my every day life. We know Cricut machines are powerful tools that can perform a whole host of crafty tricks — but did you know that they can cut and draw, too? I’ll show how with my stacked calendar SVG designs! Useful, handmade pieces like these are one of my favorite parts of crafting. Why buy it when you can make it!
Watch the full step-by-step video tutorial on making a stacked calendar:

Calendars are essential. We all need one to keep track of important dates, or even just remind ourselves what day it is! Maybe you want something simpler than a calendar app, or you want a colorful way to keep track of dates on your desk. A stacked calendar is a different style than your typical wall calendar, but it works basically the same way — one month is shown at a time, and when it’s time to begin a new one, just tuck the previous month to the back.

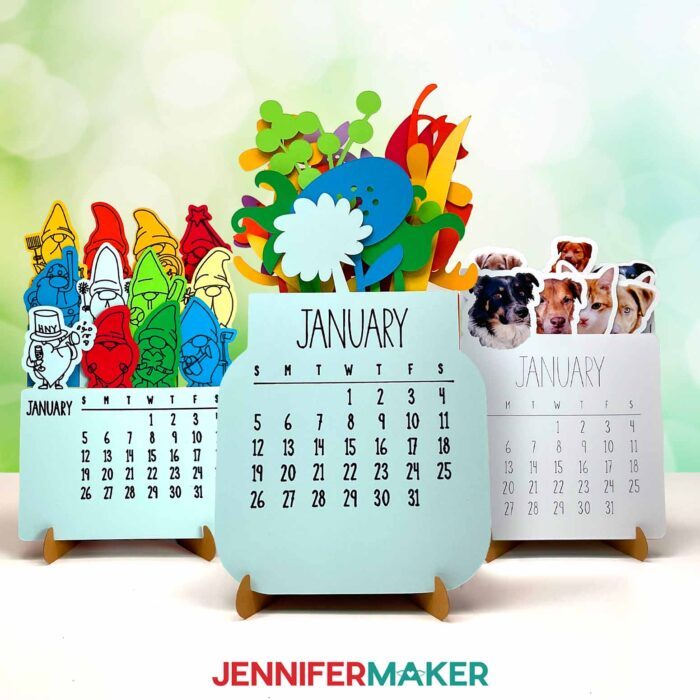
And yes, you can make one — or more! First, get my free download. I’ve included six stacked calendar SVG designs: There’s a gnome calendar for 2025, a Flower Vase calendar for 2025, as well as versions of both for any year. The versions for any year come with a every possible calendar template configuration that you might need to create a calendar for the future! And to make it even easier, I’ll show you how to make your Cricut do the writing.
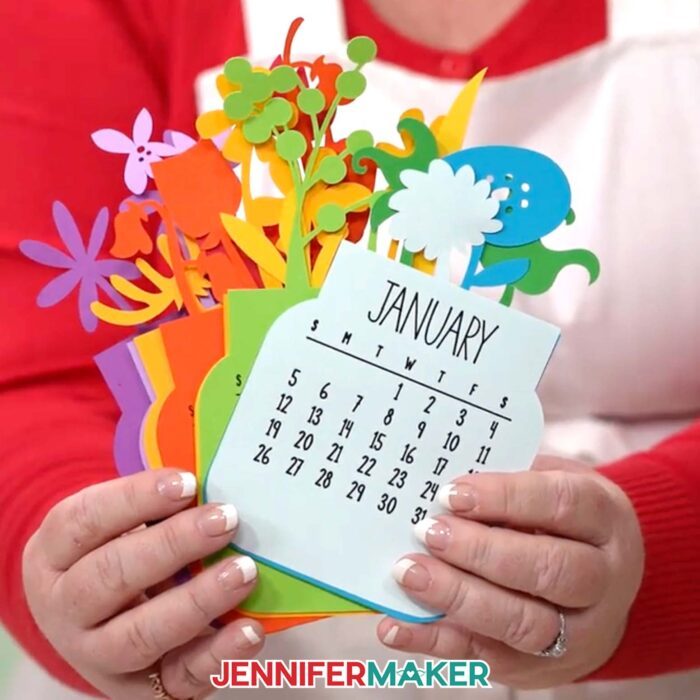
Have you noticed how cute the calendar pages are, too? The outer edges of the sides and bottom are straight, but the top of each month is fun and unique with different shapes cut from the cardstock. They look so cool when layered!
To create the stand for your calendar, there are two files: One with score lines that uses a scoring stylus or single scoring wheel to create the foldable creases, and one no-score version that uses dashed cut lines to make the creases.
If your cutting machine uses DXF files, I’ve got you covered there, too! You can also use the included PDF files so you can cut them by hand, but it’s much more fun to sit back and watch as your cutting machine does all of the hard work.
We’ll cut the stand from Kraft board and the calendar month pieces from colorful 65 pound cardstock. You don’t need to use a white background for your calendar, but I do recommend you use cardstock that is light enough to show the Cricut pen once the calendar is drawn on.

I’ll demonstrate how to cut the stacked calendar SVG pieces with my Cricut Maker 3, but you can also use an original Cricut Maker, a Cricut Explore series machine, the Cricut Venture, the Cricut Joy, or the Cricut Joy Xtra.
You’ll need some basic Cricut paper crafting supplies like a green StandardGrip machine mat to cut your cardstock. A spatula can be handy to remove the delicate pieces from the mat, and a scraper tool is so useful for removing any leftover bits that stay behind. I have a full list of tools and craft supplies you’ll need to make it below, along with links where to find them!
I recommend taking extraordinary care when attaching the cardstock to the mat — adhering it well and using a brayer to make sure it’s securely attached can ensure nice, clean results on the intricate cuts at the top of each calendar page.
You’ll never miss an important date again with my stacked calendar SVG designs! I can’t wait to see how yours turn out!
Let me show you how to make a stacked calendar! This post contains some affiliate links for your convenience (which means if you make a purchase after clicking a link I will earn a small commission but it won’t cost you a penny more, there is no additional cost)! Read my full disclosure policy.
Materials to Make A Stacked Calendar
View my Amazon shopping list for the exact items I used!
- Several Sheets of 8.5”x11″ or 12″ x 12″ 65 lb. Cardstock
- One (1) Sheet of 22-point Chip Board (for the stand)
- A way to cut your materials – I’m using the Cricut Maker 3 but you could also use the Cricut Maker, an Explore Series machine, a Venture, the Cricut Joy Xtra, or even a Cricut Joy.
- Cricut StandardGrip Machine Mat 12” x 12”
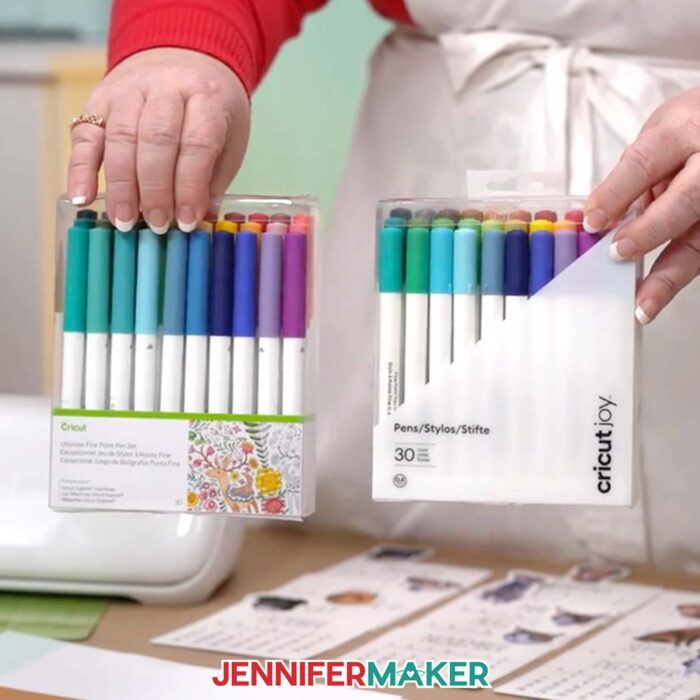
- Cricut Maker and Explore-Compatible Pens
- Scoring Stylus (optional for files with score lines) -OR-
- Single Scoring Wheel (optional for files with score lines)
- Spatula
- Scraper
- Weeding Tool (for popping out small pieces from intricate areas)
- Tweezers (optional)
- Bearly Art Glue
Cricut Joy users:

How to Make a Stacked Calendar!

Stacked Calendar
Learn how to make a stacked calendar and stand!
Materials
- Several Sheets of 12" x 12" 65 lb. Cardstock
- One (1) Sheet of 8.5" x 11" 110 lb. Cardstock (for the stand)
- Design #685 (My free SVG/DXF/PDF design files are available in my free resource library – get the password by filling out the form at the bottom of this page)
Tools
- A way to cut your cardstock - I’m using the Cricut Maker 3, but you can also use the Cricut Maker, a Cricut Explore Series machine, the Cricut Venture, or even the Cricut Joy Xtra.
- Cricut Maker and Explore-Compatible Pens
- Cricut Joy-Compatible Pens
- Cricut Green StandardGrip Machine Mat 12" x 12"
- Cricut Joy StandardGrip Machine Mat 4.5” x 12”
- Cricut Blue LightGrip Machine Mat 12” x 12” (for calibration)
- Scoring Stylus (optional for files with score lines)
- Single Scoring Wheel (optional for files with score lines)
- Brayer
- Spatula
- Scraper
- Weeding Tool (for popping out small pieces from intricate areas)
- Tweezers (optional)
- Bearly Art Glue
Instructions
STEP 1: GET MY FREE STACKED CALENDAR DESIGNS
First, download my Stacked Calendar SVG/PDF/DXF files from my free library – look for Design #685. Alternatively, you can use the Save This Project form near the top of this post and the design link will be emailed to you.
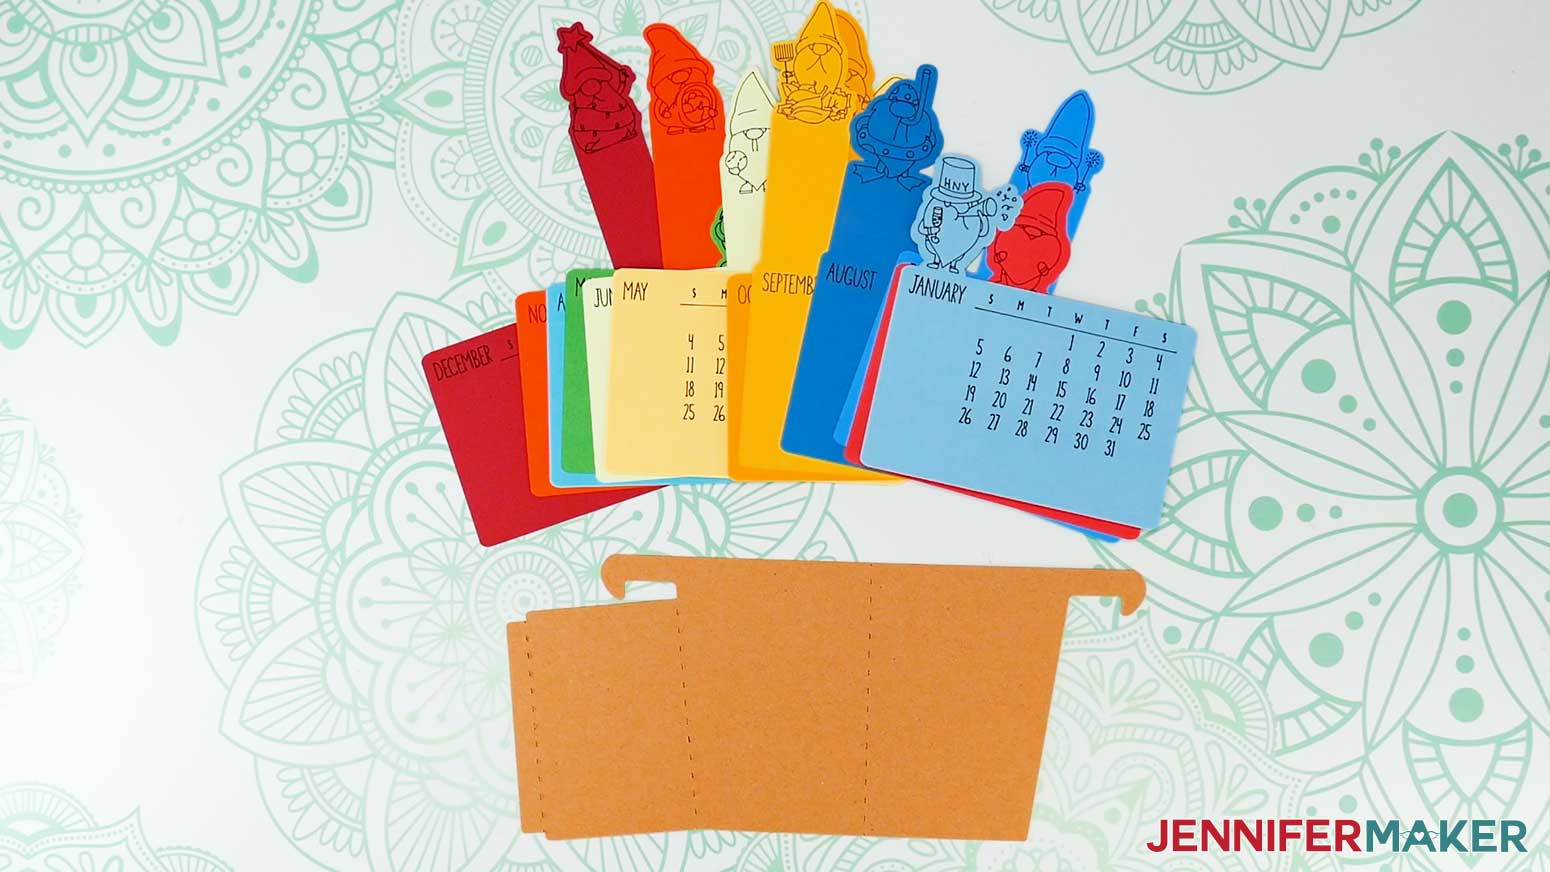
There are six total designs in the folder. Two are Gnome calendars (one blank, and one with dates), two Vase calendars (one blank, and one with dates), as well as score and no-score versions of the stands. There is also a DXF folder with cut files, and a PDF folder with versions you can print and cut by hand.
In this tutorial, I will show you how to prepare and assemble the blank Gnome Calendar and the no-score Stand, but you can also follow these steps to make the Vase Calendar.
Upload the SVG files you need to Cricut Design Space.
If you want to make the score version, follow the steps from my score tool tutorial to adjust your file.
TIP: If you’re not sure how to upload, go to jennifermaker.com/svgs to learn how to unzip and upload SVG files.
STEP 2: PREPARE THE STACKED CALENDAR AND STAND DESIGNS
CRICUT DESIGN SPACE
- Open Cricut Design Space and click “New Project.”
- Click “Upload” and then “Upload Image.”
- Click “Browse.”
- Select the file with “gnomes-blank” in the name.
- Click “Open.”
- On the Prepare to Upload screen, it will say “Cut image” with the design preview.
- Click “Upload.”
- Click “Upload Image” again.
- Click “Browse.”
- Select the file with “stand-noscore” in the name.
- Click “Open.”
- On the Prepare to Upload screen, it will say “Cut image” with the design preview.
- Find both designs in Recent Uploads and add them to the Canvas.

- Deselect both designs, then drag them apart on the Canvas.
- Hide the Stand for now.
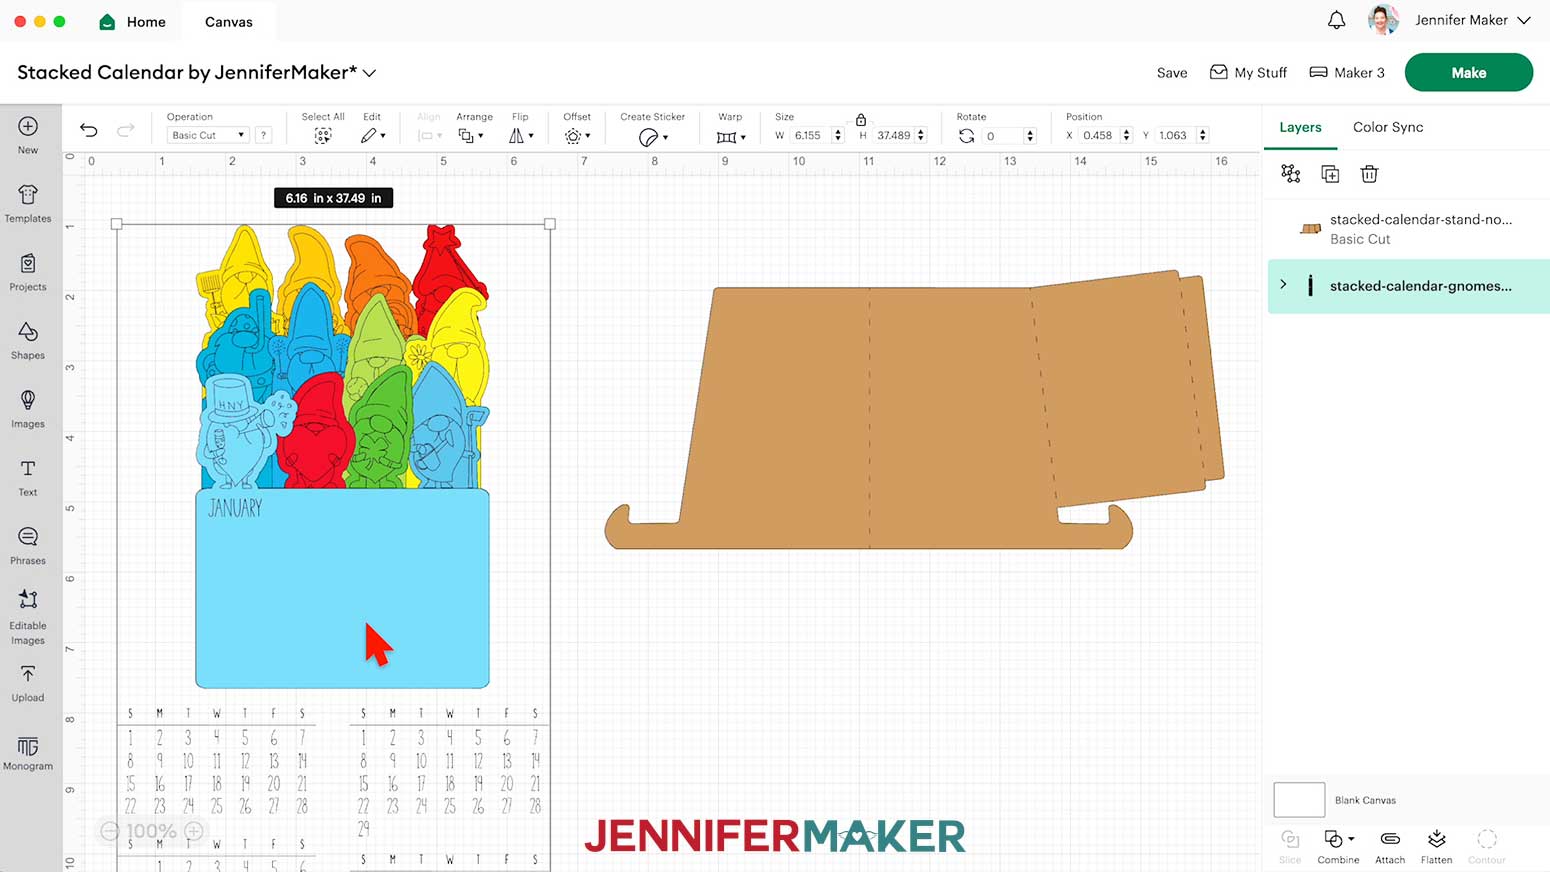
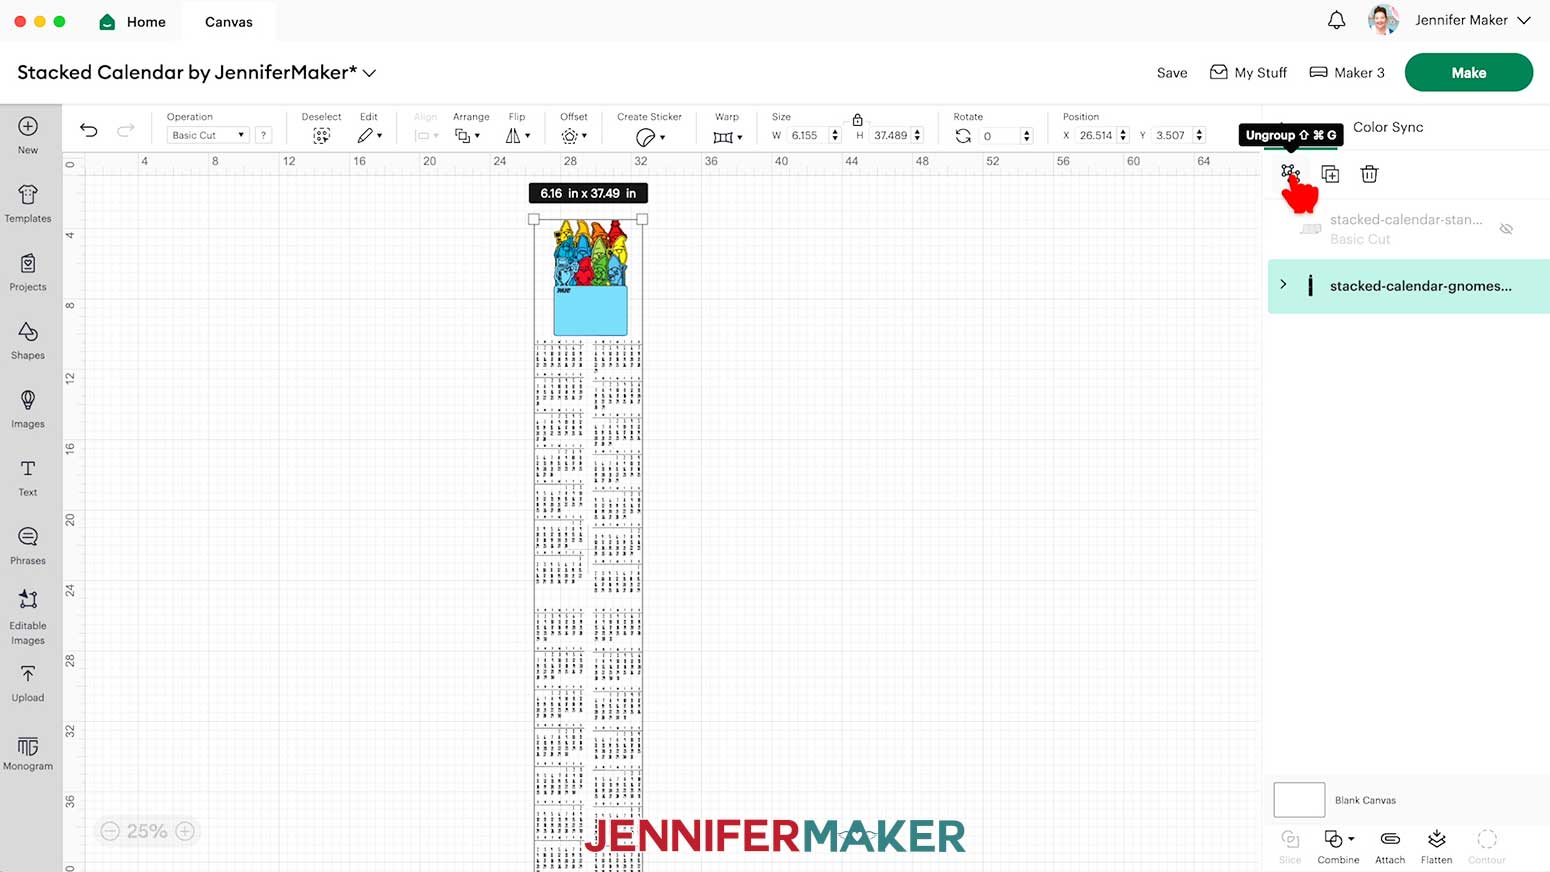
- Ungroup the calendar.
- Drag the January piece to the side. This will help to avoid selecting the other months by accident.
- Ungroup the January layers.
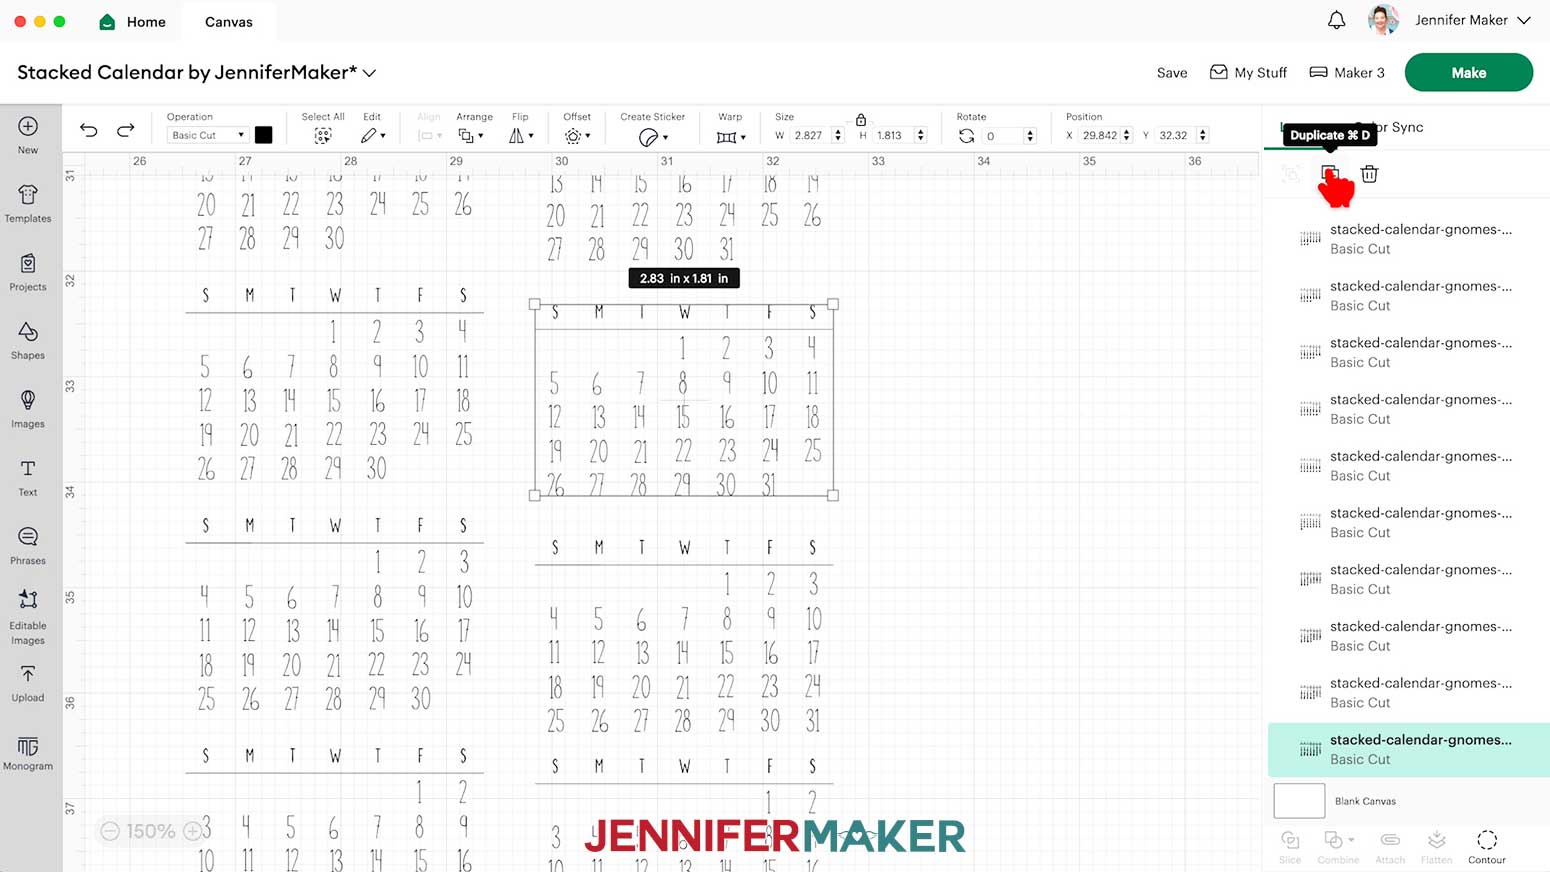
- If you’d like to change the color of the layer, click the colored layer and choose a color in the Color Box.
- Find the month grid that fits your January, and Duplicate it.
TIP: Use the calendar on your phone or computer to select the right month grid for your month and year. - Drag the duplicate into the empty rectangle on the January calendar layer.
- With the divider line under the days of the week lined up to the bottom of the month name, place the grid halfway between the month and the edge of the colored layer.
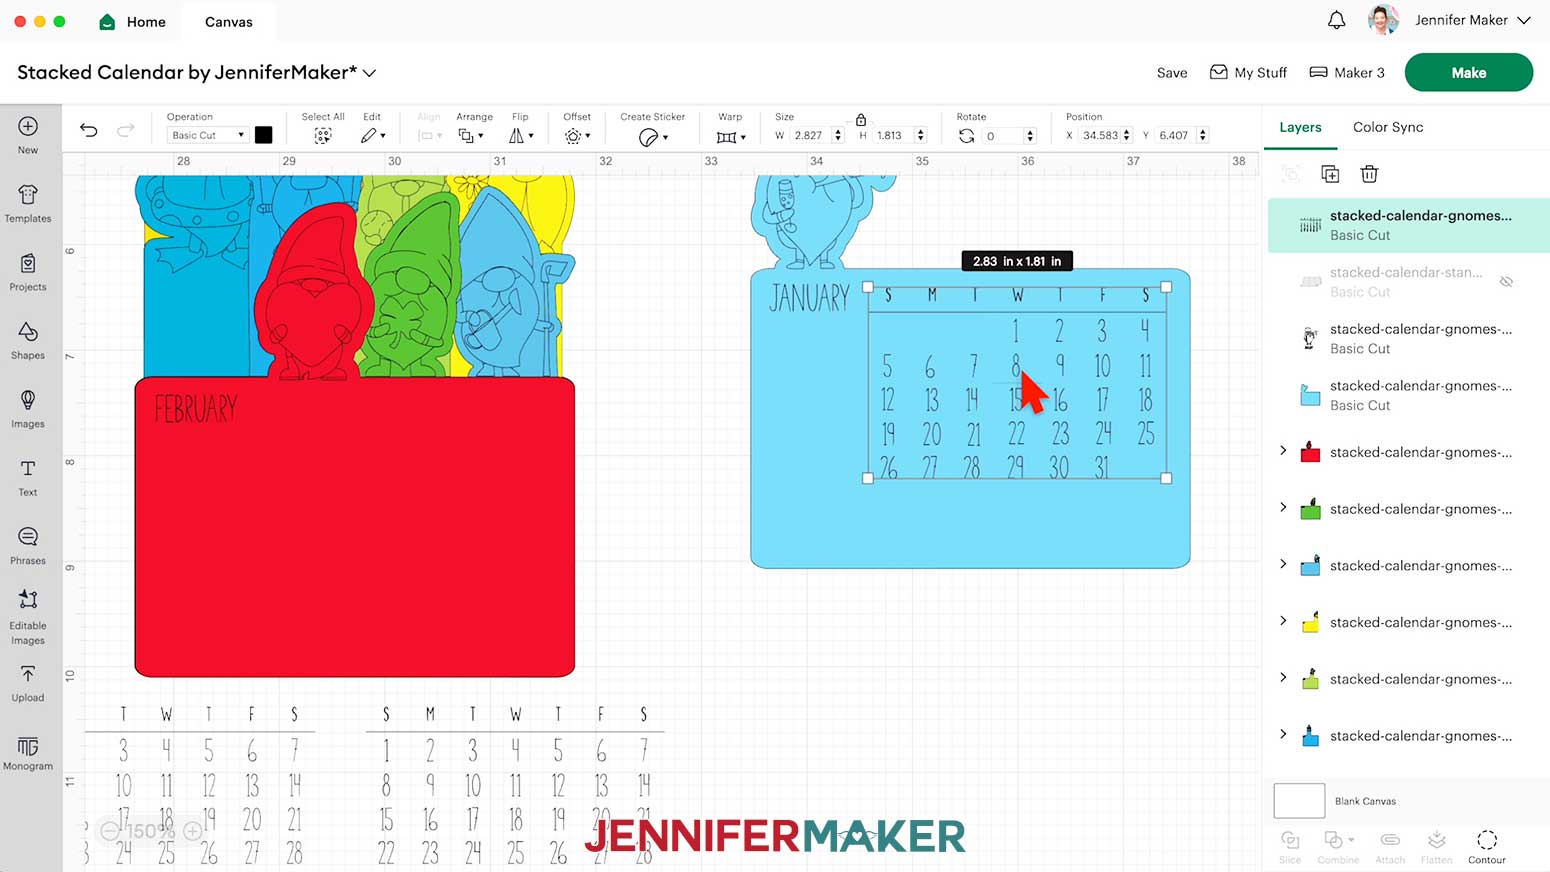
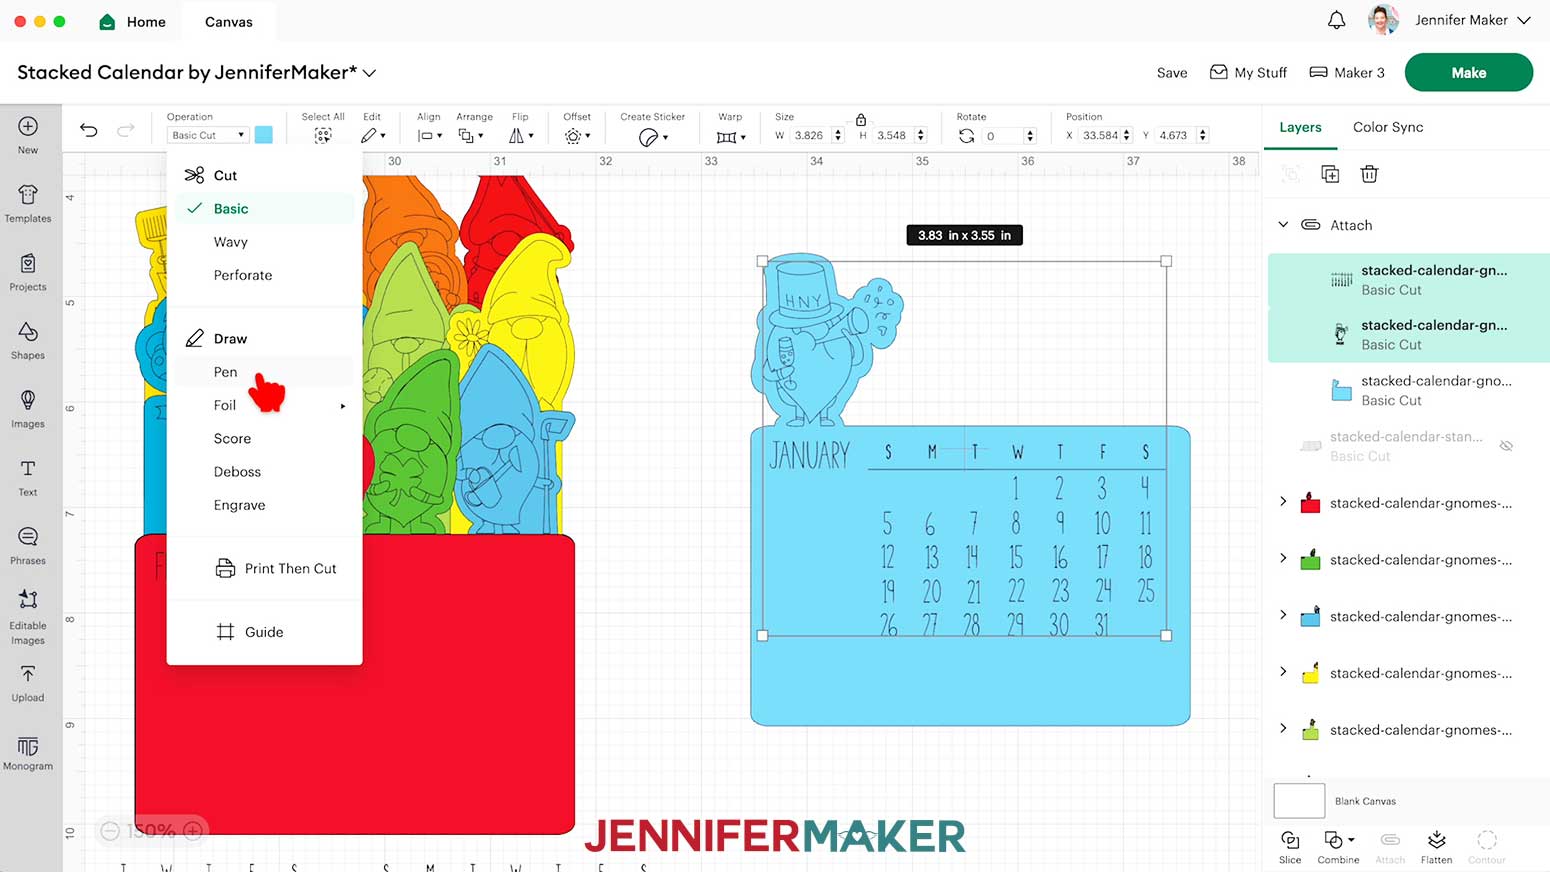
- Hold Shift and select the colored rectangle layer, the gnome, and the chosen month grid.
- Click Attach.
- Hold Shift and select the month grid and the gnome.
- Change the Operation to Pen.
- Click the box next to Operation to select the pen size and color. An Extra Fine Point (0.3mm) pen works best for the detailed designs and numbers.
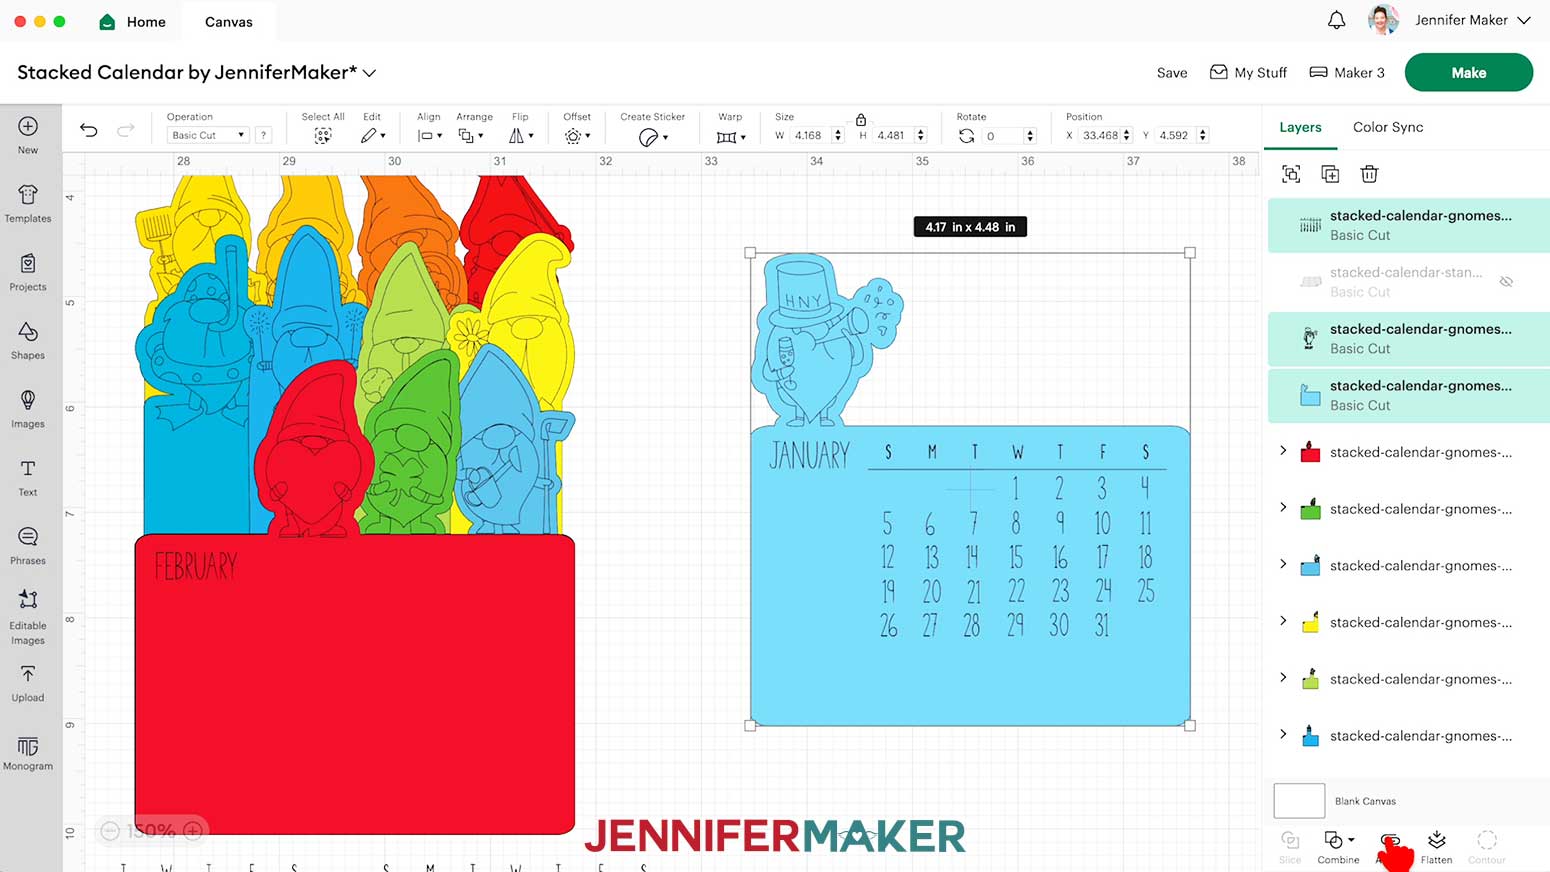
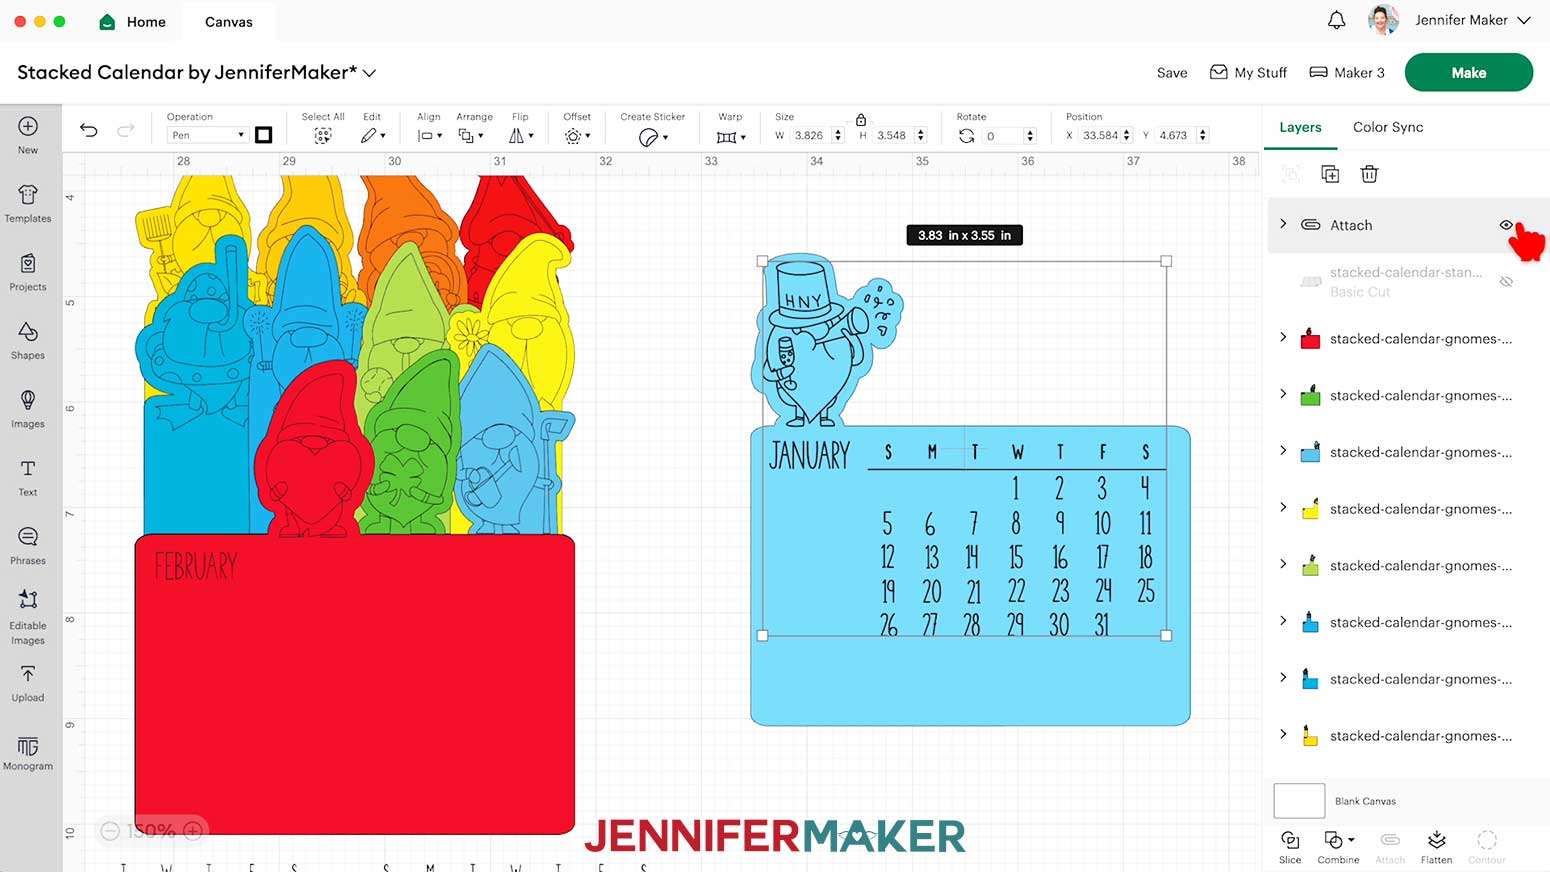
- Click the attached group in the Layers Panel and click the eye icon to hide it.
- Repeat steps 17-28 for the remaining months.
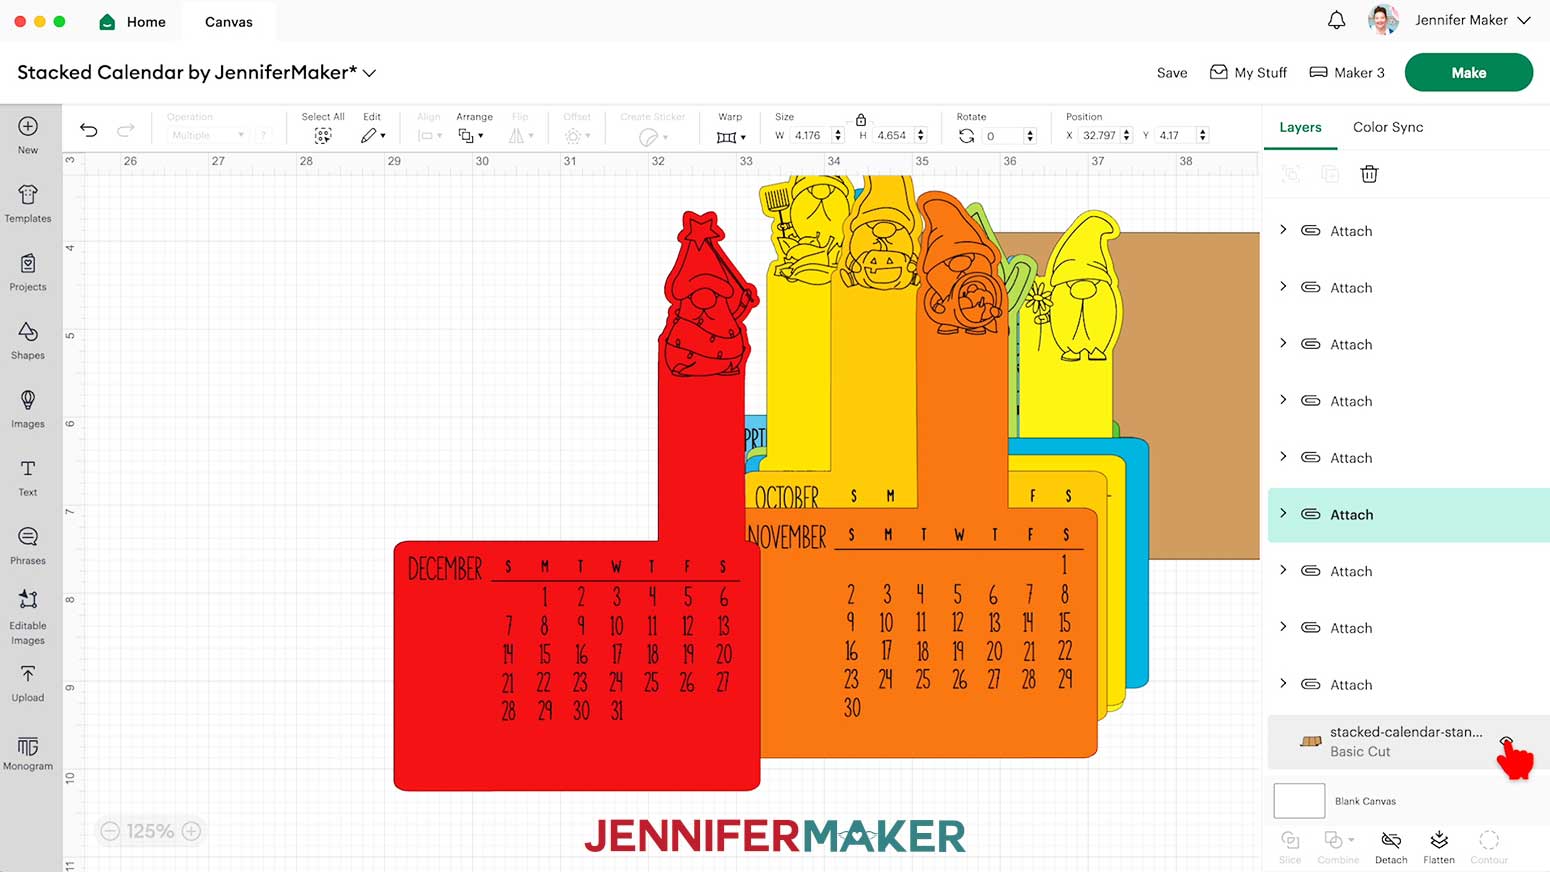
- Unhide the attached month layers, and the stand layer. If you’re cutting the “noscore” version, it’s ready to cut. If you’re cutting the “score” version, follow the steps from my score tool tutorial to adjust your file.
- Make sure the correct machine is selected in the top right.
- Click “Make.”
- If prompted, click “On Mat,” choose your mat size, and click “Confirm.”
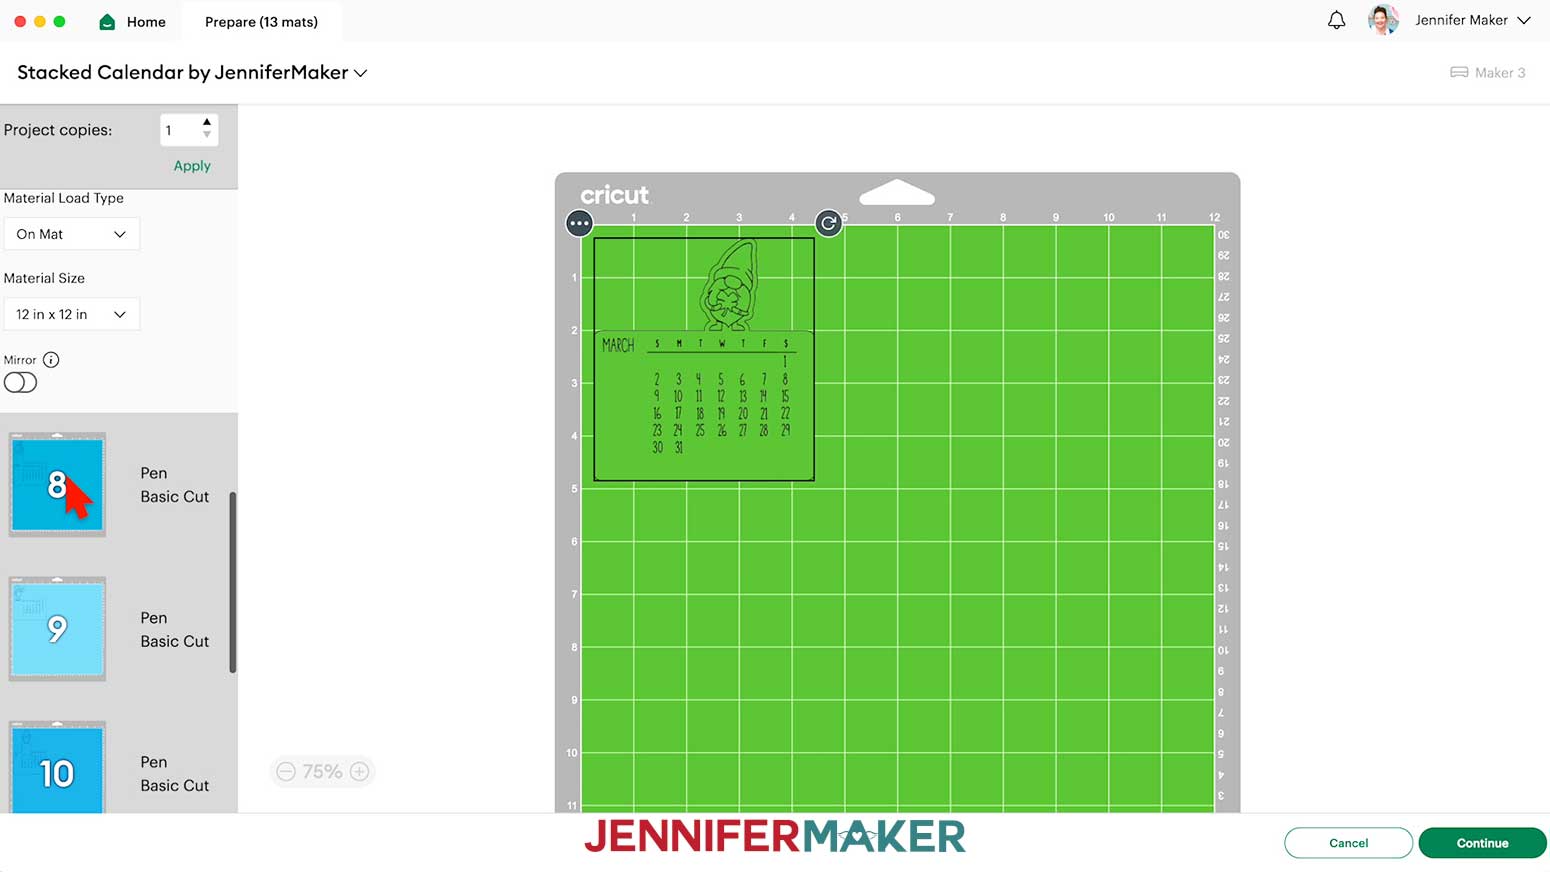
- On the Prepare screen, make sure the correct Material Size is selected for your materials.
- Select the first mat again and click “Continue.”

STEP 3: CUT THE STACKED CALENDAR AND STAND DESIGNS
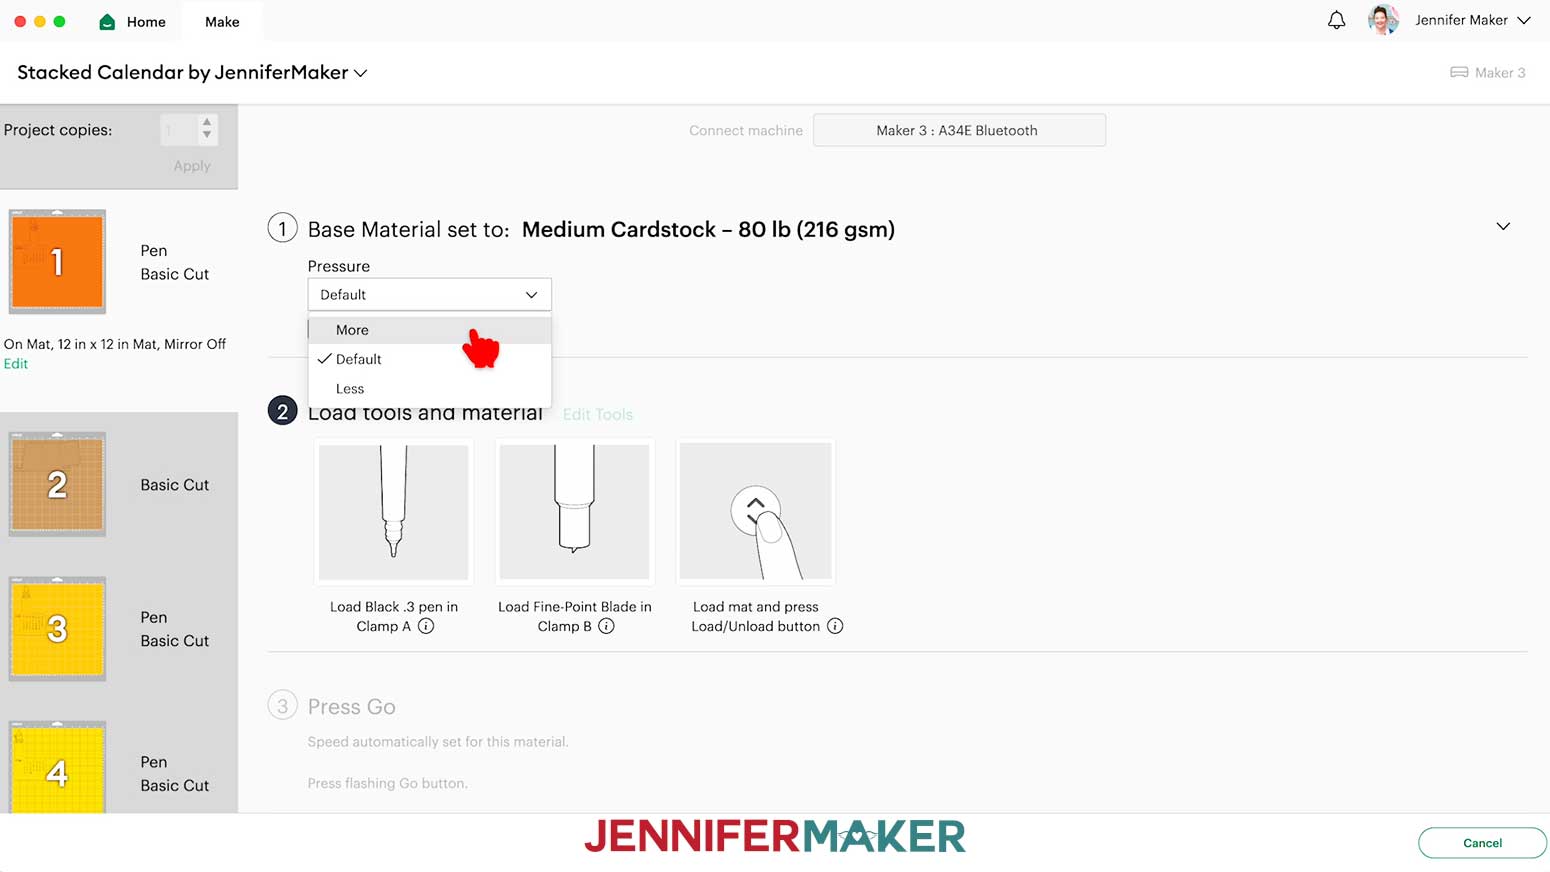
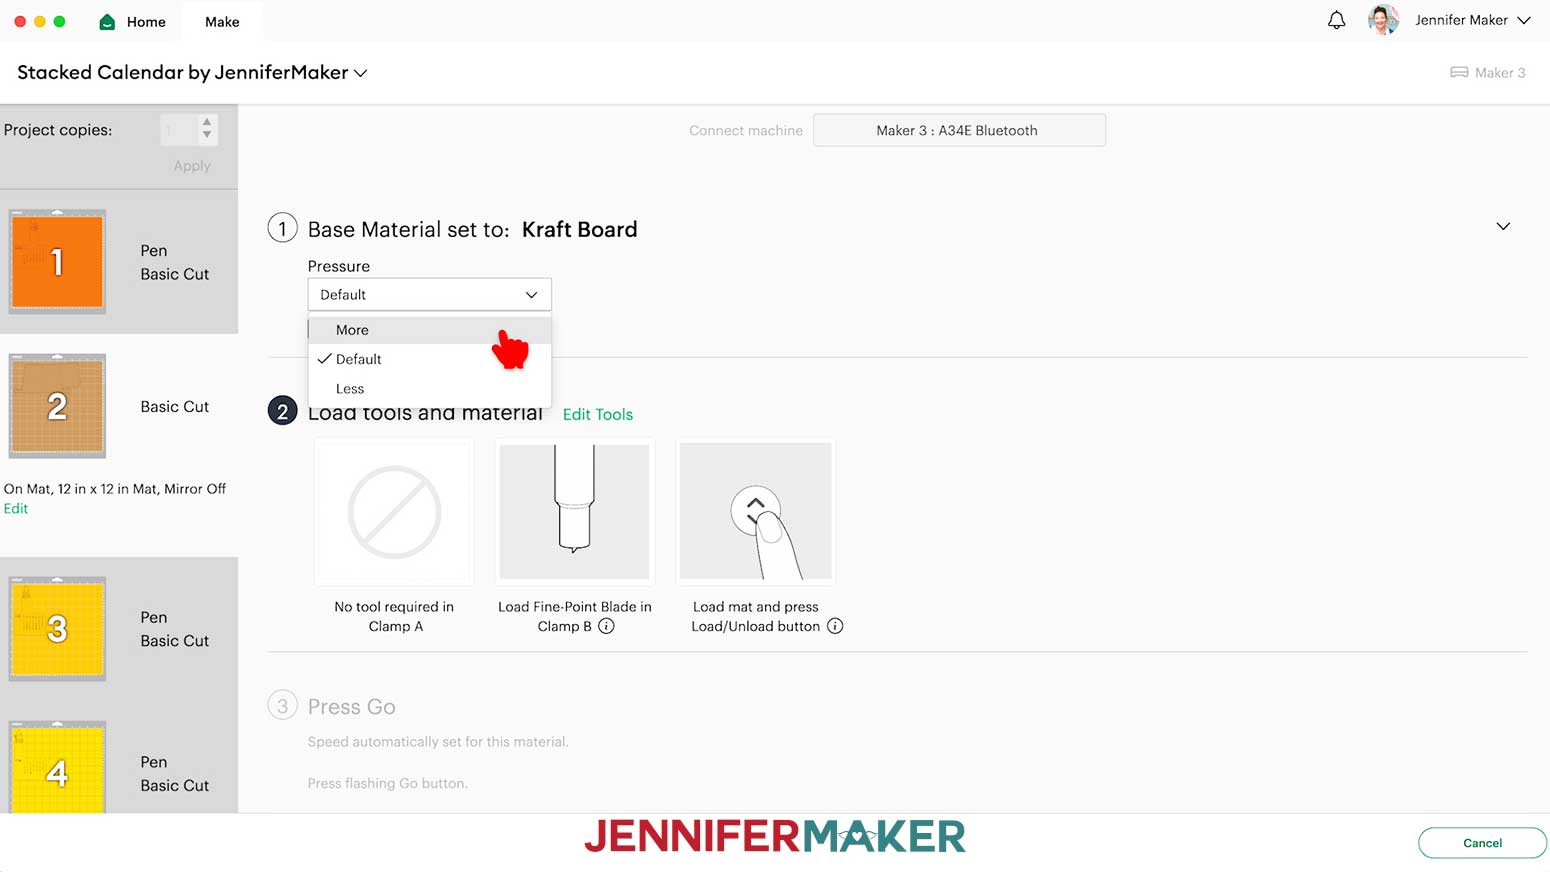
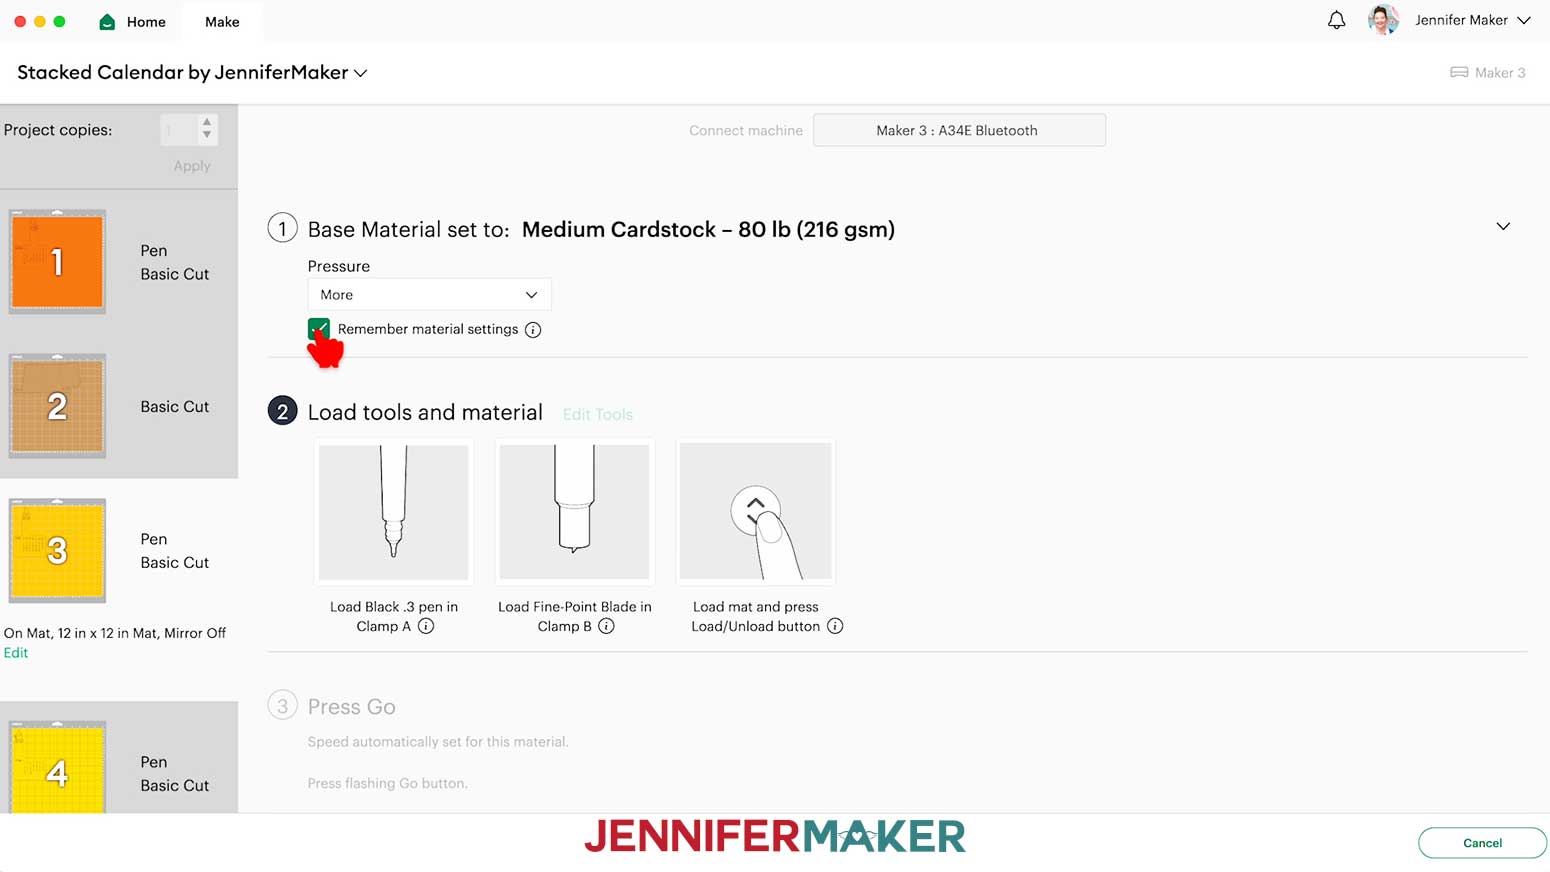
- On the Make screen, your mats will be in rainbow order. Set the Base Material for your mats. I used the following settings:
“Medium Cardstock - 80 lb (216 gsm)” setting with “More” Pressure for the calendar mats
“Kraft Board” setting with “More” Pressure for the stand mat
NOTE: If you didn’t change the colors of the Gnome calendar pieces, the calendar stand will be your second mat. If you did change the color of your calendar pieces, the calendar stand may be on a different mat. Be sure to set the correct Base Material for each mat. - Check that your Premium Fine-Point Blade is clean and in the correct clamp.
- Insert the pen you wish to use into the correct clamp.
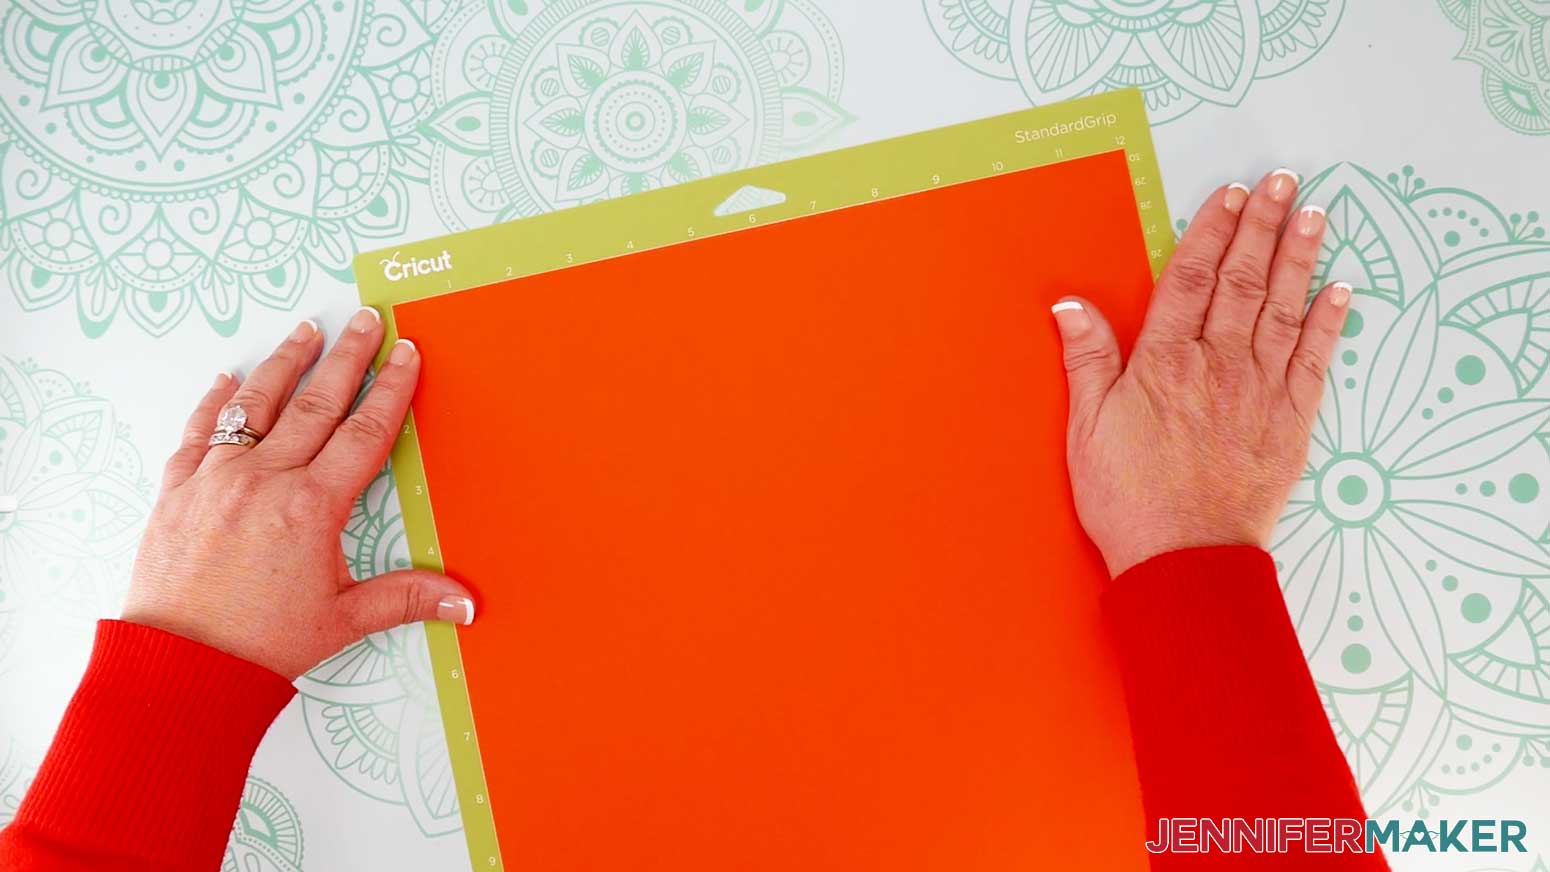
- Place your first mat’s material face up on a green StandardGrip machine mat.
- Use a brayer to make sure it’s fully adhered.
- Press the flashing “Load/Unload” button to load the prepared mat into your Cricut.
- Press the flashing “Go” button to begin cutting.
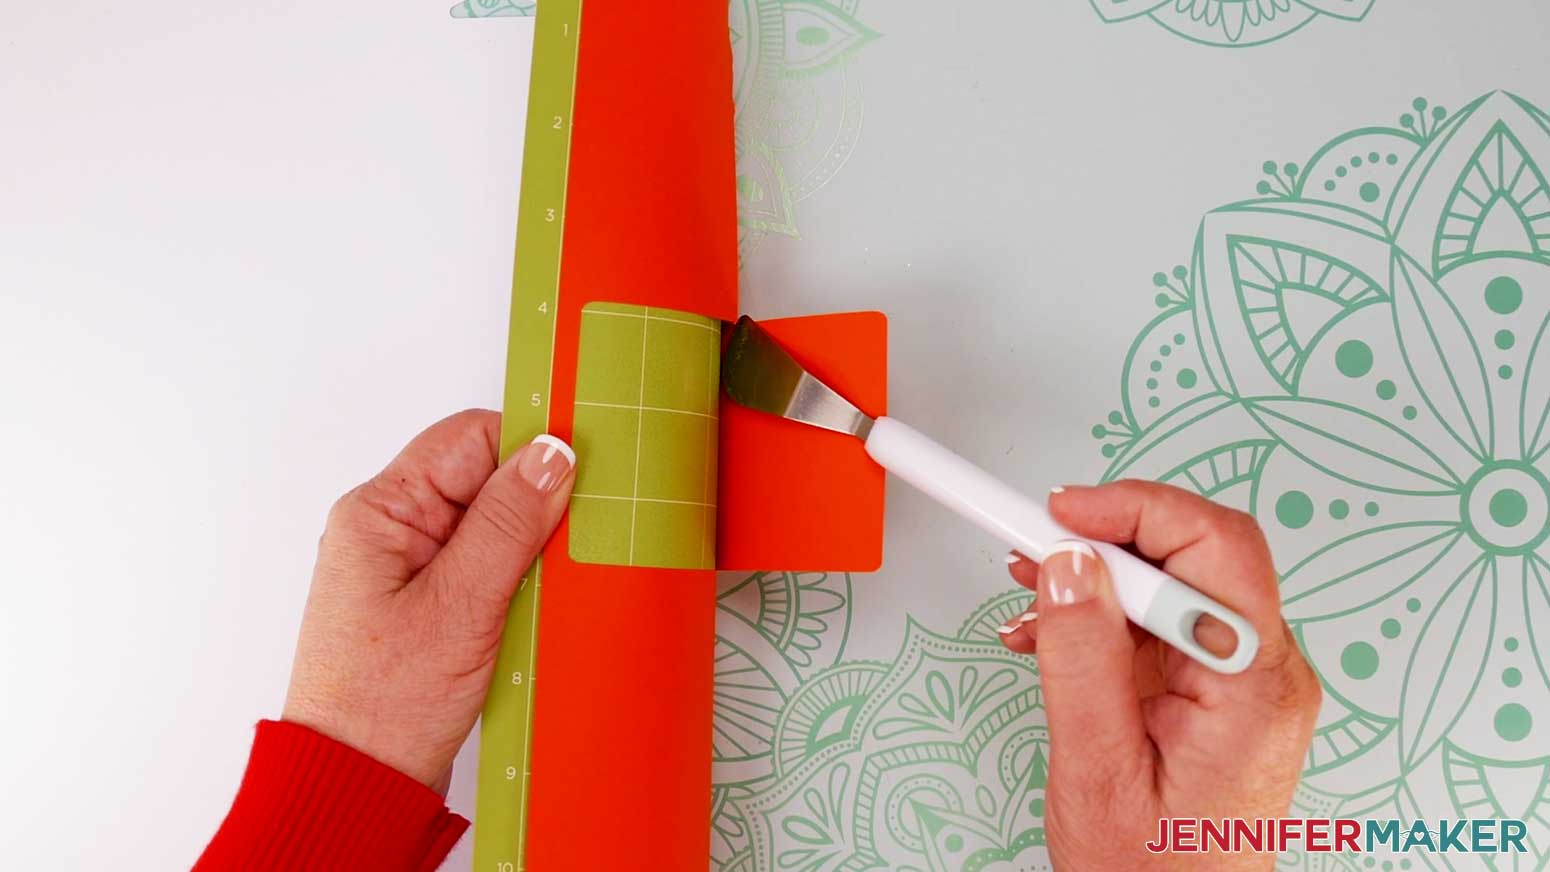
- When it has finished cutting, unload the mat, flip it over onto your work surface, and roll it back to release the material.
TIP: Use a spatula to carefully remove any intricate parts and a weeding tool to pop out any small pieces. If you have trouble with any of your cuts, check out my Cricut Tips & Tricks for Cleaner Cuts.
TIP: After you cut the stand, and after setting your next calendar mat to “Medium Cardstock” with “More” Pressure, you can check the box next to “Remember material settings” to apply those settings to the rest of your mats. - Repeat steps 4-8 for each additional mat.
- Here are what my cut calendar and stand pieces look like.
STEP 4: ASSEMBLE THE STACKED CALENDAR AND STAND
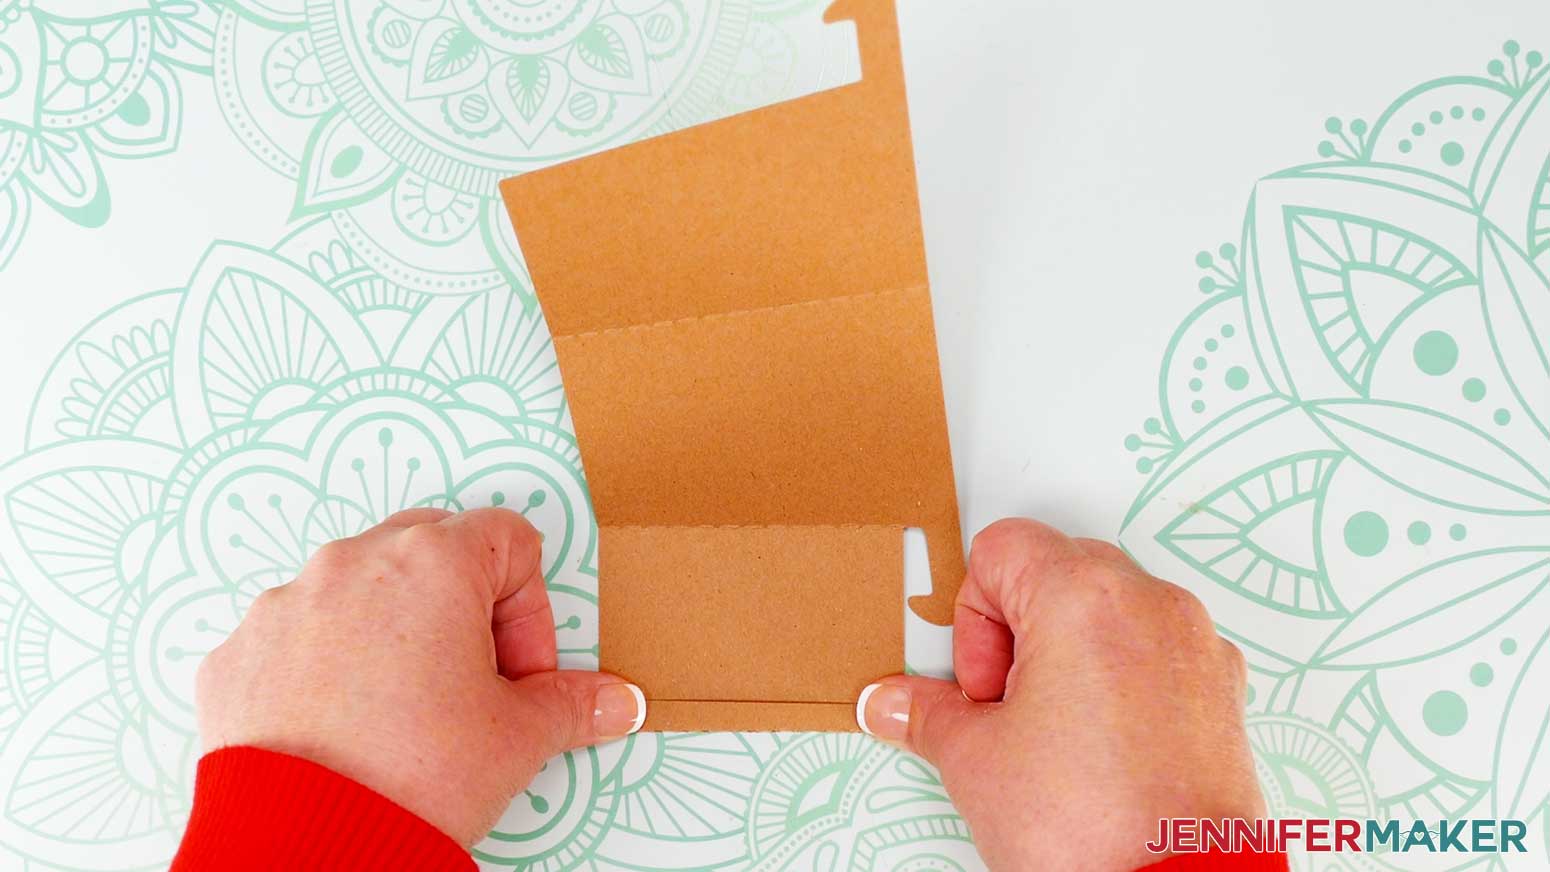
- On the stand, fold along the crease lines, all in the same direction, to create three panels.
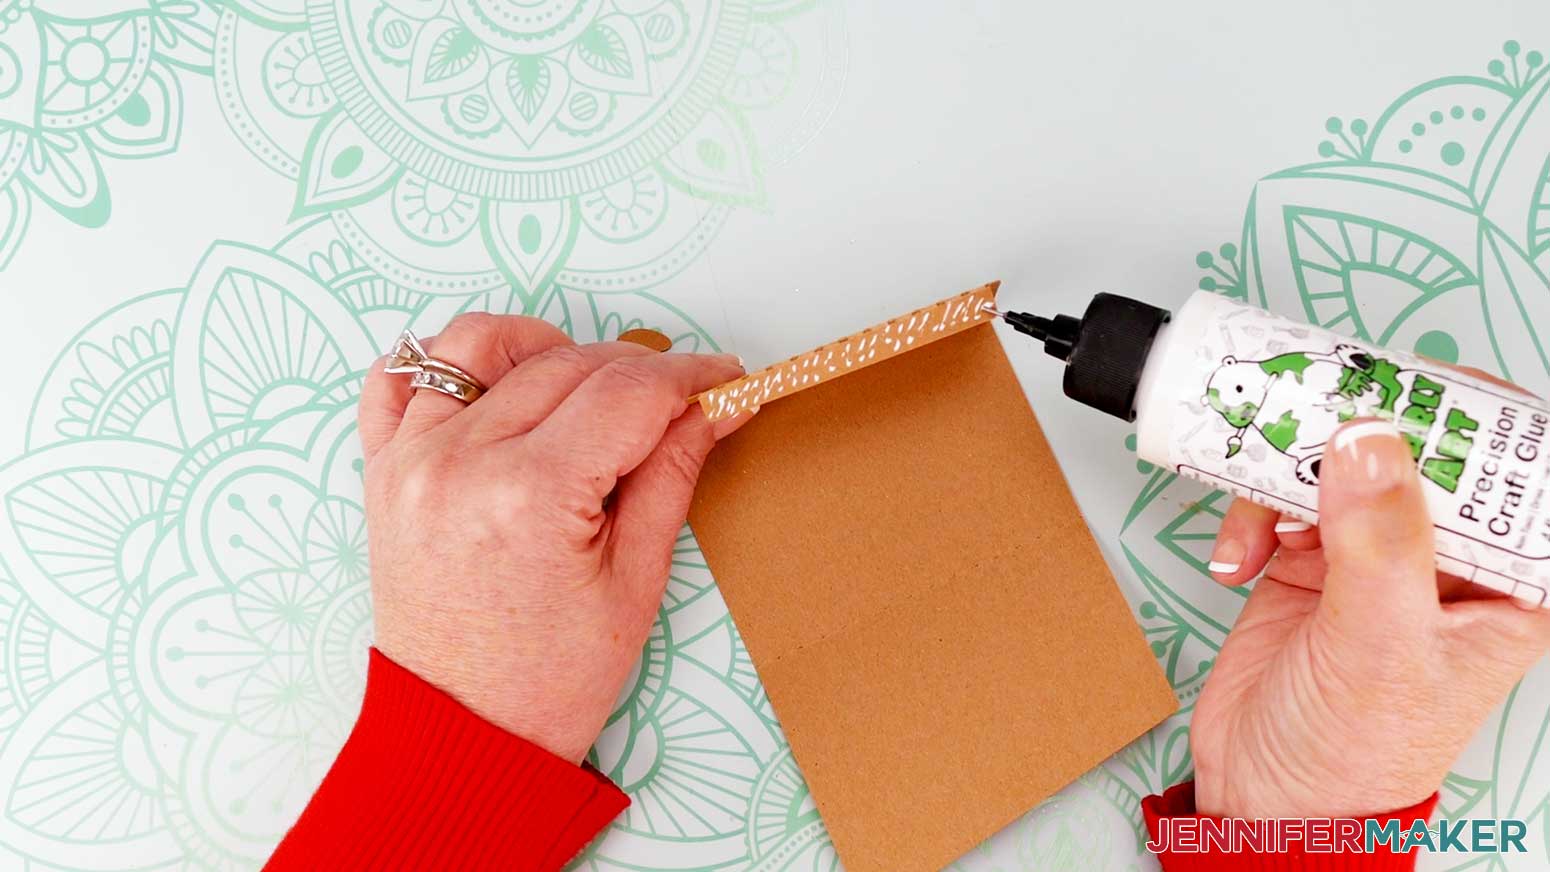
- Apply craft glue along the outside of the smallest folded panel.
- Fold the stand into a triangular tube and attach the glued edge to the inside of the last folded panel.
- Keeping the edge as flush as possible, hold until the glue sets.
- Stack the cut calendar cards in month order.
- Place the stack on the stand for display!

STEP 5: SHOW IT OFF
Here’s what my finished stacked calendar and stand look like!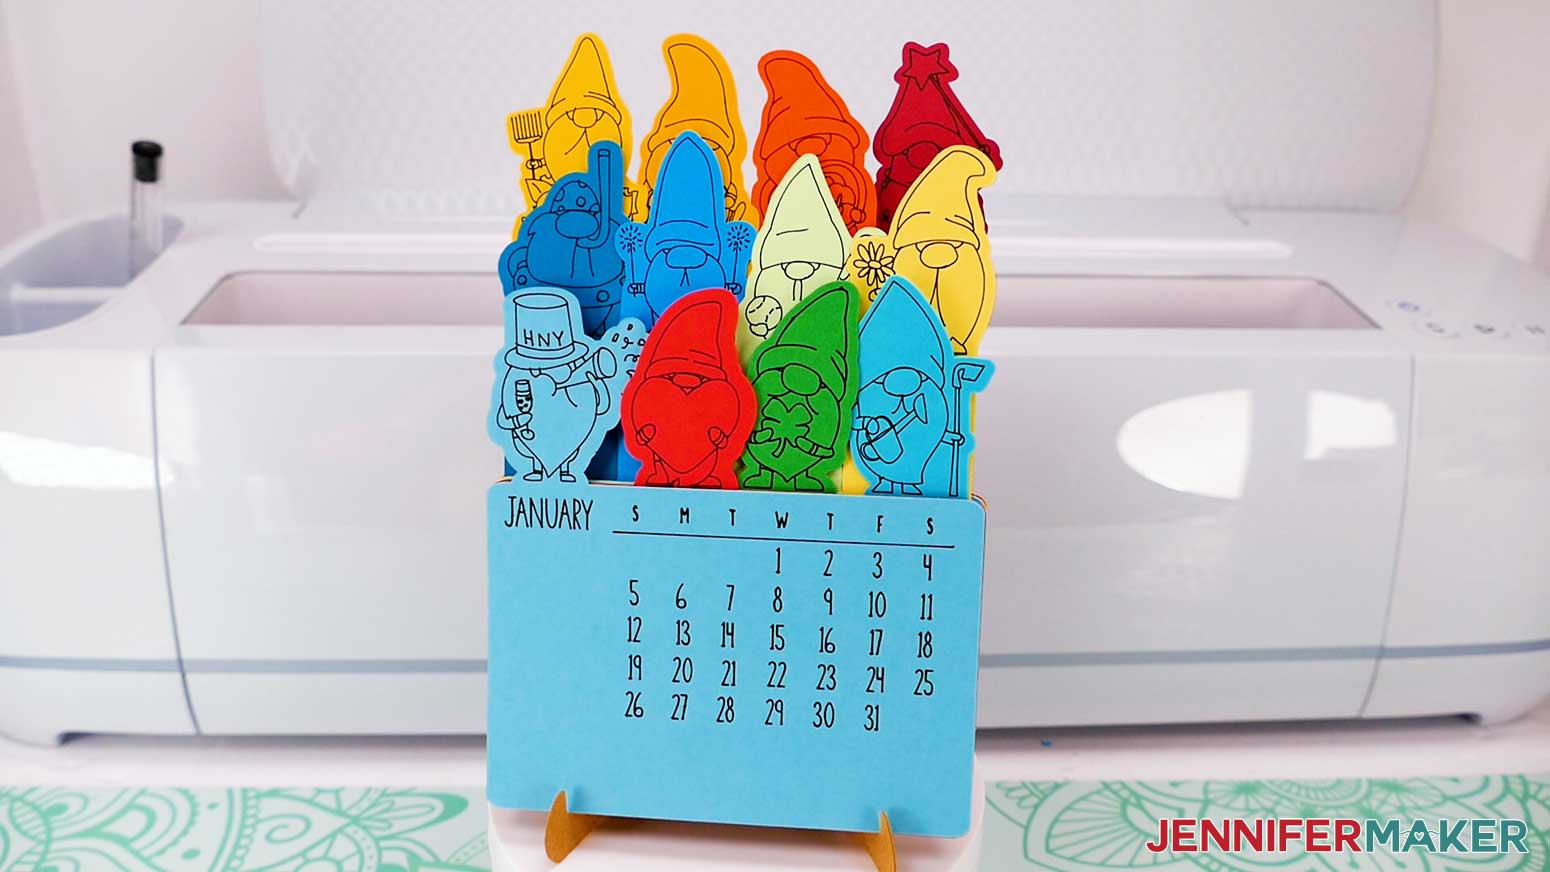
Display your calendar on your desk, kitchen counter, or anywhere you need a handy reminder of important dates.
Notes
Finished Sizes
Gnome Calendar: 4.25" x 7" when displayed on the stand.
Flower Pot Calendar: 4.25" x 8.25 when displayed on the stand.
Font Used: JM Tall
Answers to Your Questions About How to Make a Stacked Calendar
Q: I want a different design. How do I design my own custom stacked calendar?
A: You can learn how to design your own customized stacked calendars with photos in my ADVANCE program. Learn more about ADVANCE here!

Q: How do I know if my design uploaded at the correct size?
A: If you are using Cricut Design Space Beta for Desktop, try switching to the Live version as this has sometimes worked in our testing. Here are the dimensions you should see for each design on your Canvas:
- stacked-calendar-gnomes-2025-jennifermaker-SVG: 4.18″ x 7.83″
- stacked-calendar-gnomes-jennifermaker-SVG: 6.16″ x 37.49″
- stacked-calendar-vase-2025-jennifermaker-SVG: 7.87″ x 45.57″
- stacked-calendar-vase-jennifermaker-SVG: 4.28″ x 12.67″
- stacked-calendar-stand-score-jennifermaker-SVG: 8.8″ x 3.98″
- stacked-calendar-stand-noscore-jennifermaker-SVG: 8.8″ x 3.98″
- stacked-calendar-template-2025-jennifermaker-SVG: 17.17″ x 13″
- stacked-calendar-template-jennifermaker-SVG: 9.91″ x 40.74″
If you need help resizing your designs, please see my Resizing Guide.
Q: Can I cut these stacked calendar SVG pieces on a Cricut Joy Xtra or original Cricut Joy?
A: Yes you can! The stacked calendar SVG pieces in my free download file can be written, drawn, and cut by any Cricut machine including the Joy and Joy Xtra.
Q: Do I have to use a Cricut to cut my stacked calendar SVG pieces?
A: No! You can make a calendar from paper or card stock that works with your equipment, or even just with scissors. We always include several versions of each free file in the free download ZIP file. If you have a Silhouette Cameo, which uses Silhouette Studio, you can use the DXF file in Silhouette Basic Edition. If you have upgraded to Silhouette Designer Edition, Designer Edition Plus, or Business, you can use the SVG format with your Silhouette machine to cut each intricate design. If you don’t have a cutting machine, you can print and then cut out my digital download PDF files, too! The ZIP archive in my resource library includes these file types and more!
Q: Help! My Cricut Design Space screen looks different than yours!
A: If you’re using the latest version of Cricut Design Space, your screen may have slight variations than the screen you see on the video tutorial. Good news: All of the same functions are there, they may just be in different spots or have new icons. Pause the video if you need, or follow along with the written tutorial. If you get stuck, ask for expert support in our Facebook group. Our group has become not just a help center, but also a vibrant community of real people and crafters! Plus, you can catch the latest news on JenniferMaker tutorials and more.
Q: Where can I find the supplies and tools to make a stacked calendar?
A: My stacked calendar SVG files can be made with simple supplies you may already have in your crafting stash. I like to shop on Amazon for their free shipping with my Amazon Prime membership (just make sure to look for sellers with 5-star reviews). You can also find most, if not all of the supplies and tools at your local craft store.
Q: Can I make and sell these stacked calendar designs?
A: I love supporting creative entrepreneurs! If you want to use my designs and projects for commercial use, please familiarize yourself with my important licensing information before selling your crafts.
I do not permit sale of my digital items, but you can sell the creative goods you make with them — as long as you follow my licensing requirements. That means you cannot sell the stacked calendar SVG files, but you can sell stacked calendars that you made with the files on platforms like Etsy. Whether you use the Etsy app or the browser version, you’ll find a global marketplace filled with thousands small businesses, and interested buyers can find thousands of made-to-order items. I love to see creative crafting businesses thrive with the help of my designs and inspiration!
Q: I’m new to paper crafting. Can you help me learn more about it?
A: Want to learn all there is to know about paper crafting? Check out my ultimate guide to paper crafting with your Cricut, my Cricut Coach Playbook. It’s full of tips, tricks, and techniques, for all kinds of Cricut crafts. The best part is you can apply these tips to thousands of projects — not just mandalas or shadow boxes, but tons of special goods!
Get my free SVG files to make a stacked calendar!
(If you do not see the signup form above, click here.)
I love seeing what you make with my designs and how you use them! Please share a photo of your stacked calendar in our Facebook group or tag me on social media with #jennifermaker.
Love,

Want to remember this? Save this Stacked Calendar Tutorial to your favorite Pinterest Board!