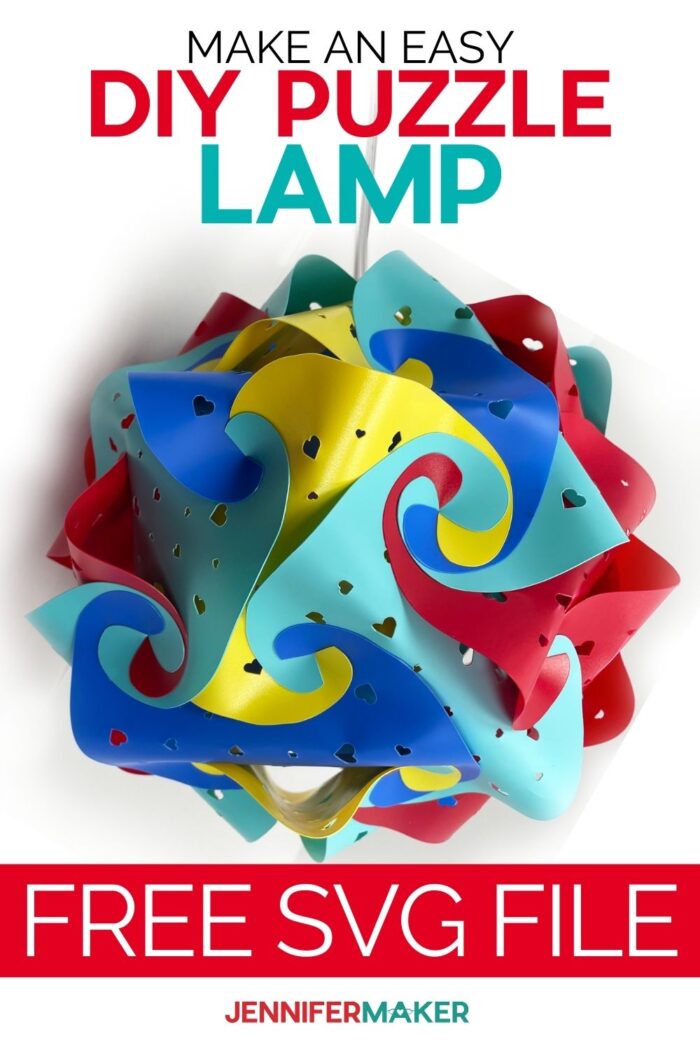
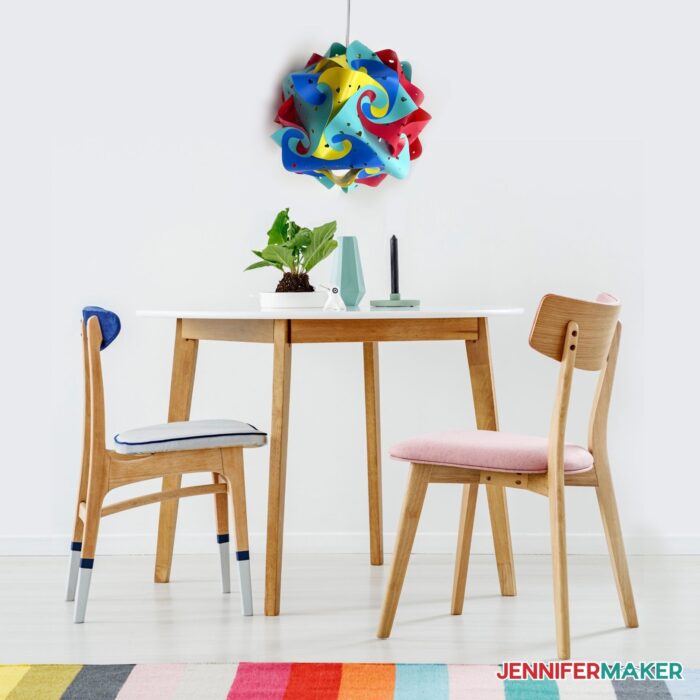
These unique “IQ” lamps are eye-catching and add a unique touch to your home! Learn how to make this DIY Puzzle Lamp using my step-by-step directions and impress anyone who sees this lively lamp hanging in your home.
Have you seen this fun and distinctive puzzle lamp at the big box stores? These caught my attention when I was at a conference in San Diego and saw them hanging in my hotel. I immediately knew I wanted to make my own version of the DIY Puzzle Lamp to go along with my DIY Hanging Lamp and my Hanging Paper Lantern Heart! These puzzle lamps are also known as IQ lamps and jigsaw lamps, and you put them together simply by interlocking flat quadrilateral shapes, and it’s the interlocking pattern that turns it into a sphere! This project is more challenging than usual to put together, but that’s really the fun of it. To help you create a puzzle lamp you’ll be proud to show off, I have a step-by-step video and photo tutorial to guide you in putting together your puzzle lamp.
Watch the DIY Puzzle Lamp assembly video here:
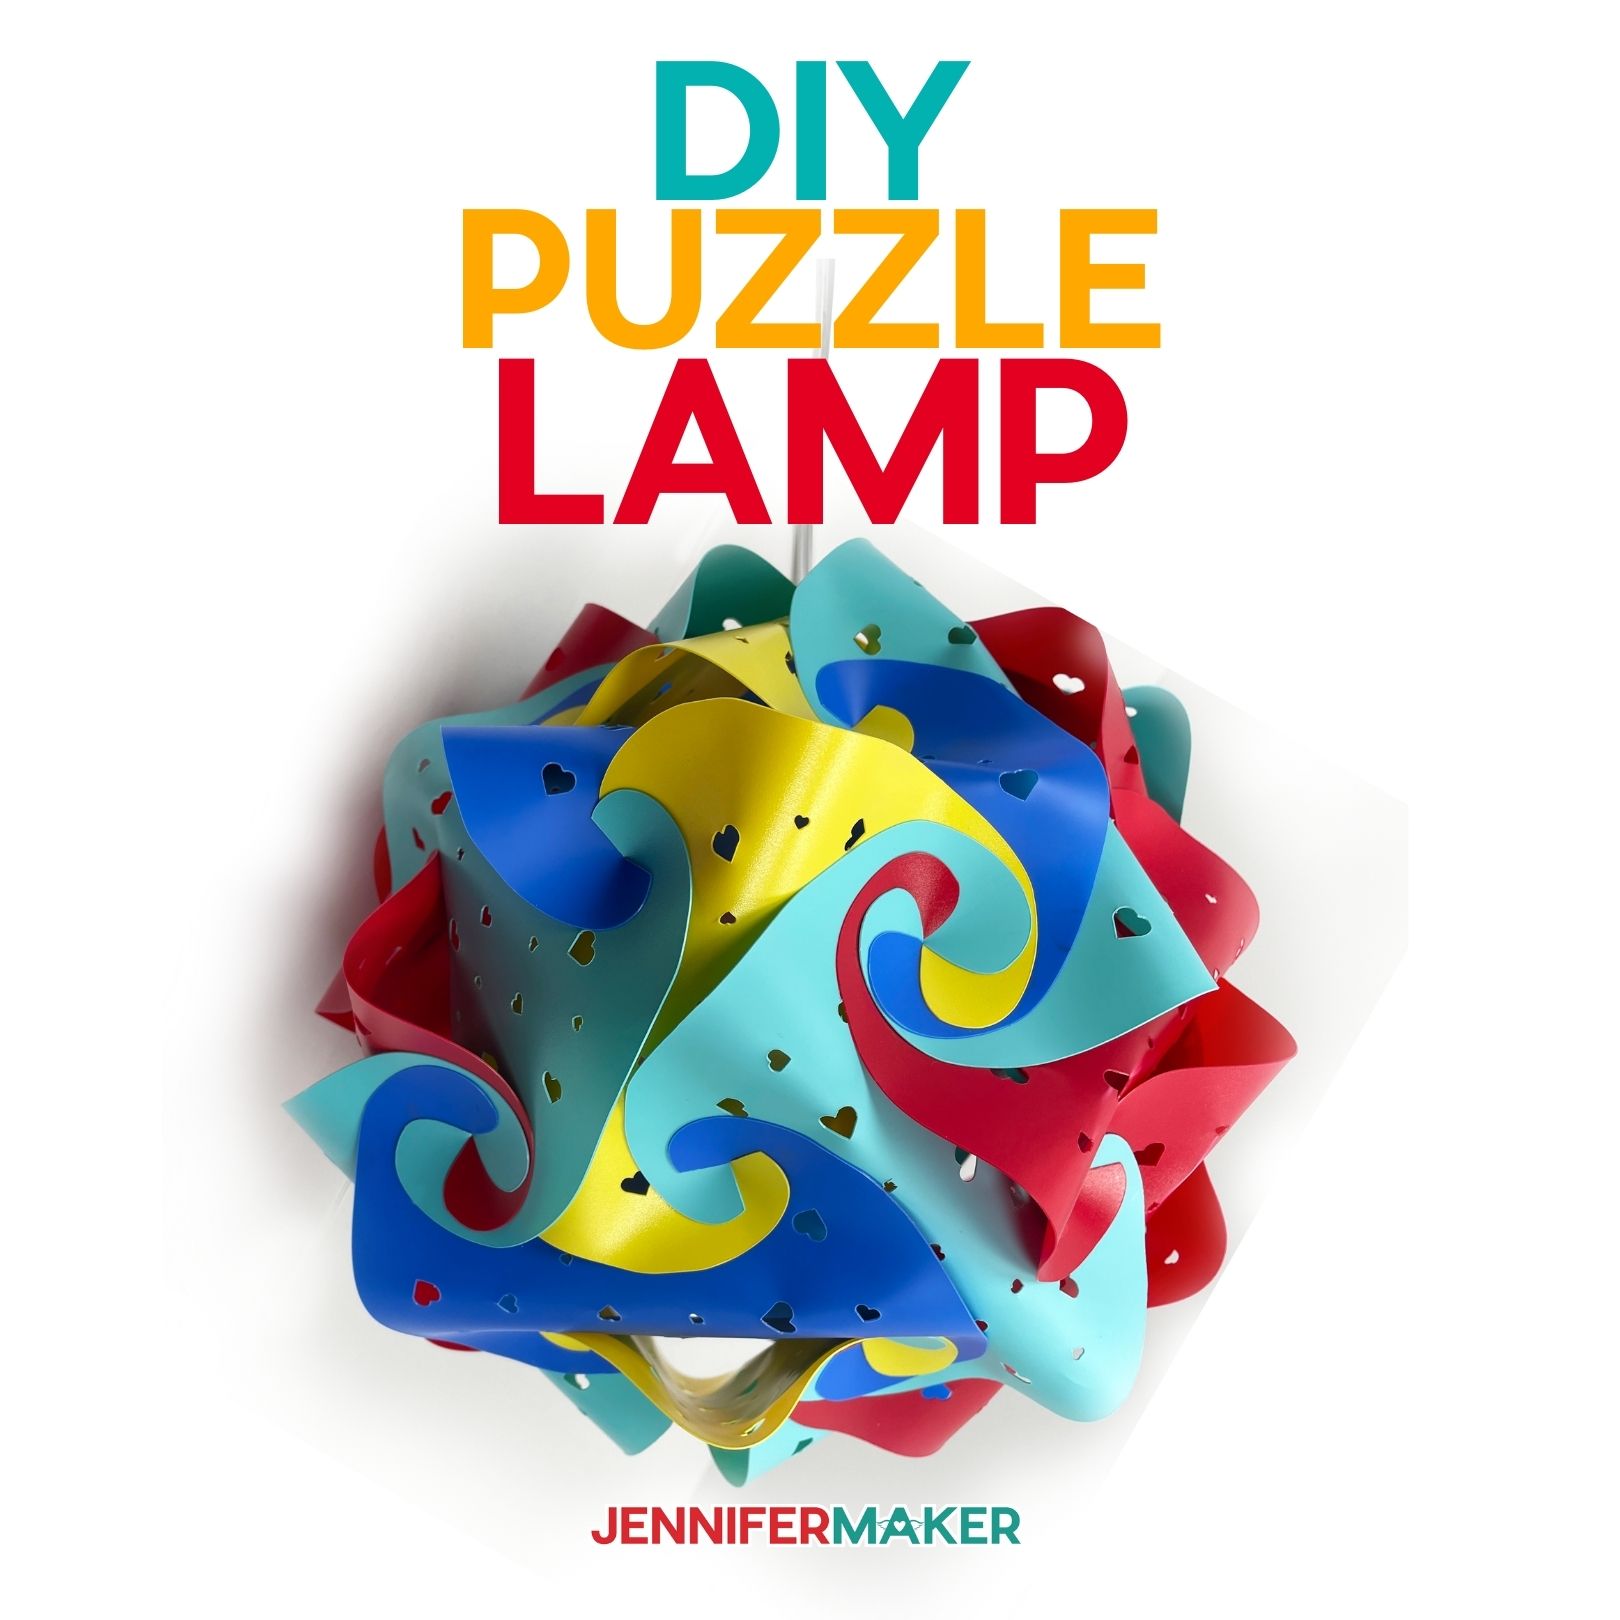

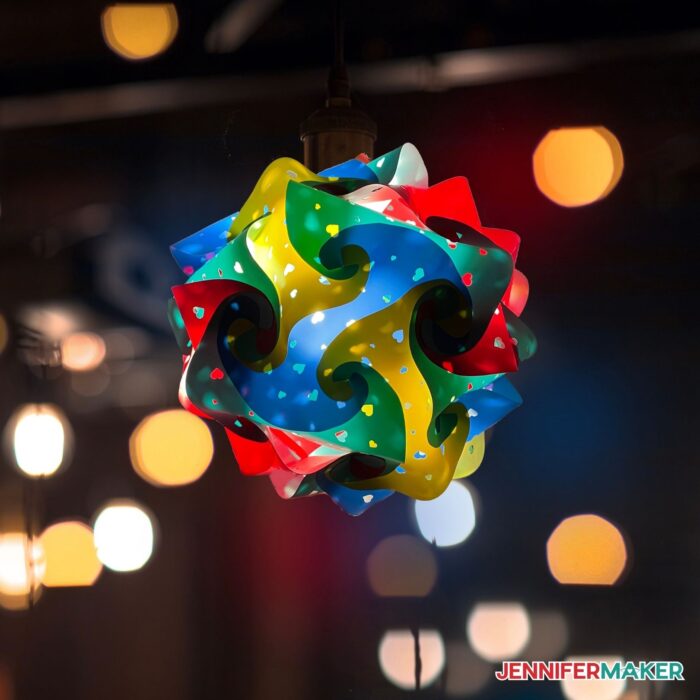
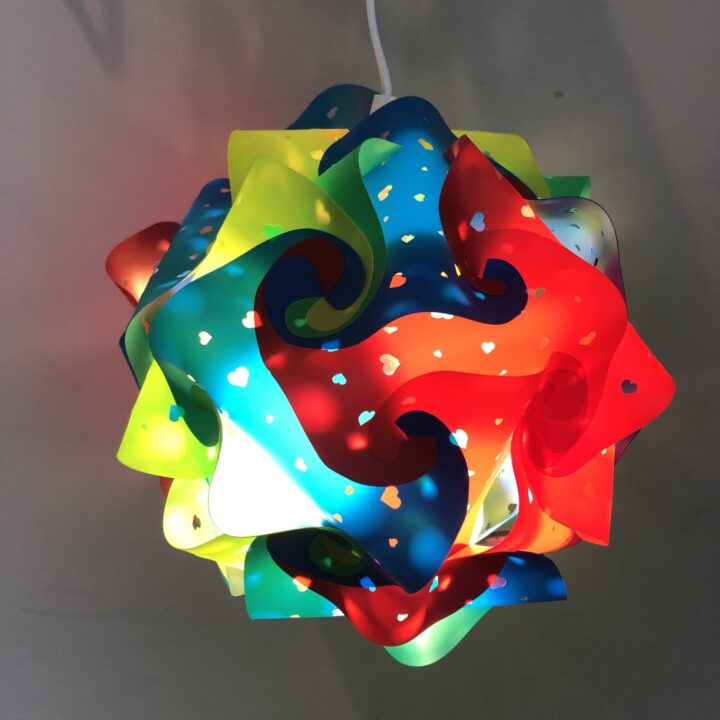
I love the style and design of this DIY Puzzle Lamp and knew it would be a really enjoyable project to make! Can you believe that I made this out of those plastic school folders? Sometimes it’s so fun to think outside the box and really try something different. I love how it turned out and I am so excited to show you the DIY Puzzle Lamp design!
To make this puzzle lamp, you need ten plastic school folders and I chose to use four different colors to keep track of assembly. It is much easier to create the DIY Puzzle Lamp using different colors for the first attempt. Once you get the hang of how the pieces go together, you can try this in all one color. Your final lamp will be about nine inches in diameter.
Of course, you can change the size of your IQ lamp, just be very careful that you make all 30 pieces of this puzzle lamp the same size in order to assemble it properly.
The only other supply you’ll need is a hanging lantern cord for pendant lighting and a light bulb. I used a 40 watt LED lightbulb. It’s VERY important you use only an LED light in your lamp, as it will not generate any infrared heat. Do not use any heat-generating light in your IQ lamp.
I used my Cricut Maker to cut the lamp pieces, but you can also make this on another cutting machine, including the Cricut Joy. You can use the regular fine-point blade to cut the puzzle lamp, but be aware that after about seven cuts, I had to clean my blade. It’s easy to clean your blade, though! All you need is to create a ball with aluminum foil, carefully remove your blade from your machine and then poke the blade through the foil ball multiple times! You can read more about how to clean your blade, along with other great tips, in my Cricut Blades: Tips and Tricks post.
I highly recommend you follow our assembly video to put your puzzle lamp together — just follow what we do, slowly, step by step. That said, my 16-year-old daughter Alexa saw me making this and asked if she could try to put it together … without the tutorial. And she did it in about 30 minutes, without once looking at the tutorial. (I’m so proud of her!) So if you, or someone you know, enjoys putting things together like this on their own, feel free to try assembling the IQ lamp without the video!
Let me show you how to make this DIY Puzzle Lamp! This post contains some affiliate links for your convenience (which means if you make a purchase after clicking a link I will earn a small commission but it won’t cost you a penny more)! Read my full disclosure policy.
Materials to Make a DIY Puzzle Lamp
View my Amazon shopping list with the exact items we used to make this project!
- Two 12 packs of plastic school folders – I used 4 different colors to help keep track of assembly (3 red, 3 teal/green, 2 blue, and 2 yellow folders) — I highly recommend THESE specific plastic folders, as thicker ones may be too hard to cut and thinner ones may be too flimsy to use
- One hanging lantern cord for pendant light
- One 40W Equivalent LED light bulb
- Cricut Green StandardGrip Machine Mat 12” x 12”
- Cricut Scraper
- Scissors
- A method to cut your plastic folders, I used the amazing Cricut Maker but you can also use the Cricut Explore or the Cricut Joy — you can use the standard fine point blade for this project
- Design #304 for the DIY Puzzle Lamp – (My free SVG/PDF/DXF design files are available in my free resource library – get the password by filling out the form at the bottom of this page)
How to Make Your Own Unique DIY Puzzle Lamp
DIY Puzzle Lamp
In this tutorial, I teach you how to interlock 30 plastic pieces to make your own DIY Puzzle Lamp! This "IQ lamp" has a gorgeous wow-effect with or without light!
Materials
- (2) 12 packs plastic school folders - I used 4 colors to help keep track of assembly (3 red, 3 teal/green, 2 blue, and 2 yellow folders) — I recommend these specific folders to ensure you're able to cut them!
- One (1) Hanging Lantern Cord for Pendant Light
- One (1) LED Light Bulb
- Design #304 My free SVG/DXF/PDF cut files/stencils (available in my free resource library—get the password at the bottom of this post)
Tools
Instructions
STEP 1: GET MY FREE DIY PUZZLE LAMP FILE
First, download my free DIY Puzzle Lamp SVG/DXF/PDF — Design #304 — from my free resource library.
Note: There are two versions of the puzzle lamp pattern — an "easy" version and a hard version. The regular one is the "easy" one, so be start with that and save the ones in the folder named "hard" for when you want a challenge!
The pattern files can be cut by hand or with a cutting machine — let me show you how to cut it on a Cricut cutting machine.
First, upload the SVG cut files in the downloaded folder to Cricut Design Space. If you're not sure how to upload an SVG cut file to Cricut Design Space, watch this helpful video training series I made. If you're on an iPhone or iPad, here's how to download and upload SVG files to the Cricut Design Space app.
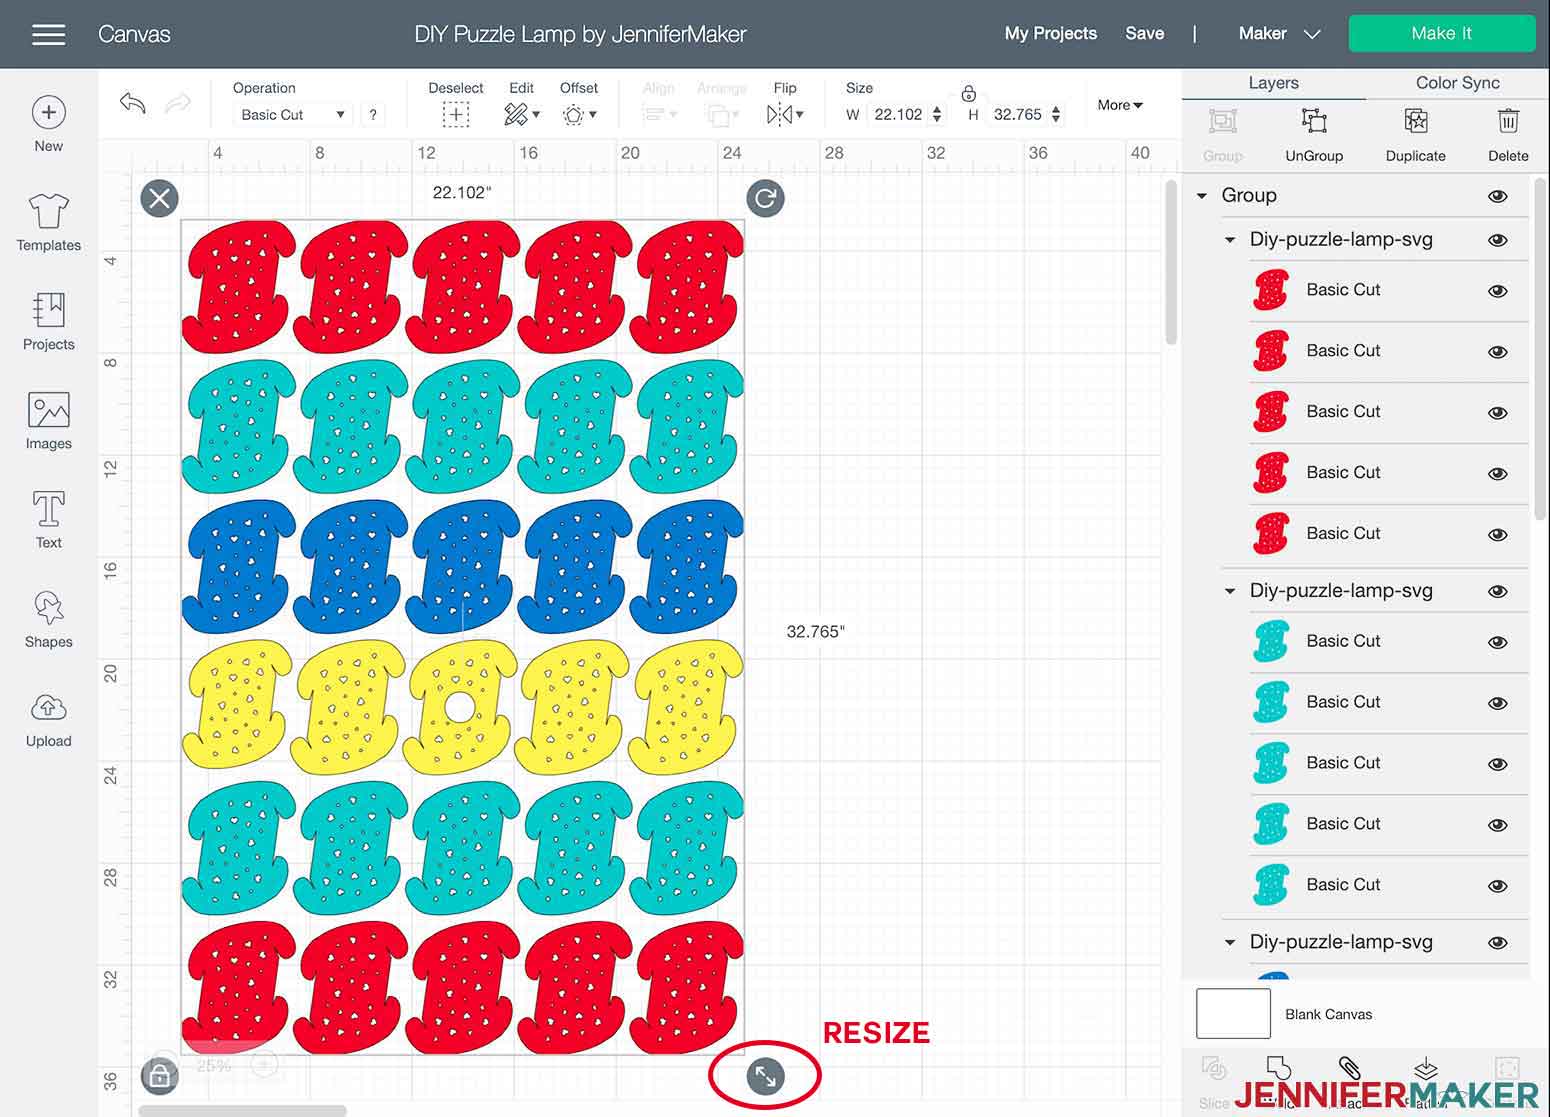
This is what the Puzzle Lamp SVG file looks like in Cricut Design Space.
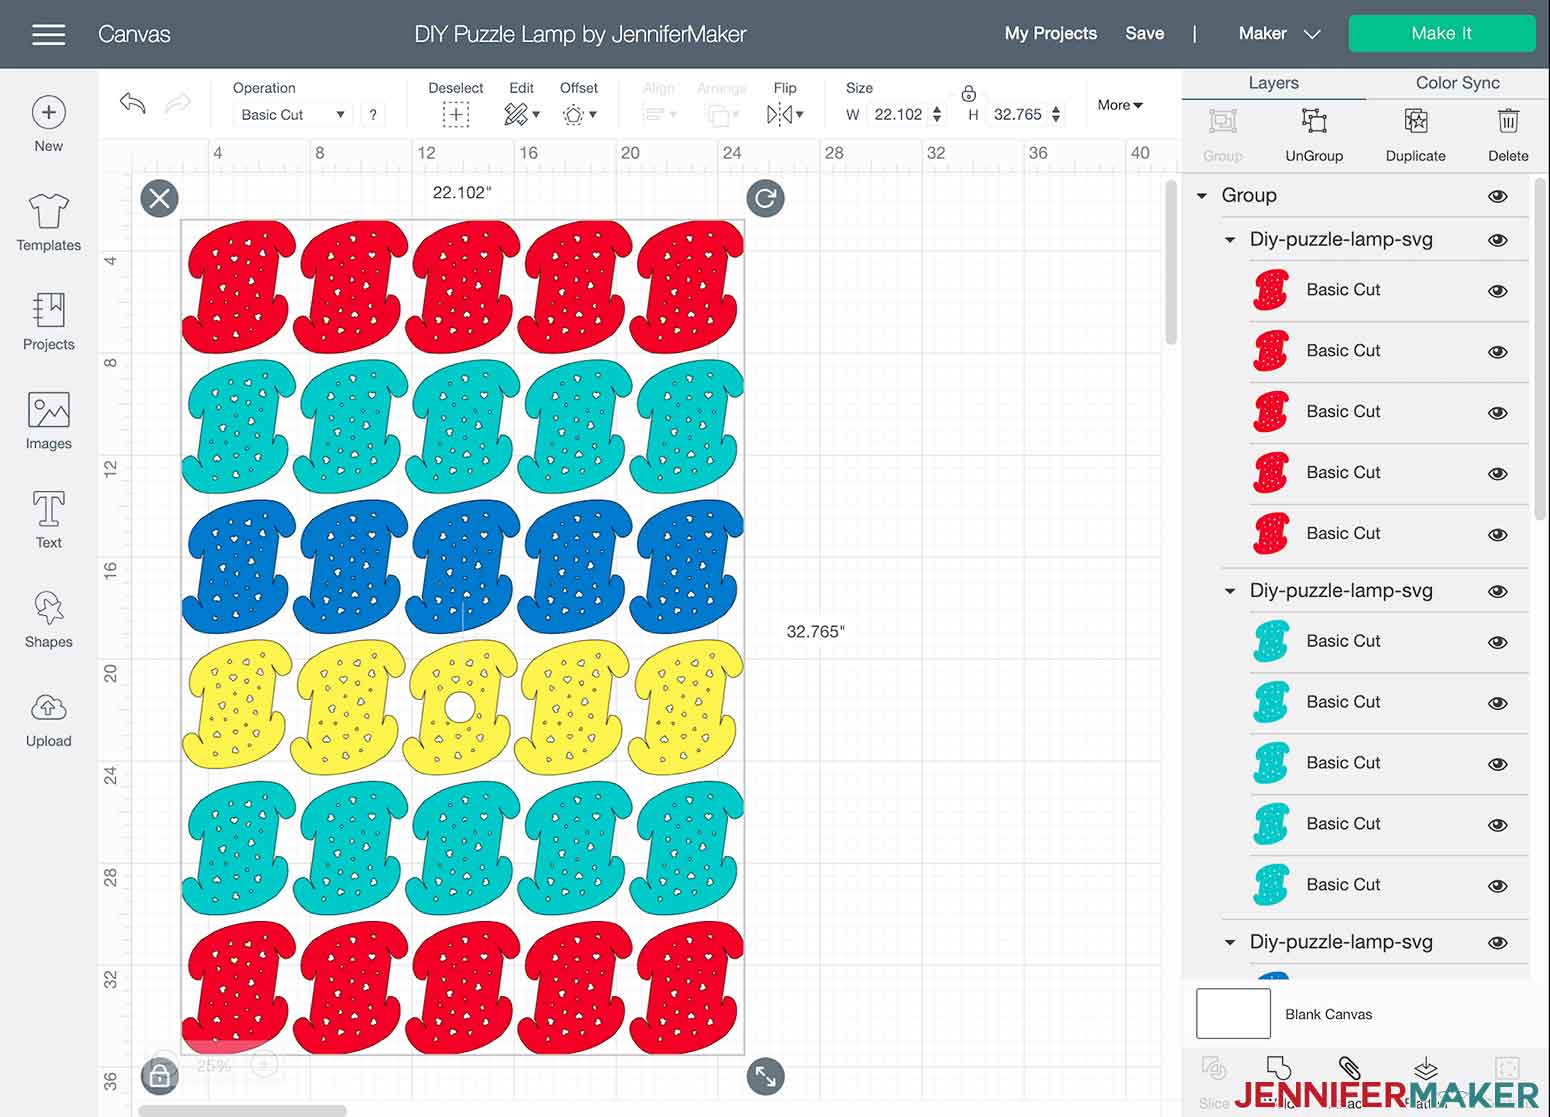
The current size of the puzzle pieces will create a lamp that has about a 9" diameter.
Feel free to resize your IQ lamp pieces to make any size, just make sure all 30 pieces remain exactly the same size. And that your pieces will fit on your plastic folders!
TIP: To evenly adjust the size of all the pieces for your DIY Puzzle Lamp, make sure to keep everything grouped and selected together. Then simply click, hold and drag on the bottom right of the bounding box where you see the arrows until you get your desired size.
When you are ready, click "Make It" in the upper right corner.
STEP 2: CREATE "CUSTOM MATERIAL" SETTING AND CUT YOUR DIY PUZZLE LAMP
To make an IQ lamp just like mine, you will need ten (10) folders: 3 red folders, 3 teal/green folders, 2 blue folders, and 2 yellow folders. Have fun making your lamp in any colors you'd like! Each layer will have five (5) puzzle pieces.
Tip: As a beginner, you may find it easier to assemble your DIY Puzzle Lamp with one color per row. Once you've mastered the assembly process, feel free to mix it up!
Before you continue in Cricut Design Space, you need to cut your folders in half with a household or craft scissors along the center fold and cut off any pocket materials on the folder.
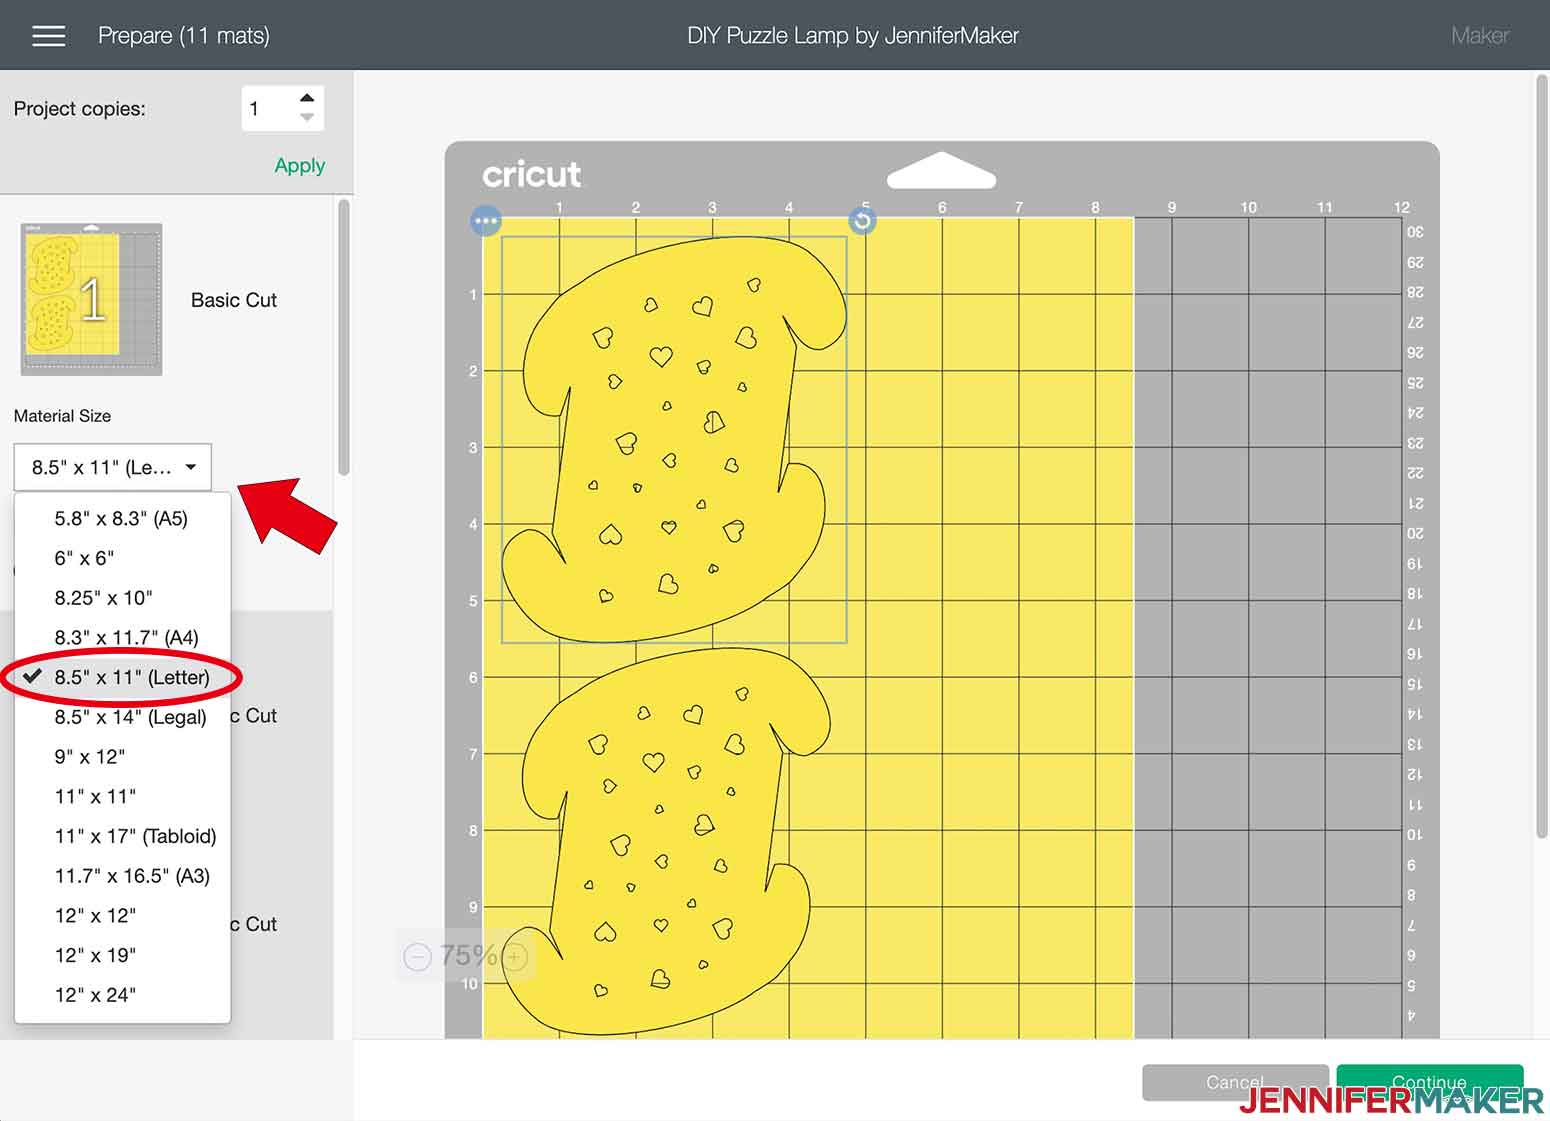
Back in Design Space, change your material size to 8.5" x 11" for all colors. Make sure you select the correct size for all mat colors. Then click back on "Mat 1" so that will be the first cut and click "Continue."
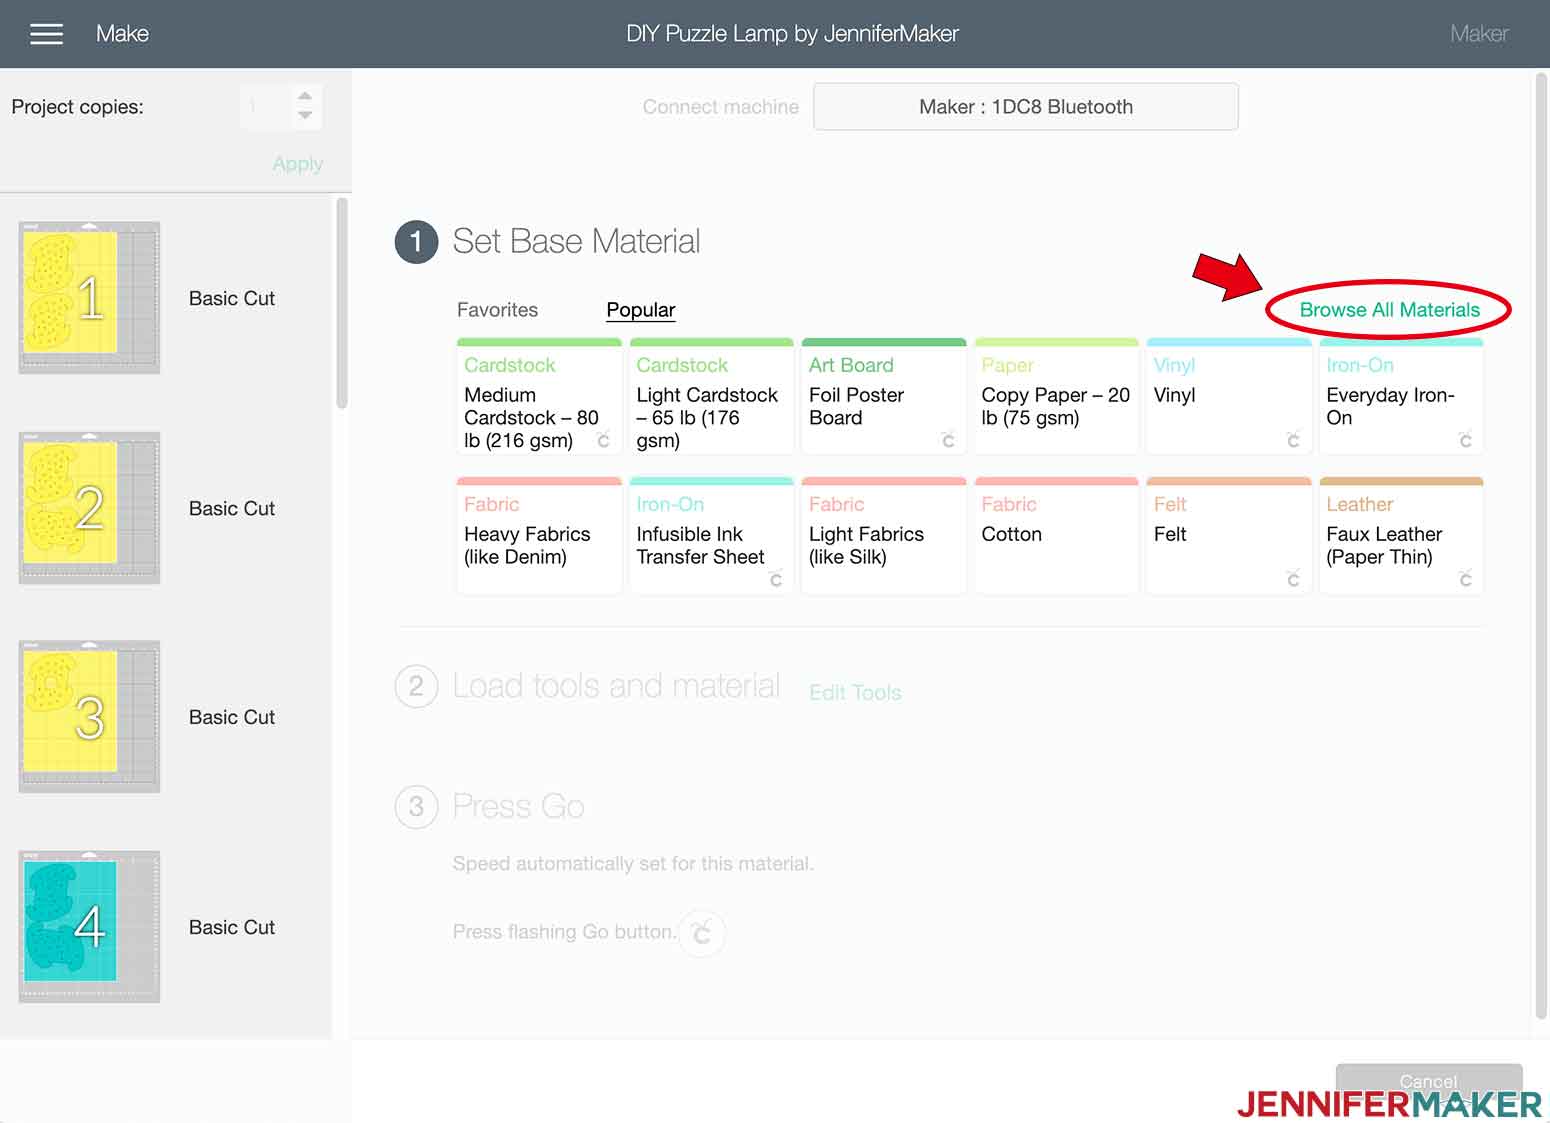
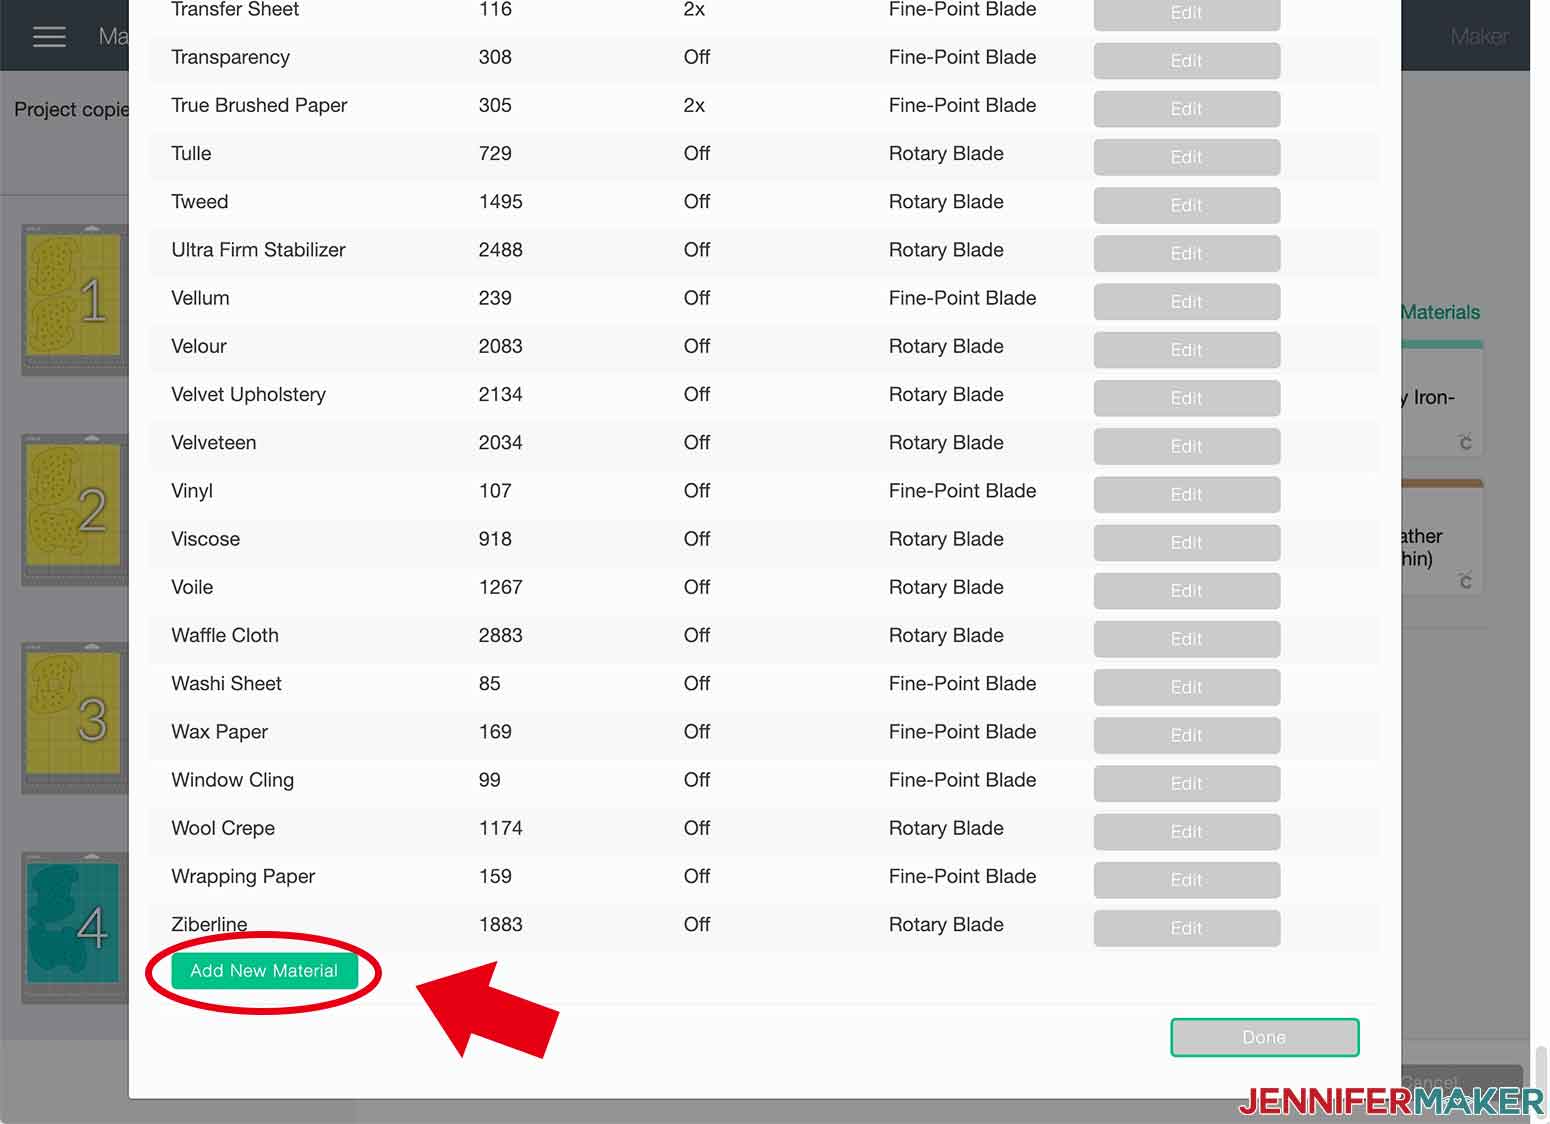
I found that the plastic folders cut best on a "Custom Materials" setting. To set this up, click "Browse All Materials" in the upper right corner.
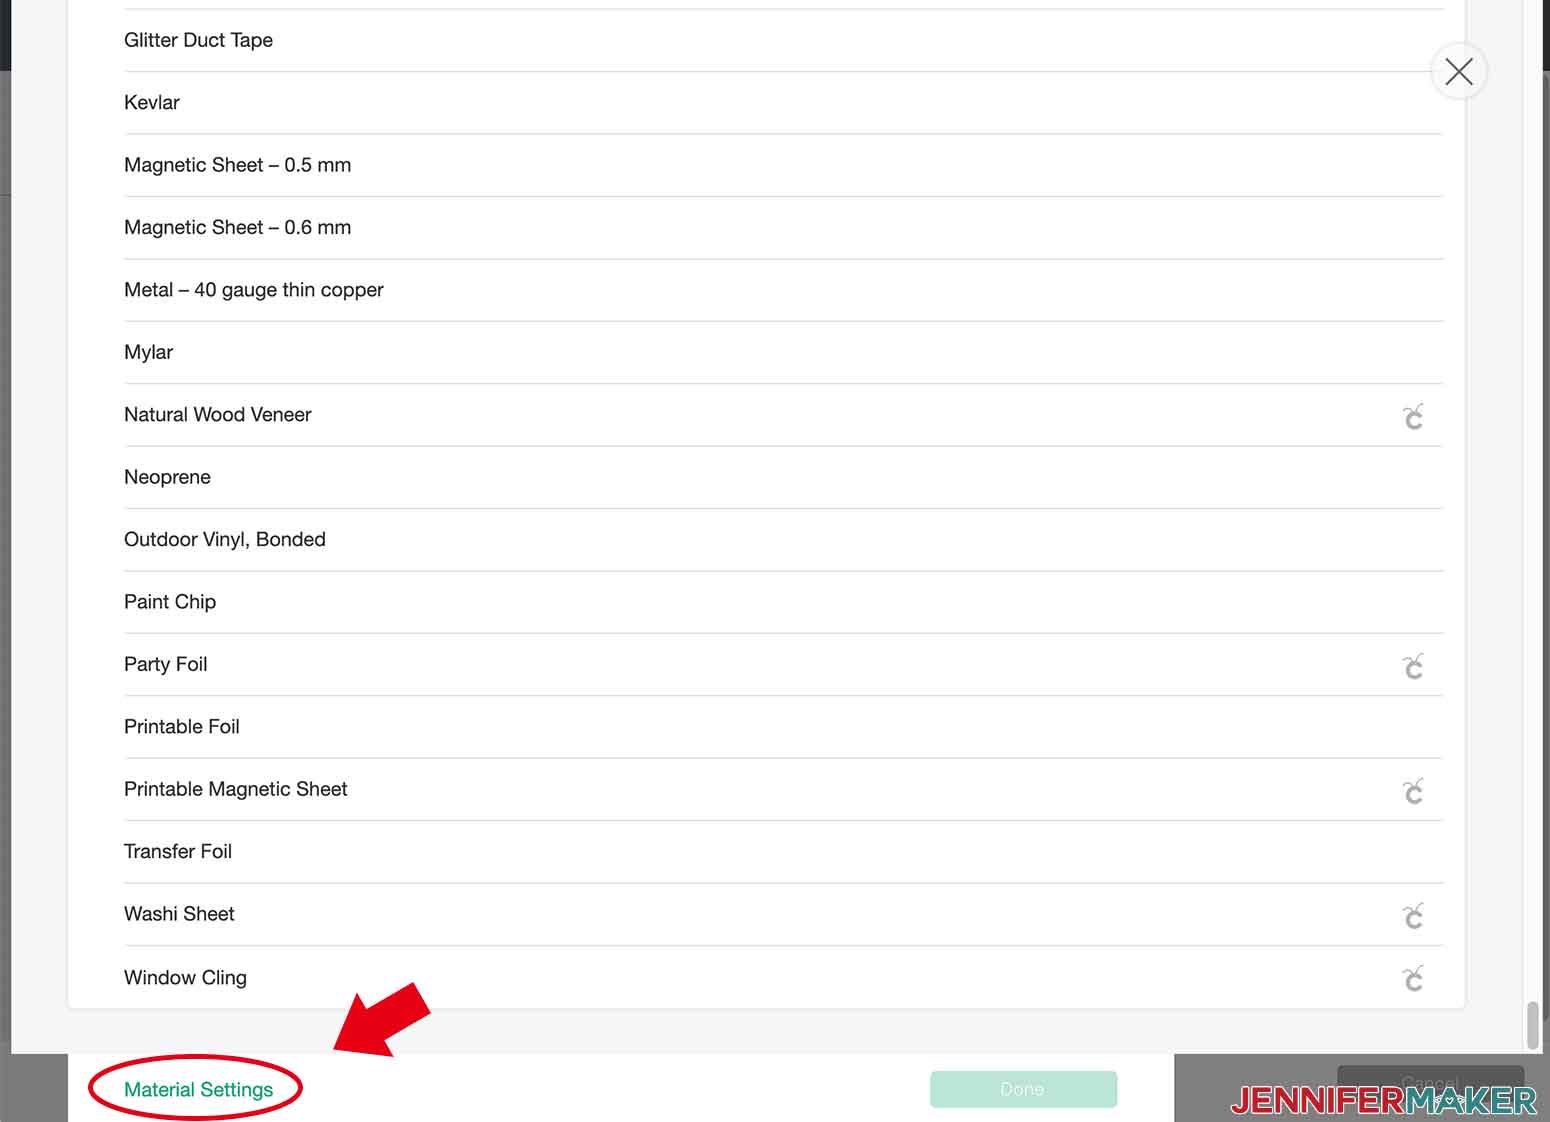
Scroll to the bottom of the window and click "Material Settings."
Again, scroll to the bottom and click "Add New Material."
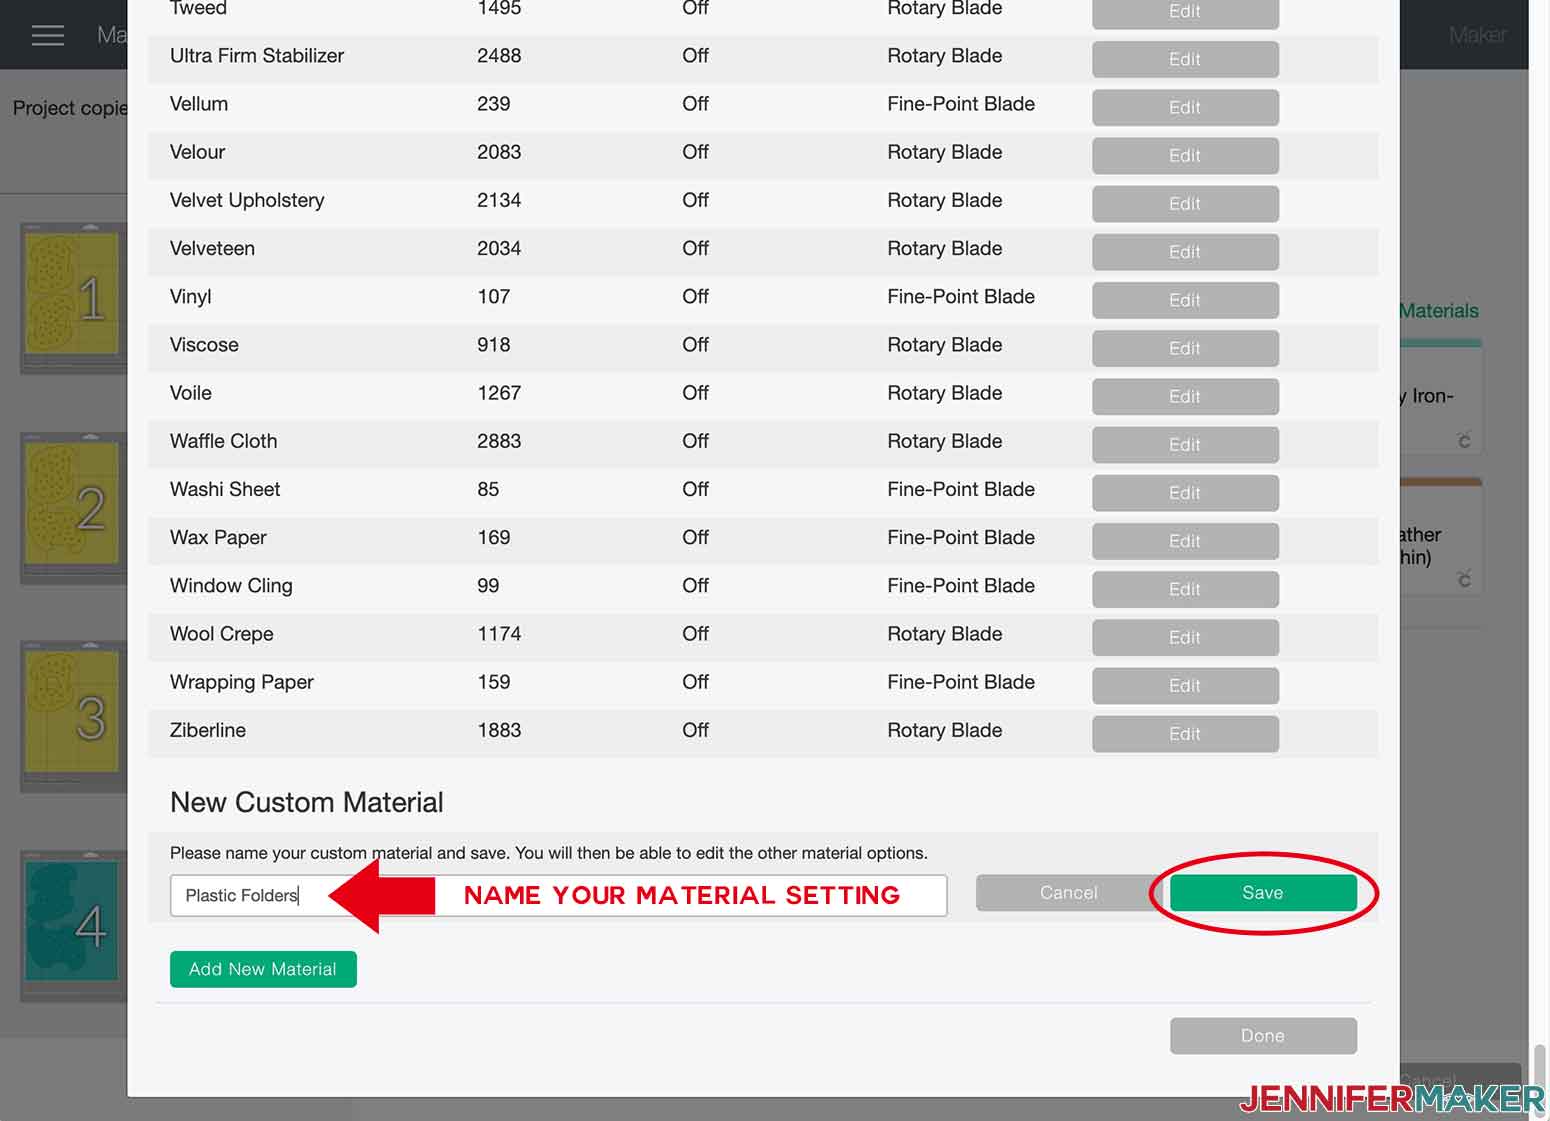
Name your material. I chose to call mine "Plastic Folders."
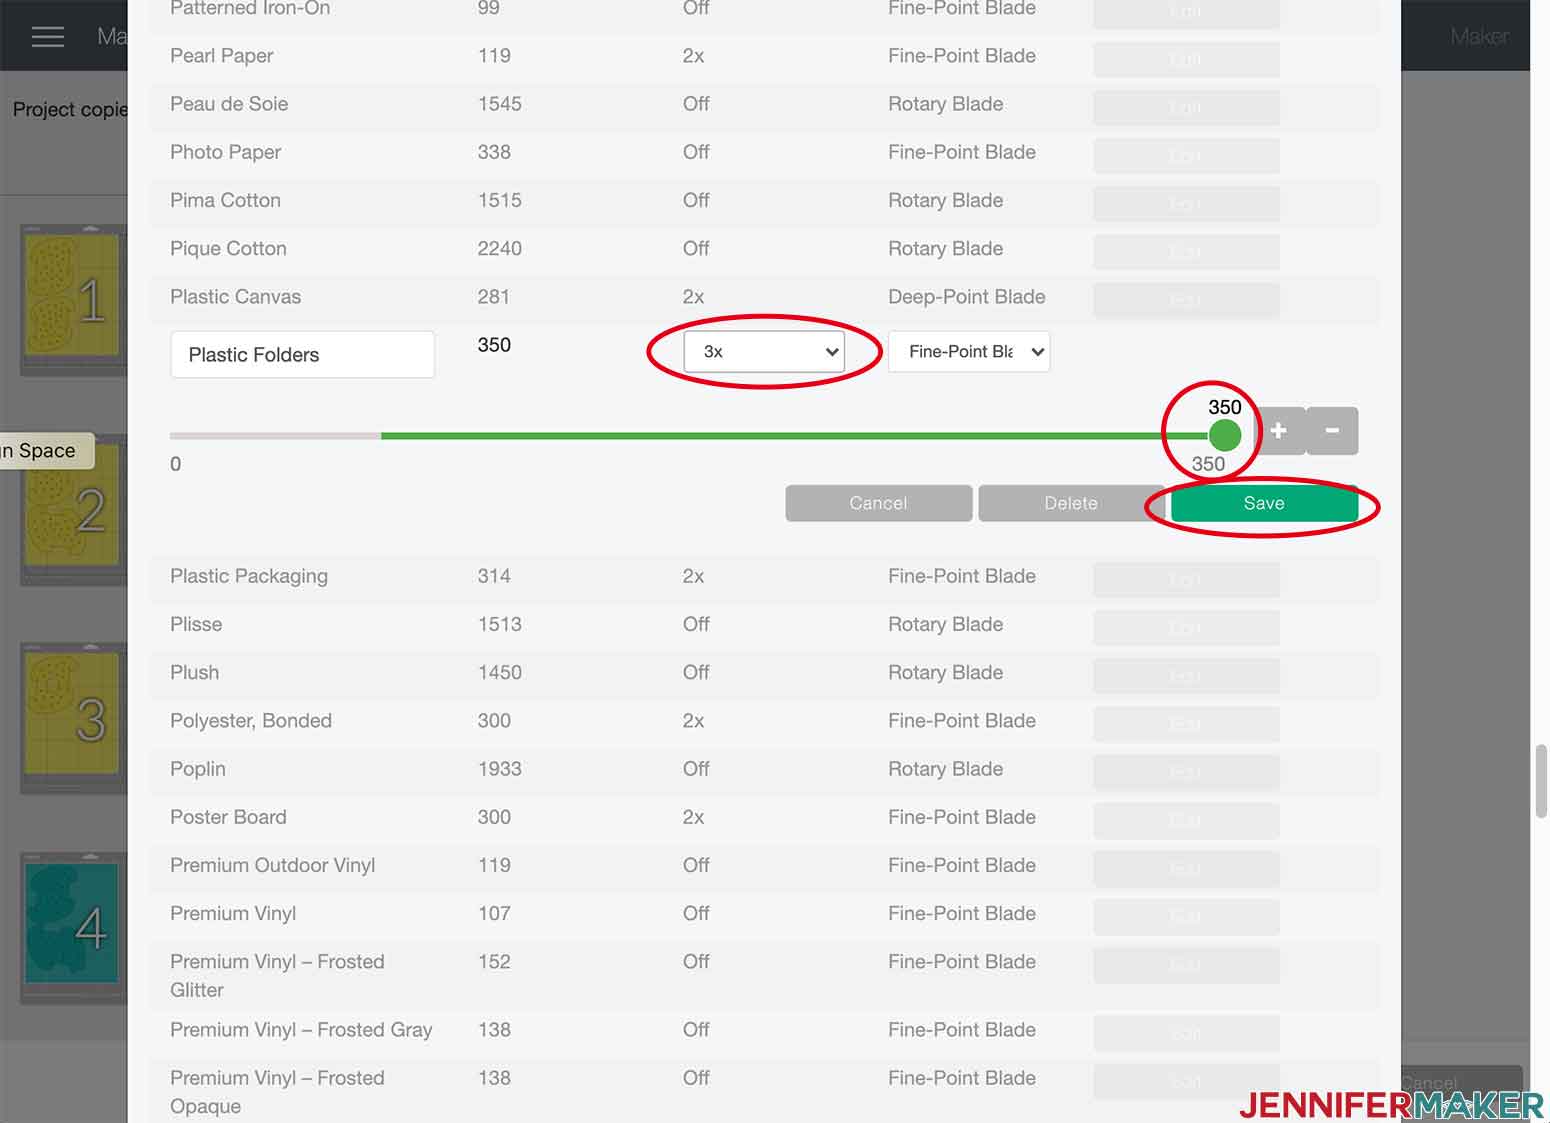
The material name will populate in your materials list. Slide the adjustment bar to 350 for maximum cut pressure. Select "3x" from the "Multi-cut" dropdown menu and click "Save."
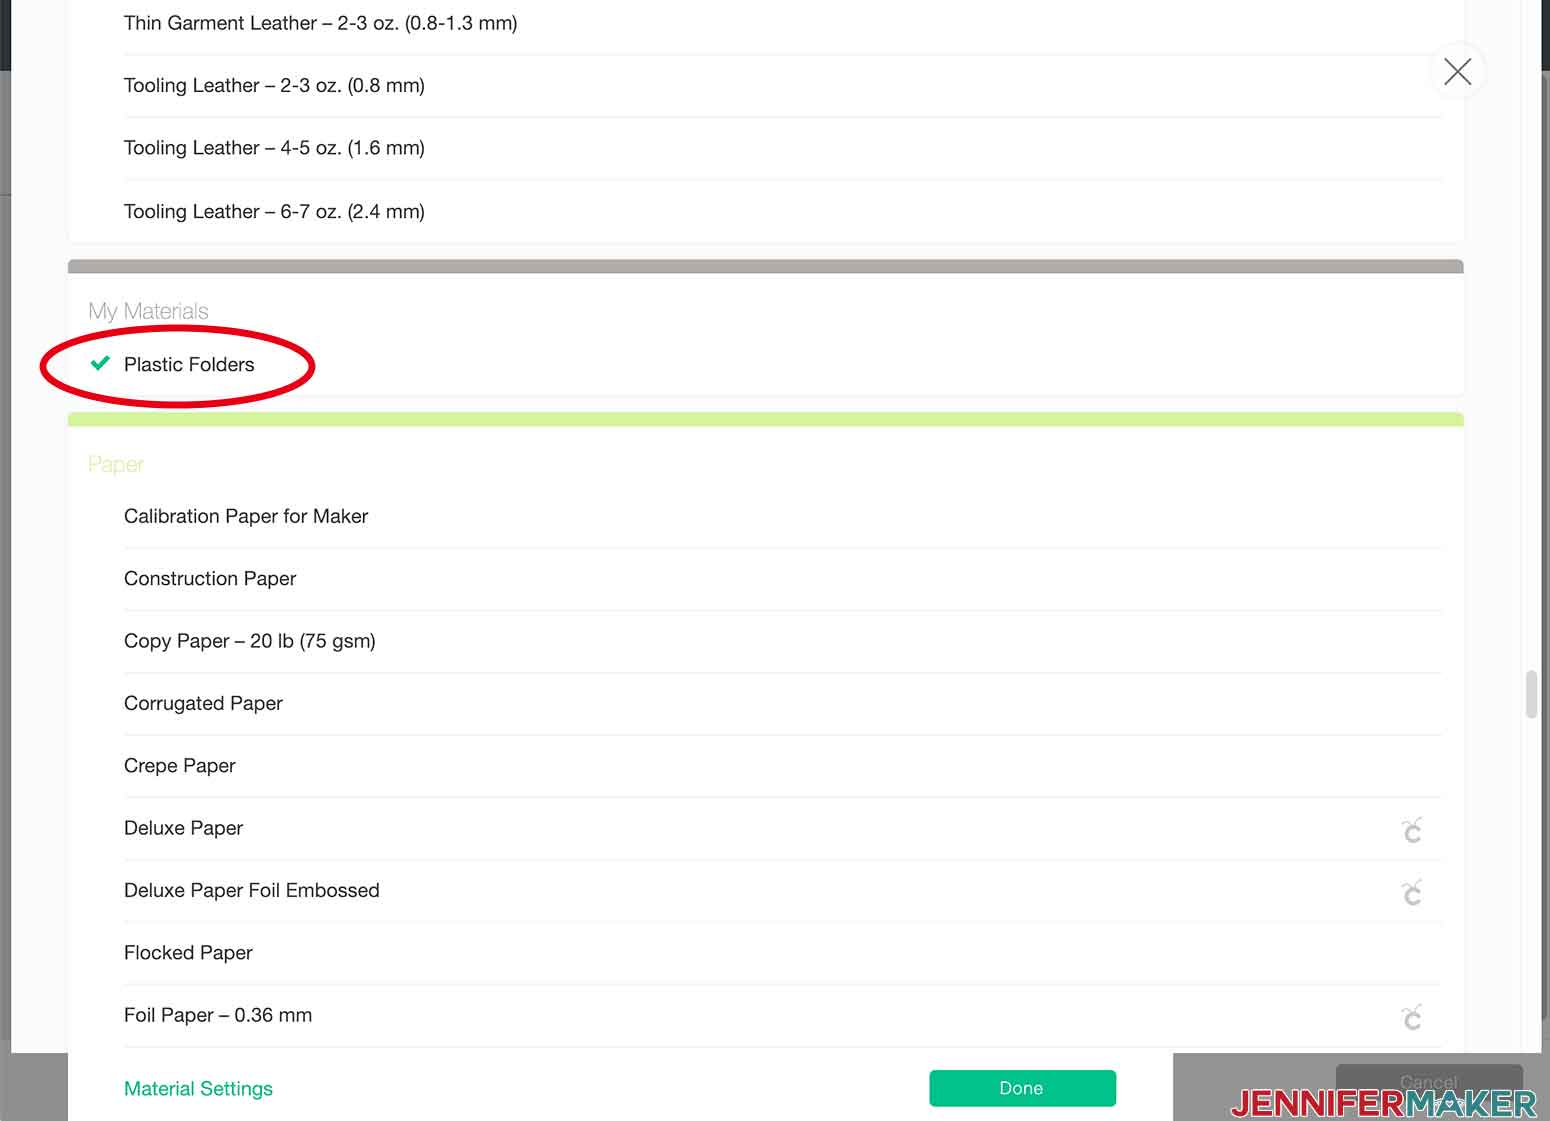
Close the "Material Settings" window by scrolling down and clicking on "Done" or scrolling up and clicking on the "X". You should be back at the main screen. Again, click "Browse All Materials." Locate your custom material setting for the plastic folders and select it.
Place your plastic folder on your cutting mat, load your mat and begin your cuts.
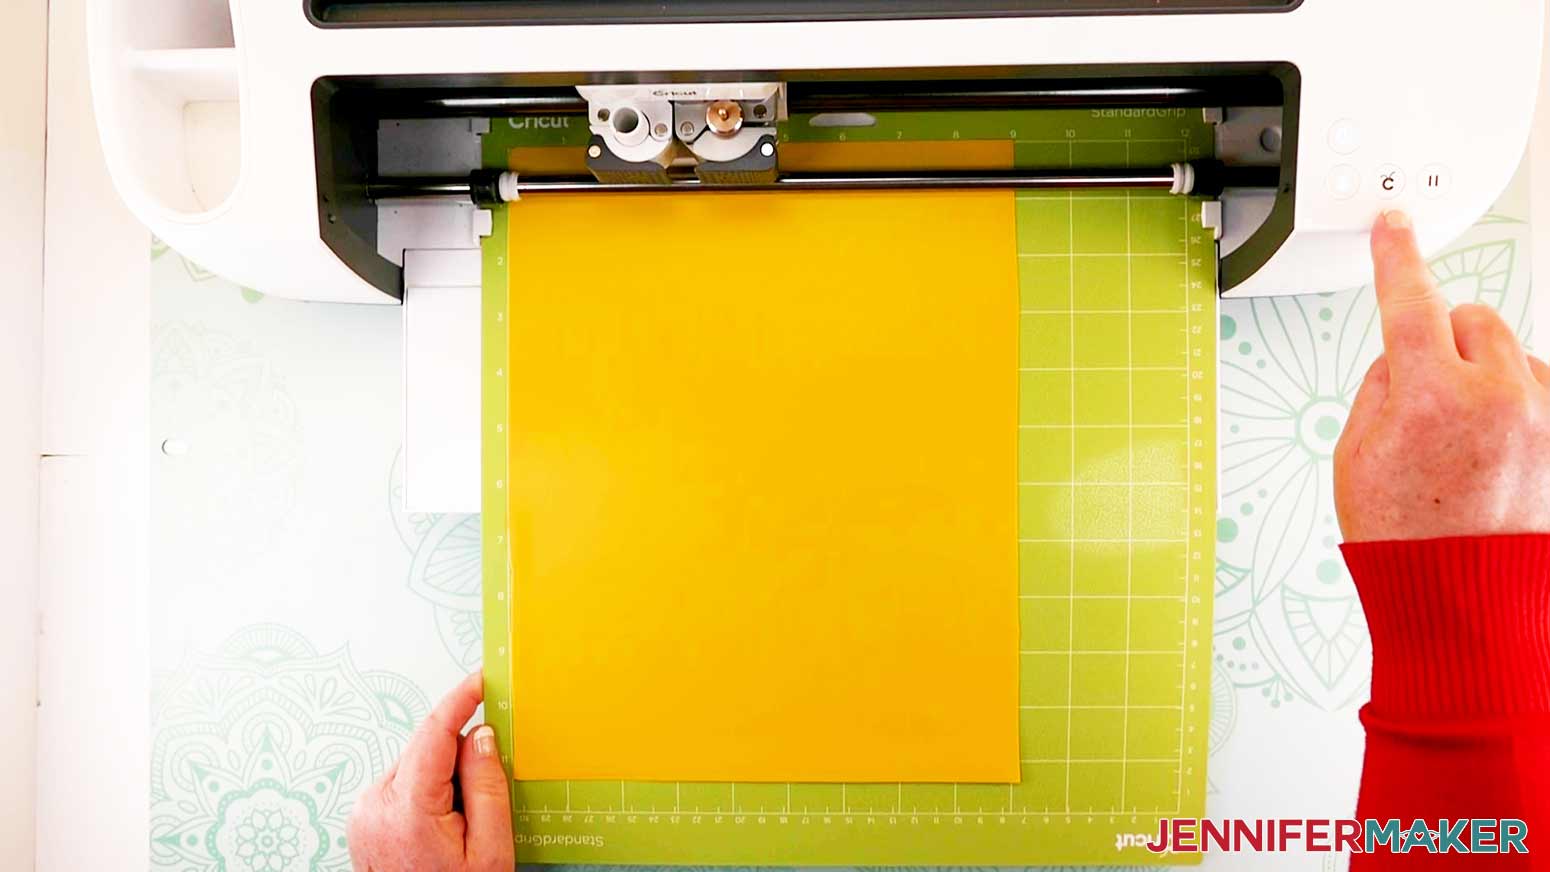
Tip: After about 7 cuts, my blade needed to be cleaned. I removed my Fine-Point Blade, poked it into an aluminum foil ball to remove any debris and reinserted the blade. The cuts continued perfectly. Depending on your folder type, I recommend checking your blade after every several cuts. You can read more on my tips and tricks for clean cuts here.
STEP 3: ASSEMBLE YOUR DIY PUZZLE LAMP
IMPORTANT: I highly recommend you follow my puzzle lamp assembly video instead of the photos. Our team members found it much easier to assemble by following along with the video.
FIRST ROW
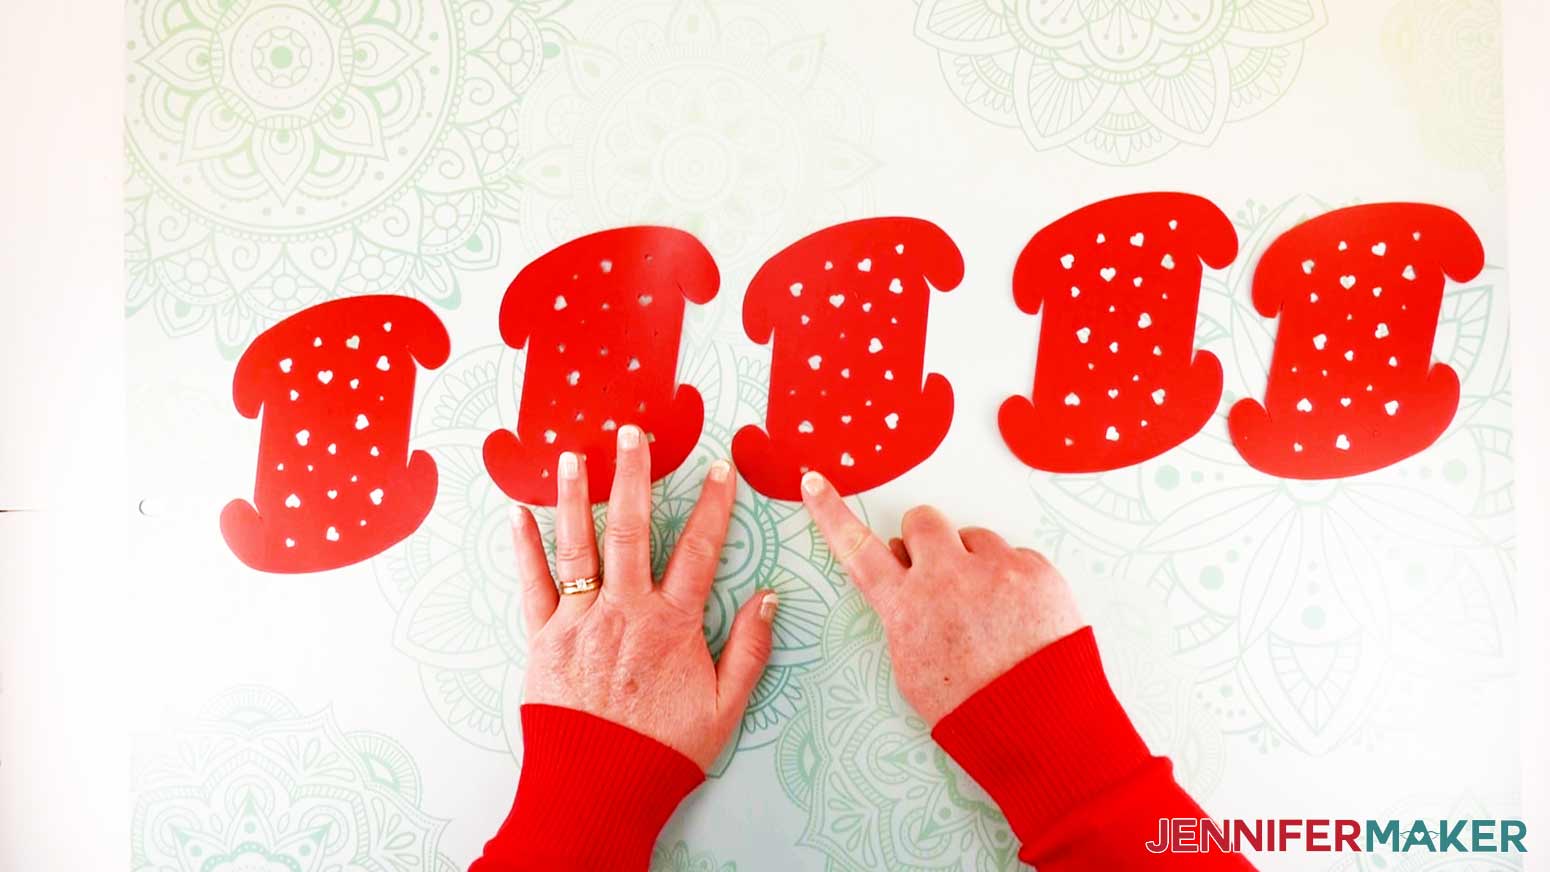
I am using five red puzzle lamp pieces. Lay them out in a row with the top and bottom pieces at an upward slant.
The direction of your pieces is very important for the proper assembly of your lamp. The starting position for each piece will be a vertical position with the top and bottom at an upward slant.
Take your first piece and hold it vertically in your left hand. Pick up your second piece and hold it identical to your first piece to confirm matching upward angles. Rotate your second piece counter-clockwise UP to a horizontal position and interlock the left two corners into the right side of your first piece.
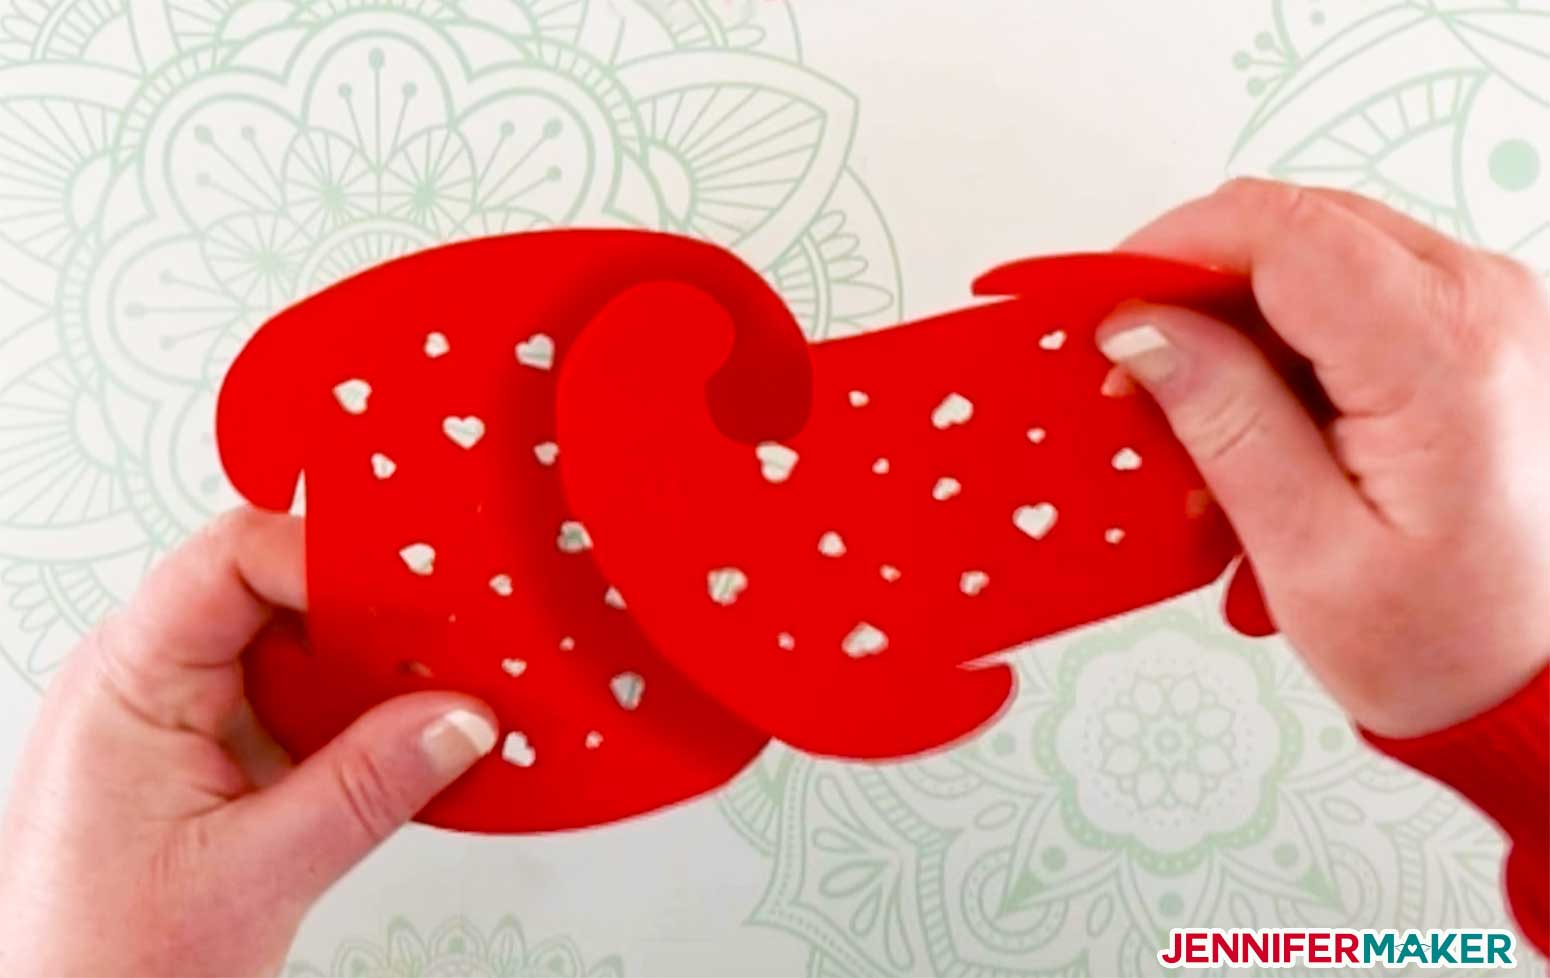
Note: You must rotate the piece UP (counter clockwise).
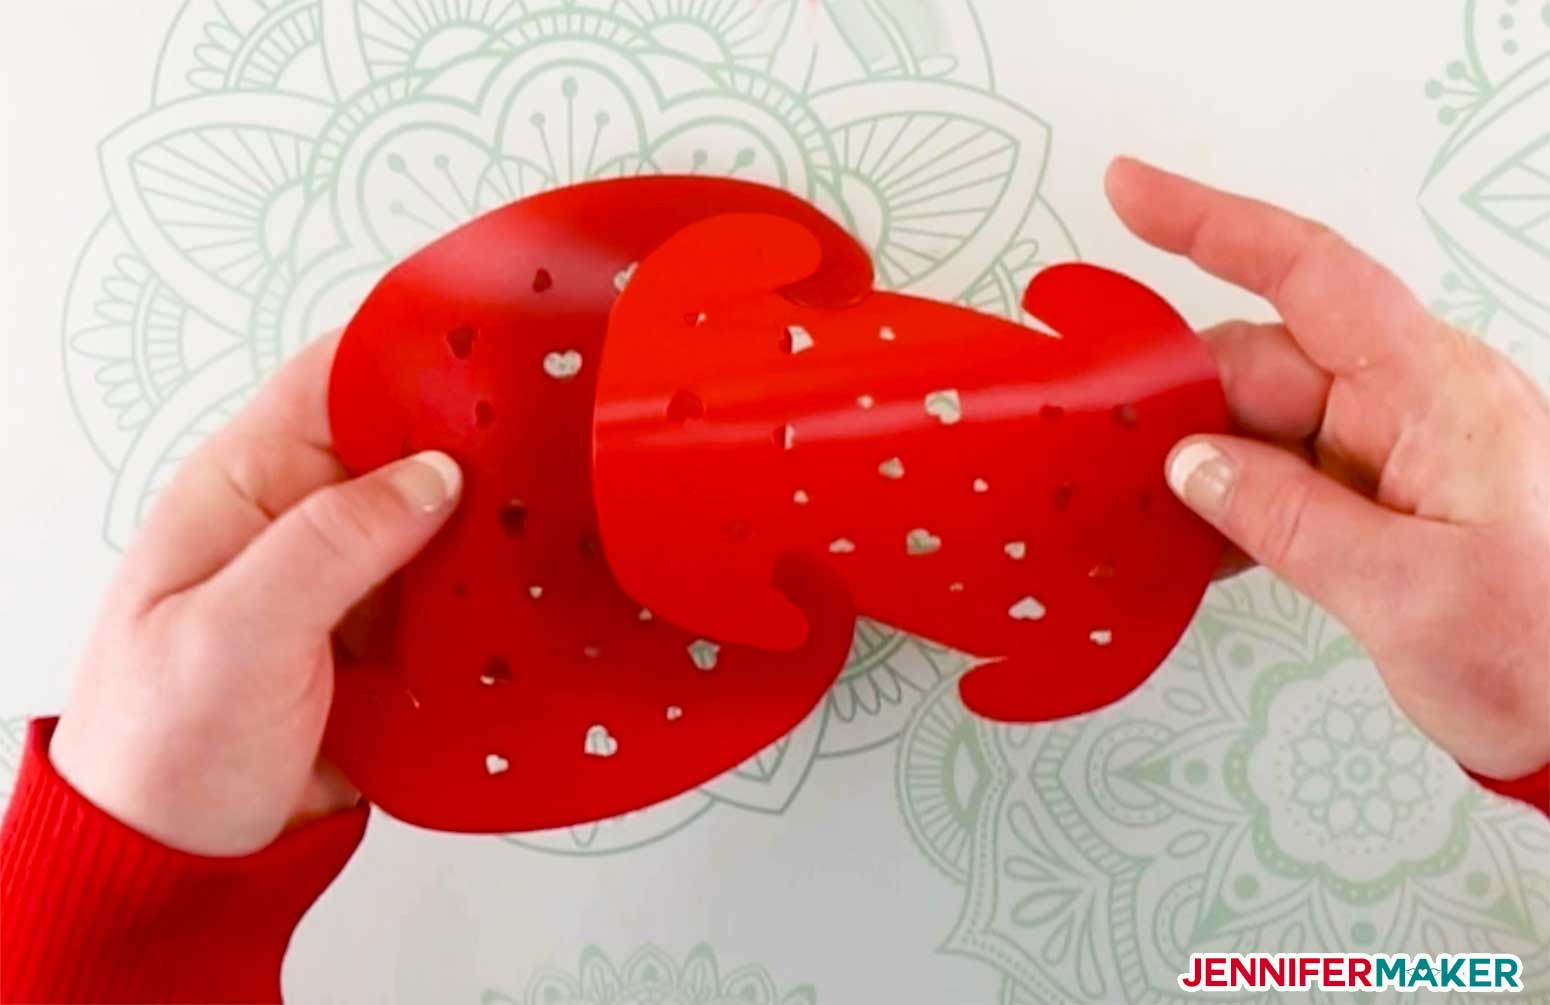
Adjust your DIY Puzzle Lamp so that the second piece is now in your left hand at a vertical angle. Take your third piece, confirm your upward slant at the bottom, and turn it horizontally in a counter-clockwise position. Interlock the third piece into the right side of the second piece.
Again adjust your puzzle lamp so that your third piece is now in your left hand at a vertical angle. Take your fourth piece, confirm the upward slant at the bottom, and turn it horizontally in a counter-clockwise position. Interlock the fourth piece into the right side of the third piece.
To complete your first layer, repeat the step to insert your fifth piece. Once you interlock it into the right side of the fourth piece, you will also connect the bottom right corner of the fifth piece into the top left corner of the first piece.
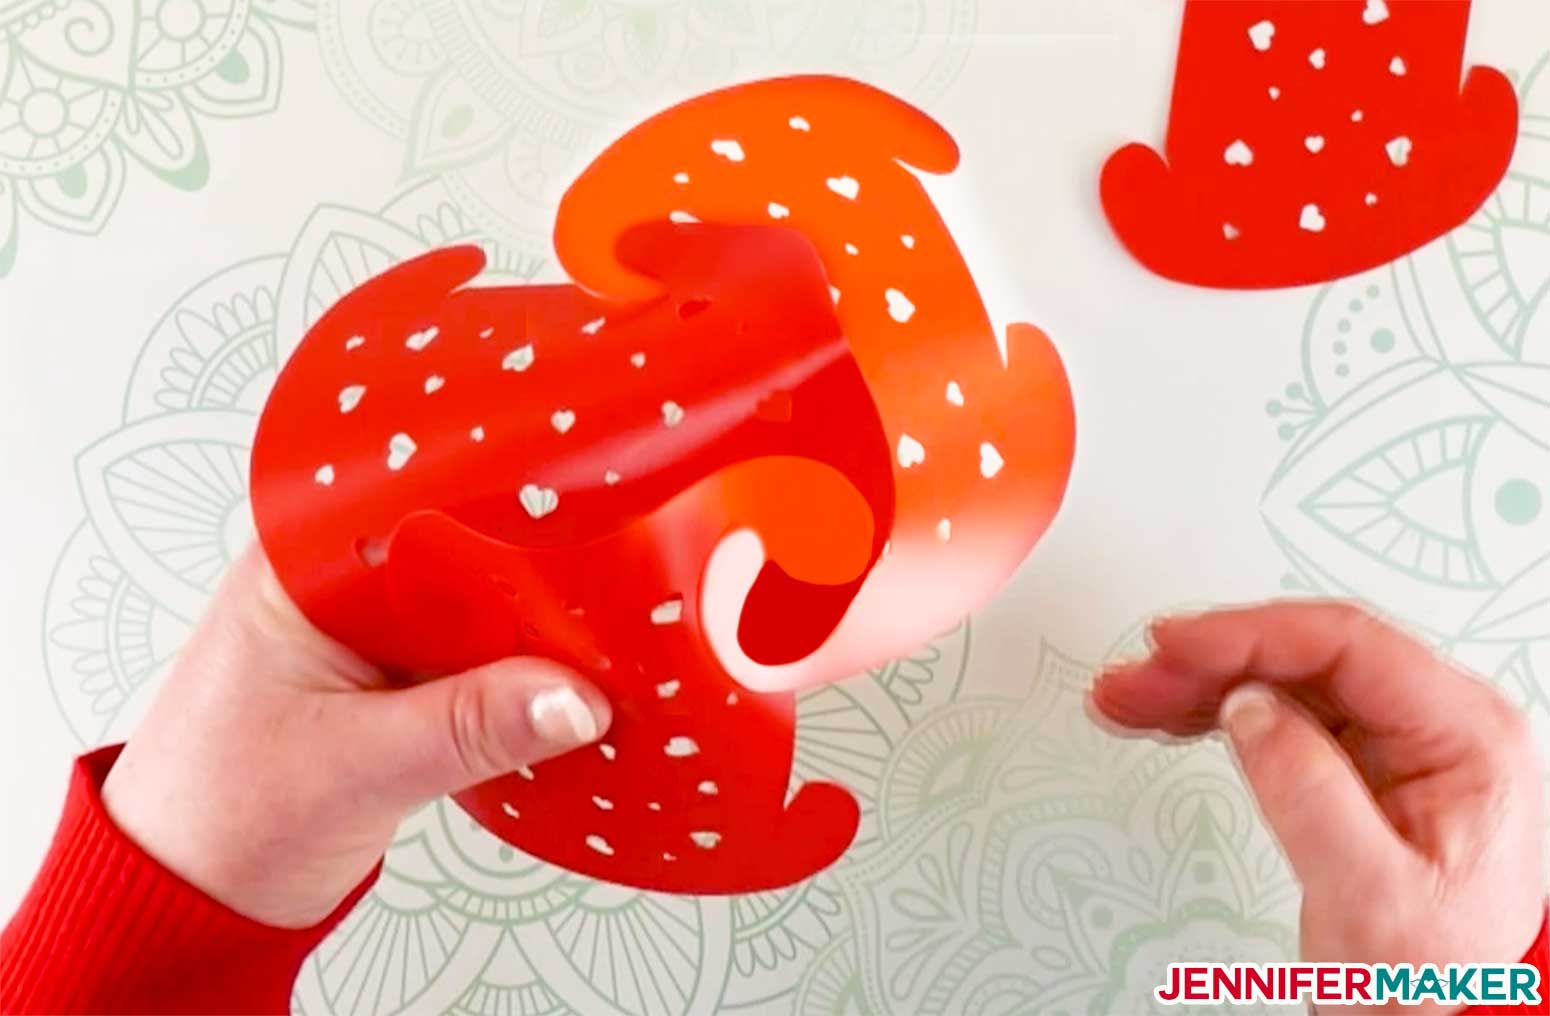
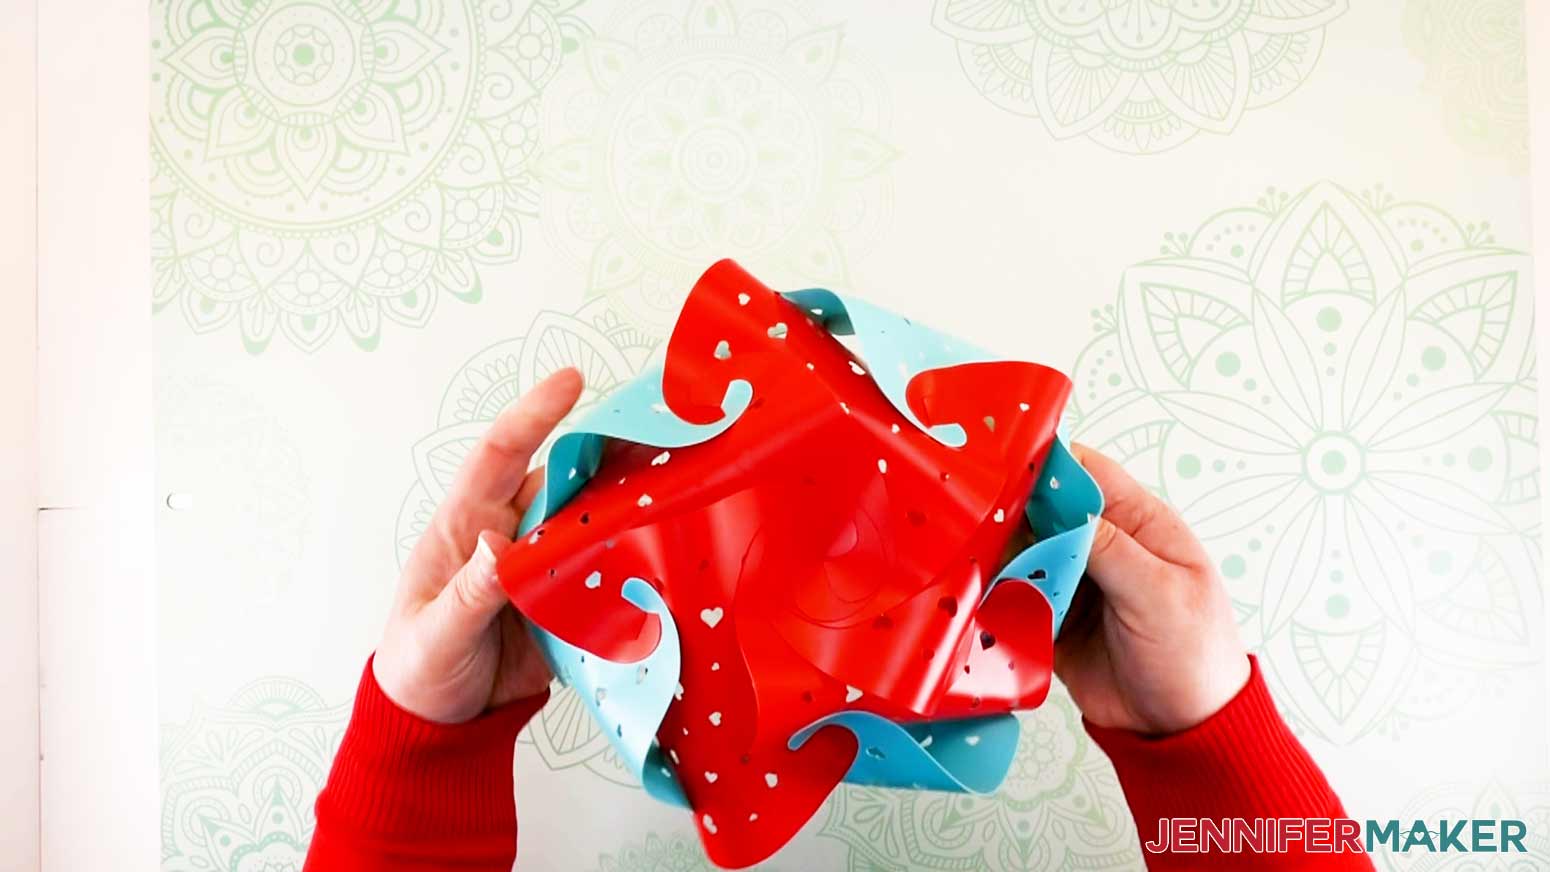
The first layer of your DIY Puzzle Lamp is now complete! You should notice a spiral in the center where all five pieces connect. Each piece will also have an unconnected corner and the shape will look like a 5-point star.
SECOND ROW
Set out your next five pieces with the top and bottom at an upward angle. For this layer, I chose a teal/green color. The color may look like a light blue on your screen, but it really was teal/green!
Before picking up your pieces, look at your first layer and identify an L-shaped area between your pieces. These areas are where the pieces for the second layer of the puzzle lamp will be attached.
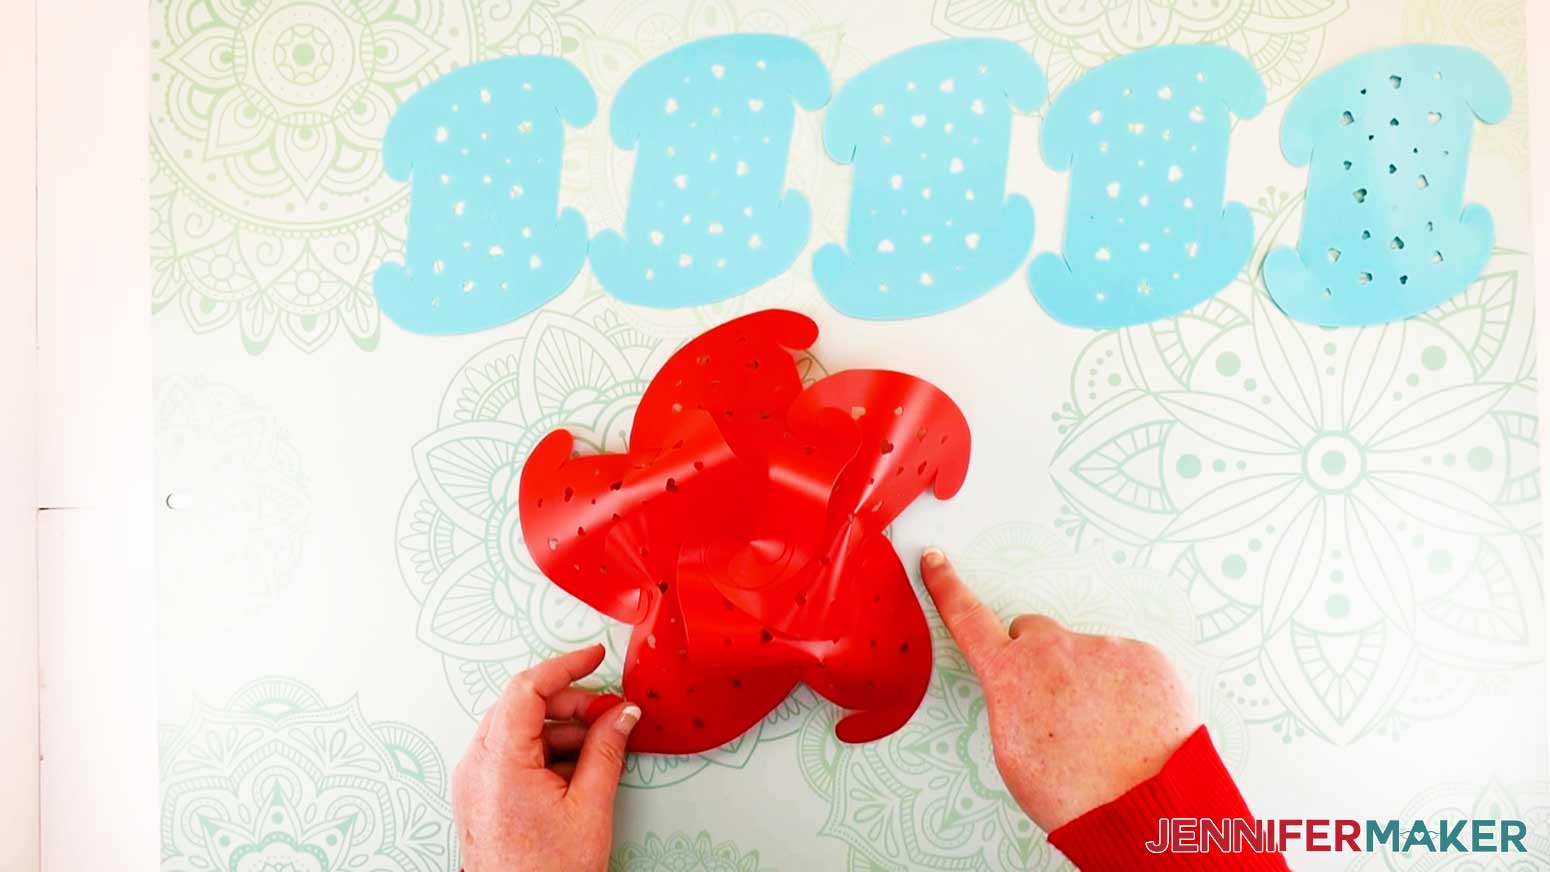
Hold the first layer in your left hand. In your right hand, confirm your first puzzle piece is slanted upward. Interlock the top left corner into the joint where two red pieces are connected in your first layer. The bottom left corner will interlock into a joint where a red piece is not connected in the first layer.
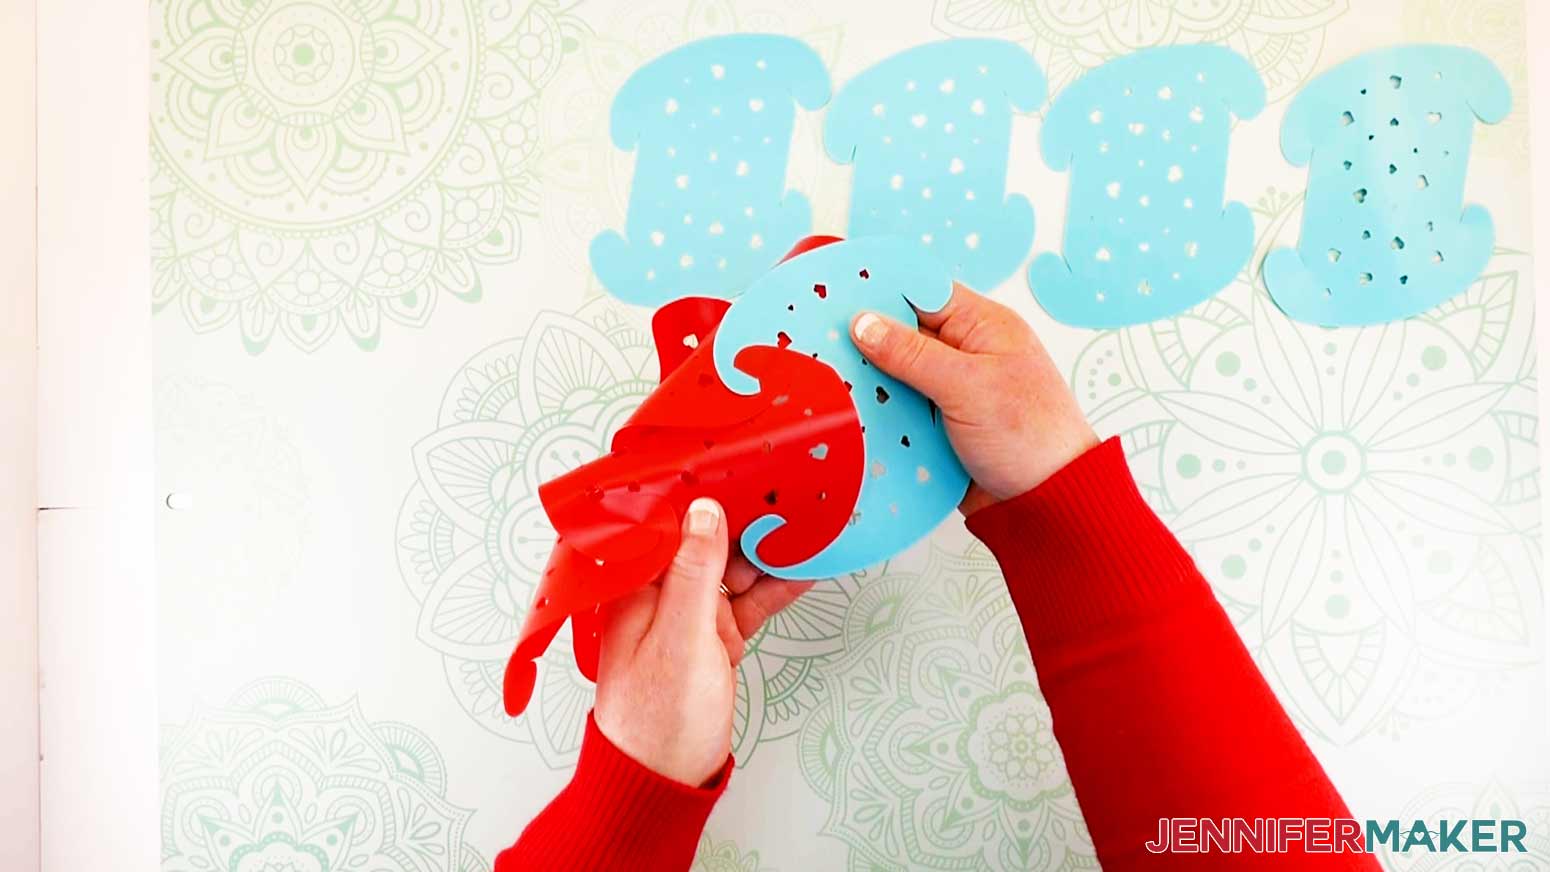
Your teal/green piece will position behind a red piece. Connect the top right to the first layer.
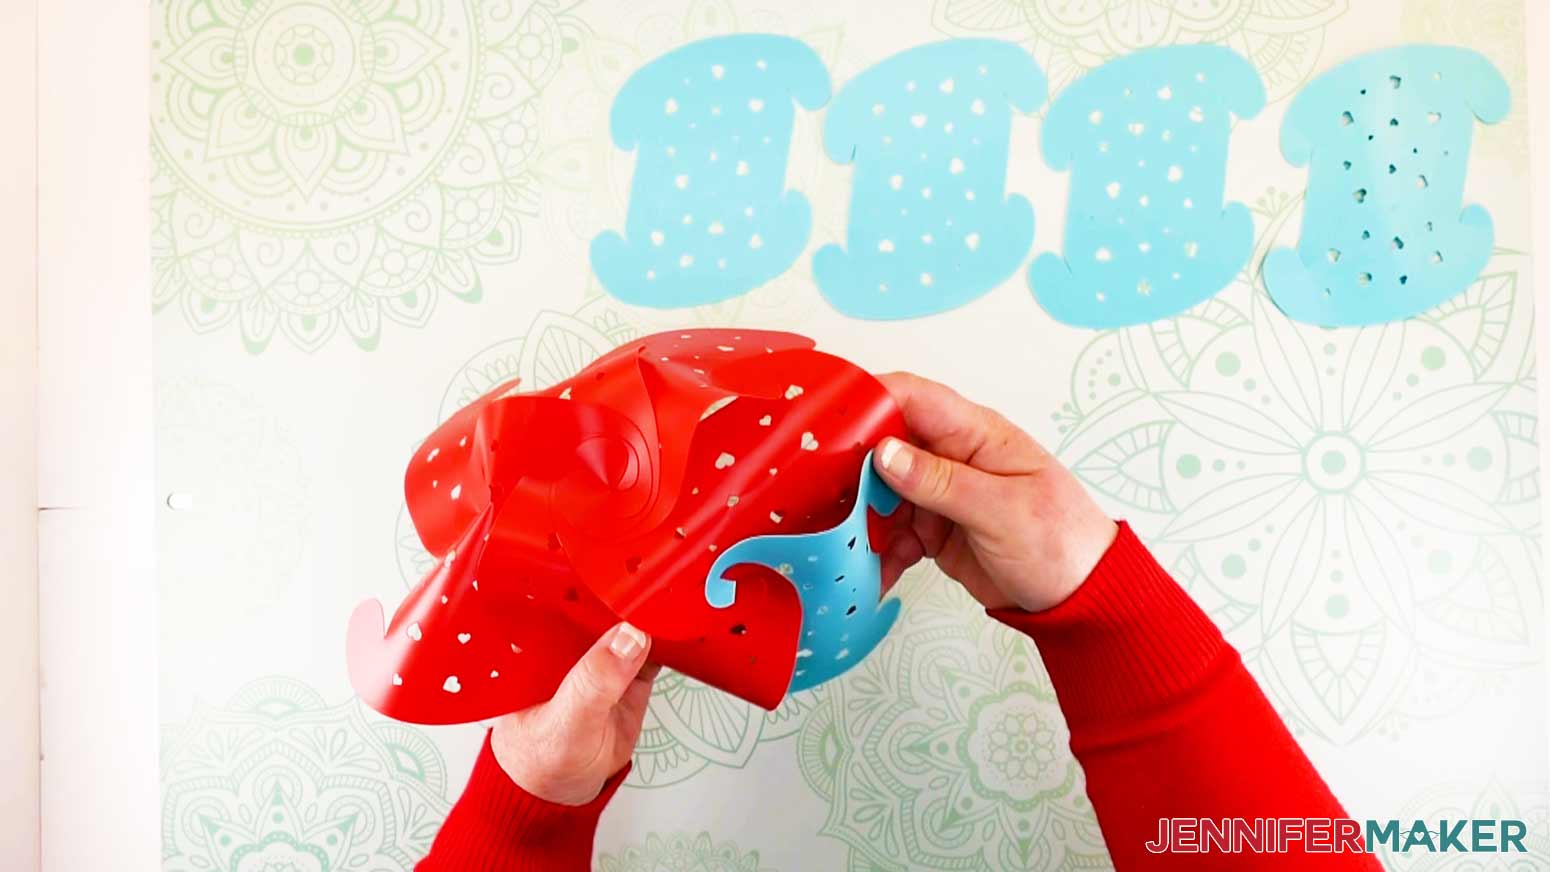
With the open part of your DIY Puzzle Lamp facing down, rotate it to work on the section to the right of your first piece. Pick up your second piece and confirm the upward slant. Like the first piece, interlock the top left corner into the joint where two red pieces are connected in your first layer. The bottom left corner will interlock into the joint where your red and teal/green just connected. Lastly, connect the top right corner into the open red corner.
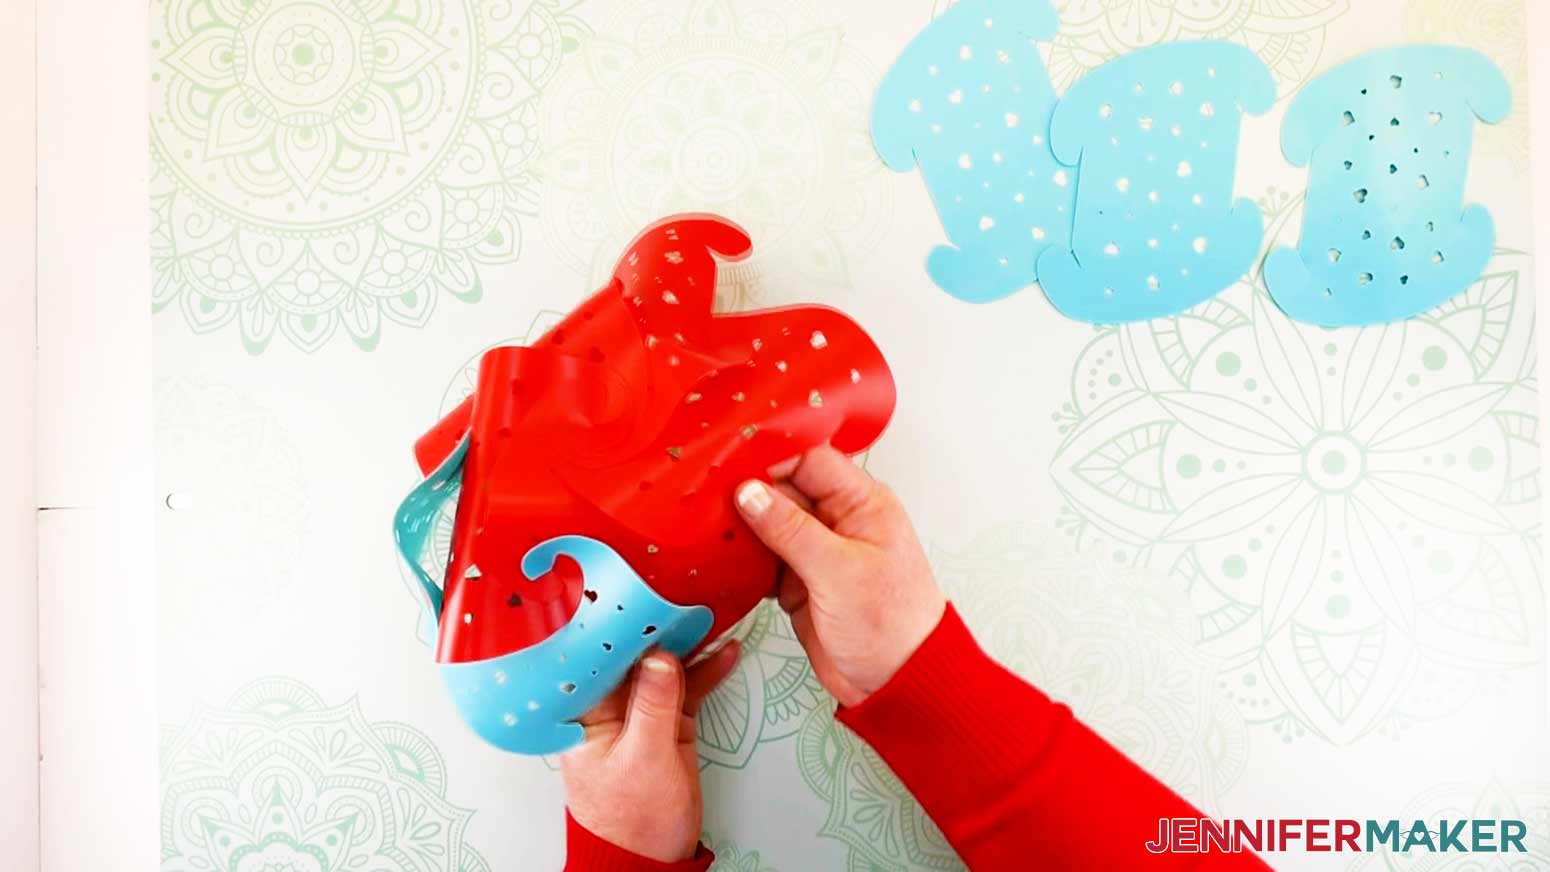
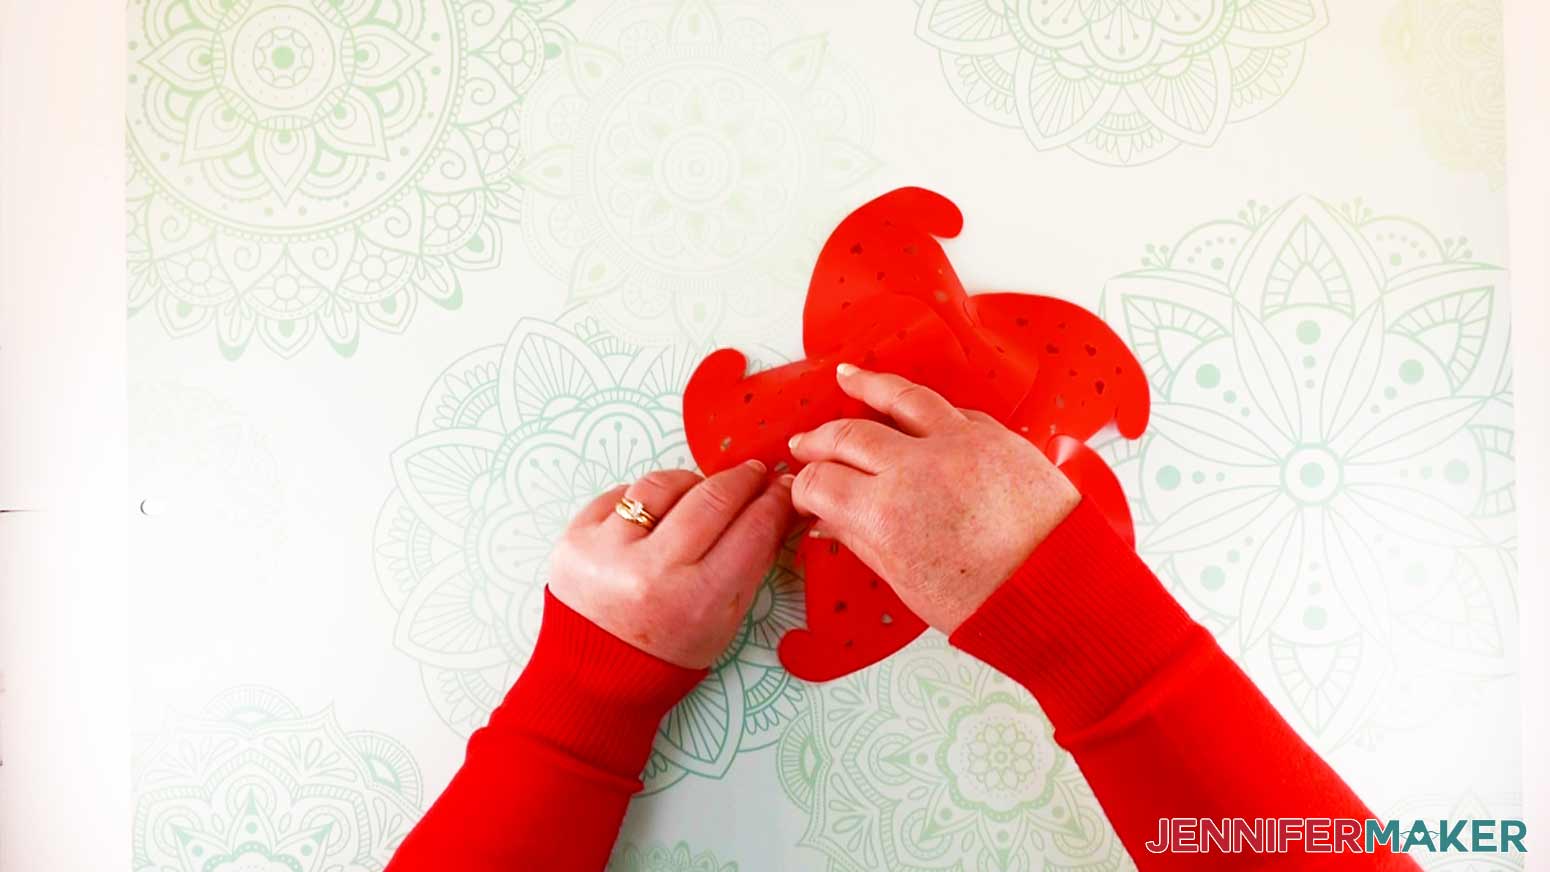
Continue the same process for the next three teal/green pieces. The lower right corner should be the only open/disconnected corner for all teal/green pieces. Your completed second layer of the DIY Puzzle Lamp should now look like a bowl!
THIRD ROW - PART 1
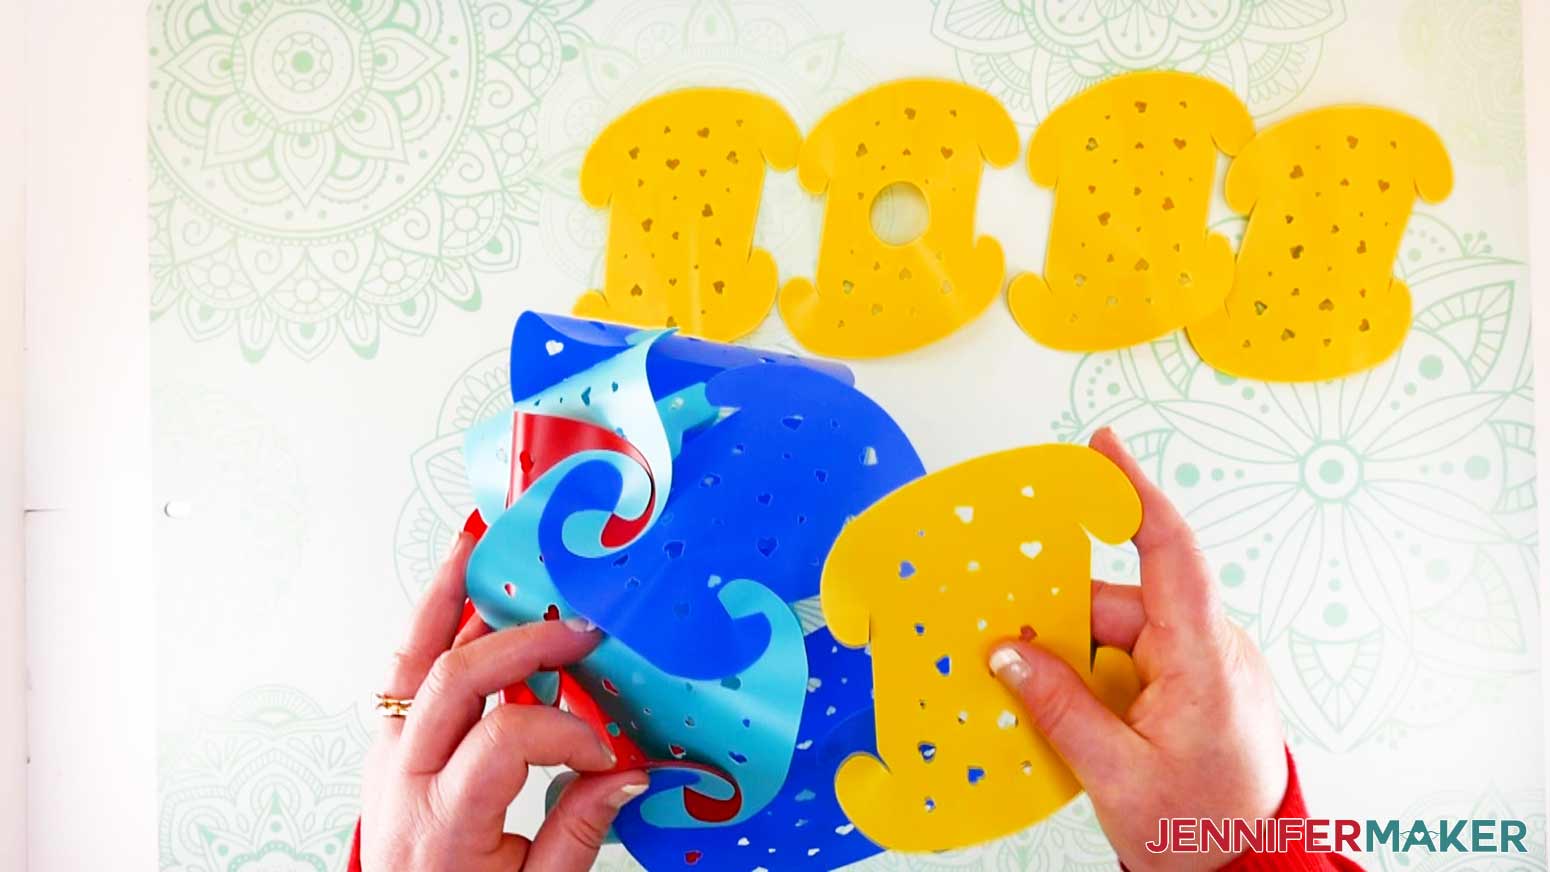
Set out your next pieces. For this layer, you will use two colors but you are going to work with one color at a time. First, I chose five blue pieces. Lay them out and confirm they slant upwards.
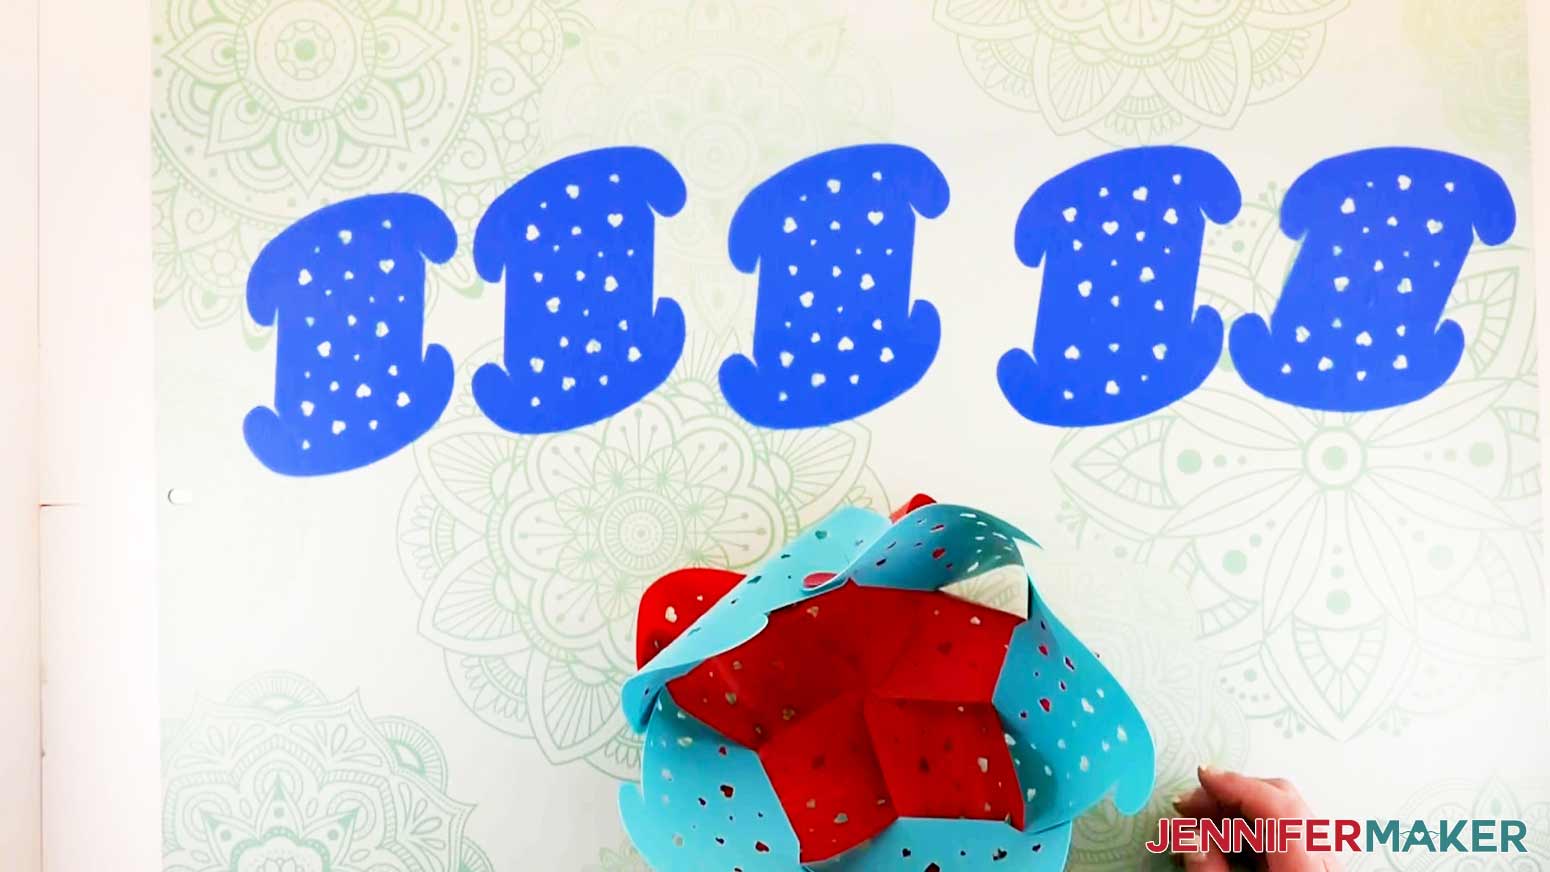
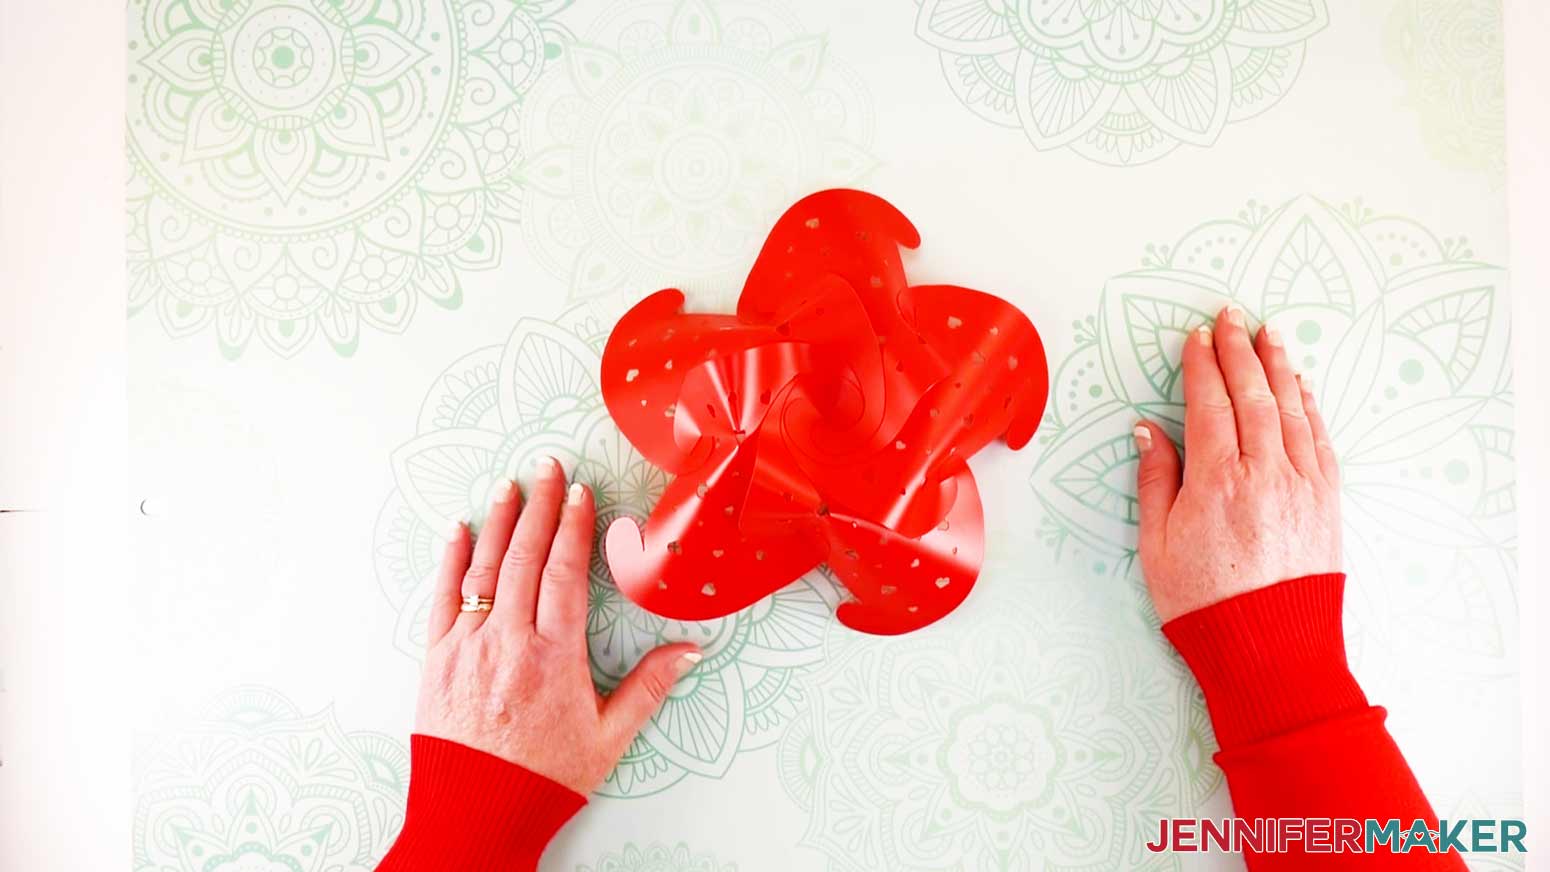
Once again, hold your puzzle lamp in your left hand, at a vertical angle, with the outer (red) part facing to the left. Take your first blue piece and connect the left corners along the horizontal side of a second layer (teal/green) piece.
Repeat this step for the remaining four pieces. Only the left side of your blue piece will be connected for this step. The blue pieces will appear to stick up vertically when this layer is complete.
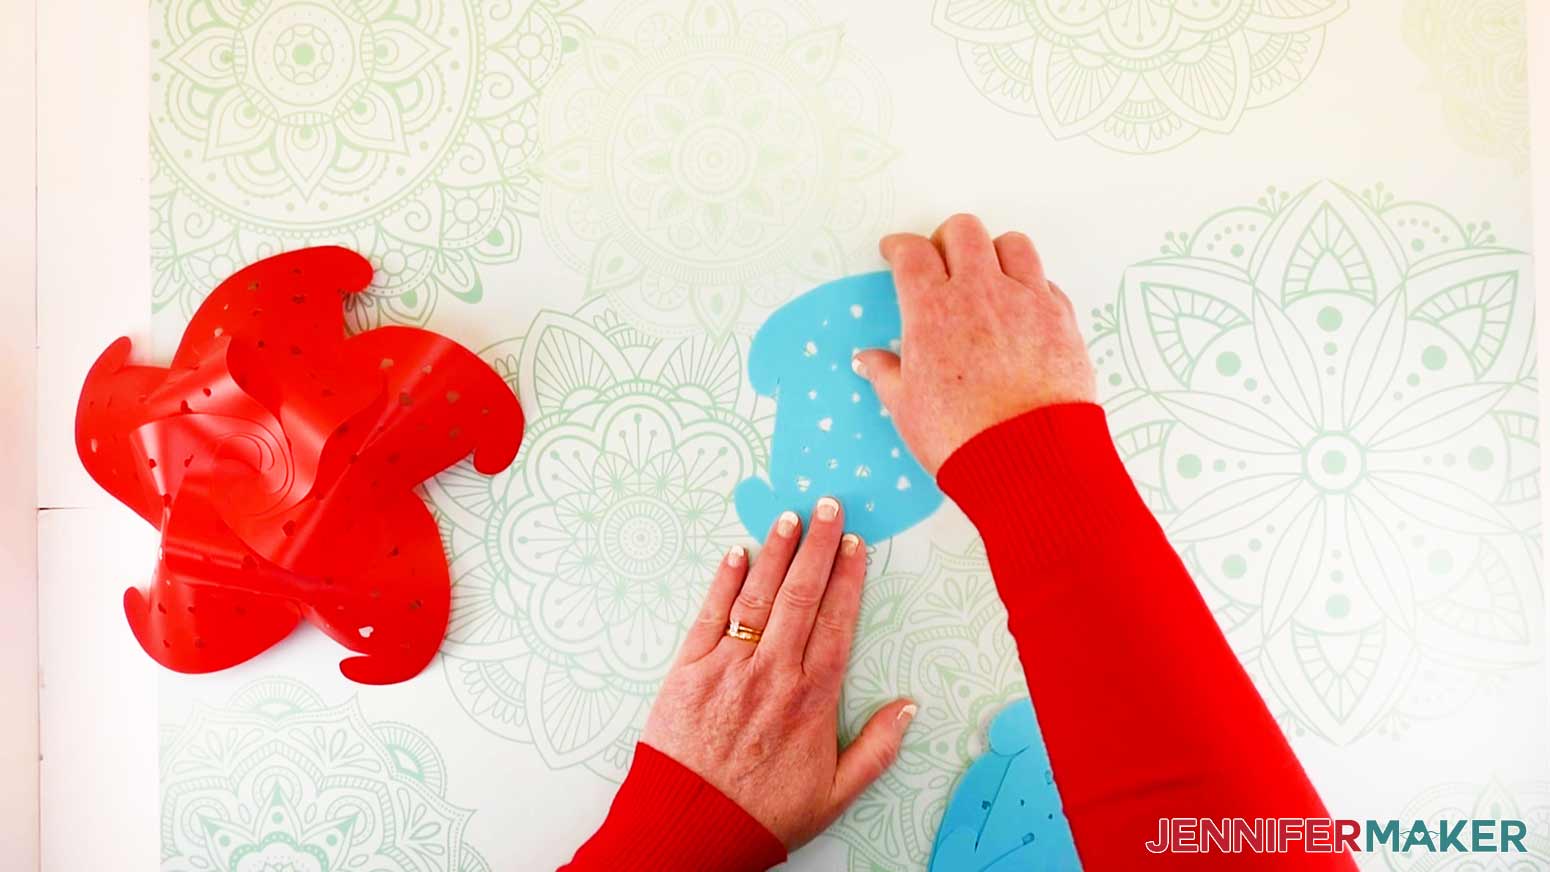
THIRD ROW - PART 2
Set out your next five pieces with an upward slant. I chose yellow. This layer of your DIY Puzzle Lamp will include the puzzle piece with the cutout for the light cord! When your lamp is held upright, these pieces are going to fit horizontally between the blue pieces that you just attached.
Hold your lamp with the red layer on the left and take your first yellow piece in a vertical position. Attach the piece to all four blue corners.
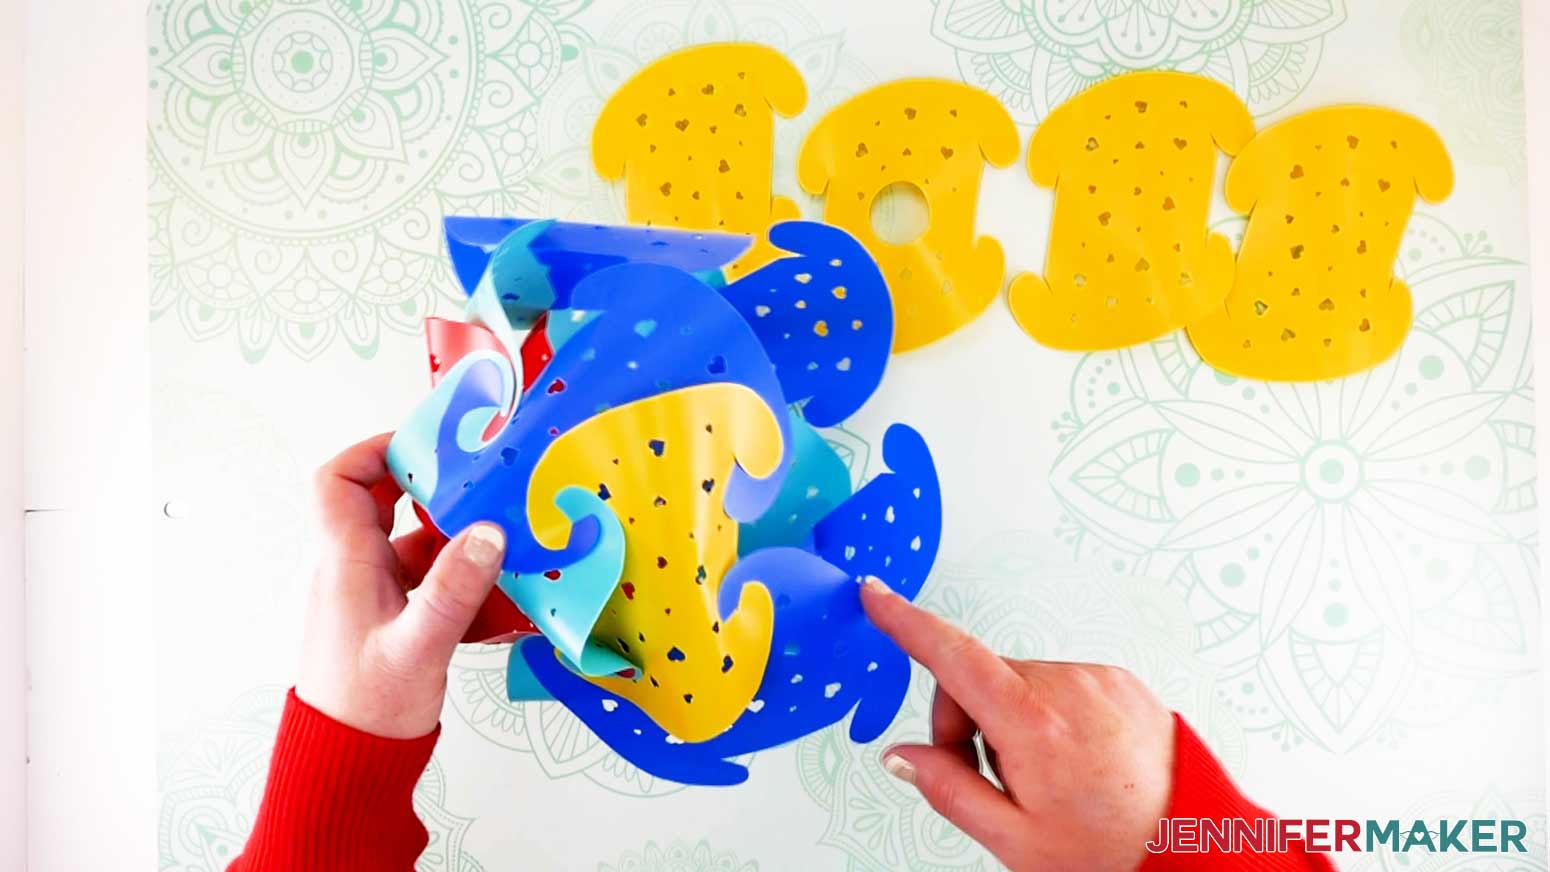
Rotate your lamp and repeat these steps for all of your yellow pieces. All four corners of each yellow piece will connect to four blue corners. It does not matter where the yellow piece with the circular cutout is placed in this layer.
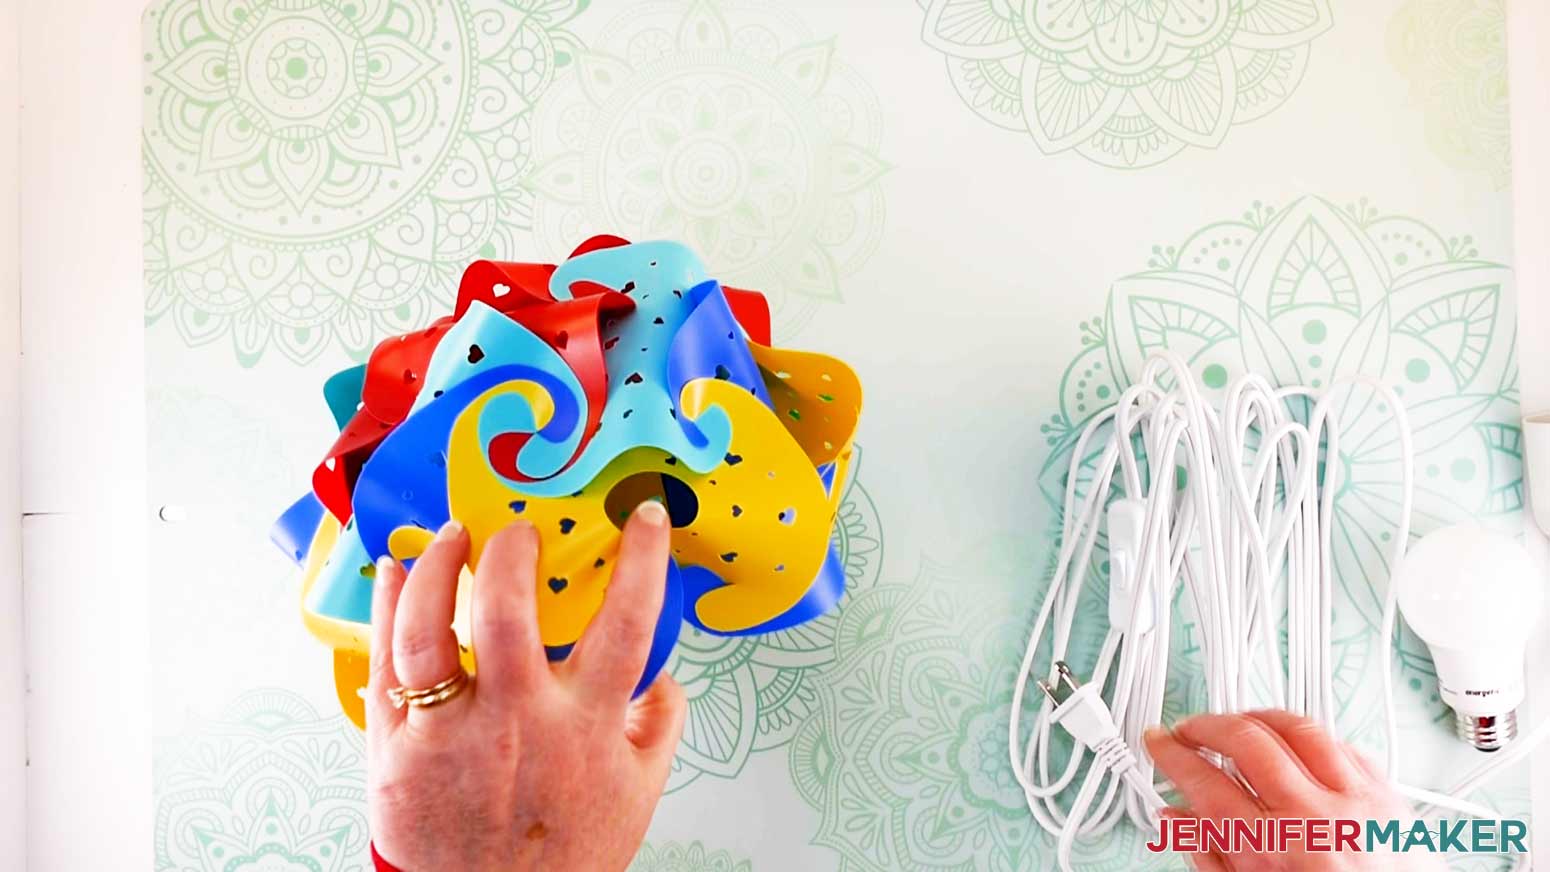
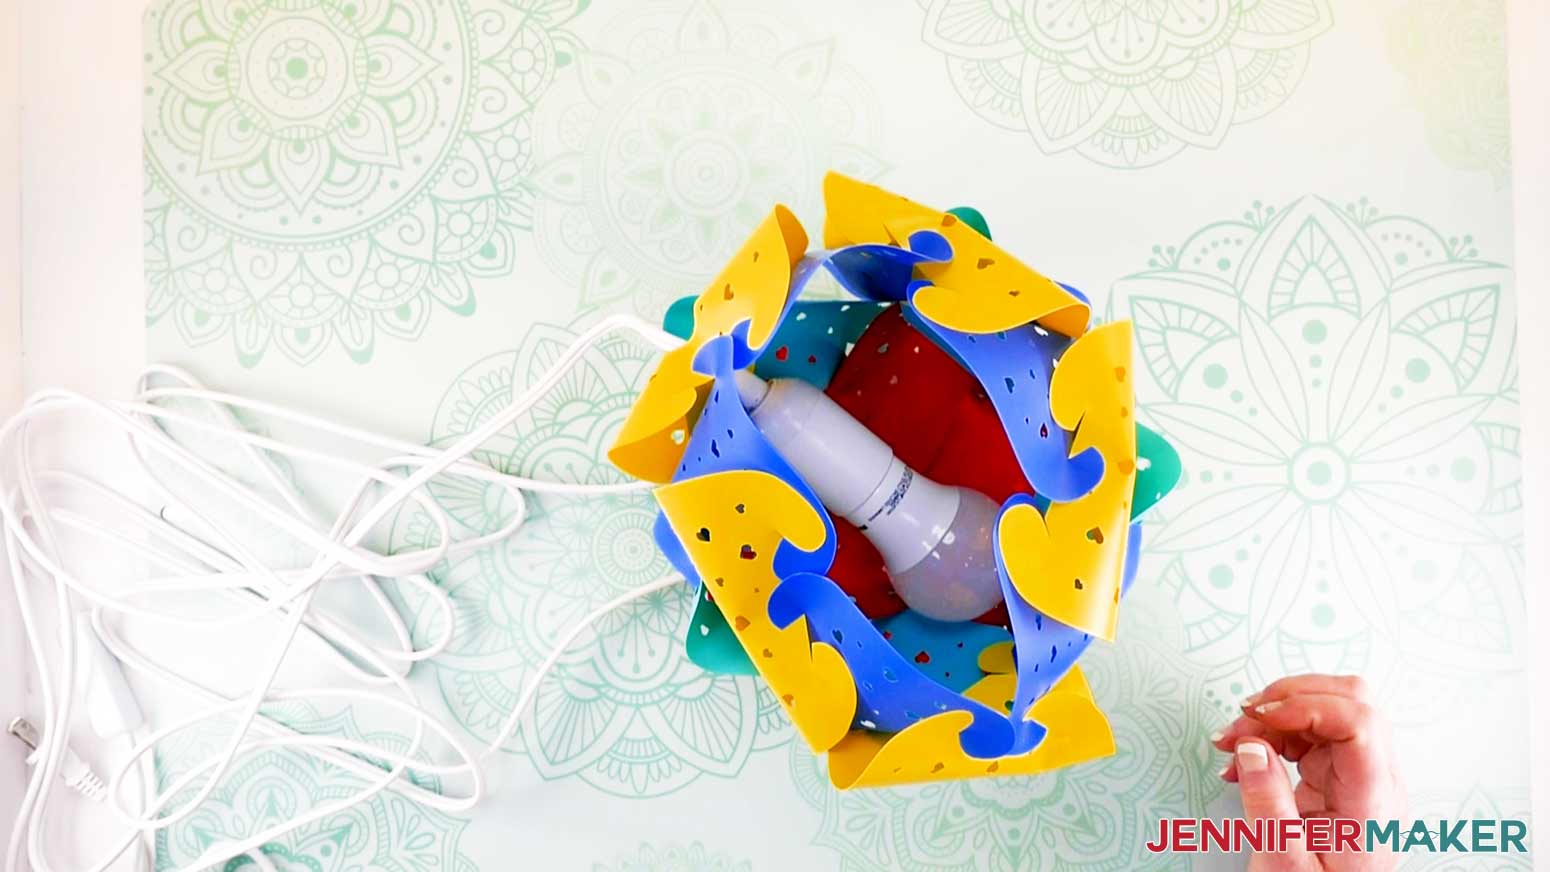
Before moving on in the assembly, you need to insert your hanging lantern cord and light bulb through your yellow cutout. Take the wall plug end of the cord, feed it through the cutout from the inside and gently pull it through the cutout.
Once your cord is pulled all the way through, attach your light bulb. Gently place the bulb inside the lamp.
FOURTH ROW
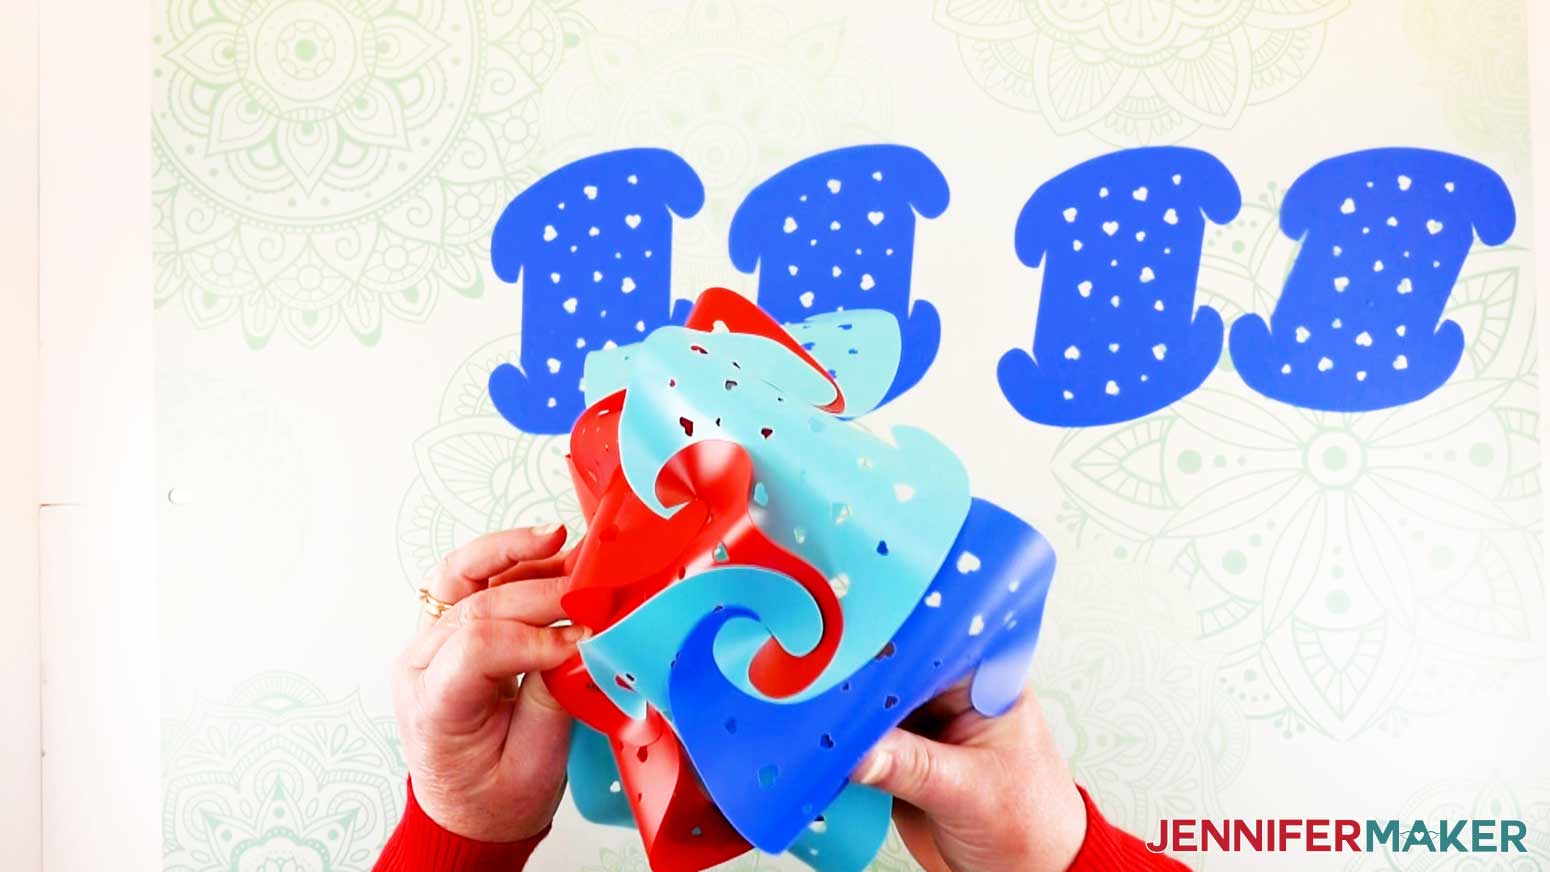
Set out your next five pieces. For this layer, I chose to use teal/green again. These pieces will connect horizontally behind each blue edge from the third layer.
With your DIY Puzzle lamp sitting upright in front of you, take your first piece and confirm your upward slant. Turn the piece counter-clockwise to the left and connect the bottom two corners to the corners of a blue piece. Connect the upper left corner of the teal/green piece to the blue/yellow joint from the piece to the left.
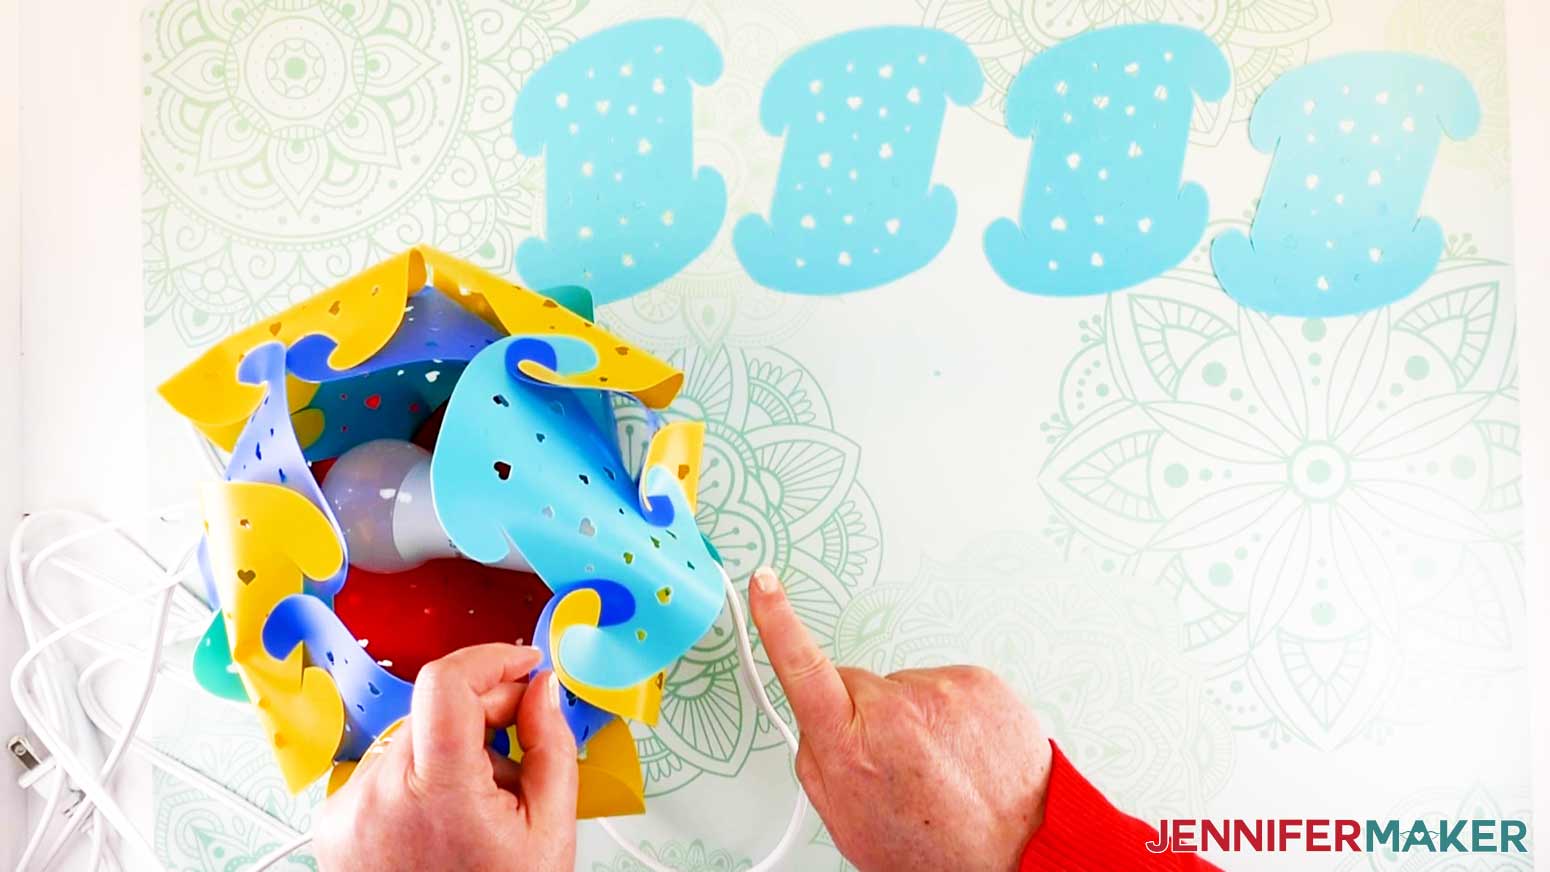
For the next three pieces, turn your lamp, rotate your assembly piece counter-clockwise to a horizontal position, and repeat the connection.
Your fifth piece will connect the row together. Insert your piece the same way. The upper right corner of each teal/green piece should be an unconnected corner.
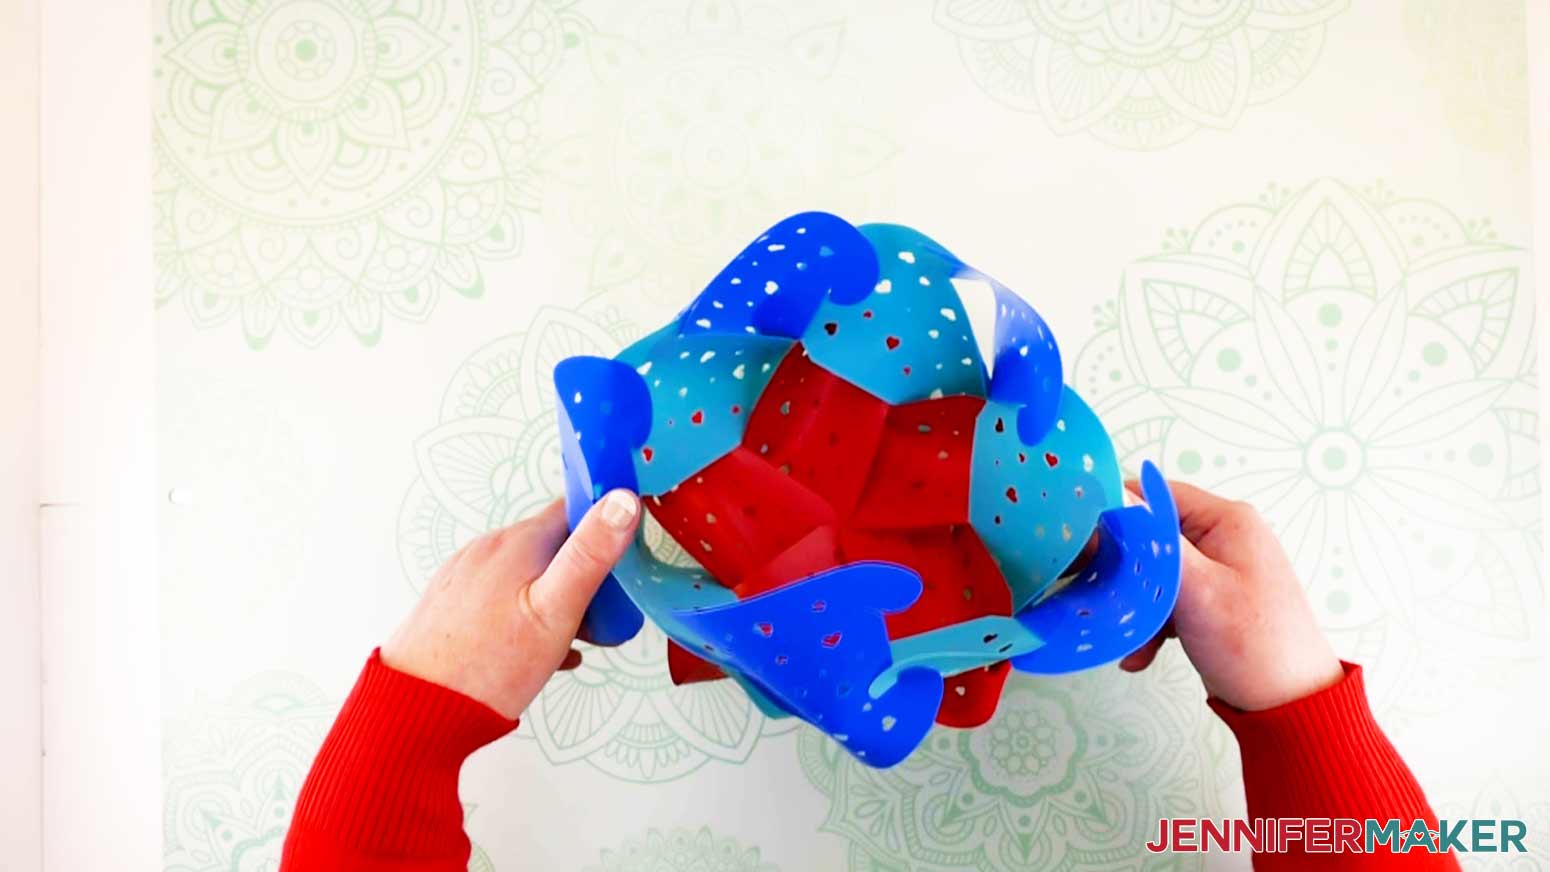
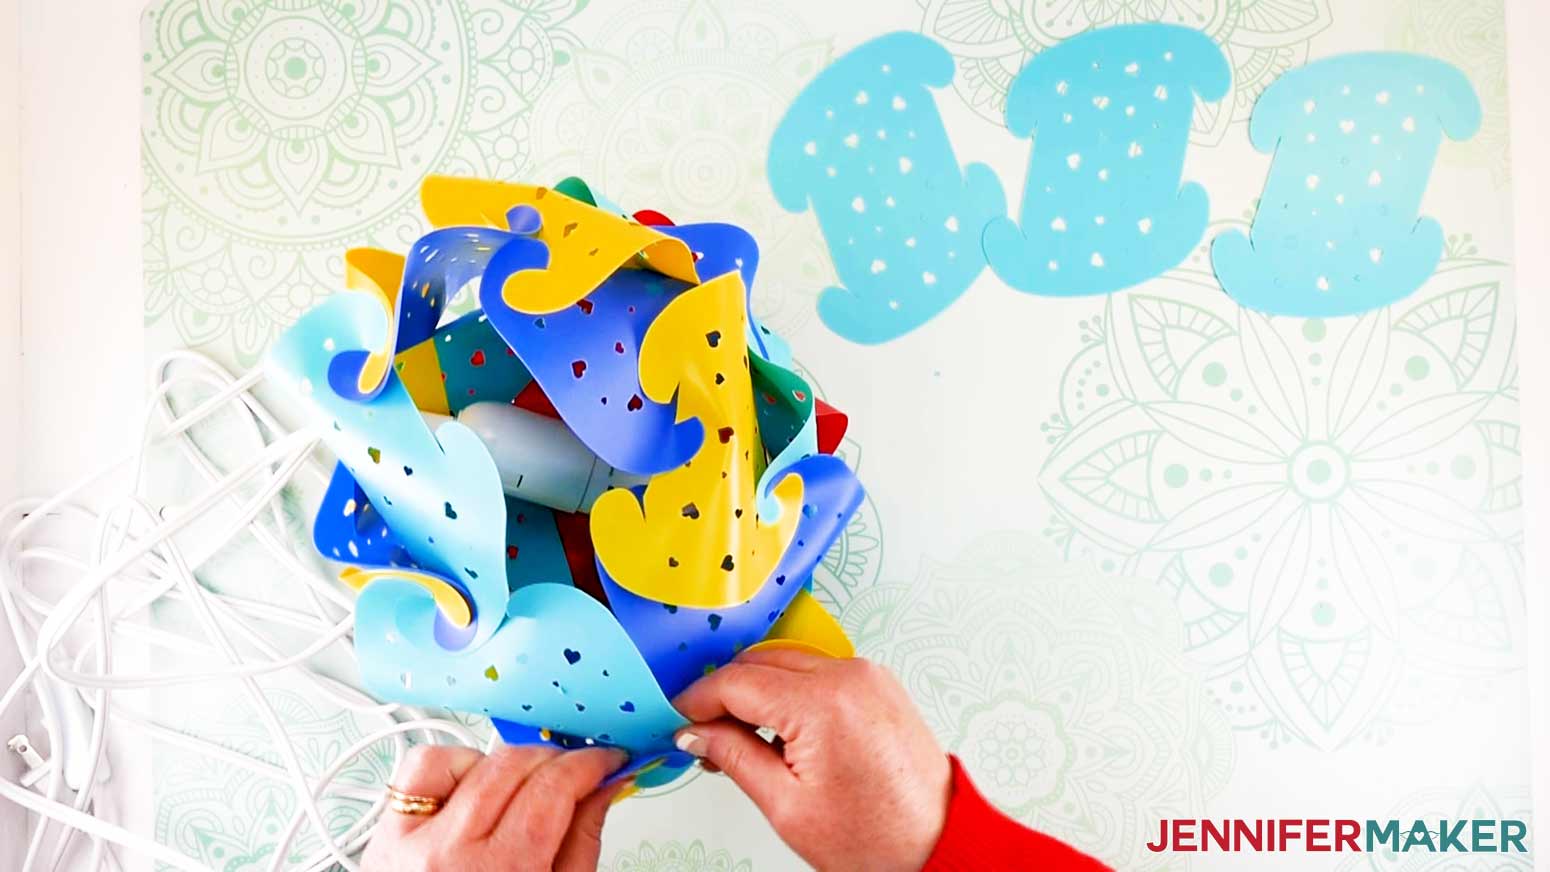
FIFTH ROW
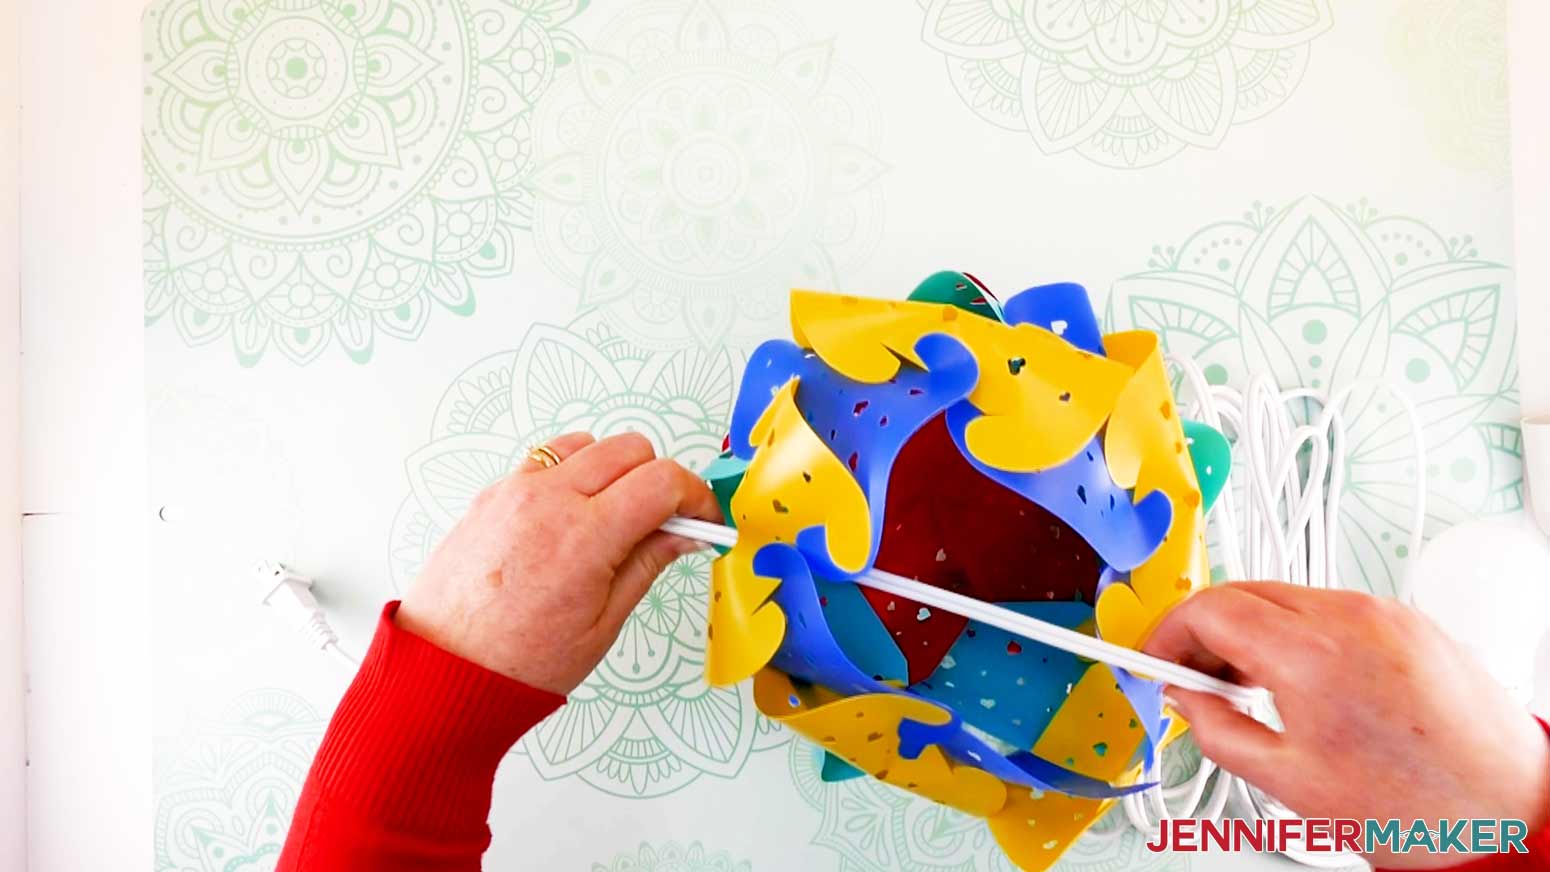
You've reached the final row to complete your puzzle lamp! Now is the time to make sure your lantern cord and light bulb are properly inserted because you are about to close your lamp.
Set out your last five pieces. For this layer, I chose to use red again. These pieces will connect horizontally behind each teal/green edge from the fourth layer.
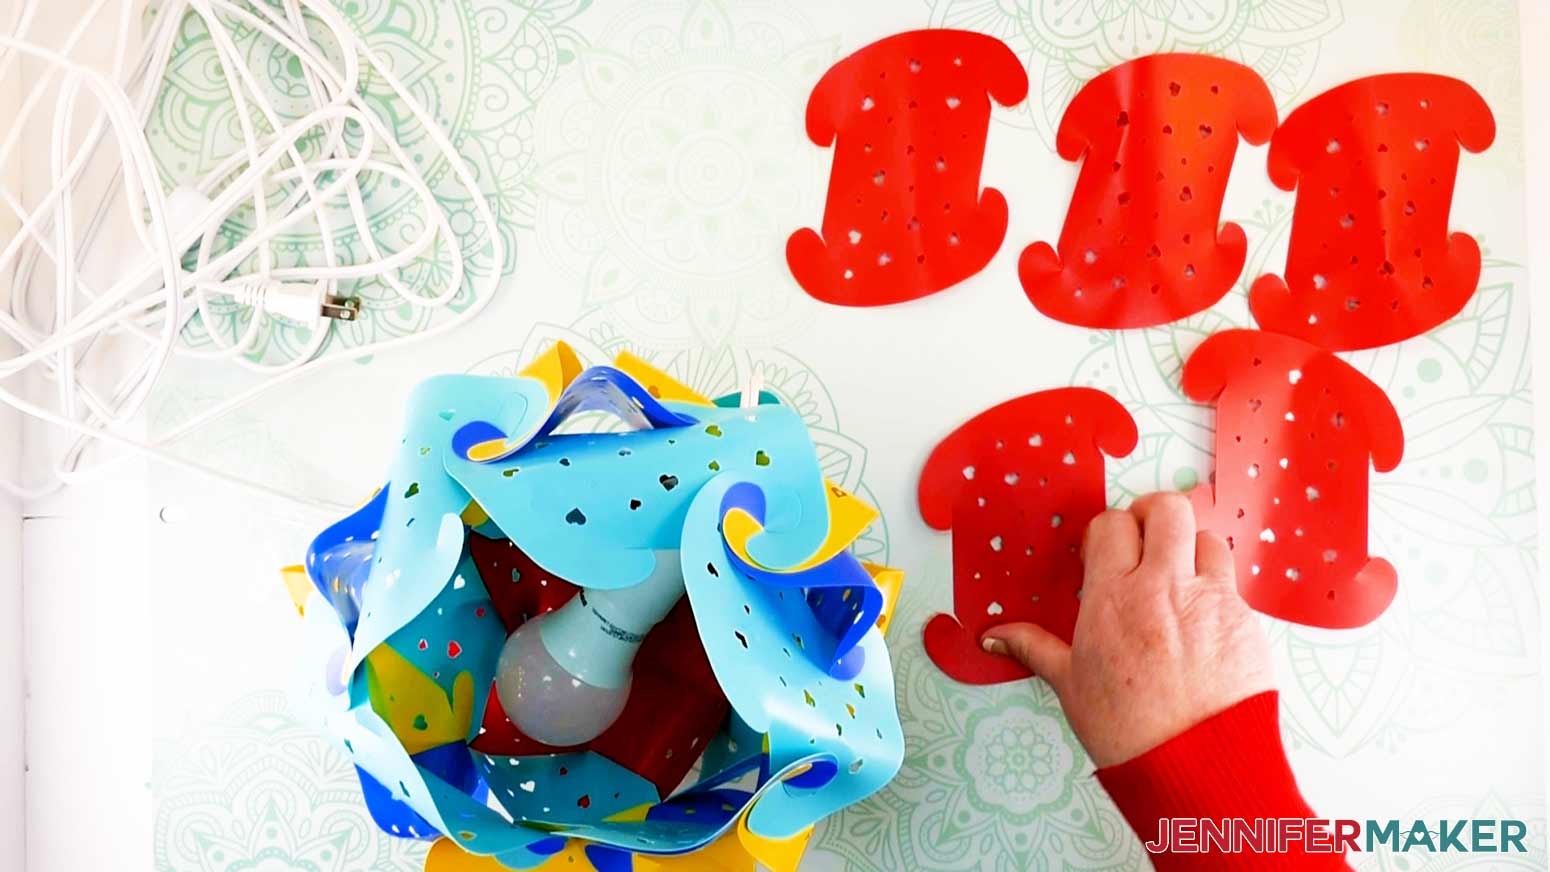
Holding your first piece vertically with an upward slant, connect the lower-left corner to a teal/green/blue/yellow joint. The upper left corner will connect to an open teal corner. The lower right corner will connect to the teal piece to the right.
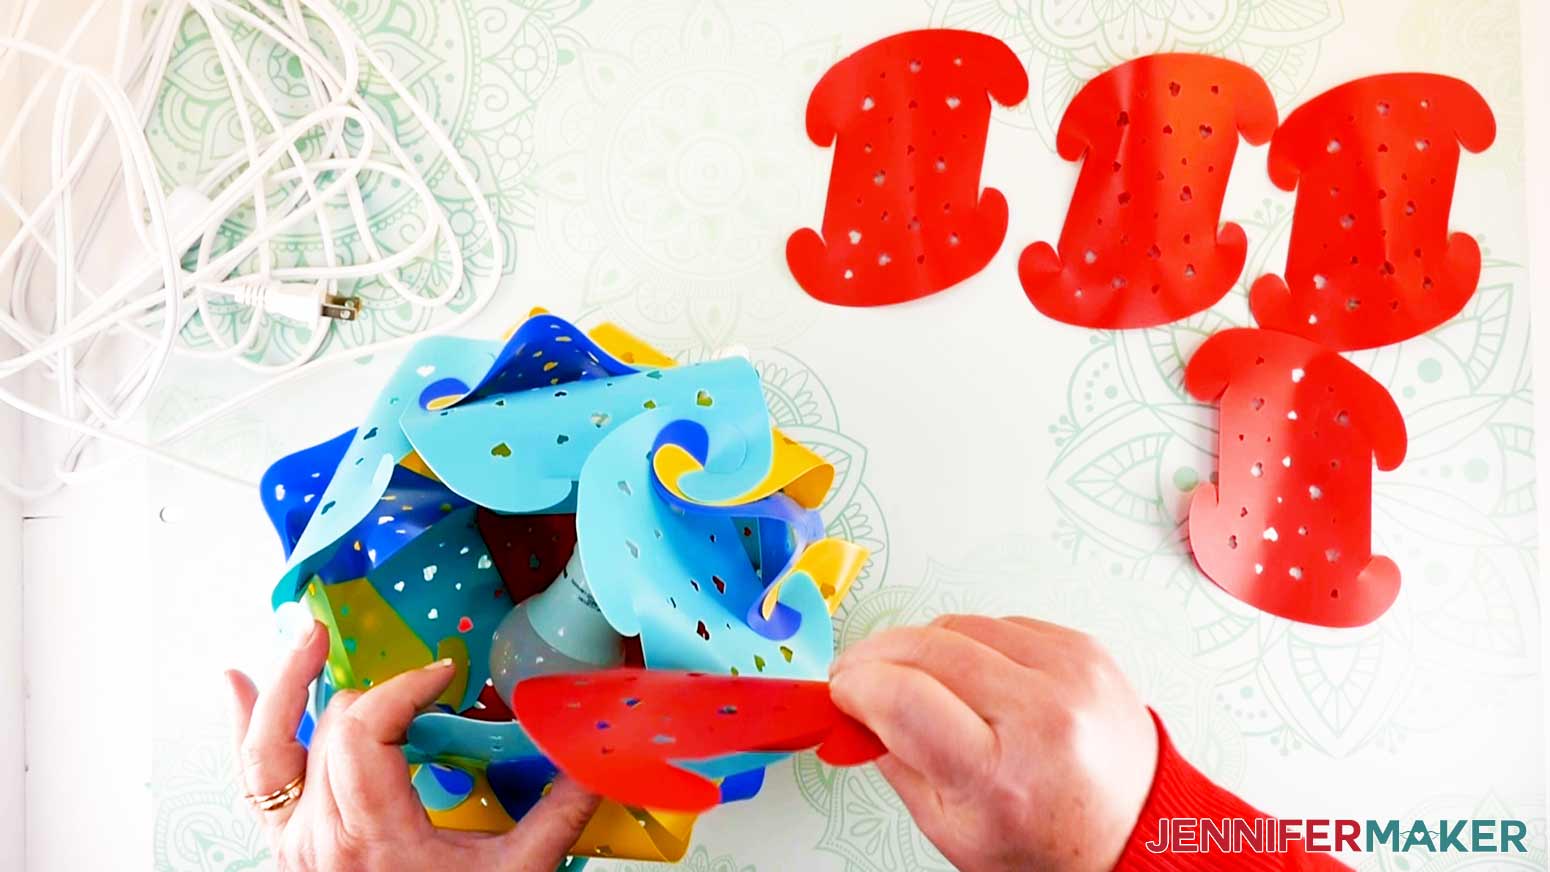
Rotate your DIY Puzzle Lamp to insert your second piece. Again, connect the lower-left corner to a teal/blue/yellow joint. Connect your upper left corner to the blue/teal/green joint. Connect your lower right corner to the open blue piece to the right. This time, your upper right corner will connect to the open red corner of your first piece.
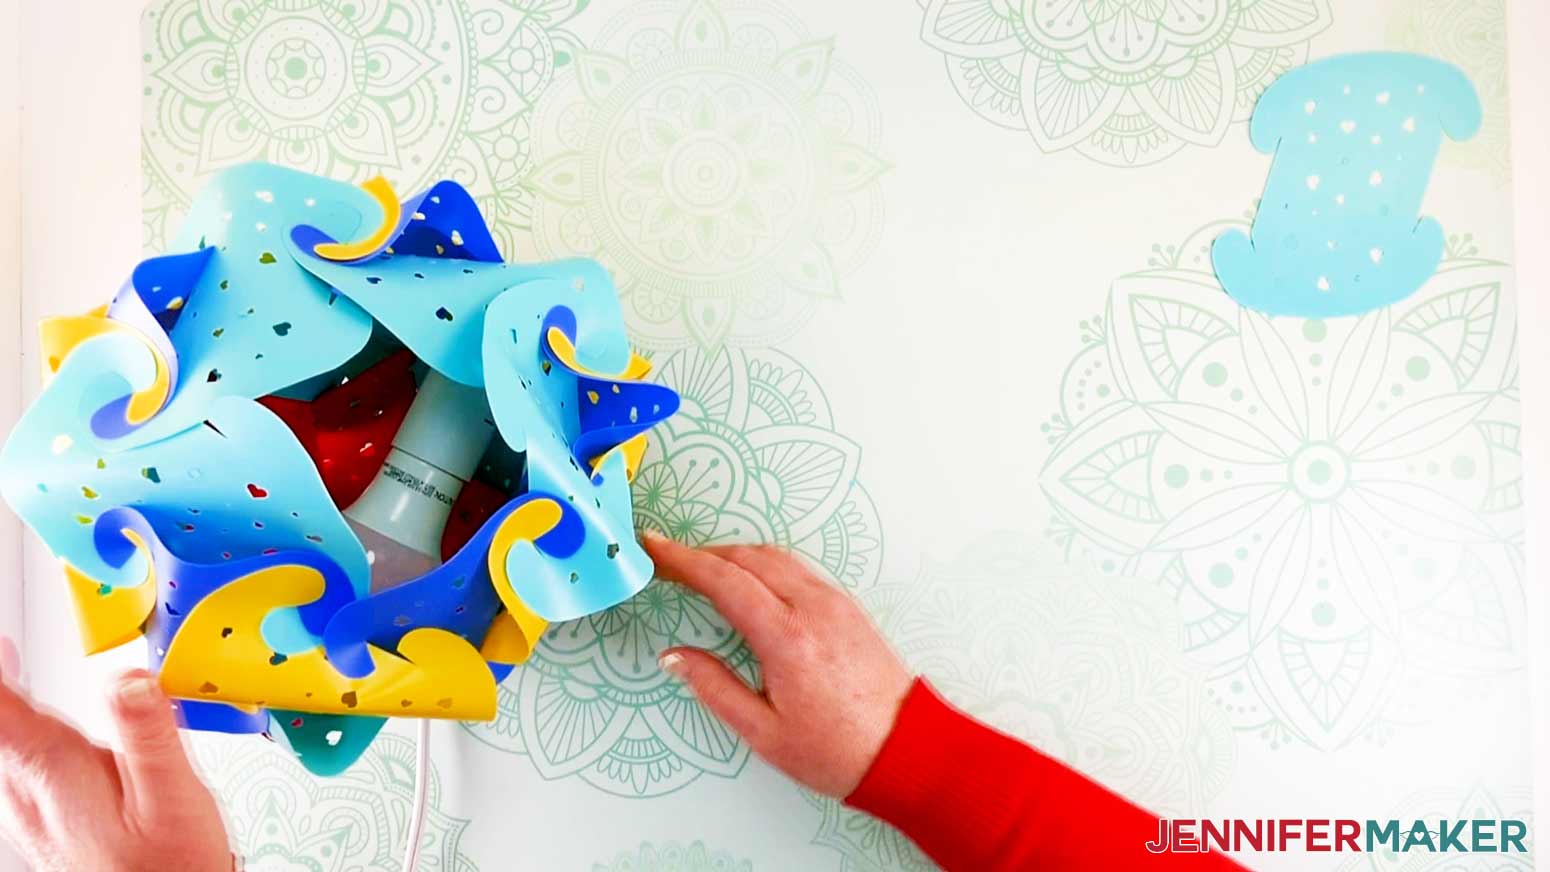
Repeat the steps for your third and fourth pieces. When they're in place, your puzzle lamp should look like this.
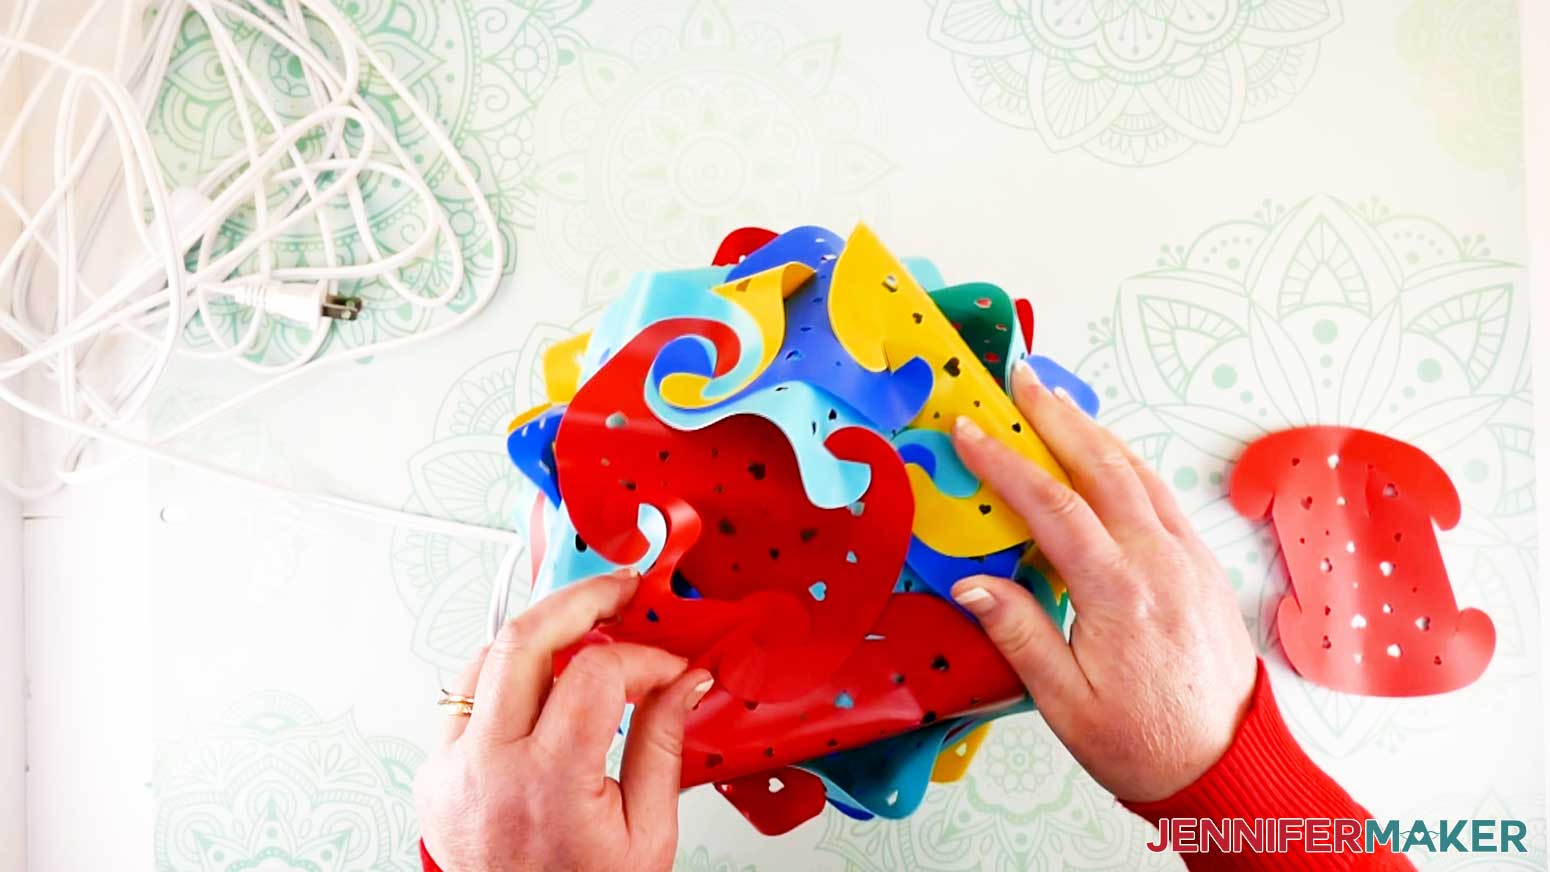
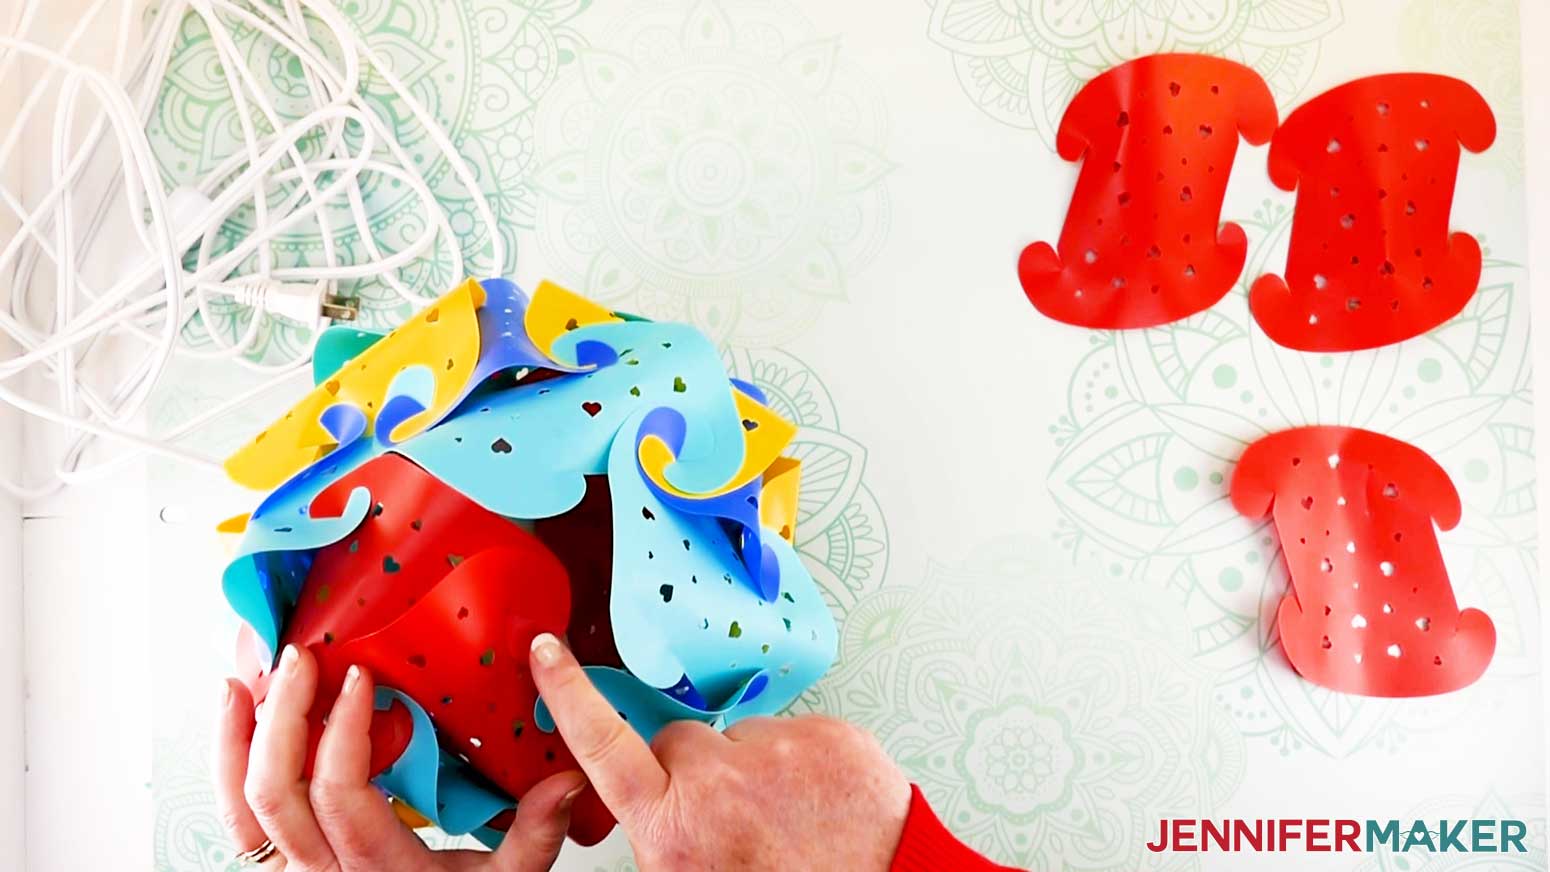
Your final piece of the IQ lamp is a little tricky. You need to tuck your fifth piece underneath your first piece and connect the lower right corner.
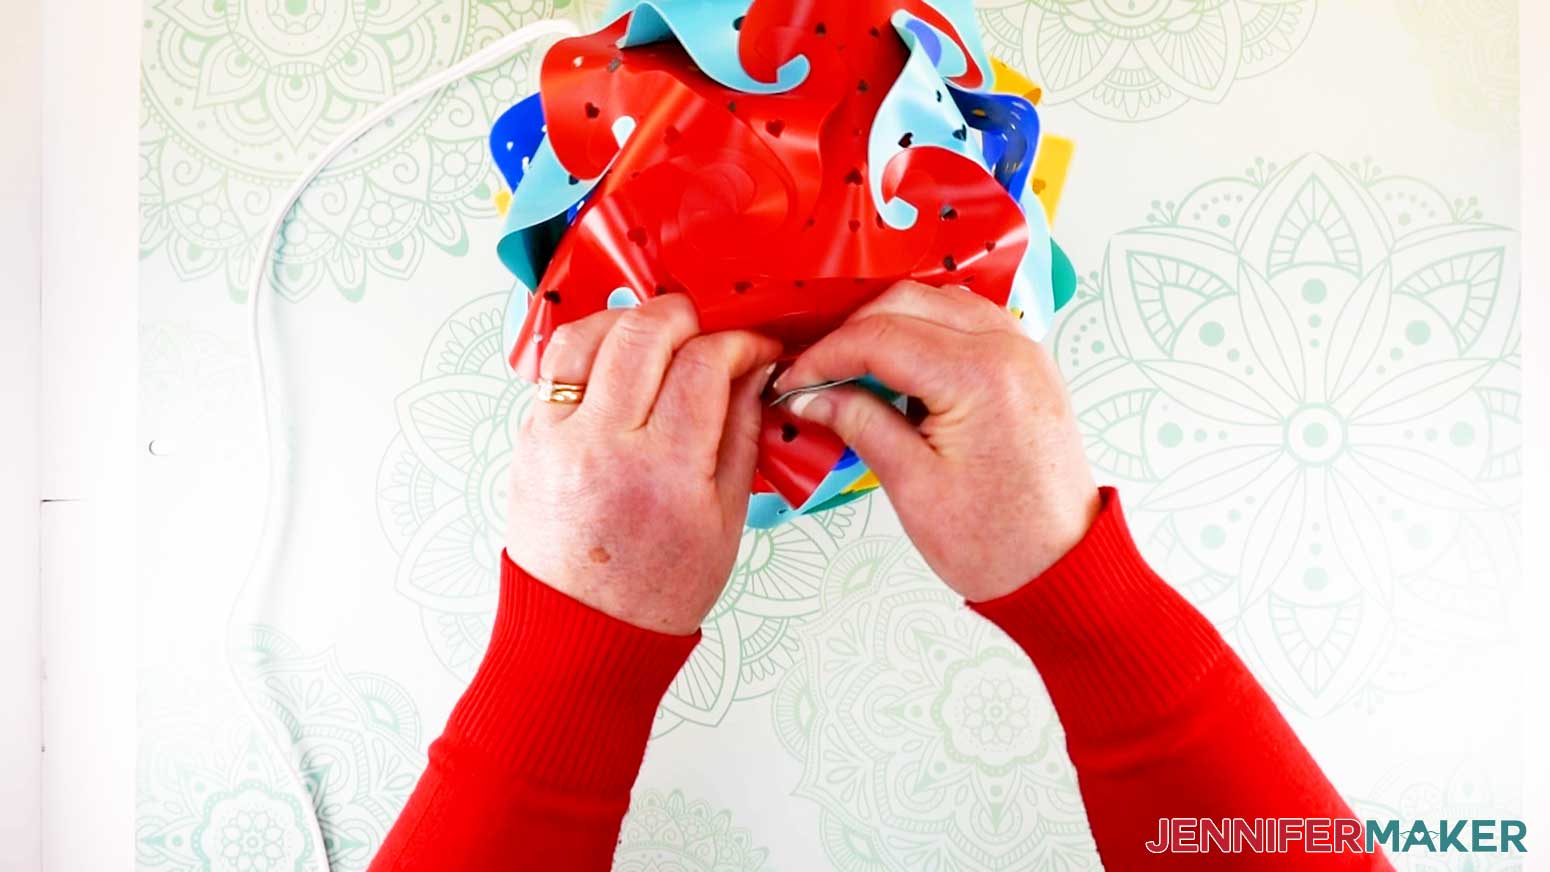
Once secure, attach your upper right side. Finally, attach your lower and upper left joints. The puzzle lamp center will look like a pretty swirl. You did it!
STEP 4: SHOW IT OFF
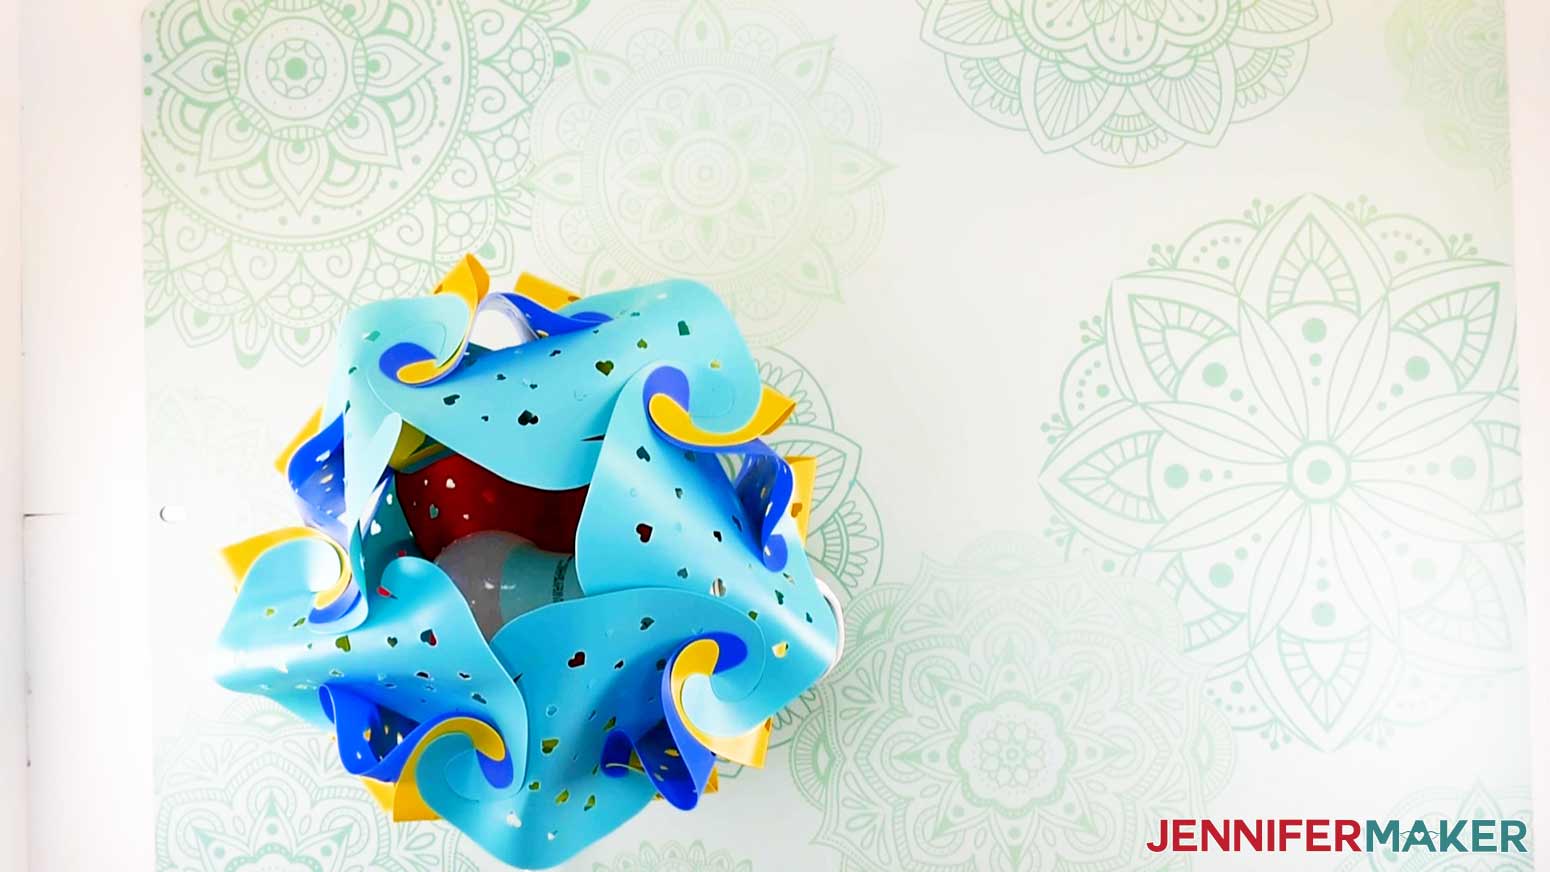
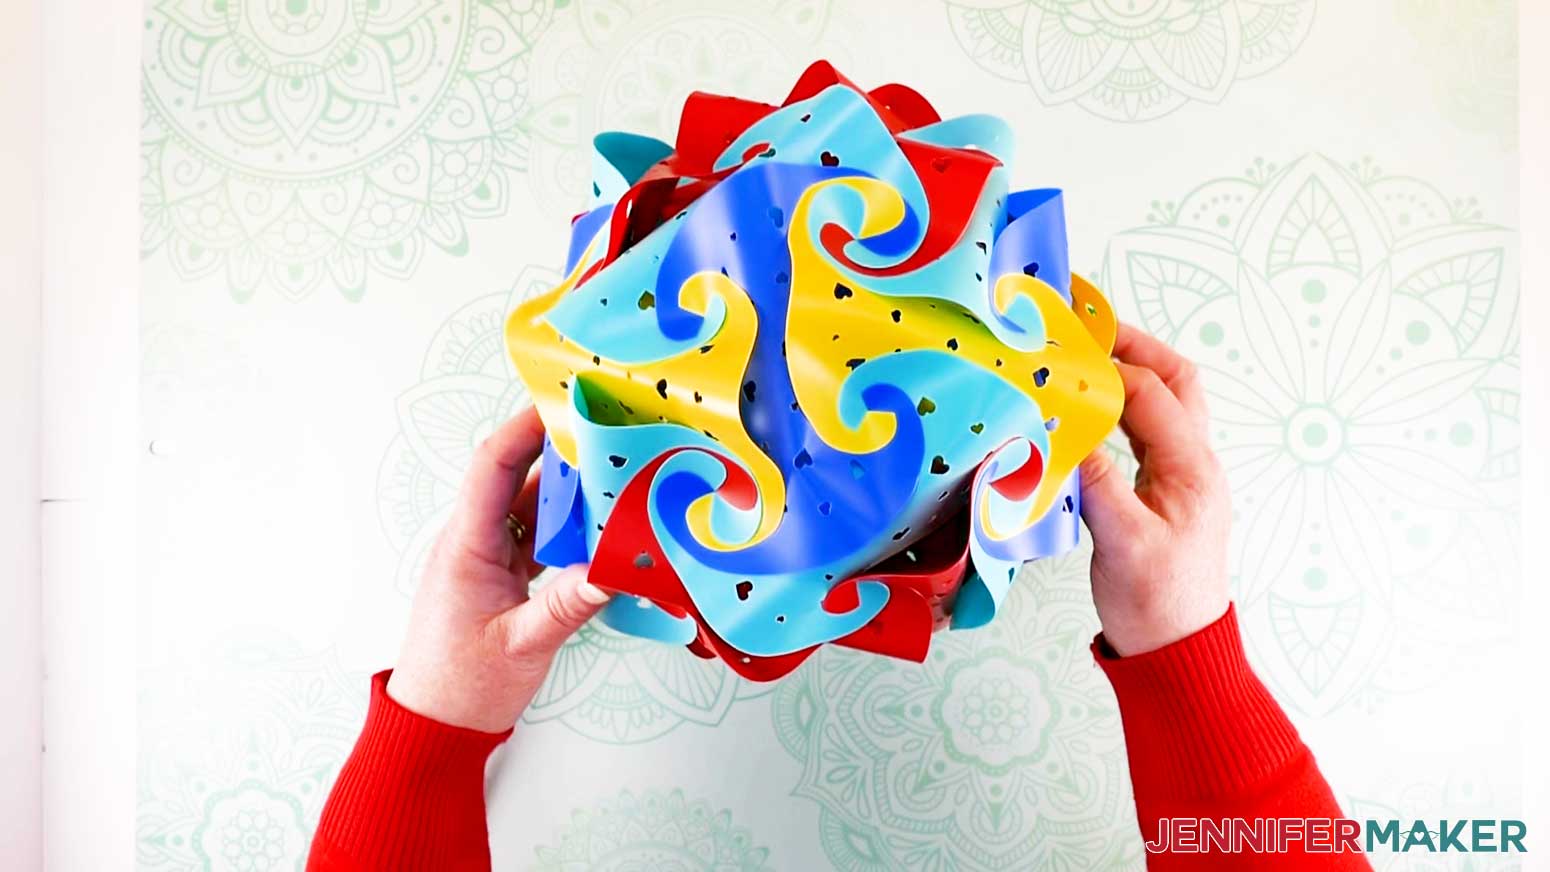
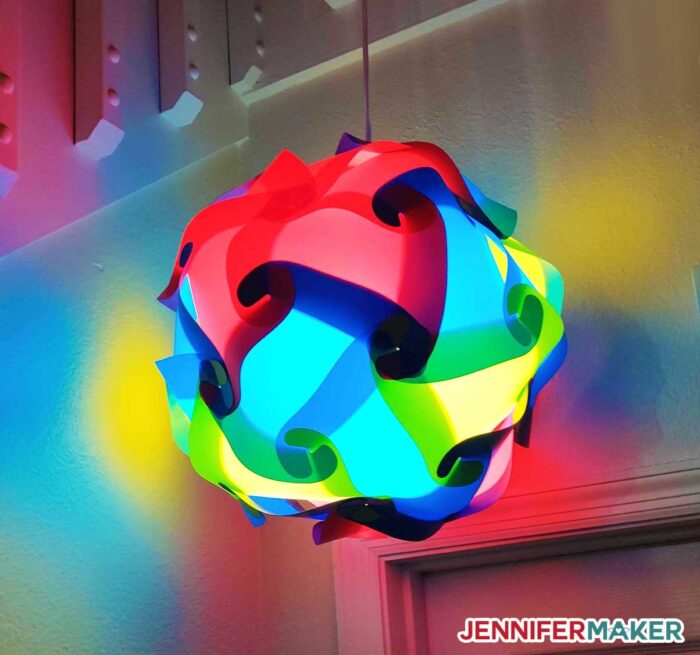
This is what my assembled DIY Puzzle Lamp looks like! Isn't the design so fascinating? I can't wait to see what you create!
Notes
The completed DIY Puzzle Lamp will measure about 9" in diameter if made at the size in my files. Making the pieces smaller or larger will change the size quite a bit!
Answers to Your Questions About How to Make a Fun DIY Puzzle Lamp
Q: What do you need to do if you change the lightbulb?
If you use the LED bulb we recommend for this puzzle lamp project, it is rated for an average of 15000+ hours! That’s a pretty long time!
Q: Won’t the lightbulb get too hot?
It is important to use LED bulbs that will not generate heat! Do not use any heat-generating light sources in your puzzle lamp.
Q: Can I hang the Fun DIY Puzzle Lamp outside?
This is a lamp only for inside use! But, you can hang it near a window or patio door and enjoy it outdoors that way!
Q: What kind of paper can I use?
I used plastic school folders to make this great DIY Puzzle Lamp, not paper. Light cardstock won’t work for this project as there are too many interconnecting pieces and the paper won’t hold up to all of the connections. Besides, you want a material that is durable enough to last for years!
Q: I can’t find plastic school folders. What else can I use?
Any thin yet flexible material that is highly durable should work. I’ve seen some people use vellum and acetate. You can also use cardstock that you’ve laminated on one side. Heavy cardstock will also work, but be aware that it may tear a bit at the corners as you try to assemble it (if this happens, just reinforce the corners with tape).
Q: I see a hard version in your puzzle lamp pattern files. How hard is hard?
The hard version was our original design, and it challenged so many members of our team that we decided it needed to be simplified and we made a new and easier version. The hard version is more challenging because the pieces fit together with more tension, and while this creates a really solid puzzle lamp when finished, the joints will pop out of placement while you’re working on other joints. This is tricky when you have to put things back together in the right order. So if you enjoy the easy version and want a challenge, try the hard one!
Q: Can I cut your IQ lamp on a Cricut Joy?
Yes, you can! The pieces are sized to cut on a mat with the Joy. But if you have any issues, resize all pieces so they are under 4″ wide. There are also a few more suggestions for perfect Joy success:
After you cut the pockets off your folders, then cut your folders so they are 4.5″ wide! This is so they will fit on the Joy material mat properly, still allowing enough room on the sides for the rollers to grip. If you use a craft knife to cut the folders, tape them to your cutting surface with masking tape or painter’s tape as they are slippery and will slide around!
You will be able to cut your lamp out much more quickly if you use the Cricut Joy StandardGrip 4.5″ x 12″ Machine Mat instead of the smaller Joy Machine Mat.
Use a brayer or scraper to burnish (adhere) your folder material tightly to the Machine Mat. Because the cutting surface is smaller with a Joy, for this particular material it seems to want to pop up and create problems. Adhering the folder as well as you can to the mat can prevent most of these problems from happening!
How big is the Joy version of the DIY Puzzle Lamp?
It’s not that much smaller than the regular pattern, coming in about 8″ in diameter!
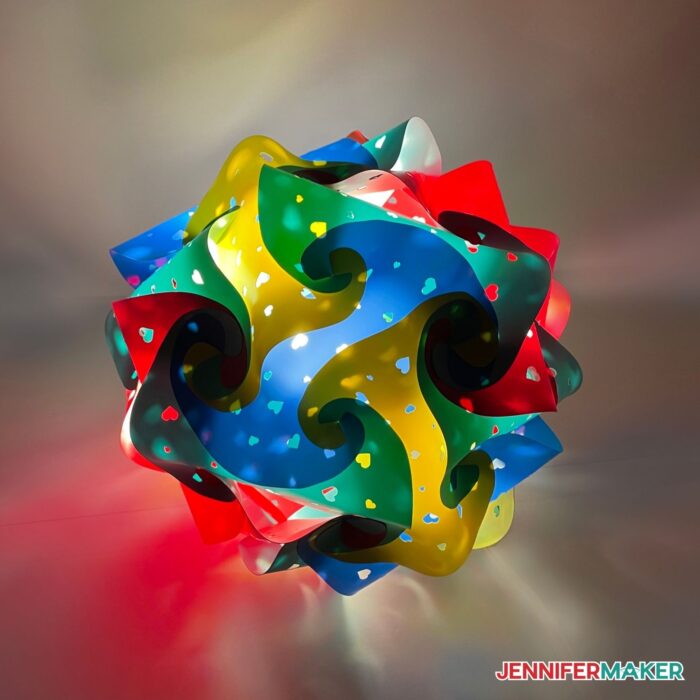
Q: Can I cut the puzzle lamp larger?
Yes, we tried that, too! We cut the pieces you see in the image below at 8.5″ x 6.936″ and those size pieces resulted in this awesome huge puzzle lamp. Look at how it glows!
Q: Why aren’t the hearts and stars showing up on my mat preview screen in Cricut Design Space?
If you choose the hearts or stars SVG cut file for your puzzle lamp and are working in Cricut Design Space on an iPad or phone, the SVG will not show the hearts or stars cut-outs but will look like a solid filled-in piece. Do not worry! When you go to cut out your puzzle piece, the stars or hearts will cut out just fine.
Q: I’m working on an iPad and the directions for adding a Custom Material don’t make sense to me. What am I doing wrong?
Probably nothing! Adding a Custom Material using a mobile app like an iPad or phone is different! What you need to do is click on your face icon or initials in the upper left corner of your Design Space screen. Choose “Manage Custom Materials” from the drop-down menu. Then tap on either “Maker” or “Joy,” whichever Cricut you are going to be using to cut out your Puzzle Lamp. The “Material Settings” screen will appear. Click on the “+” sign on the upper right of the screen and then you can follow the same directions I gave you above – name the new material and change the settings (that’s under Step #2)!
Q: I’m using an Android and followed the iPad directions and it still didn’t work!
You can’t add a Custom Material with an Android. What Cricut suggests you do is to find a material already in the list that is close to the settings you want!
Q: How do I put together a puzzle lamp? I’m stuck!
The puzzle lamp does require patience and likely more than one attempt. It’s not called a puzzle lamp for nothing! I recommend you watch our puzzle lamp assembly video slowly (I suggest half speed), work alongside us, and pause as you go. This should help you see exactly where each puzzle piece goes and how to interconnect and lock them all in. Remember, you CAN do this!
Get my free patterns and SVG files to create a DIY Puzzle Lamp
I’d love to see YOUR beautiful DIY Puzzle Lamp projects and the colors you chose to use! Please share a photo in our Facebook group or tag me on social media with #jennifermaker.
Love,

Want to remember this? Save this Unique DIY Puzzle Lamp Tutorial to your favorite Pinterest Board!