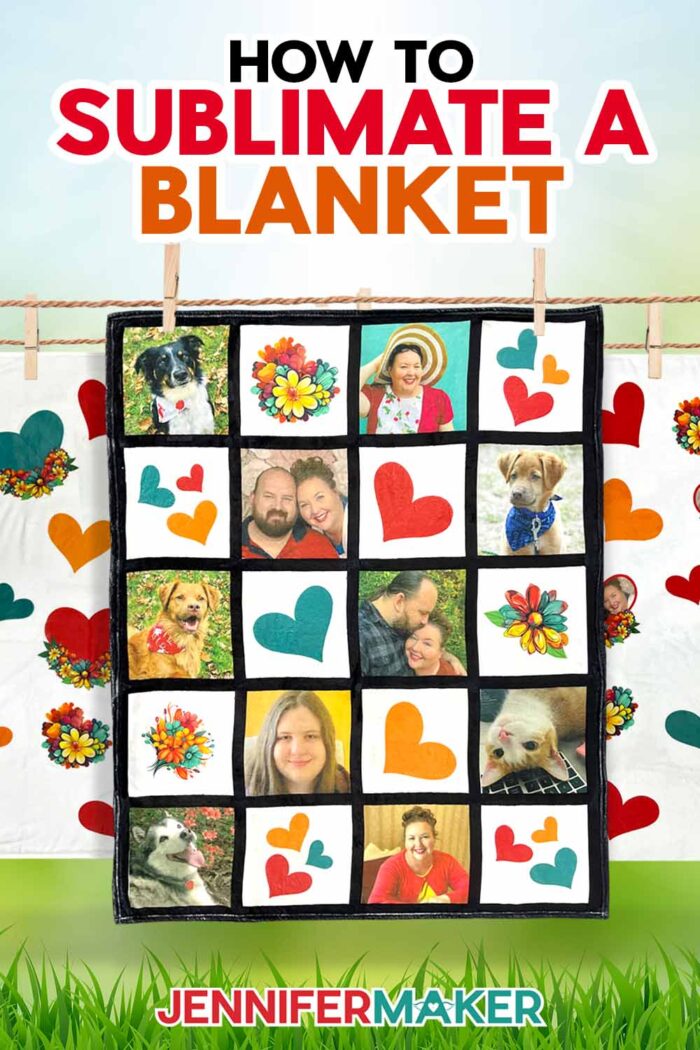
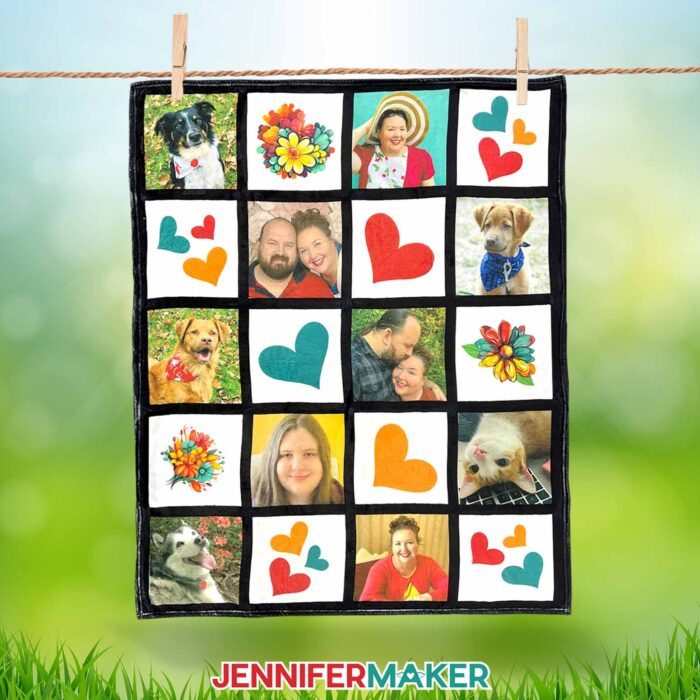
Learn how to create a custom gift with my sublimation blankets ideas!
Want to add your own photos to a blanket without spending a lot of money and waiting weeks to get the result from a seller? Try my sublimation blankets ideas and make your own! I’ll show you how to add big pictures (yes, we’re tiling!) to a pre-made grid paneled blanket. But you can use these techniques for all your sublimation blankets ideas!
Watch the full step-by-step all over sublimation blankets ideas tutorial on my Youtube channel!

How awesome would it be to cuddle up with your favorite book AND your favorite photos? Now, you can with a custom sublimation photo blanket!
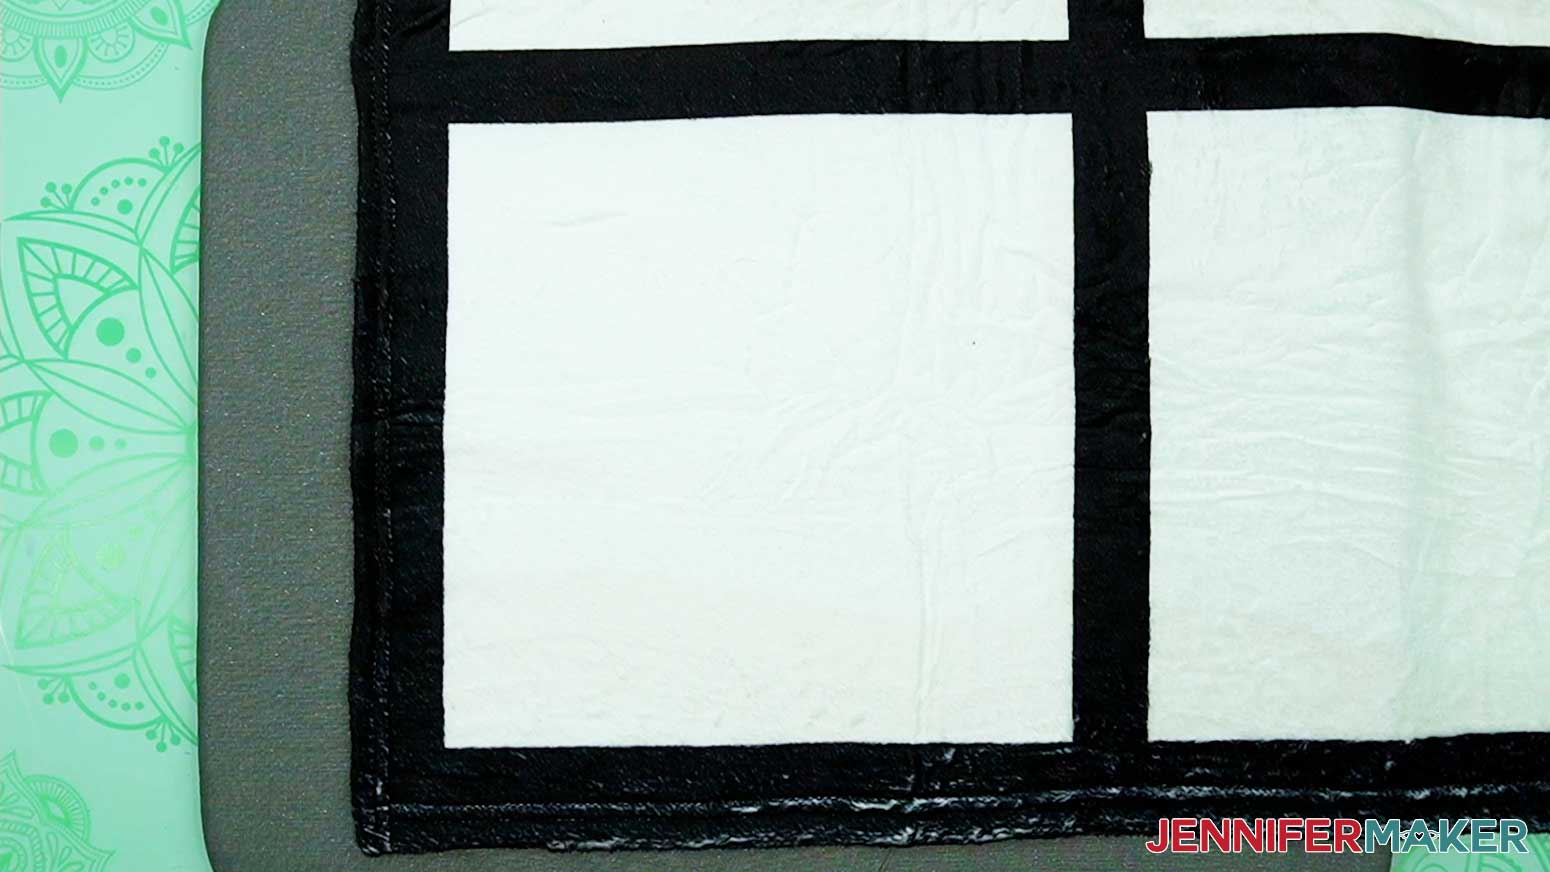
There are many sublimation-friendly blankets available, but one of my favorites is the grid style. It comes with the black lines already sublimated on the surface, so you just have to add your own photos or designs for a professional-looking result!
I’ll show you how to add designs to the white areas on the grid blanket, including some Cricut Design Space tips to print your own images large enough to completely fill the empty spots, but with a normal sublimation printer. You don’t need a wide-format printer to cover lots of area!
I’ll also show you how to prepare some of my free flower and heart designs to fit in the other grid spaces. I created the images with the help of AI software, then edited them in Photoshop to make them look their best. They look beautiful on the plain white blankets in my material list!

In addition to the blanket of your choice, you’ll need a sublimation printer with compatible ink and paper. I’m using 8.5” x 14” or legal size paper this time because the extra length makes it easier to fill the grids with tiled photos, but you can use 8.5″ x 11″ paper for smaller designs.
While we’re using Cricut software to prepare the designs, we’ll do all the cutting by hand so you actually don’t need a cutting machine. Cutting your tiled photos carefully is really important, so I’ll show you how to do it with a metal safety ruler, Cricut TrueControl craft knife, and self-healing mat. This knife is sharp, so please follow the safety instructions I’ll share!
This is a big project, so you’ll need a good amount of space to move around while working on your sublimation blankets ideas. A handheld press that can cover your design elements will be easier than a clamshell press, because you don’t want to reactivate the ink on earlier transfers each time you add a new one. Heat presses are not all the same, so I have information for different press types in my Sublimation Cookbook. And be sure to check my tools and materials list for all the items you’ll need to get started!
Let me show you how to make your sublimation blankets ideas come to life! This post contains some affiliate links for your convenience (which means if you make a purchase after clicking a link I will earn a small commission but it won’t cost you a penny more, there is no additional cost)! Read my full disclosure policy.
Materials to Make A Sublimation Blanket
View my Amazon shopping list for the exact items I used!
- 20 Panel Grid Sublimation Blanket
- White Polyester Fleece Blanket (for non-grid designs) -or-
- White Plush Polyester Blanket (for non-grid designs)
- A-SUB 125g Sublimation Paper 8.5″ x 14″ – My projects used between 20 and 30 sheets each
- Optional: White Polyester Material for Practice
- Sublimation Printer
- Sublimation Ink
- Butcher Paper
- White Cardstock
- Heat Press
- Pressing Mat
- 18” Safety Ruler
- Self-Healing Mat
- Cricut TrueControl Knife
- Scraper
- Heat Resistant Tape
- Lint Roller
- Scissors
- Fan
- Design #574 (My free PNG/PDF design files are available in my free resource library – get the password by filling out the form at the bottom of this page
How to Make Your Own Sublimation Blanket

Sublimation Blanket Ideas
Learn how to create a custom gift using my sublimation blanket ideas.
Materials
- 20 Panel Grid Sublimation Blanket -or-
- White Polyester Fleece Blanket (for non-grid designs) -or-
- White Plush Polyester Blanket (for non-grid designs)
- A-SUB 125g Sublimation Paper 8.5" x 14" - My projects used between 20 and 30 sheets each
- White Butcher Paper
- 12” x 12” White Cardstock
- Optional: White Polyester Material for Practice
- Design #574 (My free PNG/PDF design files available in my free resource library - get the password by filling out the form at the bottom of this page)
Tools
- Sublimation Printer - I used a converted Epson EcoTank ET-2800 Inkjet Printer
- Sublimation Ink
- Heat Press - I used the Cricut EasyPress 2
- Cricut EasyPress Mat
- Fan for Ventilation
- Heat Resistant Tape
- Lint Roller
- Scissors
- 18” Safety Ruler
- Self-Healing Mat
- Cricut TrueControl Knife
- Scraper
Instructions
STEP 1: GET MY FREE SUBLIMATION BLANKET IDEA DESIGNS
First, download my Sublimation Blanket Ideas designs from my free library -- look for Design #574. Alternatively, you can use the Save This Project form near the top of this post and the design link will be emailed to you.
There are many designs in the PNG folder: heart shapes in different colors that align with the border flowers, flowers in a heart shape, two single flowers, a flower bunch, several single hearts, and groups of hearts using different color patterns. You can customize and print them using Cricut Design Space.
I used an AI art generator to create the designs, then made them even more fantastic with image editing software. If you want to learn more about the process, check out my workshop on creating and using AI-generated art in your crafts.
TIP: If you’re not sure how to upload, go to jennifermaker.com/svgs to learn how to unzip and upload files to Cricut Design Space.
STEP 2: PREPARE AND PRINT YOUR DESIGNS
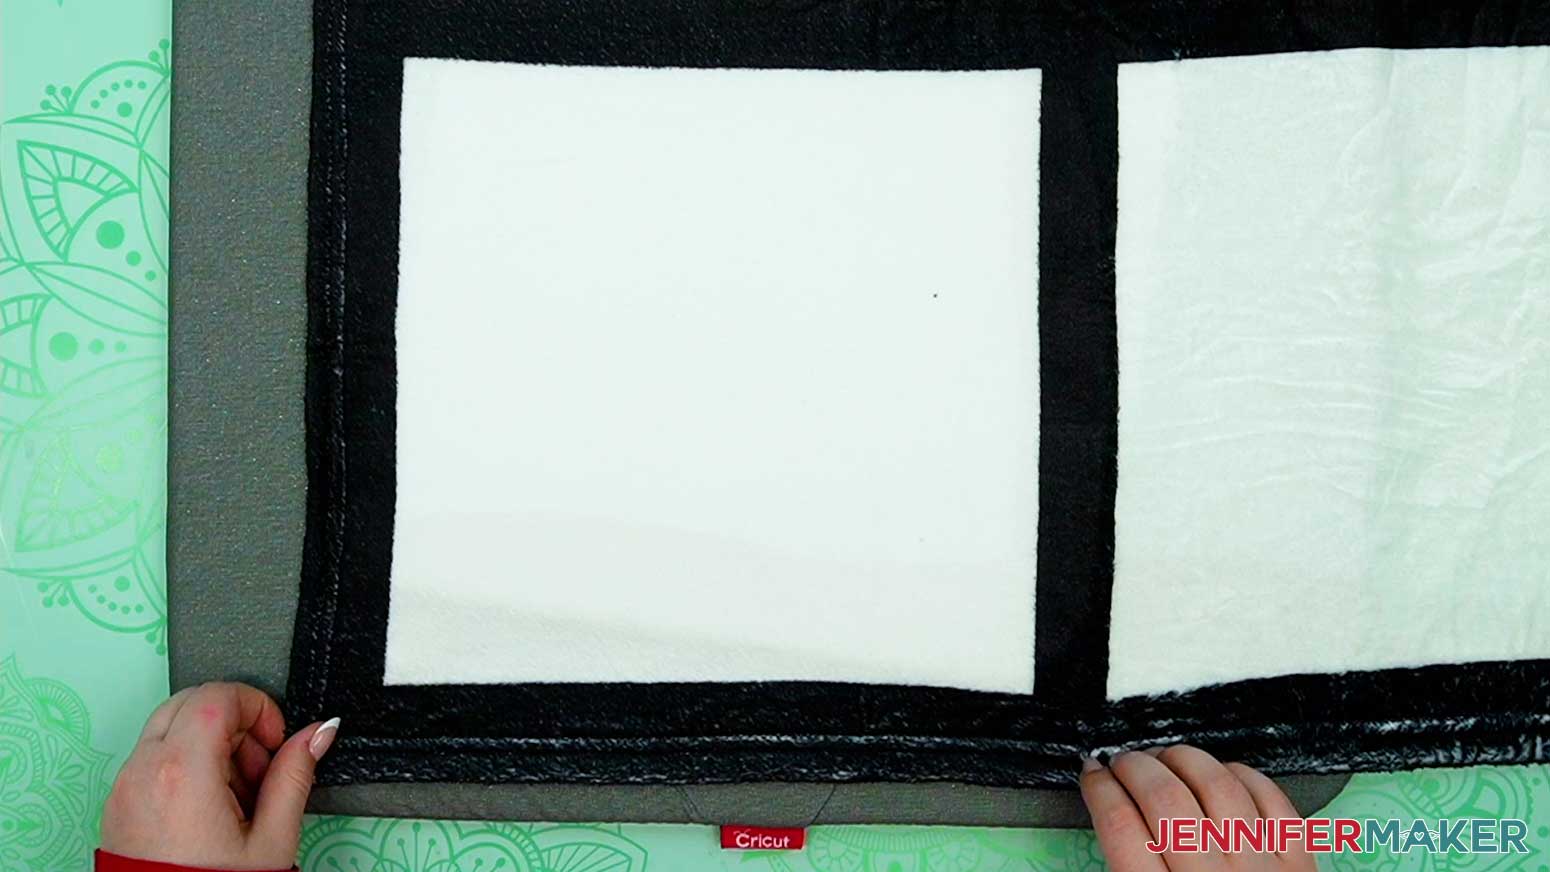
MEASURE YOUR GRID OPENINGS
1. Check if the blanket manufacturer has listed the opening sizes on the packaging so you can size your images to fit.
2. Some of my grids were uneven, so it’s a good idea to measure the height and width of each one just in case. The fabric is stretchy, so make sure each grid is flat but not stretched during measuring.
3. If you want an image to completely fill the white space, you’ll need to make the pieces large enough to overlap the grids where they’re farthest apart.
NOTE: It’s OK if the grid opening is larger than your printer can create. We’ll tile the photos in Cricut Design Space to make them print on 8.5” x 14” paper and then reassemble them before pressing. This is also a good time to plan your design by deciding how many boxes you want to fill with photos and which other design elements you want to put in the other spaces.
CRICUT DESIGN SPACE
1. Open Cricut Design Space and click “New Project.”
2. Click “Upload” and then “Upload Image.”
3. Click “Browse.”
4. Select the photo you want to use.
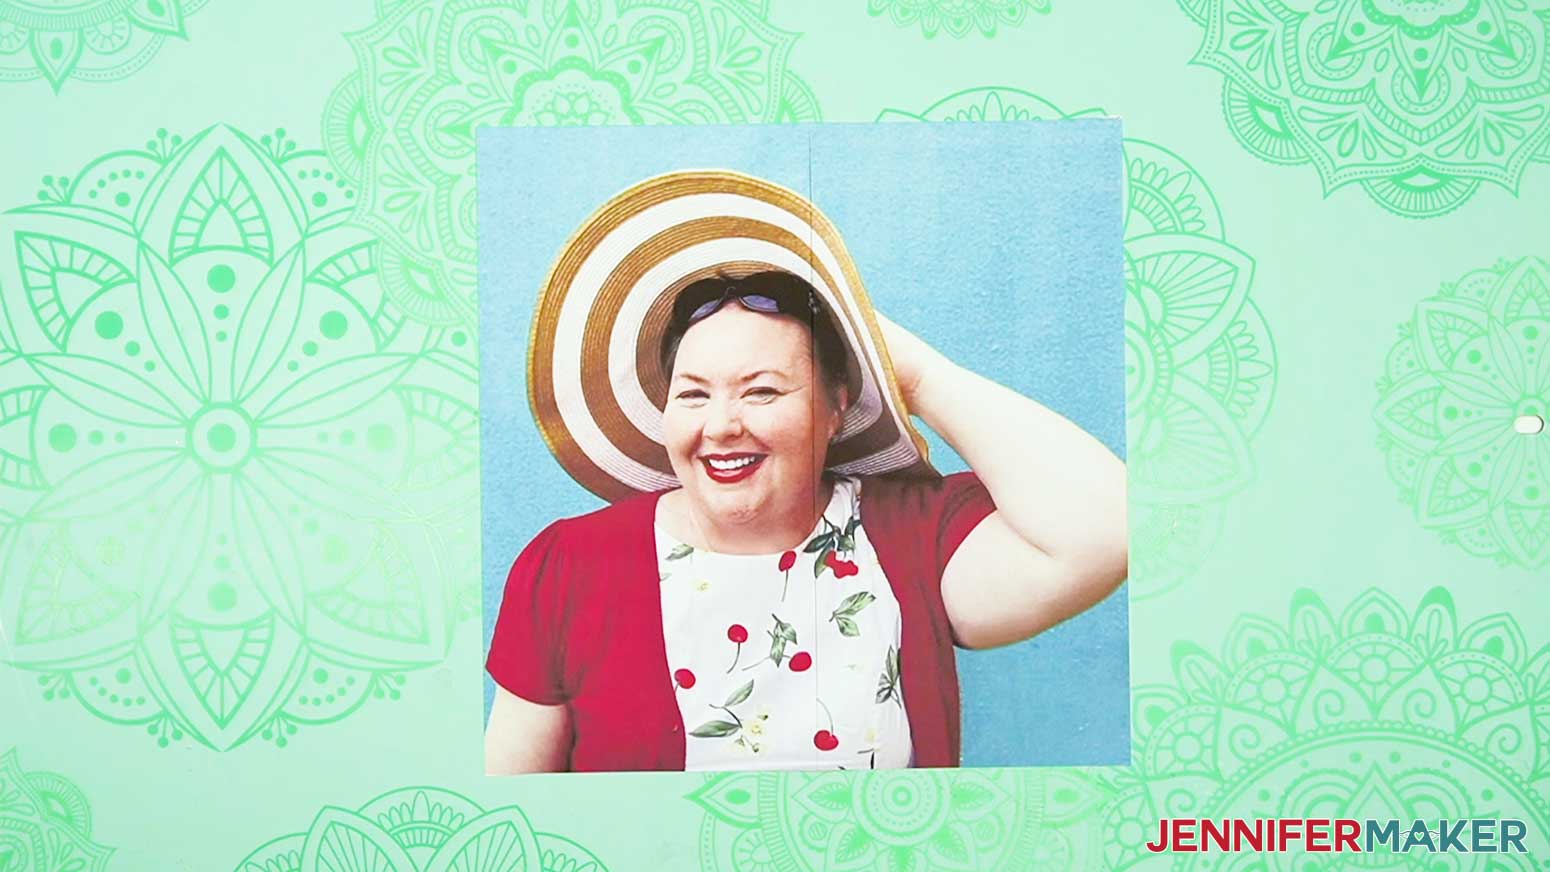
NOTE: Use a large, high-quality photo since you’ll need to print it very large to fill a grid opening.
5. On the Upload Image screen, click “Complex” and “Continue.”
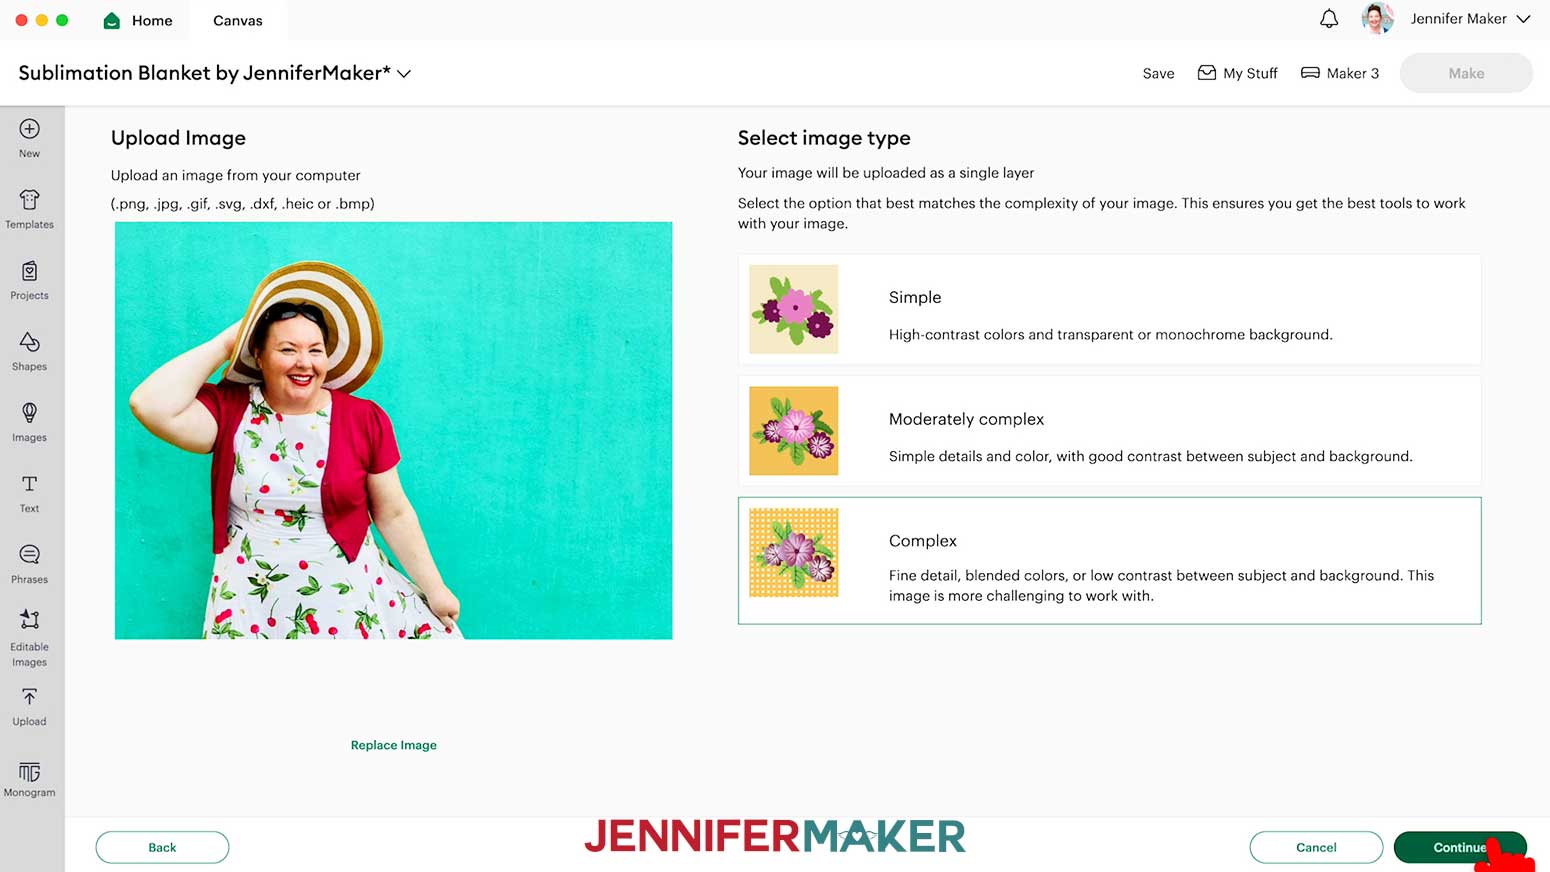
6. Click “Apply and Continue.”
7. Select “Print Then Cut Image” and click “Upload.”

8. On the next screen, select your image and click “Add to Canvas.”
NOTE: You may see a low resolution warning even after resizing your image, and that's OK. It will print just fine at the size needed for the Sublimation Blanket. However, I don't recommend enlarging these images for larger projects.
9. Click the “Shapes” icon.
10. Select a free Square to add it to the Canvas.
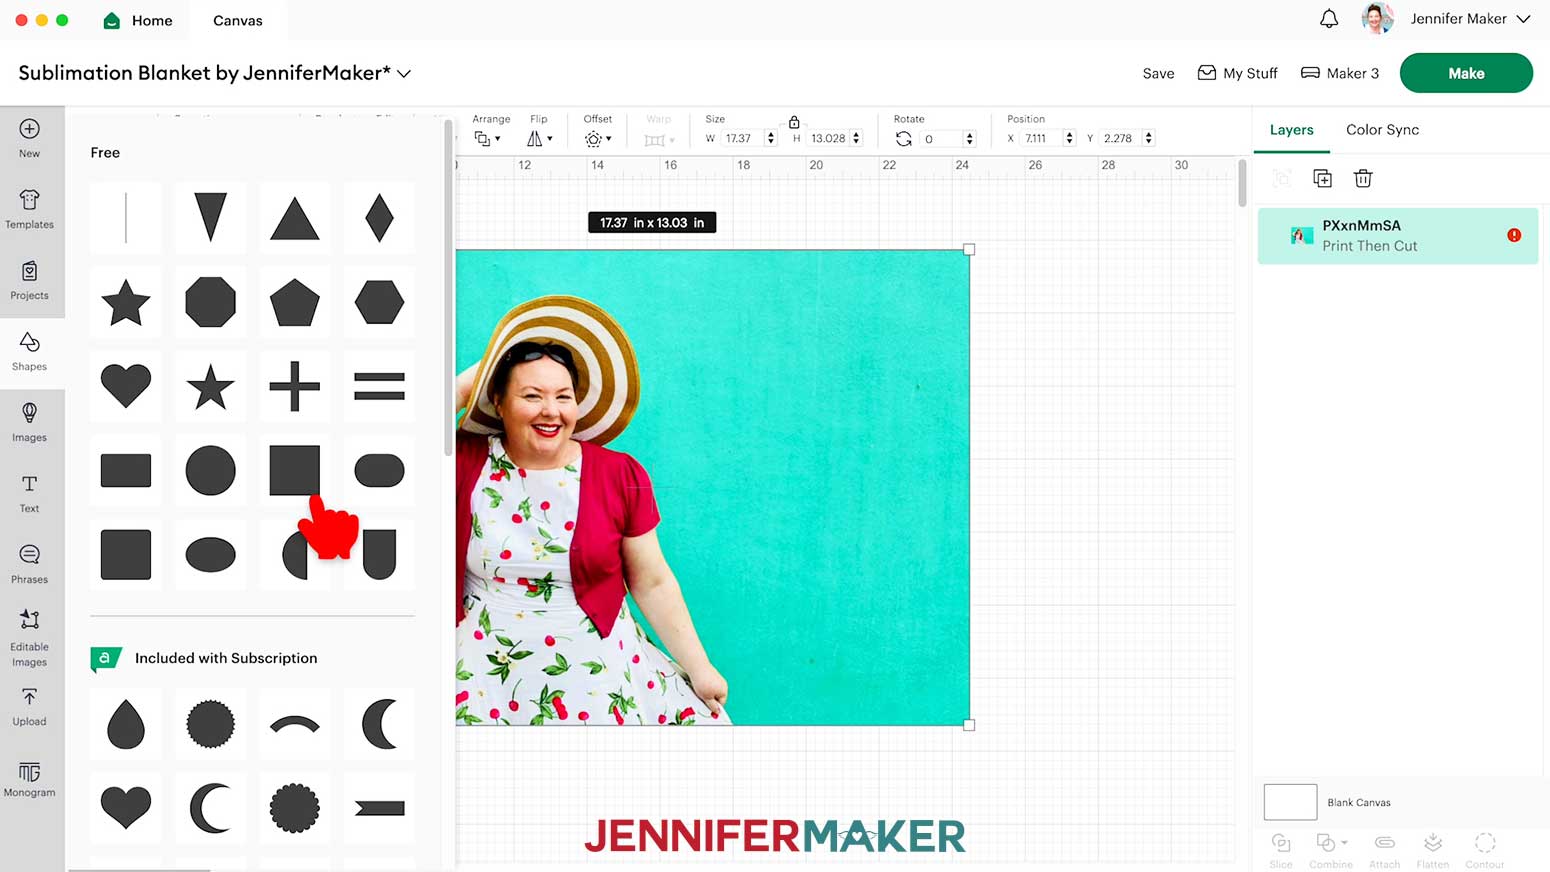
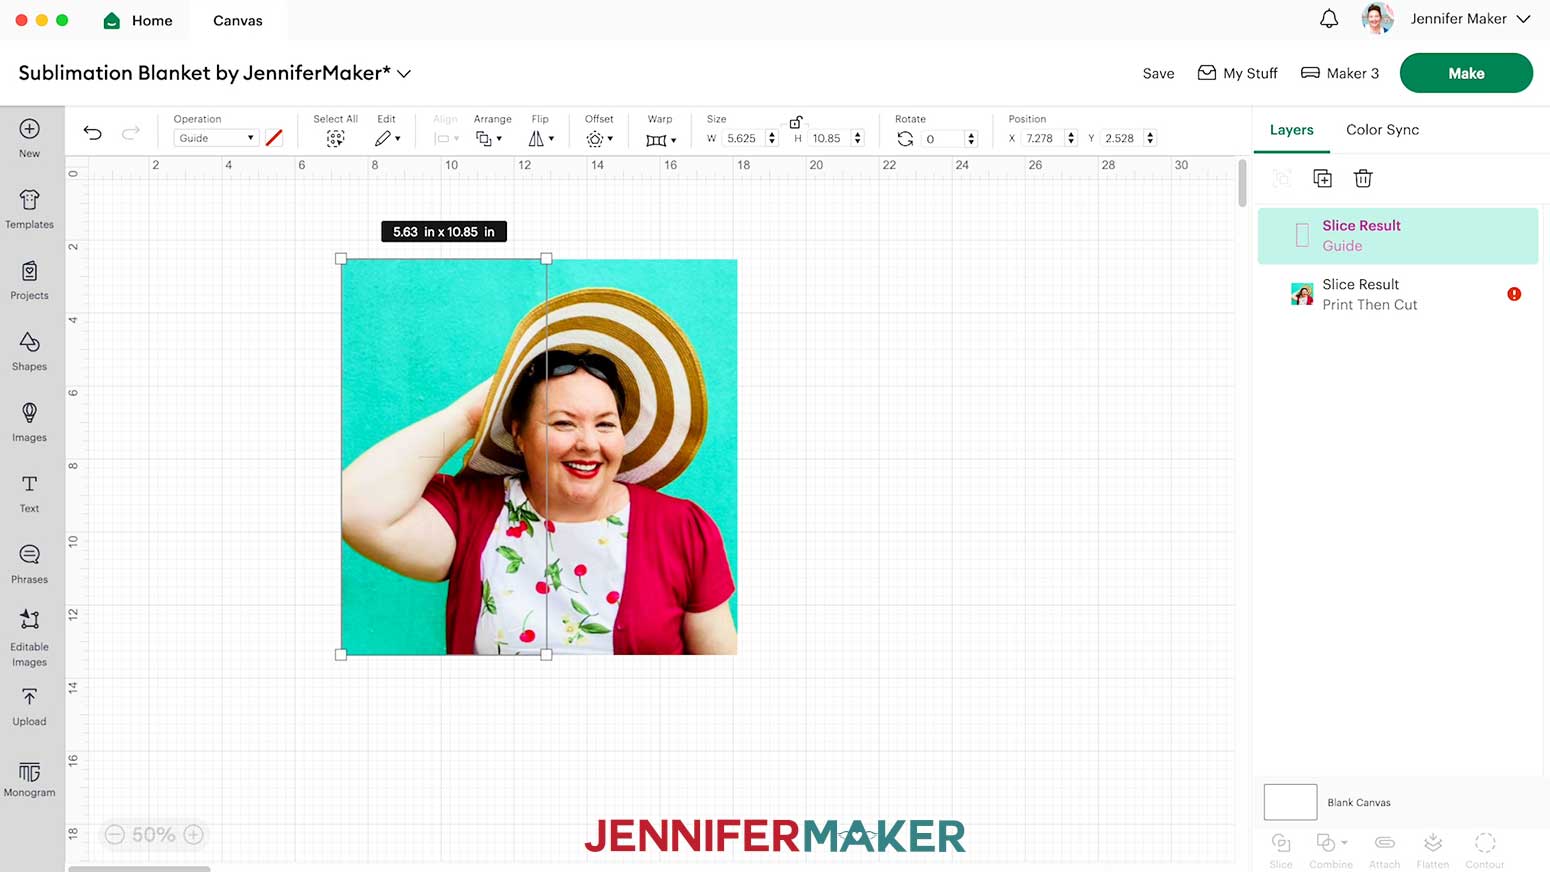
11. With the Lock icon closed, adjust the Square’s dimensions to match the open spaces in the blanket's grid.
NOTE: The grid openings in my tests varied, but were all smaller than 10.5” square, so I used 10.85” as my template dimensions so some of the image would overlap with every edge of the grid opening.
12. Use the Operation dropdown to change the square to “Guide” so you can see through it and it won’t be part of the final design.
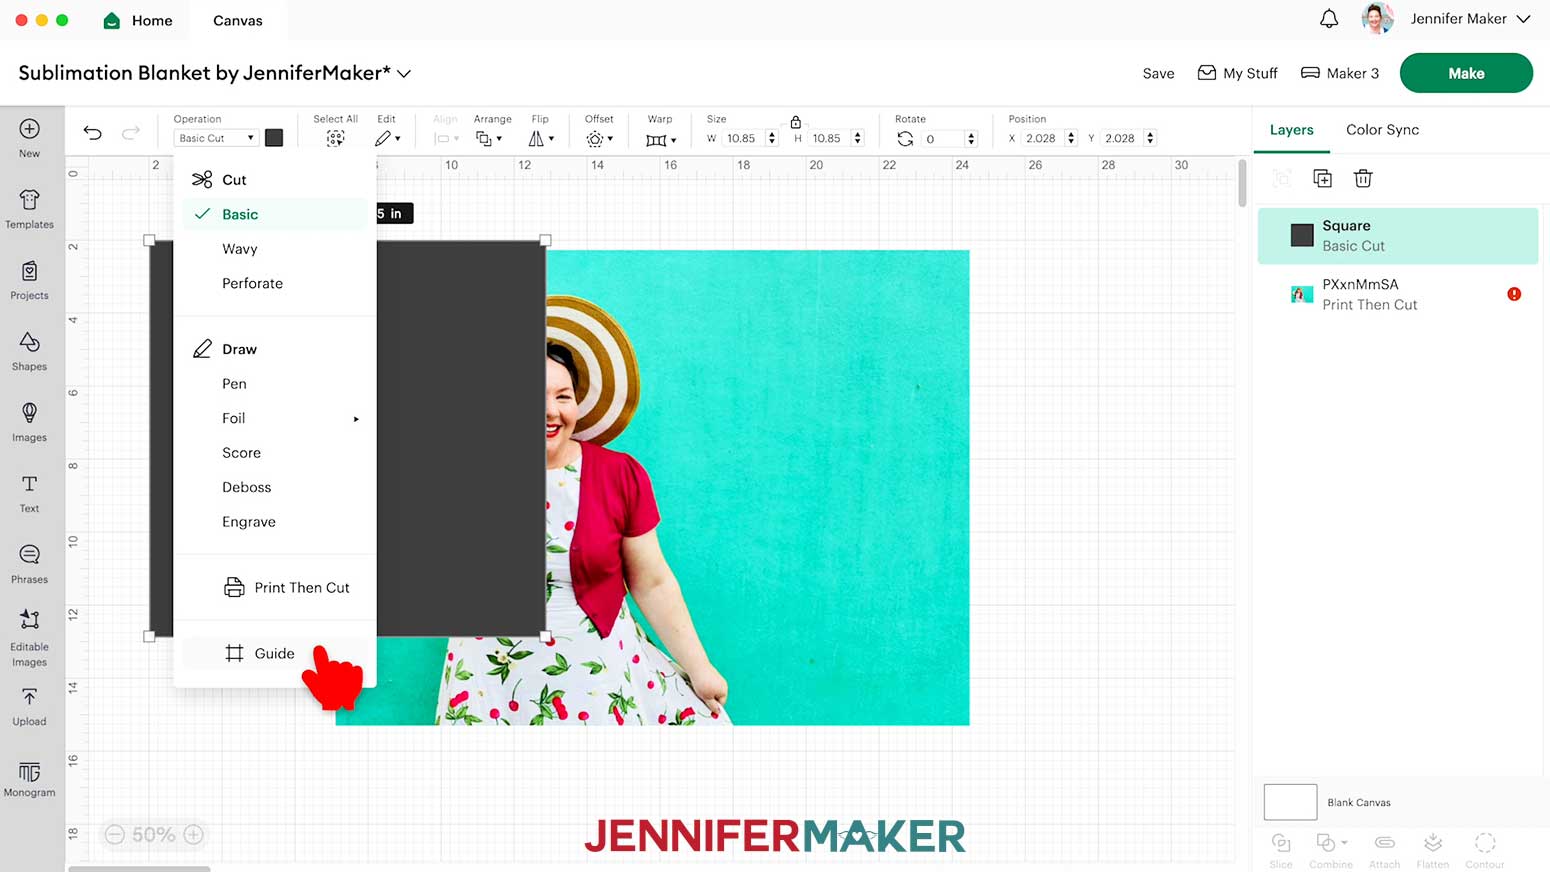
13. Drag the Square over the image so the subject is within the shape.
14. With the Lock icon closed, drag a corner of the photo’s bounding box to resize the subject, if needed, so it fits in the square.
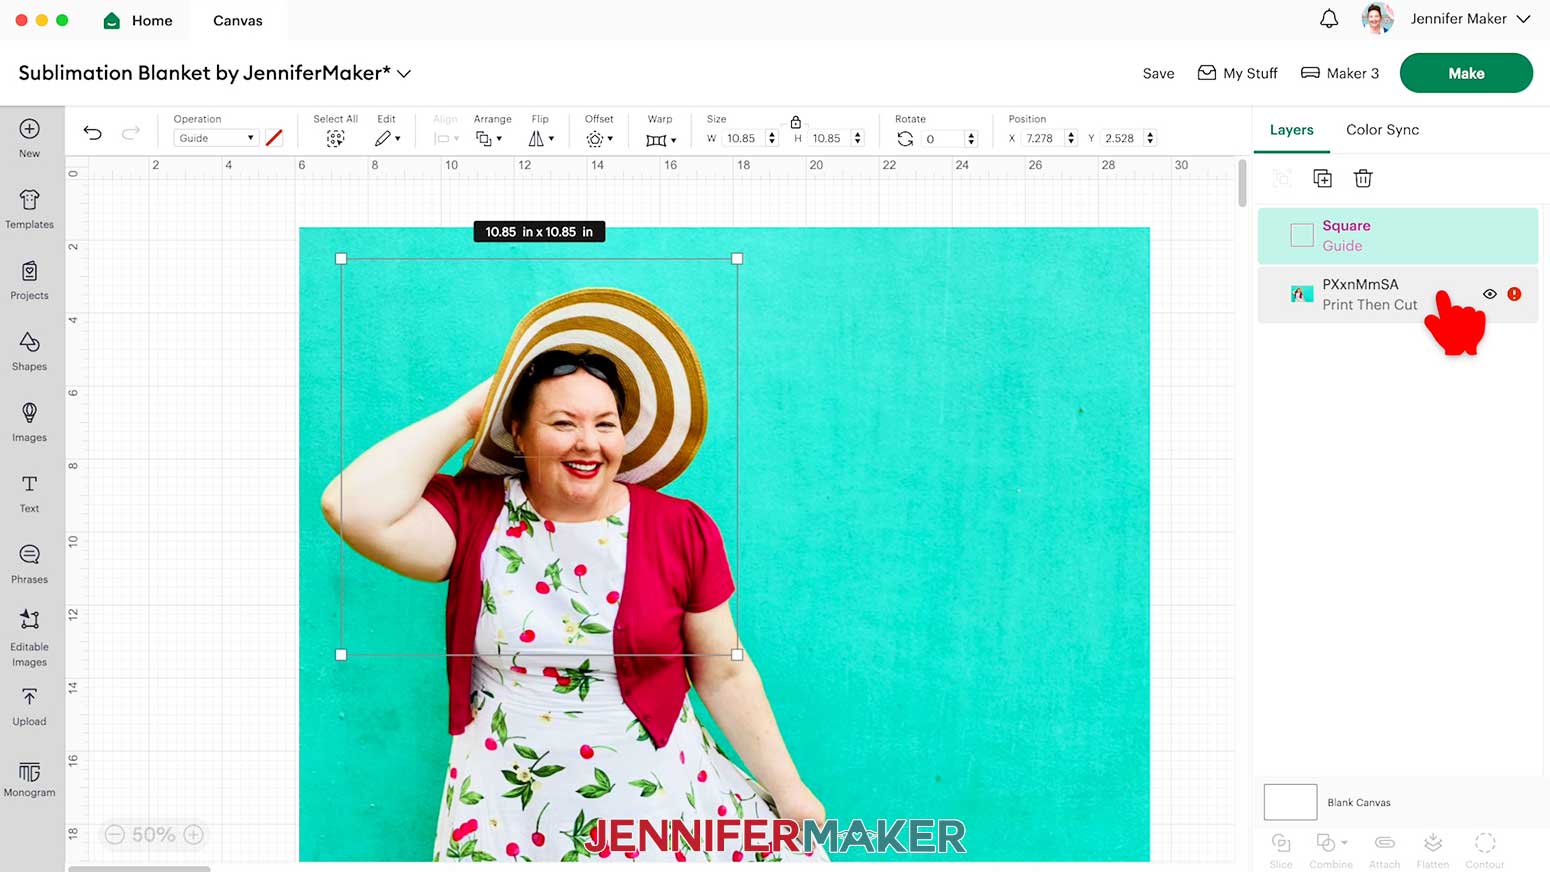
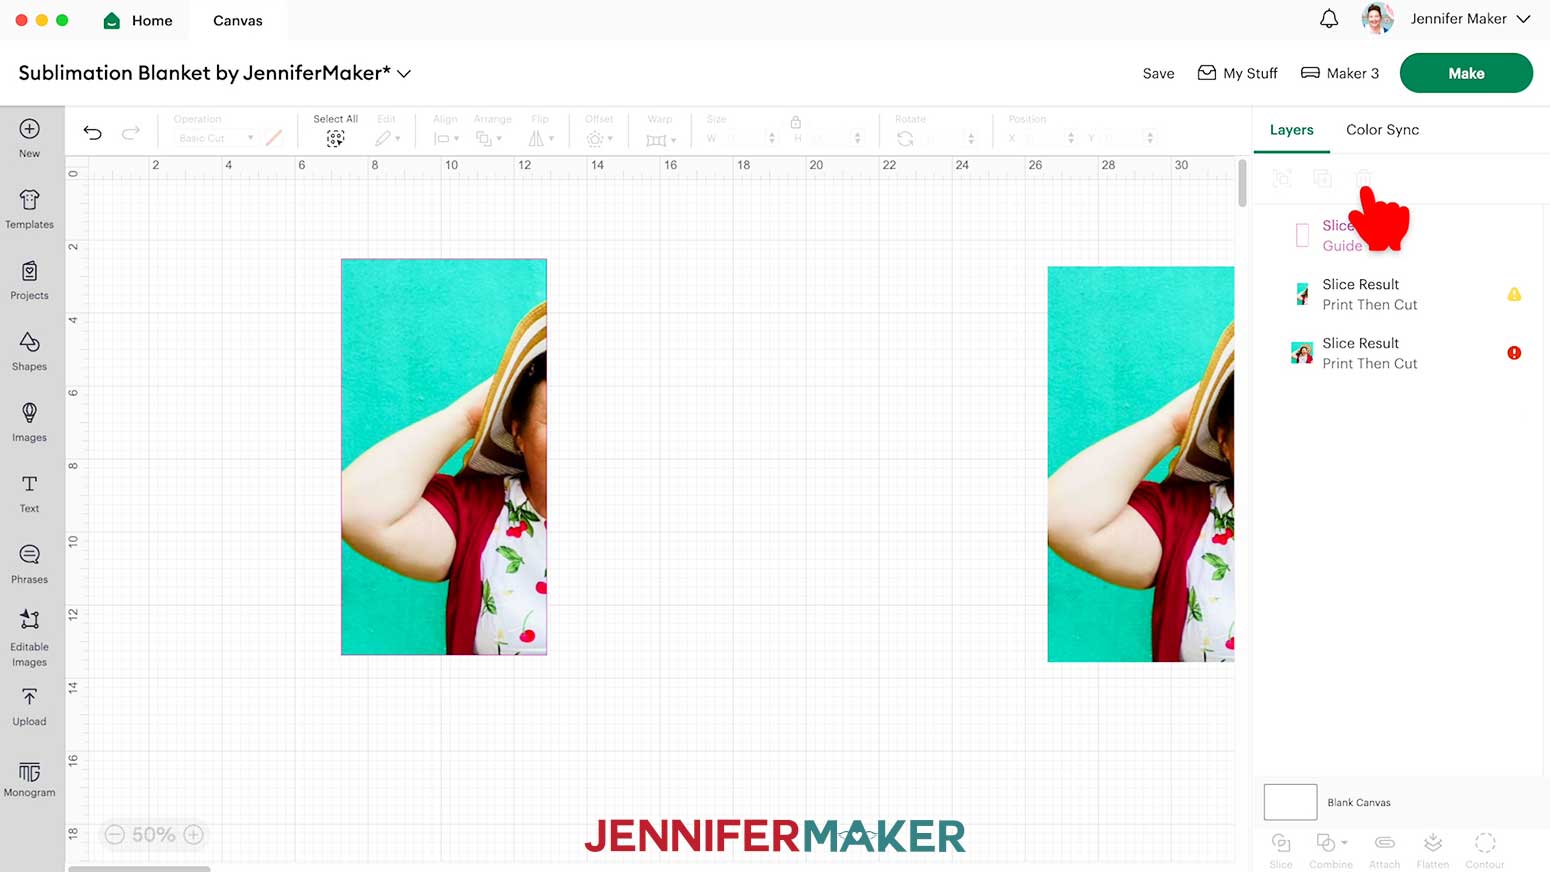
15. Hold the Shift key to select both the Square and the image.
16. Click “Slice.”

17. Delete the excess image Layer.

18. Select the Square guide.
19. Click the lock icon to open the proportions.
20. Change the “W” (width) field to be half that of the grid square plus .2” for a small overlap.
21. Select the image and Click “Duplicate,” then move the copy aside for now.
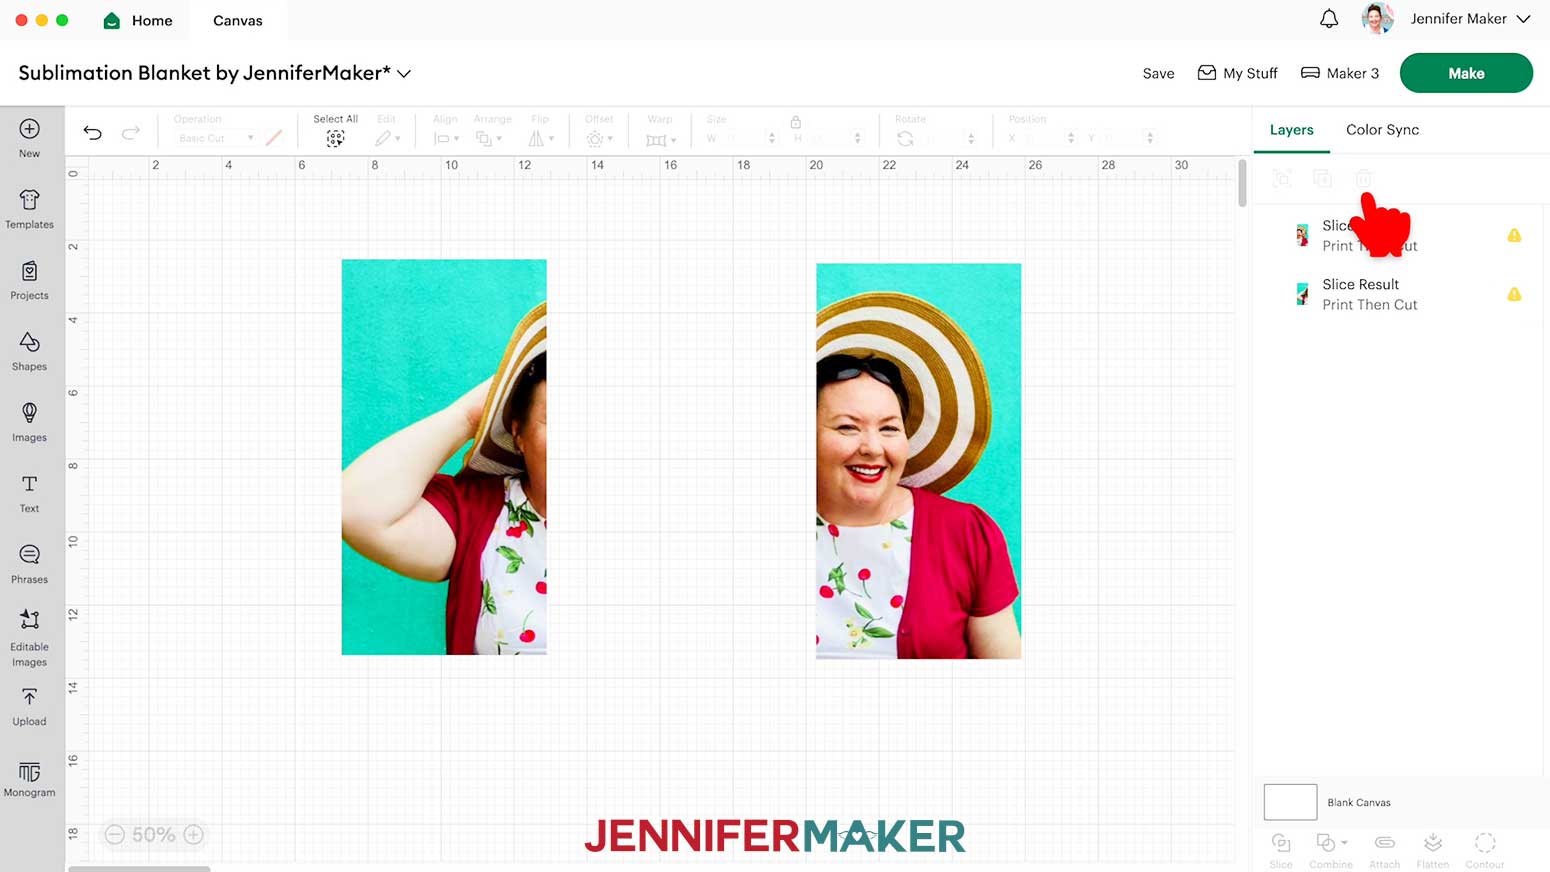
22. Hold the Shift key to select both the Guide and the original image.
23. Select “Align” and “Align Left” to begin moving the Guide into position.

24. Then select “Align” and “Align Top” to get the final position to cover the left half of the original image.
25. Click “Slice.”
26. Delete the excess original image outside the Guide.
27. Use Steps 21-26 to Slice the Guide out of the duplicate image, but use “Align Right” (instead of "Align Left") so you create the right half of the image.
28. If there is a red warning icon on the first Layer in the Layers Panel, click it.
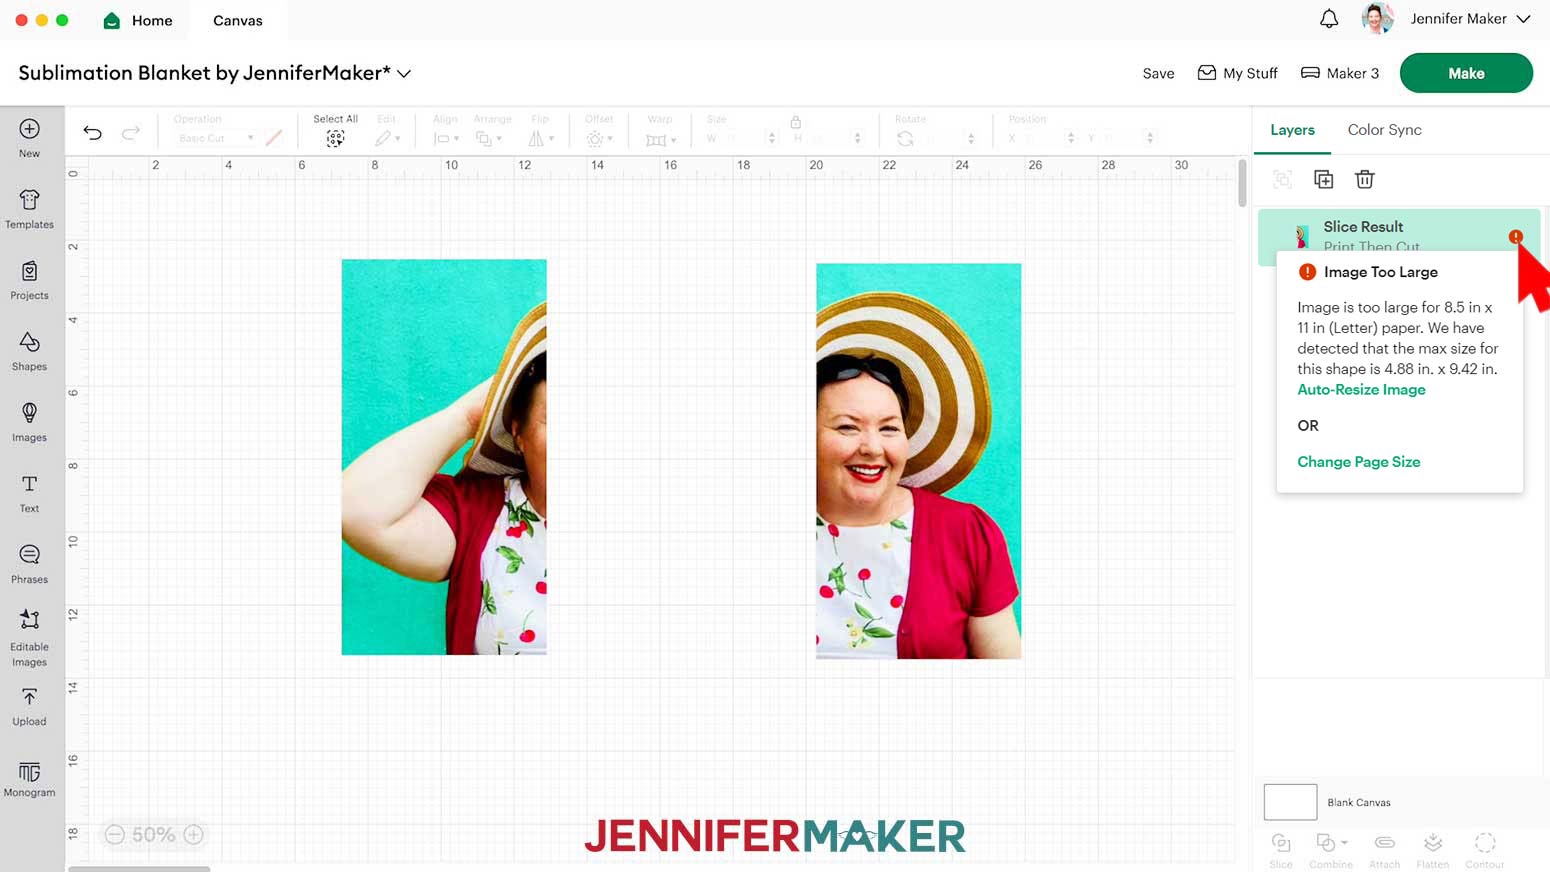
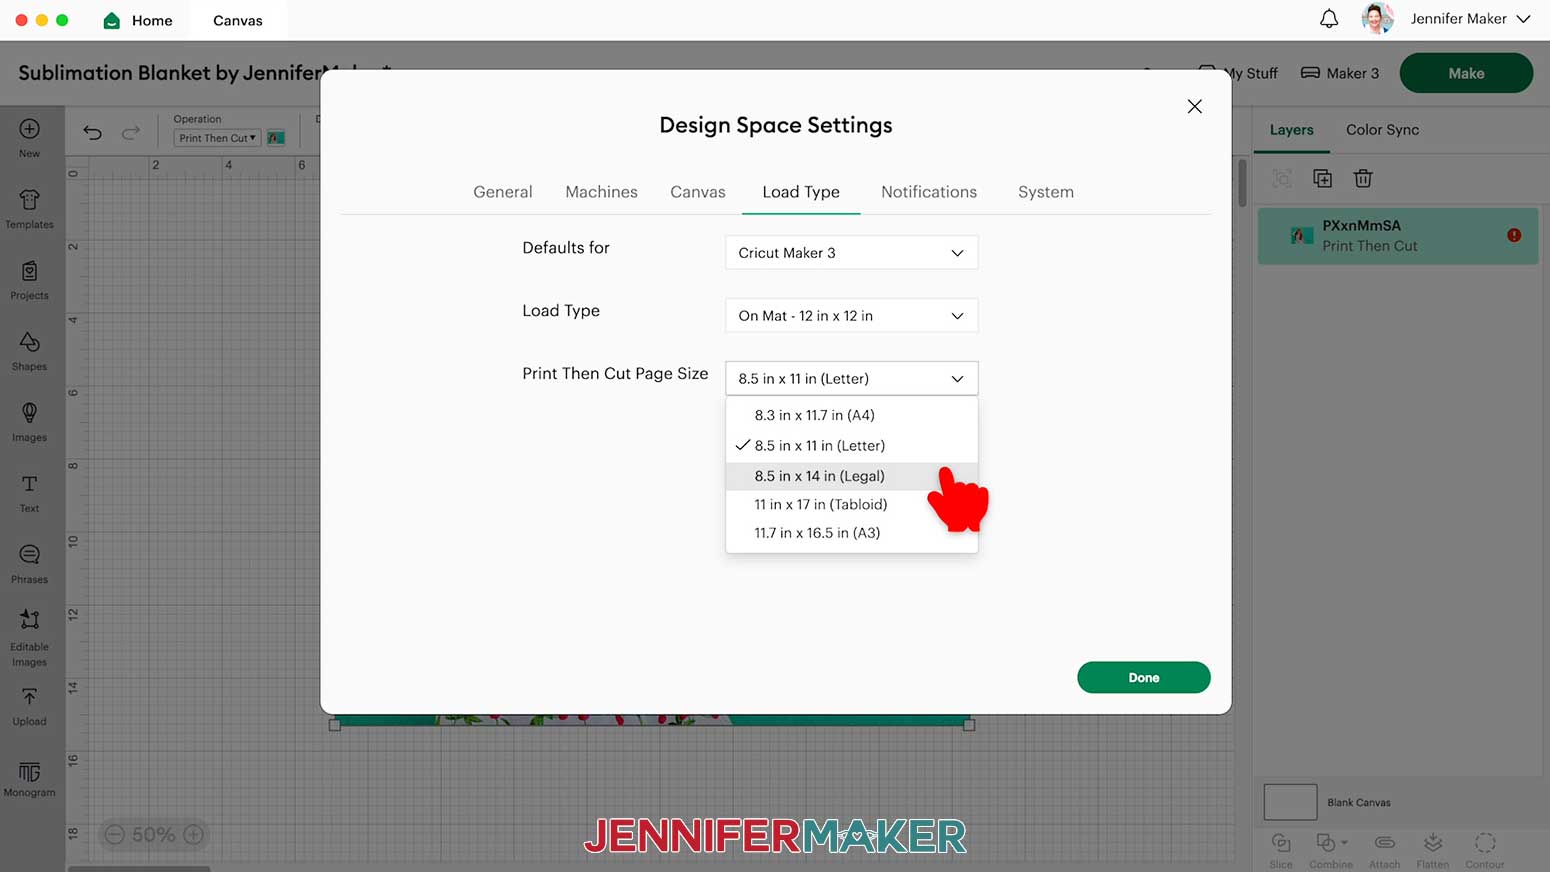
29. Make sure the paper size shown matches your 8.5” x 14” material. If not, click “Change Page Size” and adjust it.
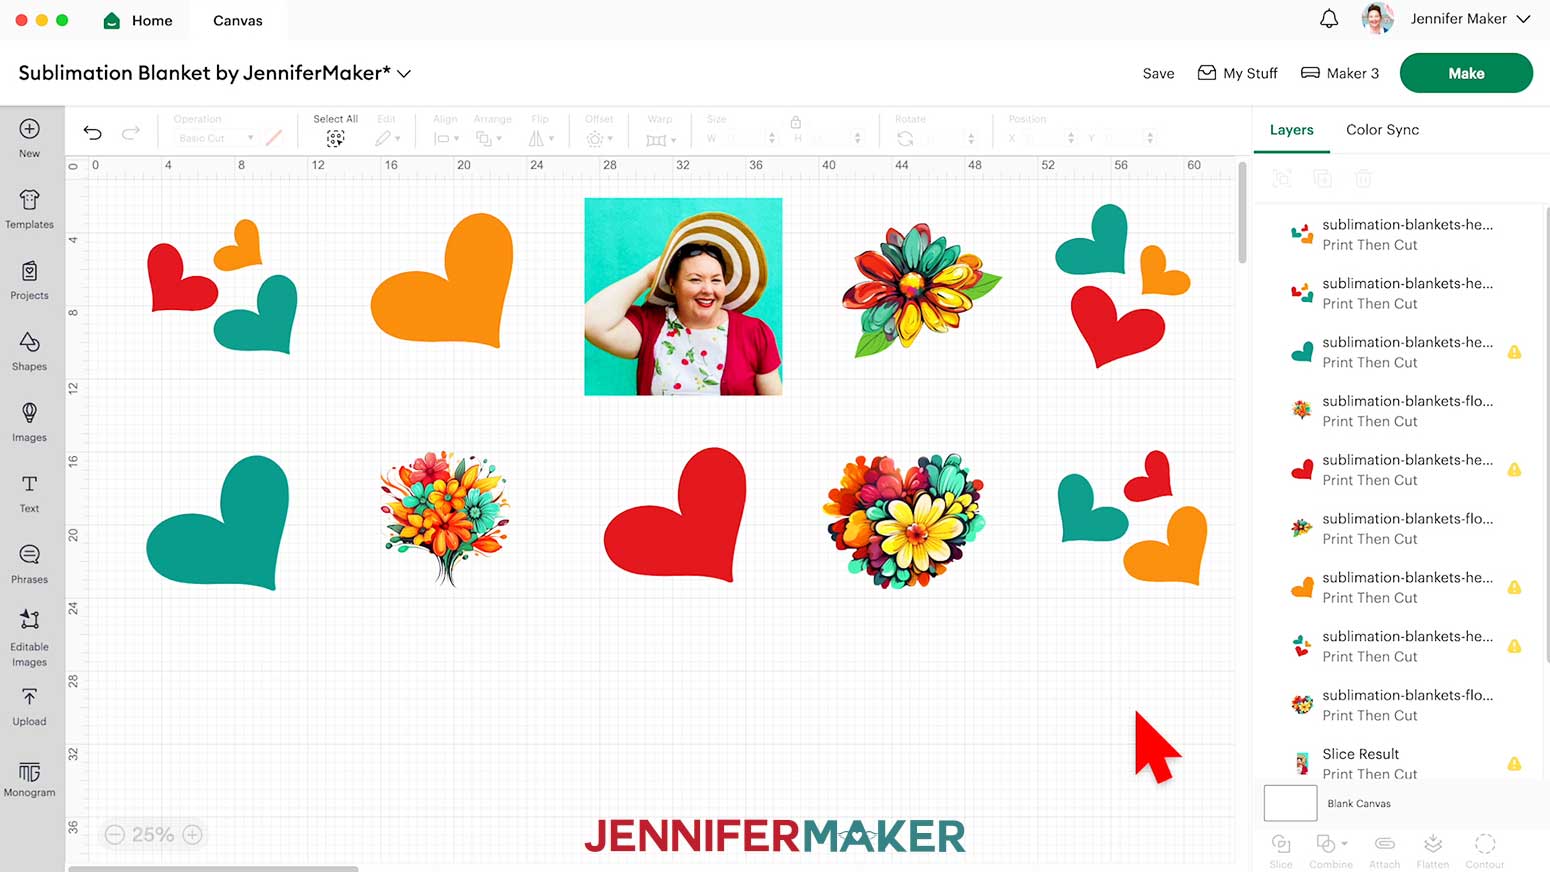
30. Now add any of the other design elements you'd like to print to the Canvas, changing sizes and quantities as needed.
31. Your designs are ready for printing.
32. Make sure the correct machine is selected in the top right.
33. Click “Make.”
34. If prompted, click "On Mat," choose your mat size, and click “Confirm.”
35. On the Prepare Screen, make sure your Material Size is set to “8.5 in x 14 in (Legal).”
36. Click “Mirror” for each mat since we’ll apply the designs face down.

37. Select the first mat and click “Continue.”
PRINTING
1. On the Make Screen, select the first mat with half of your picture and click “Send to Printer.”
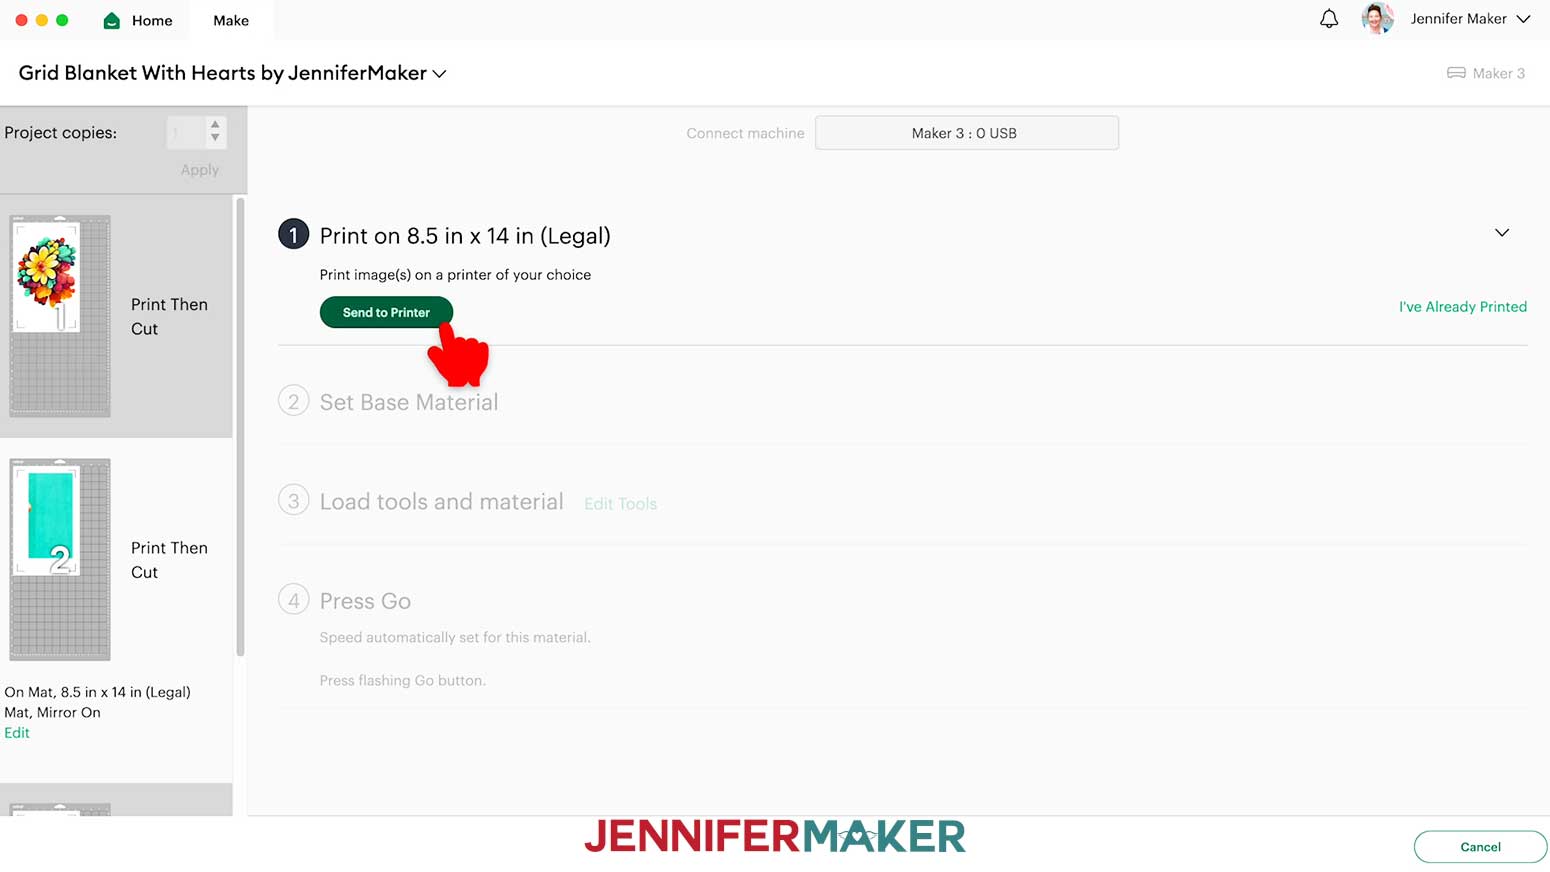
2. Select your printer from the Printer dropdown.
3. Toggle “Add Bleed” off since we don’t want extra ink around the photo pieces.
4. Toggle “Use System Dialog” on.
5. Click “Print.”
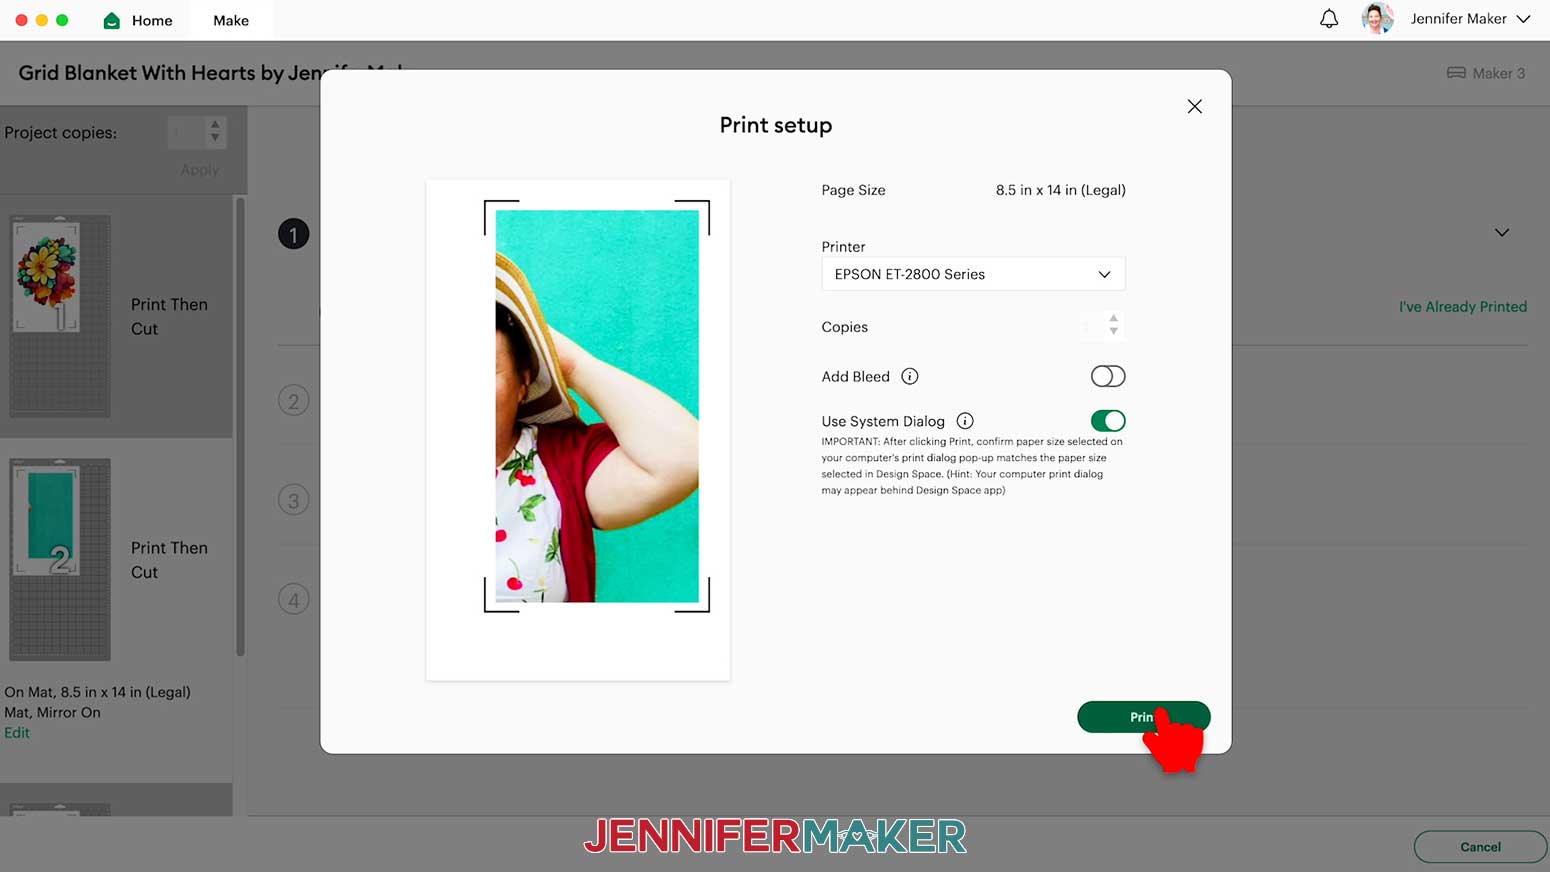
TIP: You may need to minimize or move your Design Space window to see the print dialog window. It sometimes appears behind Design Space. Each printer is different, so consult your printer's user guide for additional support.
6. The print dialog box should have the correct printer selected, the Media set to “Photo Matte Paper,” and the Quality set to “Best.” “Flip Horizontally” should be unchecked.
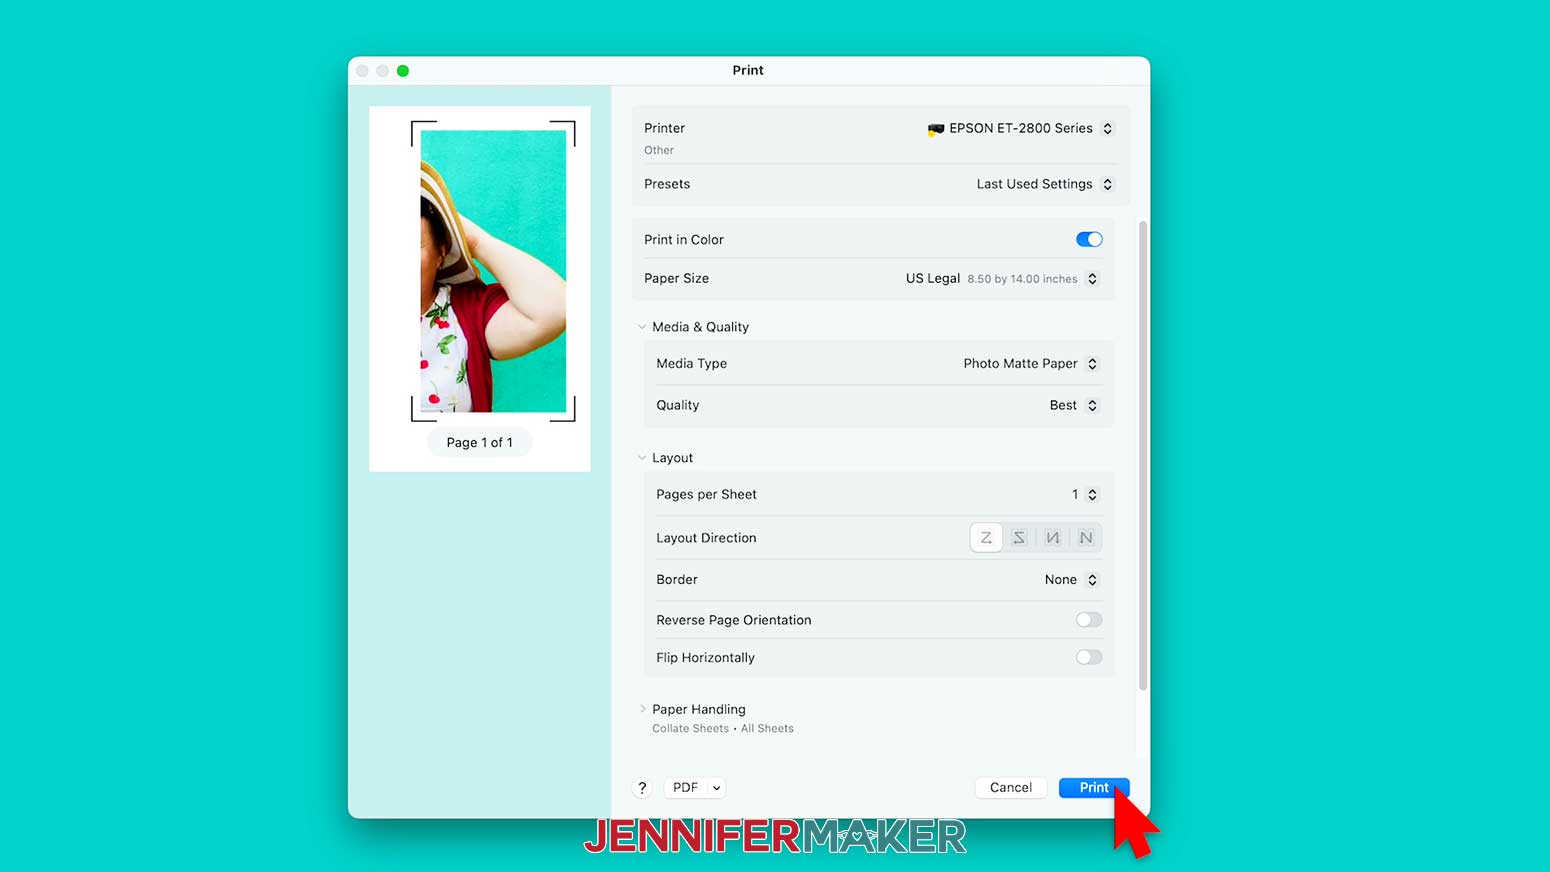
NOTE: Your screen and settings may look different, but use mine as a guide to pick the closest options you have available.
7. Make sure the sublimation paper is loaded correctly in your printer.
8. Click “Print.”
9. Set the print aside to let it dry. Be careful not to smudge it.
10. Use Steps 1-9 to print the other half of the image.
11. Use the same settings to print the other sheets for your design.
NOTE: If you’re adding heart or flower elements that won’t completely fill the grid opening, keep “Add Bleed” turned off because you don’t need the extra ink around their edges either.
12. We’ll cut the pieces by hand, so you can close Cricut Design Space.
CUTTING
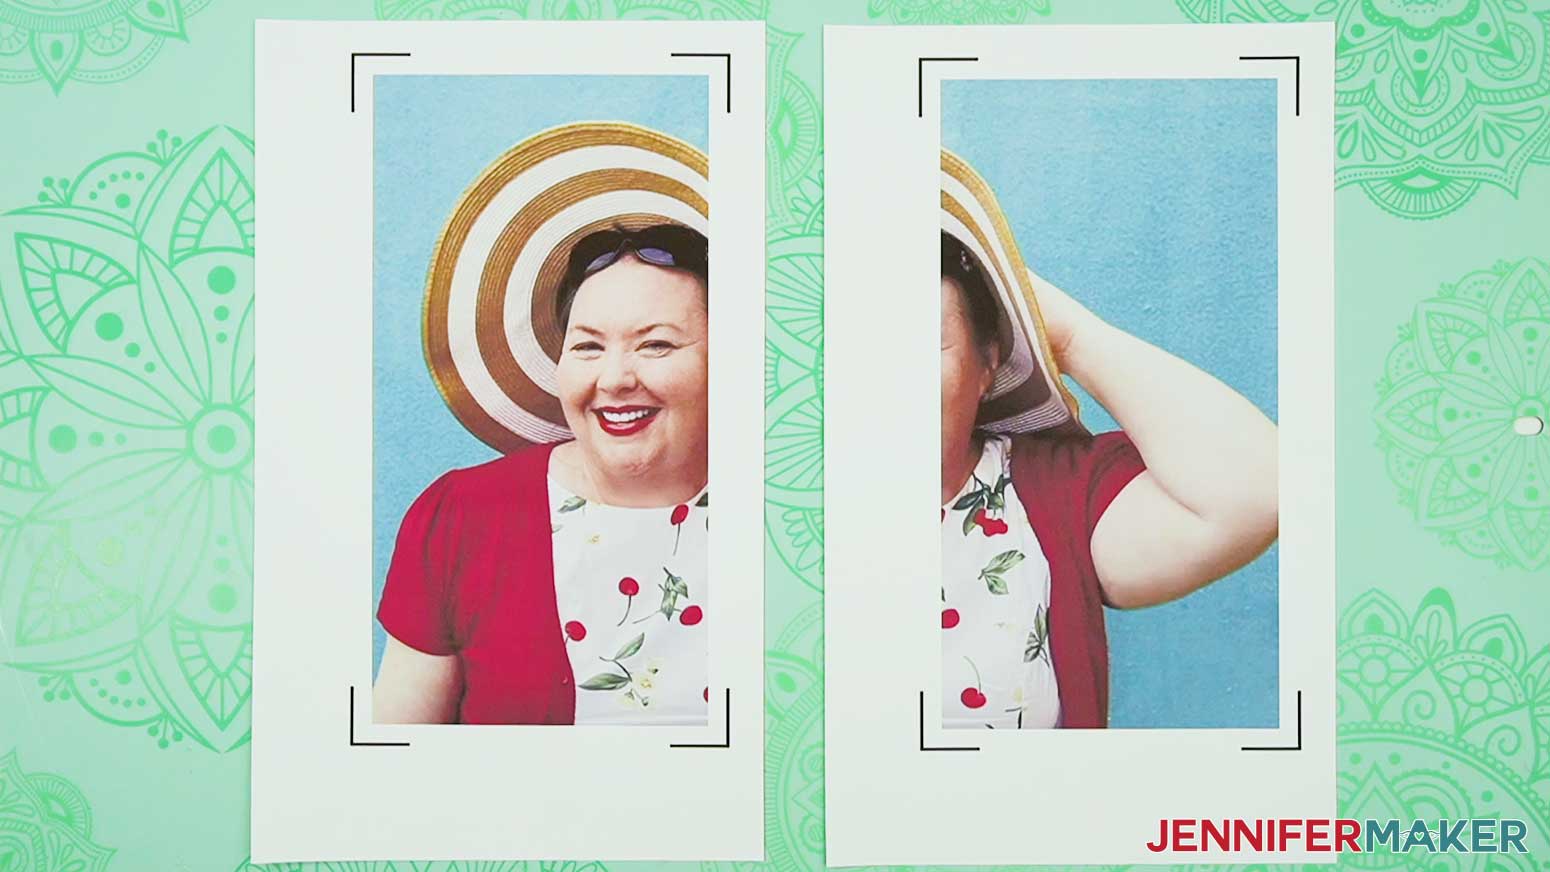
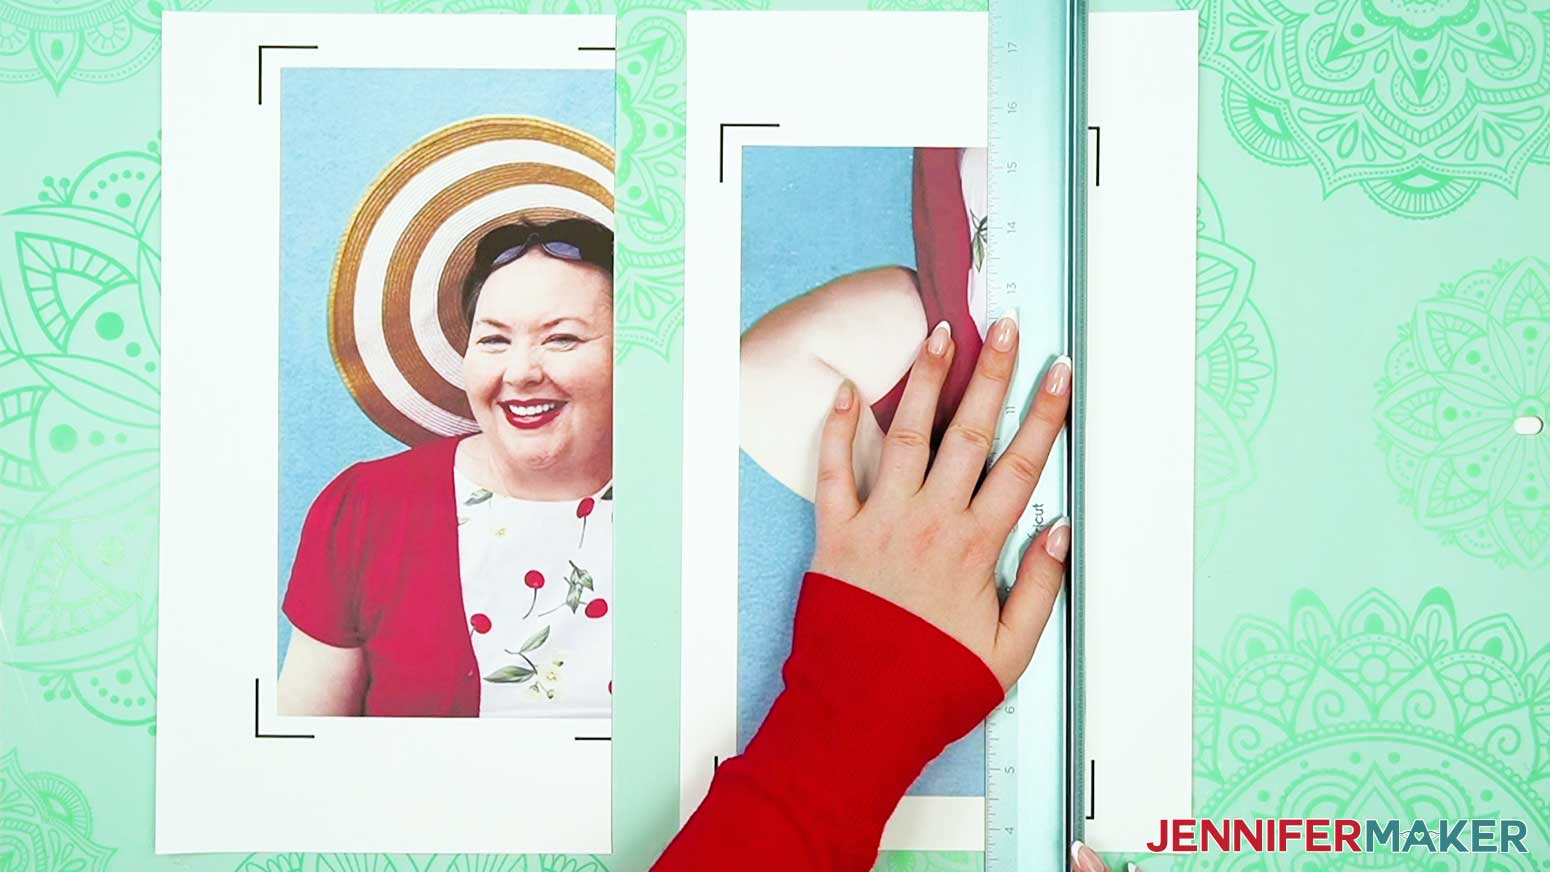
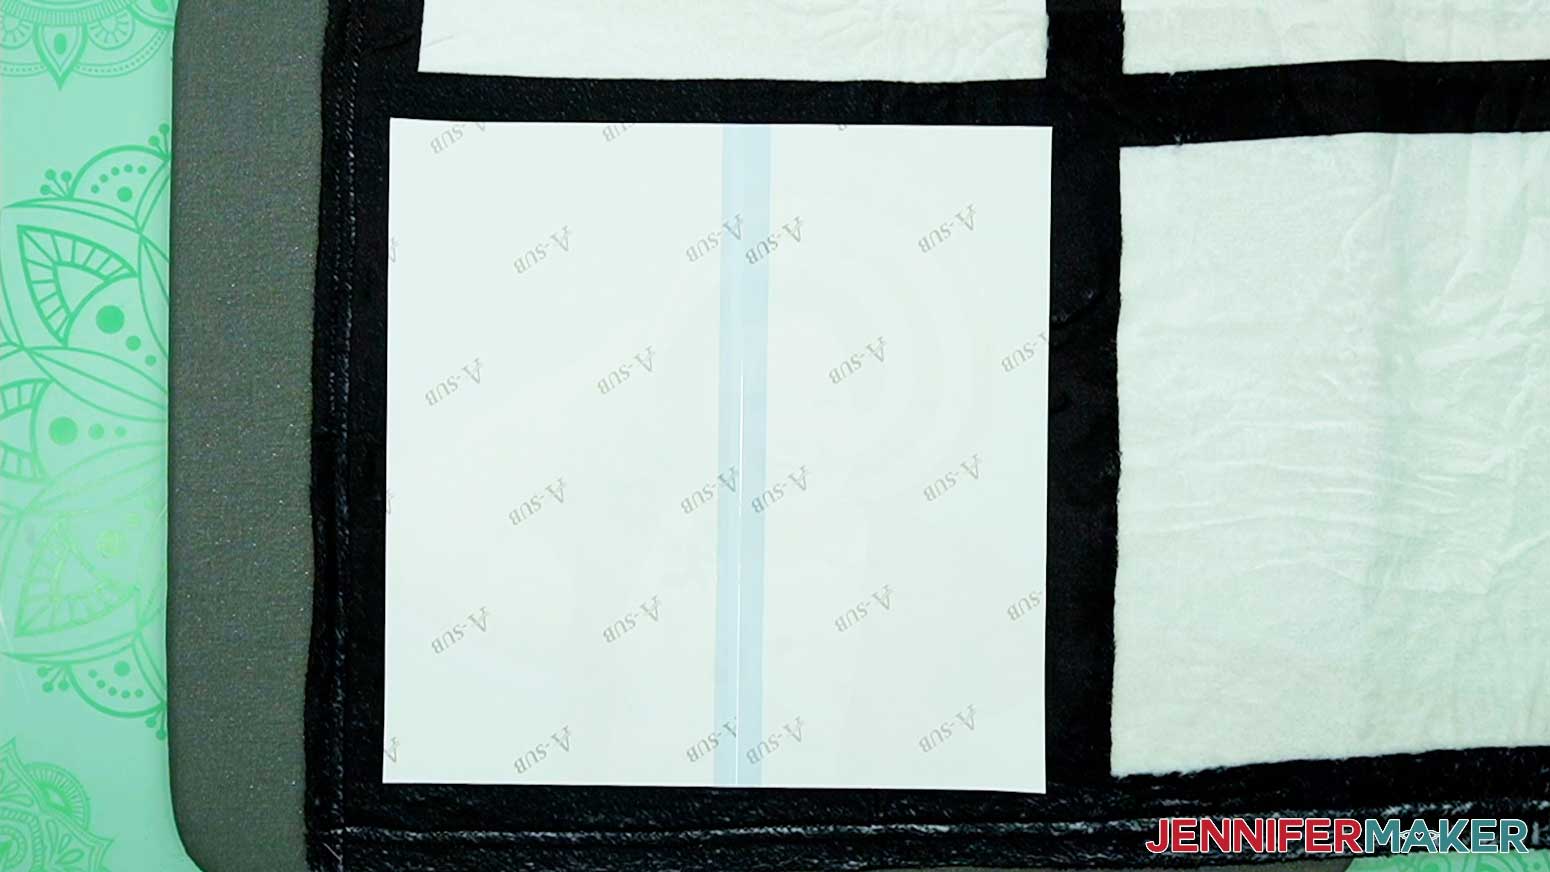
1. Place the left half of one of your photos face up on a self-healing mat.
2. Put your safety ruler along the right side of the image so just a little ink is visible beyond the edge.
3. Align the photo’s top and bottom edges with marks on the ruler to make sure your vertical cut will be straight.
NOTE: Make sure the protective vertical piece on the ruler is between your fingers and the edge that you’ll cut. Once the ruler is in place, you can press down to keep it and the paper in place due to the non-slip material on the ruler’s bottom.
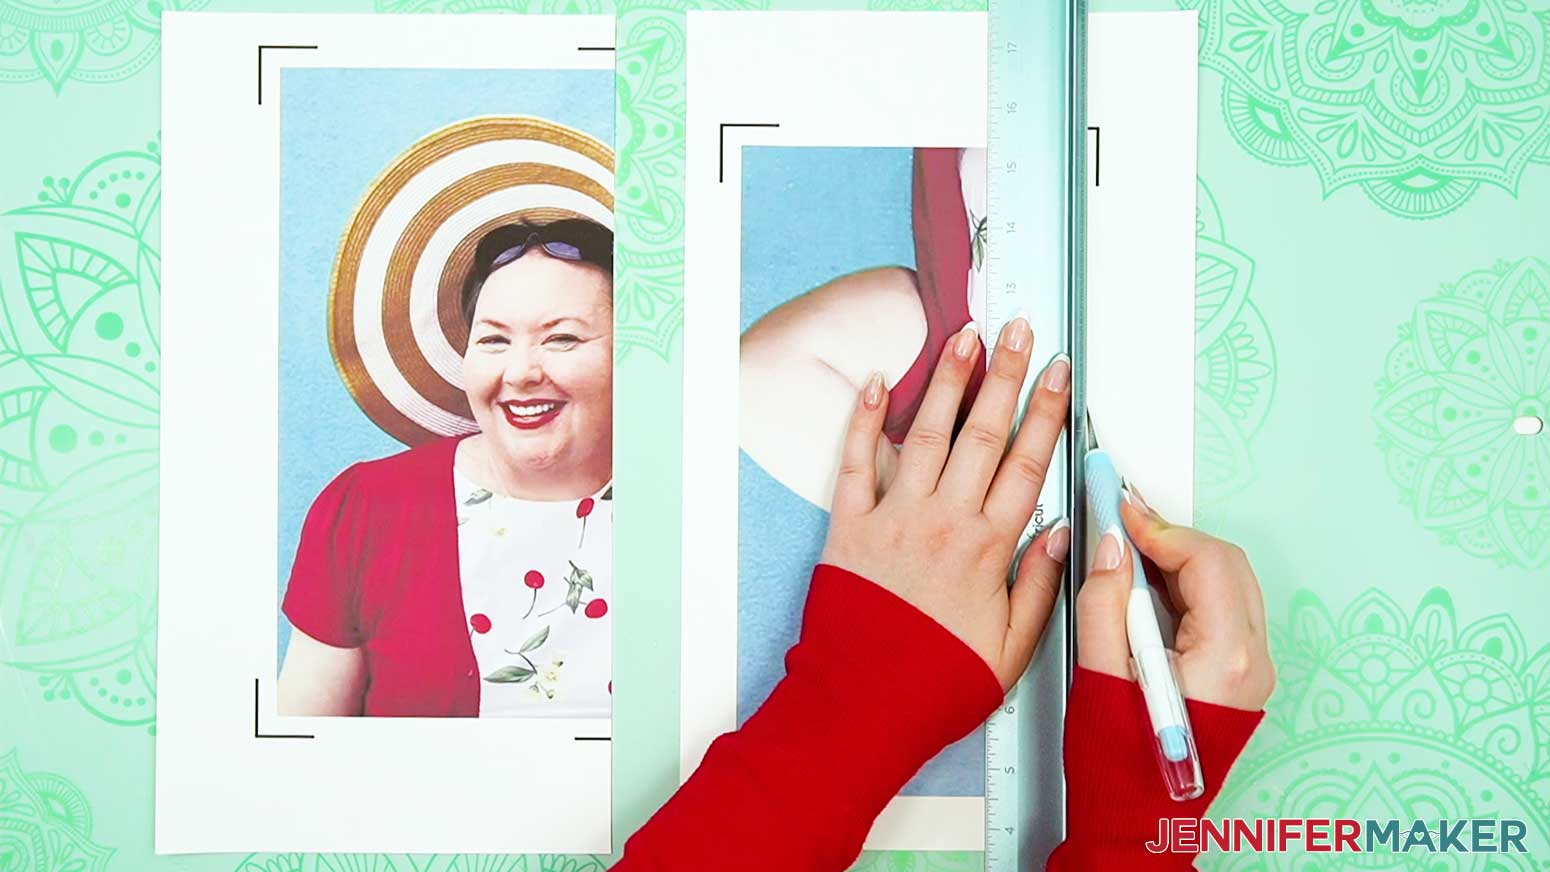
4. Hold the craft knife in your dominant hand and keep the ruler in place with your other hand. Make sure your fingers and nails remain on the other side of the vertical protective piece.
5. Use your craft knife to trim away the excess paper along the ruler’s edge.
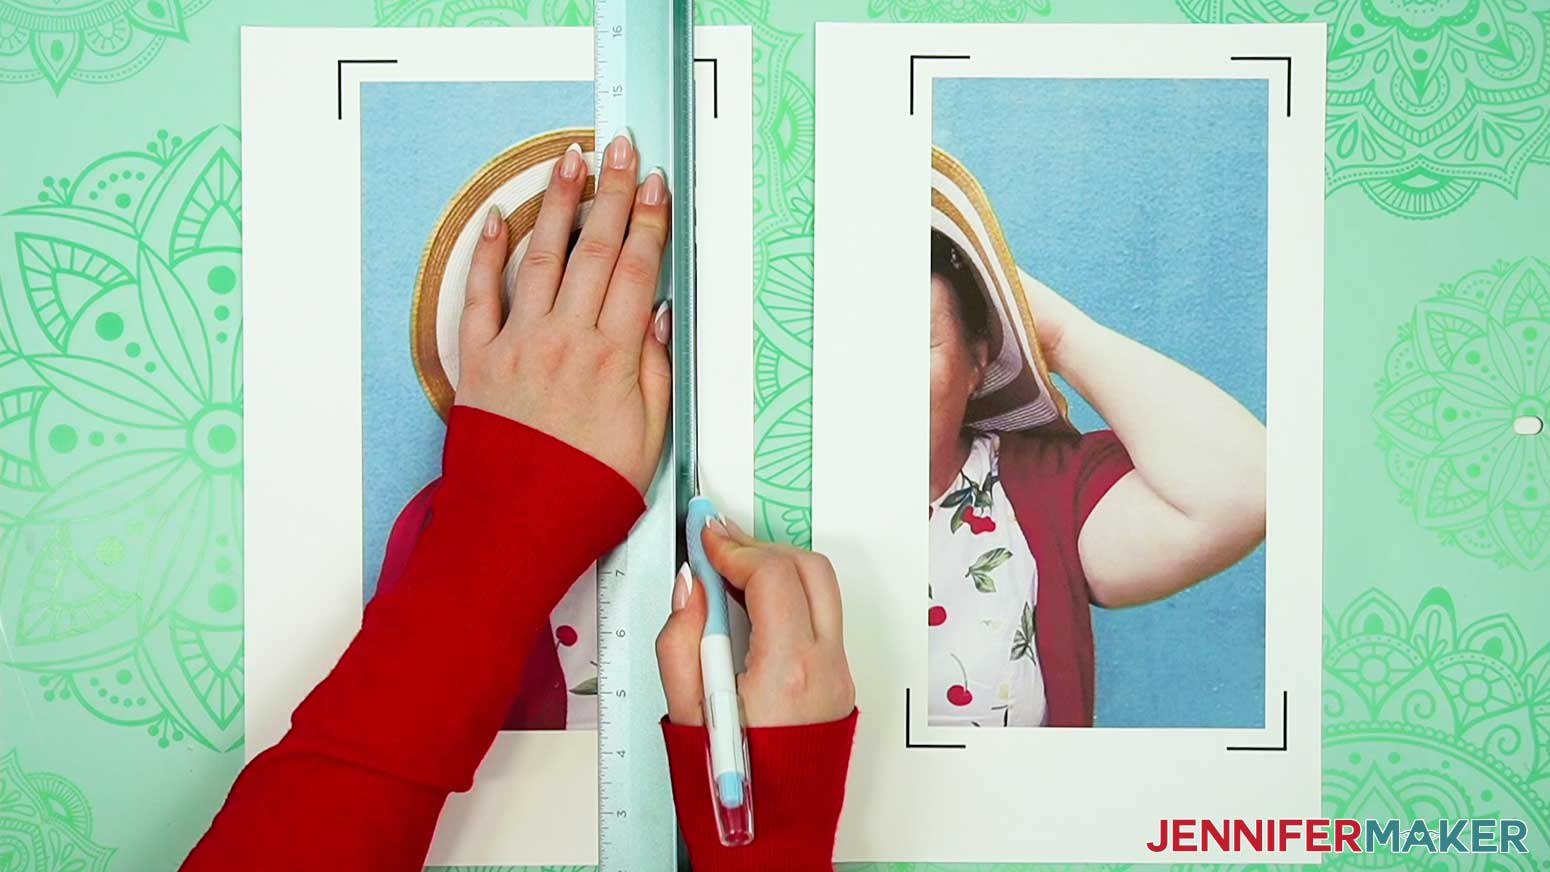
6. Then, place the right half of the image face up on the self-healing mat.
7. Place your ruler so the cutting edge is between the image’s left side and the vertical sections of the black registration marks.
NOTE: We want to leave some white paper to the left of the image for the overlap, but we need to remove the registration marks so they don’t bleed through.
8. Make sure your fingers are protected by the vertical piece on the ruler and safely cut away the excess paper.
9. Align the image halves with the white edge underneath.
TIP: You can use the black horizontal lines or top and bottom edges of the paper to help with alignment, but they aren’t always consistent, so using the image itself is most reliable.
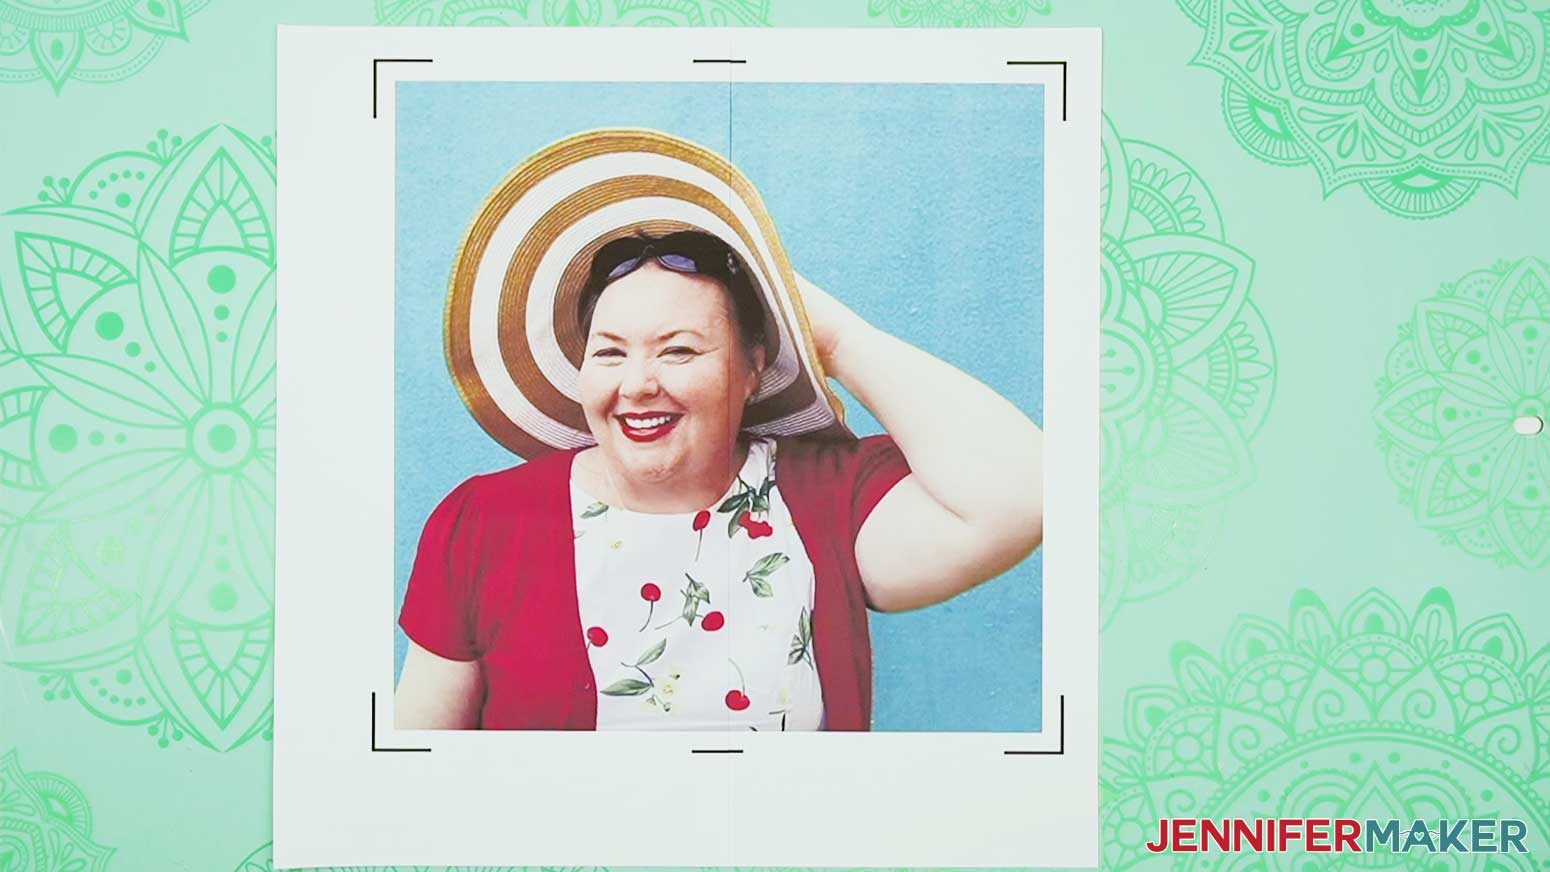
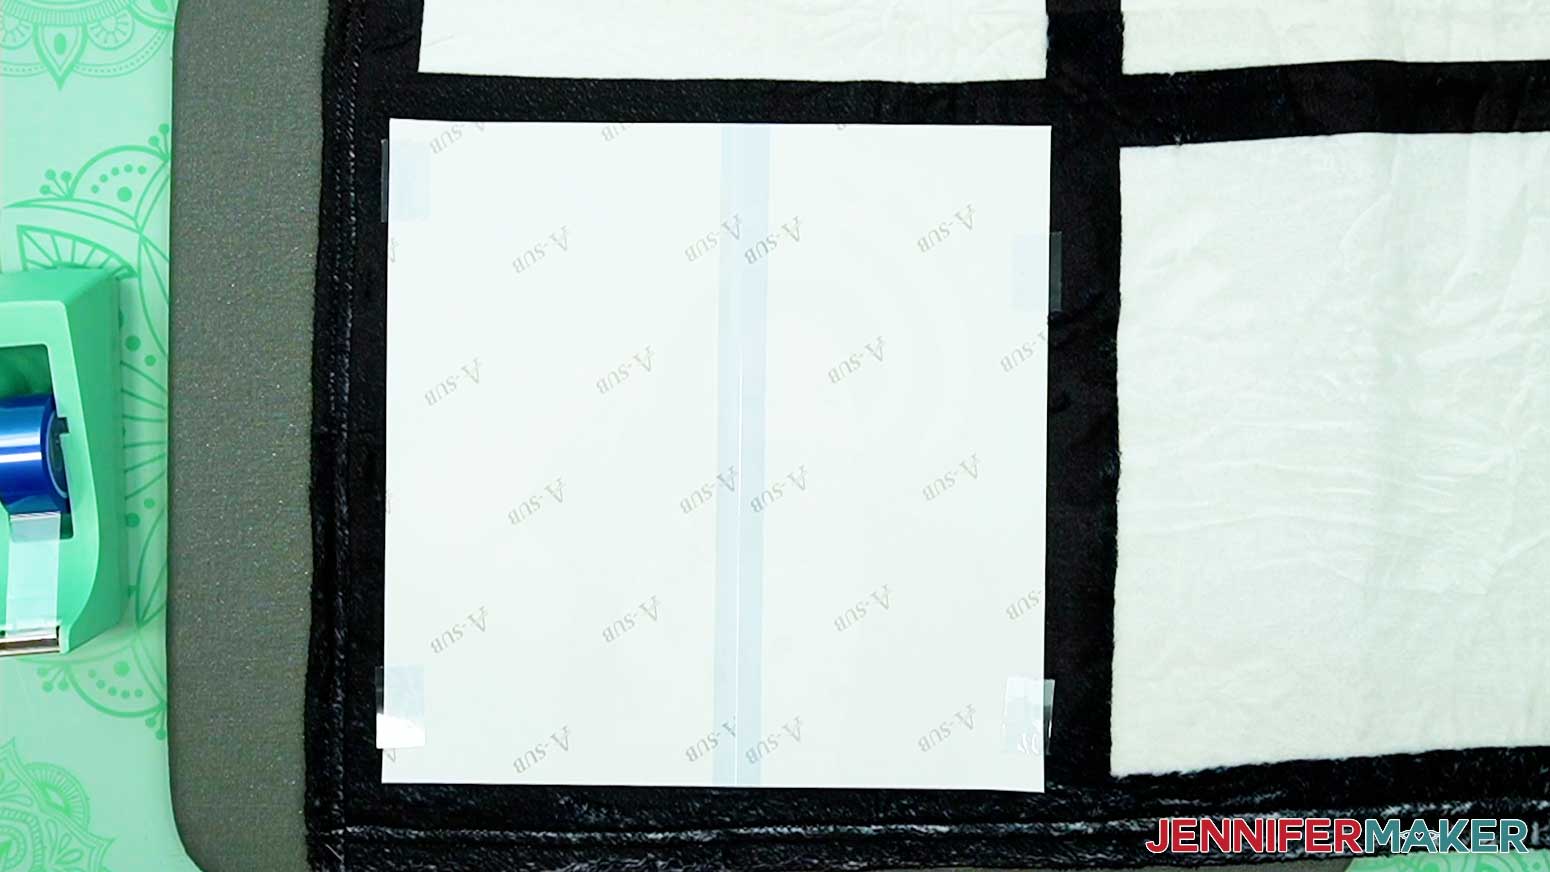
10. Once the image looks perfect, use heat-resistant tape to secure the seam section below the image on the front of the paper.
11. Smooth along the seam to make sure there are no bubbles and the image remains aligned.
12. Then tape the top section above the photo.

13. Carefully flip the paper and tape the image seam with heat-resistant tape on the back side.
14. Press the seam with your scraper tool or fingernail to smooth any gaps and really secure the halves together.
15. Flip the paper and use your ruler and craft knife to trim all the white and registration marks away on all four edges, even if you need to remove a bit of ink
16. Use the same process to prepare any other large images.
17. Cut the rest of the designs apart with scissors and feather their edges.

STEP 3: PREPARE AND PRESS THE GRID SUBLIMATION BLANKET
CAUTION: Good ventilation is important any time you use sublimation. Have your windows open and a fan going to help the fumes dissipate quickly. And don’t breathe in very close to the project while it’s still warm.
NOTE: Your design’s colors will be influenced by the printer profile you use and will not exactly match what is on the printed paper. It’s a good idea to sublimate a test design on some scrap white polyester fabric using these steps before moving to your final project.
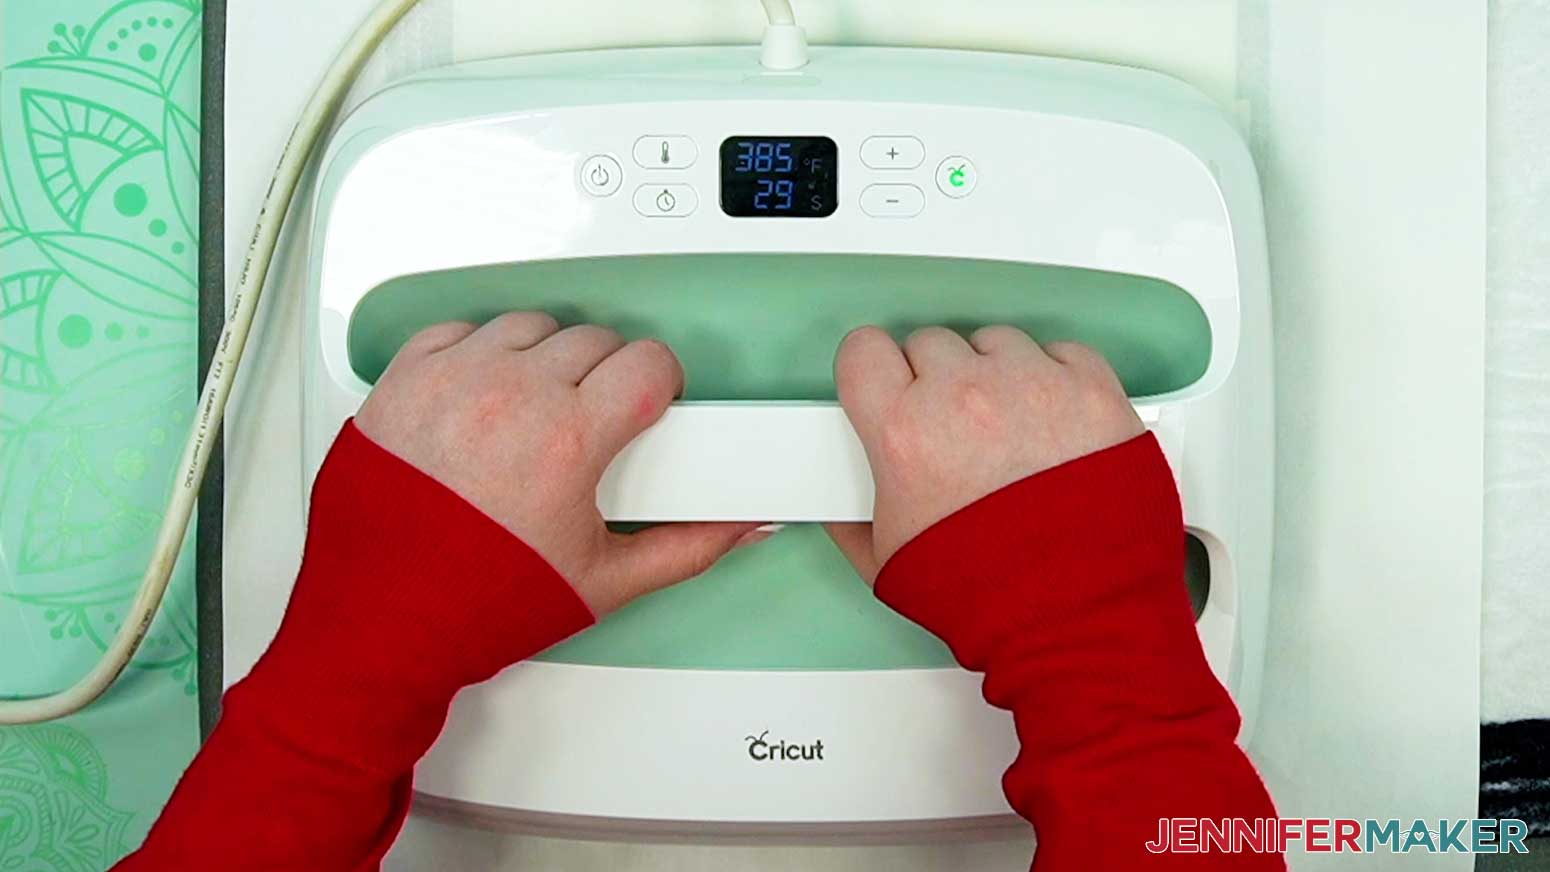
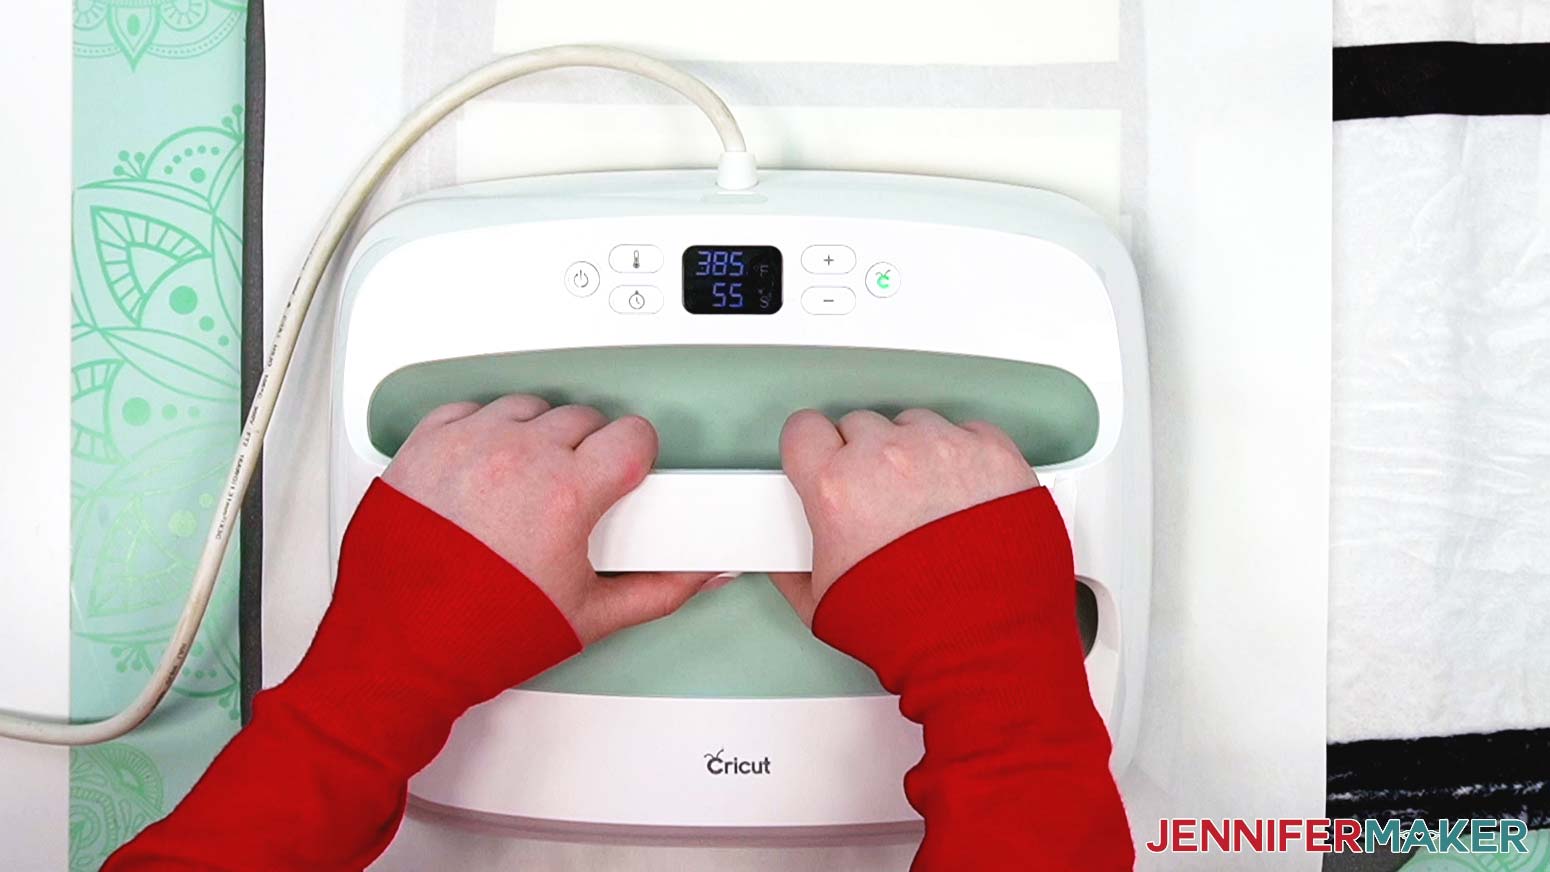
1. Set your heat press to the correct temperature and time. According to my Sublimation Cookbook, the EasyPress 2 needs to be set at 385°F (196° C) for 60 seconds with light pressure for polyester fabric.
2. Lay out the blanket face up, making sure it’s not stretched or wrinkly.
3. Place your pressing mat on the pressing area.
4. Put the first design area face up on the covered mat.
5. Lint roll the first design area to remove dust or debris.
6. Put fresh white butcher paper on top of the design area to protect the fibers from the heat press.
NOTE: The black grids on my blanket were sublimation ink, so make sure they are completely covered to avoid transferring ink to your press if it reactivates.
7. Lightly press the design area for 5 seconds to remove excess moisture from the material, and smooth out any extra wrinkles.
8. Put white cardstock under the blanket to protect the pressing pad from excess ink.
NOTE: While I didn’t experience ink going through the blanket, some fabrics might behave differently.
9. Use your hand to brush the blanket’s fibers all in one direction so the ink sublimates a smoother, more consistent surface.
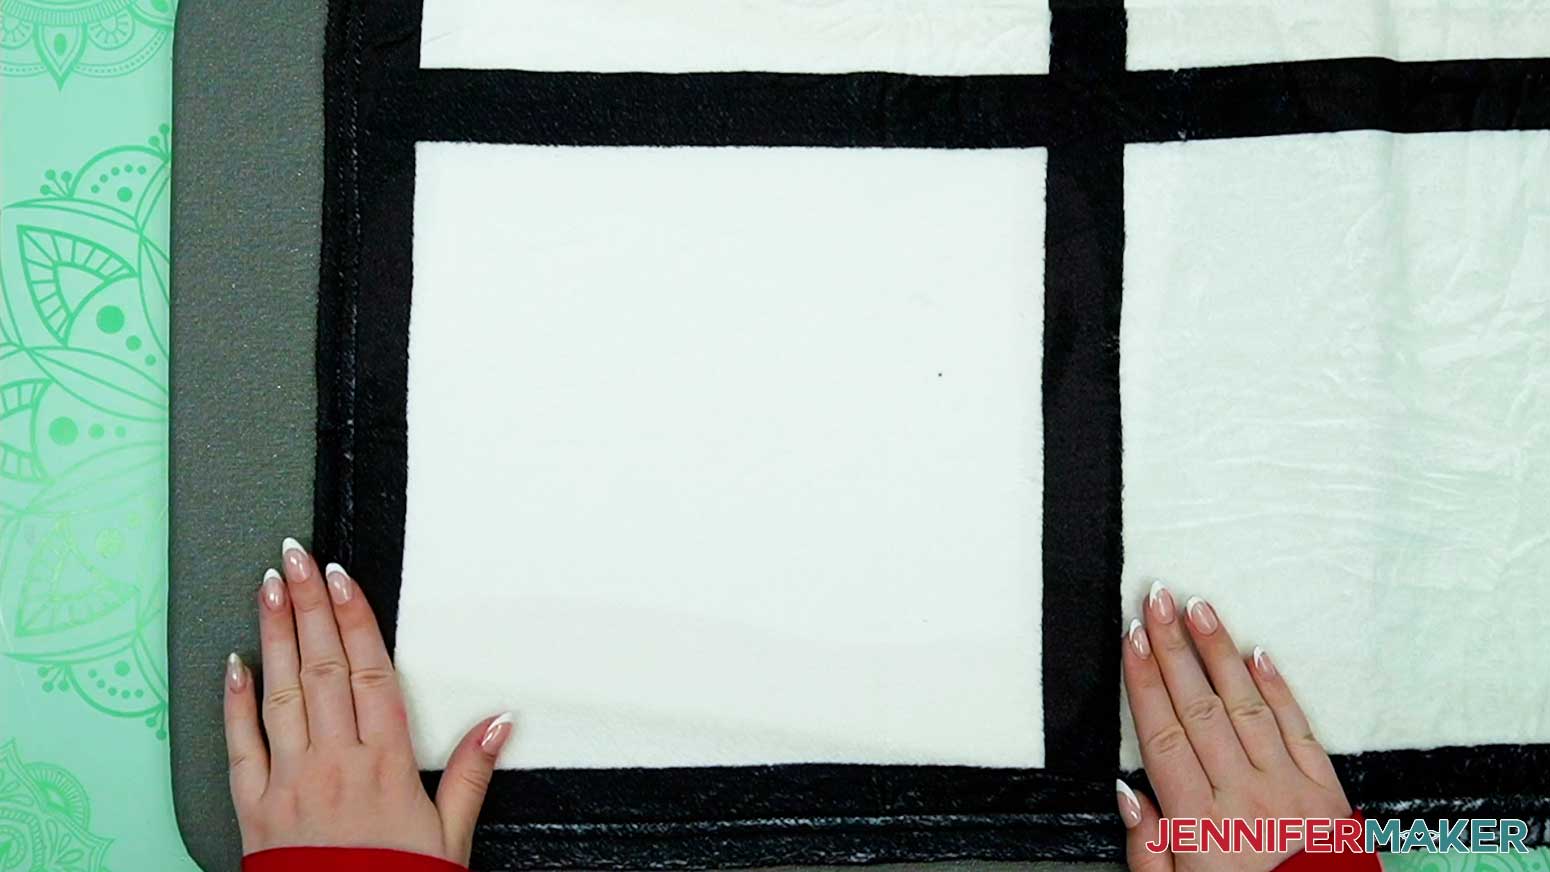
10. Gently adjust the blanket so the open grid area is on the covered pressing mat and the fabric isn’t stretched at all.
NOTE: The grid boxes in my tests did not have straight lines and are very easy to skew. Focus on getting the fabric to lay flat.
11. Place the design face down so the image is correctly oriented for the blanket design.
NOTE: Since the grid lines are wavy, do your best to completely cover the white blanket area without stretching or moving the fabric.
12. Tape the design in place with heat-resistant tape so just a little bit touches the grid lines on the blanket.
NOTE: The tape lifted some of the black in my tests, so the less the tape touches the grids, the less it will be impacted.
13. Place a fresh piece of butcher paper on top of the blanket and taped design so the entire grid is covered.
14. Press the design with light pressure for 60 seconds at the correct temperature.
15. After pressing, allow the design to sit for approximately 10 seconds to help prevent ghosting. Remove the butcher paper, tape, and transfer sheet to reveal the first photo on your blanket.
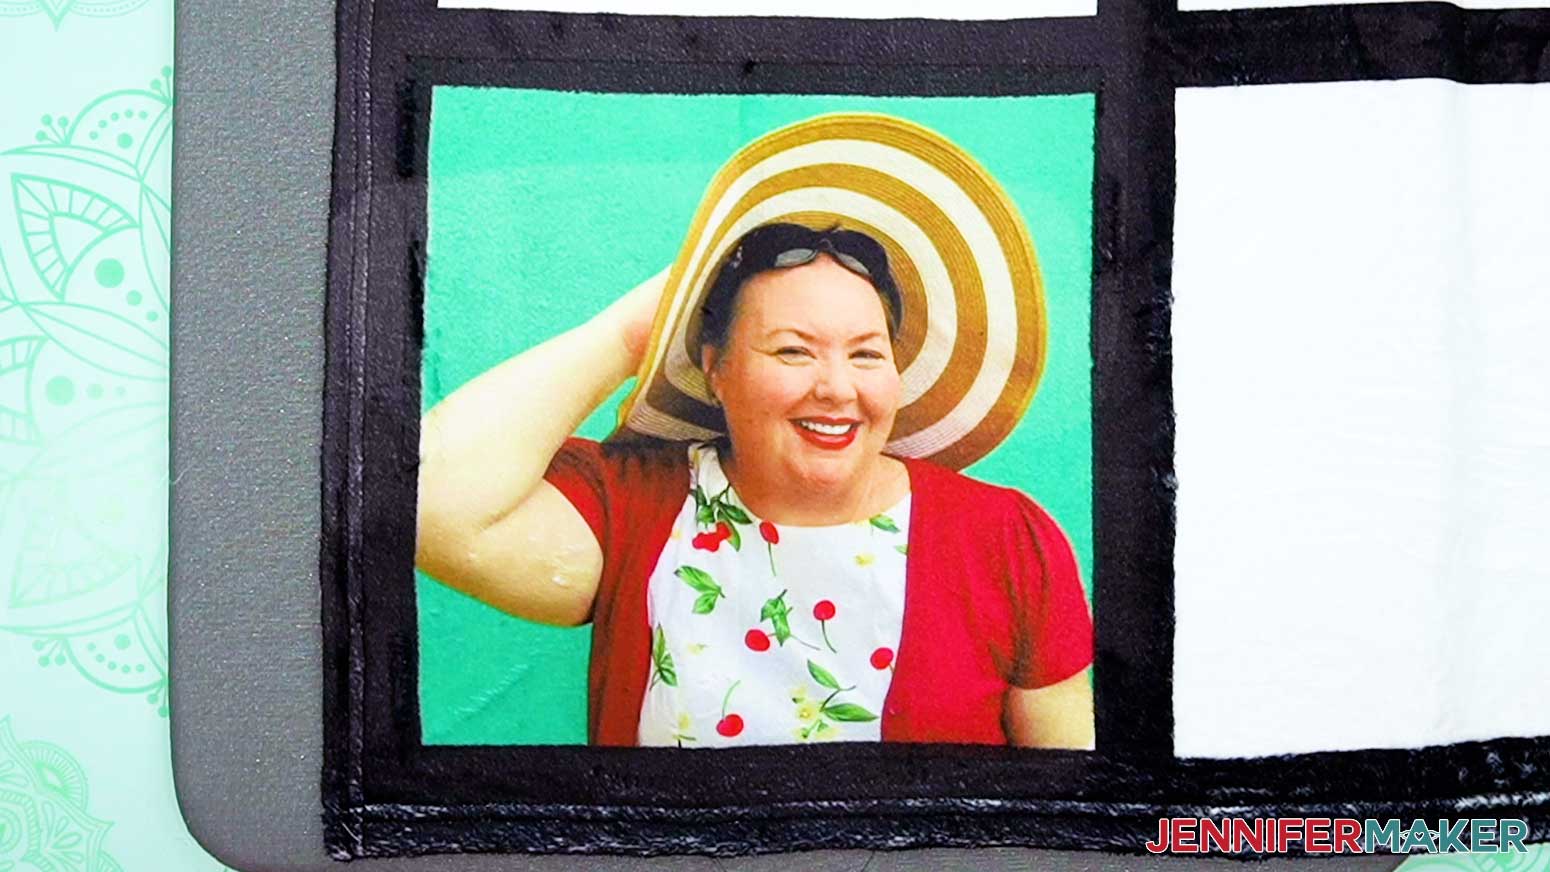
16. Add more design repeats all over the blanket’s front.
NOTE: Remember to move the pressing pad as needed, lint roll and pre-heat the design area, always secure the design with heat-resistant tape, cover it and the grid lines with fresh butcher paper, and don’t let your heat press get too near existing designs or the ink could reactivate. The ink may not fade but will transfer to the butcher paper, and it’s likely to transfer if you use the same butcher paper again.

NOTE: When you get to a design that is larger than your heat press, press it in sections with the least amount of overlap.
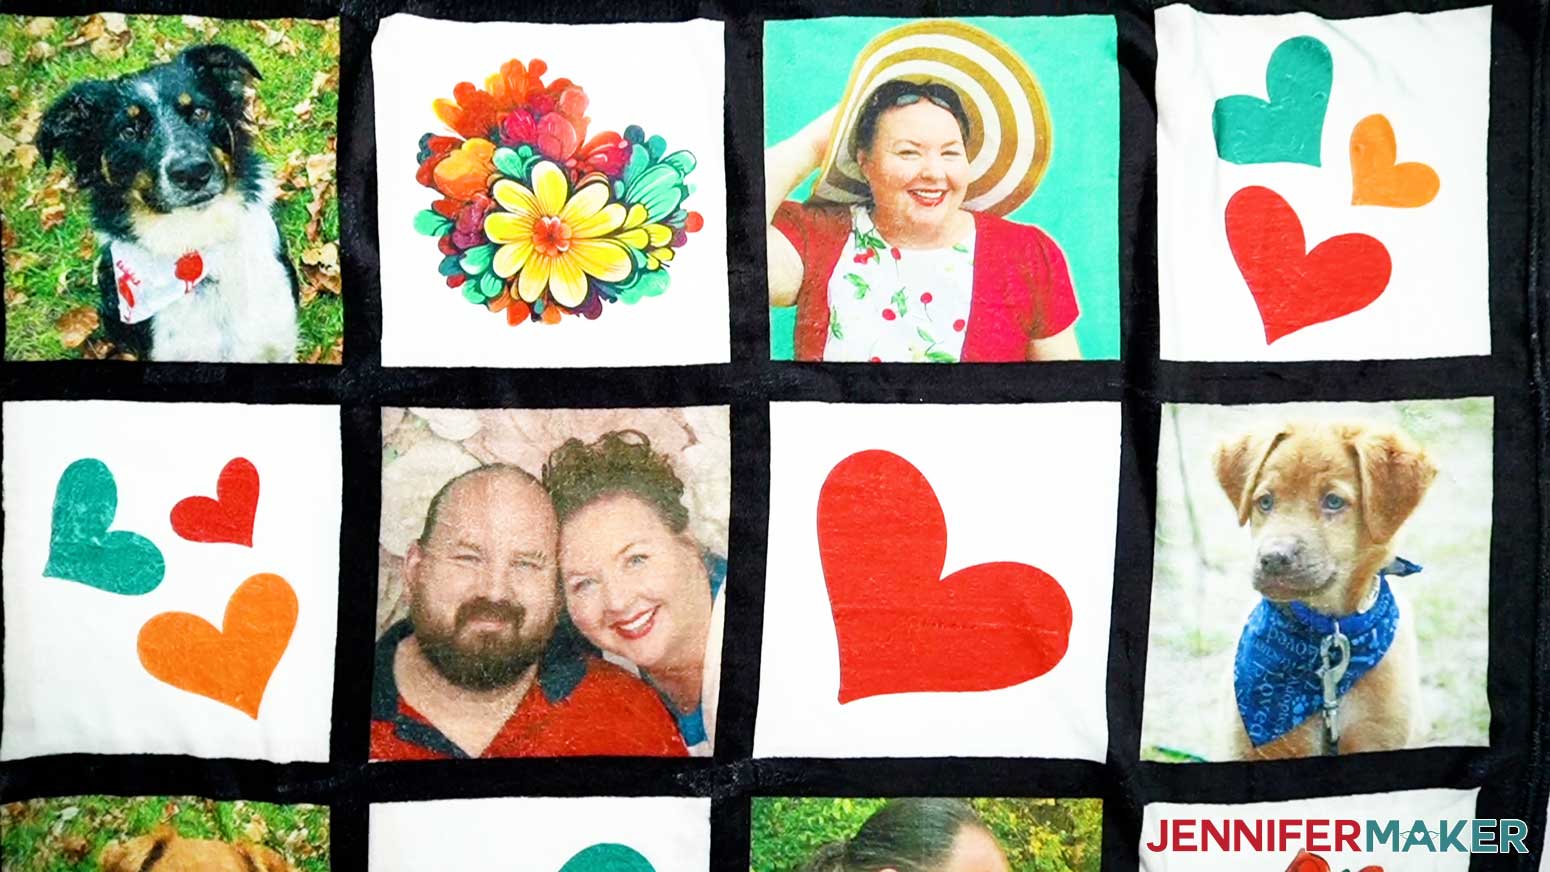
STEP 4: SHOW IT OFF!
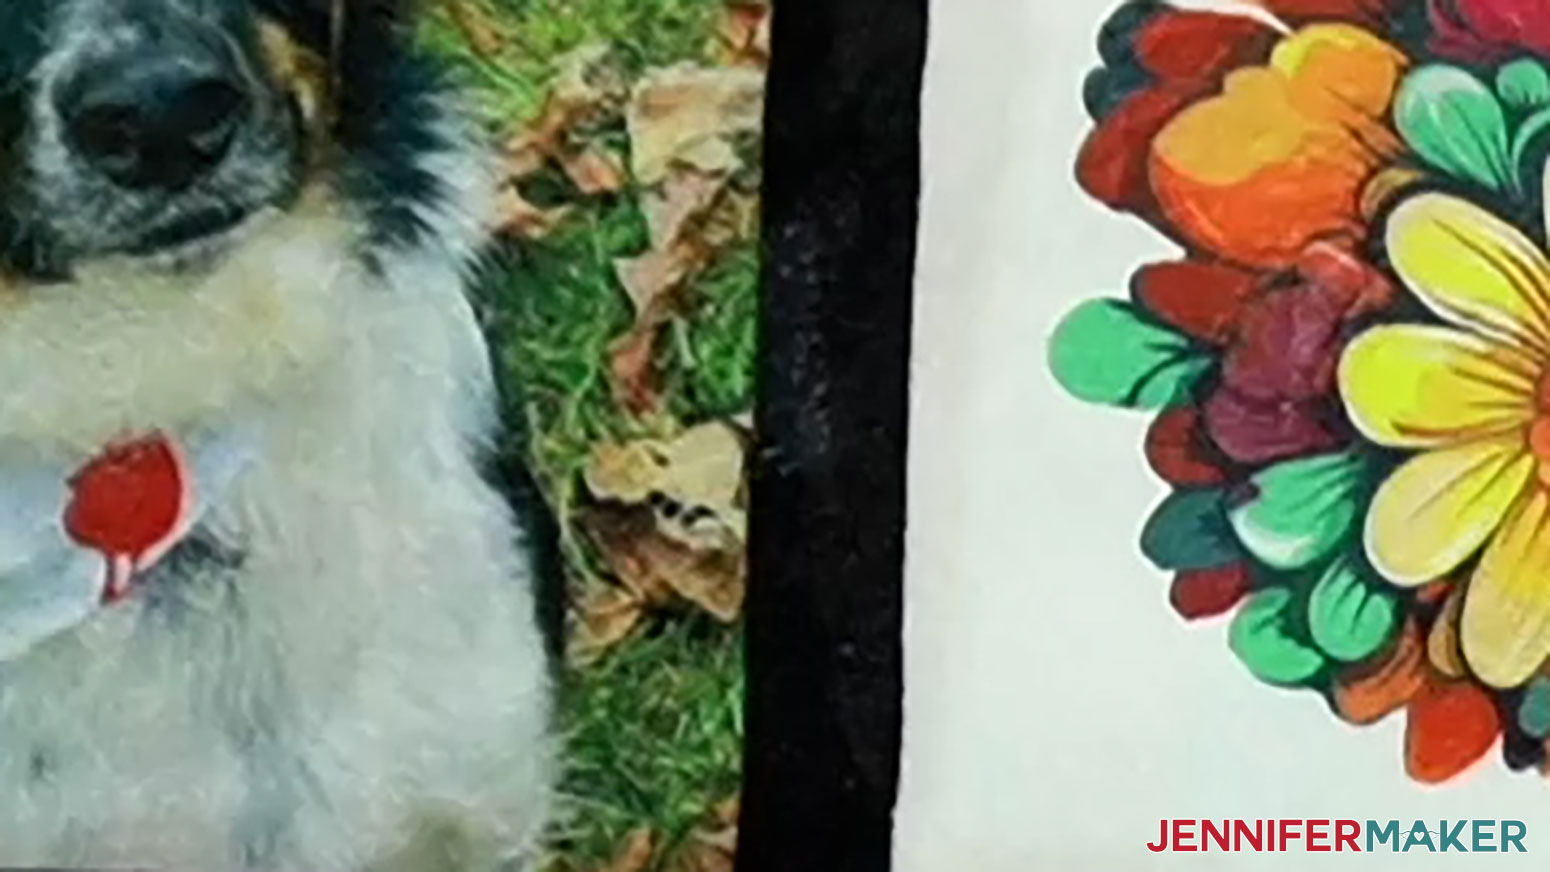
Here is what my finished grid sublimation blanket looks like!
Notes
Care: Wait at least 24 hours before washing. Machine wash with cold or warm water and a mild detergent. Hang dry or dry with low heat.
Finished Size: Depends on the blanket used. (The blankets I used on this project were 50” x 60”.)
Answers to Your Questions About Making A Sublimation Blanket
Q: Is there a way to create custom sublimation photo blankets?
A: You can learn how to create your own customized photo blankets in my ADVANCE program. Learn more about ADVANCE here!

Q: What kind of blanket is best for sublimation?
A: Blank blankets (or with white areas) that are at least 65% polyester will work. Polyester is not safe for baby blankets because it isn’t breathable, so keep these sublimation blankets ideas for older kids.
Q: Can you sublimate on any blanket?
A: The blanket should have at least 65% polyester content and be white so the translucent sublimation ink will sow correctly.
Q: How do I care for a sublimation blanket?
A: You’ll want to wait about twenty-four hours before cleaning your custom blanket. Then wash it on gentle with mild detergent. Hang it to dry for the best results. Unlike screen printing, the design becomes part of the fibers, so the image should last as long as the item!
Q: Why is my sublimation print color so dull?
A: Sublimation prints look much duller on the paper than they do after they’re sublimated, so don’t worry if your printed image looks faded or different colors than you expect. Good news, the vibrant colors will show when transferred to the sublimation blanks!
Q: Why is my sublimation not transferring evenly?
A: You may need to tweak your settings if you’re using materials other than the ones in my materials list. The sublimation printing process and transferring has a lot of variables, so follow my notes first on a test cloth, then try adjusting your temperature, time, or pressure if you need to.
Q: What does ghosting mean in sublimation?
A: Ghosting can occur when a freshly sublimated object is moved around too much while it’s still hot. If the object and the sublimation transfer is still hot, the image is still sublimating. To avoid this, simply wait until your sublimated item has cooled off before handling or removing the paper, and don’t move it around more than you need to while it’s sublimating. It’s a natural effect of the sublimation process because the ink is in a gaseous state until it’s cooled.
Q: What if I don’t have a sublimation printer?
A: You can have someone else print the designs for you! There are many Etsy sellers (and others in the global marketplace) who will print your designs and send them to you. Just check their customer reviews, see if they have a minimum order quantity, and make sure their typical production time fits your goals.
Get my free PNG files to make your sublimation blankets ideas!
(If you do not see the signup form above, click here.)
I love seeing what you make with my designs and how you use them! Please share a photo of your sublimation blankets ideas in our Facebook group or tag me on social media with #jennifermaker.
Love,

Want to remember this? Save this Sublimation Blankets Ideas Tutorial to your favorite Pinterest Board!