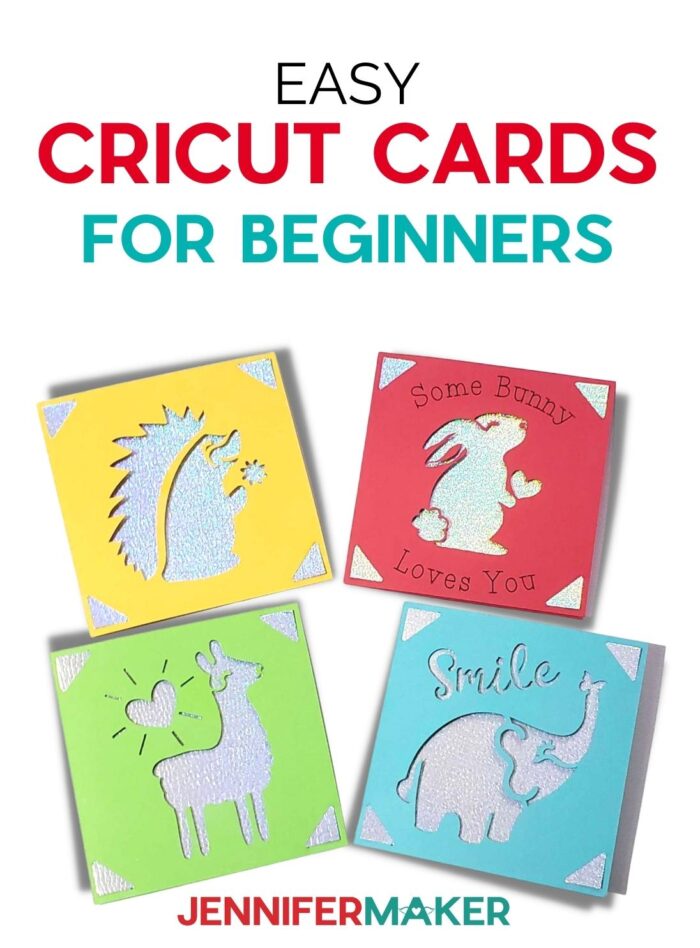
Learn how to make Cricut cards and design your own!
Cricut cards are so much fun to make! But if you haven’t made them before, it can take some time to learn all the different ways to make them. There are simple card designs that you can make in just a few minutes with just cardstock – they’re almost instant gratification! And there are so many ways to actually cut the designs depending on the machine you have! I’m really impressed by the Cricut Card Mat 2×2 and all the designs it makes possible. If you just want to know where to start, this tutorial is for you! And if you’re ready to start experimenting with your own designs, I’ll go over the basics!
See the full step-by-step video tutorial on how to make Cricut cards on my Youtube channel!

Cricut cards can be made on any Cricut cutting machine that uses Design Space, but the process depends on your machine, the style you want, the available materials, and the mat you have. The tutorial covers a few combinations!
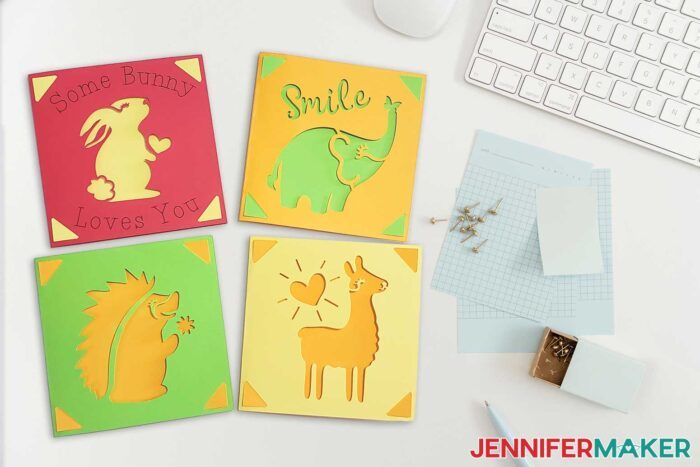
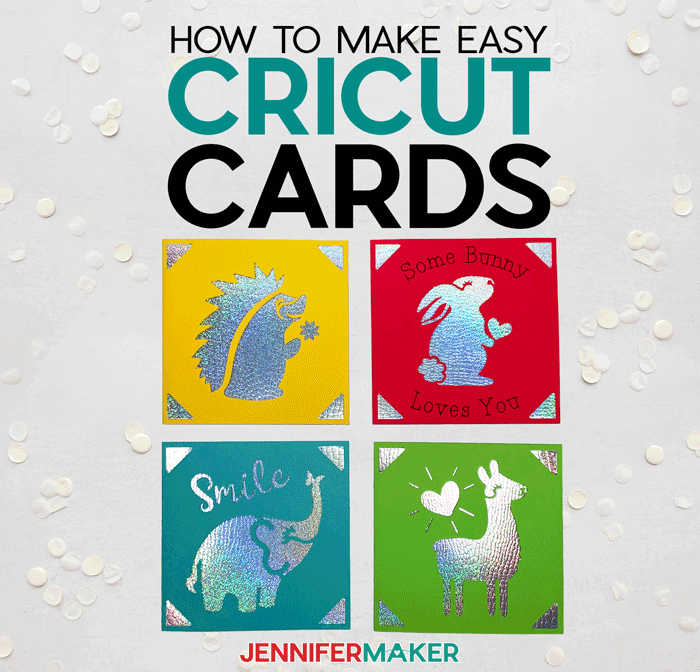
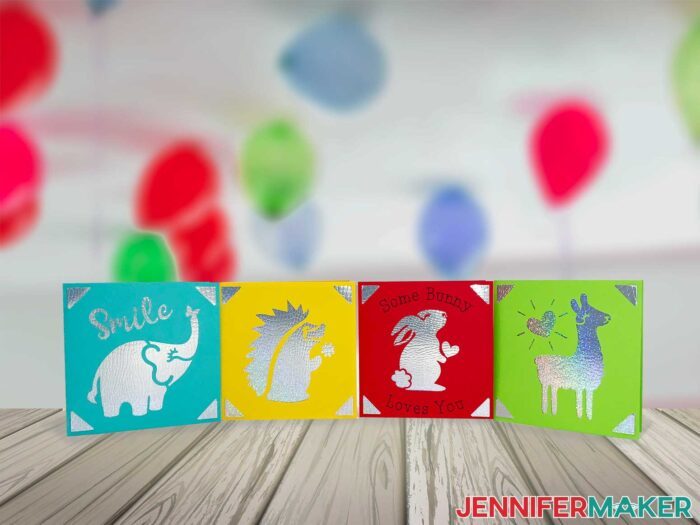
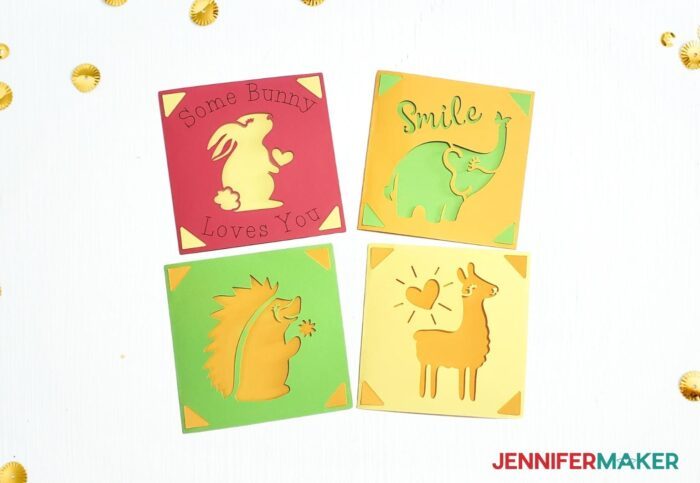
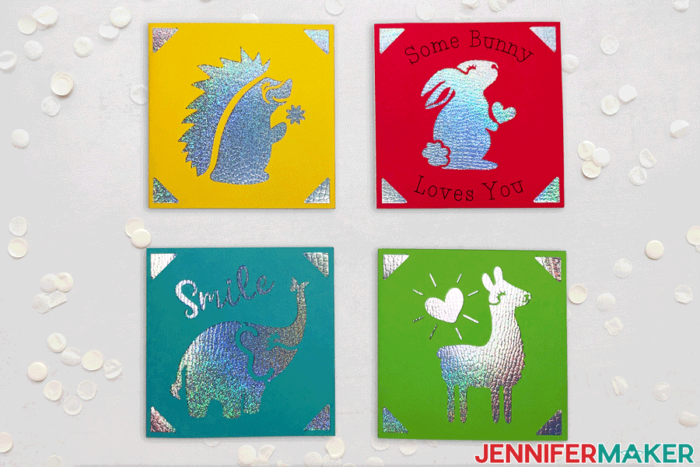
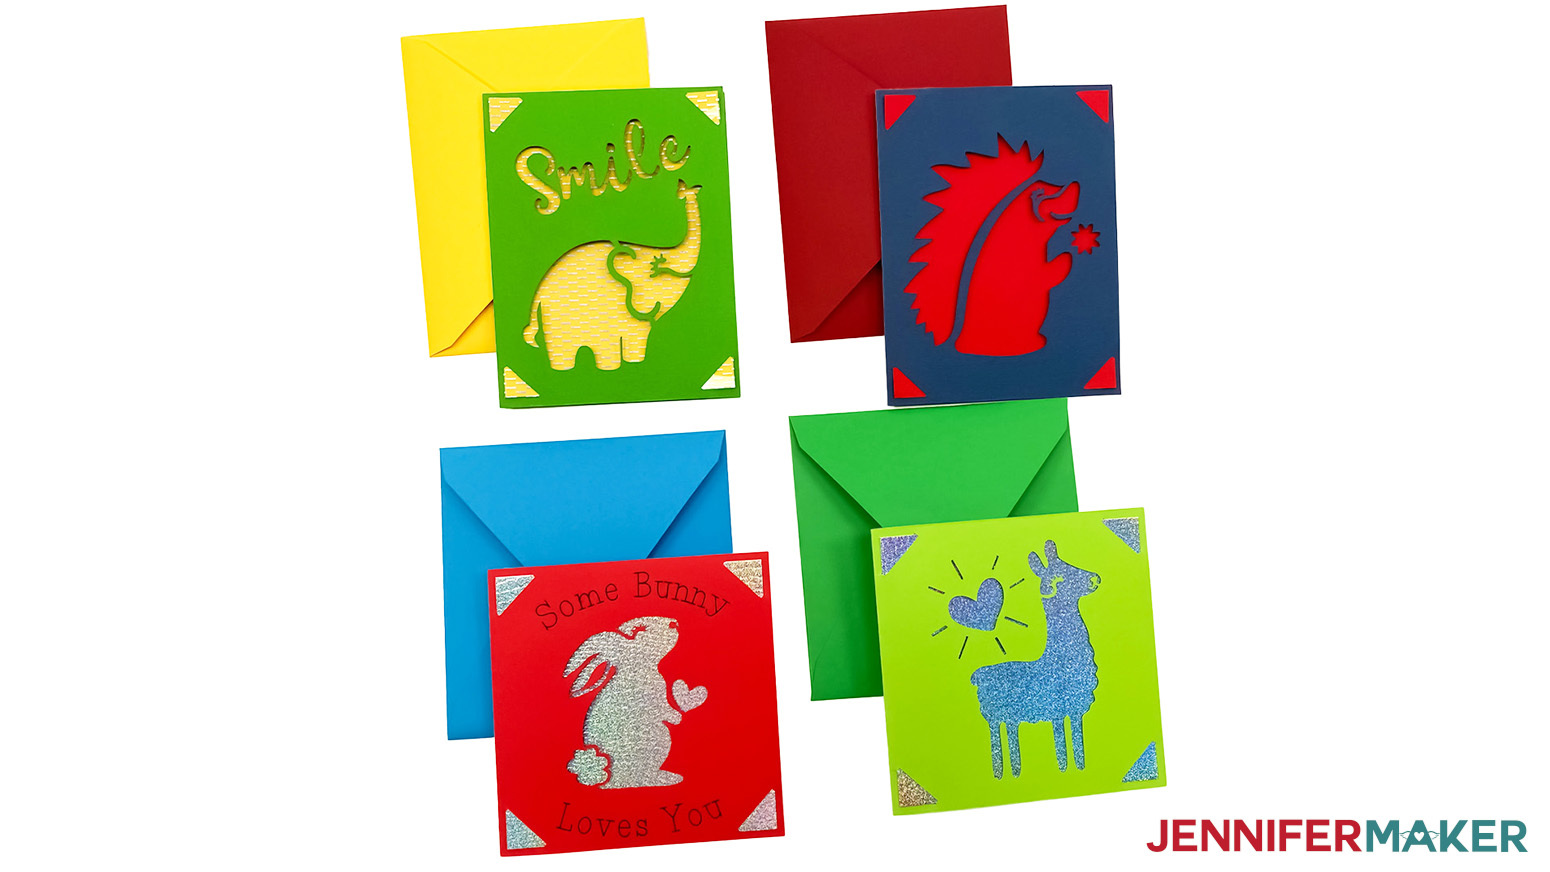
To show you the basics, I’ve designed some adorable animal cards! These free Cricut card projects will show you how to use pre-made items or save on craft supplies by making a new project at the correct size.
I’ll also share my favorite cutting and material settings for the best results with your Cricut 12″ x 12″ Standard Machine Mat. The designs cut perfectly on my Cricut Maker 3, but also work well on original Maker or Cricut Explore machines. I used a Cricut Fine Point Blade since my designs just use cut lines. I’ll also show you how to add a custom message using Cricut’s Fine Point Pens.
If you want to make these cute cards with a Joy, use the files with R20 in the name.
Thanks to the handy glue-free design of the Cricut Insert card corners, we don’t need adhesives. A few tools are helpful, though, like the scraper and brayer. If you’d like you make your own card from scratch (watch until the end of the video!) you’ll need a Scoring Stylus or Single Scoring Wheel to work with that file version.
And yes, you can mail these gorgeous cards! I’ve included envelope designs made just for these cards! Check out my tutorial on How to Make an Envelope to assemble them.
If you want to make your own corner cut card designs, I’ll show you how in the video!
These Cricut Cards are so easy to create with a template or on your own. Let me show you how!
Ready to make your own Cricut Cards? This post contains some affiliate links for your convenience (which means if you make a purchase after clicking a link I will earn a small commission but it won’t cost you a penny more)! Read my full disclosure policy.
Materials & Tools to Make Cricut Cards
View my Amazon shopping list with the exact items we used to make this project!
- 65 lb 12″ x 12″ Cardstock to make your own cards in the different colors you choose
- 65 lb 8.5″ x 11″ Foil Cardstock (alternative) if you want to make your own Inserts
- Cricut Cards, such as R20 Cricut Insert Cards if you’d prefer to use pre-made blank cards and/or inserts
- A method to cut your Cricut Cards — I used the amazing Cricut Maker 3 but you can also use the Cricut Maker series, Cricut Explore series, the Cricut Joy Xtra, the Cricut Joy, or the Cricut Venture machines.
- For Explore/Maker: Cricut Classic Fine Point Pen Set (Explore/Maker) or For Joy: Cricut Fine Point Pet Set (Joy)
- For Explore/Maker: Cricut Green StandardGrip Machine Mat (12” x 12) or Cricut Card Mat – 2×2; or For Joy: Cricut Joy 4.5″ x 6.25″ Card Mat
- Scraper, Scoring Tool (if you want to make a card without using Cricut Card packs), and a Brayer
- Design #398 – My free template (available in my free resource library—get the password at the bottom of this post)
How to Make Cricut Cards for Beginners
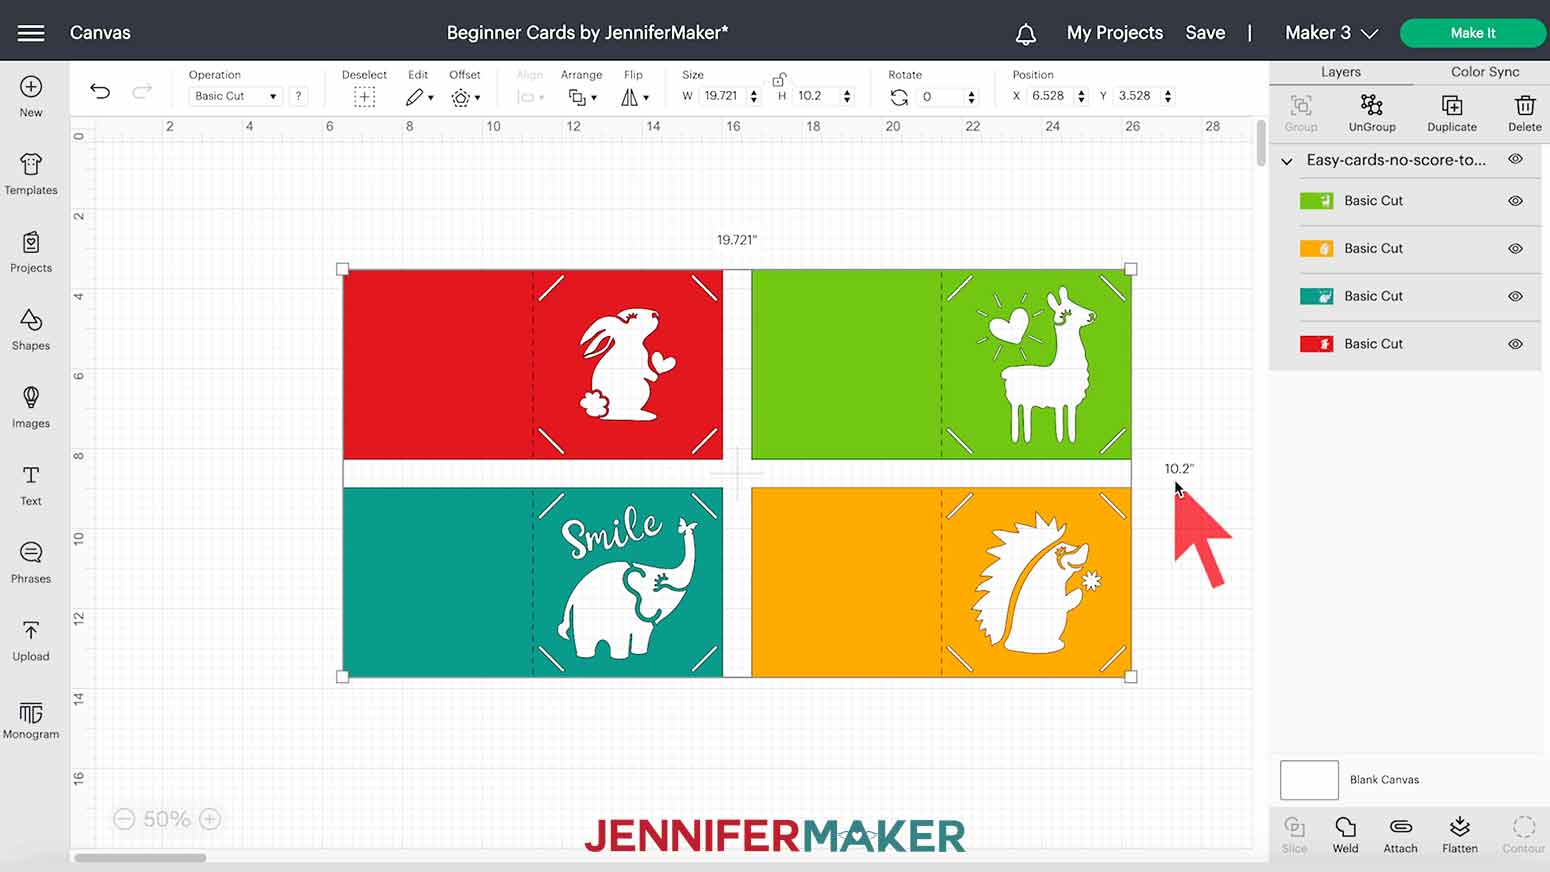
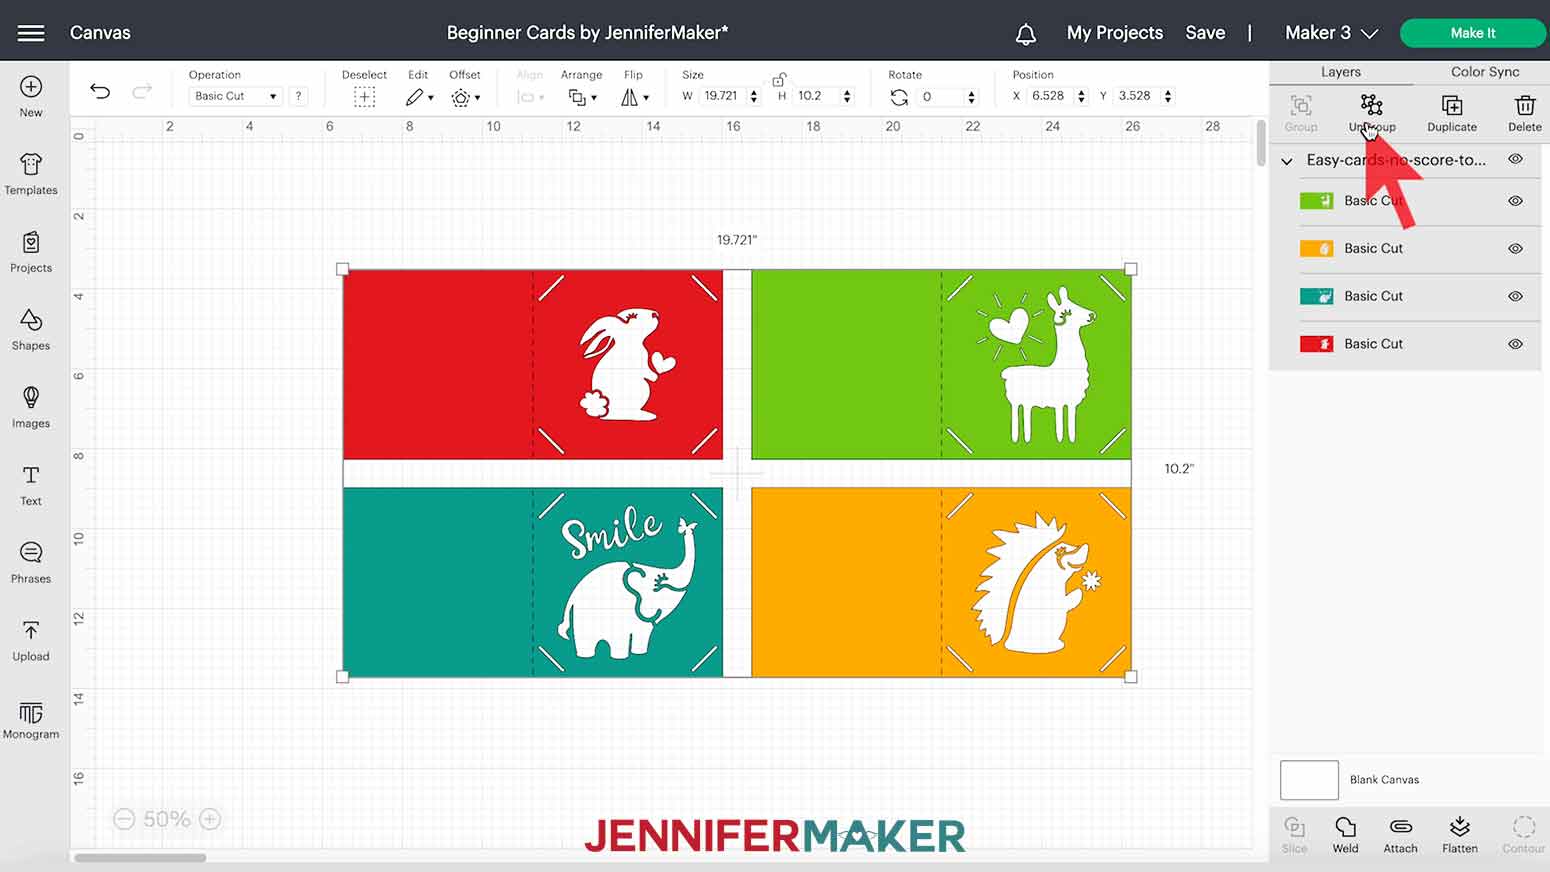
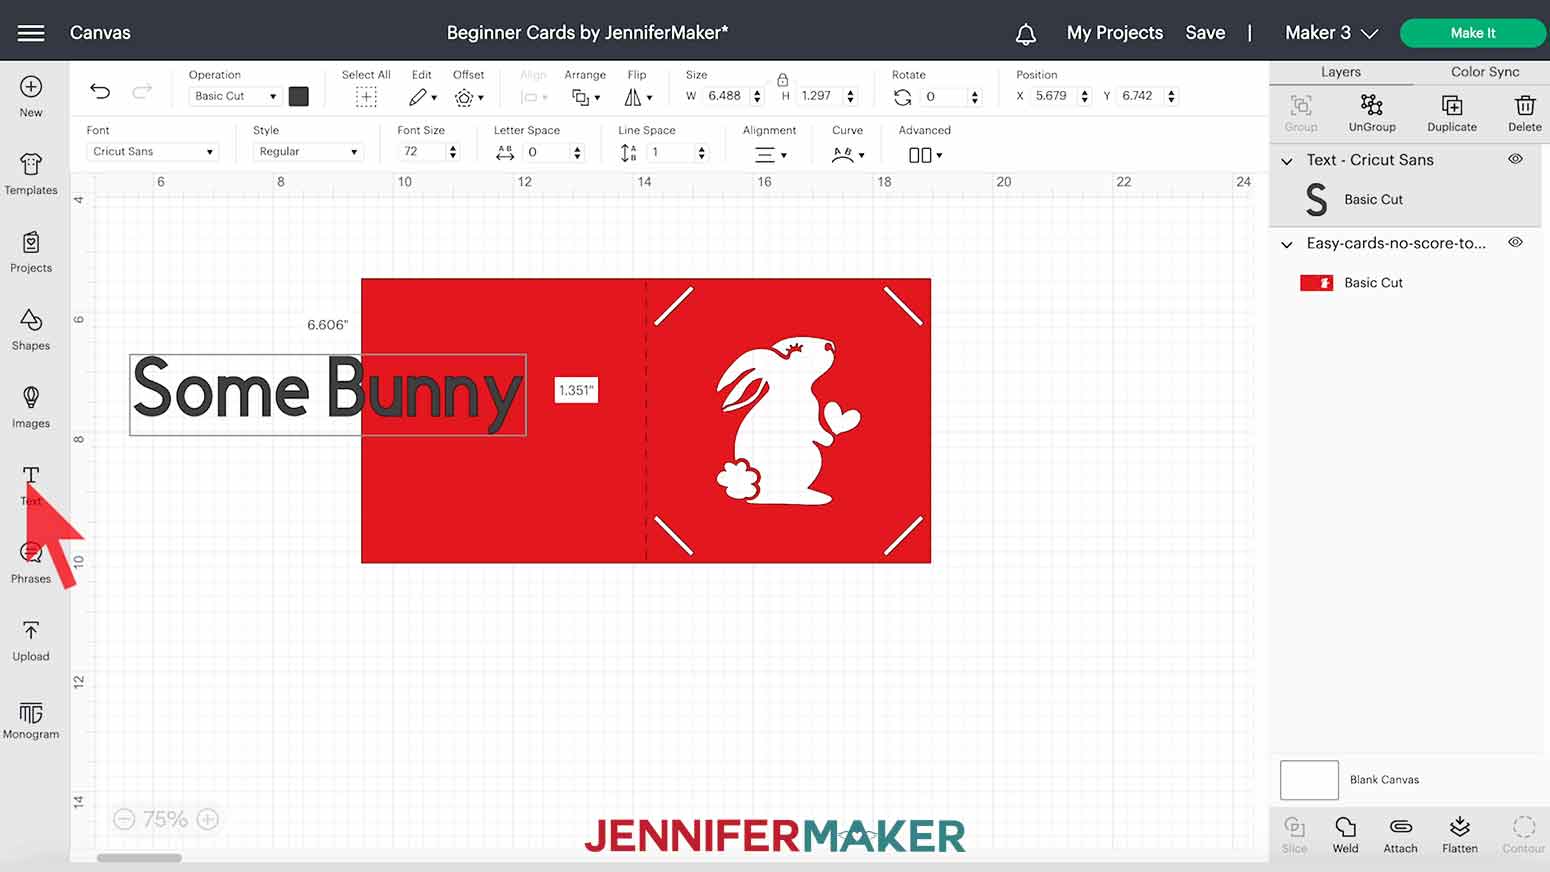
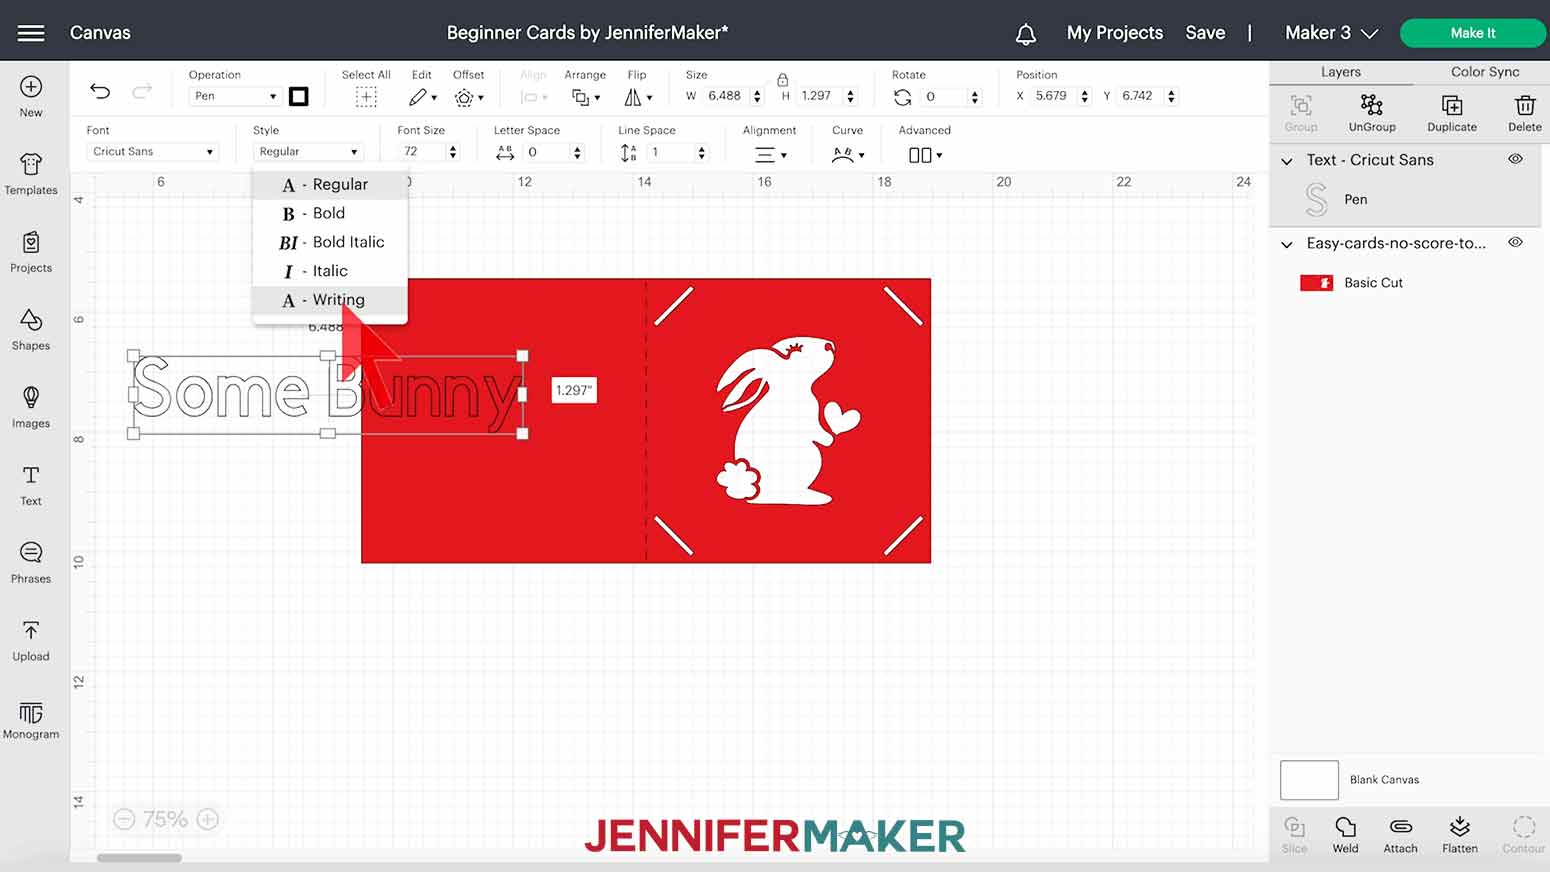
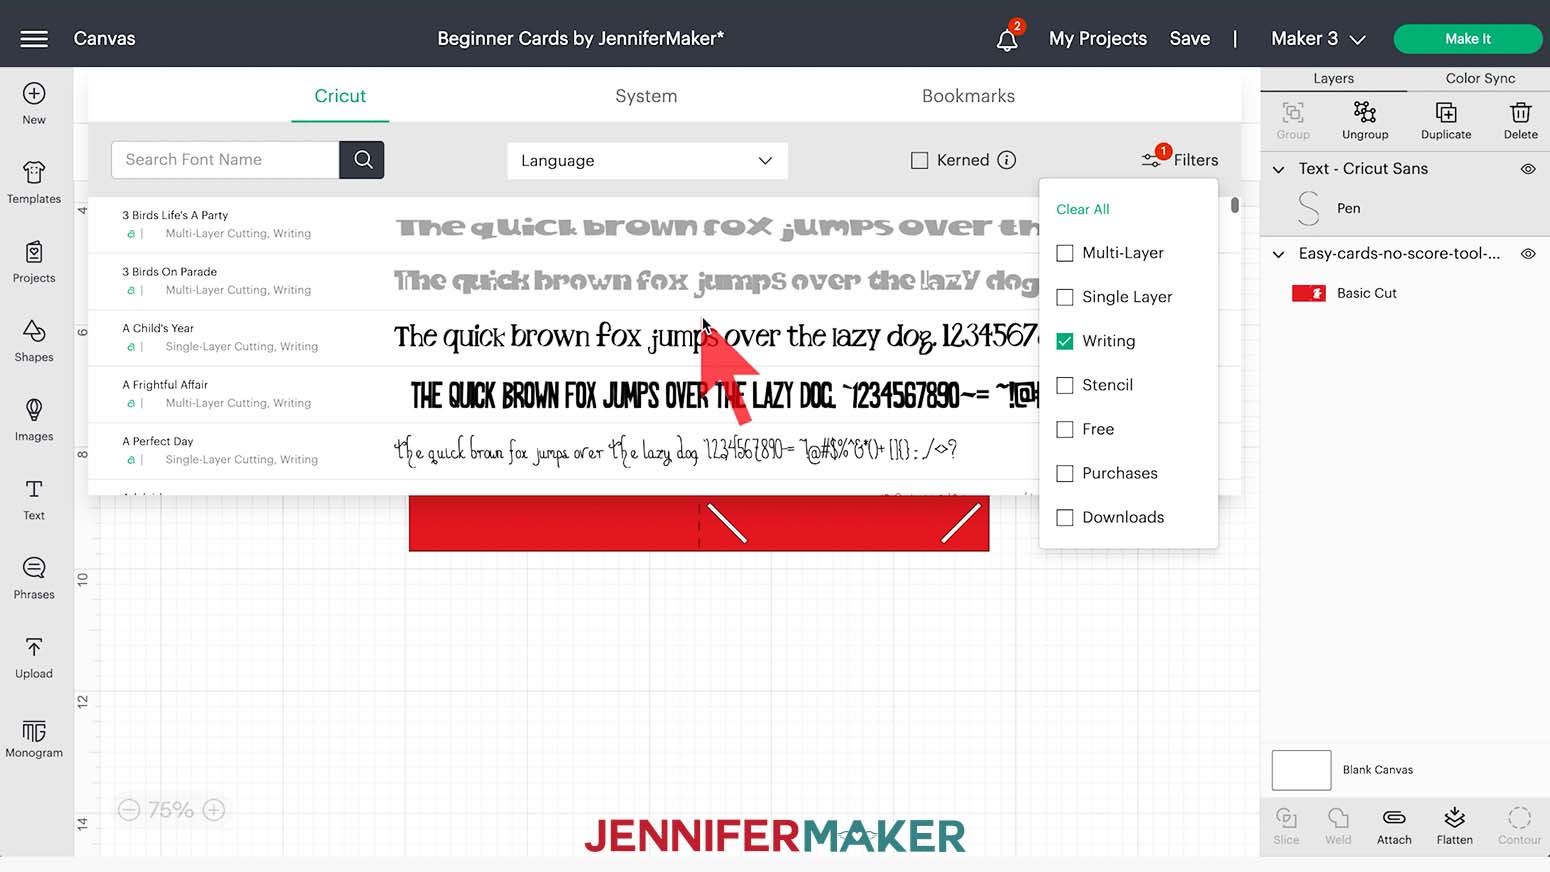
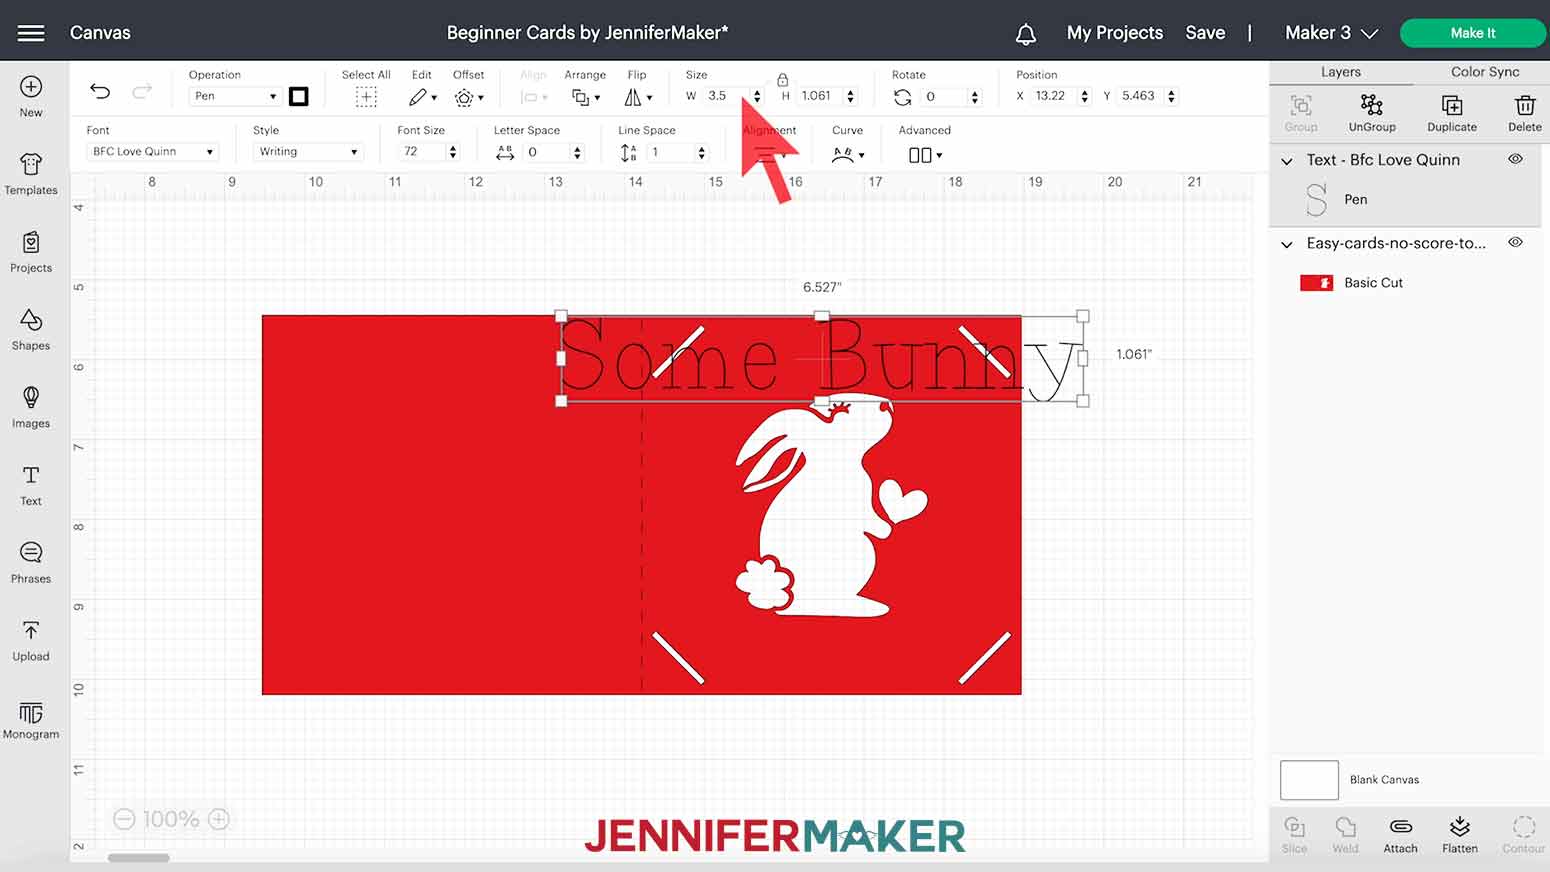
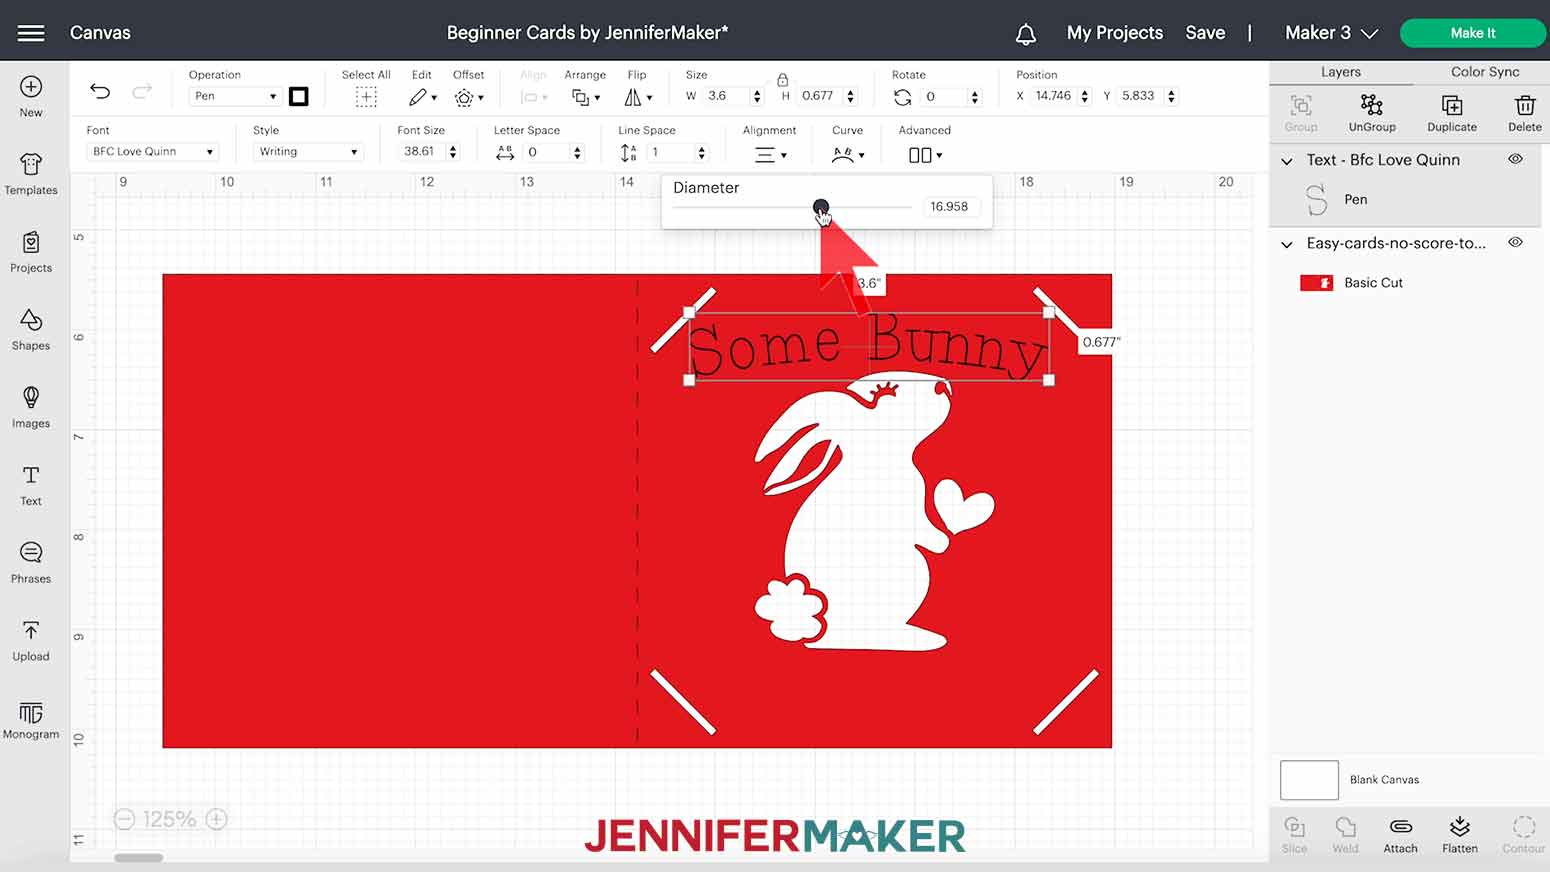
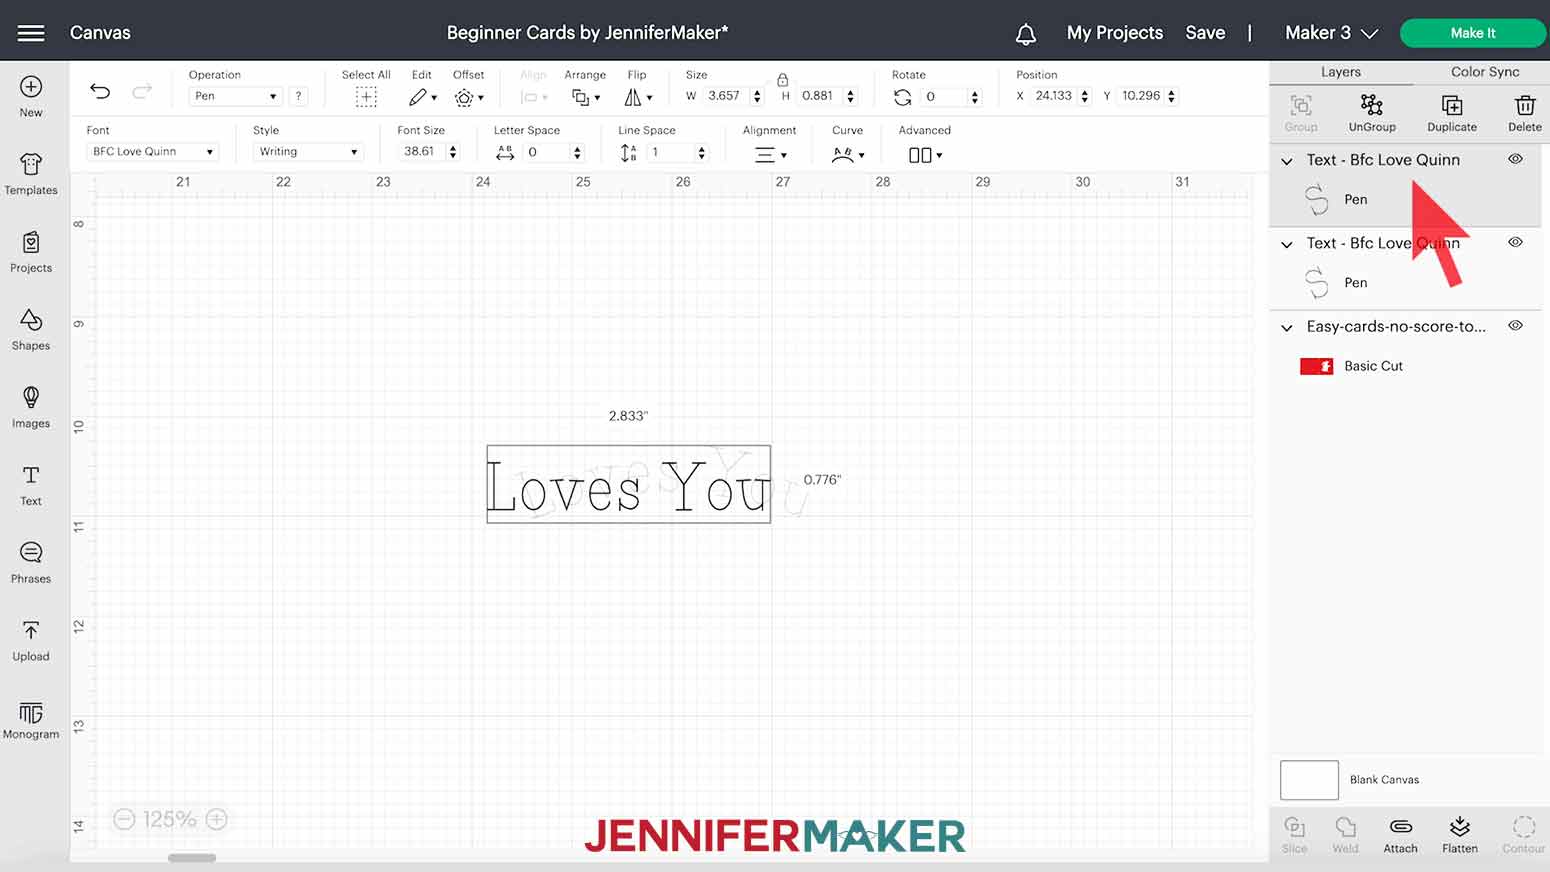
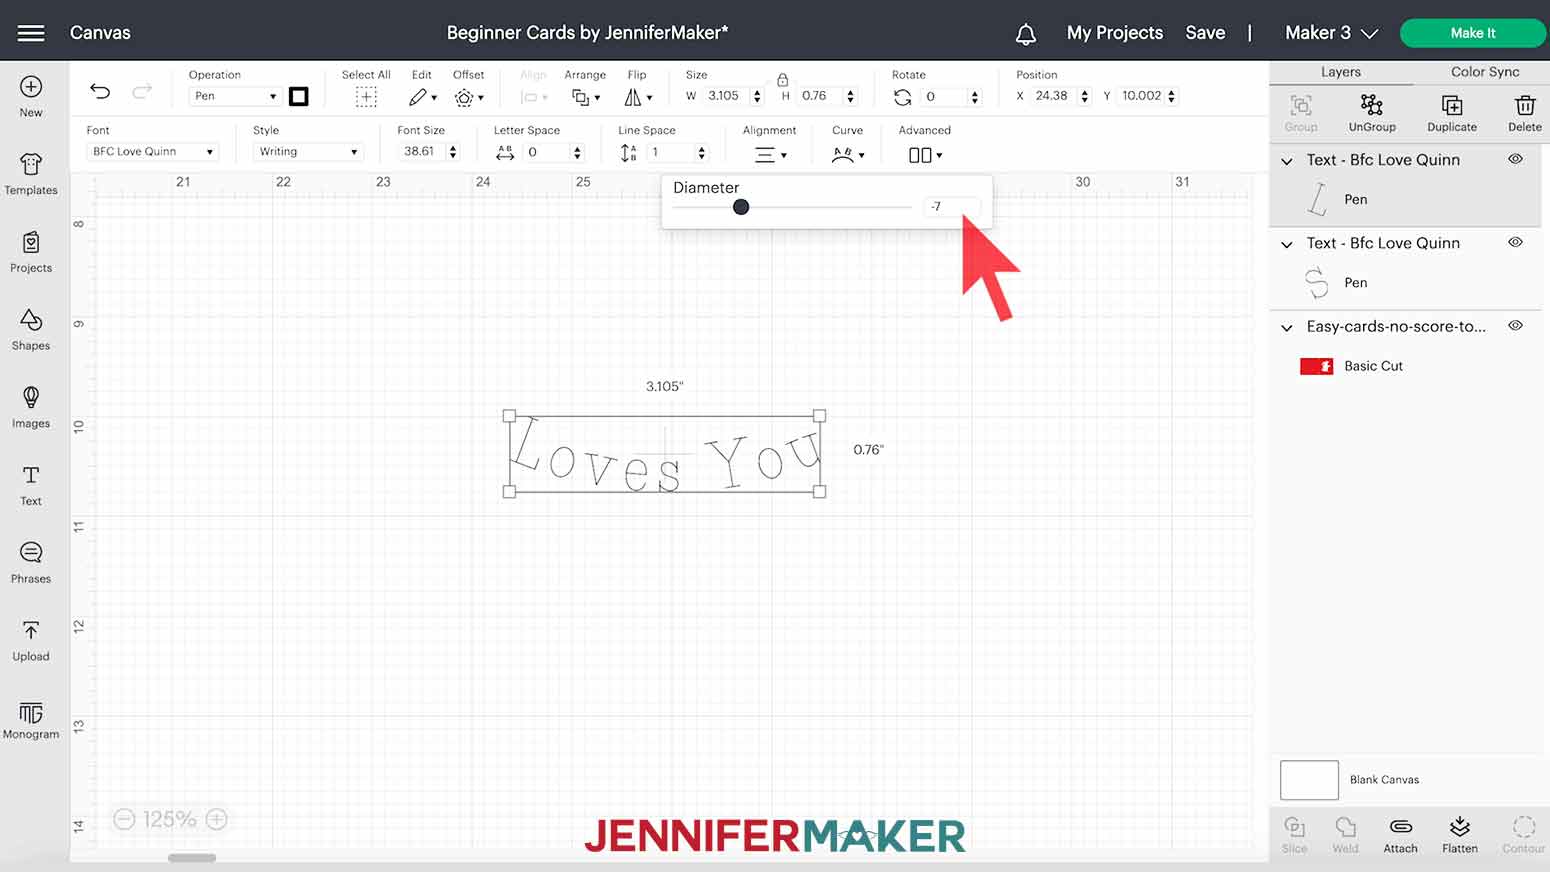
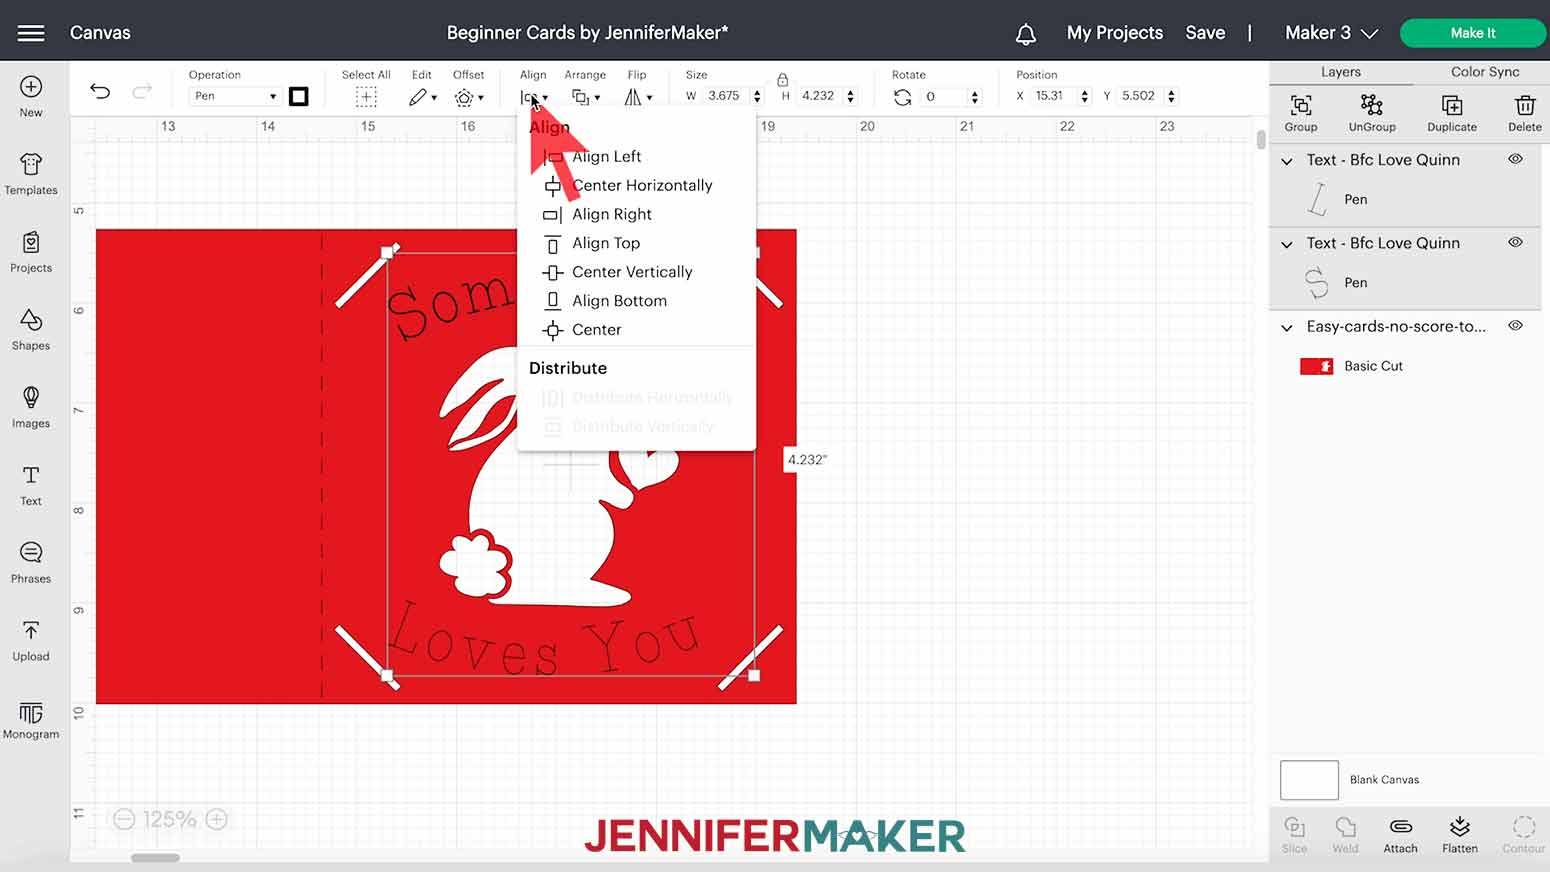
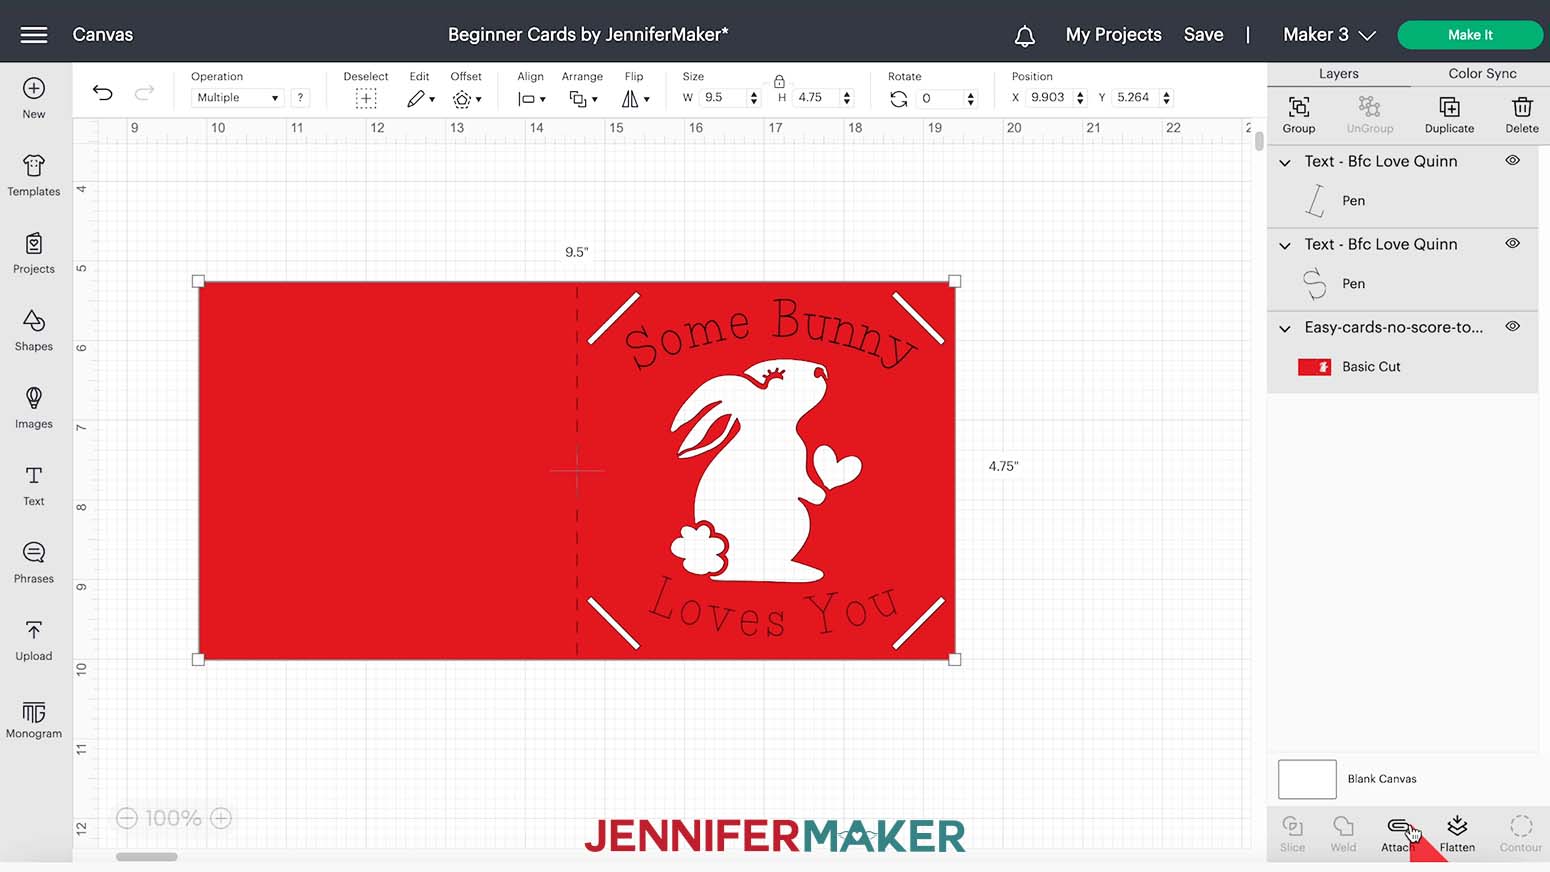
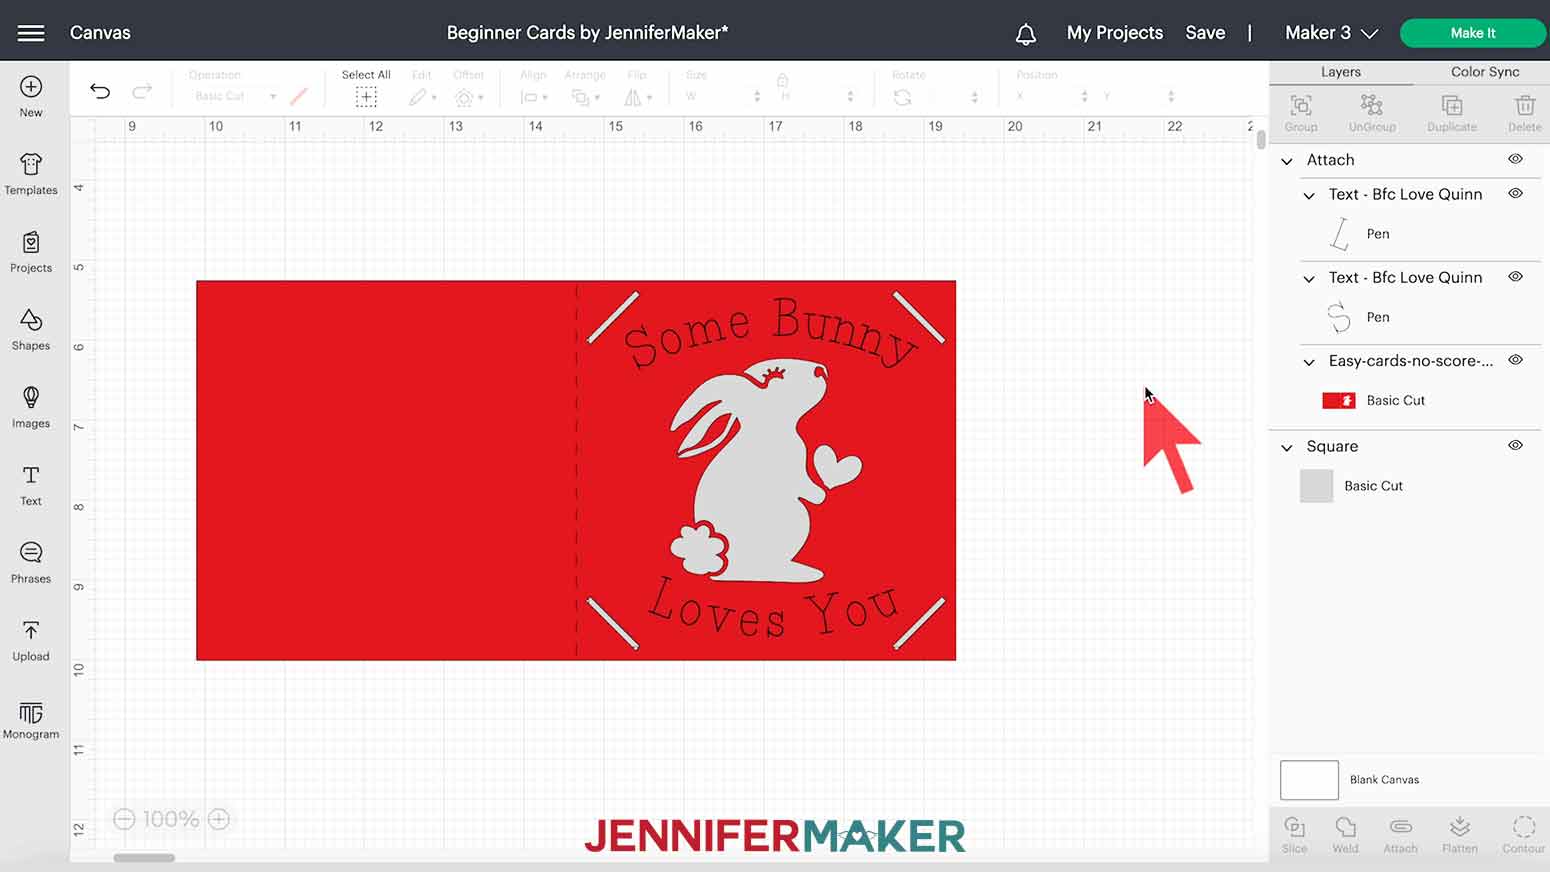
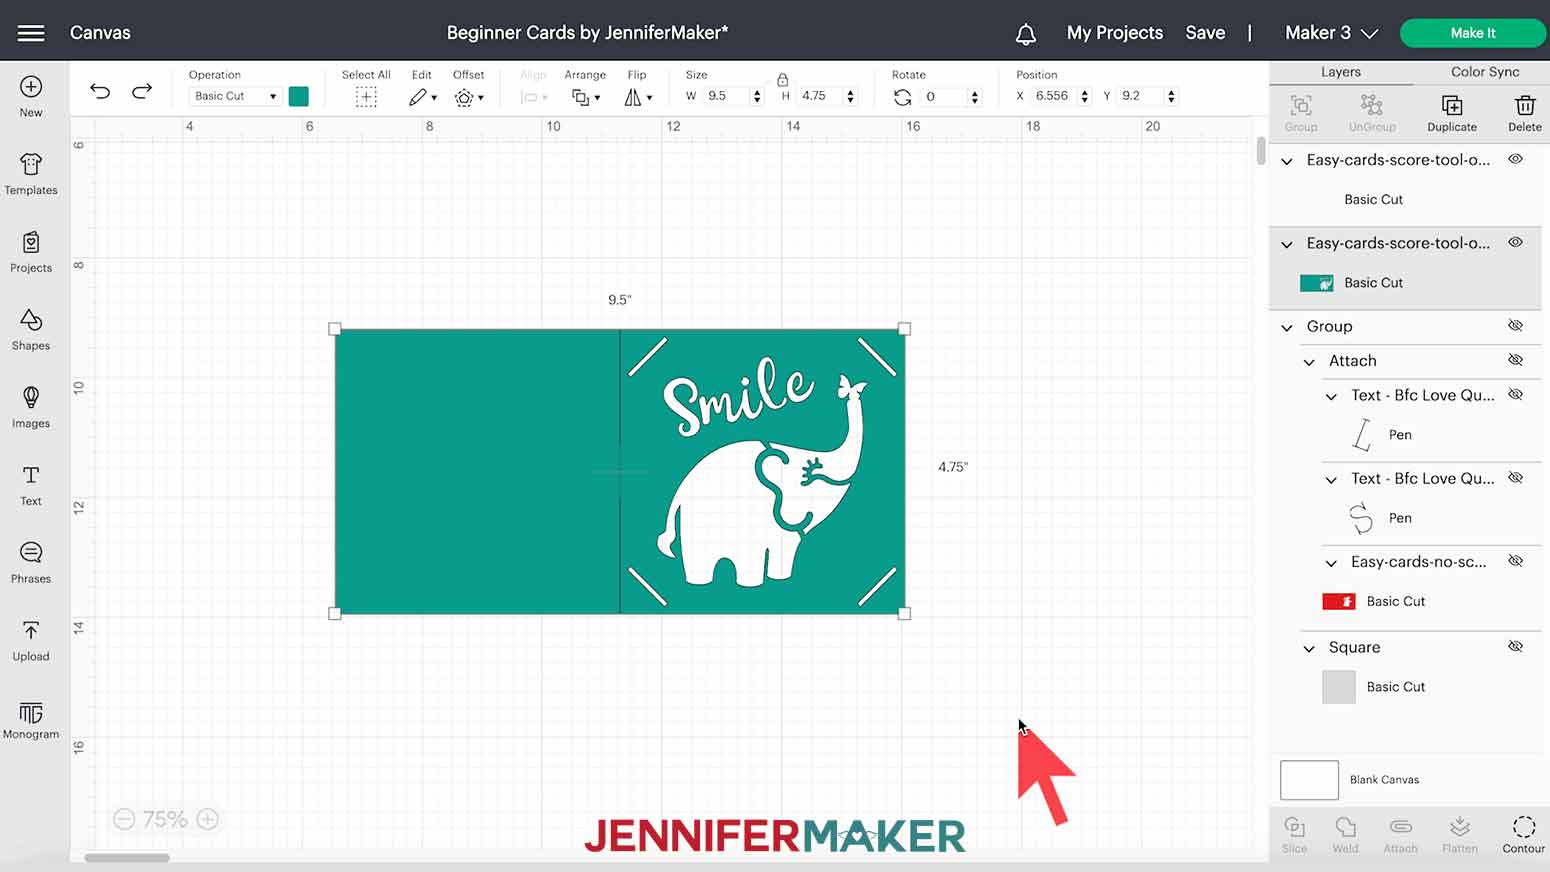
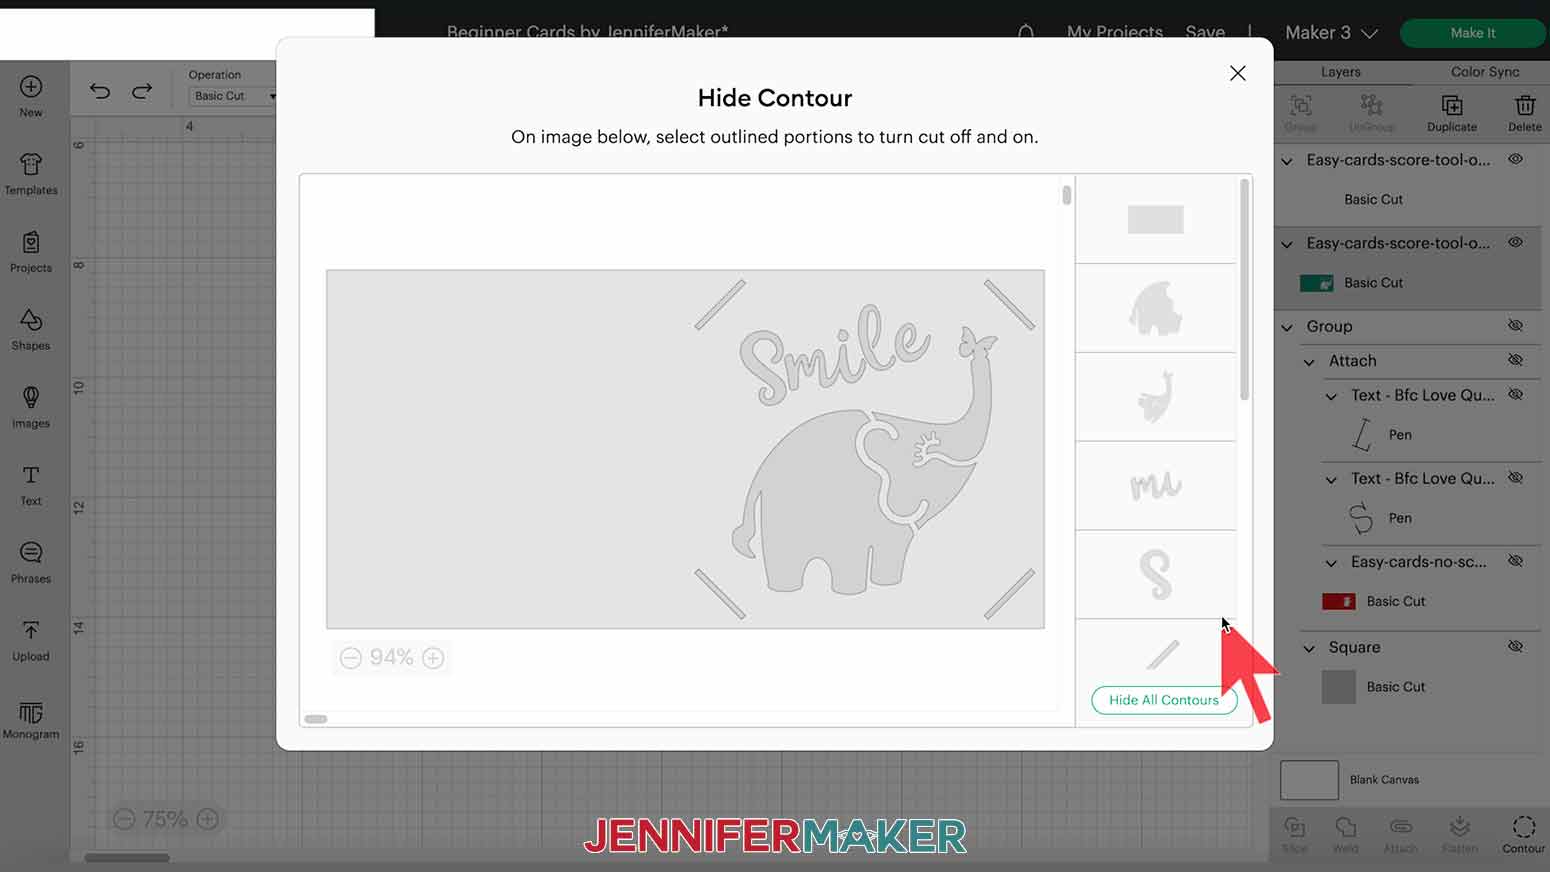
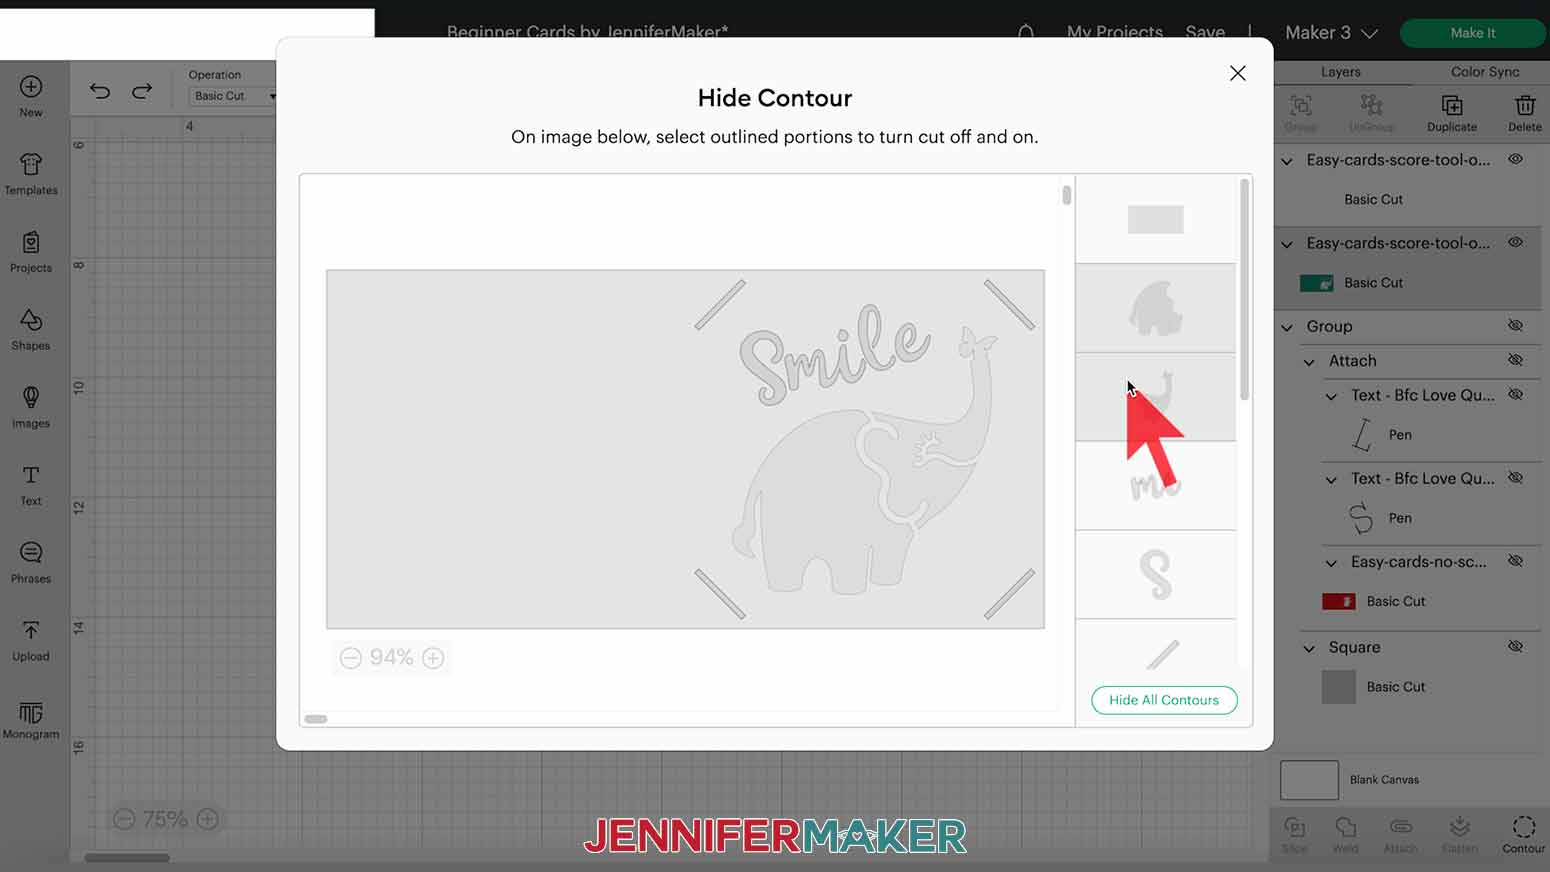
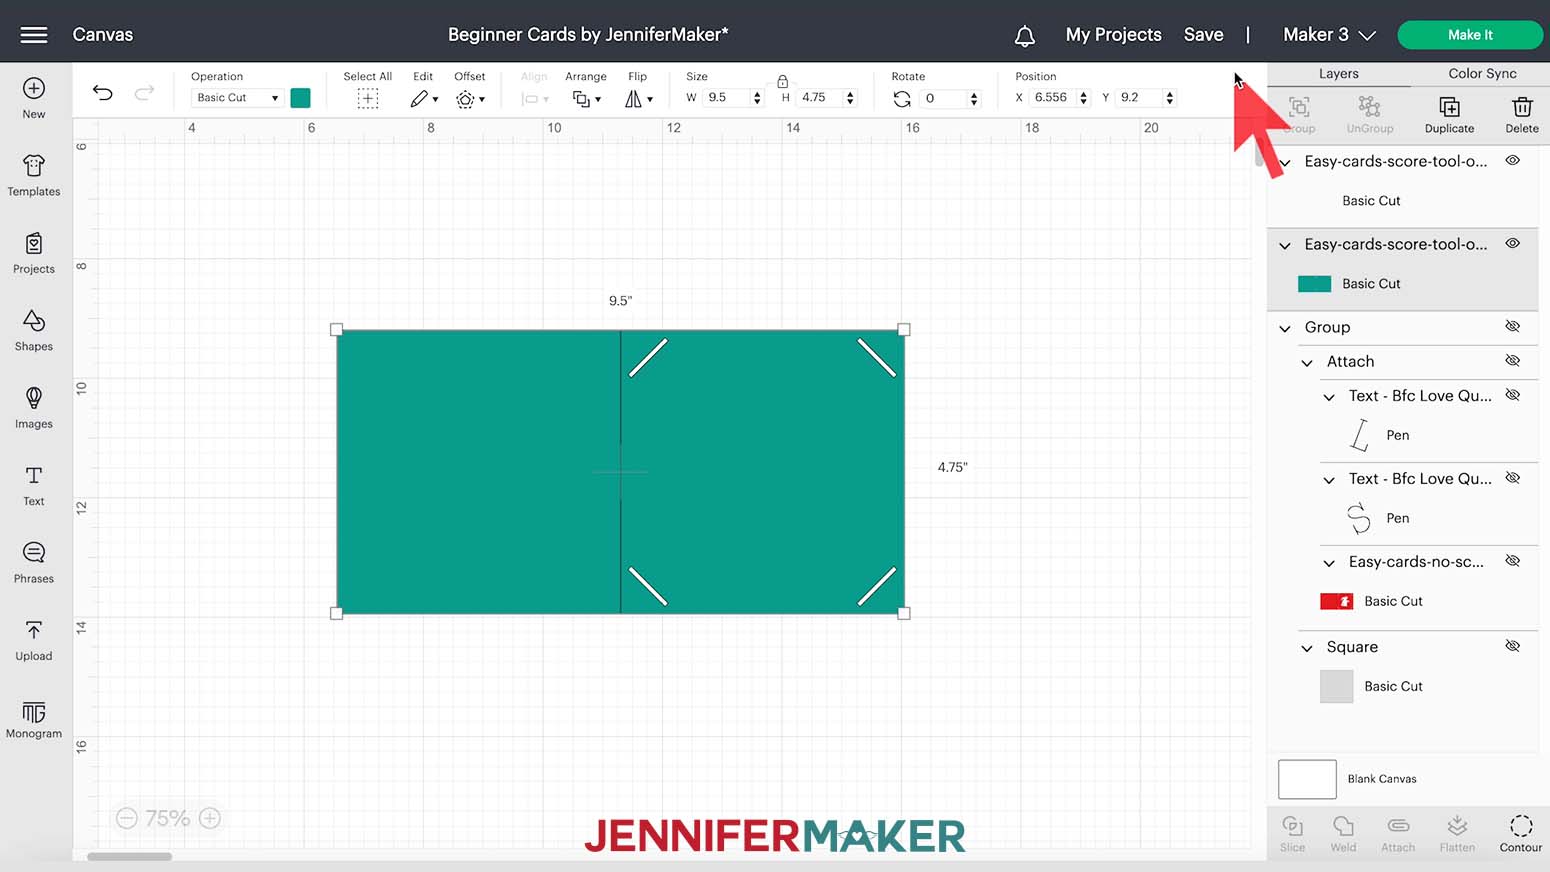
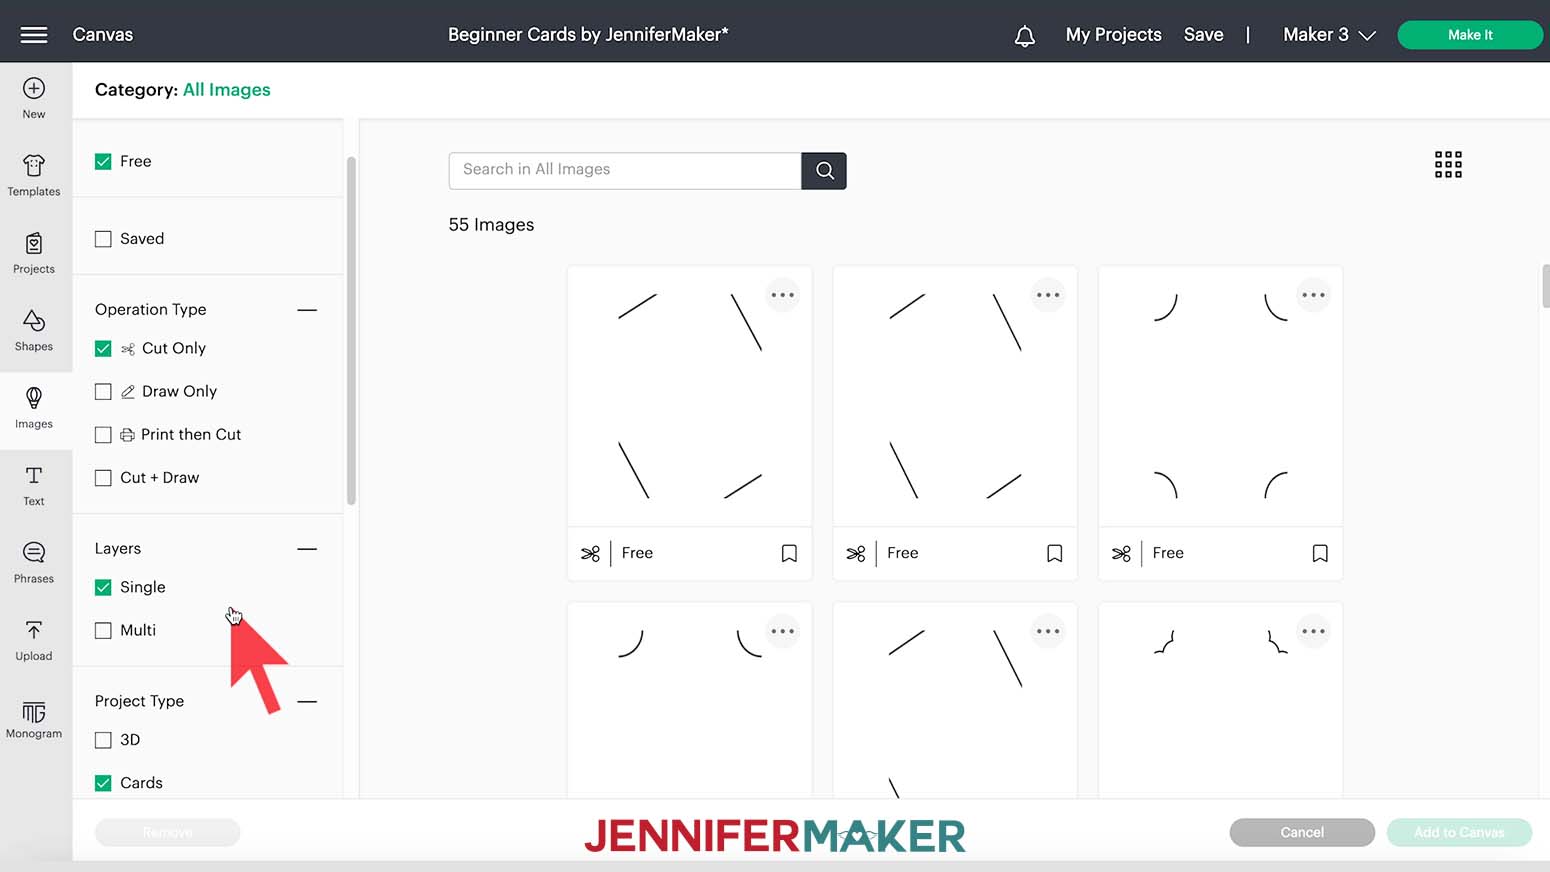
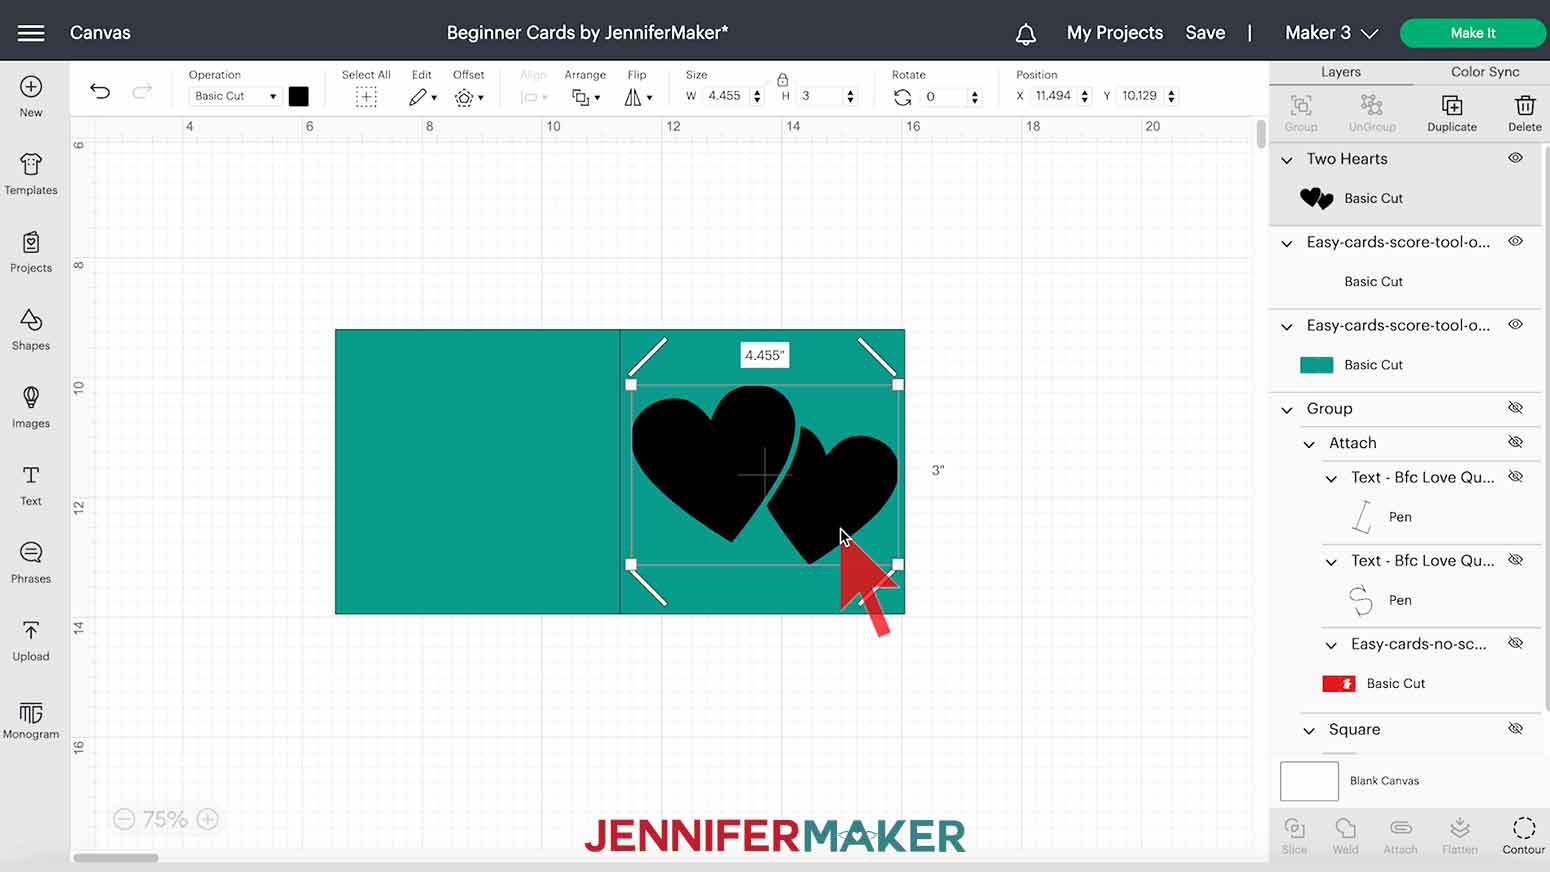
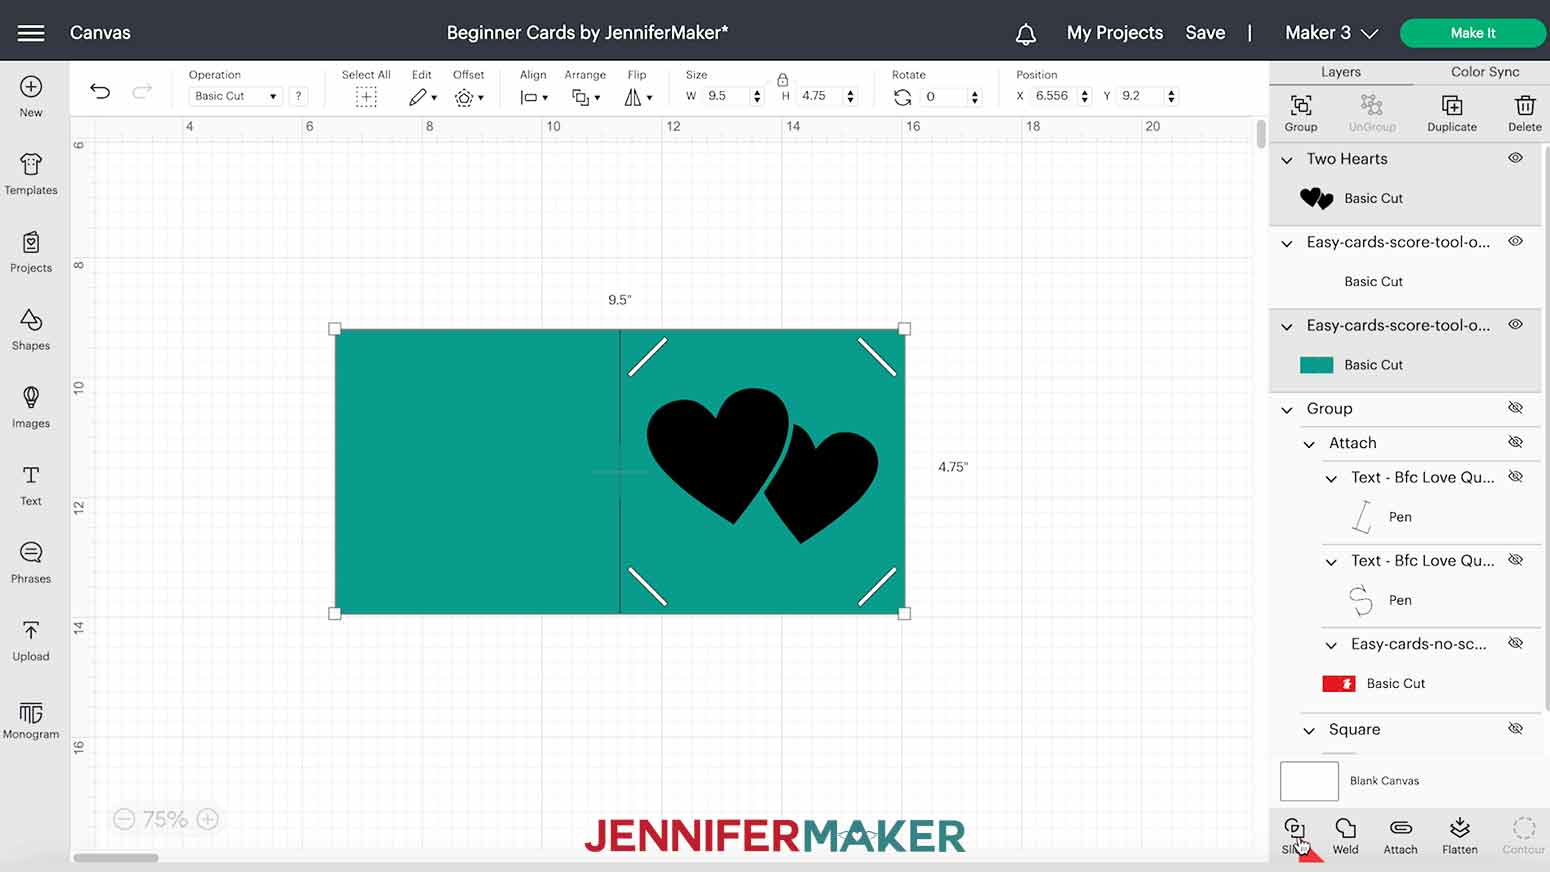
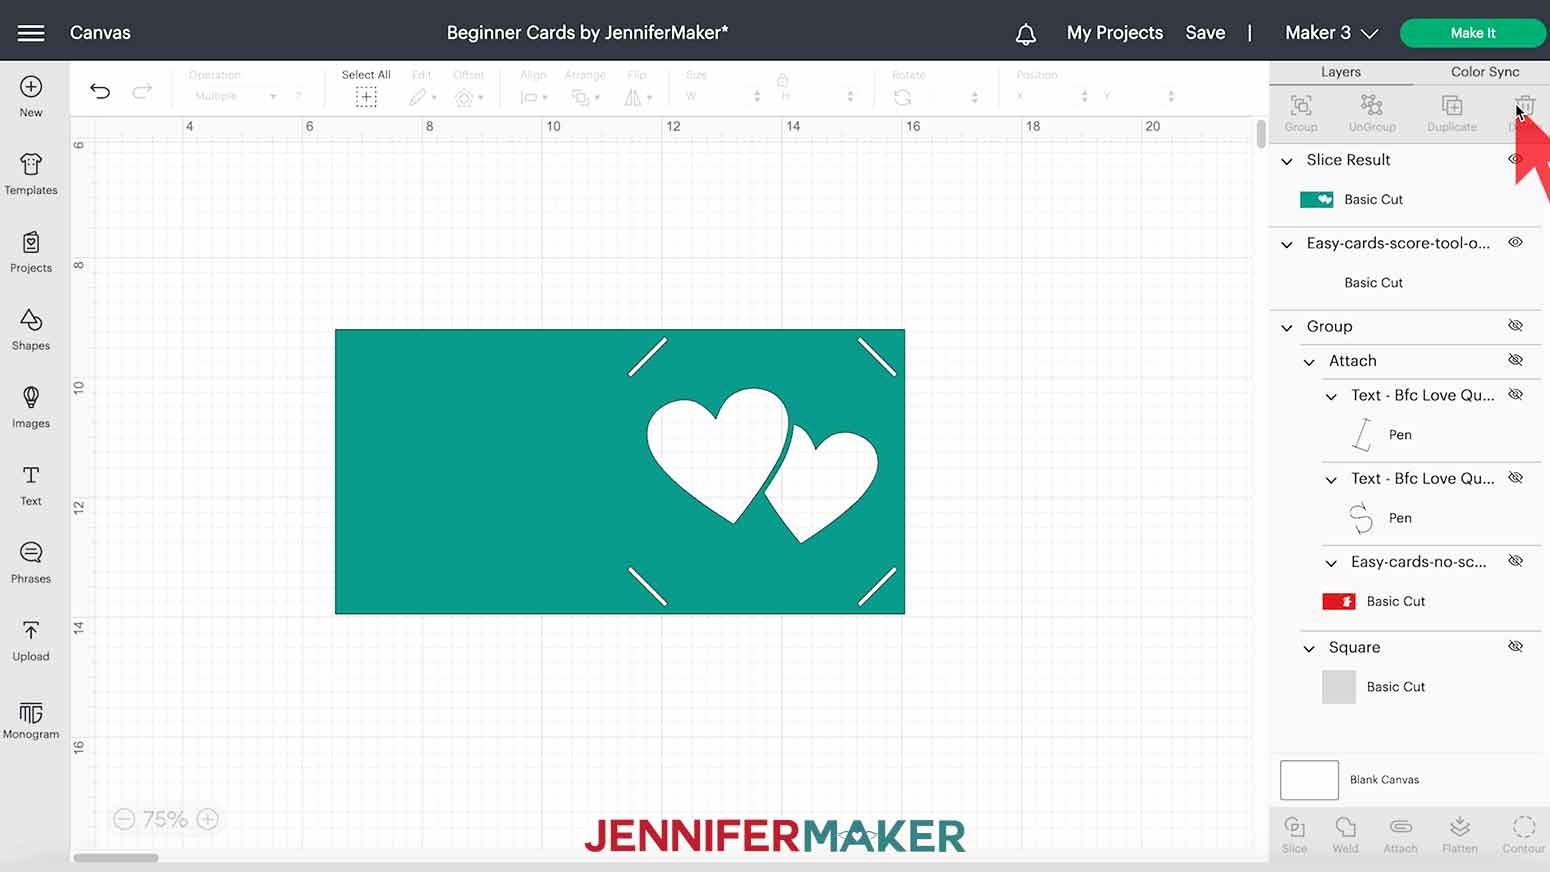
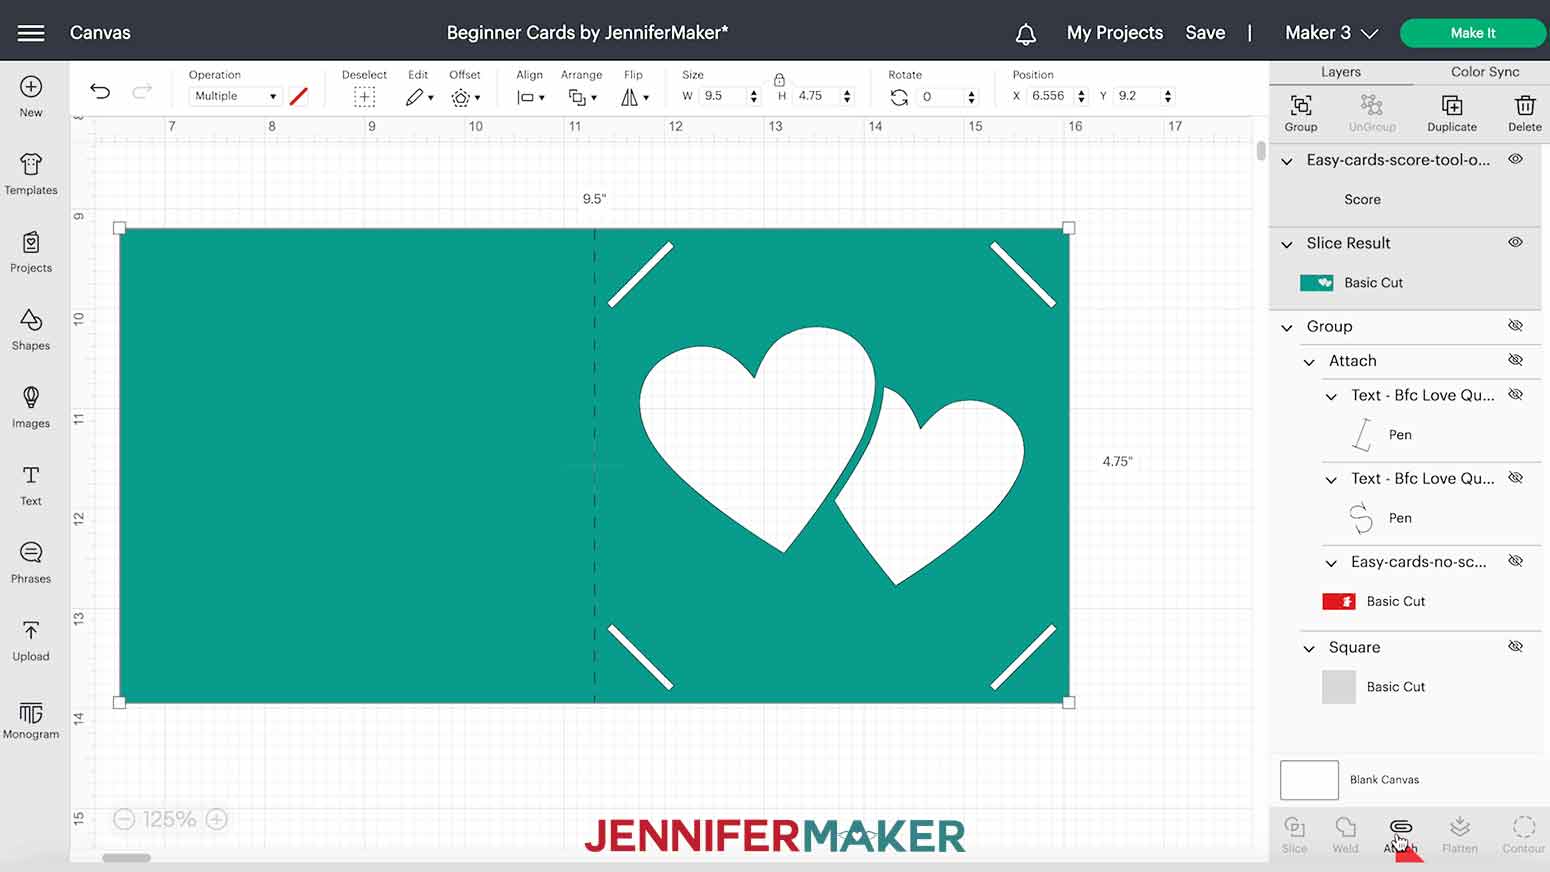
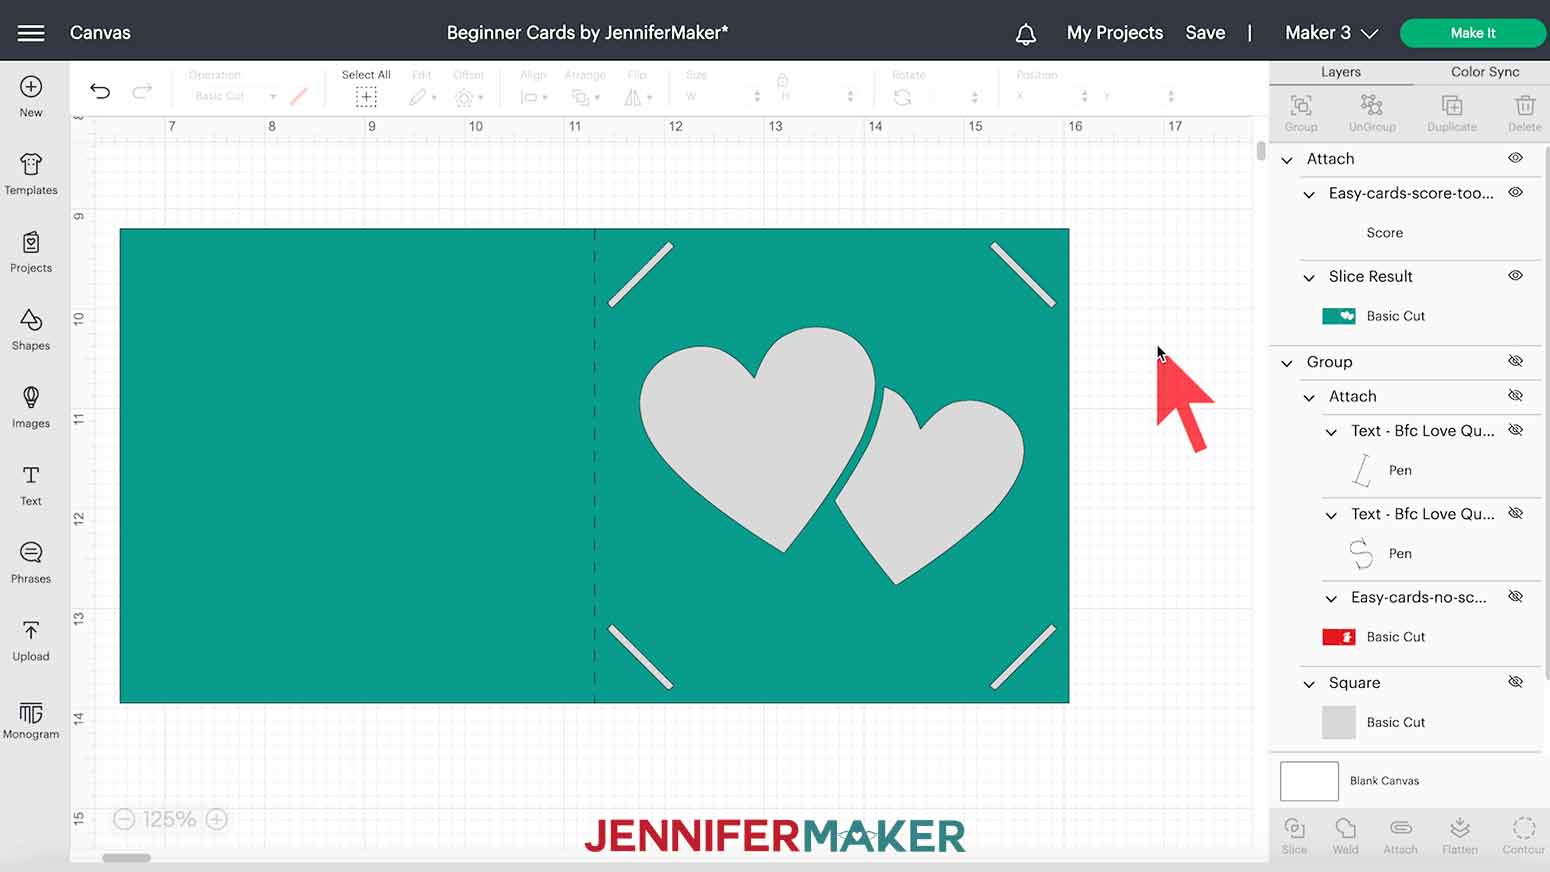
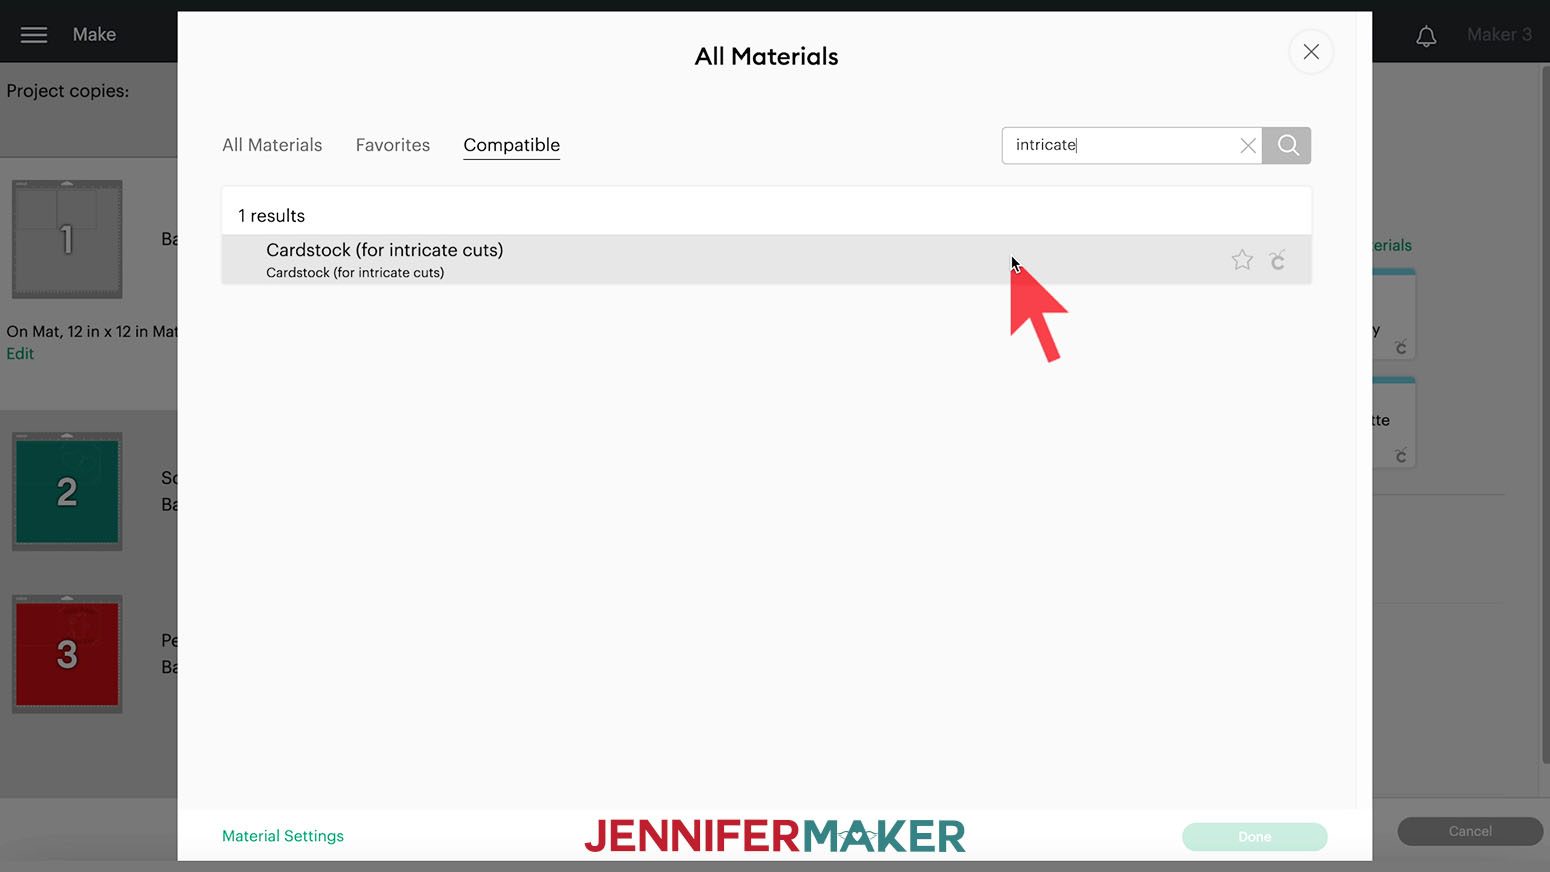
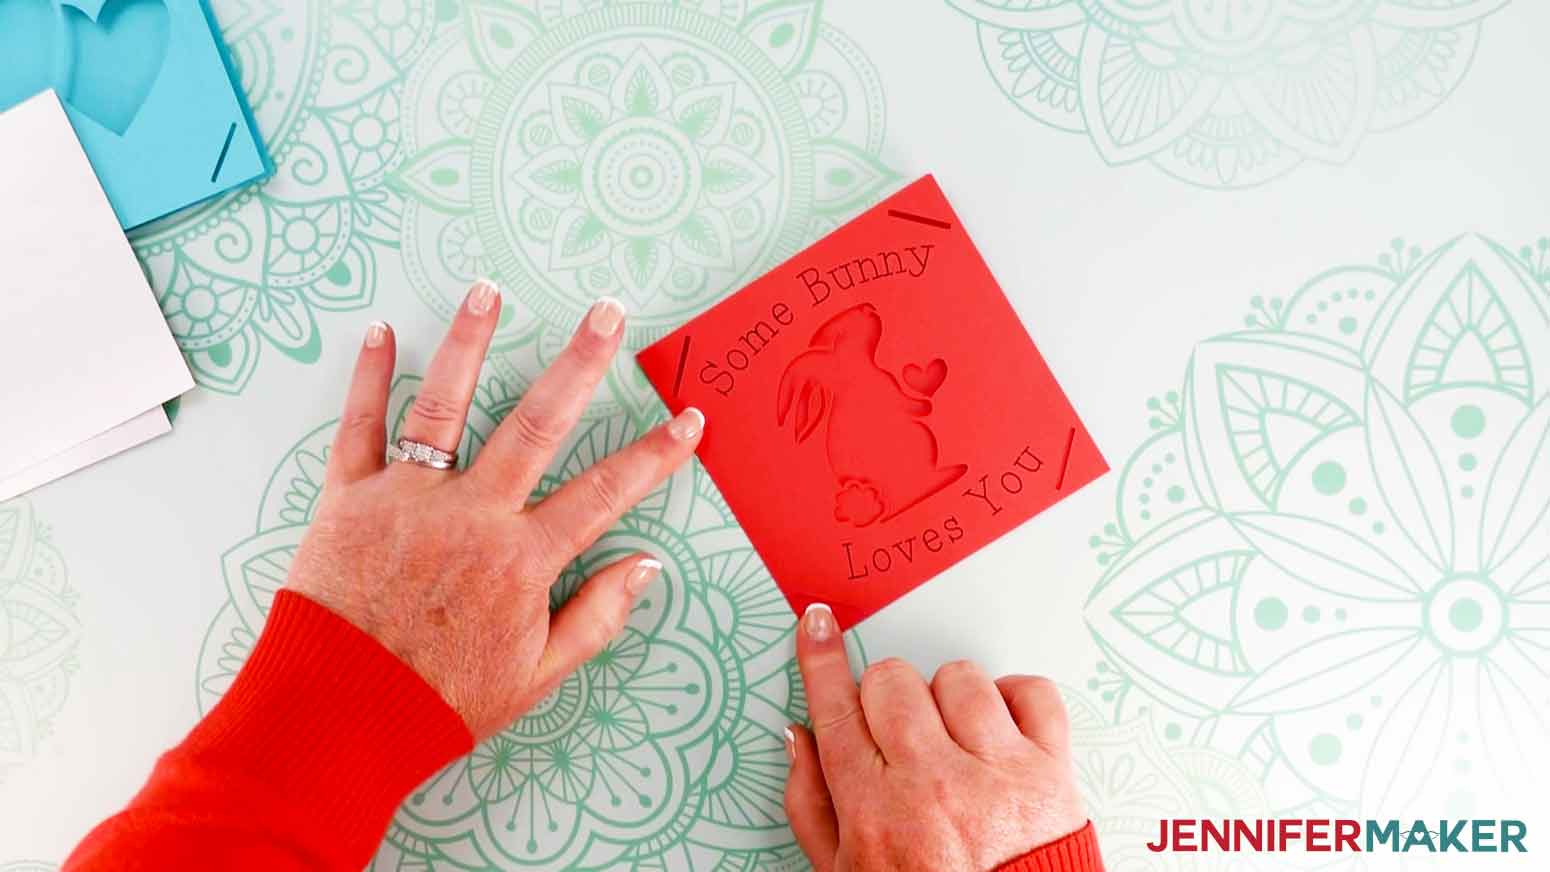
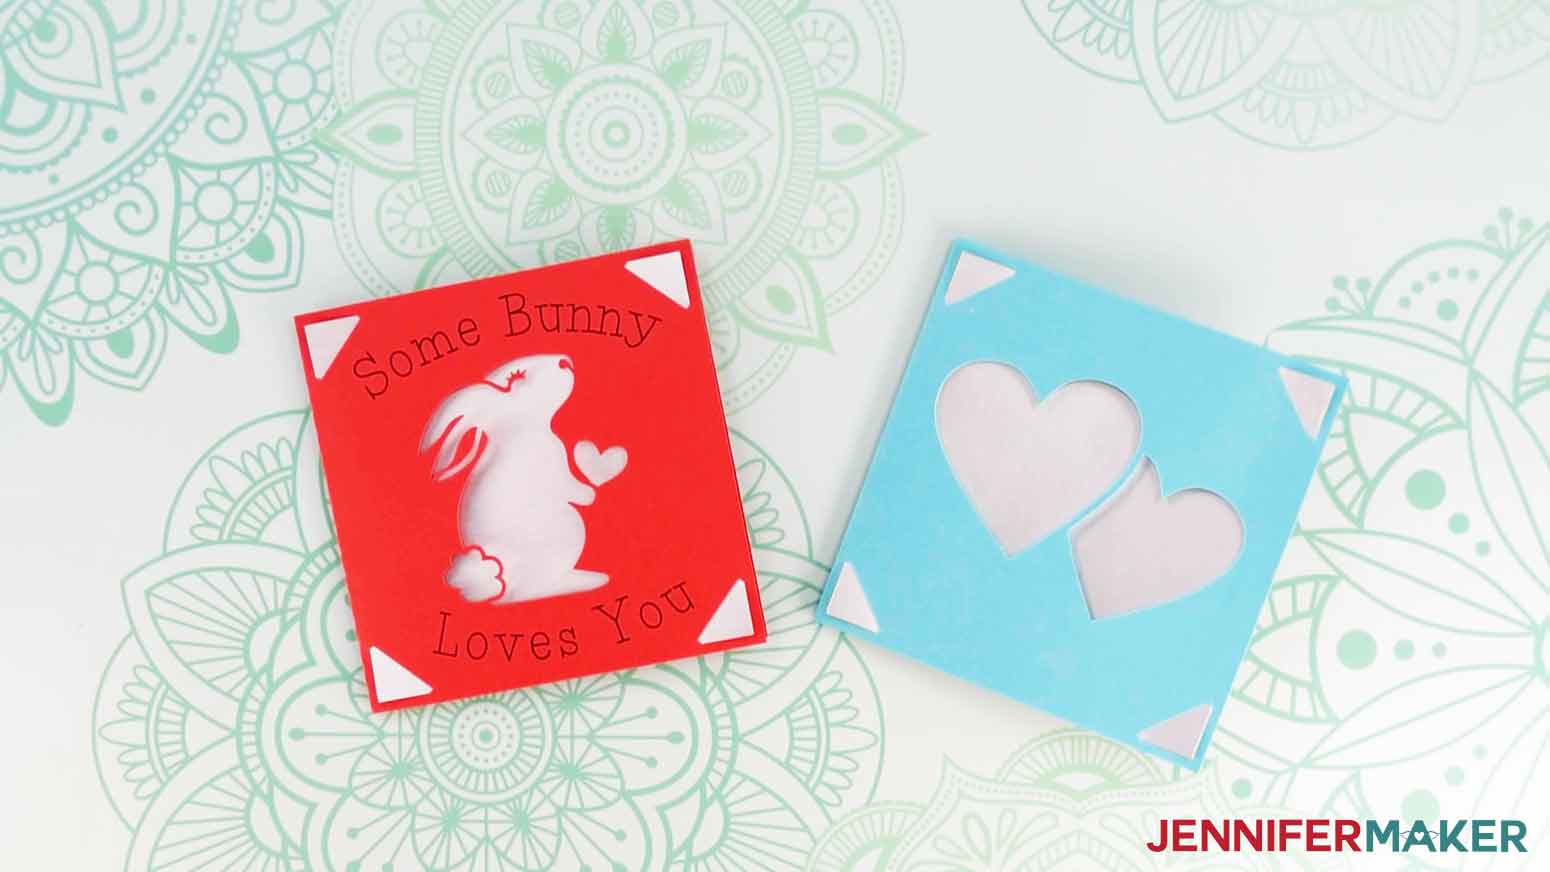
Learn how to make easy beginner cards for Cricut First, download my Cricut Cards for Beginners SVG/DXF/PDF files from my free resource library. It's Design #398. The SVG folder contains four card files, each includes all four designs: a cute bunny, elephant, llama and hedgehog. The first one with "s40" in the name is designed to use with the Cricut 2x2 Mat on an Explore or Maker using the S40-sized insert cards or a homemade equivalent. The second one with “r20” can be used on either the Cricut 2x2 mat OR the Cricut Joy card mat with the R20-sized insert cards, or the homemade equivalent. The other two versions can be cut on a regular machine cutting mat with regular cardstock. I've included one that can be made with a scoring tool or stylus, which you will see in the file name. The other file that says "no score tool" doesn't require any extra tools. I designed that one with dashed cut lines that will create a fold in the card. I've also included two envelope designs to fit these cards. You can follow the steps in my How to Make an Envelope tutorial to cut and assemble them! In this tutorial I'm going to show you how to make these simple cards with your Cricut cutting machine using different features in Design Space to make your own custom cards and add personal touches! We'll also learn how to attach score lines a little later, but let's start by uploading the file with "no-score-lines" in the title. TIP: If you are not sure how to upload an SVG cut file to Cricut Design Space, watch this helpful video training series I made. If you are on an iPad or iPhone, here is how to download and upload SVG files to the Cricut Design Space app. NOTE: For directions on using the cards with the 2x2 mat, follow the same steps as my Cricut Insert Cards 2x2 Mat tutorial. To cut the cards on a Joy, you can use an Insert Card on a Joy Card Mat. Remember to slide the card's back under the protective sheet! Here's how my simple card collection looks on the Cricut Design Space Canvas. You can zoom out to see everything by clicking on the minus (-) sign on the lower left. First, I'm going to show you how to add text to a card using a Cricut Pen. You can add text to any of these cards, but I will demonstrate on the bunny card so I'll delete the rest of the designs. Click "UnGroup" and then drag a bounding box over the other three designs and click delete. I left space above and below the bunny for a few words. If you'd like to add the curved written text like my example, here's how! I'll zoom back in a bit. I'm going to add "Some Bunny Loves You" in two sections above and below. I'll start with the first half. Click the Text icon to the left of the Canvas to add a text box to the Canvas and type in "Some Bunny." Since we want the Cricut to write our words, we need to tell the machine to use the pen instead of cutting these lines. Use the drop-down box under Operation to select "Pen." We can also designate a pen type and color by clicking in the color box to the right. I'll stick with a black fine point pen for this card. Then, under Style, select "Writing." To change the font, click "Cricut Sans" under Font in the top menu to open the Font options. Then, click "Filters" and check "Writing" to see fonts that use the Cricut writing tools. Look through the results, or search for one you have in mind. Make sure you don't pick one with a money sign next to it to avoid a fee. I'm using BFC Love Quinn, which is free for Cricut Access users at the time of this writing. Drag the text into position, over the top of the bunny, then we'll make it the right size and shape. The diagonal cuts are where the card insert will attach on the back, so we don't want to write over them. With the lock icon above Size closed, you can click and drag any corner of the bounding box until the text size looks good. Or, change the "W" field under Size. I changed my size to 3.5" and like the result. Now we can leave it like this, but I'm going to show you how to curve the text using the Curve feature in Design Space. Click the Curve icon in the top menu. If you click and drag the circle along the slider to the right with the positive numbers, the outer edges of your text will curve down. If you move it to the left with negative numbers, they will curve up. To start the curve process over, enter "0" in the field to the right. I set my curve to "7" but your choice might be different. Feel free to experiment! To add "Loves You" below the bunny, keep your text box selected and click "Duplicate" above the Layers Panel. Double-click on the duplicated text box to edit it. The text will shift to be straight while you edit it, but you'll see a lighter version of the curved text behind it. Type "Loves You!" Since we want to write in the opposite curve, click the Curve icon again. To get the exact opposite of what you already see, click in the text field and add a minus sign (-) to the left of the "7" or the number you used for the top. Now drag the bottom text into place. To line them up, hold the Shift key to select both Text Layers in the Layers Panel. Click the Align icon in the top menu of Cricut Design Space and select "Center Horizontally." With both lines still selected you can tweak the positioning a little more if needed. To make sure the Cricut writes your message right where you want it, drag a bounding box over the bunny card and both text areas to select everything on the canvas. Then, click "Attach" below the Layers Panel. You've successfully added text! Pretty cool, huh? Next, let's make an insert piece for the front of the card. We'll use this piece from a different color cardstock to give the card some nice contrast. Click the Shapes icon to the left of the Canvas. Select the square shape in the Free section to add it to the Canvas, the one with the sharp edges, not the curved edges. If you're using the same design size as me, keep the lock icon closed and type "4.5" into the "W" field under Size. NOTE: If you're using a different size card, determine the final size of your card. Then, use the previous steps to add a square to the Canvas that is .25" smaller in height than your card. You can use the color box next to Operation to change the Insert's color. To see the final look and get a preview of your card, drag it into place over the bunny, then click "Arrange" and "Send to Back." Now you can see the Insert through the bunny shapes. Remember, the corners of the Insert will come through the corner cuts and be visible on the front for a nice detail. For now let's group everything together by clicking "Select All" at the top and "Group" in the layers panel. Then we will hide this card for now by clicking on the eye icon next to it in the layers panel so we can work on making a custom card. We'll cut both at the end. You can use any of my card designs as templates to make your own custom cards! This will require the use of the "Slice" feature in Design Space. At the time of this tutorial, this feature does not work correctly with the dashed cut lines, so upload the "score-tool" version and add it to your Canvas. Zoom out if needed. I'm going to work with the elephant card. So let's ungroup and delete the other cards and score lines. With the elephant card selected, click "Contour" below the Layers Panel. A new window will pop up. In the main panel on the left, you can see the design as it exists now in shades of gray. To the right, you can see the different cut shapes that make up the card and design. Basically, you can tell the Cricut to ignore some shapes or remember to cut them by clicking on them in the main panel or the side section. This is a great way to make variations on a design without changing the original SVG since it's all reversible. If you click on a shape to remove its contour, it will become lighter in the main panel but darker in the list to the side. You can use either the panel or the list to turn contours off and on. For this example, click the two shapes that create the elephant. Then, click the five shapes that create "Smile" - the "S", the "m, i and the i's dot", the "l" and finally the "e" to remove the word. Make sure the corner cuts and card shape are still active, then click the "X" at the top of the Contour tool window to accept the changes. Now you can see the result on the Canvas! The elephant and word are gone. How cool is that! Now, we will use this as a template to make a simple custom card. If you have an image in mind, you can upload it your canvas now. If not, let's find something in Design Space. It's a good idea to look at some existing Insert Card designs before picking your art. Due to the techniques used, it's best to pick images without floating pieces. And remember that it needs to fit within the corner cuts, so don't try to squish in a really intricate design. Once you've practiced a few times with simple images like I'll show you, you can confidently experiment with more art! Click the Images icon to the left, then click "Browse All Images" where we can filter our options. To the left under Filters, check the boxes next to: Free Under Operations, check Cut Only. Under Layers, check Single. Under Project Type, check Cards. Your options will now be much smaller! Then, scroll down to to view the images. I'm going to use the two hearts. Select it, then click Add to Canvas. Keep in mind, new images are added as well as deleted from Design Space all the time, so this exact image may not be available, feel free to use something similar. Drag your art into position over your card and resize it or keep it as is as long as it fits within the corner cuts. Select the card template and your design by holding the shift key and selecting both in the layers panel. Remember, we still have a score line on the canvas, so we don't want to select that. Then, click "Slice" below the Layers Panel to cut the shape out of the card. Three layers called "Slice Results" will appear in the Layers Panel. Delete the two layers that look like the original heart design and you should be left with the heart cutout card and the score line. However, you will see right now, the score line is still labeled as a basic cut in the layers panel, so we need to change that. Click on that layer and under Operation at the top scroll down and select "Score." Make sure the score line is where it belongs in the center of the card, if not select everything on the canvas, click Align and Center. Finally with everything selected, click Attach at the bottom of the layers panel. Now, just follow the earlier steps to make an Insert and you're ready to cut. Make sure both cards are visible on the canvas in Cricut Design Space. Click the eye icon next to the bunny card to unhide it. Make sure the right machine is selected and click "Make It." If prompted, click "On Mat," "12 in x 12 in," and "Continue." To cut the DIY inserts, you can just place the silver cardstock horizontally on the mat so it covers the design area. Look over your mats and make sure your colors are correct, the text is all in the right place as well as the score line on the custom card. If not, click "Cancel" and try those steps again. When everything looks good, click "Continue." For the cards, I found that the "Cardstock (for intricate cuts)" setting worked best. To find it, click "Browse All Materials" and type "Intricate" in the search bar. Then select the result, click Apply, and leave the Pressure at "Default." Make sure your Cricut Fine-Point Blade is clean and in Clamp B. Place your first mat's cardstock on a green Cricut StandardGrip Machine Mat. Use a brayer to adhere it well. Load your mat and press your machine's Go button. Once the mat is finished, unload it, flip it over on your workspace, and gently roll a corner back to release the cardstock. Complete the process for the rest of the mats, loading the colors in the order indicated on your screen. TIP: When removing the intricate card pieces from your mats, go slowly and use the spatula to gently lift them so they don’t tear. Assembling Cricut Insert cards is so easy! First, fold your card along the central crease. Lay the card open, face down, and hold your insert face down. Gently bend the insert so you can get the corners into the matching slits cut in the card's front. When you close the card, you'll see the decorative insert peeking through the design! For a perfect finishing touch to your Cricut Card, make the envelopes in the collection using my tutorial on how to make an envelope. Now that you know all the techniques, here’s one more thing you can try. Use a basic shape to make your own card from scratch! I’m going to make an A1 card, which is a common invitation and greeting card size. Folded, it measures 4.5" x 6.25". First, click on Shapes and choose a square or rectangle. I’ll add a square. Make sure the top lock is unlocked by clicking on it. Since I’m going to fold the card vertically, I will enter 8.5 under width and 6.25 under height. Now, all we need to do is add a score line for the center fold. Click shapes, and add the line to the Canvas. You’ll notice in the layers panel the line is already a score line. We need it to be the same height as the card, so type 6.25 in the height field. Now select both the card and line, click Align and select Center. Lastly, with everything selected, click Attach at the bottom of the Layers Panel. Make sure you add whatever design or text you want to the right side so it’s on the front when you fold the card – just use the techniques I taught you earlier! Final Card size: 4.75" square Fonts:
Beachwood for elephant design
BFC Love Quinn (Design Space Font) As an Amazon Associate and member of other affiliate programs, I earn from qualifying purchases.
Cricut Cards For Beginners
Materials
Tools
Instructions
STEP 1: GET MY CRICUT CARDS FOR BEGINNERS FILES
STEP 2: PREPARE YOUR CARD

Make a Custom Cricut Card with Your Own Design!

STEP 3: CUT YOUR CRICUT CARDS
STEP 4: ASSEMBLE YOUR CARD
STEP 5: SHOW IT OFF!
BONUS: MAKE A CRICUT CARD FROM SCRATCH
Notes
Recommended Products
Answers to Your Questions on How to Make Cricut Cards
Q: What Cricut should I buy to make cards?
You can use any Cricut to make cards, just make sure you try a few mat options to see which process works best for you.
Q. What do I need for Cricut card making?
All you rally need is some card stock, your cutting machine, and a mat. A weeding tool is helpful to carefully poke out the little bits.
Q. How do I make my own Cricut card?
You can make a handmade card with your Cricut using pre-made blank cards or by cutting your cardstock to size. I’ll show you how!
Q. Will these cards cost more postage to mail?
Depending on your card’s dimensions, thickness, and weight, it may cost more than an average card. I recommend measuring and weighing it and checking with your mail service just in case.
Q. How do you use Cricut pens to make cards?
The Cricut Joy Pens and Card mat make writing on the inside of cards easy! Instead of adding your card to the mat with the front on top, open it and fold the crease the opposite way so the inner right side is on top. Then, just slide it in as normal and use a writing design with a Pen tool to add your meaningful words to the inside of the card!
Q. Do I have to use Cricut cards?
While the Cricut Card kits make handmade cards extra easy, you can make your own insert cards out of cardstock. My video will show you how, including how to center the score line for the crease perfectly.
Get my free SVG files to make Cricut Cards
I’d love to see YOUR Cricut Cards and all the designs you make with this tutorial! Please share a photo in our Facebook group or tag me on social media with #jennifermaker.
Love,

Want to remember this? Save this tutorial on Cricut Cards to your favorite Pinterest Board!