Learn how to make these cute holiday gnomes in this step-by-step tutorial. You can even cut the felt hats and iron on decals for your DIY gnomes on your Cricut!
I’m starting to suspect gnomes are taking over the world! Gnomes are popping up all over the place — I’m seeing them lounging about in my friends’ houses, cavorting about on social media, and hanging out in all the stores. I think they’re taking over the elves! My favorite sort of gnomes are the ones from Scandinavian history, where they are known as tomte. These magical gnomes live in houses and protect the family and animals from misfortune — and couldn’t we all use a little protector? The gnomes are helpful year-round, but I think we see them more during the holidays because — according to folklore — they hand out presents on Christmas Eve. So for Day 12 in my Christmas Tree Advent Calendar, I am showing you how to make DIY gnomes with a variety of cute hats to bring holiday joy into your home!

See exactly how to make these adorable holiday gnomes in my tutorial video (or keep scrolling if you prefer a step-by-step photo tutorial):
First, we need to conjure up some gnomes. They’re quite easy to make, and in this tutorial I will show you how to make both the wee little hanging ornament type of gnome as well as the chunky standalone gnomes that can go anywhere. If you want to make an ornament gnome, you’ll want a hanging ornament ball or wood disc, plus something for a nose like a pom pom or wood bed. If you want to make a standalone gnome, you’ll want a white crew sock, some uncooked rice, and some hair elastics.
Second, you need the beards! I recommend faux fur for this, and the Mongolian style fur with the long wispy strands looks the best! But you can use whatever you can find. Traditionally a gnome has a long white beard, but colors are fine, too!
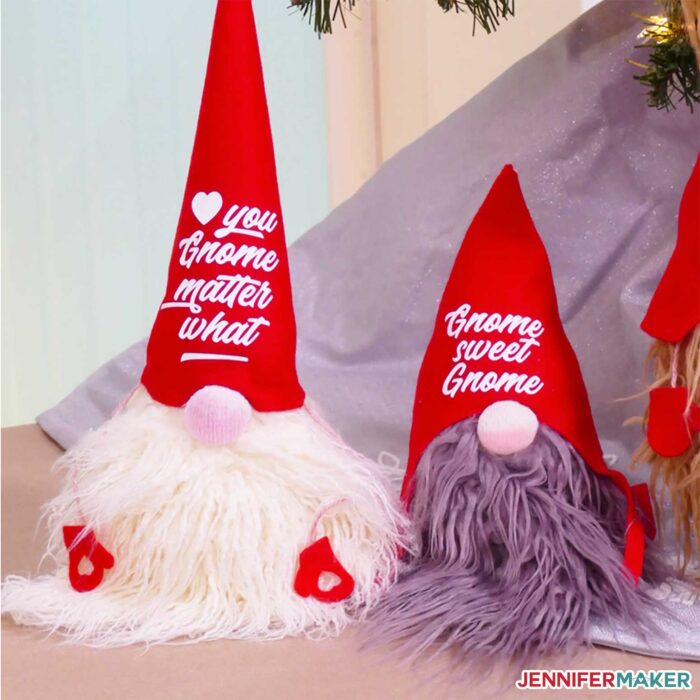
Third, you need the hats! Traditionally, gnome hats are bright red, but you can use another bright color. I’ve made my DIY gnome hats from red felt that I cut on my Cricut Explore and Cricut Maker (yes, you can cut felt on either, and I’ll show you how in this tutorial). I made five different hat styles to give my gnomes a little more personality. You can keep your hats plain, or add decorations like hearts, snowflakes, or birds with iron-on vinyl … I even made some little gnome puns to put on hats, like “Gnome Sweet Gnome” and “I Love You Gnome Matter What.” The fun of it is you get to decorate your gnome hats however you wish!
The DIY gnome hat patterns and decorations are all free on my blog! So let me show you how to find them and make them today! This post contains some affiliate links for your convenience (which means if you make a purchase after clicking a link I will earn a small commission but it won’t cost you a penny more)! Read my full disclosure policy.
Materials to Make DIY Gnomes with Decorated Cone Hats
View my Amazon shopping list with the exact items we used to make this project!
- Craft felt (I used this red felt, but you can use any color—here is a set of red, green, and white already pre-cut into 12 x 12 squares)
- Iron-on vinyl (I used Cricut white everyday iron-on)
- Faux fur (I used Monogolian-style fur, and it was less expensive to get it as a runner, throw, or blanket, but you can get a smaller amount here)
- Twine, string or ribbon
- Gnome body (ornament): hanging 2″ ornament balls or wood discs, plus pom poms or wood beads (for the nose)
- Gnome body (standalone): white crew sock (1), uncooked rice (32 oz.), four small rubber bands
- Craft knife (to cut the faux fur)
- Hot glue and glue gun
- Cutting mat (green StandardGrip mat or pink FabricGrip mat)
- Freezer Paper (if cutting on an Explore)
- StrongGrip Transfer Tape (if you want to keep your mat clean of felt fibers)
- A way to bond your iron-on vinyl to your felt (I used the 6″x7″ Cricut EasyPress 2, an EasyPress mat, and parchment paper)
- A way to cut your felt and iron-on vinyl (I did it with both a Cricut Maker and a Cricut Explore cutting machine!)
- Design #178 – My free gnome hat patterns and gnome heat decoration SVG design files and template (available in my free resource library—get the password by filling out the form at the bottom of this page)
How to Make Holiday Gnomes with Cute Red Cone Hats
Step 1: Make Your Gnome Body
Decide if you want a wee ornament gnome or a chunky standalone gnome. The wee ornament gnome bodies are the smallest, simplest, and quickest.
To make a wee ornament gnome body, just cut off a piece of twine or ribbon at least 12″ long, thread it through your 2″ ball ornament or 2-3″ wood slice and tie it at the top in a double-knot. You can even use a pine cone here in place of the ornament or wood slice.
To make a chunky standalone gnome body, do the following:
- Prepare 32 oz. of rice (that’s two big red solo cups worth) and put it into cups or glasses. You can use more rice for a bigger and taller gnome. You may want to freeze your rice first for 4-5 days to kill off any little varmints lying dormant.
- Wrap the top of your white crew sock around the rim of your rice-filled cup and pour in all the rice. Push the rice down to the bottom of the sock.
- Twist the sock where the rice stops and close it with two tight elastics or rubber bands (I use two because sometimes one breaks). Tie the top with twine for good measure.
- Hot glue the top edge of the cut sock down to the rice-filled sock to keep everything in place. This will also reduce pressure and pulling on the closed opening.
- Grab a big section of the rice-filled sock with your fingers (be sure you’re getting lots of rice in your grasp) and wrap an elastic around it tightly to create a nose. The more sock and rice you grab, the bigger the nose. Add a second elastic or piece of twine to keep it secure.
- Tie a piece of twine around the sock’s middle to give it a little more shape and prevent a saggy gnome bottom.
Step 2: Add Your Gnome Beards
Our gnome beards are made of faux fur. To make the gnome beard, first measure the length of your gnome body and add some extra — a little extra for a short beard, a lot extra for a long beard. For example, a 2″ ornament beard should be anywhere from 3″ to 6″ or even more.
Once you know how long you want your beard to be, it’s time to cut the faux fur. To cut faux fur, flip it over so the fur is against your work surface and carefully cut the backing NOT the fur itself. I recommend you use a craft knife and cut the backing just enough so you can pull it apart. This will prevent you from cutting the fur itself, which you want to avoid because it’ll look weird.
Basically, you want to cut a rectangle that’s sufficiently long and wide enough to completely cover the length and width of your gnome as viewed from the front. For a 2″ wee ornament gnome, that would be a rectangle of at least 3″ x 3″. I recommend you go longer, though, for the long flowing beard on an ornament. For a bigger chunky standalone gnome, I’d make a rectangle of at least 6″ x 6″. Once you’ve cut your rectangle, hold it up to the gnome, just under its nose, to see how it looks. Feel free to shape the beard a bit to make it more narrow at the bottom if you prefer.
To get the beard to flow around the nose better, cut a V-shape at the top center of the faux fur.
Once your beard is cut out and looks good on your gnome, it’s time to glue the beard down. Carefully add a bead of glue along the top edge of your beard and press it to your gnome body. If you’re using a wood disc and your beard is wider than it, just wrap it around the sides and glue it down.
Note: If you’re making the wee ornament gnome, you’ll also need to add a nose now. Push aside some of the fur about 1/2″ down from the top edge of the beard, dab a little hot glue there, and push a pom pom or wood bead onto the glue. Rearrange the fur so it flows around the nose nicely.
Your gnome is taking shape! Now all that’s left is the infamous red cone hat!
Step 3: Cut Out Your Gnome Hat
Time to add the hat! You could just guess at the size and shape, but that’ll likely result in wasted time and felt. And I’ve already done the work for you by creating patterns! My free gnome hat patterns and decorations are available as printable PDFs and SVG cut files for your cutting machine. Get the gnome hat patterns and files from my free resource library (get the password to the library in the form at the bottom of this post).
If you’re making the wee little hanging ornament type of gnome, use the pattern file called “gnome-hats-wee.” Alternately, if you’re making the chunky standalone type of gnome, use the pattern file called “gnome-hats-chunky.” Basically, the wee size is for gnomes about 2-3″ wide whereas the chunky size is for gnomes about 4-5″ wide.
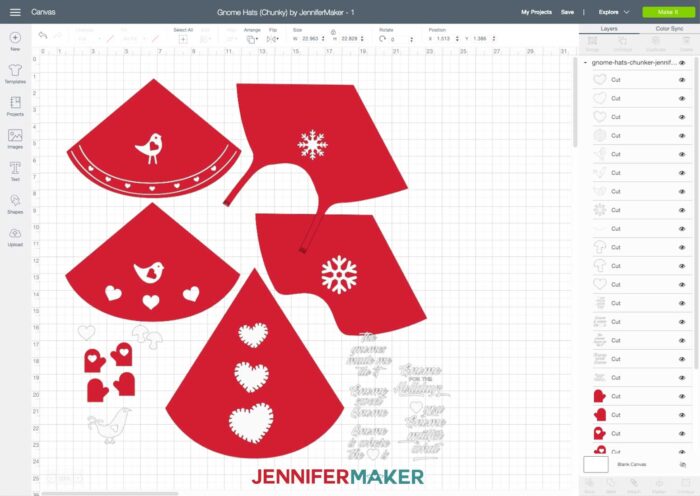
You can cut out my gnome hats by hand with a pair of scissors or a craft knife using the PDF pattern, but I prefer to use a cutting machine like a Cricut because I can get perfect curves and shapes. So I’m going to show you how to make these on a Cricut using the SVG cut file. Here is what my DIY gnome hat pattern and SVG cut files will look like when you upload it to Cricut Design Space:
Tip: If you’re not sure how to upload an SVG cut file to Cricut Design Space, watch this helpful video training series I made. If you’re on an iPhone or iPad, here’s how to download and upload SVG files to the Cricut Design Space app.
I designed this gnome hats so the red parts are cut from craft felt and the white parts are cut from iron-on vinyl. Be sure you MIRROR your iron-on vinyl before you cut it.
To cut felt on a Cricut Maker, use the rotary blade and either a green StandardGrip mat or a pink FabricGrip mat. Felt is VERY messy and will cover your mat in tiny fibers very quickly. If you don’t want to destroy your pretty pink FabricGrip mat with the little gnome hats, either use an old green StandardGrip mat that still has some stick (it’s fine for felt) or put a 12″ x 12″ sheet of StrongGrip transfer tape down on your pink FabricGrip mat (sticky side up) to protect the surface from the felt. You can cut many sheets of felt on the mat with the StrongGrip transfer tape before you need to remove it — just be aware that removing the transfer tape will be a bit of a chore. So you have to decide which is more important — a mat that can stay clean or your time.
To cut felt on a Cricut Explore, cut a piece of freezer paper (NOT wax paper) to fit the size of your felt then iron it on with the shiny side against your felt until it sticks. This will melt the plastic coating enough so it sticks to it. This is a simple and inexpensive way to turn your felt into bonded felt. Now put the bonded felt on your cutting mat paper side down and cut it out with the fine-point blade with some added pressure. I also tried the deep-point blade with the felt, but it did not work as well as the fine-point blade. When done, remove the freezer paper backing.
Step 4: Decorate Your Gnome Hat (Optional)
Weed your cut iron-on vinyl for any excess vinyl. Check the Cricut Heat Guide for the settings to use for your material and EasyPress (mine was 280‚F for 30 seconds, light pressure).
Place a piece of parchment paper (or a Teflon sheet) over your felt and pre-heat it for five seconds.
Position your iron-on decal with the liner side up, cover it with parchment paper, and press again for the recommended length of time.
Slowly remove the liner sheet while it is still warm (not hot).
Step 5: Glue On Your Gnome Hat
Put your hat on your gnome, just above his cute little nose. If you’re making the wee ornament gnome, be sure the string you attached in step 1 is hanging out the very top of the hat.
Using hot glue, carefully attach the front center edge of your gnome hat just above the nose—you may want to tuck it behind the nose a bit when you glue it down.
Now form your hat into the iconic cone shape by wrapping the hat around the gnome and overlapping the two straight edges in the back, then gluing together. Be careful – the glue is hot and it’s easy to burn yourself. I recommend you wear silicone finger protectors to be safe.
Finally, glue down the gnome hat along the back edge to keep it in place.
Step 6: Enjoy Your Gnome!
And that’s it! Now just hang your wee gnome on your tree or set your chunky gnome under your tree to guard the gifts and protect your family! Gnome sweet gnome!

Get my free adorable holiday gnome hat designs and cut files
I’d love to see your holiday gnomes, and all the other fun ideas you come up with to use these! If you make some, please share a photo in our Facebook group, email it to me at [email protected], or tag me on social media with #jennifermaker.
Love,

Want to remember this? Save the DIY Gnomes Tutorial to your favorite Pinterest board!