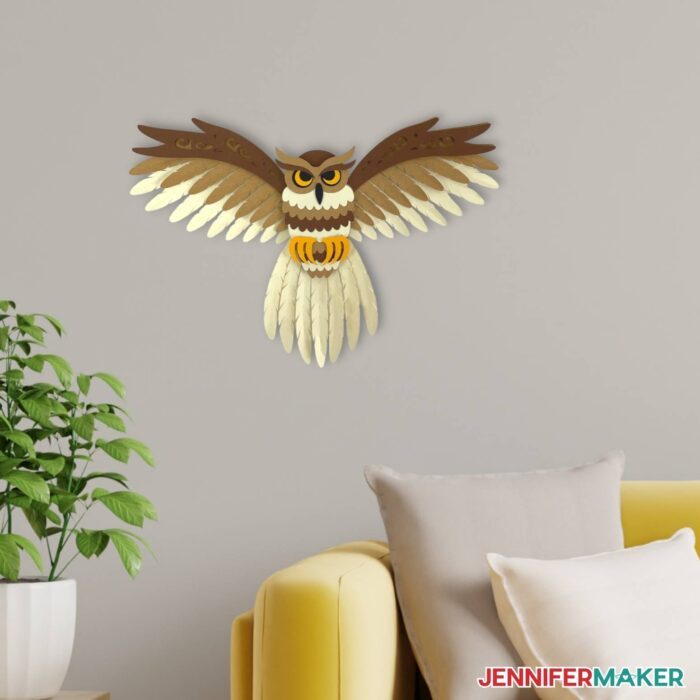
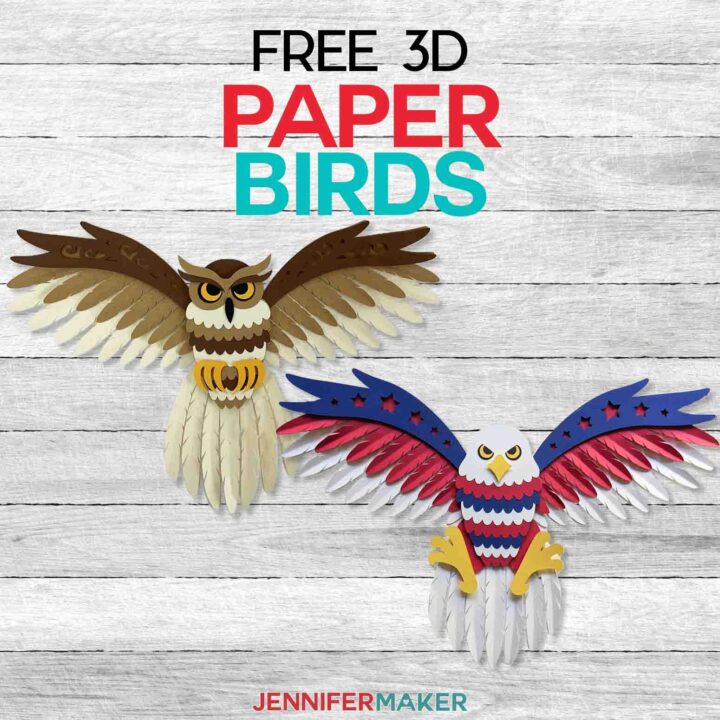
Learn how to add dimension to papercrafts with different adhesives and paper-shaping techniques by making my beautiful owl SVG!
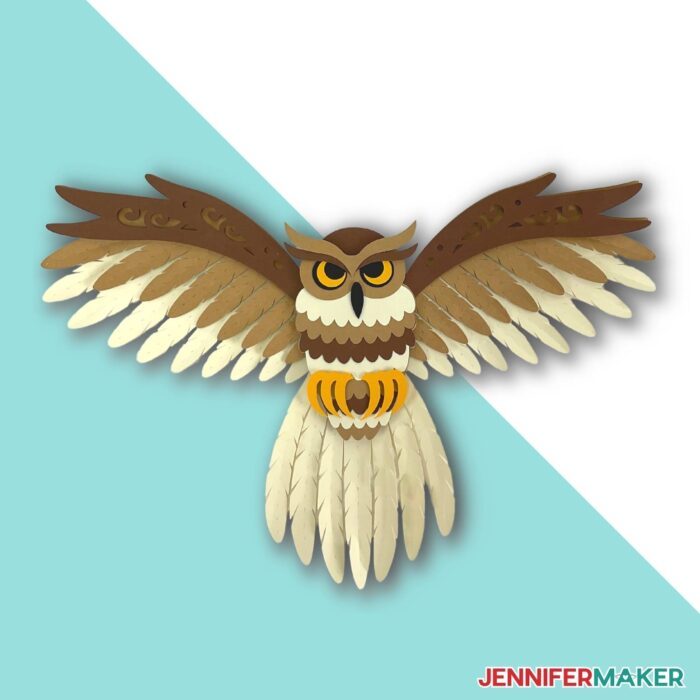
When you hear papercrafts, do you think of rolled flowers, or maybe layered mandala projects? Those are fun, but think bigger! Think ALIVE! With a few tools, adhesives, and techniques, this layered owl SVG will fly off your workspace! I’ll teach you to bring papercrafts to life with easy, fun tips. Some of the design elements and techniques even count as meditation. So follow along for this HOOT of a project!
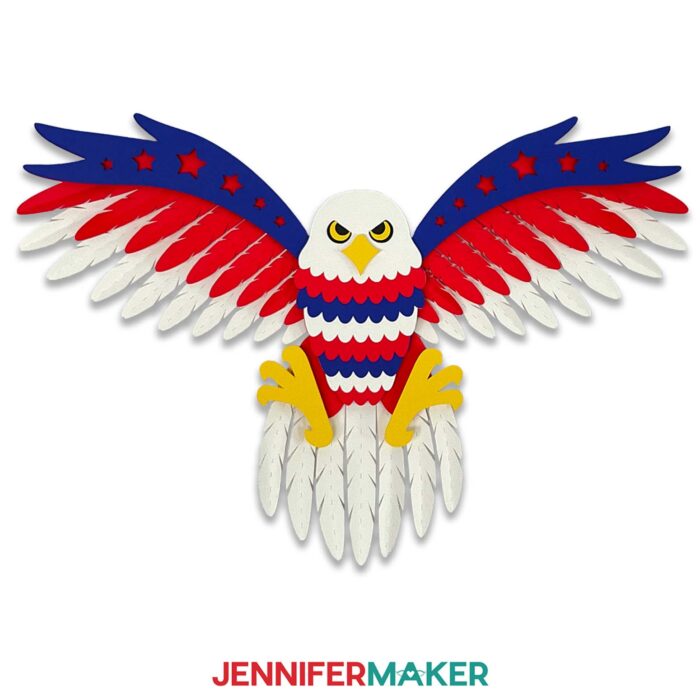
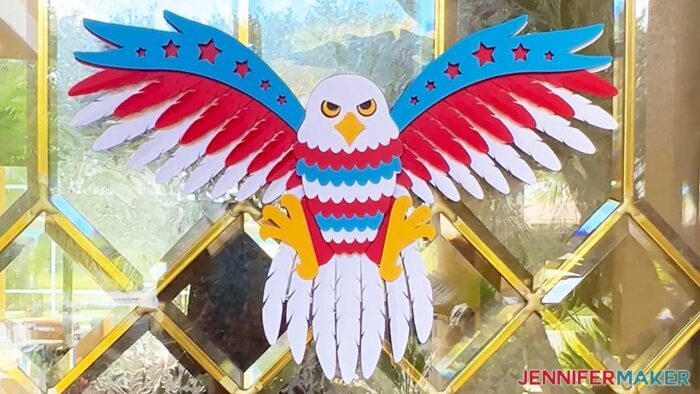
June 2023 update: I’ve added a new design: 4th of July eagle SVG that you can create using the same techniques from the owl tutorial!

Want to save this project? Enter your email below and we’ll send the project straight to your inbox.
Watch the full step-by-step tutorial video here:

I just love crafting with paper and enjoy testing new methods to share with you. To create dimension, I tried a few combinations of adhesives, cutting, and creasing tools. Once I had the technique down, it was almost meditative, which is lucky, because there are a lot of feathers to crease and shape! They’ll fly by once you’ve got the hang of it.
To get sturdy yet pliable layers for my owl, I used good-quality, 65 lb 12″ x 12″ cardstock. I used life-like shades of brown, yellow, and black, but you can use whichever palette you like! You could even incorporate fantastic details like glitter or patterned paper.
A variety of adhesives are the secret ingredients to make this owl SVG take flight. We’ll create depth by using adhesives of different thicknesses — from perfectly flat glue to stacked foam tape — while assembling our feathered friend’s layers. With careful alignment and placement, the result will really stand out!
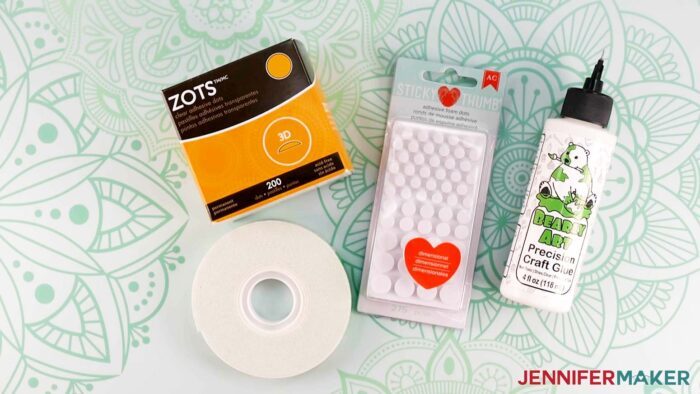
Cutting your adhesives to fit in tight spots requires a Craft Knife or sharp scissors. If you use a knife, make sure you’re cutting on a self-healing mat or another surface you don’t mind marking up at bit. Be careful of your fingers!
The owl’s body is only 4″ tall, but his tail and wings make the full design 11.5″ x 7.7″. If you want an owl more like Hedwig, you can scale the owl SVG cut file up! For tips on adjusting designs for larger projects in Cricut Design Space, see my Cardstock Cutouts Larger than 12″ x 24″ tutorial.
As I mentioned earlier, creasing and shaping are two papercraft techniques you’ll practice in this tutorial. My owl SVG project uses dashed cut lines to help you crease the paper feathers precisely. This way, you can just use the Cricut Fine-Point Blade instead of swapping out tools. Your scraper will do more than remove pieces from machine mats today!
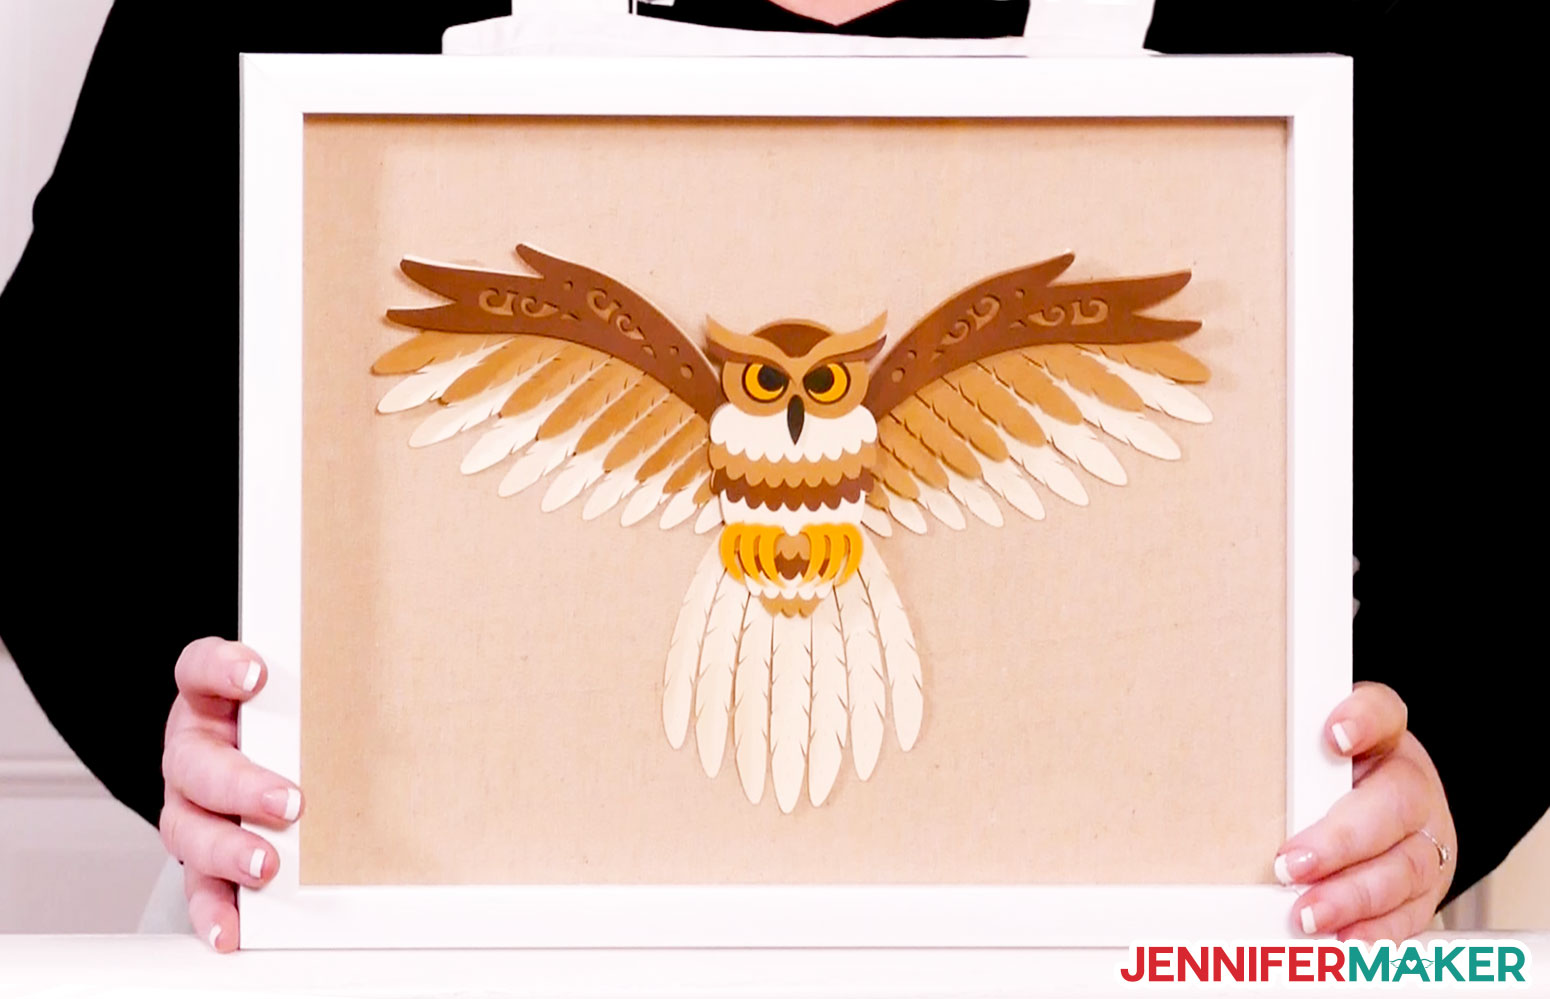
Finally, I’ll show you some fun ways to display your physical products. My favorite method is in a 12″ x 15″ shadow box! You could also glue a loop of fishing line to its back to hang the owl by a hook on the wall or make it fly from a ceiling. Or the easiest way to display creative projects: use paint-safe putty to hang it right on a wall!
Your Cricut will soar through cutting the owl SVG’s layers. I used a Cricut Maker 3, but you could use an original Cricut Maker or a machine from the Explore series. Sizing the file down for a Joy is possible, but some cuts may get too close together. Test it out on extra cardstock, first.
The cutting machine’s precision and power are super important for my free owl SVG, especially those intricate cut feathers. Keeping your cardstock in place is also vital for intricate designs cut from paper. I recommend using the Cricut LightGrip Machine Mat to avoid tearing delicate pieces. A few passes with your brayer will keep it in place! A Green StandardGrip Machine Mat will work as well, just be extra gentle while removing small pieces. Have your spatula handy!
I love the simple materials for papercraft projects! Now, let me show you where to get my free eagle or owl SVG, and then I’ll teach you bring them to life!
Ready to make this graceful, free owl SVG? You’re going to love this! This post contains some affiliate links for your convenience (which means if you make a purchase after clicking a link I will earn a small commission but it won’t cost you a penny more)! Read my full disclosure policy.
Materials to Make a Layered Papercraft Eagle or Owl SVG
View my Amazon shopping list with the exact items we used to make this project!
- 12″ x 12″ 65 lb Cardstock (Various Colors)
- 3D Clear Adhesive Dots or Zots (1/2″ diameter x 1/8″ thick) -AND/OR-
- Double-sided Adhesive Foam Dots (Various Sizes) -AND/OR-
- Double-sided Adhesive Foam Tape (1/2″ x 150″) -AND/OR-
- Bearly Art Cubies
- Scissors or Cricut Craft Knife and self-healing mat — to cut your adhesive materials
- Craft Glue — I used Bearly Art Precision Glue, my new favorite!
- Scraper Tool — for creasing and lifting small paper pieces
- A method to cut your cardstock — I used the amazing Cricut Maker 3 but you can also use the Cricut Maker or Cricut Explore Series machines
- Cricut Blue LightGrip Machine Mat 12″ x 12″ or Cricut Green StandardGrip Machine Mat 12″ x 12″
- Brayer
- Spatula — for removing delicate cut pieces from machine mats
- Tweezers
- 12” x 15” Shadow Box – White Frame — optional
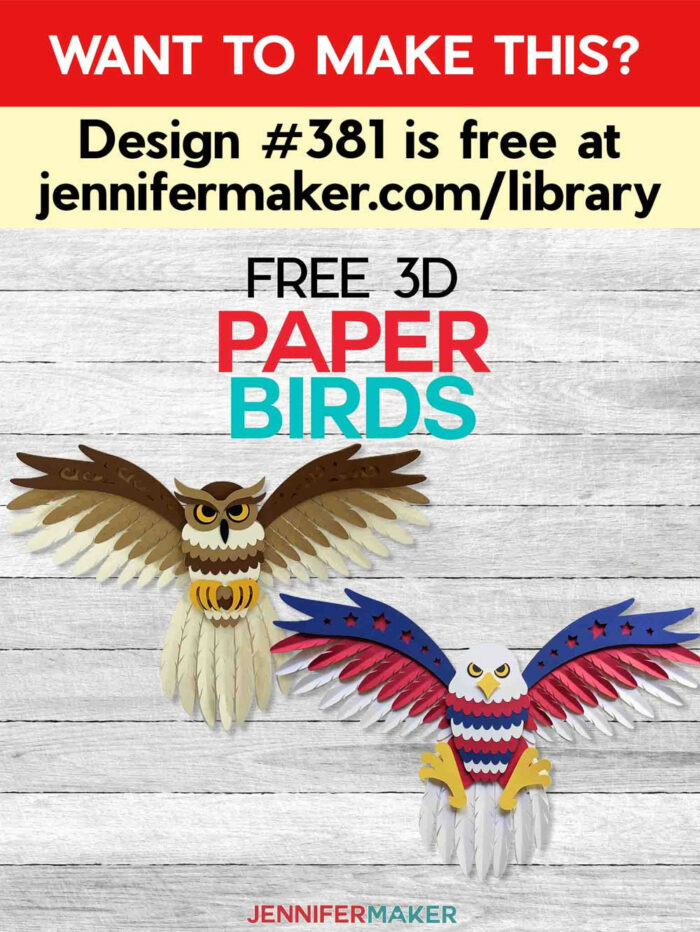
- Design #381 – My free cut files (available in my free resource library—get the password at the bottom of this post)
How to Make a Layered Eagle or Owl SVG
3D Layered Owl SVG With Eagle Variation
Learn how to use different techniques to bring a 3D Layered Owl SVG to life!
Materials
- 12" x 12" 65 lb. Cardstock (Various Colors)
- 3D Clear Adhesive Dots (1/2" diameter x 1/8" thick) -AND/OR-
- Double-sided Adhesive Foam Dots (Various Sizes) -AND/OR-
- Double-sided Adhesive Foam Tape (1/2" x 150") -AND/OR-
- Bearly Art Cubies -AND/OR-
- Craft Glue
- 12” x 15” Shadow Box - White Frame (Optional)
- Design #381 – My free SVG/DXF/PDF design files (available in my free resource library—get the password at the bottom of this post)
Tools
- A method to cut your cardstock — I used the amazing Cricut Maker 3 but you can also use the Cricut Maker or Cricut Explore Series
- Cricut Blue LightGrip Machine Mat 12″ x 12″ -OR-
- Cricut Green StandardGrip Machine Mat 12″ x 12″
- Scraper Tool
- Brayer
- Scissors -OR-
- Cricut Craft Knife -AND-
- Self-healing mat
- Spatula
- Tweezers - optional
Instructions
STEP 1: GET MY FREE 3D PAPER BIRDS SVG FILES
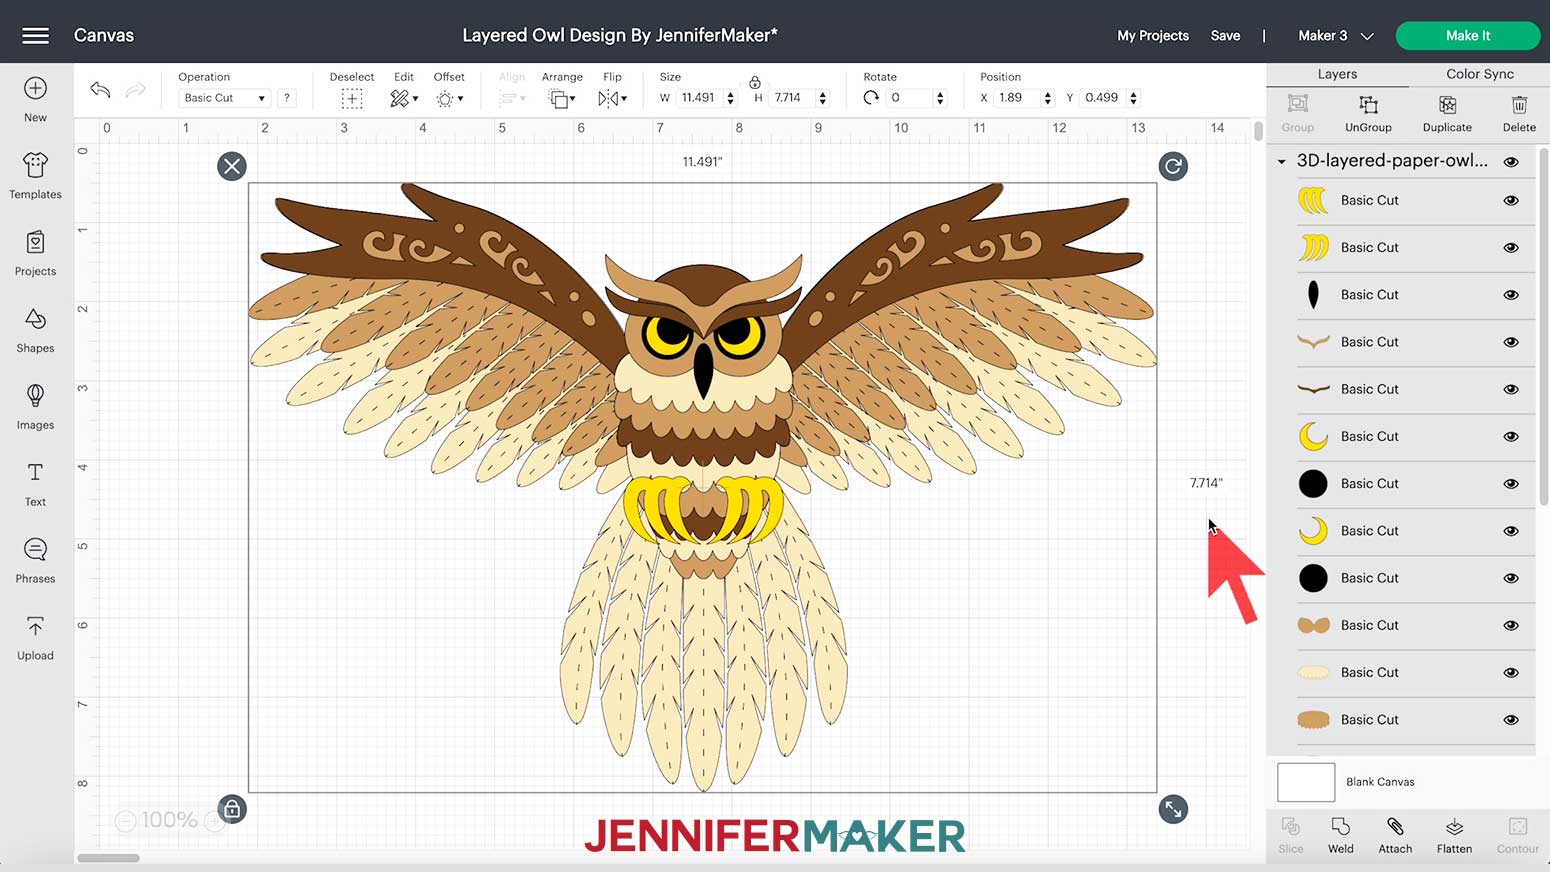
First, download my 3D Layered Paper Birds SVG/DXF/PDF files from my free resource library. It's Design #381. It includes an owl option and an eagle variation. Then, upload the SVG file of your choice to Cricut Design Space and add it to your Canvas.
If you are not sure how to upload an SVG cut file to Cricut Design Space, watch this helpful video training series I made. If you are on an iPad or iPhone, here is how to download and upload SVG files to the Cricut Design Space app.
This is what my 3D Layered Paper Owl SVG files look like when uploaded to Cricut Design Space.
STEP 2: PREPARE YOUR DESIGN FILE FOR CUTTING
The design is set up to make one owl measuring approximately 11.5” w x 7.75” h.
You can adjust the sizing if you like. Just enter specific dimensions in the top menu under Size (keep the lock locked to maintain proportions!) or you can click and drag the Resize handle on the lower right side of the bounding box. Remember, you may need larger paper if you want to make the owl bigger. For tips on adjusting designs for large cuts, see my Cardstock Cutouts Larger than 12" x 24" tutorial.
STEP 3: CUT YOUR 3D LAYERED OWL DESIGN
Now we're ready to cut. Make sure you have the right machine selected and click "Make It."
If prompted, click "On Mat" and continue.
You should see five mats on the Prepare screen. Click "Continue" in the bottom right.
Now we will choose material and tool options..
I used five different colors of cardstock: black, brown, tan, cream, and an orangish/yellow. But you can choose whatever colors you like. Just be sure there is enough contrast between each color.
Normally, I would select "Medium Cardstock – 80 lb (216 gsm), but the owl's feathers include a lot of intricate cuts. So click "Browse All Materials" and in the search bar type: "Intricate" and then select "Cardstock (for intricate cuts)."
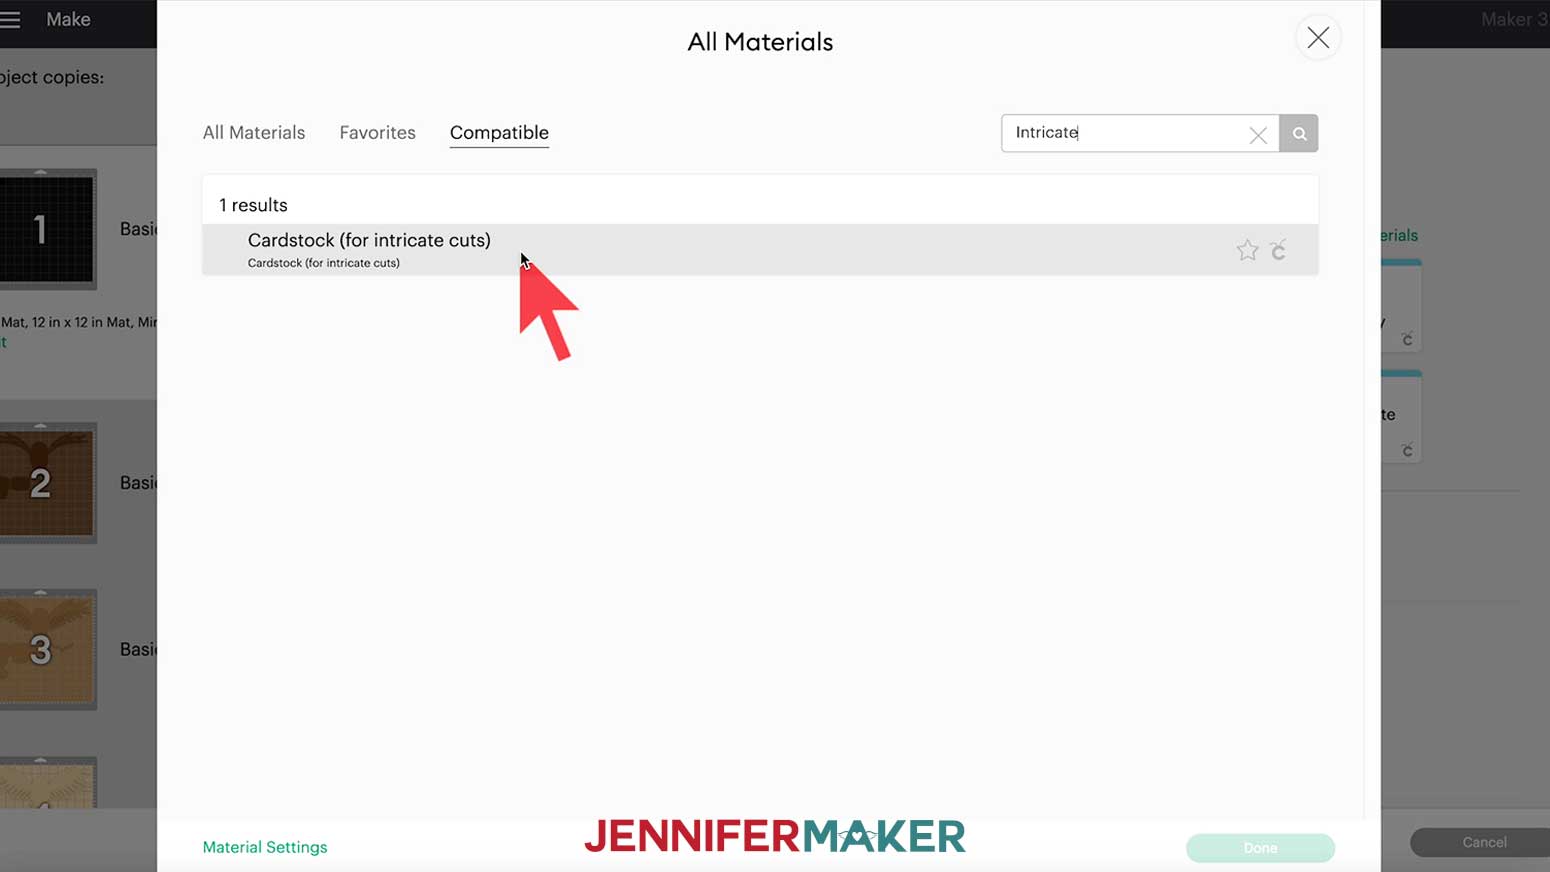
I tested a lot of different cut settings and I found this one gave me the best results every time.
Next, check the box next to "Remember material settings." This will tell the machine to use this same cut setting for all five layers, saving us time.
TIP: If you run into any issues cutting your cardstock check out my Cricut Tips & Tricks for Cleaner Cuts
Place your first piece of cardstock on your machine mat and use a brayer to make sure it's fully adhered. Check that your Fine-Point Blade is clean and in Clamp B. Then, load the mat into the machine and press "Go."
When the cut is finished unload the mat, flip it over, and roll it back to release the cardstock. This helps prevent the cardstock from curling and ripping.
Repeat the same steps for the rest of the mats. The mats with feathers will take longer to cut. The feather details and small pieces may be difficult to remove from the mat. If you have trouble try gently sliding the spatula under them.
STEP 4: ASSEMBLE YOUR 3D LAYERED PAPER OWL
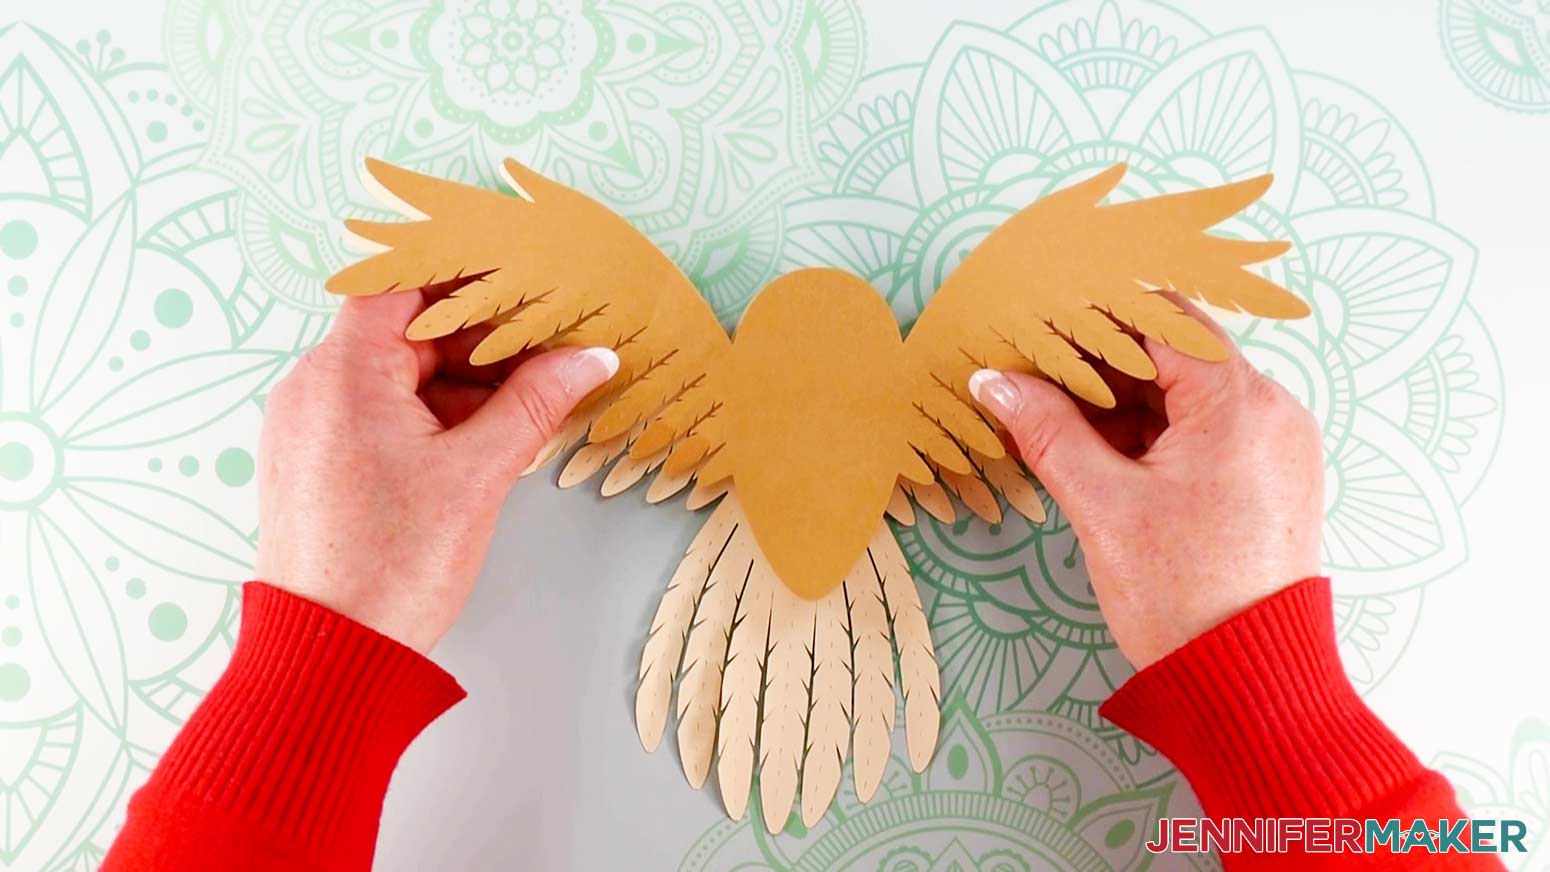
Here's a look at all the layers and pieces that will make up the owl, We will start with the very bottom layer (the cream colored layer) and work our way up.
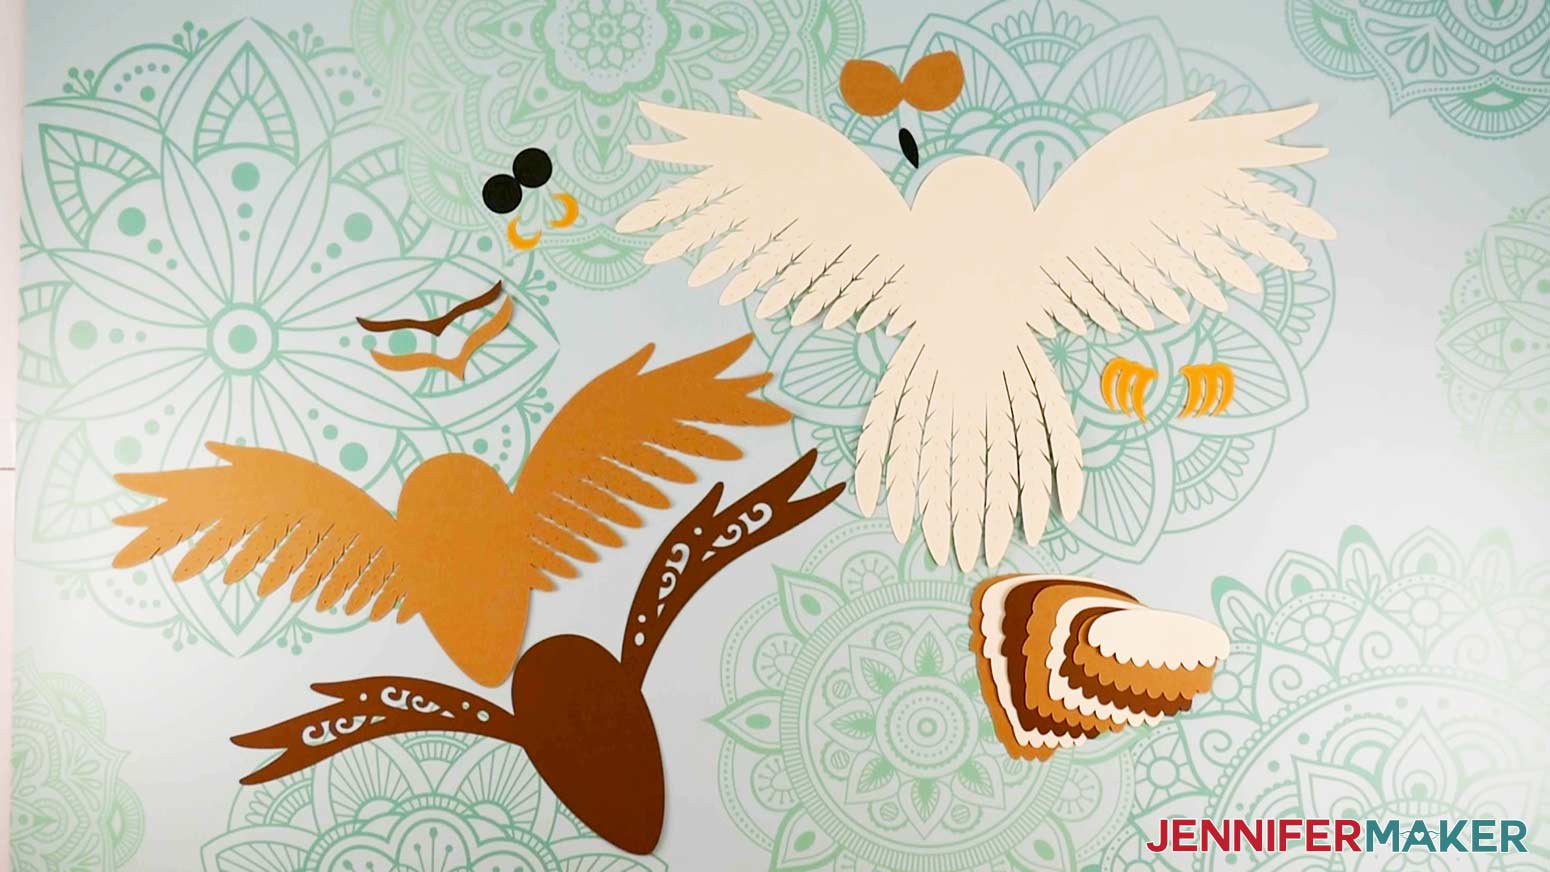
Notice the dashed cut lines that run down the middle of each feather. We will use a scraper tool to give them some dimension.
With the cardstock in one hand and the scraper tool in the other, press the scraper into the center of each feather and use your fingers to bend the sides up around the tool.
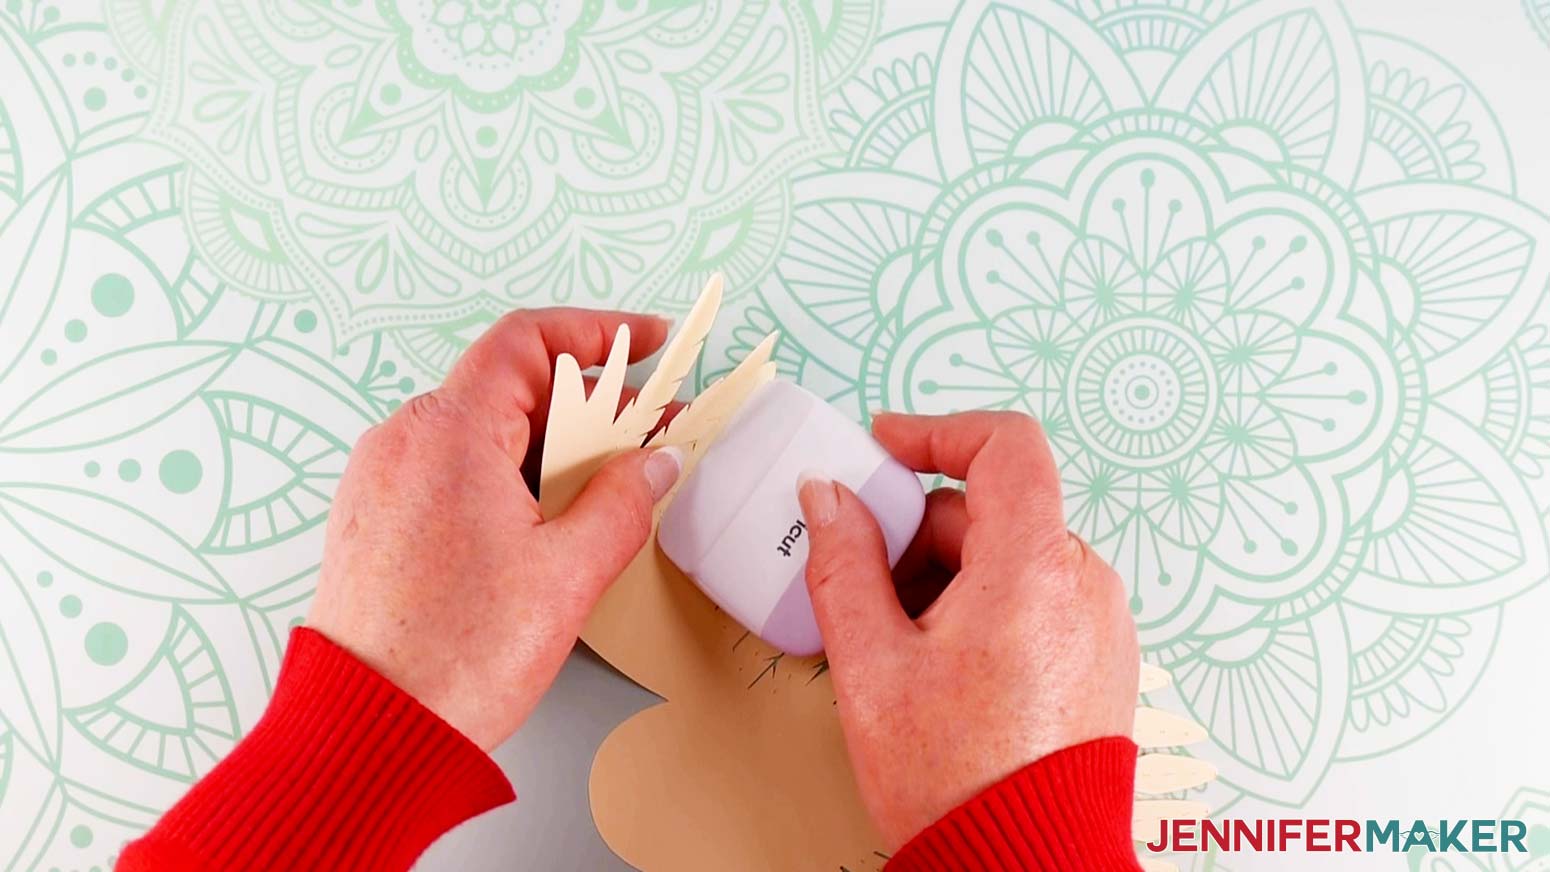
Repeat these same steps for the tan layer with feathers.
Once all the feathers have been shaped, it's time to put it all together.
To achieve the 3D look and make this project really pop, I used a variety of adhesive materials including clear Zots, which are really just dots of glue, but much less messy!
I also used double-sided adhesive foam dots and adhesive foam tape, and my favorite craft glue.
You can mix and match these on your own design to achieve your desired look.
First, we will attach the two layers with the feathers.
Begin by placing the bottom layer (the one with the tail) face up in front of you.
Then, take the middle layer without a tail and place several Zots on the back along the body and wings, leaving the feathers free.
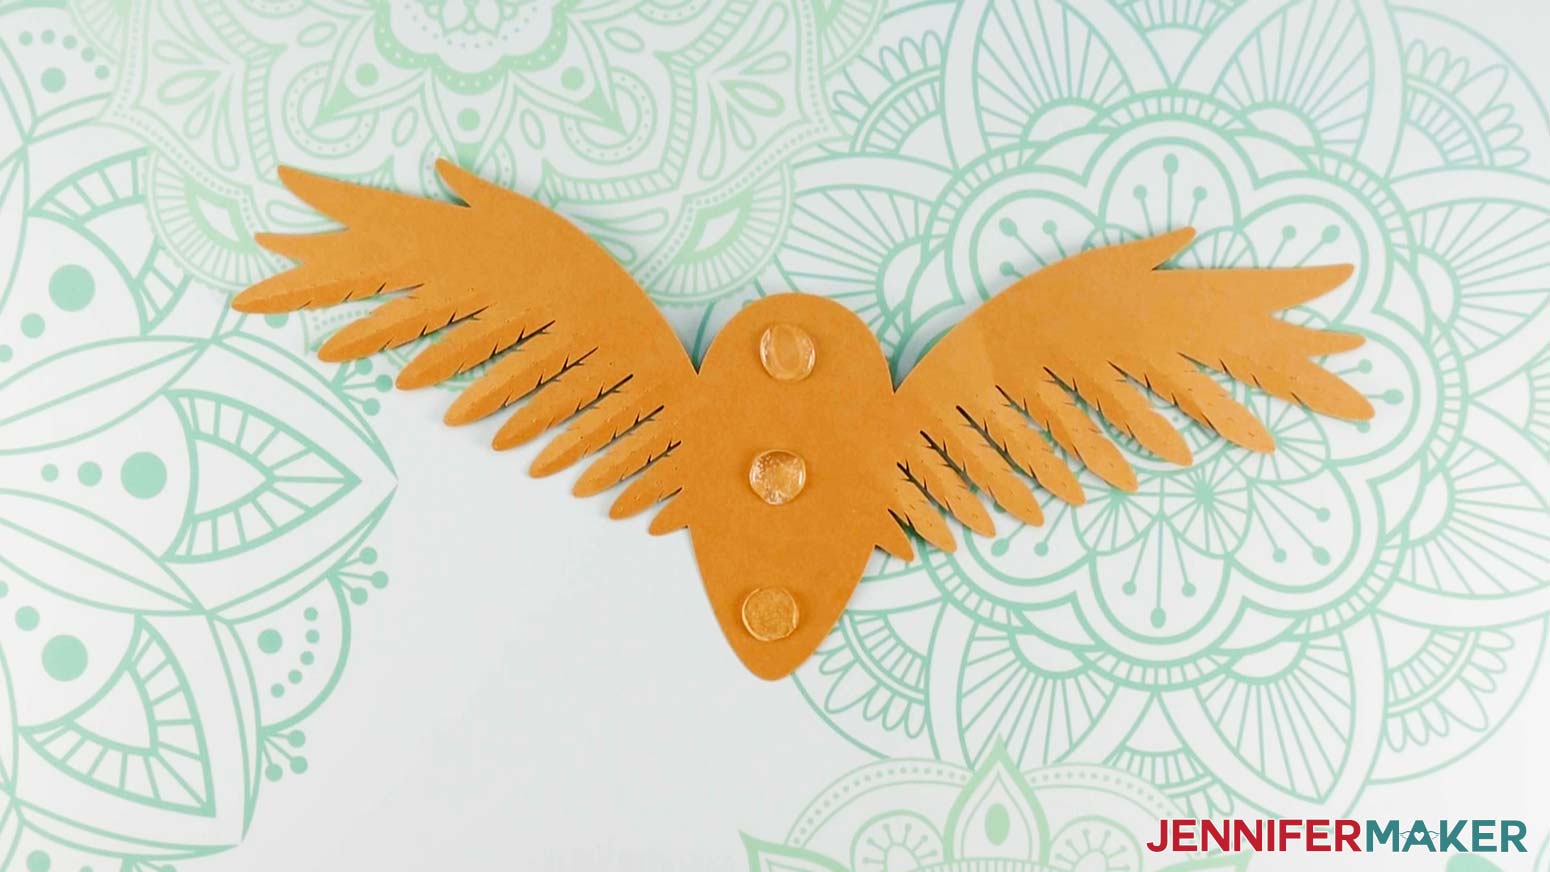
Now align the layers and press down to adhere them.
Next, find the top layer of wings with cutouts. I used brown cardstock for mine.
I used the foam dots for this layer.
Place several Zots along the back of that layer and place it on the middle layer, aligned at the top.
Next, find the eight similar-looking pieces with curved tops and scalloped bottoms. You’ll layer these on top of one another to create the smaller body feathers on the front.
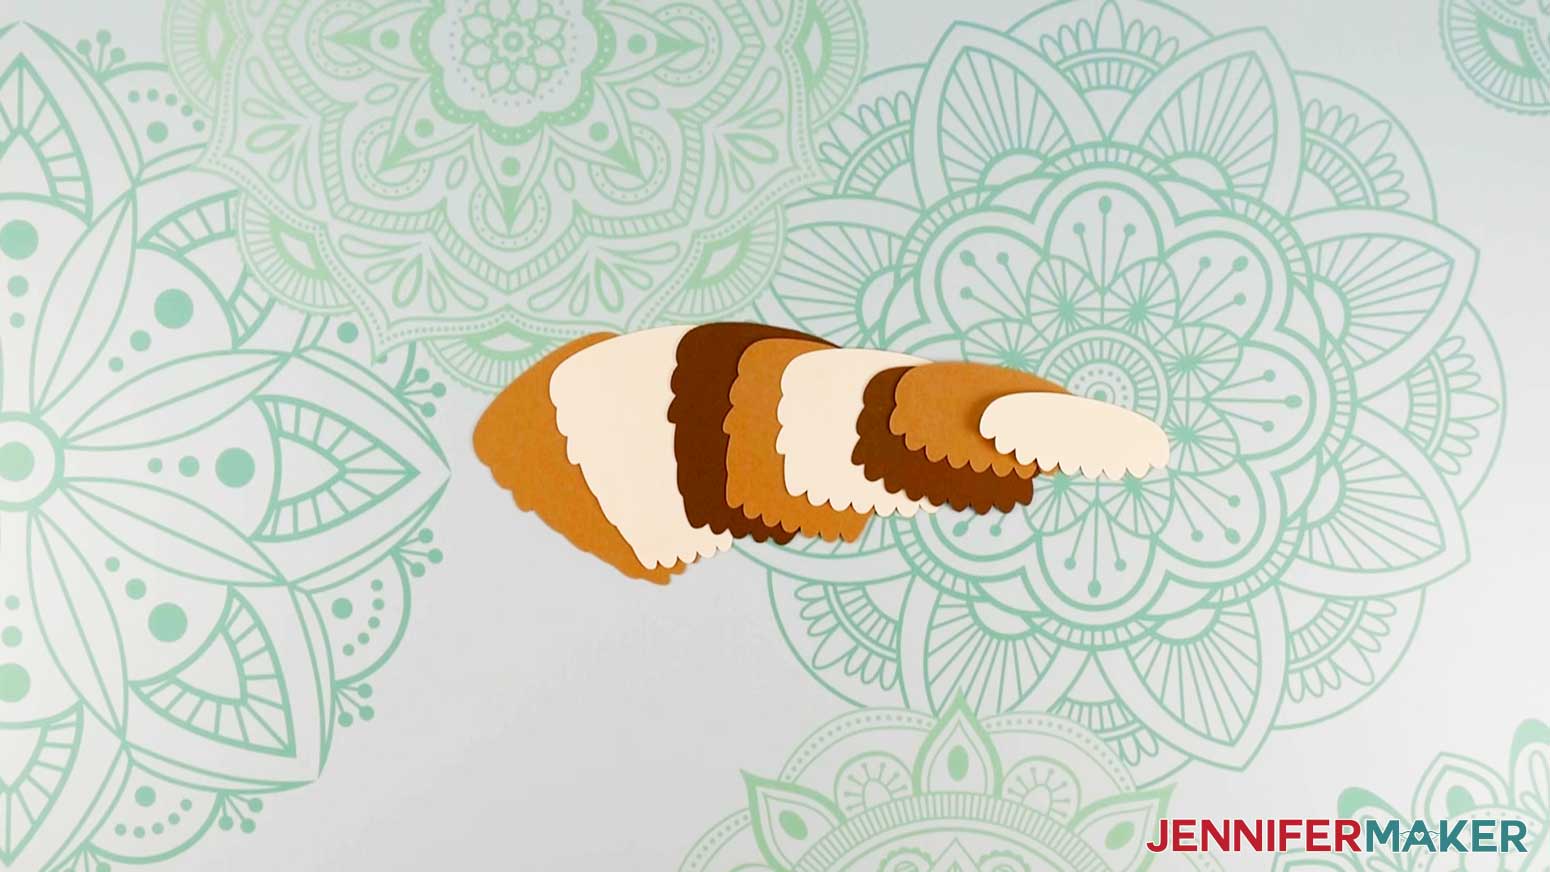
Start with the largest body piece, which we'll glue to the top body and wing layer.
Add glue to the back of the feathered body piece, avoiding the outer inch.
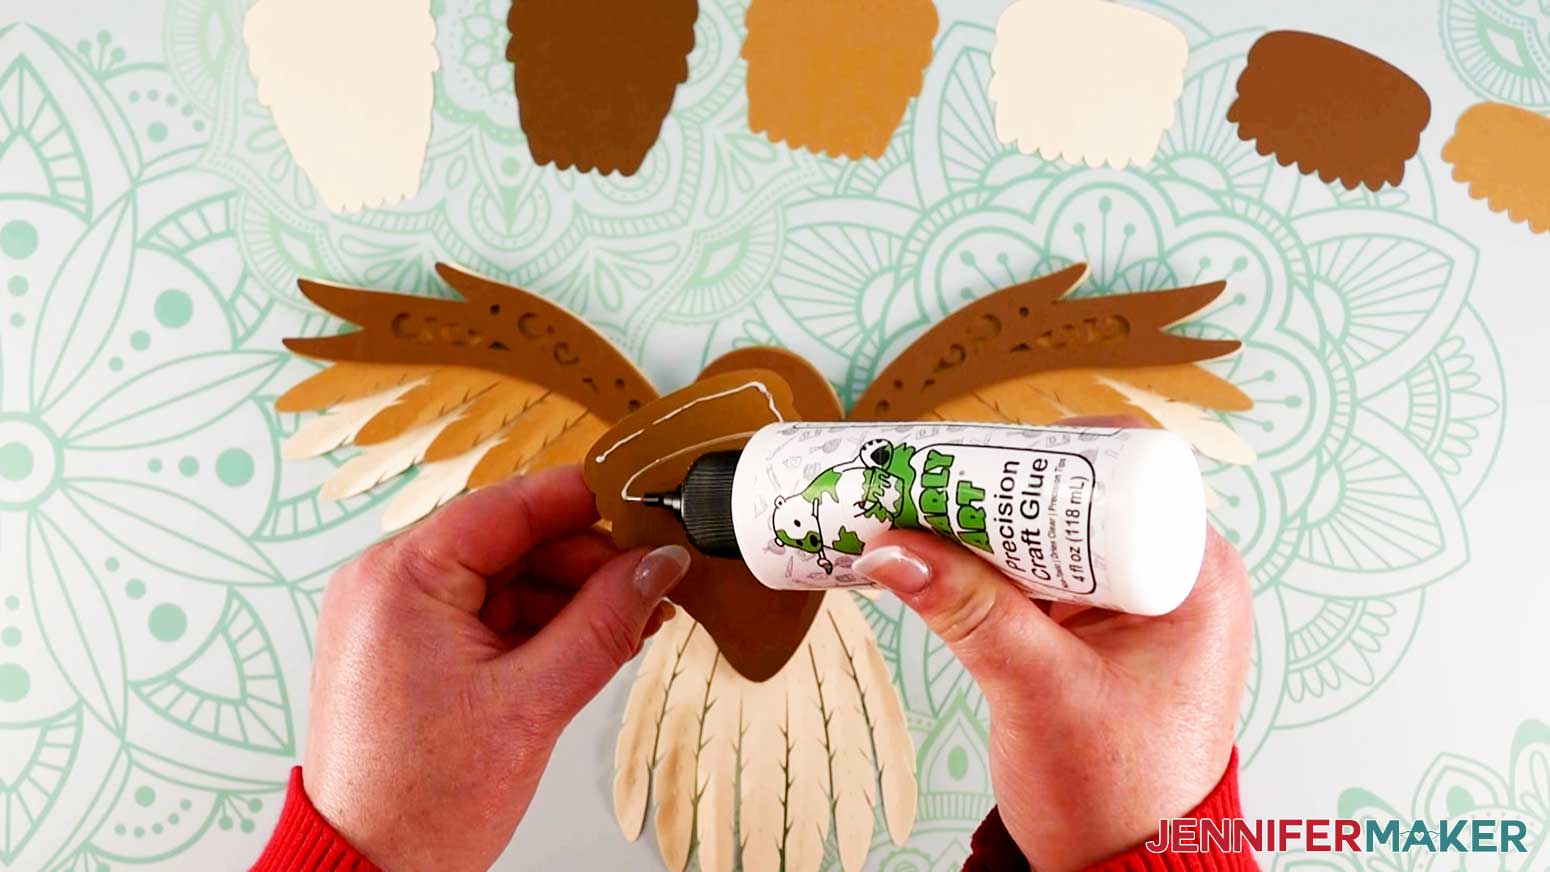
Align the shapes' bottom edges and then shift the feathers down a bit, making sure to cover the lower smooth edge of the body. Then, glue the next largest piece on top of the previous one, aligning them at the top. This will create your first row of feathers on the body. Continue aligning body feather pieces at the top and gluing them in order by decreasing size.

Next we will add the eyes.
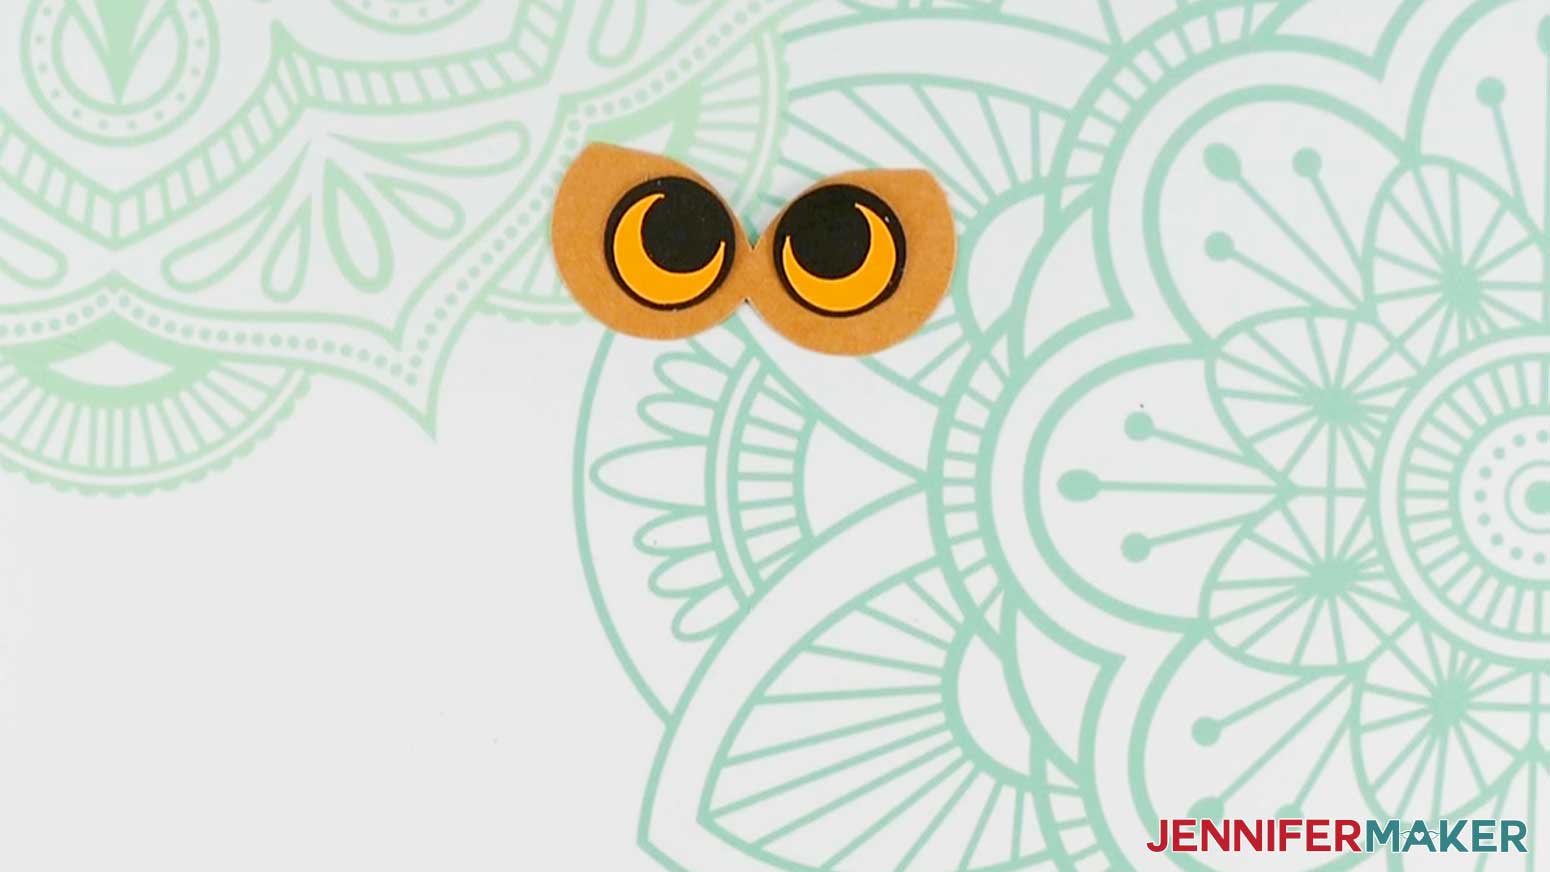
Grab the two black circles and two crescent-shaped orangish/yellow pieces.
Glue a crescent-shaped piece on top of one of the circles, positioning it so there’s an equal amount of the circle below and showing around the edges of it. You’ll only need a tiny amount of glue for this.
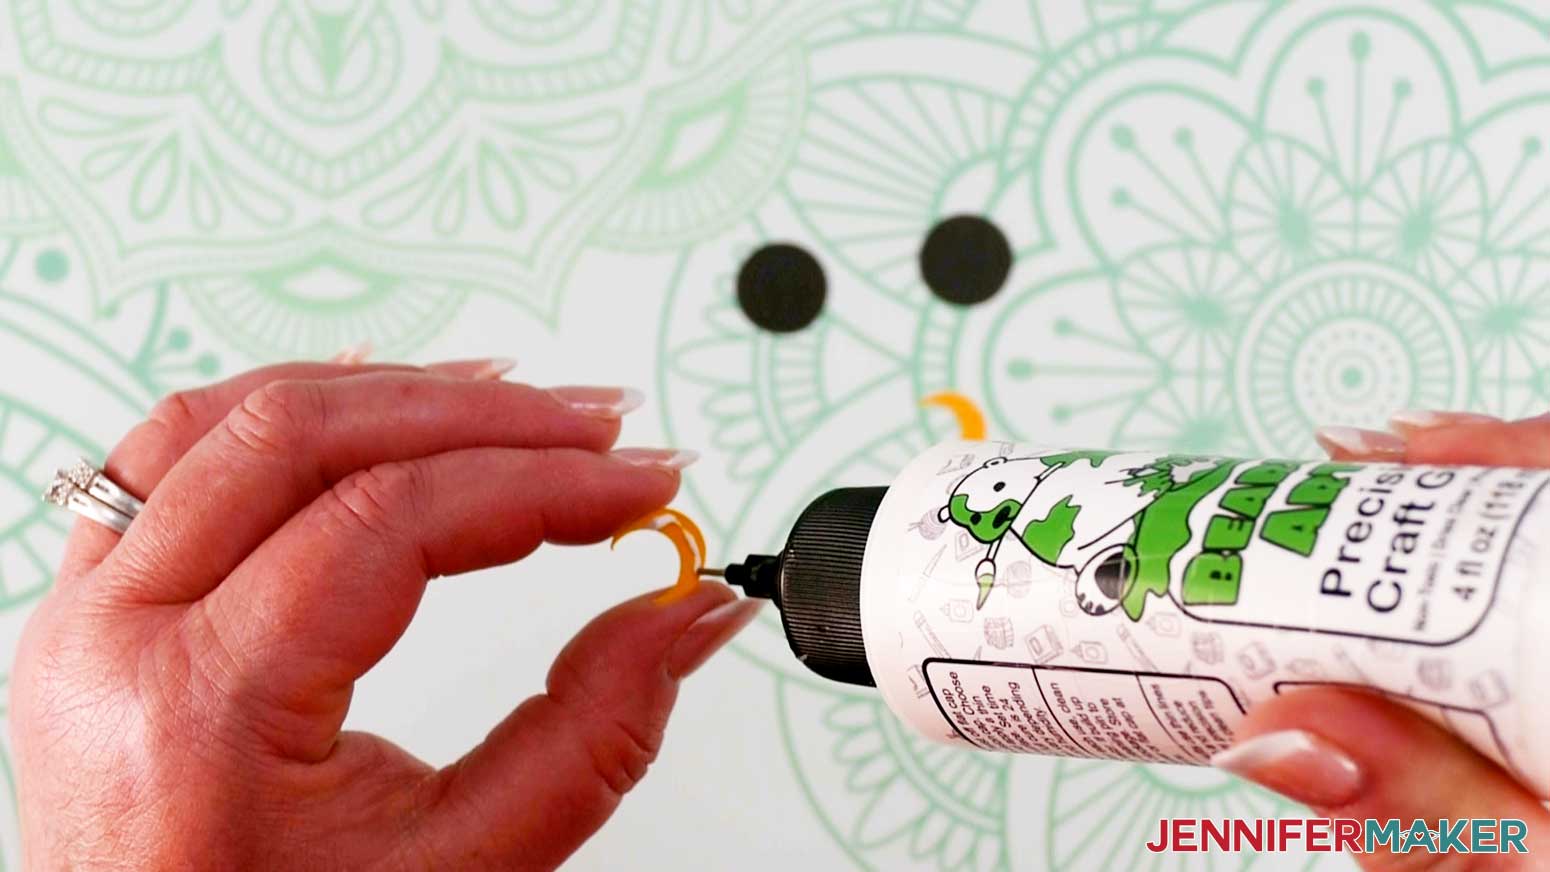
Do the same thing with the second crescent and circle.
Next, glue both eyes to the face layer, lining up the top curves and leaving an equal amount of the face showing around the bottom and sides of each eye. Make sure the crescents mirror each other so the owl feels like it’s looking forward in one direction.
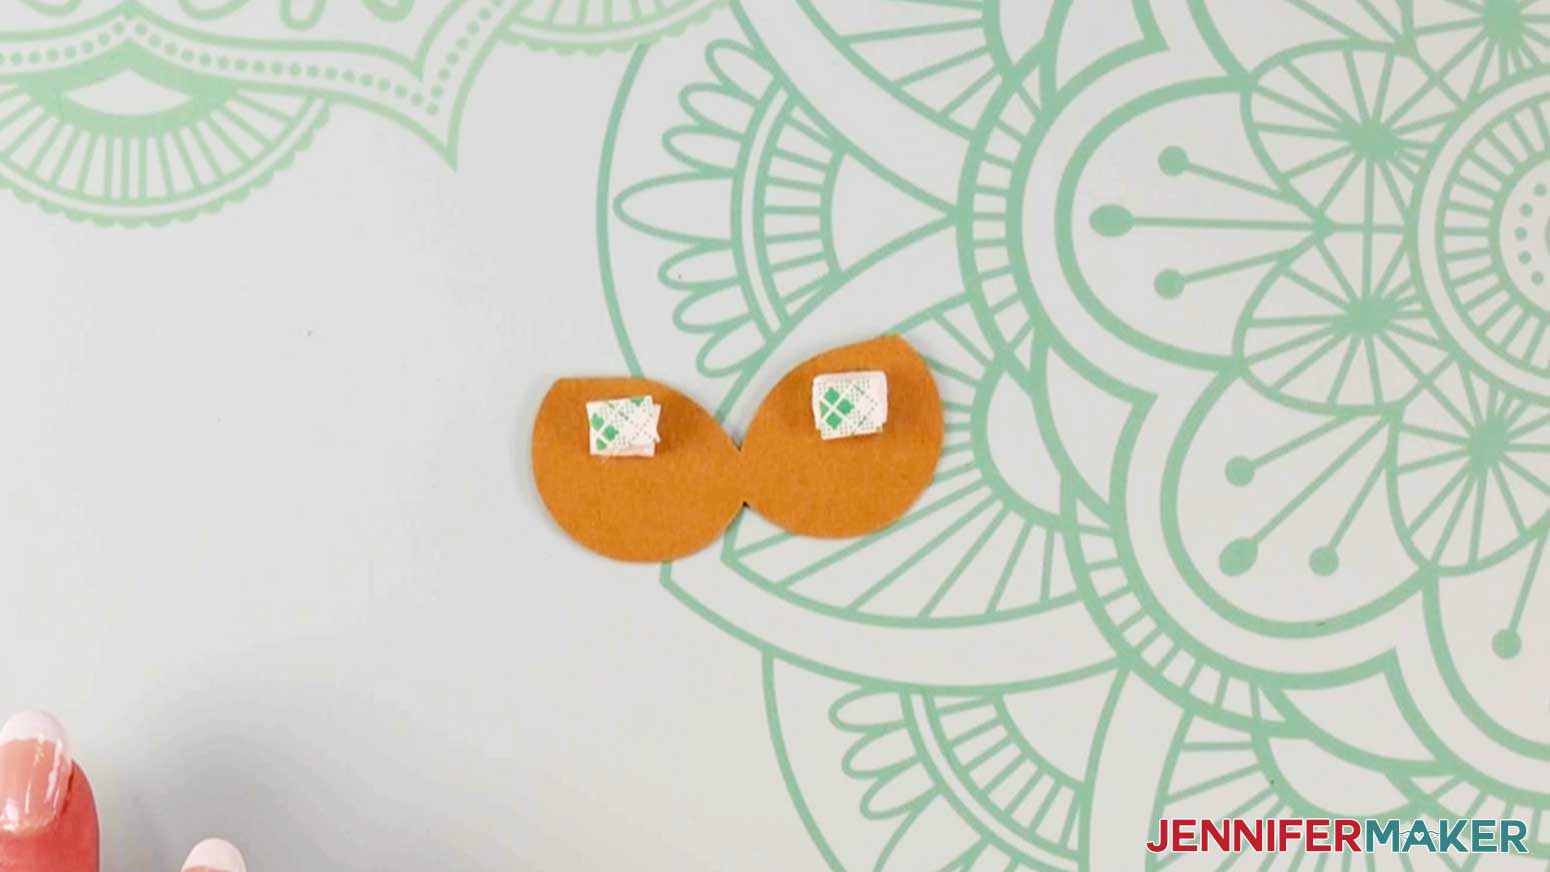
TIP: We're going to add the face layer so that it overlaps the top body feathers and the owl's head. But since these layers are not even, we'll use a double layer of adhesive tape to fill the depth as needed. Turn the face layer over and put a double layer of adhesive strips at the top of each side and a dot of glue at the bottom of each side.
Once the face is aligned, press down to adhere it.
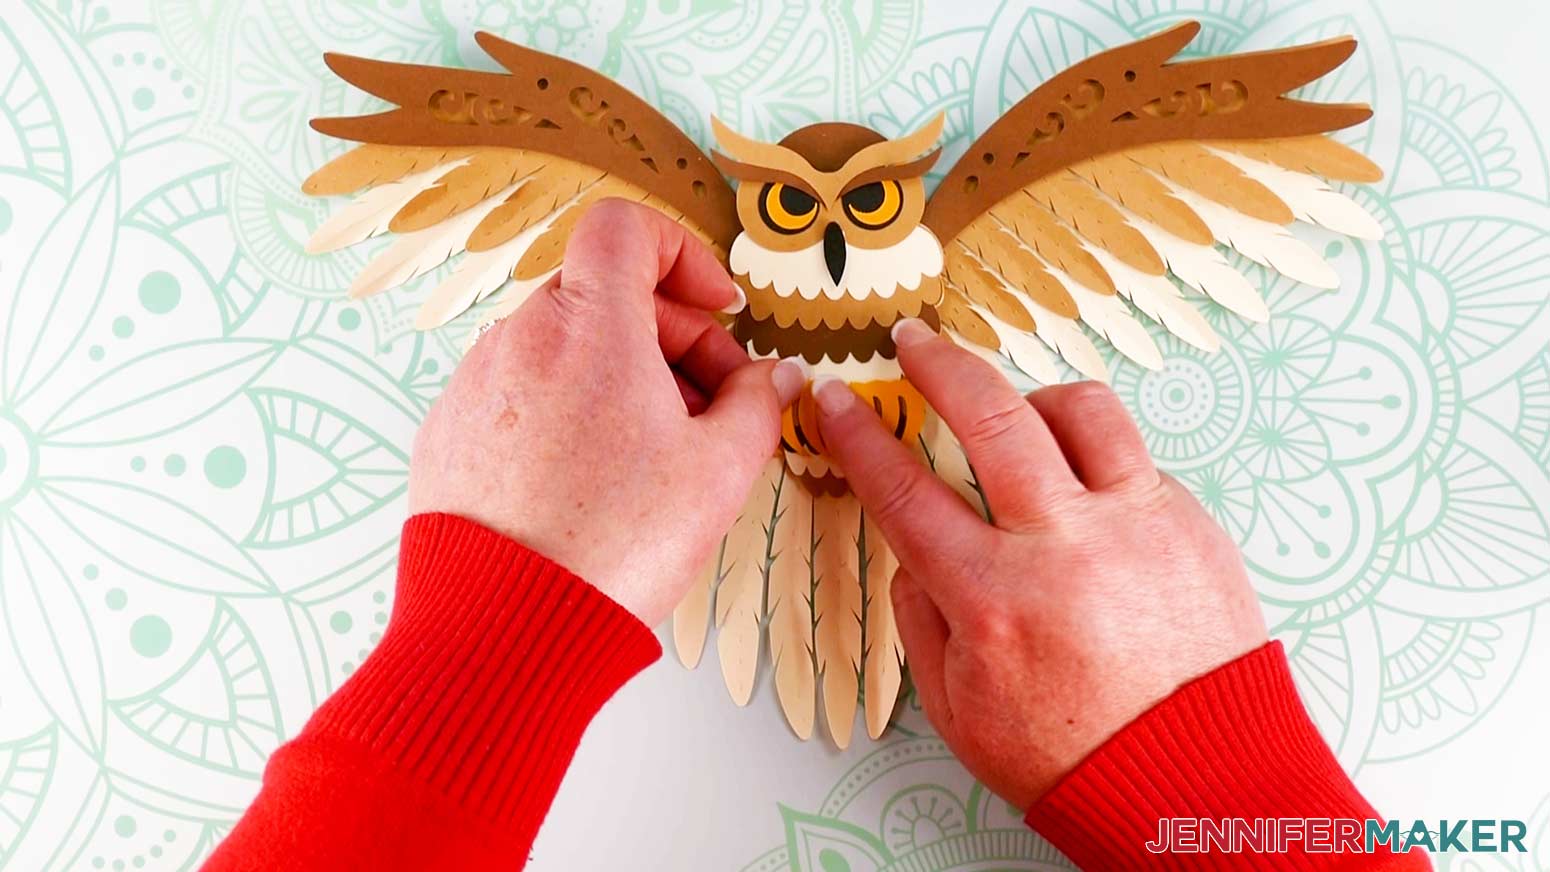
The last step is to attach the tufts (the two eyebrow-looking pieces), beak, and talons.
First, take the smaller tuft piece, I used brown cardstock for this one. Cut an adhesive foam dot in half so it’s very small but still sticky on both sides. Attach one half to the back of the left and right sides where they arch up a bit. You’ll need to make the foam pieces fairly small so they don’t show once the piece is in place.
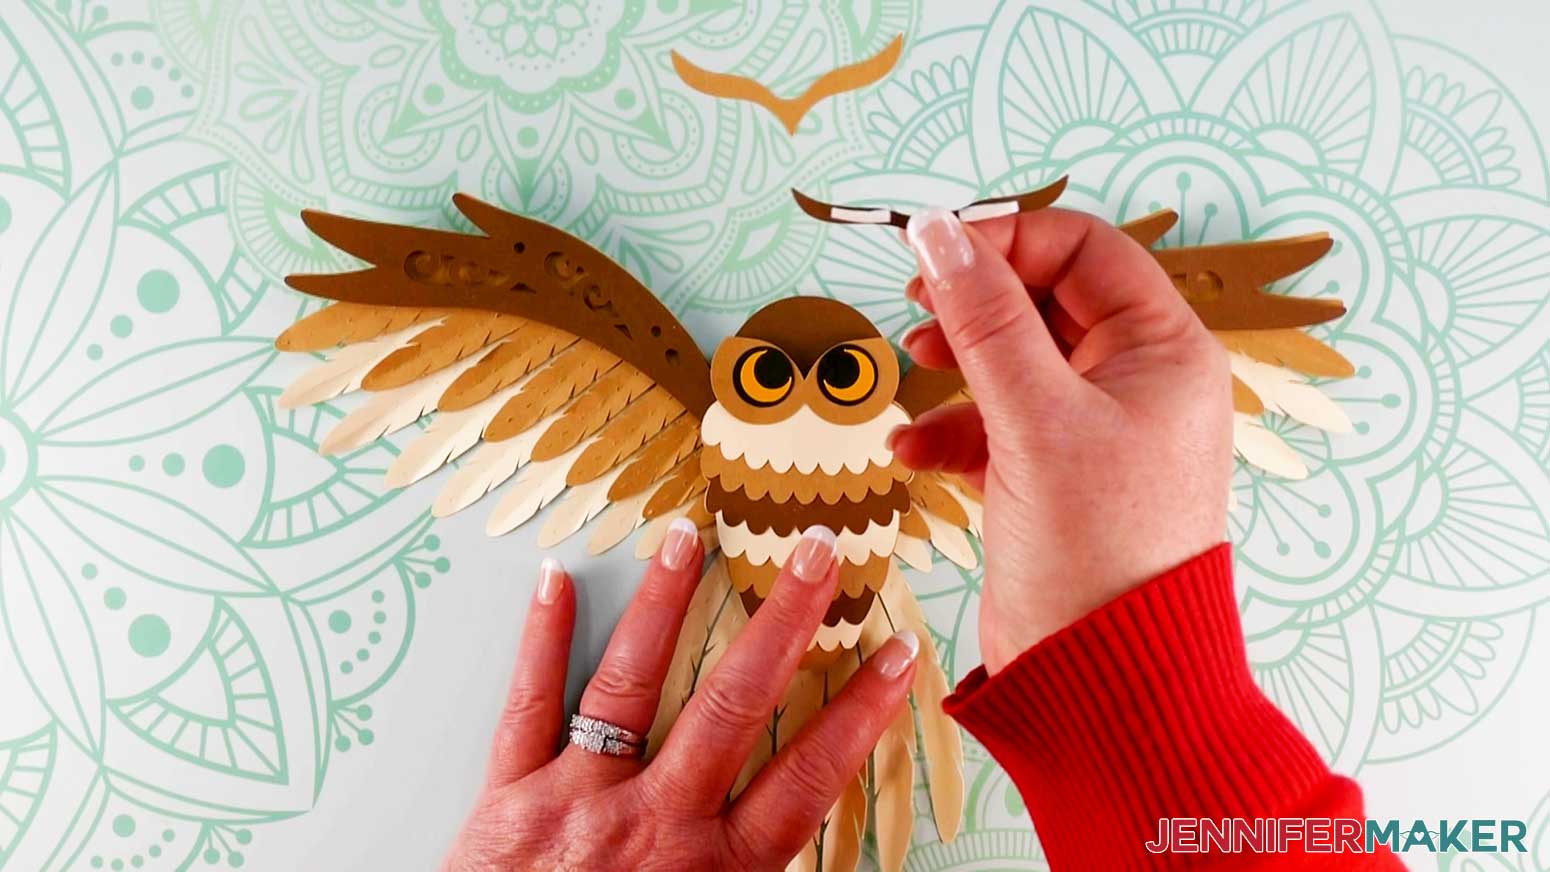
Align the tuft's top edge with the top of the face layer and eyes so they overlap. Press the tuft in place. You may want to add a bit of glue or an even smaller piece of sticky foam under the tuft’s bottom point to keep it in place.
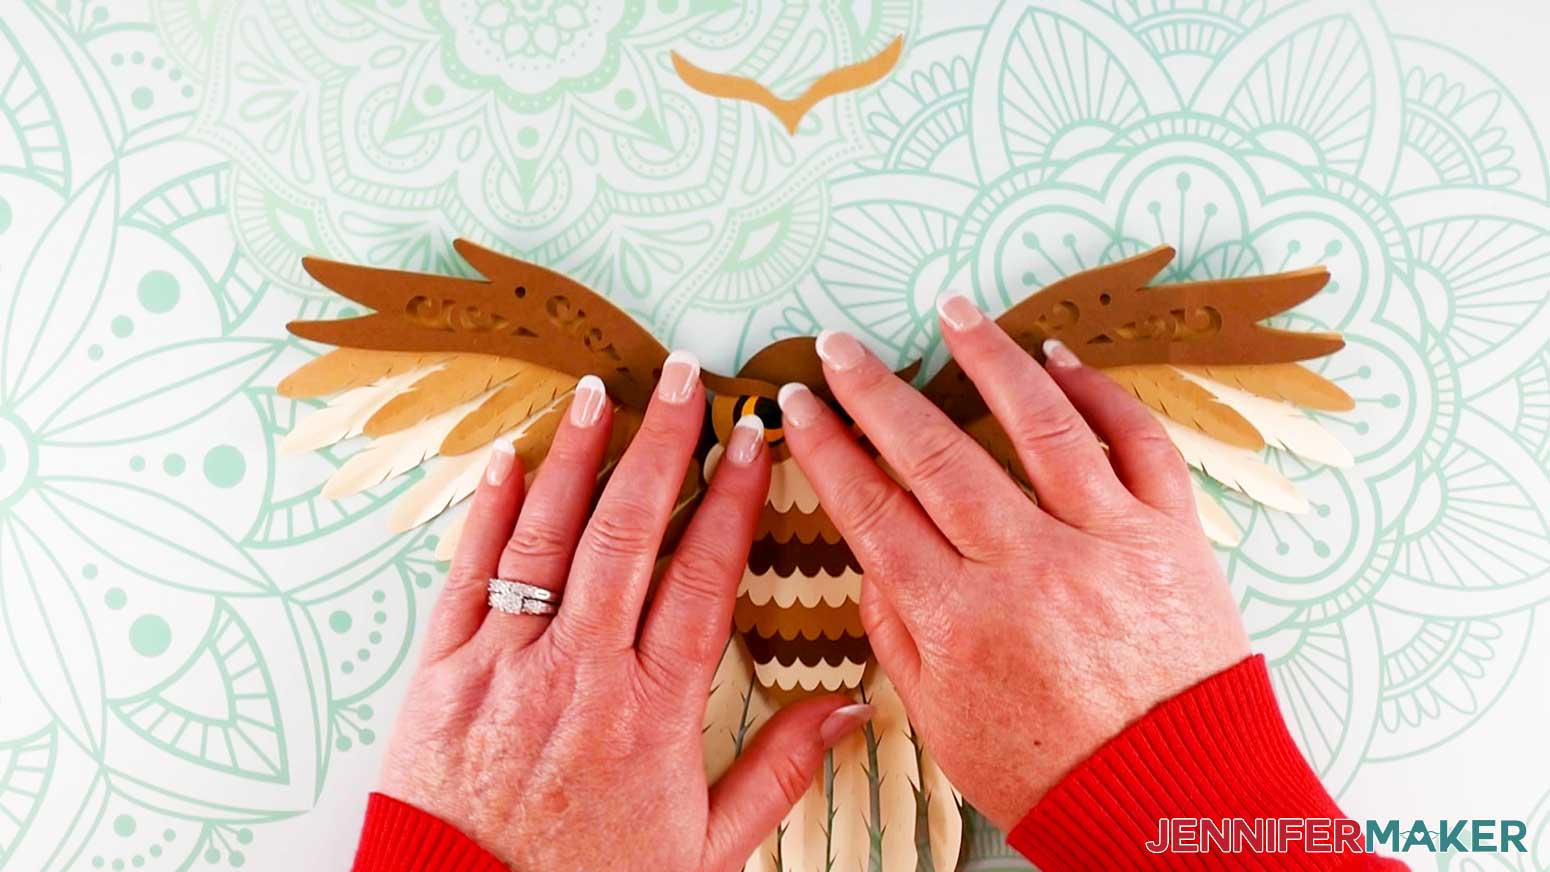
Next, take the second, larger tuft piece (I used tan cardstock for this one), which will adhere to the owl's head, but should be higher than the previous tuft. Again, we'll use stacked adhesive foam dots to make up the difference in depth.
Stick two small adhesive dots together so you have a taller piece of foam that is sticky on both sides. Repeat the process since we need one for each side of the tuft. Turn your tuft over and stick a tall foam dot to the arch on each side. Flip it over and position this piece directly above the other tuft, with its bottom point slightly overlapping the tuft in place. Press down to adhere. You may need to add a small dab of glue to adhere the low point that sits on top of the smaller tuft.
Next, attach a small adhesive strip to the back of the beak. Position the beak in the center of the face between the eyes and press down to adhere.
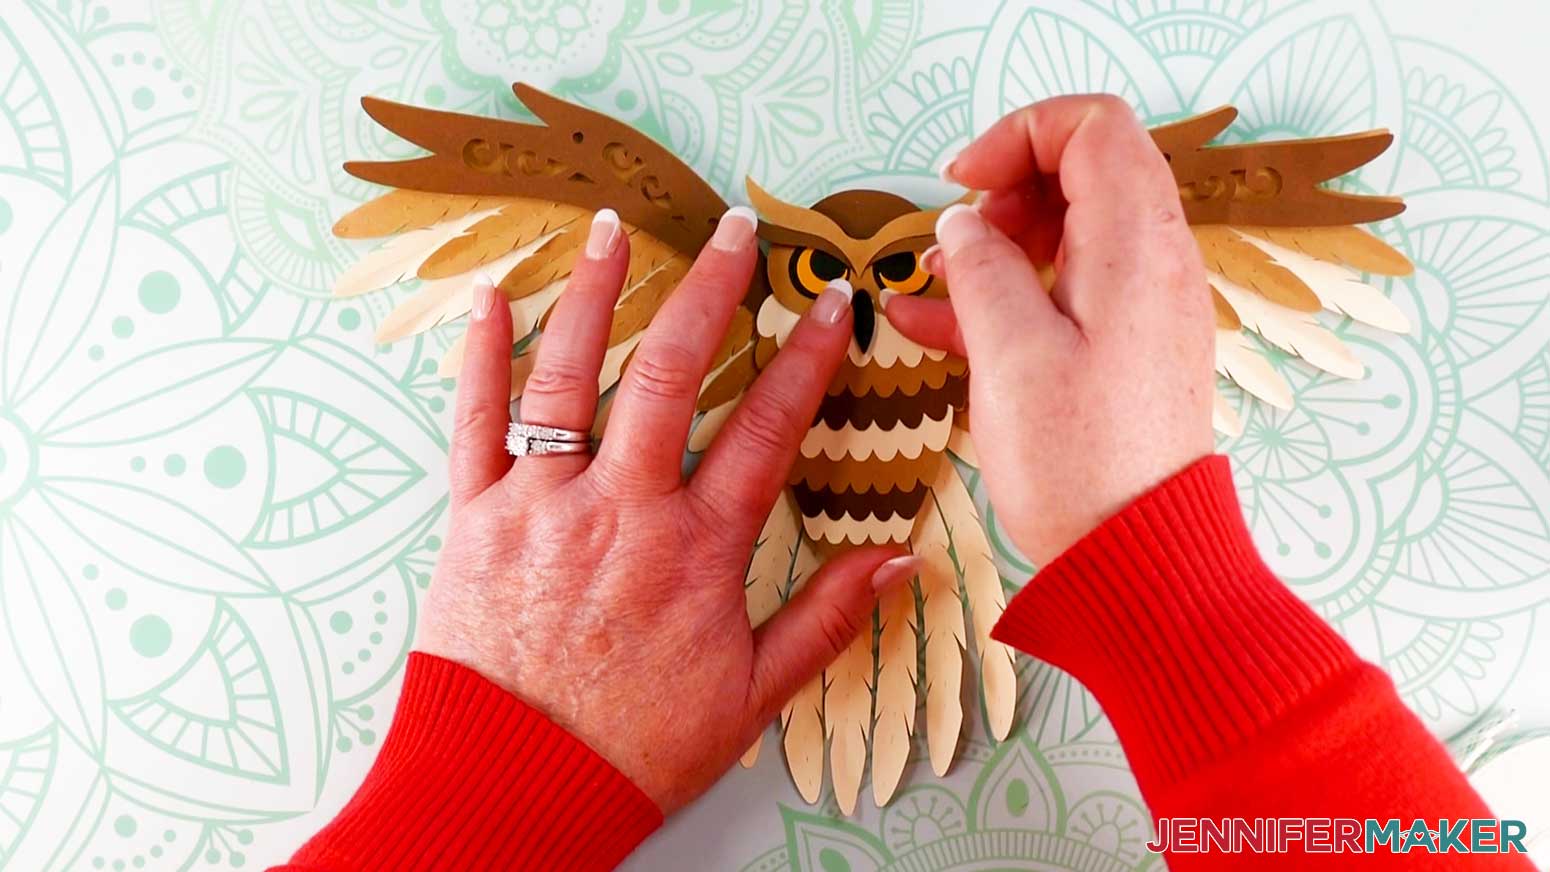
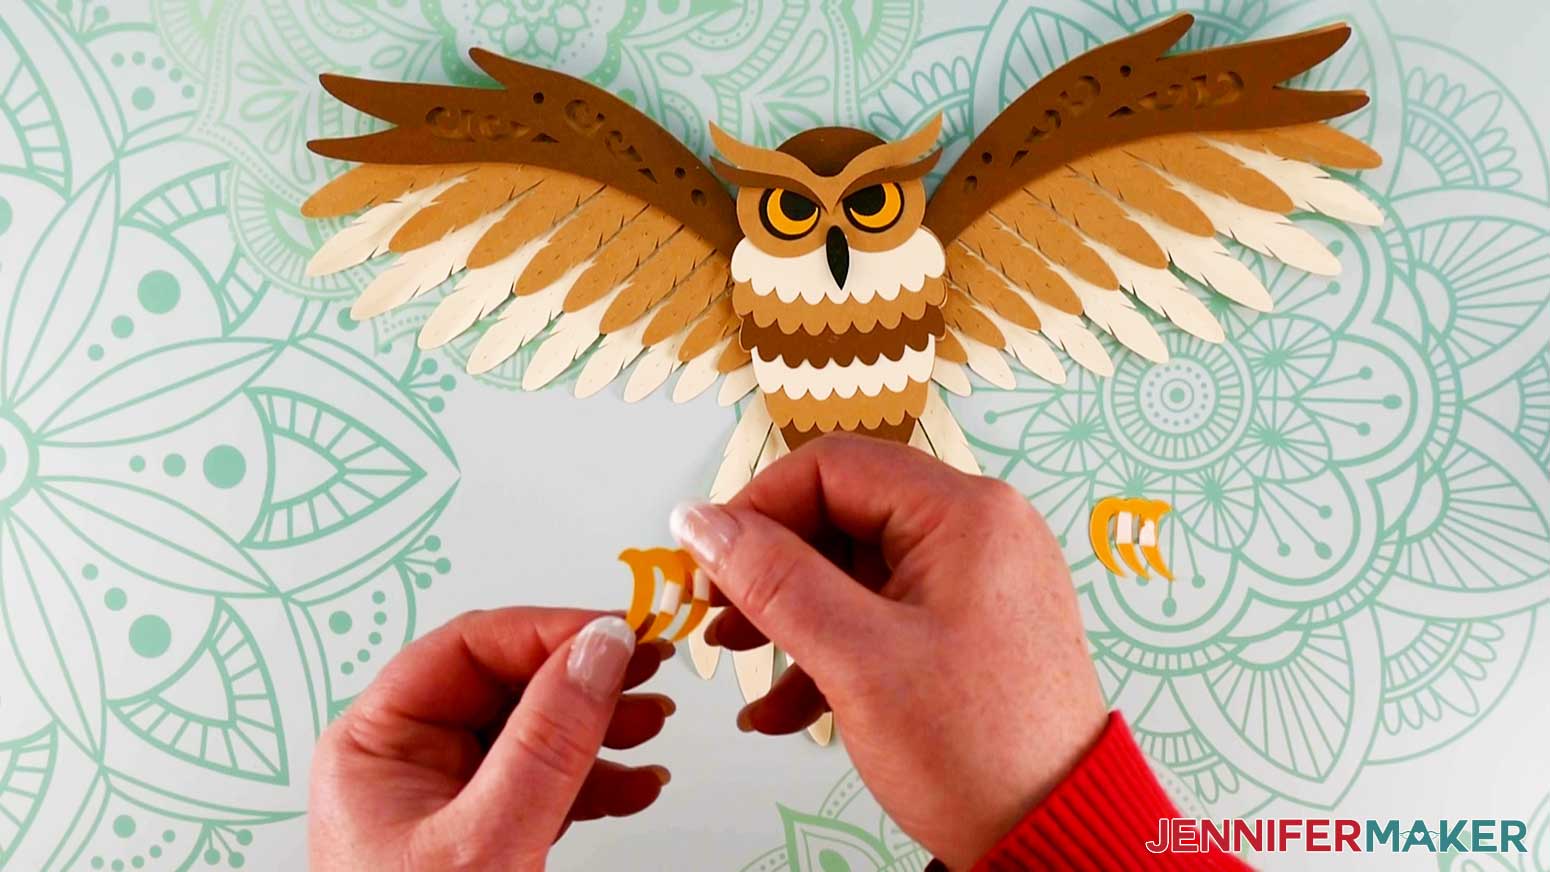
Next, grab your owl's talons and place them down to make sure they're on the correct sides. When in place, the talon tops will closely line up with the bottom wing feathers. Flip them over. Add two small adhesive foam strips to each foot, one on the back of the top and one to the talon that will be closest to the middle. Leave the outer claws clear since they will not attach to another layer.
Variation: 4th of July Eagle
The eagle uses the same steps and techniques as the owl, just with different colors and shapes.
Here is how the eagle SVG looks on my Canvas.
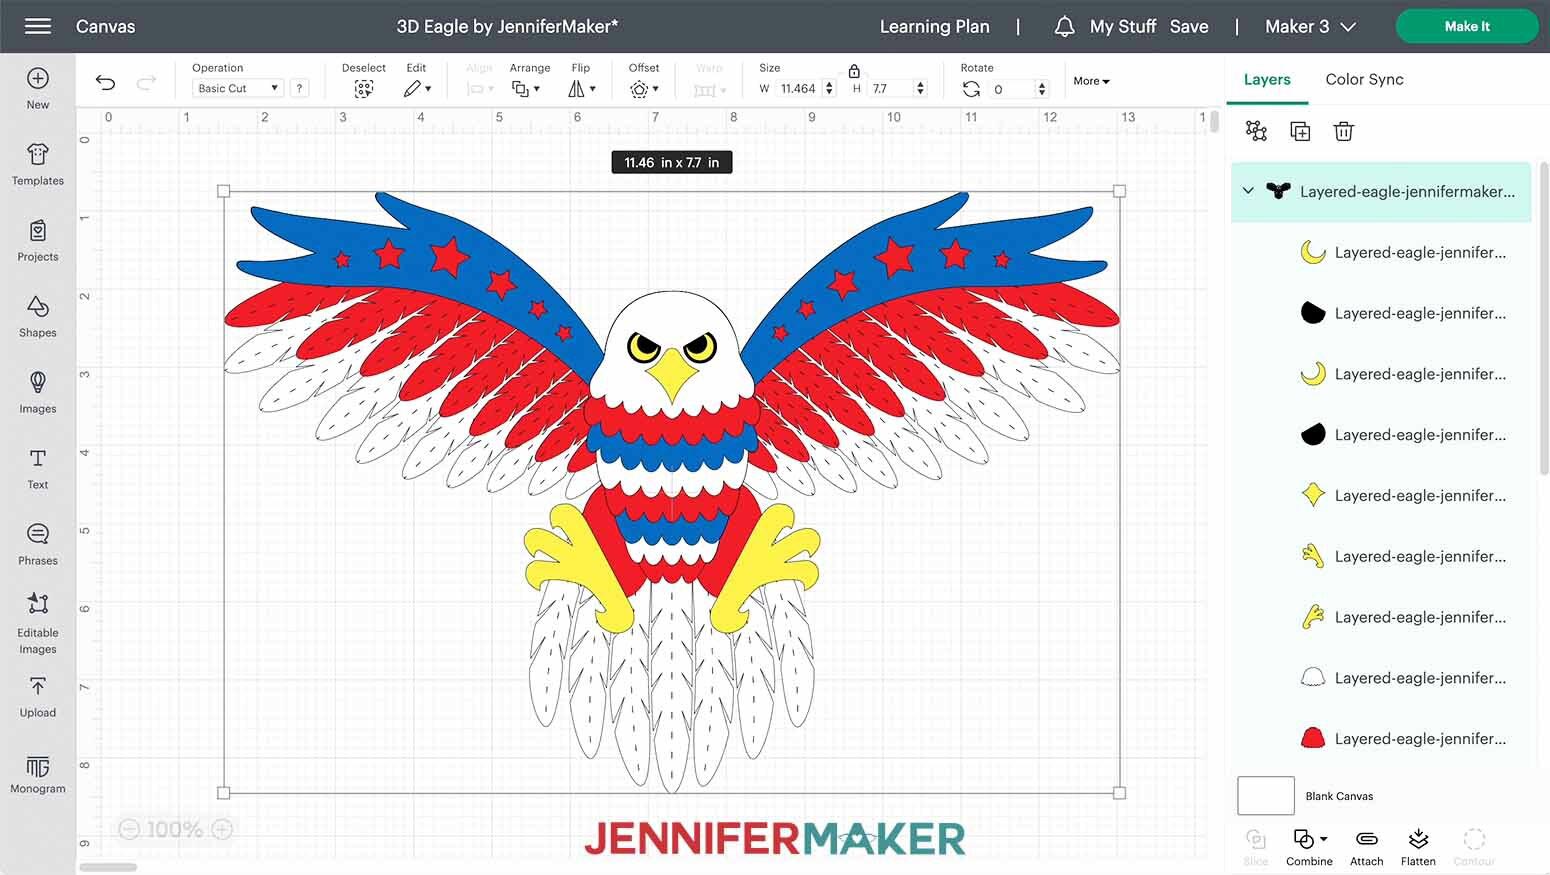
Cut your pieces using red, white, blue, yellow, and black cardstock using the same steps as the owl.
You can experiment with the different adhesives to adjust the depth between the eagle's layers using the same techniques as the owl.
He’ll make a great decoration for your Independence Day party -- just hang him on your front door using paint-safe putty!

STEP 5: SHOW IT OFF!
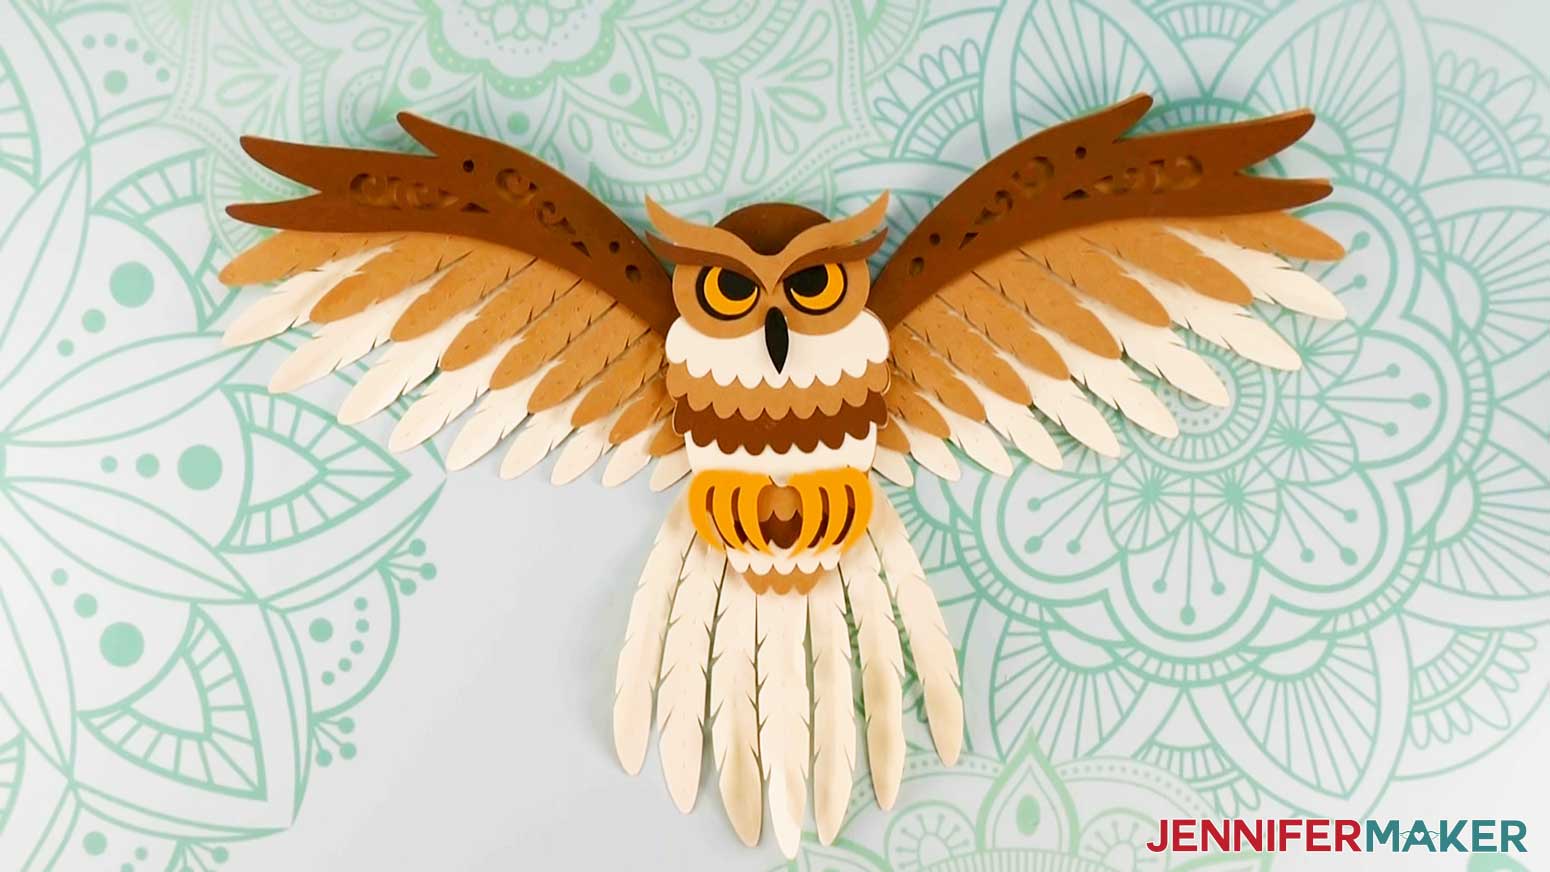
Here's what my finished 3D Layered Paper Owl looks like. Isn't it majestic?
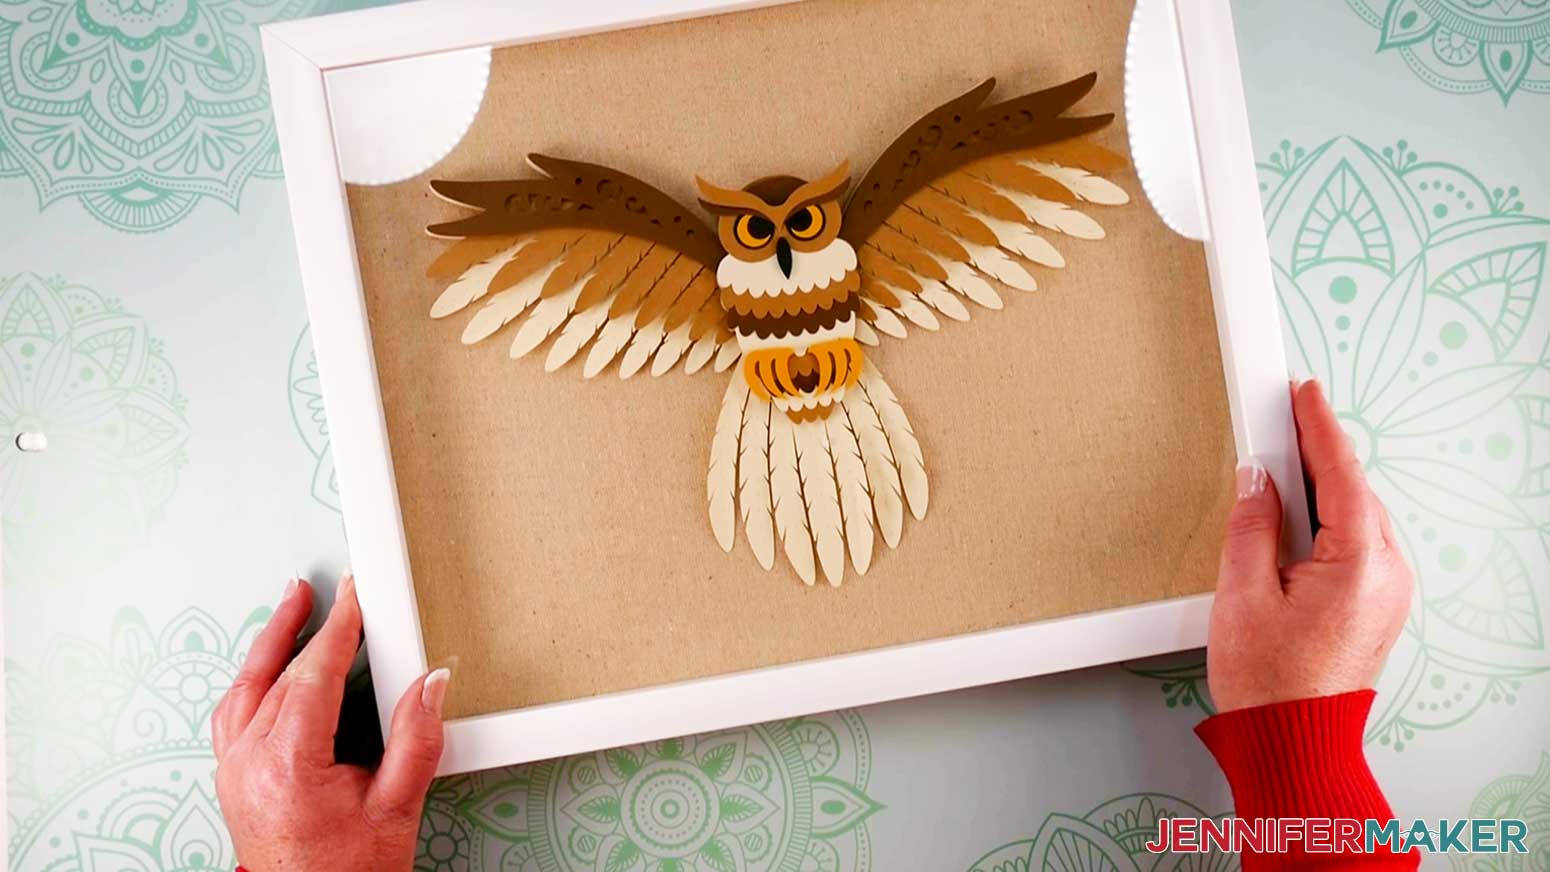
Now, you can display your owl for everyone to see. You can choose to hang it directly on the wall by attaching some fishing line to the back with tape or glue and hanging it from a nail or screw. Or use paint-safe putty to place it on your door.
Or you can put it inside a shadow box. I recommend using one that is 15” wide x 12” high. You’ll just need to apply some glue or foam adhesive strips to the back in order to attach it to the back of the box.
Notes
PROJECT SIZE:
Owl/Eagle without Shadow Box: 11.5" x 7.7"
Owl/Eagle in Shadow Box: 12" x 15"
Answers to Your Questions About My Free Eagle or Owl SVG
Get my instant download digital files for my free Eagle or Owl SVG!
I’d love to see your papercraft owls (or eagles) and hear which techniques you liked the best! If you make a shadow box or anything else with this design, please share a photo in our Facebook group, email it to me at [email protected], or tag me on social media with #jennifermaker.
Love,

Want to remember this? Save the Free Eagle and Owl SVG Design Tutorial to your favorite Pinterest Board