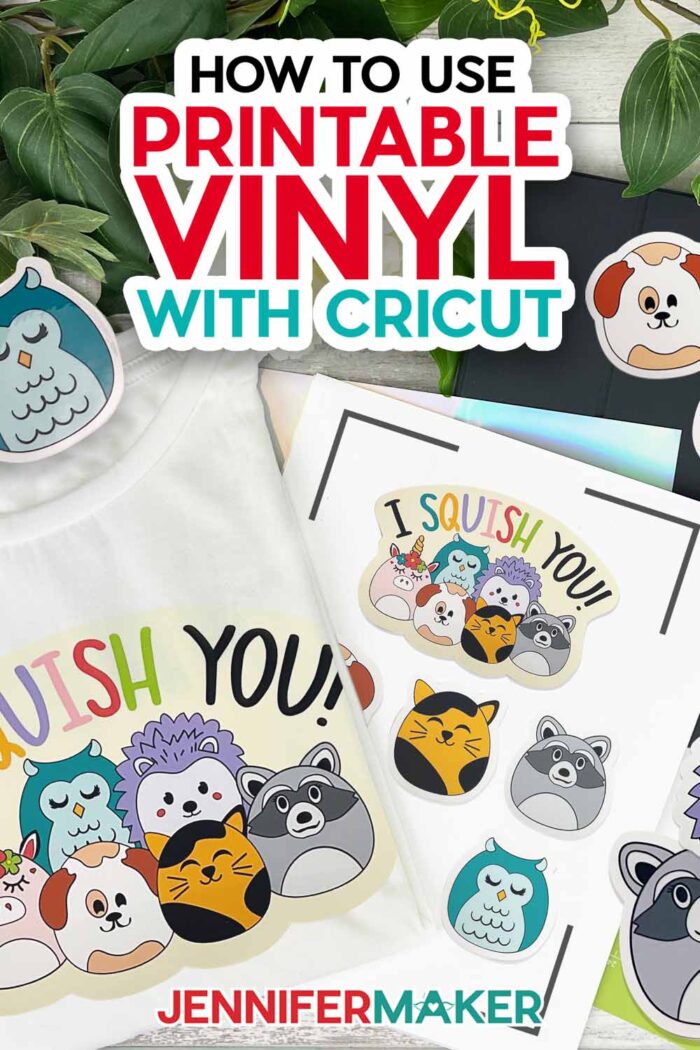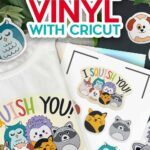
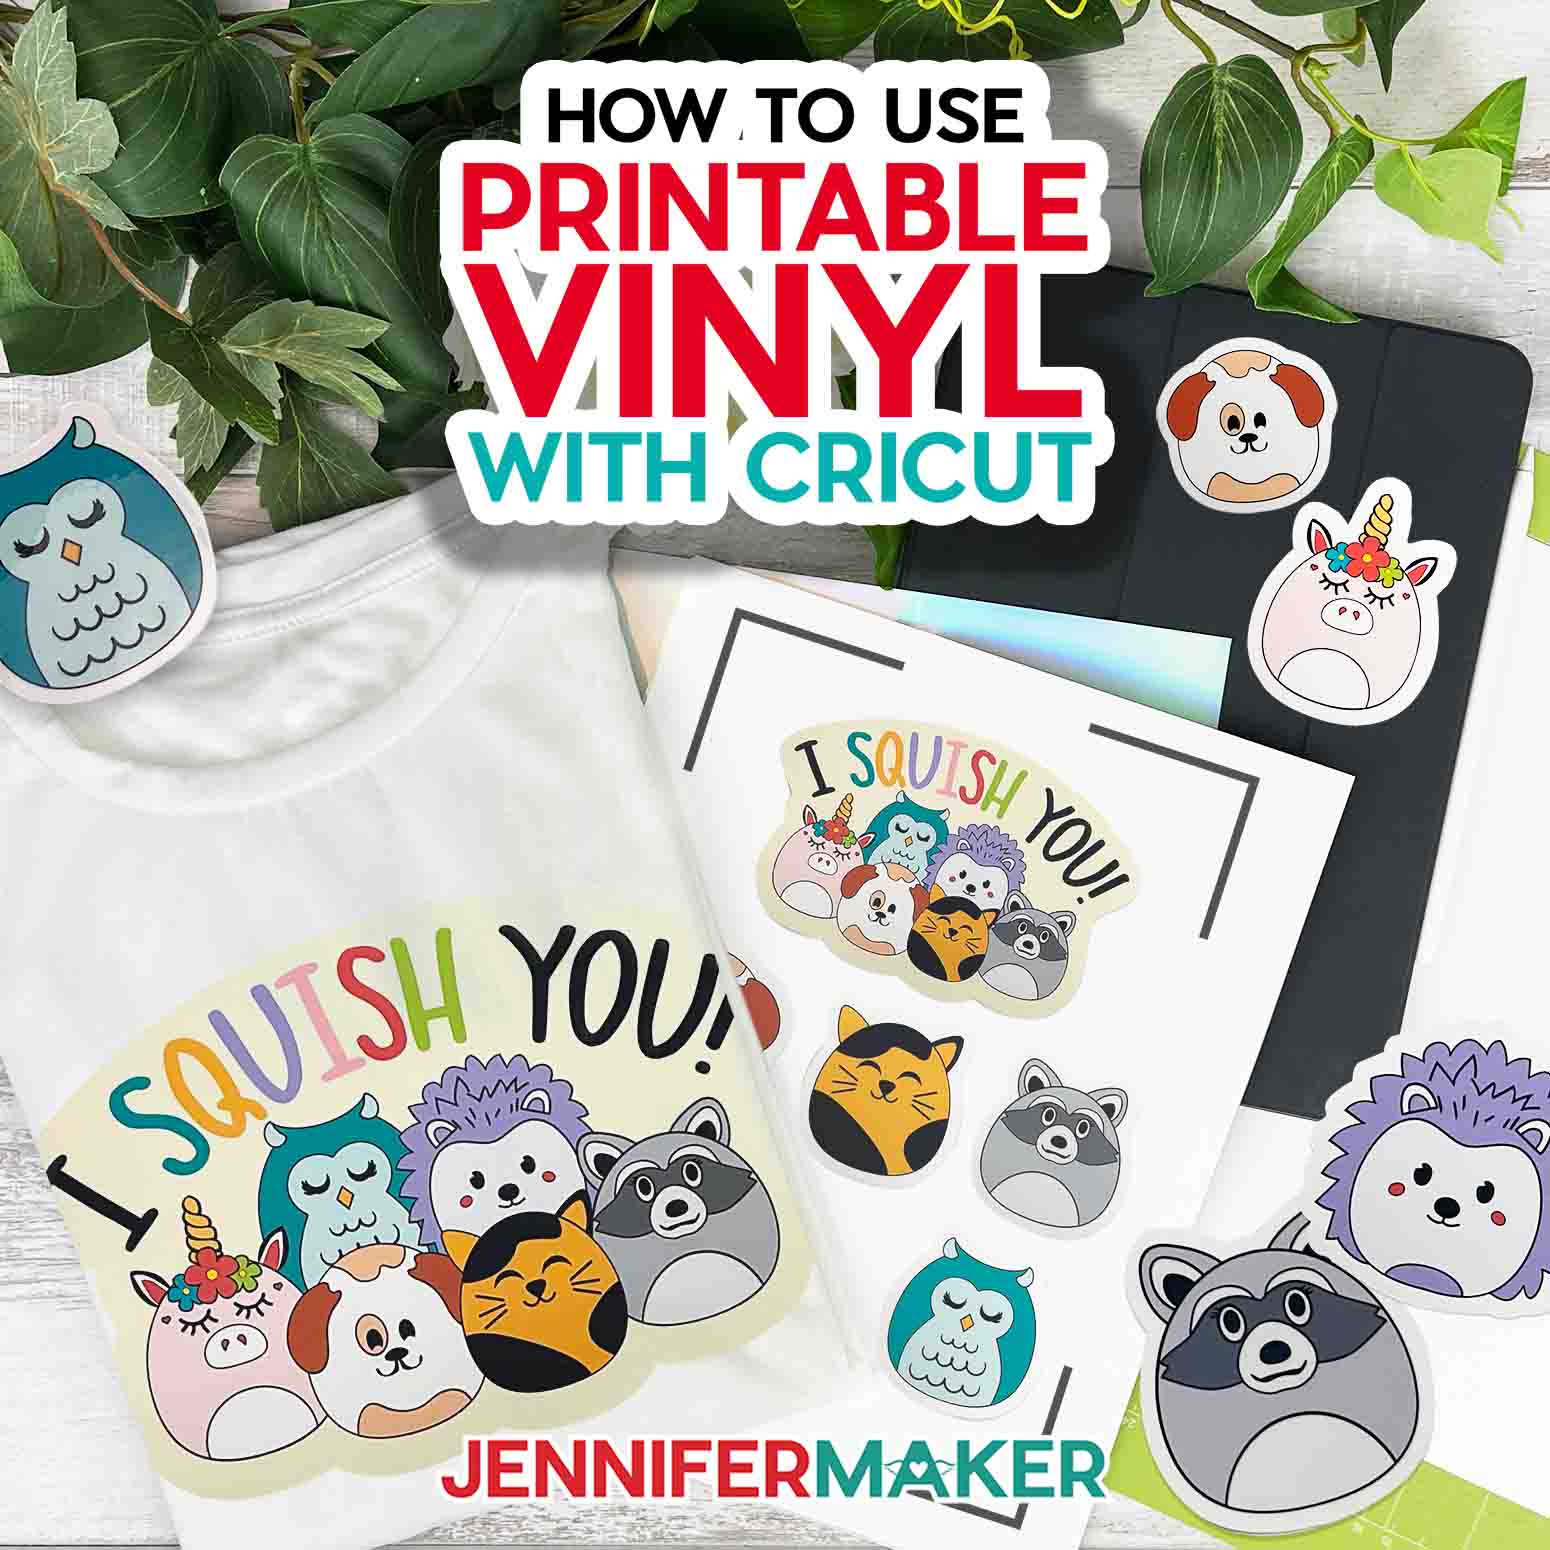
Learn how to use Printable Vinyl with Cricut to create cute stickers and T-shirts!
If you’ve been around for a minute, you know that creating fun and unique T-shirts with custom designs is one of my favorite things. I’ve shared tons of techniques with you, but even they have their limitations. For example, have you ever wanted to put a specific design on a shirt, but regular vinyl just won’t cut it? Or have you ever wished to create durable stickers at home from your design… that won’t tear or turn to goo when they get wet like regular printable sticker paper? Never fear, printable vinyl is here! I’ll show you how to use printable vinyl to create a collection of adorably squishy animal stickers, AND an impossibly cute T-shirt — all using your home printer and your Cricut cutting machine.
See the full step-by-step video tutorial on how to use printable vinyl with Cricut:

Sometimes designs are just too complex, colorful, or intricate to cut from regular vinyl, and printable vinyl is a super fun way to create beautiful stickers, T-shirts, and more with a lot of details — all without compromising your design! In this tutorial, I’ll walk you through how to use printable vinyl paper to create your own stickers, AND how to use printable heat transfer vinyl to make iron-on decals to apply to T-shirts, tote bags, pillows, aprons — oh, the possibilities!
Not a designer? First time making a project like this? No problem! This project is super fun and easy, and I’ll show you how to use printable vinyl with Cricut to create a project using my designs, your own photos, graphics from Cricut Design Space, or even clip art!
I’ll show you how to add borders to your stickers using the offset tool in Cricut Design Space and how to change the colors in an SVG design. Then you’ll use your Cricut’s print then cut feature to produce not just sticker sheets, but awesome die-cut stickers you can share with your friends, or even sell! They’ll look so cute stuck to a water bottle, notebook, or even to seal an envelope with a special touch.
Cricut’s Print then Cut ability is an amazing feature that’s become a personal favorite, and now you can make bigger ones than ever! Check out this video to learn more about the updates made in Spring 2023, including new registration marks and more space!
After that, I’ll walk you through how to use printable vinyl with Cricut to create and apply a printable heat-transfer design for a T-shirt. Printable vinyl is different than regular iron-on vinyl, AND it’s different from those other printable heat-transfers that were popular in the 90s. You know, the kind that faded in the wash the second time you wore it and could only be applied to white fabric? We’ve come a long way since then, and printable HTV is so much more vivid and durable. And the best part? You can apply it to literally any color T-shirt, and the colors will just pop!
To make both the printable stickers and the T-shirt, you’ll need an inkjet printer. Any brand will work, but it’s important to note that you shouldn’t use printable vinyl with a laser printer as the material may damage the printer. And you’ll need some printable vinyl, of course! The vinyl we’ll be using for the stickers and the shirt are both printable, but they’re different from one another — the sticker vinyl simply has an adhesive on the back, while the printable vinyl for the T-shirt needs to be applied with a heat press, like the Cricut EasyPress.

When it’s time to cut your printable iron-on and stickers, you’ll need a cutting machine like one of the Cricut Maker series or Cricut Explore machines. This project is not compatible with the Cricut Joy, as it doesn’t have the print then cut feature.
I’ll show you how to cut your stickers with both a kiss cut (which is when the vinyl is cut through, but not the backer — perfect for sticker sheets!) and a die cut (which produces loose stickers cut to the shape of the design). I’ll show you how to add a protective clear layer to your stickers to make them last longer, and customize your material settings so they cut all at once! Easy peasy!
When it comes to making your T-shirt, for best results you’ll need a 100% cotton, polyester, or cotton/poly blend shirt of ANY color, plus a few other things you’ll find below in my materials list. After we print then cut the vinyl transfer, I’ll show you how to heat-apply it. Then I’ll share all my tips for caring for your printable vinyl T-shirt to keep it looking its best.
I can’t wait to show you how to use printable vinyl with Cricut and your own inkjet printer!
Ready to make your own amazing projects with different types of printable vinyl? This post contains some affiliate links for your convenience (which means if you make a purchase after clicking a link I will earn a small commission but it won’t cost you a penny more)! Read my full disclosure policy.
Materials & Tools to Make Printable Vinyl Stickers and T-Shirts
- T-Shirt (I used one Black, one White) made of cotton, cotton-poly blend, polyester, or similar fabric that can be heat-transferred
- One pack of Printable Iron-On Vinyl Transfer For Dark Shirts
- One pack of Cricut White Printable Vinyl -or- JOYEZA White Printable Vinyl for the stickers
- One pack of Clear Printable Vinyl – optional for protecting your printed stickers
- One pack of Holographic Printable Vinyl – if you want a color other than white
- Inkjet Printer – I used a HP ENVY Photo
- A method to cut your vinyl: I used the amazing Cricut Maker 3, but you can also use the Cricut Maker, or Cricut Explore Series
- Cricut Blue LightGrip Cutting Mat (12″ x 12″)
- Cricut EasyPress – if using Printable Iron-On Vinyl -AND- Cricut EasyPress Mat (12″ x12″)
- Brayer
- Scissors – if using clear vinyl over printed vinyl
- Lint Roller – to clean shirts before applying vinyl
- DIY T-Shirt Guides or a Ruler – for placing a design on a shirt
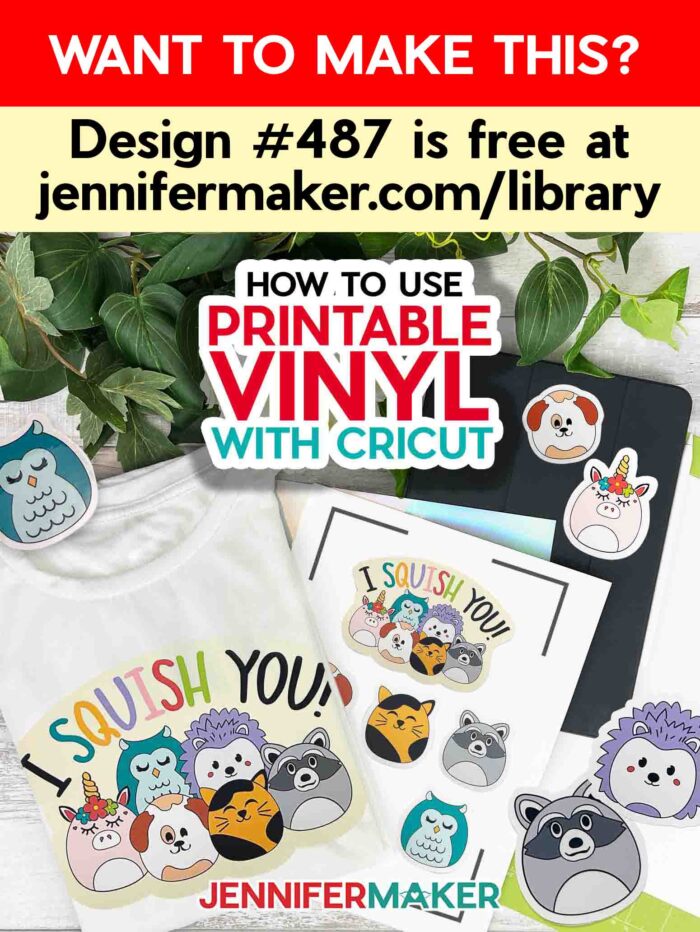
- Design #487 (My free SVG/PNG/DXF design files available in my free resource library – get the password by filling out the form at the bottom of this page)
How to Use Printable Vinyl with Cricut
How To Use Printable Vinyl With Cricut
Learn how to make decals and t-shirts with printable vinyl and your Cricut!
Materials
- 1 each White Shirt -or-
- 1 each Black Shirt
- 1 pack Printable Iron-On Vinyl Transfer For Dark Shirts
- 1 pack Cricut White Printable Vinyl -or-
- 1 pack JOYEZA White Printable Vinyl -or
- 1 pack Clear Printable Vinyl -or-
- 1 pack Holographic Printable Vinyl
- Design #487 (My free SVG/PDF/DXF design files available in my free resource library - get the password by filling out the form at the bottom of this page)
Tools
- A method to cut your vinyl: I used the amazing Cricut Maker 3, but you can also use the Cricut Maker, or Cricut Explore Series
- Inkjet Printer - I used my HP ENVY Photo 7155
- Cricut Blue LightGrip Cutting Mat (12″ x 12″)
- Brayer
- Scissors - if using clear vinyl over printed vinyl
- Lint Roller - to clean shirts before applying vinyl
- Ruler - for placing a design on a shirt or sizing the clear vinyl
- Cricut EasyPress - if using Printable Iron-On Vinyl - AND -
- Cricut EasyPress Mat (12"x12")
Instructions
STEP 1: GET MY FREE PRINTABLE VINYL DESIGNS
First, download my free Printable Vinyl files, design #487, from my free resource library.
Next, if you haven’t calibrated your machine recently I recommend that you perform a calibration of your Cricut machine and clean the print heads on your inkjet printer prior to starting your project. In case you aren't familiar with the term calibration, it simply means to adjust something, in this case, our Cricut cutting machine, so that it can be used in an accurate and exact way. Follow these steps to calibrate your Cricut. This will give you the best Print Then Cut results for your project. Consult the owner's manual for your printer to find out how to clean the print heads.
Once that is done it's time to upload the images to Cricut Design Space!
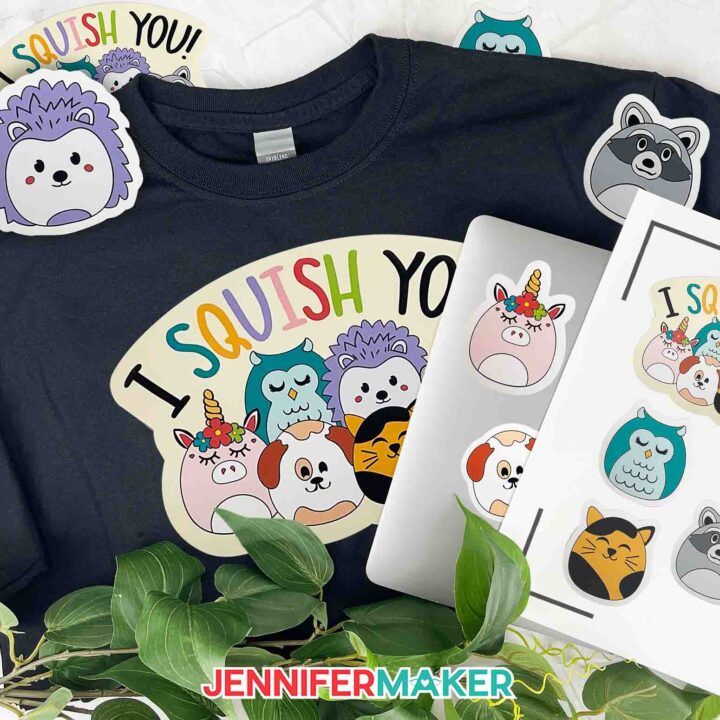
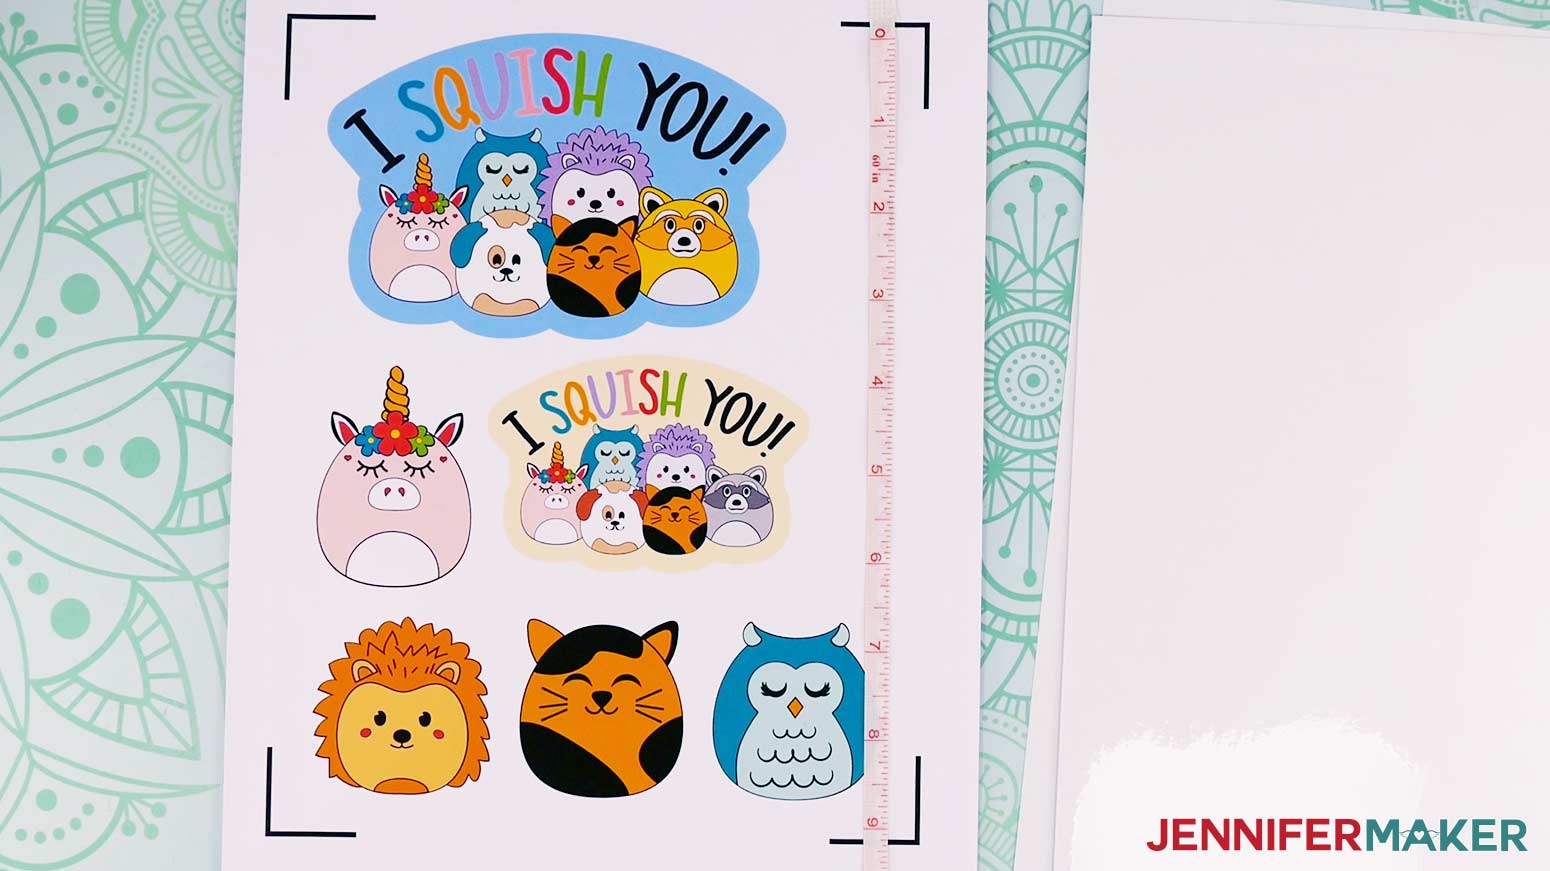
I’ve included six cute animal designs and a fun group image suitable for stickers or t-shirts. The images all have PNG, SVG, and PDF printable versions. We’ll use the PNG files to Print Then Cut on vinyl using the Cricut, but you can also use the SVG files if you wish to easily change the colors of the designs, or the PDF if you want to print out the designs and cut them by hand.
Tip: If you're not sure how to upload an SVG cut file to Cricut Design Space, watch this helpful video training series I made . If you're on an iPhone or iPad, here's how to download and upload SVG files to the Cricut Design Space app.
STEP 2: PREPARE YOUR DESIGN FILE
First, upload the PNG of each design to Design Space. To do so, click “Upload” on the bottom left of the menu next to your canvas, then click “Upload Image.”
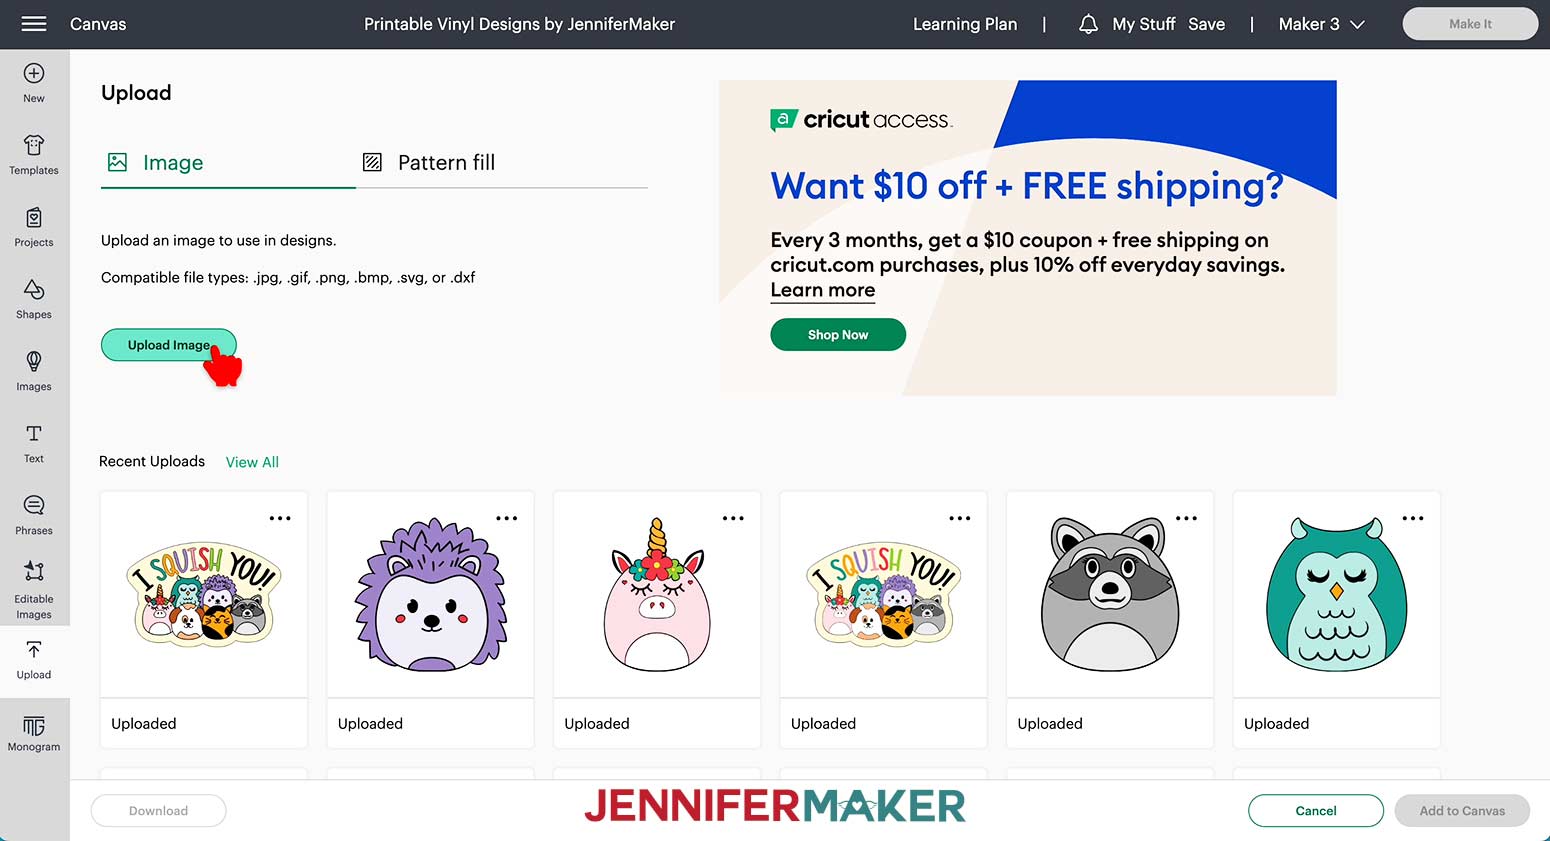
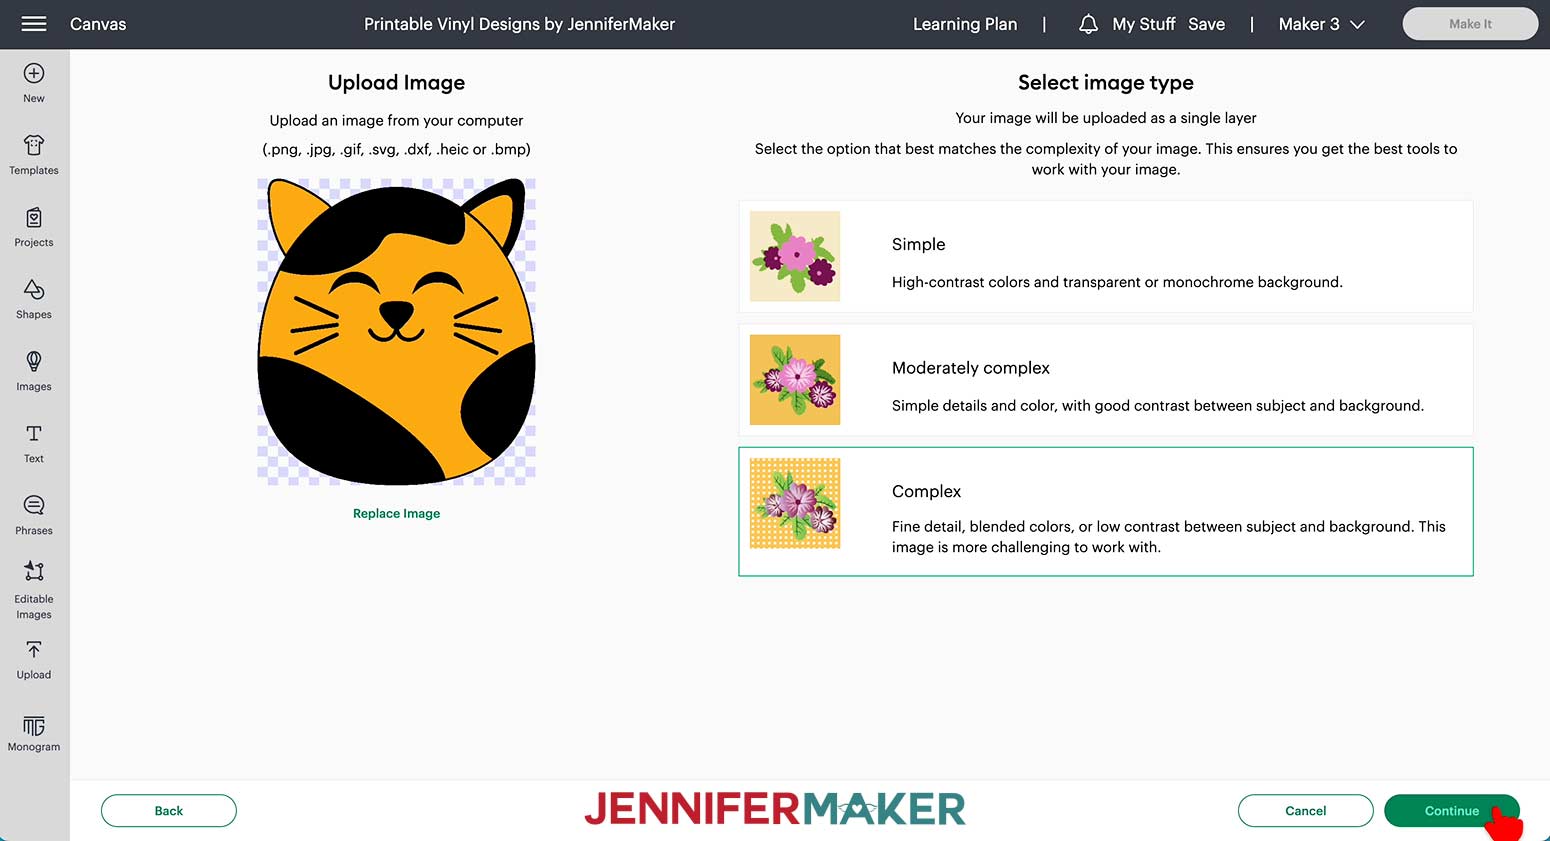
Next click "Upload", then “Browse” to the correct file folder and select the first PNG file. A Select Image Type menu will appear along with a preview of the image on the left side of the screen.
Select the “Complex” option to make sure to preserve the colors and details. Choosing the “Simple” option can sometimes result in color changes you aren’t expecting when you want to keep all the colors that are already in the image. Click “Continue.”
Next, you can use the tools on the left to remove the background from your image, if needed. I have saved my files with transparent backgrounds, so this step isn’t necessary. Click “Apply & Continue.”
Design Space will now show you two images: the one on the left is the outline of the image, and the one on the right is the Print Then Cut image we need to use. Select the Print Then Cut version, and click “Upload.”
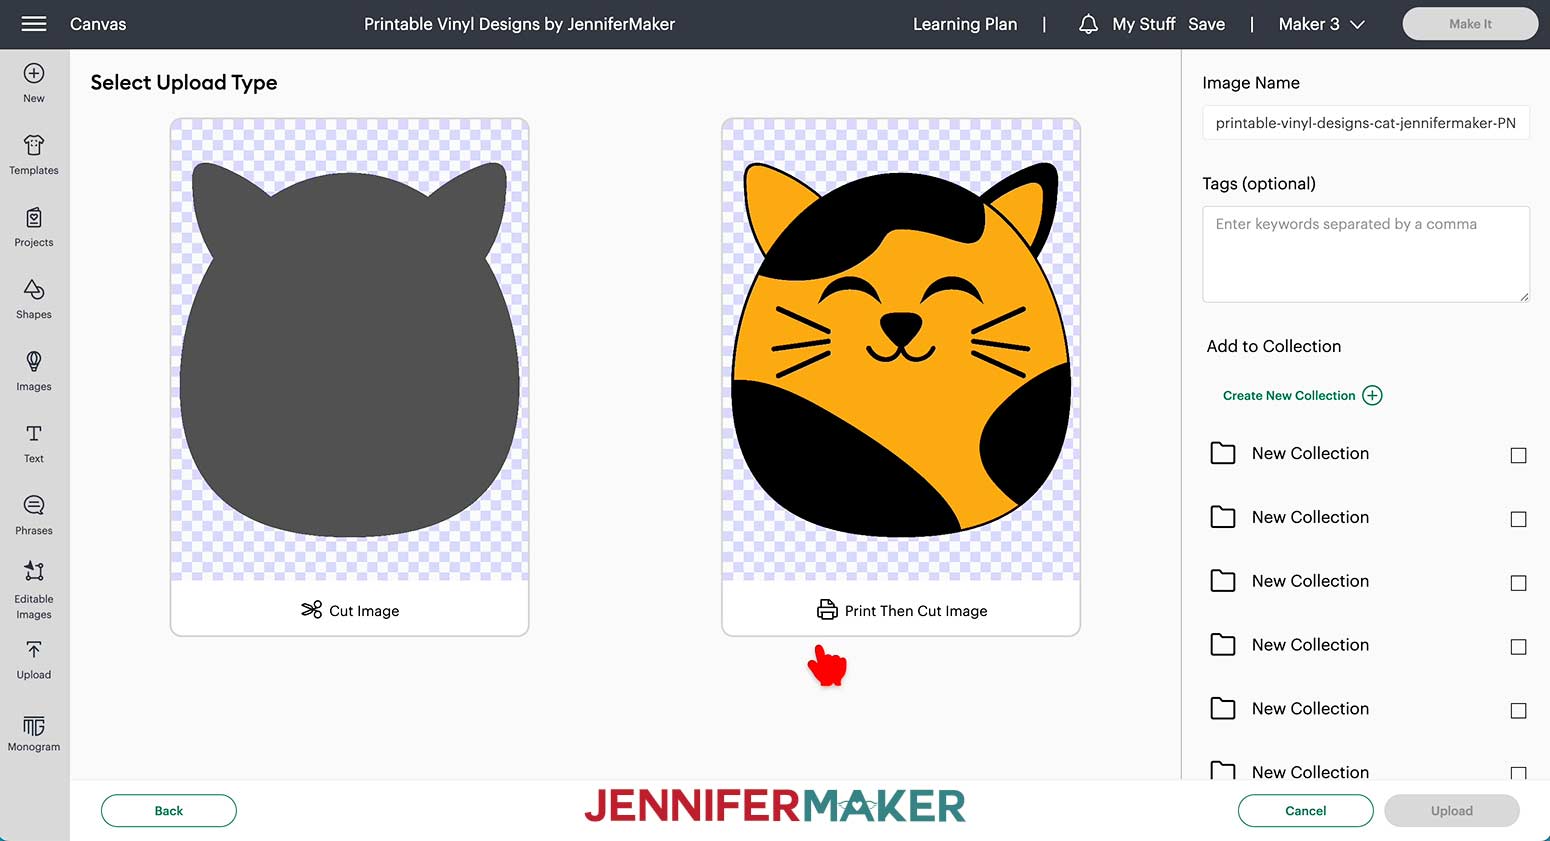
Select the image in the preview area, then click "Add to Canvas."
Follow the above steps to add each of the other designs to the Canvas.
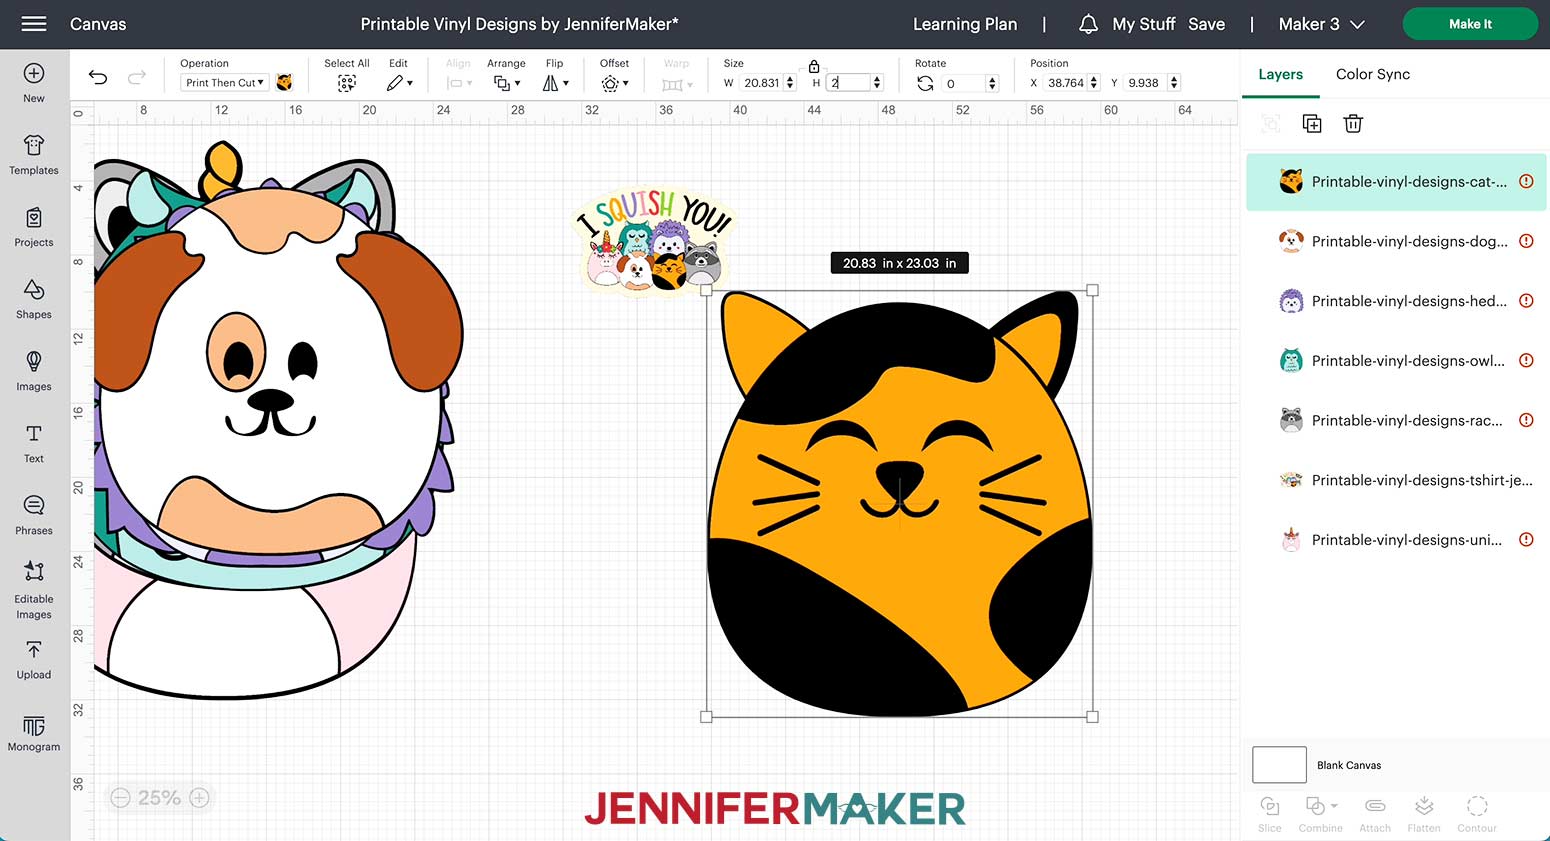
The designs will appear on the canvas at a larger size than necessary because PNG files are saved with a lot of detail and that usually translates into larger size images to hold all the information. We’ll need to make each image the correct size before proceeding.
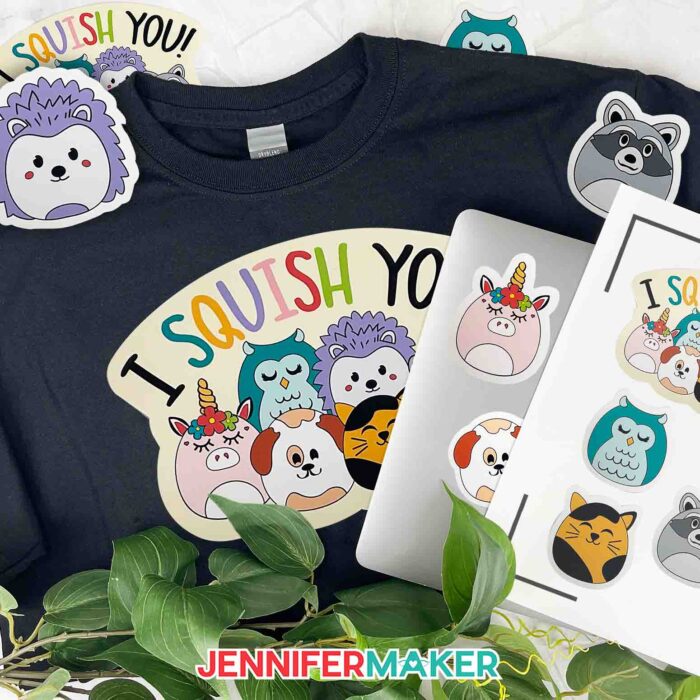
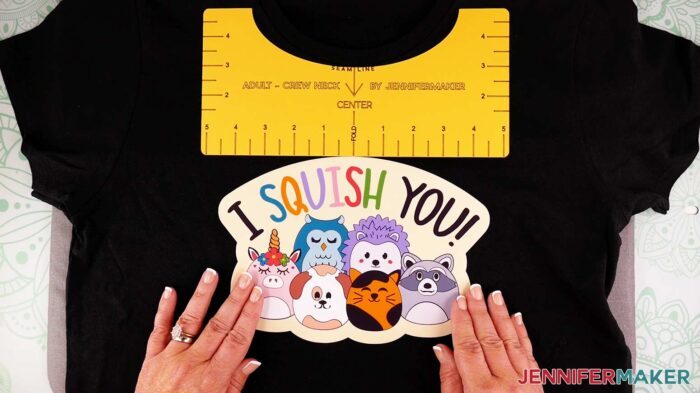
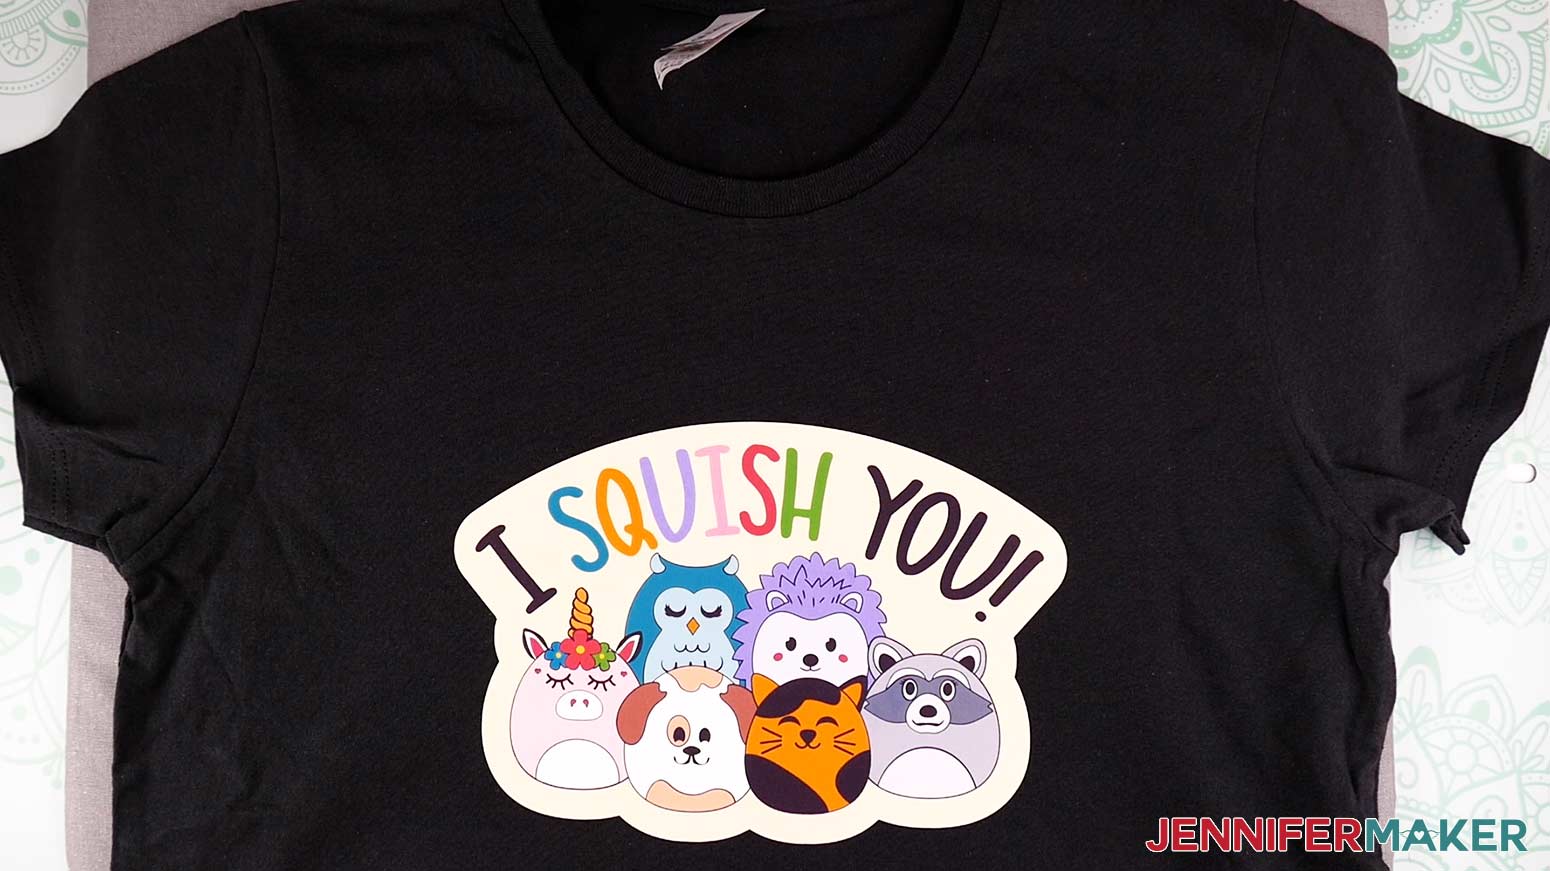
I placed the group image on an adult-sized shirt so I decided to make the group image 9” wide. Resize your image to the best size to match the size of your shirt.
The individual animal images work well as stickers at about 2” tall, but of course, they can be different sizes based on your needs. The tall horn on the unicorn head makes it a little different when changing the sizing so I made it 2.5” to match the face size to the size of the other animals.
To change the size of the images, click on the one you want to change and make sure the lock icon is closed over the size box above the Canvas. Enter the new size into the height box to resize the image.
The group image makes a great sticker, too! I duplicated the image and changed the size to 3.5” wide. To duplicate your image, right-click on the image and choose “Duplicate” from the menu that opens.
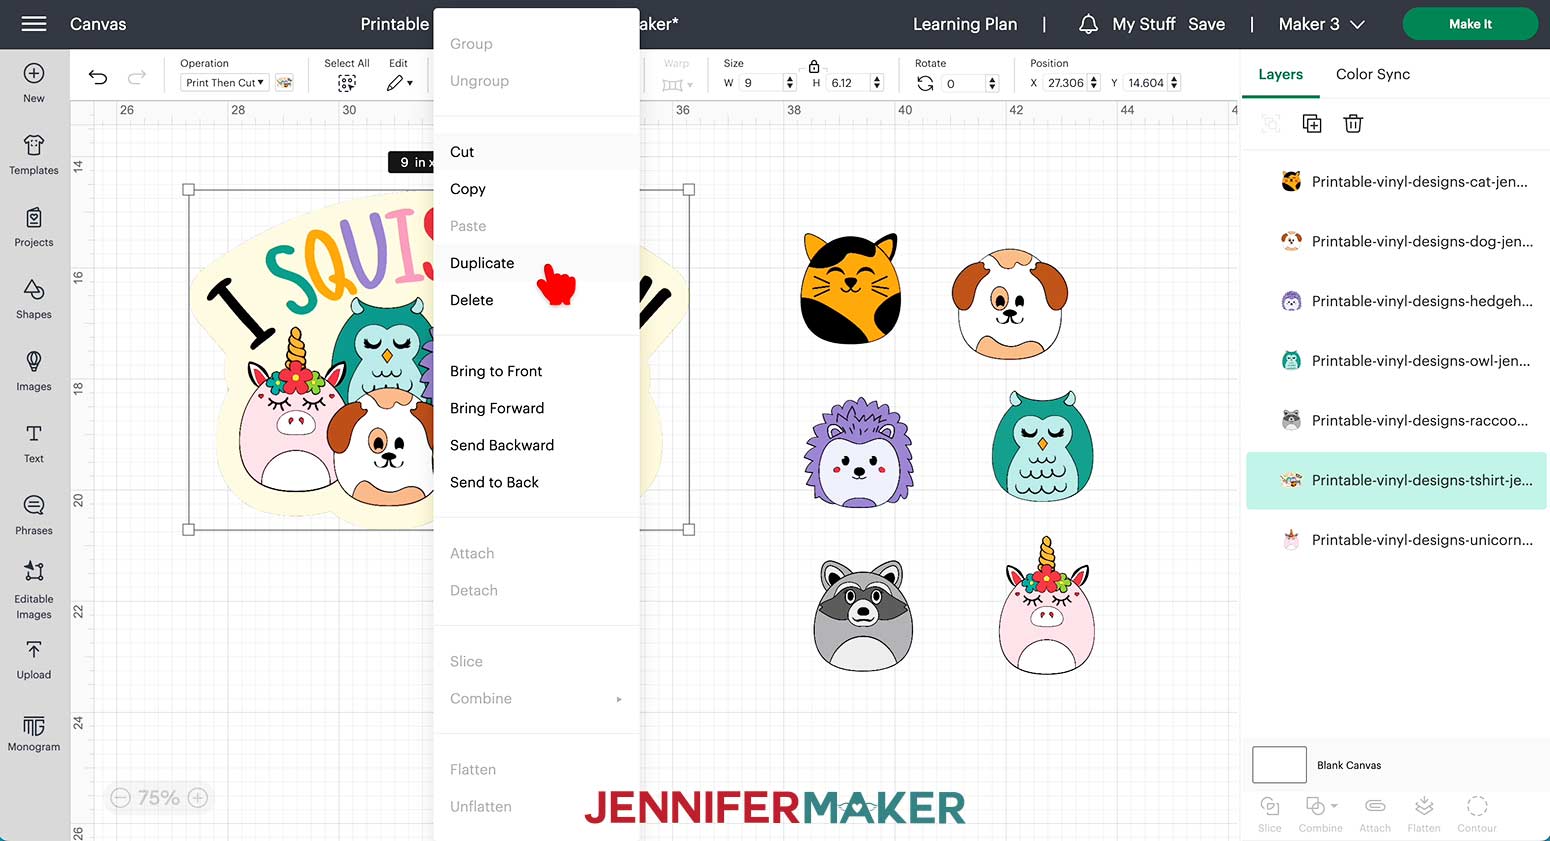
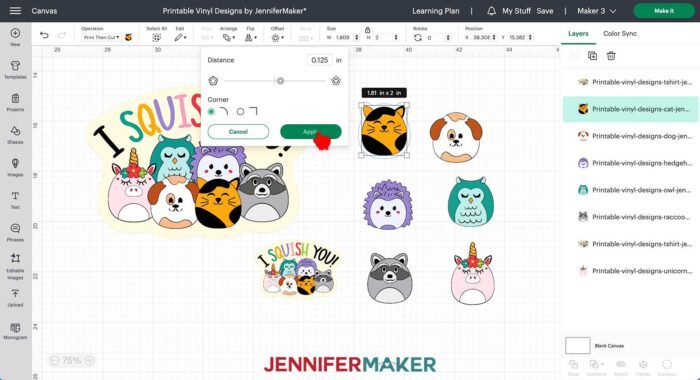
Now that you have your images resized. You can make a decision on how you want your stickers to cut. If you want to have the stickers cut as they appear, they are ready to make! If you’d like to create a background for your stickers by adding some empty space around them, however, we need to add that space before continuing.
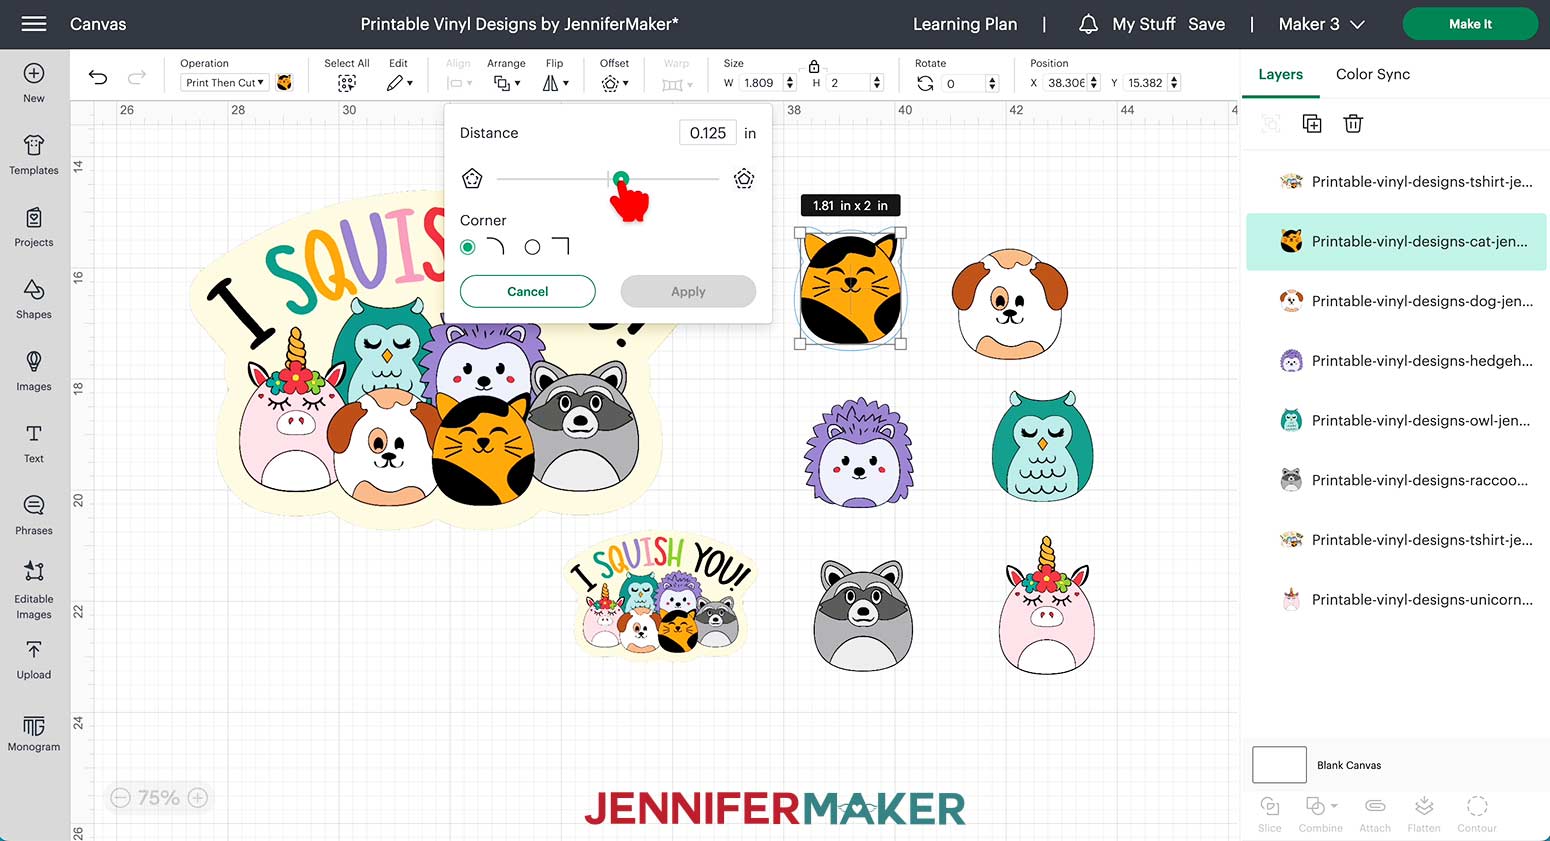
To add the border, click on an image and select “Offset” from the menu at the top of the Canvas.

Choose a rounded corner and drag the slider to find a pleasing amount of border. I chose 0.125”. Then click "Apply".
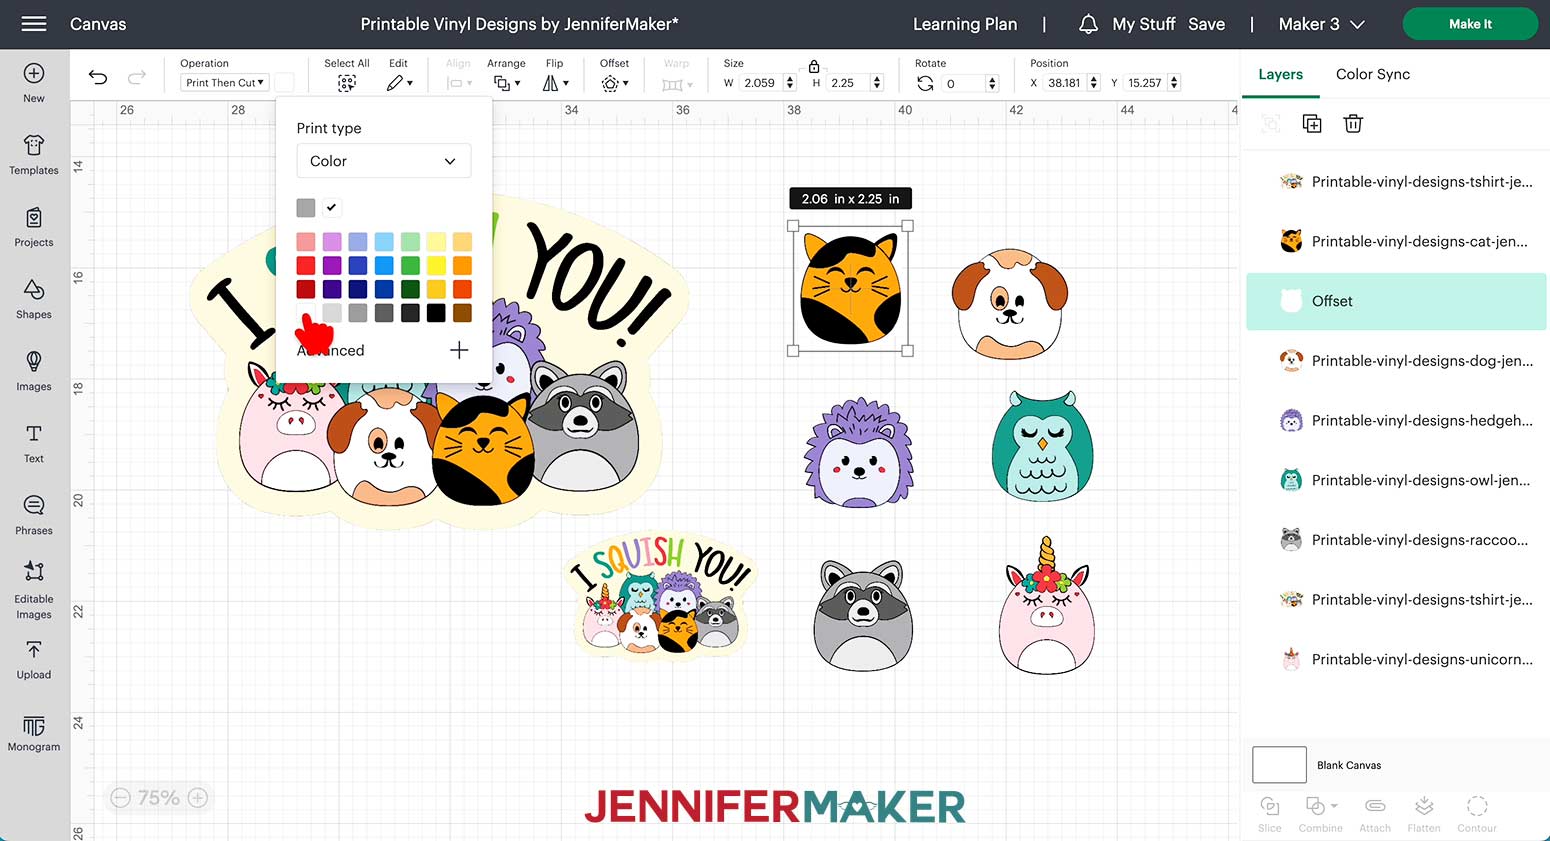
Select only the offset layer and choose a color for it. I chose white for the individual animal stickers to help them stand out a little better on most surfaces. (I did not add an offset to the larger design as it already includes a background.)
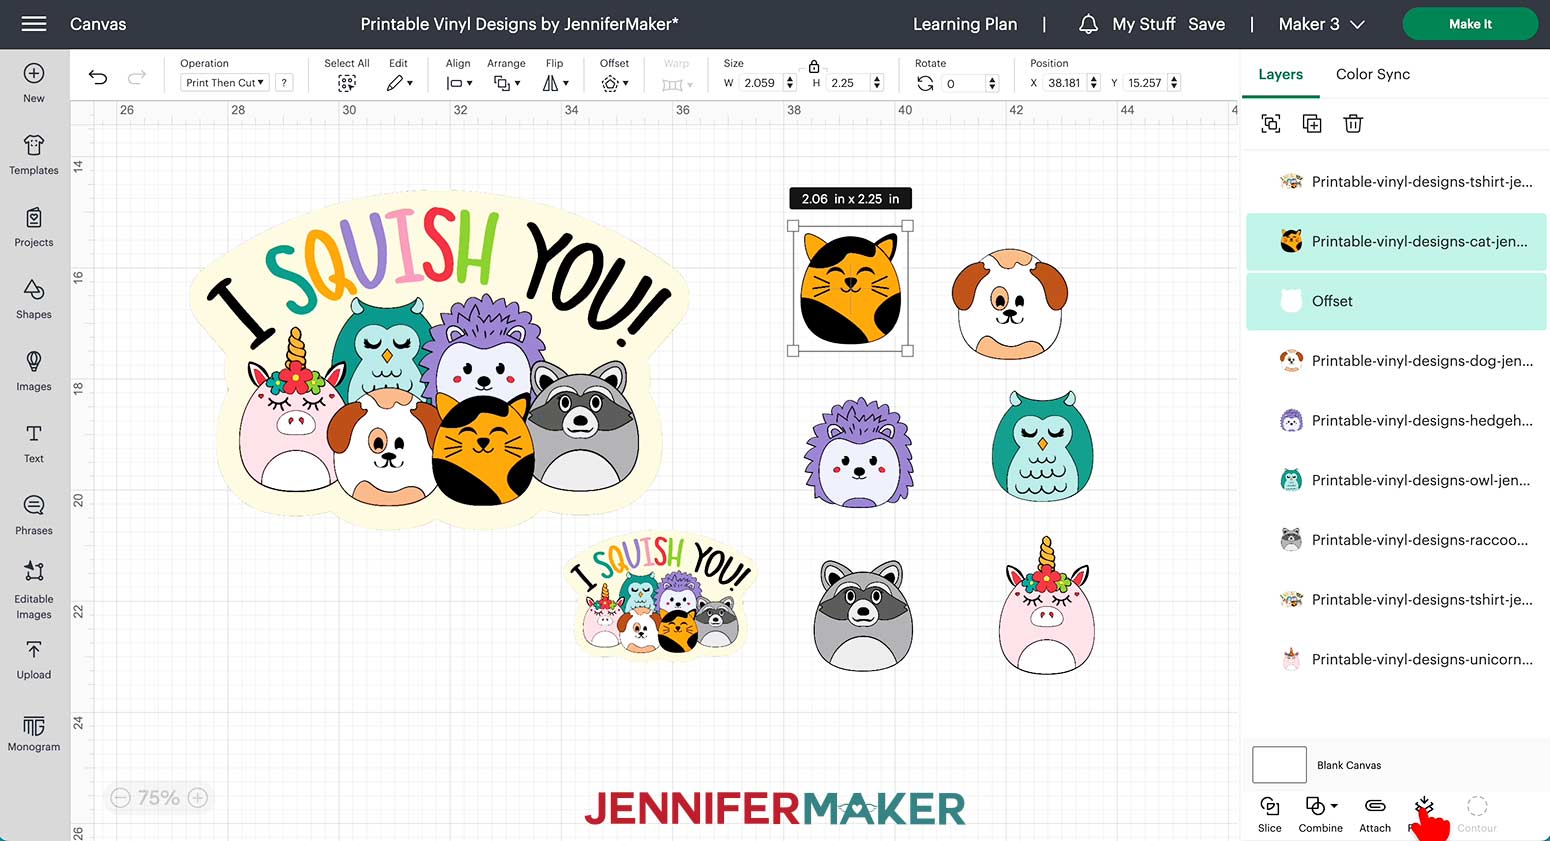
Once the offset layer is created, we need to set the sticker and the offset to print together as one image. Select both the image and the offset behind it and choose “Flatten” from the menu at the bottom right of Design Space.
(If you decide to upload the SVG files so that you can change the colors of parts of the designs, be sure to Flatten your images after editing so they will process as Print Then Cut rather than Cut images.)
We are now ready to Print Then Cut!
STEP 3: PRINT THEN CUT THE PRINTABLE VINYL
Before continuing, choose a material on which to print your designs. Printable vinyl comes in several different types. You can purchase printable vinyl with an adhesive back to make stickers and labels and printable vinyl that can be applied to clothes and other materials that accept heat-applied vinyl.
Printable vinyl made with an adhesive back comes in different colors such as white, clear, and even holographic. It can also come in matte or gloss finish.
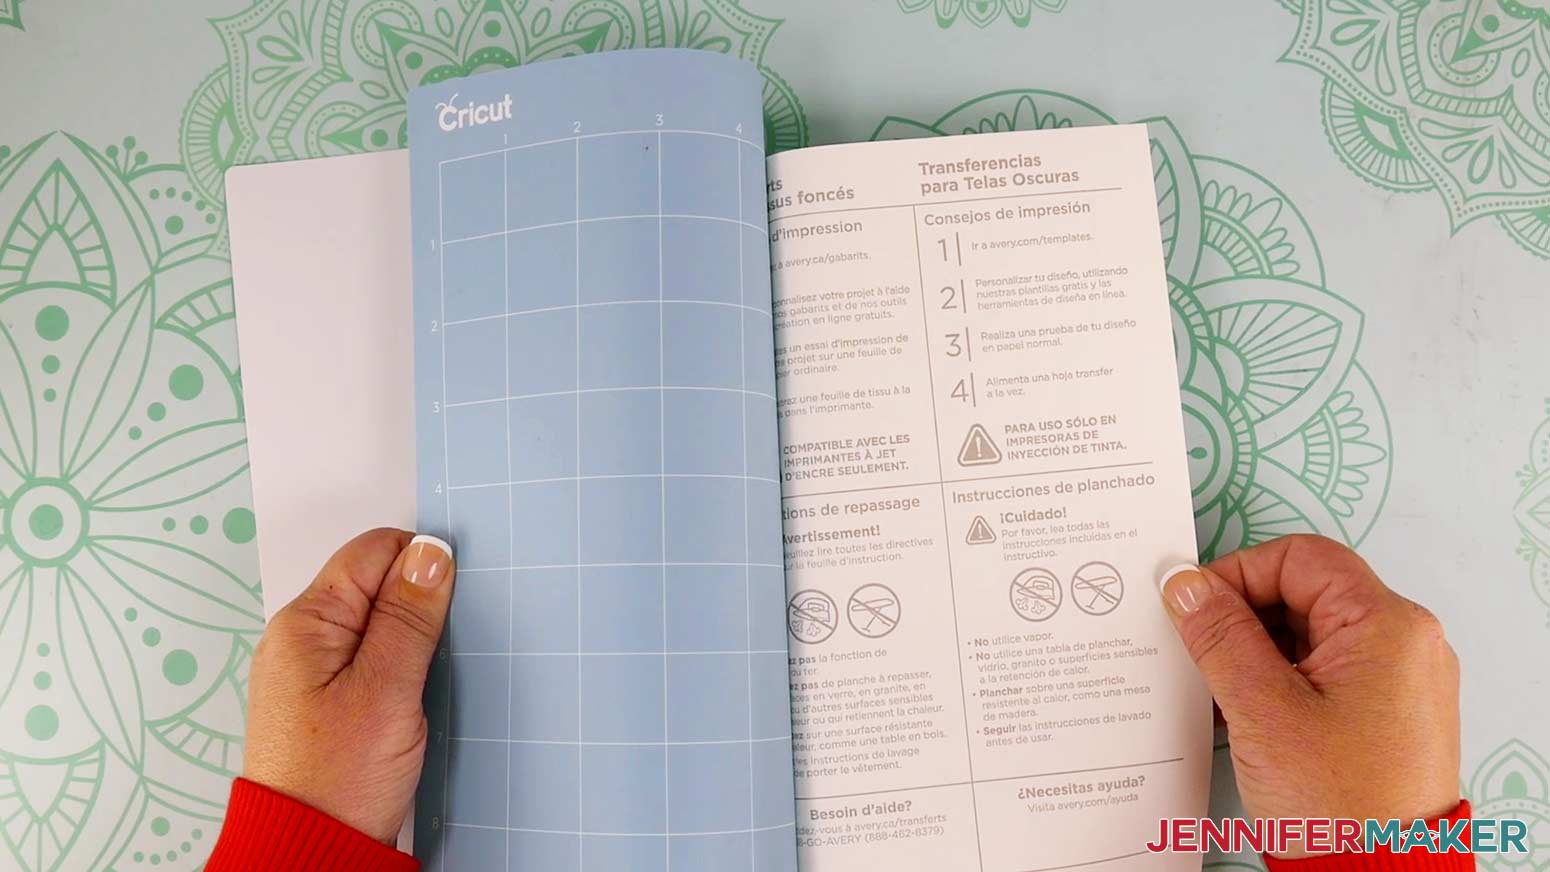
Printable iron-on vinyl does not have a sticky back because the vinyl is intended to be heated, rather than applied with adhesive. This kind of printable vinyl is usually labeled as "iron-on transfers for dark shirts" and is different from printable iron-on paper used on white shirts, so be sure to get the right kind!
When you have gathered the correct materials, check that the right machine is listed in the top corner, then click "Make It!"
If you are prompted about how you will load your materials, select "On Mat" and 12" x 12". Then click the green “Confirm” button.
The designs will appear on two mats on the "Prepare" screen.
Your designs will appear on the mats with extra border markers around them. The Cricut will use the border markers to know where to cut when the images are loaded.

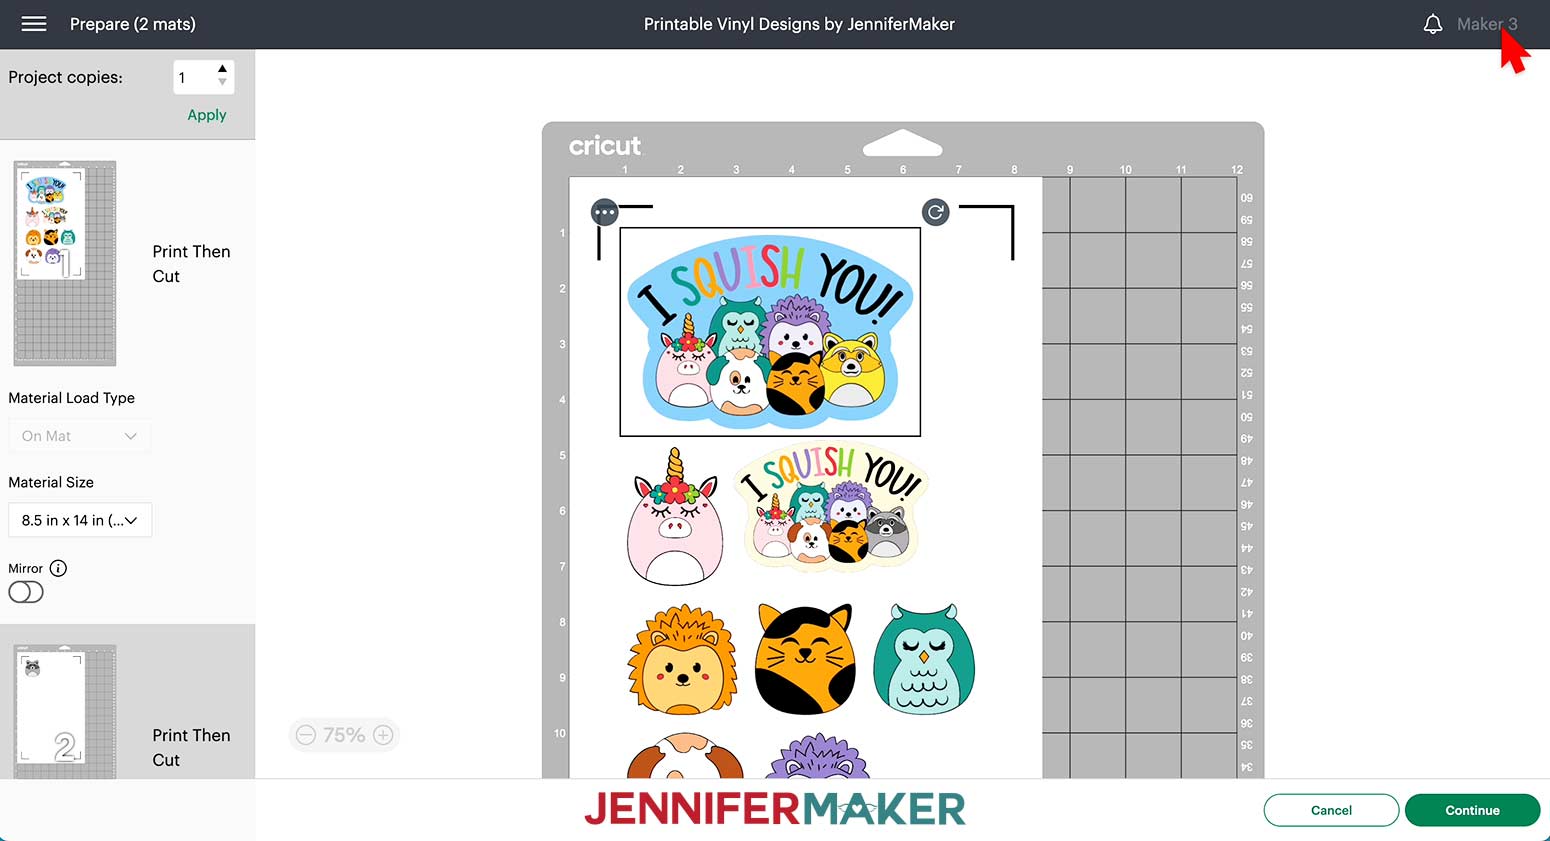
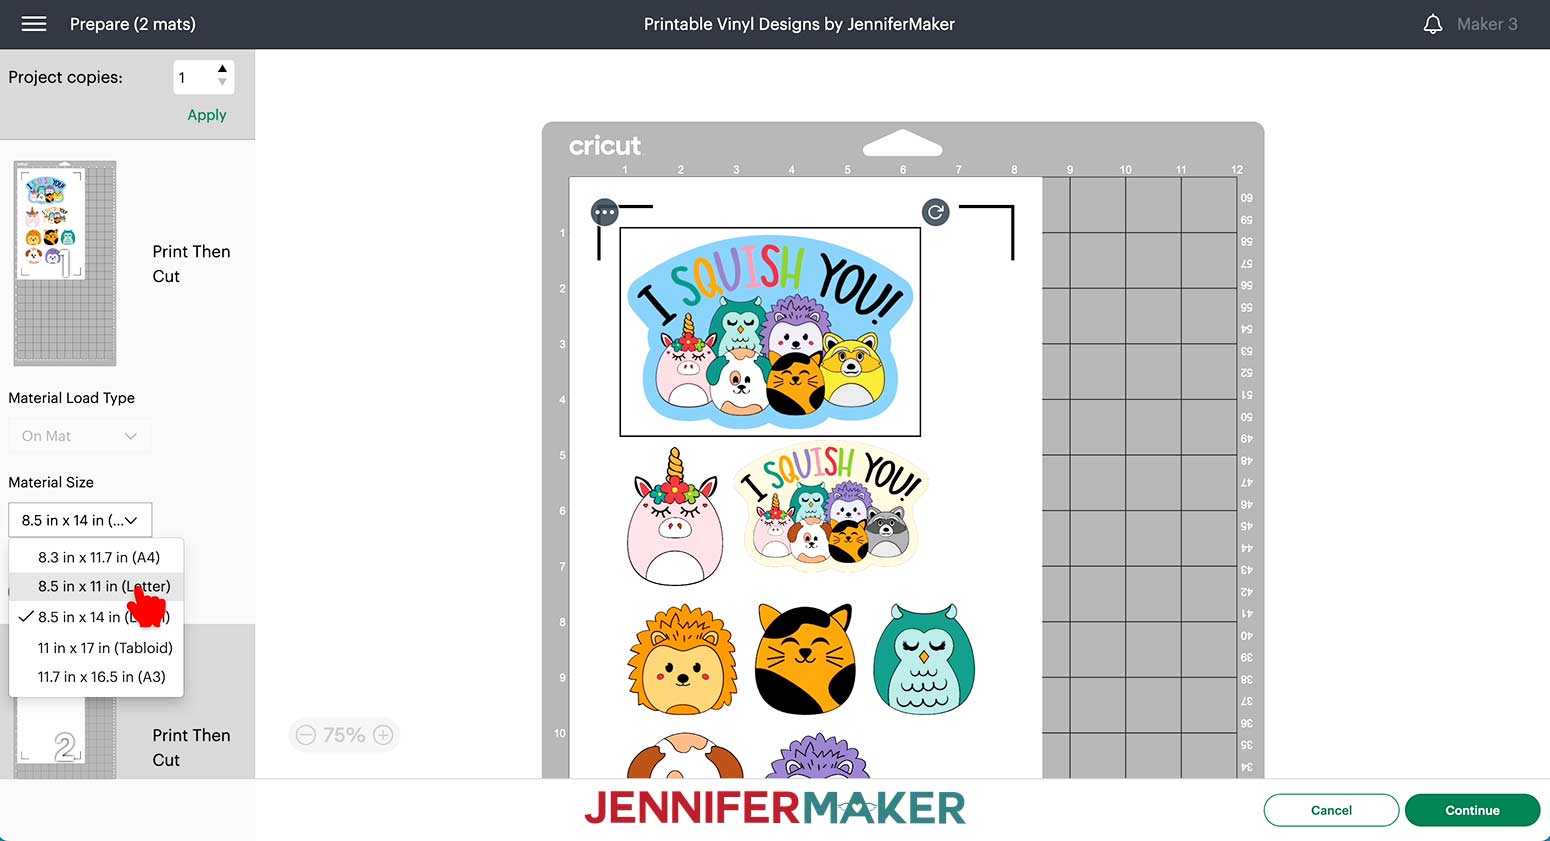
Make sure the correct Material Size is selected for each mat. All the printable vinyl I am using is sized 8.5”x11”.
TIP: Did you know Cricut Design Space now allows larger Print Then Cut images? Go to my Print Then Cut tutorial to find out how!
Leave “Mirror” turned off and click “Continue”
Click “Send to Printer”. A Print Setup box will open to allow you to make some choices about how to print your mats. Make sure the correct printer is selected and the correct number of copies you wish to print are entered.
The “Add Bleed” setting is used to minimize the chances of the cut leaving extra white on the outside of your image. Leave it turned on.
The “Use System Dialog” setting will allow you to make changes to the way your image prints using your computer’s print menu. Turn on the “Use System Dialog” setting. After clicking “Print,” this brings up a print screen for the printer which allows you to specify the tray the vinyl will print from as well as the quality of the print job. I printed my images at “High Quality.”
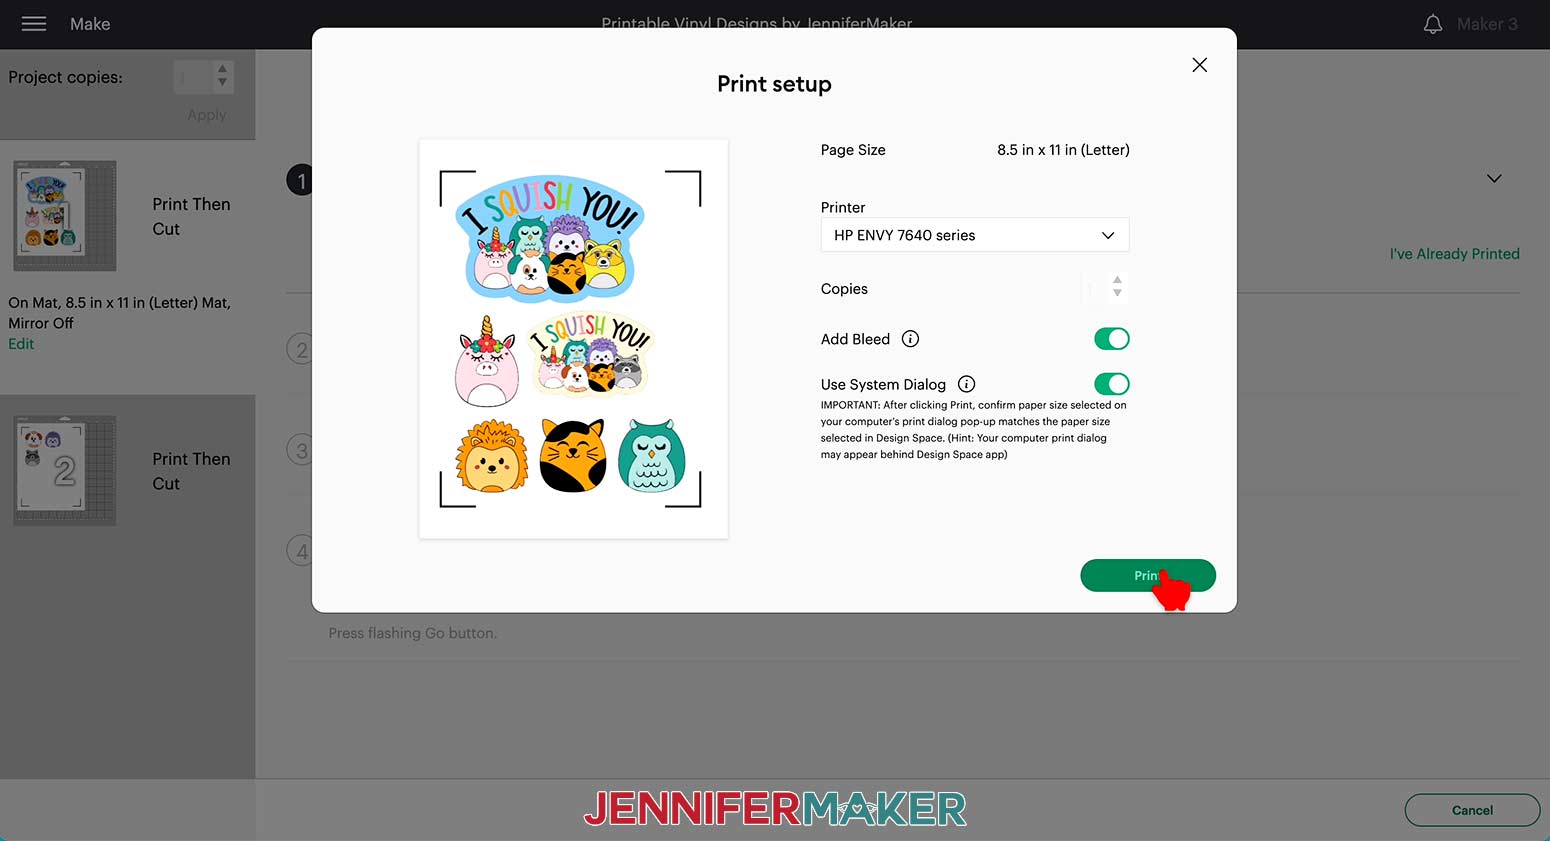
NOTE: You may need to minimize or move your Design Space window to see the print dialog window. It sometimes pops up behind Design Space. There is a chance the system dialog box will not work on all printers. Each printer is different so consult your printer's user guide for additional support.
Before clicking “Print”, make sure the correct printable vinyl is loaded into your printer and that it is facing the correct way.
Iron-on vinyl usually has directions printed on the back of the material to easily show which side is front and which is back. Some brands of printable vinyl, however, will not have printing on the back, so pay special attention that you do not accidentally flip the sheet over. (If you print to the wrong side, the ink may not dry and it can potentially make a mess!)
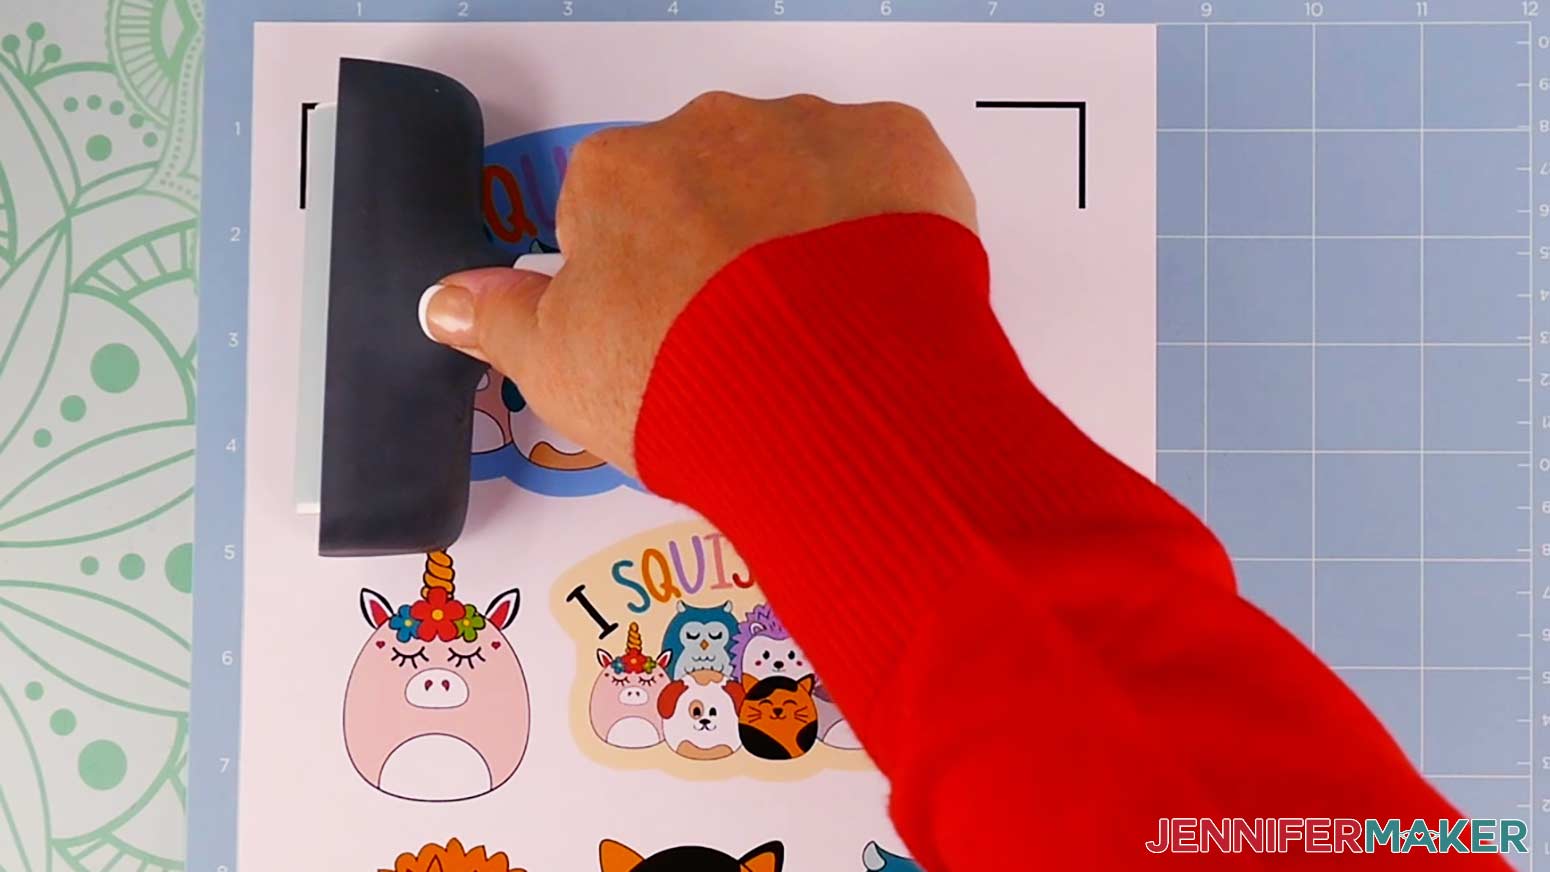
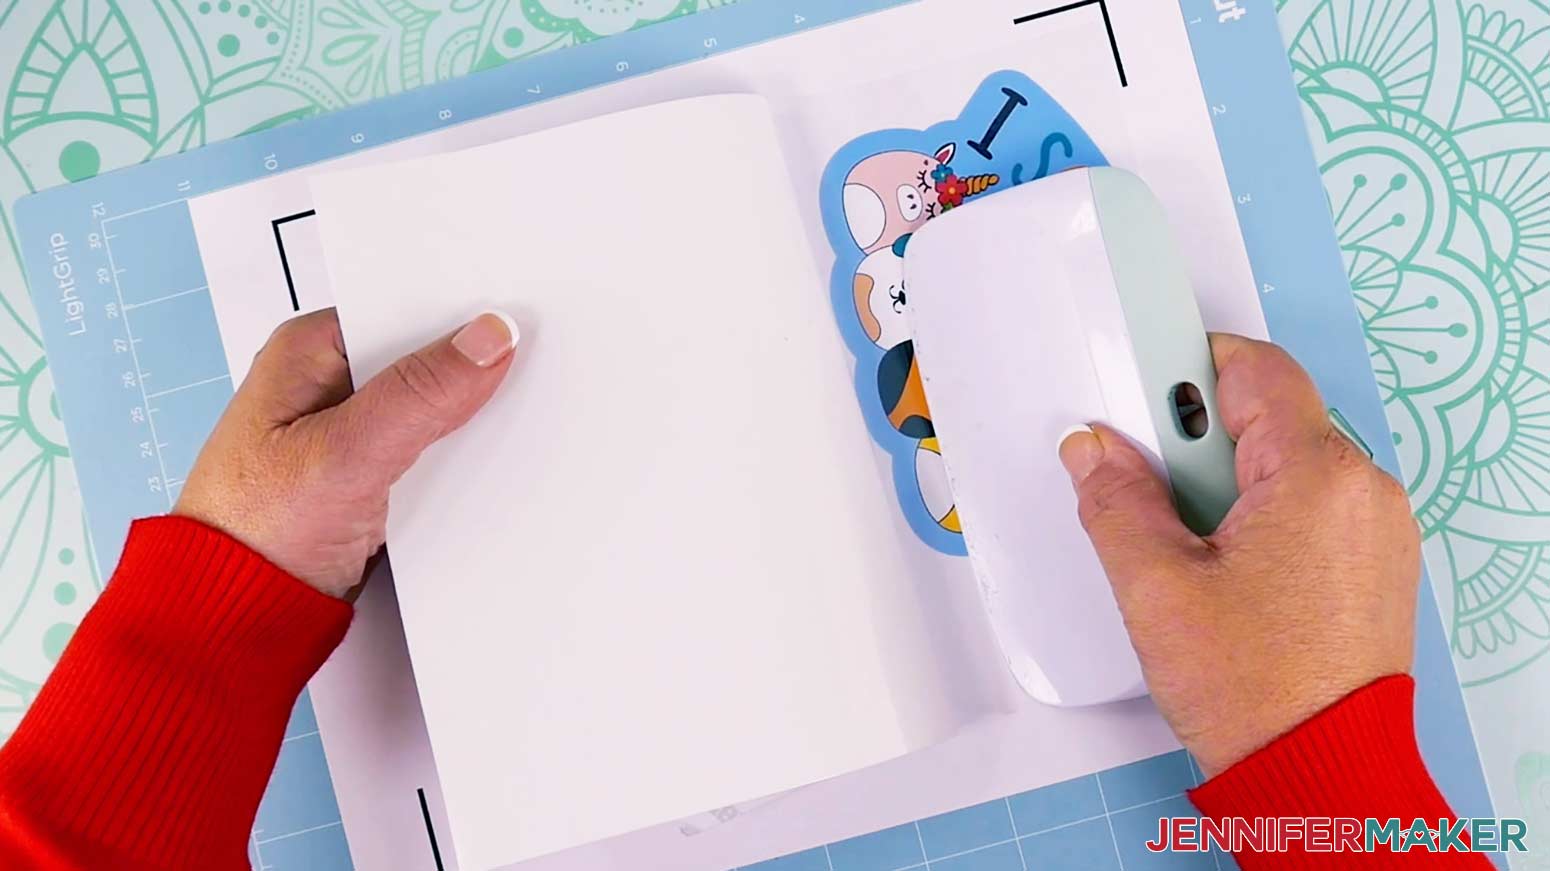
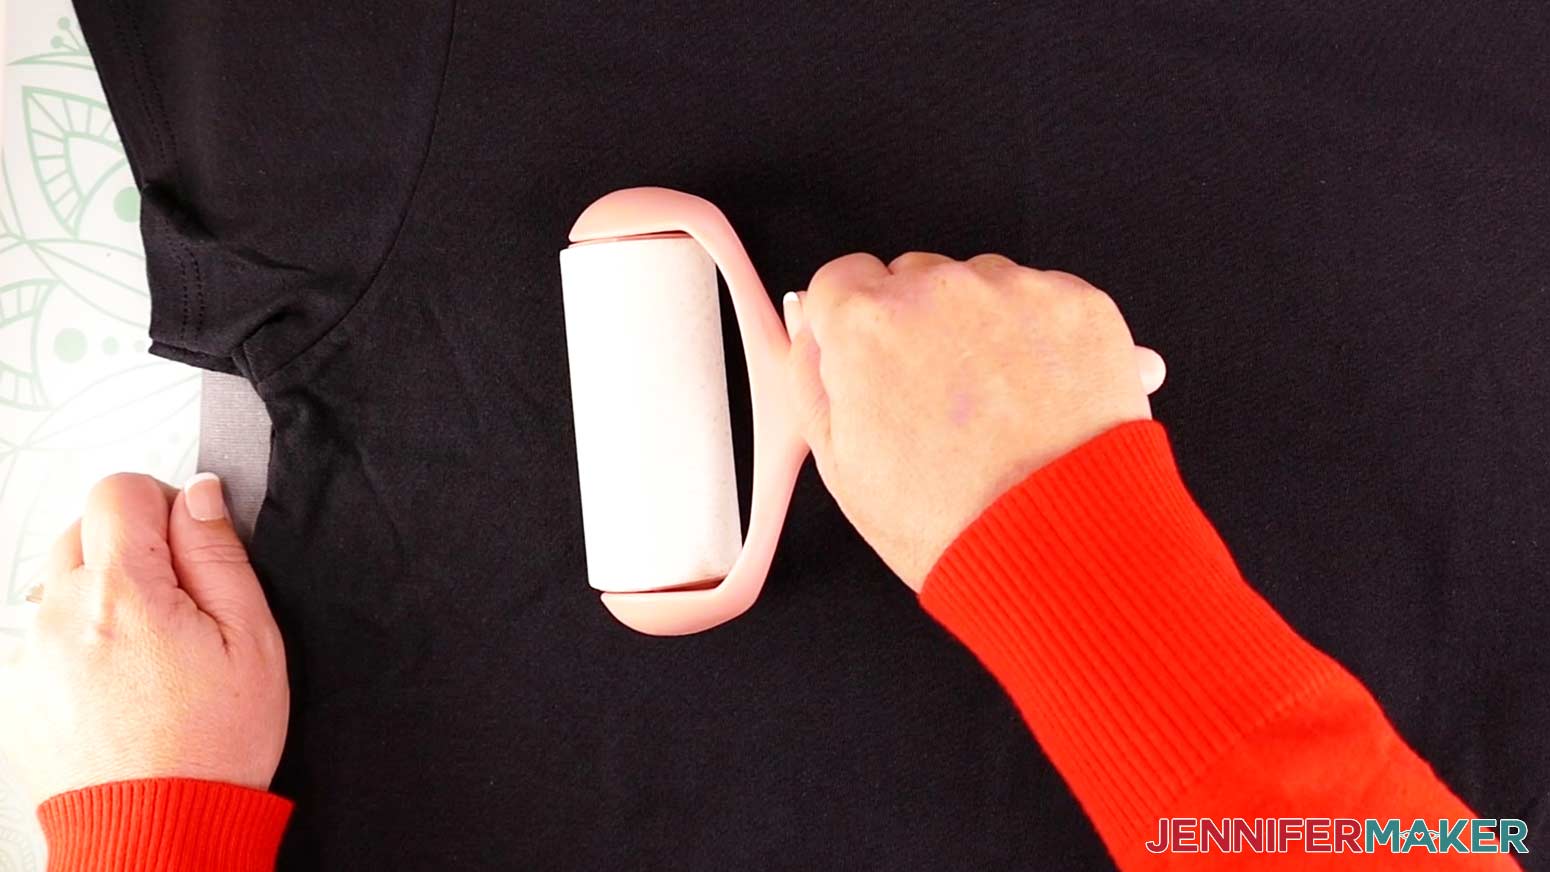
Your mat will print to your printer. Once the print is complete, let it sit for a moment to make sure the ink dries thoroughly. Place the vinyl with the print side up on your blue LightGrip cutting mat and make sure it has adhered well by pressing it with your brayer.
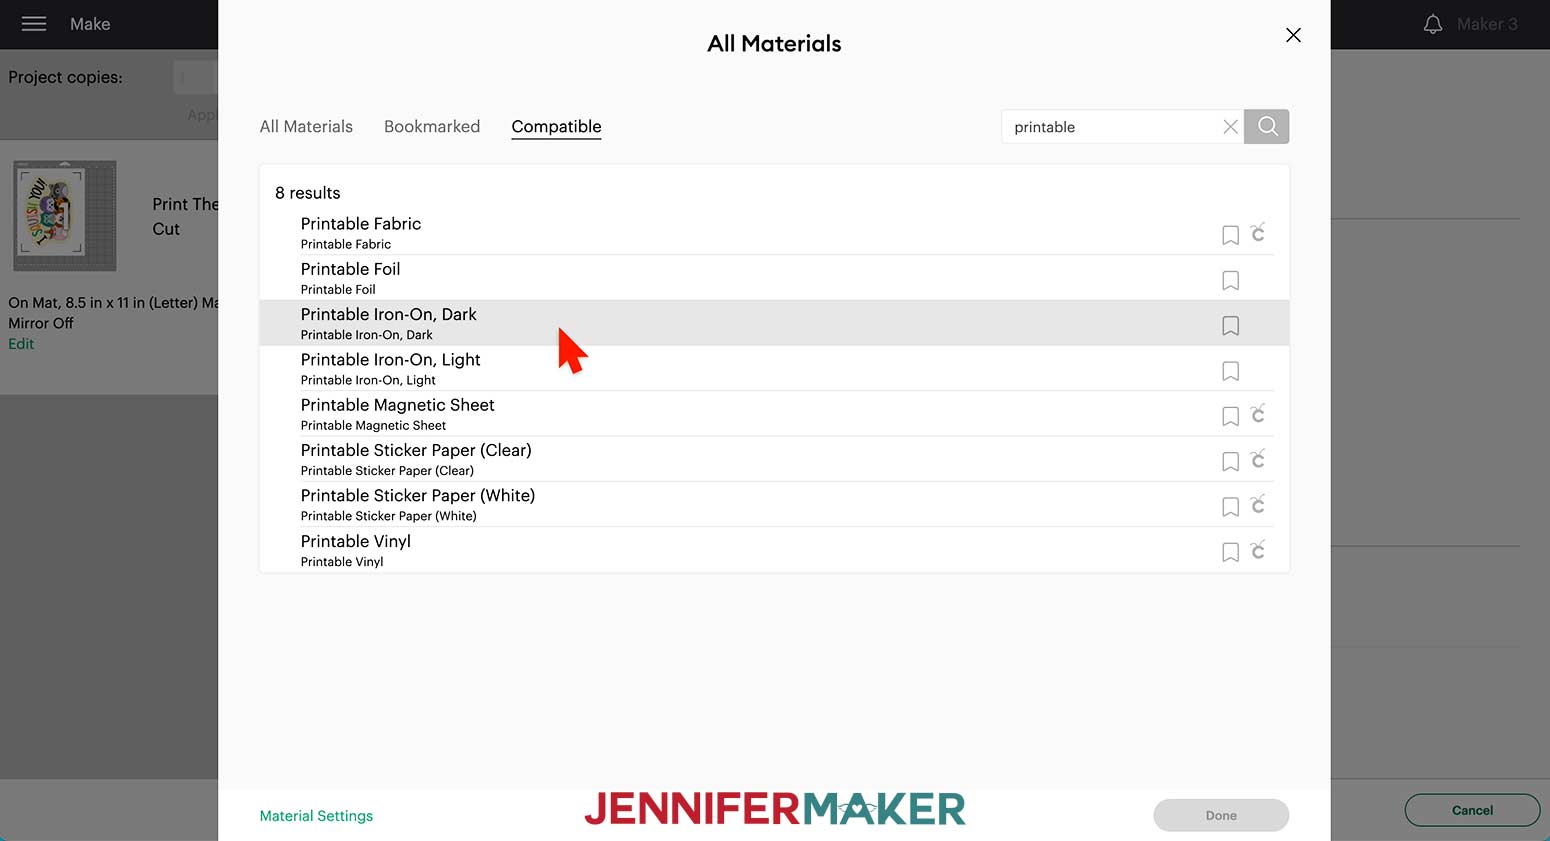
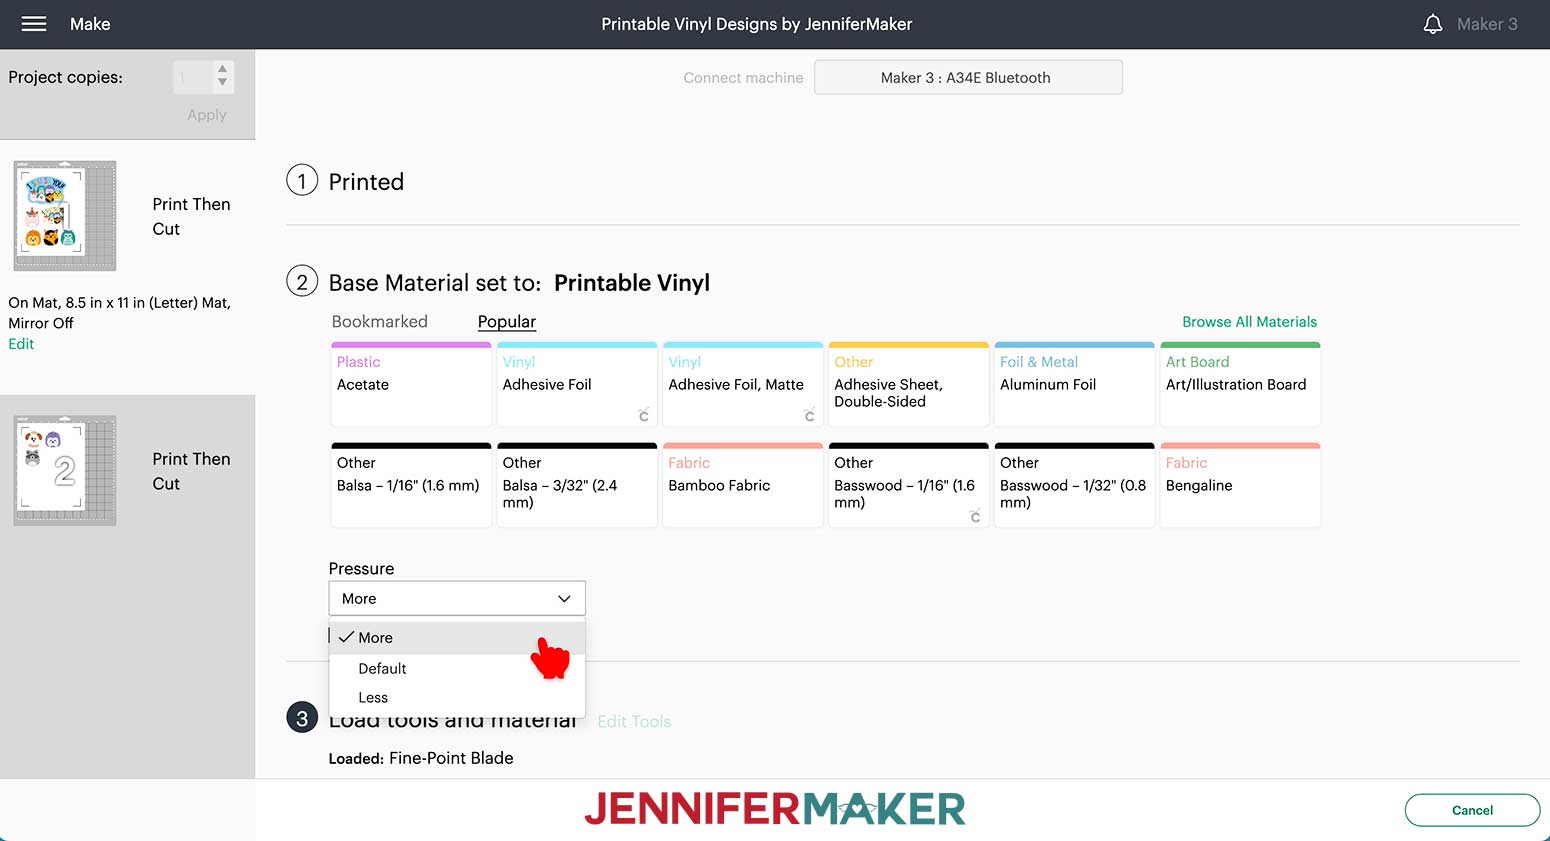
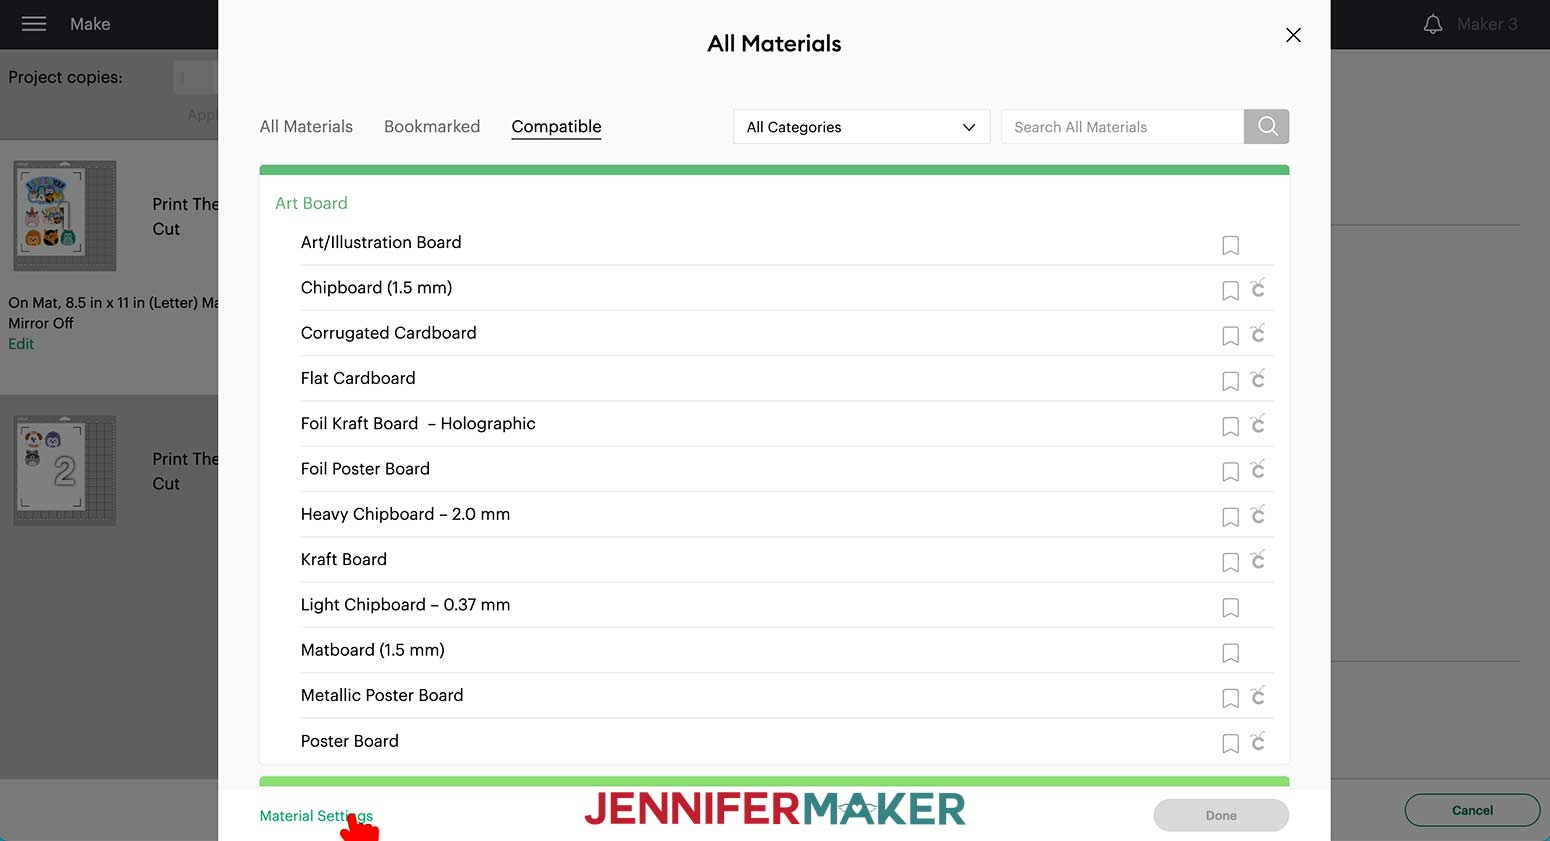
Before loading the cutting mat into the Cricut, select the correct cut setting.
Click "Browse All Materials” then type “Printable” into the search box. A list of settings for printable materials will appear.
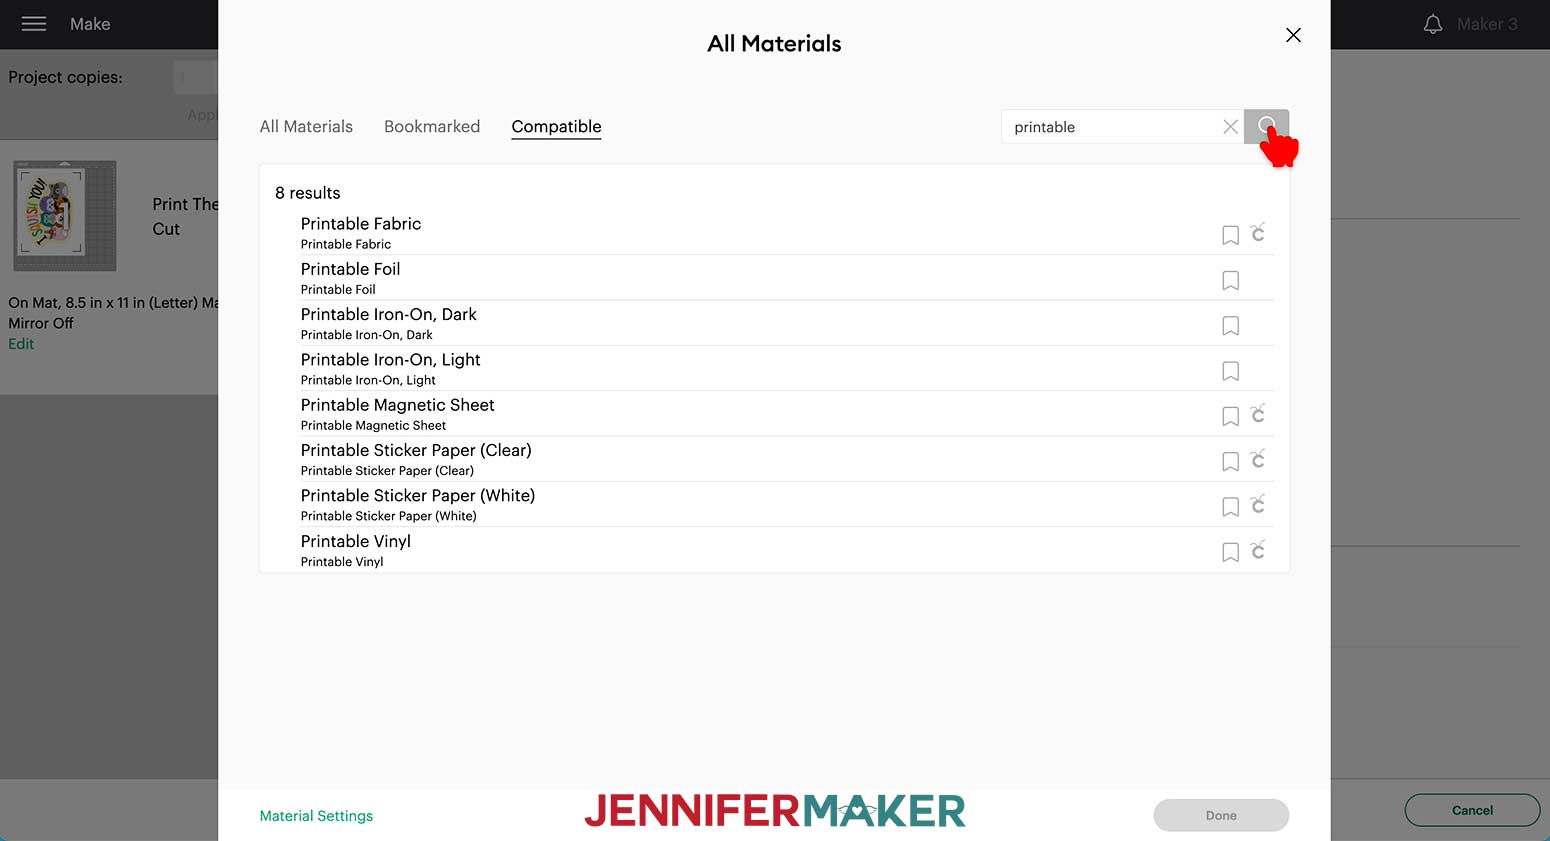
When cutting the large image for the t-shirt design, choose the cut setting “Printable Iron-On, Dark.” Then select “More Pressure.” This setting will cut through the vinyl, but not the paper backer. This is known as a “kiss cut.”
(You can also choose to cut all the way through both the vinyl and backer if you do not wish to keep the 8.5”x11” sheet size intact. You can do so by selecting a cut setting with more pressure such as “Light Cardstock – 65 lb.”)
Check that your Fine-Point Blade is clean and in Clamp B. Load the mat into your Cricut and press the flashing button to begin.
The Cricut will first find the guideline box around the image, then cut the image.
Once the cutting is complete, and before unloading your mat, check to see if the cut is acceptable. If not, press Start for another pass.
TIP: Every machine is different, so you may need to test settings before finding one that works correctly. If you run into any issues cutting your materials, check out my Cricut Tips & Tricks for Cleaner Cuts.
It is not necessary to “weed” the design because the cut image will be removed from the backer to heat-apply it. Remove the vinyl from the cutting mat by turning the cutting mat over and rolling it away from the cardstock.
Now use the same steps from above to print the second mat of stickers on the adhesive printable vinyl.
Select the correct cut setting for the printable adhesive vinyl. To get a “kiss cut” setting in which the vinyl is cut but the backer isn’t, use “Printable Vinyl.” This is perfect for being able to keep your stickers all on one sheet until you are ready to use them.
If, however, you want to cut the stickers out so they can be separated into individual pieces, a deeper cut is needed to cut through both the vinyl and the backer. I found that using the setting for “Light Cardstock – 65 lb” worked great for this type of cut.
Either way – I do prefer to use “More Pressure.”
Once you’ve chosen the type of cut you prefer, add the vinyl to the cutting mat, check that your Fine-Point Blade is clean and in Clamp B, load the cutting mat into your Cricut, and press the flashing button to begin.
If you chose to “kiss cut” your stickers, you will need to “weed” the stickers once the cut is complete and the cutting mat is unloaded from the Cricut. I prefer to weed the sheet while it is still adhered to the cutting mat. Start in an upper corner and pull the extra vinyl down and across the sheet away from the cut stickers. Go slowly and make sure the adhesive back does not touch any of your stickers or you won’t be able to pull them apart!
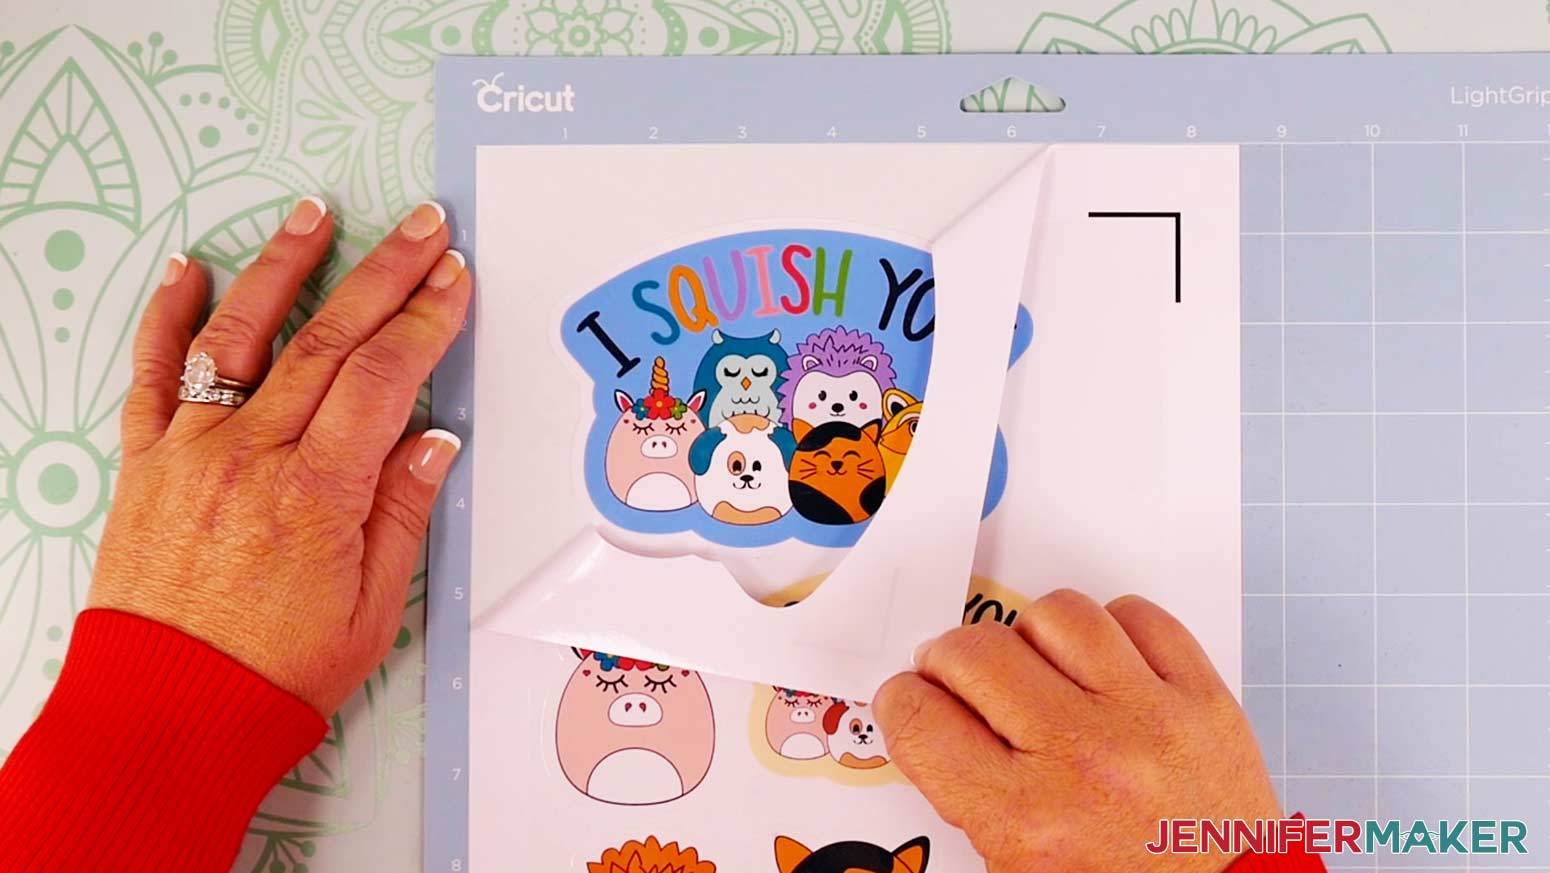
Once your stickers are weeded, remove them from the cutting mat by turning the cutting mat over and rolling it away from the backer (or from the individually cut stickers).
OPTIONAL CLEAR VINYL PROTECTION:
Printable vinyl is waterproof and holds ink well, but can still be damaged and worn down over time. Extra protection can be given to vinyl stickers by applying clear vinyl over the prints before cutting them out. The clear vinyl will act as a laminate barrier and provide extra longevity to your stickers.
To apply the clear vinyl sheet to your stickers, cut the clear vinyl into a size that fits over your stickers, but not over the black border. (Covering the black border may make it more difficult for your Cricut to find the guidelines.)
To apply the clear vinyl, I pulled back the top part of the backing paper then aligned the vinyl to the top of my stickers below the registration box line. Adhere the top edge and slowly pull the backer away from underneath the clear vinyl. I find it helpful to use a scraper tool over the vinyl as I pull off the paper backing. This helps to minimize the chances of any bubbles.
In order to obtain a “kiss cut” sticker with the additional layer of clear vinyl on top of the stickers, I adjusted my material setting for the printable vinyl setting to cut with a pressure of 250. (I used a pressure of 320 to cut individual stickers - this pressure is also similar to "Medium Cardstock – 80 lb".)
To do this, click “Browse All Materials.”
Select “Material Settings” in the lower left of the screen.
Scroll down to find Printable Vinyl and click “Edit.”
Drag the slider pressure to 250.
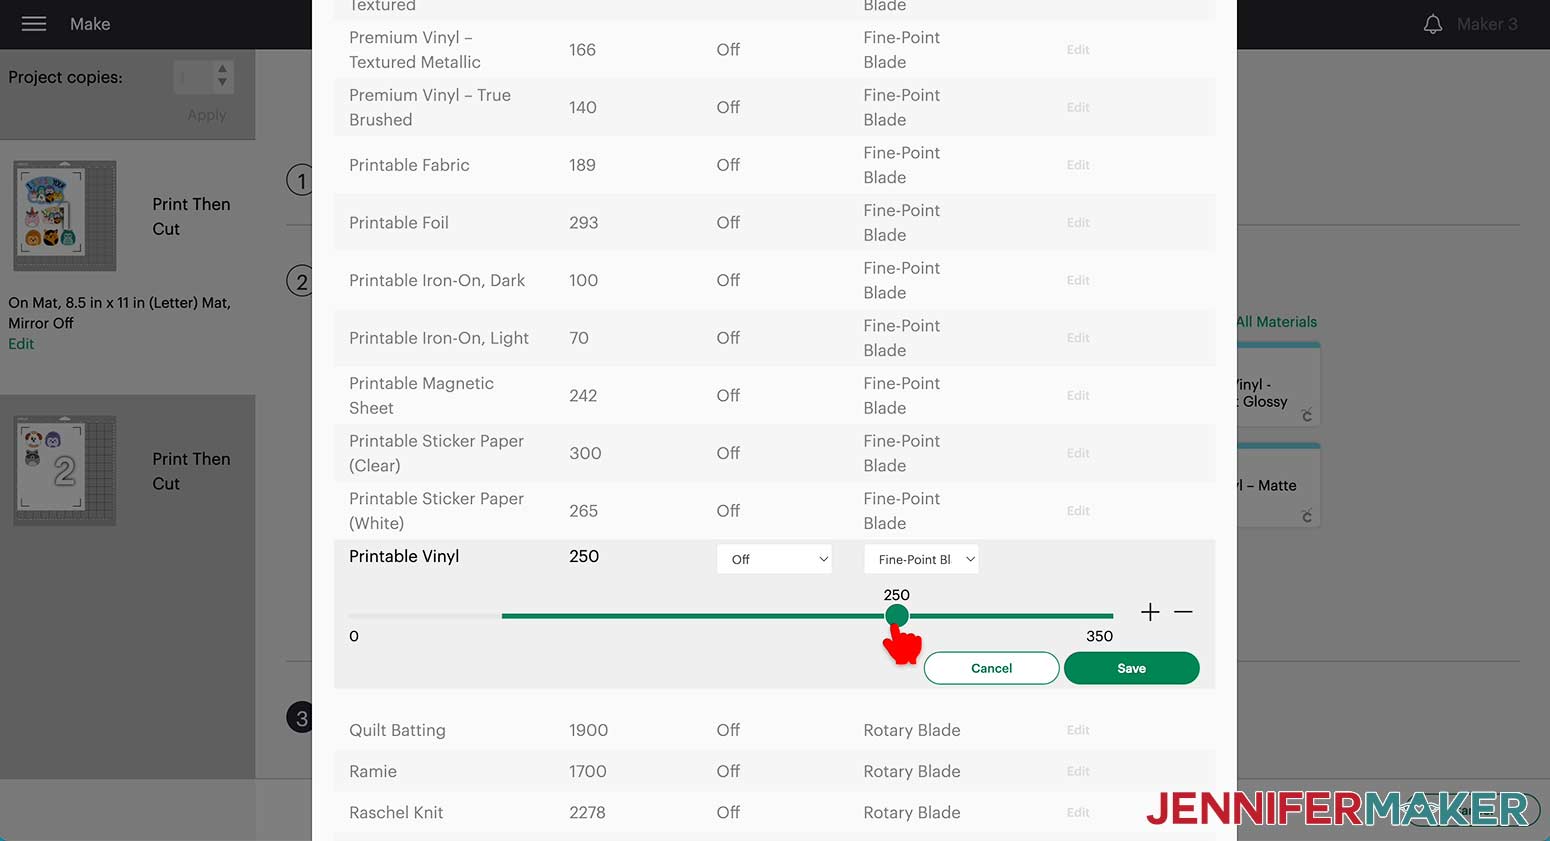
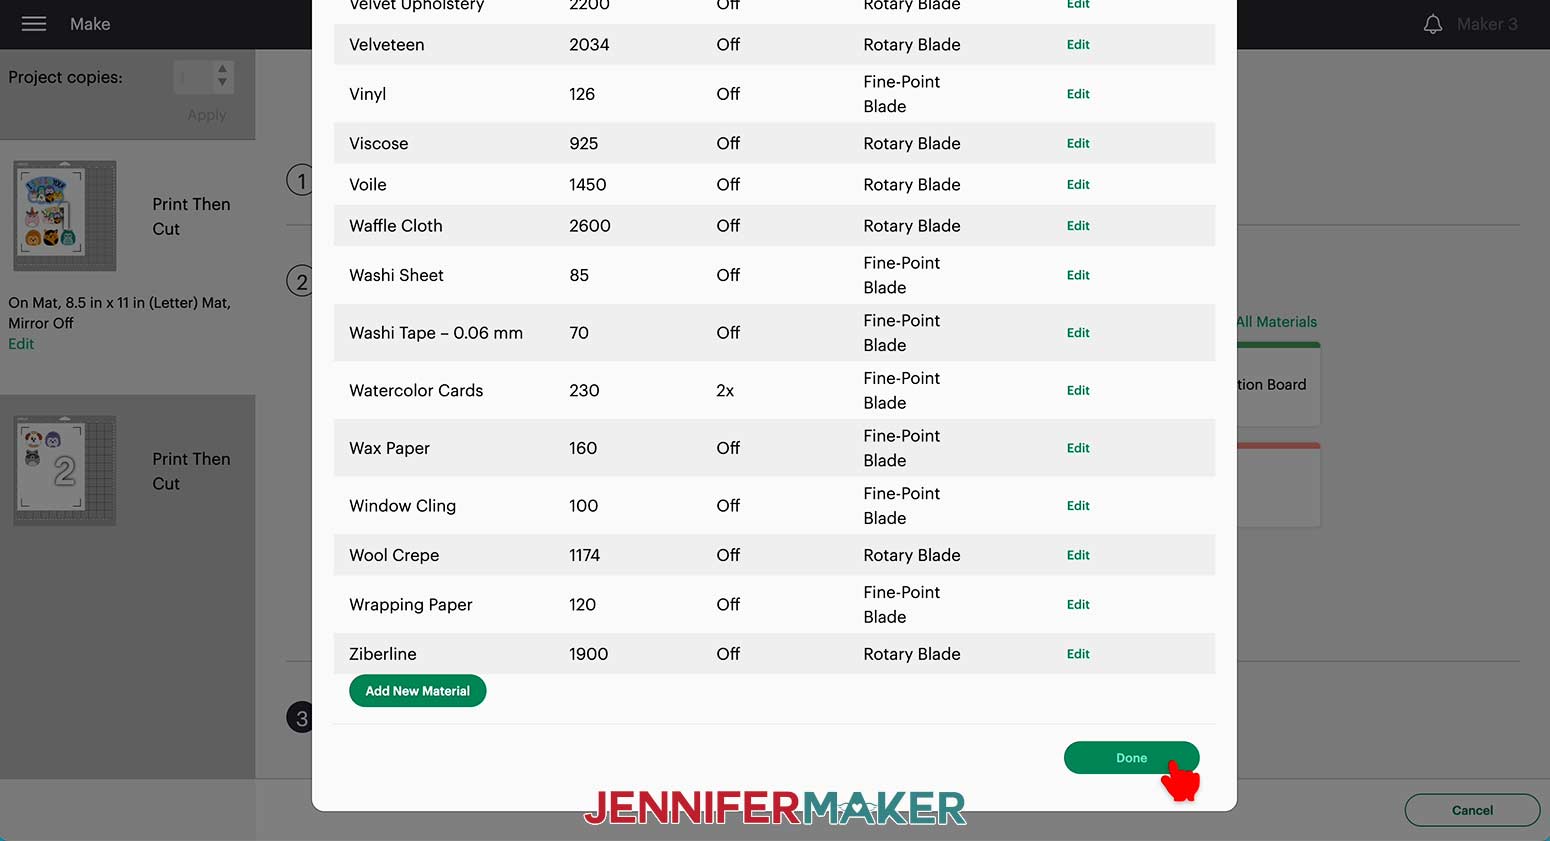
Save then scroll down to the bottom of the list and click "Done" in the lower right corner.
Click “Browse All Materials” and type "Printable" in the search field.
Select “Printable Vinyl” from the search results and click "Done."
NOTE: When changing settings, make sure to reset your custom setting when you are done. You can also create a new material instead of changing the settings for existing materials. Check out How do I use or Create a Custom Material Setting for more information on how to create a new material.
STEP 4: APPLY THE IRON-ON VINYL
The stickers are ready to go as soon as they are removed from the cutting mat, but the iron-on vinyl has to be applied!
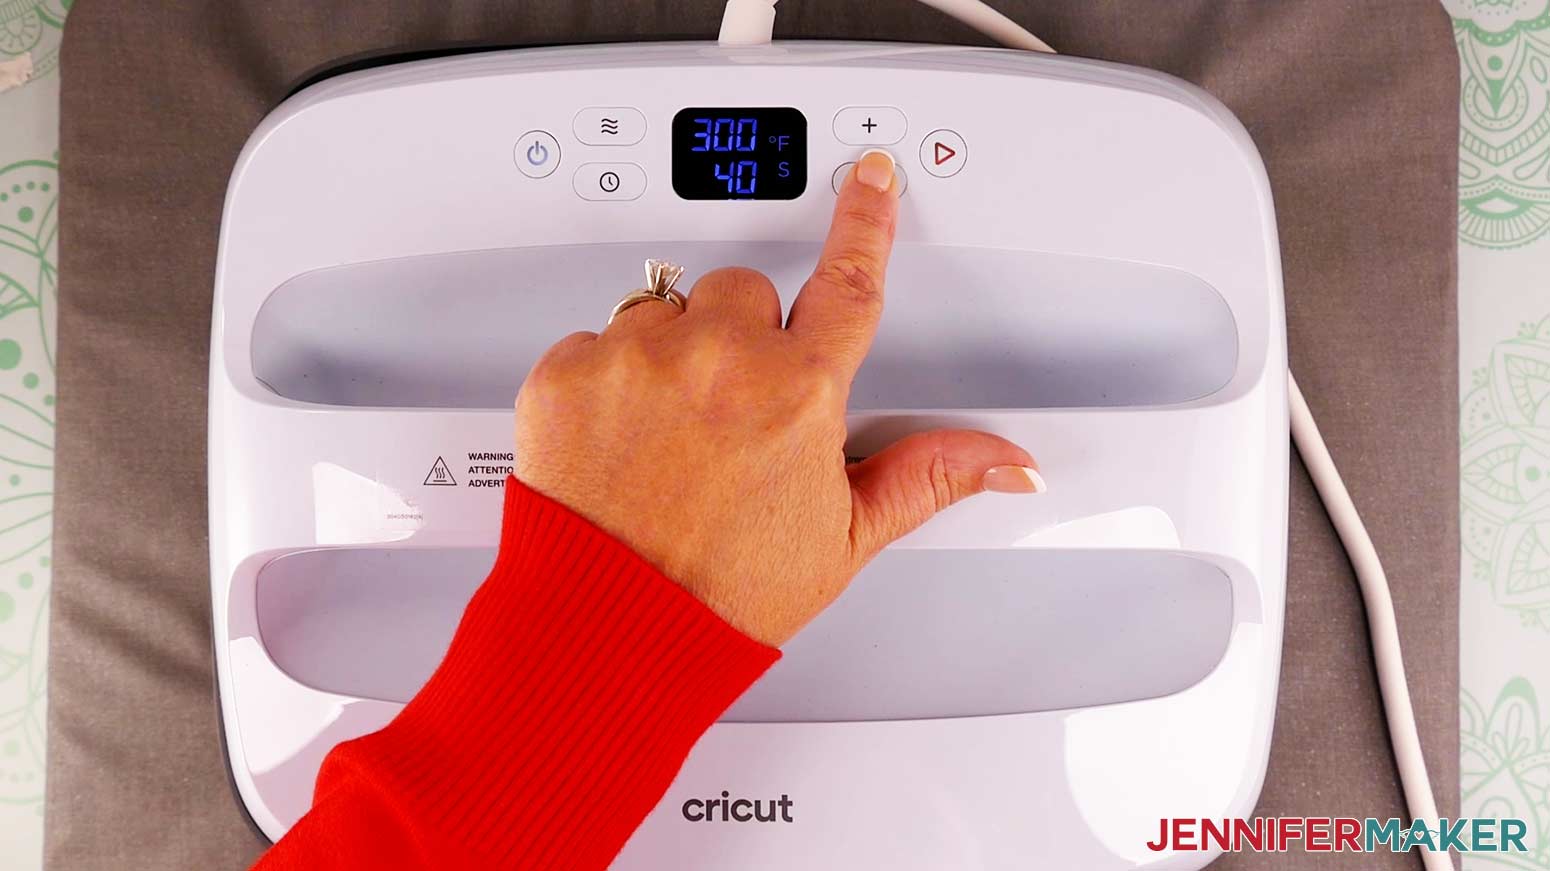
Preheat your heat press to the proper heat setting. Printable iron-on vinyl is slightly different from standard iron-on vinyl so I chose to press my design at 300 degrees Fahrenheit (149 degrees Celsius) for 30 seconds with Medium Pressure.
NOTE: The Avery brand Printable Iron-on vinyl I used for this project is recommended for 100% cotton or cotton/polyester blend shirts, but I did also successfully press it to a Cricut infusible ink shirt blank that is 95% polyester/2% spandex by using the same heat settings above. The important thing to remember is to use just enough heat and time to apply the design without overheating the shirt or vinyl.
To make it easier to find the center of the front of the shirt, fold it in half and lightly press the shirt with heat to hold the crease.
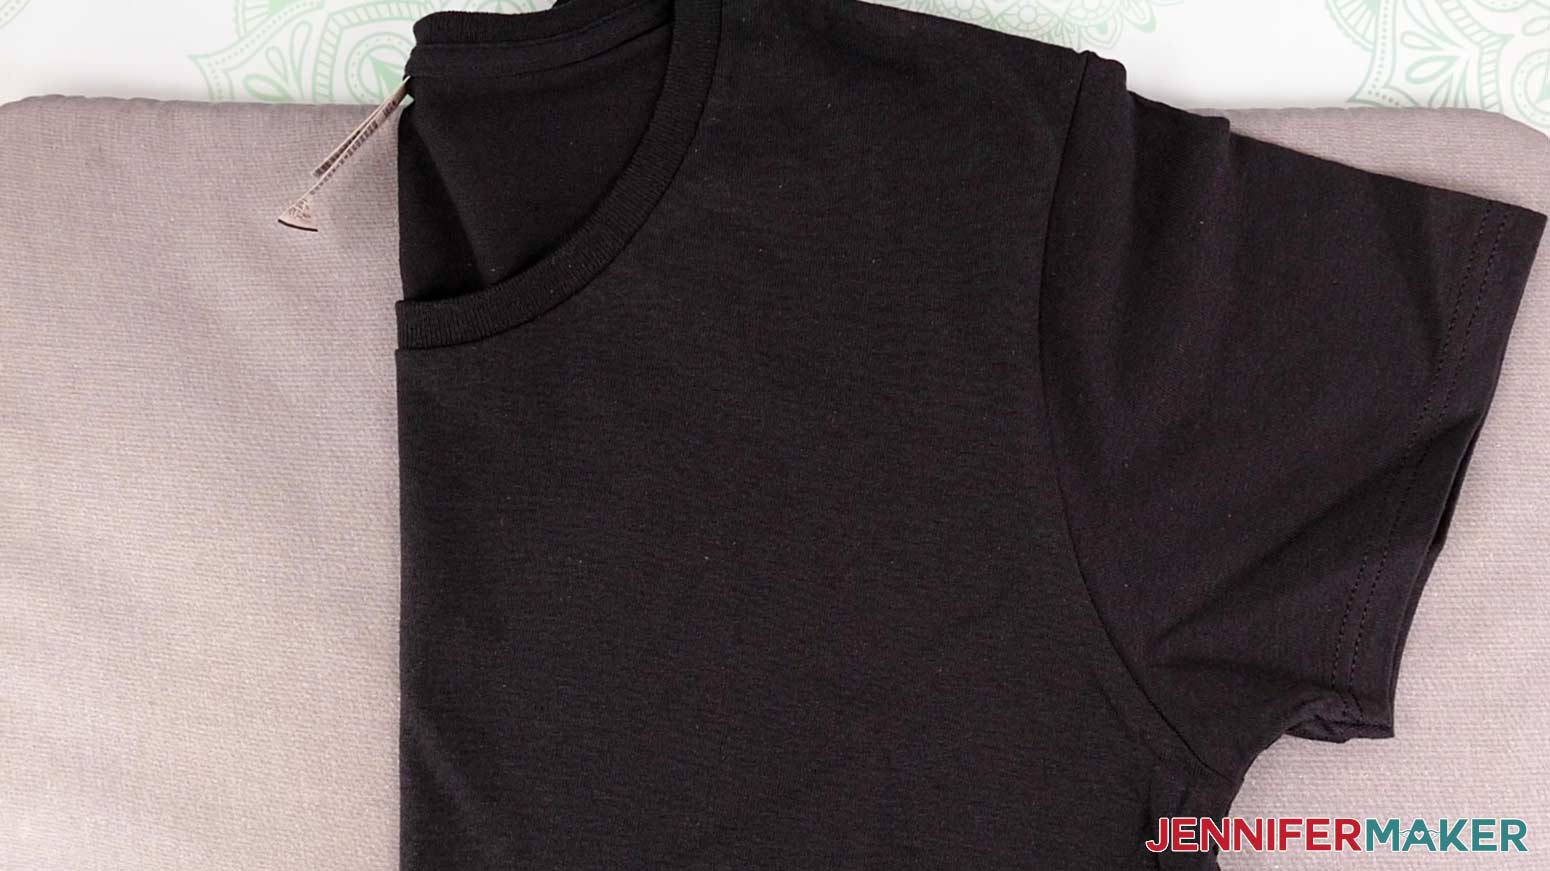
Open the shirt and use a lint roller to prepare the surface for the iron-on vinyl.
Once the shirt is ready, gently remove the iron-on vinyl from its backer and place it print side up in the correct spot on your shirt.

TIP: Check out my T-Shirt Rulers for an easy way to measure the placement of T-Shirt designs and a list of maximum recommended design sizes for various size shirts.
When the design is placed where you want it, cover it with the parchment paper included in the iron-on vinyl package.
Apply heat to the entire design with the correct pressure and time.
After heating, allow the design to cool, then remove the parchment paper and check to make sure the design has adhered well to the material. If the design lifts in any area, replace the parchment paper and iron those areas again.
The shirt is finished!
It’s important that you follow the manufacturer’s directions for washing these iron-on transfer shirts. Check the instructions that come with your packaging — for example, you’ll want to wait at least 24 hours before washing, and then when you do wash it, turn it inside out and wash in cold water. It’s also important to have a full spin cycle so your T-shirt is not left soaking in water, as that will affect the decal. If you ever iron your T-shirt, make sure you turn it inside out — never iron on the side with the decal.
STEP 5: SHOW IT OFF
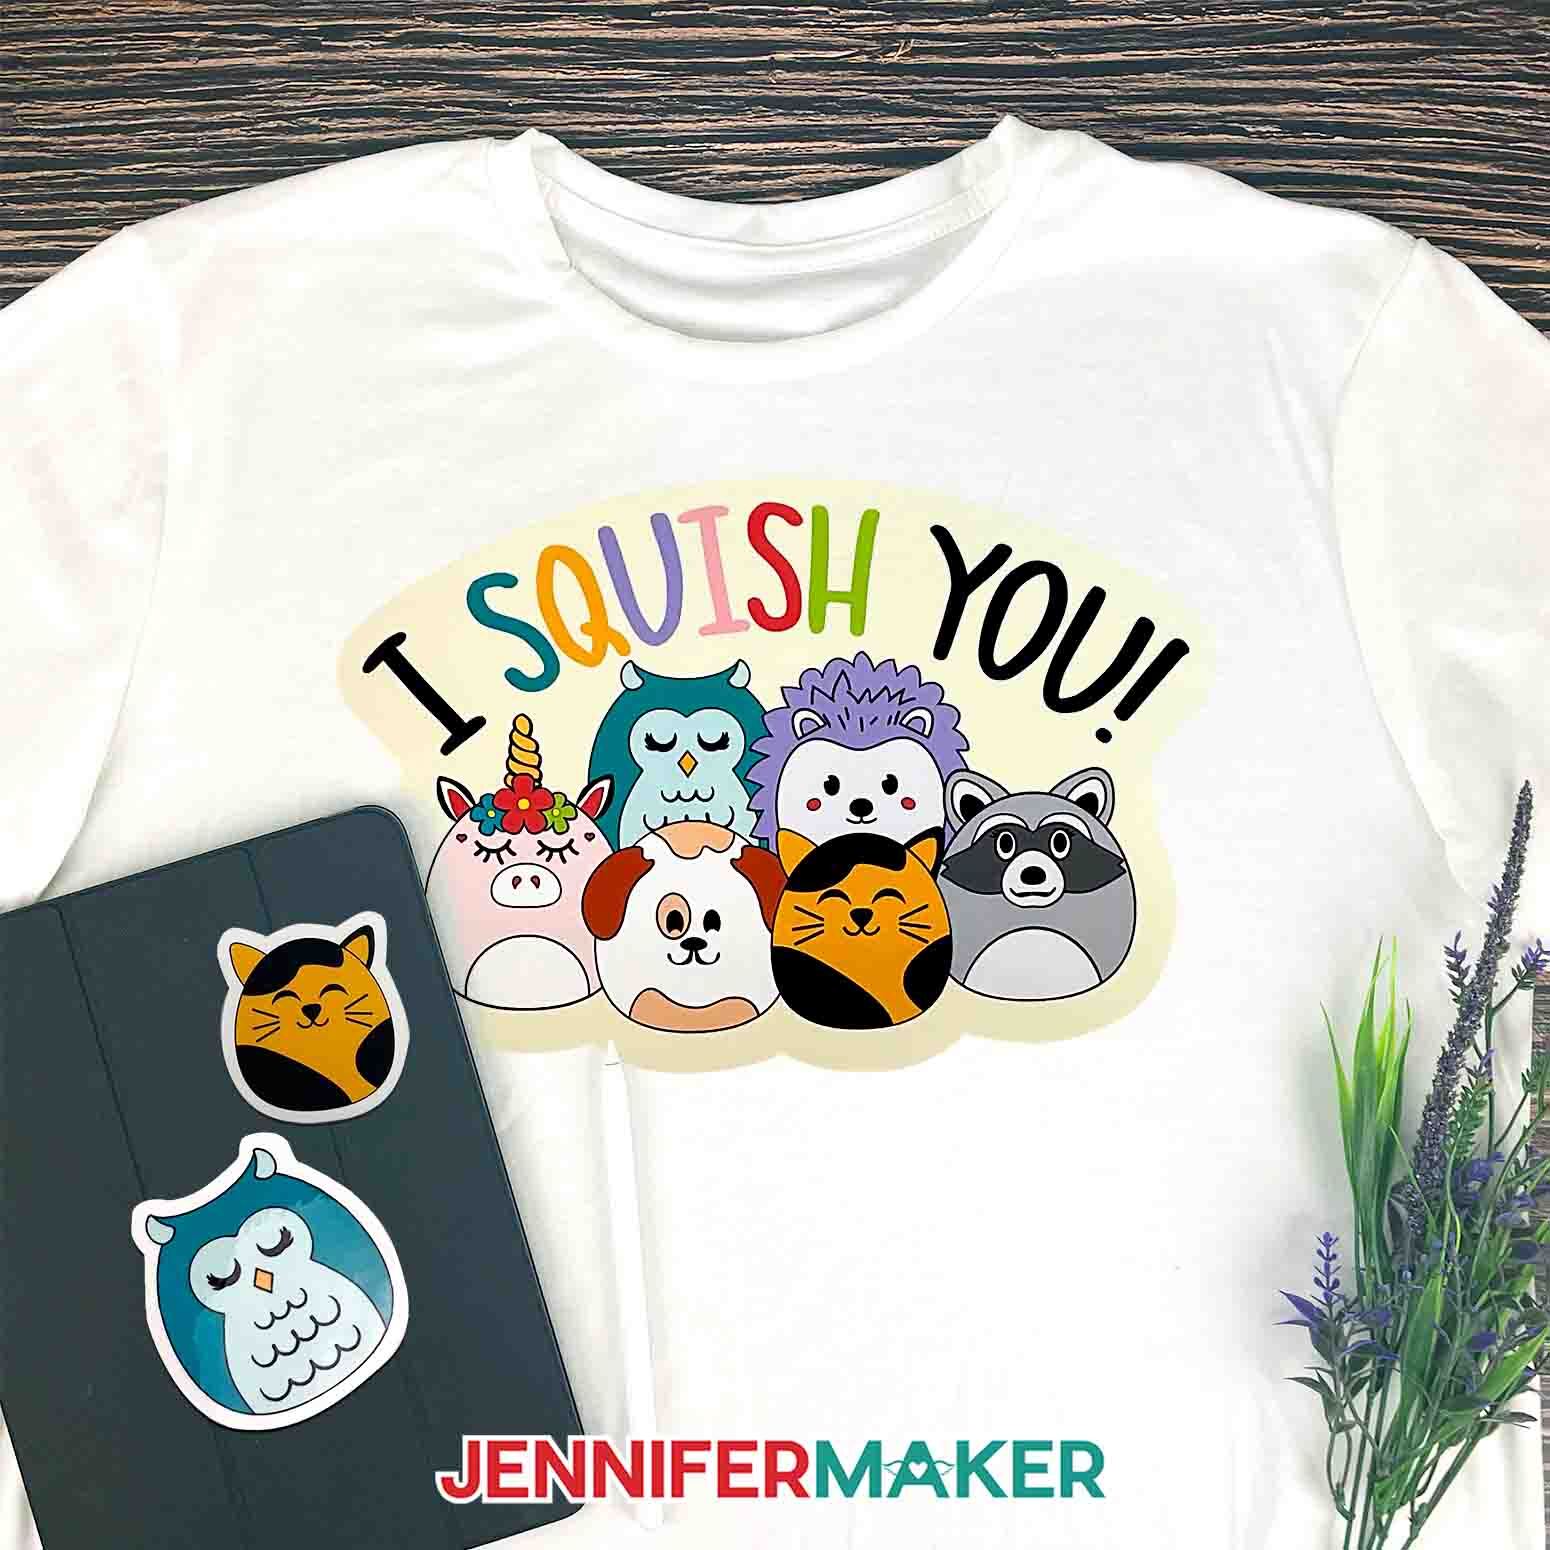
Printable vinyl makes it easy to create custom stickers and shirt designs that are full of color and art that can’t be replicated with standard color vinyl. Wear your designs, give them as gifts and stick them to all kinds of places to liven up your space!
Check out these additional projects for more information on making stickers and iron-on transfer shirts.
Notes
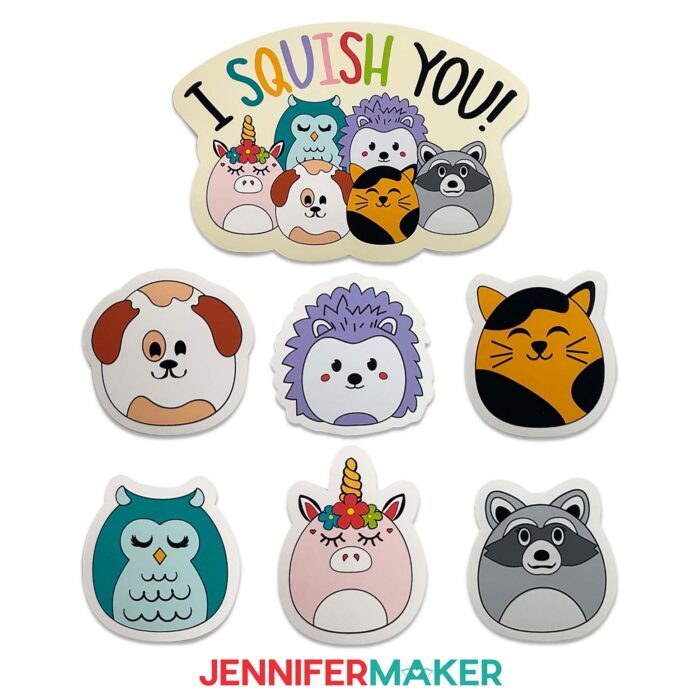
FINISHED SIZE:
T-Shirt: 9" x 6.12"
Large Group Sticker: 5.15" x 3.5"
Unicorn: 1.97" x 2.75"
Cat: 2.06" x 2.25"
Hedgehog: 2.23" x 2.25"
Raccoon: 2.04" x 2.25
Owl: 2.08" x 2.25
FONT: JM Sweet
Answers to Your Questions About How to Use Printable Vinyl with Cricut
Q: Can you use Cricut printable vinyl in a regular printer?
A: Yes! Cricut printable vinyl sheets are designed to be printed on a regular inkjet printer. They are not designed to be printed on a laser printer, as the material may damage the printer.
Q: Which way do you load printable vinyl?
A: On the Cricut printable vinyl that I used, the front and back are clearly indicated. Yours may be different depending on the brand. Check the packaging to be sure! Otherwise your ink could print on the wrong side and make a big mess. Your printer should have indicators to tell if the printable side should be loaded face up or face down.
Q: Do I need special ink for printable vinyl?
A: Nope! Your printable vinyl is designed to be printed on with regular household inkjet printer ink.
Q: Does printable vinyl need to be laminated?
A: Printable heat-transfer vinyl doesn’t need lamination. Stickers also don’t need to be laminated or protected, but a layer of clear vinyl can keep them looking better for longer. I’ll show you how to do this!
Q. What’s the difference between printable vinyl and regular vinyl?
A: The main difference is that printable vinyl has a matte finish, which allows the ink to better absorb into the material. Printing on regular shiny vinyl isn’t advised, as it will likely smear or wear off quickly.
Q. What’s the difference between Cricut printable vinyl and sticker paper?
A: Vinyl stickers are a bit more durable than paper ones. Paper stickers aren’t water resistant, and getting them wet can ruin them. They’re also more likely to get dirty or marked up, while a vinyl sticker can usually be wiped clean.
Q. Does printable vinyl need to be mirrored?
A: Printed heat-transfer vinyl is different from regular HTV because it’s cut face up and does NOT need to be mirrored when cut on your Cricut machine.
Q. How do I create a custom material setting on Cricut?
A: Creating a custom setting is a great way to save time (and frustration) when you’ve needed to tweak your Cricut’s standard material settings. My Dollar Tree Bunny tutorial shows how I created a custom material setting for a new brand of felt!
Q. How do you care for a shirt with a printable vinyl decal?
A: Check the instructions that come with your printable heat-transfer vinyl packaging. You’ll want to wait at least twenty-four hours before washing, and then when you do wash it, turn it inside out and be sure to wash it in cold water. Your printable vinyl won’t hold up well under high temperatures. It’s also important to use a full spin cycle so your T-shirt is not left soaking in water, as that can affect the decal. Hang it to dry, or tumble dry on the lowest setting. If you ever iron your T-shirt, make sure you turn it inside out for that, too. Never iron on the side with the design – or any vinyl decal for that matter!
Get my free SVG/PNG files to make Printable Vinyl Shirts and Stickers!
I’d love to see YOUR wonderful projects when you learn how to use printable vinyl with Cricut! Please share a photo in our Facebook group or tag me on social media with #jennifermaker.
Love,

Want to remember this? Save this tutorial on How to Use Printable Vinyl with Cricut to your favorite Pinterest Board!