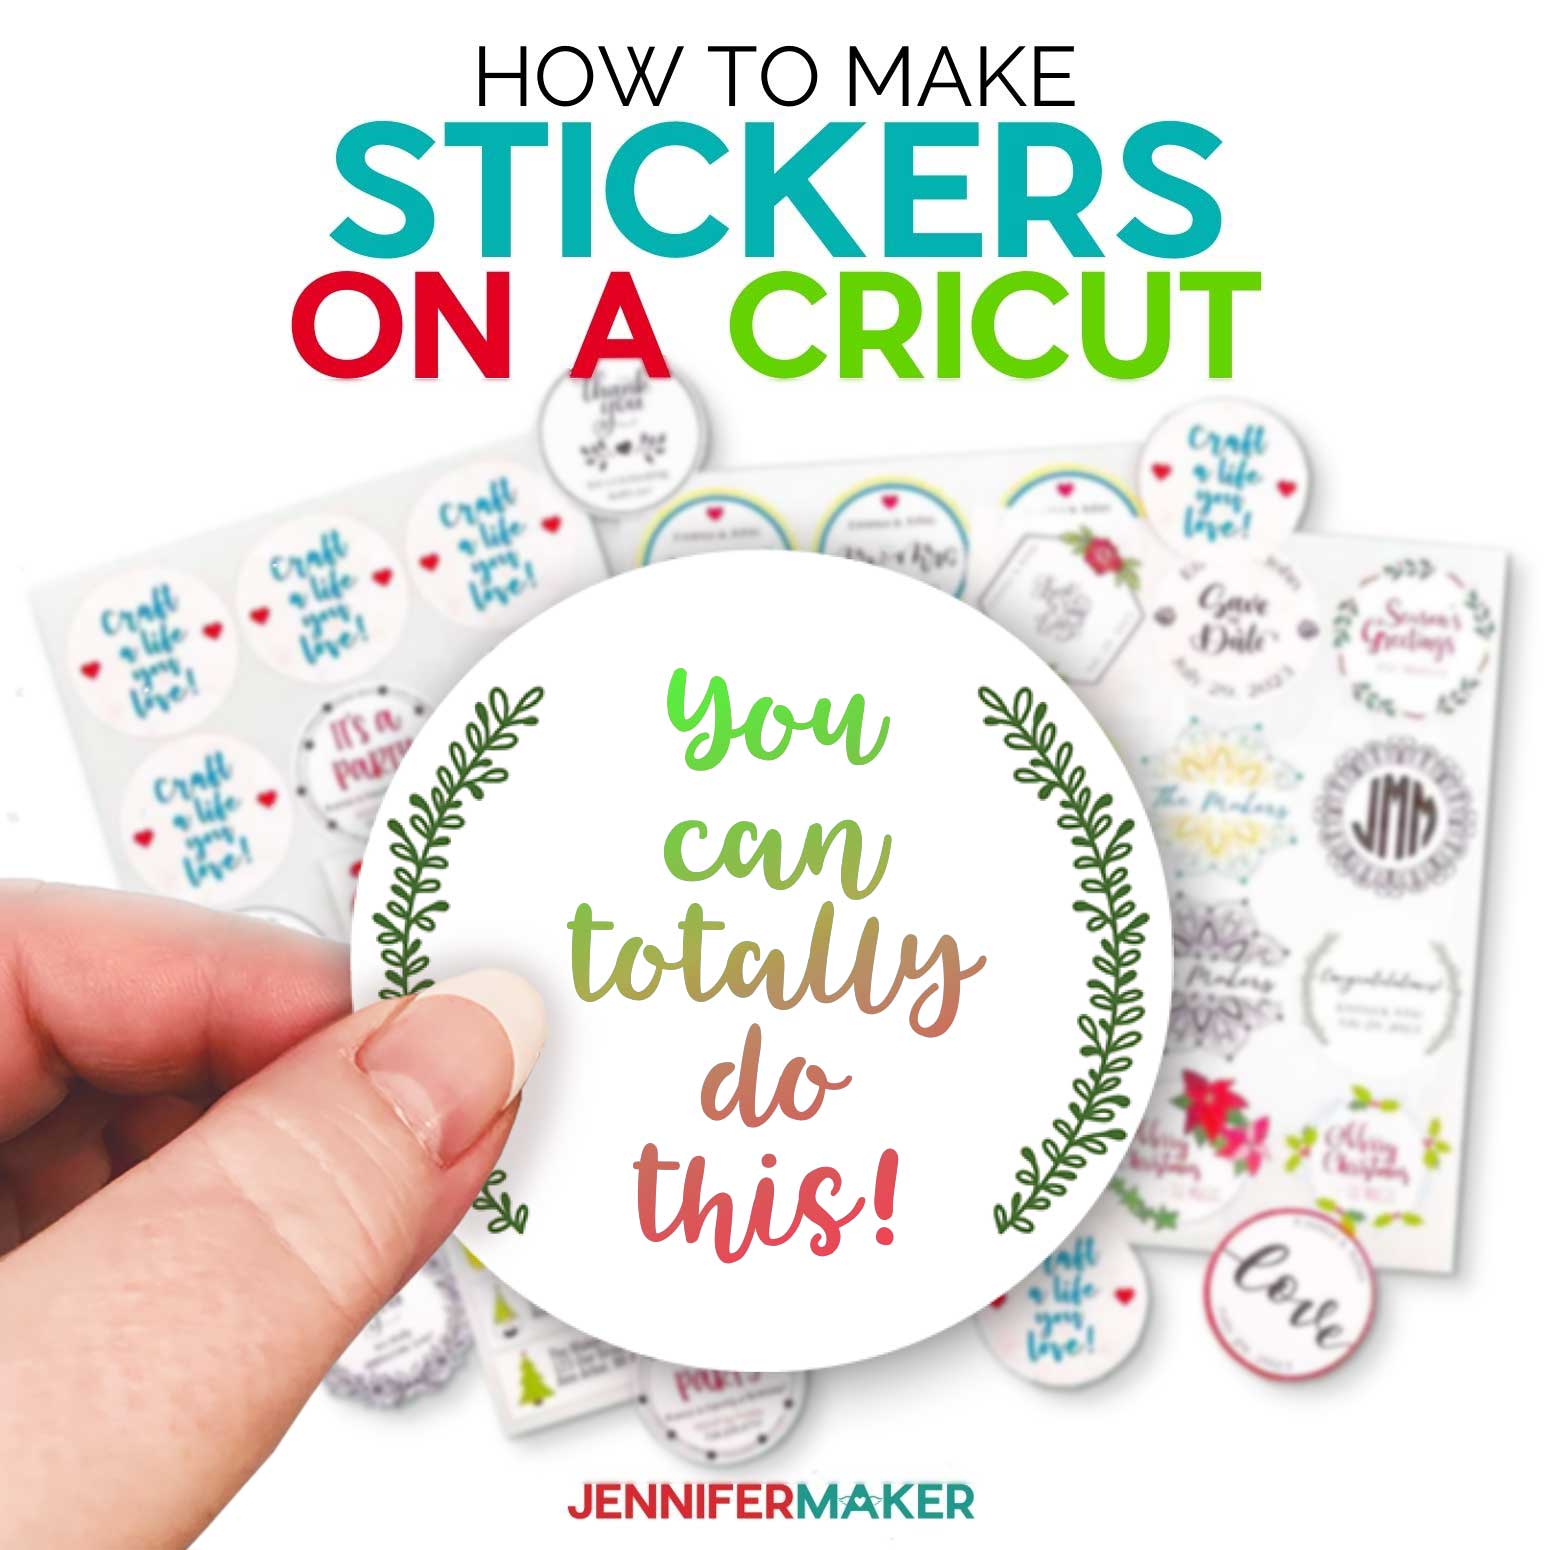
Learn four different methods for making stickers with Cricut water resistant. I’ll show you what worked, what failed, and which sticker protection method ended up being my favorite.

And that is exactly what this tutorial is all about. I’m going to show you, not only how to make stickers with Cricut, with 30+ beautiful new designs, but also how to make stickers that are waterproof… or as close to waterproof as possible.
I have done all the testing with different sticker papers and different ways to protect the stickers and I’m going to share my findings with you, along with the one way I think works best.
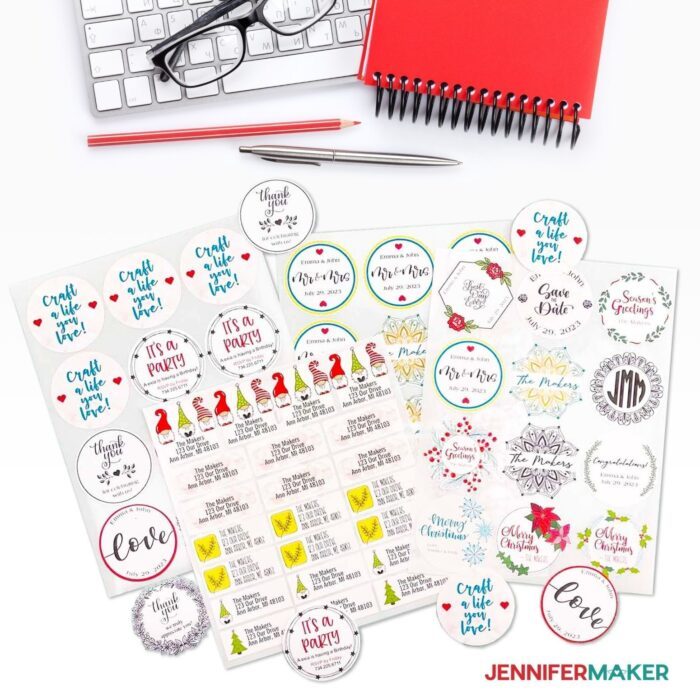
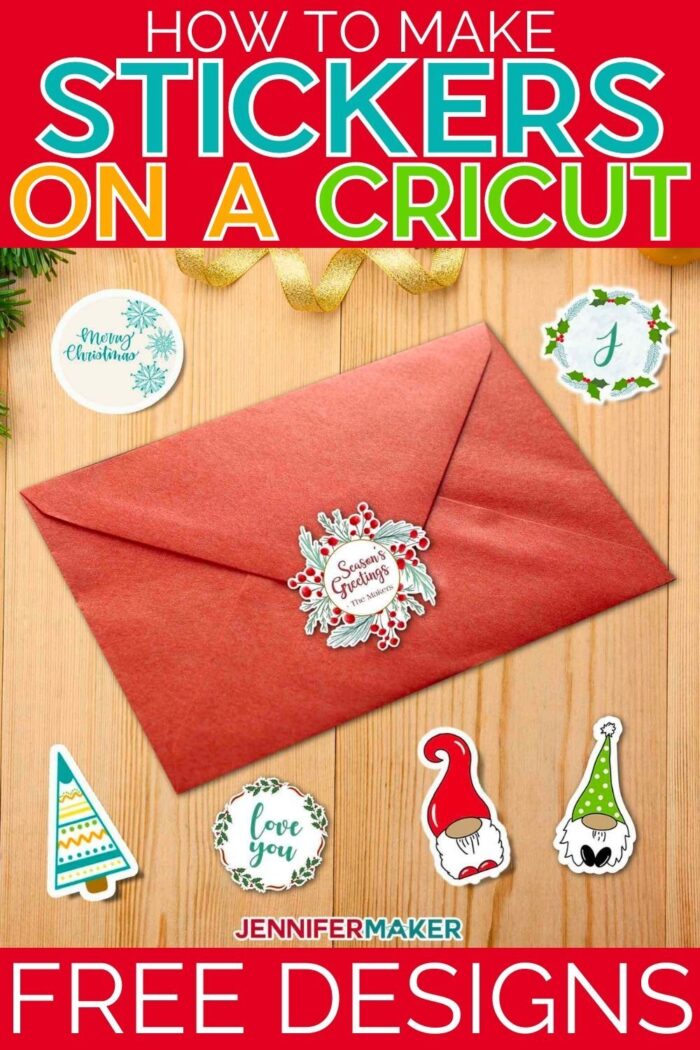
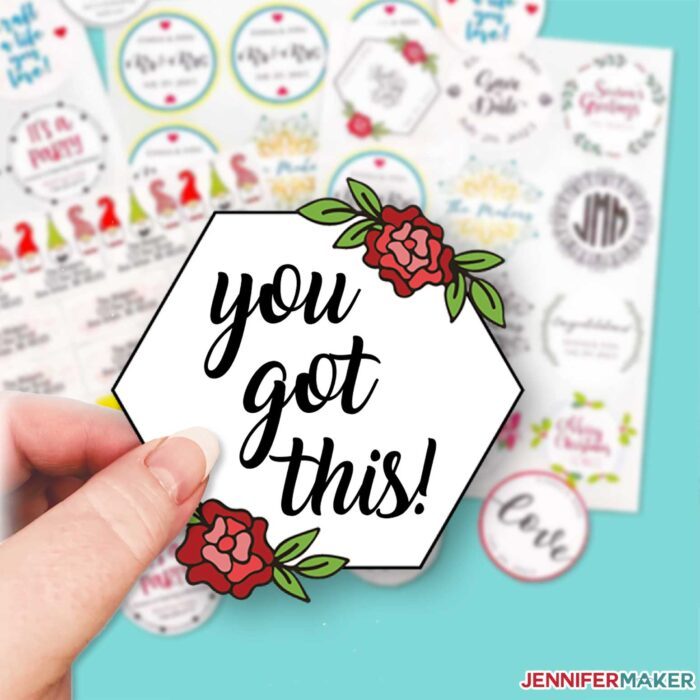
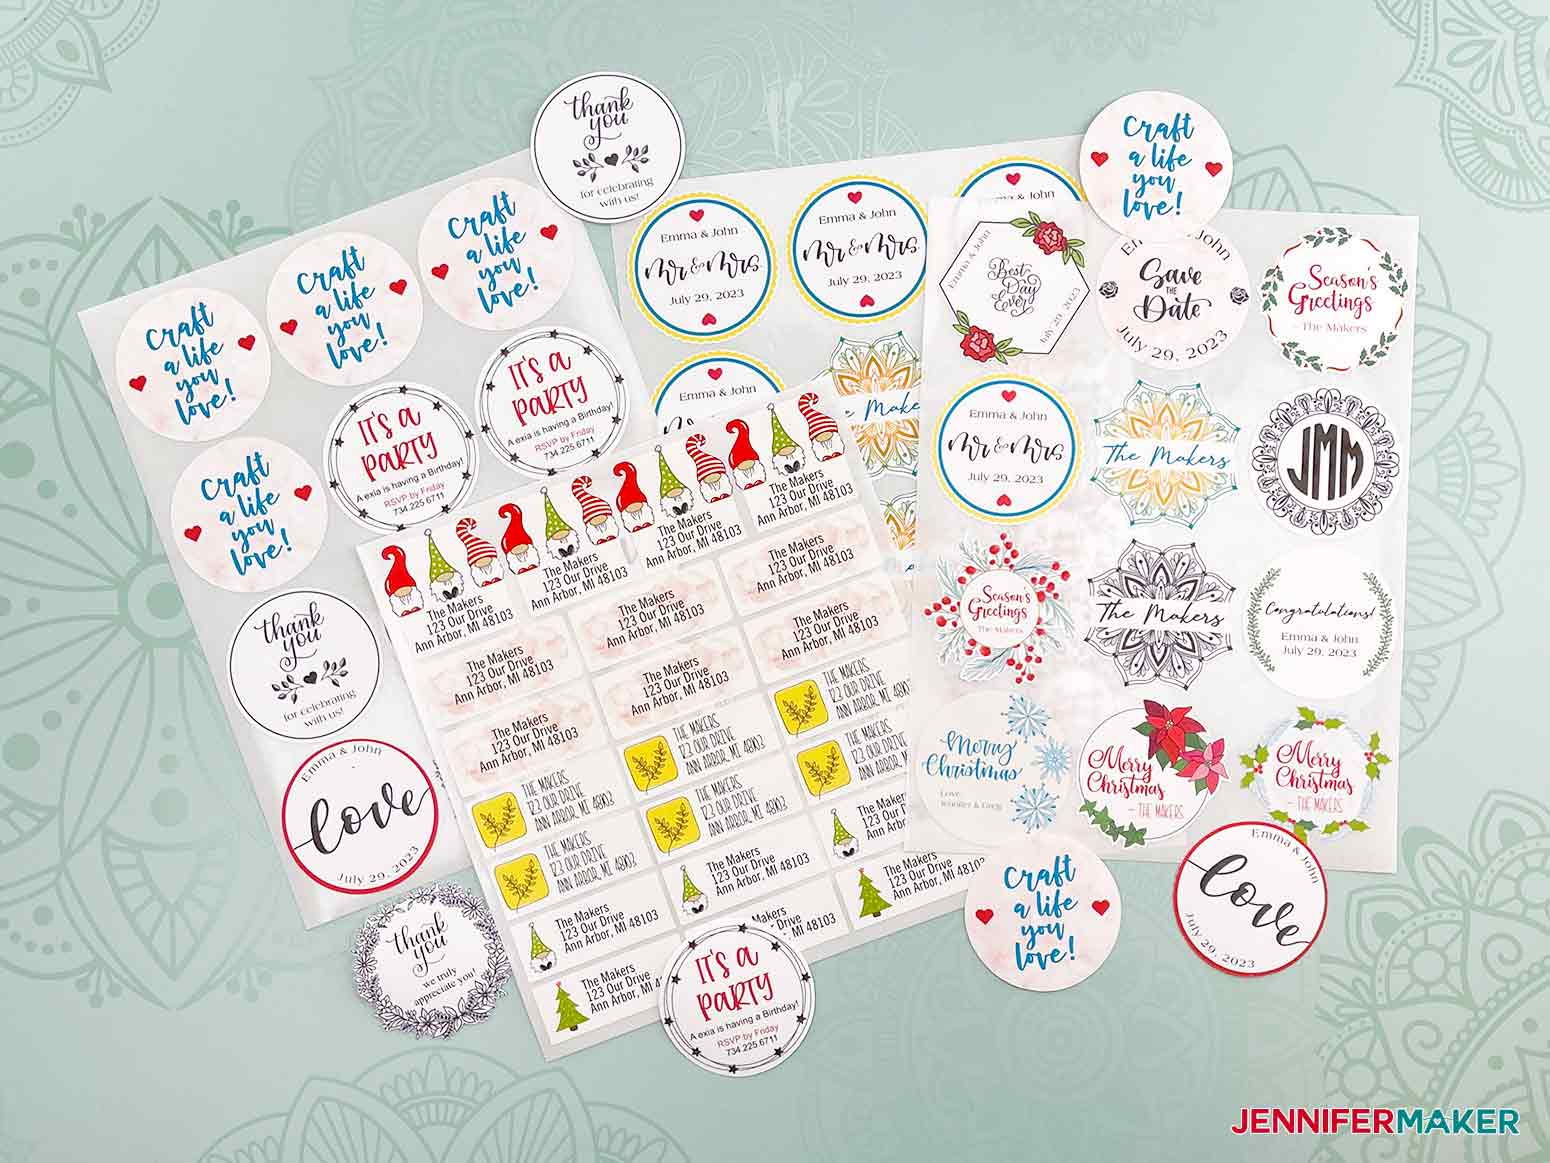
This project contains more than 30 sticker designs! I’m so excited for you to check them out as these have been one of my all-time favorite designs. I’ve included four collections: Christmas, Everyday, Thank You and Wedding.
Whether you’re looking to make some stickers to add on to your holiday cards, or you’re just looking for a fun way to decorate your planner, I think you’ll find something that’s just right!
You can also make your stickers on a sticker sheet using the kiss cut method like in the photo above, or you can make your Cricut stickers die cut like the one below where the sticker is cut all the way through. Both ways are a great way to get some practice on making your very own beautiful stickers!
If this is your first time making custom stickers, have no fear! By following my step by step tutorial, you will learn the perfect cut setting you need to get that cut just right. You’ll understand what the black rectangle, or black lines (registration box) are for when using print then cut (yes, I get this question a lot!). You’ll also learn a few other important things such as the material settings, the best sticker paper to use, and my favorite way to make this process have the best results.
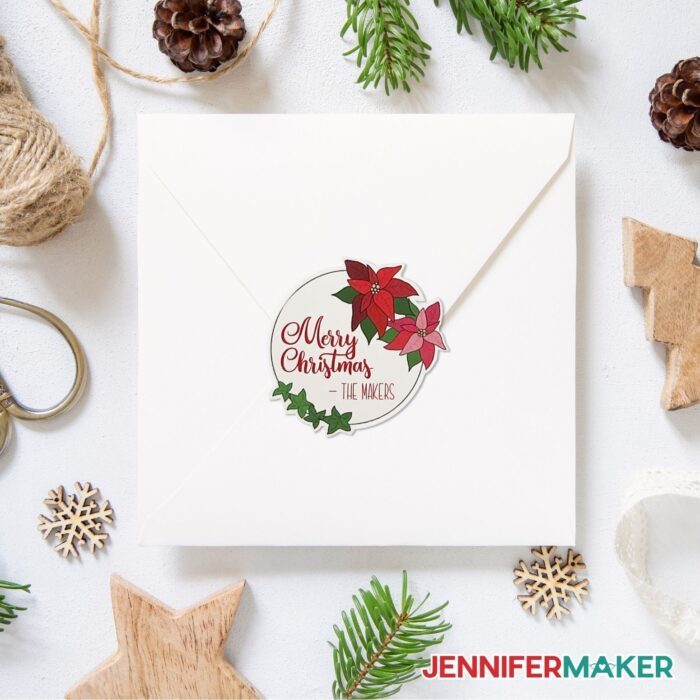
Like I previously mentioned, there are different kinds of stickers you can make with your Cricut machine including these fun and festive stickers I made for the holidays:
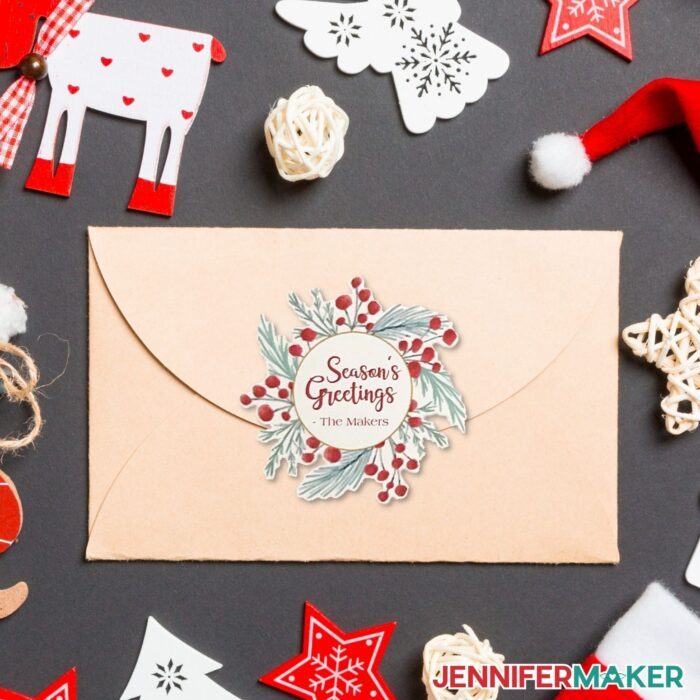
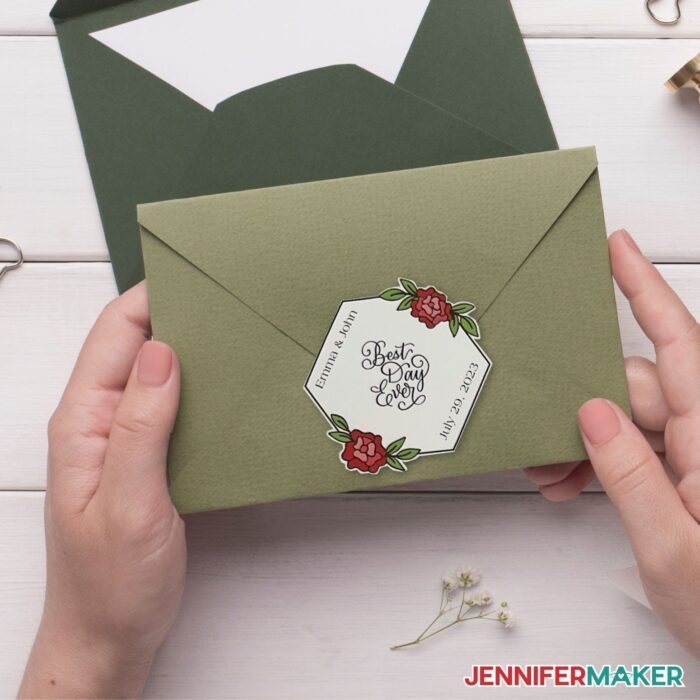
These holiday stickers can be used for all sorts of things, to dress up envelopes, greeting cards, letters. And let’s not forget, these add wonderful personalization to your gift tags. The best part about making stickers is that it’s totally up to you and you get to decide where they look best!
I printed my stickers on two different types of paper: Avery sticker paper and printable vinyl sticker paper. I then sealed them three different ways. One way was to apply clear or transparent vinyl, one using polyurethane spray and lastly I used duraclear varnish. I share my test results with you at the end of this tutorial, but I will tell you this, I was actually surprised with the findings!
Other tools I used for this project include my handy Cricut machine, a lightgrip mat (blue mat), a brayer, scraper, and trimmer (or scissors ).
Let me show you how easy it is to make stickers with your Cricut using my free designs! This post contains some affiliate links for your convenience (which means if you make a purchase after clicking a link I will earn a small commission but it won’t cost you a penny more)! Read my full disclosure policy.
Materials to Make Stickers with Cricut
View my Amazon shopping list with the exact items we used to make this project
- Printable Vinyl Sticker Paper -OR-
- Printable Vinyl Stickers
- Avery 8.5″ x 11″ Sticker Paper
- Clear Vinyl Laminate -OR- Cricut Transparent Vinyl
- Polyurethane Spray
- Gloss or Matte DuraClear Varnish (optional)
- Fast Drying Polyurethane Spray (optional)
- Kraft Paper (optional, to protect your surface)
- (Optional) Fonts: I used Hello Georgina (free alternative to Annie Leu font found in Design Space), Roman Serif (free alternative to Americana Std font found in Design Space), and Sallim font (free)
- A method to print and cut your stickers – I used the Cricut Maker but you can also use the Cricut Maker 3 or Explore Series machines
- Inkjet Printer (I used the HP Envy 7155)
- LightGrip Machine Mat 12″ x 12″ (blue)
- XL Scraper Tool
- Brayer (optional)
- Cricut Trimmer or Scissors
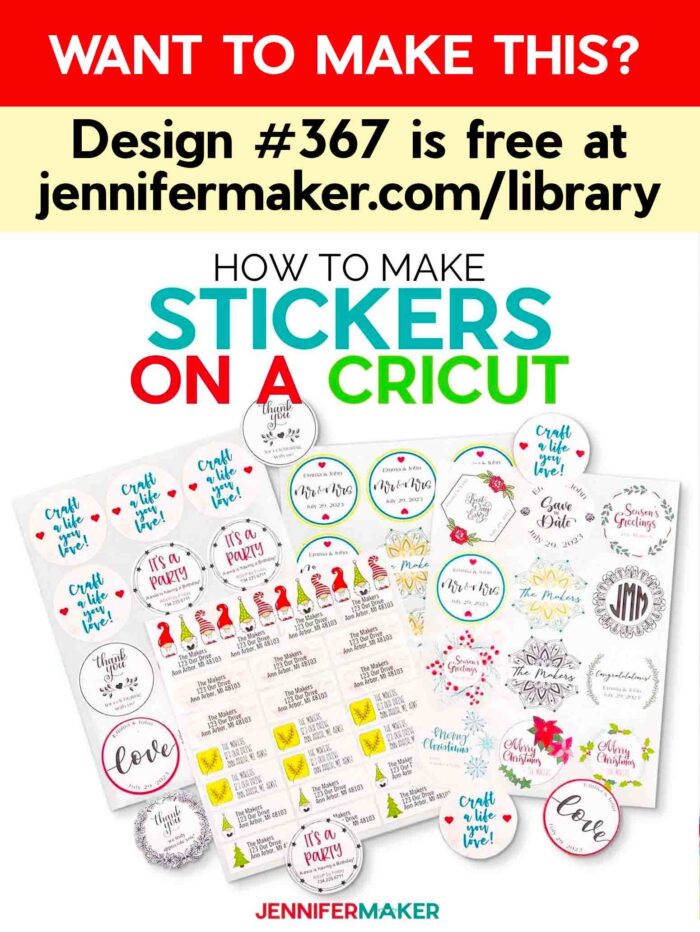
- Design #367 – My free Sticker Collection with over 30 images (available in my free resource library – get the password by filling out the form at the bottom of this page)
How to Make Stickers with Cricut and Waterproof Them!
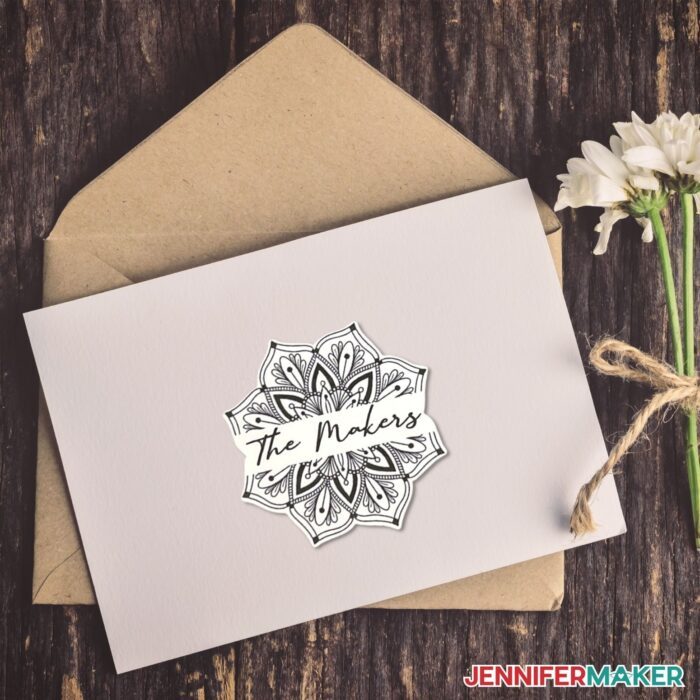
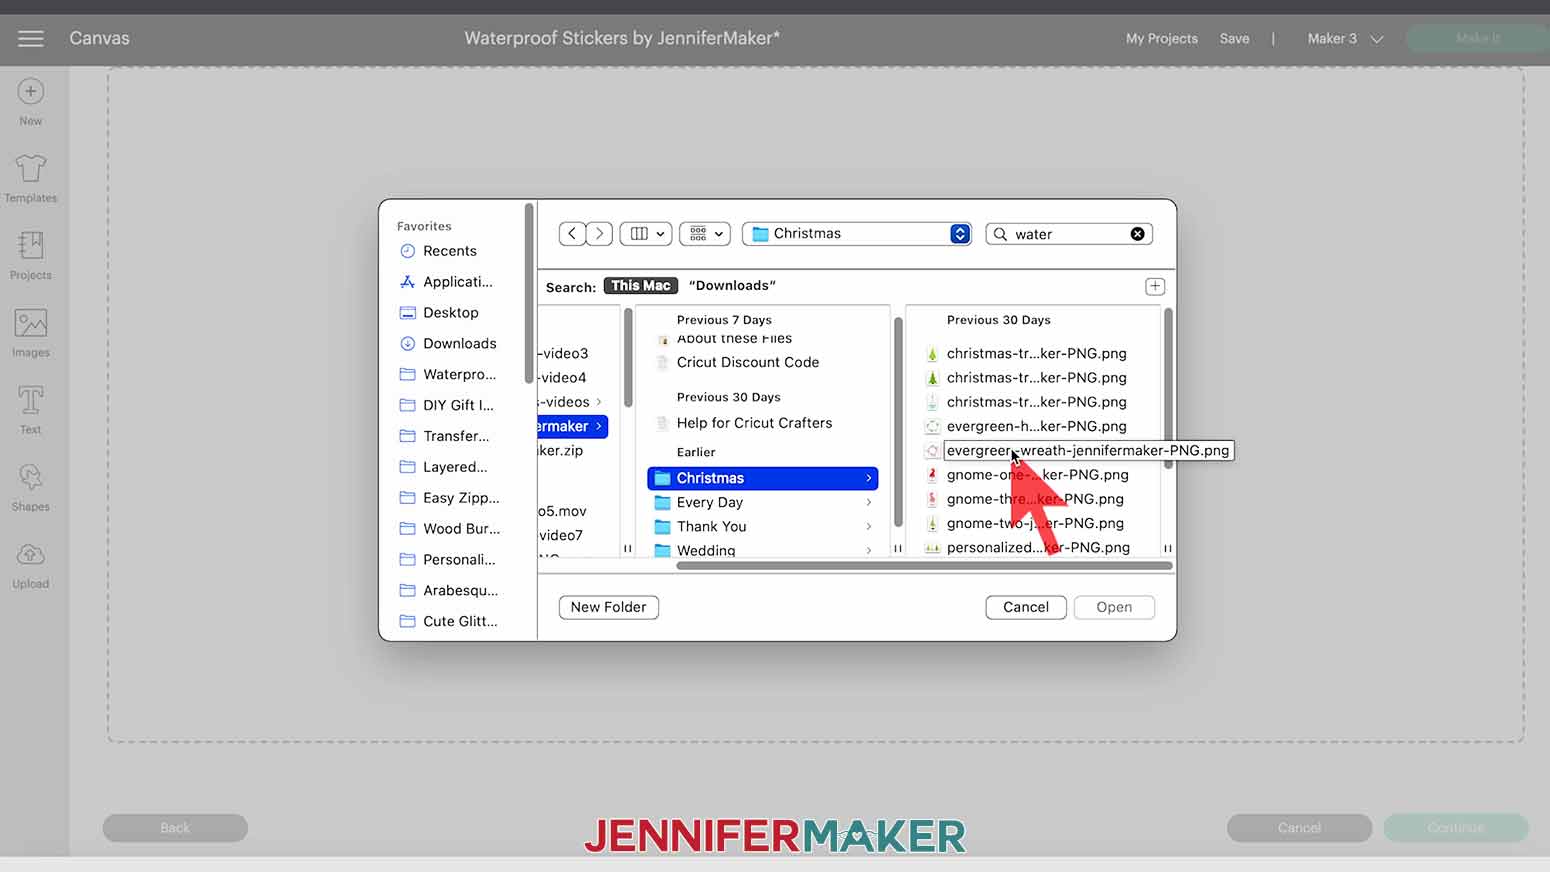
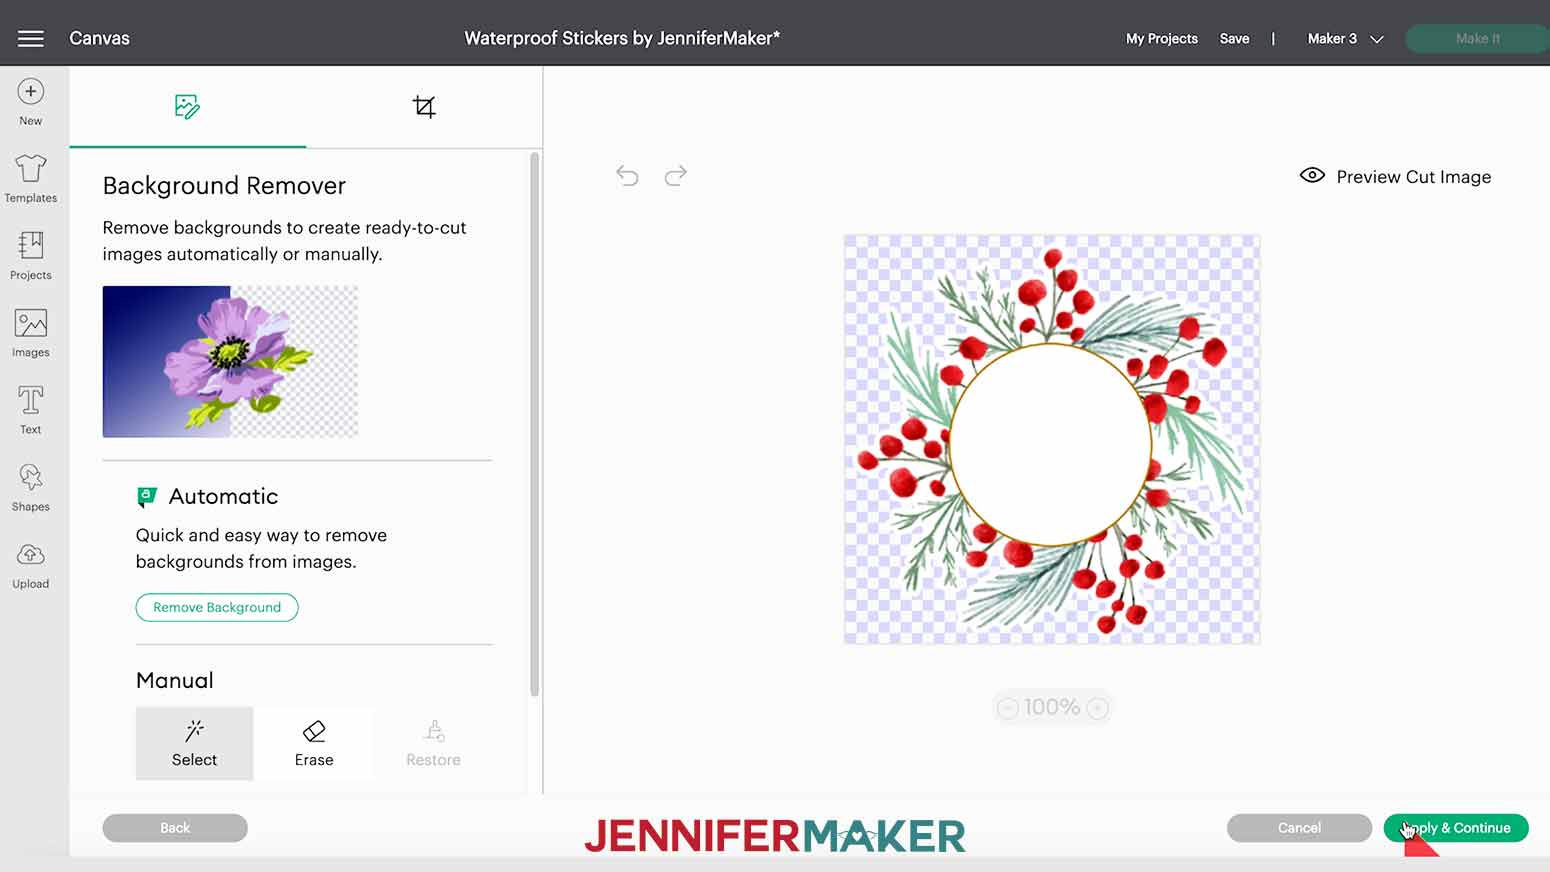
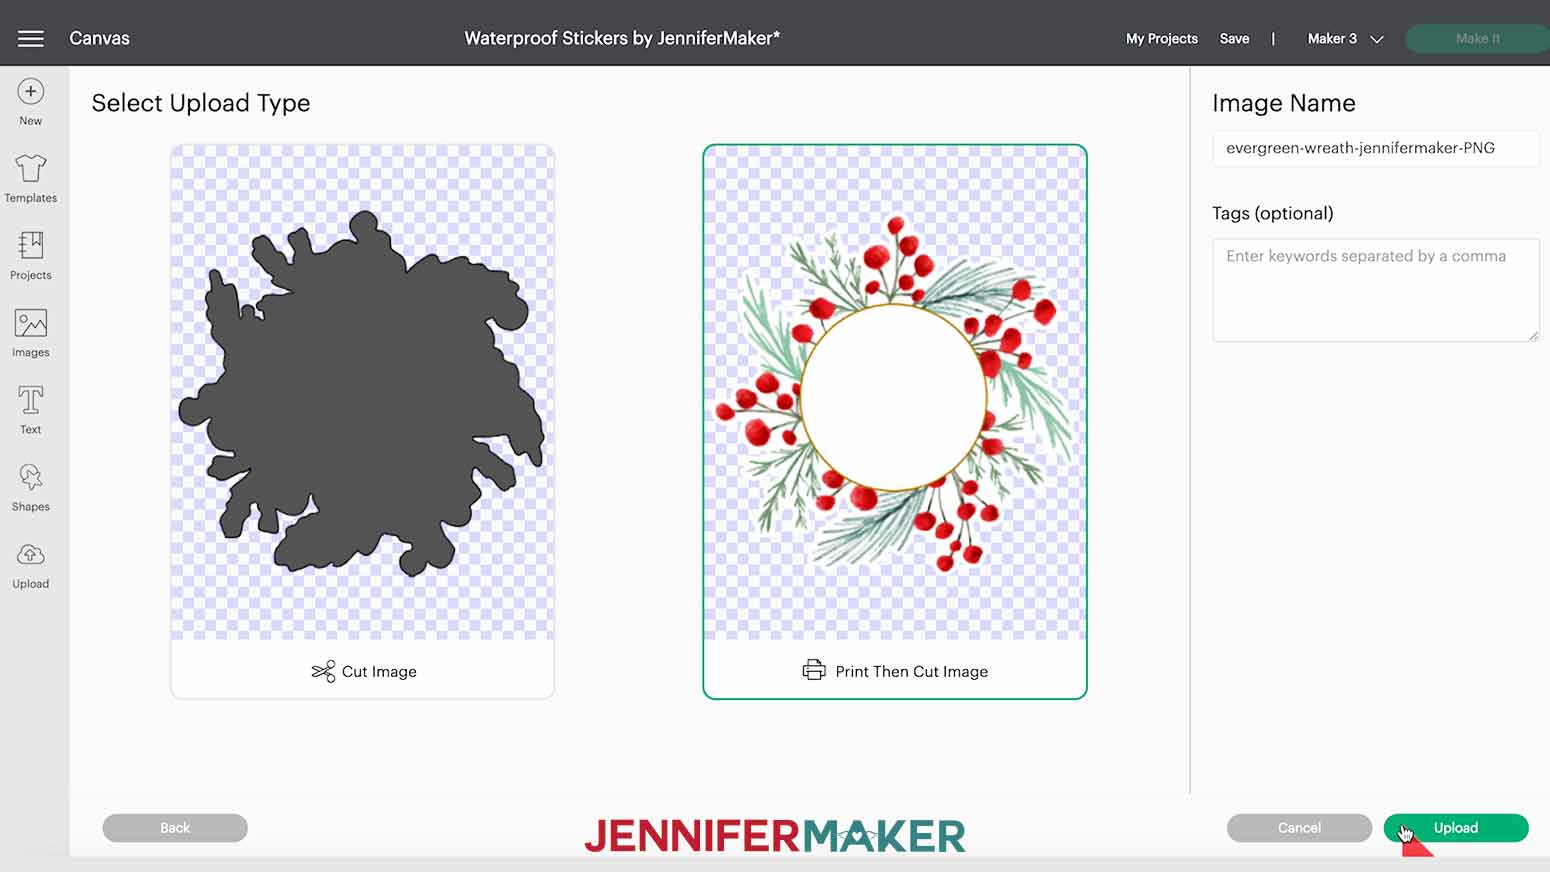
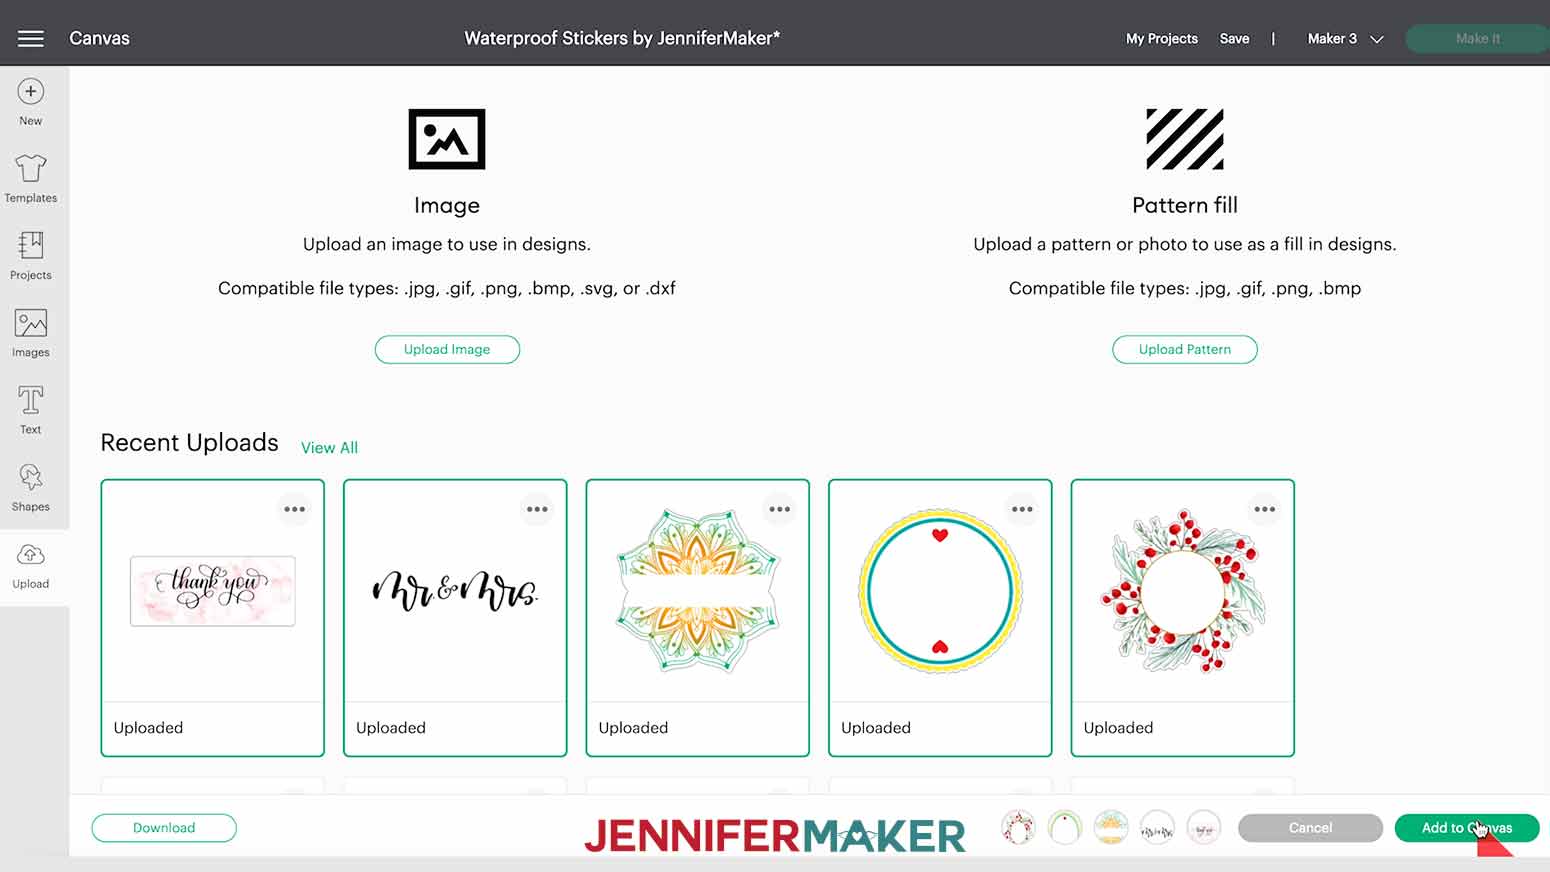
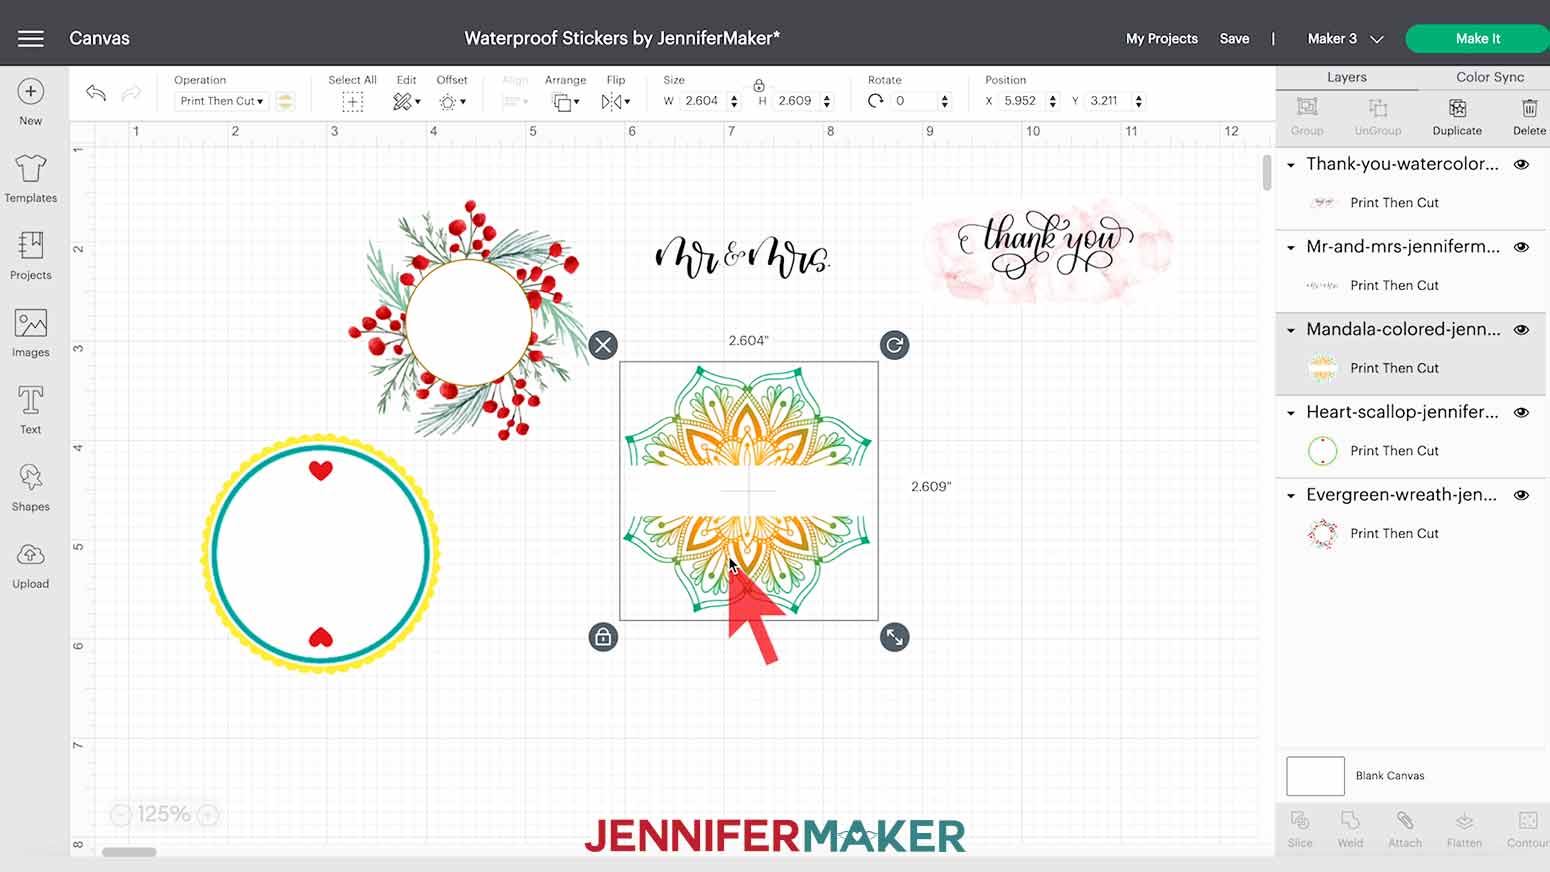
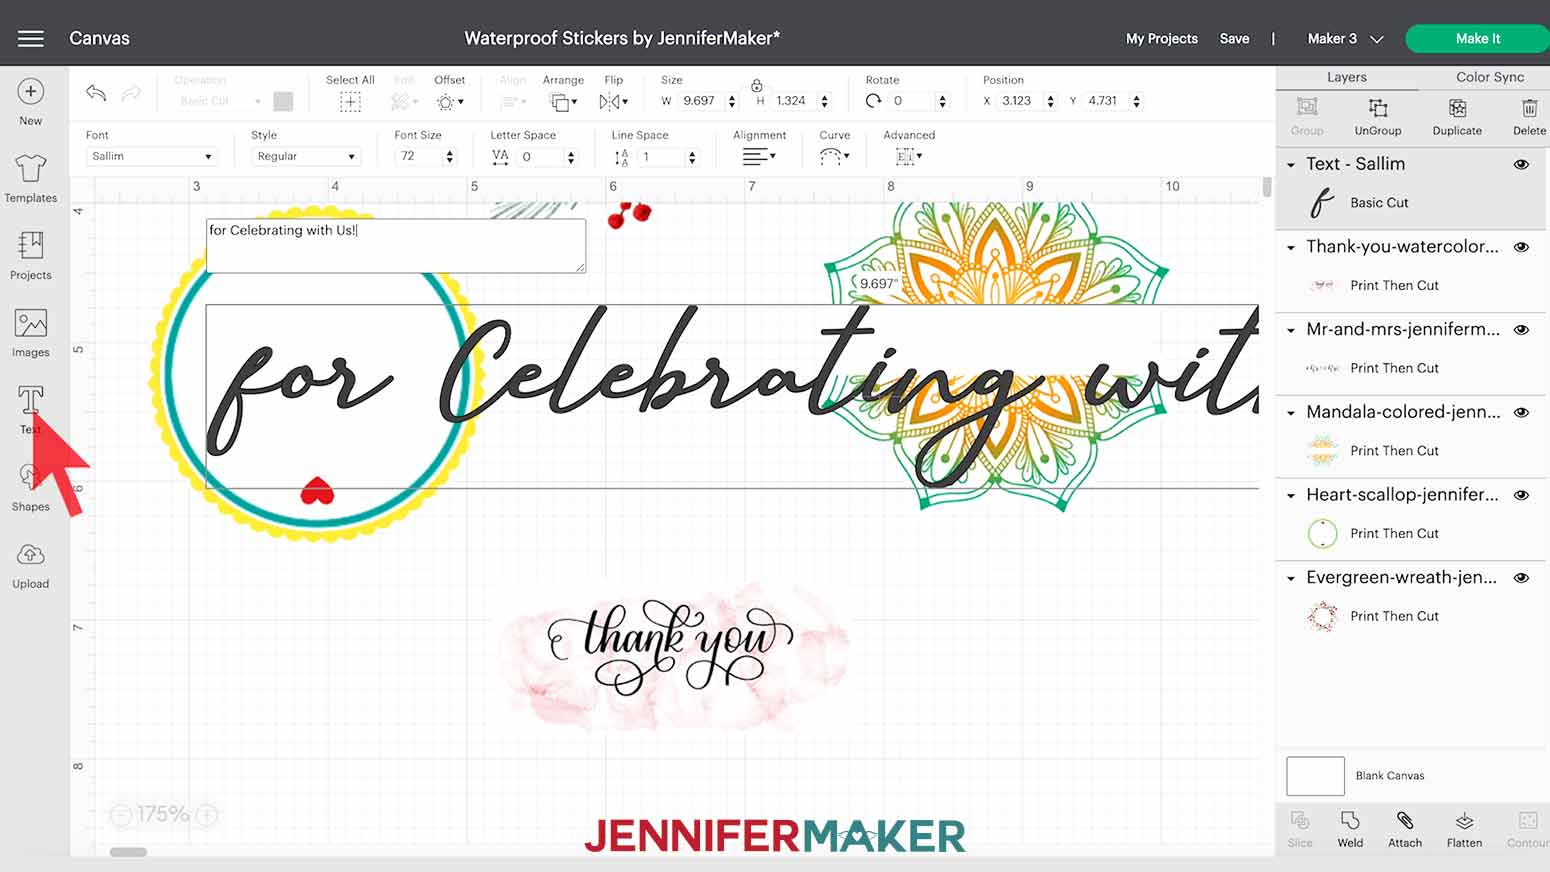
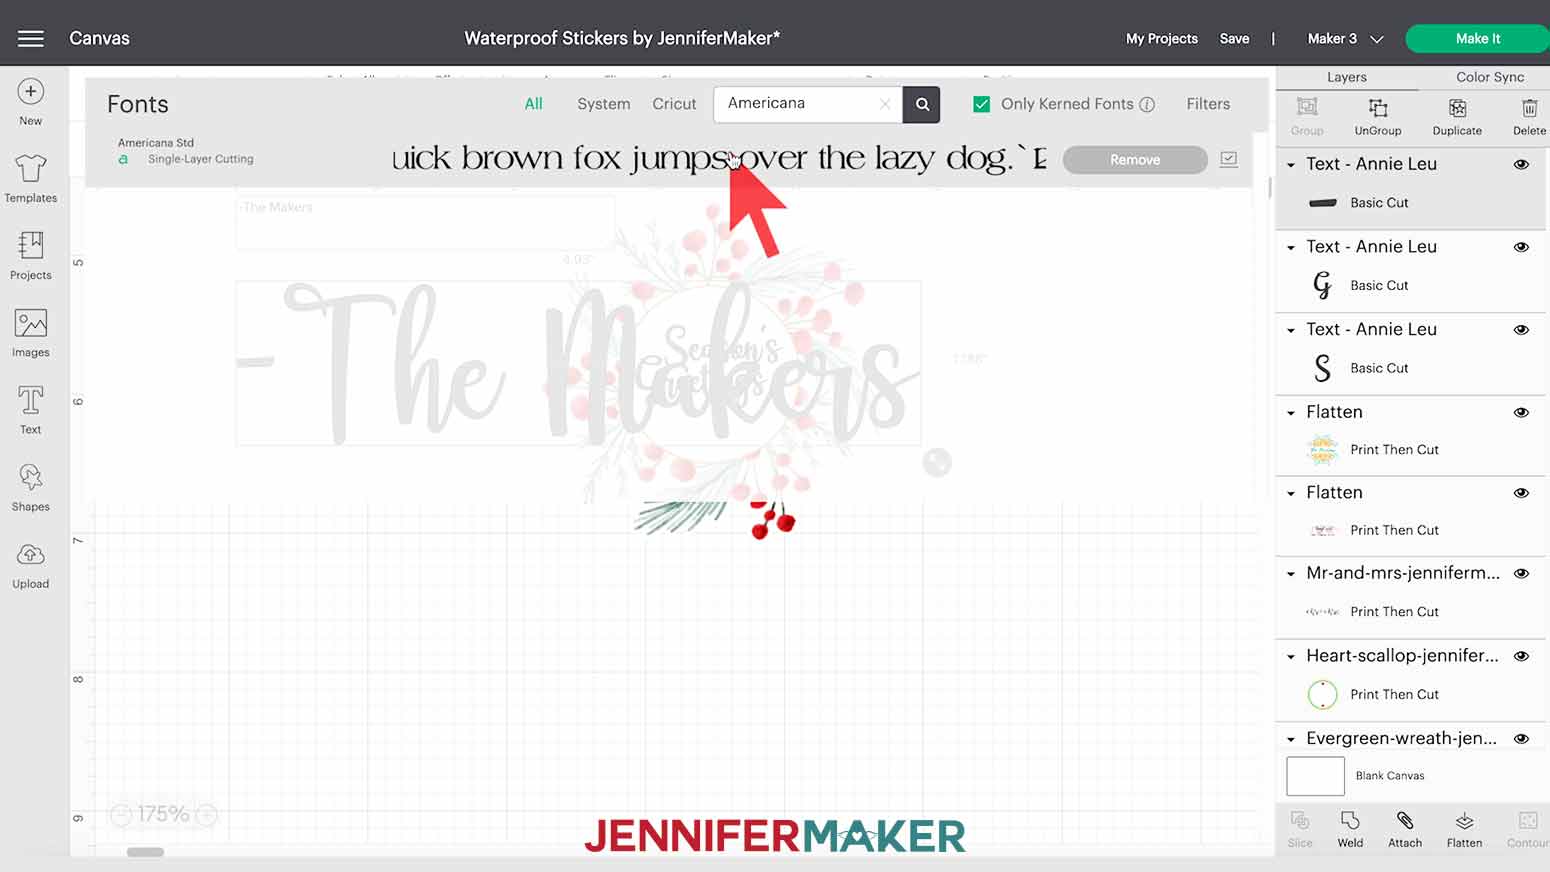
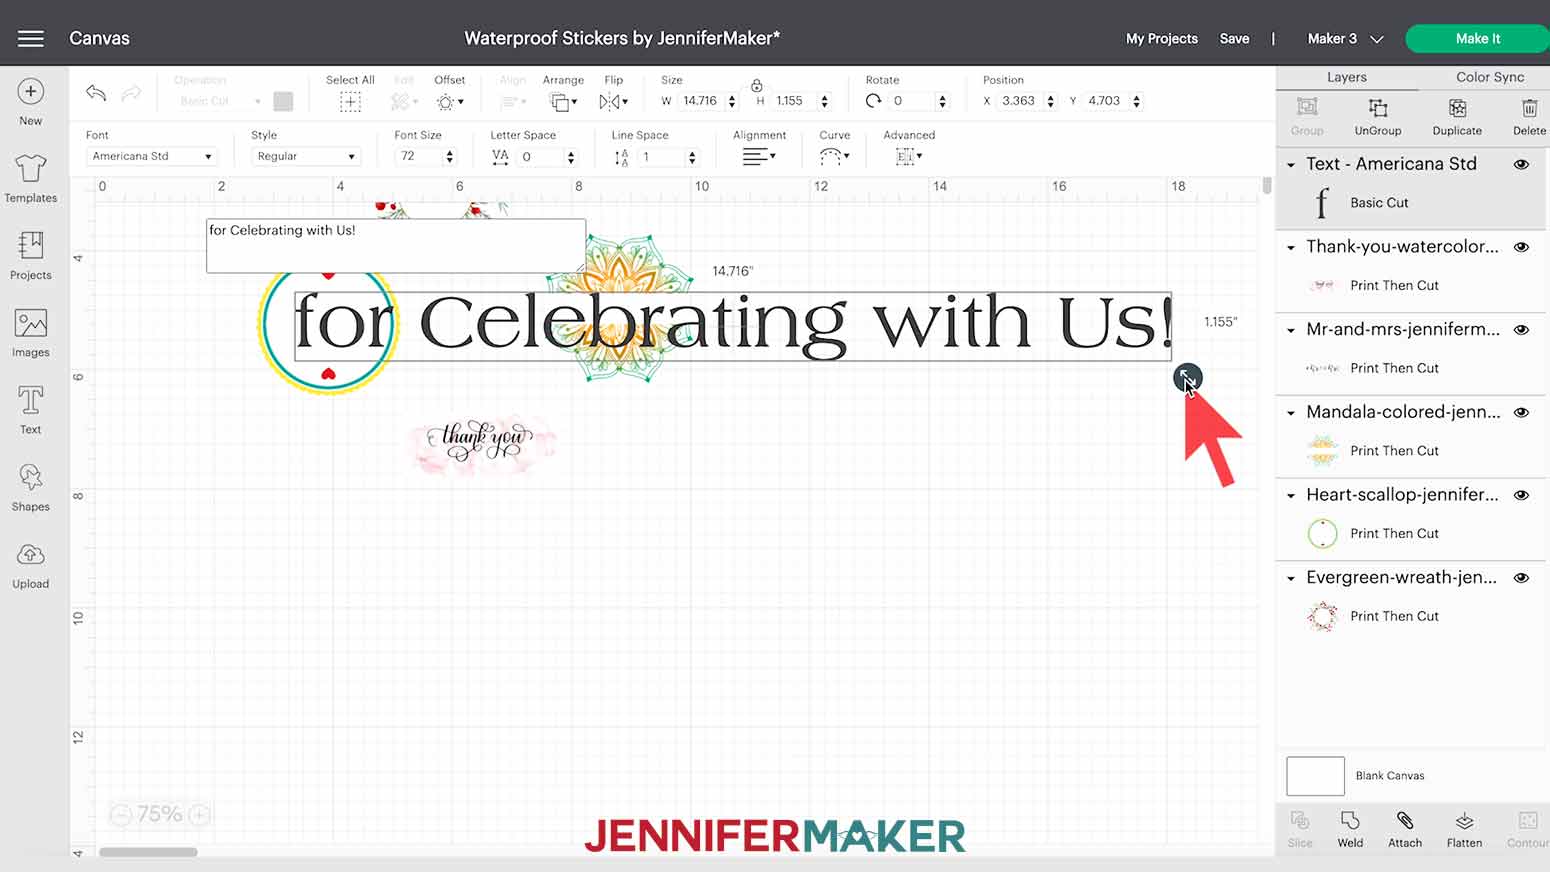
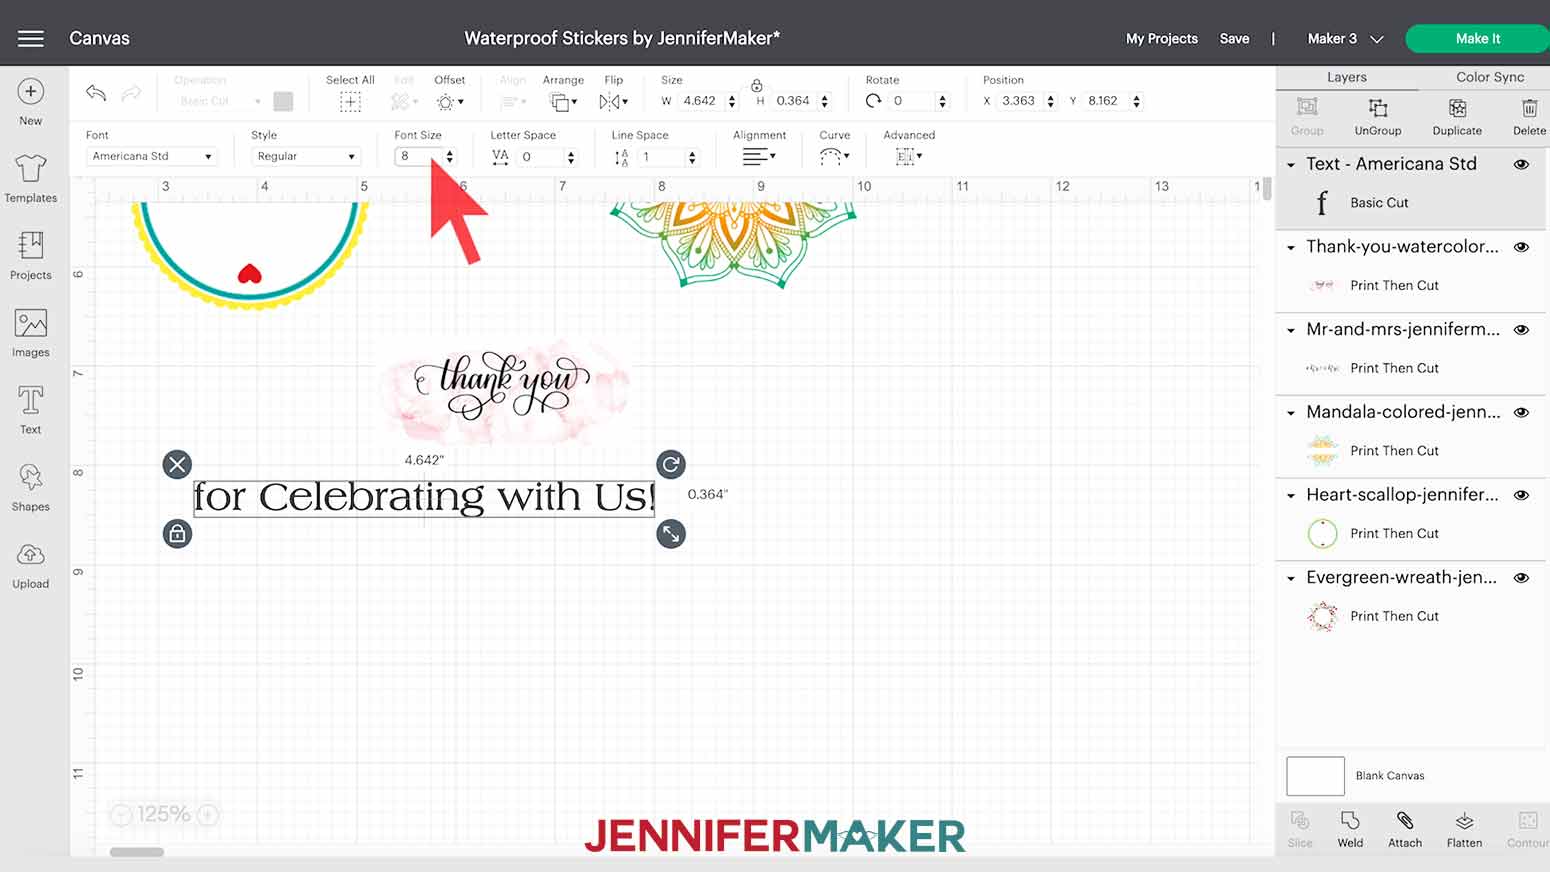
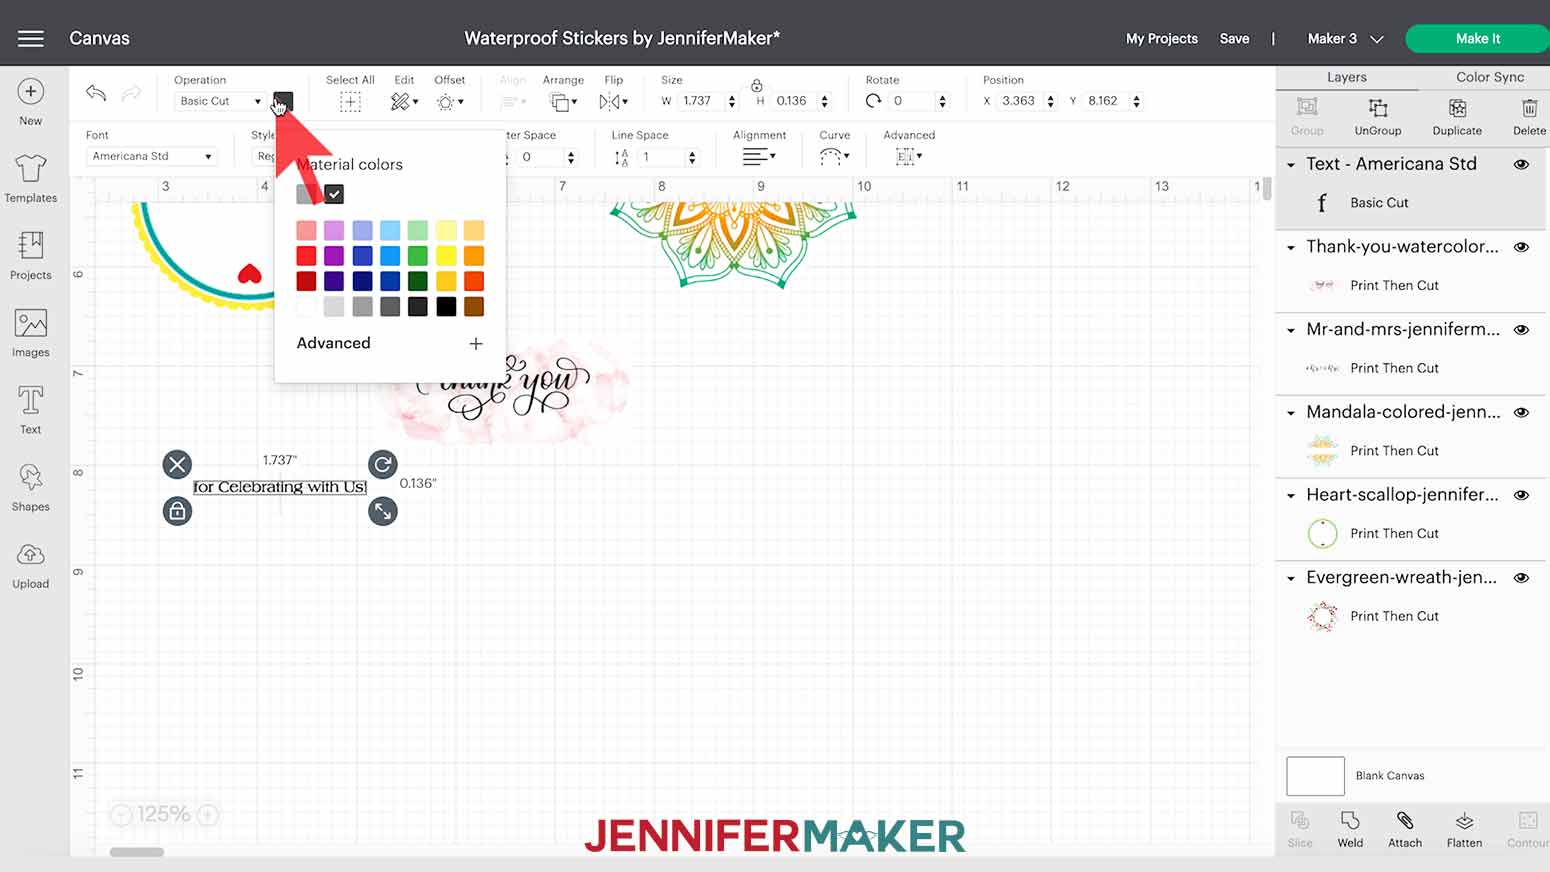
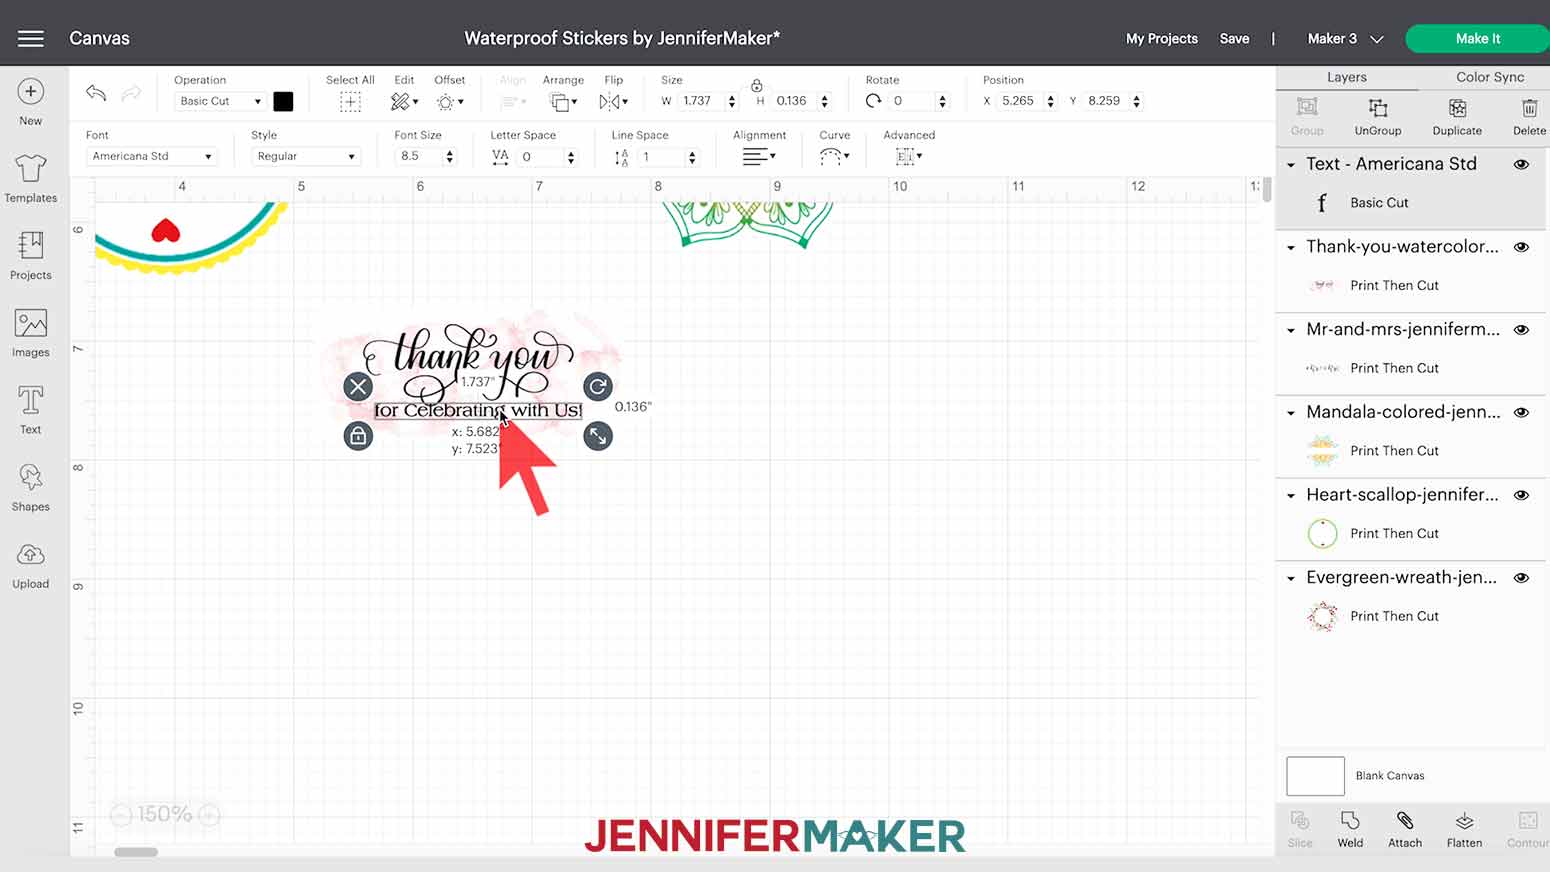
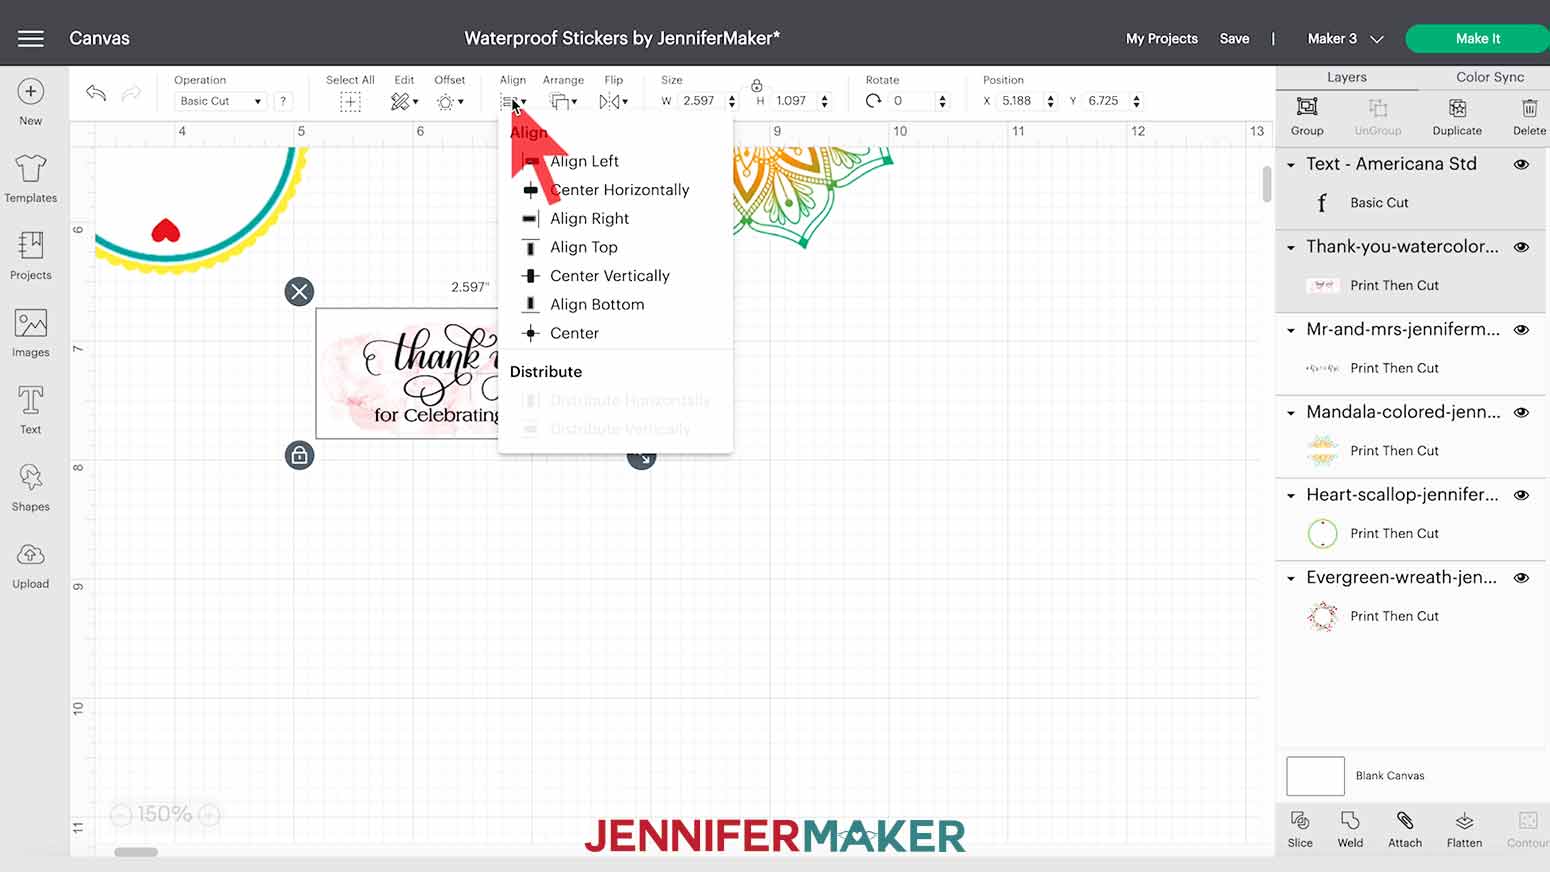
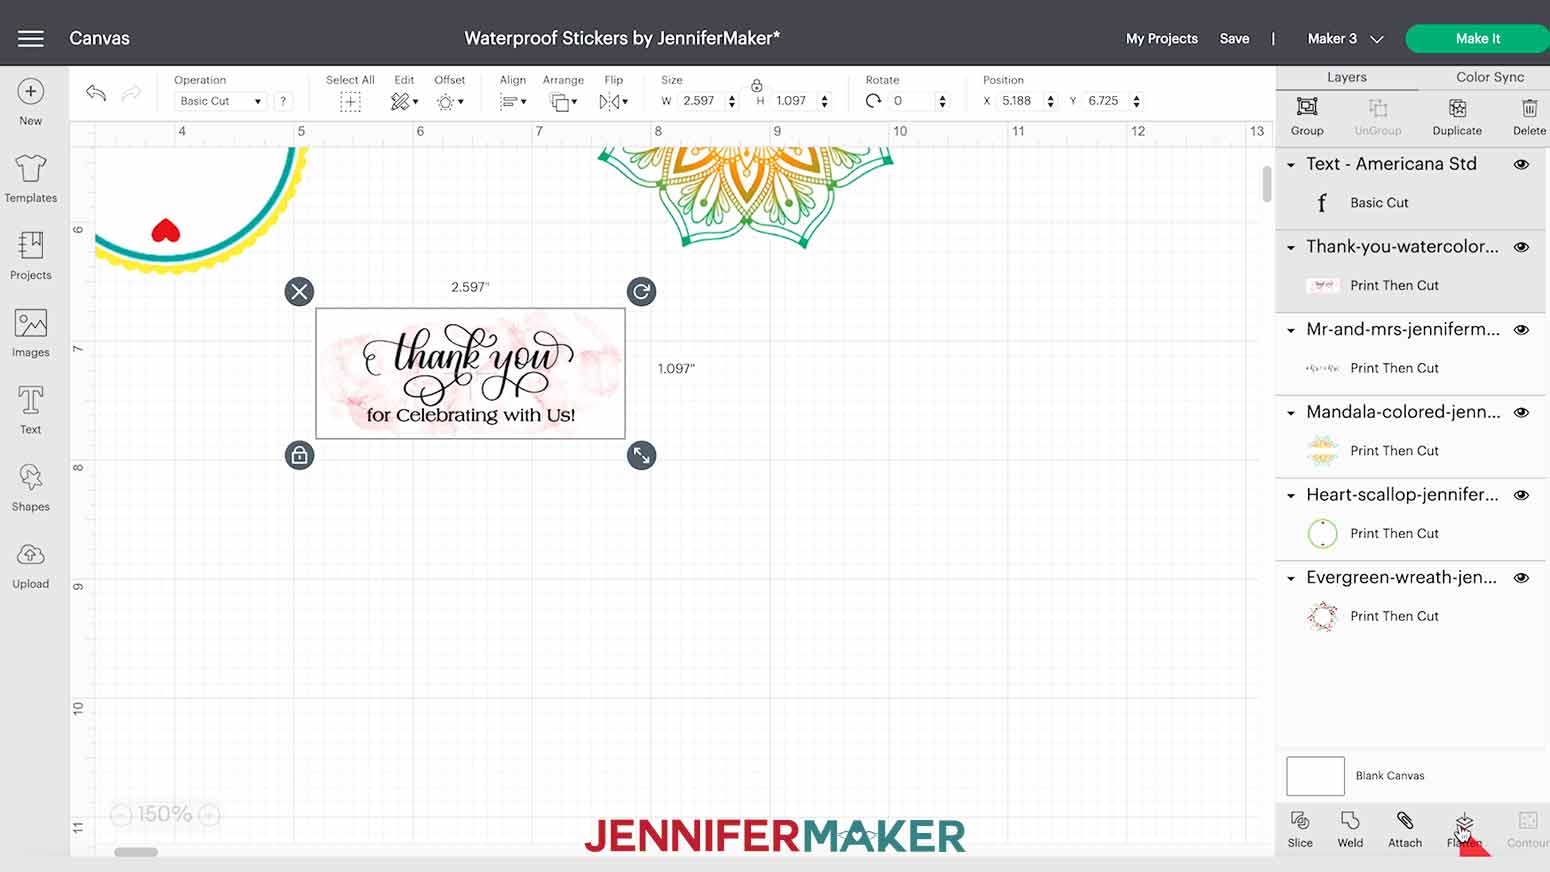
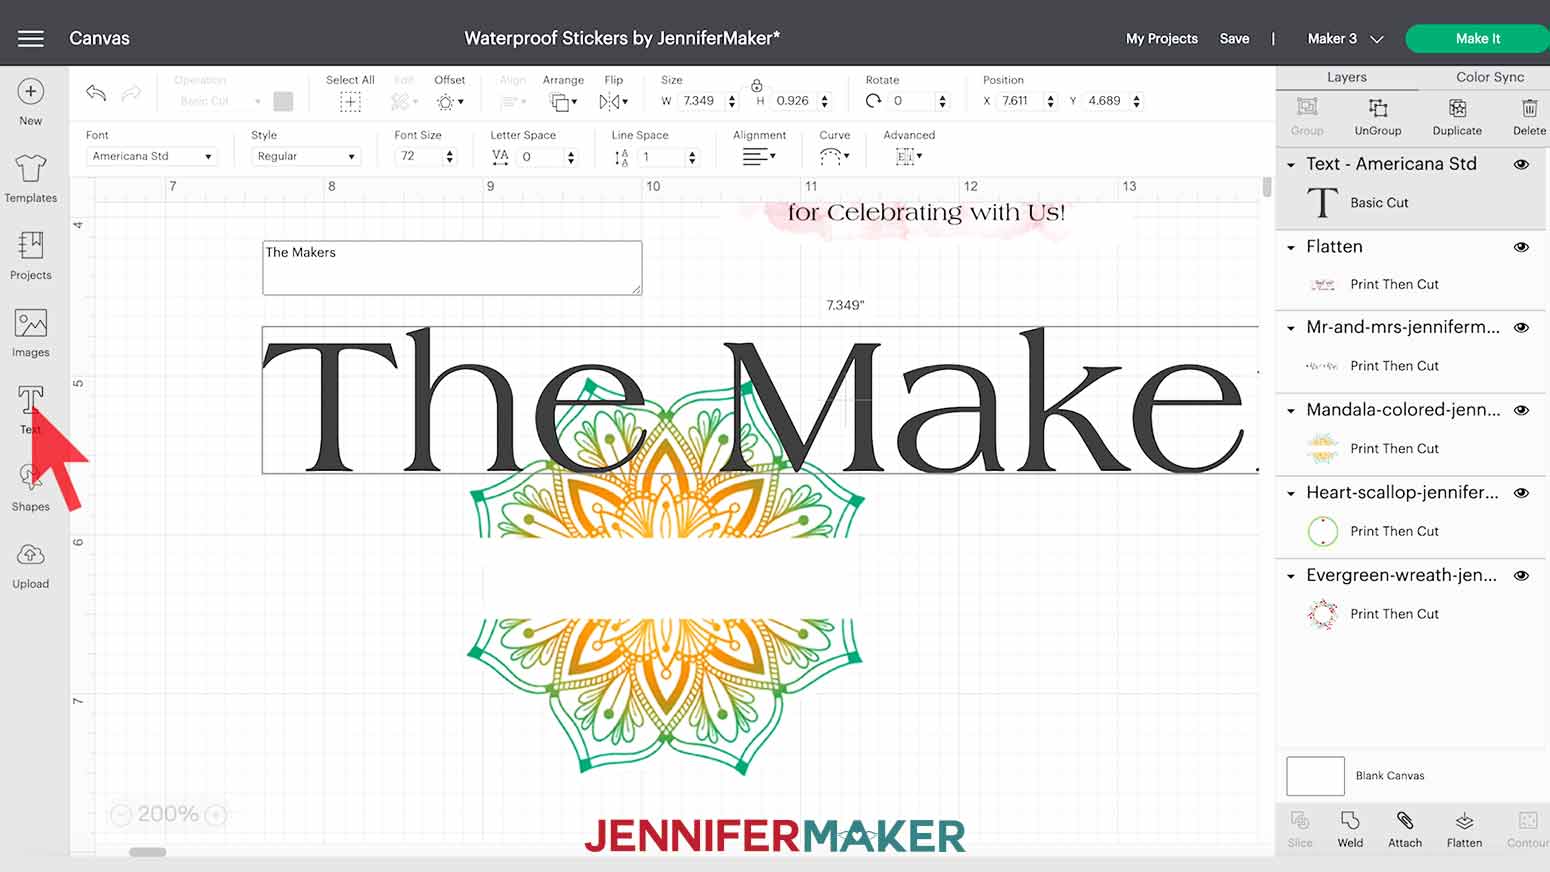
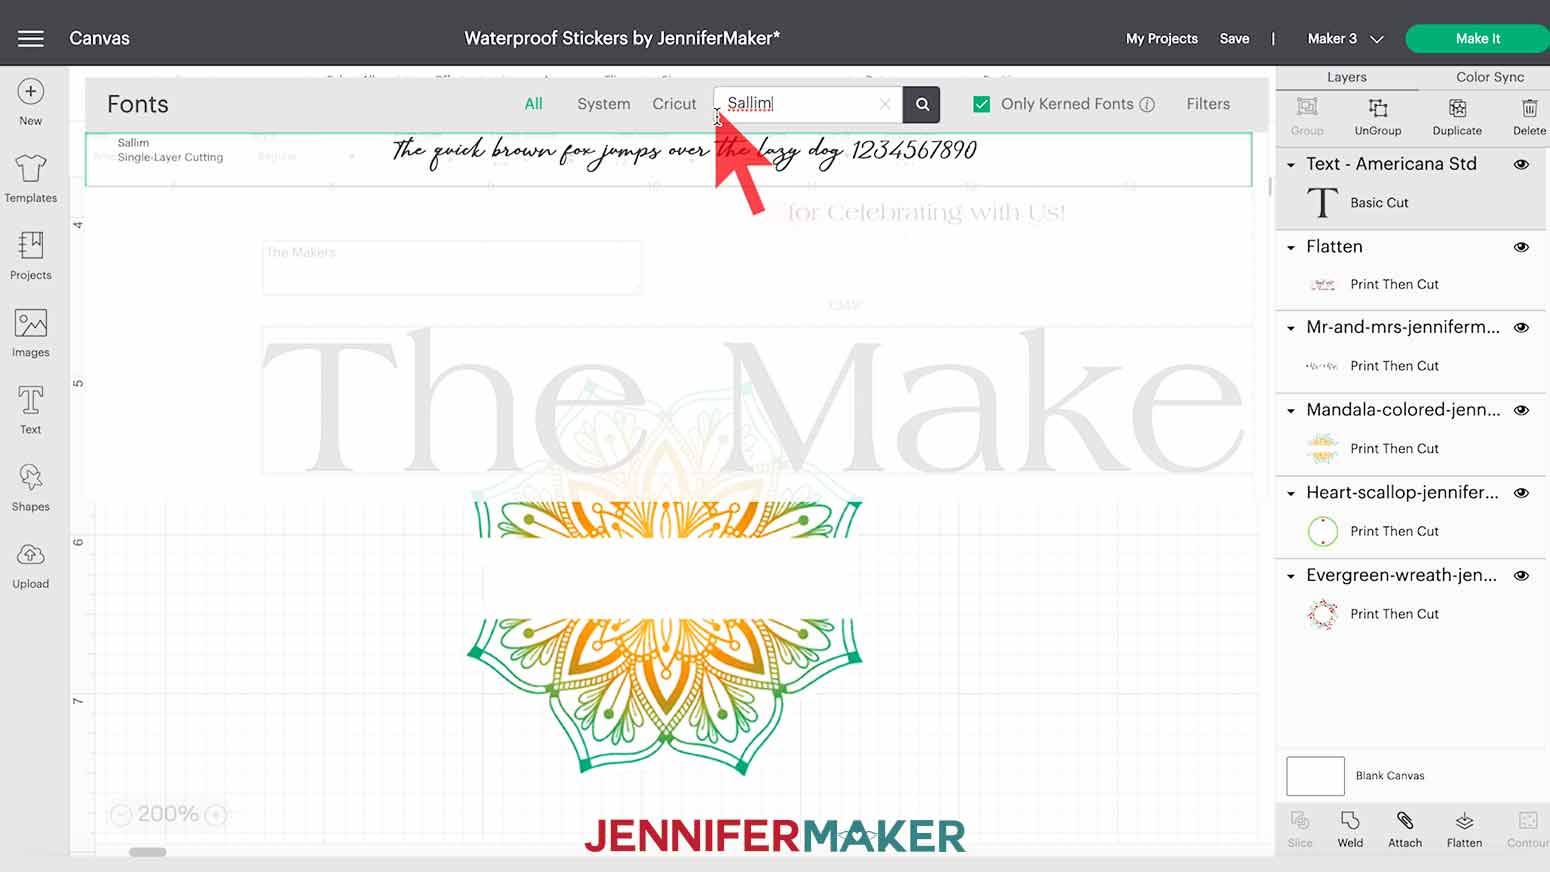
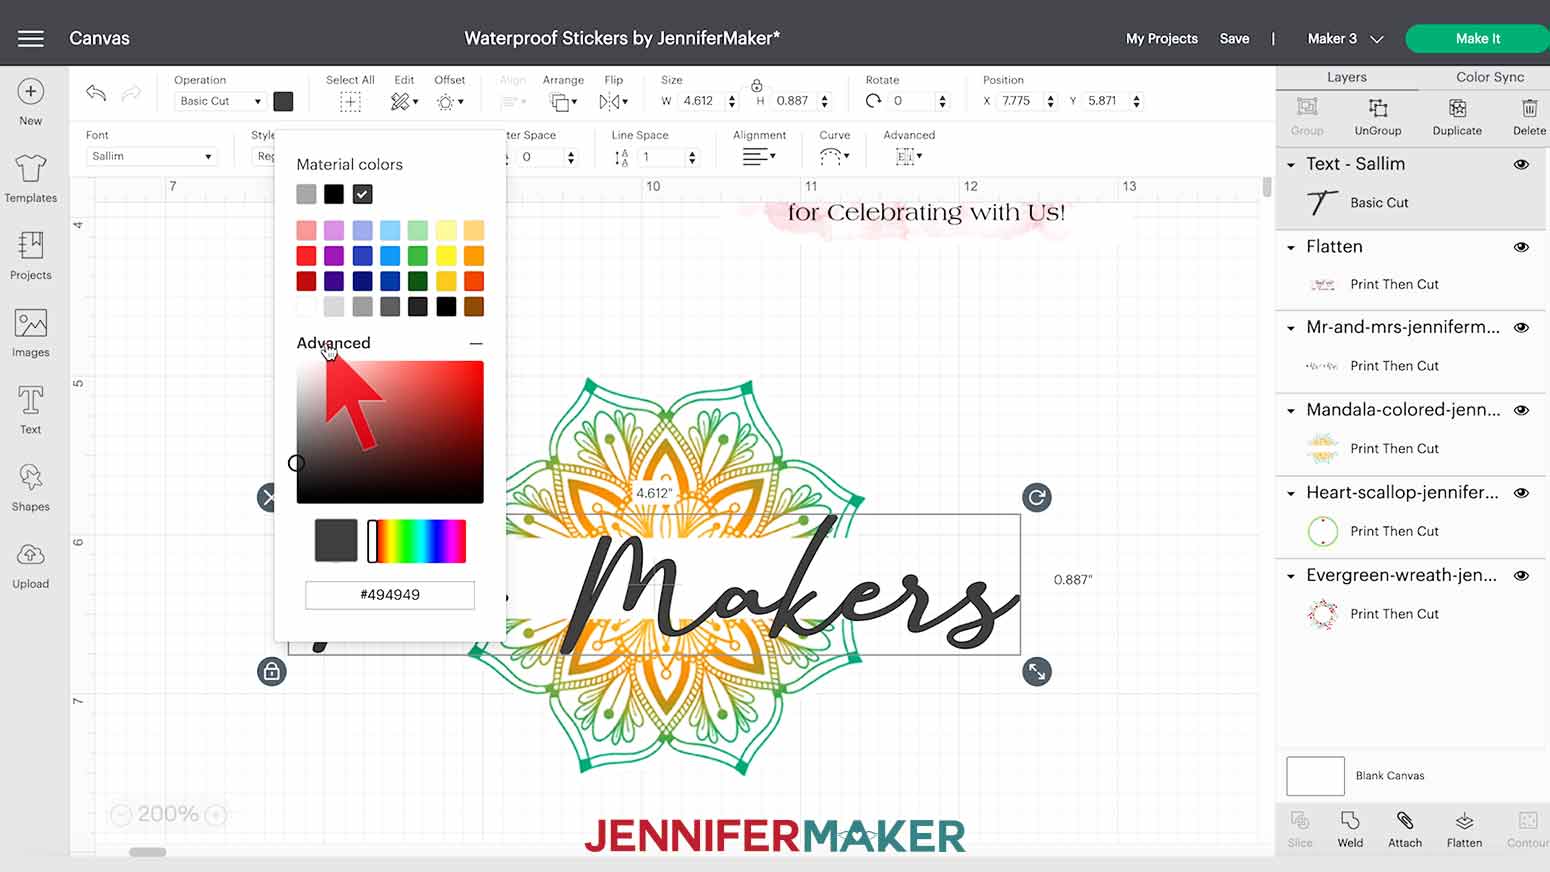
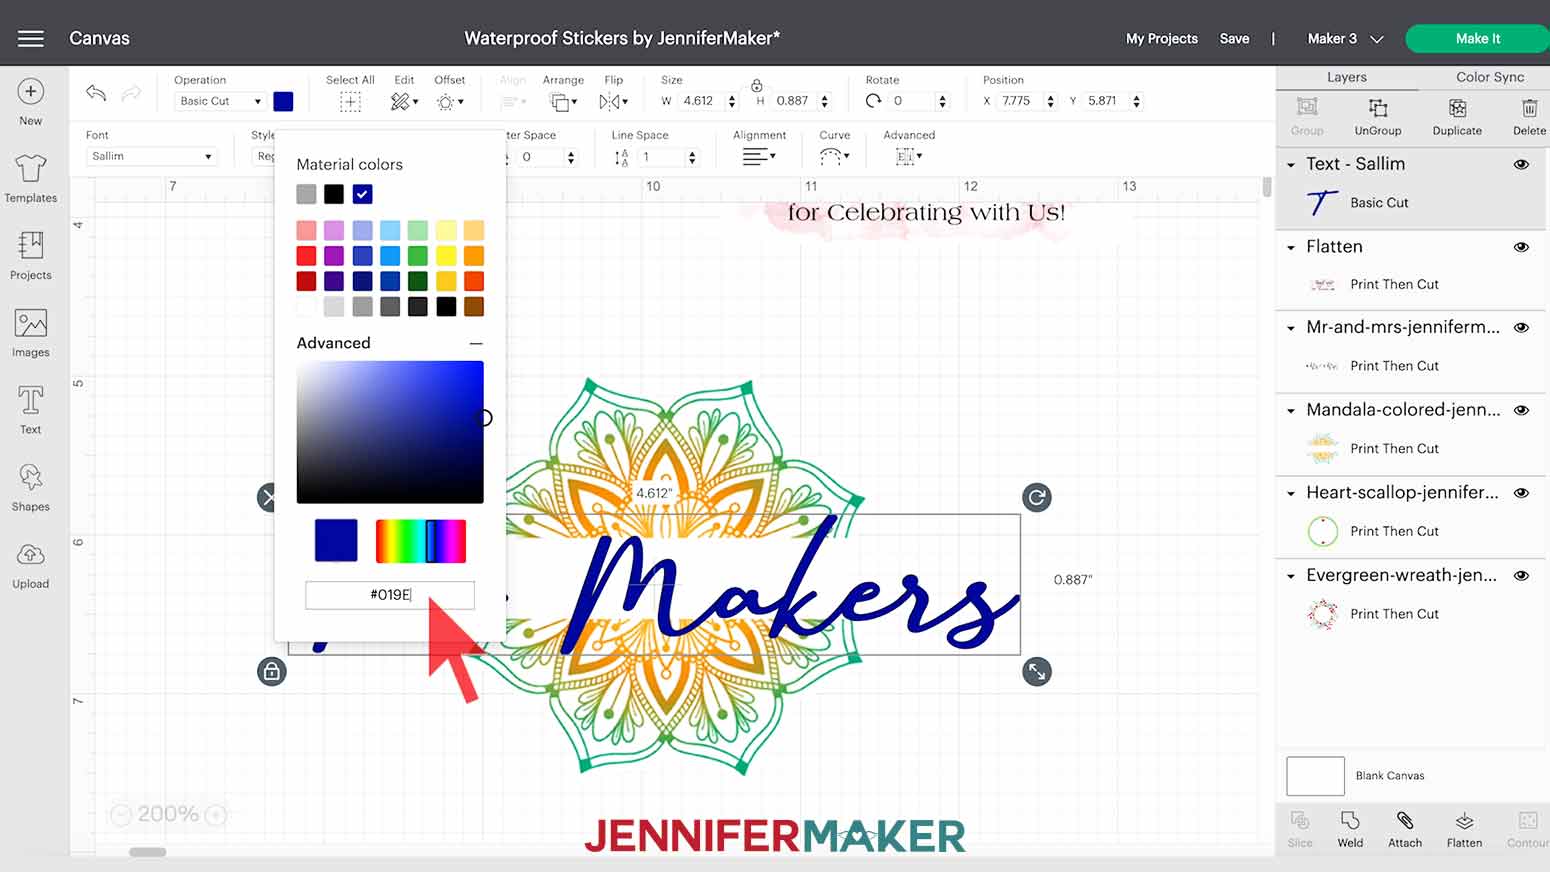
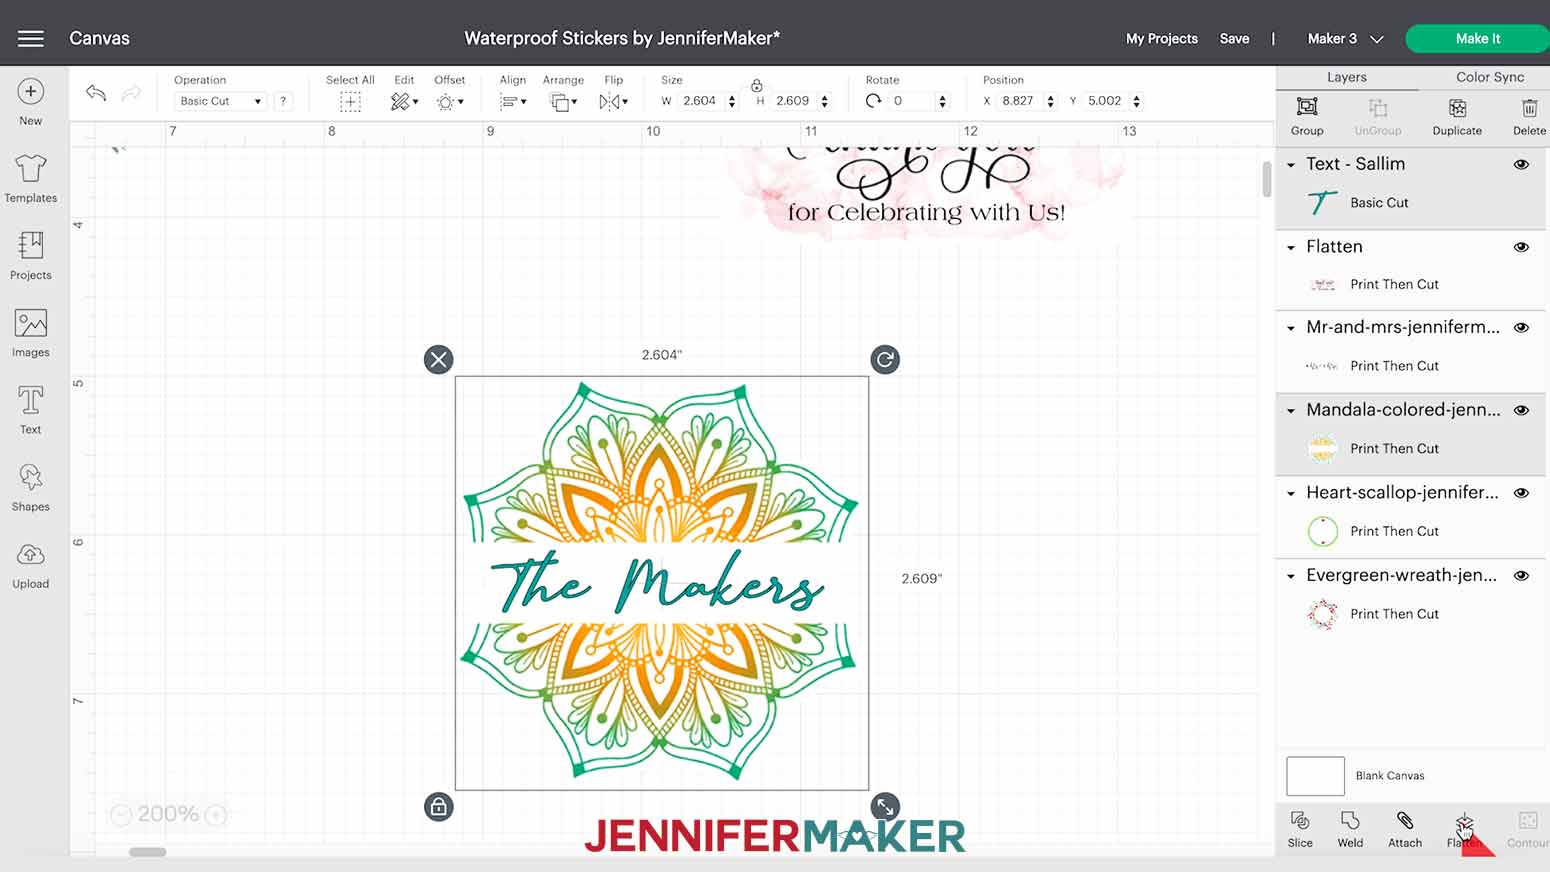
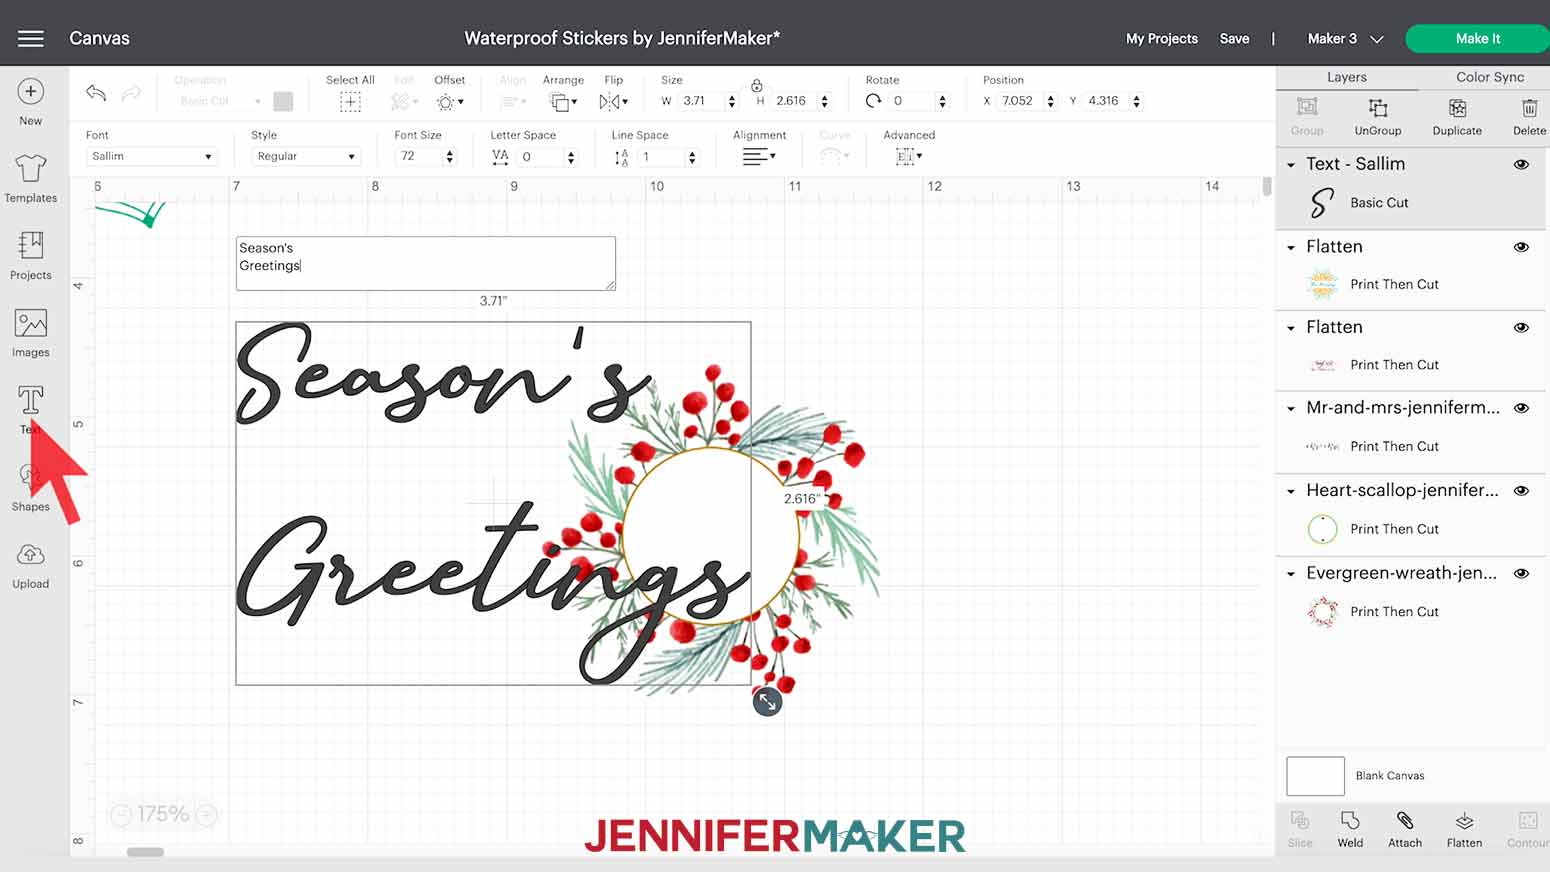
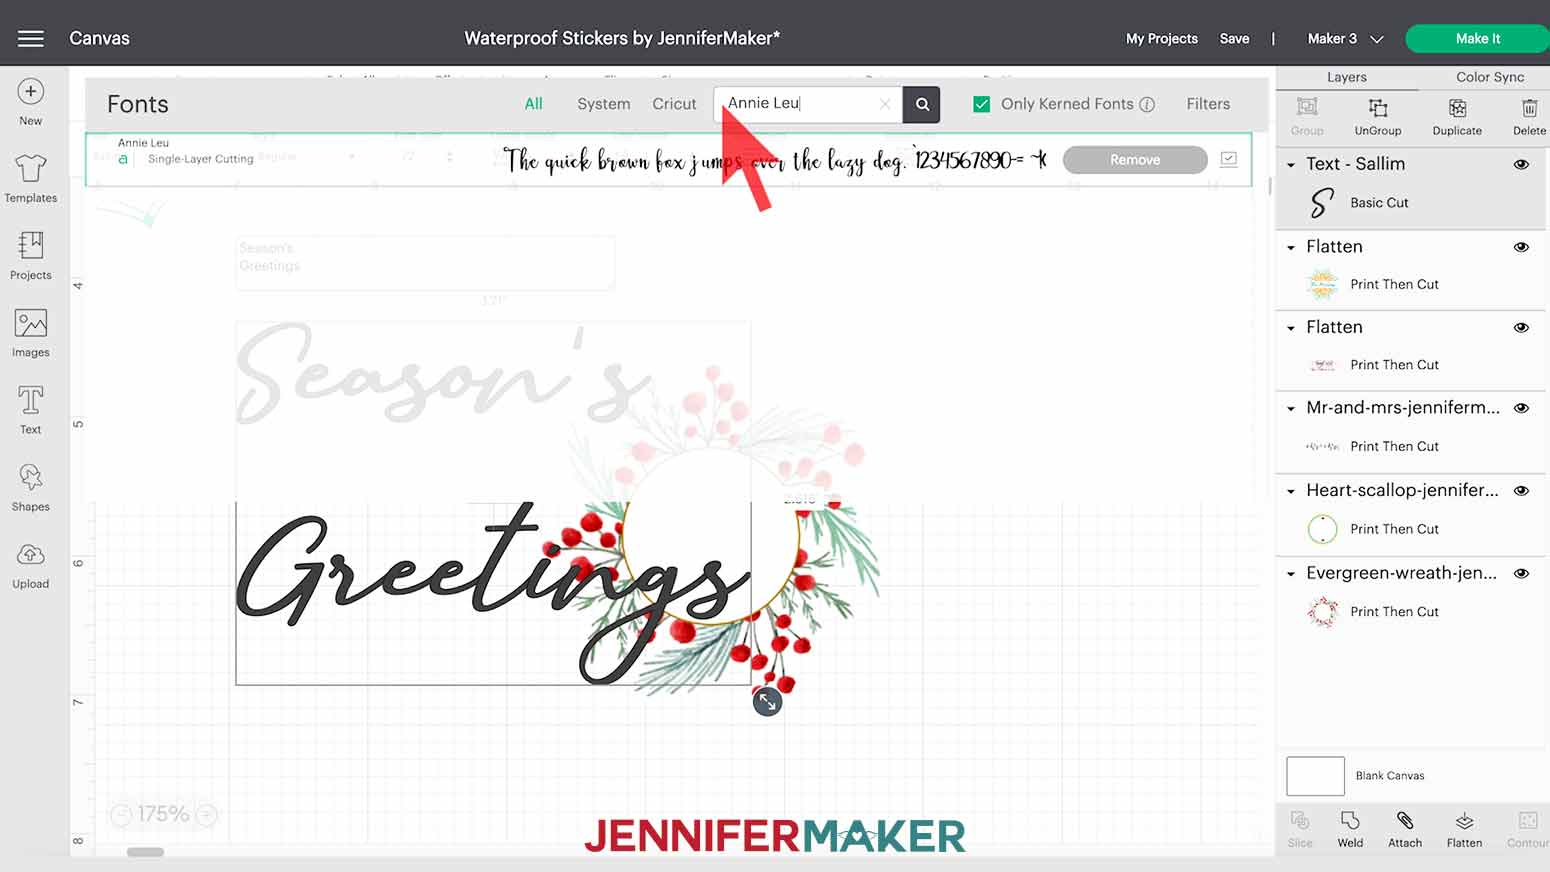
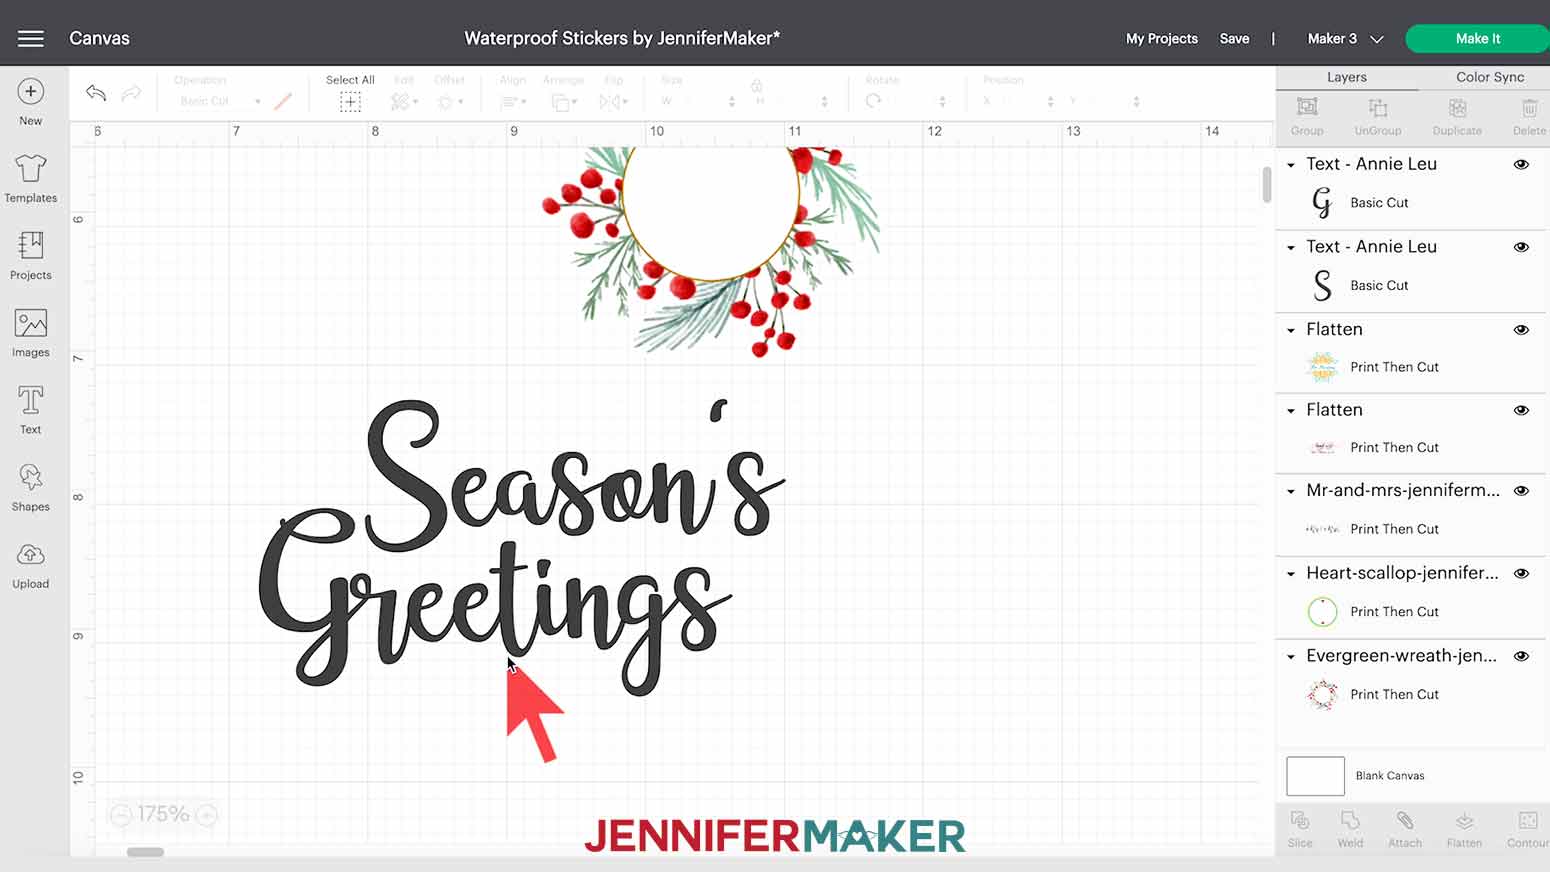
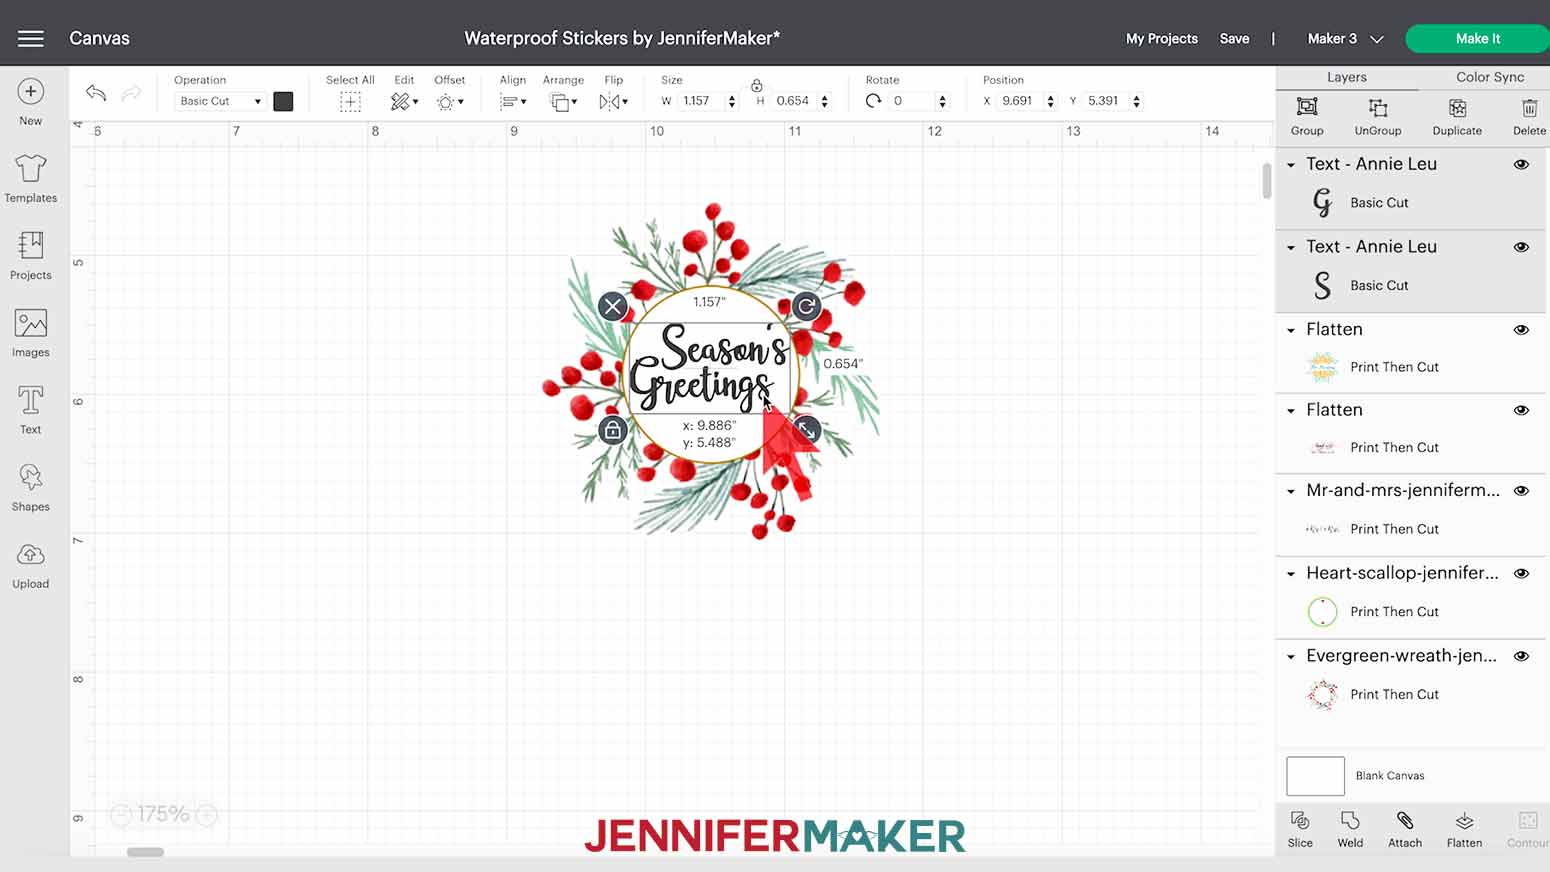
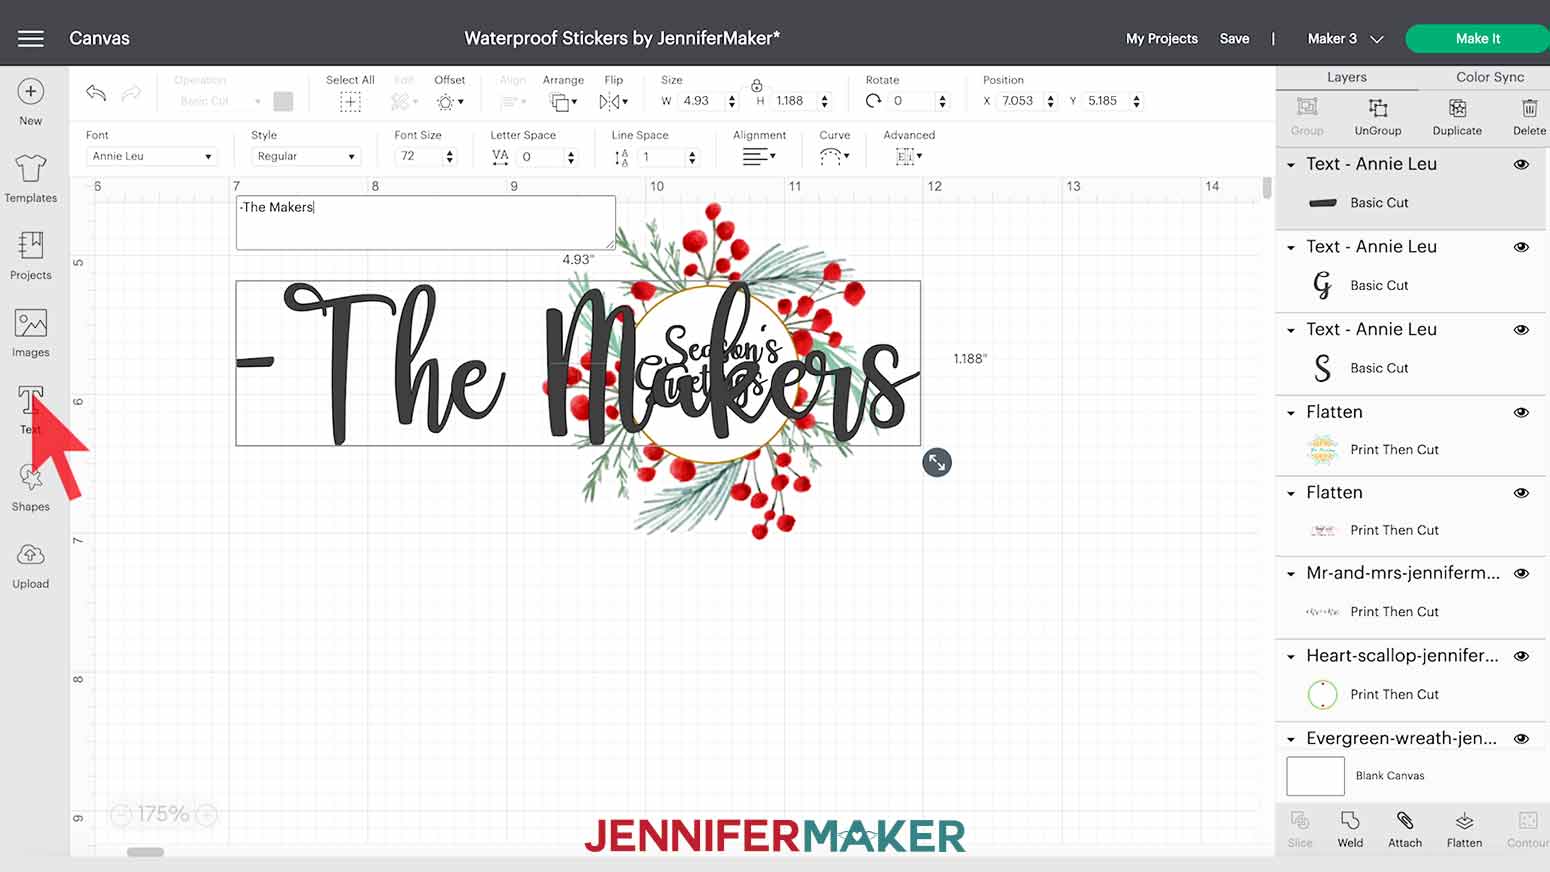
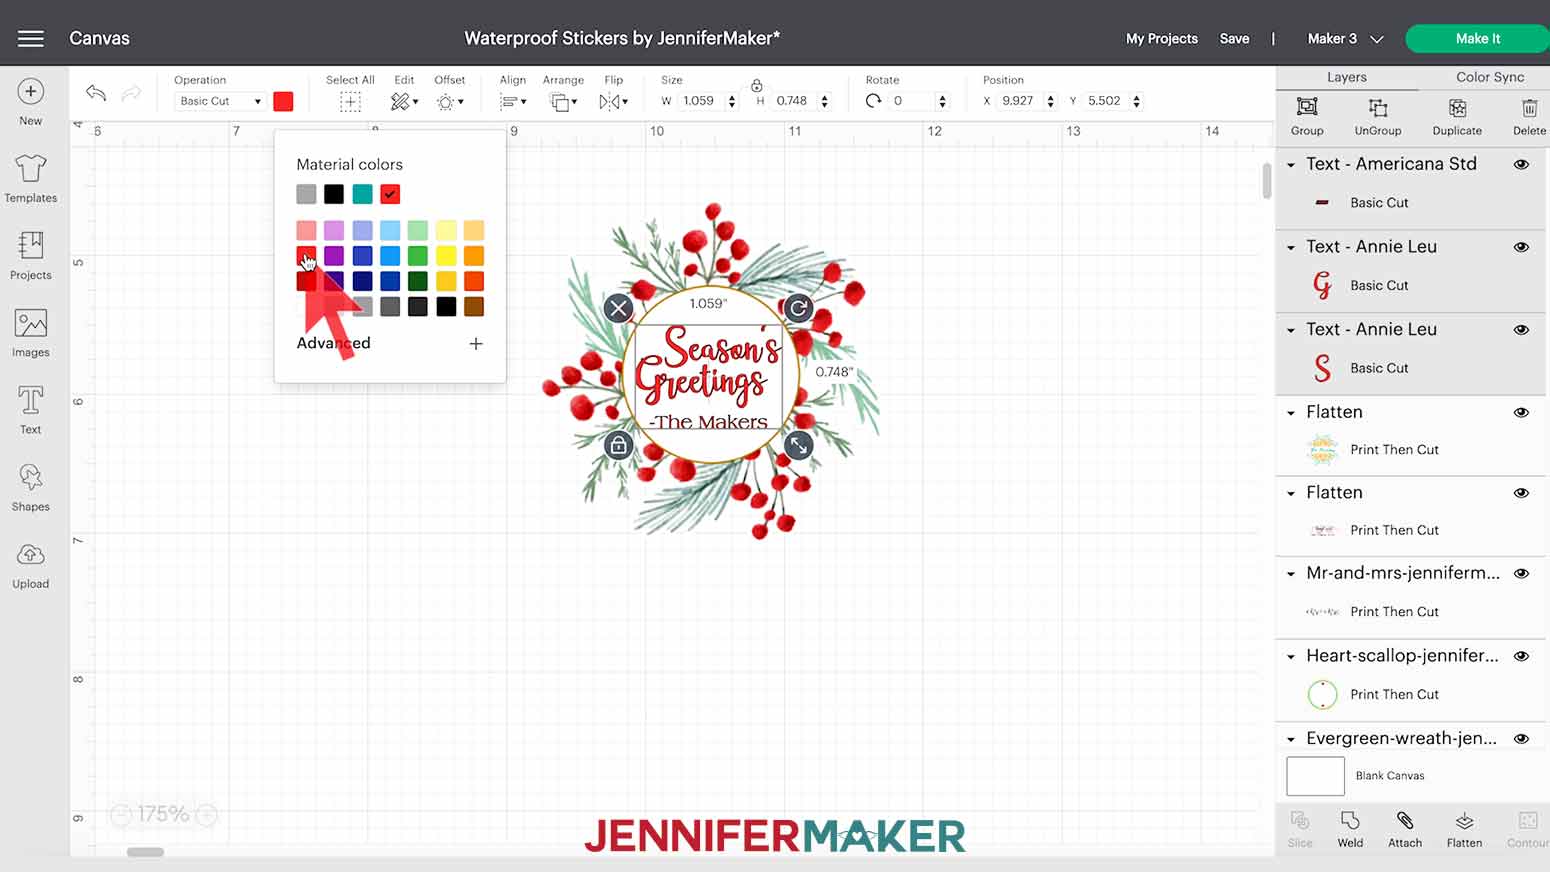
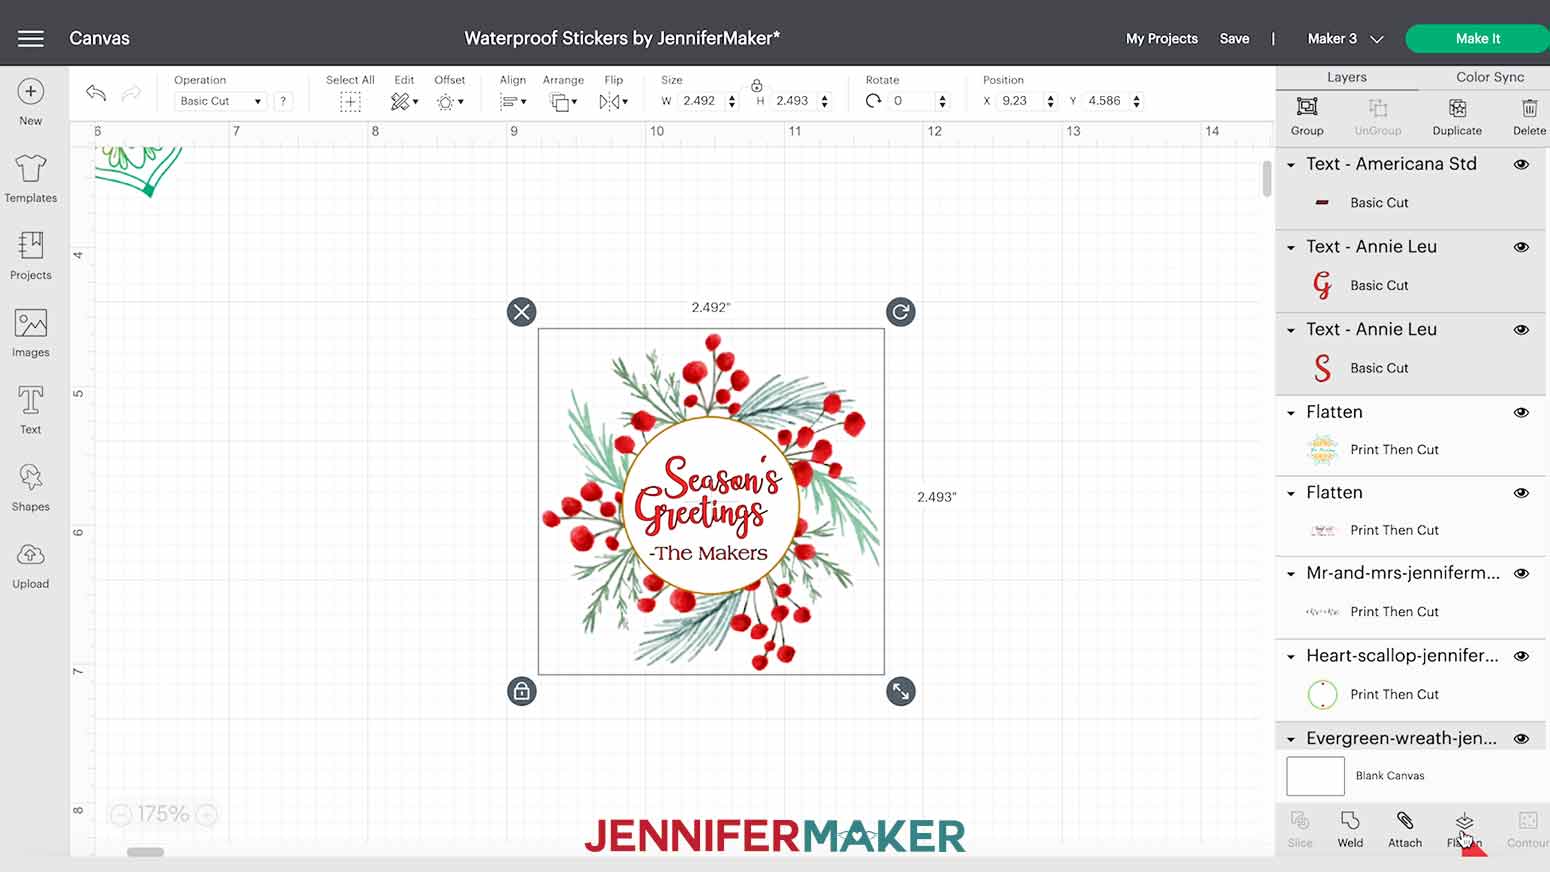
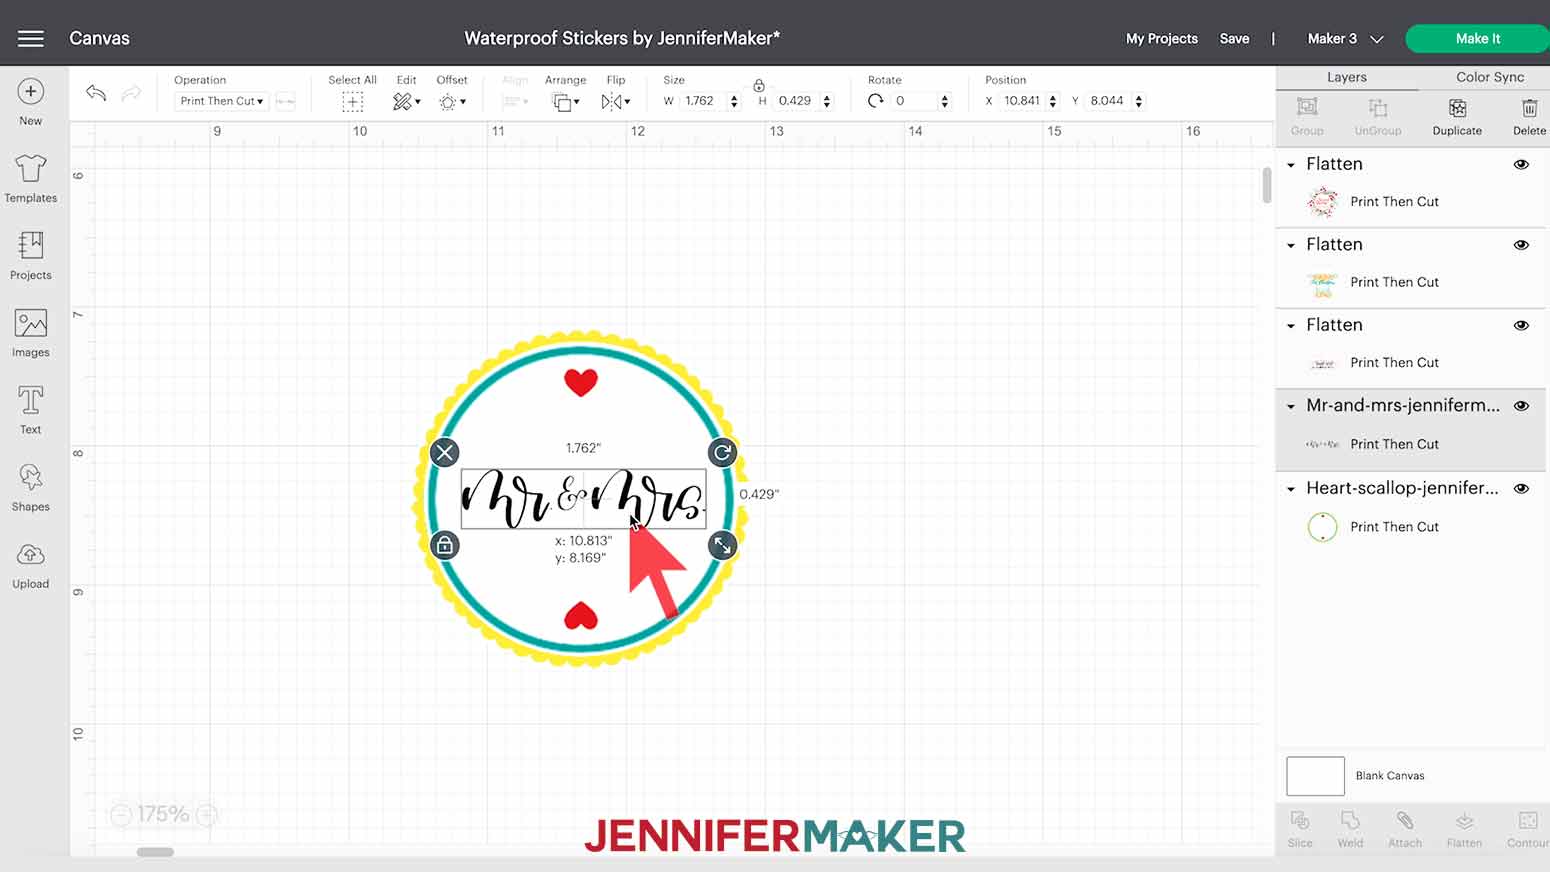
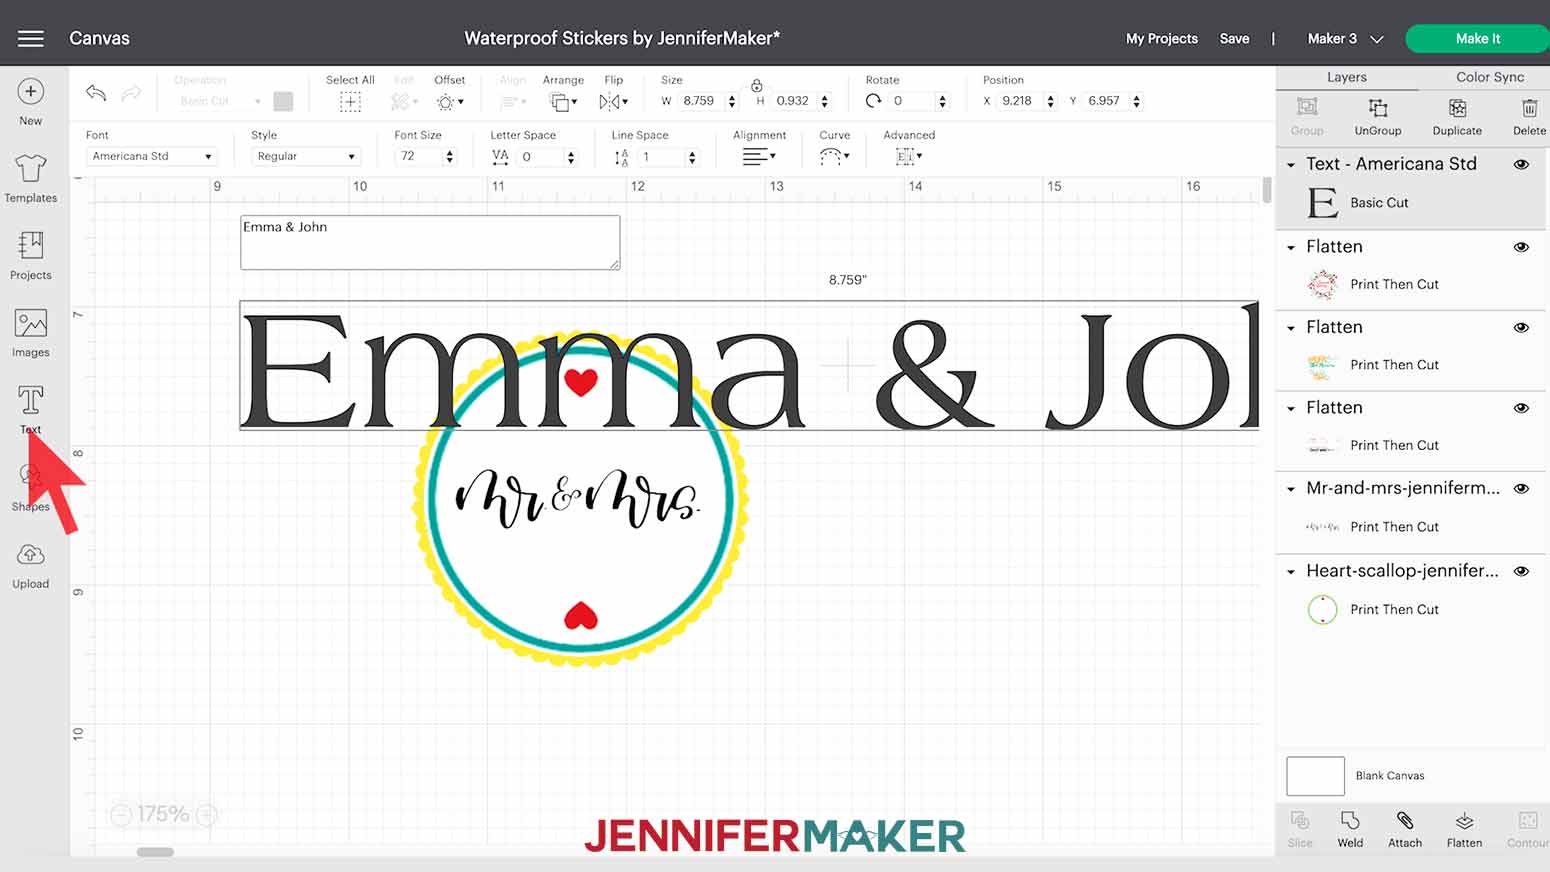
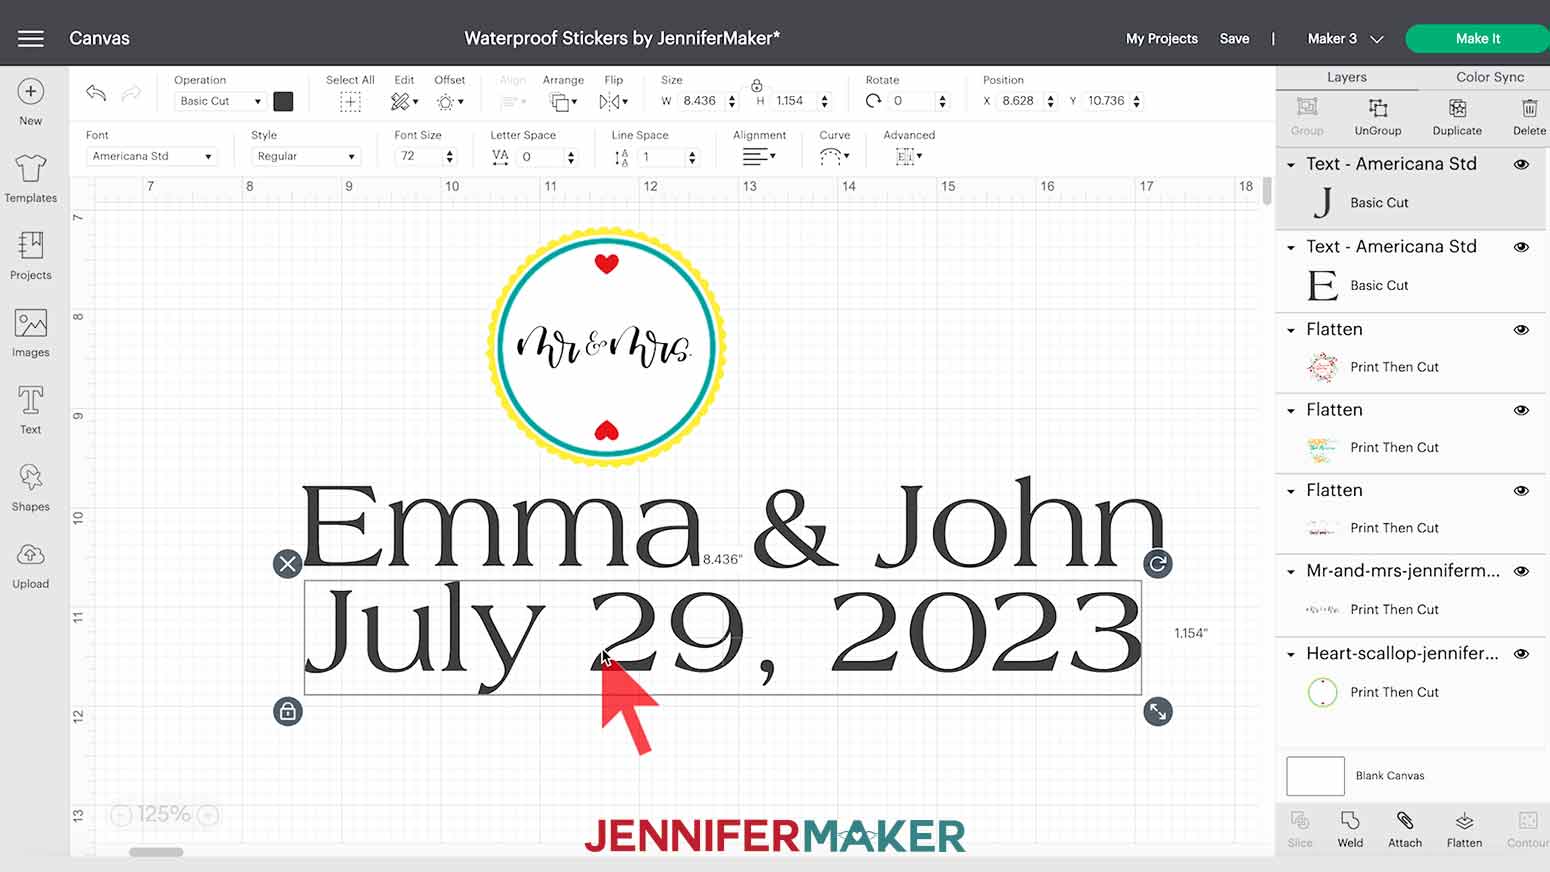
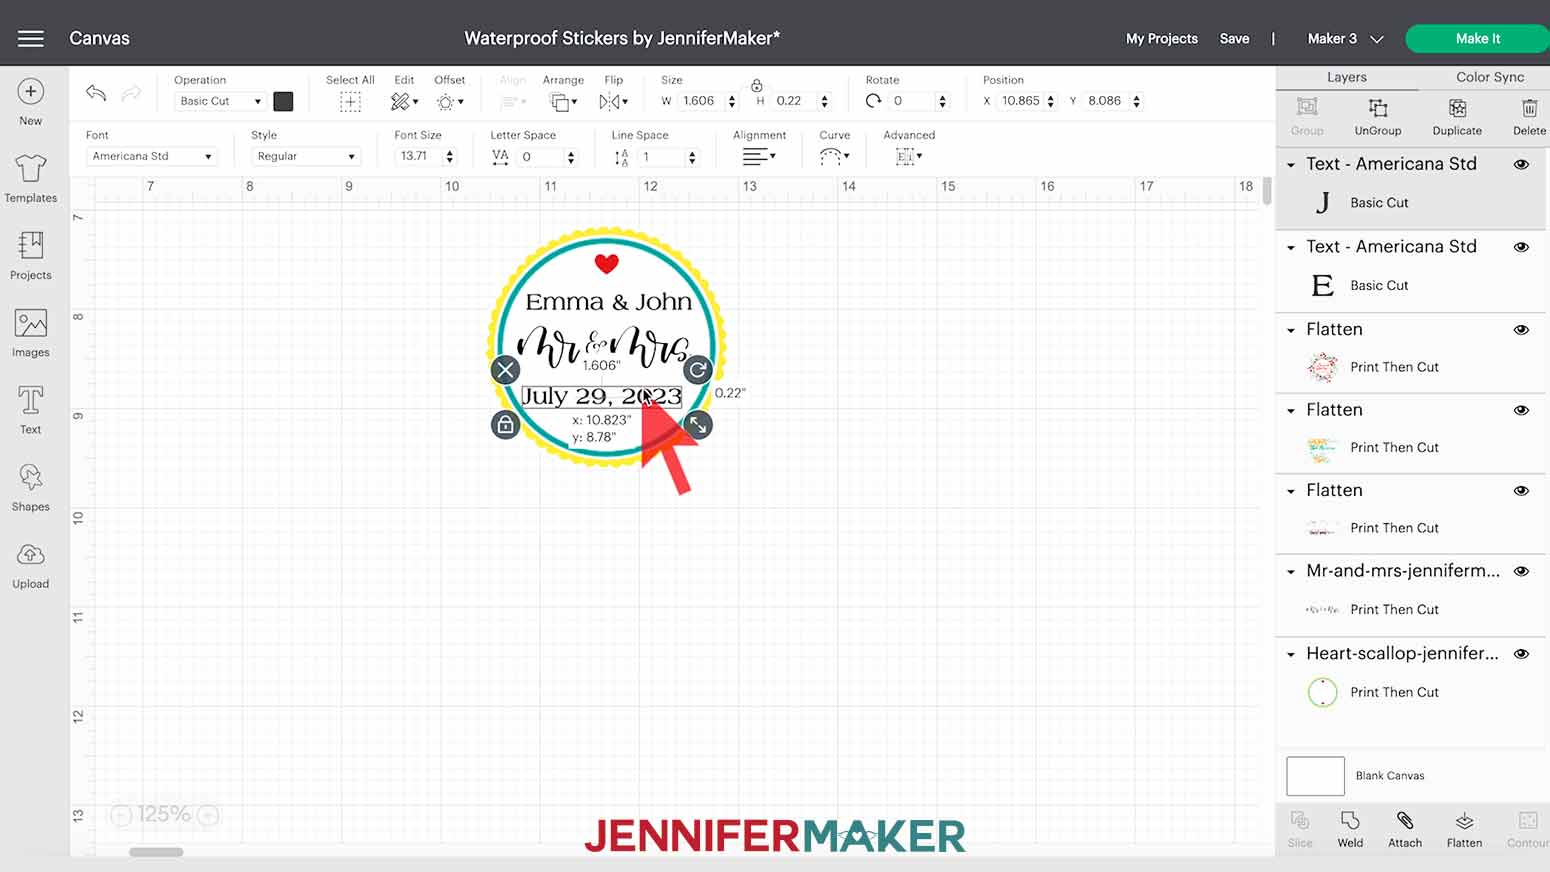
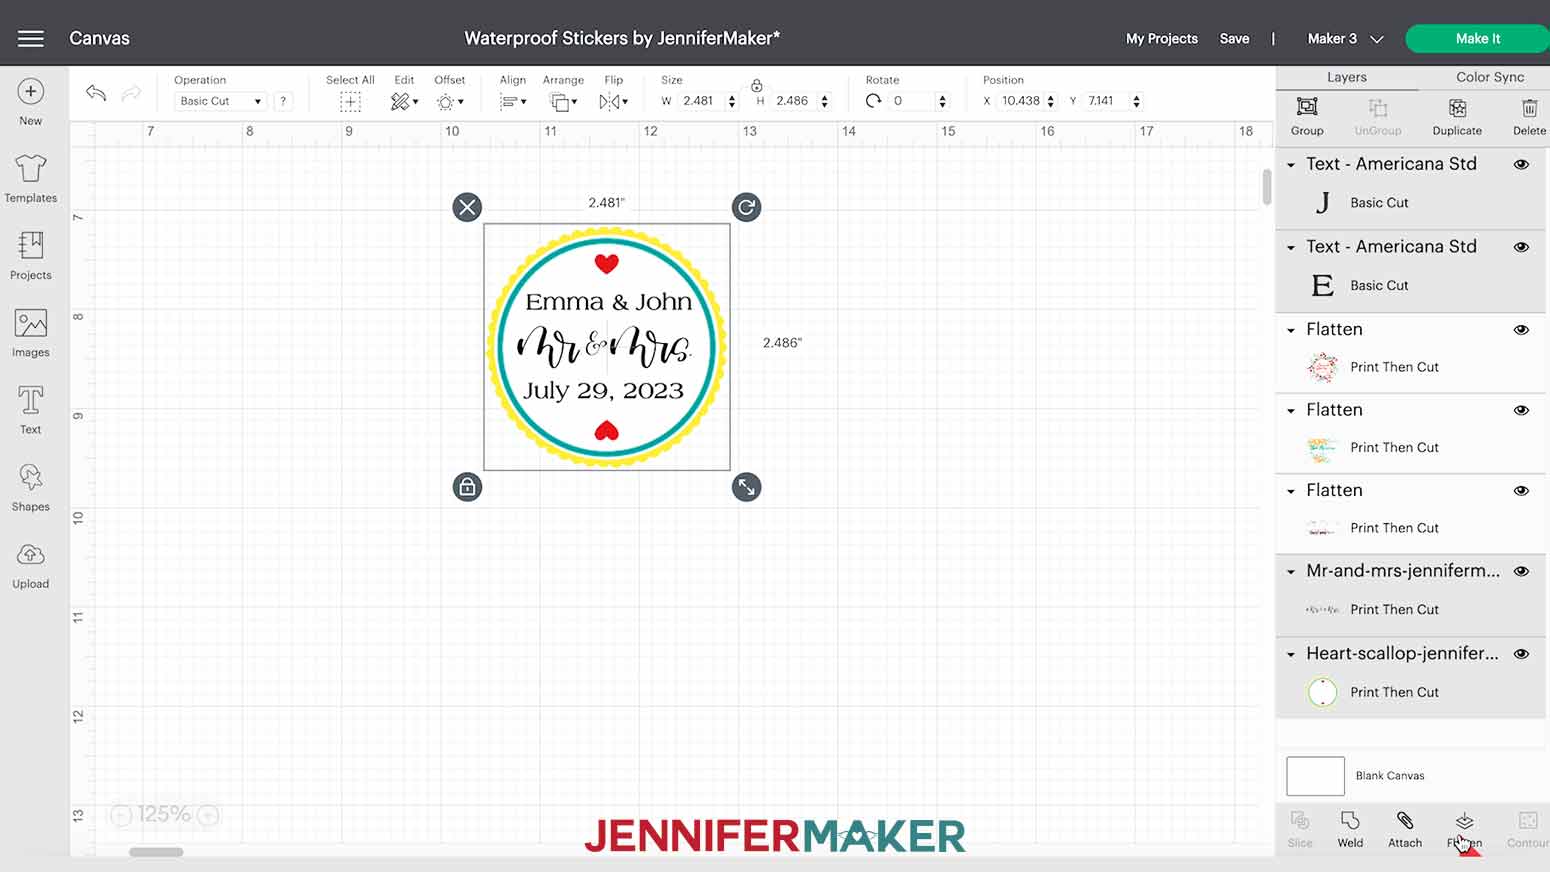
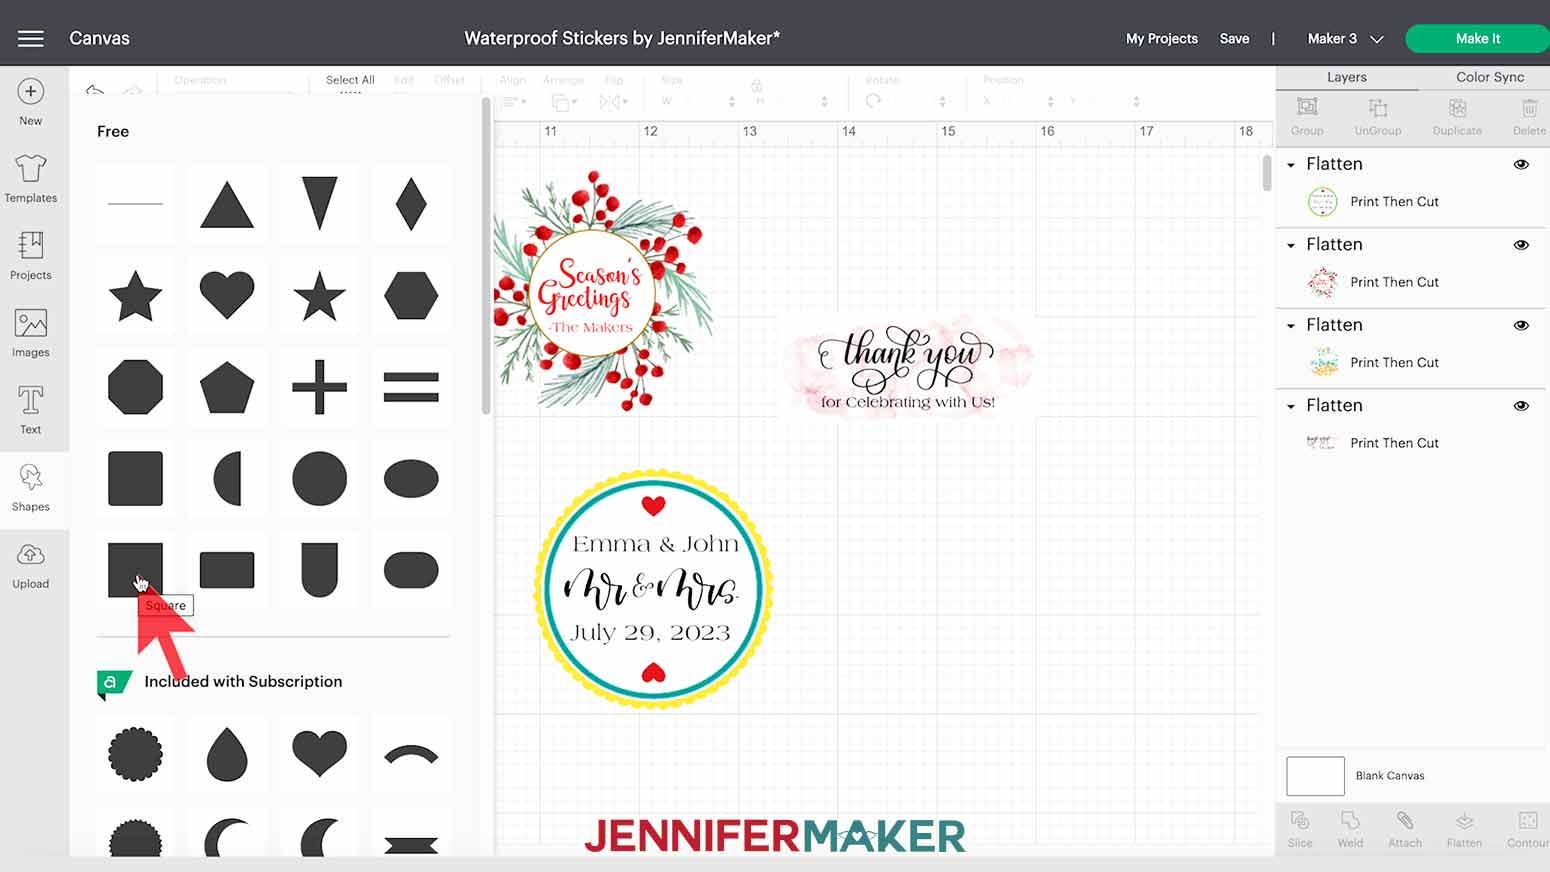
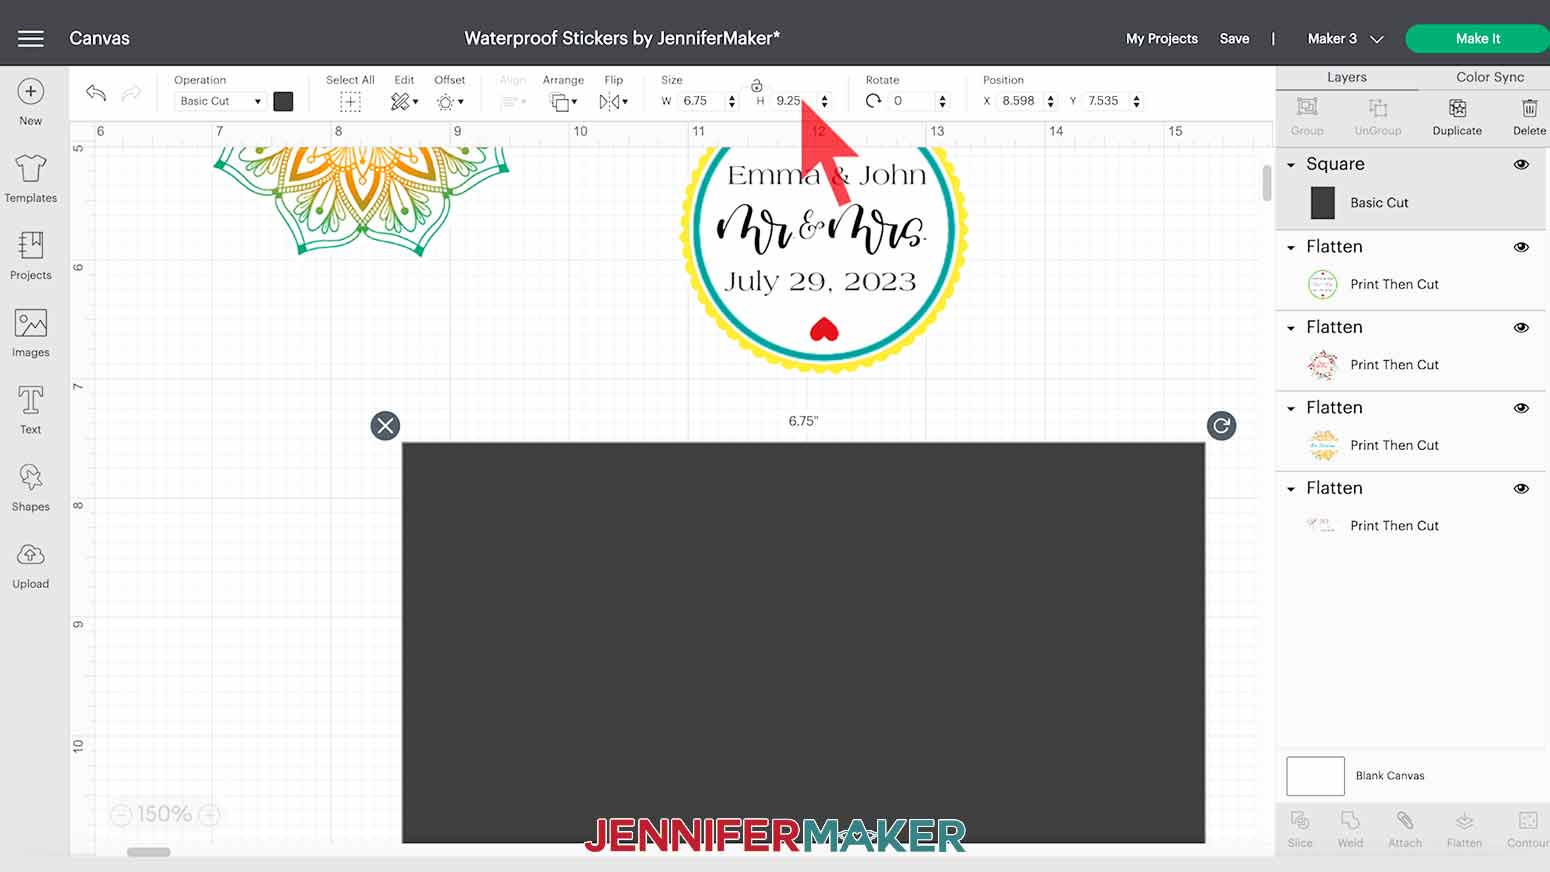
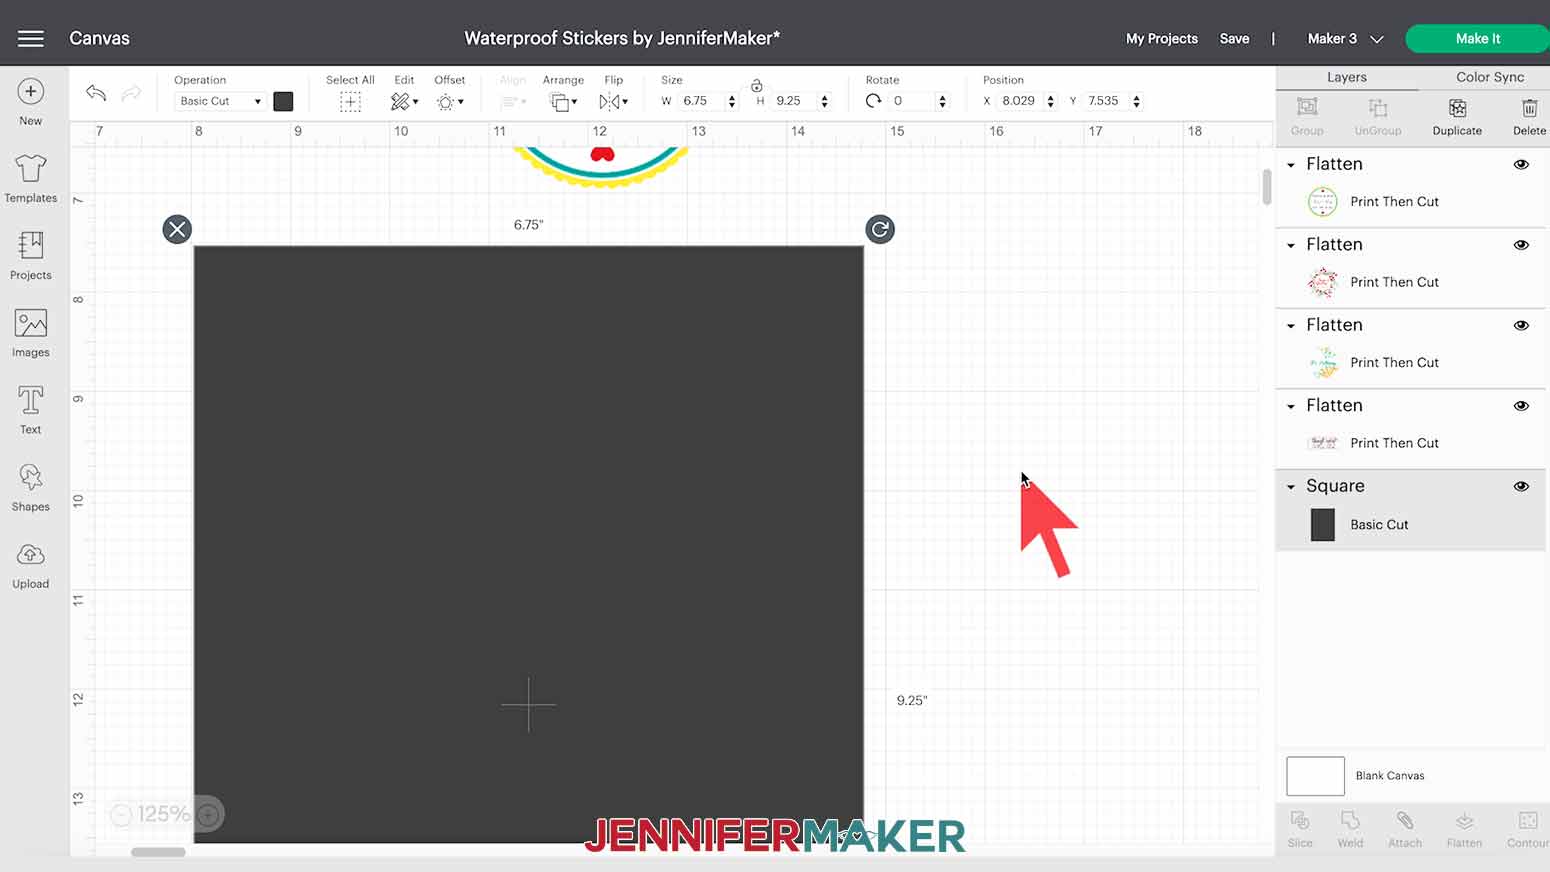
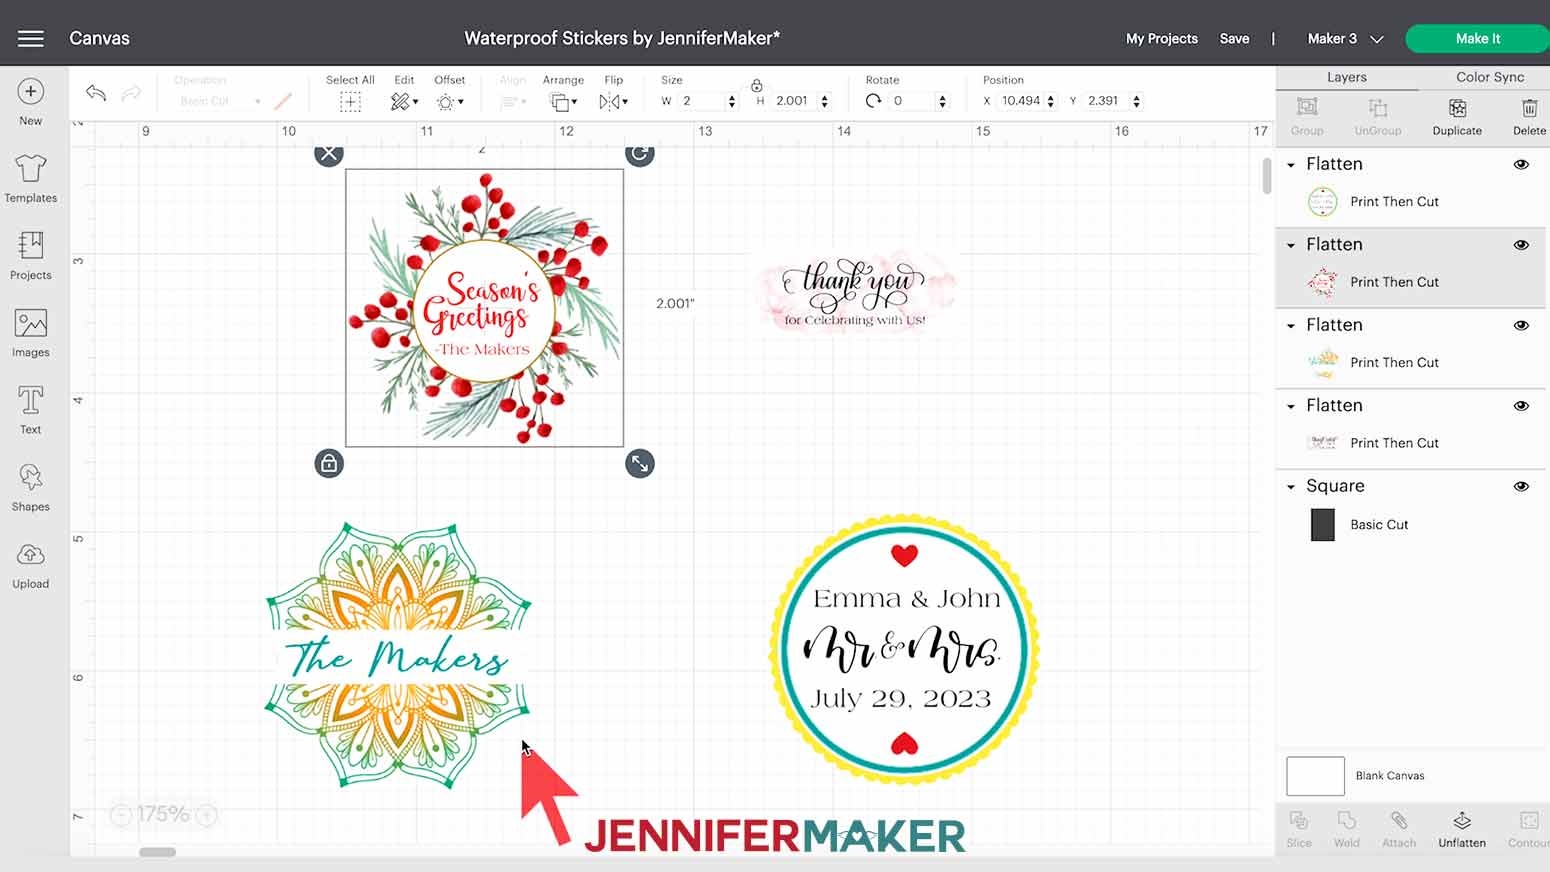
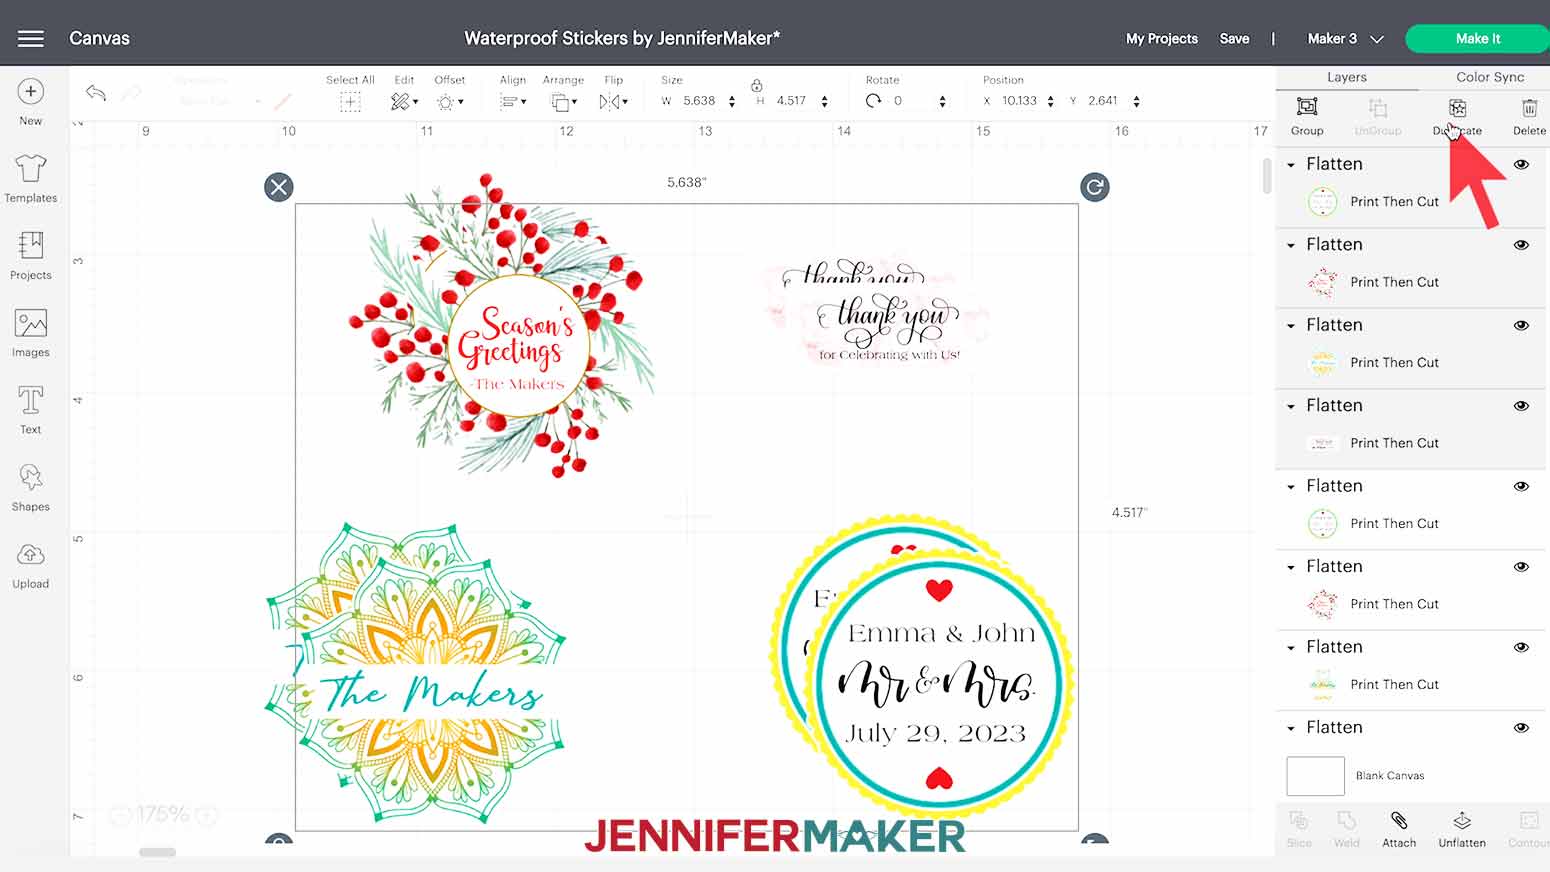
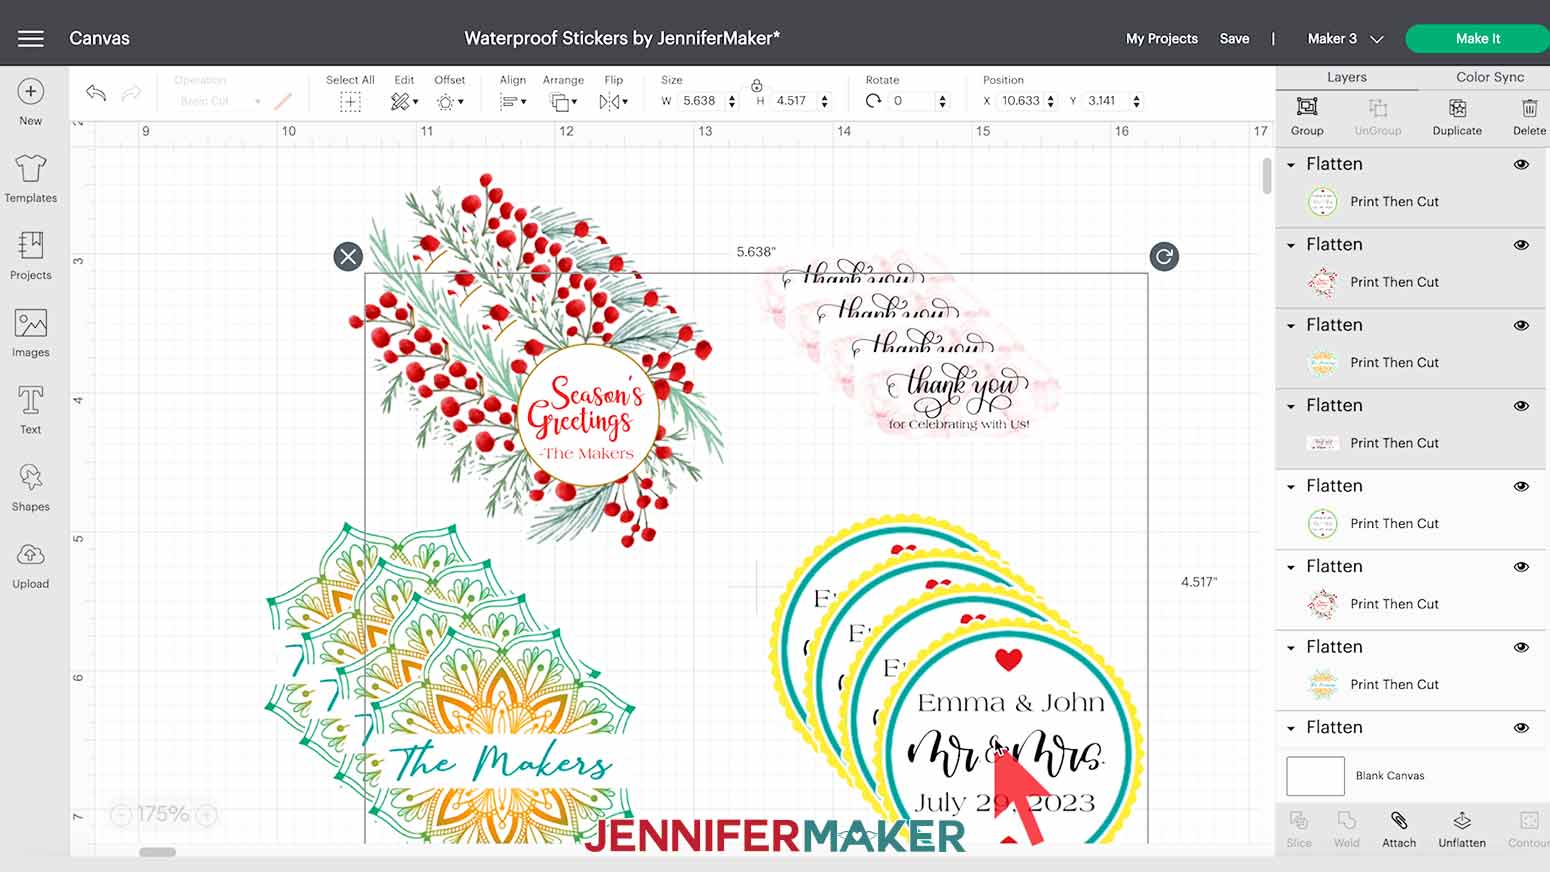
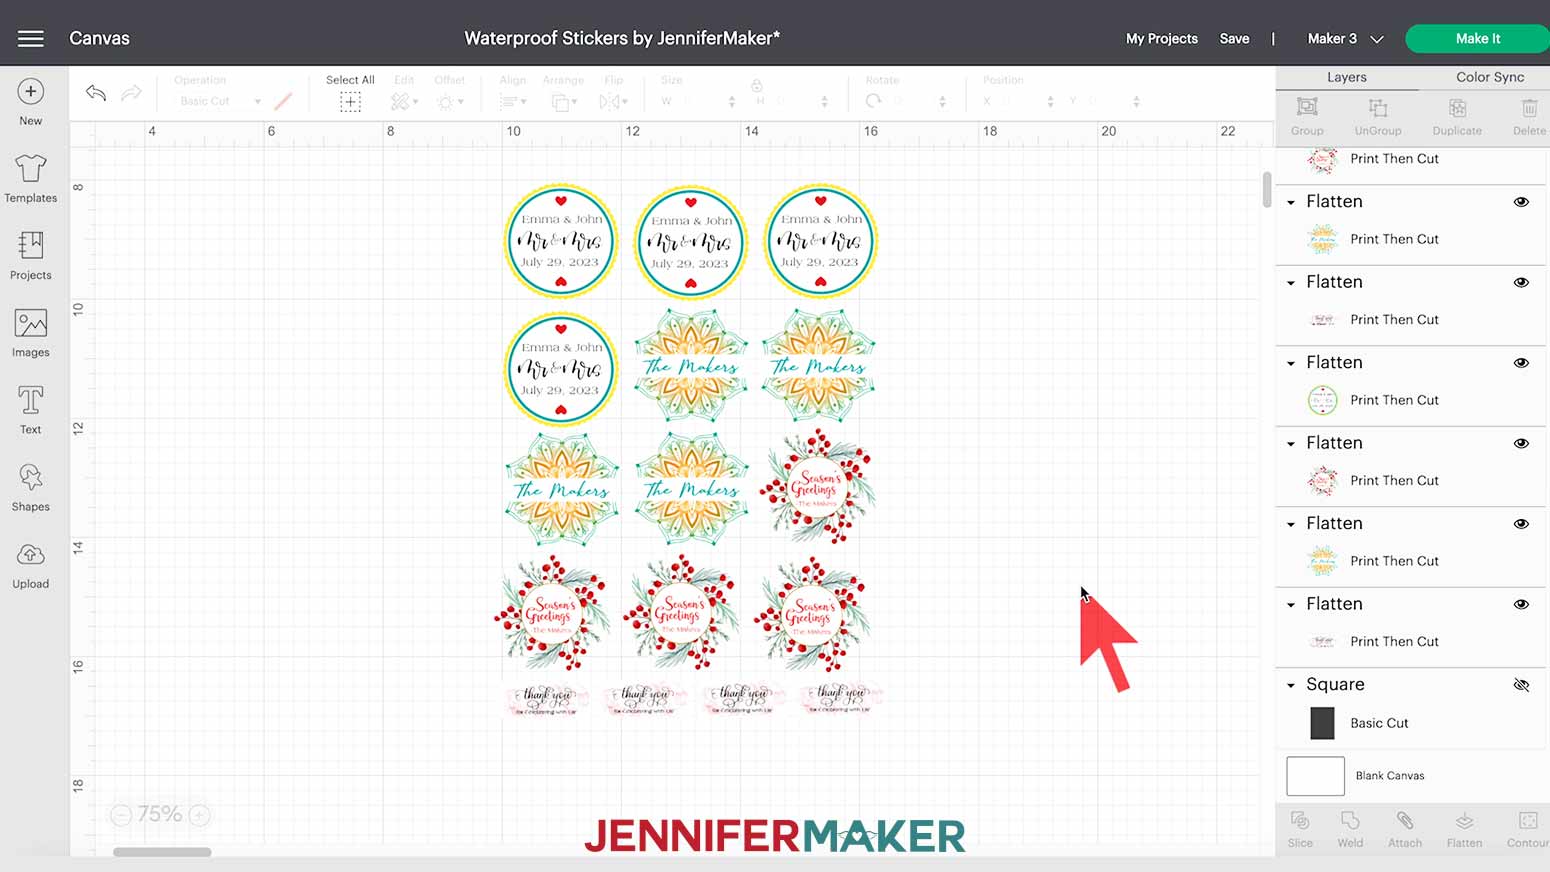
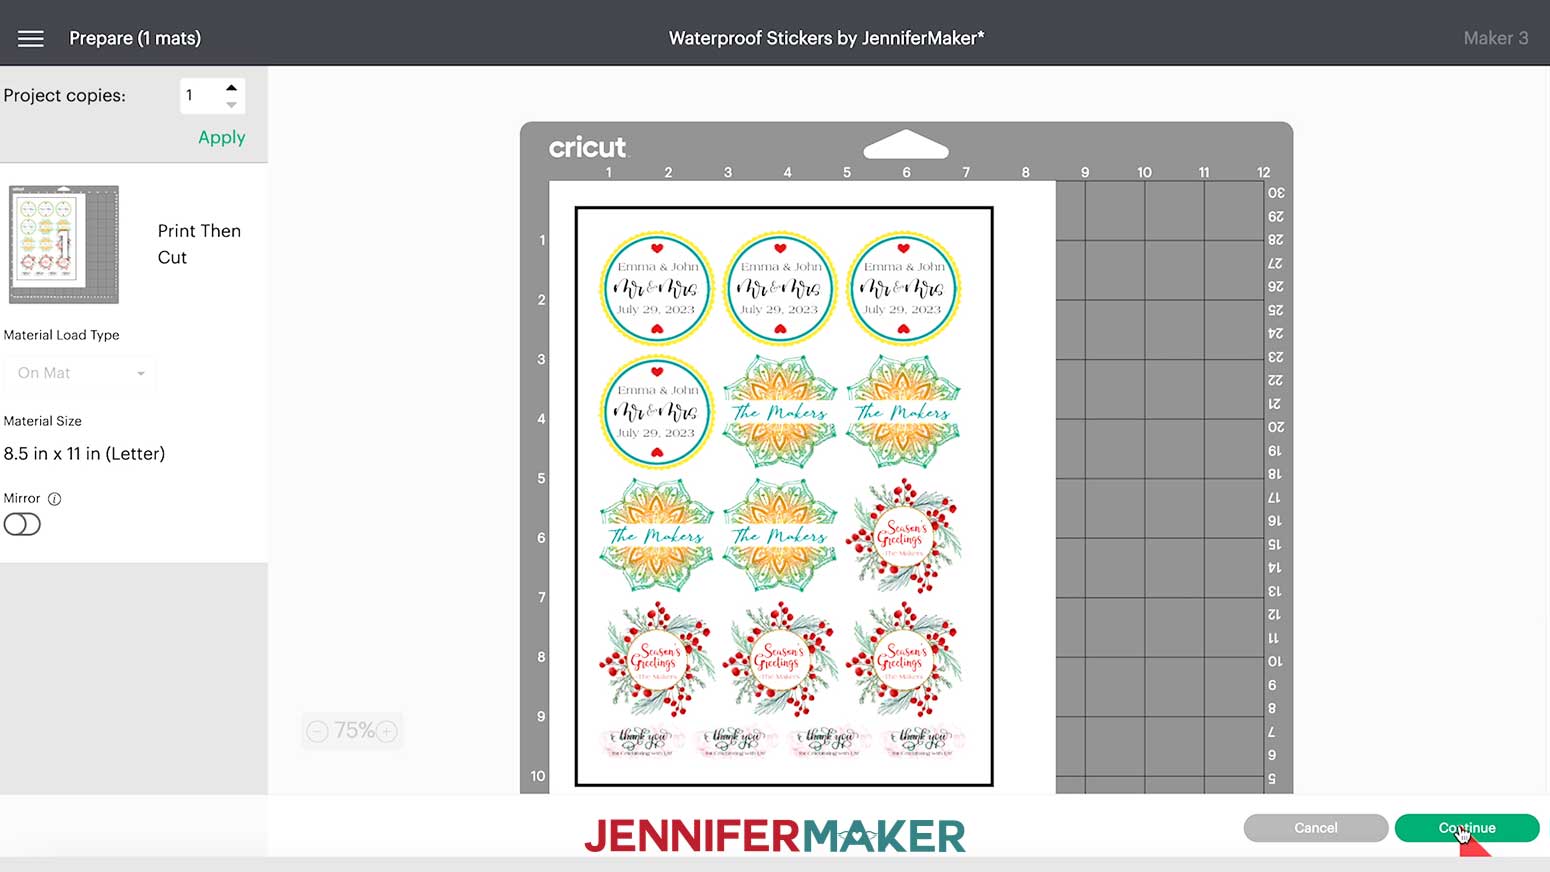
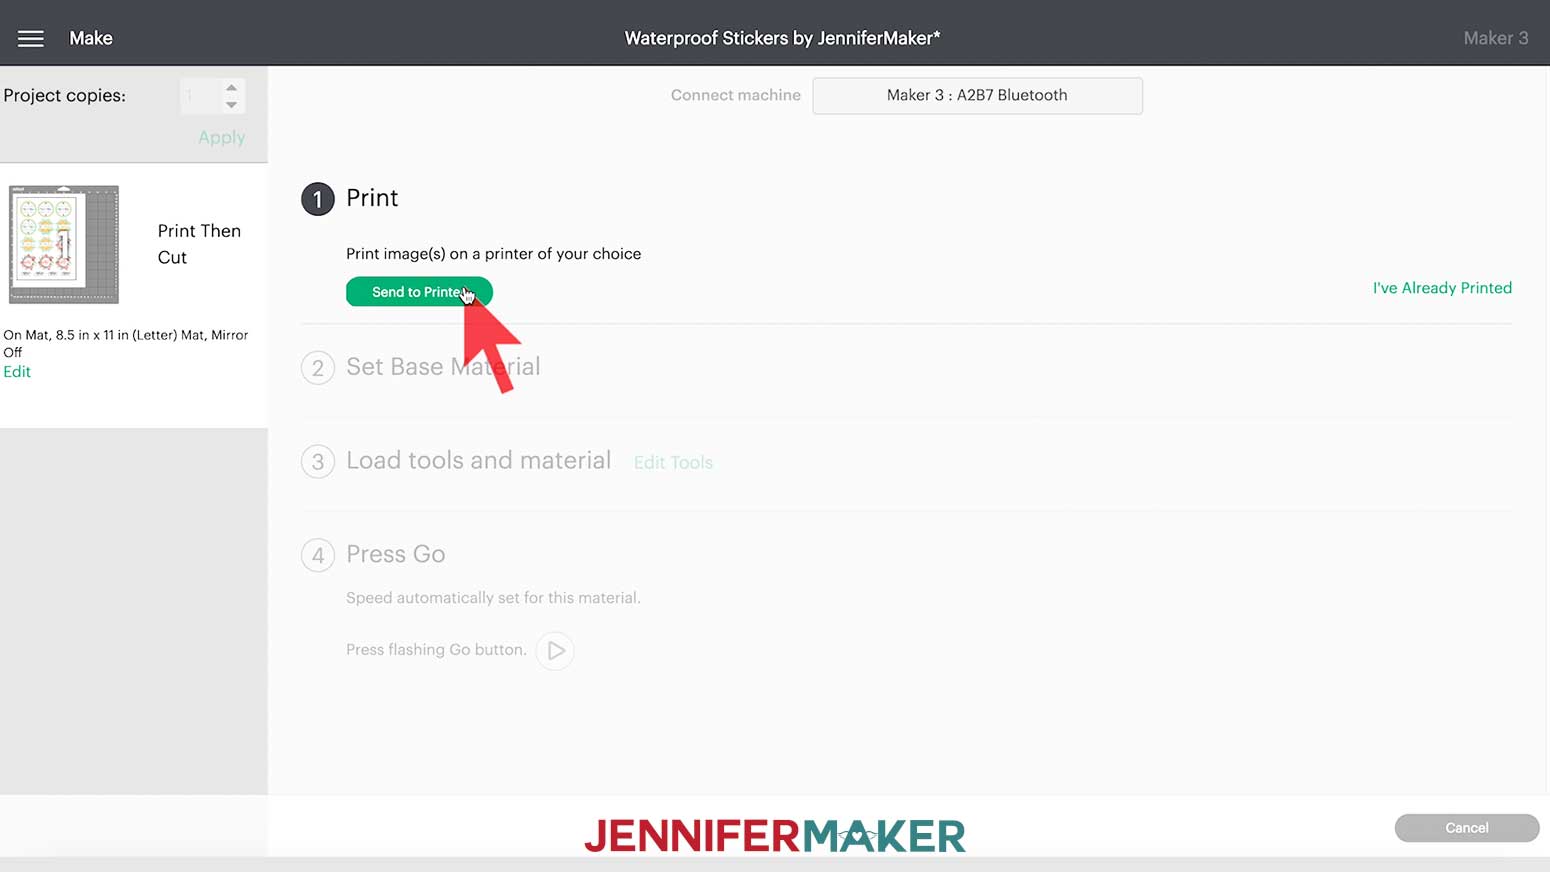
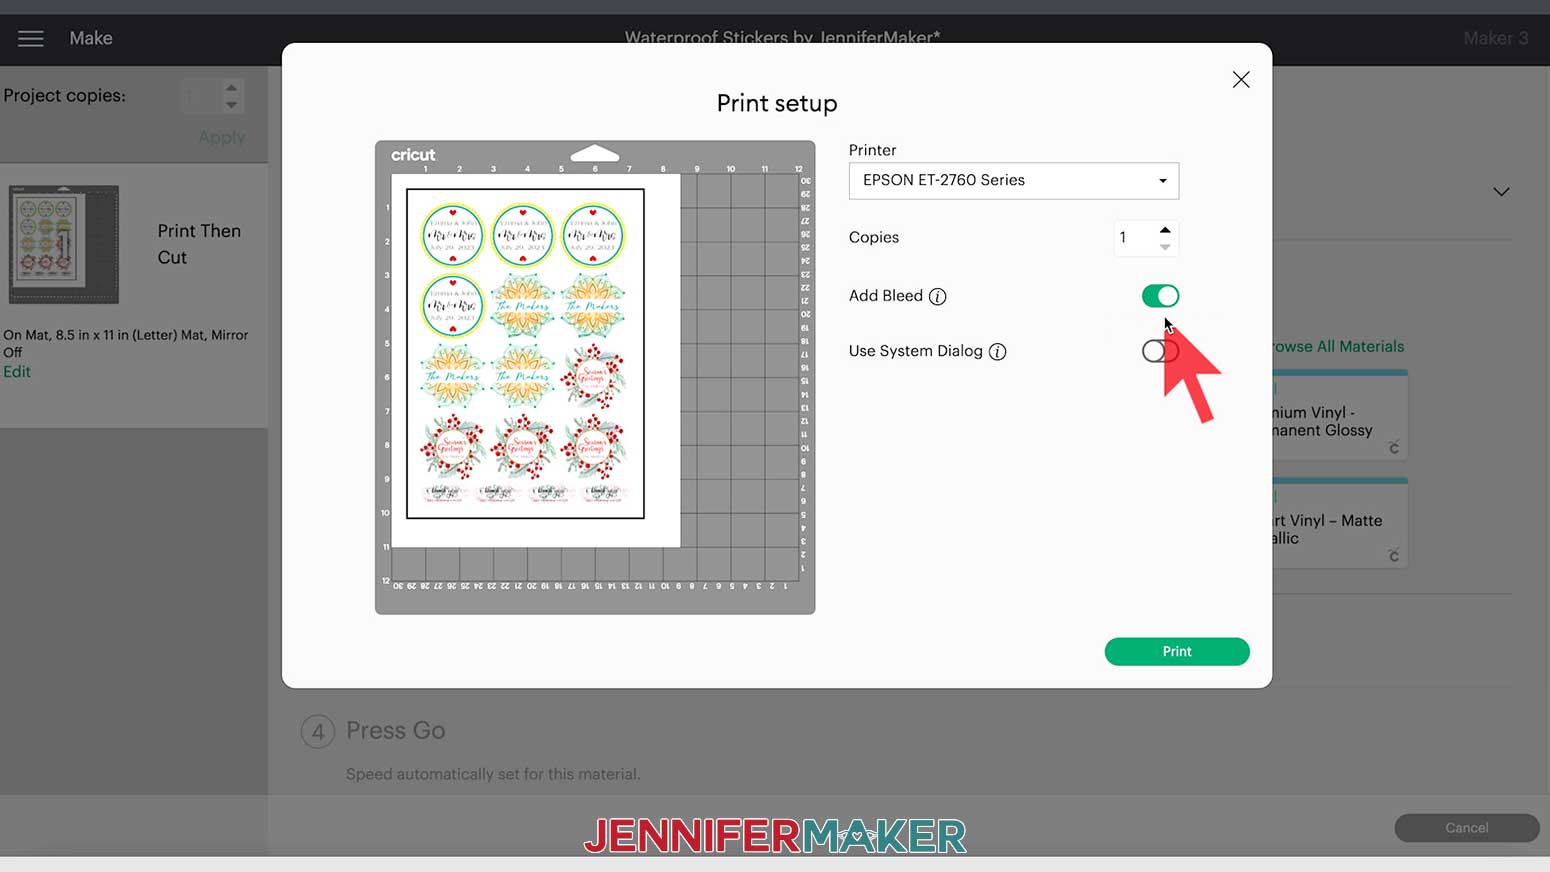
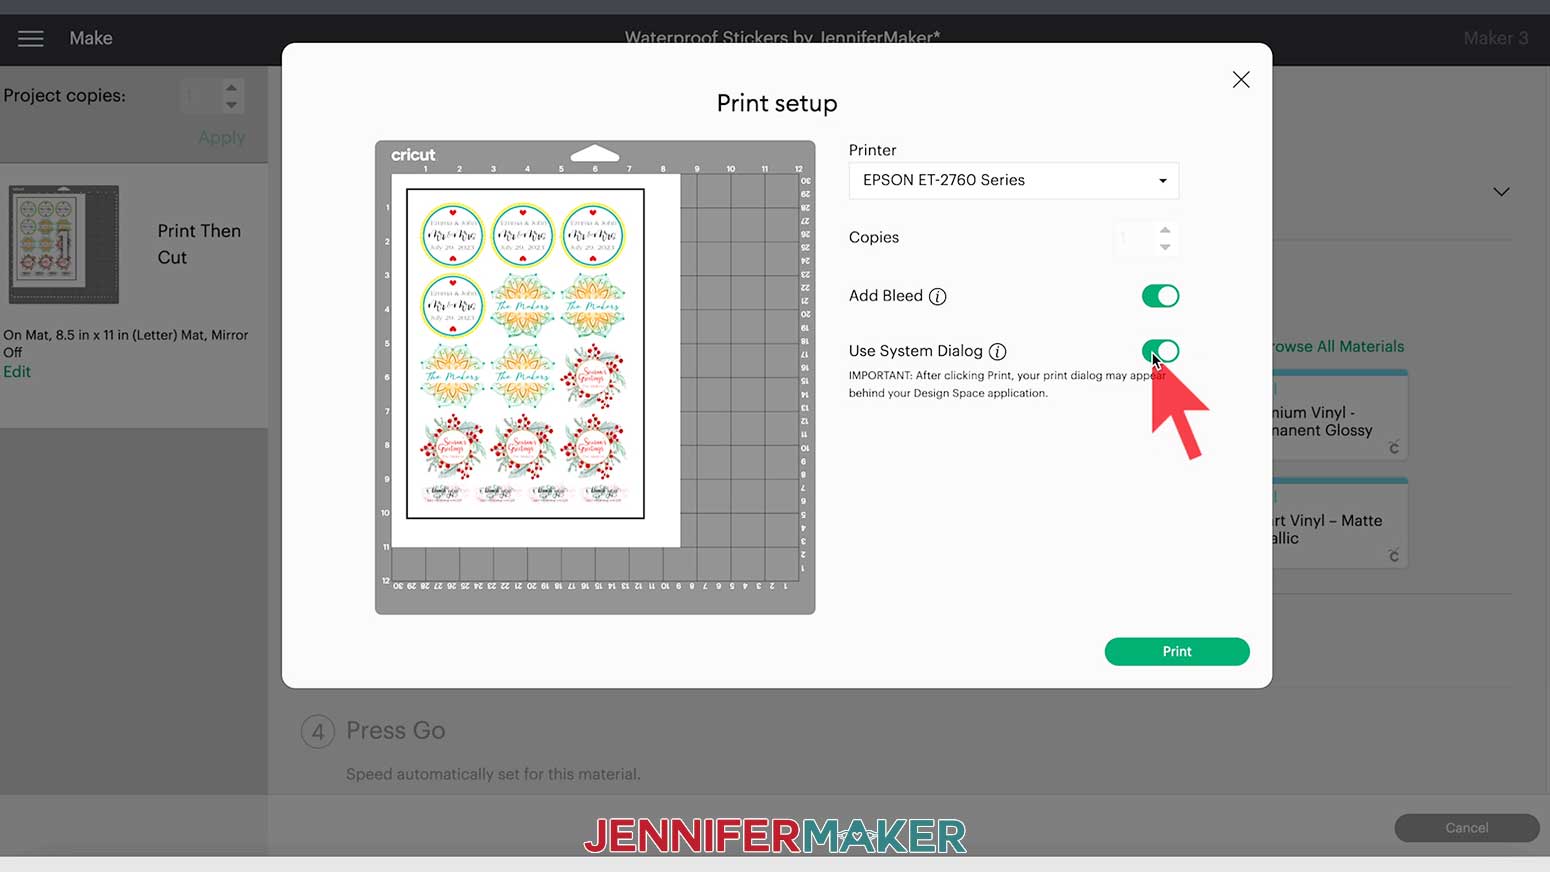
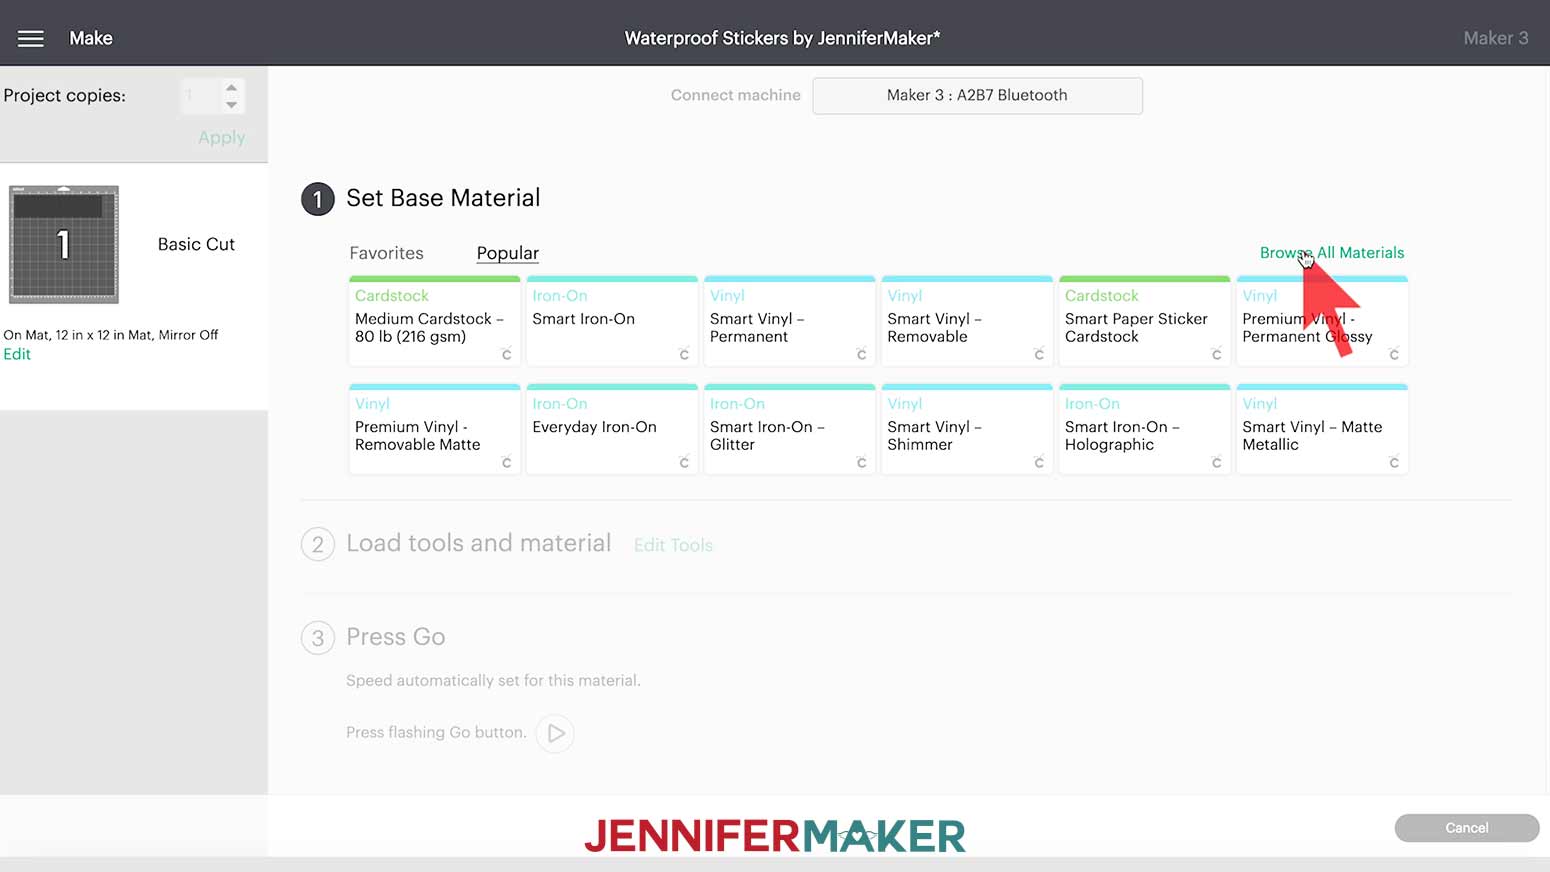
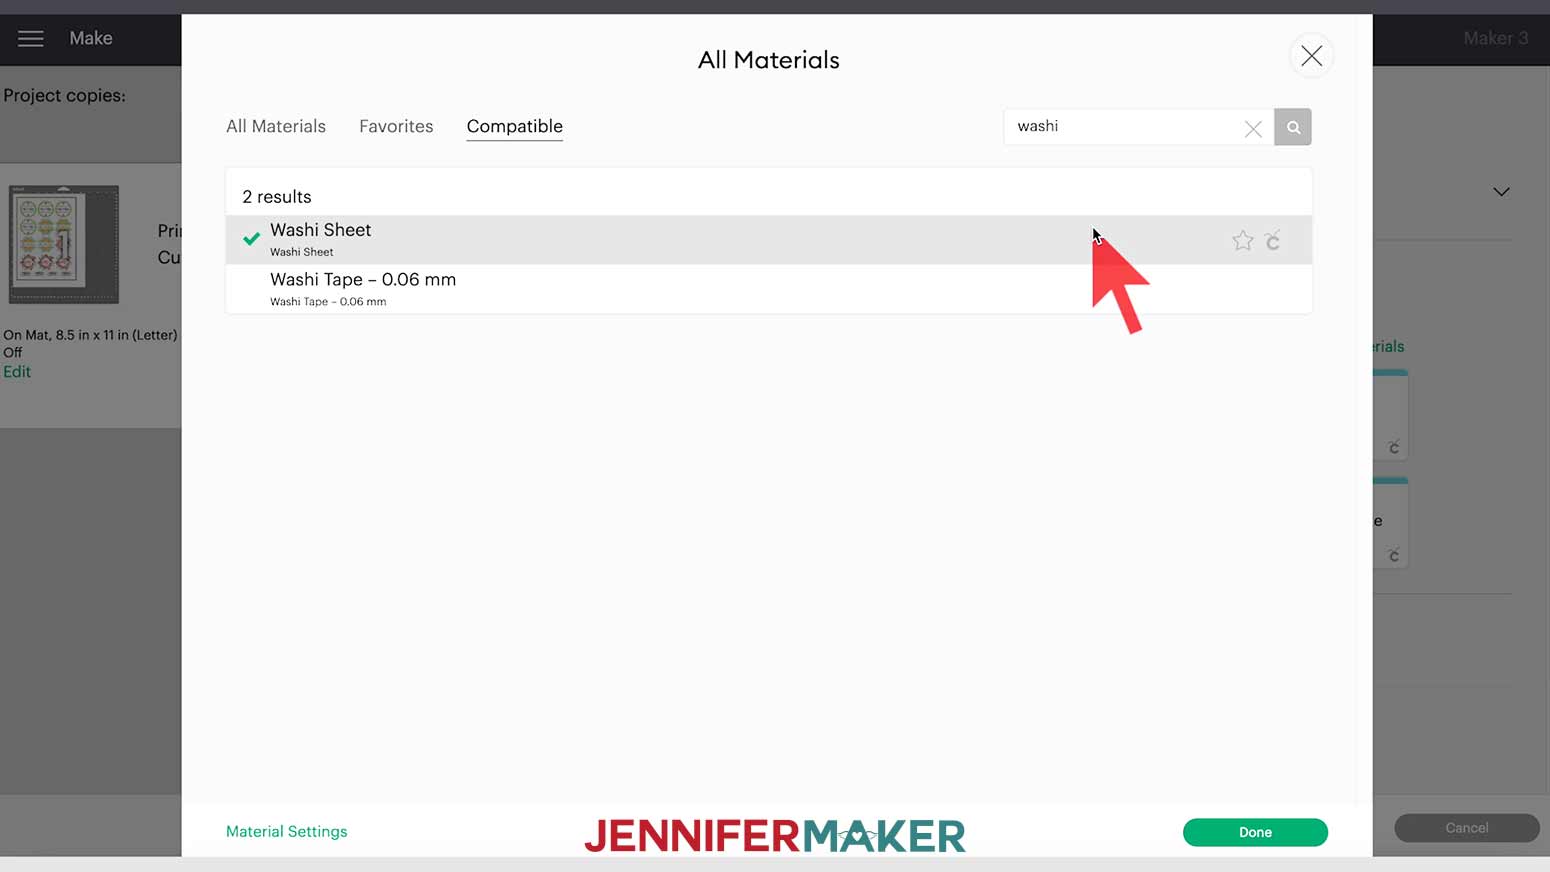
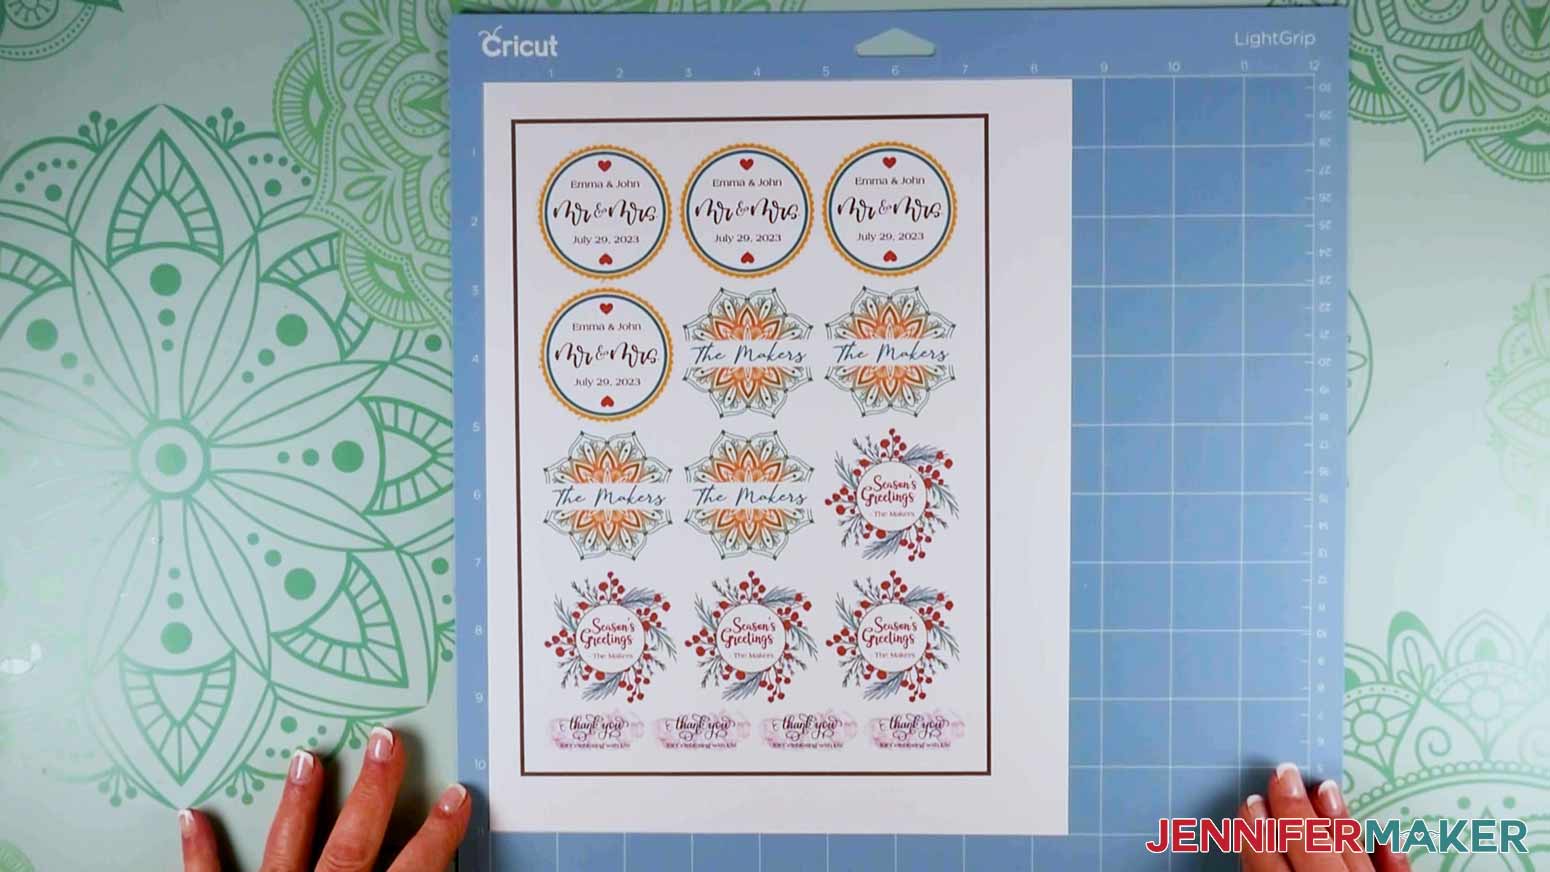
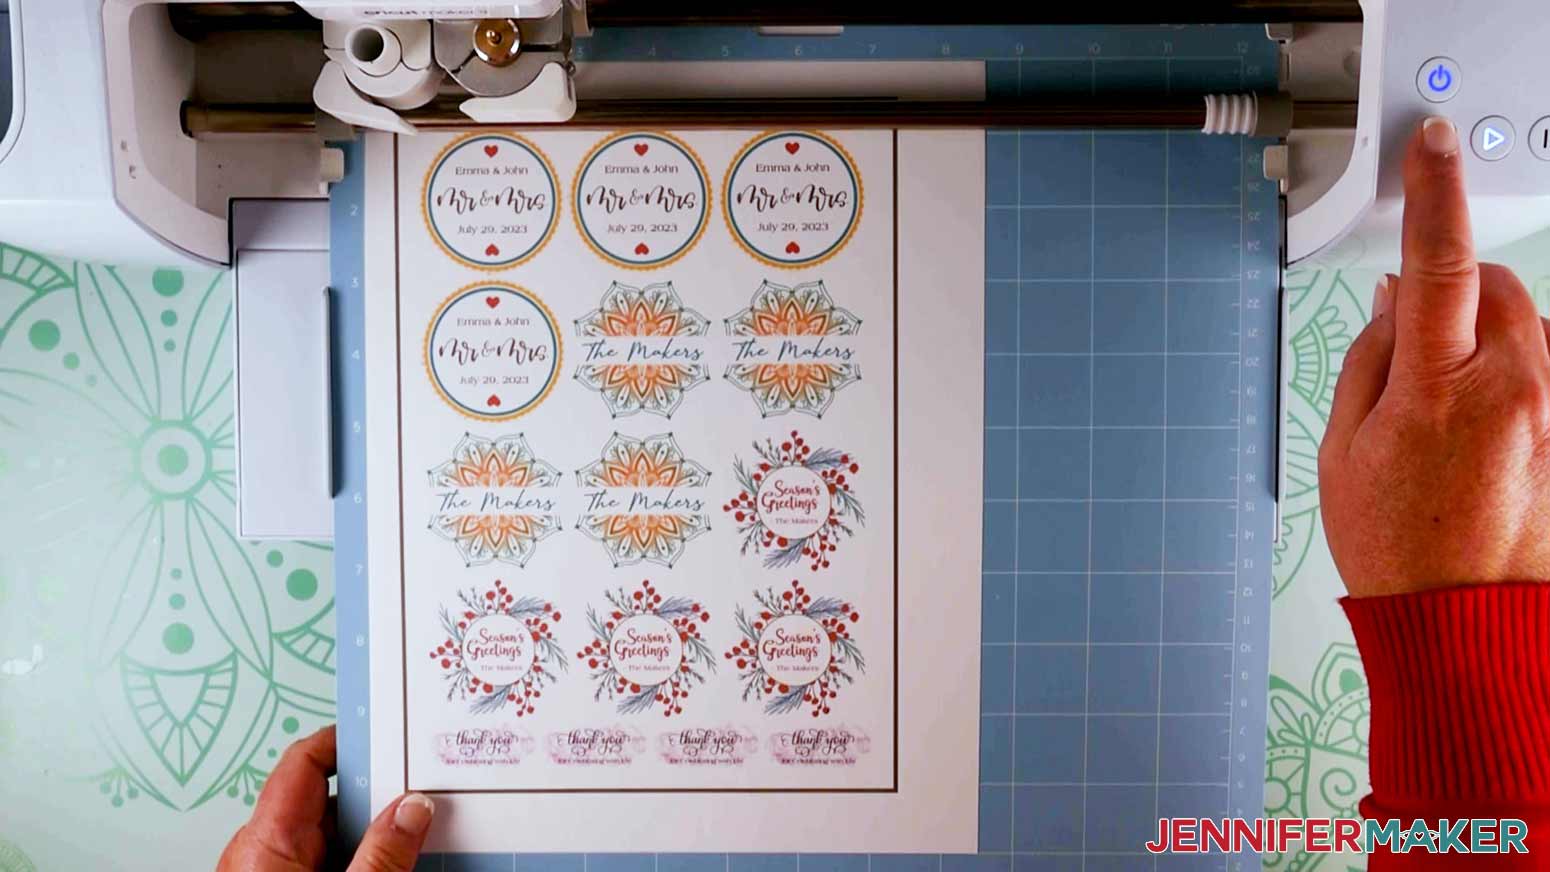
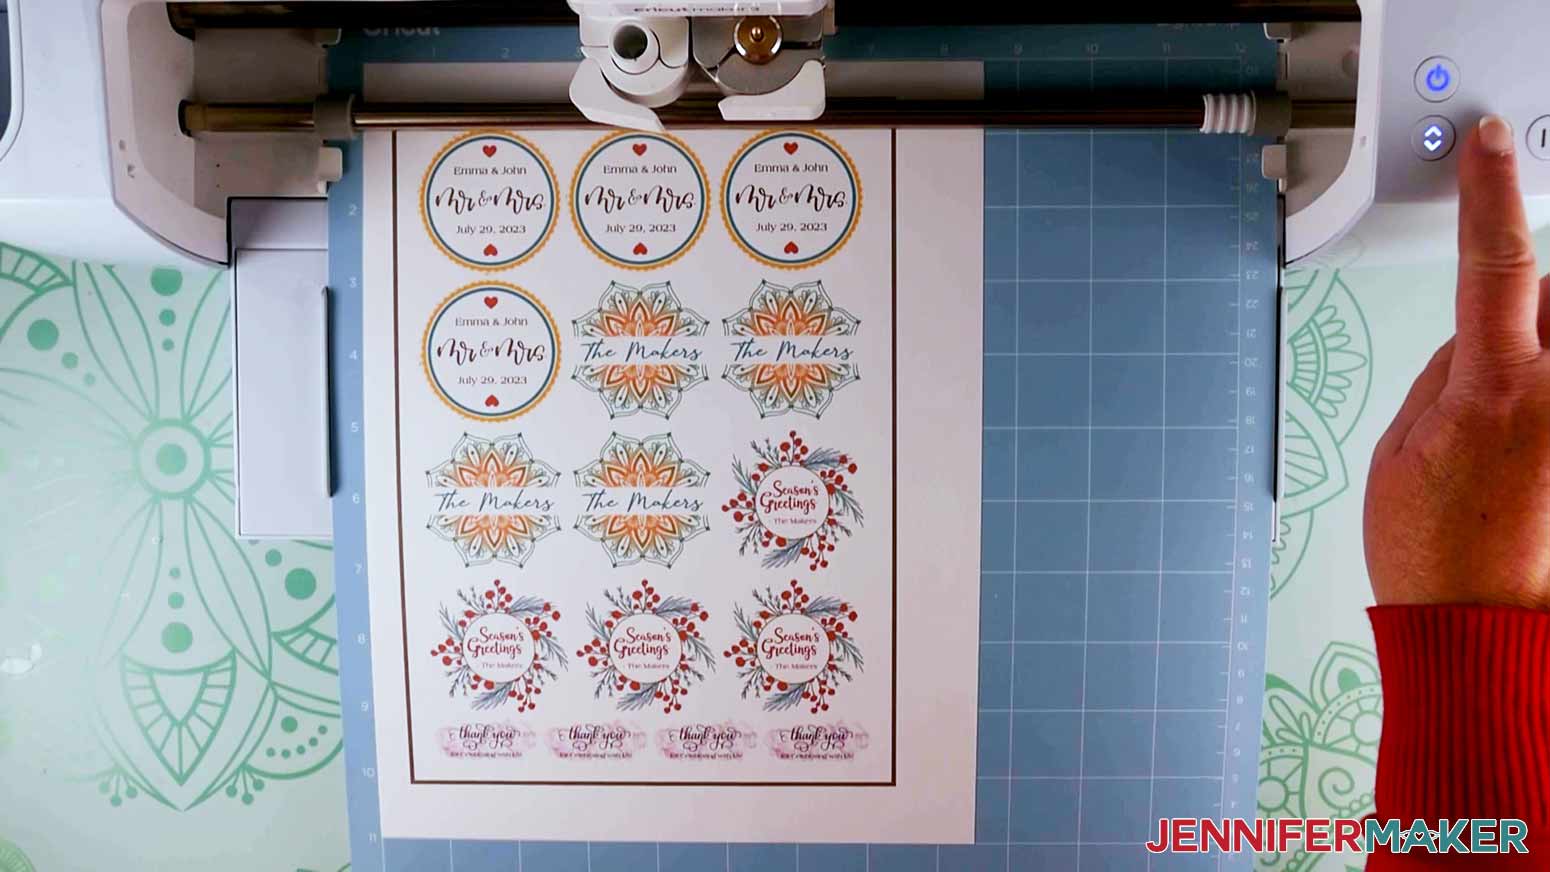
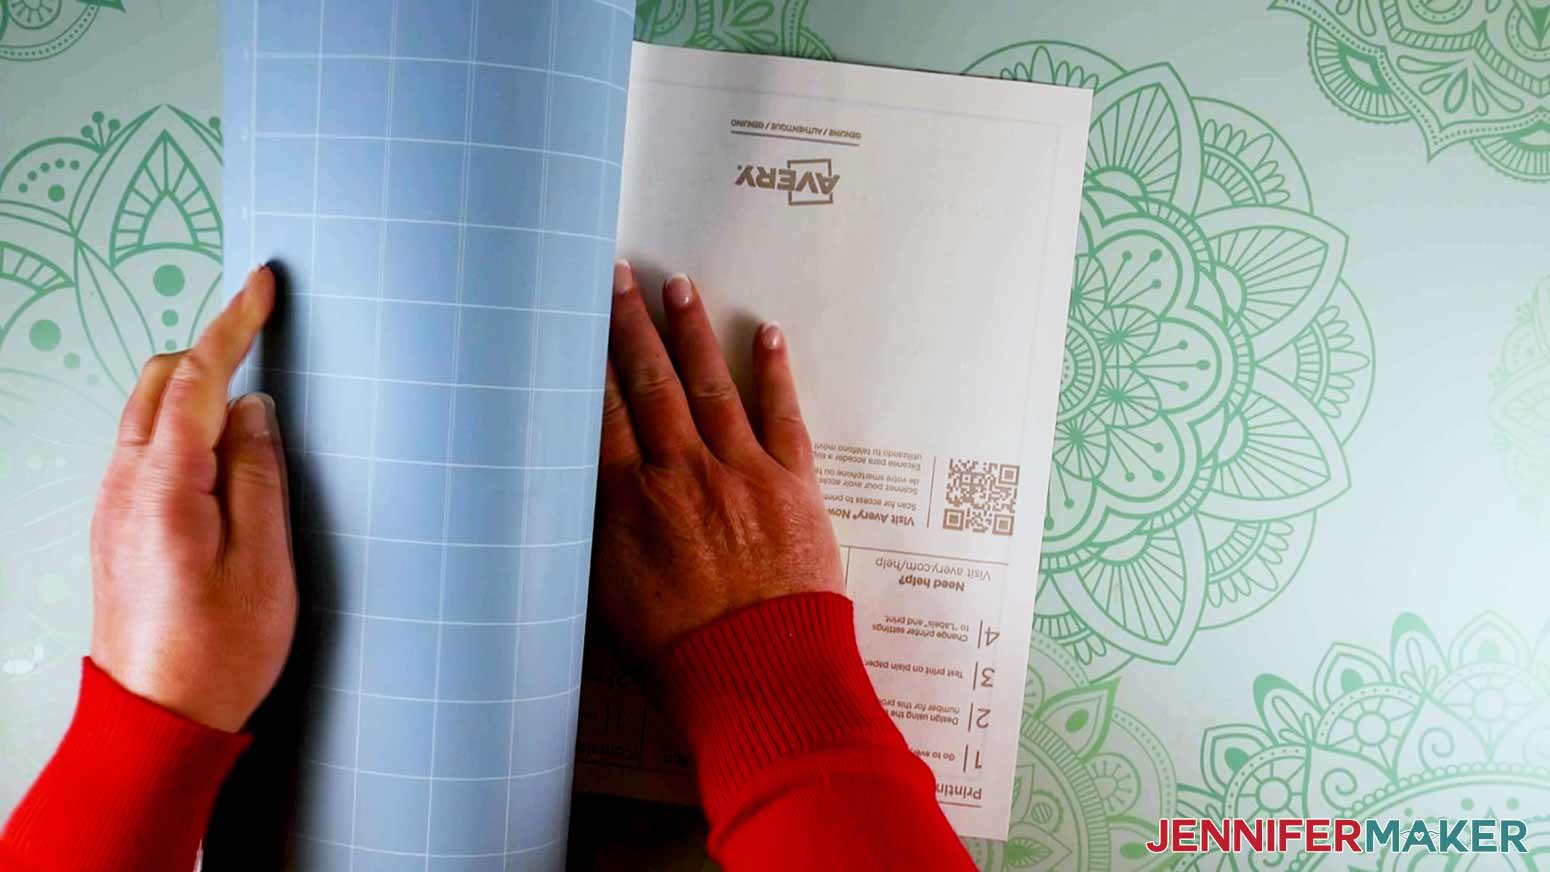
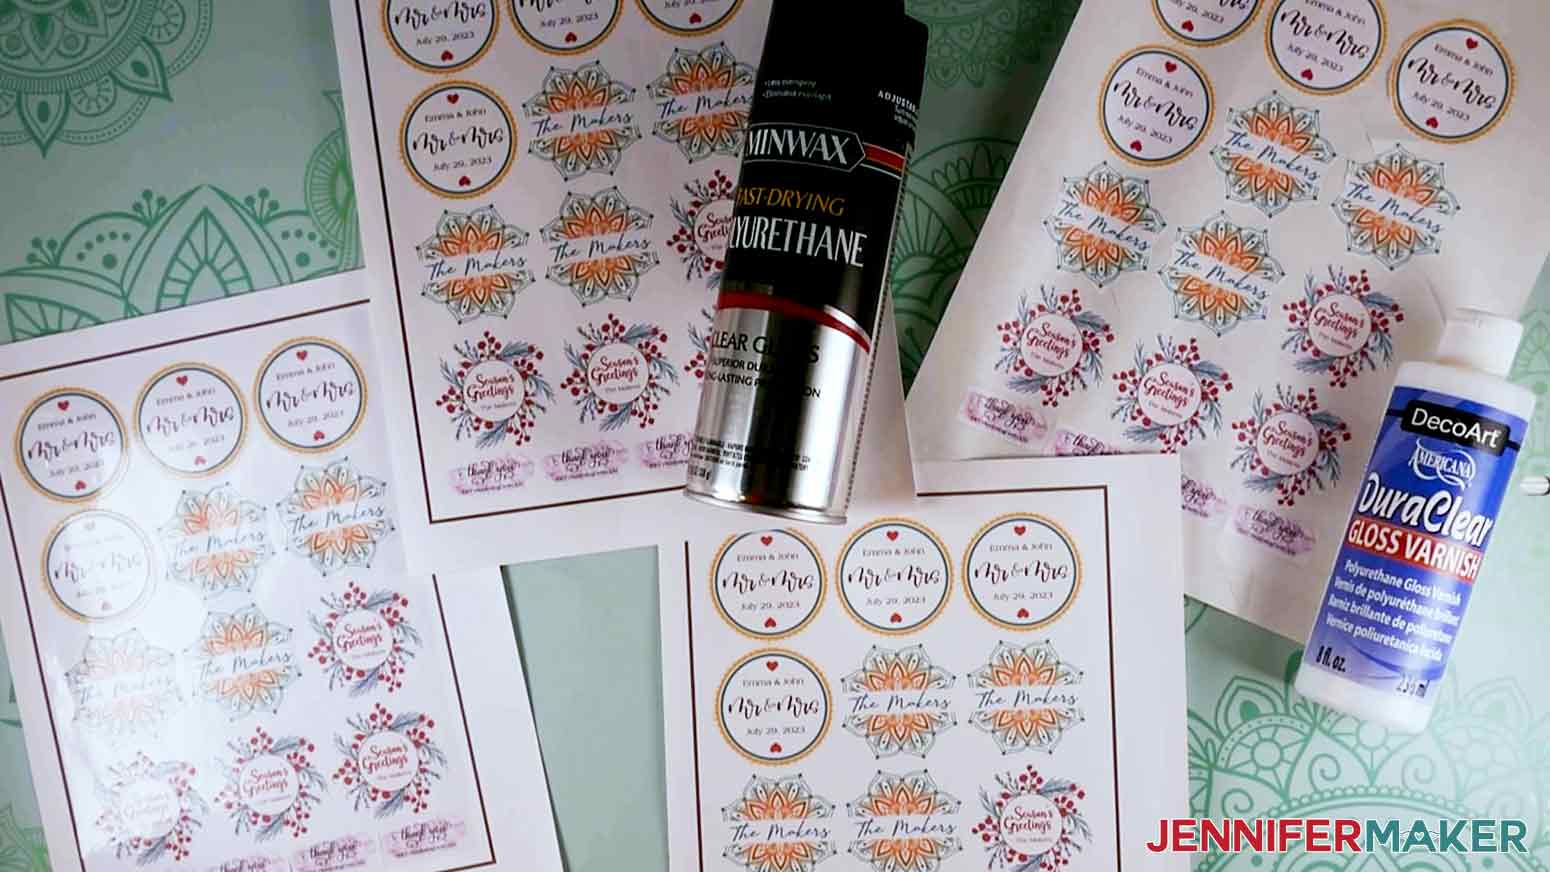
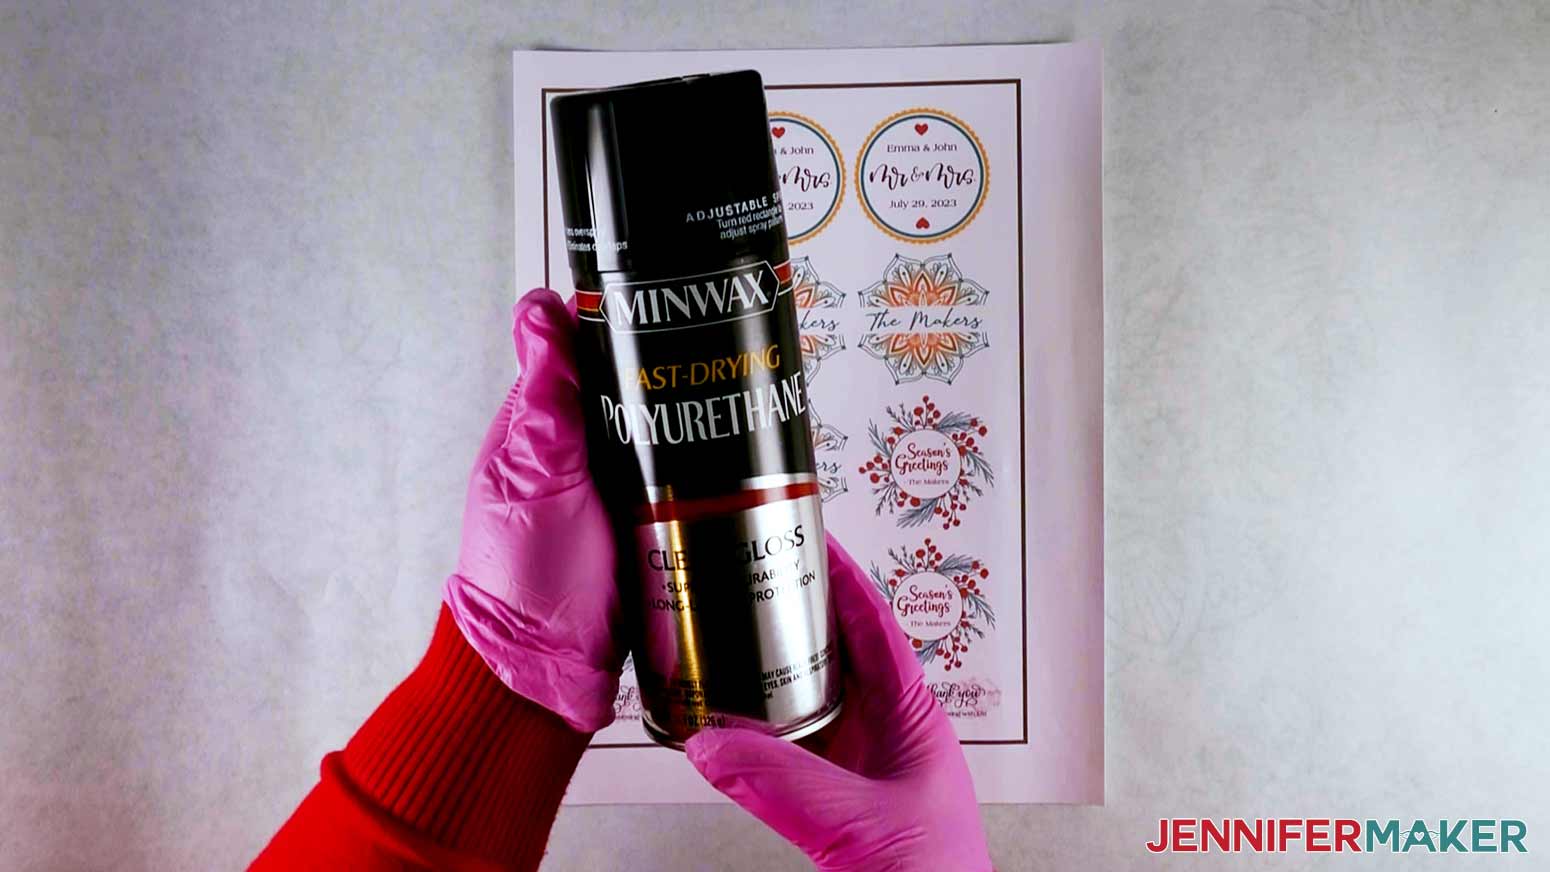
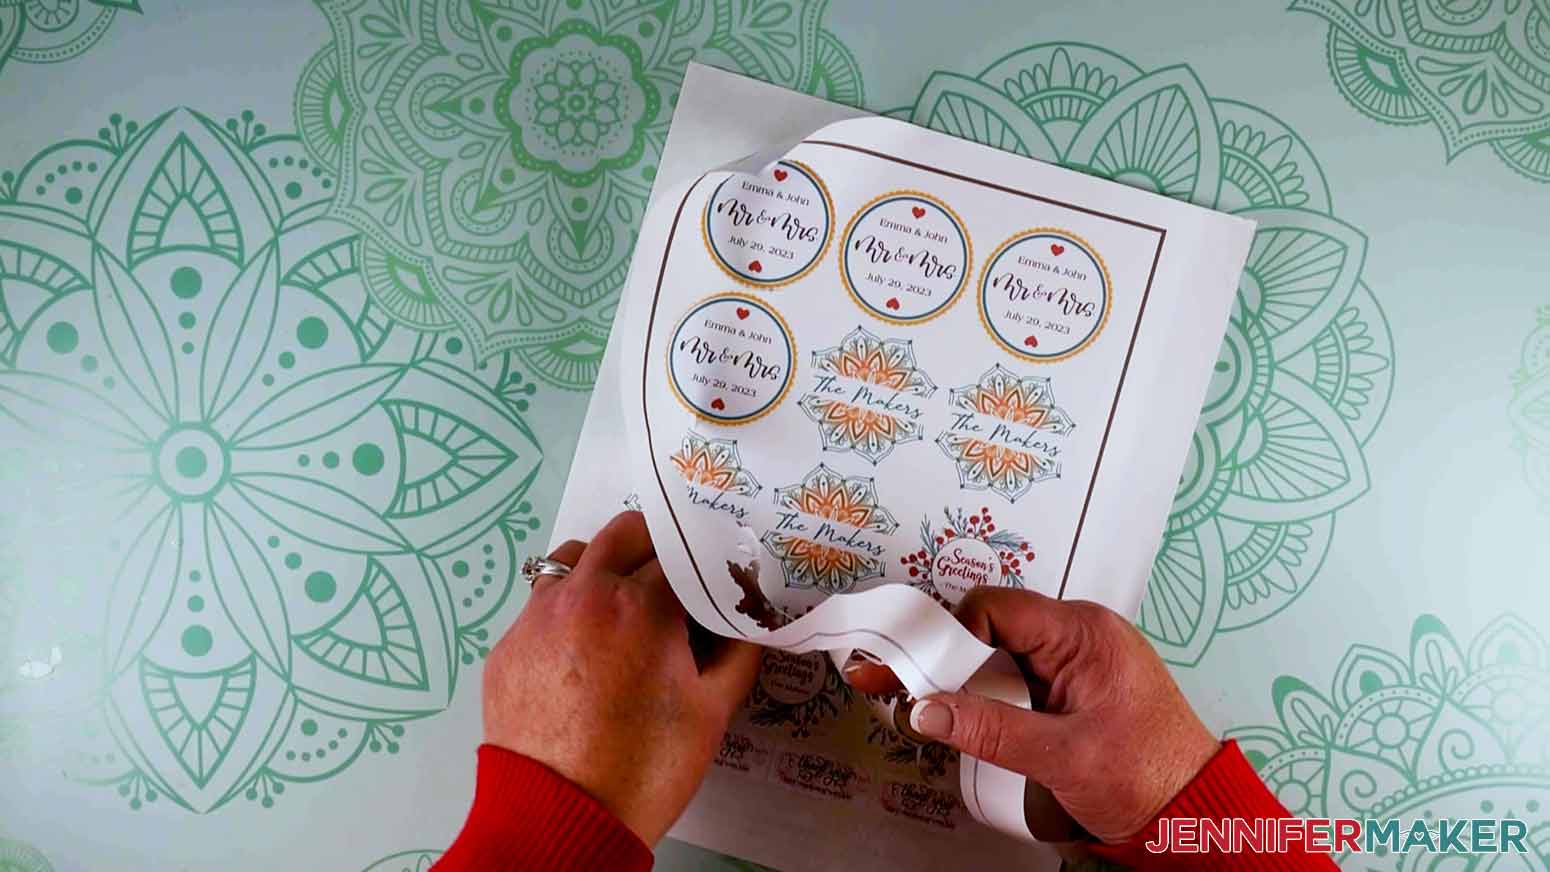
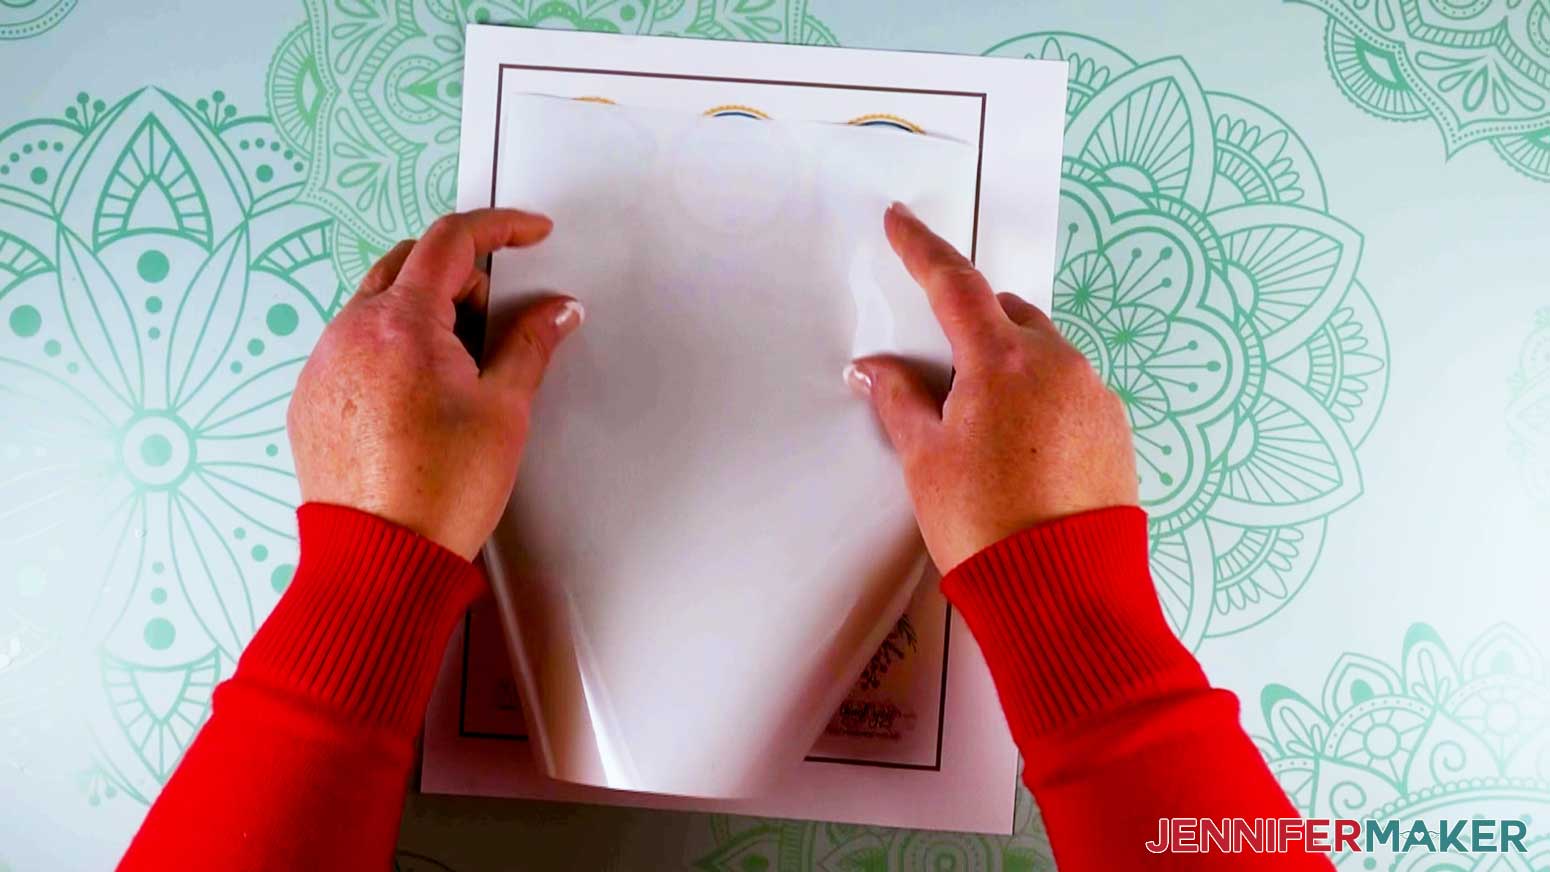
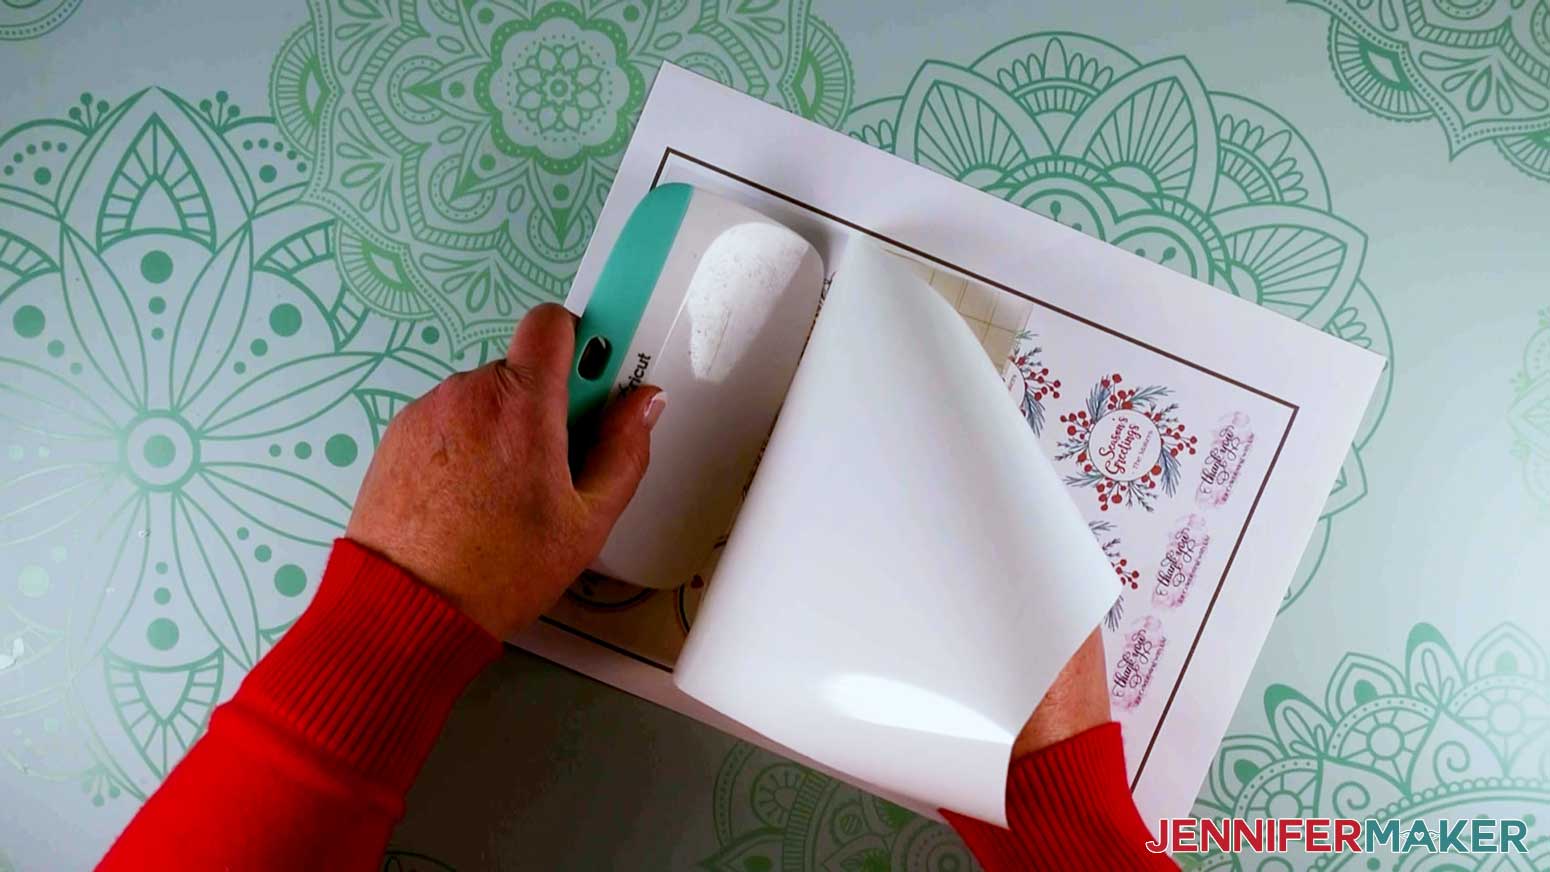
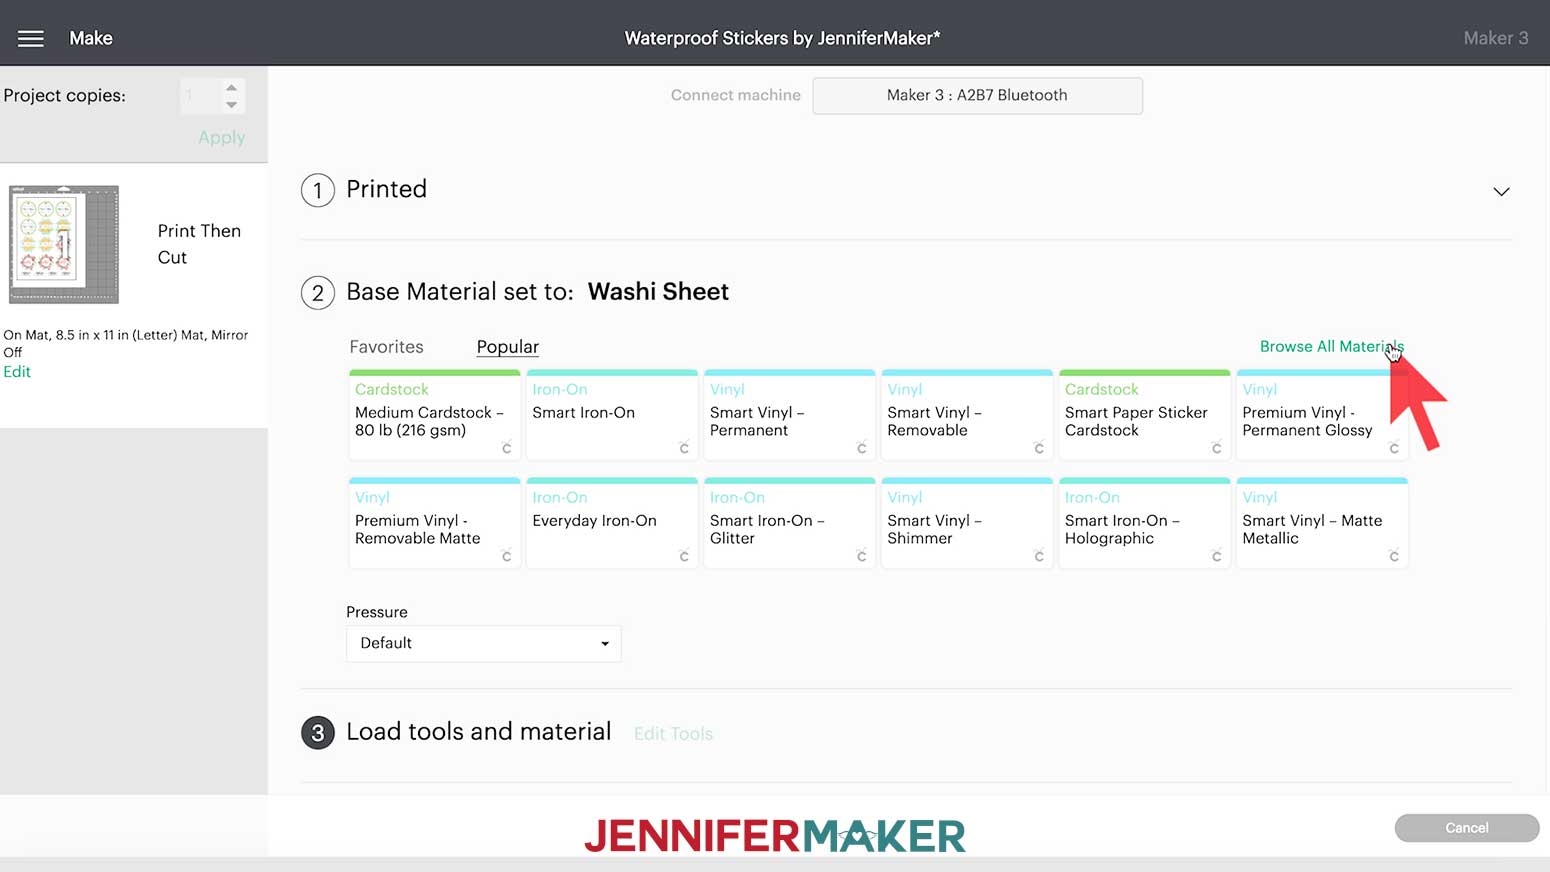
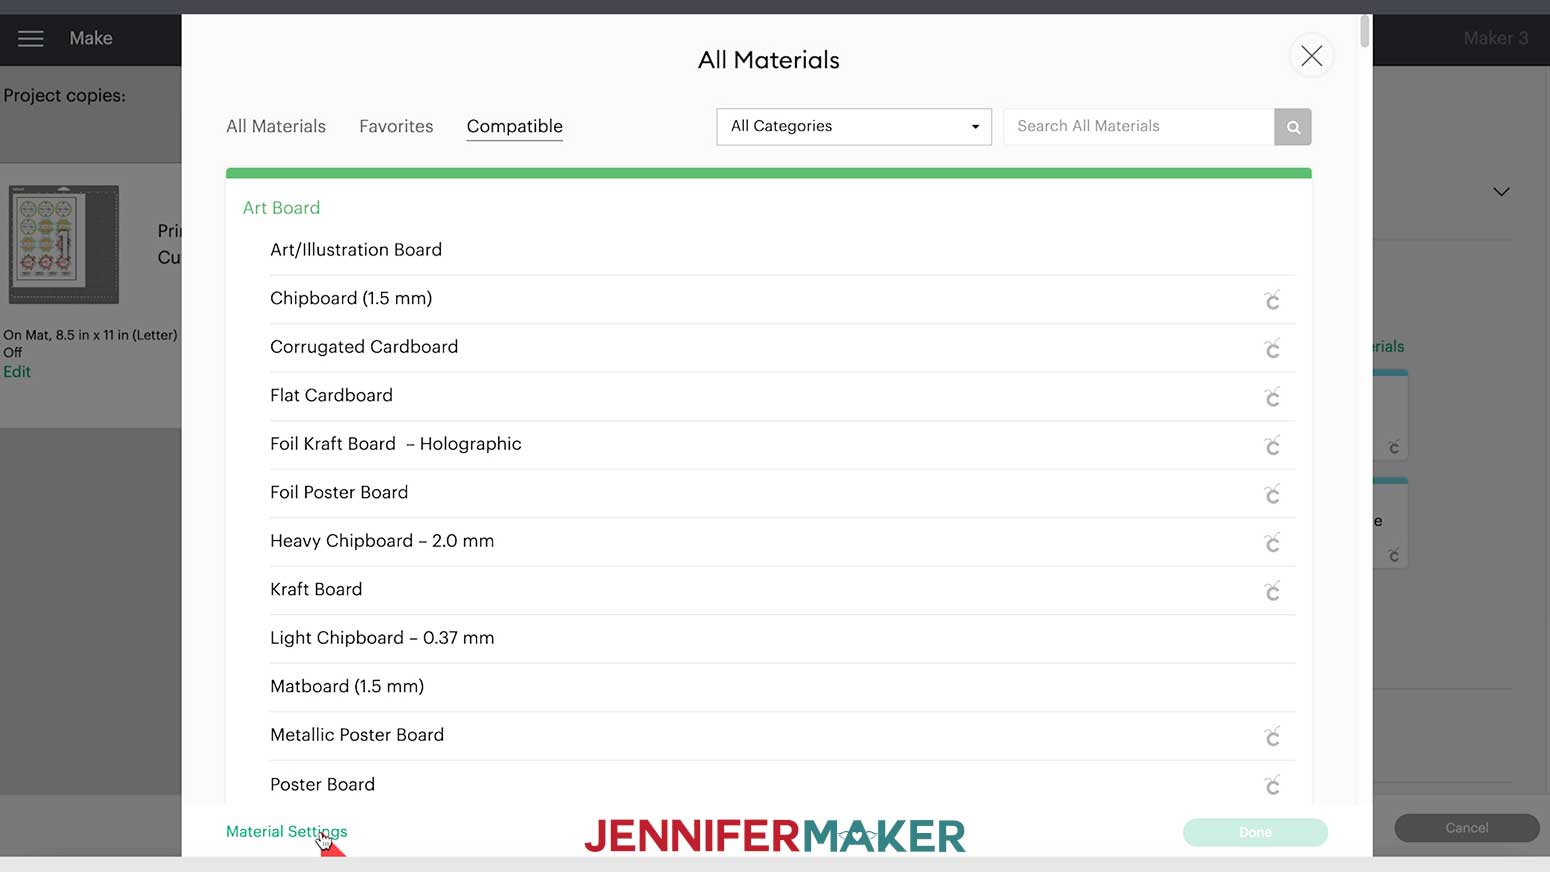
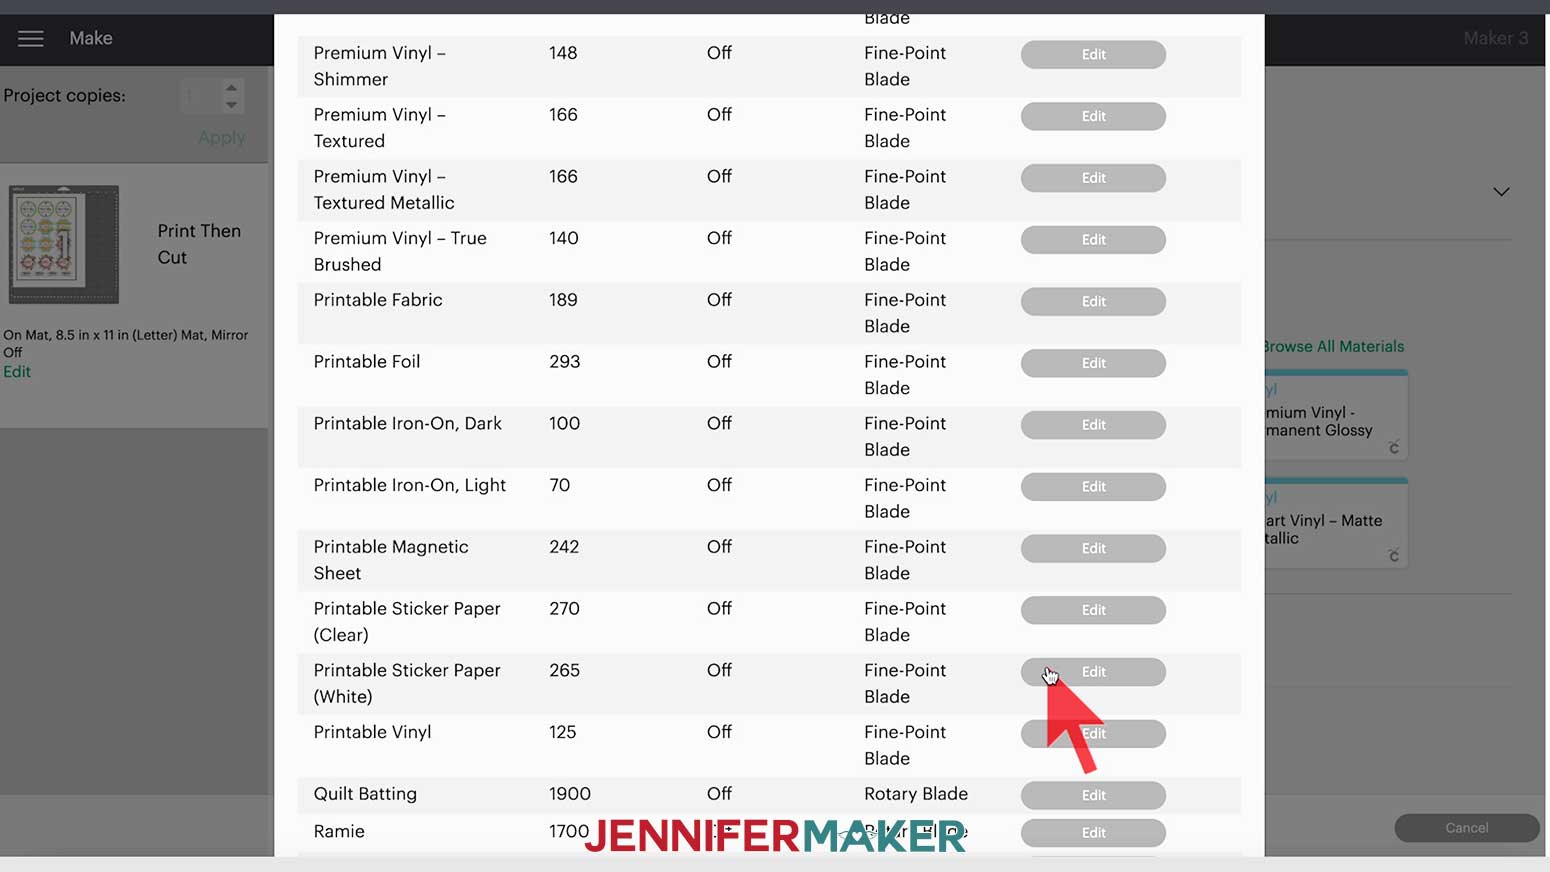
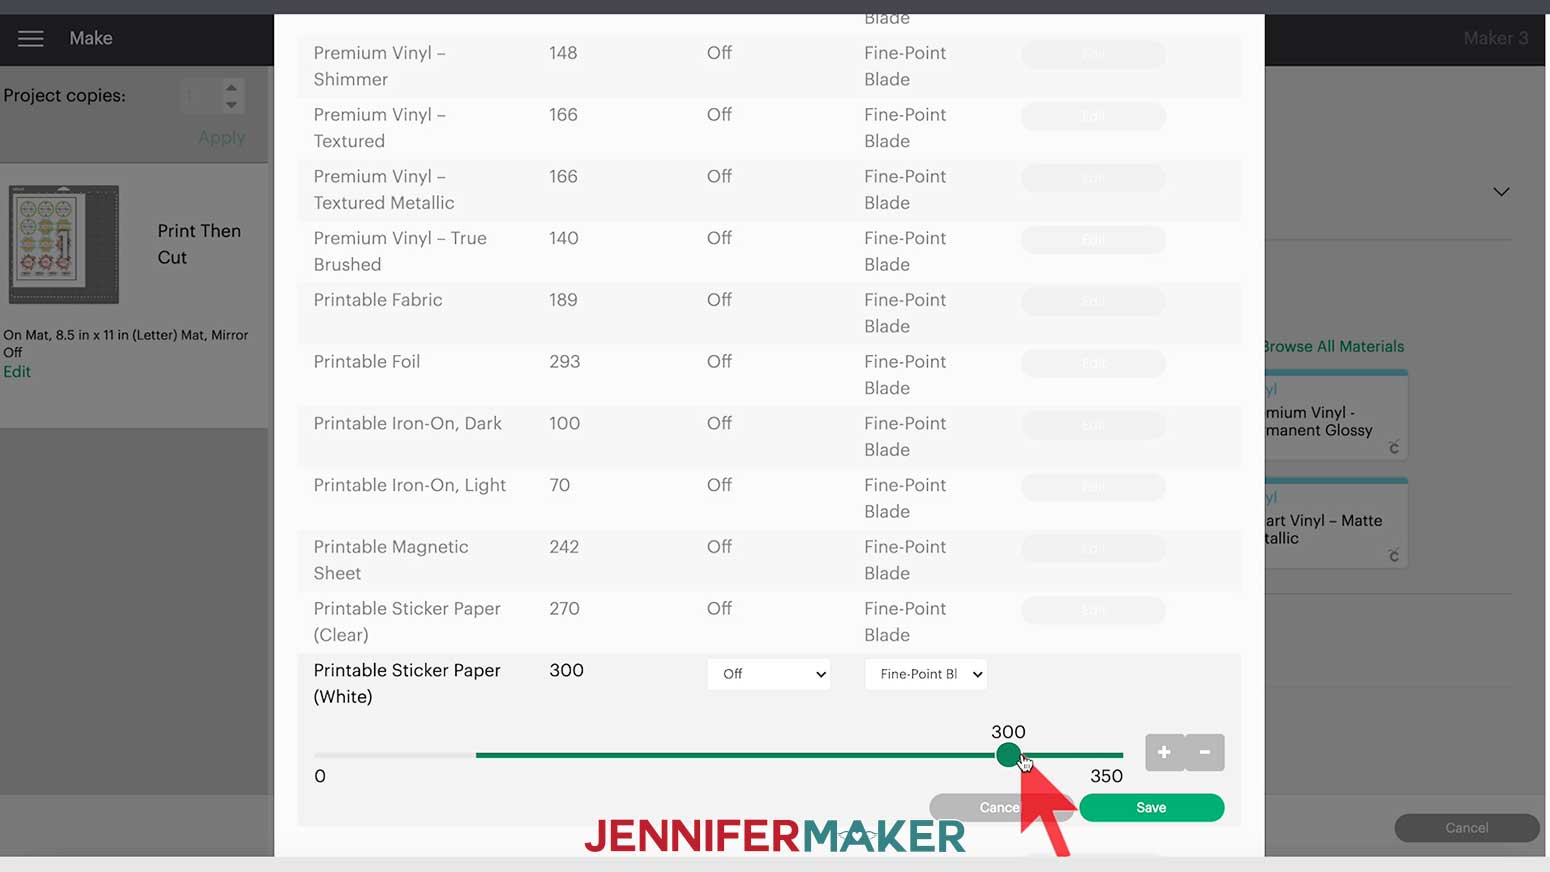
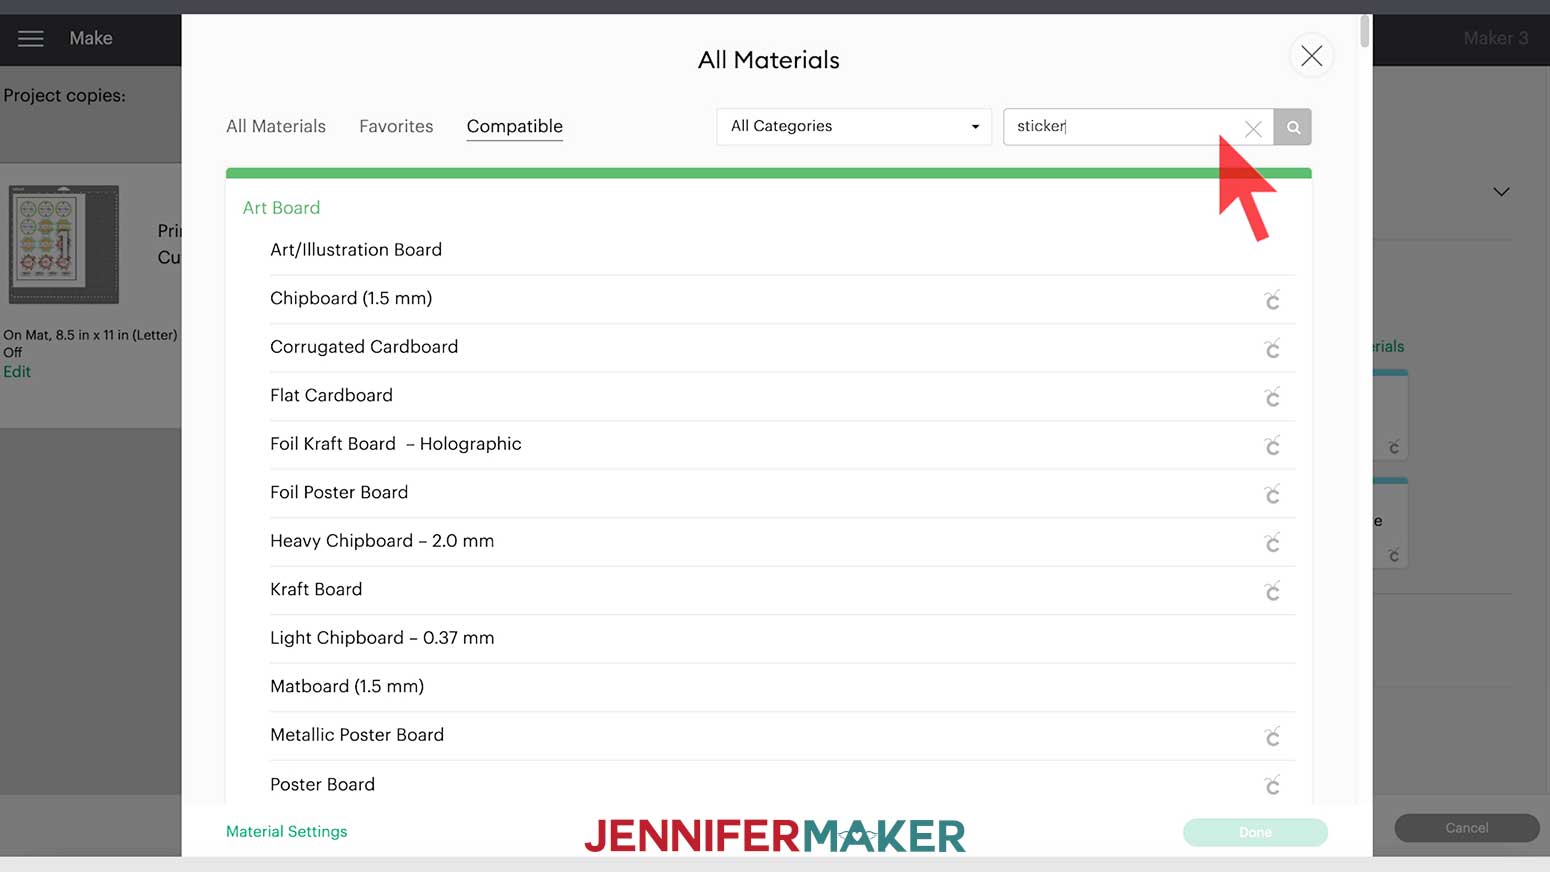
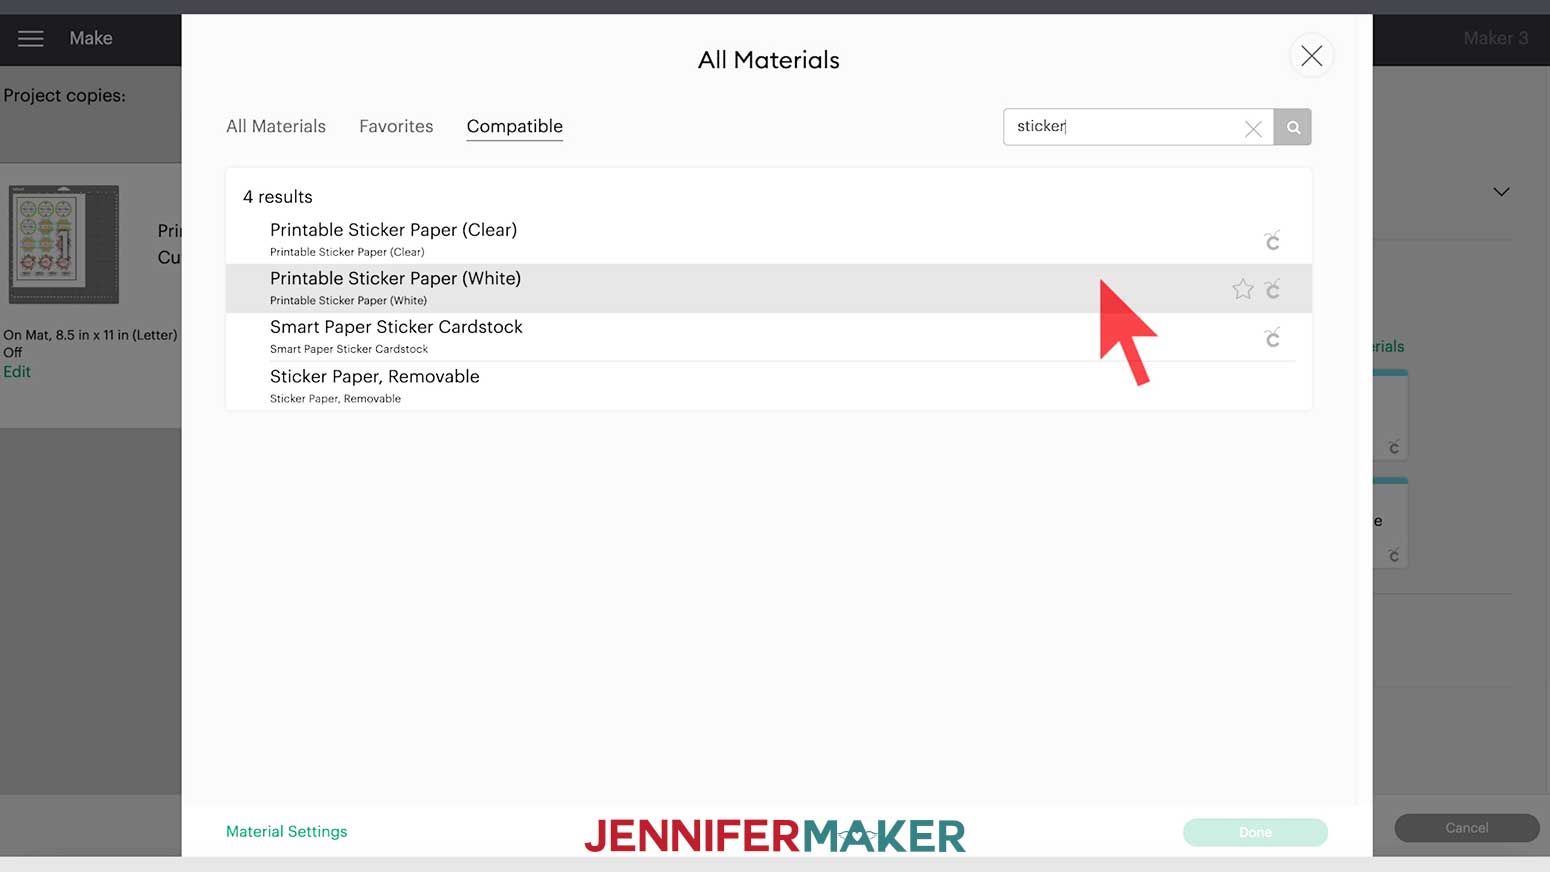
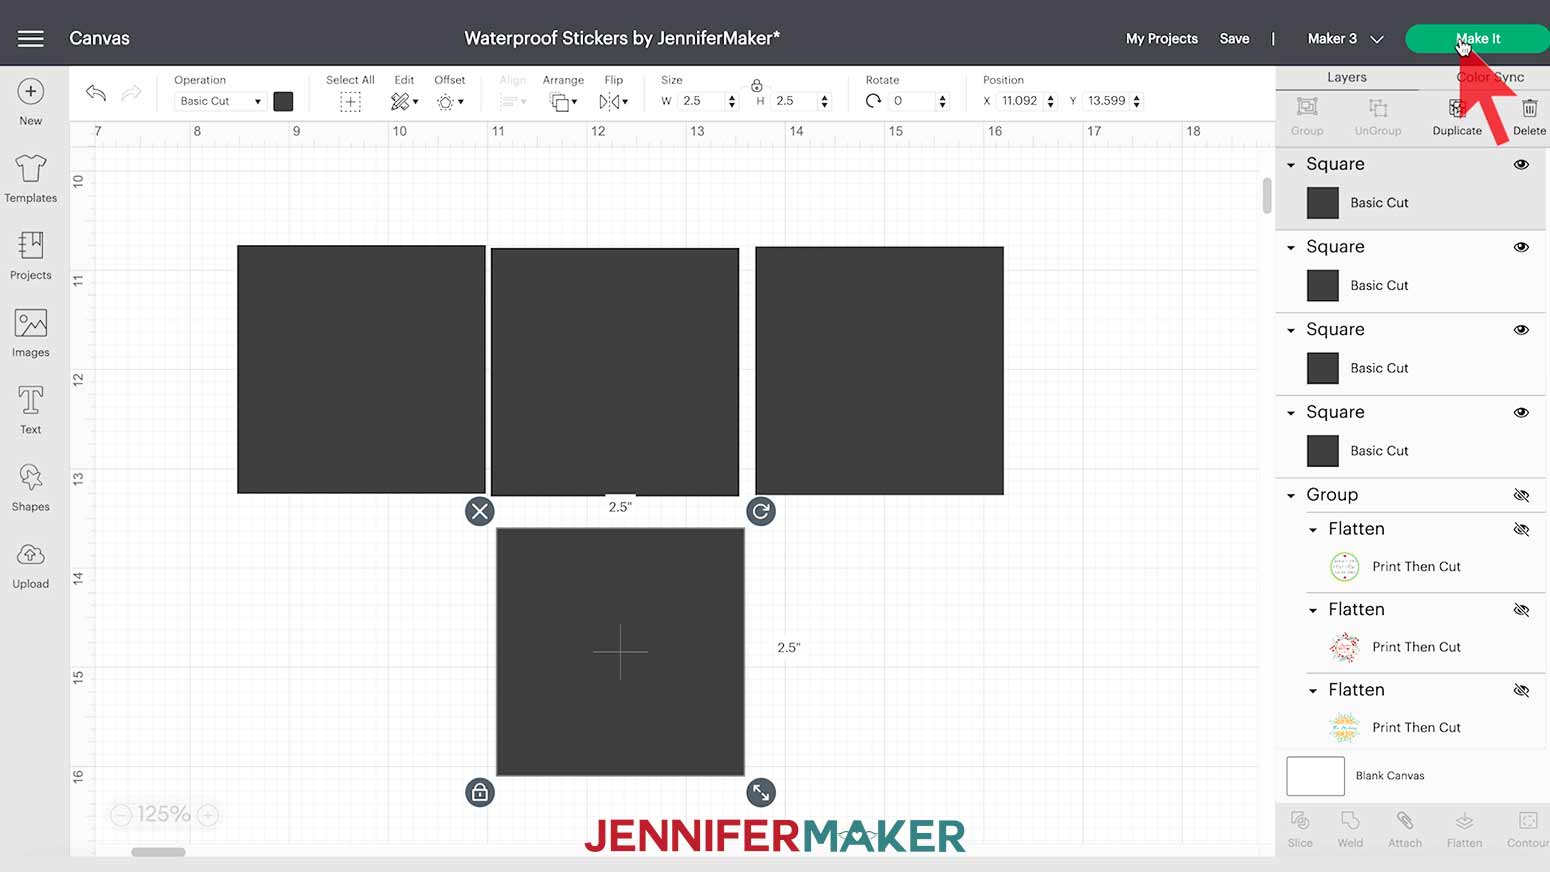
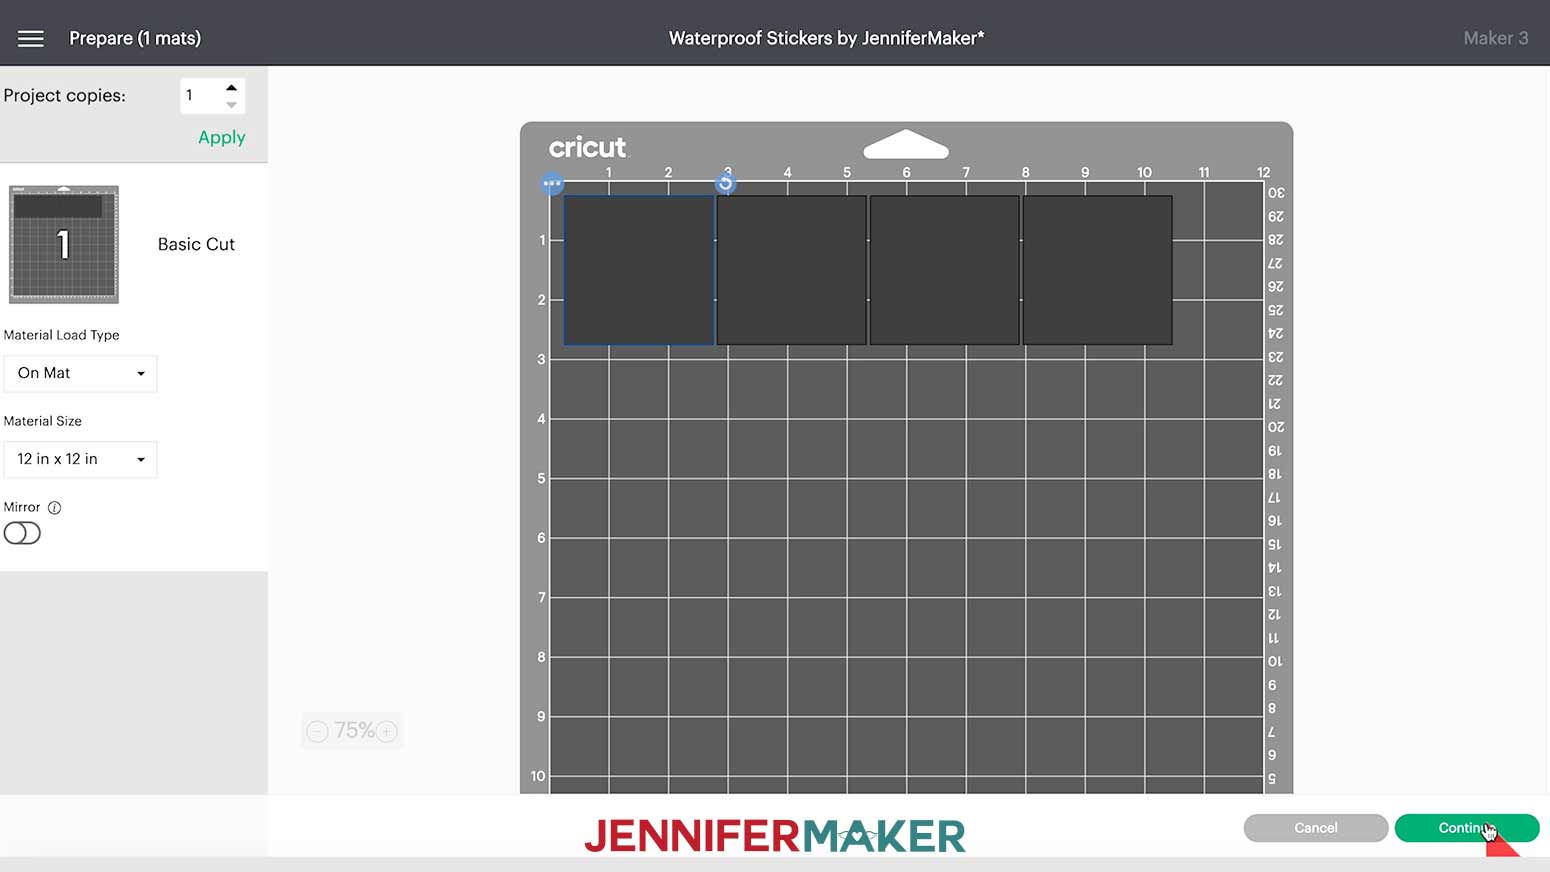
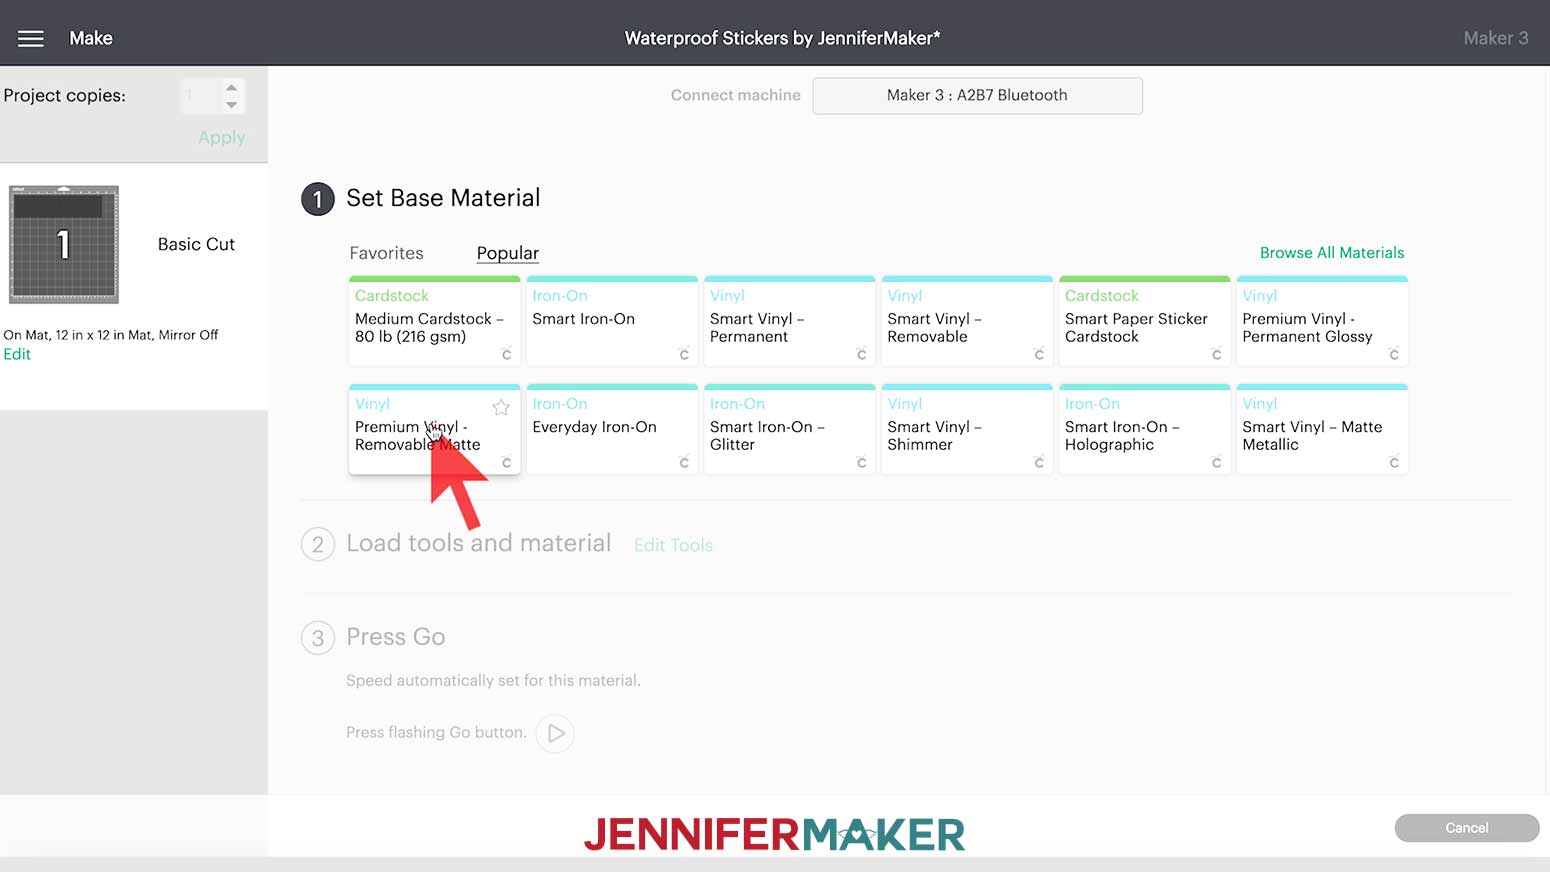
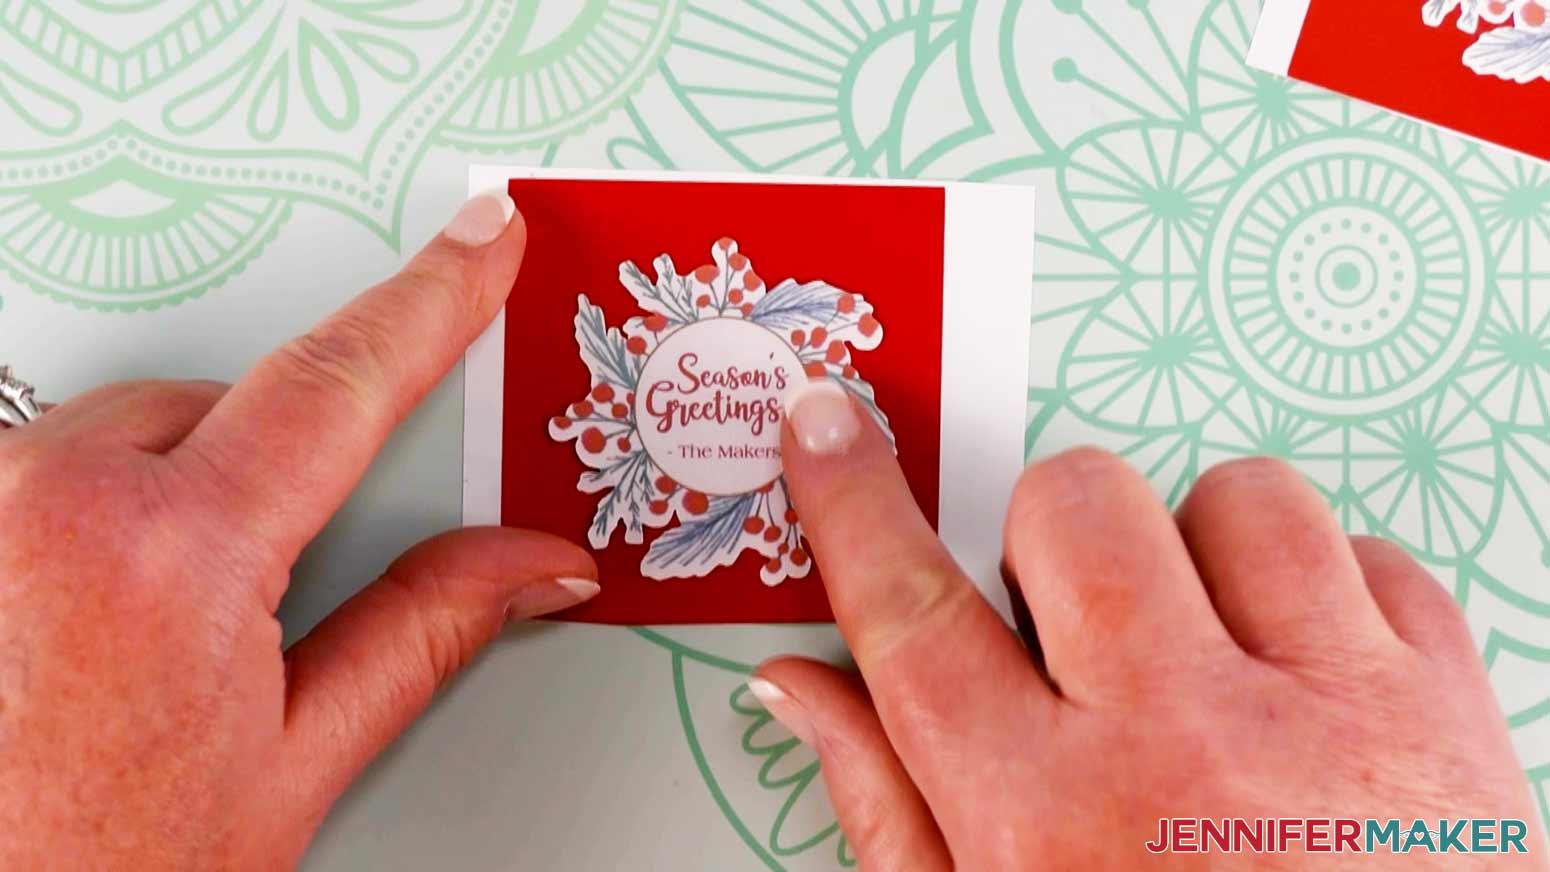
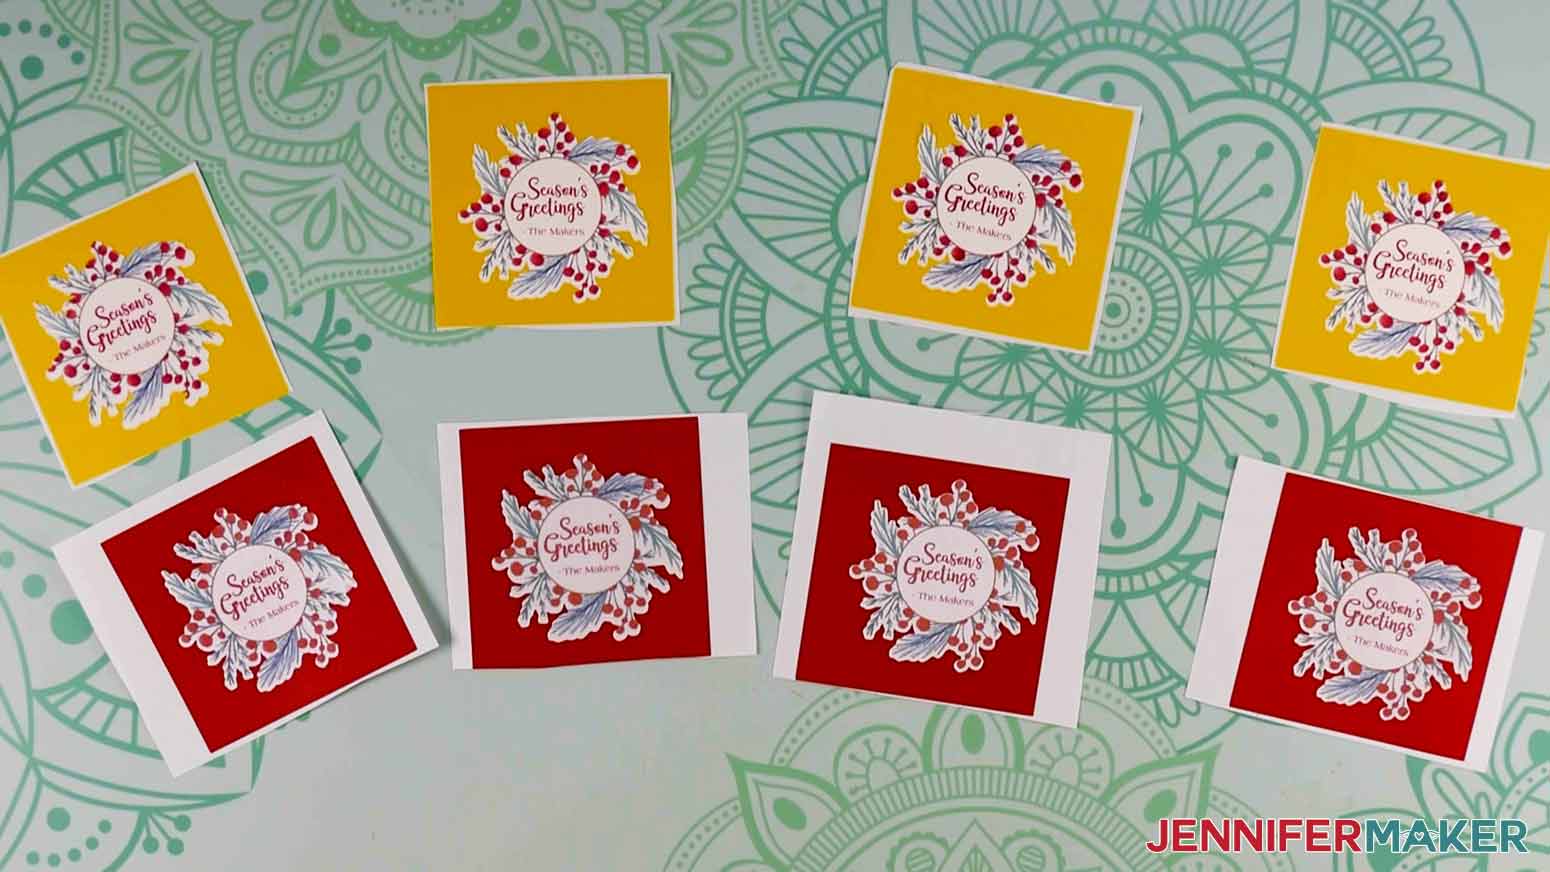
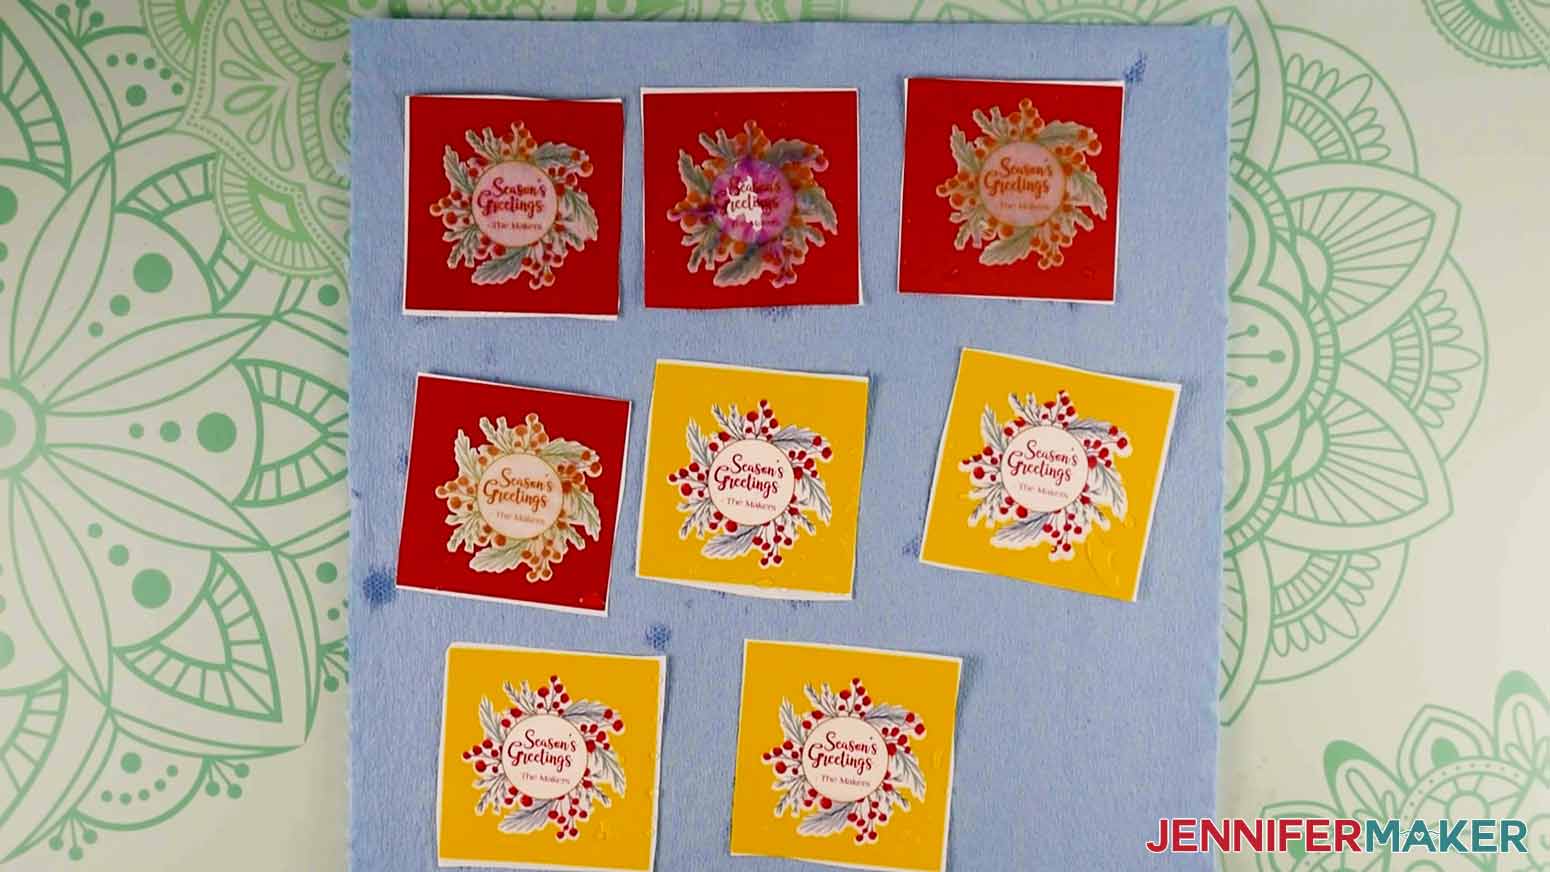
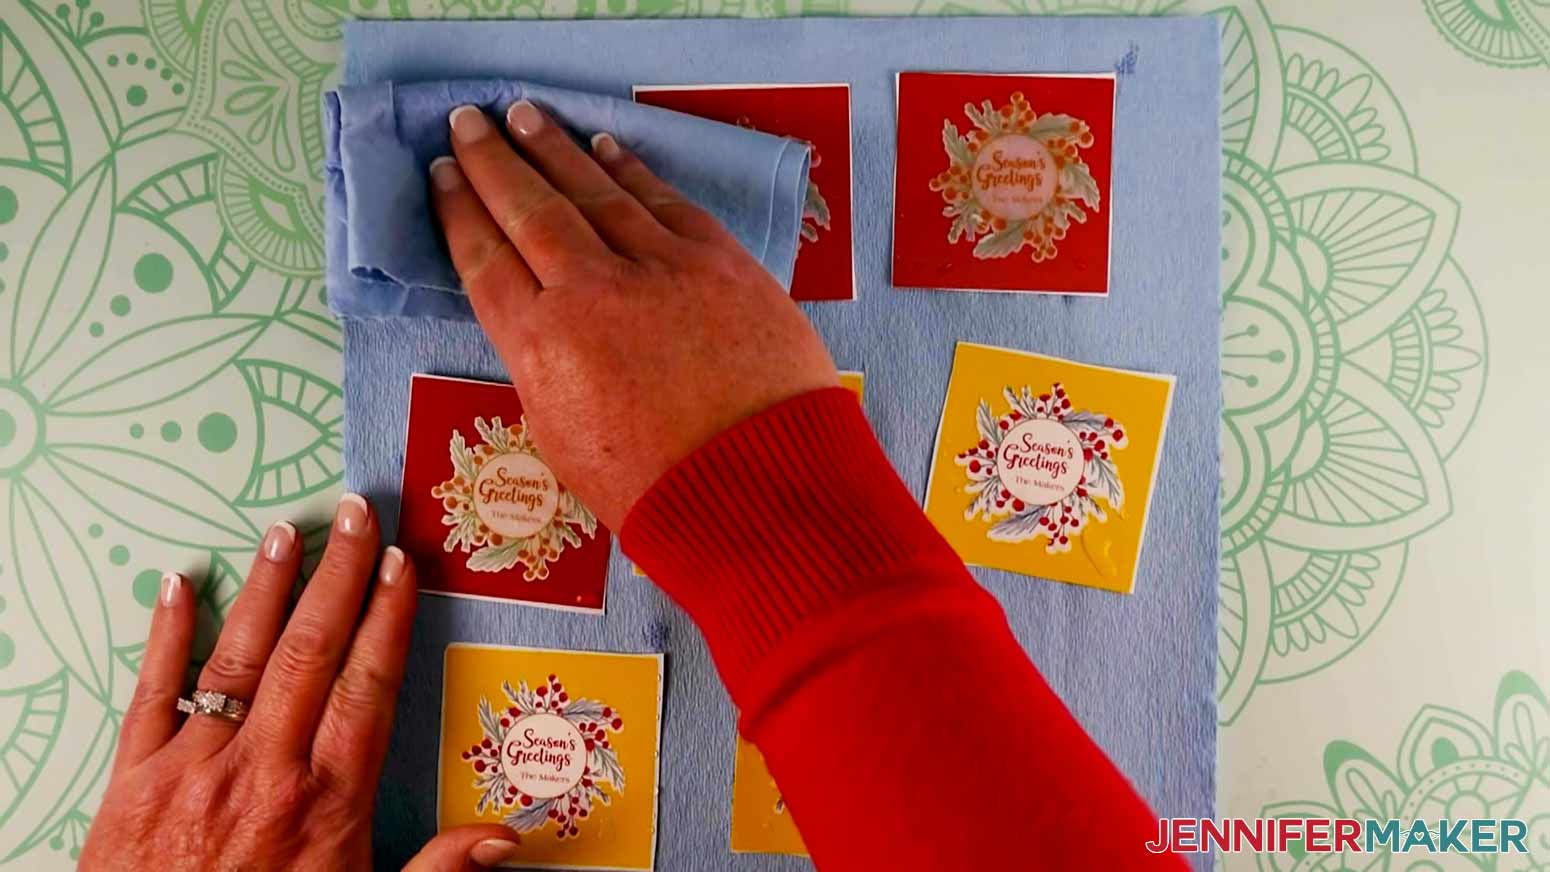
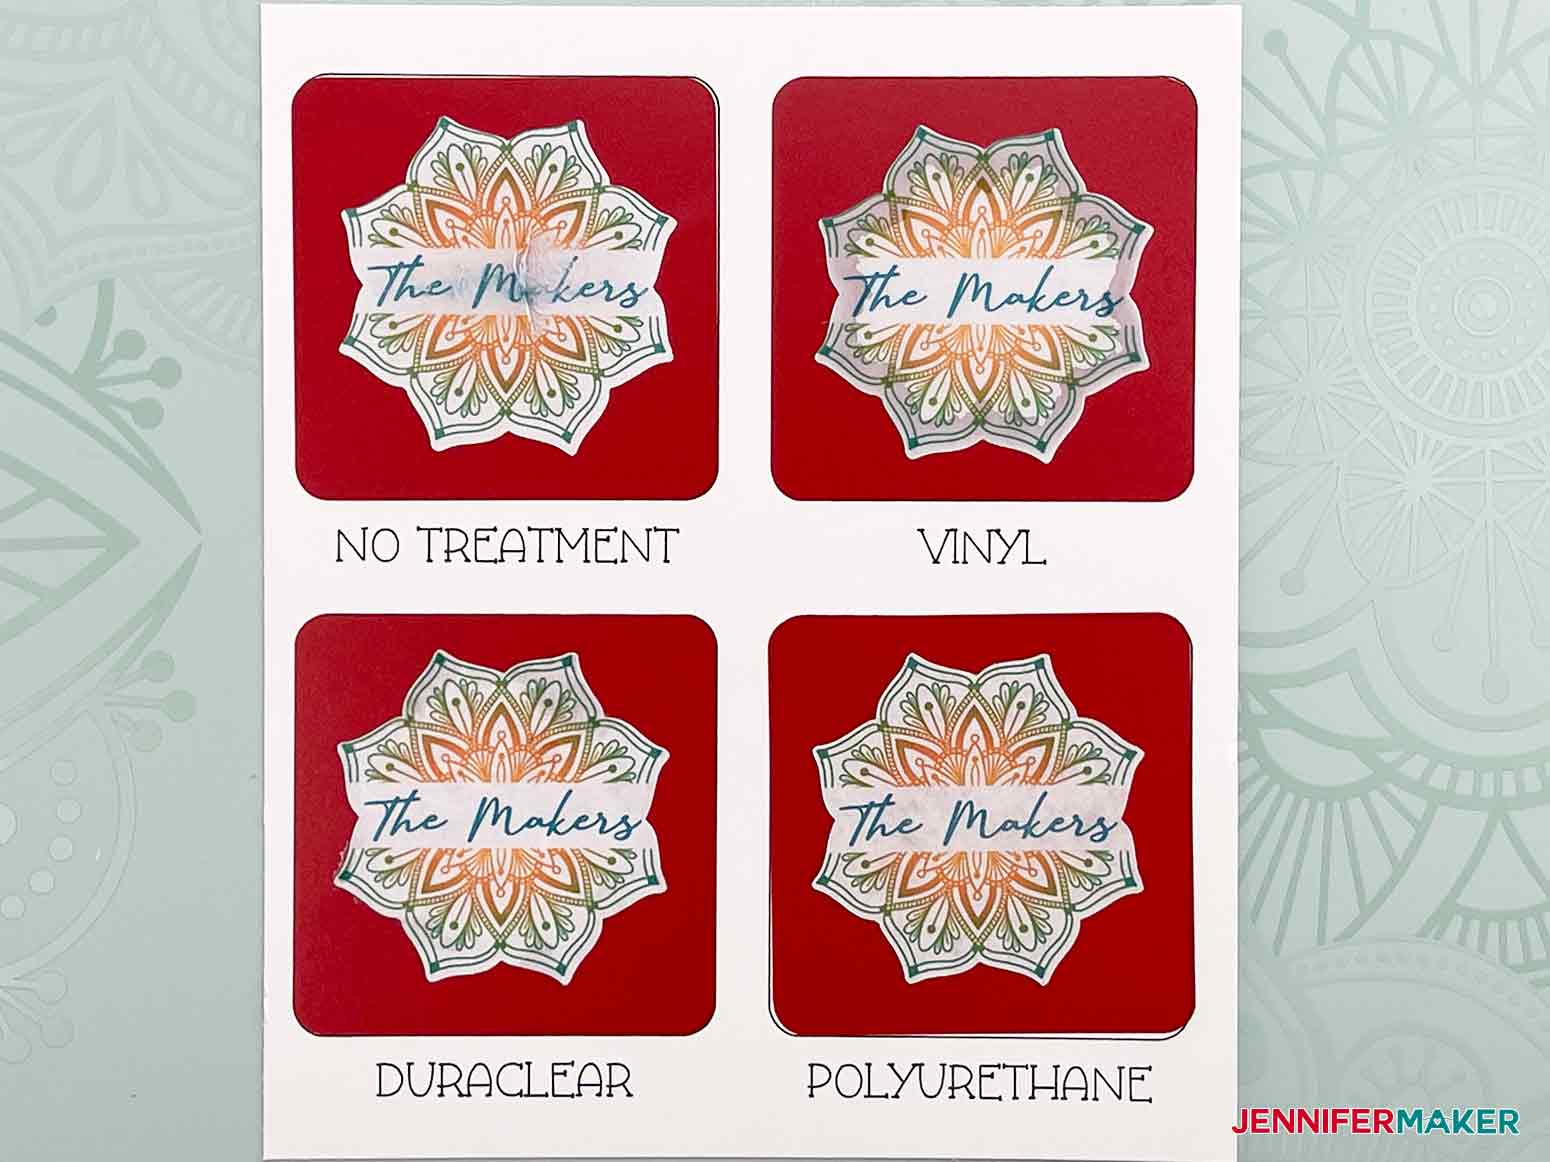
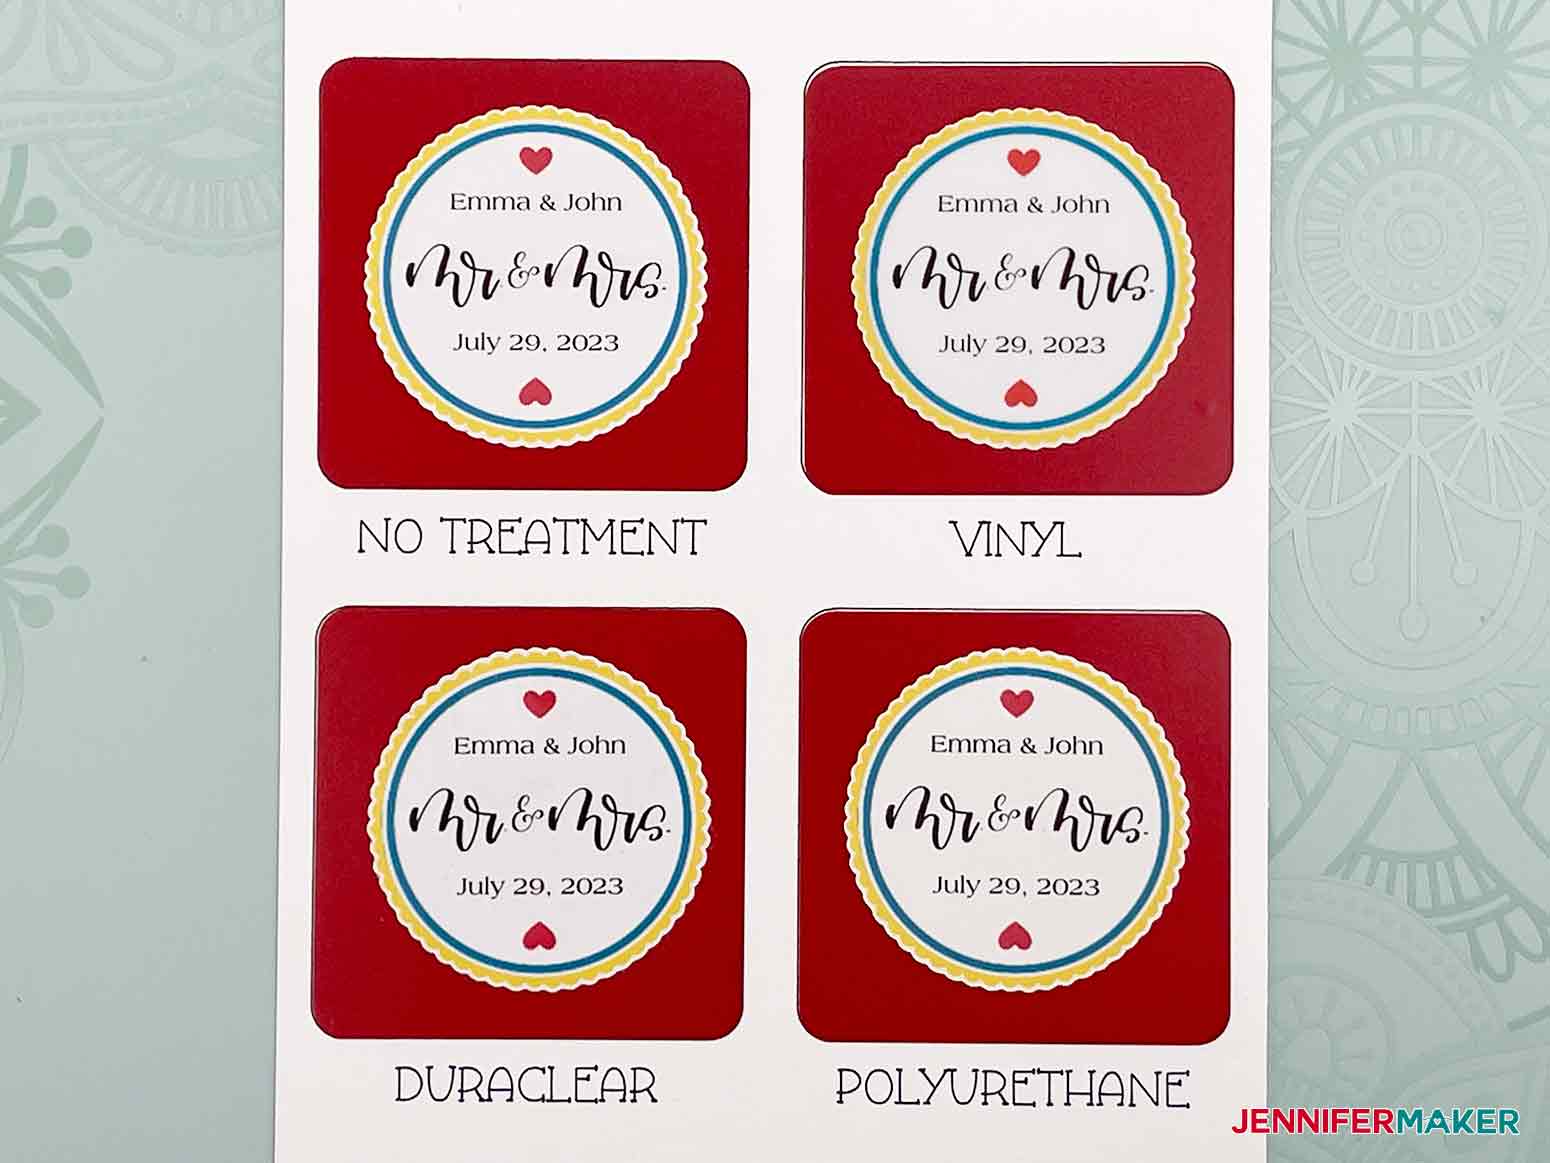
I am going to show you three different methods I tested for making stickers water resistant. I am going to share all three methods and show you what worked, what failed, and which method ended up being my favorite. First, download my free Waterproof Stickers file, design #367, from my free resource library. I made several different designs which can all be personalized. Here's a look at some of the images you can choose from. I've included designs and elements for Christmas, weddings, announcements, thank you messages, general love, and every day use. Before I share the methods I used to waterproof my stickers, let’s upload a few of my images to Design Space and make some personalized stickers. One big lesson I have learned when cutting stickers is that calibration is key. In case you aren't familiar with the term calibration, it simply means to adjust something, in this case our Cricut cutting machine, so that it can be used in an accurate and exact way. So before we design and cut our stickers, I recommend that you perform a calibration of your Cricut machine and you clean the print heads on your inkjet printer. This will give you the best print then cut results for your project. Consult the owner's manual for your printer to find out how to clean the print heads. Once that is done it's time to make some stickers! In Cricut Design Space create a new canvas. To create a new canvas, click on the "New Project" button in the upper right corner of Design Space. I am going to begin by uploading some images that I can add to the canvas. On the left side of your screen, click the "Upload" icon. TIP: If you're not sure how to upload a file to Cricut Design Space, watch this helpful video in training series I made. If you're on an iPhone or iPad, here's how to download and upload files to the Cricut Design Space app. Click “Browse.” Locate the files for this project. First I am going to select and upload the “evergreen-wreath-jennifermaker-PNG.png” file from the Christmas folder. When you see the image, choose “Complex” and then click “Continue.” Click “Apply & Continue.” Select “Print Then Cut Image” and then click “Upload.” Repeating the upload steps above, I am now going to select and upload these designs: NOTE: You can add as many images as you’d like to your canvas. Keep in mind that the more images you add, the longer it can take Design Space to process the project. With my images uploaded, I am now going to select the five images by selecting them under “Recent Uploads” and then clicking "Add to Canvas." Click on each of the images to move them around so that they are not overlapping. Let’s get started by personalizing our first sticker. We will start with the Thank You Watercolor Rectangle sticker. You can drag it to the side if you like. Click on the text icon on the left of your canvas. A box will appear that says "Add text here." I am going to type "for Celebrating with Us!" To change the font, click on the drop down below “Font” on the left side in the top menu bar. A window will come up with a list of fonts. You will see both your computer (system) fonts and those in Design Space. TIP: If you are not a Cricut Access subscriber. and do not want to worry about paying for a Cricut font, you can click on "System" at the top of the window to only use the fonts installed on your computer. I am going to select Americana Std for my font. This is a Cricut font. In my supply list, I have provided a free alternative font you can download and install on your computer. TIP: To upload my free alternative fonts, or upload your favorite fonts to use in Design Space, I can help with that. My blog post, How to Upload Fonts to Cricut Design Space, will walk you through the steps. You can scroll the font selections until you find Americana Std or you can type "Americana" in the font search box to go directly to it. As you can see, the text (font size) is far too large for my little sticker. To easily reduce the font size, click the text to select it. Now drag the double arrow icon in the lower right corner to reduce the text to a size that will fit. You can also change the font size by entering a specific size under "Font Size" in the menu bar. I used 8.5 for my font size. I would like my text to be the same color as thank you so I am going to change the color to black. Click on the text and select the dark grey box next to Basic Cut under Operation in the menu bar at the top of the canvas. Now select black which is in the bottom row. To close the color selection window, click anywhere on the canvas. Move your text so that it appears below "Thank You" on the sticker. TIP: If your text ever appears behind your sticker image, you can move it forward by right clicking on the text and selecting "Send to Front." Send to front brings that layer to the top of all other objects on the canvas. You can also move the text layer in the layers panel on the right side of the canvas so that it is above the sticker image. I want to make sure my text is centered in the sticker so I am going to click and drag my mouse over the sticker image and the text. To confirm that you have both objects selected, you will see the text layer and the image layer highlighted in the layers panel on the right side of your canvas. In the menu bar at the top of the canvas, click the drop down under "Align." Select "Center Horizontally." If you are satisfied with how your sticker looks, with the two objects selected, click "Flatten" at the bottom of the layers panel on the right side of the canvas. Flatten turns any image into a printable image by merging all the selected layers into a single layer. If we do not flatten the text with the image, our cutting machine will cut the text. Let's personalize the Mandala-Color sticker next. Select the text tool on the left side of the canvas. I am going to personalize this with my name but you could add anything. You will notice that the last font we used has been selected for us. I think I'd like something in a casual script, however. Sallim would be a great font. Select the drop down under Font in the menu bar at the top. Instead of scrolling through a long list of font names, I am entering the font name, Sallim, in the search bar at the top of the font window. I want my text to be a teal color like that in the mandala. Select the text and then click the dark grey box in the menu bar to the left of Basic Cut under Operation. I don't see a teal color I like from the default choices but I can select my own color by clicking the plus icon to the right of "Advanced." To select different colors you can drag the slider bar through the color spectrums until you find one you like. Or if you want to get even more specific, you can enter a "hex color" in the field. A "hex color" is expressed as a six-digit combination of numbers and letters defined by its mix of red, green and blue. I designed this sticker and I really like the teal color and I'd like to change the text to that specific teal to match. The teal color in the mandala and the design with the hearts is #019e9a. So I will type that into the field and there's my color. So cool, huh? Now, click anywhere on the canvas to close the color window. Place your text in the middle of the color mandala. Use the steps I showed you for the "Thank You" sticker to resize and center the text. When you are satisfied with the placement, select the sticker design and the text then flatten. Now let's add some personalization to the Evergreen Wreath sticker. Select the text tool and type “Season’s Greetings.” I am going to change my font to "Annie Leu" by selecting the drop down under font and selecting Annie Leu. I think there is too much line space between Season's and Greetings. There are two ways to reduce the text line space. You can use the down arrow under Line Space in the menu bar to decrease. You can also select the text and then split the text into two lines. To do this, select the text and then click the drop down for "Advanced" located on the right side in the menu bar at the top of the canvas. Click "Ungroup to Lines." Now I am able to select and position each line of text so they are closer to each other. Resize "Season's Greetings" so it fits in the center of the wreath like mine. Next, I am going to select the text tool and add "- The Makers" Of course you’ll want to use your name instead of mine. I am going to change the font to Americana Std for "- The Makers." Position and resize “- The Makers” below “Season’s Greetings” using the methods I showed you for the other stickers. I think my text would look great in a pretty red. I am going to select all three text objects I just created and select the red color from the default color palette. When you are happy with the placement and color, select all three text objects and the sticker design then click flatten. For the last image, I am going to create a sticker for the envelope of a wedding "Save the Date" card I want to send out. First, click and drag the Mr. and Mrs. hand-lettered graphic to the middle center of our last sticker image -- this is the one with the colorful border and two hearts. If that design disappears behind the sticker, remember you can move things front and back by clicking "Arrange" at the top. Using the text tool, I am going to add "Emma & John" above the Mr. and Mrs. image and "July 29, 2023” below. I am changing the font for both text objects to Americana Std. I want to keep both lines of text the same font size so I am going to select both text objects and reduce the font size by dragging the double arrow icon in the lower right. Let's place “Emma & John” above the Mr. & Mrs. graphic and the date below the graphic. To ensure everything is centered, select all the objects for this sticker and then select "Center Horizontally" from the Align drop down menu. When you are happy with the placement and how things look, make sure all objects for the sticker are selected then click flatten. Print then Cut projects have a maximum print area of 6.75” W x 9.25” H with a default material size of 8.5" x 11". These settings cannot be changed. To give us an idea of placement and sticker size, click on the shapes icon on the left side of the canvas and select the square. By default the square imports to the canvas at 2" x 2". To resize the shape, go to the "size" section in the menu bar at the top of the canvas. Click the lock icon that is between the W and H boxes. In doing this we are unlocking the aspect ratio for the shape. This allows me to enter custom numbers into the W and H boxes. If the lock icon remained closed, once I add 6.75 for the width, the height would automatically change to 6.75 as well. Type 6.75 in the width box and 9.25 in the height box. Select the shape then click on the drop down under Arrange in the menu bar at the top of the canvas. Select "Send to Back." The reason I selected Send to Back versus Move Backward is so the object would move behind all of the other objects on the canvas. Move Backward only moves the item under one layer. You will note that it is now the bottom layer in the layers panel on the right of the canvas. This square will serve as a template for the print then cut print area. I want to print four copies of each sticker image onto one sheet of sticker paper. The current size is too large for that many stickers. After playing with the sizes of the sticker images, I have found that if I resize the width of the three round stickers to 2" and the thank you sticker width to 1.5”, I can get four copies of each sticker on one sheet of sticker paper. NOTE: You may have to play with the measurements a few times before getting them to the size needed for the quantity of stickers you want to print on a sheet. Click and drag your mouse to select all four stickers. At the top layers panel, click the "duplicate" icon three times. We now have four copies of each sticker. You can add them to the template to make sure they all fit. I already tested these so I know they will work. We can now hide or delete our print area template. To hide the template, click the eye icon for the template in the layers panel on the right of the canvas. To delete, simply select and delete. We are now ready to print then cut our stickers. Click "Make It" in the upper right corner of the canvas. Depending on the number of stickers you are making, it can take a bit longer to process before you see the Prepare screen. Check your sticker placement on the Prepare screen. If everything looks good, click "Continue." You are now on the Make screen. First thing we need to do is click "Send to Printer." The Printer Setup window appears. Make sure "Add Bleed" has a green slider. The bleed is a small border around each image that allows for more precise cutting. The bleed is trimmed off during the cutting process resulting in a precisely cut image. You can continue by clicking "Print," however, I like to change the slider to green for "Use System Dialog" before I click "Print." This brings up a print screen for my printer which allows me to specify the tray my sticker paper will print from as well as the quality of the print job. NOTE: You will need to minimize or move your Design Space window to see the print dialog window. It pops up behind Design Space. There is a chance the system dialog box will not work all printers. Each printer is different so consult your printer's user guide for additional support. After your sticker paper has printed, set it aside until the ink is completely dry to avoid any smears during the cutting process. This is what my printed sticker sheet looks like. You will notice a black box around my stickers. This is called a registration box and is used by your Cricut cutting machine to tell it exactly where to cut your project. Now that we’ve printed our stickers, click "Browse All Materials” to select our base material. In the search bar type “Washi." That’s the setting I found works best for Kiss Cut Stickers when using the Sticker Papers in my supply list. Kiss cut stickers cut around each sticker but it does not cut through the sticker backing. Place your sticker sheet on a LightGrip (Blue) Machine Mat. Make sure to line it up to the top left corner of the mat. Use your hands or a brayer ensure the sticker sheet is stuck to the mat. Place your Fine Point Blade into clamp B of your machine. Load your mat under the mat guides of the machine. Press the button to load your mat. Press the go button when it begins to flash. When the cut is finished, click the button to unload your mat. To remove your sheet of stickers, flip your mat over and gently pull the mat away from the sticker sheet. I really enjoy making stickers and I love being able to create my own designs and personalize them. I don't, however, like how well they hold up when they get exposed to water. If you know me, I do a lot of testing when it comes to crafting. So I was determined to test and find a waterproofing method that I could recommend to you. For this test, I looked at three different waterproofing methods - polyurethane, transparent vinyl, and DuraClear varnish - and the results of these methods on paper sticker paper versus vinyl sticker paper. AVERY STICKER PAPER My first test is using Avery Sticker Paper. This is a paper sticker. To start, I printed four sheets of the stickers we just personalized on my inkjet printer using the Avery Sticker Paper from my supply list. Sheet 1: After printing, I cut this sheet of stickers just like I showed you earlier. I want a kiss cut sticker, so I left my material setting at Washi. After cutting the stickers, I removed the sticker sheet from the mat by flipping my mat over and gently pulling the mat away from my sticker paper. Next, I went to a well-ventilated area (outdoors is perfect) and sprayed the sheet of stickers using polyurethane spray. For safety purposes, I recommend reading and following the product safety data sheet. I applied two coats of polyurethane to the stickers waiting approximately one hour between coats. I then waited two hours after the second coat for the polyurethane to completely dry. Sheet 2: I also cut these stickers using Washi for the material setting to get a kiss cut sticker sheet. This time after the stickers were cut, I removed the sticker paper from around the stickers so I just had the stickers and the backing. The next day I used a paint brush and applied one thin coat of DuraClear Varnish to the top of the stickers. I let the DuraClear dry on the stickers for two hours. NOTE: It was important for me to wait one day for the printer ink to dry. During my first test I applied the DuraClear Varnish directly after printing and the ink smeared everywhere. It is also important to remove the sticker paper from around the stickers. If you leave it on, once you apply the DuraClear you will not be able to remove the stickers. Sheet 3: Before I sent this sheet of stickers to be cut, I cut a piece of transparent vinyl sized so that it fit inside the registration box. NOTE: Covering the registration box with transparent vinyl may cause issues with your cutting machine's ability to read the registration box. To apply the transparent vinyl, I pulled back the top part of the backing paper then aligned the vinyl to the top of my stickers below the registration box line. I found it helpful to use a scraper tool over the vinyl as I pulled off the paper backing. In order to obtain a kiss cut sticker with the additional layer of transparent vinyl on top the stickers, I adjusted my material setting for the printable white sticker paper setting to cut with a pressure of 300. To do this, click “Browse All Materials.” Select “Material Settings” in the lower left of the screen. Scroll down to find Printable Sticker Paper (white) and click “Edit.” Drag the slider pressure to 300. Save then scroll down to the bottom of the list and click "Done" in the lower right corner. Click “Browse All Materials” and type "stickers" in the search field. Select “Printable Sticker Paper (White)” from the search results and click "Done." NOTE: All machines can cut slightly different so you may need to experiment with the material and pressure settings. When changing settings, make sure to reset your custom setting when you are done. You can also create a new material instead of changing the settings for existing materials. Check out How do I use or Create a Custom Material Setting more information on how to create a new material. Sheet 4: For the last sticker sheet, I changed my base material setting back to Washi so I would get a kiss cut sticker. After cutting, I left this sheet of labels as is. No waterproofing method was used. Let me walk you through my testing process. When I tested the durability of the stickers in water with only the sticker backing, I really couldn't see how well they held up or lifted. The paper backing on the stickers began to fall apart. After many tests, I found the best method was to put each sticker on a square of removable or permanent vinyl. This way when the stickers were submerged in water, nothing happened to the vinyl and I could clearly see how well each waterproofing method I used on the stickers performed in water. To create my squares of vinyl, I created four 2.5" x 2.5" squares in Design Space. I then clicked "Make It" and clicked continue on the Prepare screen. For my base material, I am selecting "Premium Vinyl-Removable Matte." After I cut the vinyl squares, I removed the excess vinyl from the backing. I then cut the material so I had four individual squares. On the backing of the first vinyl square I wrote "paper-poly." I then placed a sticker from the sheet of stickers I sprayed with polyurethane onto the vinyl square. For the next square, I wrote "paper-duraclear.” I then took the same sticker design from the sheet of stickers coated with DuraClear as the design I used from the polyurethane sticker sheet and stuck it to the second square. NOTE: It was important for me to use the same sticker design for all waterproofing methods so that I could see the differences in the results. I originally selected different sticker designs and didn't find that as effective is showing the difference. I wrote "paper-vinyl" on the back of the third vinyl square and took the same sticker design from this sheet as I selected from the other sheets and applied the sticker to the vinyl square. On the back of the last vinyl square I wrote "paper-none" and put the same sticker design from the sheet of stickers with no waterproofing treatment and placed it on the vinyl square. VINYL STICKER PAPER For this test, I repeated the same exact steps I used to cut and waterproof the Avery Sticker Paper but instead of using the Avery Sticker Paper, I replaced it with Vinyl Sticker Sheets. I cut four additional squares from vinyl that those I created in Design Space. After I cut the vinyl squares, I removed the excess vinyl from the backing. I then cut the material so I had four individual squares. On the back of the first vinyl square I wrote "vinyl-poly." I then placed a sticker from the sheet of stickers I sprayed with polyurethane onto the vinyl square. For the next square, I wrote "vinyl-duraclear.” Again, I then took the same sticker design from the sheet of stickers coated with DuraClear as the design I used from the polyurethane sticker sheet and stuck it to the second square. I wrote "vinyl-vinyl" on the back of the third vinyl square and took the same sticker design from this sheet as I used from the other sheets and applied the sticker to the vinyl square. On the back of the last vinyl square I wrote "vinyl-none" and put the same sticker design from the sheet of stickers with no waterproofing treatment and placed it on the last vinyl square. I now have eight vinyl squares with a sticker on them each noted with the type of paper and waterproofing method I used. It's time to dunk them into water and see how well they hold up. I placed all eight square pieces of vinyl into water so they were completely submerged. I set my timer for 30 minutes and took a break while I waited. When the timer went off, I removed all eight vinyl squares from the water. I laid each onto a sheet of paper towel and gently patted each square dry with paper towel. I then ran my finger across the top of each of the eight stickers. AVERY STICKER PAPER No Treatment: This sticker did the worst in the test which I expected. Paper doesn't hold up well in water. When I rubbed my finger across the surface of the sticker, the paper began to lift apart and "The Makers" ink smeared. Vinyl: I had high hopes for the transparent vinyl. In fact, I thought this is the sticker that would outperform all the other methods. However, the sticker with the transparent vinyl overlay had water seeping all around the edges of the sticker. In addition, the edges of the sticker were lifting off the vinyl square I stuck the sticker to. DuraClear: The sticker painted with a thin coat of DuraClear Varnish held surprisingly well. I did observe a very small amount of water seeping into the sticker edges but it wasn't anything huge. Polyurethane: The sticker sprayed with polyurethane held up really well. I honestly thought that this would perform the worst next to the sticker paper with no waterproofing treatment. I did not see any water bleeding into the sticker paper. The only thing I observed were some faint marks in the sticker paper from the polyurethane spray. I was definitely surprised with how the stickers held up. For the test using the Avery Sticker Paper, the winner for me was the sticker coated in Polyurethane. The DuraClear Varnish came in second. VINYL STICKER PAPER I removed the vinyl stickers from the water, placed them on a piece of paper towel, and lightly patted them dry with paper towel. I had expected to see similar results to those of the Avery Sticker Paper. I was shocked to see that every sticker looked exactly the same as before I submerged them in the water. The vinyl stickers were perfect! There was no water damage and none of the stickers came apart or smeared when I rubbed my finger across them. When it comes to vinyl stickers, you do not need to waterproof them at all. The results were the same with and without waterproofing treatment. Vinyl stickers are now my favorite because they are truly waterproof. Added bonus, it is very difficult to rip a vinyl sticker in two. Check out some of my other sticker projects: Easy Print & Cut Stickers Here are the free alternative fonts I recommend for this project: Hello Georgina (free alternative to Annie Leu font found in Design Space)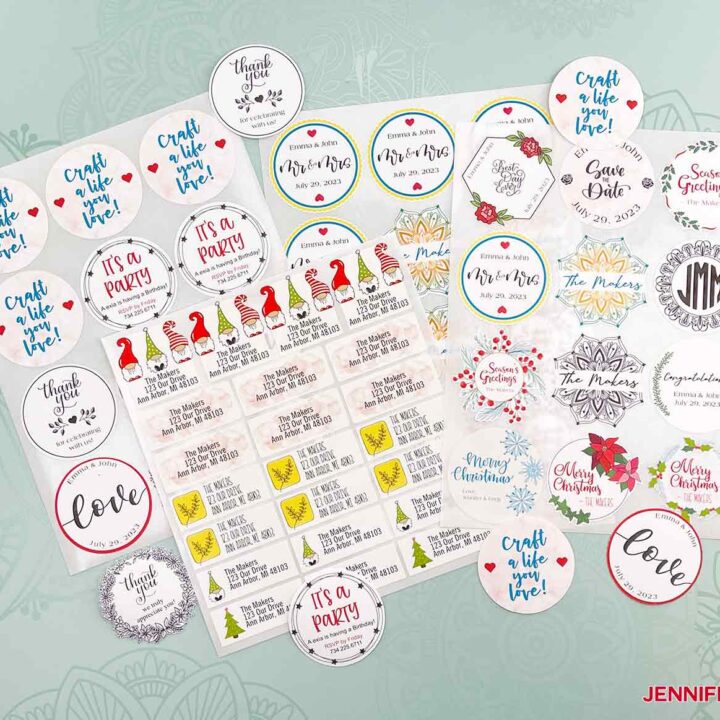
How to Make Stickers with Cricut
Materials
Tools
Instructions
STEP 1: GET MY FREE WATERPROOF STICKERS DESIGNS
STEP 2: UPLOAD AND CUT YOUR STICKERS
![]()

STEP 3: WATERPROOF TESTING
![]()

STEP 4: MY RESULTS
Notes
How to Make Stickers
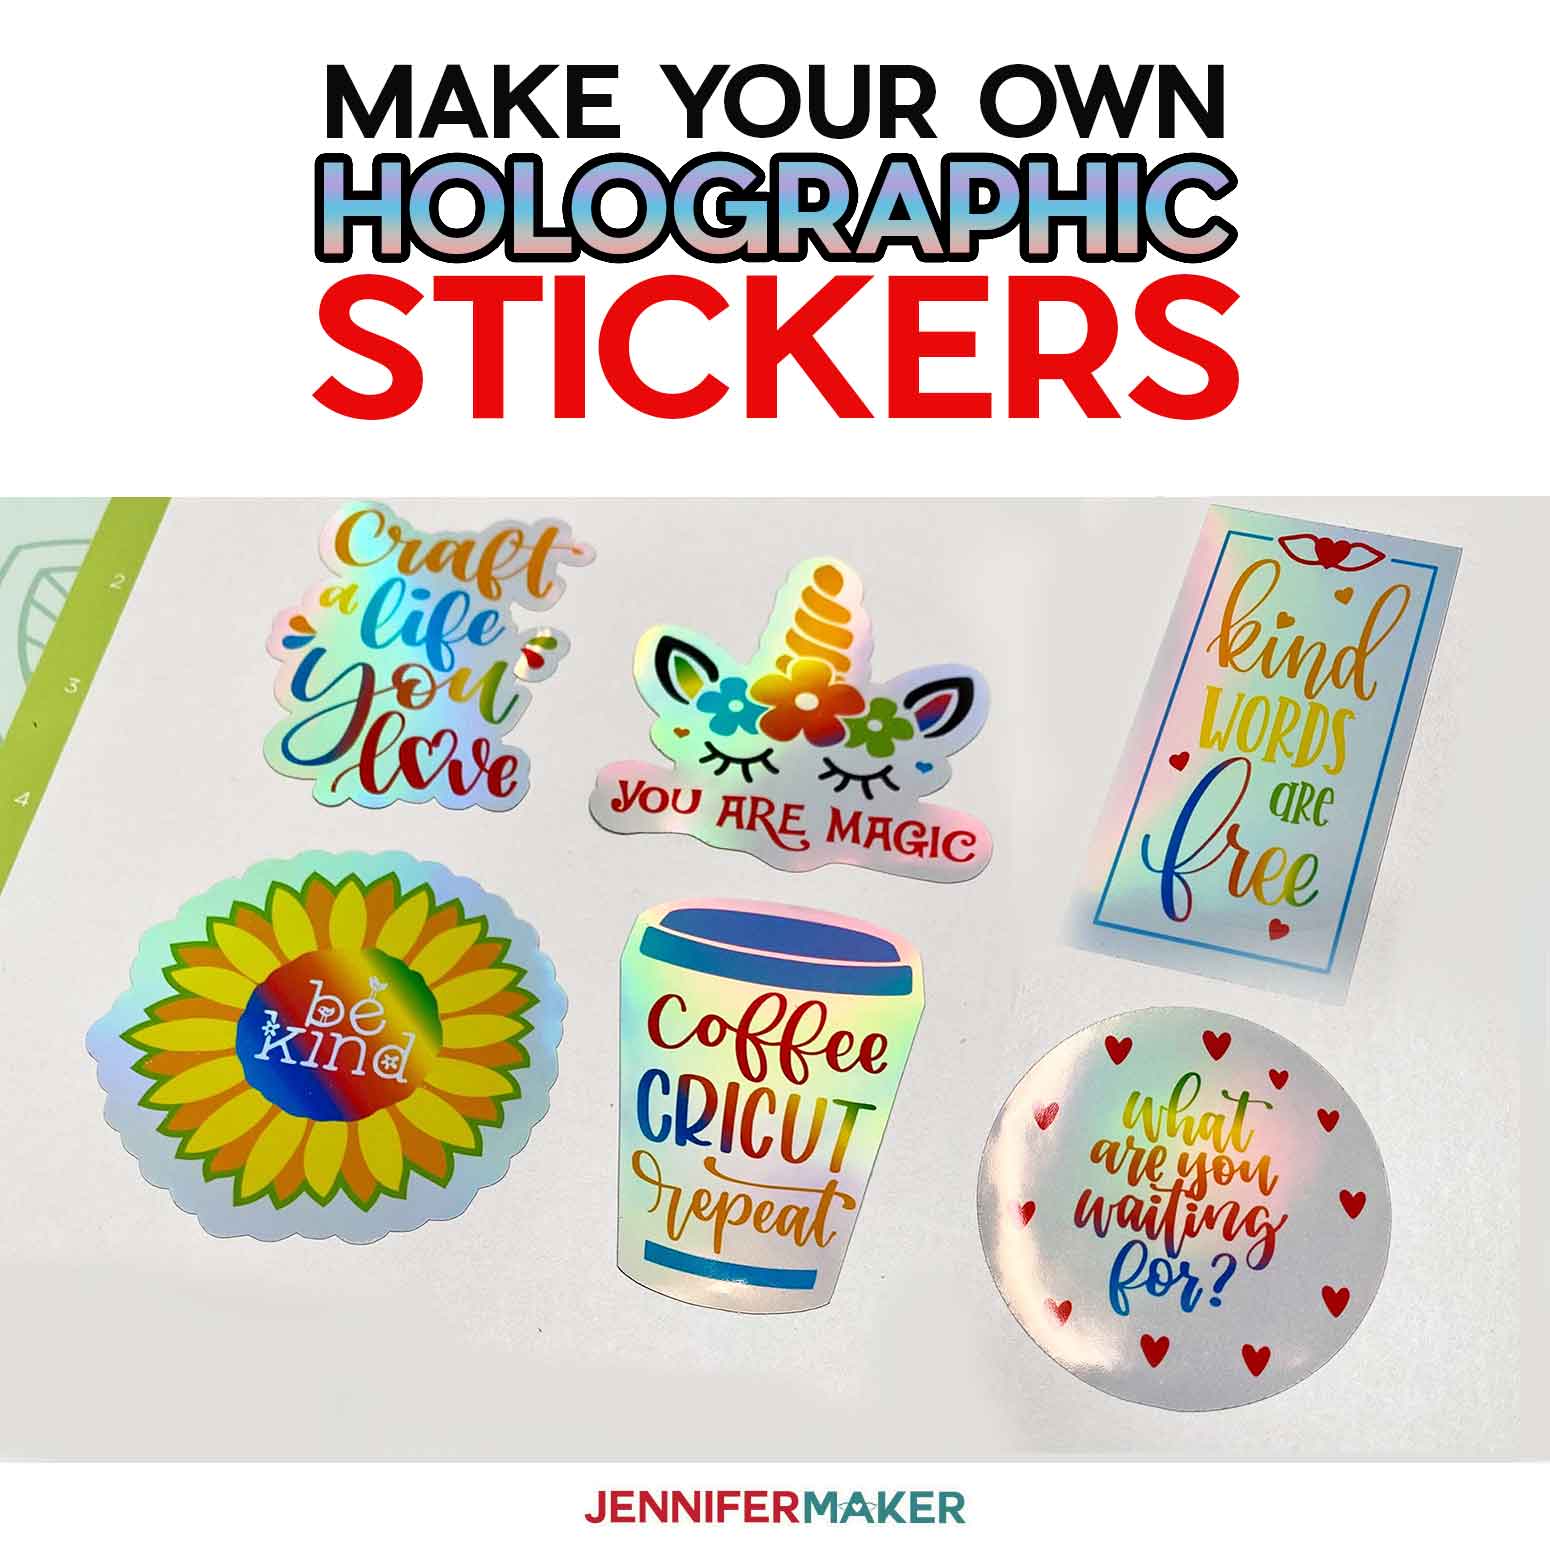
Make Your Own Holographic Stickers
Roman Serif (free alternative to Americana Std font found in Design Space)
Sallim font (free)
Answers to Your Questions About How to Make Stickers with Cricut
Q: Can I change the design to make my own sticker design?
You are welcome to create a new project from scratch or change up the text in my designs using the text tool for your own personal use.
Q: Can I sell these sticker designs on my Etsy shop/online store?
Thank you for wanting to create and sell our designs. The only thing we ask is that when selling the completed designs that you give credit to Jennifermaker.com and that you not sell the digital PNG files.
Q: I am not a Cricut Access member. Do I have to pay for the fonts?
If you are not a Cricut Access subscriber. and do not want to worry about paying for a Cricut font, you can click on “System” at the top of the window to only use the fonts installed on your computer. Free alternatives that you can download and install are Roman Serif and Sallim font.
Q: I can’t find the Print Dialog Box to customize my settings. What do I do?
You will need to minimize or move your Cricut Design Space window to see and use system dialog. The print dialog box pops up behind Design Space. There is a chance the system dialog box will not work on all printers. Each home printer is different so consult your printer’s user guide for additional support.
Q: What is the difference between die-cut stickers and kiss-cut stickers?
A Die Cut Sticker will be cut completely through the backing of the sticker, so all you see is the custom shape and sticker design. Kiss cut stickers are cut through the layer around the edge of your design without cutting through the backing paper.
Get my free designs to make stickers with Cricut!
I love seeing what you make with my designs and how you use them! Please share a photo of your stickers made with your Cricut in our Facebook group or tag me on social media with #jennifermaker.
Love,

Want to remember this? Save this How to Make Stickers with Cricut tutorial to your favorite Pinterest Board!