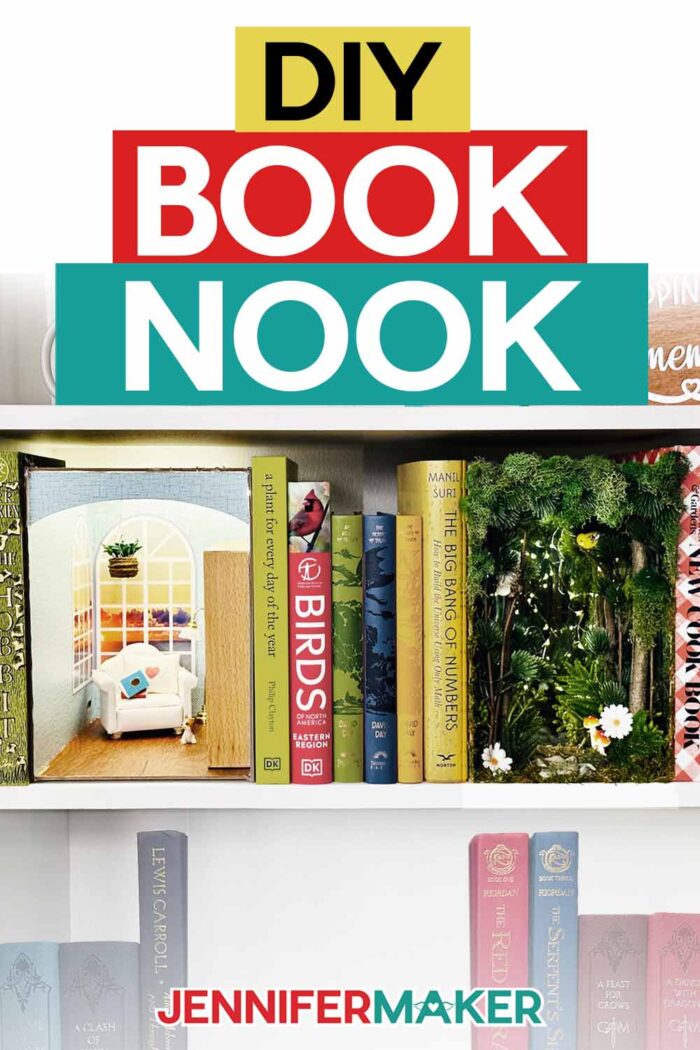
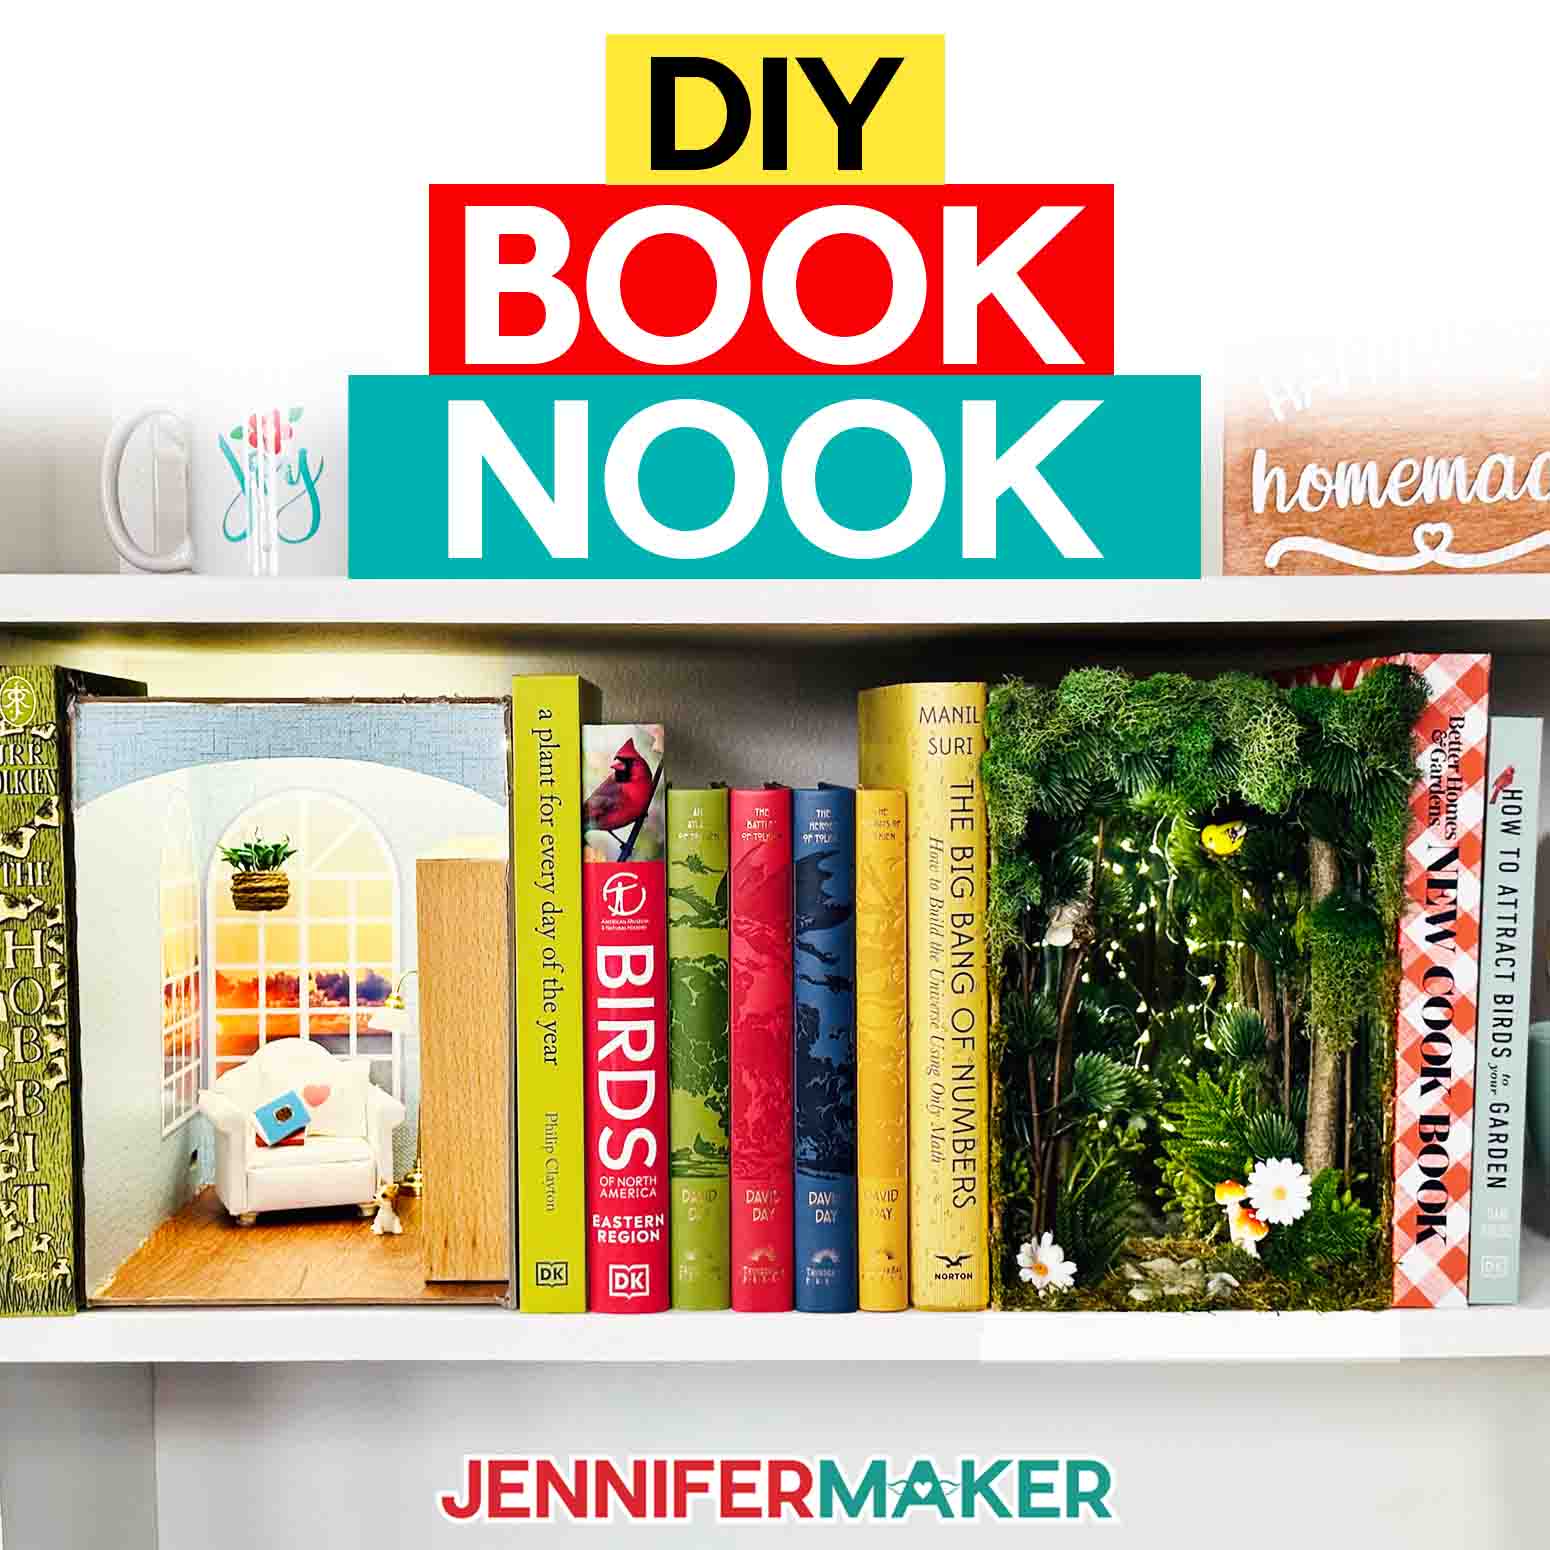
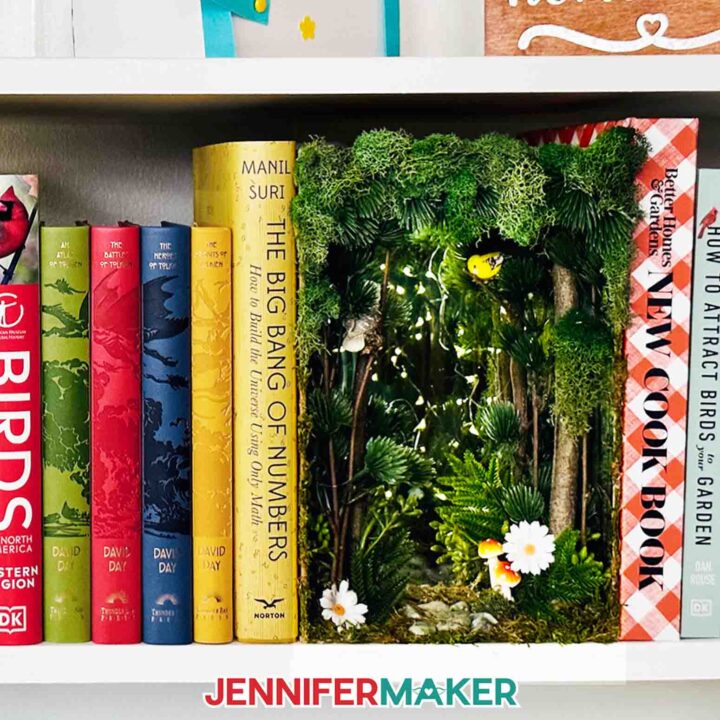
Learn how to make your own miniature world in a DIY book nook — without a kit!
Has a book ever made you wish to dive into the world within its pages? There are so many I’d love to visit! Well, with some sturdy materials and a little creativity, you can bring that world (or any other!) to life with a DIY book nook! Sure, there are kits available, but with a cutting machine (like a Cricut Maker or Glowforge, depending on your material) you can make the nook right now! I’ll even show you how to add a mirror for depth without disturbing the decorations inside!
See the full step-by-step video tutorial on how to make a DIY book nook:

There are countless ways to bring your magical bookshelf diorama to life, but first, you need the nook! I created files for you to make the shell of your book nook out of 2 mm chipboard. You can cut the chipboard right on a Cricut cutting machine using the knife blade, but I also have a version you can cut on a Glowforge machine.
Cutting the chipboard can be quite the project itself, but it’s worth it when you get to decorate your DIY book nook like a real scene! I’ve performed plenty of tests so I have lots of tips on cutting chipboard — but the most important thing to remember is patience (and plenty of time to cut the chipboard — it’s not a quick process)!
When it comes to decorating the inside of the book nook, I’ll show you a really amazing trick I learned from Nerdforge using mirrored backing so the inside really comes alive and creates the illusion of an endless scene. Combine the mirror with some creative lighting ideas and little animals, plants, mushrooms, decorations, and other charming elements, and you’ll feel like you’re peeking into a little world nestled amid your bookshelf. These really are a book lovers PERFECT gift!
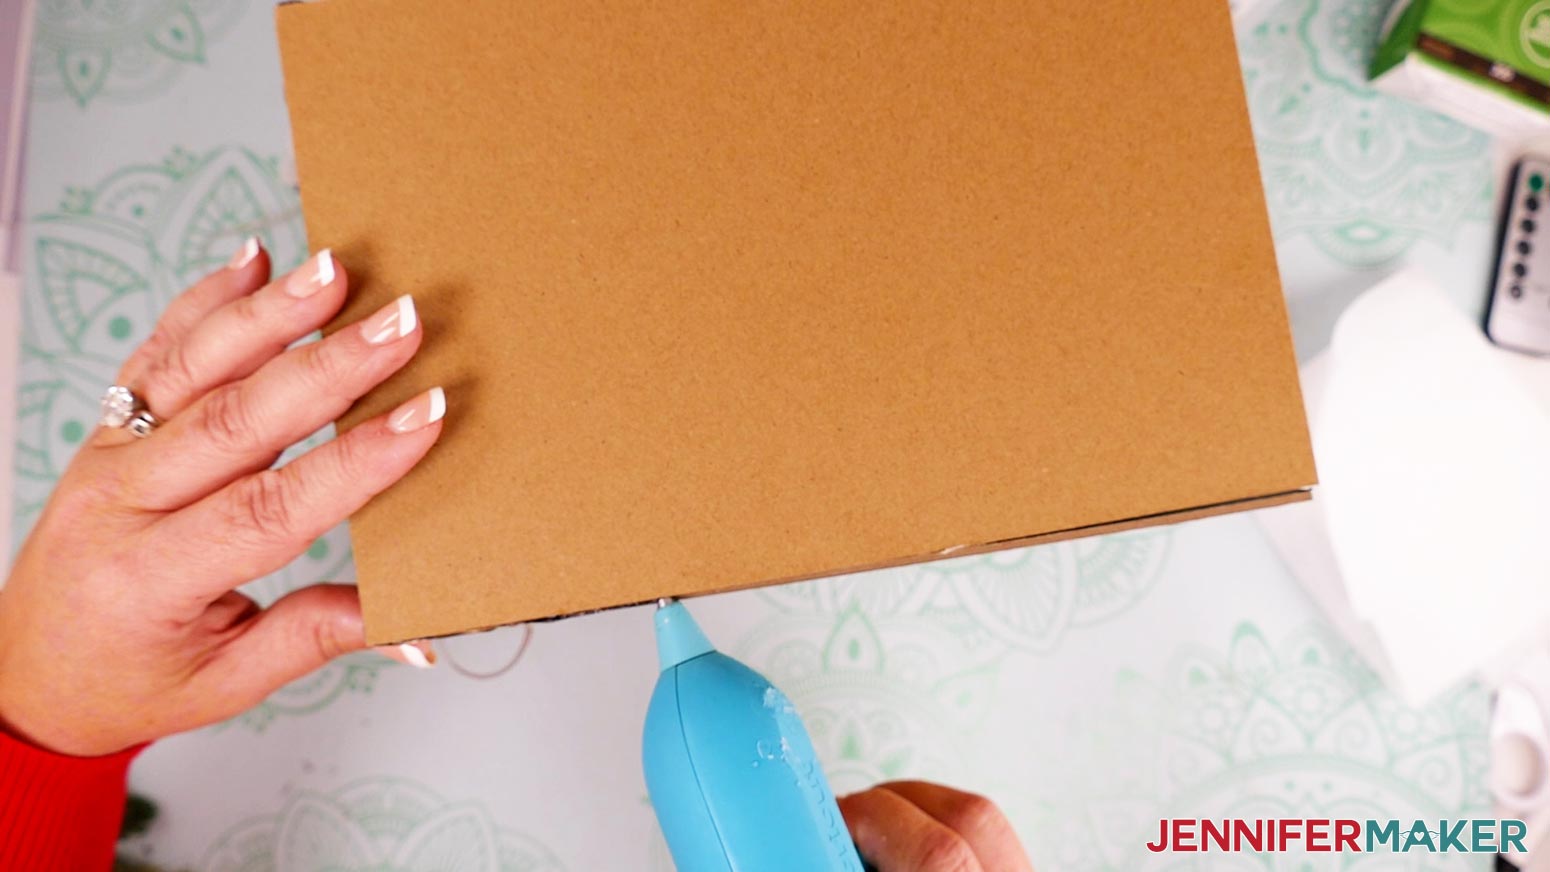
To cut chipboard on your cutting machine, you’ll need a Cricut Maker or Cricut Maker 3, or you can use the files for Glowforge if you have one. To make your DIY book nook, you’ll need five pieces of high-quality wood chipboard like the 2 mm thick kind from Cricut, along with a knife blade for your Cricut, a purple StrongGrip machine mat, and some painter’s tape. Along with all that, you’ll need some time. Cutting the box pieces on my Cricut Maker 3 took almost an hour, and you’ll want to hang out and watch your machine through the process to make sure everything is going well.
The Cricut will cut each piece of wood several times, as it takes multiple passes to get all the way through the material. For the first few passes, the cuts can sound pretty loud as the knife starts cutting, and you might be able to tell the lines are getting deeper. But as the blade gets closer to the chipboard’s back, it is harder to tell how deep the cuts are. You could end up with incomplete cuts, TOO-deep cuts (resulting in a cut machine mat), or other issues.
To help, I’ll share all my tips for cutting your nook pieces, including how often to clean your blade, in the tutorial video. I’ll also walk you through detailed instructions on how to assemble the nook once it’s cut. The finished nook will be about 6.25″ wide, by 9.25″ tall, by 9″ deep — the size and depth of many books, but a bit wider to show off the captivating world within.
Once you have a game plan for your finished product, you can begin thinking about how to decorate your DIY book nook. Along with using adorable decor or lush greenery to bring your tiny world to life, you’ll have the option to cut polycarbonate material on your Cricut to create the mirrored effect in your enchanting scene. Just like the chipboard, keep an eye on your machine while it cuts, and it can really take a while to complete the process — around 18 passes or so!
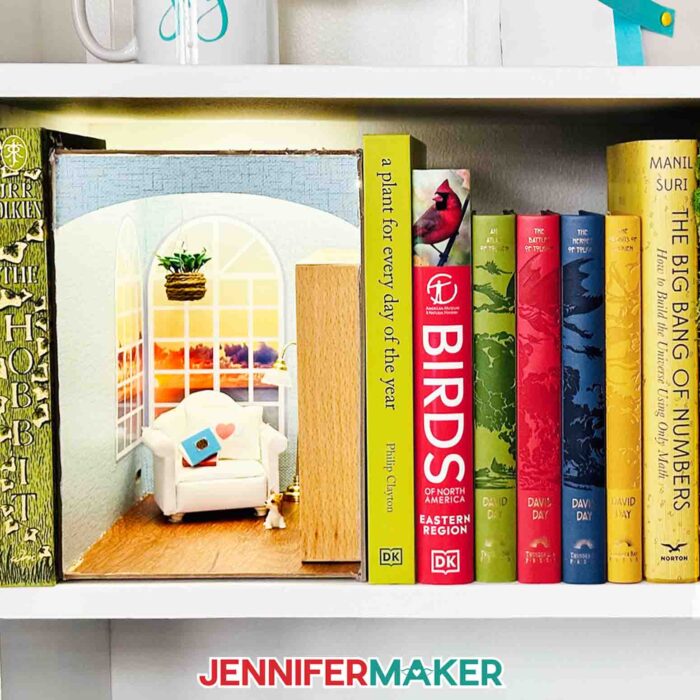
You can fill your bookshelf insert with faux foliage, tiny woodland creatures, and a mini path made of stones that trails off into forever with the help of the mirror effect. Or, you can create an indoor scene with 1:12 doll furniture (the perfect size!), tiny light fixtures, and other whimsical elements you can find in the miniature kit aisle of your local craft store.
Light up your tiny bookshelf world and welcome readers inside with miniature fairy lights or an LED light strip. Then admire your work while getting lost in your favorite book!
Ready to make your own DIY book nook? This post contains some affiliate links for your convenience (which means if you make a purchase after clicking a link I will earn a small commission but it won’t cost you a penny more)! Read my full disclosure policy.
Materials & Tools to Make a DIY Book Nook
To make the basic bookshelf insert with a Cricut, you will need:
- Five (5) Sheets of Cricut 11″ x 11″ 2 mm Chipboard
- One to Five (1-5) Sheets of 12″ x 12″ 65 lb Black or Patterned Cardstock – optional for lining panels
- Four (4) Sheets of 8.5″ x 11″ 20-24 lb White Copy Paper – optional for Print Then Cut lining images
- A method to cut your chipboard — I used the amazing Cricut Maker 3 but you can also use the Cricut Maker -AND-
- Cricut Knife Blade with Housing – for chipboard and polycarbonate -AND-
- Cricut Premium Fine-Point Blade – for cardstock and printer paper
- Cricut Purple StrongGrip Machine Mat 12″ x 12″ – for chipboard and polycarbonate
- Cricut Green StandardGrip Machine Mat 12″ x 12″ – for calibrating the knife blade, and cutting cardstock or printer paper liners
- Cricut TrueControl Knife and Self Healing Cutting Mat – optional for finishing chipboard cuts
- Brayer
- Painter’s Tape or Masking Tape
- Hot Glue Gun and Glue Sticks
- Hot Glue Gun Finger Caps
- For the optional mirror effect, you will need a 6″ x 9″ Self-Adhesive Acrylic Mirror, with 12″ x 12″ x 0.02″ sheet of Polycarbonate, and One-Way Mirror Window Film -OR- 1 mm Acrylic One-Way or See-Through Mirror, which is harder to work with.
- Isopropyl Alcohol and a Soft Cloth for cleaning the mirrors
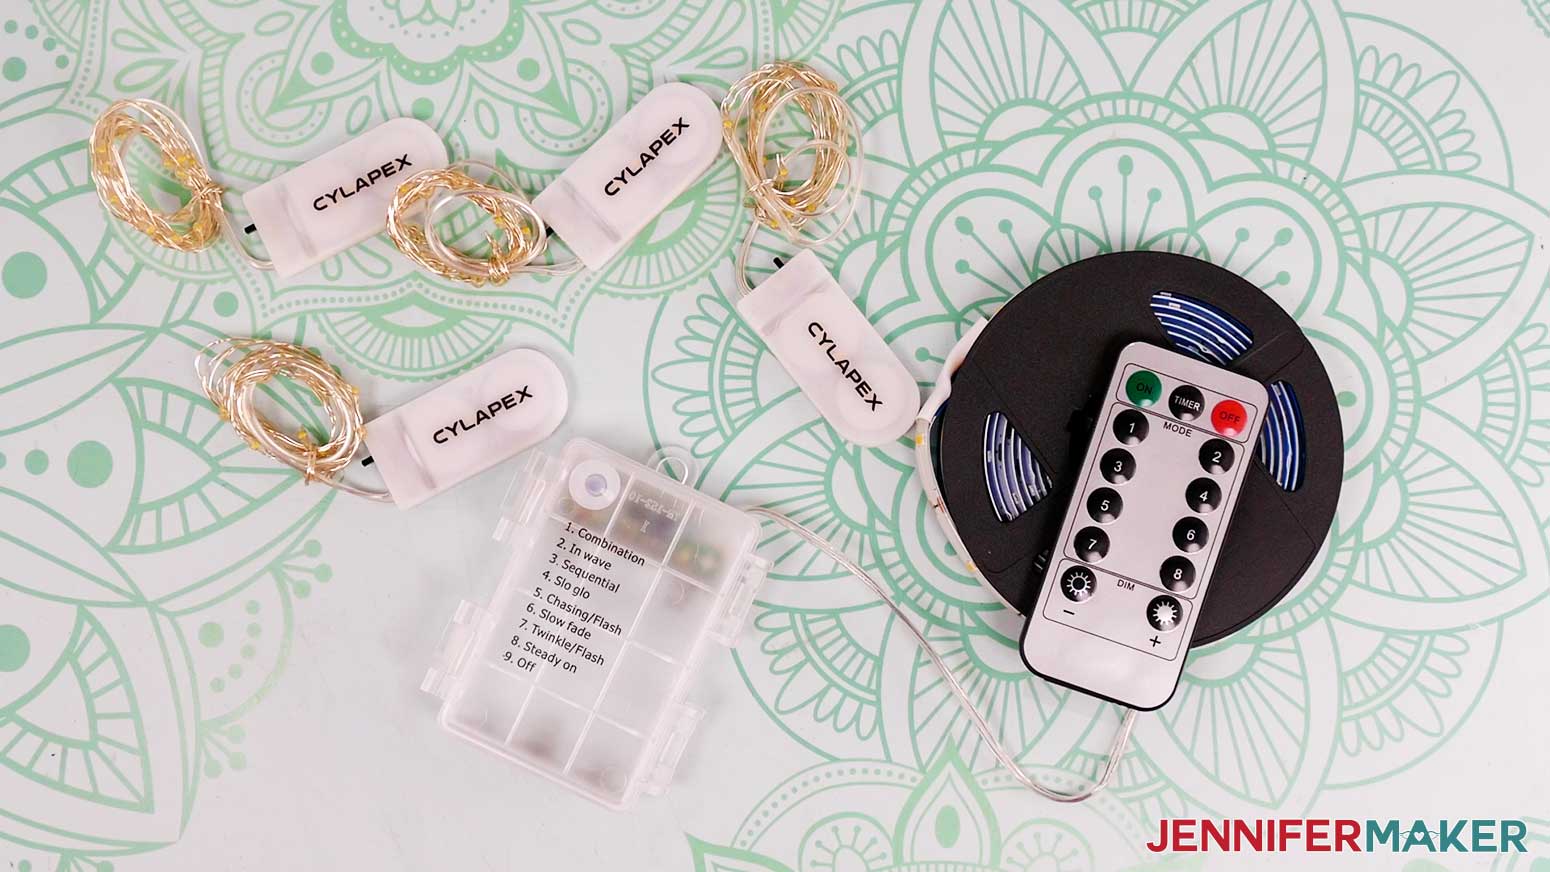
- Several Strands of 3.3′ Fairy Lights
- One (1) Strand of LED Strip Lights and three (3) AA Batteries
- Medium 3/8″ Zots Glue Dots – for securing each battery box
- Scissors
- Ruler and pencil
- Scraper
- Craft Glue
- Butcher Paper – to protect your work surface
- Inkjet Printer – optional for Print Then Cut images
- Duct Tape – optional for securing lights’ cords to outside of the box
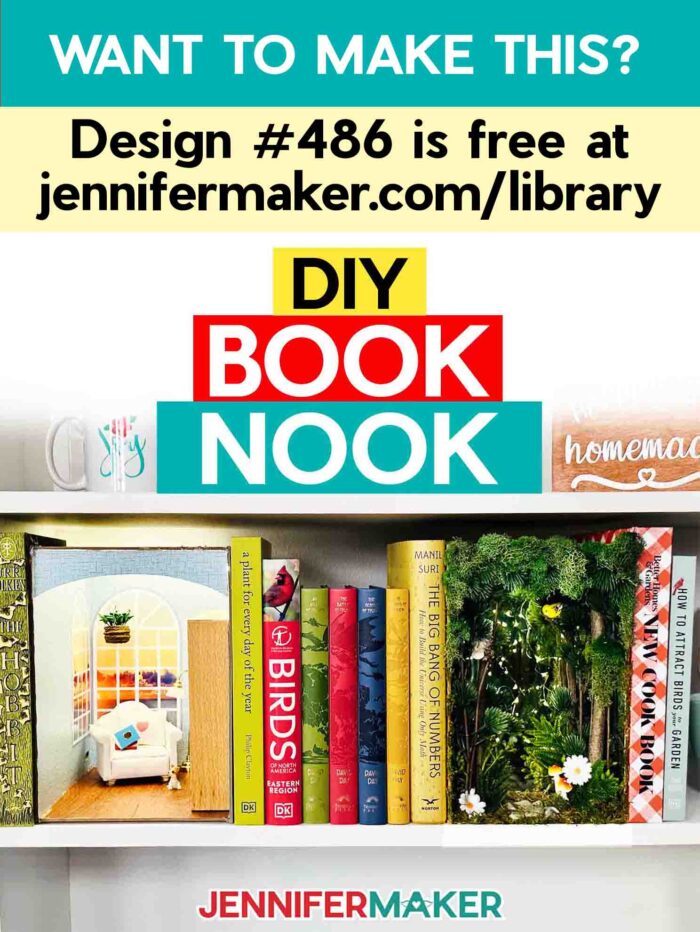
- Design #486 – My free design files (available in my free resource library—get the password at the bottom of this post
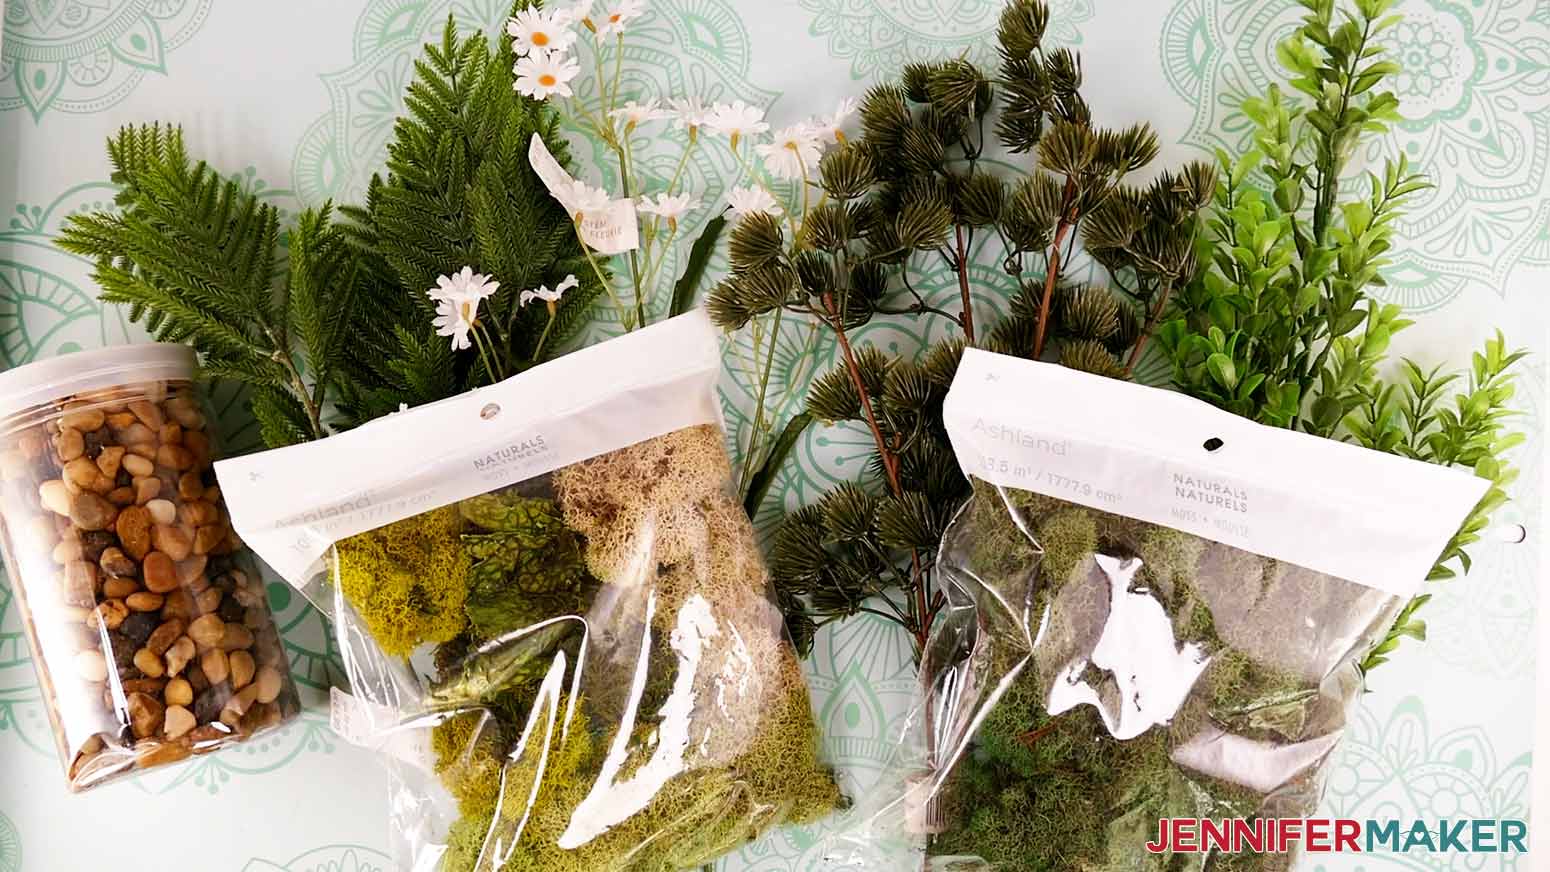
Tools and decorations for your theme, here’s what I used for my Enchanted Forest:
- River Rocks
- Moss for the Ground
- Moss for the Trees
- Pine Tree Floral Stems
- Fern Floral Stems
- Greenery Floral Picks
- Daisy Floral Stems
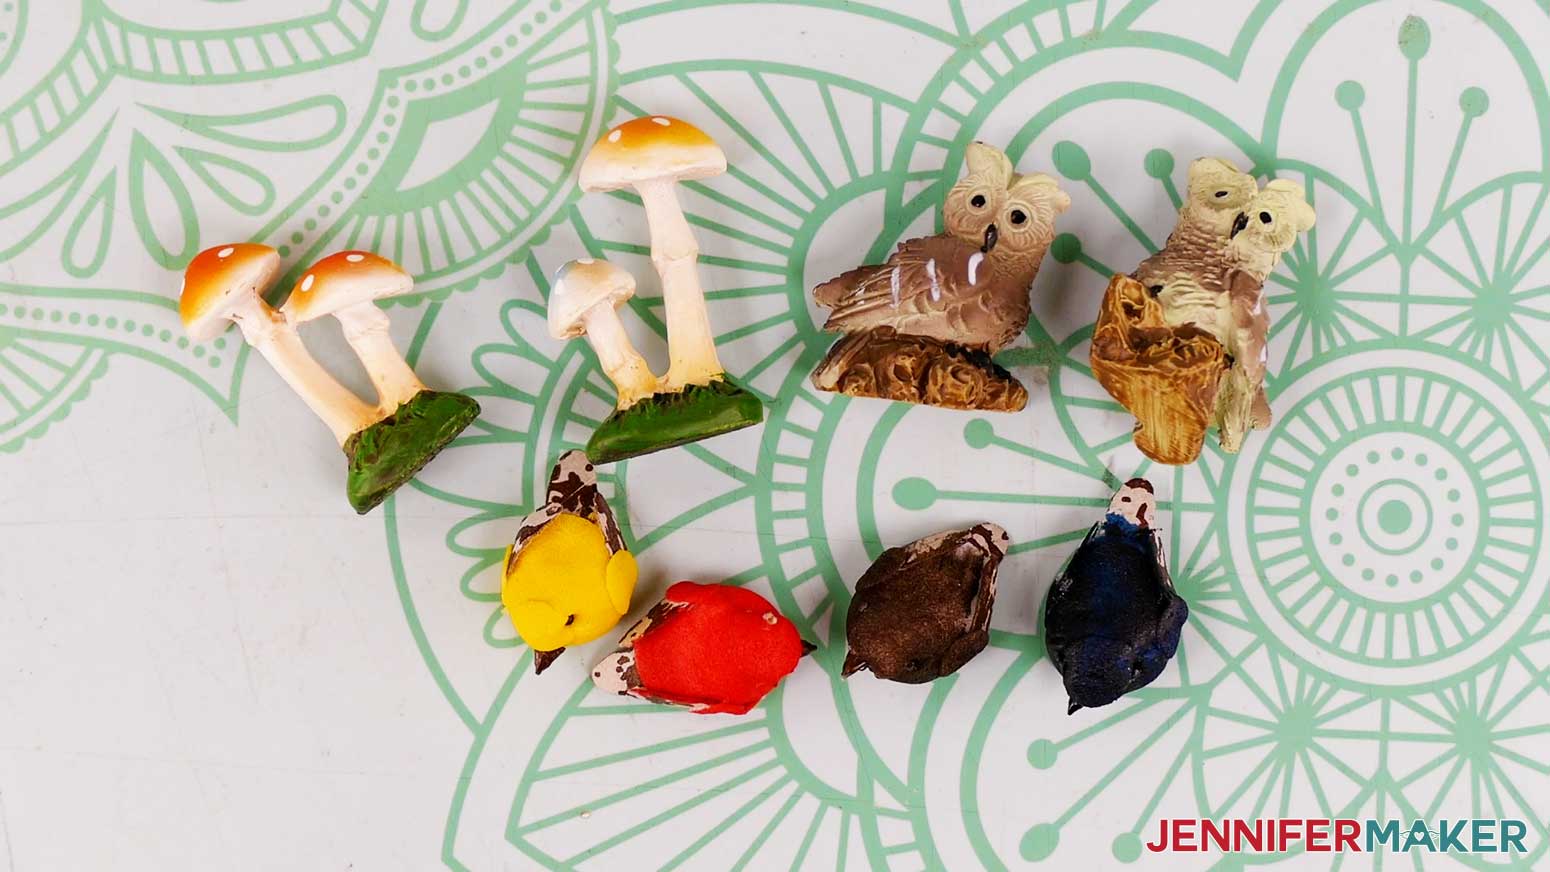
- Mushroom Miniatures
- Bird Miniatures
- Owl Miniatures
- Several Sticks or Branches Approximately 9″ Long
- Wire Cutters – for cutting floral stem pieces to size
- Tweezers – for positioning small figures and pieces inside
You can also use a Glowforge to cut the insert shapes out of 1/8″ (3 mm) MDF
How to Make a DIY Book Nook
DIY Book Nook
Learn how to make a fun DIY book nook with an "infinite" optical illusion that will wow your friends and family!
Materials
- Five (5) Sheets of Cricut 11" x 11" 2mm Chipboard -OR-
- 1/8" (3mm) MDF (for use on a Glowforge)
- One (1) 6" x 9" Self-Adhesive Acrylic Mirror (optional for infinity mirror effect)
- One (1) Sheet of 12" x 12" x 0.02" Polycarbonate (optional for DIY one-way mirror for infinity mirror effect) -AND-
- One (1) 6" x 9" Piece of One-Way Mirror Window Film (optional for DIY one-way mirror for infinity mirror effect) -OR-
- One (1) Sheet of 12" x 12" 1mm Acrylic One-Way or See-Through Mirror (optional for infinity mirror effect)
- Several Strands of 3.3' Fairy Lights
- One (1) Strand of LED Strip Lights (cut to length)
- Three (3) AA Batteries (for LED strip lights)
- One to Five (1-5) Sheets of 12" x 12" 65 lb. Black or Patterned Cardstock (optional for lining interior box panels)
- Four (4) Sheets of 8.5" x 11" 20-24 lb. White Copy Paper (optional for Print Then Cut images to line interior side panels)
- (Optional Decorations for Enchanted Forest Theme) River Rocks
- (Optional Decorations for Enchanted Forest Theme) Moss for Ground
- (Optional Decorations for Enchanted Forest Theme) Moss for Trees
- (Optional Decorations for Enchanted Forest Theme) Pine Tree Floral Stems
- (Optional Decorations for Enchanted Forest Theme) Fern Floral Stem
- (Optional Decorations for Enchanted Forest Theme) Greenery Floral Pick
- (Optional Decorations for Enchanted Forest Theme) Daisy Floral Stem
- (Optional Decorations for Enchanted Forest Theme) Mushroom Miniatures
- (Optional Decorations for Enchanted Forest Theme) Bird Miniatures
- (Optional Decorations for Enchanted Forest Theme) Owl Miniatures
- (Optional Decorations for Enchanted Forest Theme) Several Sticks or Branches Approximately 9" Long
- Design #486 – My free designs (available in my free resource library—get the password at the bottom of this post)
Tools
- A method to cut your chipboard — I used the amazing Cricut Maker 3 but you can also use the Cricut Maker -AND-
- Cricut Knife Blade with Housing -OR-
- A method to cut your MDF — I used the Glowforge
- Inkjet Printer (optional for Print Then Cut images) — I used the HP ENVY Photo 7155
- Cricut Purple StrongGrip Machine Mat 12" x 12" (for chipboard)
- Painter's Tape or Masking Tape
- Cricut Green StandardGrip Machine Mat 12" x 12" (for cardstock and copy paper)
- Brayer
- Scraper
- Hot Glue Gun and Glue Sticks
- Hot Glue Gun Finger Caps
- Craft Glue
- Medium 3/8" Zots Glue Dots (for securing lights' battery packs to box)
- Scissors (for cutting one-way mirror window film to size)
- Butcher Paper (to protect your work surface)
- Wire Cutters (optional for cutting floral stem pieces to size)
- Tweezers (optional for positioning small figures and pieces inside box)
- Isopropyl Alcohol (optional for cleaning mirrors) -AND-
- Soft Cloth (optional for cleaning mirrors)
- Duct Tape (optional for securing lights' cords to outside of box)
- Cricut TrueControl Knife (optional for finishing chipboard cuts) -AND-
- Self Healing Cutting Mat (optional for finishing chipboard cuts)
- Metal Ruler (optional for cutting 1mm acrylic mirror to size) -AND-
- Utility Knife (optional for cutting 1mm acrylic mirror to size)
Instructions
STEP 1: GET MY FREE DIY BOOK NOOK DESIGN FILES
First, download my DIY Book Nook SVG/DXF/PDF/PNG files from my free resource library. It's Design #486.
I’ve included an SVG file for cutting on a Cricut Maker or Maker 3, and an SVG file with "glowforge" in the name for cutting on a Glowforge. I’ve also included some optional PNG files of a forest background that are sized for the Print Then Cut feature on a Cricut.
Start by uploading the main SVG file to Cricut Design Space and Add it to your Canvas.
TIP: If you're not sure how to upload an SVG cut file to Cricut Design Space, watch this helpful video training series I made. If you're on an iPhone or iPad, here's how to download and upload SVG files to the Cricut Design Space app.
STEP 2: PREPARE AND CUT YOUR DIY BOOK NOOK DESIGNS
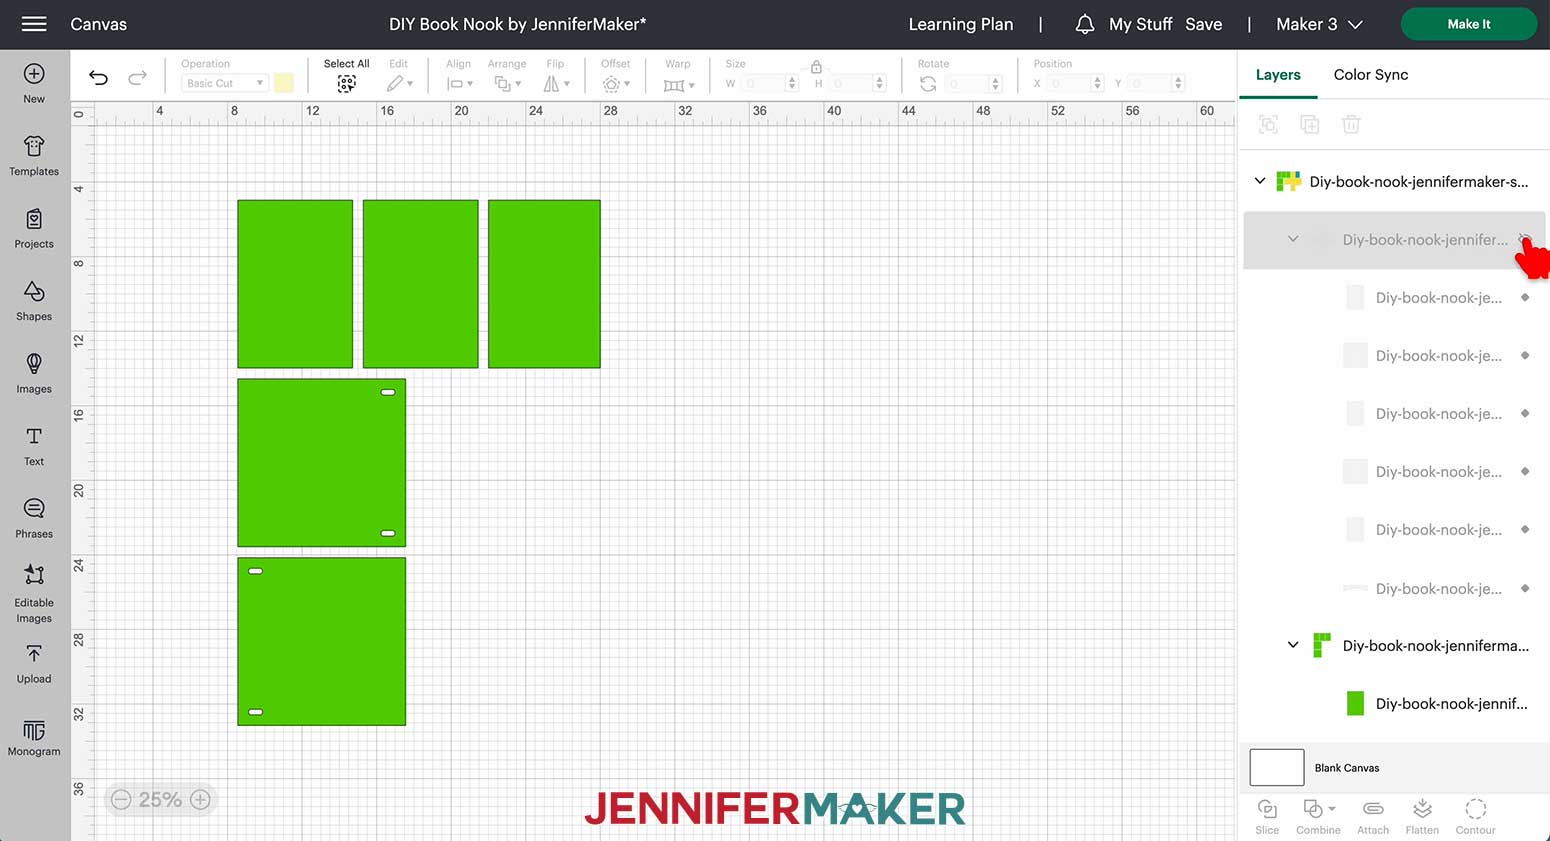
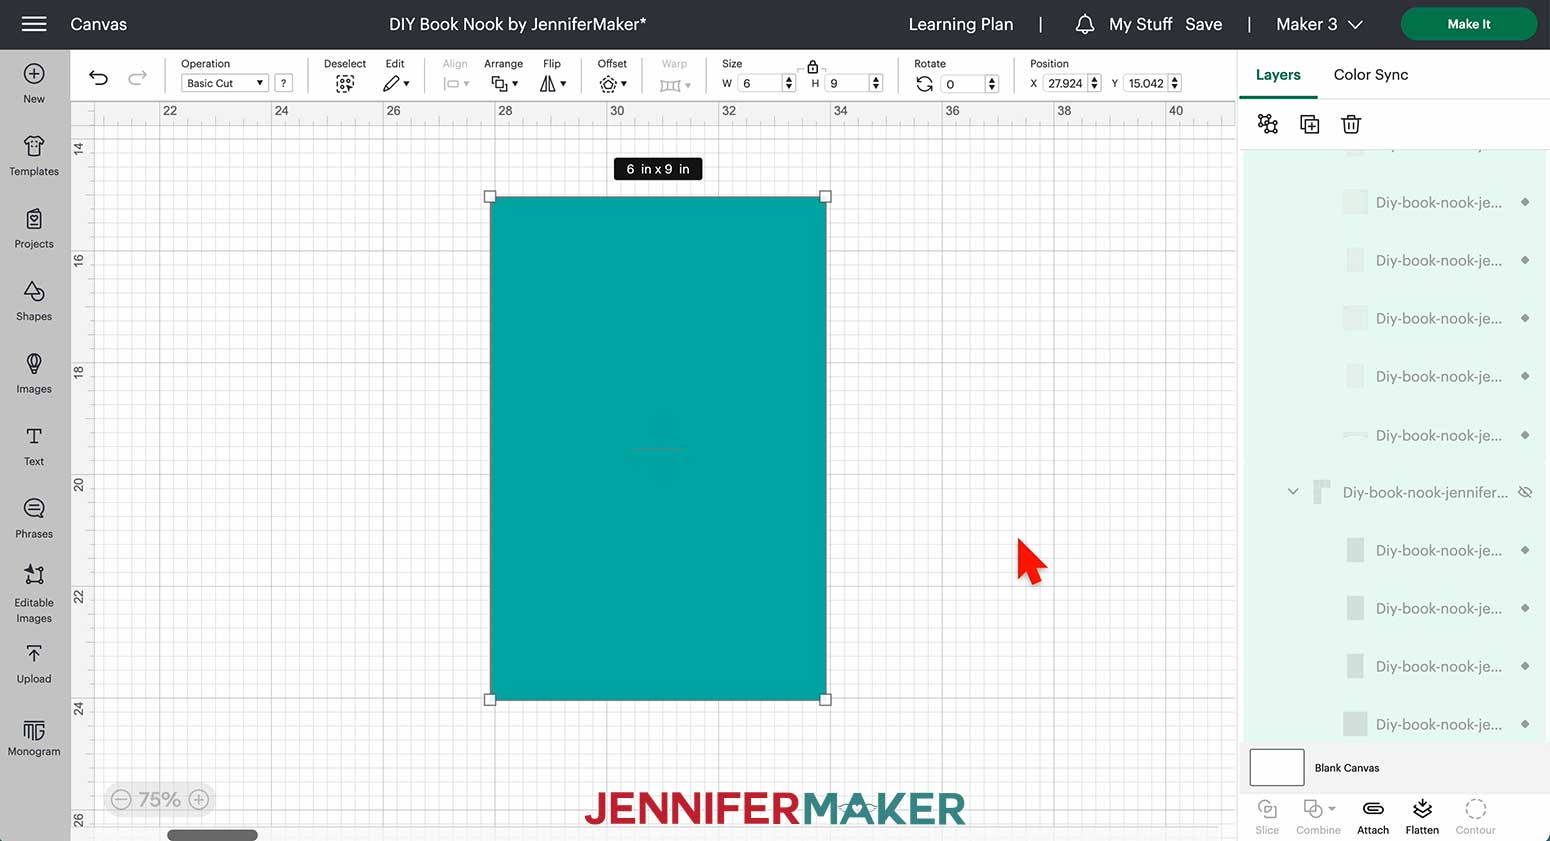
This is what my DIY Book Nook looks like on my Canvas.
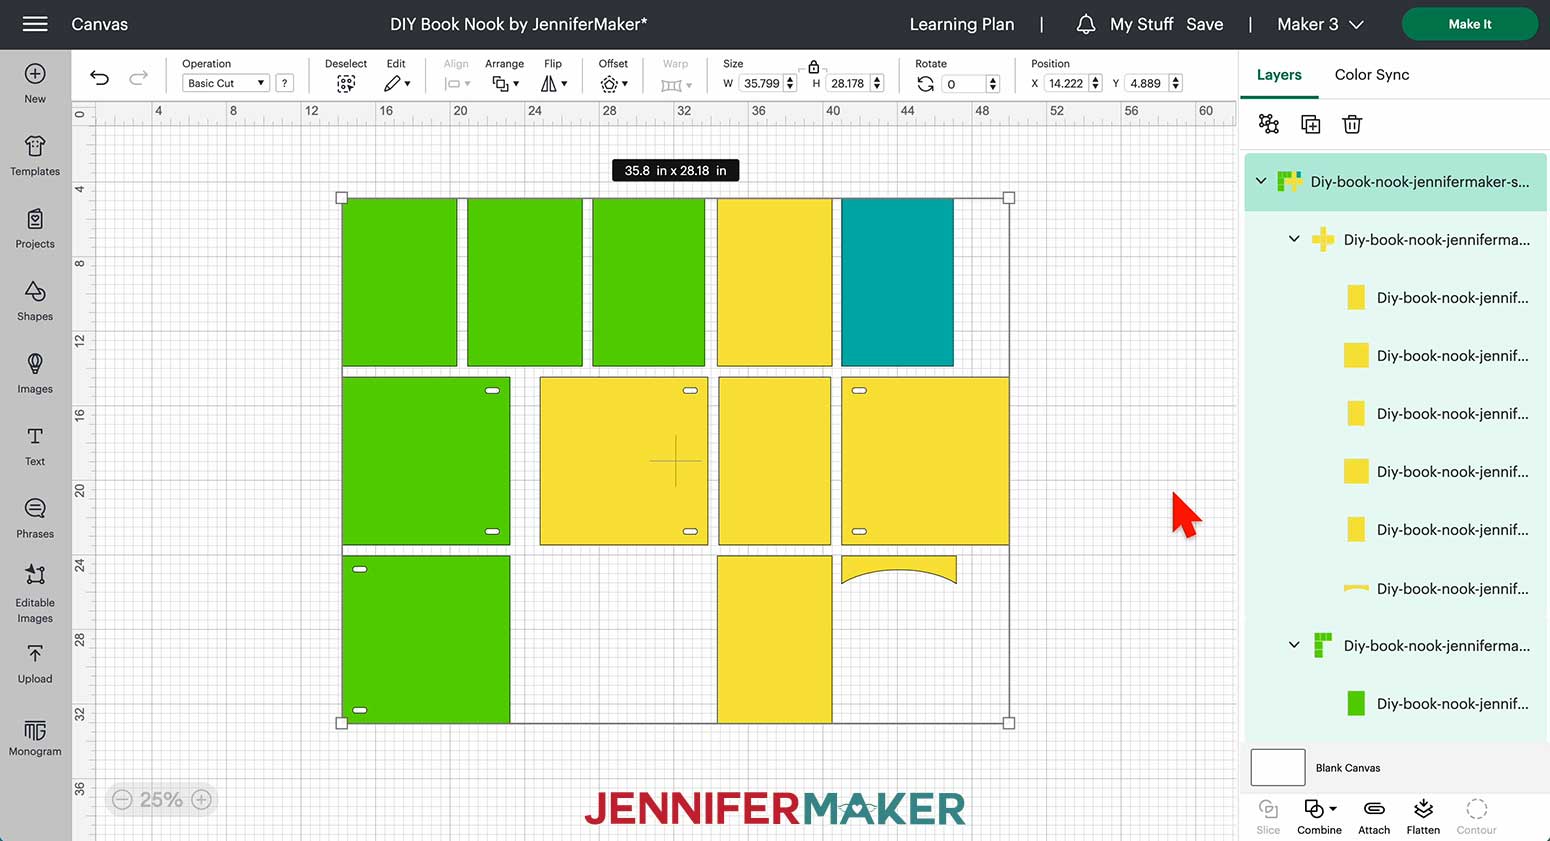
You can zoom out to see all of the design by clicking on the minus (-) sign on the lower left.
The design is set up to make one book nook box measuring approximately 6.25" wide x 9.25" tall x 9" deep when assembled. The box pieces (Pieces A-E) are yellow in the design. In addition to the box pieces, there are also optional green pieces (Pieces F-I) that can be used to cut liners for the inside of your box on cardstock or paper. There is also an optional blue rectangle (Piece J) that can be used to cut thin acrylic or polycarbonate -- like the 0.02" polycarbonate sheets in my materials list -- to make a DIY one-way mirror for an infinity mirror effect inside your box.
NOTE: If you choose to make the infinity mirror version of the book nook, I do not recommend resizing the design. The pieces are sized perfectly for the 6" x 9" acrylic mirror from my materials list, which you'll need for part of the infinity mirror.
If you'd like to make a different-sized book nook without an infinity mirror, you can resize the design on your canvas before cutting. Just make sure to select everything on your canvas to resize all the pieces equally, and keep the lock icon closed to maintain the proportions.
I've organized the box pieces, liner pieces, and mirror piece into separate groups in the SVG file to make it easier to hide or delete the elements you don't need.
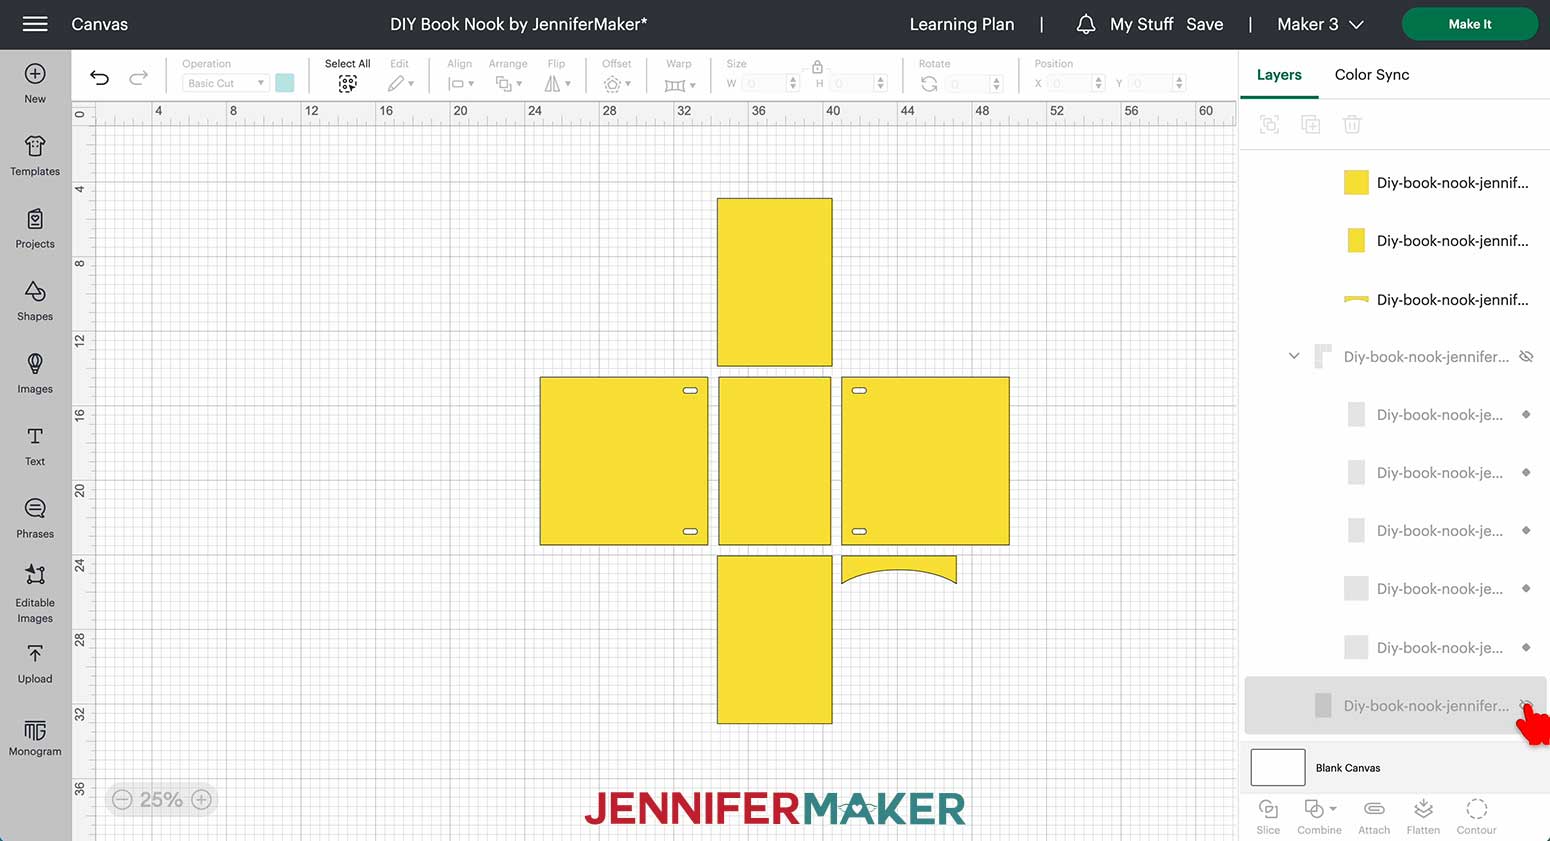
Let's start by cutting just the yellow box pieces. We can hide the green and blue pieces on the Canvas for now.
First, click the “Ungroup” button at the top of the Layers Panel (the two stacked squares on the very left). Then, click off of the design to deselect everything. In the Layers Panel, find the group of green pieces and click the eye icon next to it to hide them. Do the same for the blue piece.
Our book nook box is now ready to cut!
NOTE: If this is your first time using the knife blade with your Cricut Maker or Maker 3, make sure to calibrate your machine for the knife blade before cutting.
CUT THE BOX PIECES ON HEAVY CHIPBOARD
Check that the right machine is listed in the top right corner, then click "Make It.”
If prompted, click “On Mat,” “12 in x 12 in,” and “Confirm.”
You should see five mats on your Prepare screen.
TIP: I suggest moving the designs away from the edges of your mat in Design Space before cutting. This helps prevent the edges of your box pieces from getting damaged when you remove the tape from your mat after cutting. I moved my designs so each piece was about 1” from the top and left edges of the printed border.
If needed, rearrange your pieces on the mats so everything fits well within the 11" x 11" square that matches the size of your chipboard. You may need to move the front arch-shaped piece (Piece E) to another mat or rotate it to fit. You can move an object to another mat by clicking on it, then clicking the three dots in the top left corner and choosing "Move object."
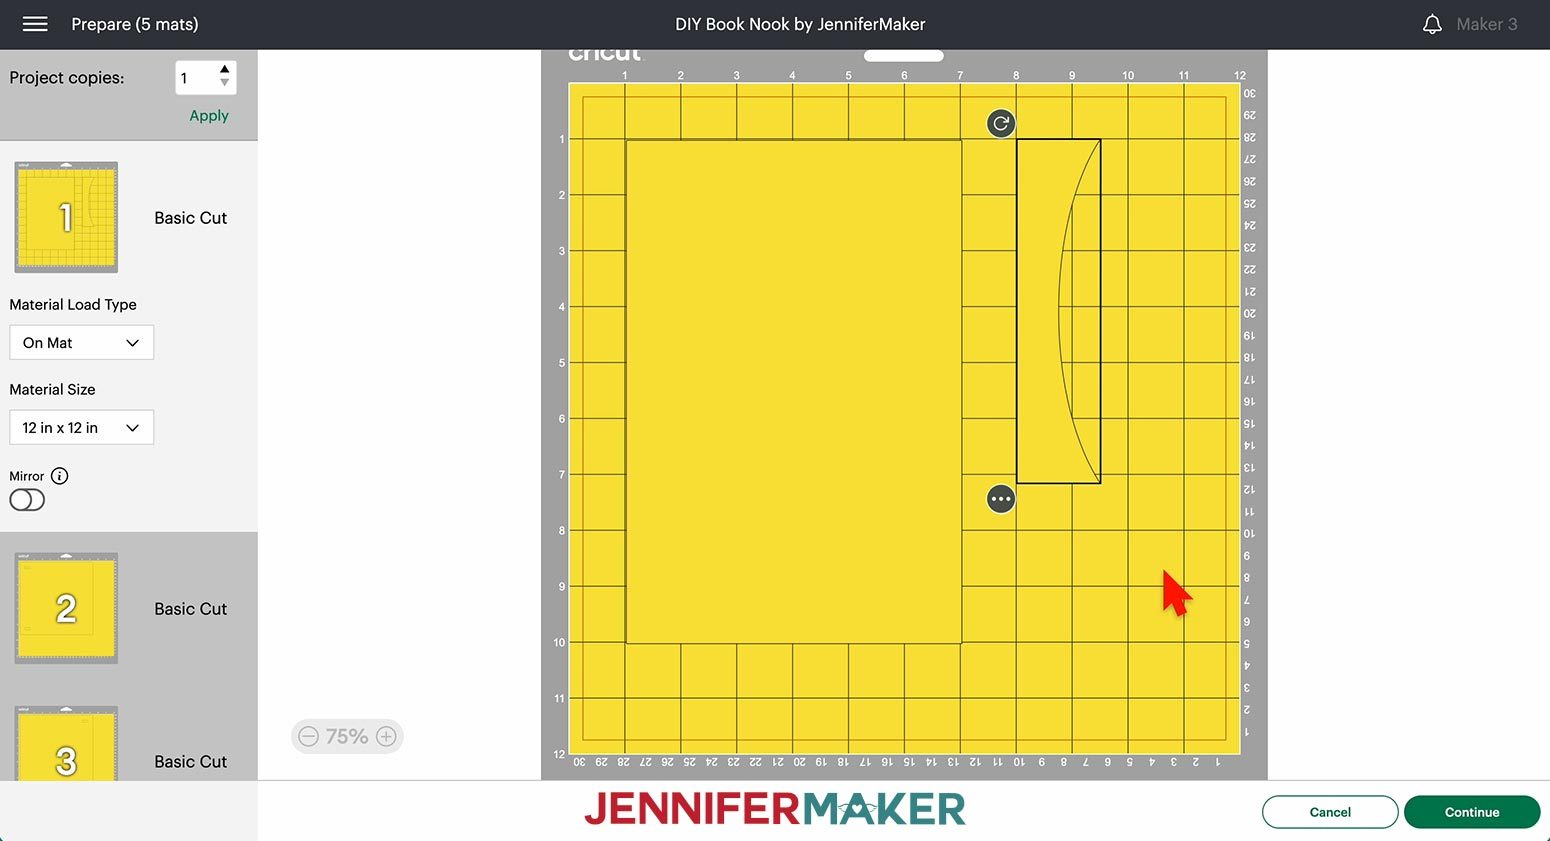
If everything looks good, click back on the first mat and click “Continue” in the bottom right.
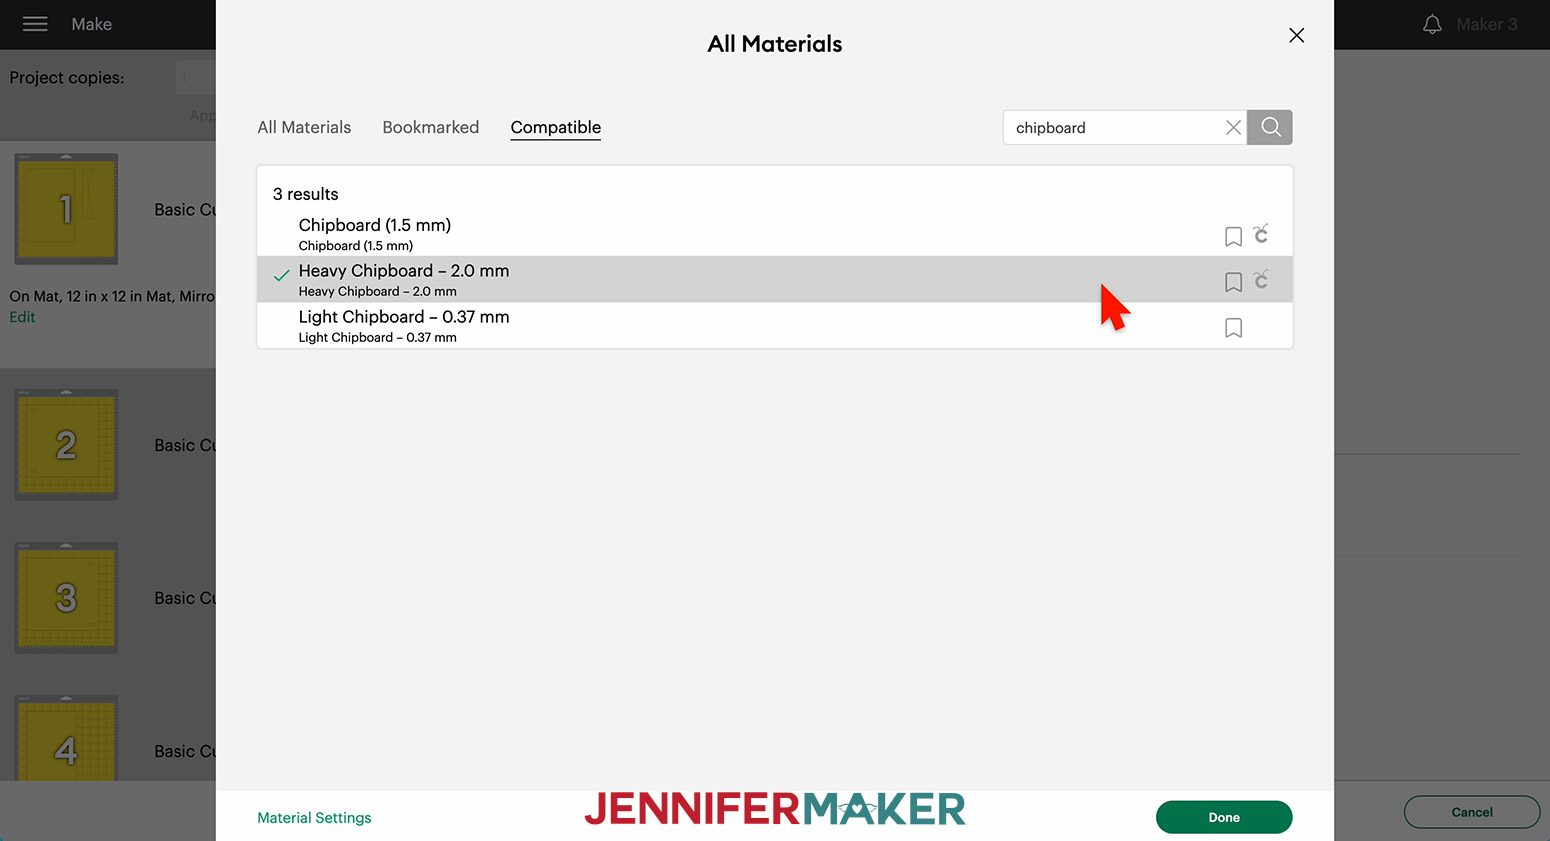
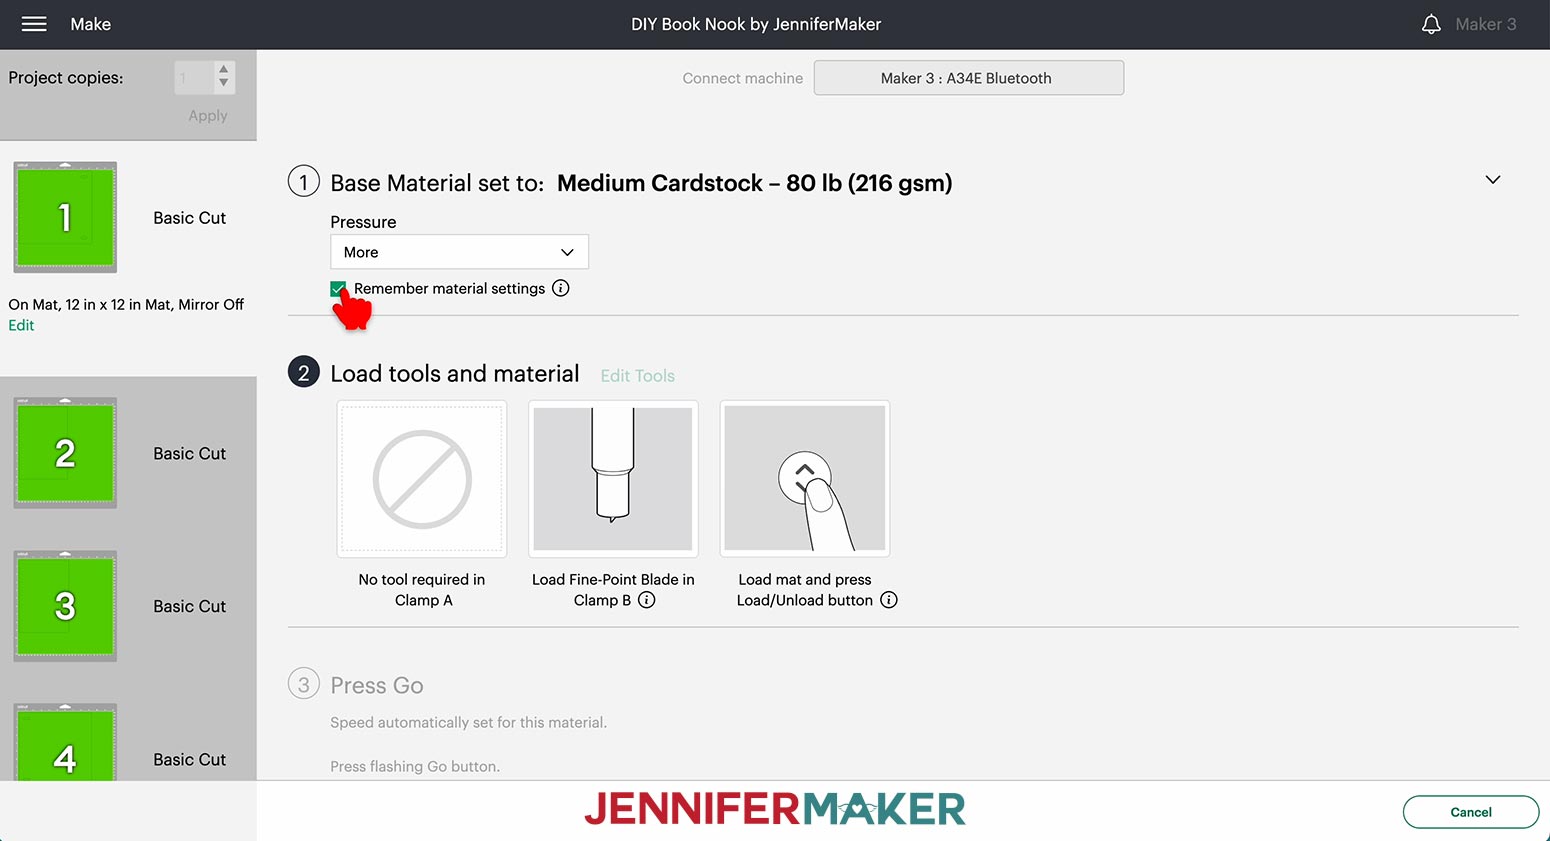
On the Make screen, select your material settings. If you're using the Cricut 2mm heavy chipboard for your box like I am, use the "Heavy Chipboard - 2.0mm” setting. To find it, click "Browse All Materials" and type "chipboard" in the search bar. Select the "2.0 mm" option and click "Done." Since this setting requires the knife blade, the pressure and number of passes will be automatically determined by the software.
TIP: If you’re using the same material for all your mats and the “Remember material settings” box is available, check it to save time between cuts!
If you cut heavy chipboard on your Maker or Maker 3, make sure the material isn’t larger than 11” x 11.”
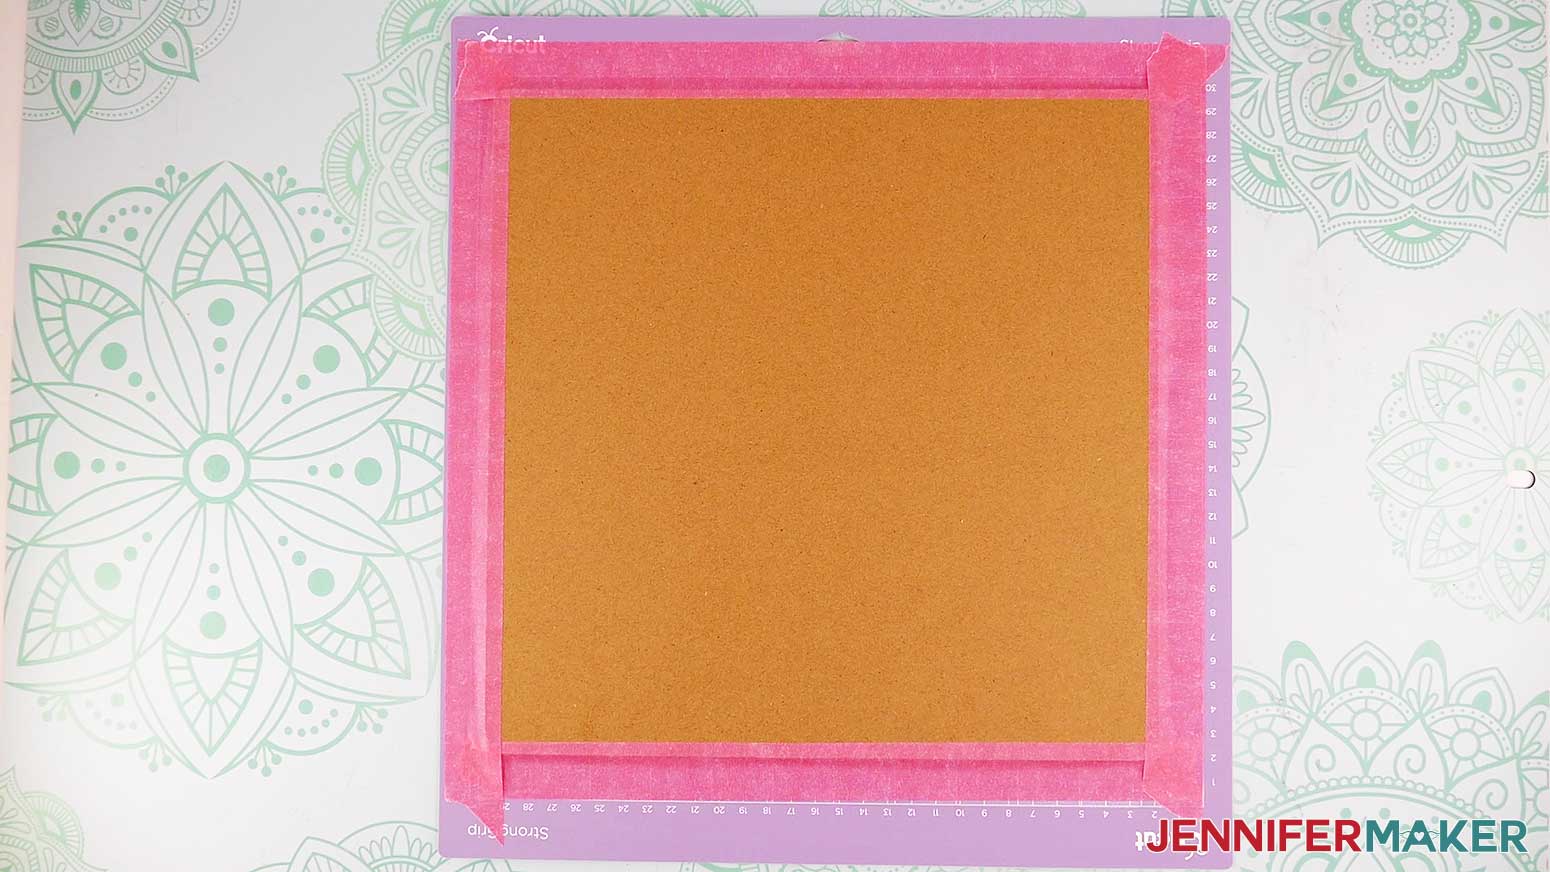
TIP: It helps to align the left edge of your chipboard so it’s about 1/8” to the right of the printed border on your purple StrongGrip machine mat -- this keeps the roller from cutting through the tape or getting hung up on the left side of the material.
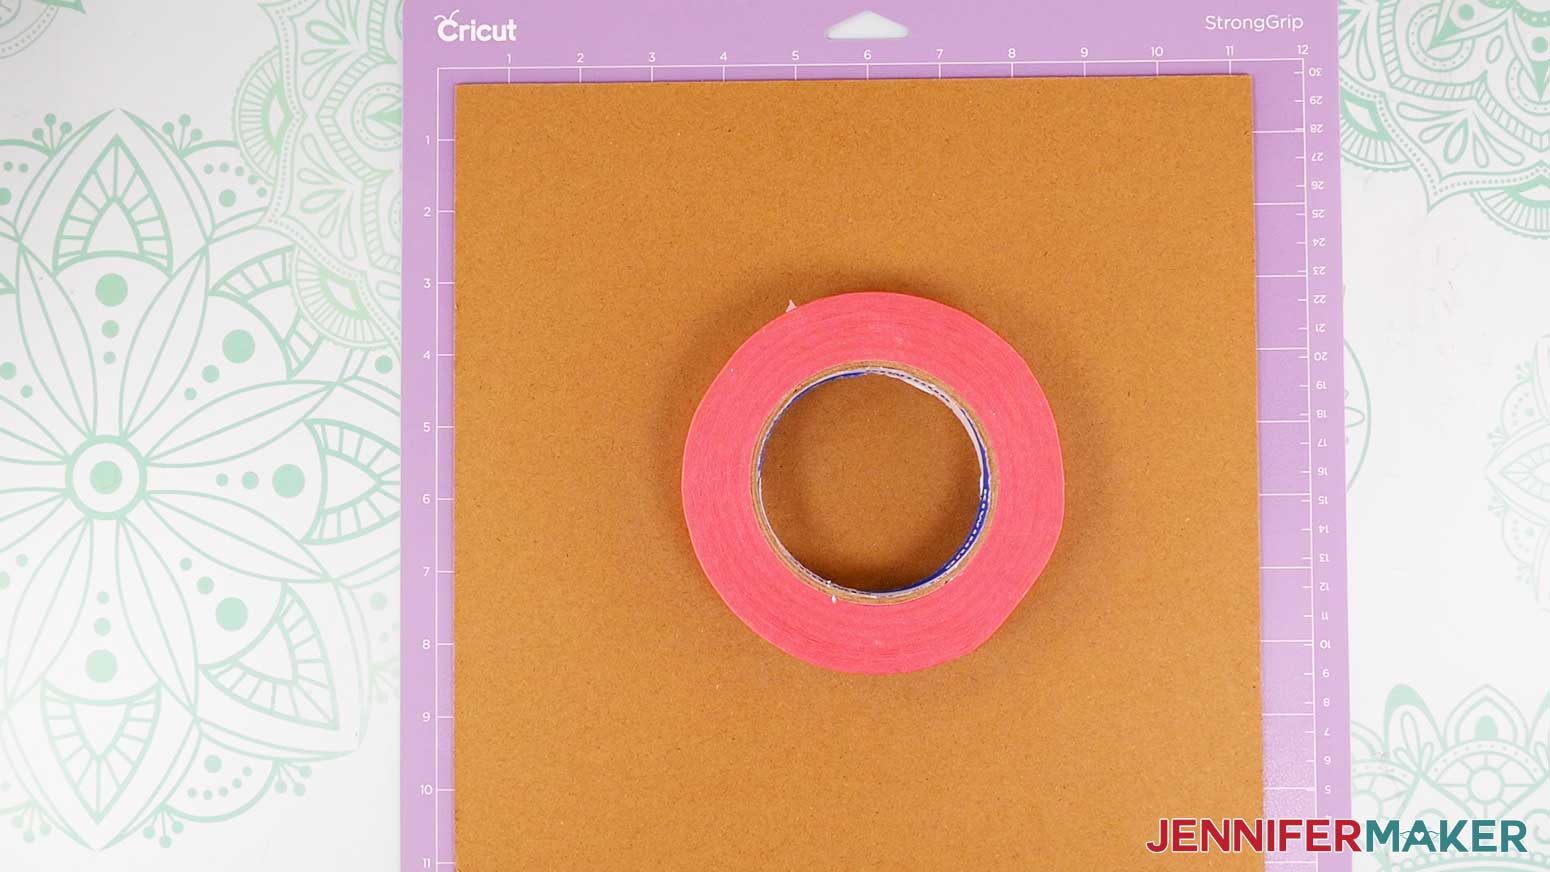
Use a brayer to adhere the chipboard, and then use painter’s tape or masking tape to secure it on all four sides.
Then load your knife blade in Clamp B and move your star wheels (those white wheels on your machine) all the way over to the right side.
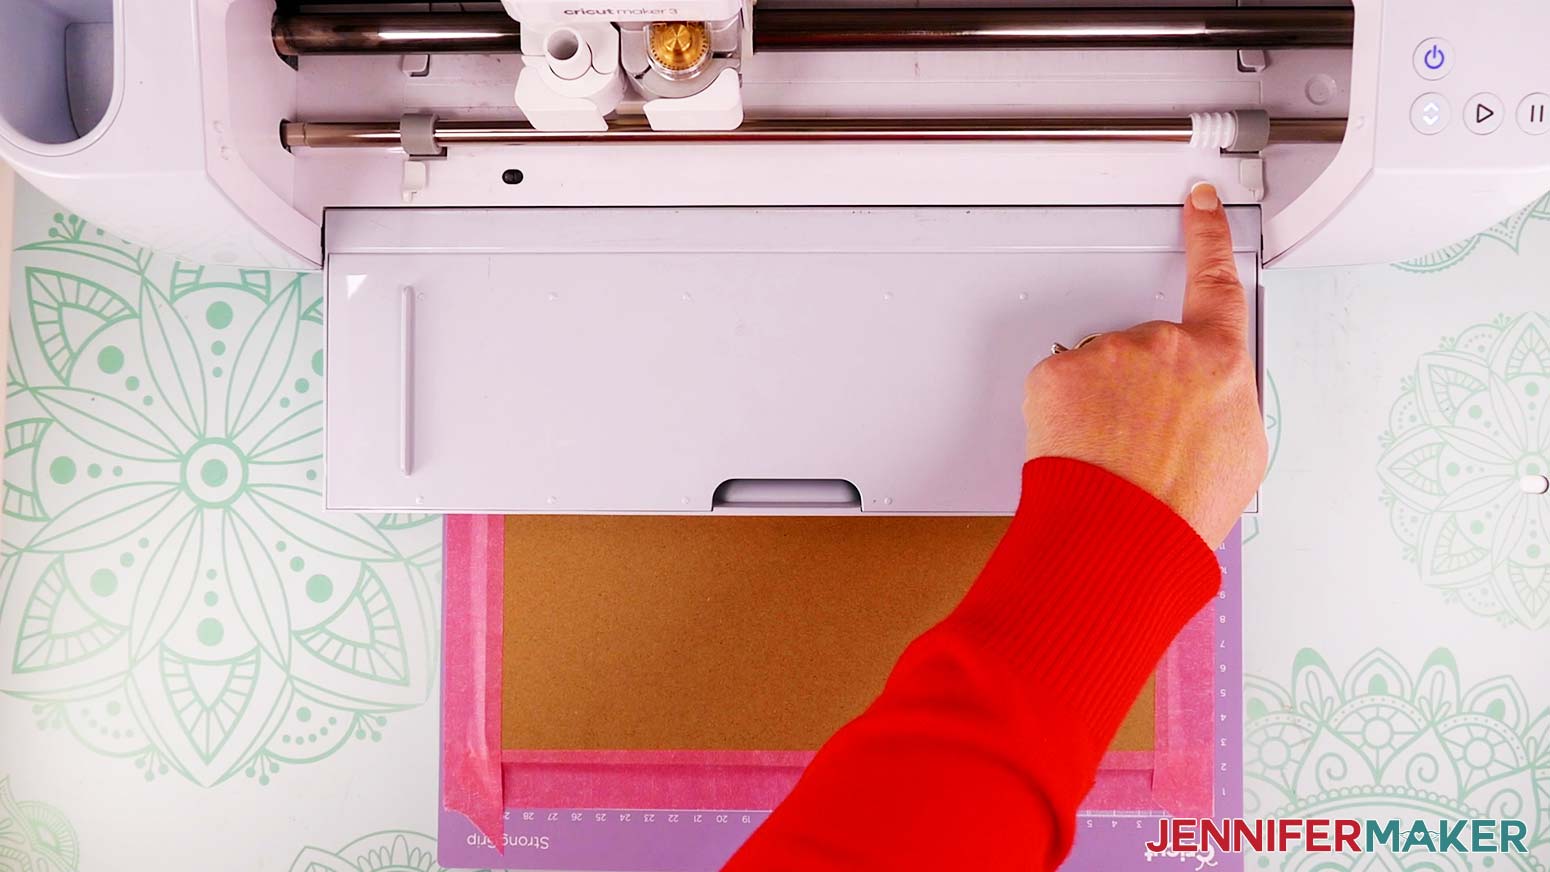
Load your prepared mat into the machine and press the flashing button to begin cutting.
IMPORTANT: Keep a close eye on your machine as it cuts, as it may be done in as little as 8 passes. Every machine is different, so be sure to check your cuts often and stop the machine early if needed so it doesn't cut through your mat.
To check your cuts, just pause your machine, lift up a corner, and see if the material is cut all the way through yet. If it is, unload the mat and remove the chipboard and tape. If it’s not, just press the Go button to continue cutting. Most of my pieces were done after 8 to 10 passes, which took my machine around 4 to 8 minutes per mat.
It's also a good idea to stop and clean your blade periodically as it's cutting. This can help prevent uneven cutting and rough edges.
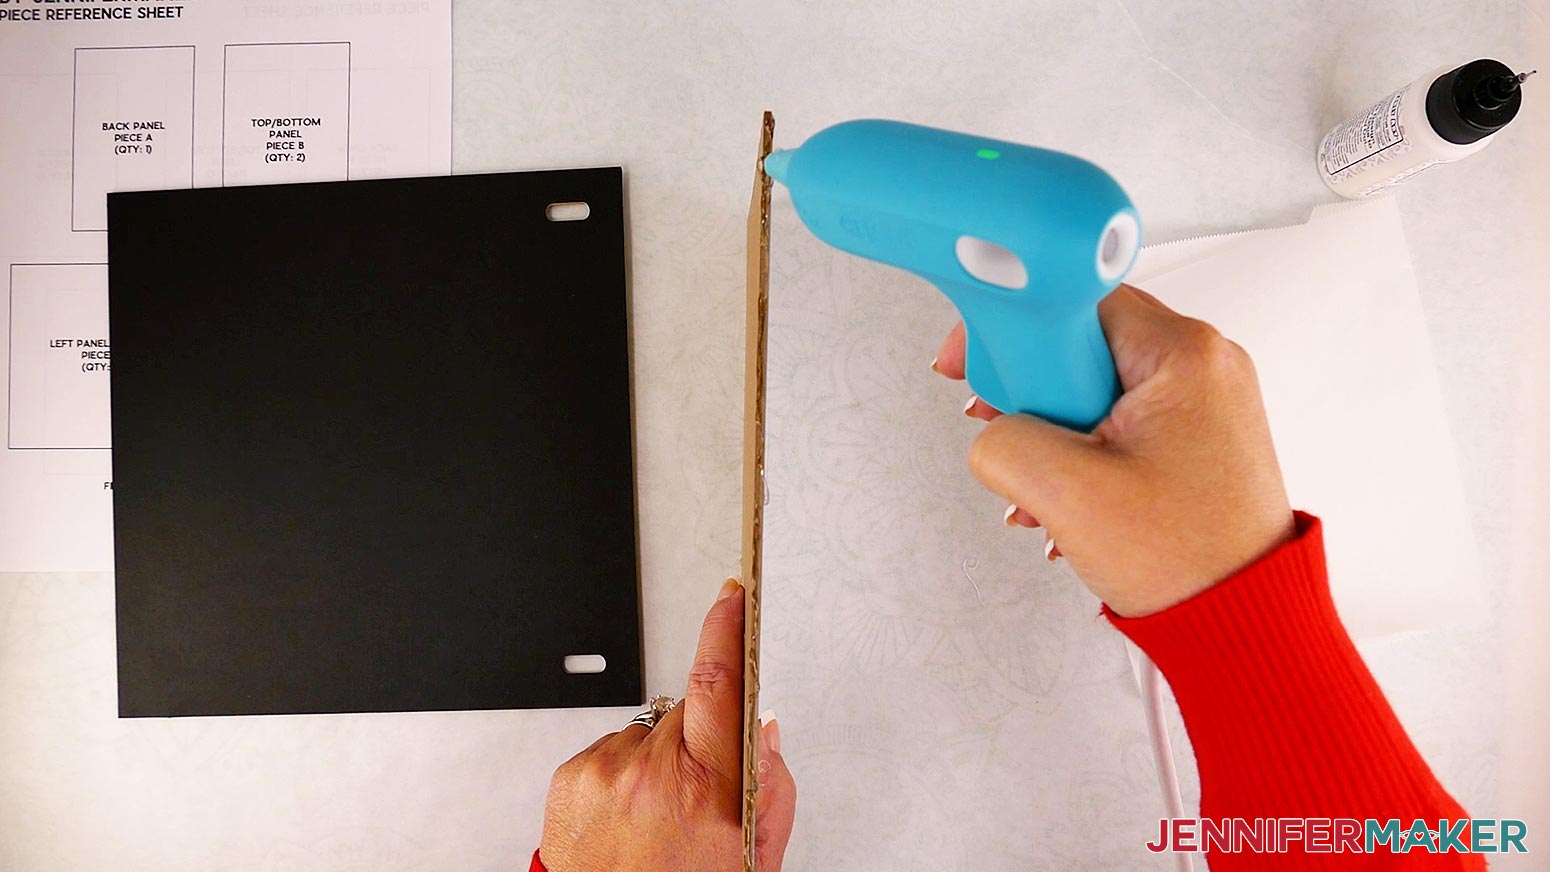
TIP: If the cuts went a bit too deep and are visible on the mat, you can try using the "Chipboard (1.5 mm)" setting instead. If the cuts didn’t go completely through, put your chipboard on a self-healing mat and carefully finish the lines with a craft knife.
Follow the steps above to cut and remove your remaining pieces from the mat.
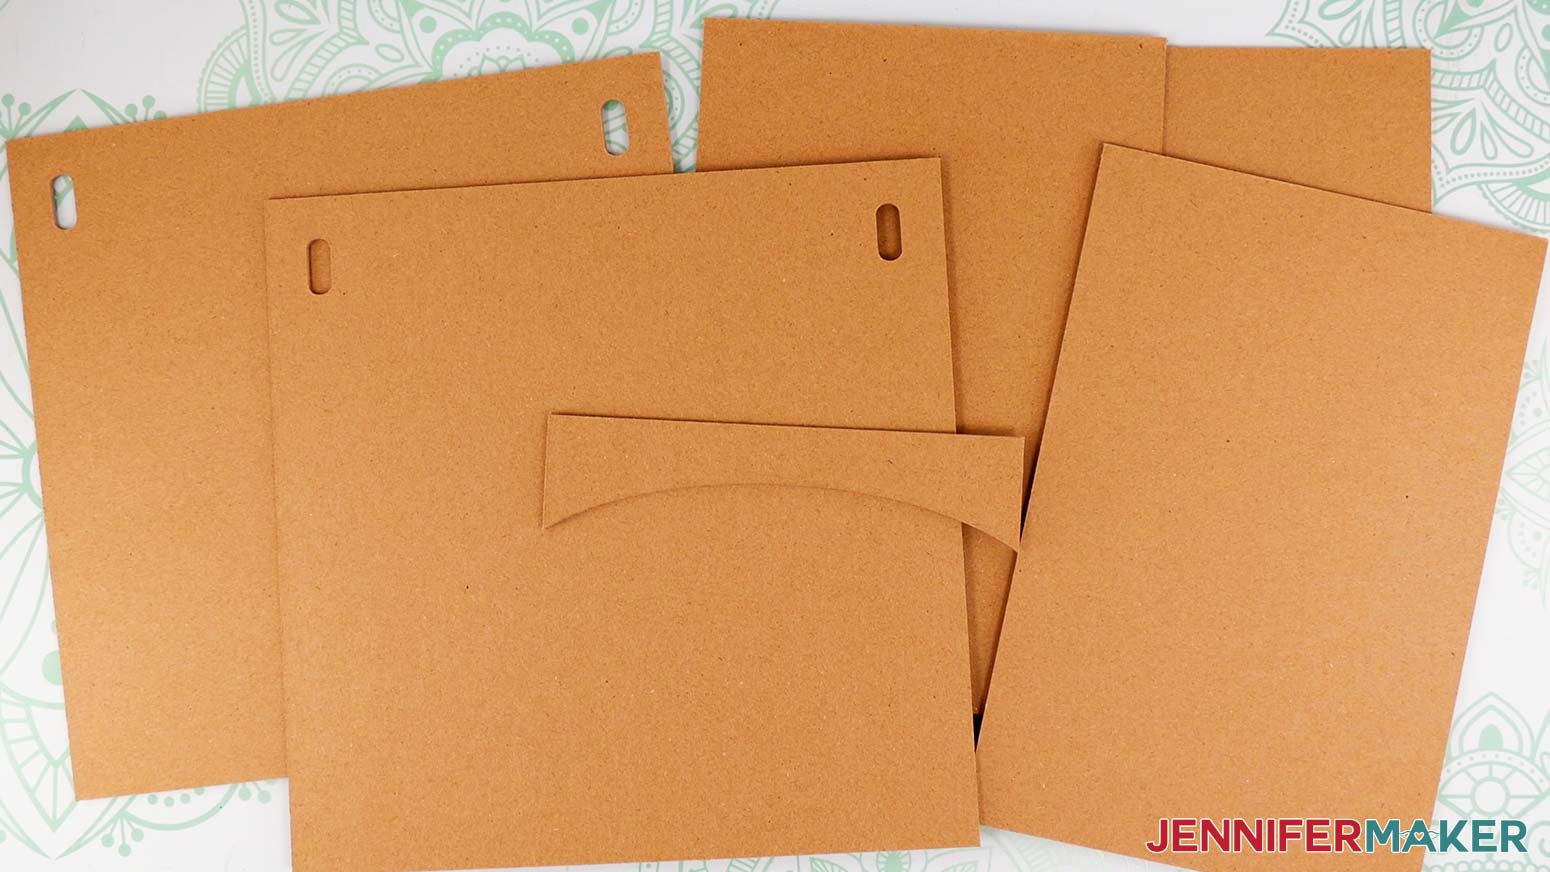
Here's what the cut pieces for my book nook box look like.
CUT THE LINER PIECES ON CARDSTOCK OR PAPER
If you'd like to line the inside of your box with colored or patterned cardstock or paper, first hide everything on your Canvas but the green pieces on the left.
TIP: You can also use the Print Then Cut feature to print custom photos on some or all of your liners. You can refer to my DIY Money Holders tutorial for help with the steps!
Check that the right machine is listed in the top right corner, then click "Make It.”
If prompted, click “On Mat,” “12 in x 12 in,” and “Confirm.”
If you're cutting all five liners, you should see five mats on your Prepare screen.
If you're using a different size material, such as 8.5" x 11" paper, you’ll need to change the Material Size for those mats from “12 in x 12 in” to “8.5 in x 11 in (Letter).” Once you’ve changed the size of your first mat, the remaining mats of the same color will change to match so you don’t have to change each one individually.
If everything looks good, click back on the first mat and click “Continue” in the bottom right.
On the Make screen, select your material settings. For 65 lb. cardstock -- like the black Recollections cardstock in my materials list -- you can use the "Medium Cardstock - 80 lb (216 gsm)” setting with More Pressure for cleaner cuts.
For copy paper -- like the 24 lb. white paper in my materials list -- you can use the "Copy Paper - 24 lb (90 gsm)" setting with More Pressure for cleaner cuts.
Place your first mat's cardstock or paper face up on your green StandardGrip machine mat and use a brayer to make sure it's fully adhered. Check that your Fine-Point Blade is clean and in Clamp B. You might also need to move your white star wheels back to the left.
Then, load the mat into the machine and press the flashing button to begin cutting.
When the cut is finished, unload the mat, flip it over, and roll it back to release the material. This helps prevent it from curling and ripping.
If necessary, use a scraper tool to remove any pieces left on the mat.
Follow the steps above to cut and remove your remaining pieces from the mat.
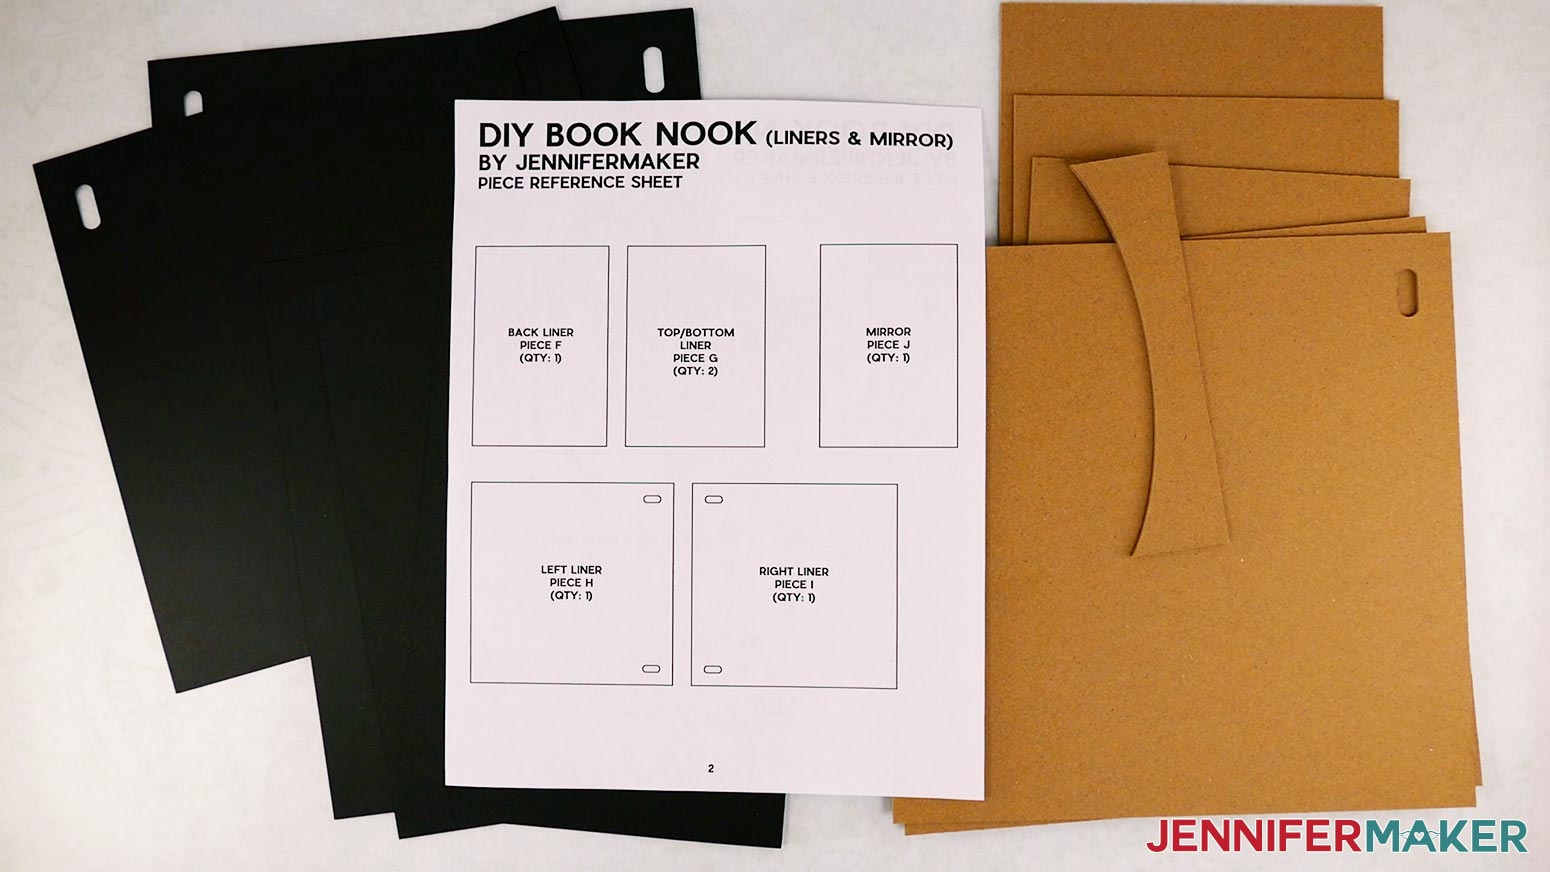
Here's what the cut pieces for my inner liners look like.
CUT THE ONE-WAY MIRROR PIECE ON THIN POLYCARBONATE
If you'd like to make the infinity mirror version of the book nook, you'll need to cut the polycarbonate for the one-way mirror to size. You can cut the sheet with scissors if you prefer -- you will just need to measure and cut a 6" x 9" rectangle. I used my Cricut to cut mine, and here's how I did it.
First, hide everything on your Canvas but the blue rectangle on the right.
Check that the right machine is listed in the top right corner, then click "Make It.”
If prompted, click “On Mat,” “12 in x 12 in,” and “Confirm.”
You should see one mat on your Prepare screen.
TIP: I suggest moving the design away from the edges of your mat in Design Space before cutting. I moved my piece so it was about 1” from the top and left edges of the printed border.
If everything looks good, click “Continue” in the bottom right.
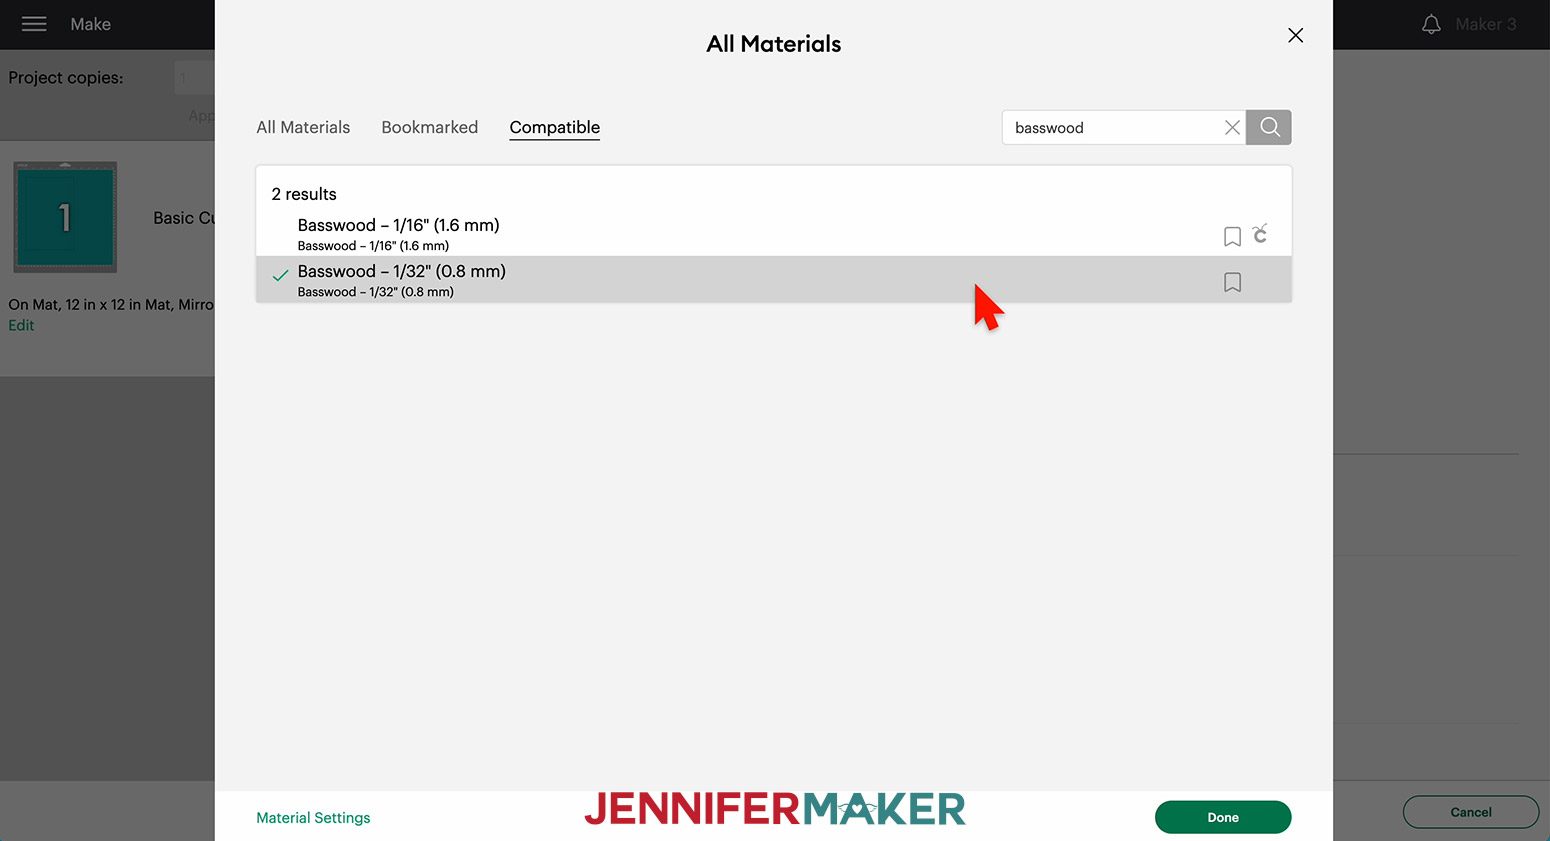
On the Make screen, select your material settings. Since the Cricut doesn't have a dedicated setting for thin polycarbonate, I used the "Basswood - 1/32" (0.8 mm)" setting. To find it, click "Browse All Materials" and type "basswood" in the search bar. Select the "1/32" option and click "Done." Since this setting requires the knife blade, the pressure and number of passes will be automatically determined by the software.
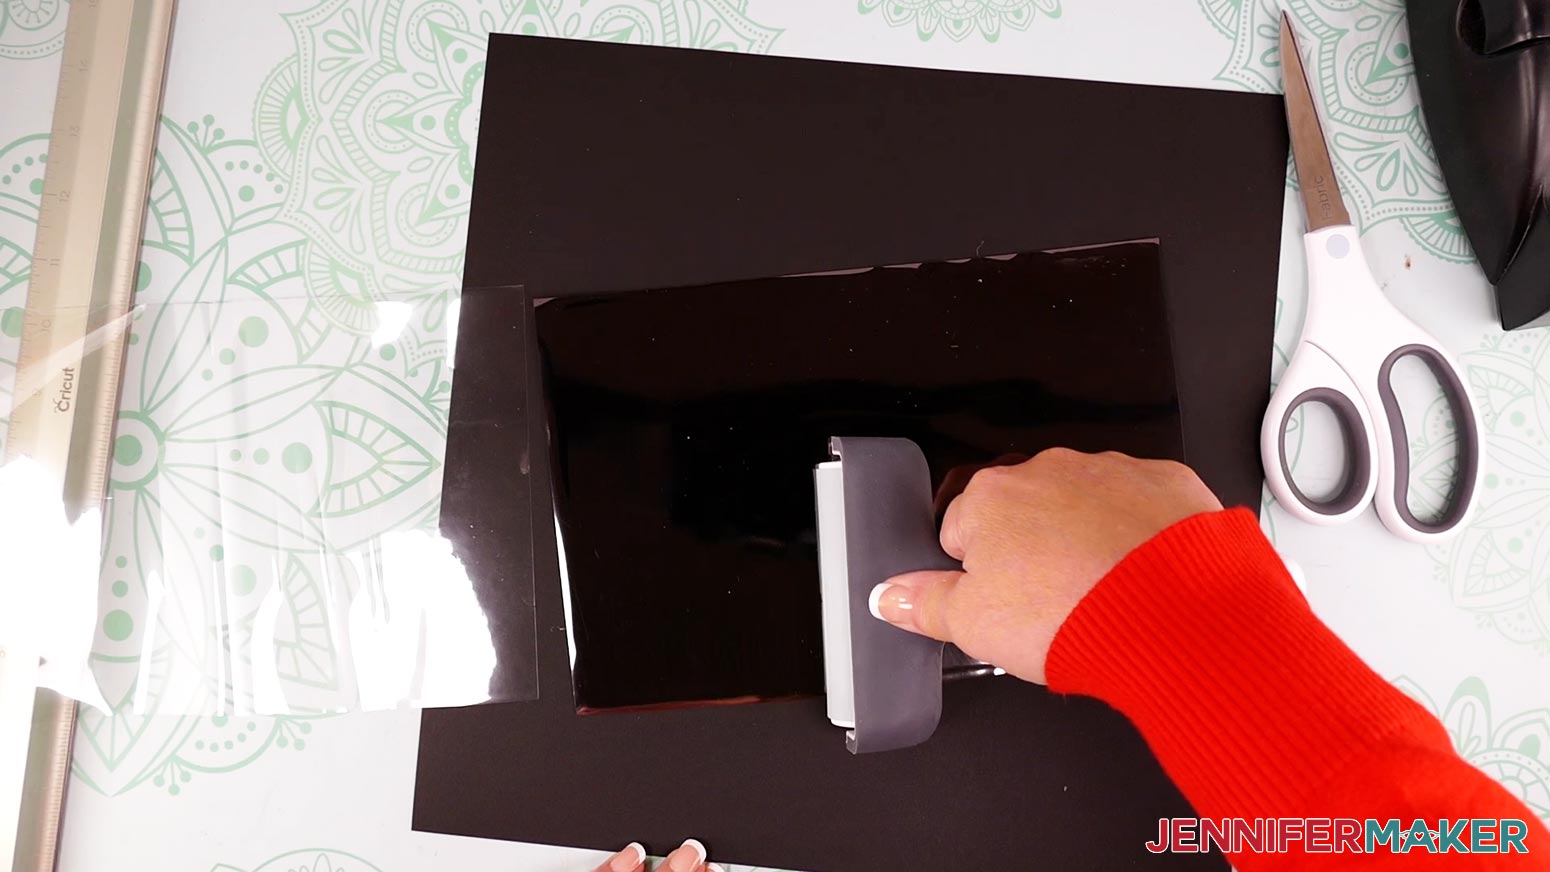
Just like with the chipboard, use a brayer to adhere the polycarbonate to your purple StrongGrip machine mat. After it's secure, remove the protective film from the front of the sheet. Then use painter’s tape or masking tape to secure it on all four sides.
TIP: It helps to align the left edge of your sheet so it’s about 1/8” to the right of the printed border on your mat, just like with the chipboard. This keeps the roller from cutting through the tape or getting hung up on the left side of the material.
Then load your knife blade in Clamp B and move your star wheels all the way over to the right side.
If you already calibrated your machine for the knife blade before cutting your chipboard, you won't need to calibrate again.
Load your prepared mat into the machine and press the flashing button to begin cutting.
IMPORTANT: I recommend you keep an eye on your machine as it cuts, as it may be done before it has finished all 18 passes. To check, just pause your machine, lift up a corner, and see if the polycarbonate is cut all the way through yet. If it is, unload the mat and remove the material and tape. If it’s not, just press the "Go" button to continue cutting. Mine took all 18 passes to cut completely through, but every machine is different.
Here's what the cut piece for my DIY one-way mirror looks like.
STEP 3: ASSEMBLE THE DIY BOOK NOOK
ASSEMBLE THE BOX SIDES AND BOTTOM
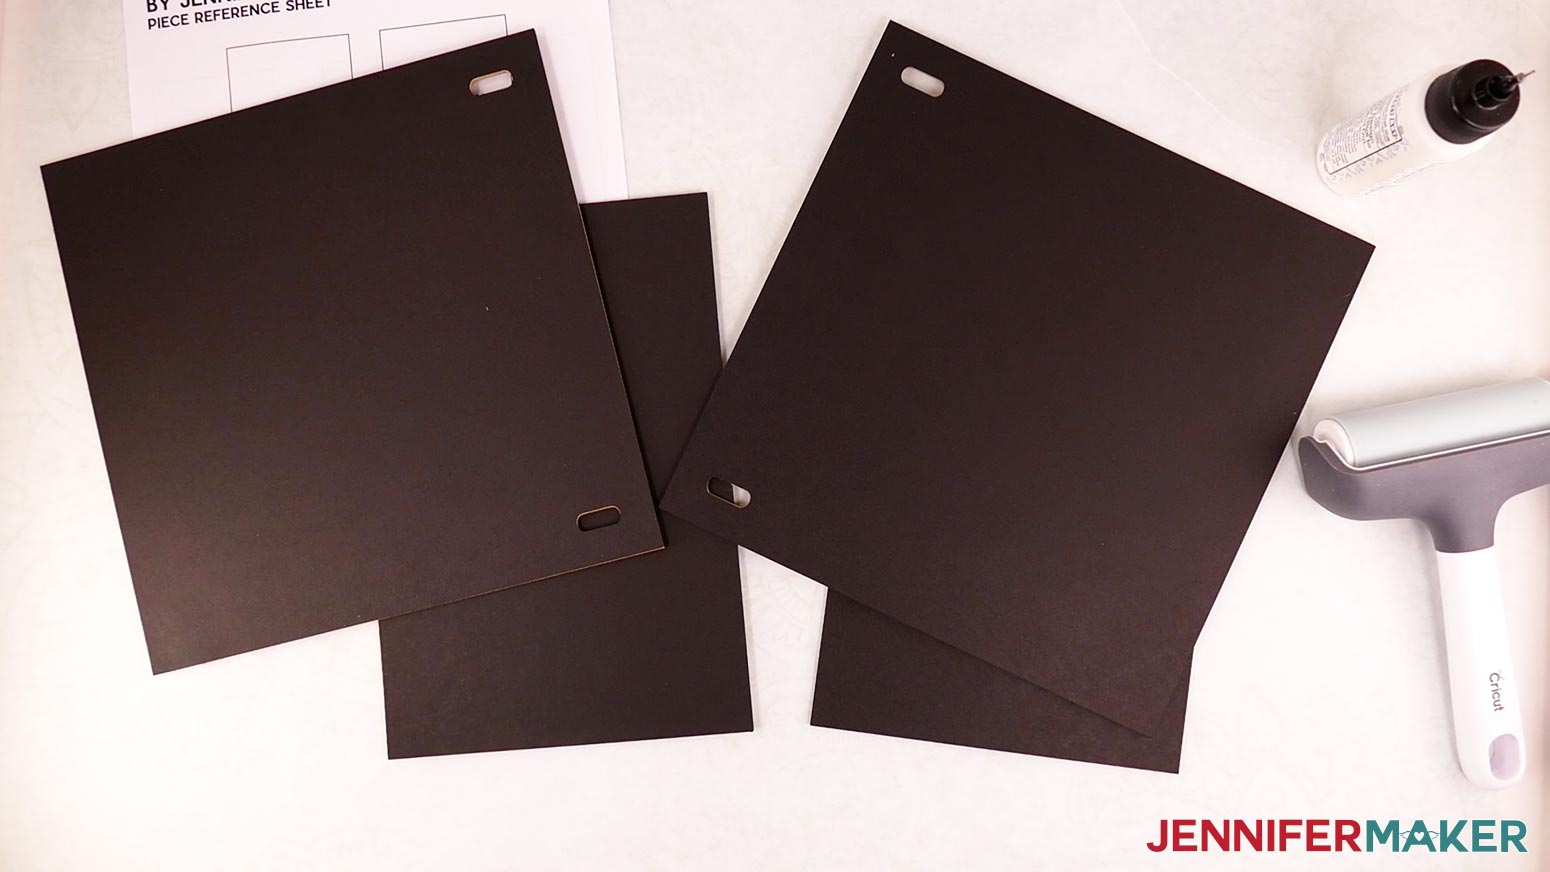
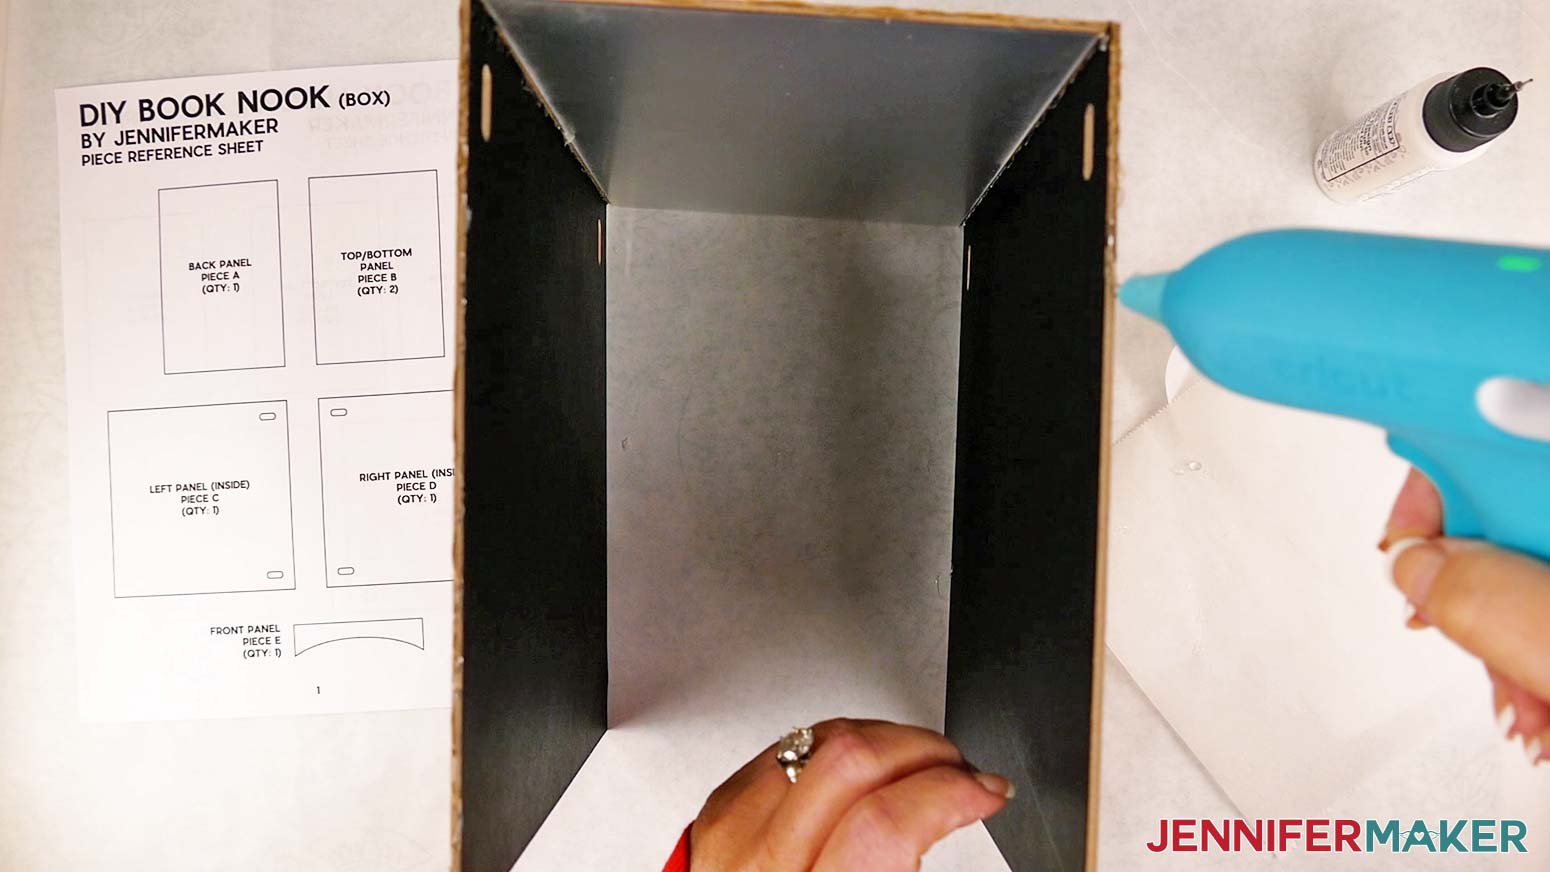
Gather the chipboard Pieces A-D. You should have two 9" x 9" pieces with small oval-shaped cutouts along one side (Pieces C and D), two rectangles 9" long and slightly wider than 6" (Piece B), and one rectangle exactly 6" wide by 9" long (Piece A).
You'll also need any liner pieces you cut for the inside, craft glue, a hot glue gun, some hot glue finger caps, and a brayer.
If you're making the infinity mirror version of the book nook, you'll also need one regular 6" x 9" self-adhesive acrylic mirror (leave the film on the front for now).
If you cut liner pieces, you'll want to apply those to the insides of your chipboard pieces with craft glue first. For the sides (Pieces H and I), make sure to apply your liners so the cutouts are facing the right edge of one piece and facing the left edge of the other piece. The sides are essentially mirror versions of each other.
Only use enough glue to hold your liner paper in place on the chipboard. Too much glue could make your paper warp. I applied a thin line of glue around the outer edges and a little bit in the center of each piece.

For the infinity mirror version, apply the 6" x 9" self-adhesive mirror to the back panel (Piece A) by removing the protective backing and pressing the adhesive side against the chipboard so the edges of both pieces are aligned. You won't need a back liner (Piece F) if you're making the infinity mirror version.

Once your mirror and/or liner pieces are attached, find the back panel (Piece A) and the left side panel (Piece C). Plug in and turn on your hot glue gun.
Apply a thin line of hot glue along the left edge of Piece A -- the long edge on the left when the inside, or liner side, of the panel is facing you.
Position Piece C so it's perpendicular to Piece A, and the two pieces meet to make the back left corner of the box. The liners should be facing inward. The left edge of the back panel where you applied the glue should be flush against the side panel. When correctly positioned, you will be covering up about 1/8" of the side panel on the inside of the box, and the two cutouts will be facing toward the back panel. Press against the hot glued edge with firm pressure until the glue dries.

Make sure the two pieces are well-adhered. Apply more hot glue along the outside corner of the box if needed. If any glue seeped out onto the inside of the box, you can just peel it off. The outside of the box doesn't need to look pretty because it will be placed on a shelf in between books when it's finished.
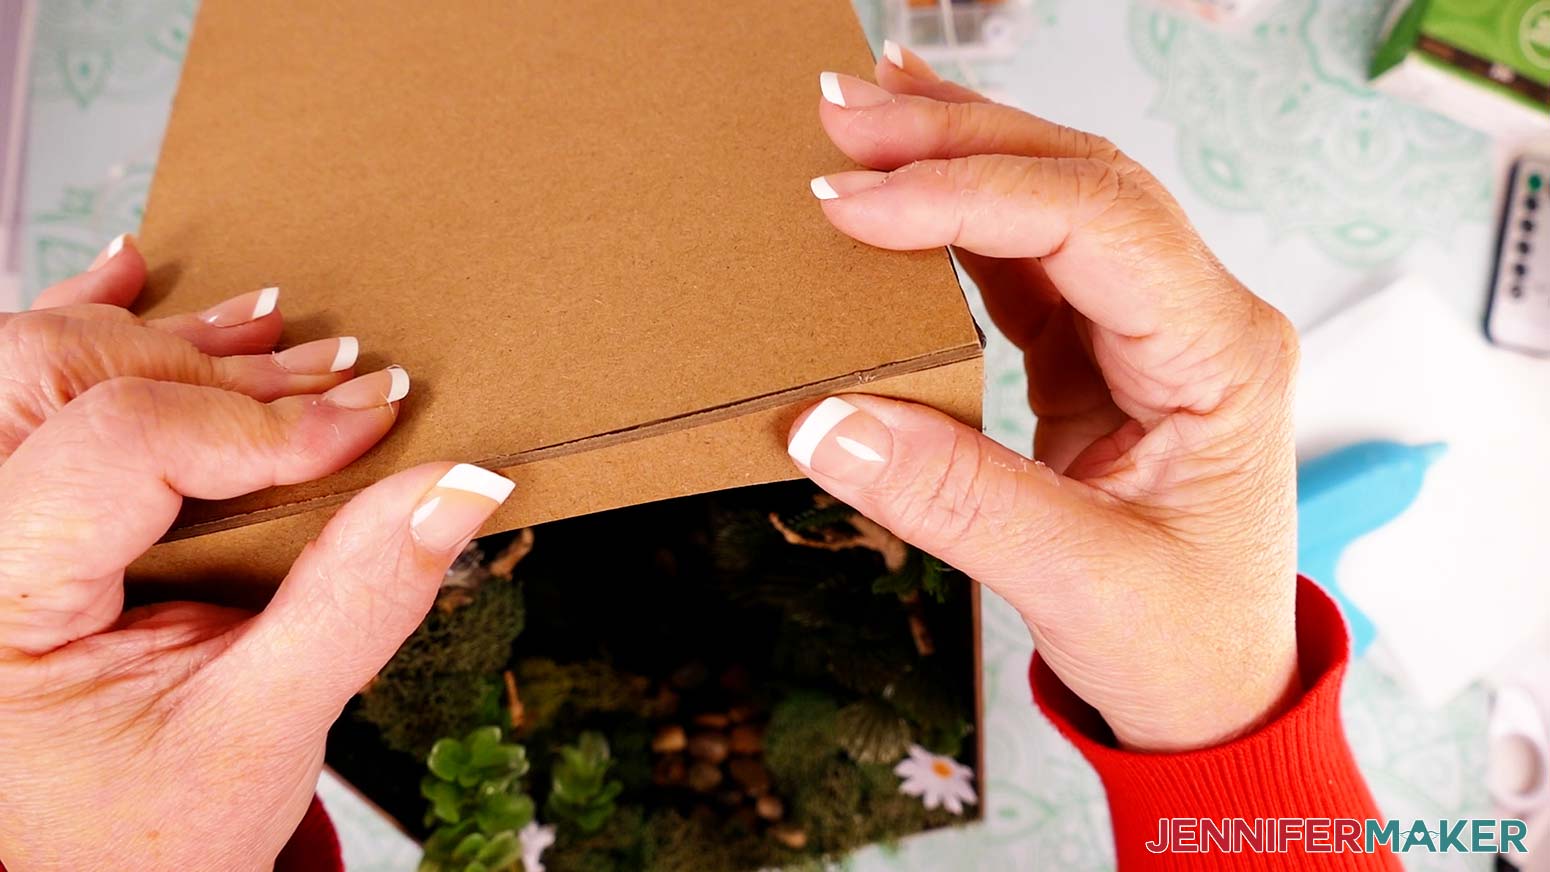
Grab the right side panel (Piece D). Apply another thin line of hot glue along the right edge of Piece A. Position the right side panel so it mirrors the placement of the left side panel. Press against the hot glued area until it dries, and apply more glue along the outside corner if needed.
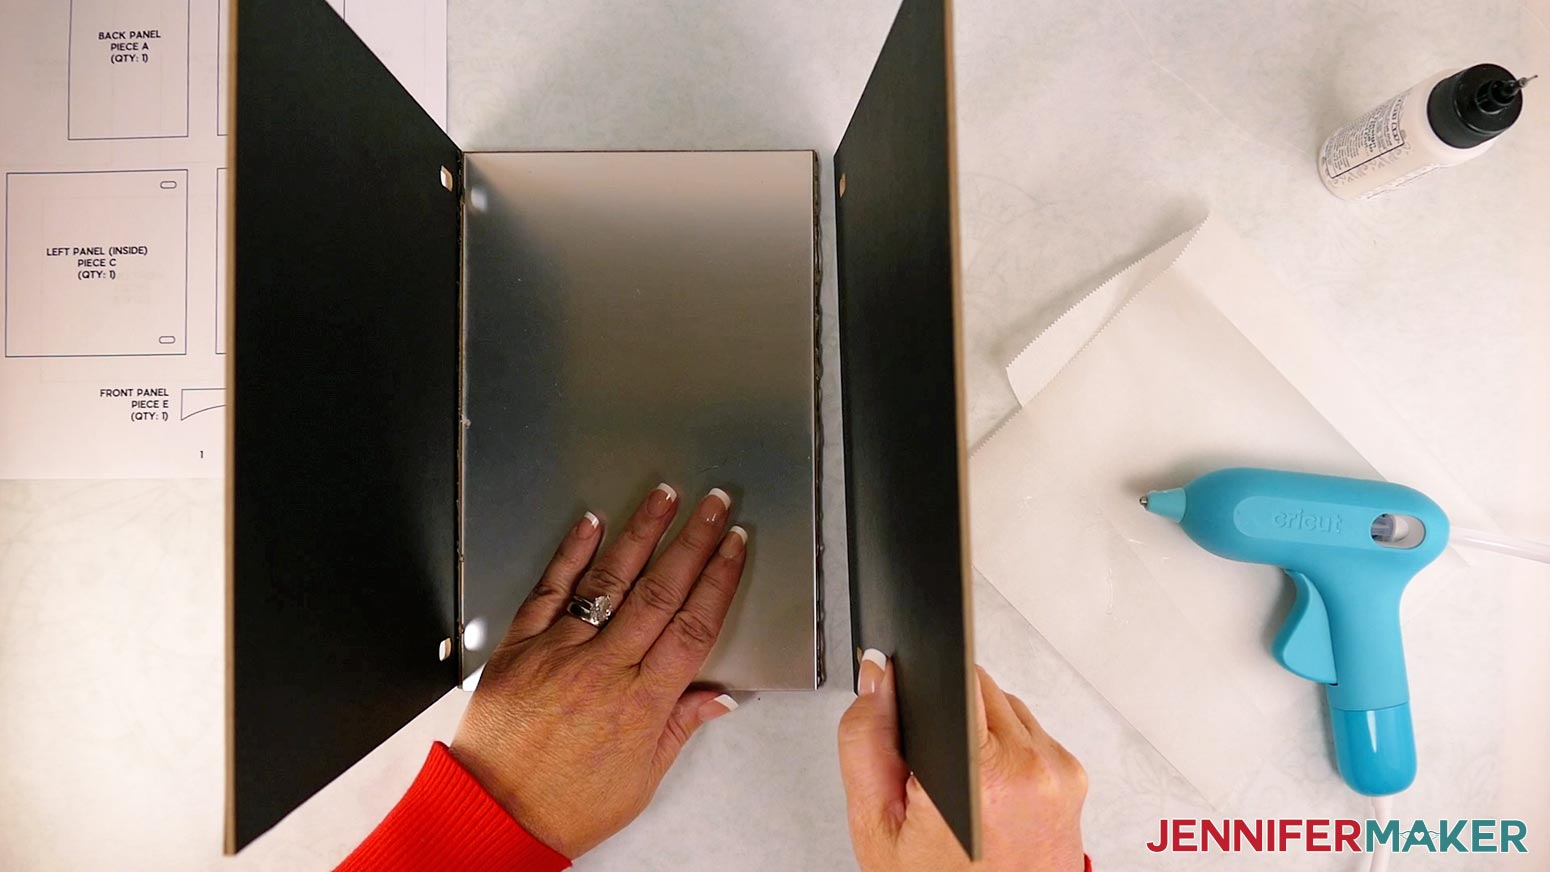
The sides of your box are now complete!
Flip your assembled pieces over so their top edges are flat against your work surface. When you look at it from above, you'll have a shape that resembles an upside-down U.
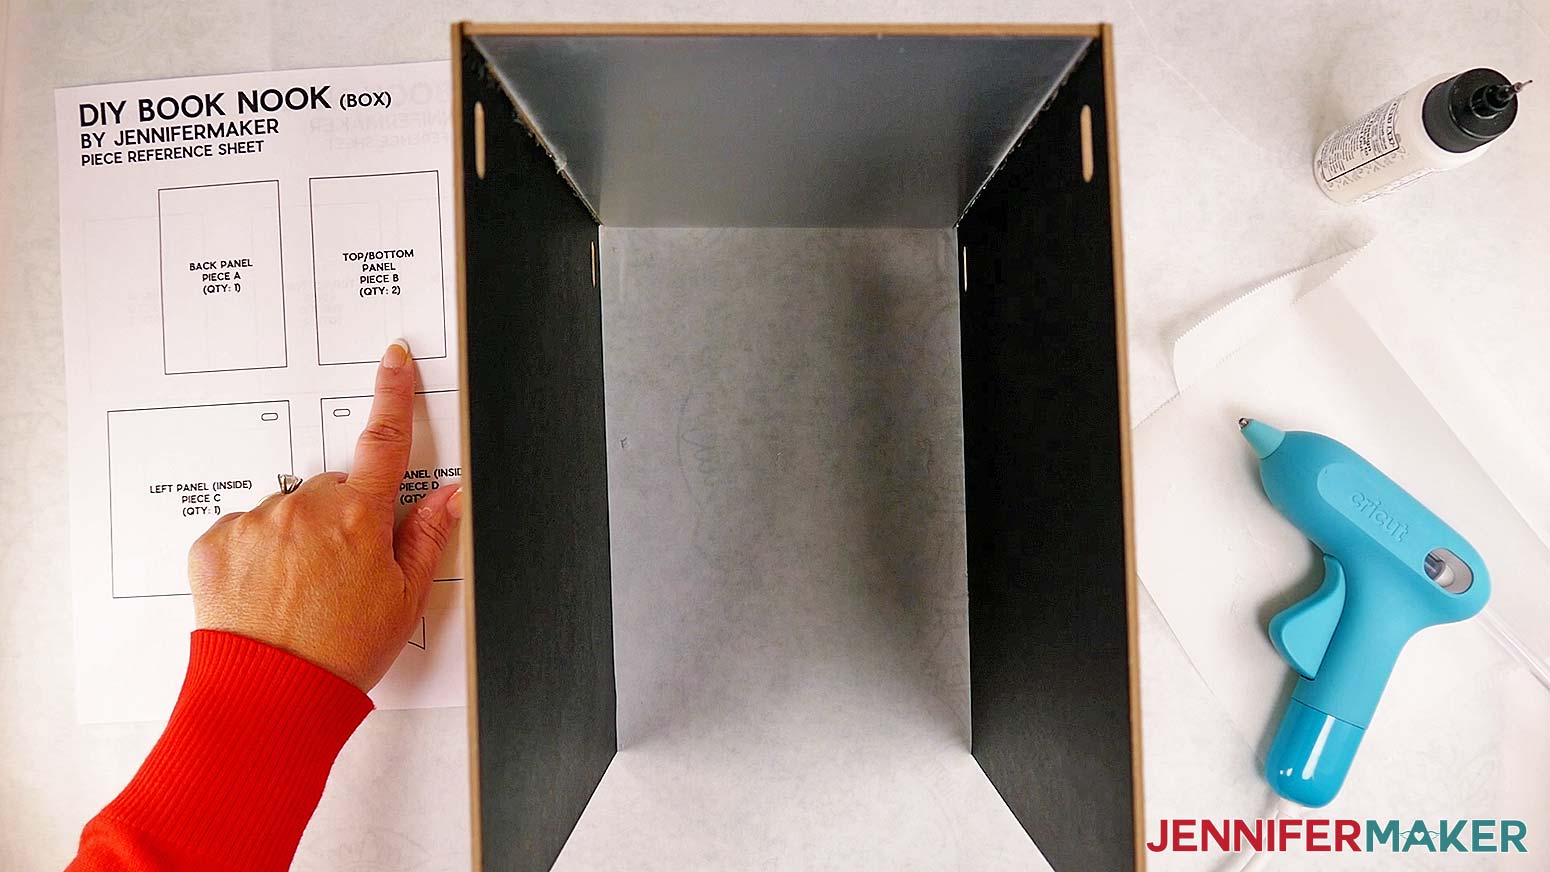
Now grab the bottom panel (one of Piece B). If you glued different colors or patterns to the top and bottom of your box pieces, make sure you're using the bottom piece.
Apply hot glue along all three edges of the bottom of your assembled box.
Attach the bottom panel so the liner is facing down, or inside the box. Make sure the edges of the bottom panel are aligned with the edges of your box sides before the glue dries. Press against the glued areas until they dry.
Check to make sure the bottom panel is well-adhered. Apply more glue if needed along the outer edges where the pieces meet. Then flip the box back over.
The base of your box is now complete!
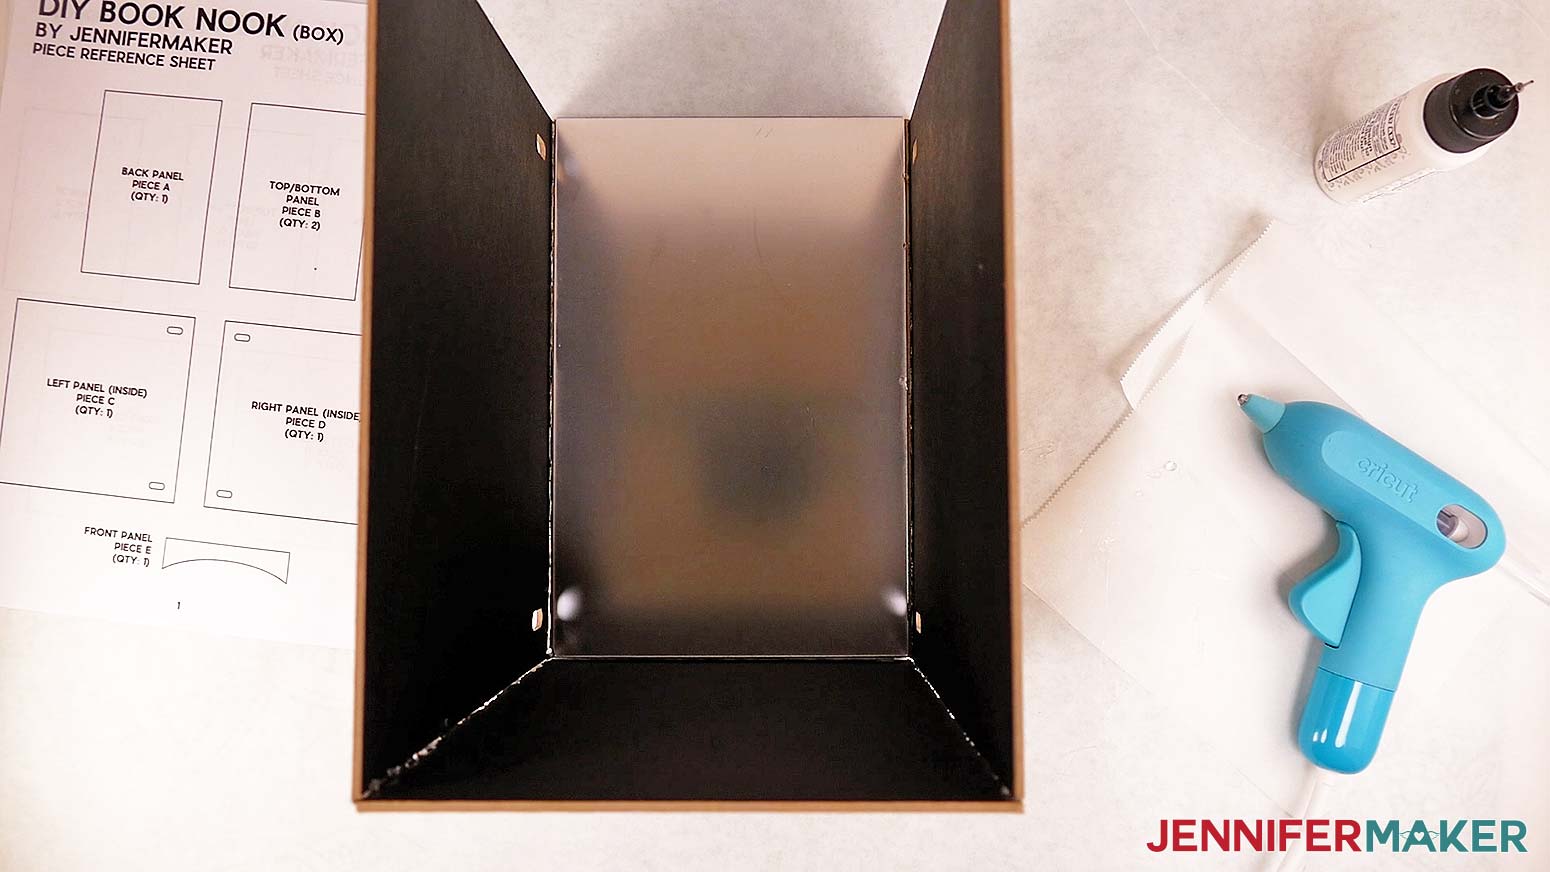
We'll leave the top of the box (the second Piece B) off for now so we can add decorations inside. It's also a good idea to leave the protective film on the mirror at the back until you're done with the decorations. This helps prevent scratches and smudges.
ASSEMBLE THE DIY ONE-WAY MIRROR
If you're making the infinity mirror version of the book nook, you'll need a one-way, or see-through, mirror for the front part of the box.
You can use a premade one-way mirror like the 1 mm acrylic sheet in my materials list, but you'll need to cut it to size using a metal ruler, utility knife, and self-healing mat. This option can be dangerous because 1 mm acrylic is difficult to cut by hand. For this reason, I recommend making a DIY one-way mirror with a piece of thin 0.02" polycarbonate and some one-way mirror window film instead. Let me show you how!
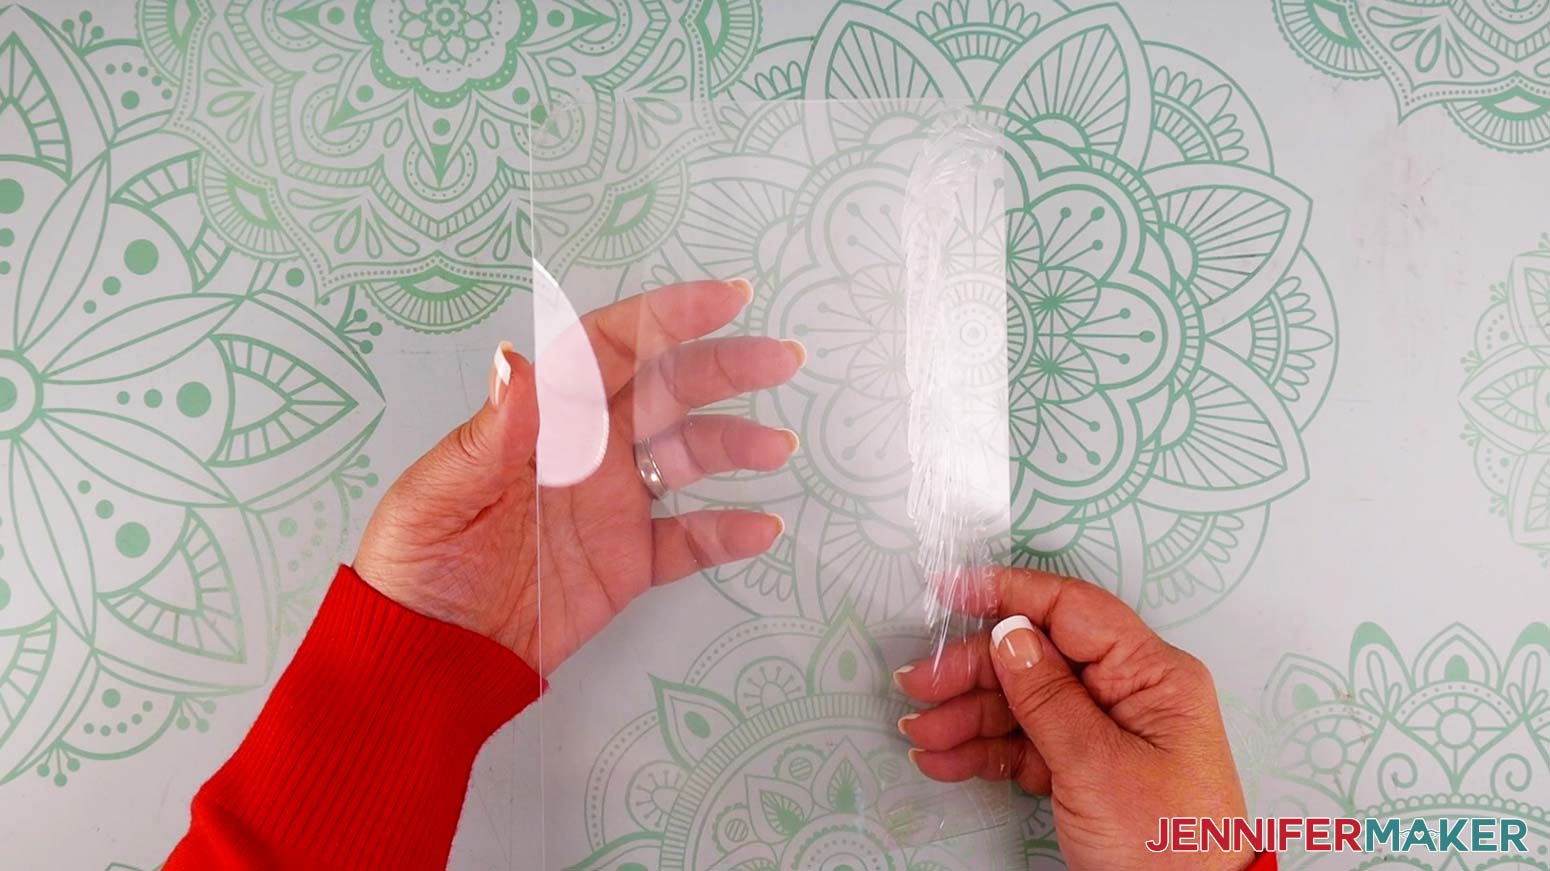
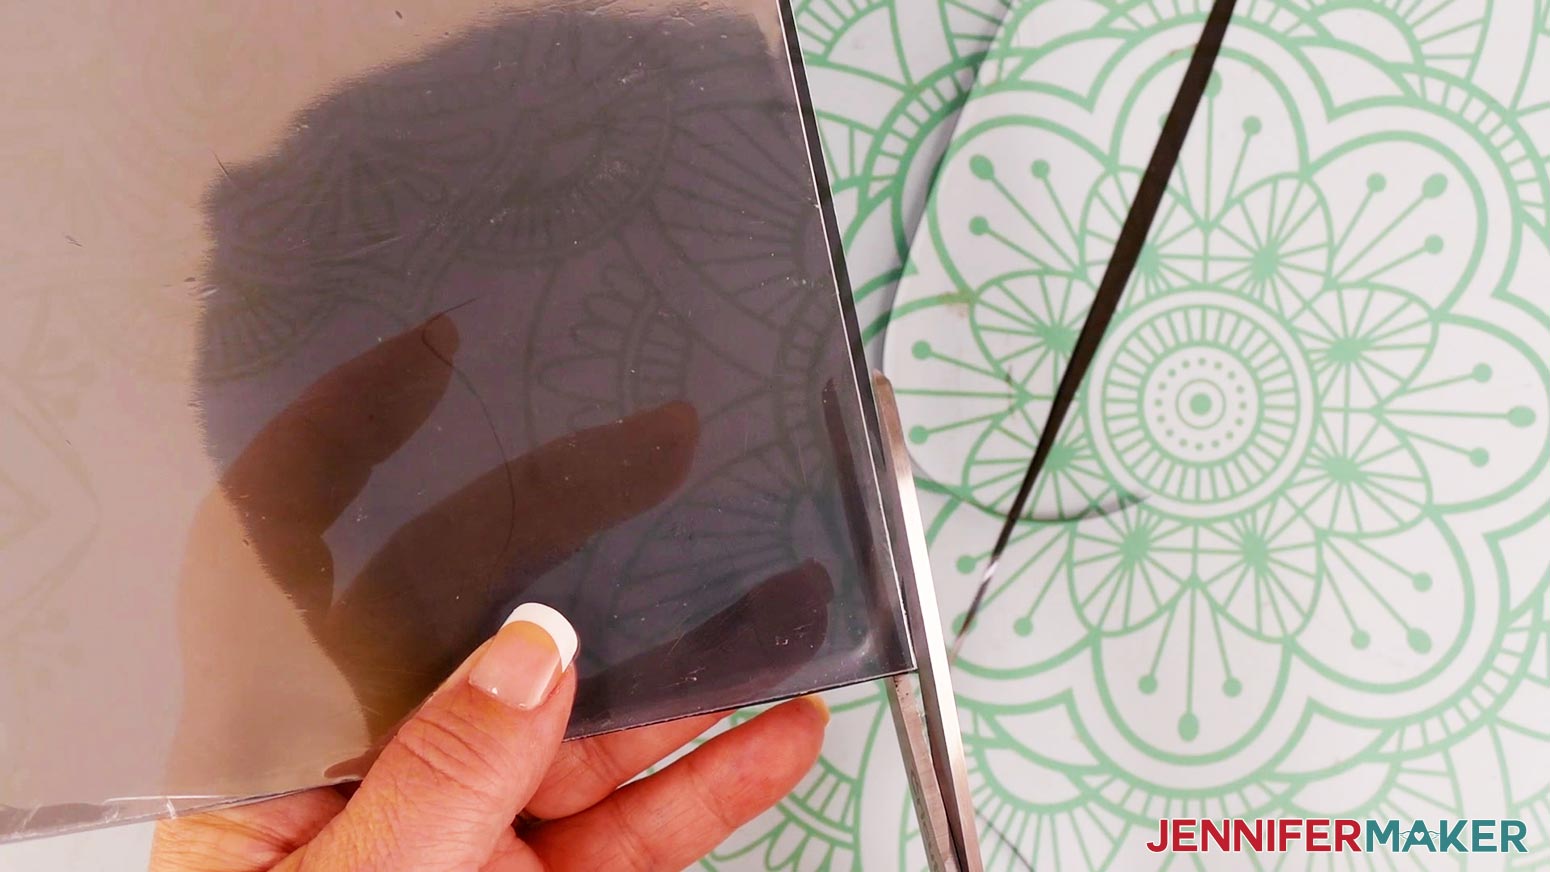
Grab the polycarbonate 6" x 9" rectangle (Piece J) and a piece of one-way mirror window film slightly larger than 6" x 9". You can use scissors to cut the window film.
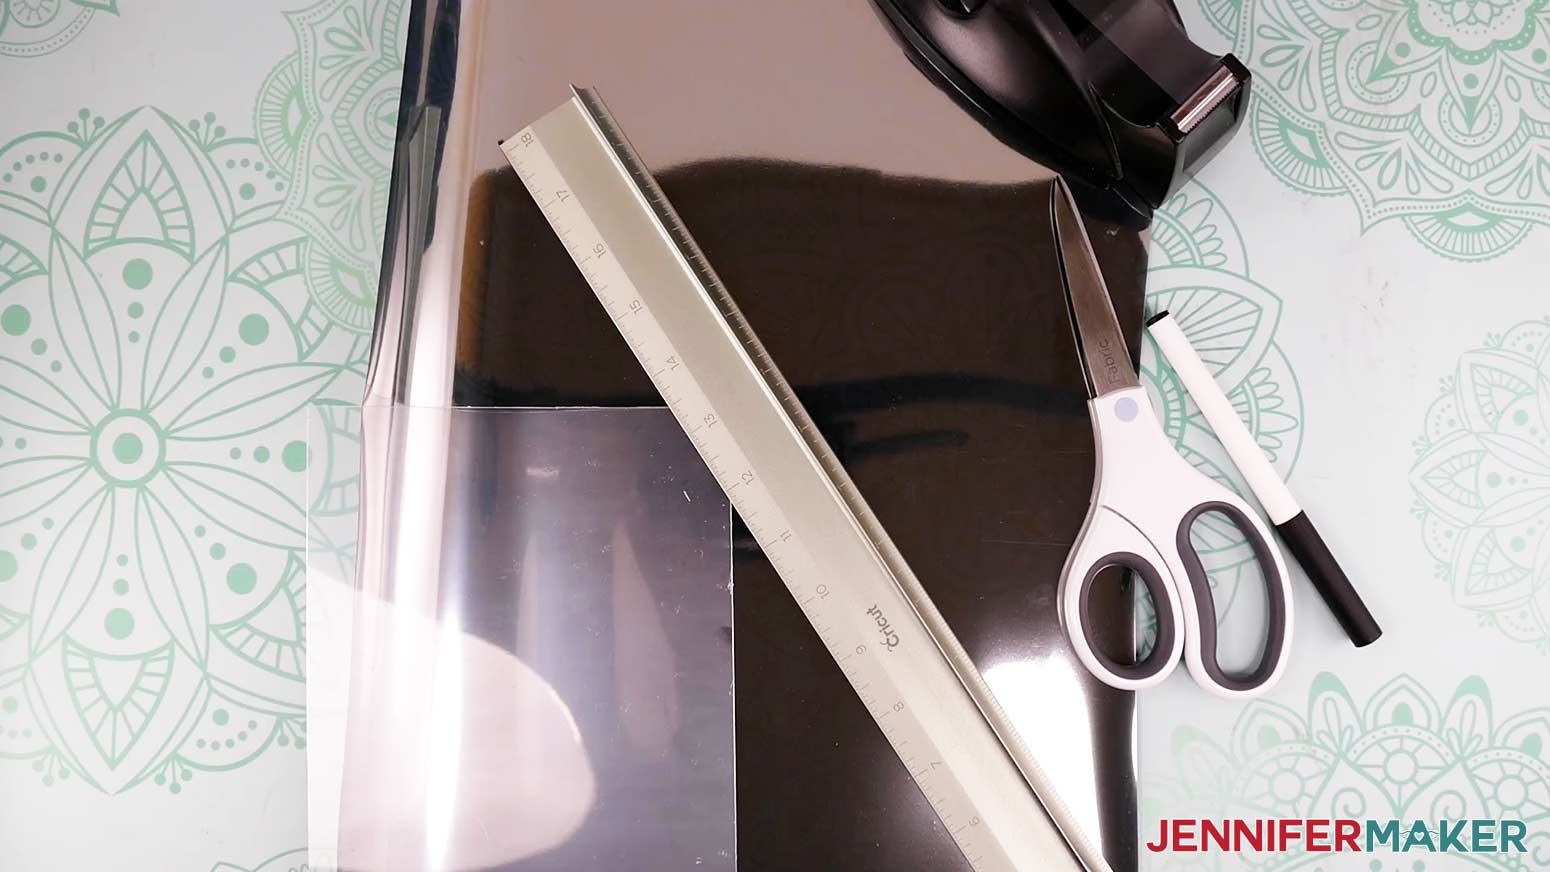
Carefully peel the backing from one of the short ends of your window film piece, exposing the adhesive underneath.

Apply this edge to the top of your polycarbonate piece on the side with the protective film removed. The edge of the window film can extend past the edge of the polycarbonate since your window film piece should be larger than 6" x 9". We'll cut away the excess film later.
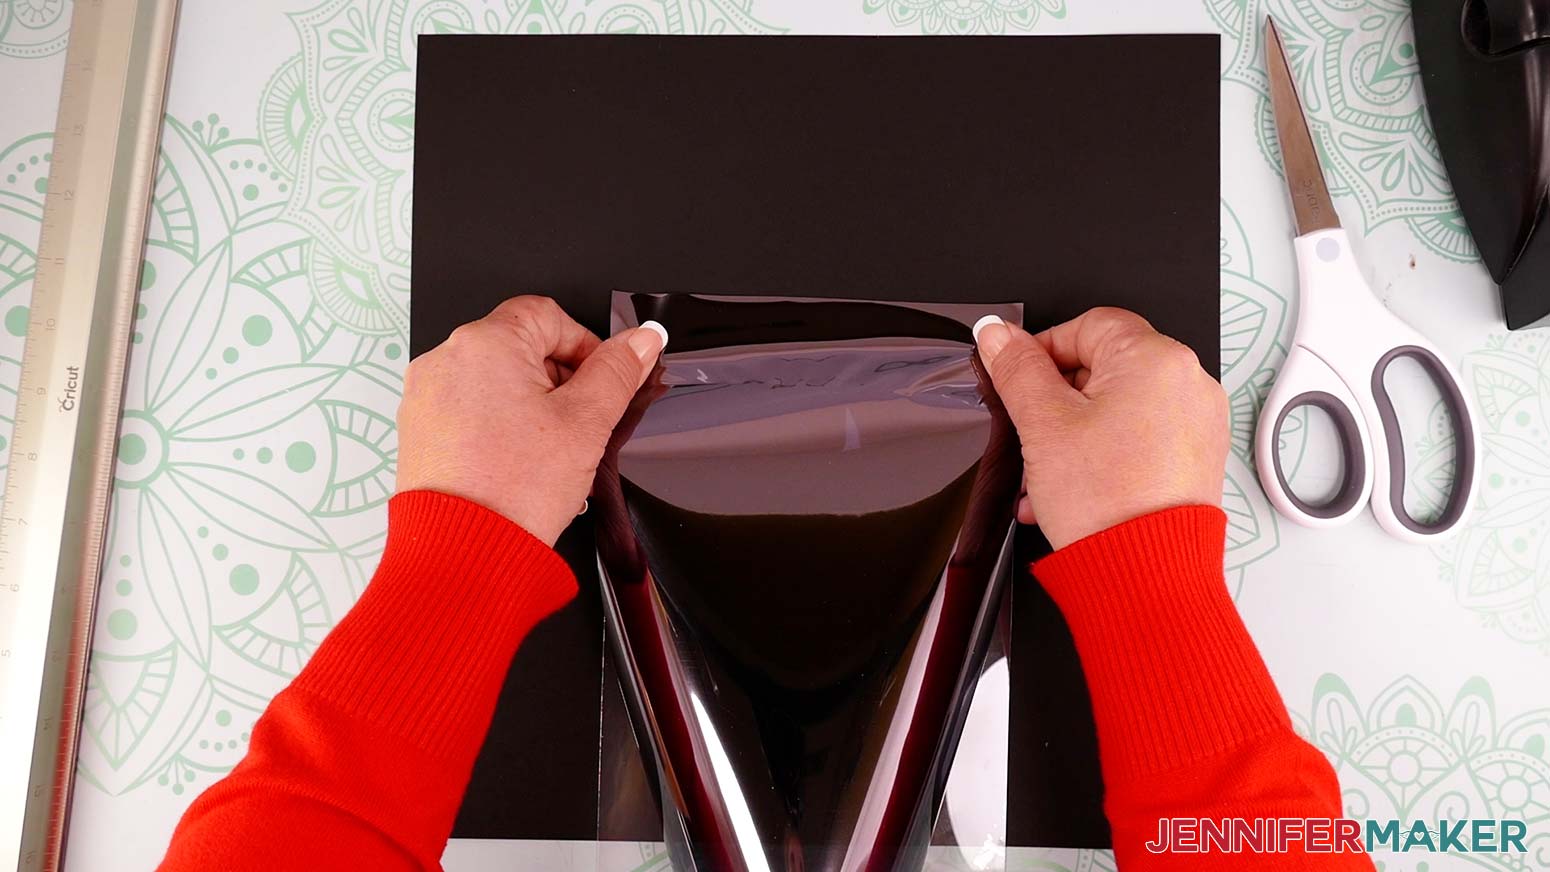
Slowly remove the rest of the window film backing from top to bottom, pressing down as you go to attach the adhesive to the polycarbonate. If you notice a wrinkle or alignment issue, just peel up the window film to fix it and reapply. Don't worry about any small bubbles that appear. We'll remove those with the brayer.
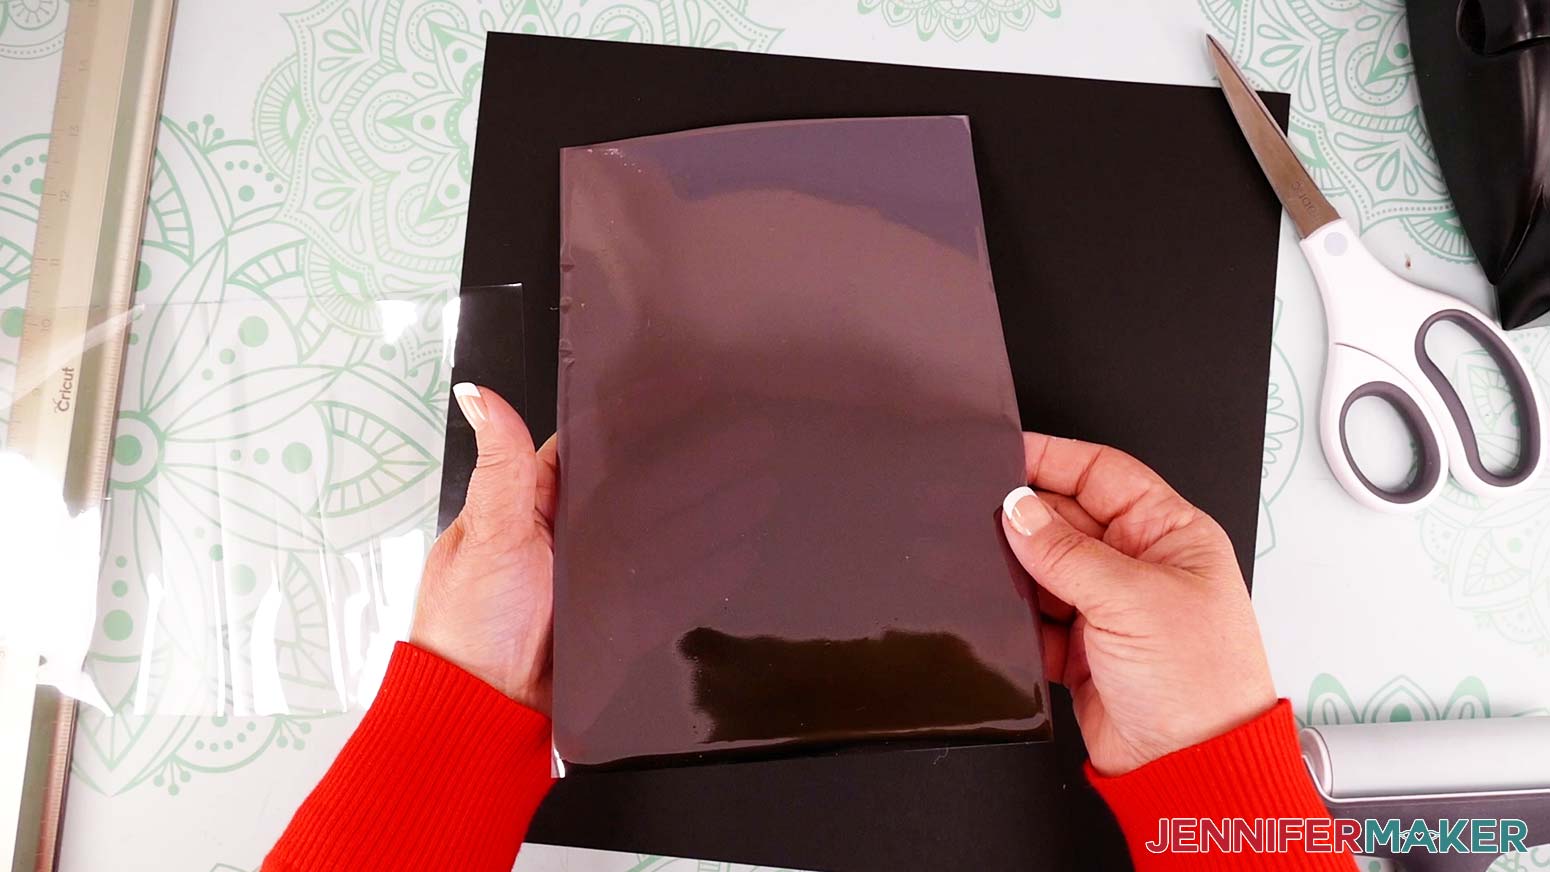
After the window film piece is completely adhered to the polycarbonate piece, use your brayer to smooth out the film and remove any air bubbles. Use firm pressure to get out as many bubbles as possible.
After you've removed the majority of the air bubbles, you can trim away the excess film around the edges with scissors.
Remove the protective film from the other side of the polycarbonate, and your one-way mirror is now ready!
You can either attach the mirror to the inside of your box now or wait until after you've added some of your decorations.
NOTE: If you have many decorations that are small or will be difficult to position inside your box, I suggest you wait to attach your mirror until after you've added some of them. If your decorations will be very simple, or you want to make an infinity mirror with just lights and no decorations, you can attach the mirror now.
Figure out which side of your mirror should be the front. Look at your mirror from both sides. The one with less reflection will be the front. If you used the same window film as I did, the front should be the side with the window film attached.
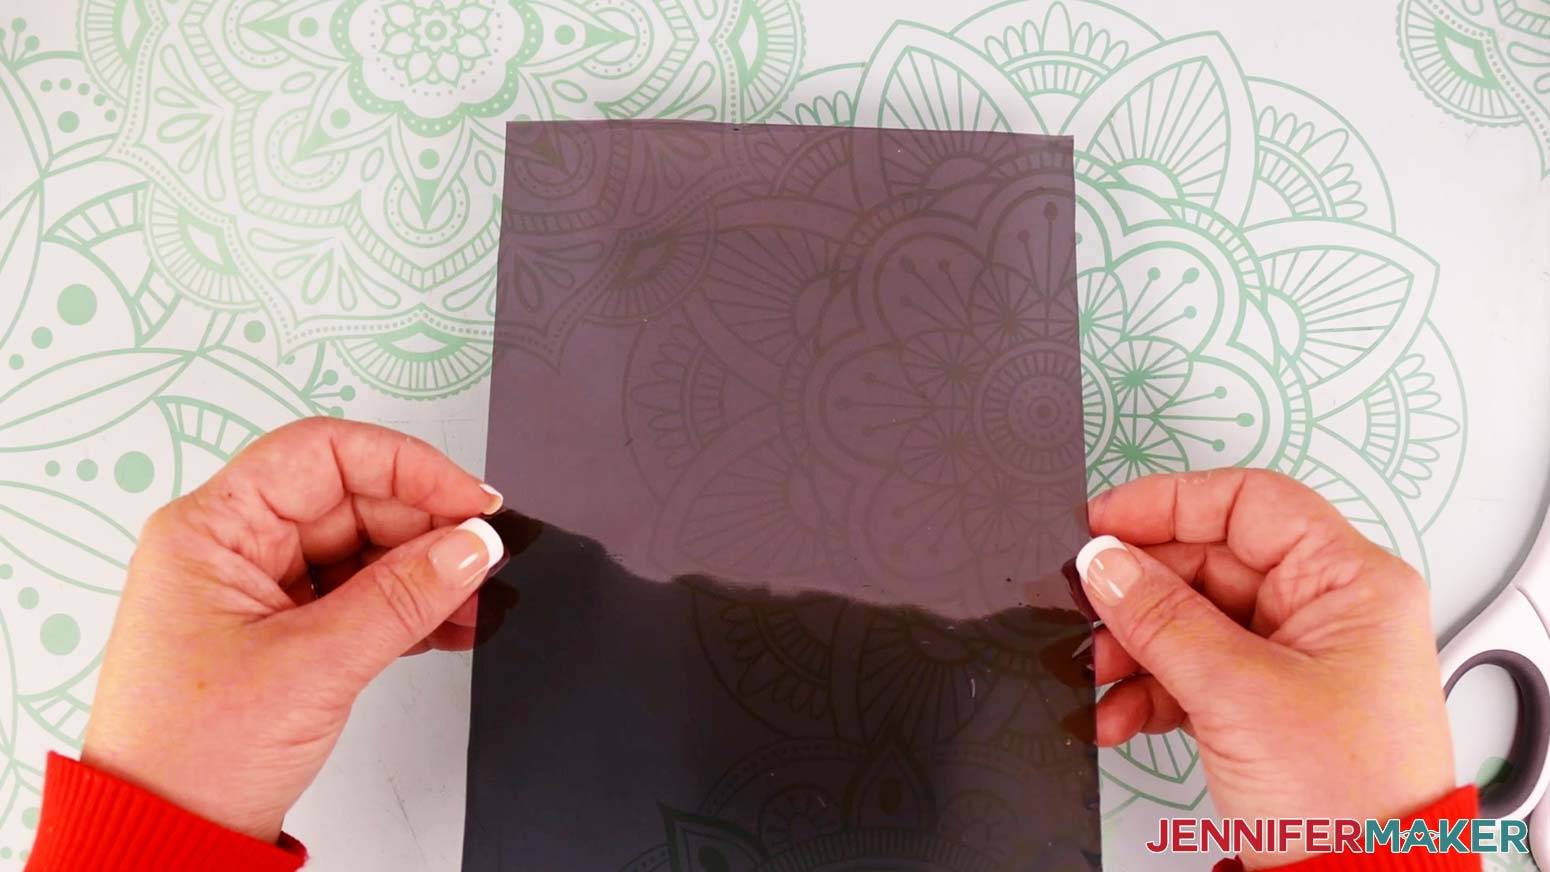
Figure out where you want to position your mirror inside the box. I don't suggest placing the mirror on the very front of your box because that will make it harder to see inside. Any light shining on the mirror from the outside will cause a reflection, which will interfere with your ability to see through the mirror to the decorations inside your book nook.
If you place the mirror further back in the box, the top panel (once attached) will help to shield the mirror from some of the light in the room and cut down on the reflection. I placed my mirror about one-third of the way back from the front of my box.
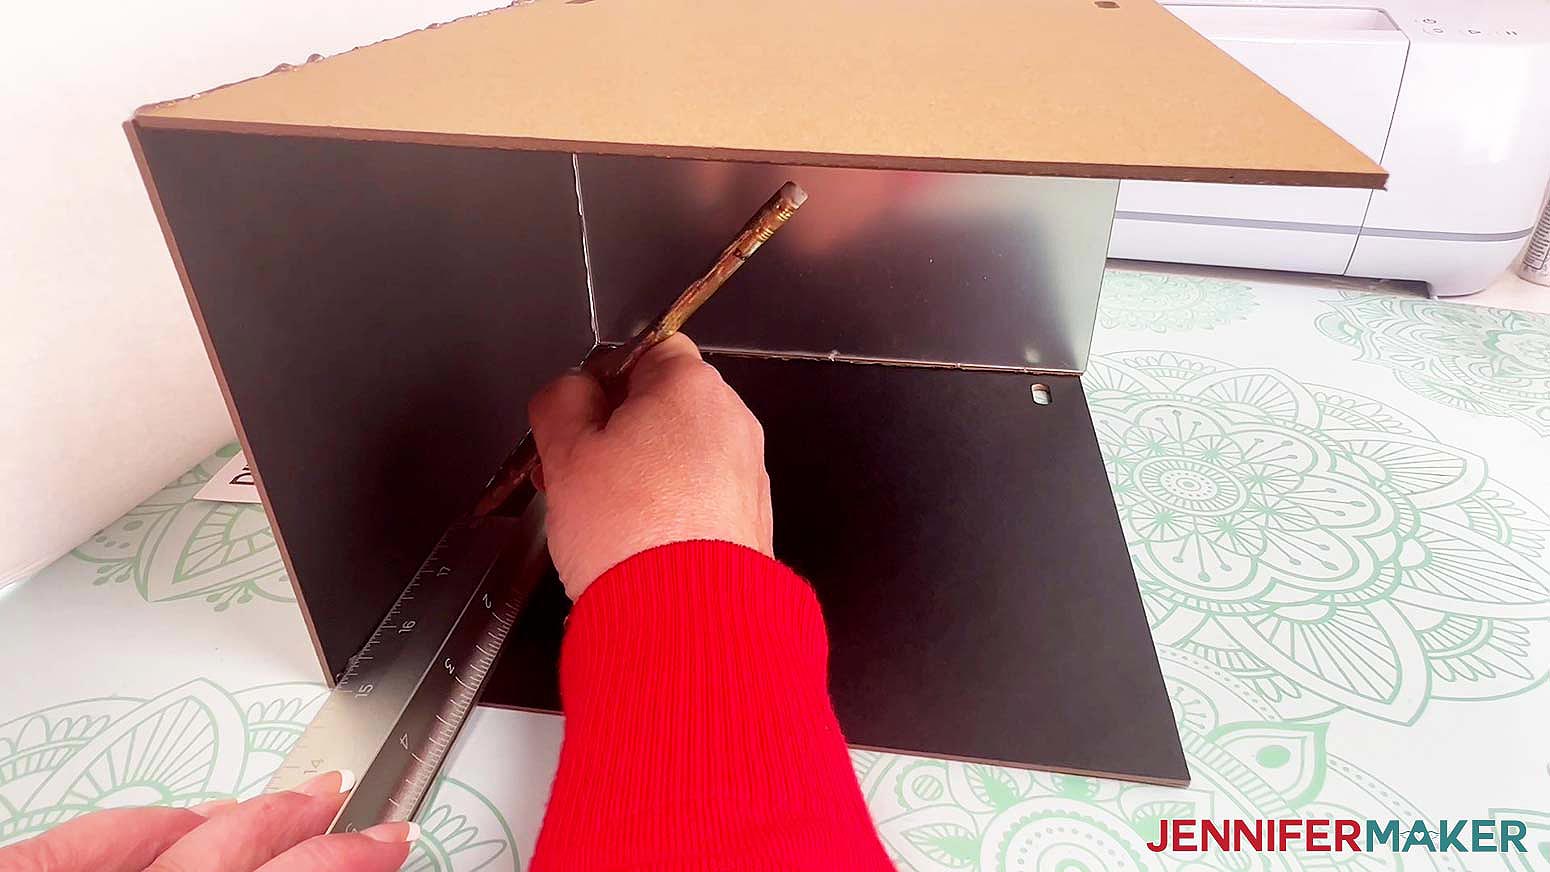
If you need to, measure the distance with a ruler and mark your desired mirror placement with straight lines drawn along the bottom, left, and right sides of your box on the inside.Make sure to measure in from both sides of each panel and connect those points with a straight line. In my case, I used my ruler to mark 3" from the outer edge of each panel.
ADD THE DECORATIONS
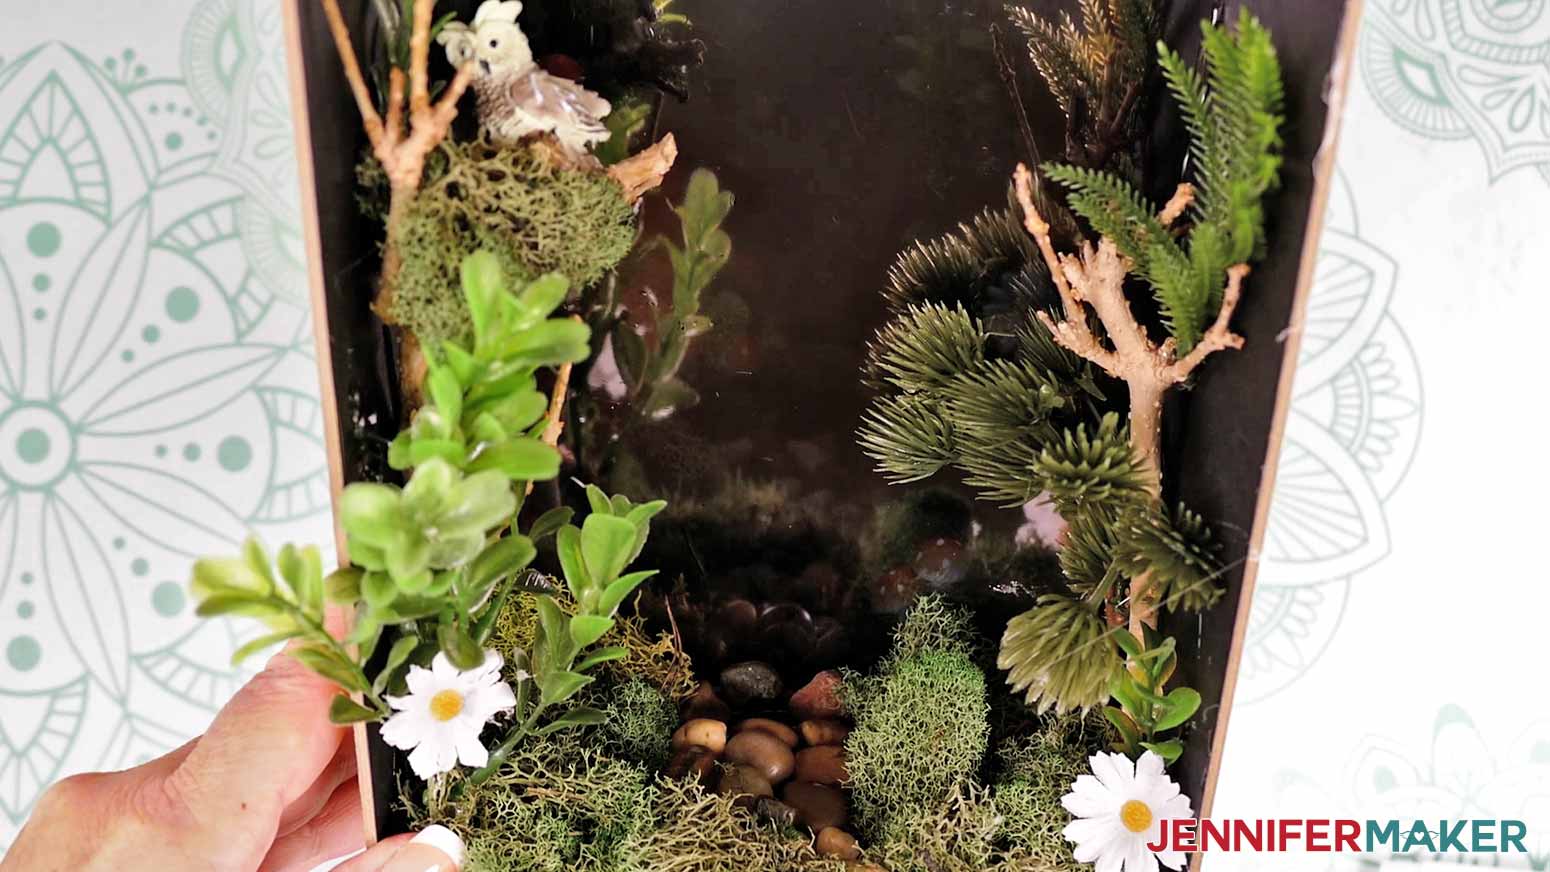
Now for my favorite part -- the decorations! There are so many themes and miniatures you can use to decorate the inside of your DIY book nook -- the possibilities are endless! I'm going to demonstrate just one way to decorate your box with an enchanted forest theme, but feel free to decorate yours however you like.
If you're not adding any decorations inside your box, you can skip this step and add the lights, one-way mirror, and top panel to finish your infinity mirror book nook.
To create an enchanted forest book nook similar to mine, you'll need several sticks or branches slightly shorter than 9" in length for the tree bases, some small river rocks for the "infinite" path, two different types of moss (one with a brown hue for the ground and one with a green hue for the trees), a variety of floral stems and picks for the tree branches and ground cover (I used some pine tree floral stems for the trees and some fern, greenery, and daisy floral stems for the ground cover).
You'll also need some miniature figures to add a pop of color and visual interest to your scene. I used some micro-sized bird figures, a miniature owl, and some mushroom miniatures.
You can attach everything with hot glue. Just be sure to use your hot glue finger caps so you don't burn yourself when handling and attaching the small items.
NOTE: If you're making the infinity mirror version of the book nook and haven't attached the one-way mirror inside your box yet, make sure to figure out where you're going to place the mirror and mark that spot with lines on each panel before you begin. Make sure none of your decorations extend across those lines or you won't be able to insert your mirror later.
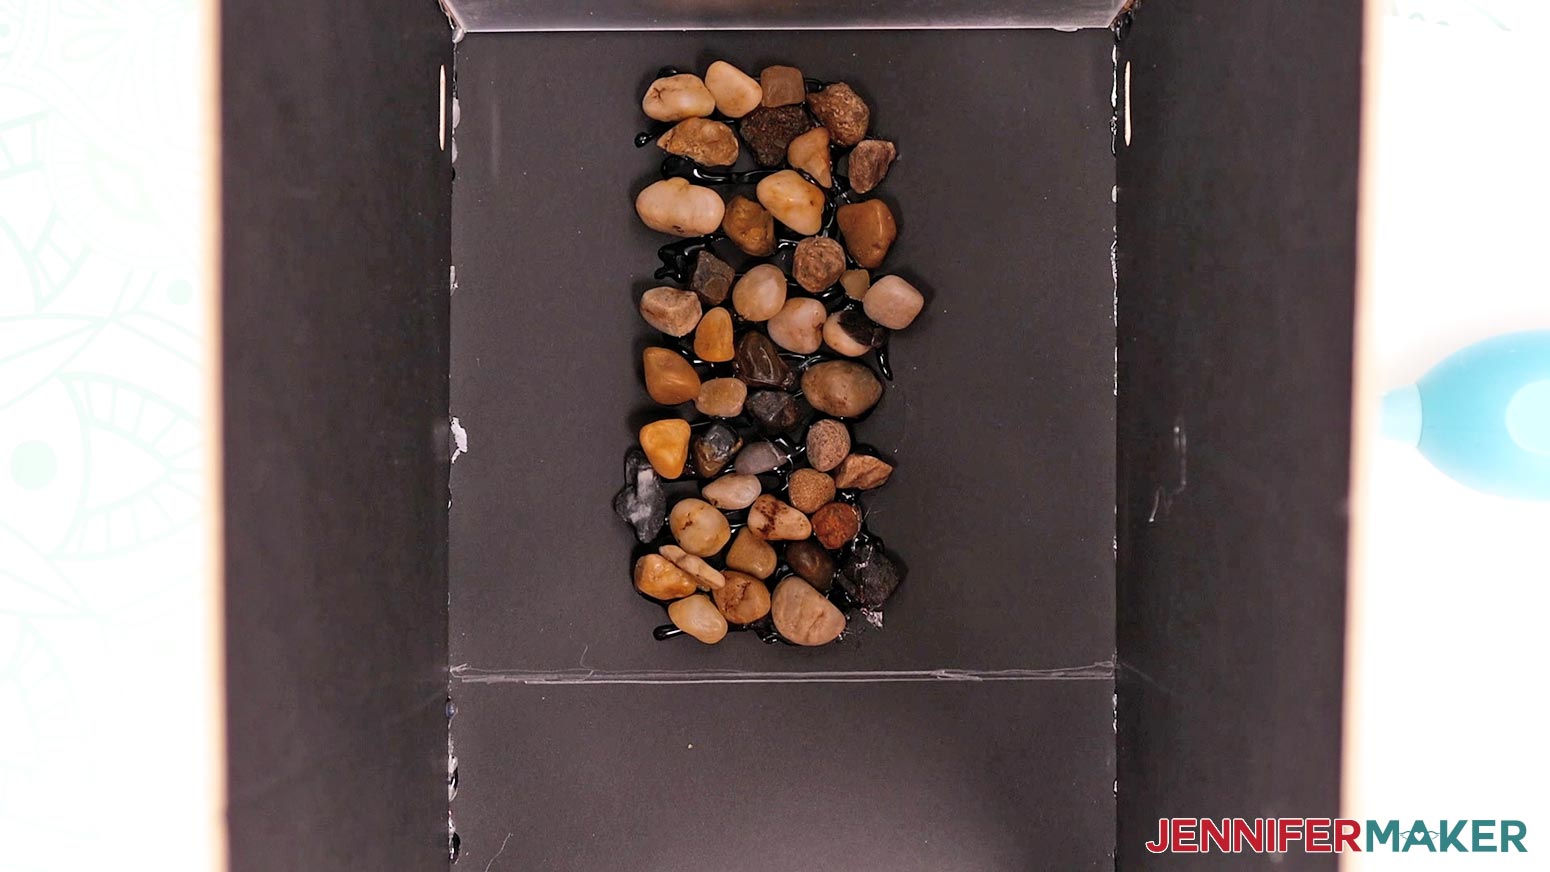
I glued the river rocks in the center of my bottom panel first, making a fairly straight path.
Then I glued the bottom of my branches and sticks along the left and right sides to create a forest of trees on either side of the path.
After that, I cut small sections off of the pine tree floral stems using wire cutters. I placed those behind the branches using hot glue to attach them to the ground and branches.
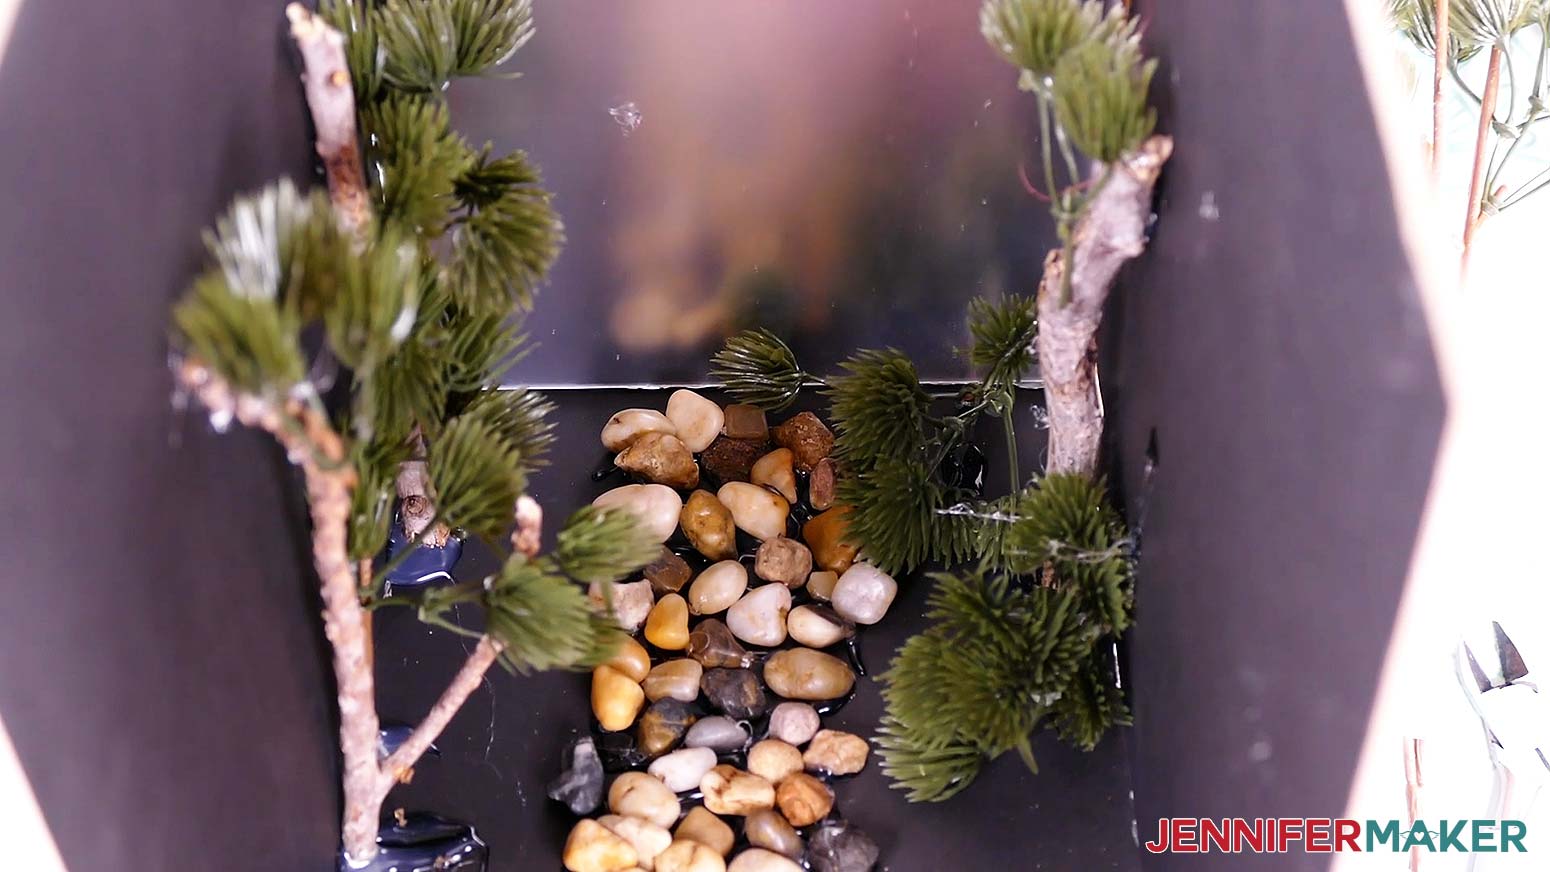
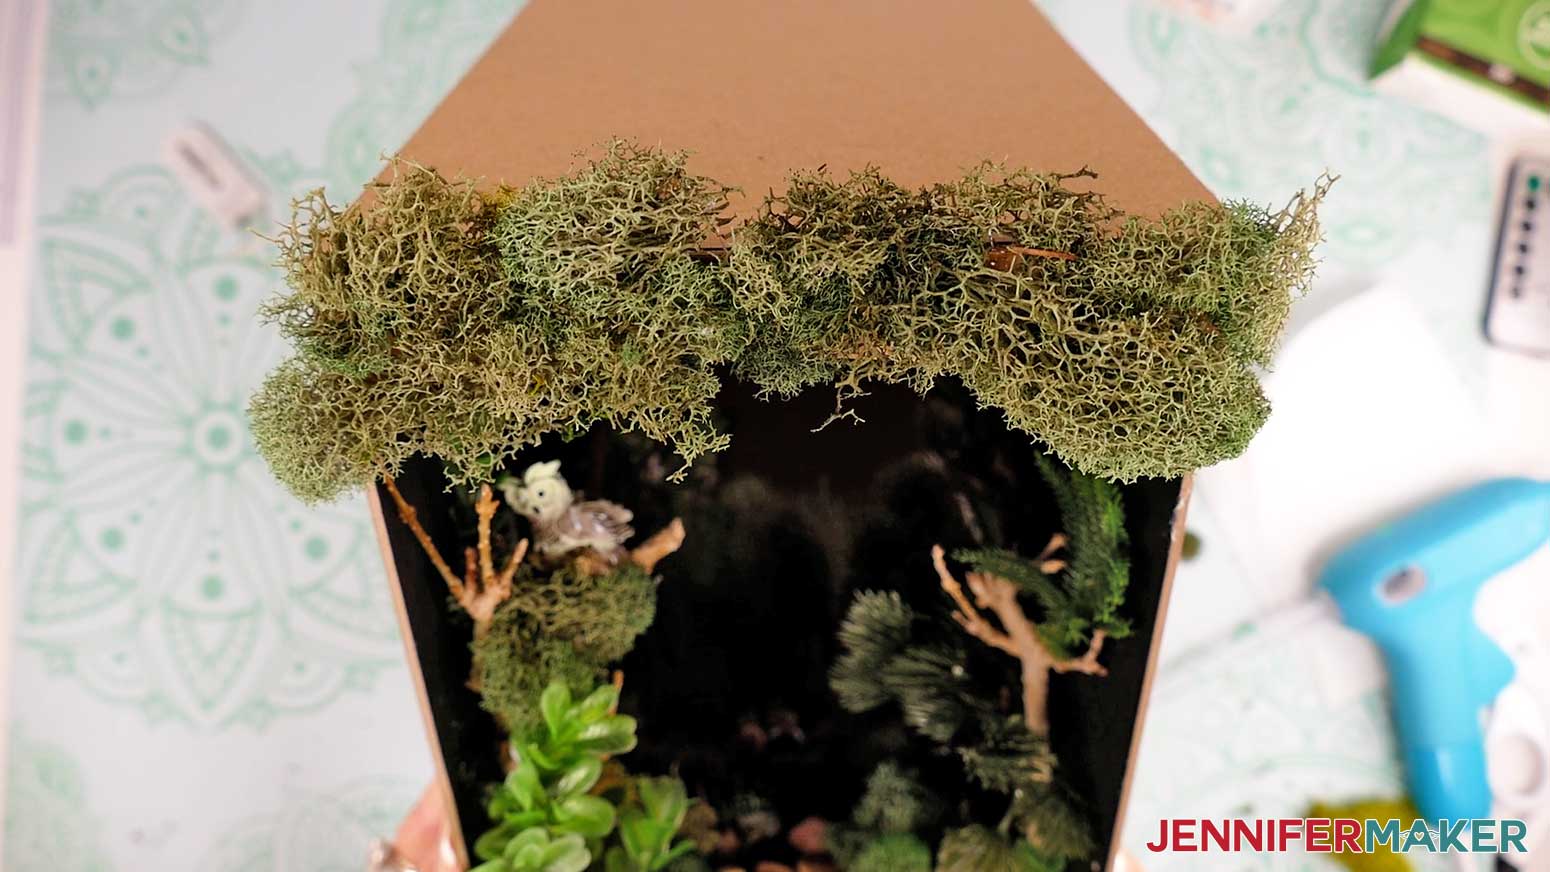
Then I hot glued moss in between the rocks on the ground and on top of the branches and stems of the "trees." I also added some "ground" moss along the bottom panel to cover any bare spots and prevent the liner paper from showing through.

Next, I added the ground cover. I cut some pieces of fern and some daisies off of the fern and daisy floral stems using wire cutters. I used hot glue to place those along the ground in between the trees to fill the empty spaces. I also glued some pieces from the greenery floral pick here and there for added texture.
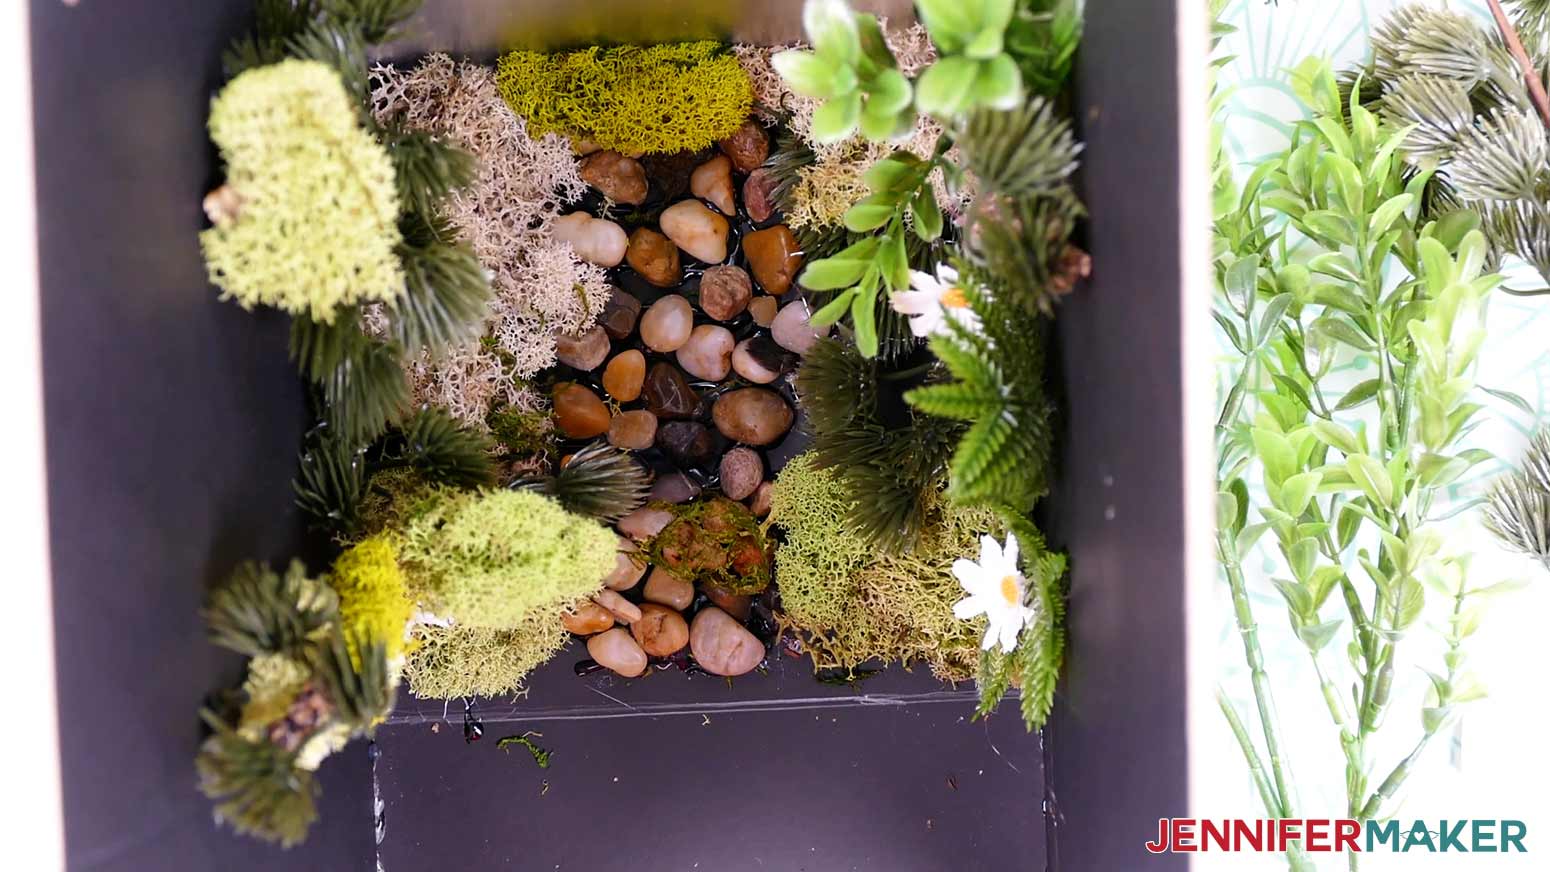
Lastly, I hot glued the birds in the trees and the mushrooms on the ground where I thought they looked best and were easy to see. If you're making an infinity mirror version of your scene, pay attention to the placement of your miniatures and note how they'll look when repeated infinitely.
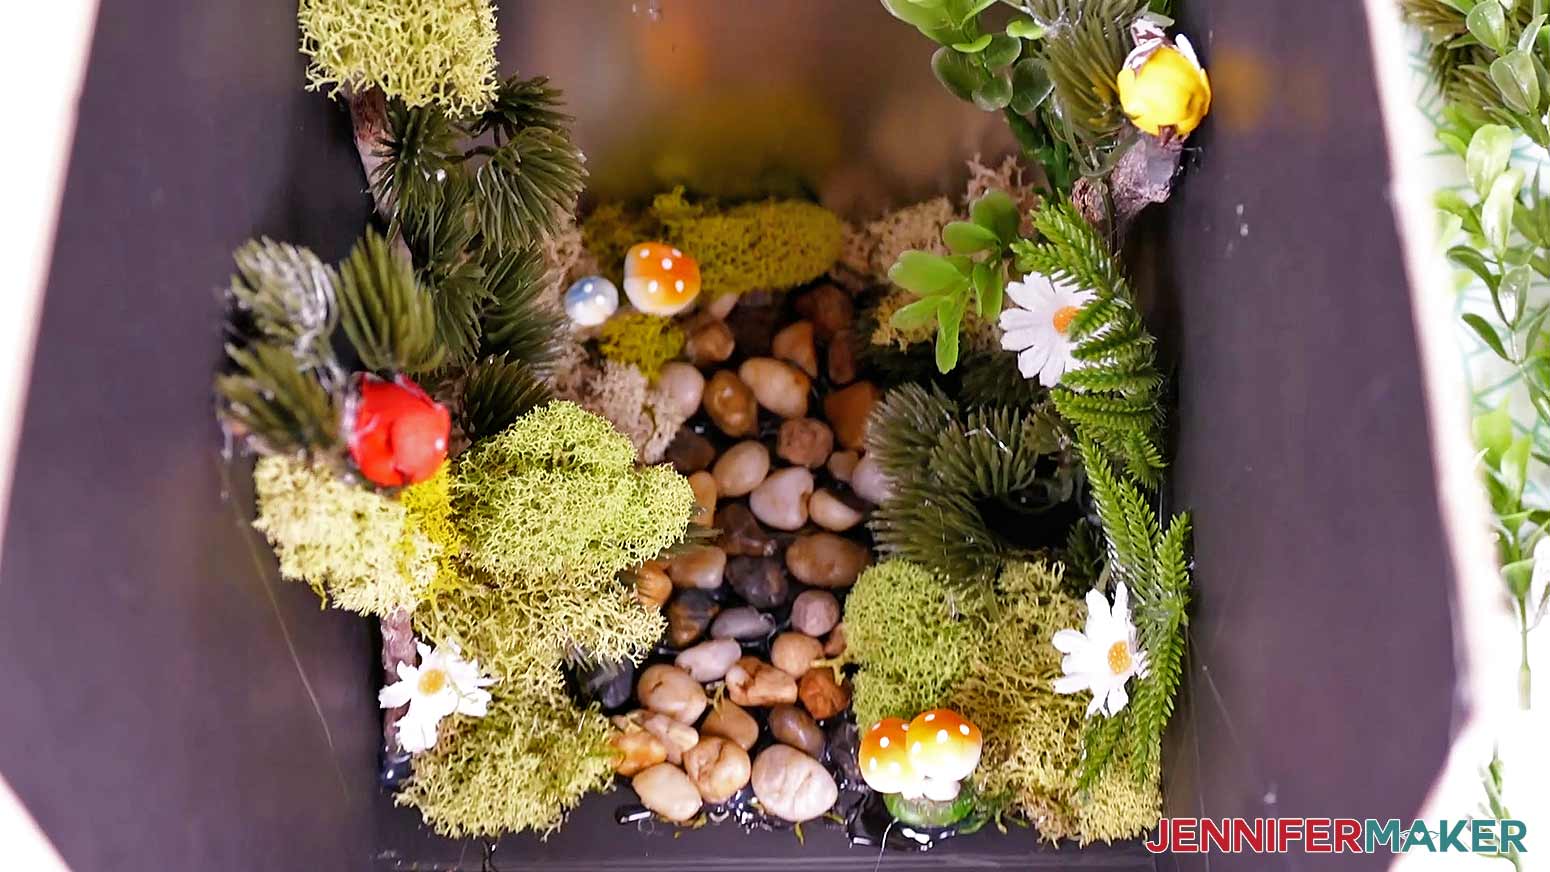
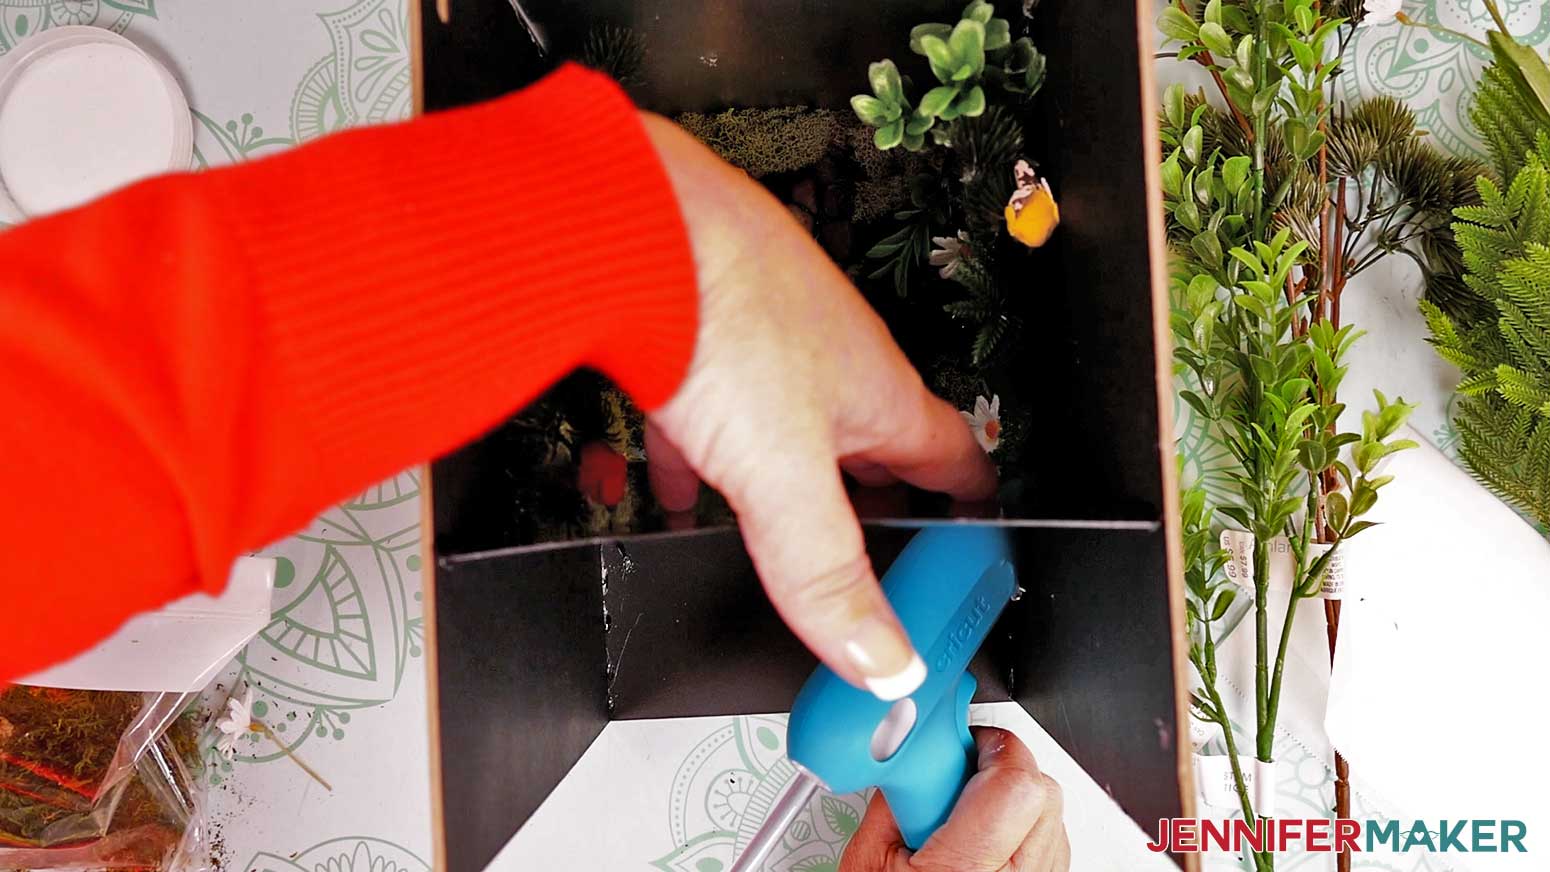
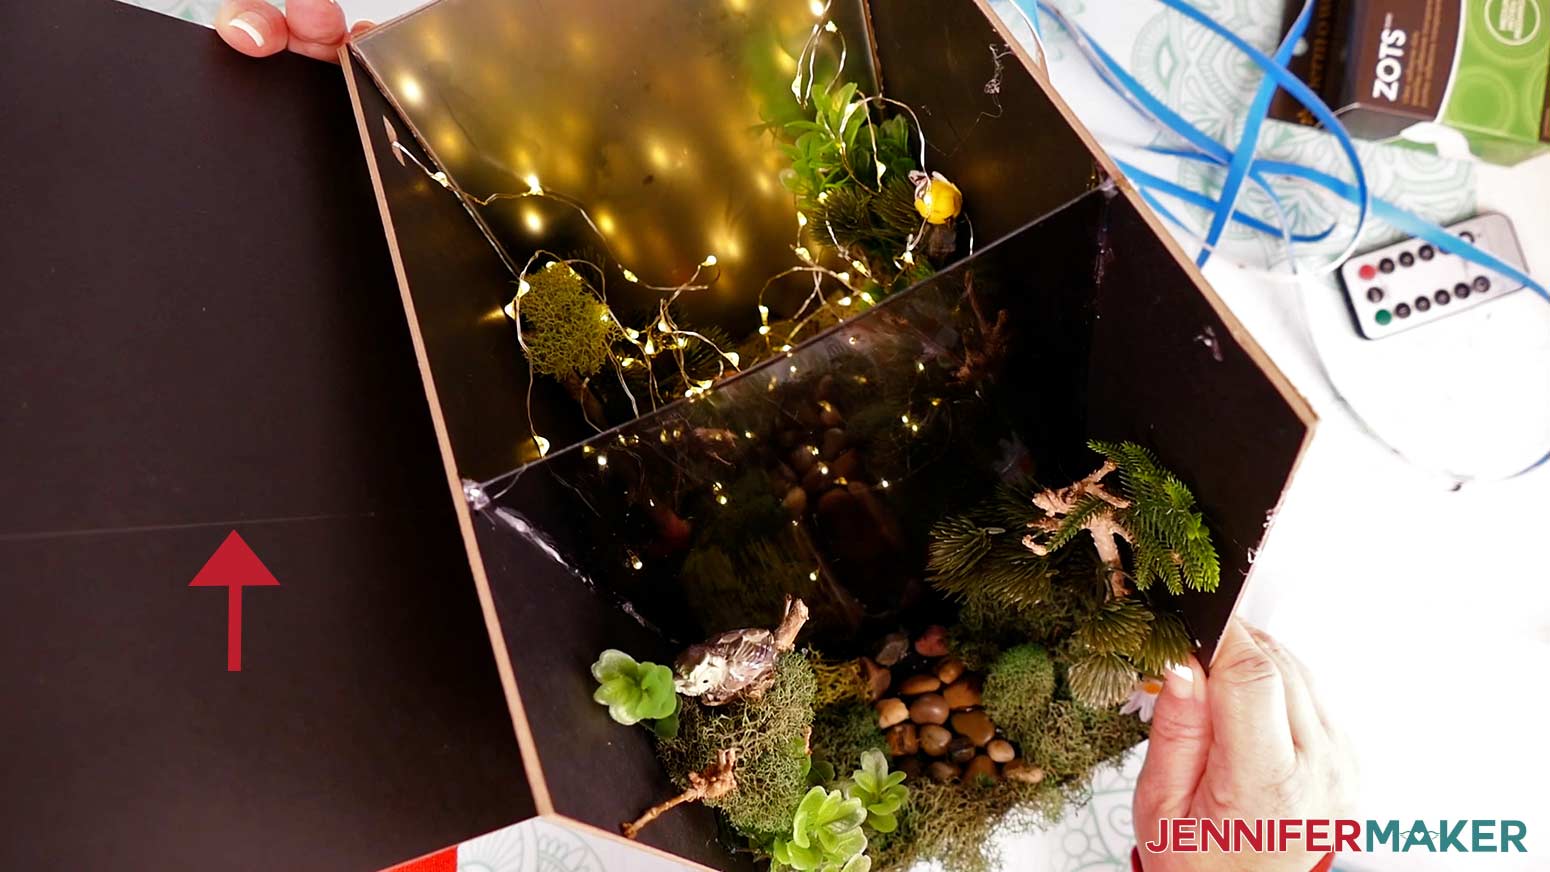
After you've placed all your decorations inside the back section of your book nook, you can attach the one-way mirror you prepared earlier.
Apply a thin line of glue along the line you drew on the bottom panel of your box. Insert your one-way mirror into the box from the top and press the bottom edge into the hot glue to attach it. Make sure the front of your mirror is facing outward.
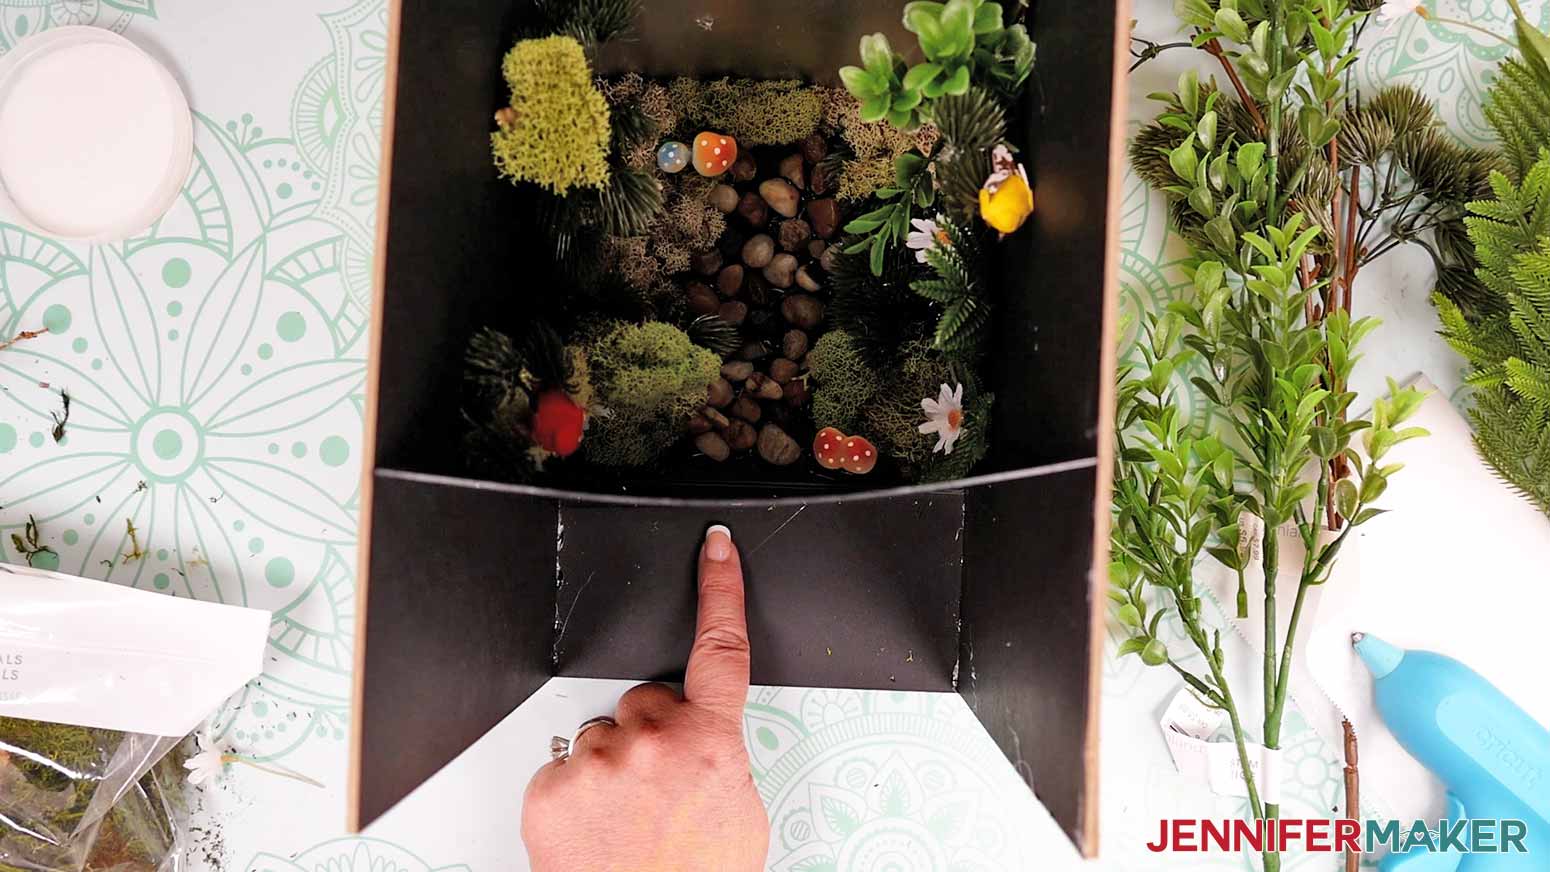
Once the glue dries, apply another line of glue along the left edge of the mirror where it meets the left side panel. Use the line you drew earlier as a guide to keep the mirror straight. Once that side dries, do the same thing on the right side, using your other line as a guide. To keep your mirror from warping and prevent that "fun house" effect, try not to bend your mirror while the glue is drying.
Now the other half of your infinity mirror is ready!
After your mirror is in place, you can finish adding decorations in front of it.
If you have any gaps where your mirror doesn't quite touch the side or bottom of the box, you can add moss to cover those areas.
ADD THE LIGHTS, BOX TOP, AND FINISHING TOUCHES
Now you can add the lights inside your book nook box! The brighter the light coming from inside your box, the easier it will be to see inside, and the more prominent the infinity mirror effect will be. For this reason, I'm going to use LED strip lights and several strands of fairy lights inside my box.
Grab your lights and turn them on to make sure they work. If you're using the LED strip lights from my materials list, you'll need to correctly insert three AA batteries and use the button on the battery pack or the included remote to turn them on. If you're using the fairy lights, you might have to remove a battery protector tab first.
If you made an enchanted forest book nook like I did, you can weave the fairy lights through the "trees" to make it look like fairies or fireflies are flying around. I used four strands of fairy lights and inserted one through each of the four oval-shaped cutouts on the sides. Just insert the free end of one of the strands through a cutout and pull it through until you get to the end of the lights where the cord begins.
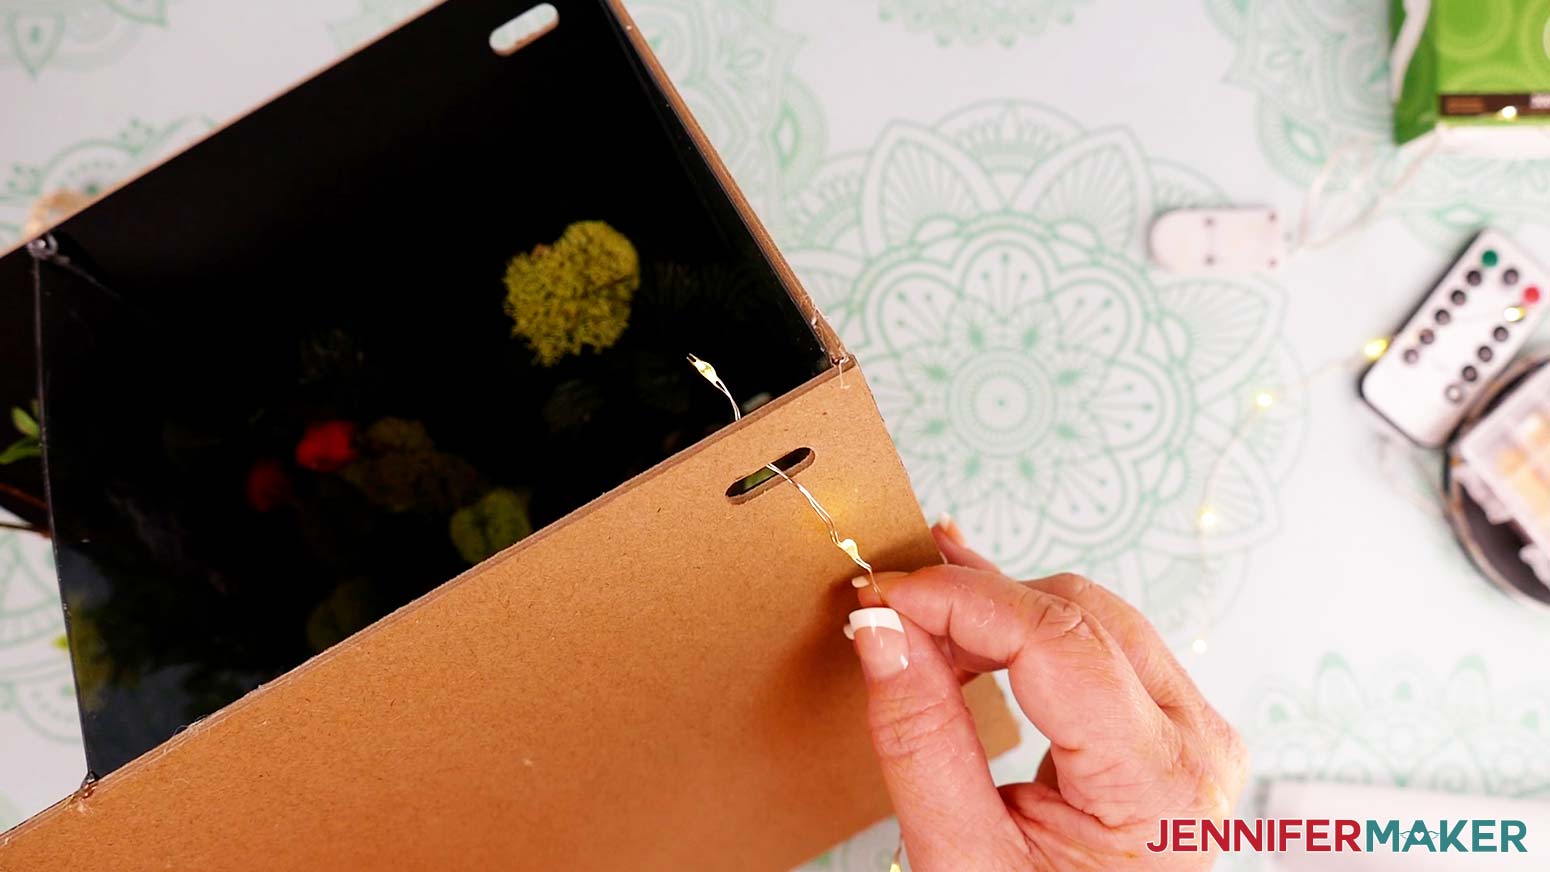
Leave the cord and battery pack on the outside of the box. We'll tape the cord down and attach the battery pack to the top of the box after we've added the top panel. Weave the lights inside the box in front of and behind your branches and plants.
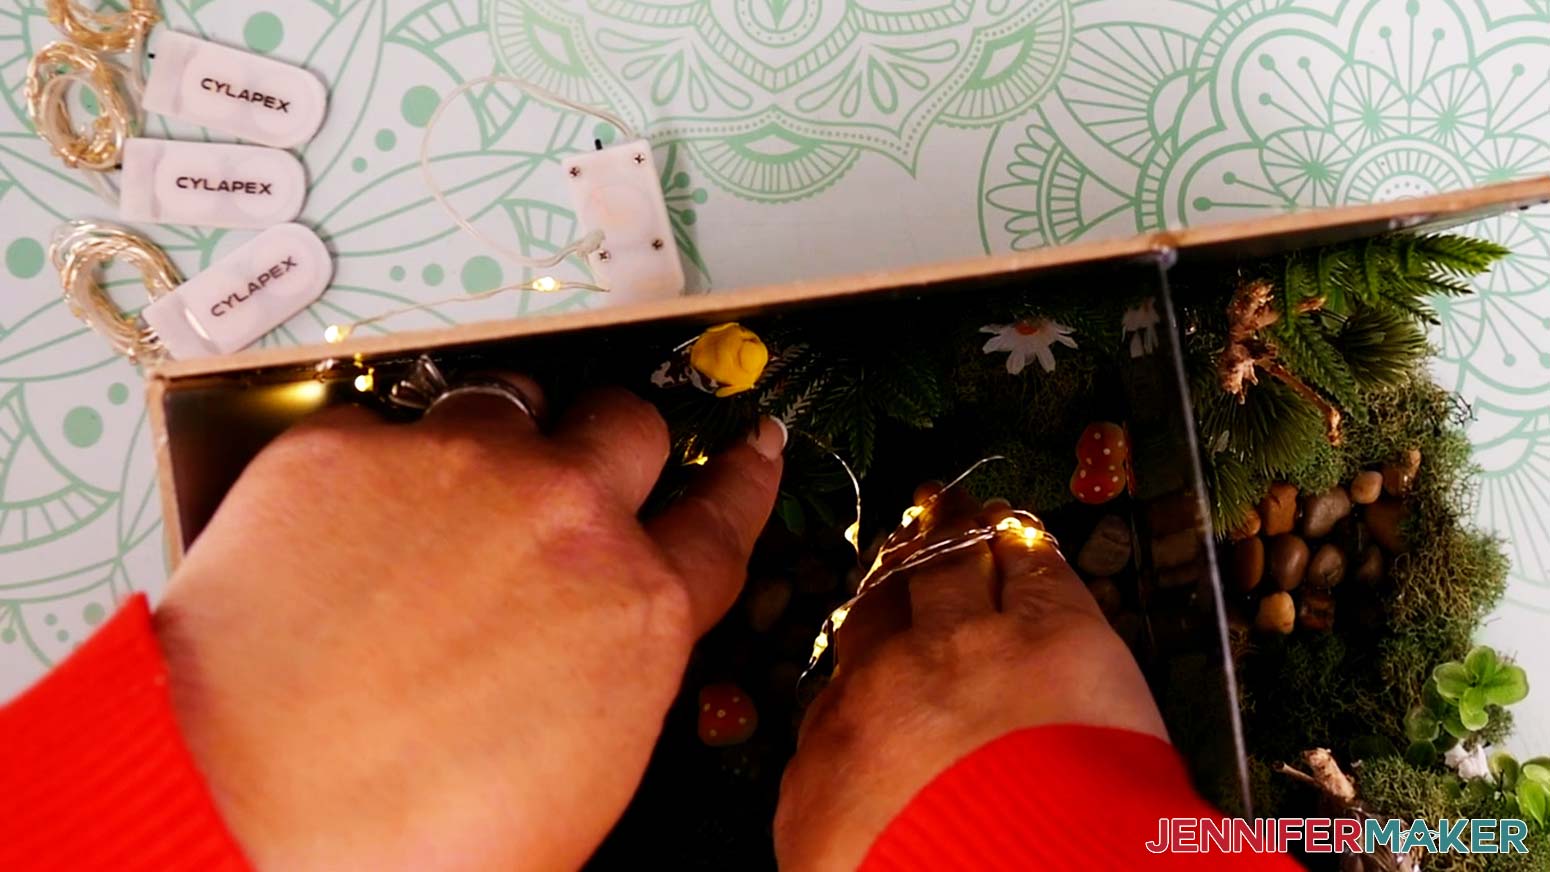
When you're happy with the placement, insert the next strand on that side to fill in the remaining blank areas within the trees. Do the same thing on the other side of the box. When you're finished, your scene should look similar to mine.
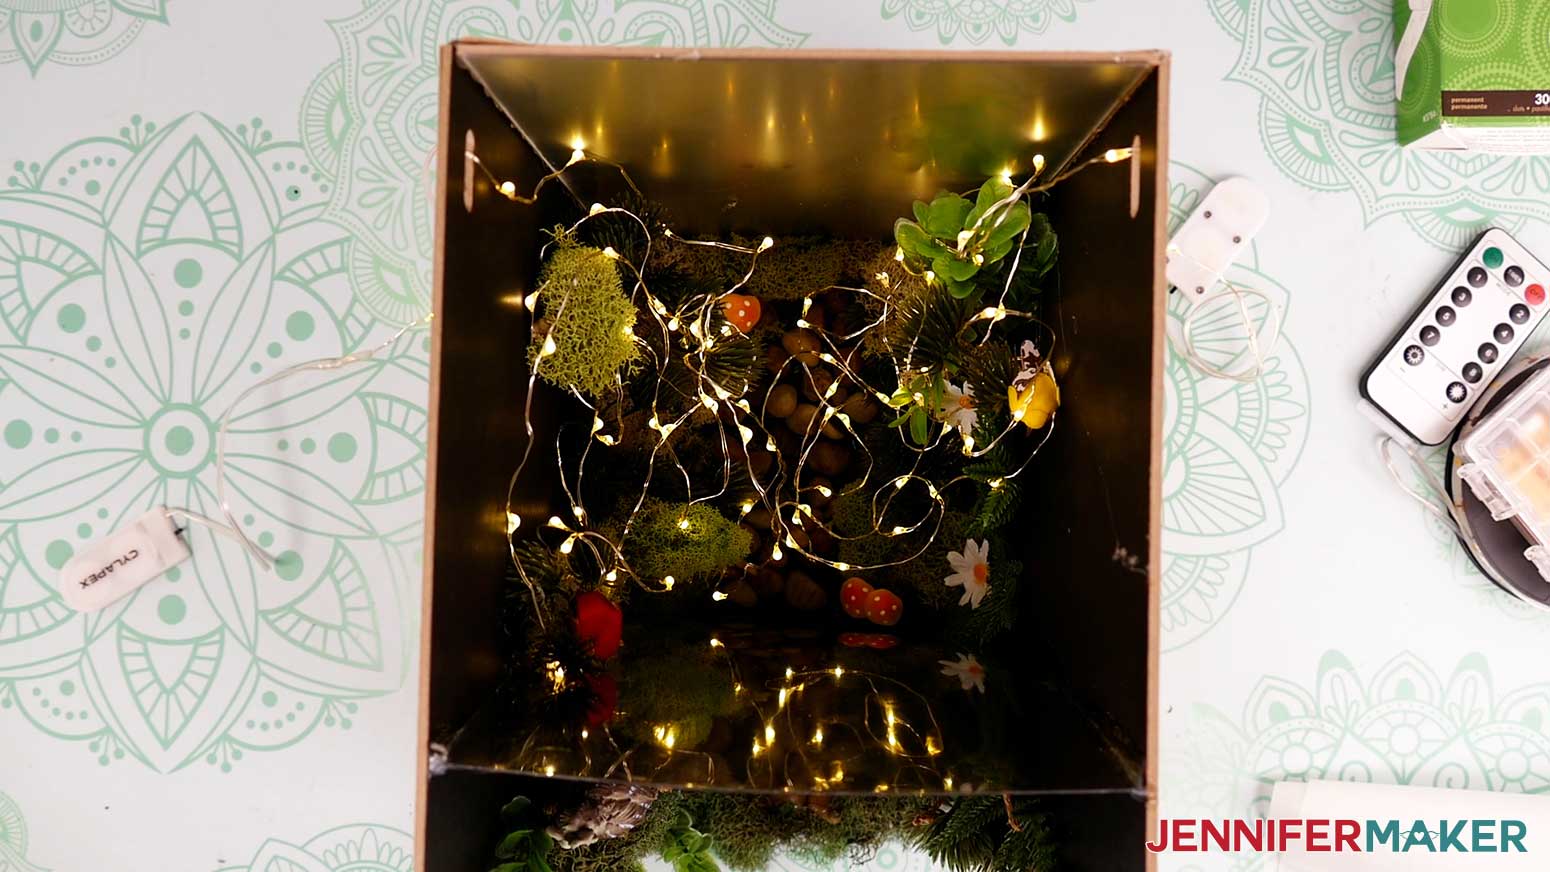
NOTE: If you didn't make an enchanted forest and don't have a way to weave your fairy lights inside your box, you can attach them to the inside of the box with glue dots. The same ones you'll use to attach the battery packs will also work to attach the lights.
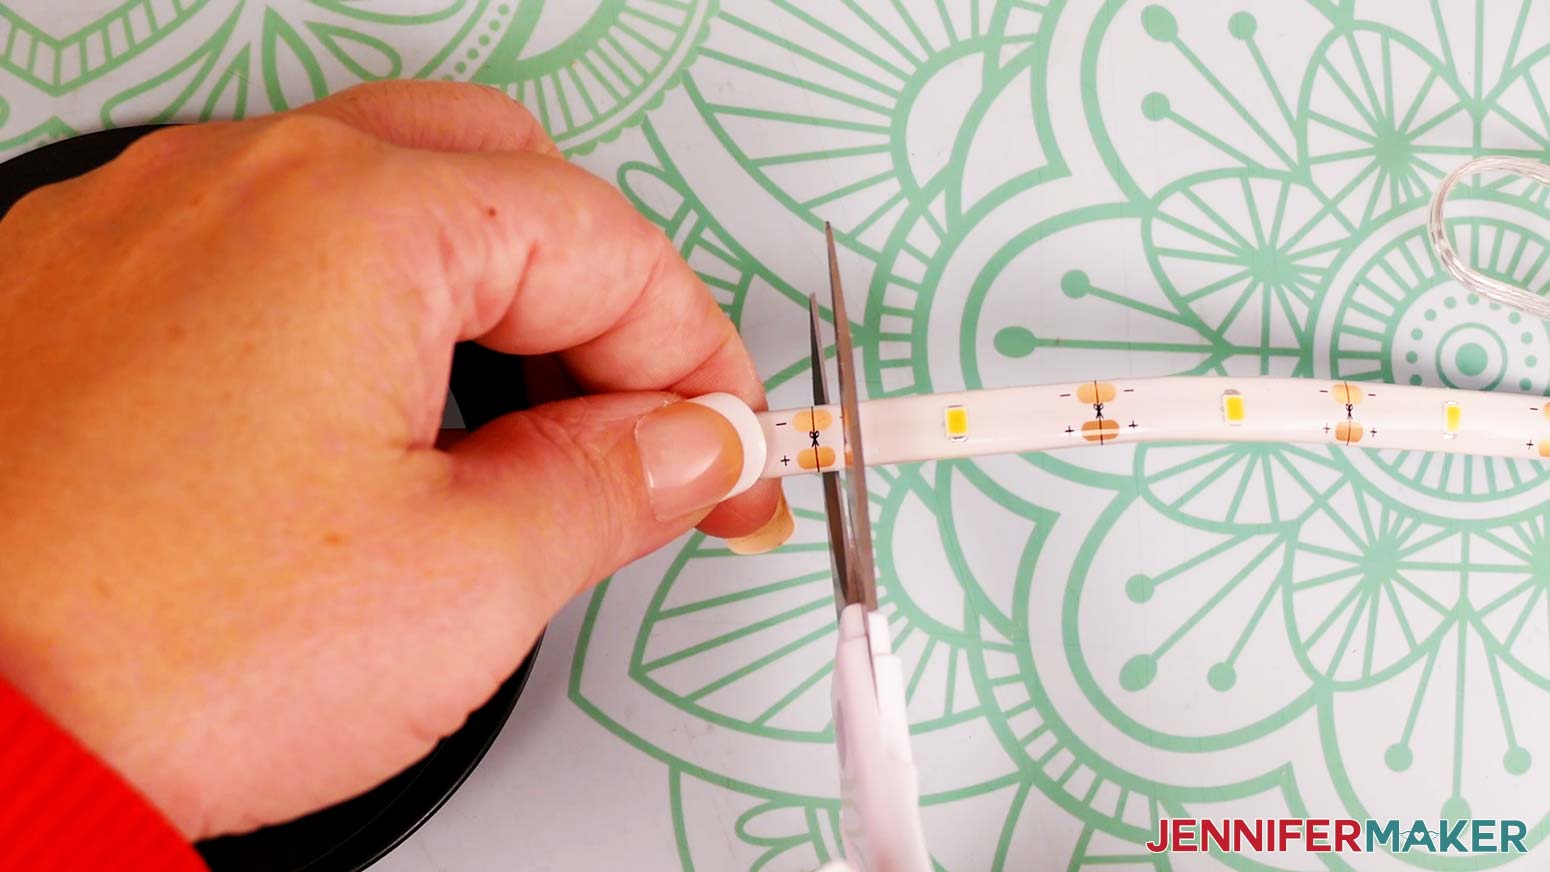
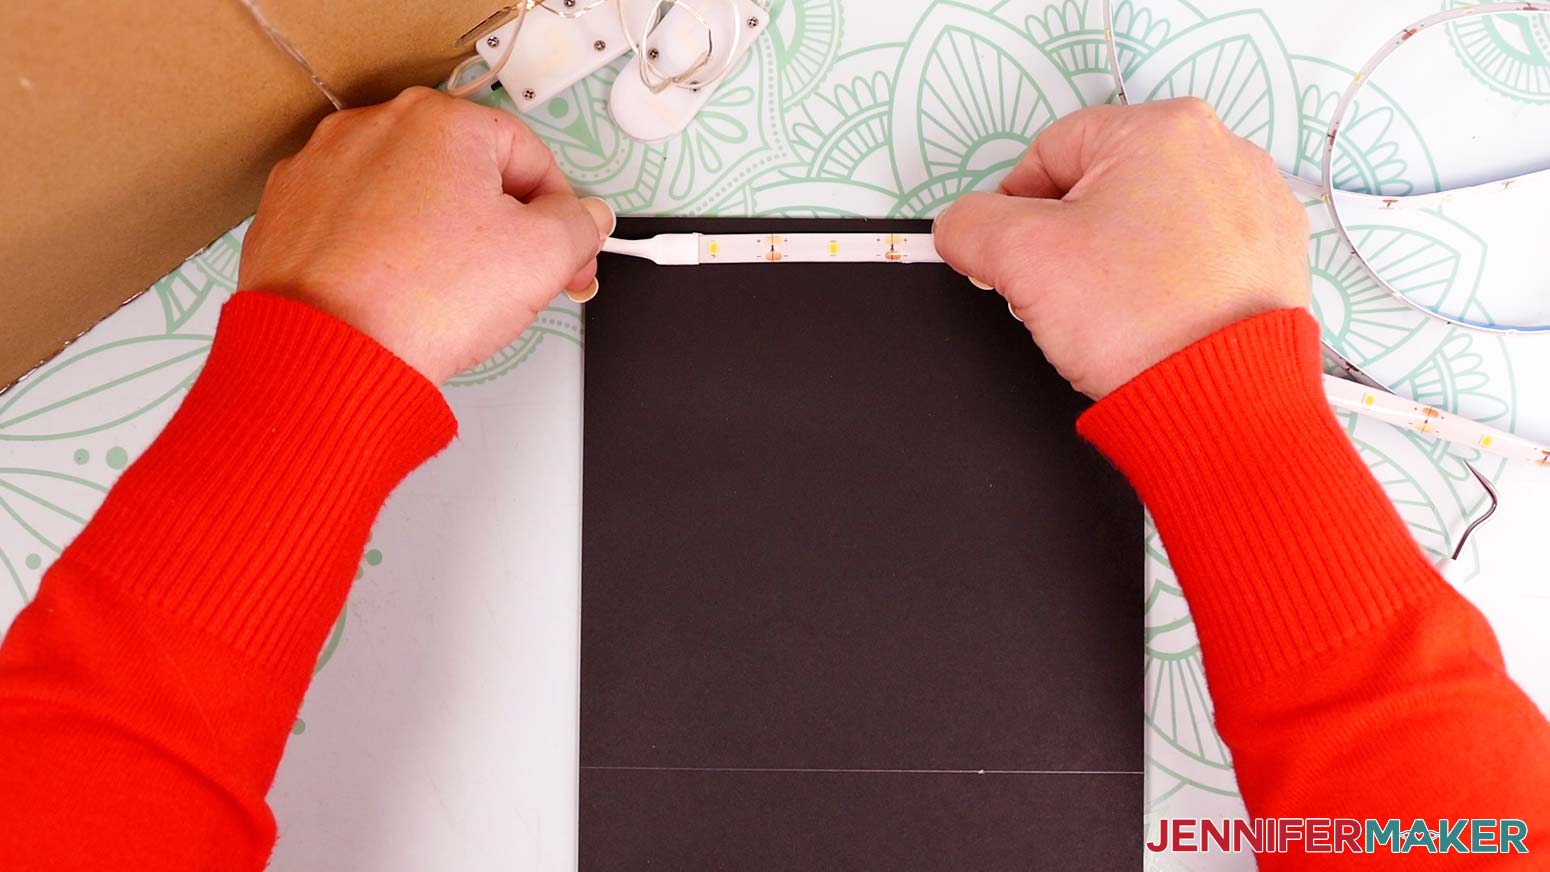
Now you can attach the strip lights to the top panel of your box. We need to insert the lights through one of the cutouts before we begin attaching them. Since the lights come on a roll and the battery pack is too big to push through a cutout, we'll first need to remove the lights from the roll by cutting them at the end.
Unroll the lights until you get to the very end where they're attached to the roll. Find the closest spot on the light strip where it can be cut. This will be denoted by a small scissors icon with + and - symbols on both sides. Make sure your lights are off and use your scissors to cut the lights in this area.
Now insert the end you just cut through a cutout on your box. Use one of the cutouts at the top of the box.
Take the top panel of your box and place it flat in front of you with the inside facing up. Before attaching the lights, you'll need to mark the area that will be behind the one-way mirror inside the box. You don't want to put any lights in front of that mirror because it will make it difficult to attach the top panel and also make it harder to see inside the completed box.
Use a ruler and pen or pencil to draw a line on the top panel where the one-way mirror will be attached. Since I attached my mirror one-third of the way inside my box, I'll draw a line at 3" from the front edge of the panel. Place your panel onto your box with the inside facing down and make sure your line matches up with the top of the mirror. If it doesn't, just measure again and draw a new line.
Now that you have the area marked where your lights should be attached, you can start attaching them from the back of the panel at the end of the lights attached to the battery pack. Peel off just a bit of the plastic backing at that end of the lights to reveal the adhesive.
TIP: If you're having trouble getting the backing to release, try using your weeding tool to get it started.
Attach the exposed adhesive to the inside of your top panel along the back edge -- the short edge opposite the line you drew. Keep the lights about a quarter inch from the edges of the panel to leave enough room to attach the panel to the sides with hot glue later.
Run your lights in parallel sections adjacent to each other, winding them back and forth to make several short lines. When you get to the end of one line, you'll need to bend the lights and make a tight turn in the other direction, leaving a small loop at the end.
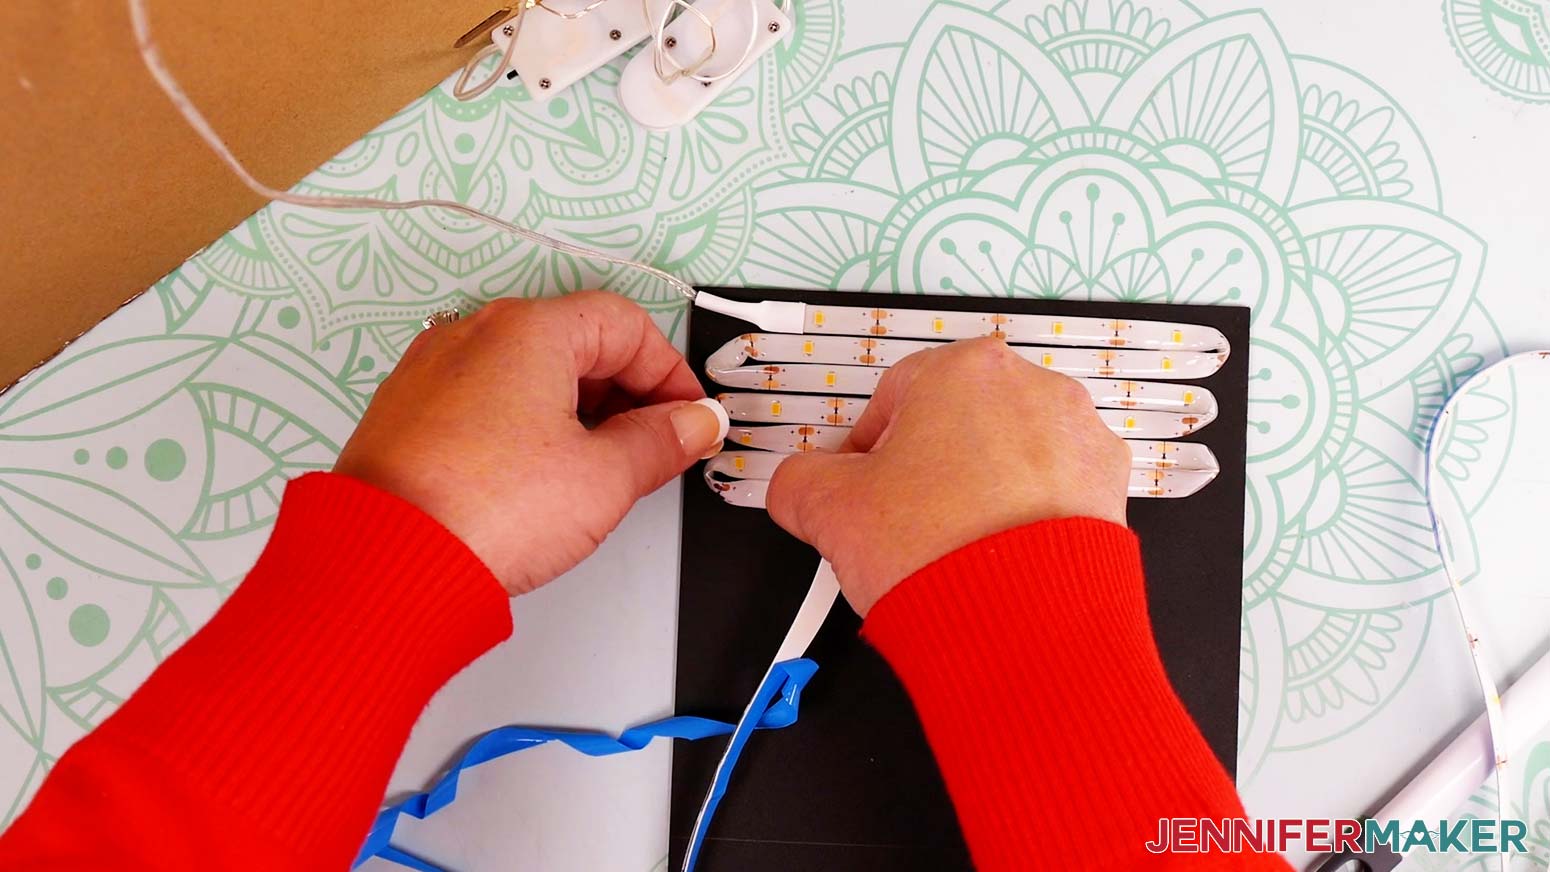
Continue peeling off the backing and attaching the lights in sections until you reach the line you drew on the top panel. Make sure to keep your lights at least a quarter inch from this line. Cut any excess lights from the strip at one of the spots marked with a scissors icon. Your lights should look similar to mine when you're finished.
Now we can attach the top panel (Piece B) to complete our book nook!
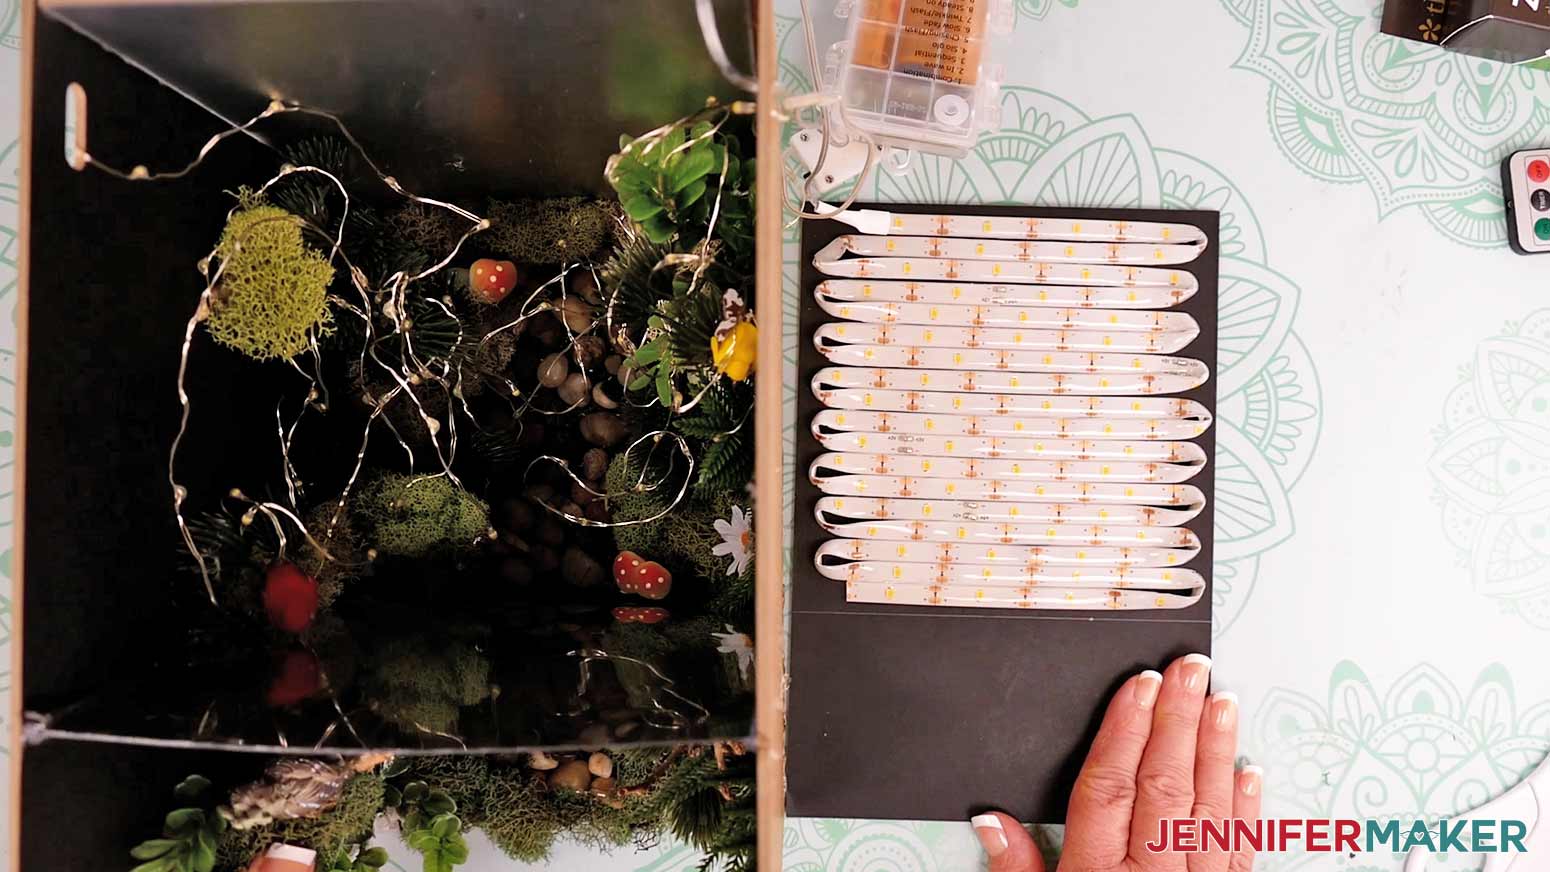
Turn on your lights and look at how your path or scene repeats in the mirrors. If you see any areas you don't like, such as a noticeable gap where the river rocks stop at the one-way mirror, make sure to fix those before you attach your top panel. I added some moss between the river rocks in front of and behind the one-way mirror to reduce the gap.
Don't forget to peel the protective film off your back mirror before attaching the top. Now is also a good time to clean both mirrors with rubbing alcohol and a soft cloth to remove any fingerprints, dirt, or residue.
Get your hot glue gun and finger caps ready. Make sure all your light cords and battery packs are outside the box and out of the way.
Apply hot glue along all three edges of the top of your assembled box. Attach the top panel so the strip lights are facing down, or inside the box. Make sure the edges of the top panel are aligned with the edges of your box sides before the glue dries. Press against the glued areas until they dry.
TIP: If you have trouble attaching all three edges at once, you can apply glue to just one section at a time. After attaching the first section (for example, the back edge), carefully insert the tip of your glue gun between the top and side panel to apply a line of glue along that edge. Once that glue dries, do the same thing to attach the top to the other side panel.
If you want to add the small arched piece (Piece E) to the front of your box, you can do that now. Just apply a thin line of hot glue around the outside edges of the back of Piece E and press it against the front of your box at the top to attach it.
You can even add decorations to your front panel like I did with some moss.
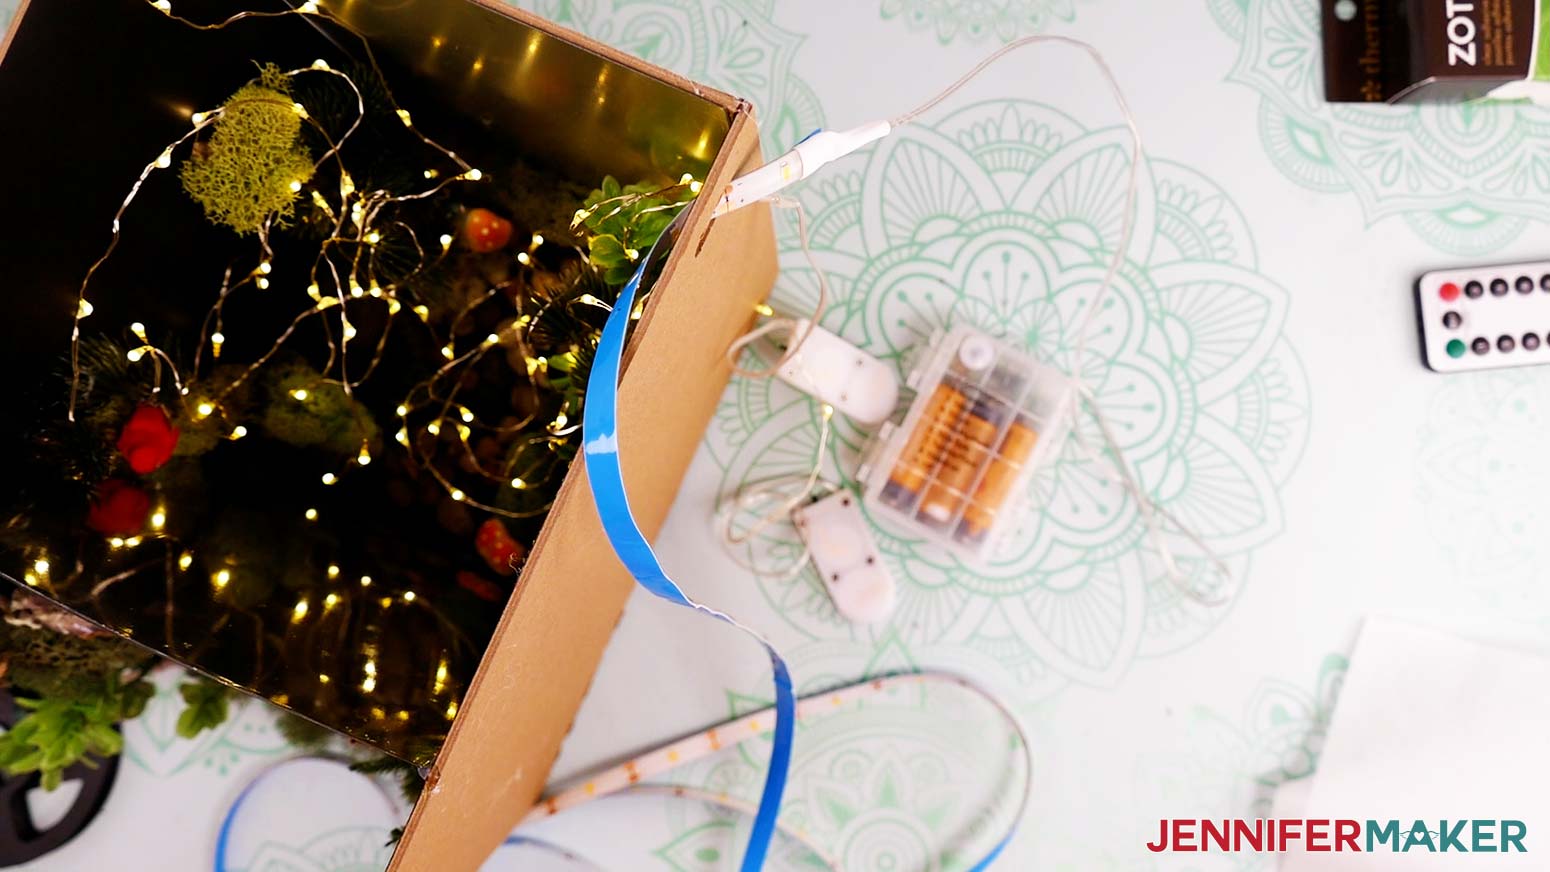
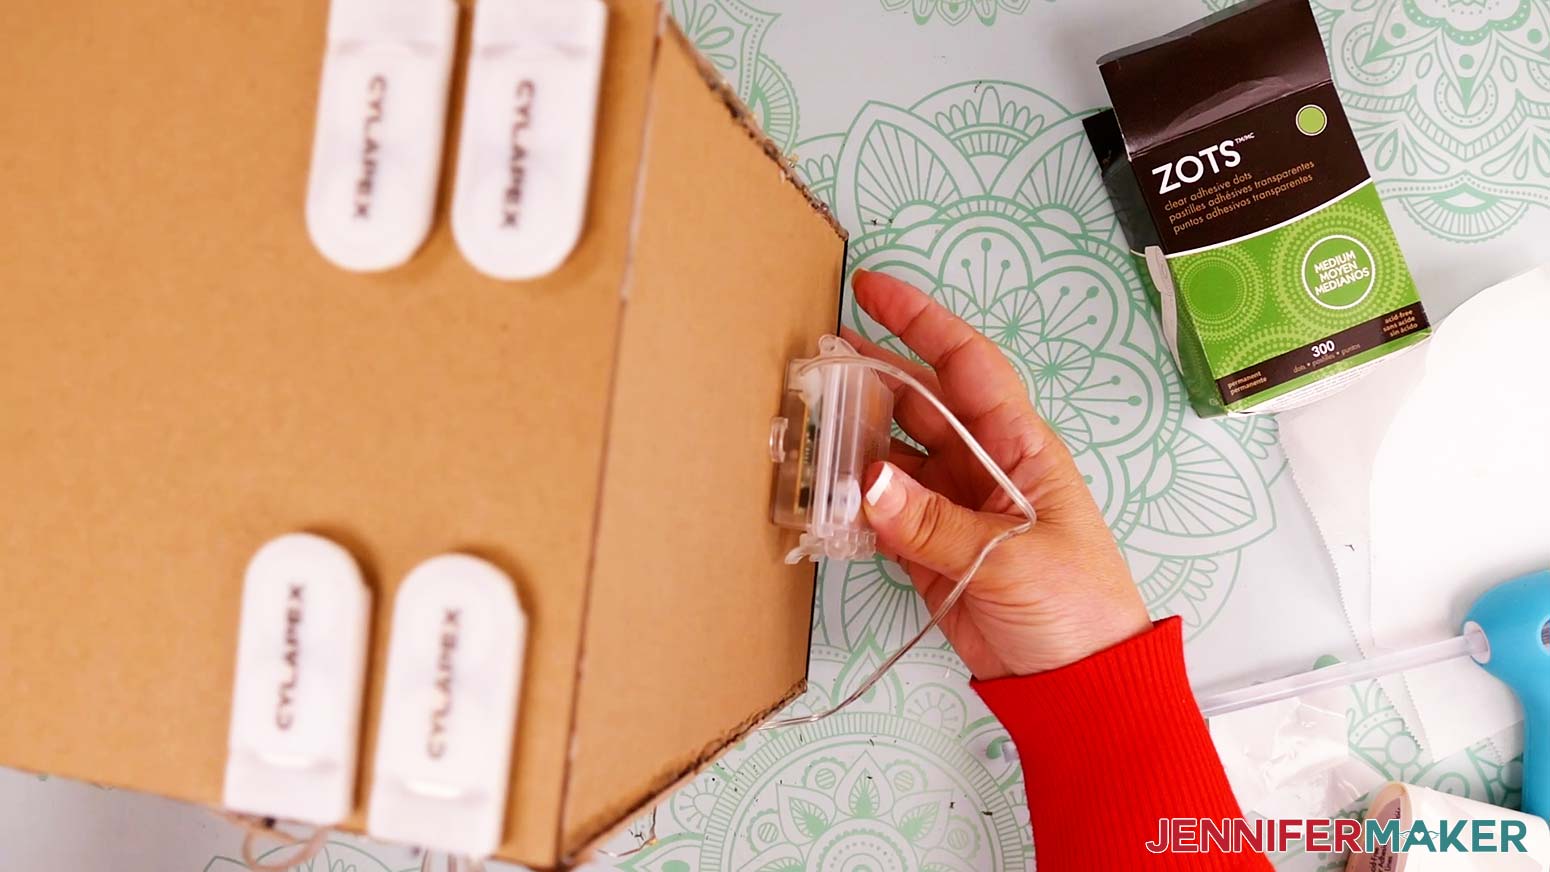
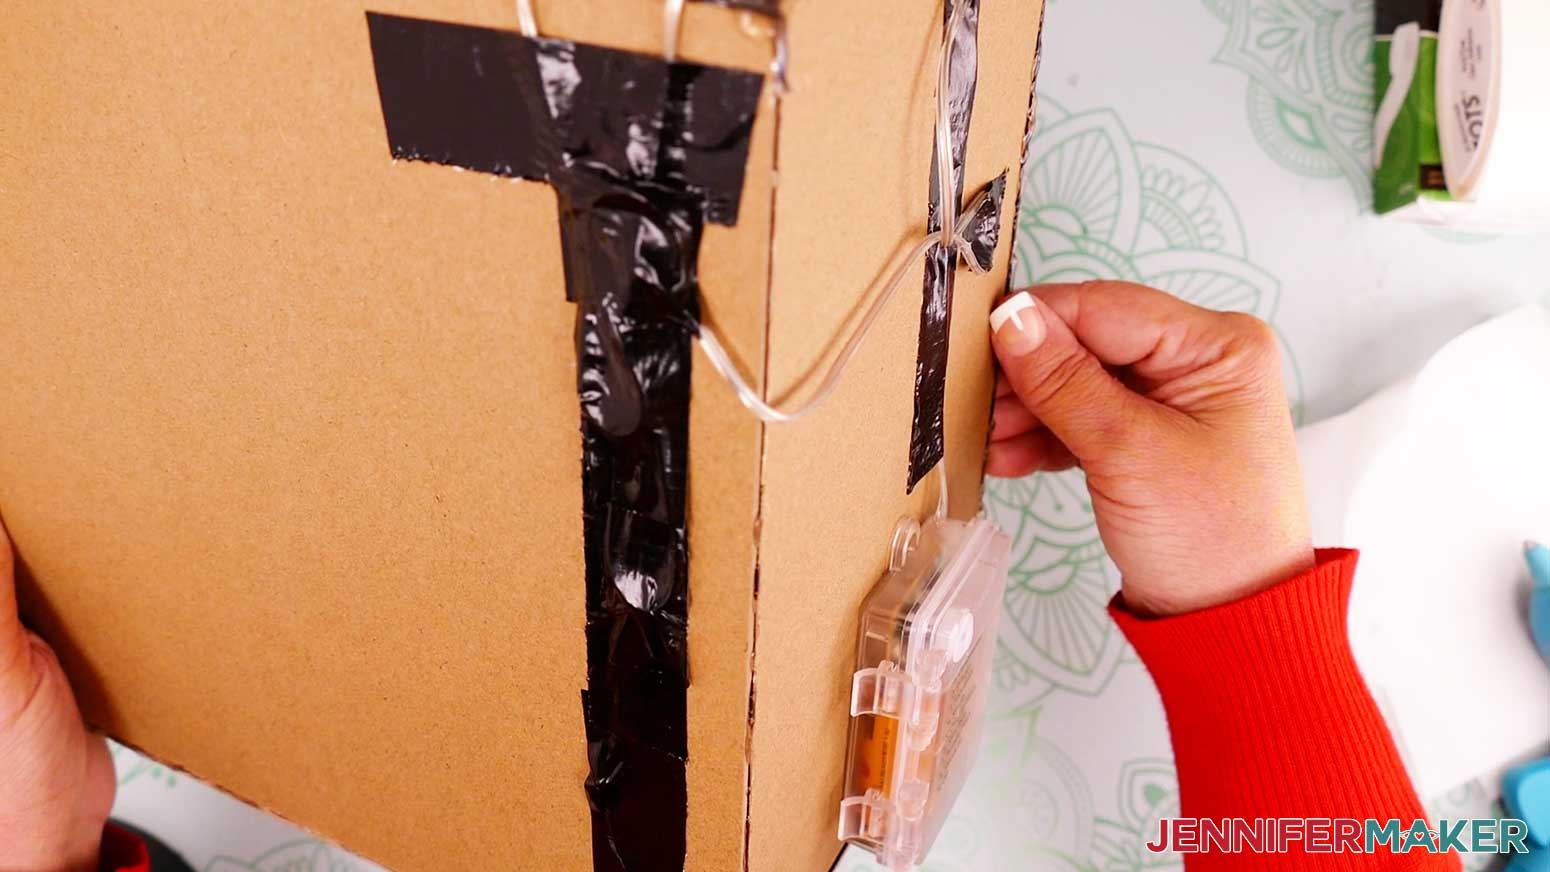
The last step is to attach the battery packs for the lights to the top and back of the box with glue dots. I used two medium-sized glue dots for each fairy lights battery pack and attached those to the top of the box, where they would be easy to reach after placing the book nook on my shelf.
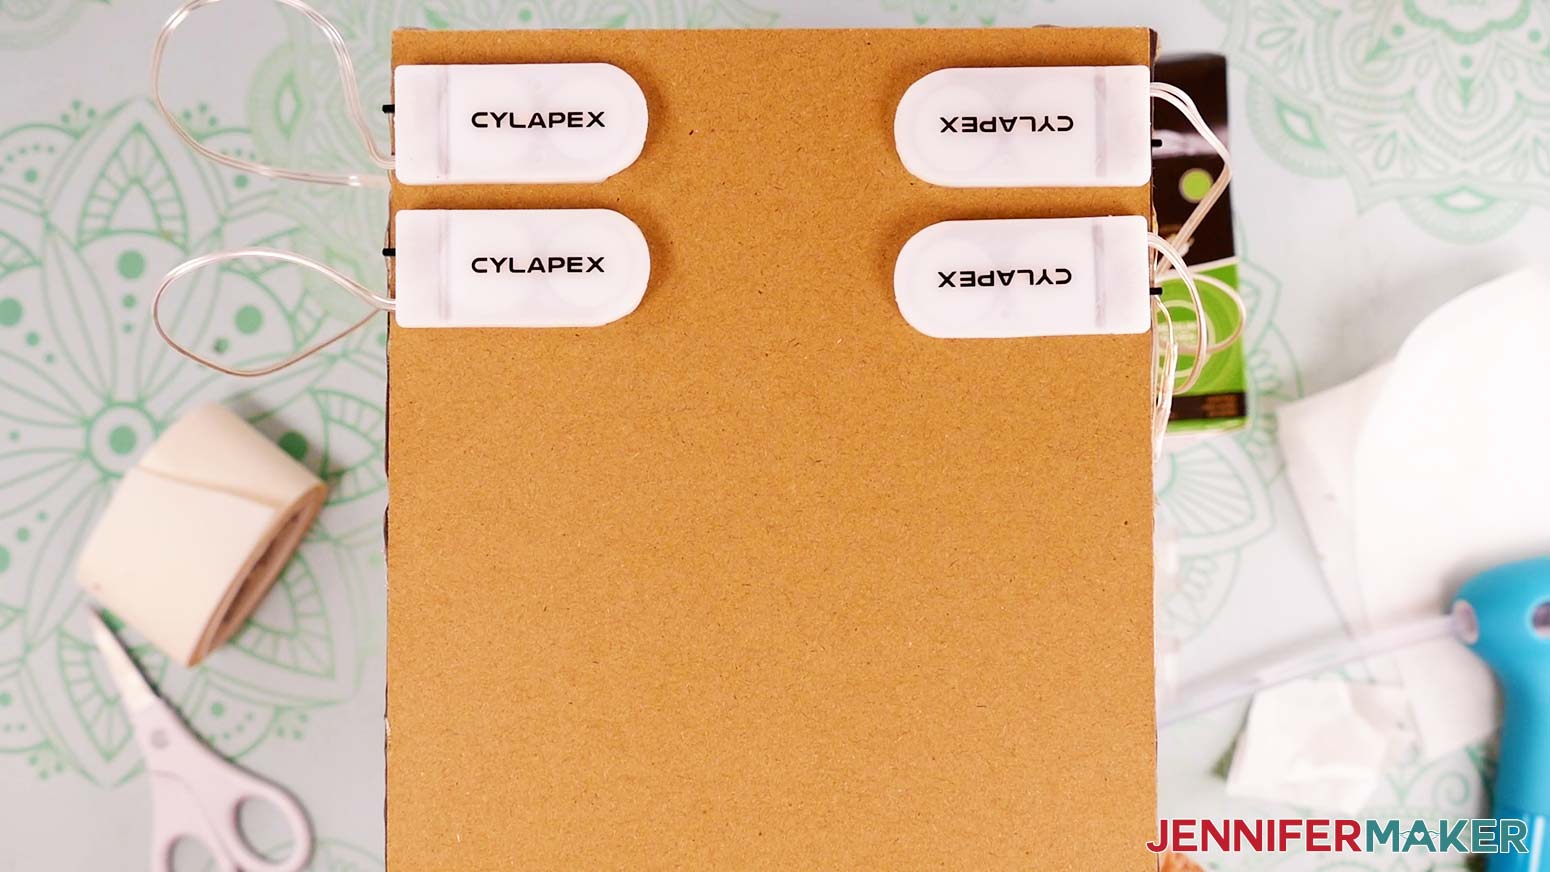
NOTE: If your fairy lights have a battery compartment, make sure to place the glue dots on the opposite side so you can still get to the compartment to replace the battery after it's attached to the box.
Since the strip lights have a remote to control them, I attached its larger battery pack to the back of my box using several medium-sized glue dots. Make sure the batteries are inserted and the remote for your lights works before attaching the battery pack.
If you want to secure your light cords to the outside of your box to keep them out of the way, you can use duct tape, masking tape, or packing tape to do so. Here's what the side of my box looks like after taping down the cords.
STEP 4: SHOW IT OFF!
You're done! Here's what my finished DIY book nook looks like. Isn't it so cool?
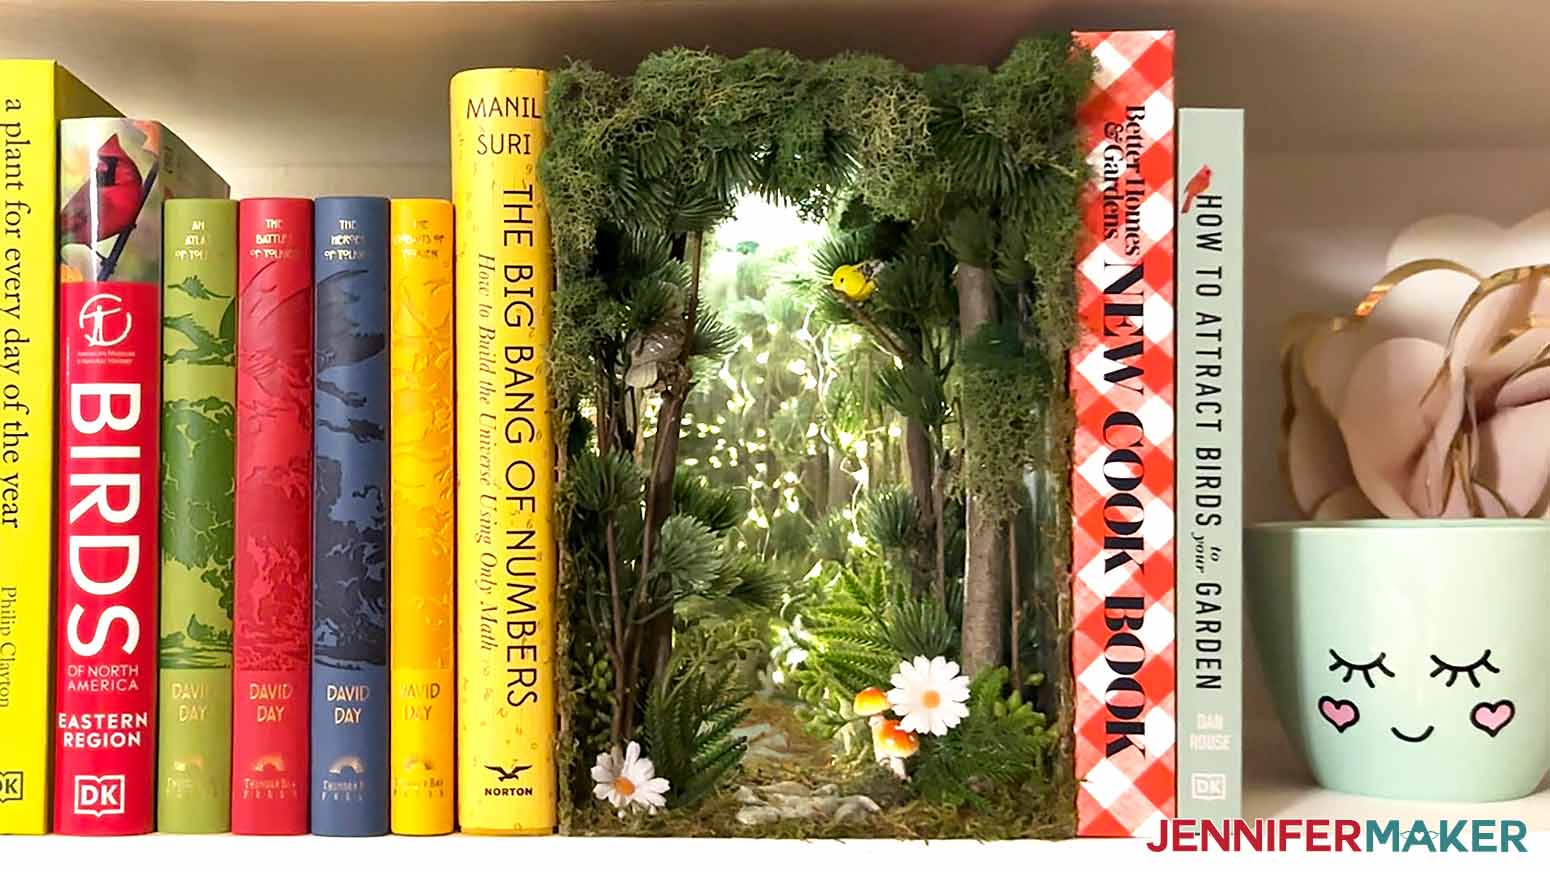
Now you can place it on your favorite bookshelf and admire your work while reading your next book. Turn off all the lights in the room to make the infinity mirror effect stand out even more! Don't forget to show it off to your friends and family.
Notes
If you choose to decorate your book nook with miniatures, 1:12 scale dollhouse items are the perfect size.
Finished Project Size: Approximately 6.25" wide x 9.25" tall x 9" deep
Answers to Your Questions About How to Make a DIY Book Nook
Q: What can I make a book nook out of?
You can create a DIY book nook out of many different materials like cardboard pieces, foam board, cardstock, and more. I’ll show you how to make a nice, sturdy book nook out of 2 mm chipboard, cut on a Cricut Maker 3 cutting machine and assembled with hot glue. If you have a Glowforge, you can also laser-cut pieces of your book nook shell. If you choose to decorate your book nook with miniatures, 1:12 scale dollhouse items are the perfect size. Tucking tiny LED bulbs or fairy lights inside lets you add cozy lighting to your bookshelf in the most delightful way.
Q: Why are book nooks so expensive?
Because they can often be very detailed with lots of tiny curated elements, DIY book nook kits can be quite pricey. However, you can make adorable book nooks by gathering your own materials and making the insert structure yourself. Your cost may vary, and there are ways to create a book nook on a budget, as well as ways to go all out and make it a highly-detailed work of art.
Q: What glue do you use for a book nook?
I found that hot glue was the most durable and easy to use when building and decorating my book nook and securing every little detail to its perfect spot. You may want to use hot glue finger covers to protect your fingers when applying foliage or decorations into the little nooks and crannies.
Q: How do you make a cute book nook?
Check out my tutorial and I’ll show you everything you need to know to make a spellbinding book nook insert for your home library! My video will show you all you need to know to get started, and then you just have to let your imagination take over. This is a super fun DIY project to do on your own, or with the help of your kids! Creating a tiny worlds based on their favorite book would be a fantastic project they’ll treasure making with you.
Q: Can you make a BookNook with Cricut?
Making book nook shelf inserts with a Cricut is easy with my free cut files! While you cannot cut chipboard on every Cricut machine, you CAN cut it on a Cricut Maker or Cricut Maker 3 with a knife blade.
Q: What is the scale of a bookshelf insert?
The scale of your magical little room or forest world is completely up to your imagination. I personally love the look of 1:12 size miniature furniture and elements inside my book nook, but if you have a narrower insert you may want to use as small as 1:24 scale items. Remember, this is an enchanting world that defies logic — it’s in the middle of your bookshelf, after all! The elements inside can be the same scale, different scales, completely nonsense or surreal, or a painstakingly accurate replica of a real or fictional place. Your nook, your rules!
Get my free SVG/PNG/PDF files to make a DIY book nook!
I’d love to see YOUR DIY book nook and all the decorations you add! Please share a photo in our Facebook group or tag me on social media with #jennifermaker.
Love,

Want to remember this? Save this tutorial on making a DIY Book Nook to your favorite Pinterest Board!