Learn how to make your very own customized Print Then Cut stickers!
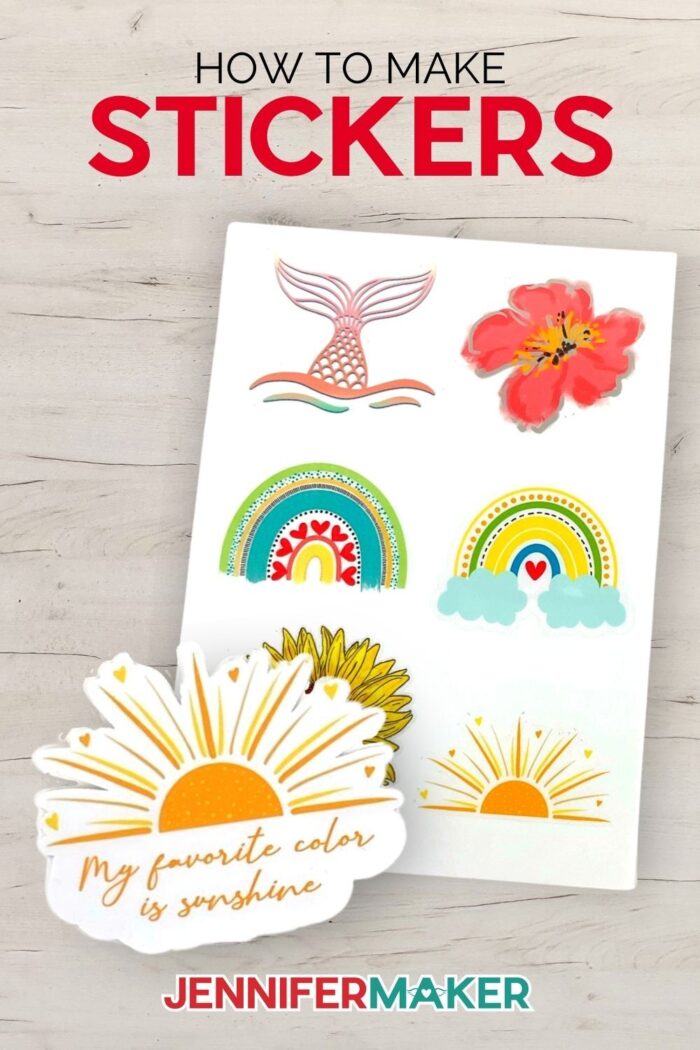
Making stickers with a Cricut Machine is fun and easy and it’s now even easier with the offset feature! In this tutorial I’m going to explain how to make Print then Cut stickers with and without the new offset feature in Design Space. I’ll show you how to make a full sheet of “Kiss Cut” stickers. These are stickers that cut around the sticker, but not through the backing material. We’ll also learn how to make “Die Cut” stickers and personalize them. A die cut sticker is when the sticker is cut all the way through the backing material. We also will make personalized Return Address Labels, a set of Planner Stickers and some fun Holiday stickers. Lastly, I will also show you how to laminate your stickers, which is an optional step.

How cute are these custom stickers?! I can show you how you can make high quality stickers and the different ways you can make them. This sticker design is one of my favorite as they can be so uplifting and quickly put you in a positive mood whether you decide to place them in a planner, notebook, card, or a space you look at everyday, they are sure to brighten up anyone’s mood! There really is no “right place” where you can place them.
The first thing we will need is lots of sticker paper. I will be showing you some of my favorite sticker paper options because there are so many out there to choose from. We are going to use four kinds: Plain white sticker paper, clear vinyl sticker sheets, white vinyl sticker sheets and Cricut Printable Vinyl.
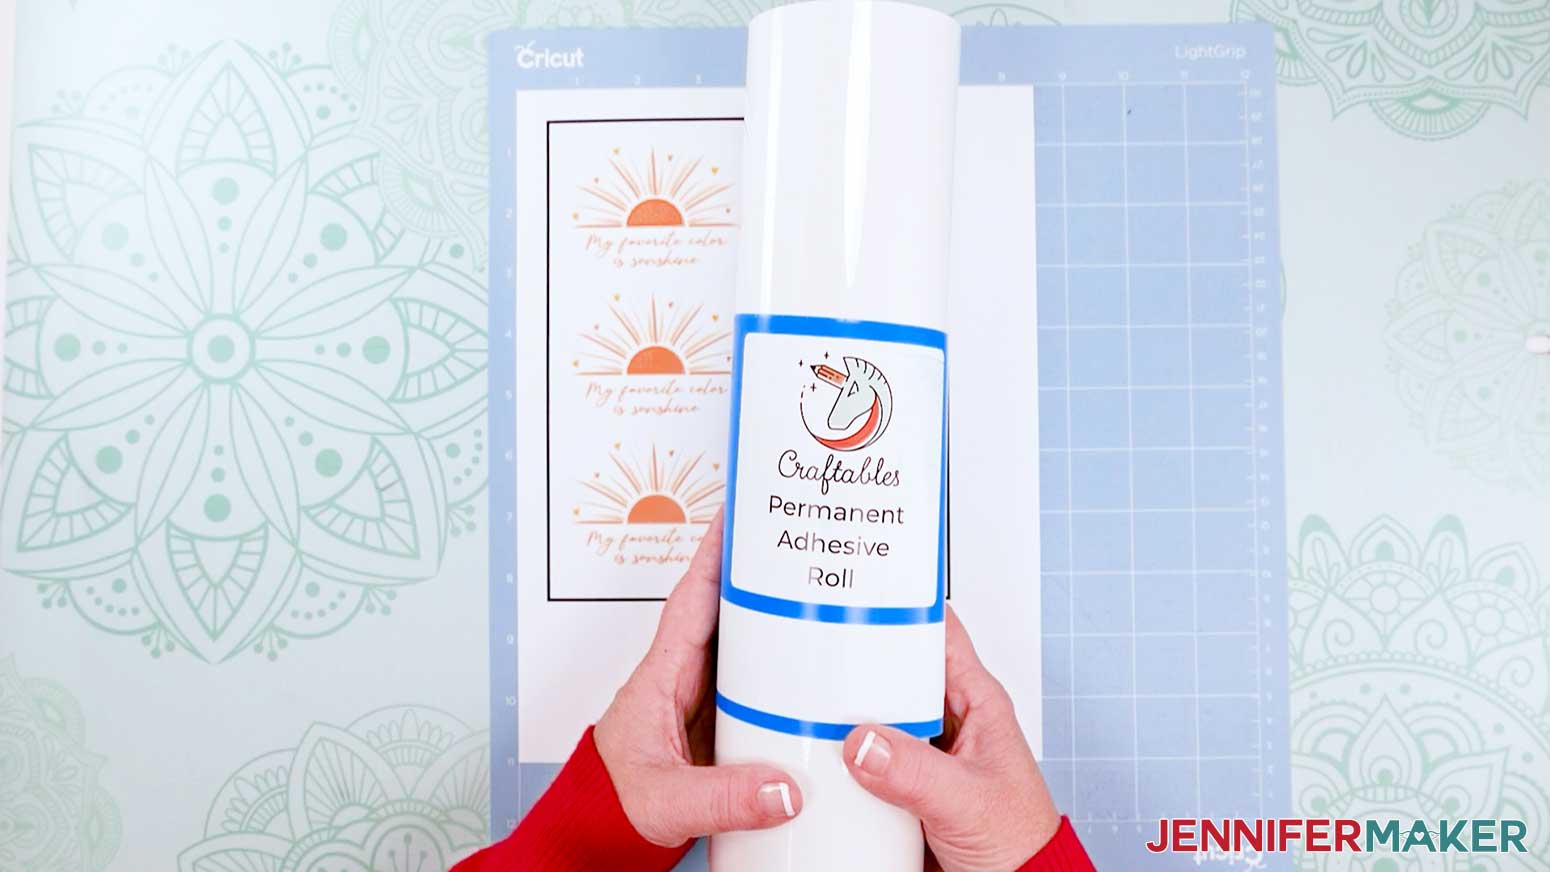
We will also use a roll of transparent vinyl to laminate some of our stickers. And I’m going to use my Cricut Maker 3, but you can also make these on the original maker, Explore 3 or original Explore cutting machine.
You will also need an inkjet printer, either a blue or green cutting mat, scraper tool, brayer and a trimmer or scissors.
These homemade stickers are a great and simple way to add some life and color to a space. Another awesome idea I’ve seen that’s been really popular is adding the die cut stickers to your water bottle. Also, if you decide to laminate them, that can help add more protection and you can even add them as bumper stickers to your car!
A lot of people would be shocked to know that you created these using some printable sticker paper, a printer (remember, inkjet printers work best), and a Cricut machine. You can decide to make the die-cut stickers or the kiss-cut stickers, it’s all about preference.
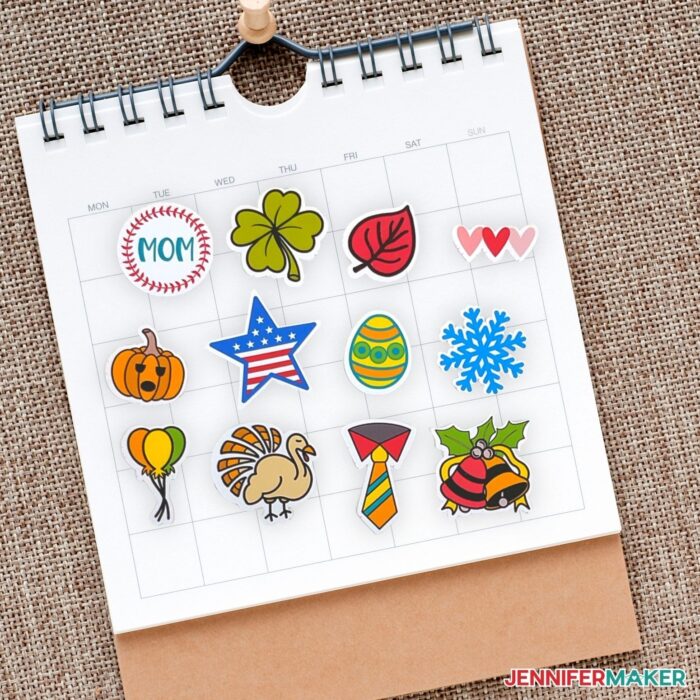
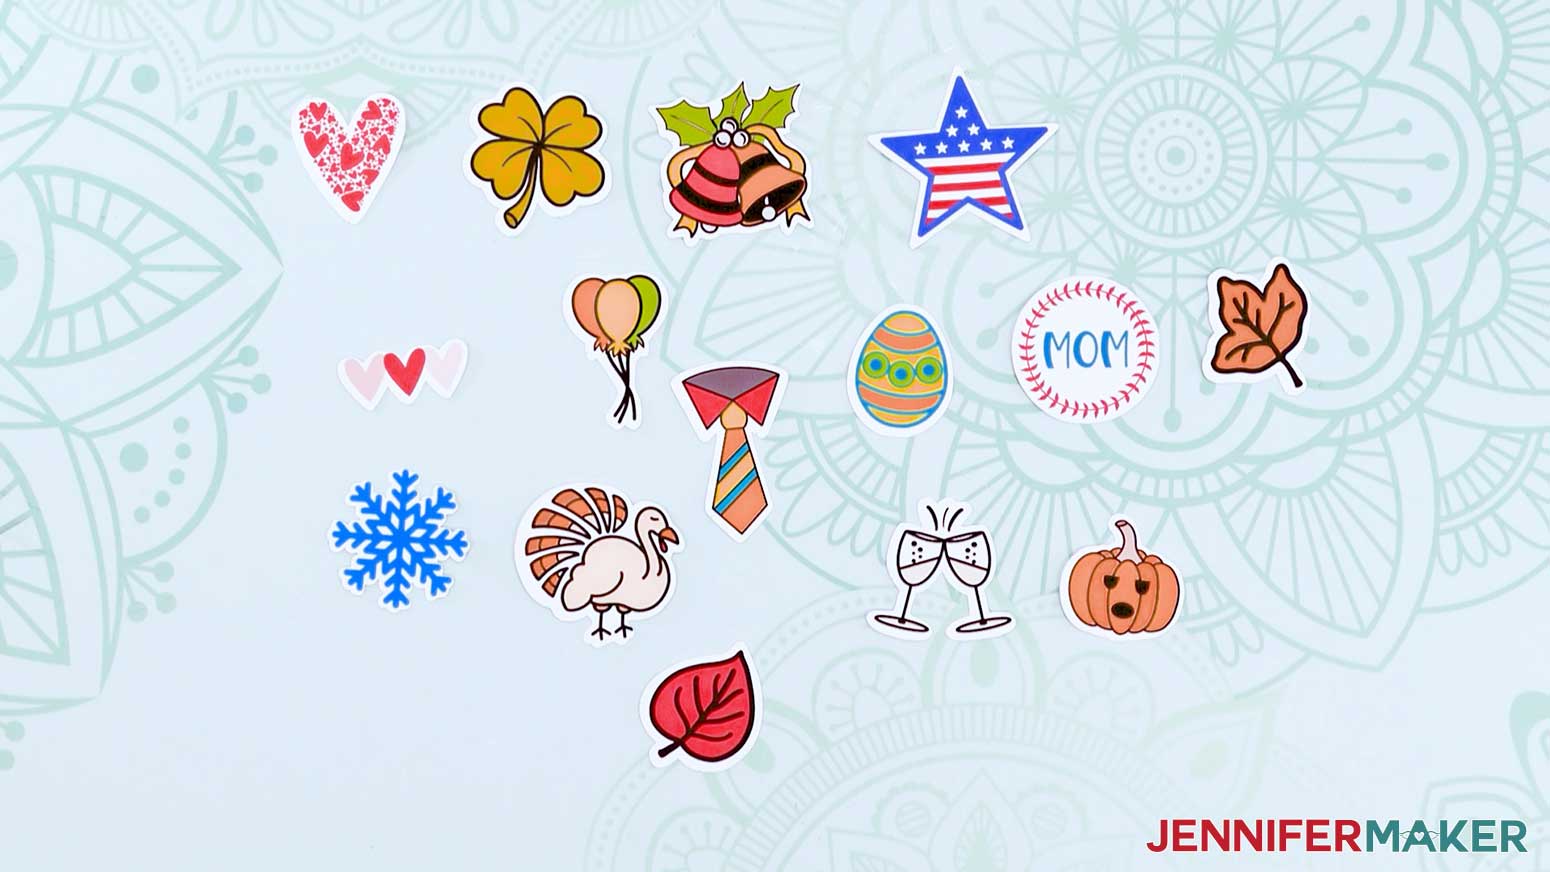
There are different kinds of stickers you can make including these fun colorful stickers I made for the holidays:
Here’s a supply list of what you need to make stickers! This post contains some affiliate links for your convenience (which means if you make a purchase after clicking a link I will earn a small commission but it won’t cost you a penny more)! Read my full disclosure policy.
Materials to Make Stickers
View my Amazon shopping list with the exact items we used to make this project
- White Sticker Paper
- Clear Vinyl Sticker Sheets
- White Vinyl Sticker Sheets
- Printable Vinyl
- Transparent Vinyl (optional)
- Sallim Font (optional)
- A method to print and cut your stickers – I used the Cricut Maker 3 but you can also use the Cricut Maker or Explore Series machines
- Color Printer (I used the HP Envy 7155)
- Blue LightGrip Machine Mat
- Green StandardGrip Machine Mat
- XL Scraper Tool
- Brayer (optional)
- Trimmer or Scissors (optional)
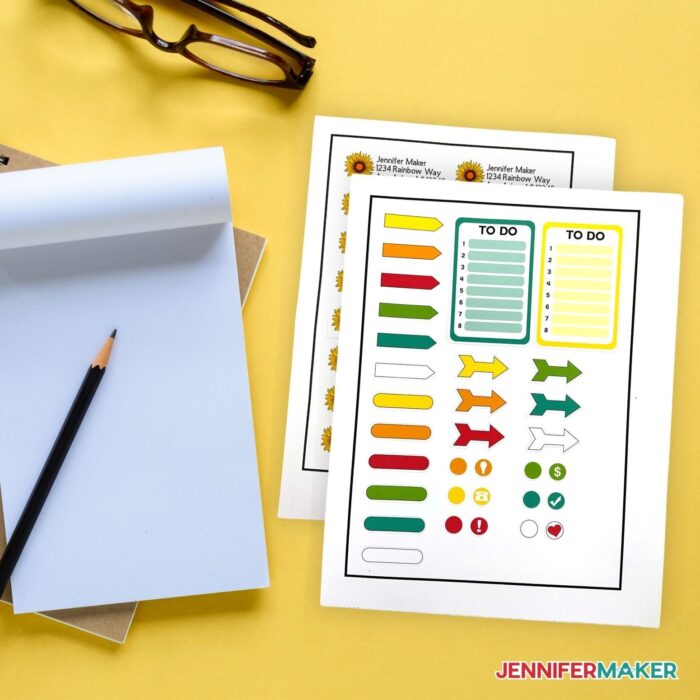
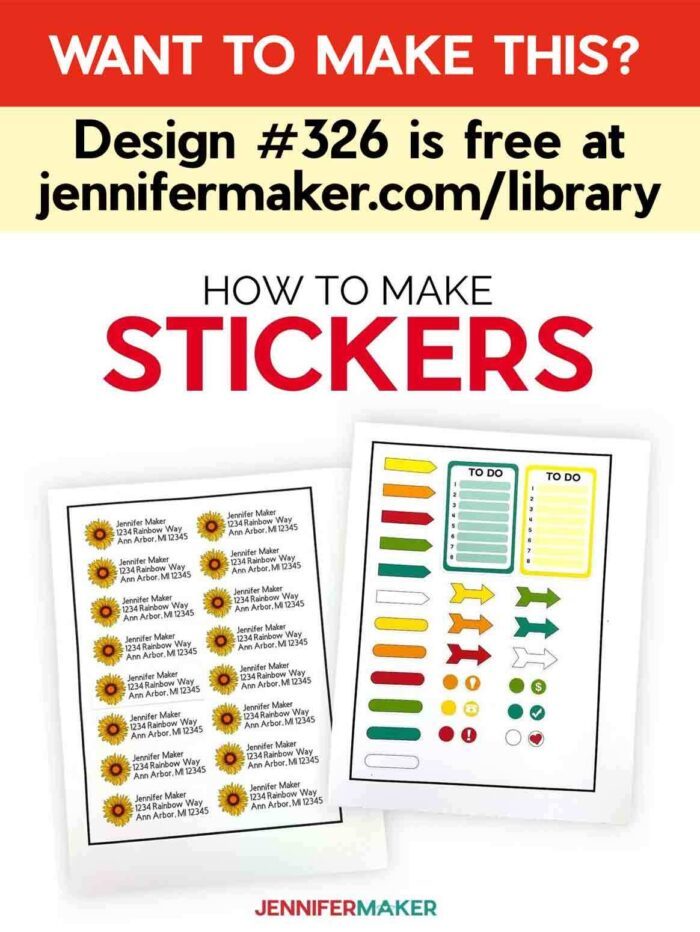
- Design #326 – My free SVG/PDF/DXF design files are available in my free resource library (get the password by filling out the form at the bottom of this page)
How to Make Your Own Stickers
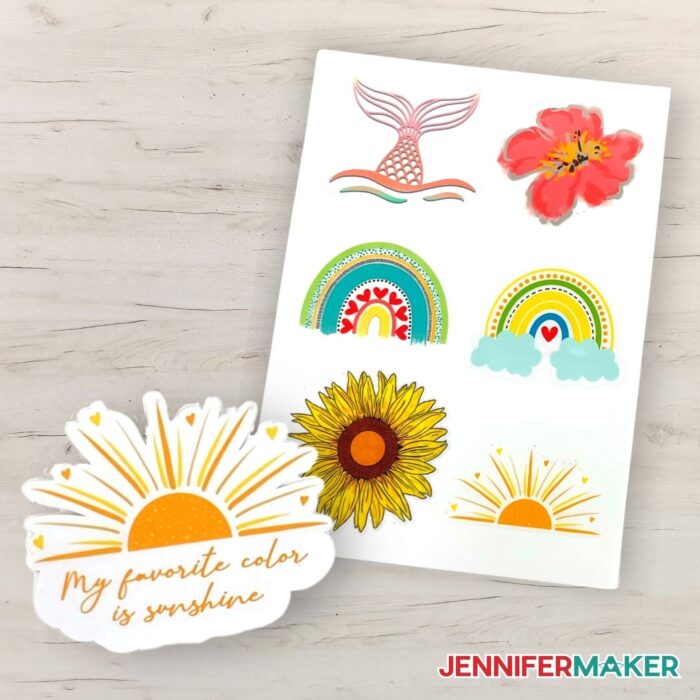
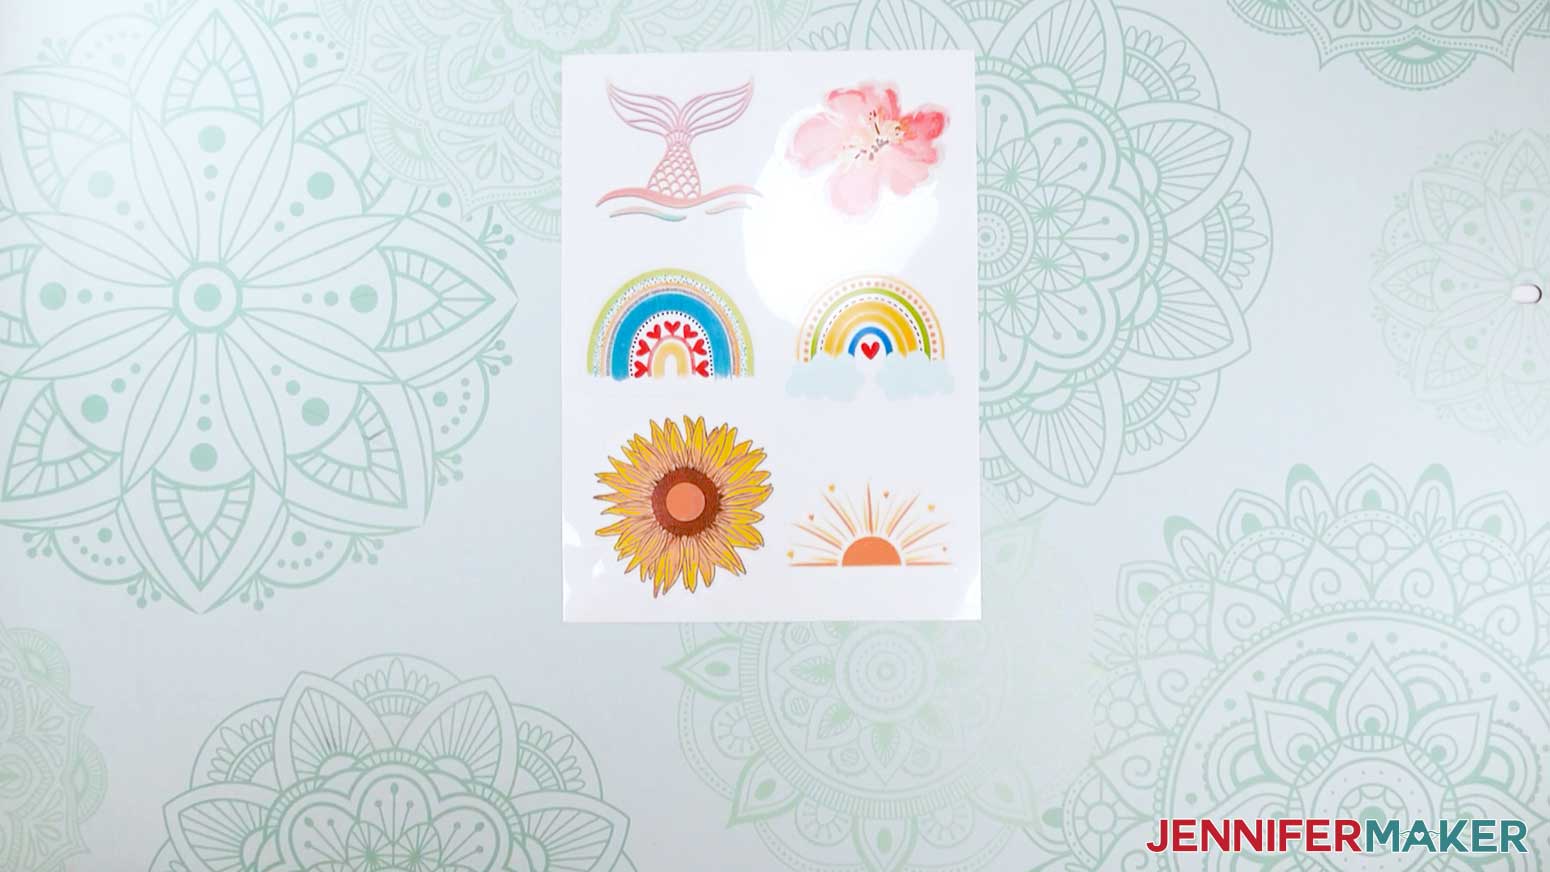
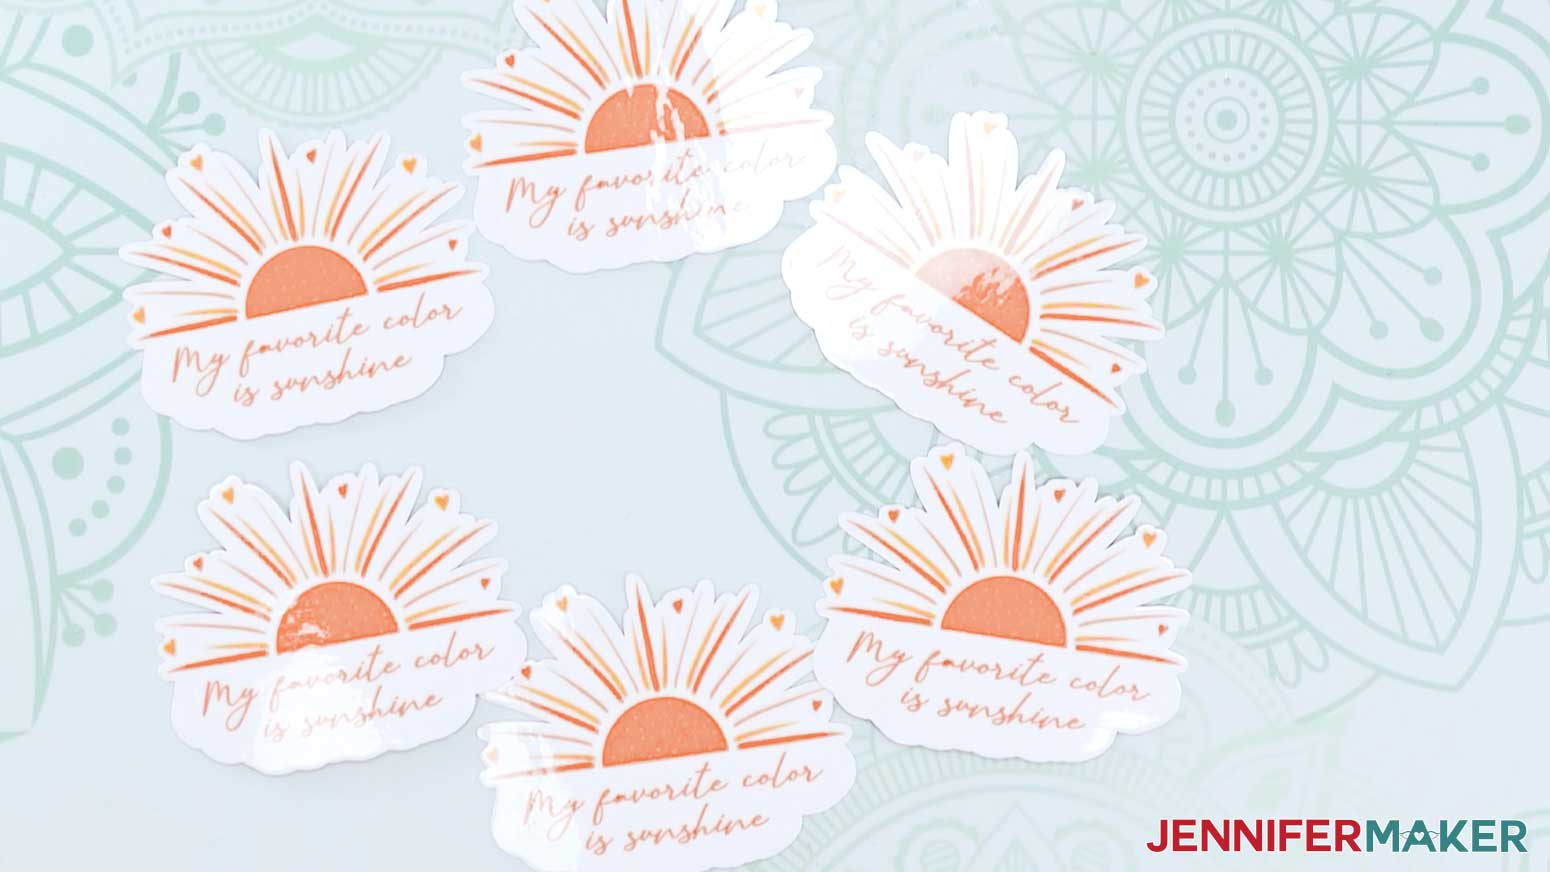
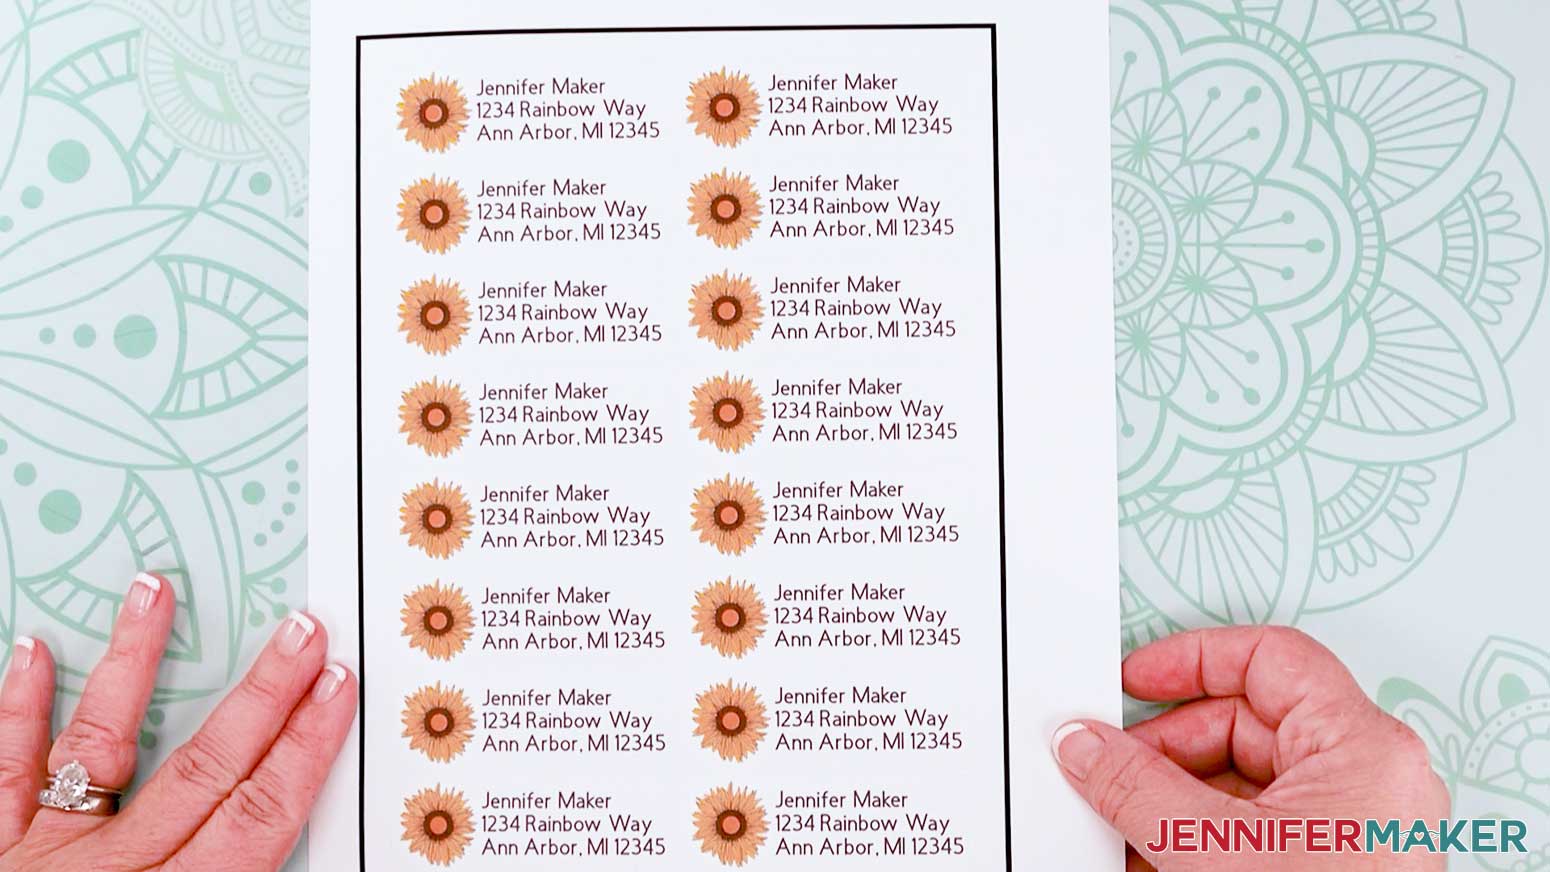
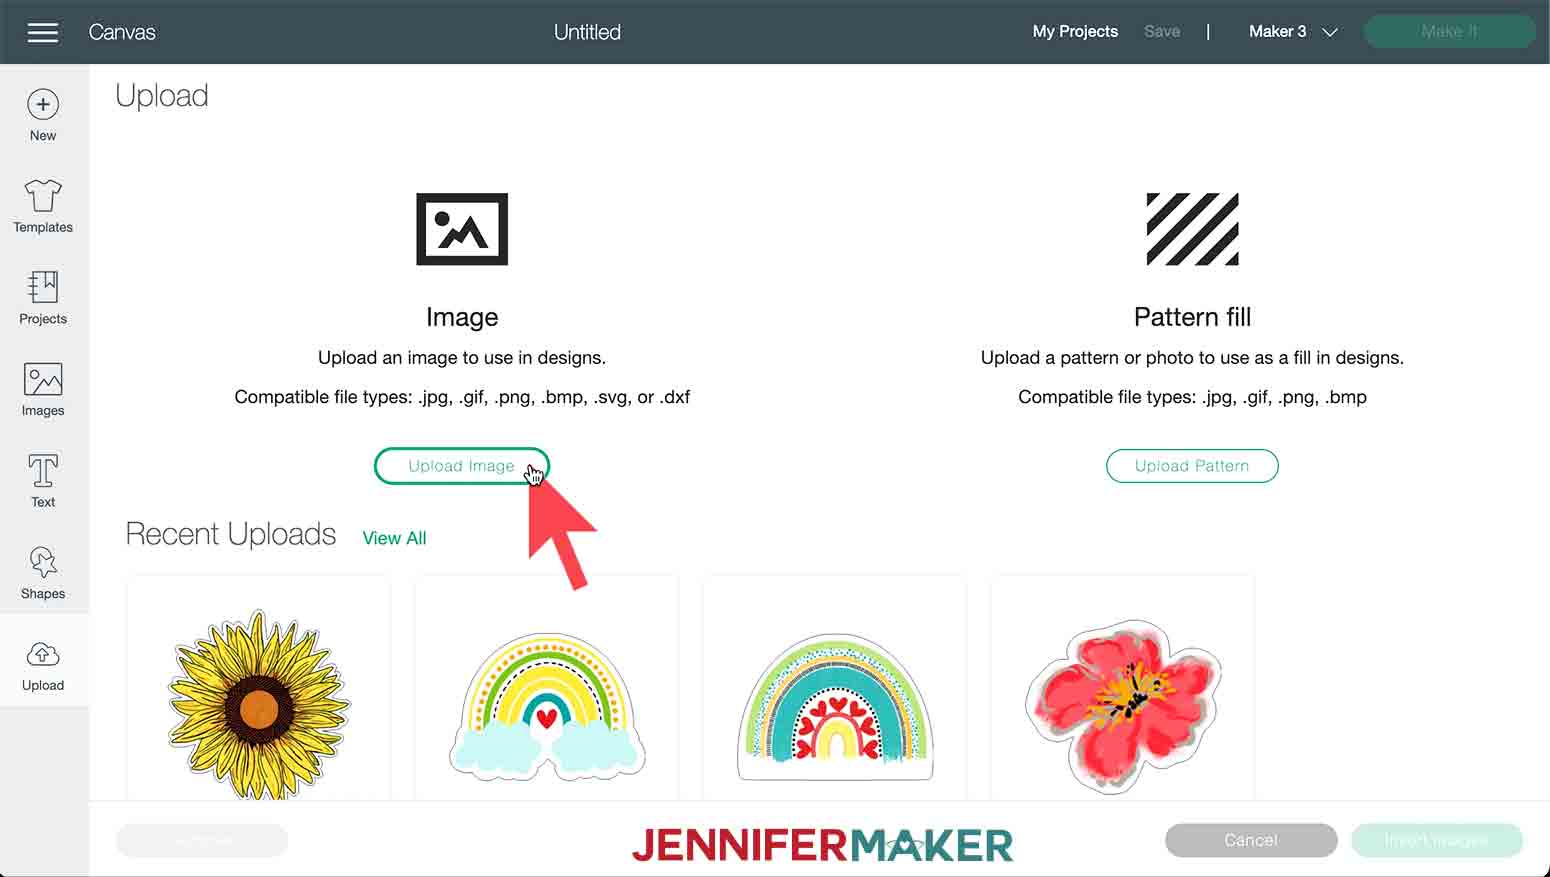
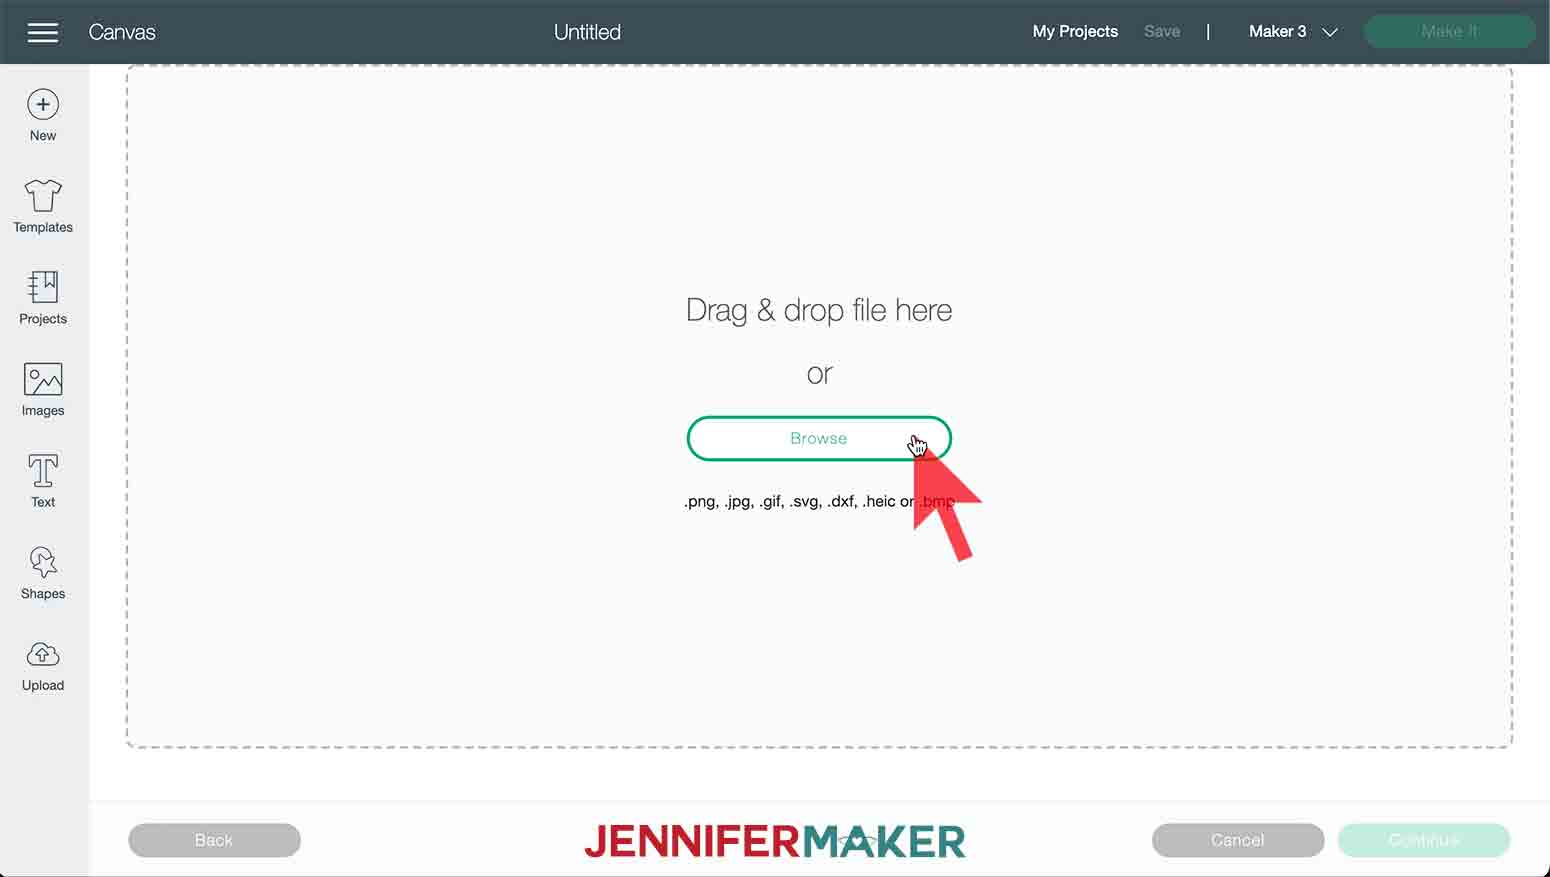
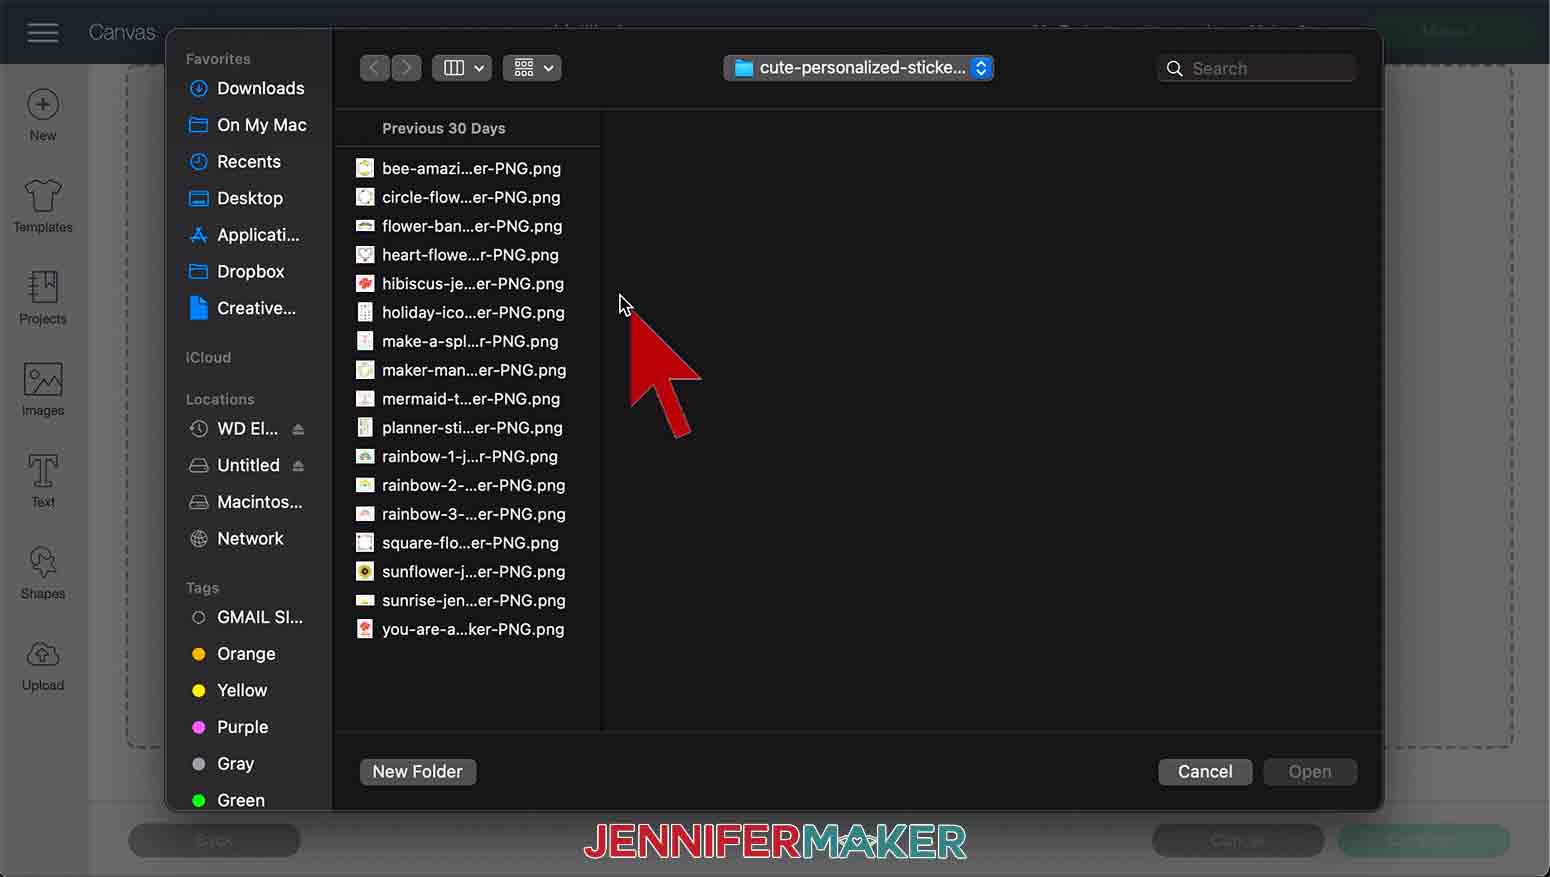
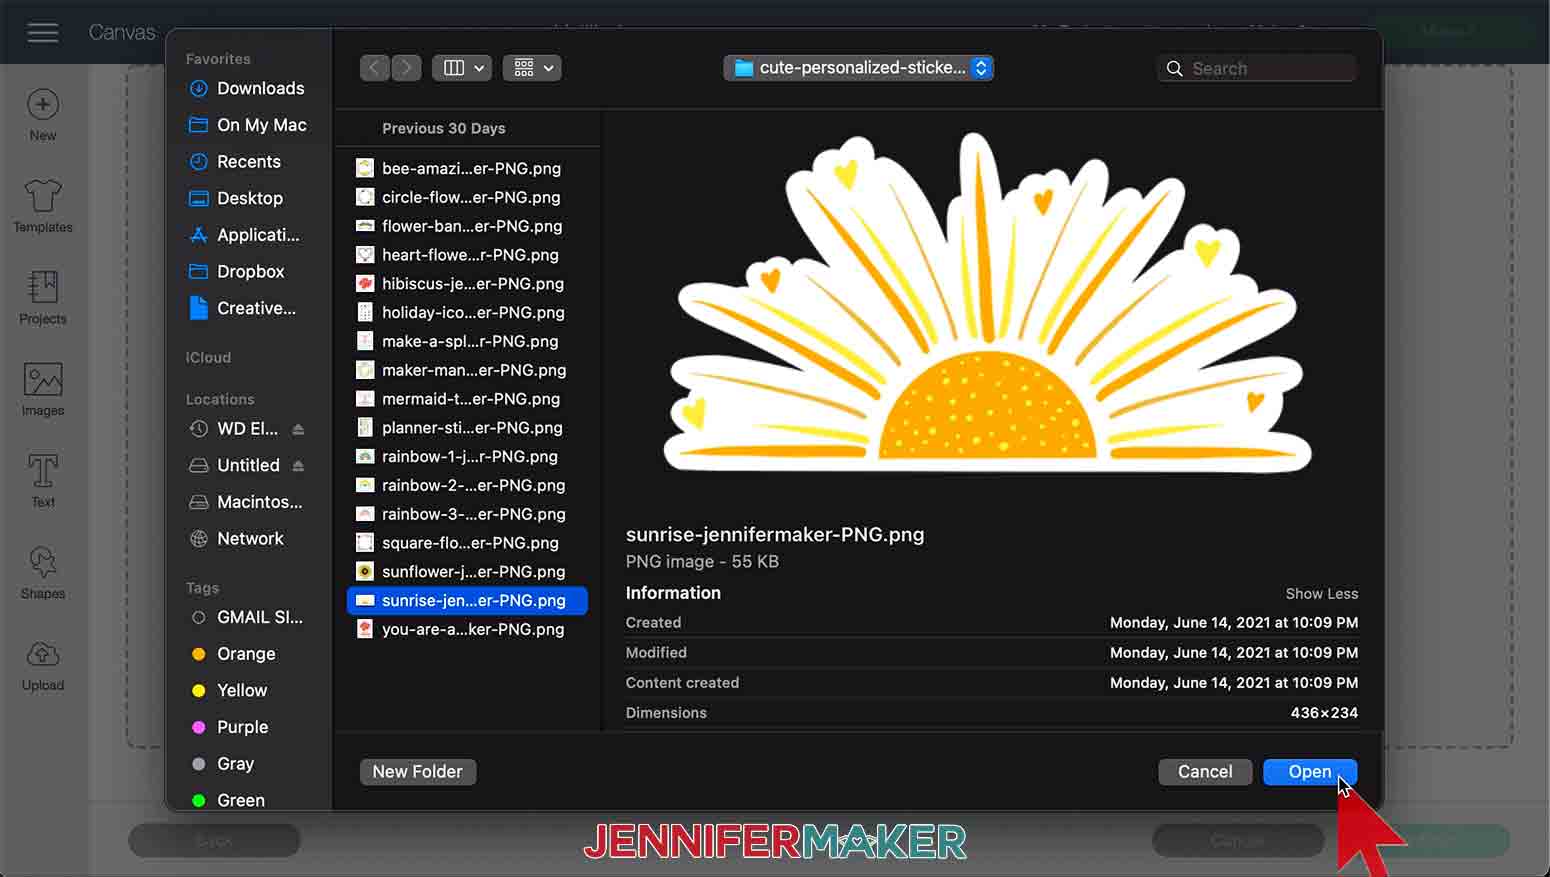
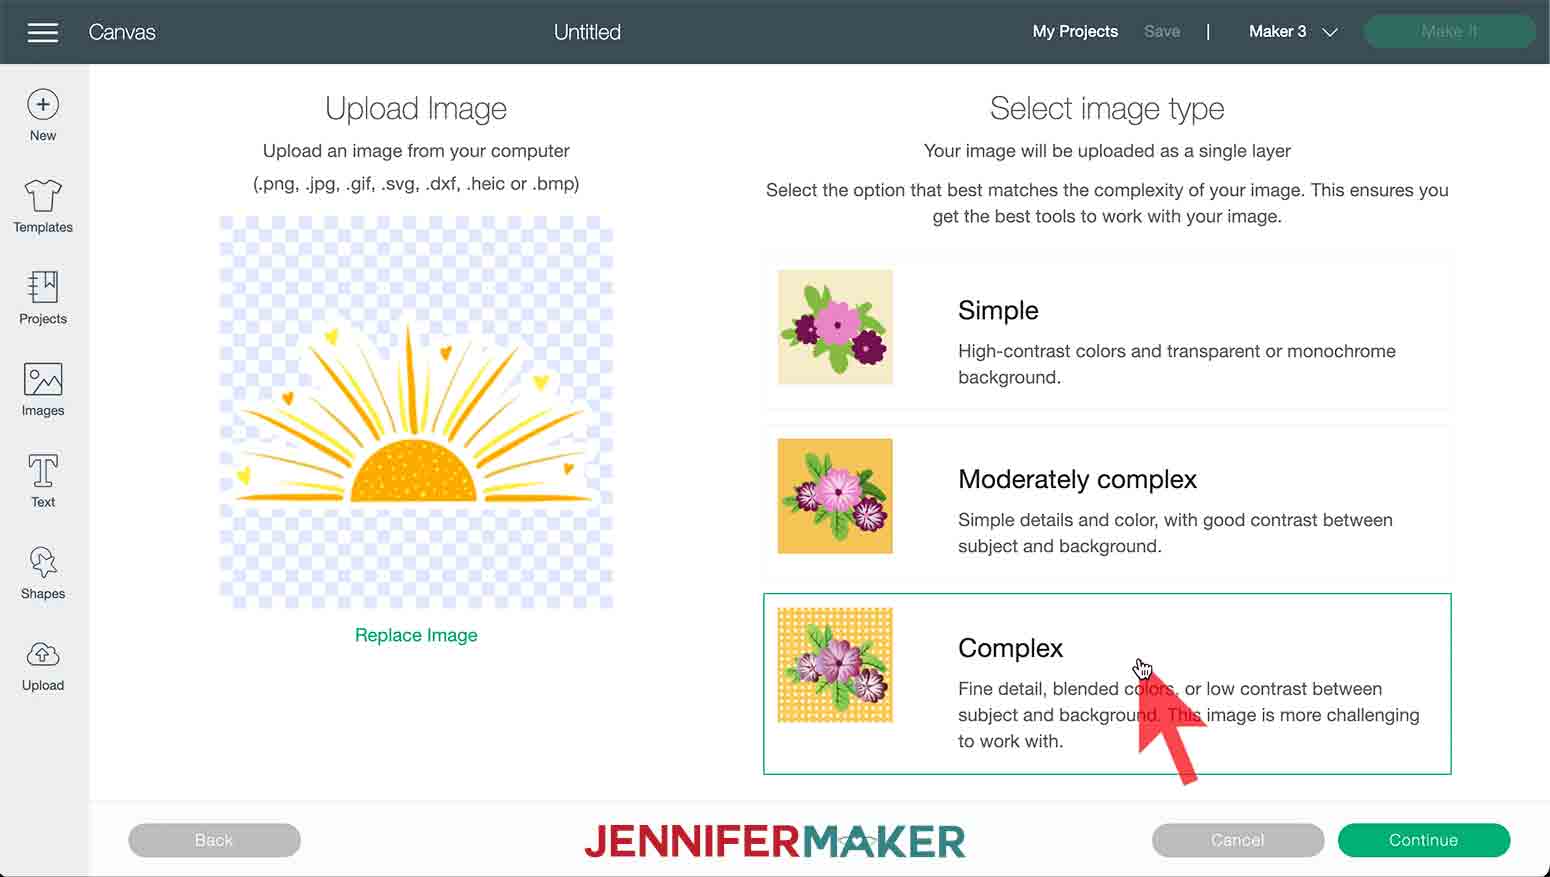
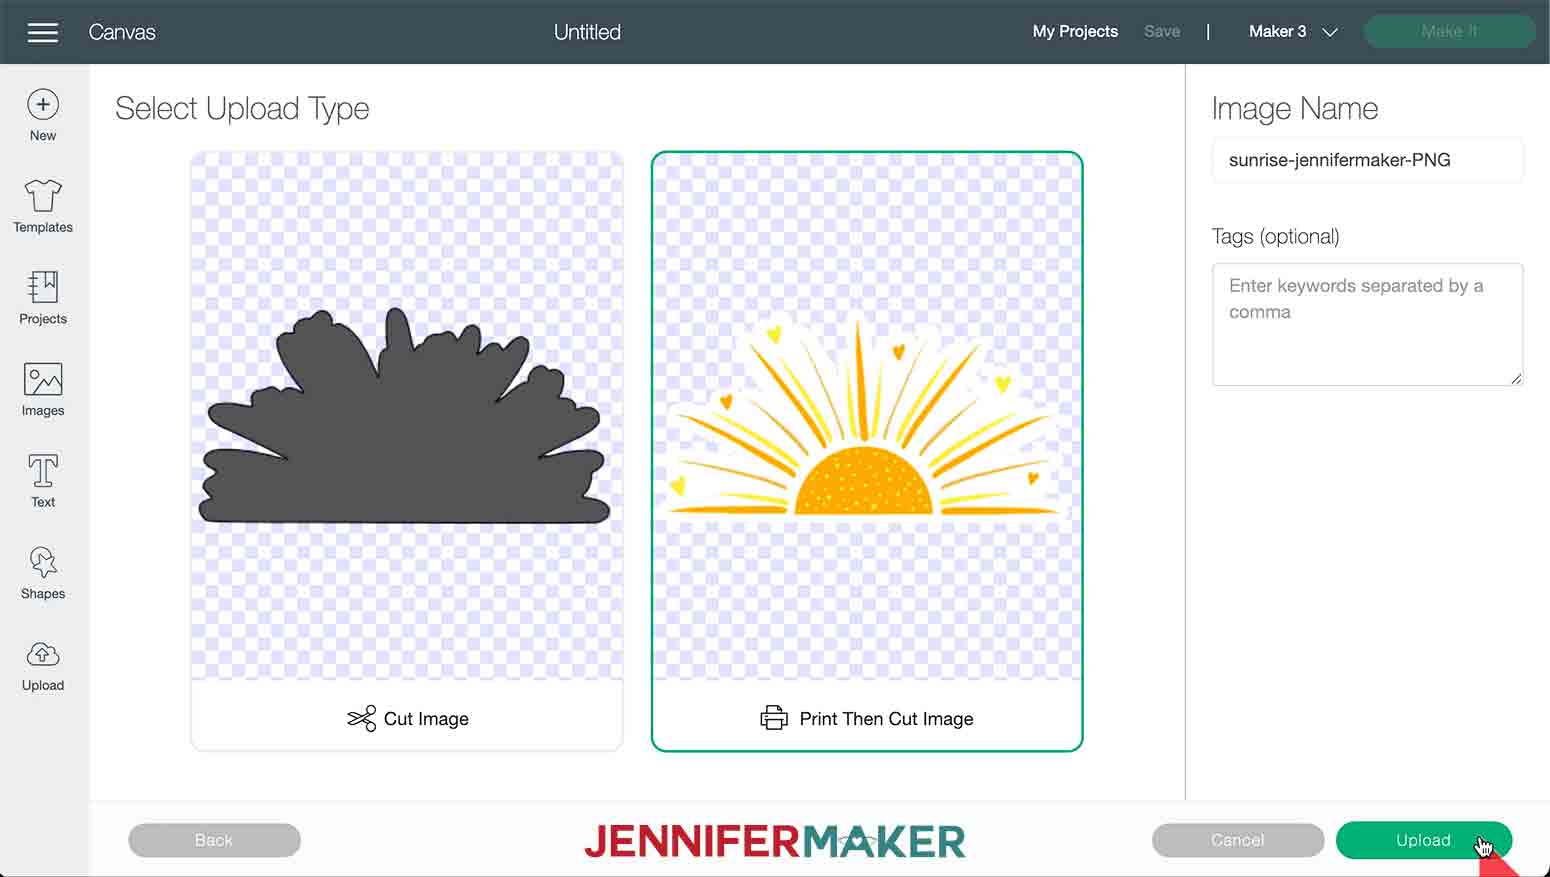
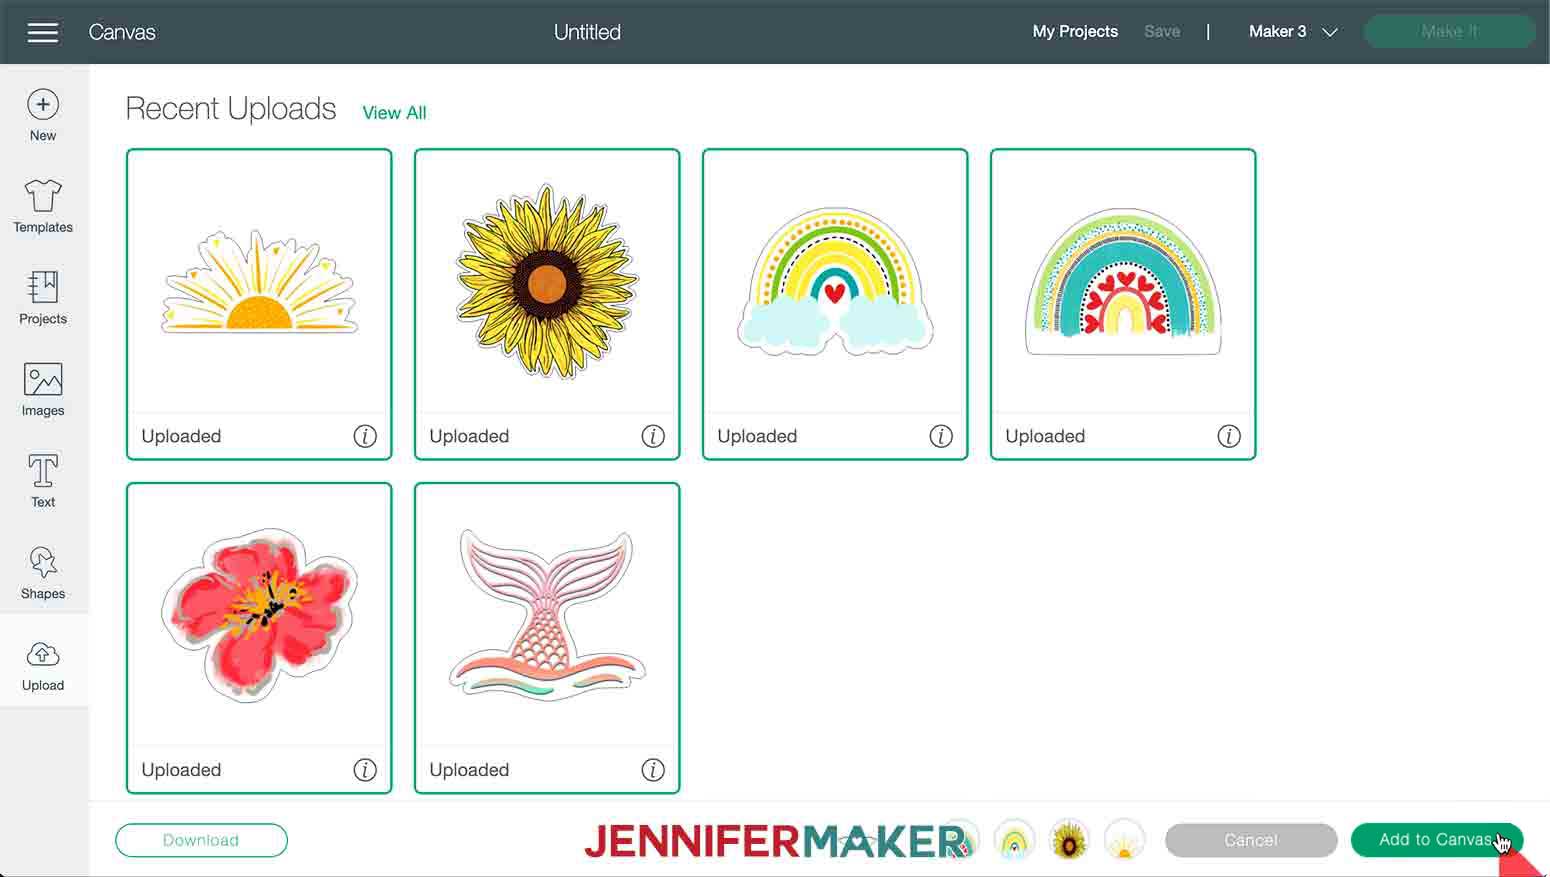
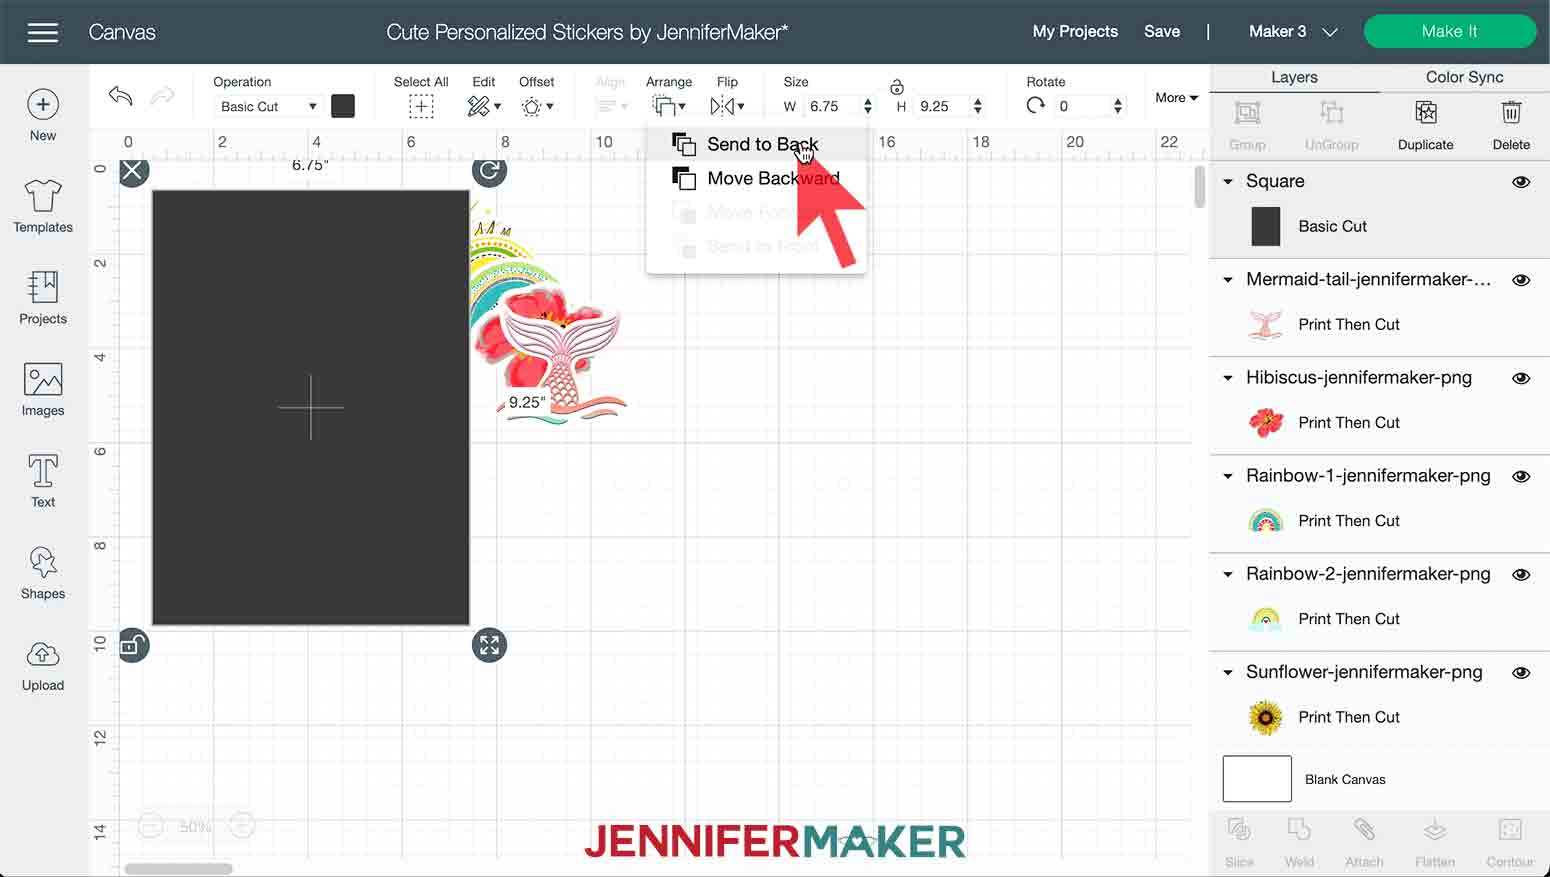
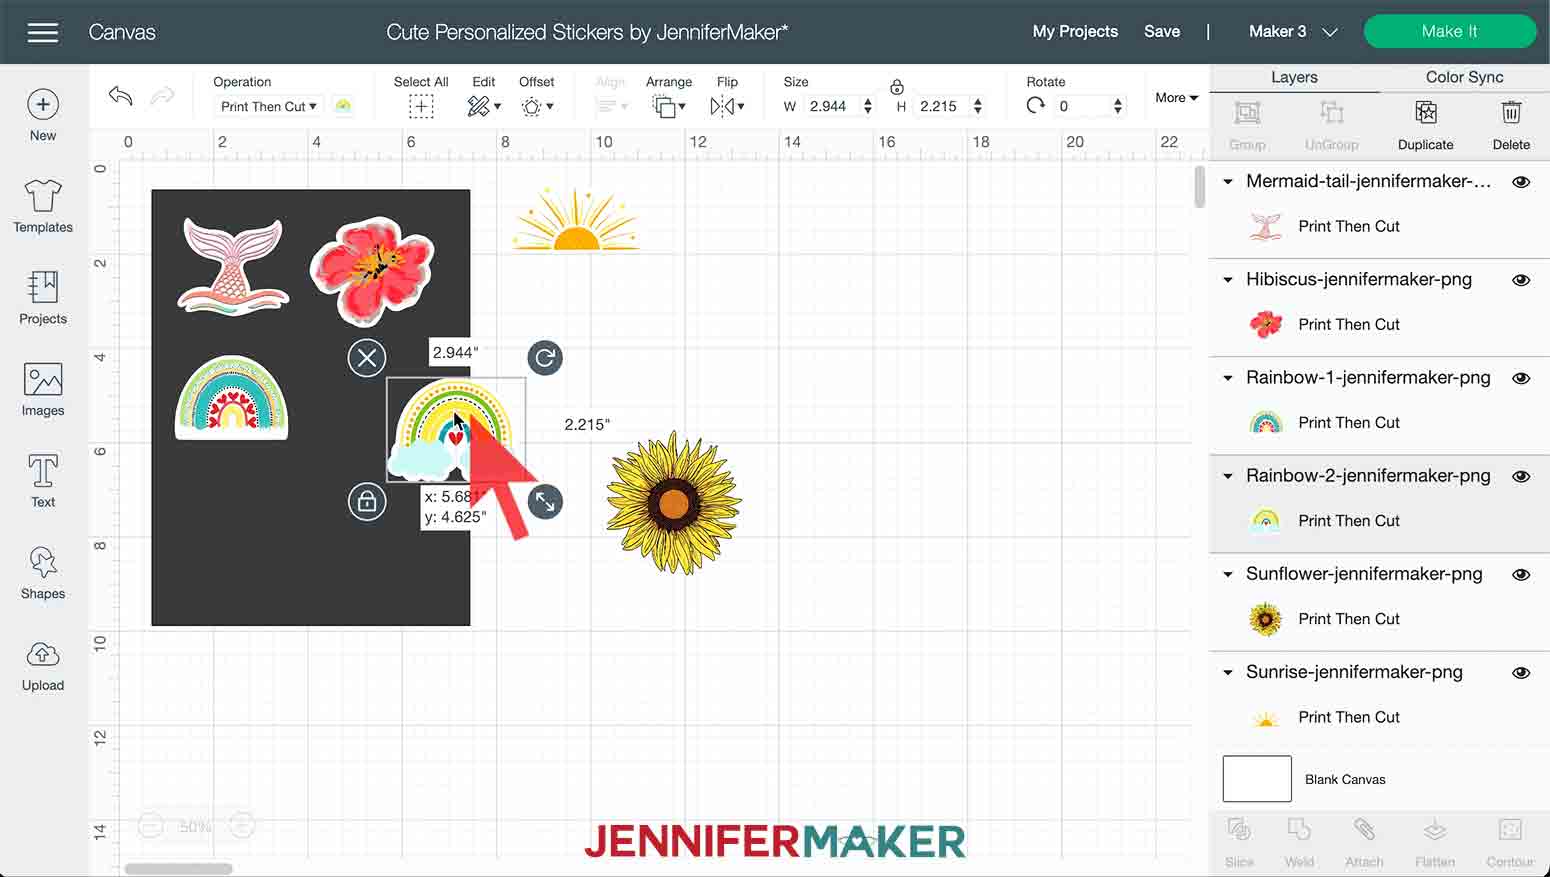
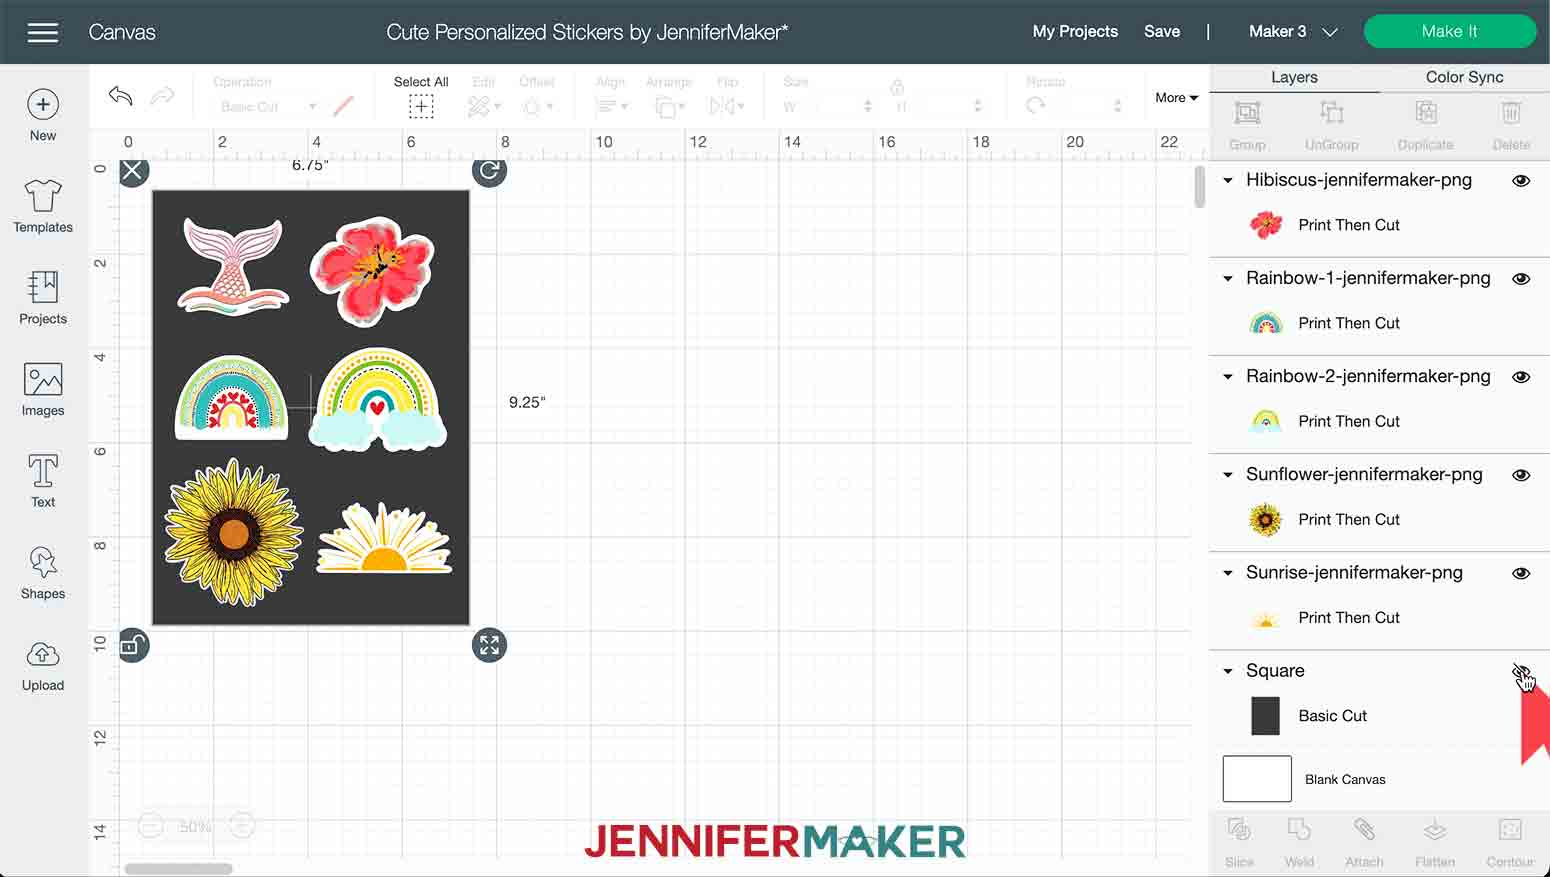
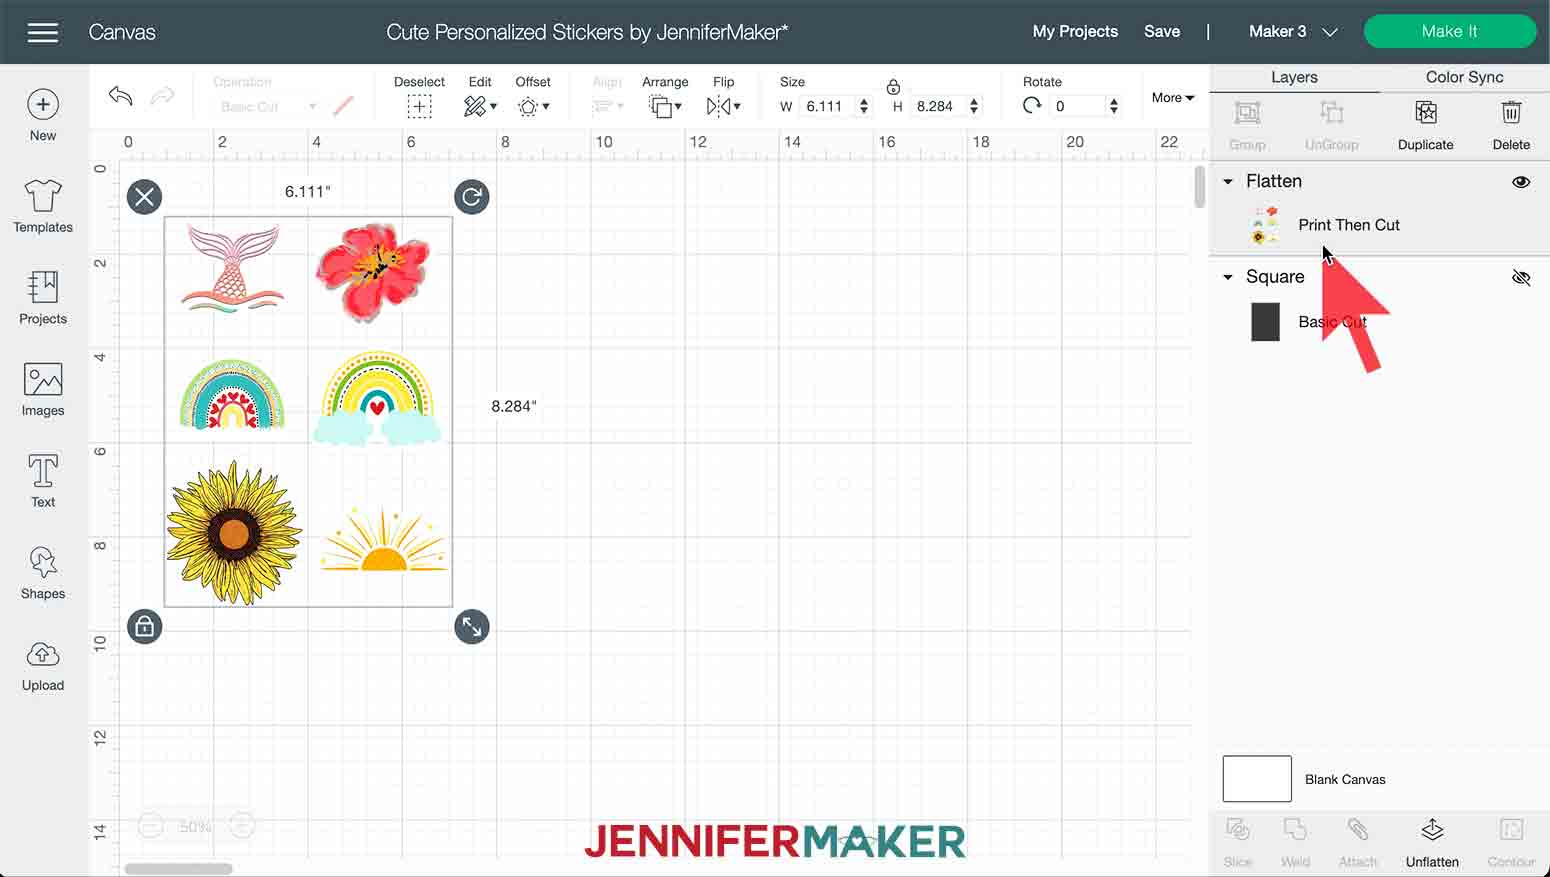
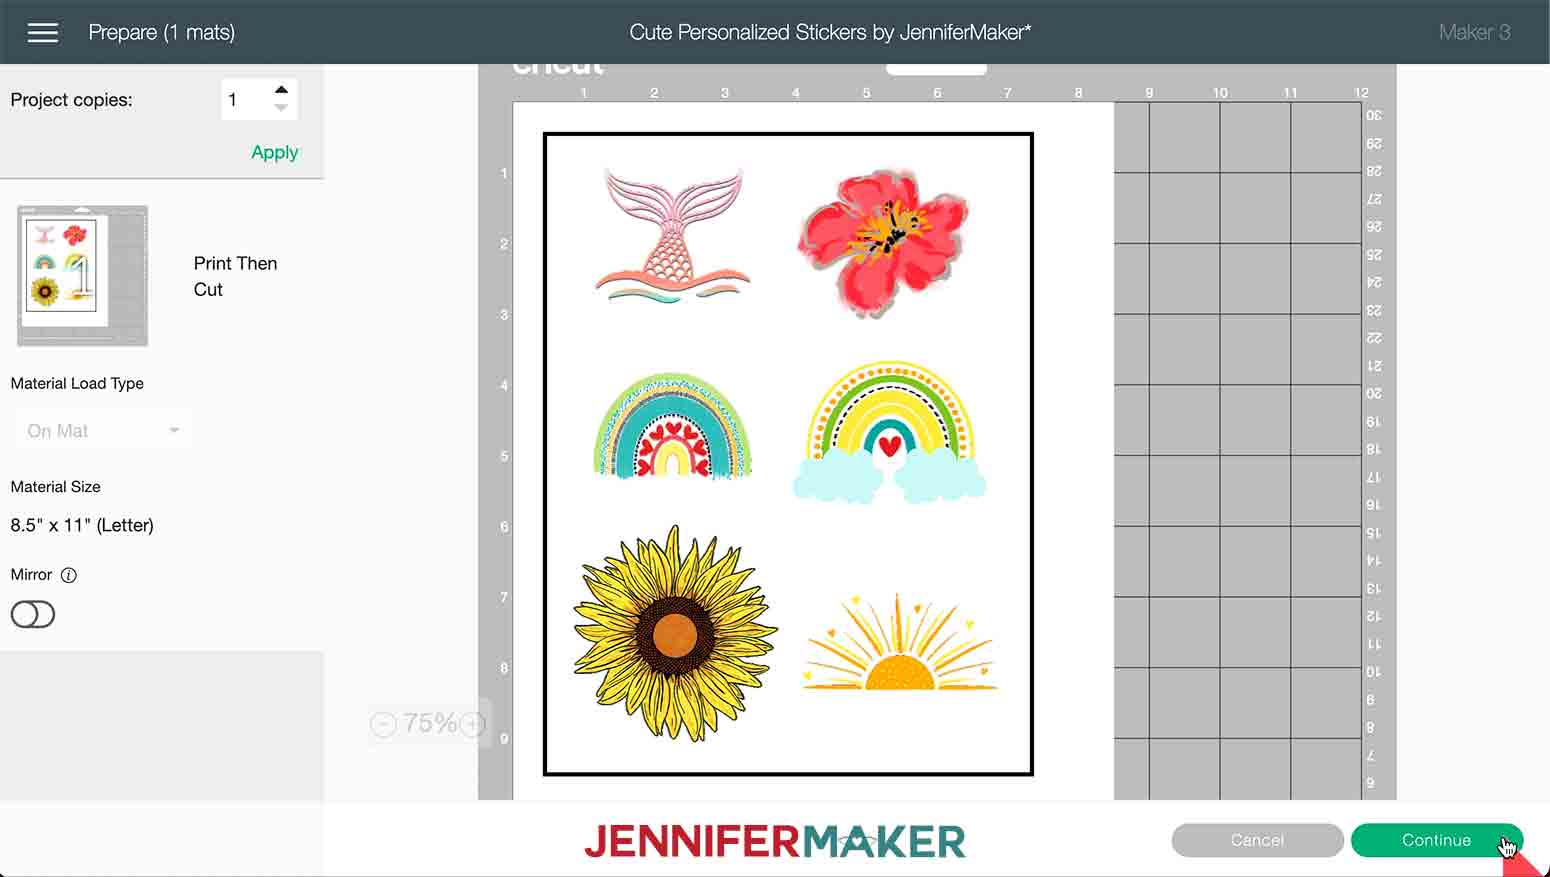
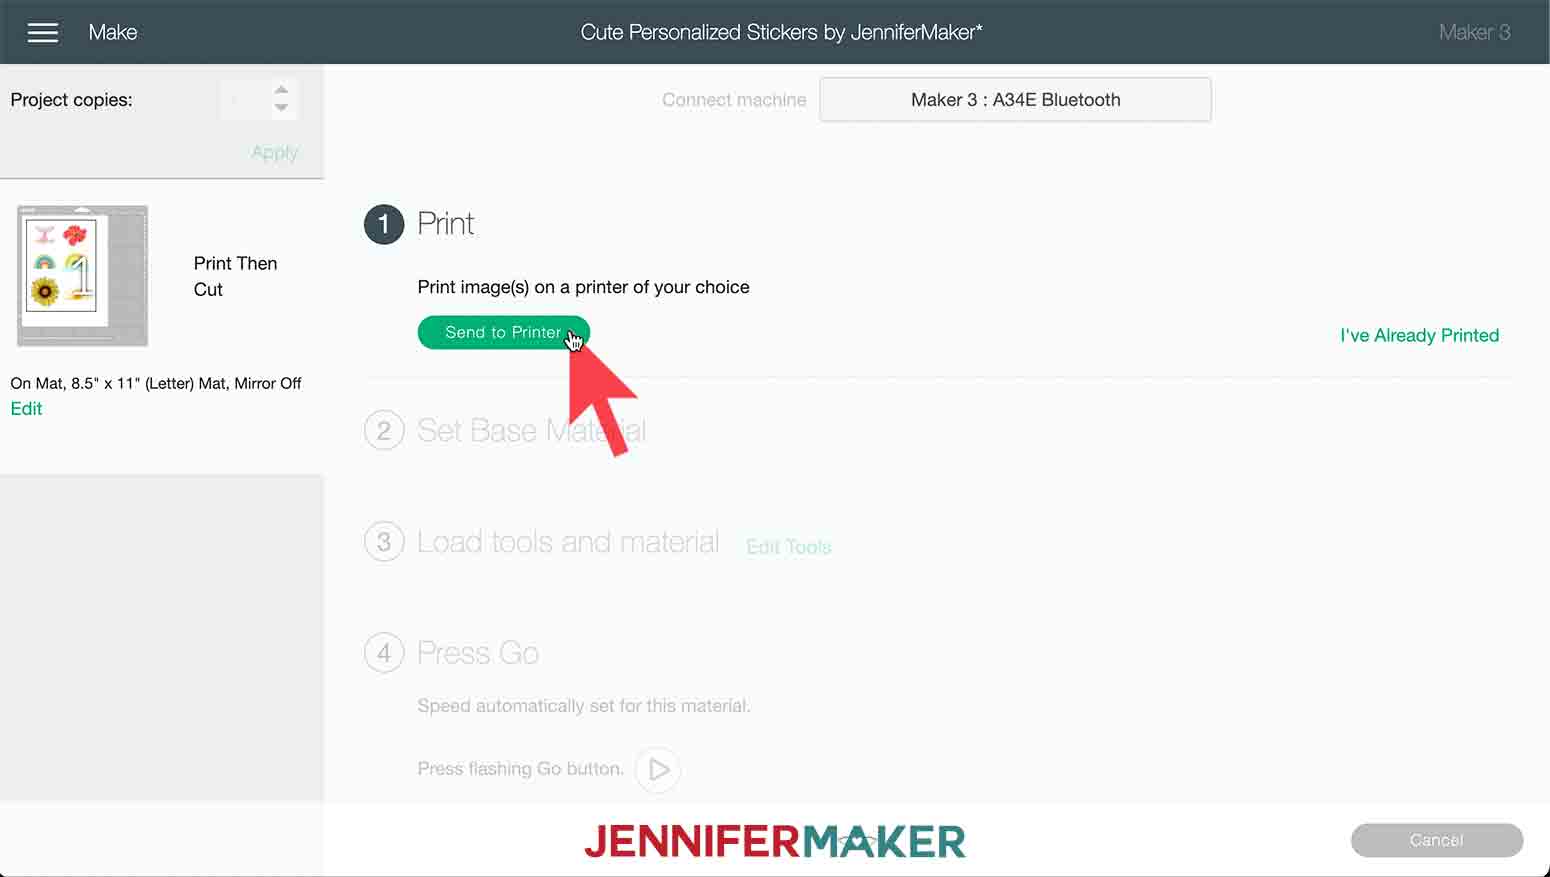
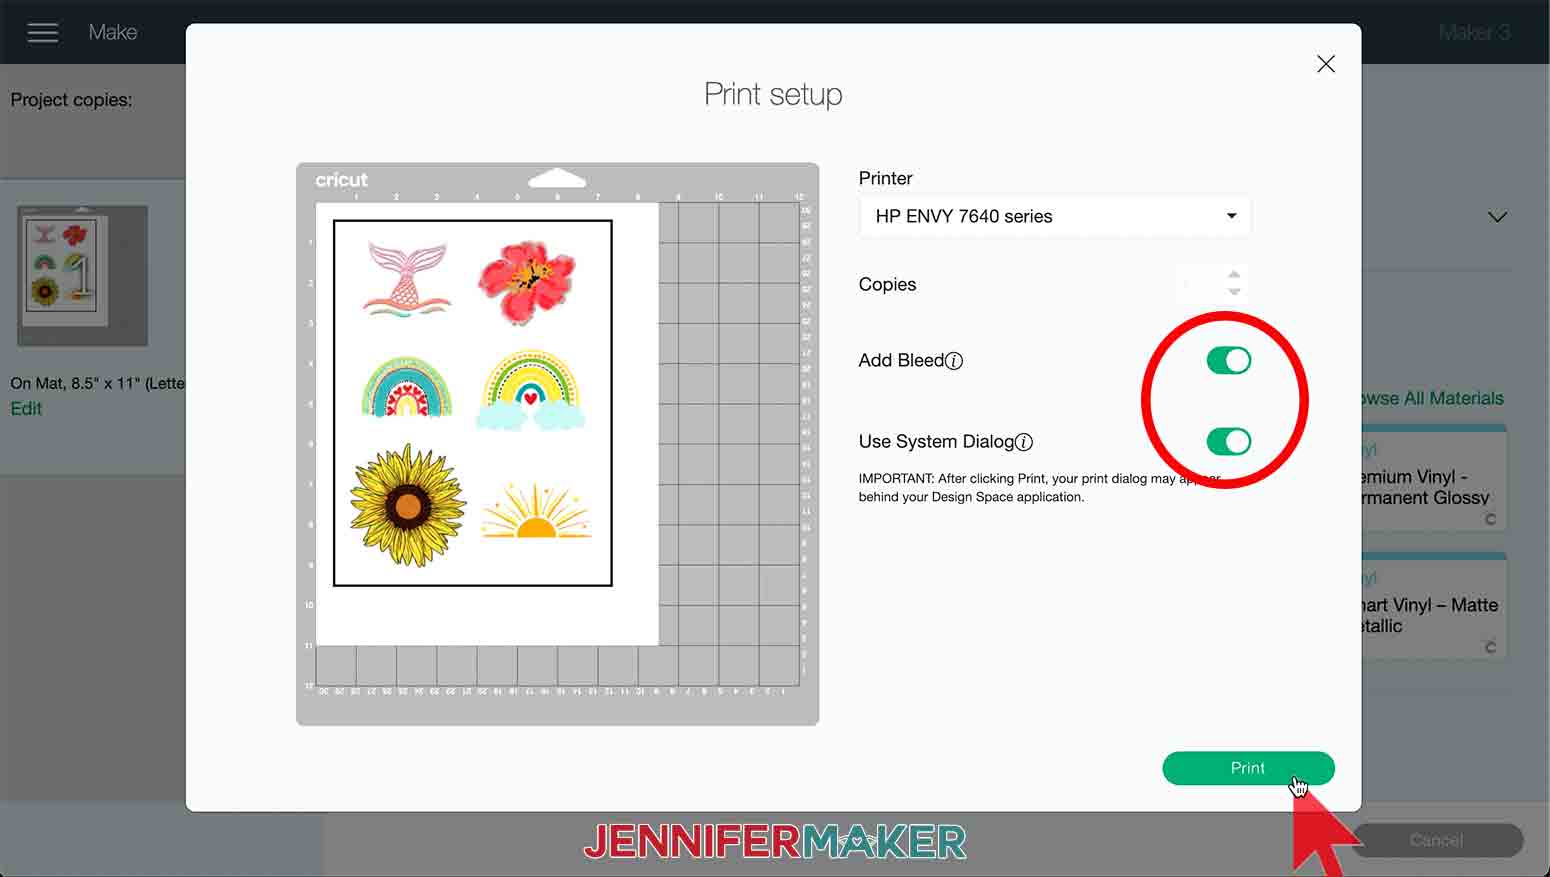
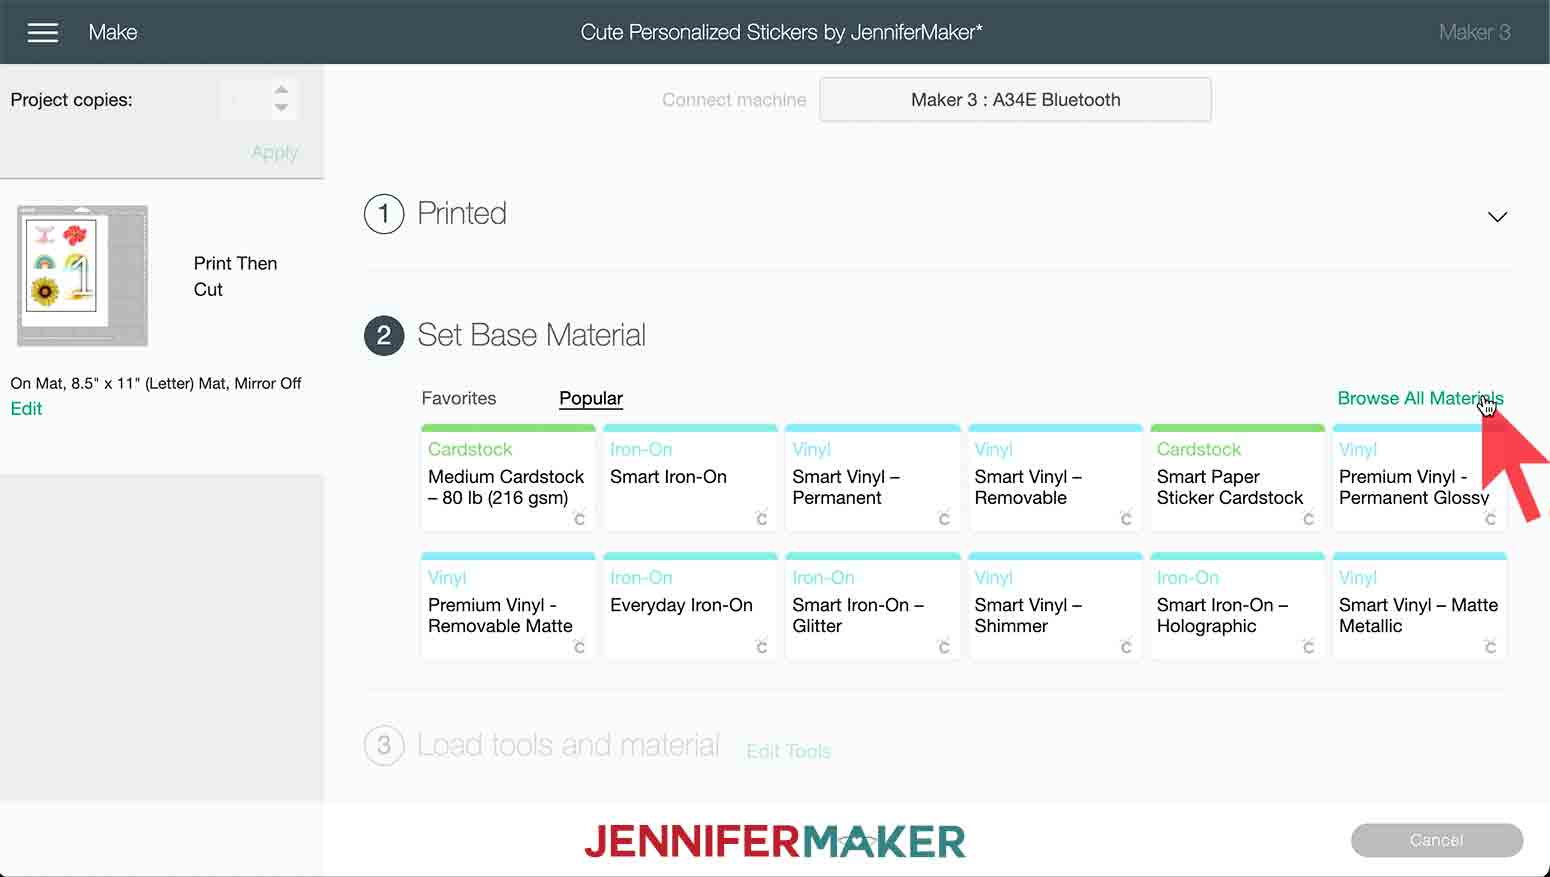
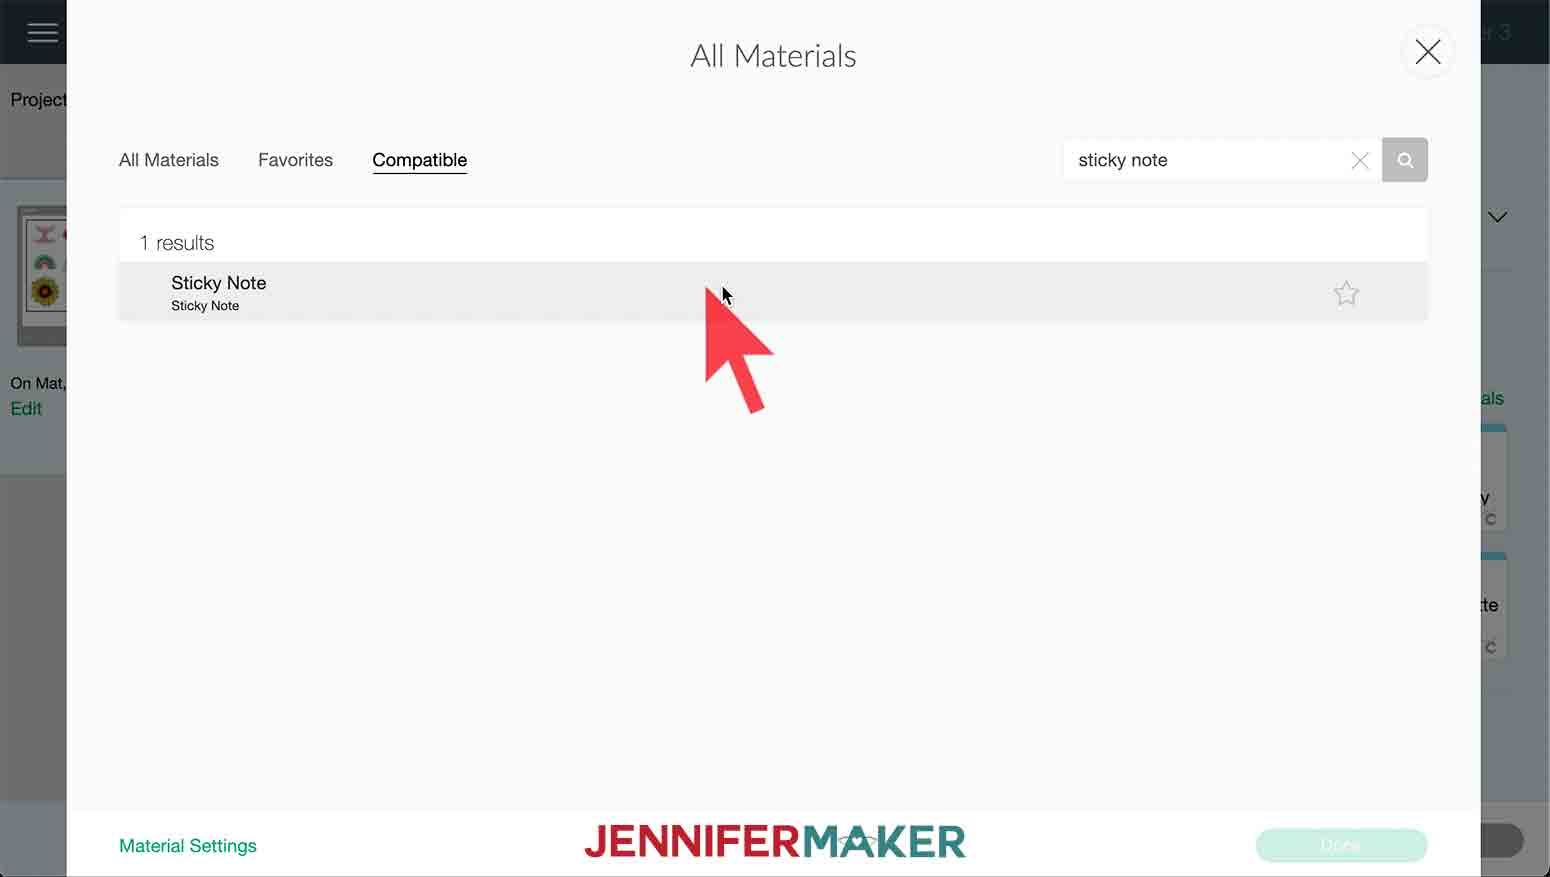
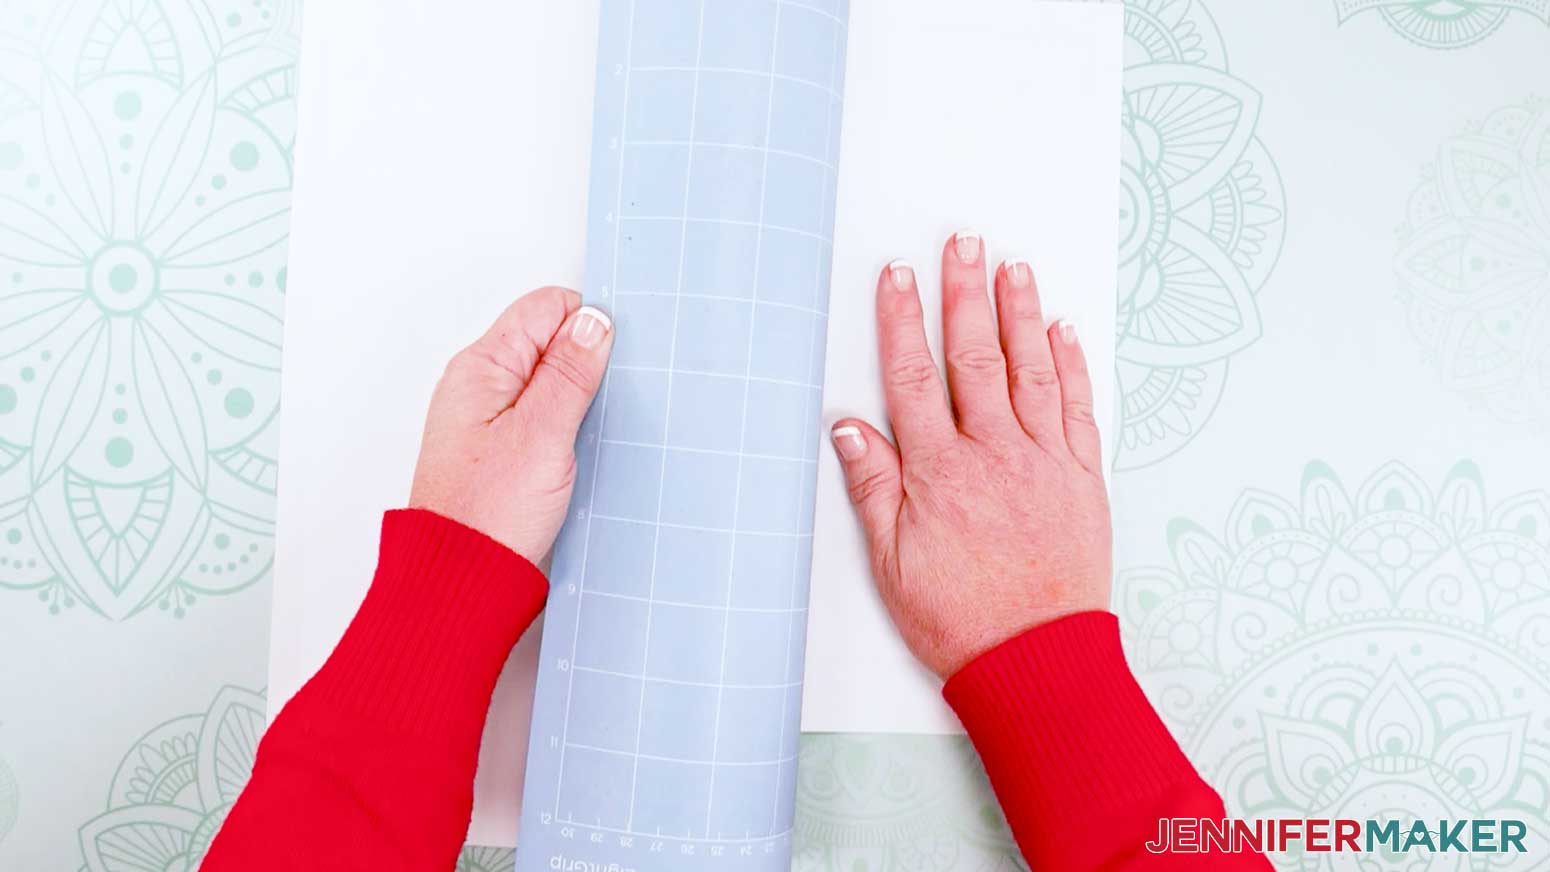
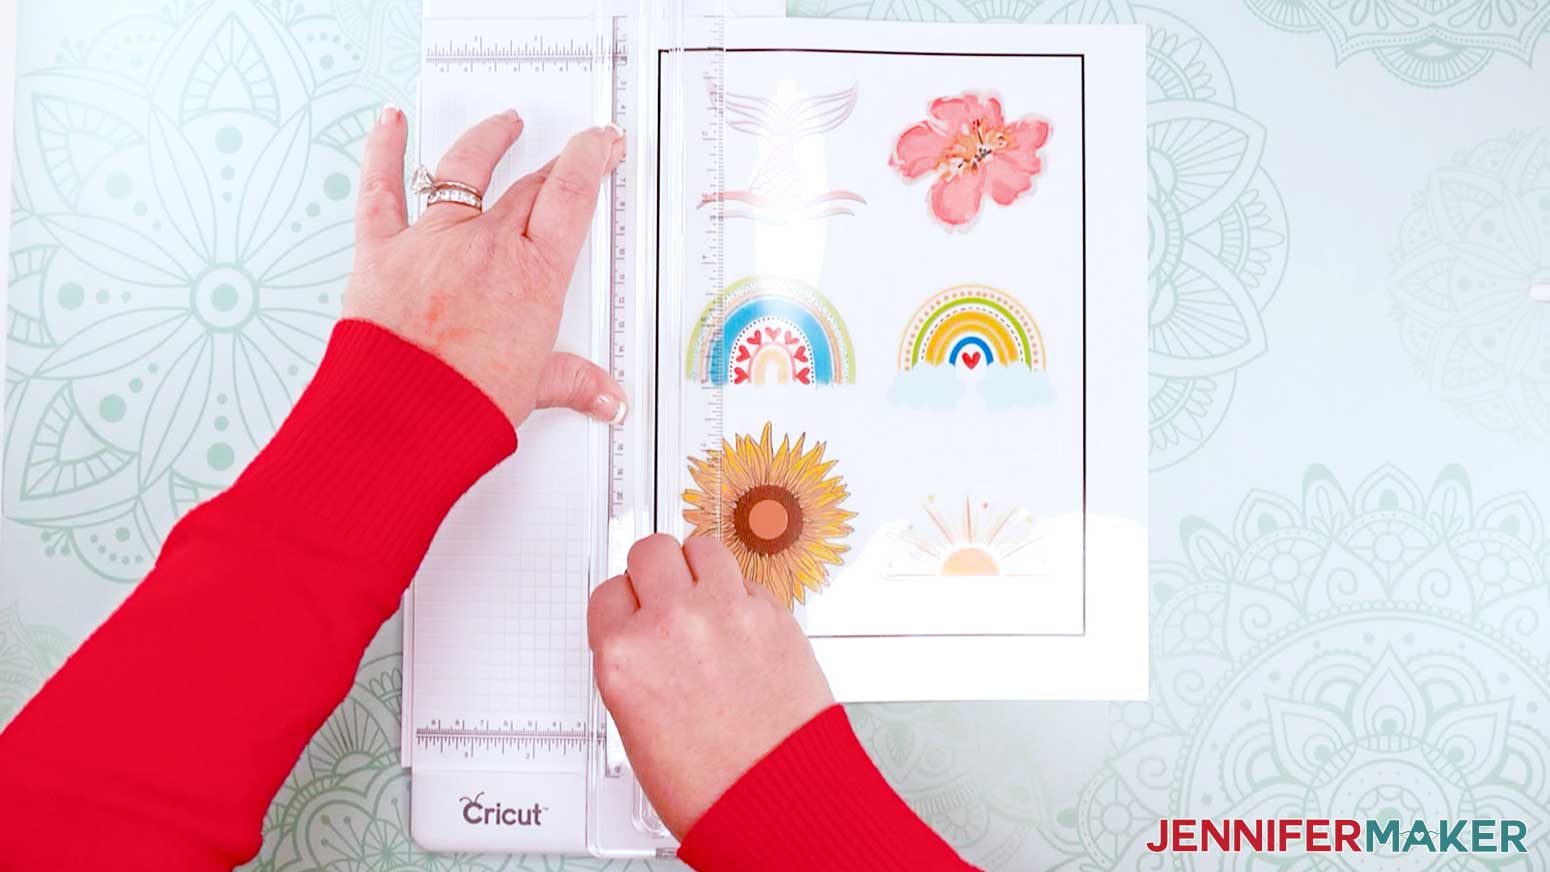
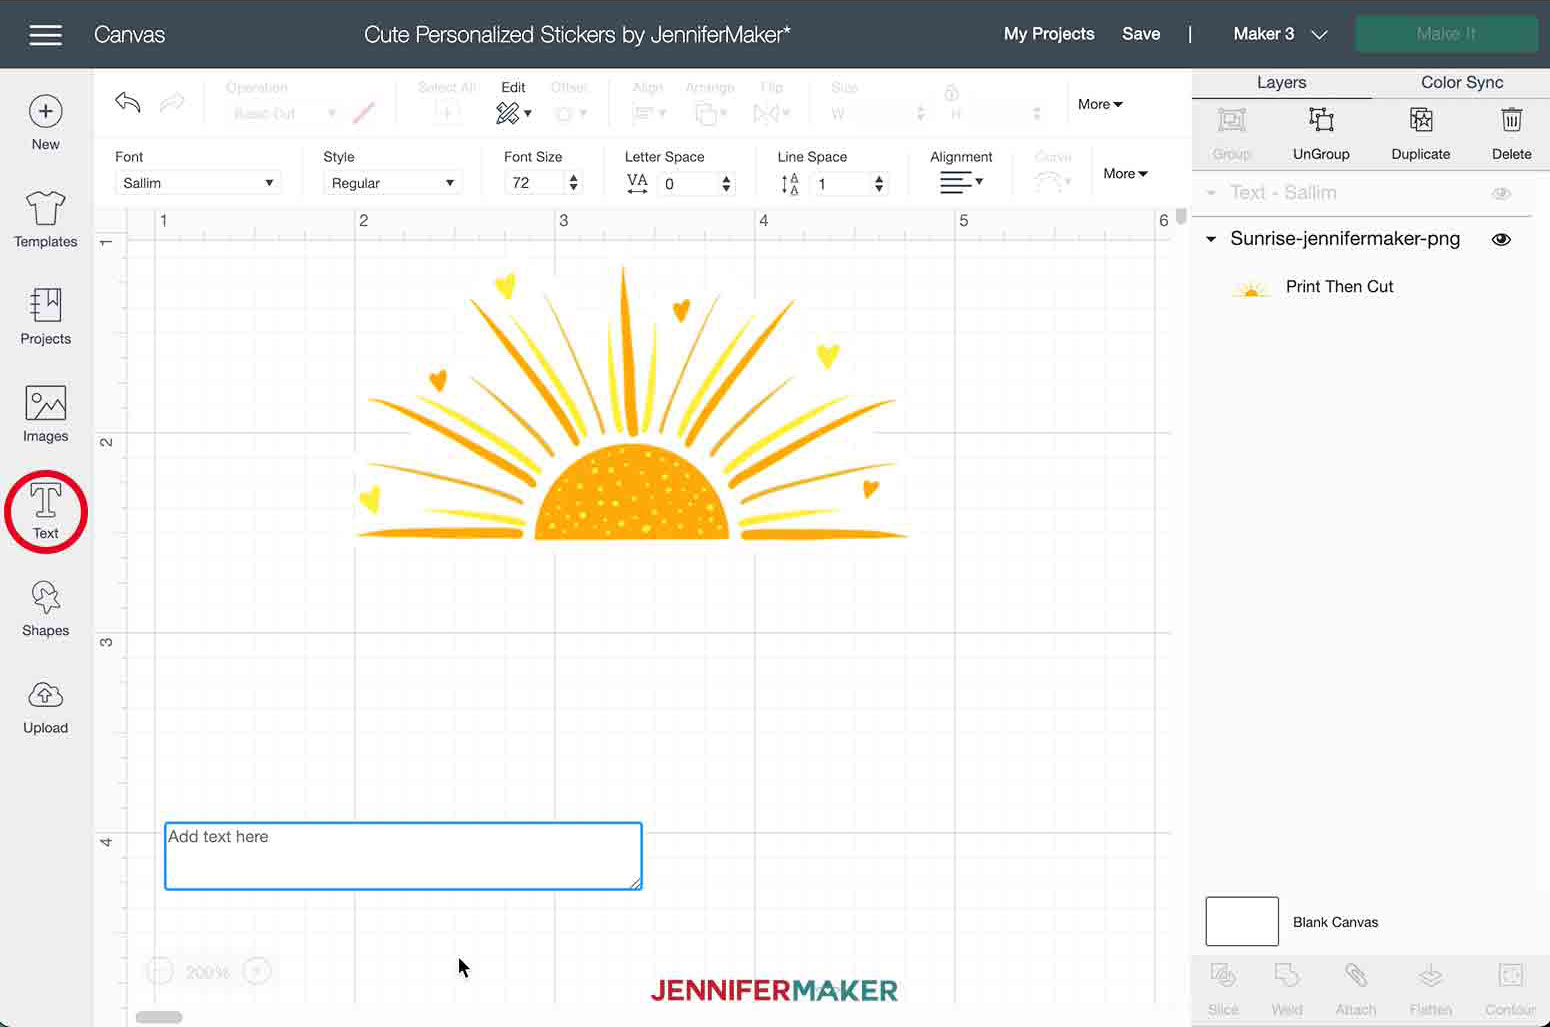
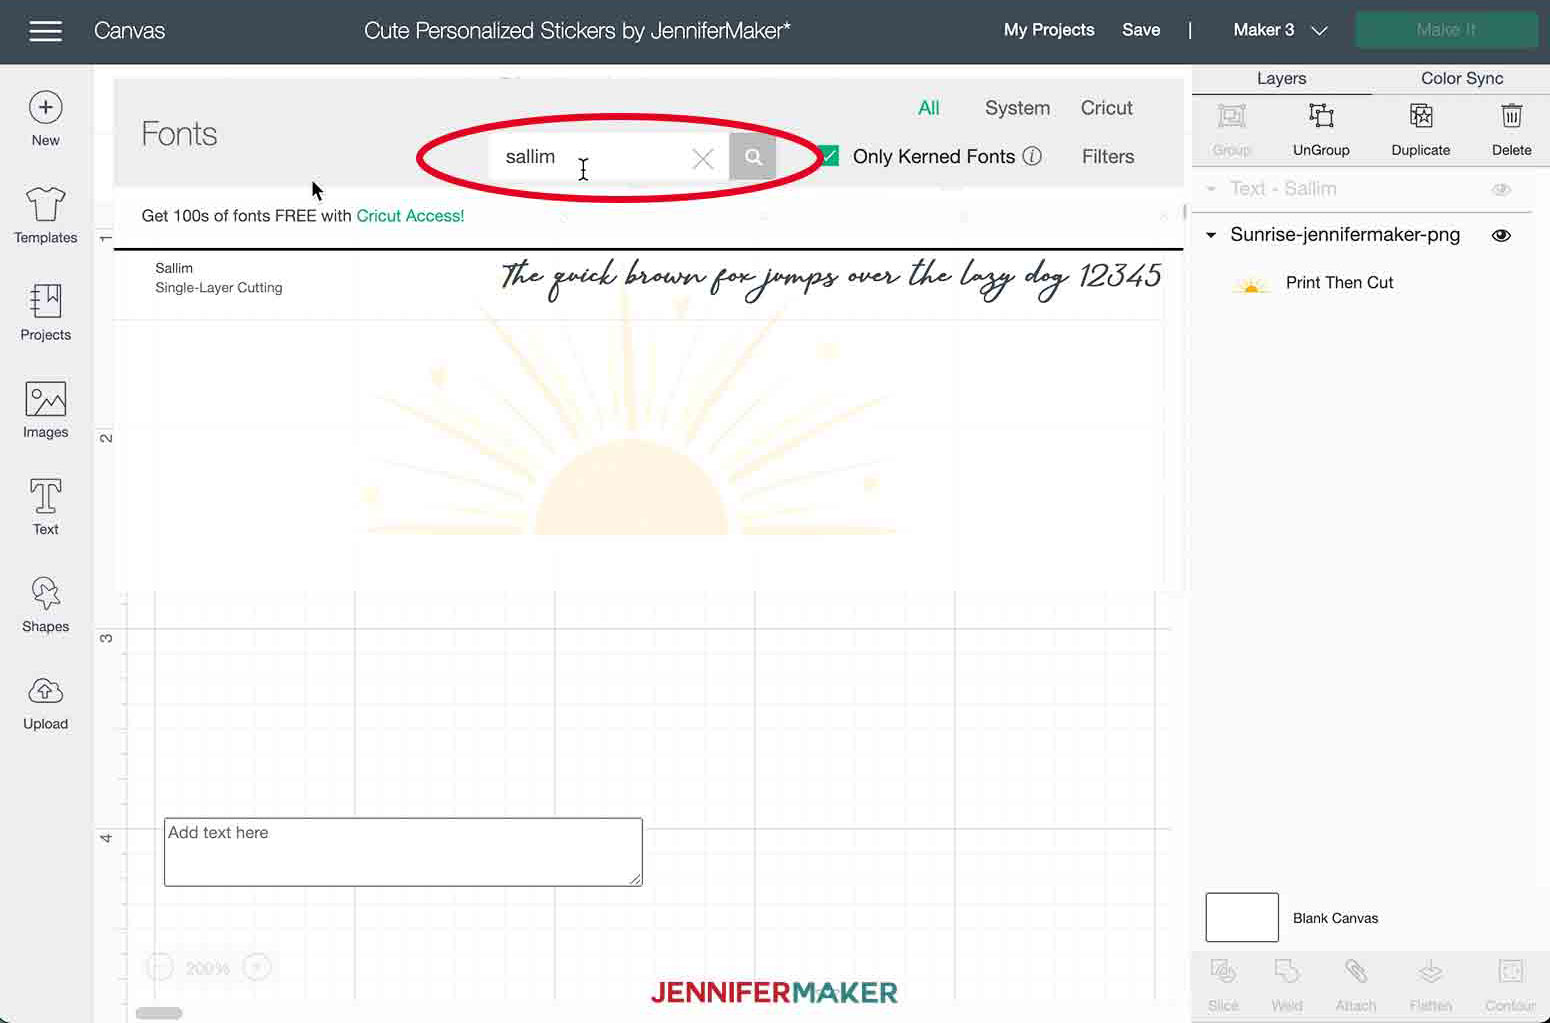
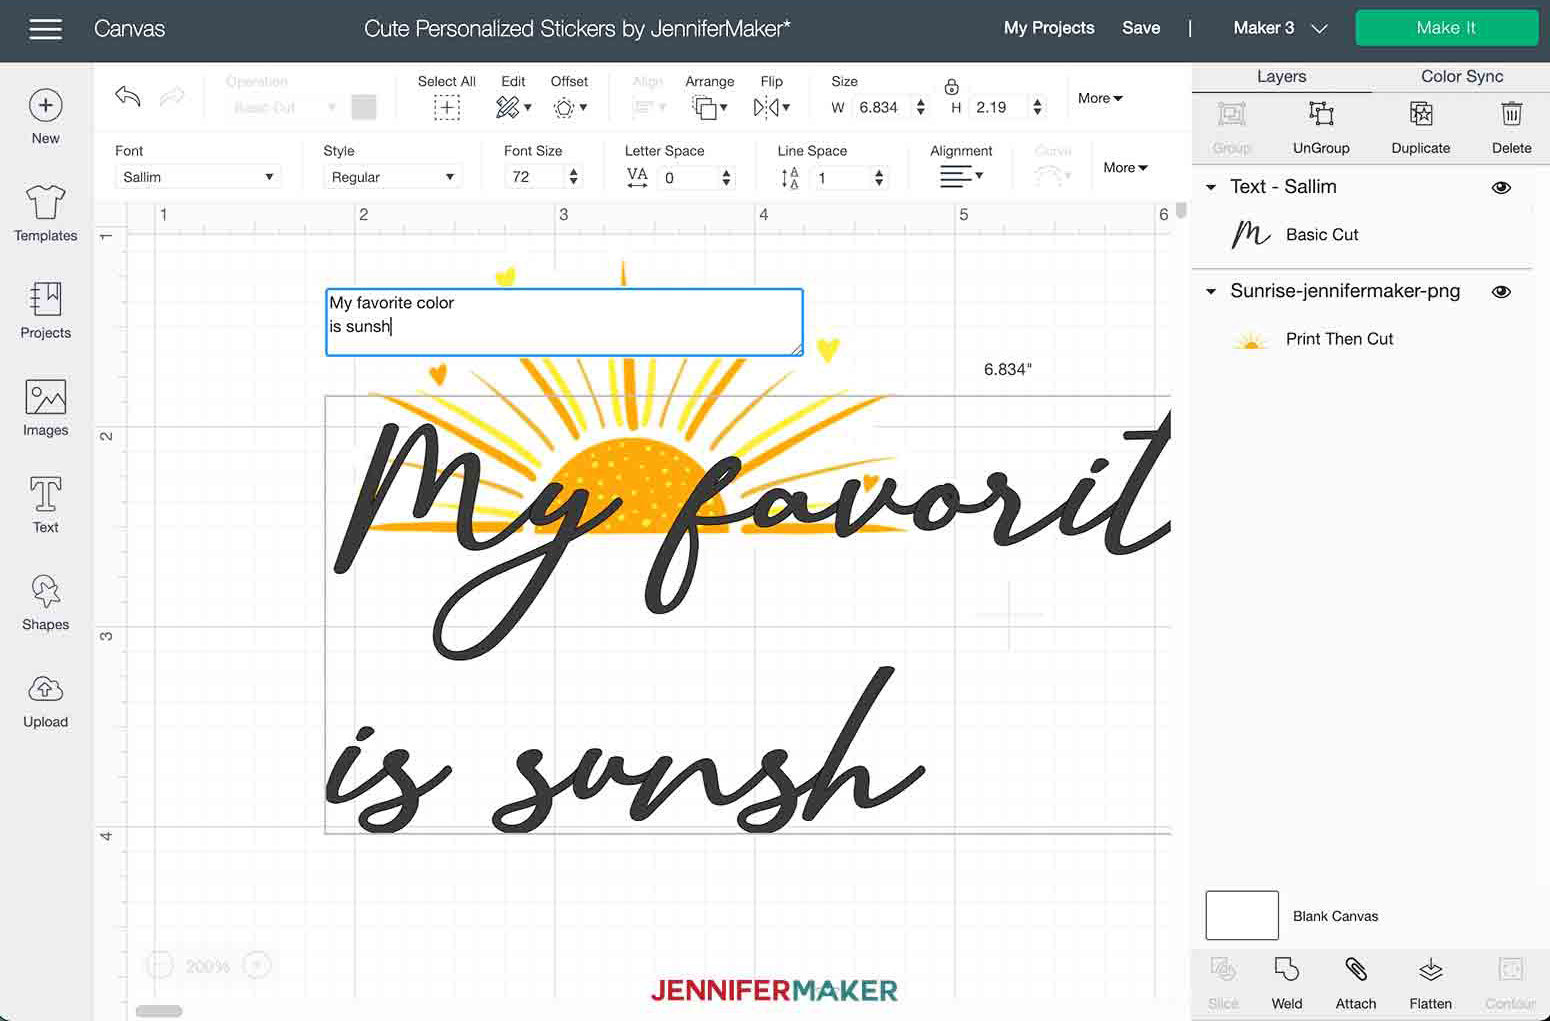
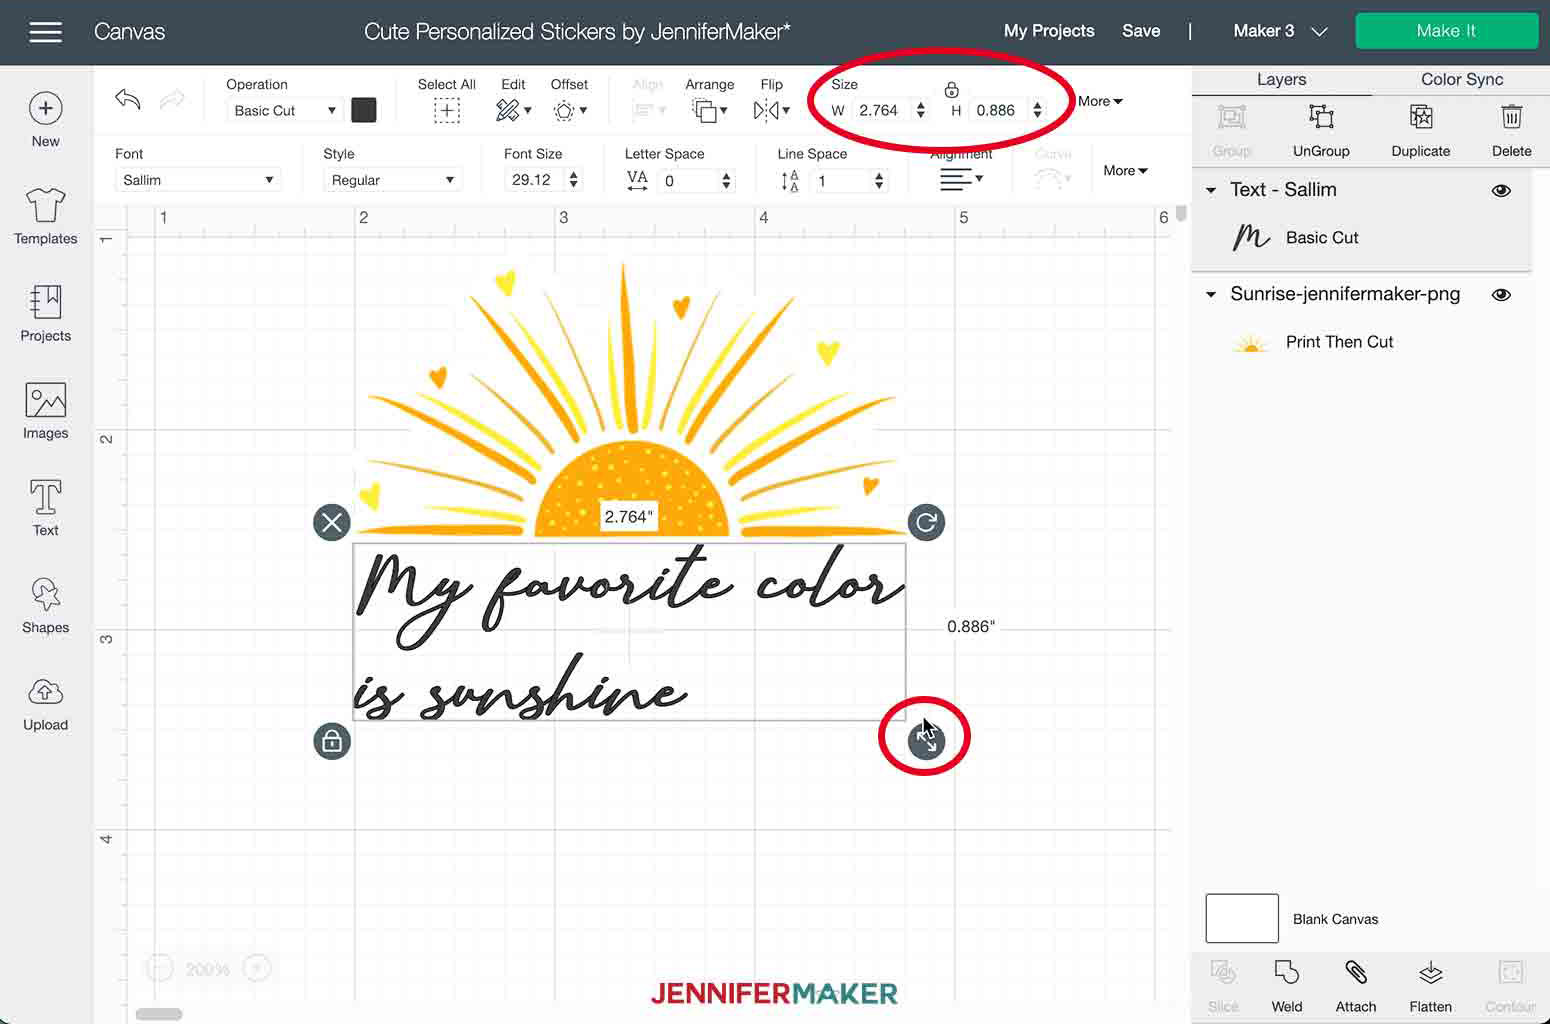
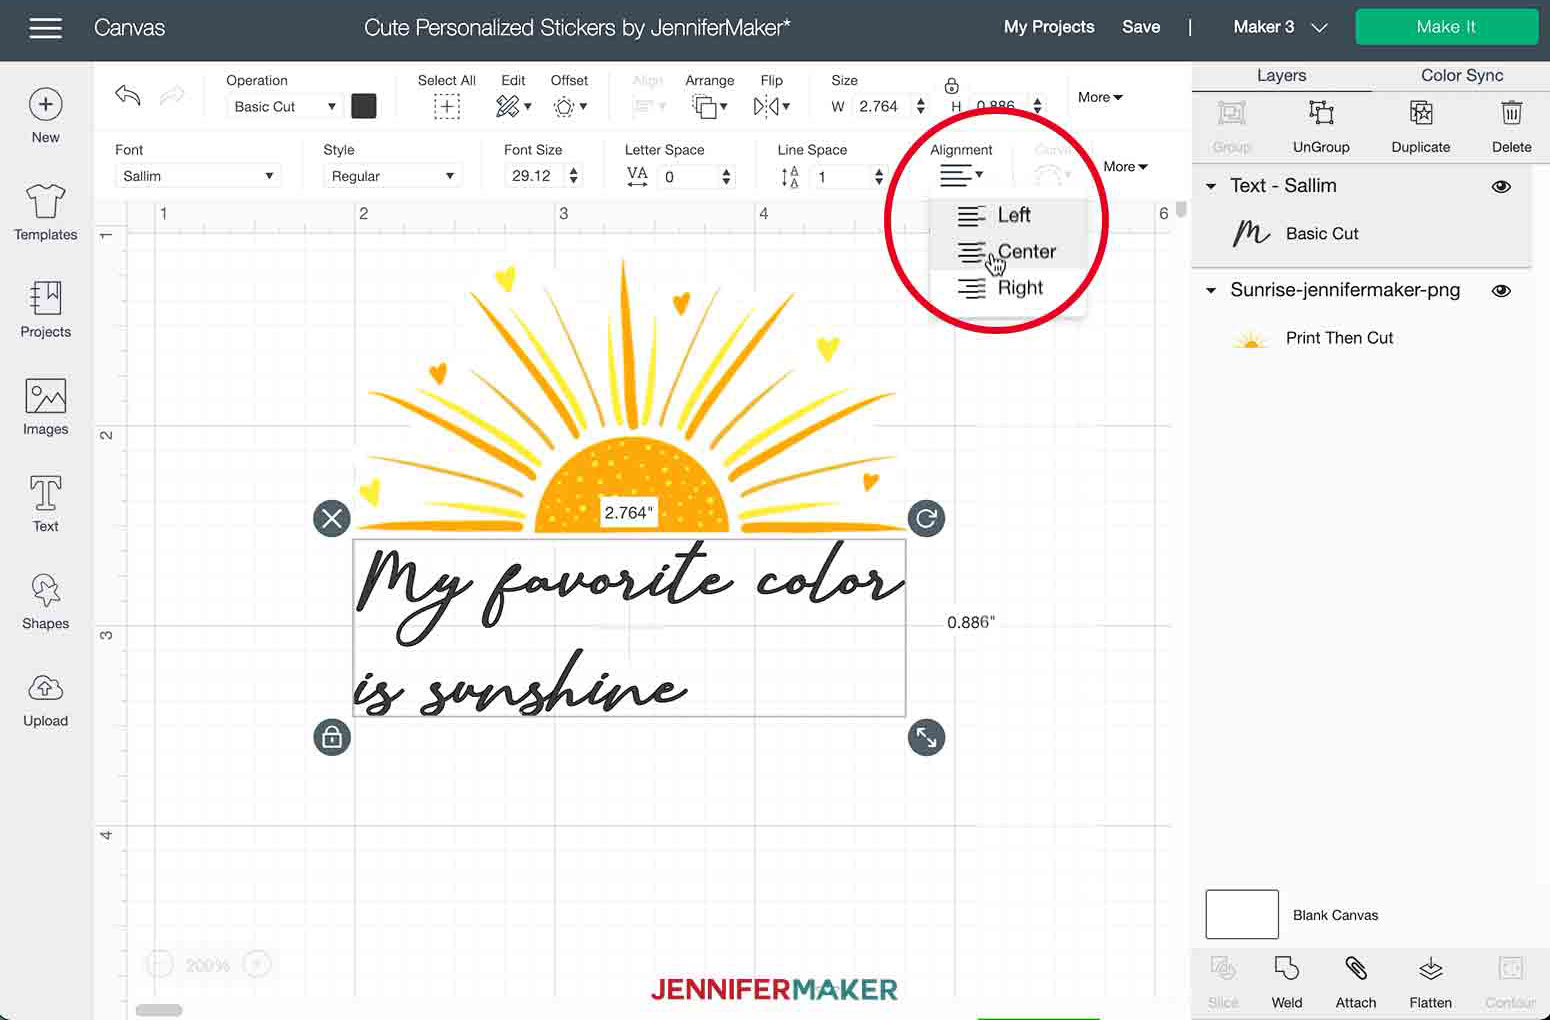
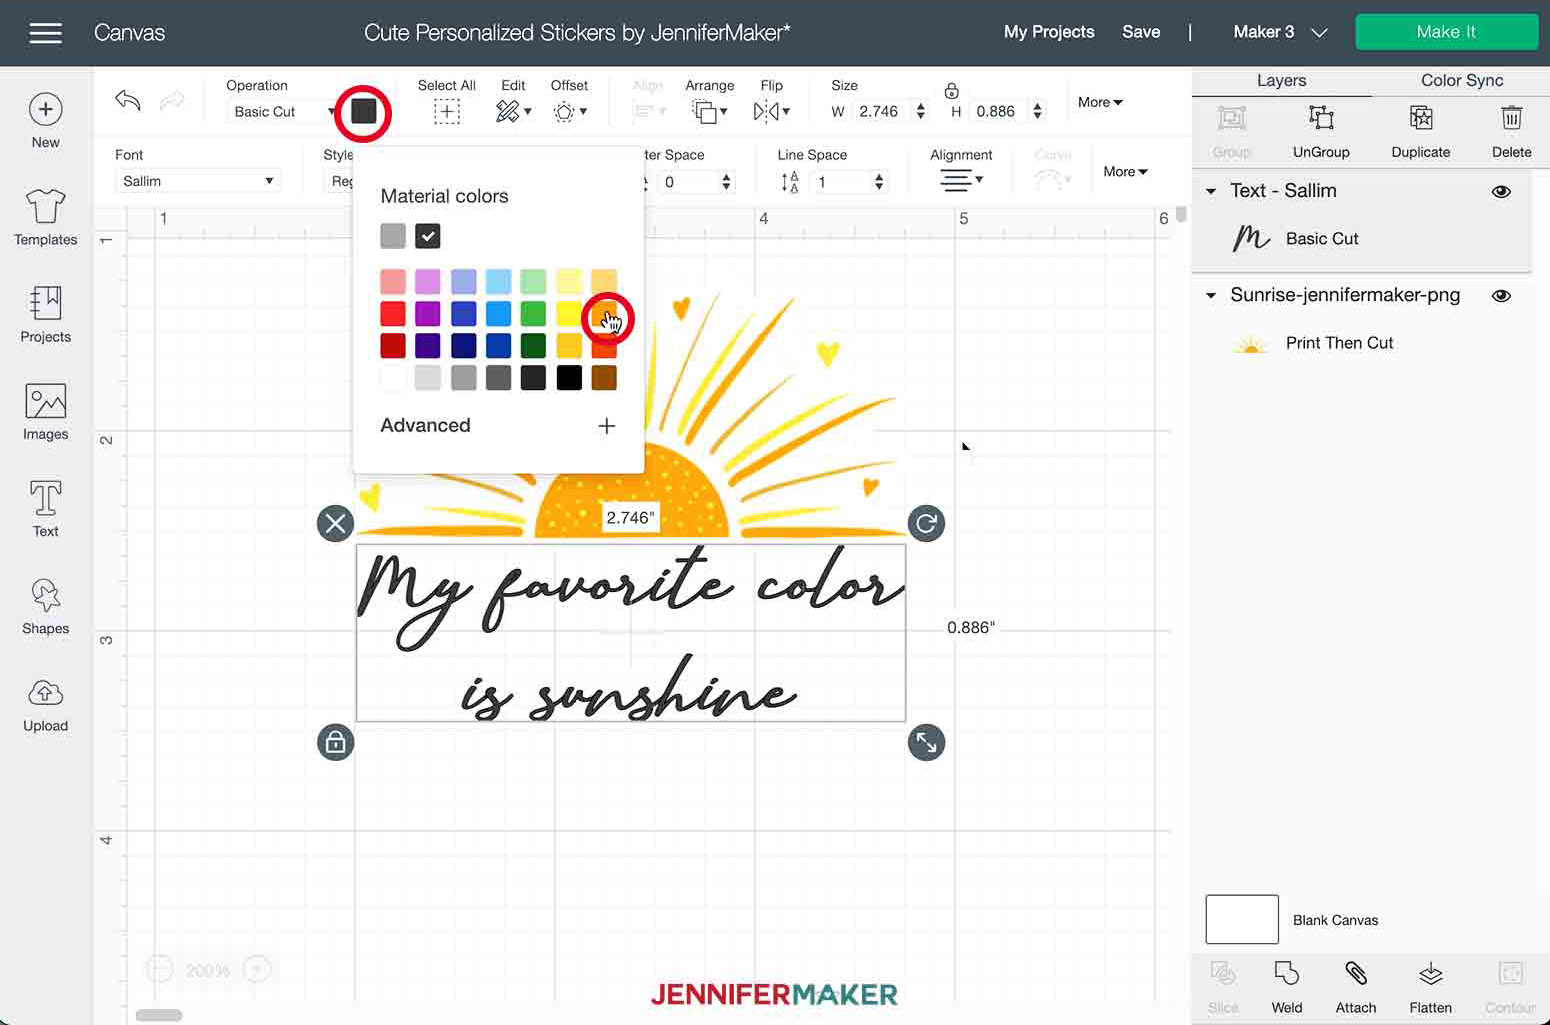
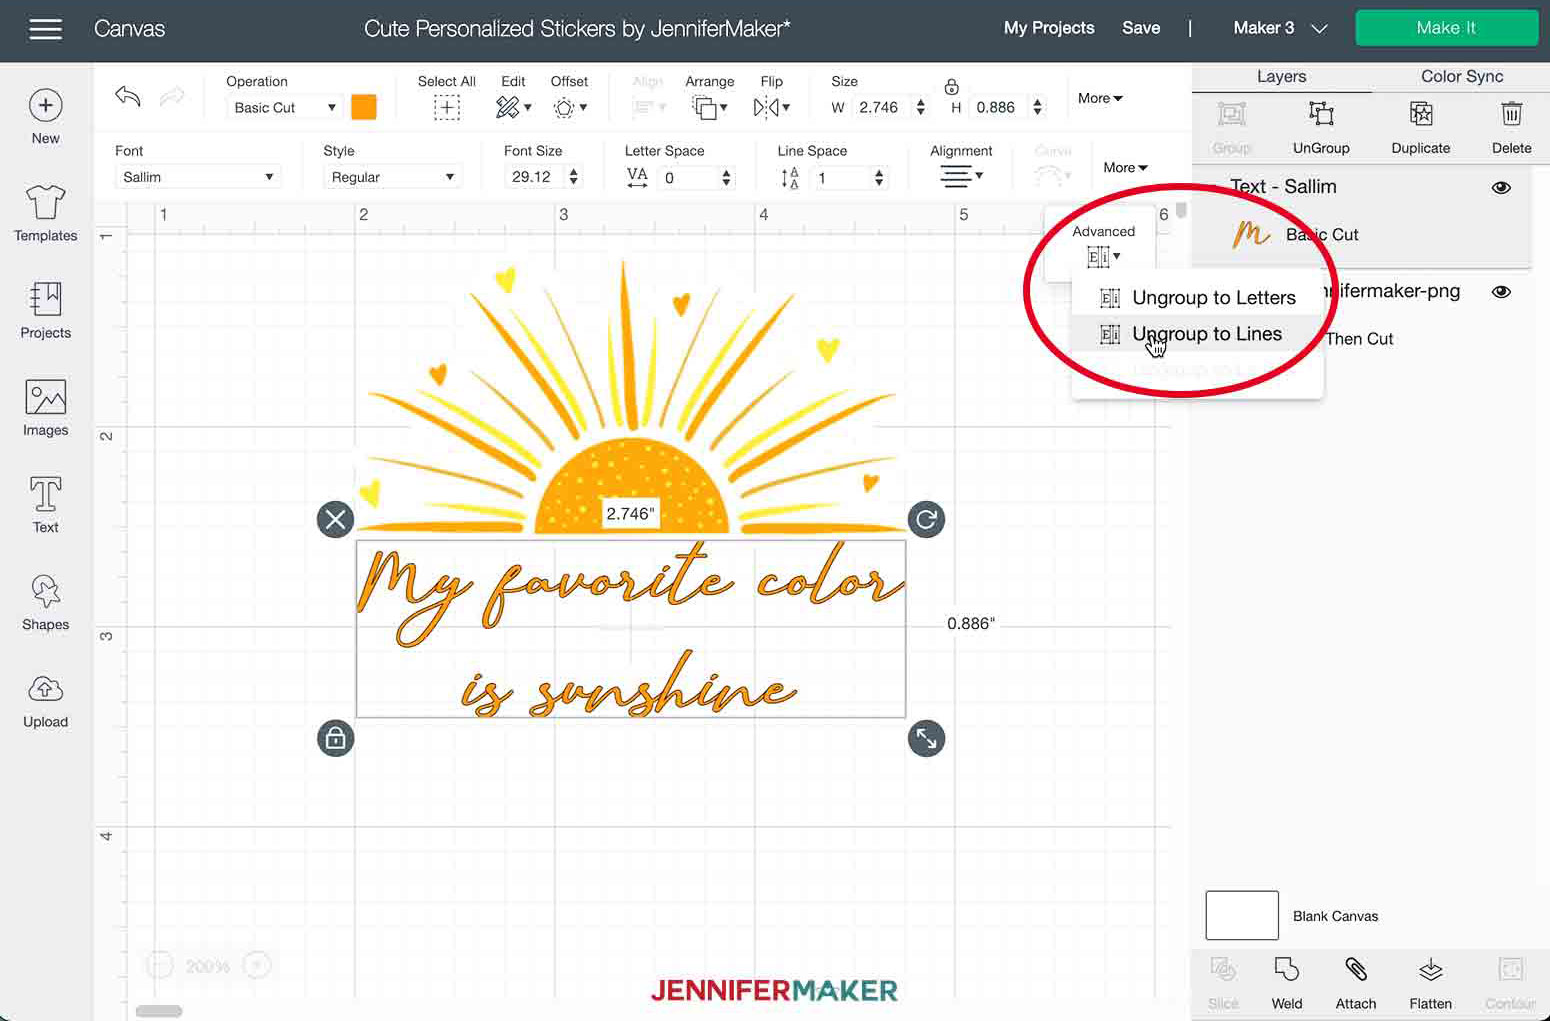
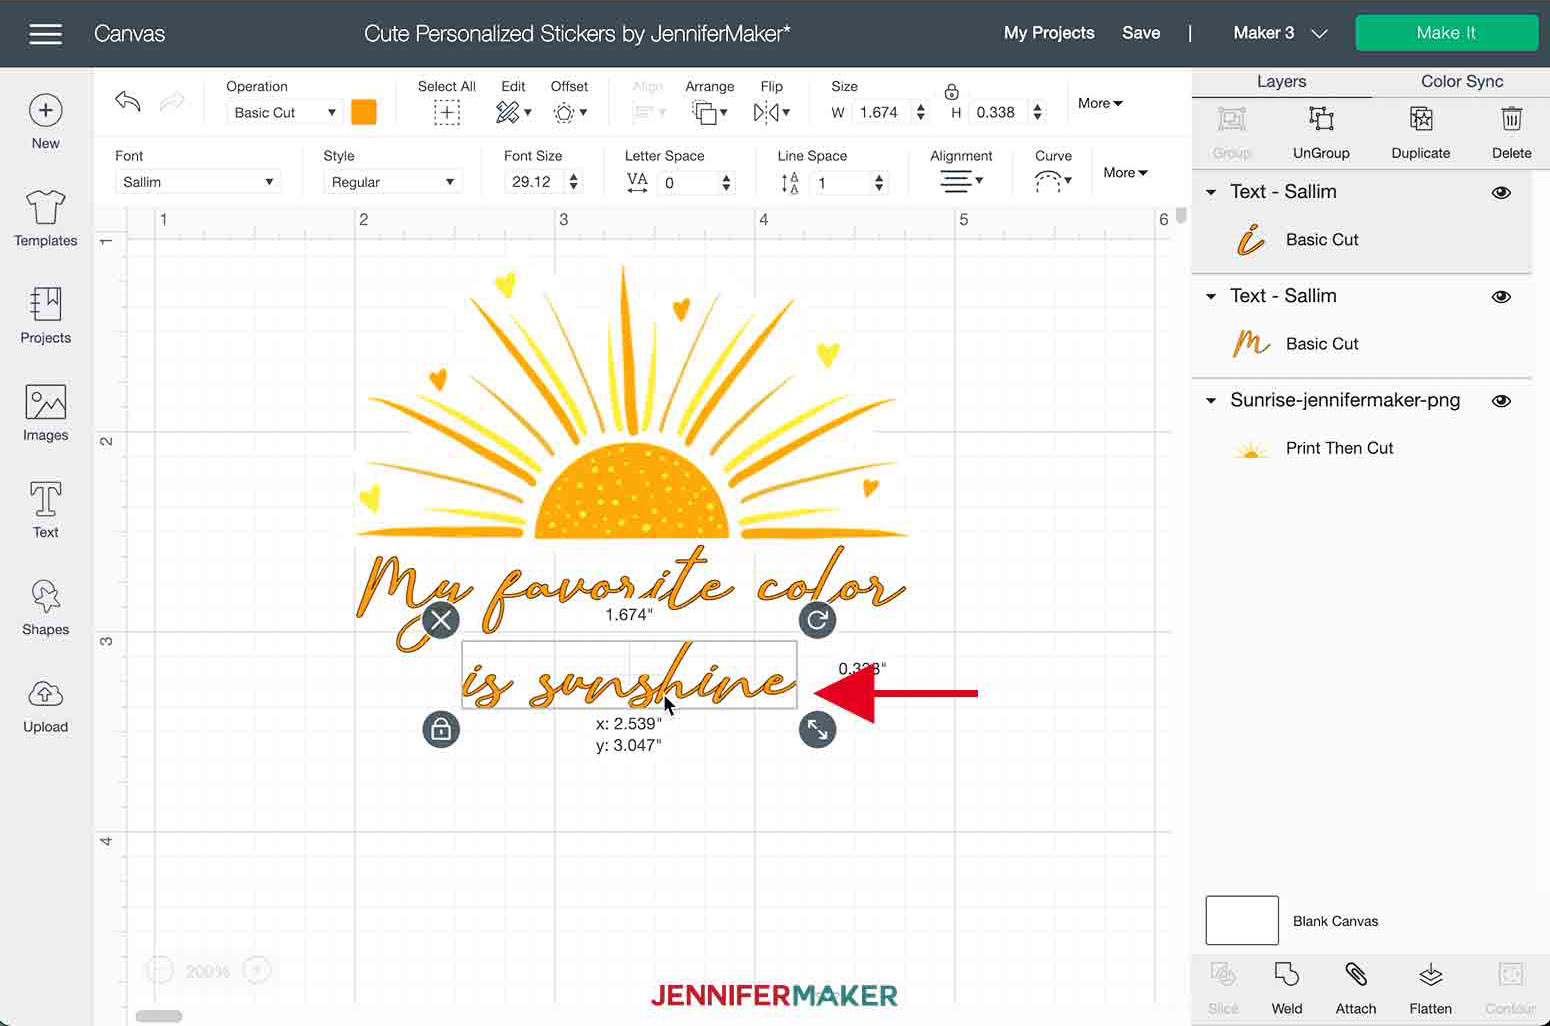
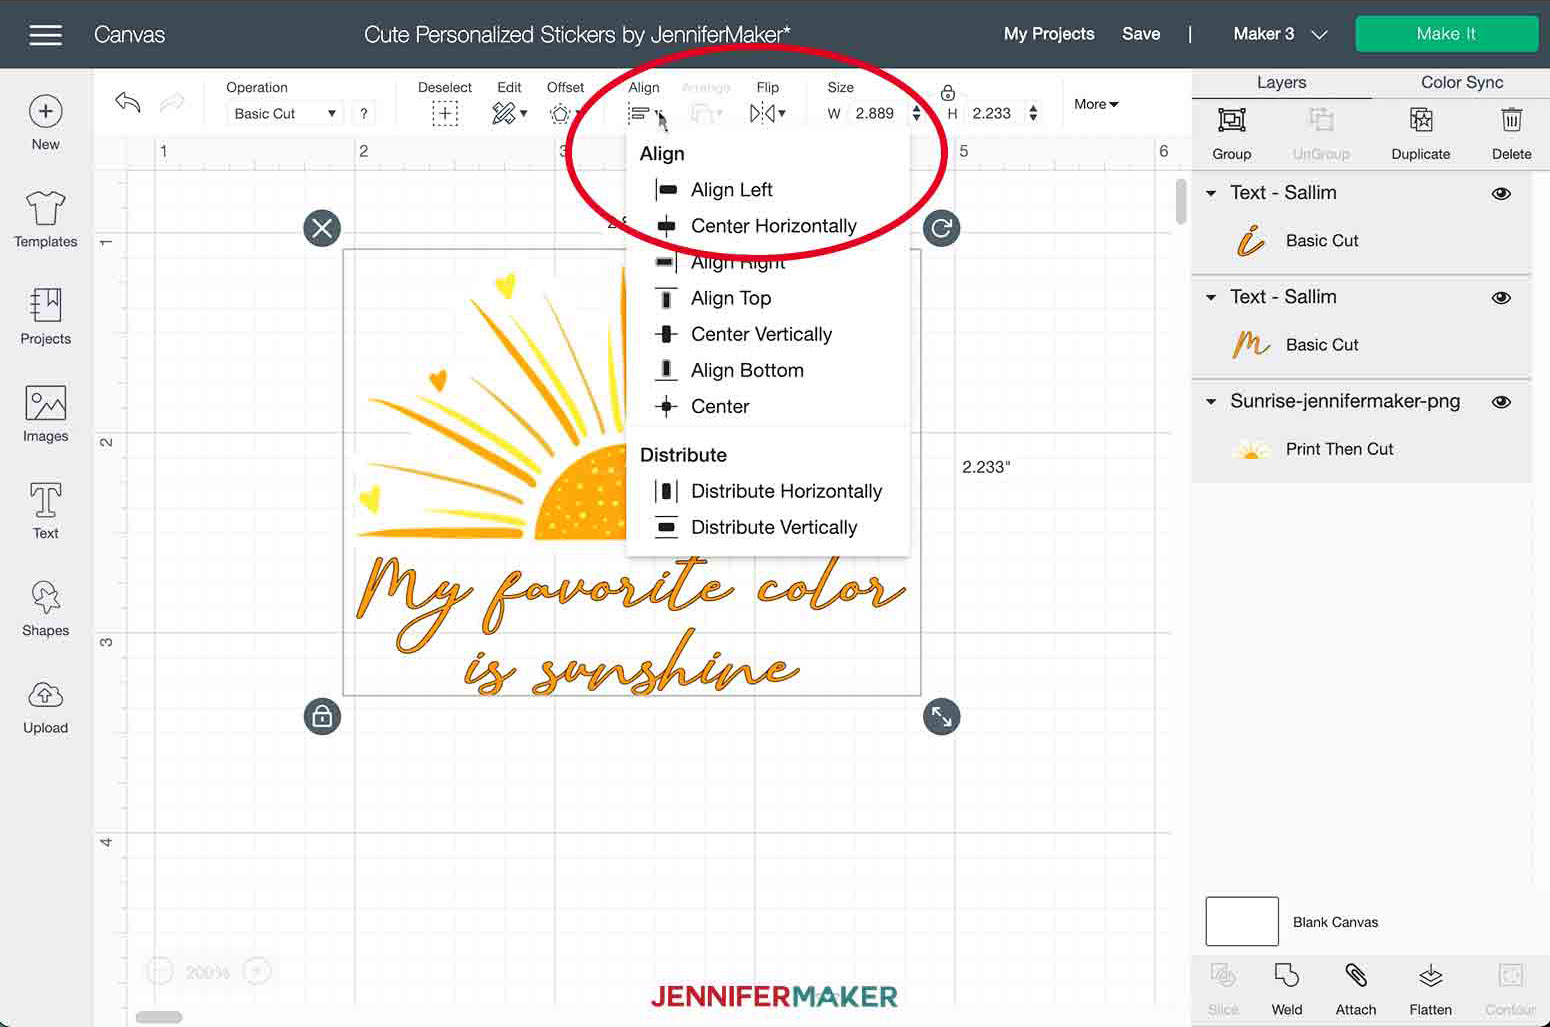
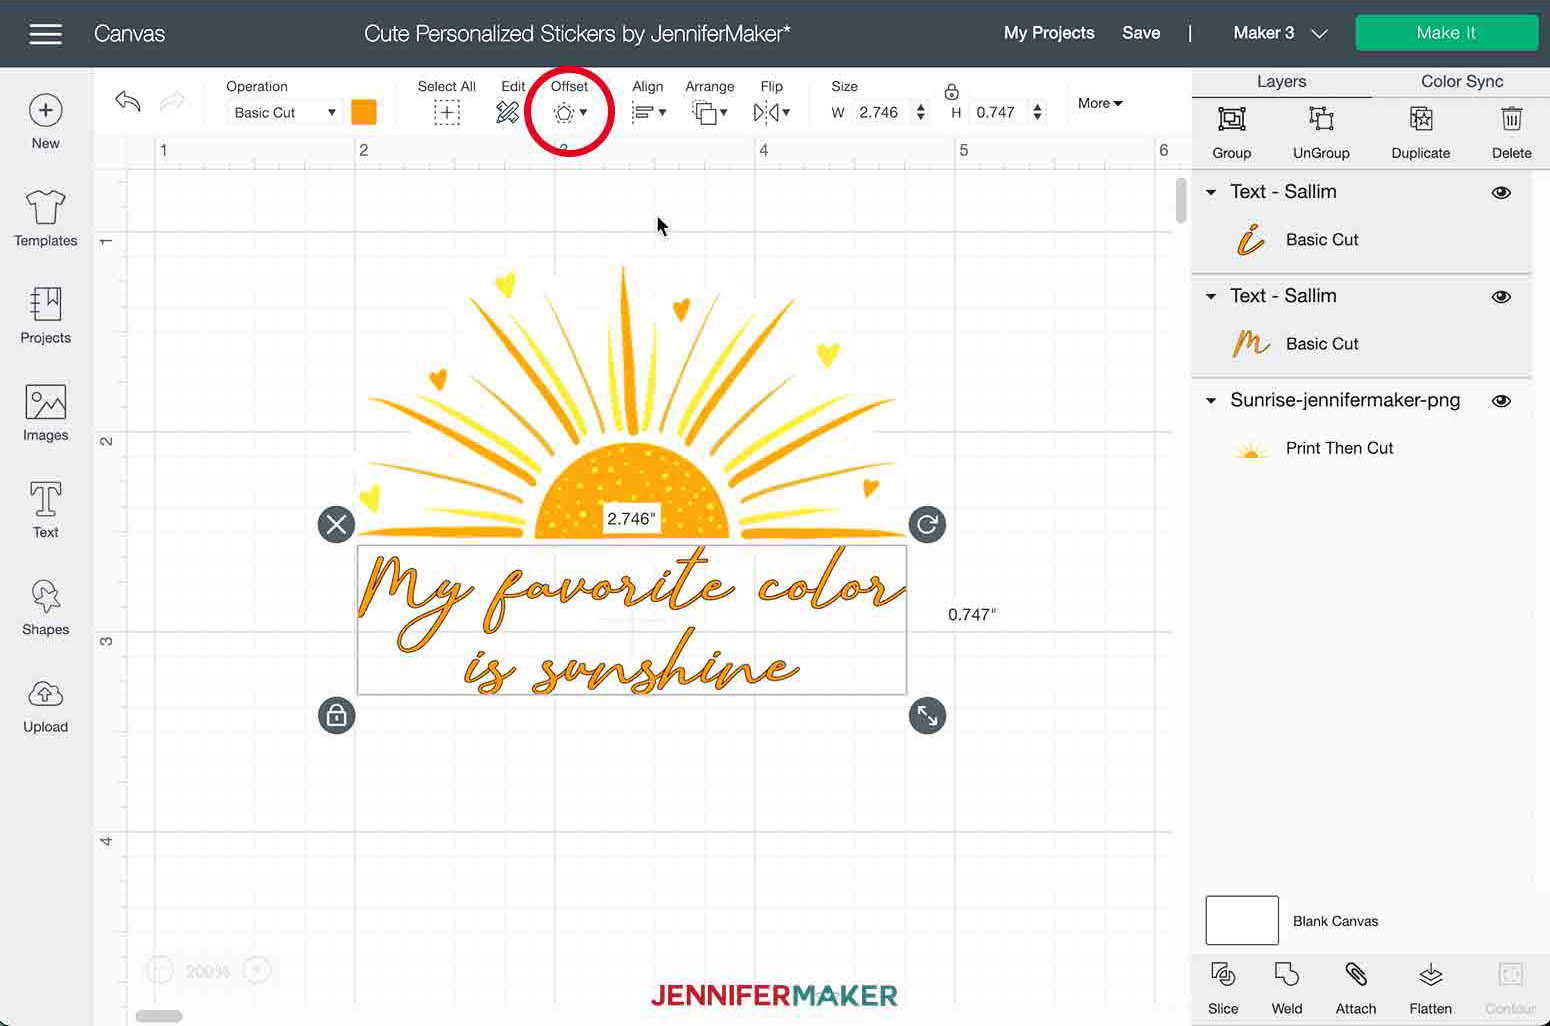
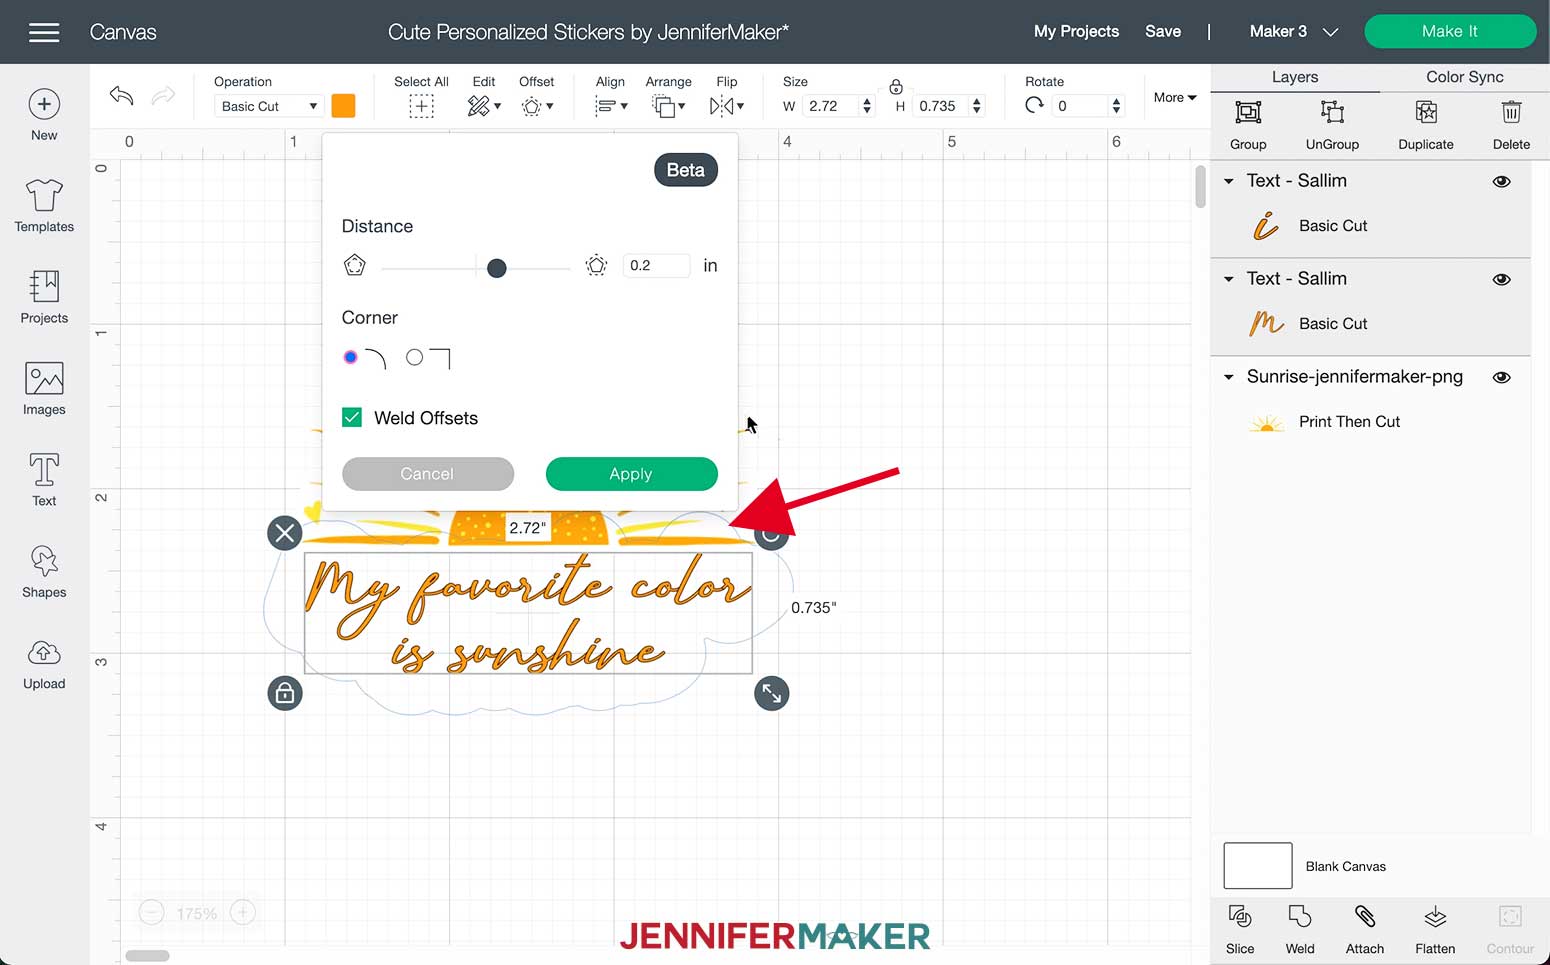
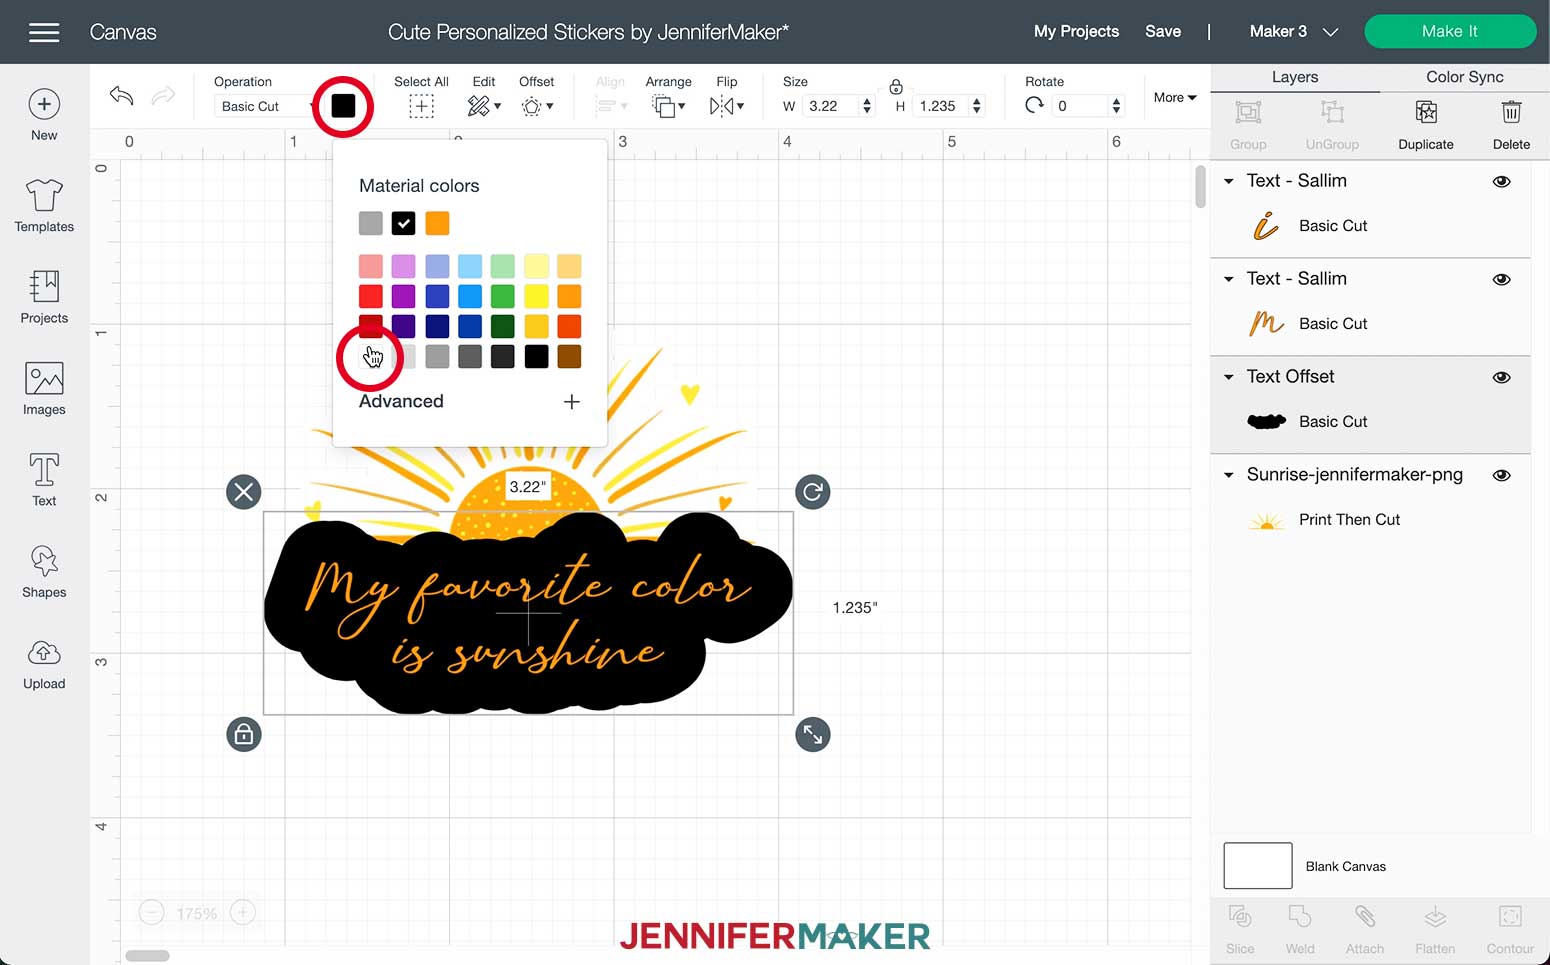
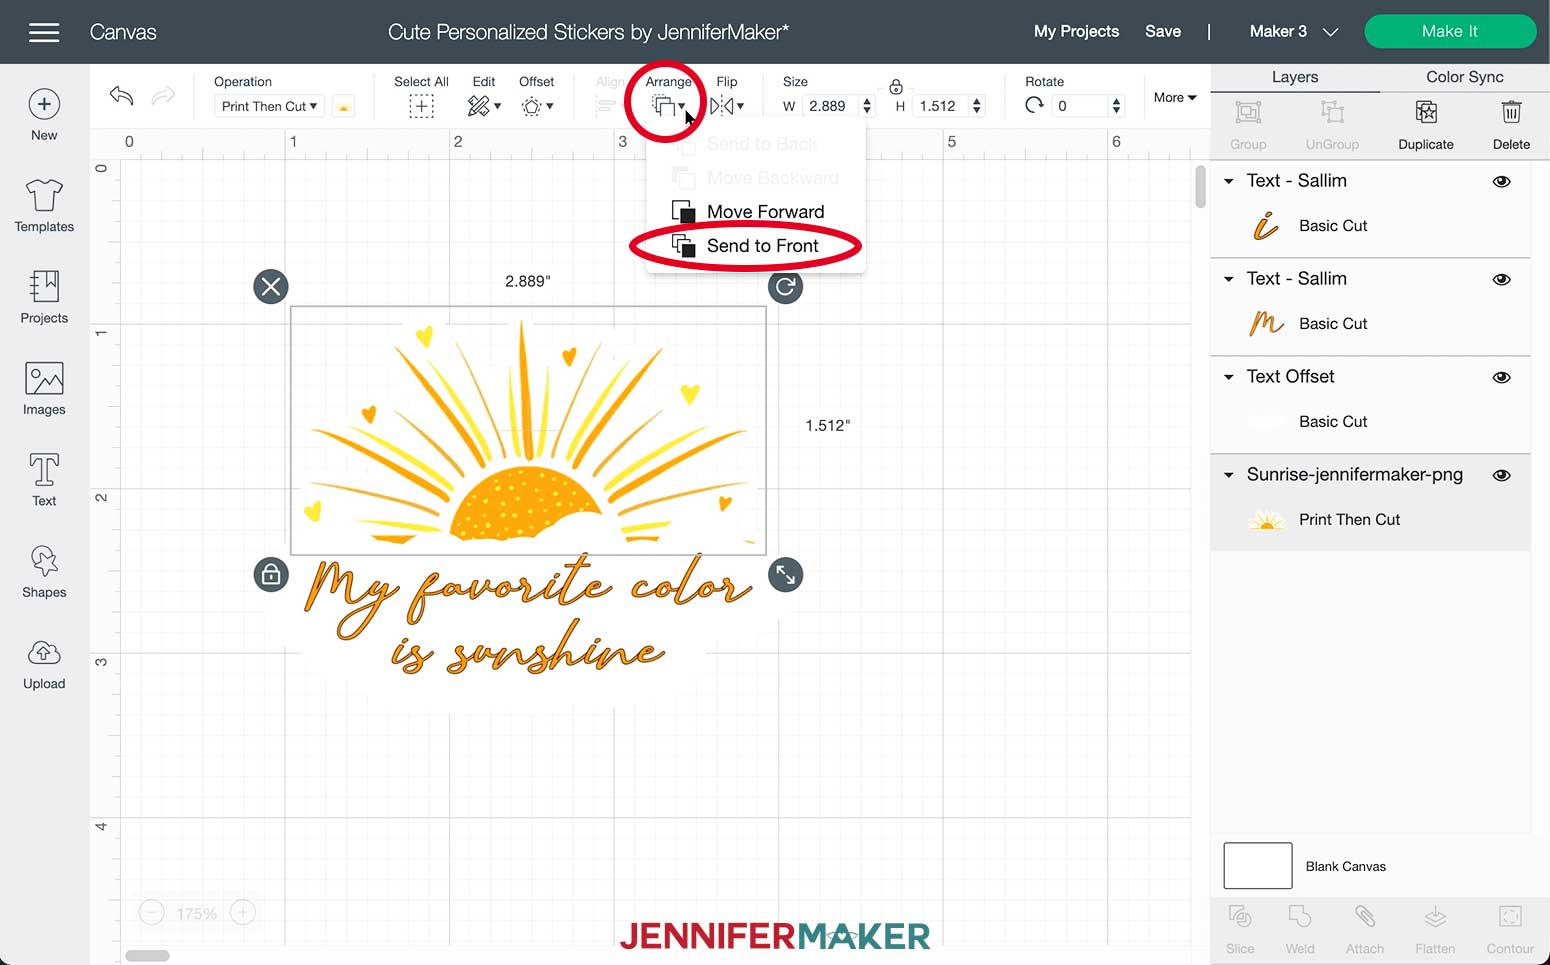
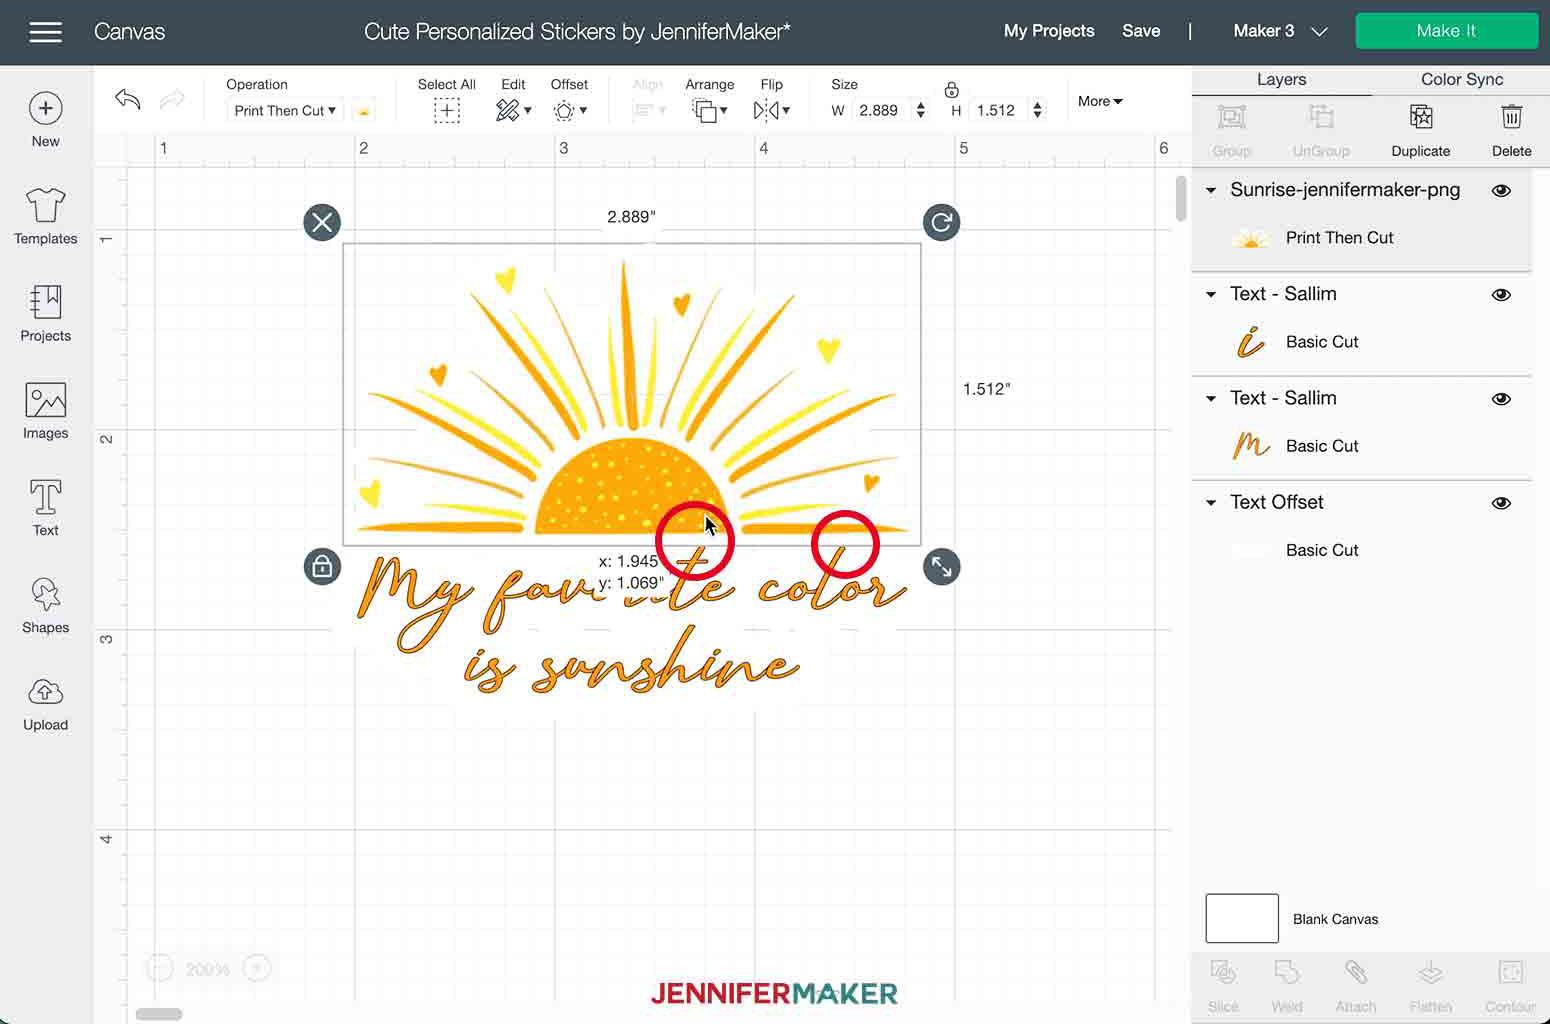
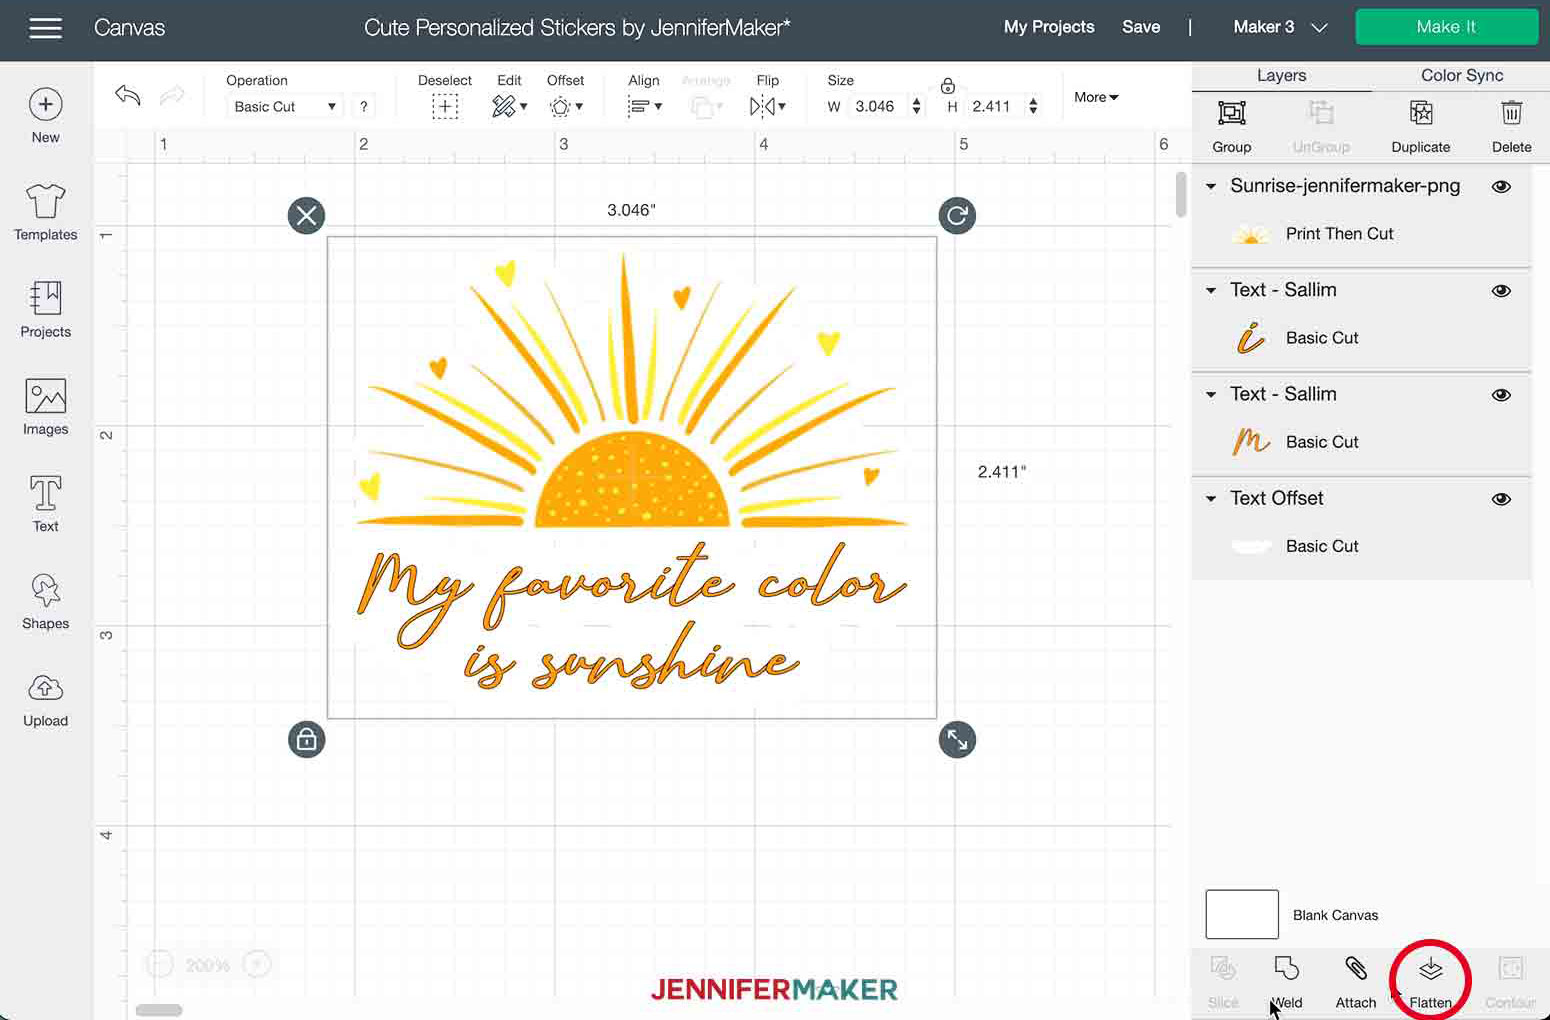
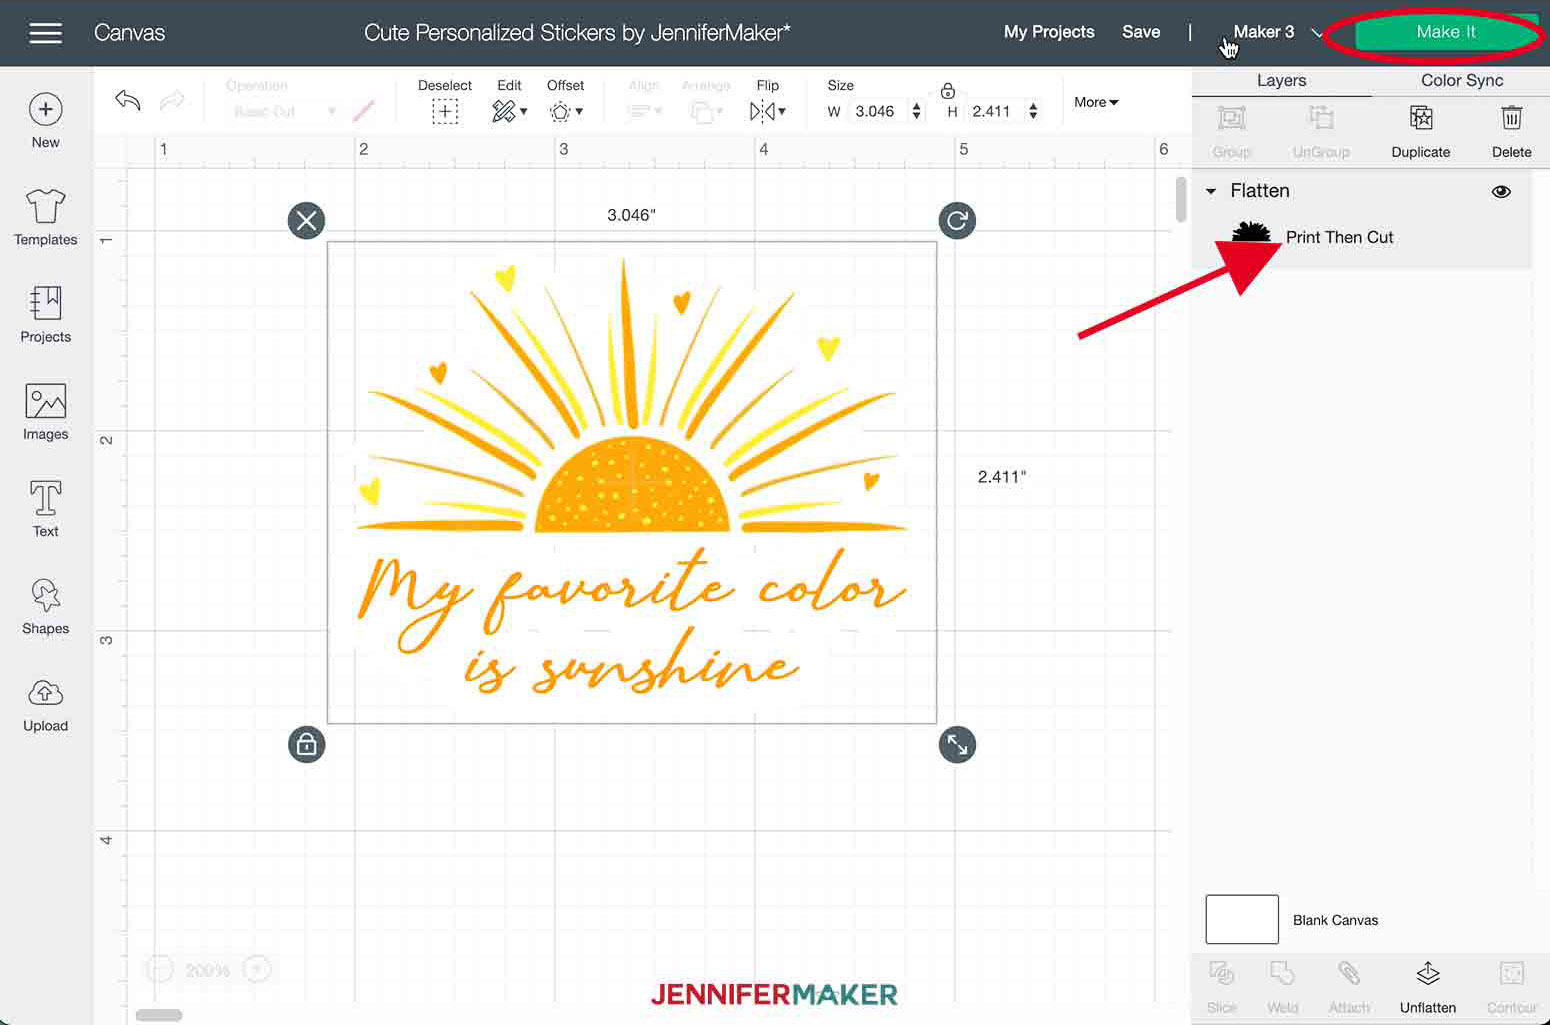
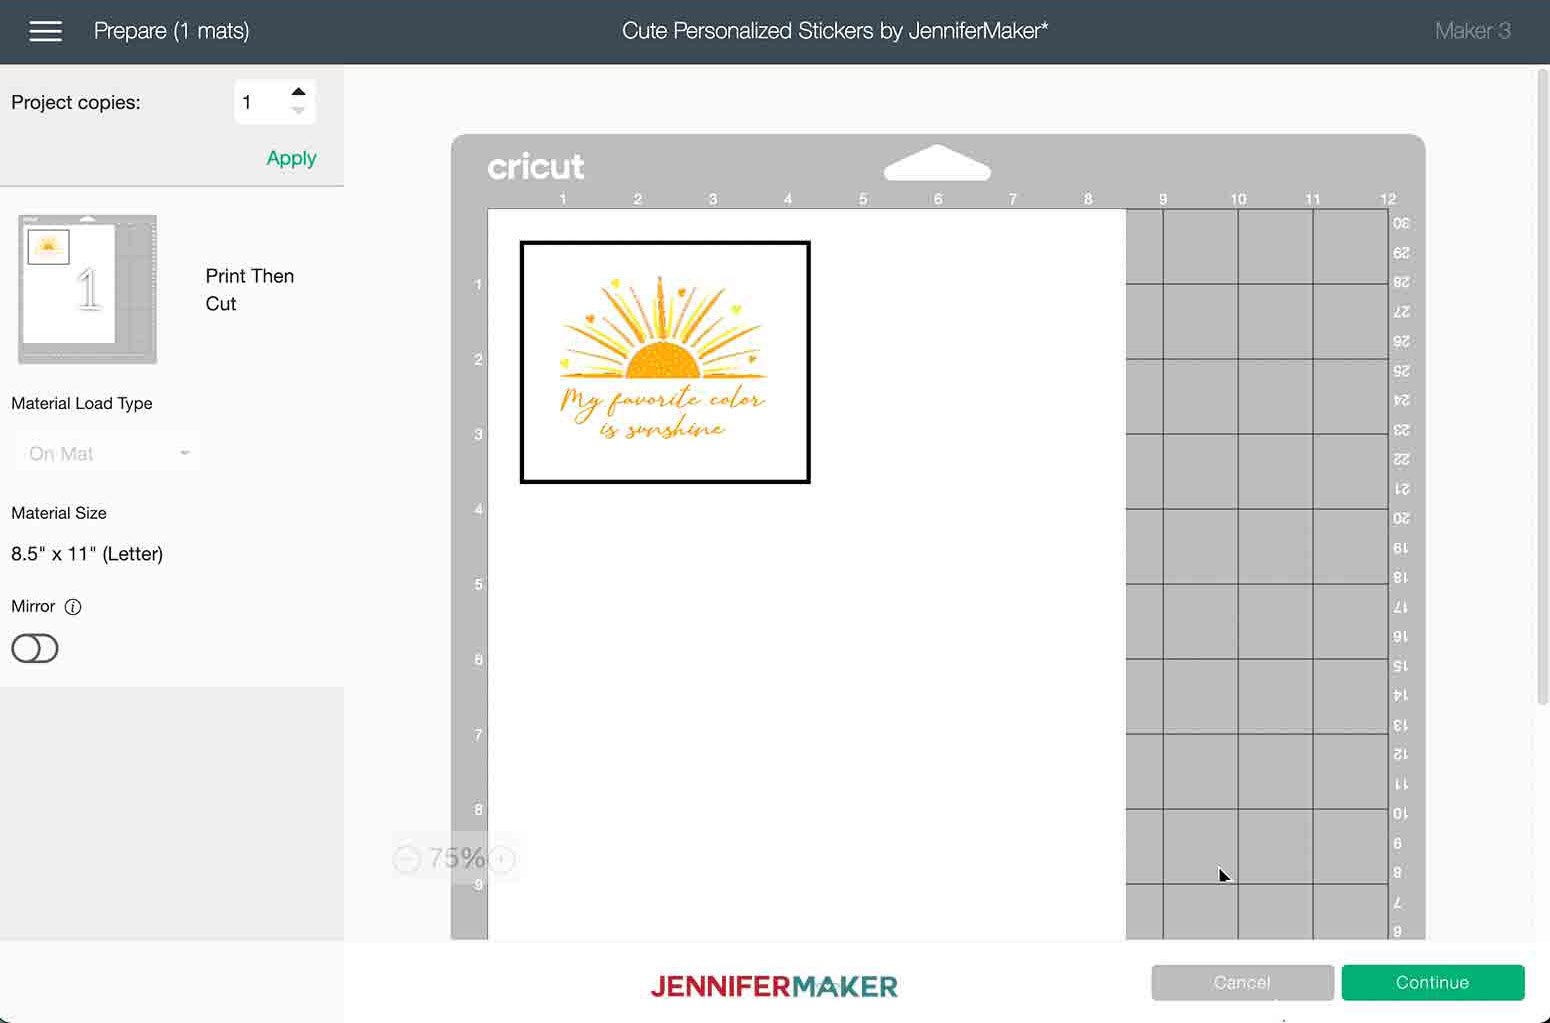
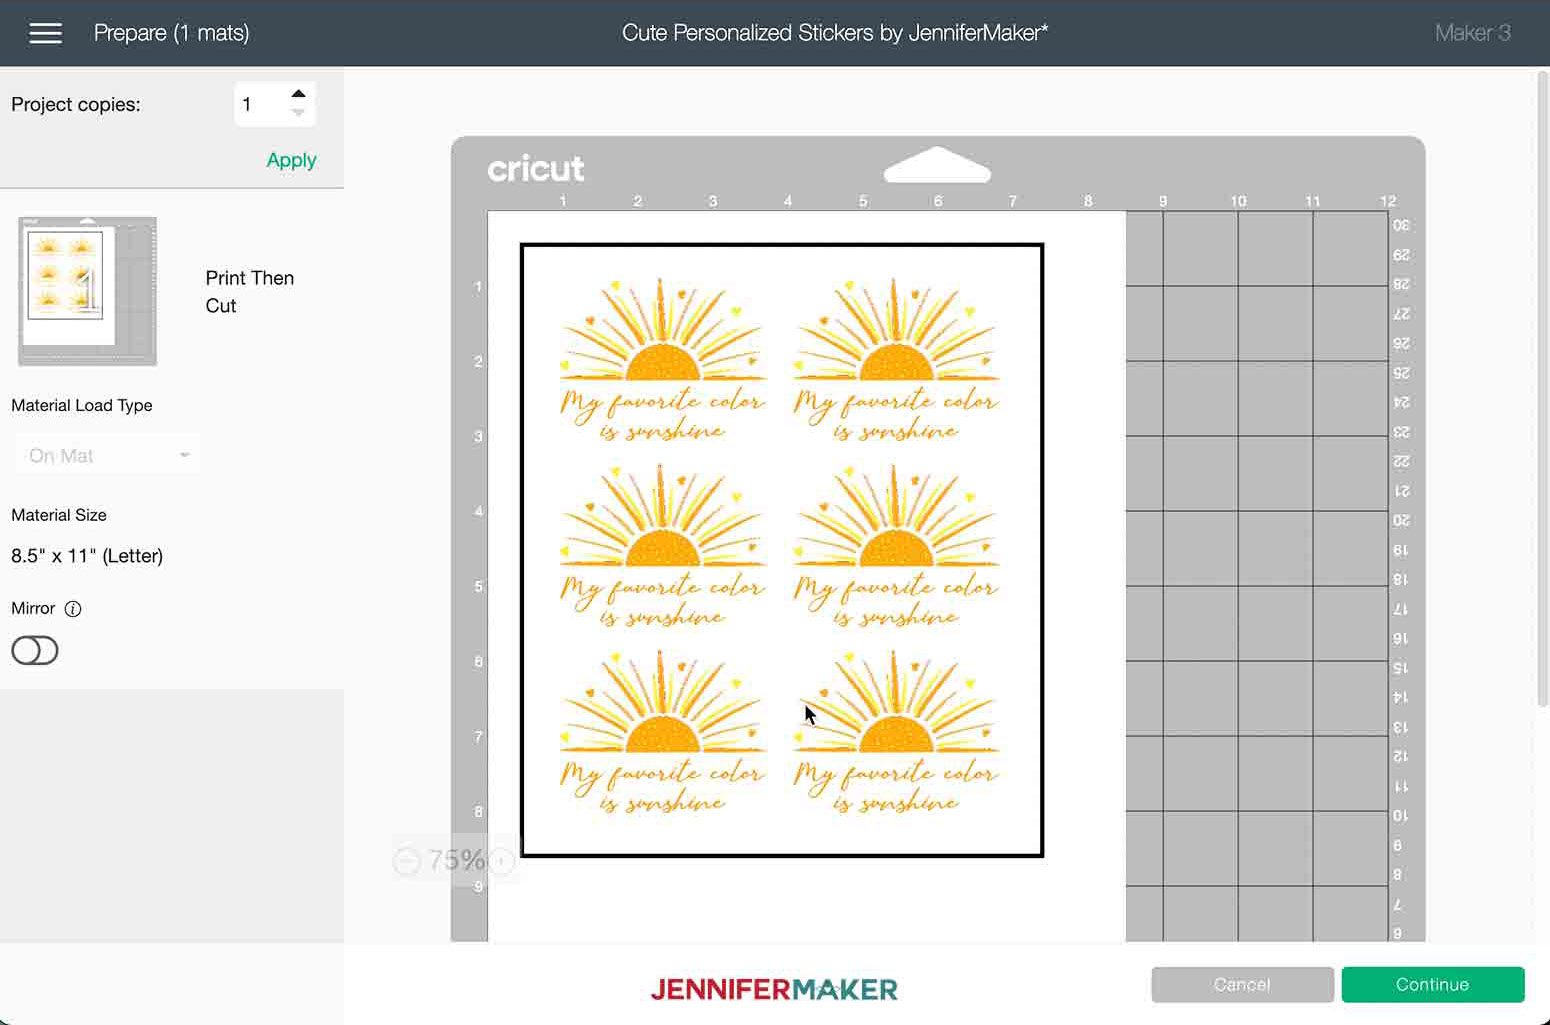
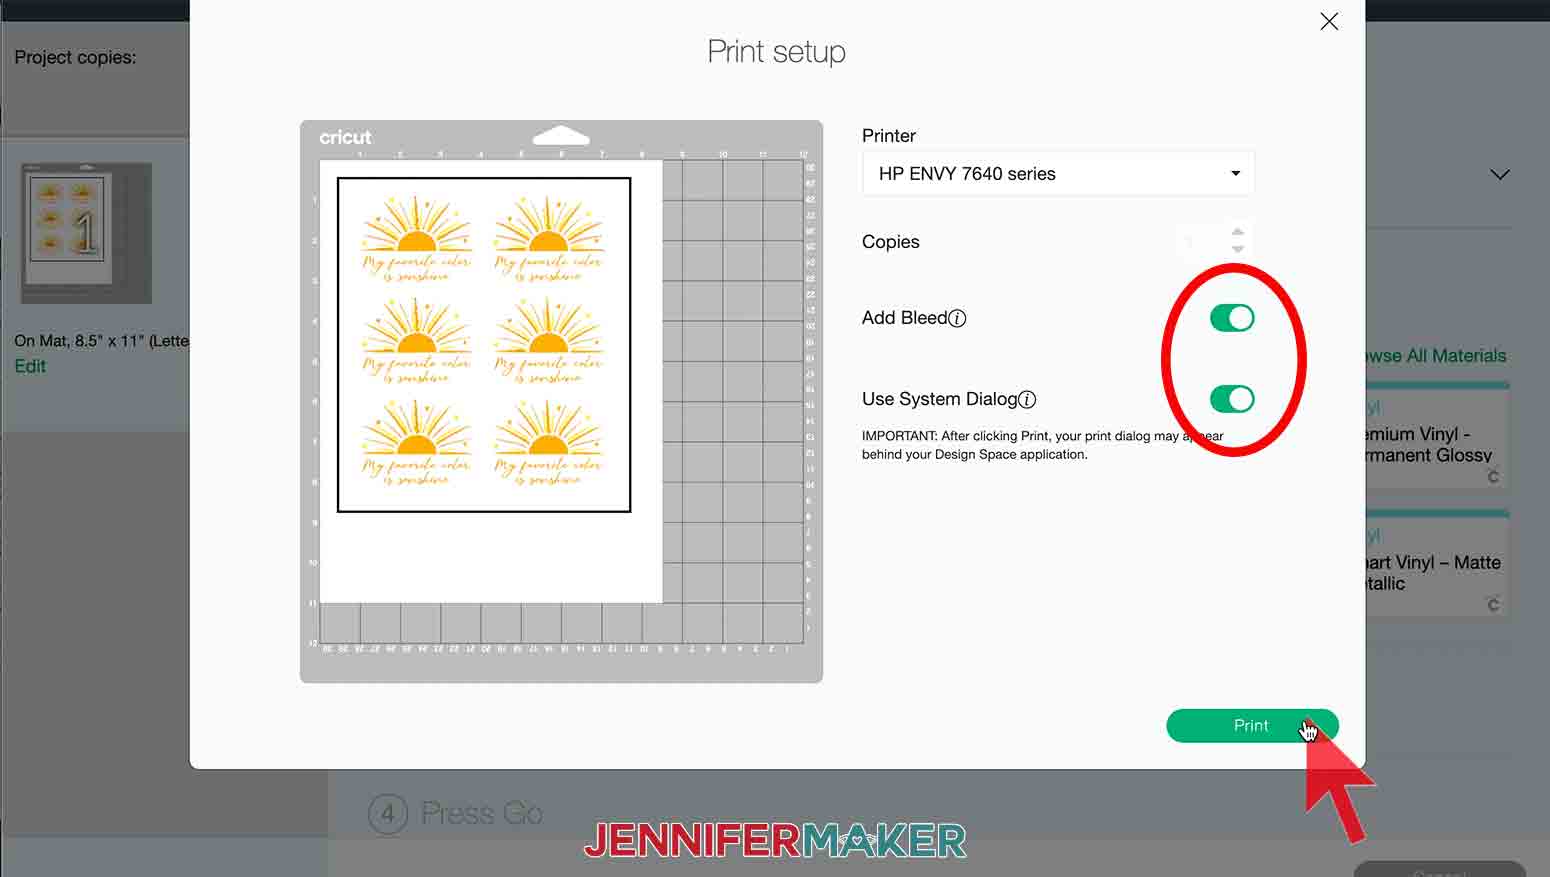
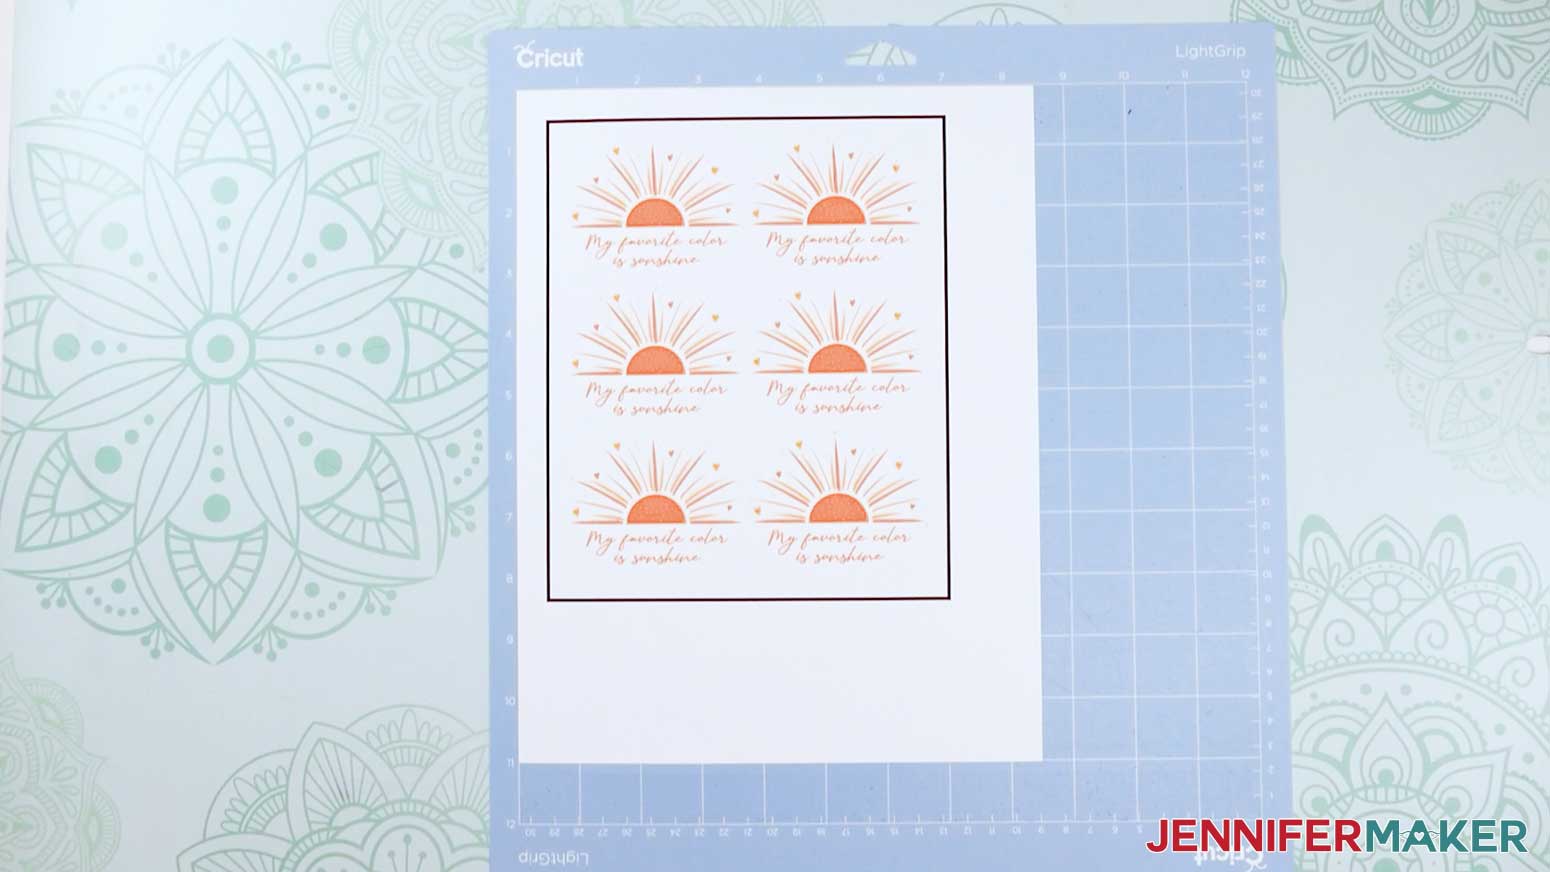
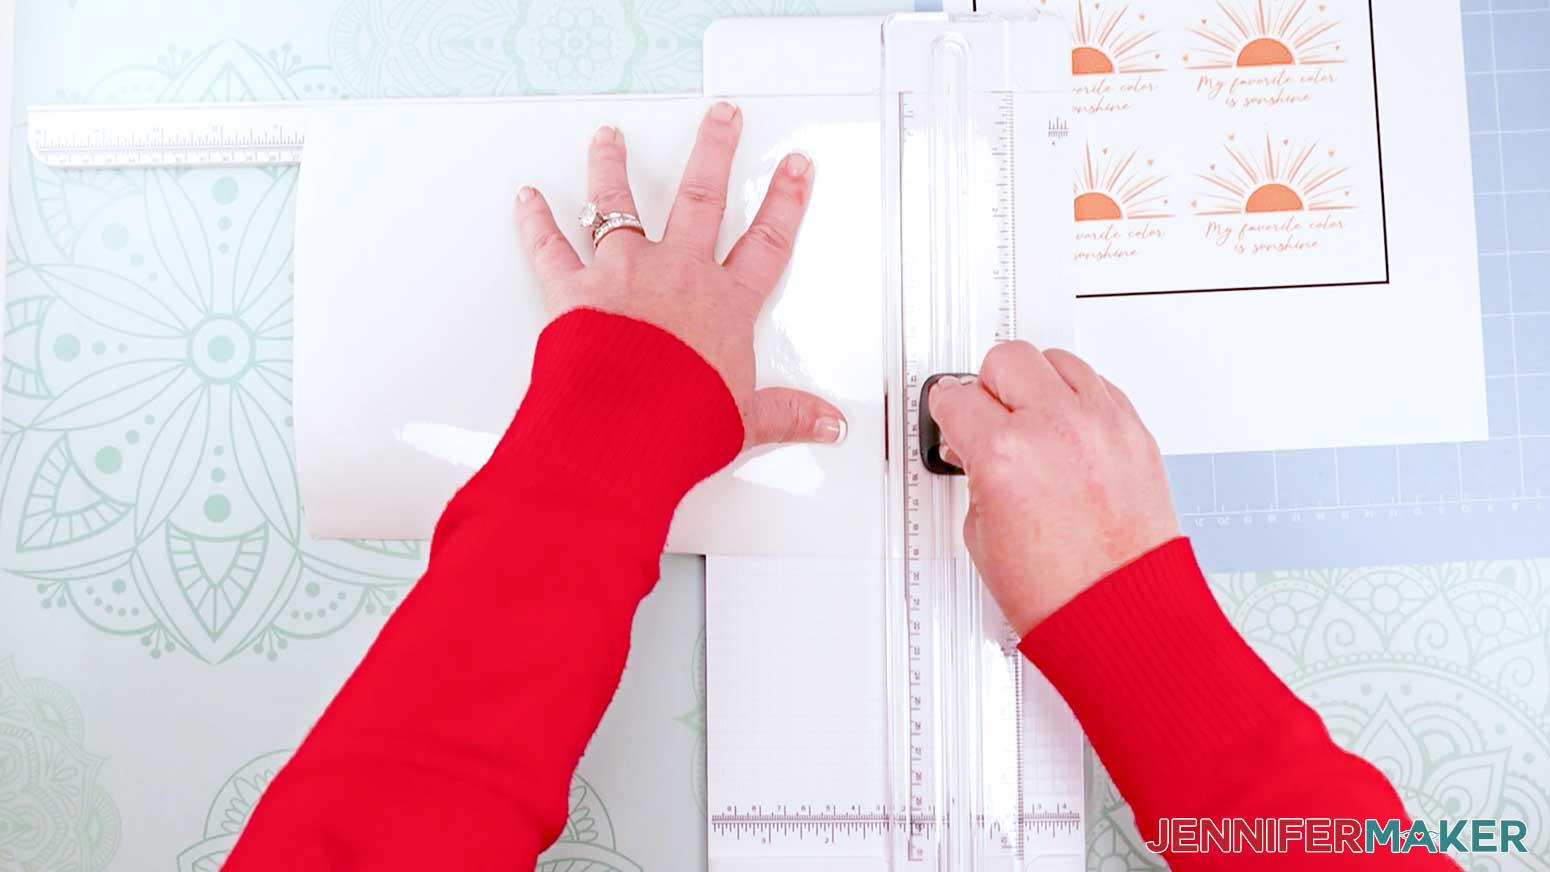
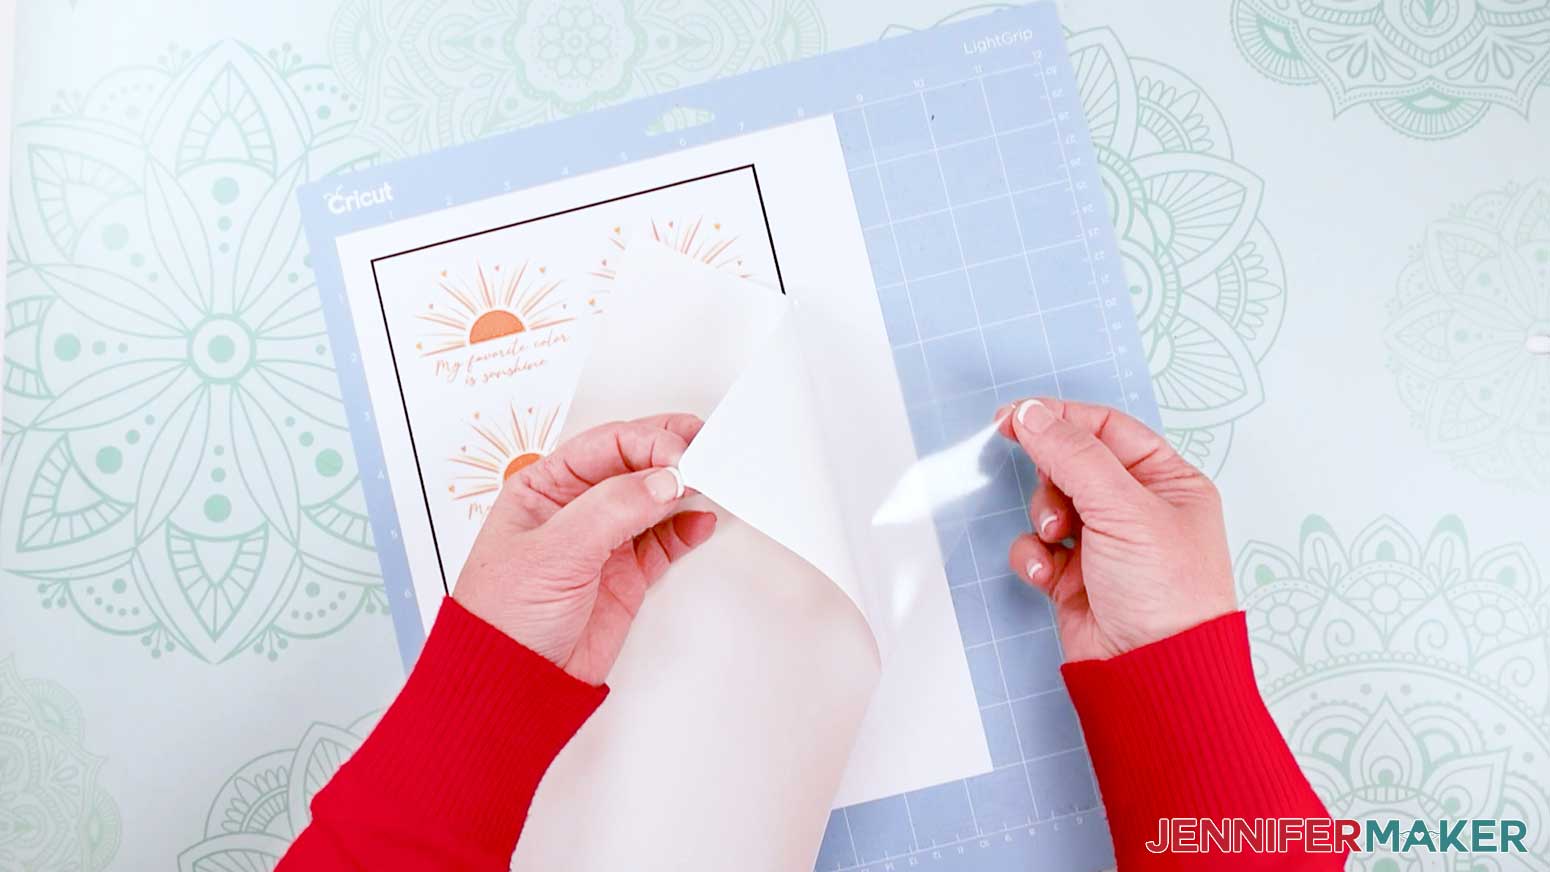
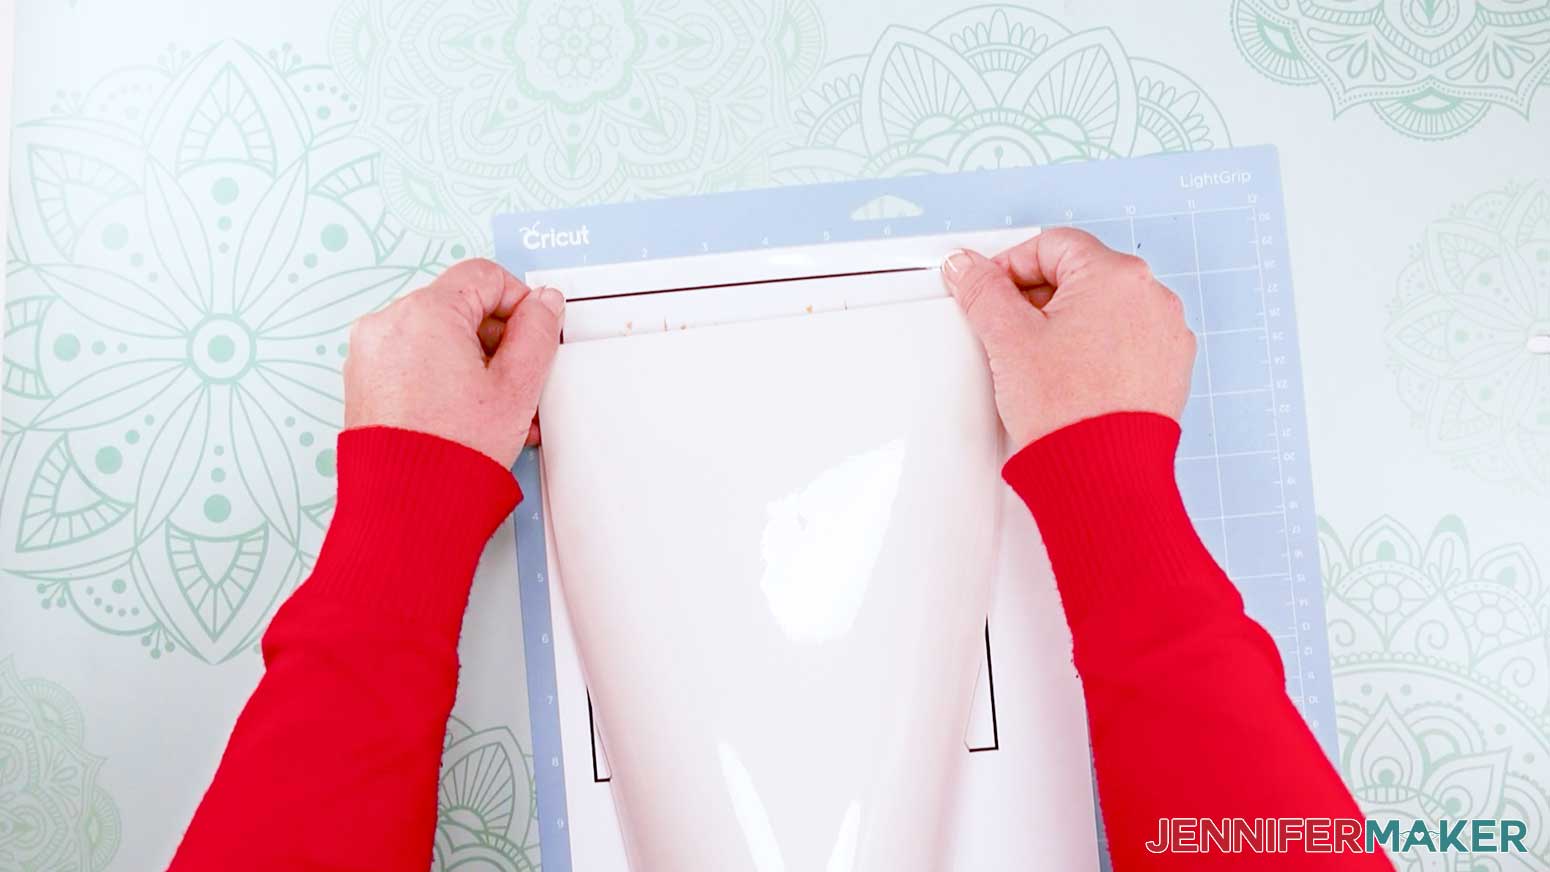
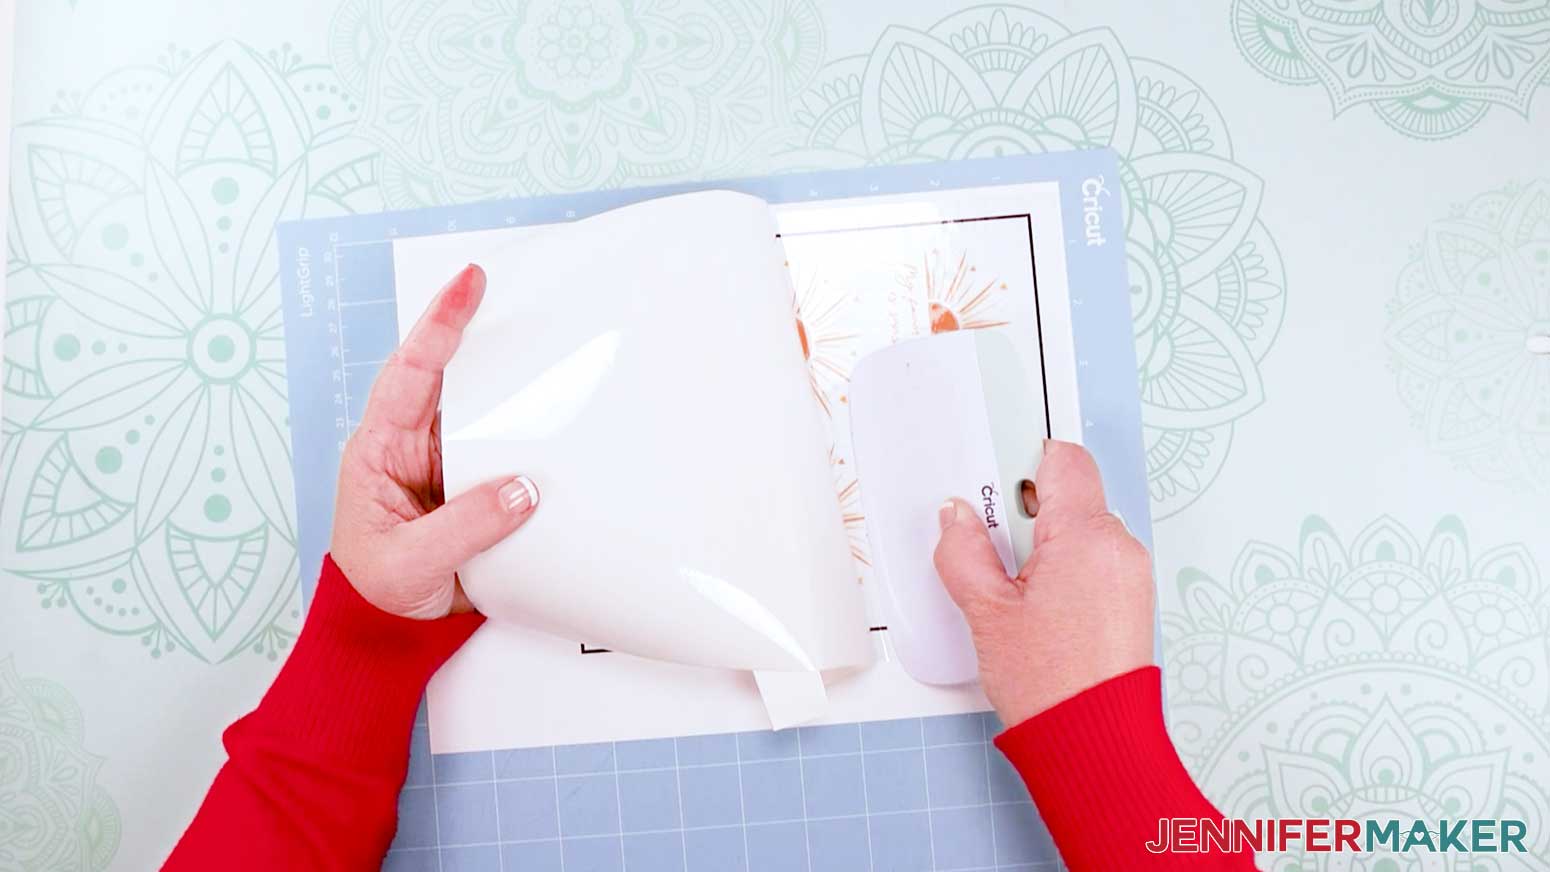
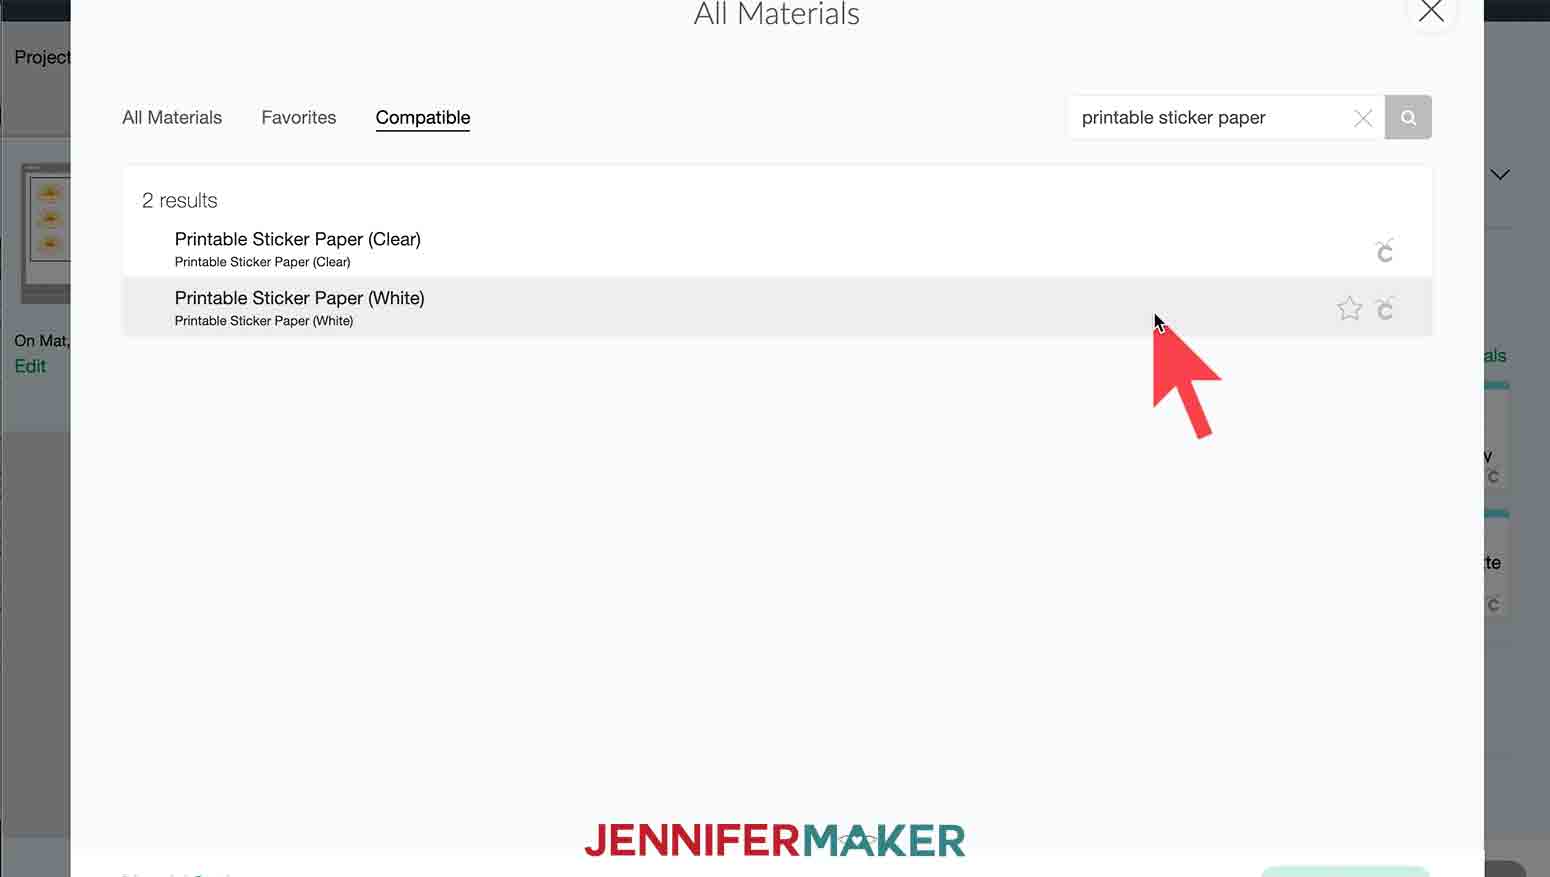
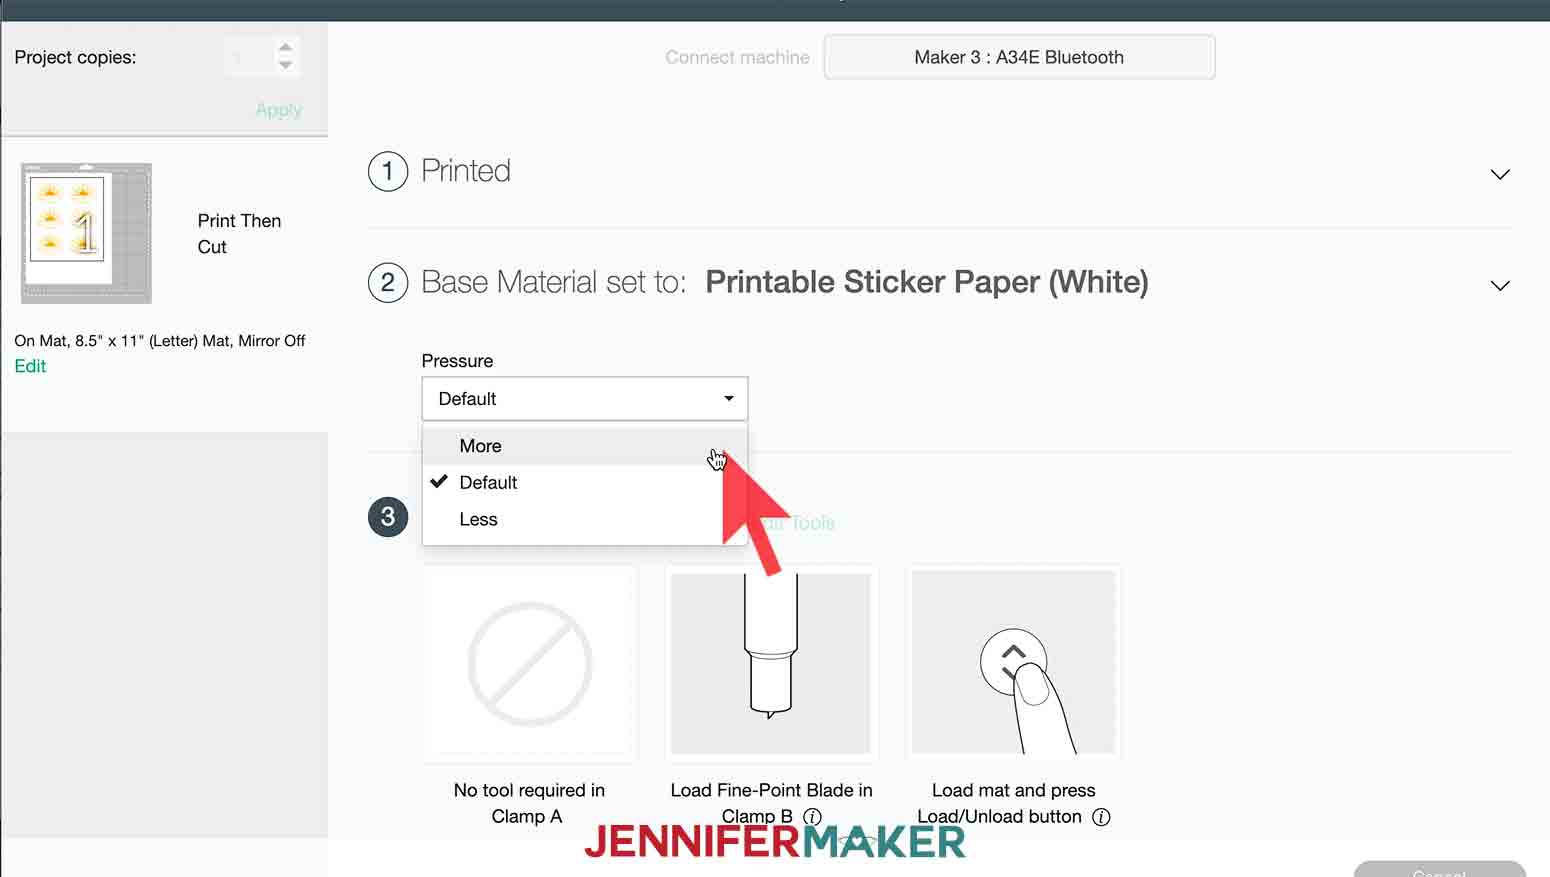
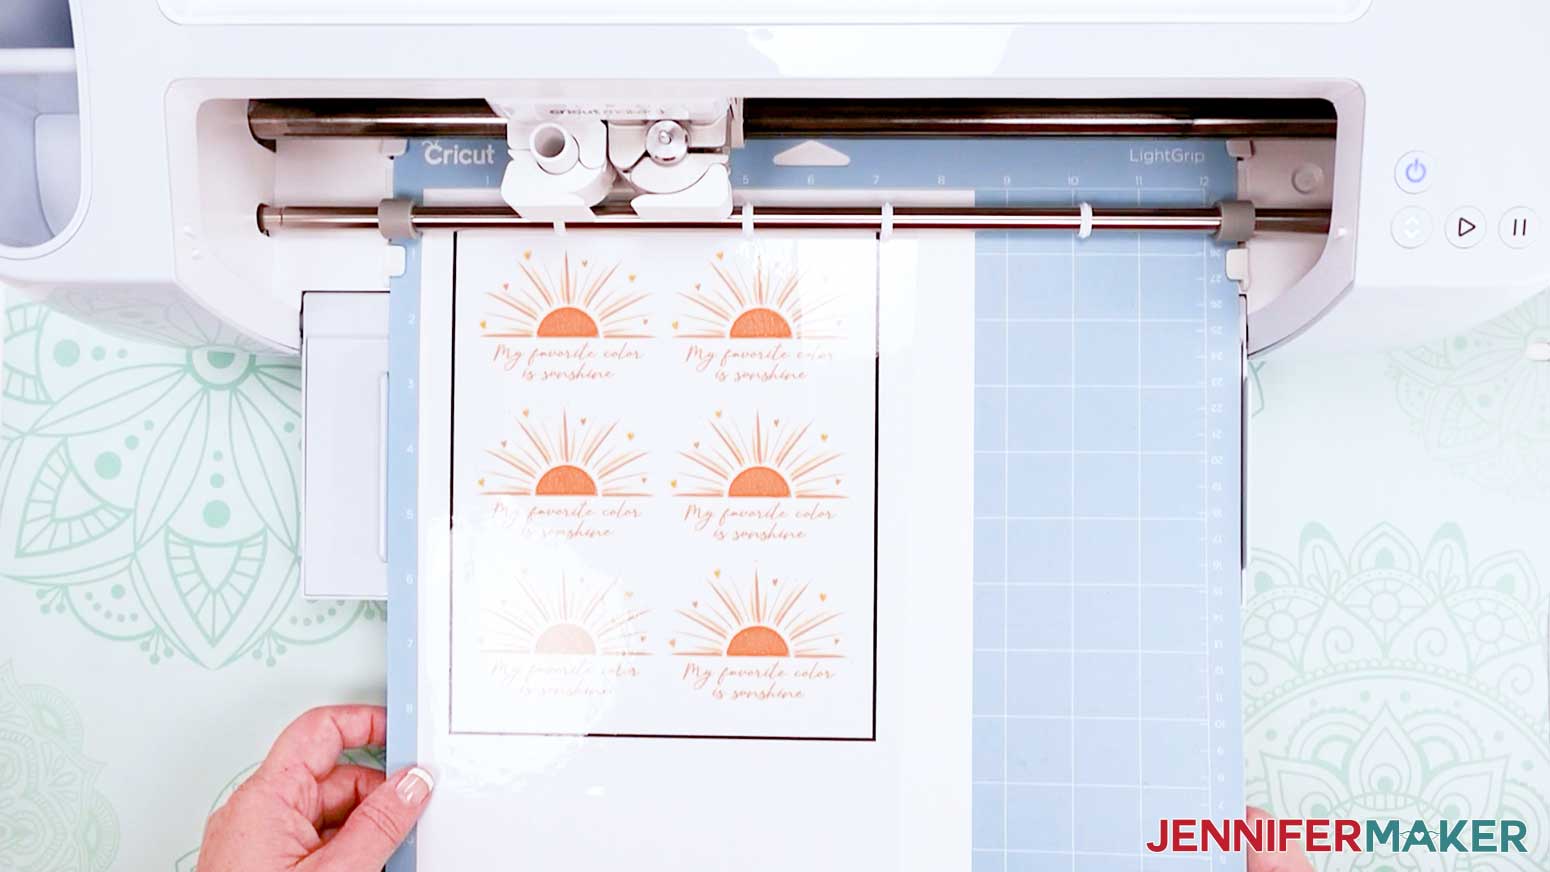
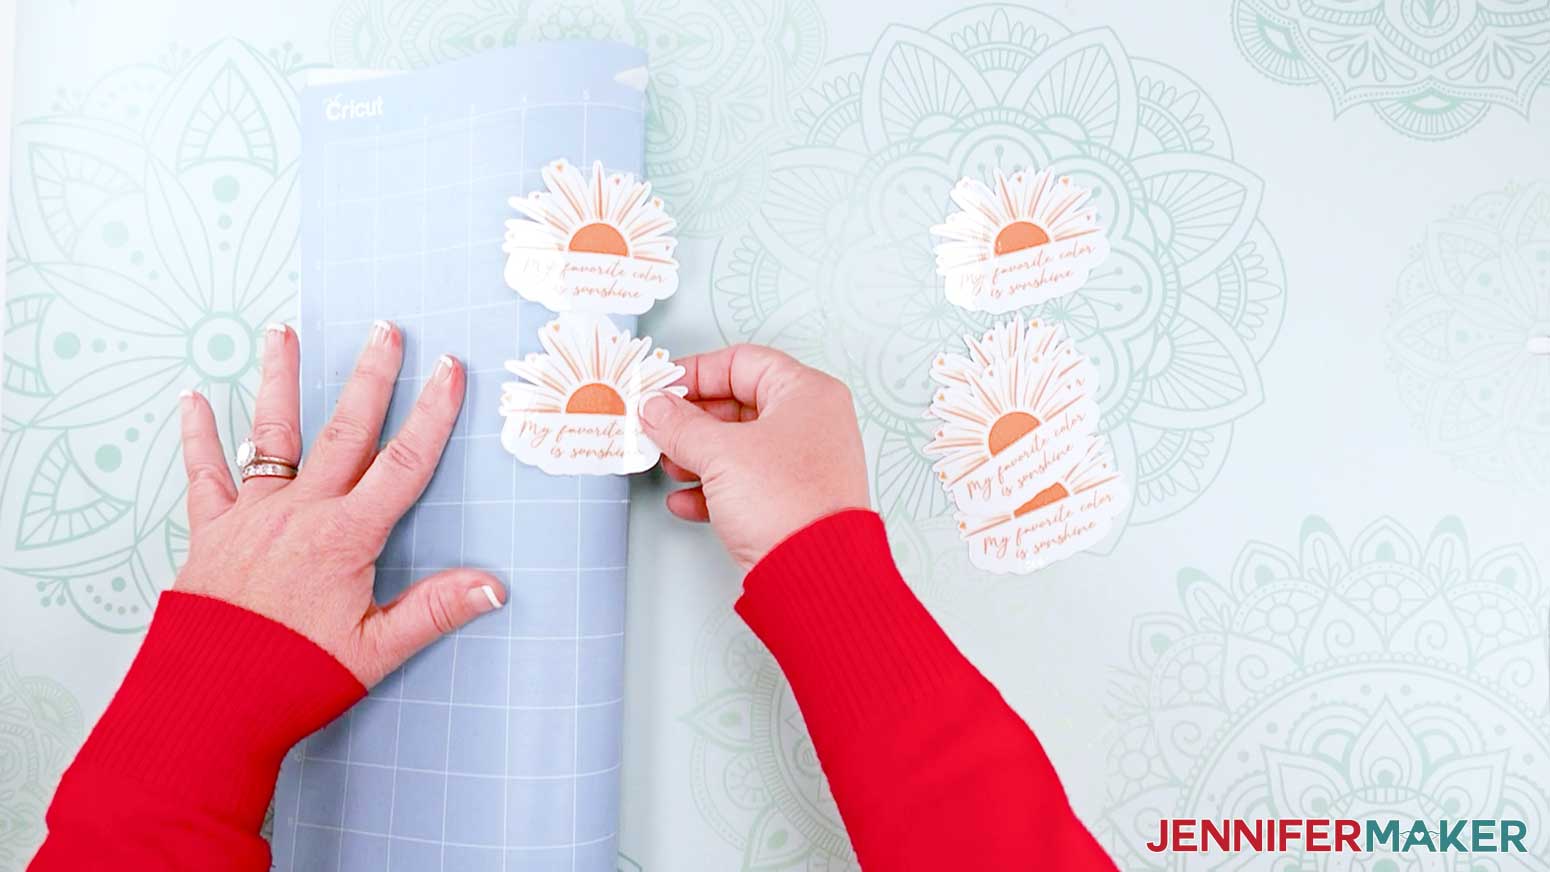
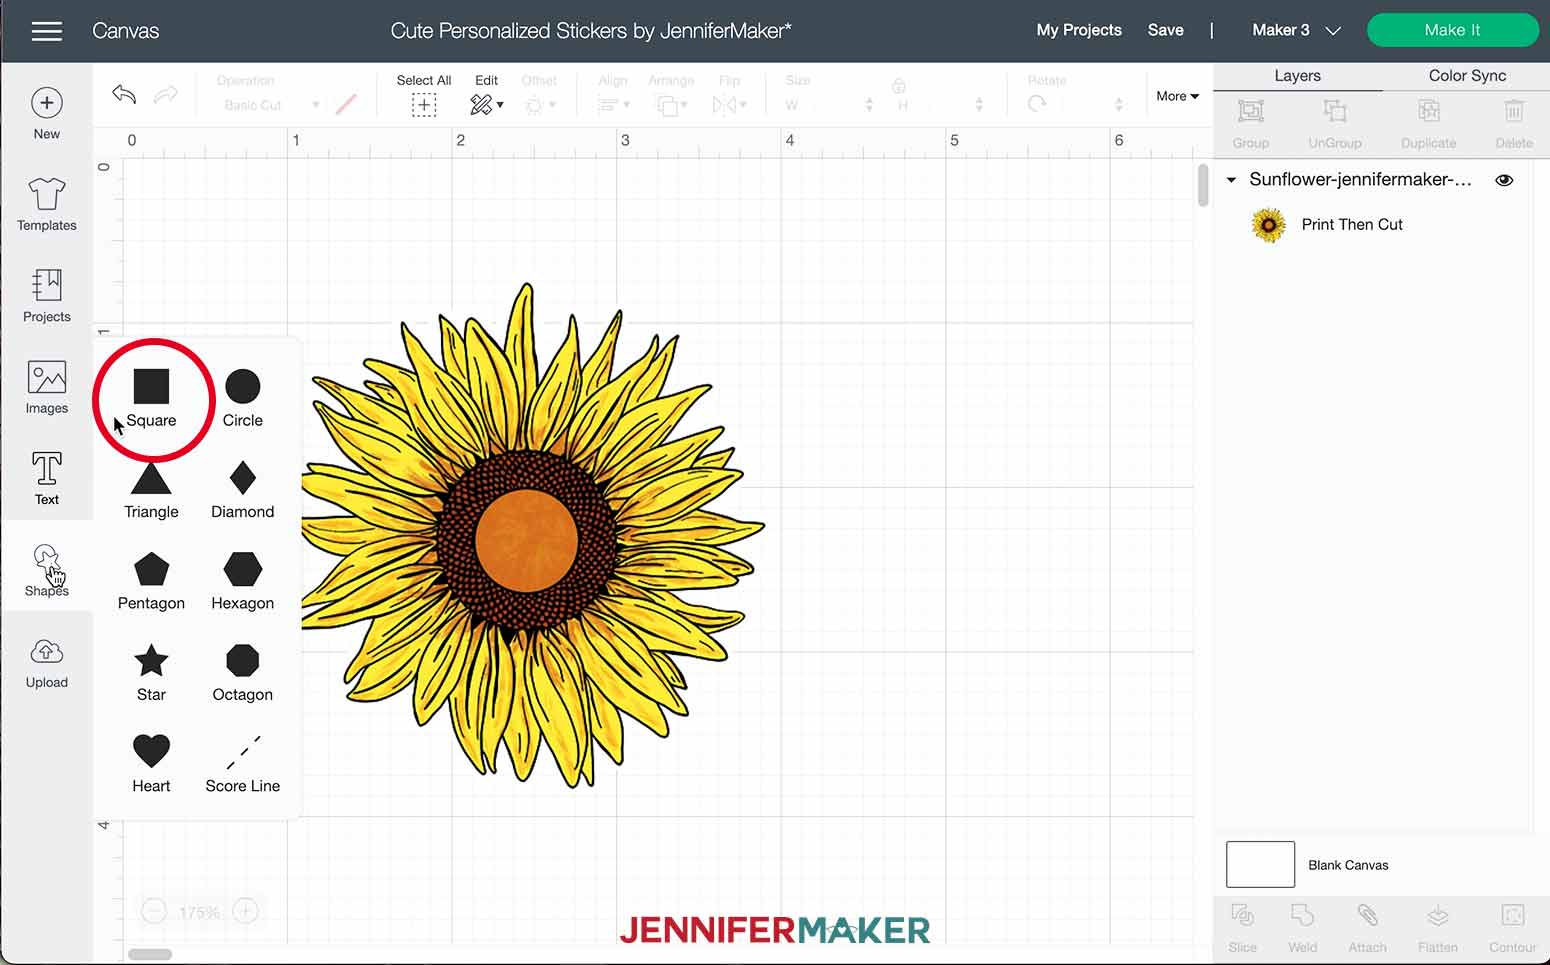
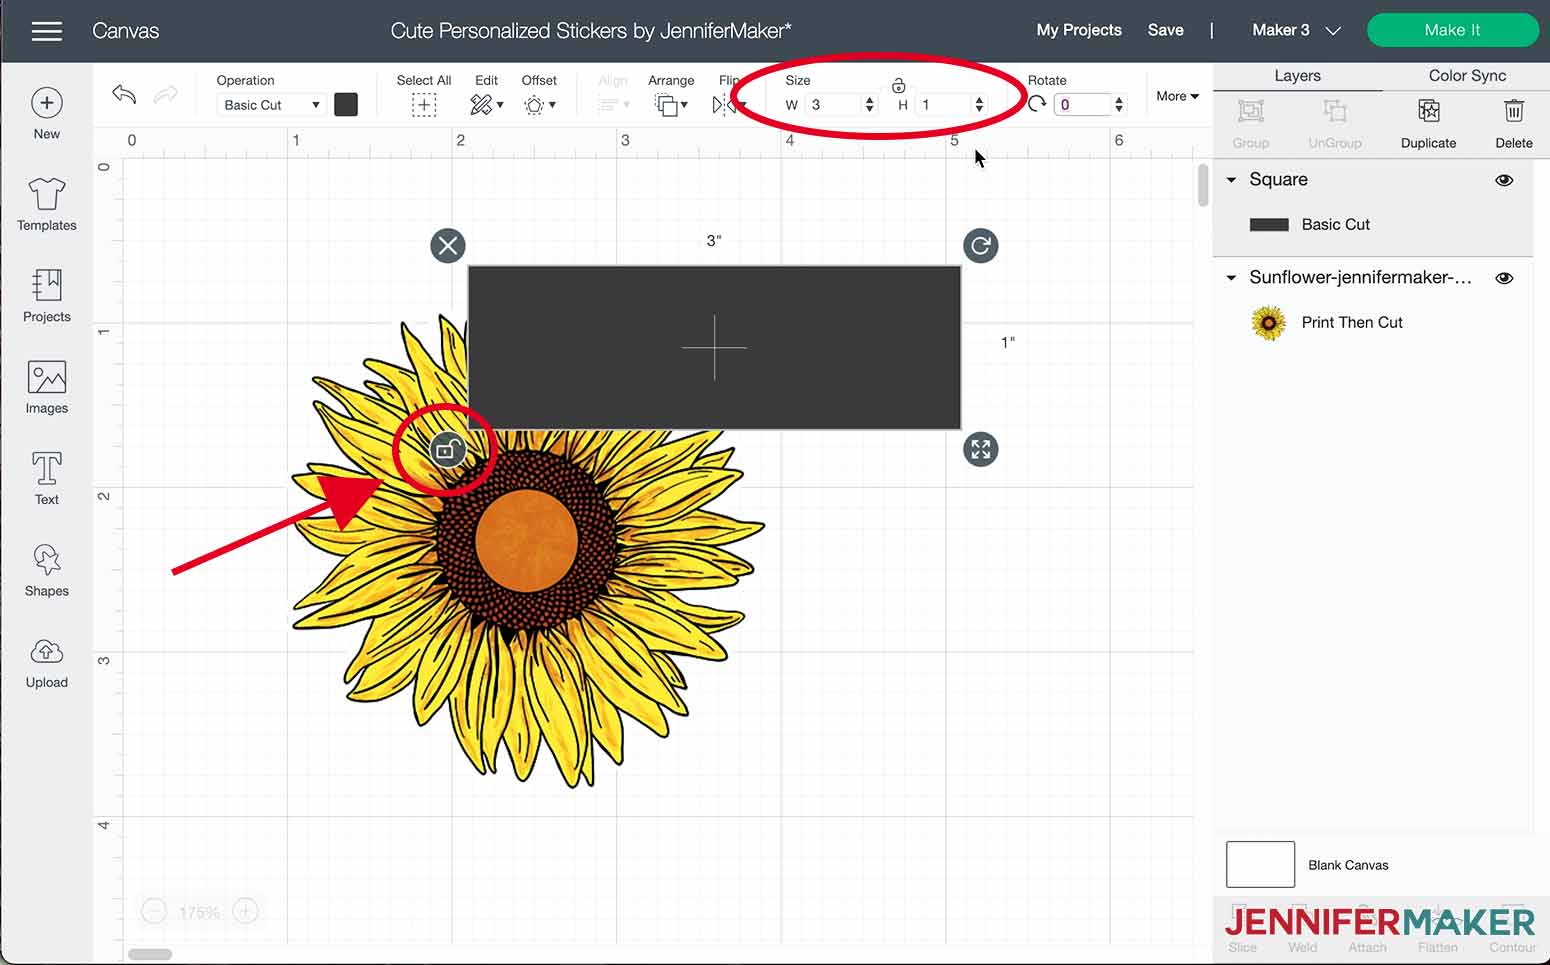
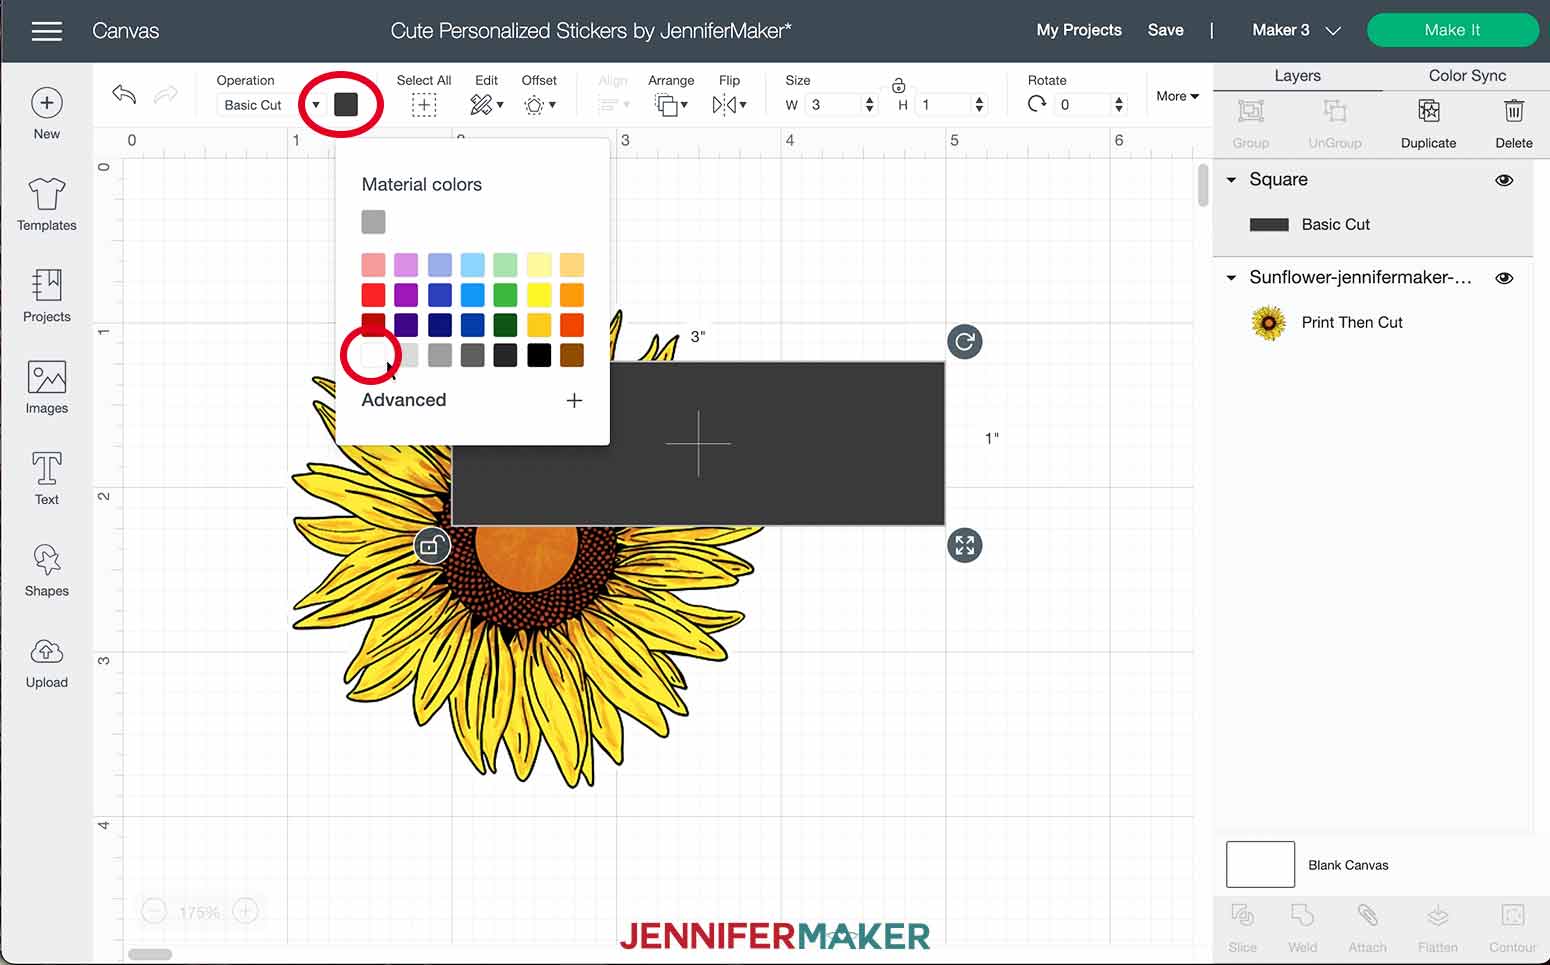
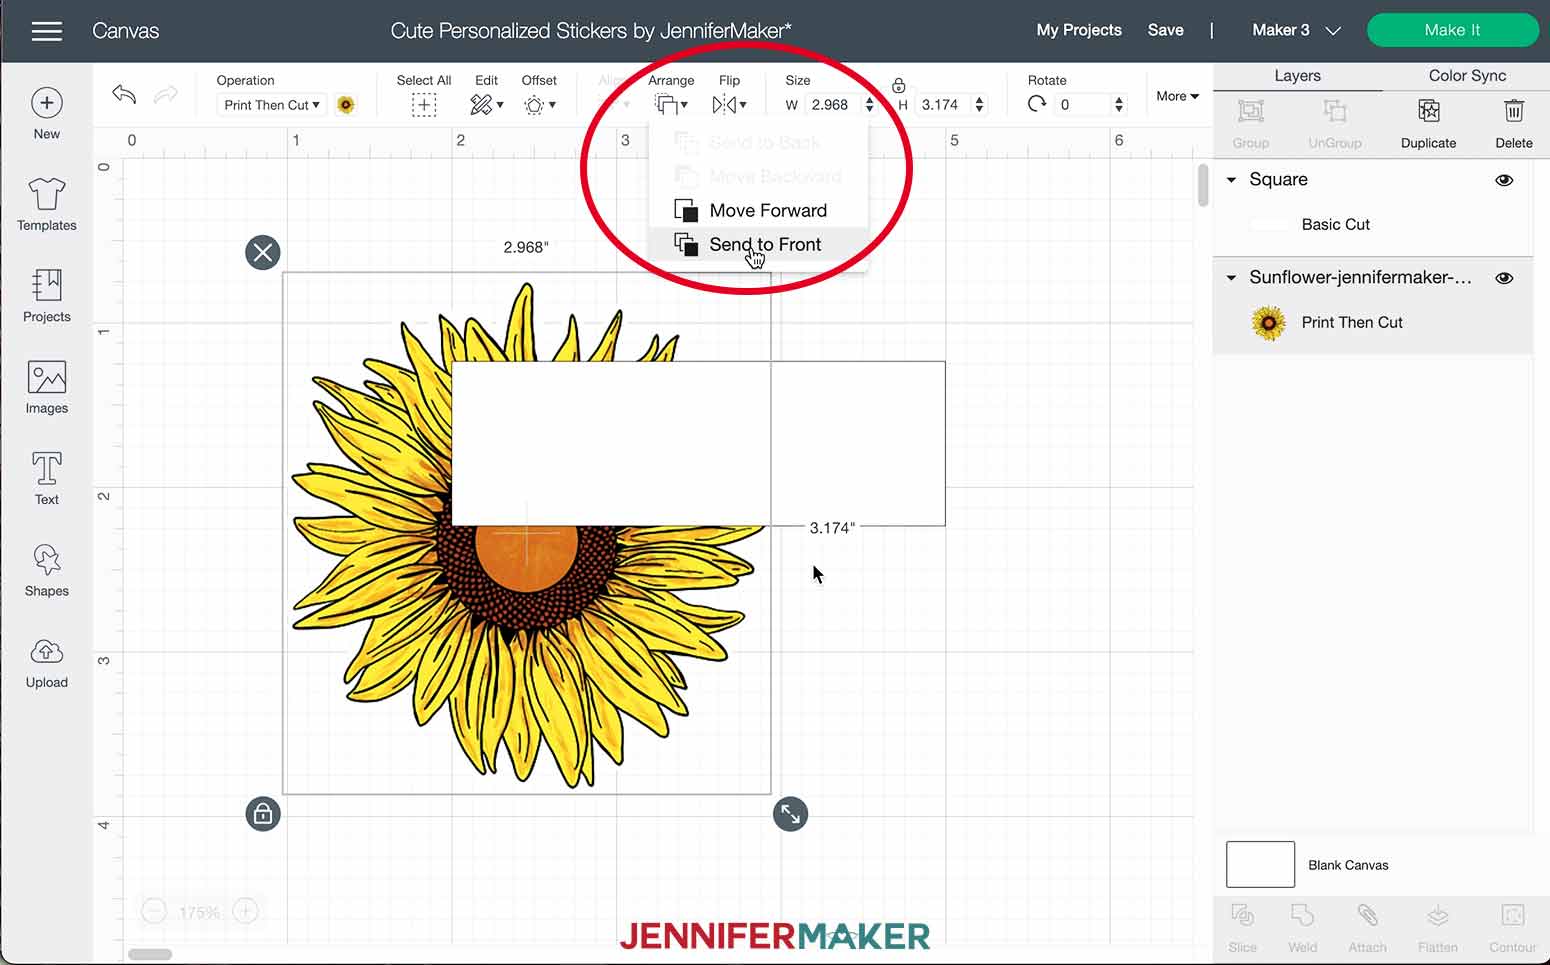
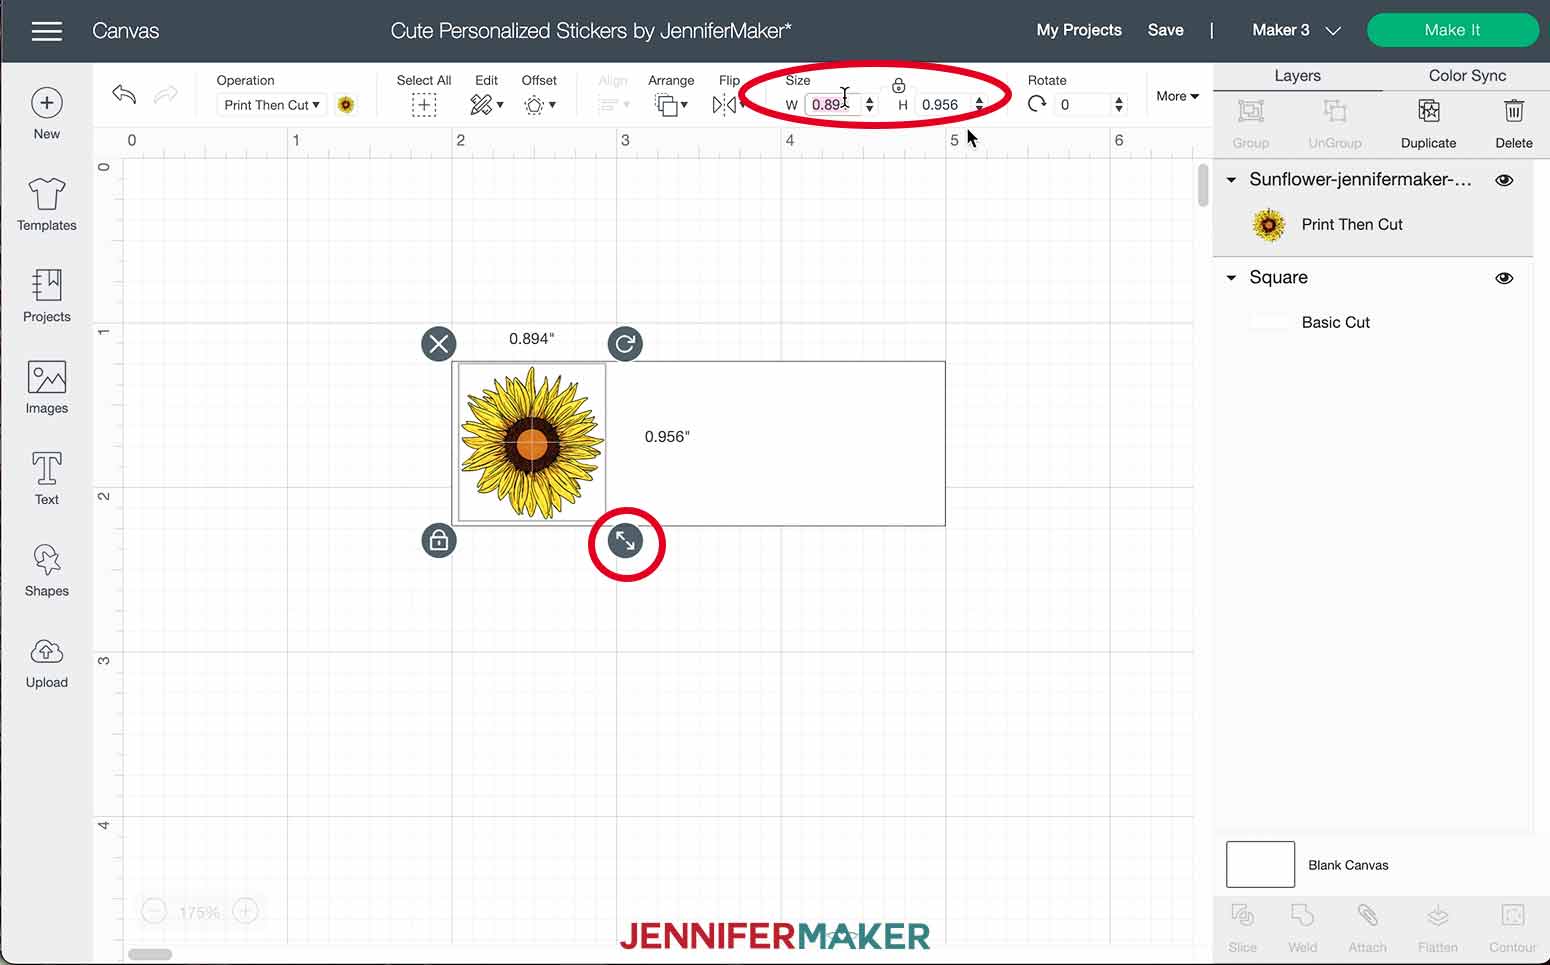
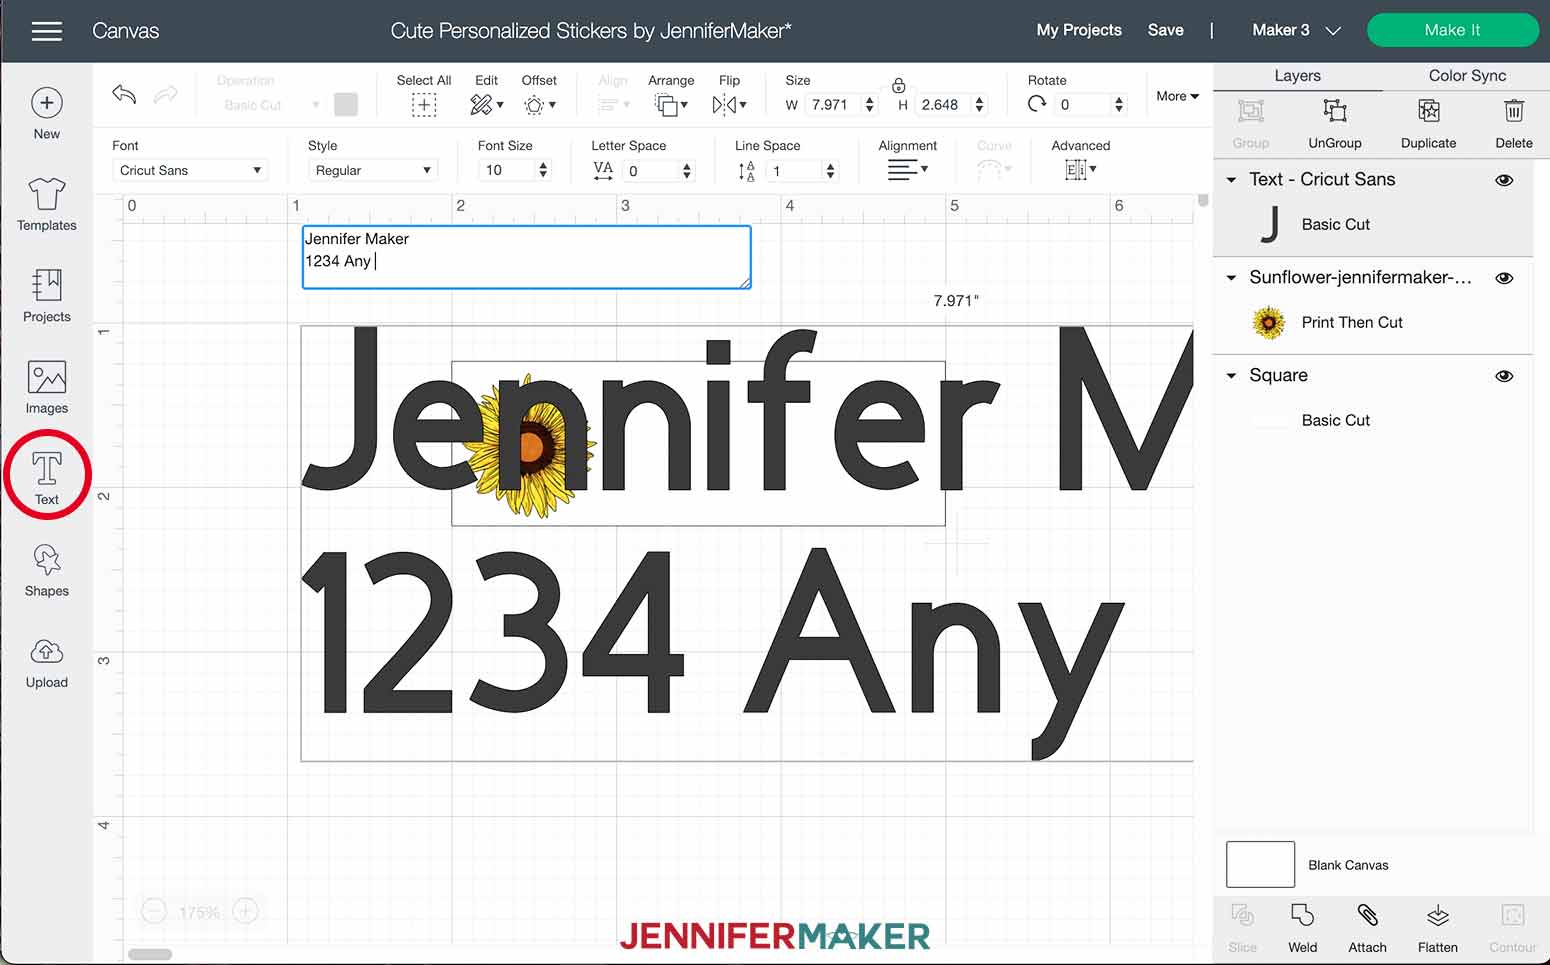
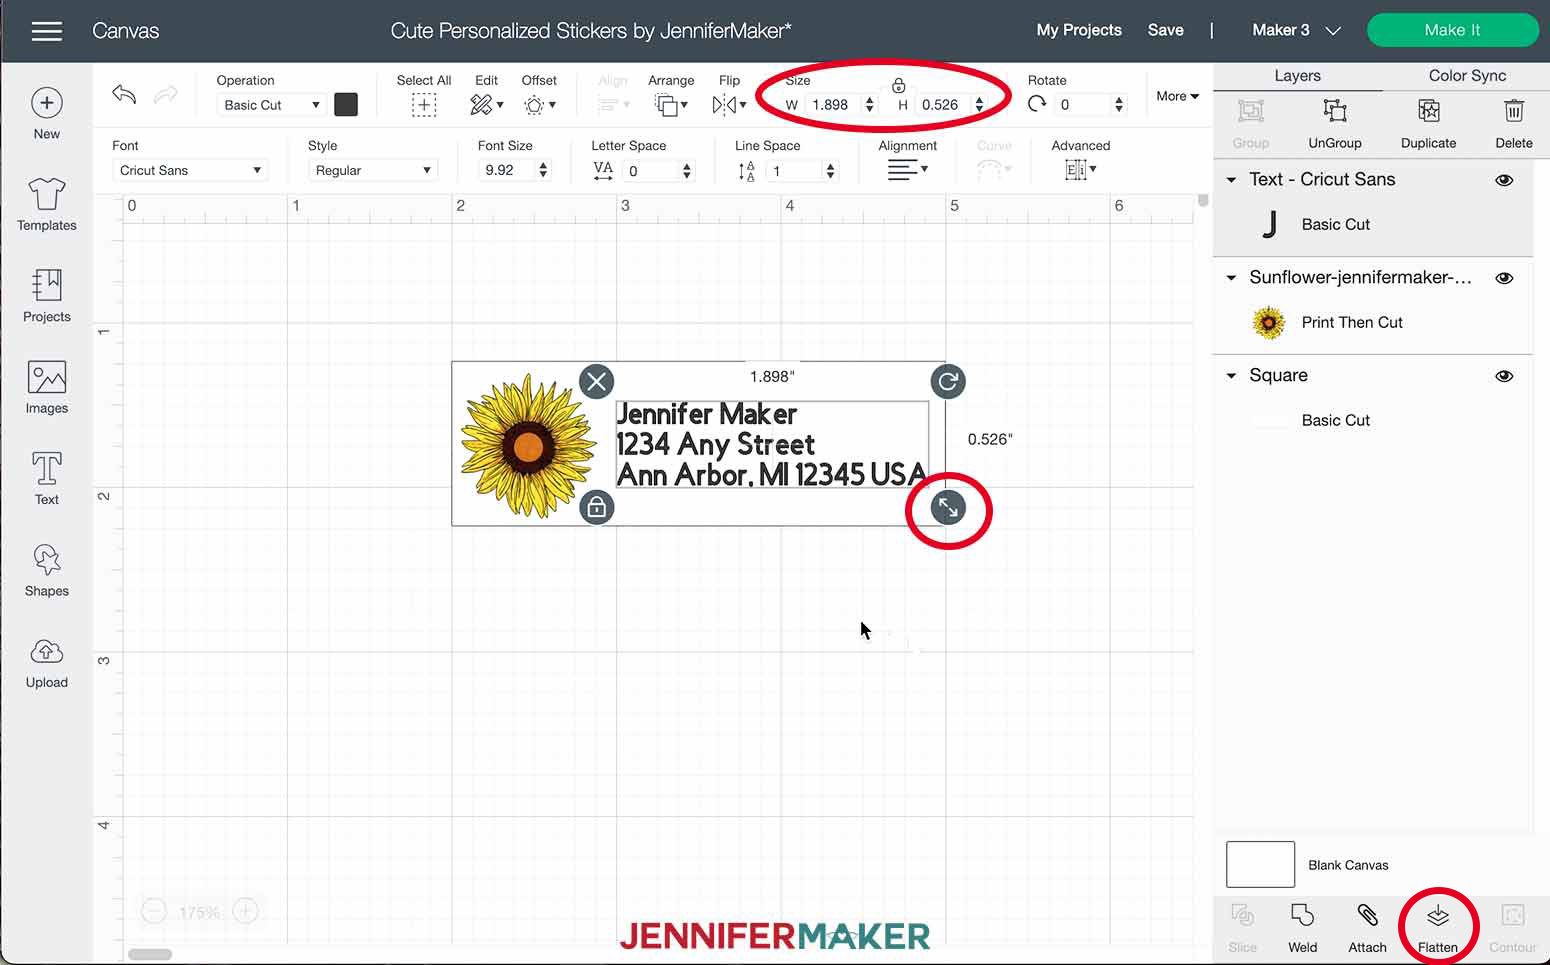
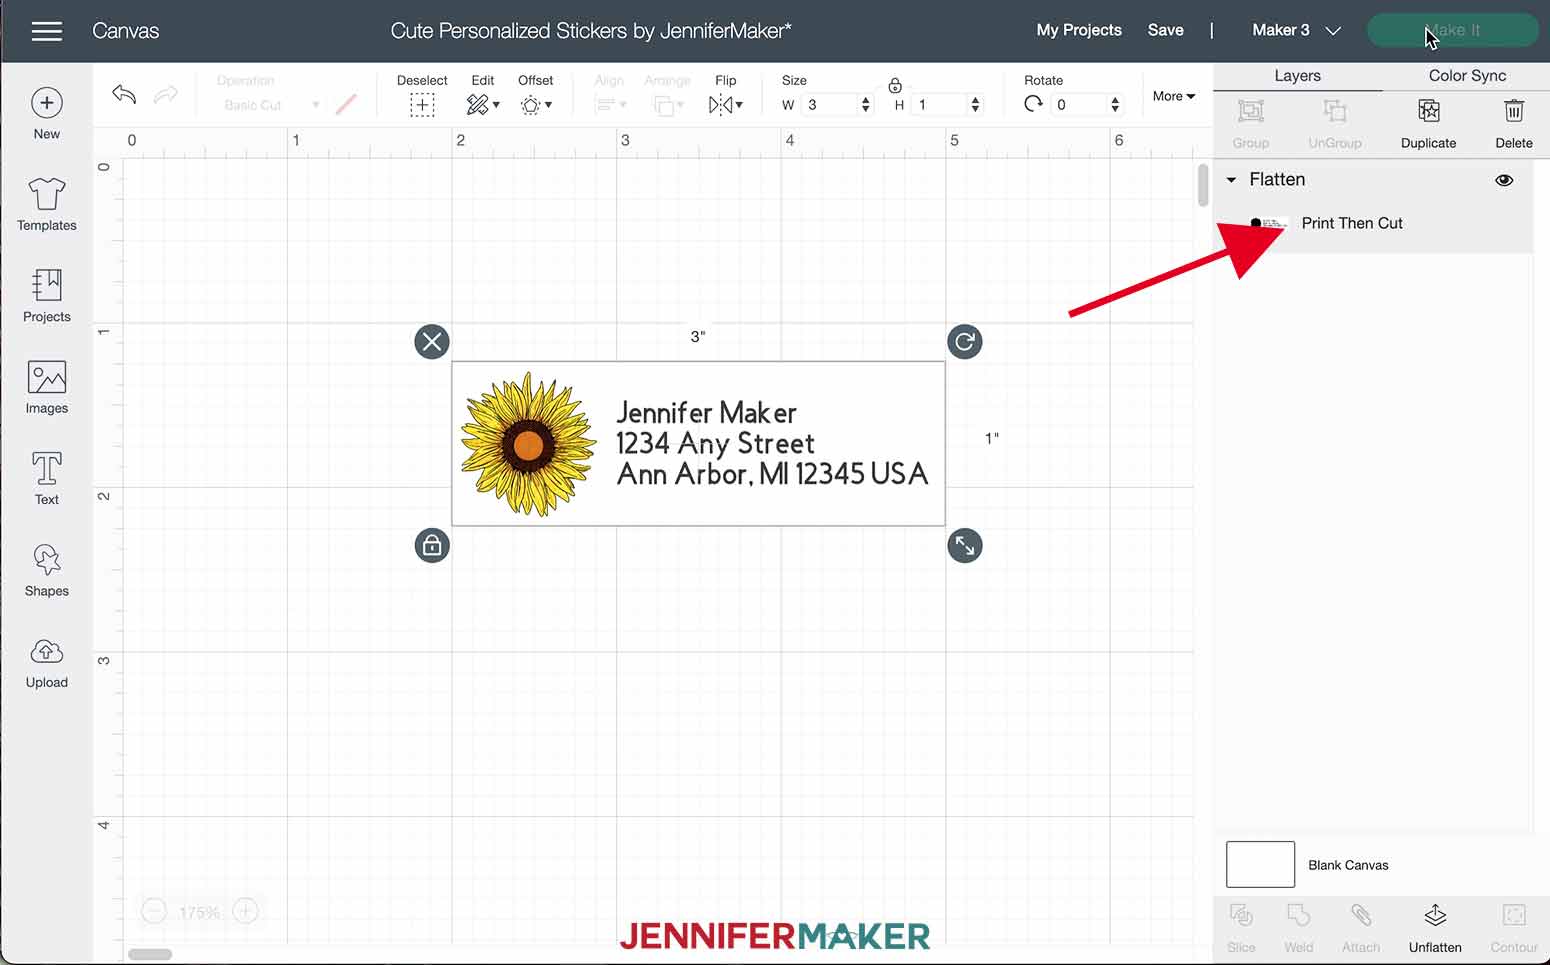
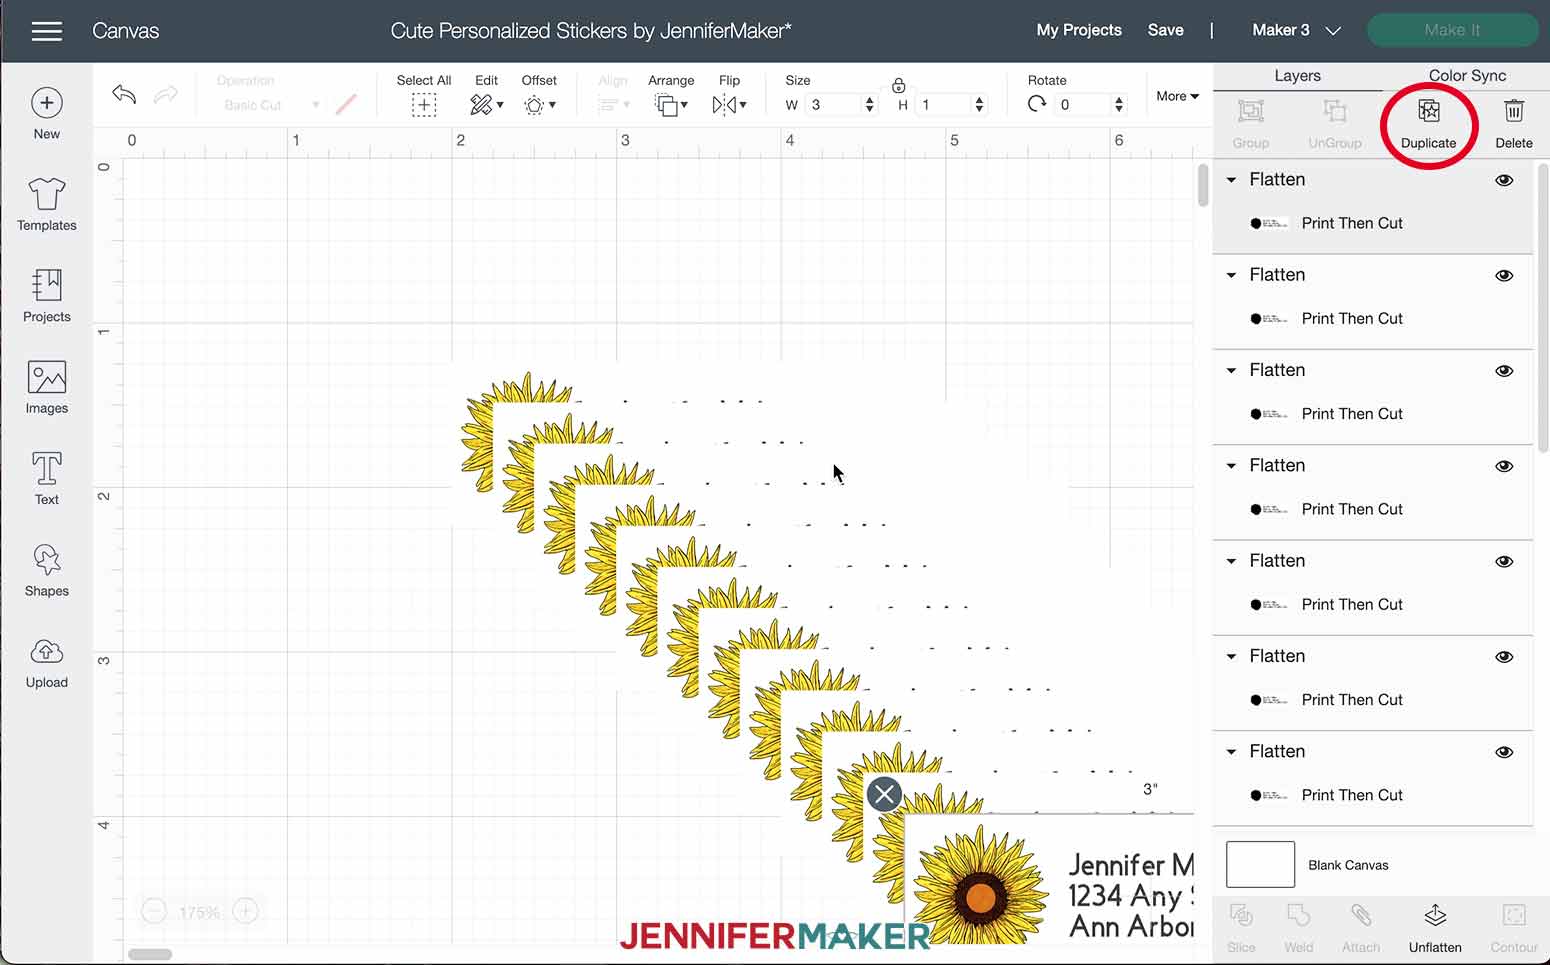
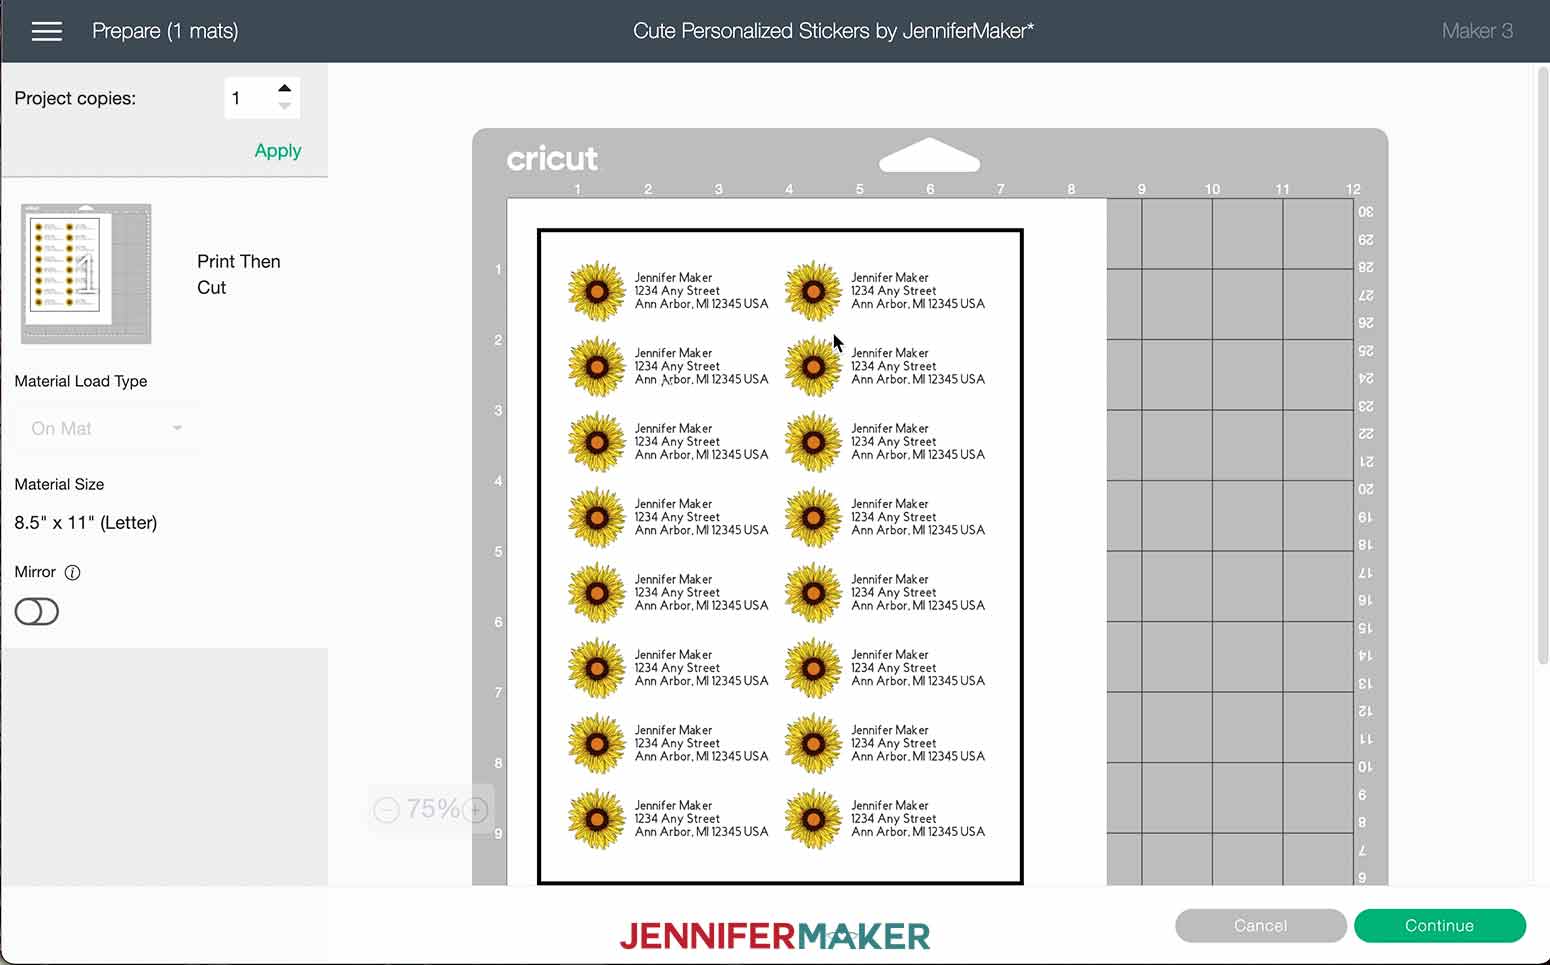
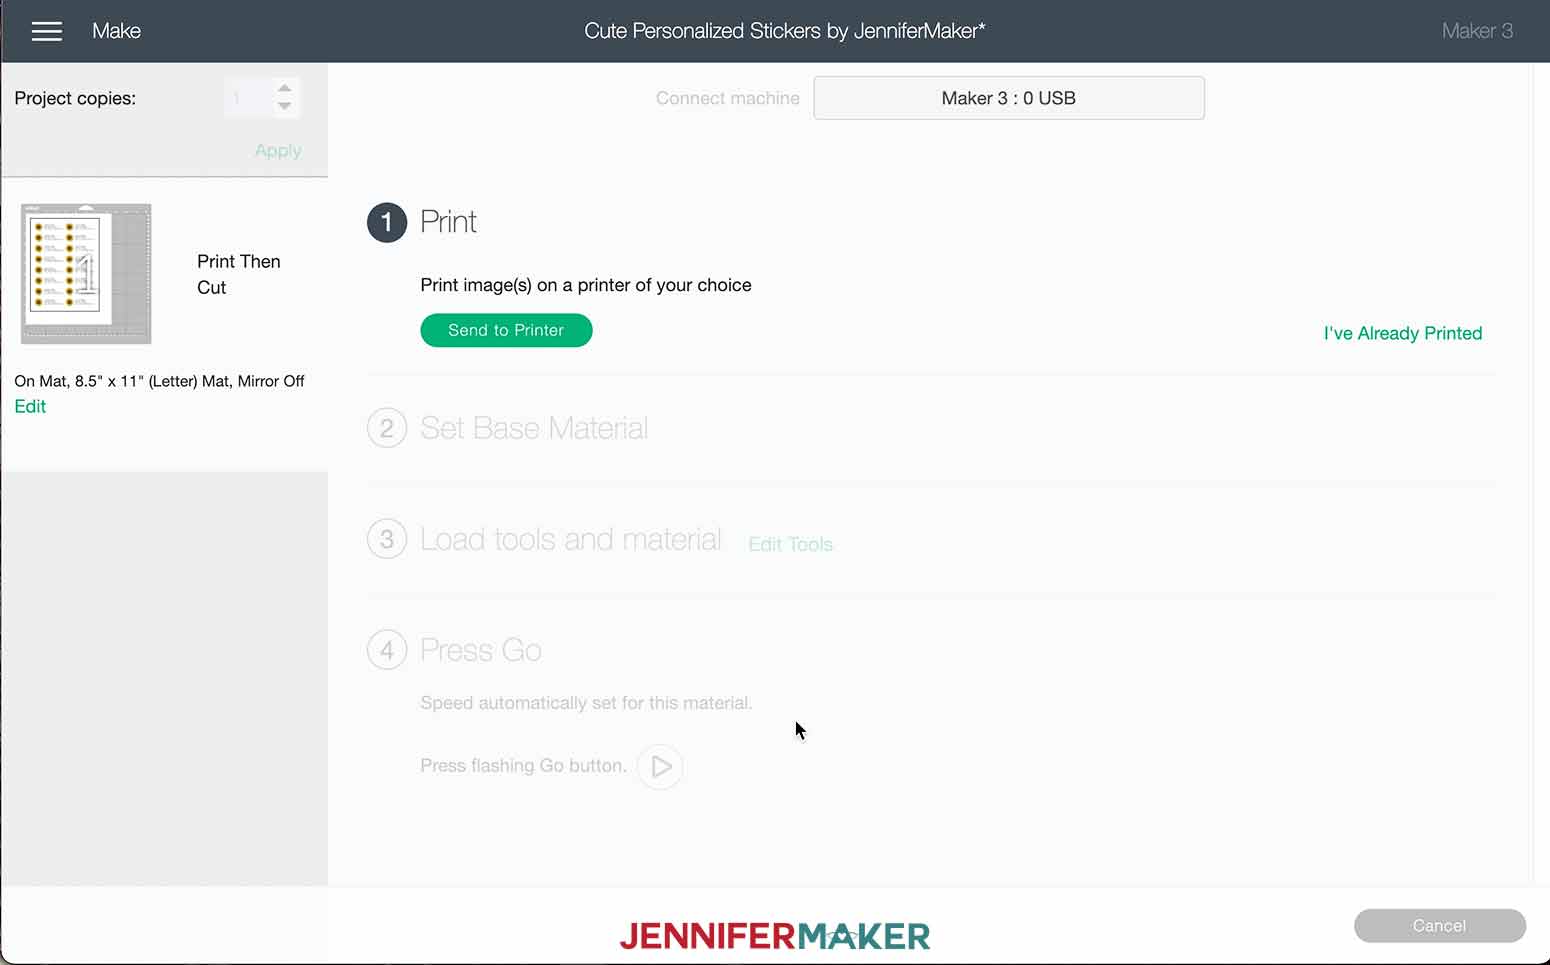
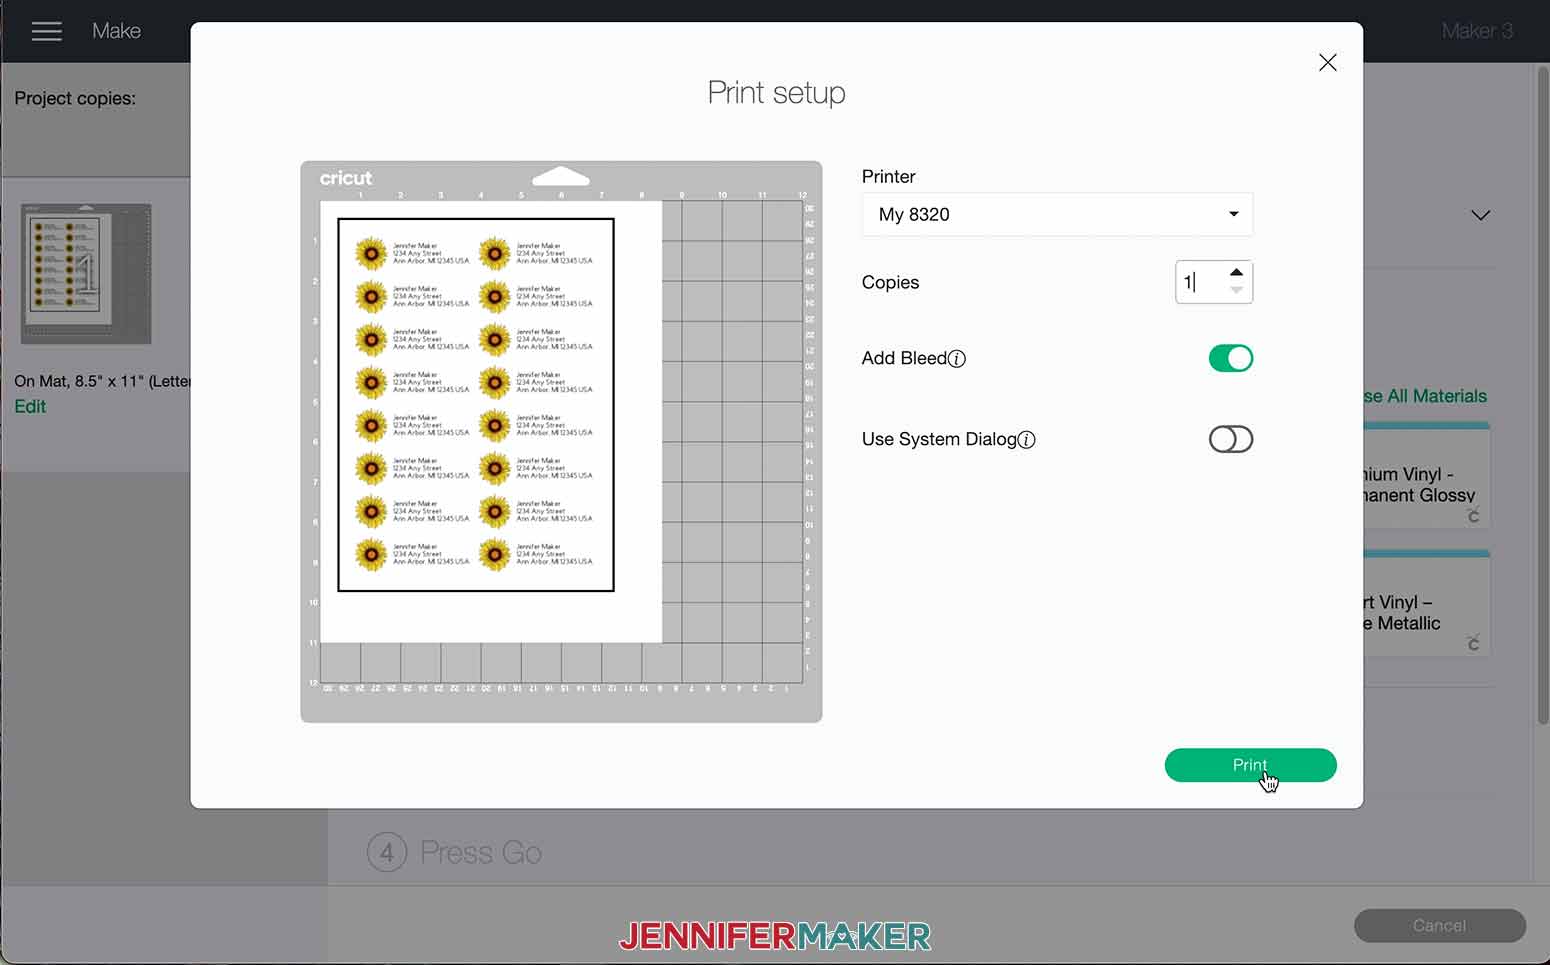
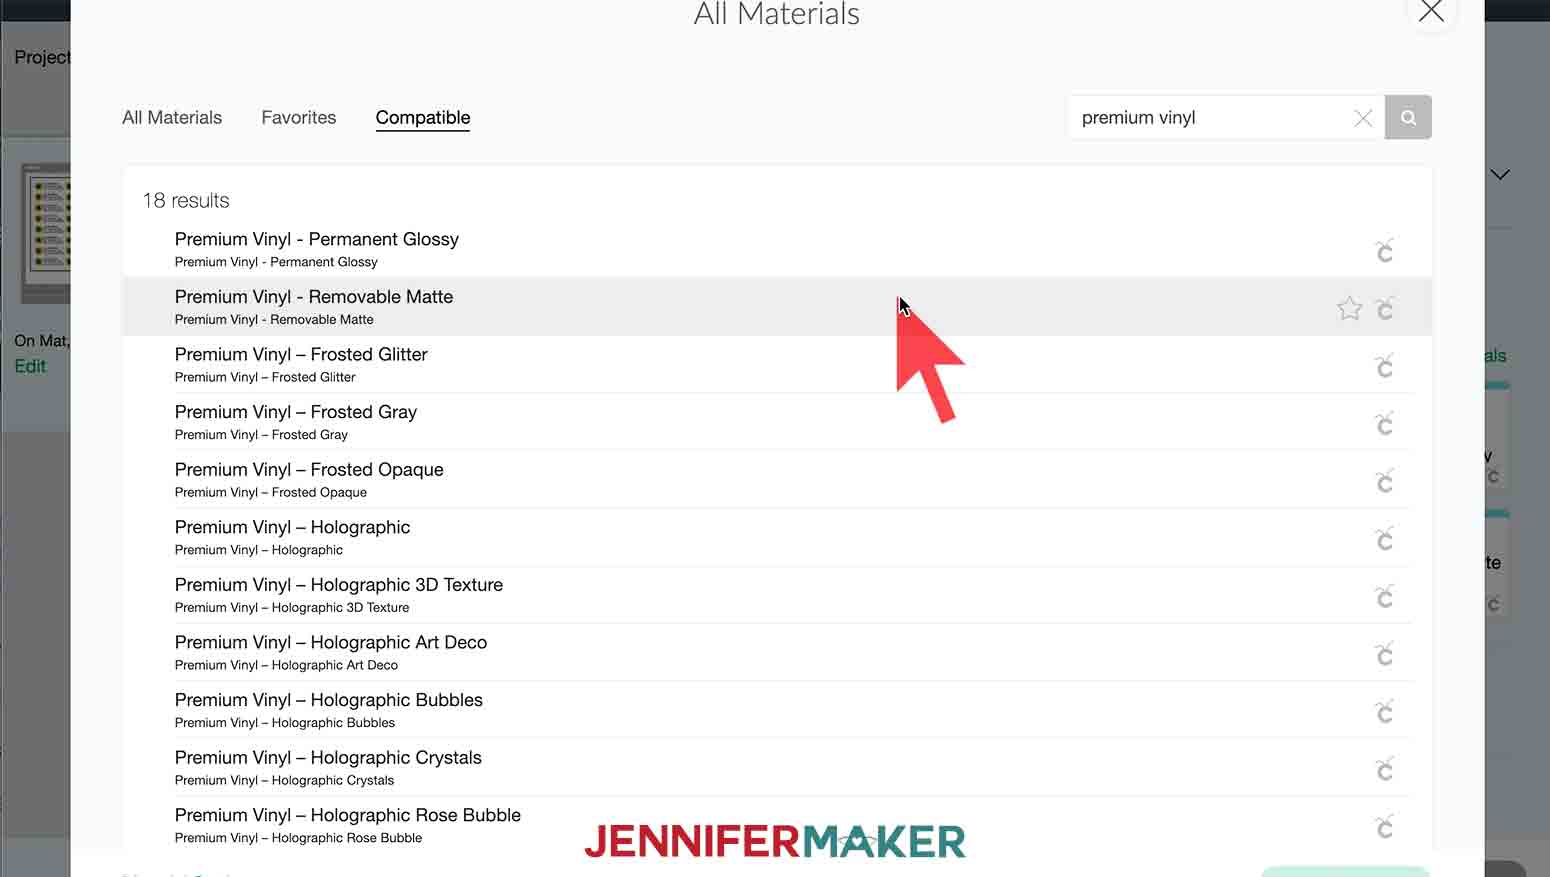
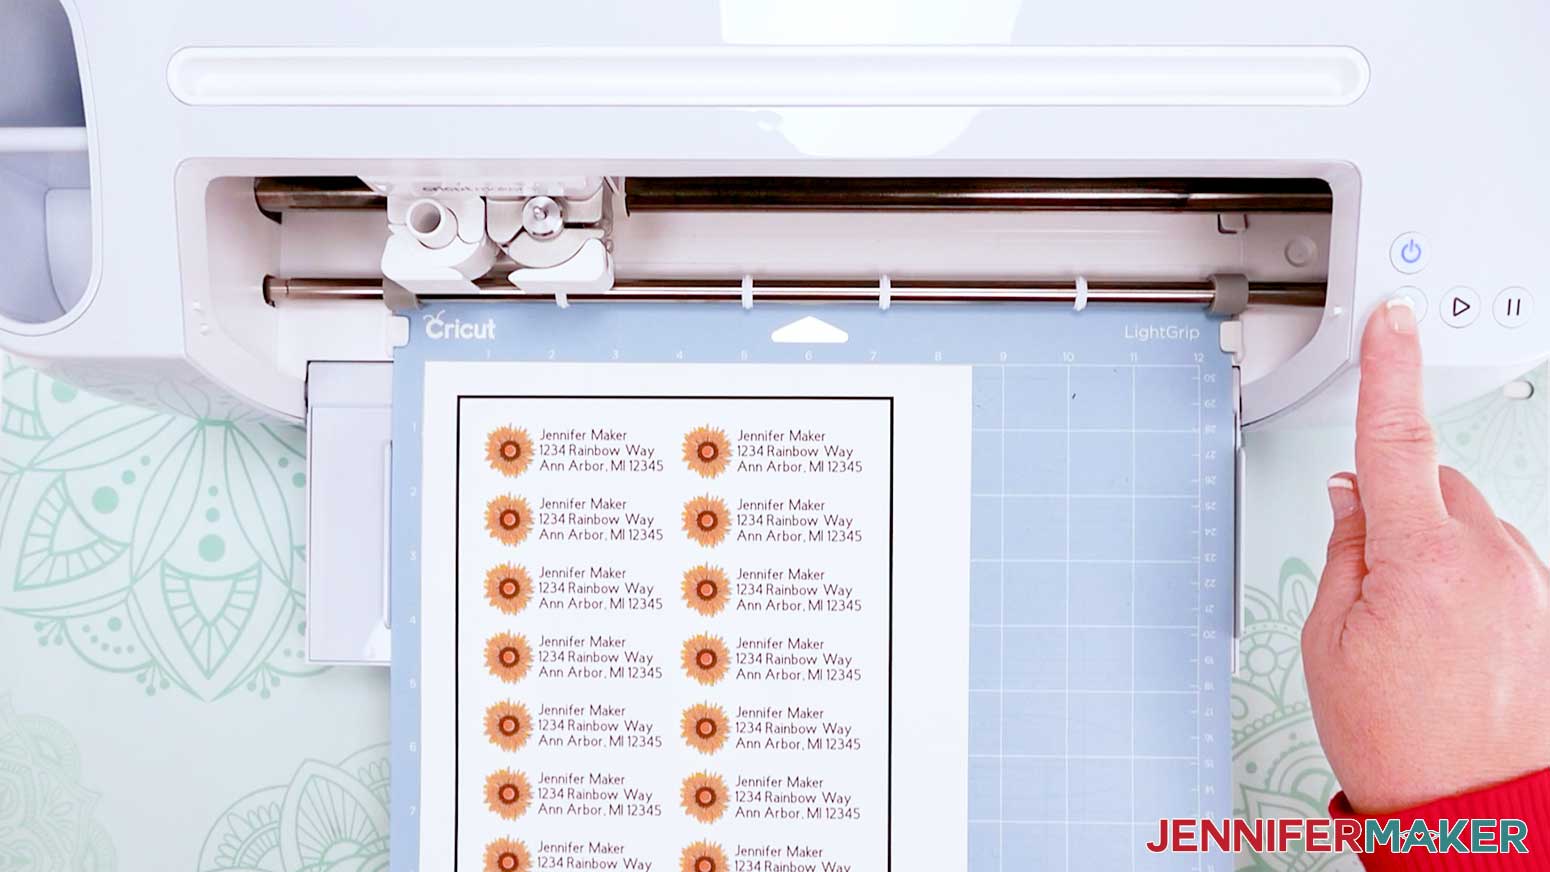
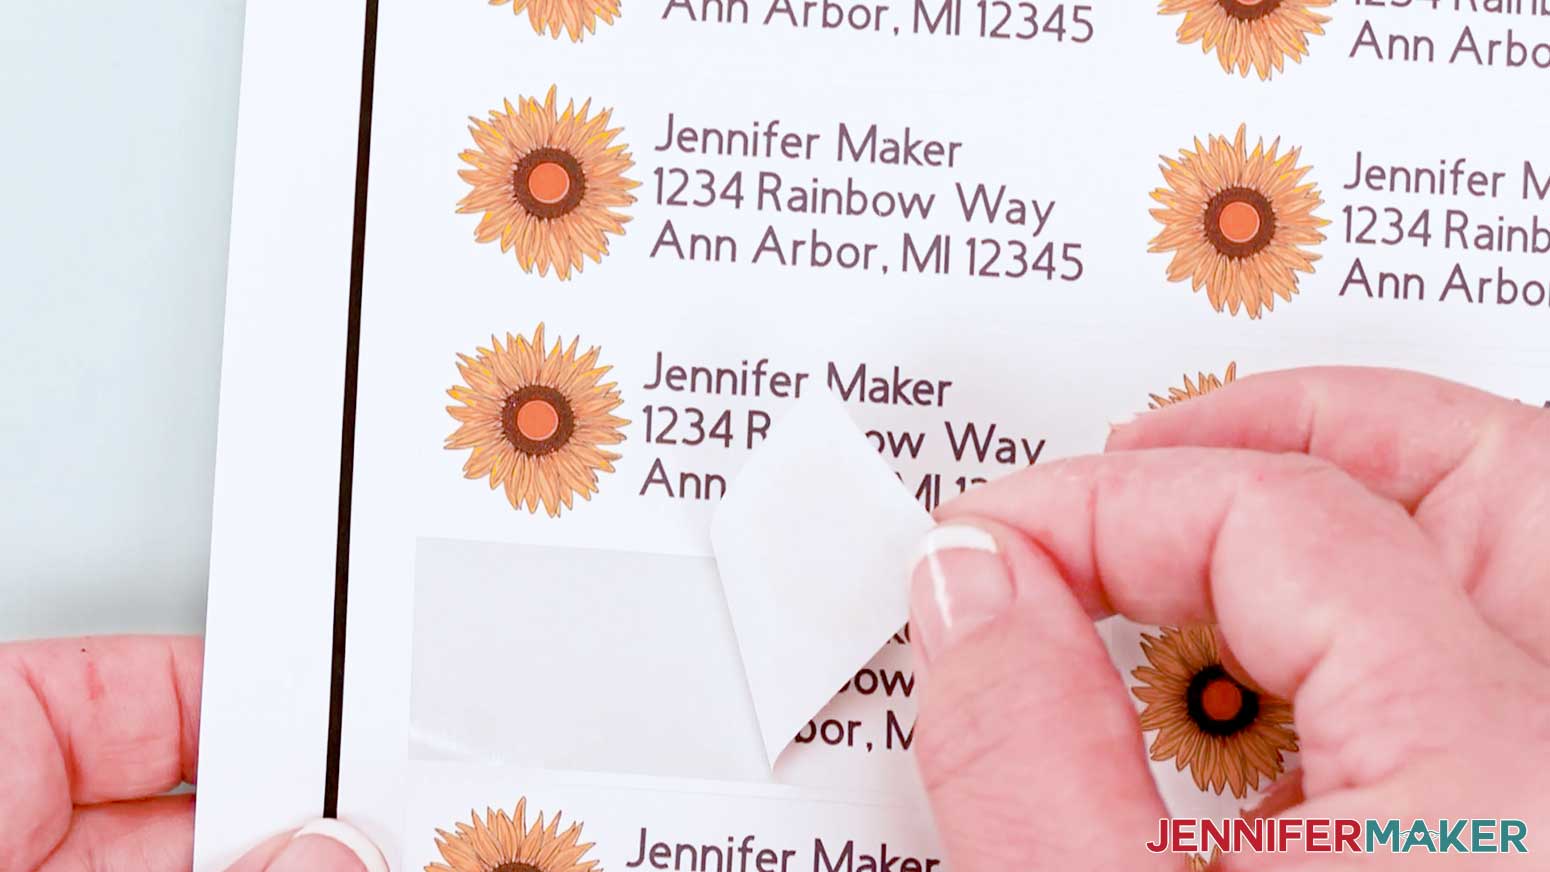
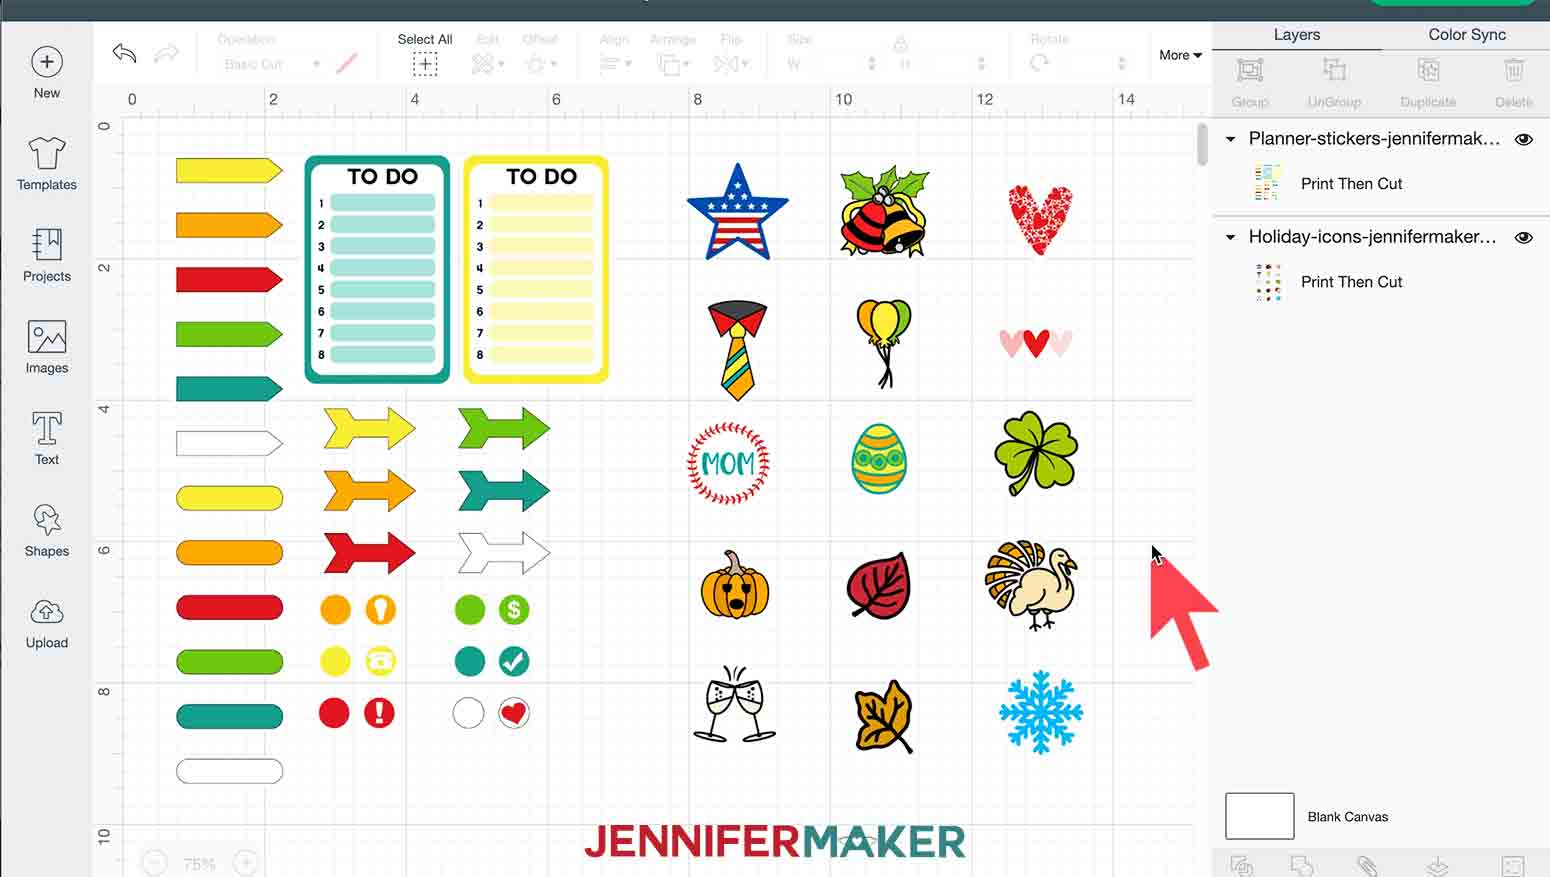
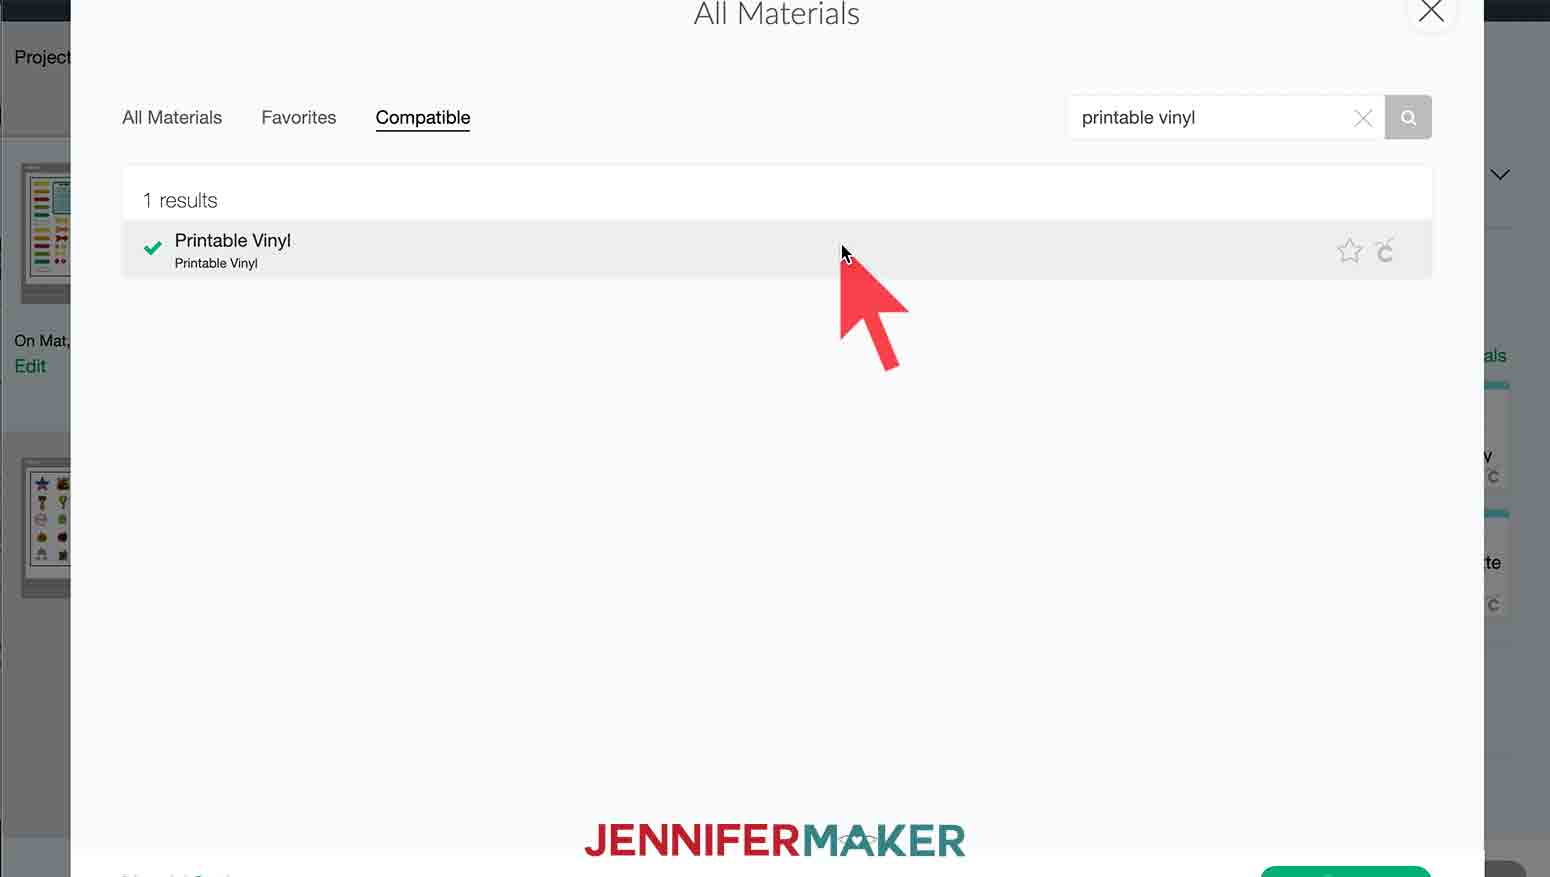
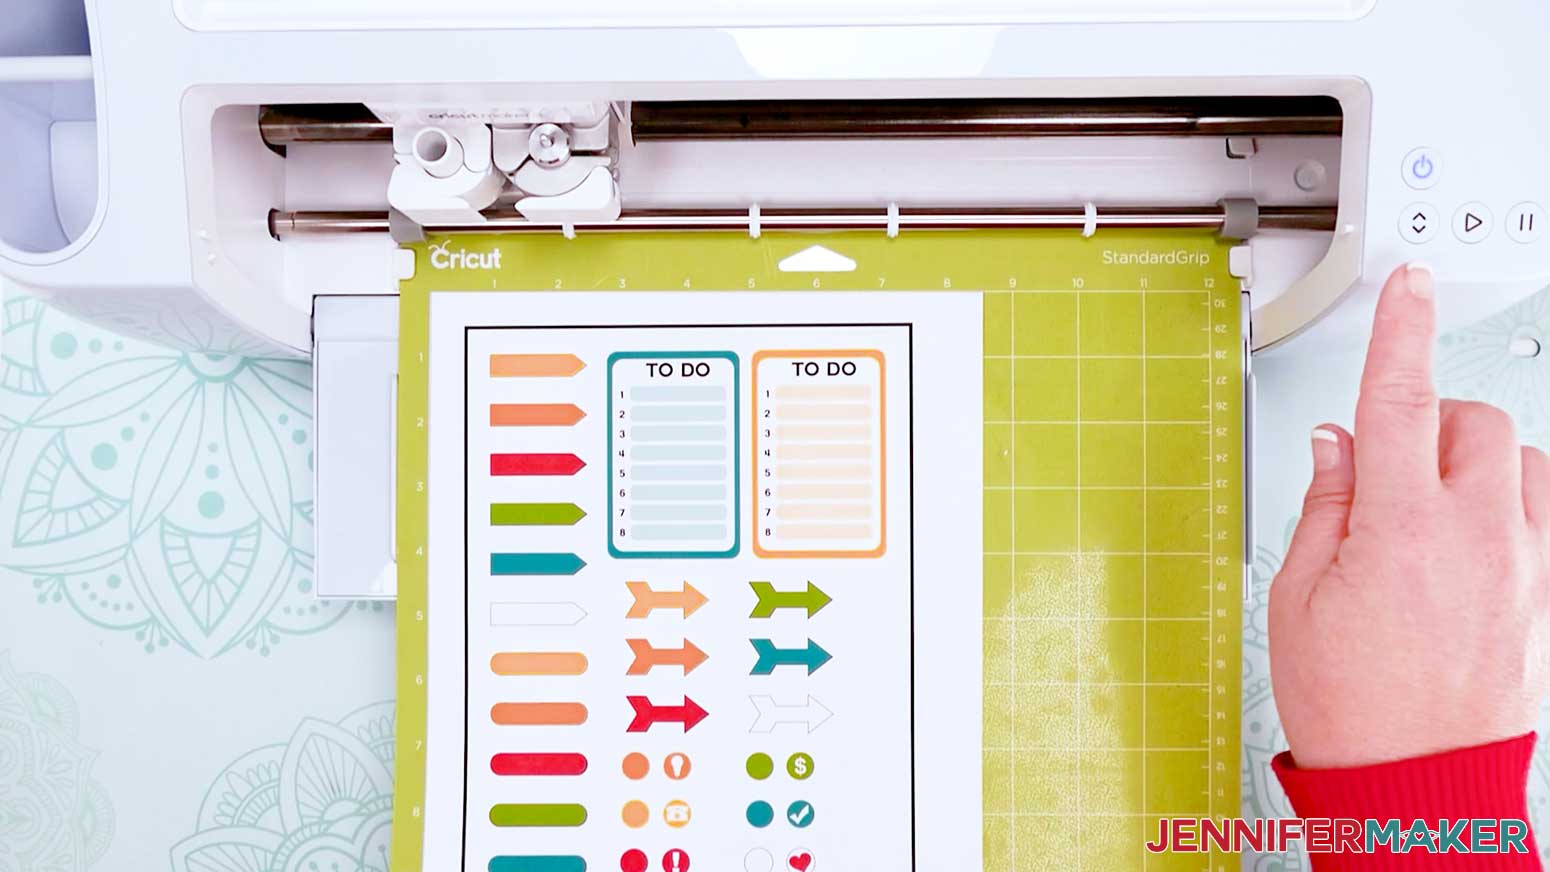
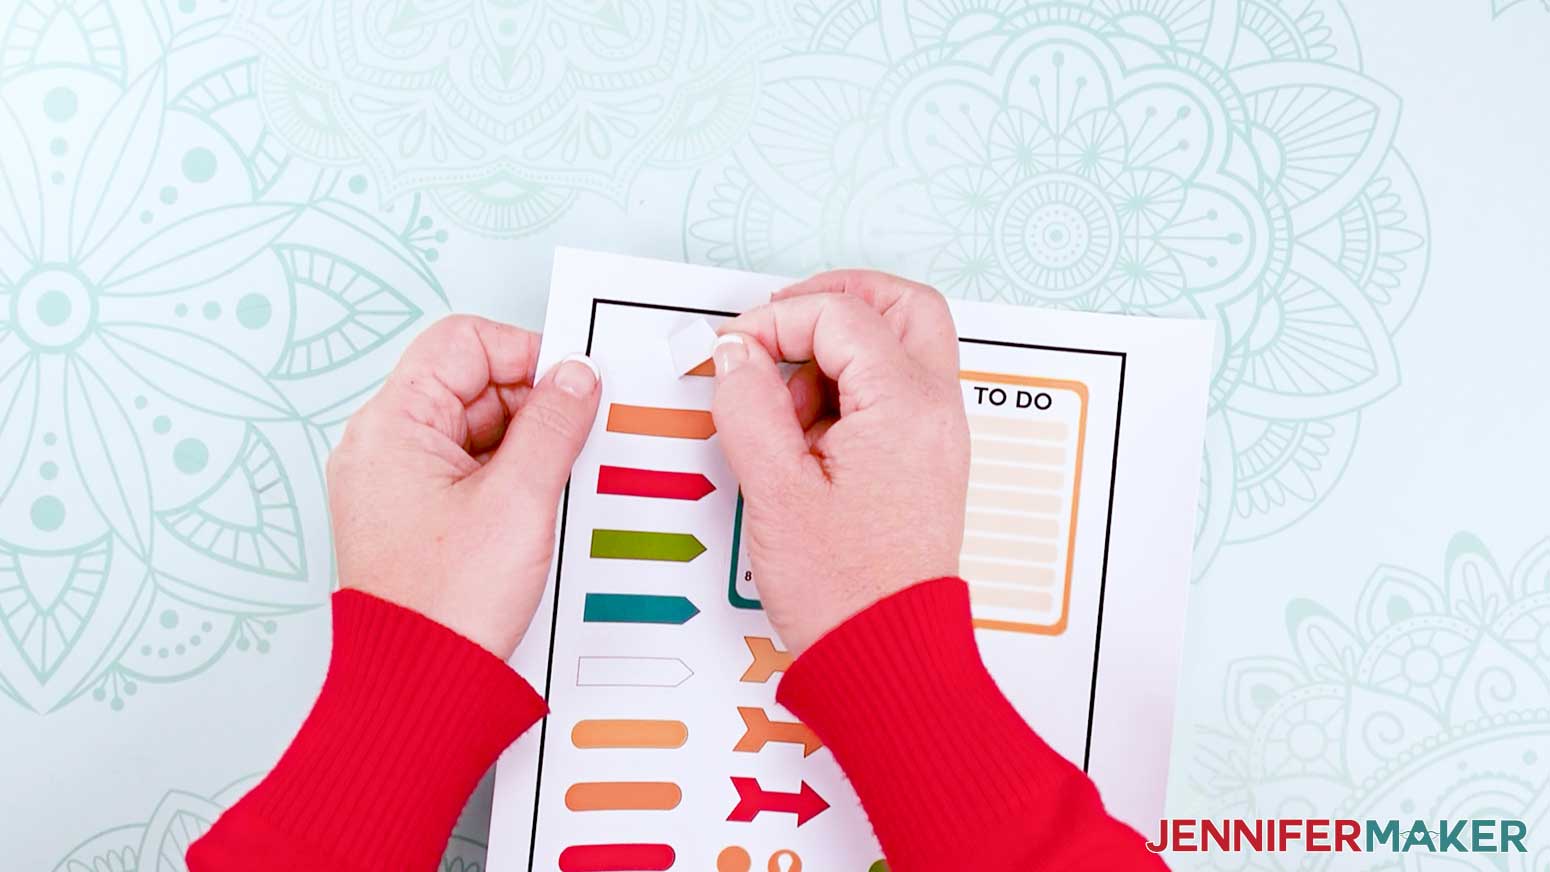
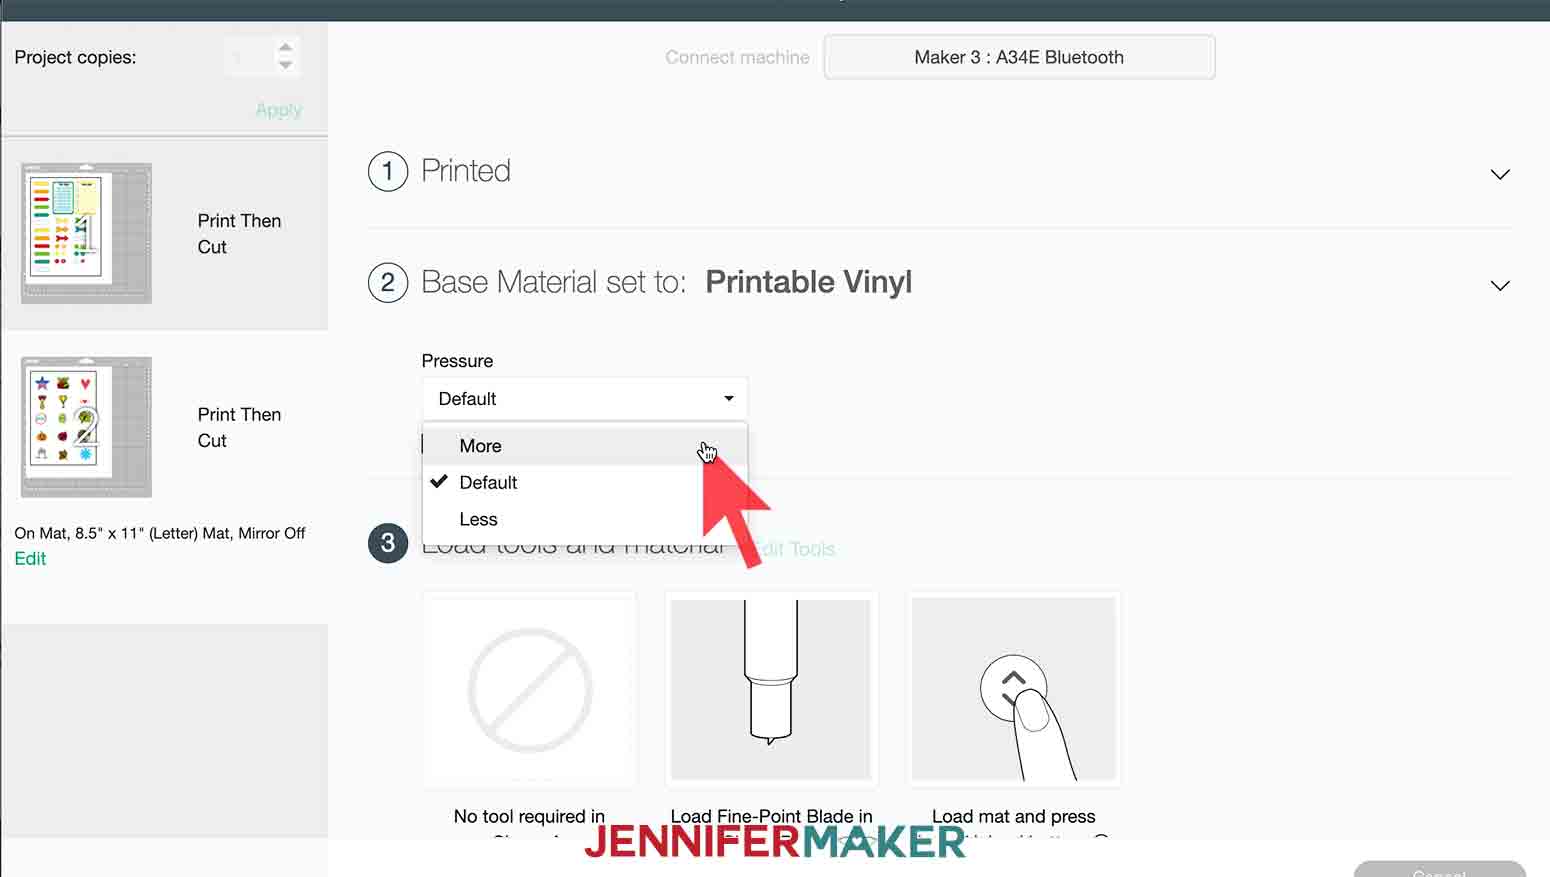
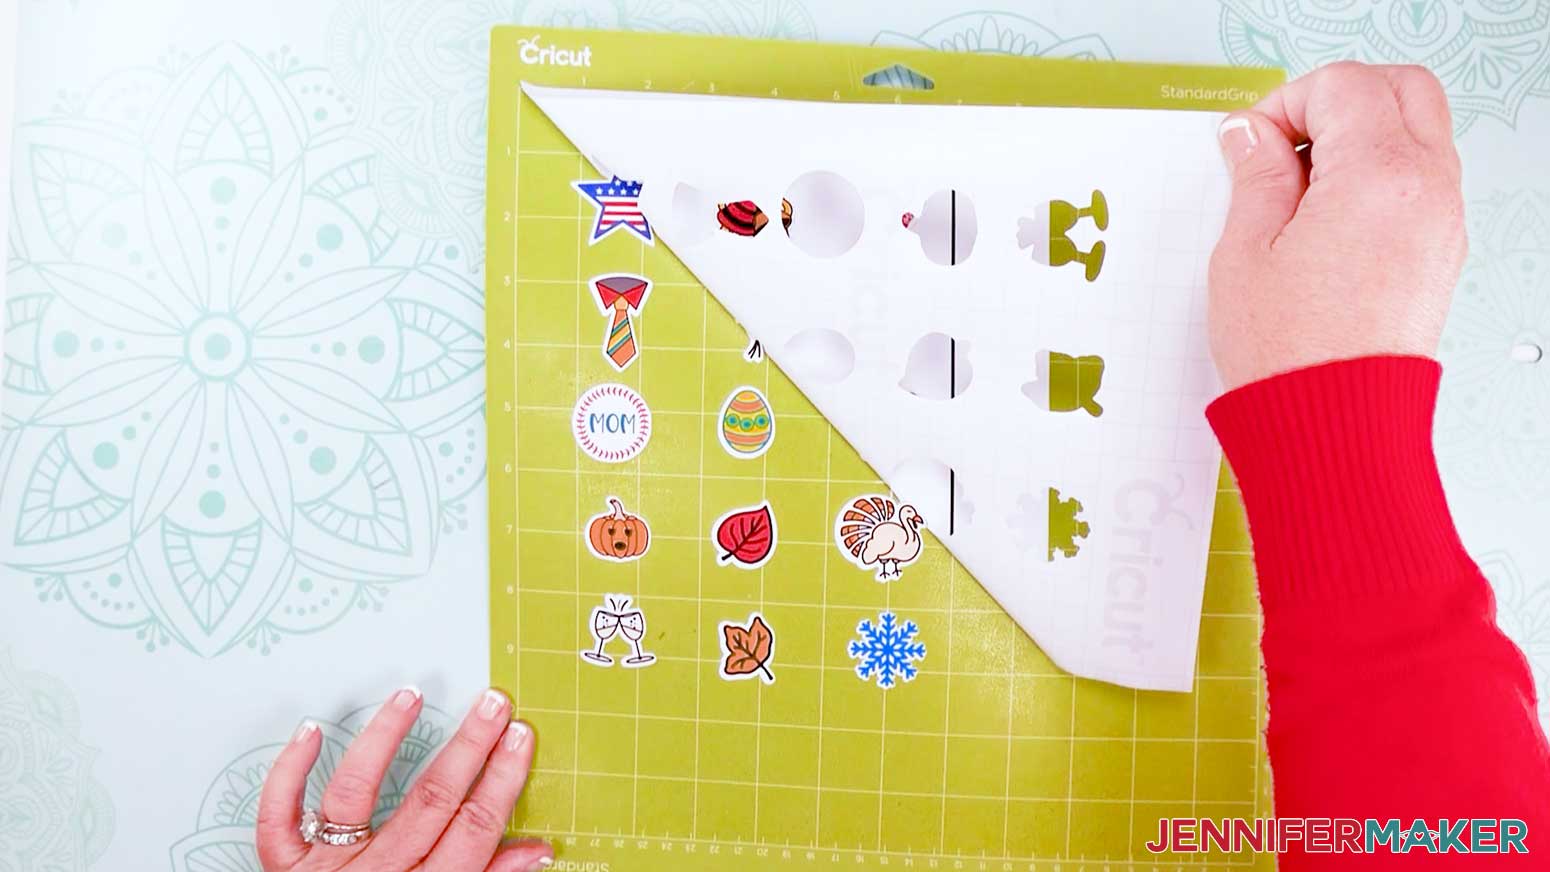
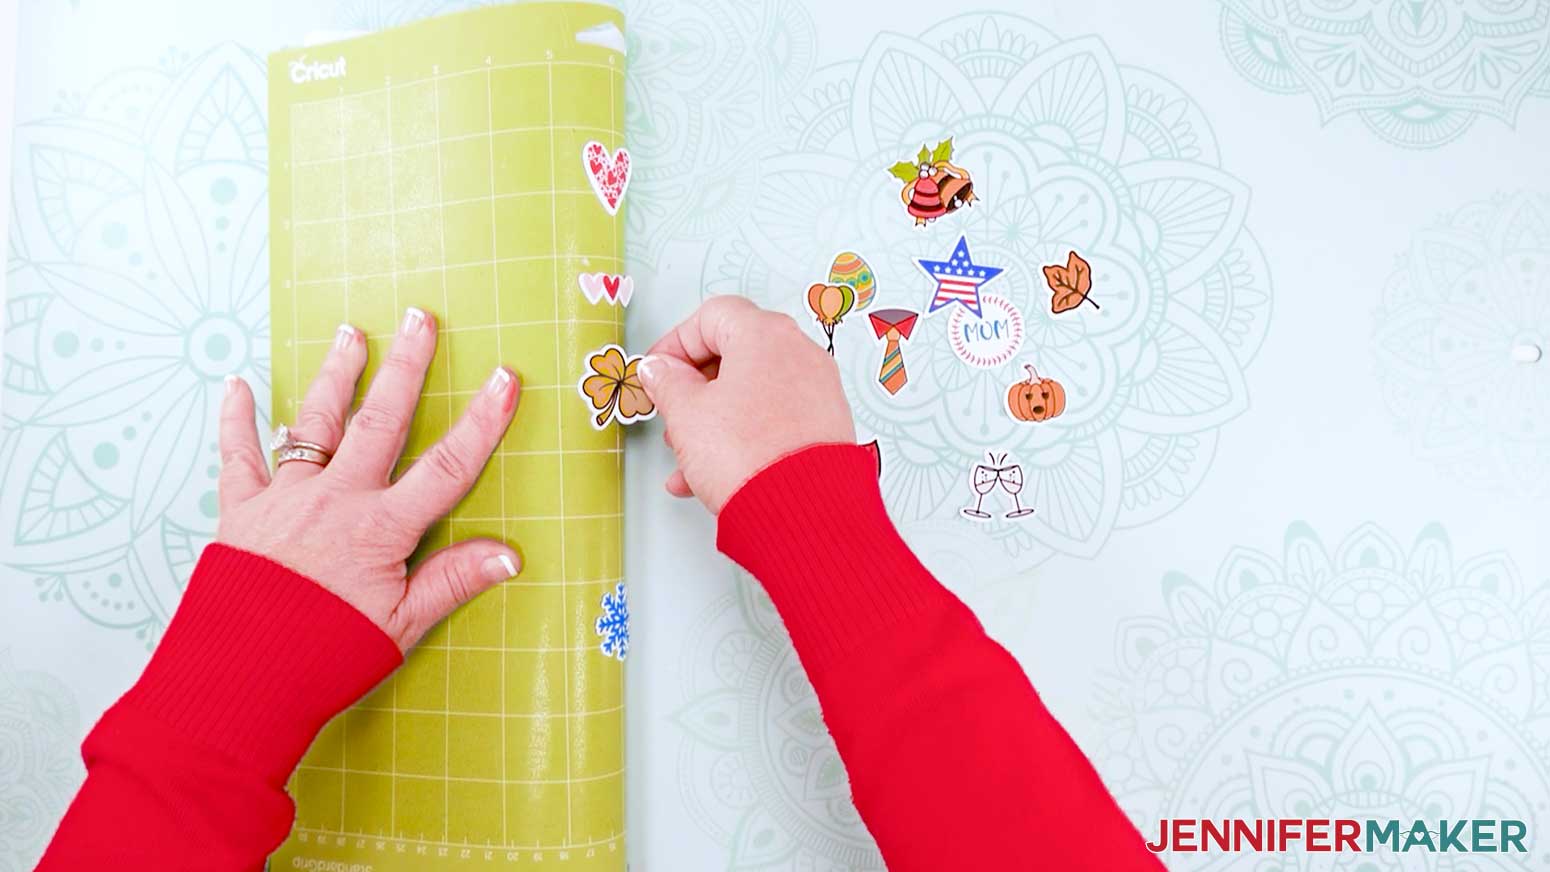
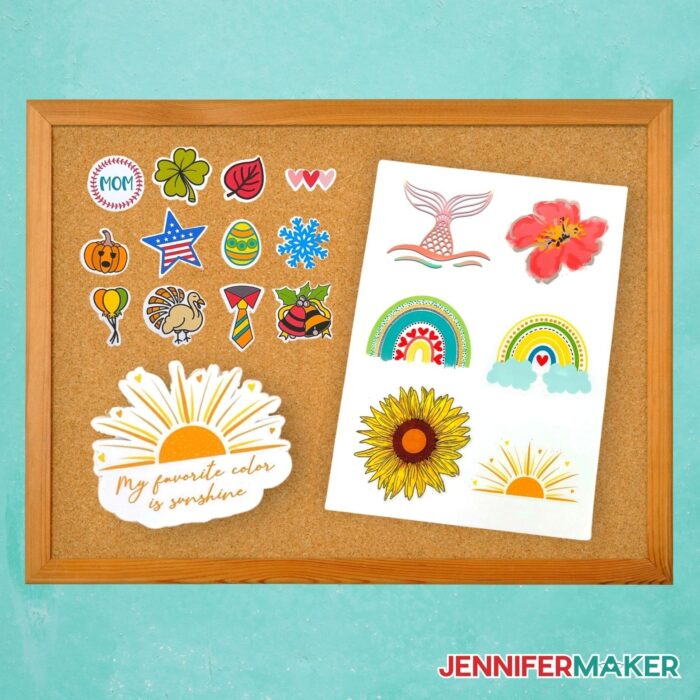
Learn how to make your very own customized Print Then Cut stickers! First, download my free Cute Personalized Print then Cut Sticker images, design #326, from my free resource library. I have several different designs for you to choose from. Here's a look at all of the designs included in this bundle. I tried to include something for everyone. From beautiful rainbows, mermaids and sunflowers (my favorite) to a full sheet of holiday stickers and even a customizable sheet of planner stickers: TIP: You can also find images you might want to make into stickers in Design Space or even make your own! In this tutorial I’m going to explain how to make Print then Cut stickers with and without the new offset feature in Design Space. You will learn: I will also show you how to laminate your stickers, which is an optional step. 1. KISS CUT STICKER SHEET (WITHOUT OFFSET) So let’s begin. I’m going to make a full sheet of Kiss Cut stickers. First, in Design Space click on “Upload Image”. TIP: If you're not sure how to upload a file to Cricut Design Space, watch this helpful video training series I made. If you're on an iPhone or iPad, here's how to download and upload files to the Cricut Design Space app. Then click “Browse.” There are 15 stickers to choose from as well as a full sheet of Holiday Stickers and Planner stickers. To upload a sticker, click on it and click “Open.” Now choose “Complex” and “Continue.” Then “Continue” again. And then click on “Print Then Cut Image” and “Upload.” I’m using six stickers for my kiss cut sticker sheet. The mermaid tail, hibiscus, two rainbows, a sunflower and sunrise. Once they are all highlighted (green outline) click “Add to Canvas.” NOTE: You can add as many stickers as you like, just keep in mind the more you add to a sheet, the smaller they will need to be so they fit on the sticker paper. Once you have the stickers on your Design Space canvas, click on "Shapes" in the left hand column and select a square. Print then Cut projects have a maximum print size of 6.75” W x 9.25” H, so we will change this square into a rectangle and use it as our template for our sticker sheet. To do this, go to the top bar and click on the lock right above "Size" to unlock it and enter these measurements. Now move the template to the back by clicking "Arrange" at the top and selecting "Send to Back." Next, click on each of the stickers and move them on top of the template then resize and arrange them however you like. NOTE: I'm only using 6 stickers, however you can make yours smaller and duplicate them to fit lots of stickers on the template, it's up to you! Once you have everything arranged just the way you like select the template and either hide or delete it. Next, click "Select All" at the top and then "Flatten" on the lower right. You will see that your design now shows up as “Print then Cut” in the layers panel on the right. Now you can click "Make It." Click "Continue." This will bring you to the next page where you will select "Send to Printer" to print your sheet of stickers. Make sure Add Bleed is set to green (on). I recommend selecting “Use System Dialog” as well. This way you can adjust the print quality. Some printers don’t have this option and that’s fine if yours doesn’t. If it does, I recommend printing on “Best” setting. Then click “Print” to send to Printer. NOTE: If you chose to use the system dialog box, be aware that it will appear behind your Design Space window -- so you’ll want to move your window to the side to find it. Be sure to print your stickers on the right side of the paper -- check your printer manual if you're not sure. You may also want to clean your print heads if you notice your print is streaky or blotchy. When the print is done, be sure to give it a few minutes to dry, too. Your sticker sheet will print with a black rectangle - this is your Cricut's registration mark which needs to be there. Back in Design Space click "Browse All Materials." Then in the search bar type “Sticky Note." That’s the setting I found works best for Kiss Cut Stickers when using White Sticker Paper. Place your sticker sheet on a LightGrip (Blue) Machine Mat. Make sure to line it up really well to the top left corner of the mat. Either use your hands or a brayer to make sure your sheet is firmly stuck to the mat. Now load your mat and press the flashing go button. TIP: For the best possible and most accurate cut, make sure when you load your mat that you have it aligned as far left as possible, butted right up against the guide. Your machine will first read the registration marks I mentioned earlier with its sensors, so it knows where to cut and then begin the cut. When the cut is finished, unload your mat, flip it over and gently pull the mat away from the sticker sheet. Now use your paper trimmer or scissors to cut just inside the registration lines. And there you go, you just made a professional looking sheet of stickers you can either sell on Etsy or keep for yourself! How cool is that? 2. DIE CUT STICKERS (WITH OFFSET/PERSONALIZED & LAMINATED) Next, I’m going to show you how to cut Die Cut Stickers and how to personalize them. Remember a die cut sticker cuts around the sticker and through the backing material. I’m going to use Avery White Shipping Labels (8255) and I’m going to add laminate to these. The laminate adds an extra layer of protection to your sticker, making it water resistant, not waterproof. For this part I'm going to use the Sunrise design. So first upload that design to Design Space. I am going to add a quote to the bottom of my sunrise image to personalize it. Select the text tool on the left of the canvas. Click where it says "Font" at the top of your canvas and search for a font you'd like to use. I'm using Sallim, a font I purchased from Fontbundles.net. But as always, feel free to use any font you have access to in the Design Space Library. In the text box, type your personalization. I am going to add the quote "My favorite color is sunshine" to mine. Resize the text by dragging the double arrow icon in the lower right corner of the text block. For best results make sure the text fits directly under the sunshine. My text should be under 3 inches wide. Under alignment, I am going to center my text. Next, I am going to change the font color to compliment the sunrise graphic. Click the black square next to "Operation" to select a color. I would like to move the second line of text closer to the first line of text. To do this, select the text block and under "Advanced" at the top, select "Ungroup to Lines." Click the second line of text and drag it up or select and use the arrow keys on the keyboard to nudge the line of text up. To ensure everything is in alignment, select all objects by clicking "Select All" at the top and then "Center Horizontally" under Align. So that the text joins with the image as one sticker, I am going to select both lines of text and first “Group” them by holding down the shift key as I click on them in the Layers panel. Next, I will add the offset. Click "Offset" at the top of the canvas. Alter the distance so that the offset of the text crosses over the sticker image (see arrow below) and then click "Apply." I used 0.2 for my text. By default the new offset will turn black so we will change the color to white by selecting white from the color picker at the top of the canvas. Select the sunrise image and then under "Arrange" at the top choose "Send to Front." Make sure that the image is not cutting off any of the text. Mine was slightly cut off so I simply moved the sunrise graphic up. NOTE: If you don’t have Offset, go to Shapes on the left, choose a square, unlock it, and resize it so it covers the entire image and text of the sticker. Now change it to white and go to Arrange, and choose Send to Back. Select all objects and then click "flatten" in the lower right corner of the canvas. After you flatten your image, the design should still say Print Then Cut. Click "Make It." You can continue with printing and cutting one sticker. But let's make an entire sheet of die cut stickers. There are two ways to do this. You can either increase your Project Copies in the field here and click Apply. Or you can click "cancel" to go back to the canvas, duplicate your sticker several times — I’ll do five times, which will give us 6 to a sheet. Click “Make It” again. Now you have an entire sheet of stickers. Click "Continue." We are now ready to print our stickers. Click "Send to Printer" to print your sheet of stickers. Just like we did with the Kiss Cut Sticker Sheet earlier, make sure Add Bleed is set to green (on). I recommend selecting “Use System Dialog” as well. This way you can adjust the print quality. Some printers don’t have this option and that’s fine if yours doesn’t. If it does, I recommend printing on “Best” setting. Then click “Print” to send to Printer. Follow your printer's specific settings to print on the sticker paper. Click Print. We are going to add laminate to this sheet before we cut. First place your sticker sheet on a LightGrip (Blue) Machine Mat. Now cut a piece of transparent vinyl (laminate) large enough to cover your stickers. If you have printed a full sheet of stickers, cut your vinyl 7.5” x 10.5”. I used the Cricut Trimmer to cut my vinyl. To apply the clear vinyl, begin by peeling it off its backing. Fold it back about an inch and line it up to the top of the sticker sheet. Stick and align the clear vinyl to the top of the square surrounding your stickers. Use your scraper tool to flatten the clear vinyl onto the sticker sheet while slowly pulling away the backing of the vinyl. TIP: If you happen to get an air bubble when applying the clear vinyl laminate, grab a straight pin or razor blade and poke a tiny hole in the air bubble then use your scraper tool to flatten. Back in Design Space, click "Browse All Materials" and search "Printable Sticker Paper (White)", select that then click "Done." Then choose "More" pressure. Now load your mat and press the flashing Go button when prompted. NOTE: If your Cricut has issues seeing the registration marks with the glossy laminate over them, you can try cutting the laminate smaller so it doesn't cover the registration box. When the cut is finished unload your mat. Next, pull up a corner and peel away all the excess sticker paper. You will be left with just your stickers on the mat. Now flip the mat and roll it back to release your stickers. And that’s all there is to it! You can follow these same directions to print all kinds of die cut stickers with or without laminate. 3. PERSONALIZED RETURN ADDRESS LABELS To make personalized return address labels, insert your favorite design from my collection. I am going to use my Sunflower design and print these on the Vinyl Sticker Paper without laminate. These will be kiss cut. First, click the shapes tool icon and then select square. Now resize the square. We are going to make it into a rectangular address label. You can do this by clicking the lock icon at the top under “Size”, we want to make our label 3” wide by 1” high. Change the color of the rectangle to white. Click the sunflower image, select Arrange at the top of the canvas and then select "Send to Front." Resize the sunflower so it fits inside the rectangle. I made the width of my sunflower 0.85". Select the text tool and begin typing out your address information. I am using Cricut Sans font. Resize the address text so it fits in the rectangle next to the image. Select all objects by clicking on that at the top of the screen and then click "Flatten." After you flatten, make sure your layer says Print Then Cut. Duplicate your address label 15 times so that you have 16 address labels total. Click “Make It.” NOTE: You may get a warning that says, “Wow! That’s a big project. This may take a moment.” No worries. It will load. Once it does click “Continue.” Check to make sure your address labels look good on the mat preview screen and click "Continue." Send the stickers to your printer. I am going to print my stickers on white vinyl sticker paper. In the Printer setup screen, make sure "Add Bleed" and "Use System Dialog" is green. Again, I recommend you print on “Best” setting if you have that option on your printer. Once your sticker sheet has printed, it's time to cut. Back in Design Space click "Browse All Materials.” This time search Premium Vinyl and select Removable Matte and click “Done.” Then keep the pressure at “Default.” Place your sticker sheet on the LightGrip (Blue) Machine Mat, you can also use a StandardGrip (Green) Machine Mat, but I find it's easier to remove the stickers from the light grip mat…Now load your mat and press Go. When it's done you will have a whole sheet of personalized Return Address Labels. These are perfect to use on envelopes for the holidays, graduation cards, weddings...all sorts of things! And you can use any of my free sticker designs for your labels or even mix and match! 4. PLANNER & HOLIDAY STICKERS I have also included a full sheet of Planner Stickers and Holiday & special occasion stickers that can be customized by adding text. I printed these on Cricut Printable Vinyl. NOTE: If you choose to add text make sure to Flatten your design before clicking “Make It.” Once you click “Make It”, you’ll want to print your sticker sheet just like we did earlier in this tutorial. For the planner stickers I went with Kiss Cut Stickers. Click "Browse All Materials" and search "Printable Vinyl." Make sure to keep the pressure set to "Default" so that the stickers will be kiss cut. Then place your printed planner sticker sheet on your mat, load it into your machine and press go. Once the cut is done, remove the entire sheet from the mat. Then you can peel off the stickers as you need them to decorate your planner…Pretty cool, huh? For the Holiday stickers I also chose "Printable Vinyl" for my material, but picked "More" pressure so they would be Die Cut. When the cut is finished peel the excess sticker sheet off the mat. Then flip your mat and release the stickers by rolling the mat back. This way they won’t curl. The Holiday Stickers can be used for all sorts of things, to dress up envelopes or greeting cards, add to gift tags…it’s totally up to you! FONTS USED: Sallim from FontBundles.net Cricut Sans (from Design Space) NOTE: All machines are different so you may need to experiment with the material and pressure settings. For more detailed information on getting just the right cut check out this Cricut guide on "How to Create Custom Material Settings."
Cute Personalized Stickers
Materials
Tools
Instructions
STEP 1: GET MY FREE CUTE PERSONALIZED STICKERS DESIGN FILES
Making stickers with a Cricut Machine is fun and easy and it's now even easier with the offset feature! Let me show you!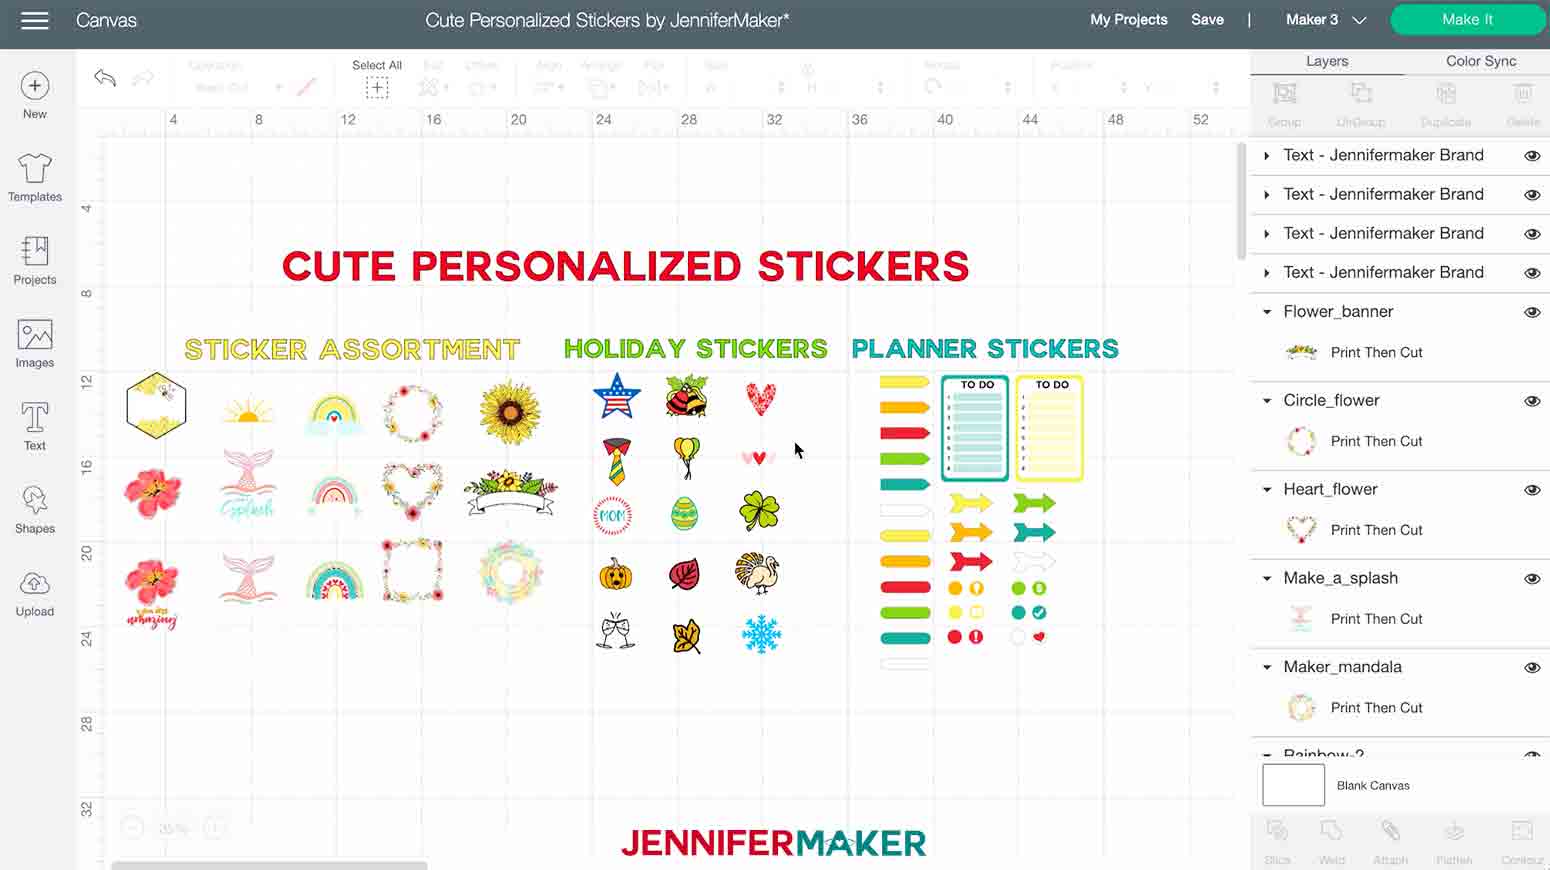

STEP 2: UPLOAD & CUT YOUR STICKERS


Notes
The detailed step-by-step assembly video on how to make your own stickers is part of Maker Academy Weekend. Get a pass to watch all 20+ workshops, each with a printable handbook, transcript, audio files, design files, and support with a VIP pass below:

Use my free digital files to take your sticker making to the next step and create all different types of stickers that everyone will love. I’m sure you’ll have a few asking if you can make some custom designs for them! This project is an easy way to get some good practice in sticker making!
The Holiday Stickers can be used for all sorts of things, to dress up envelopes or greeting cards, add to gift tags, it’s totally up to you!
Answers to Your Questions About How to Make Stickers
Q: Where is your tutorial for this project?
This is a special project we made for our free Maker Academy Weekend event! A complete and detailed step-by-step video premiered during the event November 4-7, 2021 — specifically, this tutorial video was available to watch for free for 24 hours beginning November 6 at 10:00 am ET! Get access tp the workshop and a 15-page printable handbook that details how to make this beautiful project with a VIP Pass to Maker Academy Weekend, which comes with other perks and bonuses, too!
Get the free designs for my sticker collection!
I love seeing what you make with my designs and how you use them! Please share a photo of your stickers in our Facebook group or tag me on social media with #jennifermaker.
Love,

Want to remember this? Save this How to Make Stickers Tutorial to your favorite Pinterest Board!