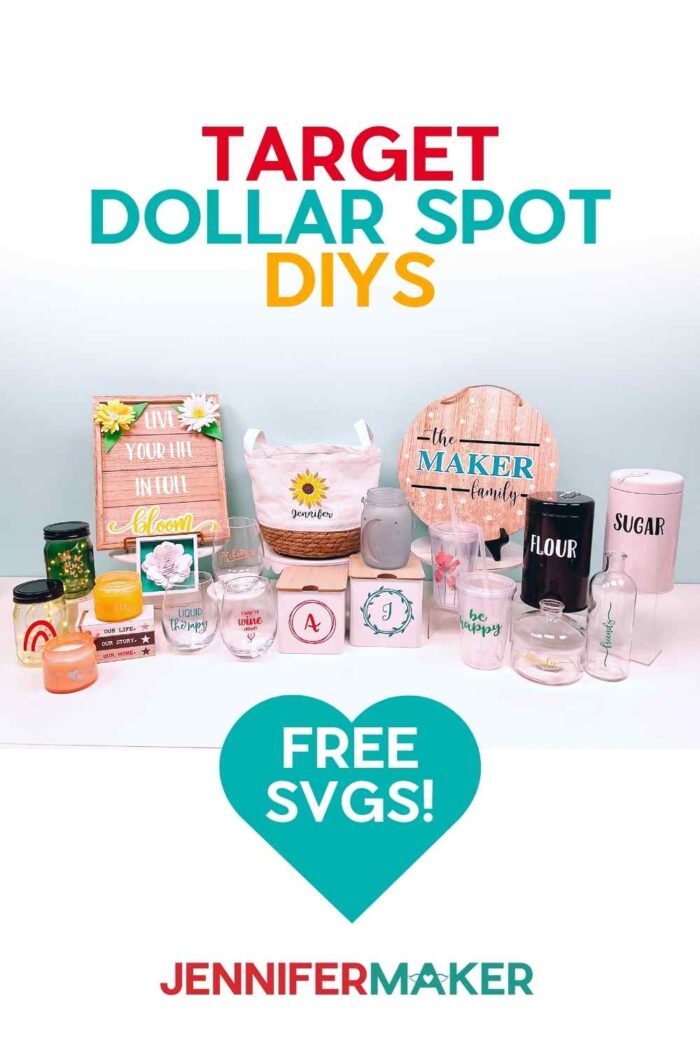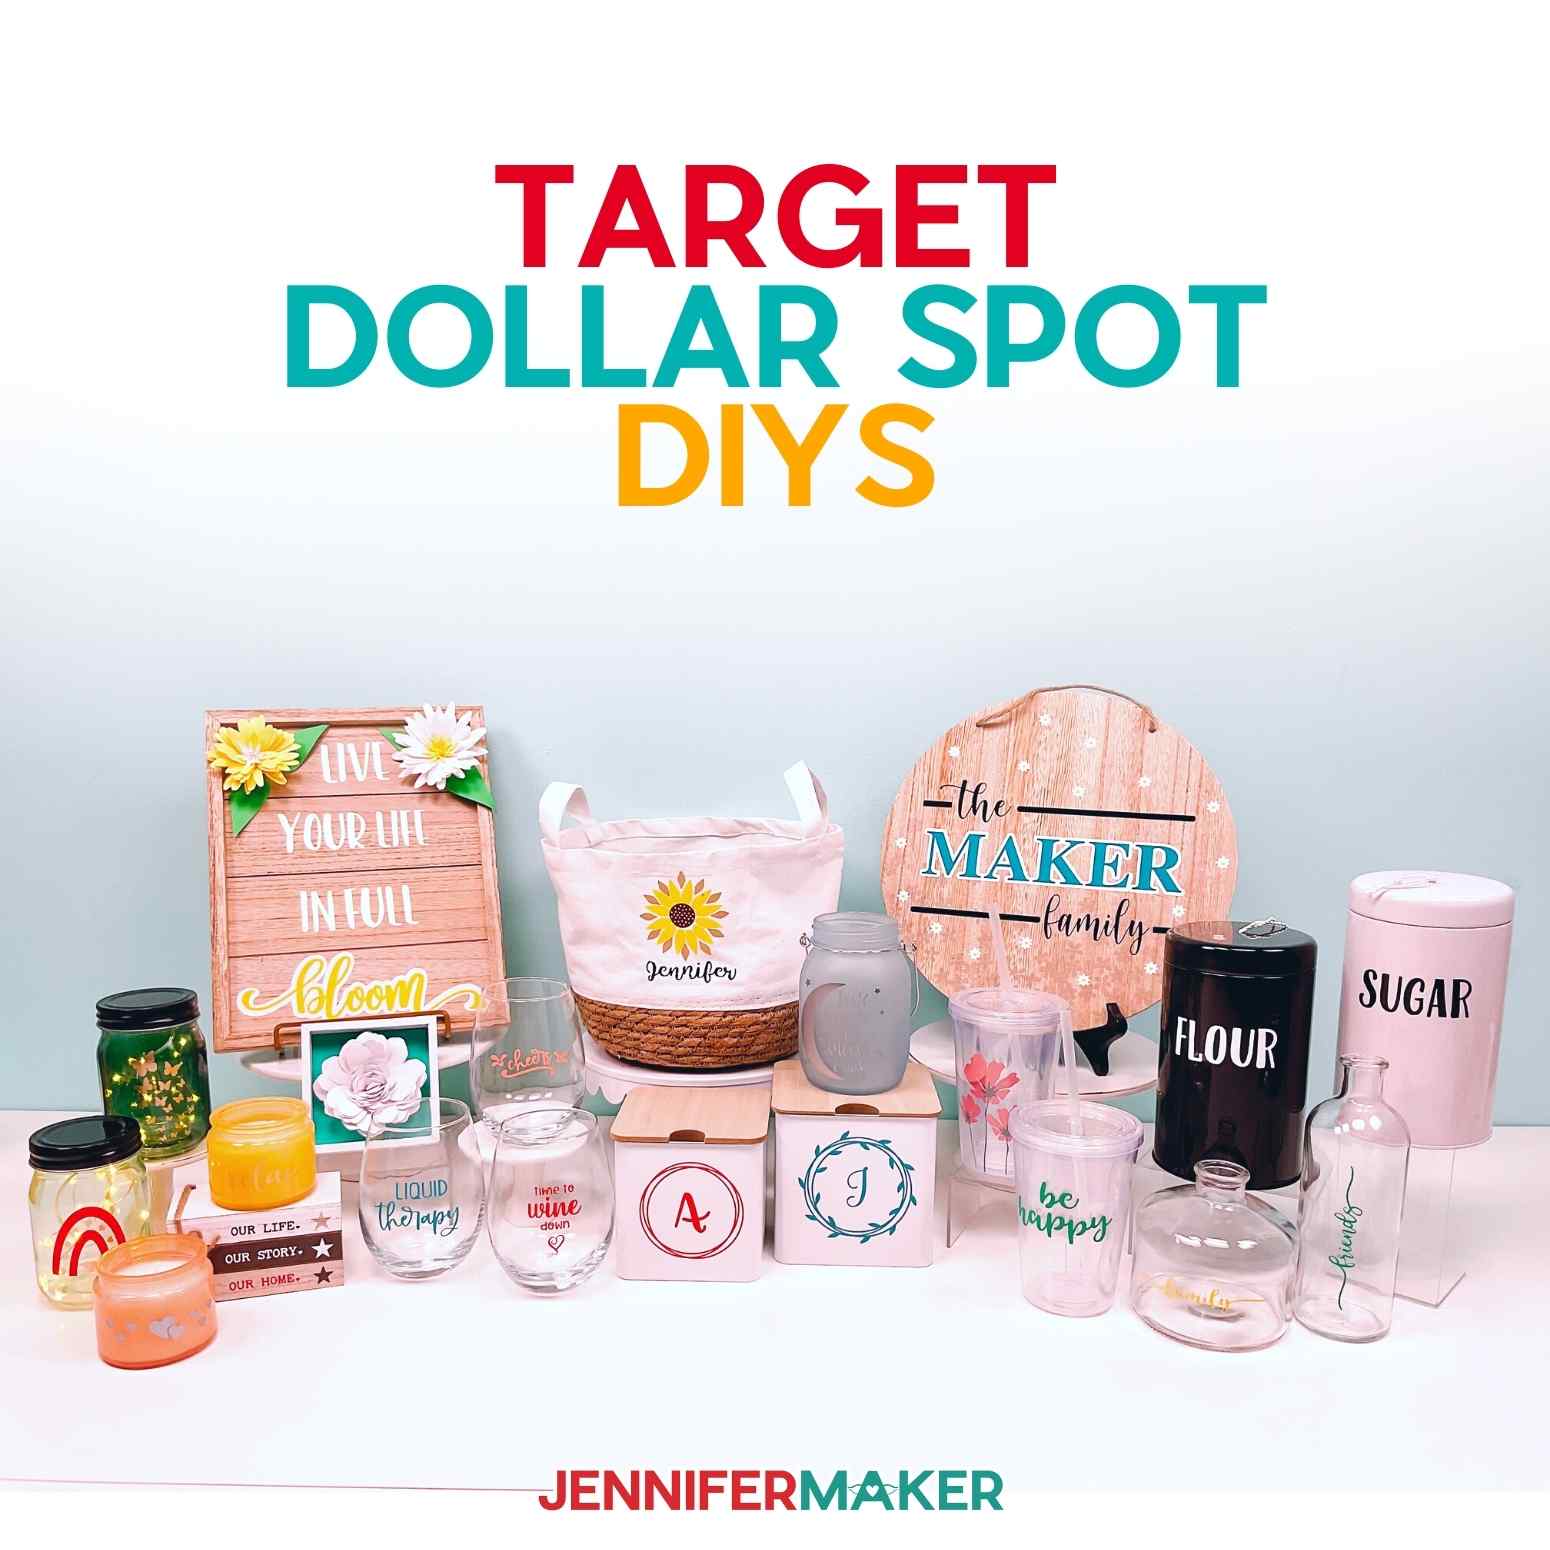
Learn how to make easy, customizable Target Dollar Spot DIYs with simple materials!
One of my favorite parts of Cricut crafting is how easy it is to decorate and personalize different items! With just a bit of vinyl and cardstock, you can take any common object to a whole new level. That’s the inspiration behind these Target Dollar Spot DIYs! And once you’ve learned to adapt designs in my tutorial, you mix and match decorations and items. My Dollar Tree DIY Projects will give you even more inspiration. And if you have a Maker, my list of 123 projects you can make with a Cricut Maker will keep you crafting in between Target runs!
Watch the haul and step-by-step tutorial videos showing each item and three project highlights:

I had so much fun coming up with ideas for Target Dollar Spot crafts, especially once I decided to stick with simple materials. The projects only use cardstock and adhesive vinyl. Sometimes, narrowing your project focus is the best way to increase your creativity!
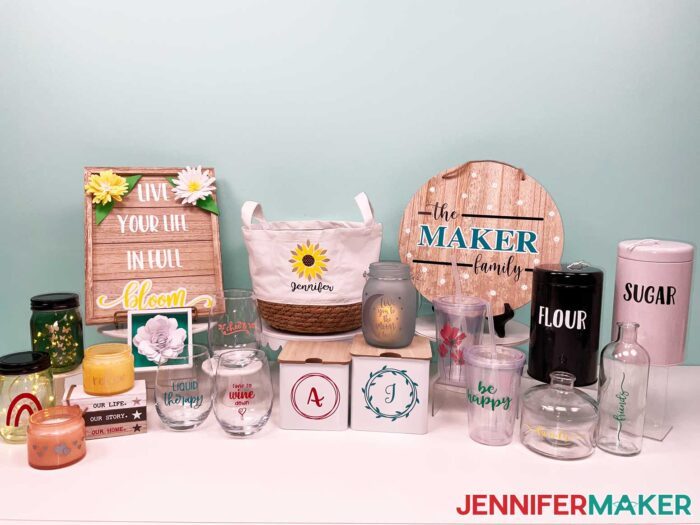
My collection includes drink decals, kitchen labels, little vase decorations, decorative wreaths, quotes, and so many more flexible options for your creative ideas!
If you want to make any of these Target Dollar Spot DIYs, check out my assembly video for step-by-step instructions on three examples:
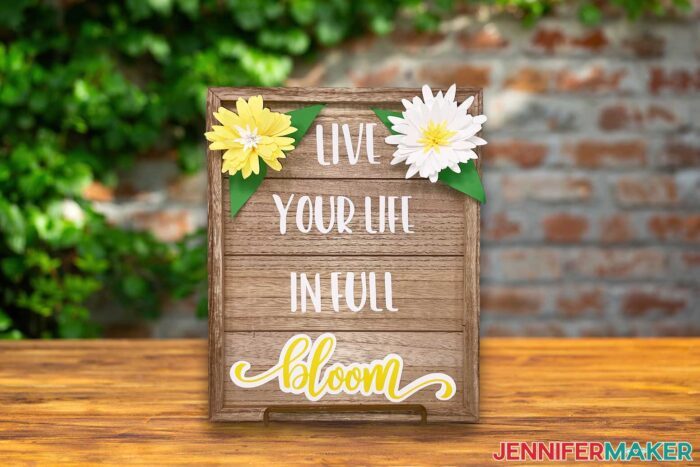
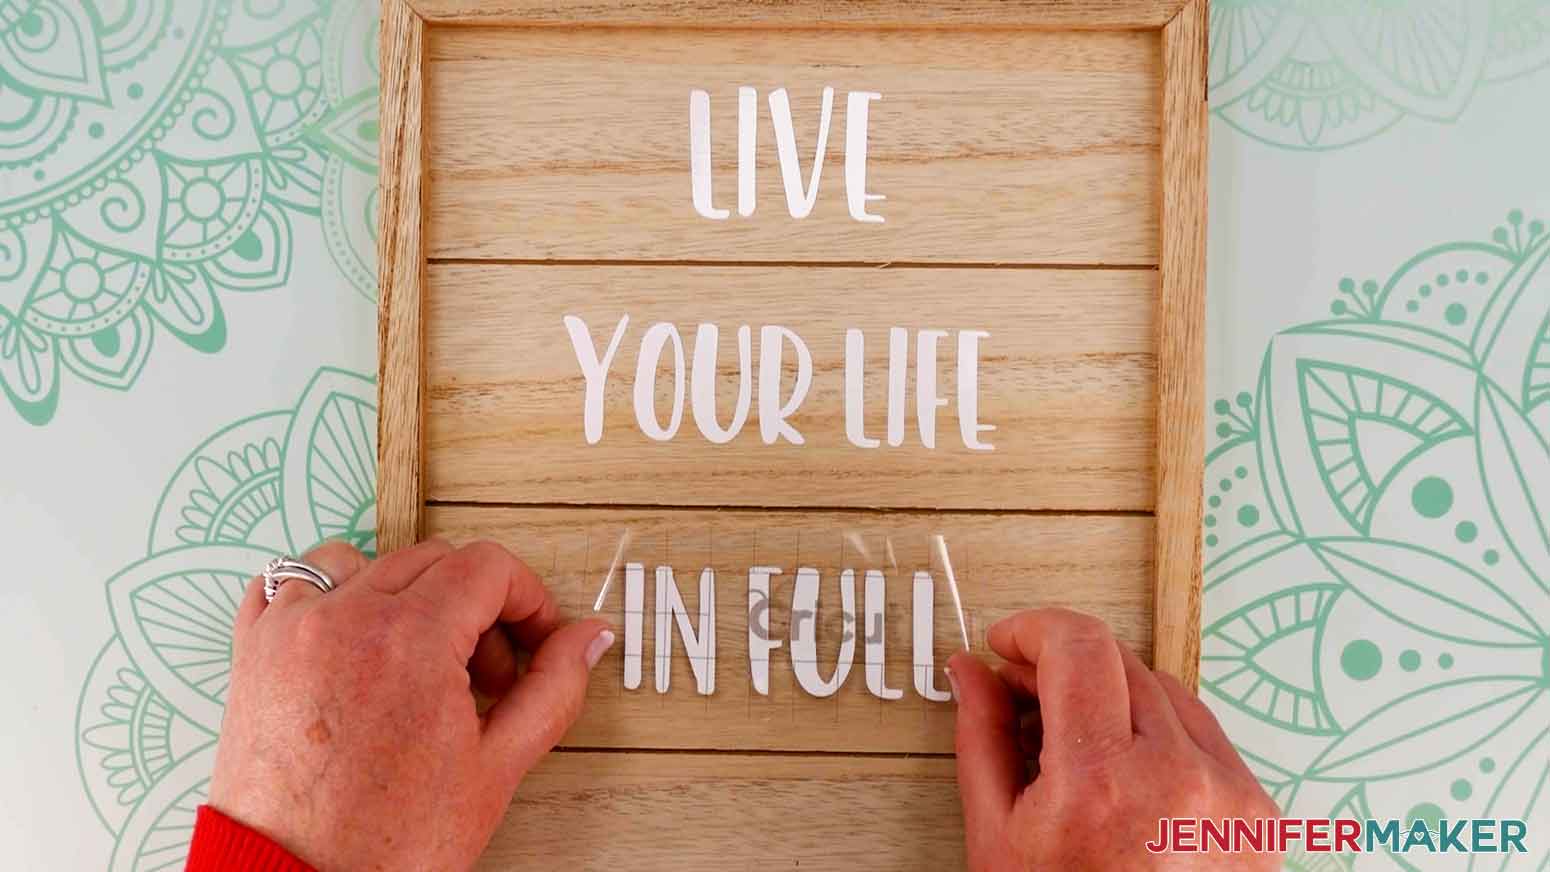
- “Live your life in full bloom” sign with offset vinyl and paper flowers
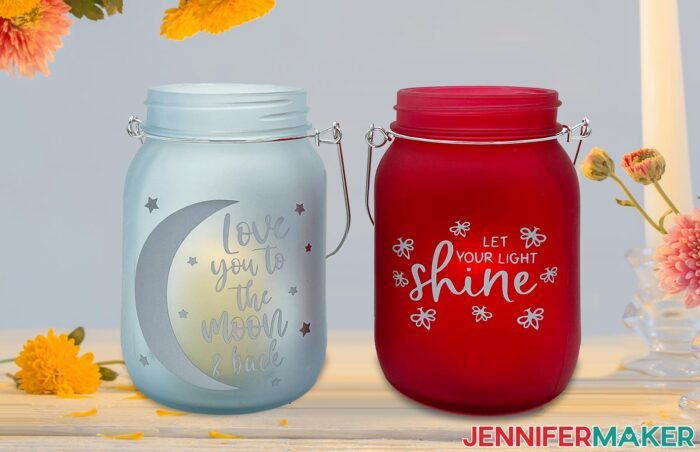
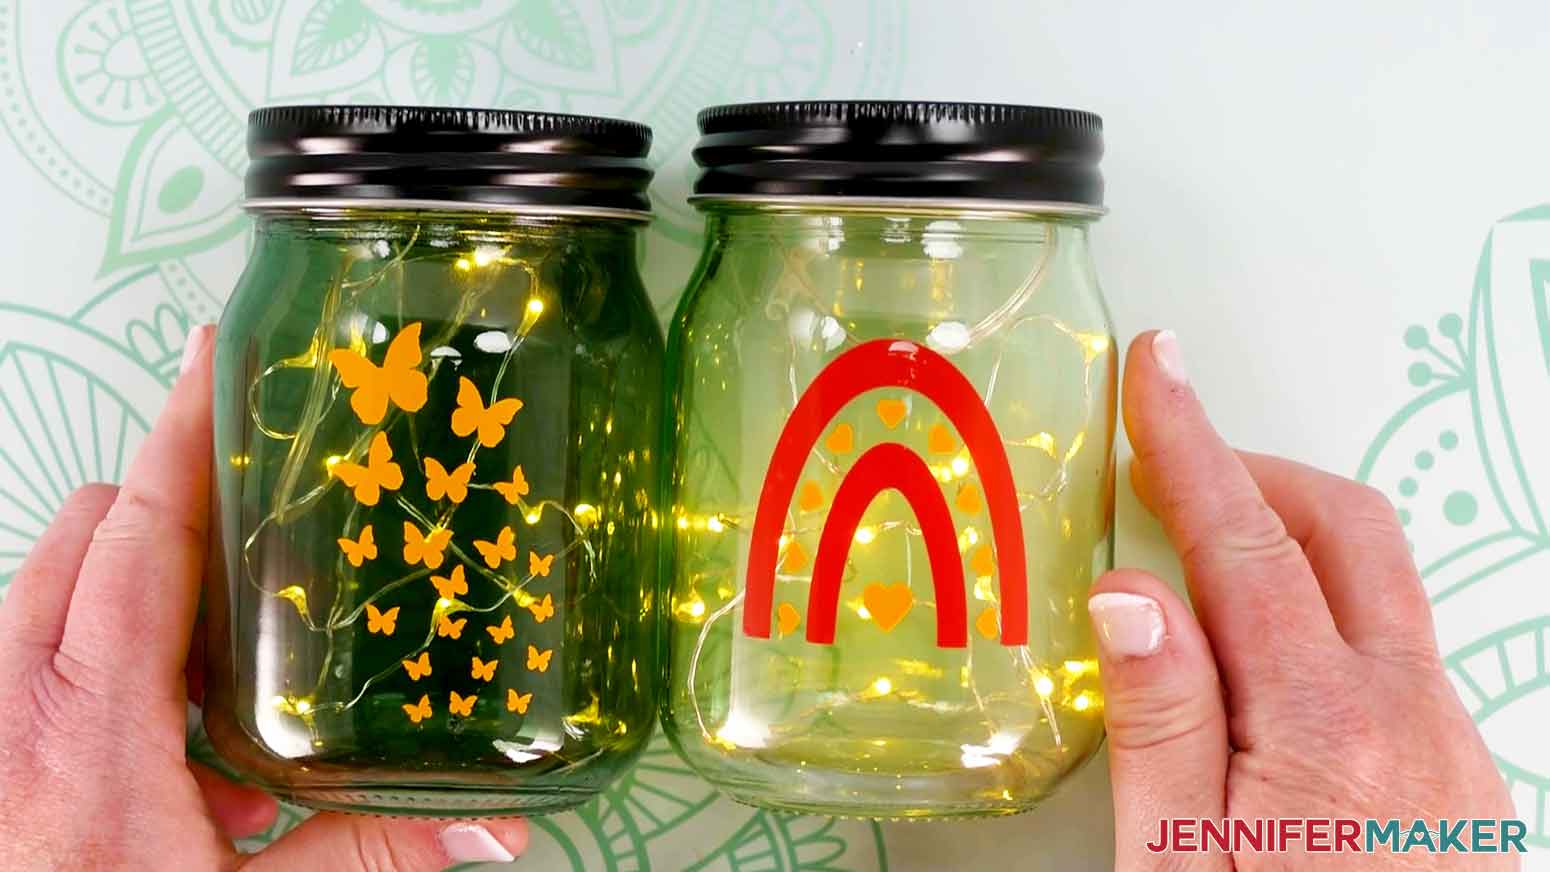
- adorable duotone lanterns with fairy lights
- and a customized, double-sided door hanger.
I’ll show you how to resize the designs for different projects, change colors, and customize the decals for perfect gifts. And once you have the steps down, you can customize any designs from the Target Dollar Spot DIYs collection. The designs would be a great addition to so many cute items and things Target carries year-round.

Just like the materials are simple, so are the tools! I made these Target Dollar Spot DIYs using my Cricut Maker 3, but you can also use an Explore. Many of the designs are small enough to cut on a Joy, too. Grab the usual Cricut accessories and tools (plus some parchment paper!) and you’re ready to go!
Target’s Dollar Spot section changes a lot, but there are always great options at affordable prices. If you can’t find these exact items, don’t worry. I’ve found similar products that you can purchase from Amazon and added them to the materials list. These projects are really just meant as inspiration to get your own creativity and imagination flowing.
Let me show you how easy it is to make Target Dollar Spot DIYs! This post contains some affiliate links for your convenience (which means if you make a purchase after clicking a link I will earn a small commission but it won’t cost you a penny more)! Read my full disclosure policy.
Materials to Make Your Own Target Dollar Spot DIYs
View my Amazon shopping list with similar items for these projects!
- Items from the Target Dollar Spot such as mini books, shadowbox, glass lanterns, wine glasses, tumblers, small glass vases, reversible signs, canisters, wood signs, candles, fabric baskets, glass jars, and stackable storage containers (if you can’t find these items at your local Target, here’s some equivalents at Amazon: Stacked Books, Shadowbox, Glass Lanterns, Wine Glasses, Tumblers, Small Glass Vases, Reversible Sign, Canisters, Wood Sign, Candles, Fabric Basket, Glass Jars, and Stackable Storage Containers
- Permanent Adhesive Vinyl – I used White, Black, Silver, Tomato Red, Aqua, Coral, Stone Yellow, and Kelly Green
- 12″ x 12″ 65 lb Cardstock for rolled flowers
- A way to cut your vinyl and cardstock, I used the amazing Cricut Maker 3 but you can also use the Cricut Maker, Cricut Explore 3, the Cricut Explore machines, or even the Cricut Joy for some of the designs.
- Cricut Blue LightGrip Mat (12″ x 12″)
- Cricut Standard Grip Transfer Tape
- Craft Glue, Hot glue gun, and Foam Adhesive Squares
- Quilling Tool or DIY Quilling Tool to Roll Flowers
- Parchment Paper for aligning vinyl
- Flameless LED Votive Candle With Remote
- LED Fairy Lights
- Lint Roller, Dish Soap, and Lint-free Cloth or Coffee Filters to clean surfaces
- Tools including a Brayer, Spatula, Scraper, Scissors, Ruler, pencil, and Weeding Tool
- Cricut BrightPad Go – optional, but helpful for weeding and layering vinyl
- Design #395 – My free design collection (available in my free resource library—get the password at the bottom of this post)
How to Make Target Dollar Spot DIYs
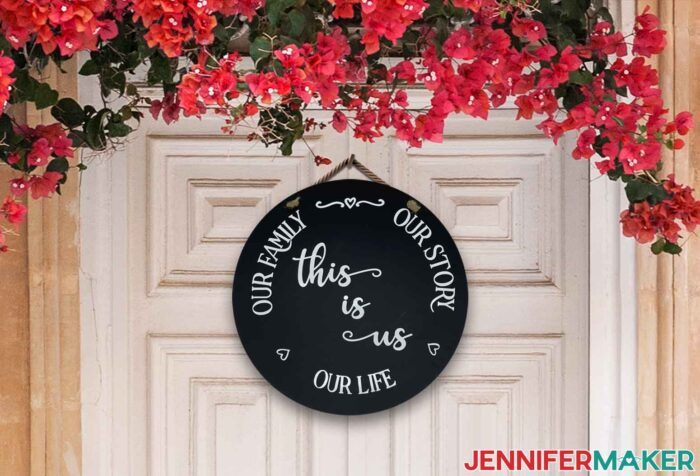
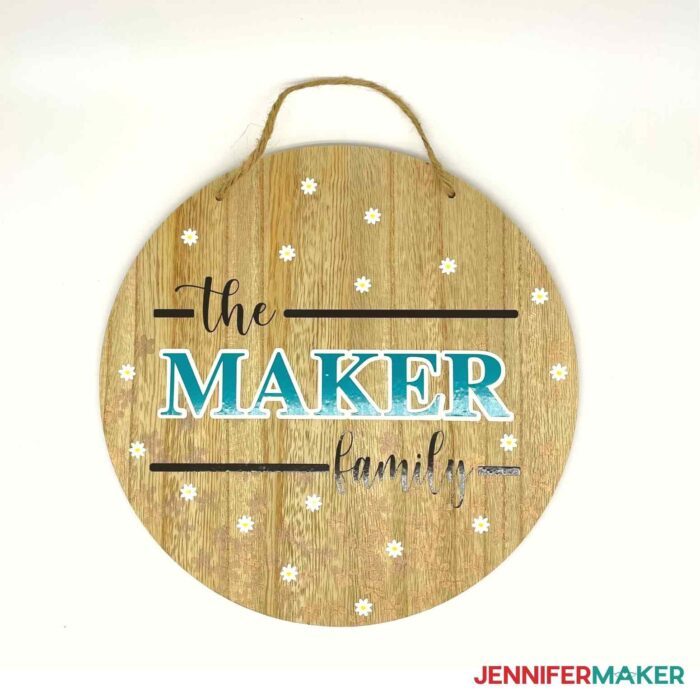
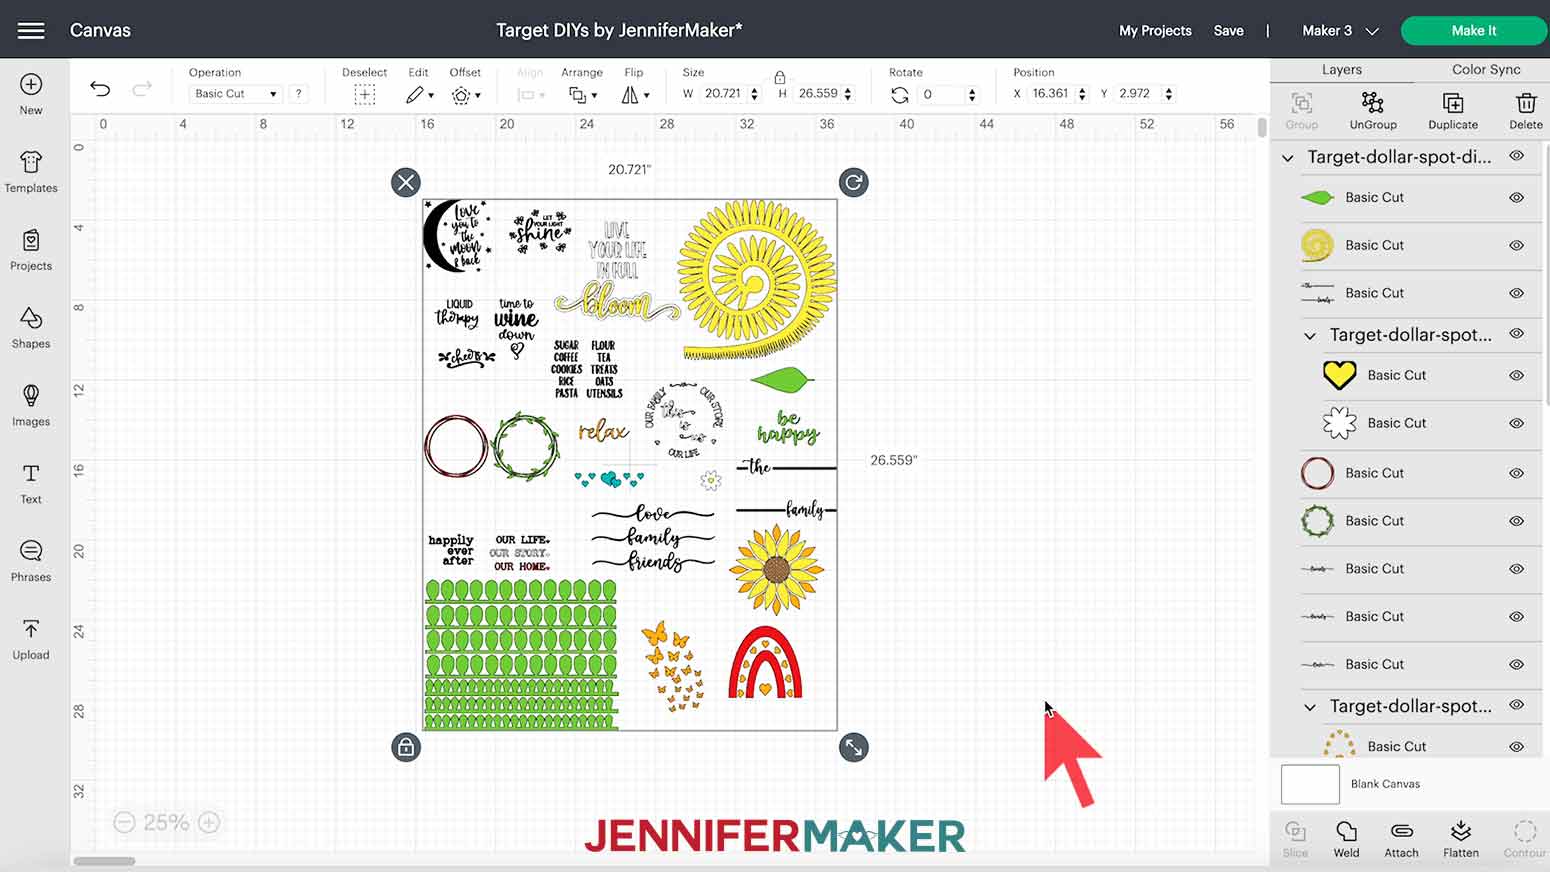
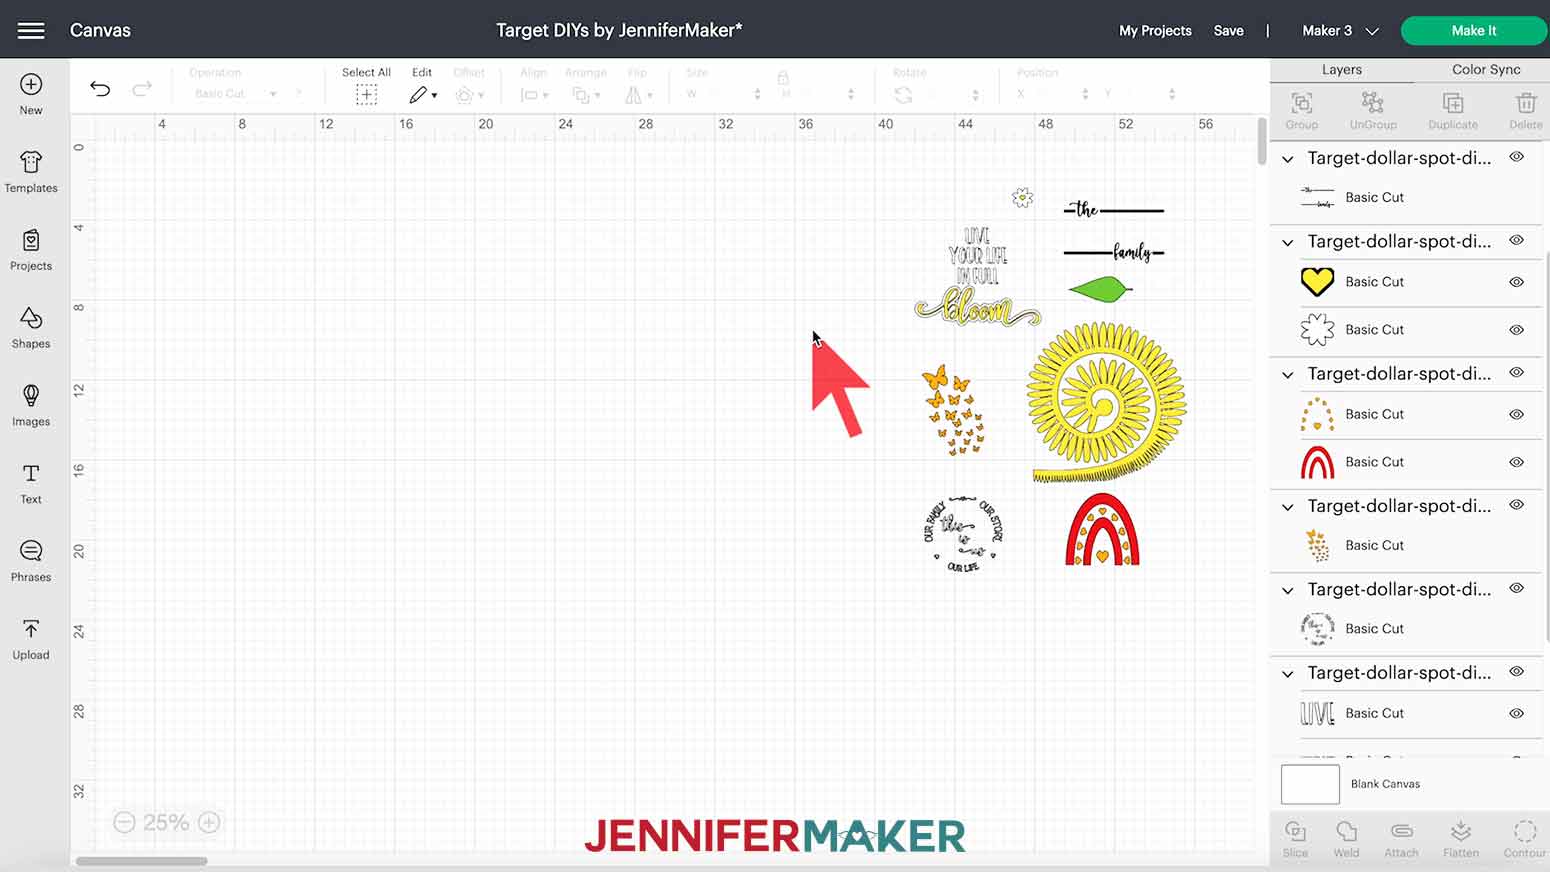
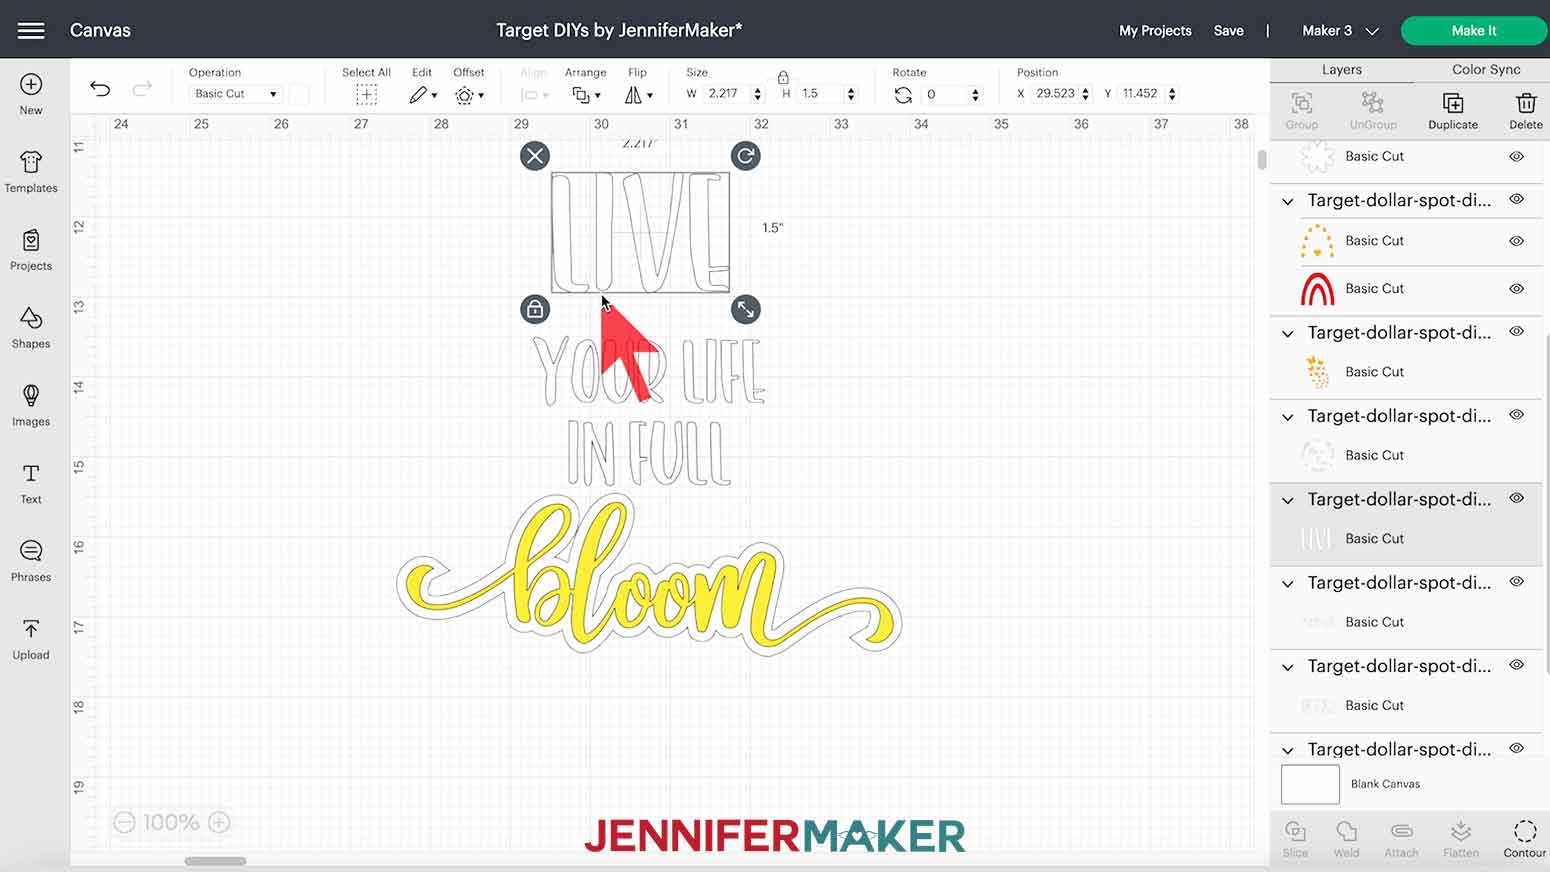
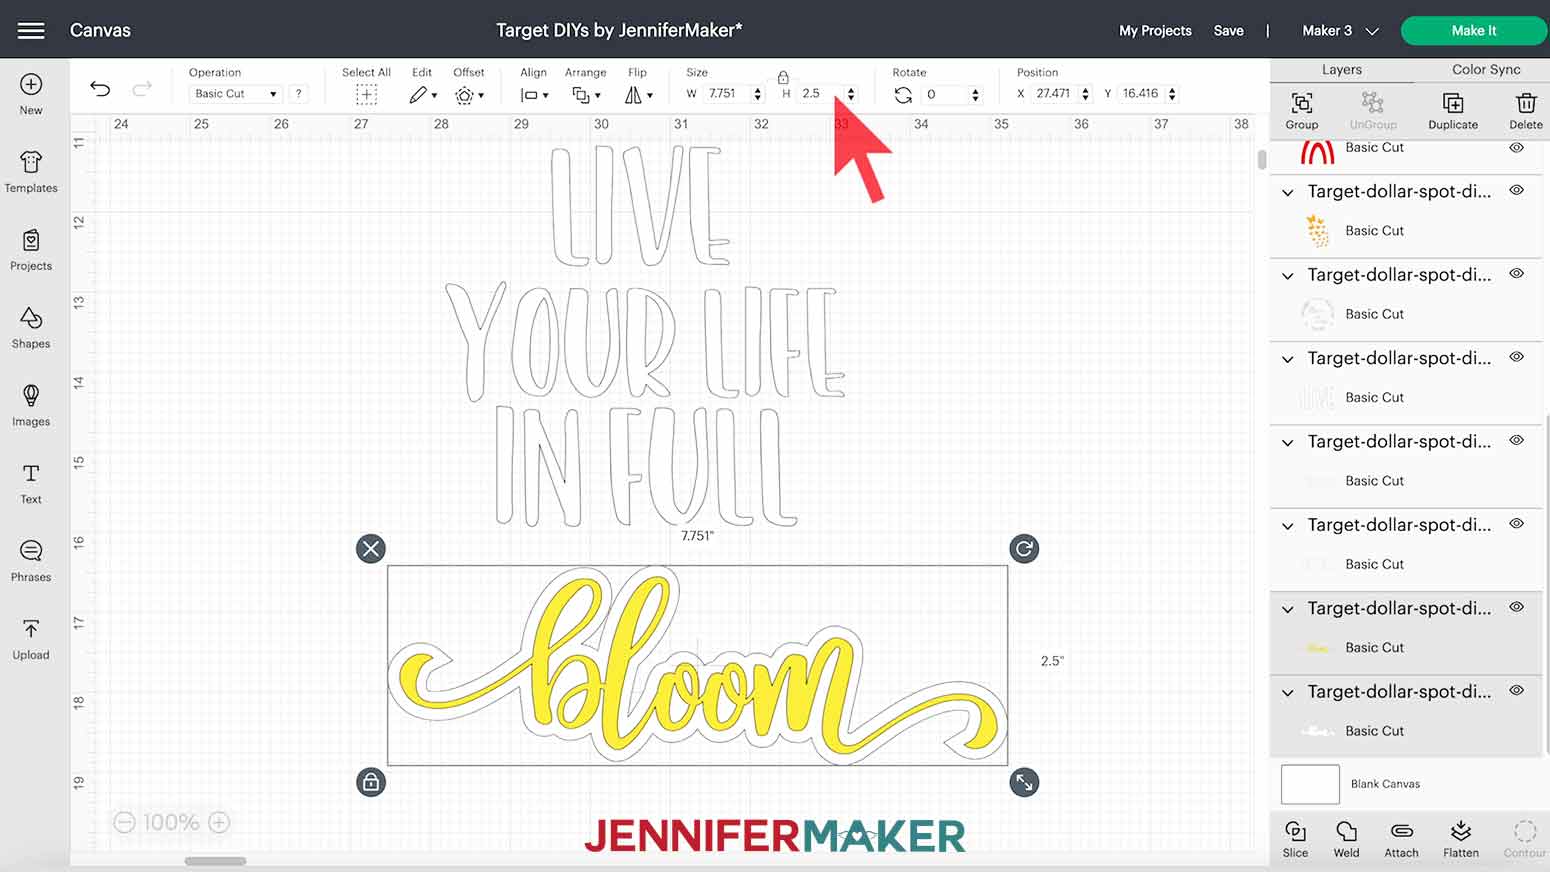
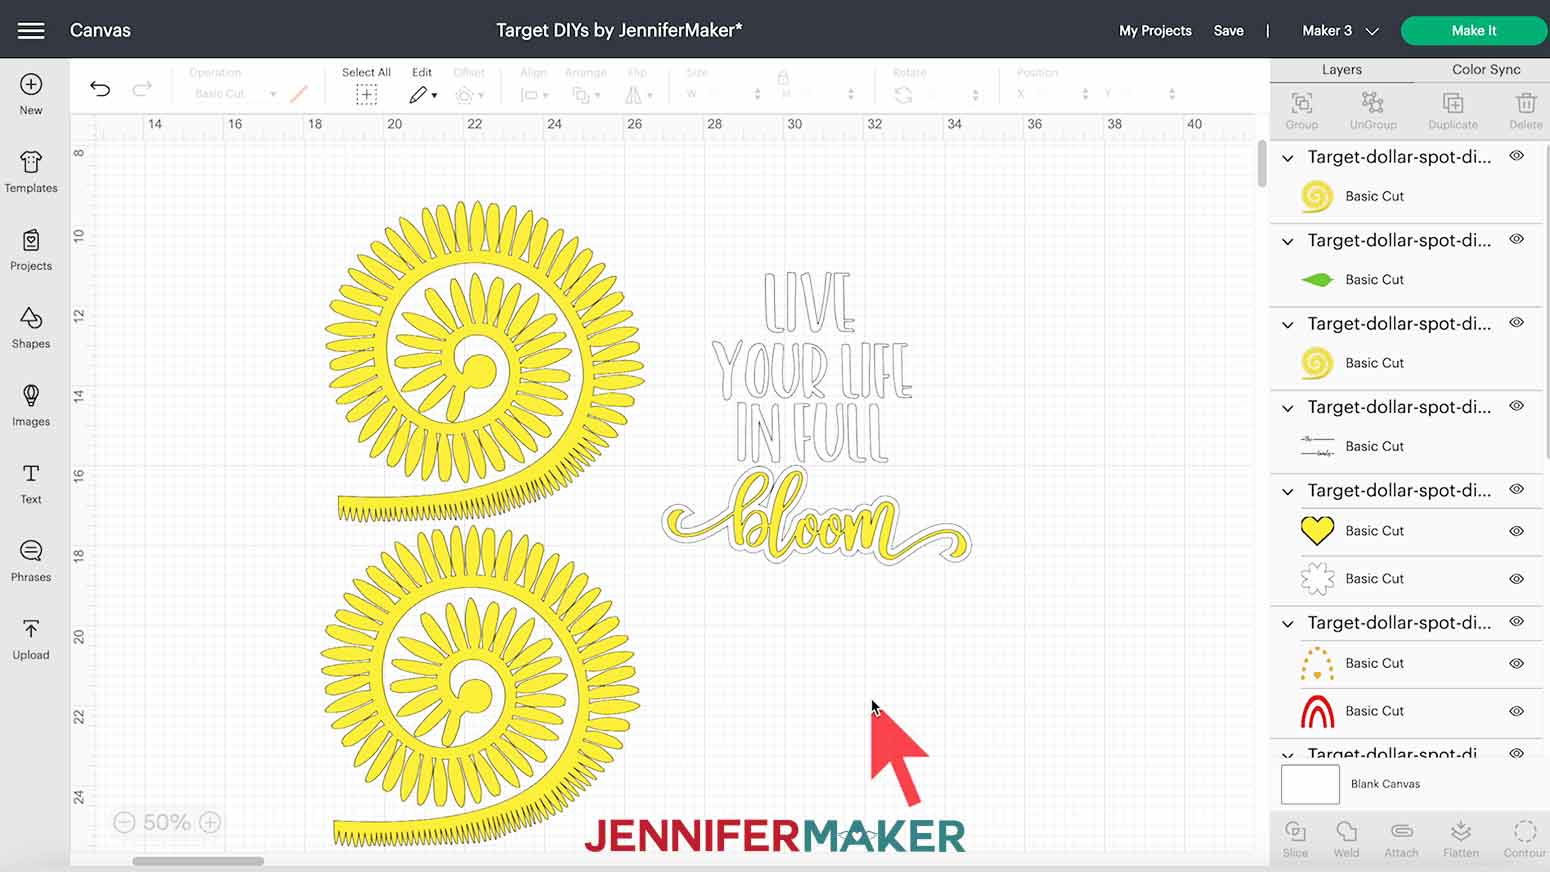
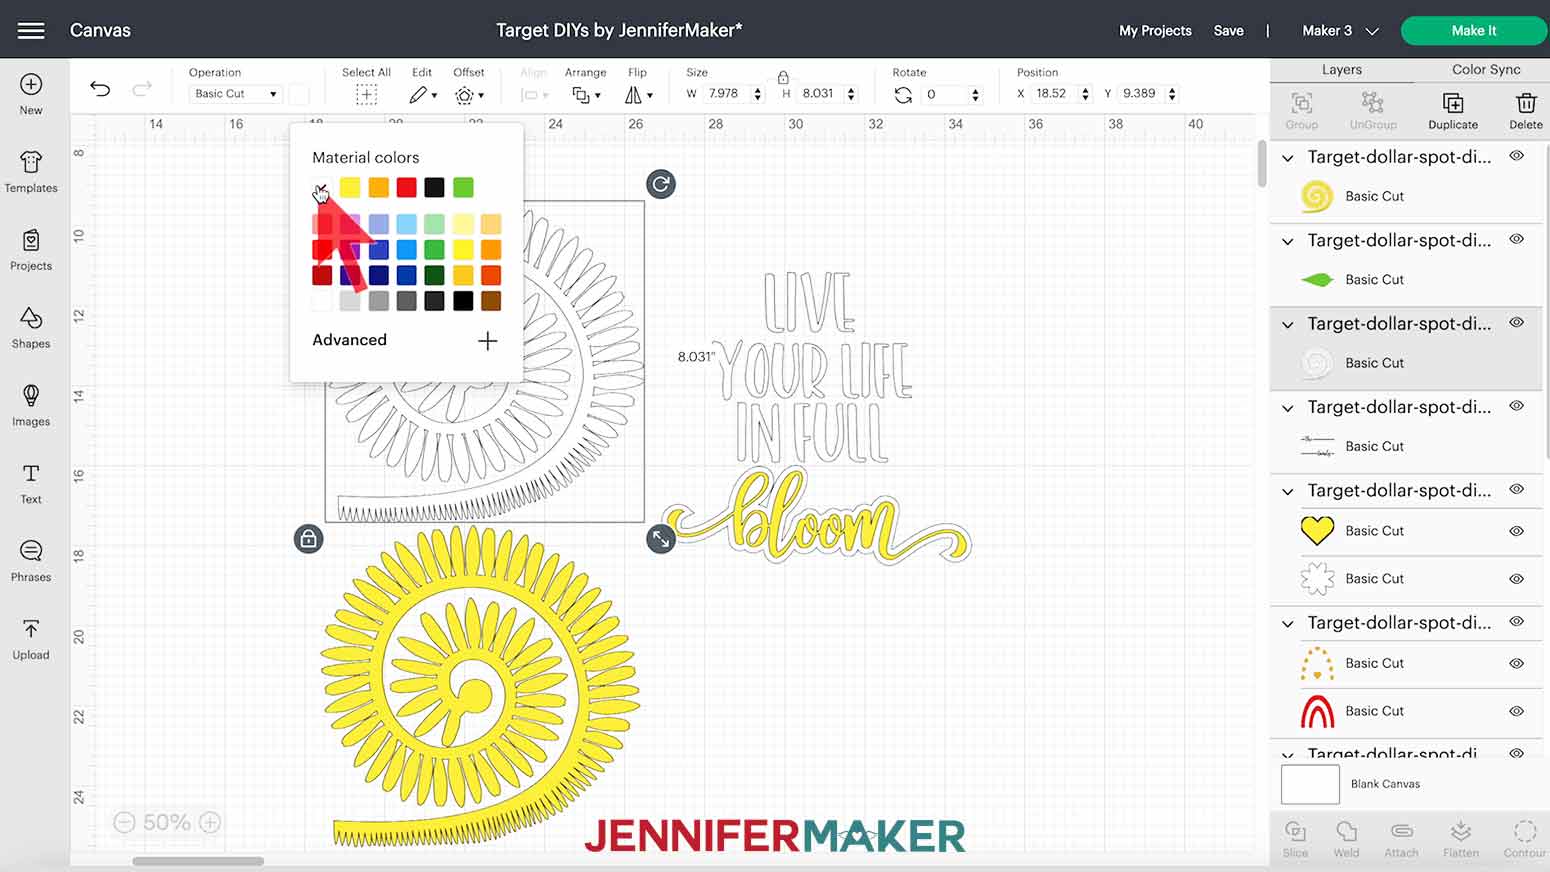
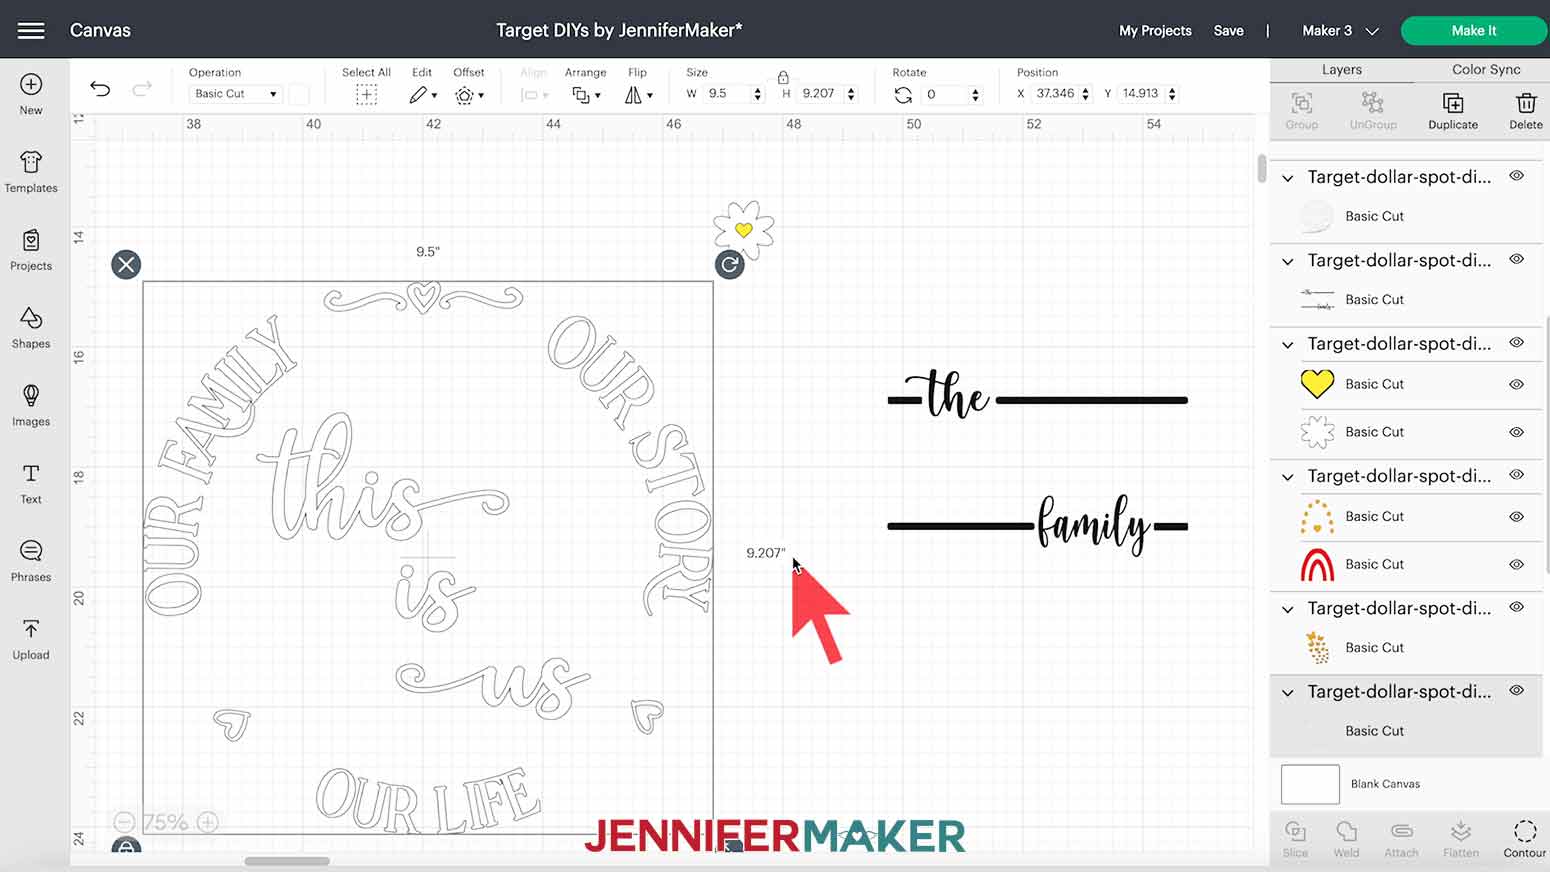
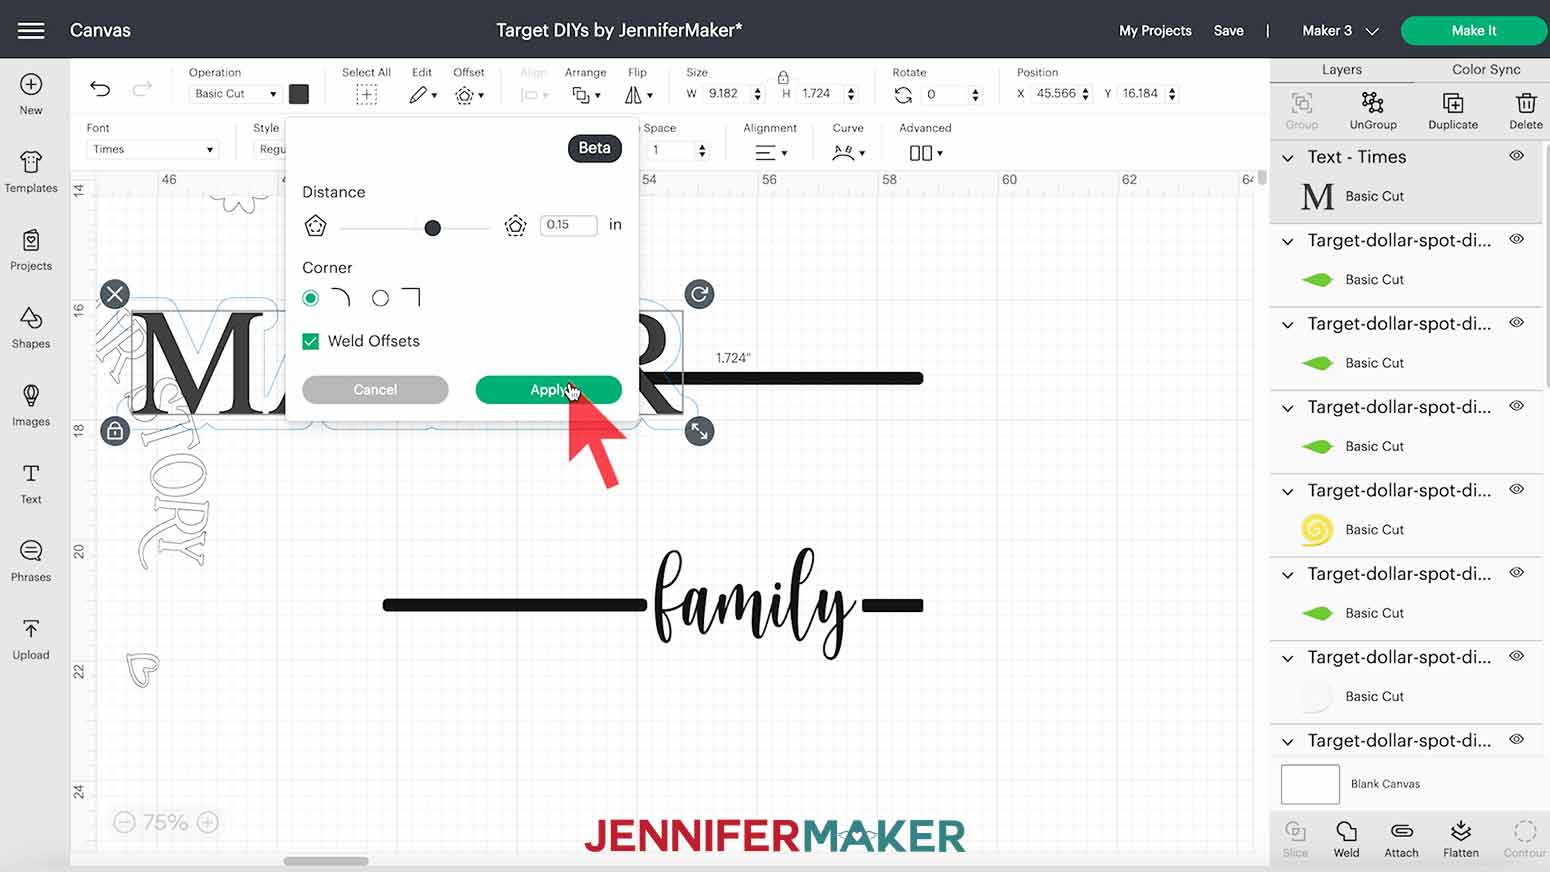
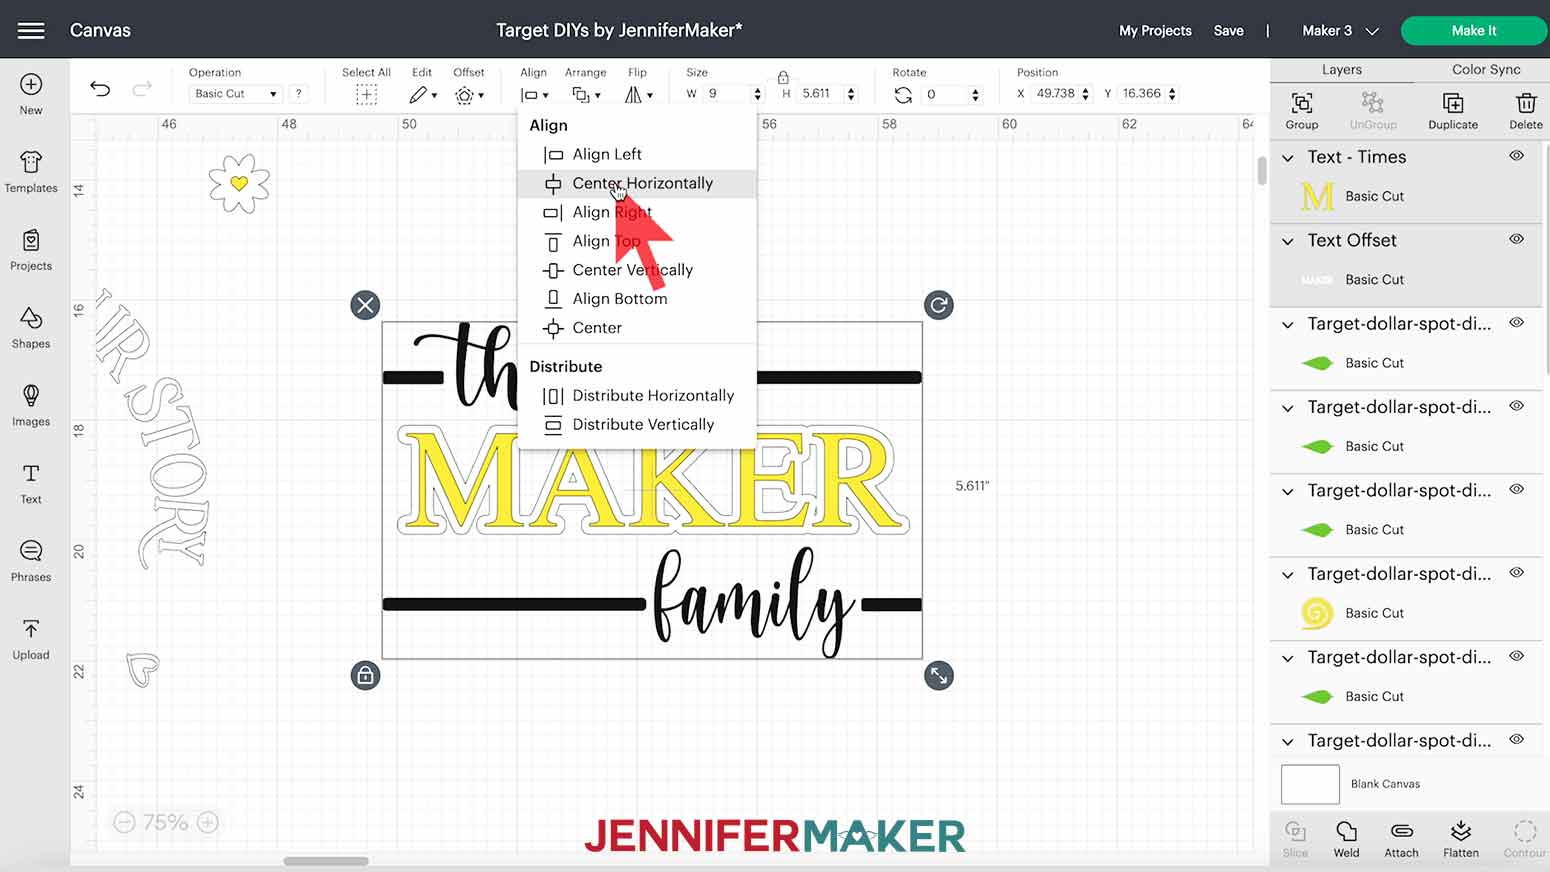
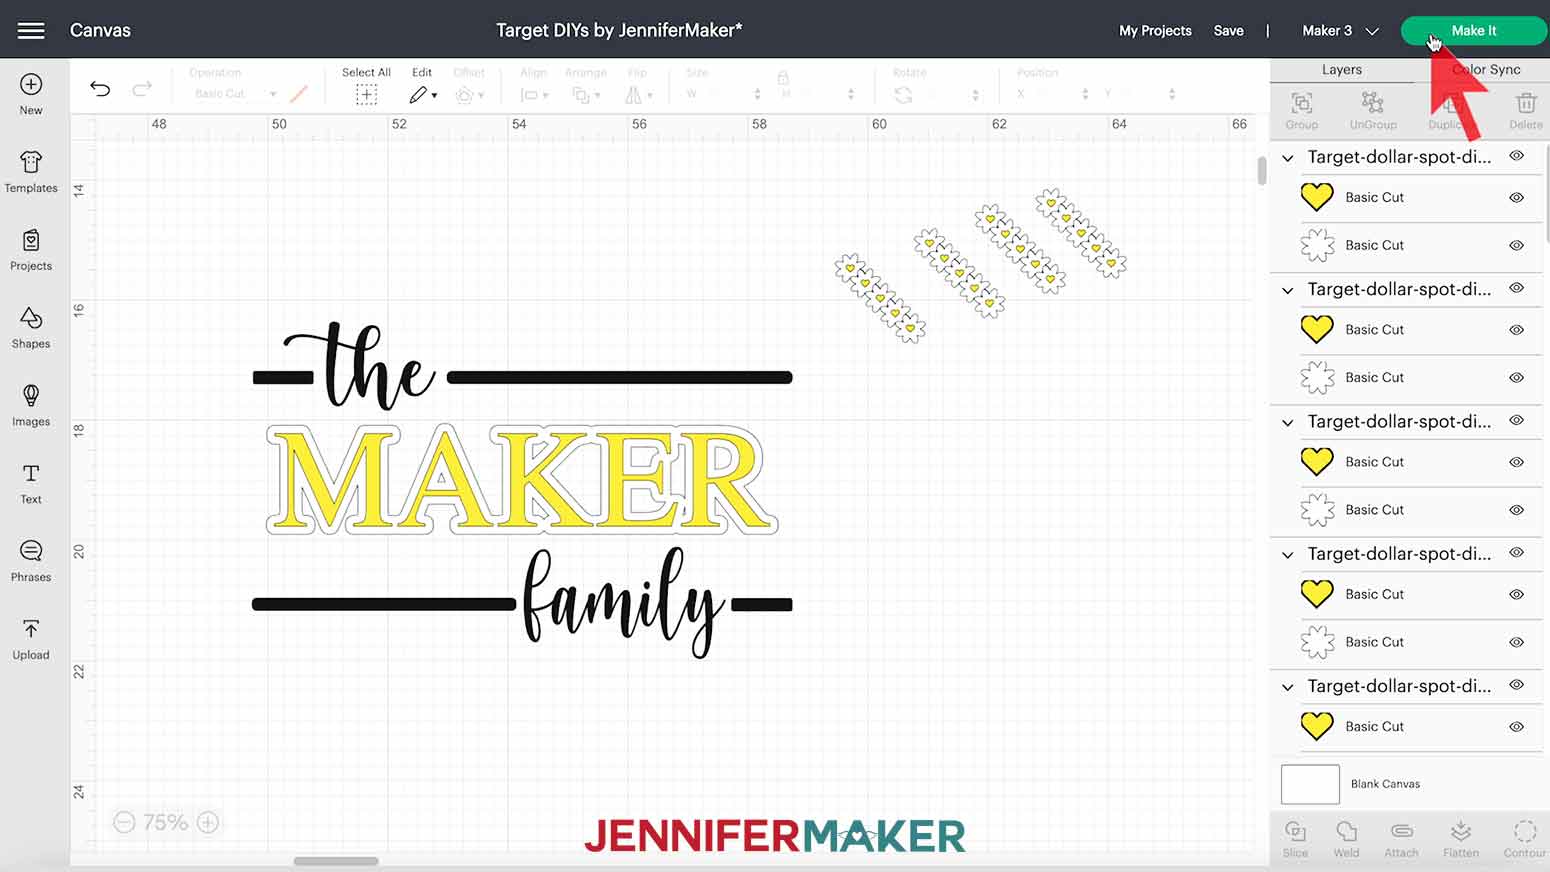
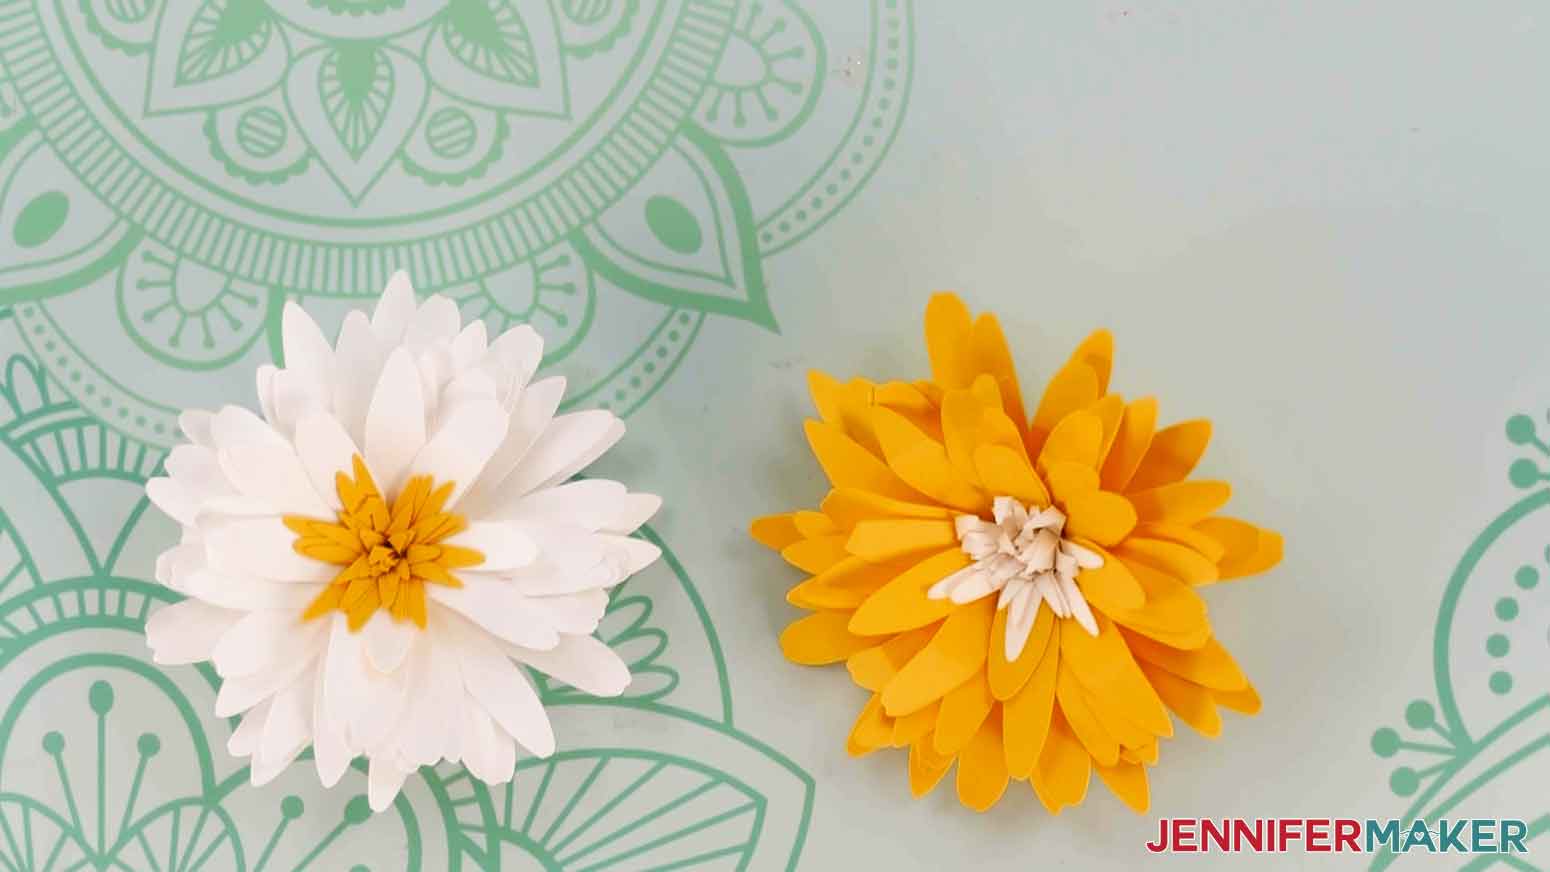
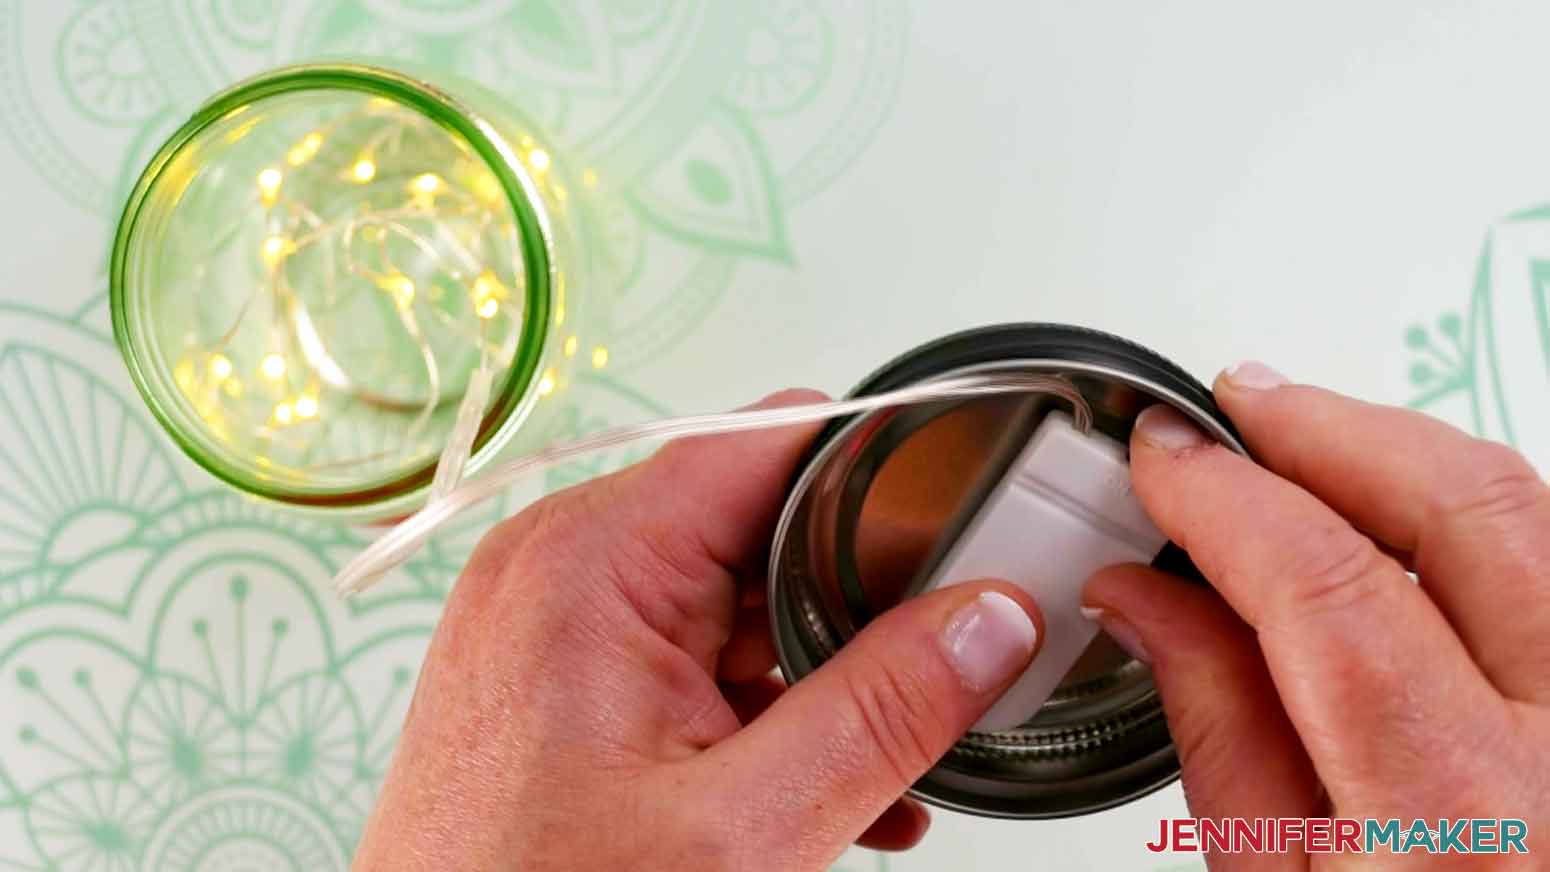
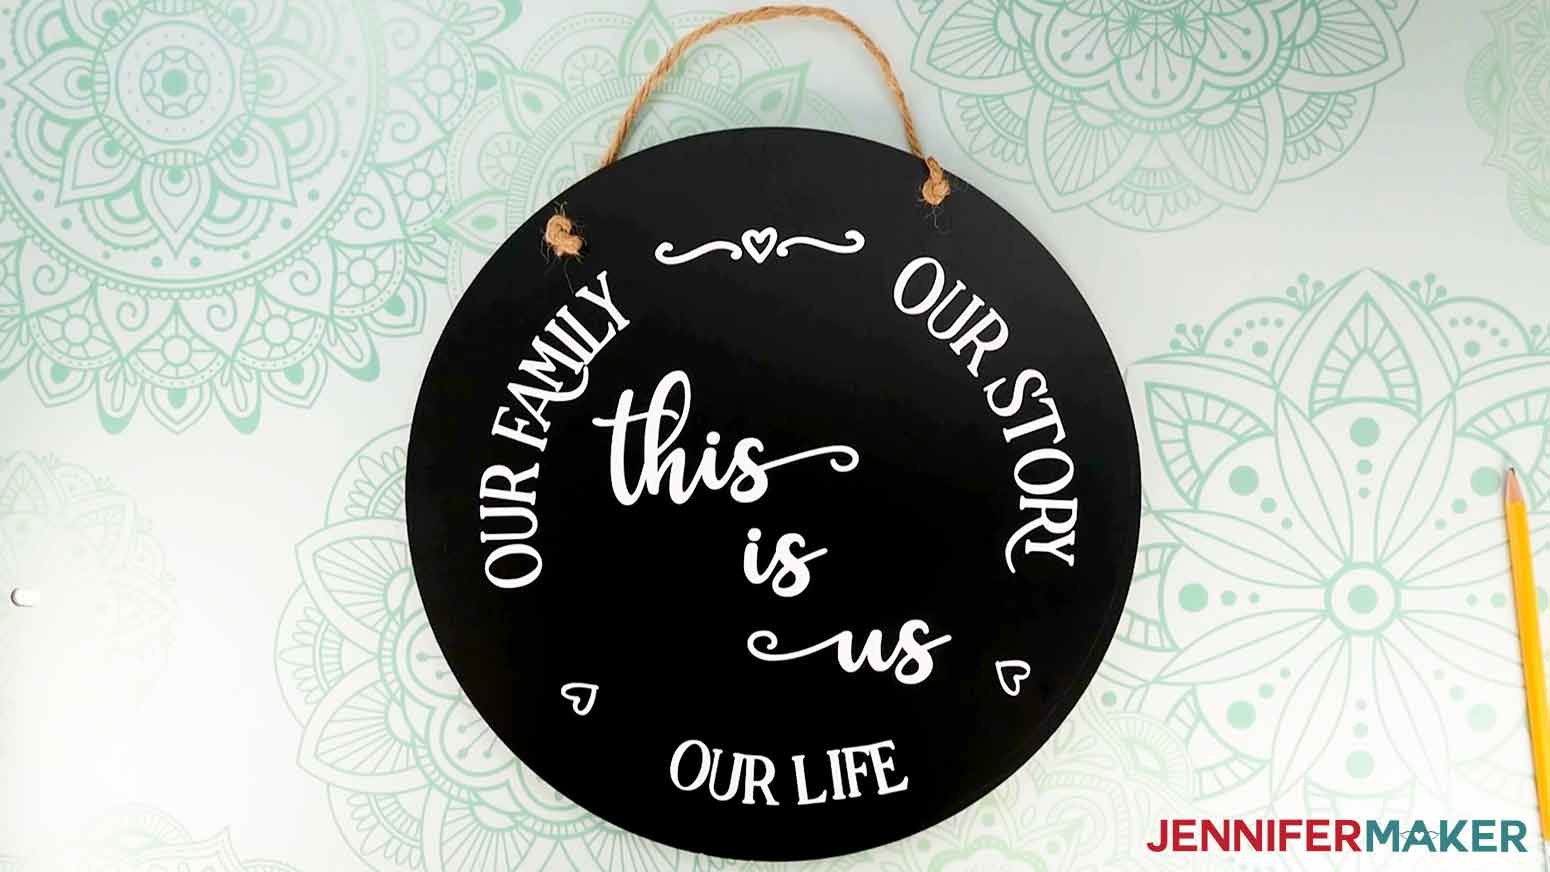
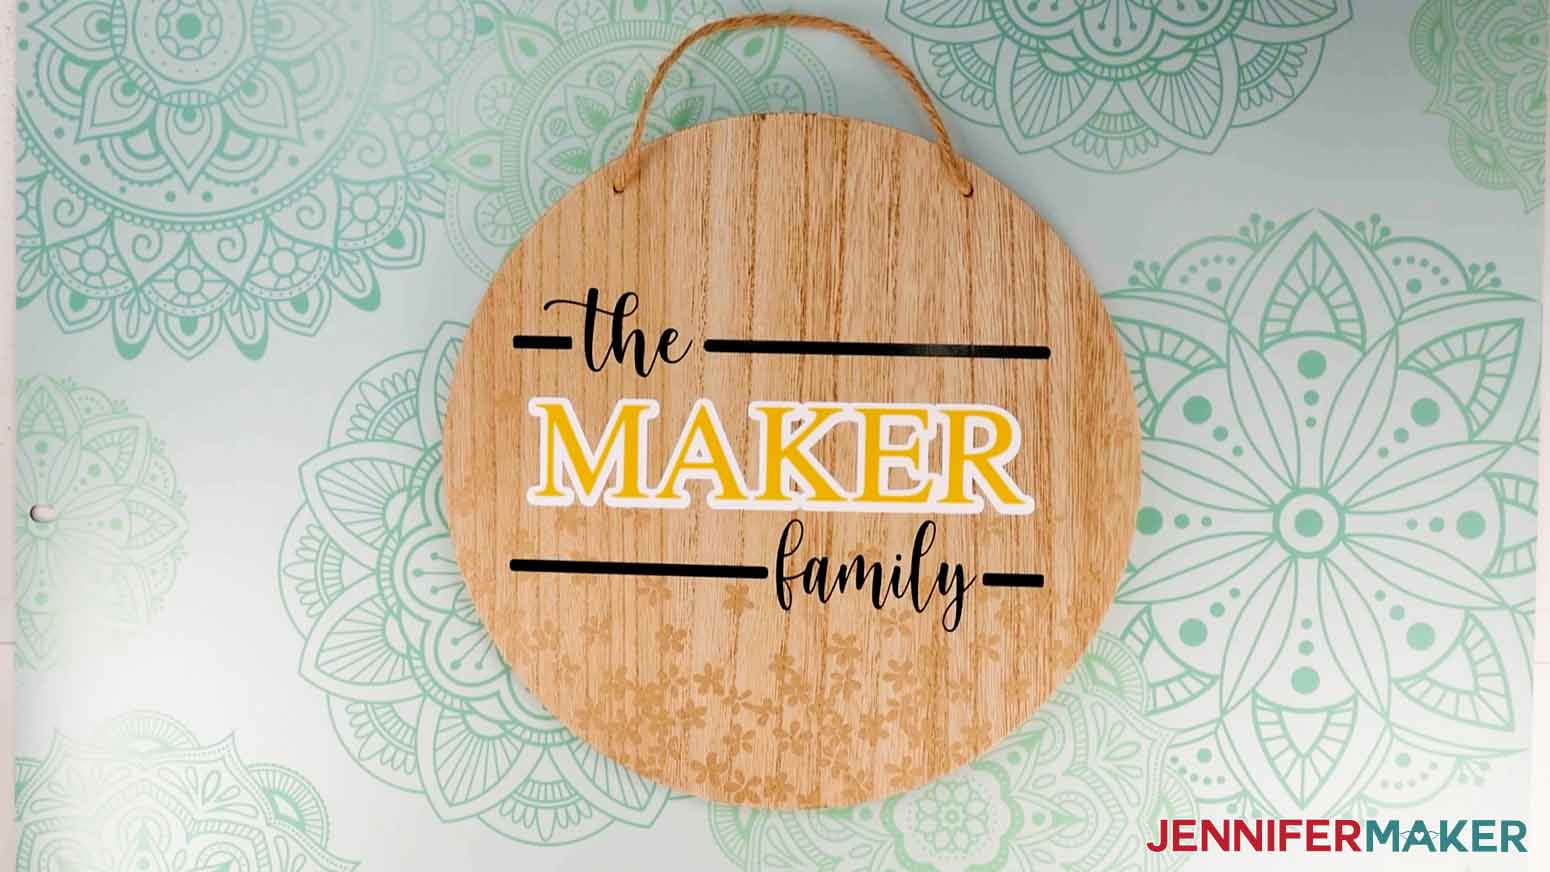
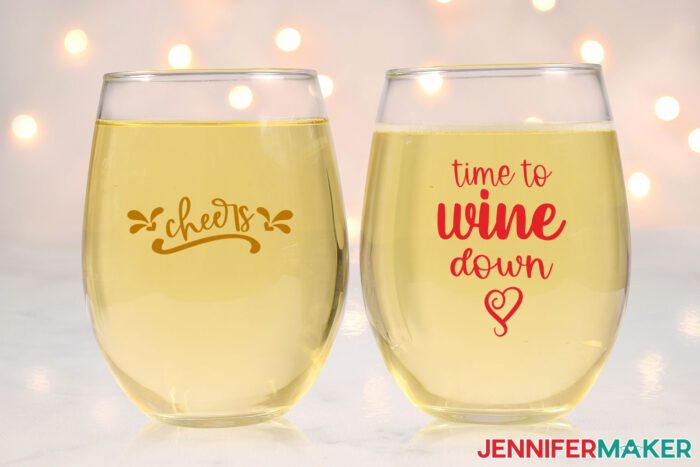
Use your Cricut to decorate Target Dollar Spot DIYs for fun home decor! Before you begin, decide which projects you want to make by reviewing your available items, materials, and the design examples. Make sure your Target items are in good shape and clean them if needed. Prepping now will save you time later! I'll show you how to apply layered vinyl to a custom wood signs and also glass jars. We'll also decorate them with paper daisies and fairy lights. If you’re using any glass items as I am, wash them in warm, soapy water to remove any debris and dry them with a lint-free towel. If you have any unfinished wood items that are rough, a light sanding will help. Just brush off the dust! Download my Target Dollar Spot DIYs Zip file from my free resource library, it's Design #395. Upload the SVG to Cricut Design Space and add it to your Canvas to see the whole collection! TIP: If you are not sure how to upload an SVG cut file to Cricut Design Space, watch this helpful video training series I made. If you are on an iPad or iPhone, here is how to download and upload SVG files to the Cricut Design Space app. You can zoom out to see all of the designs by clicking on the minus (-) sign on the lower left. This is what my Target Dollar Spot designs look like on my Canvas. There are lots of options: I’ll show you how to resize, personalize, and offset a few of these designs and then you’ll be ready to customize the others, too! Let’s clear away the designs we aren't using first so we can focus. Make sure the design collection is selected and then click “UnGroup” above the Layers panel. Click and drag the designs you want to make to the side so they’re out of the way. Then, click and drag a bounding box around the rest of the designs on your Canvas and hit your Delete key. You can also use the “Delete” icon in the Layers panel. If you’re making the same projects as me, your Canvas should look like this. Layered Vinyl and Cardstock Flowers on a Slatted Sign The slats on the rectangular wood sign are perfect for quote decals, so I'll show you how to resize the elements for the best results. I've created the Full Bloom design with each line on its own layer, which will make this much easier. Select the design and click "UnGroup" to separate the layers. Measure the slats to find the best dimensions for your lines. Mine will look best at 1.5" tall, so I'll click the first layer ("Live") and enter "1.5" in H (Height) under Size in the top menu. Leave the lock icon closed to retain the proportions! Repeat for the next two layers. When you get to the "bloom" line, notice that it's actually made up of two layers in different colors. I created the effect using the Offset tool, which I'll demonstrate for you in the third project. I want this line to be larger, so I'll hold Shift to select both Layers and then type "2.25" in the H field. NOTE: This size is for both the yellow "bloom" and the white offset layer together. Since the original word fits inside the Offset layer, it will be slightly smaller. Next, decide how many paper daisies you want on your sign. I'd like two. Since there is only one on the Canvas, I will select it and click Duplicate at the top of the Layers panel. I want the daisies to cut on different colors of cardstock, so I'll select one and then click the colored box in the top menu. I'll change mine to white. The leaf is ready to cut, so I'll just duplicate in three times to get four leaves. Move on to Step 4 to cut this project, or follow along for the other designs. Butterfly and Rainbow Decals on Glass Even though these designs look ready, it's a good idea to check your measurements. My jars measured about 5" tall and 10" around. I will make my butterfly design 2.75" tall and my rainbow design 2" wide by typing the numbers in the top Size menu. I made my jars with one design but feel free to apply a design on the backside too! You're ready to cut these designs! Jump to Step 4 to cut, or stay with me for the big project. Double-Sided Sign When you're making a reversible item like the hanging sign, you have to take size, placement, and orientation of each side into account. I want to put the "This is Us" on one side and the customized family design on the other with lots of the small flowers. First, measure the sign. Mine is 11.5", but I want to leave a 1" margin around the edge, so my decal shouldn't be larger than 10.5". Also check the location of any holes for the hanging string so you don't plan a design element in that spot. Click the "This is Us" design and enter "10.5" into the W (Width) field under Size in the top menu. Keep the lock icon closed! This decal is ready to cut. For the family name side. start by selecting the decal and entering "10.5" in the W field. Next, click the Text icon and type in your name, then choose your font from the drop-down menu. I'm creating Maker using Times, but use a font you like. I recommend using a kerned font to make alignment easier. Kerned means that the word's characters will be perfectly spaced! TIP: If you need help filtering and finding the best fonts, get my Cricut Font Finder cheat sheet! If you'd like to include the name's outline like mine, resize the text so it fits between "the" and "family" with about a quarter inch to spare. With the name selected, click "Offset" at the top to open the tool's pop-up menu. I set the distance to "0.15," kept the rounded corners, and left the "Weld Offsets" box checked. Click Apply. Design Space changed the name text to gray and the offset to black. You can use the color box to change each layer. I'm going to change the offset to white and text to yellow so they will match the flowers I want to add. To get everything to the right spots, hold Shift and click all three layers for this side. Click Align and Center Horizontally. You can adjust the size of the name, just make sure to keep both layers selected. While my name fits easily in the design, yours might look different. This is where you can get creative! Try different font, text sizes, or turn off the Offset until you're happy with the result. Finally, select the flower and click Duplicate to add the number you want. For a sign this size, 20 works well, depending on how much space your name takes up. Now, to cut! Check to make sure the correct machine is selected and click “Make It” in the top menu. If you are making the same designs as me, you may see the paper flower designs sharing a mat with vinyl designs since they're set to the same color. There's an easy fix! I'm going to move the paper flowers to their own mats. Select a paper daisy and click the three dots in the upper left corner of the design. Select Move Object. Click New, set the mat color, and click Confirm to put the paper flower on a new mat. Repeat to move your second daisy to another cardstock mat. Once your designs are set up as you'd like, click Continue. Now it's time to select your material. Design Space chooses the cut order, so yours might look different than mine. For vinyl mats, set your material to Premium Vinyl, use "More" pressure, and place your vinyl shiny side up on a LightGrip Mat. Use a brayer to get the vinyl as smooth as possible on your mat. For the cardstock mats, use "Medium Cardstock" and "More Pressure" with your cardstock face up on a LightGrip Mat. NOTE: New Blue LightGrip mats worked well for me, but if your mats are less sticky, try a Green StandardGrip mat. Load the first mat into your Cricut and press the flashing button to begin cutting. When the cut is complete, unload the mat. Flip your design over and gently peel the mat away from your material. Put the elements of each project in separate stacks so you don't get confused. Repeat these steps for the other designs, changing your material, settings, pressure, and mat application to fit each layer. TIP: Use a spatula to gently lift the delicate parts of the flowers and leaves. Live Your Life in Full Bloom Rectangular Sign Gather your sign, paper flowers, quilling tool, glue, leaves, ruler, pencil, scissors, quote decals, and Standard Grip transfer tape. You can roll your flowers just as they are, or you can combine the colors following the original Paper Daisy tutorial like I am. Here's how they turn out! For the quote, use your scissors to trim away excess vinyl and then weed the design. To help with alignment, I used my ruler to make a small pencil mark at the center of each slat. Cut a piece of transfer tape slightly larger than your largest text line. I like to bend my transfer tape with both sides up into a "taco" shape and then apply it to the vinyl from the center out. Then use the scraper to smooth out any bubbles. Remove the backing. Align the center of the vinyl with the small mark you made and press the vinyl on to the wood sign. Use the scraper to burnish the vinyl to the sign. Gently peel away the transfer tape. Repeat for the other one layer lines. For the layered "bloom" part, we'll combine the pieces and then transfer them. Use the same taco method to apply your transfer tape to the yellow layer. Remove the backing. Cut a piece of parchment paper slightly larger than your design. Place the yellow vinyl on the parchment paper with a small section of the transfer tape extending past the top. With the parchment paper protecting most of the sticky area, align your yellow layer over the white offset. Once you have it right, press the exposed transfer paper down on the Offset's backing paper so they'll stay aligned. Then, pull away the parchment paper and press the yellow layer on to the white layer. TIP: For more help on Layering Vinyl, check out my tutorial! Lastly, use your glue to apply the daisies and leaves to your sign. Arrange them however you'd like. I put mine at the top to fill some empty space. Here's my finished sign! Glass Jars with Decals and Fairy Lights Use the same steps for the first sign to transfer your butterfly and layered rainbow decals to your colorful jars. Spend a little extra time burnishing the decals to the glass to make sure they stick. The parchment paper trick works perfectly with the rainbow! TIP: For extra help on applying vinyl to curved surfaces, check out my tutorial on the subject! After the vinyl is applied, I added some fairy lights inside the jars. Remove the battery tab and make sure the fairy lights click on and off. Apply a foam adhesive square to the back of the battery pack and adhere it inside the lid. Make sure to give yourself enough room around the inside trim of the lid so that it will still close. Here are the finished jars! Double-Sided Family Sign Even though it's a larger project, you can use the exact same techniques to transfer your decals to both sides of the round sign. TIP: To help with alignment, use a ruler and pencil to make light marks at the horizontal and vertical centers of your decal and sign, like a compass. Using transfer tape a bit larger than the "family" decal, layer the pieces in two steps to keep everything aligned. First, add the name to the Offset, then pick up the family decal elements. Apply the layered design to the sign, using your pencil marks to apply it nice and straight. Since the flowers are so small, you can either apply them with transfer tape or treat them like two-layered stickers. If your pencil marks don't erase easily, cover them up with flowers! Use the same alignment and transfer steps for the "This is us" decal on the other side. Here's my finished result! Enjoy your new decor and use these skills on all the other items you can find! Love You to the Moon & Back - Mastering, Amastery Font Duo, Let Your Light Shine - Be Honest, Farmland Acres Live Your Life in Full Bloom - Amastery Font Duo, Berson Dream Font Trio Liquid Therapy - Berson Dream Font Trio, Farmland Acres Cheers - Hand Lettered Time to Wine Down - Girl Talk, Timberly Canister Words - Caferus Be Happy - Tingler Script Relax - Falling Leaves This Is Us - Home, Romatica Serif The Family - Cream Candy Happily Ever After - Baltimore Typewriter Our Life Our Story Our Home - Baltimore Typewriter Love, Family, Friends - Homework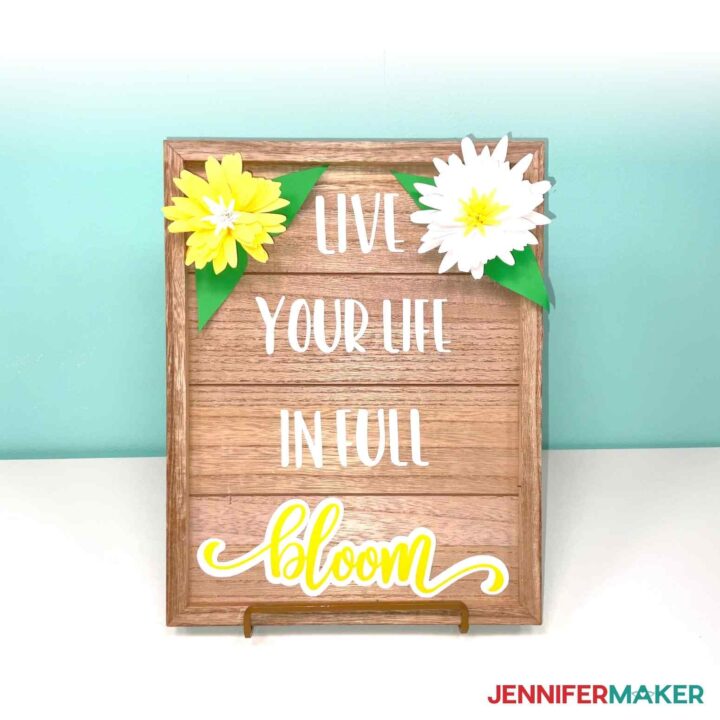
Target Dollar Spot DIYs
Materials
Tools
Instructions
STEP 1: SELECT AND PREPARE YOUR BLANKS
STEP 2: GET MY FREE TARGET DOLLAR SPOT DIYS DESIGNS
STEP 3: PREPARE THE SVGS FOR CUTTING
STEP 4: CUT YOUR DESIGNS
STEP 5: ASSEMBLE YOUR TARGET DOLLAR SPOT DIYS
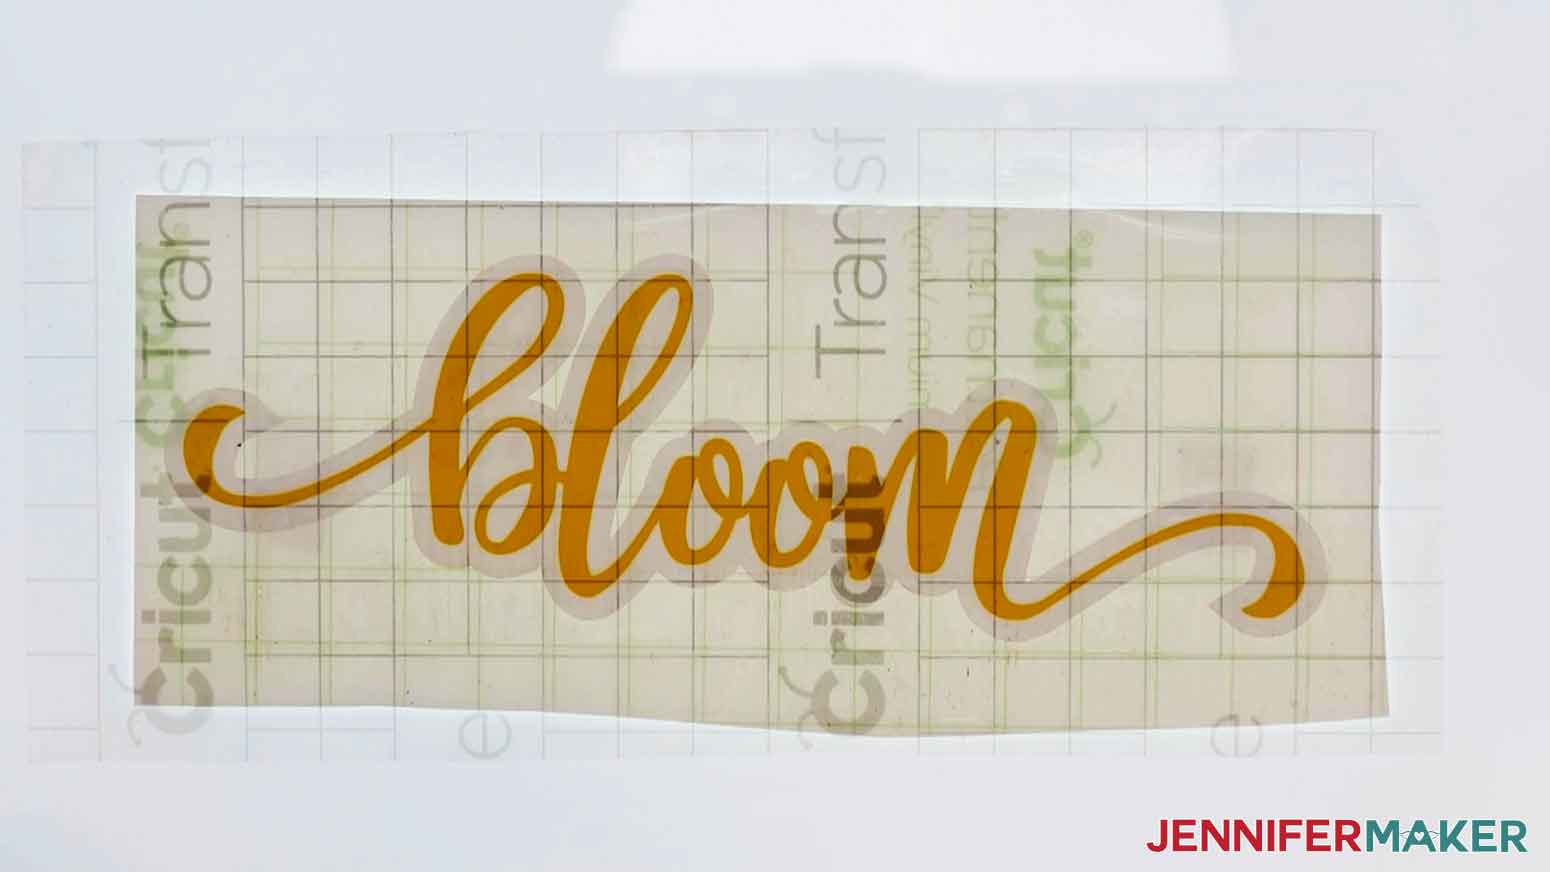
Burnish the yellow layer onto the offset. Gently remove the backing and apply the layered decal to the sign, just like the other words.


STEP 6: SHOW IT OFF
Notes
FONTS
Answers to Your Questions About Target Dollar Spot DIYs
Q. How do you style a Target Dollar Spot?
Just like any DIY project, however you like! You can go farmhouse style, modern, funky, or just go with the theme of your craft supplies!
Q. How often does Target change their dollar section?
Pretty often, so if you see something you have a plan for and it’s within your budget, grab it! If you can find the DPCI numbers of items you want (check online listings, on the price tags, and the shelf signs for a nine digit code) you can check inventory at other stores! You can also check out the online version of Target’s Dollar Spot, Bullseye’s Playground.
Q: Can I change the design to make my own style of project?
Yes! You are welcome to create a new project from scratch or change up the text in my designs using the text tool for your own personal use. There are a lot of things you can do to make these projects your own.
Q: Can I sell these projects on my Etsy shop/online store?
Great idea! Yes, you can sell completed projects using these designs, we only ask that you give credit to JenniferMaker.com and do not sell the digital files. If you use them, please share photos with us!
Q. Do I need a Cricut cutting machine to make these projects?
No, you don’t have to have a Cricut. I’ve included files for other cutting machines like Brother and Silhouette equipment. I also offer printable PDFs so you can cut materials by hand with a craft knife or scissors, too.
Q. I can’t find these exact items!
That’s ok! I chose simple items so that you can pick similar pieces that fit your vision. Or, visit your local dollar store, craft store, or other stores and see what good stuff they have in stock! You’re sure to find some similar items that will inspire you just as much.
Get my free SVG files to make my Target Dollar Spot DIYs
I love seeing what you make with my designs and how you use them! Please share a photo of the Target Dollar Spot DIYs you made in our Facebook group or tag me on social media with #jennifermaker.
Love,

Want to remember this? Save this Target Dollar Spot DIYs tutorial to your favorite Pinterest Board!