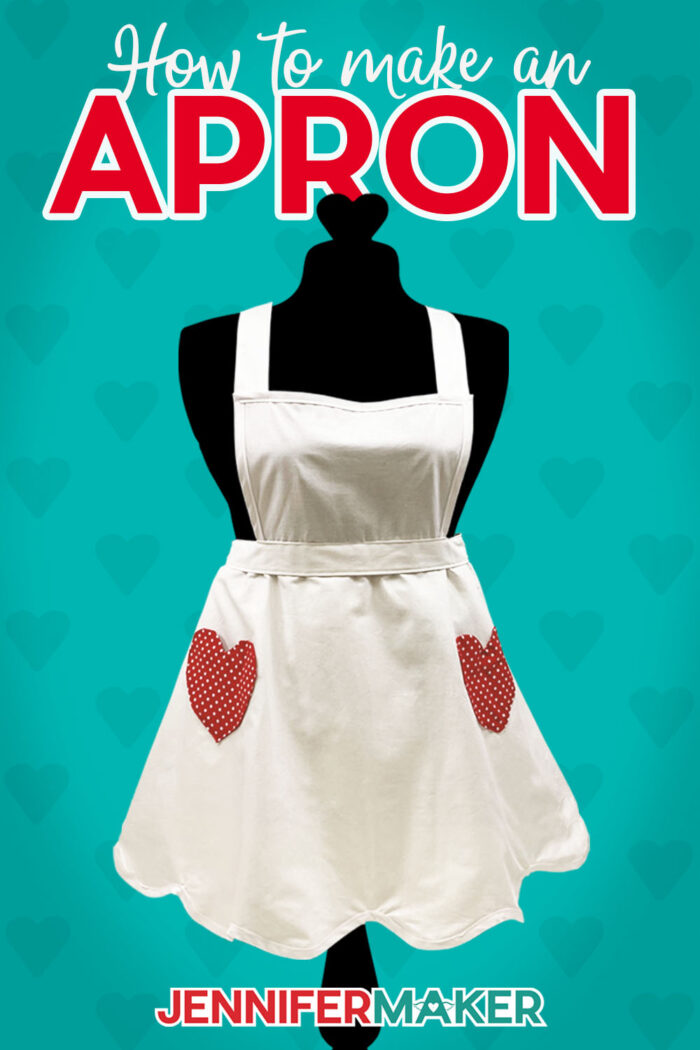
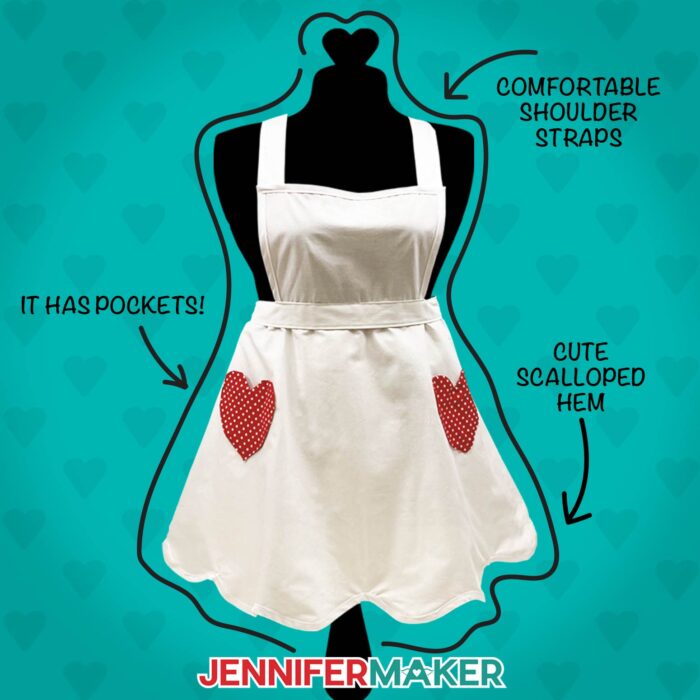
Learn how to make an apron with a vintage style and cute pockets!
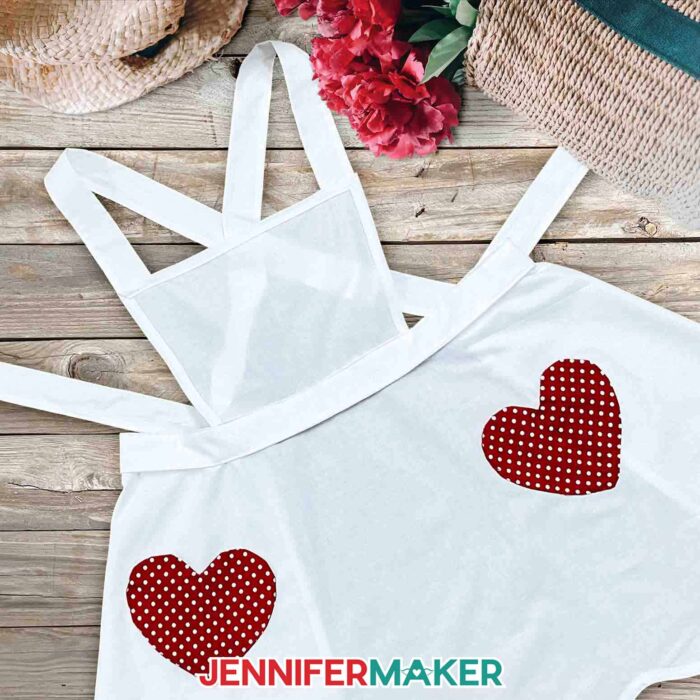
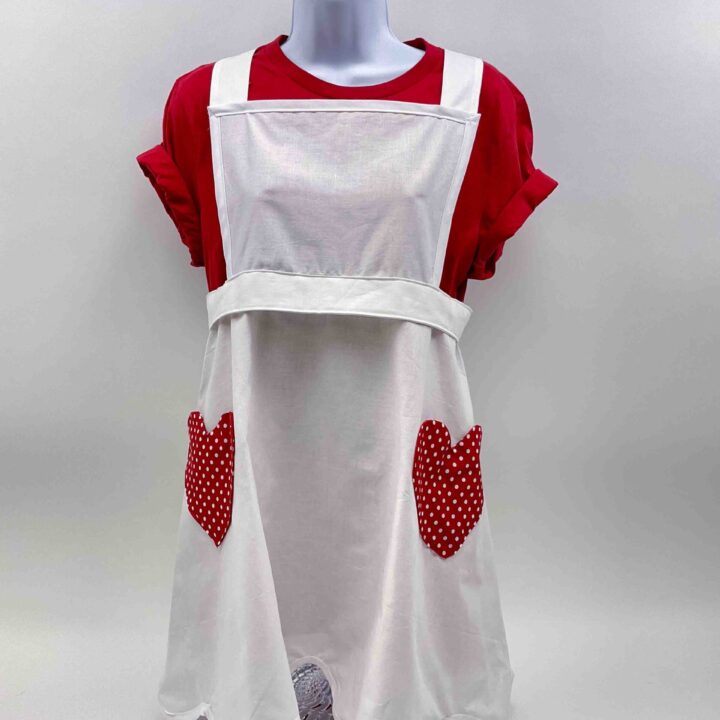
I love aprons! They’re functional and fashionable, especially when you add your own twist! Many of you have asked where I get the aprons I wear in my videos. Well, I make them! And now you can, too, with my free, printable crossback apron pattern! It’s a simple and satisfying sewing project with basic materials. Plus, I’ll show you how to cut adorable heart pockets with your cutting machine, but you can add decals or other decorations, too!
Want to save this project? Enter your email below and we’ll send the project straight to your inbox.

See the full step-by-step tutorial on how to make an apron:

I’m so excited to share my free apron sewing pattern with you! This beginner pattern combines elements from my favorite apron styles: lots of coverage; wide shoulder straps that cross in the back; a cute bottom edge; and handy pockets!
Learning how to make an apron is an excellent way to practice sewing because it doesn’t take many supplies but does include a few intermediate level techniques. Don’t worry, my apron tutorial covers all the steps, from printing and cutting your pattern pieces to binding the raw edges!
The apron is too large to easily cut with a Cricut, so I’ve included a printable pattern PDF that you’ll use to cut out the apron front, bib, straps, and belt. Printing, tiling, and taping together the pattern file is easier than you might think. All you need is Adobe Acrobat Reader, a printer, letter size paper, tape, a large flat surface, and scissors. Don’t use your fabric scissors on paper or they’ll get dull!

I’ll show you how to lay out the pattern on your cotton fabric so everything fits and secure the paper with pins. You can cut the fabric with fabric scissors or a handheld rotary cutter, just don’t forget to put a self-healing mat underneath it! A washable fabric marker is also handy when you’re learning how to make an apron so you can trace the pieces in case they shift.
You can also use the PDF’s heart shapes to cut the pocket pieces by hand, but I’ll show you how to use the included SVG in Cricut Design Space and cut them with a Cricut. I used my Cricut Maker 3 with the rotary blade and a pink FabricGrip machine mat, but you can also cut fabric with an Explore.
Then we’ll get to the fun part: sewing! Good news, you don’t need a fancy sewing machine, because all you’ll need is a simple straight stitch. I’ll help with all the details, like seam allowance, binding the raw edges with bias tape, pressing sections with your iron, and adjusting the simple cross-over straps for the perfect fit. And of course, we’ll add the large pockets!
Ready to make your own vintage style apron? This post contains some affiliate links for your convenience (which means if you make a purchase after clicking a link I will earn a small commission but it won’t cost you a penny more)! Read my full disclosure policy.
Materials & Tools to Make a Vintage Style Apron
- Sewing Machine – I used the Janome Arctic Crystal Sewing Machine with an appropriate needle
- Printer – preferably color, I used my HP Envy 7858
- A method to print a PDF – I’m using Adobe Acrobat Reader, which is free
- 3 yards white cotton fabric
- 1/2″ Double Fold Bias Tape – I used white
- White Thread
- 1 Yard contrasting cotton fabric – for Heart Pockets – I used red
- Red Thread – for Pockets
- Scotch Tape
- Printer Paper
- Household Iron
- Heat Pad
- A method to cut your heart pockets -I used the amazing Cricut Maker 3 with a Cricut Rotary Blade but you can also use the original Maker or an Explore with the Bonded Fabric Blade, or cut them by hand
- Pink Fabric Grip Mat 12″ x 12″ – if you use a Cricut to cut the pockets
- Brayer
- Straight Pins
- Sewing Clips – Optional but really helpful
- Ruler
- Paper scissors to cut out the pattern
- Handheld Rotary Cutter and Self-Healing Mat or Fabric Scissors
- Washable Fabric Marker
- Design #482 – My free designs available in my free resource library — get the password at the bottom of this post!
How to Make an Apron
How to Make an Apron
Learn how to make a vintage apron with heart pockets.
Materials
- 3 yards white cotton fabric
- 1/2" Double Fold Bias Tape - I used white
- White Thread
- 1 Yard contrasting cotton fabric - for Heart Pockets - I used red
- Red Thread - for Pockets
- Scotch Tape
- Printer Paper
- Design #482 – My free designs (available in my free resource library—get the password at the bottom of this post)
Tools
- Sewing Machine - I used the Janome Arctic Crystal Sewing Machine with an appropriate needle
- Fabric Scissors
- Household Iron
- Heat Pad
- A method to print a PDF, I'm using Adobe Acrobat Reader, which is free
- A method to cut your heart pockets — I used the amazing Cricut Maker 3 but you can also use the original Maker or an Explore - Optional for Heart Pockets
- Pink Fabric Grip Mat 12" x 12"
- Cricut Rotary Blade for Maker
- Brayer
- Printer - preferably color
- Straight Pins
- Sewing Clips - Optional
- Ruler
- Paper scissors to cut out the pattern
- Handheld Rotary Cutter and
- Self-Healing Mat
- Washable Fabric Marker
Instructions
STEP 1: GET MY FREE APRON PATTERN
First, download my apron SVG/DXF/PDF files from my free resource library. It's Design #482. I’ve included a printable apron PDF pattern and an optional heart pocket. I'll show you how to cut the heart SVG with a Cricut Maker. Don't worry, I included the heart shape in the PDF as well to be cut by hand.
TIP: If you're not sure how to upload an SVG cut file to Cricut Design Space, watch this helpful video training series I made. If you're on an iPhone or iPad, here's how to download and upload SVG files to the Cricut Design Space app.
STEP 2: PRINT THE PATTERN FILE
Open the "apron-pattern-jennifermaker-PDF.pdf" file, I'm using Acrobat Reader, a free tool.
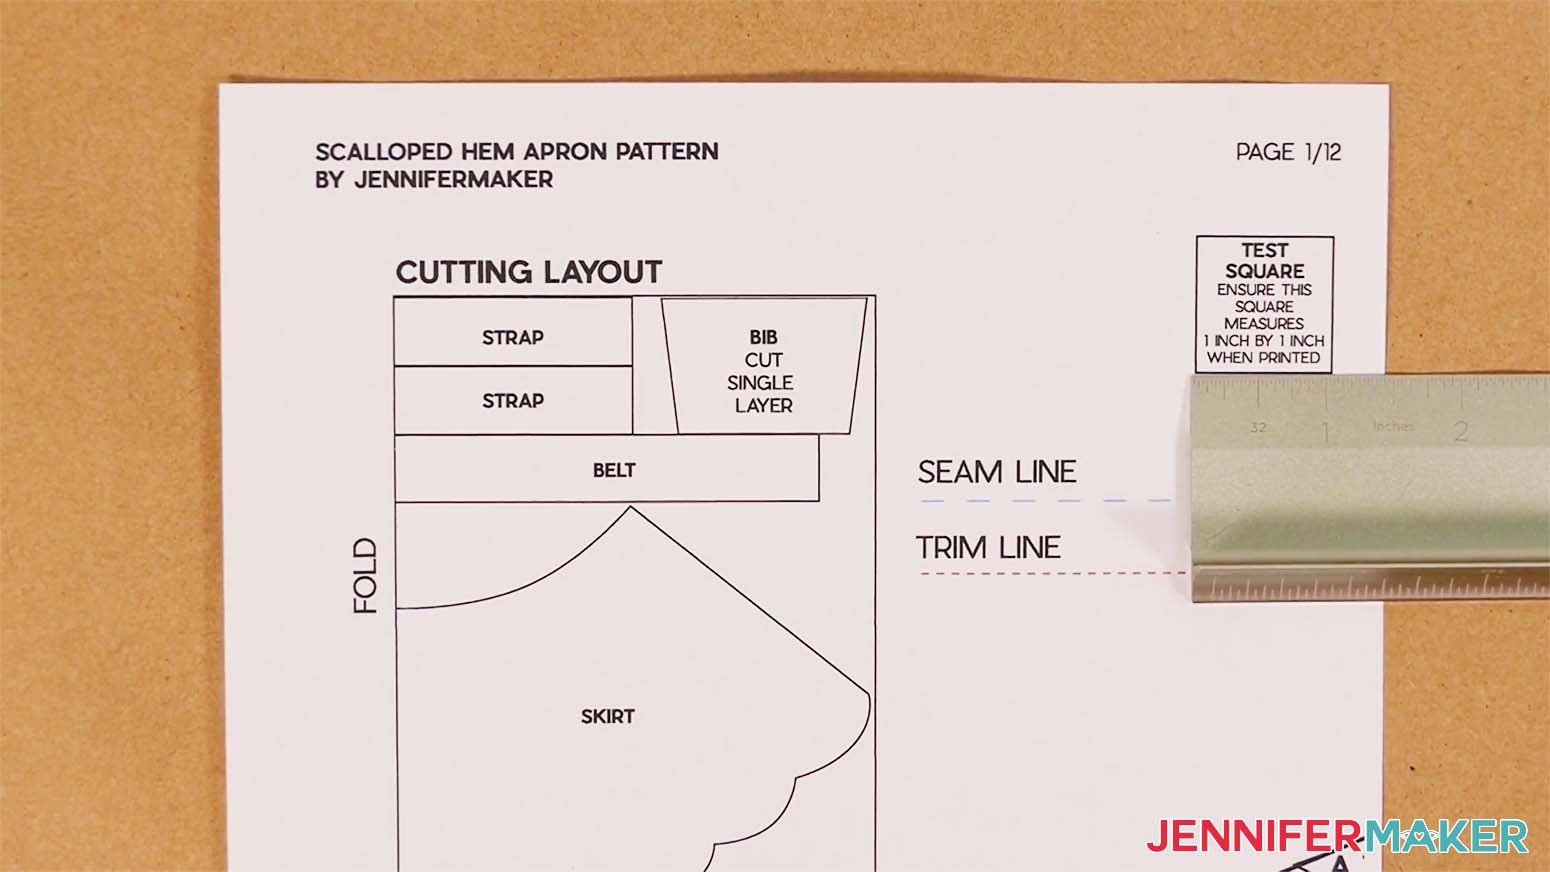
It's always a good idea when working with a pattern like this to print the first page only and measure the "TEST SQUARE" for accurate results.
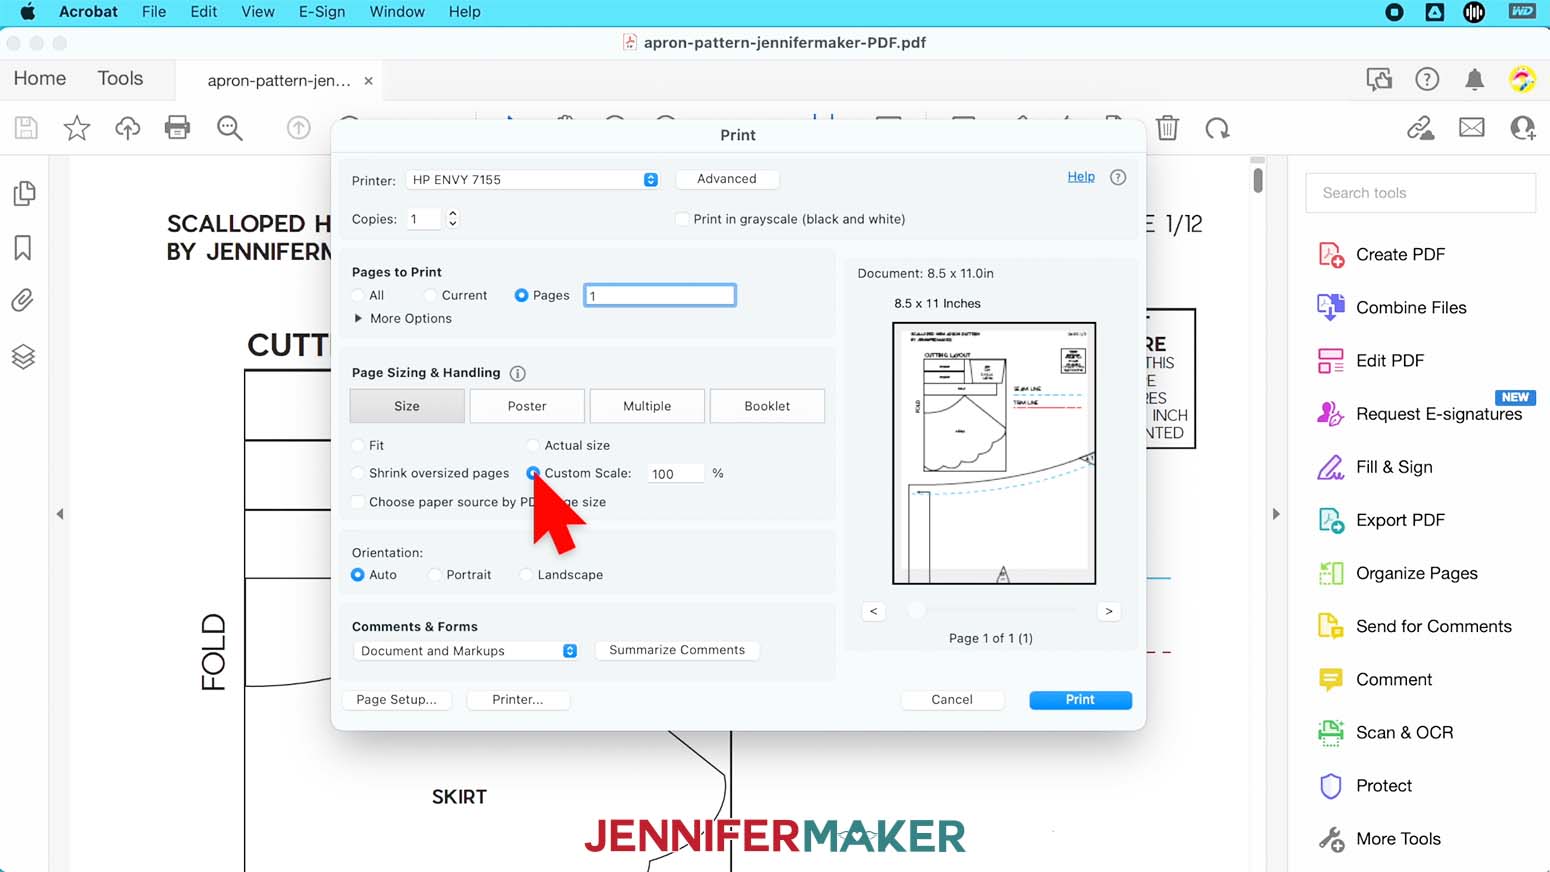
Click the "File" menu and select "Print." In the print screen under "Pages to Print" select "Pages" and input "1," this will print just the first page. Under "Page Sizing & Handling" make sure that "Size" is clicked and "Actual Size" is selected.
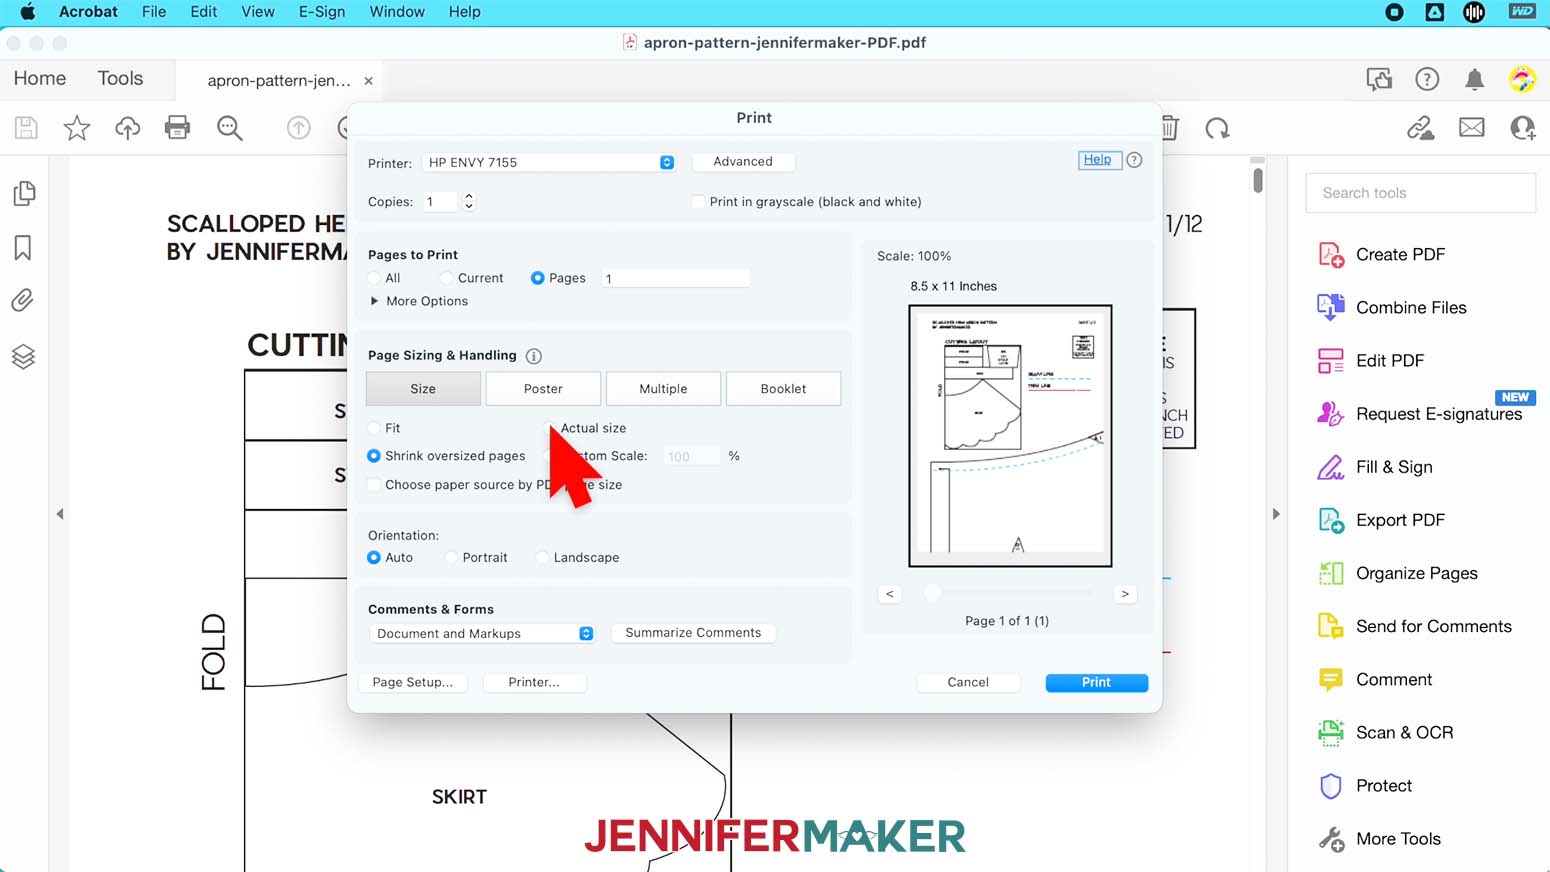
Take a ruler and make sure the test square measures 1" both ways.
If it doesn't measure 1", go back to the print screen. This time select "Custom Scale" and adjust the percentage by +/- one or two percentage points. Print the first page again and measure the square.
When you have the correct proportions, print the rest of the pages. Make sure they print one-sided.
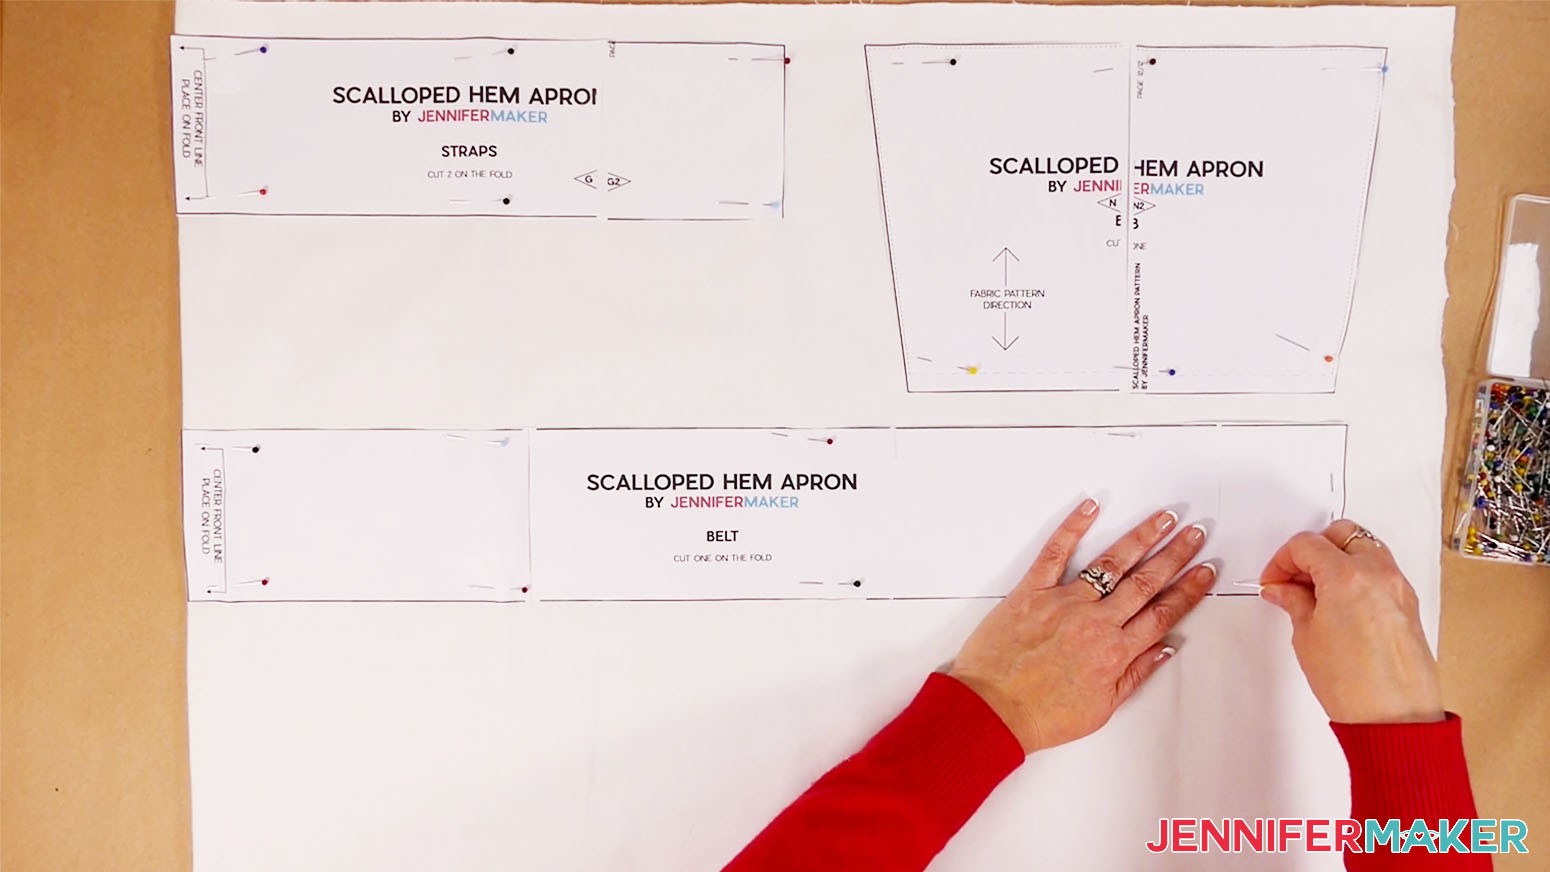
Next we will tape the pages to make our pattern pieces. The pages line up 4 across by 3 down.
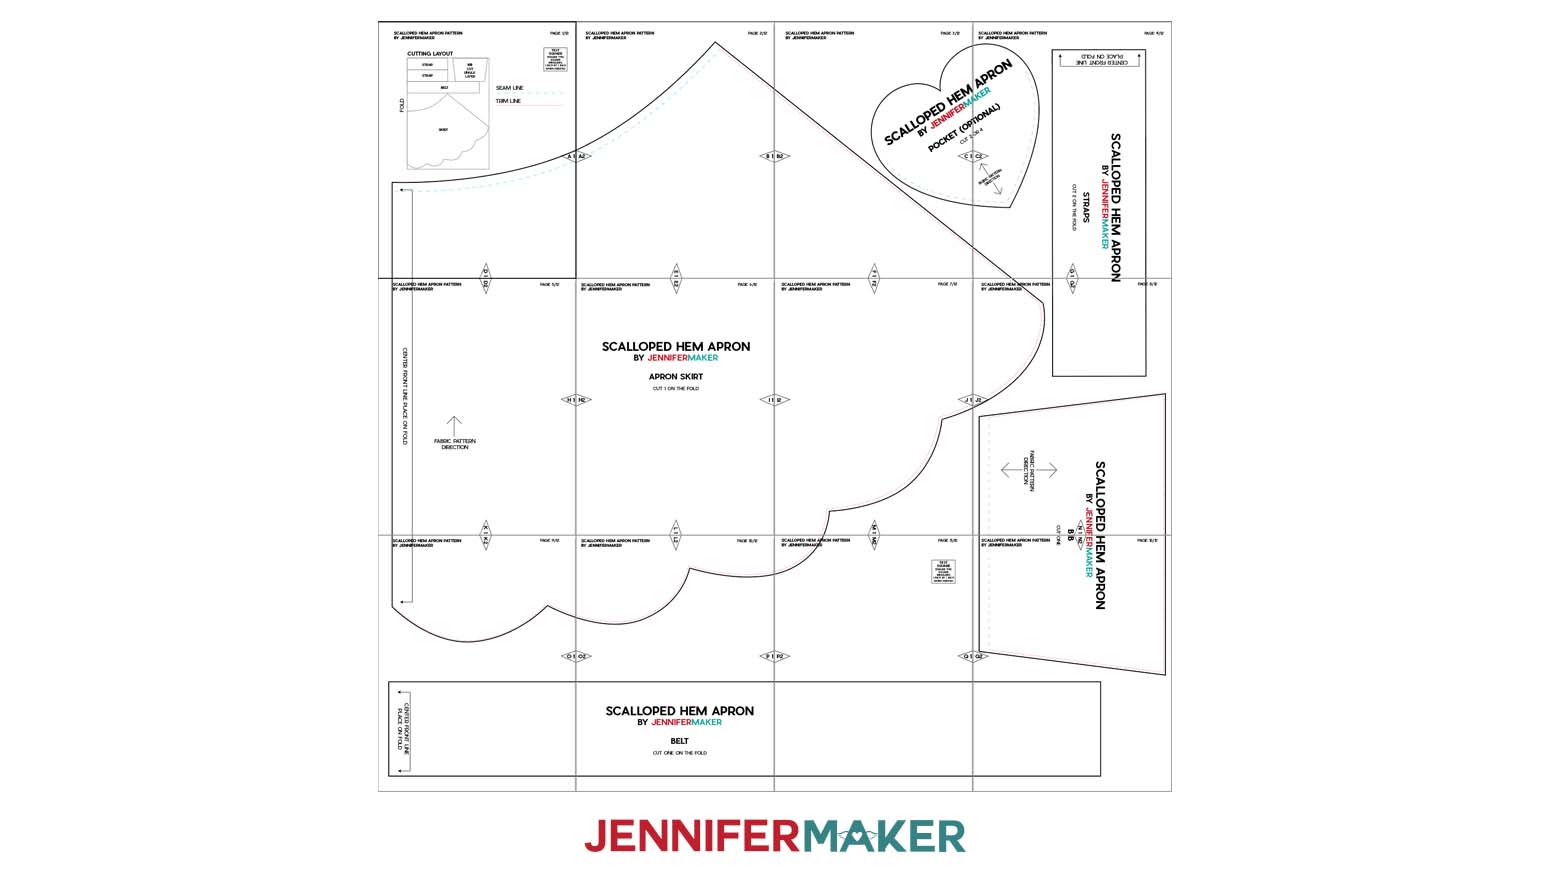
You will notice that there are triangles on the sides of the pages. Each has a letter and number inside. These line up with the next letter/number combination on the page next to it. For example A1 matches A2. You can also line up the pages using the page numbers in the upper right corner.
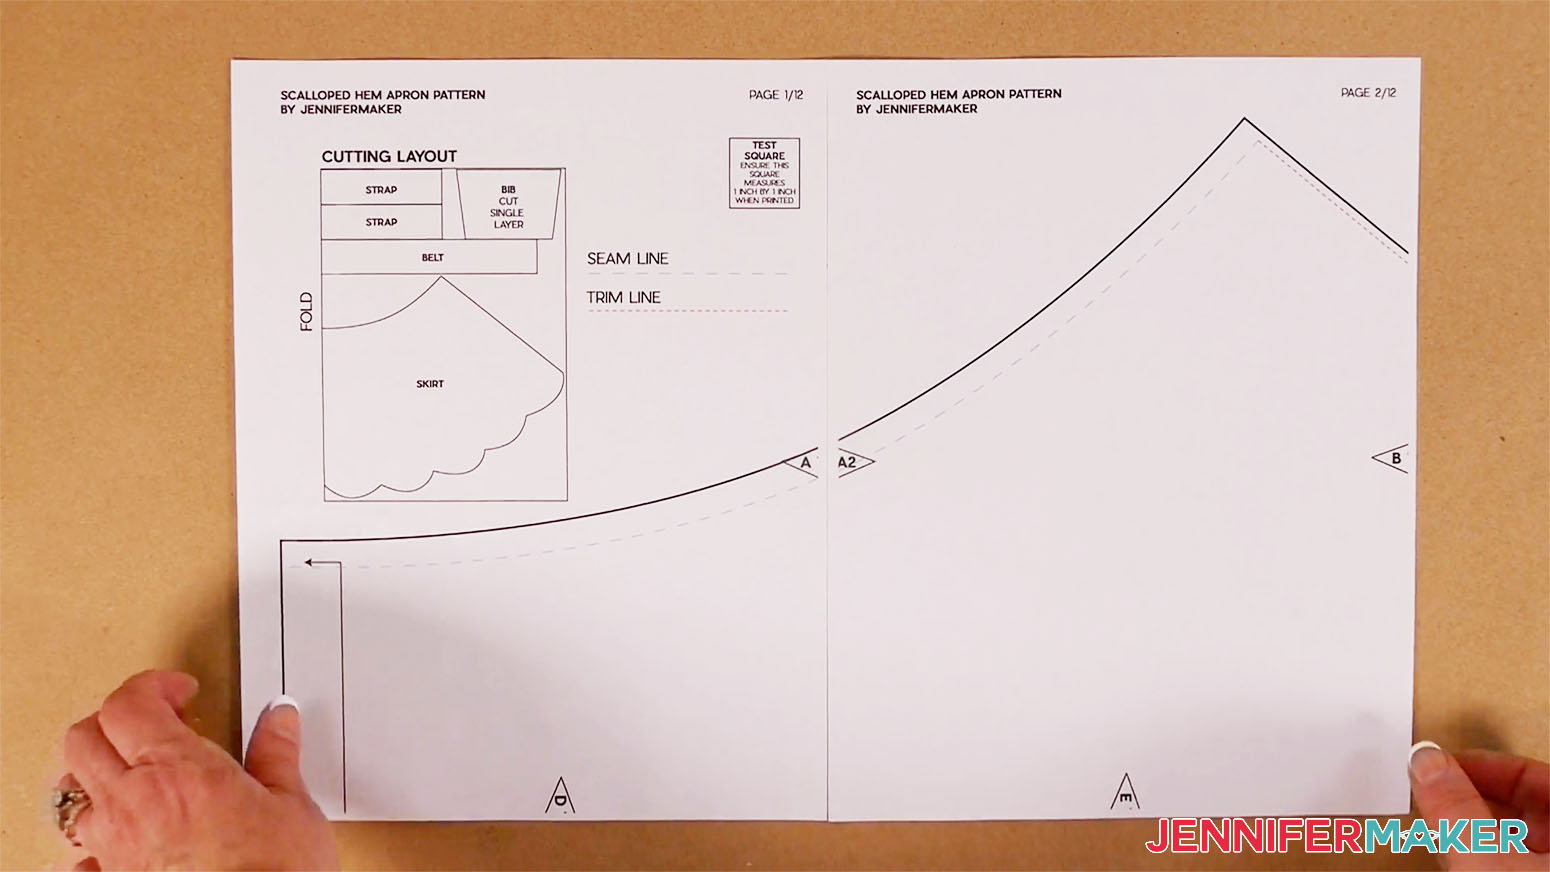
Match the triangle markers and tape the pages together.
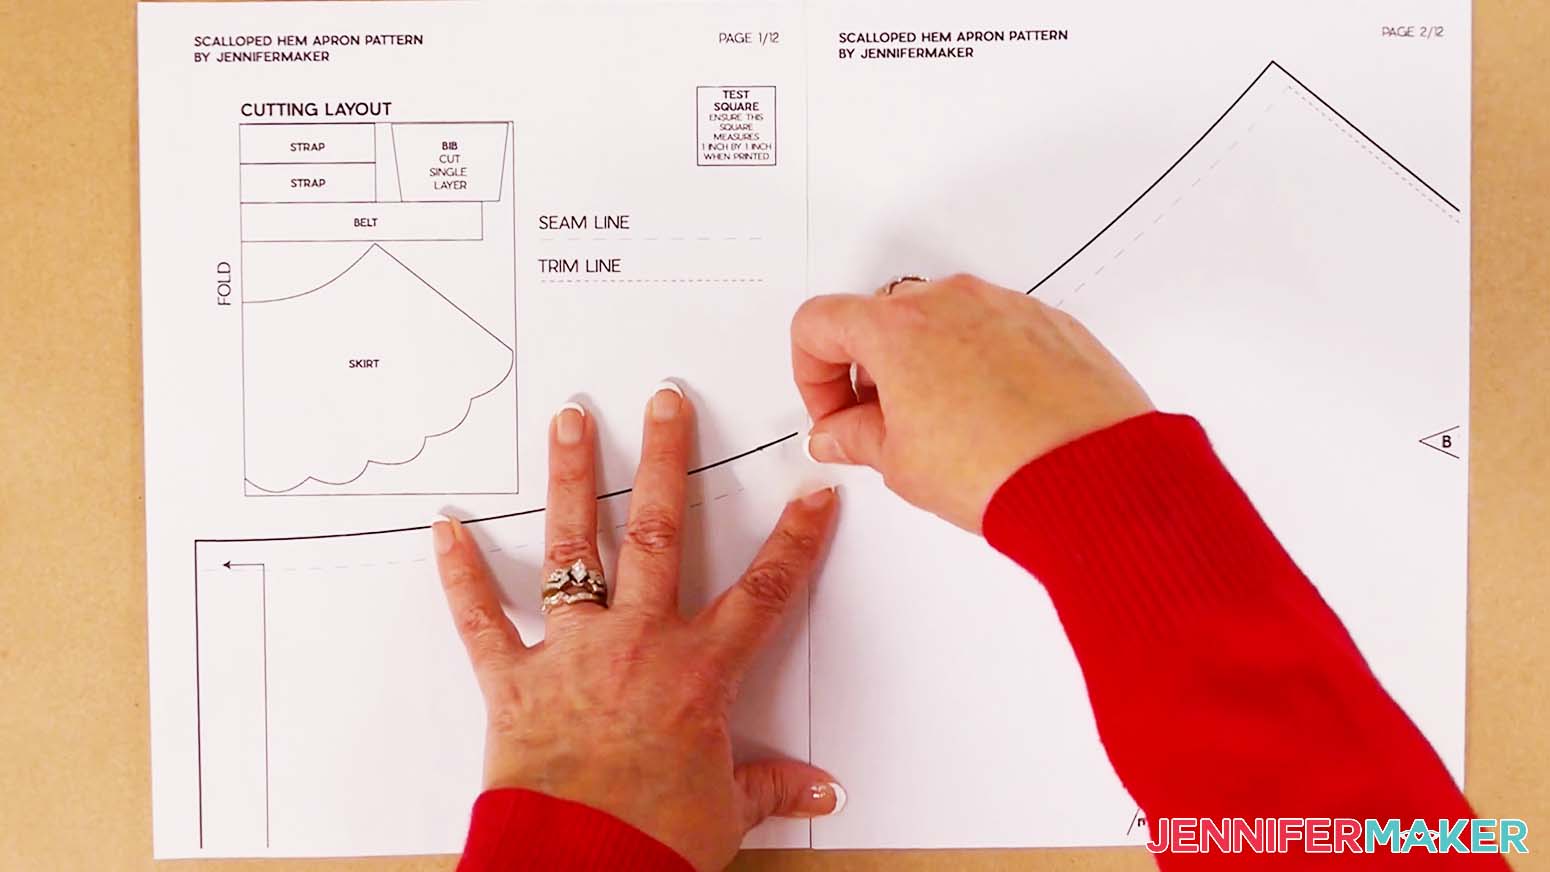
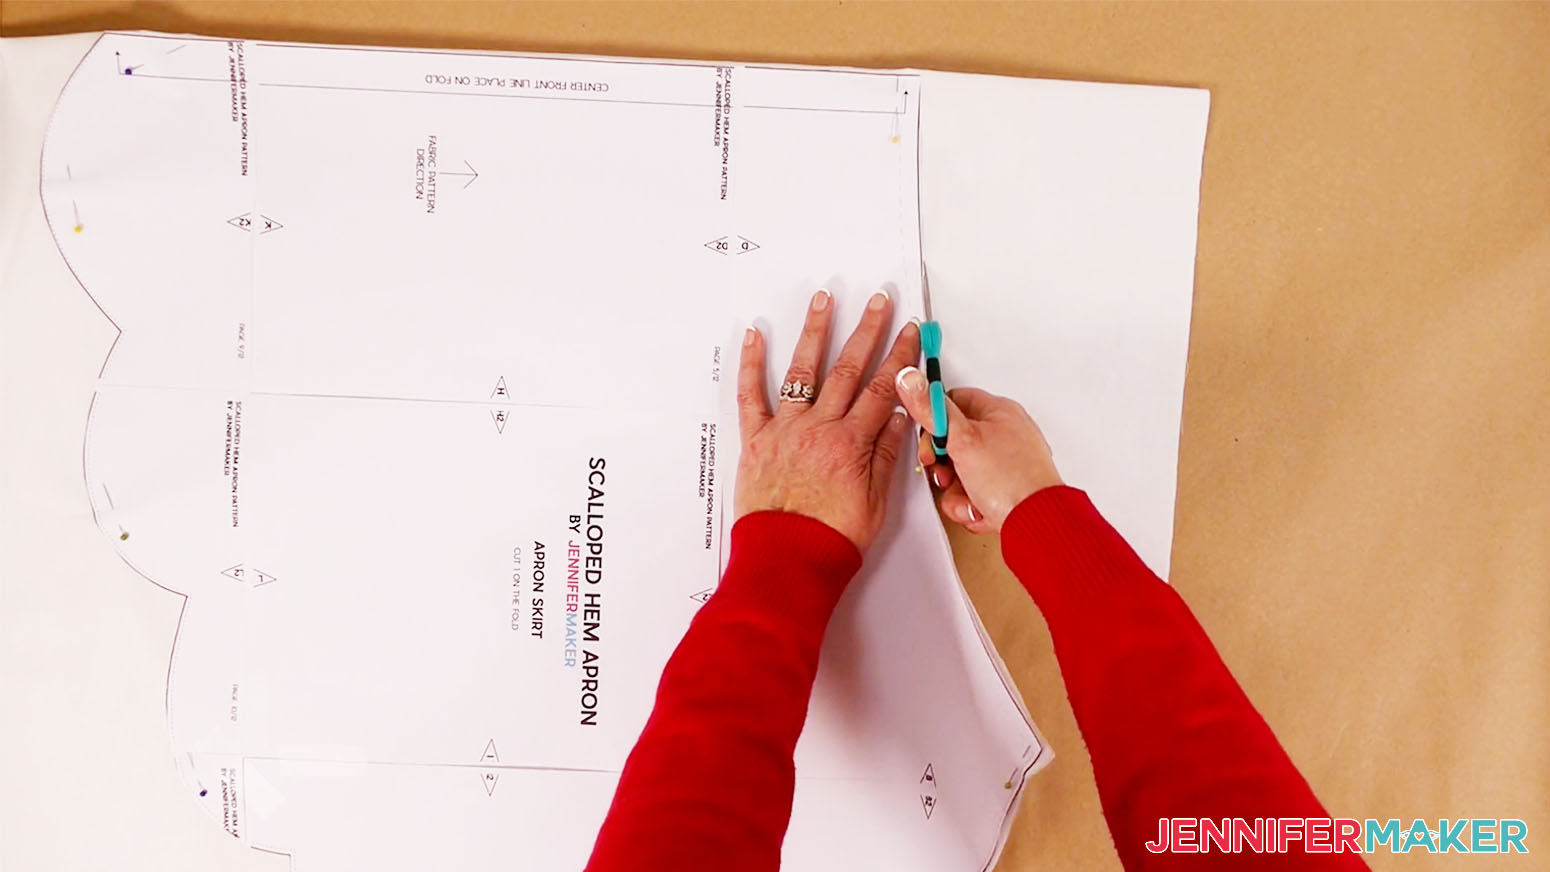
Cut out the pattern pieces using the solid black line as your guide. Use your paper scissors, not the fabric ones. Don’t discard the cutting diagram on page 1!
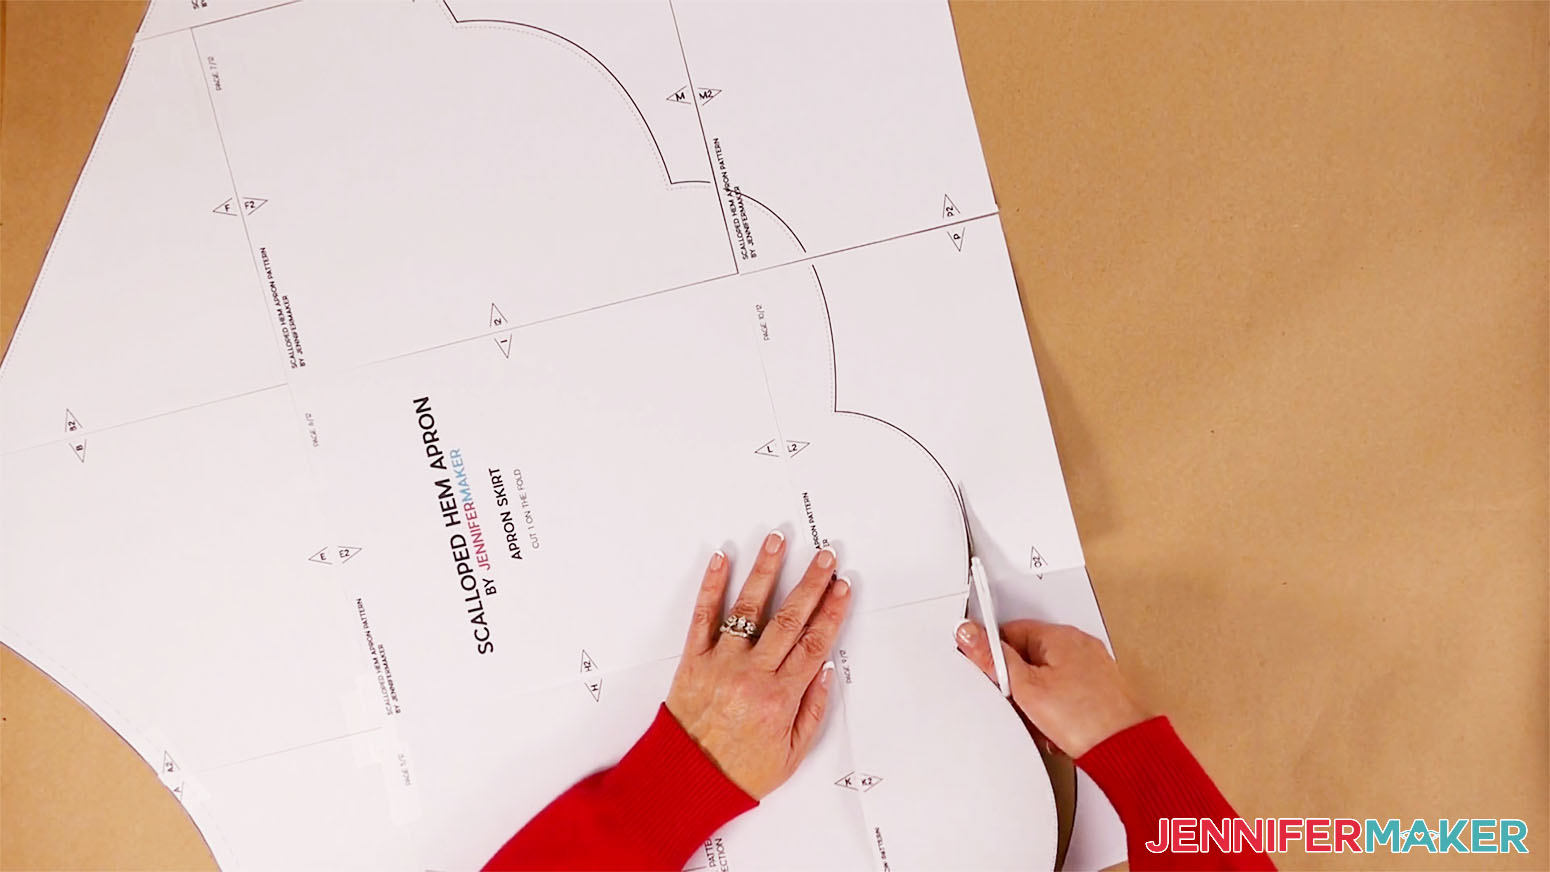
NOTE: The "Belt" piece currently measures 61" in length. You can make it longer by cutting the horizontal lines longer on the fabric.
STEP 3: CUT YOUR APRON FABRIC
APRON PIECES
Fold your white fabric in half and lay it flat on your table right sides together.
NOTE: You only need to cut a single layer of fabric for the Bib piece.
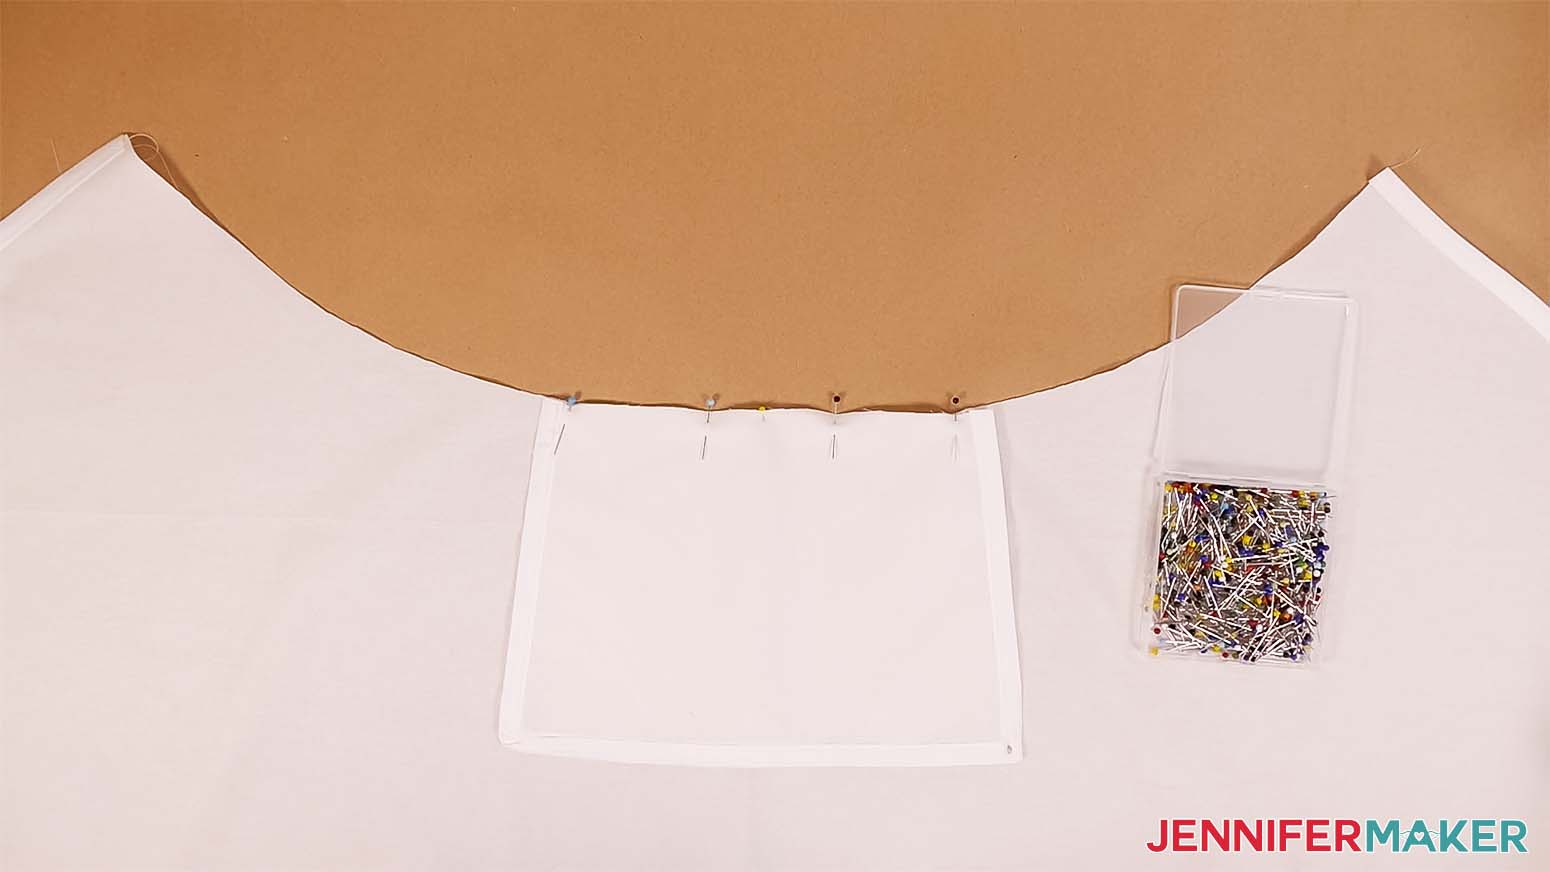
Pin your pattern pieces face up on the according to the diagram on page 1 of your pattern.
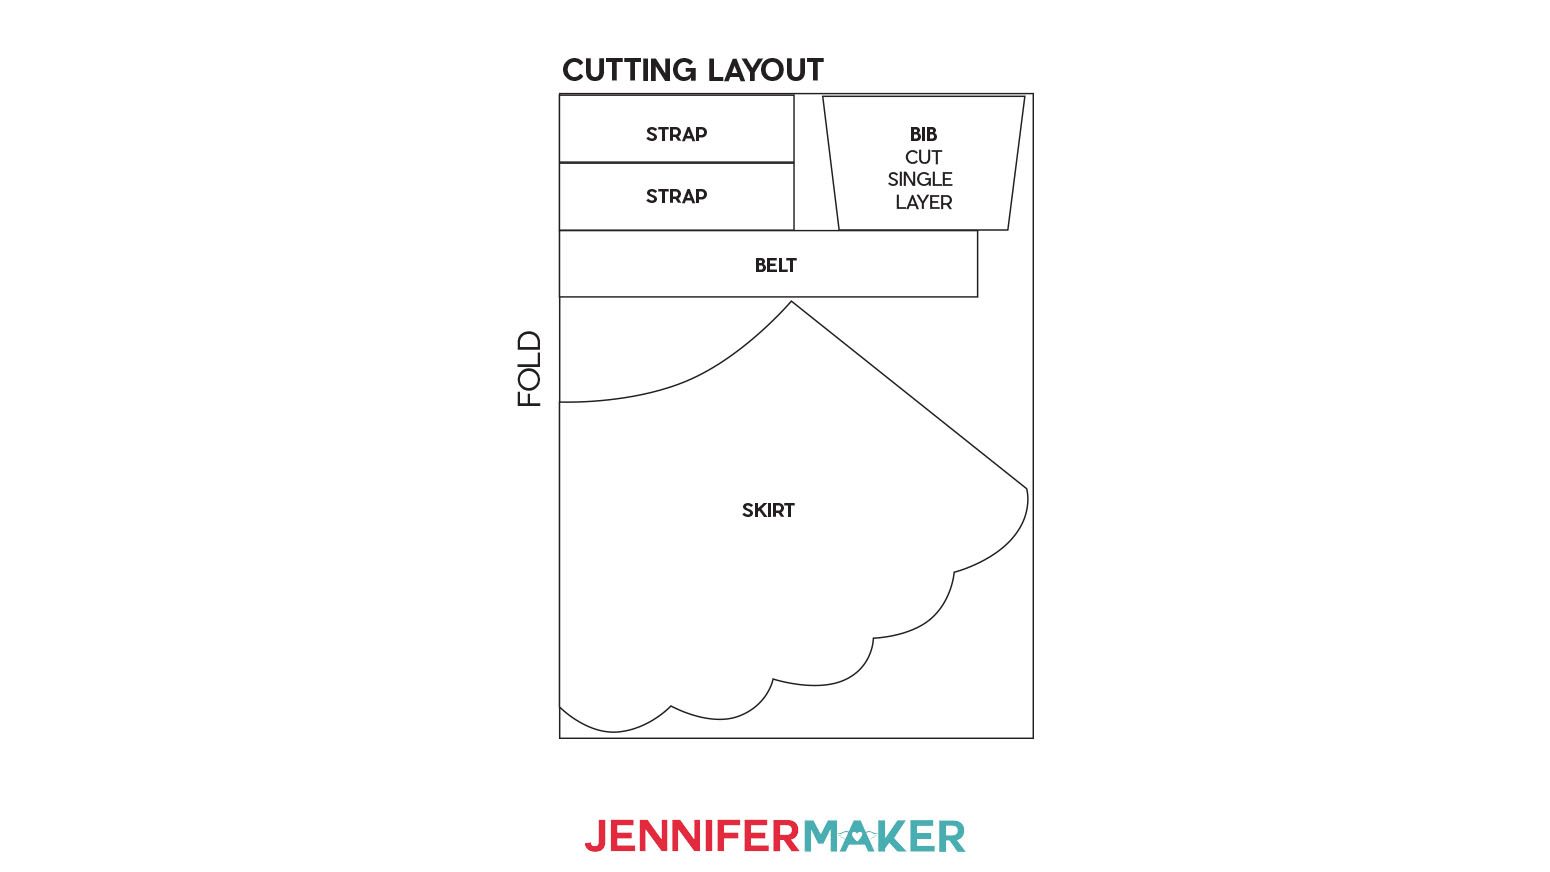
Make sure your get both layers when you pin them.
Now, cut the fabric around each piece. You can use a handheld rotary cutter with a self-healing mat underneath, or fabric scissors. If your pattern pieces won't stay in place, you can trace them with a washable fabric marker to make it easier to cut both layers to match.
NOTE: If you want to make longer ties, extend the length of the tie pattern piece as needed. We’ll attach the assembled belt using the middle as the starting point so the length is totally customizable.
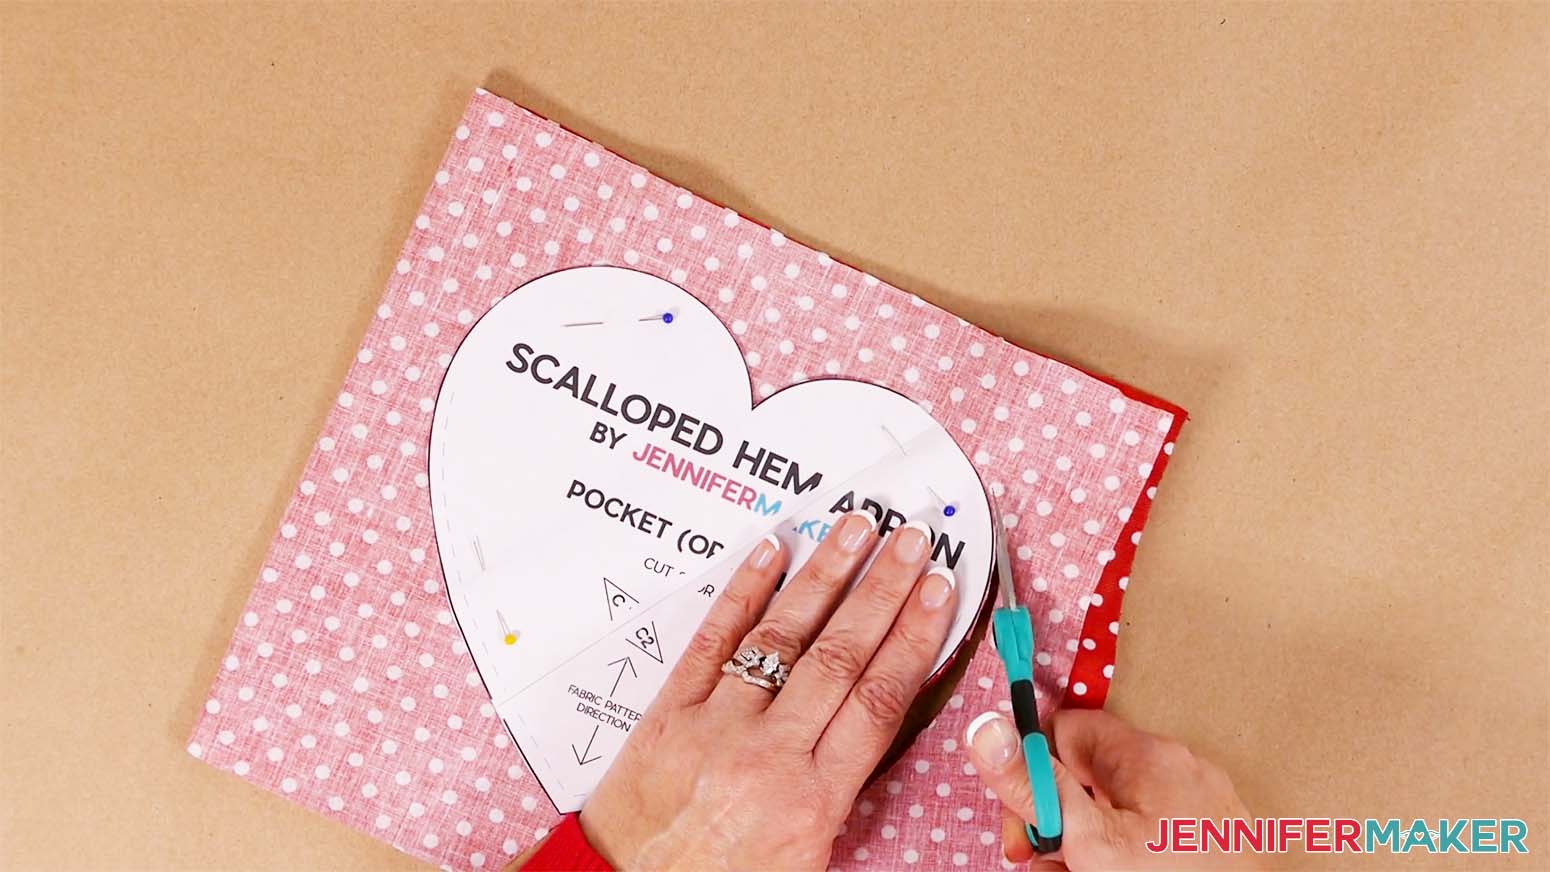
HEART POCKETS
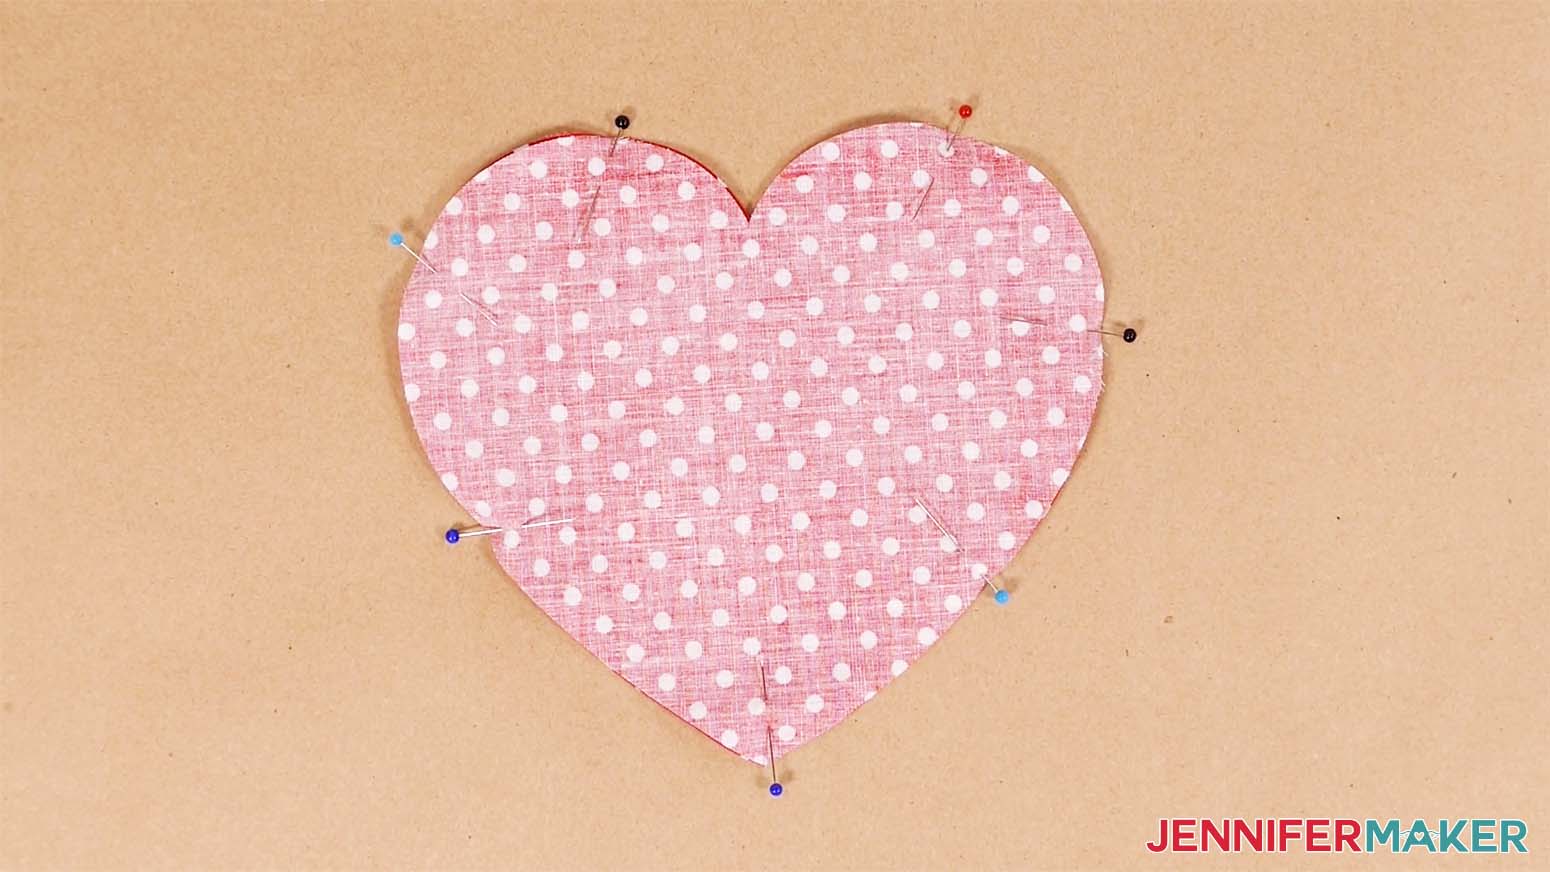
If you like, you can cut the heart pocket pieces by hand. Just fold your chosen fabric right sides together, then pin the paper heart in place.
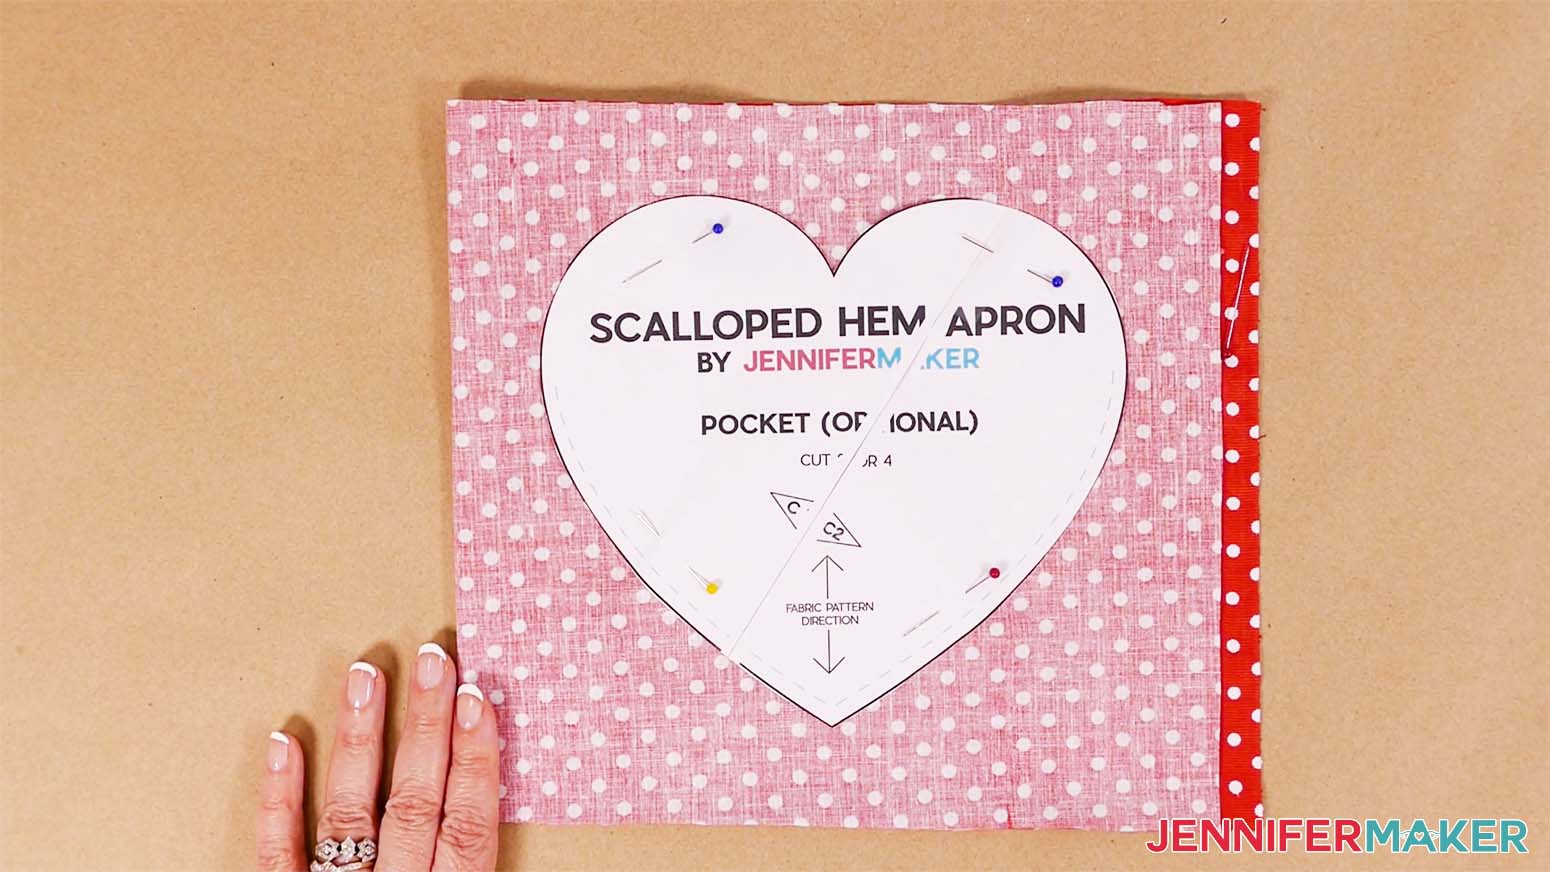
Cut 2 hearts for one pocket or 4 hearts if you'd like two pockets.
HEART POCKETS IN DESIGN SPACE
If you have a Maker or Maker 3, you can cut the fabric with a rotary blade. If you have an Explore check out this tutorial on how to cut fabric with a Cricut Explore.
Upload the heart SVG to Cricut Design Space and add it to your Canvas.
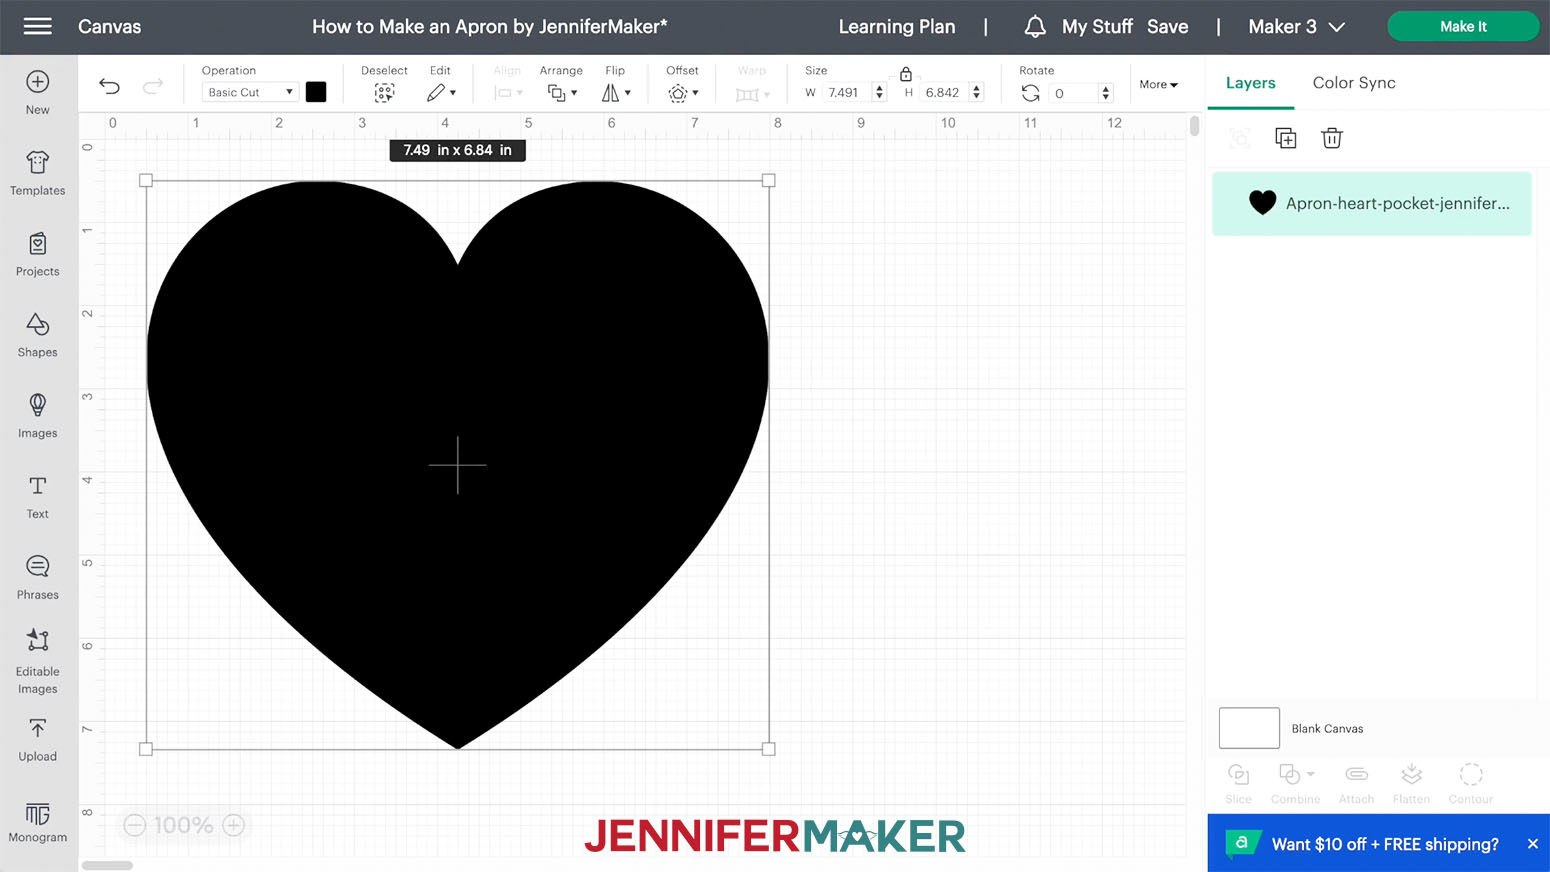
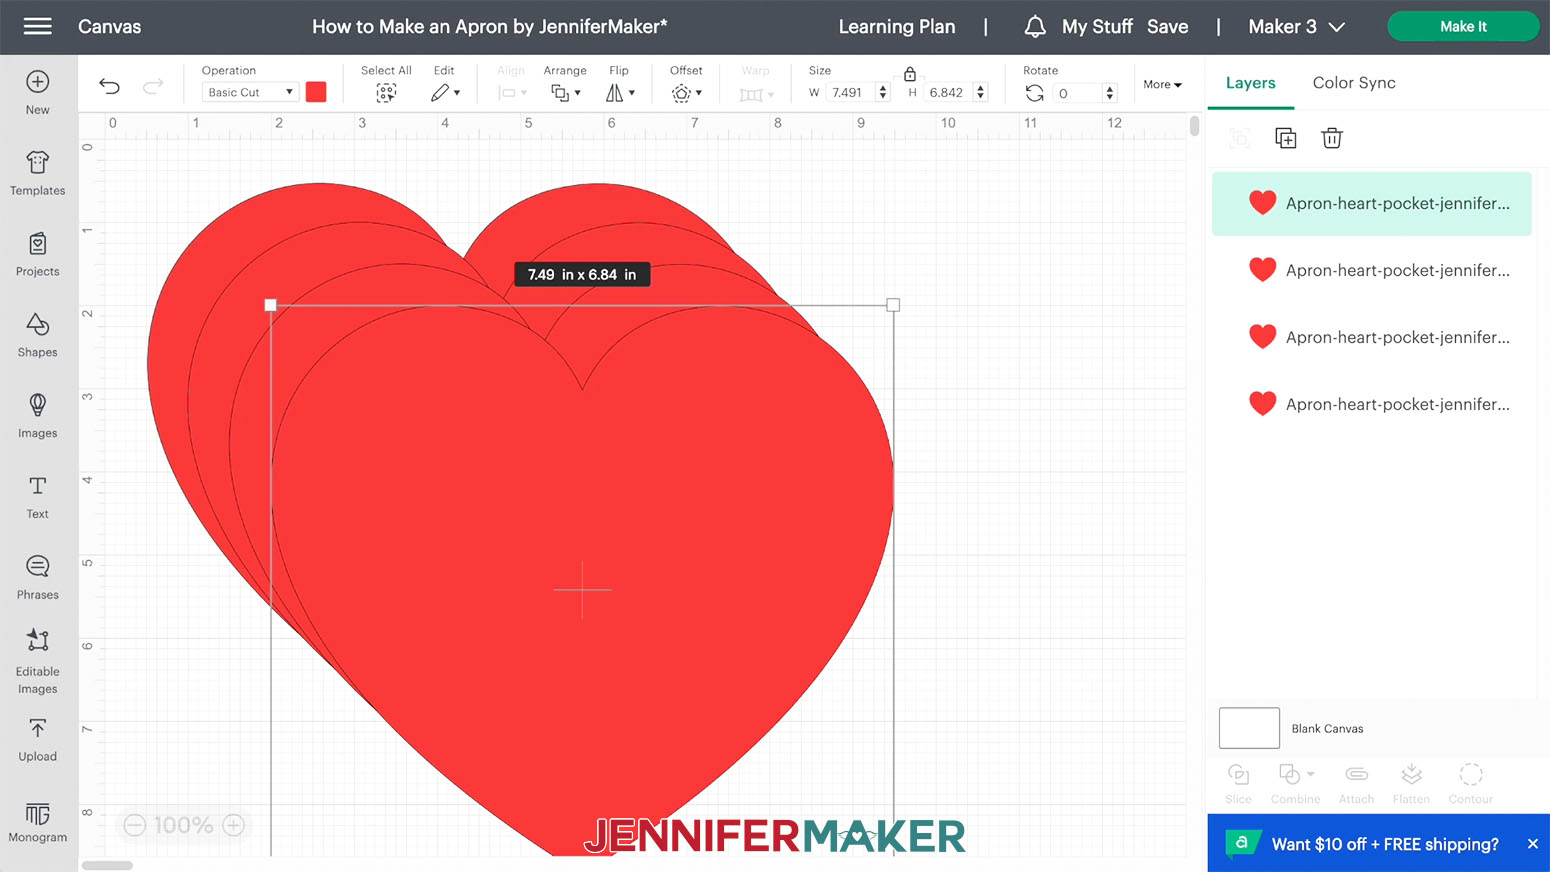
I’m going to use red fabric, so I’ll change the color to match using the color box.
For one pocket, duplicate the heart once. For two pockets, duplicate it three times. That's it, you're ready to cut!
Make sure the correct machine is selected and click "Make It" in the upper right corner.
If prompted, select "On Mat" and "12 in x 12 in" then click "Continue."
Make sure you have the correct number of hearts, then click back on the first mat and click "Continue."
On the Make screen, select "Cotton" for your material and set the pressure to "Default."
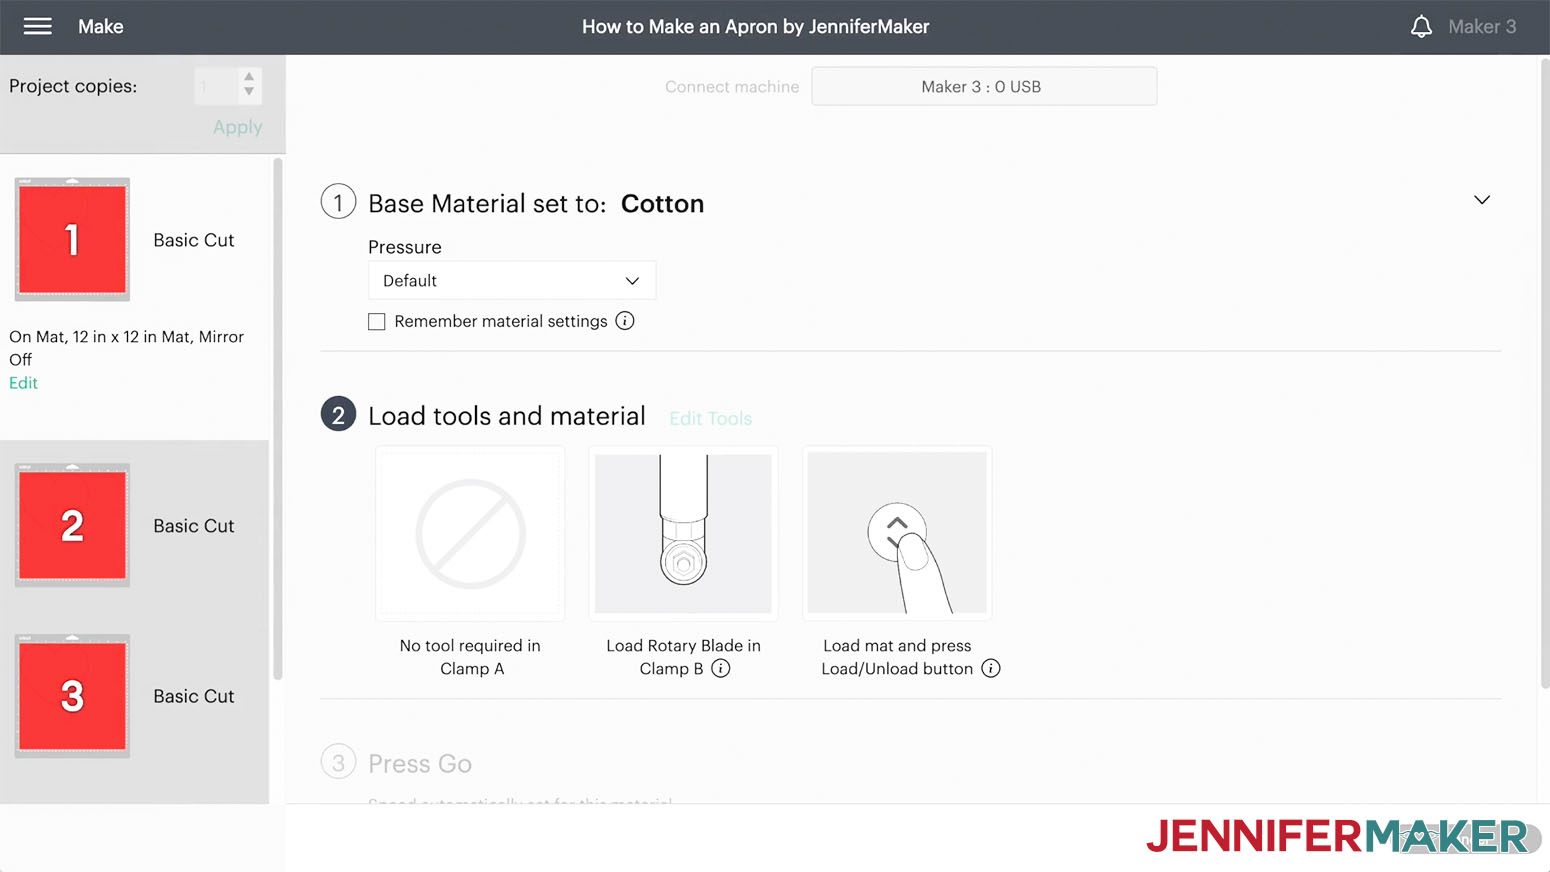
Make sure you have loaded the Rotary Blade into Clamp B.
Prepare your pocket fabric by cutting a 9" x 9" square for each piece.

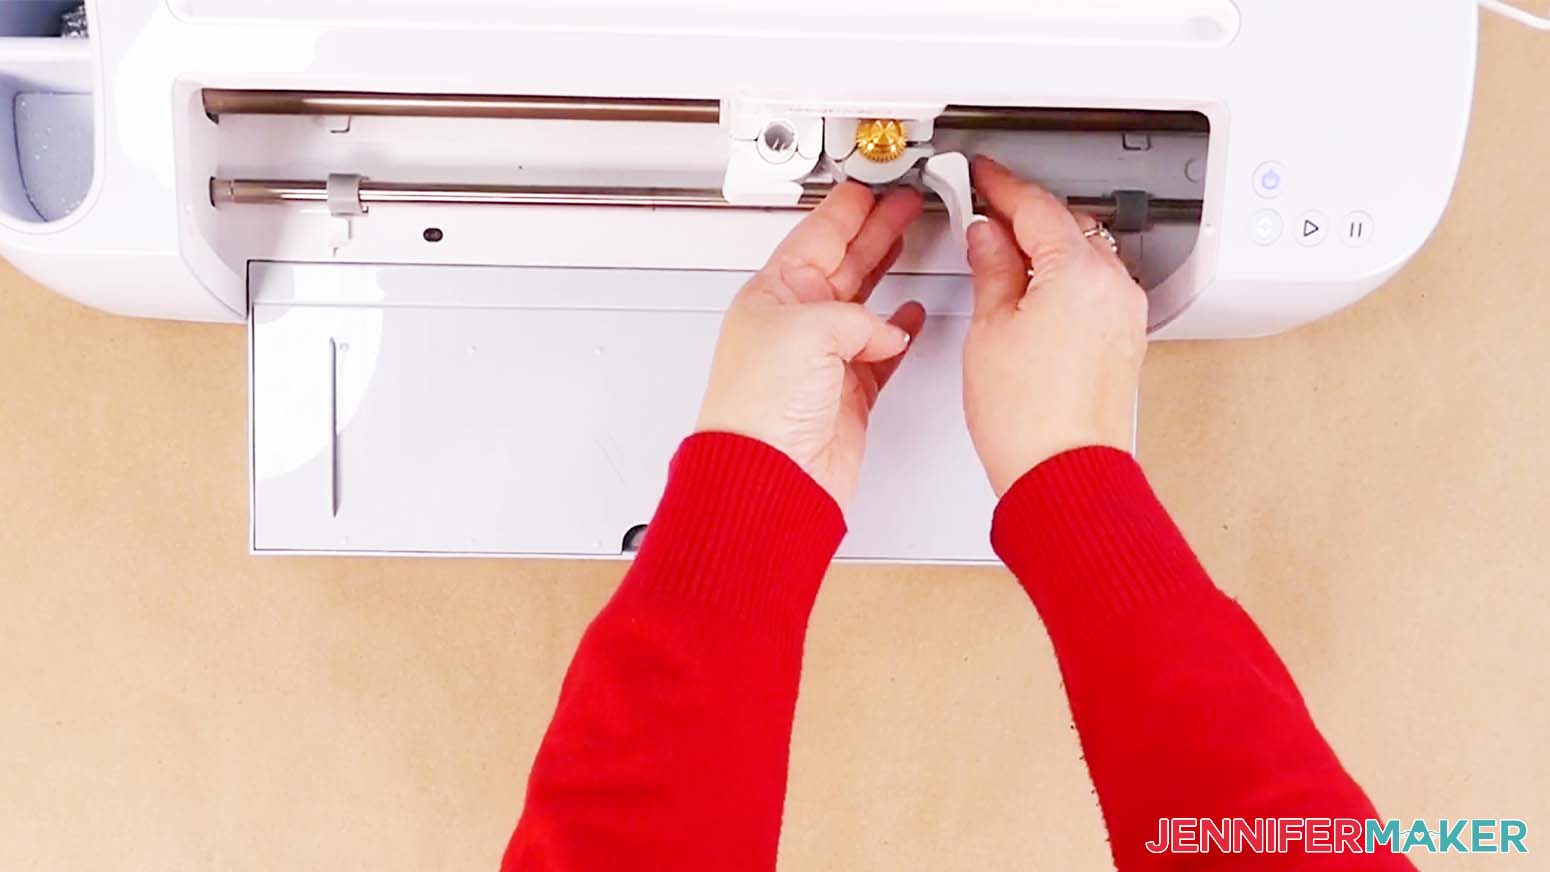
Place your first fabric square face up onto a pink FabricGrip mat. Make sure it covers the heart area using your screen for reference. Use a brayer to secure it.
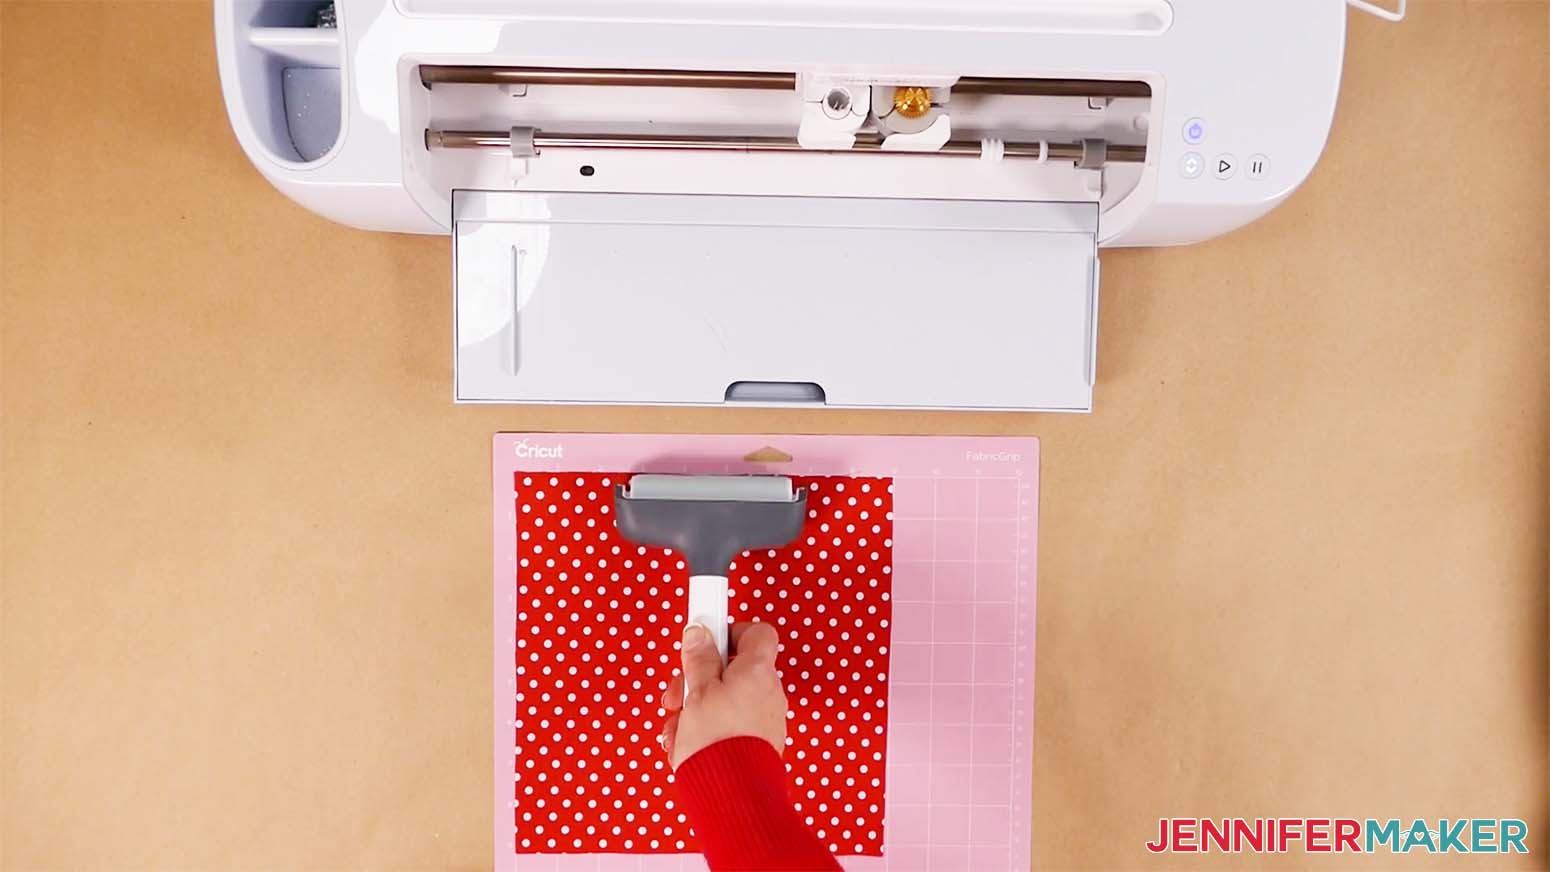
Load the mat and when prompted press the Go button.
When the cut is done, before unloading the mat, make sure the cut went all the way through by lifting a corner of the fabric. If it didn't cut, press the Go button again.
Repeat with the rest of the mats.

STEP 4: SEW YOUR APRON
First we will add the bias tape to the bib and skirt pieces.
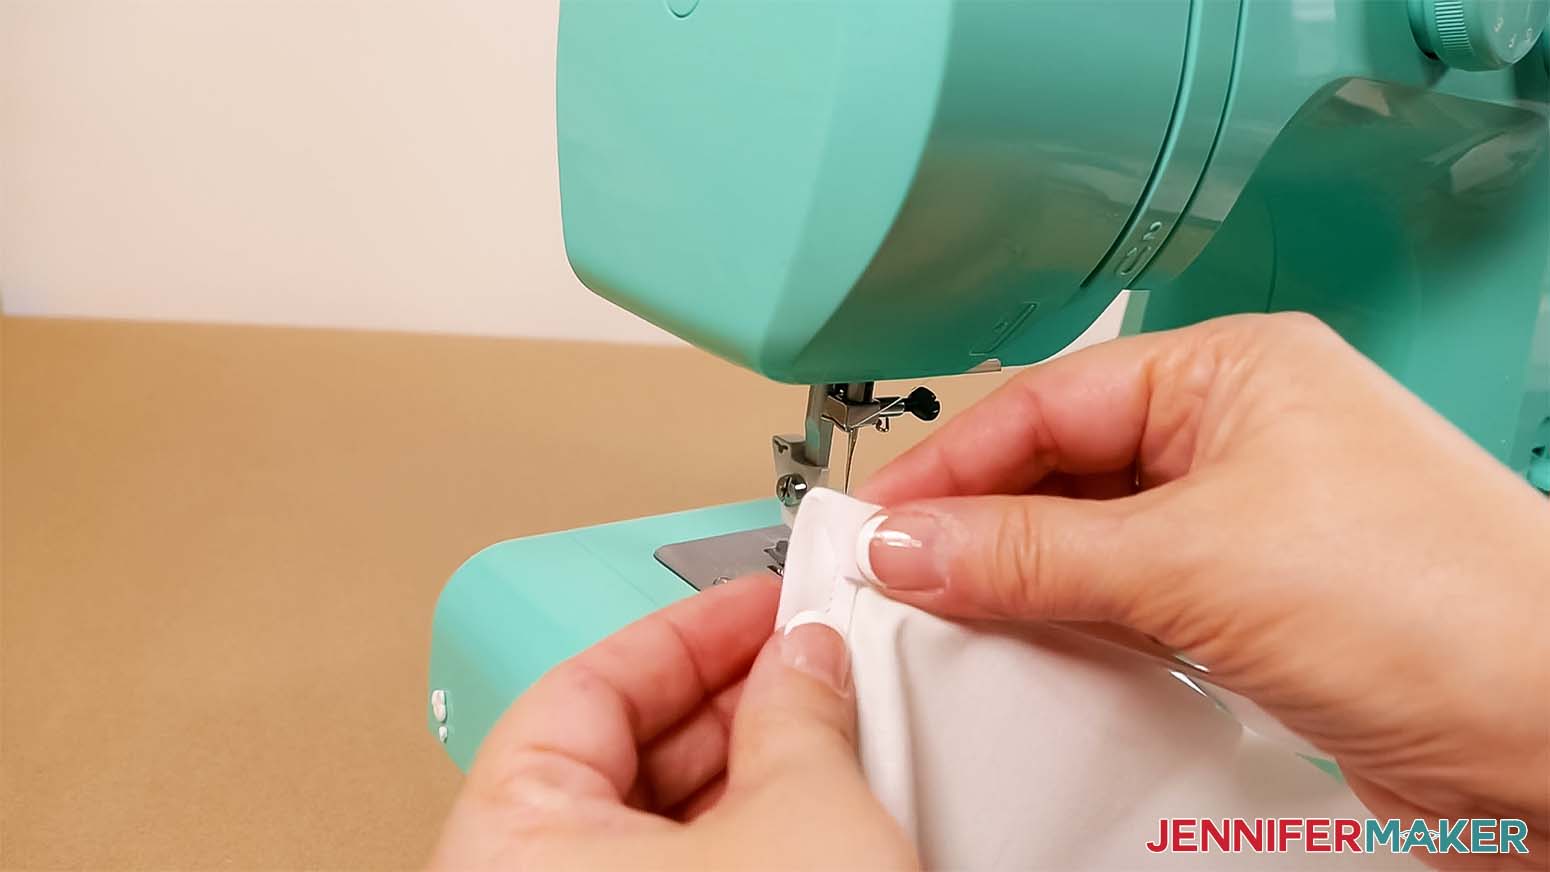
For the bib, we will add the bias tape to the sides and the top. Open the tape at the center seam and place the bib fabric edge between the layers starting at the bottom of one of the sides.
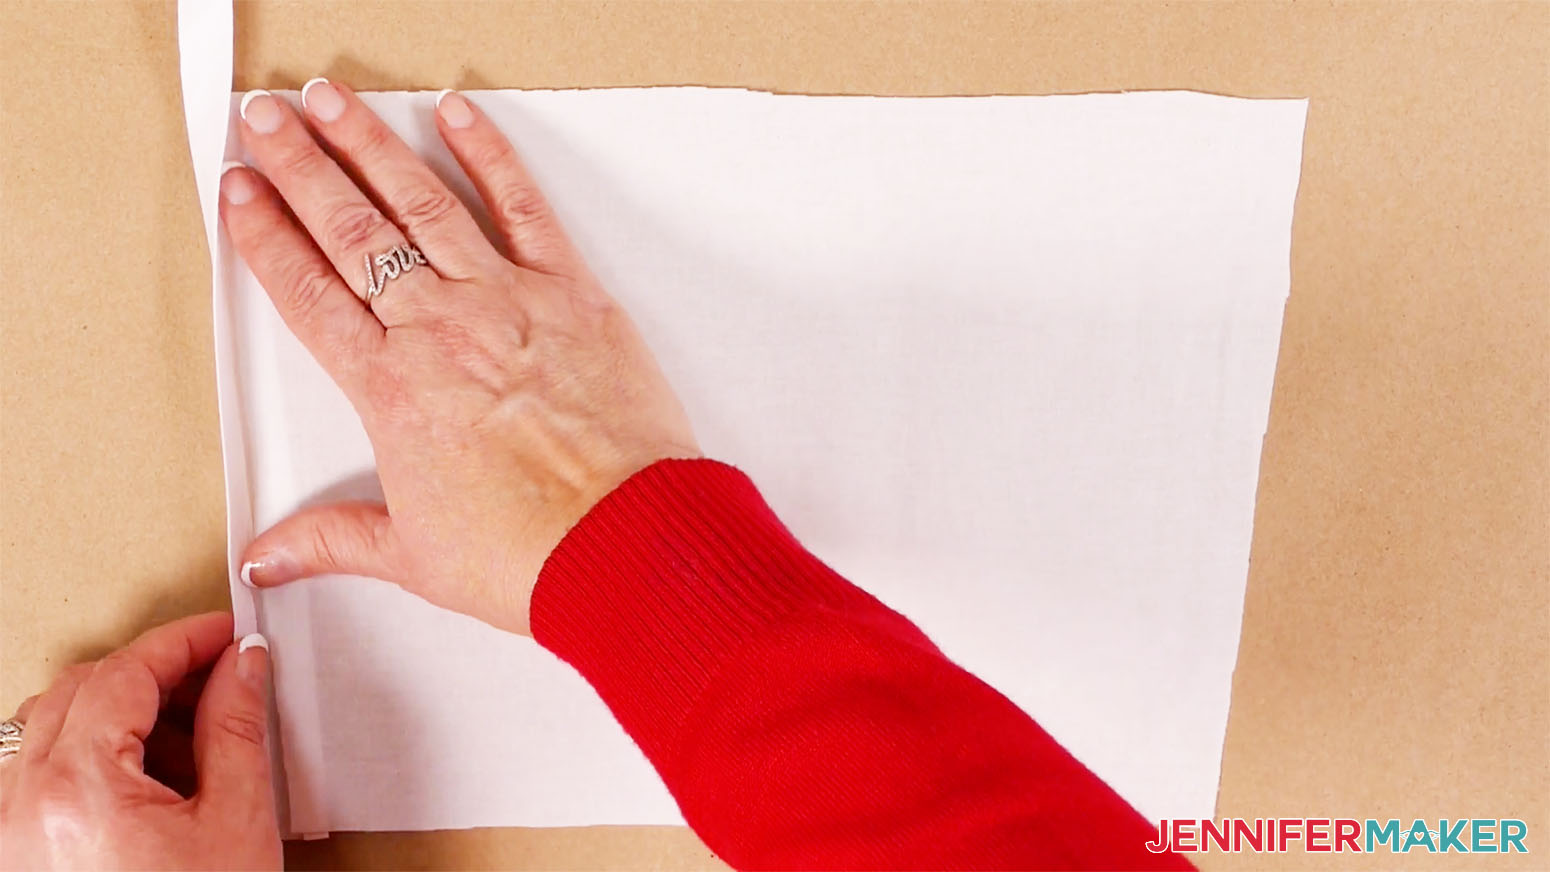
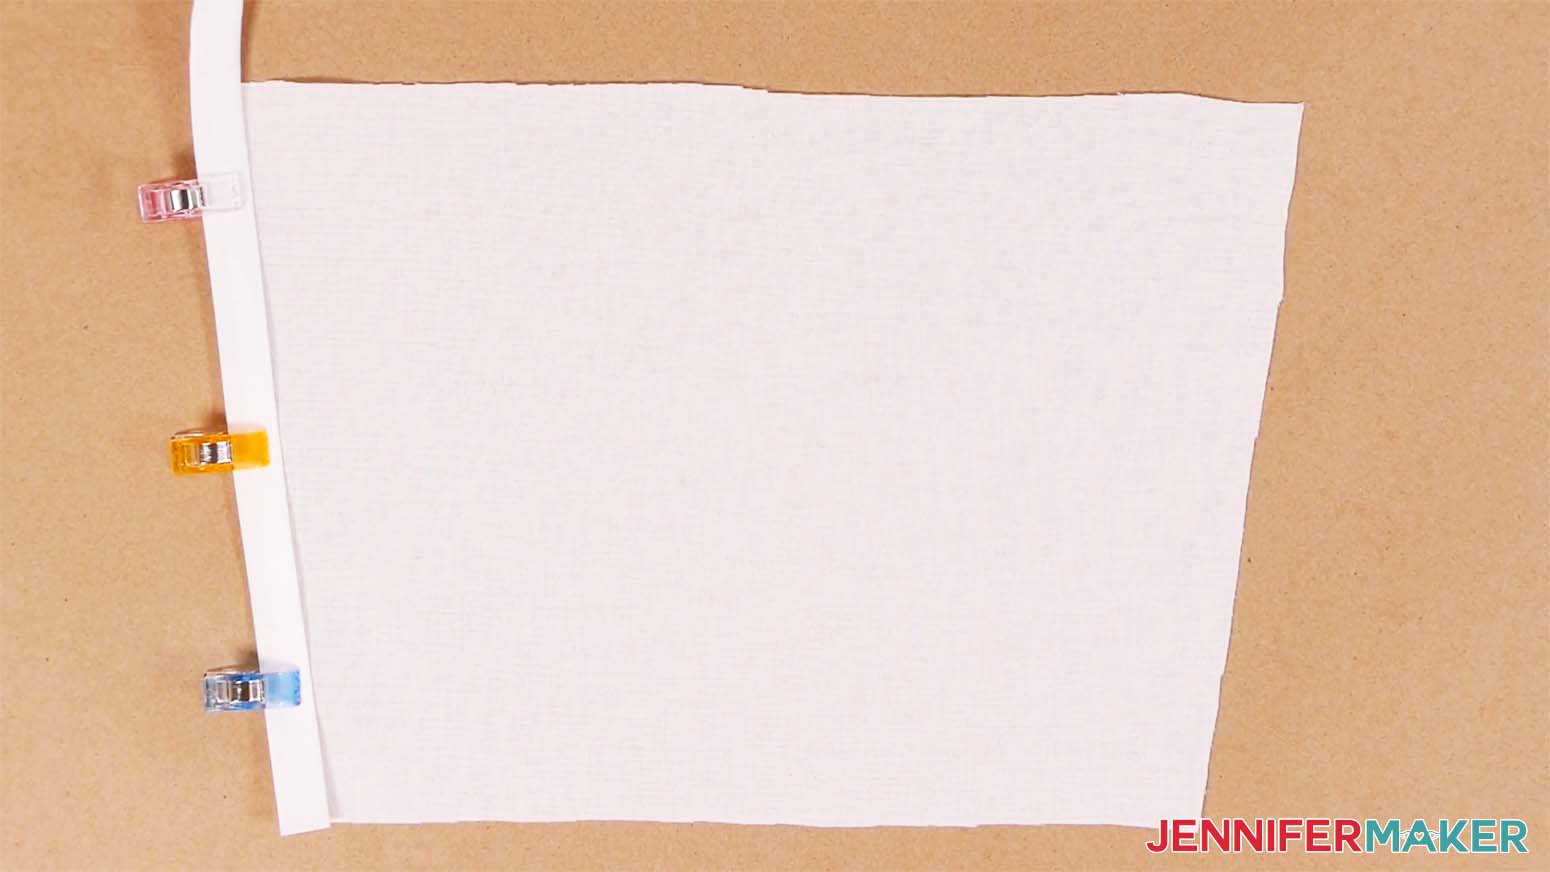
The fabric edge should touch the folded tape. Make sure the tape's edges are lined up on either side of the bib so your stitches will catch it on the bib's top and bottom. Clip the tape in place along the side edge all the way to a corner.
Using a a straight stitch about 10-11 stitches per inch and a 3/8" seam allowance from the edge, sew along the tape toward the corner. Don’t forget to lock your stitches when you begin and end by sewing backward just a bit.
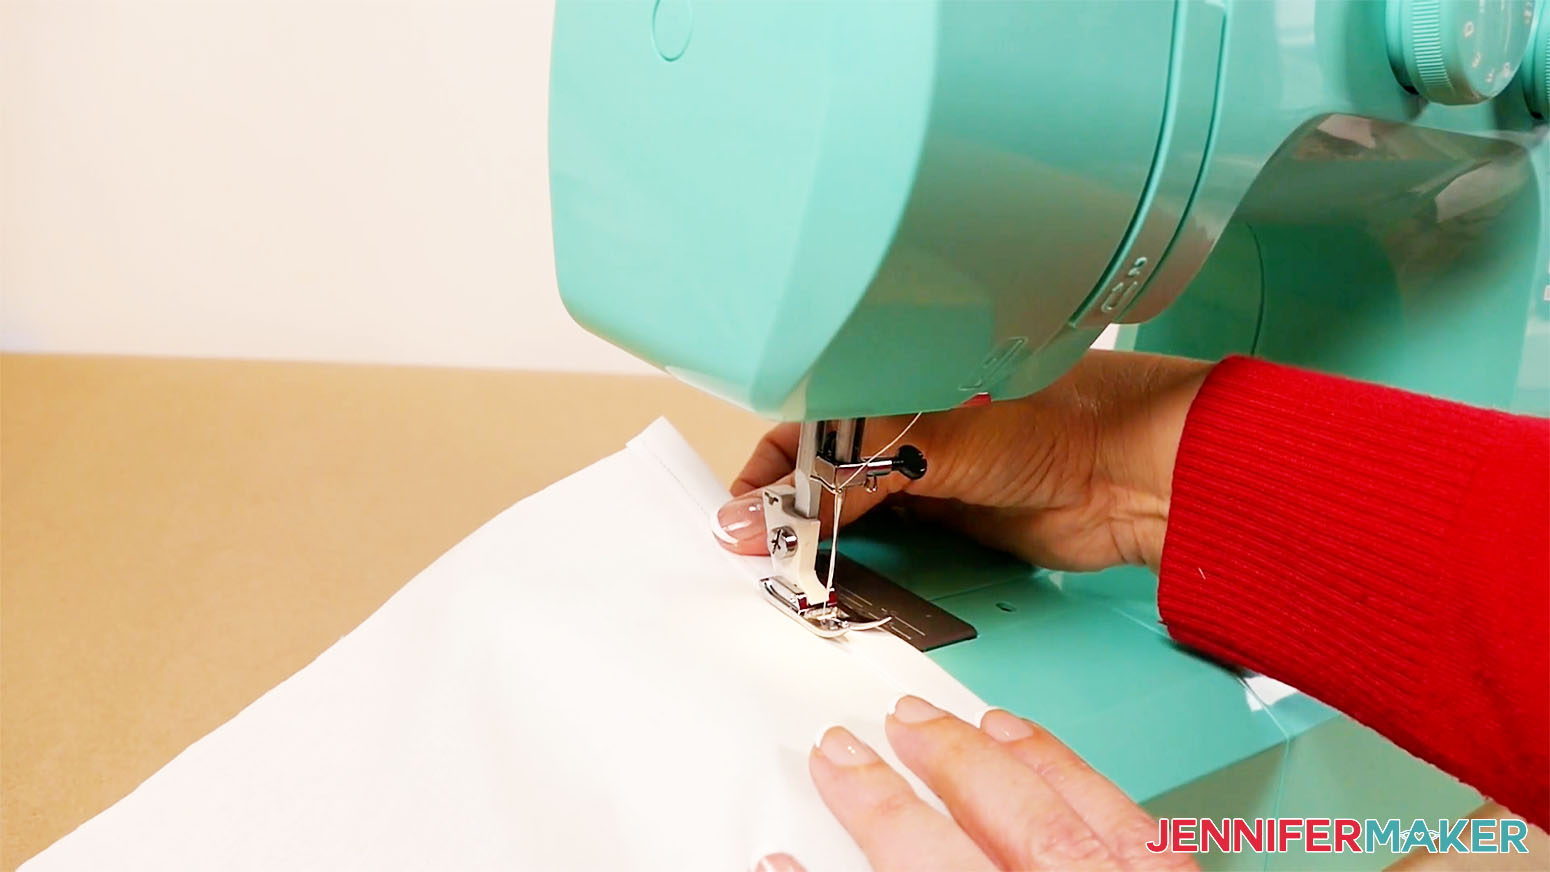
When you get close to the corner, angle your stitches down for the last 1/4" and sew off the edge of the bib. Trim your thread.

To bind the corner, fold the unattached section of tape to meet the next bib edge, like you're going to glue just the edge to the center of the tape. Don't make it such a tight bend that the corner distorts. Sections of tape will pop out at the corner.
Squish the bumps down with your fingers and pin or clip them in place. Pin the rest of the tape to that edge. Start sewing again by locking your start, going over the folded tape at the corner, and continuing along the top edge.
Then bind the next corner and continue down the other side of the bib. When you’re done, trim the excess thread and tape.
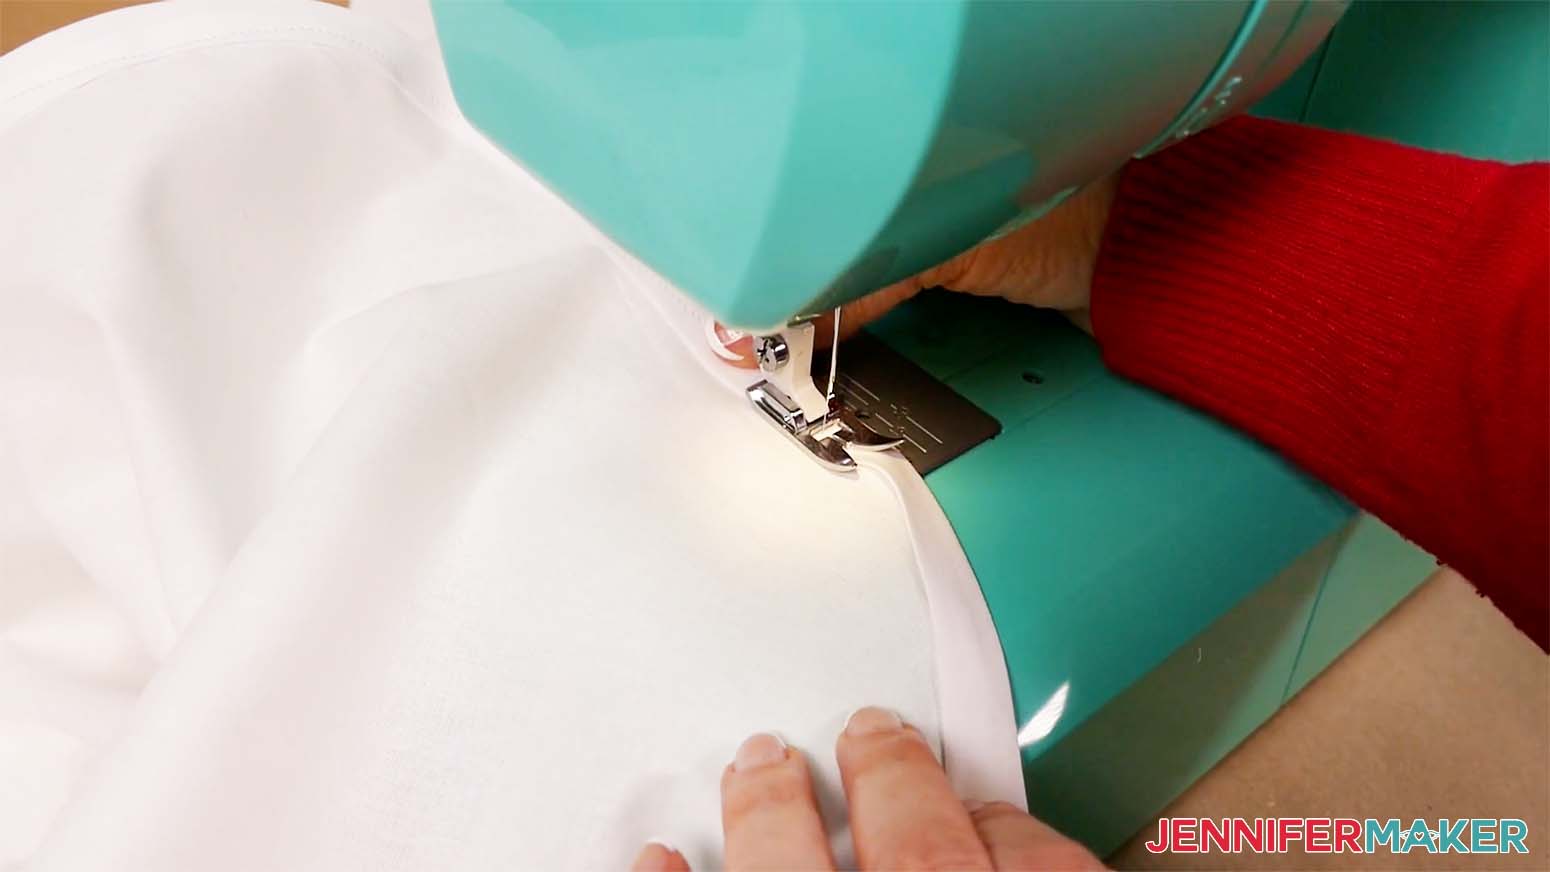
Starting at one edge of the skirt where it will meet the belt, attach the bias tape to the vertical side using the same method.
When you get to the bottom, bind the corner.
Carefully sew the scallop edges by following the curves. The end result should look like this.
Bind the other corner, then add the tape up the other vertical edge. Lock your stitches and trim the excess thread and tape.
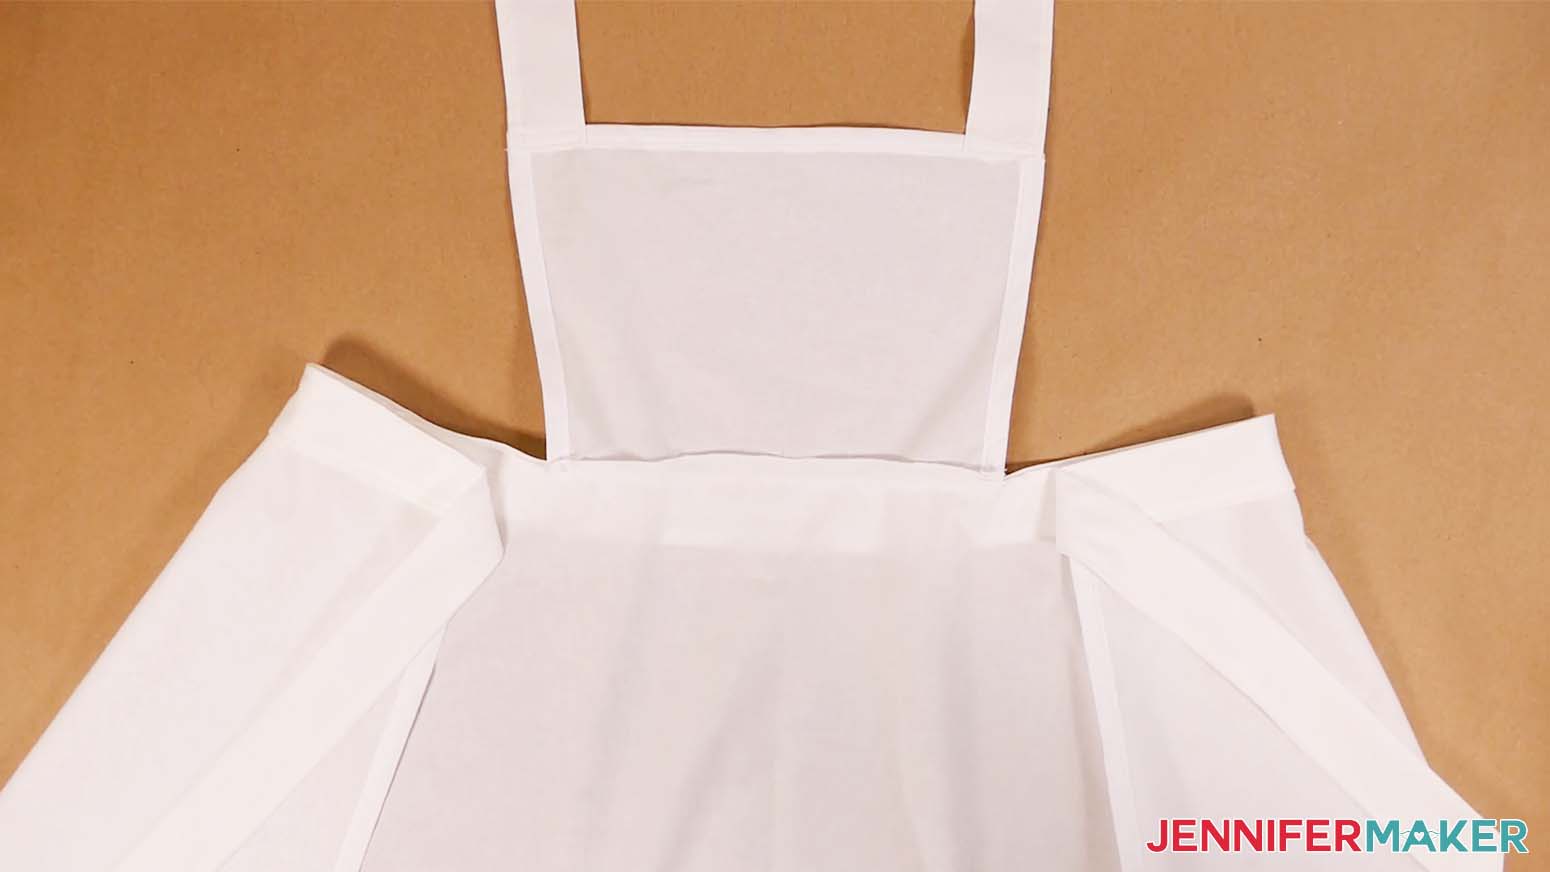
Next we will sew the bib to the skirt. To start, fold both pieces vertically in half to find the centers. Place a pin at the center in both pieces at the edges where they'll meet.
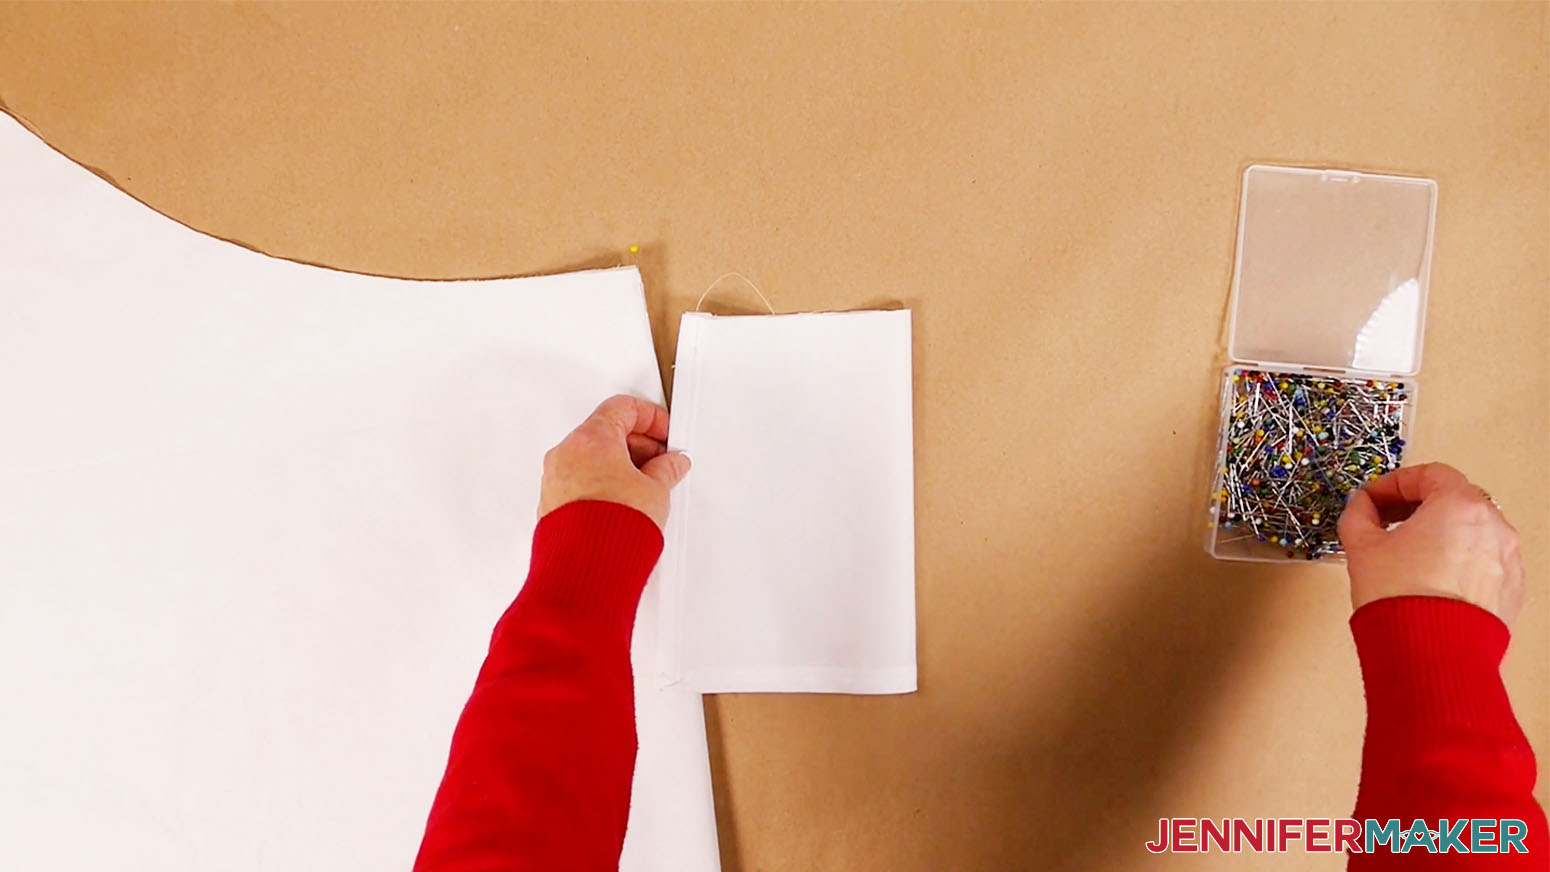
Unfold with right sides facing up, match the pins to each other.
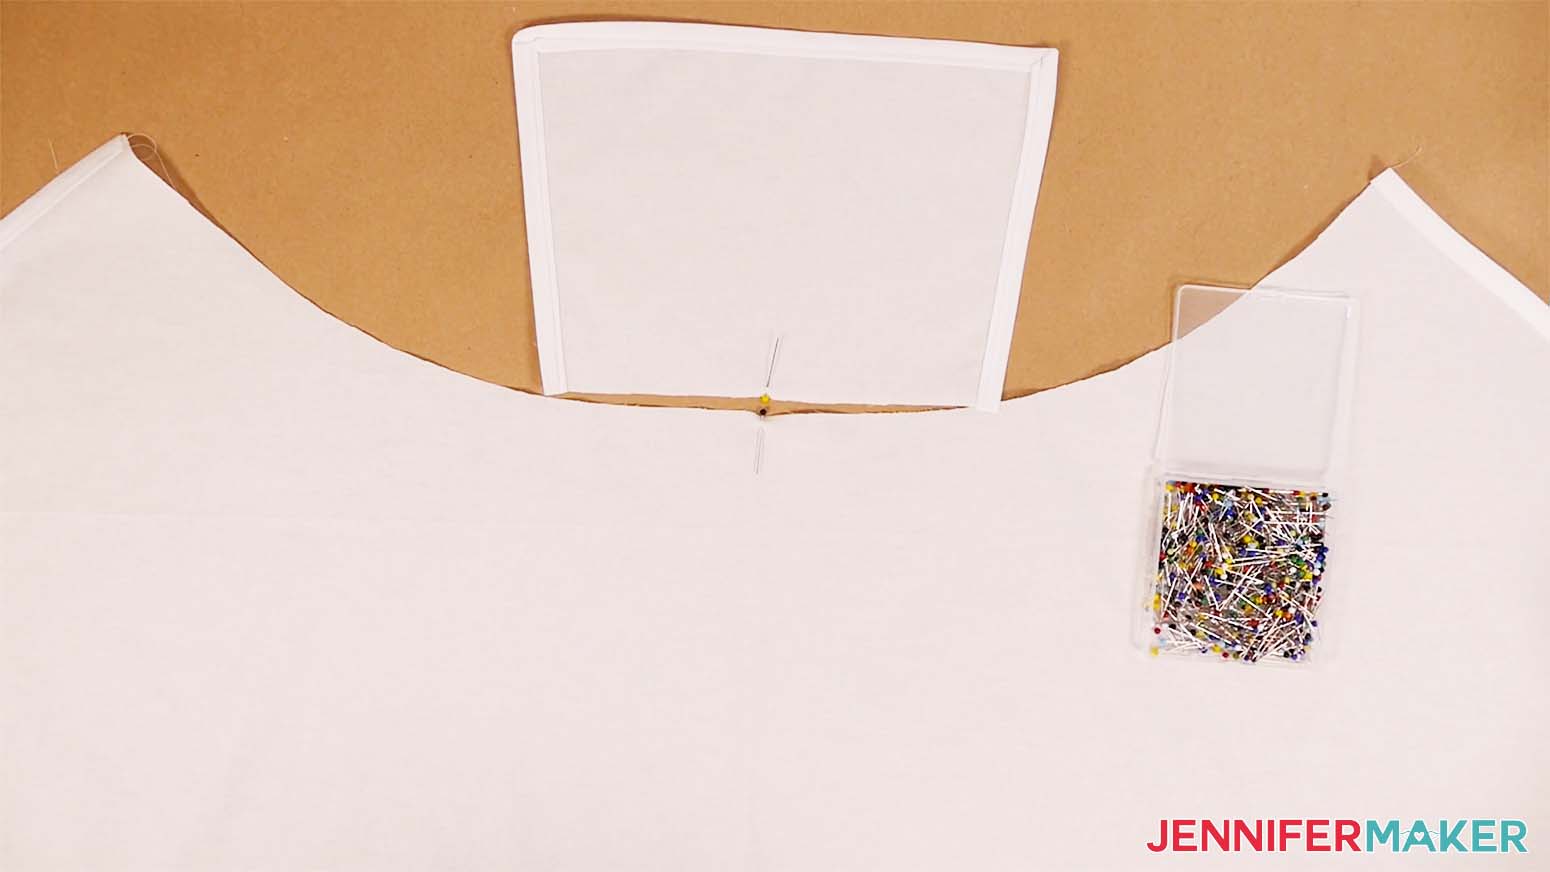
Grab the top of the bib and fold it over on top of the skirt so that the raw fabric edges are lined up and the center pins match. The right sides of both the bib and skirt should match. Pin or clip the edges together.
Sew along the edge with a 3/8" seam allowance.
Unfold the pieces and place them face down on an ironing surface. Set your iron to "Cotton" and iron the seam down the center.
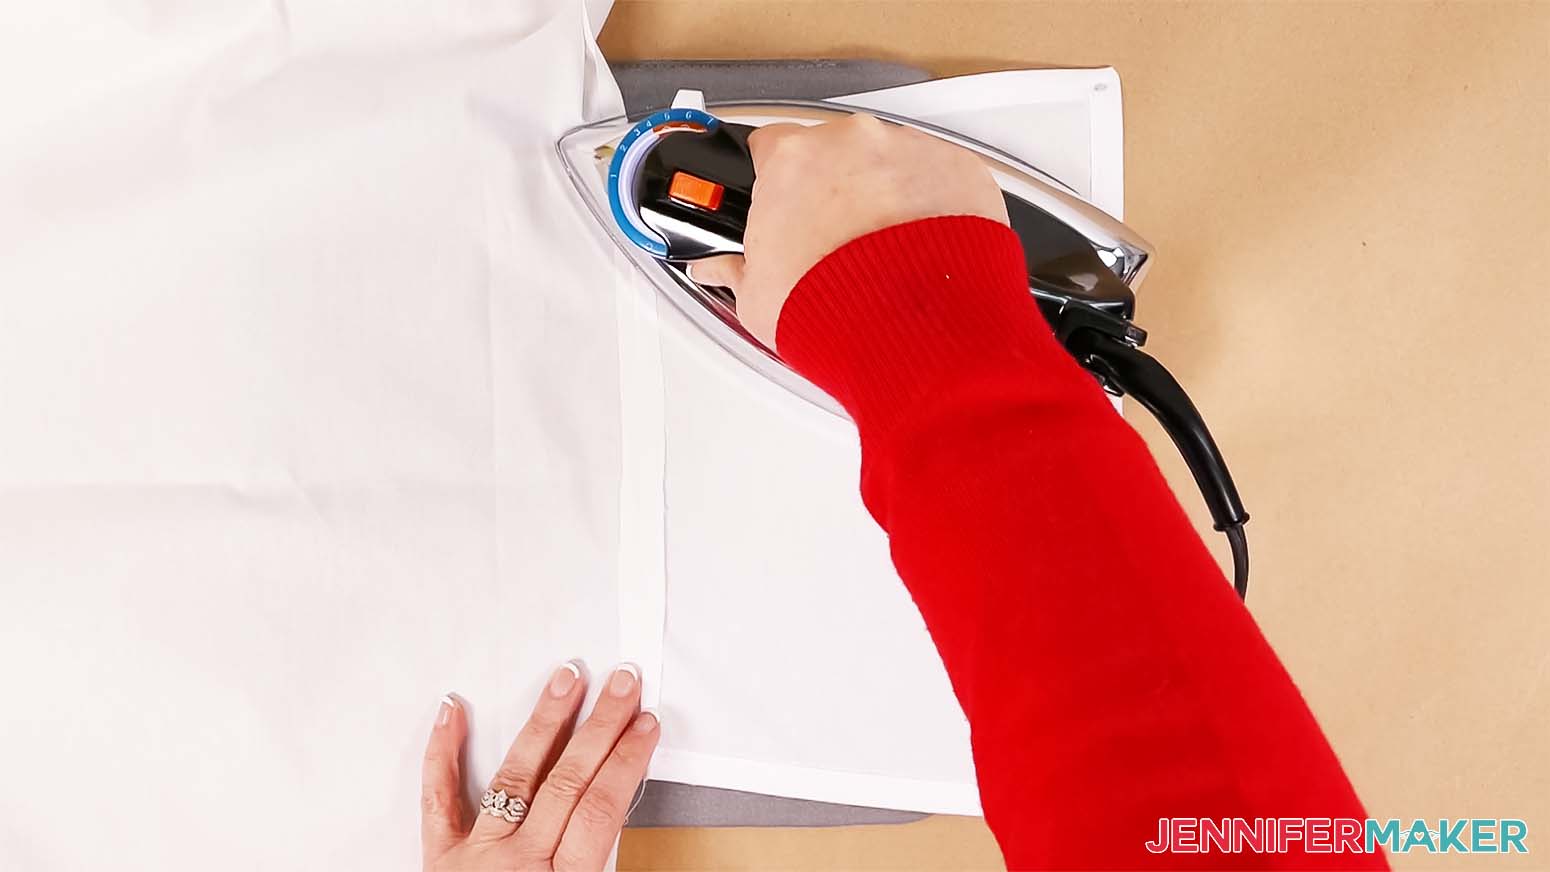
There will still be some raw edges at the skirt’s top since the bib is narrower. Fold each side down ¼” to touch the back of the skirt and press it firmly in place.
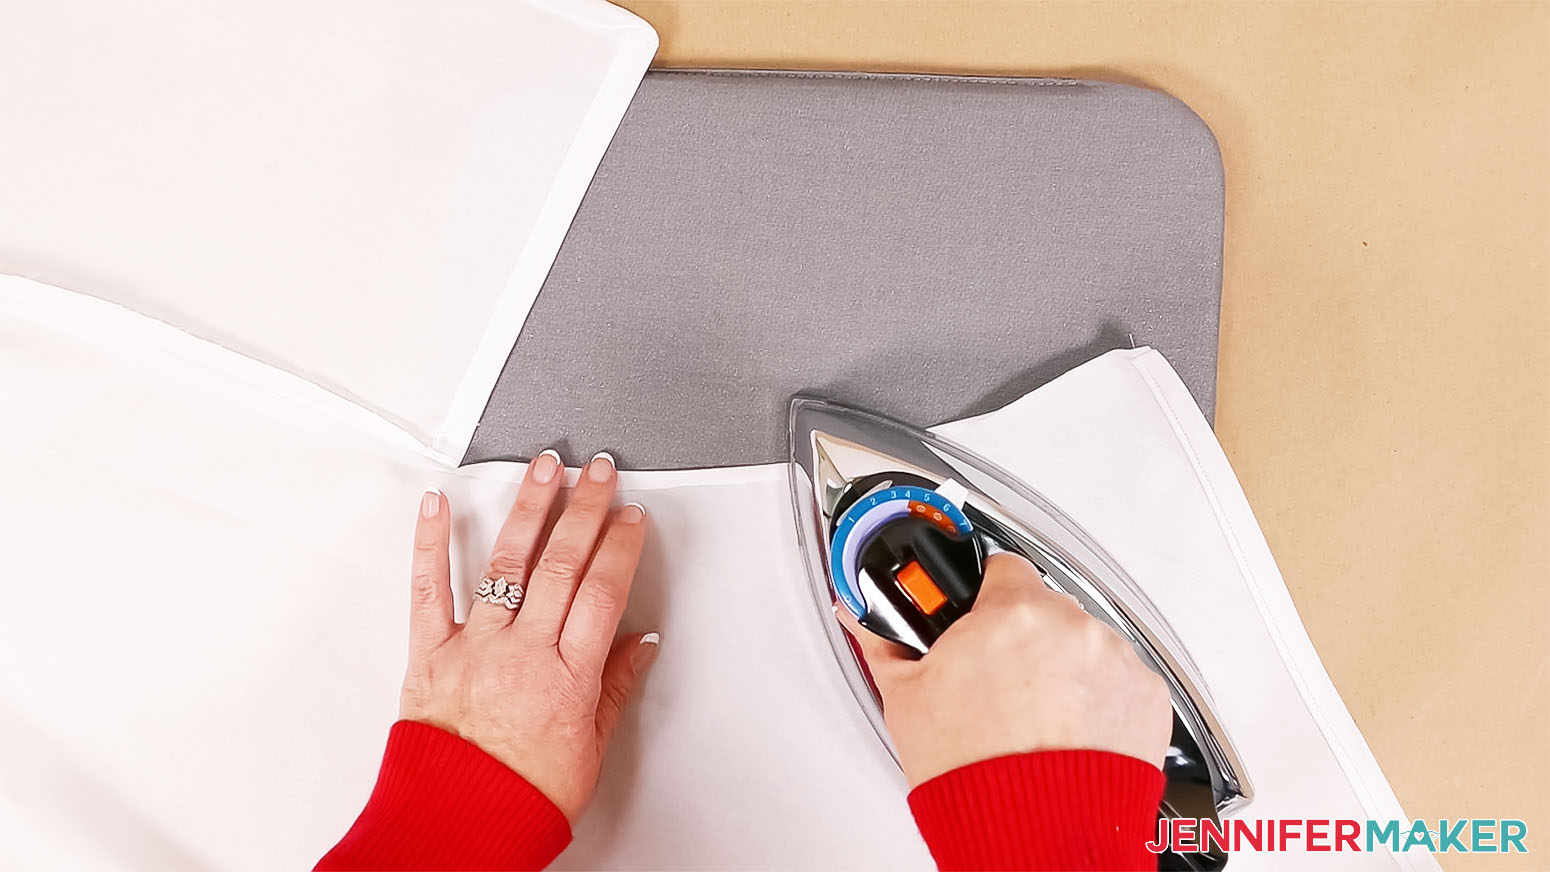
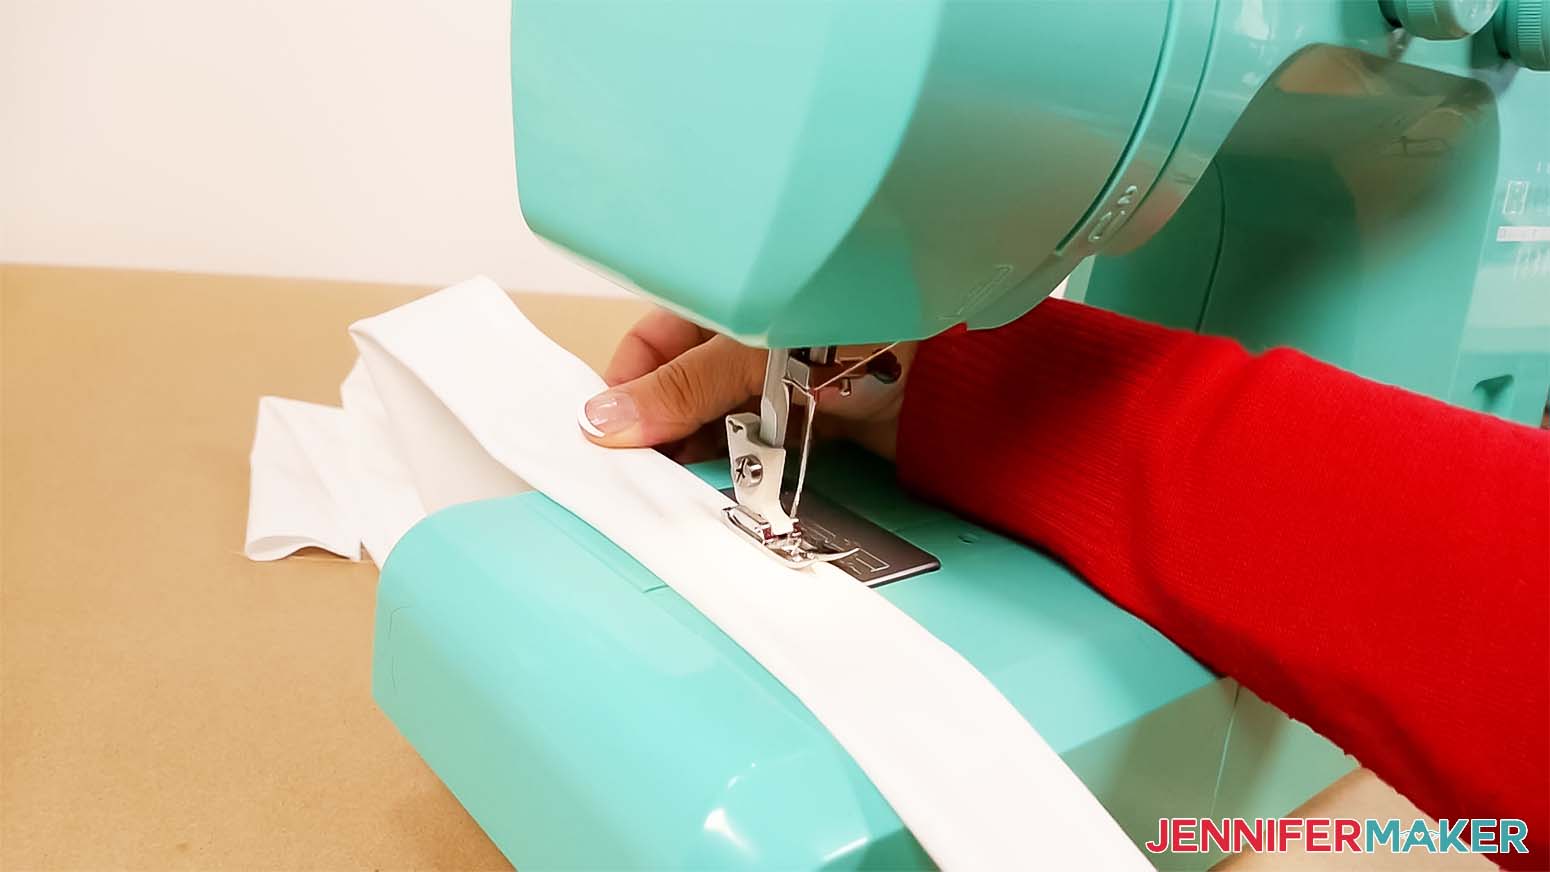
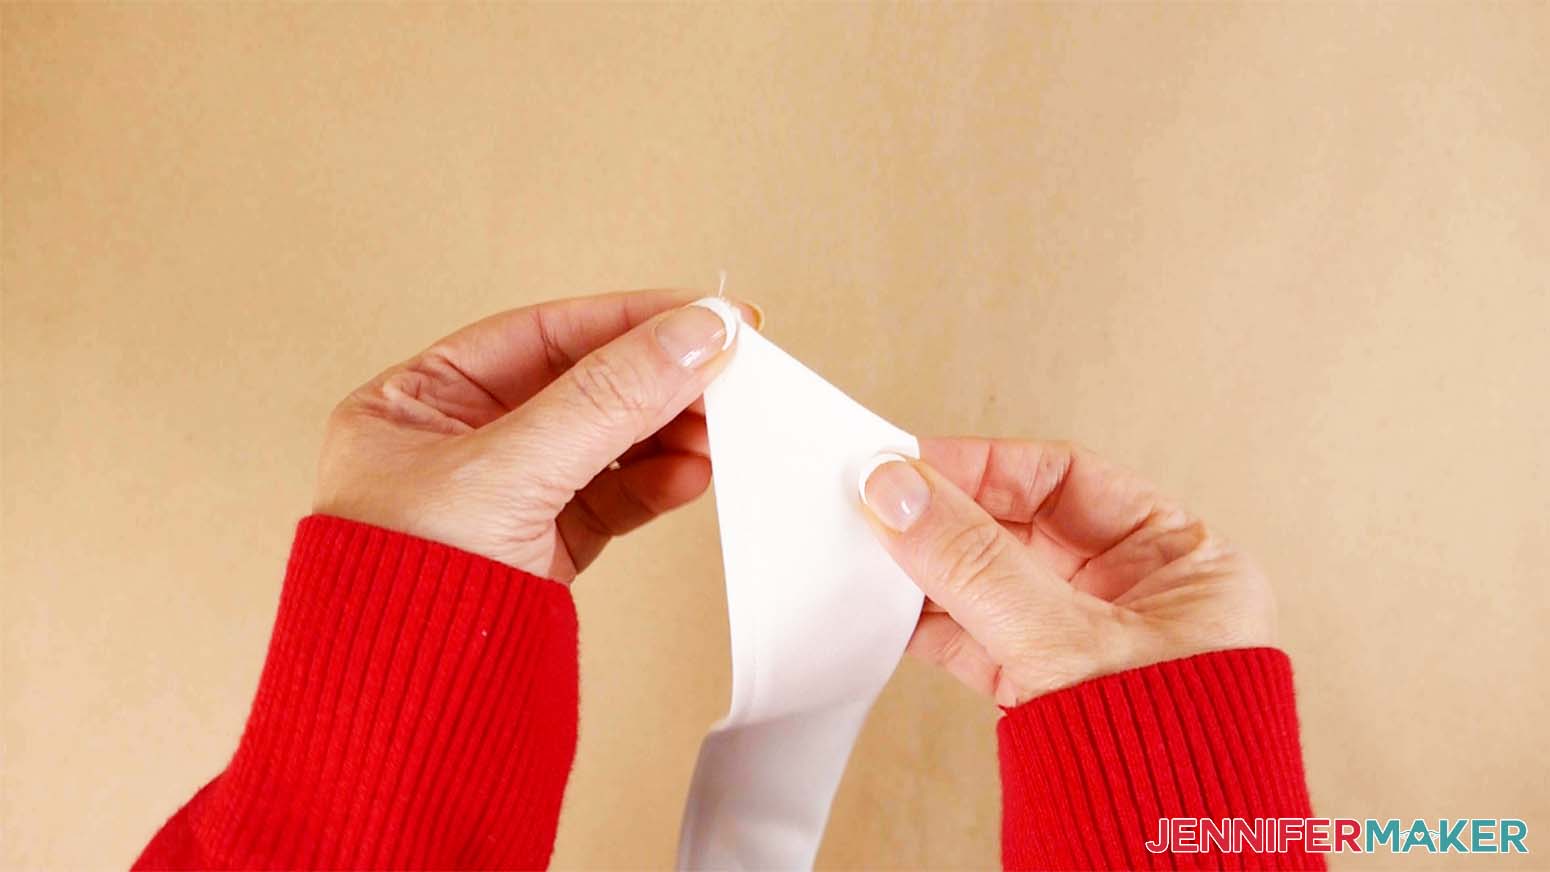
Take the belt piece and place it on your heat pad face down. Fold a long edge 1/4" and iron. You can do this in sections.
Iron the raw edge of the other long edge of the belt the same way.
Next, fold the belt in half lengthwise, matching the ironed edges. The right side should be facing outward. Pin the folded edges and sew close to the edge, about 1/8".
To finish the ends, tuck the smooth corner in and sew the angle toward the sewn corner, making sure to lock the stitches on both ends.
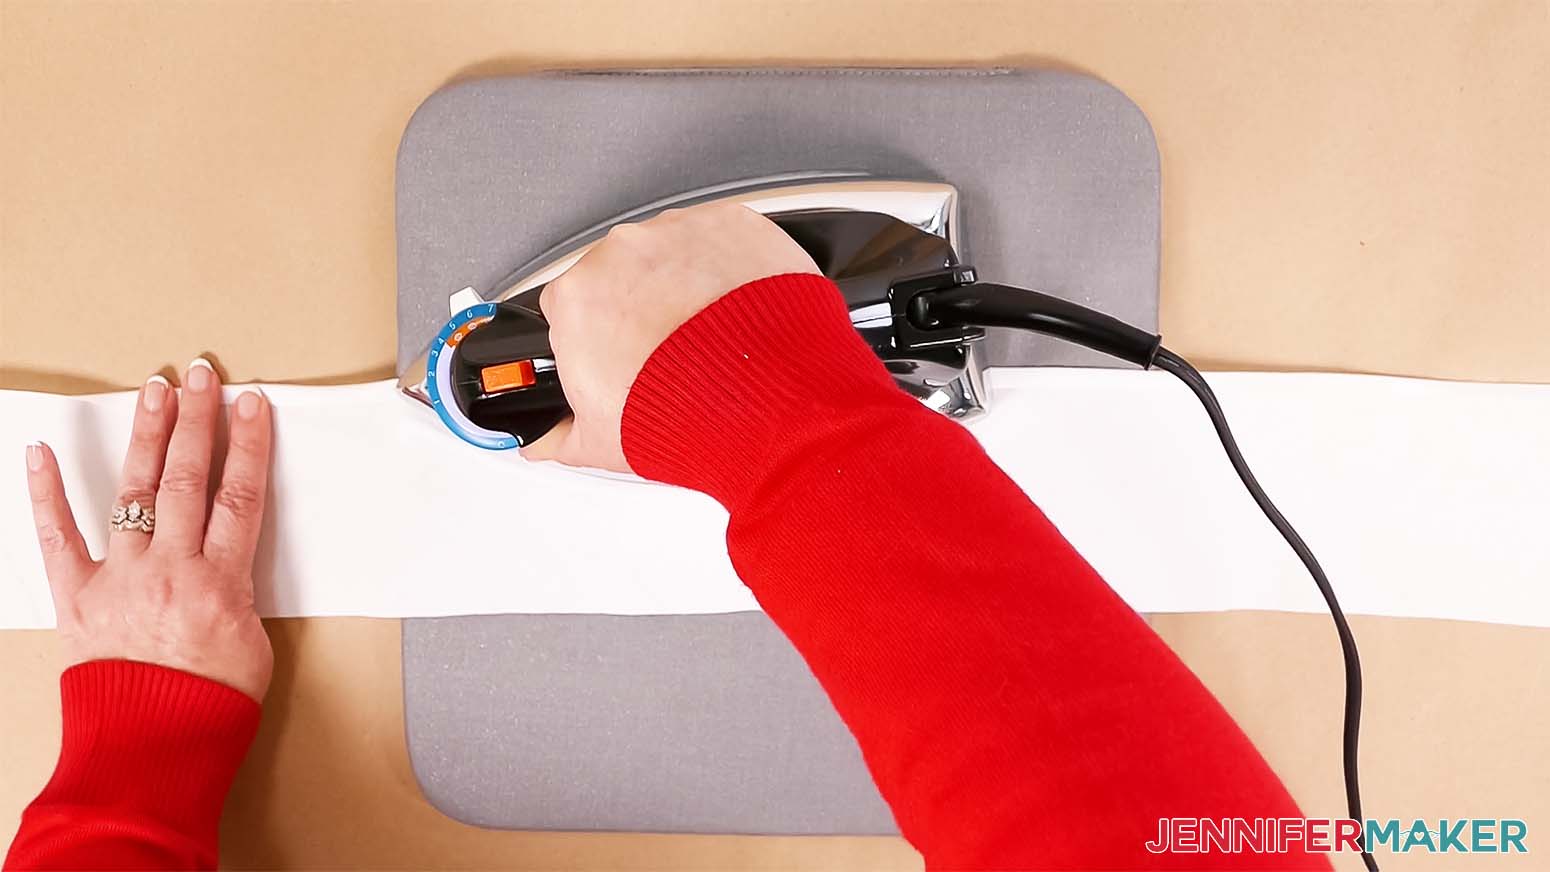
Iron the belt.
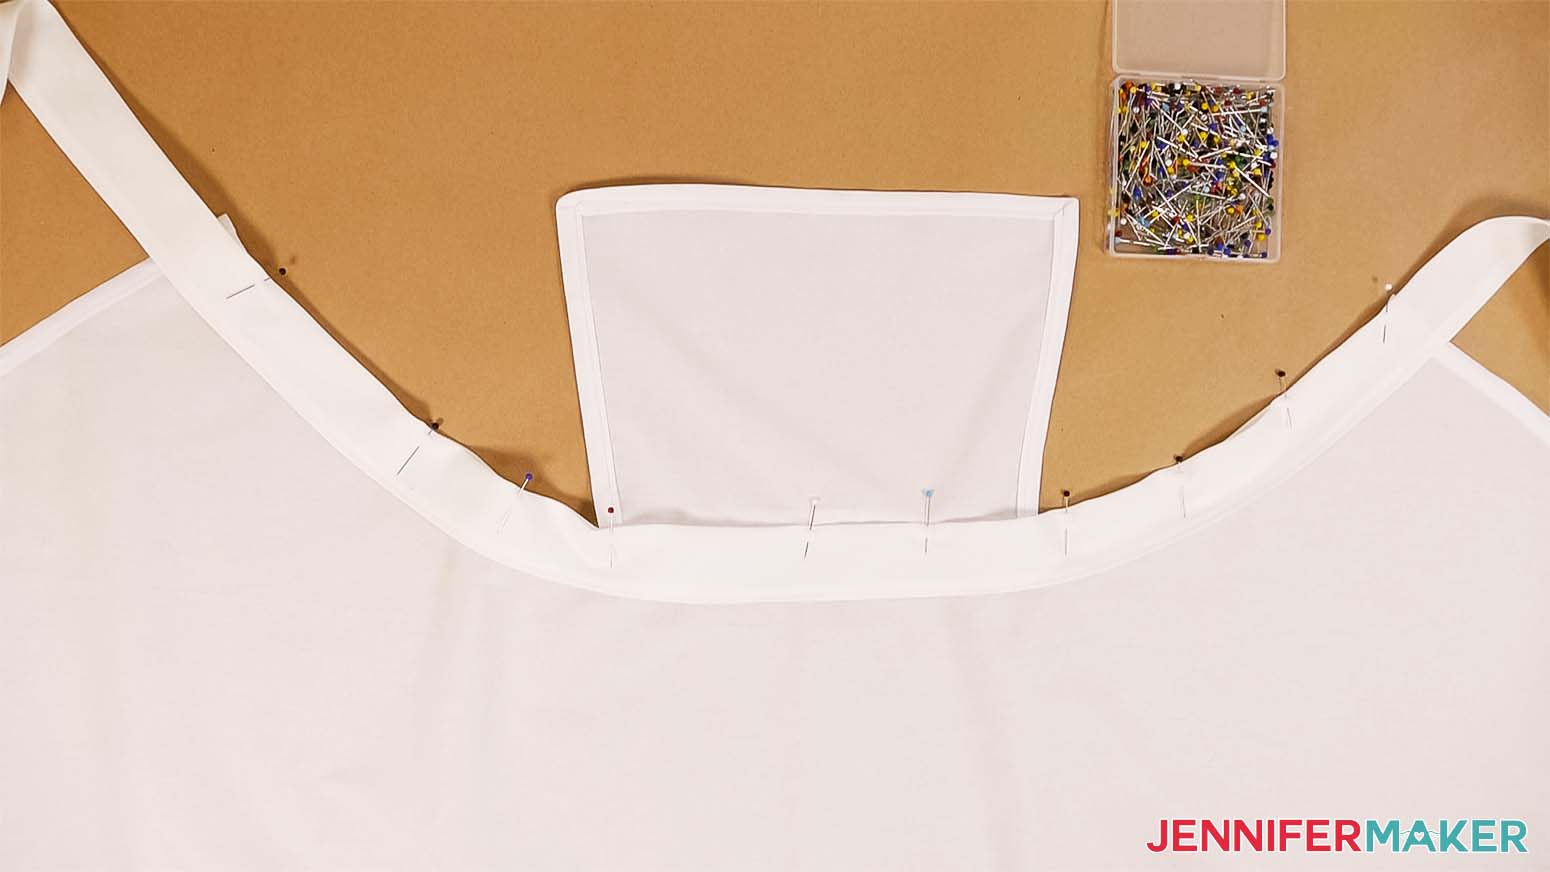
Find the center of the belt and pin it to the front center of the apron so the long seams match. Pin along the seam line under the bib. Then, match and pin the belt to the sewn top edge of the skirt until you reach the end. Sew along the top edge from one side of the skirt to the other using a ¼” seam allowance to secure the belt in place.
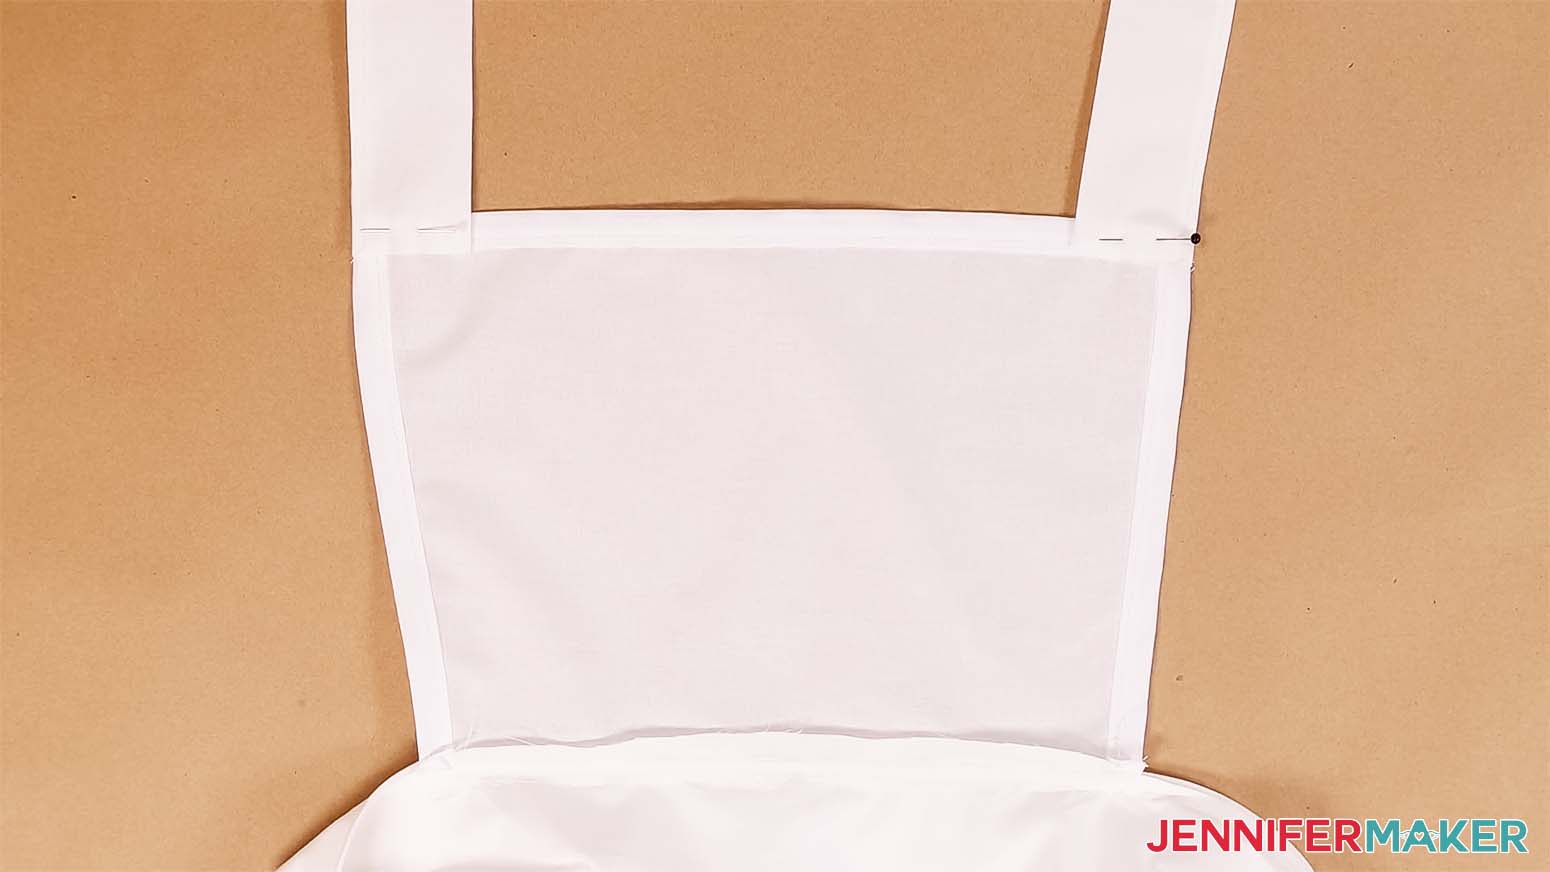
Prepare the straps the same way as the belt. You can leave the ends unfinished.
With the top of the bib face down on your work surface, place the edge of one strap so the sewn edge lines up with the bib’s outer edge and the raw short side is just below the bias tape. Pin them together.
Sew the strap to the bib, locking the stitches on both ends
Repeat for the other strap.
Lay the apron face down on the table and fold the skirt sides in a little.
We need to criss-cross the straps. Take one strap and fold it over to meet the opposite top side of the apron skirt. Do the same for the other strap. The straps should make a "X".
Pin the straps' ends to the inside of the apron skirt in the back. After it is pinned, you may want to try on the apron to see if the straps are positioned to your liking.
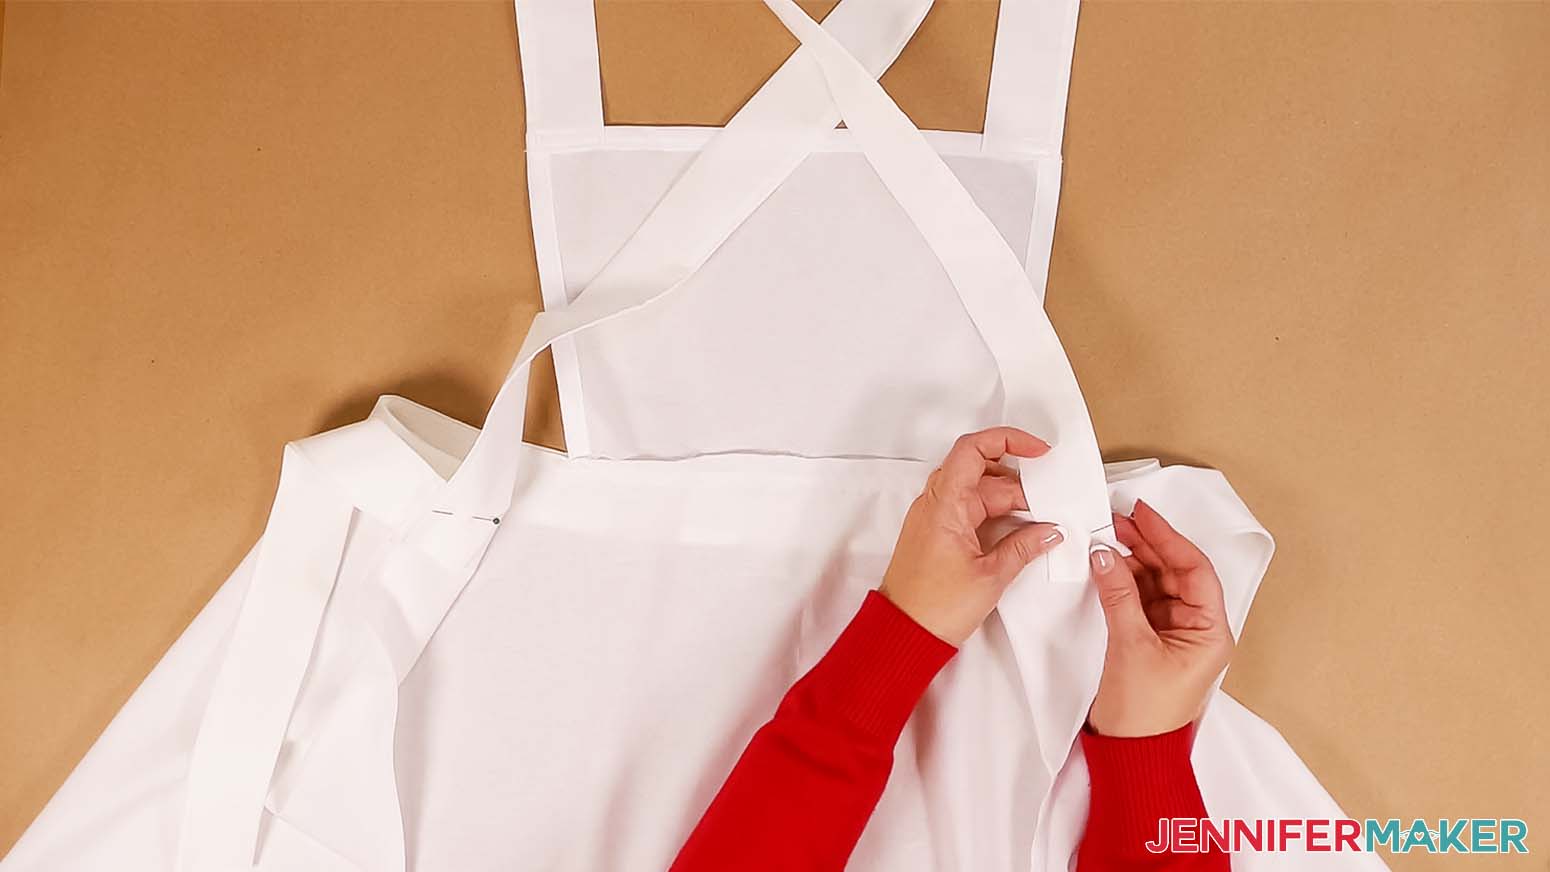
Sew the straps to back of the apron skirt locking the stitches on both ends.
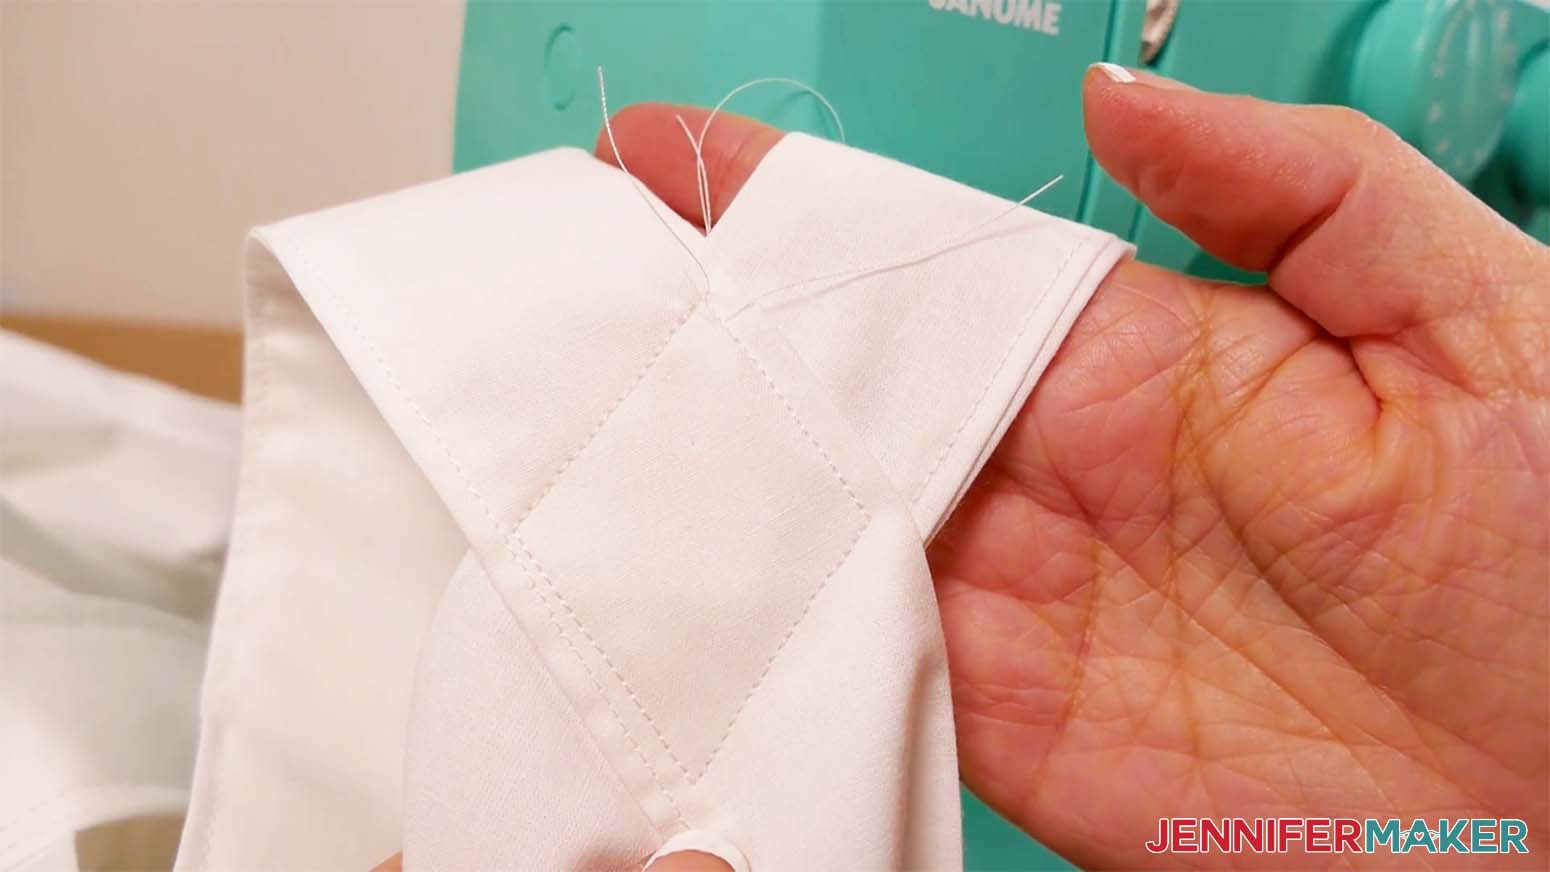
If you like, you can secure the straps in the back so they don't get tangled. You may want someone help you with this. Try on the apron and have someone pin the straps where they naturally fall and cross. Remove the apron and sew a diamond shape to secure the straps in the right position.
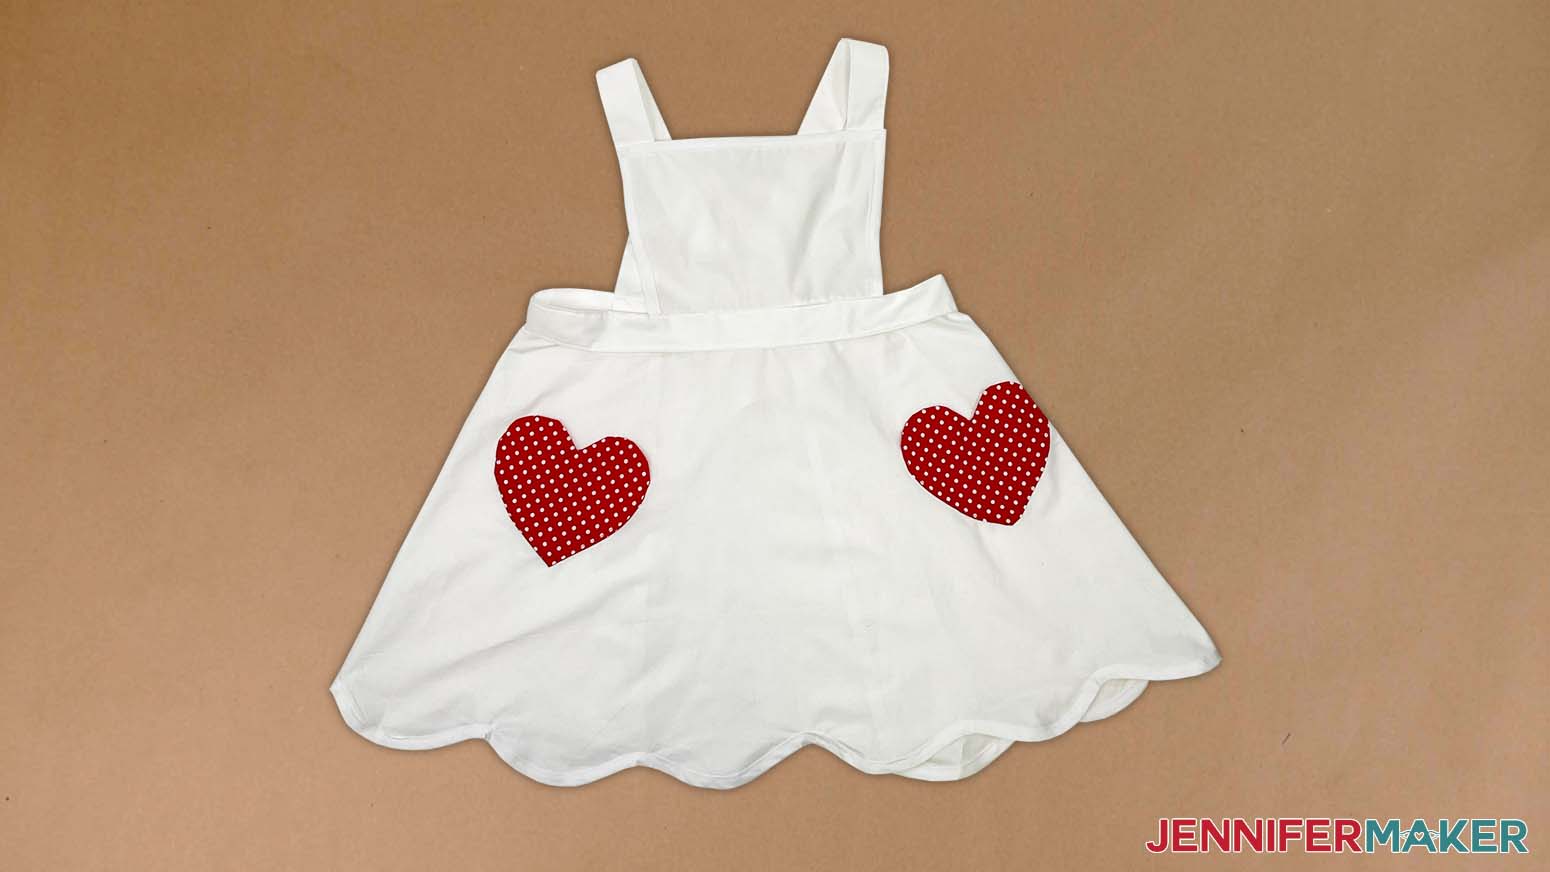
Your apron is complete!

ADD HEART POCKETS
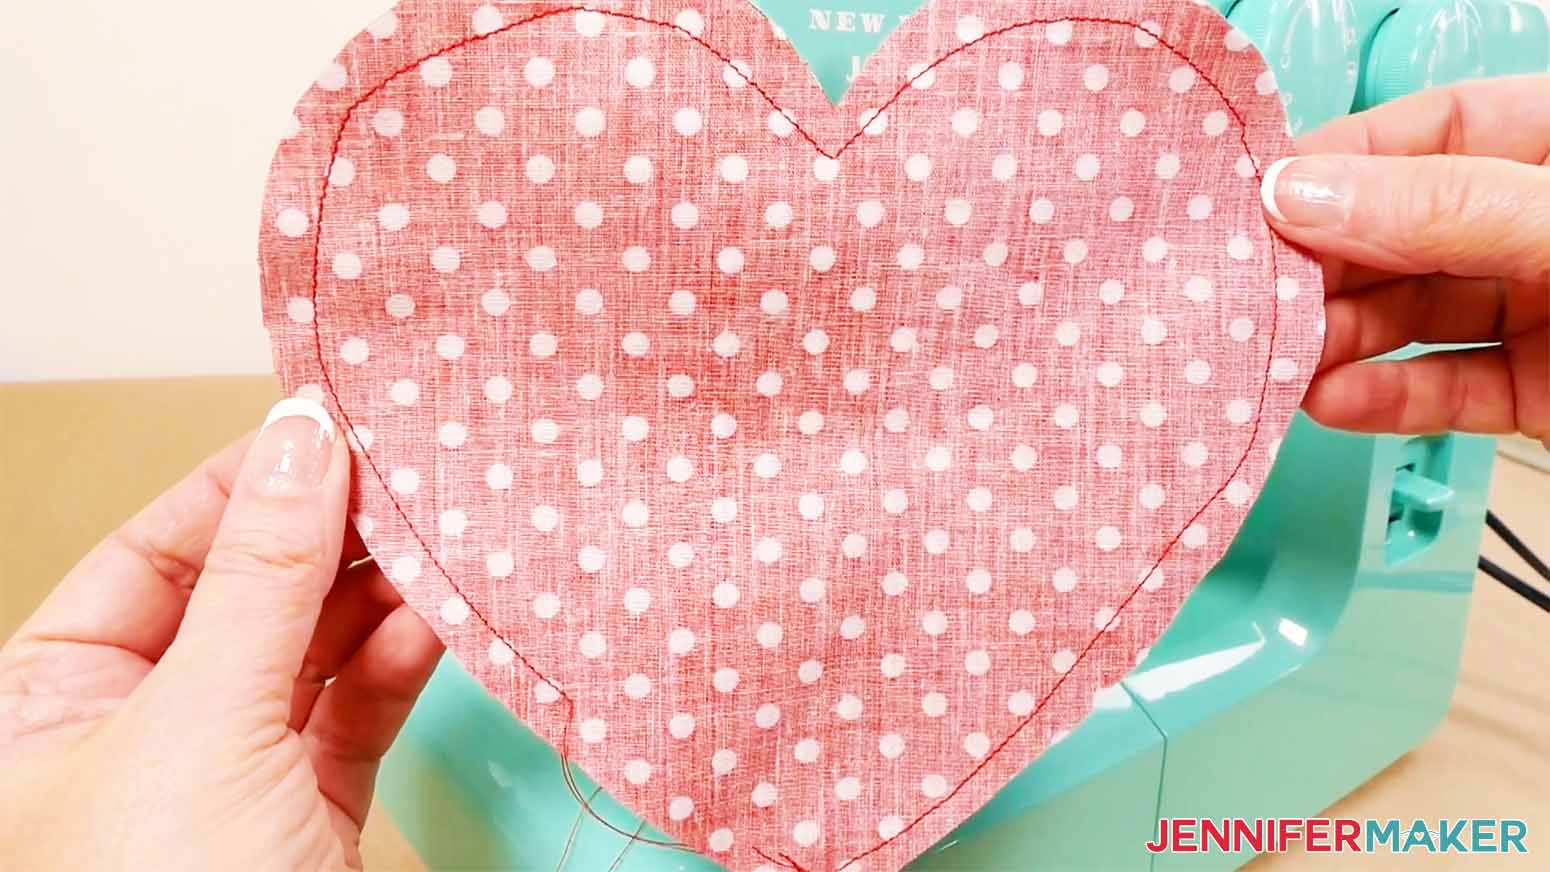
For each pocket, take two heart shapes and pin them together, right sides facing each other.
Sew around the outer edge with a 1/4" seam allowance, leaving about 2" unsewn along one side toward the point to pull the fabric through.
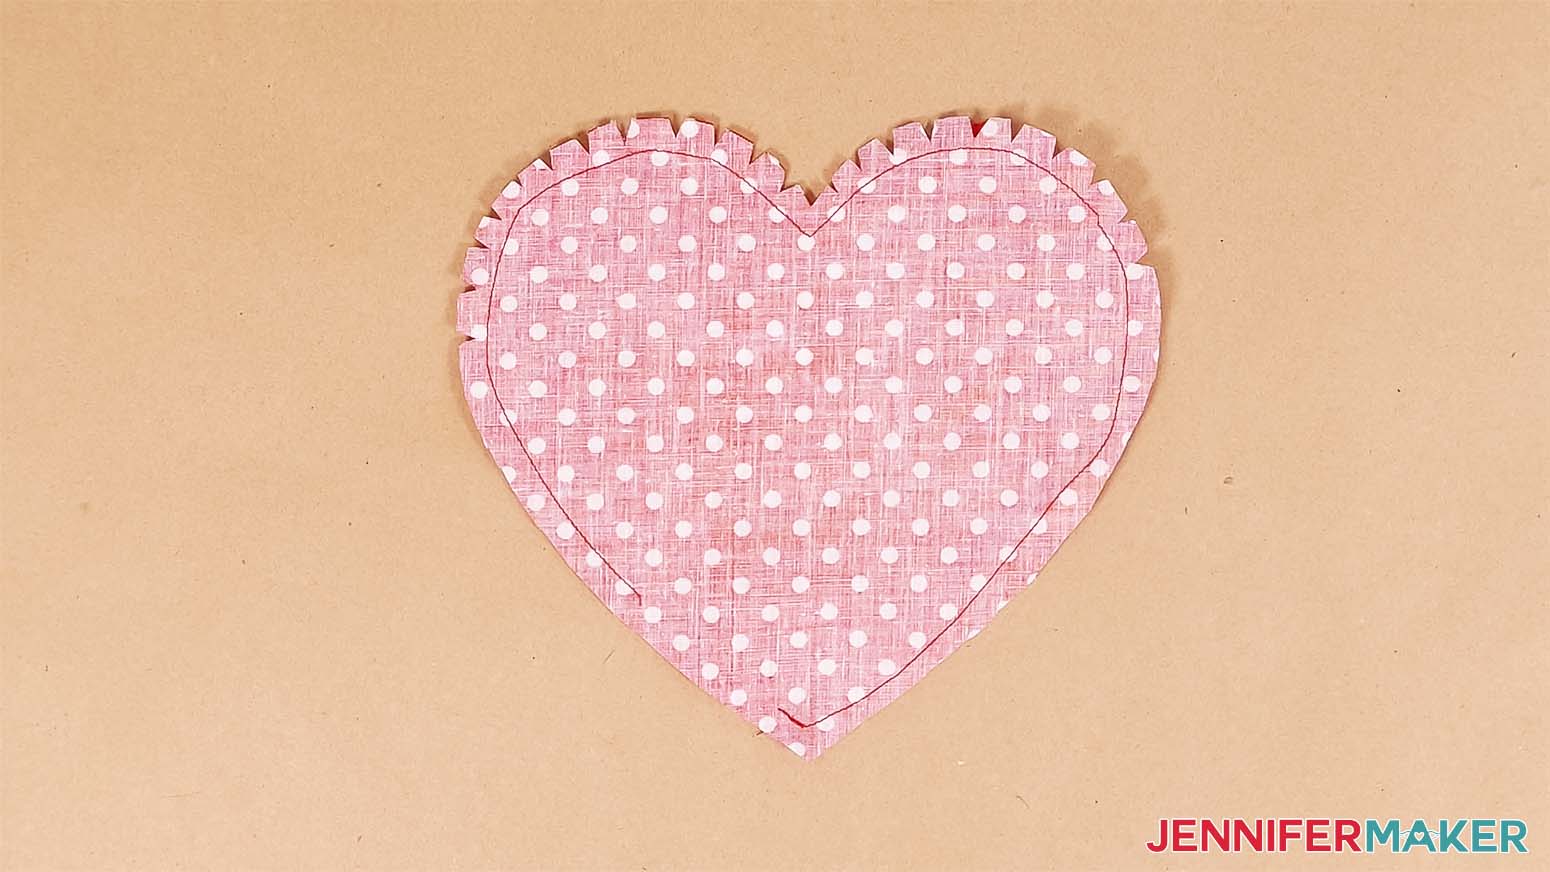
Cut notches along the curved edges to release the fabric's tension. Be careful not to cut through the seam.
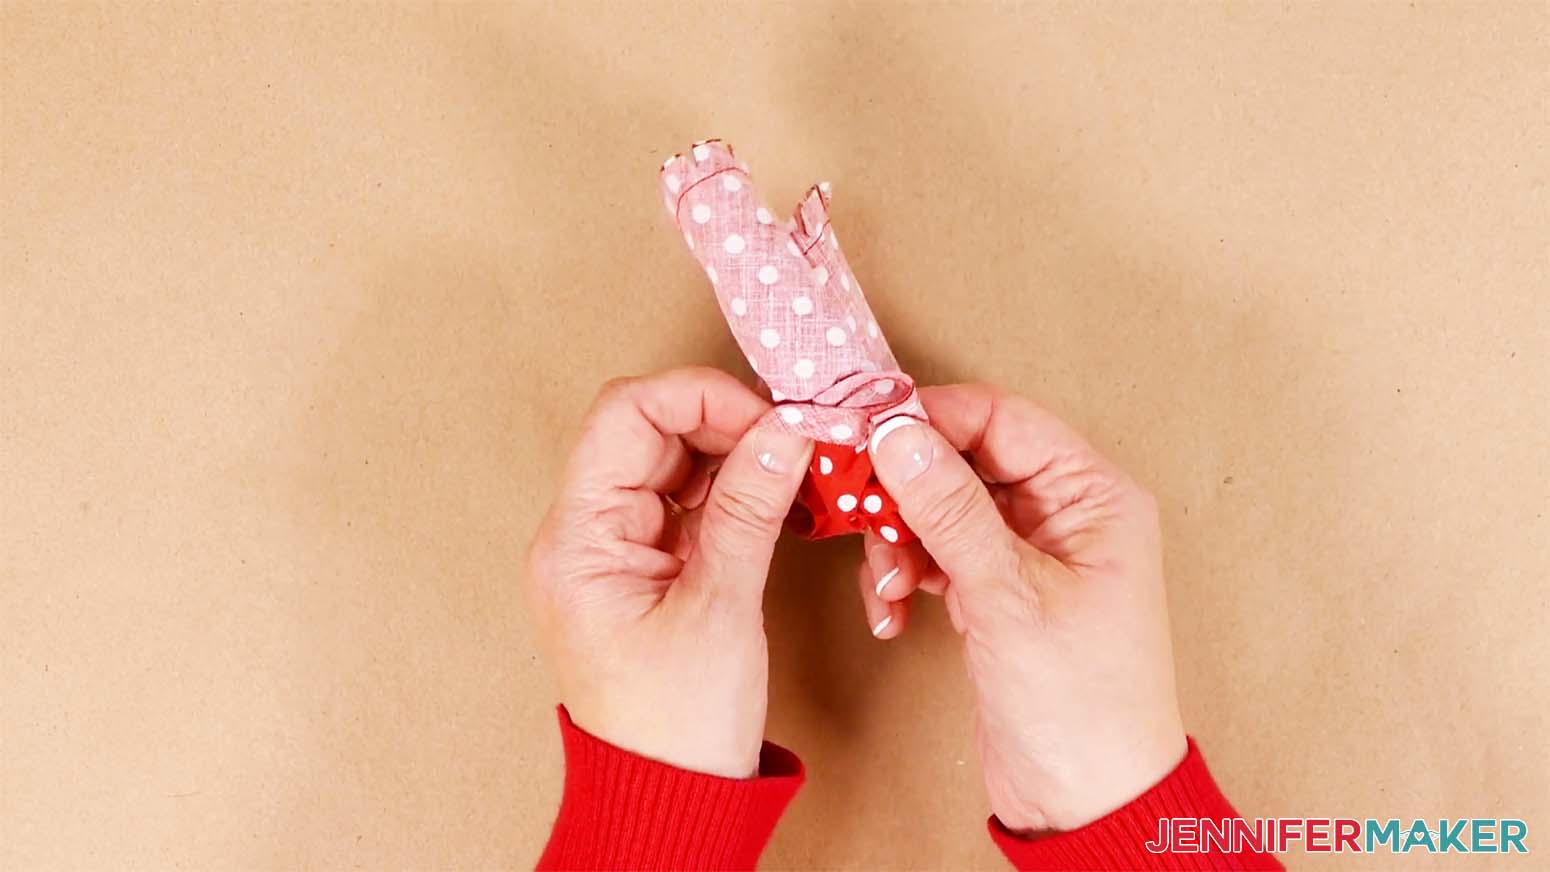
Pull the fabric through the hole. Using your fingers or a pencil with the eraser end, smooth the curved edges from the inside.
Make the other pocket.
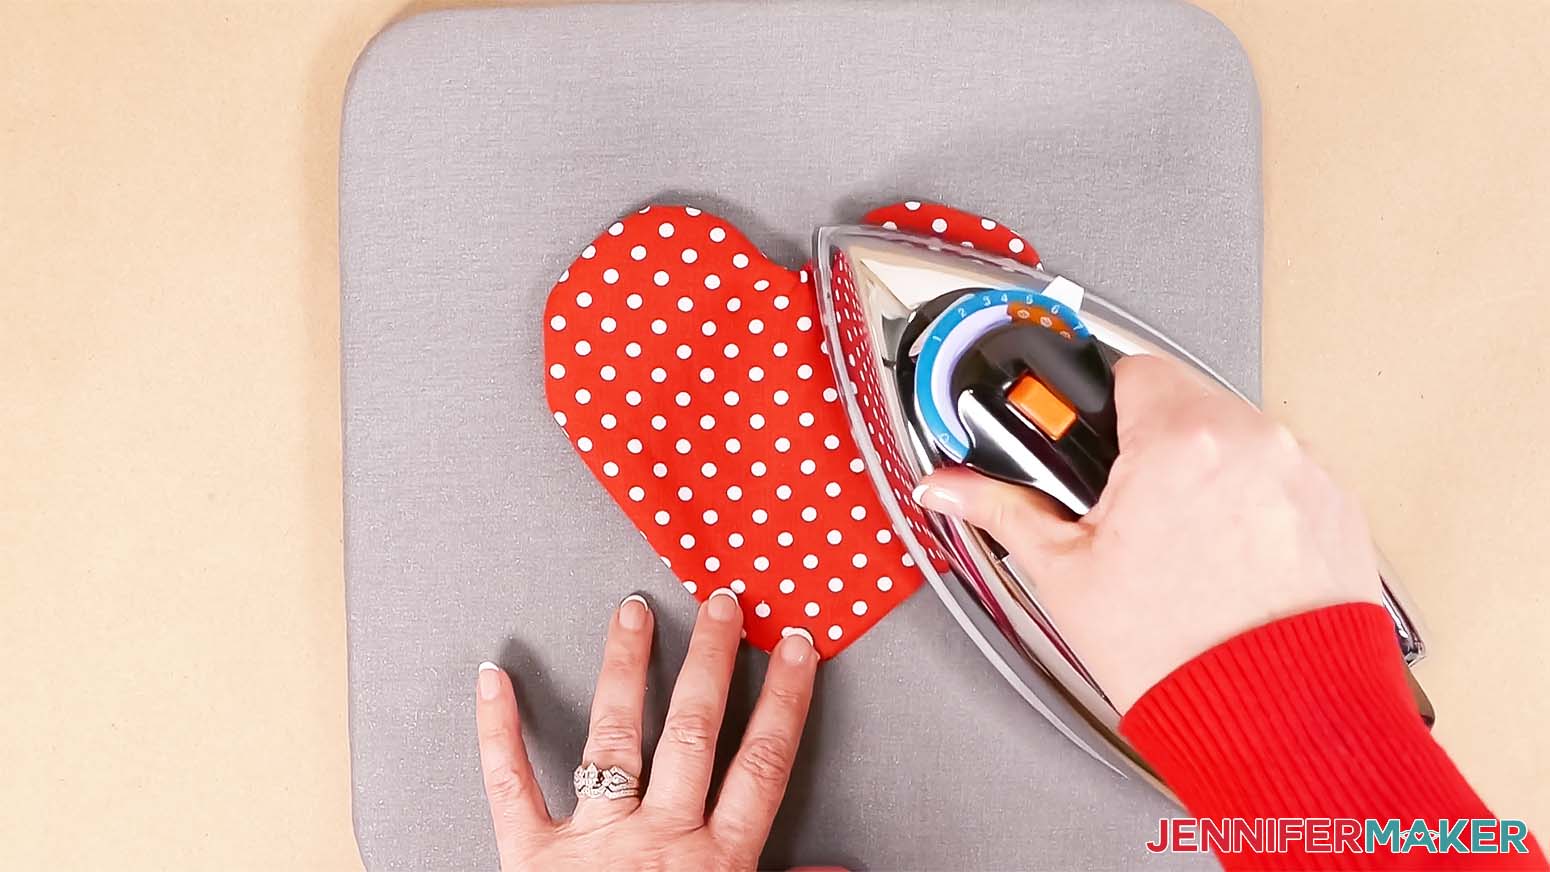
Iron the hearts flat, tucking in the raw edges.
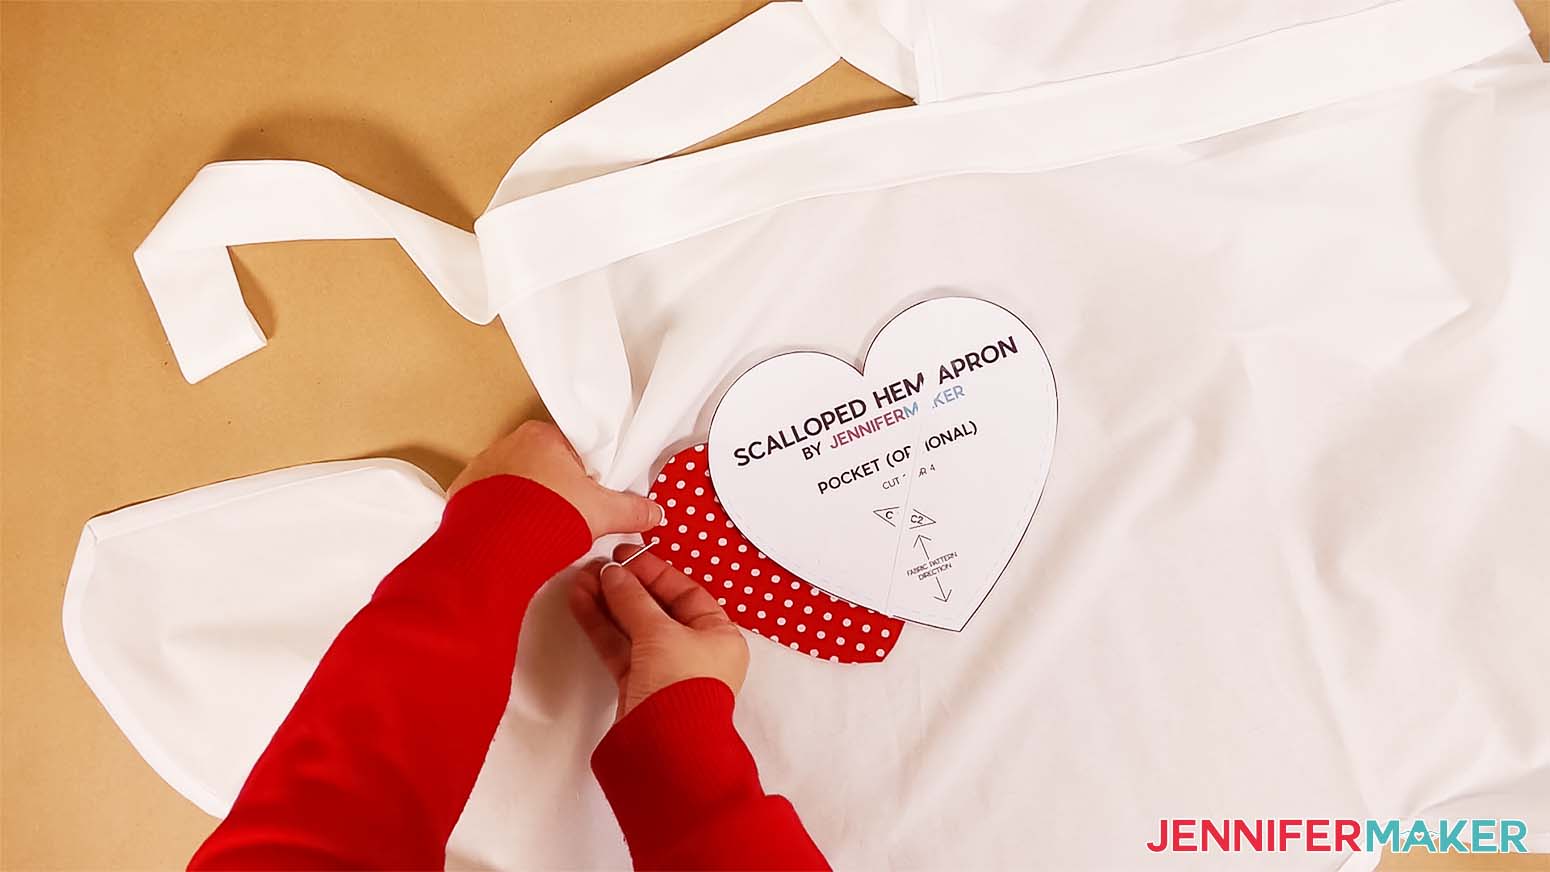
Place the pockets on the apron's front. You can put them where ever you'd like, I placed mine 5 1/2" down from the top of the skirt. Pin in place so the rounded tops will be the openings.
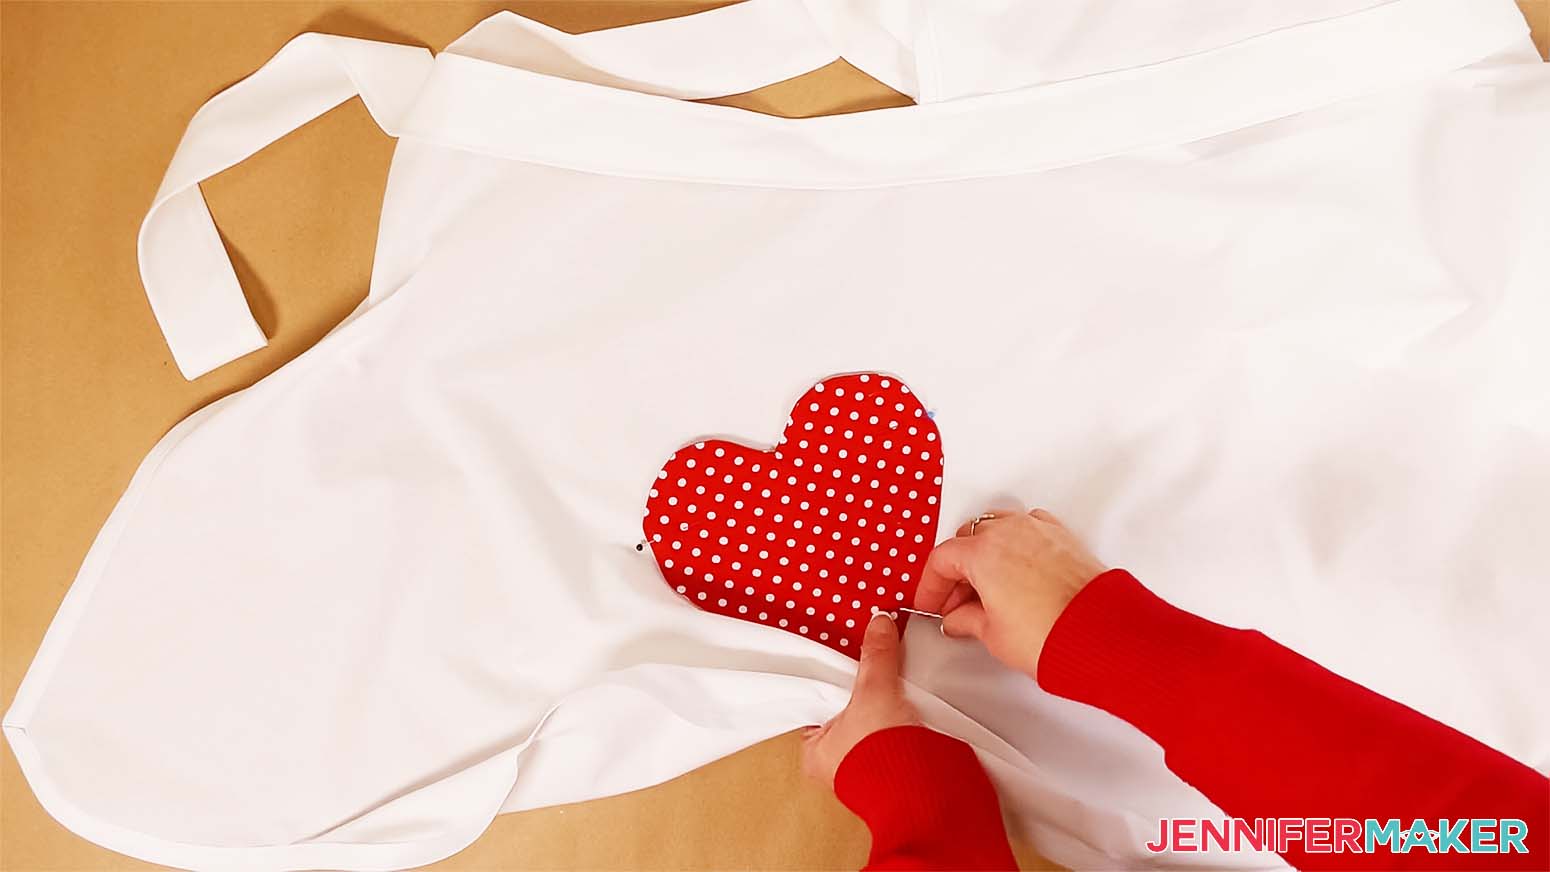
Using the paper pattern as your guide, place pins where the blue dotted line begins and stops.
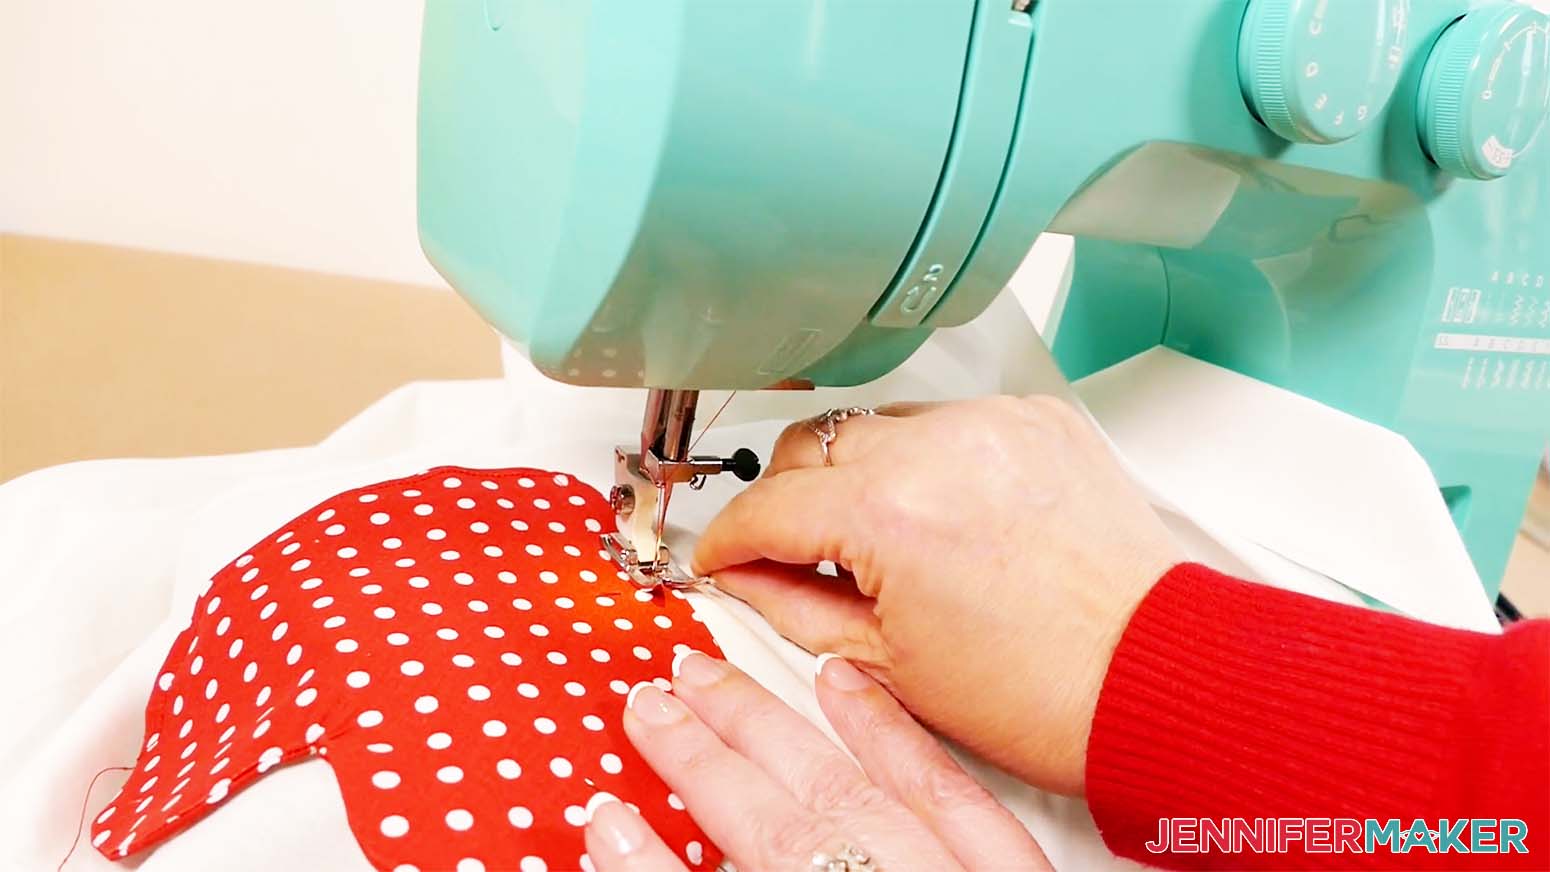
Sew along the edge of the heart between the pins using a 1/8" seam allowance, making sure you close the turning hole at the same time. Lock your stitches on both ends.
Attach your other pocket and now you’re ready to go!
STEP 5: SHOW IT OFF!
Notes
Care Instructions: Machine wash cold, delicate cycle. Dry with low heat.
Answers to Your Questions About How to Make an Apron
Q: How much fabric do I need to sew an apron?
A: The material needed depends on your apron pattern selection. My pattern uses about 3 yards of the main fabric and a yard of fabric for the pockets. Free apron patterns will note the amount of fabric needed, so check the notes before you purchase materials. Mine is an adult pattern, but kids aprons take less!
Q: What fabric is best for aprons?
A: While I used 100% cotton, a cotton blend would also work to learn how to make an apron. If you’d like to add sublimation designs, polyester is also a great choice!
Q: What is the best knot for an apron?
A: You can use whichever knot you prefer, just make sure it’s secure enough to stay in place, but also easy to loosen when needed. A lovely feature of my free PDF pattern is that you can extend the tie to be however long you want it, allowing you to try different knots! Just cut the tie piece longer than the paper pattern. If you want to make it longer than your fabric allows, cut enough pieces to create the belt you want, then just sew their short edges together (right sides together so the seam is on the inside!) to create one piece. Since we attach the belt starting from the middle, you can make it any length you want!
Get my free sewing pattern to make a Vintage Style Apron!
I’d love to see your apron and what you create while wearing it! Please share a photo in our Facebook group or tag me on social media with #jennifermaker.
Love,

Want to remember this? Save this tutorial on How to Make an Apron to your favorite Pinterest Board!