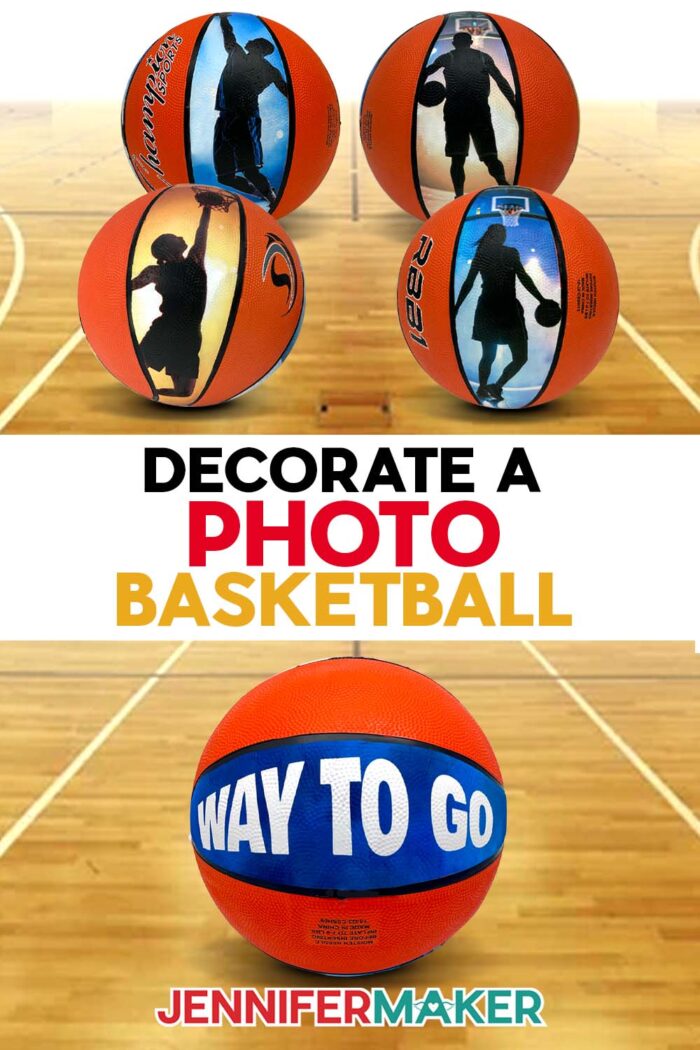
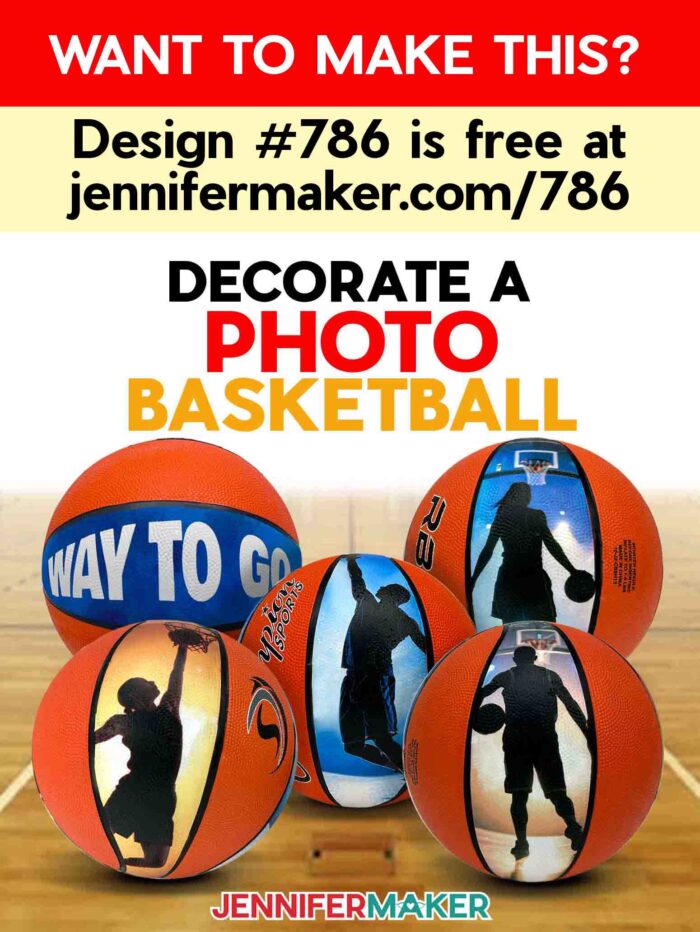
Learn how to decorate a custom photo basketball using printable heat transfer material!
Have you ever noticed how the simplest things can spark the most creative ideas? I was tidying up my craft room one afternoon when I spotted an old basketball Hunter and Chloe used to play with. As I looked at the different panels on its surface, I suddenly imagined it covered in photos, almost like a scrapbook you could hold in your hands. That’s when I realized a ball could be more than just equipment — it could become a DIY custom photo basketball decorated with memories worth displaying forever.
See the full step-by-step video tutorial on how to make a custom photo basketball:

We crafters know that anything can be transformed with a little creativity, and this project is proof. Taking a ball and turning it into a keepsake is not only fun, it’s surprisingly simple. All you need are your favorite digital photos, some printable iron-on sheets, your Cricut machine, and my free templates. With those tools and some high-quality materials, you’ll be able to decorate a basketball that is vibrant, durable, and truly one of a kind.

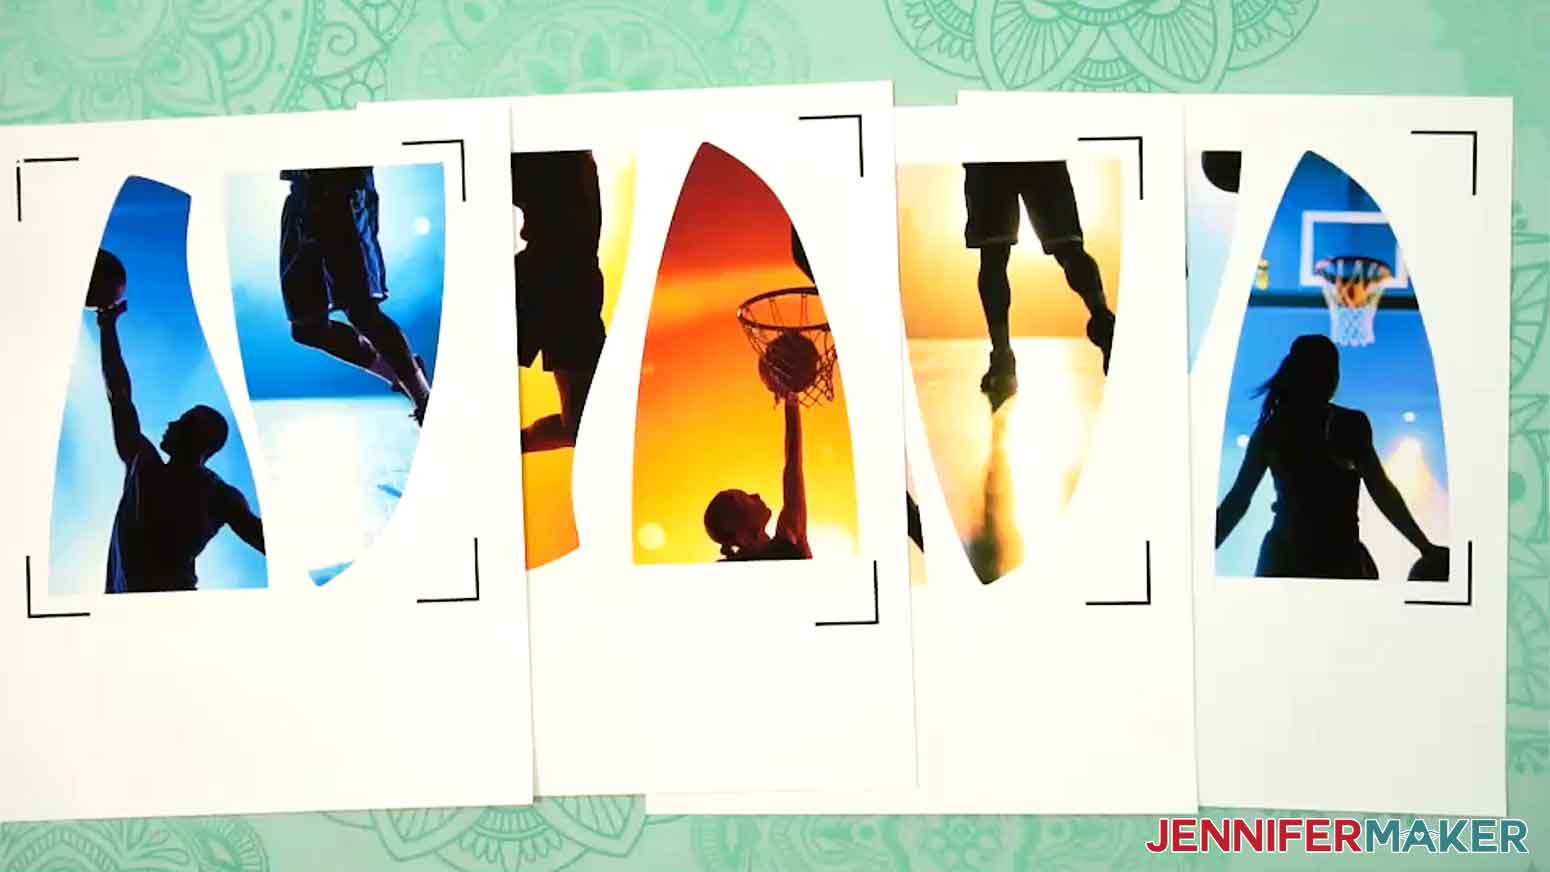
The secret is in the design files, which are carefully sized to match the panels on a full size basketball. Once uploaded into Cricut Design Space, they guide you through preparing your photos to fit each section perfectly. You can practice with my free downloads (made with the help of an AI generator and image editing software). Decorating the ball feels a little like piecing together a puzzle, but this time every piece is a memory. You’ll upload your photos, size them within the template, and slice them into just the right shapes. Watching your snapshots transform into ball-ready panels is an exciting part of the process.
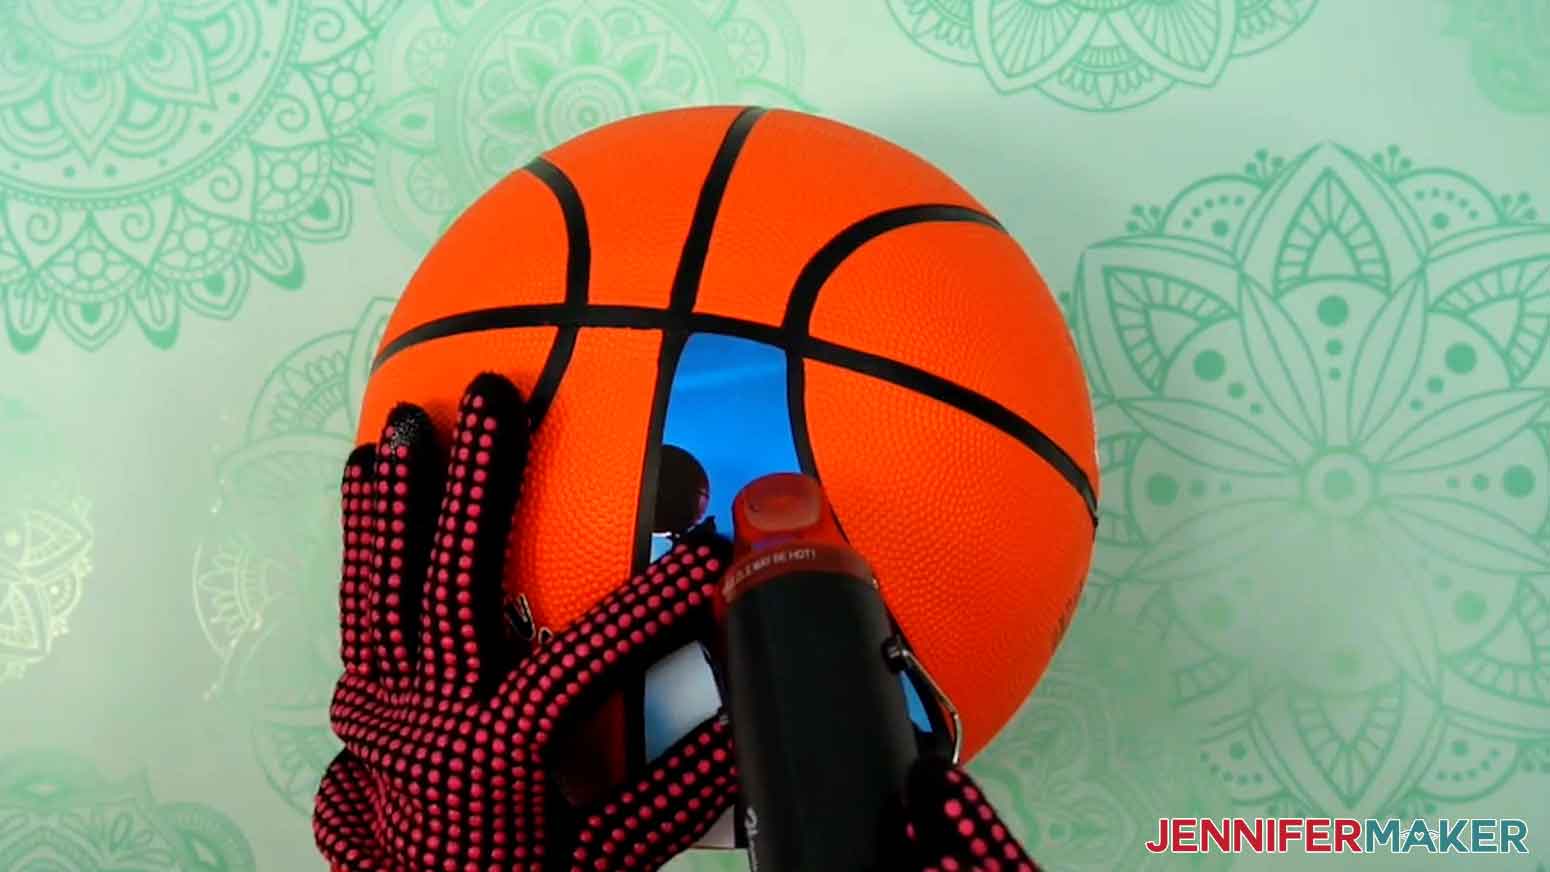
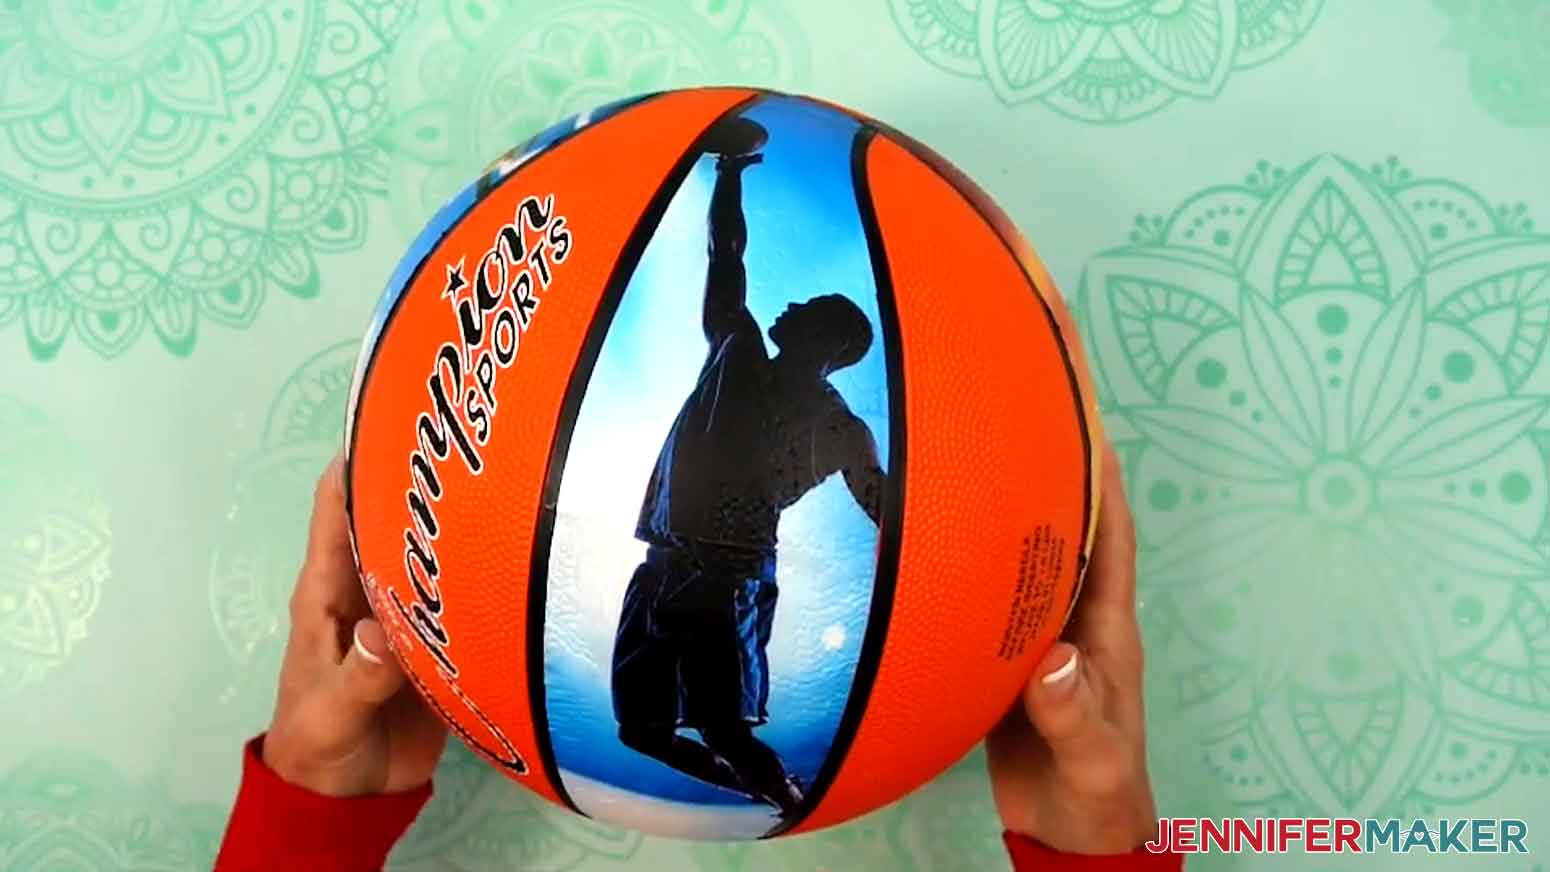
Once your panels are ready, the crafting really comes alive. Printing on full color, heat transfer sheets means every detail is sharp and vibrant. With a heat gun in hand, you’ll press each piece carefully into place, smoothing as you go. It’s amazing to see the photos soften with the heat, then cling to the surface of the ball. Working panel by panel, you’ll watch your project transform from something ordinary into a personalized basketball that’s bursting with character. To finish, a coat of Mod Podge gives everything a polished, professional look.
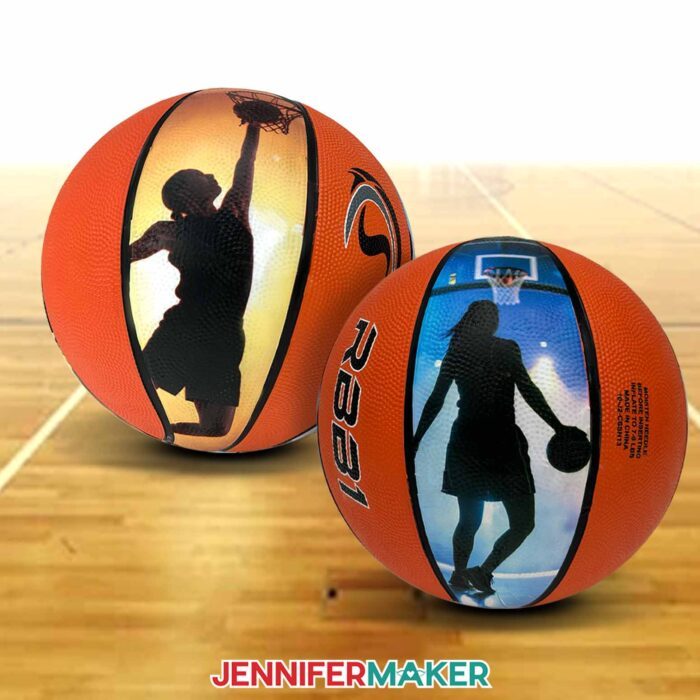
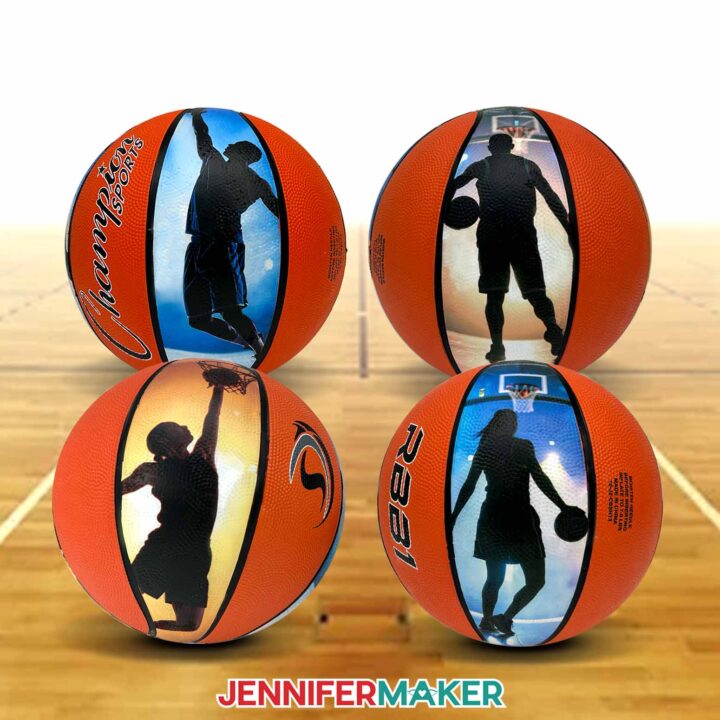
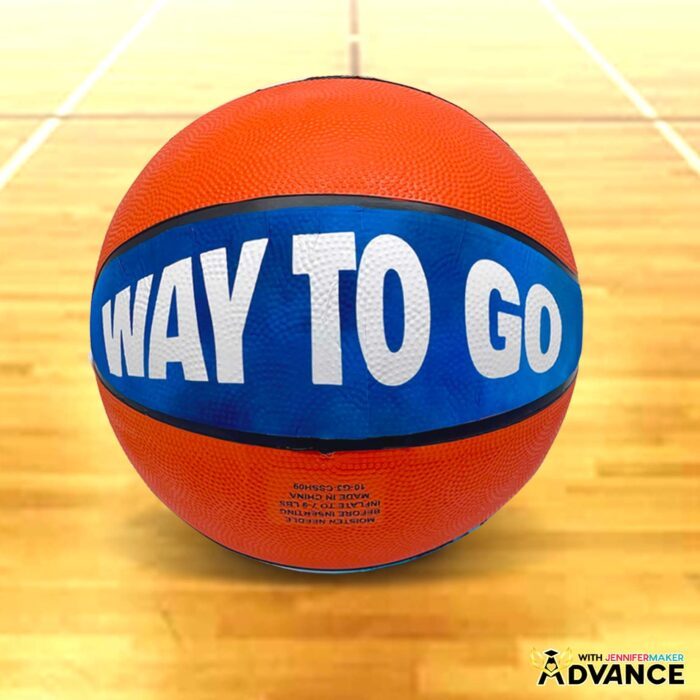
It’s amazing how different sizes and styles of photos can change the overall design. Some crafters love to use close-ups of individual players, while others prefer wide group shots. Adding a team name or season title across a few panels turns the project into something that looks like it belongs in a trophy case. With so many ways to customize, you’ll find that no two projects ever look alike. And the best part is knowing that your keepsake was made with care, not mass-produced.
The colors are what really bring the memories to life. Using high-quality materials ensures the photos stay bright and clear even after applying heat. Jerseys look crisp, faces glow, and every detail of the court shows up in full color. The panels are shaped to fit seamlessly, blending into the ball’s natural lines for a smooth, professional result. It’s a custom basketball that feels every bit as polished as something from a store, but with your personal touch shining through.
Since the templates are designed for standard balls, it’s important to use a regulation-size basketball like the one in the supplies list. That way, your photo panels line up with the ball’s existing seams and shapes for a clean, professional finish. Once you see the pieces come together, you’ll be amazed at how perfectly the photos fit and how polished the final project looks.
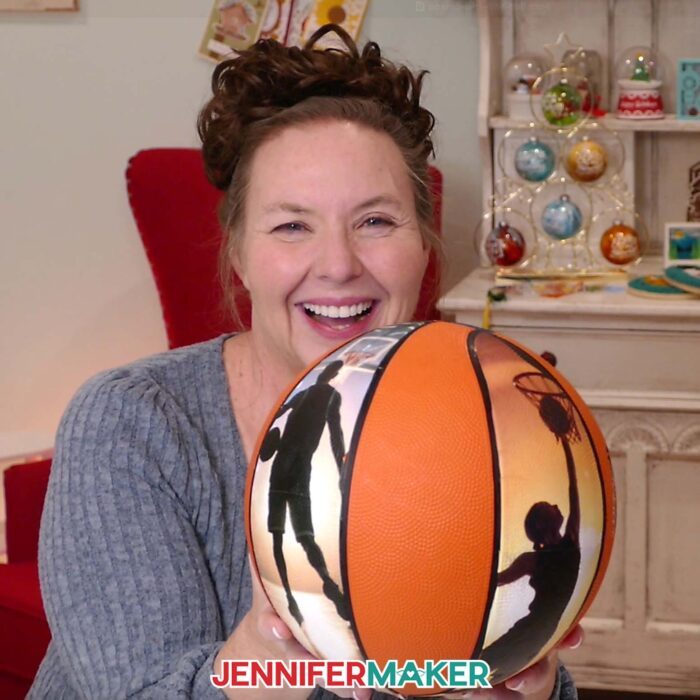
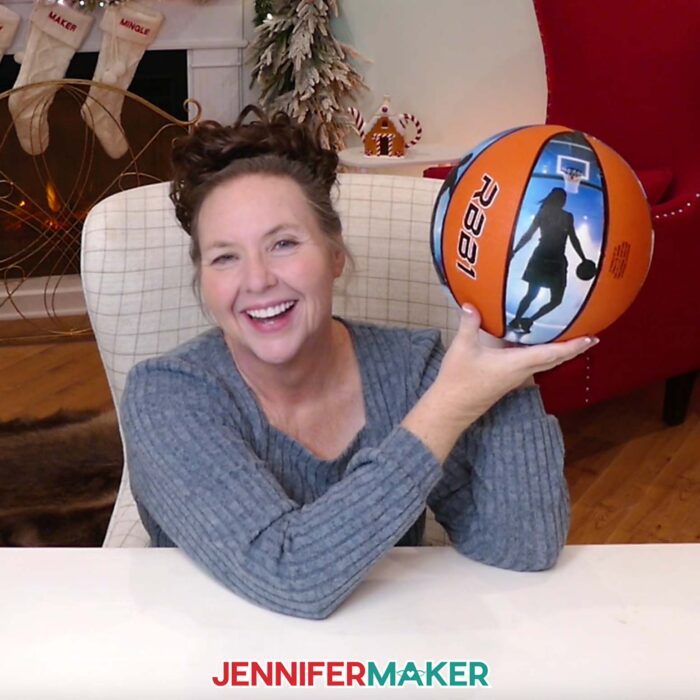
Seeing the finished project never gets old. The ordinary turns extraordinary as the ball becomes a three-dimensional scrapbook of your favorite moments. Each panel adds another story, and together they create something you’ll want to pick up, show off, and admire. It’s a wonderful way to capture memories from a special occasion, whether that’s a season finale, a tournament, or even just a collection of your favorite everyday snapshots.
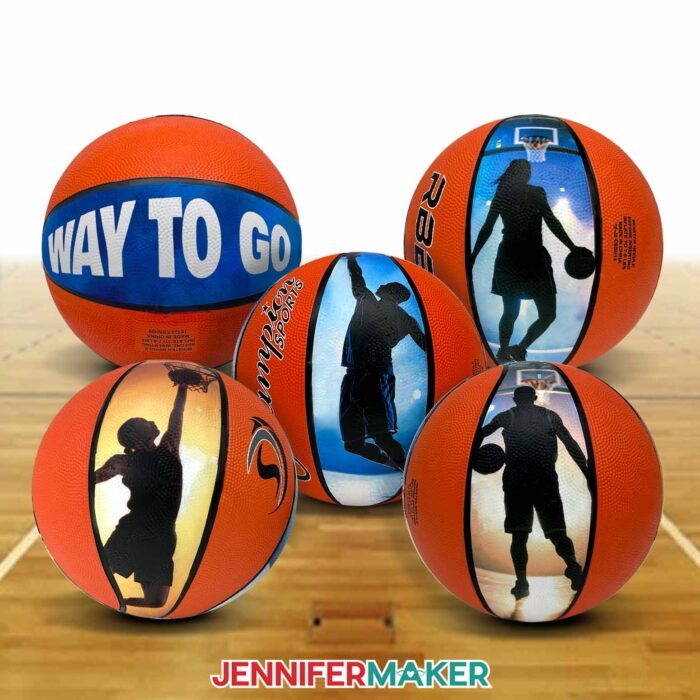
If you’d like to take this project even further, my Advance with Jennifer Maker workshop teaches you how to add text panels to your custom photo basketball. This extra step lets you include a special message or even a player’s name right alongside your photos. It’s the perfect way to create a personalized design that feels truly one of a kind.
If you’re ready to try this project, gather your Cricut, your printable iron-on supplies, and your favorite photos. Follow along with the video tutorial, and you’ll be guided through each step from printing to sealing. By the time you finish, you’ll have a keepsake that’s every bit as beautiful as it is meaningful. A basketball covered in a mosaic of photos is always a slam dunk!
Crafting is about more than just the final project — it’s about the process, the creativity, and the joy of bringing an idea to life. With this project, you’ll experience the fun of turning memories into something you can hold, display, and treasure. So don’t leave those photos stashed away on your hard drive. Print them out, give them shape, and let them shine on a ball that will be treasured for years to come.
Let me show you how to decorate a custom photo basketball! This post contains some affiliate links for your convenience (which means if you make a purchase after clicking a link I will earn a small commission but it won’t cost you a penny more, there is no additional cost)! Read my full disclosure policy.
Materials to Decorate a Photo Basketball
View my Amazon shopping list with the exact items I used.
- One (1) Size 7 Basketball
- Four to Eight (4-8) Sheets of 8.5” x 11” Cricut Printable Iron-On for Dark Fabrics -OR-
- Four to Eight (4-8) Sheets of 8.5” x 11” HTVRont Printable Heat Transfer Paper for Dark Fabrics
- Copy Paper (optional to protect the printed sheet when rolling with a brayer)
- Optional: Mod Podge (for sealing your basketball)
- A way to cut your material – I’m using the Cricut Maker 4, but you can also use a Maker series machine, a Cricut Explore Series machine, the Cricut Venture, or the Cricut Joy Xtra
- Color Inkjet Printer
- Cricut Green StandardGrip Machine Mat 12” x 12”
- Weeding Tool
- Heat Gun
- Heat-Resistant Gloves
- Brayer
- Soft Measuring Tape (Optional for measuring your ball)
- Ball Pump
- Isopropyl Alcohol -AND-
- Lint-free Cloths
- Foam Paint Brush (for Mod Podge)
- Painter’s Tape (Optional for stabilizing ball while applying sealer)
How to Make a Custom Photo Basketball!
Custom Photo Basketball
Learn how to decorate a custom photo basketball with printable iron-on material!
Materials
- One (1) Size 7 Basketball
- Four to Eight (4-8) Sheets of 8.5” x 11” Cricut Printable Iron-On for Dark Fabrics -OR-
- Four to Eight (4-8) Sheets of 8.5” x 11” HTVRont Printable Heat Transfer Paper for Dark Fabrics
- Copy Paper (optional to protect the printed sheet when rolling with a brayer)
- Optional: Mod Podge (for sealing the basketball)
- Design #786 (My free SVG/PNG/DXF/PDF design files are available in my free resource library - get the password by filling out the form at the bottom of this page)
Tools
- A way to cut your material - I’m using the Cricut Maker 4, but you can also use a Cricut Maker Series machine, a Cricut Explore Series machine, the Cricut Venture, or the Cricut Joy Xtra
- Color Inkjet Printer
- Cricut Green StandardGrip Machine Mat 12” x 12”
- Weeding Tool
- Heat Gun
- Heat-Resistant Gloves
- Brayer
- Soft Measuring Tape (optional for measuring your ball)
- Ball Pump
- Isopropyl Alcohol -AND-
- Lint-Free Cloths
- Foam Paint Brush (for Mod Podge)
- Painter's Tape (optional for stabilizing ball while applying sealer)
Instructions
STEP 1: GET MY FREE PHOTO BASKETBALL DESIGNS
First, download my Custom Photo Basketball files from my free library – look for Design #786. Alternatively, you can use the Save This Project form near the top of this post and the design link will be emailed to you.
In the SVG folder, you’ll find my “basketball” panel designs. These contain templates to make Print Then Cut panels from photos.
In the PNG folder, you’ll find basketball demo images for your panels. I made these designs with the help of AI art generation and adjusted them with image editing software. You are welcome to use any of my demo images for personal use, but for a truly custom look, use some of your favorite photos!
There is also a DXF folder with cut files, and a PDF folder with versions you can print and cut by hand.
TIP: If you’re not sure how to upload, go to jennifermaker.com/svgs to learn how to unzip and upload SVG files.
STEP 2: PREPARE YOUR PHOTO PANELS IN CRICUT DESIGN SPACE
1. In Cricut Design Space, open a blank Canvas.
NOTE: If you’re new to using Cricut Design Space, go to cricutkickoff.com for my introductory tutorial on Design Space basics.
2. Click “Upload” and then “Upload Image.”
3. Click “Browse.”
4. Select the “basketball” SVG.
5. Click “Open,” and then “Continue.”
6. Click “Upload” to add the design to your Canvas.
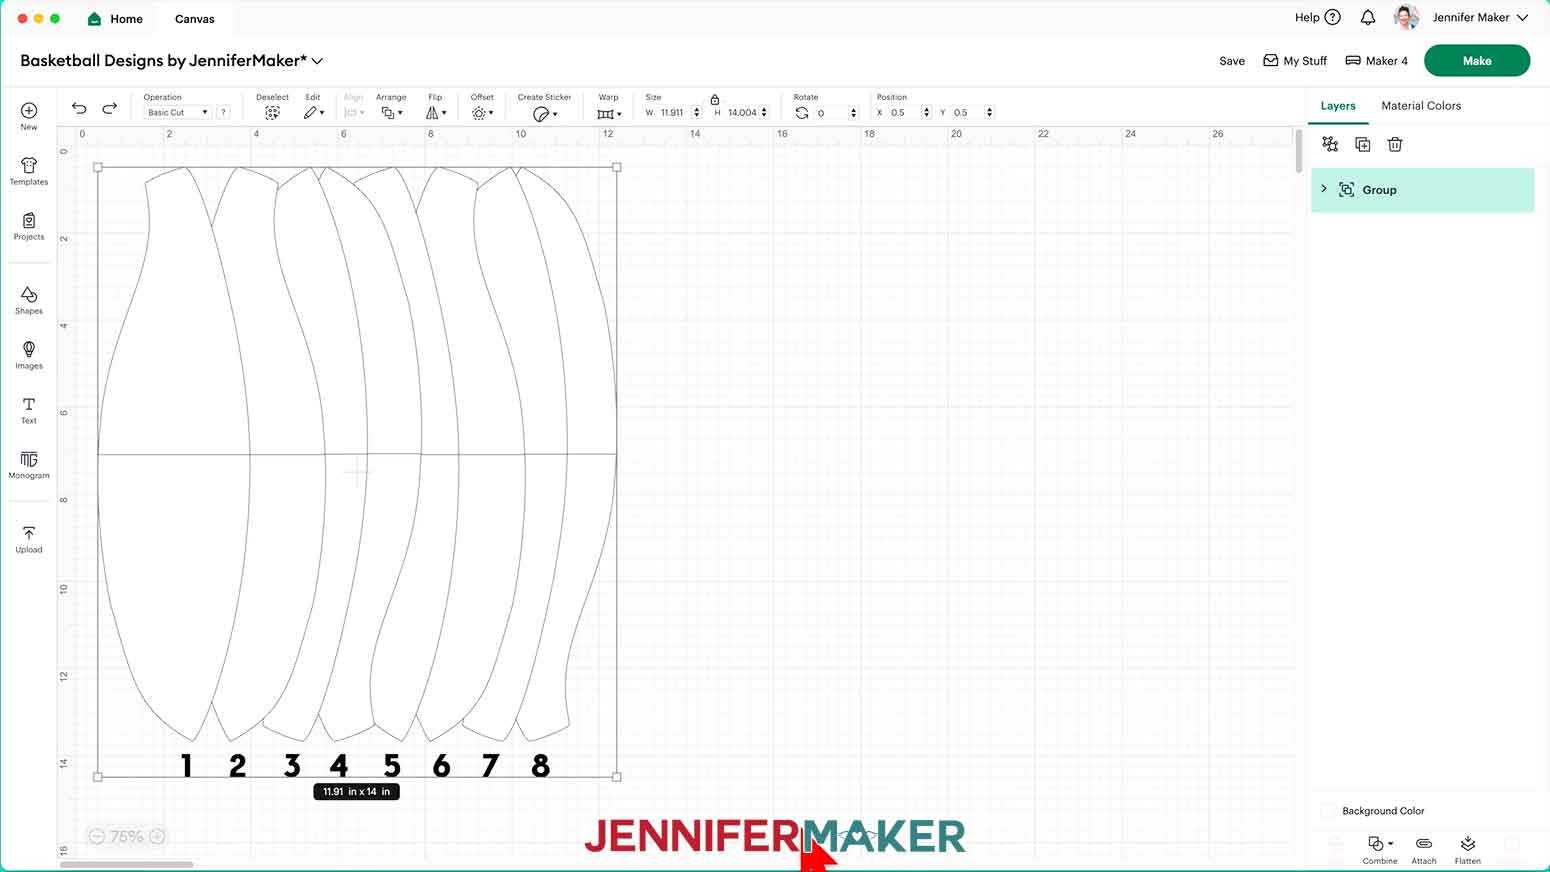
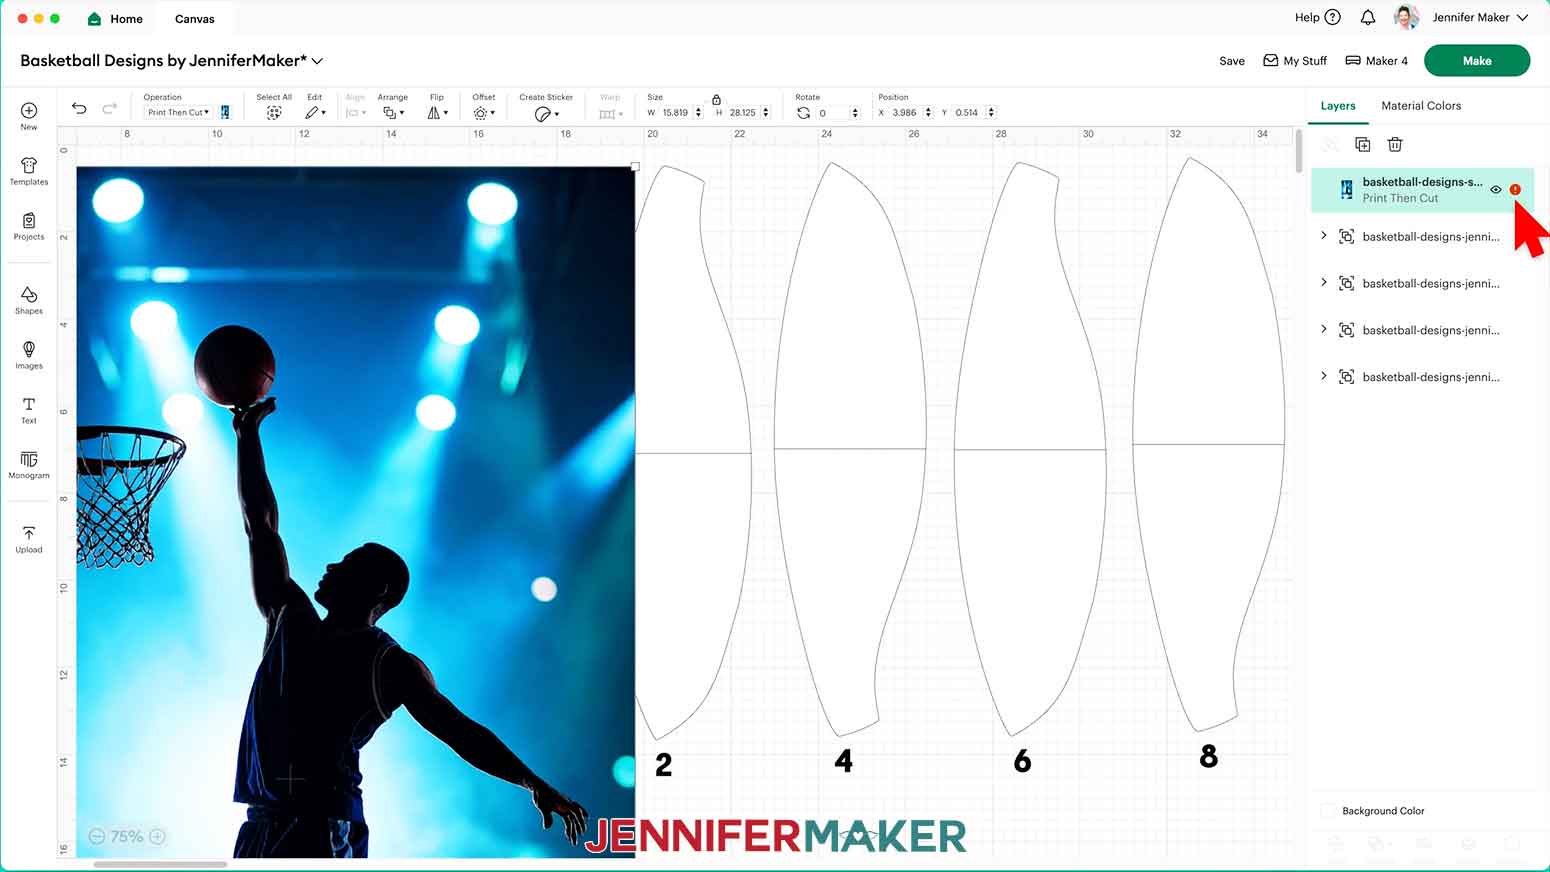
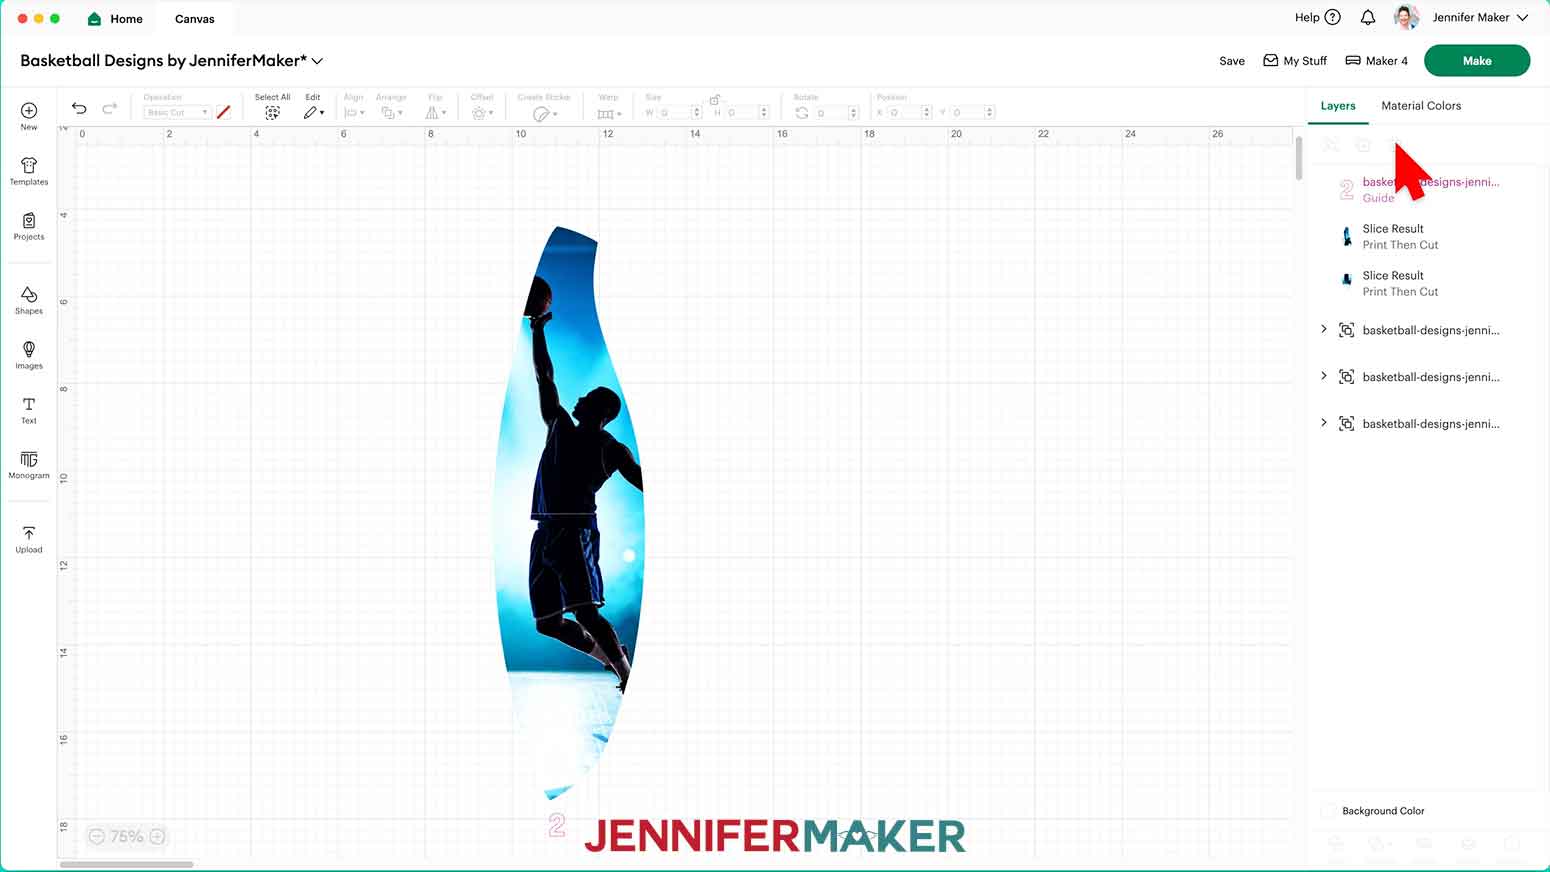
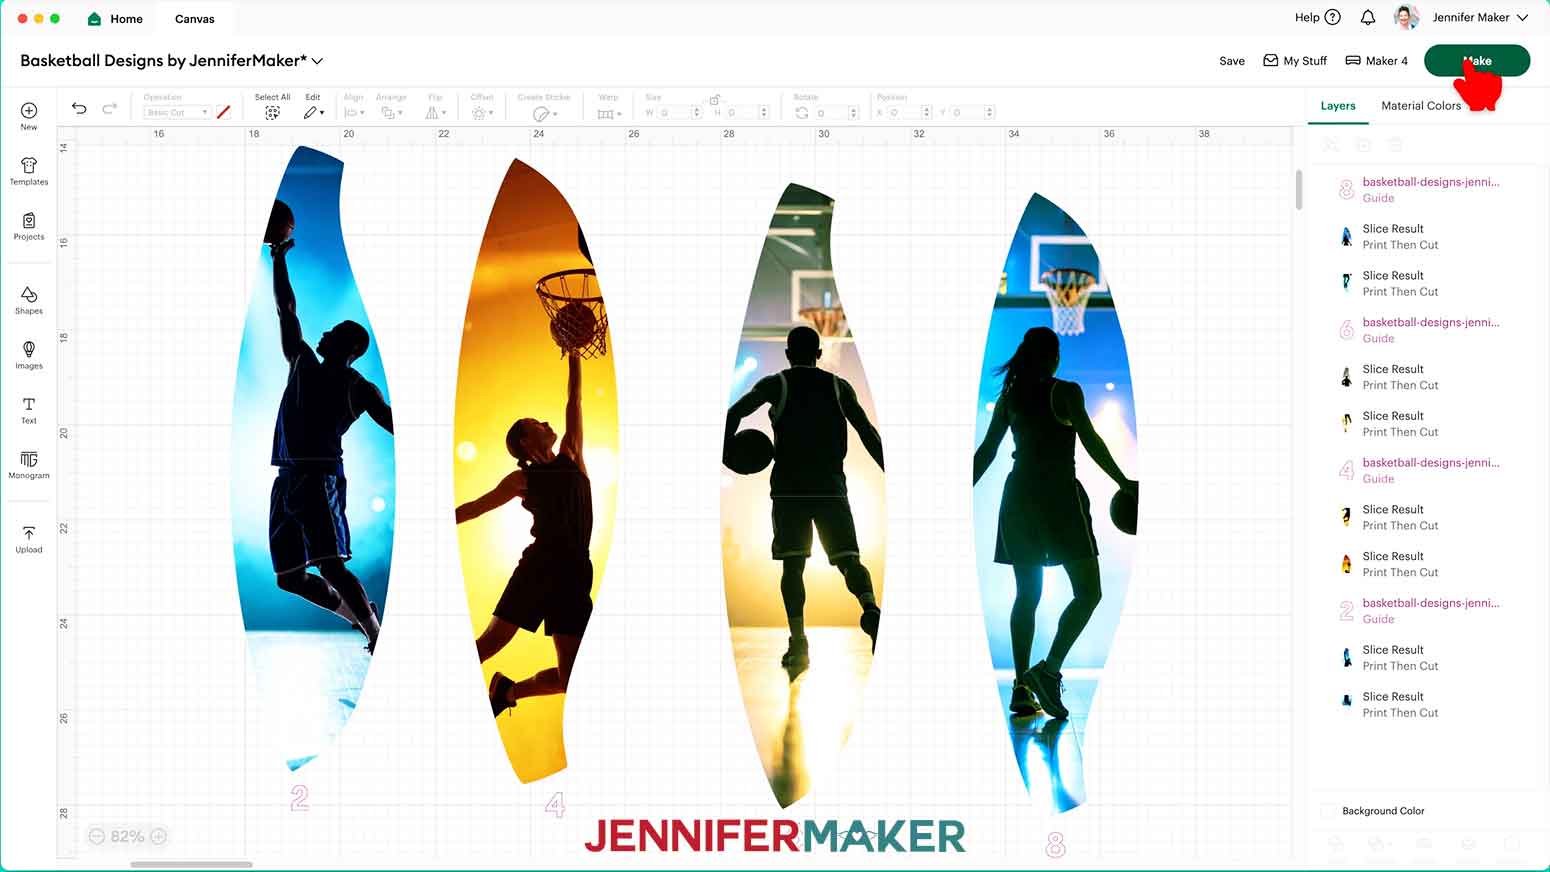
NOTE: On your Canvas, you’ll see eight numbered panels. Each one matches a specific section of your basketball.
7. Click “Save” and give your project a name.
8. “Ungroup” the design and spread out the pieces.
NOTE: Each panel has a top piece, a bottom piece, and a number grouped together. The panels are split into two pieces because the full panel size is too large for Cricut’s Print Then Cut feature.

9. Each panel matches a section of your basketball. Decide which panels you want to make for your basketball and use the “Trash” icon to delete the rest.
NOTE: I’ll keep the even-numbered panels so I can cover every other section of my basketball, including the section with the basketball’s barcode.
10. Next, click “Upload” and then “Upload Image.”
11. Click “Browse.”
12. Select the photo you want to use for your first panel.
NOTE: I’ll use one of my basketball PNGs to demonstrate, but you can use any photo you like.
13. Click “Open” and then “Continue.”
14. On the “Background Remover” screen, you don’t have to remove anything, so click “Apply & Continue.”
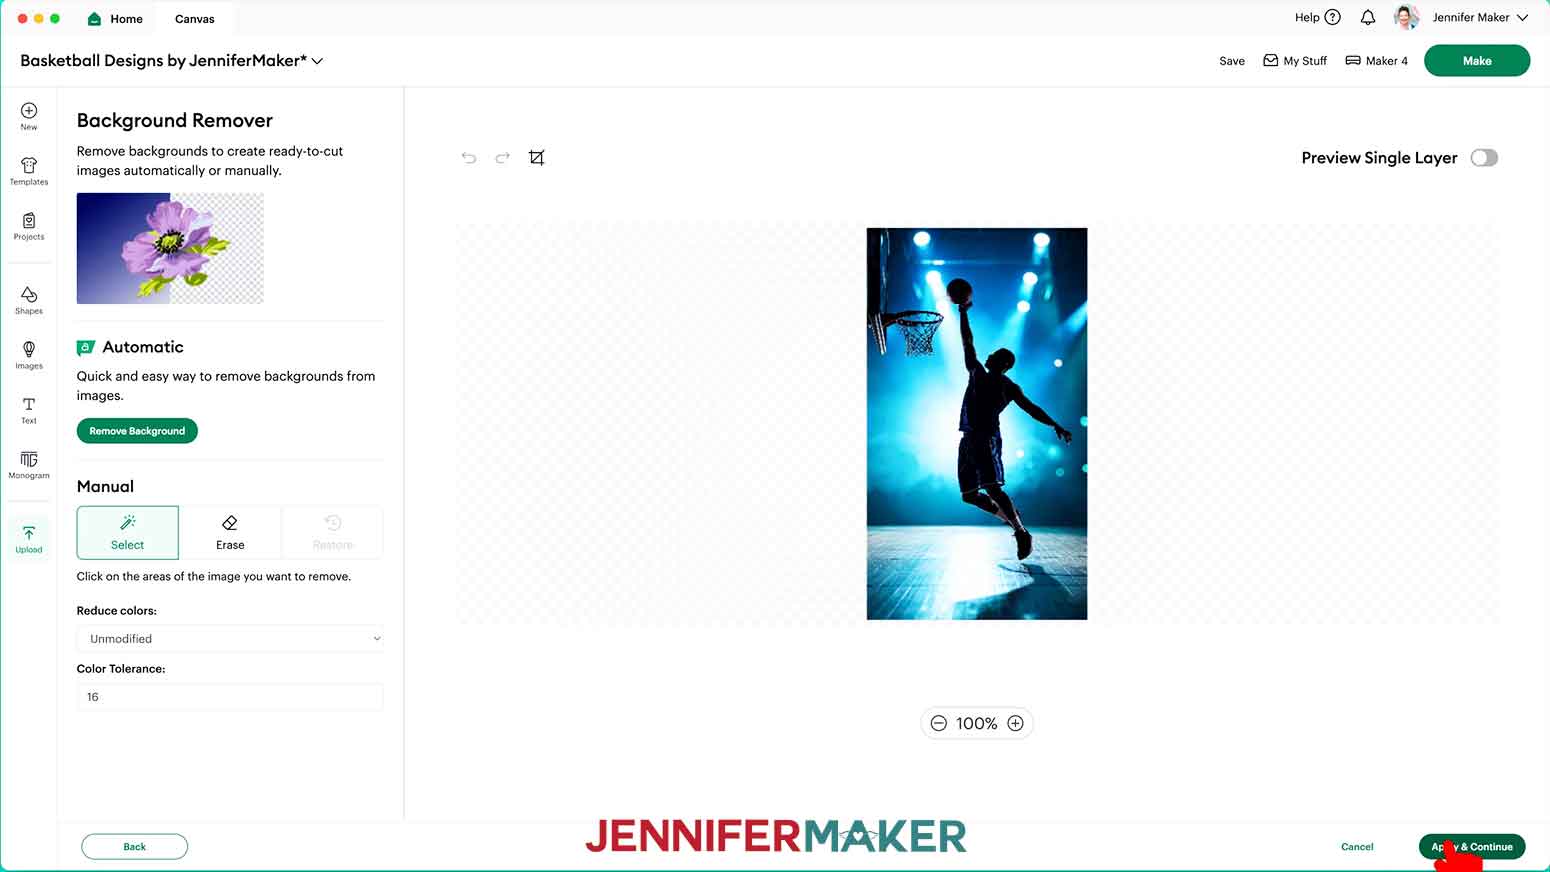
15. On the “Convert Upload To” screen, click “Flat Graphic” and “Continue.”
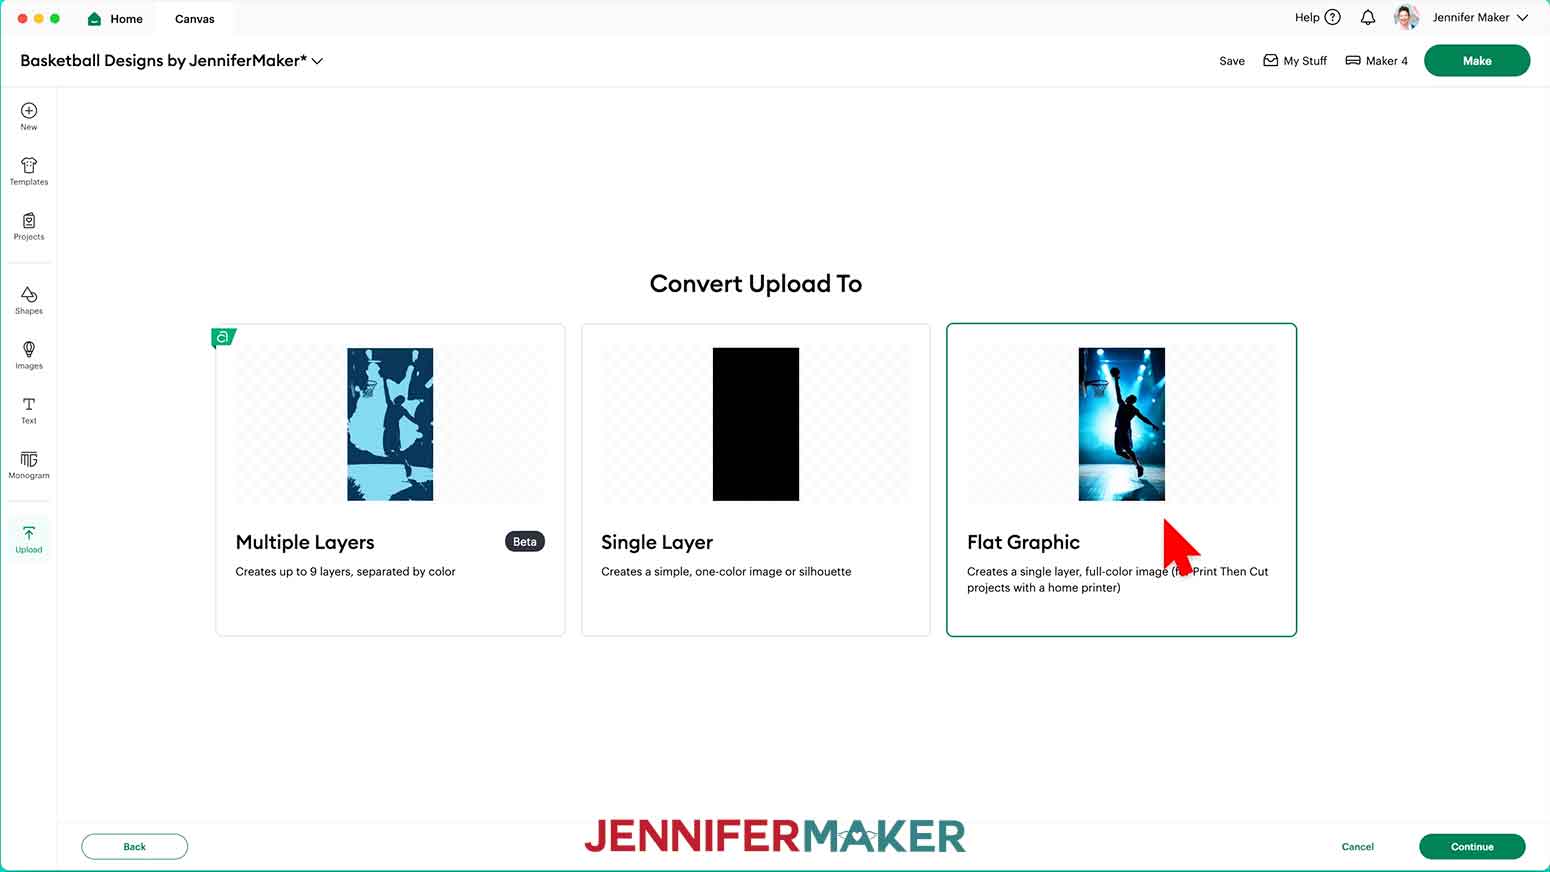
16. Click “Upload” to add the photo to your Canvas.
NOTE: Your image might load in too large for Print Then Cut. If so, you’ll see a red warning icon in the Layers Panel, but it’s OK. We will fix this later.
17. Click the “Minus (-)” icon in the lower left corner to zoom out and see everything on your Canvas.
18. Select your first panel group.
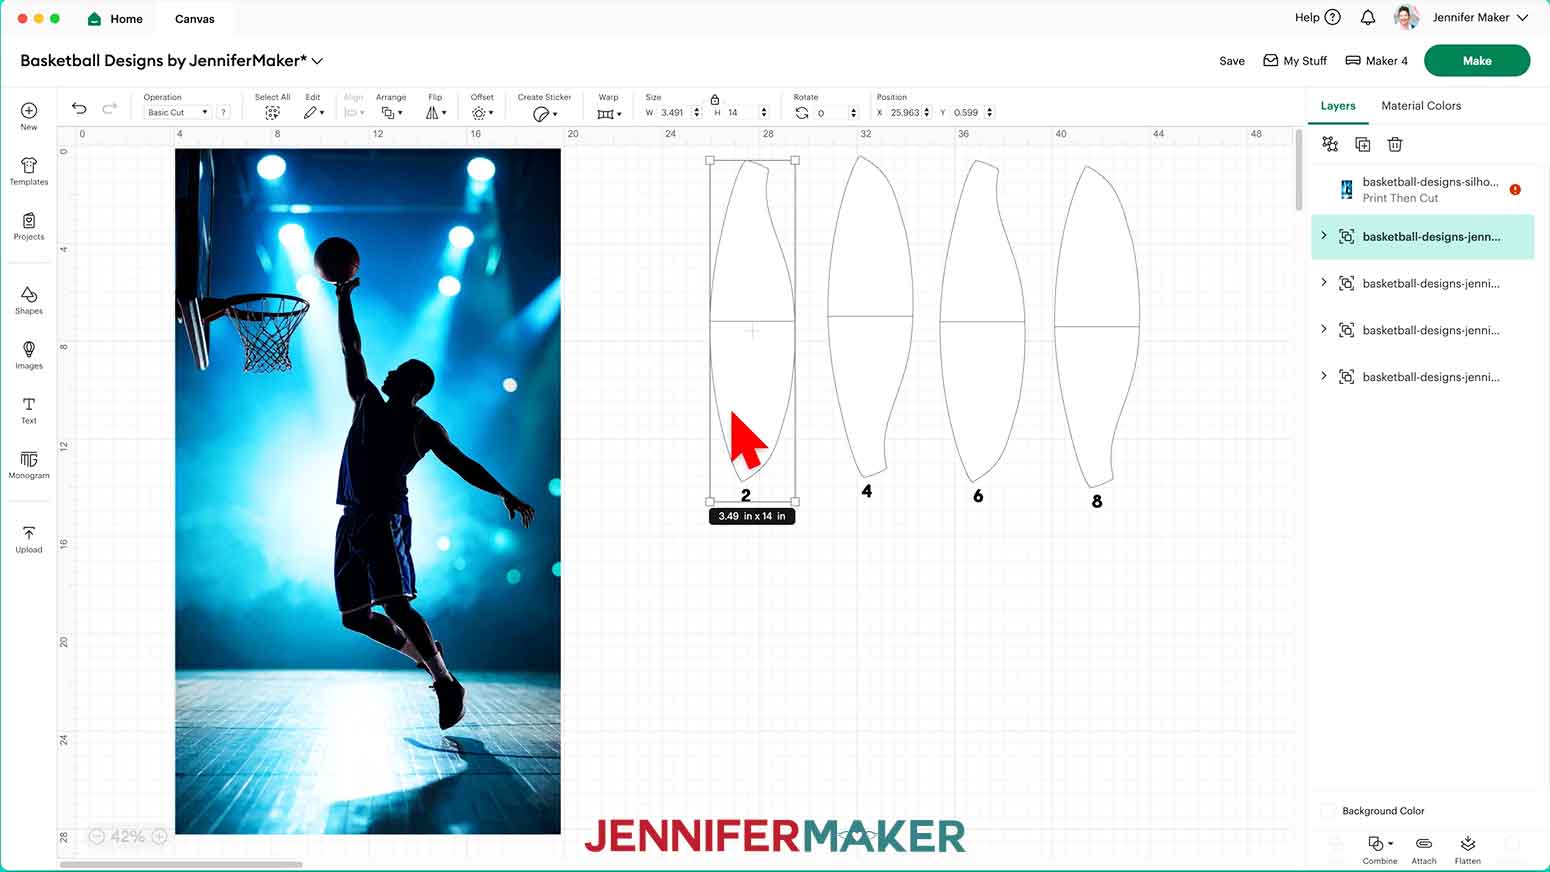
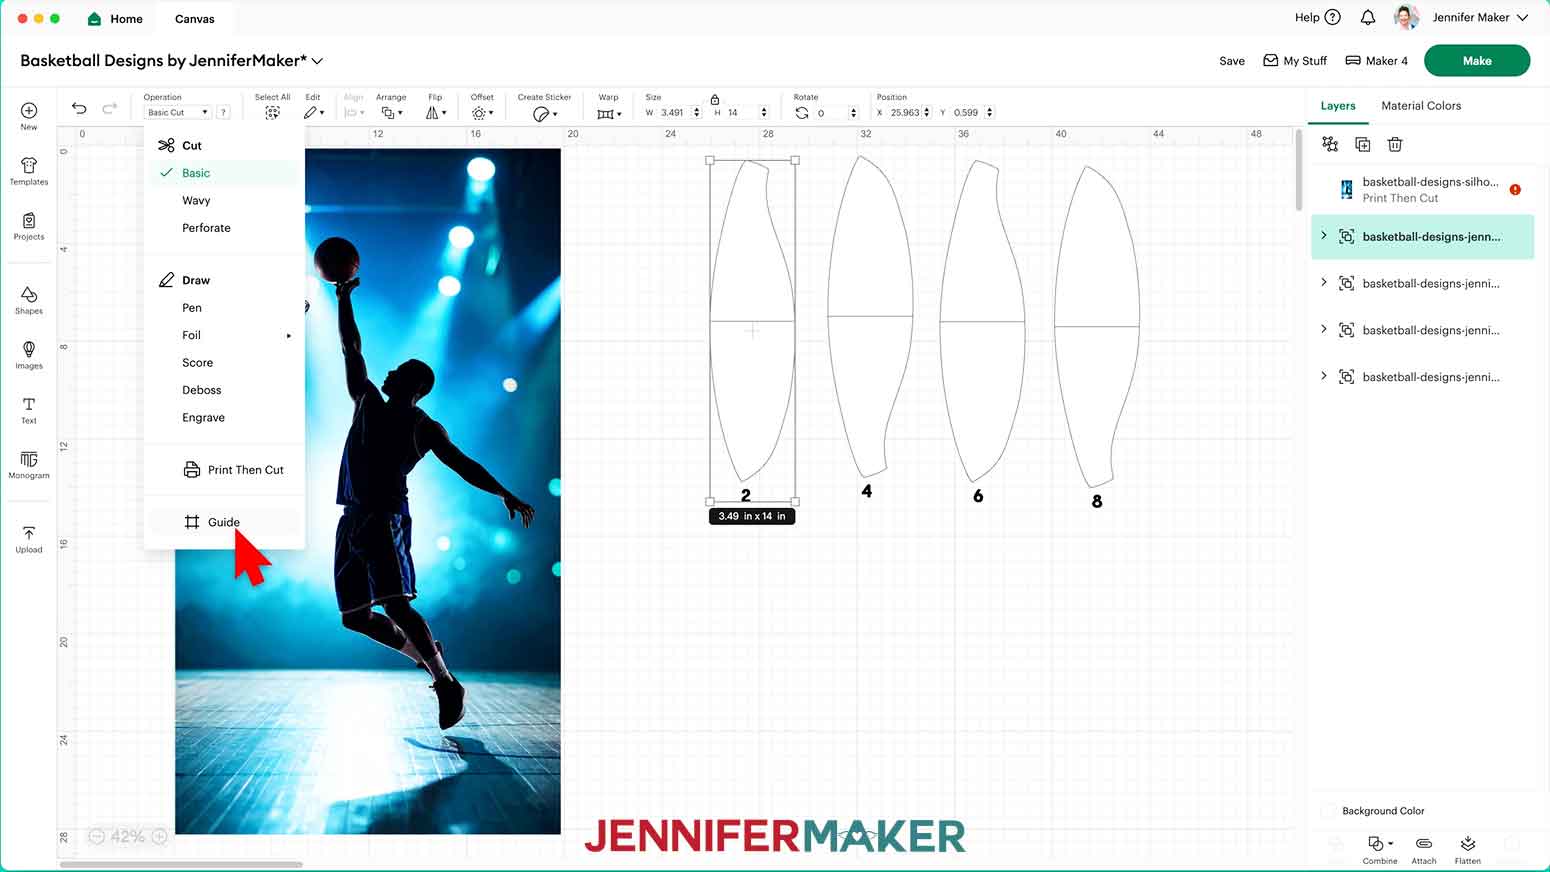
19. Click the “Operation” dropdown, then select the “Guide” option to turn both pieces into pink “Guide” layers.
20. With the “Guide” layers still selected, click “Arrange” then “Bring to Front.”
21. Then drag the selected pieces over your first photo so the part you want to show on your panel is inside the “Guide” layers.
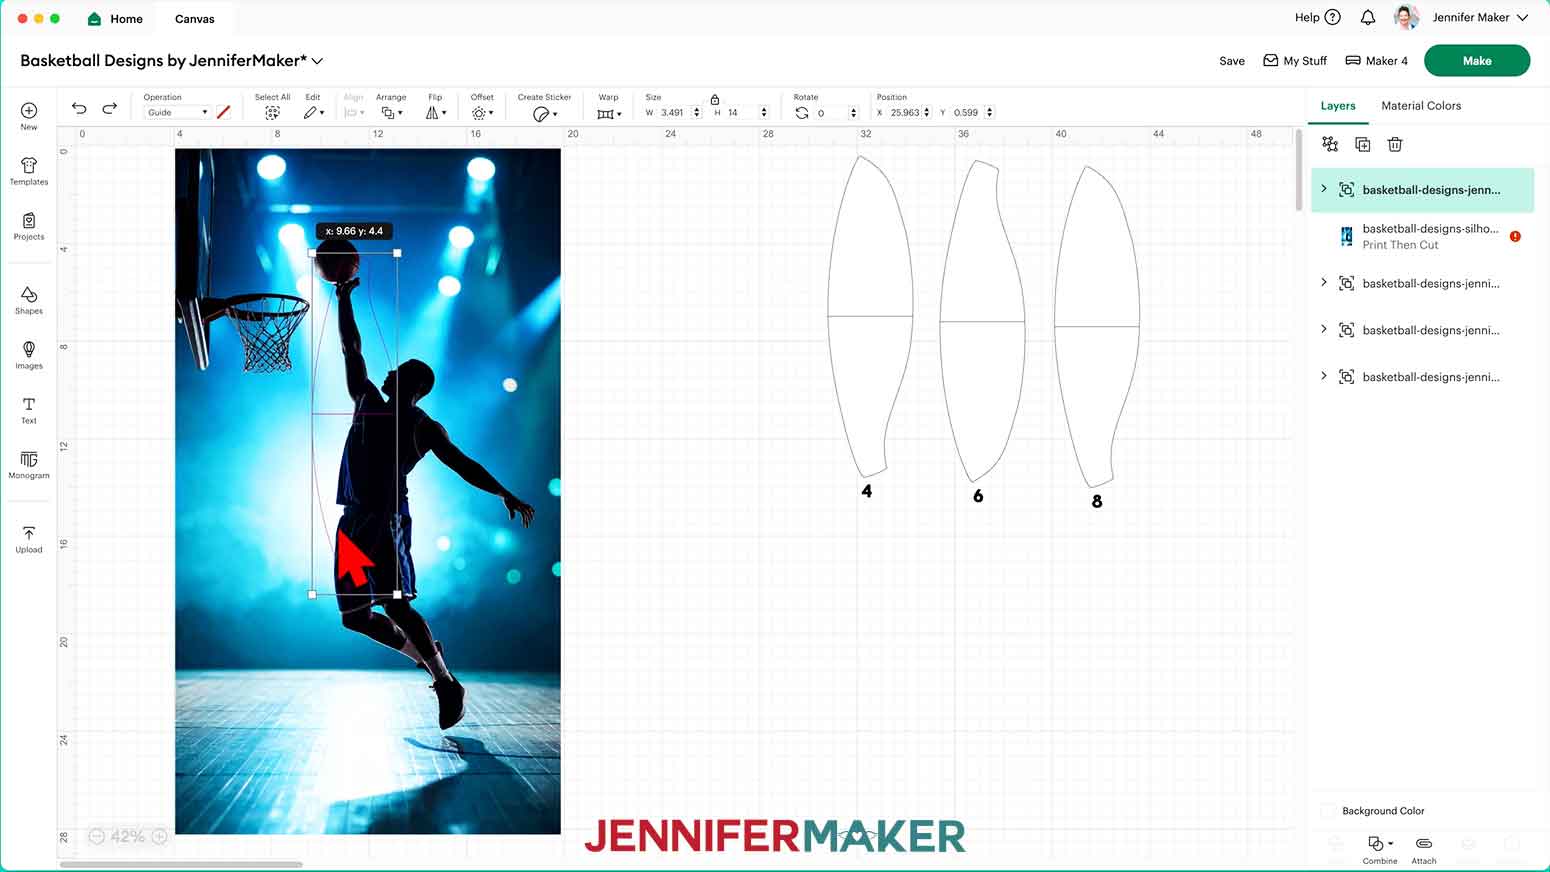
22. If you need to resize the photo so its important elements are inside the panel shape, select it and make sure the “Lock” icon in the Size Menu is closed to maintain proportions.
23. Use the photo’s corner Resize handles to adjust its size, then reposition the photo as needed.
NOTE: Be sure not to change the size of the guide panels, or the photo will be the wrong size for your ball!
TIP: Make sure the photo’s edges are outside the guide so the image doesn’t look cropped when you apply it to your ball later.
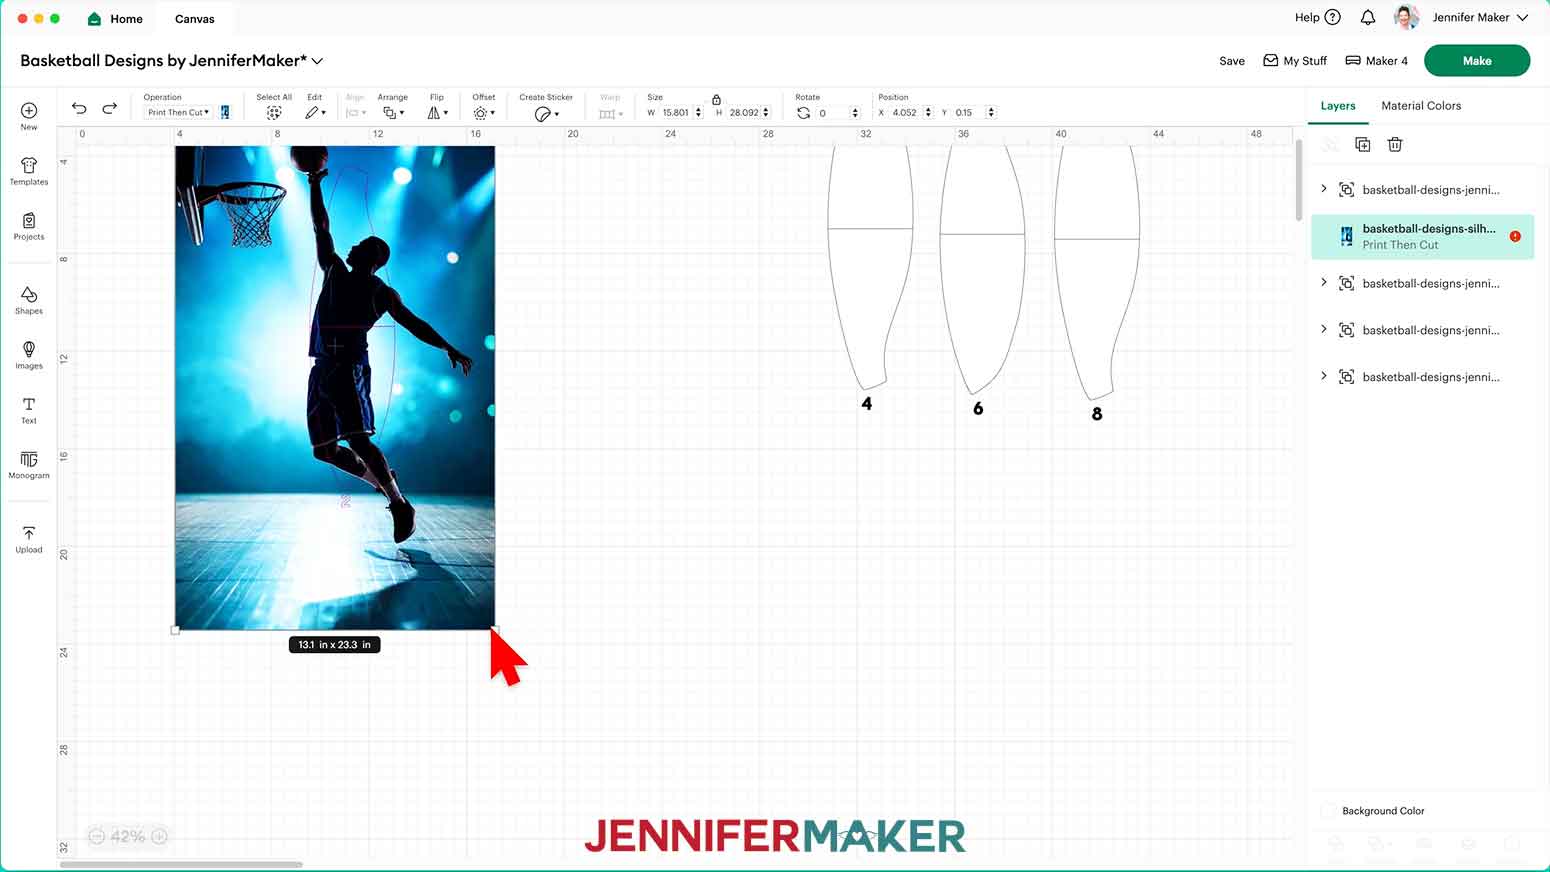
24. Next, select the panel group and click the “Ungroup” icon to work with the pieces individually.
25. Drag a bounding box over the photo and just the top panel guide to select them both.
26. Click the “Slice” button to remove the top piece from the photo.
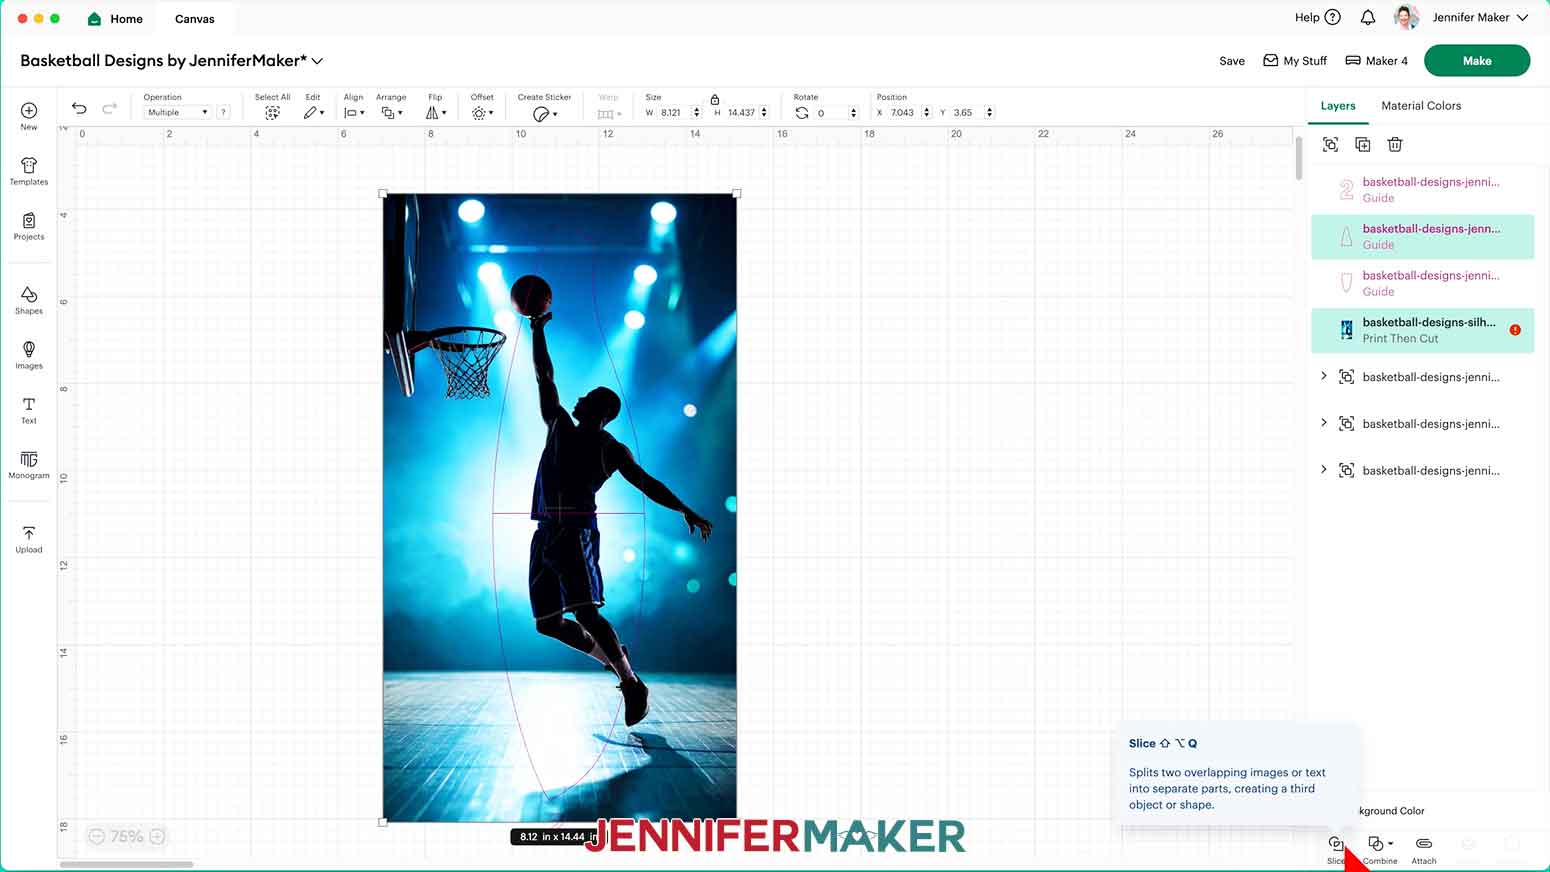
27. Don’t move anything, then drag a bounding box over the photo and just the bottom panel guide.
NOTE: The bottom panel guide might be hidden behind your photo. You can check the Layers Panel to confirm both layers are selected.
28. Click the “Slice” button to remove the bottom piece from the photo.
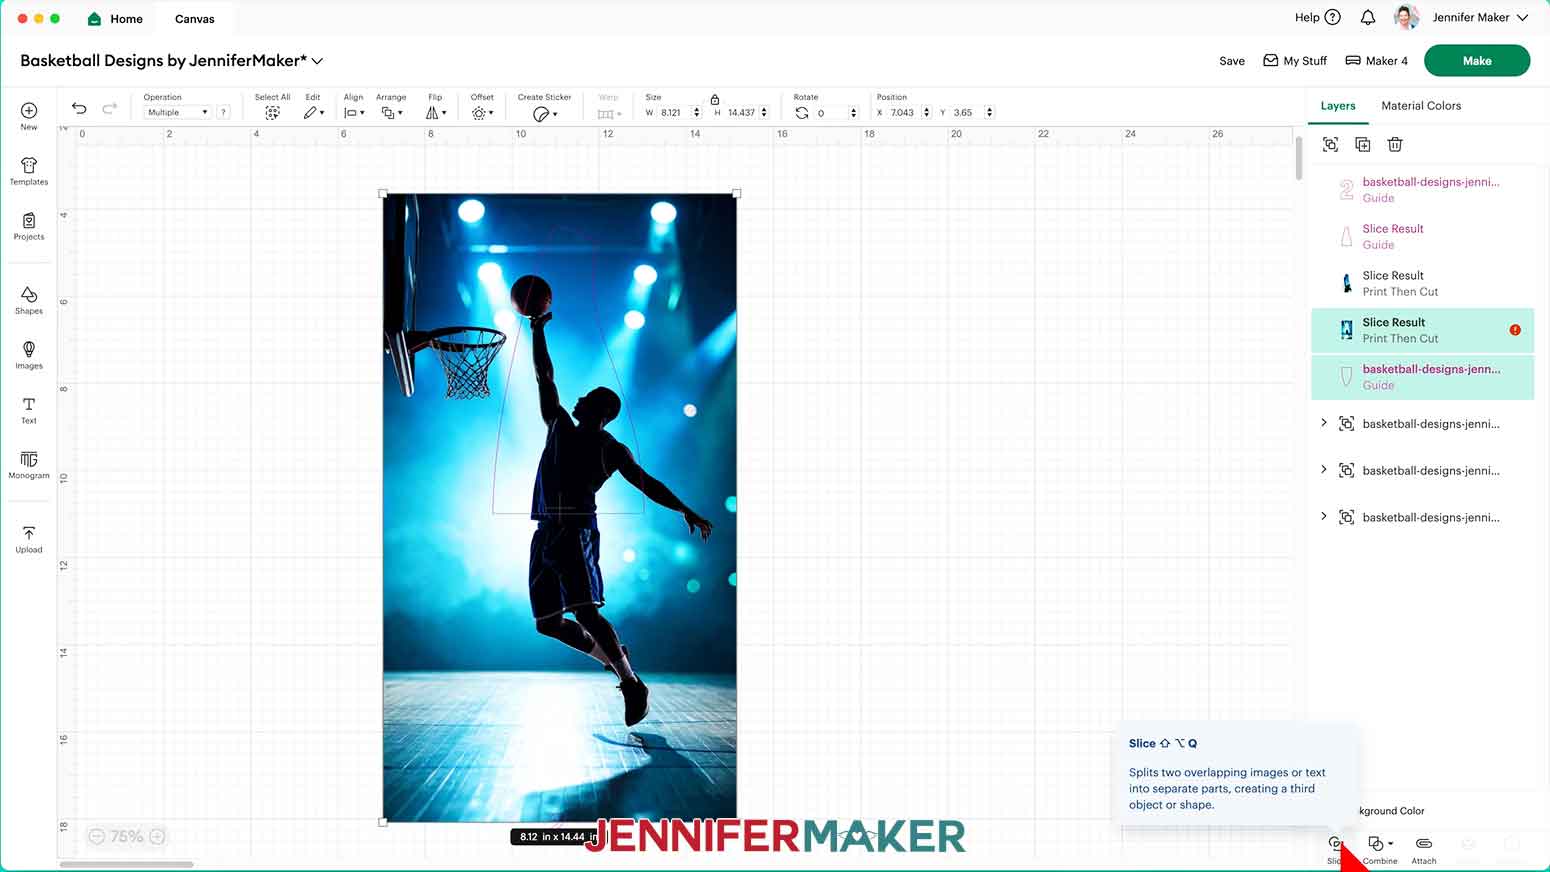
29. In the Layers Panel, delete all the “Slice Result” layers except the top and bottom photos in the shape of the template.
30. Repeat Steps 10-29 for your remaining panels.
31. Your project is ready to Print Then Cut following the STEP 3 directions below.
STEP 3: PRINT THEN CUT YOUR IRON-ON PANELS
1. Make sure the correct machine is selected in the top right.
2. Click “Make.”
3. On the Prepare screen, make sure the correct Material Size is selected for your mats and materials.
NOTE: I’ll use “8.5 in x 11 in” for all my mats to match my printable iron-on material.
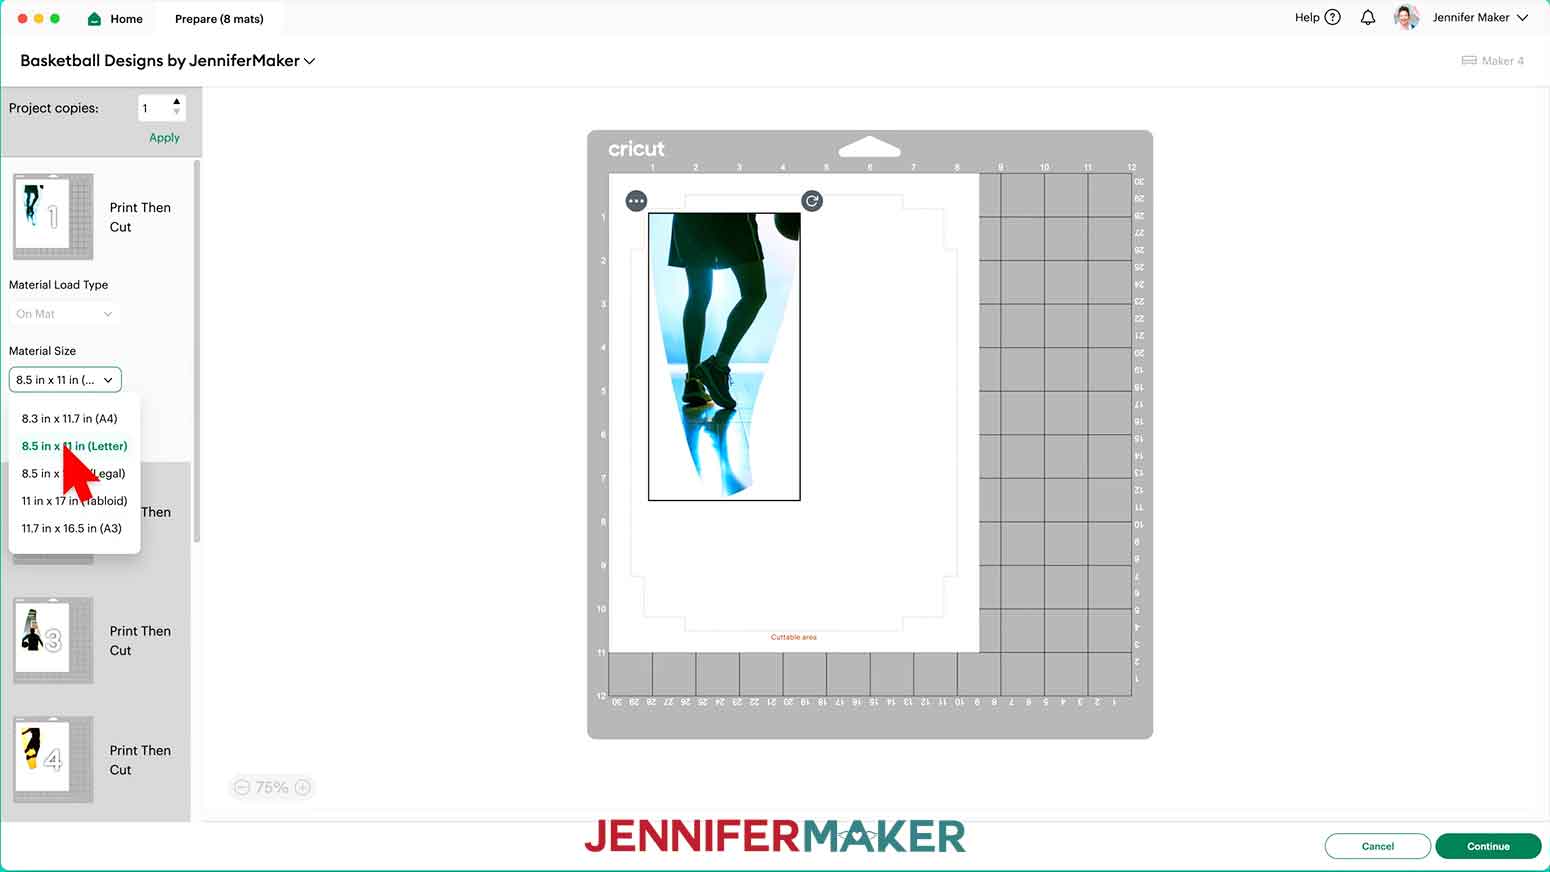
4. Keep “Mirror” toggled OFF.
NOTE: Unlike iron-on vinyl, printable iron-on doesn’t need to be mirrored since the design is cut from the top of the material and the adhesive is on the back.
5. If you have a lot of panels, you can combine mats to save time and materials. Select a panel you want to move, then click the icon with three dots and select “Move object.”
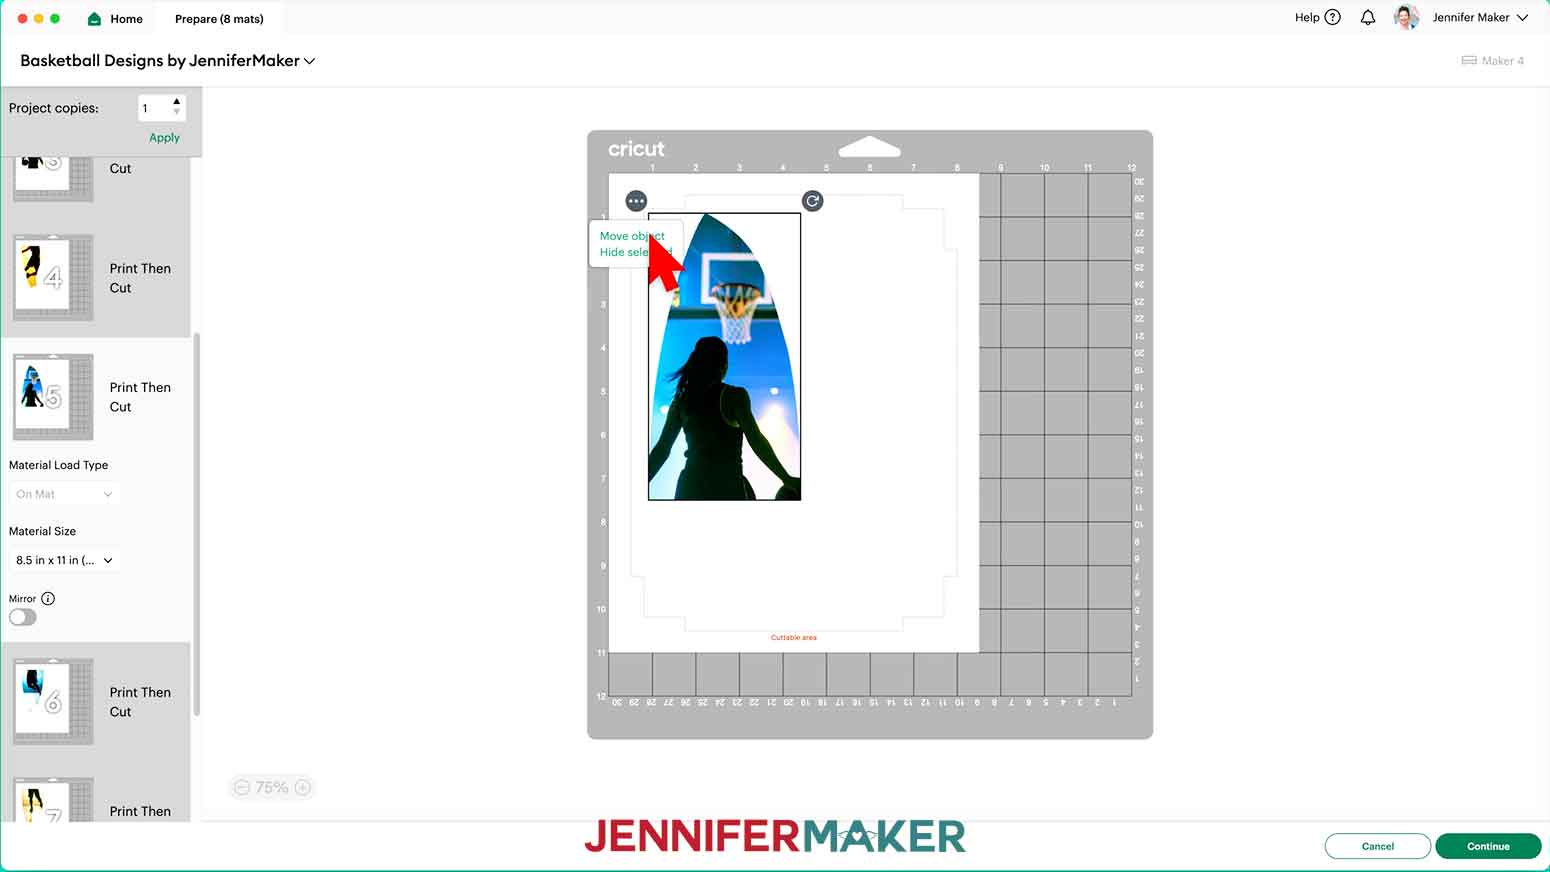
6. In the “Move Object” window, select a different mat with available space to reassign the panel to that mat.
TIP: Use your mat previews to find the top and bottom pieces of a single photo and move them onto the same mat to make them easier to find when applying your basketball panels later!
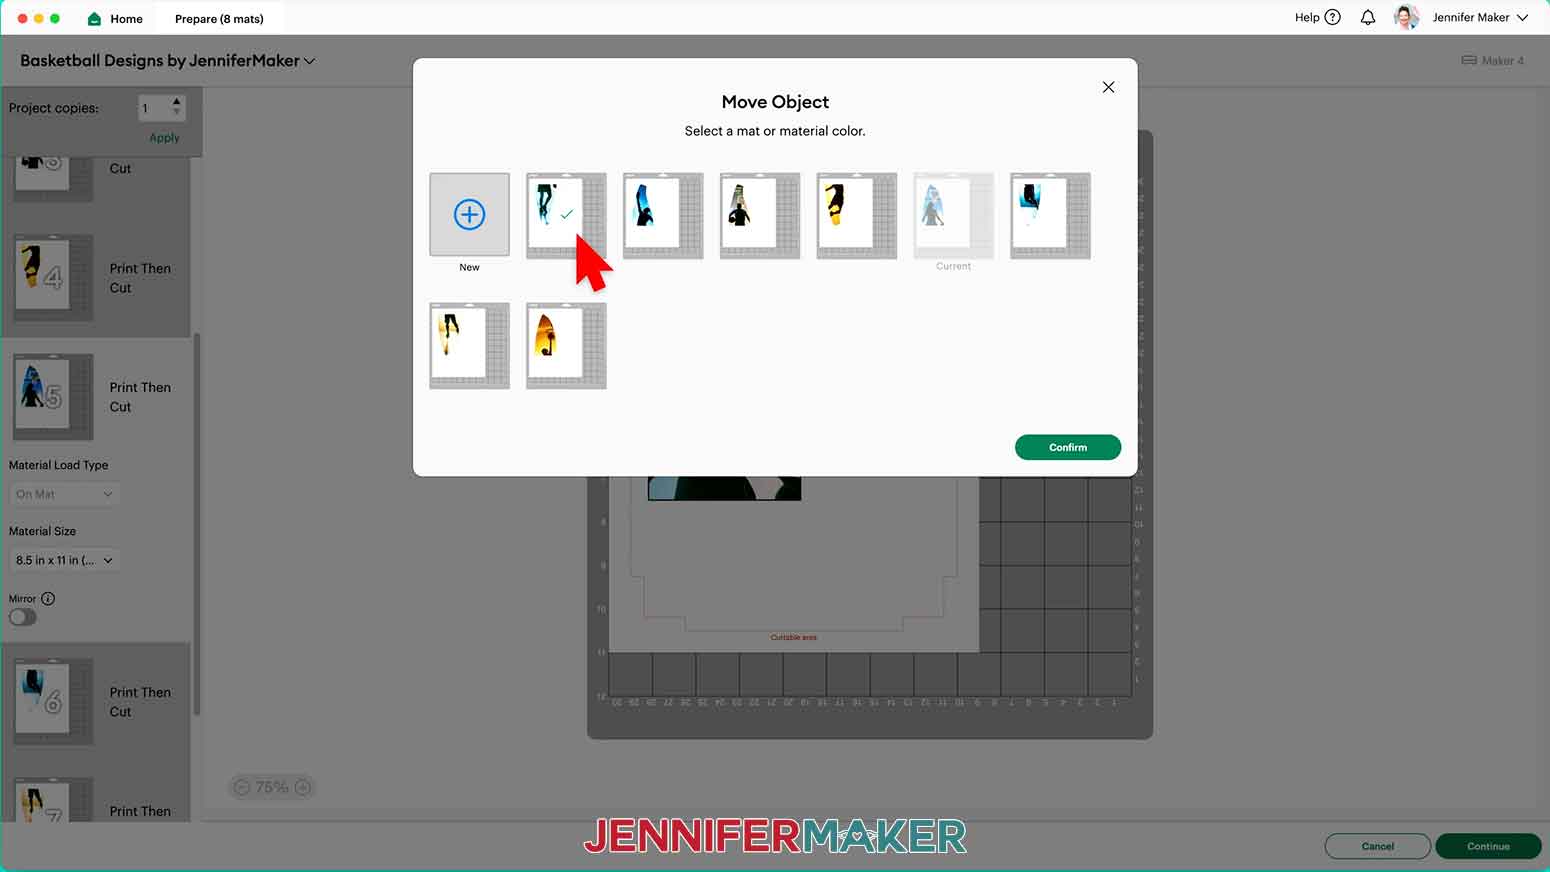
7. Click “Confirm” to move the object to the chosen mat.
8. If needed, drag the relocated object to an empty space on the mat.
TIP: Sometimes objects overlap when moving them to a different mat. If you don't see the moved panel, try repositioning objects until you find the one you’ve added to the mat.
9. Select Mat 1 so it loads first on the next screen and click “Continue.”
10. On the Make Screen, click “Send to Printer” to print your first mat.
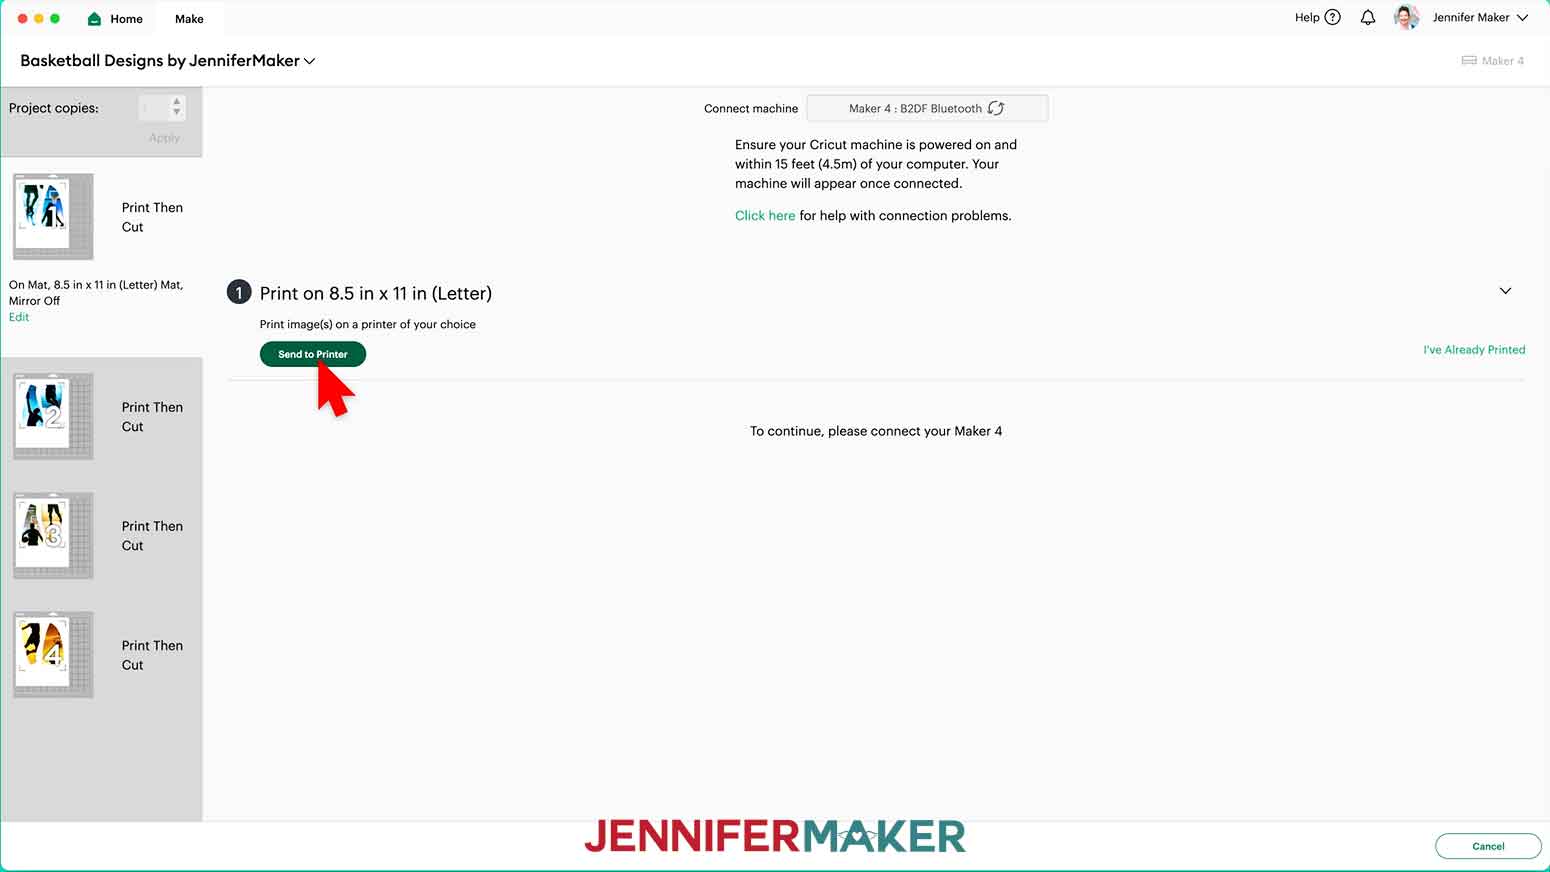
NOTE: If Design Space prompts you to calibrate, go ahead and follow the on-screen instructions to complete the process. If you need help, check out “STEP 3” of my How to Use Fill Patterns tutorial for a complete walkthrough.
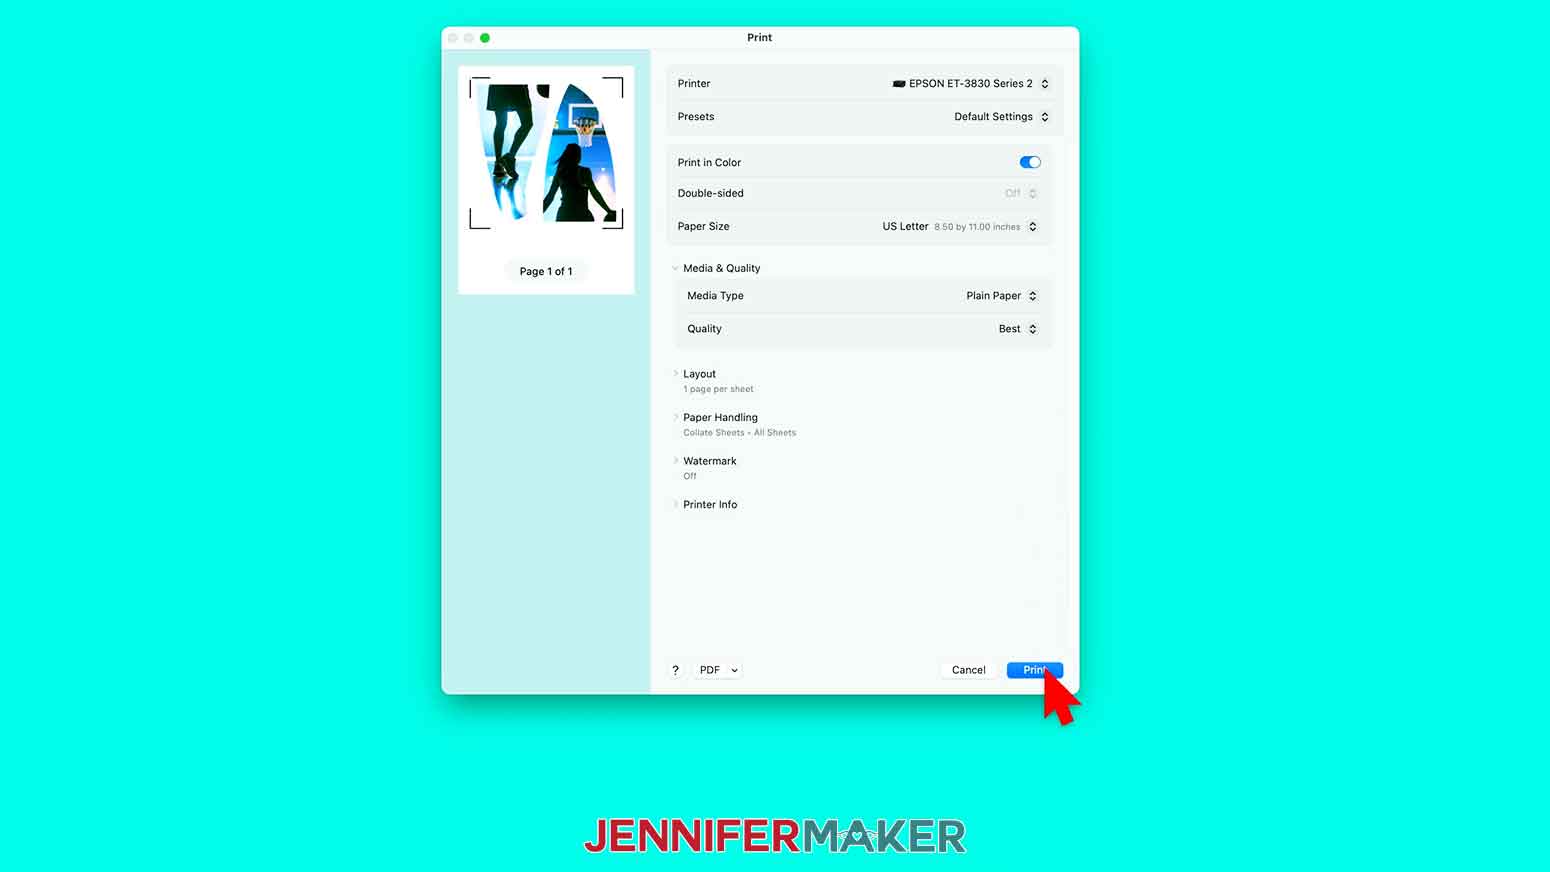
11. In the “Print Setup” window, select the correct printer, toggle ON both “Add Bleed” (to prevent white areas around your print) and “Use System Dialog.”
NOTE: Your System Dialog window might be behind the Cricut Design Space window, so minimize it if you don’t see the settings
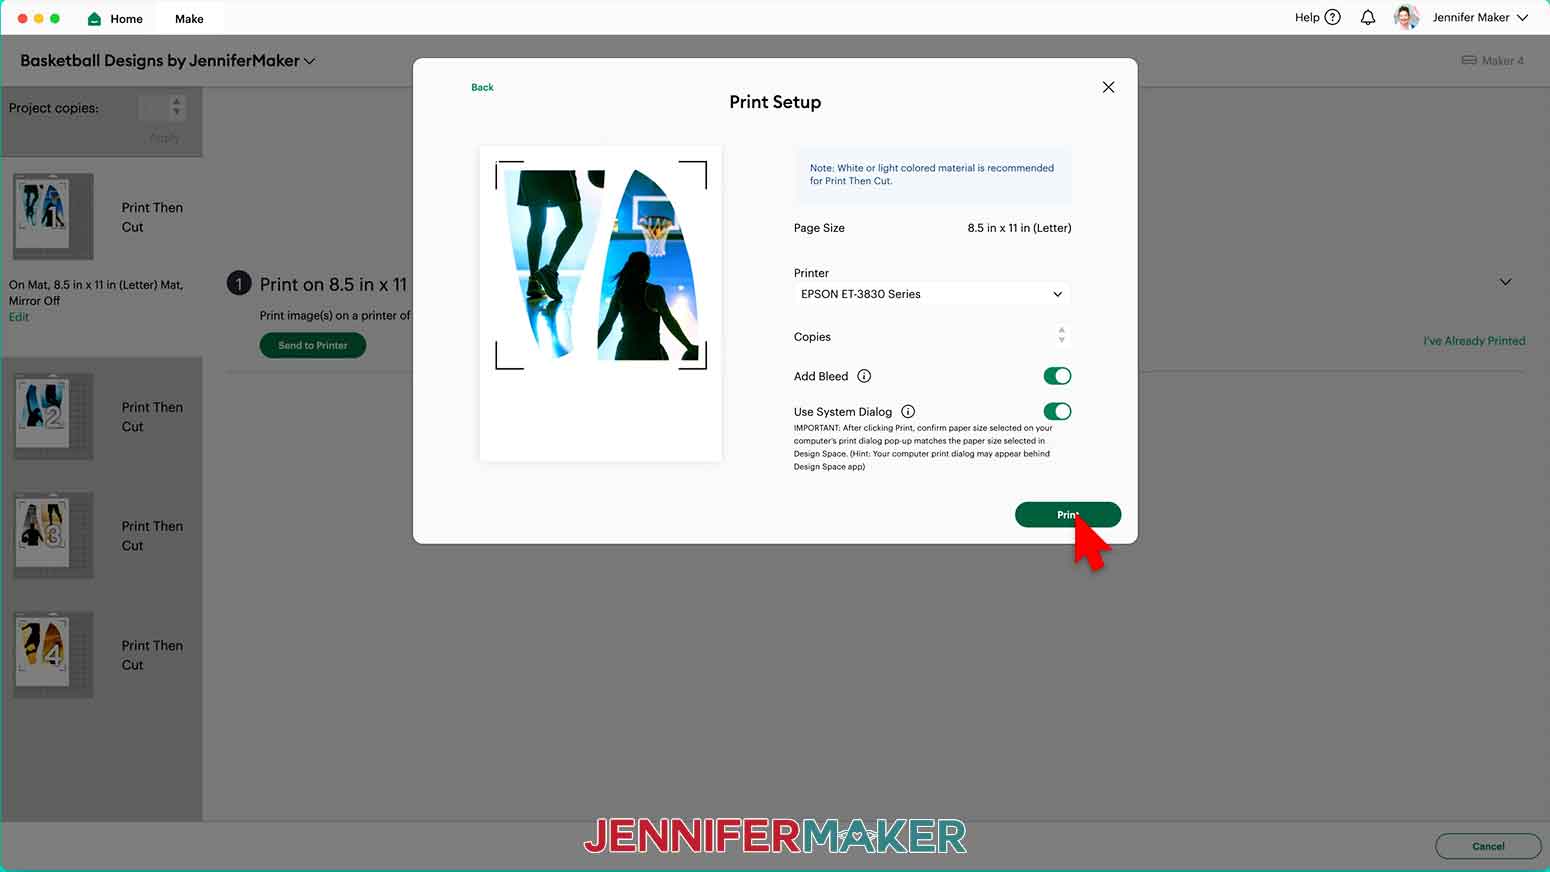
12. Click “Print.”
13. In the System Dialog Box, make sure the correct printer is selected. Change the Media Type to “Plain Paper” and the Quality to “Best,” or whichever settings are closest.
NOTE: Not all printer settings will be the same, but you can use my choices as guidelines.
14. Load the printable iron-on material into your printer according to the directions on the package.
15. Click “Print” to send the Print Then Cut design to your printer.
16. Let the print dry before handling it to avoid smudges.
17. Back on Cricut Design Space’s Make Screen, set the Base Material for your mat.
NOTE: I used the “Printable Iron-On, Dark” setting with “More” Pressure for my iron-on material.
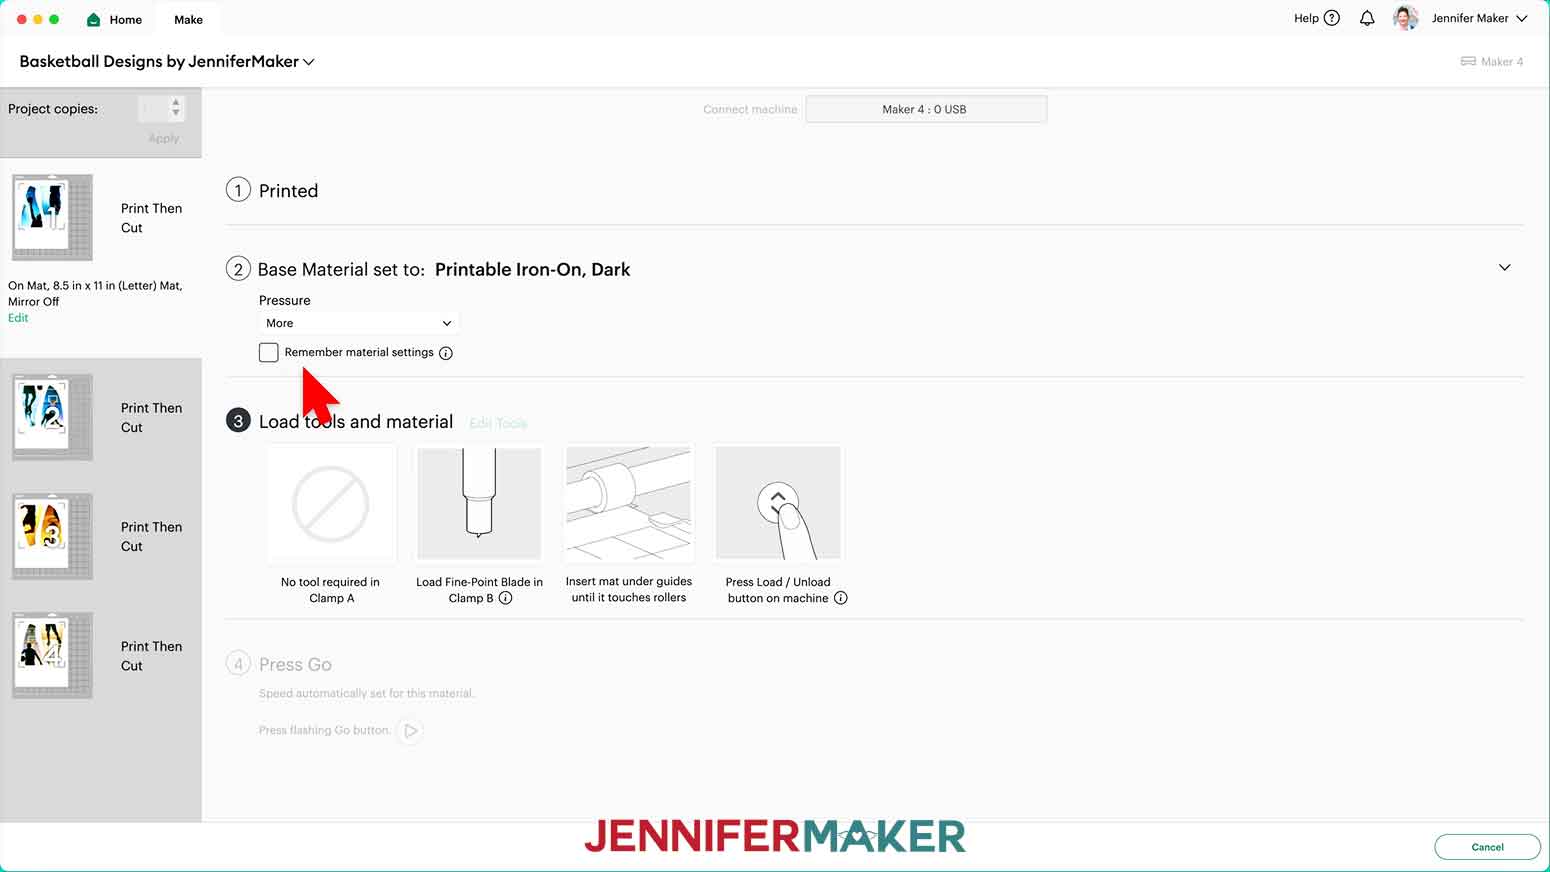
NOTE: If you don’t see the material in your materials list, click on “Browse All Materials.” Then type in the material’s name in the search bar and select the correct setting from the results.
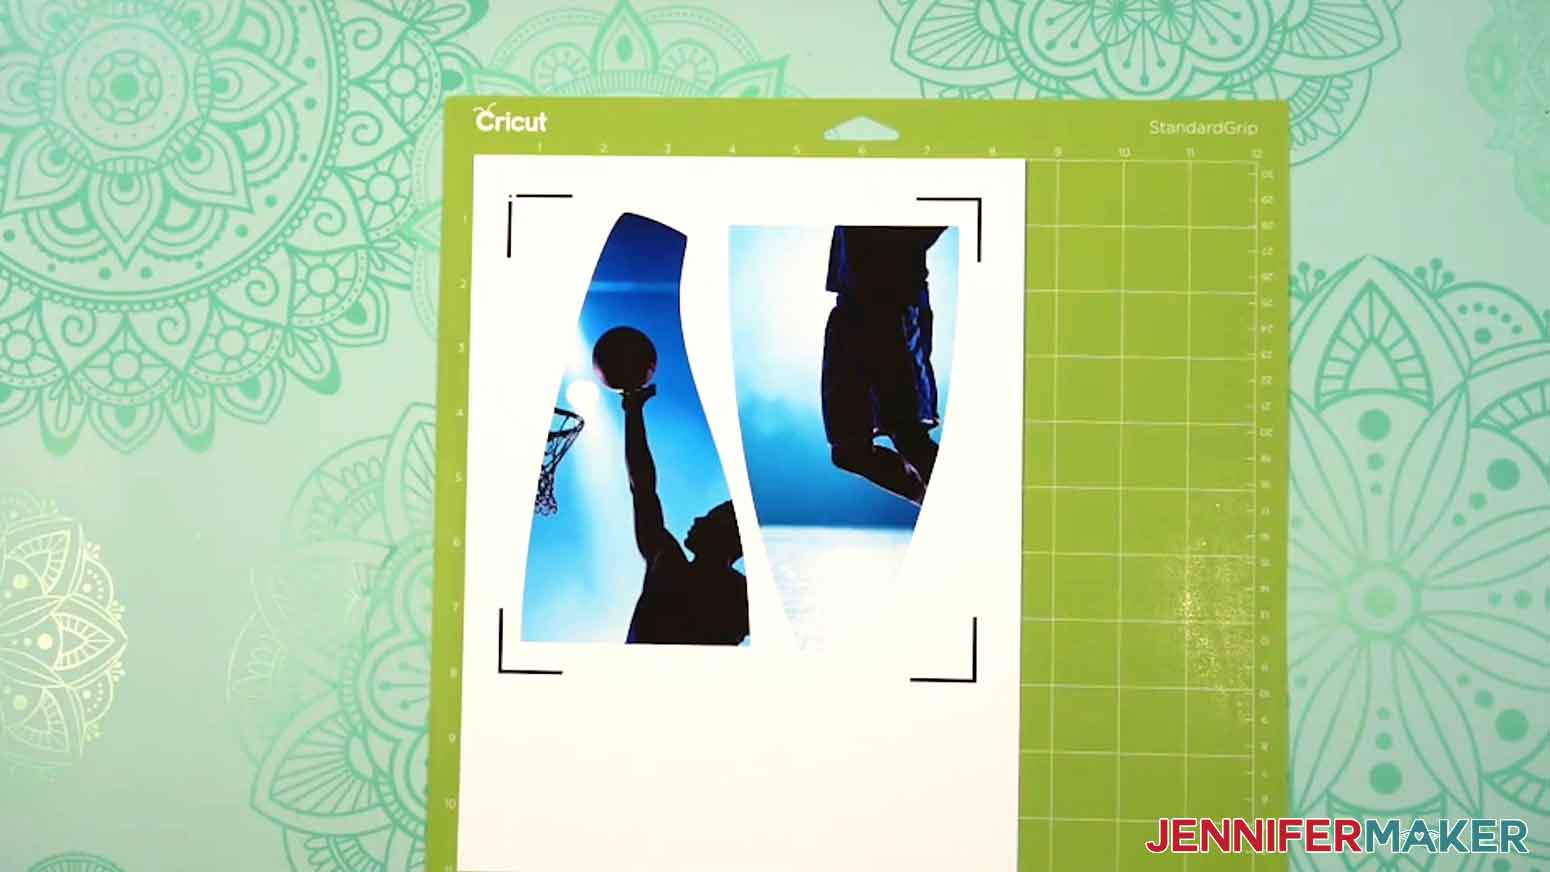
18. Place your printed iron-on sheet face up on a green StandardGrip machine mat so it matches the screen preview.
19. Place a clean sheet of copy paper on top of the print and use a brayer to make sure the print is fully adhered. Remove the copy paper.
20. Check that your Premium Fine-Point Blade is clean and in the clamp.
21. Press the flashing “Load/Unload” button to load the prepared mat into your Cricut so it matches the screen preview.
22. Press the flashing middle button to begin cutting.
23. When it has finished cutting, don’t unload the mat right away. Make sure the cuts went all the way through the top layer of the material. If not, press the middle button again to make a second pass of cuts in the same spots.
TIP: If you have any issues with your cuts, go to jennifermaker.com/cleaner-cuts.
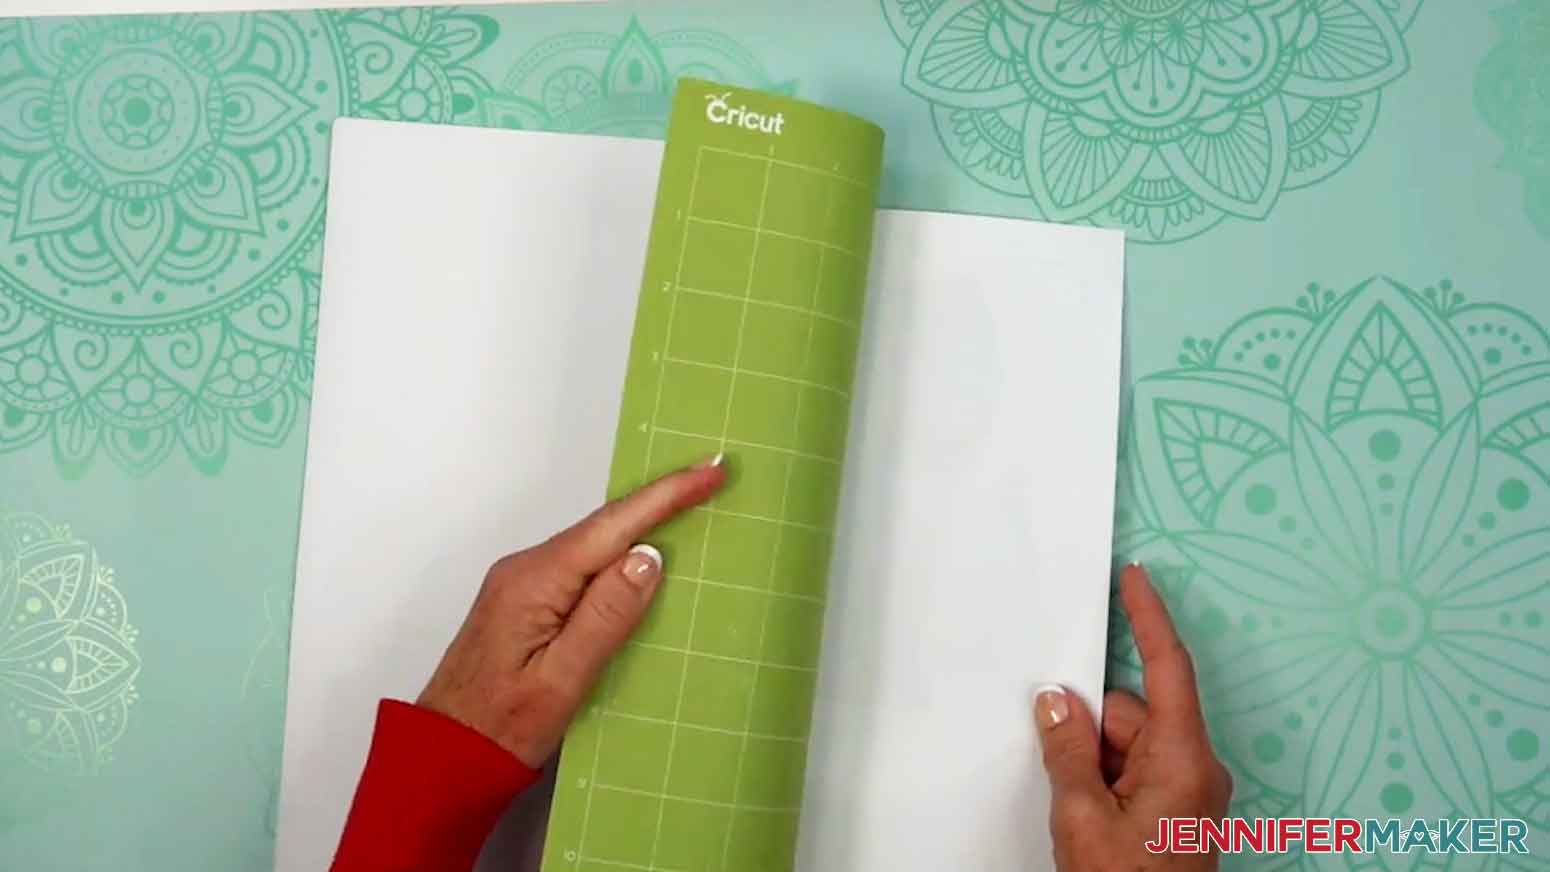
24. When the cuts are complete, unload the mat, flip it over onto your work surface, and roll it back to release the printable iron-on sheet.
25. Repeat Steps 10-24 for your remaining mats.
TIP: Make sure your screen preview and prepared mat match each time so the cuts are in the right spots.
26. Lay out your printed iron-on sheets face up.
27. Your photo panels are ready to apply to your ball!
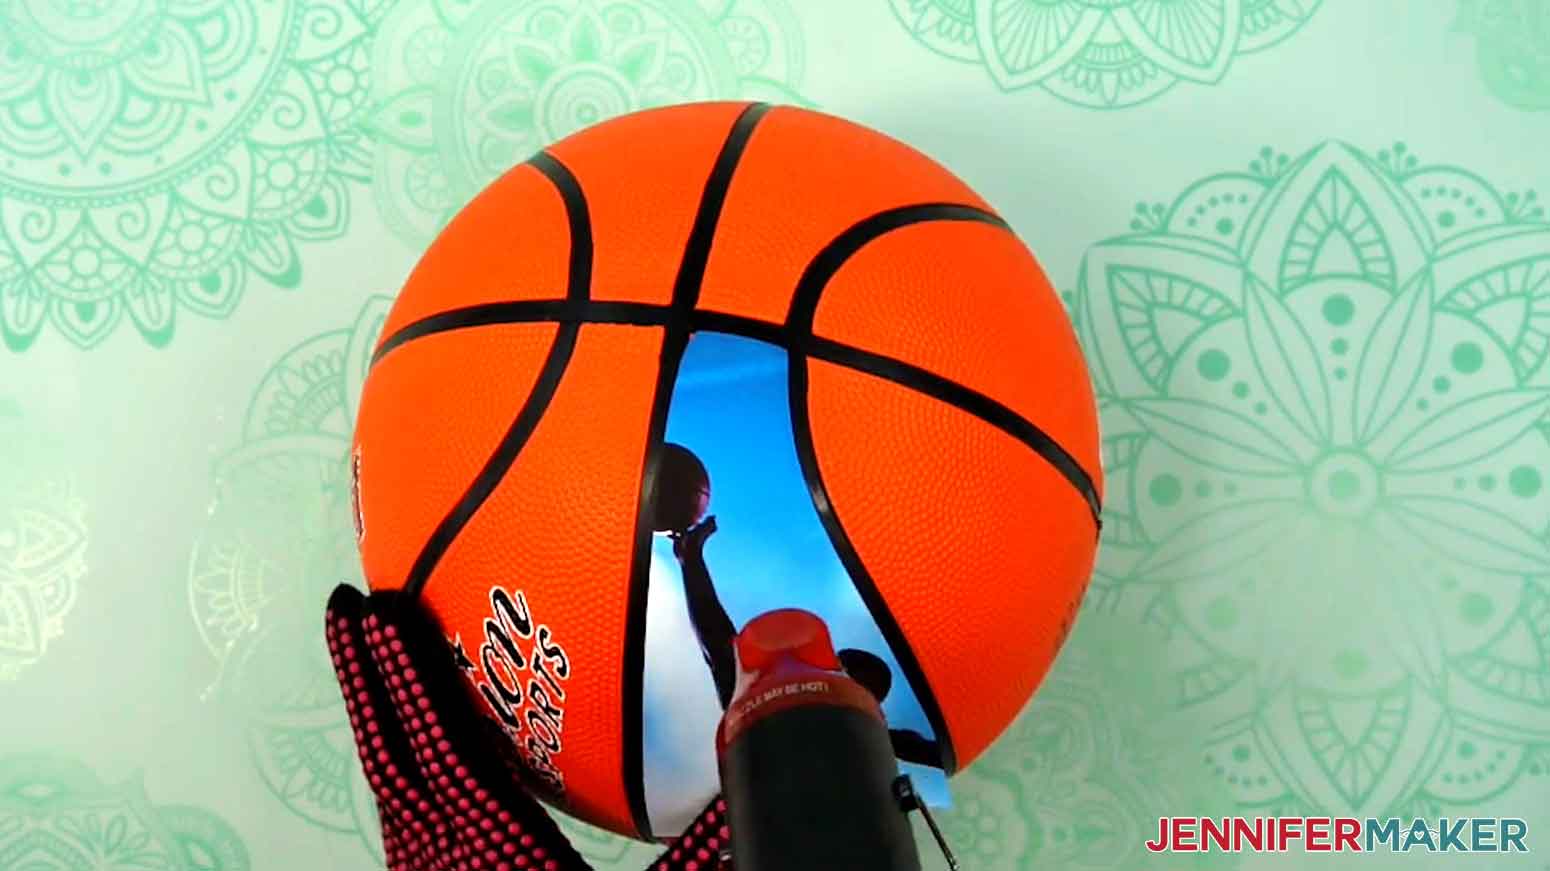
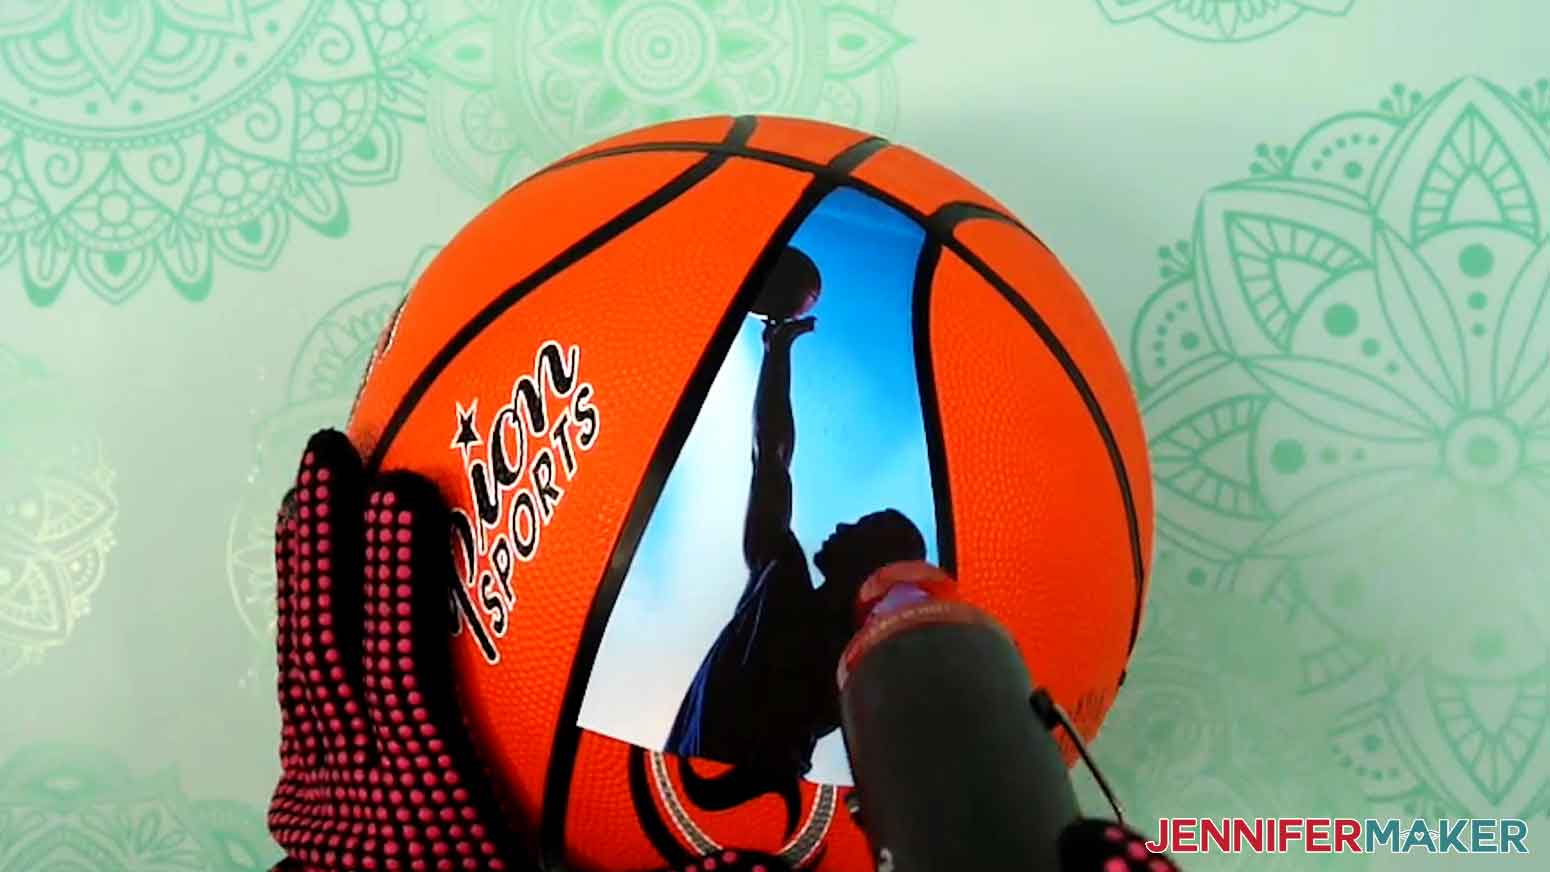
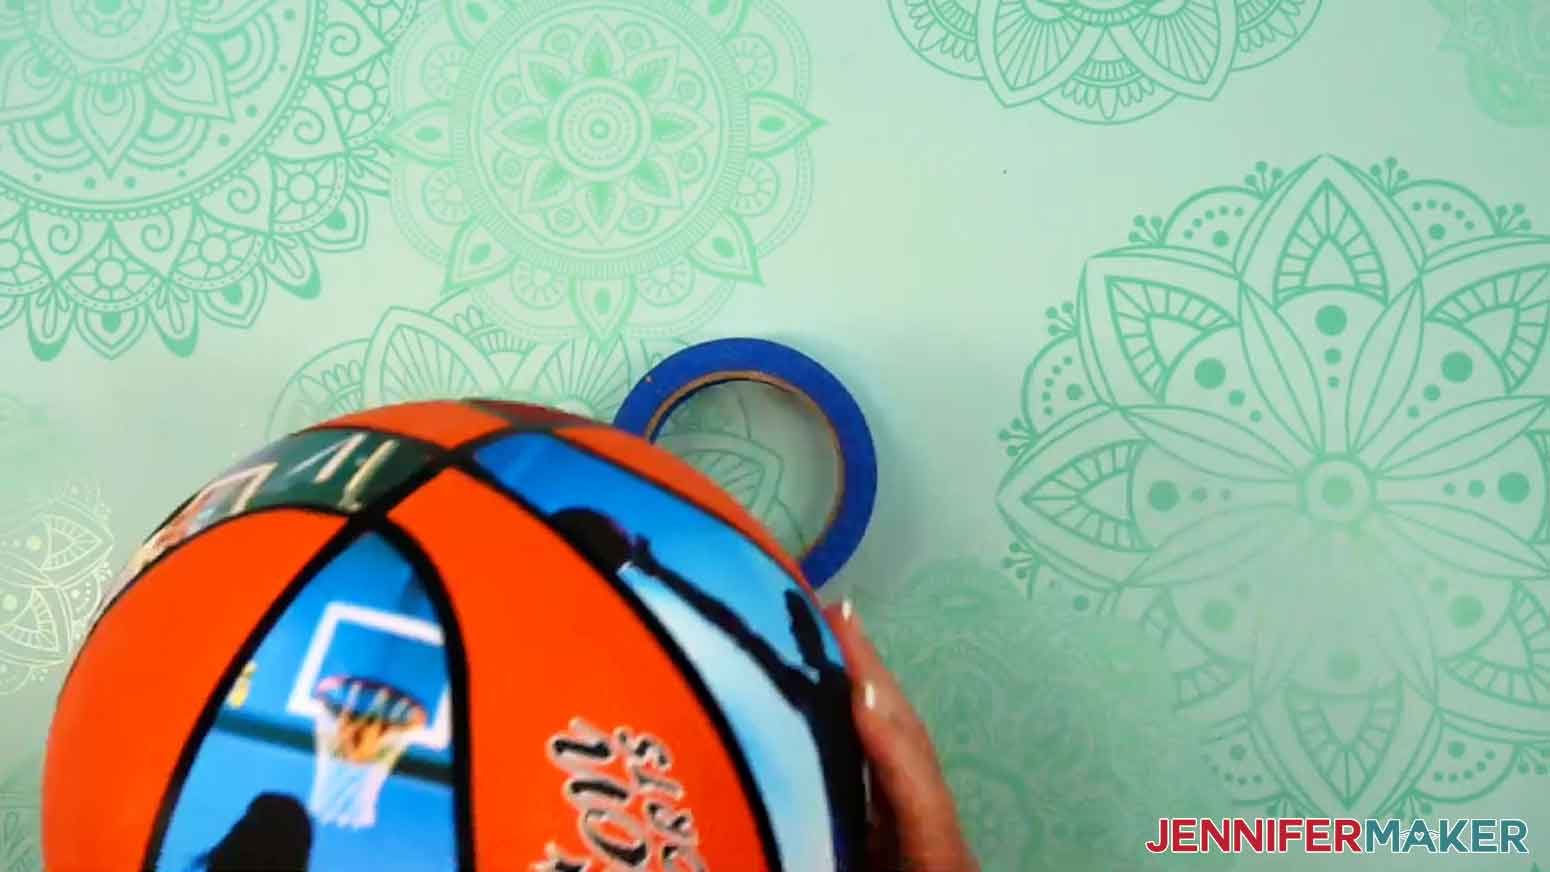
STEP 4: APPLY YOUR PHOTO PANELS WITH A HEAT GUN
IMPORTANT SAFETY INFORMATION: I recommend wearing heat-resistant gloves when working with the heat gun for this project. If you notice the gloves are pulling ink from the iron-on material while pressing and smoothing it to the ball, remove heat from the area and allow it to cool for ten seconds, then smooth the material into place with your fingers.
1. If you’re using a new ball, use the pump to inflate your ball according to the manufacturer’s instructions.
NOTE: A basketball should be firm with a slight give.
2. Use isopropyl alcohol and a lint-free cloth to clear the ball of dust or debris.
3. . Find the panel on your ball where you want your first photo to go.
NOTE: Refer back to your Design Space screen if you’re not sure which panel your photo goes on.
4. Match the shape of your printed panel to the corresponding section on your ball to confirm the fit.
5. Carefully peel the printed photo off the backing sheet.
TIP: Use a weeding tool to help lift the material.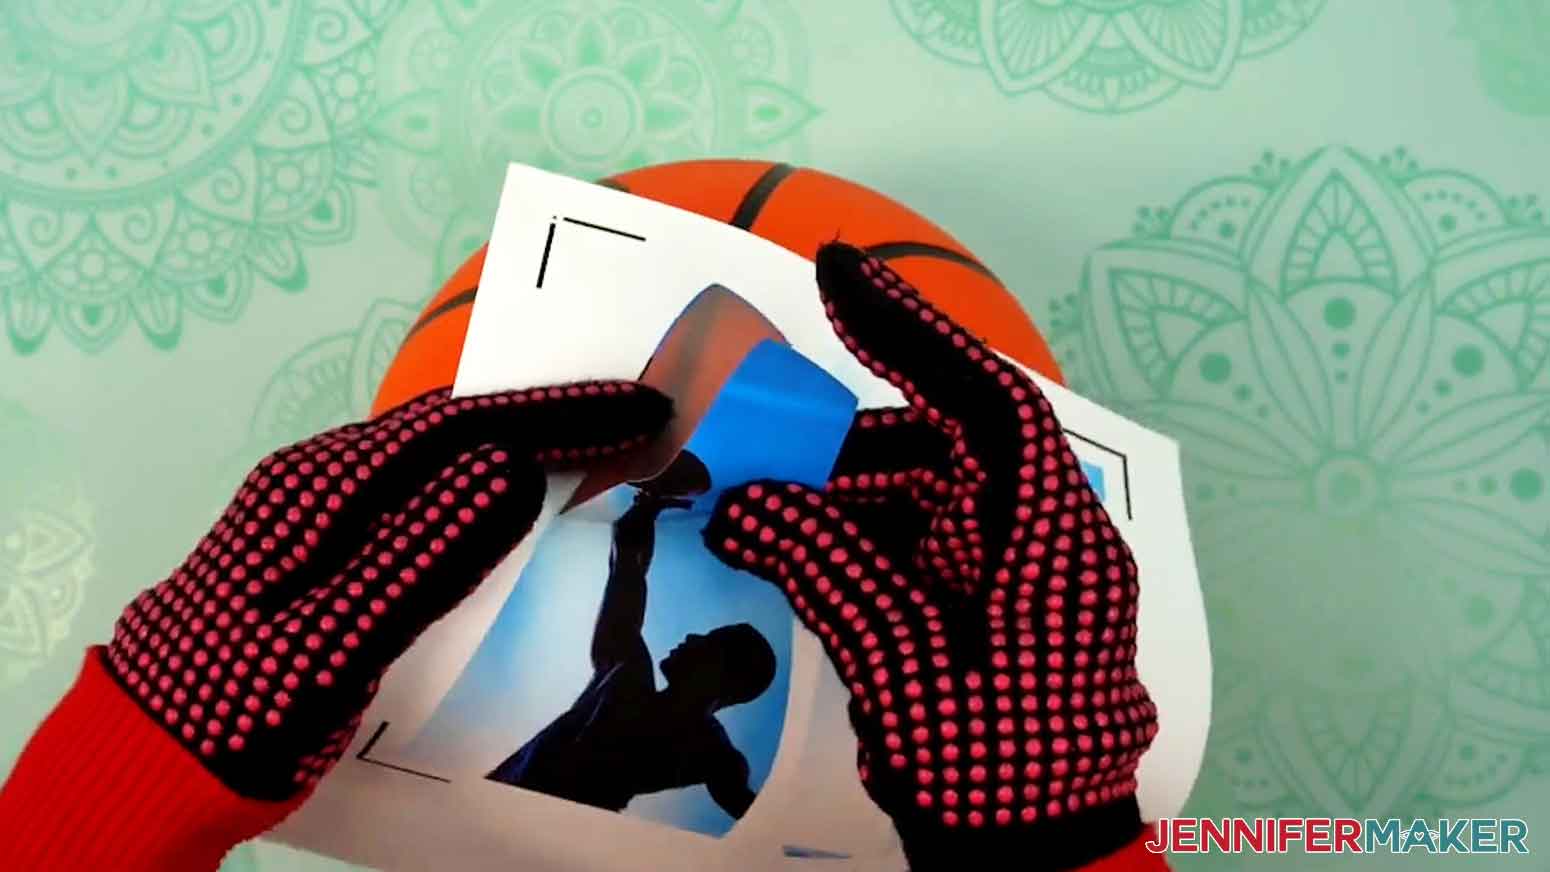
6. Position the photo on the panel and hold it in place.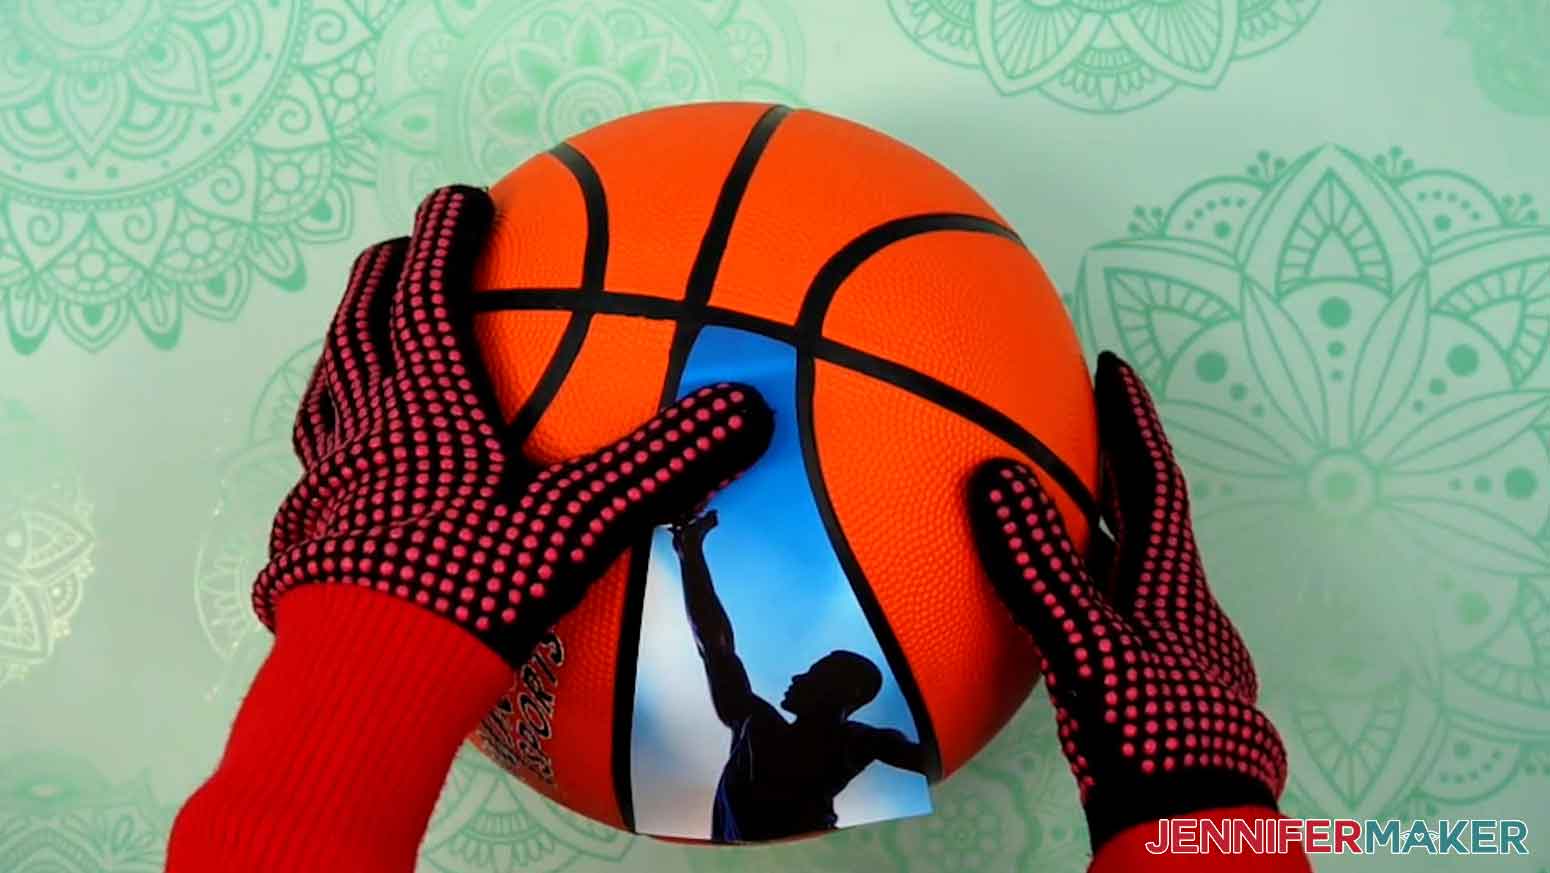
7. Point the heat gun at the iron-on material, keeping its tip a couple inches from the ball’s surface.
8. Turn the heat gun to its lowest setting and make small circles in your focal area, gently heating the iron-on material and pressing it into place.
9. Slowly heat and press the material into place, smoothing as you go to avoid wrinkles, until it’s fully adhered to the panel.
10. Repeat Steps 3-9 for your remaining printed photos.
TIPS FOR APPLYING IRON-ON TO THE BASKETBALL
1. There are two iron-on prints for each basketball, and the panels have different shapes, so make sure your pieces are matched up and fit the panel you’re working on before you start heating the material.
2. For best results, work on one panel at a time.
3. Start by positioning the top piece, and hold it in place as you apply heat to the top of the iron-on material until it stays in place when pressed.
4. Then apply heat down the center of the piece and press it into position.
5. Once it’s secure, apply heat from the center to the edges, pressing and smoothing the material into place until it’s fully adhered
6. Then position the panel’s bottom piece, carefully lining it up with the top piece so the photo is aligned in the center.
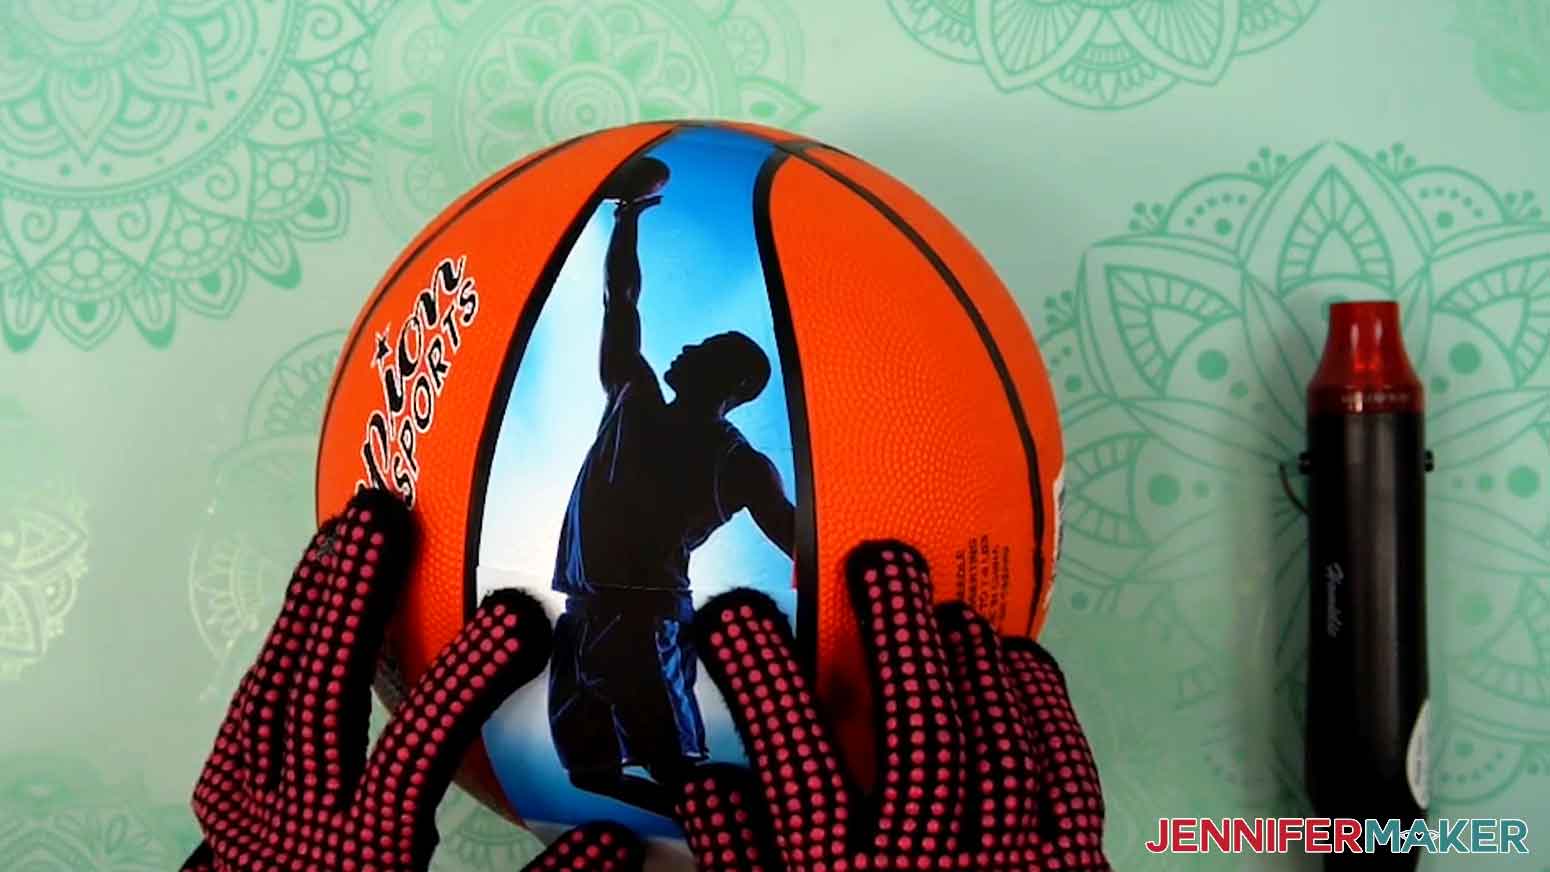
7. Then apply heat at the seam and press the bottom panel’s top edge into place.
8. Then heat and adhere it down the center and out to the edges, smoothing as you go.
OPTIONAL: SEAL YOUR BALL WITH MOD PODGE
1. Once your photo panels are in place, use a lint-free cloth to wipe down your ball and make sure it is free of any smudges or fingerprints.
2. Lay a roll of painter’s tape on its side and place the ball on top to stabilize it.
NOTE: I like to position the basketball so I can seal four panels at a time.
3. Use a foam paint brush to apply a small amount of Mod Podge to the top of the first panel.
TIP: You can use any type of Mod Podge to seal your ball, including matte, satin, glossy, glitter, or even glow-in-the-dark!
4. Brushing in one direction, completely cover the panel with an even layer of Mod Podge to fully protect the material.

5. Continue applying Mod Podge to each of the panels on the top half of the ball.
TIP: For a more even finish, apply the sealant to the spaces without material, too!
6. Allow at least 20 minutes for the Mod Podge to dry to the touch, then flip your ball over and apply Mod Podge to the remaining panels.
7. Let your ball dry for 24 hours for a full cure.
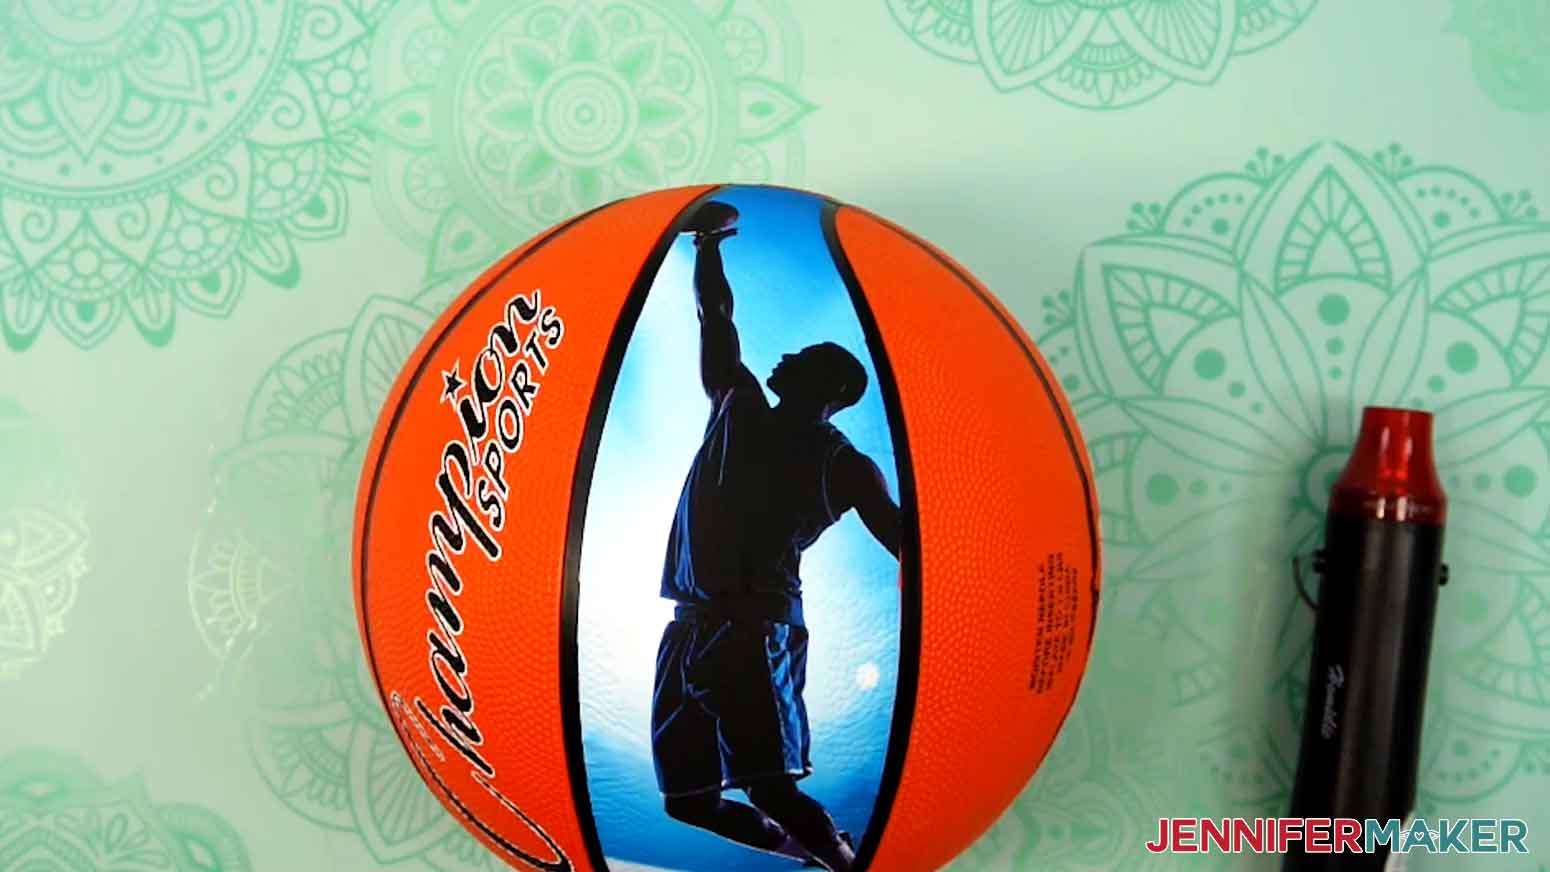
STEP 5: SHOW IT OFF
You now have an amazing basketball decorated with personal photos!
Notes
Finished Sizes:
Basketball: Size 7 basketball panels are approximately 3.5” W x 13.2” H (when top and bottom pieces are combined)
Answers to Your Questions About Decorating a Basketball
Q: I’d like to design a personalized panel with custom text for my ball. How do I do that?
A: You can learn how to design a photo panel with custom text in my ADVANCE program. Learn more about ADVANCE here!
Q: Can you add your own photos to decorate a ball?
A: Yes, you can add your own photos to a basketball using a printer and special heat-activated material! Just follow the video tutorial or read through the written tutorial above to learn how to use my free templates to print your photos and transfer them to the ball of your choice.
Q: What kind of material do you use to transfer the photos to the balls?
A: For this project, I use printable iron-on material for dark fabrics. It’s similar to iron-on vinyl, except you can print your design on one side, and then use heat to activate the material’s adhesive and secure the photo to your ball.
Q: What should I use to apply heat to the iron-on material?
A: I recommend using the heat gun in my supplies list to transfer the iron-on material to your ball. It’s hot enough to activate the adhesive without scorching the material or the ball. If you use a different heat gun, start it out on the lowest setting needed to heat the glue enough for the material to stick. Remember to wear heat-resistant gloves when you apply the material–safety first, always!
Q: Can I use a hair dryer to apply the iron-on/heat transfer material?
A: No, I don’t recommend using a hair dryer to apply photos to your basketball with heat transfer material. It simply won’t get hot enough!
Q: What settings do I use for the printable heat transfer material?
A: I show you exactly which settings I used to print and cut my material in the tutorial, so be sure to watch carefully so you can grab the correct settings!
Q: Do I have to use the ball in your supplies list/Can I use an older ball for this project?
A: For the best results, I recommend using the standard-sized basketball listed in my supplies list since my template is designed to match its panels. If you use a different sized ball, the panels might not fit the way you want them to. If you’d like to use an older ball, be sure to clean it up first so the adhesive is able to stick directly to the surface!
Q: What sorts of photos can I use for this project?
A: You can use any photos you like for this project! Photos of your favorite athlete or a sporty family member are a great choice, or you can use the PNG photos I’ve included in my download file for a more general style. Just make sure to use high quality images and the right print settings (which you can find in my tutorial, too!).
Q: What is the best way to protect my photos from damage?
A: I recommend sealing your balls to protect them from damage. You can use a coat of Matte Mod Podge, which you can find in my supplies list. I show you how to apply it for the best results in my video tutorial.
Get my free PNG/SVG/DXF/PDF files!
(If you do not see the signup form above, click here.)
I love seeing what you make with my tutorials and how you customize them! Please share a photo of your custom decorated basketball in our Facebook group or tag me on social media with #jennifermaker.
Love,

Want to remember this? Save this Custom Photo Basketball tutorial to your favorite Pinterest Board!