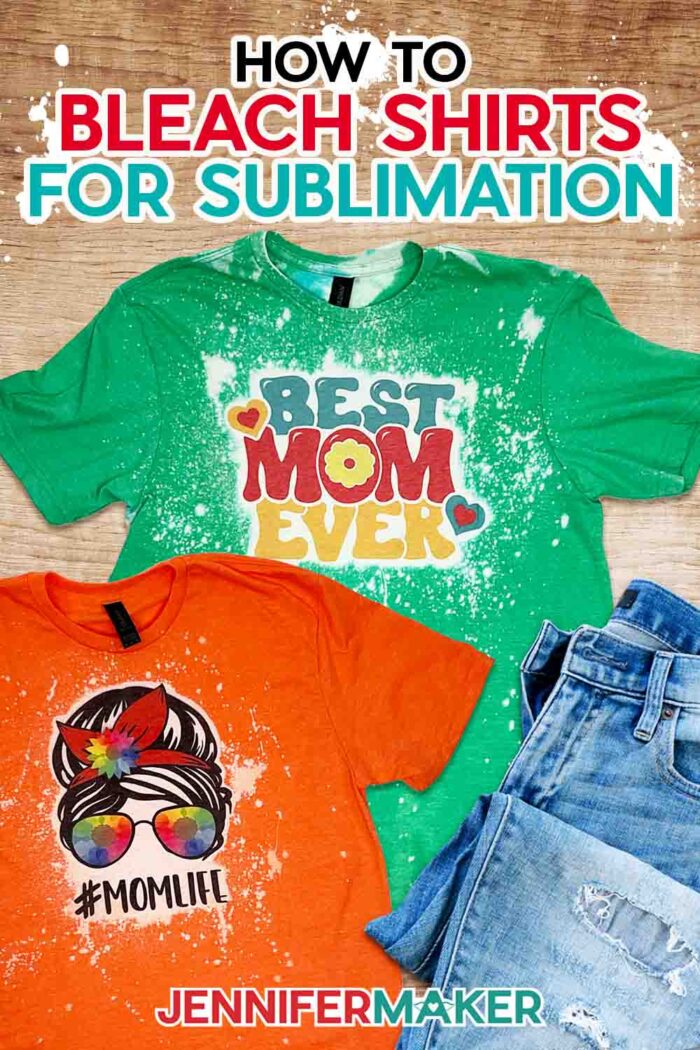
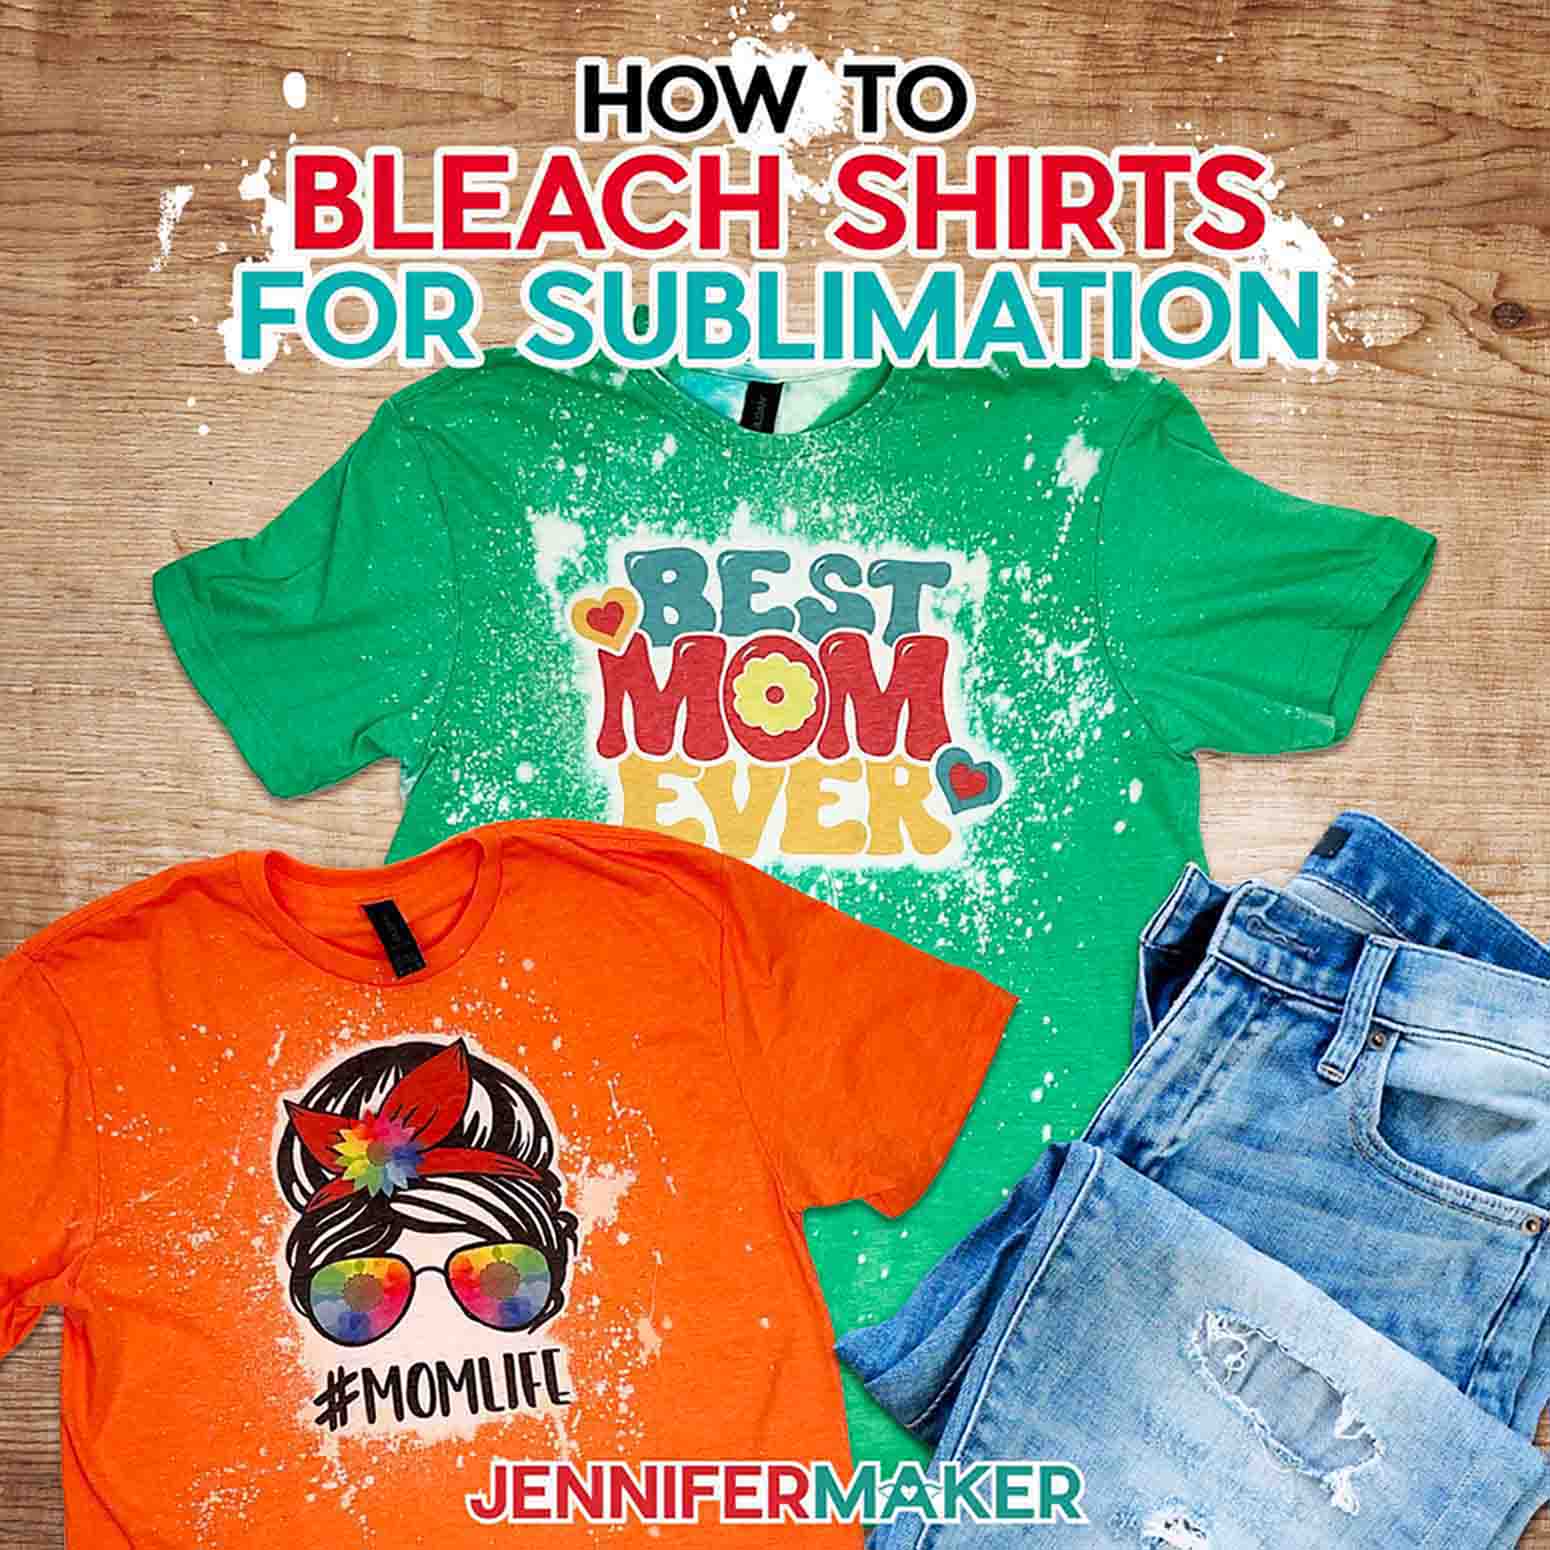
Learn all about bleaching shirts for sublimation!
Have you ever wanted to sublimate onto a shirt that’s any color but white? Typically sublimation is limited to white or very light-colored surfaces, but I found the perfect hack. Using bleach to decorate T-shirts isn’t just a fun way to add some cool effects — it’s also a way to create a light-colored area on a shirt to let your sublimation design shine! But don’t grab the bleach just yet! Bleaching shirts for sublimation takes some important steps and safety tips, so let’s learn the right way to do it!
See the full step-by-step video tutorial on bleaching shirts for sublimation:

You probably know by now that I’m almost always in the mood for fun T-shirts, and will jump on any excuse to create a new one for my collection. Custom shirts are also a great way to create an ultra-personalized gift – like these super cute tees I designed for Mother’s Day!
I love the effects you can get with bleach, and I also love sublimating to decorate shirts. I especially love consulting my new Sublimation Cookbook for super helpful recipes on how to sublimate all the things. But most of all, I love combining techniques to create unique NEW ideas!
Bleaching shirts creates really neat, edgy-looking results, and no T-shirt turns out exactly the same. That’s the beauty of it! This method is especially cool because usually you can only sublimate onto white or very light color fabric. However, bleaching allows you to sublimate onto any color shirt you want, because bleaching out the area you want to sublimate creates a nice light canvas to show off your design.
Best done outside on a sunny day, I’ll show you two different ways to bleach shirts for sublimation. But don’t worry — you can do this inside, too (with the right safety precautions). The first method I’ll show you will create a bleached T-shirt with a design area for sublimation. The second method I’ll show you actually involves sublimating first, and bleaching second. It sounds crazy, I know! I’ll share which I believe to be the best option, and we’ll compare the results!
I’ll also show you my favorite unique effects you can achieve using household bleach — including using a paintbrush, cornstarch, a spray bottle, and even a scrunch method reminiscent of tie dye patterns!
Before you get started, make sure you have the right safety equipment, because bleach can be dangerous. Protective goggles, a respirator, a vinyl apron, disposable cups, paper towels, and gloves will make handling bleach safer, and working outside is the best way to address the fumes.
If you have no choice but to work inside, you must have excellent ventilation or you should not attempt this. Keep windows wide open and turn on a fan to help ventilation. You need maximum ventilation and you must wear a respirator. Garbage bags work to protect your work area, too! And have a bucket and a mixture of water and hydrogen peroxide (10 parts water, 1 part hydrogen peroxide) nearby to stop the bleaching process when the timer dings!
If you’re familiar with sublimation, you know that you’ll need a polyester shirt. But if you’re familiar with bleaching, you know that bleach works best with cotton shirts. So, what’s a crafter to do?
Don’t worry, I have the answer! The most important thing, the key for best results, is using a shirt that’s a polyester and cotton blend. But not just any cotton/poly blend, the best shirts to use when sublimating and bleaching are 65% polyester and 35% cotton. Seems specific, right? It may be, but it’s also the perfect compromise between the two materials, with the high polyester content allowing for successful sublimation, and the cotton content is high enough to yield awesome bleaching effects!
Typically these perfectly blended shirts are heathered, like the dark heather shirts I link to in my materials list. I have heard that some of the shirts in these listings do not bleach well. Always check that the shirt is at least 65% polyester for results like mine. The fiber content isn’t always the same depending on the color.
To create your bleached and sublimated T-shirt, you’ll need a sublimation printer. This is a special printer designed to print sublimation ink — regular inkjet printers and ink won’t work for sublimation. And remember, the printed design might look dull at first, but they brighten right up on the final project! And with a bleached area, the T-shirt’s color won’t interfere!
You’ll also need a heat source like a Cricut EasyPress with a pressing mat, Autopress, or traditional style heat press. You cannot sublimate with a household iron, as it doesn’t get hot enough.
If you don’t have a sublimation printer, you can use infusible ink transfer sheets, infusible ink pens, order a sublimation transfers from makers online, or use heat-transfer vinyl instead! If you go the vinyl route, be sure to bleach first, then apply the design after. It works really well as stencils for negative space designs, too!
There are some other supplies you’ll need like bleach, paintbrushes, a spray bottle, water/Hydrogen Peroxide mix, garbage bags, and more that you’ll find in my materials list below. If you don’t want the bleach to discolor the back of the shirt like the green example, put some foam board or cardboard under the front of the shirt.
Ready to learn about bleaching shirts for sublimation? This post contains some affiliate links for your convenience (which means if you make a purchase after clicking a link I will earn a small commission but it won’t cost you a penny more)! Read my full disclosure policy.
Materials & Tools for Making a Bleached Sublimation Shirt
View my Amazon shopping list with the exact items we used to make this project! (you can also watch my Amazon video that shows you what exactly each time looks and feels like here)
For bleaching:
- Gildan Softstyle T-Shirt in Heather Galapagos Blue, Heather Red, Heather Orange, or Heather Irish Green worked well for my bleach sublimation shirts. NOTE: I have heard that some of the shirts in these listings do not bleach well. Always check that the shirt is at least 65% polyester for results like mine. The fiber content isn’t always the same depending on the color.
- Clorox Beach
- Hydrogen Peroxide (important: only use this with bleach when mixed with water at the ratio of 10 parts water to 1 part hydrogen peroxide)
- Bucket
- Garbage Bags
- Optional – Foam Board to protect the back of the t-shirt (I used foam board from Dollar Tree) but, an old cardboard box cut to size will also work
- 3/4″ Flat Paintbrush
- Spray bottle (for bleach)
- Paper towels
- Cornstarch
- My handy T-shirt ruler guide
- Respirator (R95 rated respiratory mask) for protection from fumes
- Goggles for eye protection while bleaching
- Excellent Ventilation – it’s best to bleach outside, but if you must be inside, use a fan and wear a respirator
- Gloves, such as long dishwashing gloves (to protect your skin when rinsing your bleached shirt)
- Disposable Plastic Cups
- Timer
- Vinyl Apron
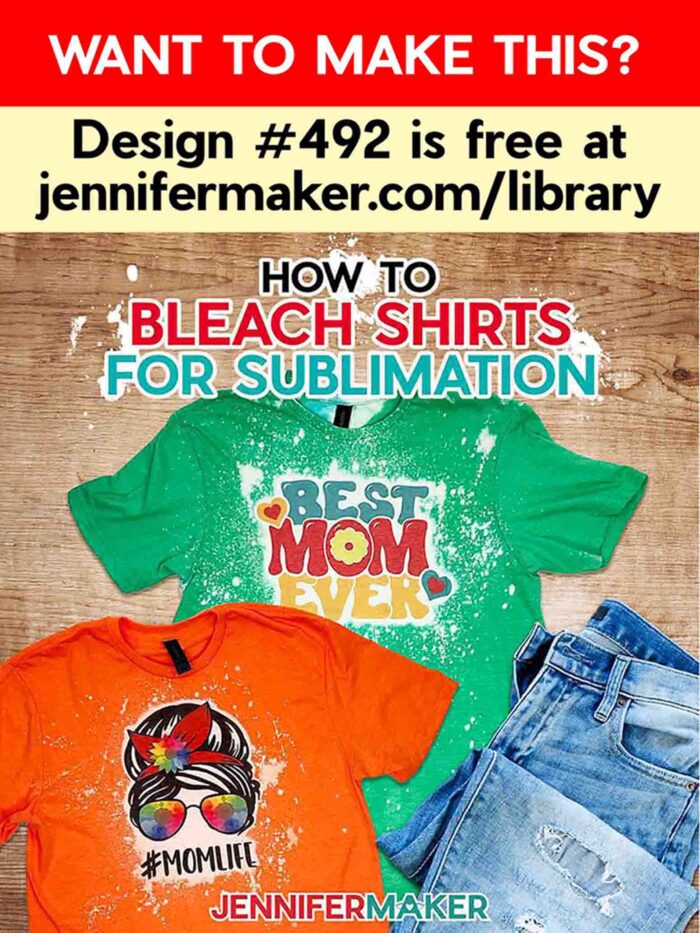
- Design #492 – My free sublimation & HTV design files are available in my free resource library (get the password by filling out the form at the bottom of this page)
For sublimation:
- Free Google account to use the free Google Docs software
- Sublimation Printer
- Heat Press – I used my Cricut EasyPress with a 12″ x 12″ EasyPress mat
- HIIPOO Sublimation ink
- A-Sub Sublimation paper 8.5″ x 11″
- White Cardstock 12″ x 12″
- Uncoated White Butcher Paper
- Cricut Heat-Resistant Tape
- Disposable Gloves (nitrile)
- Scissors
- Design #492 – My free sublimation & HTV design files are available in my free resource library (get the password by filling out the form at the bottom of this page)
How to Make a Bleached Sublimation Shirt

How to Bleach Shirts for Sublimation
I’m using several techniques to bleach T-shirts. It’s great to have some bleached shirts on hand to decorate with HTV or sublimation!
Materials
- Gildan Softstyle T-Shirt in Heather Galapagos Blue
- Gildan Softstyle T-Shirt in Heather Red
- Gildan Softstyle T-Shirt in Heather Orange
- Gildan Softstyle T-Shirt in Heather Irish Green
- Clorox Beach
- Hydrogen Peroxide (only used when mixed with 10 parts water/1 part hydrogen peroxide)
- Garbage Bags
- A-Sub Sublimation paper 8.5"x11"
- 3/4" Flat Paintbrush
- Spray bottle (for bleach)
- White Cardstock 12" x 12"
- Optional- Foam Board to protect the back of the T-shirt I used foam board from Dollar Tree but, an old cardboard box, cut to size will also work.
- White Uncoated Butcher Paper
- Paper towels
- Cornstarch
- Design #492 (My free sublimation design files are available in my free resource library – get the password by filling out the form at the bottom of this page)
Tools
- Ventilation - I used a fan for both bleaching and sublimation with a window open
- Respirator (R95 rated)
- Nitrile Gloves
- Goggles Since I'm using bleach
- Vinyl Apron
- Sublimation Printer
- HIIPOO Sublimation ink
- Heat Press - I used my Cricut EasyPress and
- Pressing mat 12" x 12"
- Cricut Heat-Resistant Tape
- Scissors
- Bucket
- Free Google account to use the free Google Docs software
- Timer
- My very handy T-shirt ruler guide
- Disposable Plastic Cup
Instructions
STEP 1: PREPPING AND BLEACHING T-SHIRTS
I’m using several techniques to bleach T-shirts. It’s great to have some bleached shirts on hand to decorate with HTV or sublimation! There is even a way to completely customize the bleaching over a design!
Whether you're bleaching shirts for your craft stash or to sell, bleaching T-shirts is fun!
NOTE: Before you begin it's a good idea to change into some clothes that you don't mind accidentally dripping bleach on. Gloves and eye protection are also important, as well as good ventilation and protective covering on any surfaces you don’t want to come into contact with bleach.
I also HIGHLY recommend you work outside for safety. Also be sure to wear your respirator, goggles, gloves, and apron.
Have a stack of paper towels nearby to use for spills.
Fill a bucket with a 10:1 ratio of cool water and hydrogen peroxide to safely stop the bleaching process. That means ten parts water to 1 part hydrogen peroxide. Do not use any more hydrogen peroxide than this, or you can create toxic gases that are dangerous to you and your family.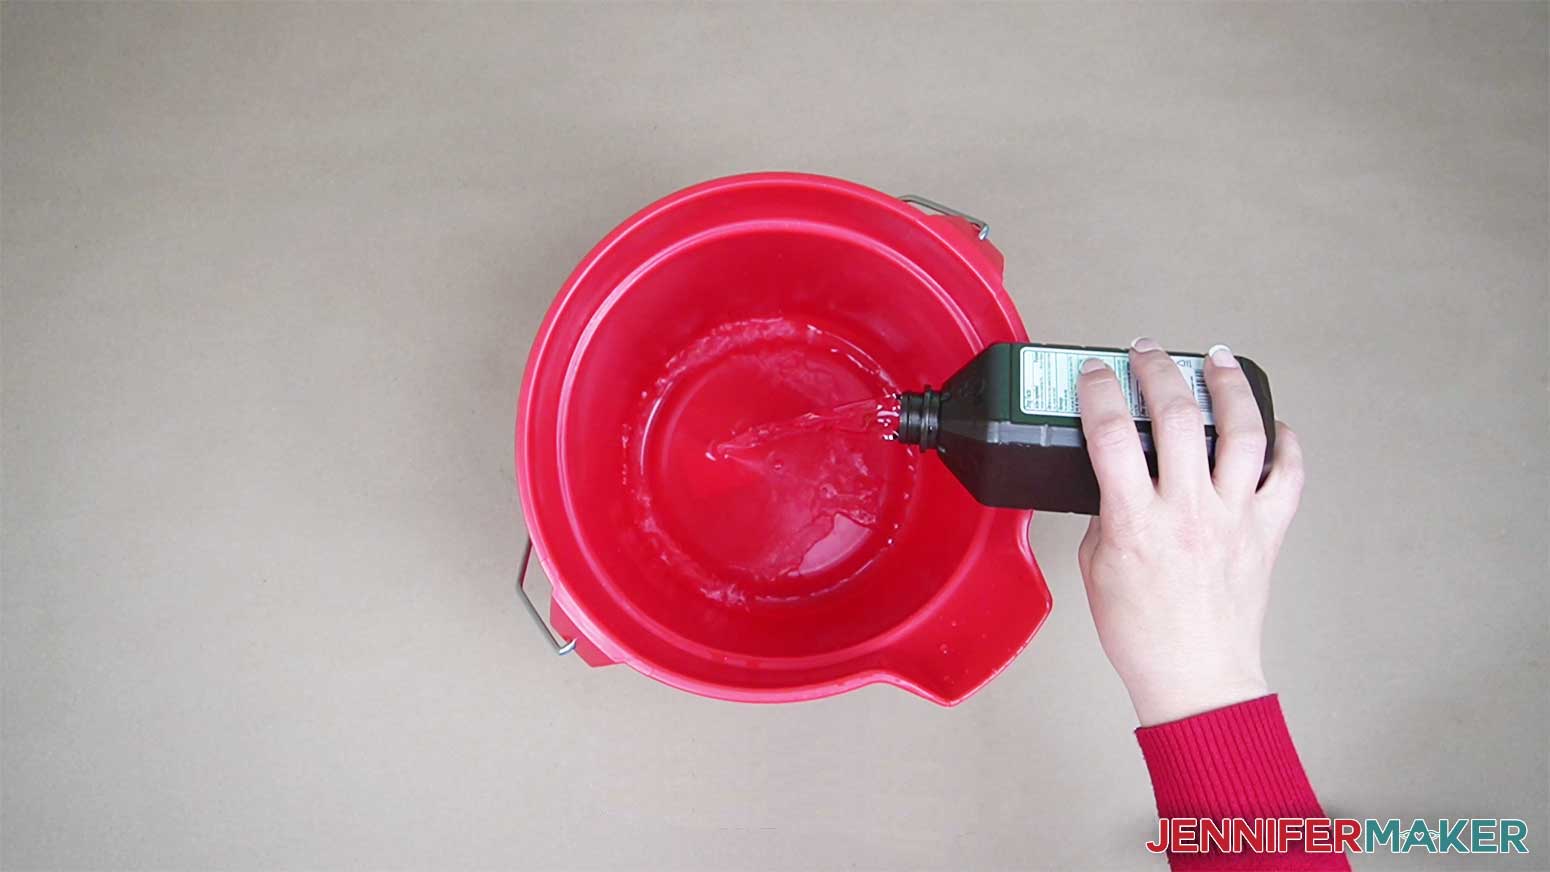
Make sure your water/hydrogen peroxide solution is enough to submerge your entire shirt. I’ve selected shirts with a high polyester count since I’m planning on sublimating them, but if you plan on using HTV to decorate a cotton blend will work well.
Optional next step - Some shirt suppliers have swatches you can order and test with bleach, if you don't happen to have one, use a paintbrush and a drop of undiluted bleach to make a ¼” dot along the bottom inside the hem of the shirt.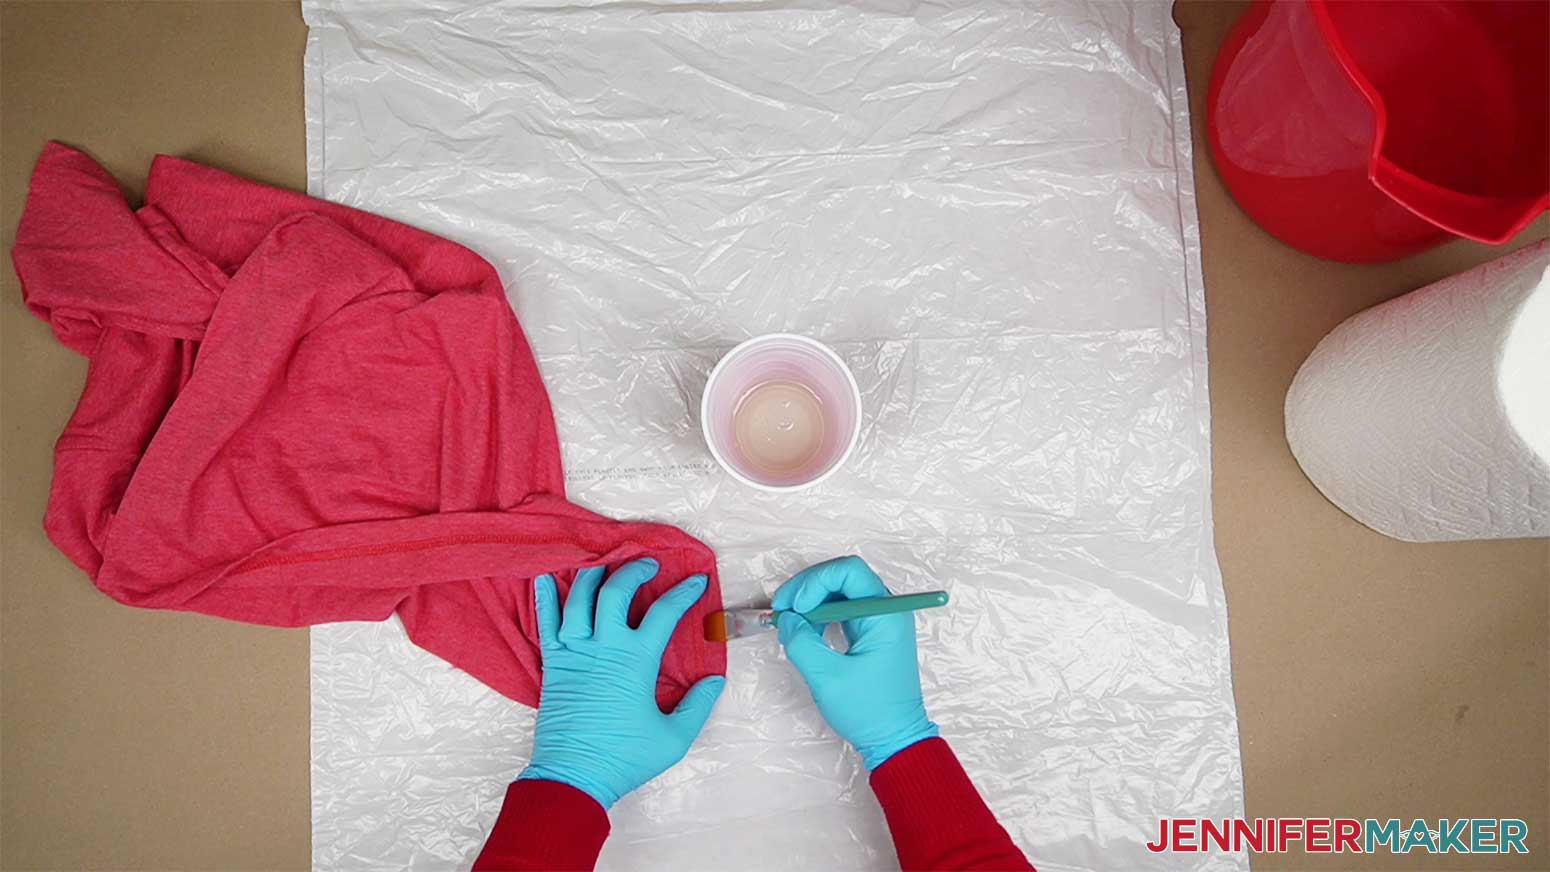
Place the bleach spot in the sun and set a timer. 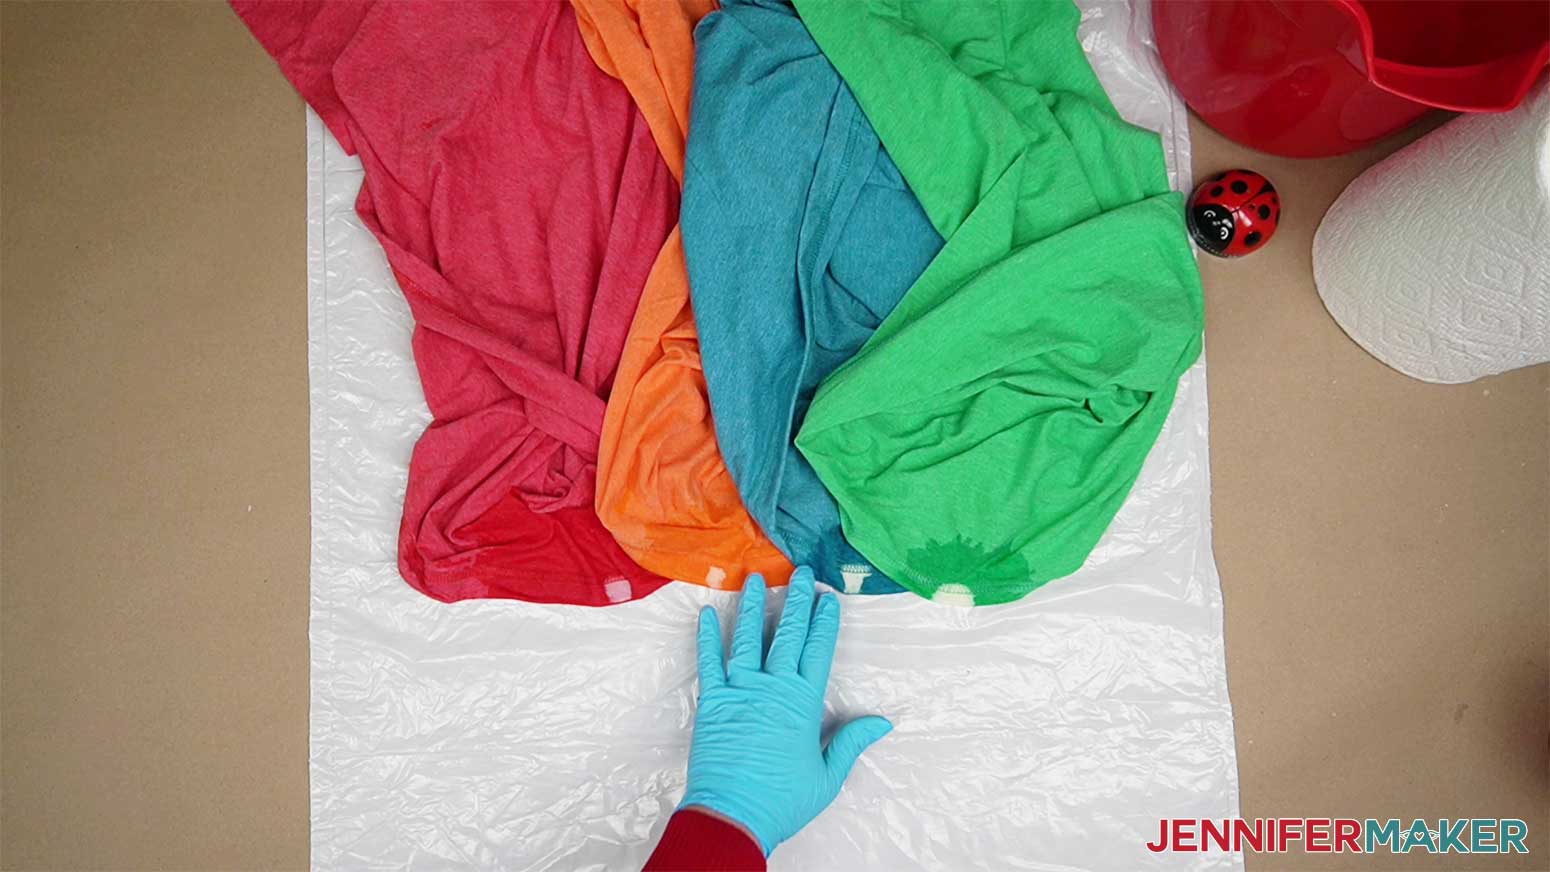
Watch to see how long it takes to bleach to your desired color and lightness.
I found that 7-8 minutes was sufficient with the T-shirts I used. Though different brands may yield different results so it's always best to do a spot test. Now that I know how long to bleach my T-shirt, I will try a few different methods to see their results.
Next, I'll prep the shirt and the area.
I found it easiest to use a sheet of foam board inside the shirt, but you can use an extra cardboard box cut to size or even a garbage bag. The goal is to keep the bleach off the back of the T-shirt and to ensure the bleaching is centered. 
Next, I'll create a cardstock template to trace around with a paintbrush and cornstarch.
TIP: You can use any shape template you’d like. If you already have a design in mind, you can make a template from that. You can also create a square or rectangle shape for a more versatile bleached shirt.
Cut a template roughly the shape of the design, but a little bigger - I’ll use it to create an area on my shirt that I can either sublimate or apply HTV.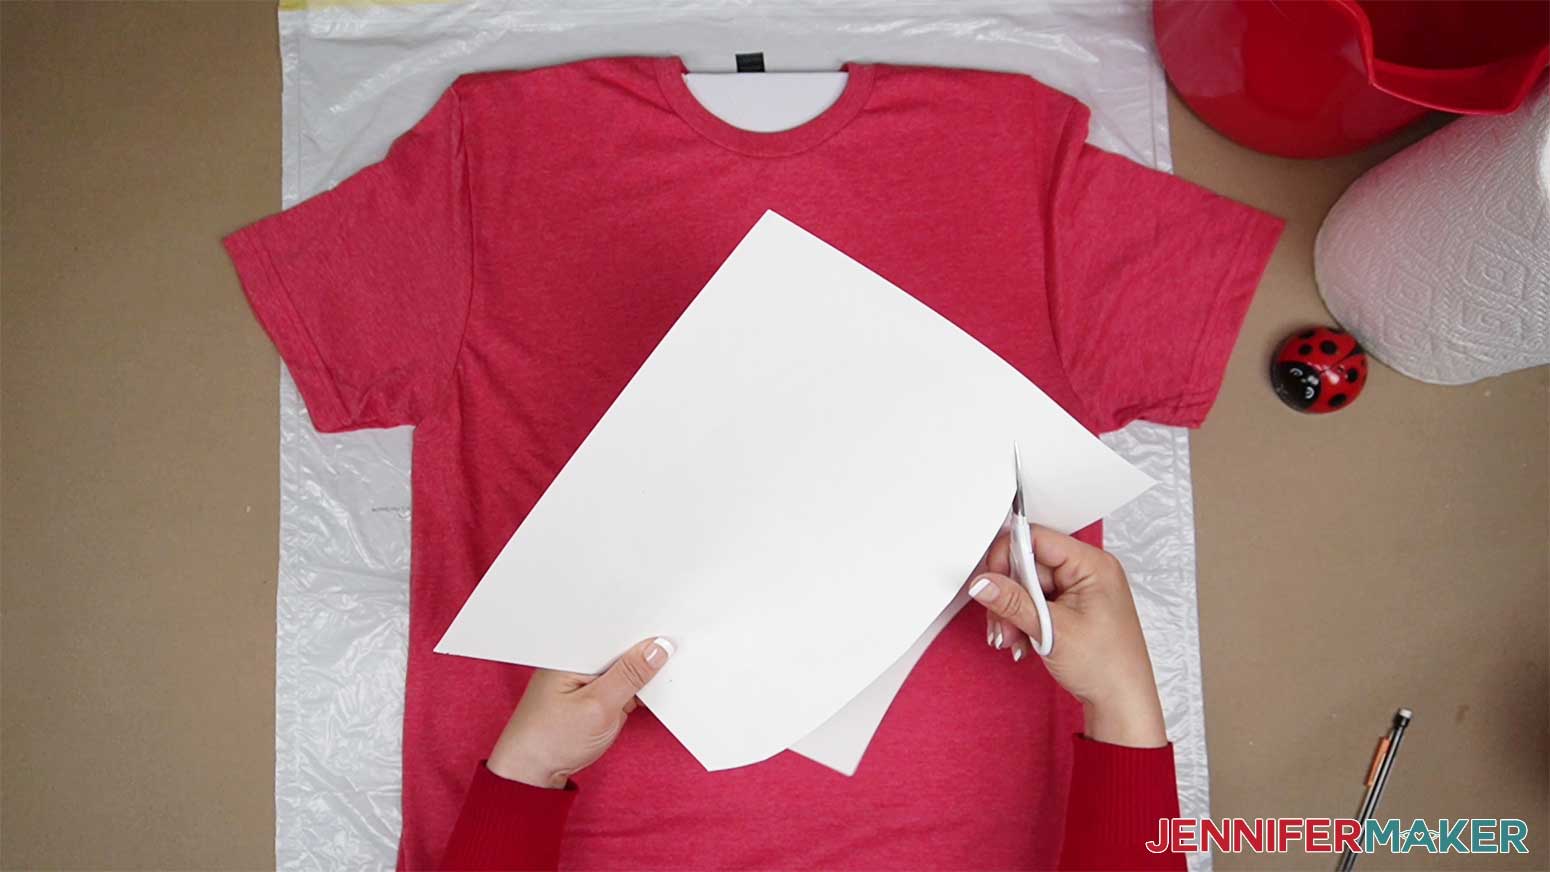
I will place the template on the shirt backward since the design will be mirrored. It’s important to remember this step, as the design and bleached space may not line up.
Using a small amount of cornstarch in a cup and a clean paintbrush, I traced along the outside of a template I cut out of cardstock. 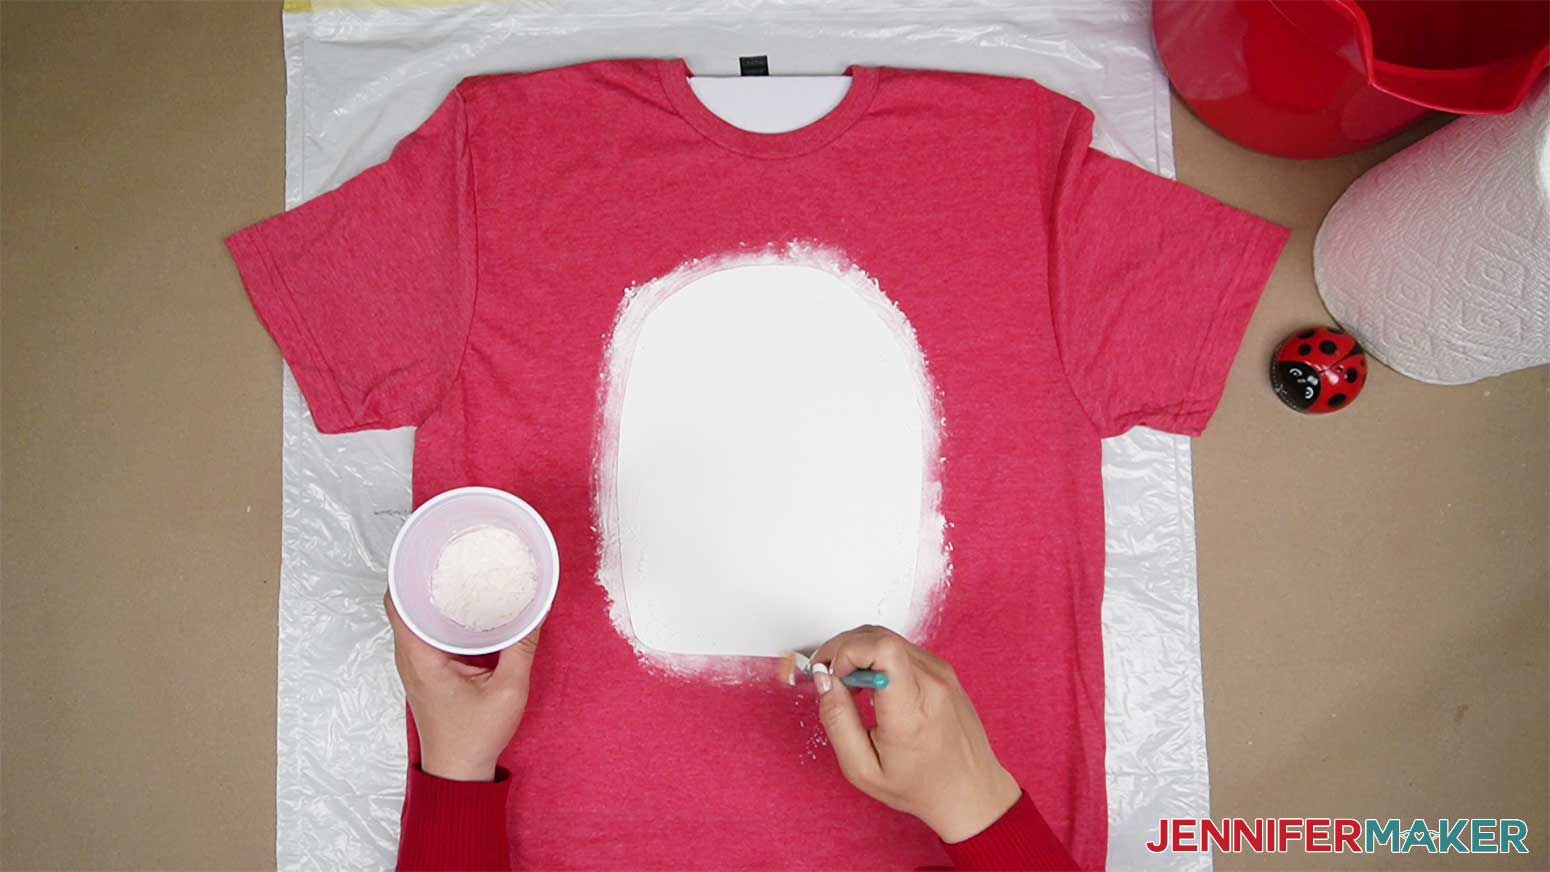
Dipping my brush in cornstarch as needed until the template is outlined completely.
And then using a new, clean paintbrush to "paint" the bleach inside the cornstarch outline.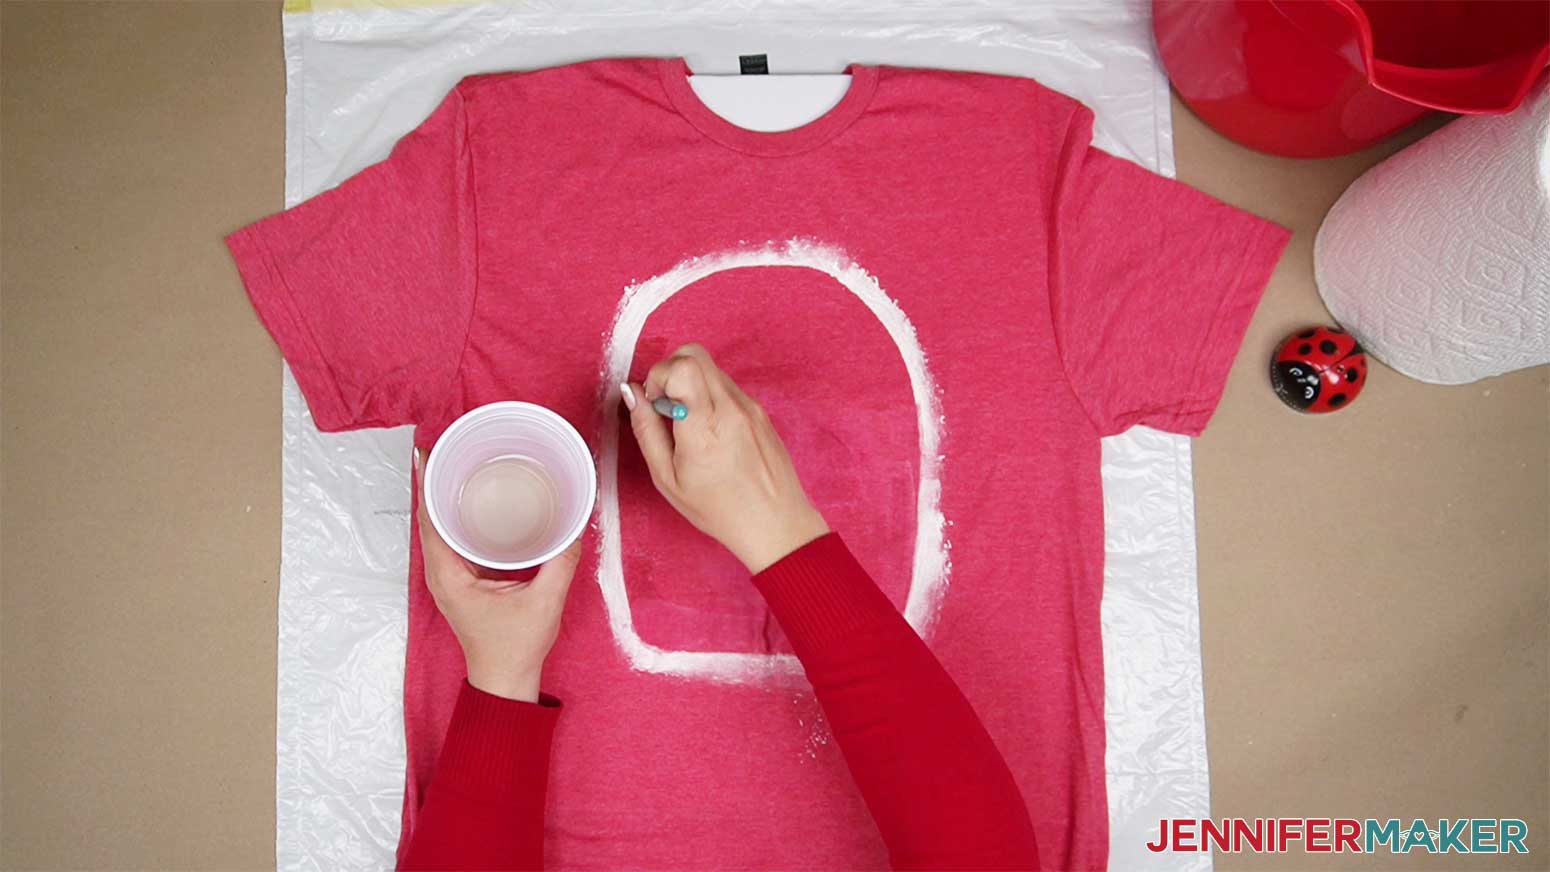
I also tried tracing with bleach around the cardstock template by itself.
I filled a second cup, about 1/4 full, with undiluted bleach and then painted it with bleach to fill it in with nice results.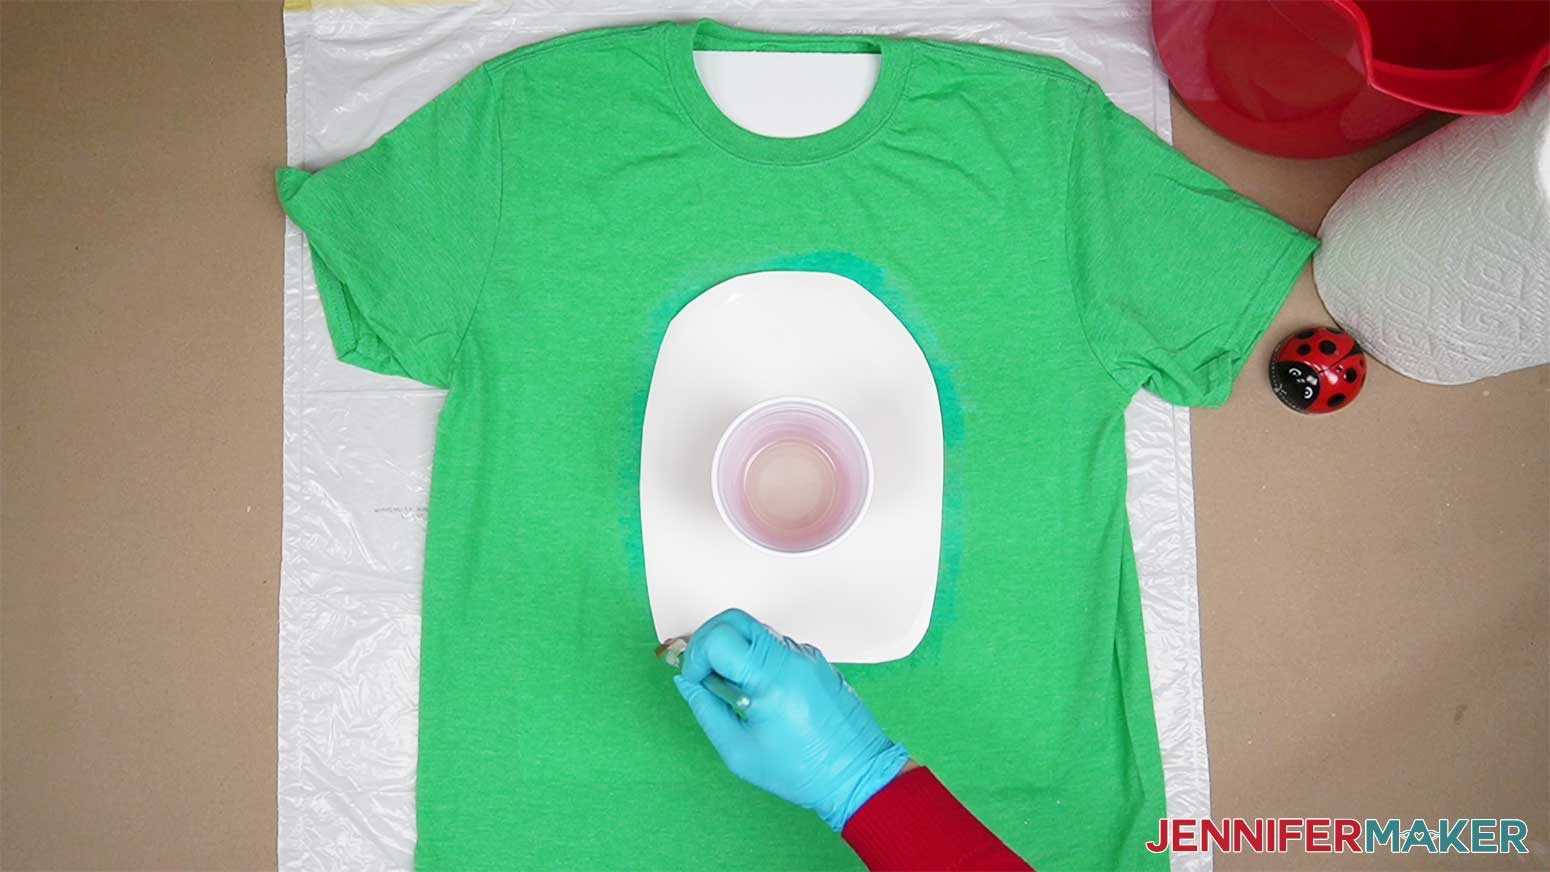
Either of these methods works well to get an overall shape to the bleached area. 
If you’d like to bleach the entire front of the T-shirt, using bleach in a spray bottle will quickly get the desired effect.
For more subtle bleaching, dilute the bleach as I did in my Bleach Stencil tutorial https://jennifermaker.com/bleach-stencil-shirt
NOTE: While technically a heat gun (on the lowest setting) or a hairdryer CAN help to speed up the bleaching process, it is NOT recommended that you heat bleach. Please read the Safety Data Sheet before working with bleach to be sure you're using it safely.
After the timer goes off, submerge your shirt in the 10:1 water/hydrogen peroxide solution to stop the bleaching process. Alternatively, you can immediately wash your shirt ALONE in the washing machine to stop the bleaching process.
Wash the shirt alone or with other bleached shirts, if you happen to be making more than one, in cool water with a mild detergent and then tumble dry on low heat.
Once they're ready, pull your shirt out of the dryer for the big reveal!
STEP 2: DECORATING BLEACHED T-SHIRTS
Add some personalization or a design to your T-shirt with HTV (iron-on vinyl) or sublimation! For help adding HTV to your bleached shirt check out my tutorial - https://jennifermaker.com/how-to-layer-vinyl-on-a-shirt
Sublimate your bleached shirt following my tutorial - https://jennifermaker.com/sublimation-t-shirt/
VARIATION: SUBLIMATE THEN BLEACH
STEP 1: You can use my Sublimation T-Shirt design files from my resource library, Design #492.
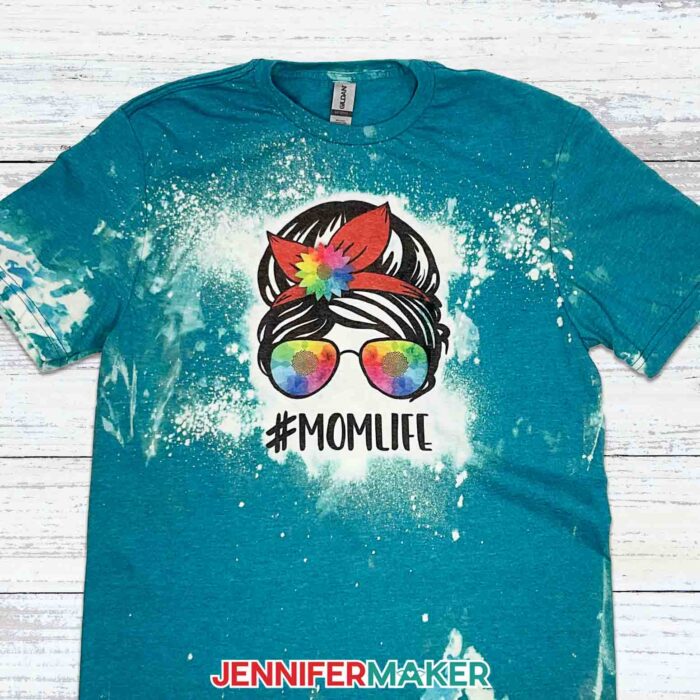
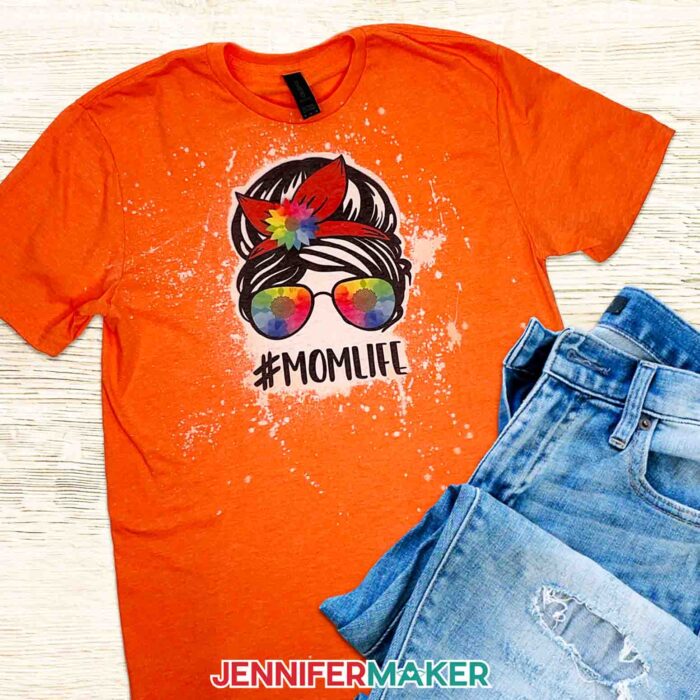
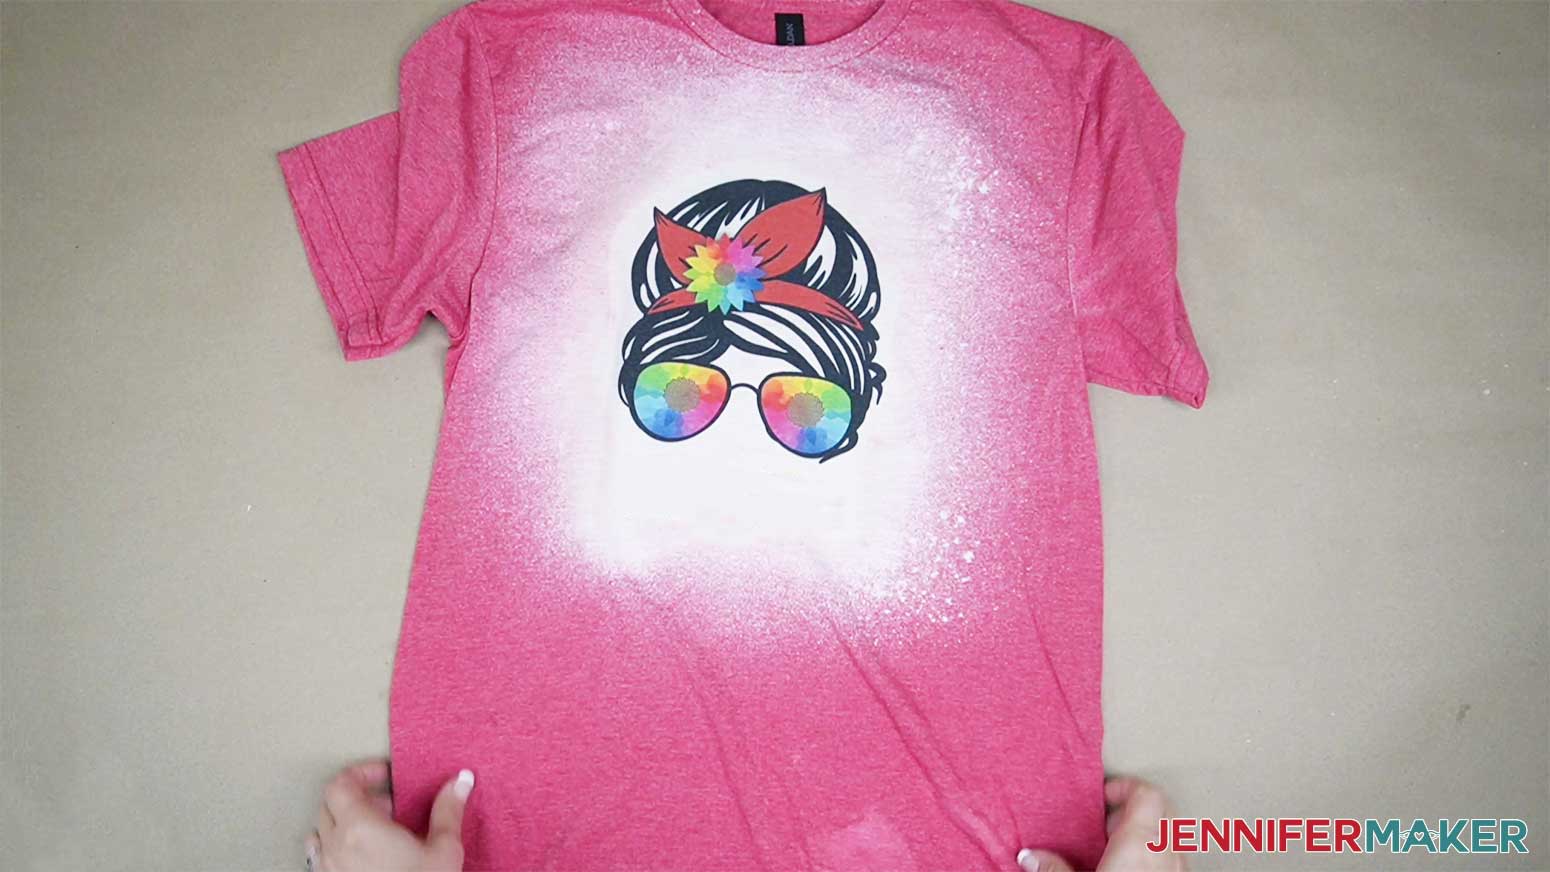
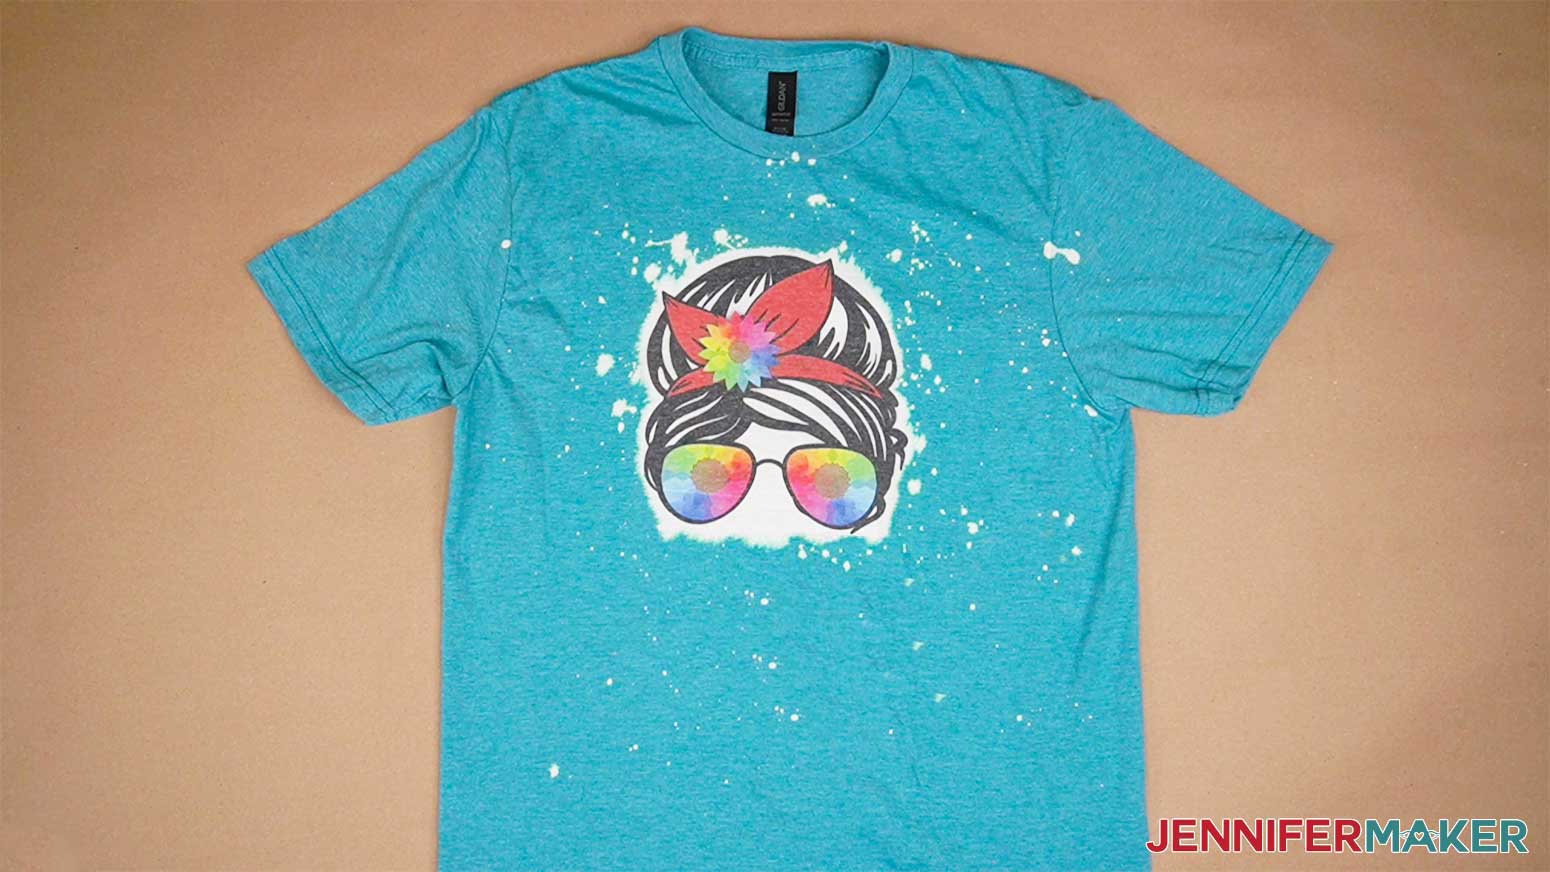
I’m going to make the Messy Bun design, but you can use these steps for any design you'd like.
We'll print the design on good-quality sublimation paper for the best results. I’m using A-SUB paper in my Epson EcoTank with Hiipoo ink with the relevant ICC profile. You can use another combination, of course. Here is my Messy Bun design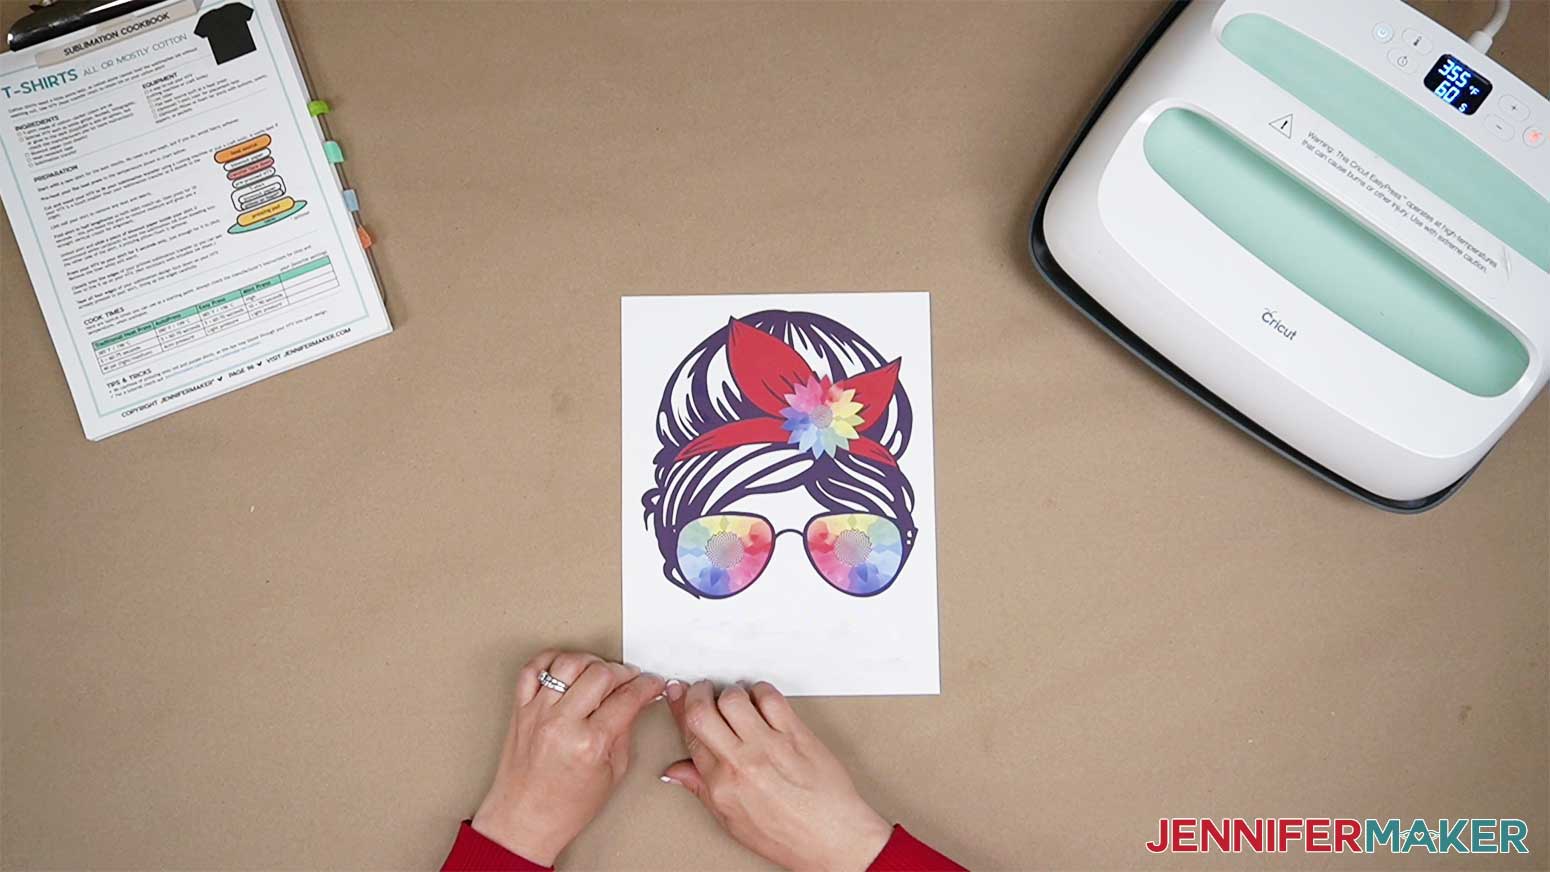
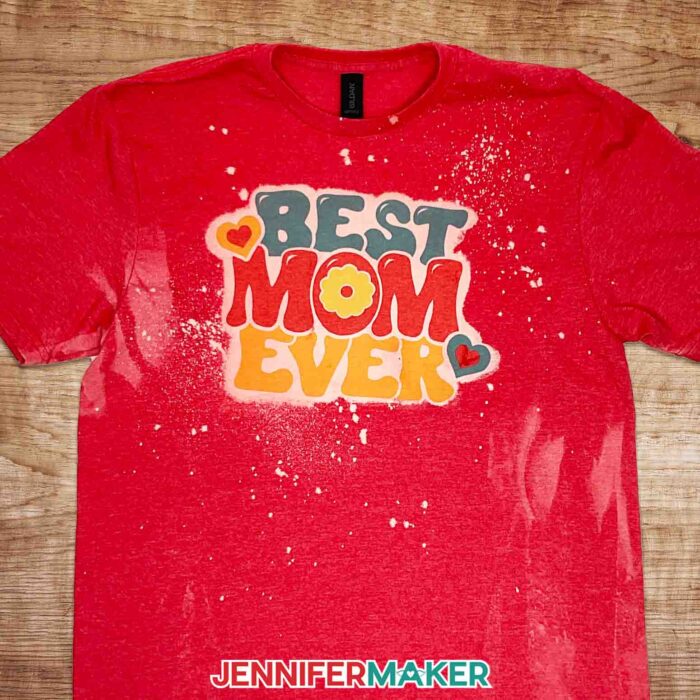
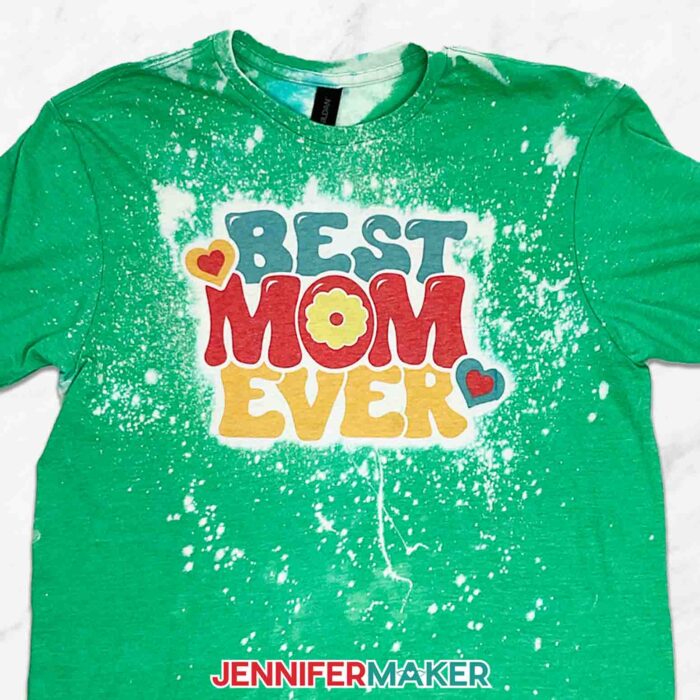
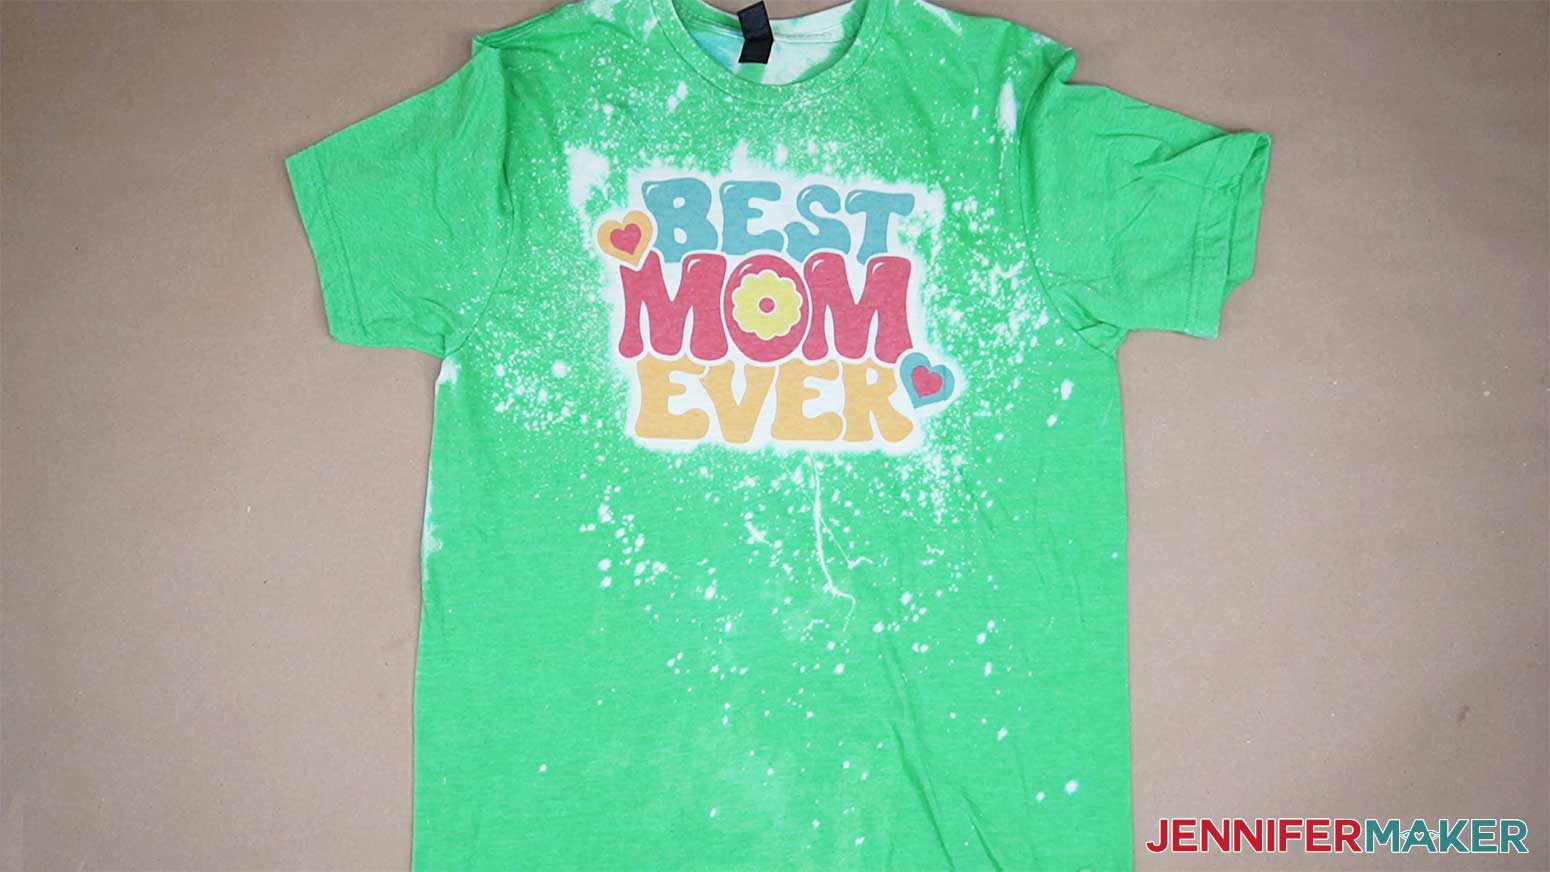
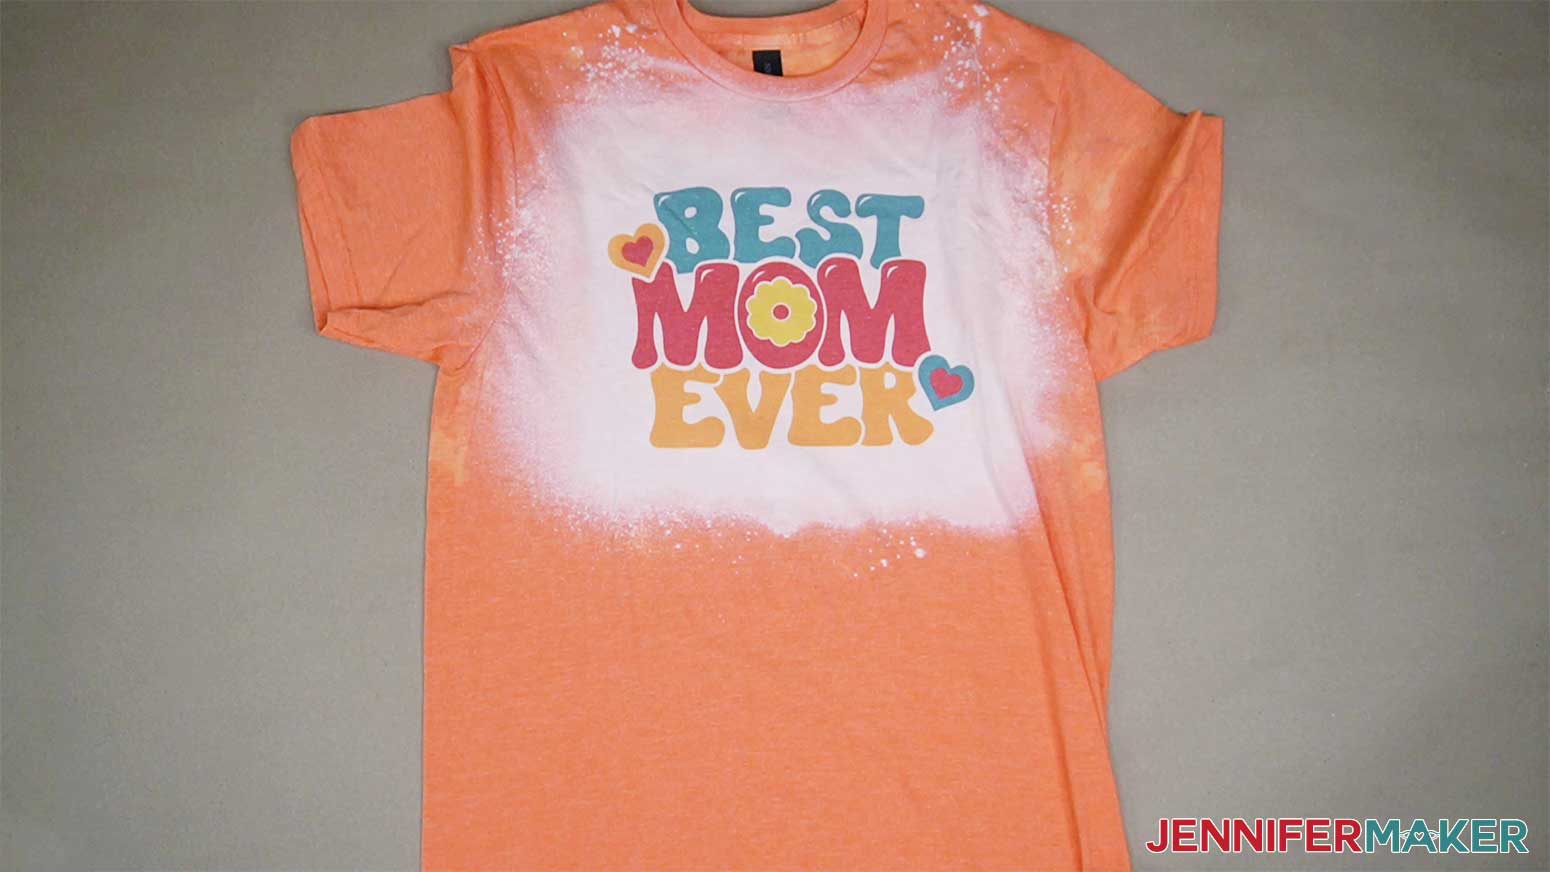
and my "Best Mom Ever" design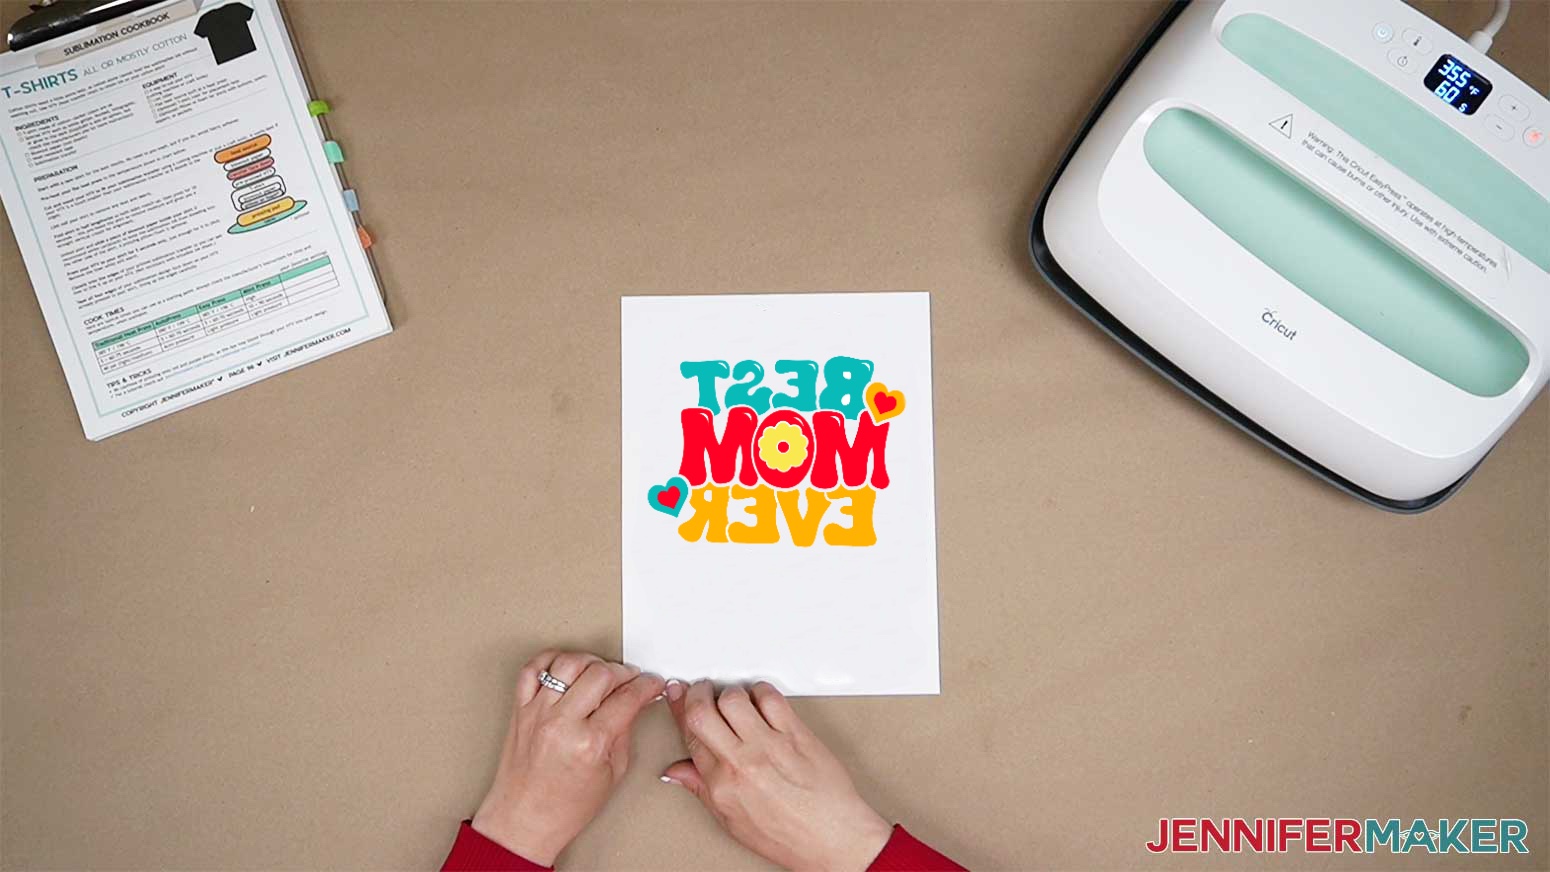
I will be printing these designs on my converted sublimation printer with Google Docs. If you need help determining the size of your design and printing with Google Docs please see my helpful tutorial Sublimation T-Shirts.
Print out the sublimation image gently tearing or feathering the edges to smooth out the transition. Feathering also prevents any lines of sublimation ink that might have snuck onto the edge of your paper undetected from transferring onto your shirt.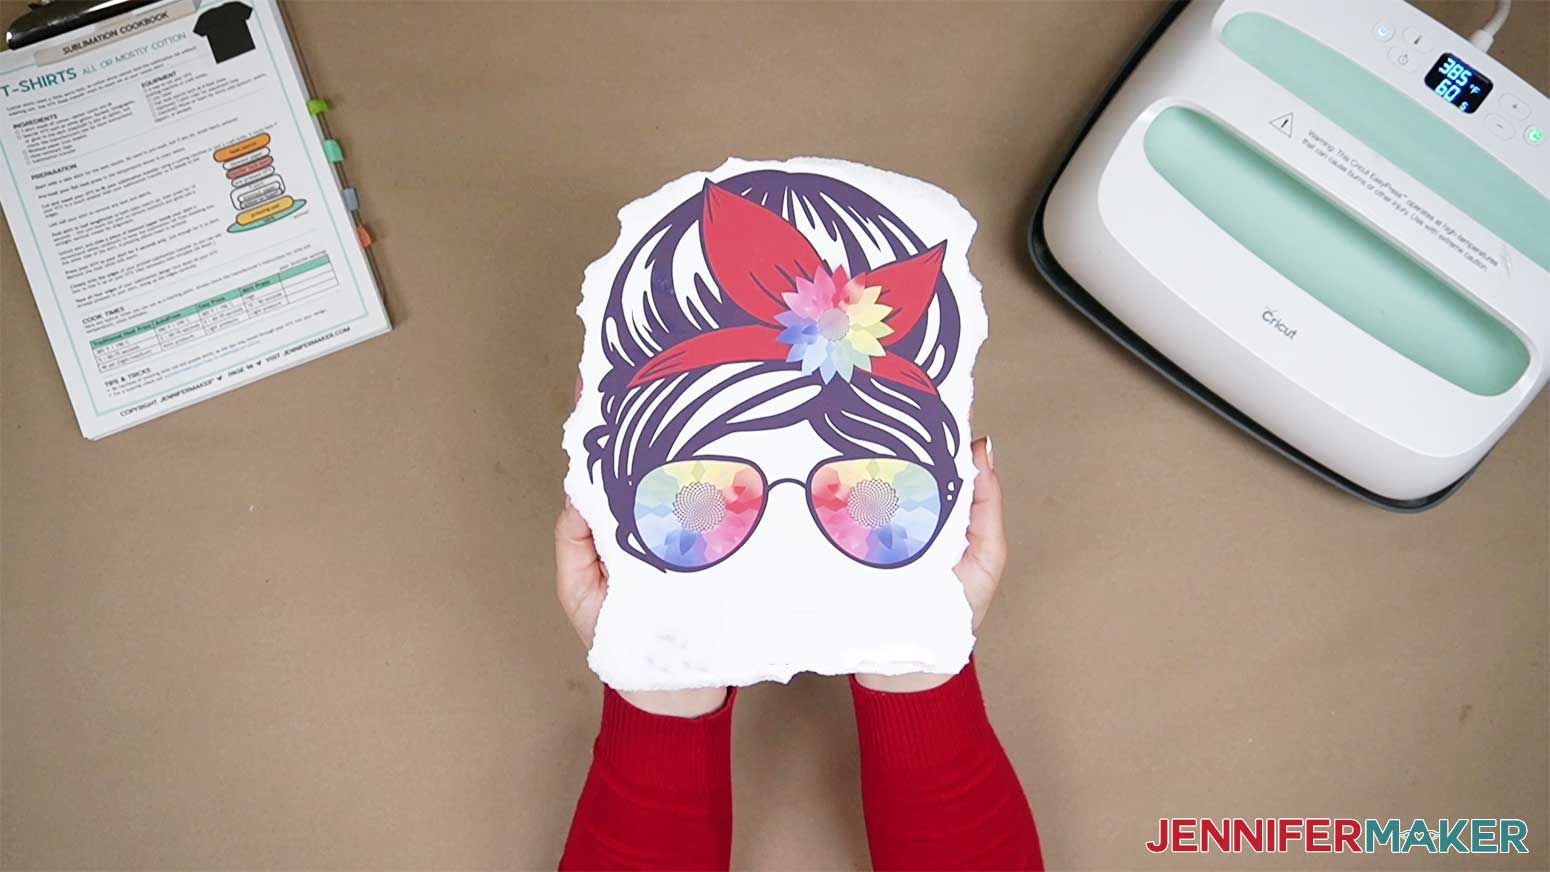
STEP 2: PREPPING AND SUBLIMATING SHIRTS
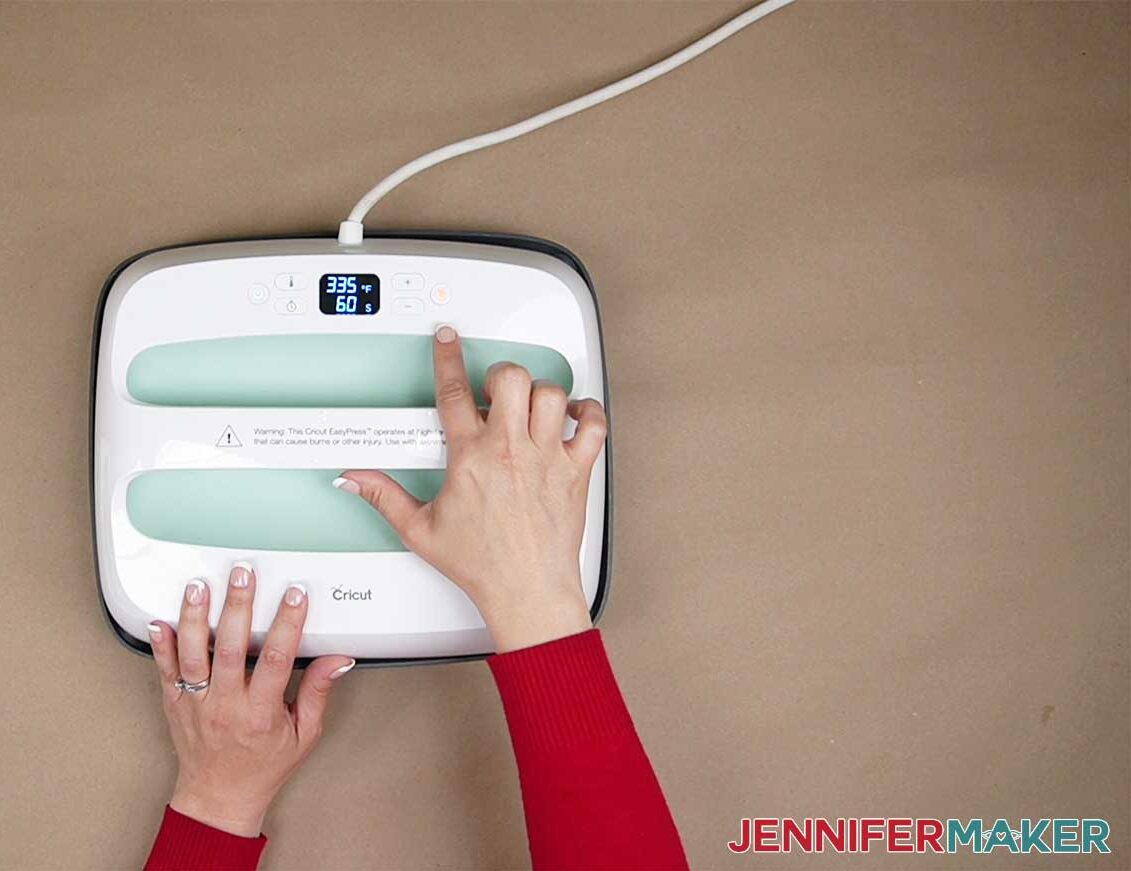
Now, set your heat press to 385° F (196° C) to warm up.
Since sublimation produces fumes, open your windows and turn on a fan to craft safely.
I'll show you how to press a design using a Heather Irish Green 65% polyester/ 35% Cotton shirt from Hanes.
For sublimation, don’t use anything less than a 65% polyester shirt, or your ink will fade and eventually mostly disappear in the wash. High polyester shirts don't bleach as well, so this blend is best to use. 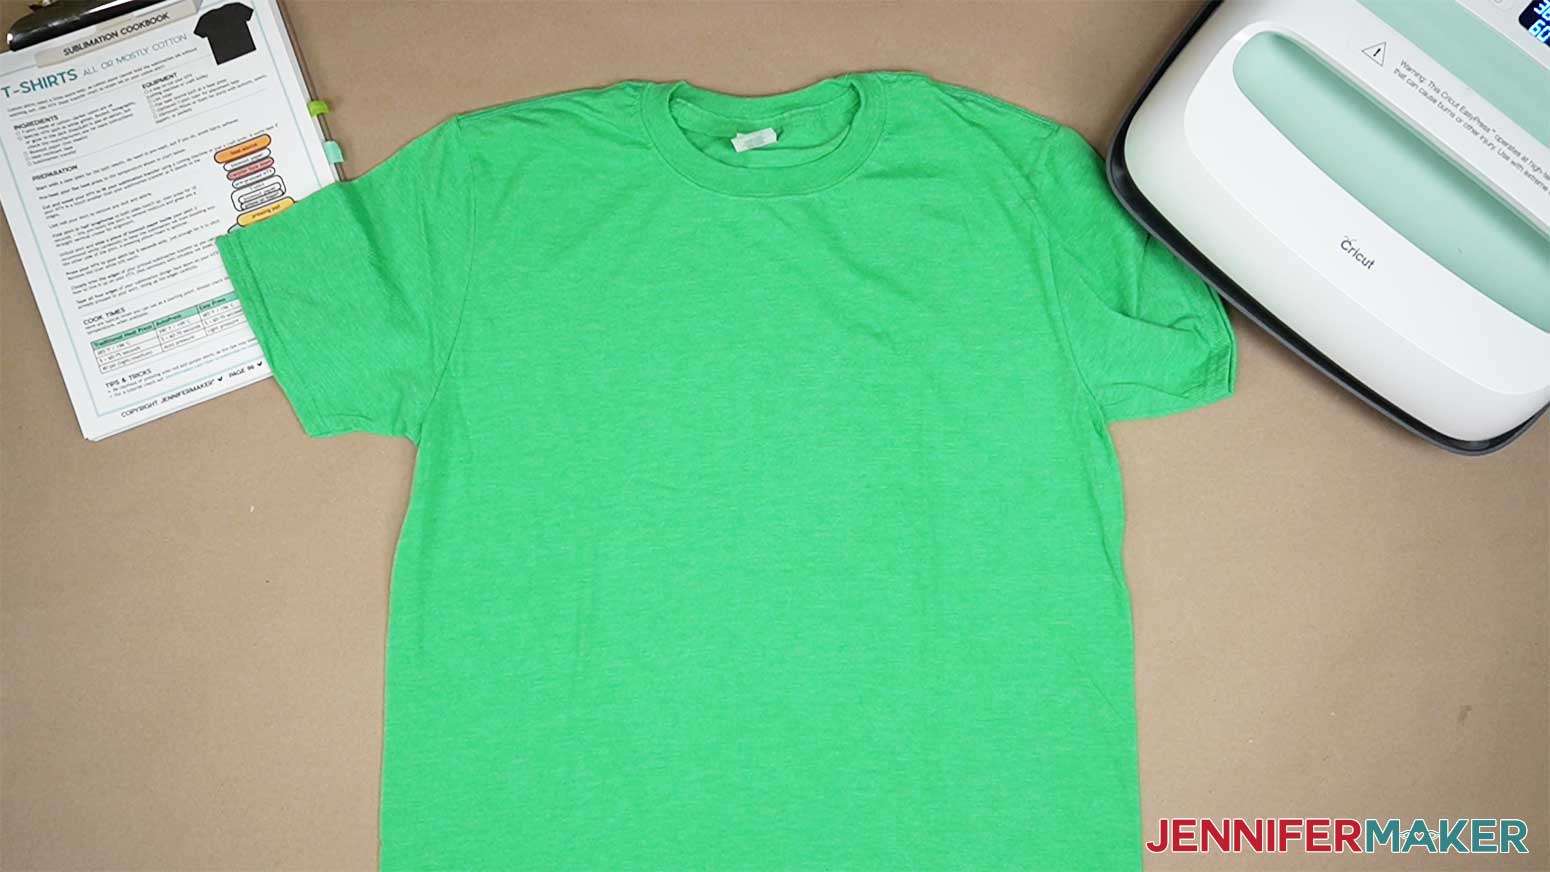
Lint roll the shirt to remove any dust or debris, which can cause strange dots and marks to sublimate onto the surface. 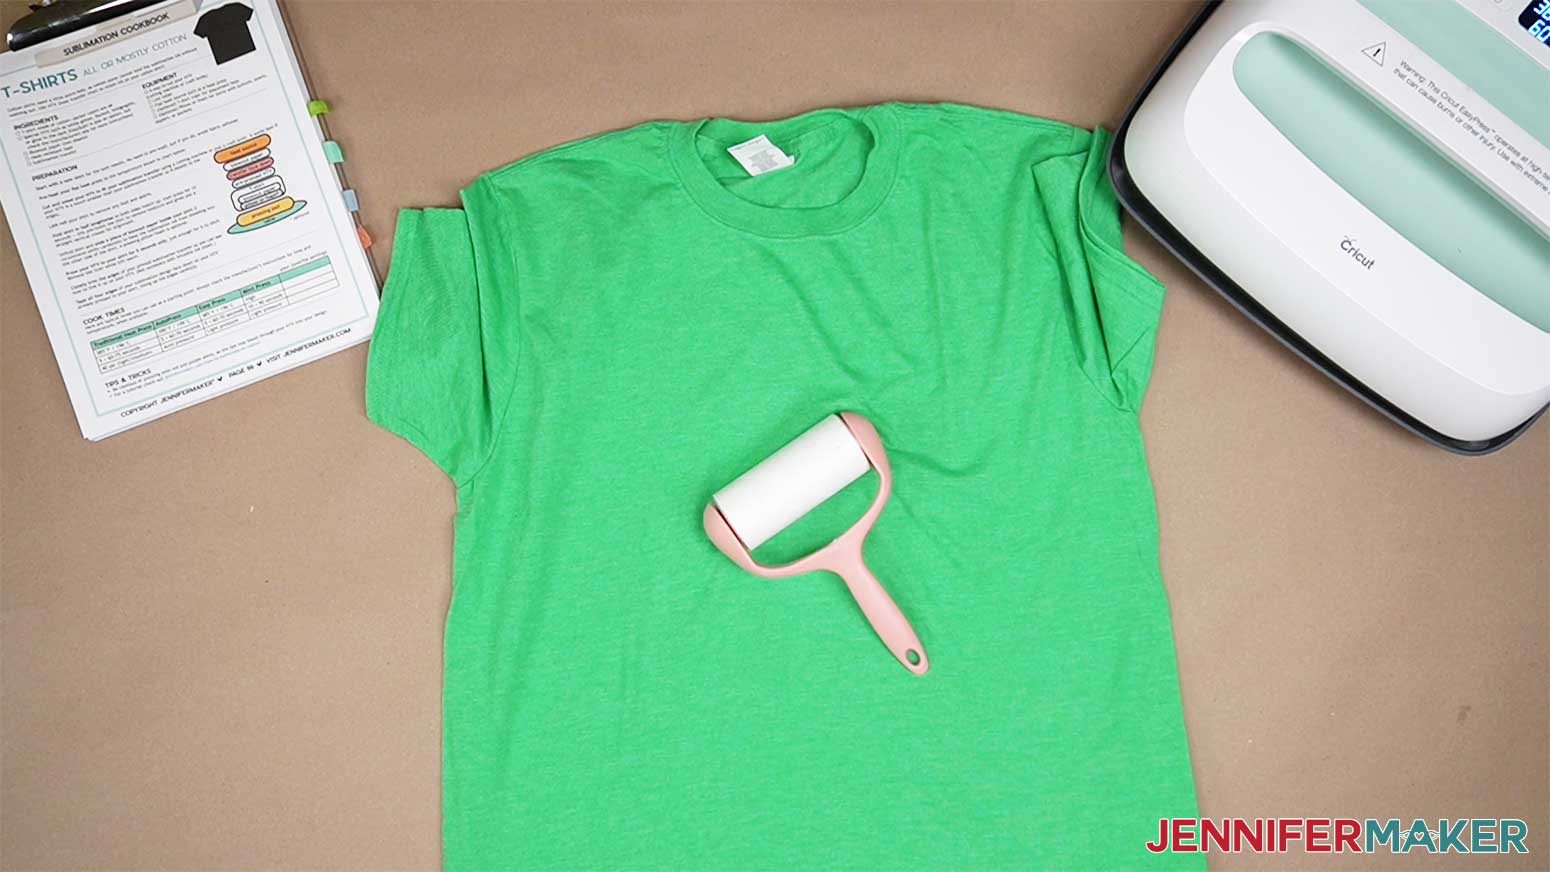
We’ll add a vertical crease to help center the design.
Fold your shirt in half vertically and press it for 10 seconds along the crease. When you open it up, you have a center line! This also serves as the pre-heat, removing moisture and ensuring a good transfer. Pre-heating is important for a beautiful sublimation result!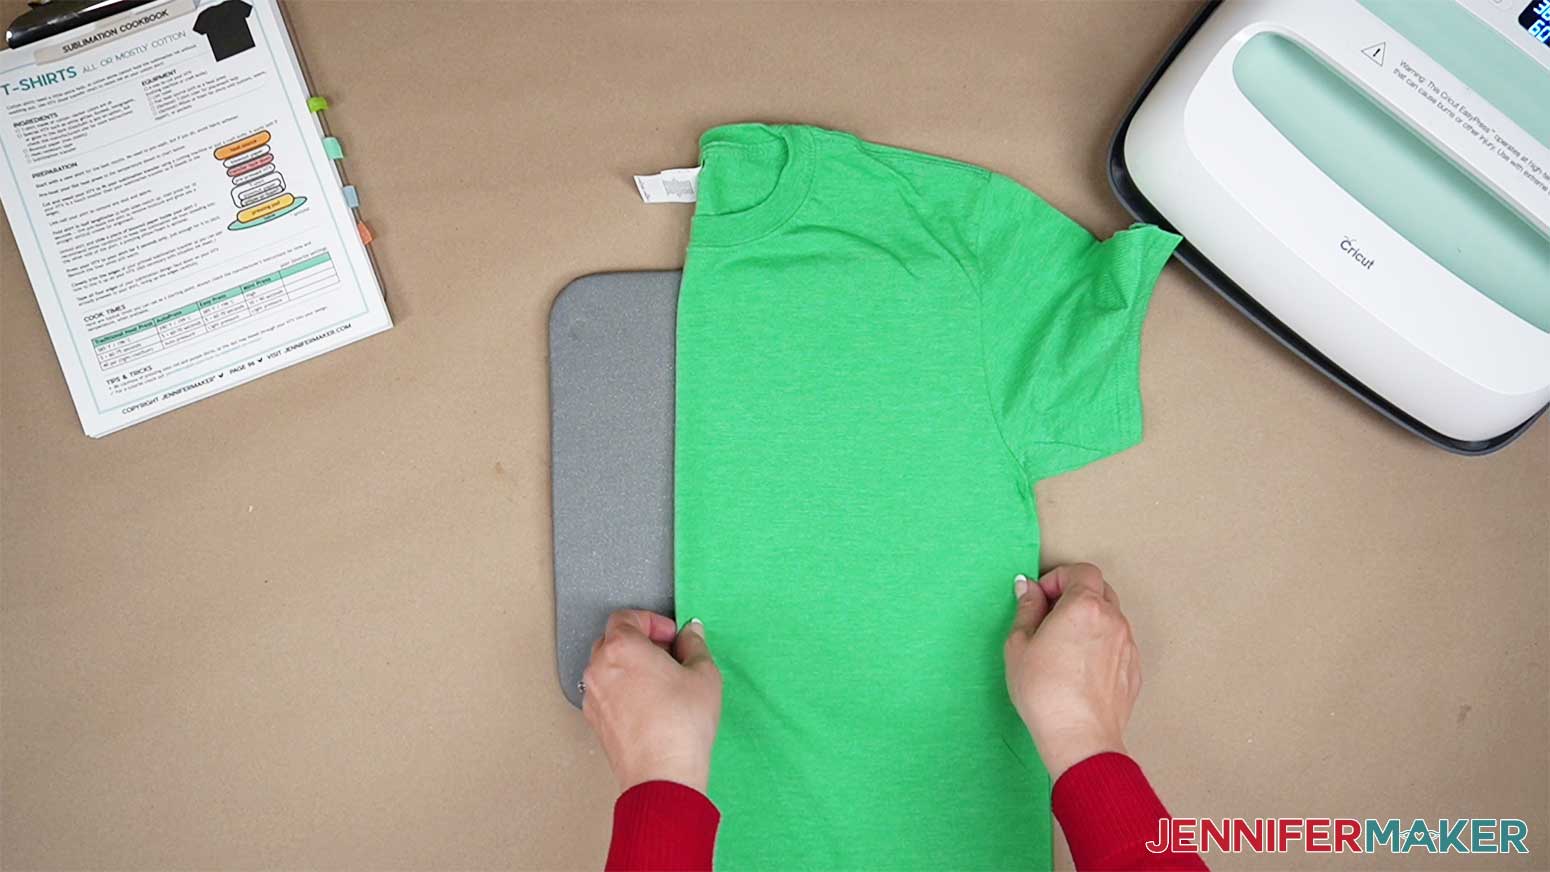
Unfold your shirt and lay it face up on the pressing area.
Slide a piece of white cardstock inside the shirt under where your design will be.
This will protect the back layer of your shirt and the pressing mat from any sublimation ink that may bleed through. Gently crease your printed design at the top and bottom of the paper. Don’t fold through any of the printed images!
These creases will help us center it on the shirt.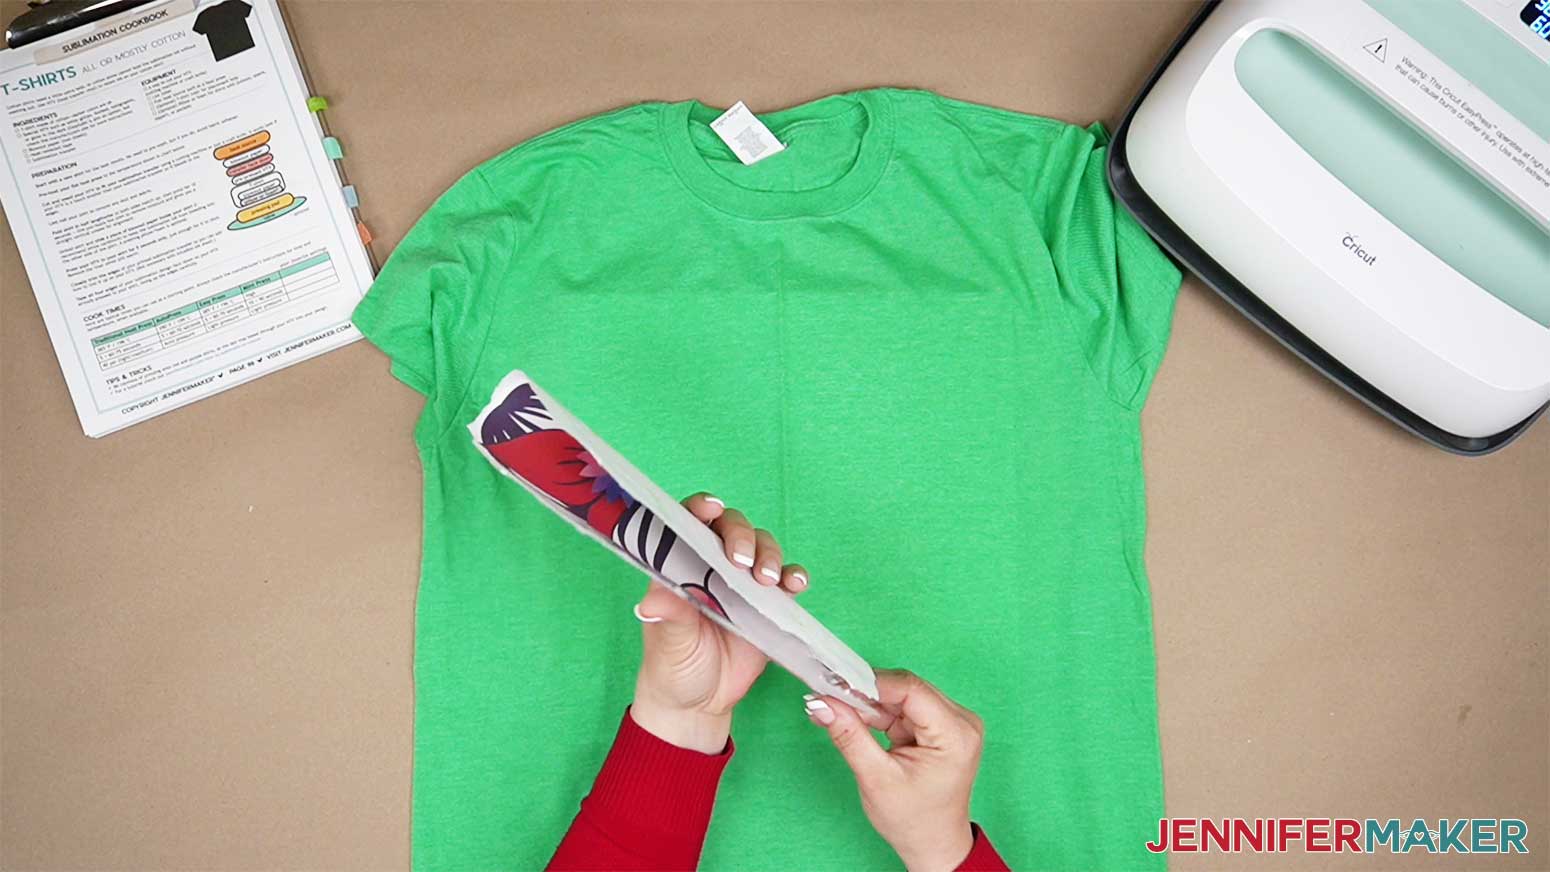
Since I’m making a crew neck T-shirt, the top of the design should start about 2" below the collar. For a v-neck shirt, the top of the design should start about 1" below the collar. You can also use my handy T-Shirt Rulers.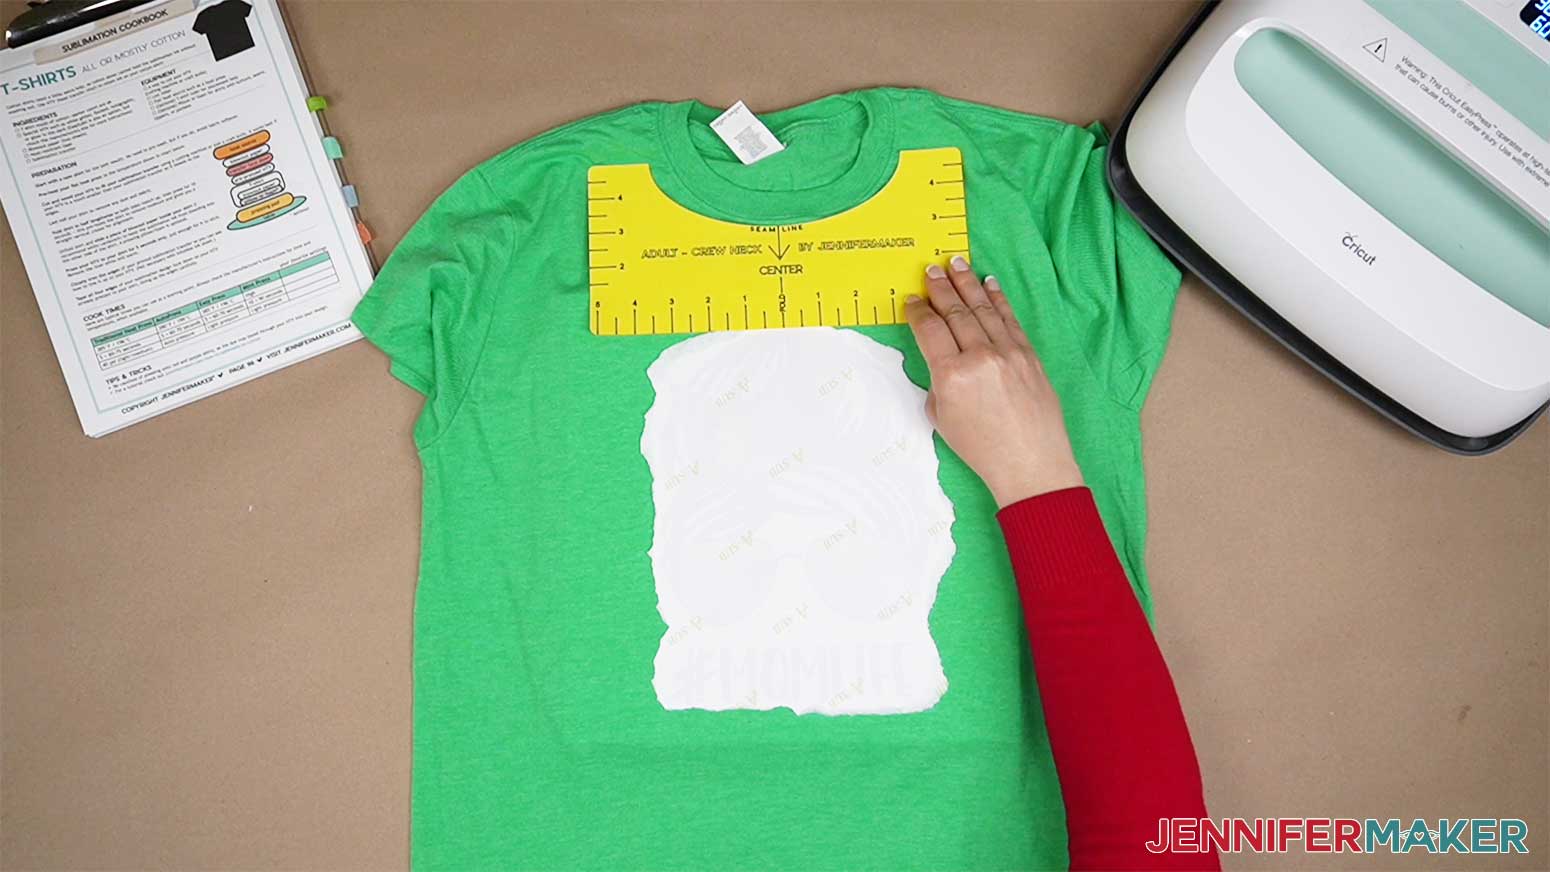
Place the design ink-side down on the pre-heated shirt, lining up the creases
Secure the design with heat-resistant tape on all four edges to keep it in place during the press. Cover with white butcher paper and press the design for 40 seconds at 385° F (196° C)
Allow the paper to cool before peeling it off and revealing your design. 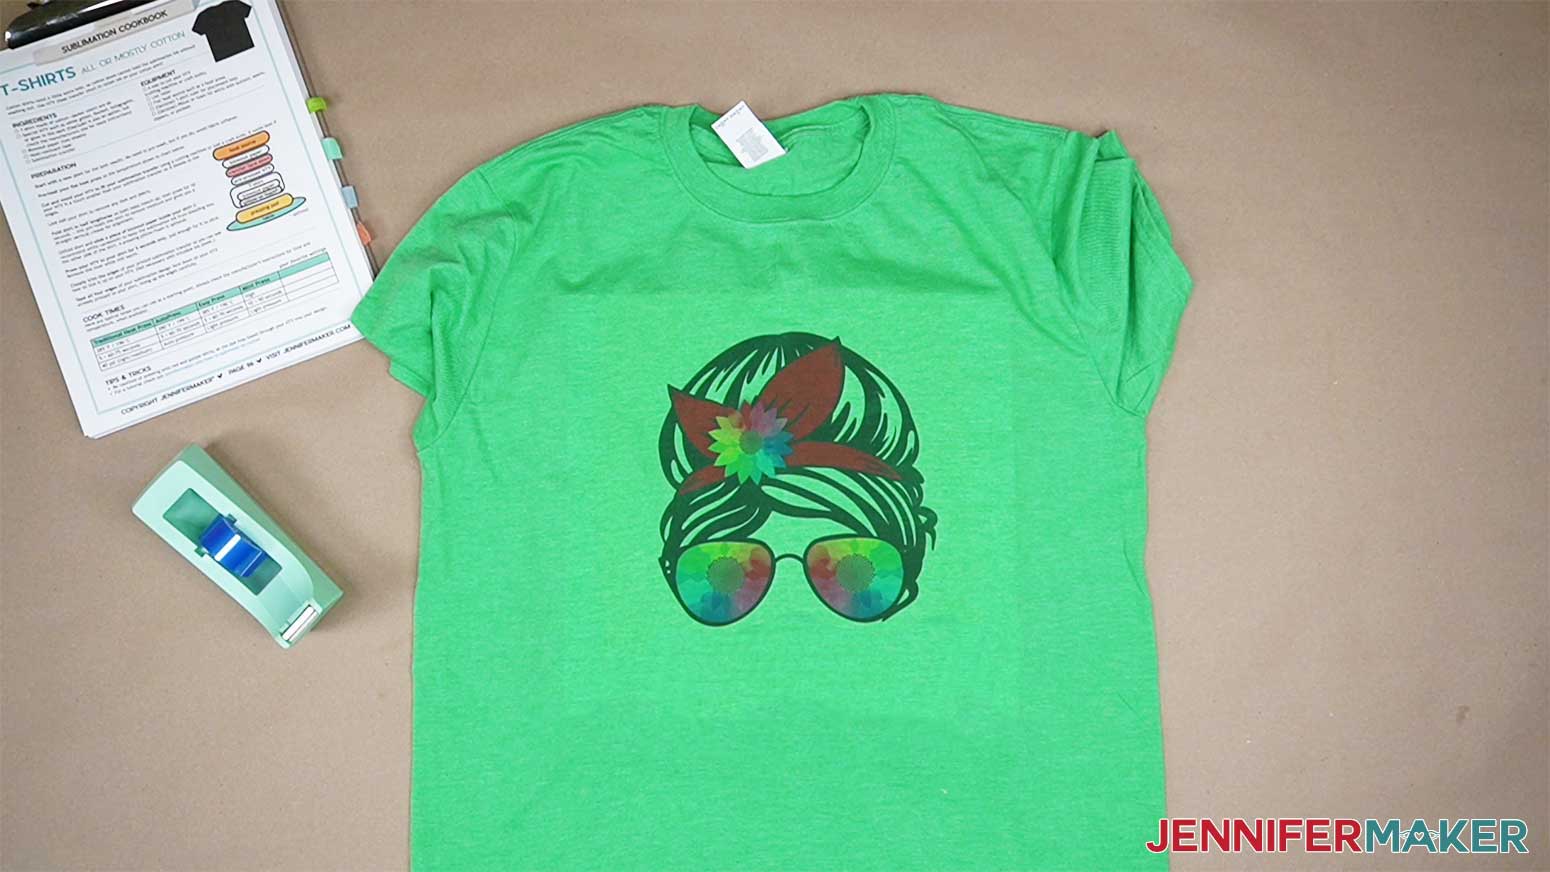
STEP 3: BLEACHING THE SHIRTS
I'm using a piece of foam board I purchased at Dollar Tree, but you can use scissors to cut old cereal boxes down to size, or a garbage bag if that's what you have on hand.
This step is to stop the bleach from touching the back of the shirt.
Slide the shirt down over the foam board and line up the neck and shoulders of the shirt. Since we've already sublimated our design, this part is super easy. 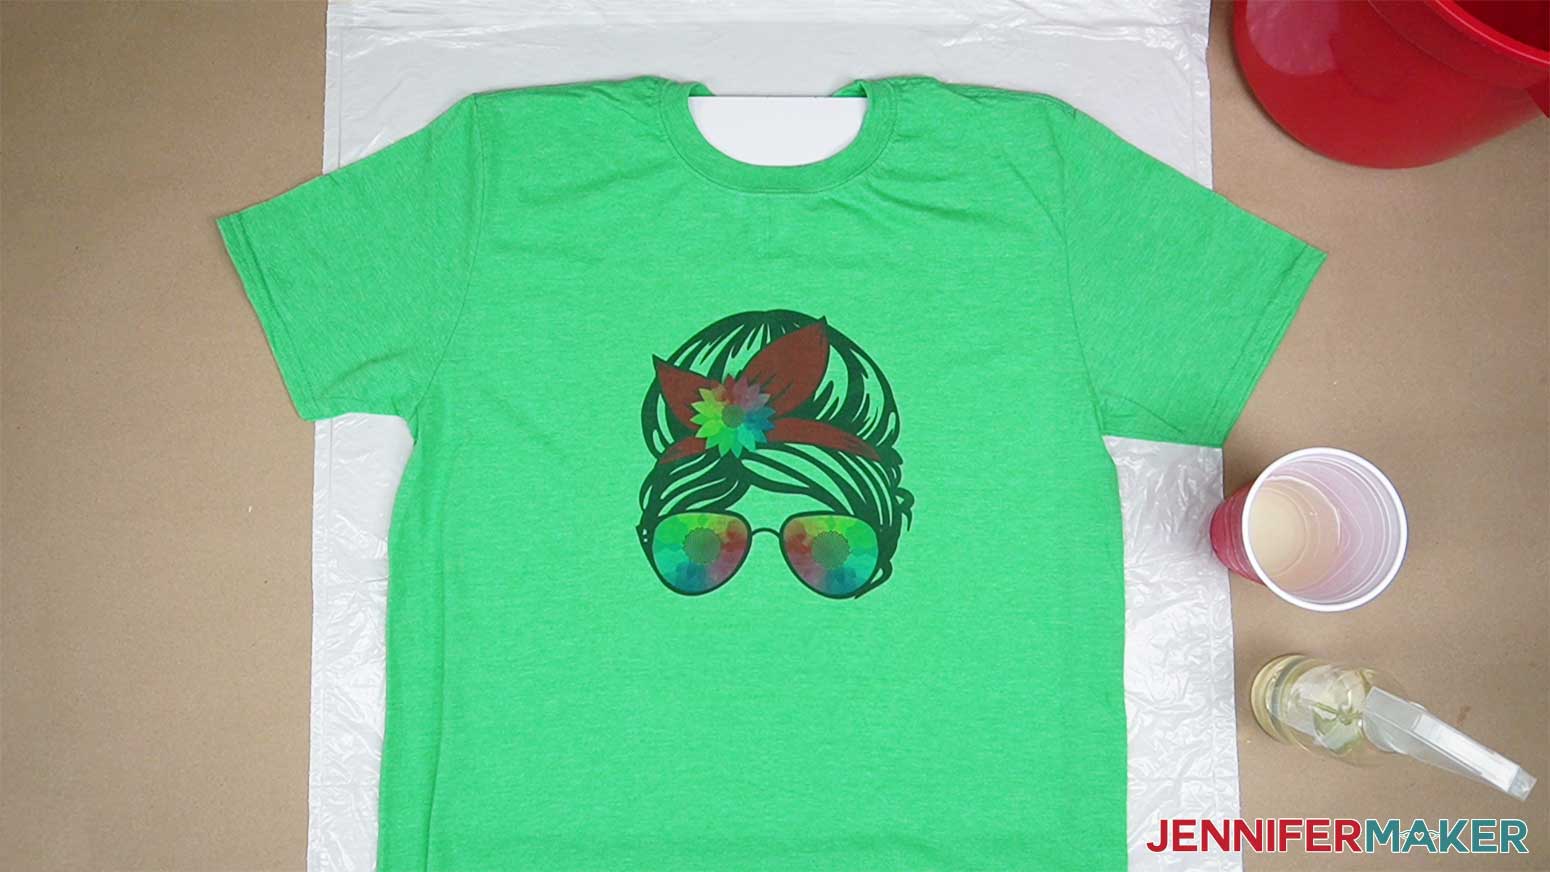
Prep your surface with a garbage bag and put on your gloves.
Carefully pour bleach into a cup with a paintbrush and the spray bottle, remember to use proper ventilation as well. This is a great project to do outside on a sunny day. Use the brush to paint with bleach around the edge of the design and then fill it in. 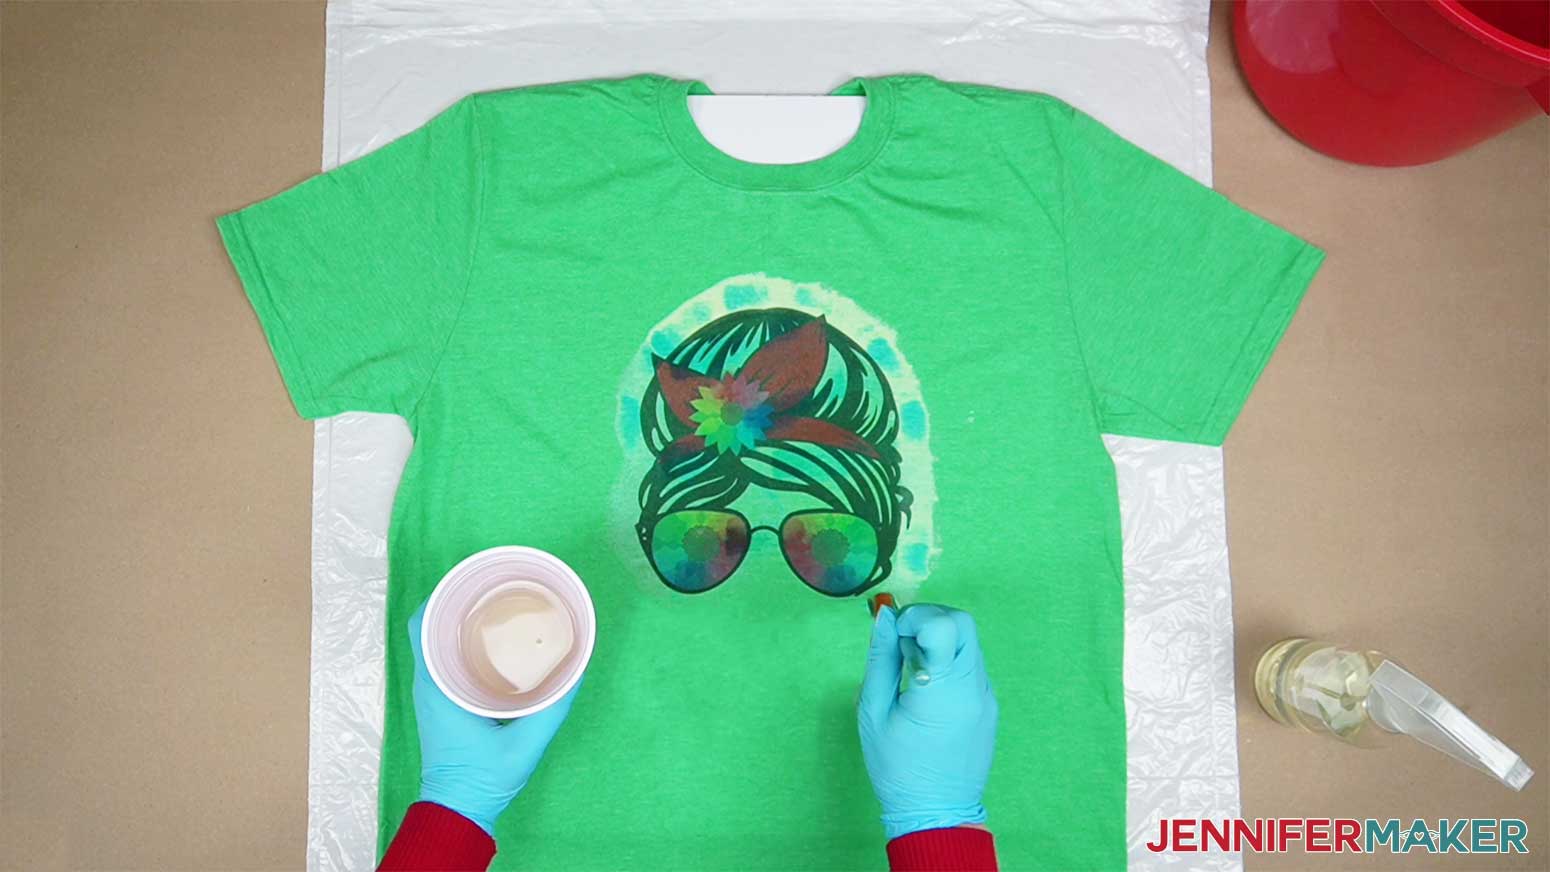
You can also add drips and dots of bleach by tapping your paintbrush over the shirt.
Next, use the spray bottle with the same undiluted bleach and spritz it around the T-shirt. This step is optional, if you only want to bleach over the sublimated design, skip this step. It's fun to watch the sublimated design appear before your eyes! 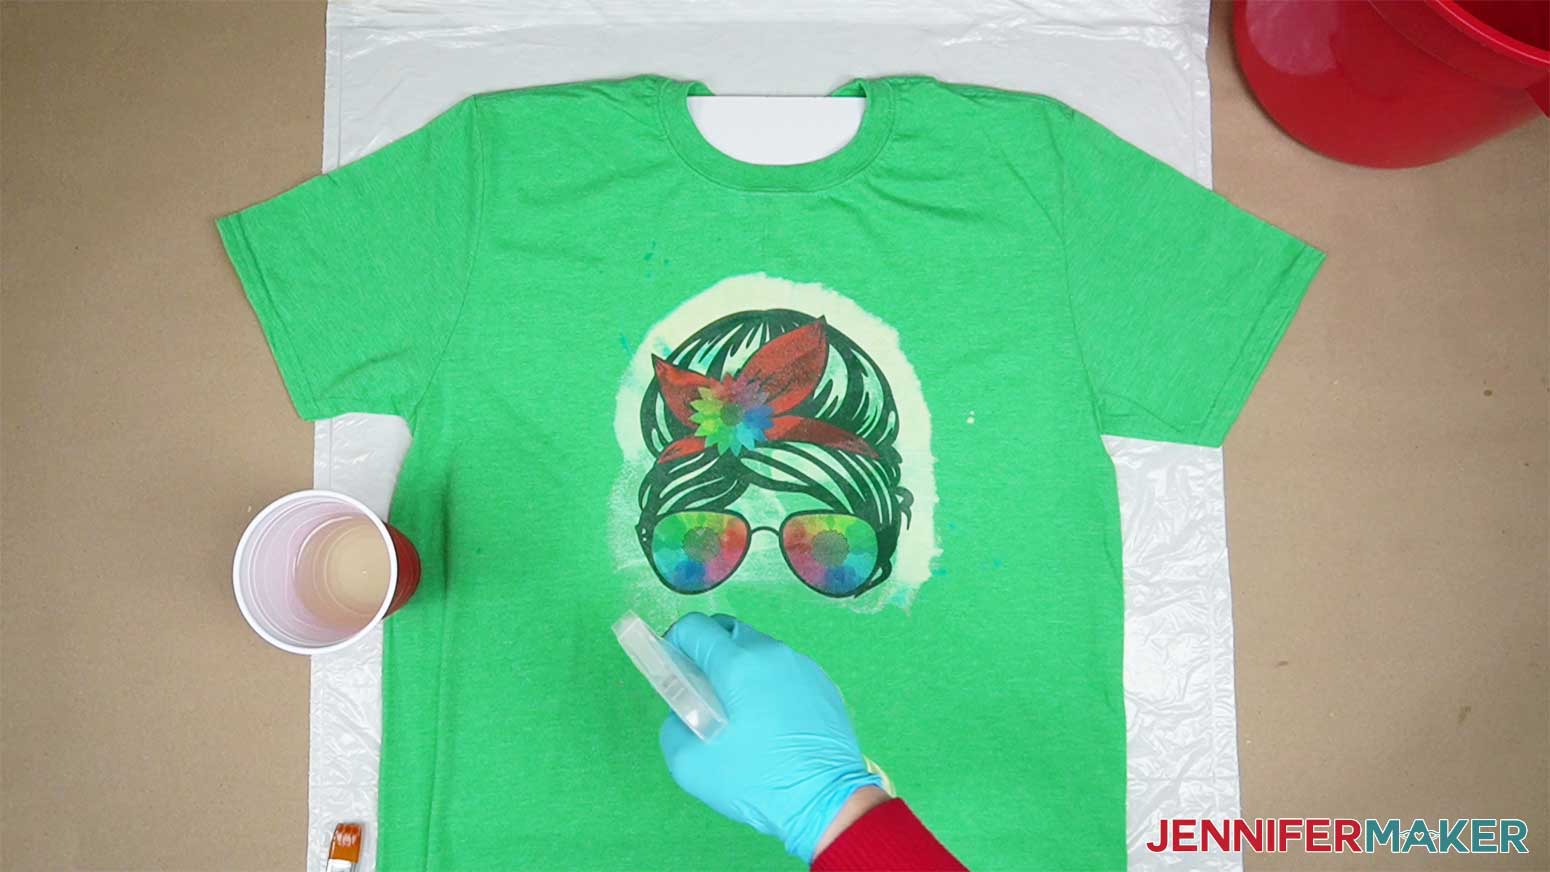
It is recommended to bleach T-shirts out in the sun, but if it's not a sunny day, a few minutes with a hairdryer or heat gun (Low heat) will help the colors to fade faster. 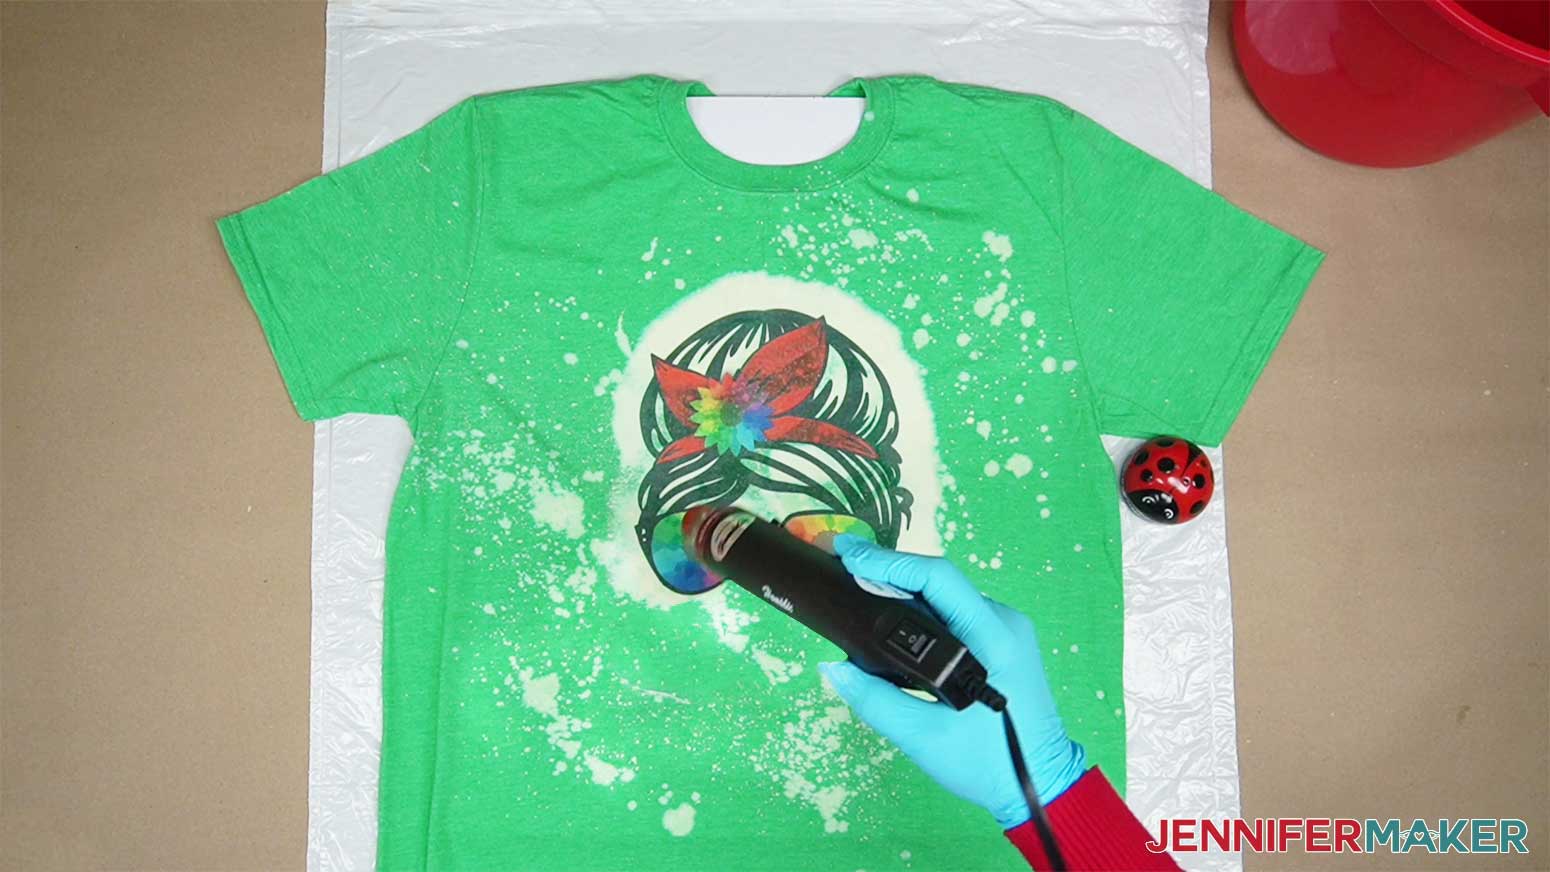
TIP: For more all-over bleaching, remove the shirt from the foam board and scrunch it into a pile. Mist it with bleach spray to give some variation in color to the rest of the shirt.
Set a timer based on your swatch. I will set a timer for 7 minutes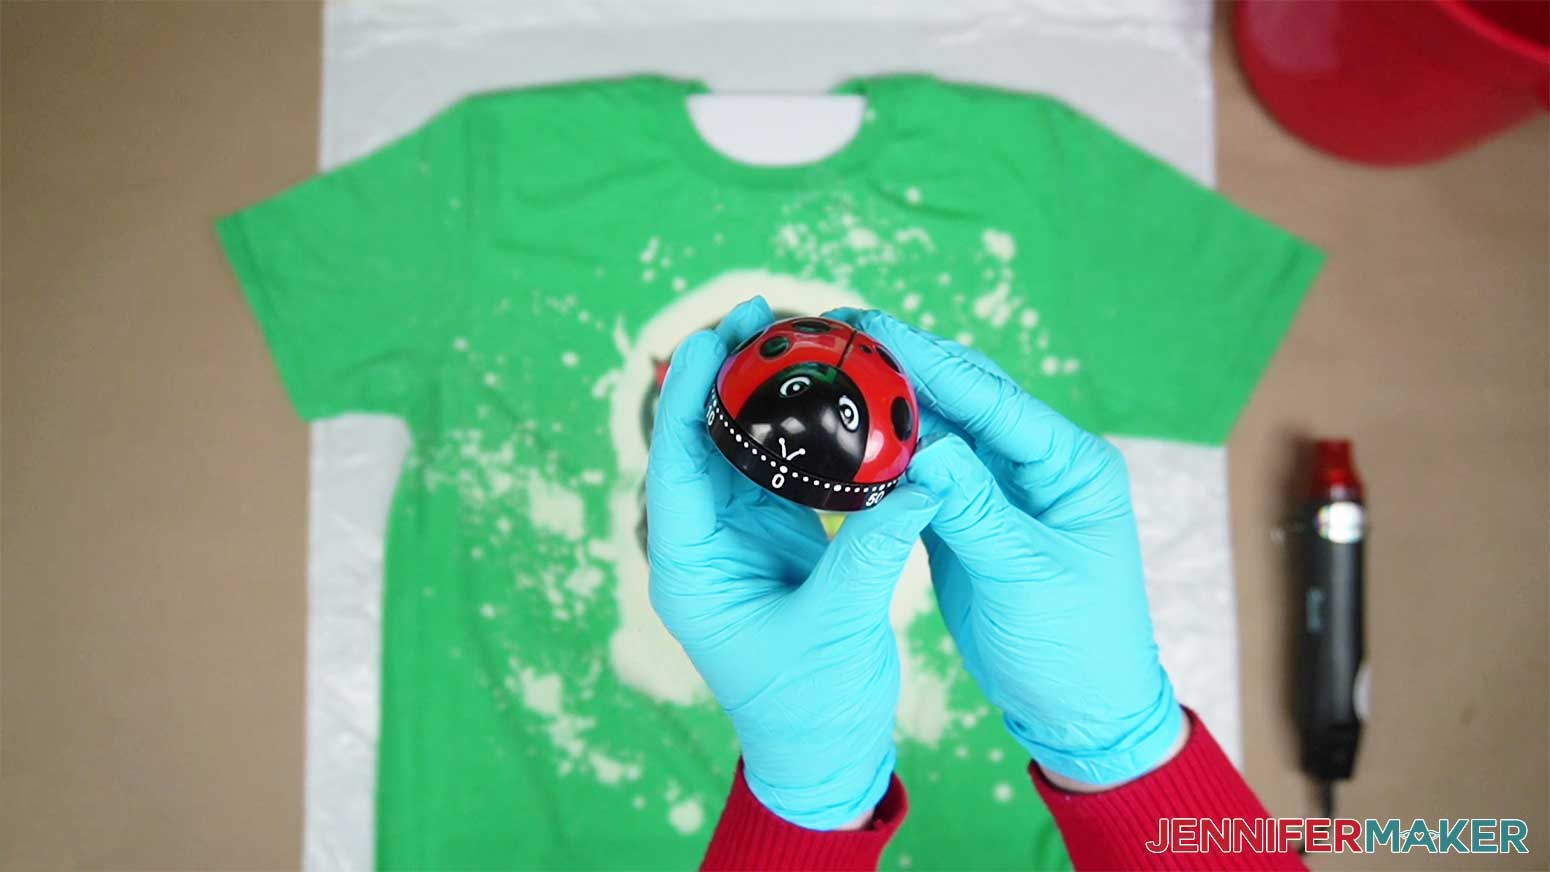
Have your 10:1 water/Hydrogen Peroxide solution ready to stop the bleaching and when the time is up, remove the shirt from the foam board if you haven't already, and soak it in the bucket. Alternatively, you can immediately wash your shirt alone in a washing machine to stop the bleaching process.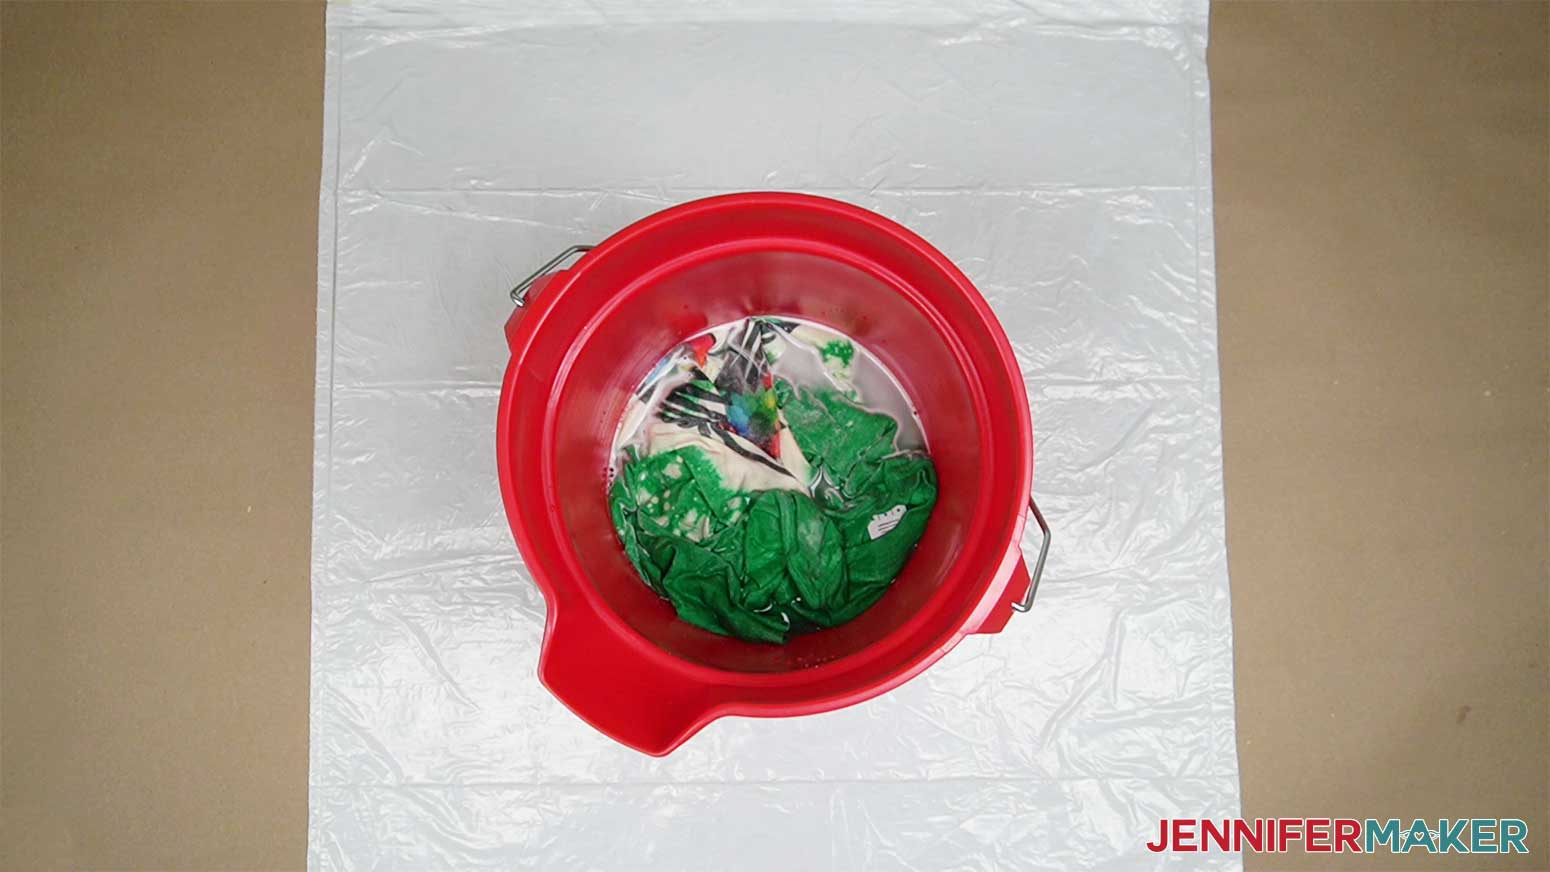
Next, toss the shirt in the washing machine (without other clothing). Wash on cold with a mild detergent.
Either allow to air dry or tumble dry on low heat.
STEP 4: SHOW IT OFF!
Perhaps the best part about sublimating and then bleaching is that it's super quick and easy to get beautiful results consistently. Painting with bleach around the edge gave me better control but overall, I think all the shirts turned out great!
With the proper care, your shirt will last a long time! Here are a few tips for keeping it looking its best:
- Turn your shirts inside out before washing them. That way, the front of the shirt won’t rub against other things in the machine.
- Use cold or warm water and mild detergent to keep the design vibrant.
- Take your sublimated shirts out of the wash right when they’re done. You don’t want them sitting crumpled up and wet.
- Then you'll want to AIR dry them, which you do either on a hanger or in a dryer set to air dry or low heat.
- The key is not to expose your sublimation shirts to super-high heat again, as the ink might sublimate out. That said, your washer and dryer probably don't get up to 350°F to reactivate the sublimation ink, so you should be just fine.
After trying all the methods above I found that Sublimation before Bleaching was the most predictable, I didn’t have to worry about the design and the bleached shirt not matching.
The colors will be a little faded because the shirt will be washed after sublimating, giving a “vintage” look.
The standard bleach then sublimate yields brighter results since we’re not washing the shirt right after sublimating it.
TIP: It is much easier to scorch the bleached fabric, use the lowest possible temperature settings when pressing. If you happen to scorch your shirt, use a 10:1 solution of water and hydrogen peroxide (10 parts water/1 part hydrogen peroxide) on the scorched area and then wash as directed above. The color will fade slightly after the first wash because of the fabric blend.
I preferred sublimation before bleaching, it's fun to watch the design appear before your eyes and also the bleached edge matches the design, giving it a customized look.
Notes
Typeface used: BFC Hippie Chick
Free Alternative: Abstract Groovy
Answers to Your Questions About Bleaching Shirts for Sublimation
Q: Do you bleach shirts before or after sublimation?
A: You can bleach before OR after sublimation, and this tutorial will show you both ways. Which one is the best way? Personally, I found I got better results overall when I sublimated first and did the bleaching process second.
Q: What type of shirt is best for bleaching for sublimation?
A: When bleaching for sublimation, it’s important to choose a shirt with high enough polyester count to hold the sublimation, but also enough cotton to bleach. I often find that T-shirts in heather colors contain the right blend of fabric really ideal for bleaching for sublimation. Shirts that are 65% polyester, 35% cotton are a great option. Always check the material on your specific shirt before beginning any project like this. Colors do matter! For example, black shirts might be slightly more yellow after bleaching.
Q: Do you use peroxide after bleaching shirts?
A: After your bleached shirt has lightened to your desired color, you’ll want to dunk it in a mixture of peroxide and cold water, with 10 parts water to 1 part peroxide. This halts the bleaching process immediately. Your shirt only needs to sit in the solution for a minute or two, and then it’s ready to wash in your washing machine.
Q: How long do you leave bleached shirts in peroxide?
A: Because the peroxide/water mixture stops the bleaching process immediately, you only need to leave your bleached shirt in the solution for a minute or so, until it’s fully saturated. Then, remove it from the mixture and put the shirt in the washing machine by itself (unless you’ve been bleaching other shirts too, then you can wash them all together). Wash on cold with mild detergent, then hang dry or tumble dry low.
Q: How long should you let bleach sit on a shirt?
A: Depending on the shirt, it usually takes 5-10 minutes to see the lightening results of undiluted bleach when bleaching shirts for sublimation. You can leave the bleach on longer, but be warned that prolonged bleaching may weaken or damage the fabric, or cause it to wear out faster than normal.
Q: Can you over bleach a shirt?
A: Yes, you can over-bleach a shirt. Over-bleaching a T-shirt can cause the fabric to weaken, become damaged, yellowed, or even develop little holes. When bleaching shirts for sublimation transfers, your bleach should only sit on the shirt a maximum of ten minutes or so.
Q: Do I need to dilute bleach to bleach a shirt?
A: In short, no. You don’t need to dilute your bleach, but you can if you want. Diluting the bleach makes the bleach thinner and more easily absorbed into the shirt, and it can help a clogged spray bottle of bleach to spray better and more evenly. It can however significantly impact the time it takes to achieve your desired results.
Q: Can you mix bleach with hydrogen peroxide?
A: No, hydrogen peroxide should never be mixed directly with bleach. It can create toxic gases that are dangerous. Do not mix hydrogen peroxide directly with bleach. You can only use hydrogen peroxide with bleach if you first mix the hydrogen peroxide with water in a ratio of 10 parts water to 1 part hydrogen peroxide.
Q: How long do you sublimate on a bleached shirt?
A: Sublimating on a bleached shirt follows the same time and process as sublimating on any other T-shirt. I recommend pressing with light pressure for 40 seconds at 385°F (196°C) if using the Cricut EasyPress, or 400°F (204°C) for 45 seconds if using the AutoPress.
Q: How can I learn more about sublimation?
A: Can’t remember how long to press that sublimation blank? Not sure what order to stack your layers? Confused about how to get the best transfer? The Sublimation Cookbook guide can help, with step-by-step sublimation printing project recipes for over 150 different sublimation blanks. Each of these “recipes” show you exactly what to use, how long to press, how hot to press it, and how to take care of your sublimated project for long lasting results.
Get my free PNG files for Bleaching Shirts for Sublimation!
(If you do not see the signup form above, click here.)
I’d love to see YOUR awesome results from bleaching shirts for sublimation! Please share a photo in our Facebook group or tag me on social media with #jennifermaker.
Love,

Want to remember this? Save this tutorial on Bleaching Shirts for Sublimation to your favorite Pinterest Board!