Learn how to find the best free fonts and get fonts from Dafont to Cricut Design Space!
Today I want to show you how to find and download awesome and beautiful free fonts and add them to Cricut Design Space on both Windows and Mac. One of my favorite places for free fonts is at Dafont.com – I’ve been using this font library safely for years myself and they have many different fonts for all sorts of projects. This is the largest free resource for the best fonts! So I will show you how to download, extract (decompress) the zip files, install, and then actually find and use your fonts in Cricut projects! I’ll even show you how to use the glyph characters that some fonts provide and insert them into the Cricut Design Space app.
Watch my step-by-step video tutorial on how to get fonts from Dafont to Cricut here:
How to Use DaFont.com
First, go to dafont.com in a web browser.
On Dafont, you’ll see different categories near the top which you can browse, and if you scroll down you’ll see the most recent ones – note that most are free for personal use, not commercial use. If you want to use these fonts on things you’ll sell, check the font descriptions for contact information so you can purchase a license. I’ve used many of the awesome fonts here for my personal projects, there are just so many font choices.
You can search for any font in the search bar, of course, but there are other ways to find fonts. For example, under Script fonts in the categories area, which I know so many of us love, you’ll see all sorts of beautiful fonts. For example, “Hello Honey” is a gorgeous script font, which looks like it even has extras in it, like the heart.

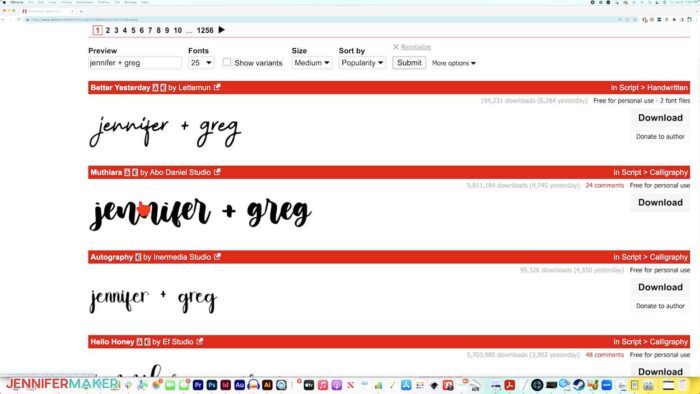
You can tell that this is a well-loved font with more than 5 million downloads, and it’s free for personal use. You can click Download right from this page, but before we do that, I want to point out a couple of cool things that will help you find the right font for your project. First, you can sort by popularity if you want to see what fonts others like too. Or you can sort my newest or size. For example, you can preview what each font will look like in your chosen text by typing it in the Preview box right here – so I’ll type “Jennifer + Greg” (because he’s my hero) and I can see my text in every font. Isn’t that cool?
So once you find a specific font you like, you can click on it to learn more about it. So if we look closer at Hello Honey, you can see all sorts of information about it – it has special characters like the swashes and hearts, that make it really fun. And all the information on how to contact the author and purchase a commercial license at an additional cost are right here. And note that at the bottom, you can see ALL the characters in this font, which I think is really useful is there something special you want to use it for. Not all fonts will have all characters, for example I noticed that the PLUS sign was missing in some of those other fonts, but it’s available in this font.
So when you think you’ve found a font winner, just click the Download button on the right. And the ZIP file for the font will immediately download to your computer – you do not need to login or create an account or anything like that. It’s super easy. If you’re on Google Chrome as I am, your font file will download and open right away for you. If it does not, go to your Downloads folder. Now I will show you how to download these fonts on a Windows computer first, then on a Mac computer.
How to Download Fonts on Windows
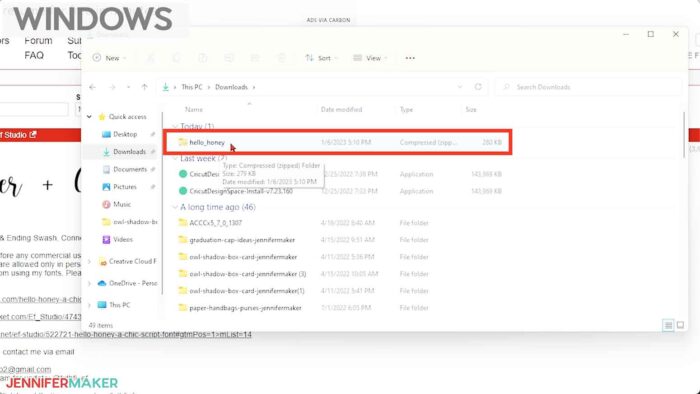
First, click the Download button. To find a downloaded font on Windows 11, select File Explorer from the taskbar, then look in Quick Access on the left side and choose Downloads. It should look something like this. Sort by Date Modified and you should see the file at the top of your list. If you just see a bunch of icons rather than a list like mine, click on View and change it to Details, then sort by Date Modified. Now you can find things easier!
Next, you need to decompress the font ZIP folder, right here. To do this, just right-click with your mouse on the zip folder and choose Extract All, then click Extract on the window that appears next. Now after it extracts, you should see a new folder appear in your list with a similar name as the zip folder, and it will probably open right up for you as mine did. If it does not, you’ll find it in your Downloads folder where you can double-click it to open it. Inside the font folder, you’ll see the fonts inside it, along with some extra information files. In this folder, we have a Please Read Me file with more information on the font, a License Request file that explains where to purchase a commercial license, and the actual font file. The font file will either be in TrueType or OpenFont type. If you have BOTH types, you want to use the OpenType, also known as OTF, as it contains more font information. This font is only available in OTF, which is great. TrueType, or TTF, is also fine, I just prefer OTF as it gives font designers a space for the special characters like glyphs and other cool features.
To install your font on Windows, you may be able to simply double click on the font file and click on the Install button on the window that pops up. If you need your font installed for applications other than Cricut, I recommend you do it a little differently, however. So instead, right click on the font, then look for an option called Install For All users — you may need to click Show More Options here to see it, then click Install For All Users. Note that your account must have administrator rights on your computer to do this, but Installing For All Users does mean you should be able to access this font in all applications and accounts, so it’s the safer bet.
That’s all there is to it. If you get any sort of a warning, which is not typical, you may want to choose not to install the font. It’s not usually worth the risk.
How to Download Fonts on Mac
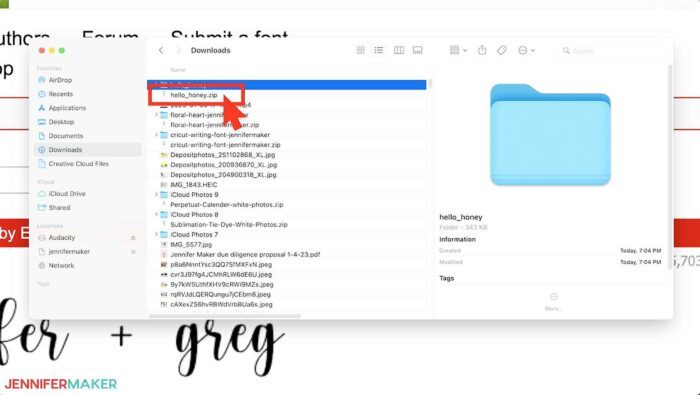
First, click the Download button. To find a downloaded font on Mac, go to the Finder from your dock (which looks like this blue and white face icon) and click on the Go menu then choose Downloads. Sort by Date Added and you’ll see it at the top of your list. If you just see a bunch of icons rather than a list like mine, click on View and change it to “as List” and then click the Date Added column. Now you can find things easier!
Next, you need to decompress the font ZIP folder, right here. To do this, just double-click it. Now after it extracts, you should see a new folder appear in your list with a similar name as the zip folder, and my Hello Honey font folder is right here at the top. Now just double-click on the font folder and you’ll see the fonts inside it, along with some extra information files. In this folder, we have a Please Read Me file with more information on the font, a License Request file that explains where to purchase a commercial license, and the actual font file.
Should you use the TTF or OTF Font File?
The font file will come in one of two file types: either TrueType or OpenFont type. If you have BOTH types, you want to use the OpenType, also known as OTF, as it contains more font information. This font is only available in OTF, which is great. TrueType, or TTF file, is also fine, I just prefer the OTF file as it gives font designers a space for the special characters like glyphs and other cool features.
To install your font on a Mac, simply double-click on the font file and click Install Font. If for any reason that doesn’t work or your screen does not match mine, you can just right-click on the font file, choose Open With, choose Font Book, and then click Install Font. That’s all there is to it. By the way, if you get any sort of a warning, you may want to choose not to install it. It’s not usually worth the risk.
How to Find Fonts in Cricut Design Space
Okay, so now we’ve got the font installed on either Windows or Mac … now how do we use it in Cricut Design Space? First, you’ll want to head on over to Design Space right now, and if it is already open, save any work and then quit and restart Design Space. On Windows, just on the Design Space icon on your taskbar and choose Close Window or Close All Windows. On Mac, go to the Cricut Design Space menu and choose Quit.
Now let’s find the font in Cricut Design Space. Start up Design Space again, click New Project, and then click Text tool over on the left to add some text to your screen. This places a new text box on your Canvas. By default, your new text is selected, and you can immediately go up to the Font menu and click on the font name to see your font options. If you’re working with an existing layer of text, just be sure to select it first, then go up to the Font menu. Clicking on the font menu gives you the Font window, where by default only Cricut fonts are listed. And if you look for your font in this list, even search for it with the search box here, you will NOT find it. And this can make you think it’s not there, but it really is. To find your installed font, you must click on System and then type in the name of the font. I recommend typing in just a few characters of your font, like HE for “Hello Honey.” And there is the new font we installed. Just click on it and you’ll see your text change to the new font on your Canvas!
If you can’t see your text change because your font window is blocking the view, you can actually undock this window and move it anywhere you want. Just click, hold, and drag on the top edge of the Font window and you can move it anywhere on your Canvas/ Neat, huh?
How to Use Glyphs in Cricut Design Space
So now I can type in whatever text I want, such as Jennifer + Greg. But if I want to use those cool characters we saw over in Dafont, the swashes and hearts? Those are known as glyphs, and we CAN use them! Let me first show you how to do it on Windows – if you’re on Mac, skip to the 11:55 mark in this video.
Windows
To find glyphs in Windows, click on the magnifying glass icon in the taskbar, type in Character Map, select it to open it, then click on the Font menu, and choose the font you’re working with. I’ll choose Hello Honey. Now you can see ALL characters in the font. There are a LOT in this font and it can be hard to find them. So here’s a tip – click on Advanced view at the bottom of the Character Map window, then click the Group by menu and choose Unicode Subrange. A little box will pop up and you can then select Private Use Characters, and that will show you all the special stuff for this font! This may or may not work for others fonts, but it works great for this one.
Find the character you want, like the heart, and click on it, then click on Select. You’ll see it appear in the Characters to Copy box at the bottom. Now just click Copy. Once you’ve copied the character, go back to Cricut Design Space, double-click on your text to enter edit mode, place your cursor where you want the glyph character to go, then paste it in – you can paste by right-clicking and choosing Paste or just press Control+V on your keyboard.
Mac
To find glyphs on Mac, click on the magnifying glass icon in the top right corner, type in Font Book, select it to open it, then choose the font you’re working with from the list on the right. I’ll choose Hello Honey. Click on the View menu and make sure Repertoire is selected. Now you can see ALL characters in the font. Find the character you want, like a swash after the letter g, and click on it. Now just copy it – you can do this from the Edit menu, or just press Command+C. Once you’ve copied the character, go back to Cricut Design Space, double-click on your text to enter edit mode, place your cursor where you want the glyph character to go, then paste it in – you can paste by right-clicking and choosing Paste or just press Command+V on your keyboard.
And now you can add all the glyphs and special character you want, so I can add the swashes to the front of my name and now I have the complete and beautiful result. Isn’t this fun?
How to Bookmark Favorite Fonts in Cricut Design Space
When you find a font you love, remember to bookmark it. If ever you can’t remember the name of the font you used, right click on the text layer in the Layers panel here on the right, scroll down to the bottom of the menu that pops up, and hover over Image Info – and it will tell you exactly which font you used. Then you can go back to the Font menu, find your font, and click the bookmark icon right here. Any bookmarked fonts appear under Bookmarked for you to find quickly. Another way to find your favorite fonts is to click on Recent – this tells you want font is currently on the Canvas, and you can bookmark right from here, too!
If you’d like to learn more about fonts, I’ve got free cheat sheets – they cover everything I mentioned here, plus tips on how to make lists of system fonts and Cricut fonts, and lists of my favorite Cricut Access fonts that are pre-installed in Cricut Design Space – everything from bold and chunky and handwriting scripts to pen-friendly and vinyl friendly!
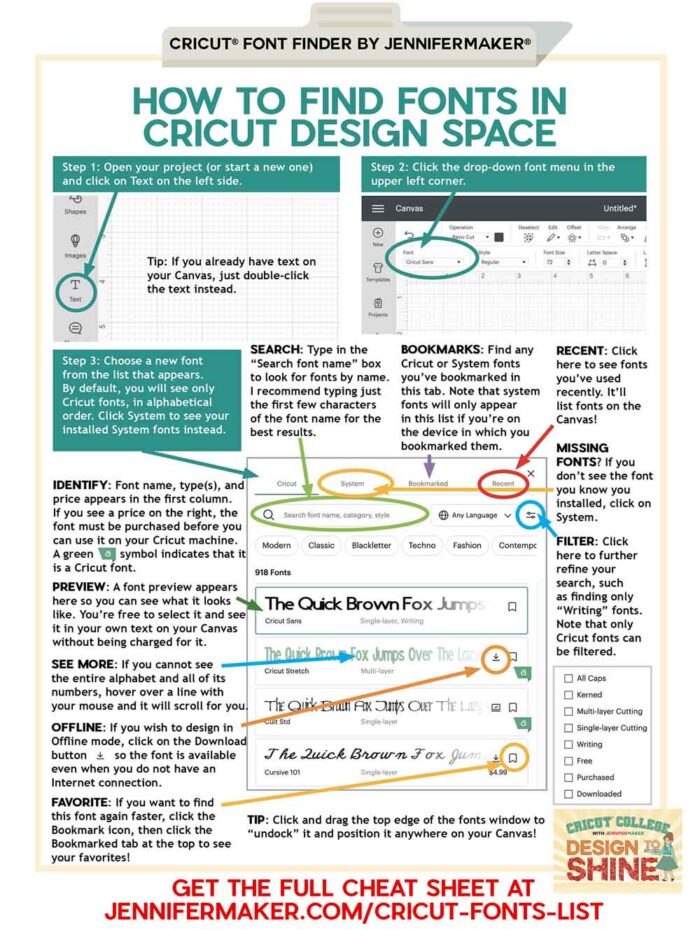
Here’s a shareable cheat sheet showing you how to find use the Font window in Cricut Design Space:
Where to Get More Free Fonts for Cricut Design Space
And if you’re looking for other places to find free high-quality fonts, you can get some from Font Bundles– just go there and click on the Free tab. These free fonts change all the time. There are also free fonts over at Creative Fabrica under Freebies > Free Fonts. The nice thing about the free fonts at FontBundles and CreativeFabrica is that they offer commercial use fonts free here, too. And I have some own fonts that are free, too, made just for writing in Cricut Design Space – they are in design #437 in my library.
Get my free printable Cricut Design Space Cheat Sheets!

If you have a new Cricut machine and want to learn how to use Cricut Design Space software like a pro, be sure to check out my awesome and FREE Cricut Kickoff course to help you get setup for success!

I love fonts and love designing with them! I hope these Cricut Font Finder cheat sheets helps you add just the right font to your next project!
Love,

Want to remember this? Save this Dafont to Cricut Guide to your favorite Pinterest Board!