These shadow boxes are perfect for displaying special collections, savings funds, or memorial items. Choose from a variety of vinyl decals and collect or decorate to your heart’s content!
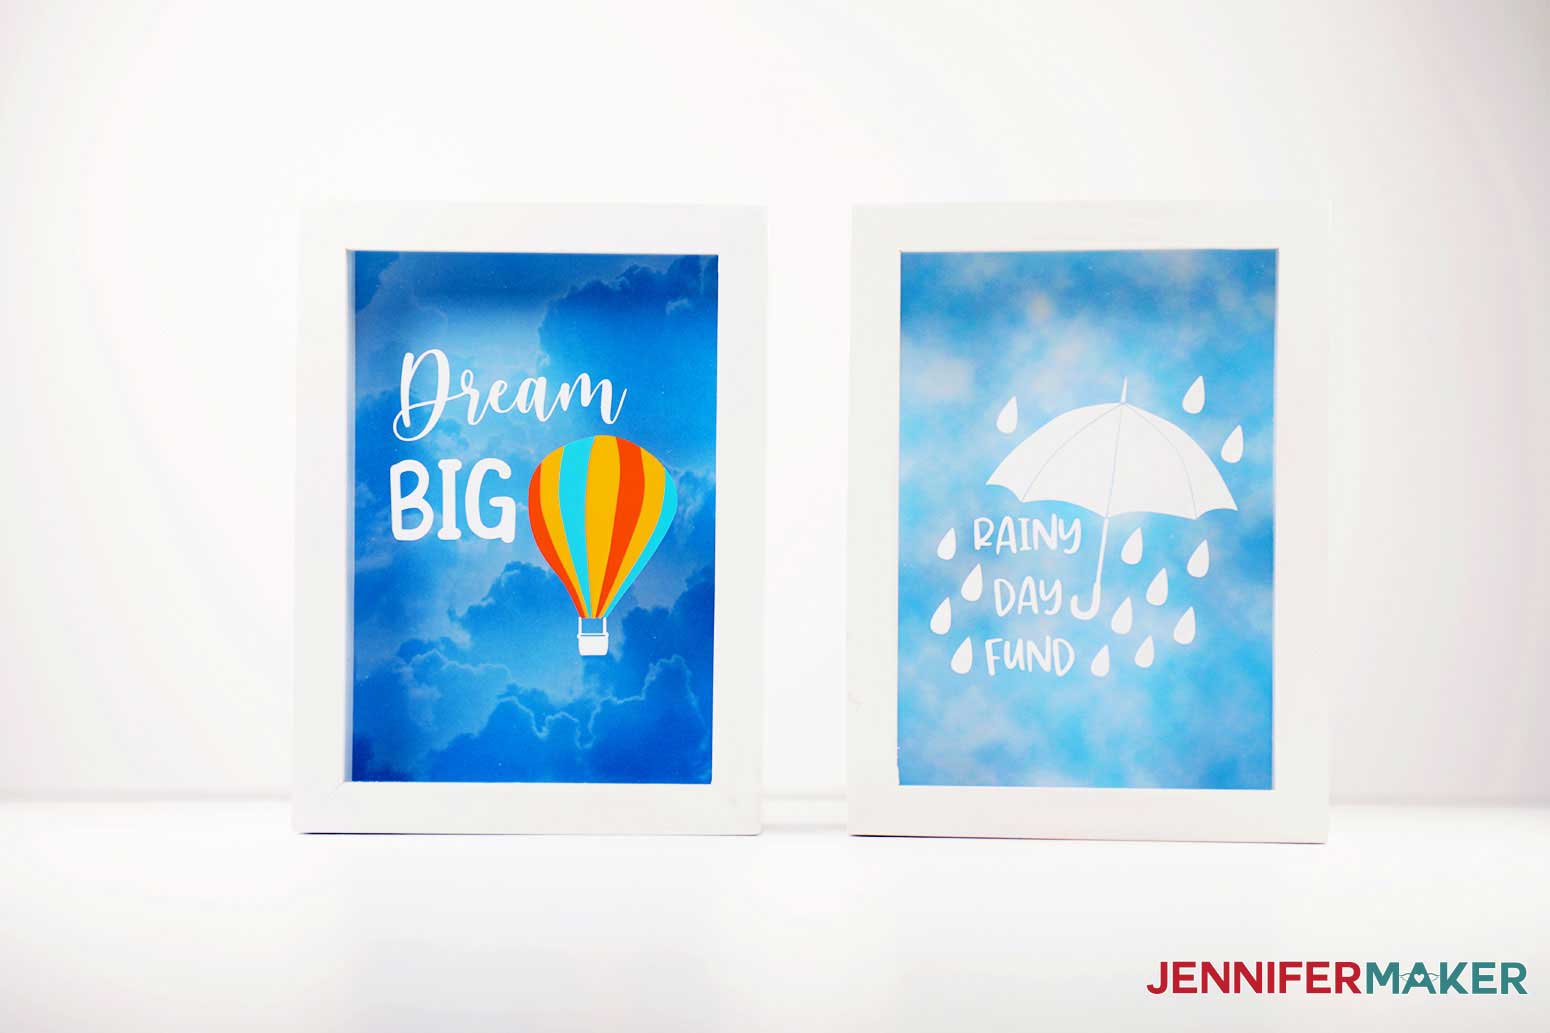
Making shadow boxes is one of my favorite Cricut projects. There are just so many different things you can do with them. For this project I made an assortment of what you might call “interactive” shadow boxes. They were a lot of fun to make and there’s a little something for everybody. There’s a “travel fund” and “savings fund,” with top loading slots and holes for saving money, coins, tickets or other memorabilia. I also made “teacher appreciation” and “beach collection” decals for making special memory or gift frames. I’m so excited for you to make this project!

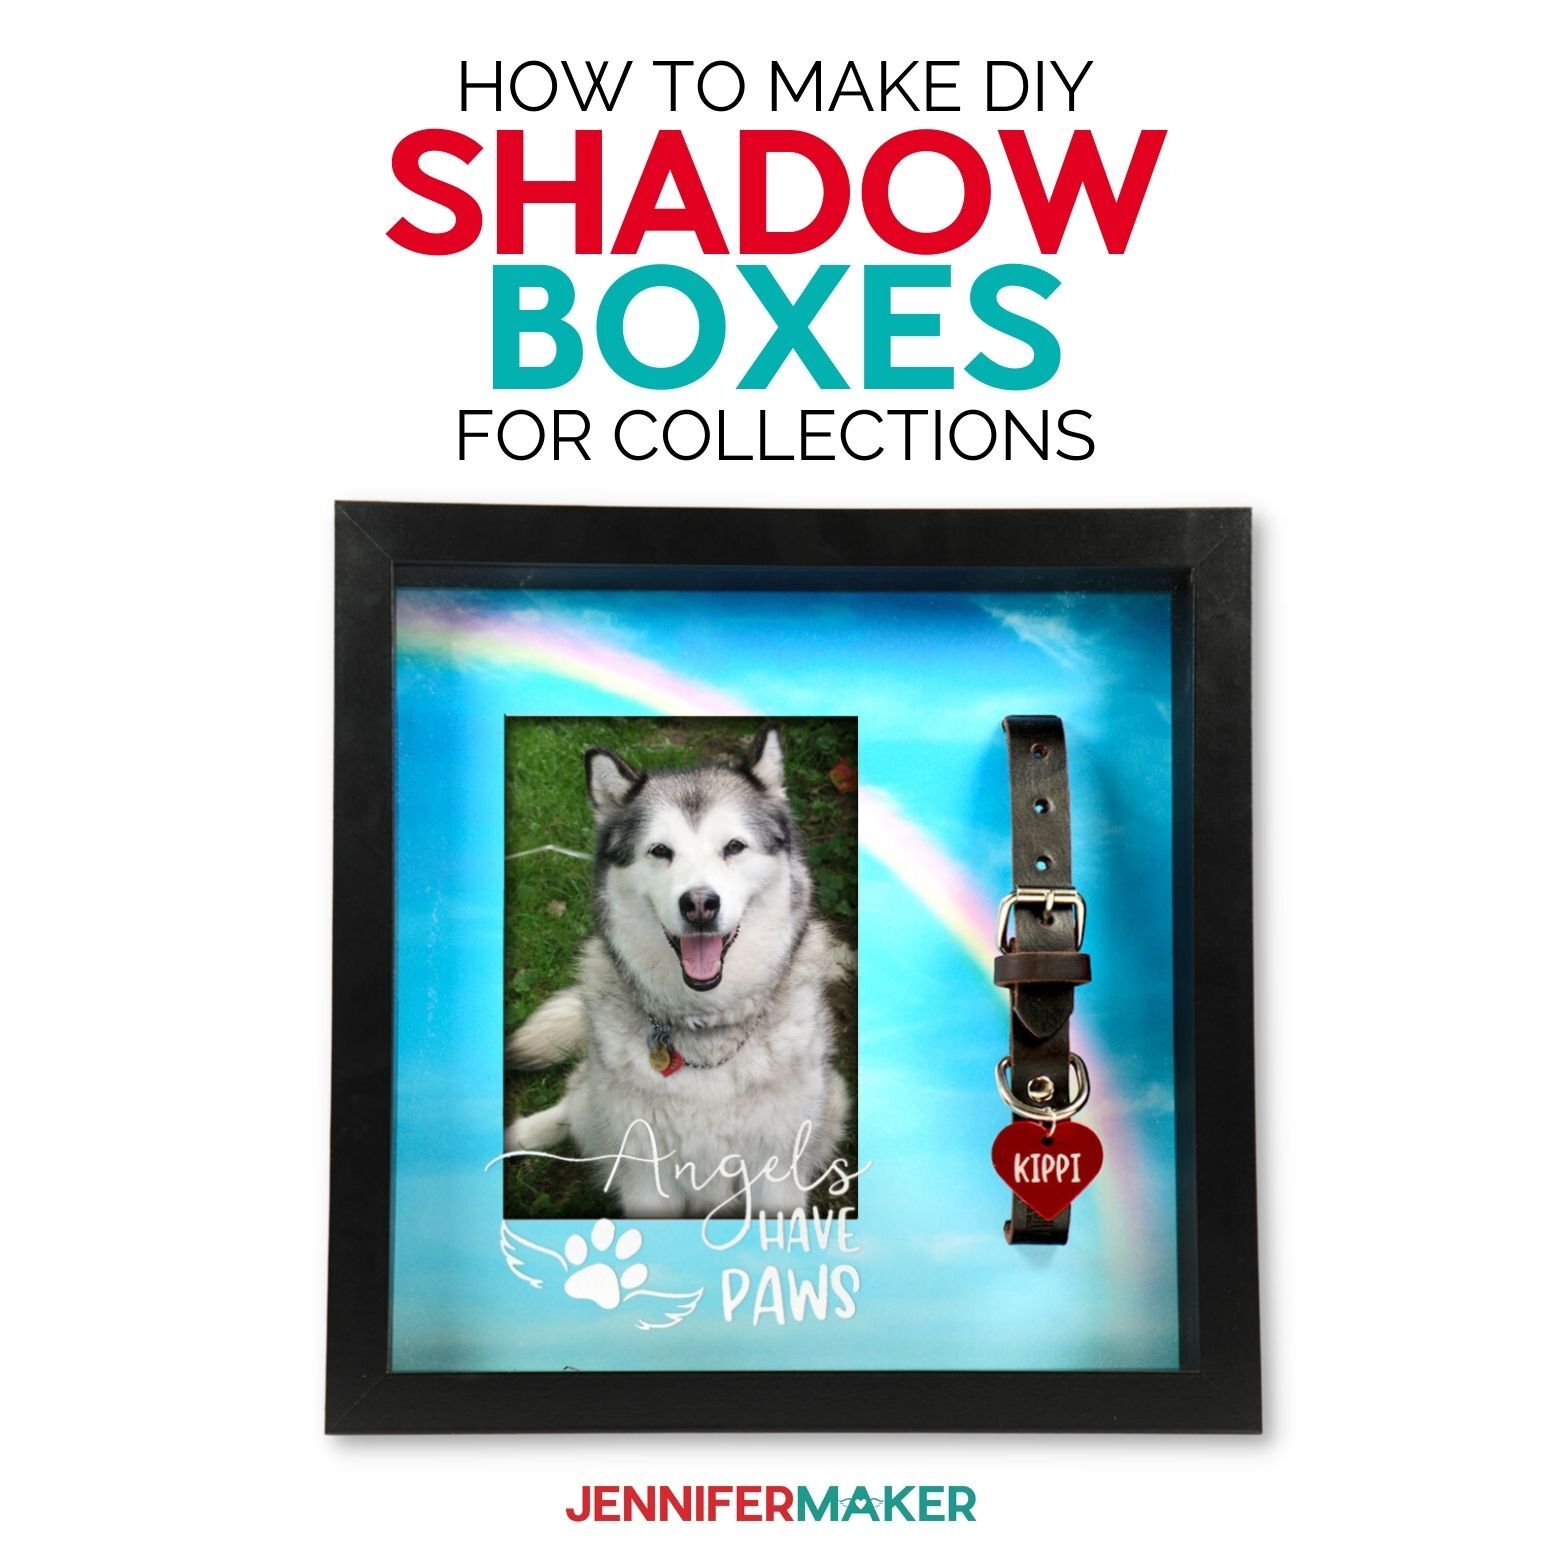
Looking for a way to display a keepsake or one of your collections? This shadow box is perfect for displaying any collectibles or memorabilia that you’d like to have a special place to put in. Here is one I made that is very special to me and close to my heart.

Let’s take a look at the materials we will need for all of these designs. Of course it will vary depending on which design you make and I’ve explained what you will need for each design in my materials list. So, I’m using four different size shadow boxes, with both black and white frames. We will also use a variety of vinyl and cardstock.
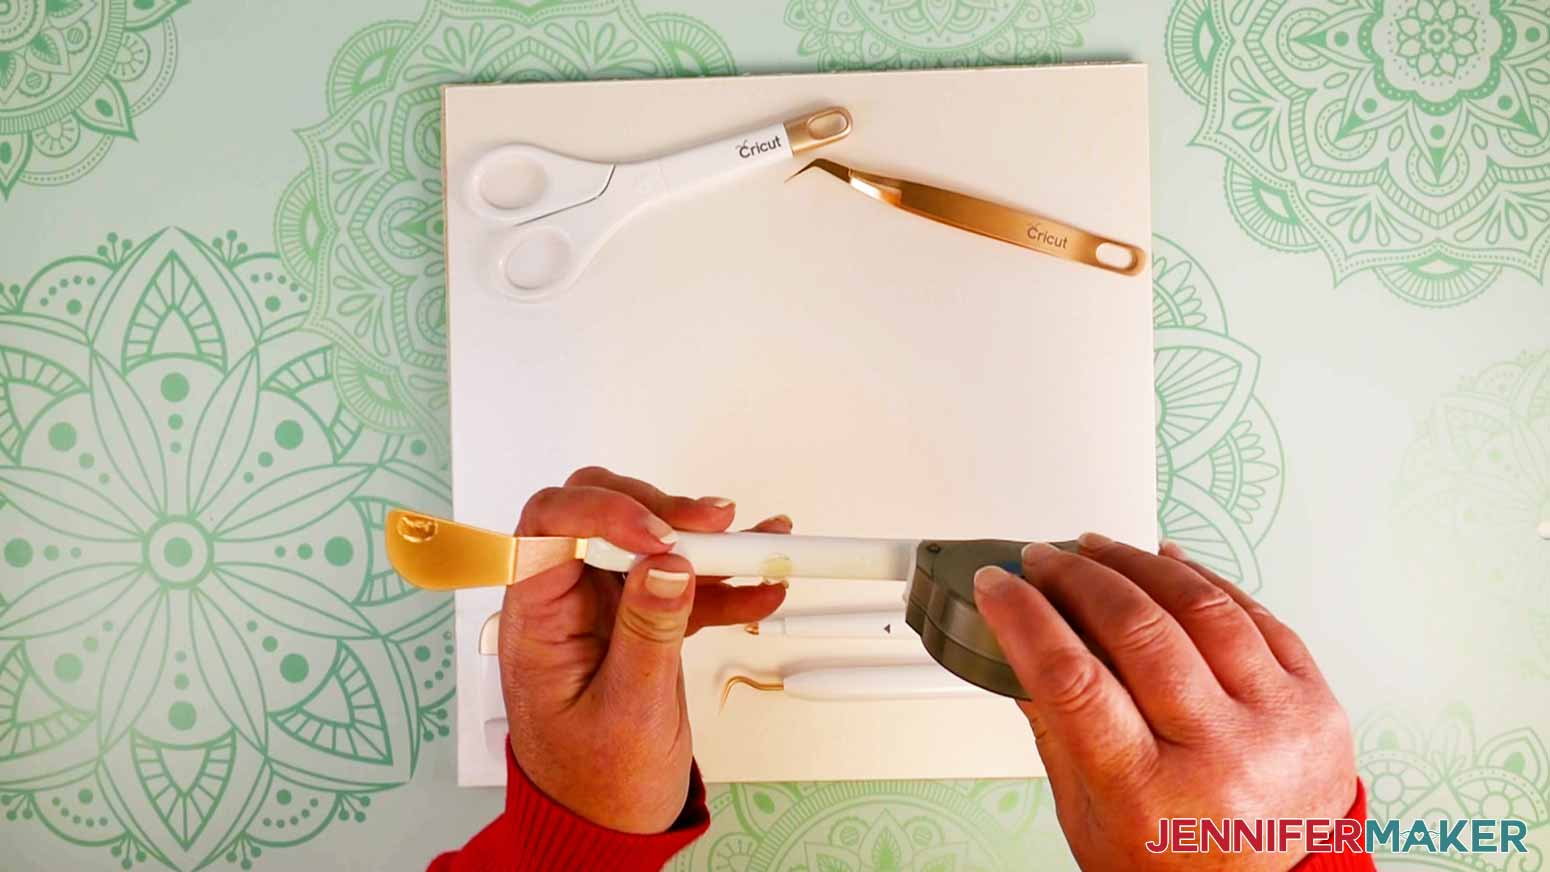
A piece of Cricut Chipboard, some photo paper. A pretty Gold Cricut Tool set, a craft hammer and a jewelry-making set to go along with that. Some glue dots and glue, spray paint and coating. Of course we will use our Cricut cutting machine, along with our mats and both the fine point blade and Knife blade. An extra large Cricut scraper and our regular weeding tools. A drill and drill bits are optional.
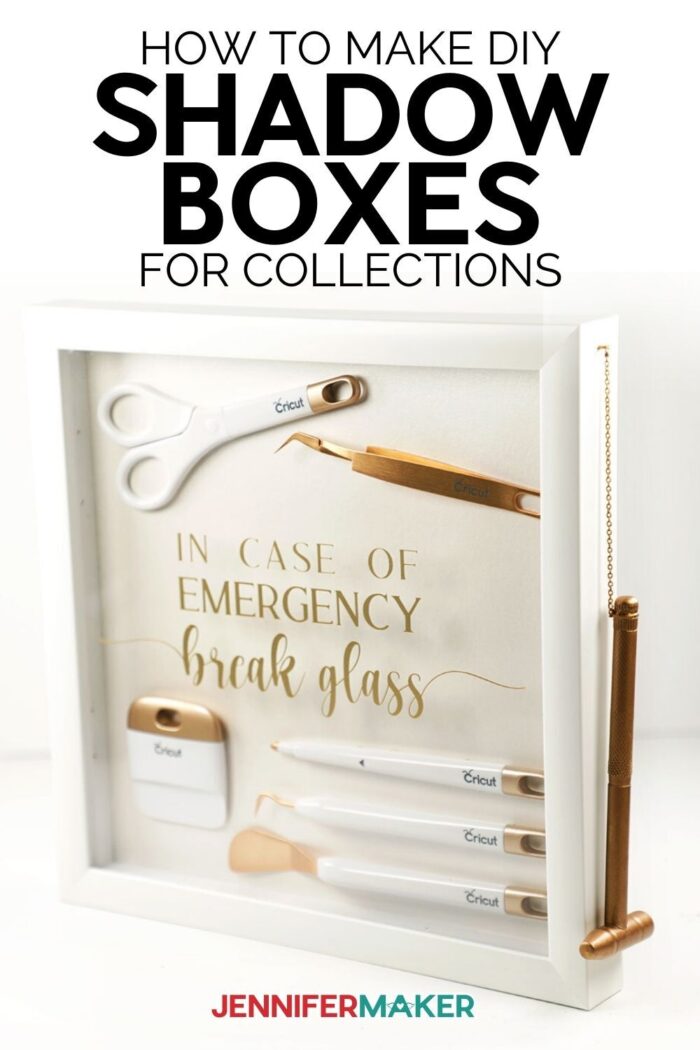
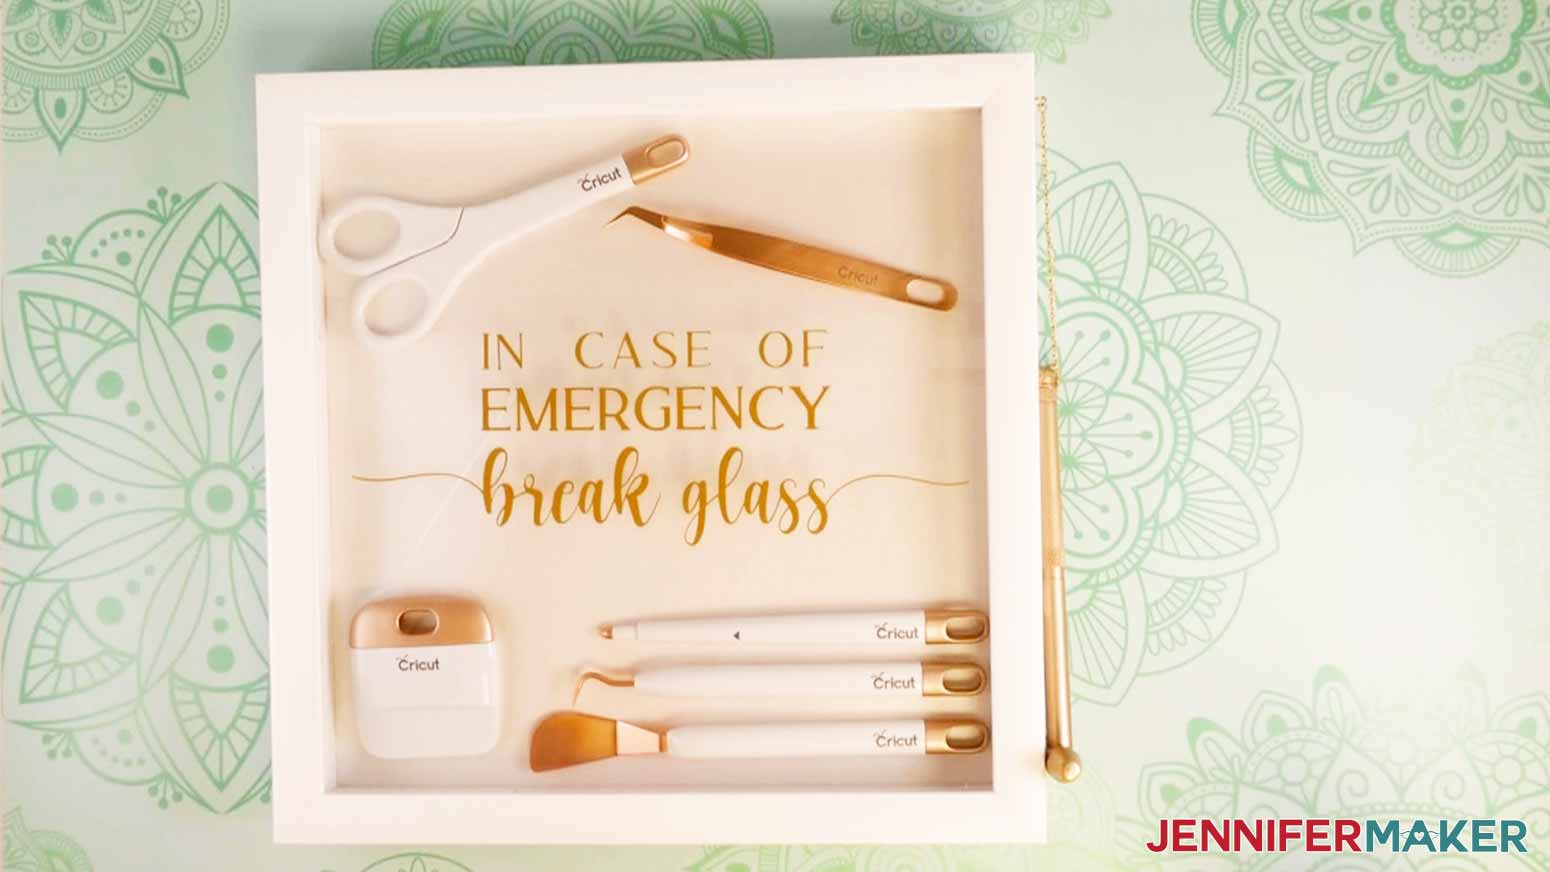
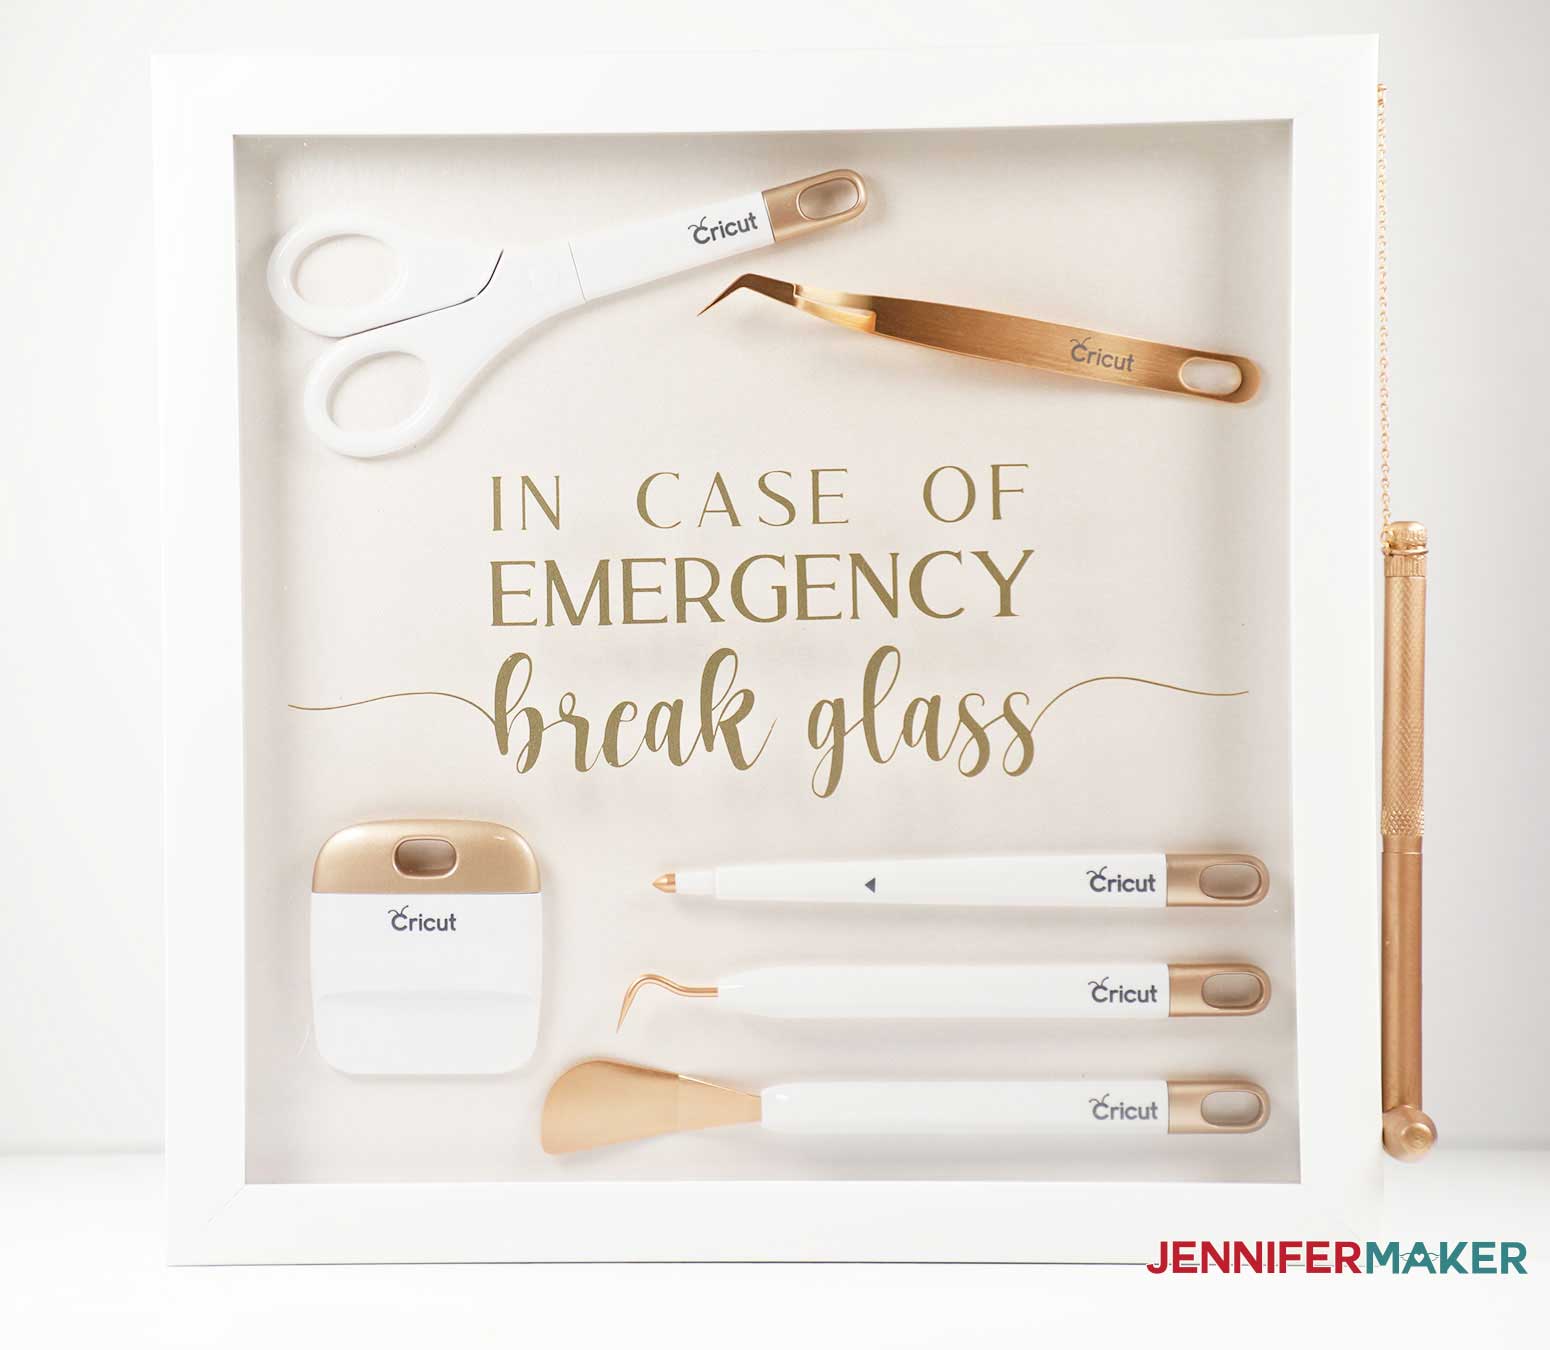
This shadow box is one of my favorites! I love how all the Cricut tools are displayed and look so very well put together. And look at that little hammer on the side. How cute is that?! You can customize these using different craft tools that you have lying around. Add this shadow box to your craft room to add a personal touch to your decor.
Or, create a shadow box that you can gift out to your friends and family! These are so fun to make and can be personalized to your liking.
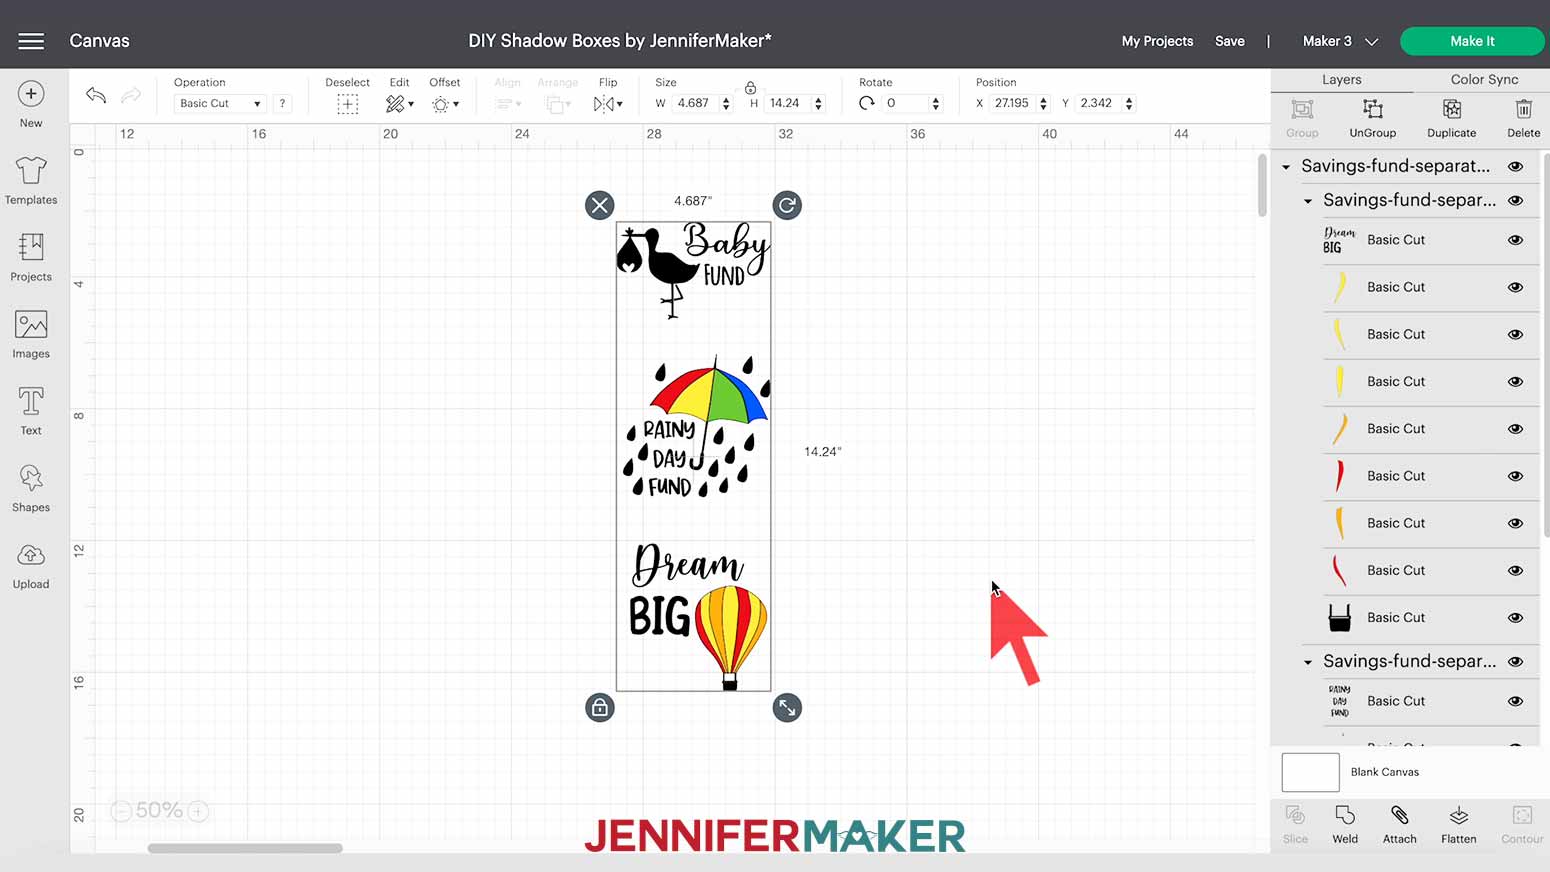
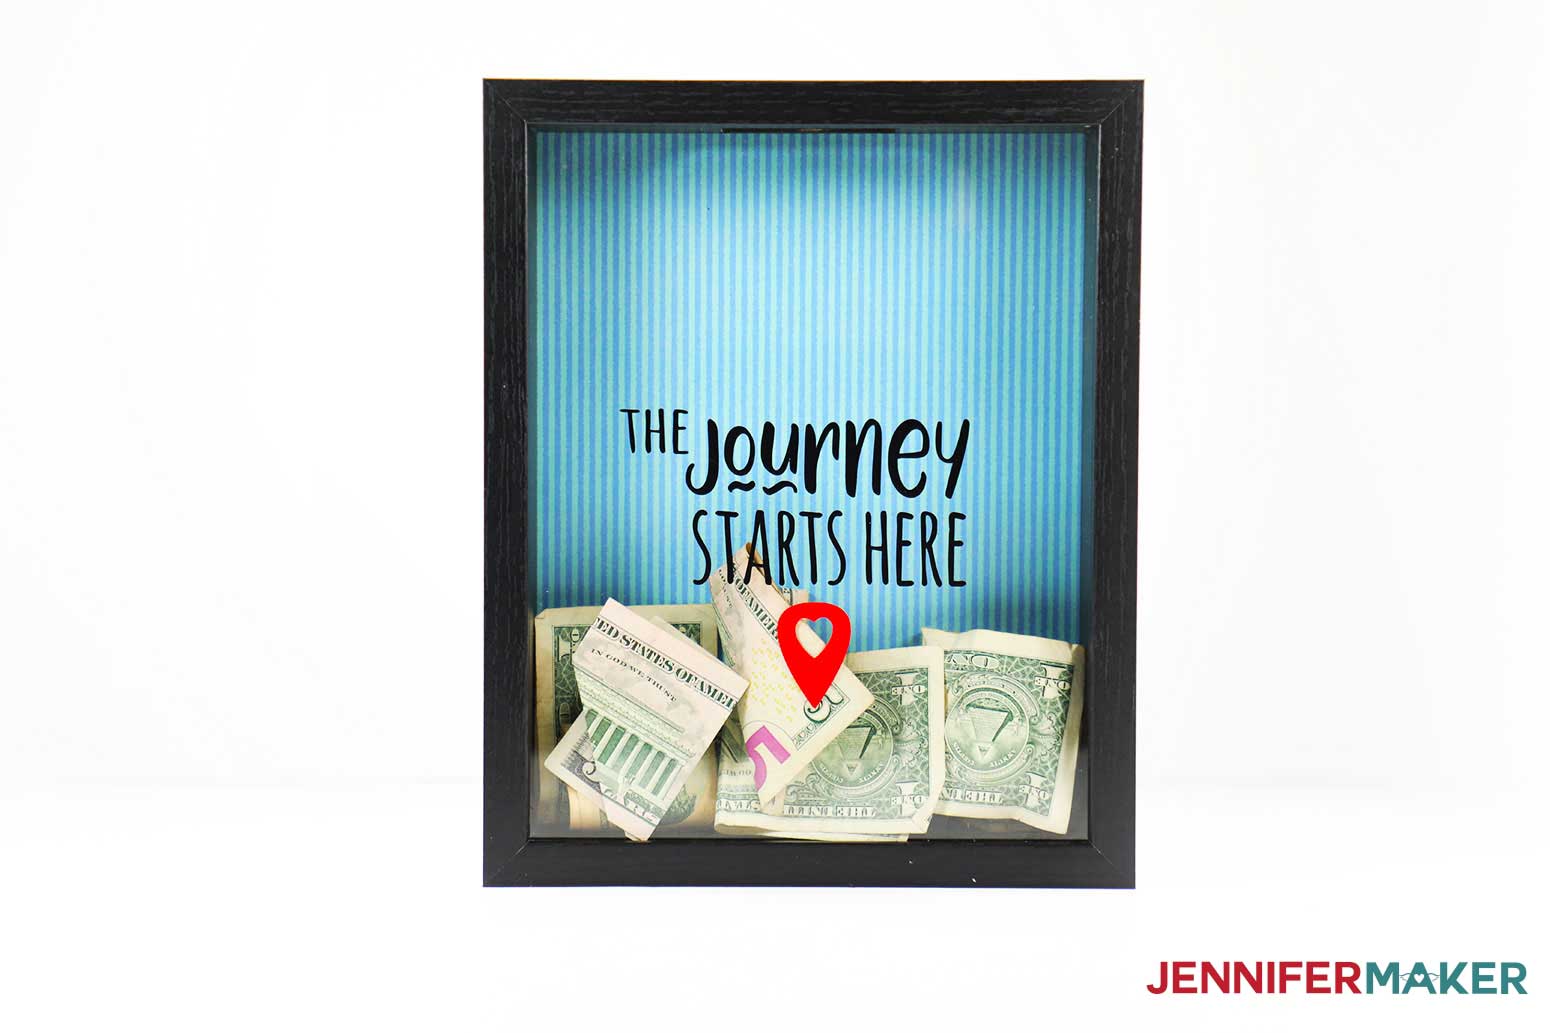
Like I mentioned before, I’ve made a few different designs that you can use. The one below is one that can be used as a way to save money for a special trip. You can customize the quote to your liking and use the box to save up for a special trip. It’s also great because you will clearly be able to see your box get filled adding to your motivation to fill it up to the top!

Here’s a supply list of what you need to make shadow boxes for collections! This post contains some affiliate links for your convenience (which means if you make a purchase after clicking a link I will earn a small commission but it won’t cost you a penny more)! Read my full disclosure policy.
Materials to Shadow Boxes for Collections
View my Amazon shopping list with the exact items we used to make this project
- Shadow Box Frames (I used these Emergency Frame, for Travel Frame, for Pet Frame, for Savings Fund Frame)
- Premium Vinyl (I used Permanent in Gold and Silver (for Pet Frames), Champagne (for Emergency Frames), Black (for Travel Frames), White, Light Blue, Orange and Tangerine (for Savings Fund Frames)
- American Crafts Variety Pack Primaries (for Travel Frame)
- Reminisce Skyscape Scrapbook Collection (for Pet and Savings Fund Frames)
- Sheet of Cricut Chipboard (for Pet Frame)
- Photo Paper (Optional for printing photo for Pet Frames)
- For Emergency Frame I used Cricut Tools, Hammer, Jewelry Making Set – Gold, Mini Gold Eye Screw, E6000, Rustoleum Metallic Spray Paint in Champagne Mist, Krylon Crystal Clear Spray Coating, and White Cardstock
- Glue Dots
- Transfer Tape
- Cricut Knife Blade and Housing (for Pet Memorial Frame)
- XL Scraper
- StandardGrip Cutting Mat
- StrongGrip Cutting Mat (for Pet Memorial Frame)
- Weeding Tool
- Isopropyl Alcohol (for cleaning the frames)
- Lint-free towel or coffee filters (for cleaning the frames)
- A method to cut your vinyl decals, I used the amazing Cricut Maker 3 but you can also use a Cricut Maker series, Cricut Explore series, Venture, or Joy series machine
- Design #337 – My free SVG/PDF/DXF design files are available in my free resource library (get the password by filling out the form at the bottom of this page)
How to Make Your Own DIY Shadow Boxes for Collections
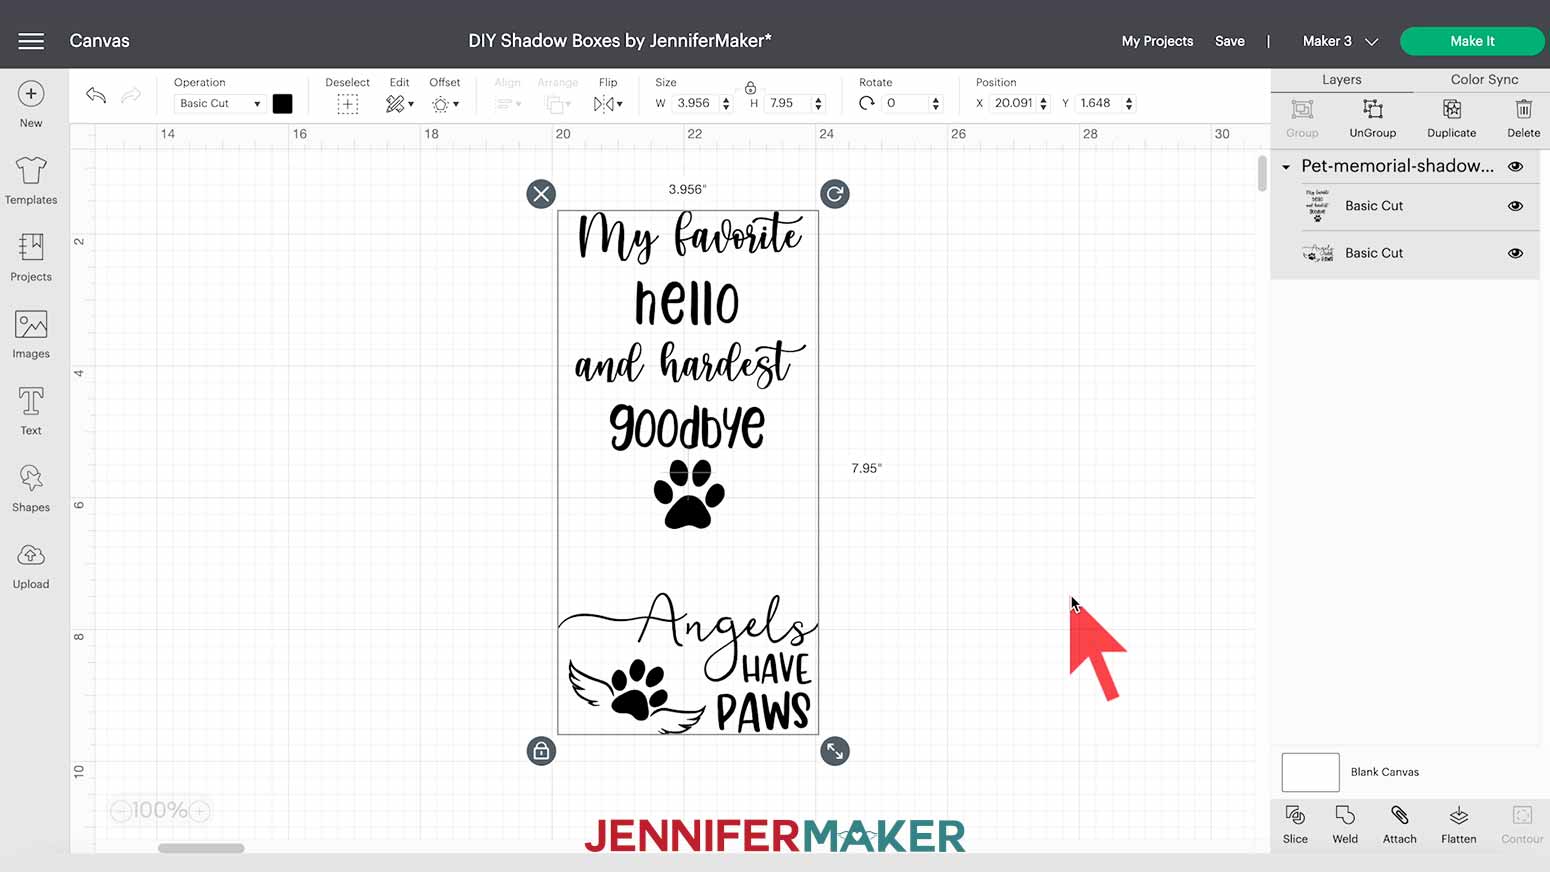
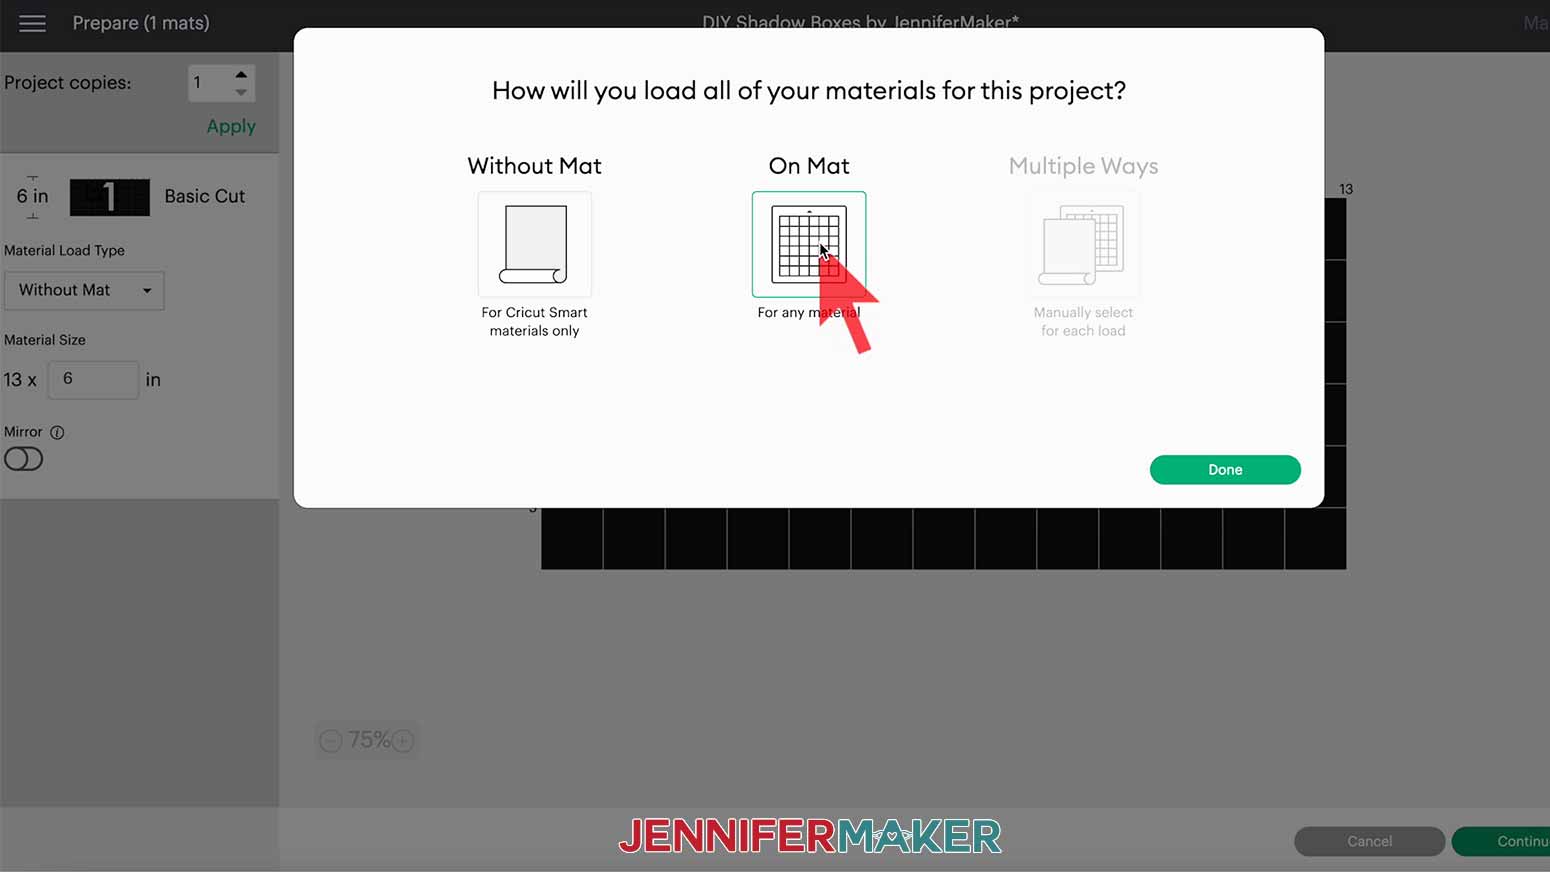
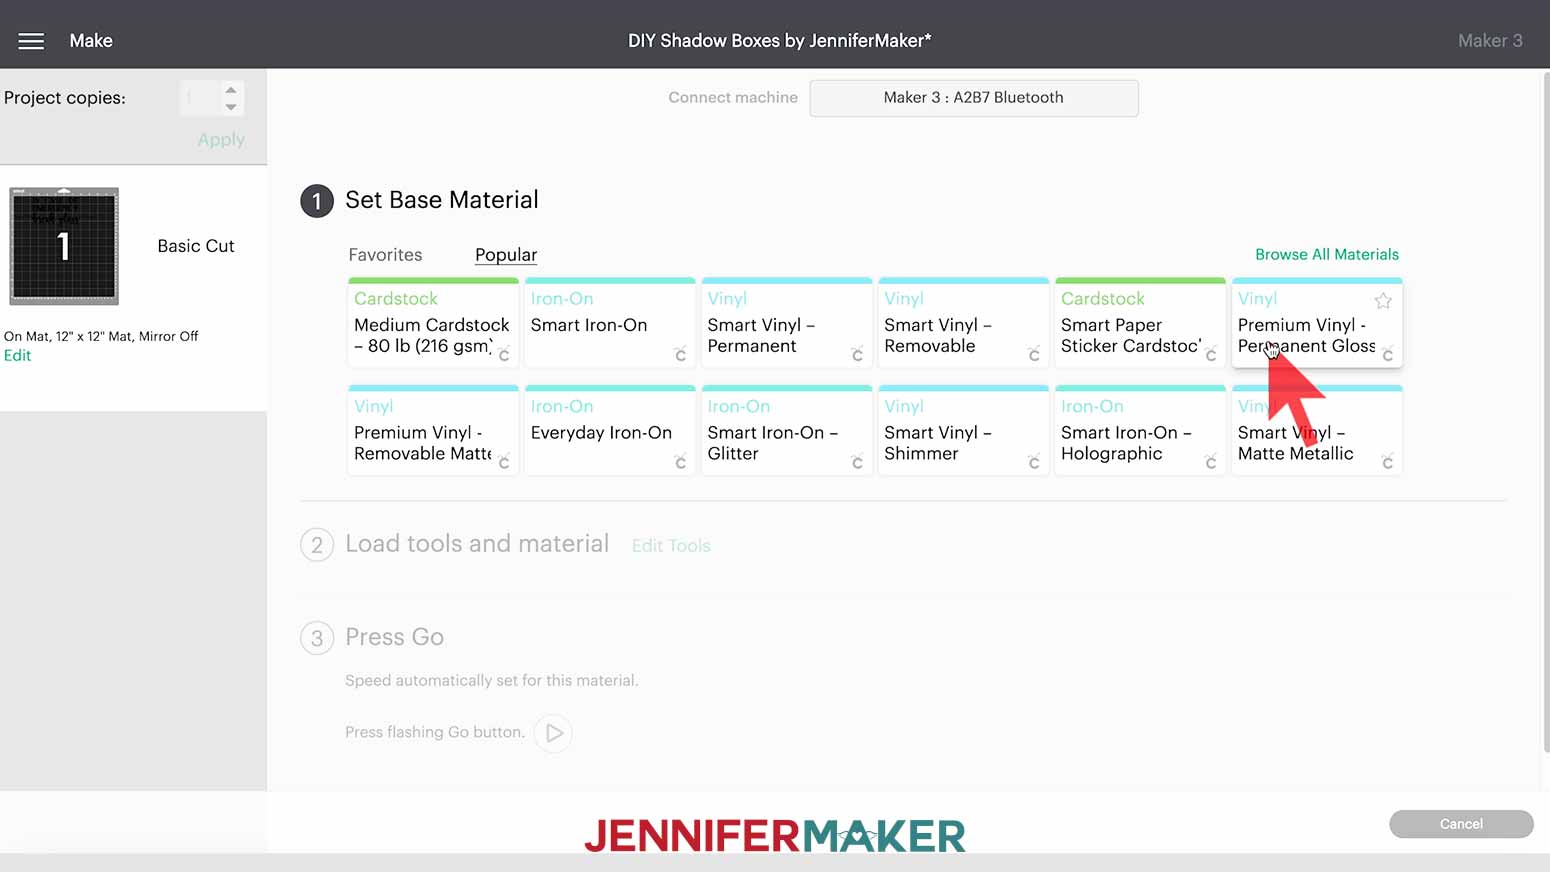
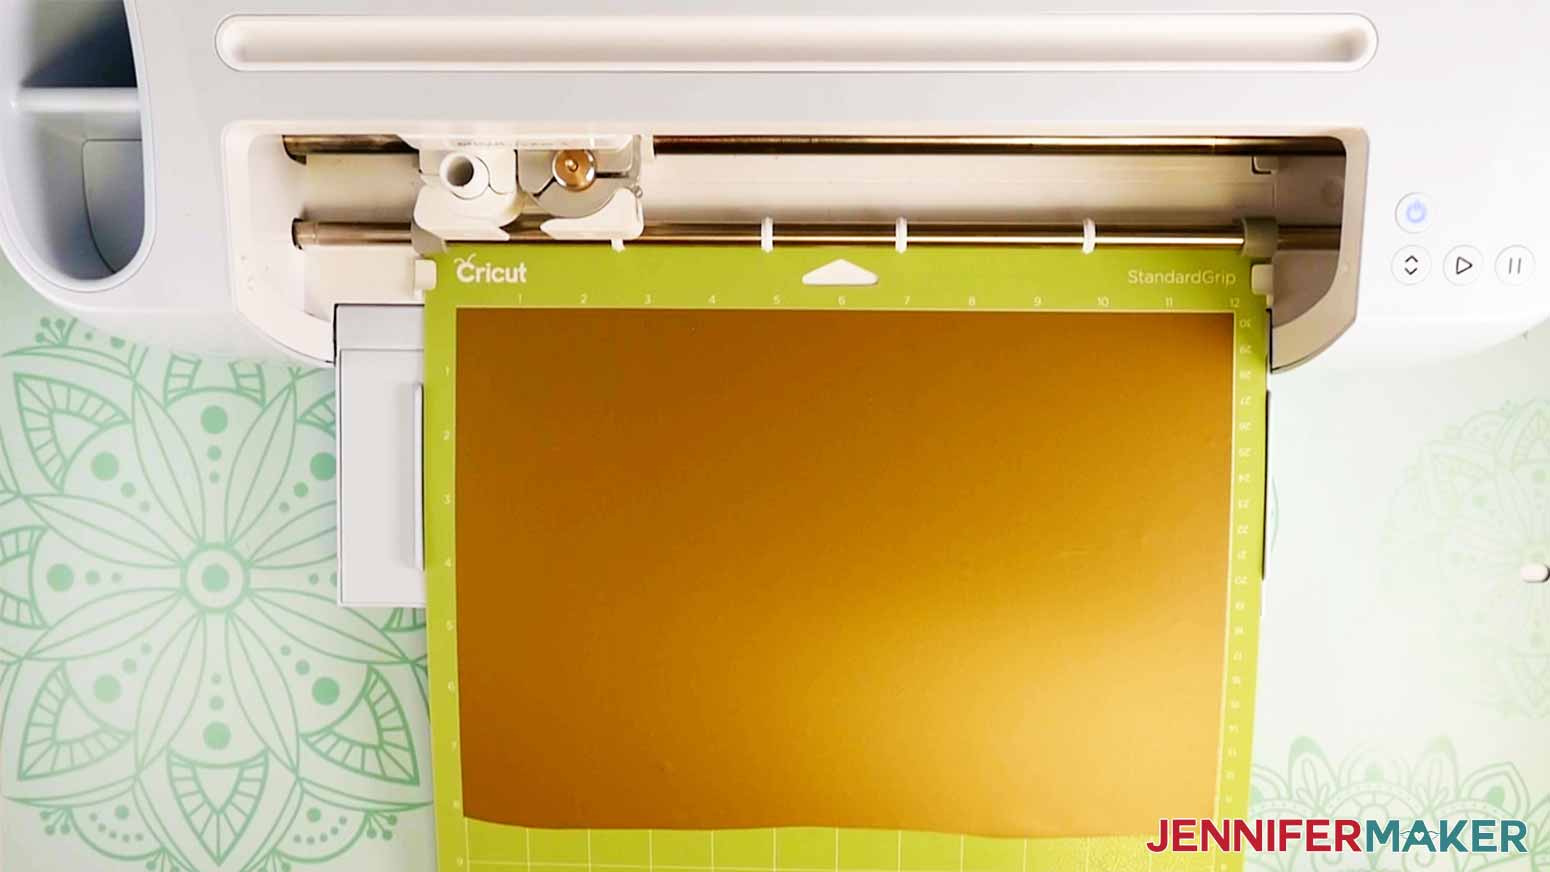
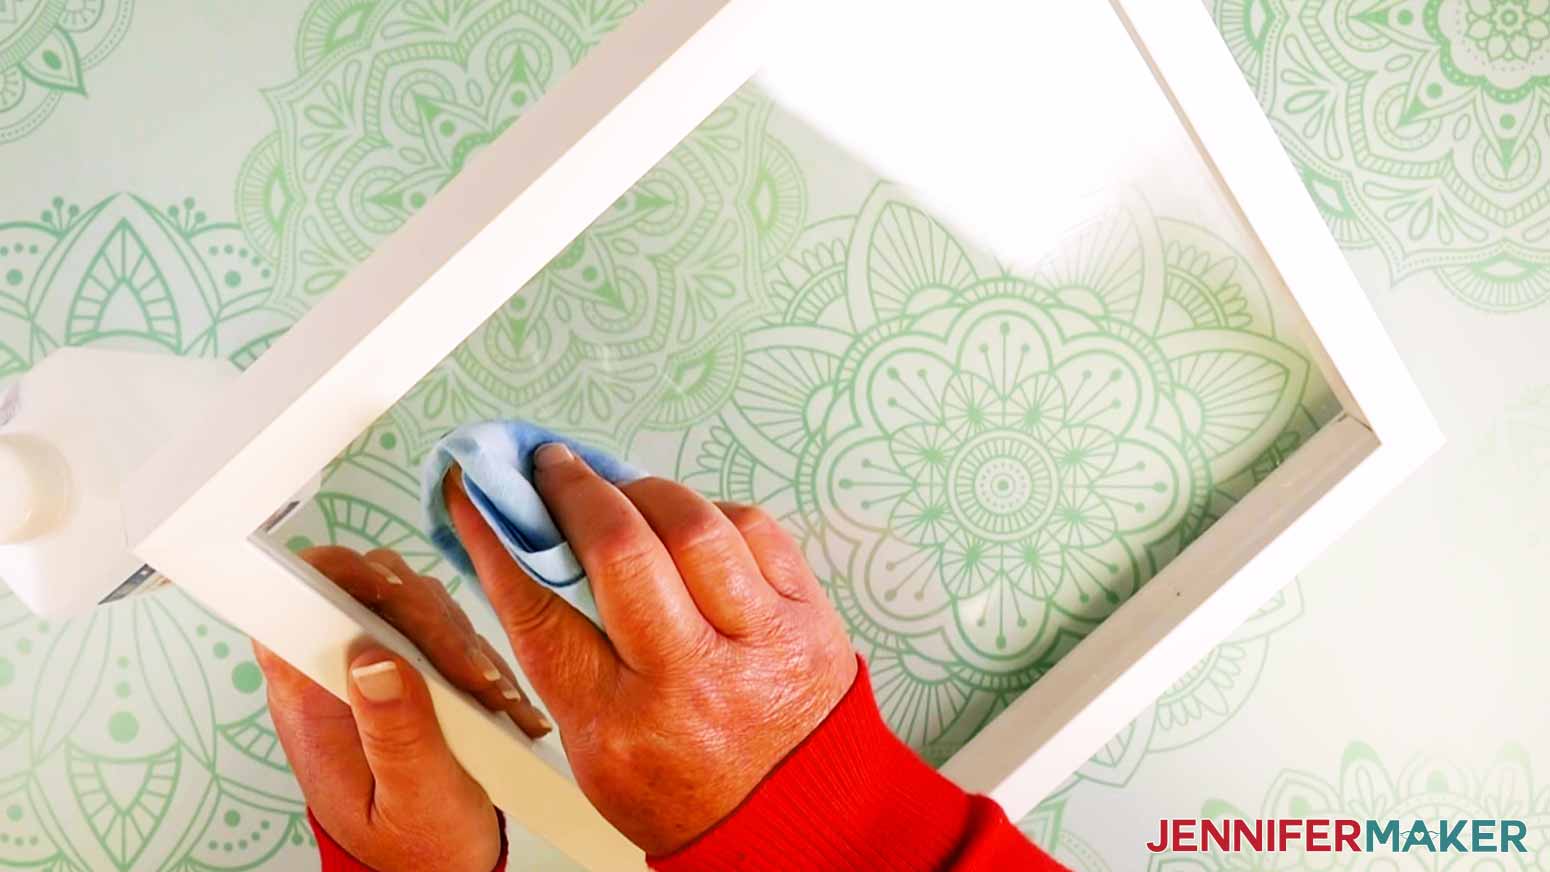
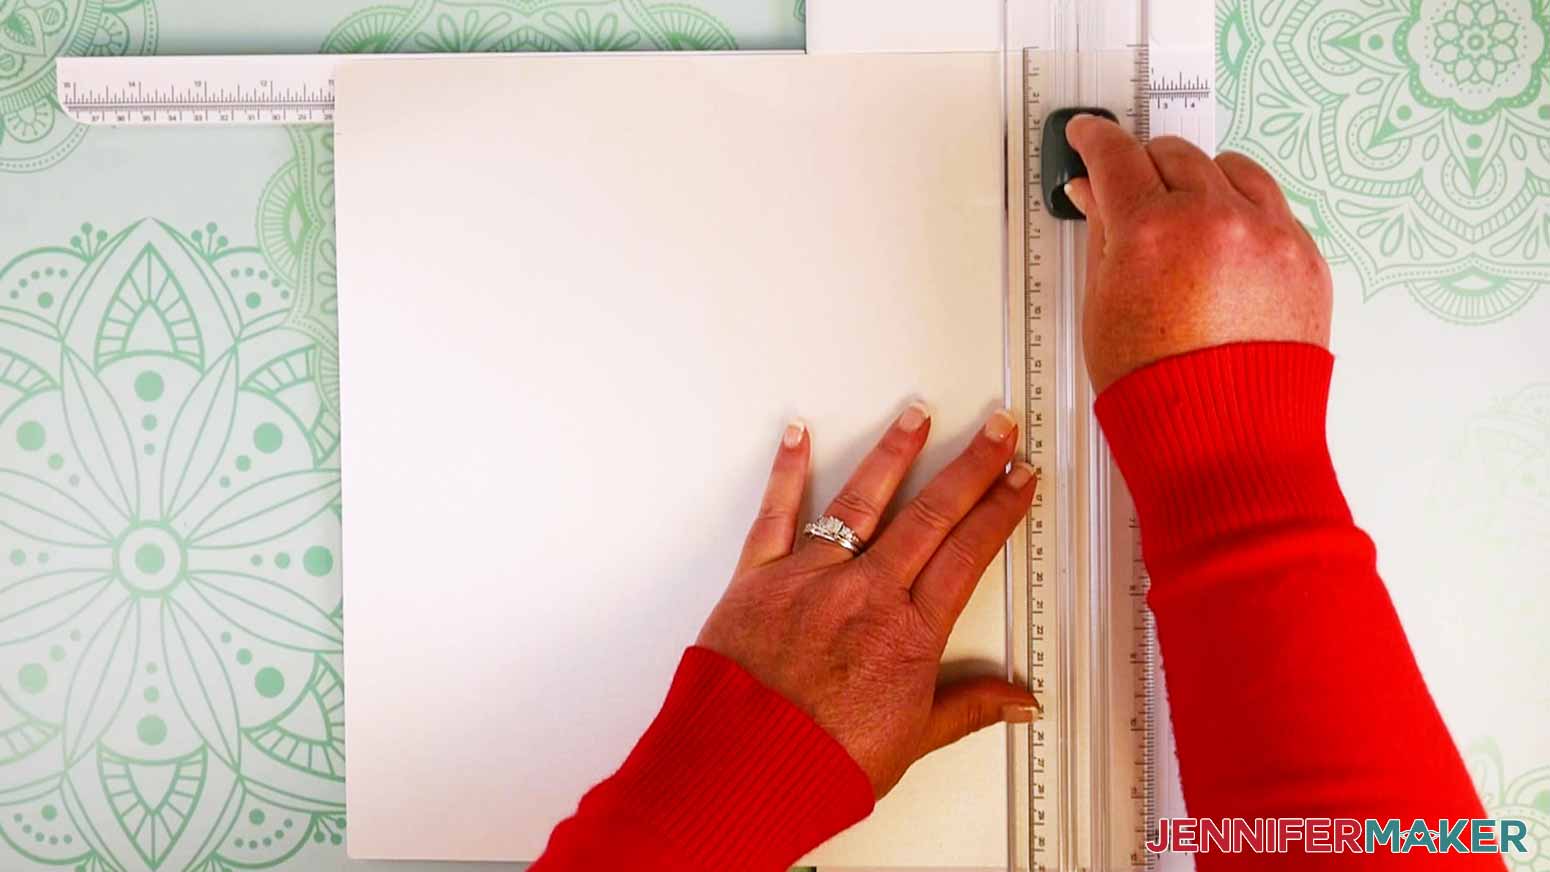
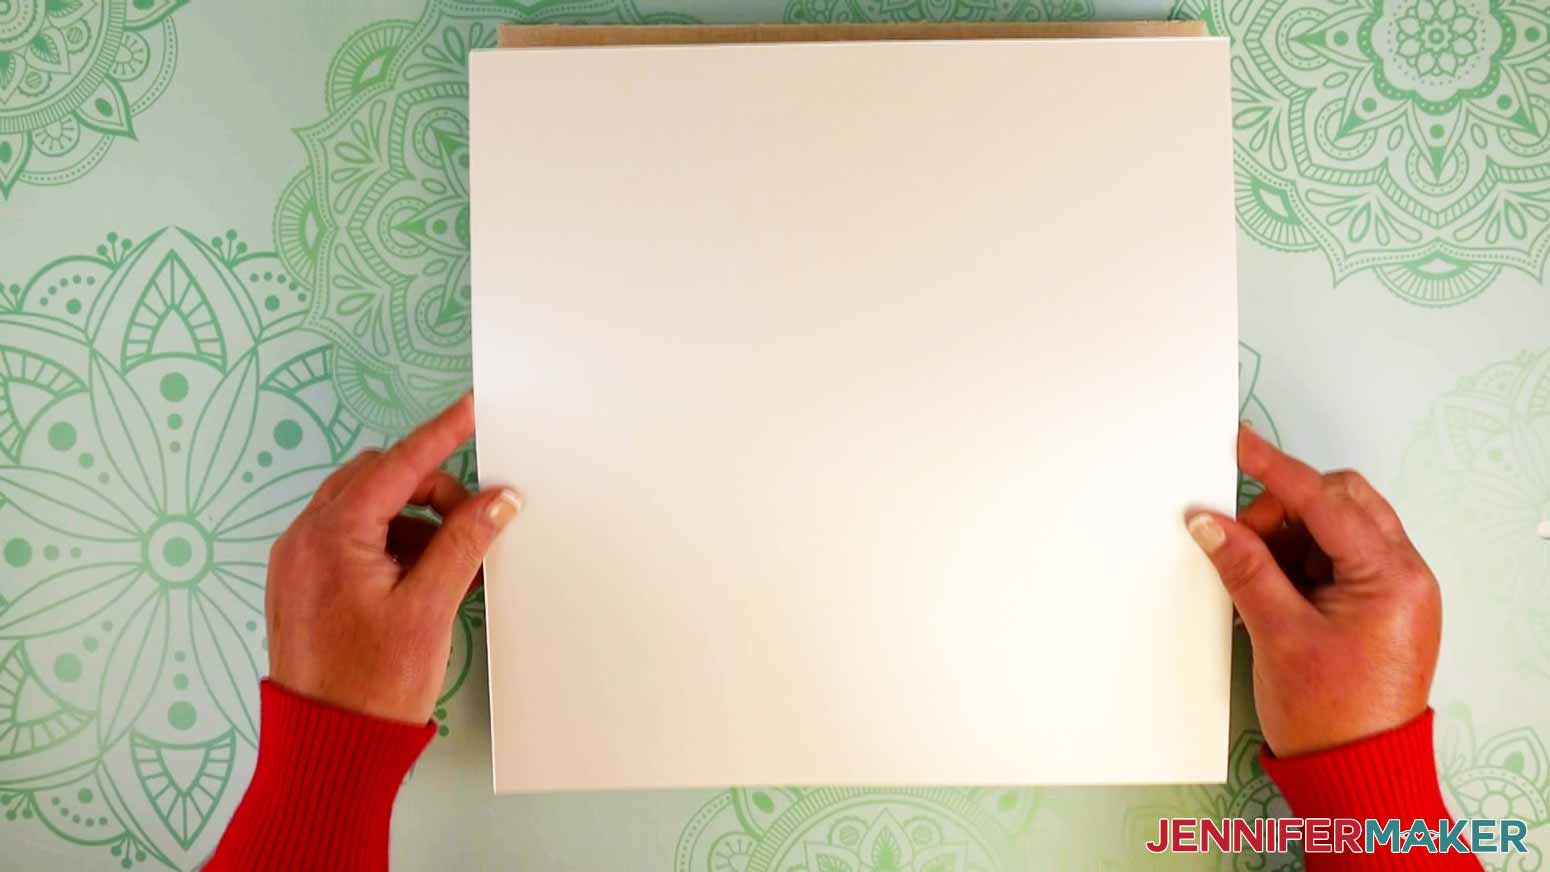
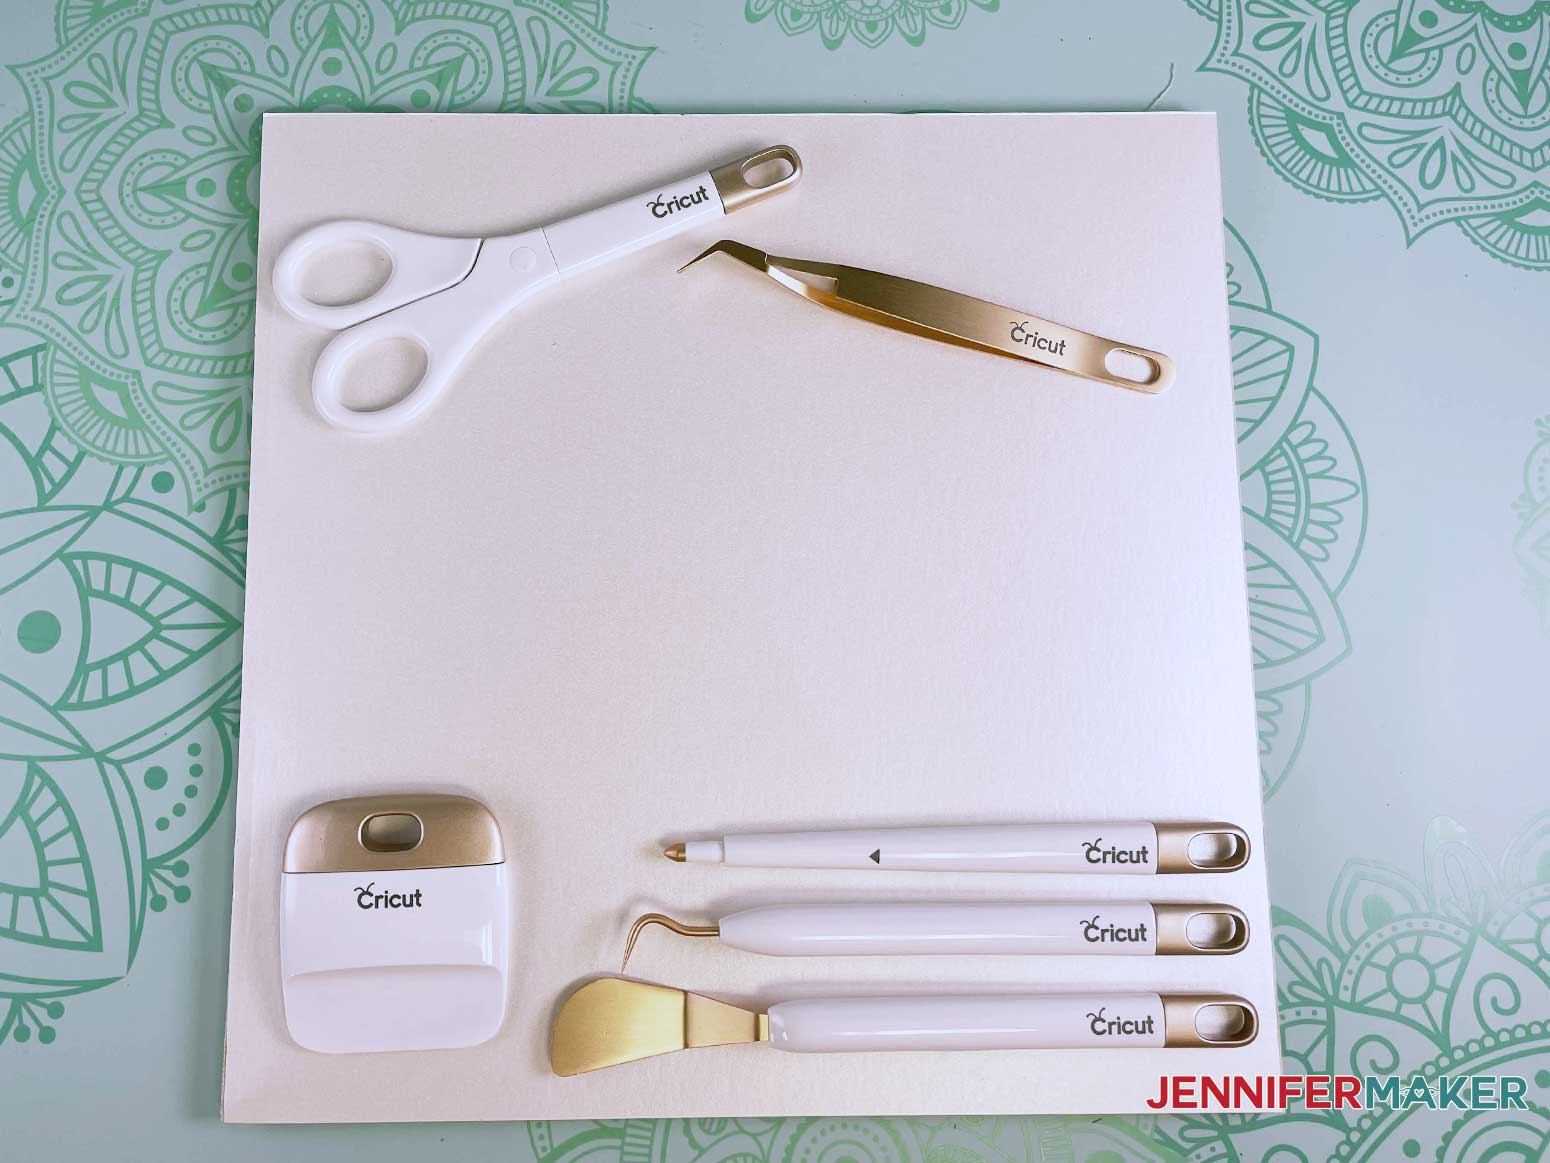
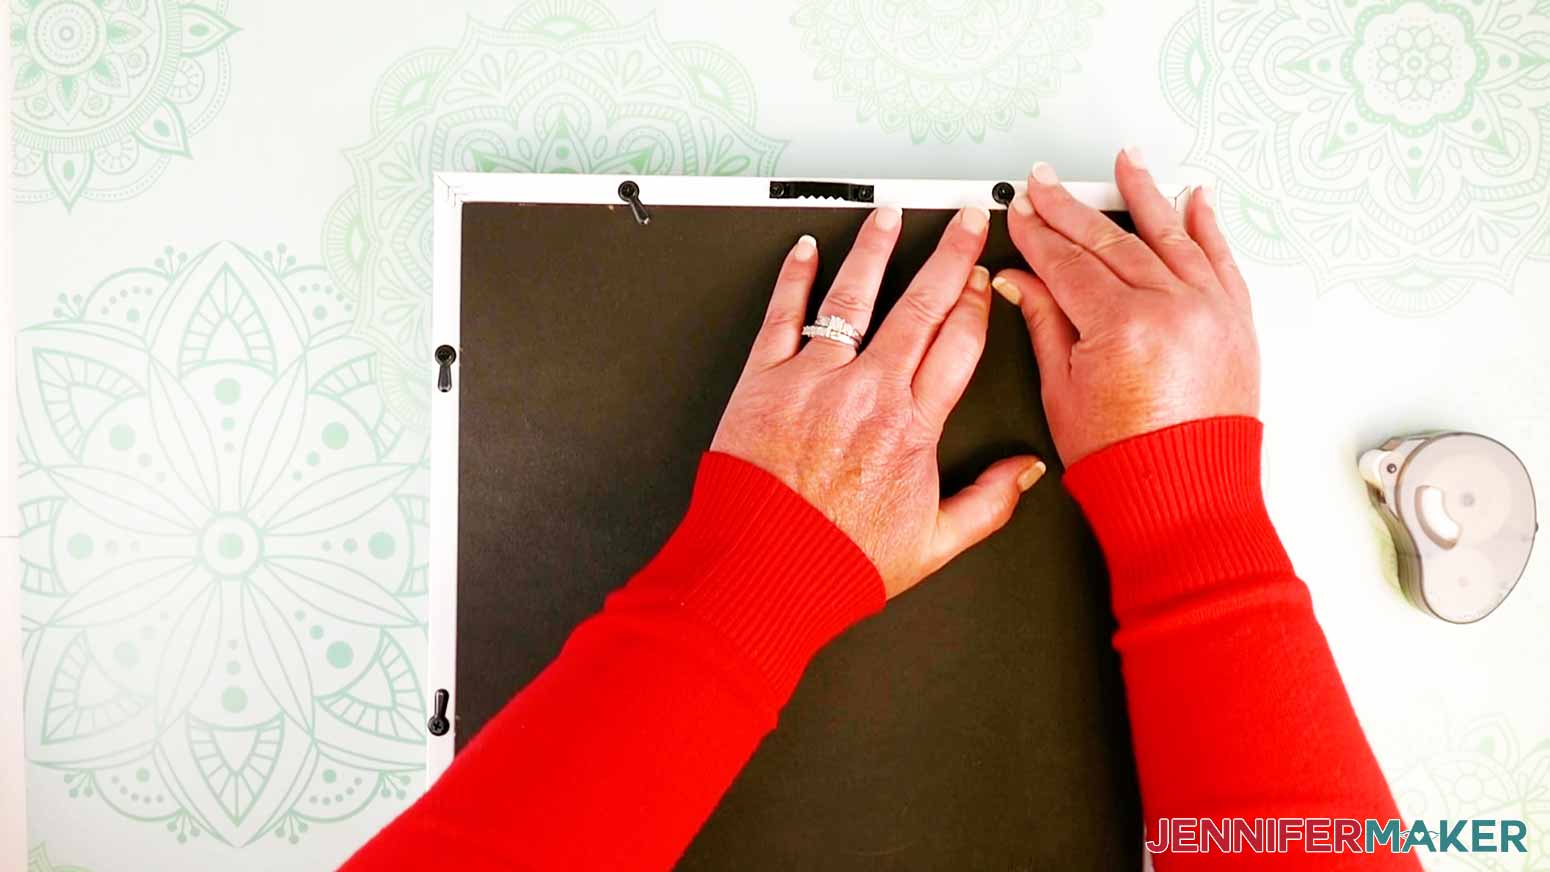
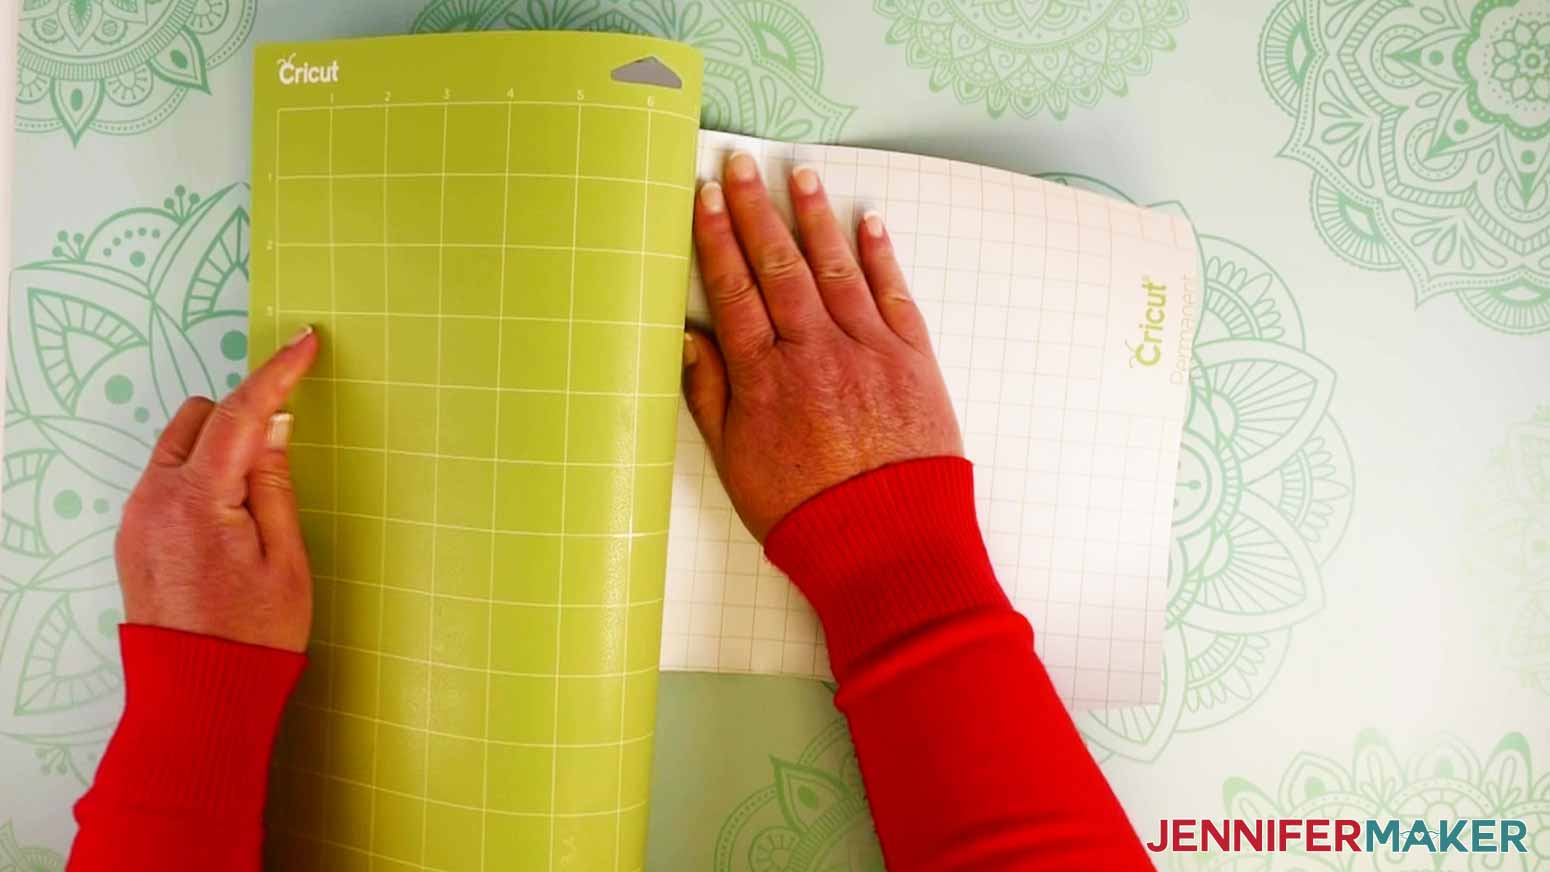
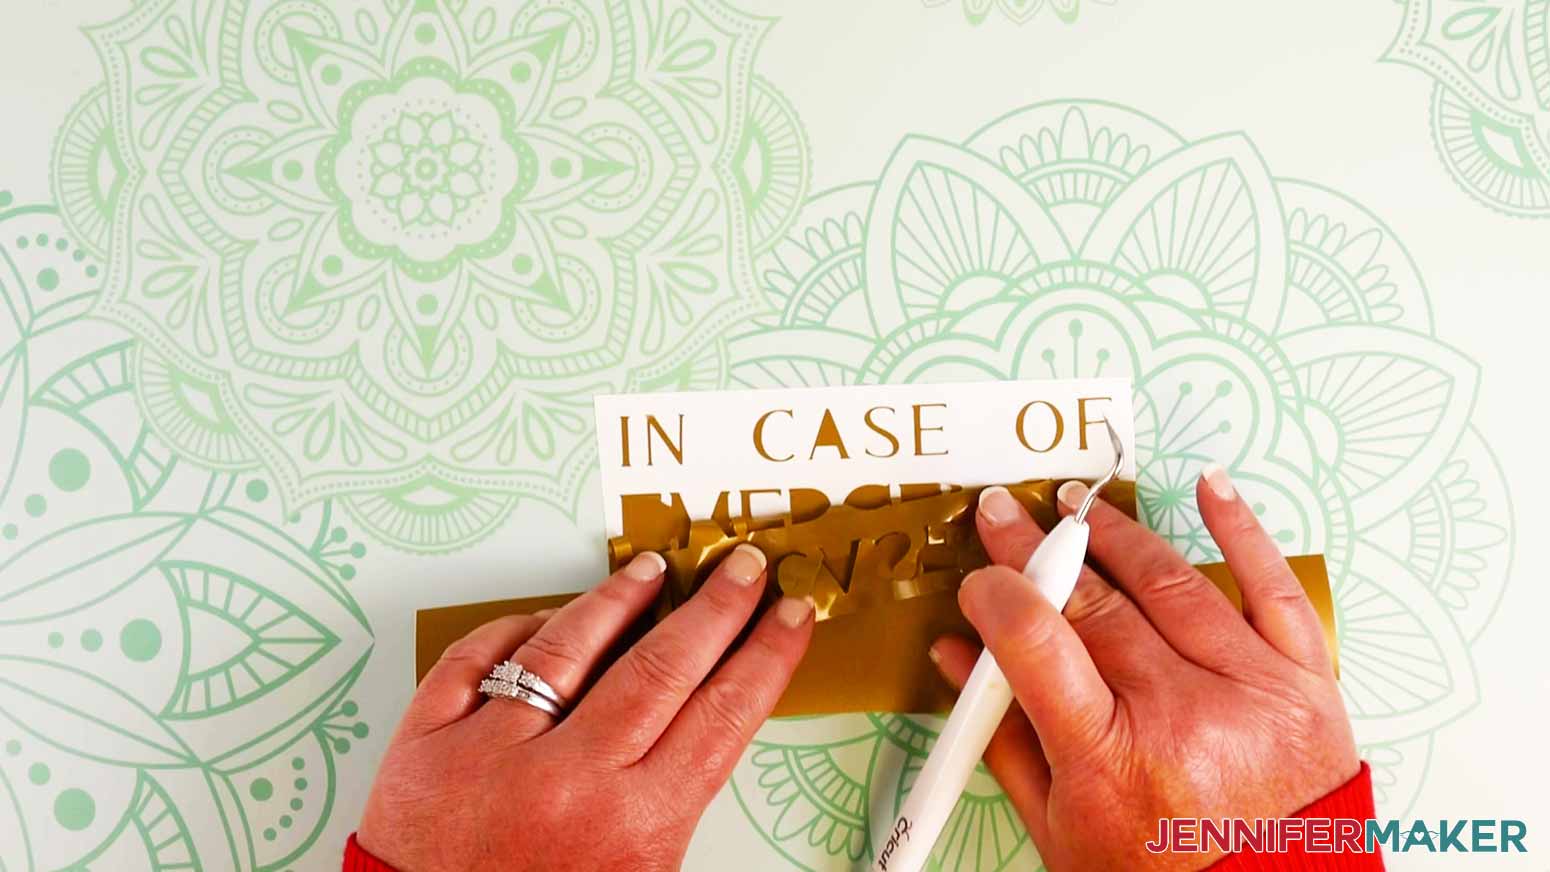
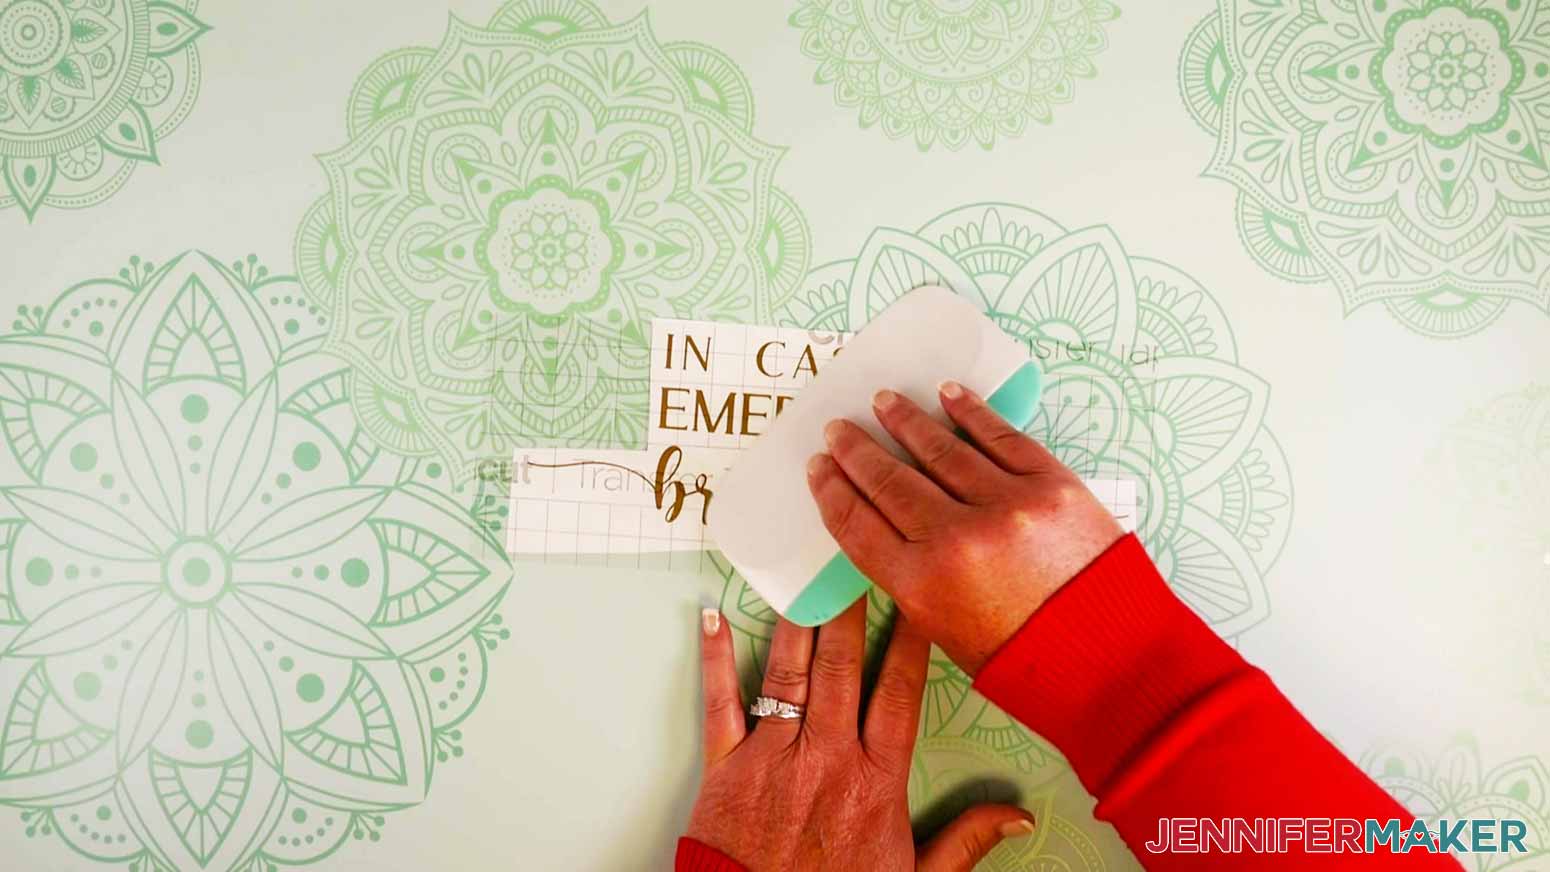
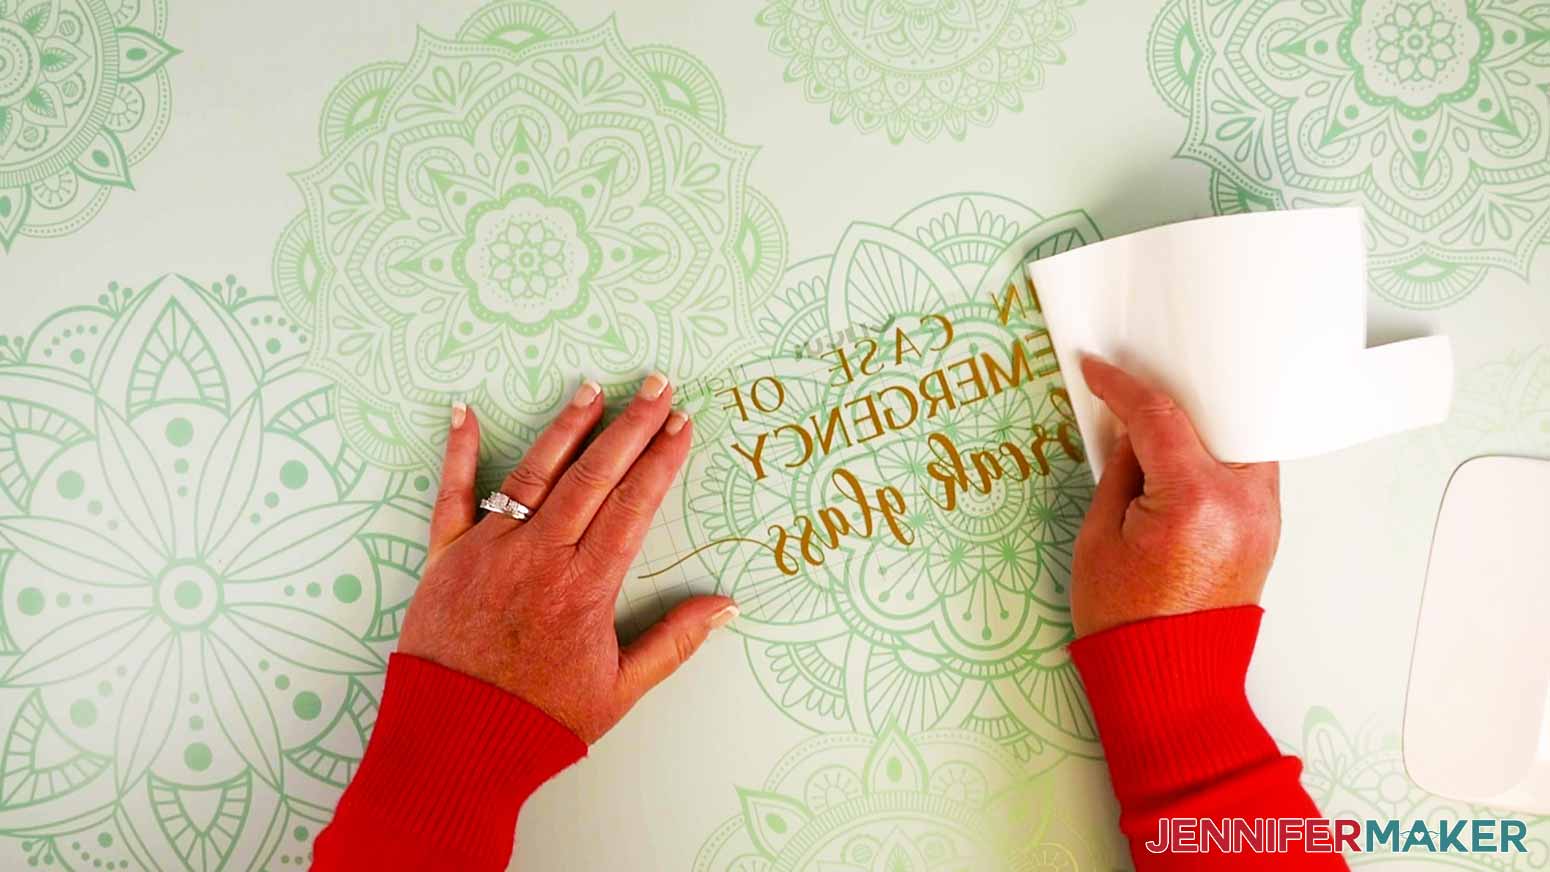
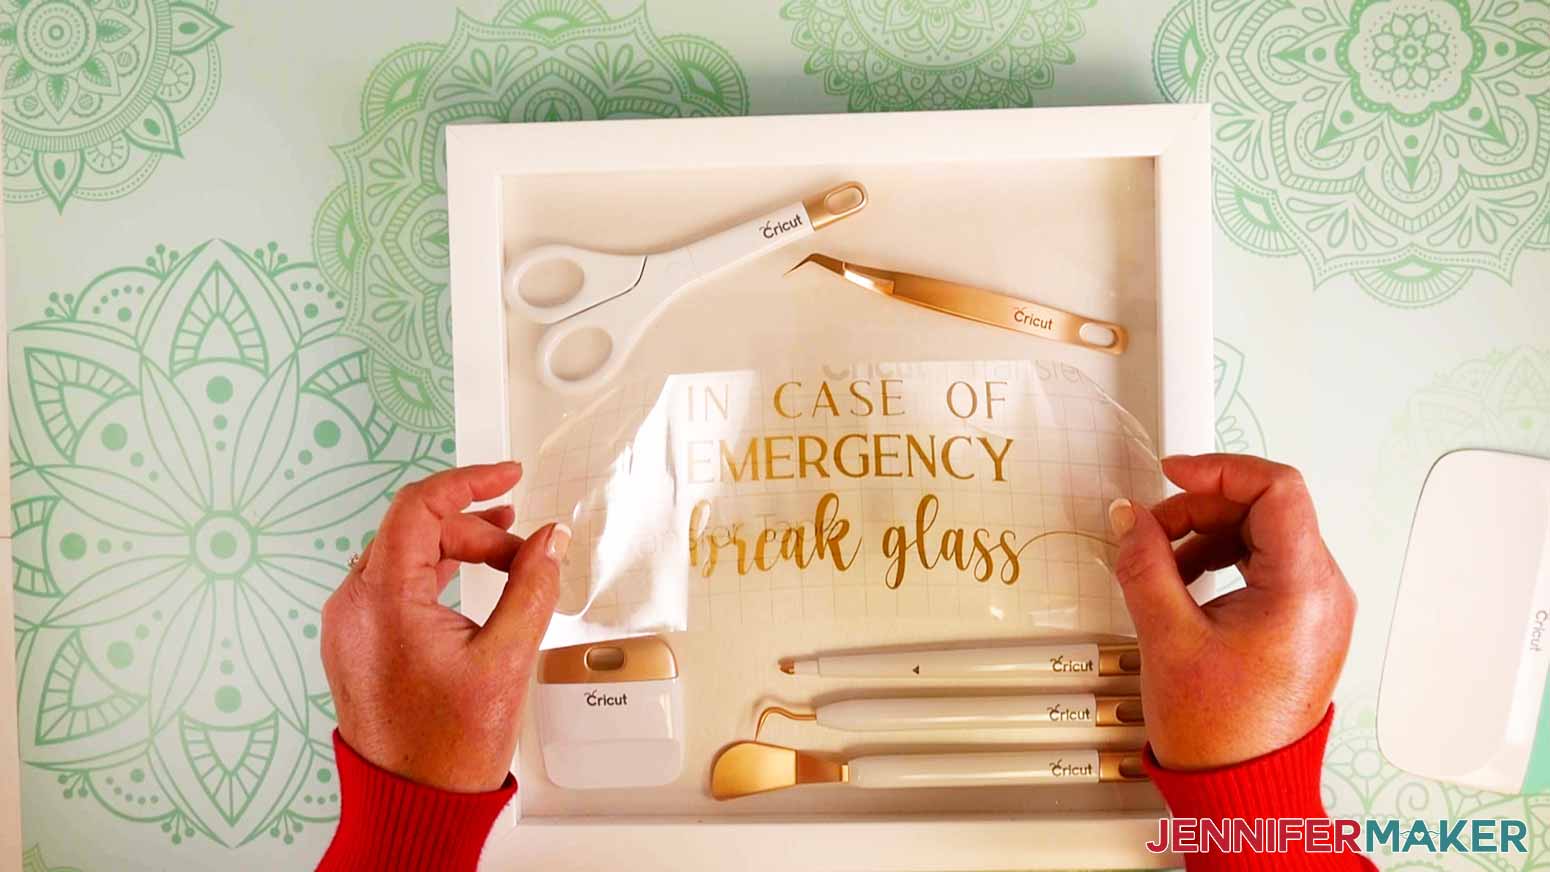
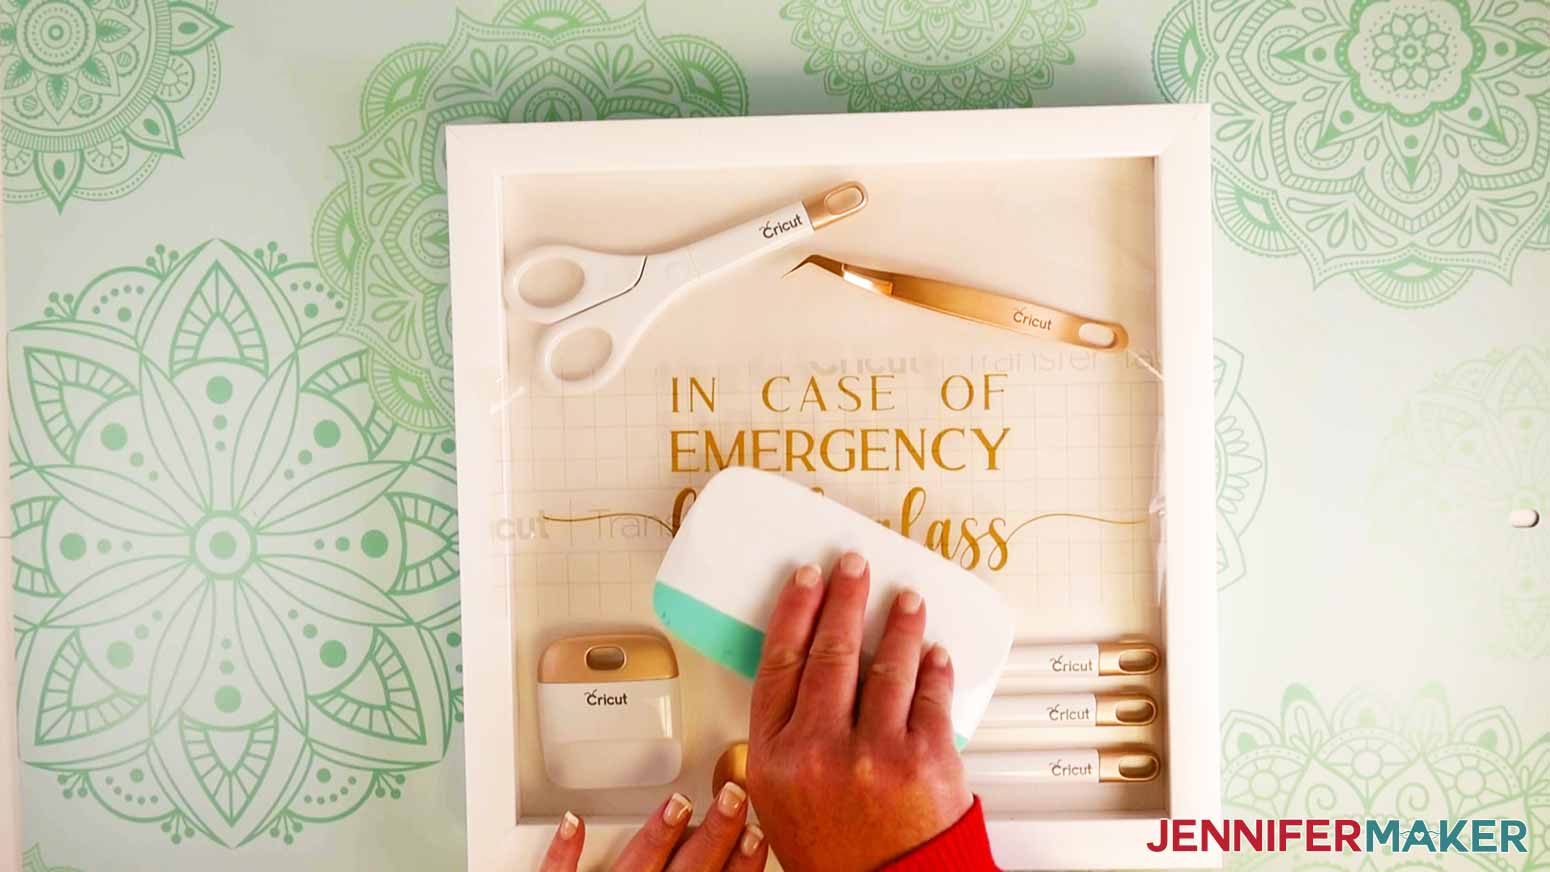
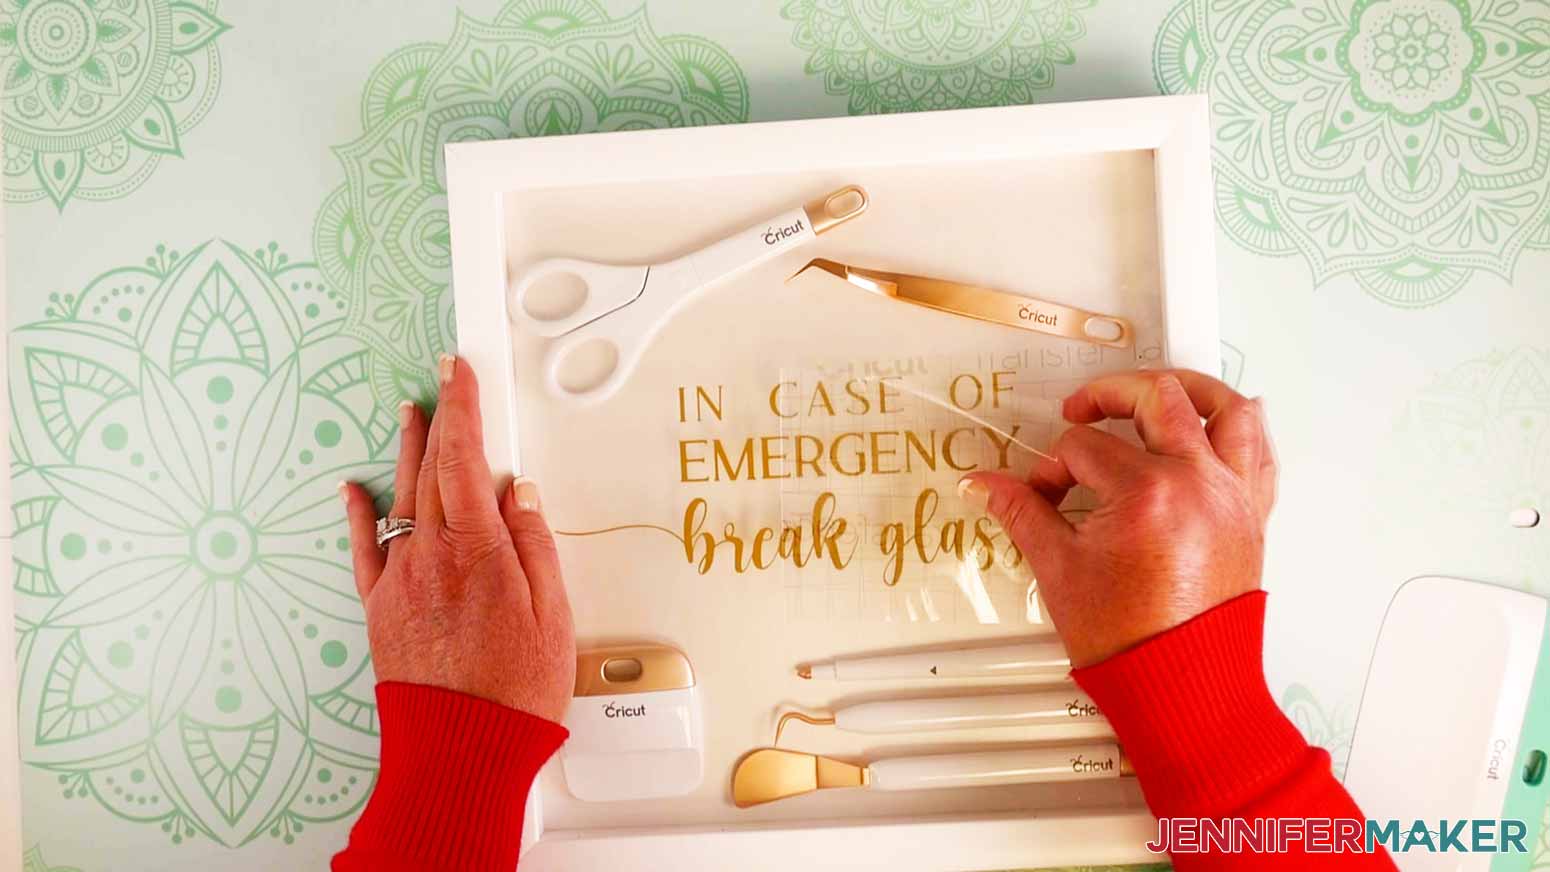
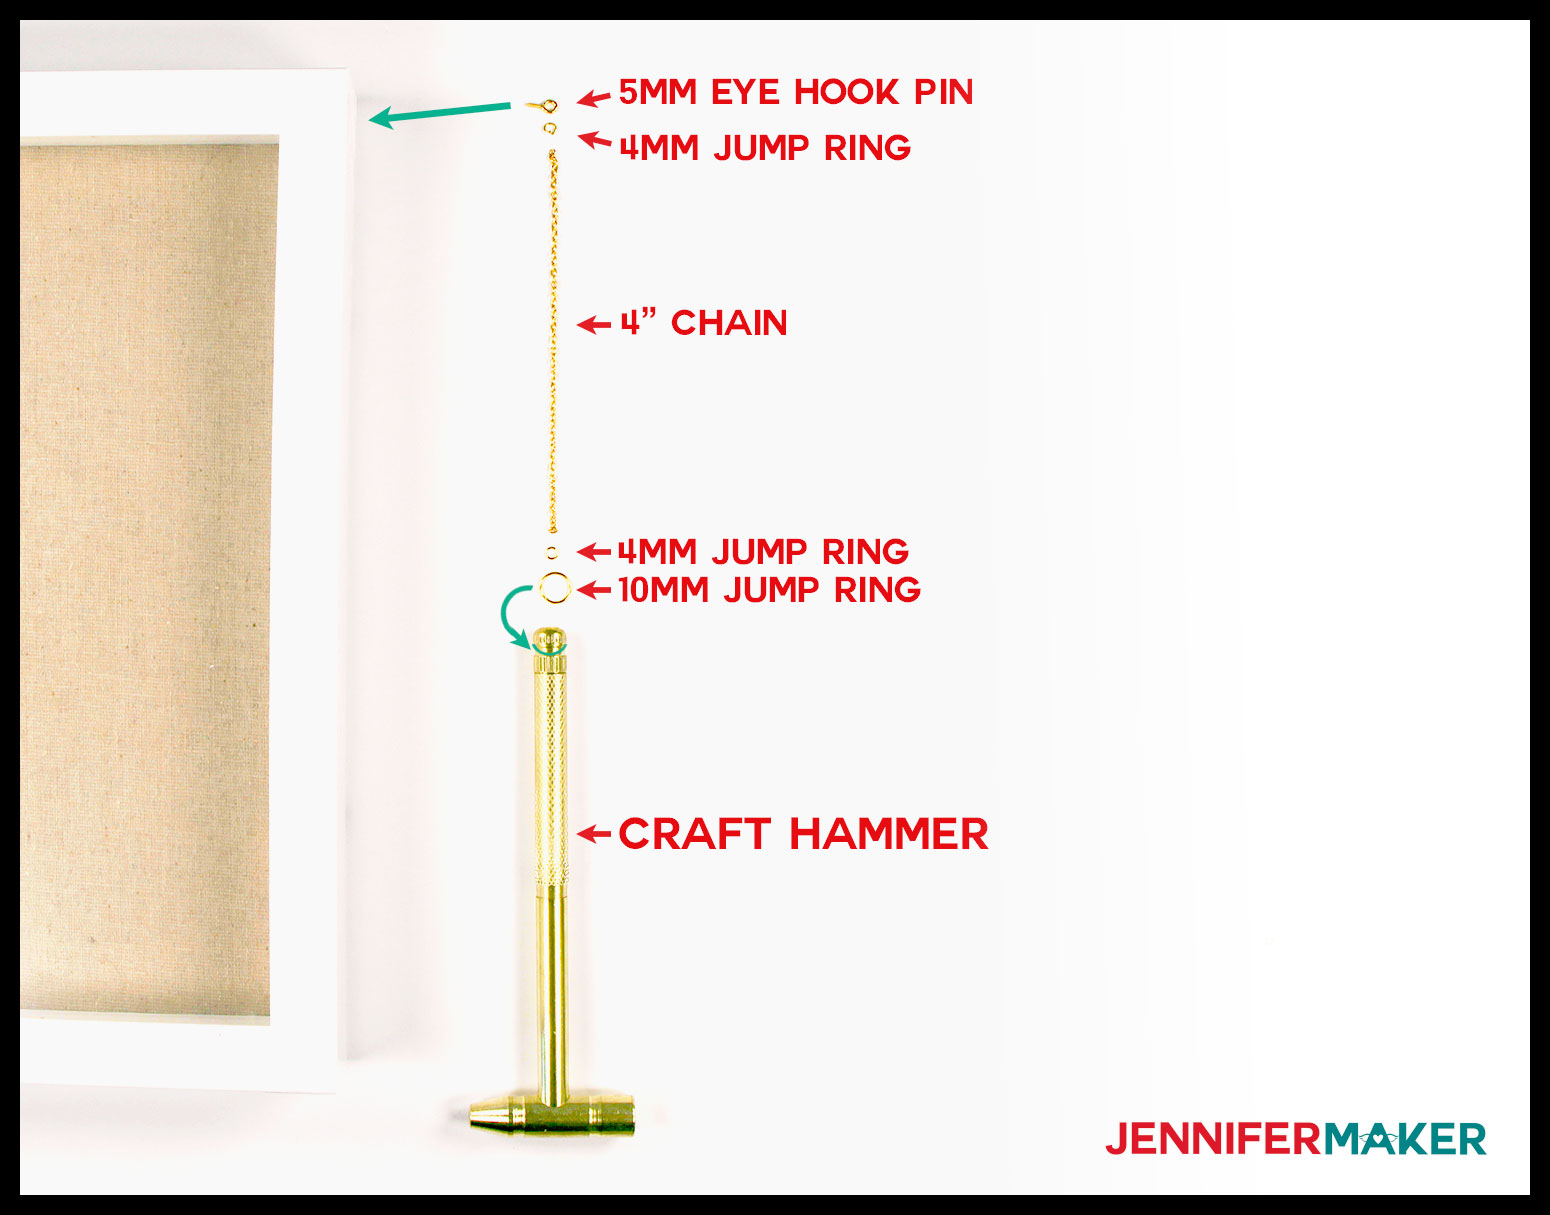
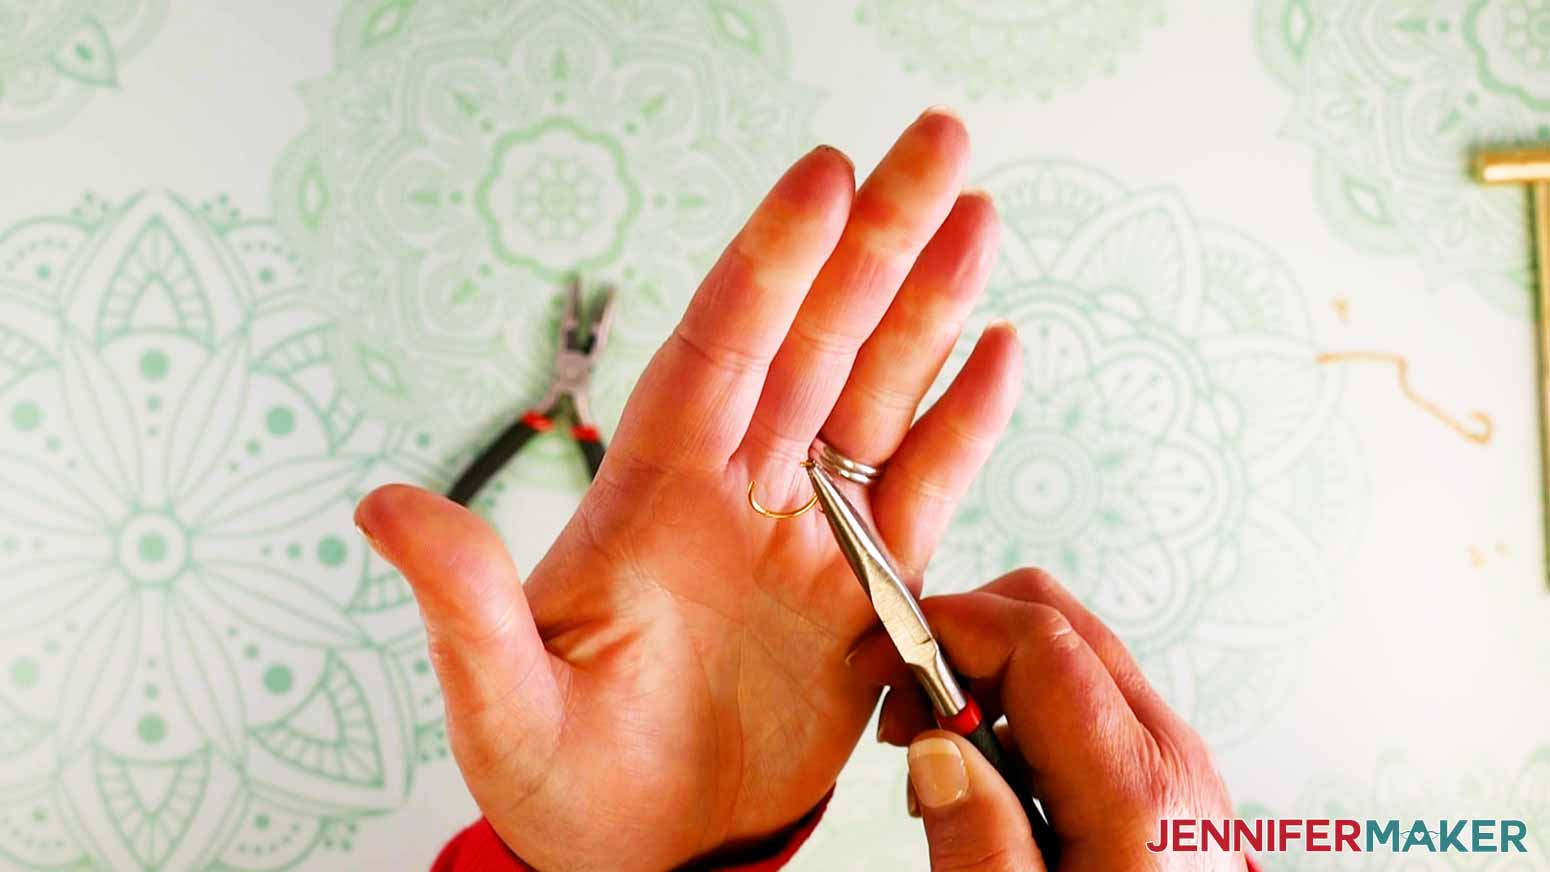
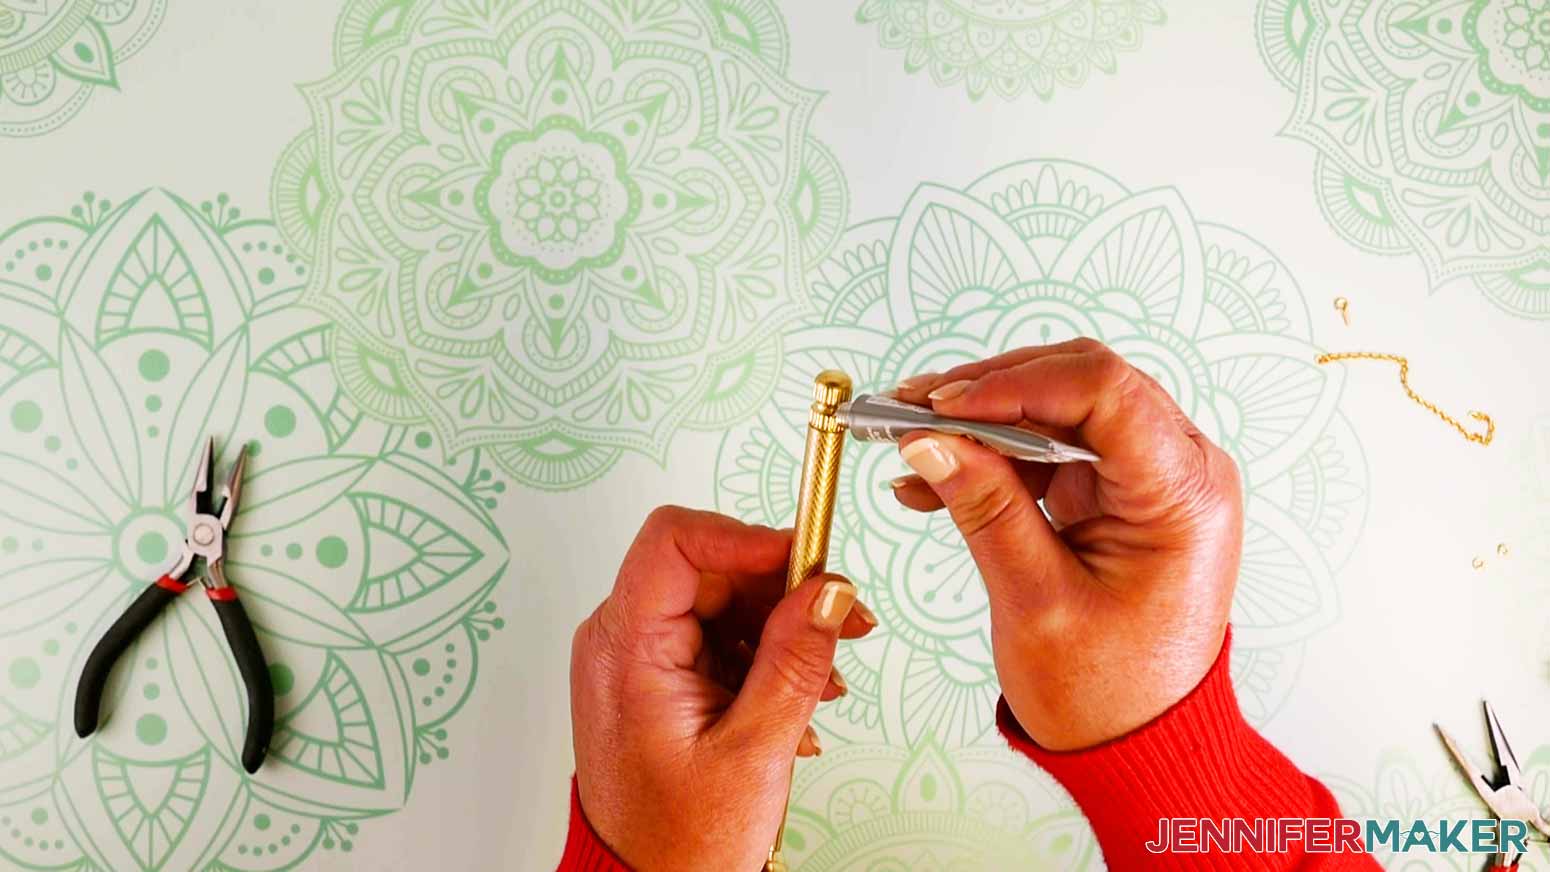
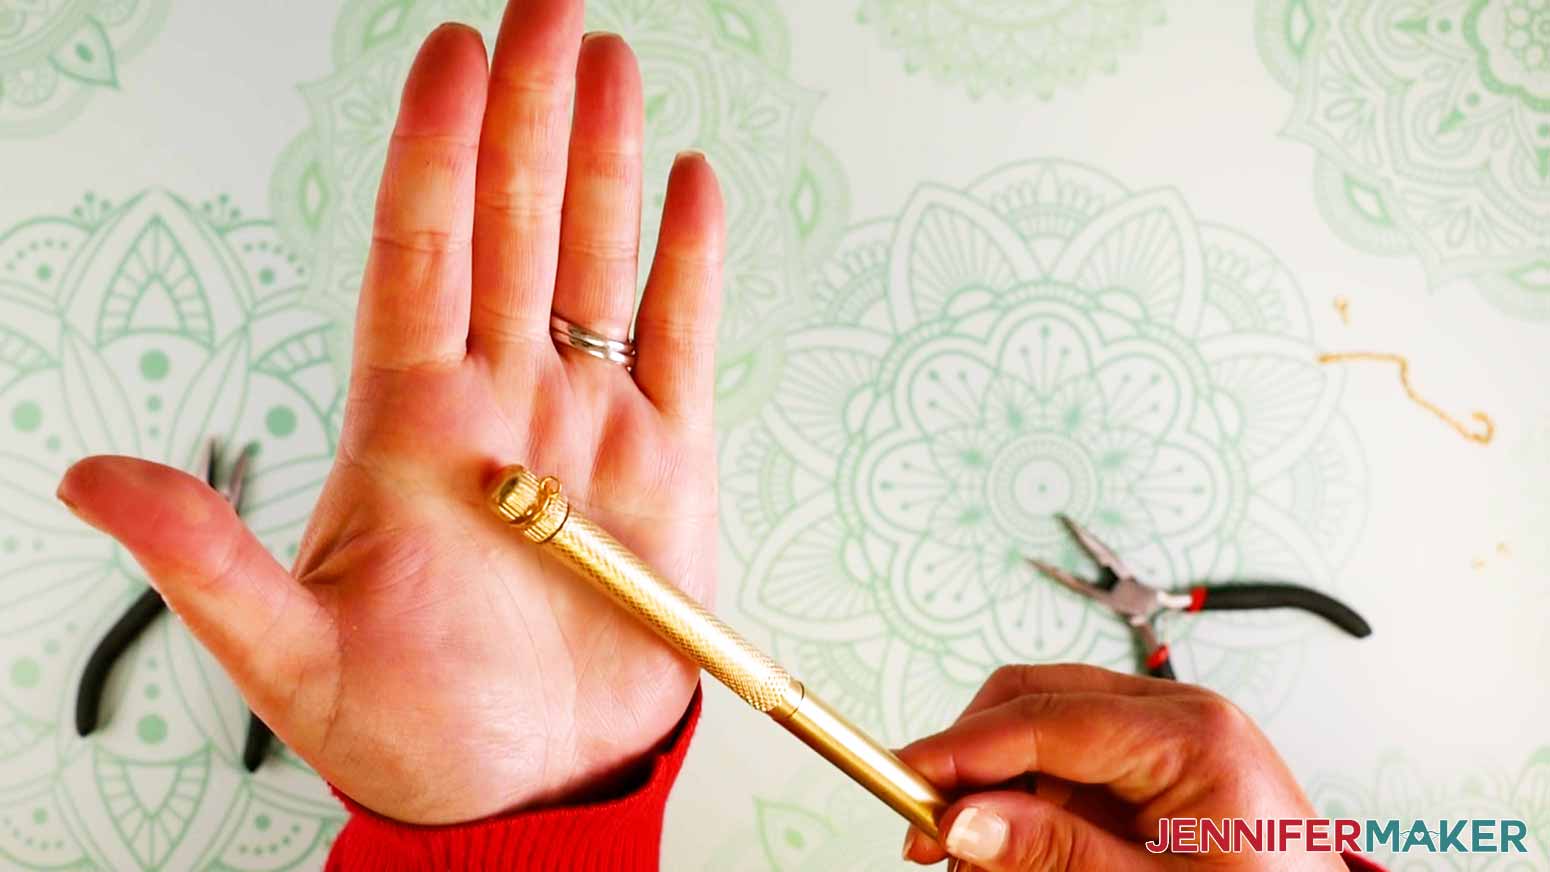
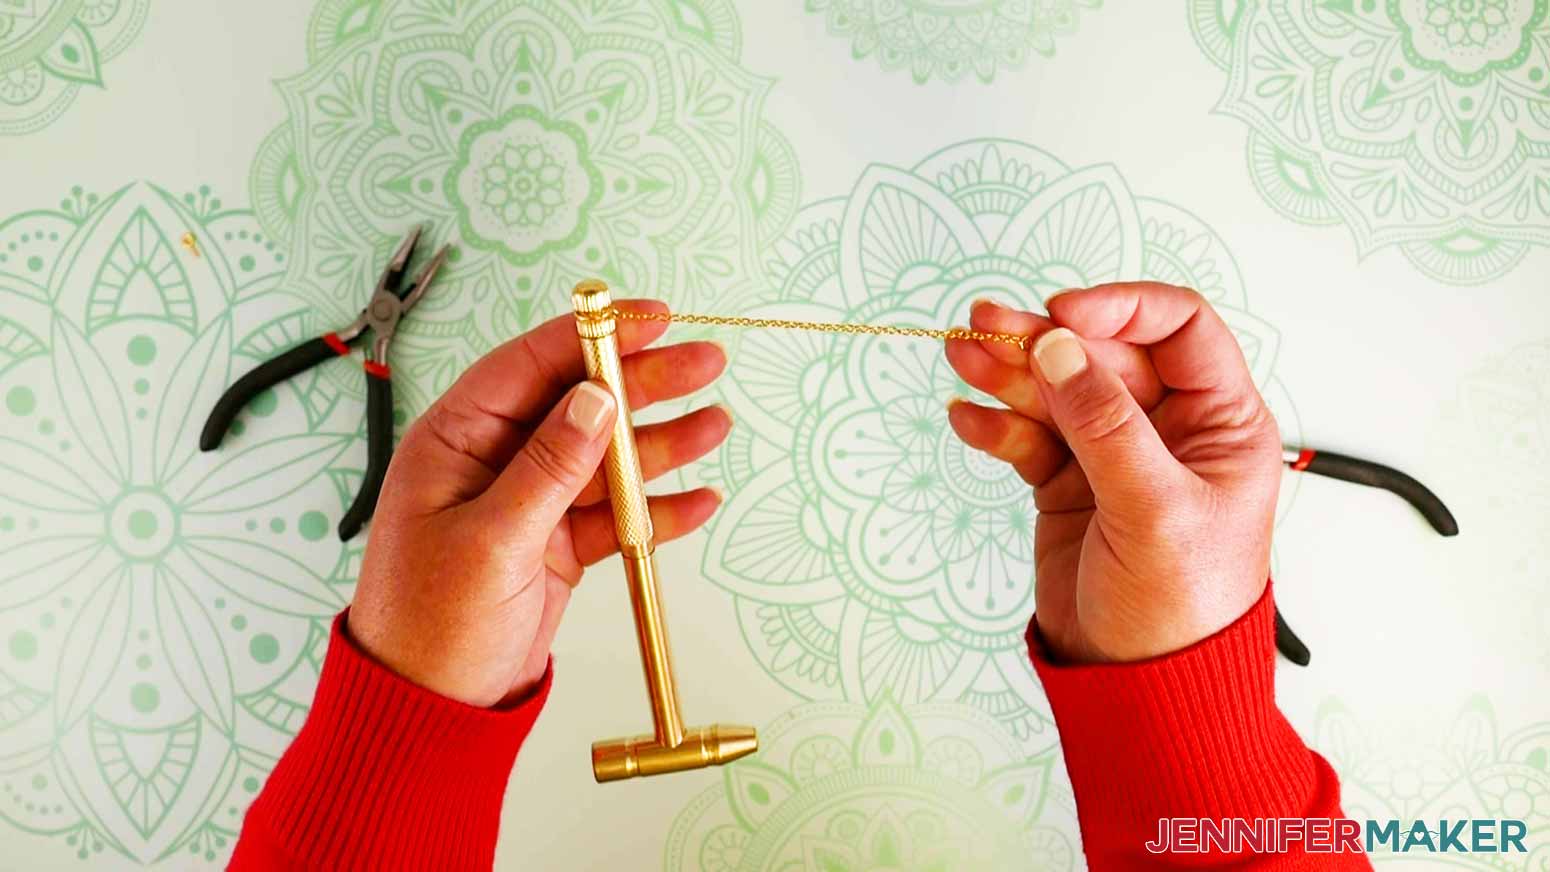
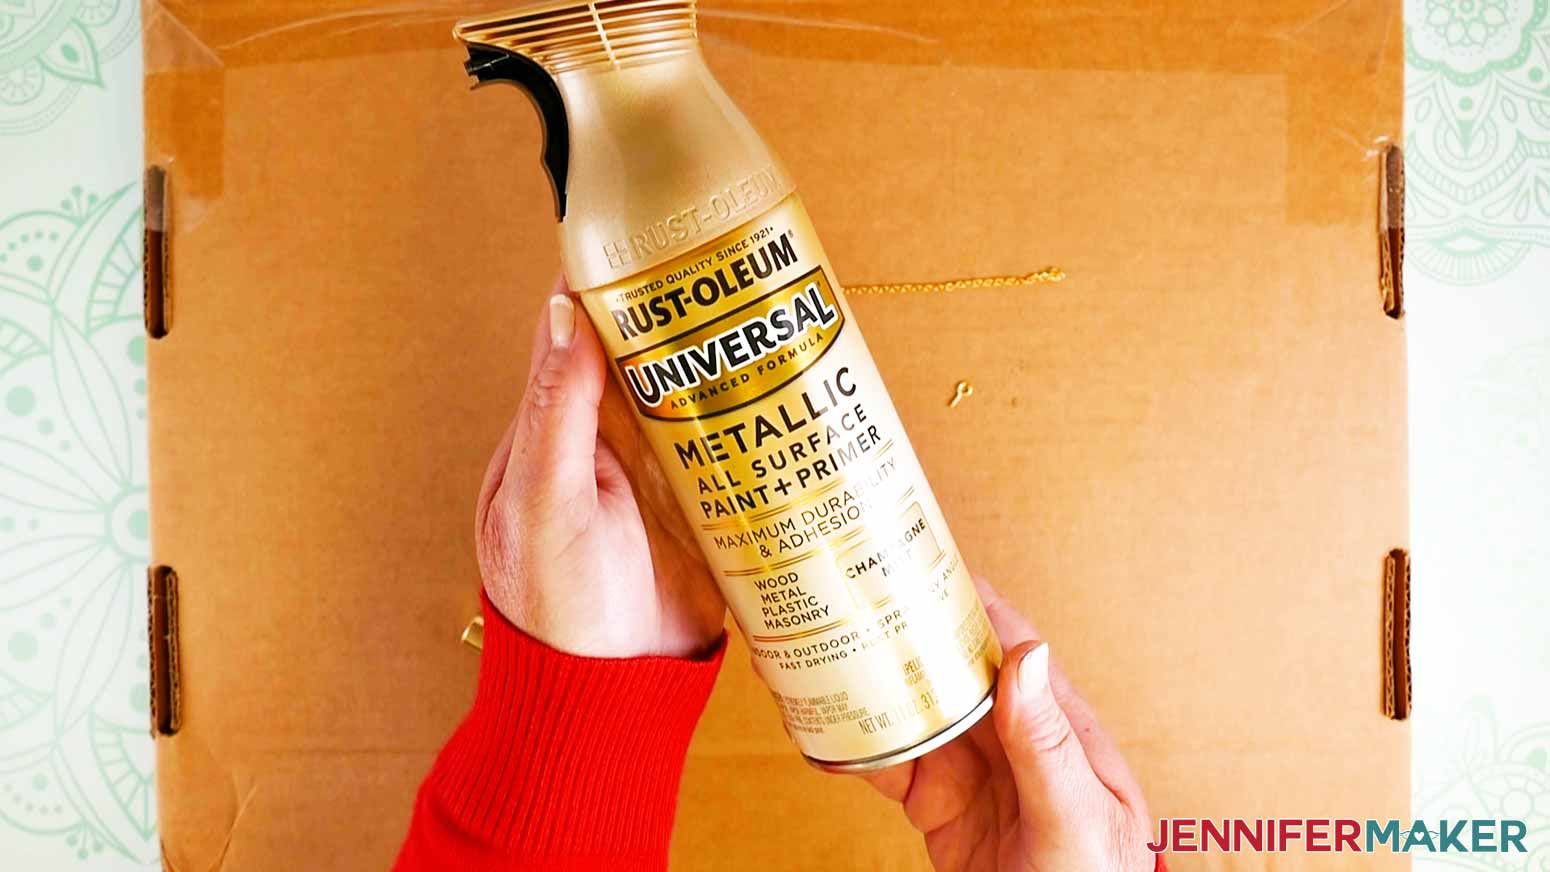
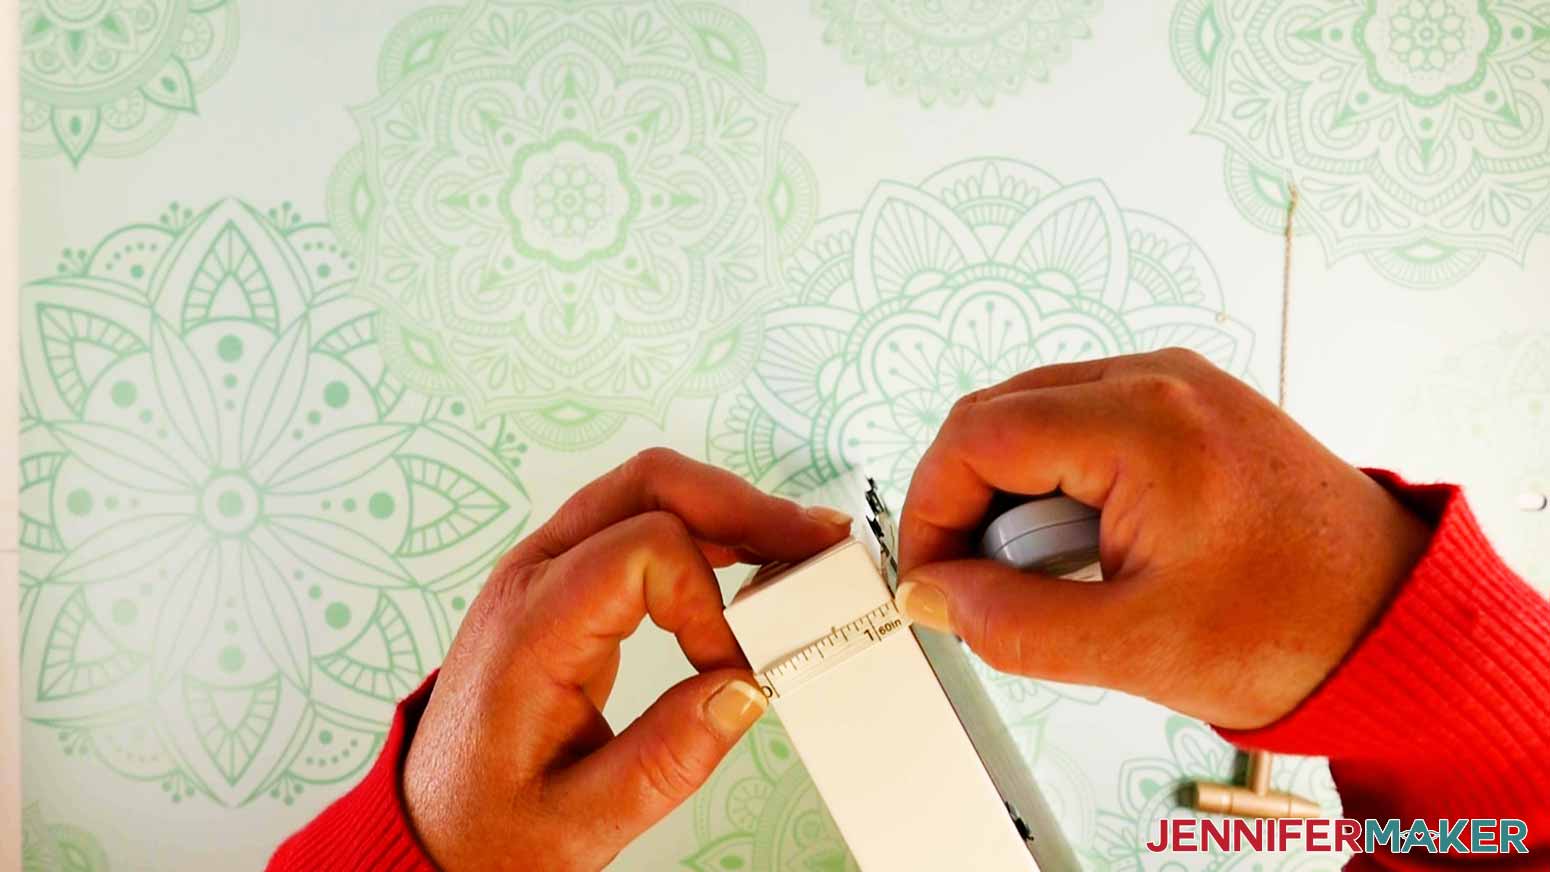
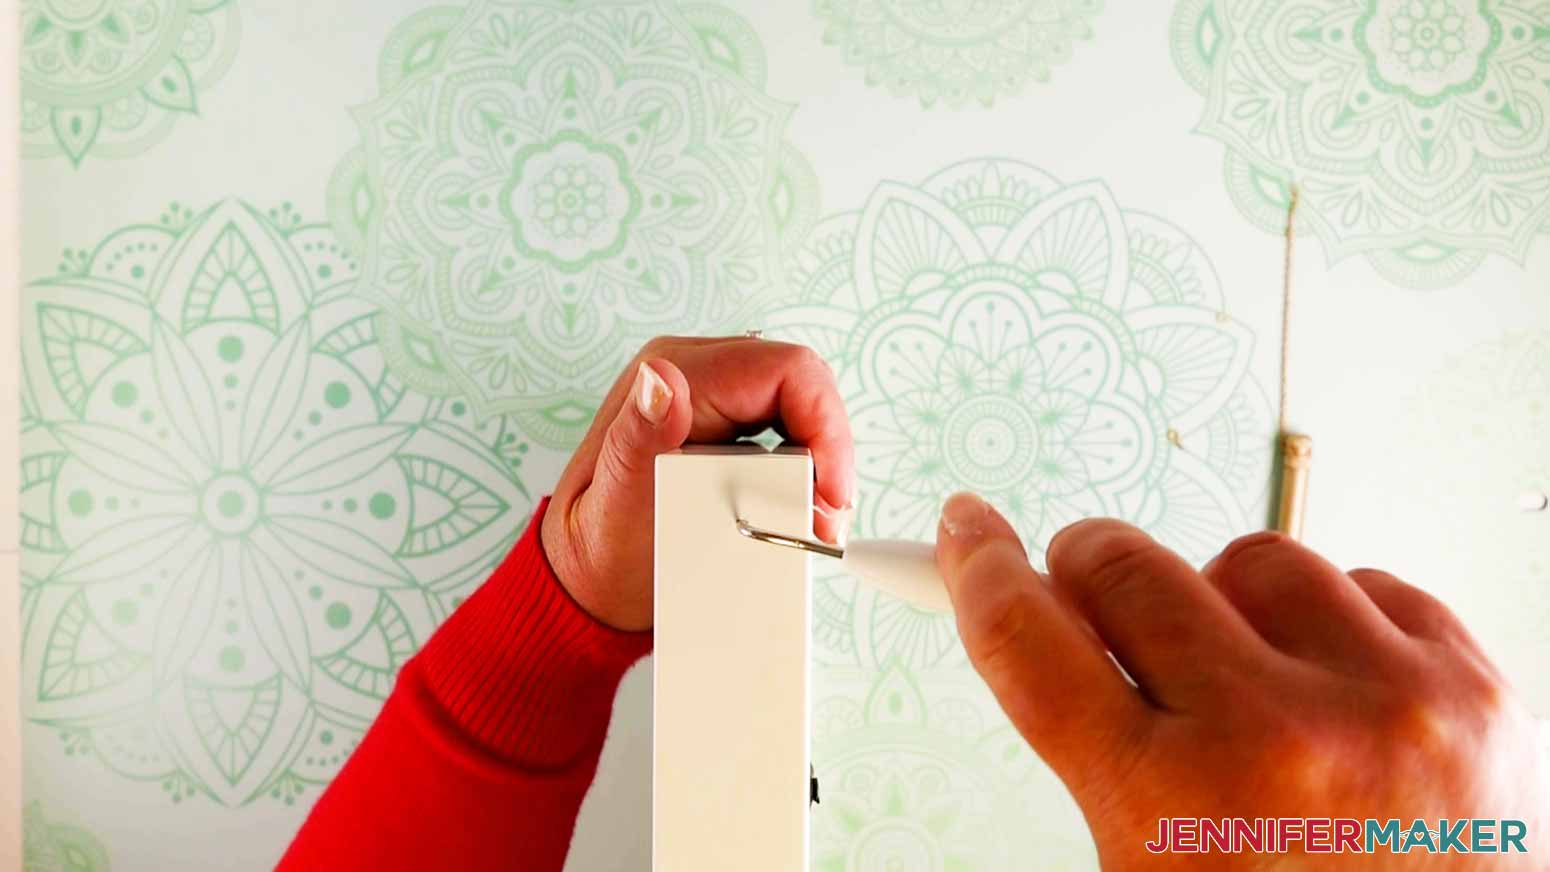
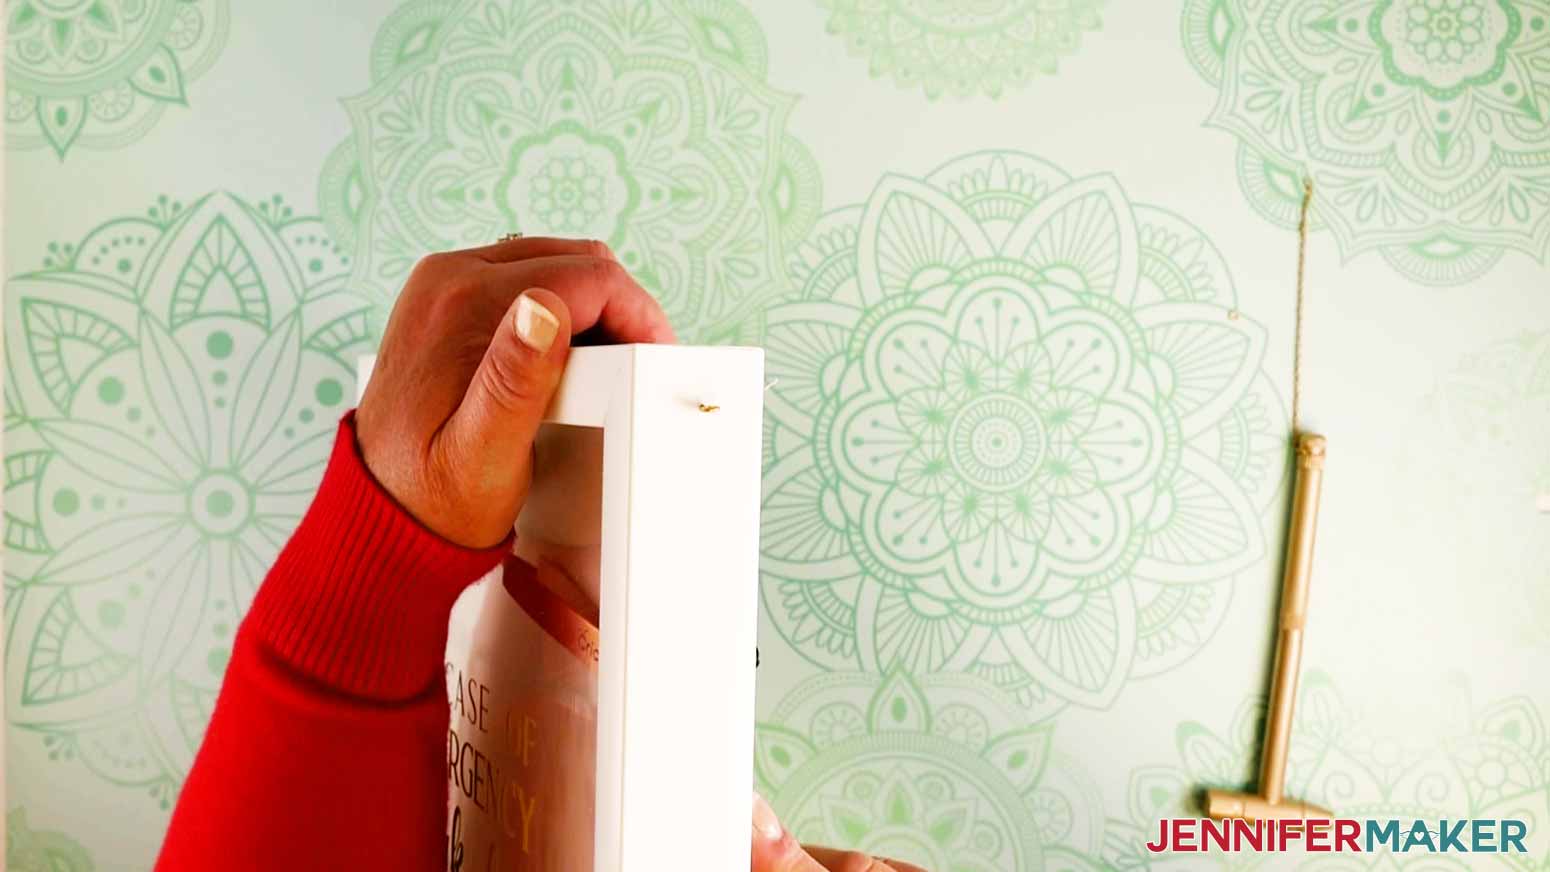
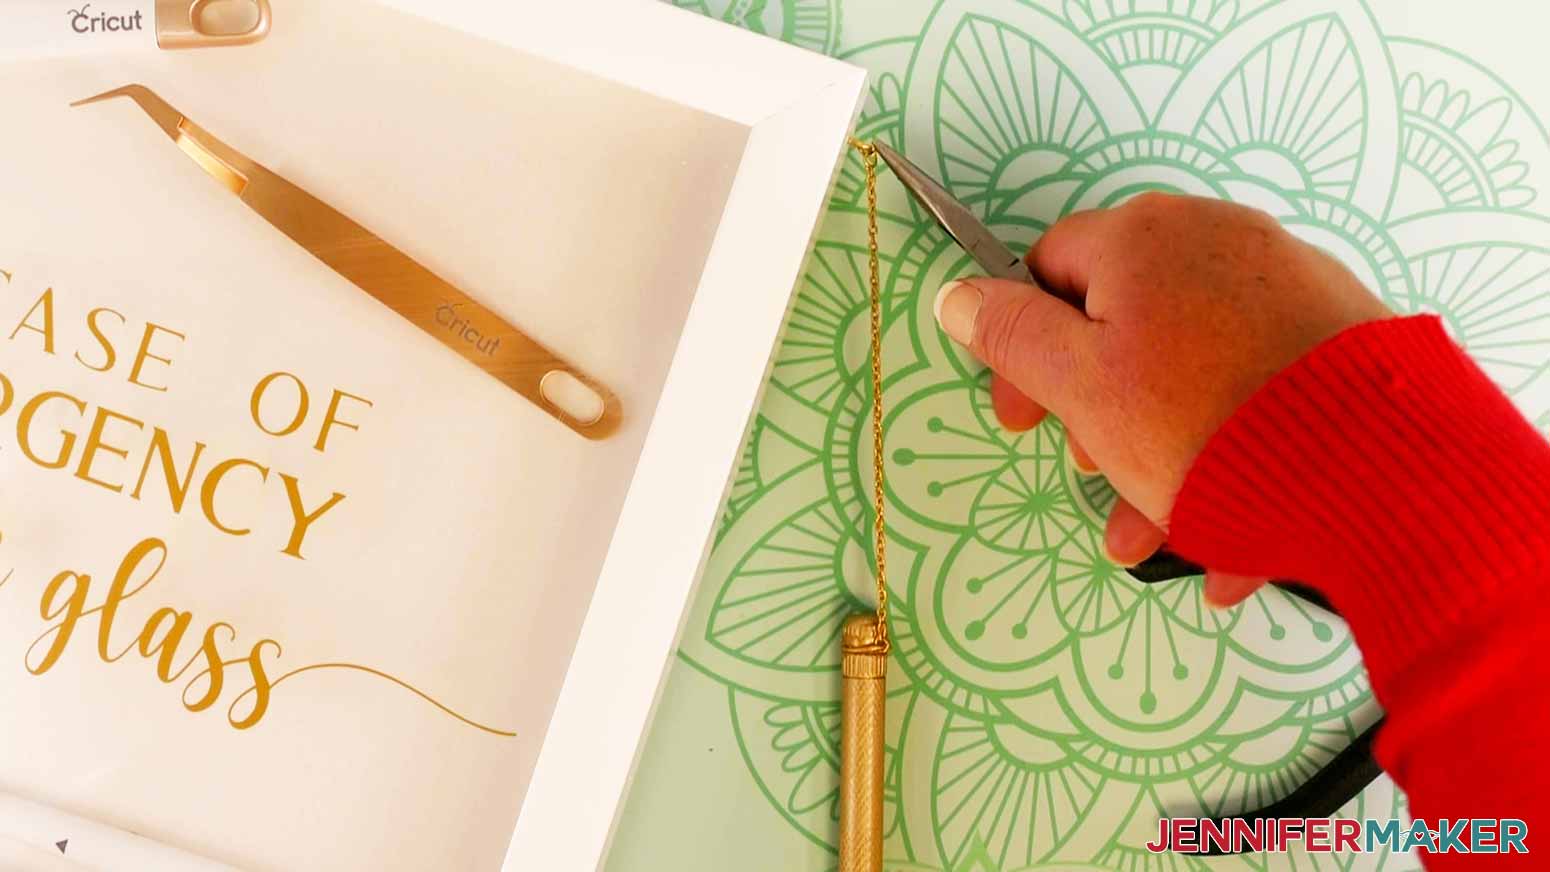
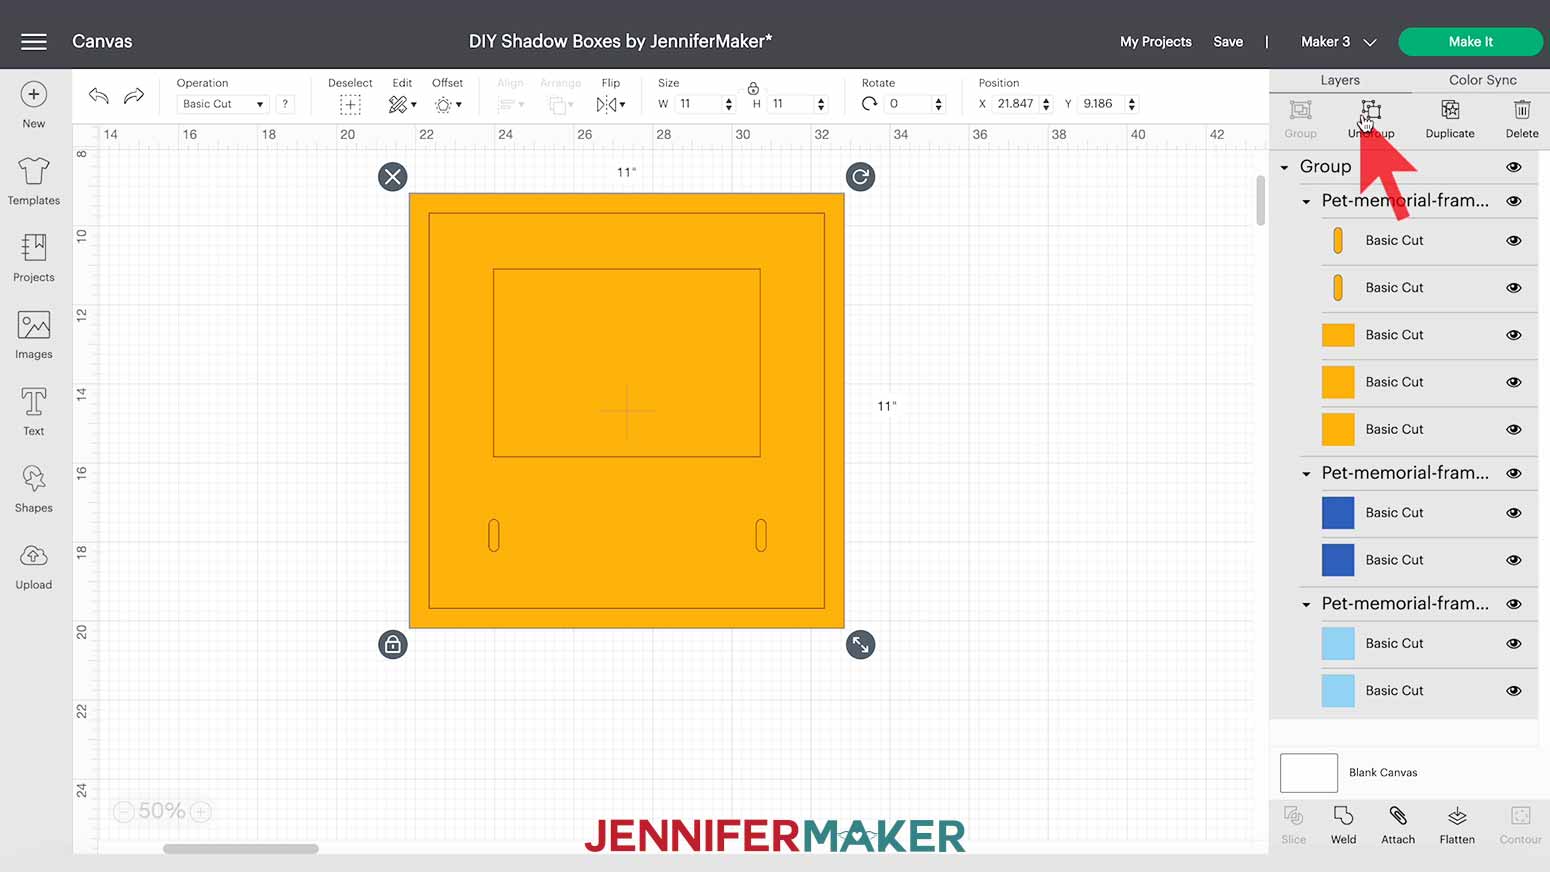
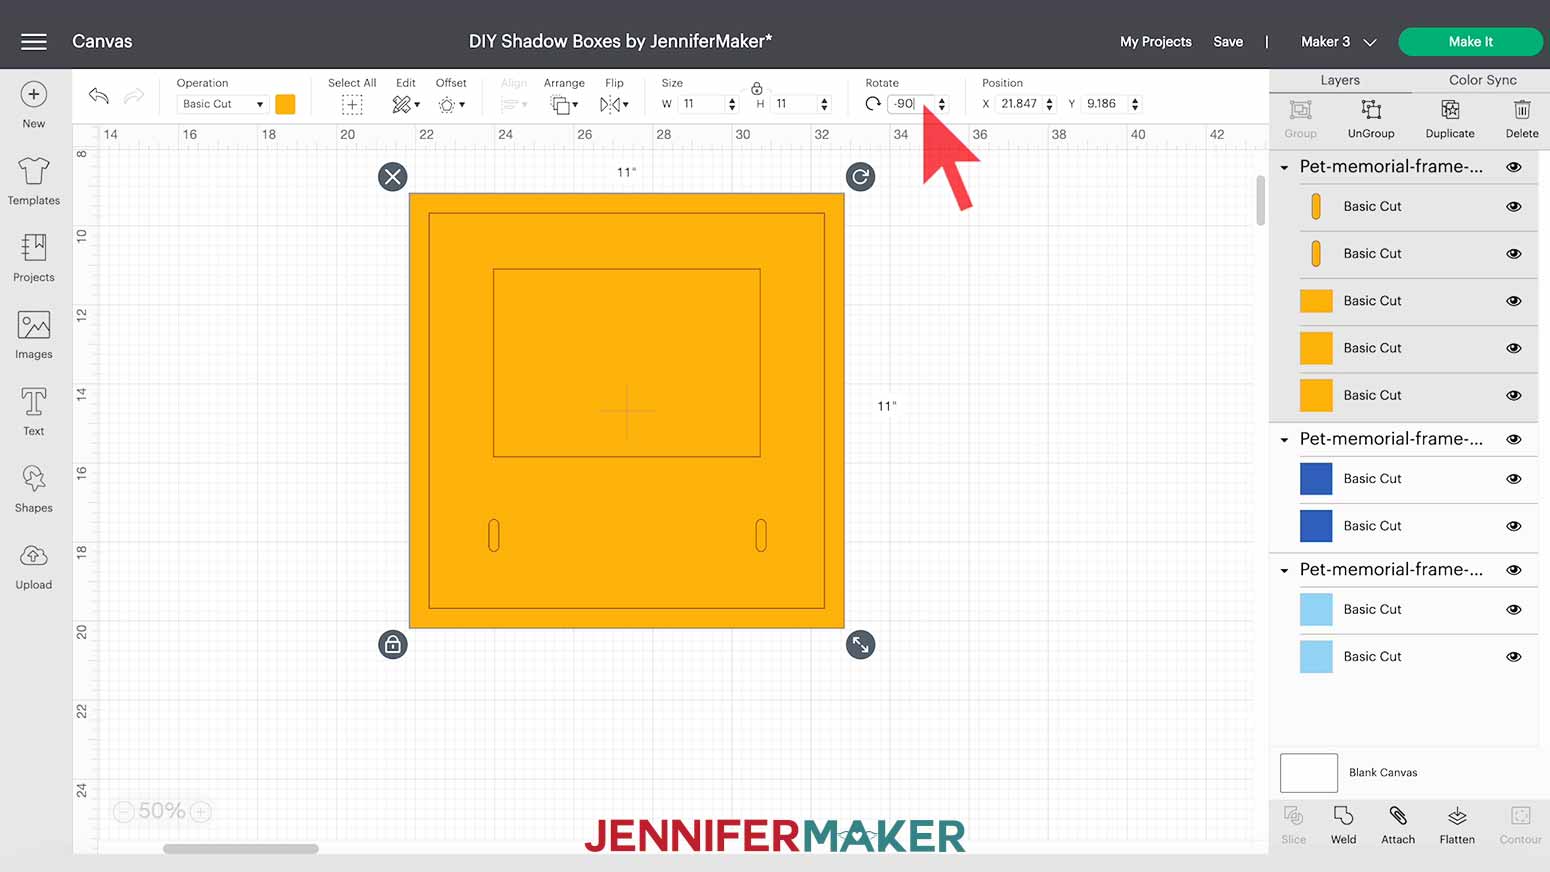
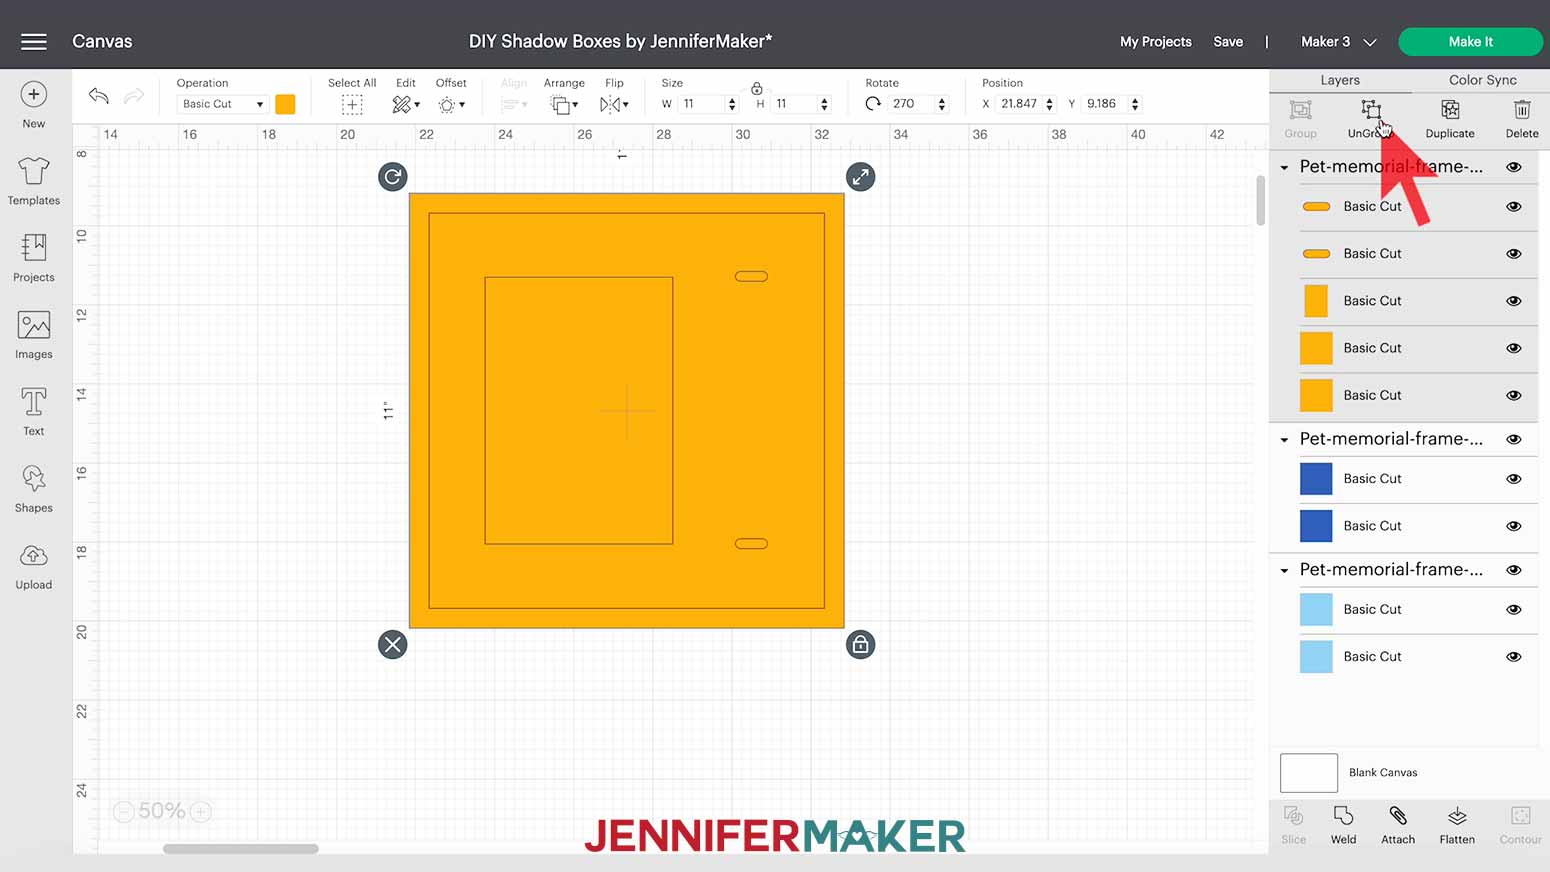
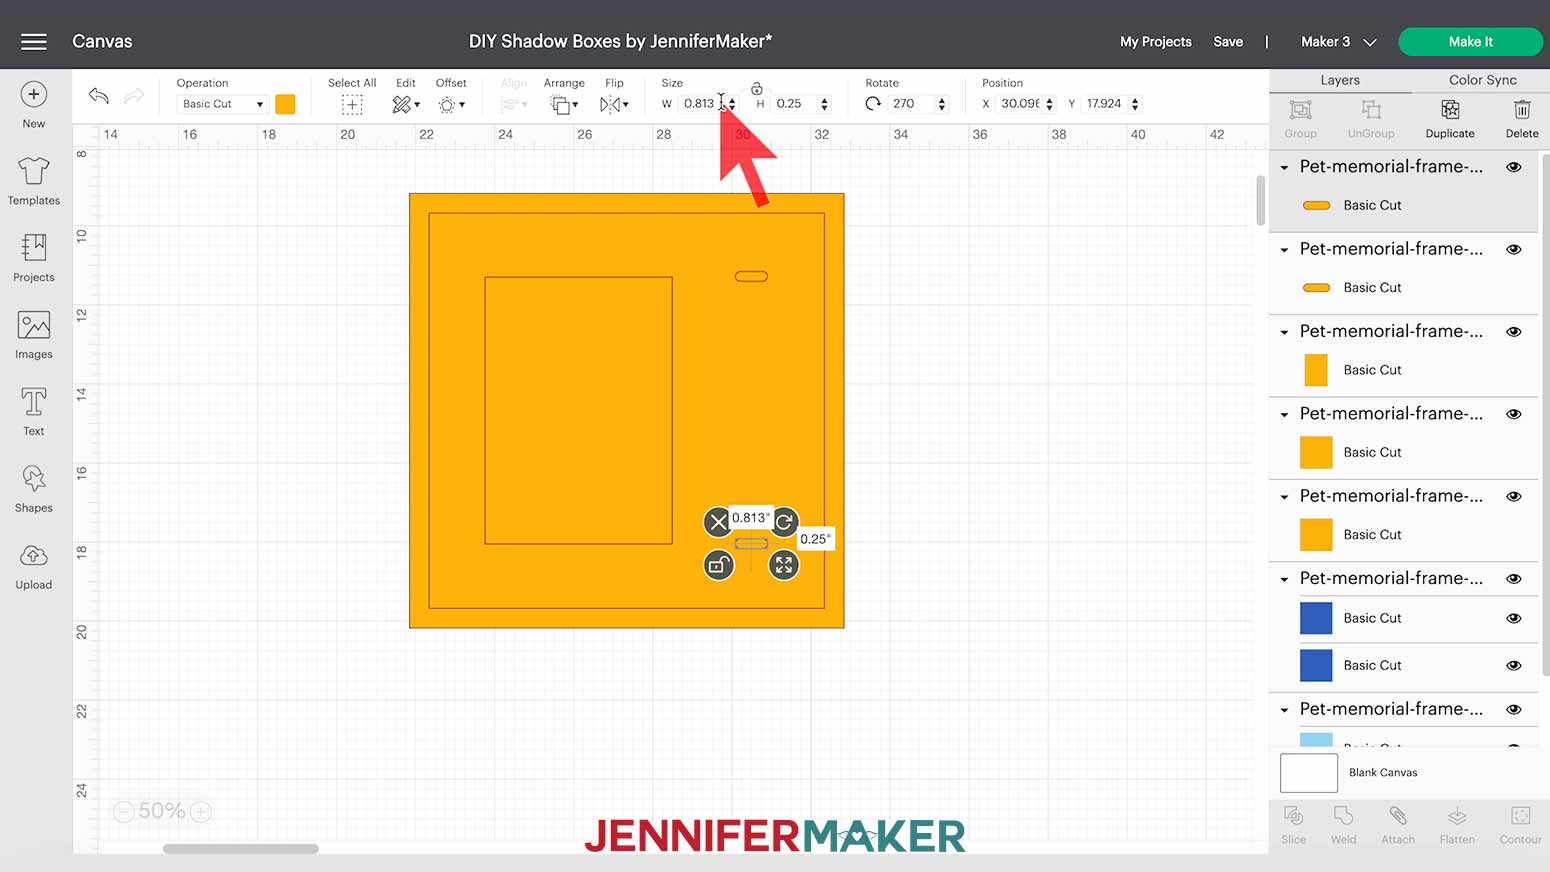
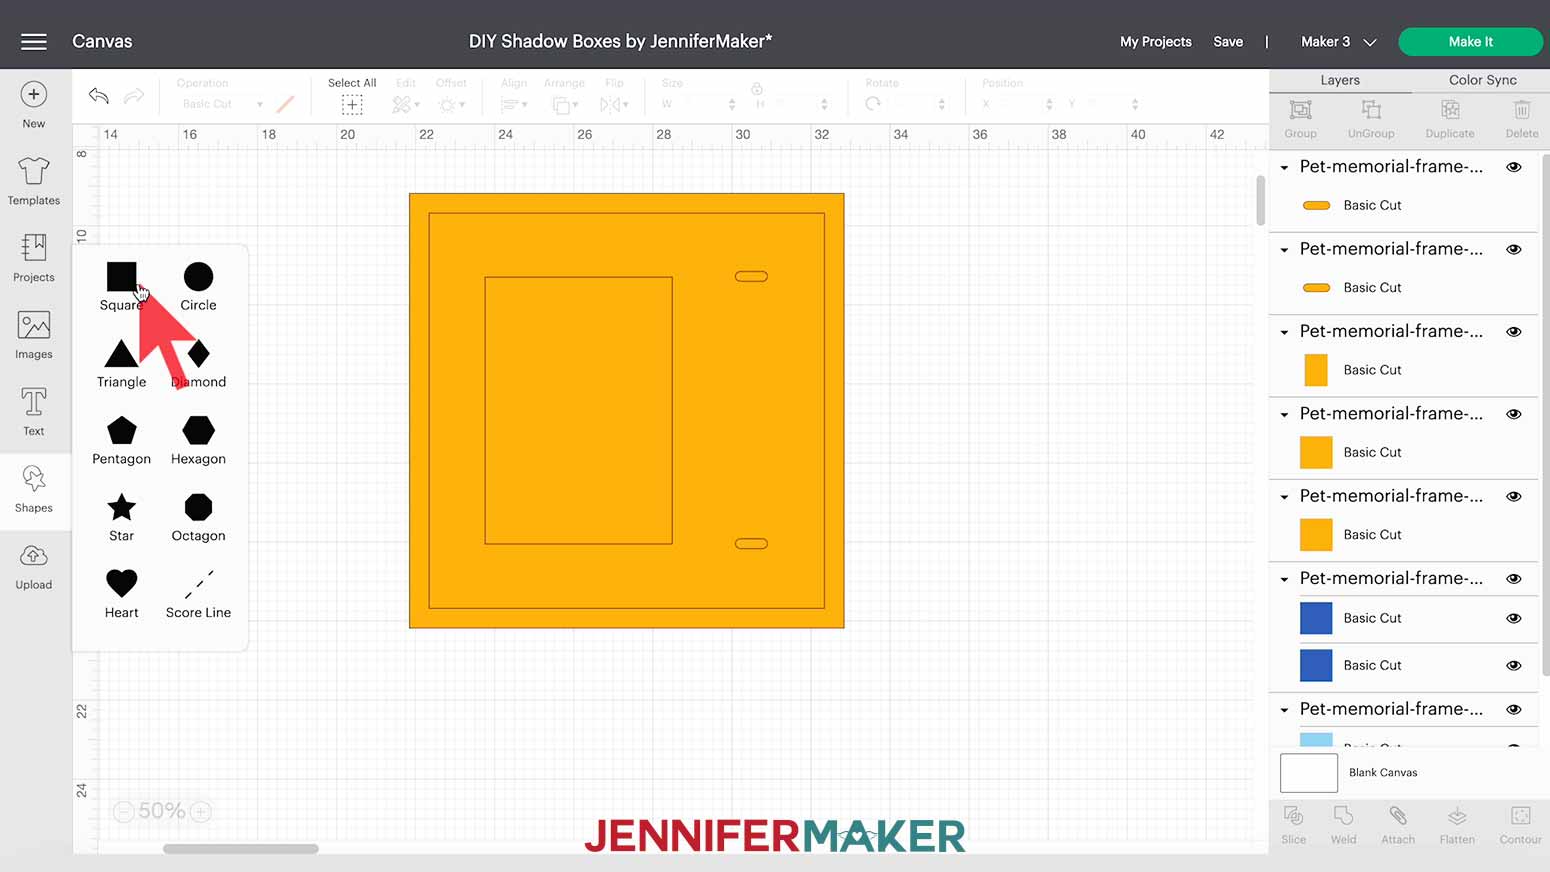
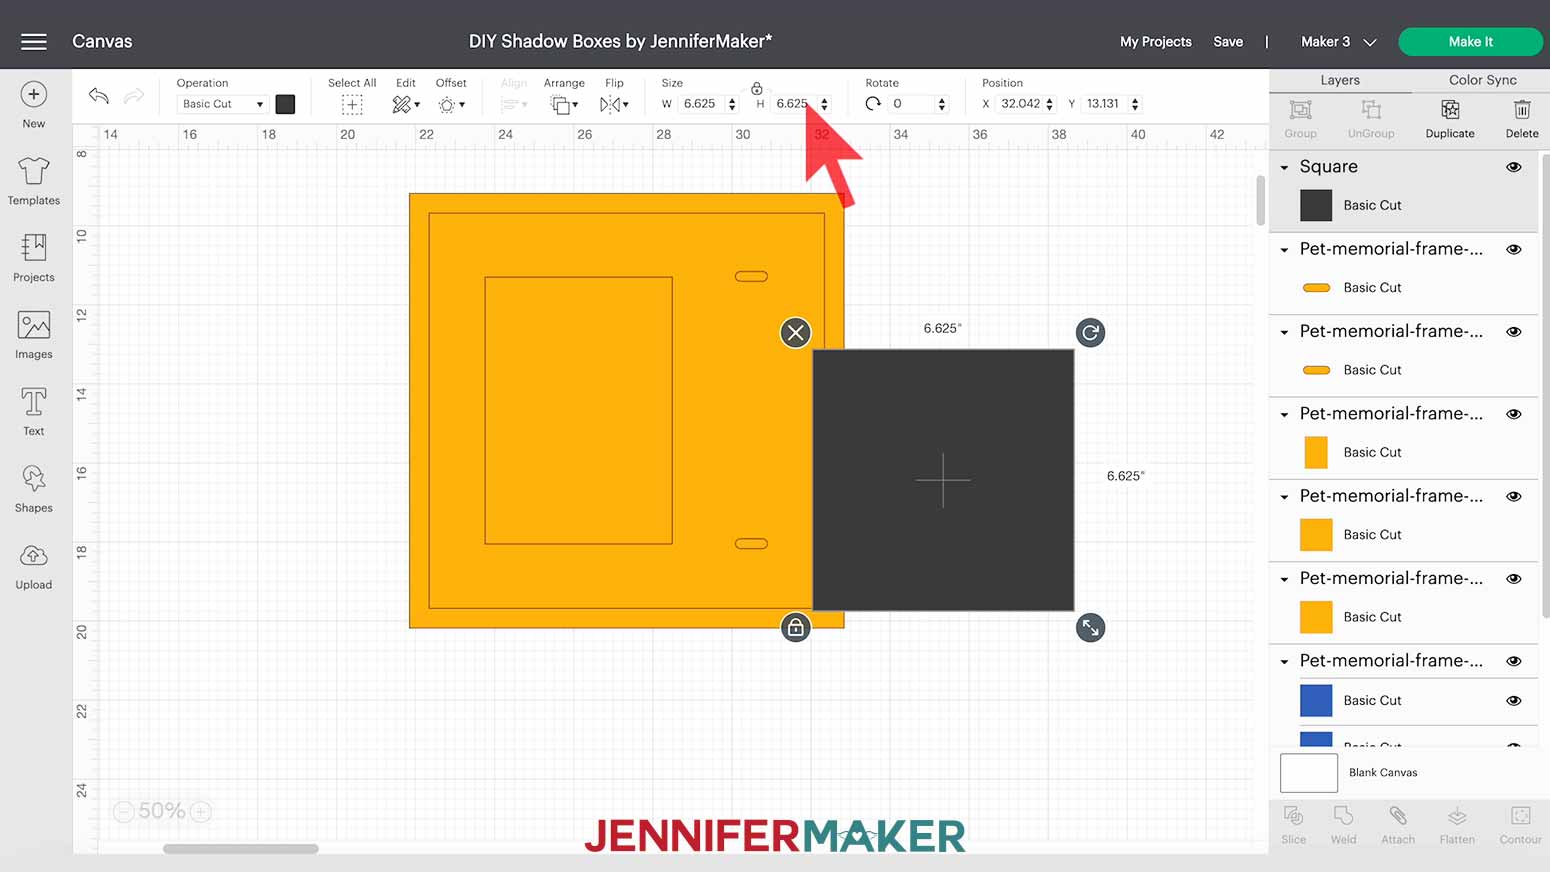
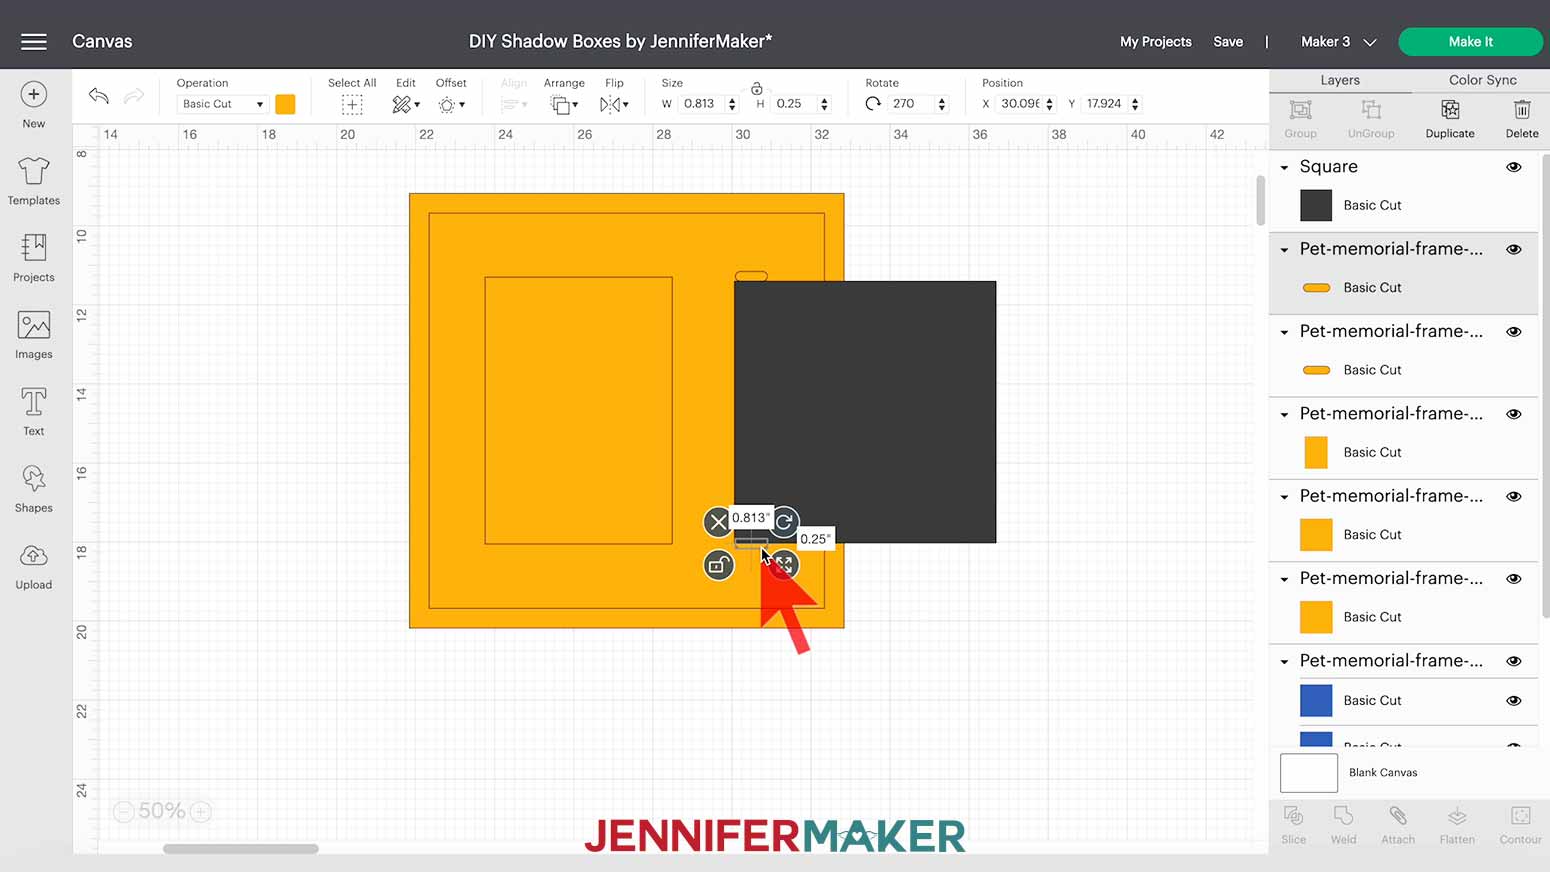
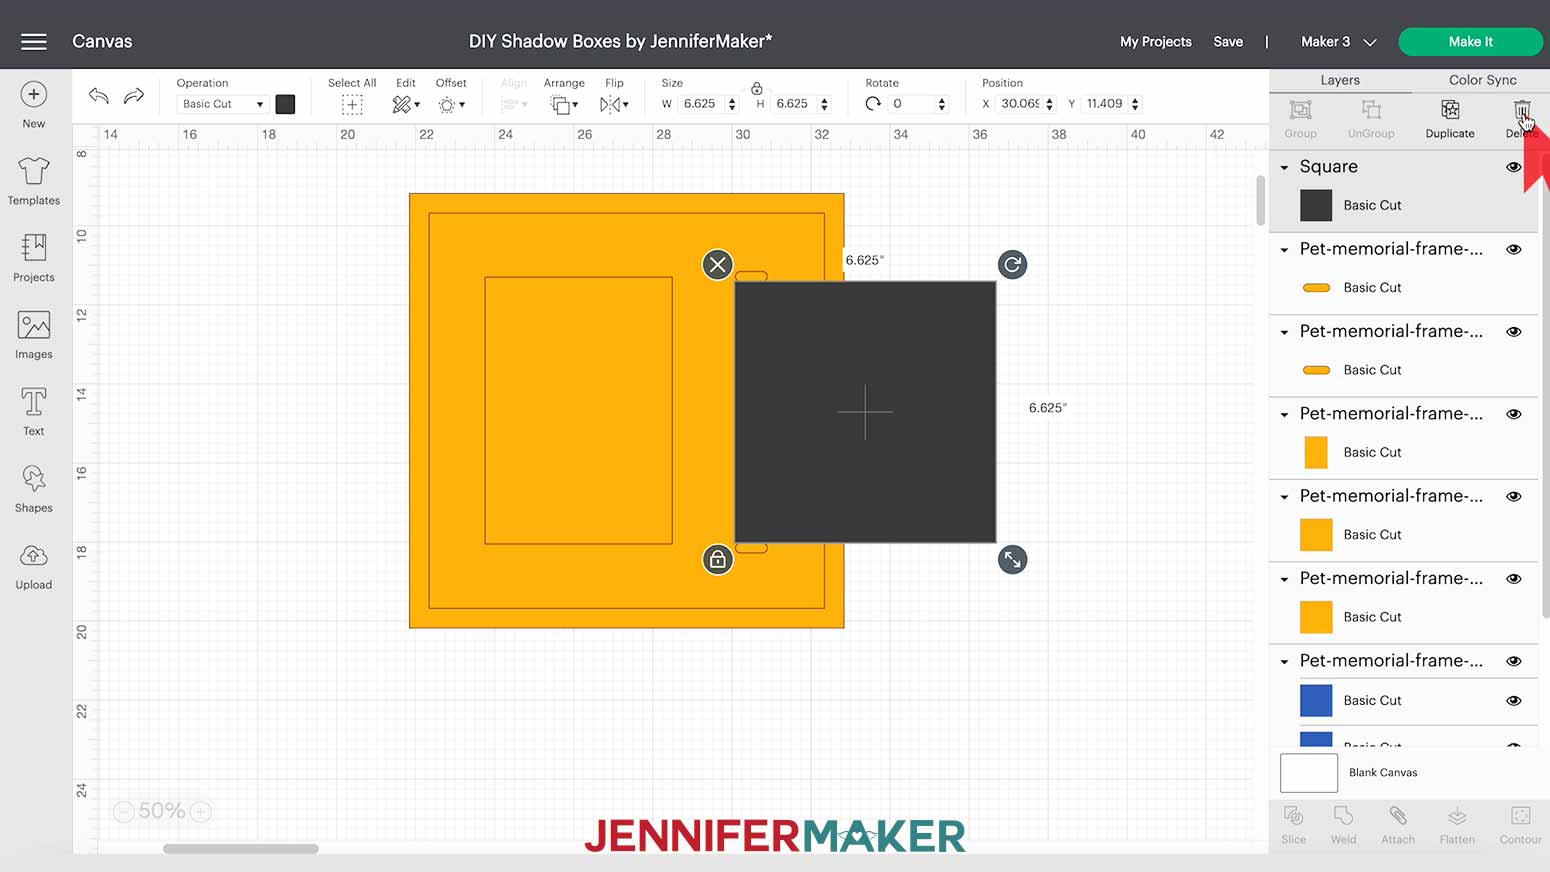
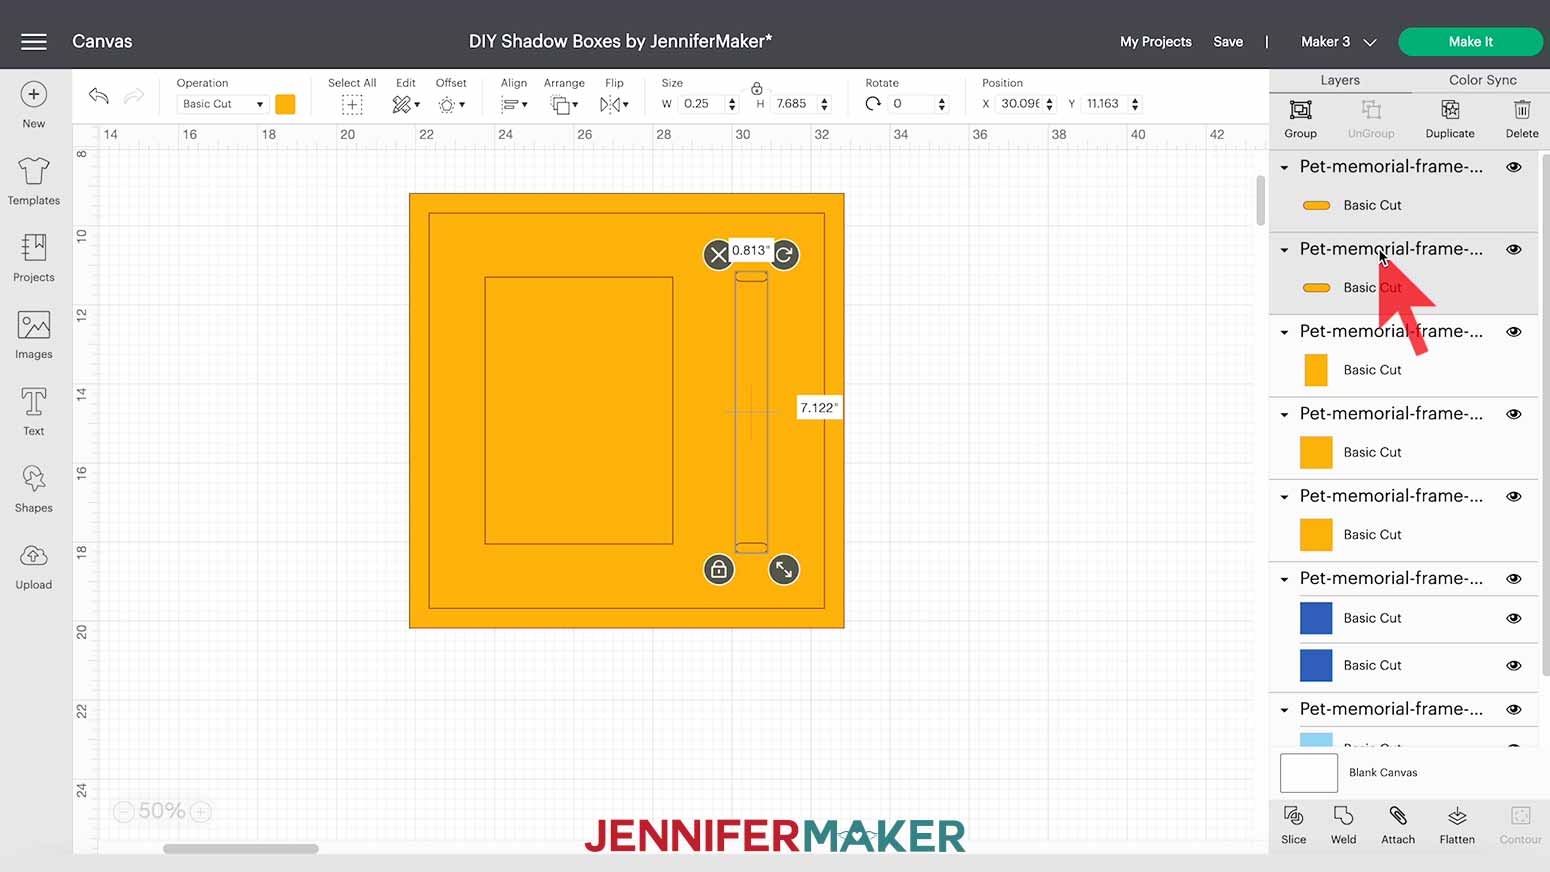
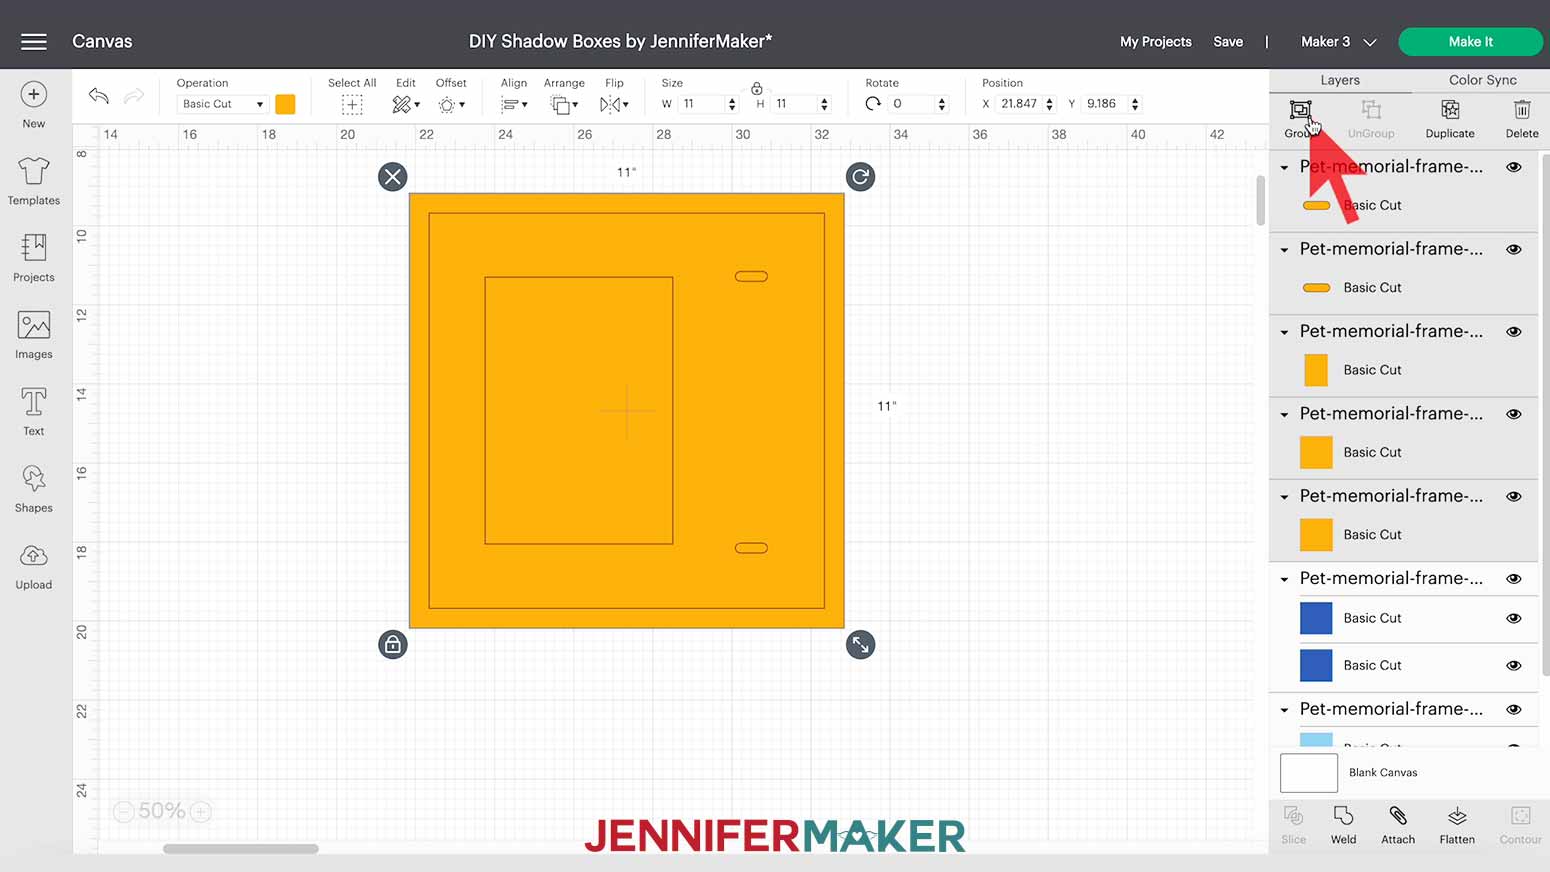
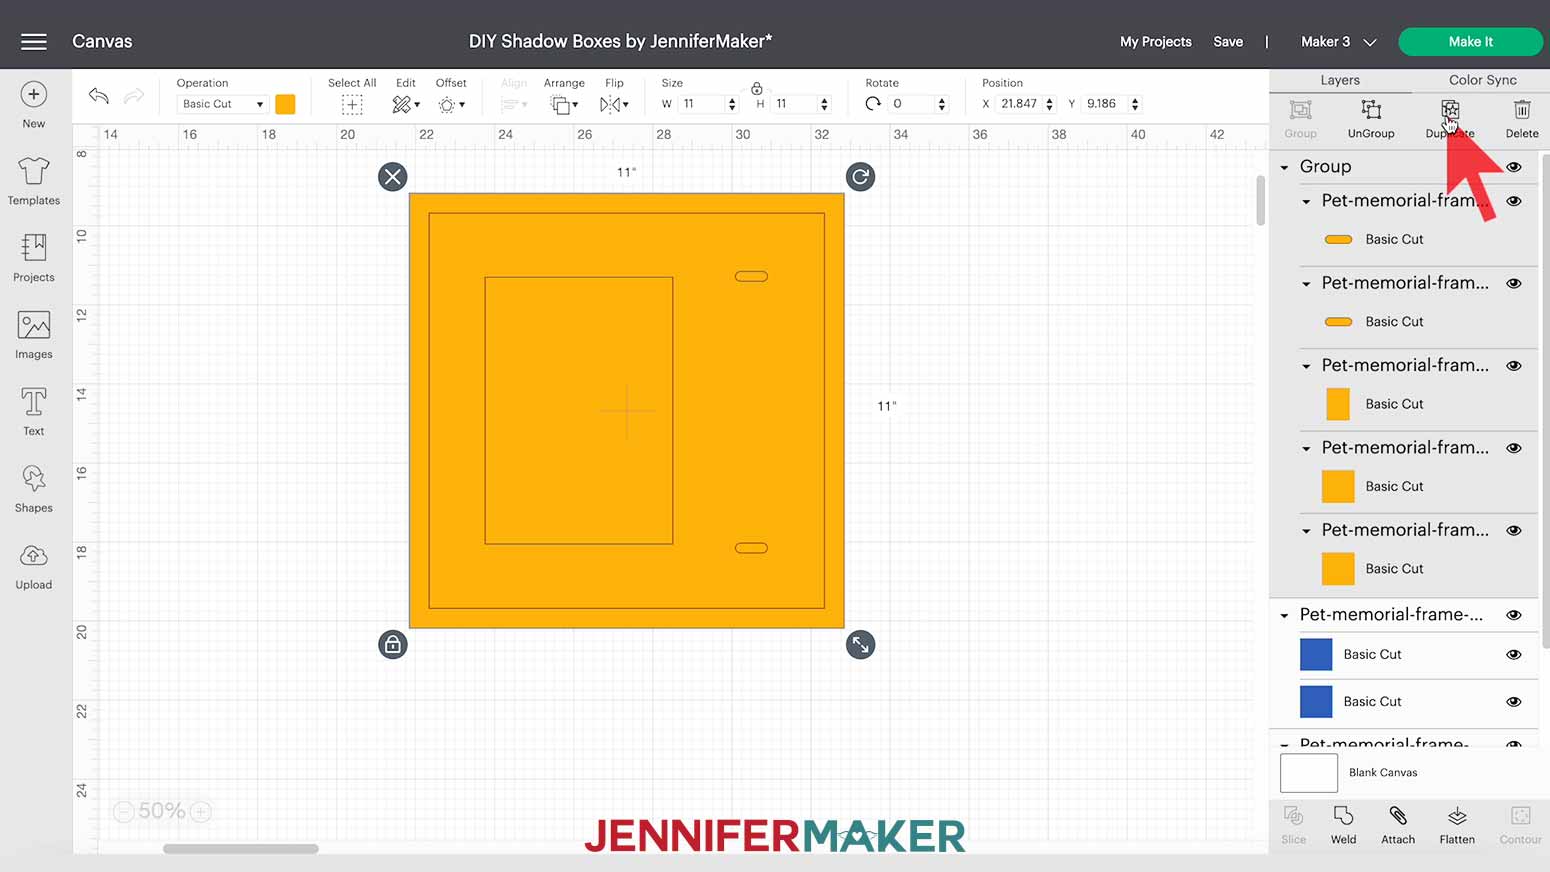
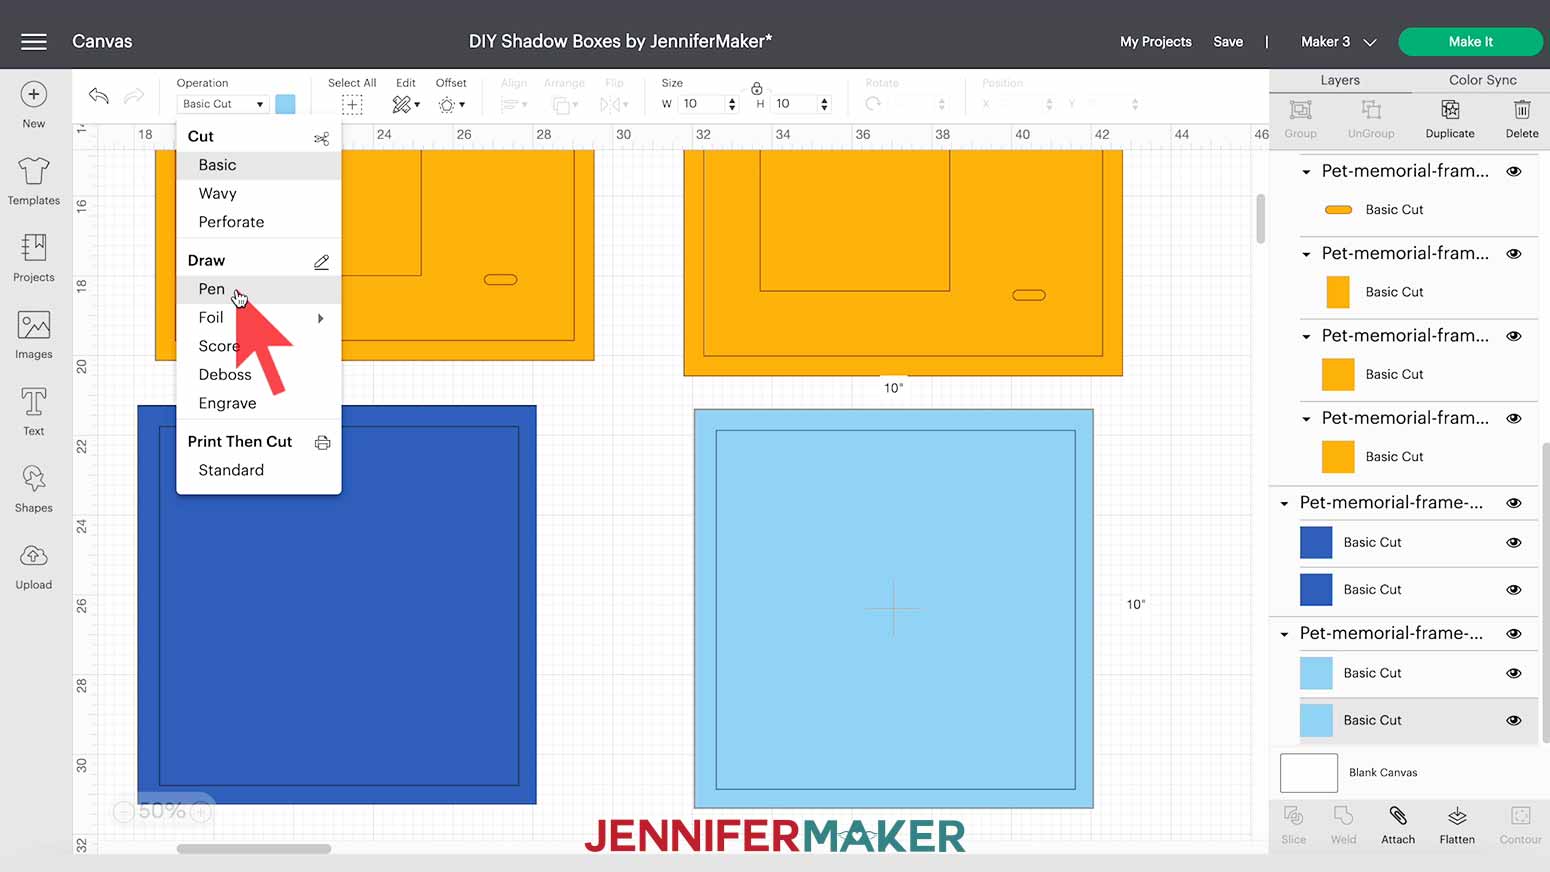
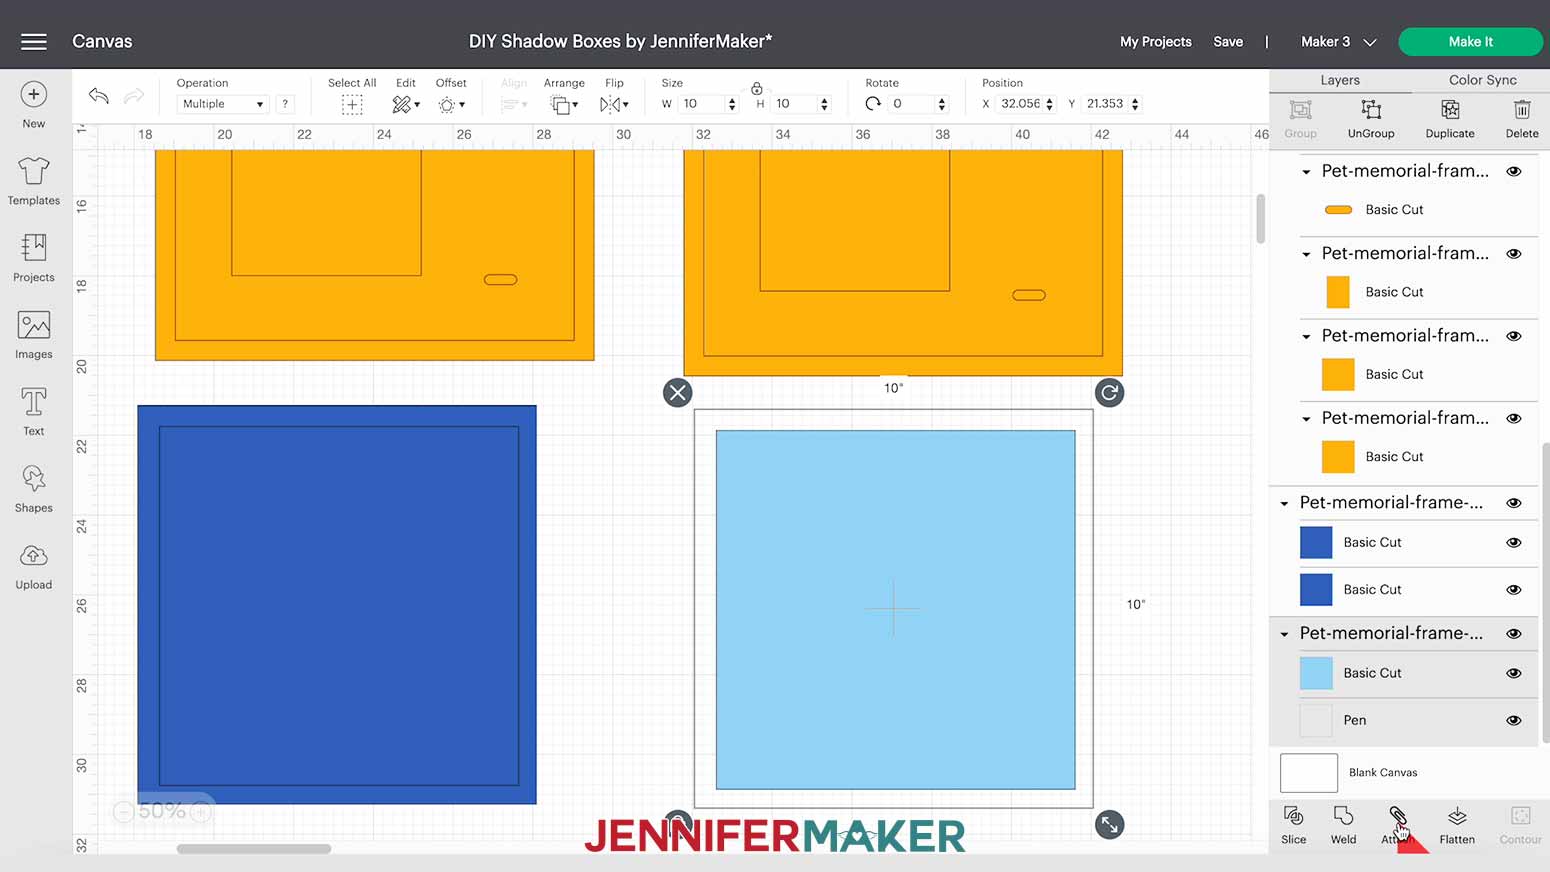
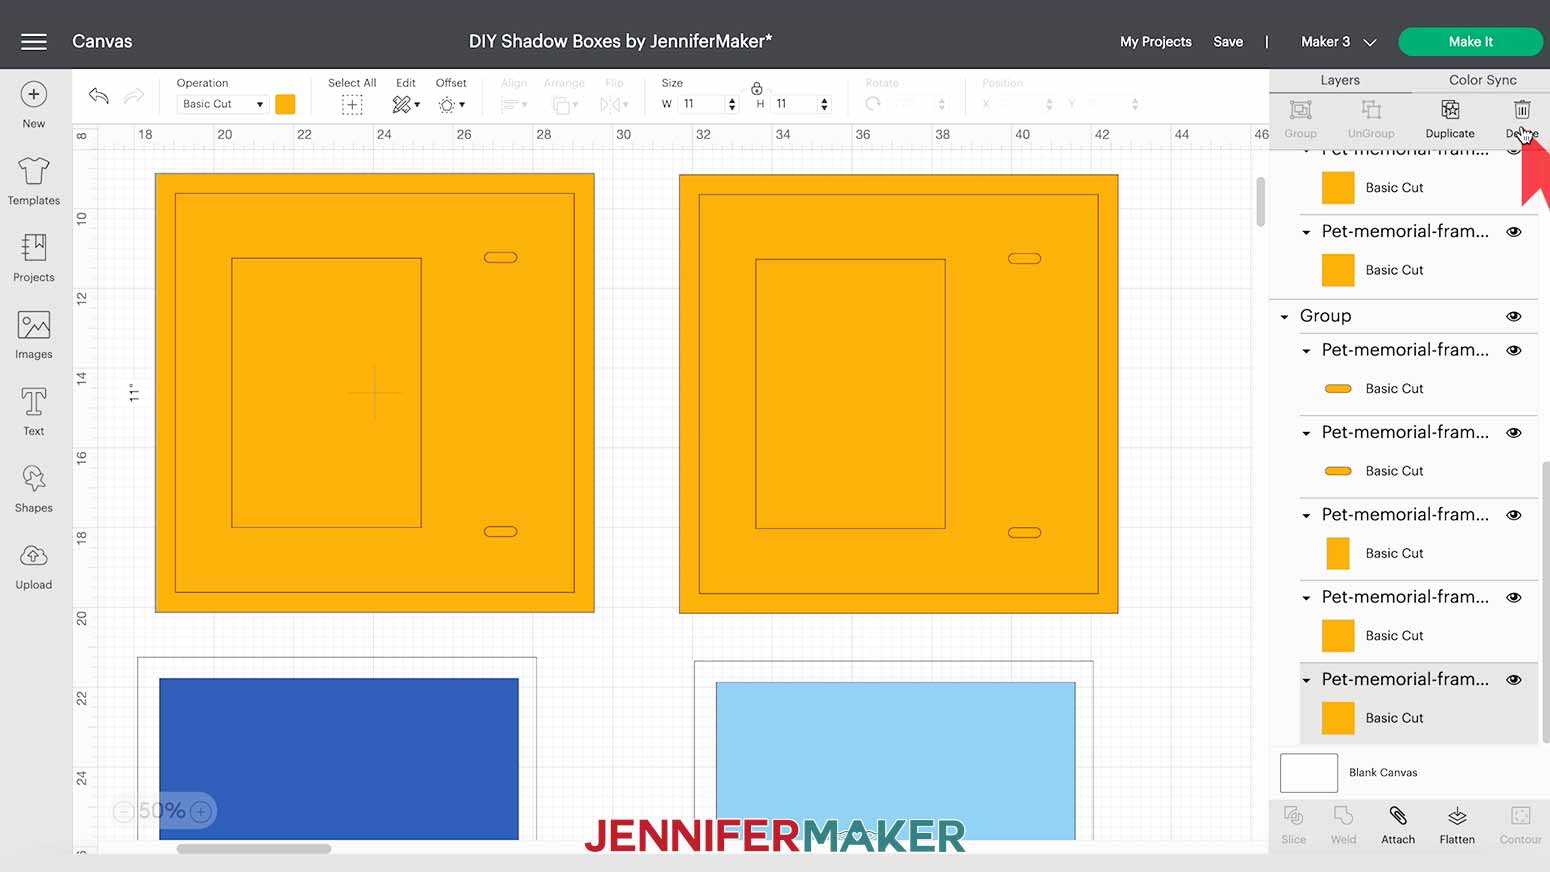
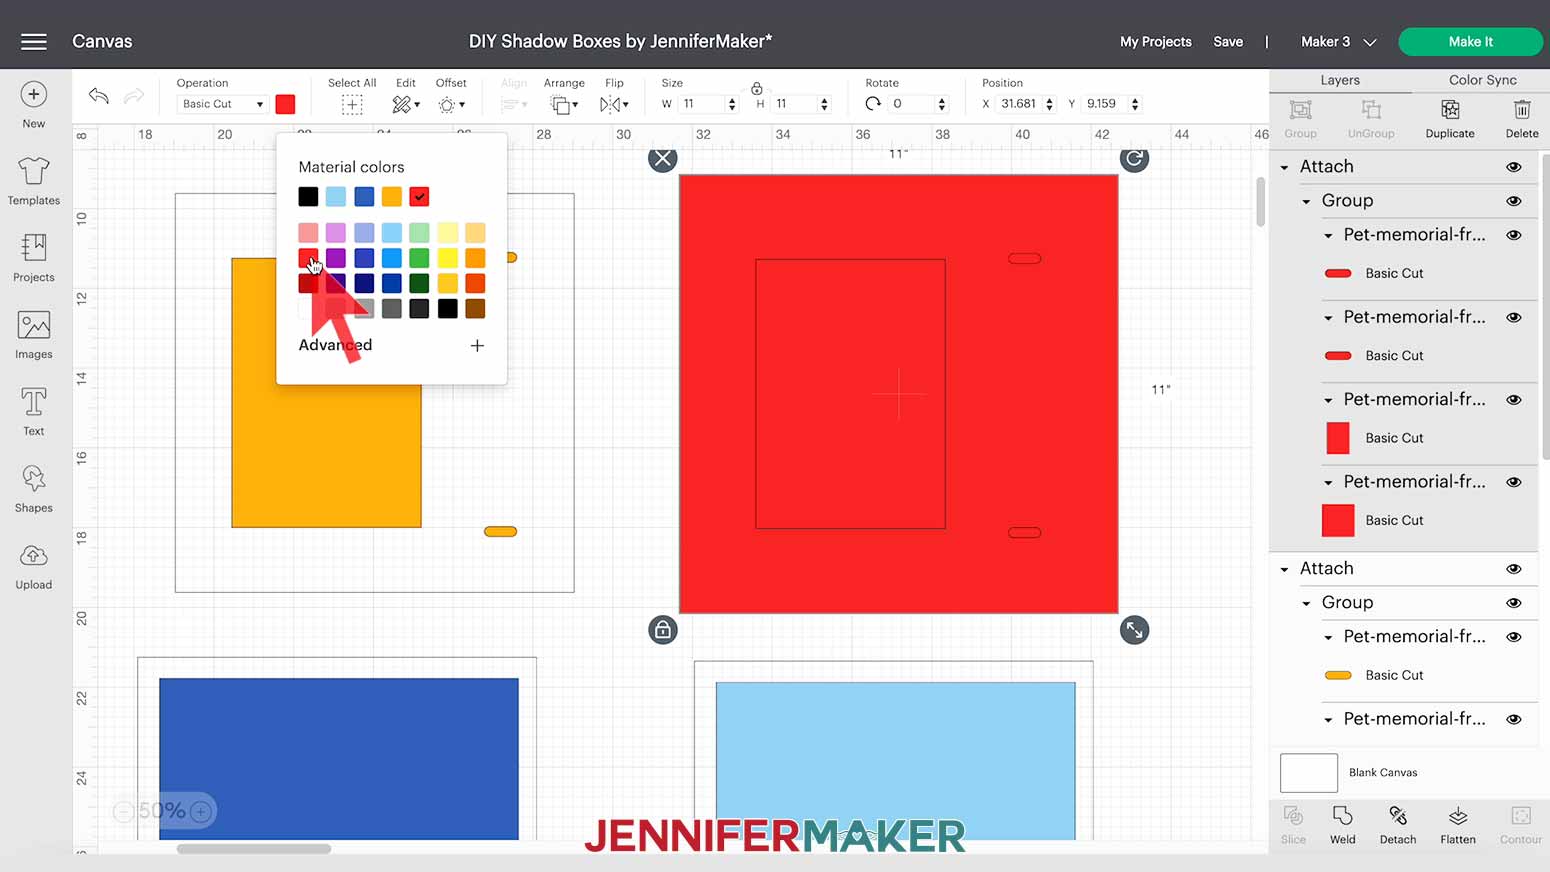
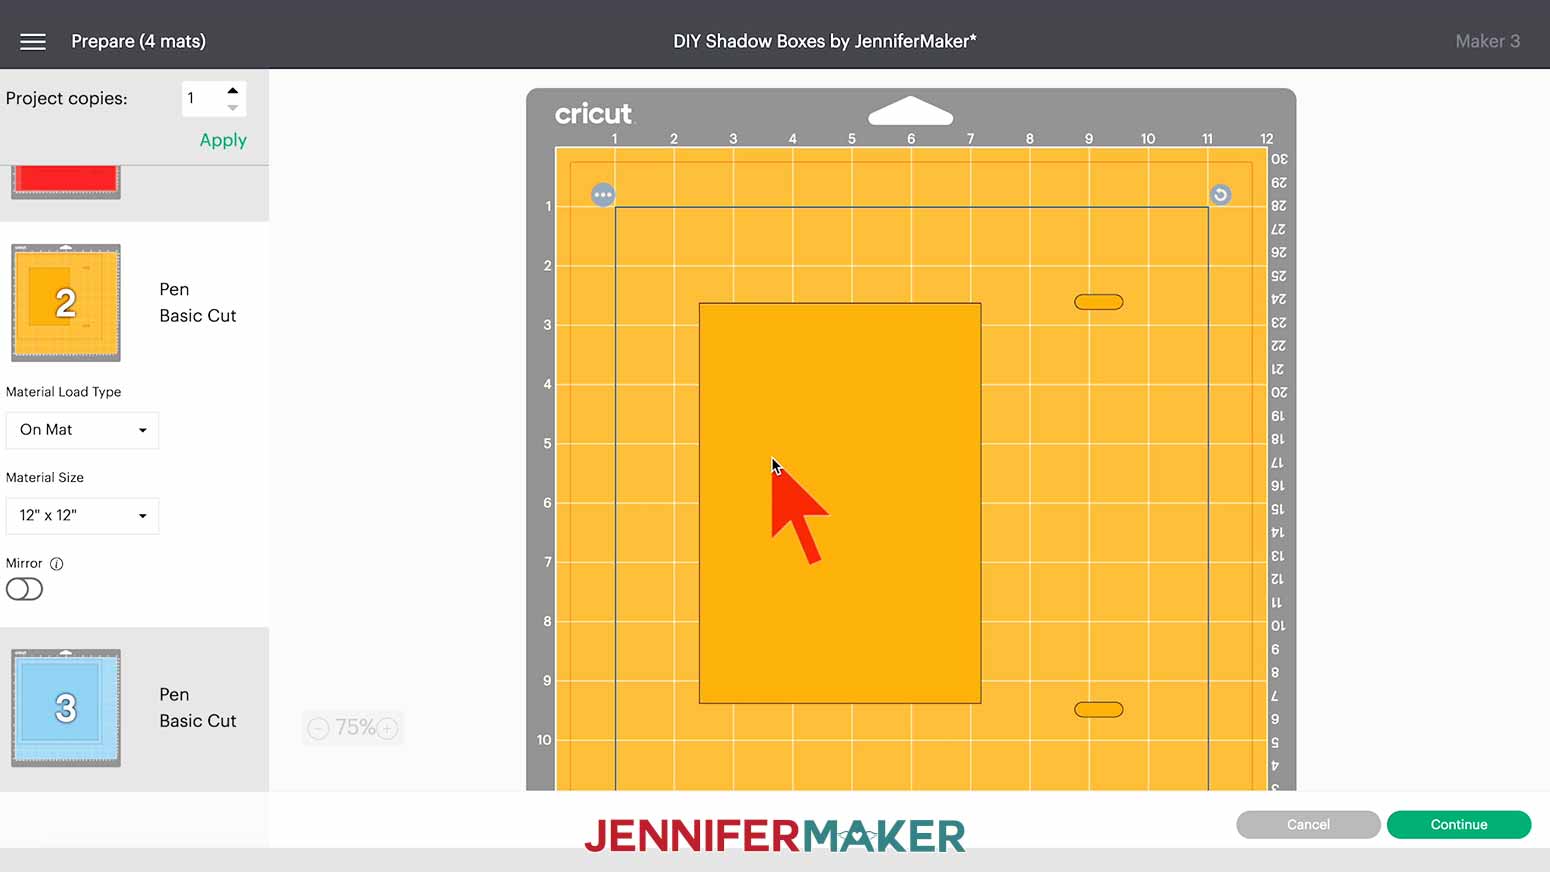
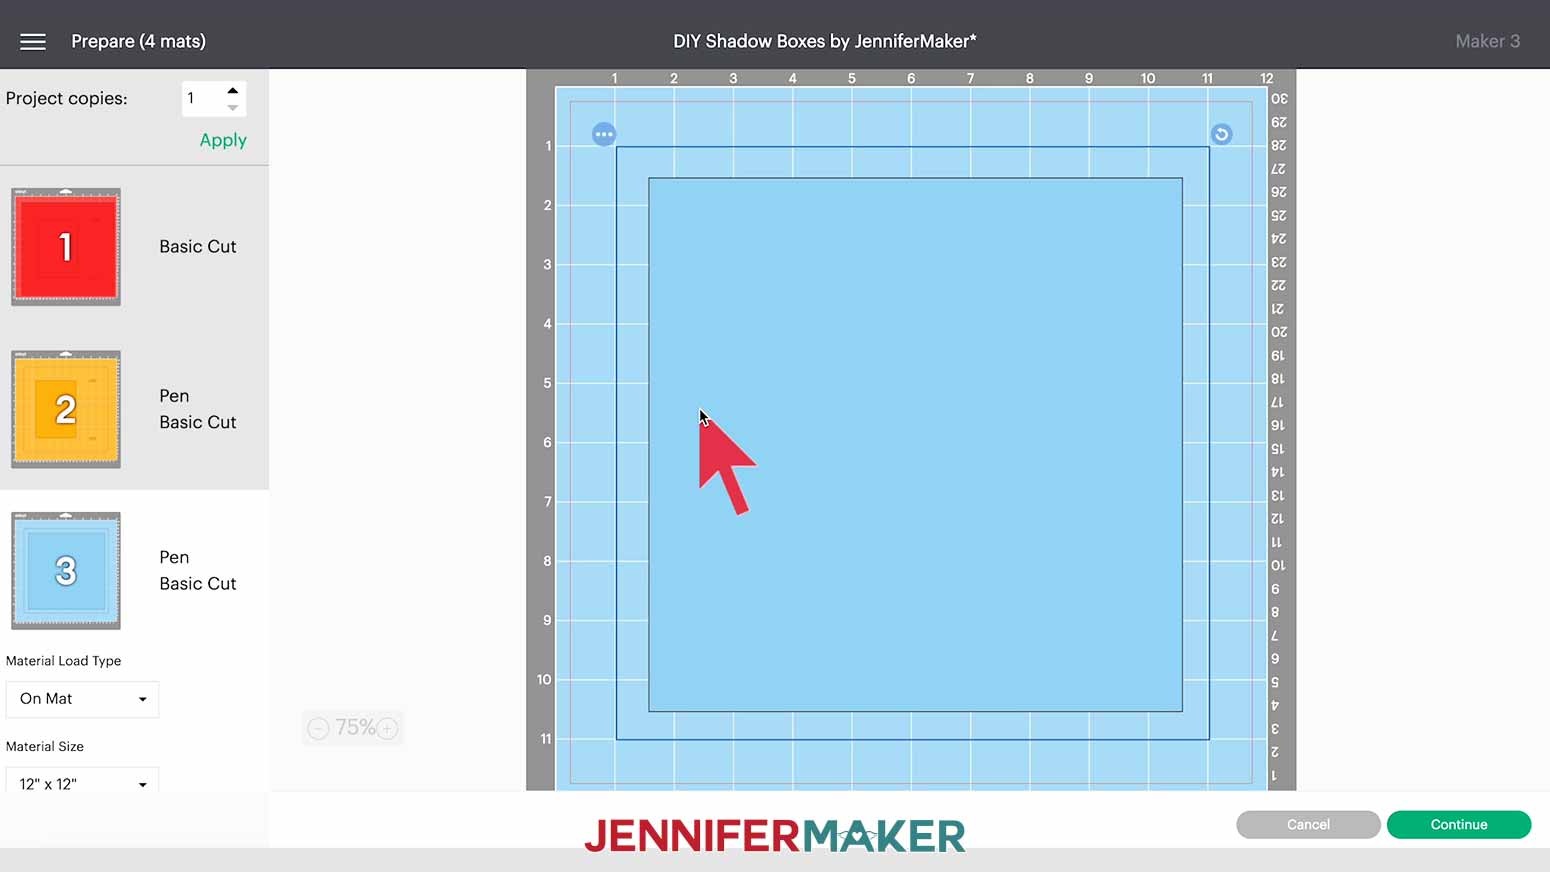
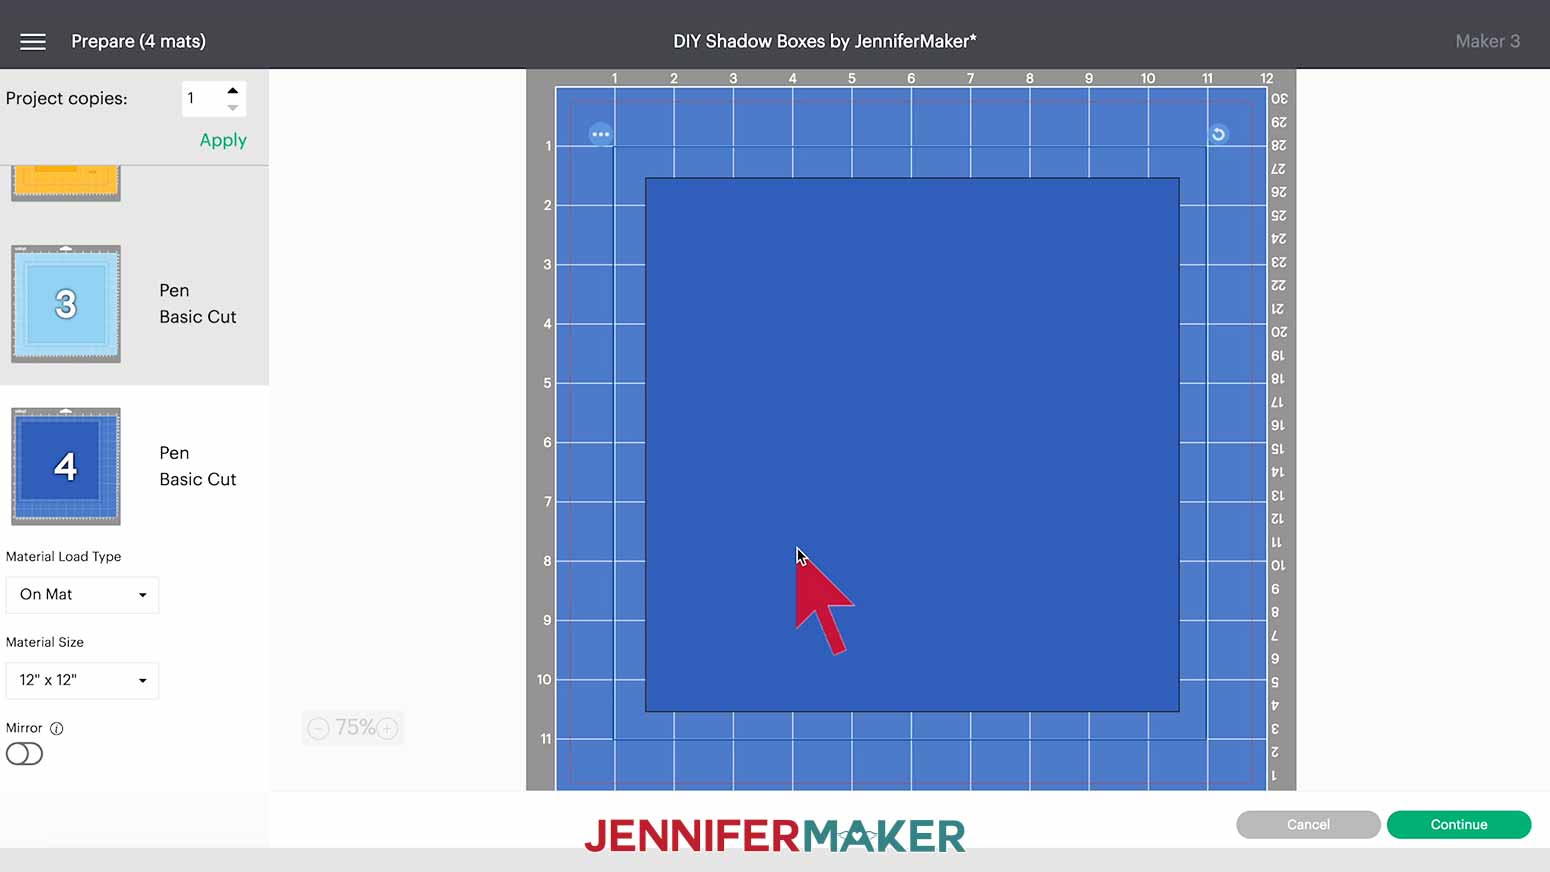
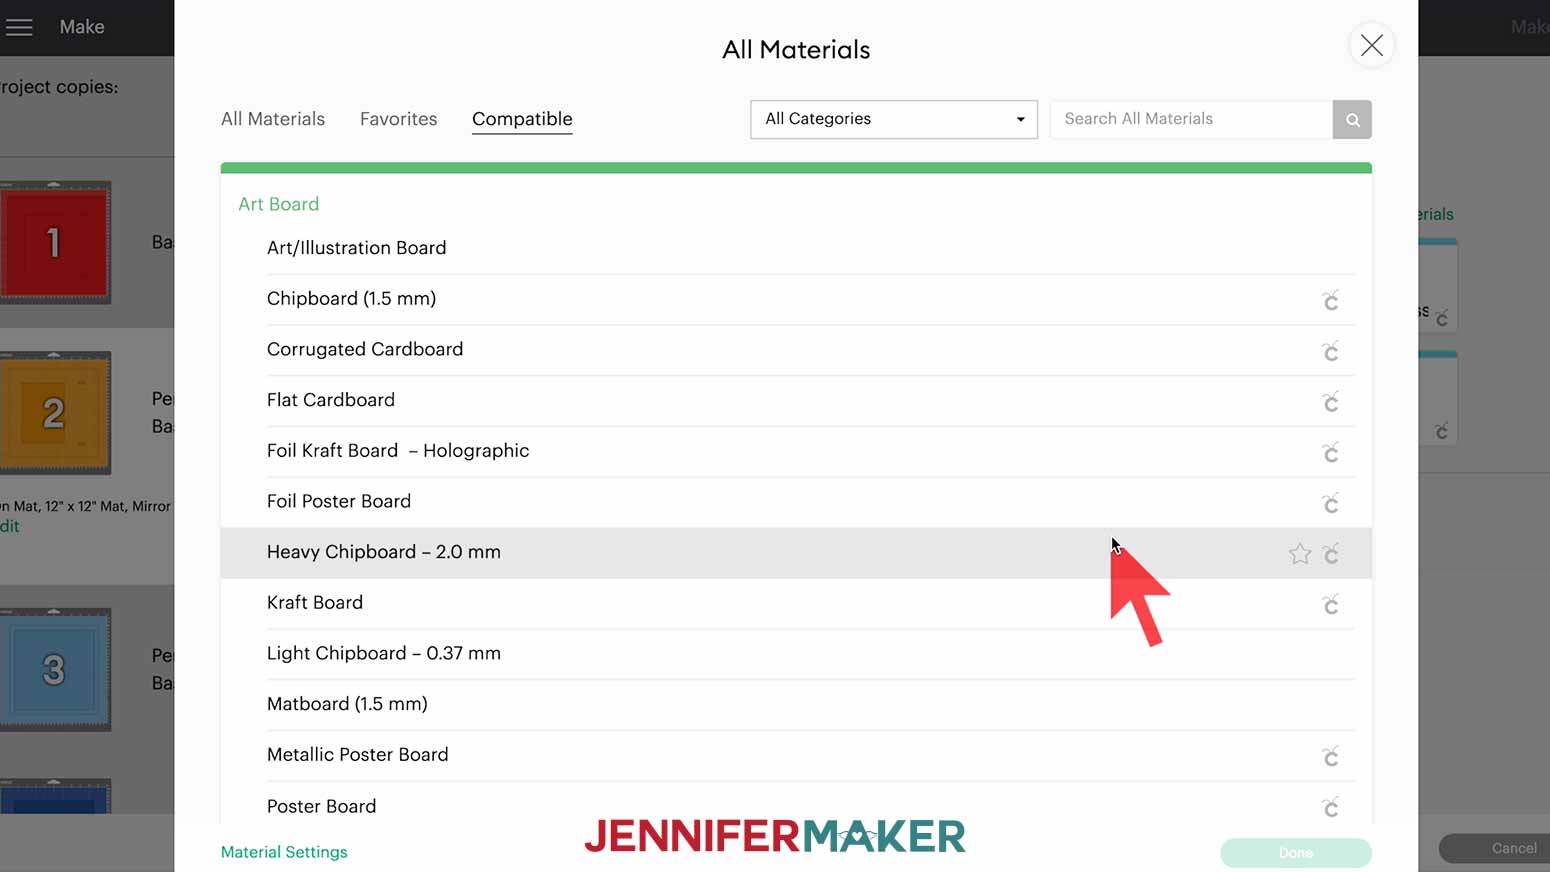
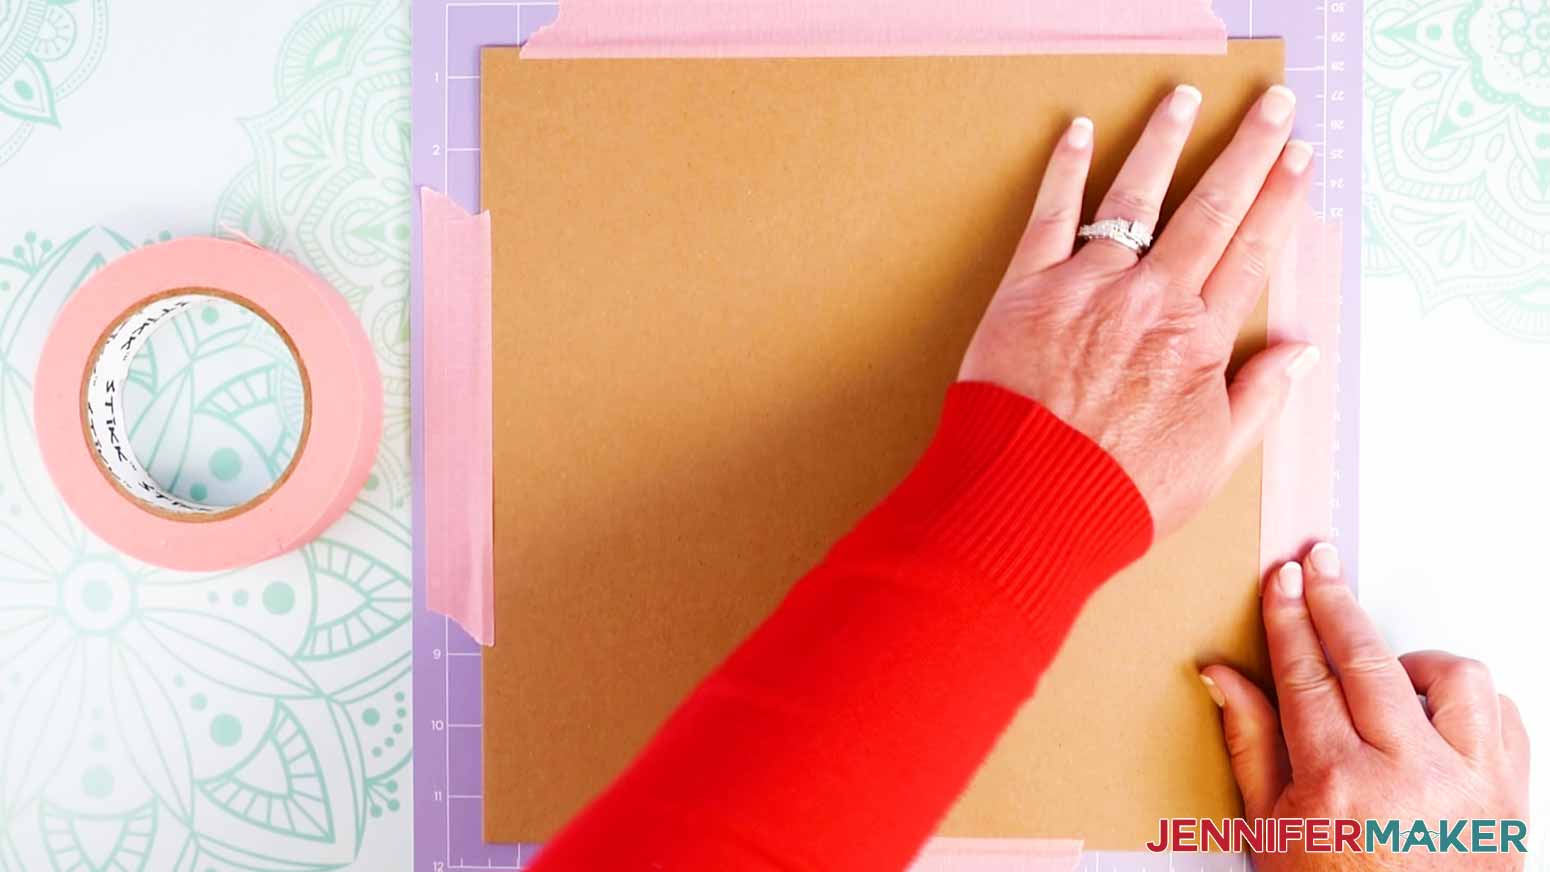
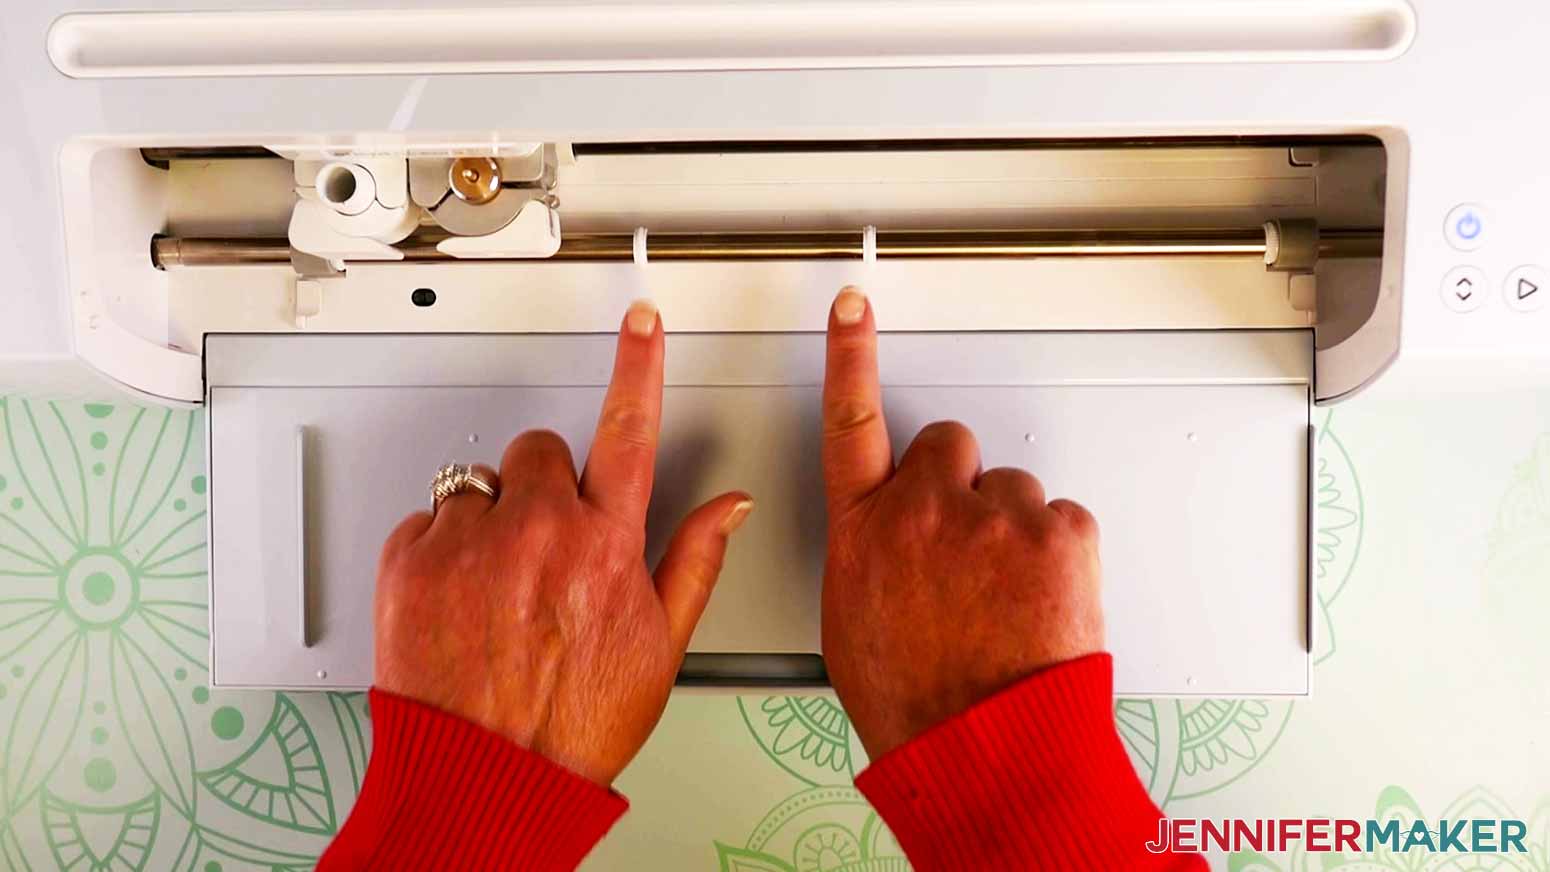
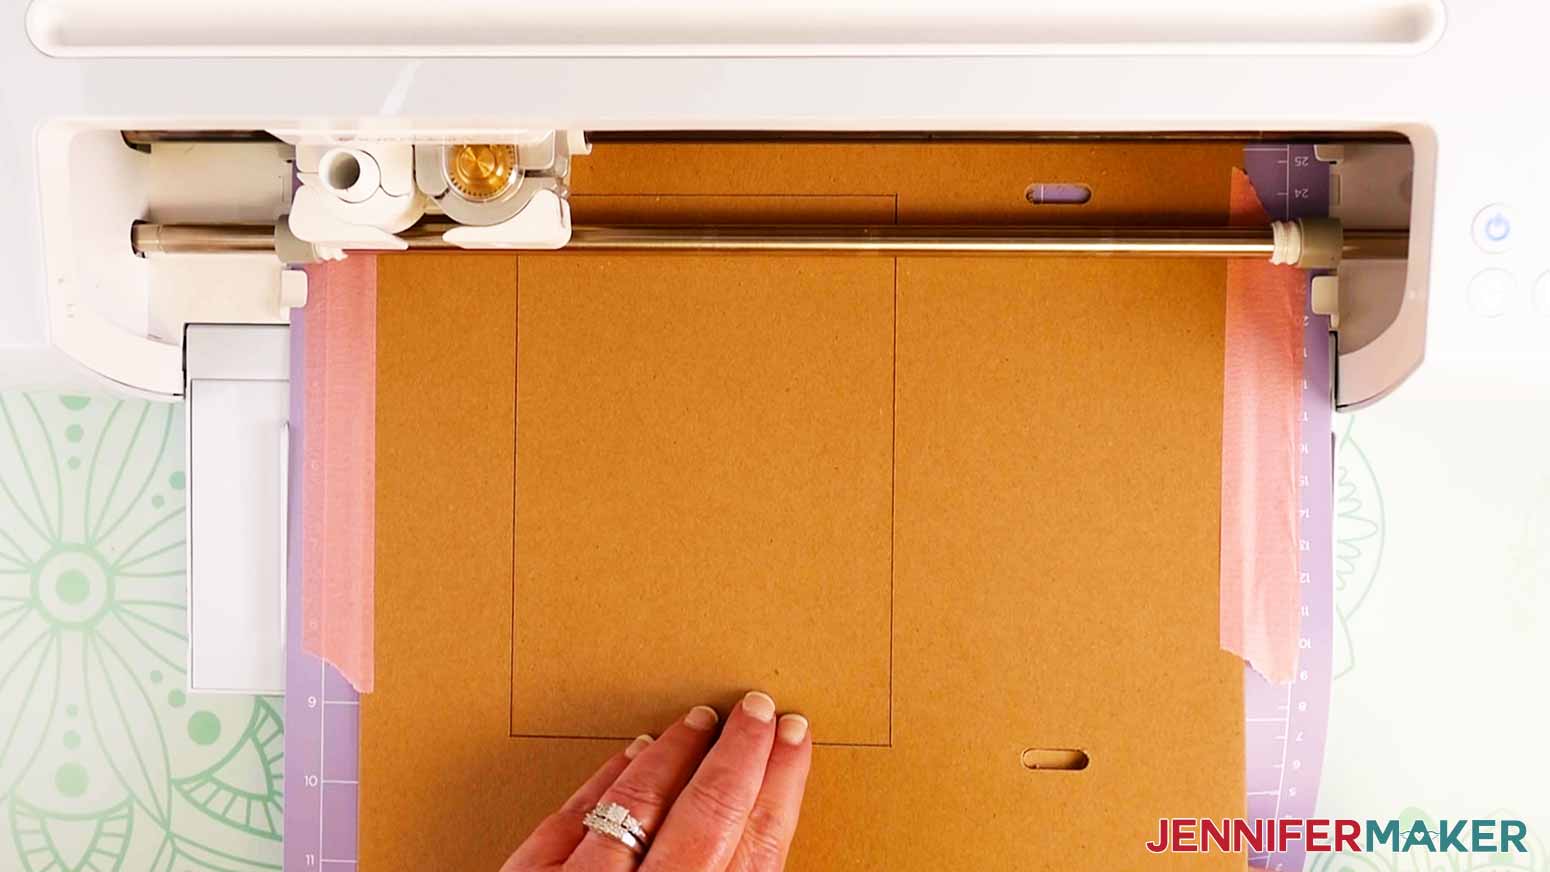
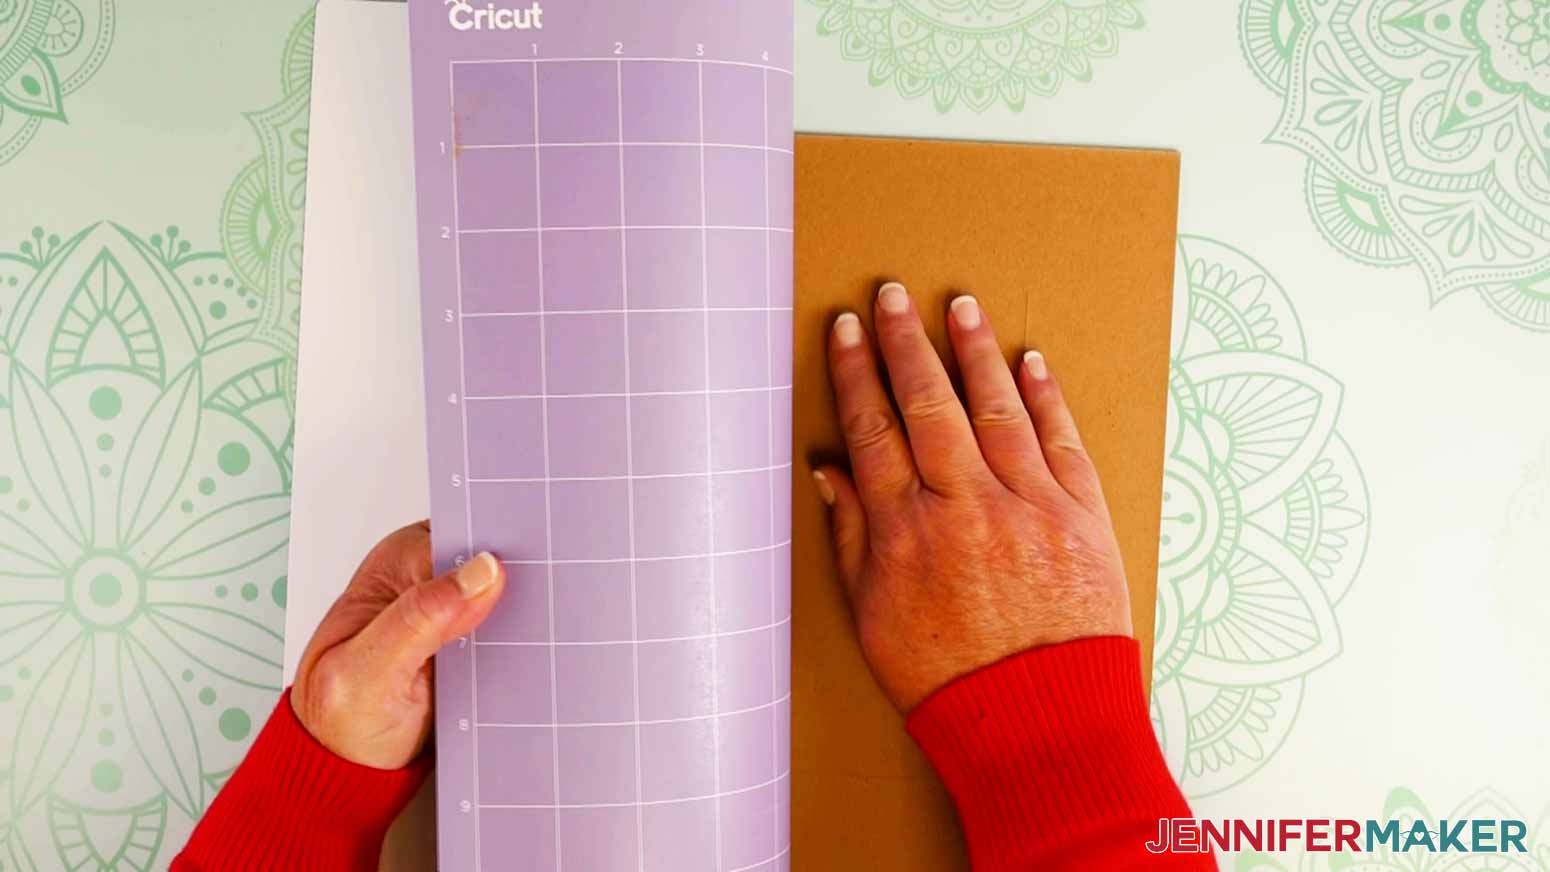
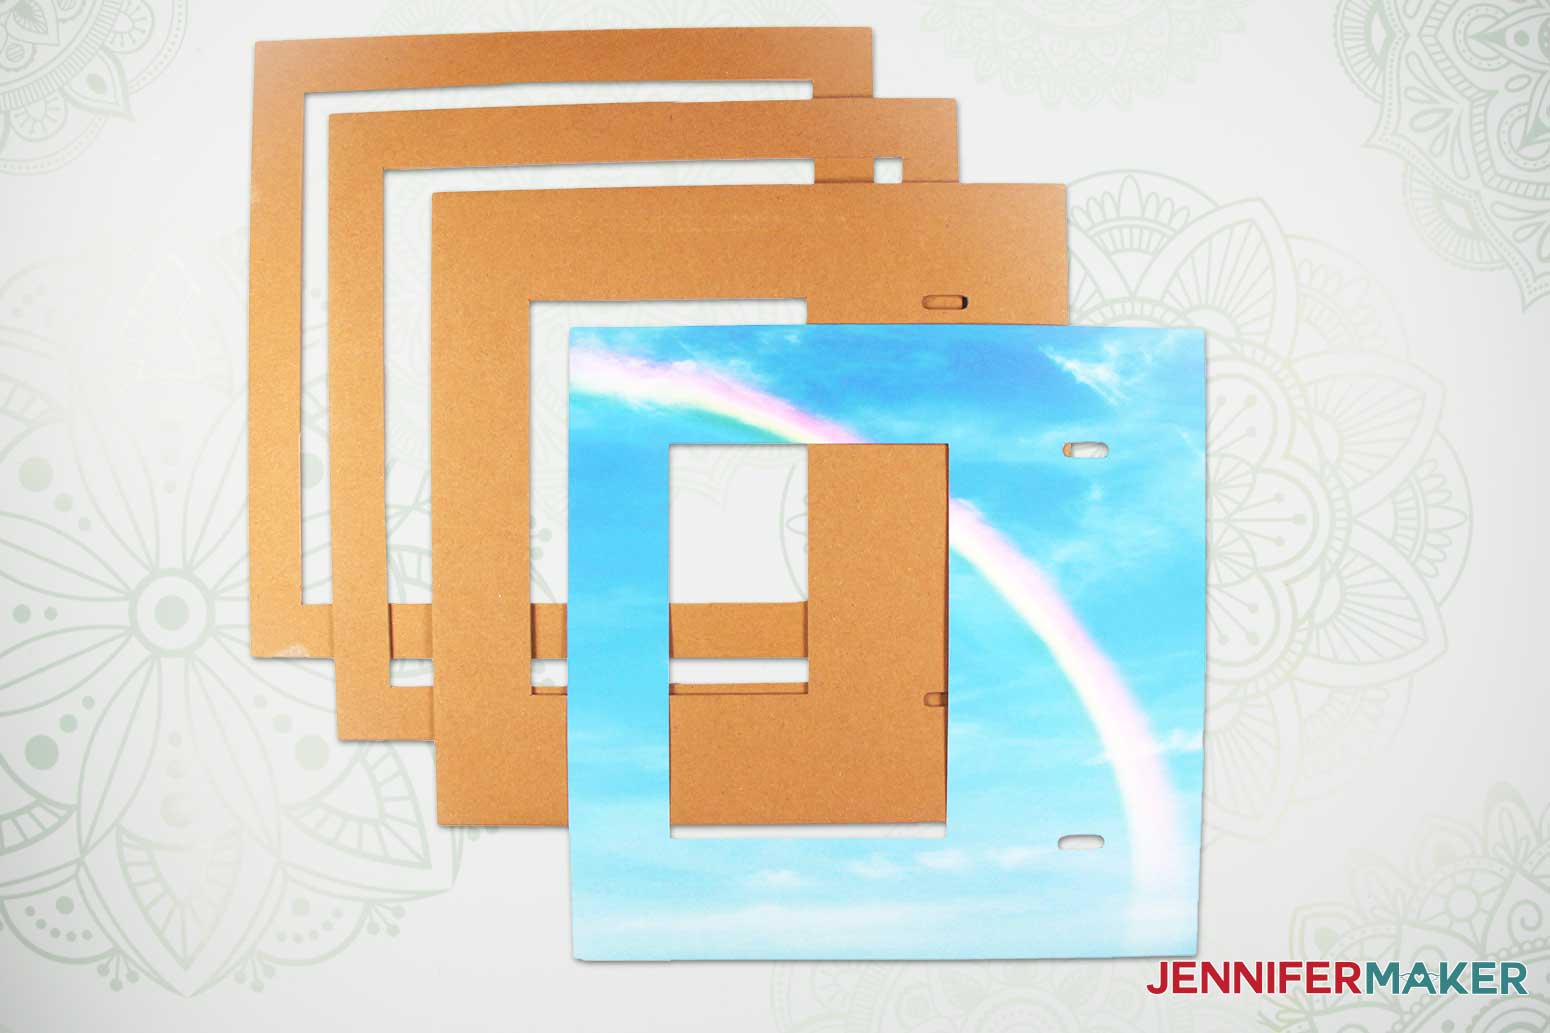
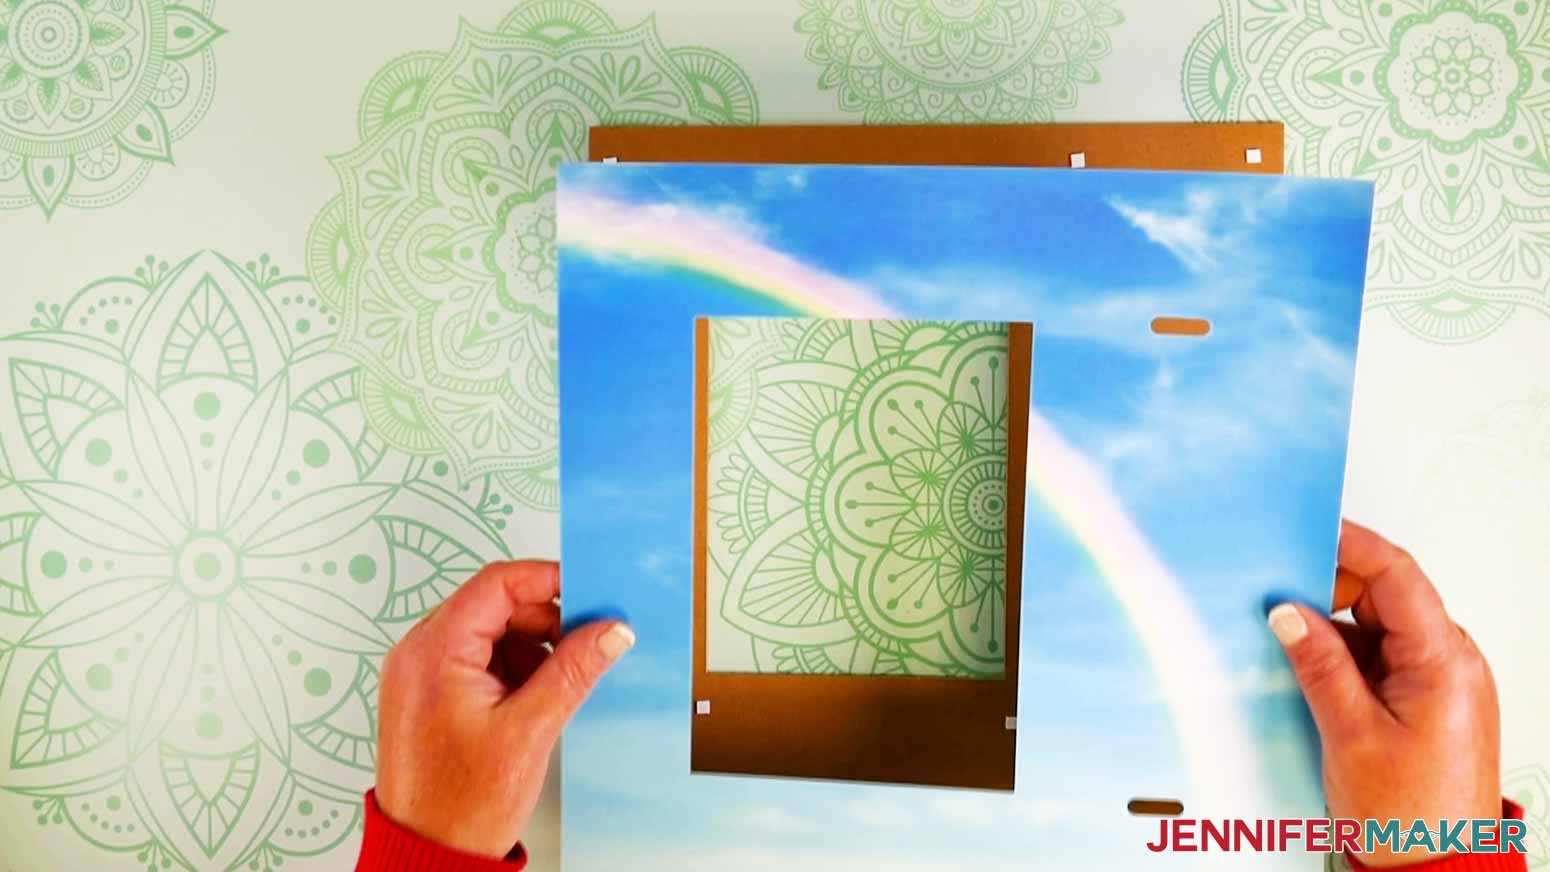
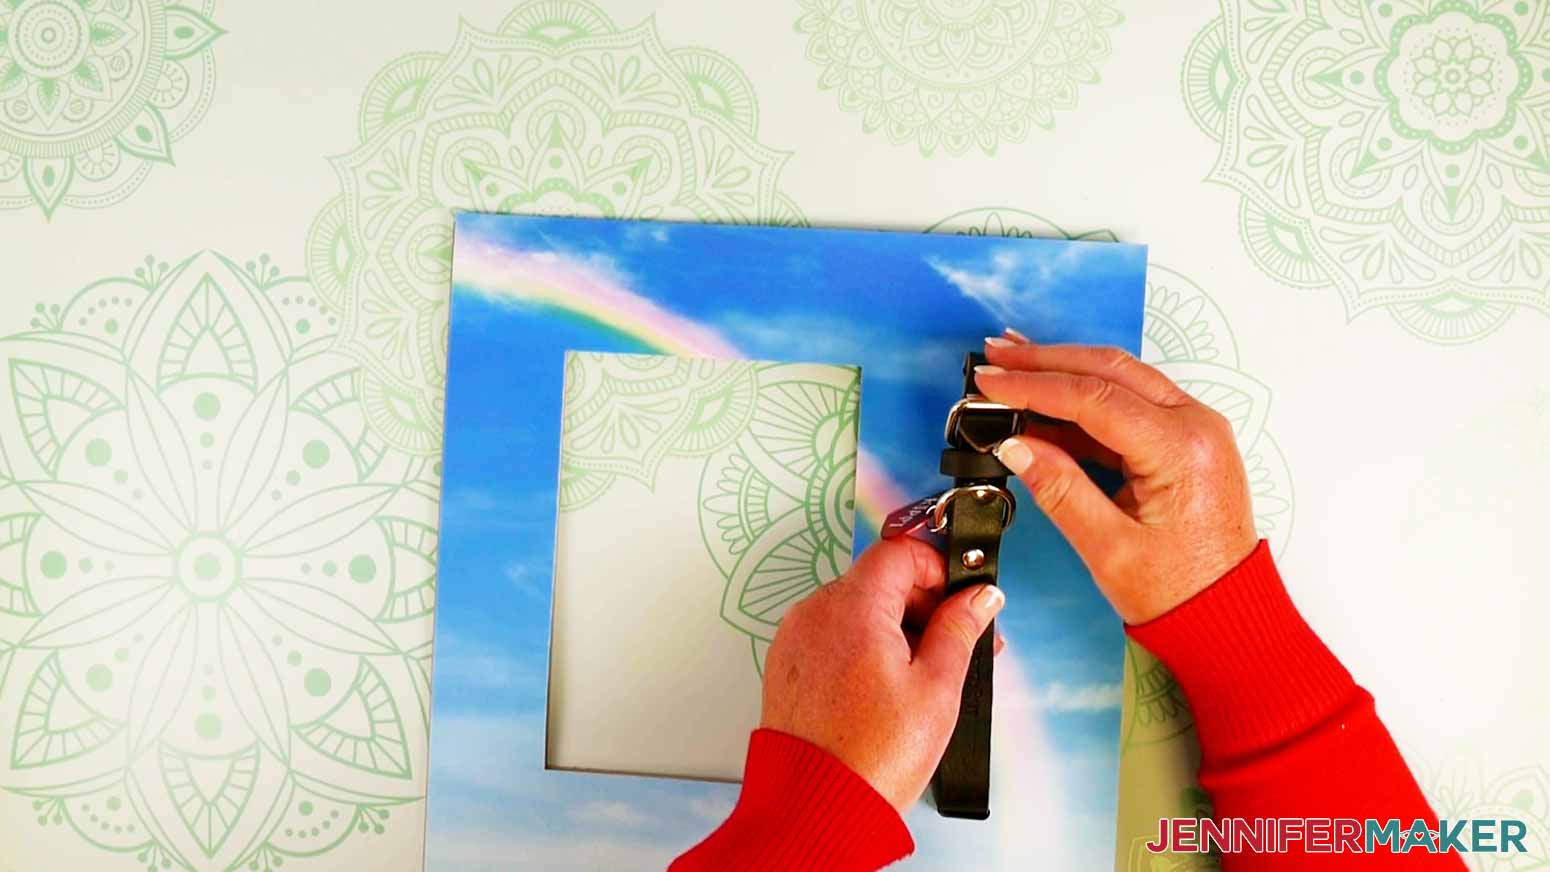
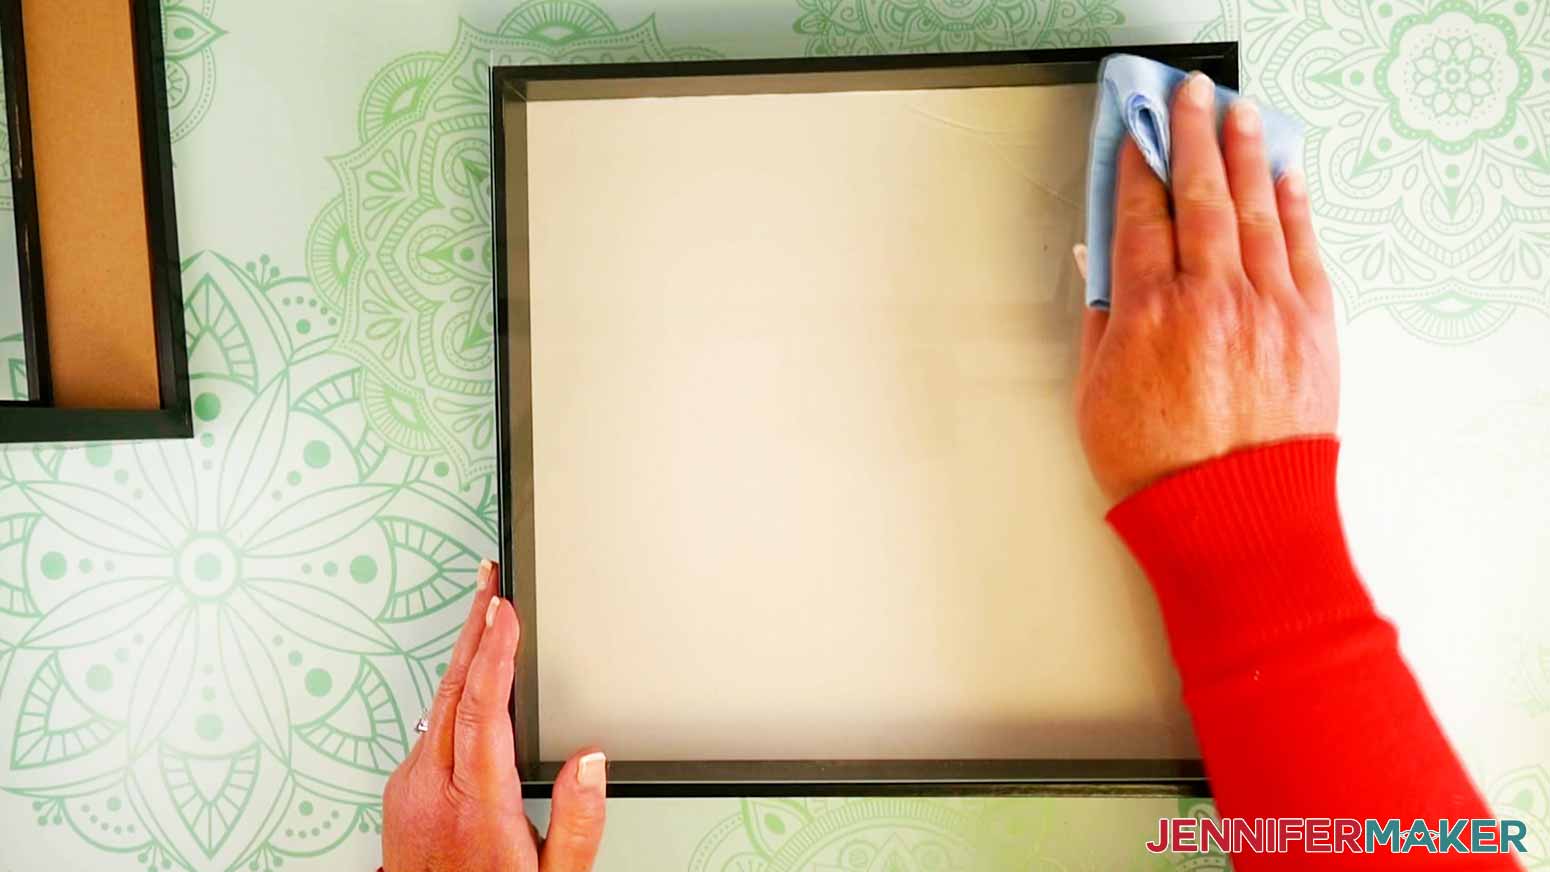
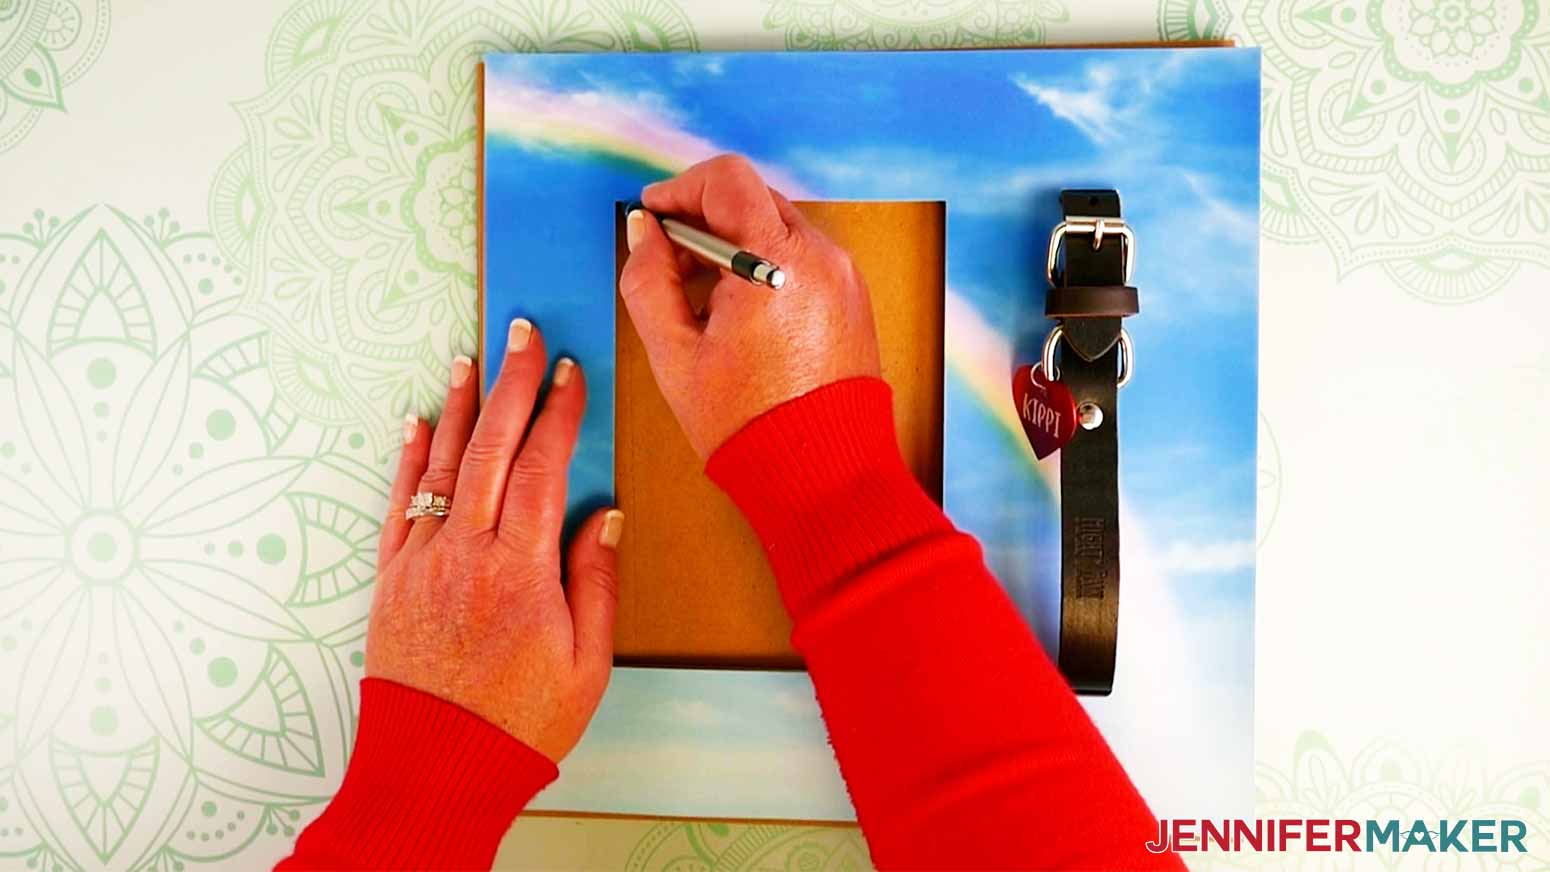
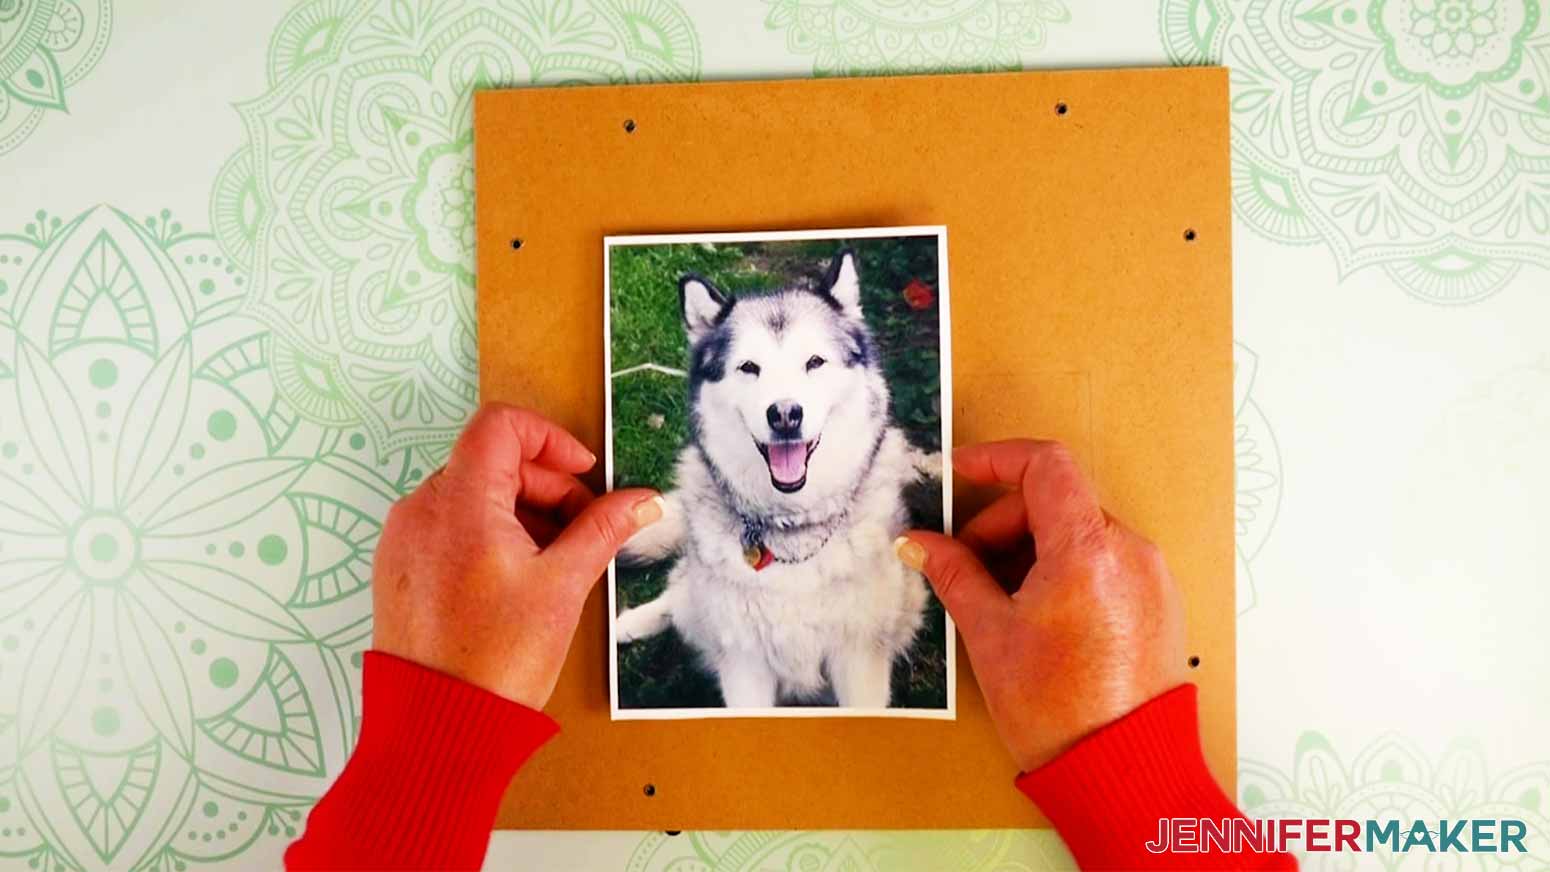
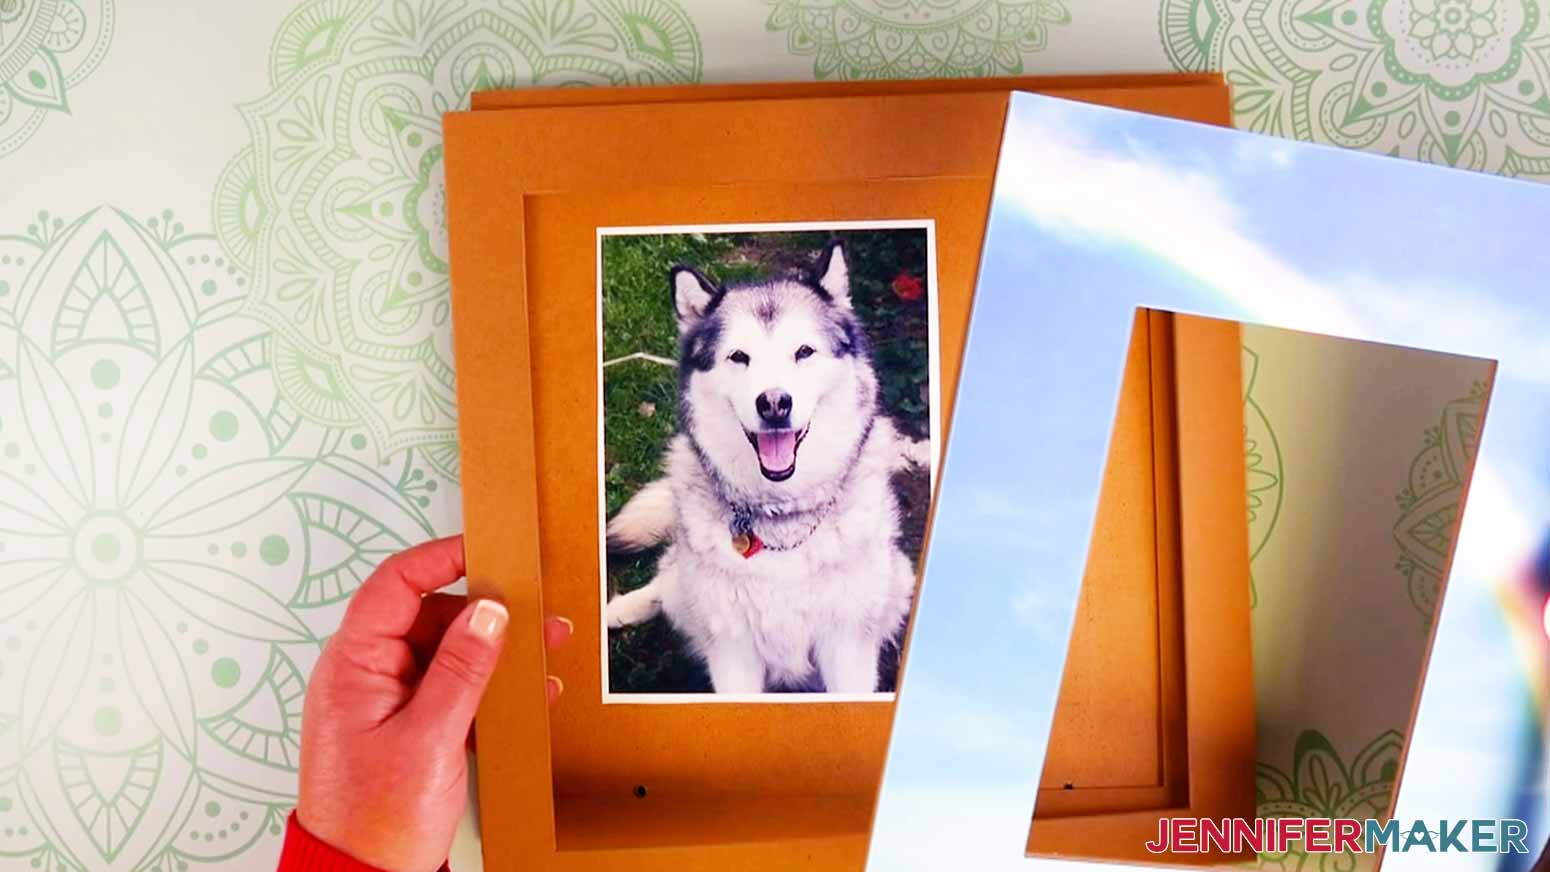
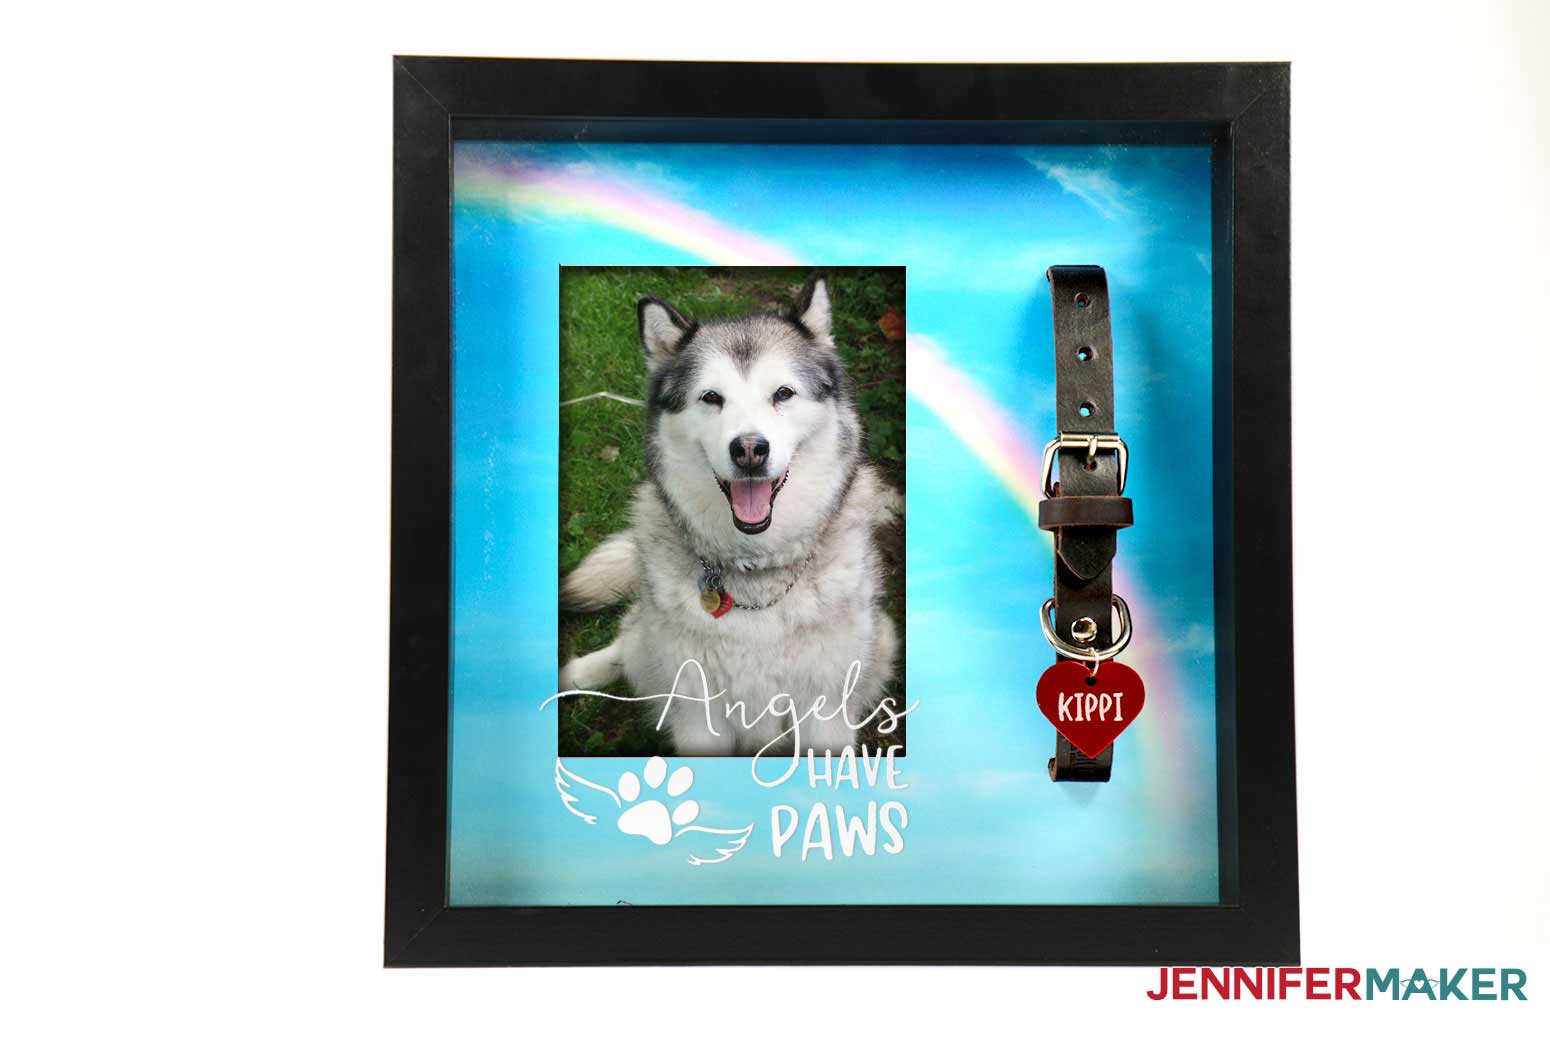
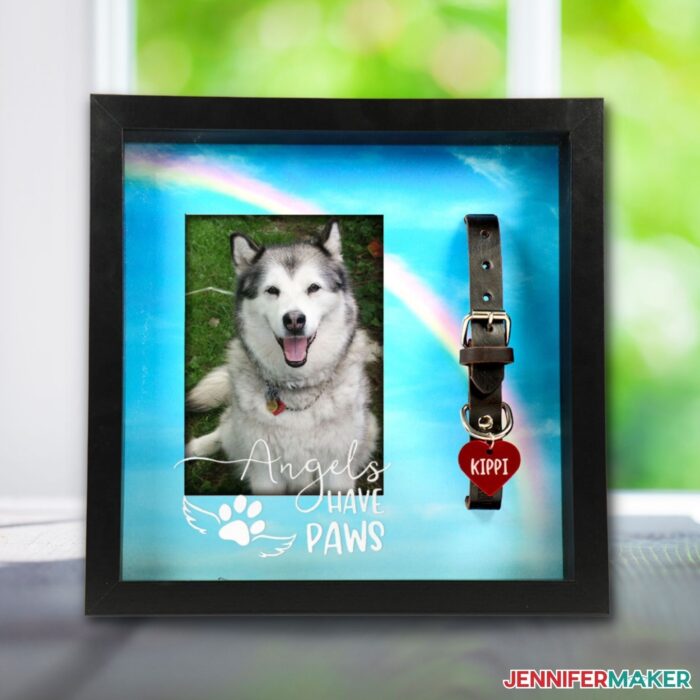
These shadow boxes are perfect for displaying special collections, savings funds, or memorial items. Choose from a variety of vinyl decals and collect or decorate to your heart's content! These shadow box decals are designed to be cut in vinyl and placed on the outer glass of shadow box frames. I made an assortment of “travel fund” and “savings fund” decals, which are perfect for dressing up collection shadow boxes that come with top loading slots and holes for saving money, coins, tickets or other memorabilia. Simply pair your favorite decal with a fun cardstock background — and voila! — your frame is ready to start collecting. I also made “teacher appreciation” and “beach collection” decals for making special memory or gift frames. The method for applying decals to glass is the same, regardless of which frame or decal you choose to make. In this tutorial, I’m going to go further in depth to show you how to assemble two special shadow boxes. The first one is a fun frame for your craft room and displays the gold Cricut Tool set with an “In Case of Emergency Break Glass” decal on the glass. The second one is a “Pet Memorial” frame for displaying your pet’s collar and photo. First, download my shadow boxes designs from this page — or search the library for design number 337. TIP: If you are not sure how to upload an SVG cut file to Cricut Design Space, watch this helpful video training series I made. If you are on an iPad or iPhone, here is how to download and upload SVG files to the Cricut Design Space app. This is what my Shadow Box SVG files look like when they are uploaded to Cricut DesignSpace. Determine where on the frame’s glass you’d like to place your decal, and measure the space you’d like to fill. I’m using an 11” x 11” shadow box and want the decal to span nearly the width of the glass, so I want my decal to measure 9.5” wide. To change the size of any decal to fit your space, click and drag the resize handle on the bottom right corner of the decal box on the canvas. TIP: You can even cut these files on a Joy! You will need to resize them to fit on a Cricut Joy mat – the maximum width for cutting on a Joy mat is 4.25”, but you can go longer depending on which mat you use (the 6.5” or 12” mat) — that should be big enough for pretty much any decal you want to cut. Select your Base Material when prompted. I used Premium Vinyl—Permanent in Gold. If you’re using a mat like I did, place Premium Vinyl—Permanent on a Green StandardGrip Mat. Refer to the placement of the decal on the Mat in Design Space when placing your vinyl on the mat. TIP: You can also use any other vinyl color or even another type of vinyl like Removable Matte if you prefer. You will be prompted to load your Fine Point Blade and mat. When you’re all set up, click the flashing Start button. While your vinyl is cutting, prepare your shadow box. If your frame glass has protective plastic on it, make sure to remove it. Also remove the back of the frame. Thoroughly clean both sides of the glass with Isopropyl Alcohol using a lint-free cloth or coffee filter. I use cardstock as my background inside the shadow boxes. Measure the size of the inner backer board to see what size cardstock you will need. Use a Cricut Trimmer or pair of scissors to cut your cardstock down to size if necessary. For my “Emergency” frame, I used a single piece of 12” x 12” Pearl Shimmer Metallic Champagne White Cardstock cut down to 11” x 11” to fit a white Tasse Verde 11” x 11” shadow box. Generously use glue dots to adhere your cardstock to the backer board of the frame. Arrange your Cricut Gold Tools the way you’d like to display them on the cardstock. This is how I arranged mine. TIP: Make sure you allow enough space (at least 1/4") around the tools so they fit comfortably when they are placed inside the frame. Also, make sure the wall hanger is the correct side up before attaching your tools. Place two or more glue dots on the back of each tool where it touches the cardstock and firmly press them down. Once everything is adhered, place the backer board and attached tools into the frame and close the clasps in the back. Now, let’s apply the decal to the glass of the shadow box. First, gently peel the mat off the vinyl. Weed your design carefully, removing all of the excess vinyl you do not need. Be sure that all the small dots and pieces stay adhered to the carrier sheet, while making sure you remove all the small centers to your letters and numbers. TIP: I have lots of weeding tips on my Cricut Best Tips and Tricks post. Next, cut a piece of Cricut Transfer Tape slightly larger than your vinyl decal. Remove the backing from the transfer tape. Apply the transfer tape to your vinyl decal by holding the transfer tape in the shape of a taco or “U” shape then putting the bottom of your “taco” onto the middle of your design. TIP: Line up the lines of the transfer tape perfectly under some of your lines of text. The straighter your transfer tape is, the easier it is to align your decal on your frame. Smooth the tape over the decal from the center outward making sure to press out and remove any bubbles. When the transfer tape is in place, use a scraper tool or other hard and flat-edged item (like a store loyalty card) to transfer the vinyl decal design to the transfer tape. It’s important to scrape it well to transfer the vinyl decal. It helps to scrape it from both the transfer tape side AND the carrier sheet side. Carefully peel the carrier sheet off the decal. TIP: If little bits don’t want to transfer to your tape, scrape it again and pay careful attention to those problem areas. Now place your decal on the glass, being mindful that it is straight and centered. Make sure both the vinyl and transfer tape are adhered to the glass. Use your fingers to push out any bubbles or creases in the vinyl. Pick up a corner of the transfer tape and slowly remove it from your decal. Use your fingers again to make sure the decal is securely adhered to the glass without any noticeable bubbles. I went one step further with my shadow box and added a gold hammer to the exterior! Lay out all the parts before you start. This is what I used: one 6” craft hammer, one large 10mm jump ring, two 4mm jump rings, 4 inches of chain, one more 4mm jump ring and one 5mm eye screw. Use a pair of pliers (or two) to open the 10mm jump ring. Loop one end through a 4mm jump ring. Squeeze a small amount of E6000 glue around the collar of the craft hammer. Using pliers, close the 10mm jump ring around the collar of the hammer making sure it is fully touching all the glue. Make sure the smaller 4mm jump ring is attached but free-standing so another jump ring can be attached to it later. Add more glue if necessary, or wipe away any excess glue. You want only enough glue to adhere the jump ring, but not so much that it is goopy. Let the glue dry overnight. When the glue is dry and the jump rings are securely attached to the hammer, use pliers to open another 4mm jump ring. Loop it through one end of the chain and also the small jump ring adhered to the hammer. Carefully close it with the pliers. Place the hammer and chain ensemble plus the other 4mm jump ring and the eye screw on a large piece of cardboard. In a well-ventilated area, spray them with a light coat of Rust-oleum Metallic Spray Paint in Champagne Mist. Let dry for an hour then spray again with another light coat. Then flip the ensemble over and repeat with another two coats. After the hammer and chain ensemble are fully coated and dry, spray a light coat of Krylon Crystal Clear protective sealant on one side, allowing the first coat to dry at least 10 minutes before adding another coat. Wait at least one hour before flipping over the ensemble and spraying a couple coats on the other side, waiting at least 10 minutes in between coats. Let the last coat of sealant dry one hour before handling. Once the sealant is dry, choose which side of the frame you’d like to hang the hammer on, and then measure 1/2” down from the top of the frame. Mark the spot with a pencil. Then measure the center point from back to front and mark that spot as well. Where your points intersect is where you will want to screw in the eye screw. You can poke a hole with a sharp end of a weeding tool or a screw at that mark to make a pilot hole. Then screw the eye hook into the hole by hand. If you have a drill, you can use a small bit the size of the eye screw and drill a hole that way. Once your eye hook is secure, use the remaining small 4mm jump ring to attach the hammer and chain assembly to the eye screw. To do this, open the jump ring with pliers. Thread the end of the chain through the jump ring, and then enclose it around the eye screw. Now your frame is complete! This is what my framed “In Case of Emergency Break Glass” shadow box looks like. The Americanflat 11” x 11” Shadow Box I used for the “Pet Memorial” shadow box comes with pushpins and a nice foam backer board for attaching items. You can simply attach your pet’s collar and a photo into place using the pins, and then apply a decal to the front of the glass. But I took it one step further. If you have a Maker or Maker 3 and a Knife Blade, you can make a custom photo mat like I did. I supplied an SVG file that has all the parts you need to make a beautifully polished mat. I’m going to show you how to customize it to fit your particular collar and photo. First, import the “Pet Memorial” mat SVG. Refer to the instructions in Step 1 if you need help with importing. While everything is still selected, press Ungroup once. There are three layer groupings, and we need to prepare them for cutting. The bottom two groups in BLUE are the spacers we will cut from chipboard. Once our frame is assembled, these layers provide the space to allow the pet collar to fit between our photo mat and the backer board of the shadow box. The top group in YELLOW contains the photo cutout we will cut in chipboard and also in decorative cardstock. This layer includes two slots for attaching the pet collar. My pet’s collar is the traditional buckle style. This means I can thread it through slots in my mat. If you have a plastic quick release style buckle, you may need to make the slots much bigger than mine, but the process is the same. To feed the collar through the slots, you will need to unbuckle it. Choose the smallest end. That’s the end you will measure and then feed into the slots. My collar is 3/4” wide and the material that needs to fit through the hole is 1/8” thick, so my slots should be at least 1/16” larger than those dimensions. I made my slots 13/16” (0.813”) wide by 1/4” (0.25”) tall. NOTE: Cricut recommends that all shapes cut in chipboard are no less than the size of the width of pencil, so I made my collar slots slightly larger than they really need to be. The holes in the imported file are already set to a 1/4” wide so just don’t go any smaller than that and you’ll be fine. So let’s modify our mat to fit our collar. First, click on the title layer of the YELLOW group to select all the mat layers (the photo cutout and both collar slots). Now is the time to rotate the photo mat if you prefer to use a vertical photo. With all the YELLOW layers selected, change the angle in the “Rotate” box in the top menu. I typed in -90 so the photo will be on the left side and the collar on the right. NOTE: Design Space automatically does the math for you and changes it to 270. Now, click “Ungroup” at the top of the layers panel. This allows you to now individually modify each layer. Select one of the collar cutout slots, and in the top menu bar change its dimensions to fit your collar as you determined above. Then repeat to make the other slot the same size. TIP: You may need to click on the lock icon to unlock the dimensions so you can change the width without it affecting the height. When folded, my collar is 6.75” long, so my slots need to be spaced about that far apart. I decided it was best to shorten it by about 1/8” to make sure it would fit without needing to be stretched. So the final space between the BOTTOM of the top slot and the TOP of the bottom slot (so the white space between them) is 6 5/8” (6.625”). NOTE: If you plan to use a horizontal photo and did not rotate this group of layers, this space will be between the the RIGHT side of the left slot and the LEFT side of the right slot. To get the slots perfectly spaced, make a new square by clicking on the “Shape” tool on the right side and then click on the canvas. A square will be added. Go up to the “Size” boxes at the top menu and change the Height (H) to the dimension you decided is best for your collar. I entered 6.625”. The width doesn’t matter. Now, click and drag your square between the slots. Use it as a guide to space out the slots. Just move the slots to fit snuggly on either side. Once your slots are the right distance apart, you can select and then delete the square you used as a guide. Now that your collar slots are the right size and distance apart, you may want to change their location on the mat. I centered my slots vertically so they aligned with the photo, and horizontally between the photo and the edge of the mat. But be sure to check your collar. If the tags hang down below the collar, you may need to move both slots upward to allow space for the tags to hang freely once the collar is in place, and not just resting on the bottom of the frame. So hold your collar in the frame where you think you'll want it, and measure up from the inside bottom of the frame to the bottom edge of the collar (not the tags), so you know how far to move the bottom part of the slot upward. To move your slots together, select BOTH of them by holding down the Shift key while clicking on them. Now you can move them together. If you need to move or change the size of the hole for the photo, you should do that now. Click on the photo rectangle and change the size like we did for the slots. You can also drag it around the canvas to place it anywhere you want. I made the hole for the photo 4.75” by 6.75” to fit a standard 5” x 7” photo. TIP: Make sure while you are moving things around that you keep the two outer boxes untouched. Double check everything is aligned within them the way you want them to cut once you’re done moving things around. Now that the photo and slot layers are how you want them, you need to group all the YELLOW mat layers together again. First, select them all by holding down the Shift key while clicking on each of the layers in the YELLOW group in the layers panel. Then, click “Group” at the top of the layers panel. While the group is still selected, click on the “Duplicate” button at the top of the layers panel. This will create a second grouped photo mat layer, which you can use to cut a decorative cardstock layer to cover the chipboard in the frame. Now we have four groups of layers. The bottom two groups in BLUE are the spacers, and the top two groups in YELLOW are the photo and slot layers we will cut from chipboard AND decorative cardstock. Now, let’s make our final preparations. If you’re using the same size frame as me with an 11” x 11” inside space, Cricut Chipboard pieces are the perfect size. You won’t need to cut them down at all. But to make sure everything stays aligned and cuts out perfectly, I included an extra 10” x 10” box in each group (one for each spacer and one for the photo and slot mat group). I also included an 11” x 11” box in the photo and slot group. This is so you can cut out a perfectly sized piece of decorative cardstock to fit over the 11" x 11" chipboard. Let’s work our way upward from the bottom group to prepare the layers for cutting. The bottom group (LIGHT BLUE) contains an inner 9” x 9” box (which is the top layer in the LIGHT BLUE group) for cutting out a spacer from chipboard. The outer 10” x 10” box (the bottom layer in the LIGHT BLUE group) is just a guide to help us align the cut layer on the mat. Change this layer to “Pen” in the “Operation” menu on the top bar. Click on the group name to select both layers and click “Attach” at the bottom of the layers panel. The attached group will move up to the top of the layers list. Now, repeat this process for the second spacer group (DARK BLUE) — change the outer 10” x 10” box to “Pen.” Leave the inner 9” x 9” box alone. Click on the group name layer to select everything and click “Attach.” The attached group will move to the top of the list. The two YELLOW groups remaining on the bottom of the layers panel contain the layers for cutting the photo and collar slots on cardstock and chipboard. Both these groupings include an outer 11” x 11” box so you can cut down a 12” x 12” piece of cardstock to fit the frame perfectly. It also includes a 10” x 10” box for aligning this group on chipboard. On the lowest group in the layers panel, click on the 11” x 11” box and press “Delete” at the top of the panel. Now you are left with the photo cutout layer, two slot layers and the 10” x 10” box within this group. Click on the 10” x 10” box and change the line type to “Pen,” just like you did for the spacer layers. Click on the group name so all the layers in the group are selected. Click “Attach” at the bottom of the layers panel. This attached group will be the one we use to cut on chipboard. On the final YELLOW group at the bottom of the layers panel, click on the 10” x 10” box and click “Delete.” You will be left with the 11” x 11” box, the photo cutout layer and the two slot layers. Click on the group name and click “Attach.” This is the attached group you will use to cut the cardstock. Now is a good time to change the color of this group to RED so you can easily tell it apart from the chipboard mat. To do this, while the attached group is selected, go to the “Operation” menu in the top bar and click on the color box and change it to “Red.” Now you’re all set! It’s time to set up our mats for cutting. Select your machine and then click “Make It.” If you’re prompted to select “On Mat” or “Without Mat,” choose “On Mat” and click “Done.” On the left side you’ll see your four mats. We need to align all of our cut layers on each mat by clicking and dragging the layers on the mat. You want to center everything on each mat. The mat guidelines will help — just CENTER the 10” x 10” outer square along the guidelines 1” inward from each edge of the mat. IMPORTANT: Make sure the layers are perfectly centered on every mat you plan to cut from chipboard so they align correctly when you assemble your frame. That means you will be centering the 10” x 10” outer square on the LIGHT BLUE, DARK BLUE and YELLOW mats like this. On the RED mat, you will be cutting out the photo and slot layers with the 11” x 11” outer square from a 12” x 12” piece of cardstock, so you can place the group anywhere on the mat. But you may want to align the group to cut a particular part of the image on the cardstock if there is an image like the rainbow I used. It does not need to be centered like the other mats. When you’re done arranging everything on the mats, click between each of the mats to double-check that everything is centered on the mats correctly. Now click “Continue.” You will be prompted to select your material for each mat. Select Heavy Chipboard 2.0 mm for the YELLOW photo and slot mat and for both BLUE spacer mats. I selected Cardstock 80# to cut out my second photo and slot mat, which is on the RED mat. NOTE: You may be prompted to calibrate your Knife Blade. I recommend doing this step if prompted. Make sure your Knife Blade is loaded in Clamp B when prompted for cutting the chipboard mats. To prepare the material, center a piece of 11” x 11” chipboard on a purple StrongGrip Mat. Use painter’s tape to tape down all four edges. On your Maker, make sure two white star wheels are moved all the way to the left side and two are moved all the way on the right side. This allows room for the thicker material and makes sure they won’t indent the chipboard. Also prepare a blue LightGrip Mat with a 12” x 12” piece of cardstock and have your Fine Point Blade ready. For the chipboard mats, you will be prompted to load a Pen in Clamp A, but make sure Clamp A is empty. Your Cricut will go through the motions to draw the 10” x 10” square, but without a pen loaded nothing will happen, which is exactly what you want. That square is only there to help you make sure everything is perfectly aligned on your mats. When prompted by each mat, either load the Knife Blade (for chipboard) or the Fine Point Blade (for the cardstock layer). Load the appropriate mat when prompted, and press the Start button. You may receive a message about expecting longer than normal cut times. Be sure to monitor the cutting of the chipboard. When it looks like the material is close to being cut all the way through, pause your Cricut and carefully check to see if your material is cut through. If not, press Go again and let it continue. IMPORTANT: Do NOT unload your mat until you are sure your chipboard is cut all the way through! Your Cricut will take many passes. I found my Maker 3 completed a single piece of chipboard in about 15 passes, but yours could be different so make sure to check on them. If you find your material is cut through and you stop the process early, just make sure to select the next mat on the list on the left side of the screen before proceeding to cut the next mat. Then follow the prompts to load your mat, and change the blade if necessary. Carefully remove the painter’s tape from the chipboard, making sure not to tear the board. Pop the pieces off the mat and discard the centers. These are all the pieces you'll have when you're done cutting. Line up the photo and collar cutouts and use adhesive tape to adhere the cardstock to its matching chipboard. Thread the collar through the slots and buckle it closed on the front, making sure the tags are where you want them. To prepare the frame for assembly, remove the backer board. Clean the inside and outside of the glass with Isopropyl alcohol using a lint-free cloth or coffee filter. My frame came with a foam core layer attached to the backer. If you are pinning your collar and photo into the frame, this is the piece you would attach those to. But if you made a custom mat, you need to remove this layer from the backer. I used a hair dryer on medium setting to heat the adhesive and peel it off the backer. You can also use a heat gun on low heat. Once the foam is removed, it’s time to assemble the frame. The photo cutout is 4.75” x 6.75” so will fit a 5” x 7” photo of your pet. You can center a photo on the back of the chipboard and tape it into place. Or if you like a layered effect you can tape it to the backer piece of the frame instead, like I did. To do this, line up your chipboard photo mat on the backer board and trace the inside edge of the photo frame on the backer board with a pencil. TIP: Just make sure the placement of your photo is aligned the right way according to the hangers on the back. Now center your photo over your traced lines and tape it onto the backer board. Layer your chipboard pieces. On the bottom will be the frame backer board with the attached photo, then two spacer pieces, and on top will be the final photo and collar chipboard piece, which is covered with the cardstock and has the collar already buckled on. Your layers will look like this. Now put it all inside your frame and close up the tabs. Add one of the “Pet Memorial” decals to the glass like you did in Step 4 above. This is what my “Pet Memorial” frame looks like when it’s all done and assembled! Here are a few others I made, too. Bhatoshine and Amatic Oh Juliya, Bhatoshine and Amatic Amatic and Cream Candy Black Mint, KH Karlie School, Girl Talk and Rockhead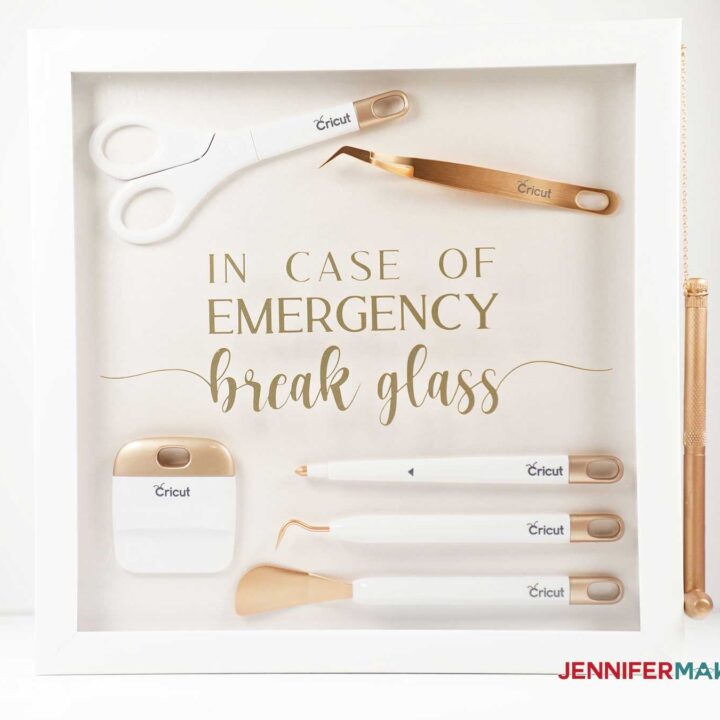
DIY Shadow Boxes
Materials
Tools
Instructions
TIP: You won't need any fonts to make these shadow boxes, but I listed all the fonts I used to design the SVG decals in the Notes section below.STEP 1: GET MY FREE SHADOW BOX SVG FILES


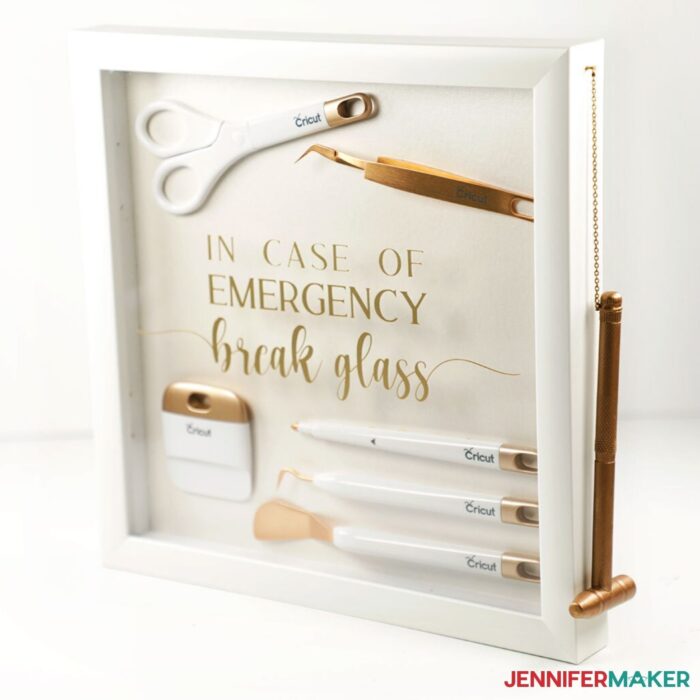
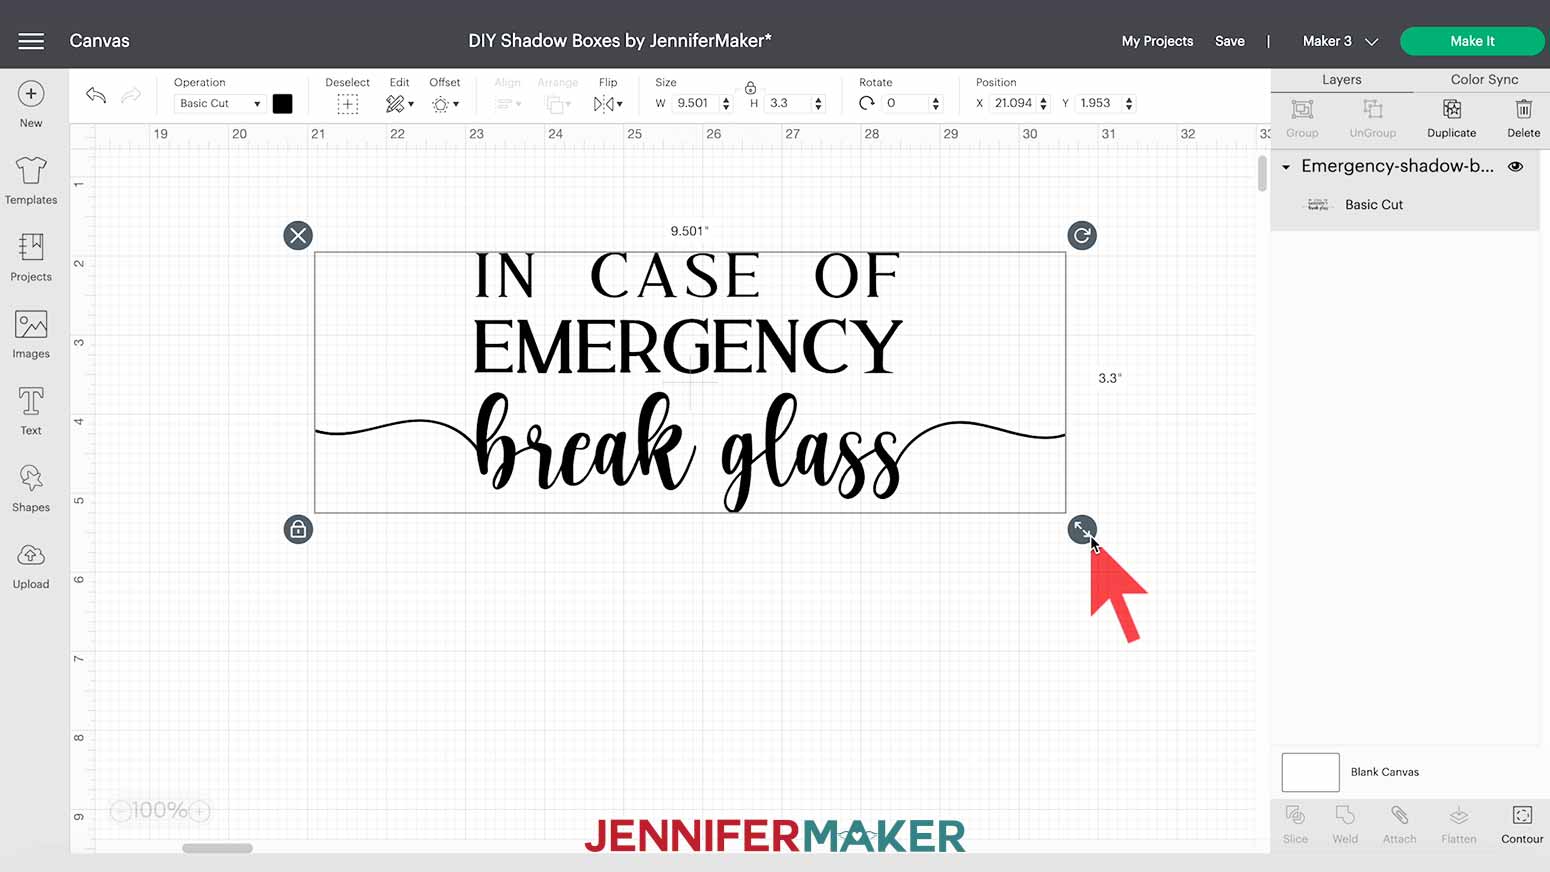
I am going to assemble the “In Case of Emergency Break Glass” frame to show you how to prepare, cut and apply the decal to a shadow box.“In Case of Emergency Break Glass” SHADOW BOX
STEP 2: Prepare decal in Design Space
Select your machine on the top menu bar and then click “Make It.” Unless you’re using Smart Vinyl on a Cricut Maker 3, Explore 3 or Joy, select “On Mat” and click “Done.”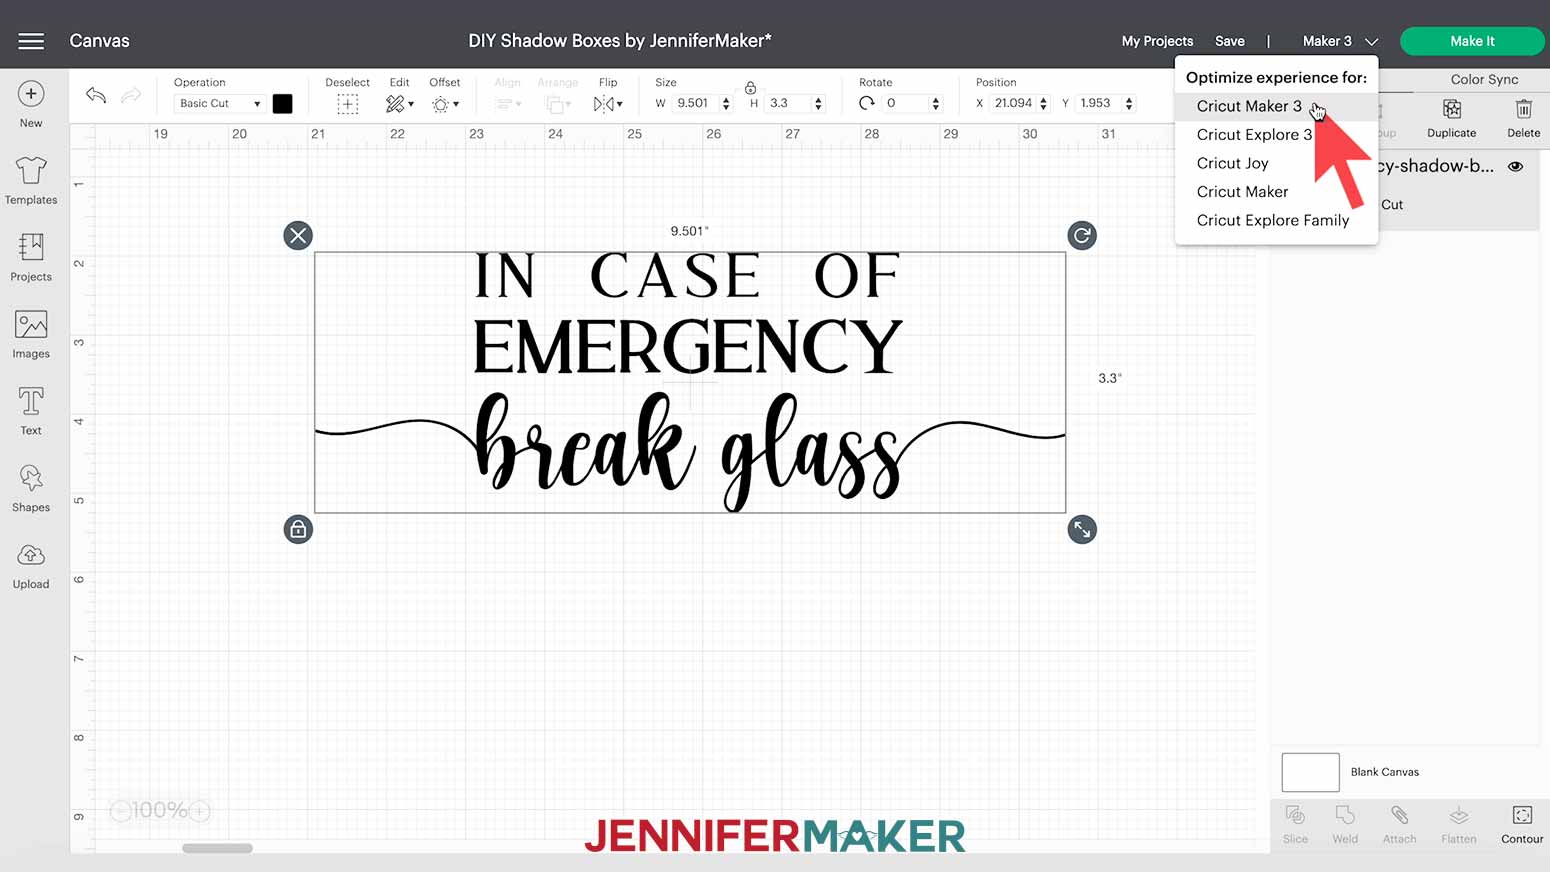
STEP 3: PREPARE THE FRAME

STEP 4: APPLY THE DECAL

STEP 5: ADD HAMMER


“Pet Memorial” Shadow Box
STEP 6: Preparing the photo mats
STEP 7: ASSEMBLE THE “Pet Memorial” FRAME

Notes
Fonts Used
In Case of Emergency Break Glass:
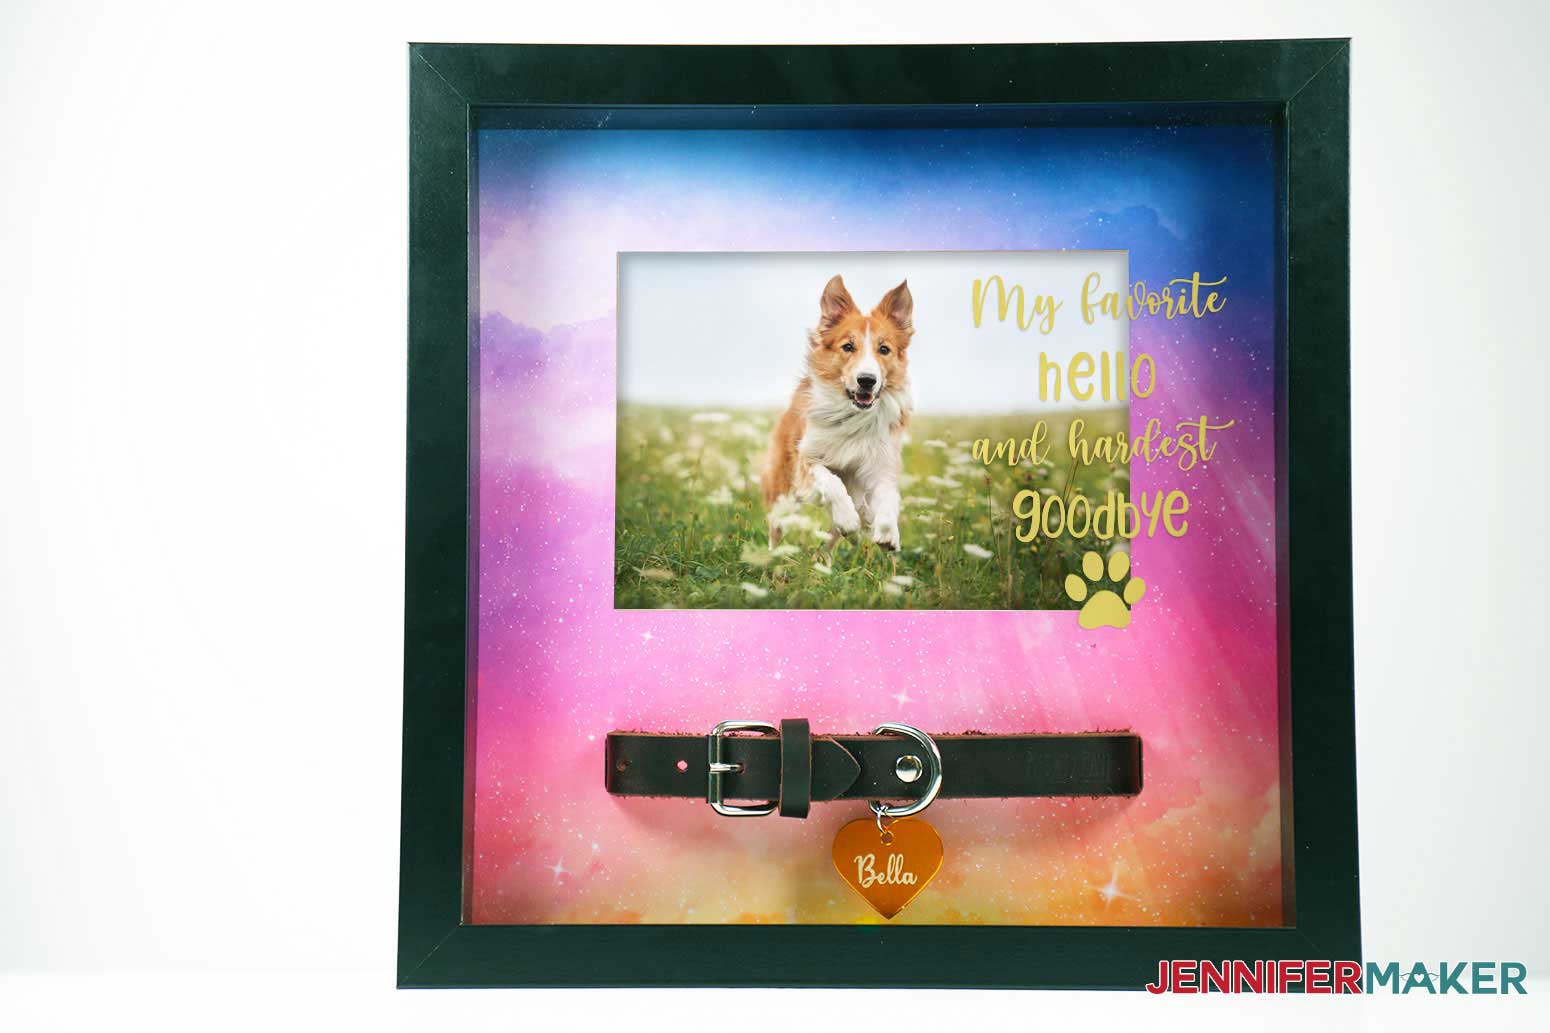
My Favorite Hello and Hardest Goodbye:
Angels Have Paws:
Travel Fund:
The Journey Starts Here:
Save. Travel. Repeat.:
Adventure Fund:
Baby Fund:
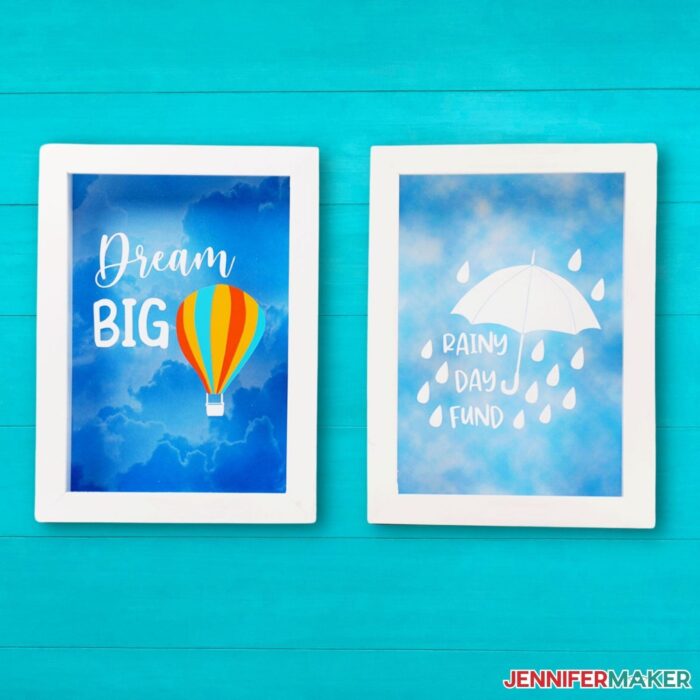
Rainy Day Fund:
Dream Big:
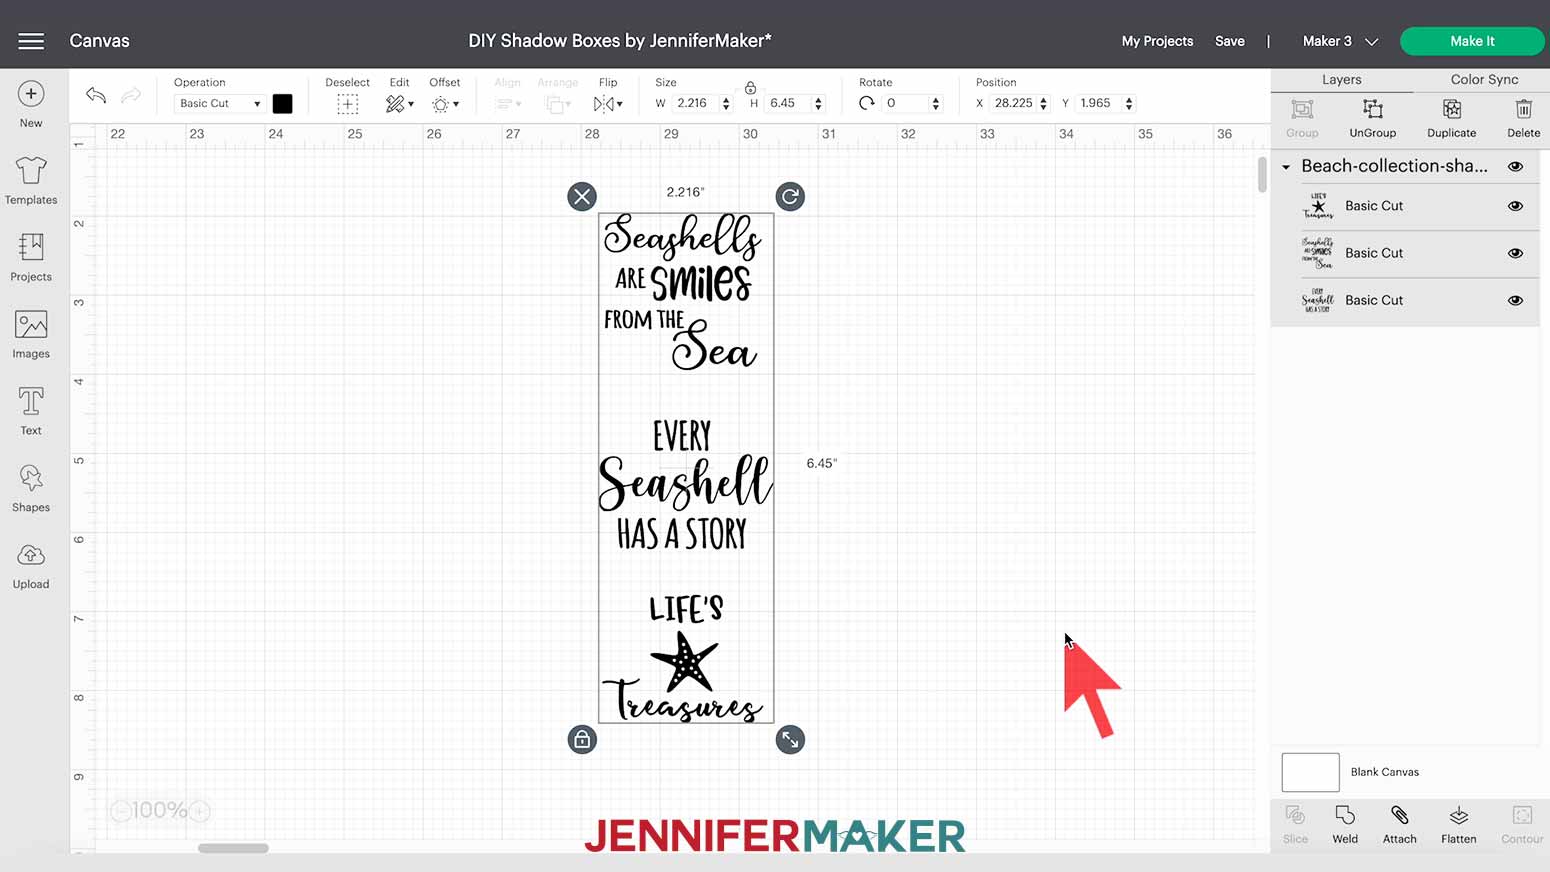
Seashells are Smiles from the Sea:
Every Seashell has a Story:
Life’s Treasures:
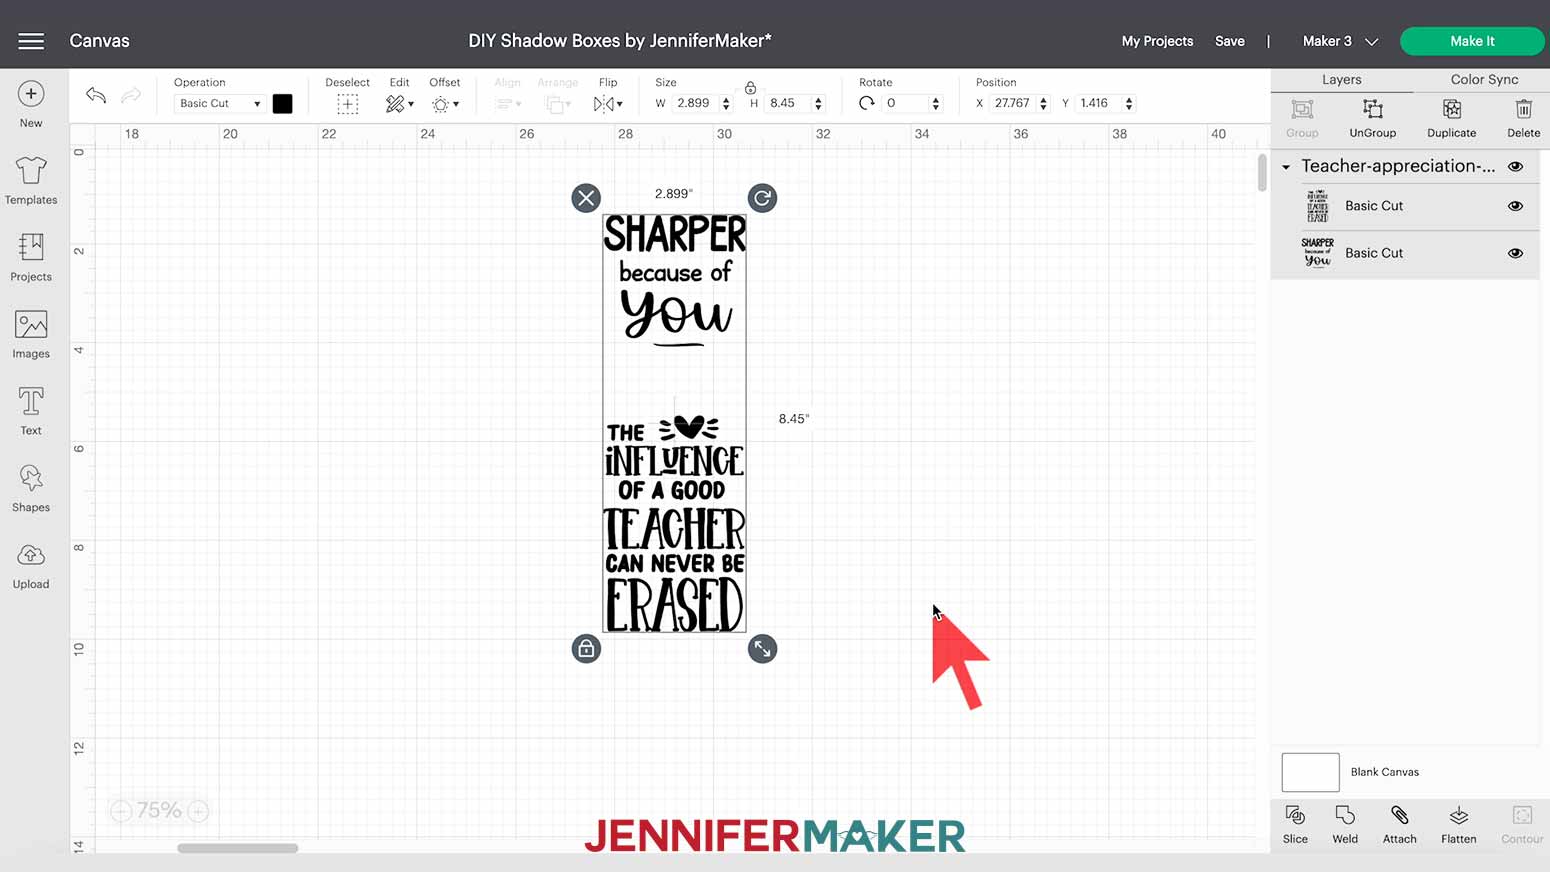
Sharper Because of You:
The Influence of a Good Teacher Can Never Be Erased:
The detailed step-by-step assembly video on how to create personalized round wood door hangers is part of Maker Academy Weekend. Get a pass to watch all 20+ workshops, each with a printable handbook, transcript, audio files, design files, and support with a VIP pass below:

Creating a shadow box like this is also a great way to display a loved one. I decided I wanted to make two shadow boxes specifically for two very special pets I had. I will never forget them and these shadow boxes are a constant reminder that they will always remain in my heart. Adding the collars inside made it even more special and it’s something I will always want to keep on display.
Create a rainy day fund or a vacation fund so and before you know it, you’ll be ready to pack your bags and head off to that well deserved vacay! You can also create these for children and have them put in their savings so that they too can learn how fun it is to save for something you really want!
Answers to Your Questions About How to Make DIY Shadow Boxes for Collections
Q: Where is your tutorial for this project?
This is a special project we made for our free Maker Academy Weekend 2021 event! A complete and detailed step-by-step video premiered during the event November 4-7, 2021 — specifically, this tutorial video was available to watch for free for 24 hours beginning November 5 at 12:00 pm ET! Get the workshop video replay and a 15-page printable handbook that details how to make this beautiful project with a VIP Pass to Maker Academy Weekend 2021, which comes with other perks and bonuses, too!
Get the free designs for my Collection Shadow Boxes!
I love seeing what you make with my designs and how you use them! Please share a photo of your shadow boxes in our Facebook group or tag me on social media with #jennifermaker.
Love,

Want to remember this? Save this DIY Shadow Boxes for Collections Tutorial to your favorite Pinterest Board!