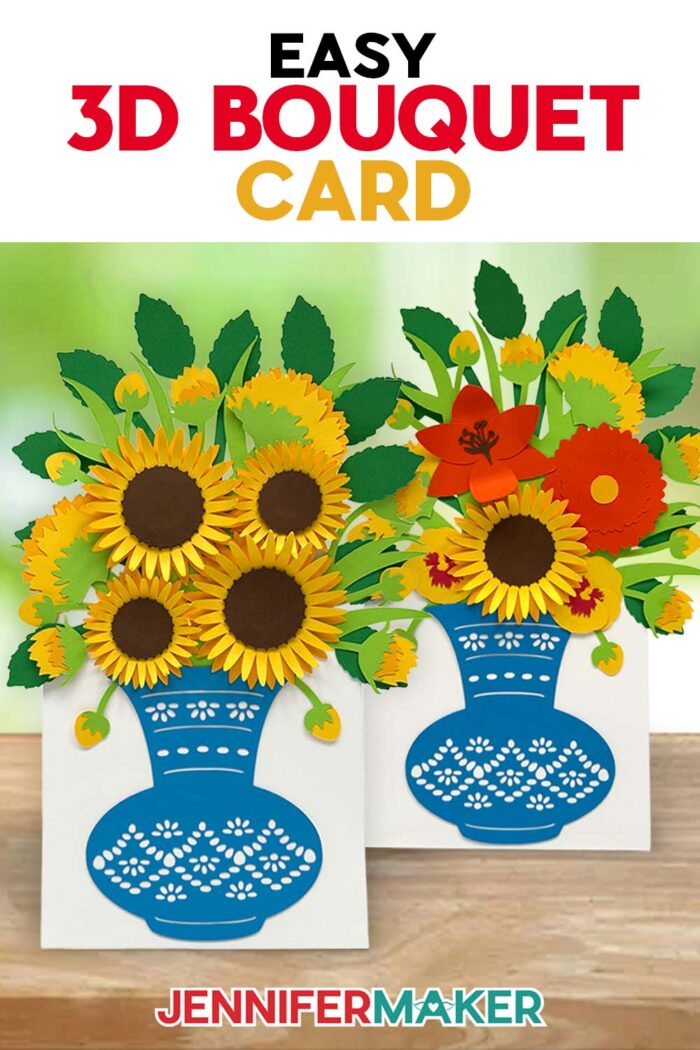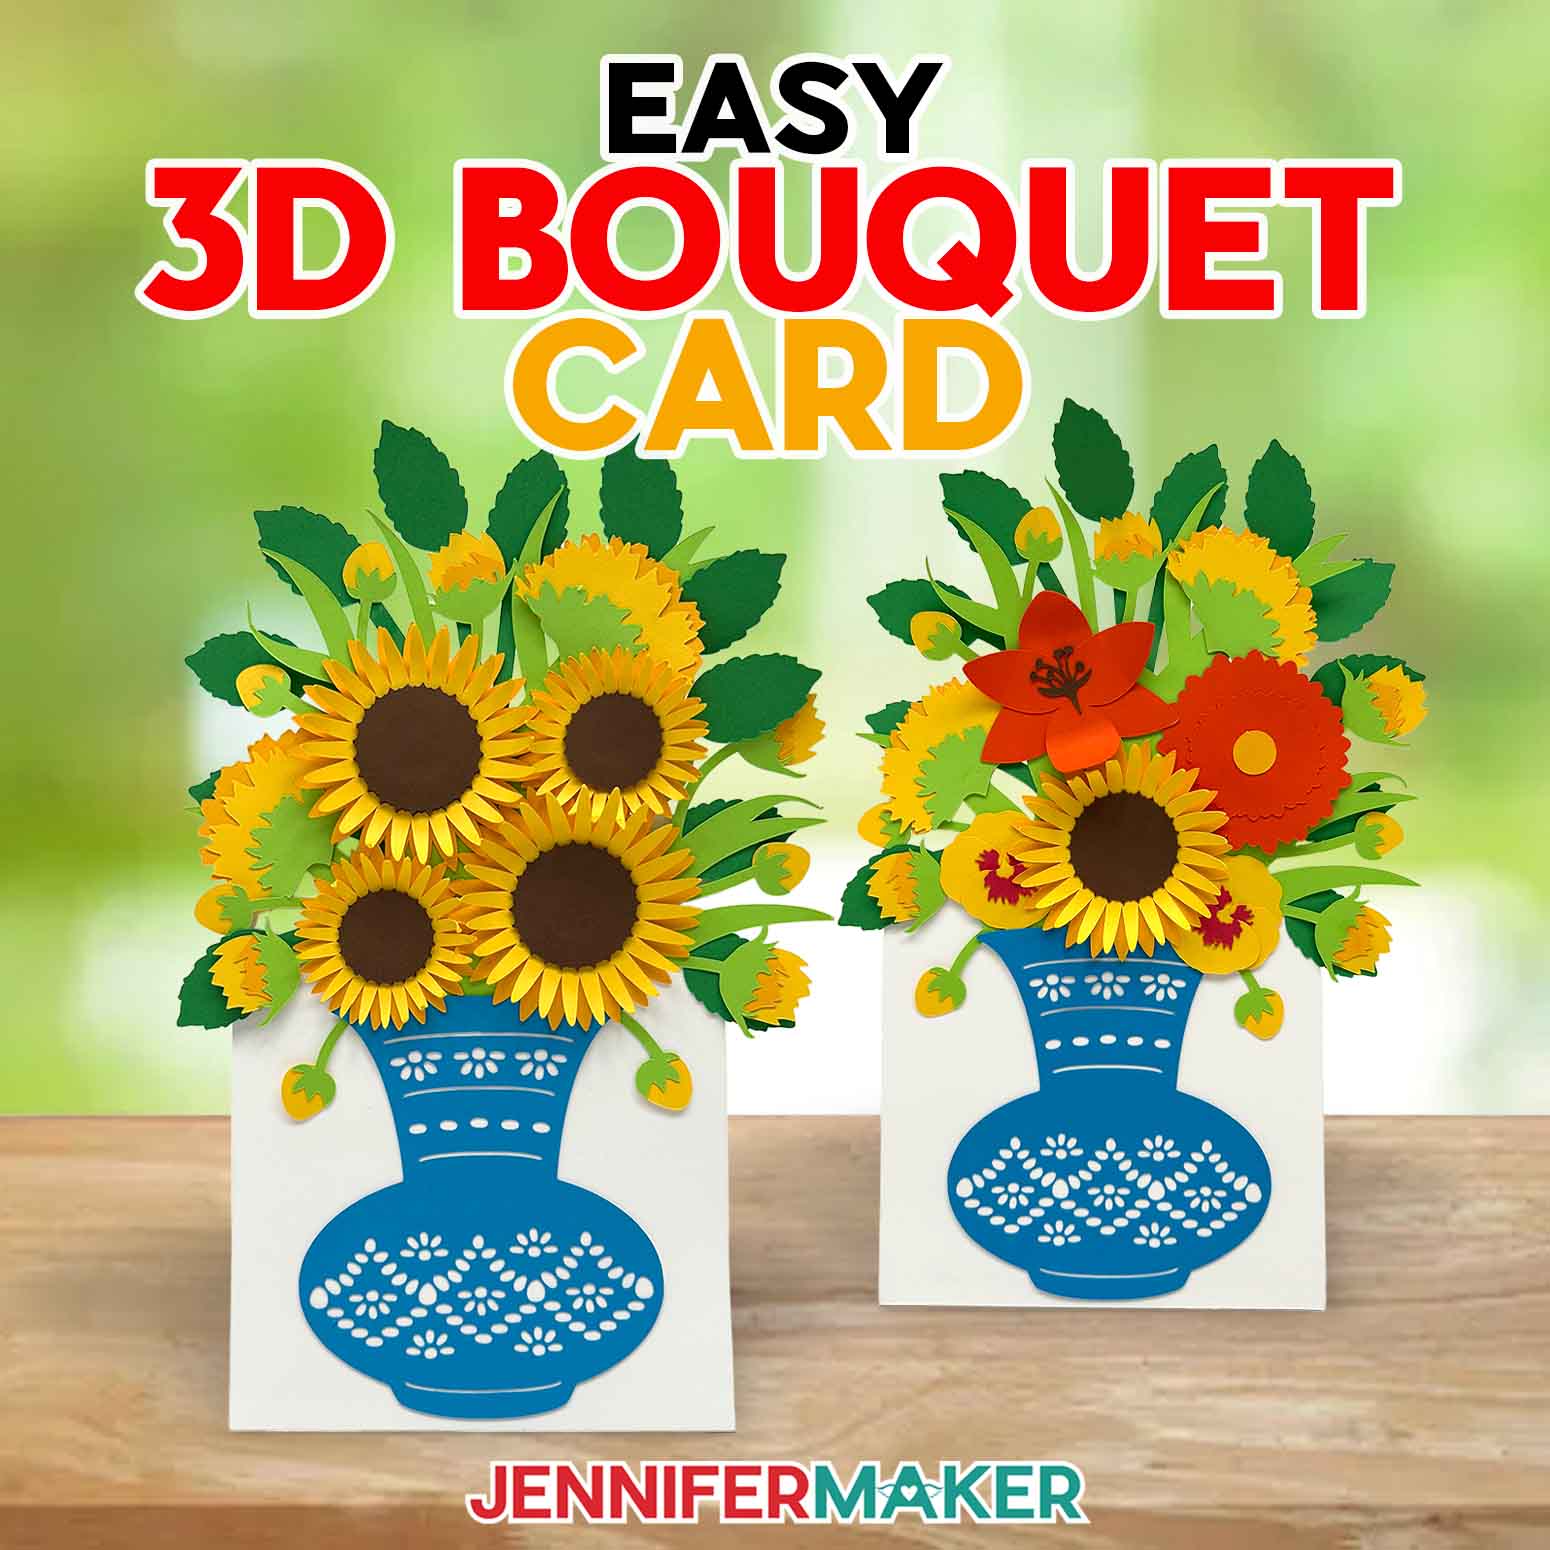
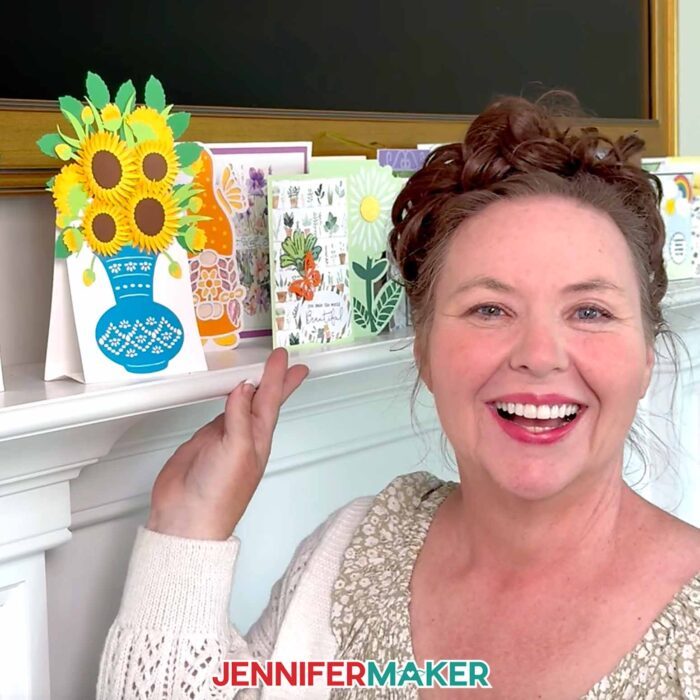
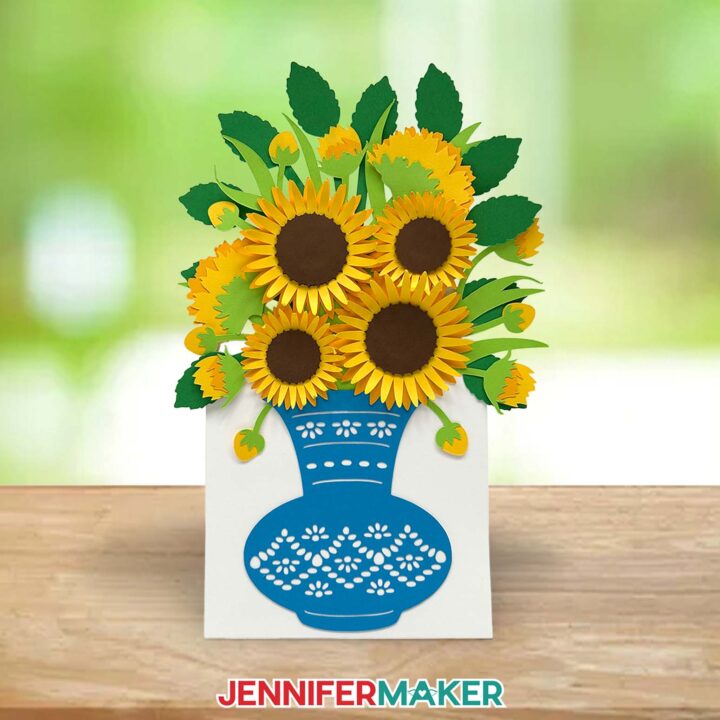
Learn how to make your own easy 3D bouquet card that stands up on display!
If you’ve ever wanted to give someone flowers but worried they’d wilt before you could, there’s a better way to deliver the bloom without the gloom! This easy 3D bouquet card lets you send a flower bouquet through the mail that springs to life the moment it’s opened. With its cheerful sunflowers, dimensional layers, and built-in stand, it’s the perfect solution when you want something more personal than a store-bought card. And the best thing? Handmade cards like these last way longer than real flowers!
Watch the full step-by-step tutorial on how to make an easy 3D bouquet card:

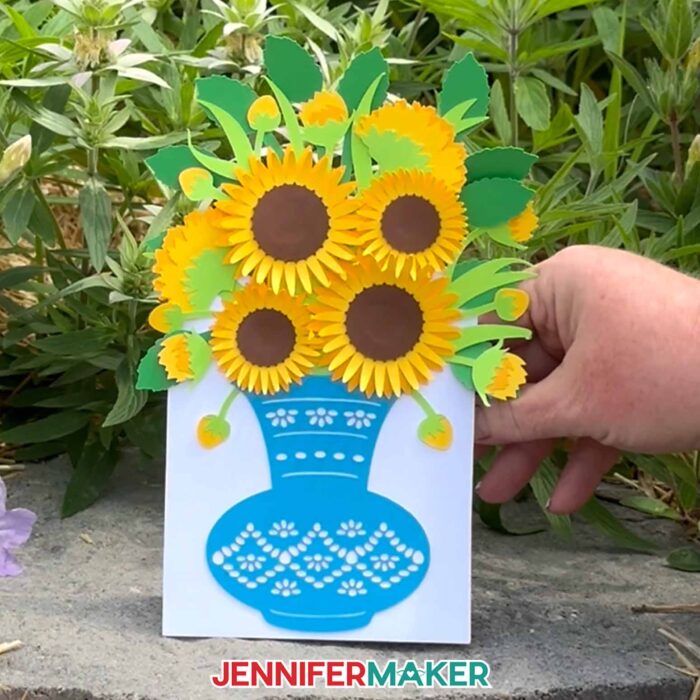
Imagine opening a flat envelope and revealing a full sunflower bouquet bursting from inside! This design’s layered flower shapes are easy to curl and assemble, and I even include a built-in vase and stand so your finished card doesn’t just look good, it also stays standing. And because it folds flat, it fits into a regular A10 envelope, making it a mail-friendly card.
My easy 3D bouquet card may look complex, but it’s so simple to make! It combines the charm of flower crafts with the pop-up magic of a dimensional greeting card design, and you can make it with your Cricut or even cut it by hand. It uses simple materials you probably already have, like cardstock in a variety of colors, plus a bit of craft glue. I’ll show you how to make your own with a Cricut cutting machine and my free SVG file!
My free download comes with a score version of the card design (for placing creases) if you’re using a Scoring Stylus or Single Scoring Wheel, and a no-score version with dashed lines if you’d rather use your Cricut’s standard Fine-Point blade for everything. Either way, it’s easy to make an absolutely delightful card that stands tall with gorgeous paper blooms!
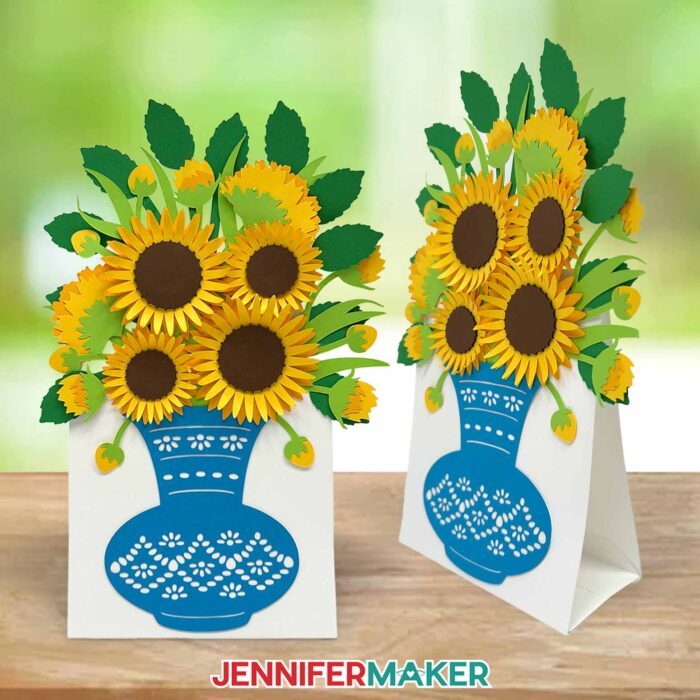
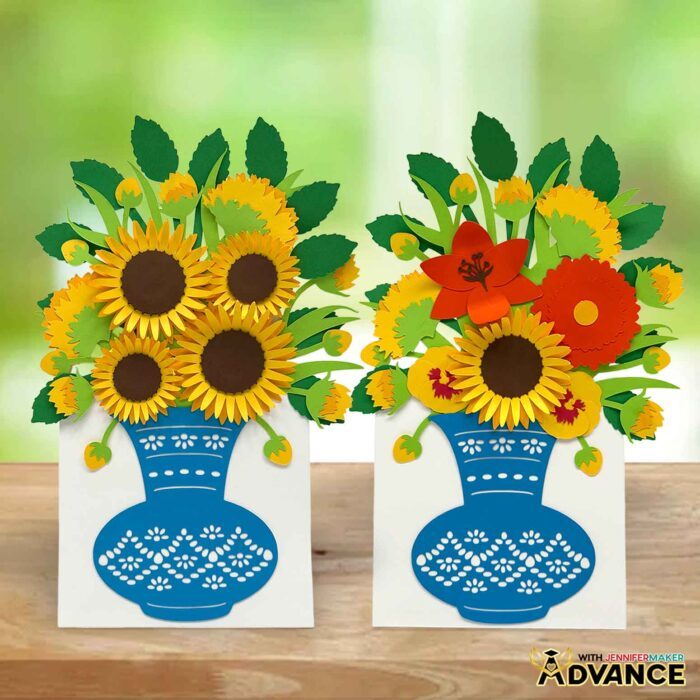
Whether you need a Valentine’s Day card, a pretty Mother’s Day craft, or just something cheerful to brighten a friend’s day, this easy craft delivers. You can keep the classic yellow sunflower look, or get creative and try a romantic red-and-pink palette, a mix of spring pastels, or even bold tropical colors. The base flower shapes work for so many styles, making this one of those cards you’ll want to recreate again and again.

Assembling the bouquet is as satisfying as it is easy. I’ll show you how to use a bone folder or your fingers to curl the sunflower petals to give them a realistic lift coming off of the card. When it comes to assembling the layers, I’ll show you how to place the glue to keep layers fluffy, not flattened. The built-in card stand adds just the right touch of stability so your flower bouquet can be displayed proudly! If you’re mailing the card, consider leaving the petals flat and encouraging the recipient to curl them on delivery.

Whether it’s your first flower project or you’re a seasoned Cricut crafter, you’ll find this tutorial fun and easy. The free SVGs in my library take the guesswork out of designing, and I walk you through every detail in the step-by-step video. If you want to personalize your 3D flower cards even further, members of my Advance community can also access a workshop on designing your own floral arrangements using the same bouquet base! Click here to learn more about the Advance program!

My easy 3D bouquet card project is a great option for families to make together. Younger kids can help curl the petals or place the paper flowers with supervision, while older kids can tackle the cutting and layering. It’s a great way to get the whole family involved in creating handmade greetings that actually mean something.

So if you’re ready to surprise someone with a card that folds flat but pops with joy, grab your favorite craft paper and watch the video tutorial. You’ll love seeing your bouquet come together one petal at a time!
So, want to learn how to make an easy 3D bouquet card? Let me show you how fun and easy it is! This post contains some affiliate links for your convenience (which means if you make a purchase after clicking a link I will earn a small commission but it won’t cost you a penny more)! Read my full disclosure policy.
Materials to Make an Easy 3D Bouquet Card
View my Amazon shopping list with the exact items I used.
- Seven (7) Sheets of 12″ x 12″ 65 lb. Solid Core Cardstock (alternative)(I used one sheet each of dark brown, light orange, bright yellow, teal, white, medium green, and light green)
- A way to cut your cardstock – I’m using the Cricut Maker 4, but you can use any Maker series machine, any Cricut Explore series machine, the Cricut Venture, or the Cricut Joy Xtra
- Green StandardGrip Machine Mat 12″ x 12″
- Brayer
- Spatula
- Scraper
- Weeding Tool (for popping out small cutouts from intricate areas)
- Craft Glue (I used Bearly Art Precision Craft Glue)
- Scoring Stylus (optional for files with score lines) -OR-
- Single Scoring Wheel (optional for files with score lines)
- Bone Folder (optional for curling the petals)
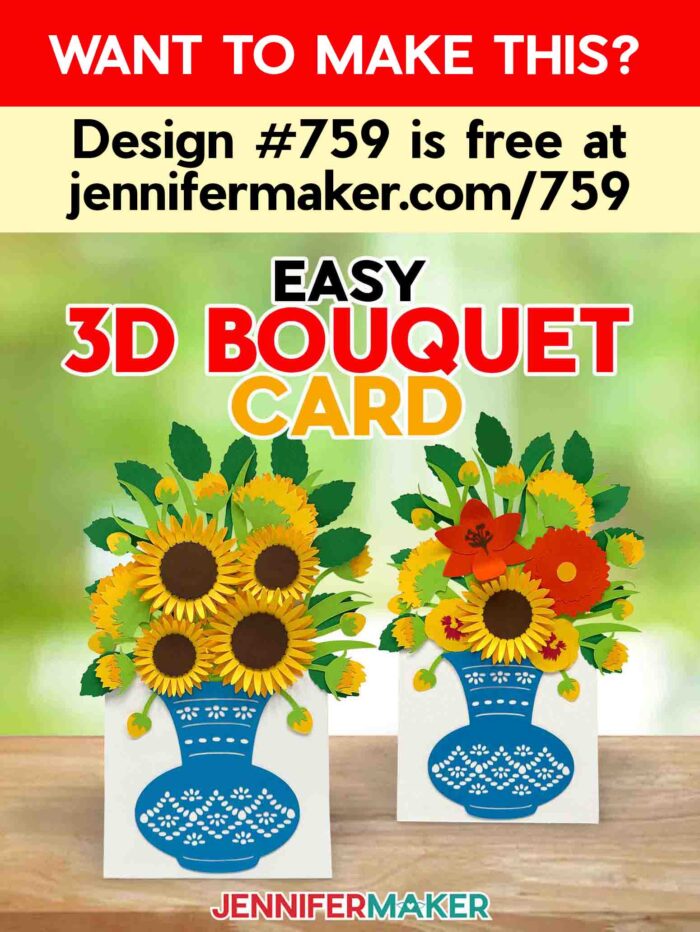
- Design #759 (My free SVG/DXF/PDF design files are available in my free library – get the password by filling out the form at the bottom of this page)
How to Make an Easy 3D Bouquet Card
Easy 3D Bouquet Card
Learn to create an easy 3D bouquet card with just some cardstock and adhesive!
Materials
- Seven (7) Sheets of 12" x 12" 65 lb. Solid Core Cardstock (I used one sheet of dark brown, one sheet of light orange, one sheet of bright yellow, one sheet of teal, one sheet of white, one sheet of medium green, and one sheet of light green)
- Design #759 (My free SVG/PDF/DXF design files are available in my free resource library - get the password by filling out the form at the bottom of this page)
Tools
- A way to cut your cardstock - I’m using the Cricut Maker 4, but you can use any Maker series machine, a Cricut Explore Series machine, the Cricut Venture, or the Cricut Joy Xtra
- Cricut Green StandardGrip Machine Mat 12" x 12"
- Brayer
- Spatula
- Scraper
- Weeding Tool (for popping out small cutouts from intricate areas)
- Tweezers (optional)
- Craft Glue (I used Bearly Art Precision Glue)
- Scoring Stylus (optional for files with score lines) -OR-
- Single Scoring Wheel (optional for files with score lines)
- Bone Folder (optional for curling the petals)
Instructions
STEP 1: GET MY FREE EASY 3D BOUQUET CARD DESIGNS
First, download my easy 3D bouquet card files from my free library – look for Design #759. Alternatively, you can use the Save This Project form near the top of this post and the design link will be emailed to you.
In the SVG folder, you’ll find “score” and “no-score” versions of my sunflower bouquet design. The “score” version requires a Scoring Stylus or Single Scoring Wheel to create smooth lines for folding and alignment. If you don’t have a scoring tool, or if you prefer dashed cut lines, you can use the “no-score” version instead.
There is also a DXF folder with cut files, and a PDF folder with versions you can print and cut by hand. You’ll find a handy reference sheet with all of this project’s pieces labeled for easy identification in the PDF folder, too.
TIP: If you’re not sure how to upload, go to jennifermaker.com/svgs to learn how to unzip and upload SVG files.
STEP 2: PREPARE AND CUT YOUR 3D BOUQUET CARD DESIGN
CRICUT DESIGN SPACE
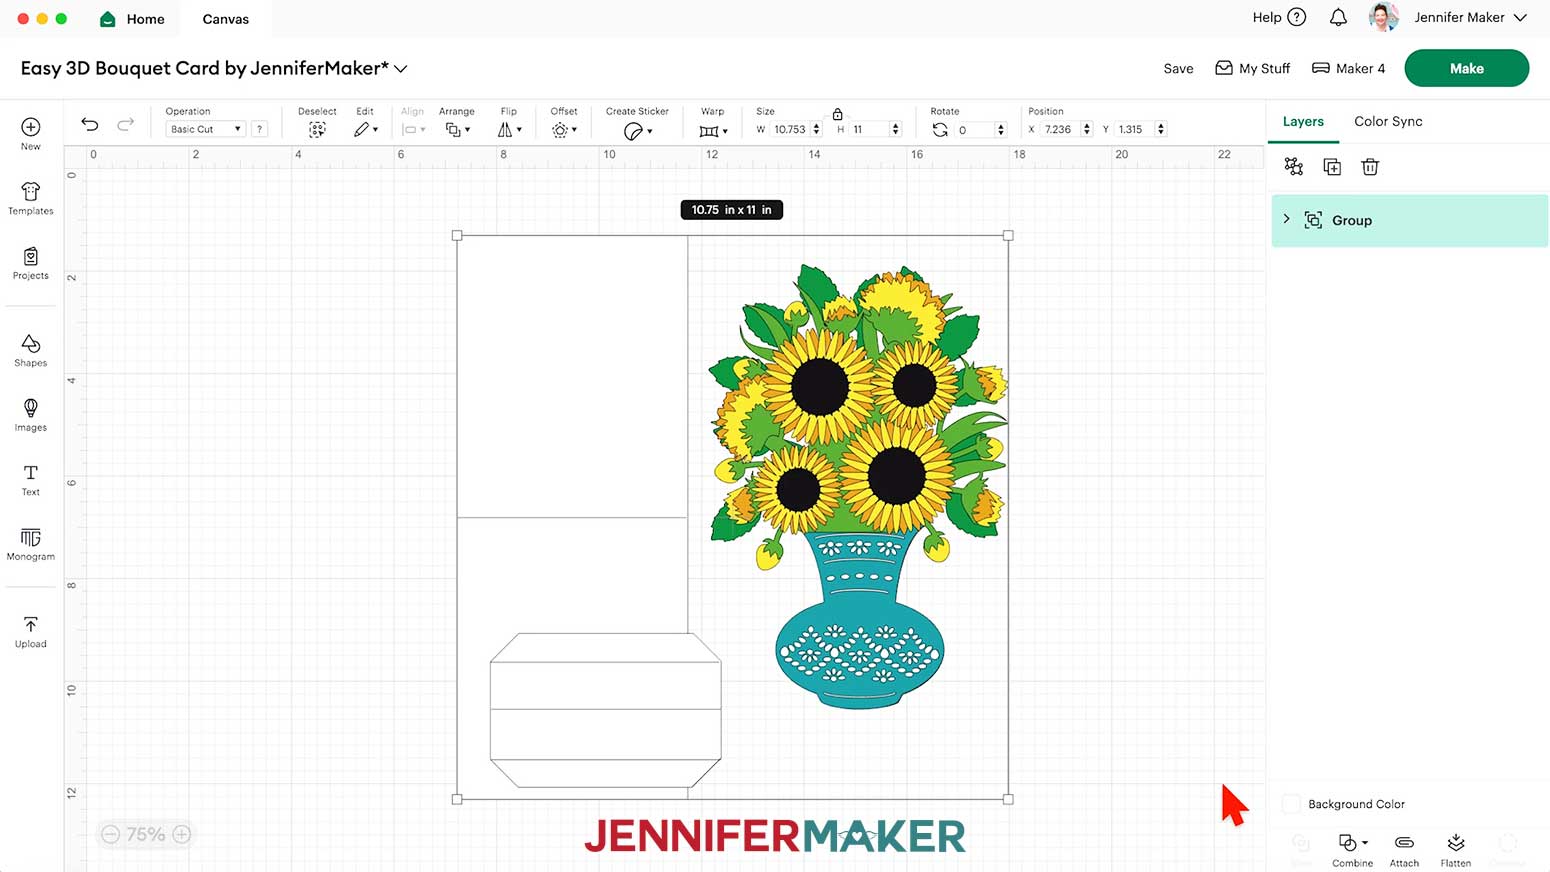
- In Cricut Design Space, open a blank Canvas.
NOTE: If you’re new to using Cricut Design Space, go to cricutkickoff.com for my introductory tutorial on Design Space basics. - Click “Upload” and then “Upload Image.”
- Click “Browse” and select the SVG file you want to use.
NOTE: I’ll use the “score” file to demonstrate how to set and attach score lines. - Click “Open,” and then “Continue.”
- Click “Upload” to add the design to your Canvas, then use the small arrow to close the side panel.
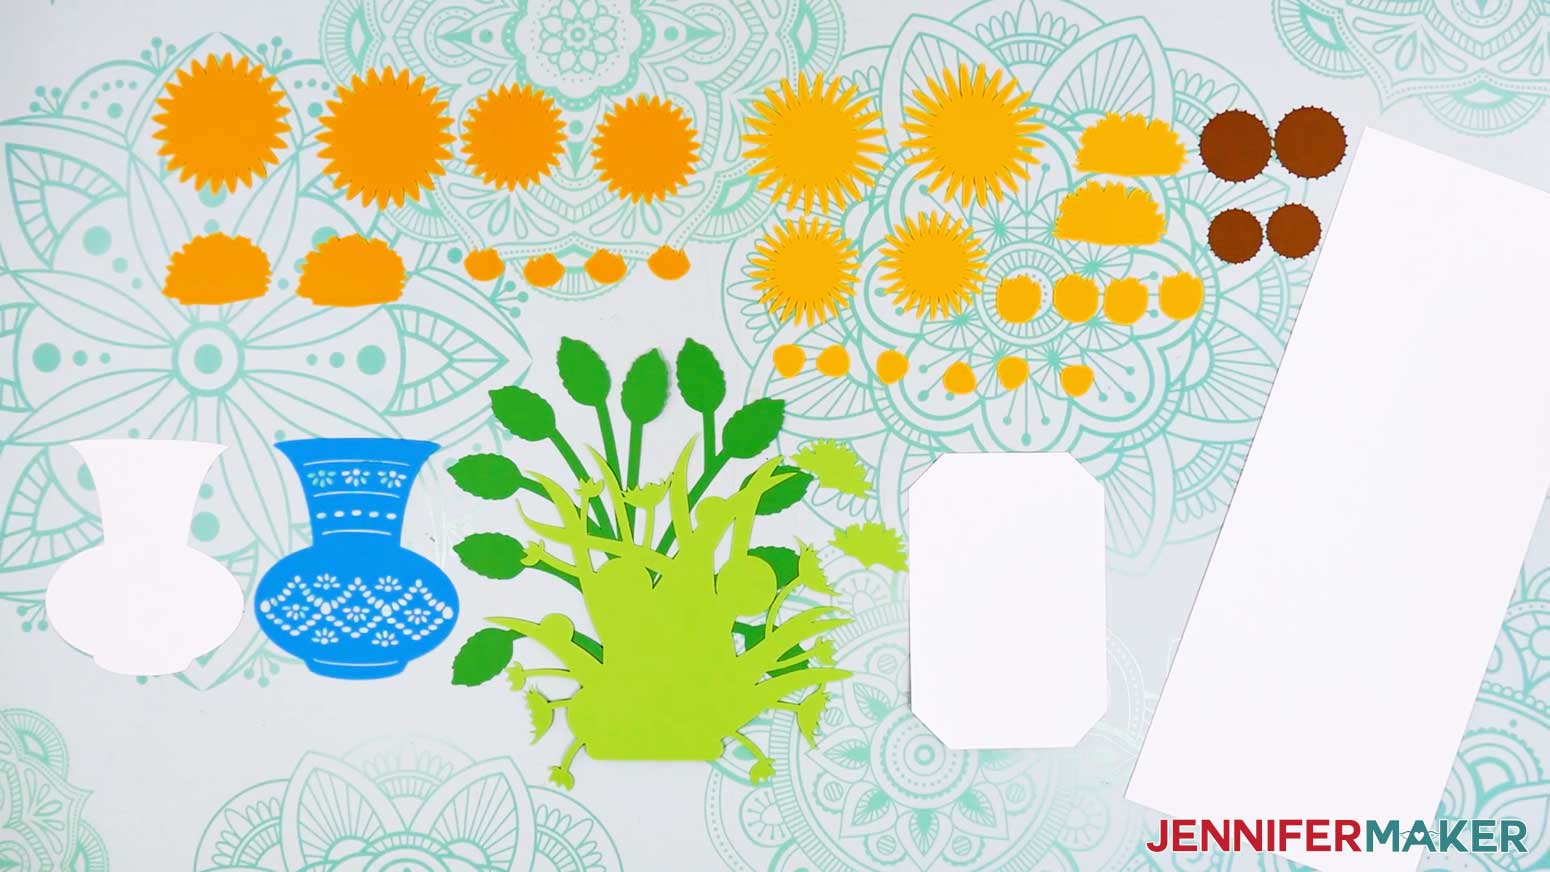
- On your Canvas, you’ll have:
- Two large sunflowers: an orange back petal piece, a yellow front petal piece, and a dark brown center piece
- Two small sunflowers: an orange back petal piece, a yellow front petal piece, and a dark brown center piece
- Two sideways sunflowers: an orange bottom piece, a yellow middle piece, and a light green top sepal piece
- Four partially opened sunflowers: a yellow back piece and an orange front piece
- Six yellow buds
- A light green front foliage layer and a medium green back foliage layer
- A teal top vase piece and a white bottom vase piece
- A white card base and a white card inside stand
- Click “Save” and give your project a name.
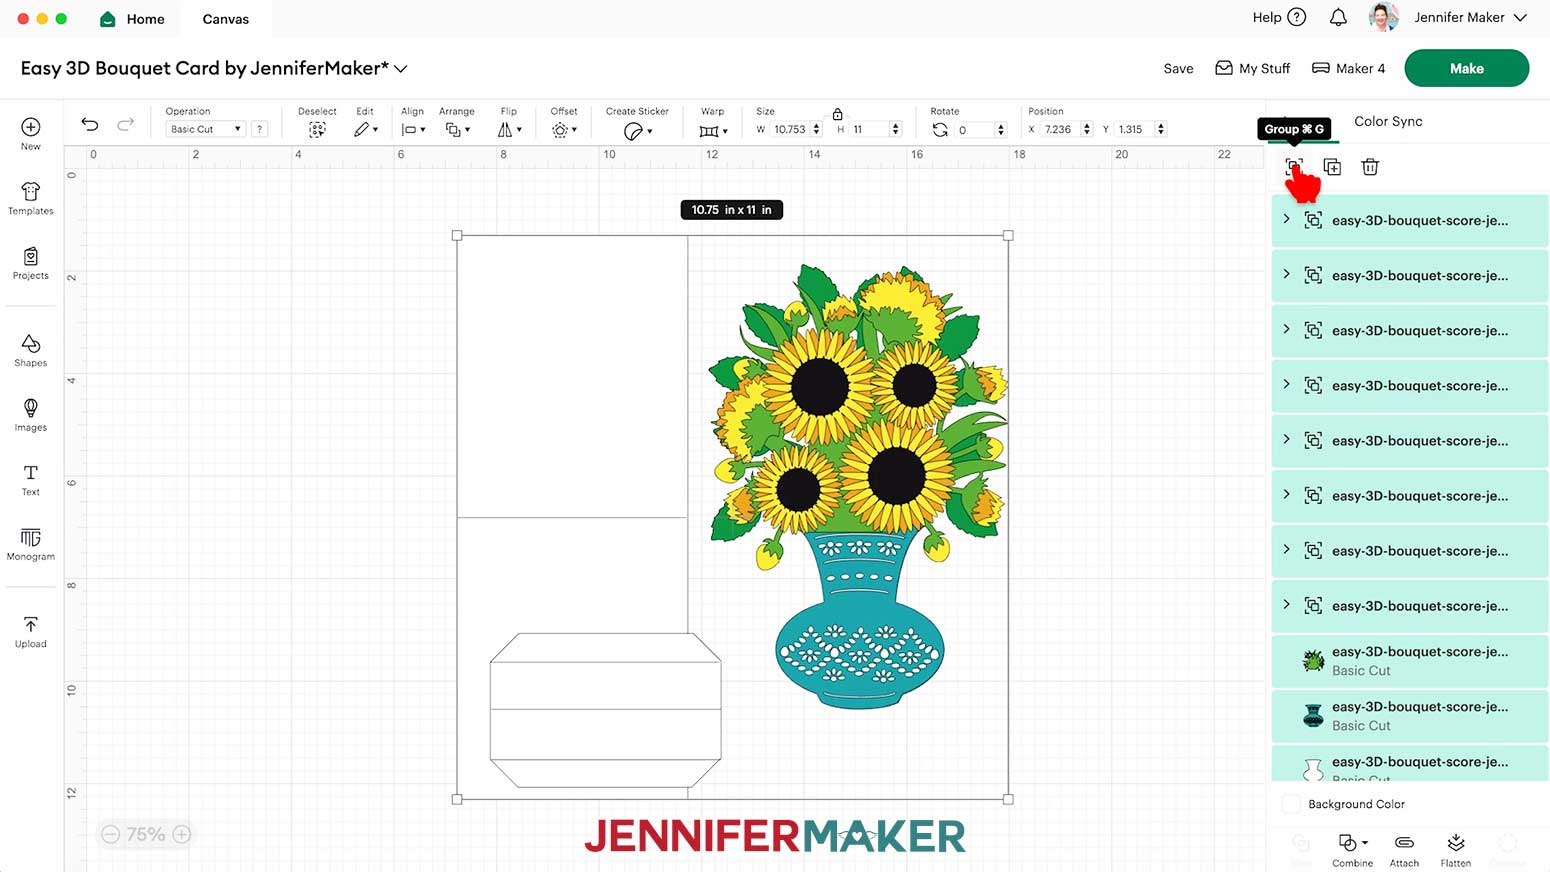
- “Ungroup” the design.
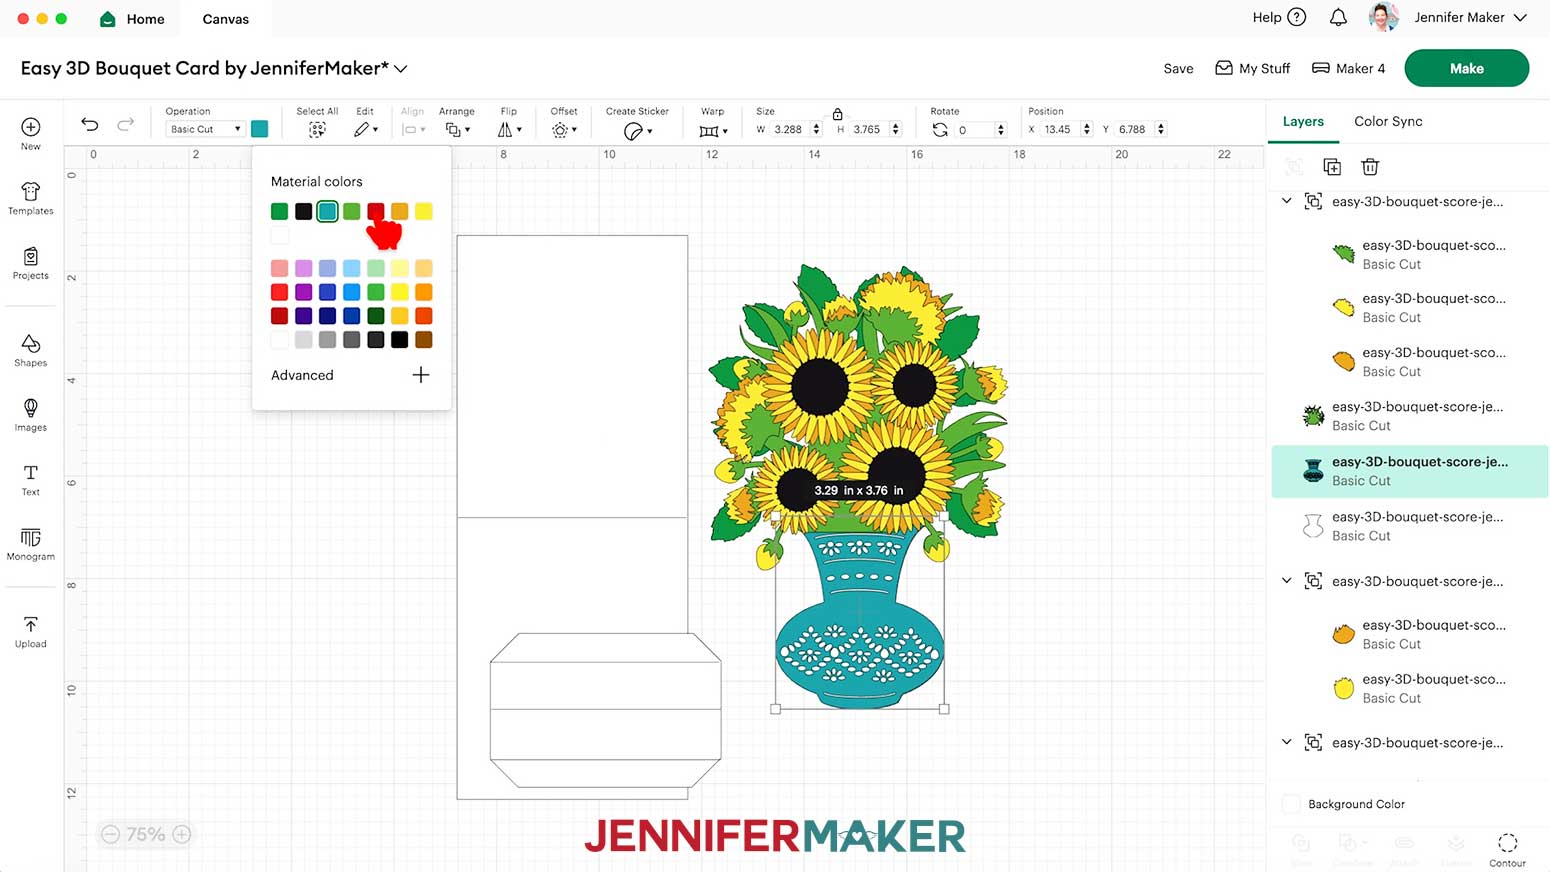
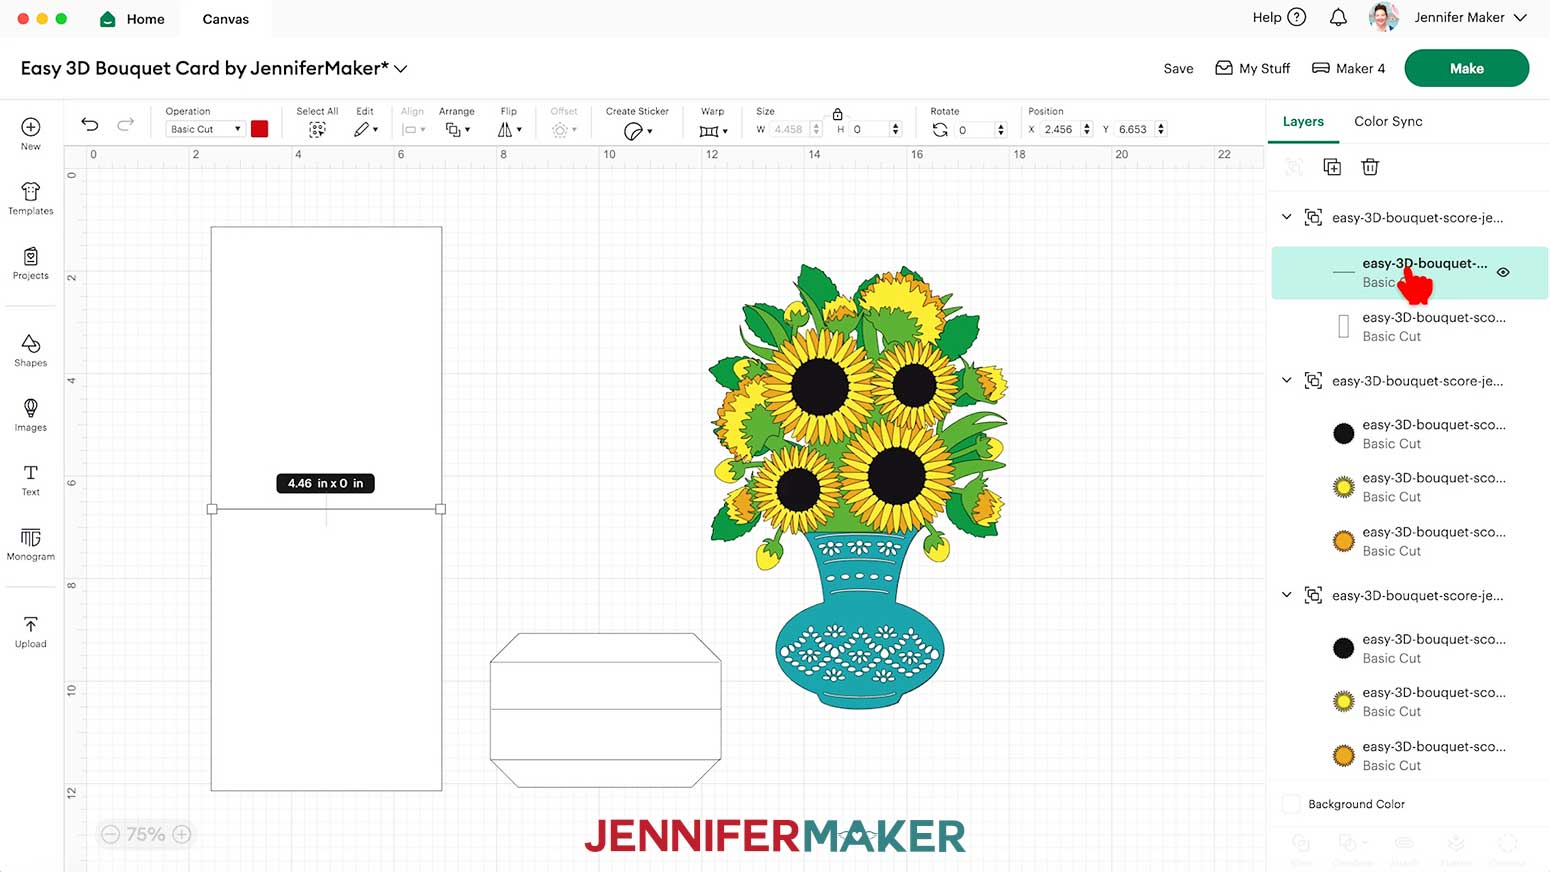
NOTE: Each of your layered flowers will still be grouped in the Layers Panel. - To change the color of a piece to match the cardstock you’ll cut it from, select it in the Layers Panel, click the Color Box next to “Operation,” and choose a new option.
NOTE: If the piece is in a grouped layer, click the small arrow to expand the group, and then select the single piece you want to change. - Next, select the card base on your Canvas to highlight its group in the Layers Panel.
NOTE: If you’re making the “no-score” version of the bouquet card, your card is ready to cut and you can skip to the “CUTTING” section. - In the Layers Panel, click the small arrow to show both of the layers in the highlighted group.
- Select the top layer (the solid lines) and change its “Operation” to “Score” so the Cricut knows to make the crease lines where your card will be folded.
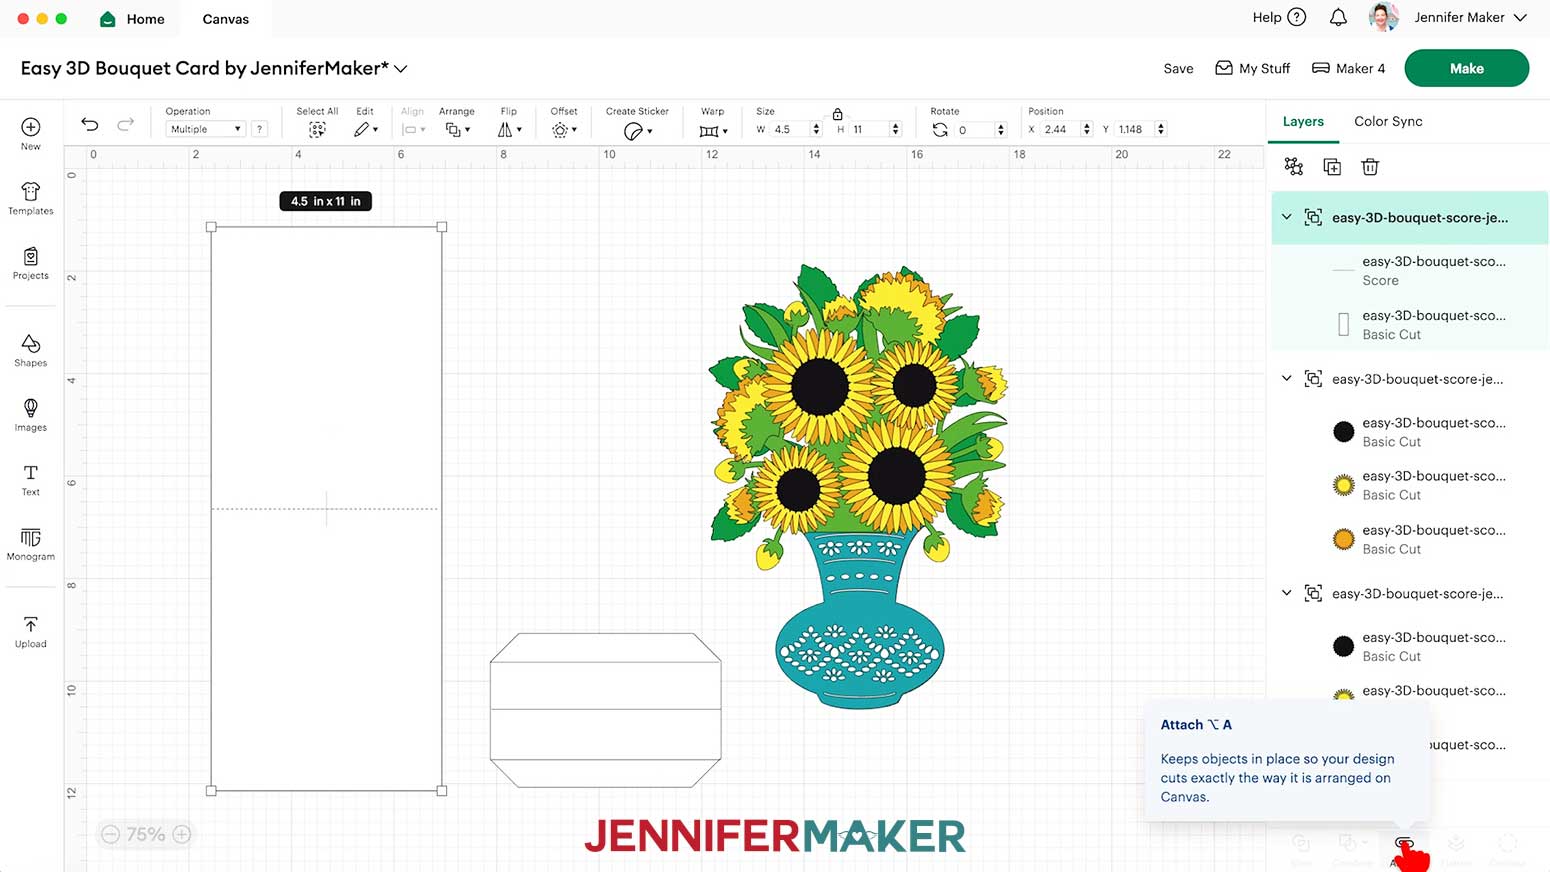
NOTE: The score lines for this project are all red, which is reflected in the Color Box when selecting a line layer. - Click the layer with the arrow to select both layers in this group, then click “Attach” to keep your crease lines with your cut shape.
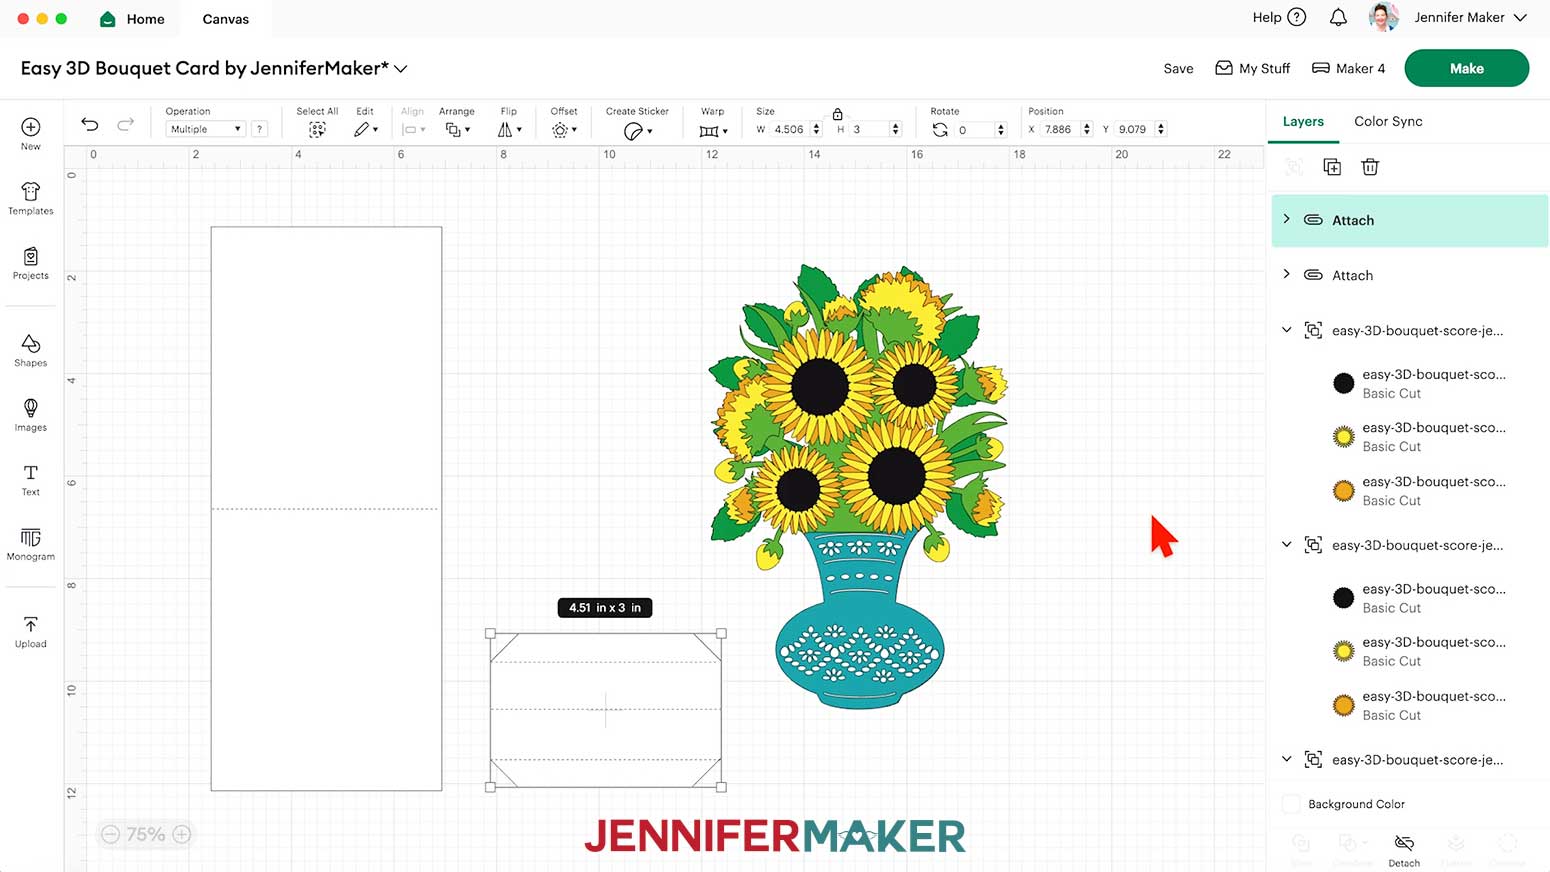
NOTE: The newly Attached group will jump to the top of the Layers Panel. - Repeat Steps 10-13 to convert and Attach the card stand’s score lines.
- Your card is ready to cut!
CUTTING
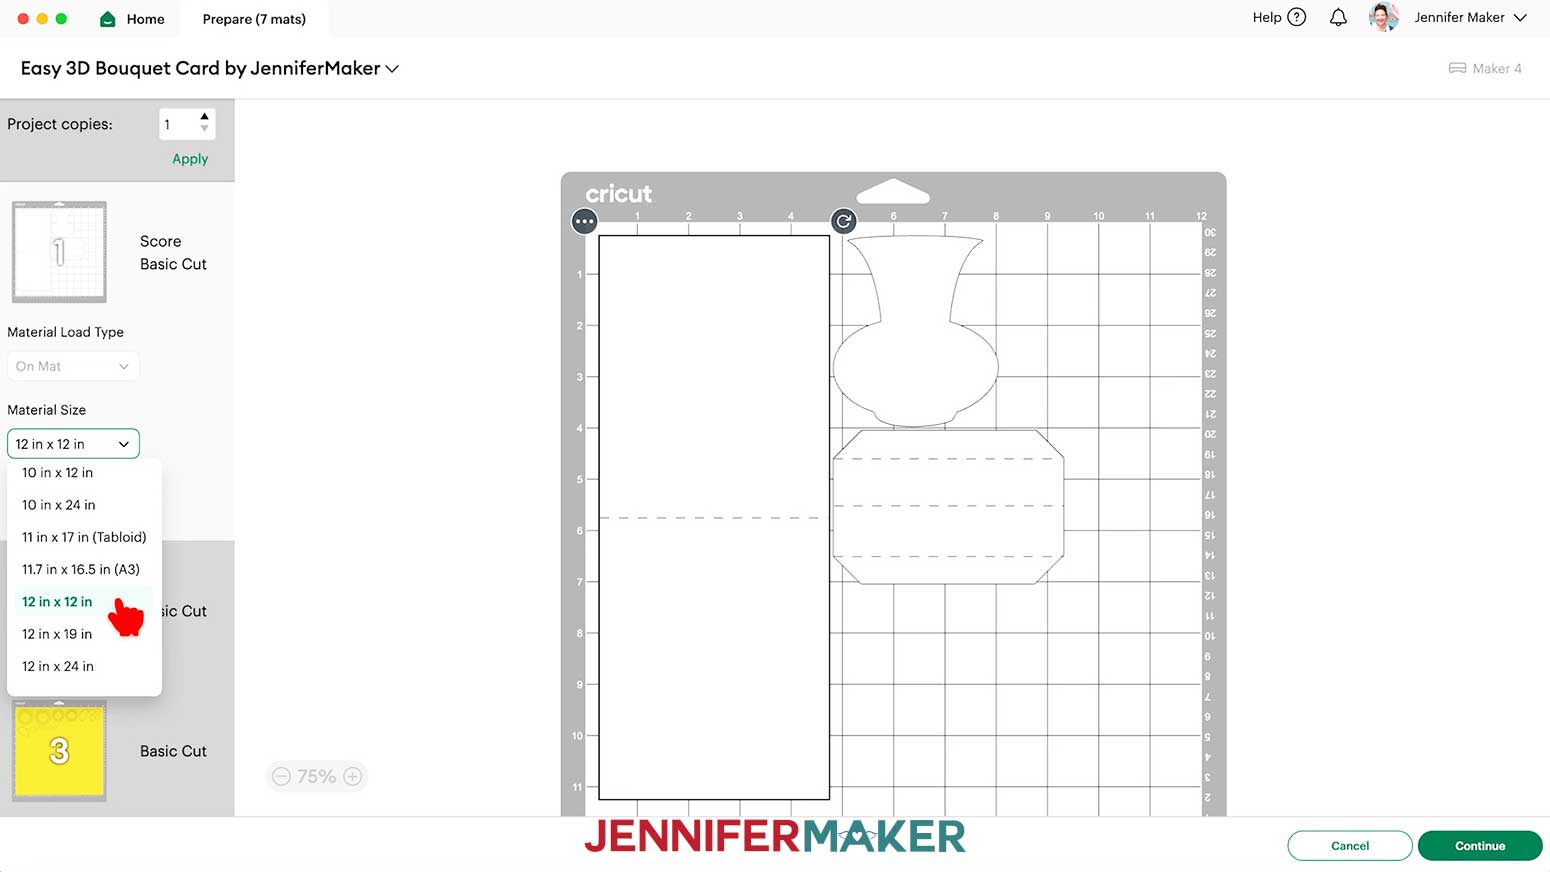
- Make sure the correct machine is selected in the top right.
- Click “Make.”
- On the Prepare screen, make sure the correct Material Size is selected for your mats. I’ll choose 12” x 12” for all of mine.
- Once you are satisfied with your mat layouts, select the first mat again and click “Continue.”
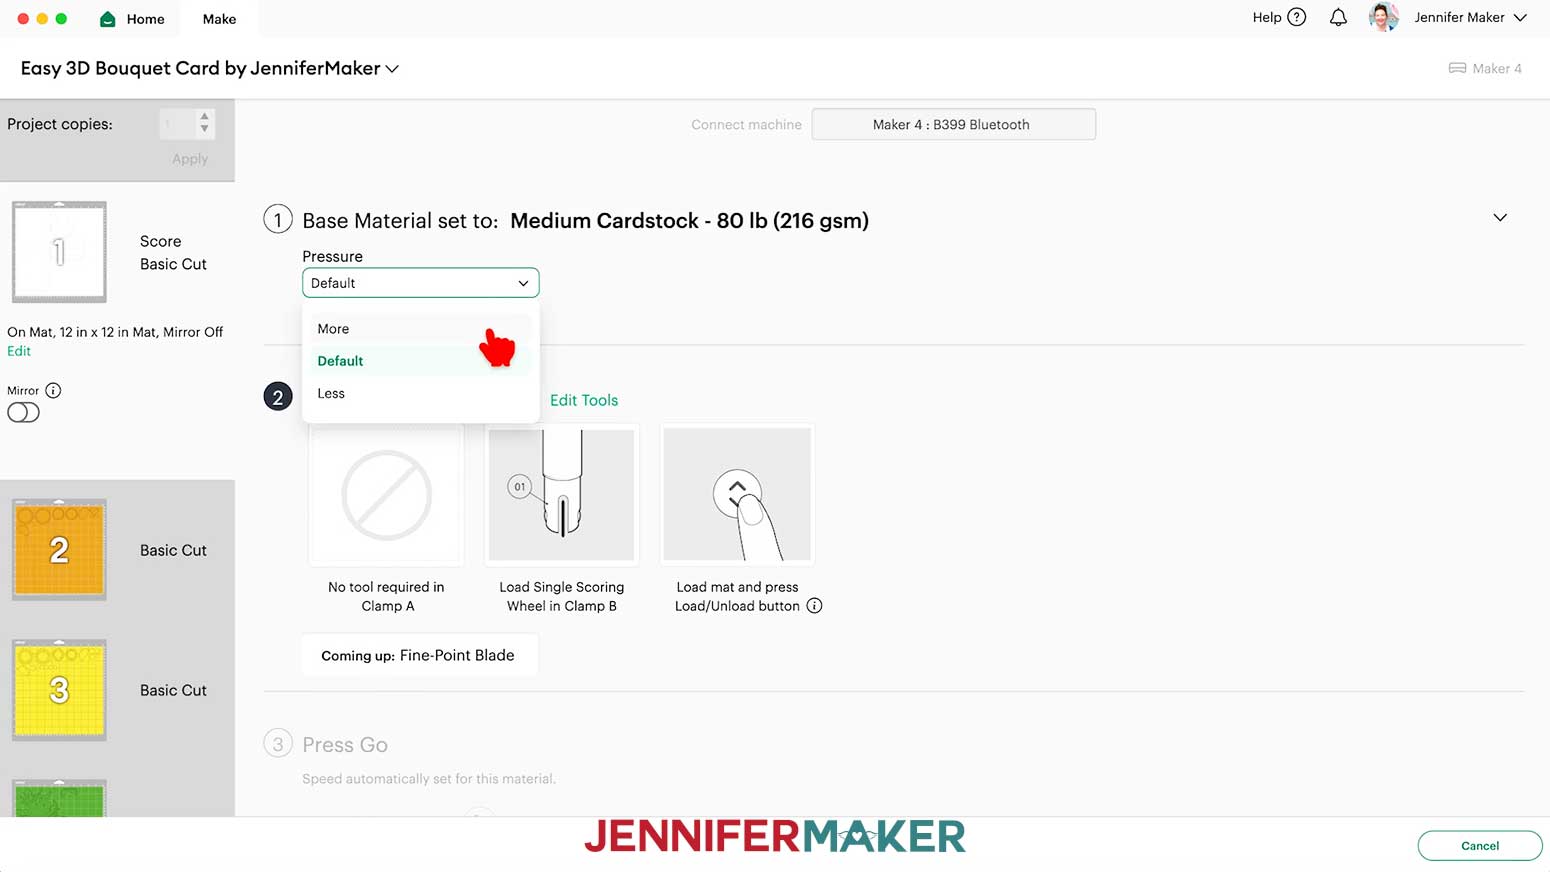
- On the Make screen, set the Base Material for your first mat.
NOTE: I used the “Medium Cardstock - 80 lb (216 gsm)” material setting with “More” pressure (for a cleaner cut) for all my mats.
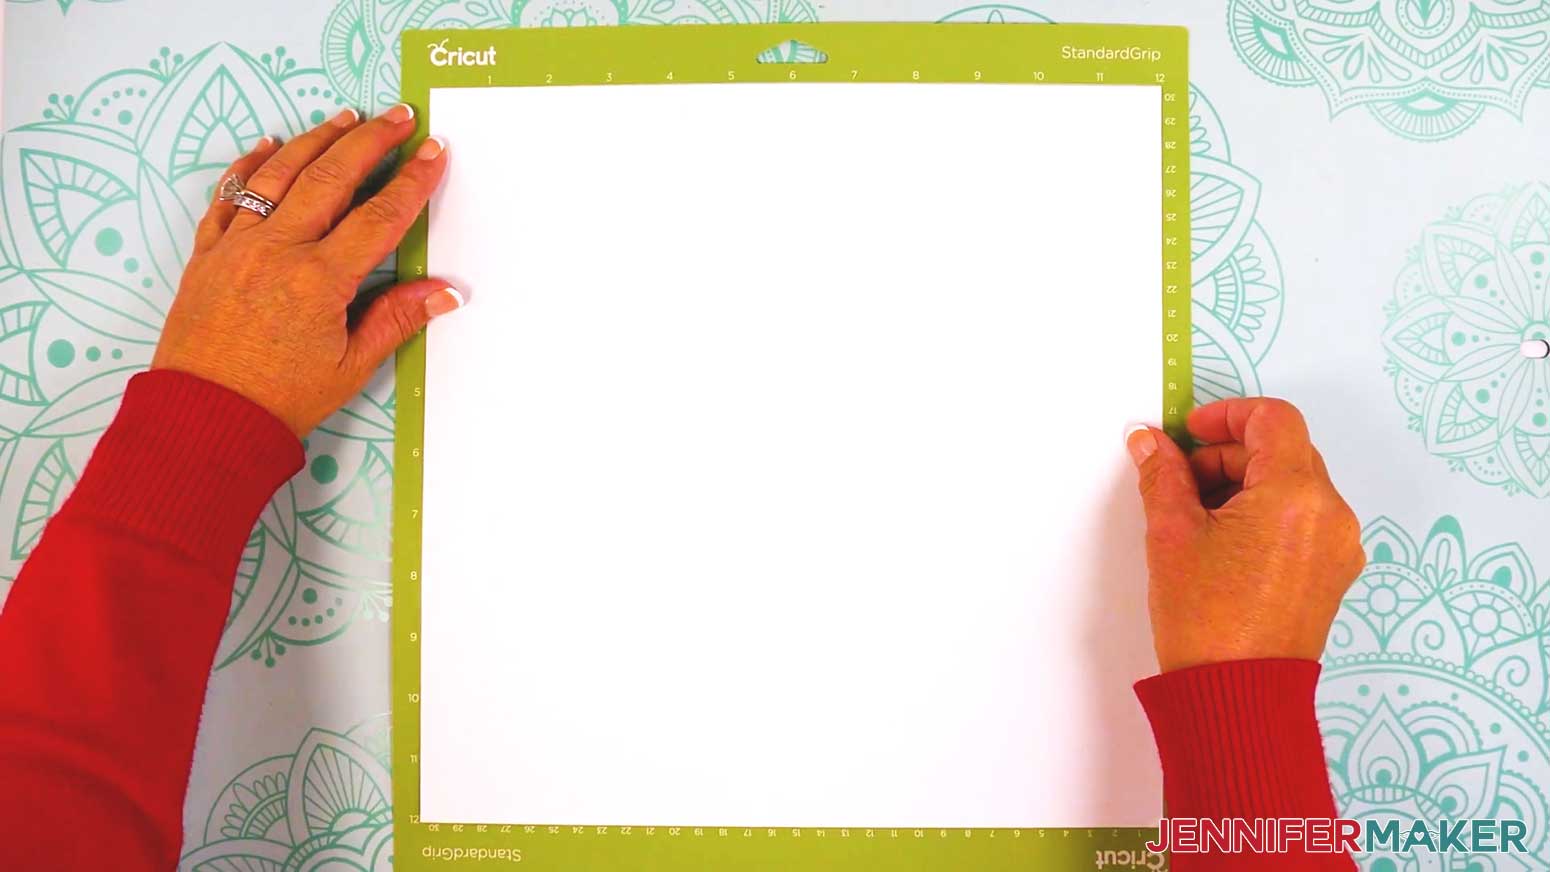
TIP: After you set the material for a mat color, you can check the box next to “Remember Material Settings” to save time between mats of the same type. - Place your cardstock face up on a green StandardGrip machine mat.
- Use a brayer to make sure it’s fully adhered.
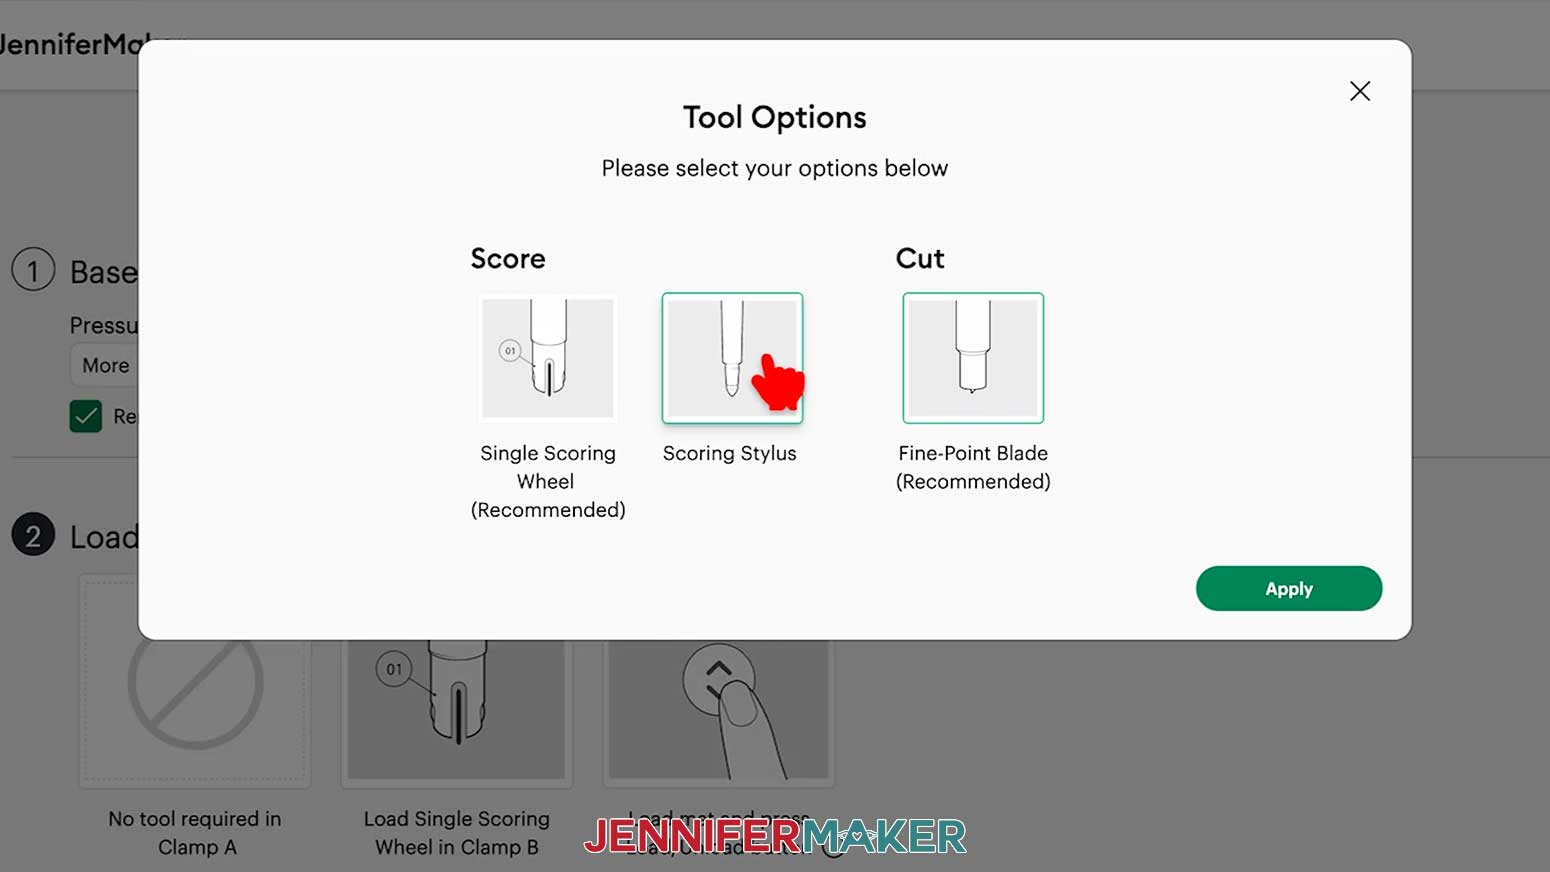
- For mats with score lines, follow the screen prompts to load your tools in the order indicated.
NOTE: I’ll click “Edit Tools” and select the Scoring Stylus so I can load both the scoring tool and my blade at the same time. If you use a Scoring Wheel, your Cricut will score and then cut, and prompt you to switch tools when necessary. - Check that your Premium Fine-Point Blade is clean and in the clamp.
- Press the flashing “Load/Unload” button to load the prepared mat into your Cricut.
- Press the flashing middle button to begin cutting.
- When it has finished cutting, don’t unload the mat right away. Gently lift a corner of the material to make sure the cuts went all the way through. If not, press the middle button again to make a second pass of cuts in the same spots.
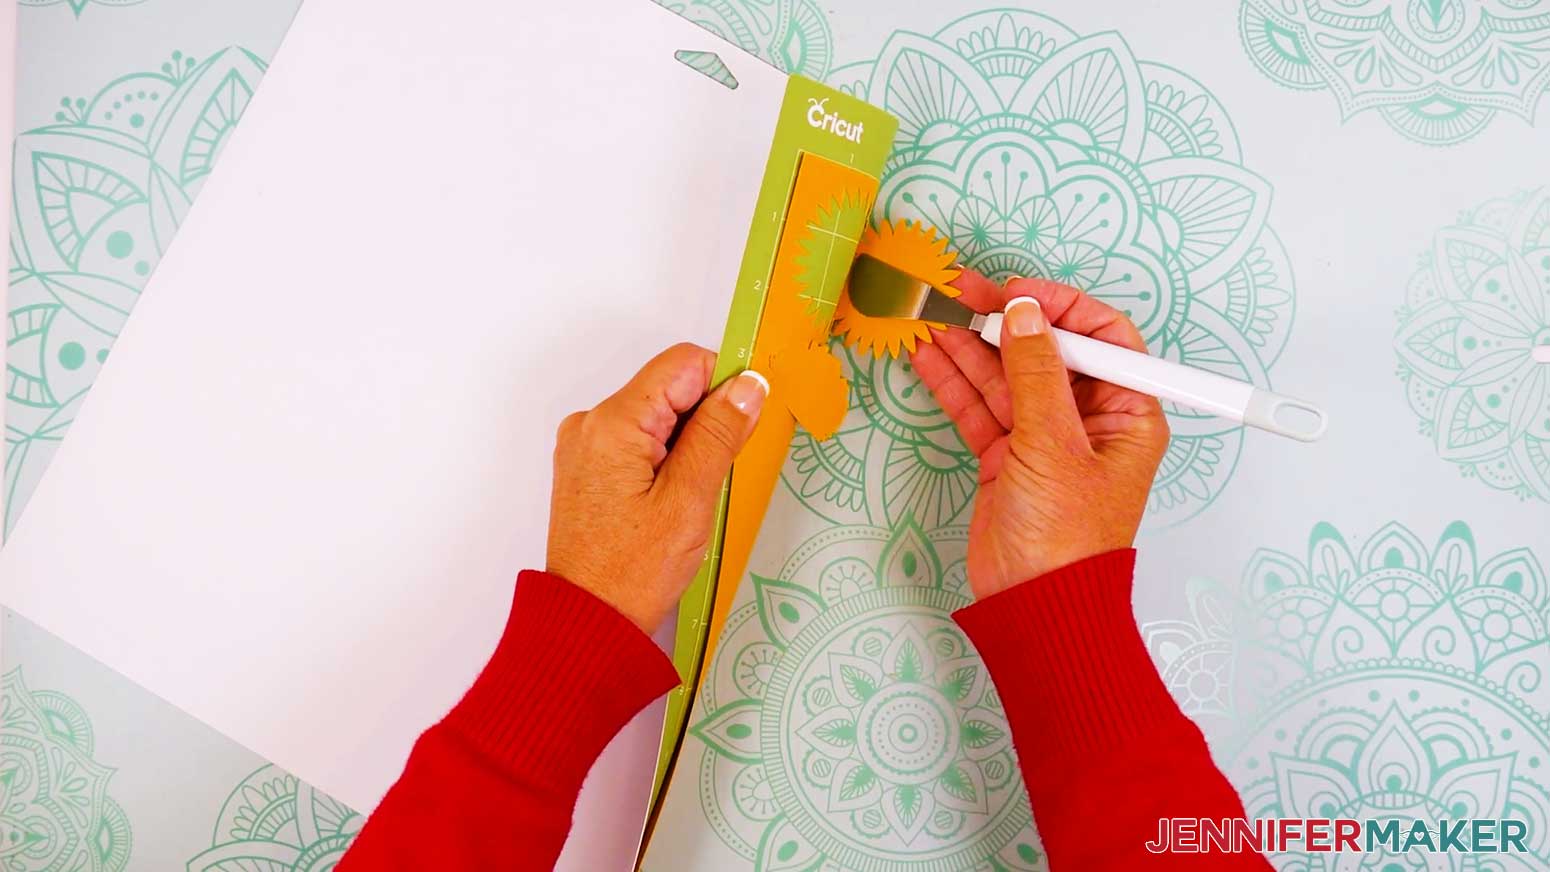
- When the cuts are complete, unload the mat, flip it over onto your work surface, and roll it back to release the cardstock.
TIP: Use the spatula to help lift delicate parts, and your weeding tool to poke out small bits of cardstock that may have been left behind. If you have any issues with your cuts, go to jennifermaker.com/cleaner-cuts. - Use a scraper tool to remove the small bits left on your mat after you remove the cut pieces.
- Follow Steps 6-14 to cut your remaining mats.
- Lay out all of the pieces face up in organized piles.
TIP: Refer to the Design Space screen if you’re not sure about some pieces’ orientation.
STEP 3: ASSEMBLE YOUR 3D BOUQUET CARD
ASSEMBLE THE FLOWER BOUQUET
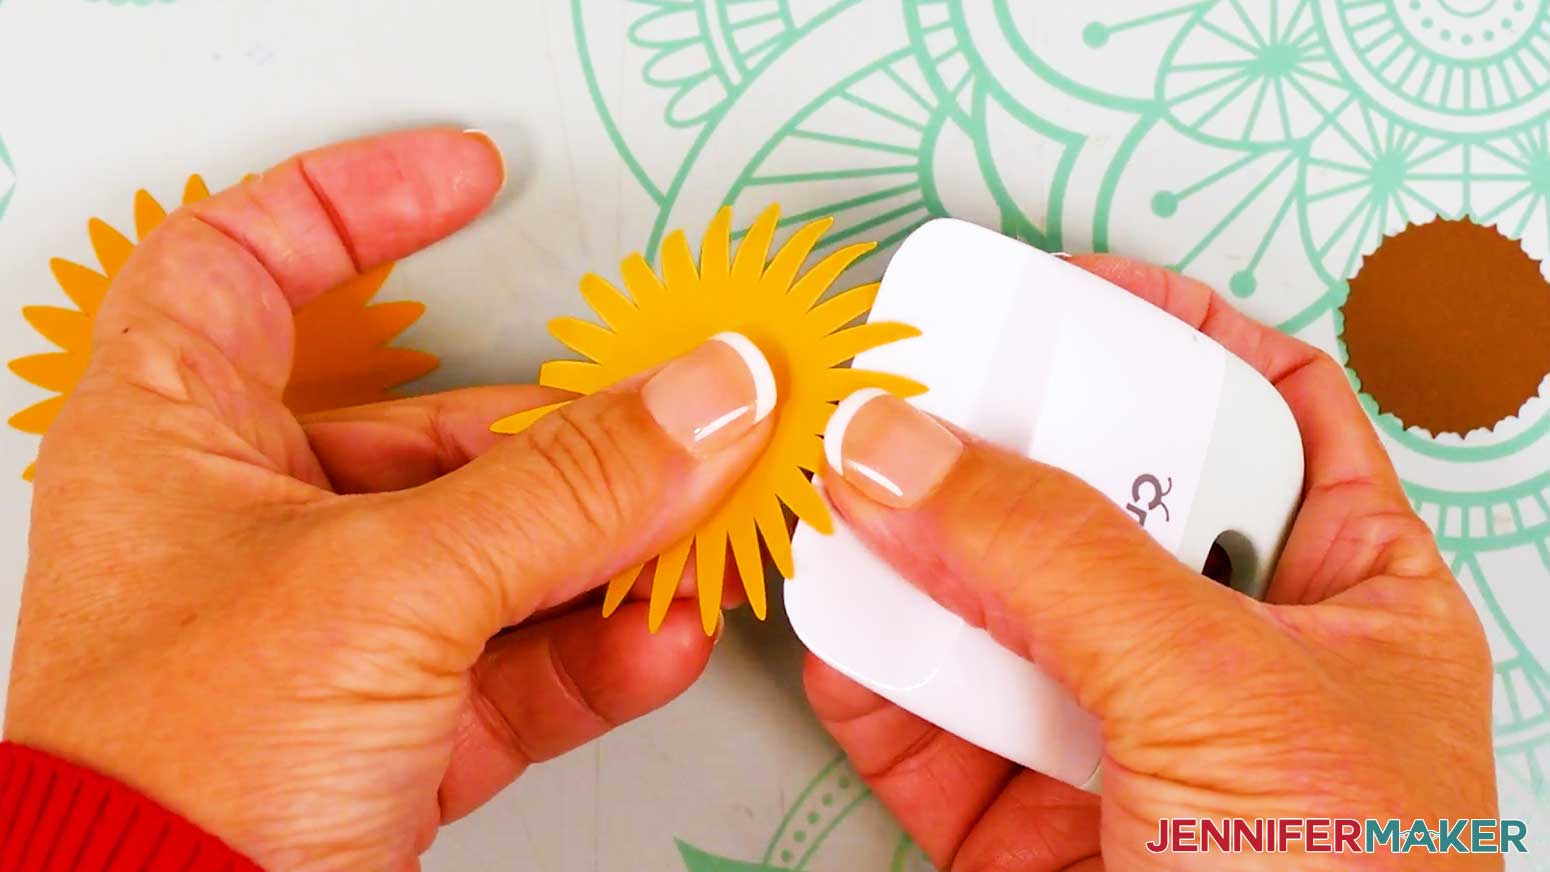
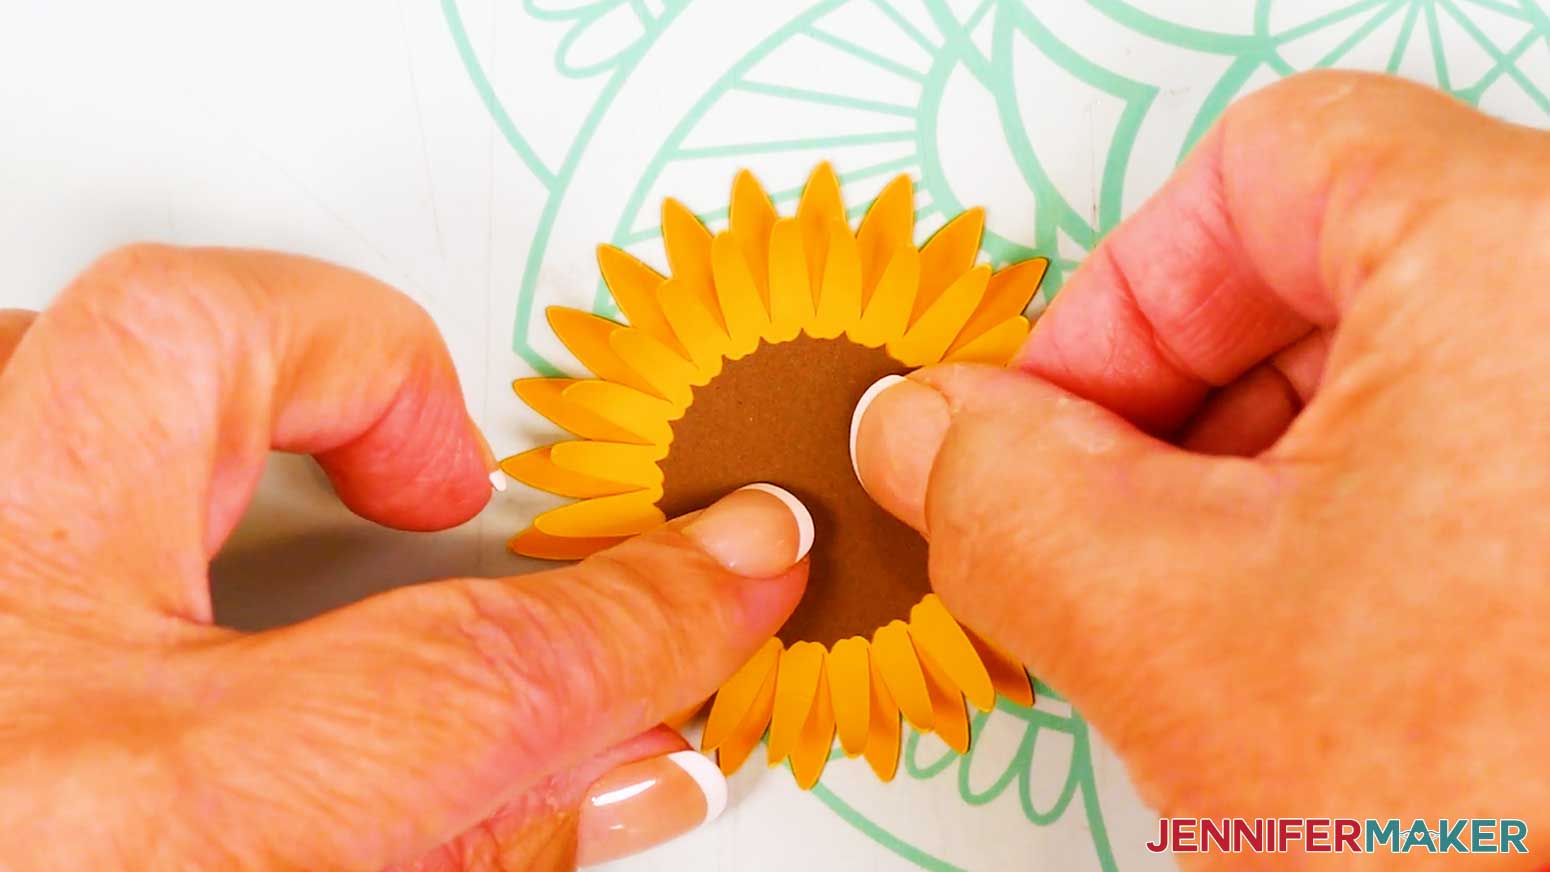
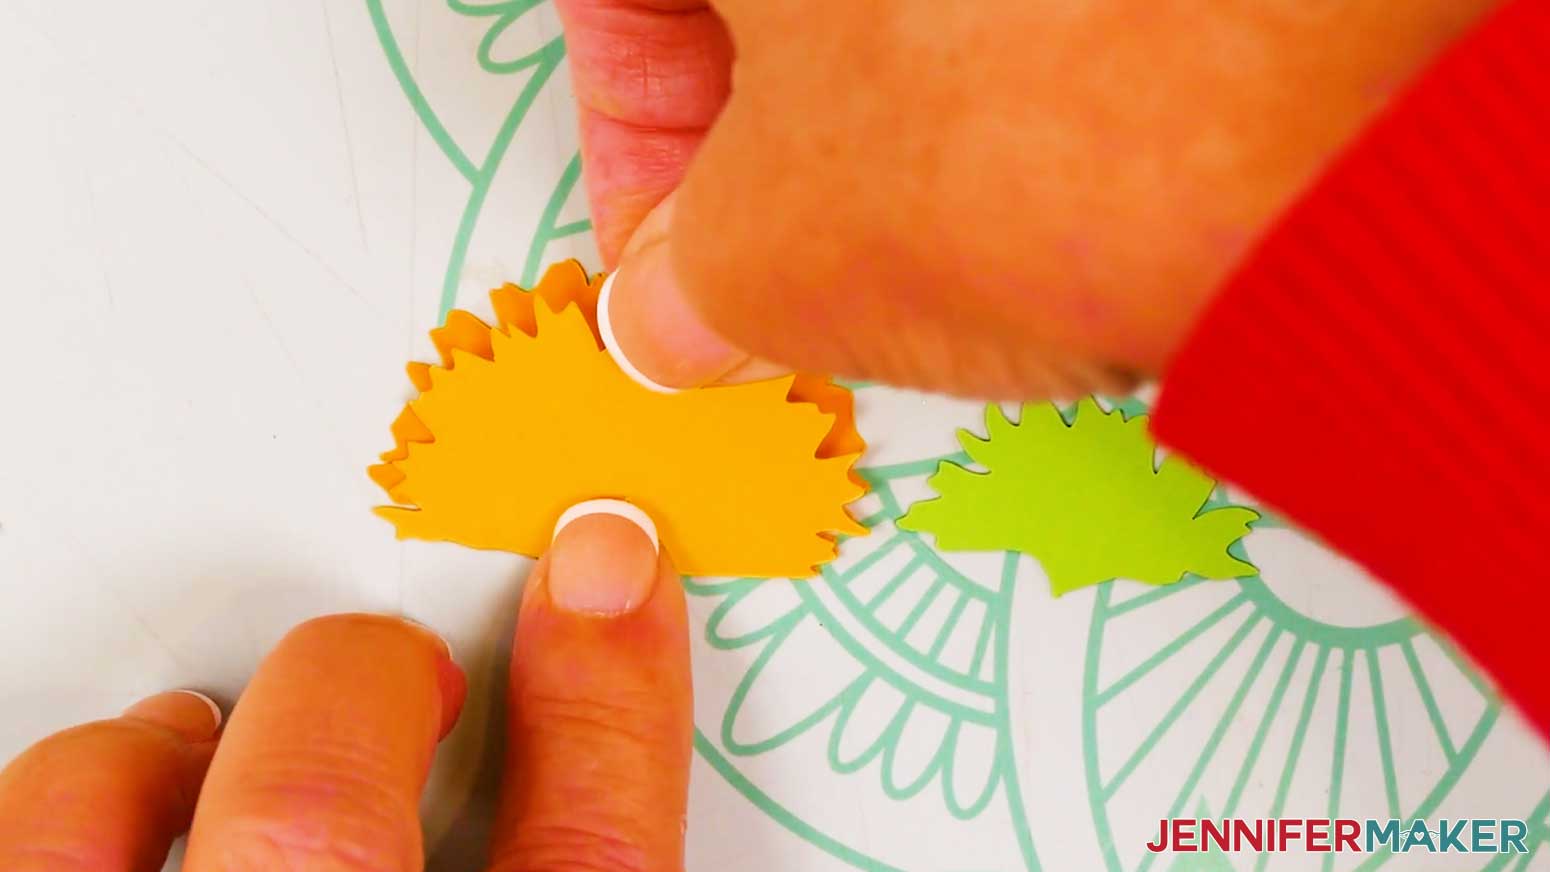
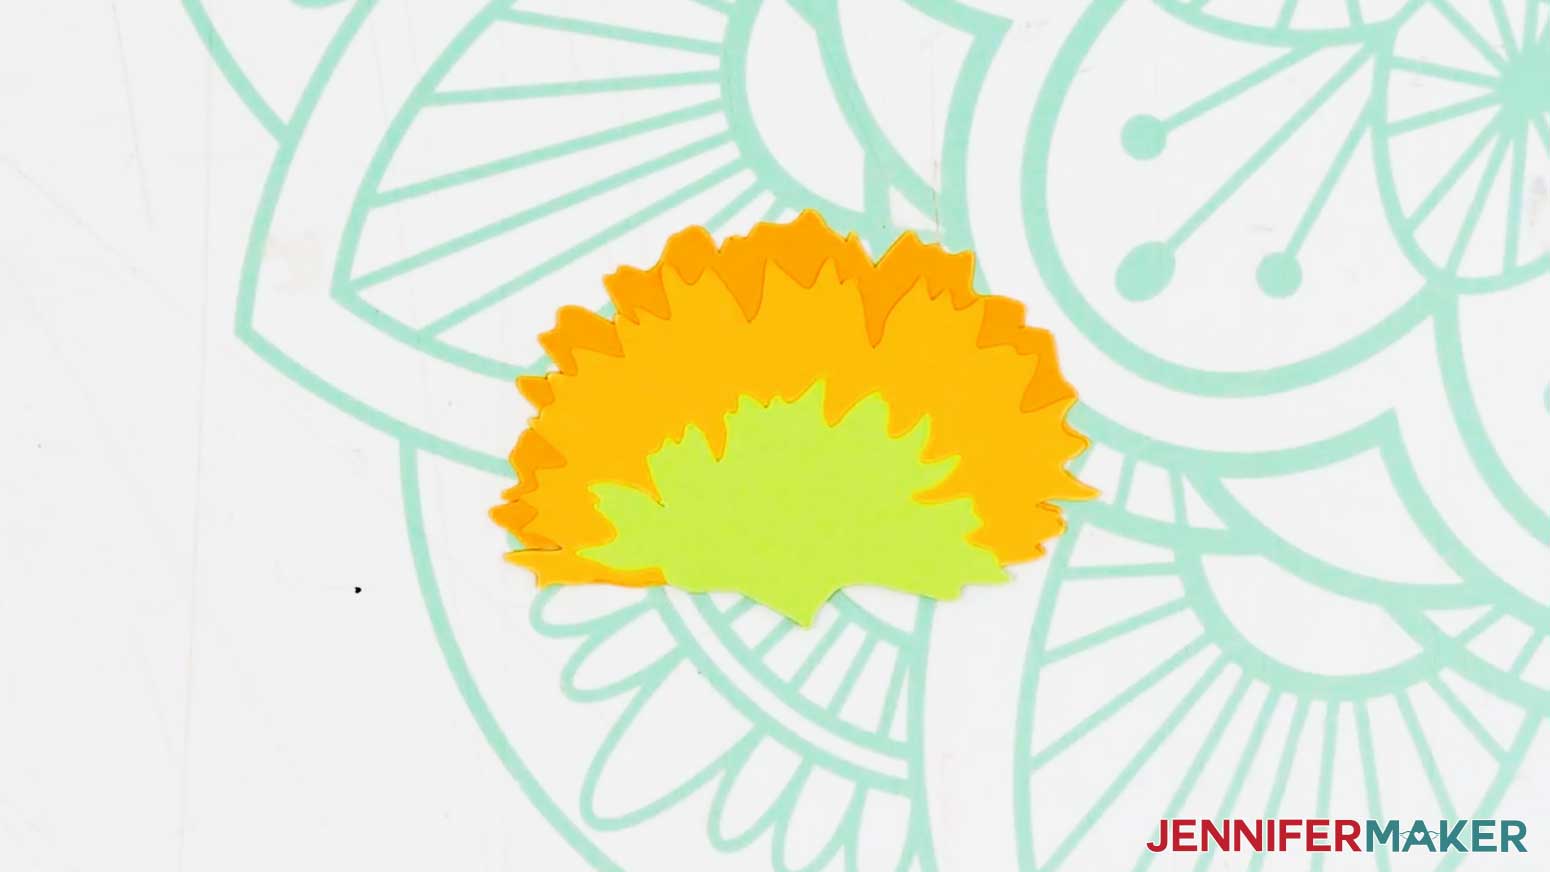
- To assemble a large sunflower, take a large yellow front petal piece and use your fingers or a curling tool, such as a bone folder or scraper, to gently curl the petals toward the center.
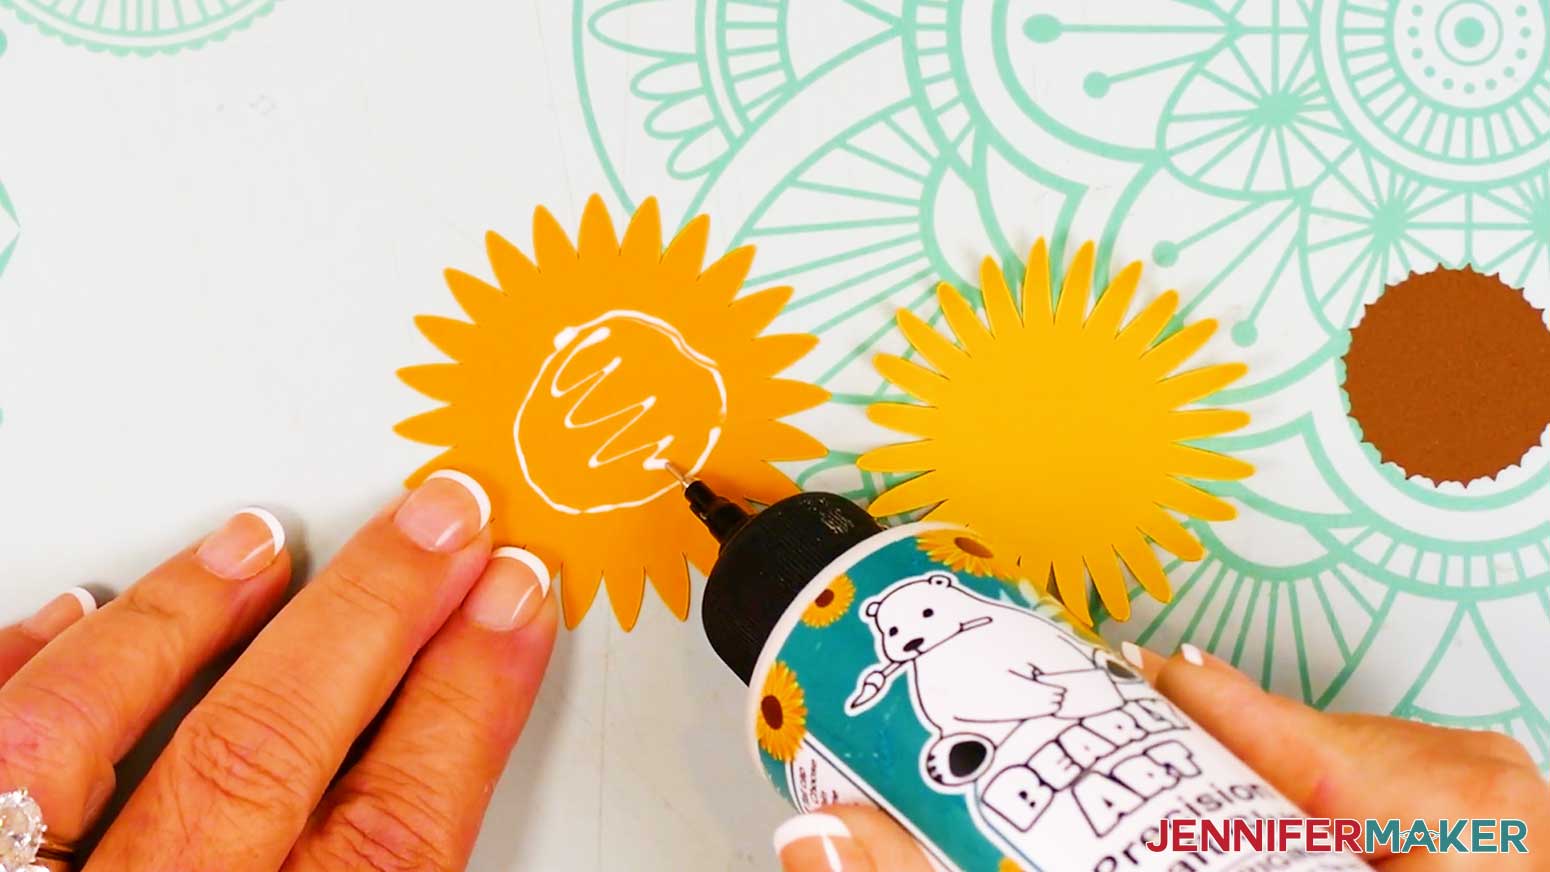
NOTE: If you're planning to mail your card, I don't recommend curling the petals as they can get crushed during transit. Curled flower bouquets make great hand-delivered gifts! - Lay a large orange back petal piece face up in your work area and add craft glue in the center, avoiding the petals.
TIP: If you’re not sure about the pieces’ order or placement, use your Cricut Design Space Canvas for reference, or print the PDF reference sheet and keep it nearby. - Hold the large yellow front petal piece face up over the back piece and rotate it so it fills the gaps between the back piece’s petals.
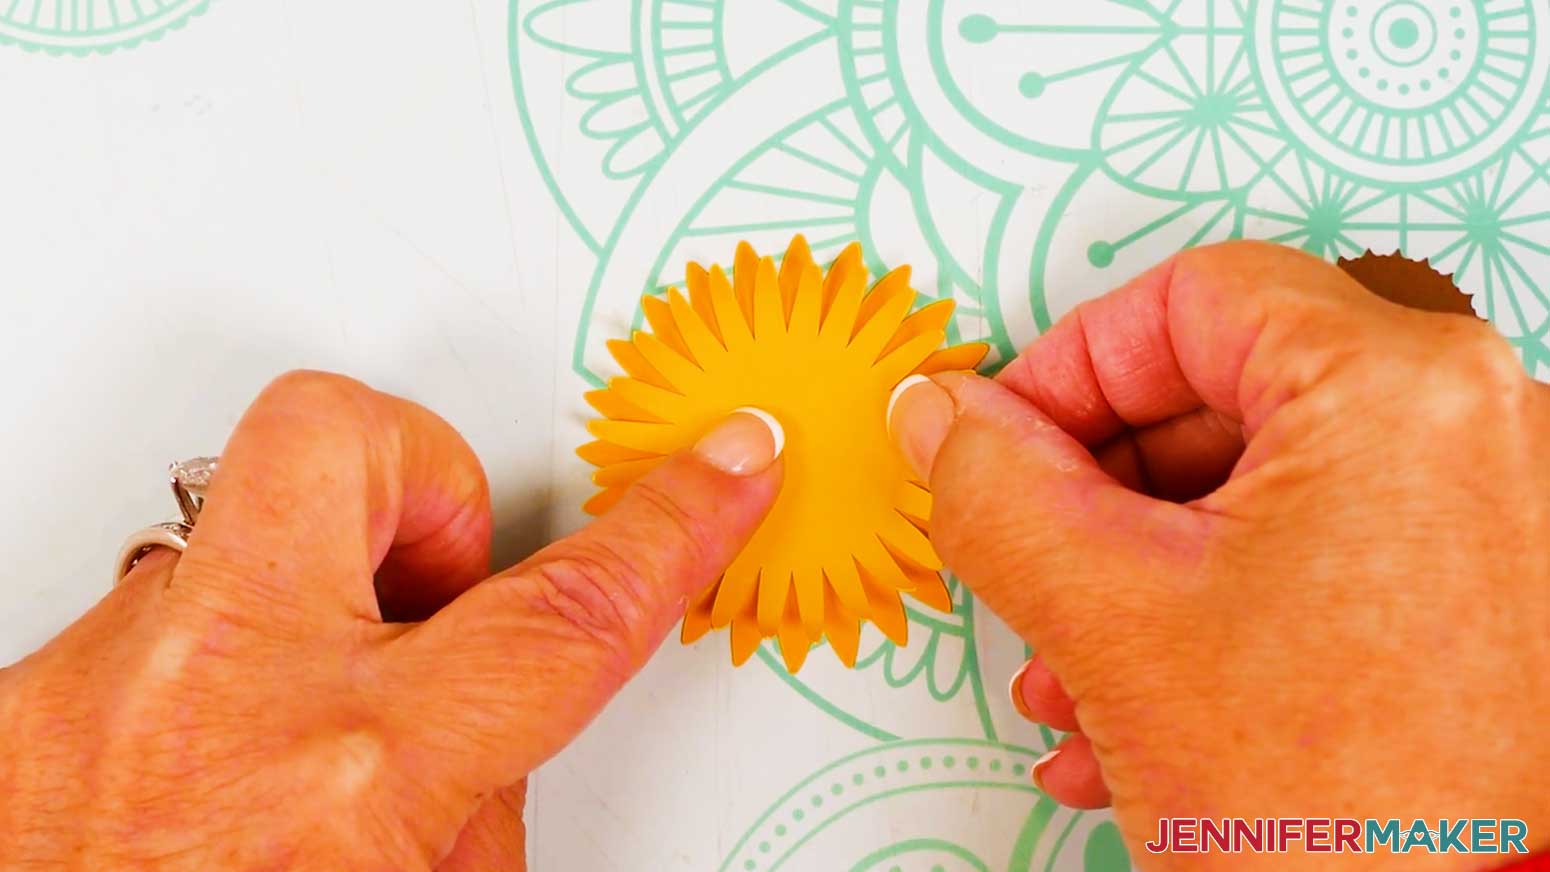
- Center and lower the front piece onto the back piece, then press and hold the center to adhere.
TIP: Wipe away any excess glue with your finger or a paper towel. - Add a small amount of glue to the front petal piece’s center, then center and adhere a brown piece on top.
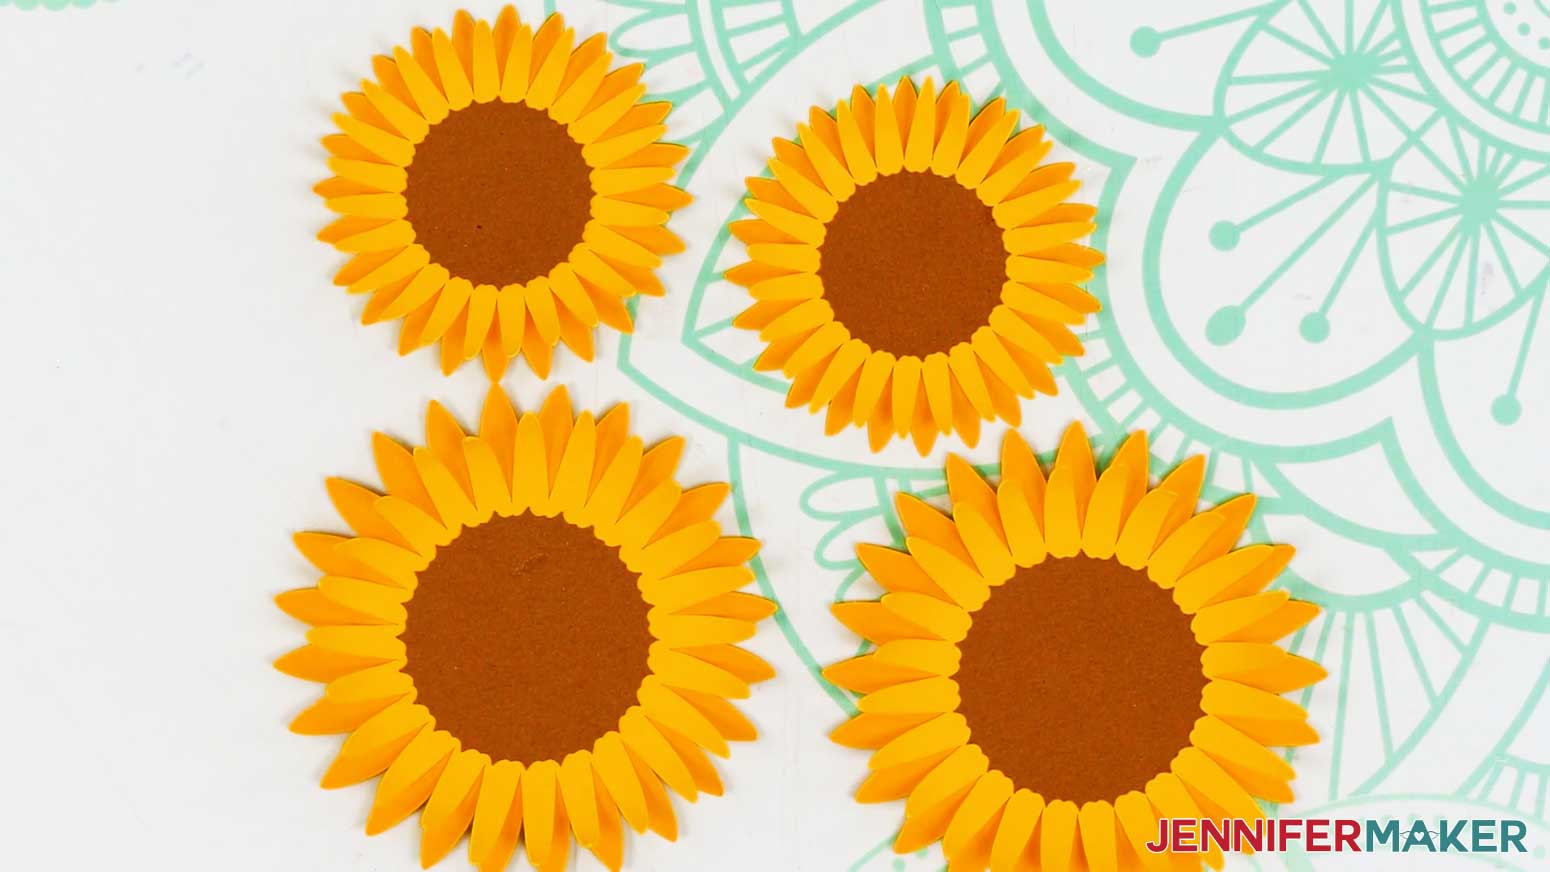
- Repeat Steps 1-5 to assemble the remaining large sunflower.
- Then follow Steps 1-5 to assemble the two small sunflowers.
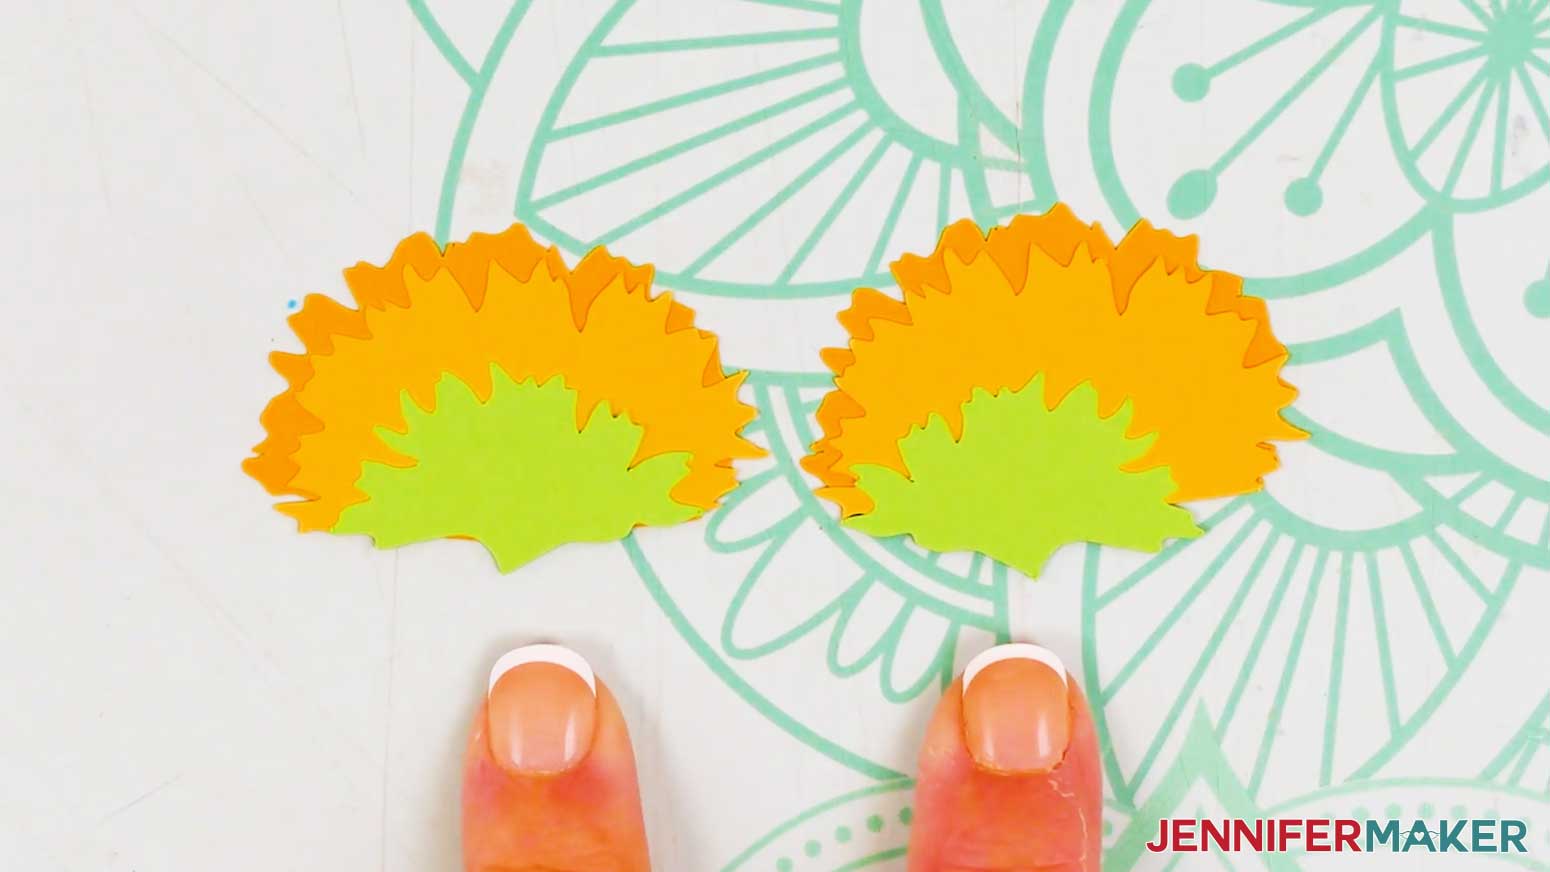
- To assemble the sideways sunflowers, stack the three pieces for both flowers face up in order, from top to bottom.
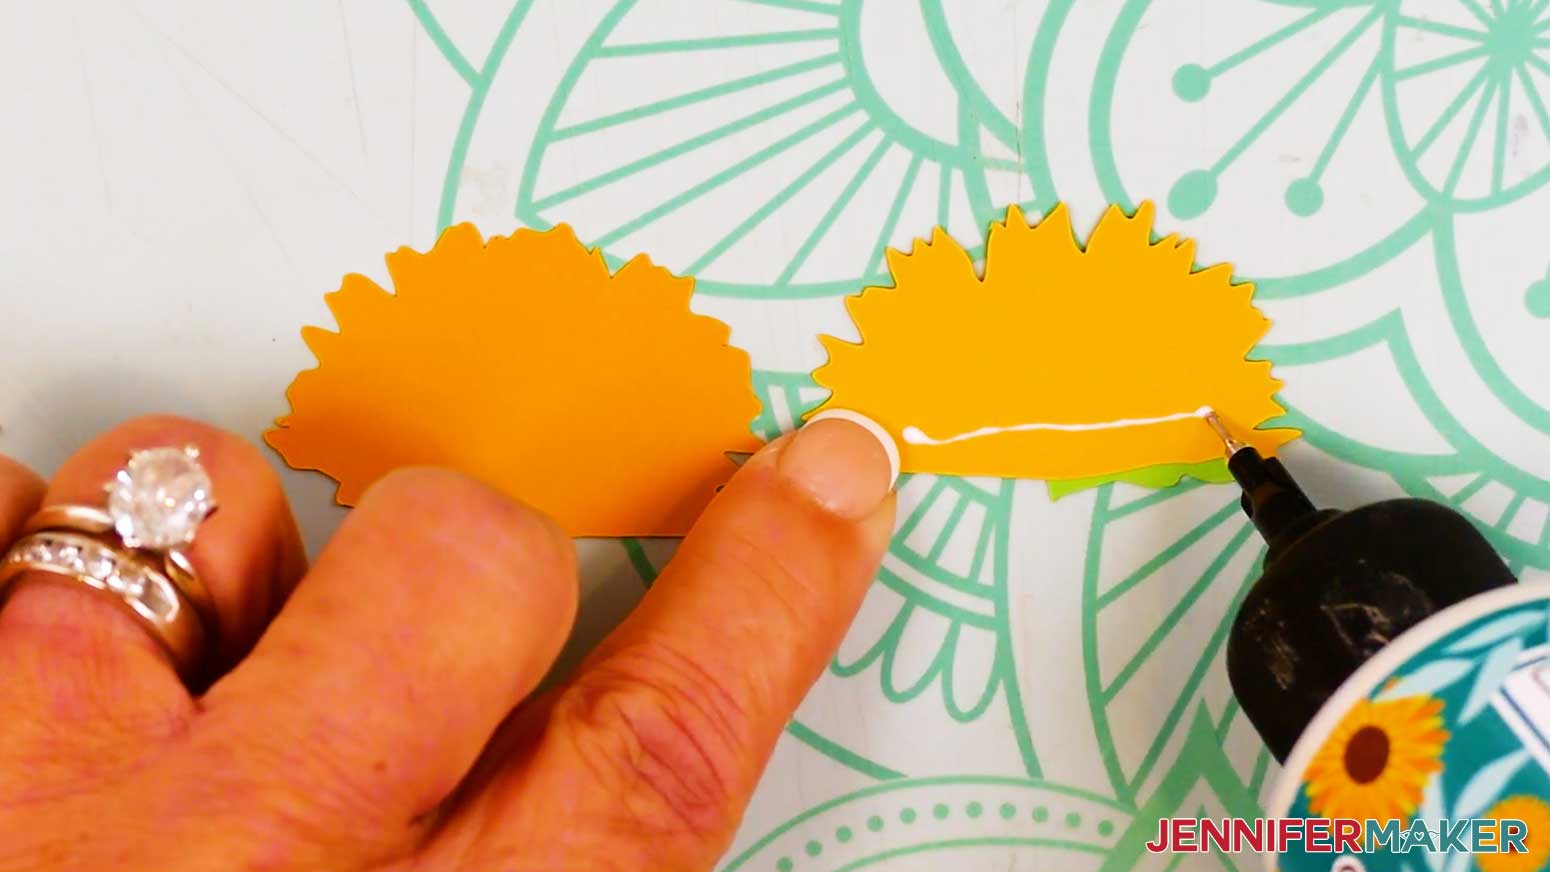
NOTE: The light green sepal pieces (the pointed stem tips) of the assembled flowers should mirror each other so the flowers can point in different directions. - Flip over the first flower’s top light green and yellow pieces, then add craft glue along the bottom edge of the yellow middle piece’s back side.
- Flip the yellow piece onto the orange piece, and line up the bottom edges.
- Press and smooth to adhere.
- Then add craft glue along the bottom edge of the top light green sepal piece’s back.
- Flip the sepal face down on the middle yellow piece, line up the bottom edges, and press and smooth to adhere.
- Repeat Steps 9-13 for the remaining sideways sunflower.
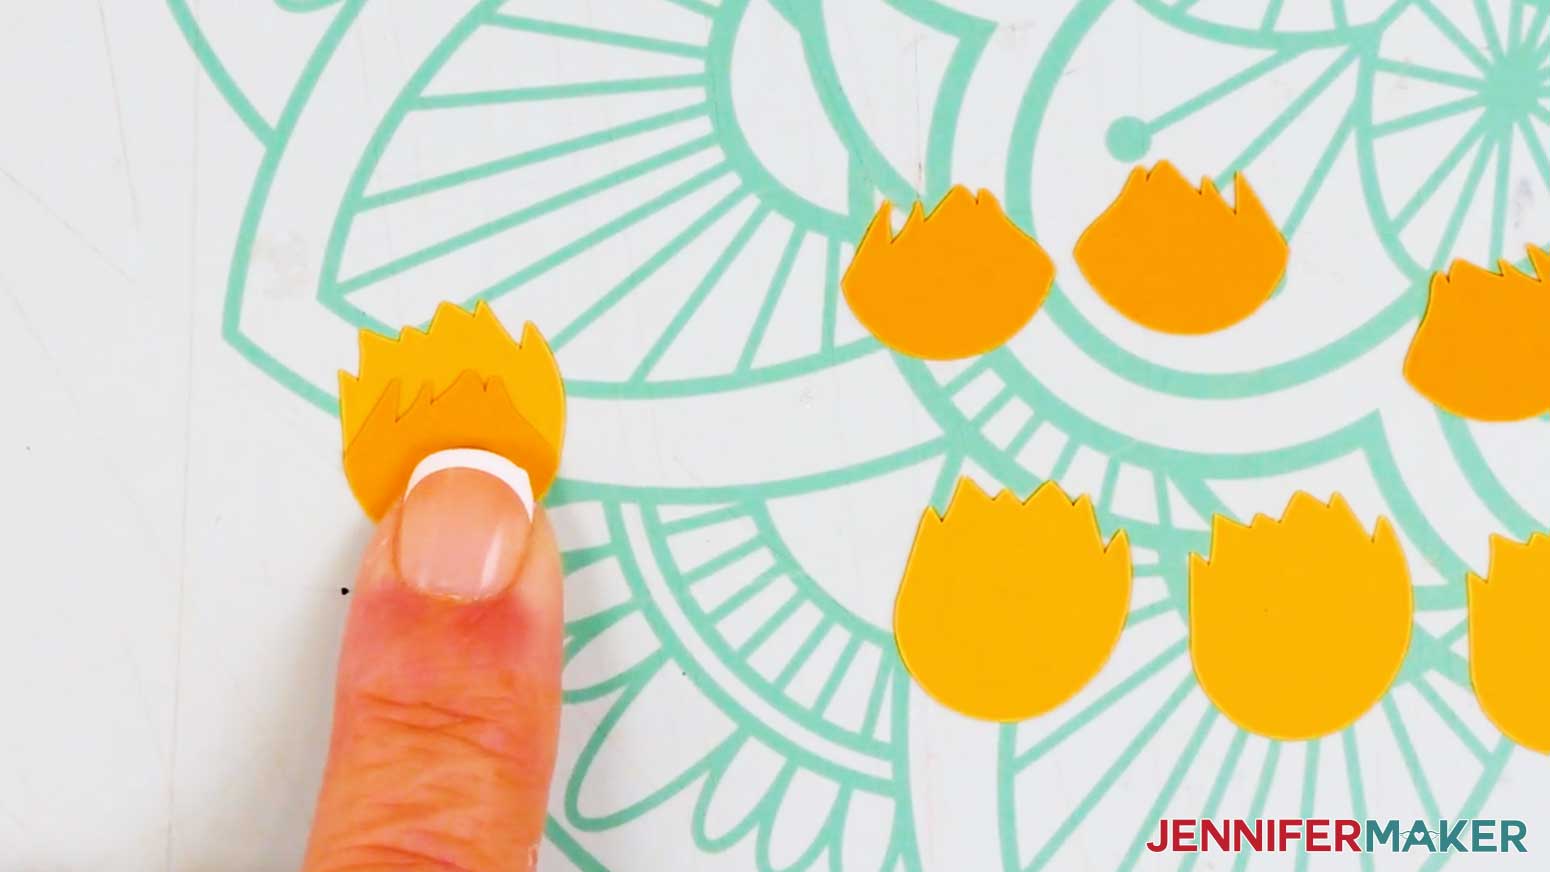
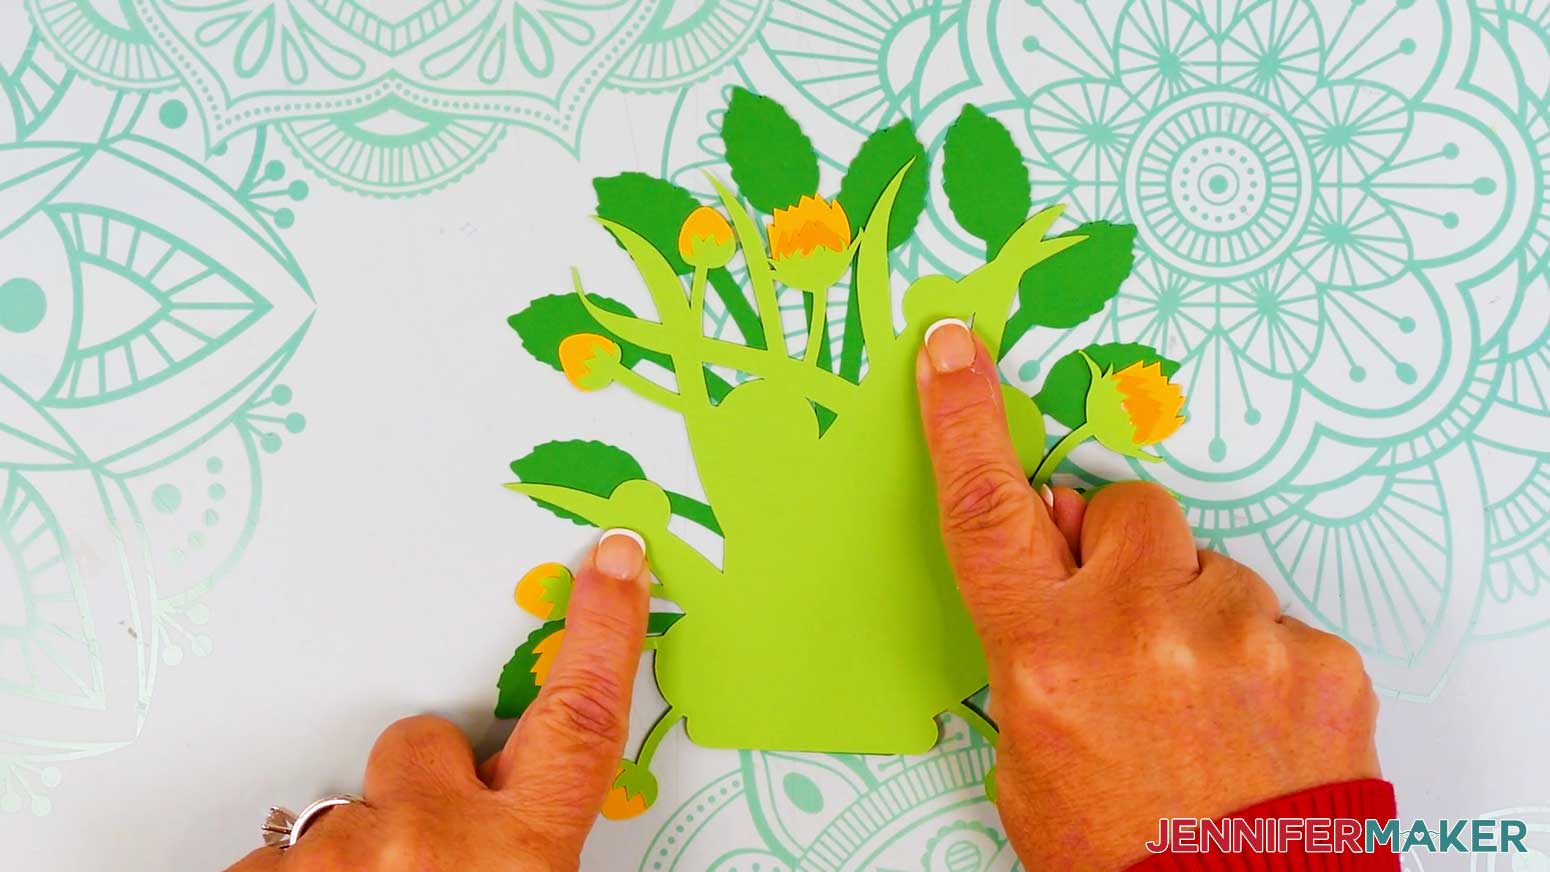
- To assemble a partially opened sunflower, stack the pieces face up, with the orange front piece on top of the yellow back piece.
- Flip over the orange piece, then add a small amount of craft glue in the center of its back.
- Flip the orange piece onto the yellow piece, and line up the bottom edges.
- Press and smooth to adhere.
- Repeat Steps 15-18 for the three remaining partially opened sunflower pieces.
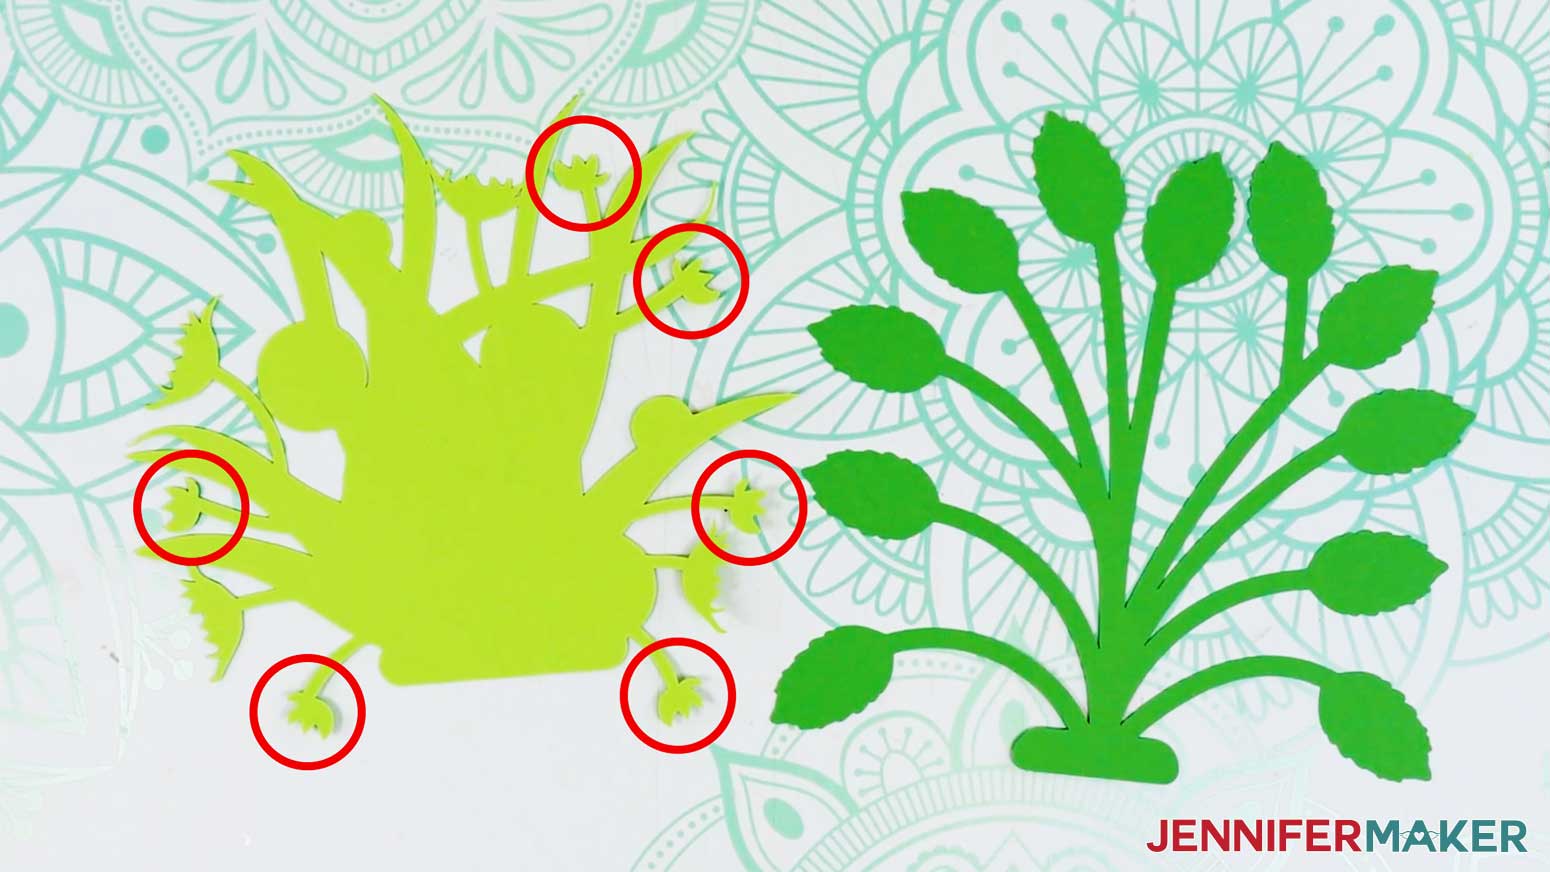
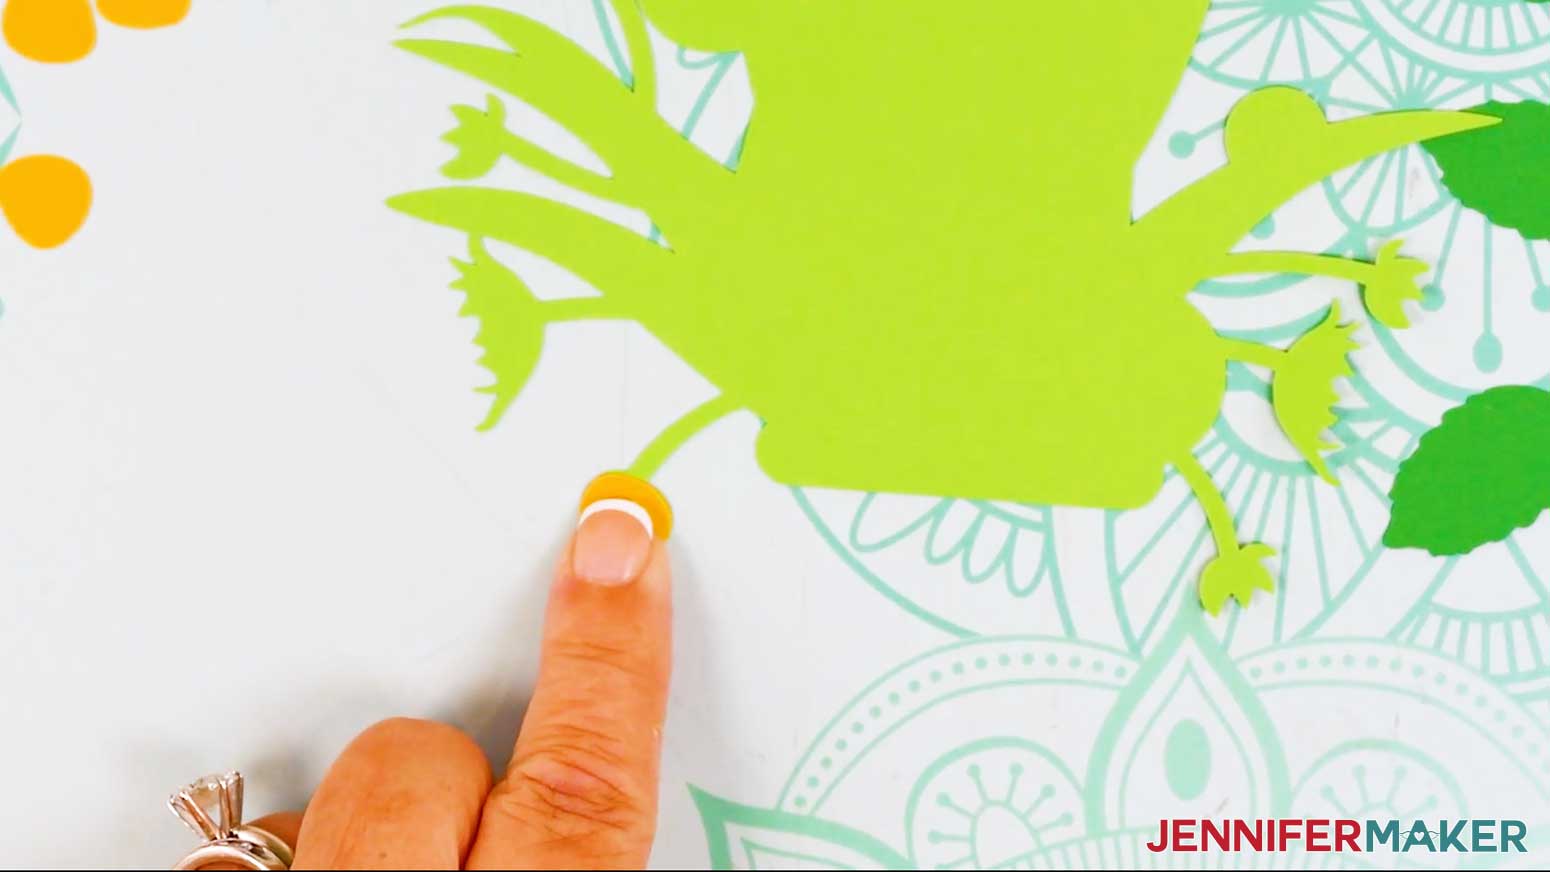
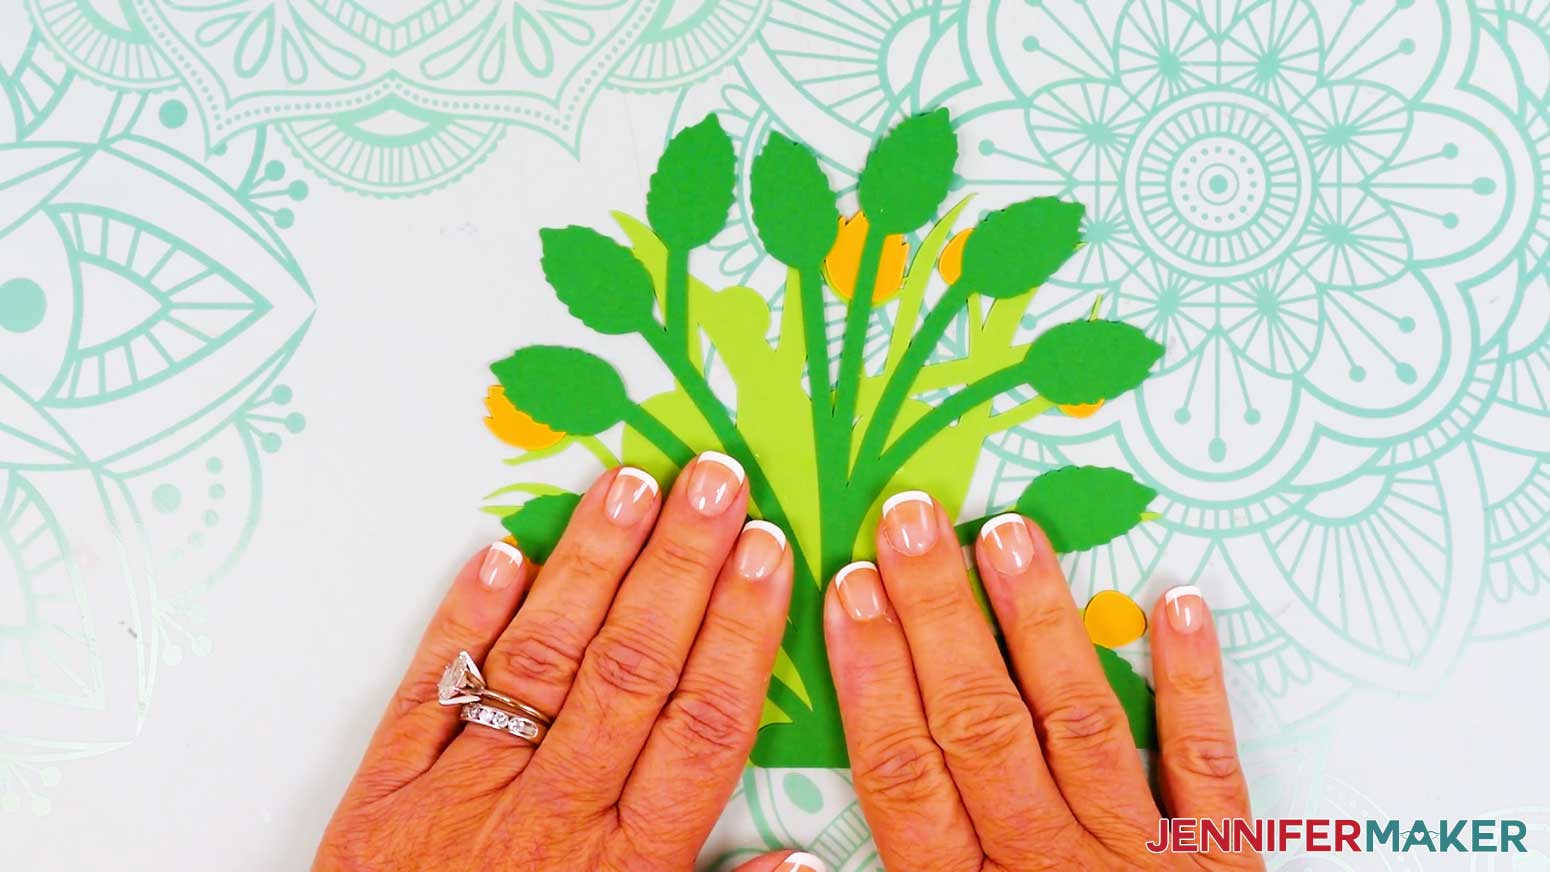
Lay the light green front foliage piece face down.
NOTE: There should be a distinct circle shape near the top left of the foliage when it’s positioned correctly. - Locate the six small, four-pointed sepals around the edge of the foliage.
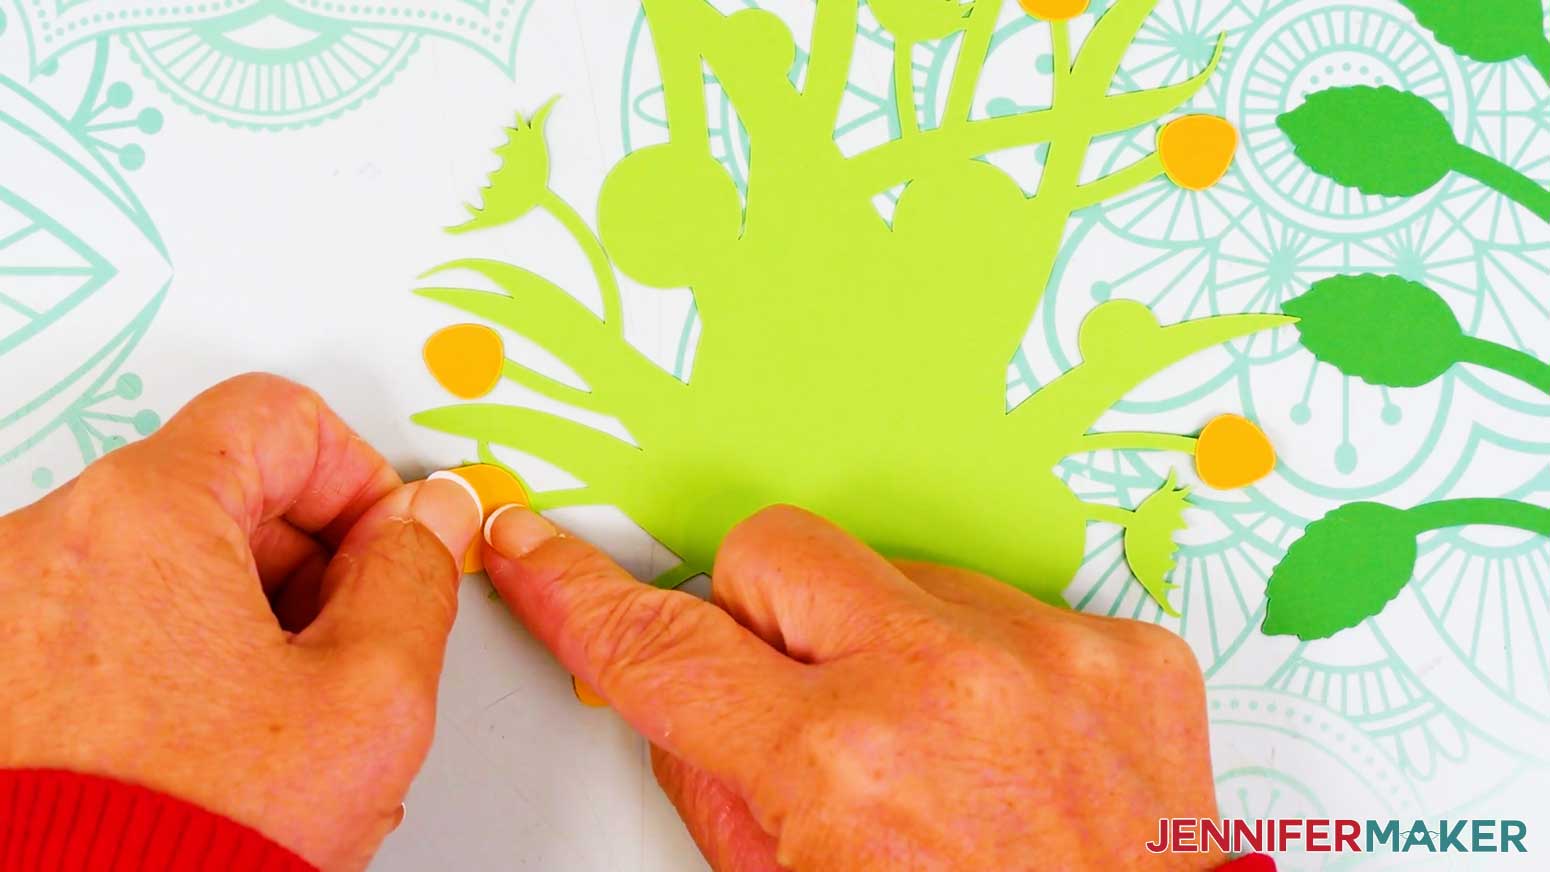
- Add a small amount of craft glue to the first small sepal.
- Then place a yellow bud piece on top of the sepal, keeping the rounded bottom edges aligned.
- Press and smooth to adhere.
- Repeat Steps 21-23 for the five remaining small sepals and bud pieces.
- Locate the four large sepals around the edge of the foliage.
- Add craft glue to the first large sepal.
- Then, place a partially opened sunflower piece face down (yellow side up) on top of the sepal, keeping the rounded bottom edges aligned.
- Press and smooth to adhere.
- Repeat Steps 26-28 for the three remaining large sepals and partially open sunflower pieces.
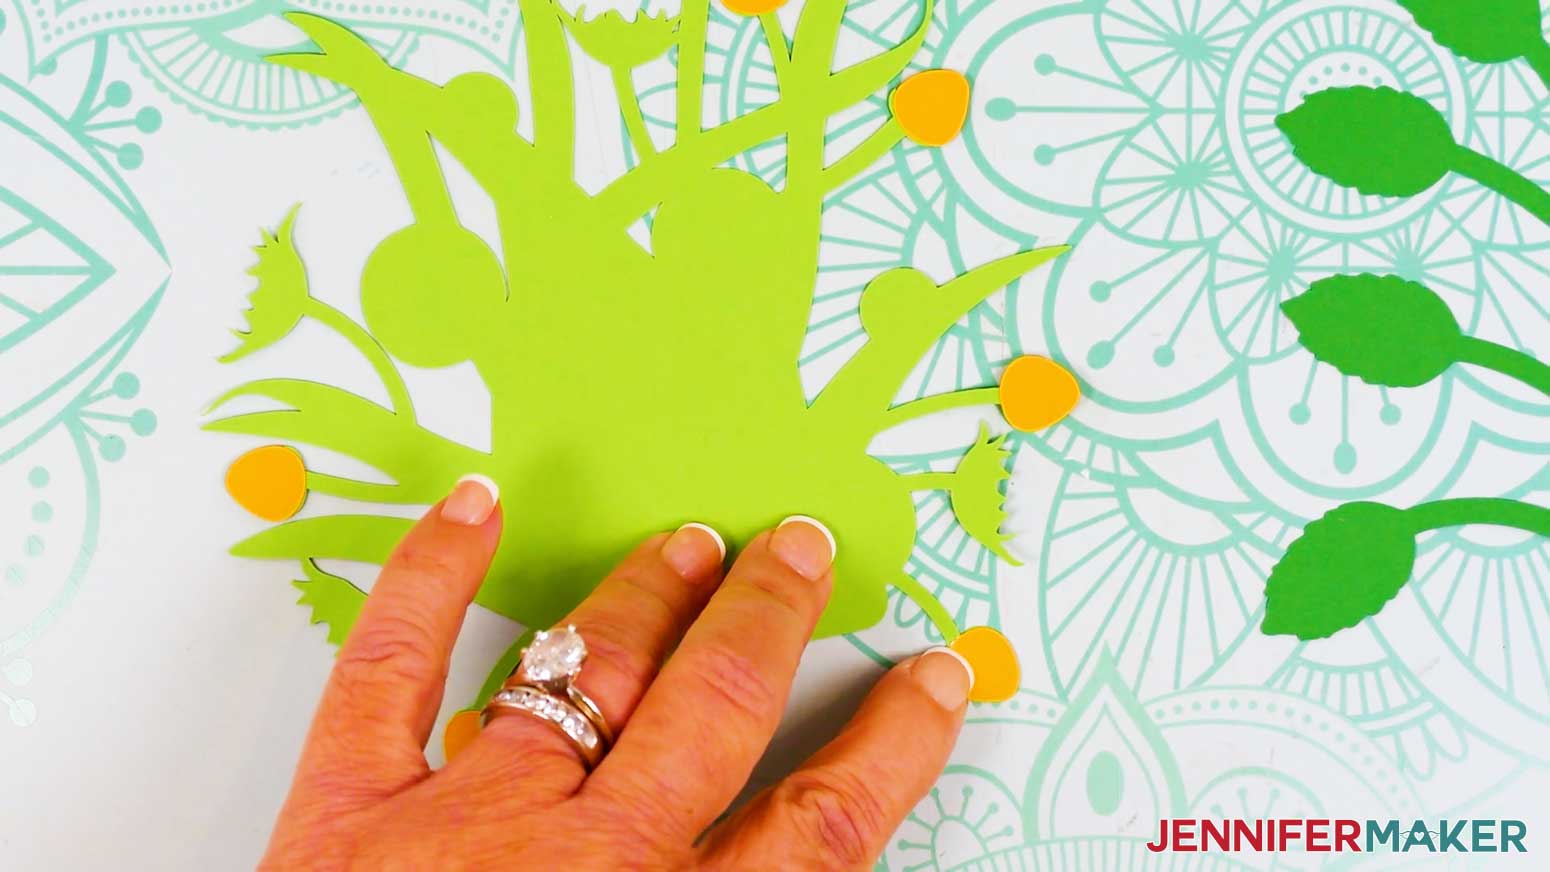
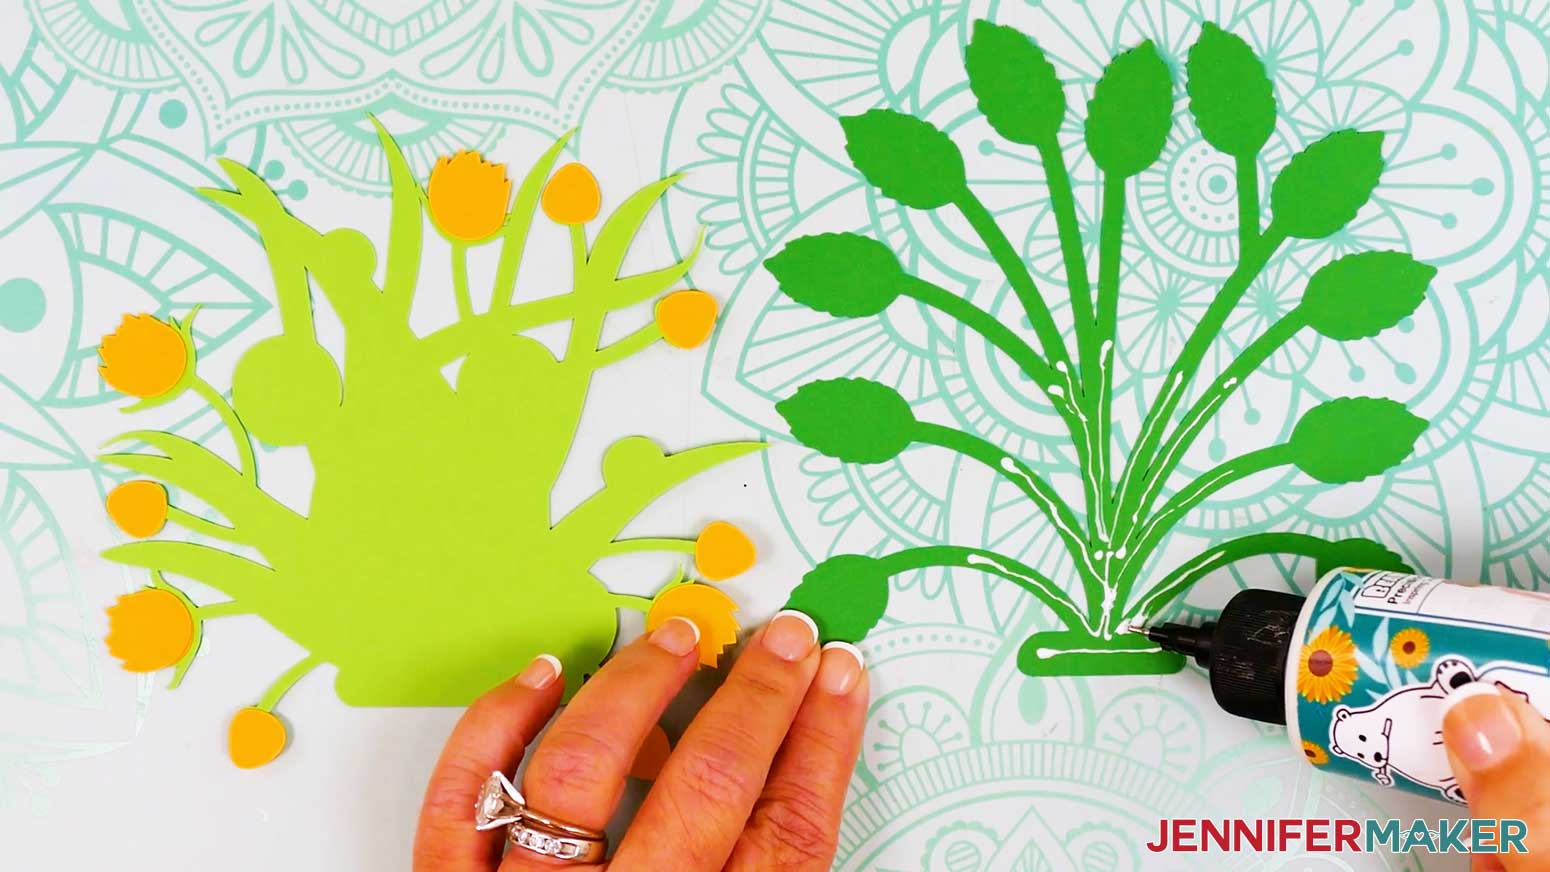
- Lay the back foliage piece face up on your work surface.
NOTE: There should be a leaf with a short stem near the top right of the back foliage when it’s positioned correctly. - Apply glue to the bottom section and halfway up the stems of the back foliage piece.
NOTE: This makes sure the back foliage piece sticks to the front foliage piece and not the flowers. - Flip the back foliage piece face down onto the front foliage piece, keeping the bottom edges of the foliage pieces flush and centered.
- Press down and smooth to adhere.
- Flip the foliage pieces face up.
- Locate the two half-circle shapes on the foliage leaves.
- Add glue to the left half-circle on the foliage, and press an assembled sideways sunflower on top of it, angling it slightly.
- Then add glue to the right half-circle on the foliage, and press the other sideways sunflower on top of it, angling it slightly to the right.
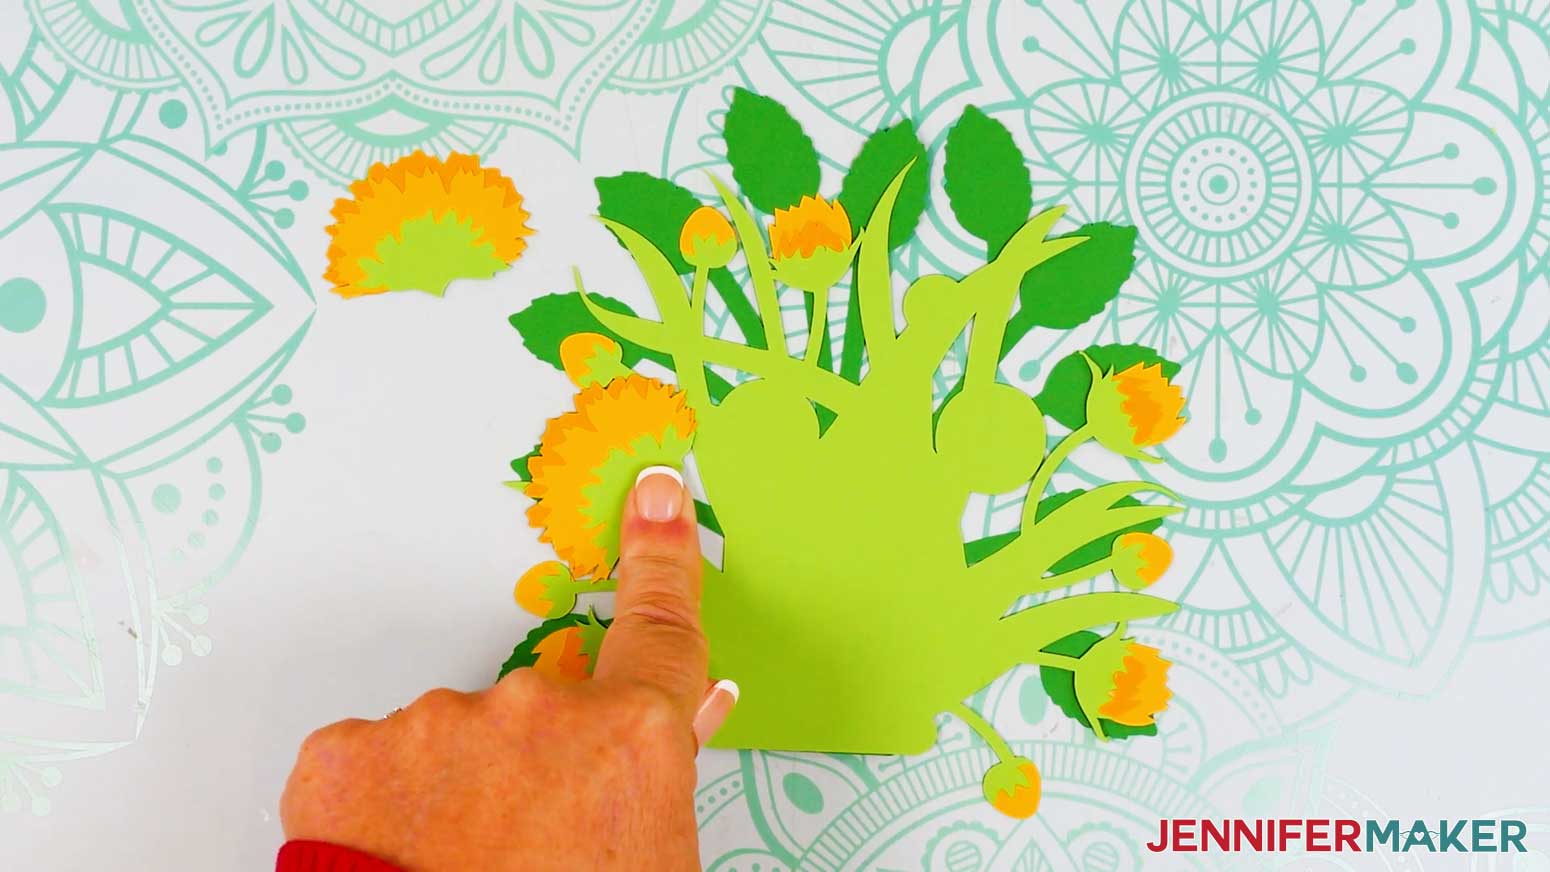
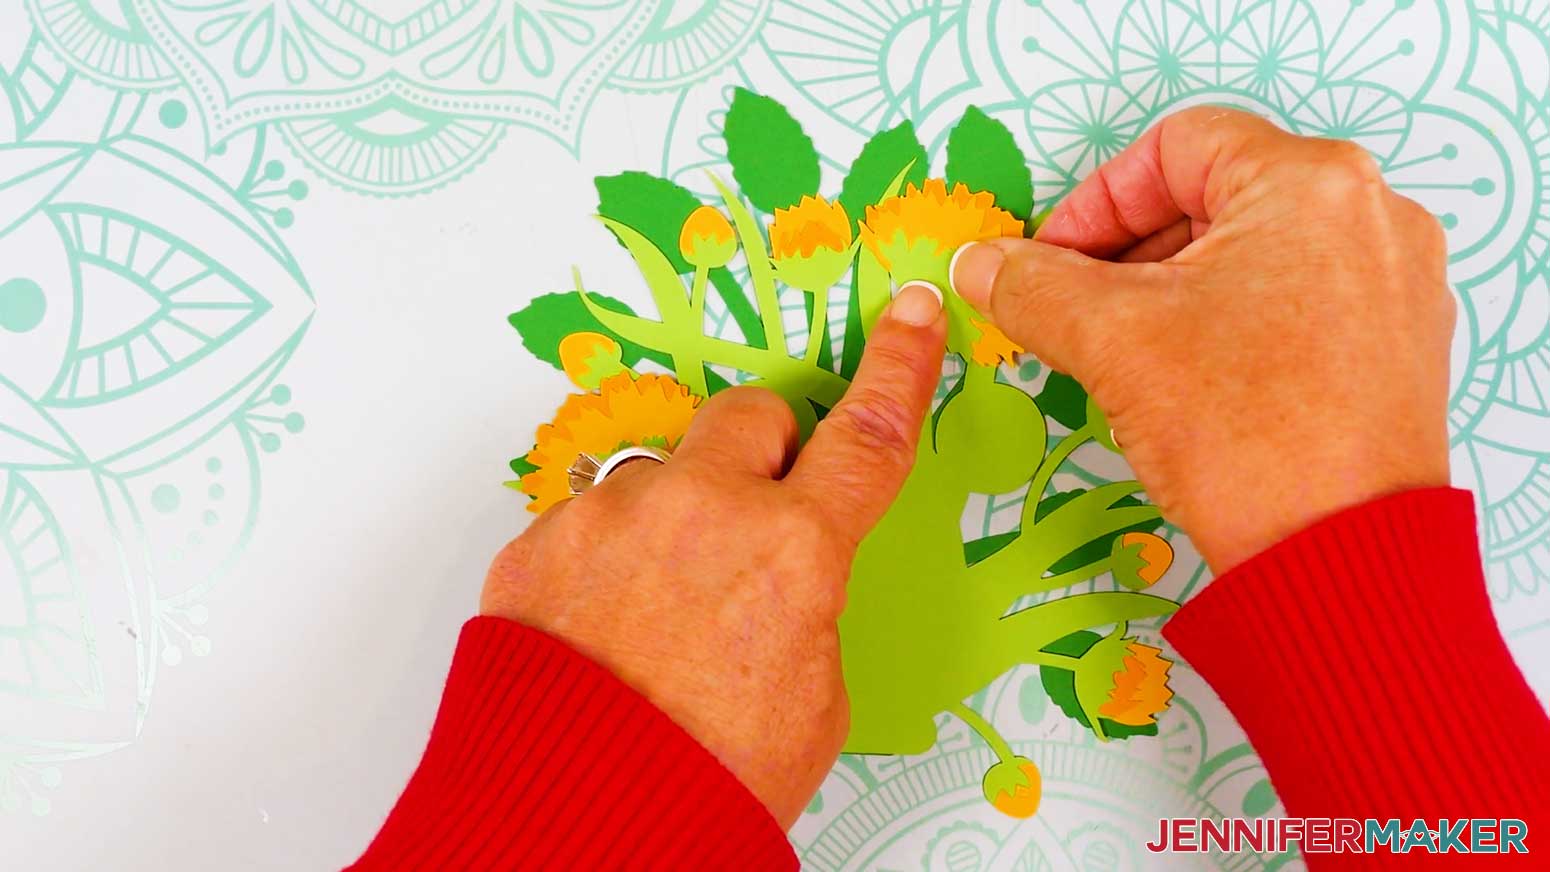
- Next, test out your arrangement of the forward-facing sunflowers on the foliage so they cover the large circular areas on the foliage.
NOTE: I like to put the large sunflowers in the top left corner and bottom right corner, and the small sunflowers in the top right corner and bottom left corner.
TIP: There are only three circular areas, but four sunflowers, so your placement doesn’t have to be exactly like mine. Just aim for both coverage and balance! - Lift up the first sunflower and add glue to the front foliage piece where you want the sunflower to go.
NOTE: Be careful not to get glue on the back foliage piece or other flowers, or the bouquet layers may stick together! - Then press the flower in place to adhere it.
- Repeat Steps 39-40 to adhere the remaining sunflowers in place.
- Your bouquet is assembled!


ASSEMBLE THE VASE AND CARD STAND
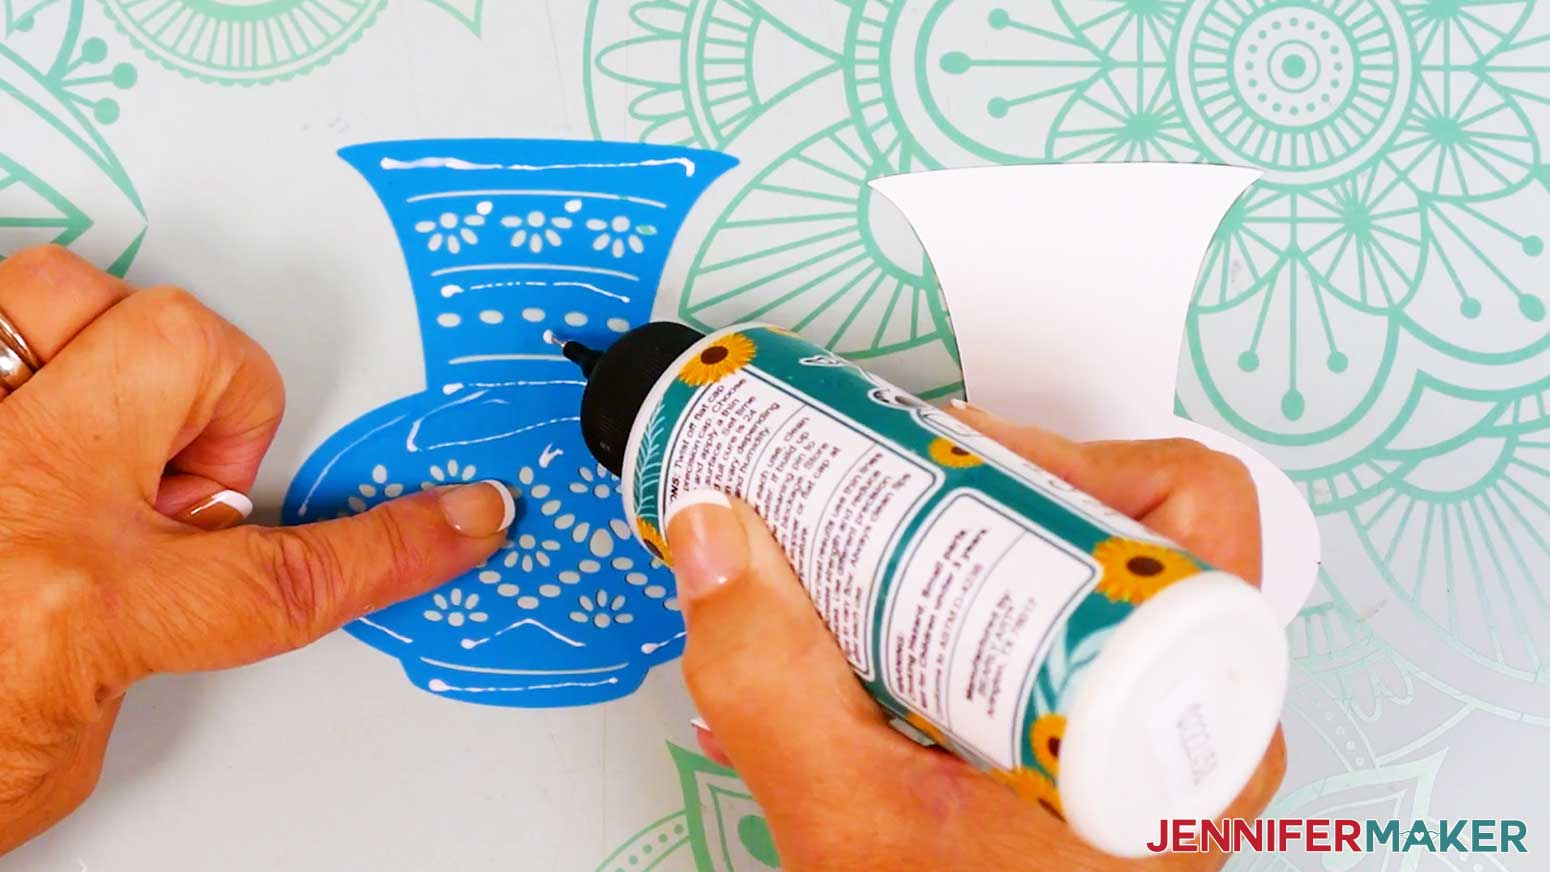
- Next, stack the vase pieces in order, with the teal piece with design cutouts on top of the solid white piece.
- Flip over the top layer and add glue all over its back, avoiding the cutouts.
- Flip the top layer back over and place it onto the bottom layer, aligning the edges carefully.
- Press down and smooth to adhere.
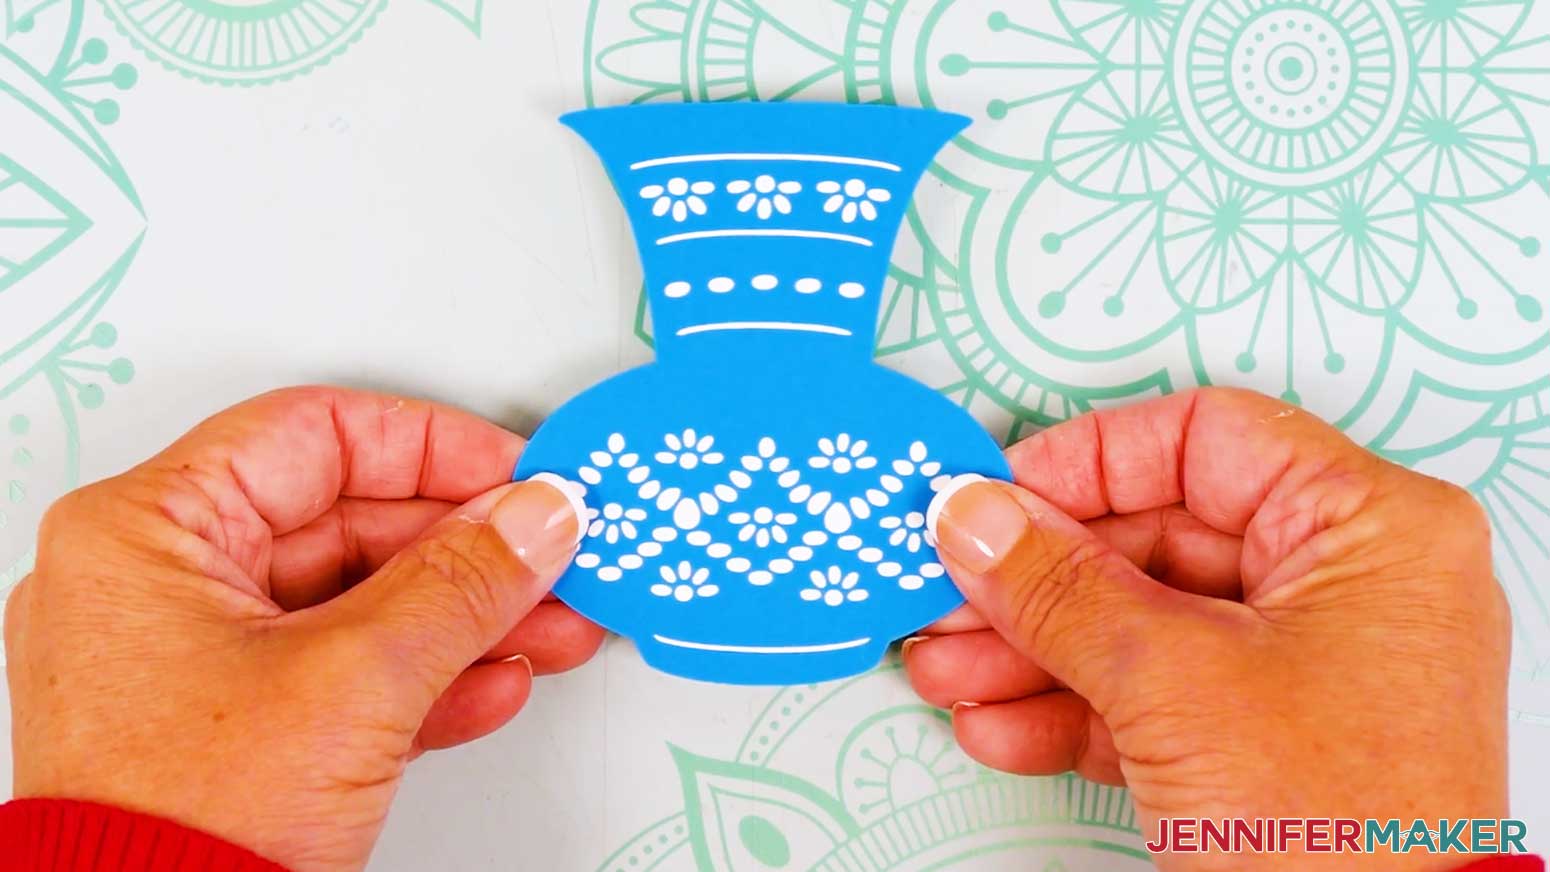
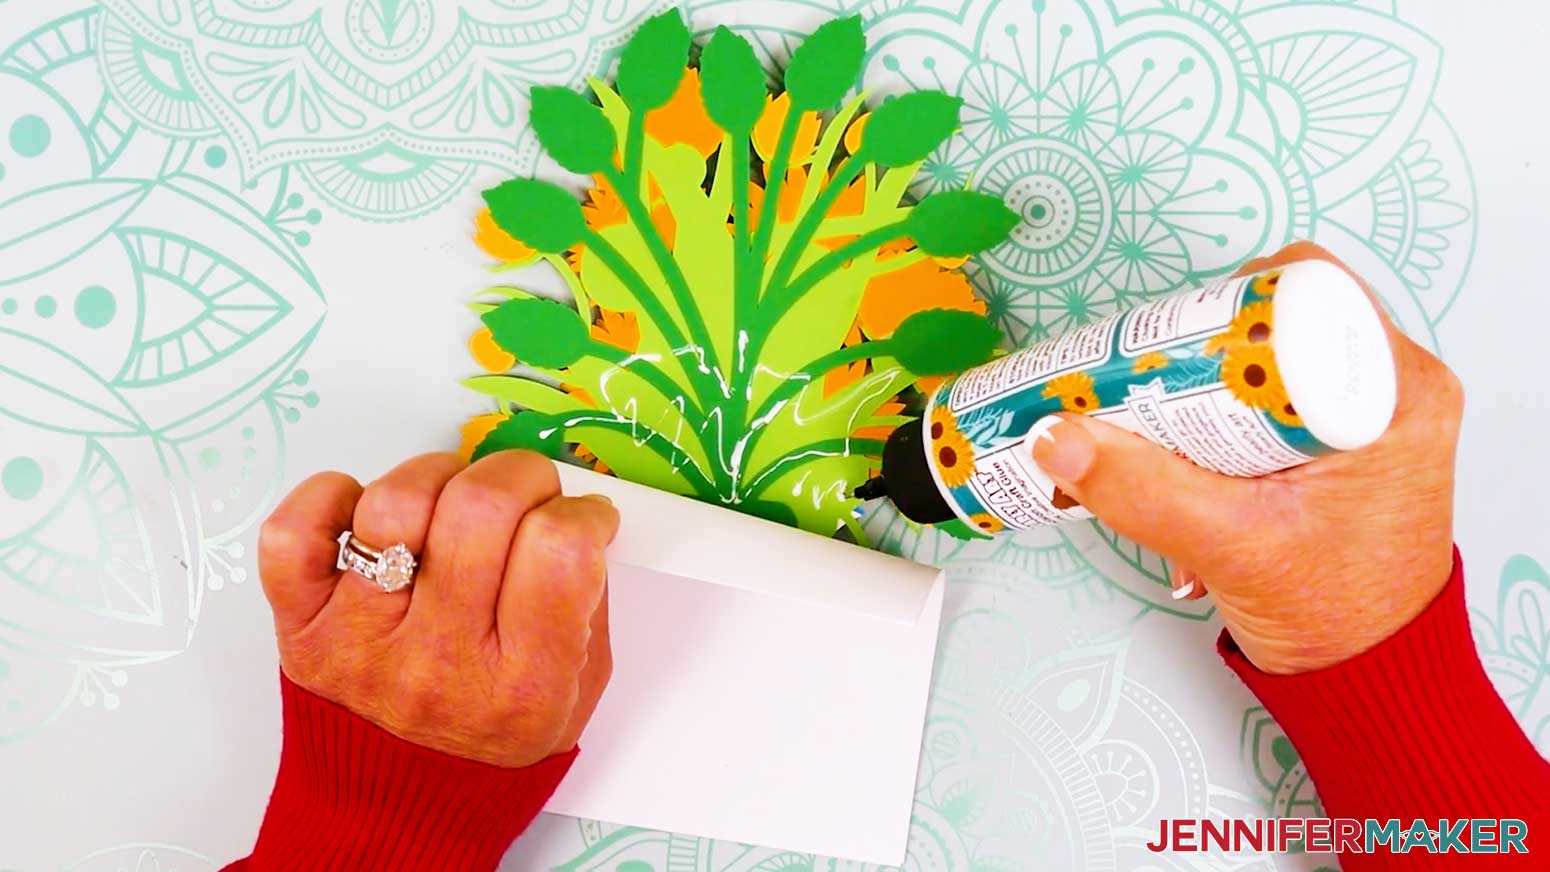
- Then, apply a small amount of glue across the bottom of the face-up foliage and attach the back of the vase’s top lip to the foliage.
TIP: If your flowers' petals extend past the vase's top edge, slip the vase between the flower and foliage to create depth! - Next, fold the card base in half along the center crease line and use a scraper tool to sharpen the fold.
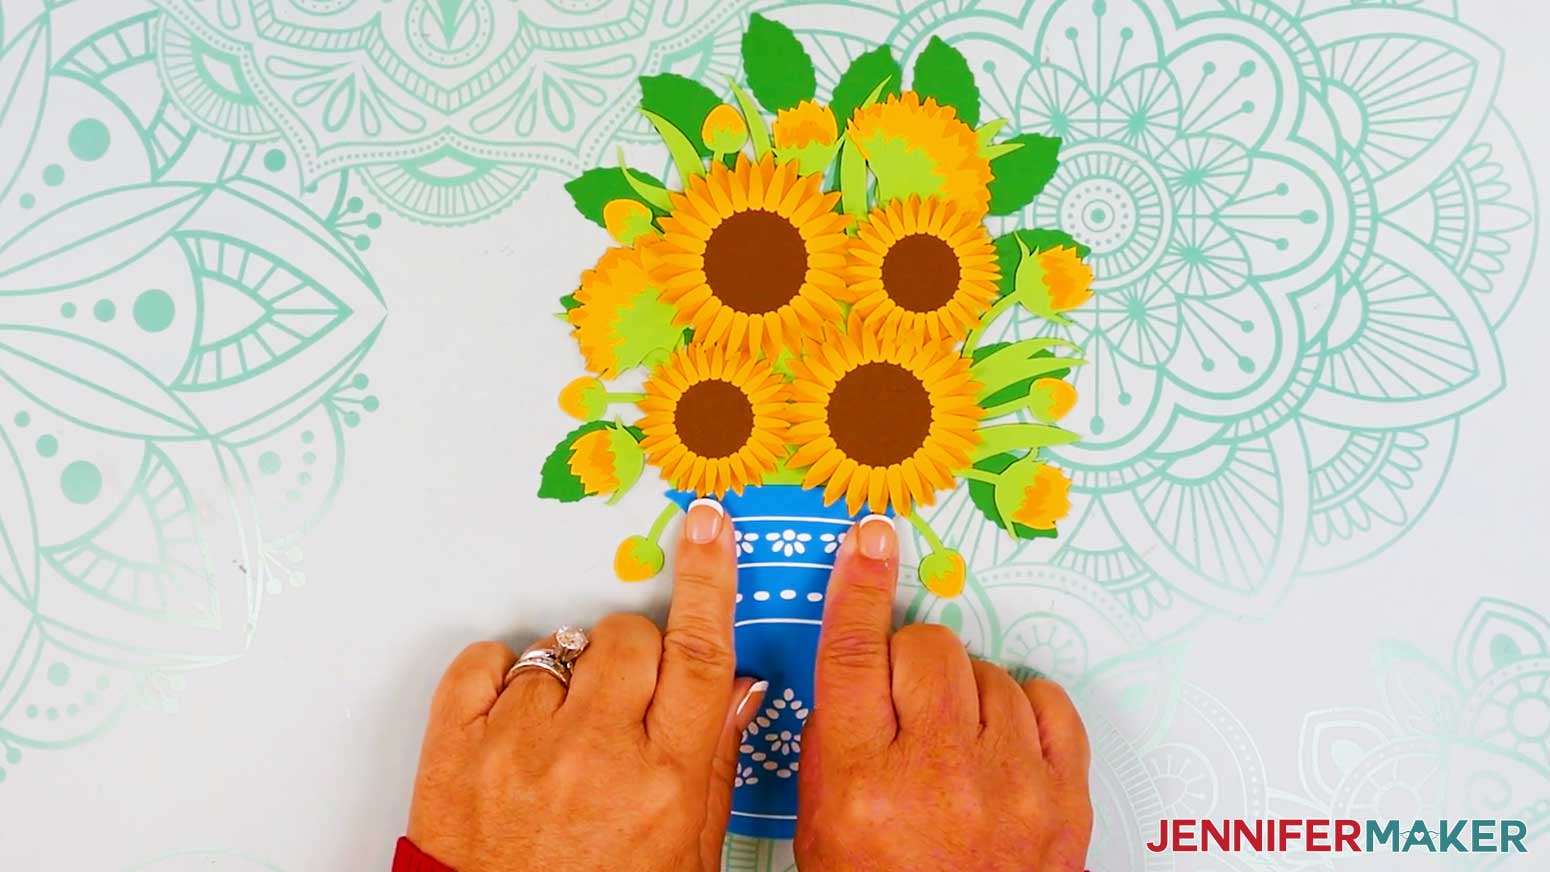
- Position the folded card base so the open end is toward you.
- Lay the assembled vase and bouquet face down.
- Add glue just to the back of the vase.
- Flip the vase face up and place it onto the card base, centering the vase with its lower edge just above the card base’s bottom edge.
- Press and smooth to adhere, then let it dry.
- Flip the assembled card and base face down.
- Lift up the top of the card where it overlaps the foliage.
- Add craft glue to the foliage under the card, then smooth the card back into place and press to adhere.
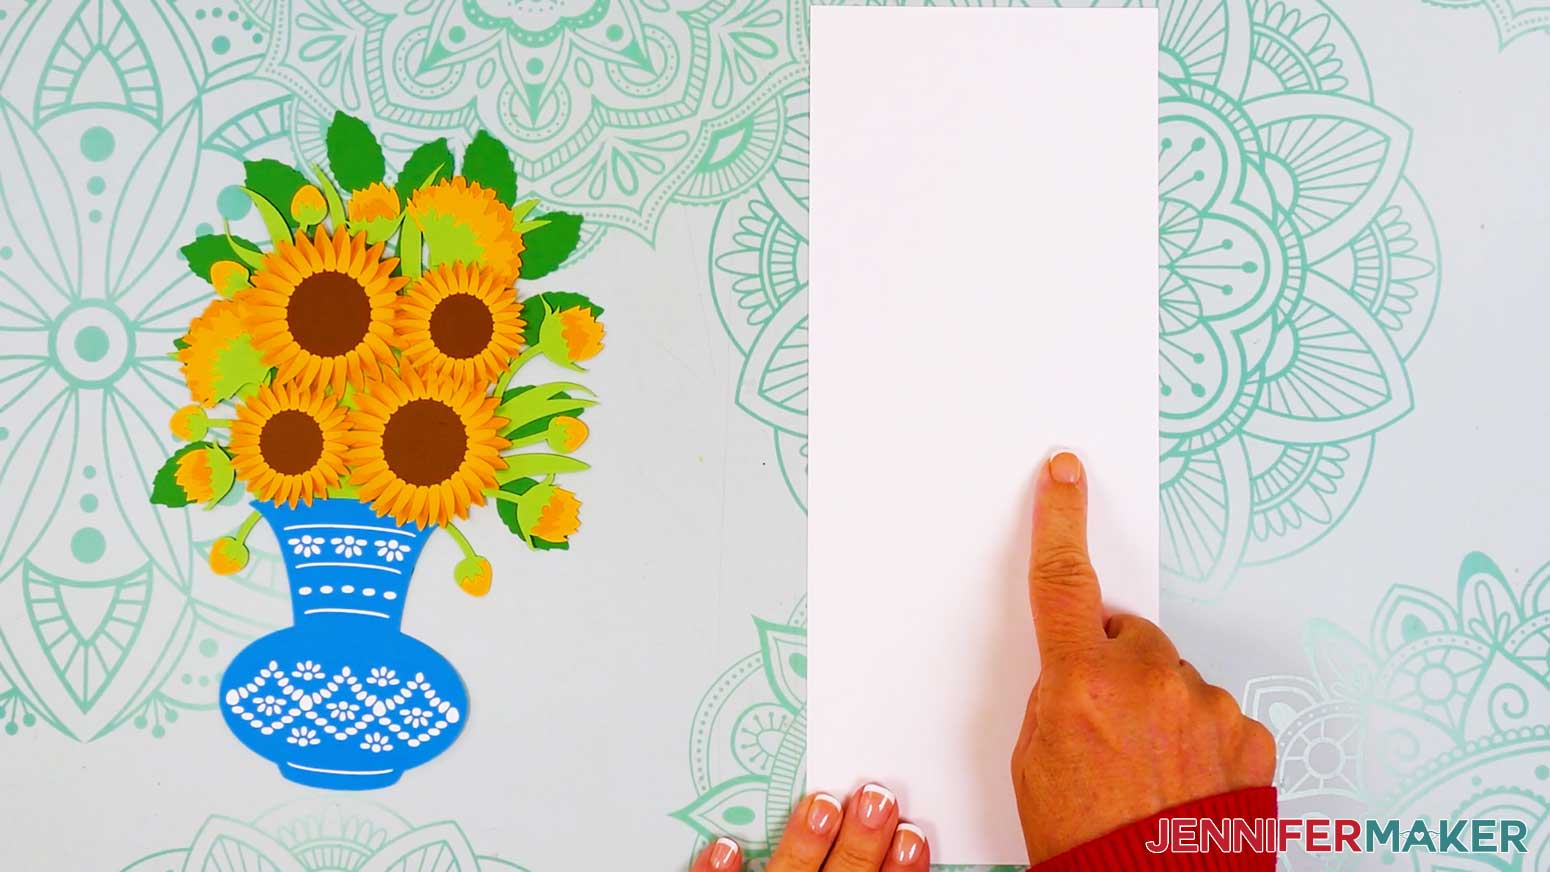
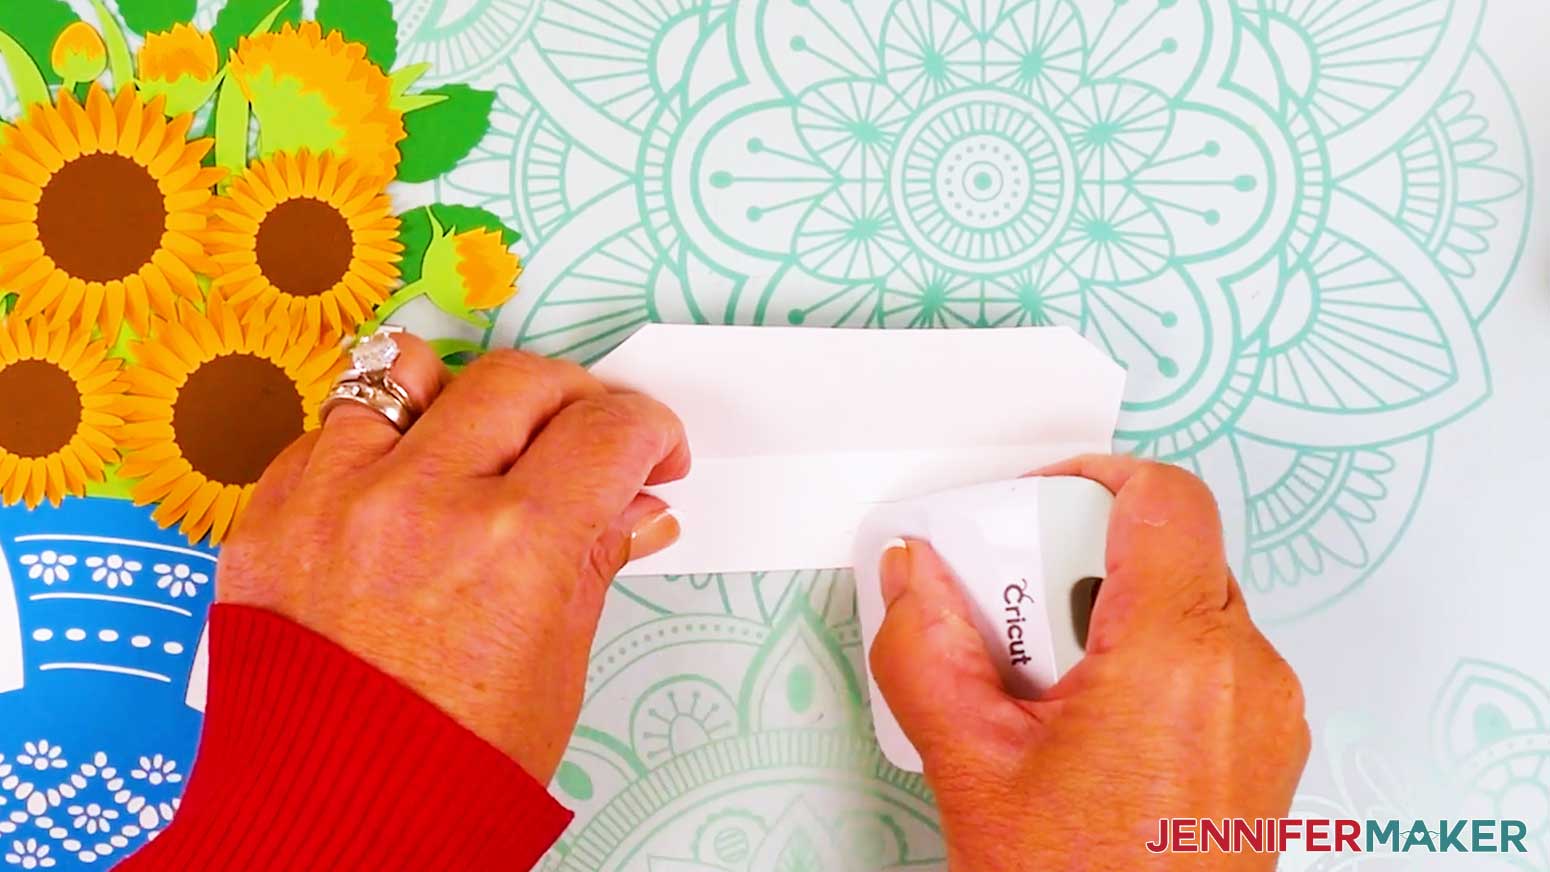
- Next, lay the card stand on your work surface so the crease lines run horizontally.
- Fold the top of the card stand down along the center crease line and use a scraper tool to sharpen the fold.
- Then fold up the card stand’s first side tab up along the crease line and sharpen the fold.
- Flip the card stand over, then fold up the other side’s tab along the crease line and sharpen the fold.
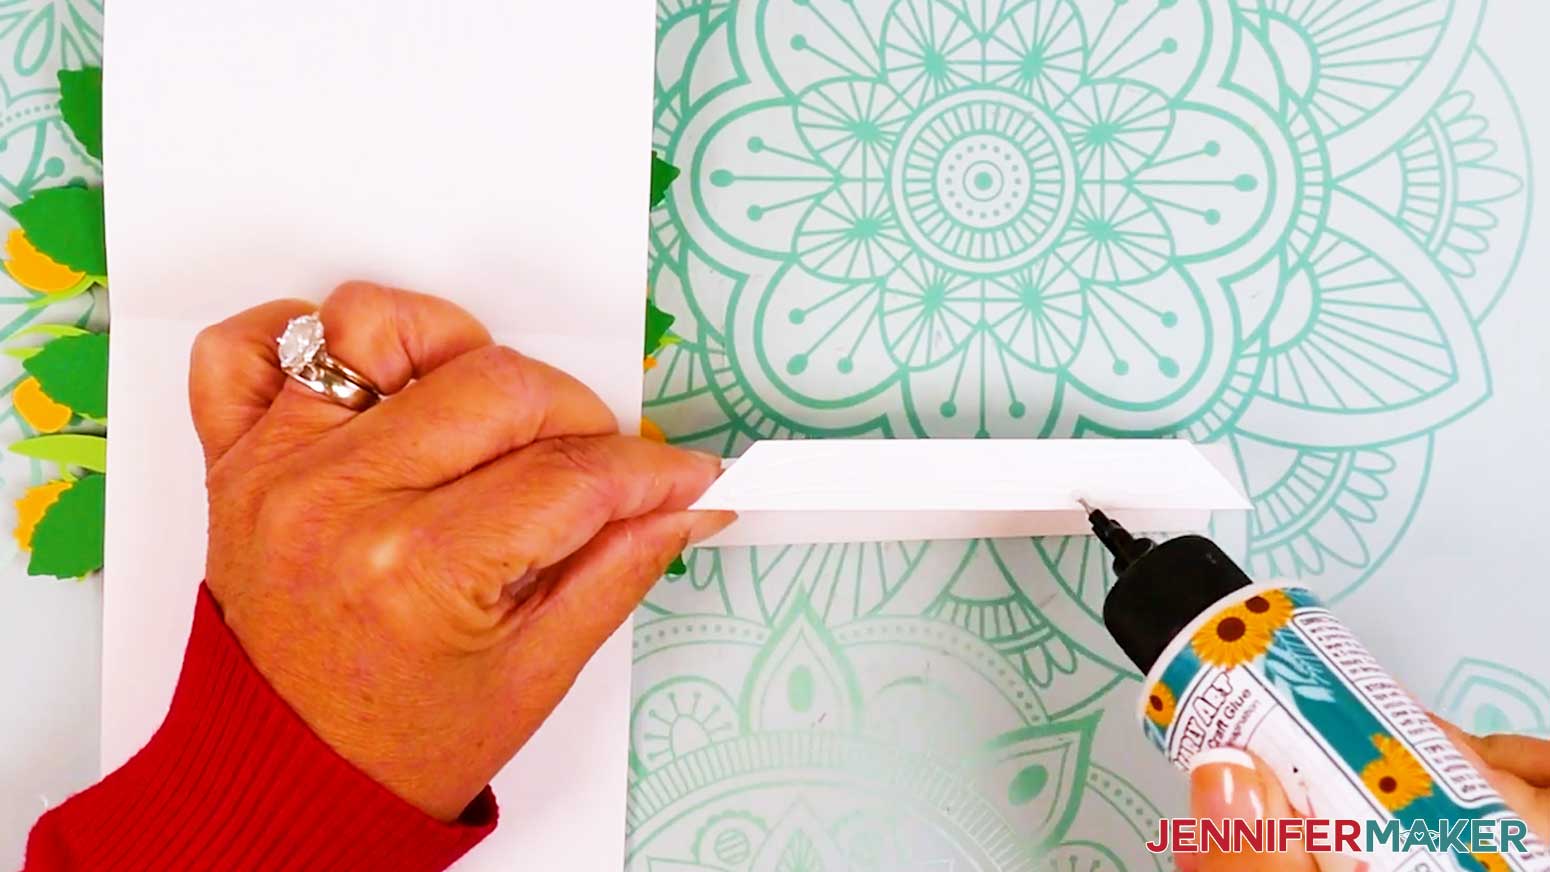
- Open the assembled card so the center crease line is horizontal.
- Add glue to the card stand’s first side tab, then flip it over and align the glued side tab with the bottom edge of the open card.
- Press and smooth to adhere.
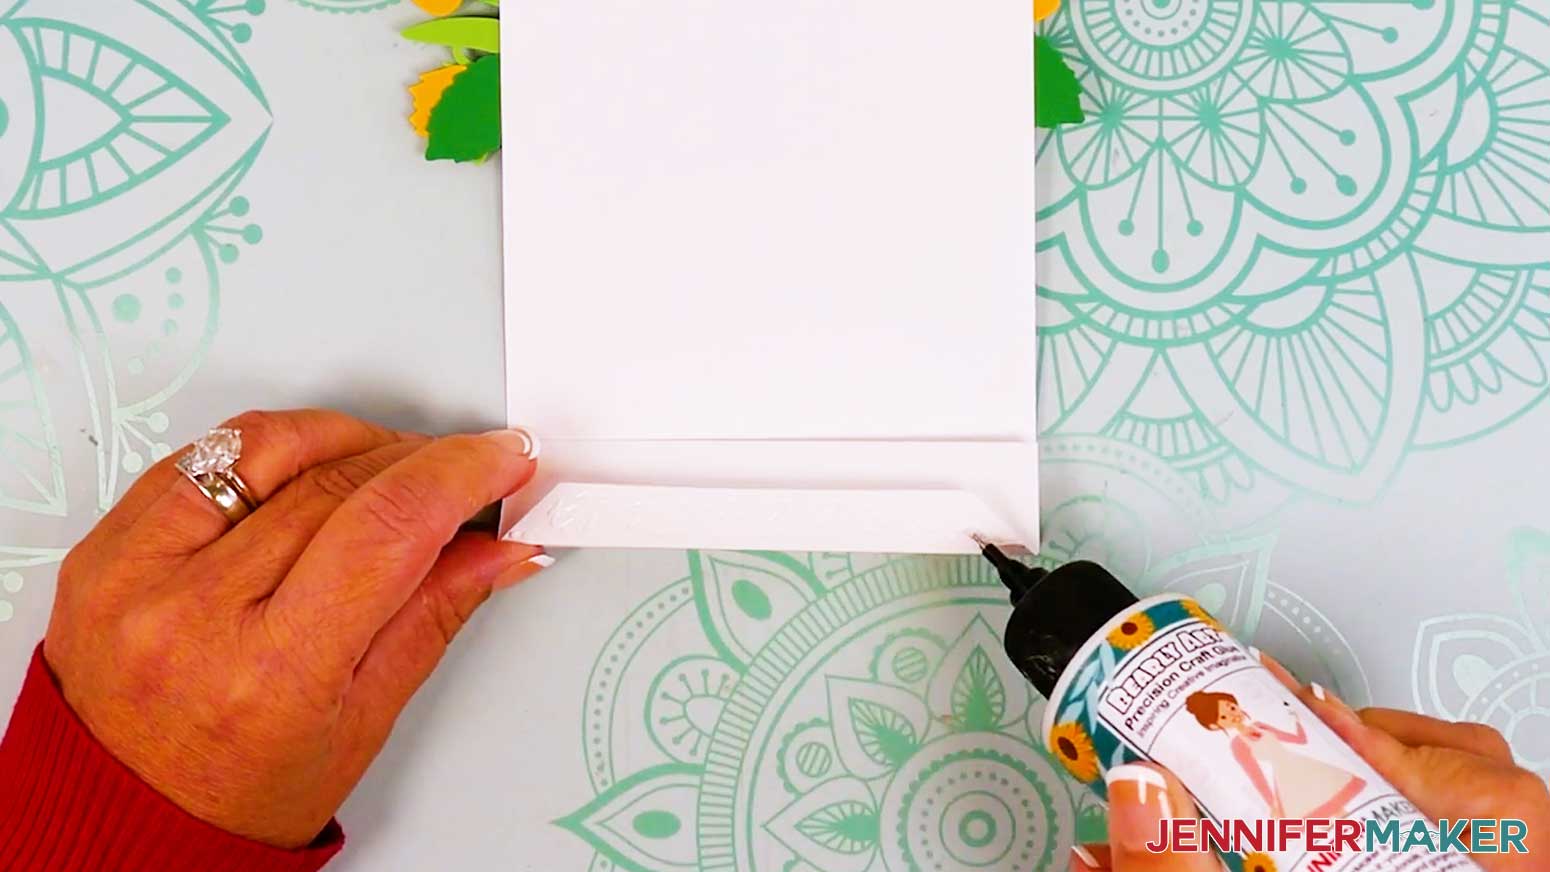
- Then add glue to the other side tab and fold down the card, making sure the card’s edge aligns with the edge of the stand’s side tab.
- Press and smooth to adhere.
- Your card is ready!


STEP 4: SHOW IT OFF
You now have an easy 3D bouquet card to send to friends and family! If you curl your flowers, I recommend hand-delivering your card so the petals don’t get crushed in the mail. Flat cards can be mailed in an A10 envelope. Follow my How to Make an Envelope Tutorial to learn how to make a custom envelope for your card!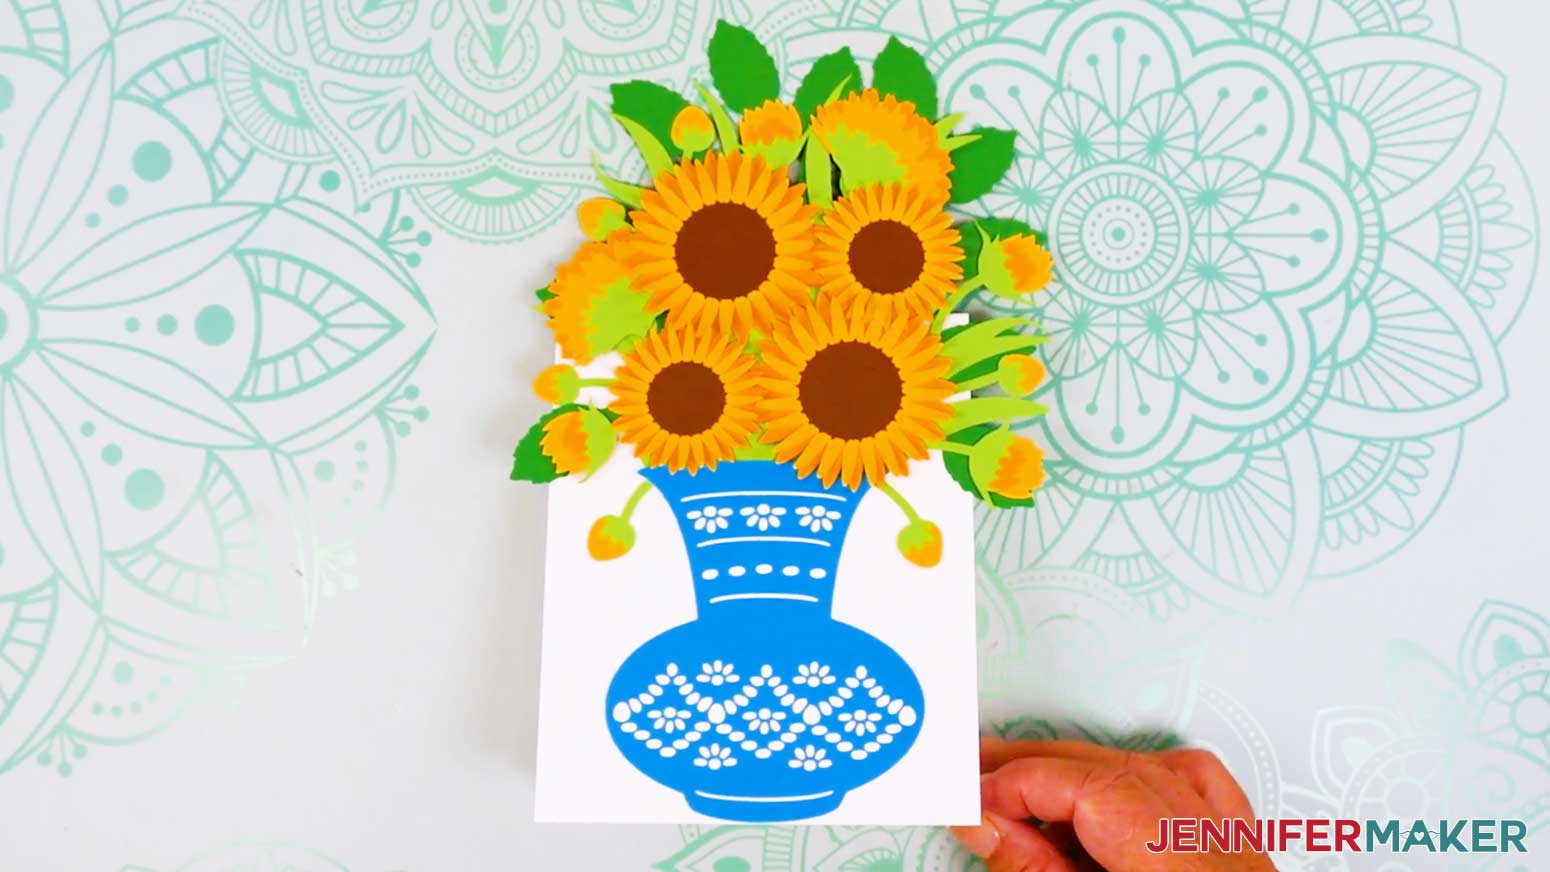
Notes
Finished Size: Approximately 6” W x 9” H
Answers to Your Questions About Making an Easy 3D Bouquet Card
Q: Is there a way to create a custom 3D bouquet card?
A: You can learn how to design your own 3D bouquet card in my ADVANCE program. Learn more about ADVANCE here!
Q: Can you show me how to make a 3D decorative card?
A: I sure can! Just scroll up and follow the video tutorial or the written tutorial with photos to learn how to make your own card. My easy 3D bouquet design is perfect for Mother’s Day cards, unique birthday cards, or even “just because.”
Q: Can Cricut make 3D cards?
A: Yes! Cricut machines are perfect for making 3D cards like pop-up and layered designs. You can cut intricate shapes and score folds, making it easier to shape flat paper. Then, you can assemble dimensional cards like the easy 3D bouquet card, which stands up, folds flat, and even features layered paper flowers that “bloom” when opened.
Q: What is needed to make cards with Cricut?
A: To make cards with a Cricut, you’ll need cardstock, a cutting machine mat, a Cricut machine, and a free SVG design to cut. Optional tools like a scoring stylus or scoring wheel can help with clean folds, but you can also use no-score files with your standard Fine-Point blade to make dashed cut lines for folding.
Q: Can you make a card on Cricut without scoring wheels? What can I use instead of a scoring wheel?
A: Yes, you can absolutely make Cricut cards without a scoring wheel. You can use a scoring stylus if your machine supports it, or choose a “no-score” SVG version with dashed cut lines that fold easily.
Q: What size envelope will fit a 3D bouquet card?
A: The 3D bouquet card folds flat and fits inside a standard A10 envelope. That’s approximately 6″ x 9.5″, making it easy to mail or hand-deliver. For a special touch, you can also create a custom envelope using coordinating cardstock.
Q: Do you have any other 3D cards I can make?
A: I sure do! Here are some of my favorites:
- Butterfly Pop-Up Card
- Birthday Pop-Up Cards
- Hot Air Balloon Pop-Up Birthday Card
- Pop-Up Grill Gift Card Holder
- Pop-Up Apple Tree Card
- 3D Pop-Up Flower Bouquet
Q: Can I make and sell 3D bouquet cards?
A: If you want to use my bouquet card designs and projects for commercial use, please familiarize yourself with my important licensing information before selling your crafts.
Get my free SVG/DXF/PDF files to make your own easy 3D bouquet card!
(If you do not see the signup form above, click here.)
I absolutely love seeing your homemade card projects! Once you’ve learned how to make 3D bouquet cards, inspire others and share a photo of your card in our Facebook group or tag me on social media with #jennifermaker.
Love,

Want to remember this? Save this Easy 3D Bouquet Card Tutorial to your favorite Pinterest Board!