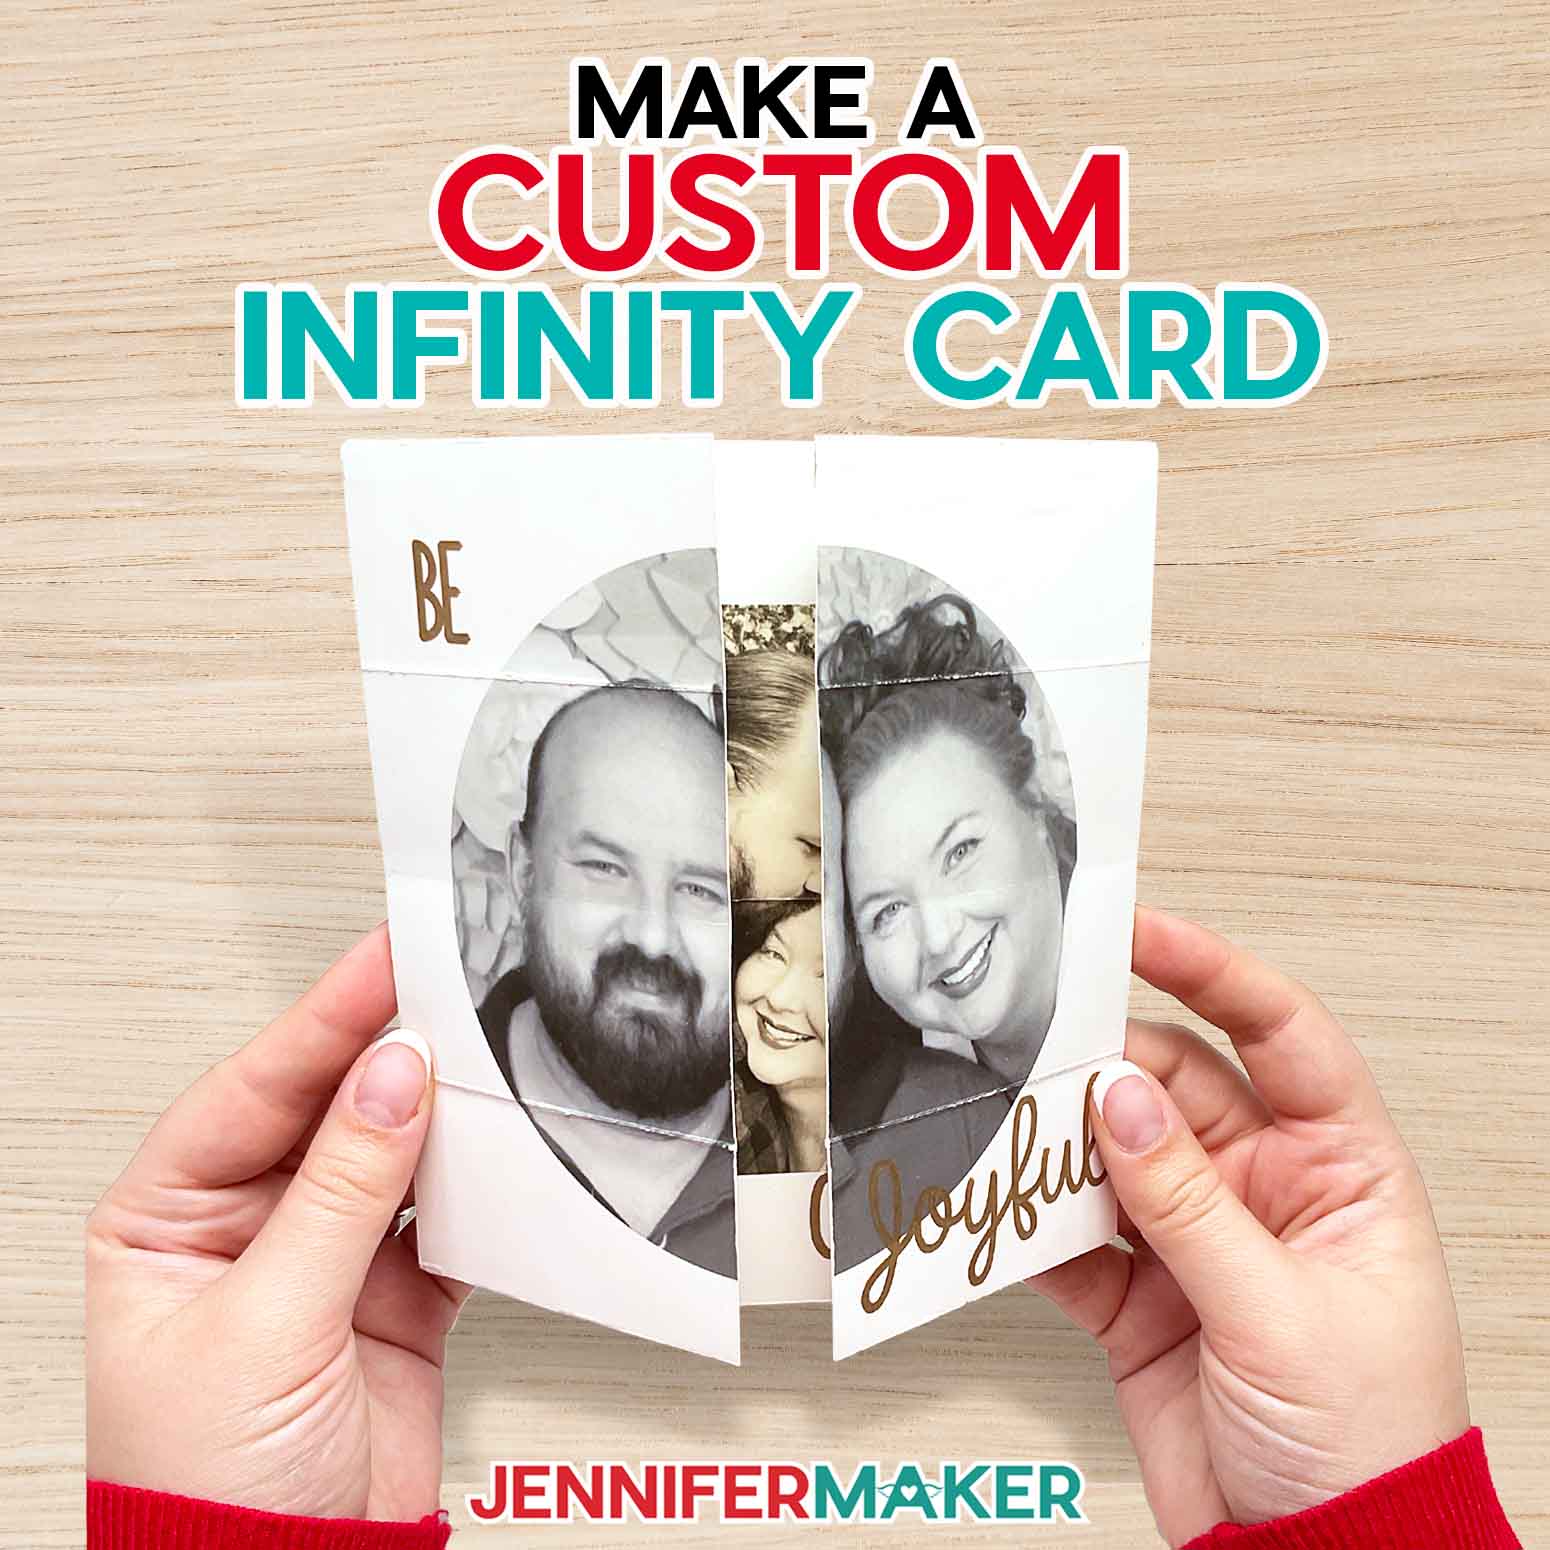
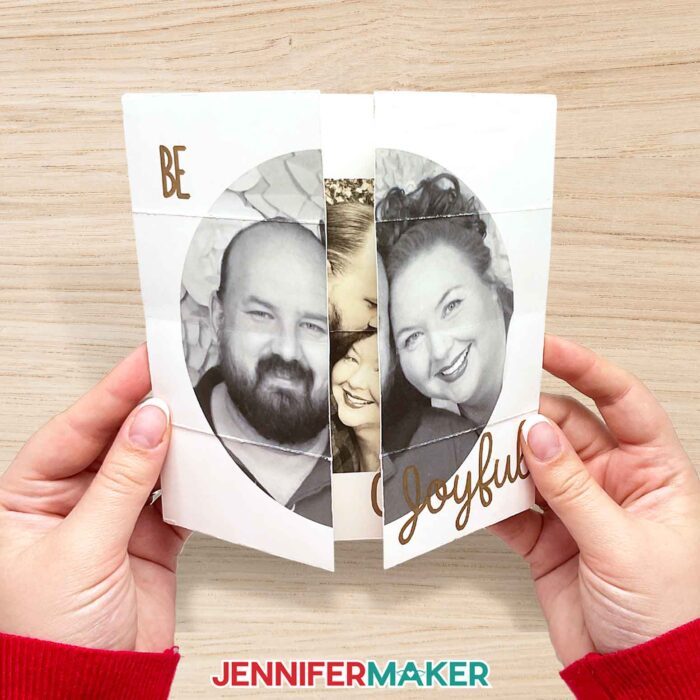
Learn how to make an Infinity Card with Photos!
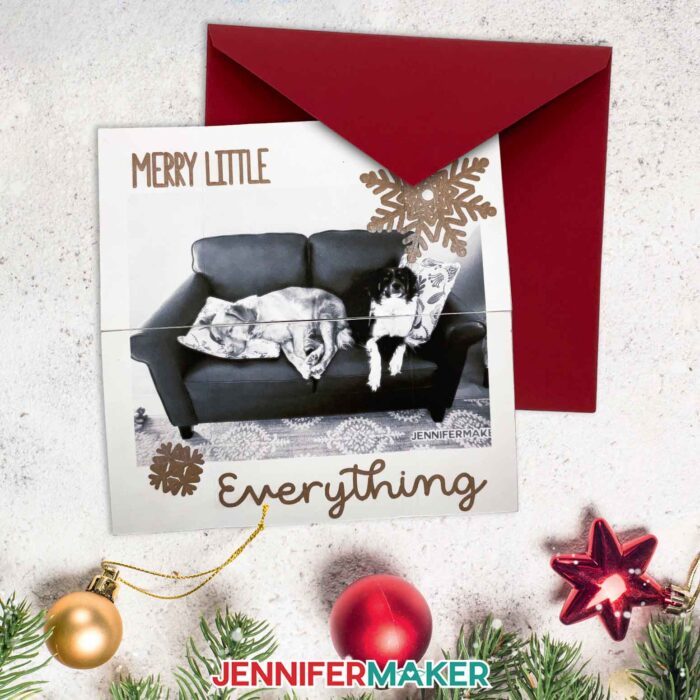
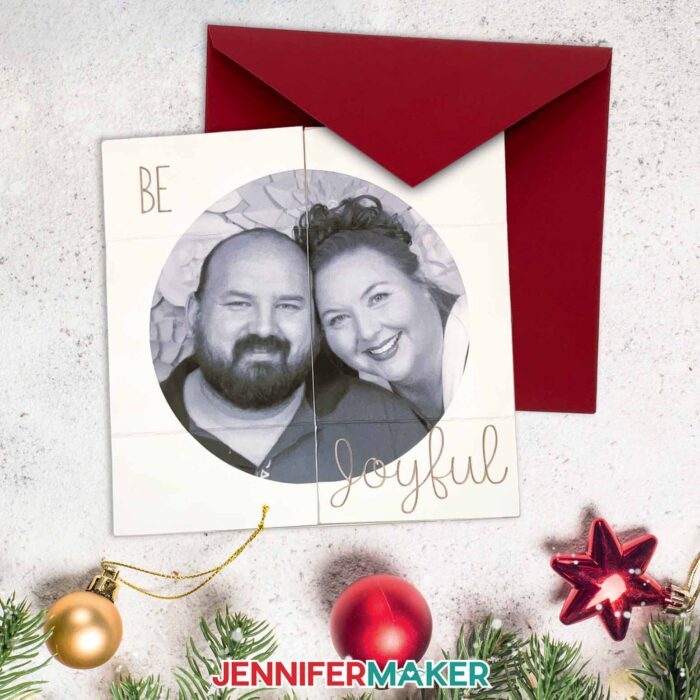
Who doesn’t love a super neat card? When I saw those super neat infinity cards online, I was so intrigued with how they worked. They just keep opening and opening, revealing new layers. I knew I wanted to make one that included photos, so I went on a mission to design one that could be cut with a Cricut cutting machine! So, after lots (and lots) of testing, I’m so excited to share that I’ve cracked the code. Not only can you make your own infinity card, I’ll show you how to do it with your own photos in Cricut Design Space with my free video tutorial and template!
Want to save this project? Enter your email below and we’ll send the project straight to your inbox.
These custom infinity cards may look like magic, but they’re really just cardstock put together in a clever, creative way. But adding your own photos really makes them exciting and special. They’re like little mini albums of special photos from your year! Plus, I’ll also show you how to add a special message or cute ephemera using a Cricut pen and the drawing feature. Homemade cards never looked so cool.
I used my Cricut Maker 3, but you can use any Cricut with Print then Cut capabilities like the original Maker, Explore series machines, the Venture, and the Joy Xtra.
The other supplies and tools you’ll need are really simple, and there’s a good chance you might already have everything you need on hand. With a color printer and good quality cardstock, I’ll show you how to use your Cricut’s Print then Cut feature to make an incredible infinity card that will make a big impression to whoever is lucky enough to receive it!
To write some holiday season sentiments on your card, we’ll also use a Cricut. You can use any compatible pen or marker you like, but I personally love the shine from the Cricut metallic pens. They add some fun flashiness to the card! Aside from some other common papercrafting tools and the nice ultra thin, double-sided tape, you just need my design file which you can find the link to in this tutorial.
As with all Print then Cut projects, I highly recommend you calibrate your machine before starting. It may be tempting to skip this step to save time, but you risk wasting time and materials if your machine isn’t calibrated correctly — especially with projects like this. You can find all the steps in my DIY Money Holders tutorial.
When it comes to preparing your card in Cricut Design Space, you’ll find that the process is very detailed. I strongly recommend you watch the full tutorial video and read through the step-by-step instructions before starting your card, even if it’s not your first time making one! I walk you through each part step-by-step, but watching and reading beforehand will help to make sense of the layout, photo requirements, editing process, and assembly. I’ve also included printable layouts for future reference, to help you picture everything.
To prepare the card file in Design Space, first you’ll upload the template SVG file and add it to your Canvas. I’ll help you to set your score lines for folding, as well as show you how to customize your text. Want to tweak the font so it draws the exact way you want? Check out my Cricut Writing Fonts tutorial to learn how.
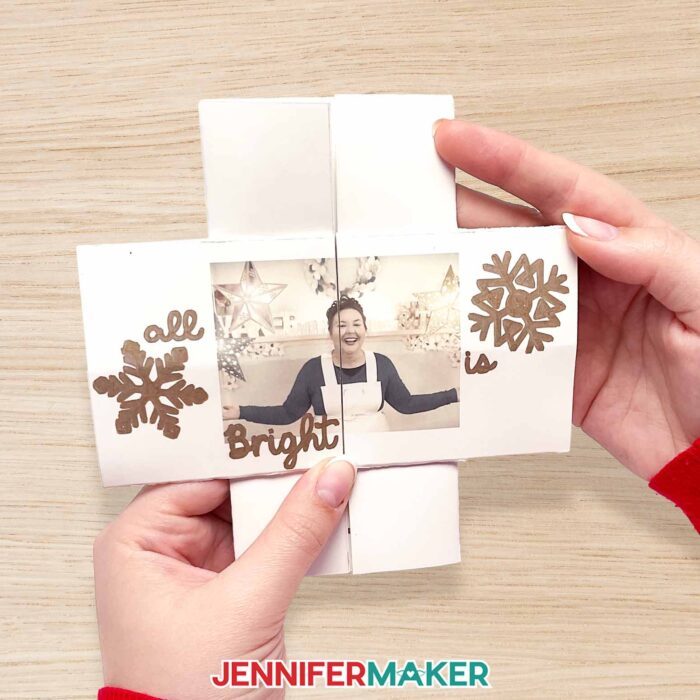
Next comes choosing your photos — my favorite part! It’s best to use high-resolution JPGs or PNGs that will fit into the shapes on the gray pieces. It can be really helpful to refer to the layout template so you can imagine how the images will move when someone is opening the card. I’ll show you how to shape your photos using the slice tool, as well as what to do to make the photos move with your card!
When you’re done preparing your photos in Design Space, you’ll be left with four groups of attached layers — one for every “face” of the card. Next comes printing, cutting, and drawing the card pieces, then assembly. Finally!
Putting the card together was fun because you get to see it come to life. I’ll guide you through assembling the card frame my frame, and then we’ll smooth any creases and make sure the photos line up the way they’re supposed to.
Once it’s all put together, it’s time to test it out! Ok, I lied — THIS is my favorite part! They’re so much fun to make and give for special occasions like Christmas, Valentine’s Day, to wish someone happy birthday, and more. You can even make an envelope to mail it to a loved one. There are so many creative ways to use an infinity card to make someone smile!
Let me show you how easy it is to make an infinity card with photos! This post contains some affiliate links for your convenience (which means if you make a purchase after clicking a link I will earn a small commission but it won’t cost you a penny more)! Read my full disclosure policy.
Materials and Tools to Make an Infinity Card
View my Amazon shopping list with the exact items we used to make this project
- 8.5″ x 11″ High quality 65 lb cardstock – use white for a neutral background when printing photos
- Color printer to print your photos. I used my Epson EcoTank ET-2800
- A way to cut your cardstock – I used the amazing Cricut Maker 3, but you can also use the original Maker, an Explore 3, Explore Air 2, Explore, Venture, or Joy Xtra machine with the Fine-Point Blade
- Cricut Green StandardGrip Mat 12″ x 12″
- Cricut pen or marker, in any color of your choice – I used the Cricut Metallic 1.0 Pen in Copper
- Ultra-Thin Permanent Double-Sided Tape
- Single Scoring Wheel -OR- Scoring Stylus
- Brayer
- Bone Folder -OR- XL Scraper
- Weeding tool
- Scissors -OR- Craft Knife
- Self-Healing Cutting Mat
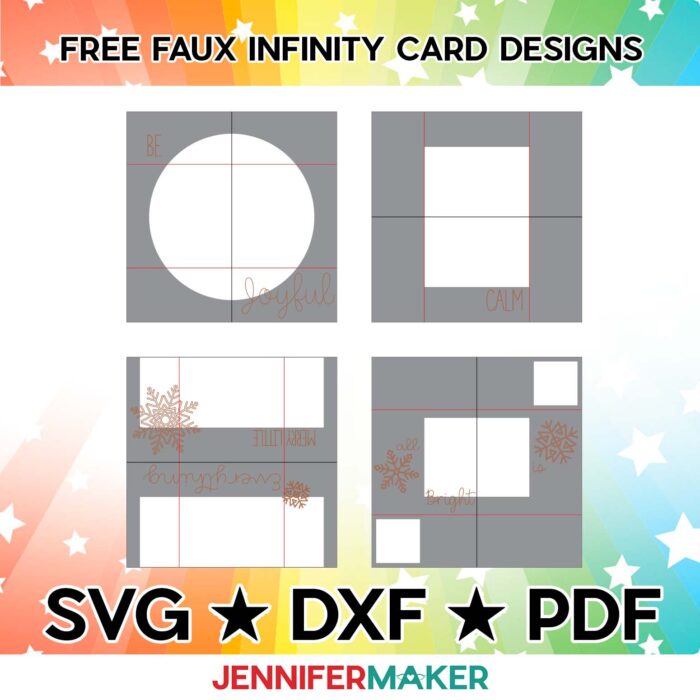
- Design #531 – (My free SVG/PDF/DXF design files are available in my free resource library (get the password by filling out the form at the bottom of this page)

How to Make Your Own Infinity Card
The detailed step-by-step assembly video on how to make infinity cards debuted during Maker Academy Weekend 2023, held online November 1-5, 2023. Get an on-demand pass to watch all 30+ workshops, each with a printable handbook, transcript, audio file, design files, and support with a VIP pass below:

Answers to Your Questions About How to Make an Infinity Card With Photos
Q: Where is your tutorial for this project?
A: These infinity cards with photos are a special project we made for our free Maker Academy Weekend 2023 event! A complete and detailed step-by-step video premiered during the event November 1-5, 2023 — this tutorial video was available to watch for free for 24 hours only during the event. If you missed it, you can get access to the full video, the 15-page printable handbook that details how to make this beautiful project with a VIP Pass to Maker Academy Weekend 2023, which comes with other perks and bonuses, too! Look at all the star ornaments made by our VIP passholders in the lead up to our big event!
Q. What is an endless card? What is an infinity card? Are they the same thing?
A. Endless cards, infinity cards, and never-ending cards are all ways to describe a cleverly folded greeting card that appears to open over and over again, without end. These cards have gained popularity, and I’ve made a template and tutorial to not only add printed photos, but also make it cuttable with a Cricut. They’re a great way to make an impressive gift without paying drugstore or grocery store prices for cards.
Q. How do you make an endless card out of paper?
A. To make my infinity card design, just follow my tutorial in this post. I’ve included written step-by-step instructions with photos as well as a full video tutorial to help. I’ve also compiled a handy materials list with links to everything I used!
Q. What are the dimensions of a never ending card?
A. My never-ending card design comes out to 6 x 6″. My How To Make an Envelope tutorial includes a collection of 4 x 4″ square envelopes that can be re-sized to fit. I recommend sizing the inner square of the envelope design to approximately 6.5″ on each side to accommodate your 6 x 6″ card.
You can re-size the infinity card file as well, but be aware that it may change the project time and the number of mats used. Be sure to size your envelope accordingly, making it about a half inch larger than your card.
Q. What do I need to make cards on Cricut?
A. To make almost any card with a Cricut, you’ll need to start with some card stock. Beyond that, it depends on the project! For my infinity card, you’ll need some high quality 65 lb cardstock (I used white because I printed photos onto it), a color printer, a bone folder or a scraper, scissors or a craft knife, ultra-thin permanent double-sided tape, and a self-healing cutting mat.
If you’re using a cutting machine for this project like me, you’ll also need a Cricut cutting machine capable of Print then Cut (like the Maker 3, original Maker, Explore 3, Explore Air 2, Explore, Venture, or Joy Xtra), basic paper cutting tools like a single scoring wheel or scoring stylus, a brayer, weeding tool, and a green StandardGrip mat. If you’d like to add messages or sentiments to your card, you’ll need a pen (I used a metallic copper Cricut pen and had my Cricut write the messages for me). Easy links to everything I used can be found in my materials list!
Q. Can you make photo cards with Cricut?
A. You sure can! If you have a Cricut with Print then Cut capabilities (which all models except the original Cricut Joy do), you can print photos onto cardstock with your inkjet printer and cut your own cards seamlessly with your Cricut. What a fun way to wish a family member or friend Happy Holidays, Merry Christmas, Happy Hanukkah, Happy Kwaanza, or Happy New Year!
Q. How do you take a picture and put it into Cricut Design Space?
A. From your Canvas, click “Upload,” then “Upload Image.” Click “Browse” to find and select the photo you’d like to use. Cricut Design Space currently works with .png, .jpg, .gif, .svg, .dxf, .heic or .bmp file types, though most photos are .jpg or .png format. Then click “Open.” Click “Complex” so your photo will look as detailed as possible, and then click “Continue.” On the next page, you can remove the background if you wish, or erase any parts of the photo you’d like to remove. Then click “Apply & Continue.” Select “Print Then Cut Image” and click “Upload.” Select the photo from your Recent Uploads, then click “Add To Canvas.” Voila! Now you can prepare your photo to Print Then Cut.
Q: Are there other greeting card ideas I can make?
A. I have so many fun greeting cards you can make by hand or with a cutting machine! Check out my Christmas Shadow Box card, Holiday Manor pop-up card, and Winter pop-up card for your holiday card exchange. There are tons more tutorials for beautiful cards for all year long on my blog, including shaker cards, holders for gift cards, amazing pop-up cards and more. When you factor in all the ways you can customize these designs, there are endless opportunities for creativity!
Get my free SVG files to create an infinity card!
Get FREE access to this design and ALL of my SVG cut files!

Subscribe (free!) to my newsletter with updates and tips PLUS get instant access to my resource library with this file and all of my other free files, printables, and patterns! Once subscribed, I will send you a newsletter with details about my new free and helpful files each week.
Enter my free resource library for my latest files, printables, and patterns! Password is 'craft' -- please copy and paste that in at the link above. Thanks for being a subscriber!!
I SO hope you’ll make an infinity card with photos! Please share a photo of your new cards in our Facebook group or tag me on social media with #jennifermaker.
Love,

Want to remember this? Save this Infinity Card tutorial to your favorite Pinterest Board!