Learn how to decorate cookies with royal icing and cookie stencils!
A few years ago, I was elbow-deep in a cookie decorating frenzy, determined to make the cutest holiday treats anyone had ever seen. I had the sugar cookies, the royal icing, and a heart full of holiday spirit … but the results? Well, let’s just say they were more “homemade charm” than “bakery wow.” That is, until I discovered the magic baking tool hiding in my craft corner: my Cricut! That moment led to me discovering the world of cookie stencils, and let me tell you, they’re a total game changer!
See the full step-by-step video tutorial on how to make cookie stencils:

Once I figured out how to use a Cricut to cut cookie stencils, they became a must-have tool for cookie decorating. No more spending a high price on plastic stencils with limited designs, or buying cookie cutters that never quite matched my theme!

You can make your own stencils for just about any special occasion, from Valentine’s Day and Easter stencils, to Mother’s Day, Father’s Day, and even happy birthday celebrations. Now I have a lot of stencils ready to go when I need to whip up a batch of unique cookies. The best part? You can reuse them again and again because they’re made with food-safe Mylar!

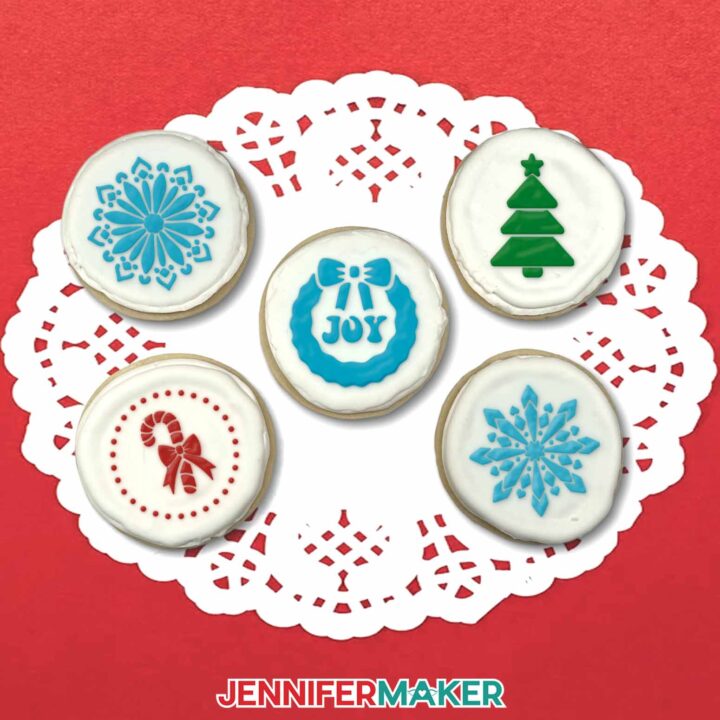
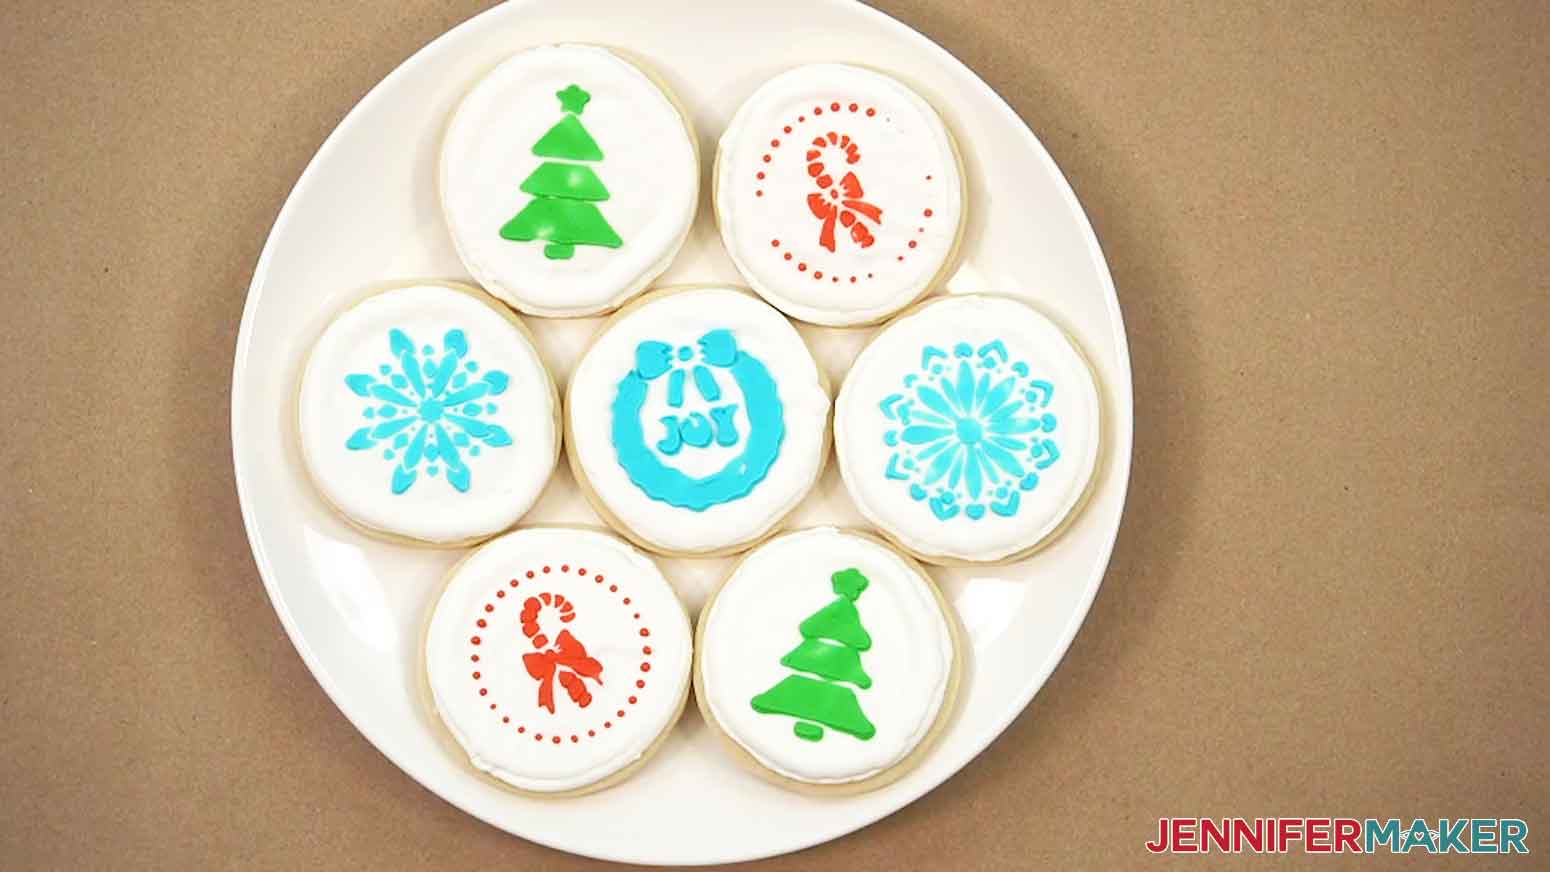
For this project, I’ve designed five festive stencil designs: a candy cane, a snowflake, a little tree, a wreath, and a whimsical flower. They’re all sized just right for three-inch sugar cookies and a standard six-inch stencil holder, but you can resize them for a different size holder if you need to. Since it might be a new material for you (and your Cricut), I’ll share the best settings to use when cutting the Mylar material with your cutting machine. Just make sure you have a clean cutting blade before you get started!

Bakery-style decorating tools made at home? How cool! There’s no need to buy special supplies at a high price when it’s this much fun to make the best tools ourselves.

Once the cookie stencils are cut and ready, it’s time to get baking! Whether you make your cookies from scratch or grab a pack from the store, all we need are flat, cooled sugar cookies about a quarter-inch thick. Then comes the icing! This is where the magic happens. I’ll share my favorite way to whip up a batch of royal icing that dries smooth and firm with a glossy, polished finish.

After the base layer dries (overnight works best!), we’ll mix up another batch of icing, this time thick and bold like gum paste. Be sure to add a drop of food coloring for festive candy colors, or even sprinkle on a touch of edible glitter for the perfect blend of sweetness and sparkle. And here’s a tip: Make a note of how much food coloring you used so you can get consistent colors from batch to batch.

Next, I’ll show you how to load your cookie stencils into the stencil holder, center them over your cookies, and gently apply icing to the stencil to create the flawless cookie design. With the holder, it’s truly effortless stenciling!

If you want to go even further, I show how to create custom cookie stencils in my ADVANCE with JenniferMaker workshop! There, I teach you how to design themed elements for any event, and even pair them with matching cookie cutters to bake and decorate batches of personalized treats for parties or gifts. Click here to learn more about the ADVANCE program!

These treats are more than just delicious. They’re handmade, heartfelt creations you can feel proud to share … and eat! Be sure to watch the full video tutorial where I guide you step-by-step through every part of the project. Let’s turn ordinary sugar cookies into edible masterpieces, and make memories that last long after the last cookie’s been enjoyed. They make great gifts, too. Use clear cookie boxes to show off your beautiful bakes inside!
Let me show you how to make cookie stencils with your Cricut! This post contains some affiliate links for your convenience (which means if you make a purchase after clicking a link I will earn a small commission but it won’t cost you a penny more, there is no additional cost)! Read my full disclosure policy.
Materials to Make Cookie Stencils
View my Amazon shopping list with the exact items I used.
- One or Two (1-2) 12″ x 12″ Food-Safe 4 Mil Mylar Blank Stencil Sheets
- Two (2) 16 oz. Packages of Royal Icing Mix
- Twelve (12) Premade 3″ Round, Flat-Top Sugar Cookies -OR-
- Twelve (12) Homemade 3″ Round, Flat-Top Sugar Cookies
- A way to cut your mylar – I’m using the Cricut Maker 4, but you can use any Cricut Maker series machine, a Cricut Explore series machine, the Cricut Venture, or the Cricut Joy Xtra
- Cricut Green StandardGrip Machine Mat 12″ x 12″
- 6″ x 6″ Magnetic Cookie Stencil Holder
- Quart Storage Plastic Zipper Bags
- Liquid Food Coloring
- Paper Towel
- Brayer
- Crafting Spatula
- Crafting Scraper
- Weeding Tool
- Tweezers
- Icing Spreader
- Handheld Electric Mixer
- Mixing Bowls
- Silicone Kitchen Spatula
- Rolling Pin (for uniform cookie height if making cookies at home)
- Cookie Sheet
- Tall Glass
- Toothpick
- Chip Clips

How to Make Cookie Stencils With a Cricut!
Cookie Stencils
Learn how to make cookie stencils and decorate cookies with royal icing!
Materials
- One-Two (1-2) 12” x 12” Food-Safe 4 Mil Mylar Blank Stencil Sheets
- Two (2) 16 oz. Packages of Royal Icing Mix
- Twelve (12) Premade 3” Round, Flat-Top Sugar Cookies -OR-
- Twelve (12) Homemade 3” Round, Flat-Top Sugar Cookies
- Quart Storage Plastic Zipper Bags
- Liquid Food Coloring
- Paper Towel
- Design #774 (My free SVG/PDF/DXF design files are available in my free resource library - get the password by filling out the form at the bottom of this page)
Tools
- A way to cut your mylar - I’m using the Cricut Maker 4, but you can use any Cricut Maker Series machine, a Cricut Explore Series machine, the Cricut Venture, or the Cricut Joy Xtra
- Cricut Green StandardGrip Machine Mat 12" x 12"
- 6" x 6" Magnetic Cookie Stencil Holder
- Brayer
- Crafting Spatula
- Crafting Scraper
- Weeding Tool
- Tweezers (Optional)
- Icing Scraper
- Handheld Electric Mixer
- Mixing Bowls
- Silicone Kitchen Spatula
- Rolling Pin (for uniform cookie height if making cookies at home)
- Cookie Sheet
- Tall glass
- Toothpick
- Chip Clips
Instructions
NOTE: Your cookies need to rest for several hours (or overnight for best results) between icing and decorating with the stencil, so plan ahead to make the best use of your time. I like to prepare my cookies in the morning and cut the stencils while they’re resting!
STEP 1: GET MY FREE COOKIE STENCIL DESIGNS
First, download my Cookie Stencil files from my free library – look for Design #774. Alternatively, you can use the Save This Project form near the top of this post and the design link will be emailed to you.
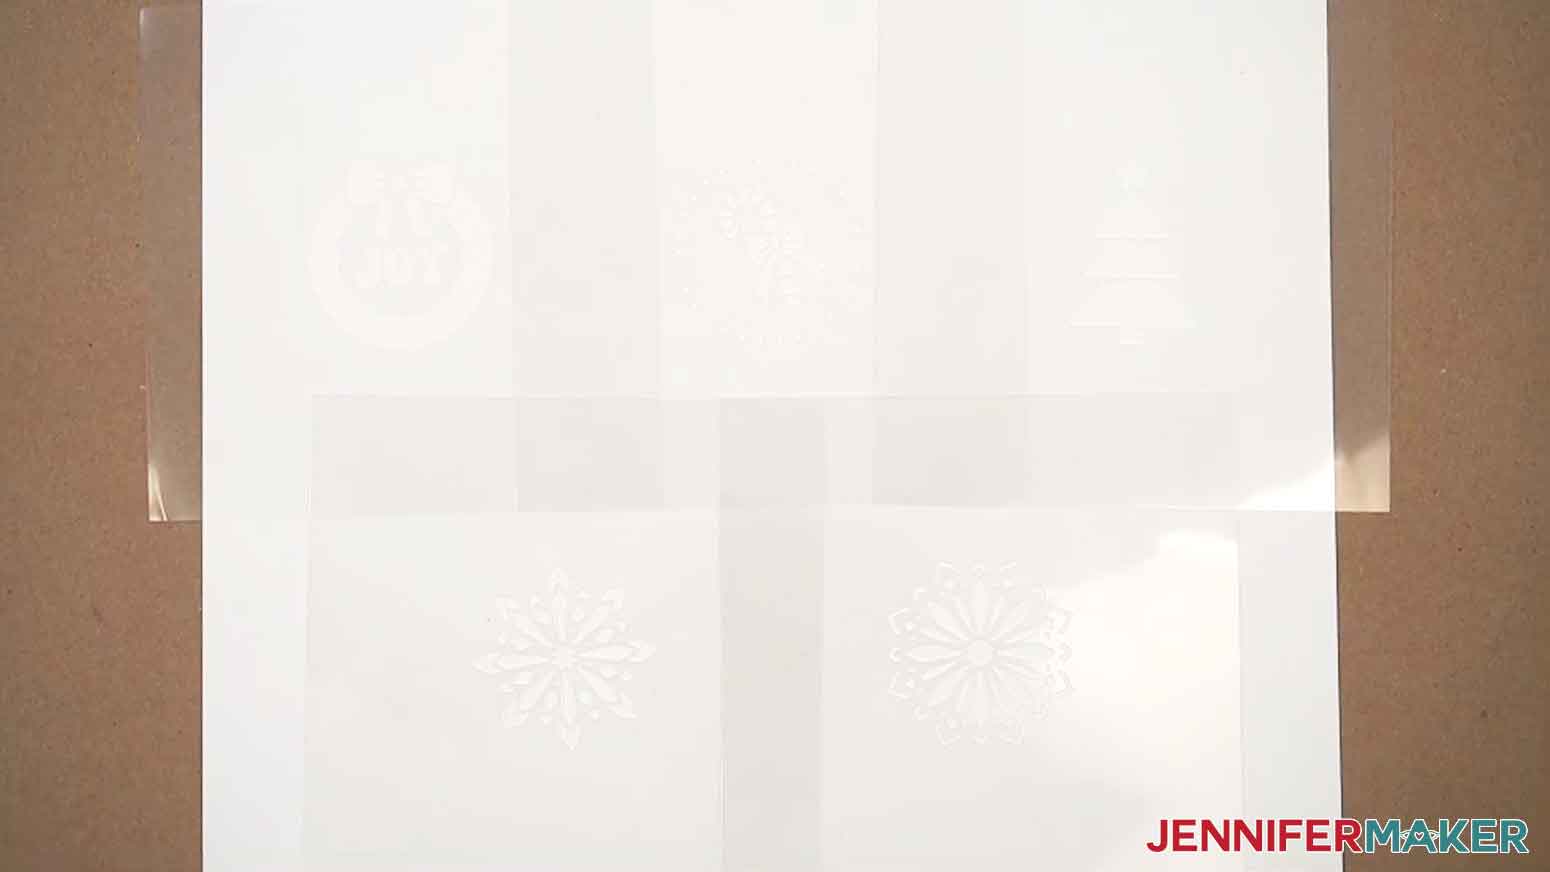
In the SVG folder, you’ll find five holiday cookie stencil designs: a candy cane, a flower, a snowflake, a tree, and a wreath.
There is also a DXF folder with cut files, and a PDF folder with versions you can print and cut by hand.
TIP: If you’re not sure how to upload, go to jennifermaker.com/svgs to learn how to unzip and upload SVG files.
STEP 2: PREPARE AND CUT YOUR COOKIE STENCIL DESIGN
CRICUT DESIGN SPACE
- In Cricut Design Space, open a blank Canvas. NOTE: If you’re new to using Cricut Design Space, go to cricutkickoff.com for my introductory tutorial on Design Space basics.
- Click “Upload” and then “Upload Image.”
- Click “Browse.”
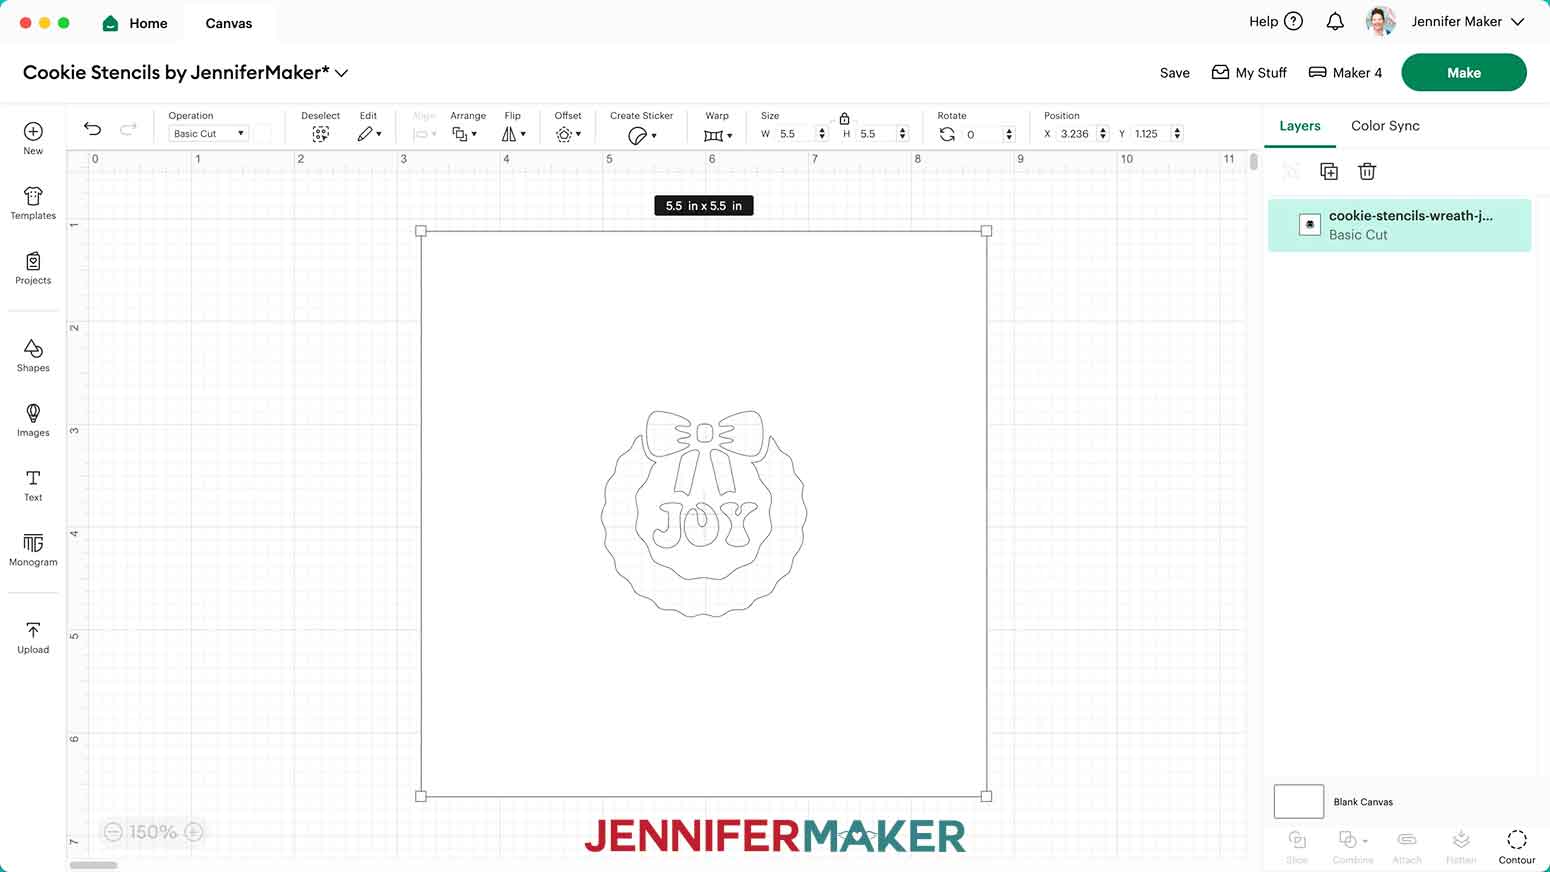
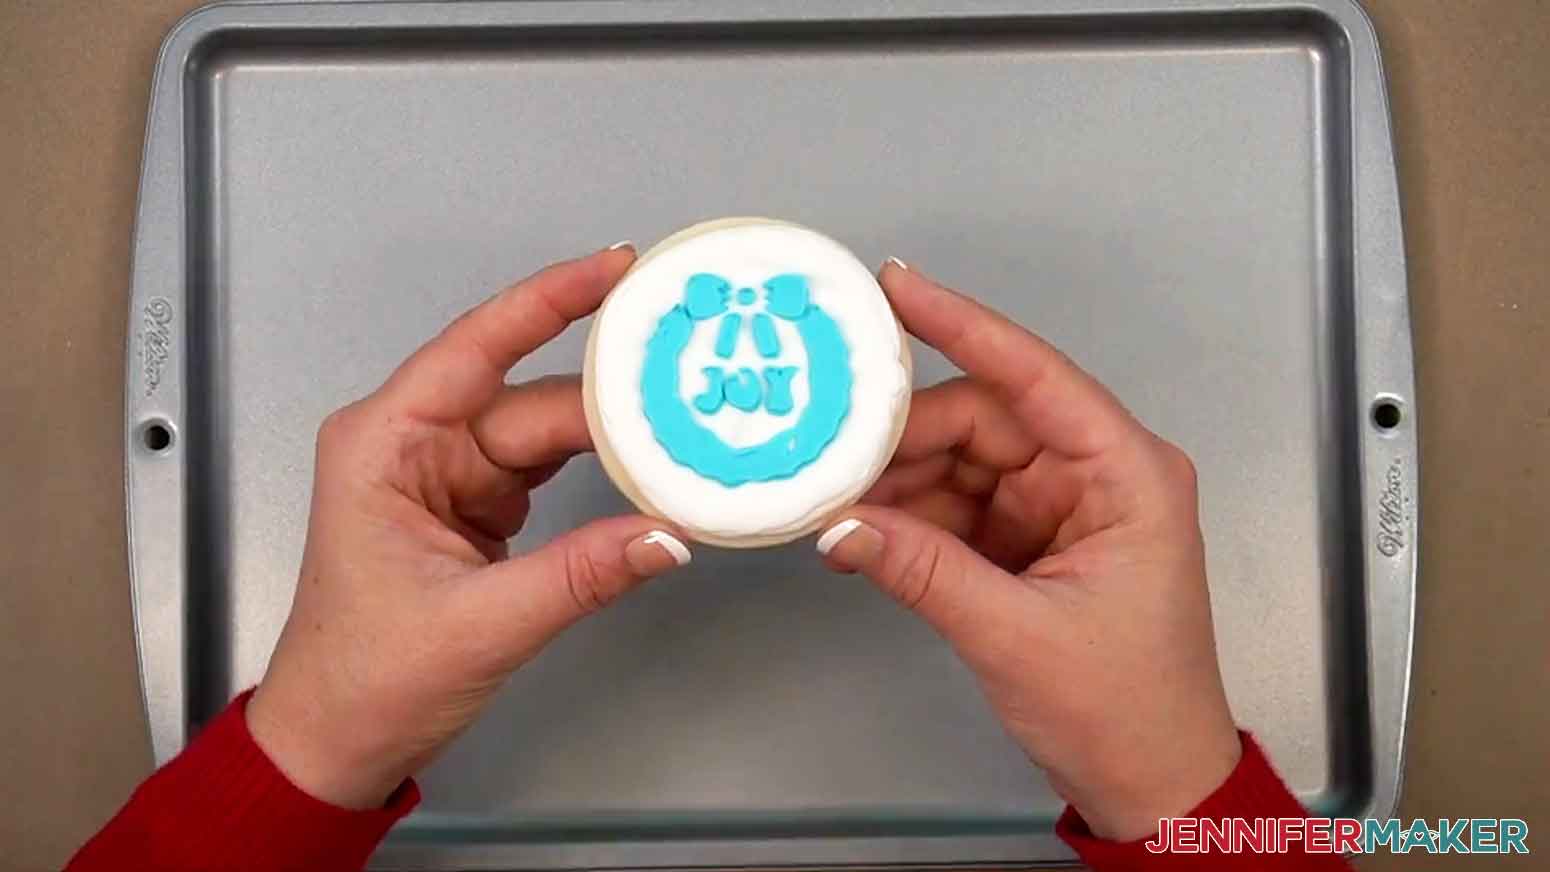
- Select the SVG file of your choice. NOTE: I’ll pick the “wreath” version, but you can use these instructions for any of the designs.
- Click “Open,” and then “Continue.”
- Click “Upload” to add the design to your Canvas.

- Repeat Steps 2-6 to add any additional cookie stencil designs you want to cut to your Canvas. NOTE: I’ll add the “candy-cane,” “snowflake,” and “tree” SVG files as well.
- My designs are sized to fit the 6” x 6” stencil holder in my supplies list and look best on cookies approximately 3” in diameter, but you can use the corner Resize handles with the “Lock” icon closed to adjust them to fit your stencil holder or cookie if needed. I don’t recommend making them much smaller since some details can be lost.
- Click “Save” and give your project a name.
- Your project is ready to cut!
CUTTING
- Make sure the correct machine is selected in the top right.
- Click “Make.”
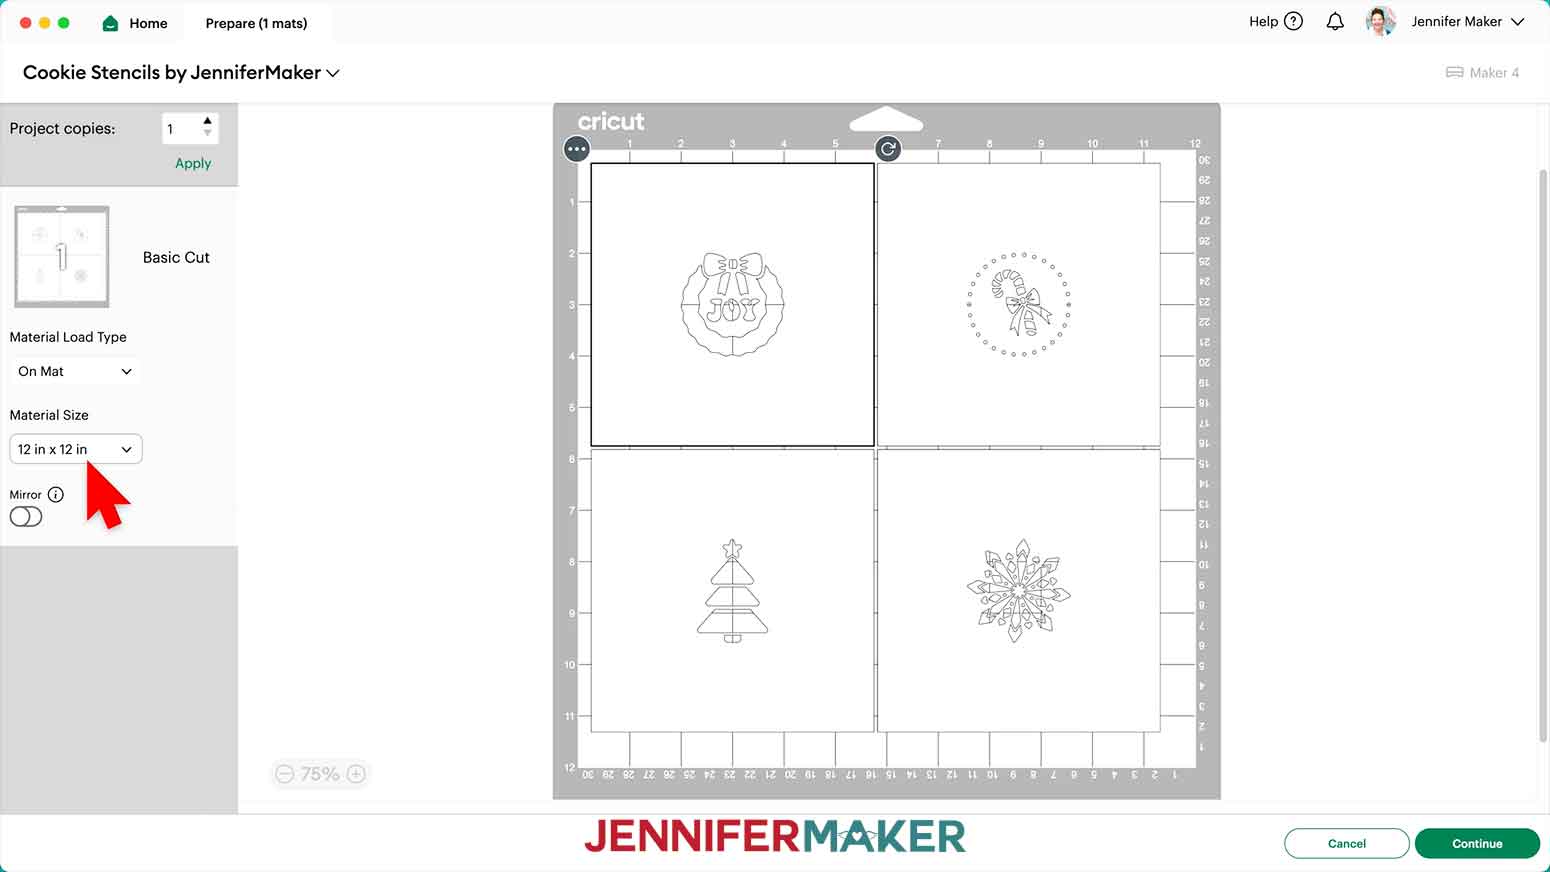
- On the Prepare screen, make sure the correct Material Size is selected for your materials. I’ll use 12” x 12” for my stencil sheet.
- Select the first mat if you have more than one, and click “Continue.”
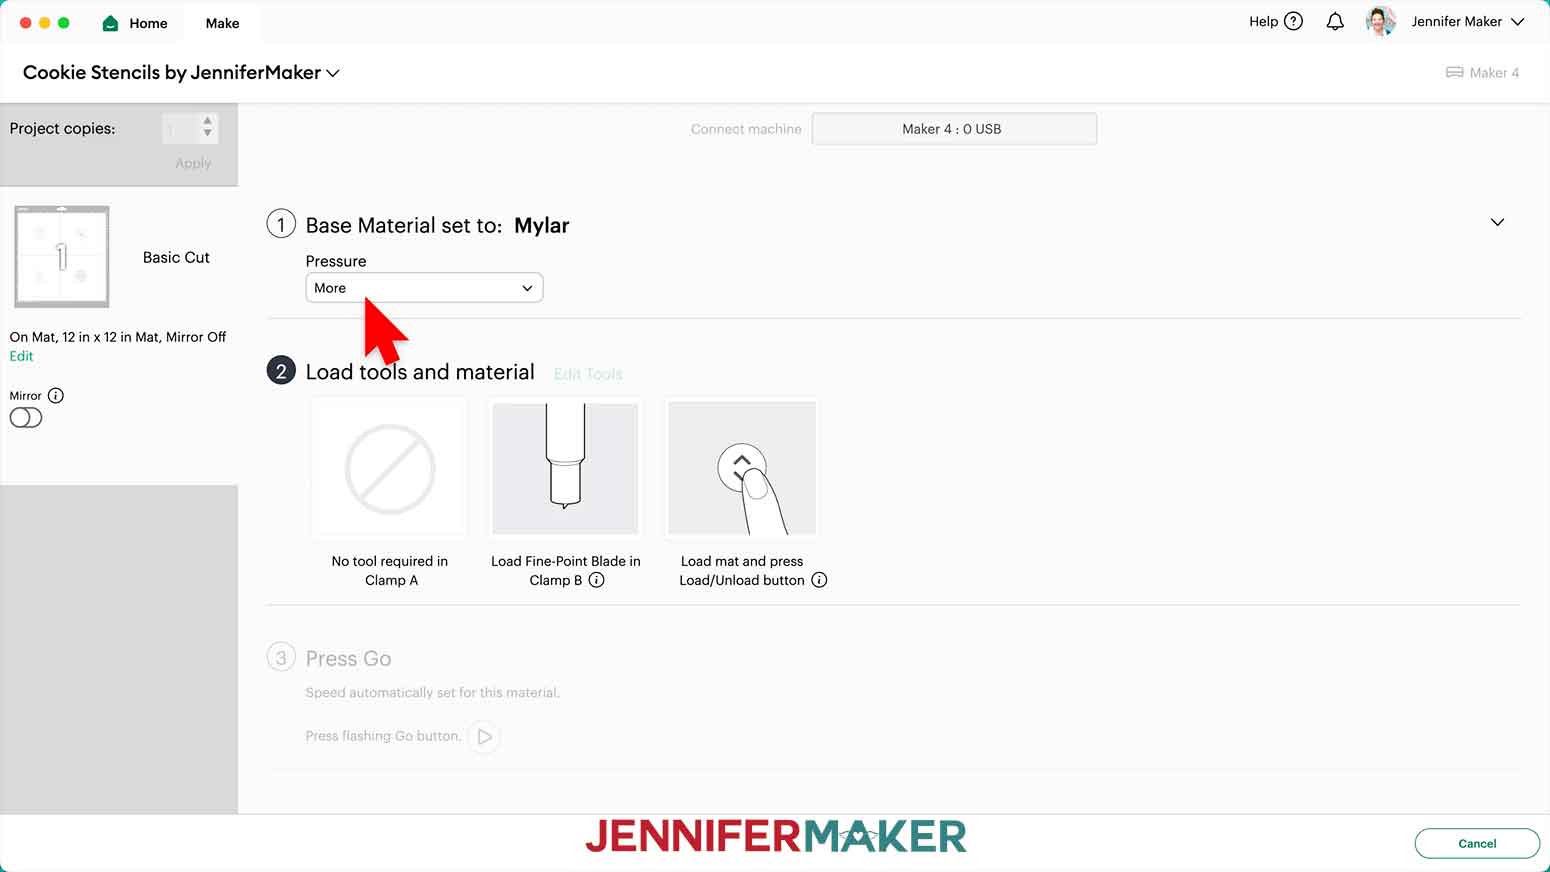
- On the Make screen, click “Browse All Materials” and enter “Mylar” in the search bar.
- Click on “Mylar” and then “Done” to set it as your Base Material.
- Change the Pressure to “More” for a cleaner cut.
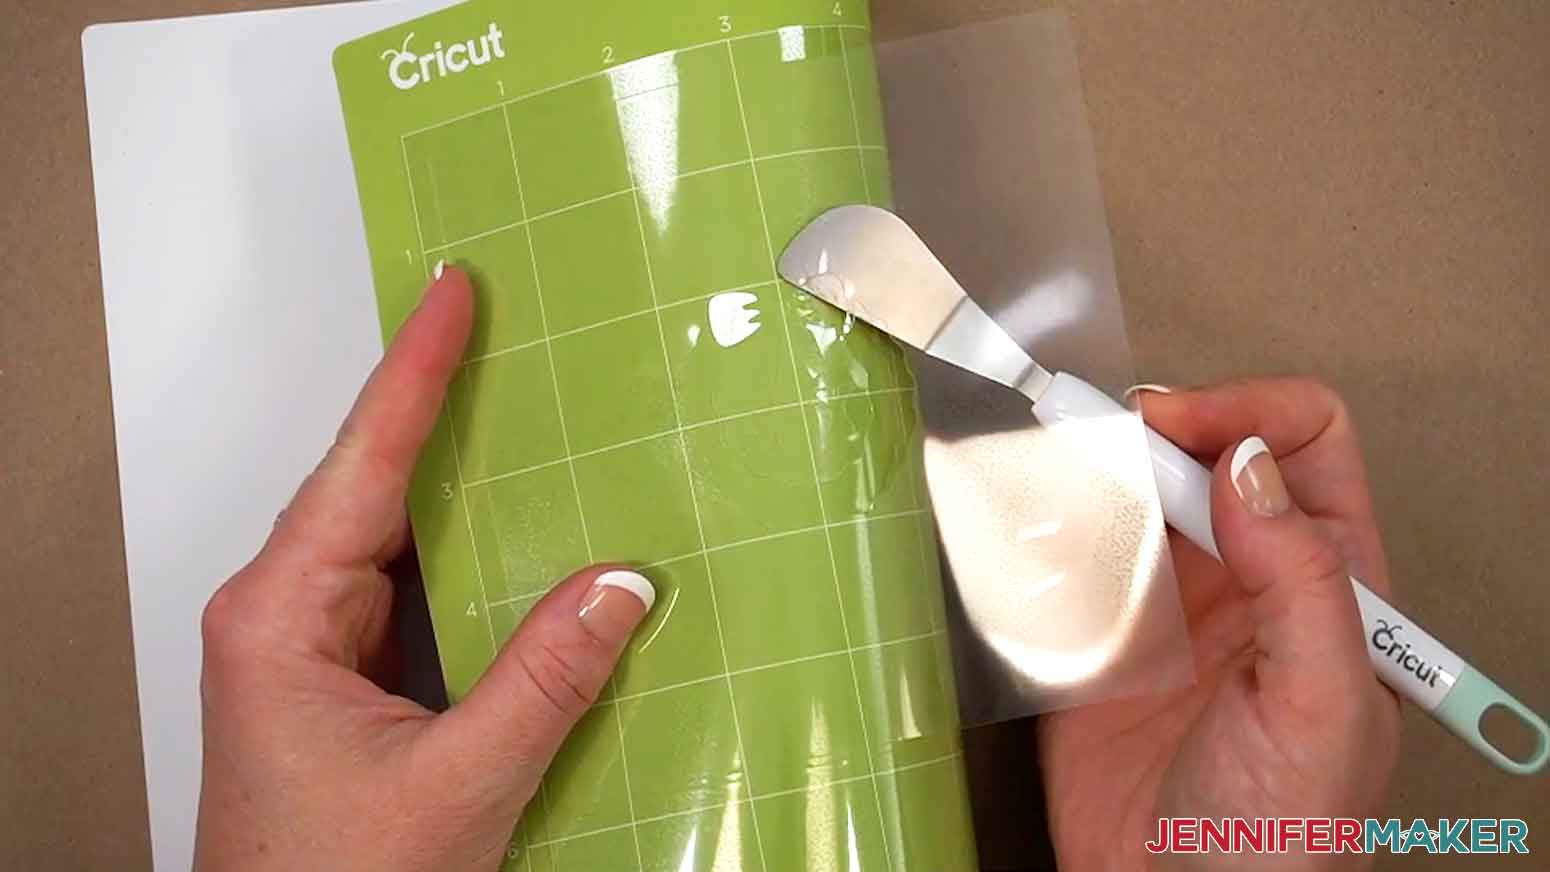
- Place your mylar on a green StandardGrip machine mat.
NOTE: My mylar is the same on both sides, so either side can go on the mat.
TIP: Make sure your mat is clean and sticky for the best results!
- Use a brayer to make sure it’s fully adhered.
- Check that your Premium Fine-Point Blade is clean and in the clamp.
- Press the flashing “Load/Unload” button to load the prepared mat into your Cricut.
- Press the flashing middle button to begin cutting.
- When it has finished cutting, don’t unload the mat right away. Gently lift a corner of the material to make sure the cuts went all the way through. If not, press the middle button again to make a second pass of cuts in the same spots.
- When the cuts are complete, unload the mat, flip it over onto your work surface, and roll it back to release the mylar.
TIP: Use the craft spatula to help lift delicate parts, and your weeding tool to poke out small bits of mylar that may have been left behind. If you have any issues with your cuts, go to jennifermaker.com/cleaner-cuts.
- Use a scraper tool to remove the small bits left on your mat after you remove the cut pieces.
- Give your cut stencils a quick rinse with warm water and pat them dry.
- Your stencils are ready to use!

STEP 3: ICE YOUR COOKIE’S BASE LAYER
NOTE: For this project, you can use either store-bought or homemade sugar cookies. Just make sure your cookies are between 1/4" and 3/8" in height for the best results. If you make your own, let them cool completely before starting, or your icing will melt!
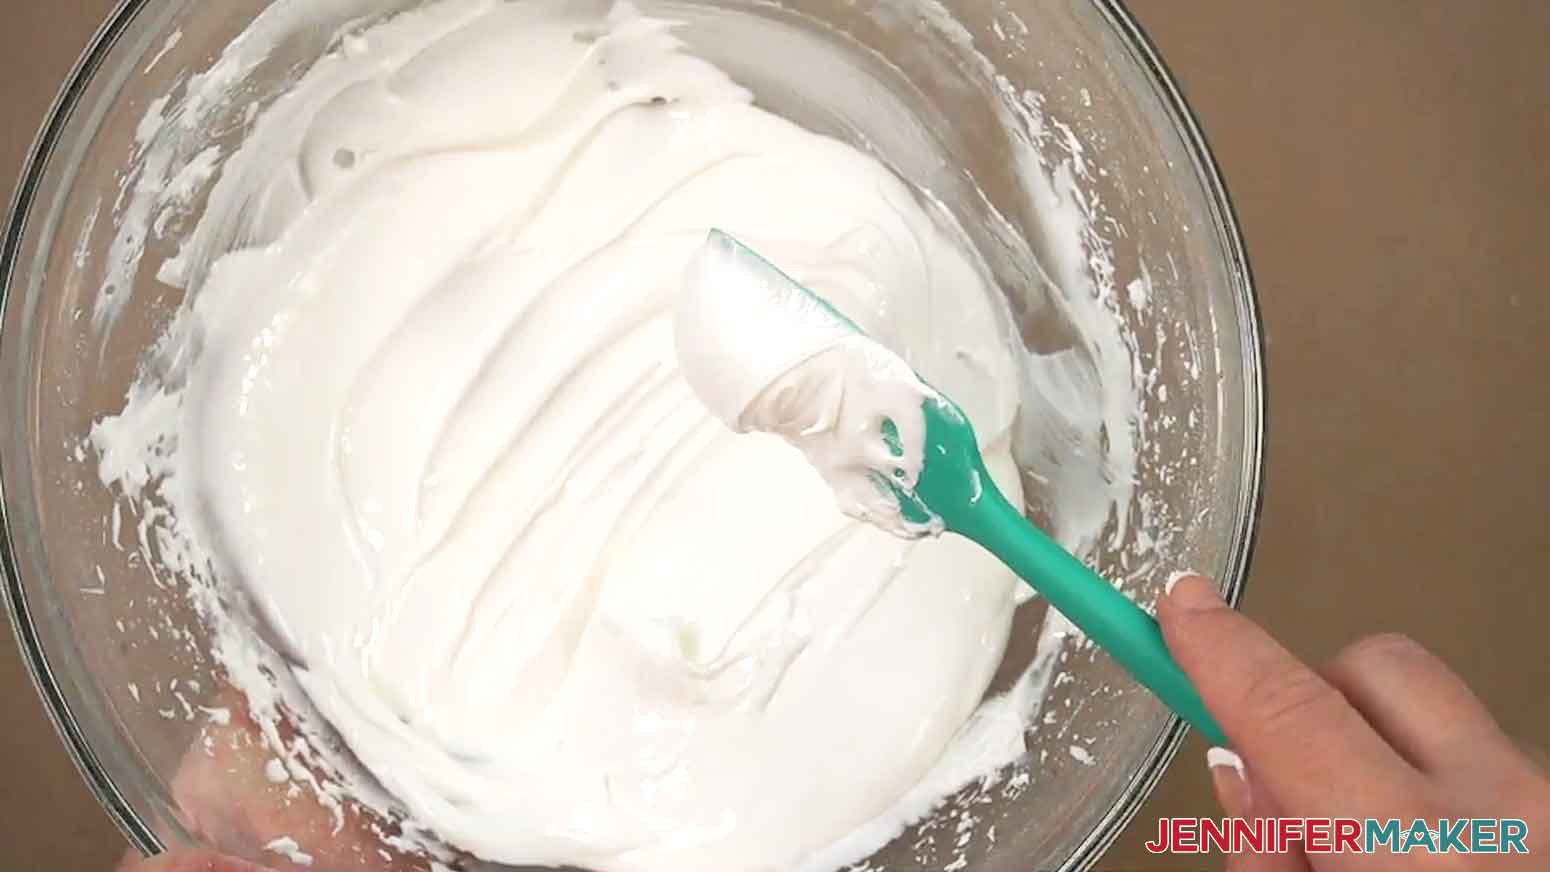
- To ice your cookie’s base layer, first you need to outline the layer’s shape with icing. Prepare one package of royal icing in a mixing bowl according to the package instructions. It should form soft peaks without clumping when lifting a spatula from it.
NOTE: If it flows off the spatula, it’s too thin for outlining and you should add more powder to make it thicker. If it’s too thick, add more water, a little bit at a time.
- Place about 3/4 of your icing in a second mixing bowl, cover it with a damp paper towel so it doesn’t dry out, and set it aside to help make the flood icing later.
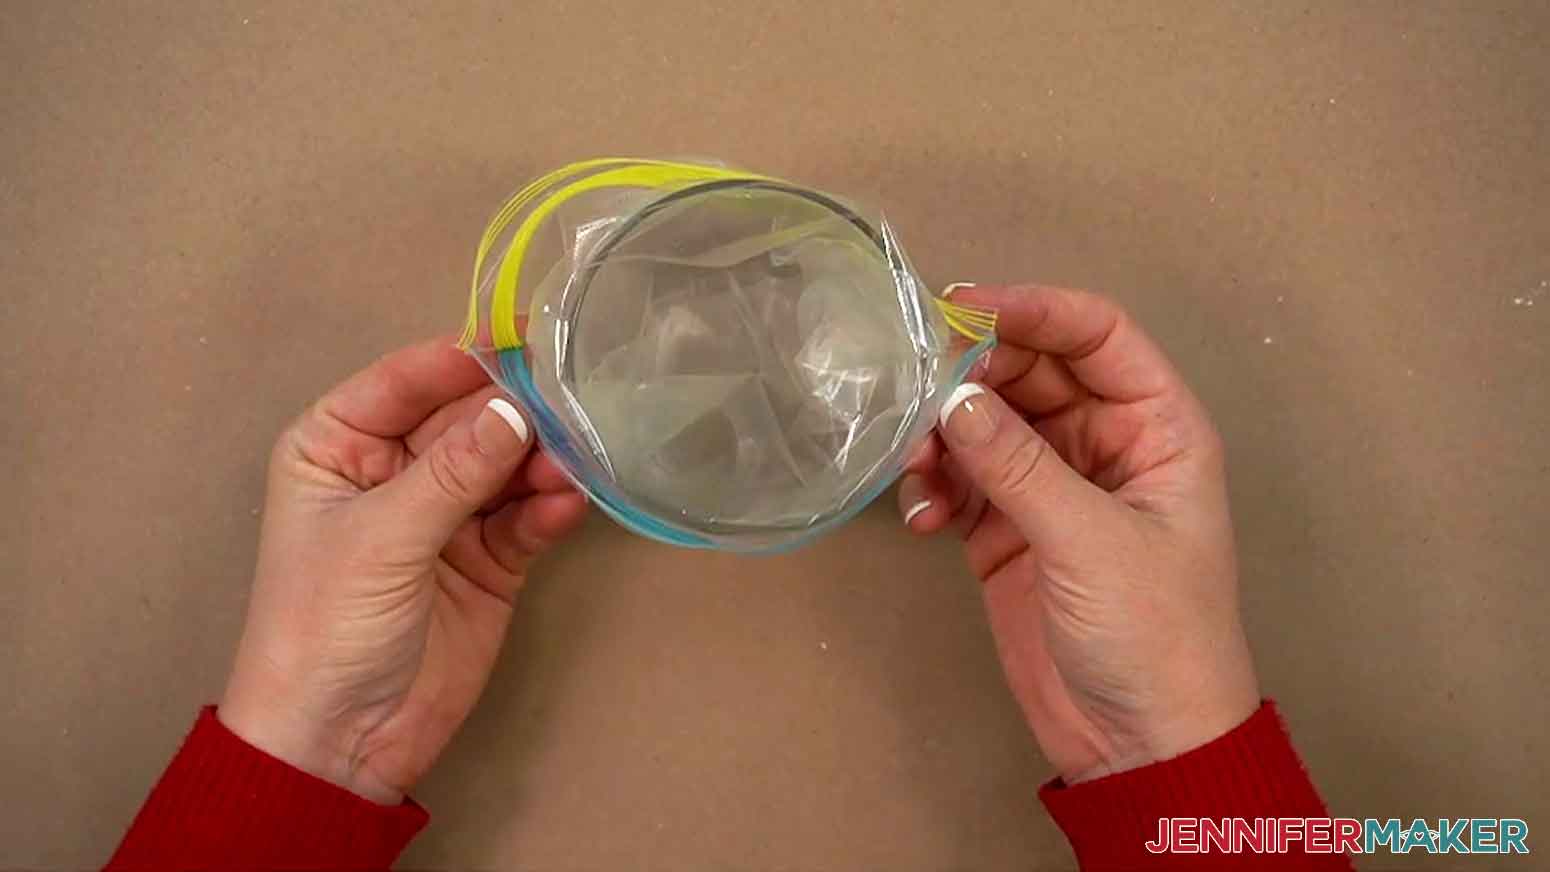
- Place one corner of a zipper bag into a tall cup, and fold the opening of the bag over the cup’s rim.
- Use your silicone spatula to fill the bag with your outline icing.
- Remove the bag of icing from the cup.
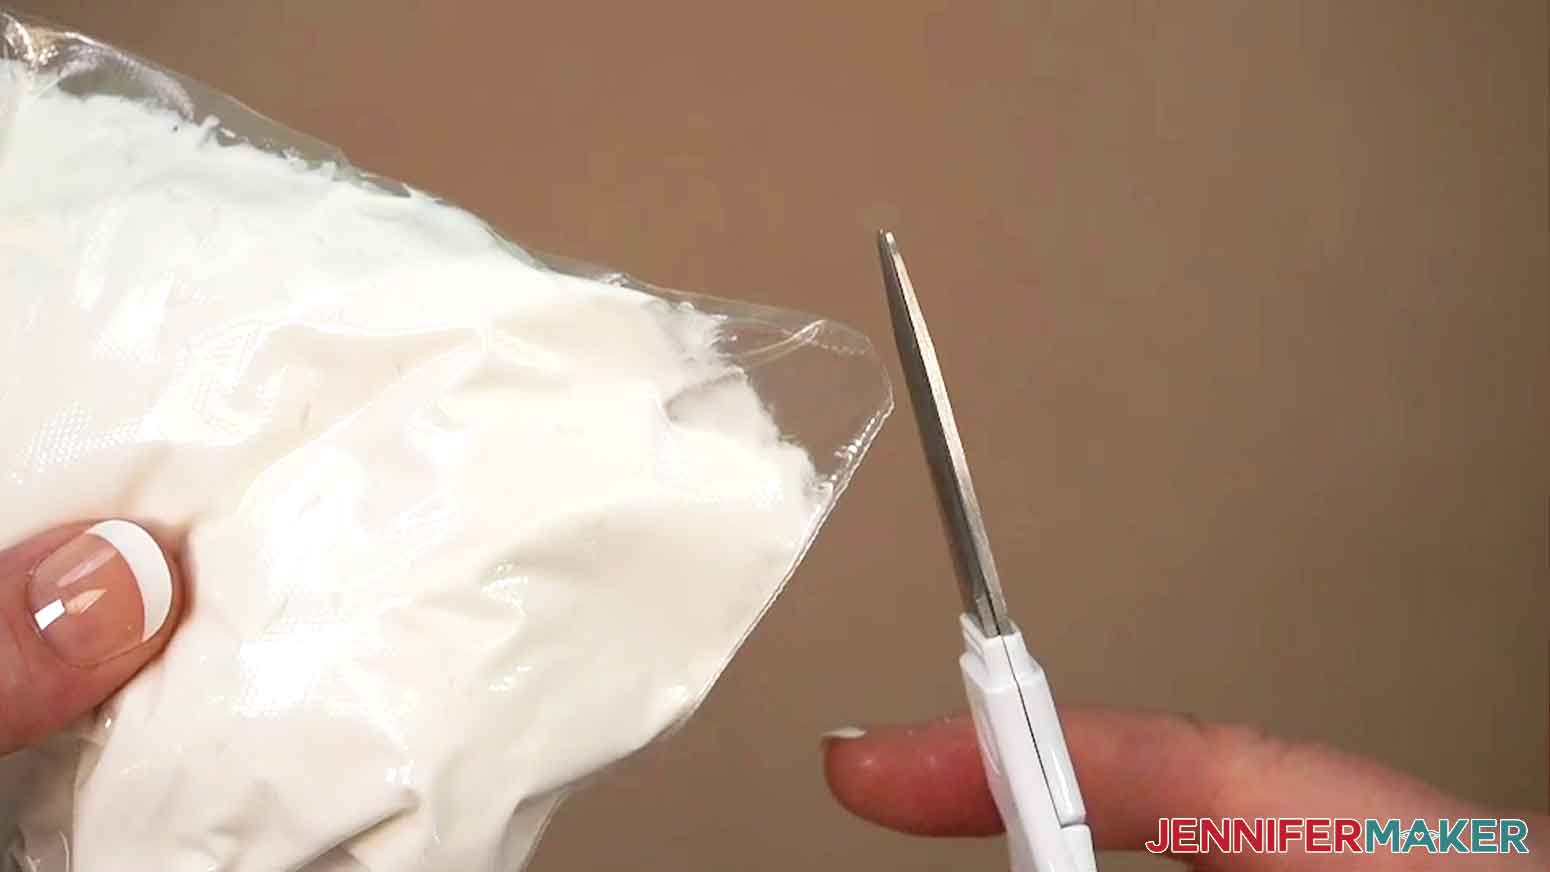
- Use clean scissors to snip the corner of the icing bag, leaving a hole slightly smaller than ¼” across.
- Use your hand to gently squeeze the icing toward the snipped corner.
- Place a cookie on a flat, stable surface.
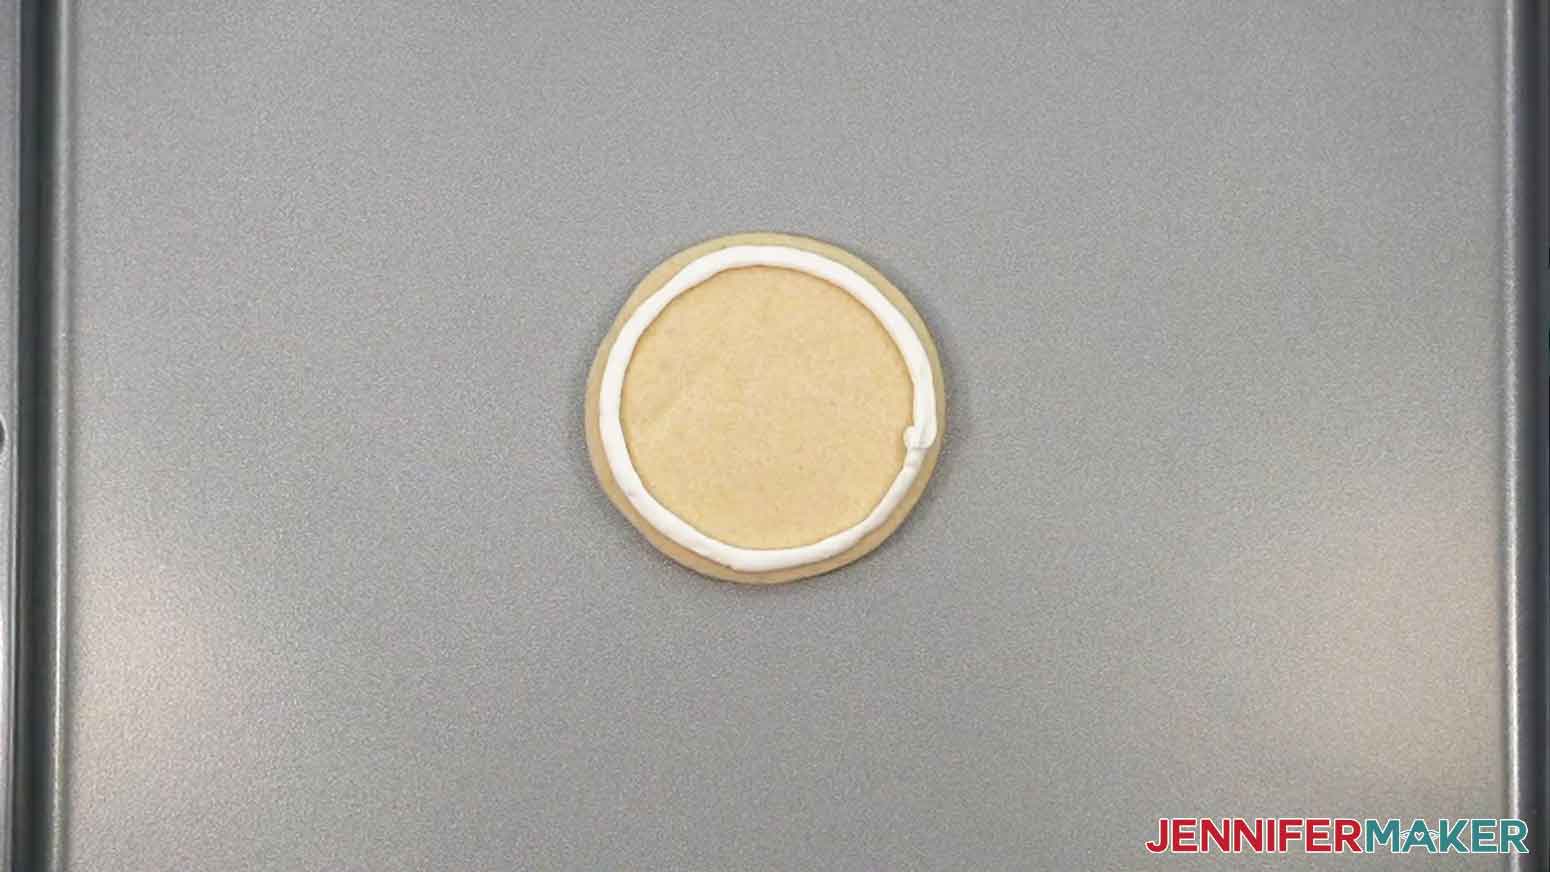
- Place the icing bag’s tip close to the cookie’s edge and gently squeeze the bag until the icing begins to flow.
- Maintaining gentle pressure and keeping the tip away from the cookie, let the icing fall into place as you outline the cookie’s edge.
- Set aside the cookie and let it dry for one to two minutes.
- Repeat Steps 8-11 to outline the rest of your cookies.
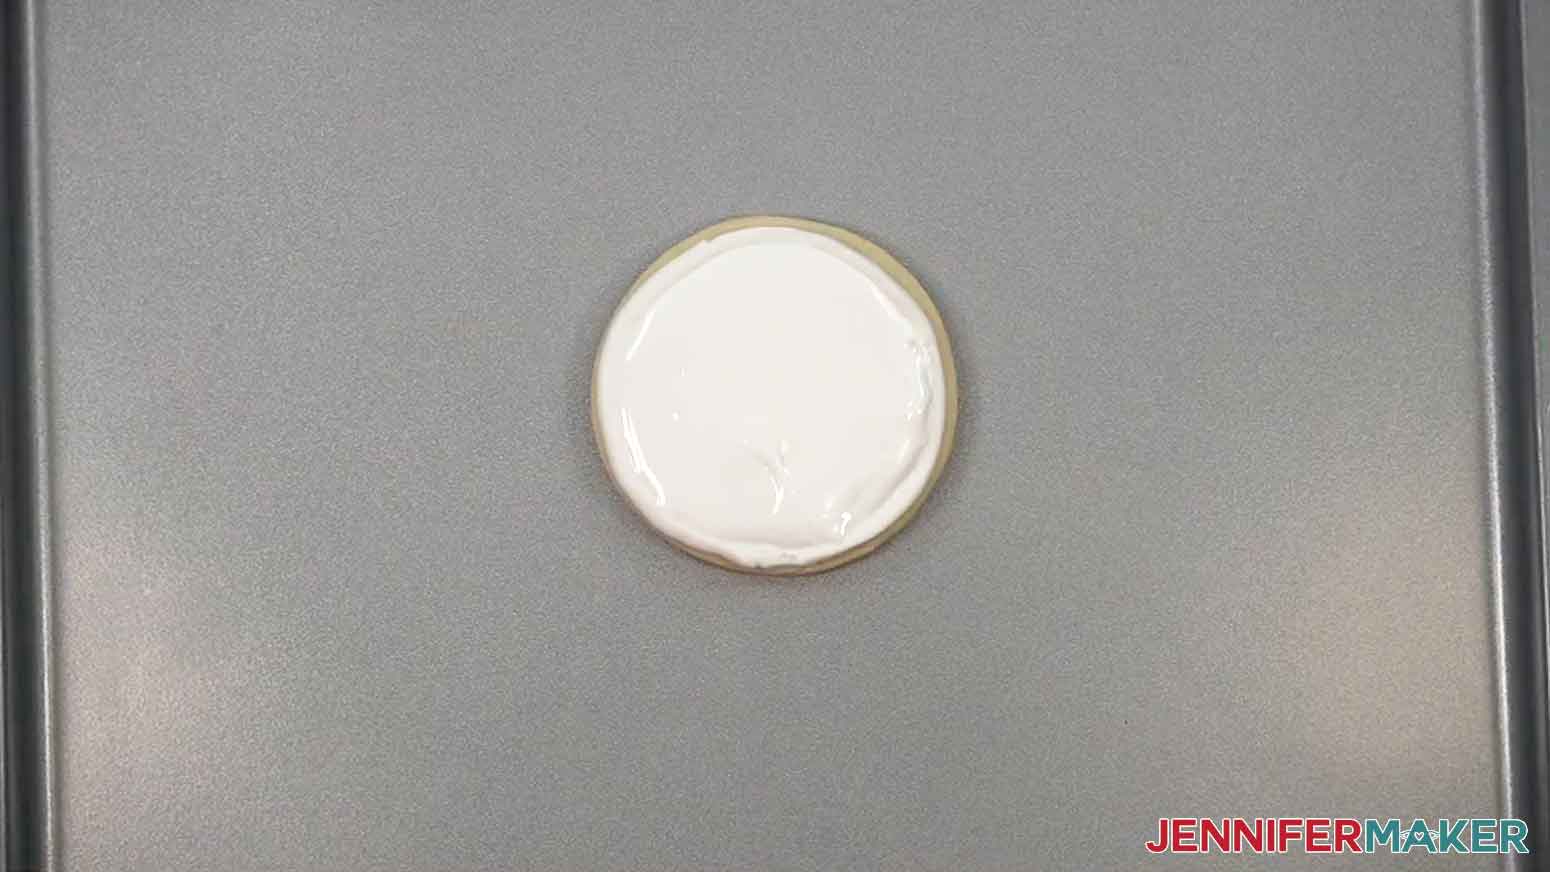
- To fill in your cookies, take your reserved bowl of prepared icing and slowly mix in a few drops of room temperature water at a time until the icing’s consistency is thin enough to fall off the spatula in smooth ribbons. This is called “flood icing” since it can easily fill in shapes.
NOTE: Flood icing should level out in about 10 seconds if you stir it, and it should be pourable, but not runny like water.
- Wet a paper towel and cover your bowl of flood icing to prevent your icing from drying out.
- Set aside the flood icing for 10 minutes to allow air bubbles to rise to the surface.
- Remove and discard the paper towel.
- Use a toothpick to pop the air bubbles on the surface of the icing.
- Repeat Steps 3-6 to add your flood icing to a fresh zipper bag.
- Use your hand to gently squeeze the icing toward the snipped corner.
- Gently fill in the inside of your first outlined cookie using a spiral motion from the outside toward the center.
TIP: Secure the icing bag’s tip with a chip clip when not using it to keep the icing from running out!
- Then use your icing needle or toothpick to evenly spread the icing.
- Repeat Steps 19-21 to flood the rest of your cookies.
- Set aside the cookies and allow the icing to dry, uncovered, for about six to eight hours minimum for best results. NOTE: I let mine dry uncovered overnight.

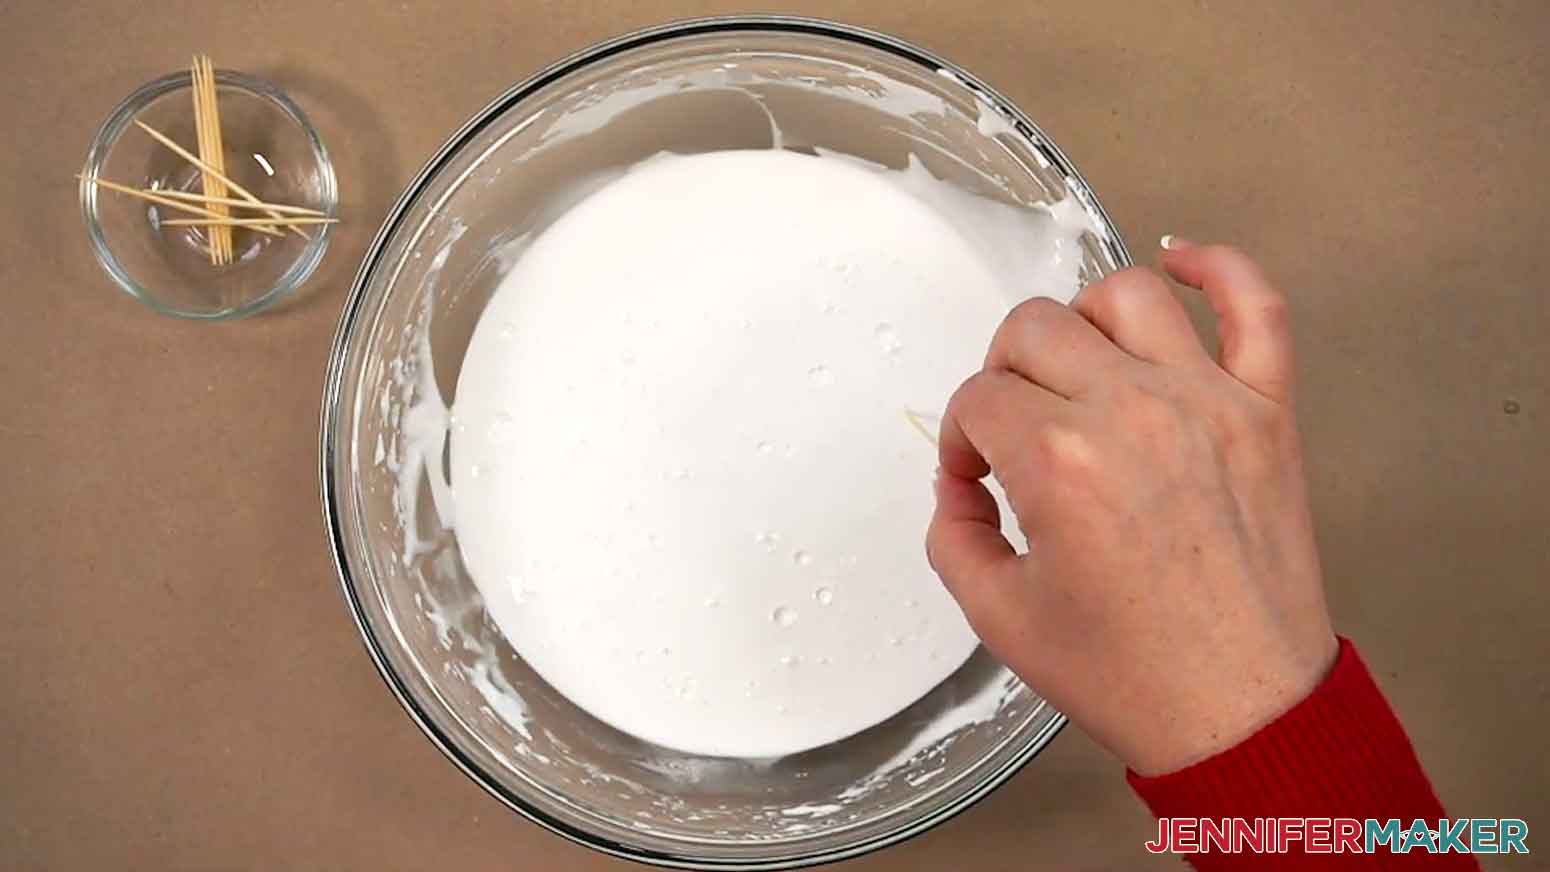
 TIP: Secure the icing bag’s tip with a chip clip when not using it to keep the icing from running out!
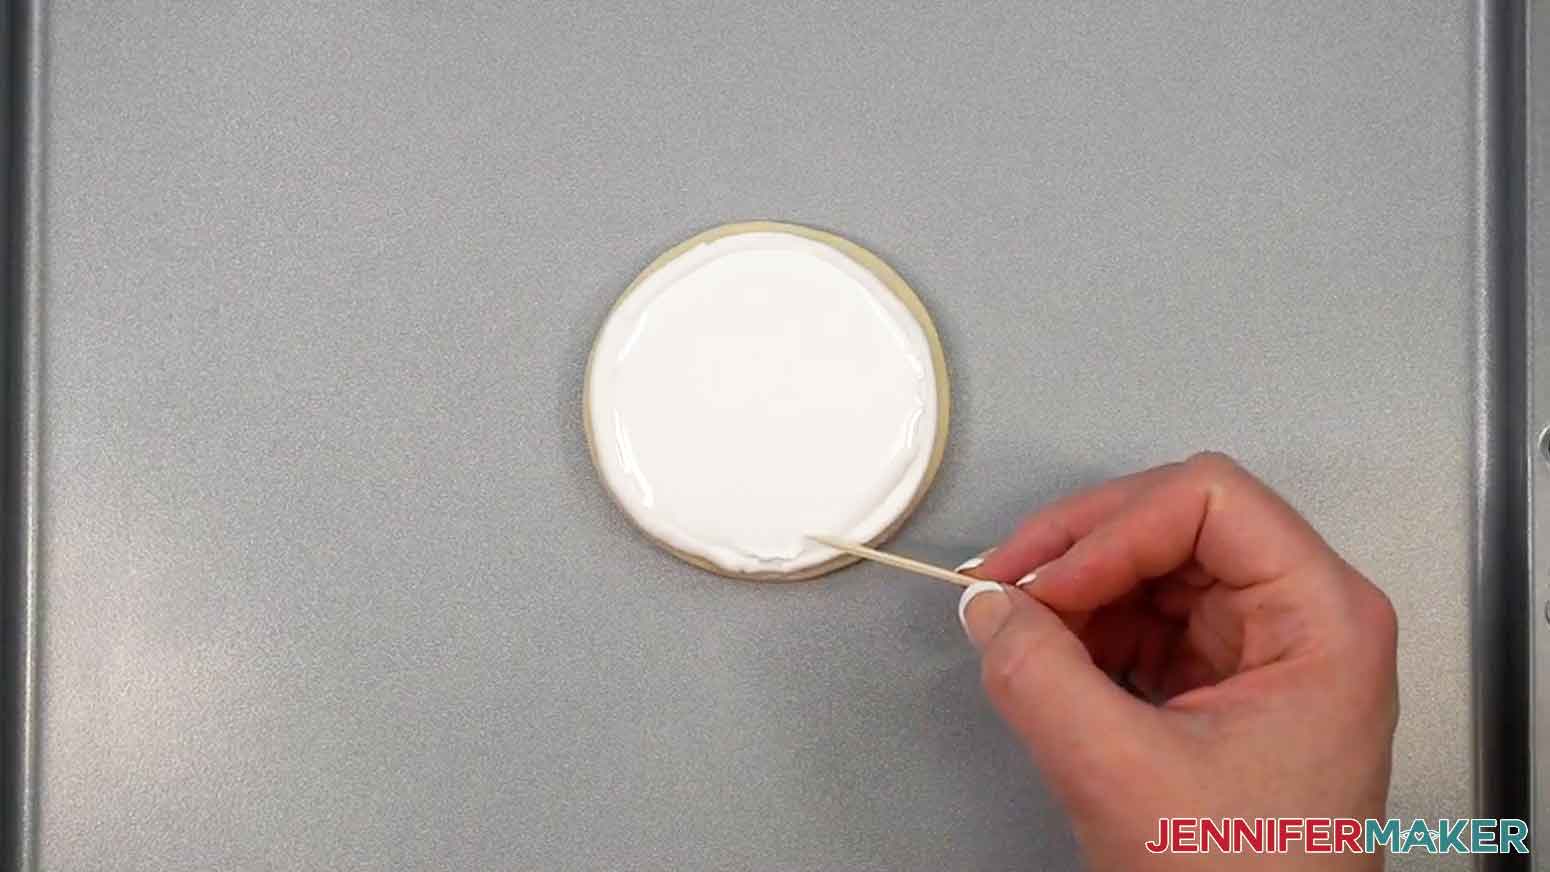
STEP 4: USE YOUR COOKIE STENCILS
- To decorate your cookies using the stencils, take your leftover outlining icing and slowly mix in additional icing powder a little at a time until the icing’s consistency forms stiff peaks when lifting the spatula, similar to toothpaste.
NOTE: If you run out of outlining icing, you can prepare a small batch of icing according to package instructions and add extra mix to thicken the icing to the correct consistency.
- Add food coloring to the icing until it reaches your desired shade. TIP: Be careful not to add too much liquid food coloring or your consistency will change! If needed, mix in additional icing powder to adjust the consistency.
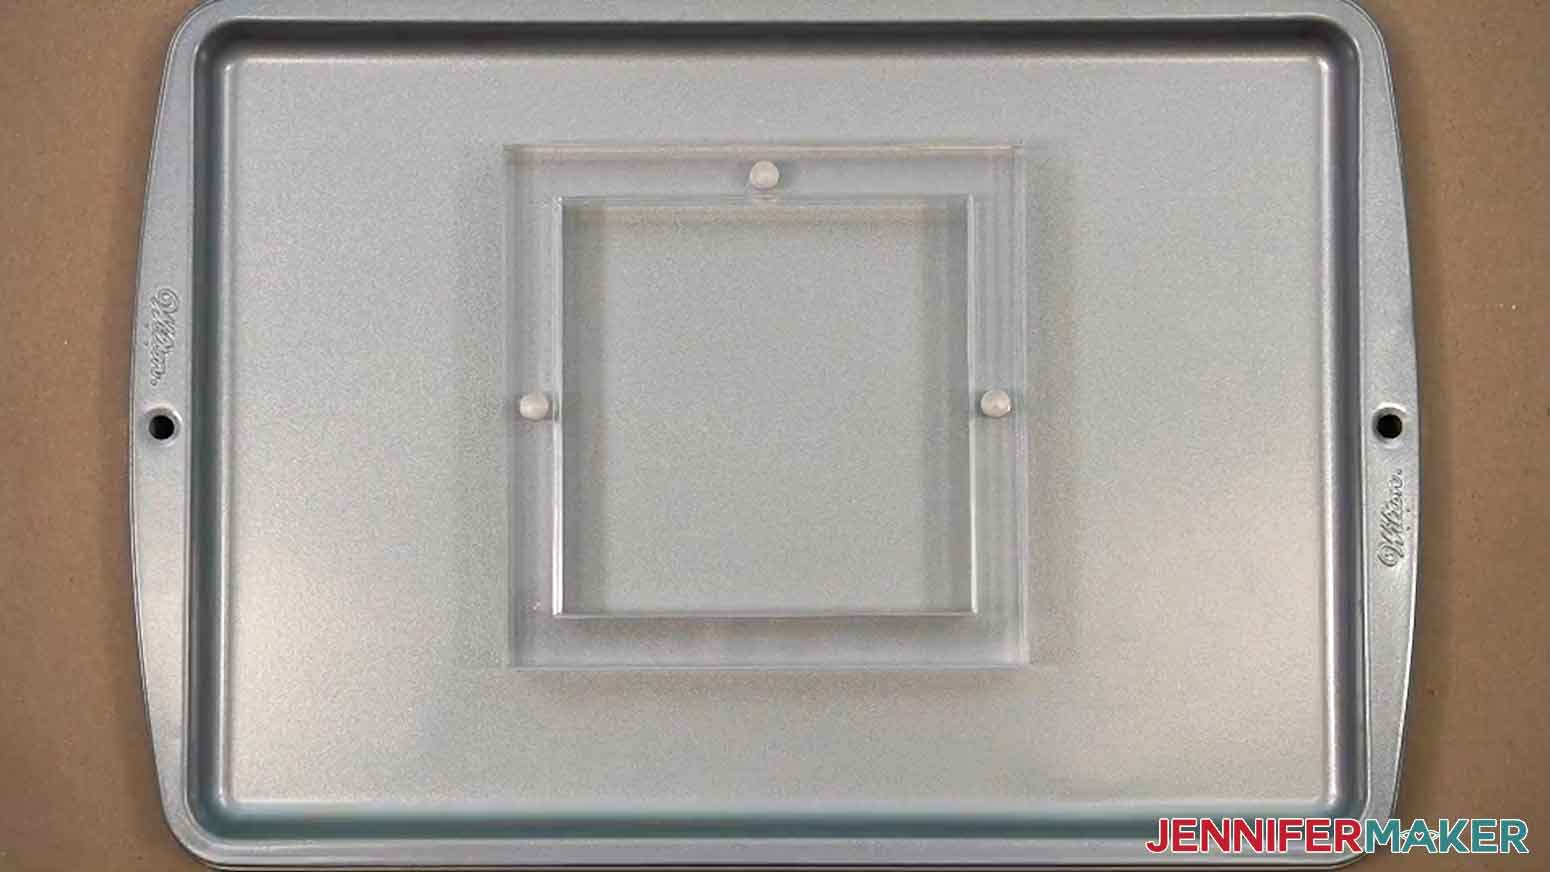
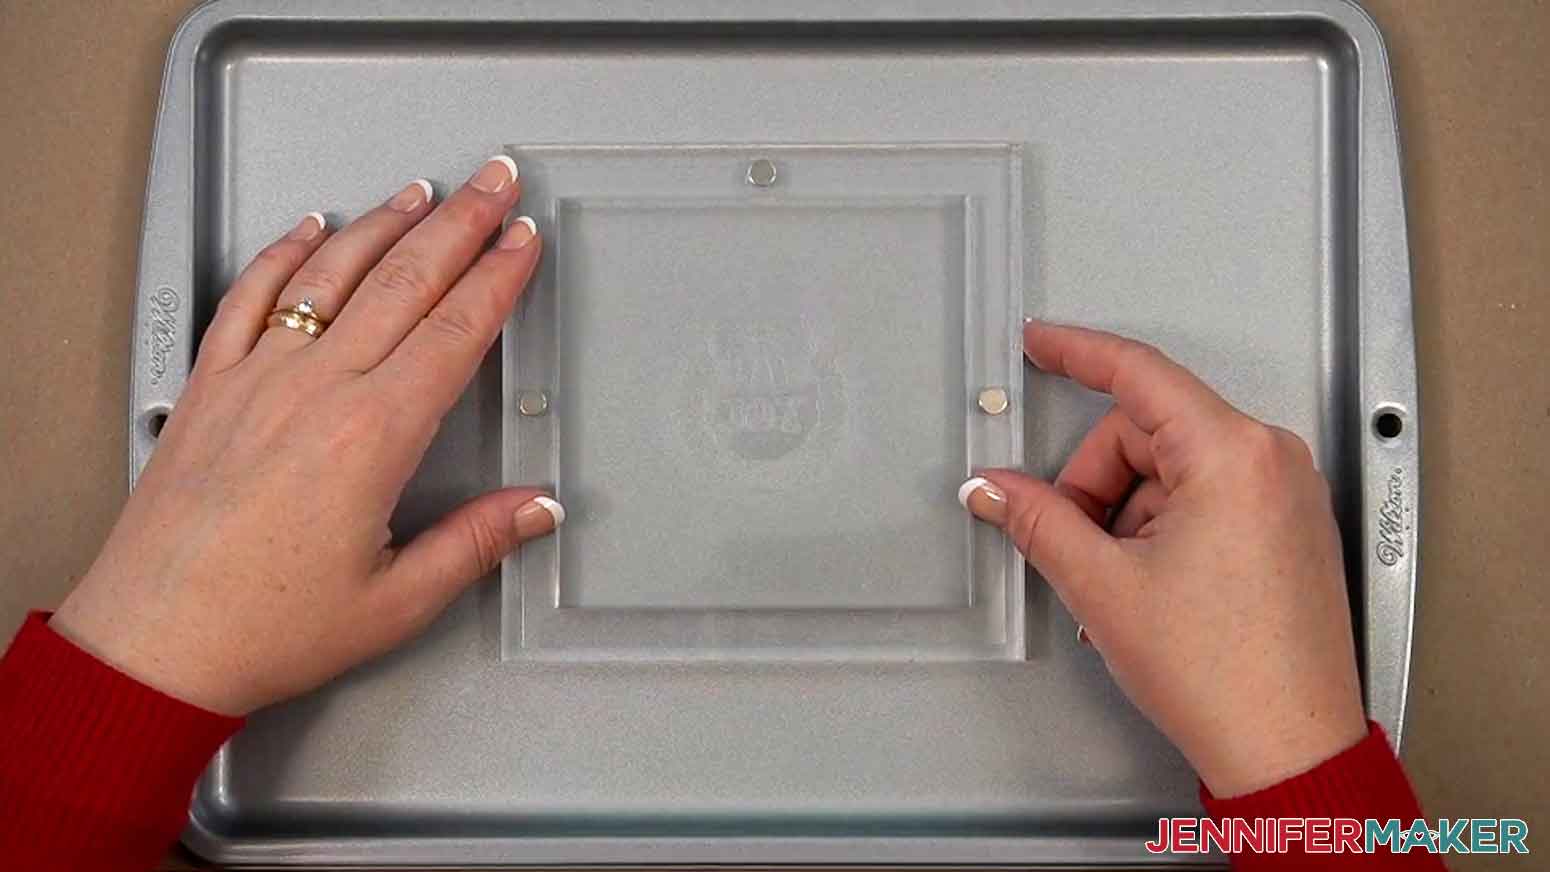
- Place your stencil holder on a clean, flat surface with the magnets positioned at the left, top, and right sides.
- Lift the top off the stencil holder.
- Center your mylar cookie stencil face up inside the holder so the design looks correct. Make sure the stencil’s edges rest on all three magnets in the holder.
- Place the holder’s top back on to hold the stencil in place.
- Place your first outlined, filled-in cookie on a clean, flat, and stable surface.
- Center the stencil holder on top of the cookie. The stencil should rest on top of, or be very close to, the cookie for best results. NOTE: The height of your cookie is important for keeping both the cookie and the stencil in place. If your cookie is too thin, things may move around a bit, making it difficult to apply the stencil icing. If it’s too thick, it won’t fit the stencil well, and you’ll be more likely to damage the icing.
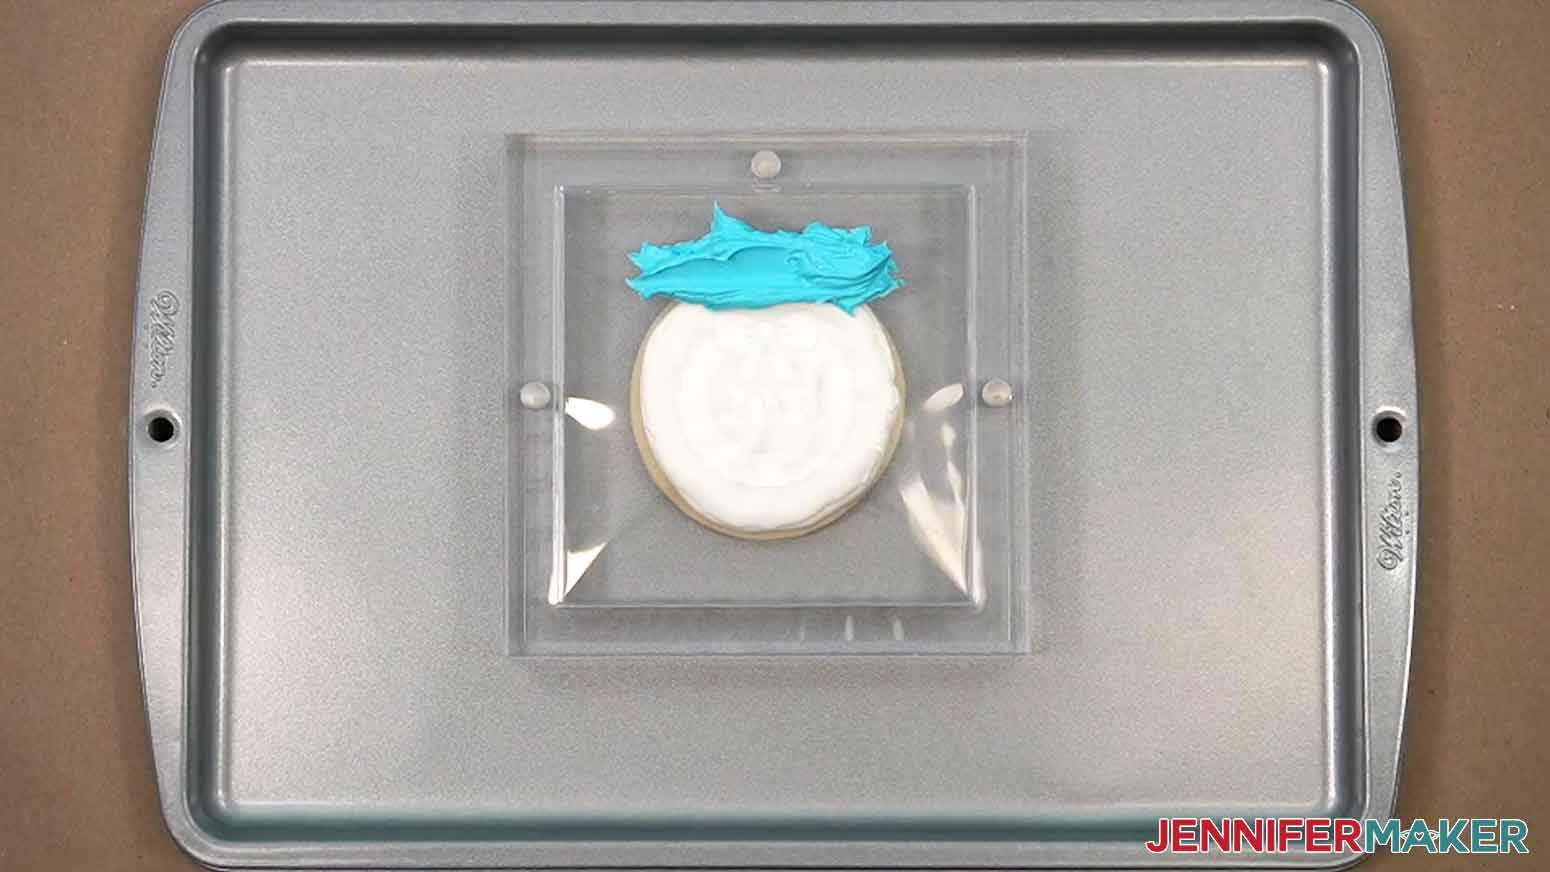
- Use your kitchen spatula to add a small amount of icing across the top edge of the stencil.
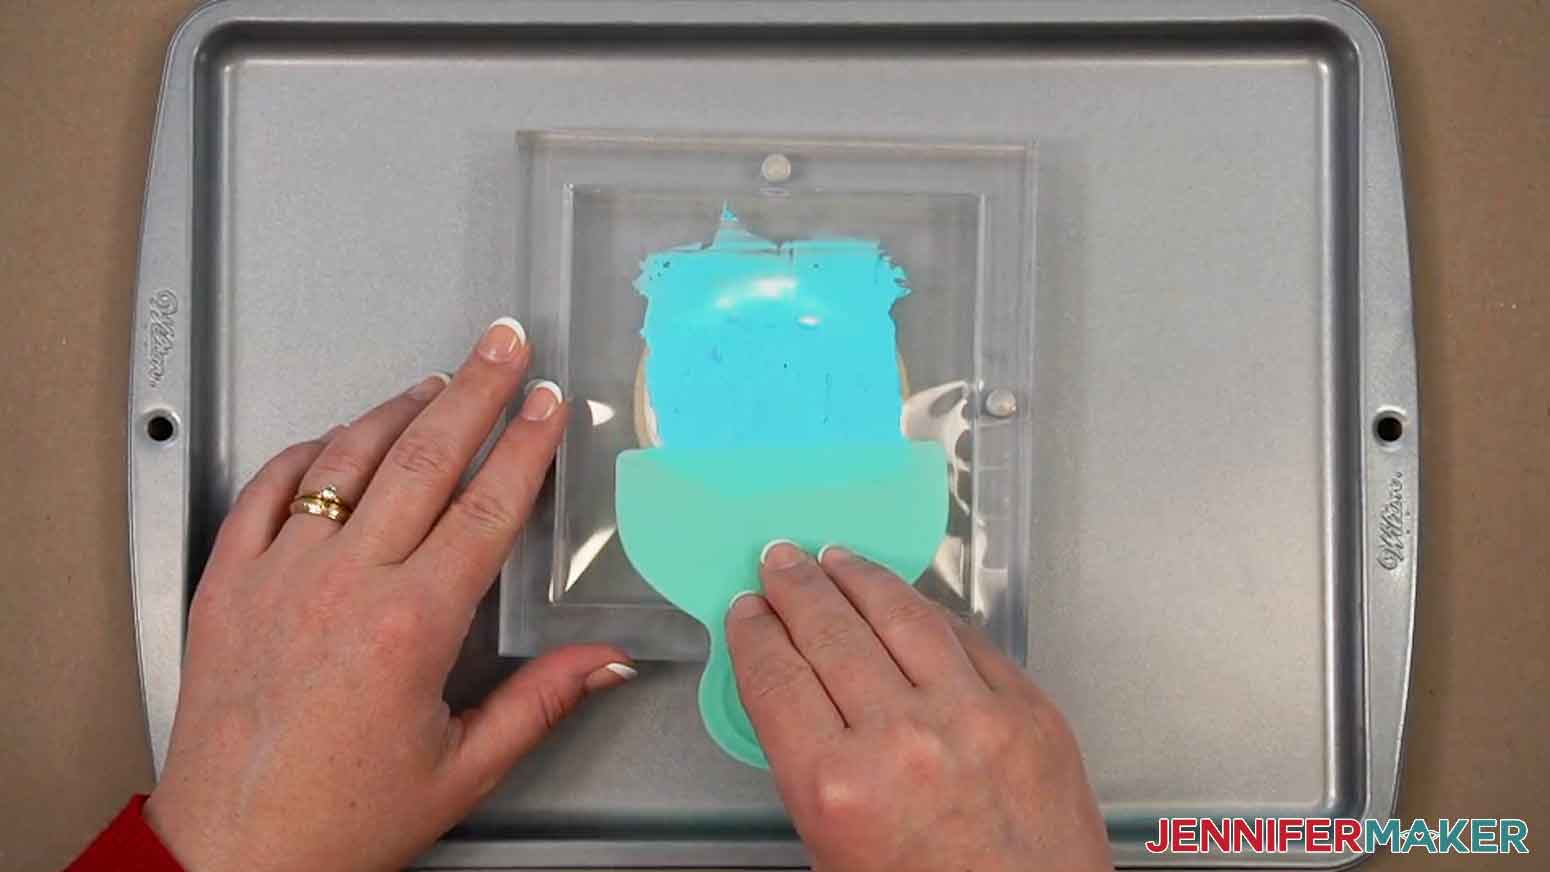
- Place the icing scraper on the stencil above the icing, then press down lightly and spread the icing towards you and across the stencil to fill the cutout shapes. Use only downward strokes to avoid getting color under the stencil. Make sure to cover the full design.
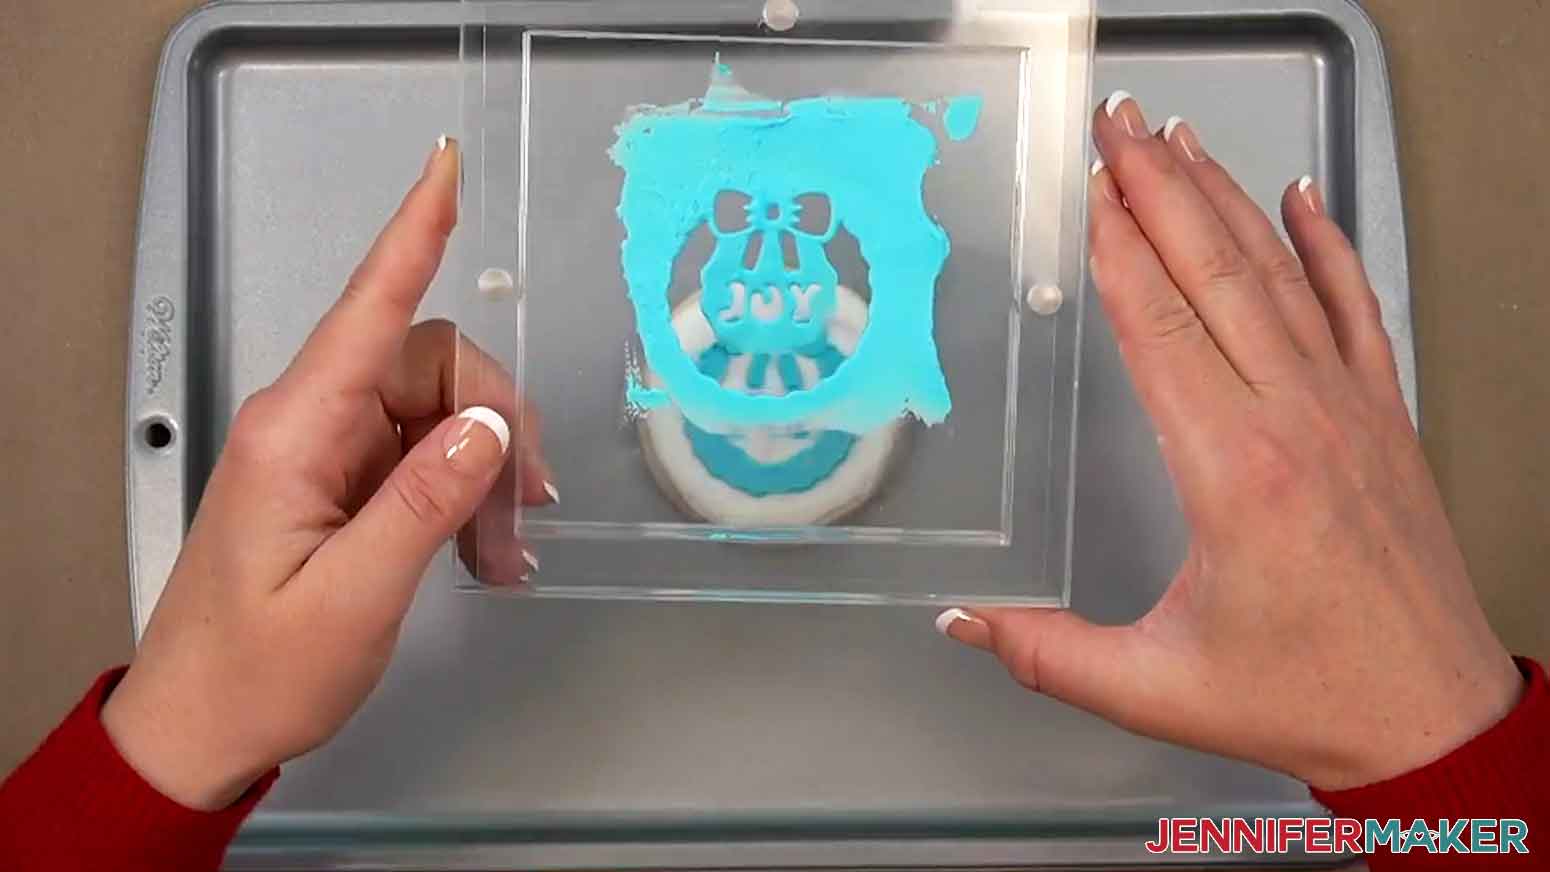
- Once the design is evenly covered and you can see the outline of the stencil through the icing, gently lift the stencil holder straight up.
- Allow your cookie to dry for one to two hours.
- If any icing gets on the underside of your stencil, rinse (don’t scrub!) the stencil with warm water and pat completely dry between paper towels before reusing.
- Repeat Steps 3-13 to decorate the rest of your cookies.
STEP 5: SHOW IT OFF
You now have one or more delicious decorated cookies for a sweet holiday treat! Store these in an airtight container at room temperature for up to two weeks.
Notes
Stencil Finished Size: 5.5” H x 5.5” W
Care Instructions: Rinse in warm water after use, and pat completely dry between paper towels before reusing. Avoid scrubbing, as this may damage the stencil’s surface.Typefaces used: JM Groovy
Answers to Your Questions About Decorating With Cookie Stencils
Q: I want to design my own cookie stencils. How do I do that?
A: You can learn how to design a custom cookie stencil in my ADVANCE program. Learn more about ADVANCE here!

Q: Can a Cricut make cookie stencils?
A: Yes, I can show you exactly how to make cookie stencils using your Cricut! Just follow the video tutorial or read through the written tutorial above to learn how to prepare and cut a cookie stencil design in Cricut Design Space.
Q: What material is used for cookie stencils?
A: I’m using food-safe Mylar sheets for my cookie stencils that is sturdy, washable, and reusable … perfect for decorating cookies again and again! The material comes in 12″ x 12″ sheets, so its fits perfectly on a Cricut machine mat. It also cuts easily with a Cricut Premium Fine-Point Blade, so you don’t need a special blade to cut it. While acetate looks similar to Mylar, it’s thinner and less durable, so I don’t recommend it.
Q: Can I use Cricut stencil vinyl for my cookie stencils?
A: No, you should not use Cricut stencil vinyl to create your cookie stencils. It’s not food-safe, and the adhesive on the vinyl can be harmful if it comes into direct contact with your food.
Q: How do you stencil a design on a cookie?
A: These cookie stencils are simple to use! You just need to hold it in place (I recommend using the Stencil Holder in my supplies list!), spread some icing over the cut-out area, and then lift the stencil away! I’ll show you exactly how I do it in my video.
Q: What kind of icing should I use to decorate my cookies?
A: My cookie stencils work best if you use royal icing that’s thick enough to spread without running. If you’re unfamiliar with royal icing, the powdered mix in my supplies list is a great place to start. Just mix in some water and go! To learn how to get the consistency just right, be sure to watch my tutorial!
Q: What cookies work best for decorating with cookie stencils? Do I have to make my own?
A: You can use store-bought or homemade cookies with my stencils. Just make sure they’re flat on top, and that they’re about three inches wide so the designs fit on top. They should also be 1/4″ to 3/8″ thick for best results if you’re using the stencil holder. If you bake your own, I recommend using an adjustable rolling pin to get the height right (you can find one in my supplies list). Be sure to let your cookies cool before decorating or your icing will melt right off!
Q: What kind of Cricut do I need to make cookie stencils?
A: I used the Cricut Maker 4 to cut my 6″ x 6″ cookie stencils to fit my stencil holder, but you can use any Maker series machine, an Explore series machine, the Cricut Venture, or the Cricut Joy Xtra to cut my designs. The Cricut Joy may be able to cut the Mylar material into stencils for smaller designs and cookies, but I haven’t tested this out.
Get my free cookie stencil SVG/PNG/PDF design files!
(If you do not see the signup form above, click here.)
I love seeing what you make with my tutorials and how you customize them! Please share a photo of your amazing cookies decorated using your stencils in our Facebook group or tag me on social media with #jennifermaker.
Love,

Want to remember this? Save this Cookie Stencils tutorial to your favorite Pinterest Board!