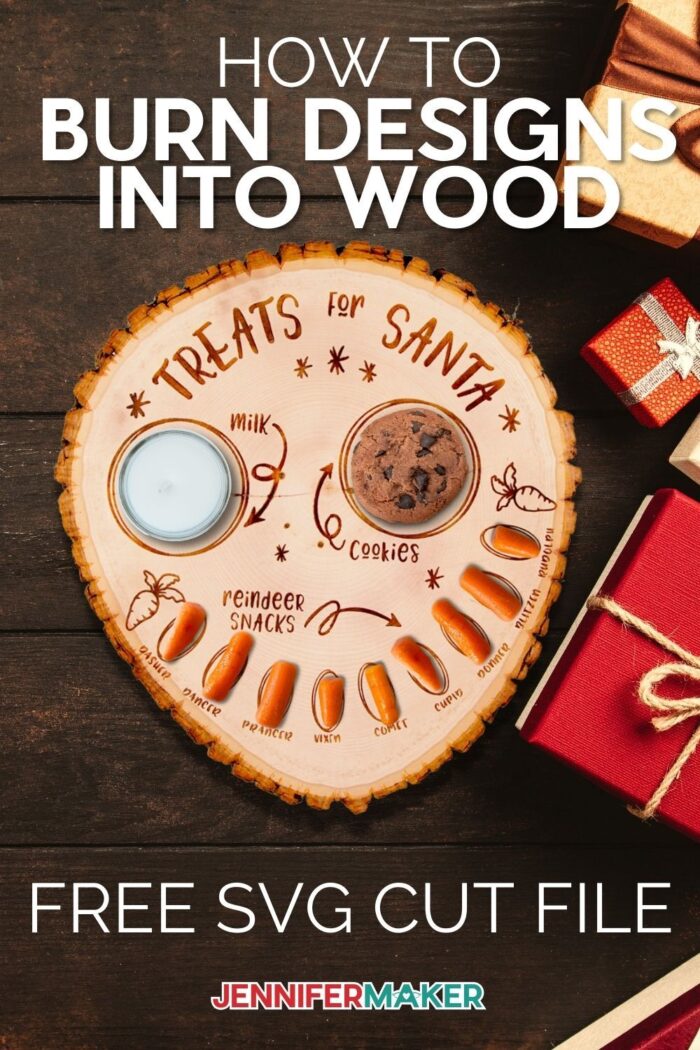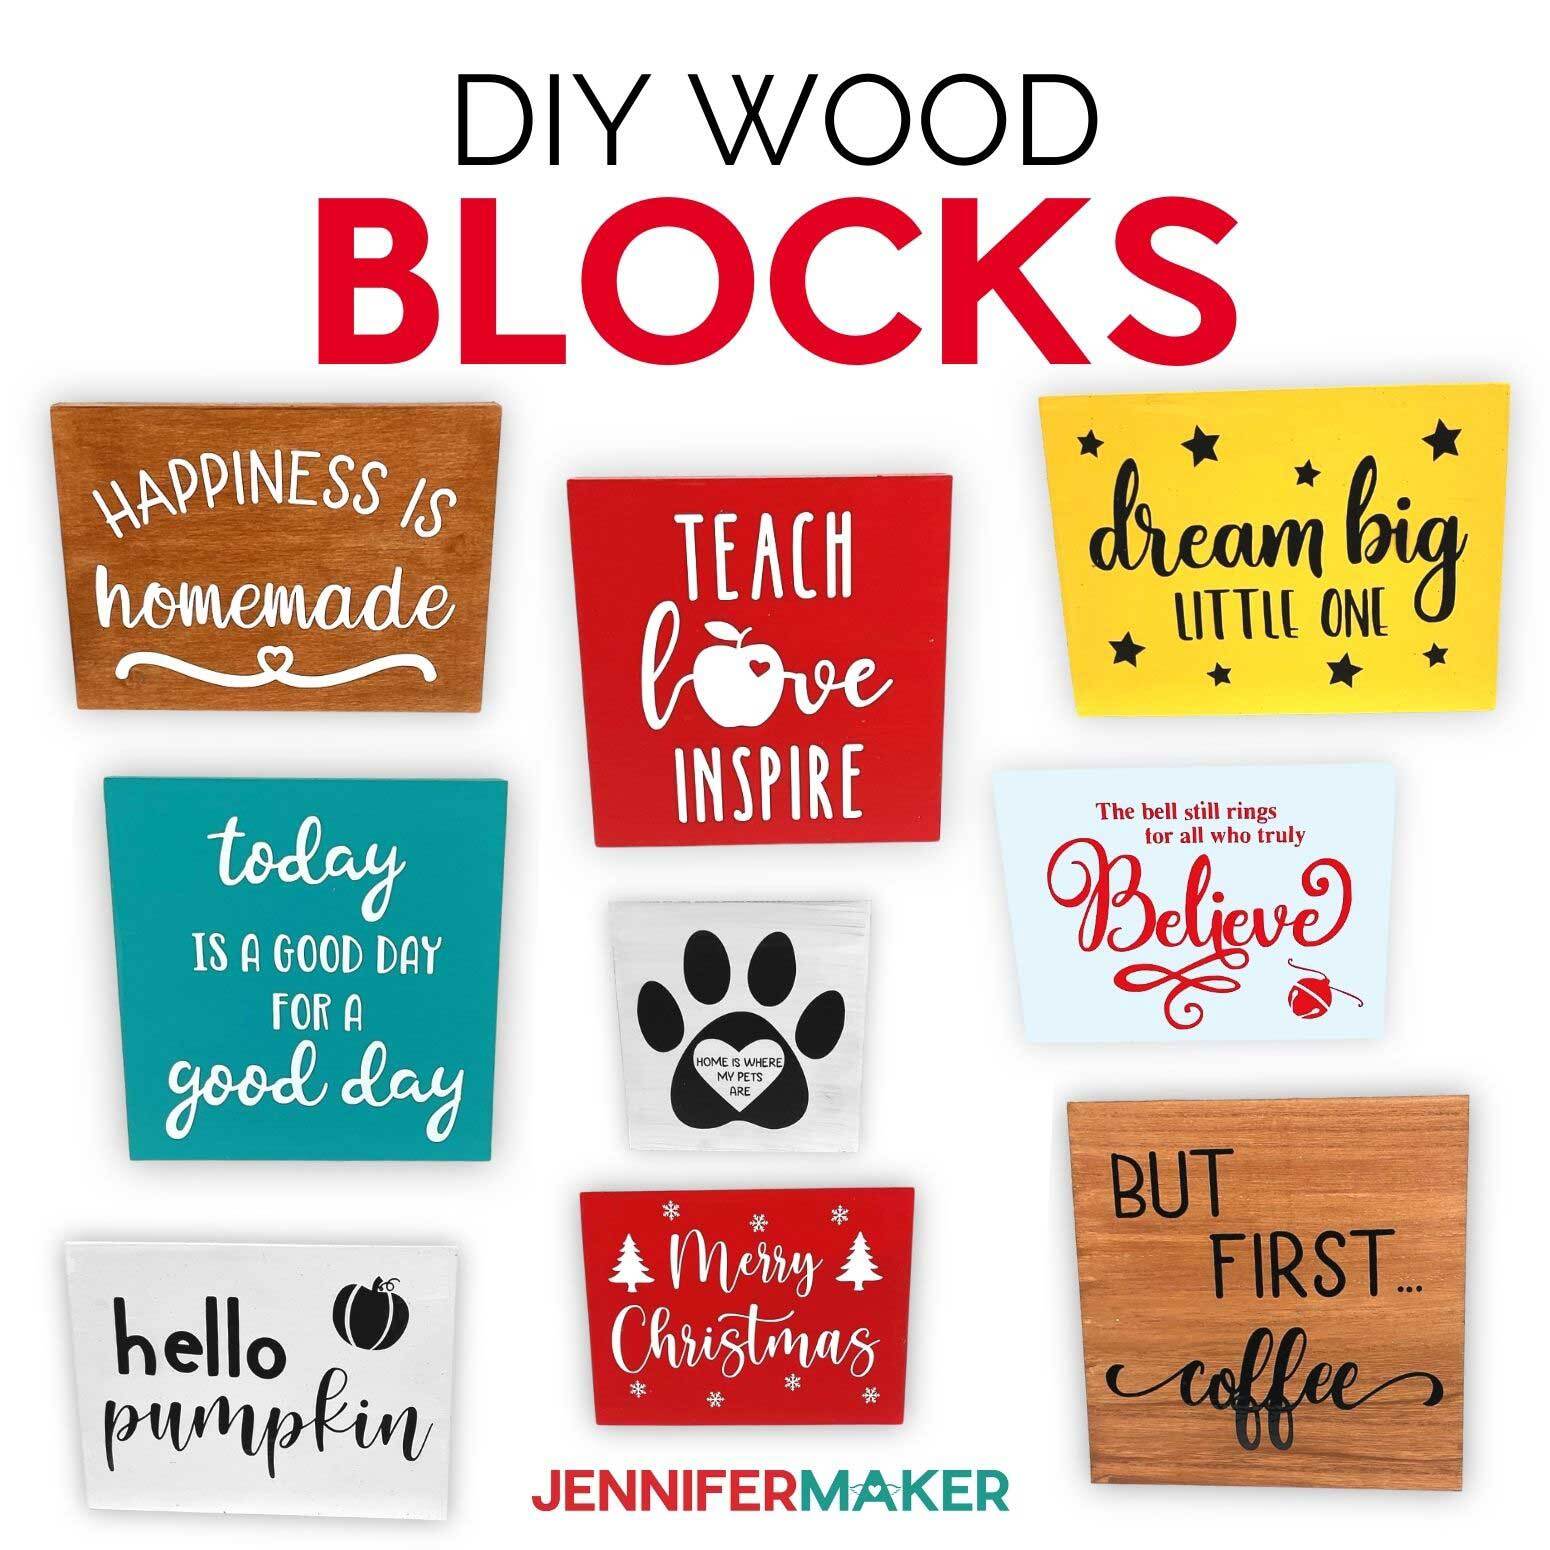
How to use a Cricut cutting machine to easily make stencils and burn designs into wood!
So back in the early ’90s, I taught myself how to use a wood burning tool and painstakingly made a cutting board with one of my recipes on it. I shared this cutting board with everyone recently and many of you asked me to teach you how to burn wood. Well, these days there are new and easier ways to do wood burning, and I’m going to show you several of those techniques. It’s really hard to tell they are homemade and everyone would probably think you paid a bunch to get some custom-made wooden designs. But, in reality, these wood burned projects aren’t all that hard and make for great gifts … especially during the holidays. So let me show you how to use a Cricut cutting machine to easily make stencils and burn designs into wood!
Watch the full step-by-step tutorial on my channel tonight!

There’s a few ways to burn designs into wood and I did a lot of testing so hopefully you won’t have to. There are two really popular techniques, both use chemicals and stencils to burn the designs into the wood. Also, both are food-safe which is definitely a plus when it comes to showing off your skills to friends and families for those get-togethers! Look at the amazing detail!
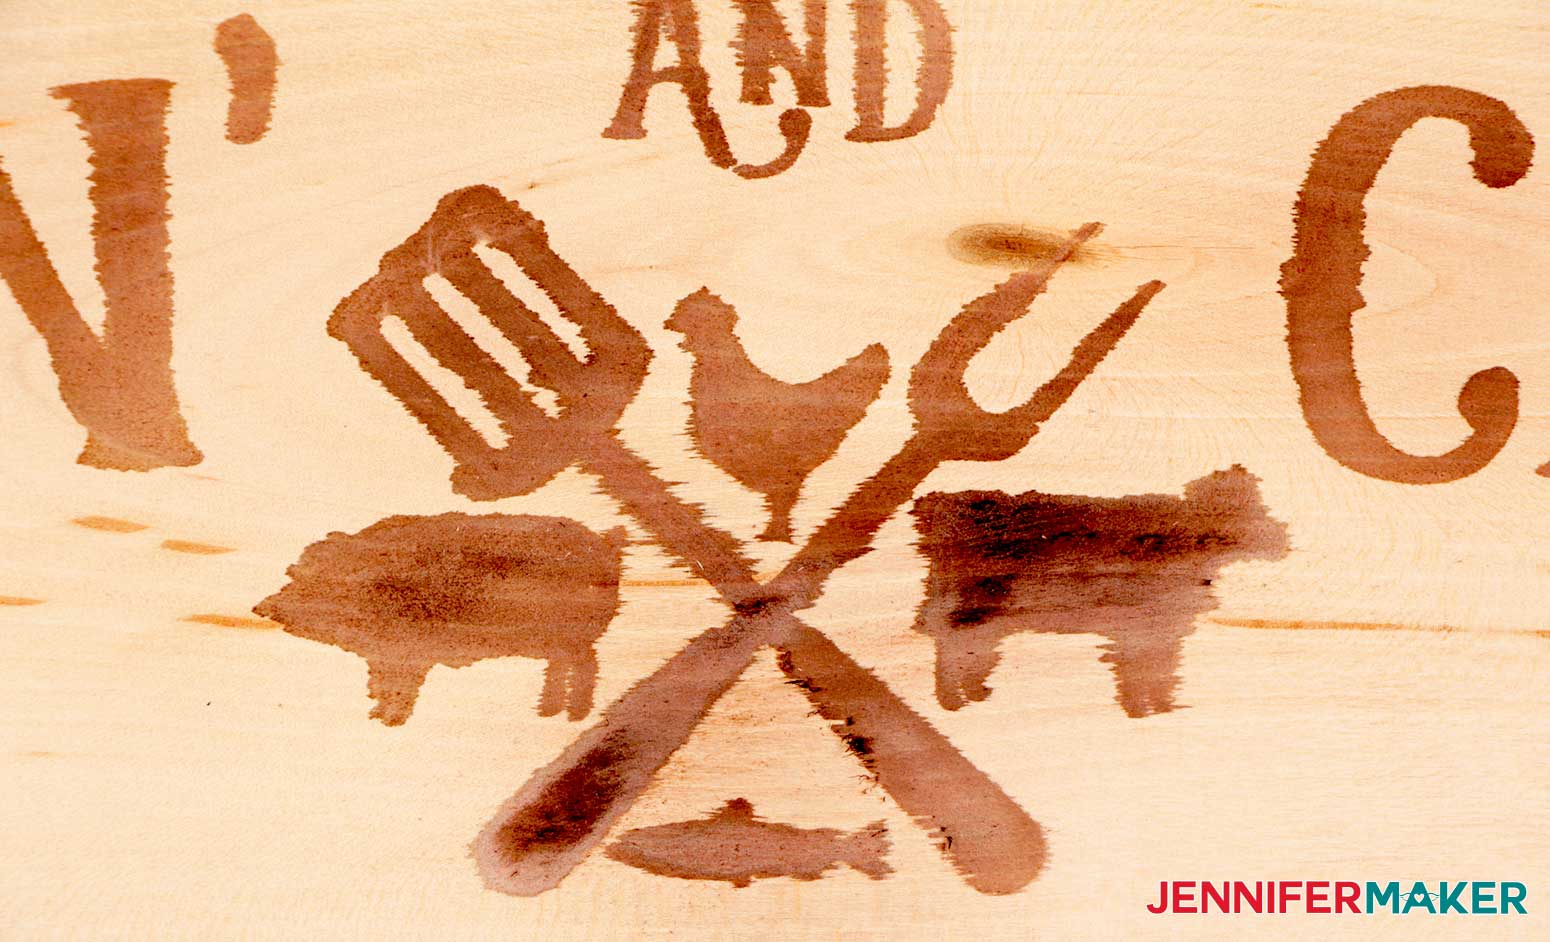
We will need a few things for this project. One of the most important of course is a wood blank, I used two wood blanks that are both natural basswood with no finish, which is important. I sized my designs for these particular size wood boards, but they can be resized to your personal preference or blank. I will also show you how to add all the hardware to hang the Grillin’ and Chillin’ design.
We will use both ammonium chloride and a scorch marker to add our design to the wood. We will also need “Thick-It” which is a food and beverage thickening agent which will help turn the ammonium chloride into a thick paste or gel. We will apply that with a paintbrush.
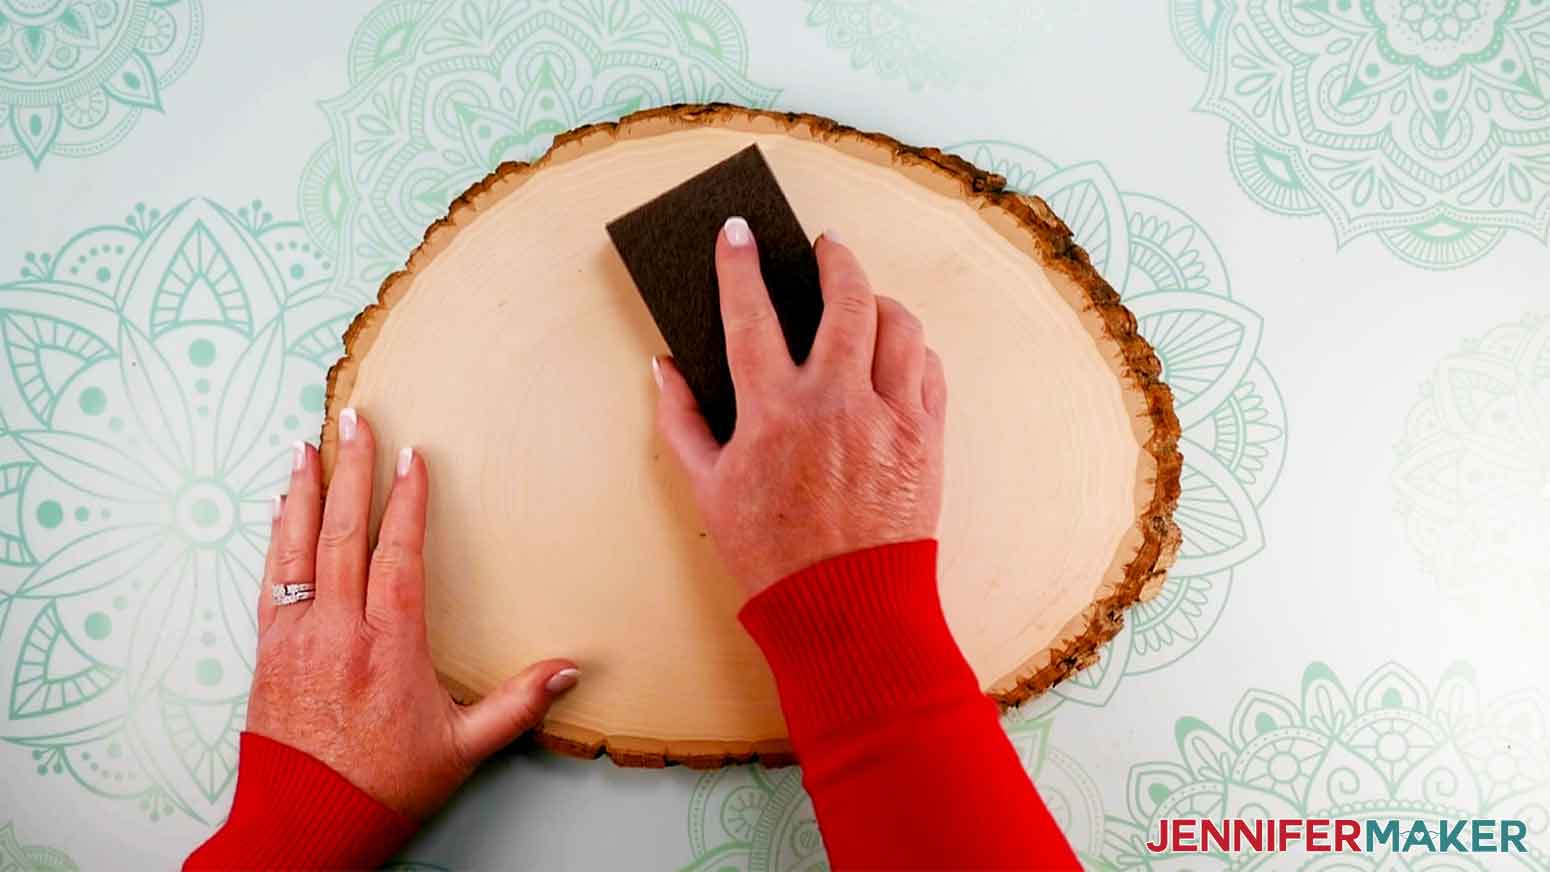
We need a heat gun to burn the design into the wood and something to sand the wood like a sanding sponge.
Of course we will need our Cricut Cutting machine, I’m using the Cricut Maker 3, but you can also use the original Maker or Explore series.
We need a cutting mat, some permanent vinyl and transfer tape. We also don’t need to spend ours searching for the color of the vinyl since we are using it as stencil. (Is it just me or does it take forever to figure out which vinyl you want to use?) We also need a weeding tool and a scraper.
And most importantly, as always, safety first. Make sure to use a respirator, gloves and something to protect your eyes since we are working with chemicals. The last thing I’d want is for you to get hurt making this awesome project so please, stay safe!

I really like how they turned out. These would make super nice gifts for just about any occasion. You could totally use this technique with pretty much any design you can think of!
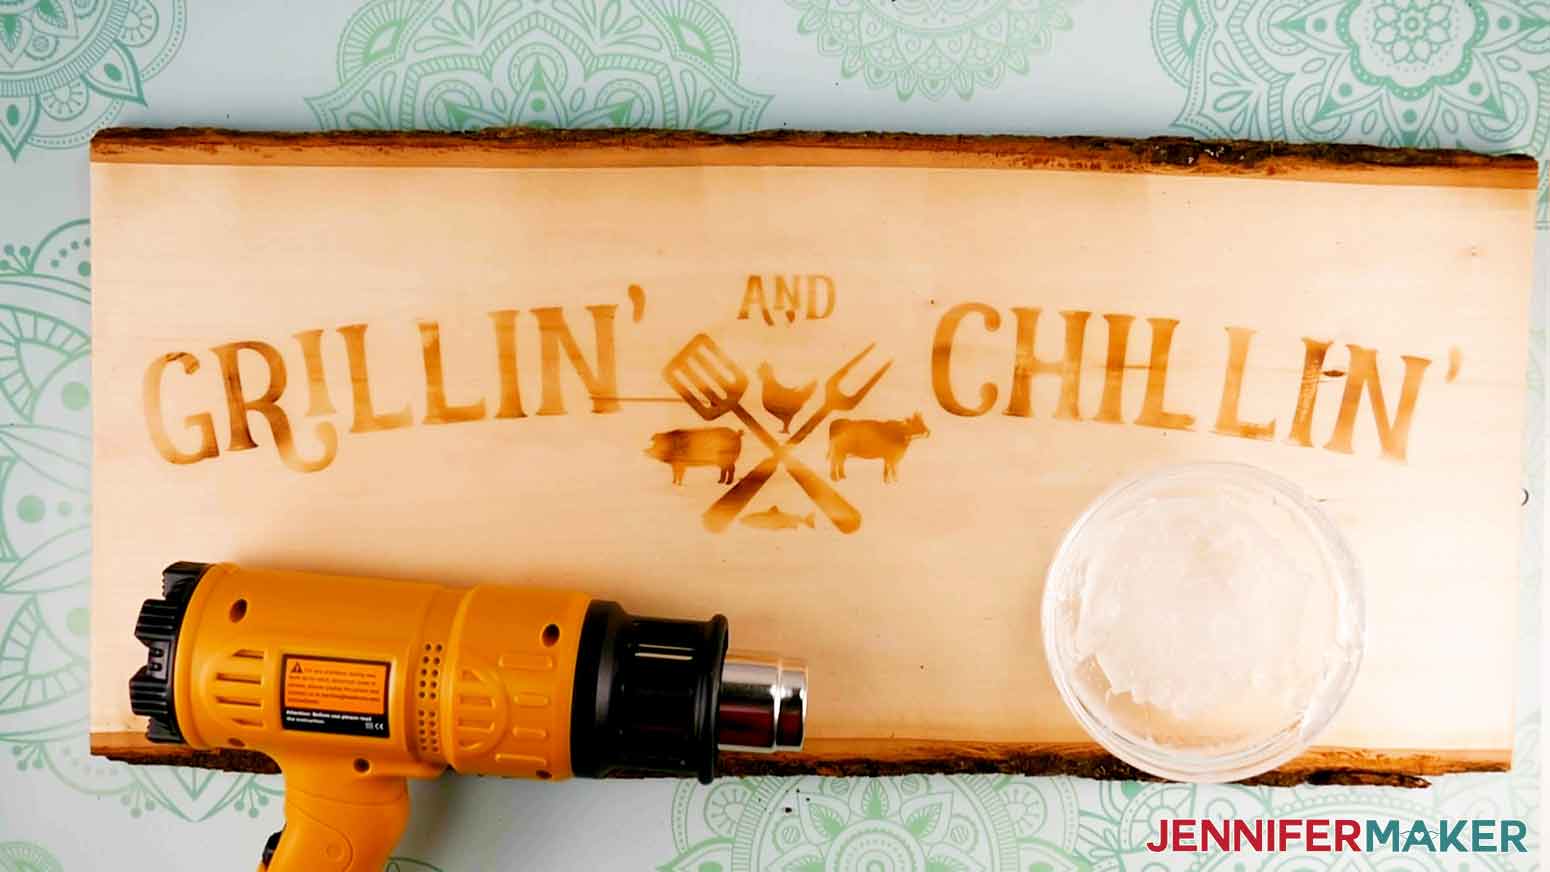
The first technique uses Ammonium Chloride. I tested this method while making the Santa cookie tray. The second technique I tested uses a Scorch Marker, which already contains all the chemicals mixed within it. I made the Grillin’ and Chillin’ sign using this method.
Remember that although both methods are non-toxic and food safe, they do involve chemicals so you definitely want to take extra safety precautions which I will cover in more detail in the tutorial. Just be sure you have all the personal protective equipment on hand so you’re safe!
Let me show you how easy it is to make this wood burned design project with my free stencils! This post contains some affiliate links for your convenience (which means if you make a purchase after clicking a link I will earn a small commission but it won’t cost you a penny more)! Read my full disclosure policy.
Materials to Make Wood Burned Designs
View my Amazon shopping list with the exact items we used to make this project
- Wood Board (One 23” board for Grillin’ and Chillin’ sign)
- Basswood Round (One 14″ for Santa cookie tray)
- Ammonium Chloride
- Food & Beverage Thickener
- Scorch Marker Pro (Optional — Not recommended)
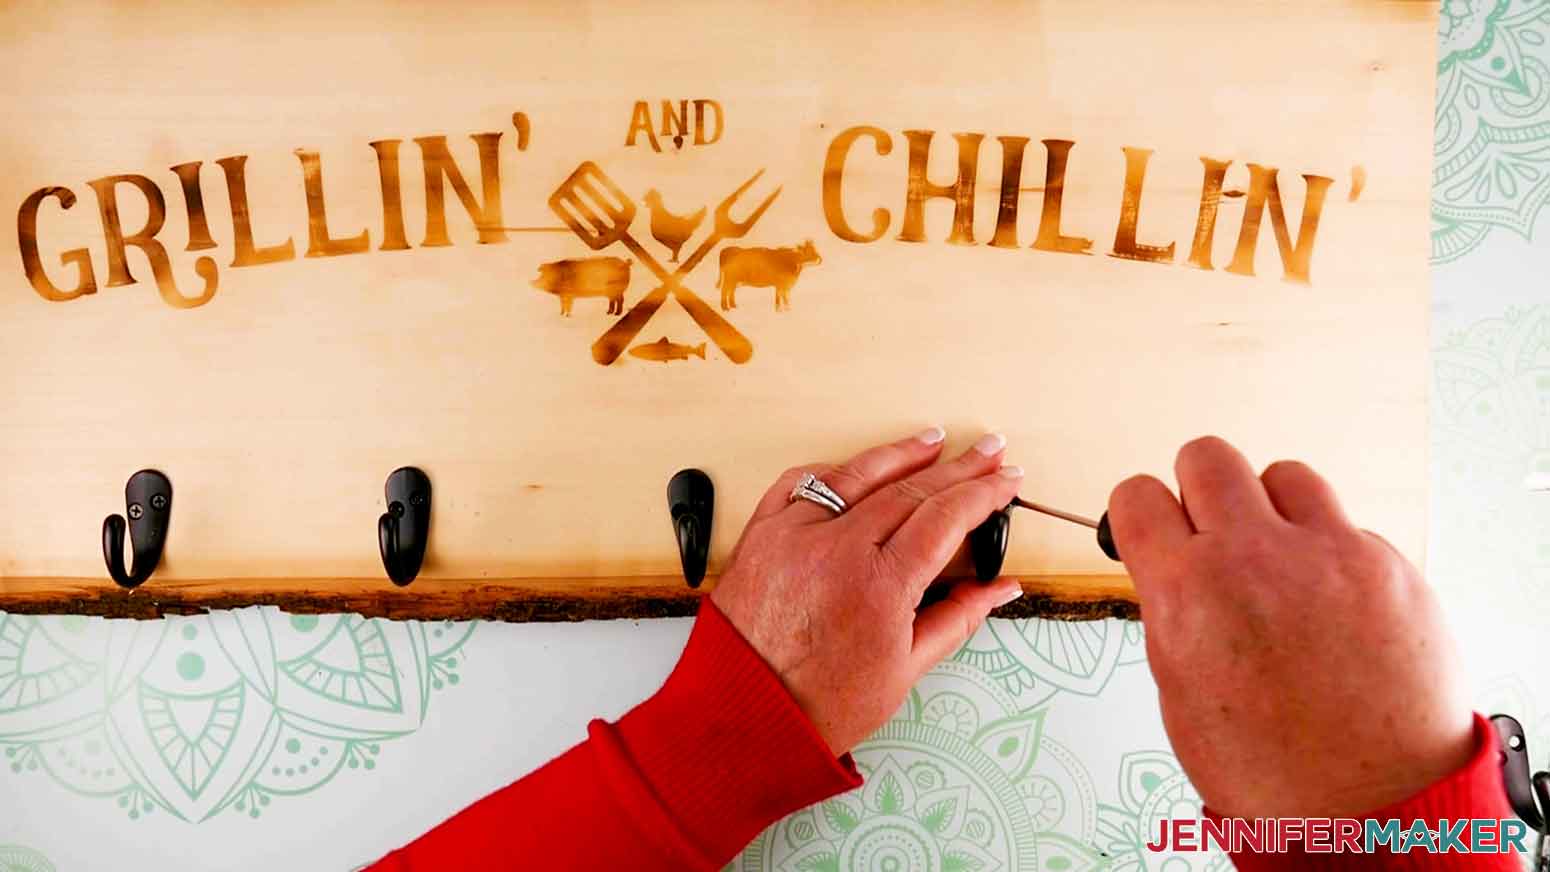
- Oil Rubbed Bronze Hooks (Five for sign)
- Screws (Ten 1/2″ #4)
- Saw Tooth Hangers (Two for sign)
- Cricut Premium Vinyl – Permanent (12″ for tray and 24″ for sign)
- Cricut Transfer Tape (12″ for tray and 24″ for sign)
- Mineral Oil (optional)
- A method to cut your vinyl: I used the amazing Cricut Maker 3 but you can also use the Cricut Maker, Cricut Explore 3, or the Cricut Explore — you can use the standard fine point blade for this project
- Heat Gun -OR- Cricut EasyPress
- Cricut EasyPress and/or EasyPress Mini (Optional)
- Sanding Sponge
- Lint Roller
- Weeding Tools
- Cricut XL Scraper
- Green StandardGrip Cutting Mat (12″ x 12″) – for Santa Cookie Tray
- Green StandardGrip Cutting Mat (12″ x 24″) – for Grillin’ and Chillin’ Sign
- Paintbrush
- Design #357 – My free template (available in my free resource library—get the password at the bottom of this post

How to Burn Design Into Wood
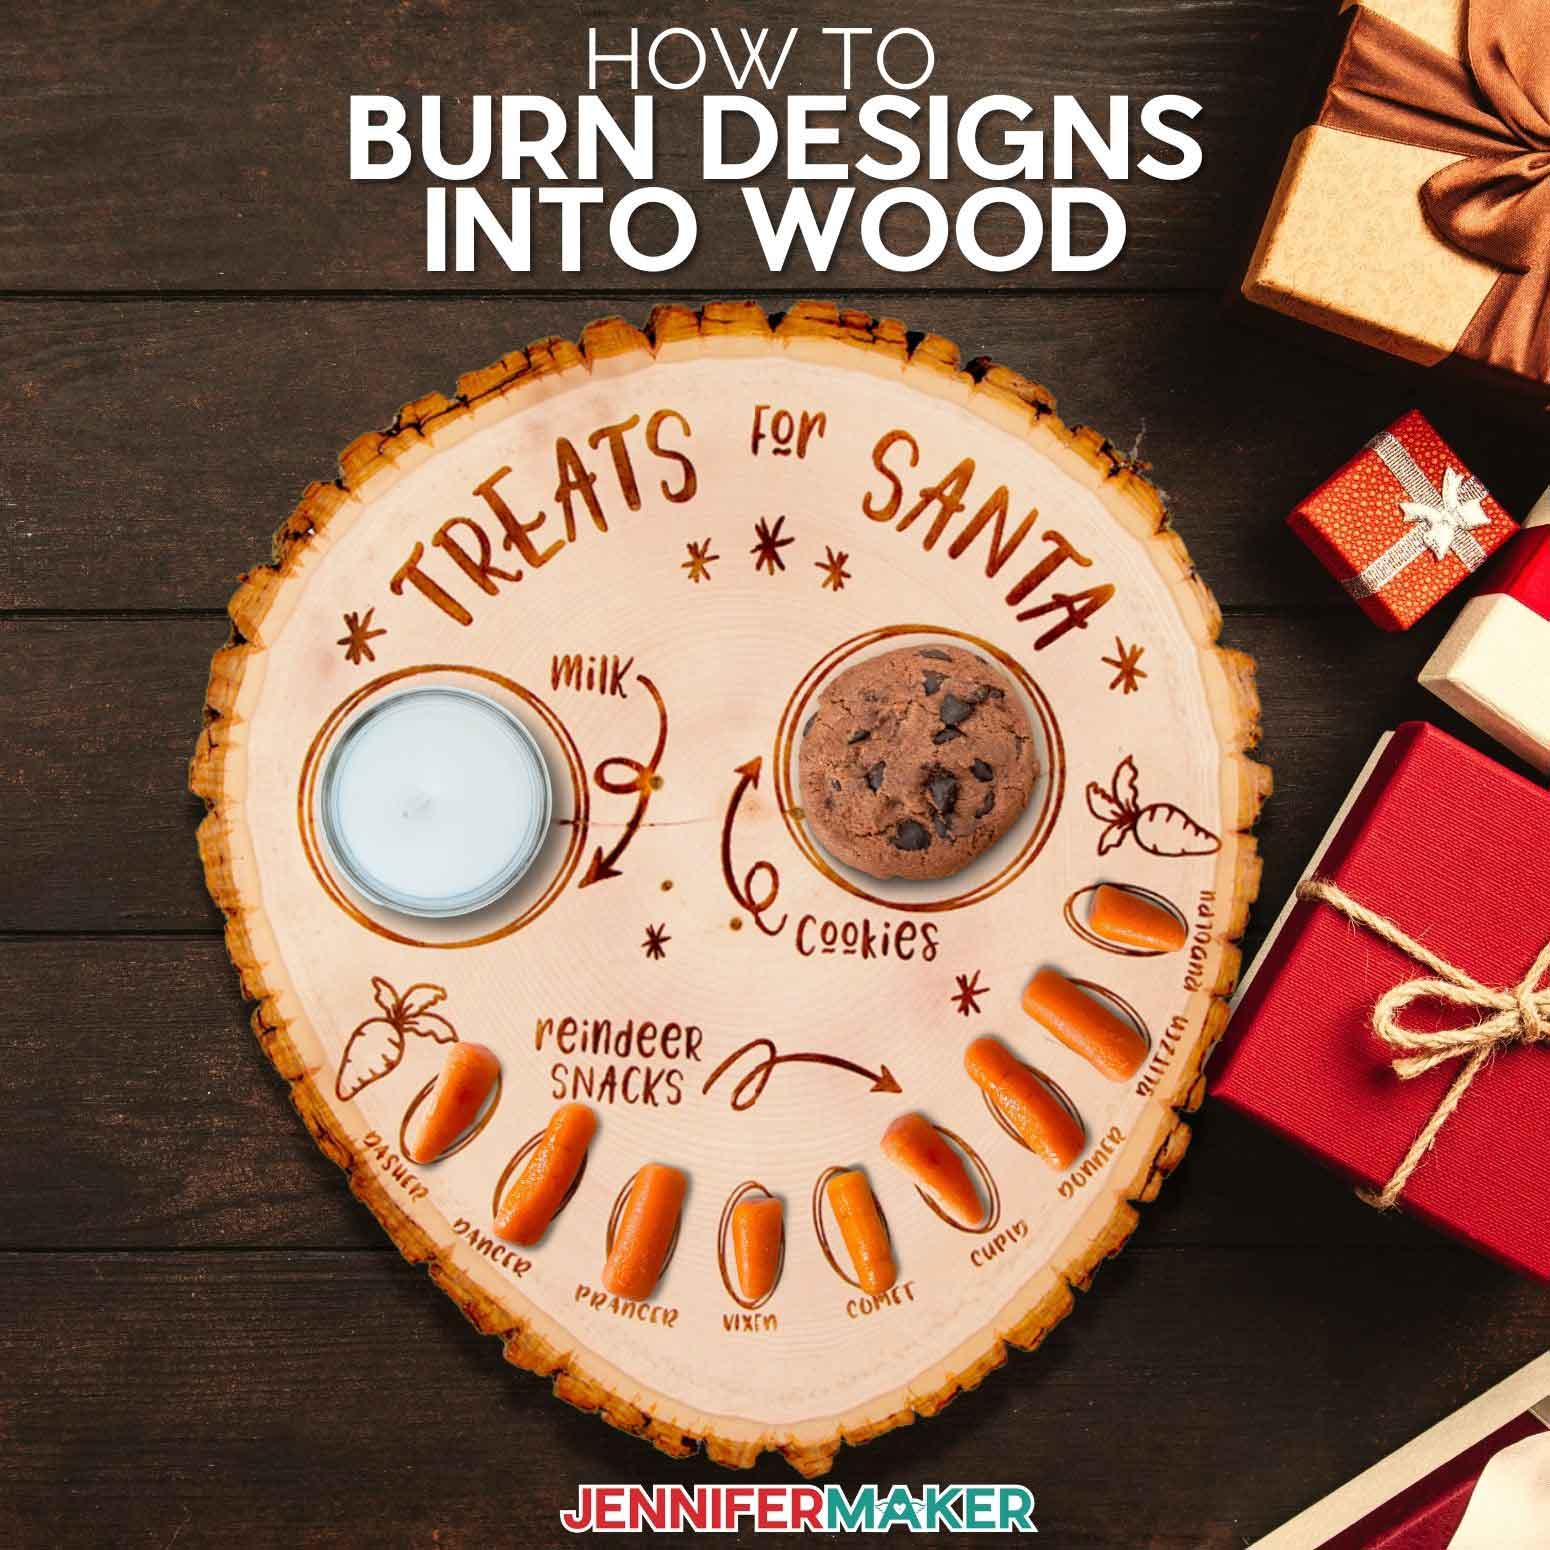
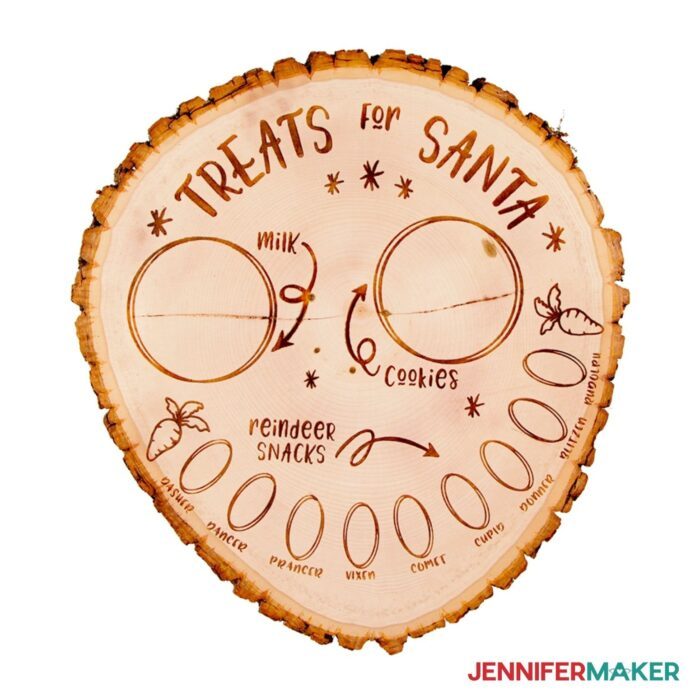
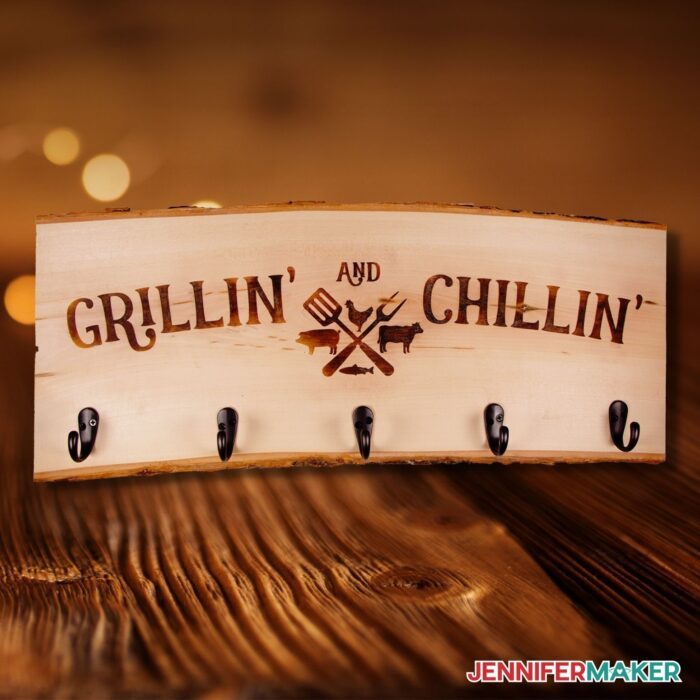
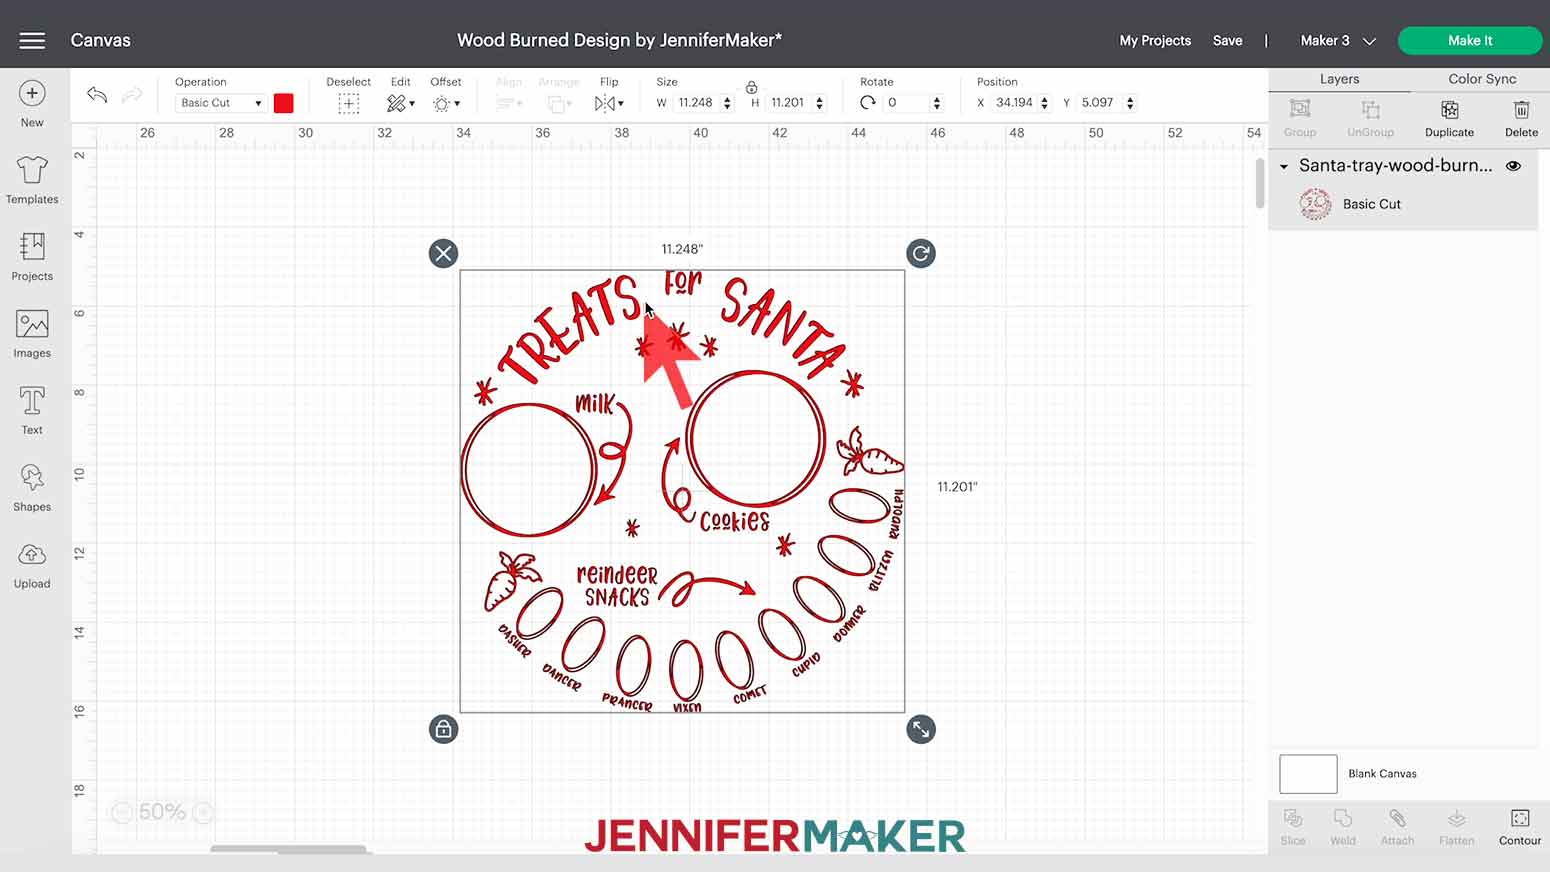
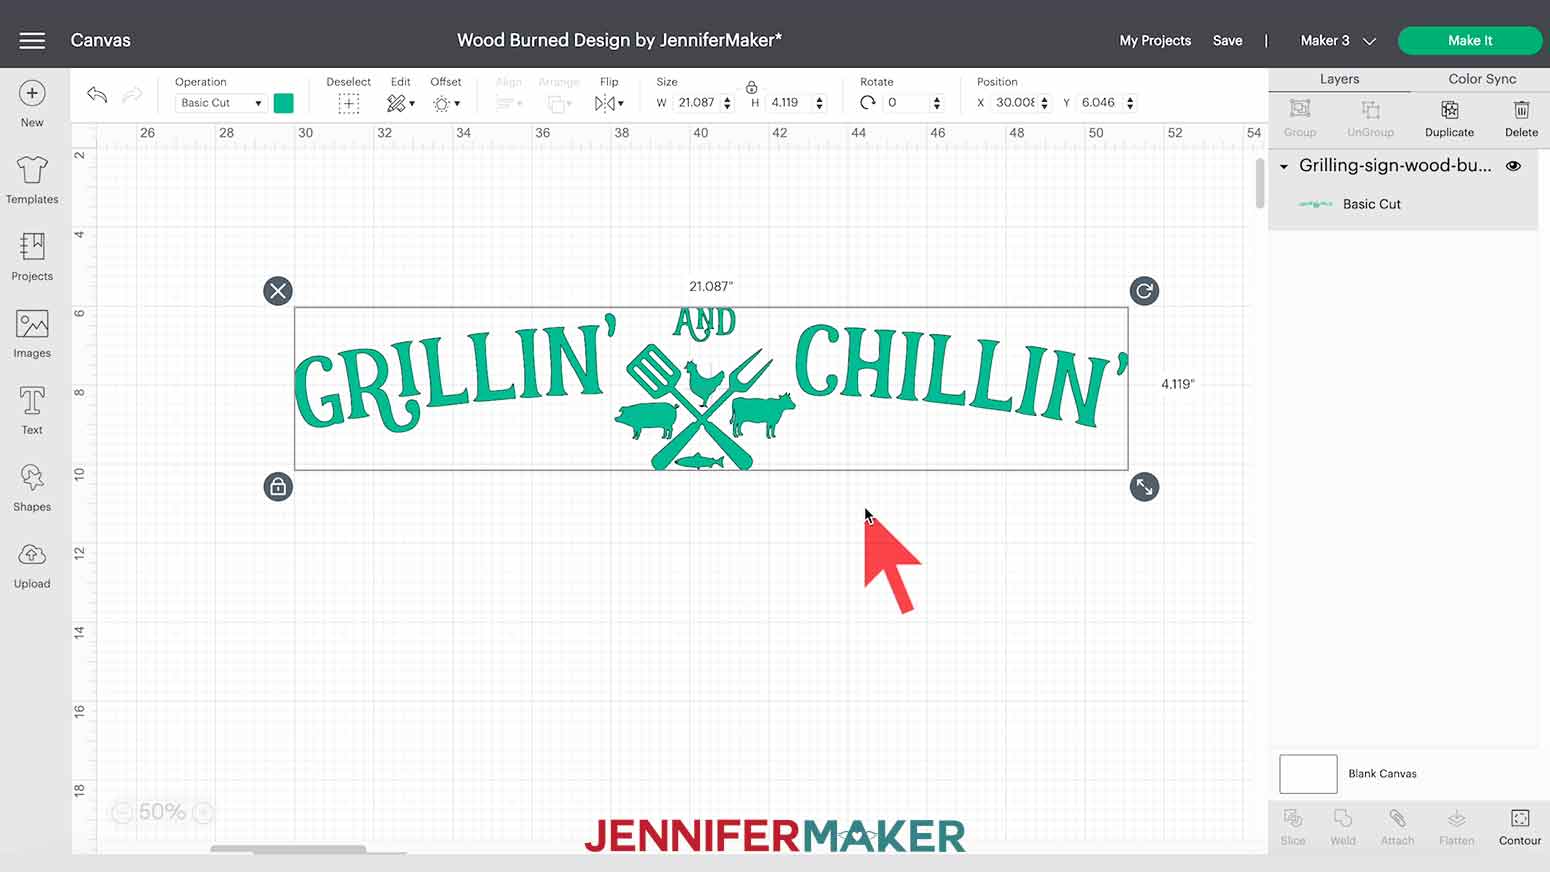
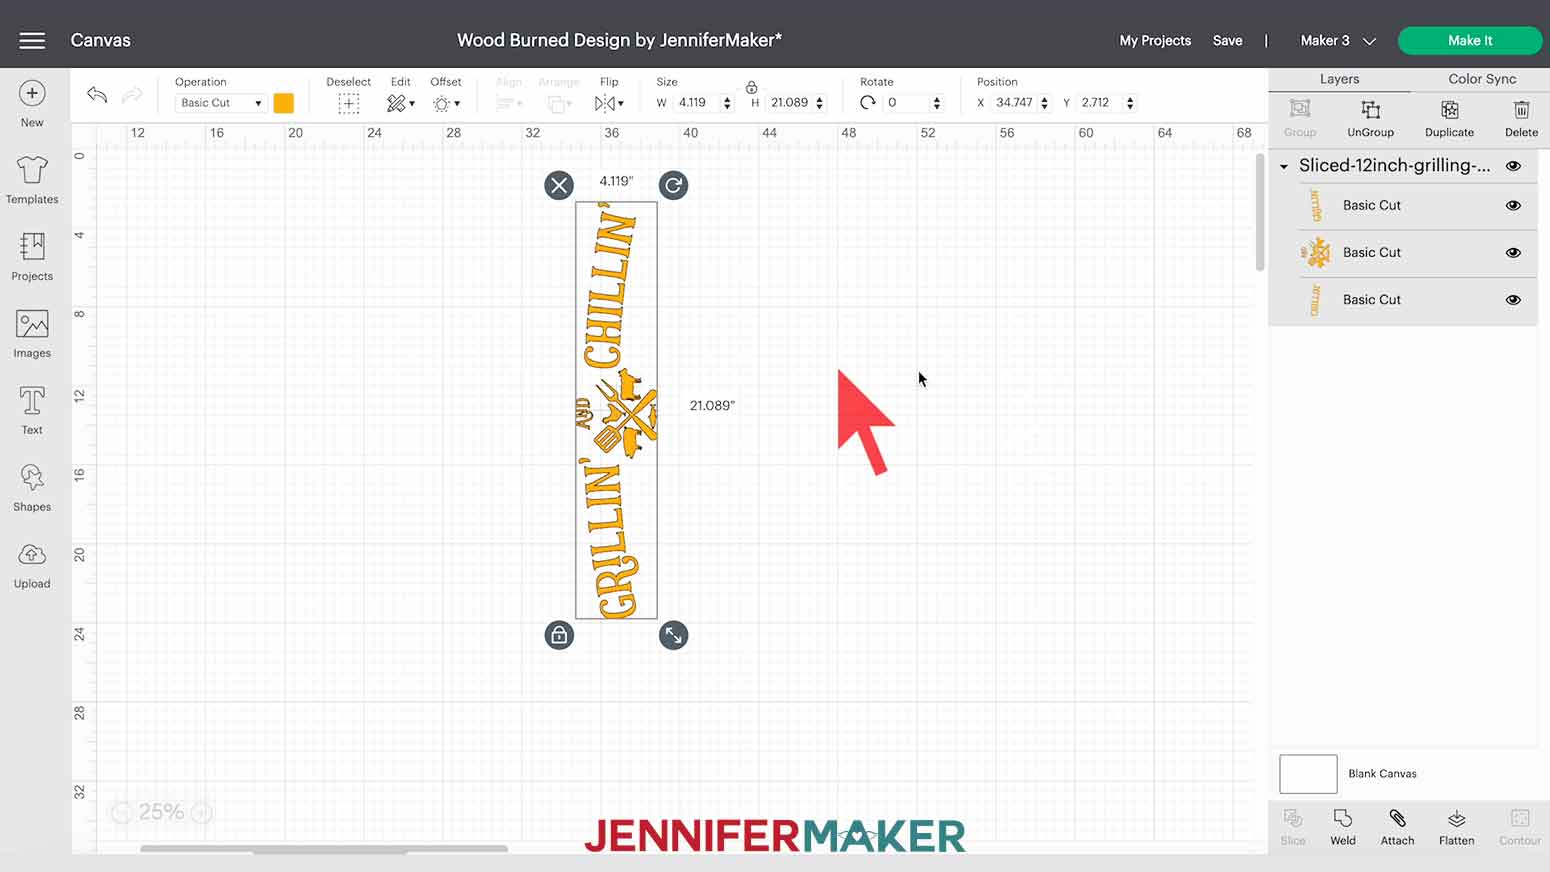
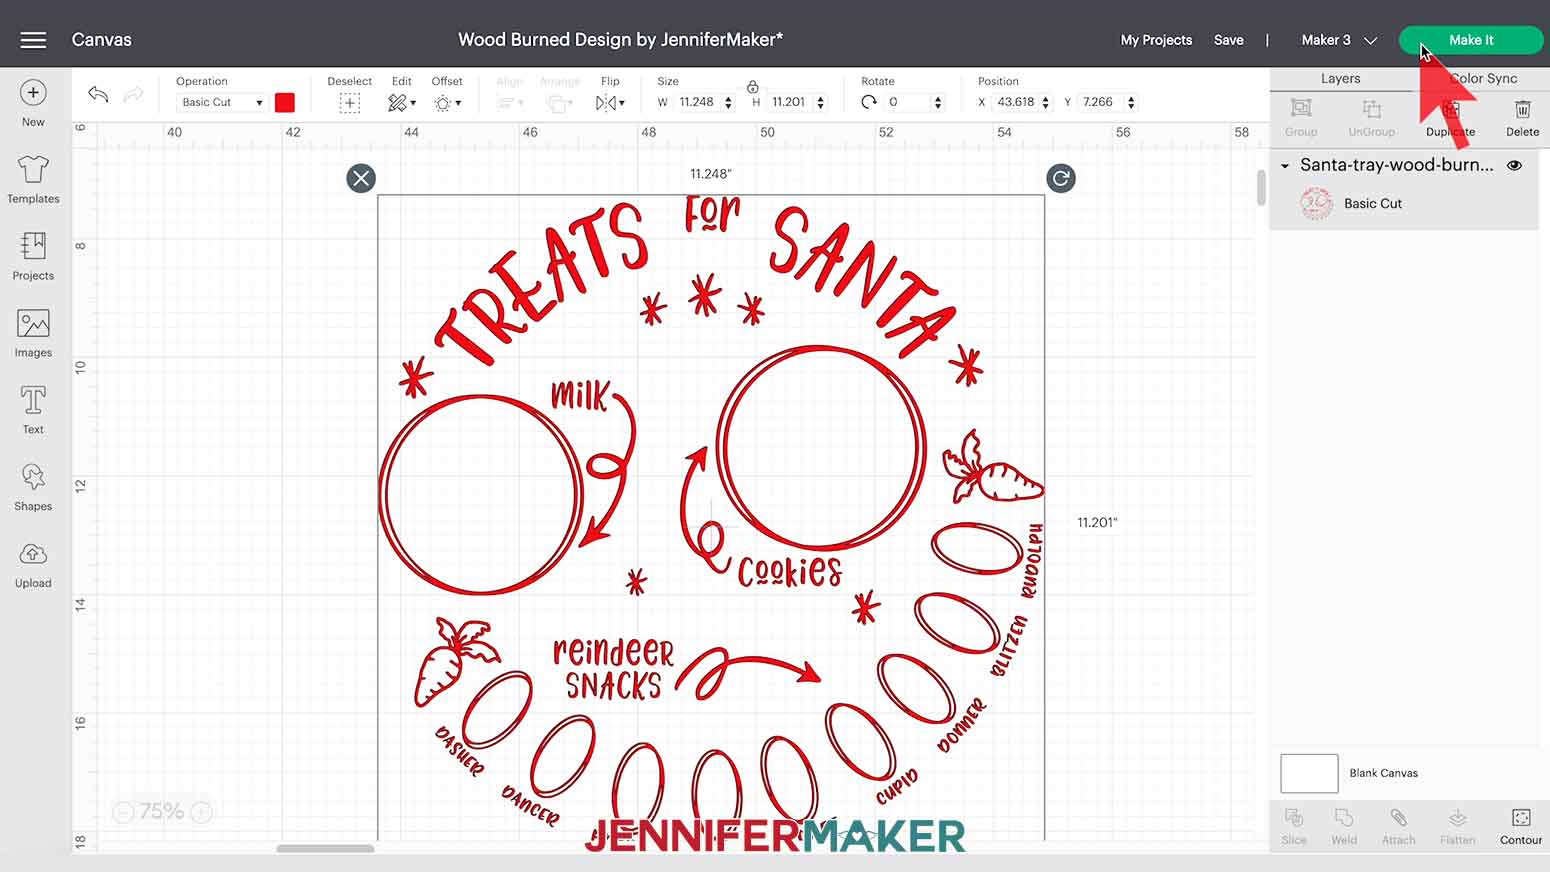
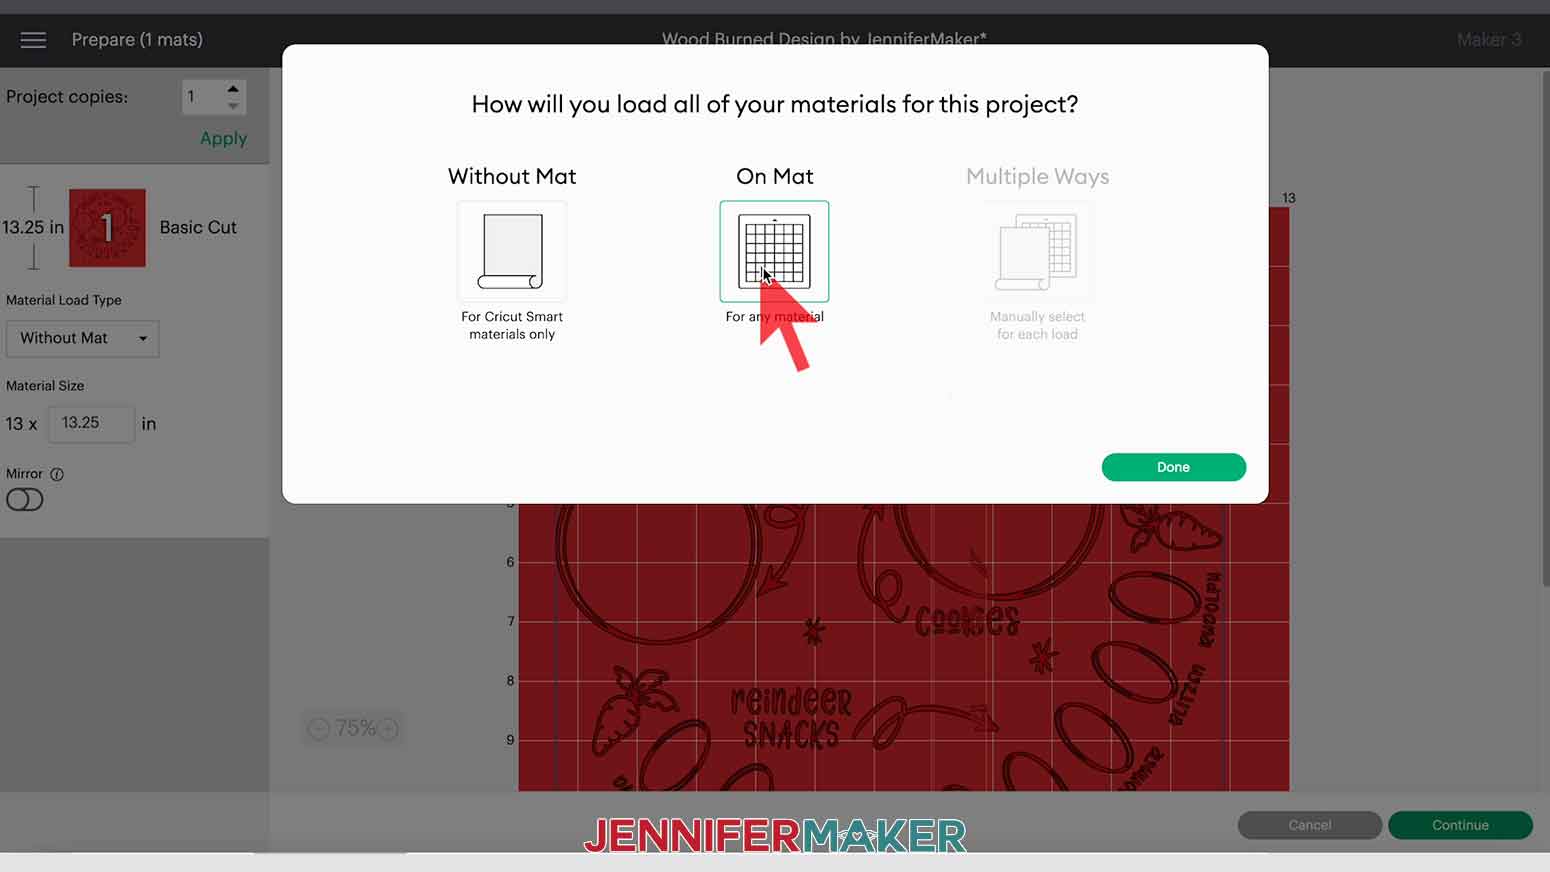
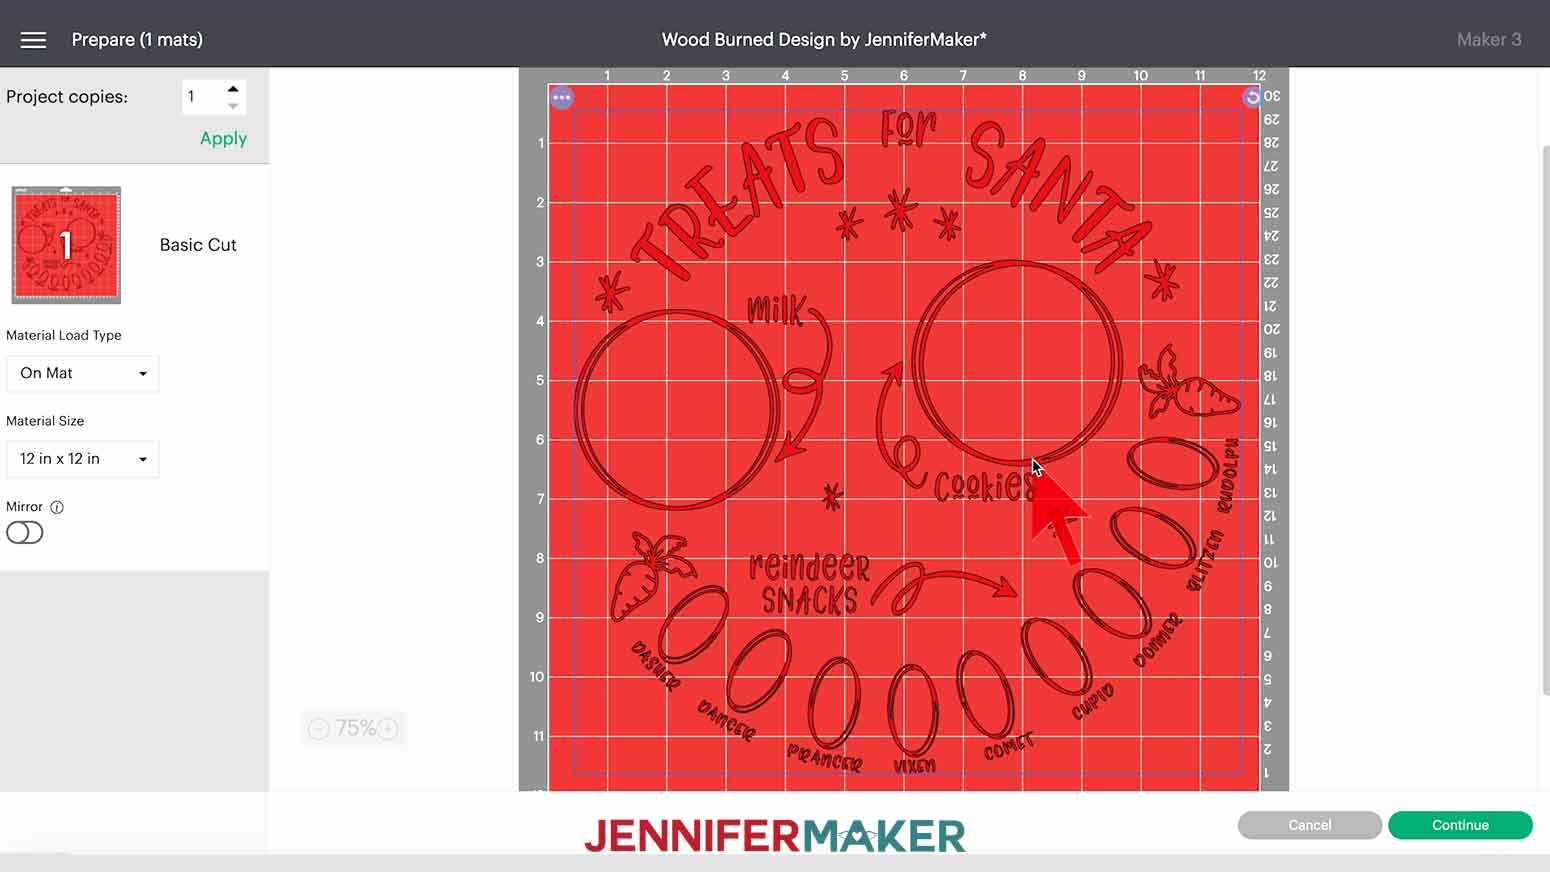
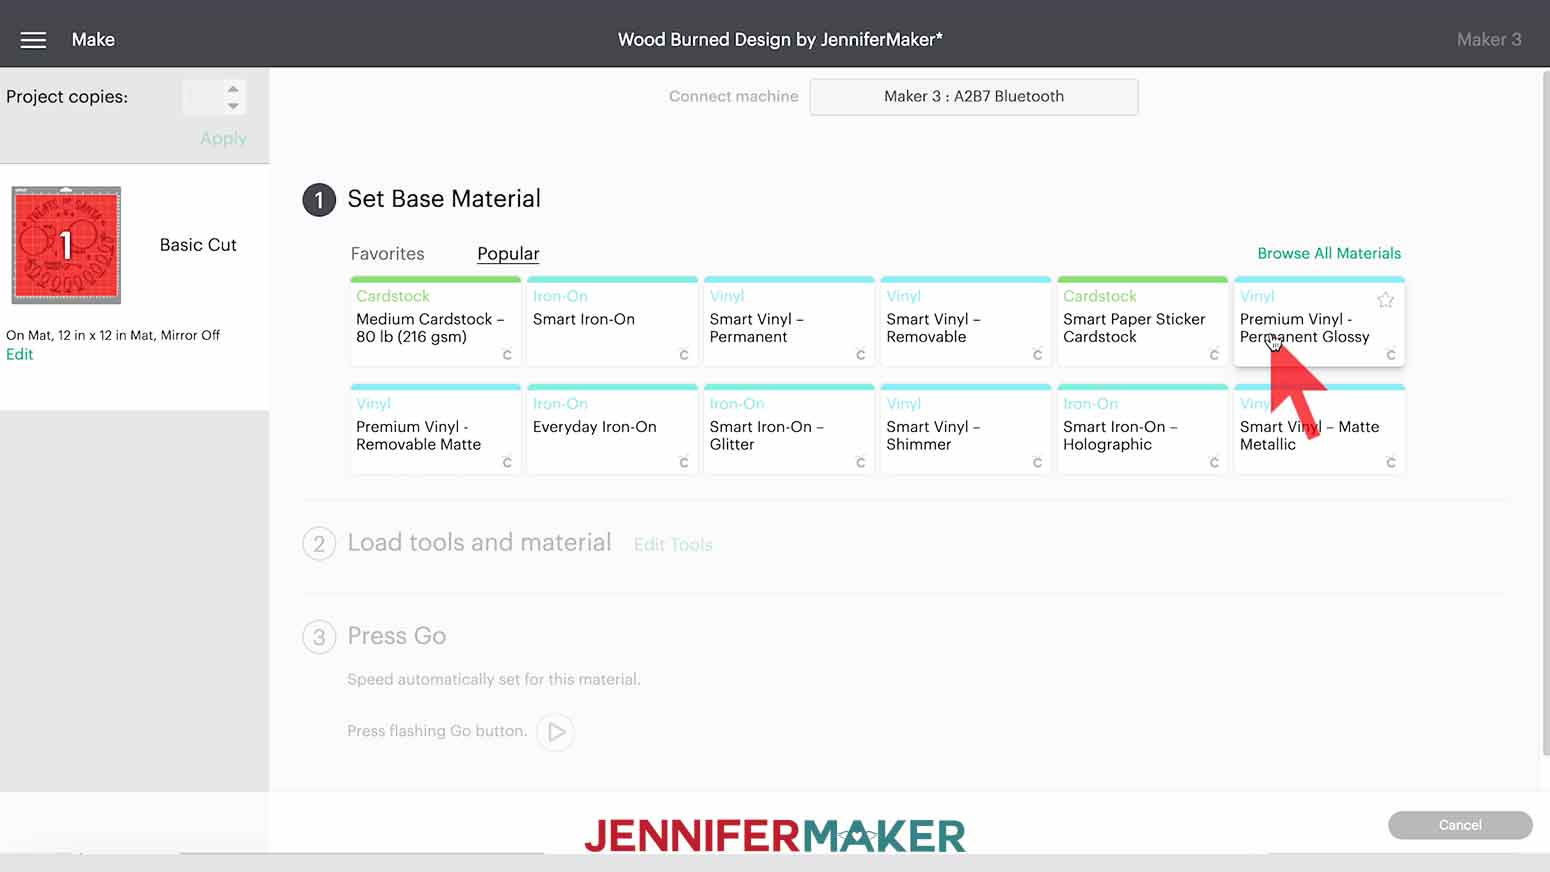
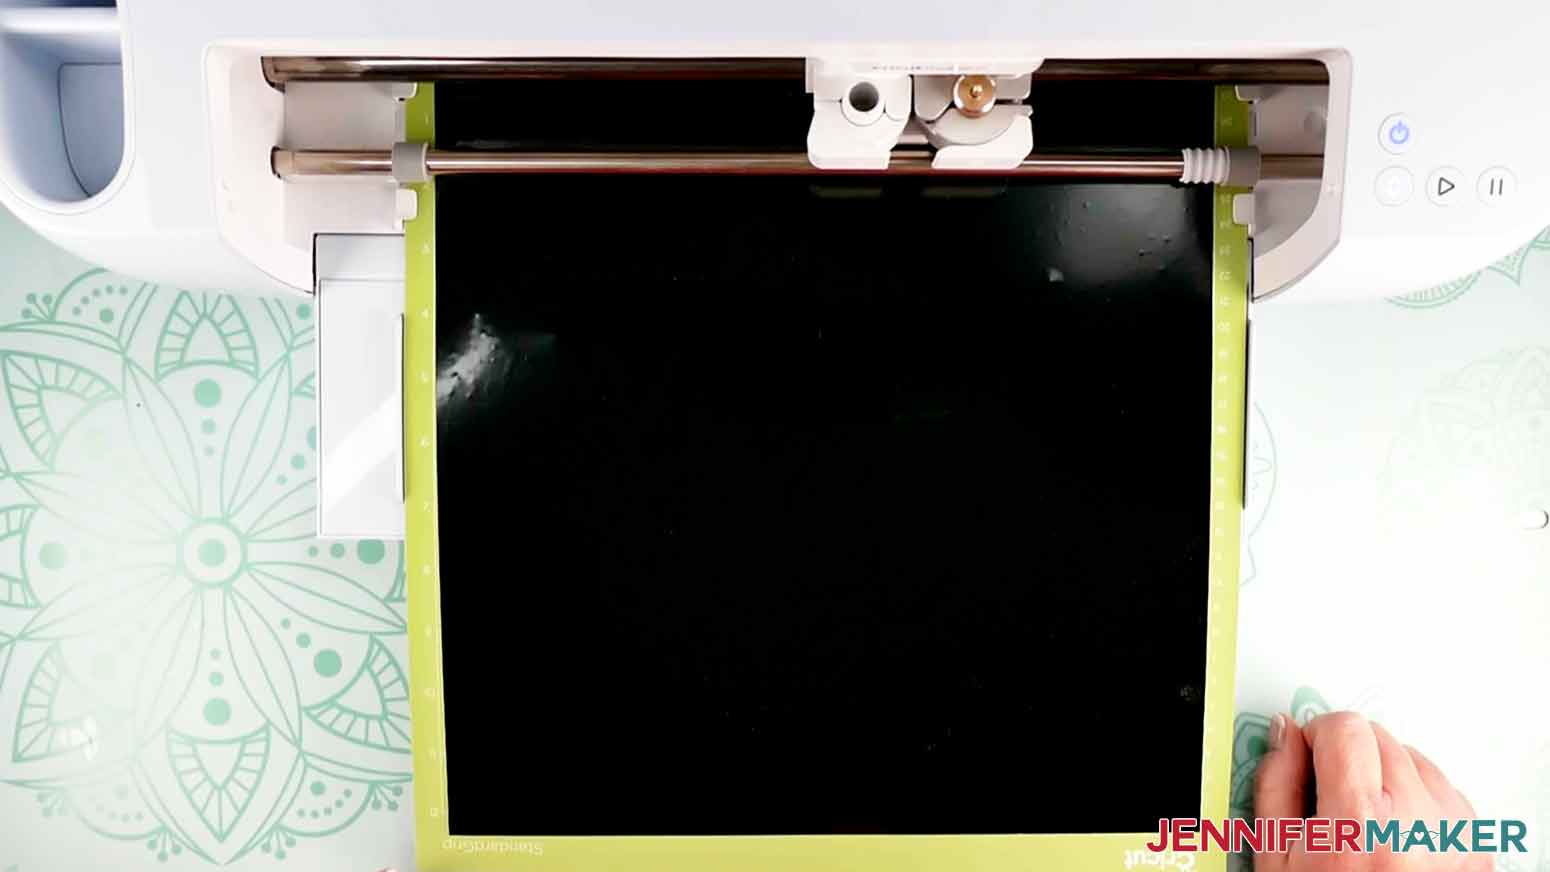
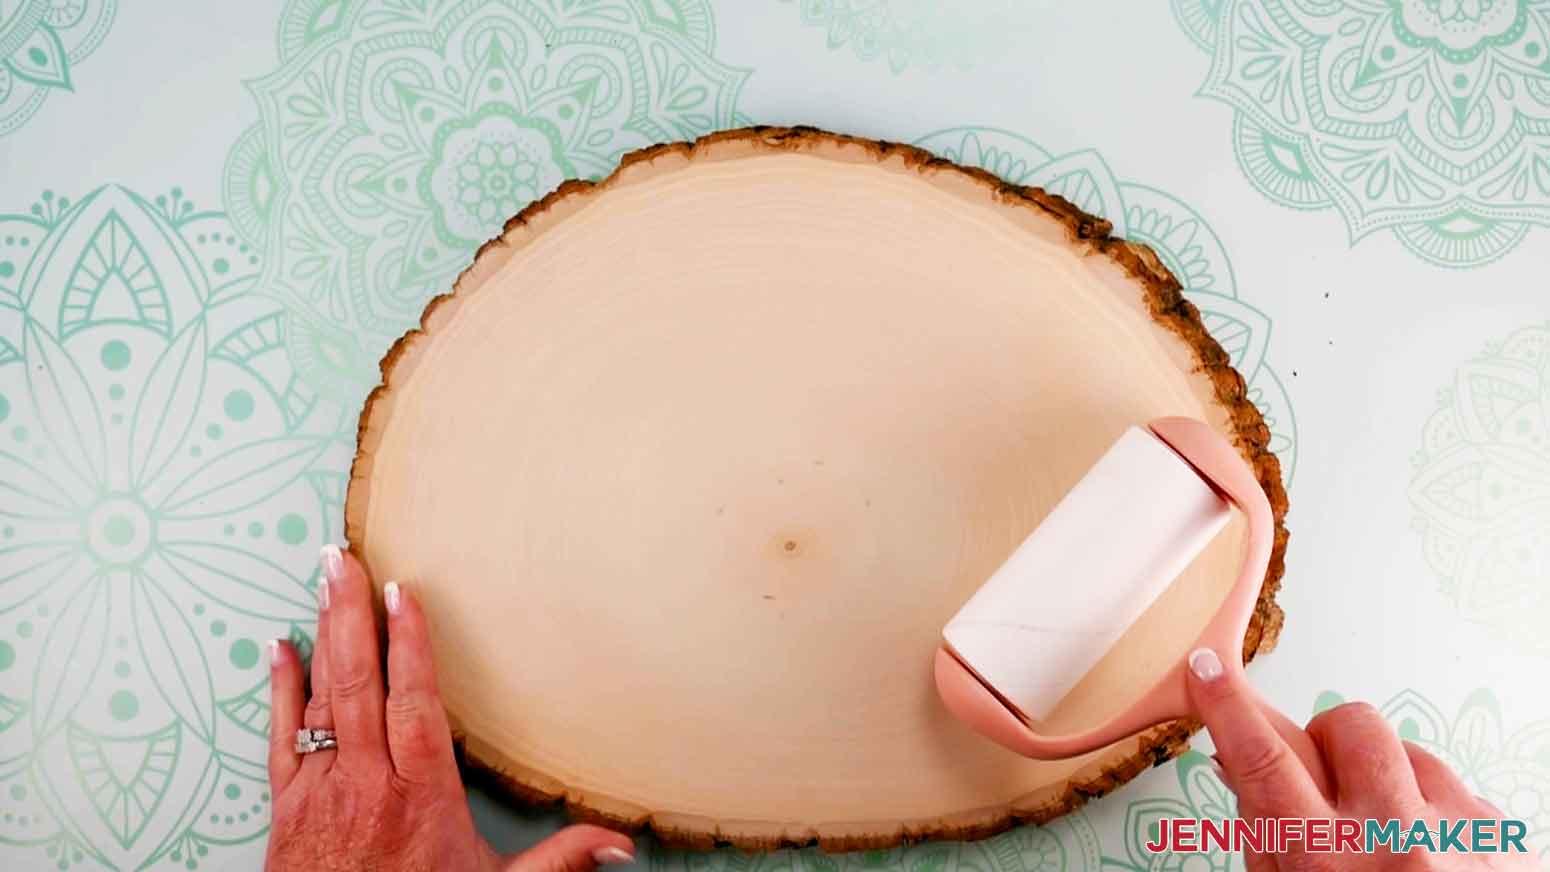
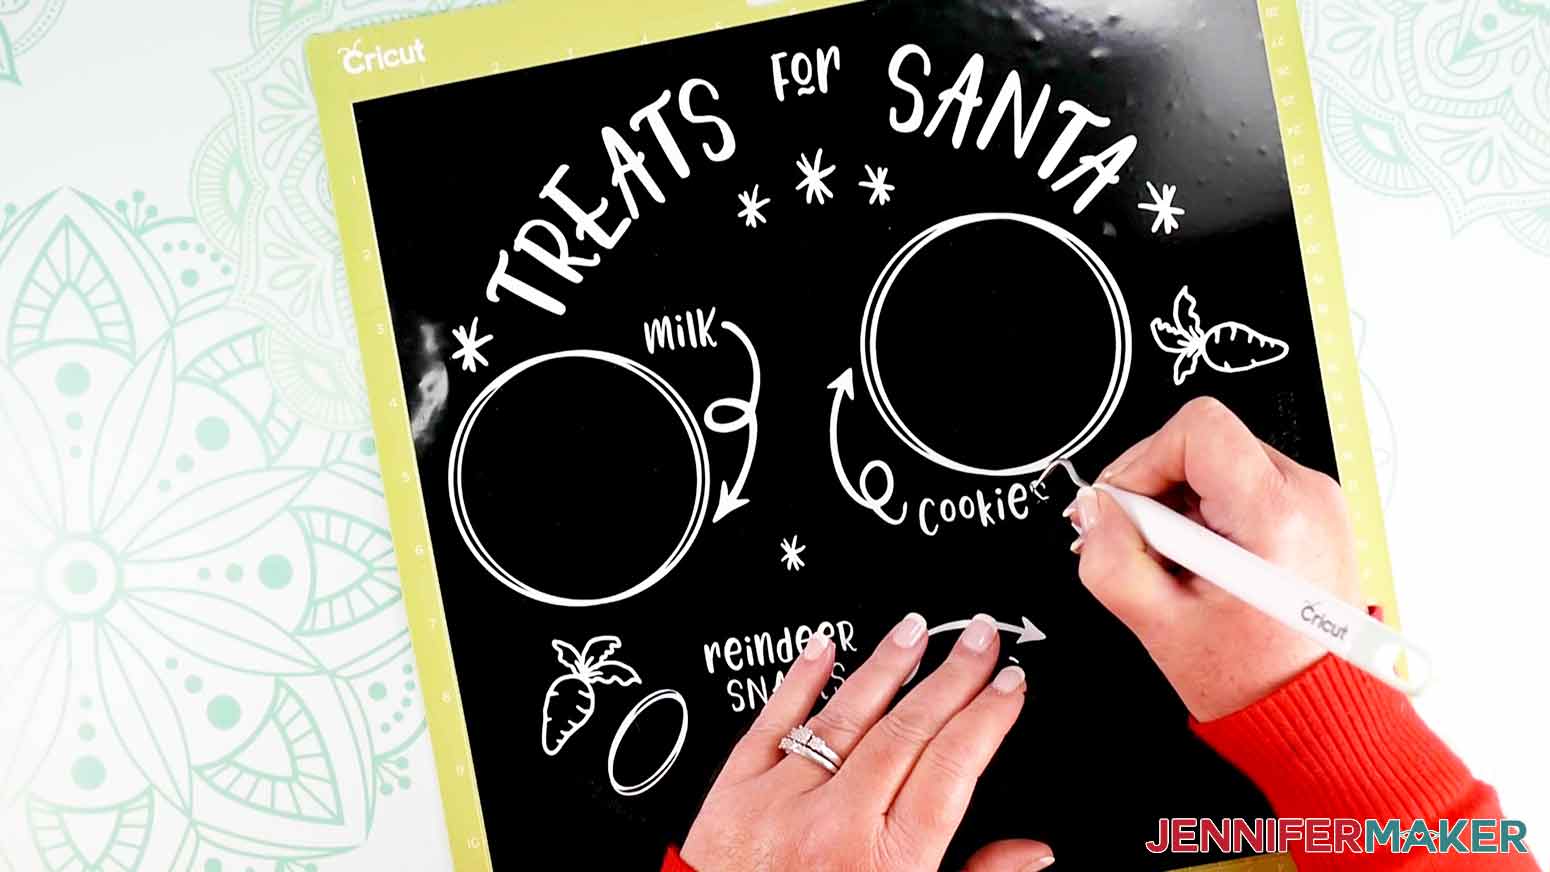
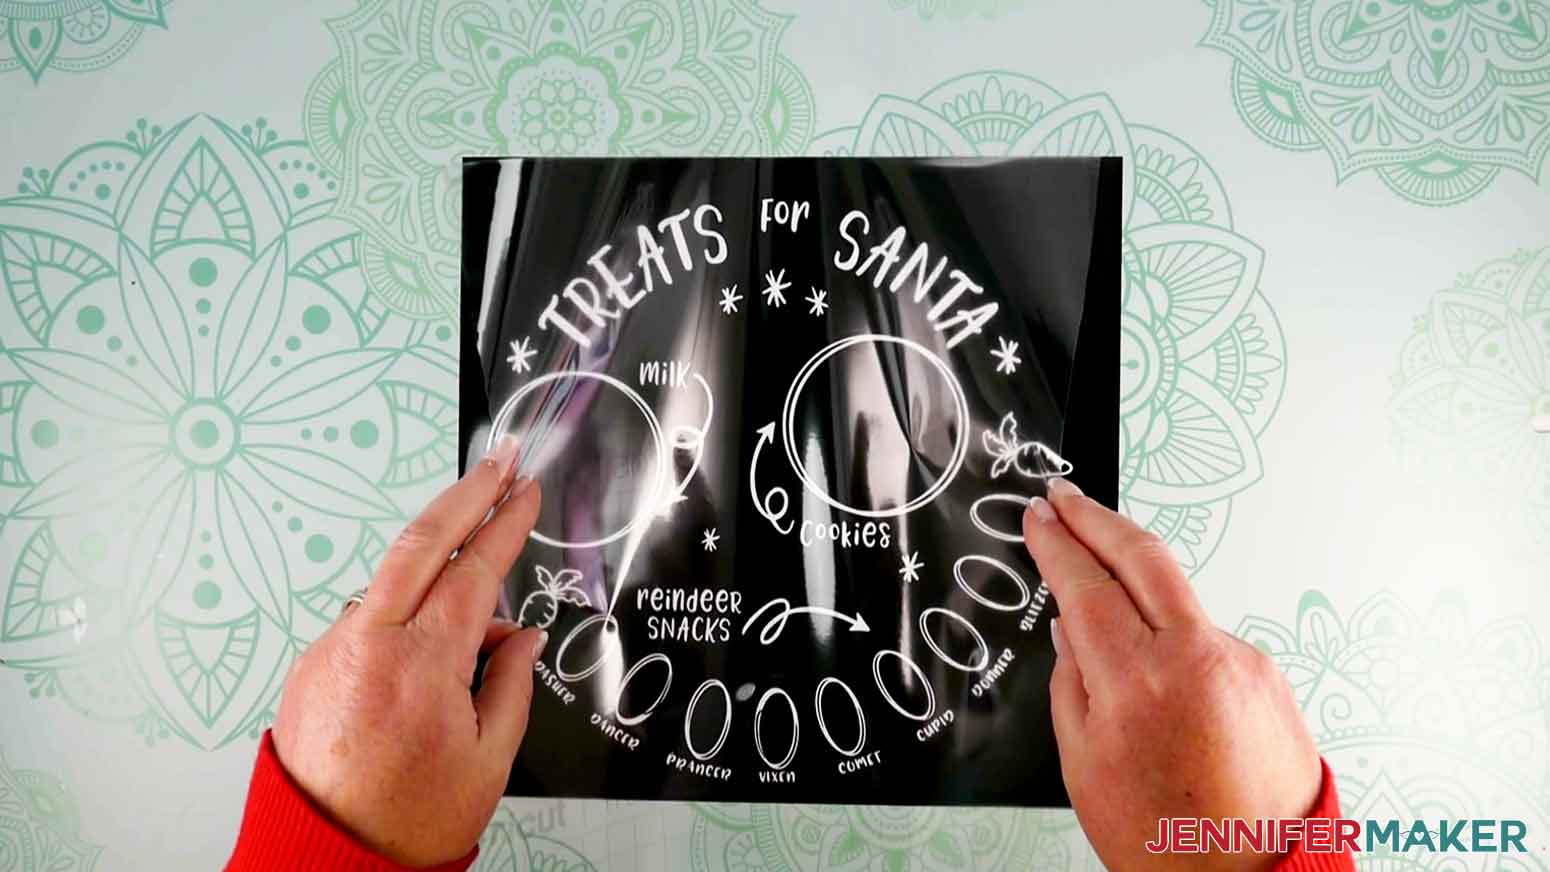
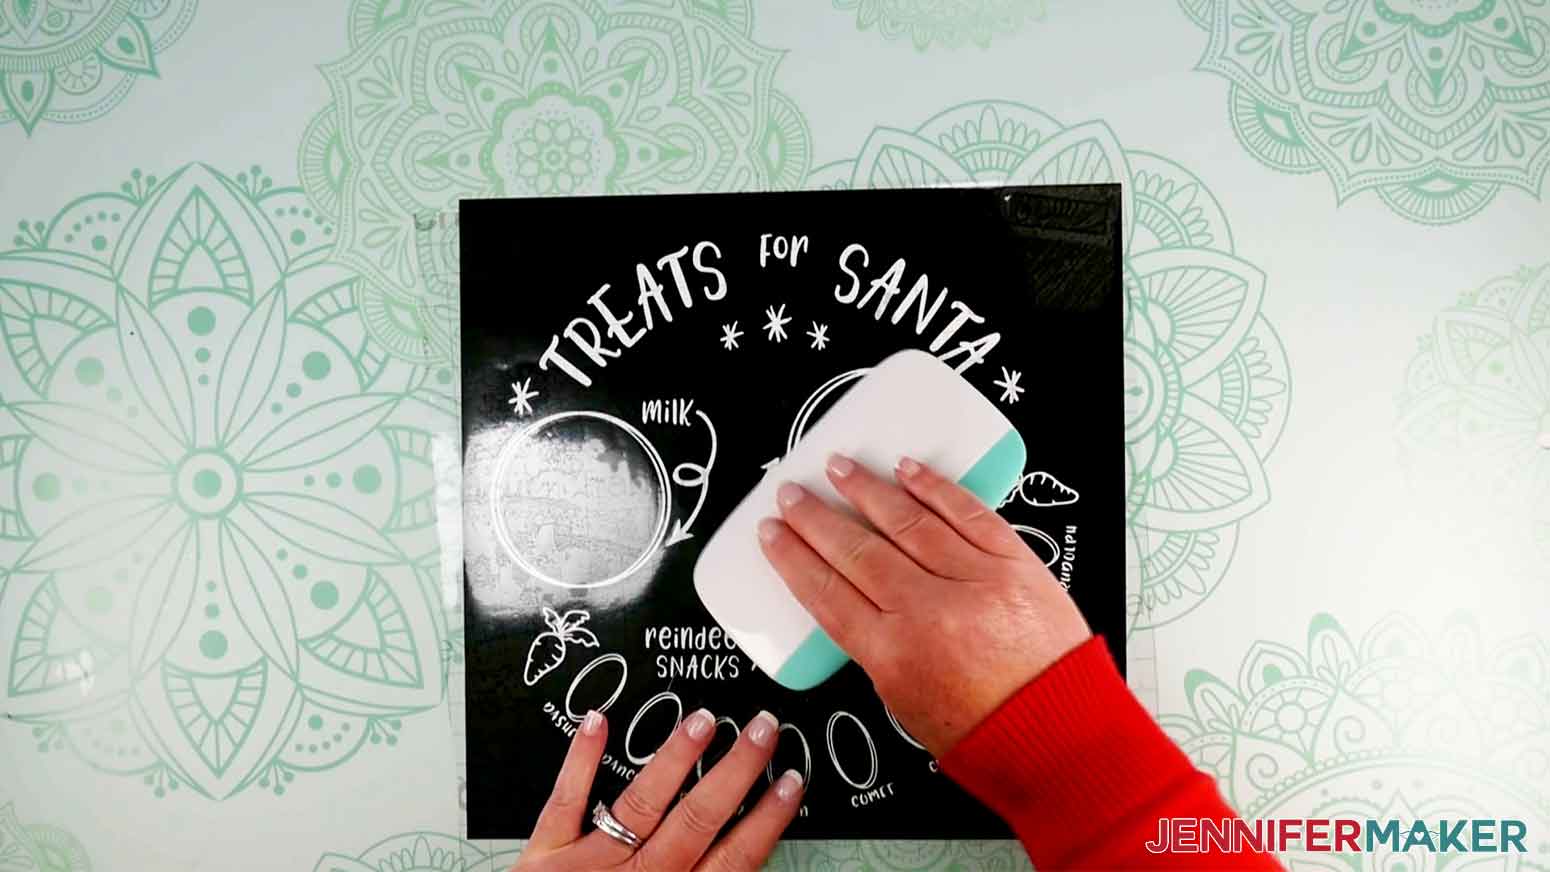
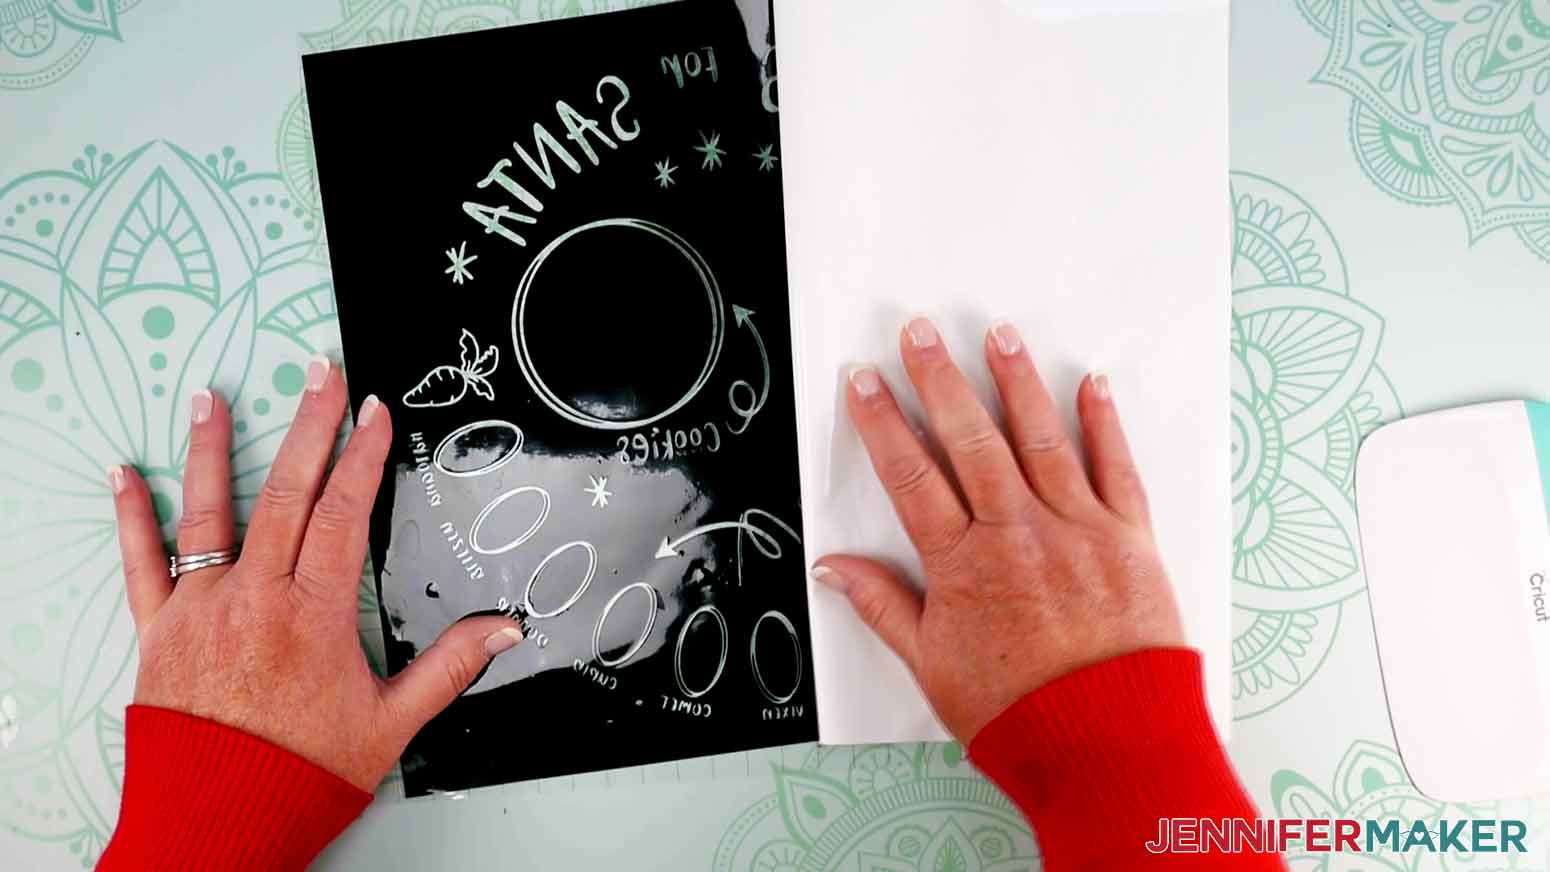
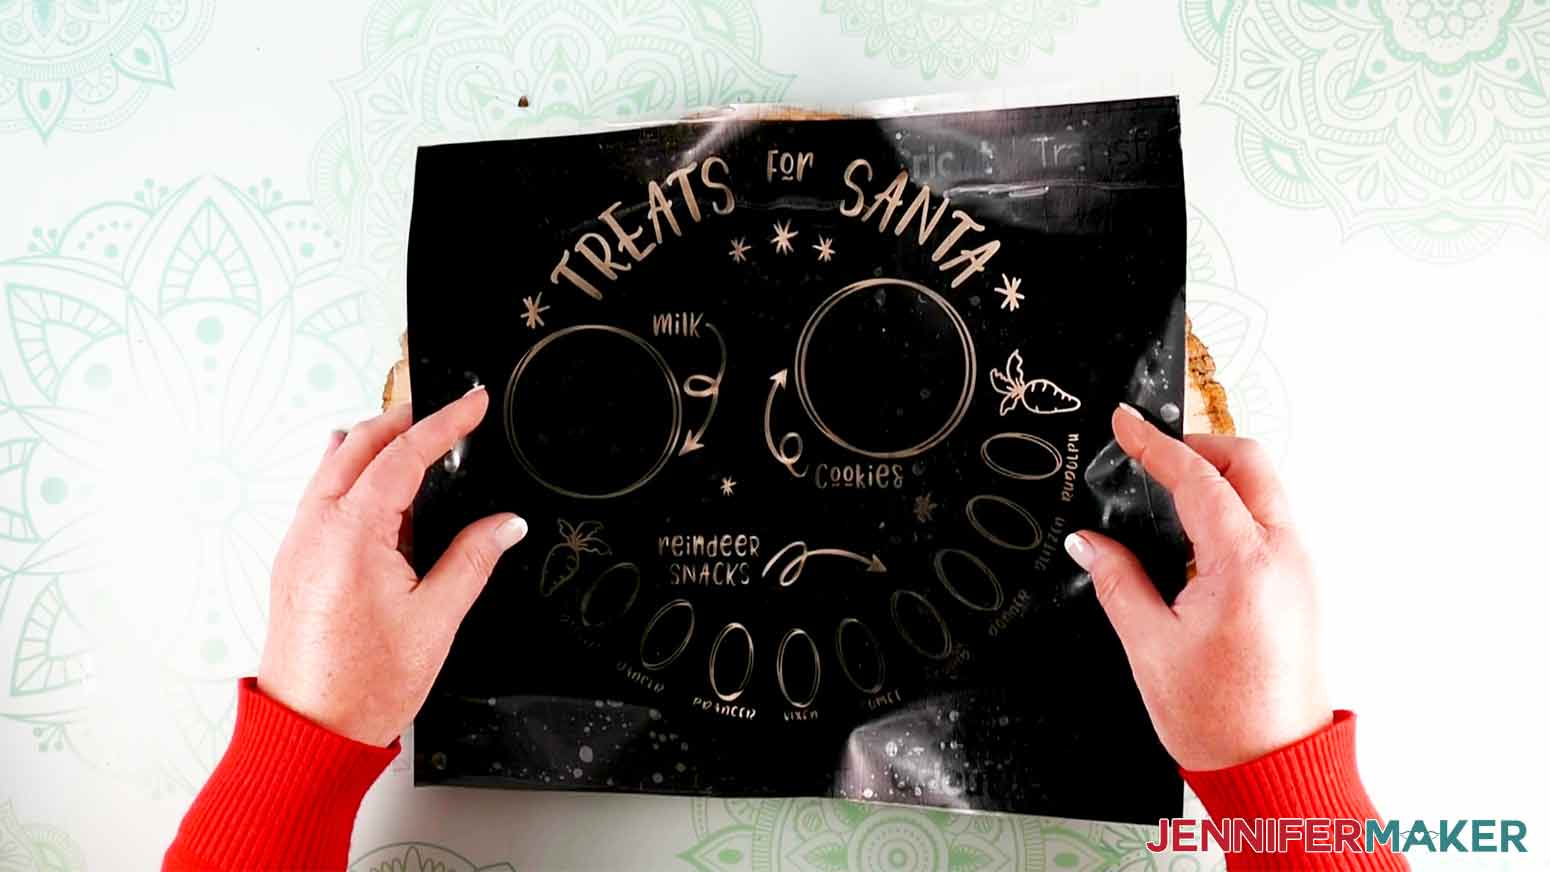
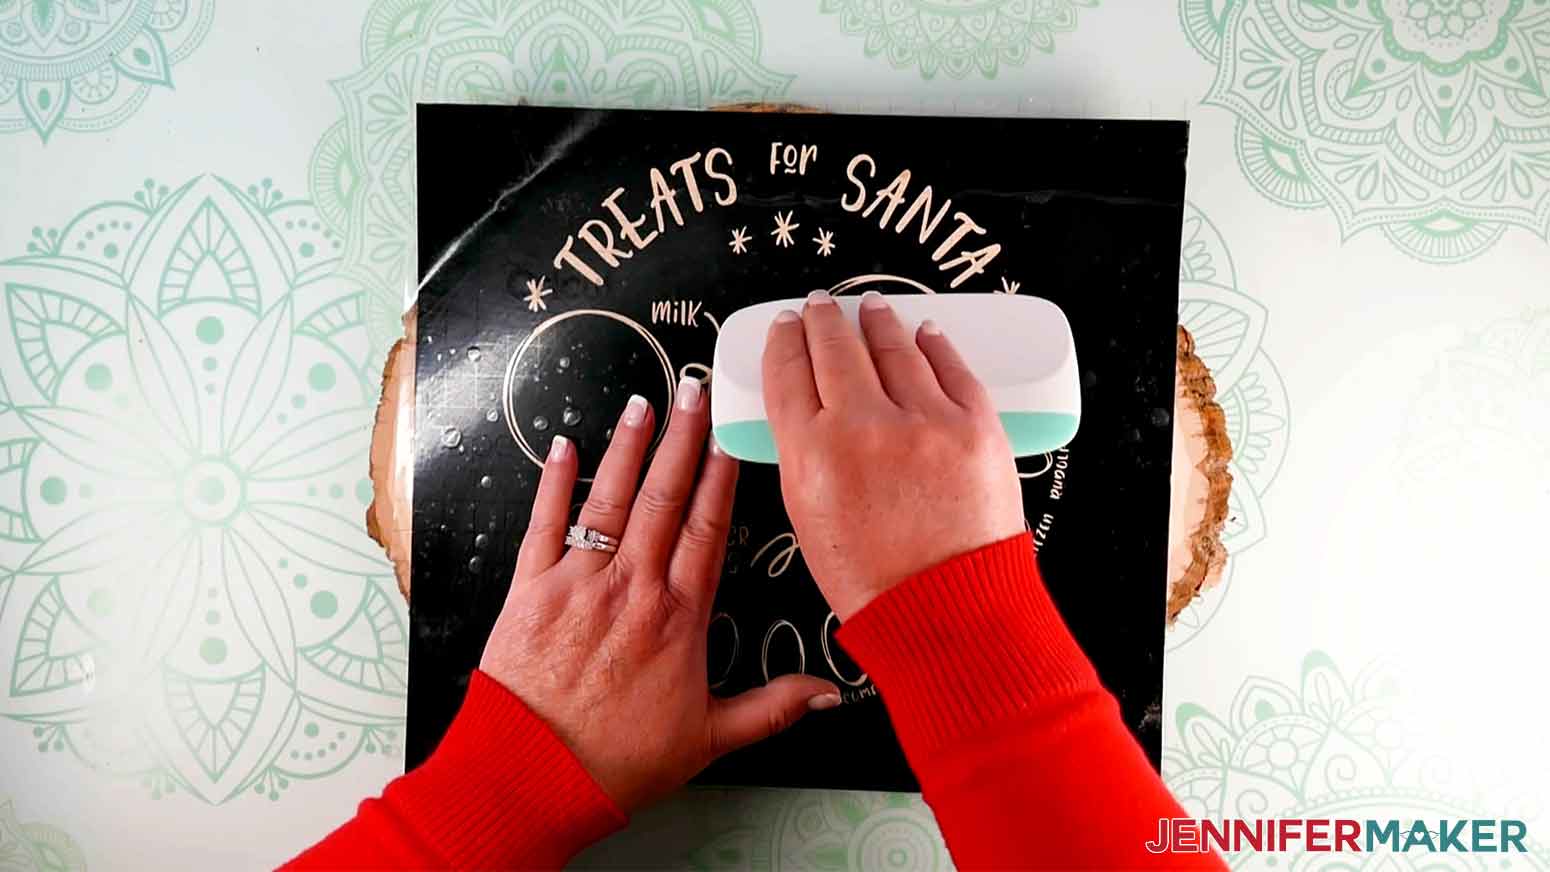
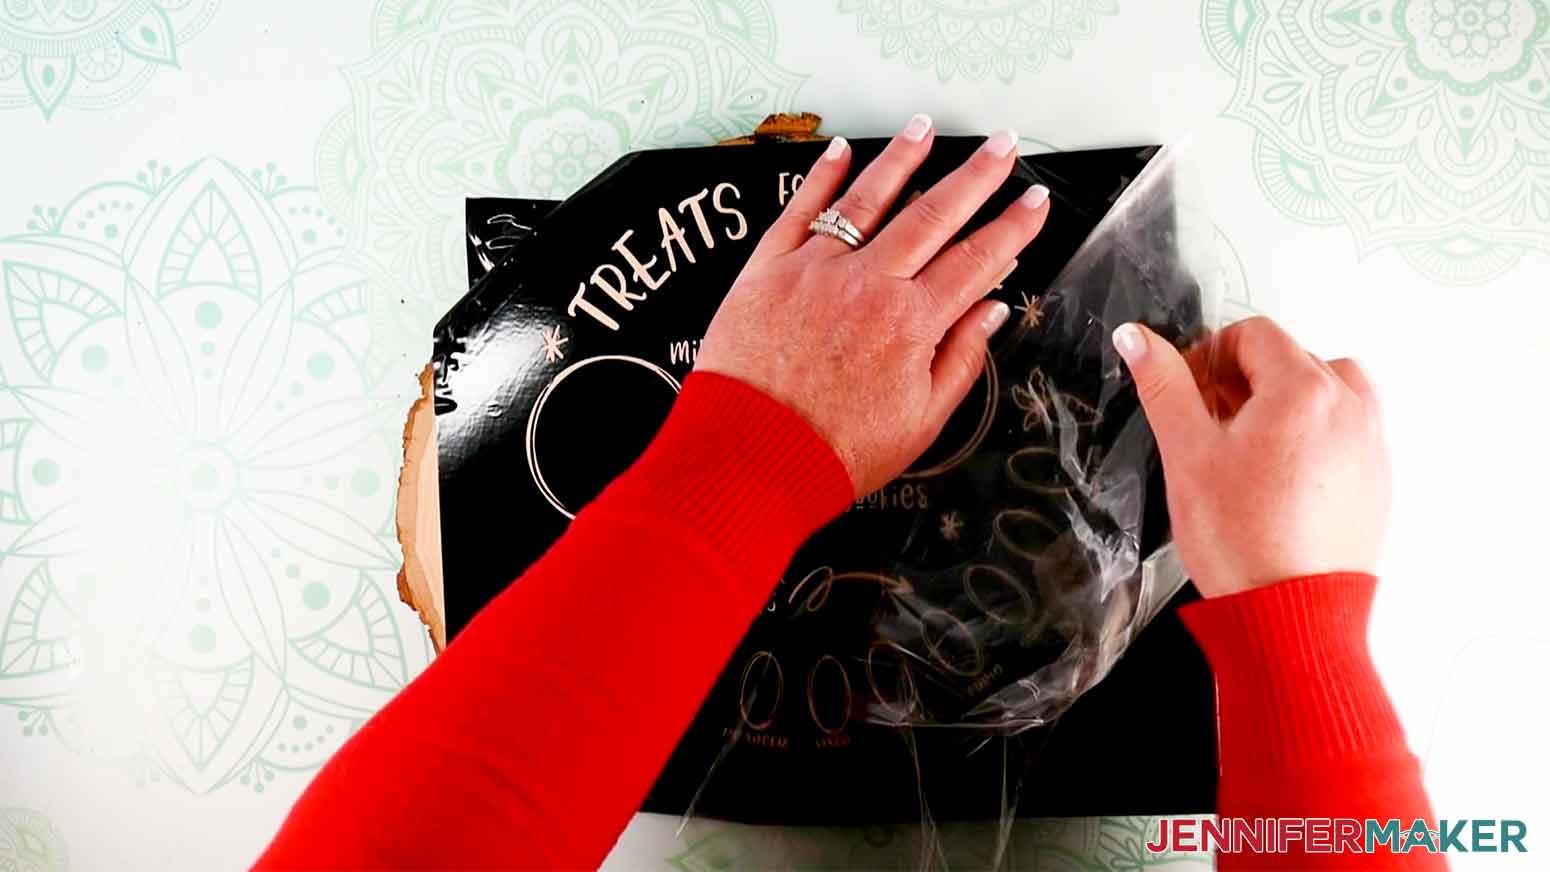
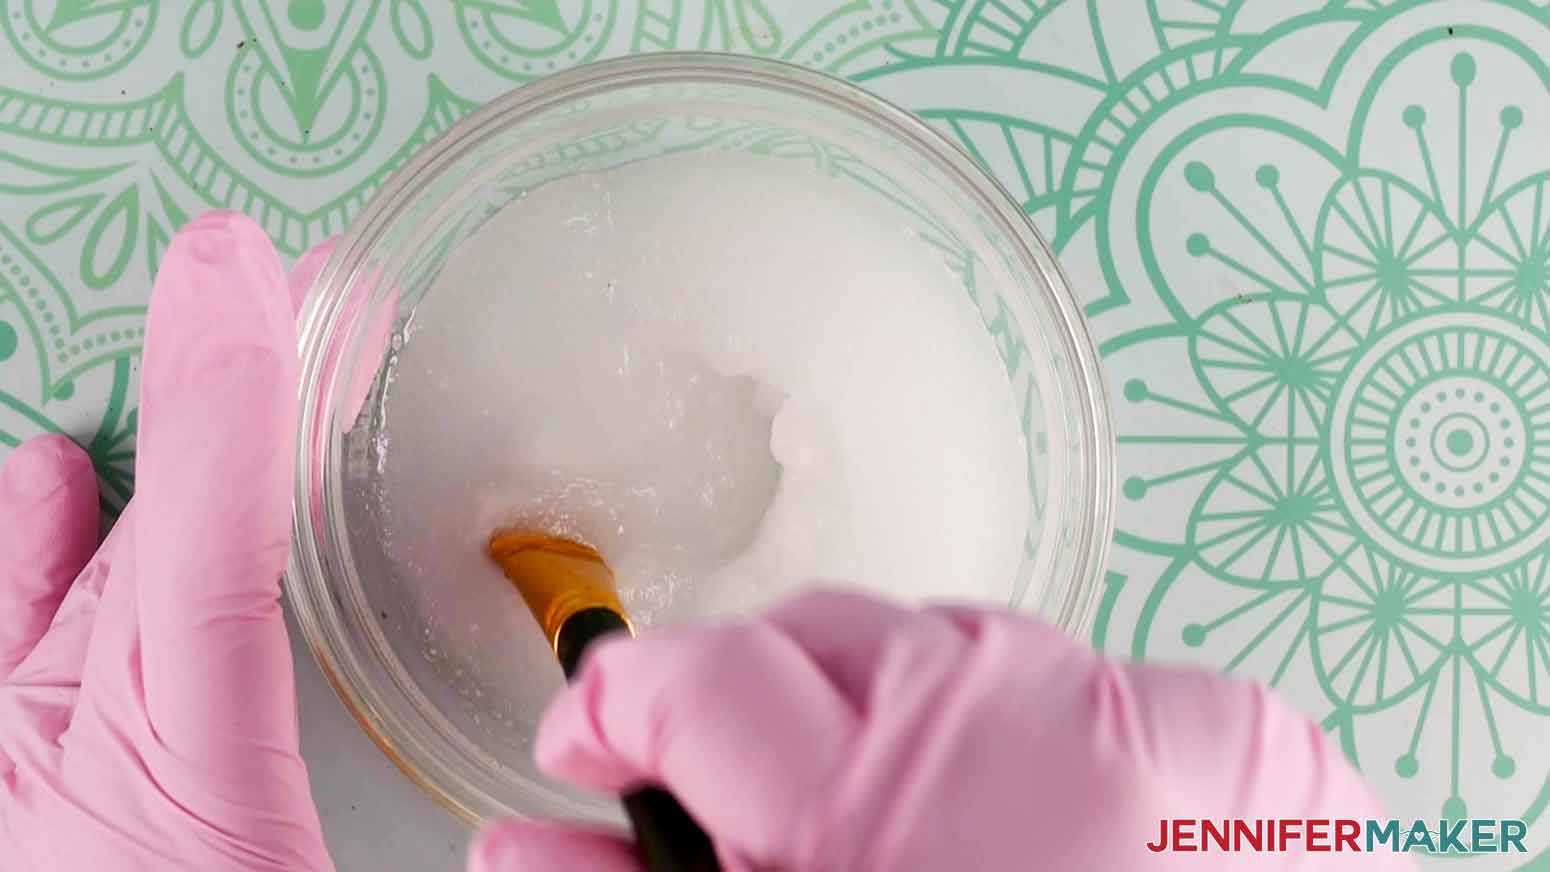
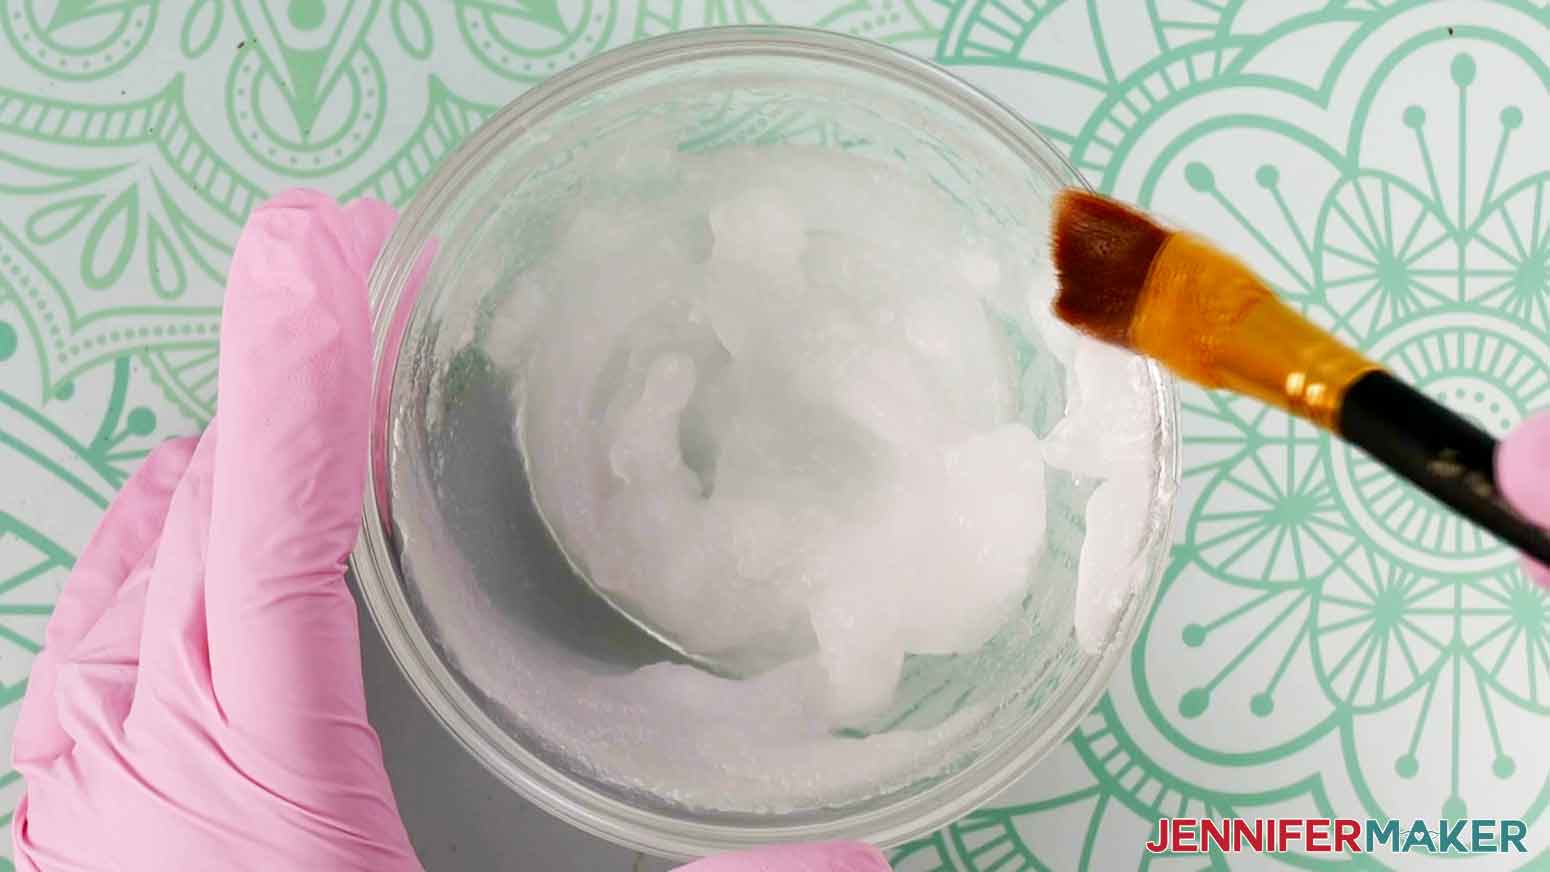
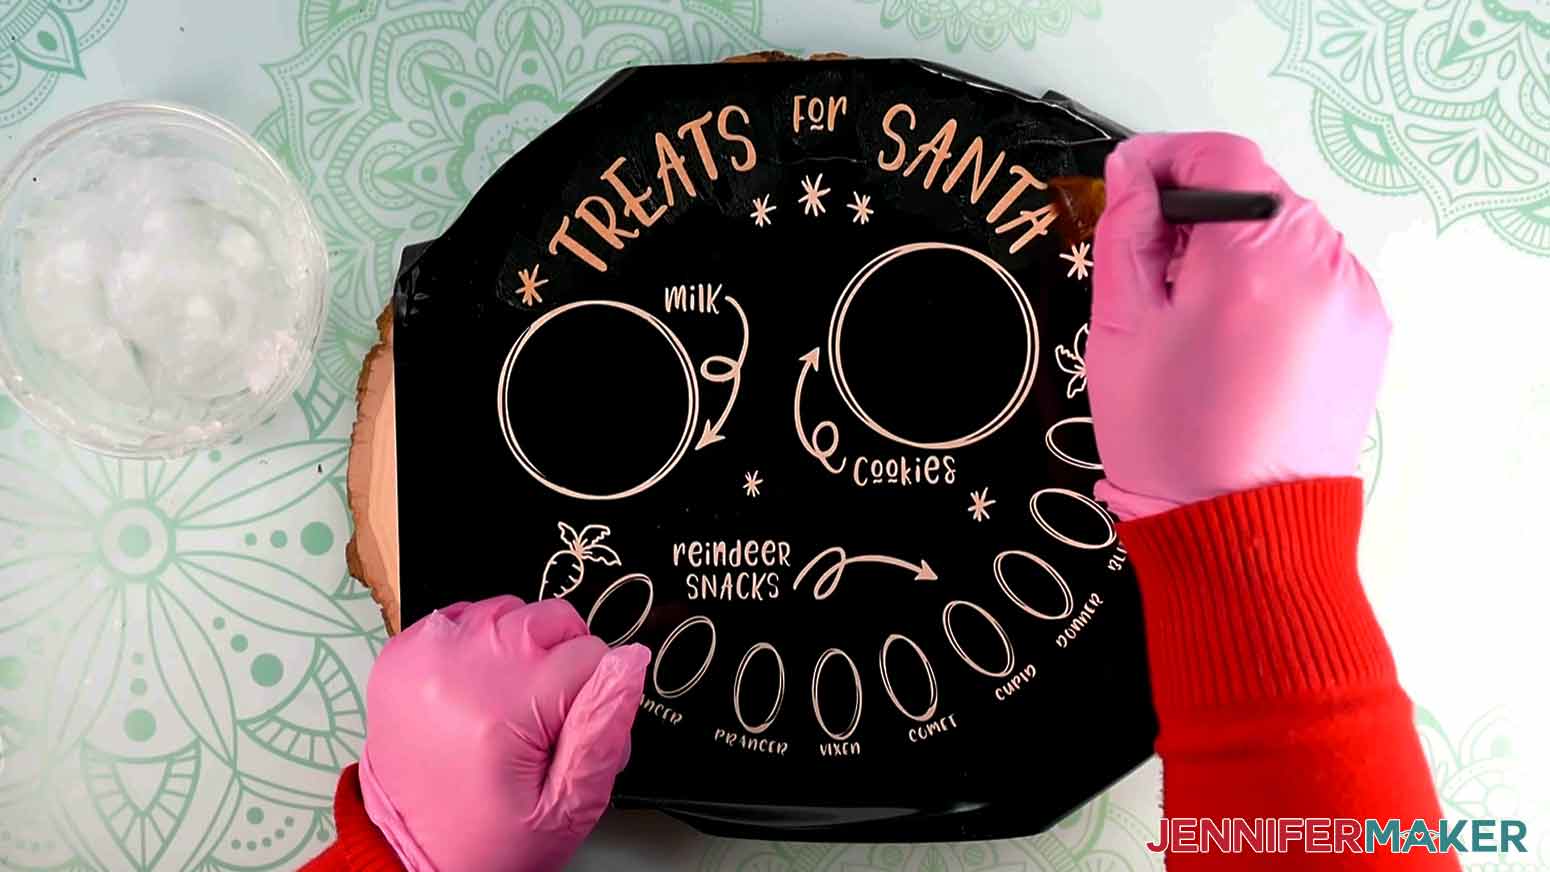
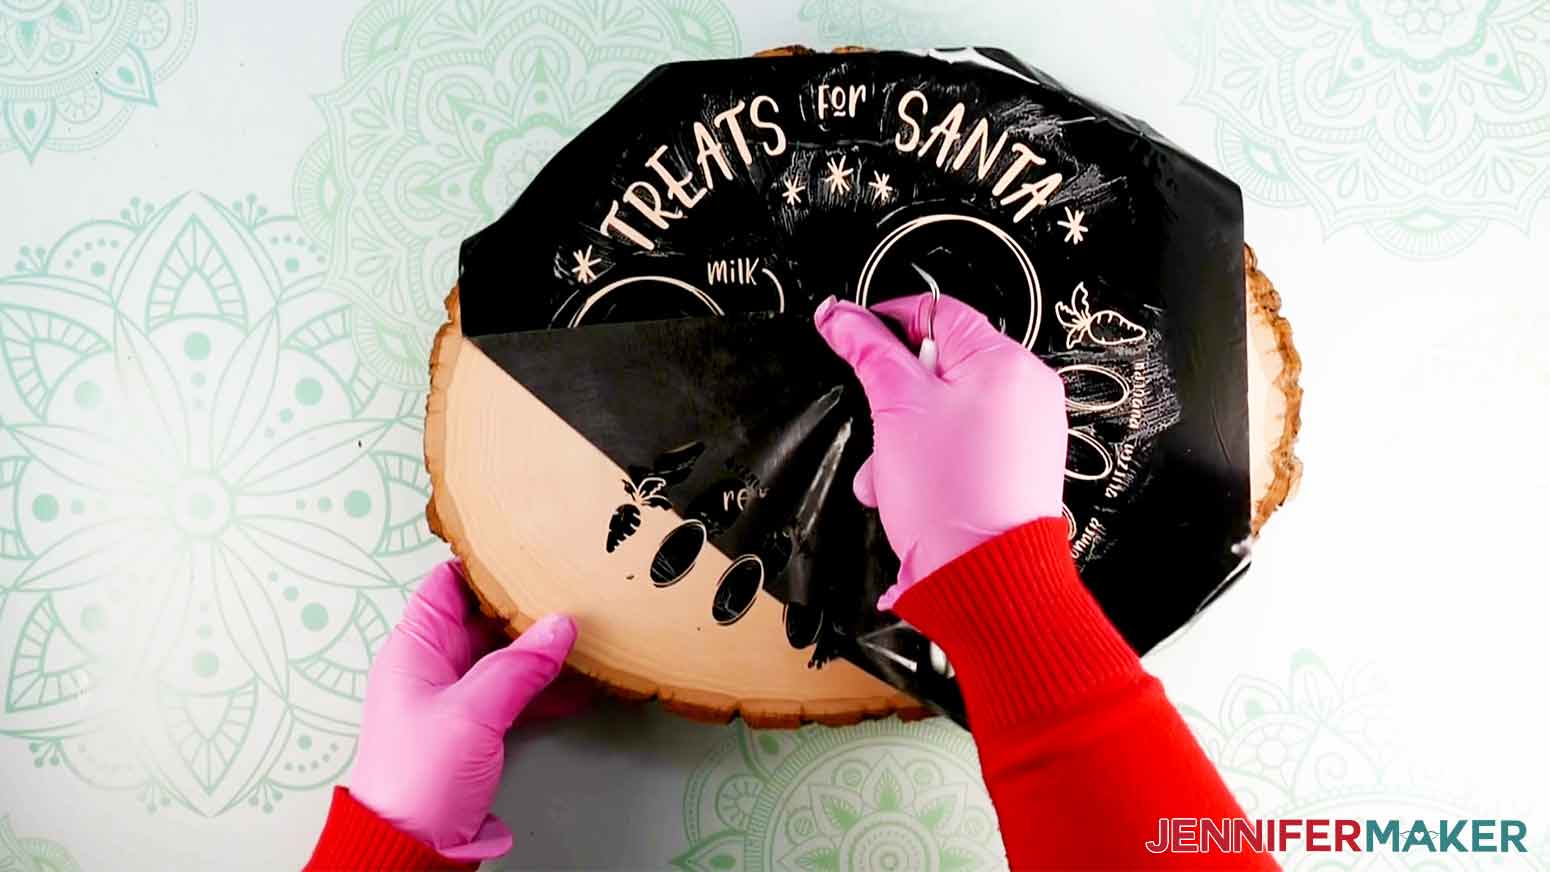
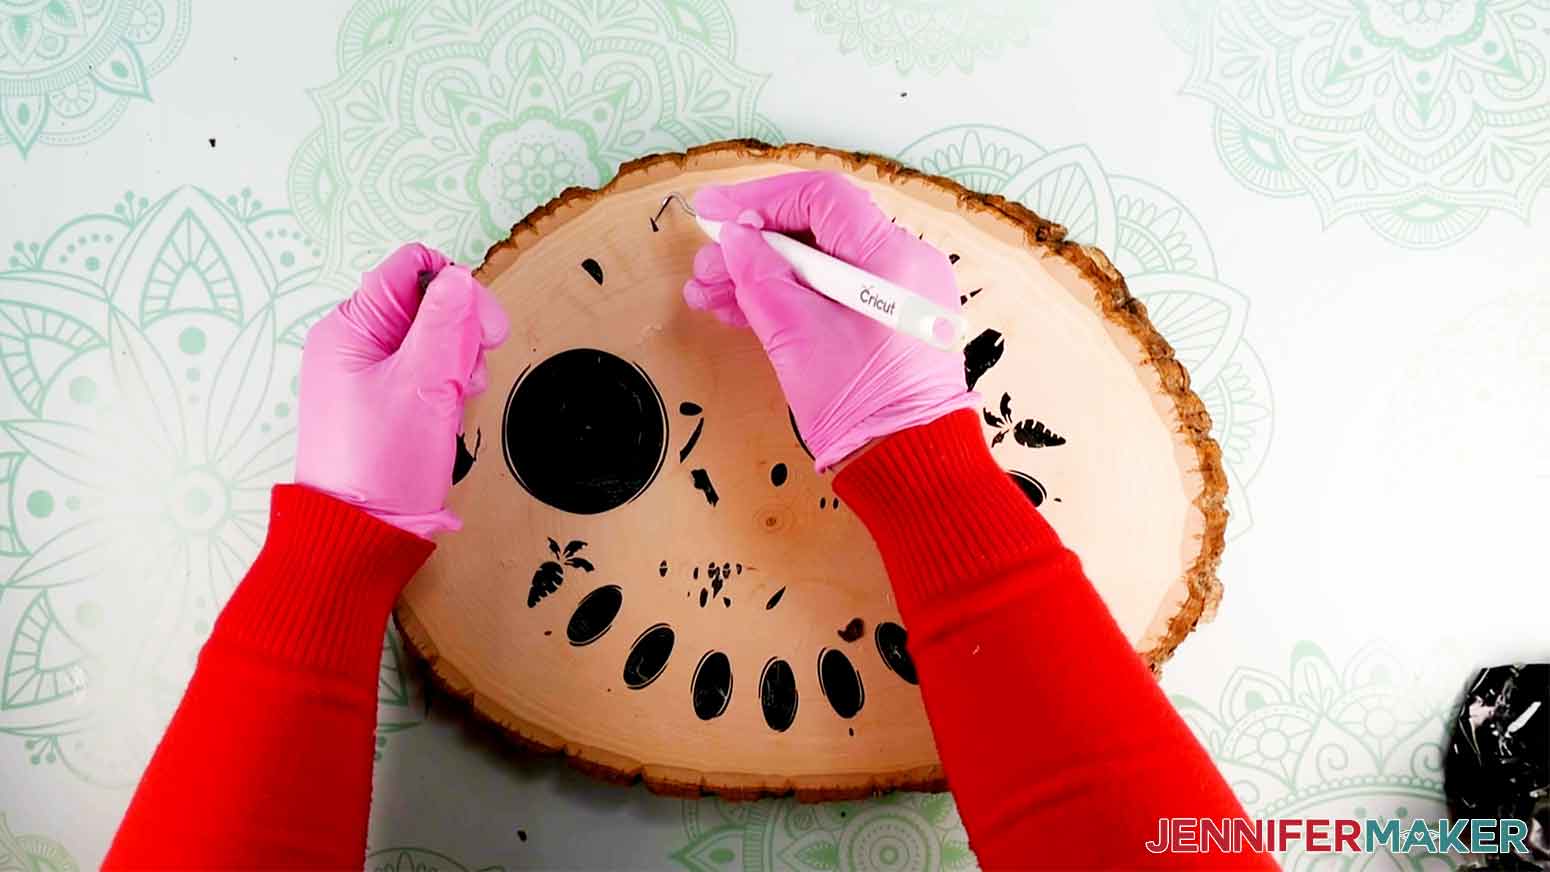
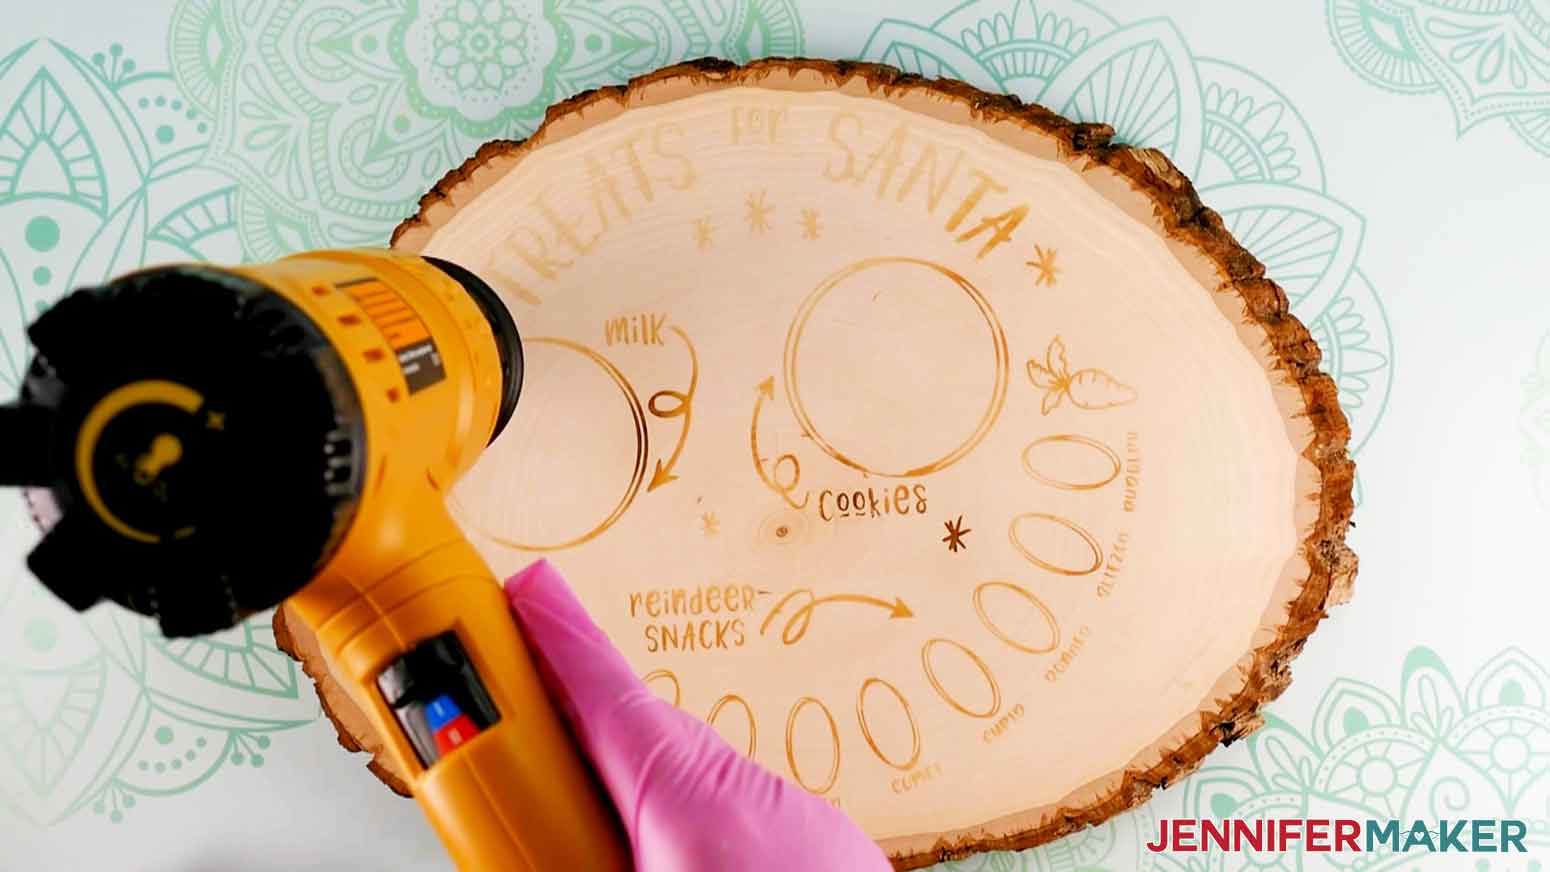
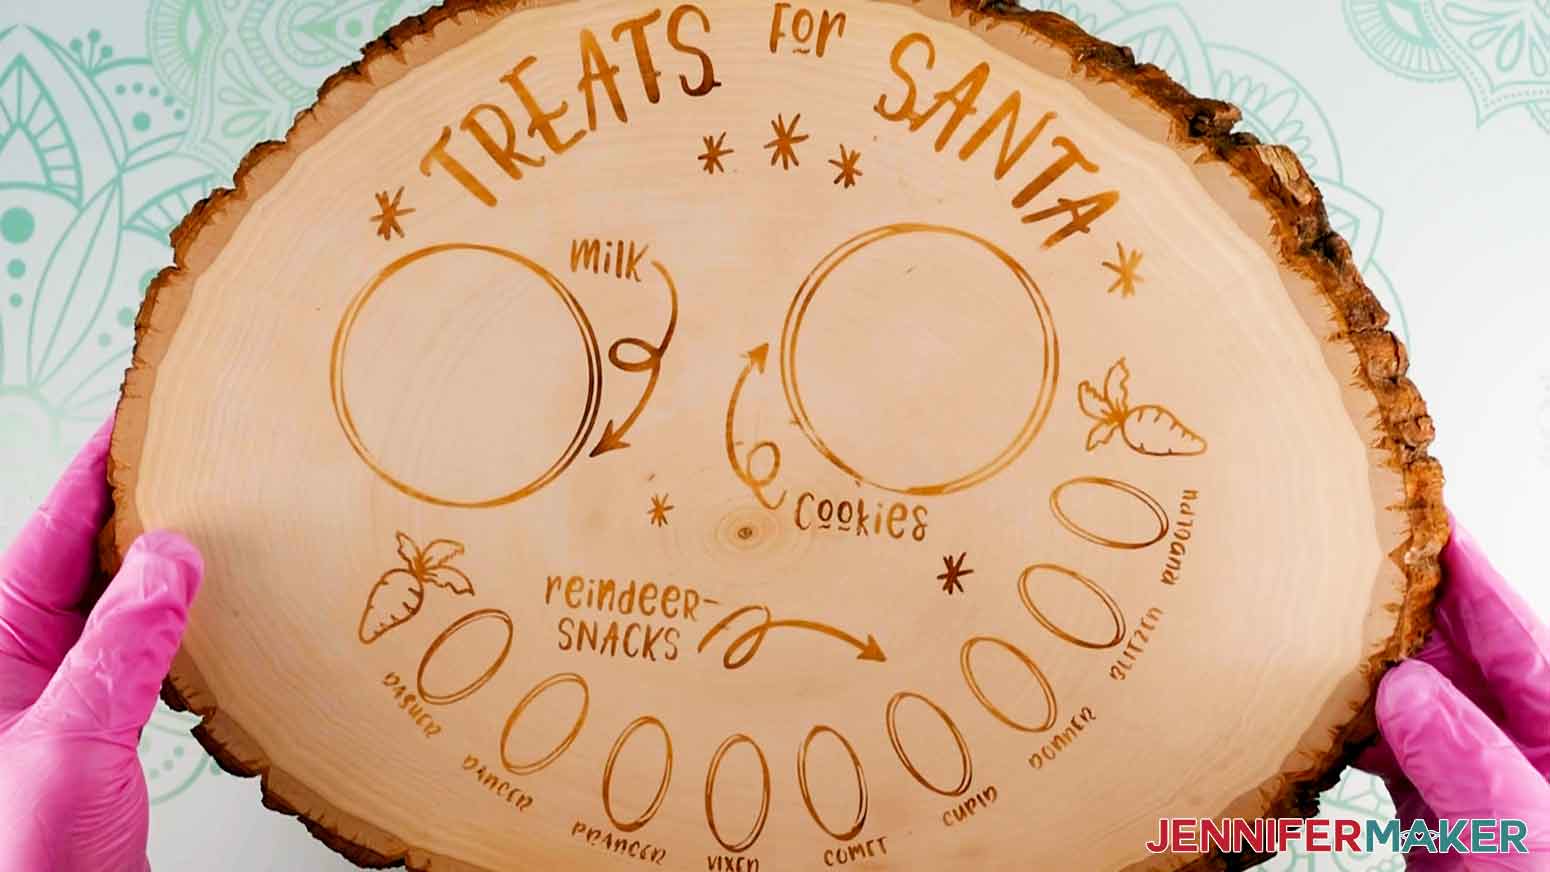
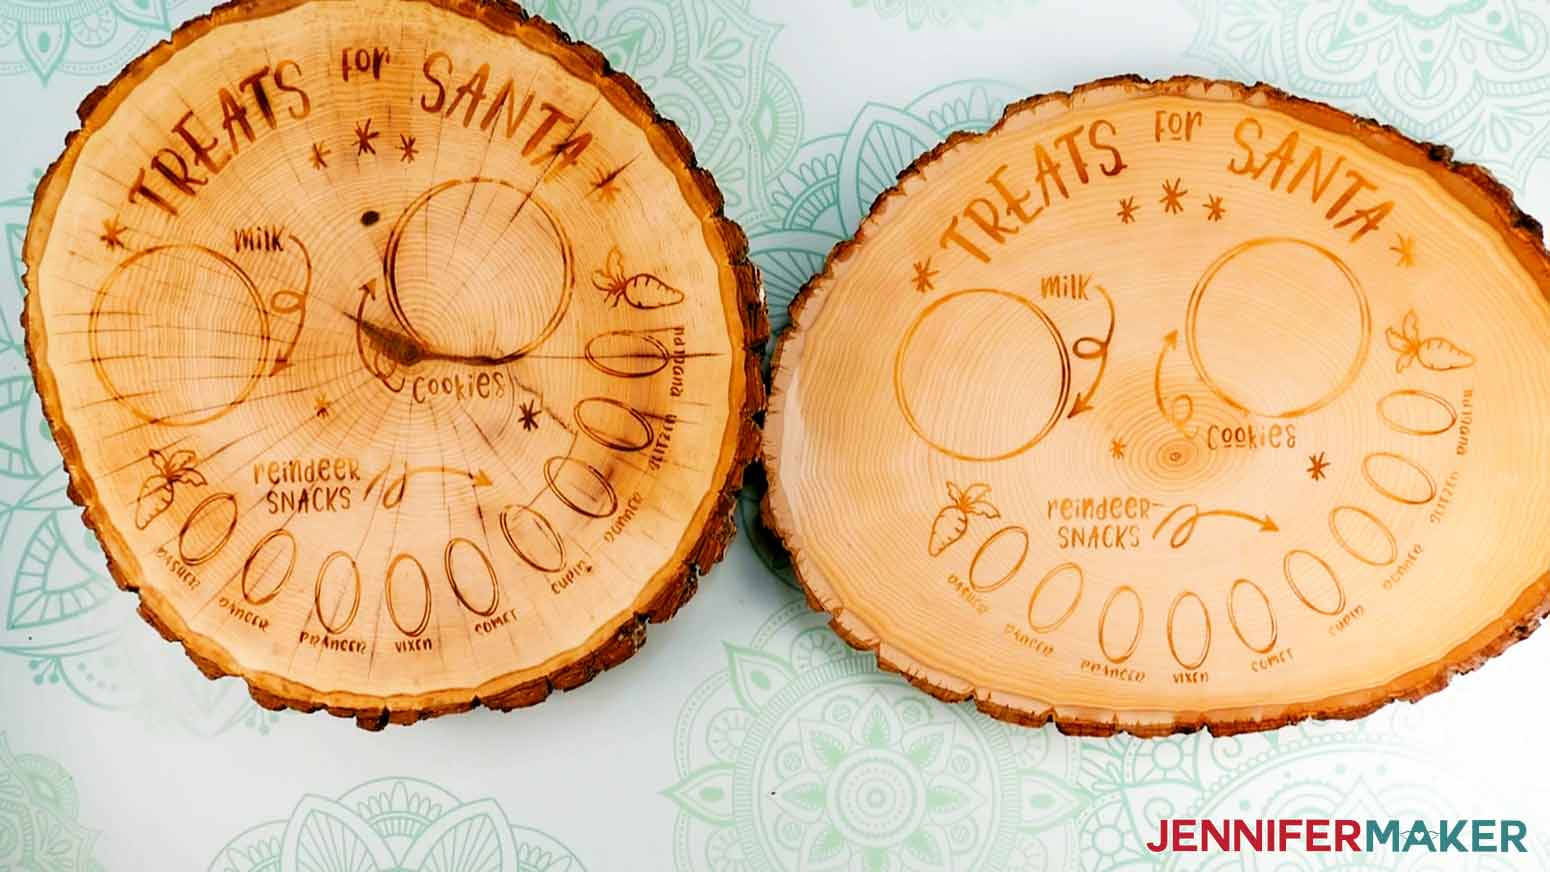
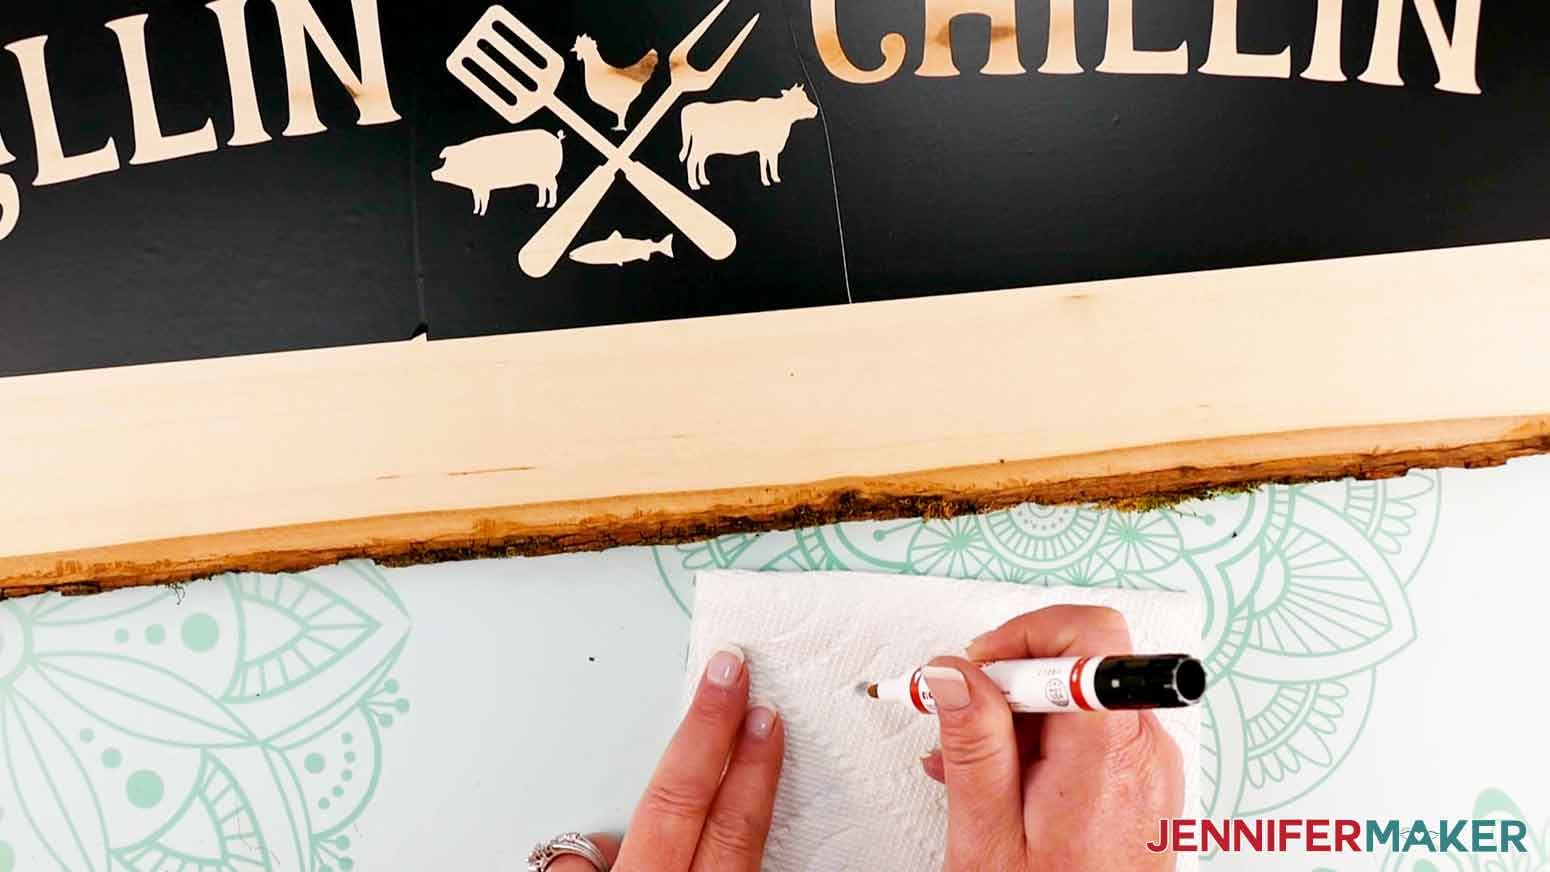
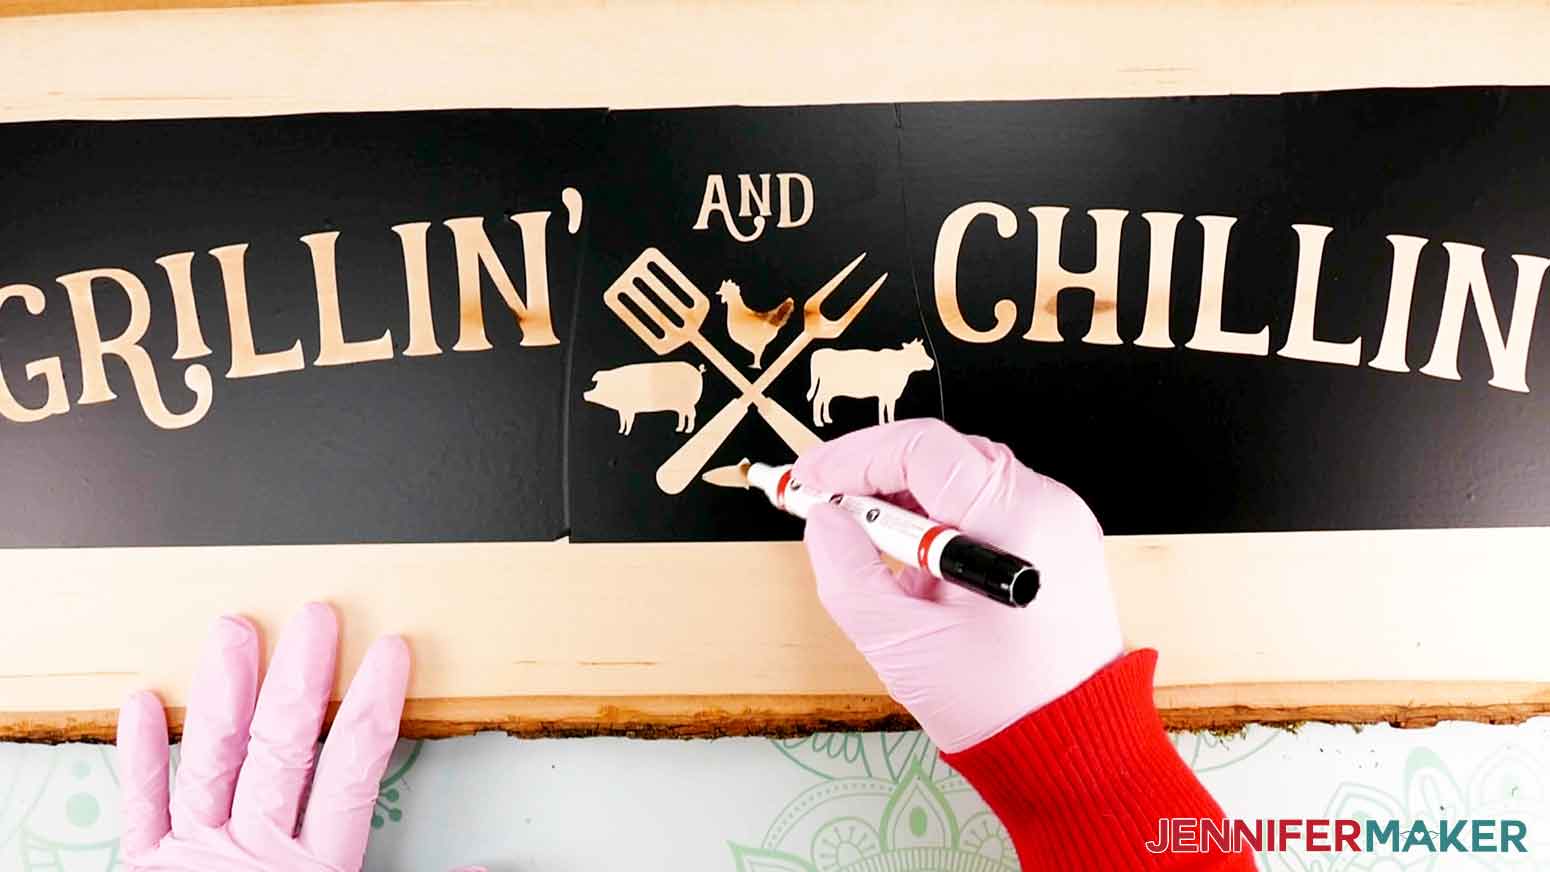
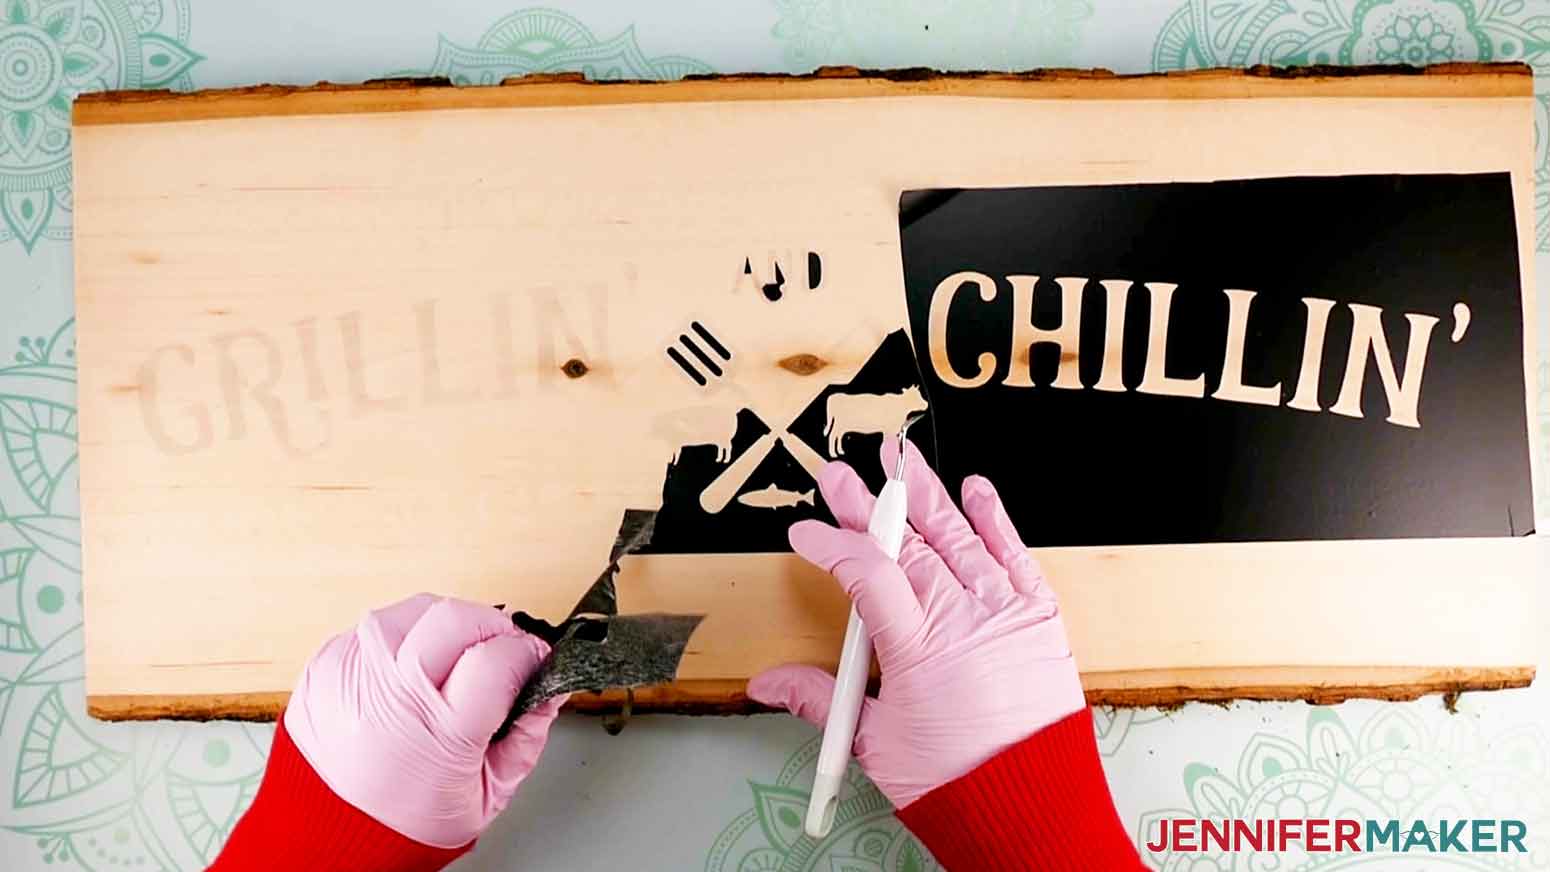
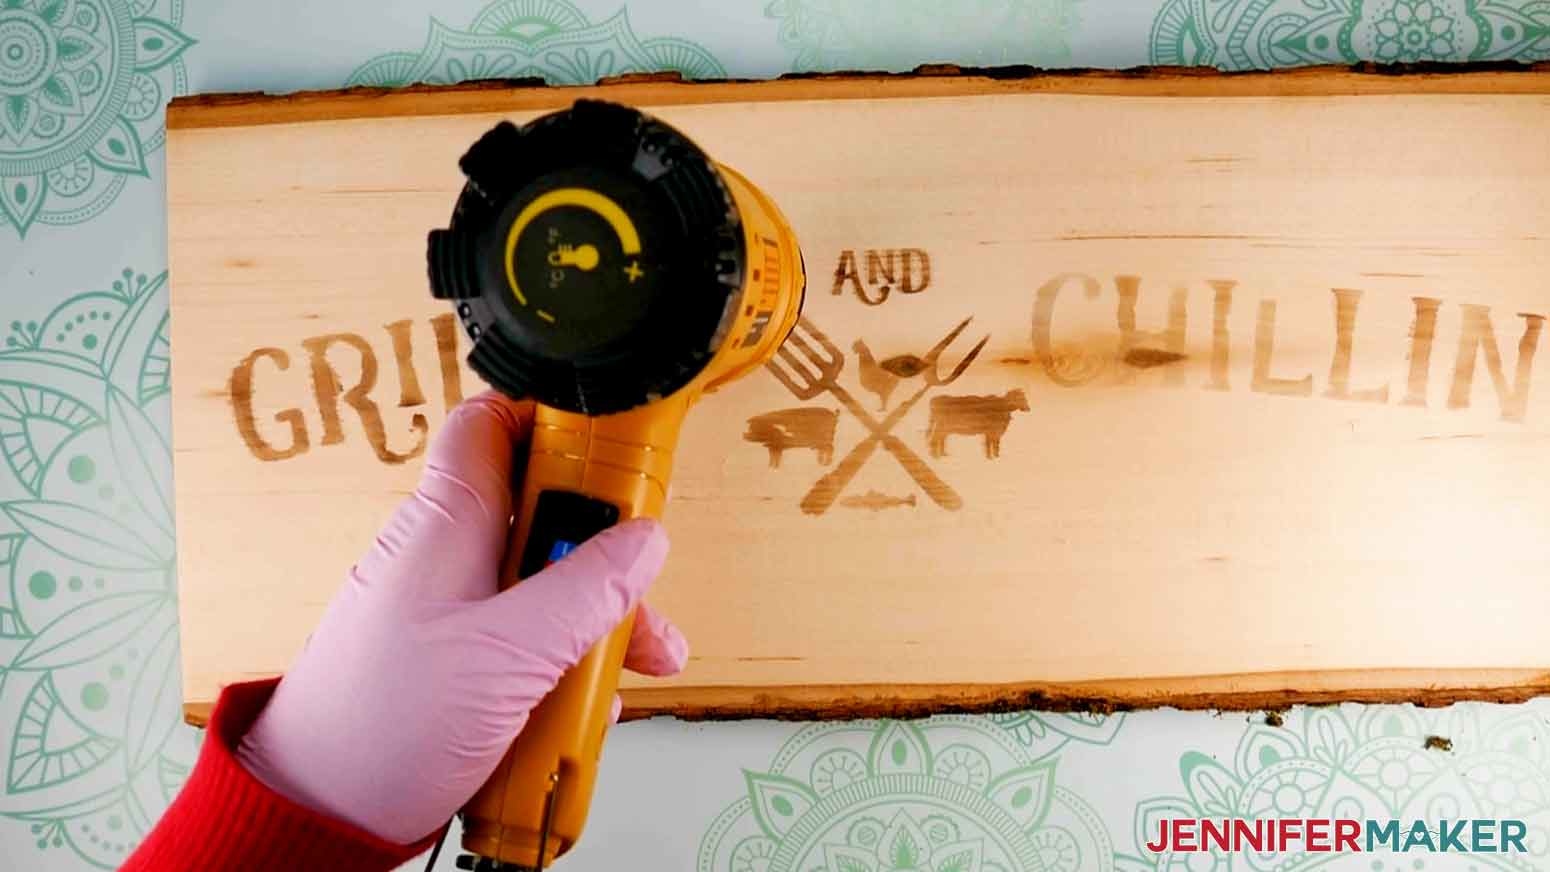
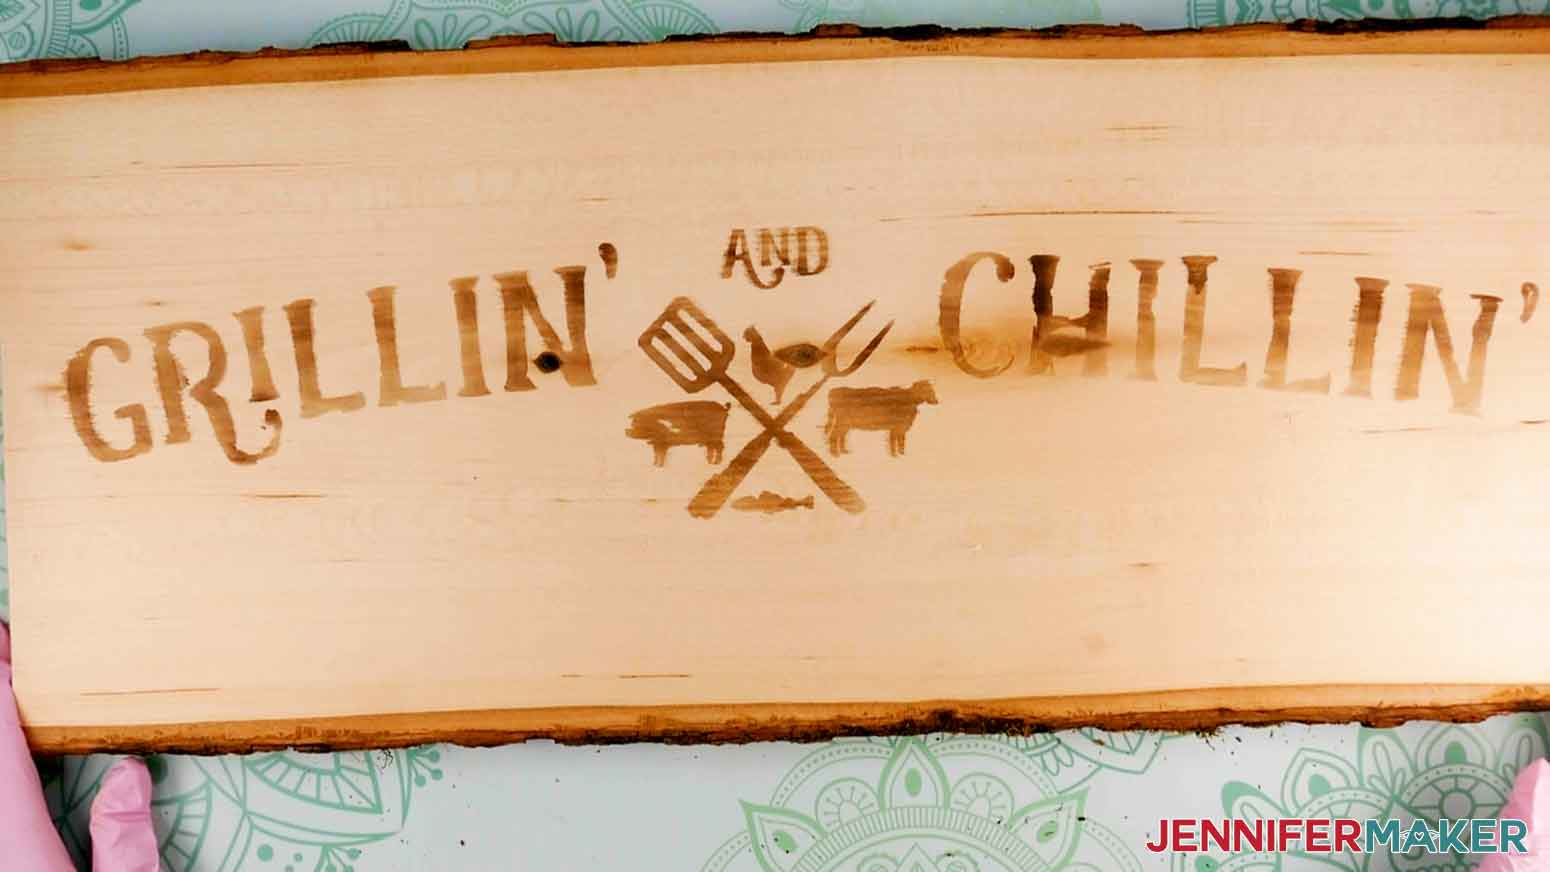
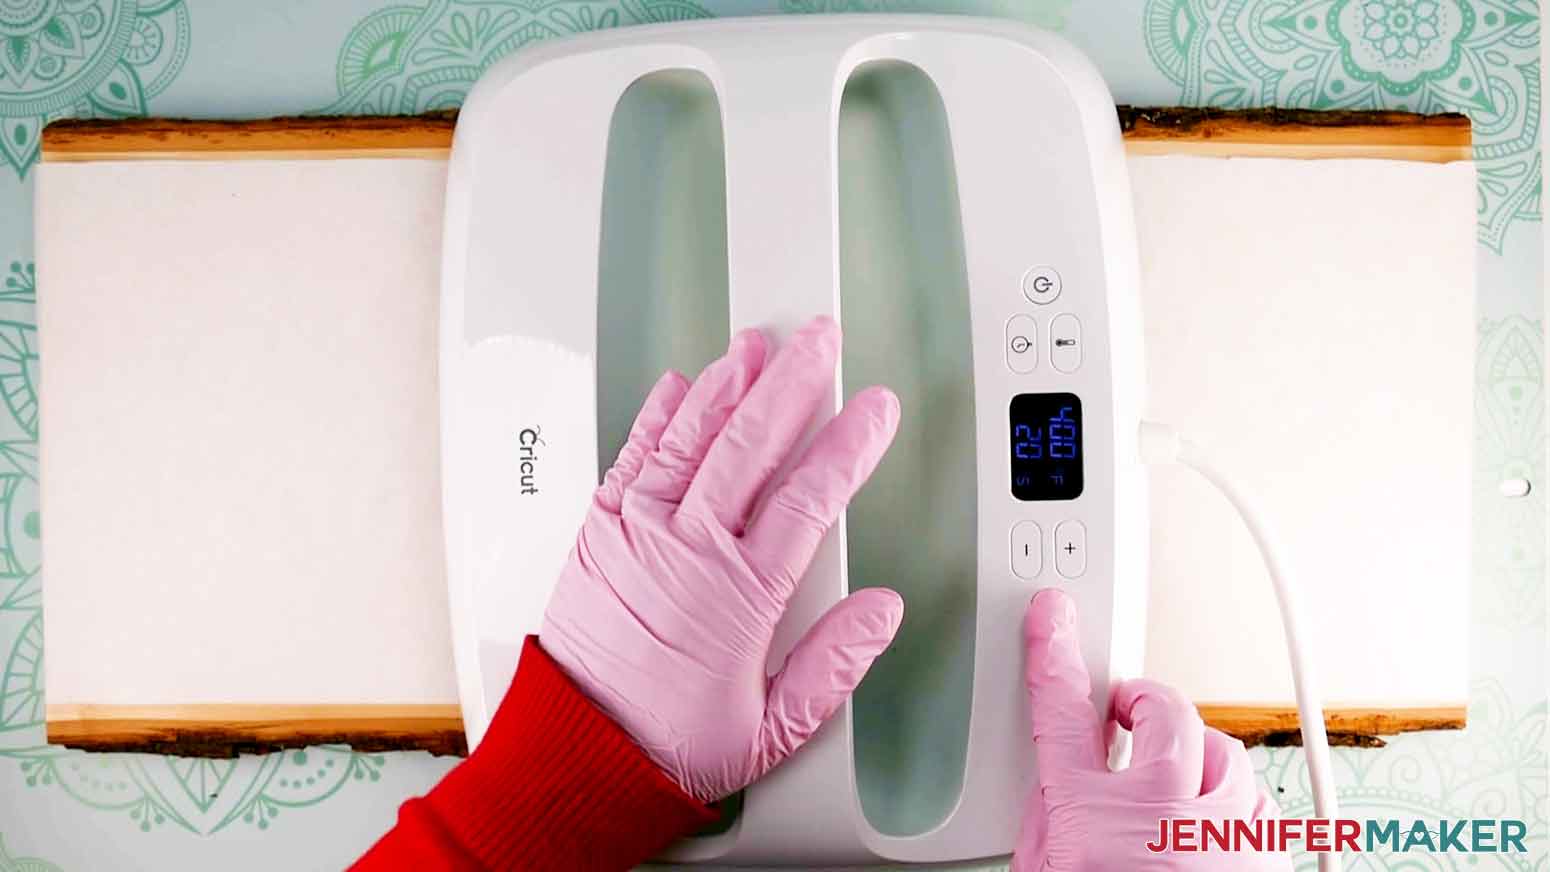
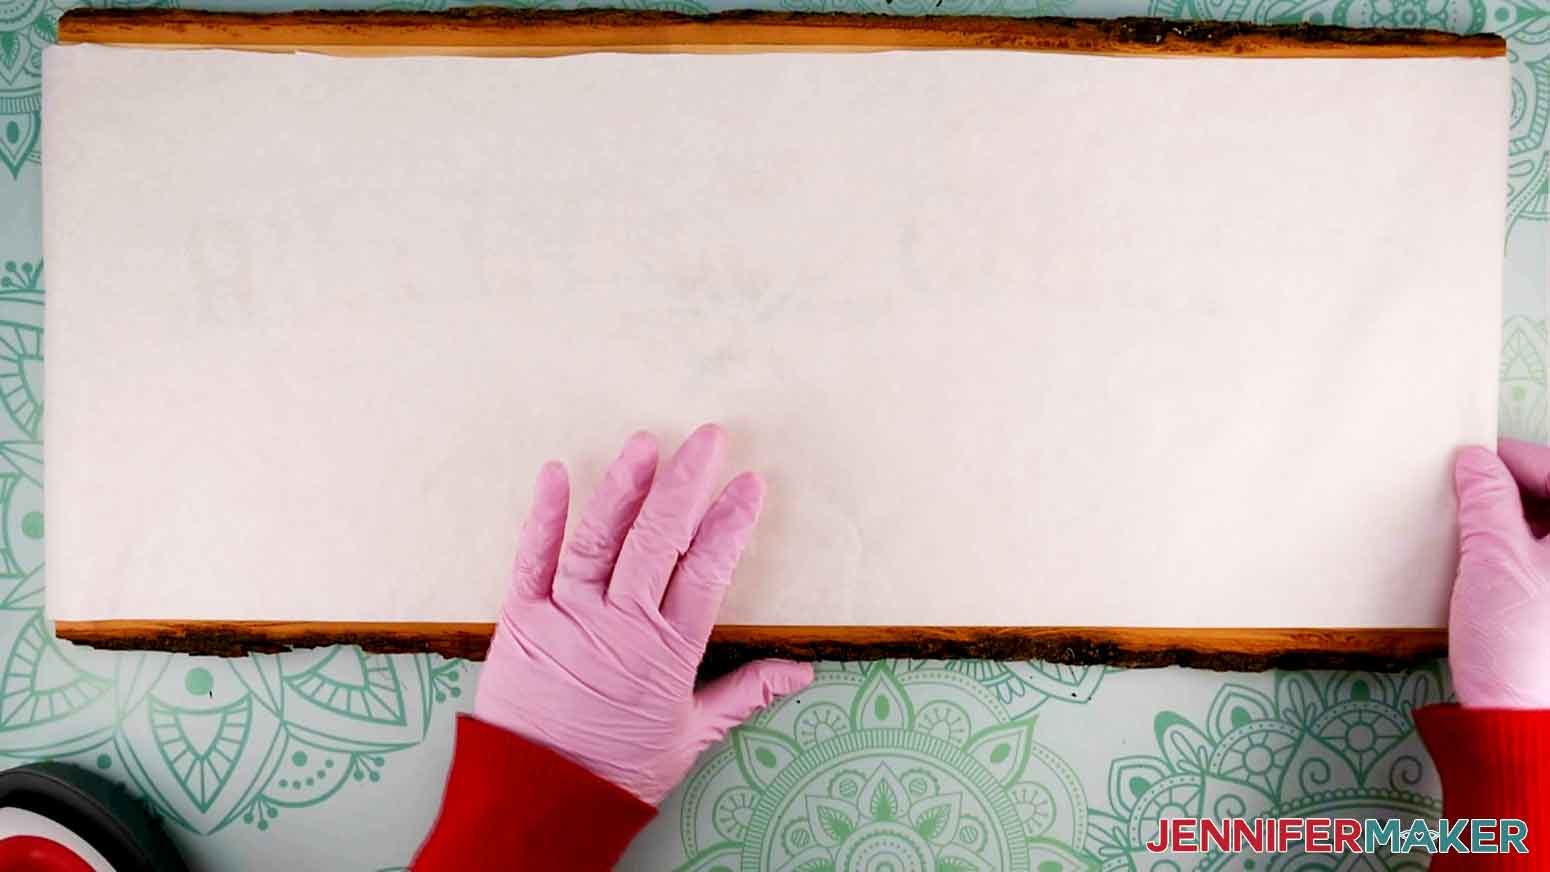
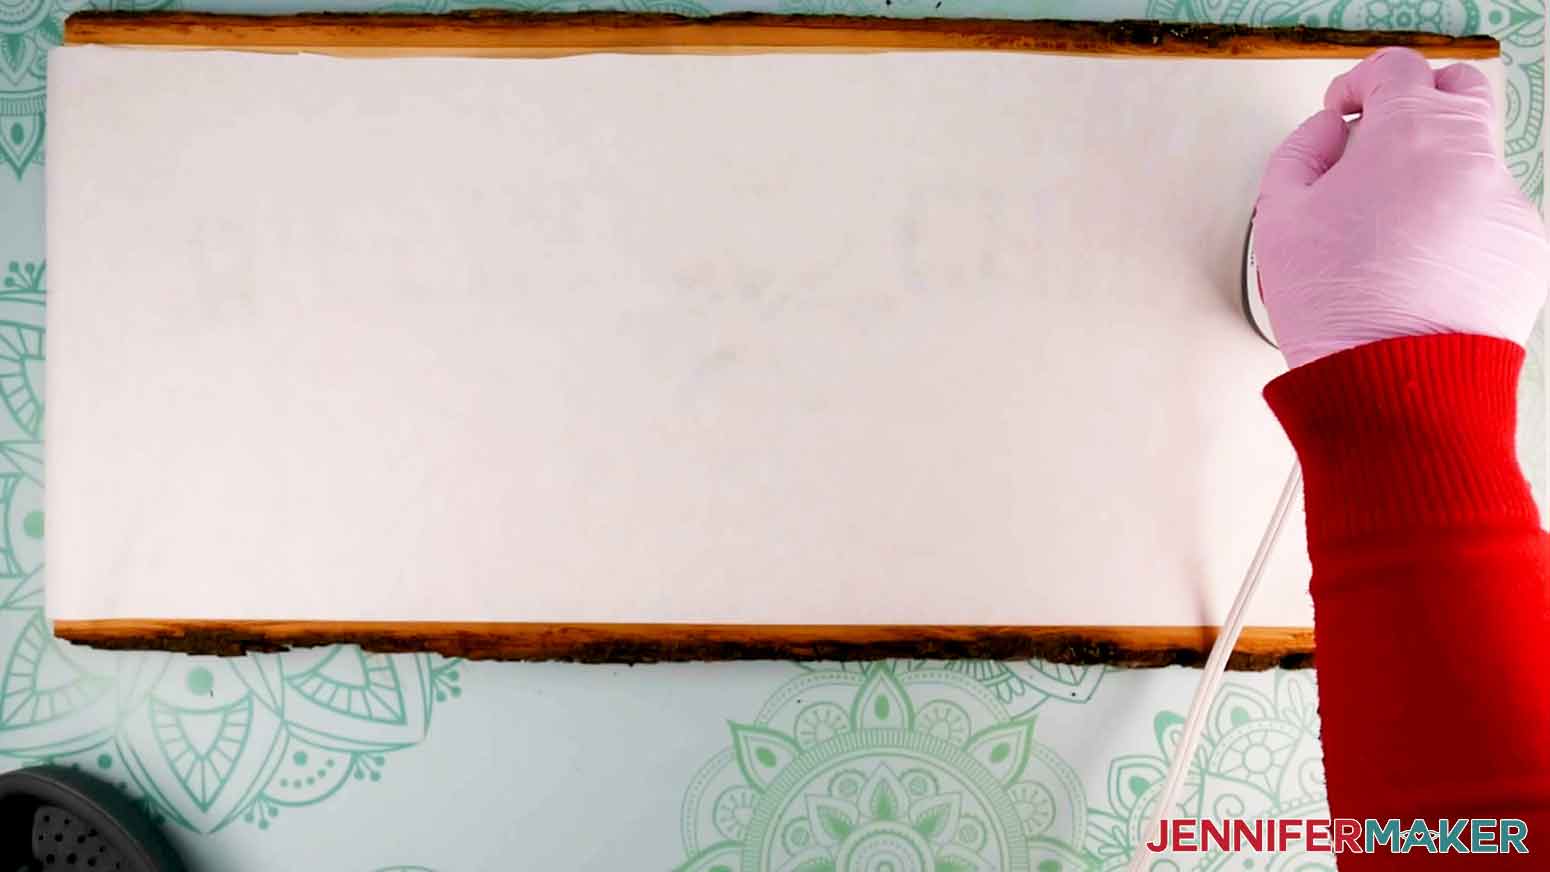
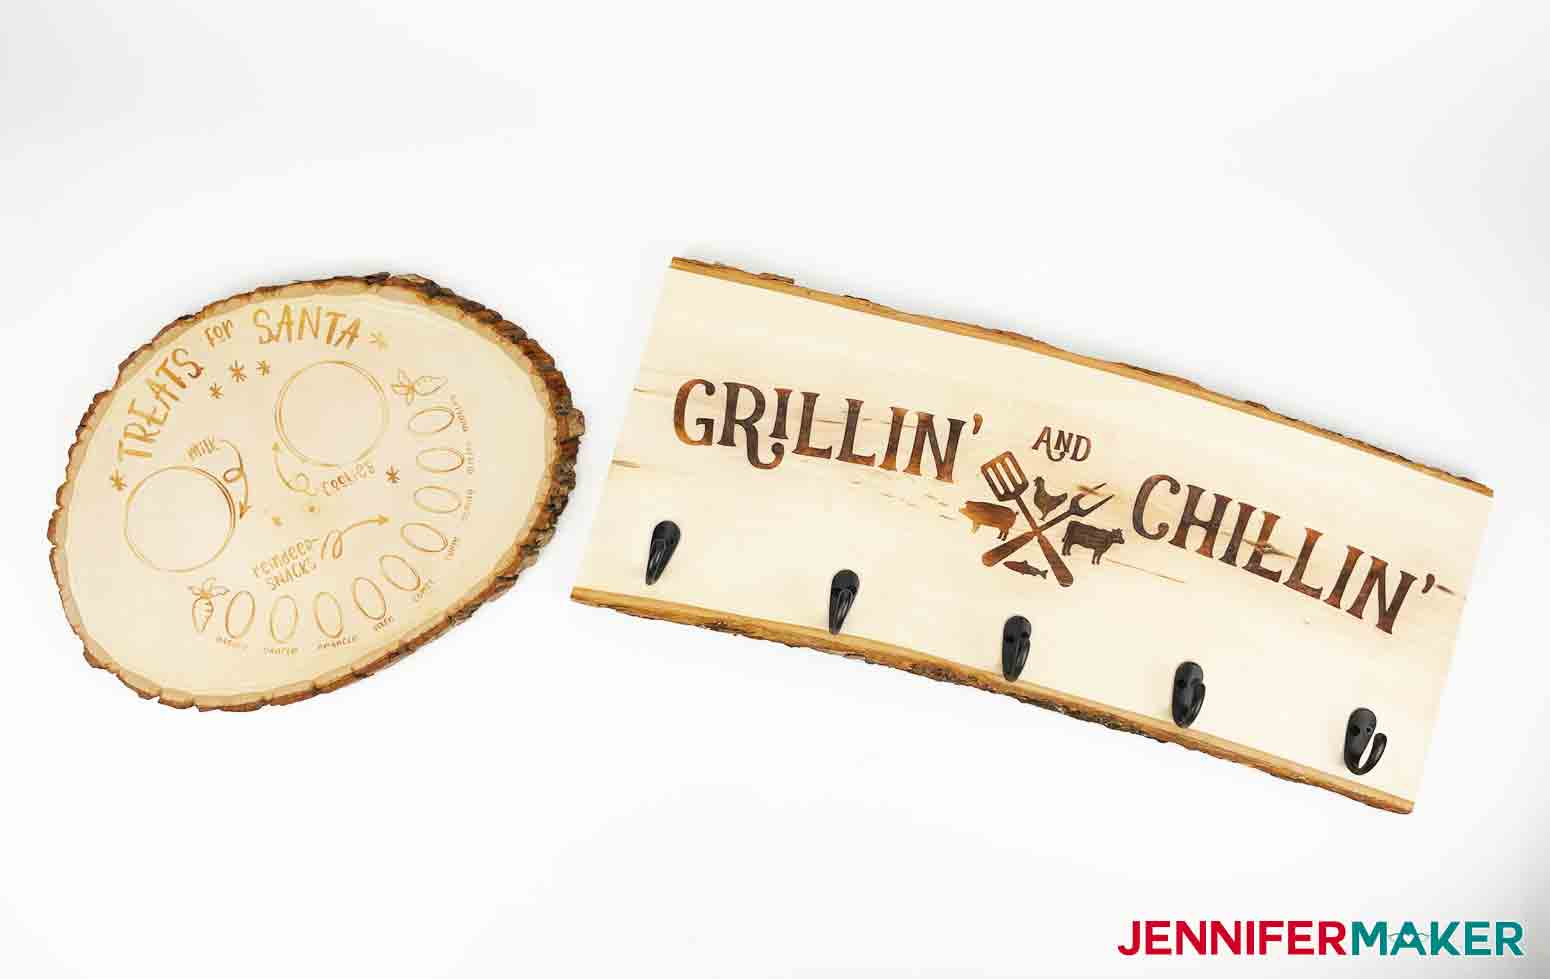
How to use a Cricut cutting machine to easily make stencils and burn designs into wood! I'm going to show you how to use a Cricut cutting machine to easily make stencils and burn designs into wood! I tested two different techniques for chemically burning designs into wood using stencils. These food safe methods are great alternatives to using traditional wood burning irons, especially for those of us who aren’t maybe all that great at freeform drawing. The first technique I tried uses Ammonium Chloride. I tested this method while making the Santa cookie tray. The second technique I tested uses a Scorch Marker, which already contains all the chemicals mixed within it. I’ll show you how the Grillin’ and Chillin’ sign turned out using this method. Both methods are non-toxic and food safe. But seeing as these are chemicals, even if they are safe in small quantities, you’ll still want to take extra precautions to made sure nothing irritates your skin, eyes, and lungs since the chemicals do give off gas fumes when they are heated. So be sure to wear protective gloves, eye protection, and a respirator. And since you’ll be using a heat gun to apply high heat to make the chemicals burn the wood, be extra cautious during that step to avoid touching the tip of the heat gun and keep away pets and kids. First, let’s prepare our files for the two designs. My adorable holiday cookie plate design for Santa and his helpers fits on a 12 x 12 inch round wood slice or tray, and my Grillin’ and Chillin’ sign for hanging grilling tools out on the deck fits on a 24 inch long plank. The first step is to download my Wood Burned Designs from my free resource library -- it's design #357. TIP: If you are not sure how to upload an SVG cut file, watch this helpful video training series I made. If you are on an iPad or iPhone, here is how to download and upload SVG files to the Cricut Design Space app. This is what my Wood Burned Design files look like when they are uploaded to Cricut Design Space. Unless you want to customize or resize them, these stencils are ready to make. NOTE: If you need to resize the stencils to fit your wood tray or sign, now is a good time to do that. Measure your wood sign or tray to see how much space you have. Make sure to allow for some blank space along the edges. Then, resize the design in Design Space to fit your wood by clicking and dragging the arrow on the lower right corner of the design box on the canvas until it is the correct dimension. Or, change the width and height of the design in the "Size" boxes on the menu bar at the top of the canvas. The Santa cookie tray design fits perfectly on a 12” x 12” cutting mat. The Chillin’ and Grillin’ sign fits on a 12” x 24” mat. TIP: If you don’t have a 24 inch long mat, use the file “sliced-12inch-grilling-sign-wood-burned-design-jennifermaker-SVG.svg” I included in the SVG folder. I already spliced the design into smaller sections so you can cut them using a standard 12” x 12” mat. Just be sure that all layers are selected if you resize them. I’m going to show you how to make both designs, but I’ll start with the Santa cookie tray design. Once you’re ready to cut, select your machine on the top menu bar and then click "Make It." Unless you’re using Smart Vinyl on a Cricut Maker 3 or Explore 3, select "On Mat" and click "Done". Prepare your mat by moving the design so it’s centered on the mat. That way you have some extra margin space around the stencil when you cut it out. Click “Continue.” Select your "Base Material" when prompted. I used Premium Vinyl—Permanent. And I always recommend “More” pressure to ensure the best cut. If you’re using a mat like I did, place Premium Vinyl—Permanent Glossy, shiny side up, on a Green StandardGrip Mat. TIP: You can use any color since it will only be used as a temporary stencil. You will be prompted to load your Fine Point Blade and mat into your machine. When you’re all set up, click the flashing "Start" button. While your vinyl is cutting, prepare your wood tray or sign. I used basswood with a natural bark edge, but you can use any wood you want. Just make sure the wood is unfinished with no stain, paint or wax. IMPORTANT: Make sure your wood is unfinished with no stain, paint or wax so the chemicals can burn the wood grain. Otherwise, you may end up with unpredictable results, and you really don’t want to be heating any finishes that may be toxic! Lightly sand the face of the wood plank that you plan on burning. This helps to make sure your vinyl stencil adheres well to the wood and doesn’t allow any of the wood burning chemical to bleed underneath. My basswood was pretty smooth, so I used the Fine side of a sanding sponge. Just be sure not to sand away any of the rough bark if you plan on maintaining the rough edge look. TIP: If your wood is rough, start by sanding it with the Medium side of the sponge until the wood is smooth, and then finish it by sanding it lightly again with the Fine side. Wipe or blow away any sawdust. I used a lint roller to make sure my surface was clean of any debris. Once your vinyl is cut, weed your design carefully, removing all of the excess vinyl you do not need. Remember, this is a stencil so you will be weeding in reverse. You want to remove all the parts you want to burn into the wood (which are the parts you would normally leave on the carrier sheet). Be extra careful that all the small pieces and centers to your letters stay on the carrier sheet. TIP: I have lots of weeding tips on my Cricut Best Tips and Tricks post. Next, cut a piece of Cricut Transfer Tape a size just larger than your weeded vinyl piece. Remove the backing from the transfer tape. Apply the transfer tape to your vinyl stencil by holding the transfer tape in the shape of a taco or “U” shape then putting the bottom of your “taco” onto the middle of your design. Smooth the tape over the stencil from the center outward making sure to press out and remove any bubbles. When the transfer tape is in place, use a scraper tool or other hard and flat-edged item (like a store loyalty card) to transfer the vinyl stencil design to the transfer tape. It’s important to scrape it well to transfer the vinyl. It helps to scrape it from both the transfer tape side AND the carrier sheet side. Carefully peel the carrier sheet off the vinyl. TIP: If little bits don’t want to transfer to your tape, scrape it again and pay careful attention to those problem areas. As mentioned I will show you how to assemble the Santa Cookie Tray first, but you will follow the same steps to cut the vinyl for the "Grillin' and Chillin'" design. Now place your design on your wood, being mindful that it is straight and centered. Make sure both the vinyl and transfer tape are adhered to the wood. Use your fingers to push out any bubbles or creases in the vinyl. TIP: If you need help centering your stencil you can measure and mark the center point of your wood with a pencil. Then fold your vinyl into a taco "U" shape and line up the bottom of the "U" over your center mark. Gently press the vinyl down starting in the center and working outward. Pick up a corner of the transfer tape and slowly remove it from your vinyl. Use your fingers again to make sure the vinyl is securely adhered to the wood without any noticeable bubbles. You want to make sure it is firmly adhered to the wood since it’s a stencil and you don’t want any bleeding to occur. TIP: I used a soft basswood so didn’t have any issues getting the vinyl to stick to the wood. In fact, my vinyl wanted to stick REALLY well. But if you’re having problems, first check to make sure your wood is unfinished with no stain, paint, oil or wax. Be sure to sand your wood surface until it is smooth, and make sure your wood is clean of all debris. I used a lint roller. To prevent oils from transferring from your hands, use transfer tape and don’t handle the adhesive side of the vinyl. And, be sure to burnish the vinyl really well! First I’m going to show you how to burn designs into wood using Ammonium Chloride. I made my Santa cookie tray this way. Grab a glass bowl and measuring spoons. All the chemicals you will use are food safe, so you can safely use items you already have in your kitchen. NOTE: Ammonium Chloride is a food additive found in things like cheeses, pudding, spreads, cereals, condiments licorice and sport drinks. Thick-It is a corn starch based food and beverage thickener. Even though these are food safe, some people may be sensitive to Ammonium Chloride. Wear protective gloves and eyewear when measuring, stirring and applying it to the wood to prevent any skin or eye irritation. Also consider wearing a respirator and using it in a well ventilated area since ammonium chloride fumes decompose into ammonia gas and hydrochloric acid. In a glass bowl measure out and combine these ingredients: 1 tablespoon Ammonium Chloride (this is what burns the wood once heat is applied) TIP: This recipe makes A LOT of gel. You will only need a really small amount if you’re only making a couple trays or signs. But it does keep for several weeks without losing integrity if stored in a covered glass container such as a clean jar. Just be sure to store it in a cool location out of direct sunlight. Or, consider making a third of the recipe, which is approximately 1 tsp Ammonium Chloride, 2.5 tsp Thick-It, and 8 tsp water. Stir well with a paintbrush and then let your mixture sit for 10 minutes or until the water is fully absorbed and a nice gel has formed. When your solution is the texture of a thick gel, use the paintbrush to pick some of the gel up. Wipe off the excess on the side of the bowl. You only want enough left on your brush to lightly paint the gel onto the wood. Make sure you apply the gel to all the parts of the wood showing through the stencil. Once everything is covered with a light coat, let it dry completely, about 10 to 20 minutes. Make sure the gel doesn't get on any part of the wood you DO NOT want to burn. TIP: Be sure to apply only a single thin coat of gel to the wood. You don’t want too much gel since it would need to burn off before burning the wood, and it might end up leaving a filmy appearance on top of your burned design. Plus, you really don’t want to overwork the stencil and risk it bleeding underneath. Once it’s fully dry, carefully peel the vinyl off the wood. Use a weeding tool to help remove any little bits of vinyl stuck to the wood. Take your wood tray outside or to a WELL VENTILATED AREA with your heat gun. When you heat up the chemicals, it will actually burn the wood so there will be smoke! The ammonium chloride will also emit ammonium gas and hydrochloric acid. Be sure to wear a respirator and eye protection. Set your heat gun to at least 495 degrees Celsius. I used the hottest setting on my heat gun which is about 650 degrees Celsius. I added the extra heat because my wood tray is very thick, and I found that the thicker the wood, the more heat you can apply to speed things up. Move the heat gun over the design on the wood, making sure to keep it moving continuously. The design will magically appear and burn as it heats up! TIP: Always keep your heat gun moving so you don't accidentally over-burn the wood. It is possible to burn the parts of the wood that don't have the Ammonium Chloride solution on it if you apply too much heat, and any knots or prominent wood grain will probably darken quickly, too, so be aware of that while heating your design. Keep heating the wood surface until your design is the color you want. The longer you apply heat, the more burned and darker it will become. You can make the burned areas look as light or dark as you want. I kept some areas of my image lighter and made some areas a bit darker. Rinse off the chemicals making sure it’s all completely removed. Now your food safe tray is ready to use! TIP: You can stain and seal your tray if you want, but be aware that those chemicals may make your tray NOT food safe, depending on what you use. Simple mineral oil or beeswax is a good food safe alternative, or you can always use small bowls or napkins to serve your yummy cookies and carrots on! One of the wood trays I made had a lot of fissures in the wood grain. When I applied heat using the heat gun the cracks darkened. The result was a more rustic look (tray on left) versus the more polished look of the tray without fissures (tray on right). Just be aware of this when selecting your wood so you get the results you want! I tried making my Grillin’ and Chillin’ sign using a Scorch Marker. My first attempt wasn’t very successful because it bled under my stencil —the marker is almost a watery consistency so it’s not really surprising that it bled. I also couldn’t get a very dark burn. I was underwhelmed with the result. I wasn’t sure if it was my technique (did I not not let it dry long enough, or did I apply too liquid much making it too wet?) so I decided to try again. This is what I did: Once the stencil was adhered to the sign, I shook the Scorch Marker really well for a minute or two. I primed the bullet tip by dabbing it on a paper towel. The Scorch Marker comes with both a bullet tip and a foam brush for applying the chemicals directly onto the wood. The brush is great for “painting” large areas, and the bullet tip seemed easier to use in the smaller areas. I tried using both in all areas. I applied only a SMALL amount hoping it wouldn’t bleed under the stencil this time. Once all the wood showing through the stencil was covered with a really thin coat, I let it dry really well. The first time I let it sit for only about five minutes, so this time I let it dry for twenty minutes. Once it was dry, I carefully removed the stencil by peeling it off the wood. I heat up the design by constantly moving a heat gun over the wood. As the design heated, the chemical started burning into the wood fibers. The more heat I applied, the darker the burn became, but I found it never quite got a dark burn like the Ammonium Chloride did. The Scorch Marker Pro manufacturer recommends using a heat gun set to at least 700 degrees Fahrenheit. The thicker your wood, the higher temperature you should go. I used the gun set to the hottest setting it could go, which is about 650 degrees Celsius, which is equivalent to about 1200 degrees Fahrenheit and is plenty hot enough. TIP: If you are using the Scorch Marker on a surface intended for food, it’s okay to leave it unrinsed according to the manufacturer. You can apply a food safe finish like mineral oil or beeswax right over the top. Here are the results from my second attempt at using the Scorch Marker for the Grillin’ and Chillin’ sign. I’m still not happy with the results. You can see that it bled again under the stencil causing a fuzzy and uneven edge. I wanted to love this method SO much because it was super easy to apply, but I just couldn’t get the good results I’d hoped for. Maybe a different wood such as a hard wood would work better. I used basswood, which is a soft wood and the bleeding happened right along the grain. For comparison, I made another Grillin’ and Chillin’ sign using the Ammonium Chloride gel mixture and got this beautiful result. This was a winner! Look at those really crisp lines! The thickness of the gel really prevents bleeding. But let me tell you a little secret... I really wanted to know whether someone without a heat gun could use a heat press or Cricut EasyPress instead. So I tried out using the EasyPress to burn this one, and it worked! You'll need to do something big like this sign in sections -- and the burned results are not quite as dark as you can get from a heat gun -- but it does work. This is how to use an EasyPress: Set the temperature of your EasyPress to 400 degrees Fahrenheit, and set the timer to 20 seconds. Cover your wood completely with a single layer of butcher paper. Mentally divide your design into equal sections and press the first section for 20 seconds while lightly pressing down. Lift and move the easy press over to the next section and press for 20 seconds. Continue until each section has been pressed for 20 seconds. Then repeat another two times until each section has been pressed three times for a TOTAL of one minute. If your burned areas are not dark enough, continue in 20 second increments. Change out your butcher paper when it starts to get discolored to make sure you don't accidentally reapply any "ghosted" ammonium chloride gel back onto the wood. I changed mine once about midway through. My plank wasn’t perfectly flat so I touched up areas using my Cricut EasyPress Mini. You can even do the whole thing using a Mini if you want! Just be sure to always keep a layer of butcher paper between your plank and EasyPress. TIP: If your design is smaller than the size of your EasyPress, then you'll only need to heat that one section three separate times for 20 seconds each pressing. Just make sure to lift the EasyPress and check your progress after each pressing to make sure your design is not overcooking. I decided this version of the sign turned out the best so finished it off by adding hooks and hangers. To do this, line up a set of hooks along the bottom long edge of the sign. Every plank is slightly different size, so it’s hard to tell you exactly where to align the hooks, but I pulled a tape measure across the bottom of my plank and equally spaced out the hooks along it. I started by centering one hook and then measuring about 4.75" out from each side to place the next hooks, and so on. With your hooks lined up, use a pencil to mark each of the screw holes and then go back with a drill or screwdriver to screw in 1/2” long screws. TIP: The basswood I used was soft enough that I could screw them in by hand using just a Phillips head screwdriver, but using a drill would be really quick and easy. To hang your sign, attach saw tooth hangers to the back of the sign along the top edge. I nailed in two hangers spaced a couple inches inward from the short sides, and about one inch down from the top edge. TIP: You might want to use a level to help you align them if you have one handy. Now put up your sign and hang some grilling tools from the hooks! So from my tests I decided I really like the result of the Ammonium Chloride the best. You can add just the right amount of Thick-It thickener to control the consistency of the gel mixture so it doesn’t bleed under the stencil, even if you’re using a soft grainy wood. If you decide you want a more watery texture to paint on a hard wood, you can just reduce the amount of thickener you use. Plus, you can get any amount of burn you like from light to dark. I love the variation of burn colors I got just by playing around with the heat gun or EasyPress! Here are my Wood Burned Designs using Ammonium Chloride on the Santa cookie tray and Grillin’ and Chillin’ sign. I really like how they turned out. These would make super nice gifts for just about any occasion. Now that you know how to burn wood, you can use this technique with pretty much any design you can think of! Oh, one last thing...here’s a very big TIP if you make a mistake or if your design does bleed under the stencil for some reason just sand down your wood and start over! The approximate final size of the Santa cookie tray is 12 inches. The fonts I used are Bhatoshine and Tingler Print
Wood Burned Designs
Materials
Tools
Instructions
STEP 1: GET MY FREE WOOD BURNED DESIGN FILES
STEP 2: PREPARE THE WOOD
STEP 3: WEED AND TRANSFER THE VINYL
STEP 4: BURN DESIGNS INTO THE WOOD USING AMMONIUM CHLORIDE
8 teaspoons Thick-It (this thickens the mixture into a gel so it doesn’t bleed under the stencil)
1/2 cup warm water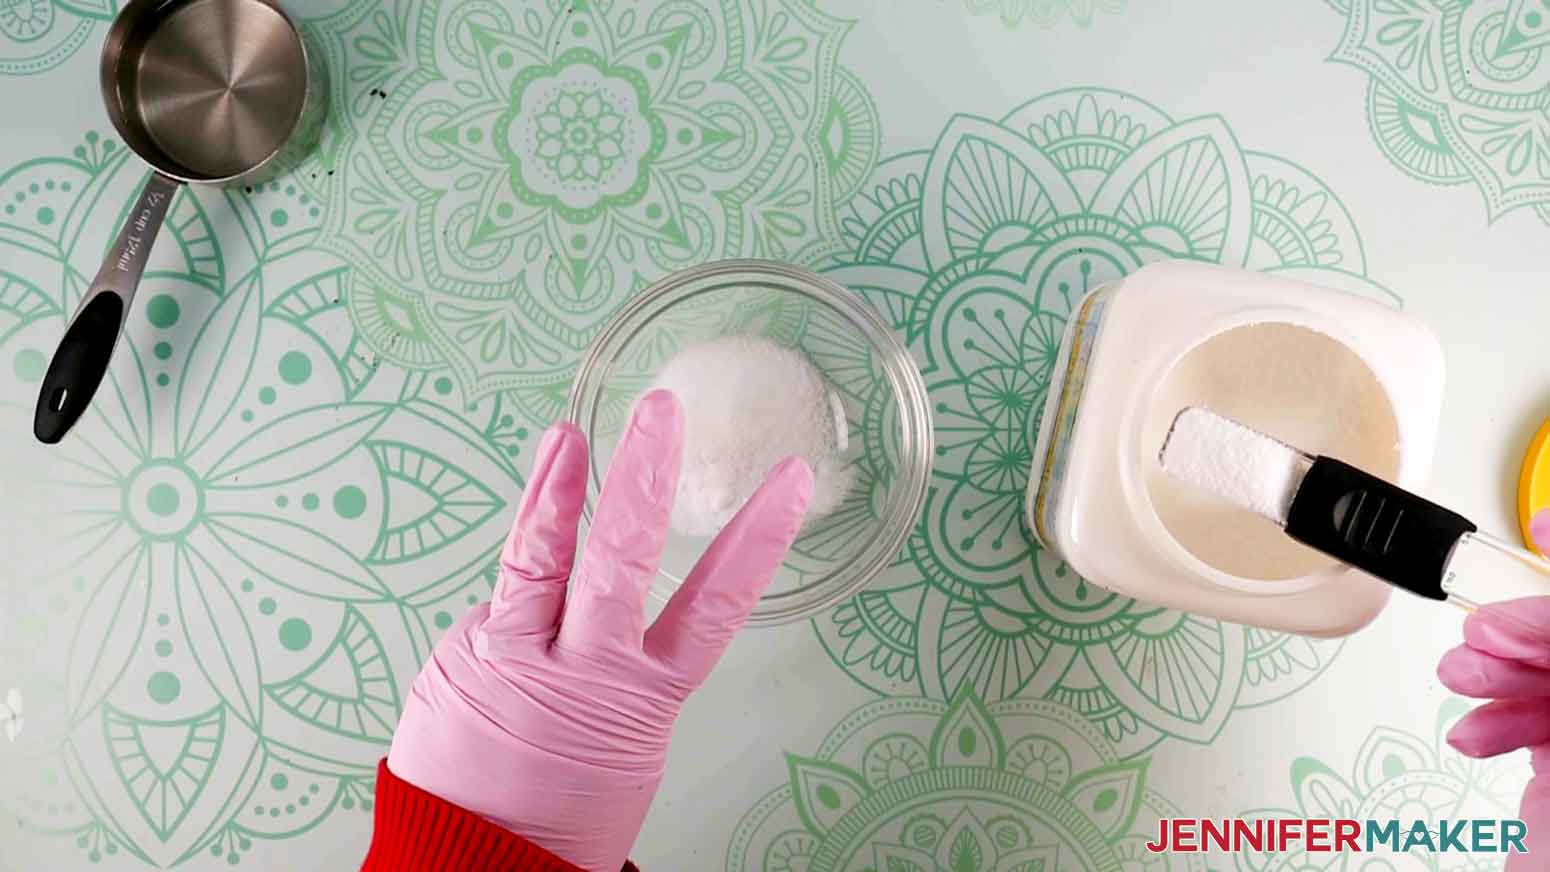
STEP 5: HOW TO BURN DESIGNS INTO WOOD USING A SCORCH MARKER
STEP 6: USE AN EASYPRESS INSTEAD OF A HEAT GUN
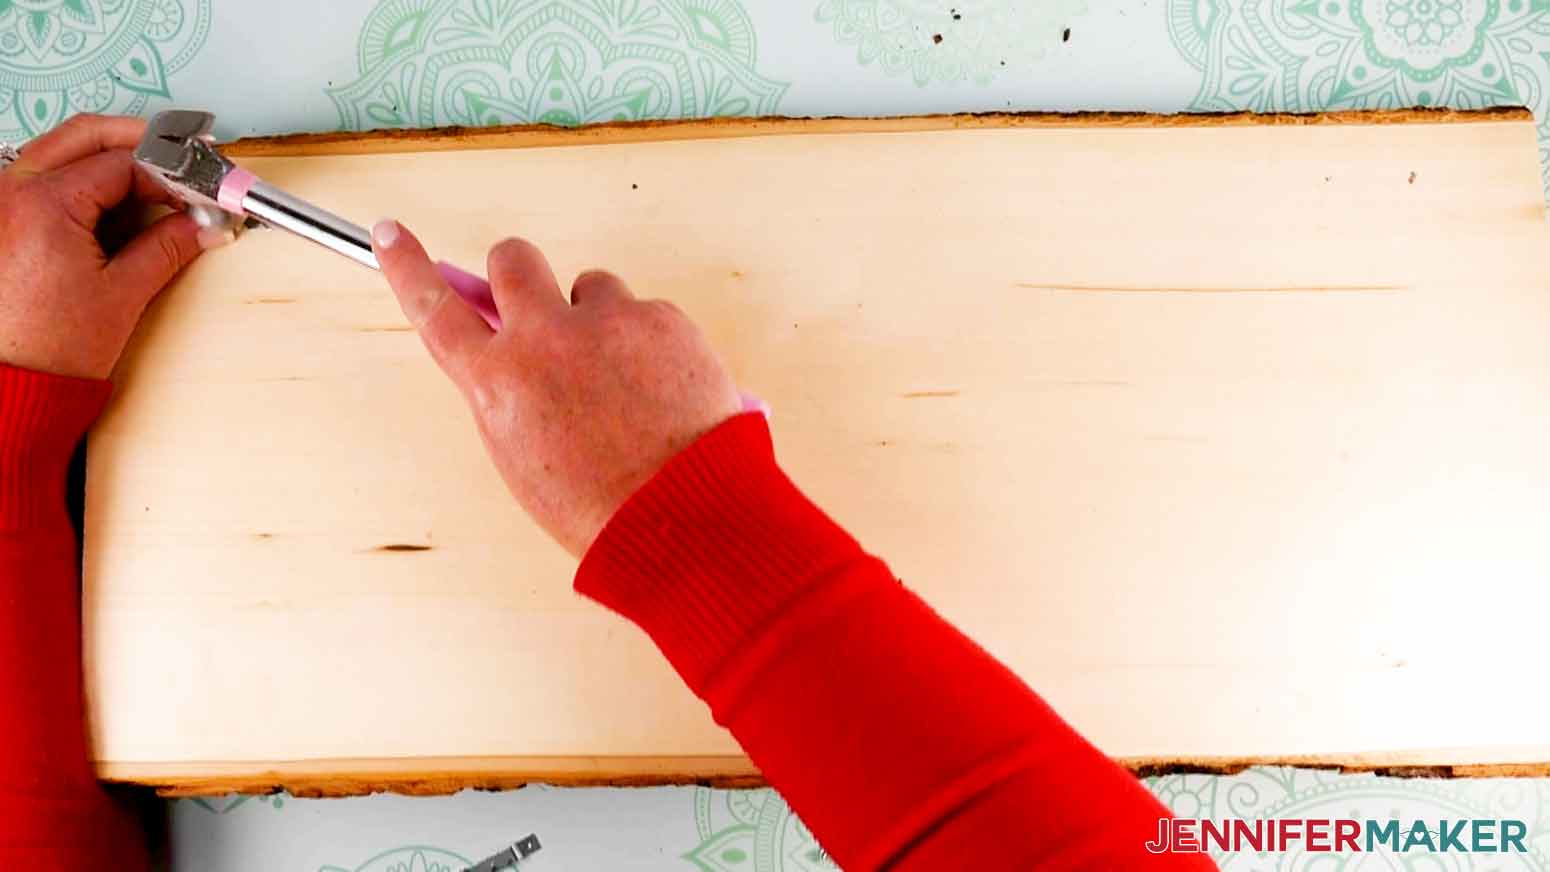
STEP 7: PUT FINISHING TOUCHES ON THE GRILLIN' AND CHILLIN' SIGN
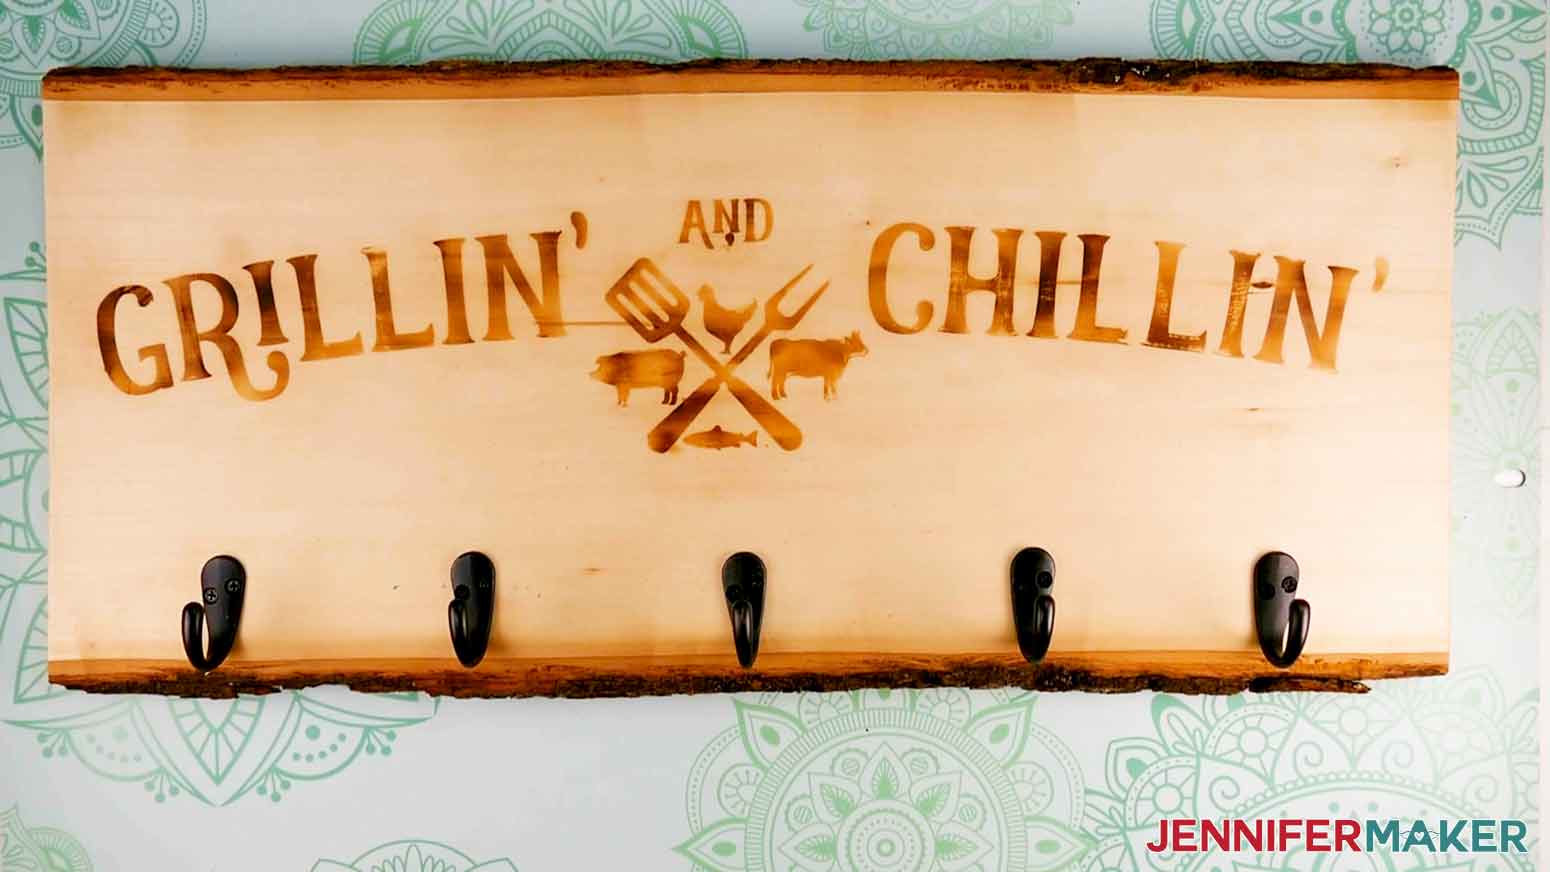
STEP 8: FINAL THOUGHTS AND RESULTS
Notes
The approximate final size of the Grillin’ and Chillin’ sign is 9 x 23 inches. The font I used is Realist Typeface.
Answers to Your Questions About How Burn Designs Into Wood
Q: I can’t get my design centered onto my blank
If you need help centering your stencil you can measure and mark the center point of your wood with a pencil. Then fold your vinyl into a taco “U” shape and line up the bottom of the “U” over your center mark. Gently press the vinyl down starting in the center and working outward.
Q: I’m having issues getting my vinyl to stick to the wood
I used a soft basswood so didn’t have any issues getting the vinyl to stick to the wood. In fact, my vinyl wanted to stick REALLY well. But if you’re having problems, first check to make sure your wood is unfinished with no stain, paint, oil or wax. Be sure to sand your wood surface until it is smooth, and make sure your wood is clean of all debris. I used a lint roller. To prevent oils from transferring from your hands, use transfer tape and don’t handle the adhesive side of the vinyl. And, be sure to burnish the vinyl really well!
Q: How do I remove bits of vinyl left behind on the wood?
You can use a weeding tool to help remove any little bits of vinyl stuck to the wood.
Q: How do I make some parts look darker than others?
You will want to keep heating the wood surface until your design is the color you want. The longer you apply heat, the more burned and darker it will become.
Q: Can I start over if I make a mistake?
If you make a mistake or if your design does bleed under the stencil for some reason, just sand down your wood and start over!
Get my free SVG files to create beautiful wood burned designs
I love seeing what you make with my designs and how you use them! Please share a photo of your wood burned designs in our Facebook group or tag me on social media with #jennifermaker.
Love,

Want to remember this? Save this How to Burn Designs Into Wood Tutorial to your favorite Pinterest Board!