Learn how to create a DIY dome cup holder for gifting treats!
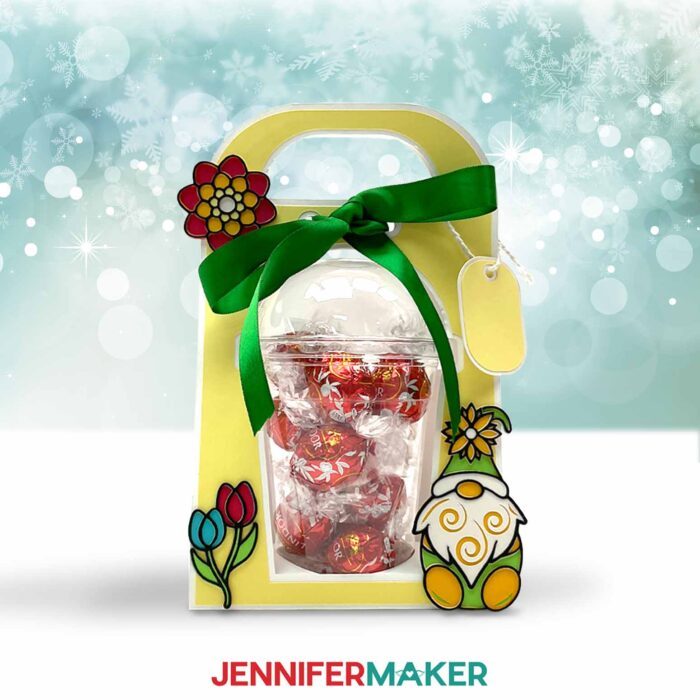
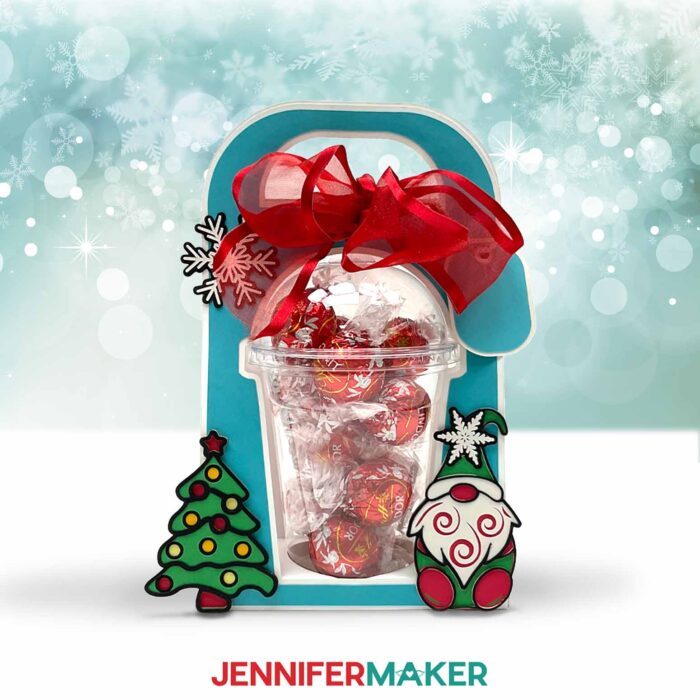
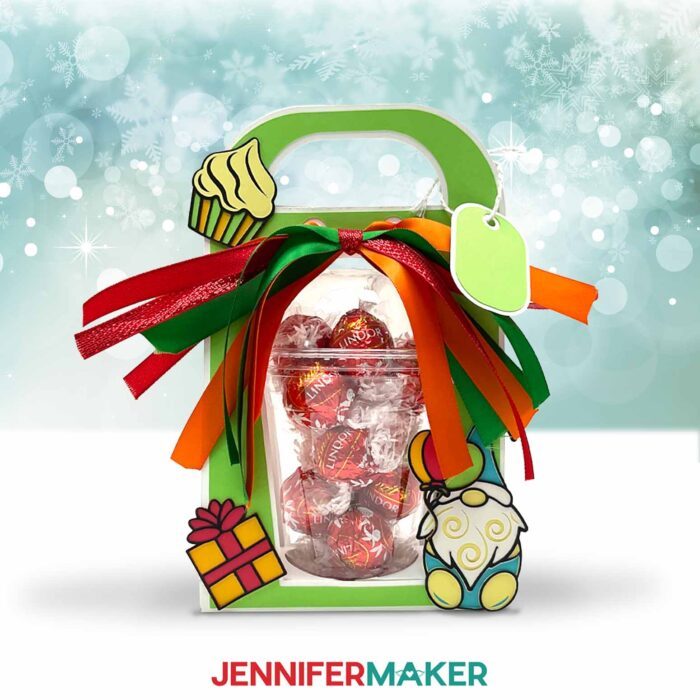
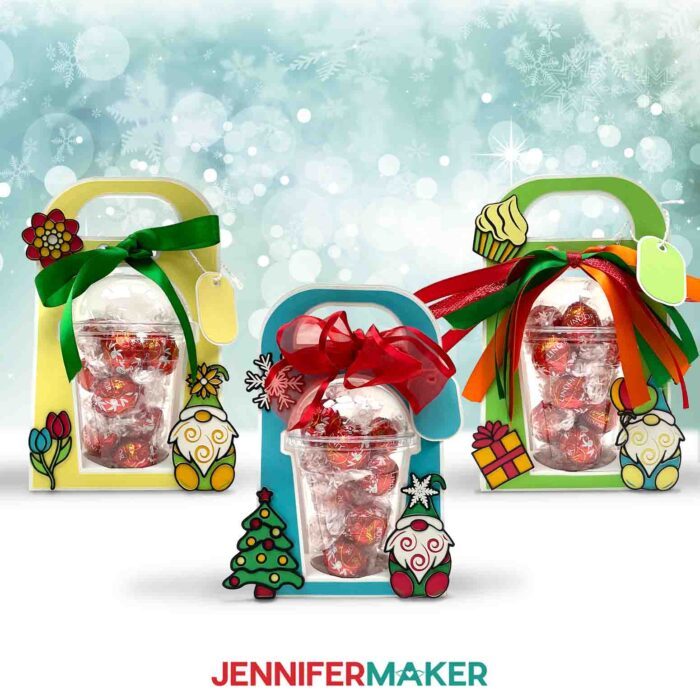
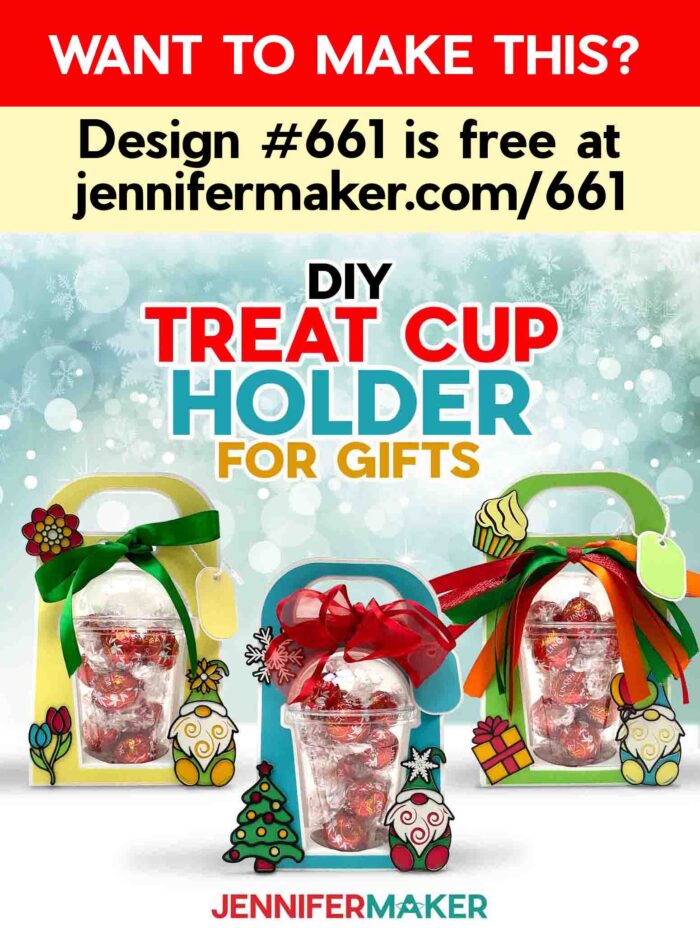
Want to make a treat holder that fits a TON of candy? I have lots of treat boxes on my blog, but this one is super fun and different! Let’s learn how to make a dome cup holder for gifting holiday treats! The dome design of the cup makes it so you can really pack these treat cups past the brim with tasty goodies or small gifts. Meanwhile, the handle and adorable gnome embellishments make it easy (and cute) to transport the goods!
The full step-by-step video showing you exactly how to create your own dome treat cup holder was part of Maker Academy Weekend 2024. Get a pass to watch all 18 workshops, each with a printable handbook, transcript, audio files, design files, and support with a Maker Academy Weekend 2024 VIP pass!
Did you know ADVANCE with JenniferMaker annual members get a free 2024 VIP pass and lifetime access to the 2024 Maker Academy Weekend projects? Join now!
In the tutorial, I’ll show you how to make cardstock holders with cute gnome embellishments to hold a clear plastic cup with a domed lid. When you break down the cost, they’re a great value for such a sweet gift! These dome cup holders aren’t just for candy or small gifts, you could use them as party favors or as part of a holiday celebration. In the video, I’ll show you how to cut, assemble, and decorate your cup holder using my adorable toolkit of designs. Aren’t they the sweetest? I just love these little gnomes!
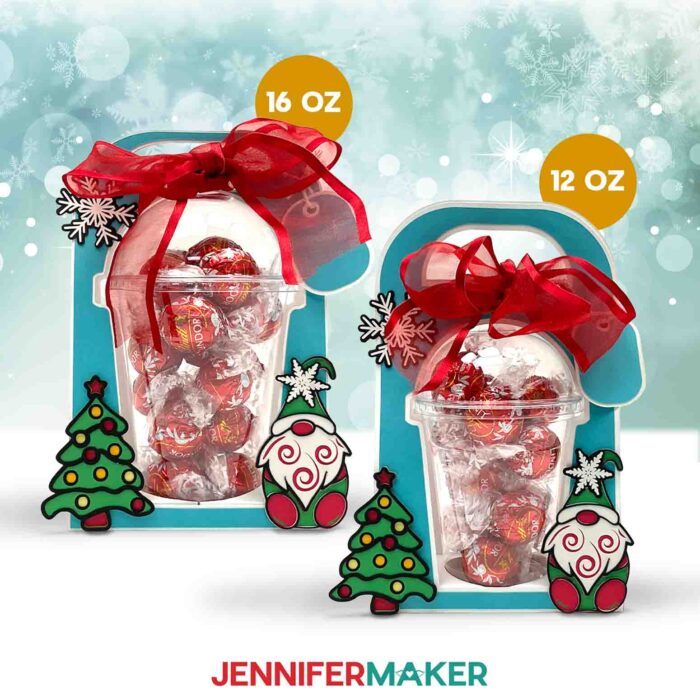
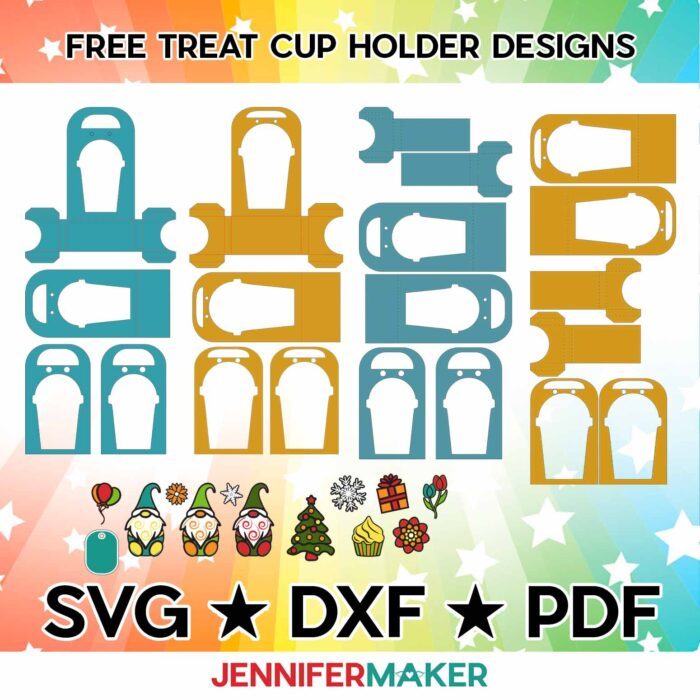
The download file includes designs to make holders for both 12 oz cups and 16 oz cups. Be careful not to make the wrong size holder for your cup! There are a lot of very similar cups available, but the height, width, dome, and lid rim placement are important for these holders to hold the gifts securely.
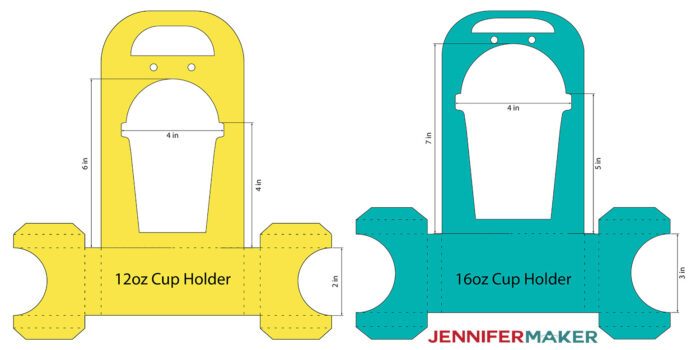
To work, a 12 oz cup should have a base smaller than 2″ wide, be a little less than 6″ tall and 4″ wide at the rim, which should end at about 4″ tall. A 16 oz cup should have a base smaller than 3″ wide, be a little less than 7″ tall and 4″ wide at the rim, which should end at about 5″ tall.
You can use my PDF files to cut these designs by hand, but I’ll use a Cricut Maker 3 to make it much easier. You can also use an original Maker, an Explore series machine, a Cricut Venture, or another machine that uses cut files. I didn’t find domed cups small enough to fit on paper that fits in an original Cricut Joy, but they do work with the Joy Xtra’s larger cutting area! That version has a few extra steps, but I’ll show you the differences in the tutorial.
I used eighty pound cardstock for the extra-detailed black pieces because I’ve found that heavier cardstock holds up better with their extra-intricate cuts, AND in getting them off the mat when they’re done. Remember, this is when material quality is REALLY important, because lower-quality paper often can’t handle these delicate designs. The blade can smoosh or tear the paper instead of cutting it. So save yourself the frustration and use high-quality paper. I used twelve-by-twelve inch cardstock for the project on my Maker 3, and eight-and-a-half by eleven inch material for the Joy Xtra version I’ll show you later. You can use either size material for embellishments and a gift tag that fit your machine – especially if you want more color options, since a lot of fun colors are only available in the eight-and-a-half by eleven inch size.
First, you’ll need the disposable cups from my materials list, which come with plastic dome lids. They’re sometimes known as disposable plastic smoothie cups, domed cold cups, domed iced coffee cups, or iced tea cups. They’re made of food grade plastic, meaning you can place a whole host of food and treats (like cookies) directly into them, or fill them with bulk wrapped or unwrapped candy, small toys, gifts, and more. When working with food, always be sure to use safe materials to store and gift them.
I have the perfect size cup and lid linked in my materials list. If you purchase different cups, the dimensions should be in the listing or on the original packaging — just make sure they’re the same size so they’ll fit into the cardstock holders.
Your family and friends will love these little handmade pieces of holiday art — and the treats inside!
Not only are they recyclable, they’re actually reusable — just hand wash them in warm water and a gentle soap, dry them off, and fill them back up with treats, iced coffee, your morning protein shakes, a bubble boba tea, or anything else you’d like! The cups themselves are cup holder friendly, too if you want to repurpose your treat cup for an on-the-go beverage.
Want to customize these further? You can create gift tags to add to the dome candy holder, place a sticker with personalized advertising on the cup or holder to promote your business, or experiment with different colors, embellishments, and more. There are no rules, as long as you’re having fun!
I just love these dome cup holders for treats! These are a super cute way to gift candy, tiny little gifts, or anything else you can fit inside! I love how there’s so much room for goodies with the domed lid.
Let me show you how to make dome cup holders for treats! This post contains some affiliate links for your convenience (which means if you make a purchase after clicking a link I will earn a small commission but it won’t cost you a penny more, there is no additional cost)! Read my full disclosure policy.
Materials to Make Treat Cup Holders
View my Amazon shopping list for the exact items I used!
- When purchasing cups, the dimensions are very important so they can fit the holders correctly.
-
One (1) sheet each of multiple colors of 12” x 12” 65 lb. Cardstock -OR-
-
One (1) sheet each of multiple colors of 8.5” x 11” 65 lb. Cardstock
-
Filler for the Cup (I used festive chocolates)
-
Optional: Pen to Write Message on Gift Tag
-
Craft Glue (I used Bearly Art Precision Glue)
-
Scoring Stylus (optional for files with score lines) -OR-
-
Single Scoring Wheel (optional for files with score lines)
-
Weeding Tool (for popping out small cutouts from intricate areas)
-
Scissors (for cutting the twine or ribbon for the gift tag and tie)
-
Tweezers (optional for gluing intricate layers into place)
- Design #661 – My free SVG/PDF/DXF design files are available in my free resource library (get the password by filling out the form at the bottom of this page) or get additional access to the workshop video and printable workbook by getting a 2024 VIP Pass to Maker Academy Weekend or by joining the ADVANCE with JenniferMaker program as an ANNUAL (yearly) member!
How to Make Treat Cup Holders with Domed Lids!
The detailed step-by-step assembly video on how to make domed treat cup holders was available to watch for free for 24 hours during Maker Academy Weekend 2024, held online November 7-10, 2024. Get access to the Maker Academy Weekend 2024 videos, printable handbooks, and design files with a 2024 VIP Pass to Maker Academy Weekend or by joining the ADVANCE with JenniferMaker program as an ANNUAL (yearly) member!

Answers to Your Questions About My Treat Cup Holder Tutorial
Q: Where is your tutorial for this project?
A: This is a special project we made for our free Maker Academy Weekend 2024 event! A complete and detailed step-by-step video premiered during the event November 7-10, 2024. You can get access to the video tutorial and printable handbook that details how to make this great project if you get a 2024 VIP Pass to Maker Academy Weekend or by joining the ADVANCE with JenniferMaker program as ANNUAL (yearly) member which comes with other perks and bonuses, too!
Q: Can you make custom packaging with Cricut?
A: Yes you can! In this tutorial, I’ll show you how to make a treat cup holder. I have lots of other boxes, bags, and treat holders on my blog, too. These designs fit cold cups, so if you’re using hot cups they may not fit.
Q: How much weight can a dome cup holder hold?
A: These can hold a good amount of treats! I filled mine up with wrapped candy and it easily held 7 oz. They fit in most car cup holders!
Q: What kinds of things besides candy can I put inside a domed treat cup?
A: Instead of candy, you can put cookies, chips, pretzels, cut up vegetables, cake balls, or small gifts inside! Just don’t put anything extra heavy inside, or the holder may not withstand the weight.
Q: Why is my Cricut not cutting all the way through my cardstock?
A: Your blade may need to be cleaned or replaced. Check out my Tips for Cleaner Cuts blog post to troubleshoot your cutting problems.
Q: What is the best setting to cut cardstock on Cricut?
A: I typically use the Medium Cardstock setting with “More” Pressure to cut light and medium cardstock, and it works well!
Q: What blade do you need to cut cardstock on Cricut?
A: I use my Premium Fine-Point blade for most of my Cricut projects, cardstock included. The blades hold up for a long time, too. I clean my blade often so I haven’t even replaced it in the past year.
Q: Where can I buy the supplies for this project?
A: I love purchasing craft supplies on Amazon because of the low price and fast shipping service in the United States with my Prime account. I order supplies often, and delivery times are almost always super fast. I love the low price and convenience of Amazon. You can also check out Etsy sellers online or the Etsy app, especially for specialty cardstock. It’s a fun global marketplace of supplies and crafts, and you’re bound to find something unique for crafting! If you want to make a lot of these, check the retail price on your supplies and calculate your final price per item to avoid a surprise.
Q: Can you edit the design to work with a Joy or a different size cup, like a stainless steel option?
A: You would need to use a program to edit the files to match the size – just reducing the files will probably not work since the sizes are very specific, especially the hole at the bottom to keep the cup secure.
Q: Can I use vinyl for the black details?
A: It’s possible – but the cut lines are very thin and vinyl sticks immediately, so you’d need to be extra careful when placing the vinyl since you won’t have a chance to slide it into place like you do when gluing.
Q: How thick does the ribbon need to be and can it be wired?
A: You can use wired or unwired ribbon. I recommend staying with 5/8″ ribbon, but you can use thicker ribbon if it will fit through the holes.
Q: I don’t see the Score lines in Cricut Design Space, where are they?
A: Make sure you have uploaded the design with “score” in the name. Then in the Design Space Layers Panel, click the arrows to expand the grouped layers. The top layer should be red in the Color Box, which is how I indicate a line should be the Score operation.
Q: How can I tell which weight my cardstock is if I lost the packaging?
A: I would find a piece of cardstock of a known weight, then compare it to the unknown pieces. The feel of each weight is very different, so the heavier the weight, the stiffer the cardstock.
Q: I’ve downloaded the file and it opens to the treat cup as a Chrome HTML document and not an SVG.
A: The file type is probably automatically opening in the browser. Open a new project in Cricut Design Space and upload the SVG file to the Canvas and that way you can follow the tutorial.
Q: Can you use double stick tape (where it’s wide enough) instead of glue?
A: As long as the double stick tape works with the cardstock that is being used, it will work. Just make sure to give adequate coverage to keep everything well adhered.
Q: Any ideas for other things to put inside besides candy?
A: Gift cards, small toys like items used in piñatas, money, fun erasers, anything that can fit inside the cup!
Q: Can you make the embellishments with print then cut?
A: Sure, you can select the layers for a given embellishment and click “Flatten” to make it into a Print Then Cut piece. Make sure the embellishments either fit completely on the sides of the holder, or are printed on heavy enough paper to not bend and curl if pasted so that parts are not on the holders.
Q: If you have a two-sided paper and the two sides are not the same, but, you want to score the paper, is it safe to put the good side down on the mat and not ruin it?
A: It depends on the type of paper and how sticky the machine mat is. Usually it is fine, but testing it with an extra sheet is a good idea if you’re not sure.
Q: Are the no-score score lines just printed, or are they somehow scored with the maker cutting tool?
A: The no-score lines are dashed cut lines made with the cutting blade. They make a perforated line you can crease along.
Q: Can designs for the Cricut Joy using 8.5″ x 11″ paper be made on the Explore Air 2?
A: Yes, files for the Joy or Joy Xtra can be cut on the larger machines.
Q: How do I separate the layers to cut the embellishments? Like the gnomes on the treat cups?
A: If you don’t want to make all of the embellishments, “Ungroup” the designs and then you can delete the ones you don’t want.
Q: How do I know if my design uploaded at the correct size?
A: If you are using Cricut Design Space Beta for Desktop, try switching to the Live version as this has sometimes worked in our testing, or use the stacked version of the design and ungroup it to spread the pieces out. Here are the dimensions you should see for each design on your Canvas:
- dome-cup-holder-12oz-joyxtra-jennifermaker-SVG: 11.157″ x 25.635″
- dome-cup-holder-12oz-noscore-jennifermaker-SVG: 11.143″ x 25.643″
- dome-cup-holder-12oz-score-jennifermaker-SVG: 11.143″ x 25.643″
- dome-cup-holder-16oz-joyxtra-jennifermaker-SVG: 10.578″ x 26.815″
- dome-cup-holder-16oz-noscore-jennifermaker-SVG: 11.007″ x 24.842″
- dome-cup-holder-16oz-score-jennifermaker-SVG: 11.007″ x 24.842″
- dome-cup-holder-embellishments-jennifermaker-SVG: 8.132″ x 7.527″
If you need help resizing your design, please see our Resizing Guide.
Get my free SVG files to create dome lid cup treat holders!
(If you do not see the signup form above, click here.)
I love seeing what you make with my designs and tips! Please share a photo of your treat cup holders in our Facebook group or tag me on social media with #jennifermaker.
Love,

Want to remember this? Save this Treat Cup Holder Tutorial to your favorite Pinterest Board!