Learn how to make this felt Christmas tree advent calendar with layered ornaments!
Christmas is just around the corner, and every year I design and make a new advent calendar — a countdown to Christmas! I’ve made 3D Christmas trees with little drawers for gifts and goodies, paper villages with a door for every day, and even ornament stands so you can put a new ornament on the tree. It’s a fun tradition, and one that I know many of you share with me! And this year is no different! Our annual advent calendar design this year is a heartfelt hanging Christmas tree with 25 felt ornaments to decorate each day in December. I’m excited to teach you how to make an easy felt Christmas tree advent calendar that you will treasure for years to come.
Watch the full step-by-step felt Christmas Tree advent calendar assembly video:

Now you might take one look at this pretty felt Christmas tree advent calendar and think to yourself, “there’s no way I can make that!” But I promise, it’s really not as hard as it looks. And we’re going to do it together. I am going to break it all down into super easy steps and all you need to do is follow along. Before you know it you will have a beautiful, finished tree to Countdown to Christmas that you can use to decorate your home or give as a gift to impress your friends! And trust me, they will love it!
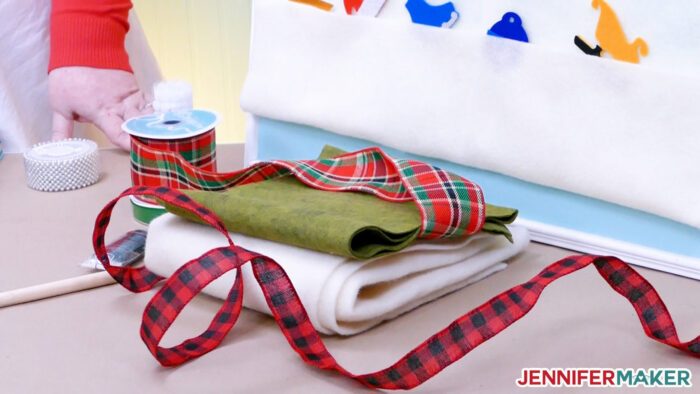
The main thing you need for this DIY project is felt, felt and more felt. You need a lot of felt for this hanging wall decoration between the Christmas tree and the ornaments. You can make your tree just like mine or you can pick your own colors to match your own decor. Be creative and have fun with it! I’m using felt sheets in roughly eight and a half by eleven inch sizes, but you can use larger amounts and cut them to size.

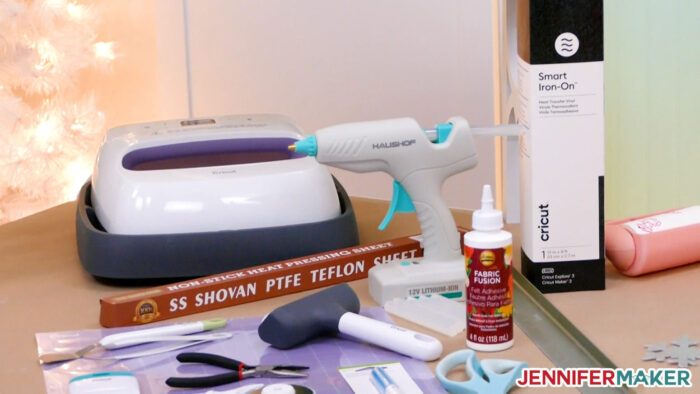
You also need a wooden dowel and some ribbon to hold it up, along with some hot glue to hold it all together! You can use some hook and loop dots to add the ornaments to the tree.
And I also used Smart Iron-On vinyl to add the personalization underneath my Christmas tree. This step is optional, but if you add it you will need a Cricut Easy Press or household iron to attach it. Feel free to change that to anything you like, or nothing at all!
Other items you will need include freezer paper, a lint roller, and a hack saw or something to cut the wooden dowel.
I used a Cricut cutting machine to cut both the felt and vinyl for this project. In this tutorial I use both the Cricut Maker 3 and the Cricut Explore 3, because you can use both to make this wall decoration. You can also use the original Maker and Explore series if that’s what you have.
And don’t forget your machine mats (both green and purple), some scissors, a weeding tool, and a brayer.
Let me show you how easy it is to make this pretty felt Christmas Tree advent calendar! This post contains some affiliate links for your convenience (which means if you make a purchase after clicking a link I will earn a small commission but it won’t cost you a penny more)! Read my full disclosure policy.
Materials to Make a Felt Christmas Tree Advent Calendar
View my Amazon shopping list with the exact items we used to make this project
- Stiff acrylic felt in a variety of colors (for the ornaments)
- 1/2 Yard of Green Felt at 72″ (for five 12″ x 12″ pieces of the Christmas tree)
- 1 Yard of Contrasting Felt at 72″ (23″ x 52″) (for the background)
- 1 Yard of Red Grosgrain Ribbon 5/8″
- 3 Yards of Decorative Wired Ribbon 2-1/2″
- Felt Glue (here’s another alternative glue that works)
- 24 Hook & Loop Adhesive Dots (only the rough side is needed)
- Iron On Vinyl (or other heat transfer vinyl)
- Freezer Paper (used to bond your felt when cutting on the Explore series)
- 8 inches of Floral Wire
- 1 Wooden Dowel Rod 1/2″ x 36″ and 2 Wooden Dowel End Caps 1/2″
- Cherry Cordial Font or Hello Font (free alternative to Cherry Cordial)
- Purple StrongGrip Machine Mat (for the felt)
- Cricut Easy Press (or Household Iron)
- Lint Roller
- Fabric Scissors and Straight Pins
- Yardstick or Ruler
- Washable Fabric Pen
- Hand Saw (for cutting the dowel to size)
- Large EasyPress Mat (or folded towel)
- Brayer
- Cricut Basic Tool Set (includes Scissors, Spatula, Tweezers, Weeding Tool, and Scraper)
- Wire Cutters
- Hot Glue Gun and one (1) Hot Glue Stick
- (Optional) Cricut Rotary Cutter and Mat Kit
- (Optional) Cricut Roll Holder for the Maker 3 and Explore 3
- A method to cut your felt and vinyl – I used the Cricut Maker 3 and Explore 3 but you can use the Cricut Maker or any of the Explore Series machines
- Design #342 – My free Christmas Tree home decor SVG/PDF/DXF design files are available in my free resource library – get the password by filling out the form at the bottom of this page
How to Make Your Own Felt Christmas Tree Advent Calendar
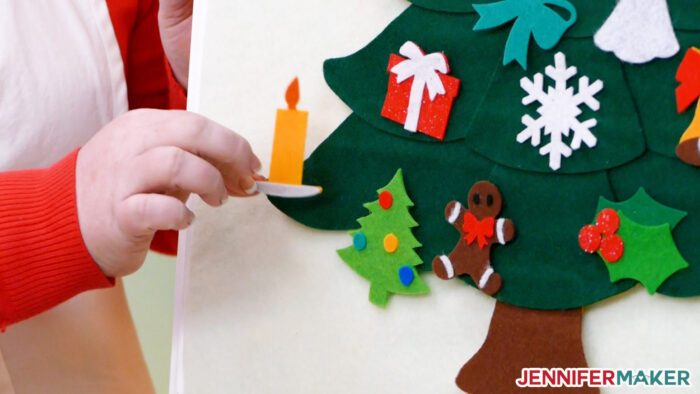
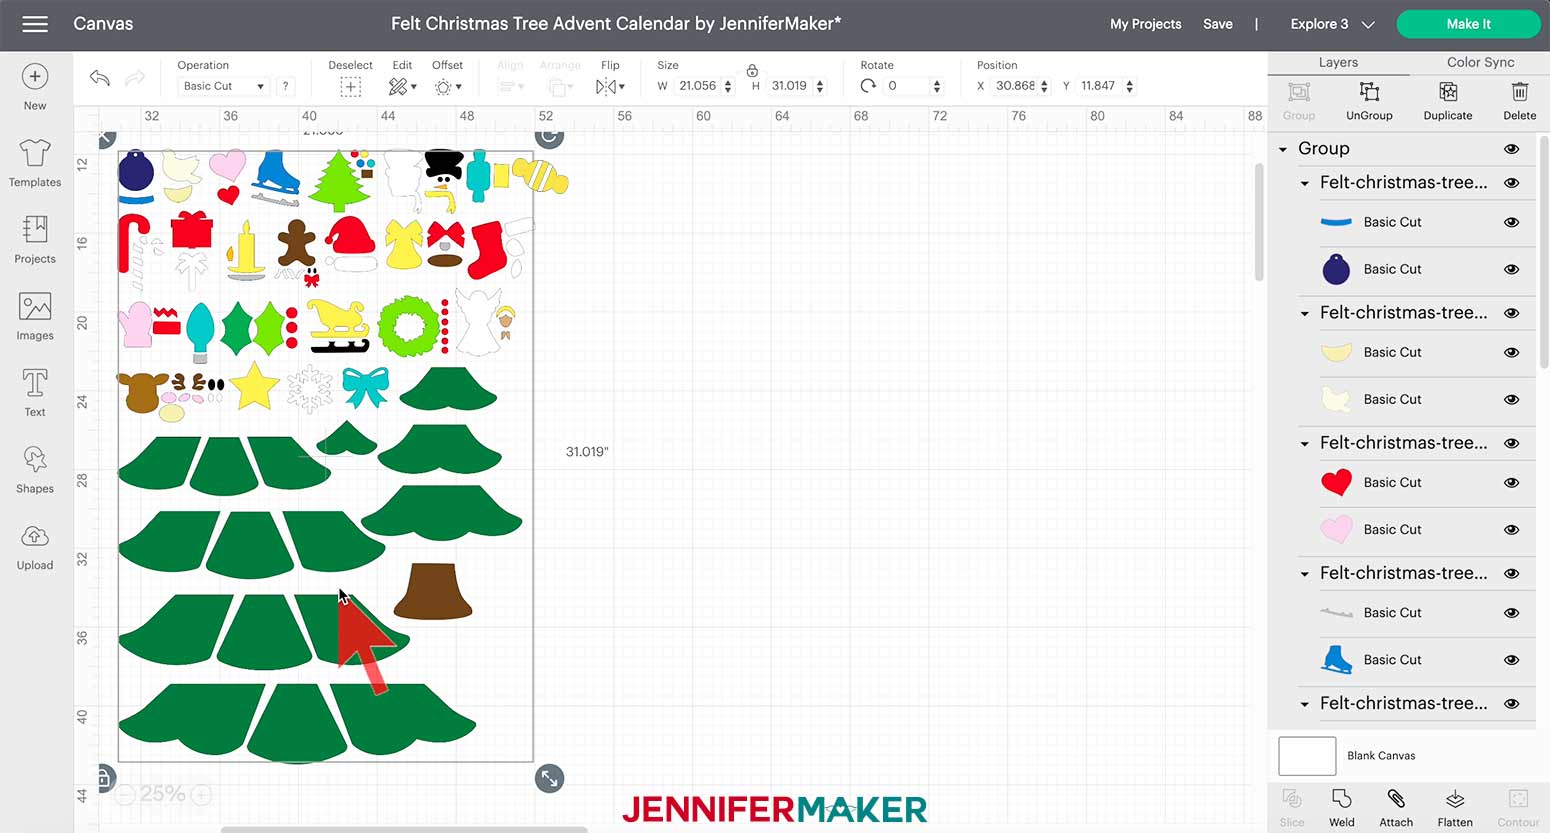
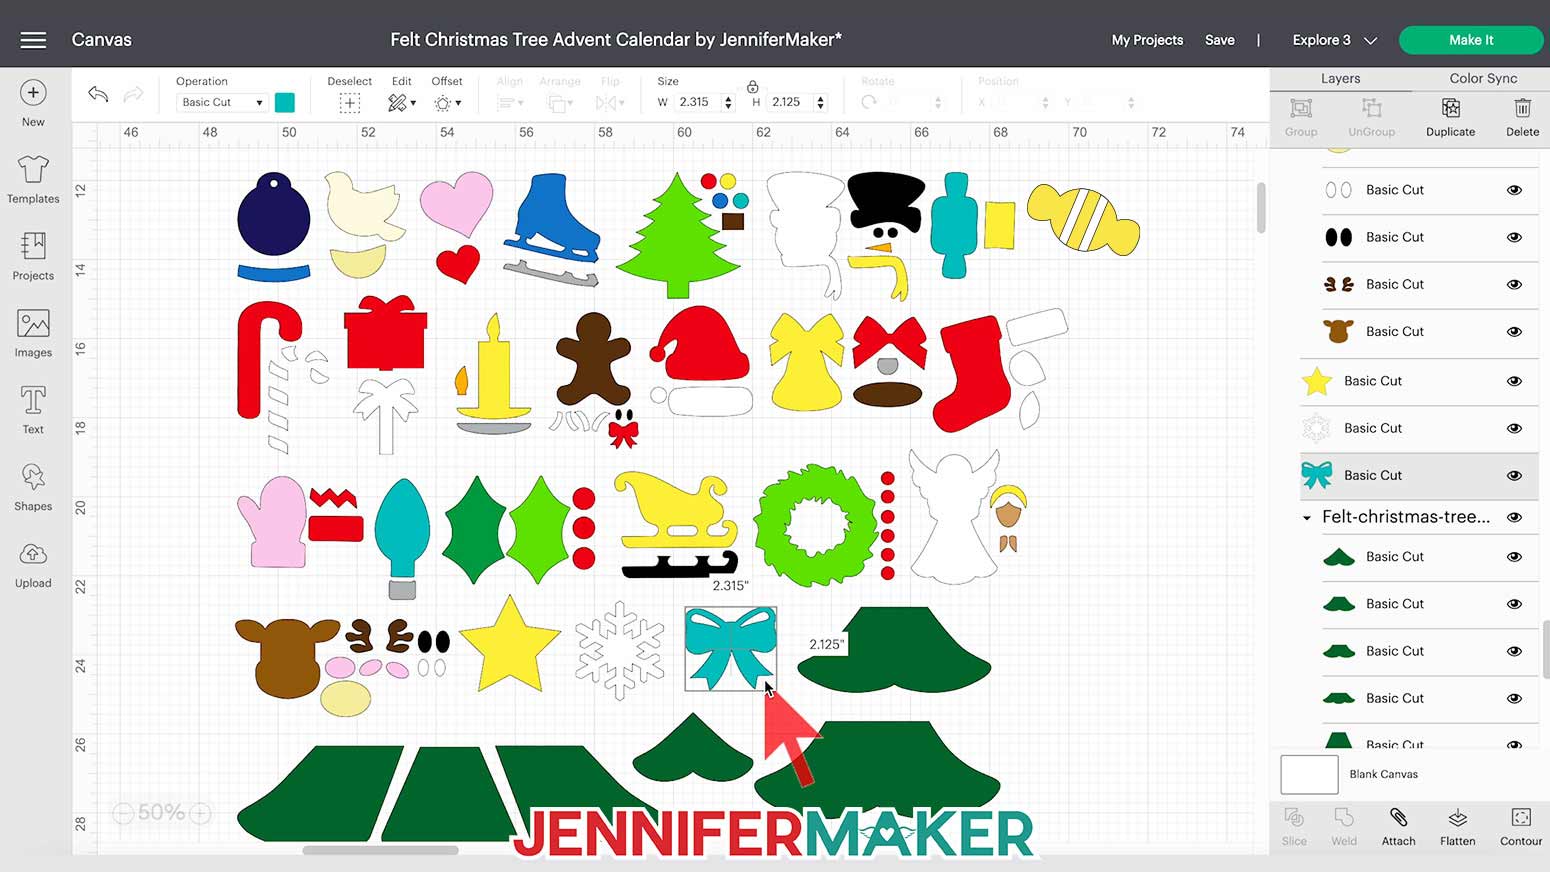
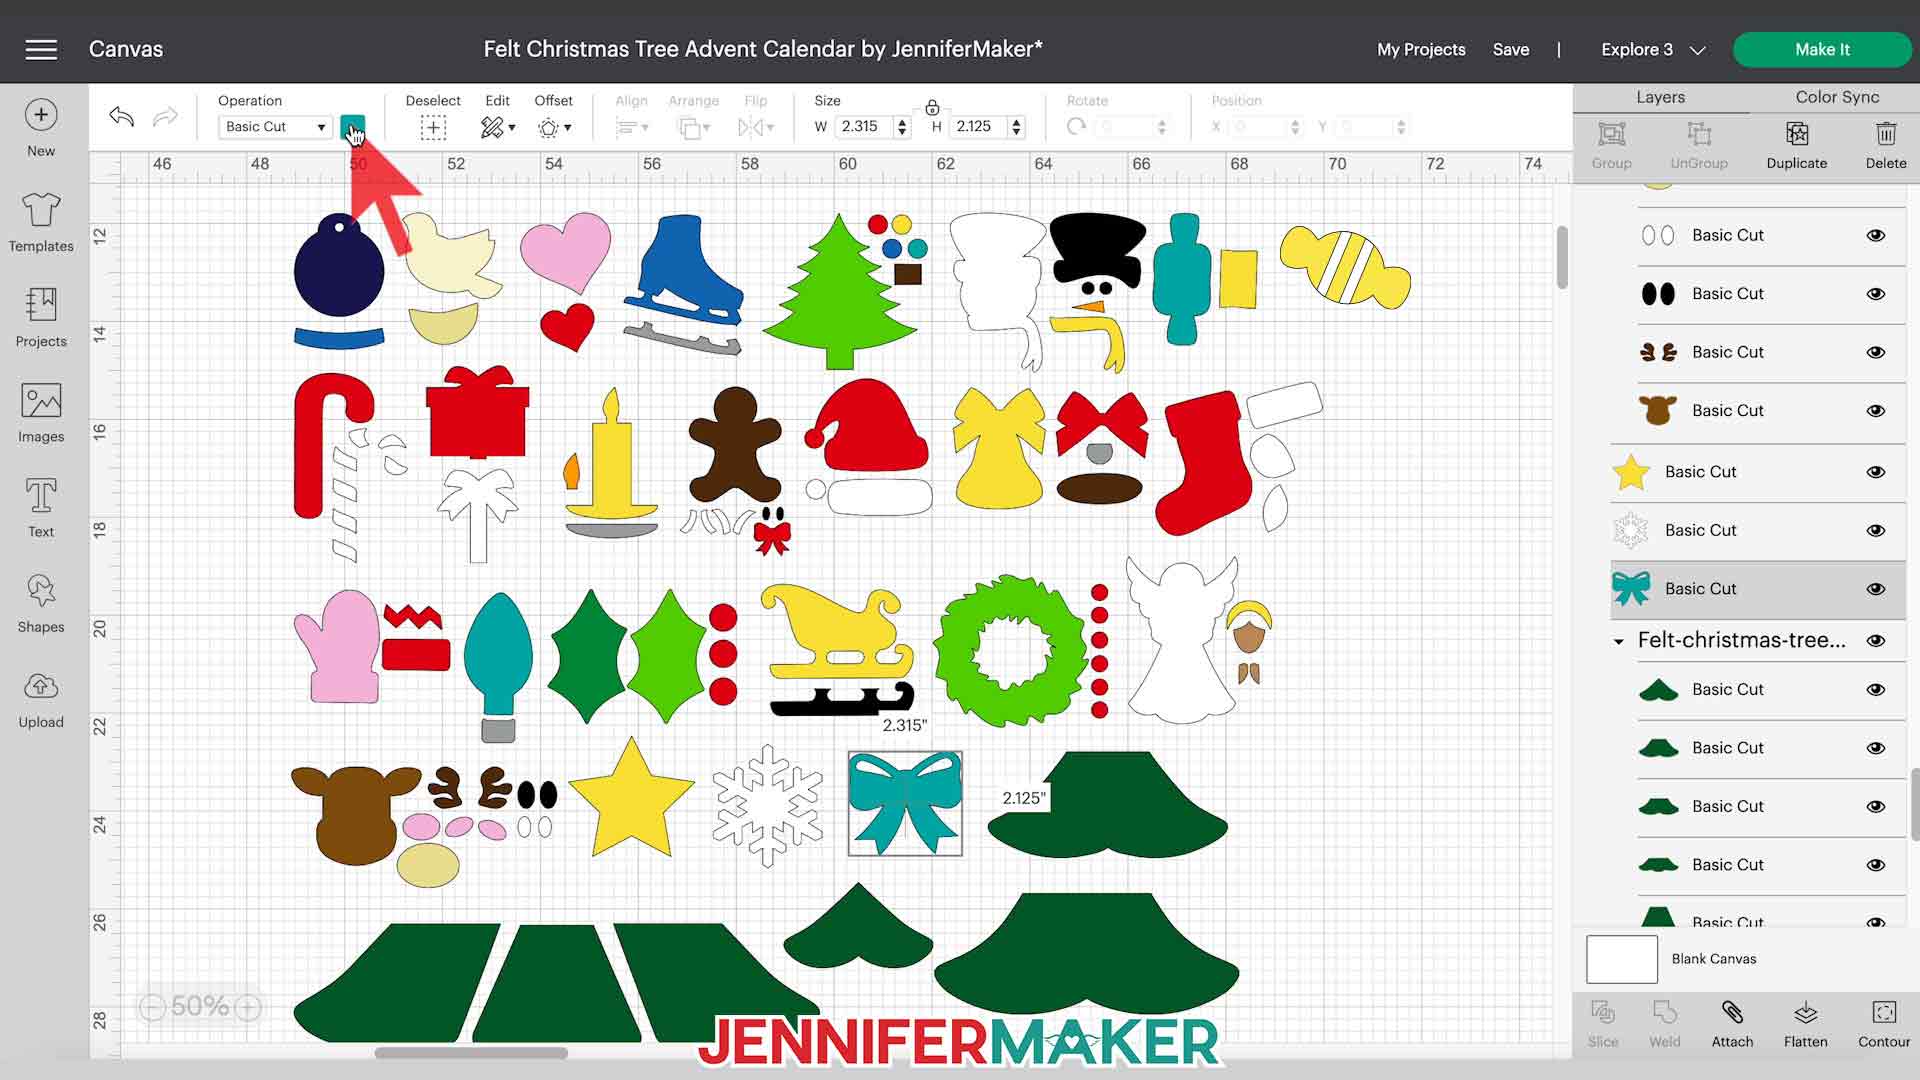
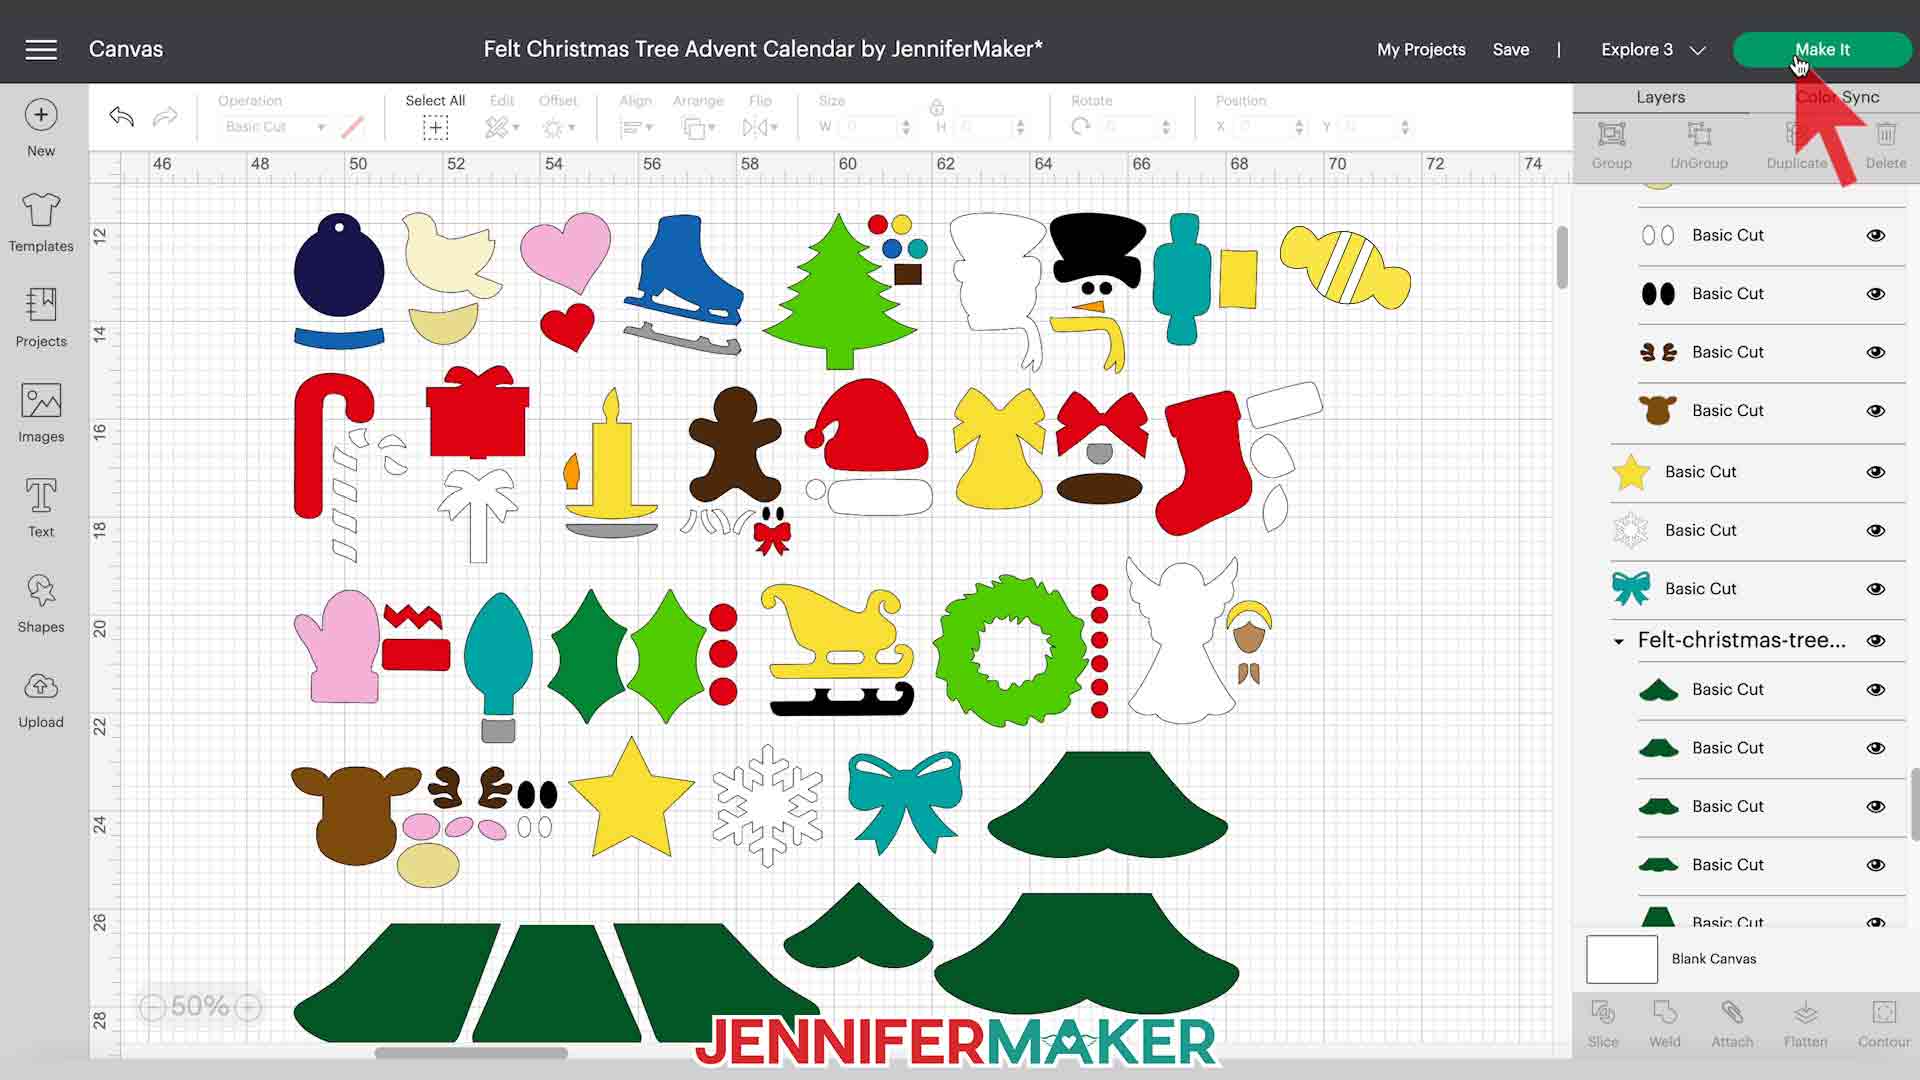
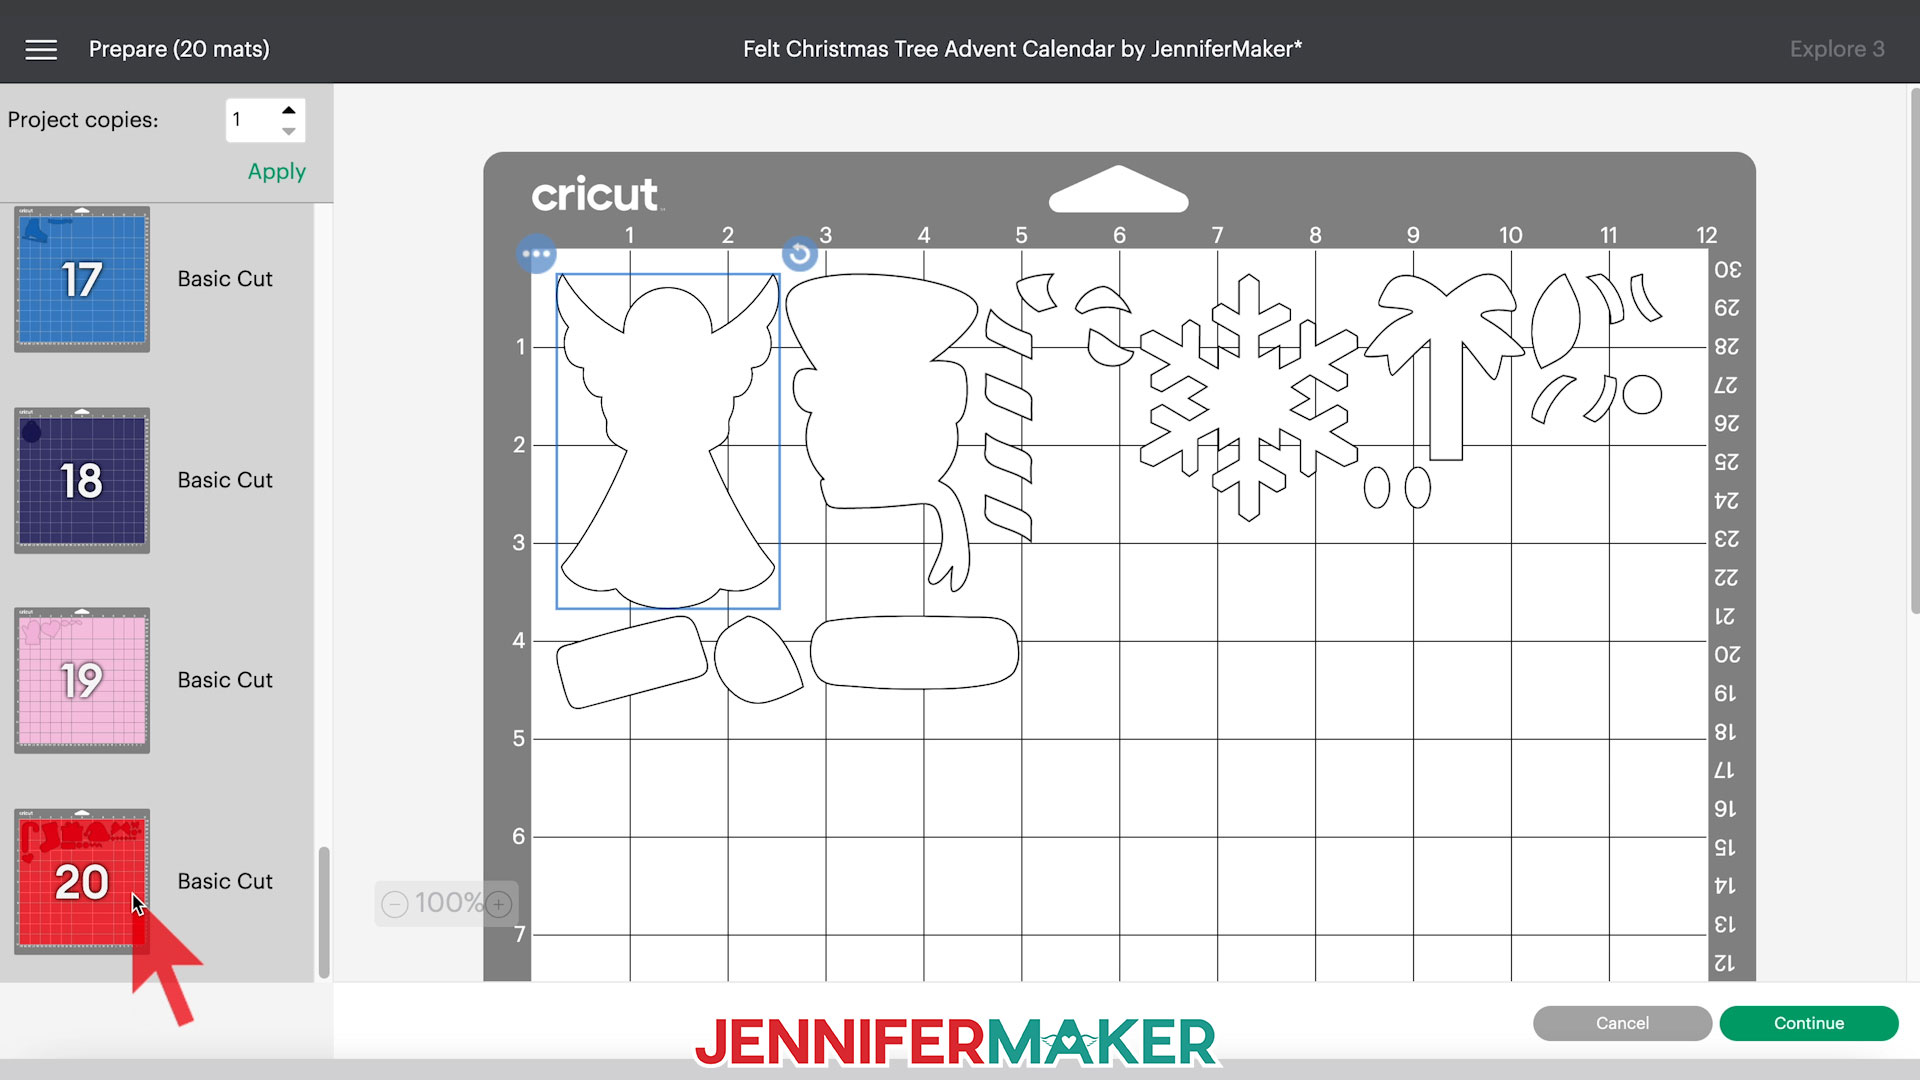
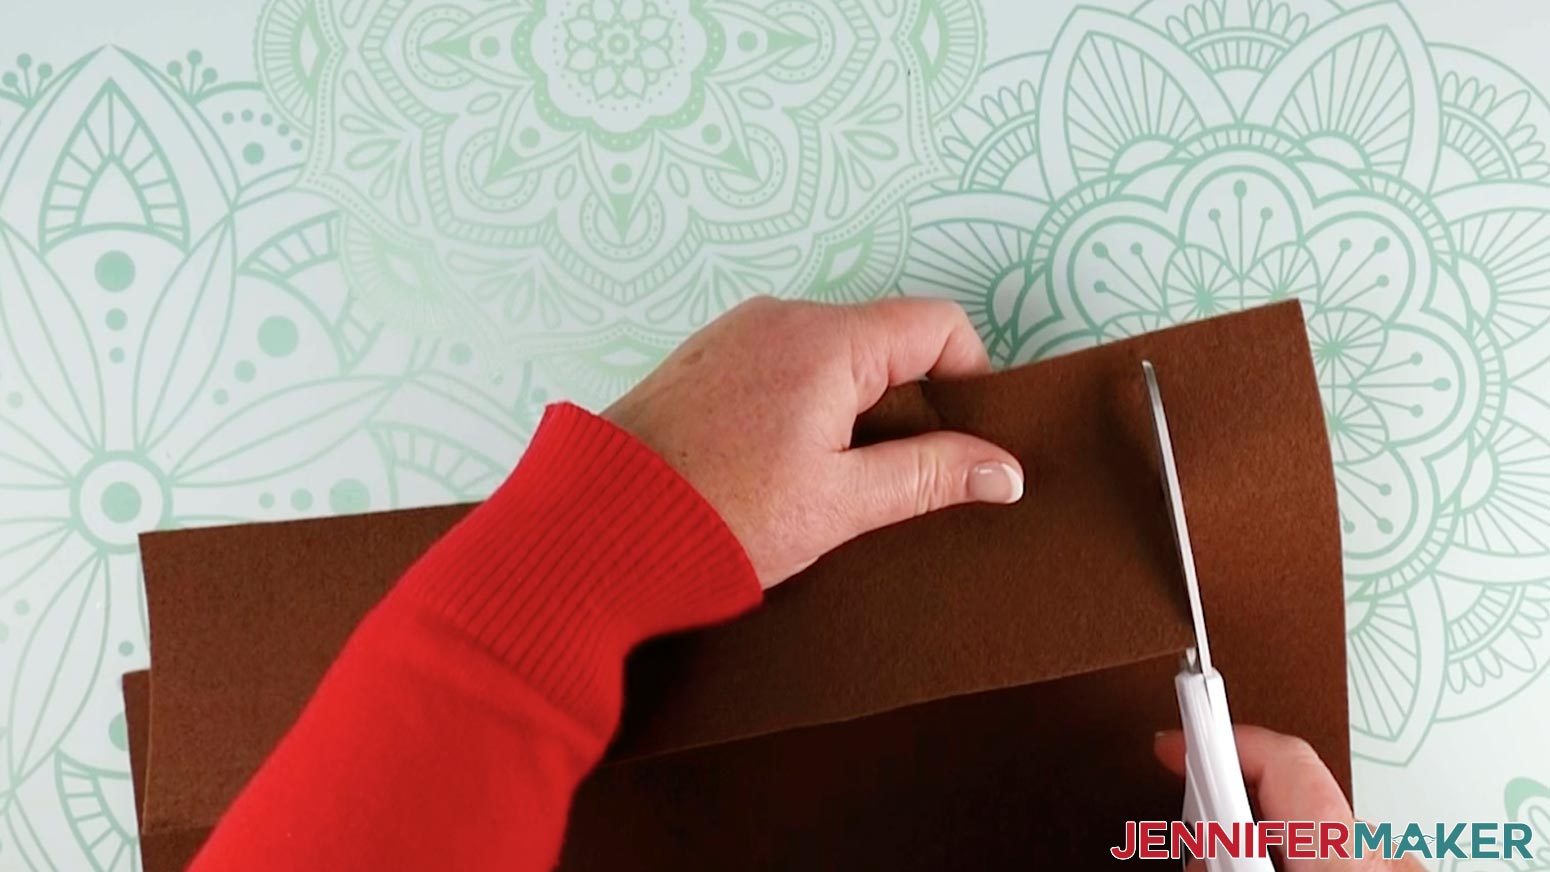
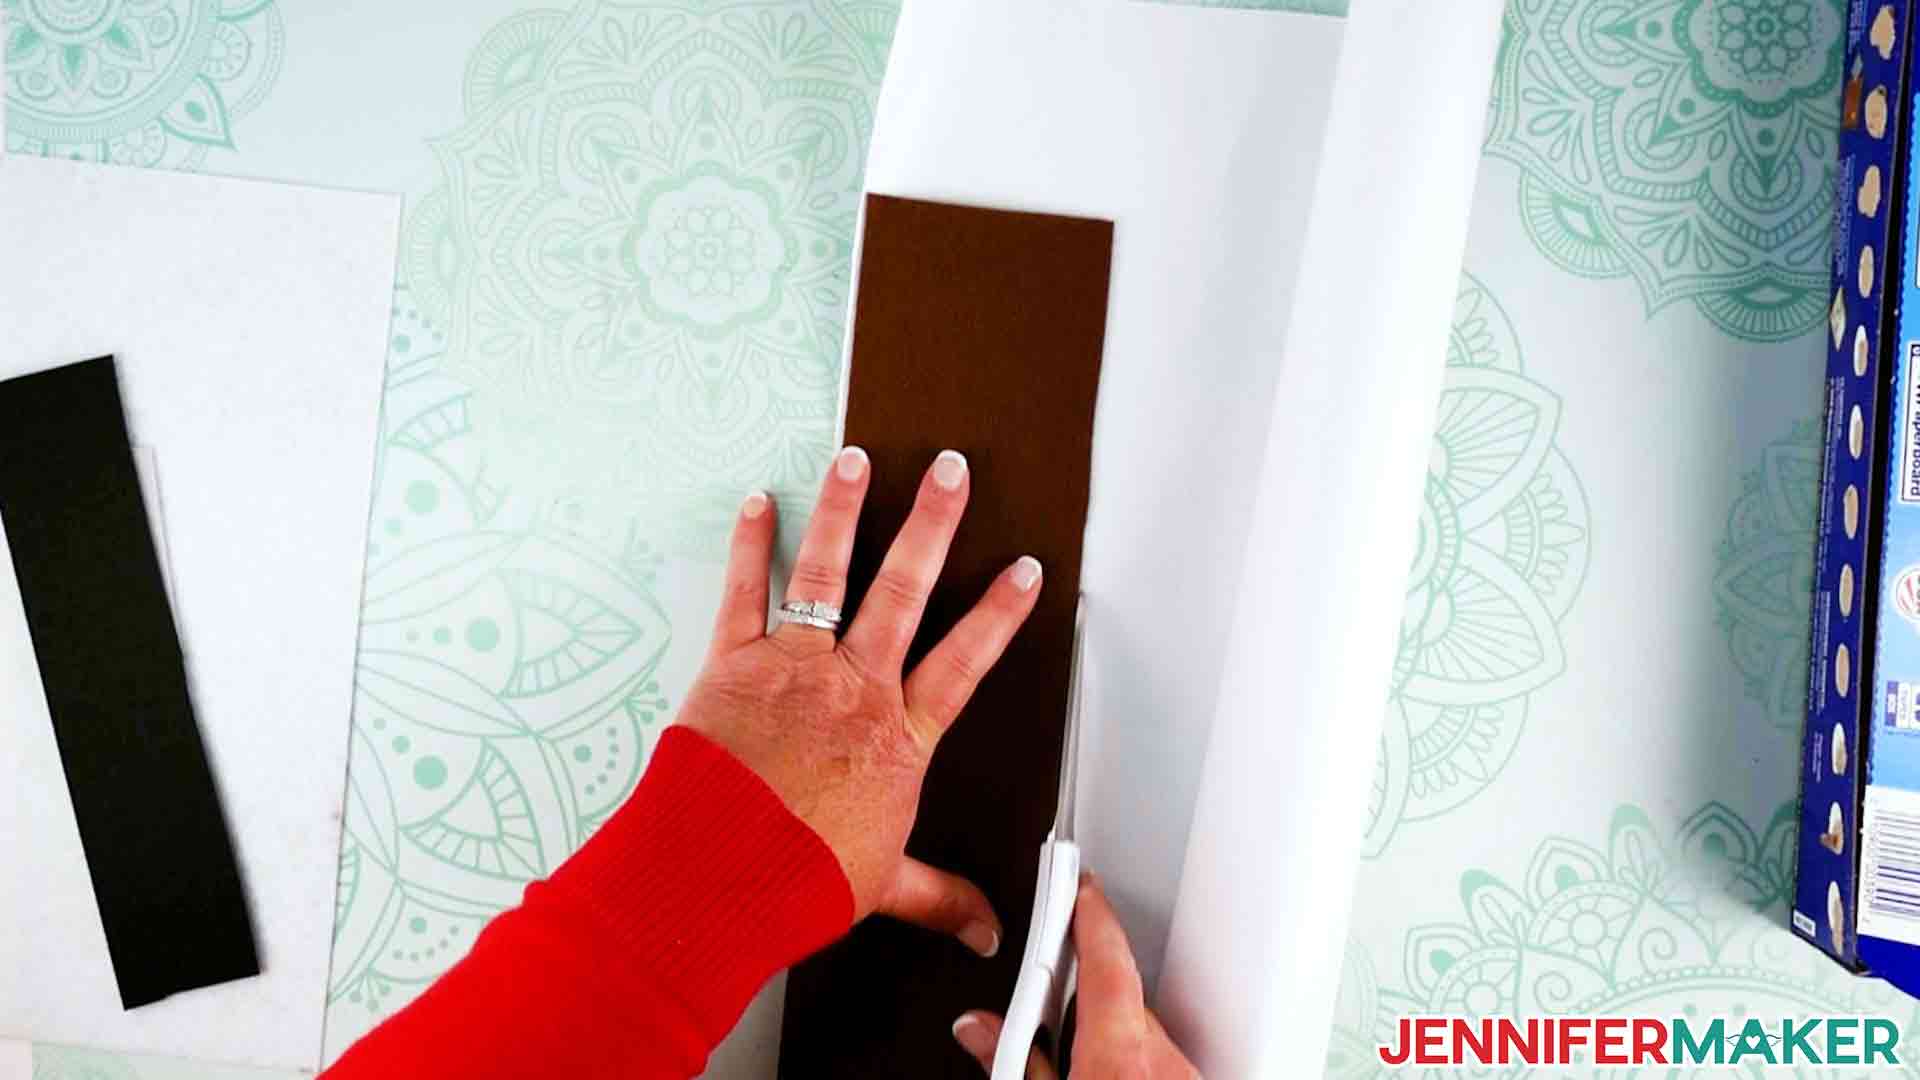
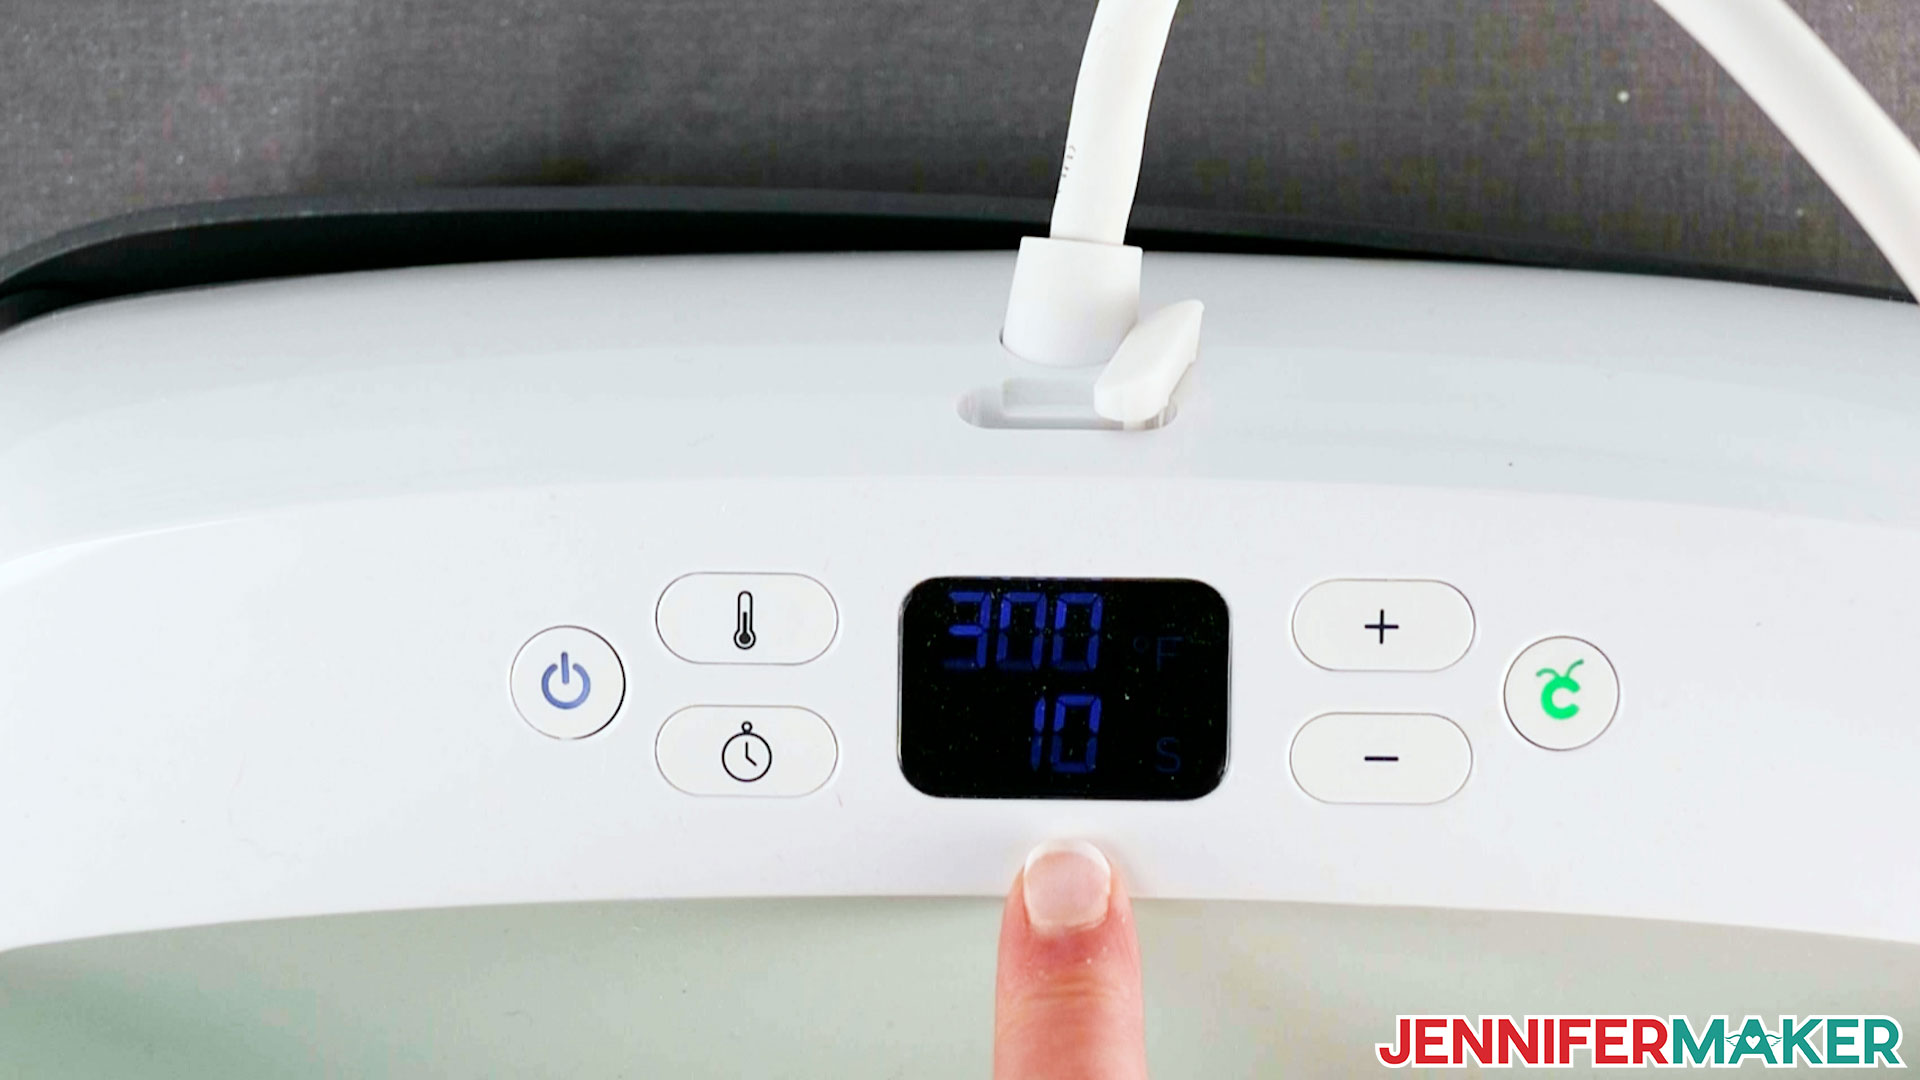
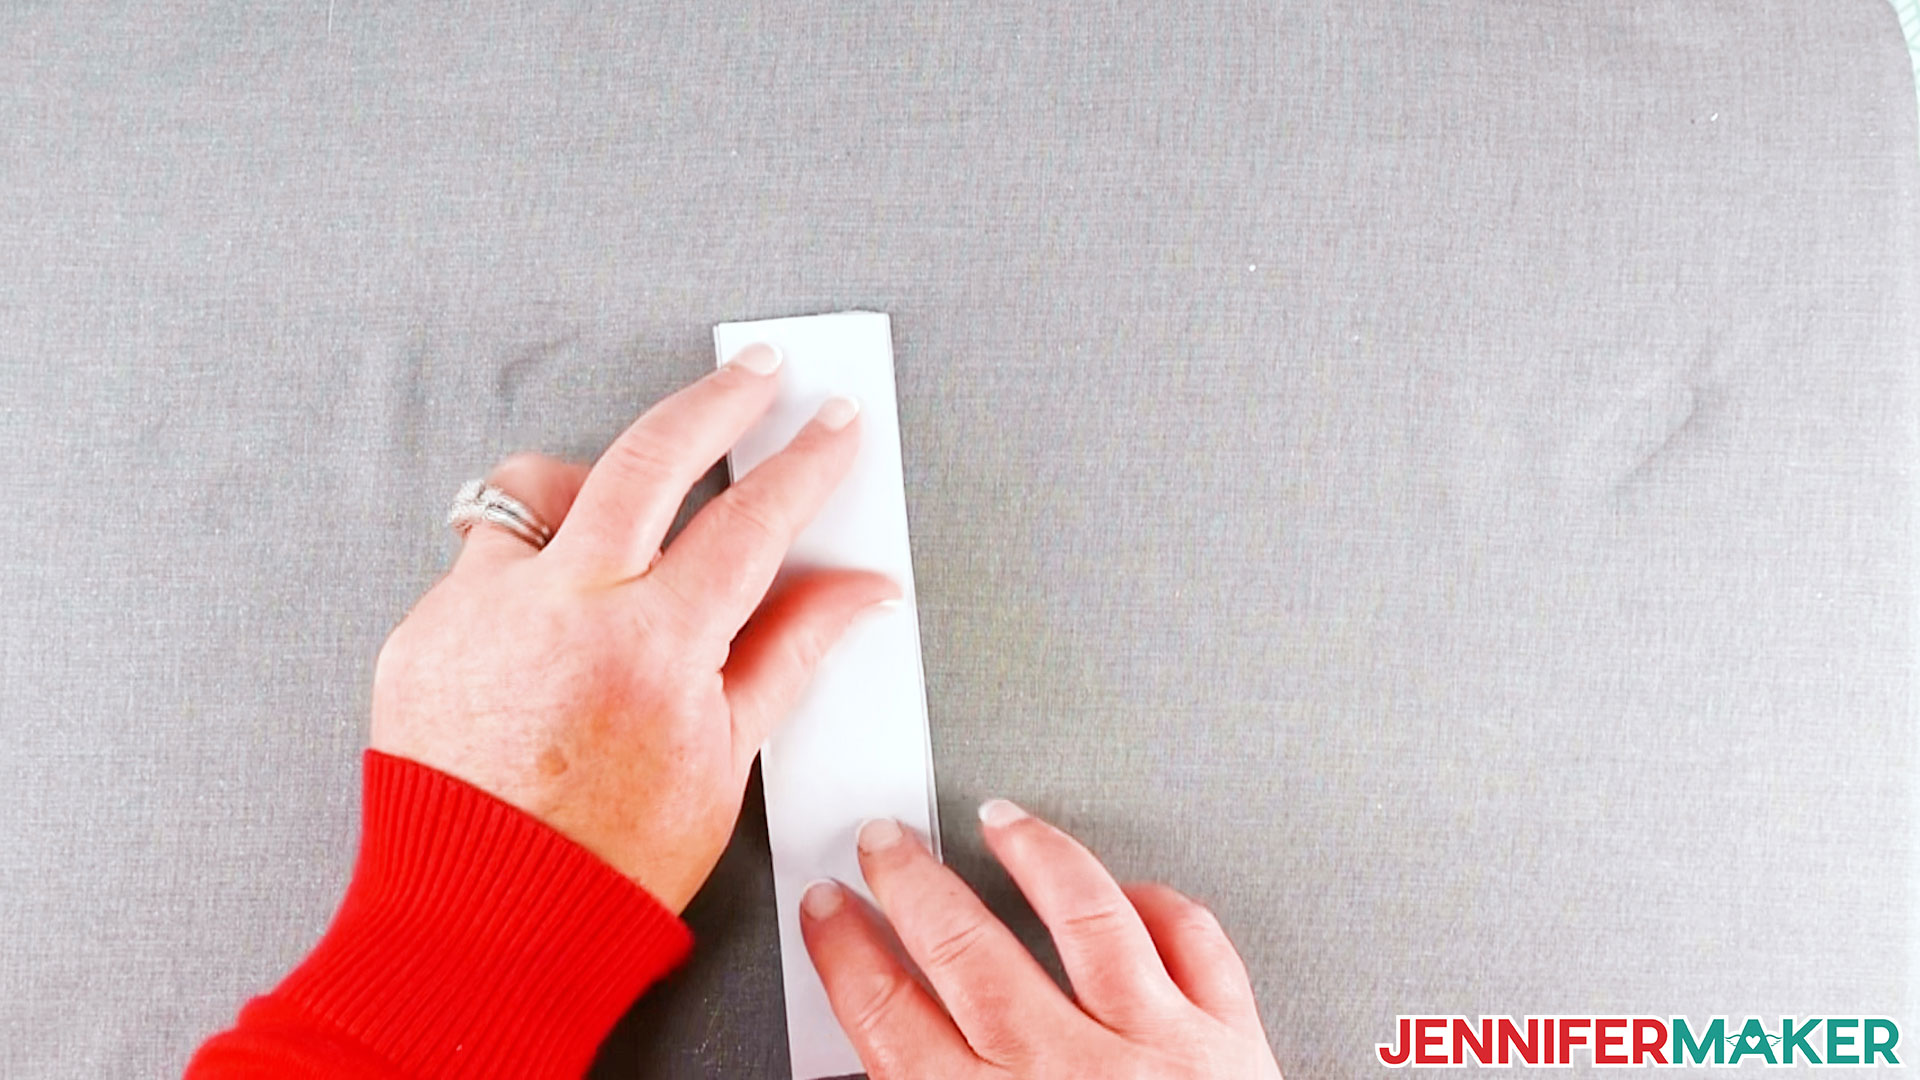
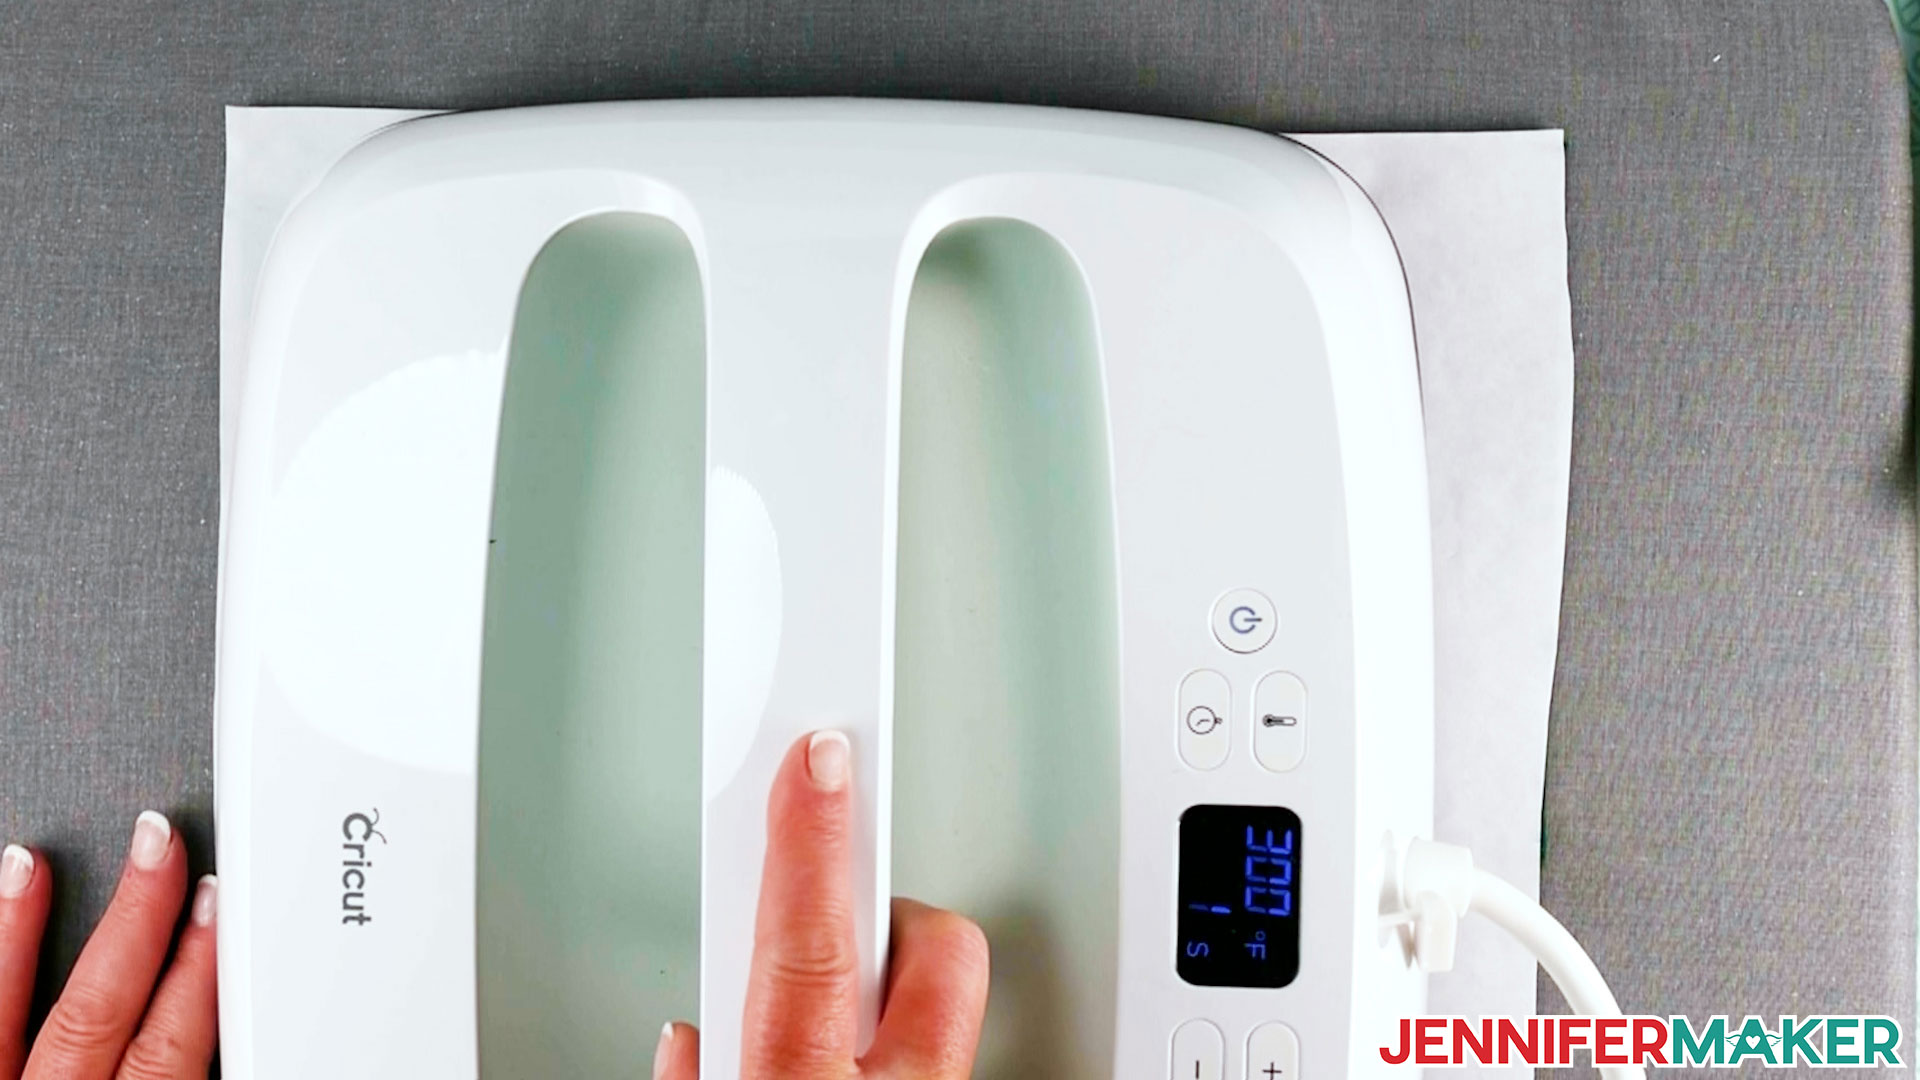
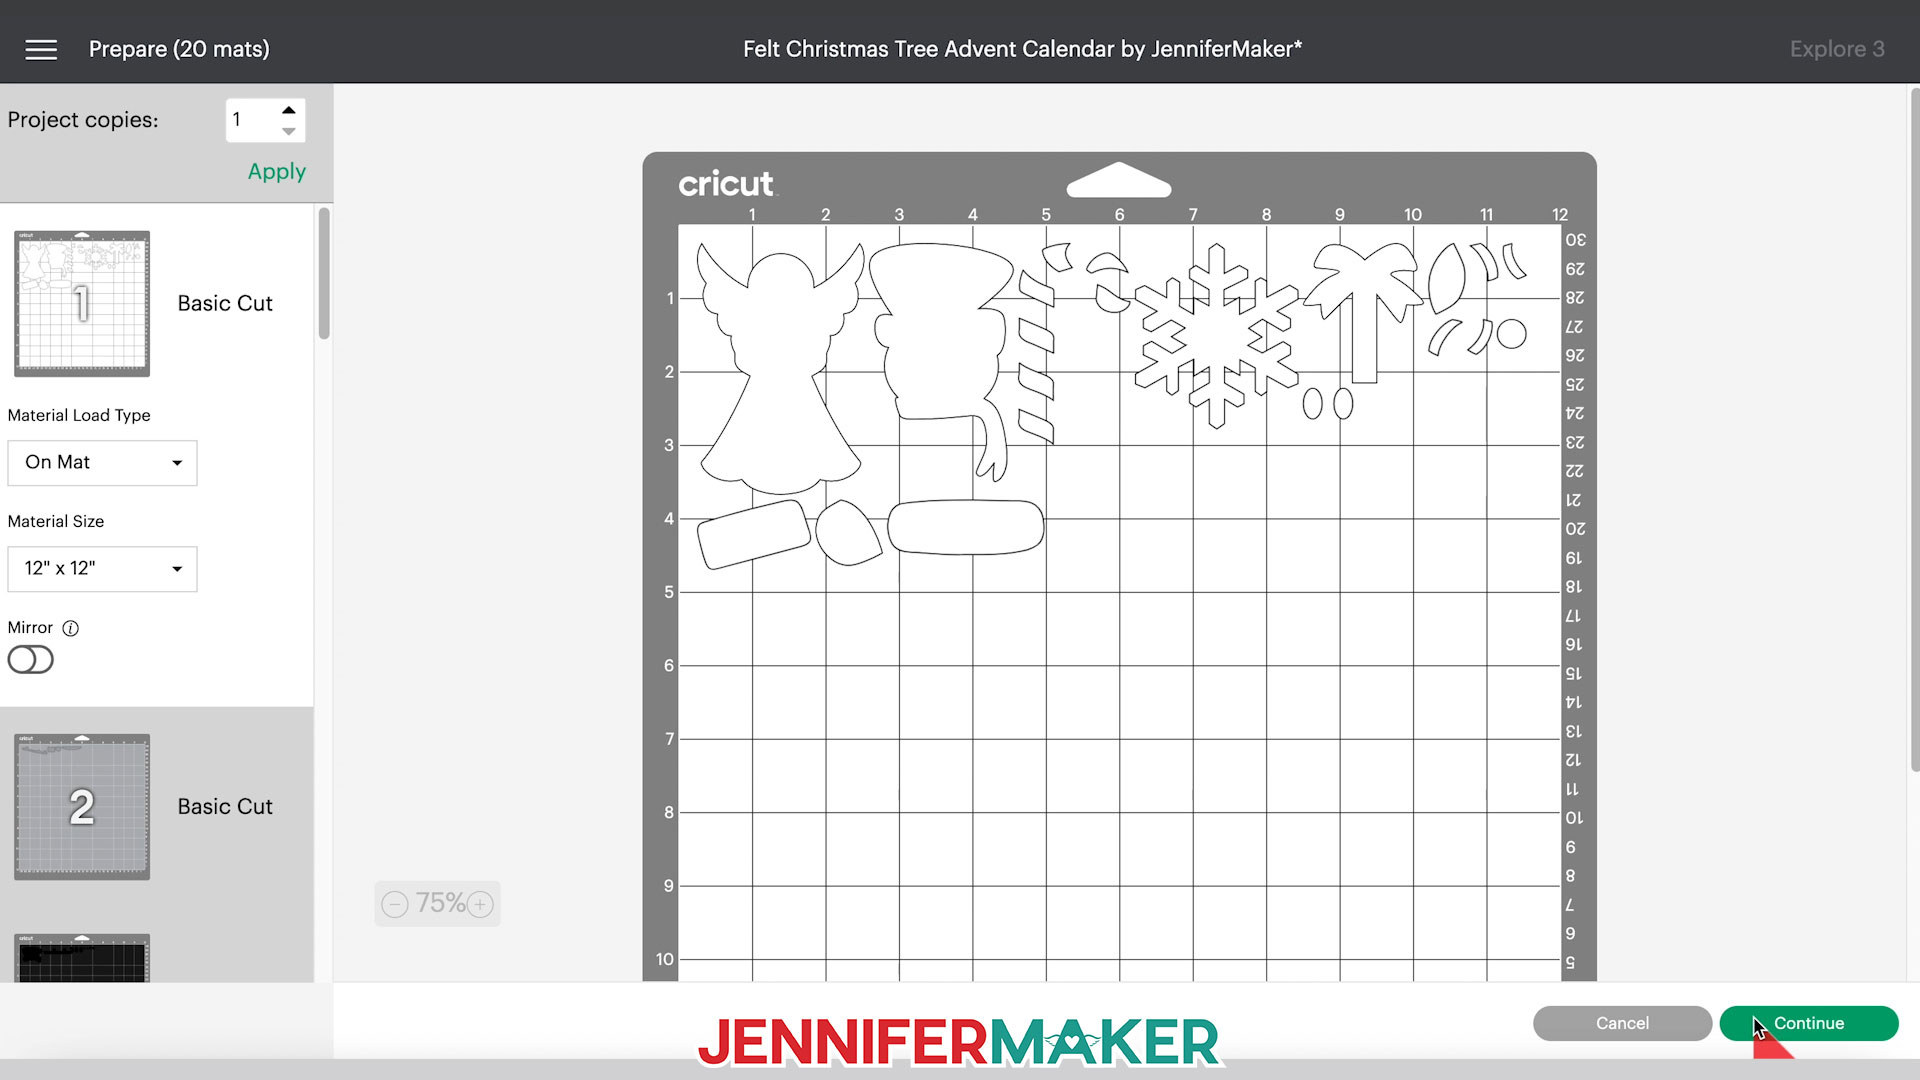
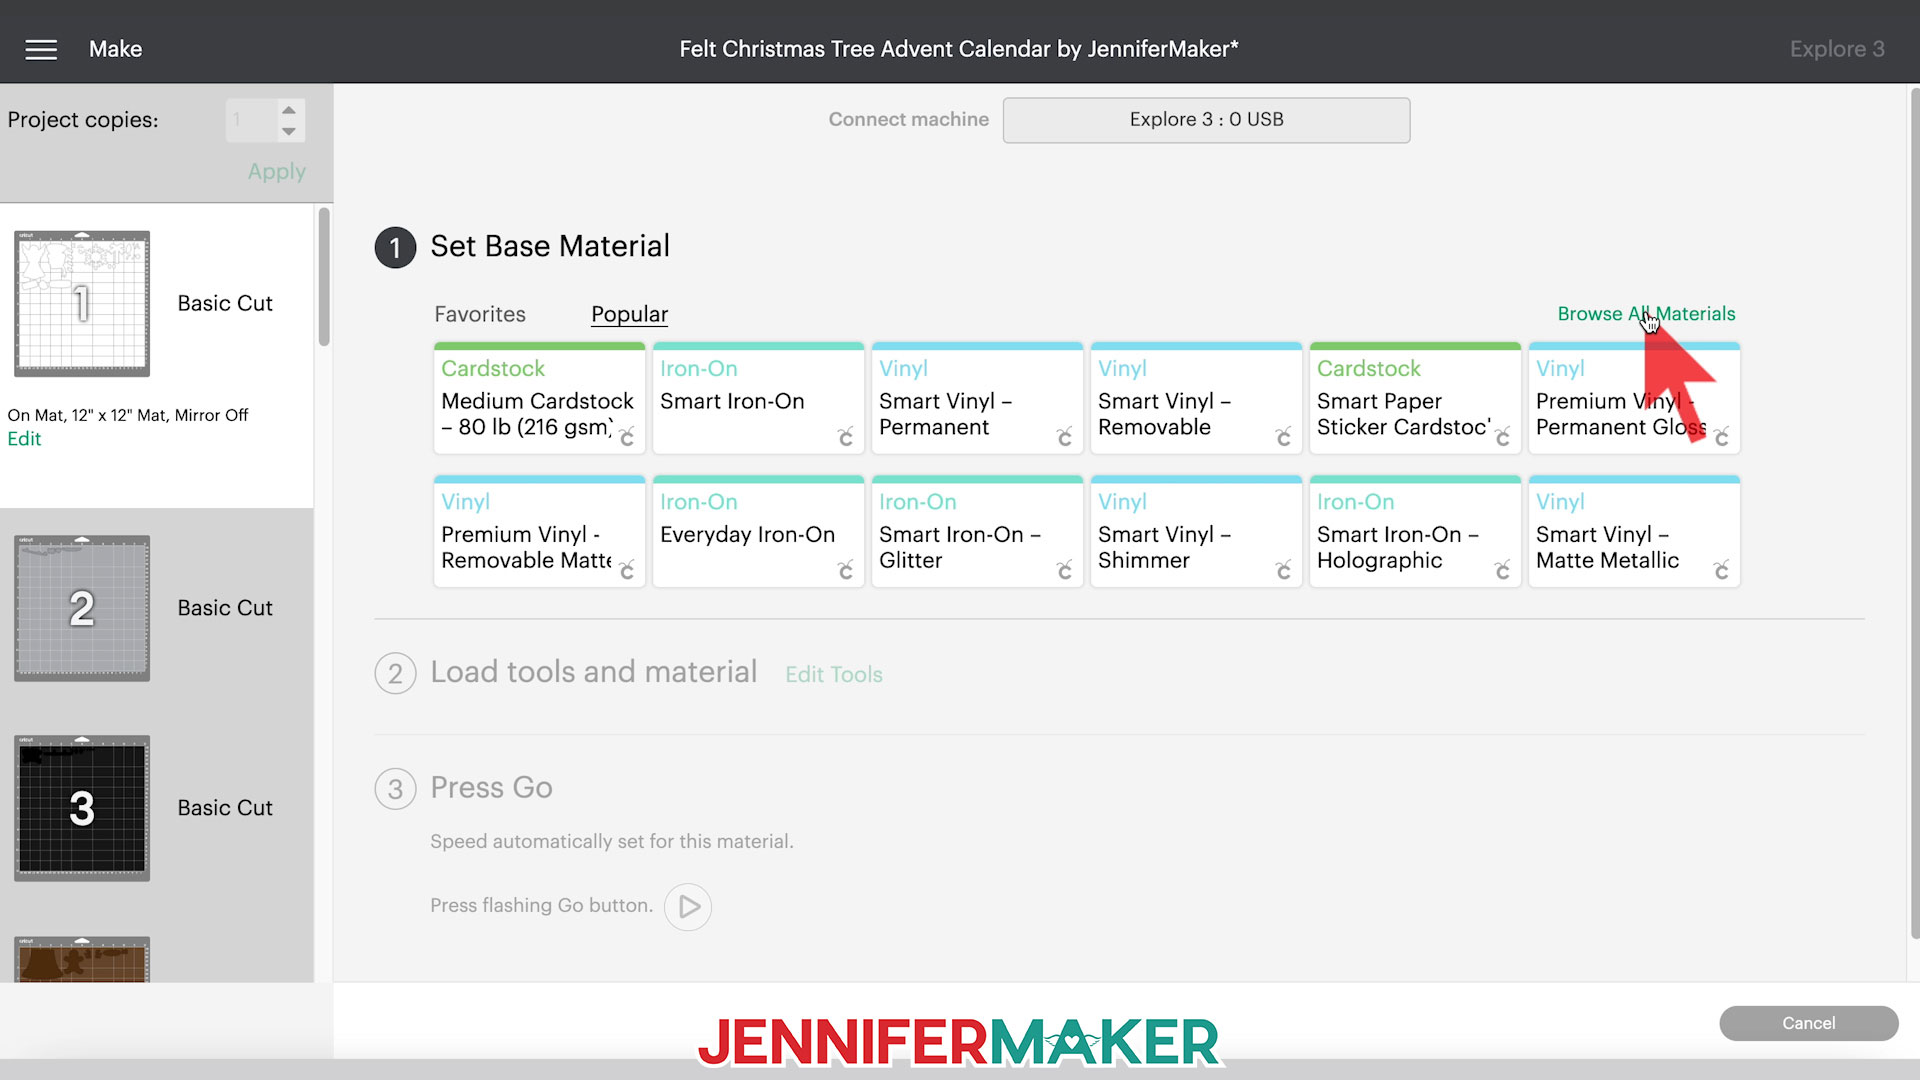
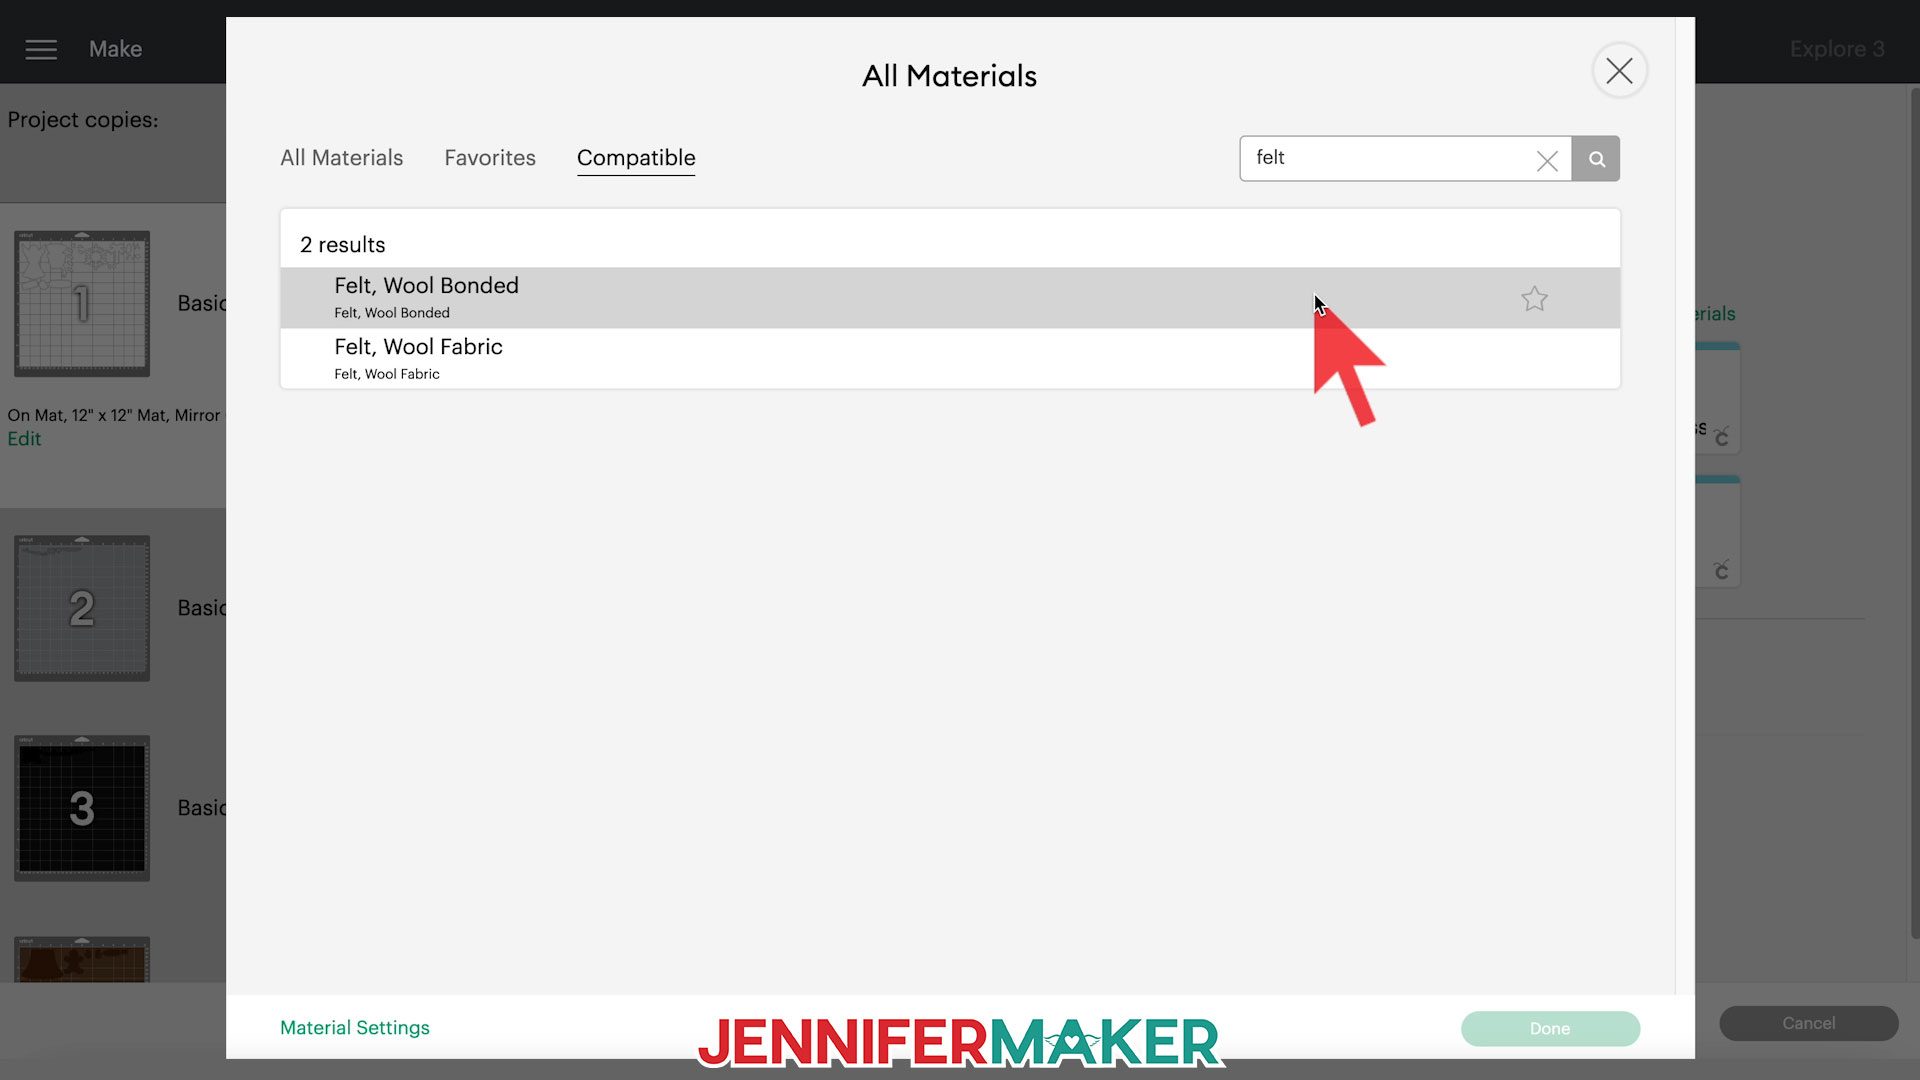
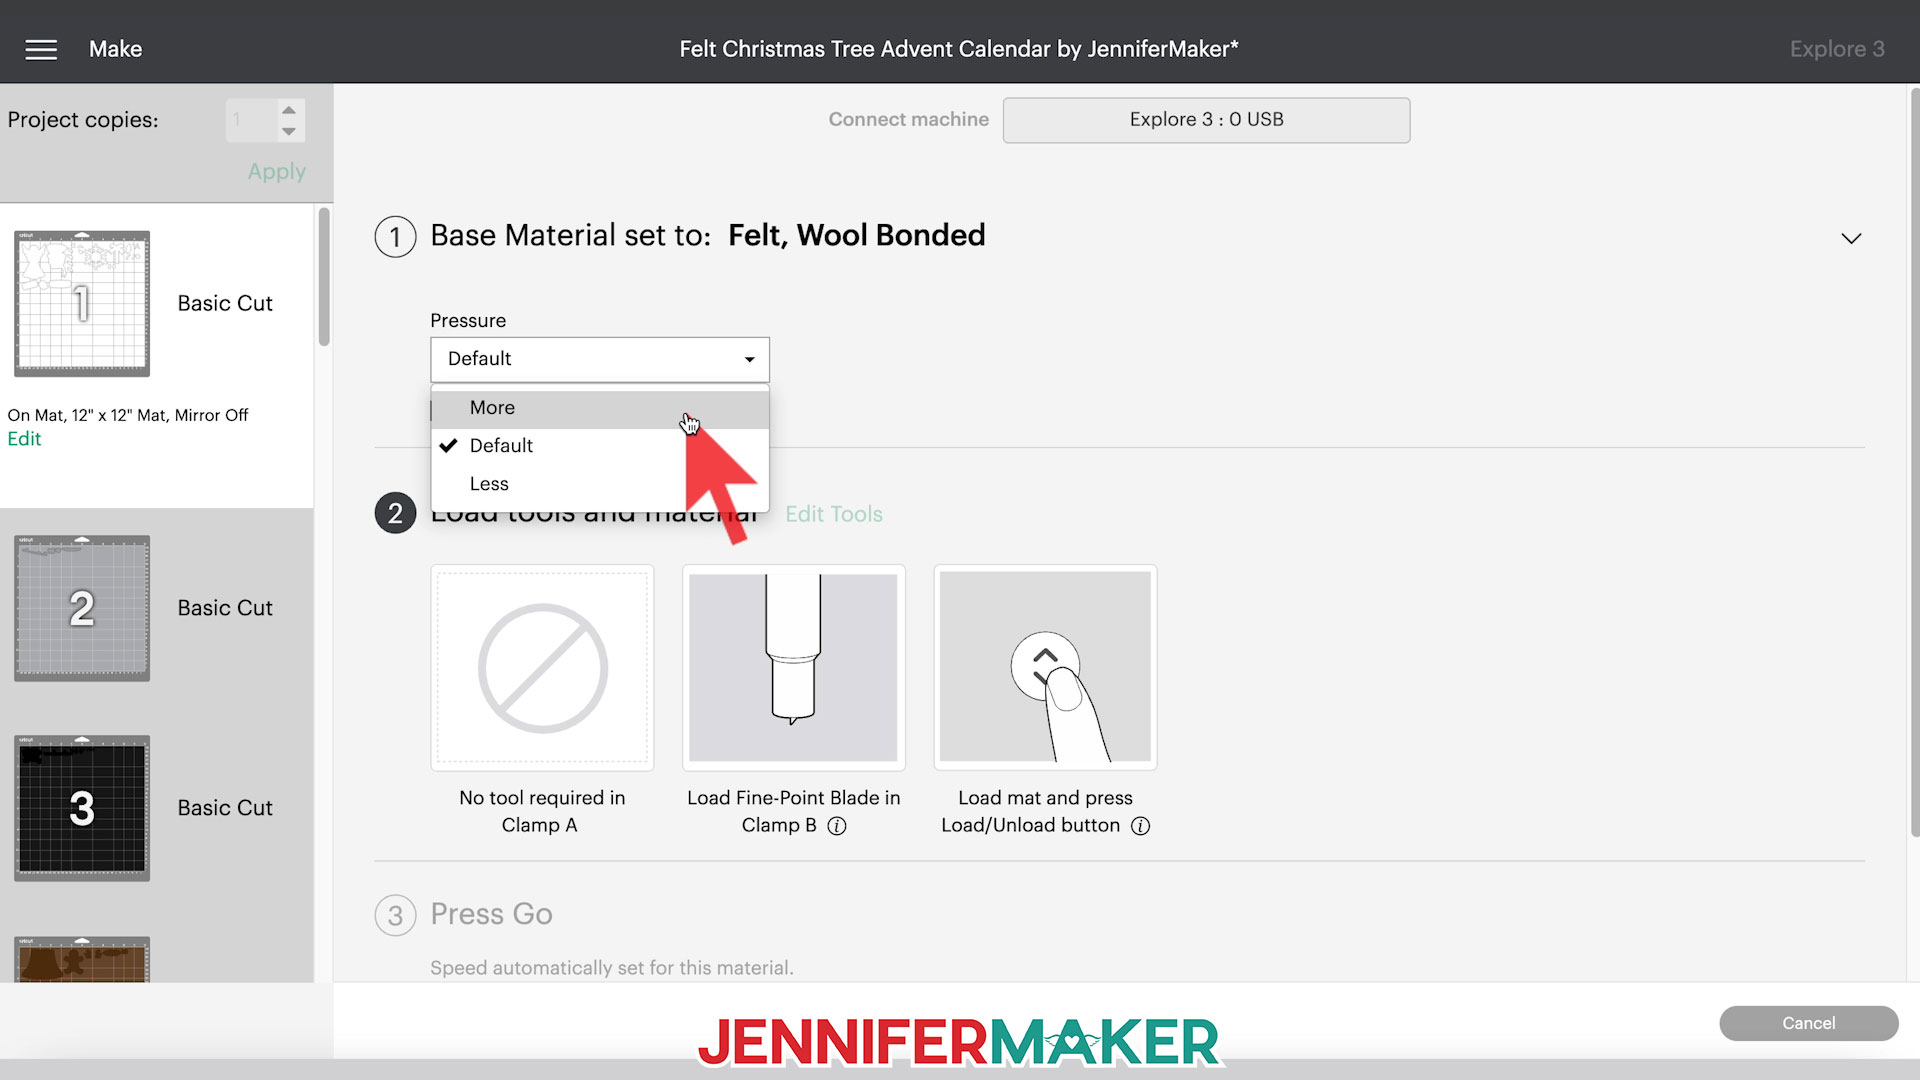
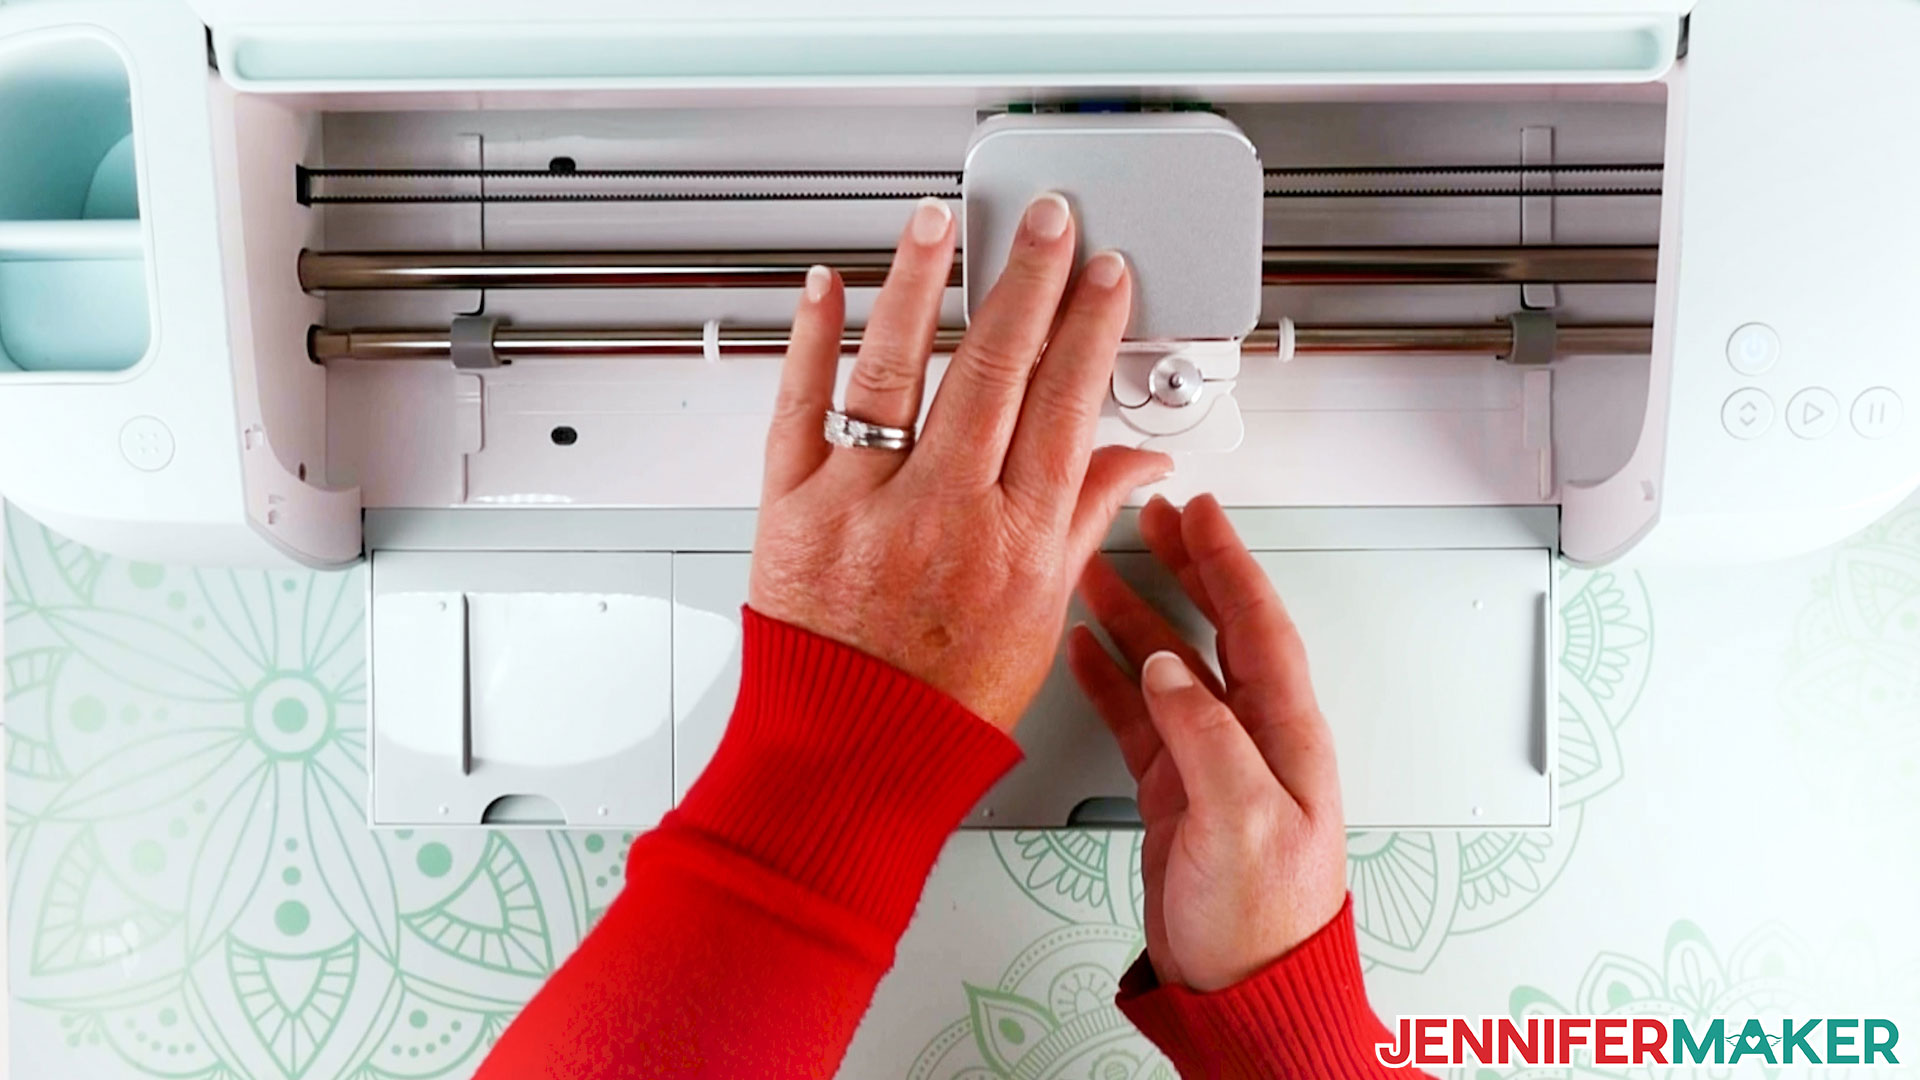
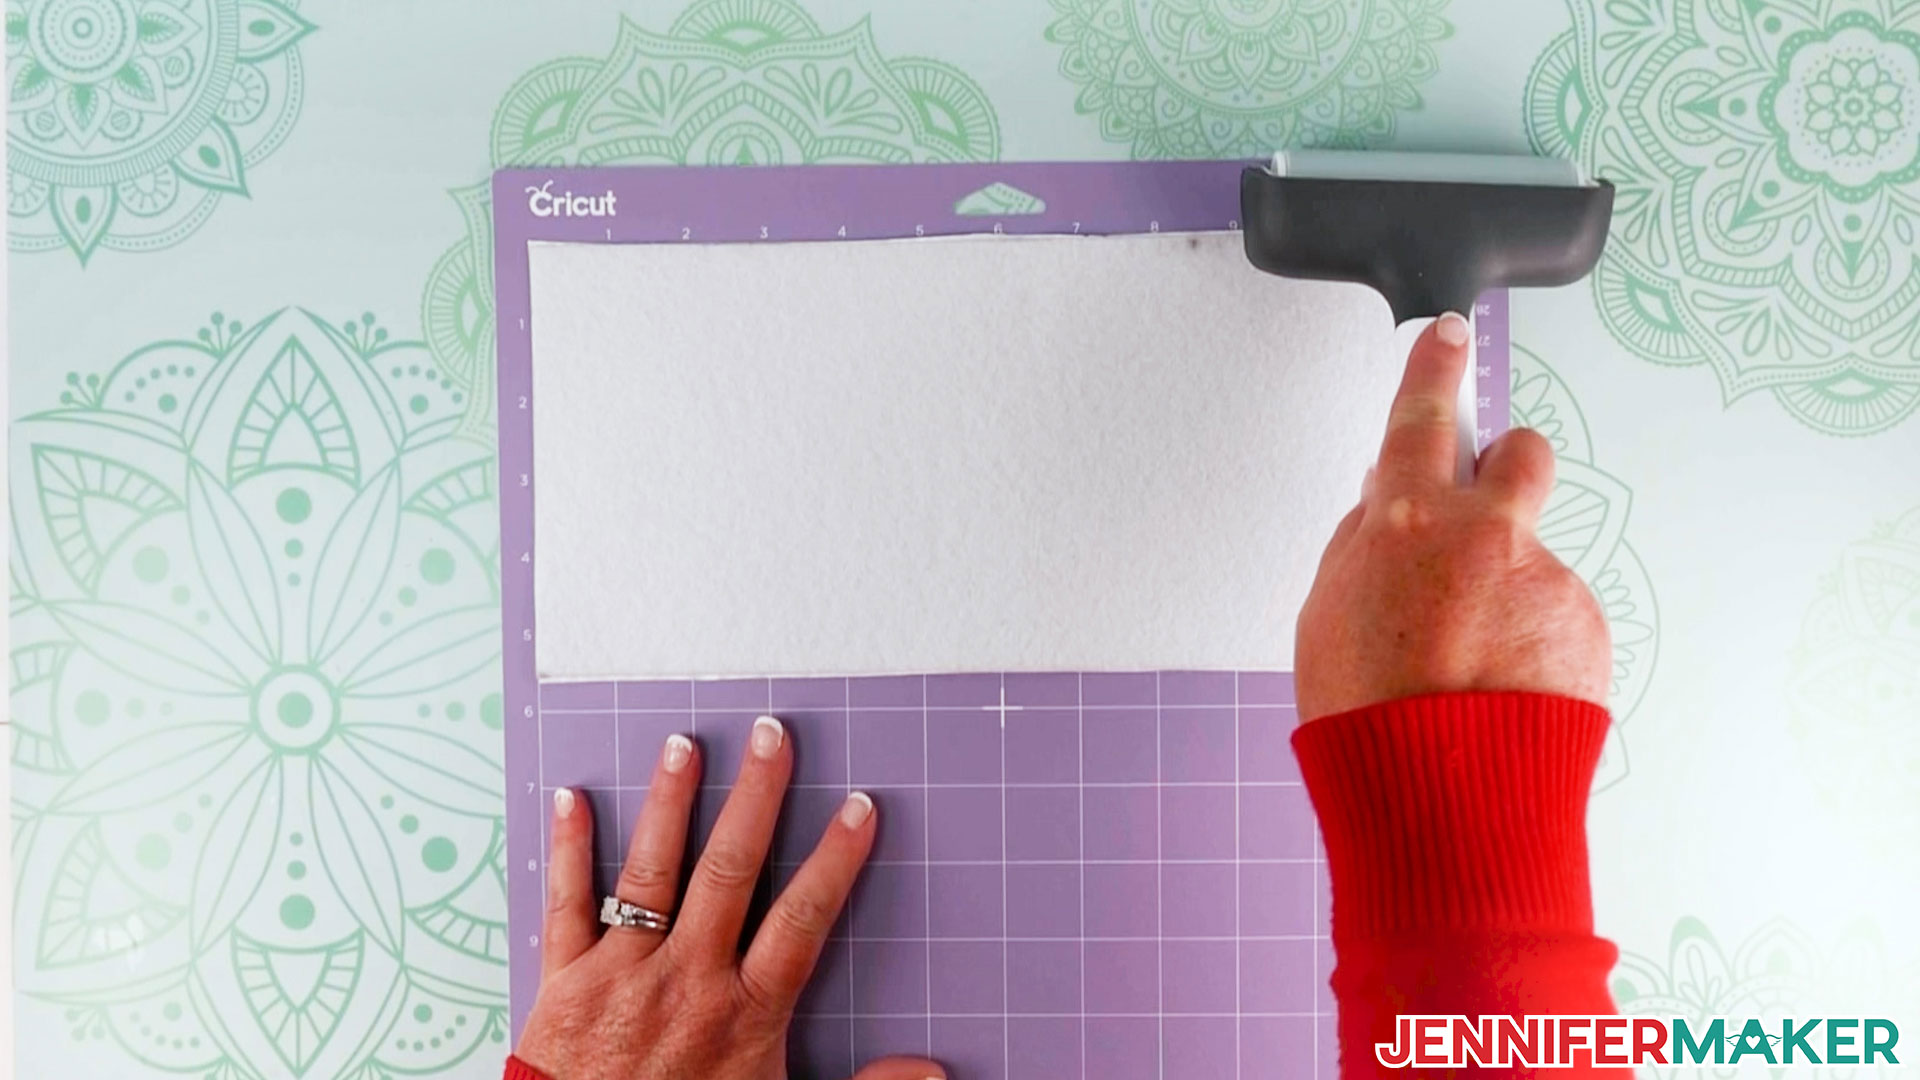
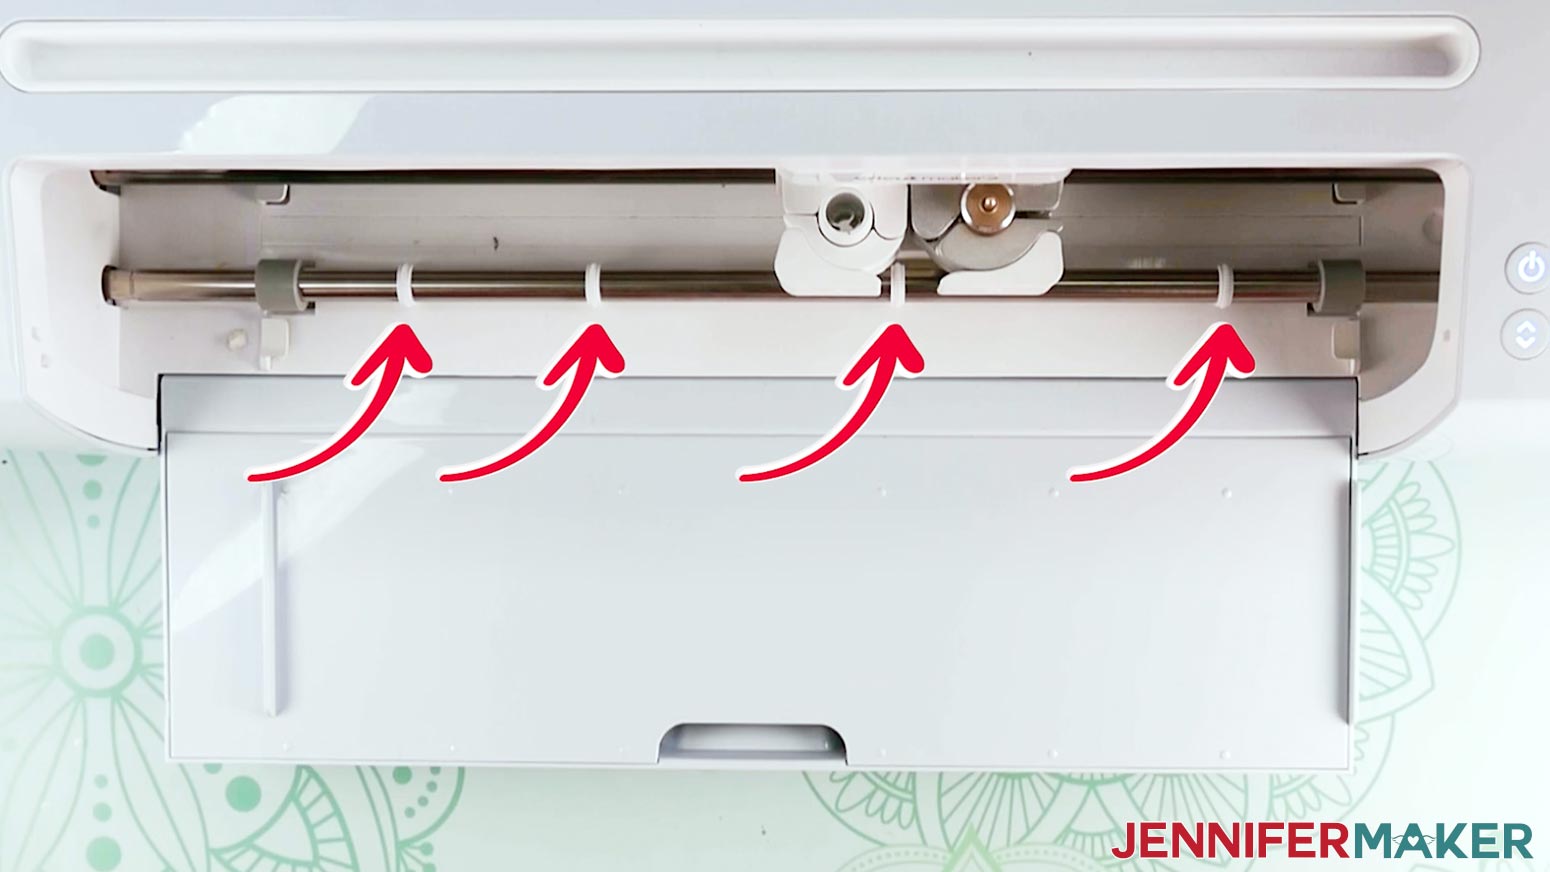
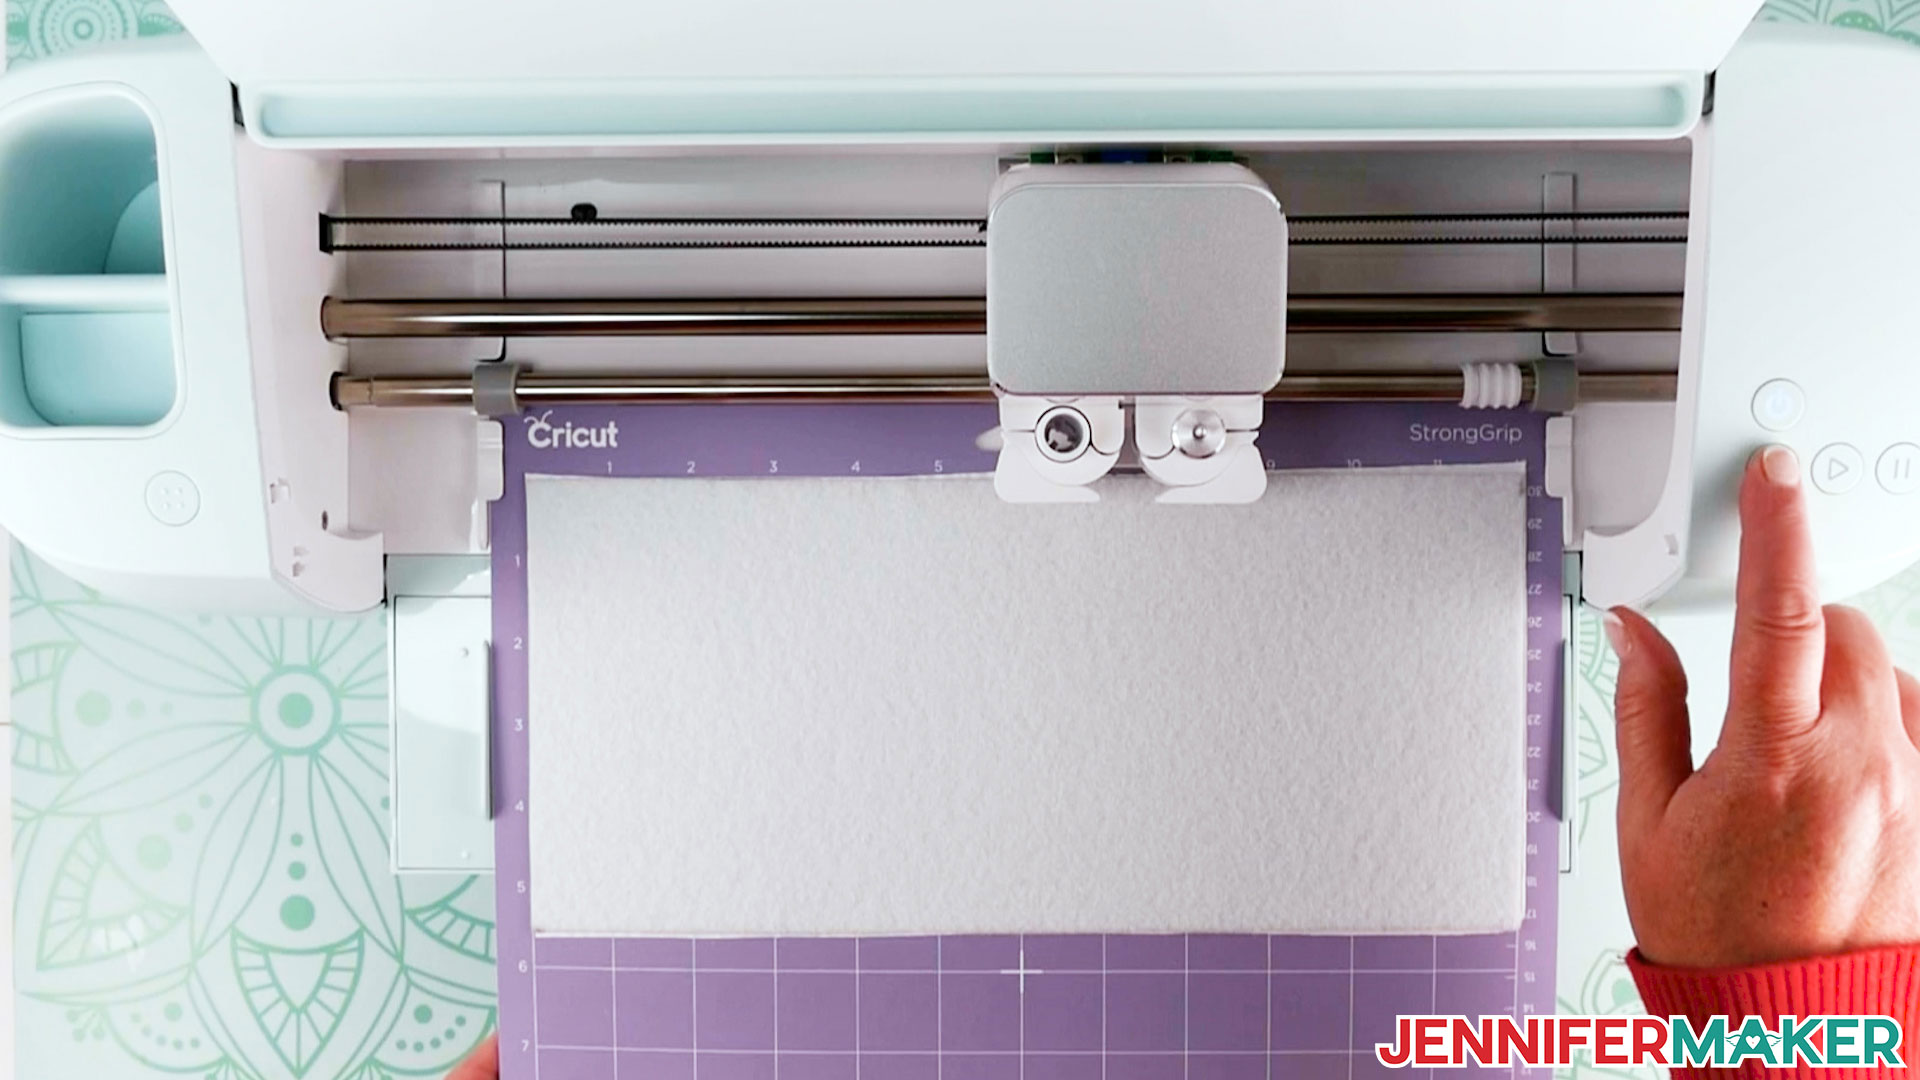
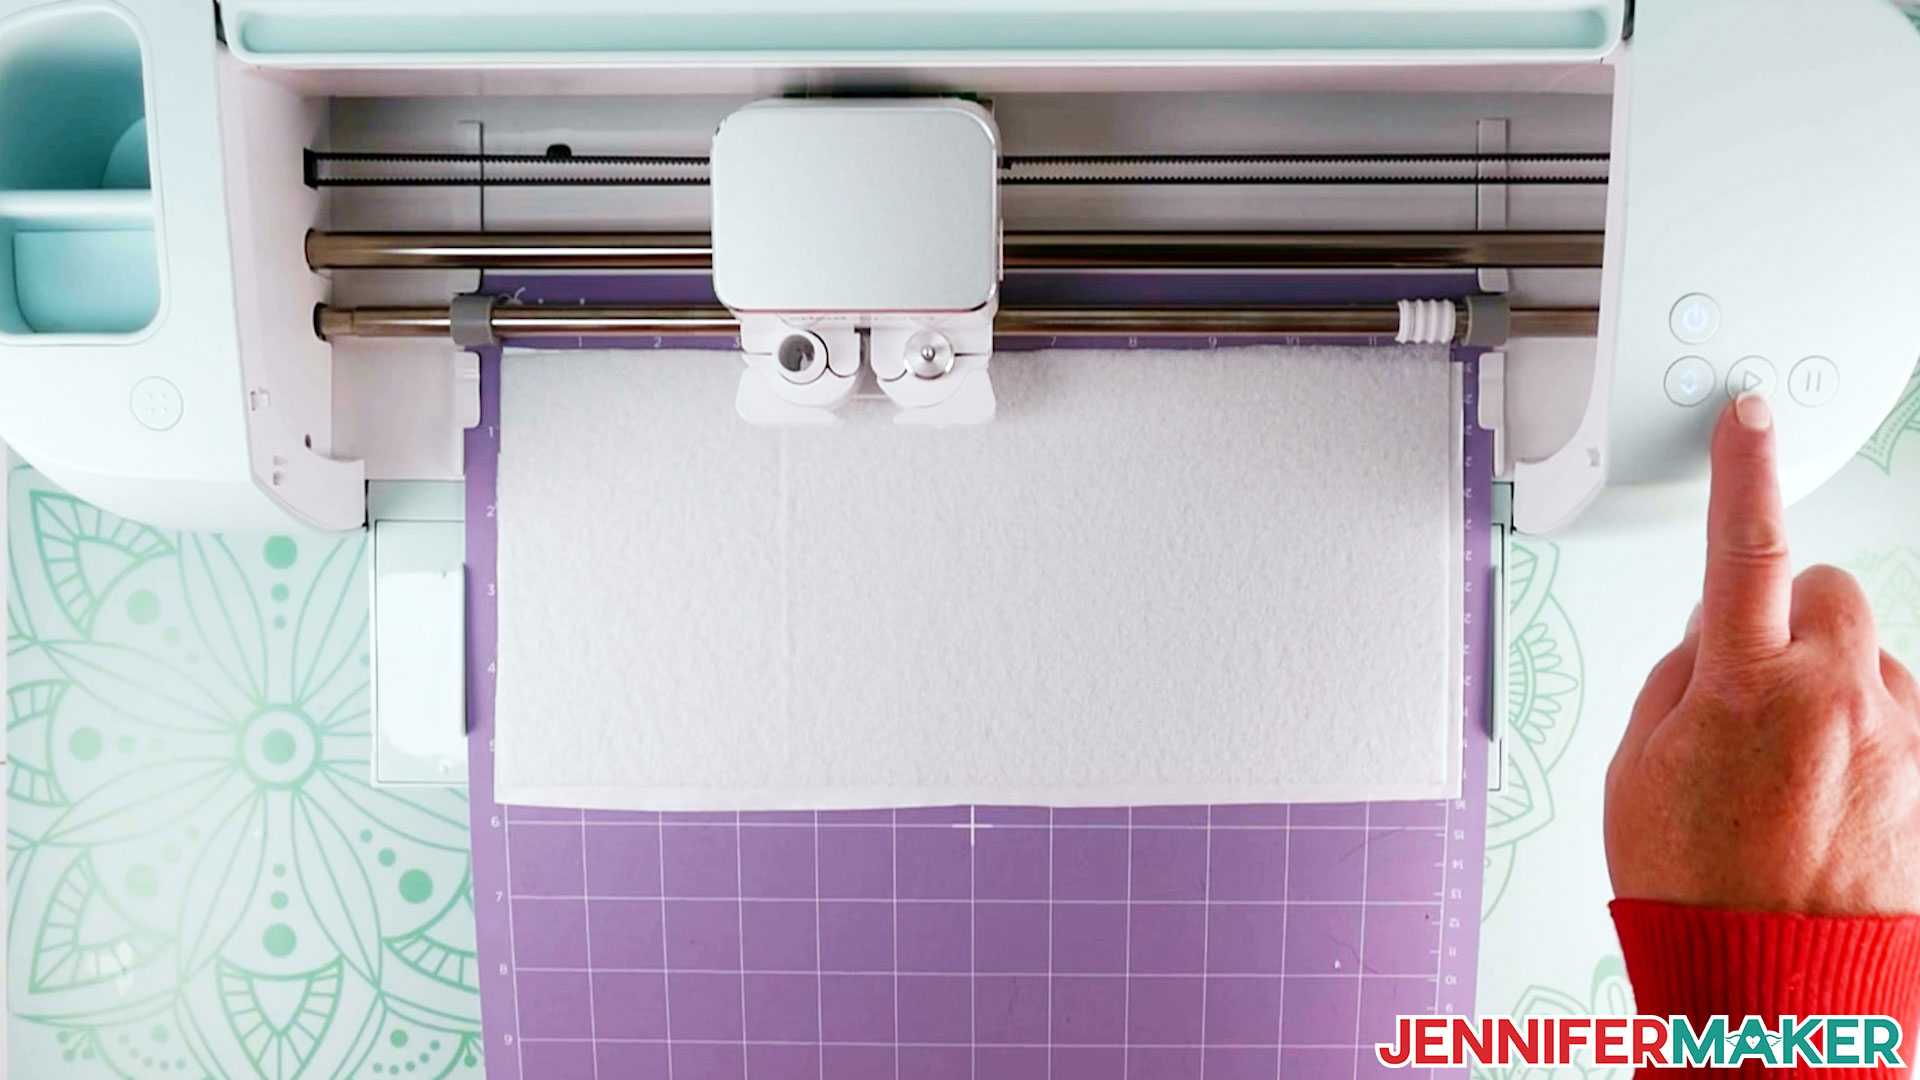
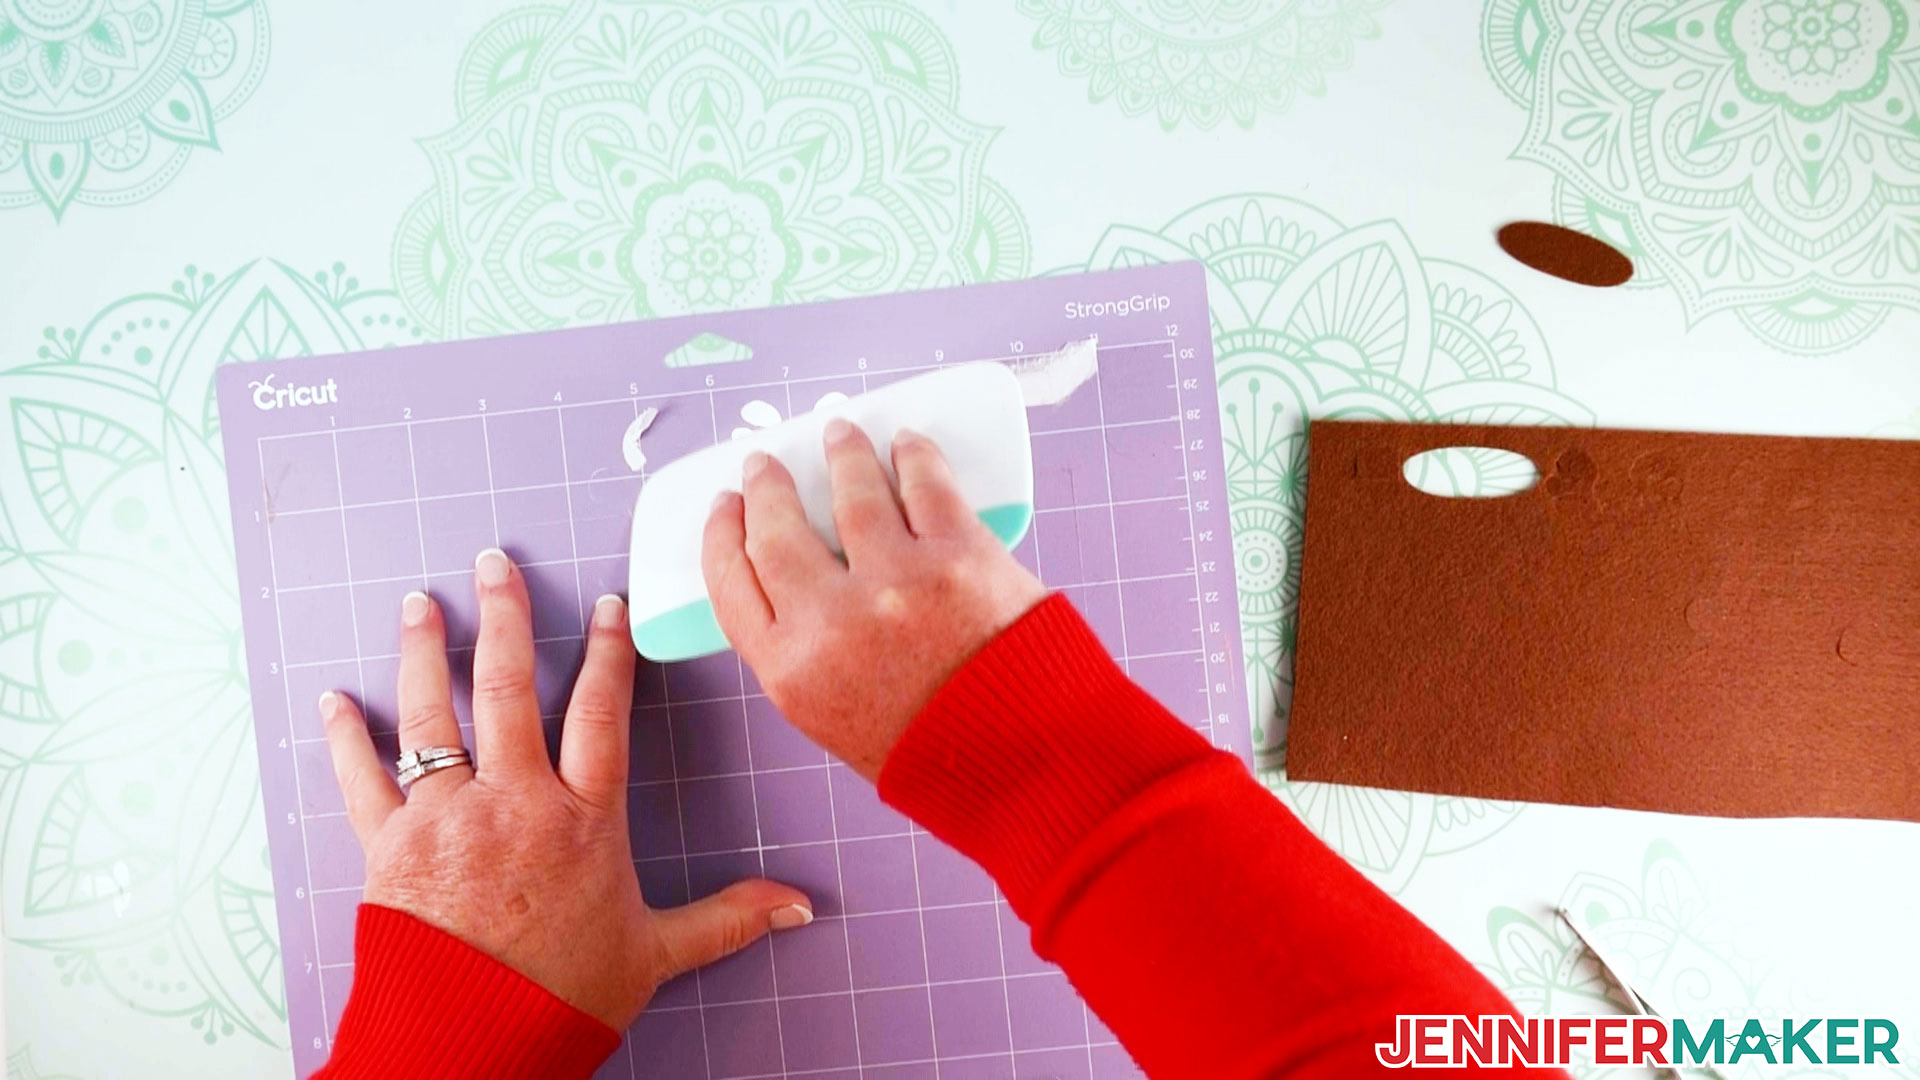
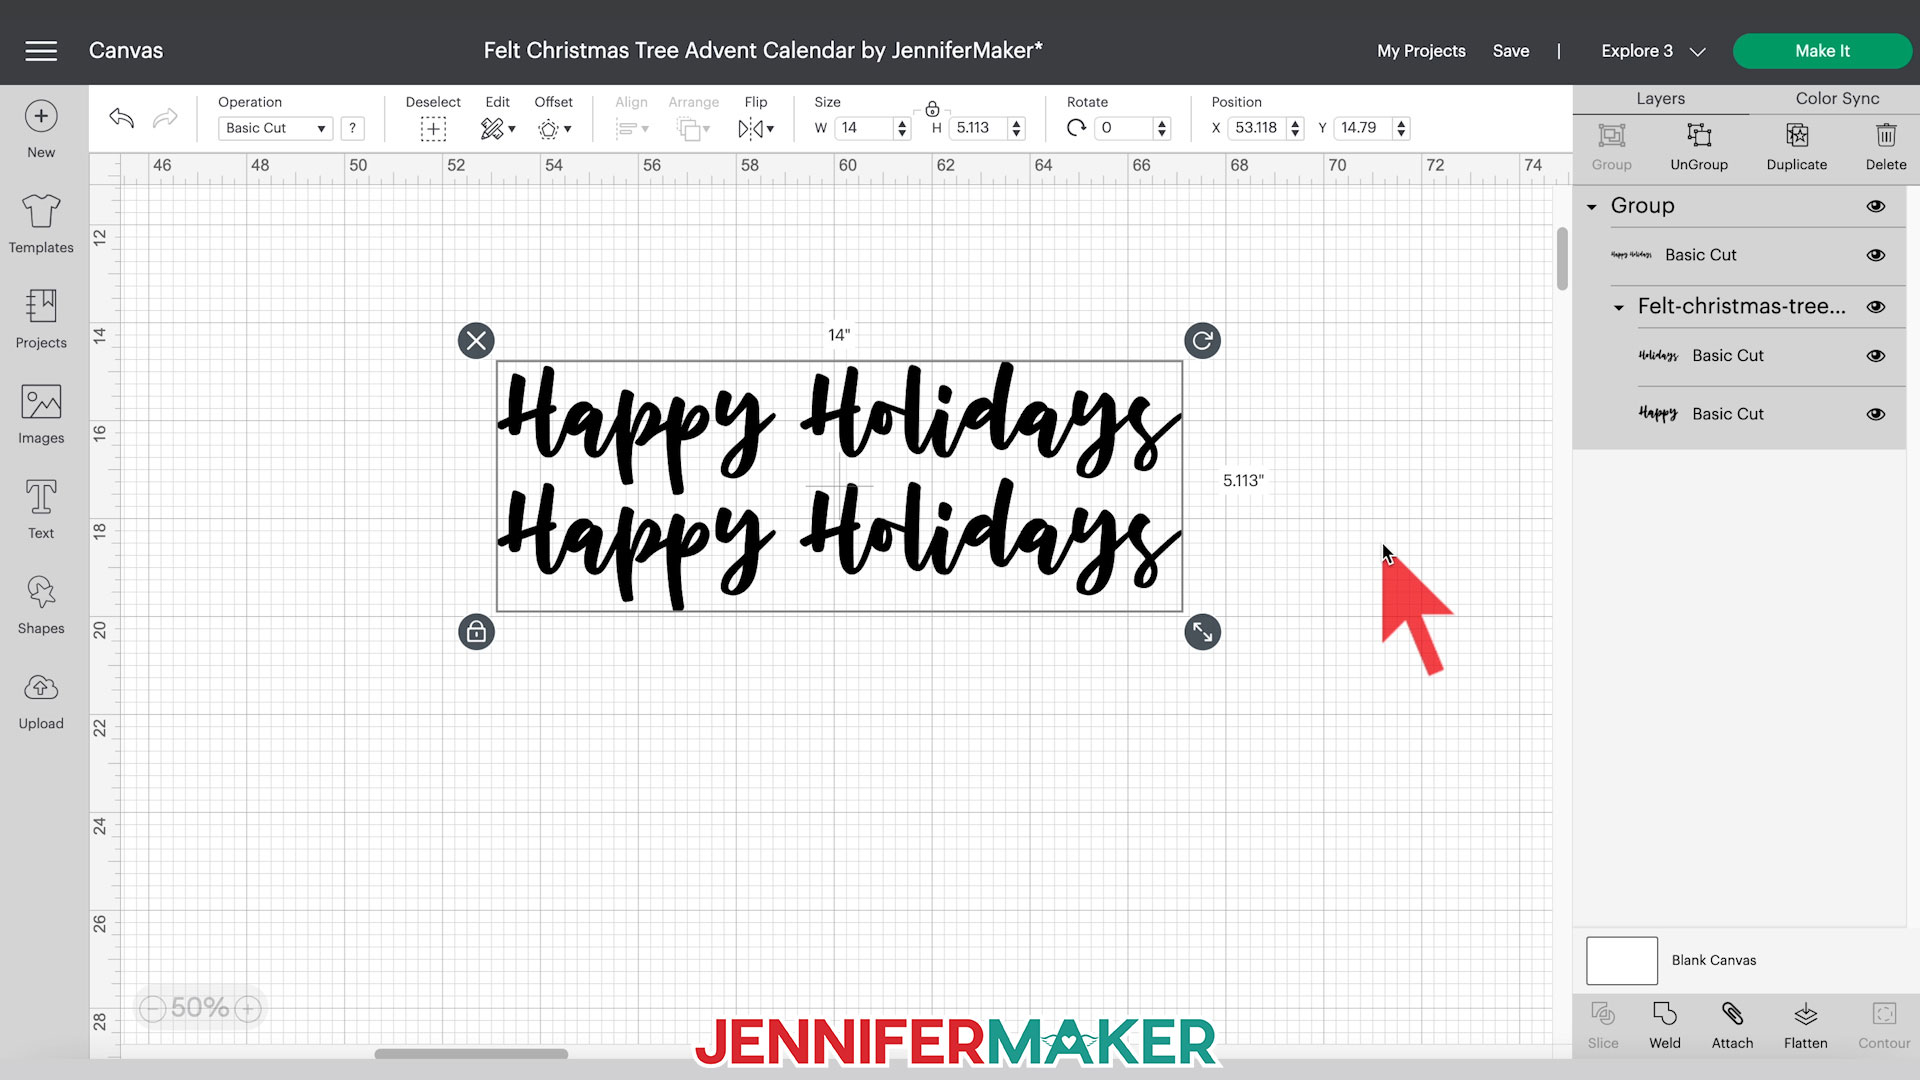
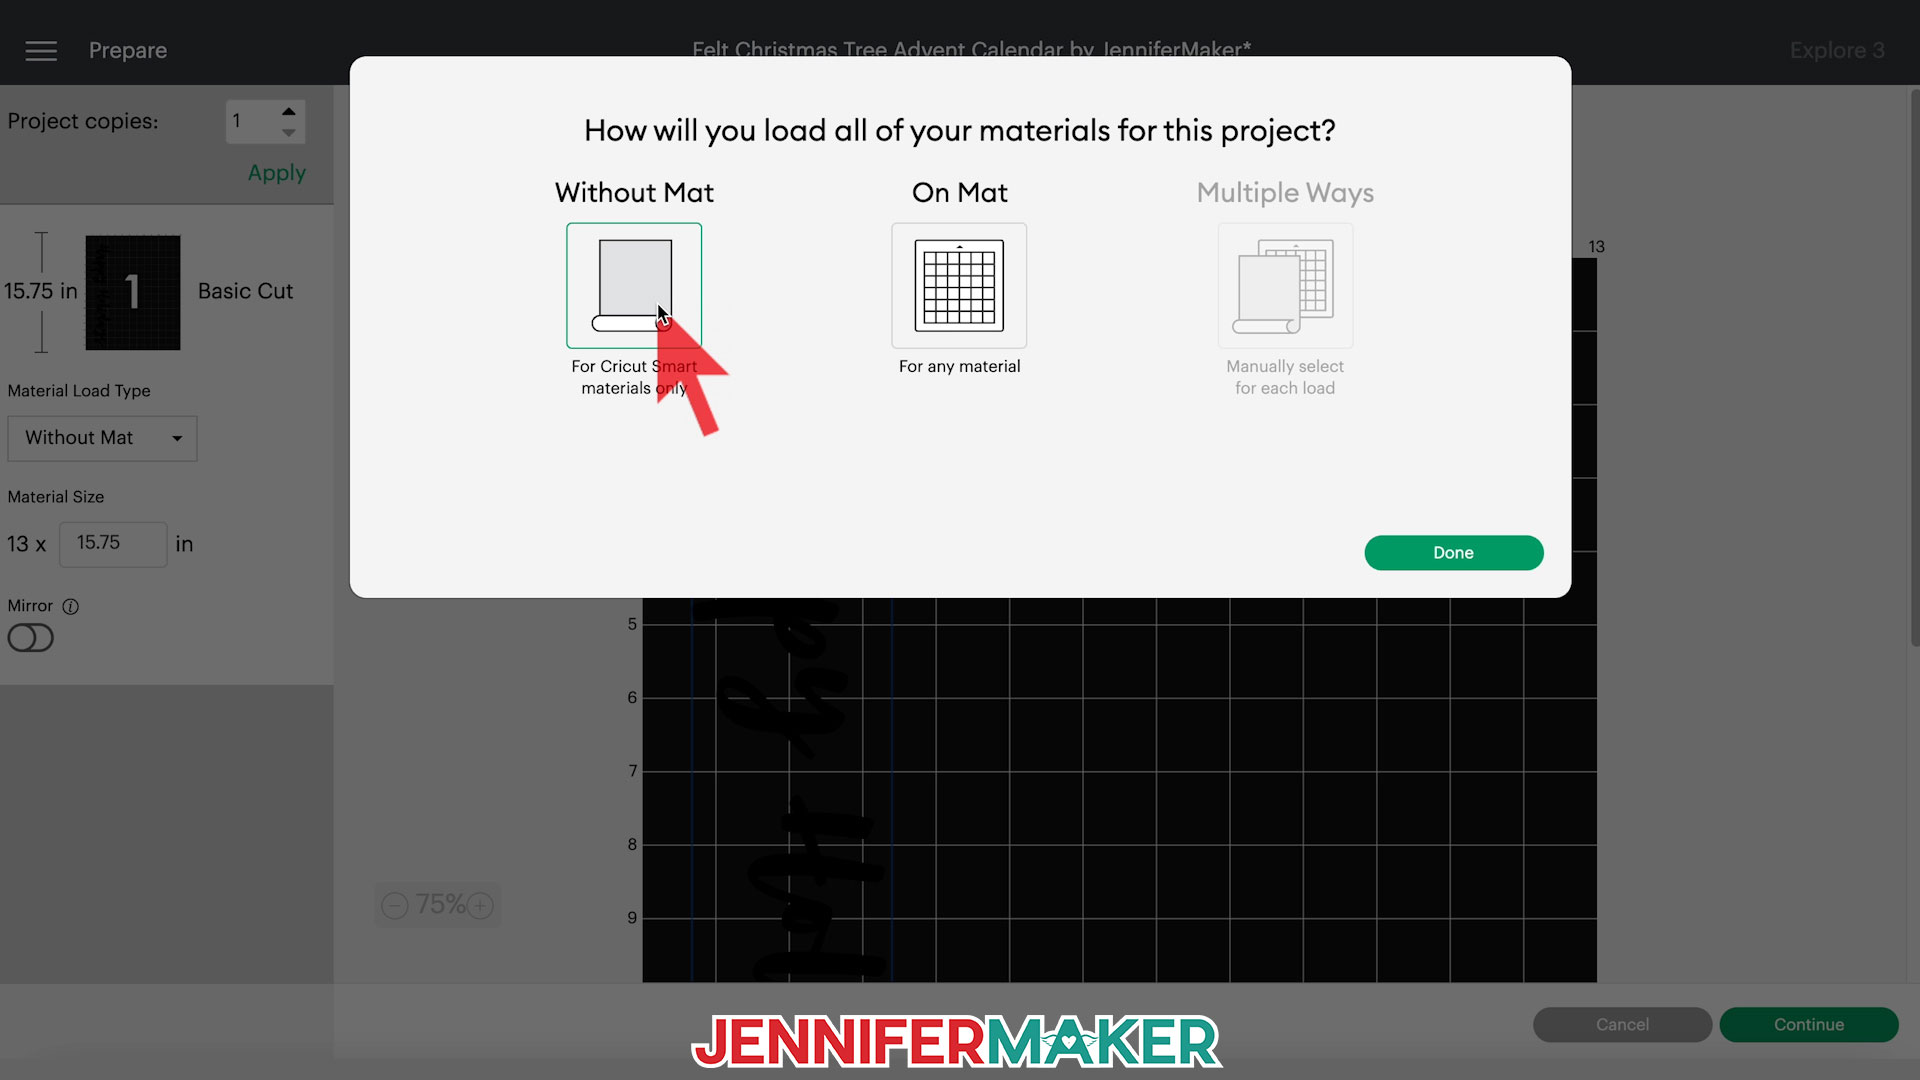
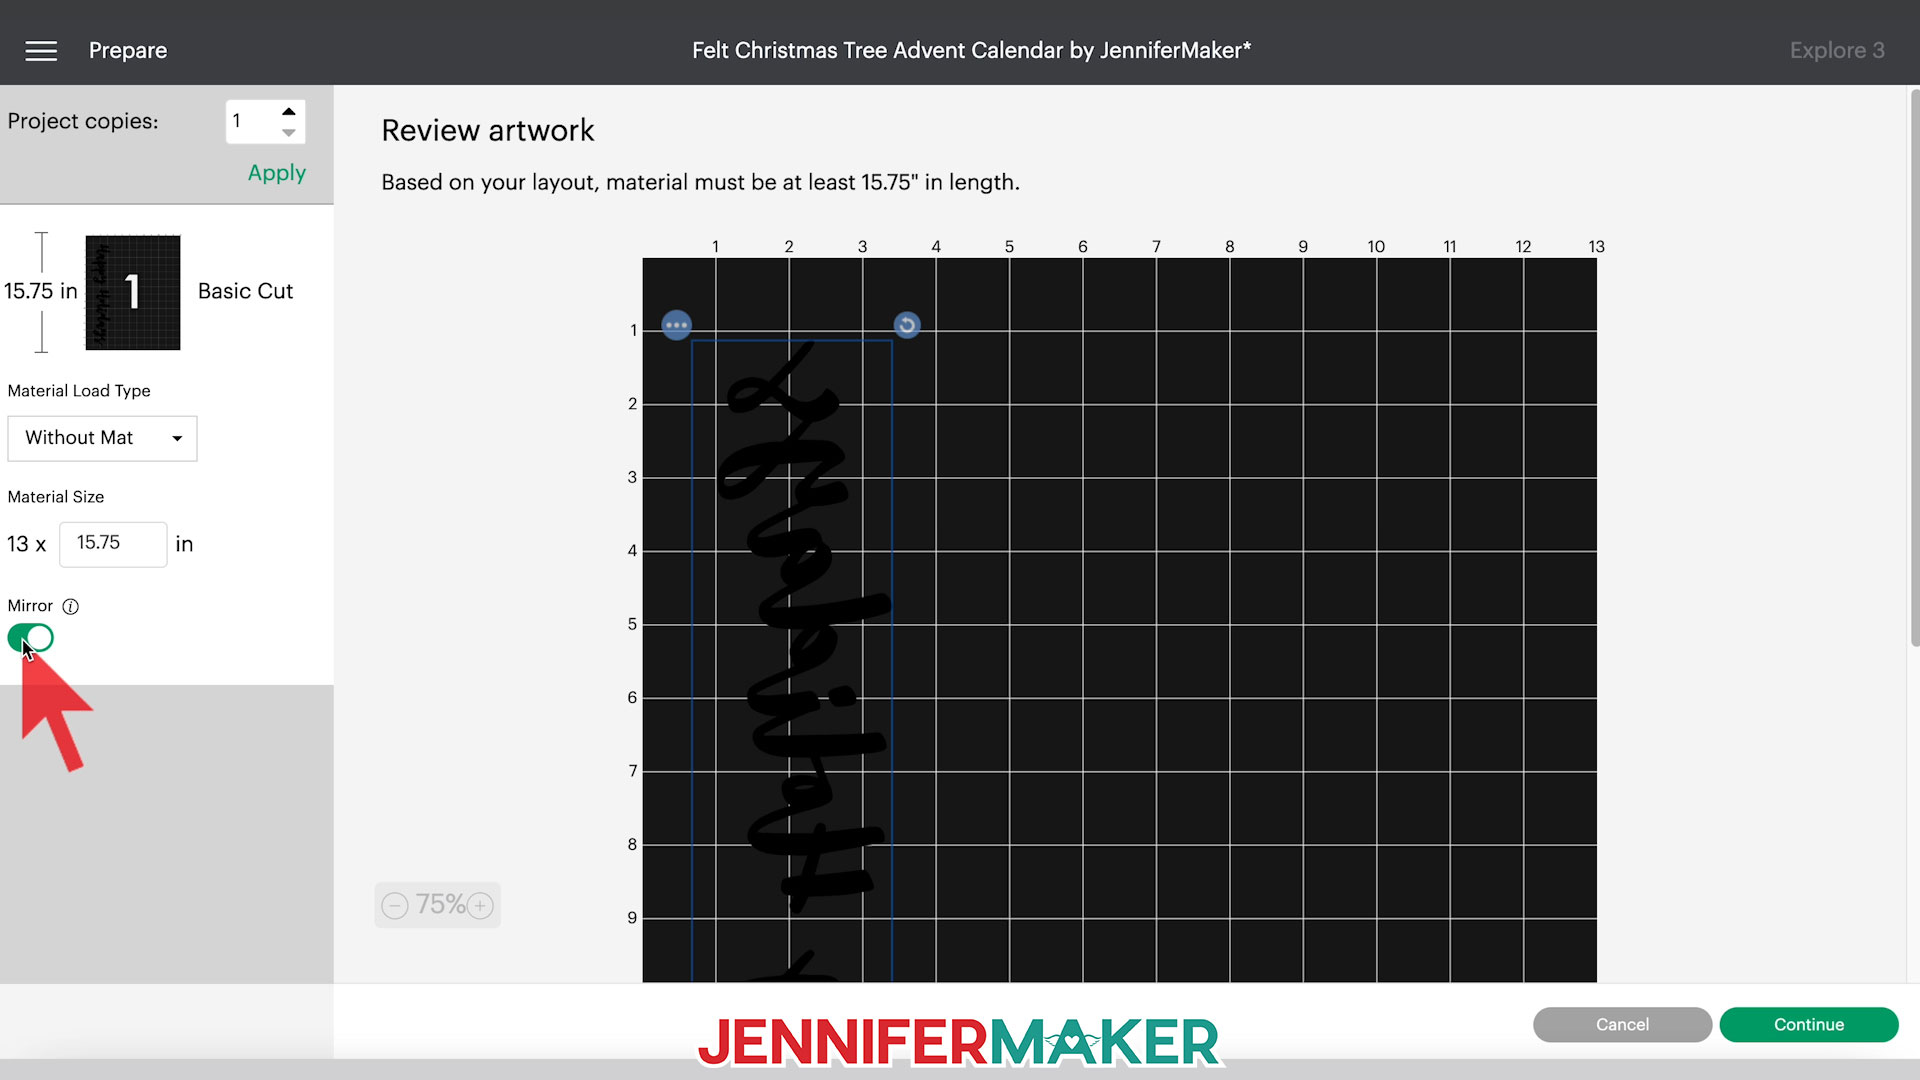
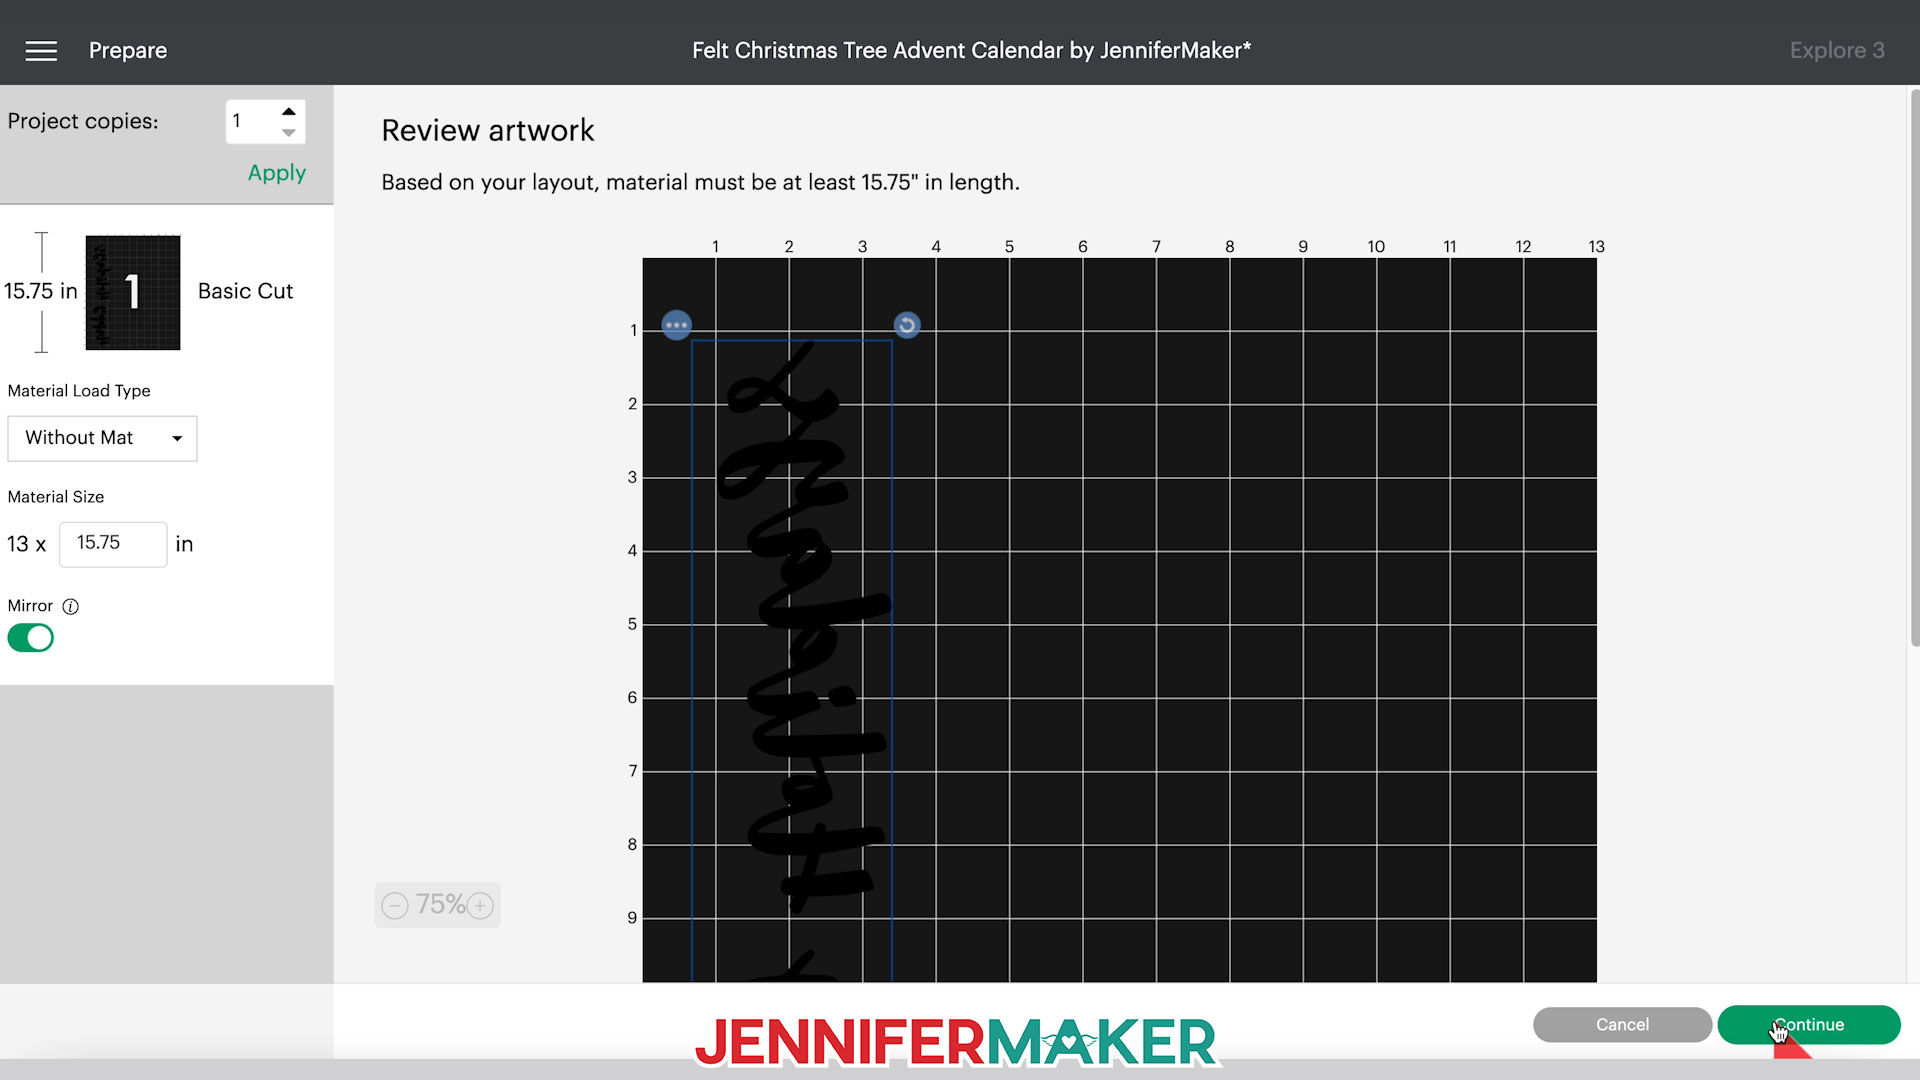
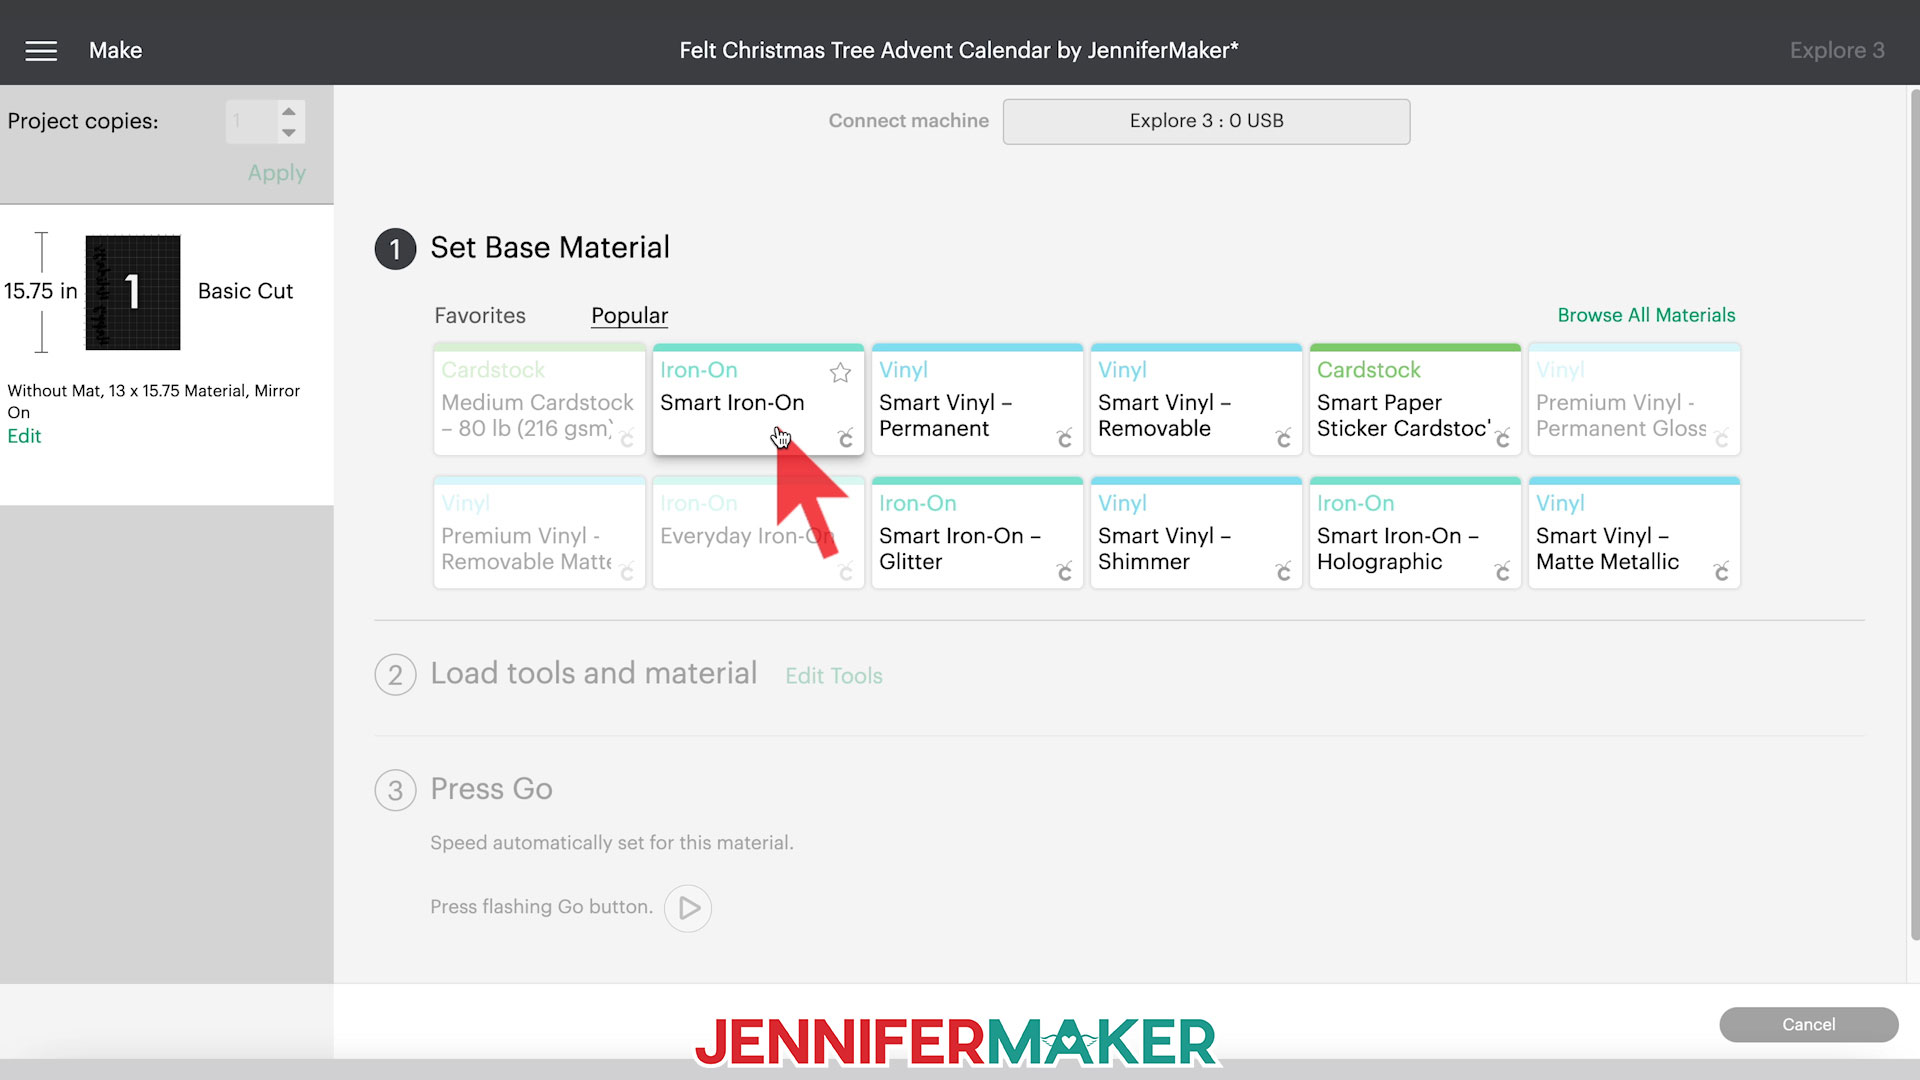
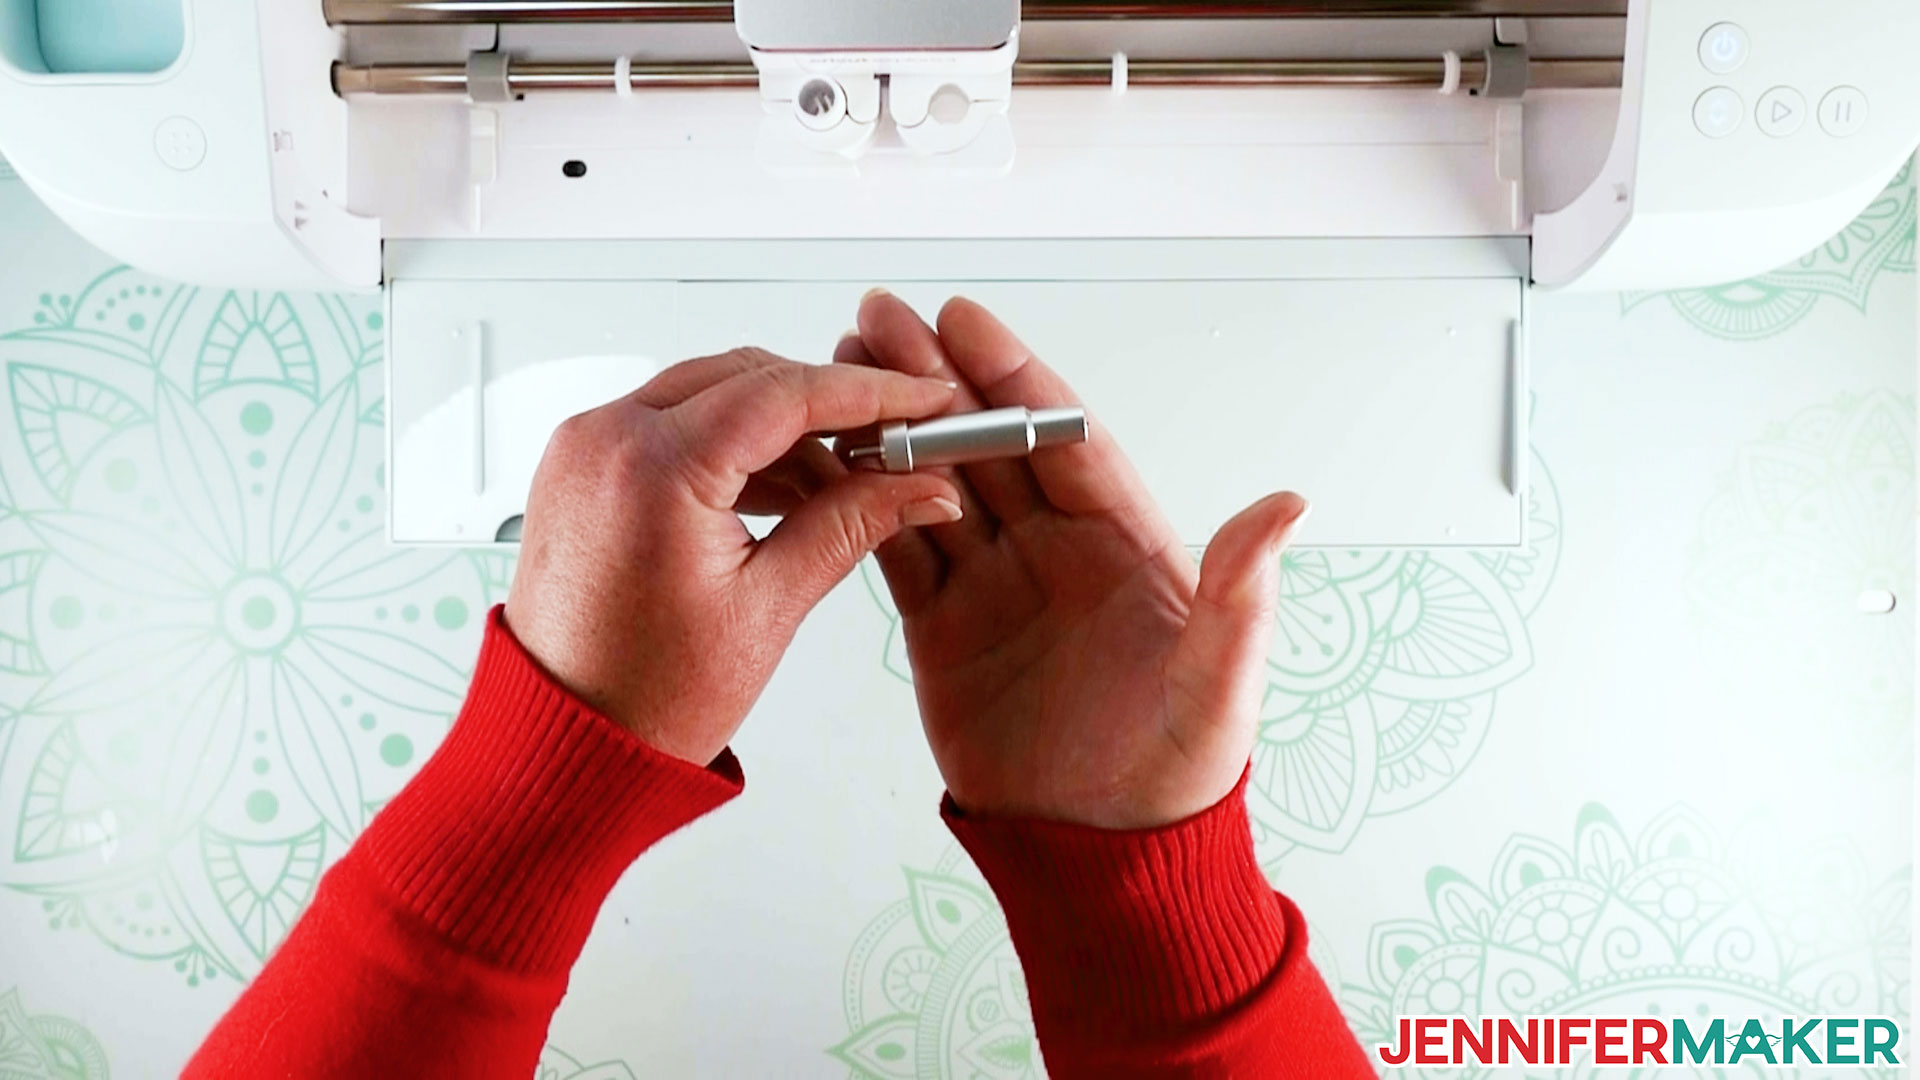
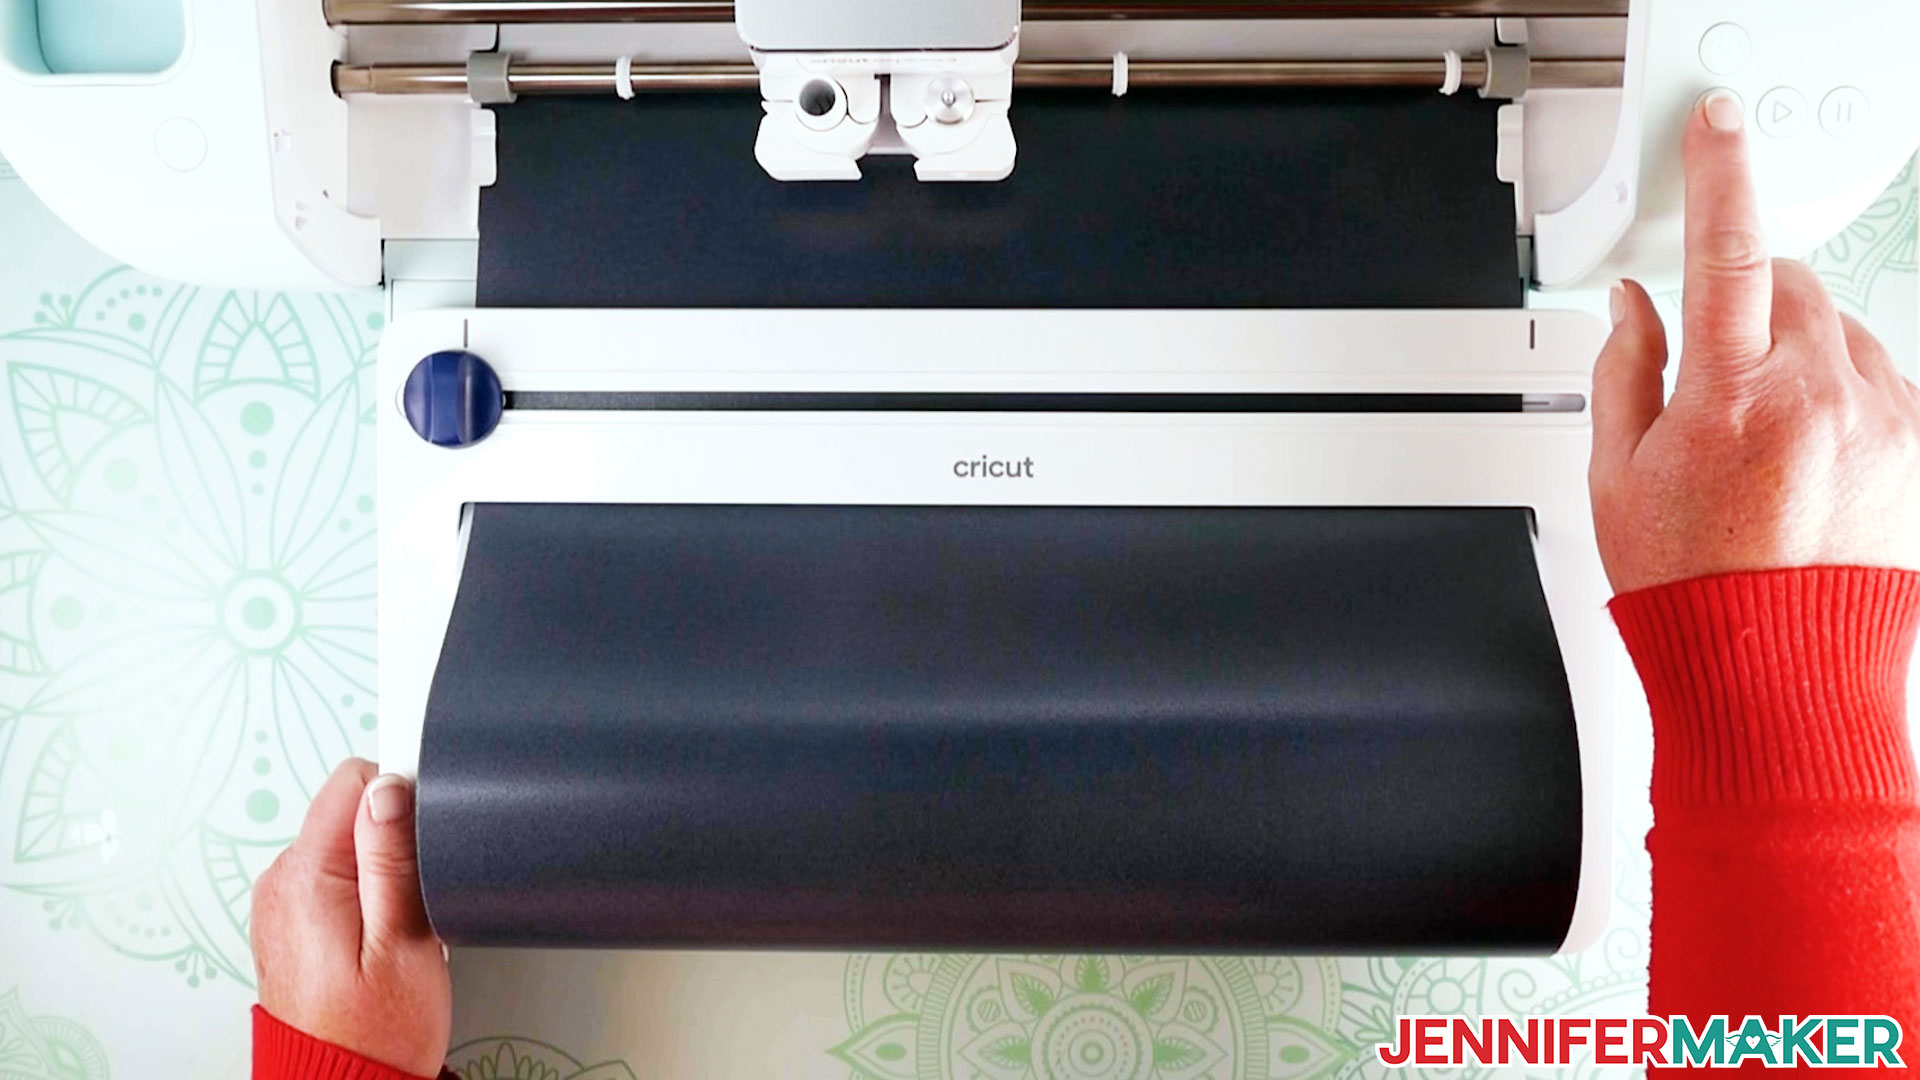
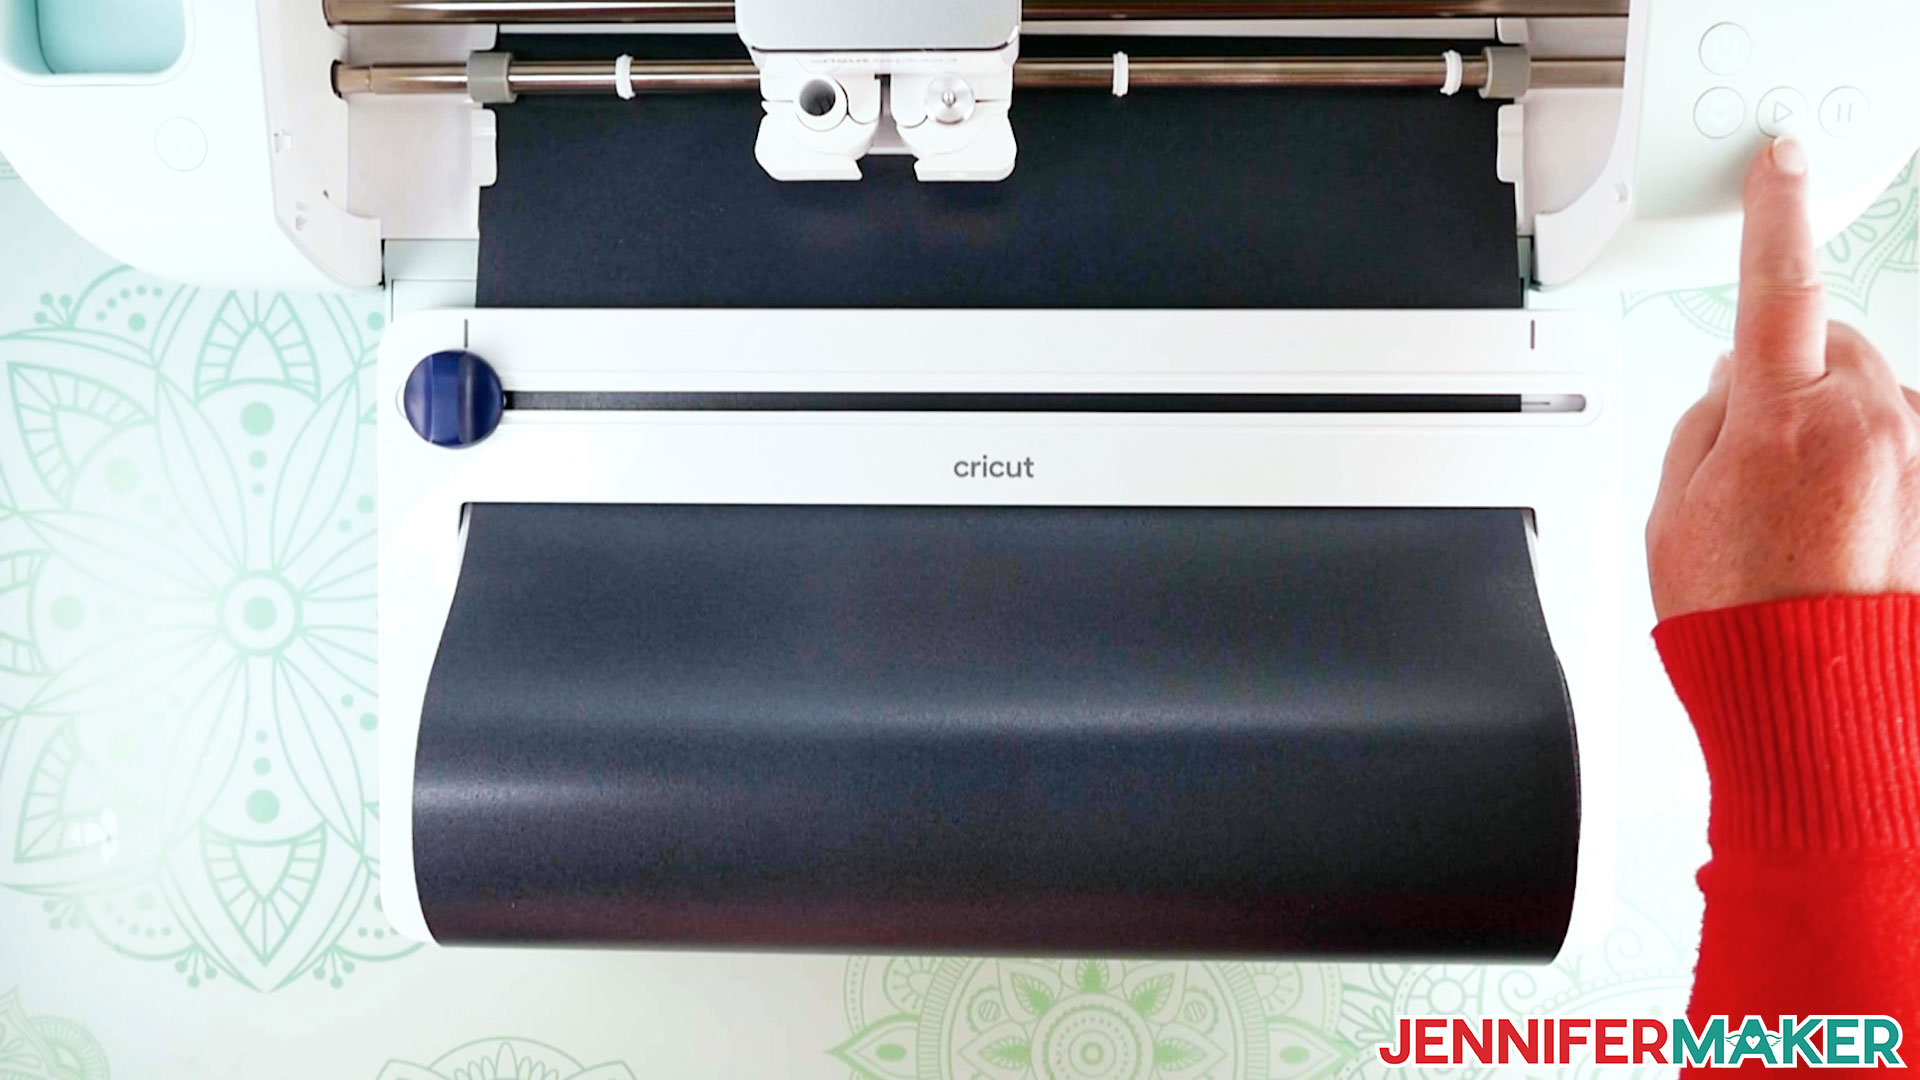
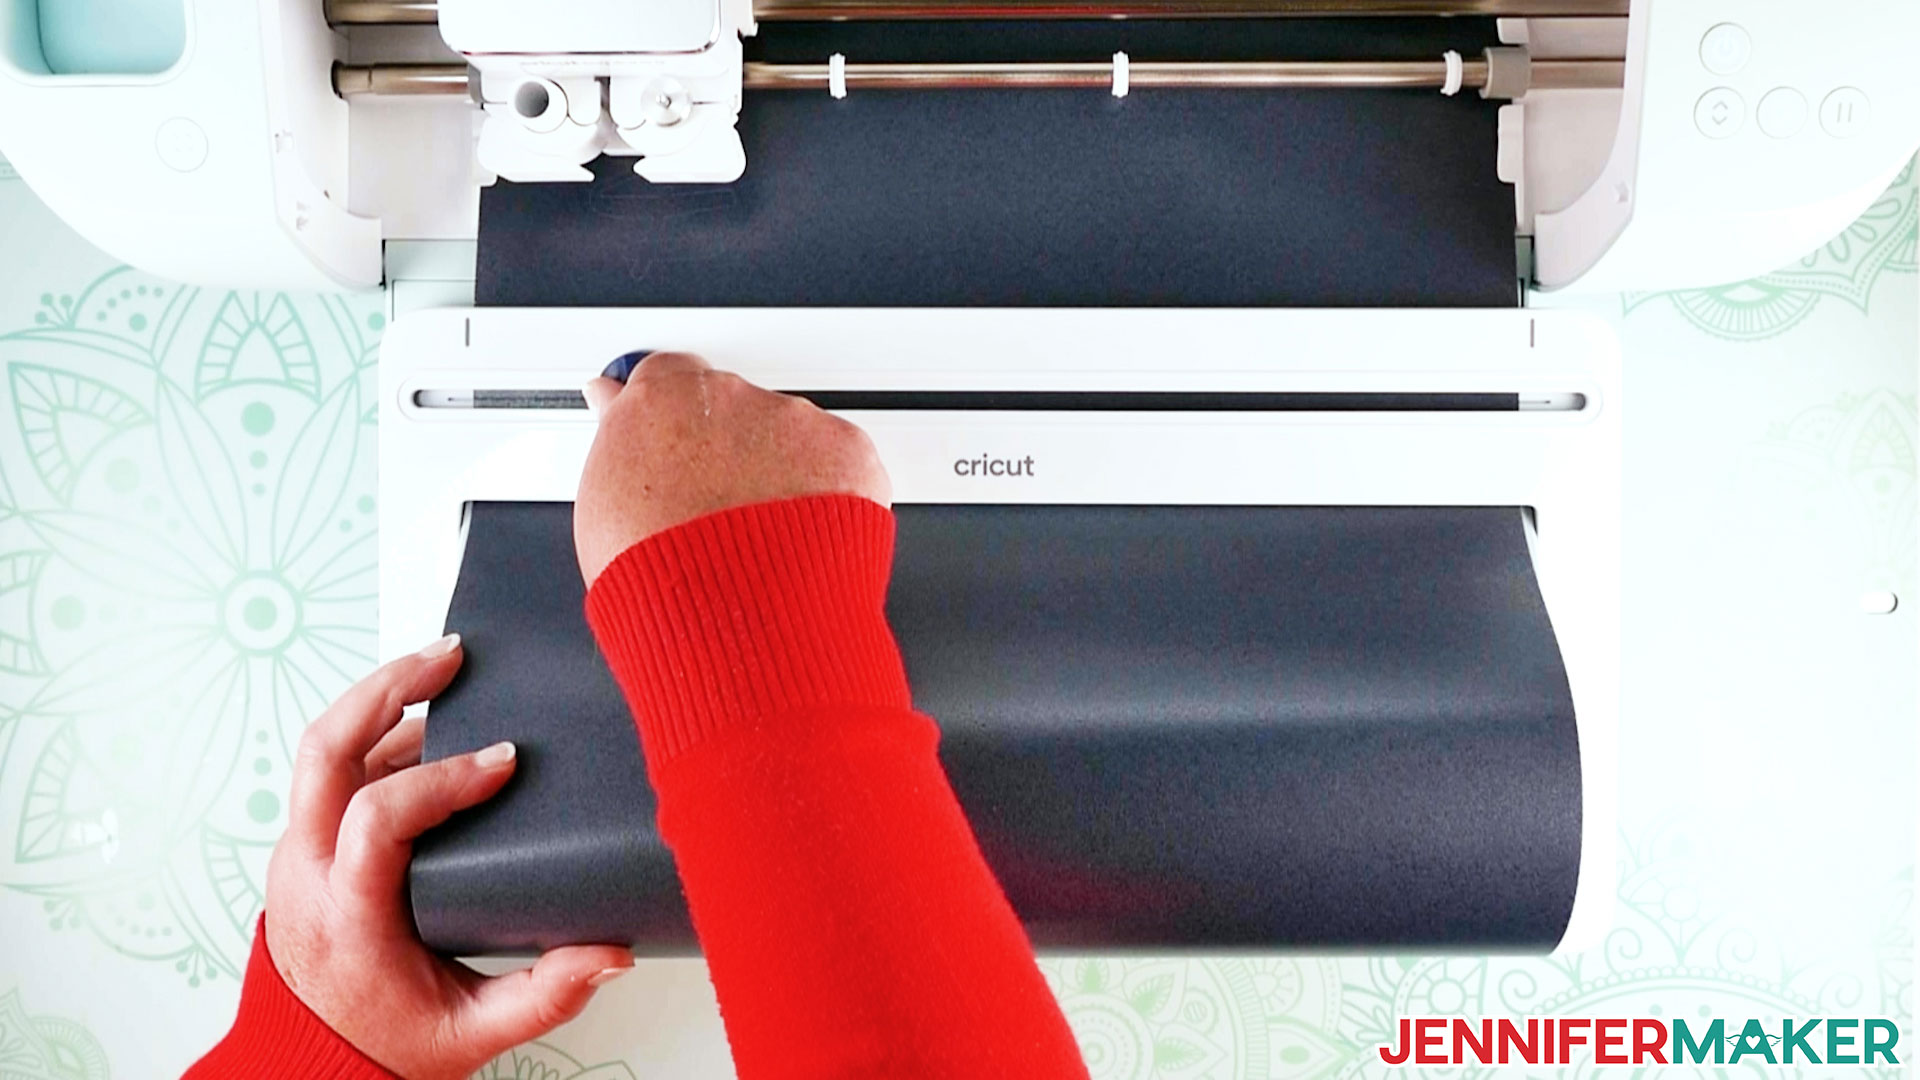
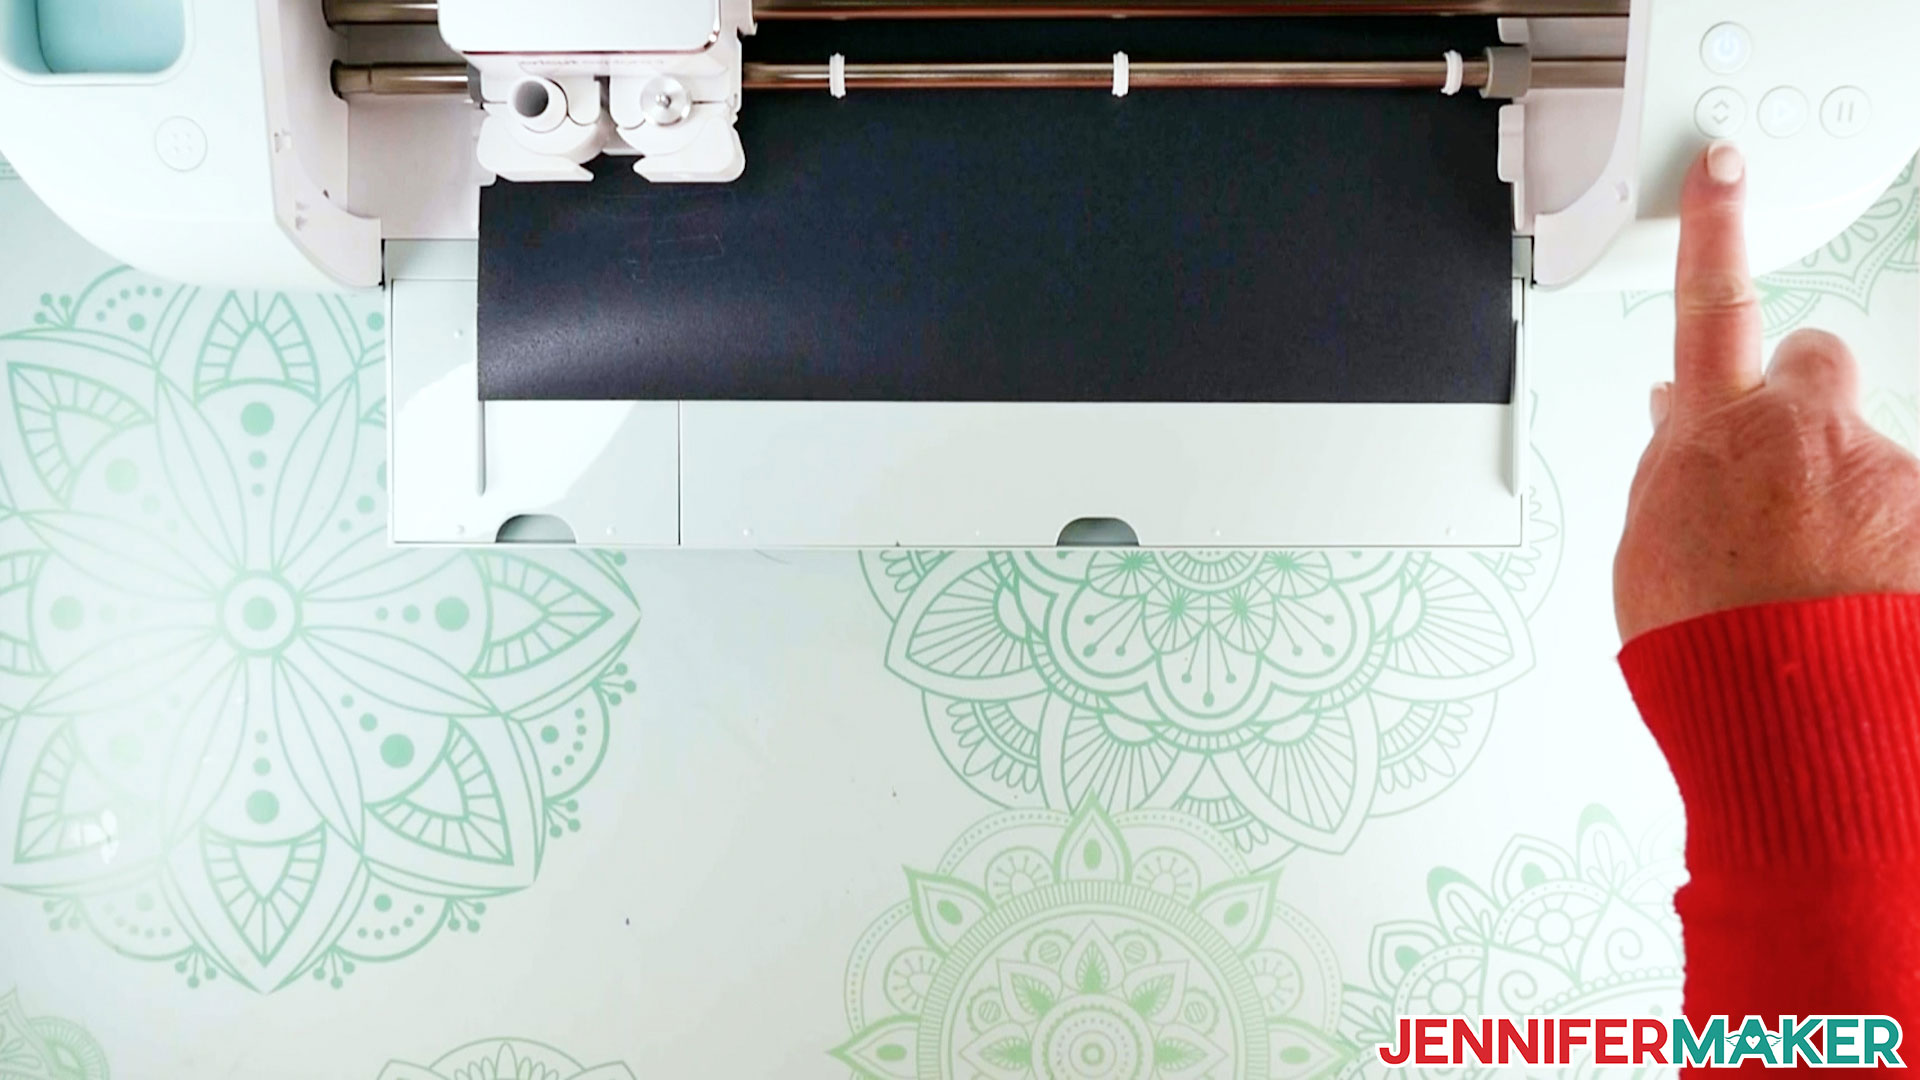
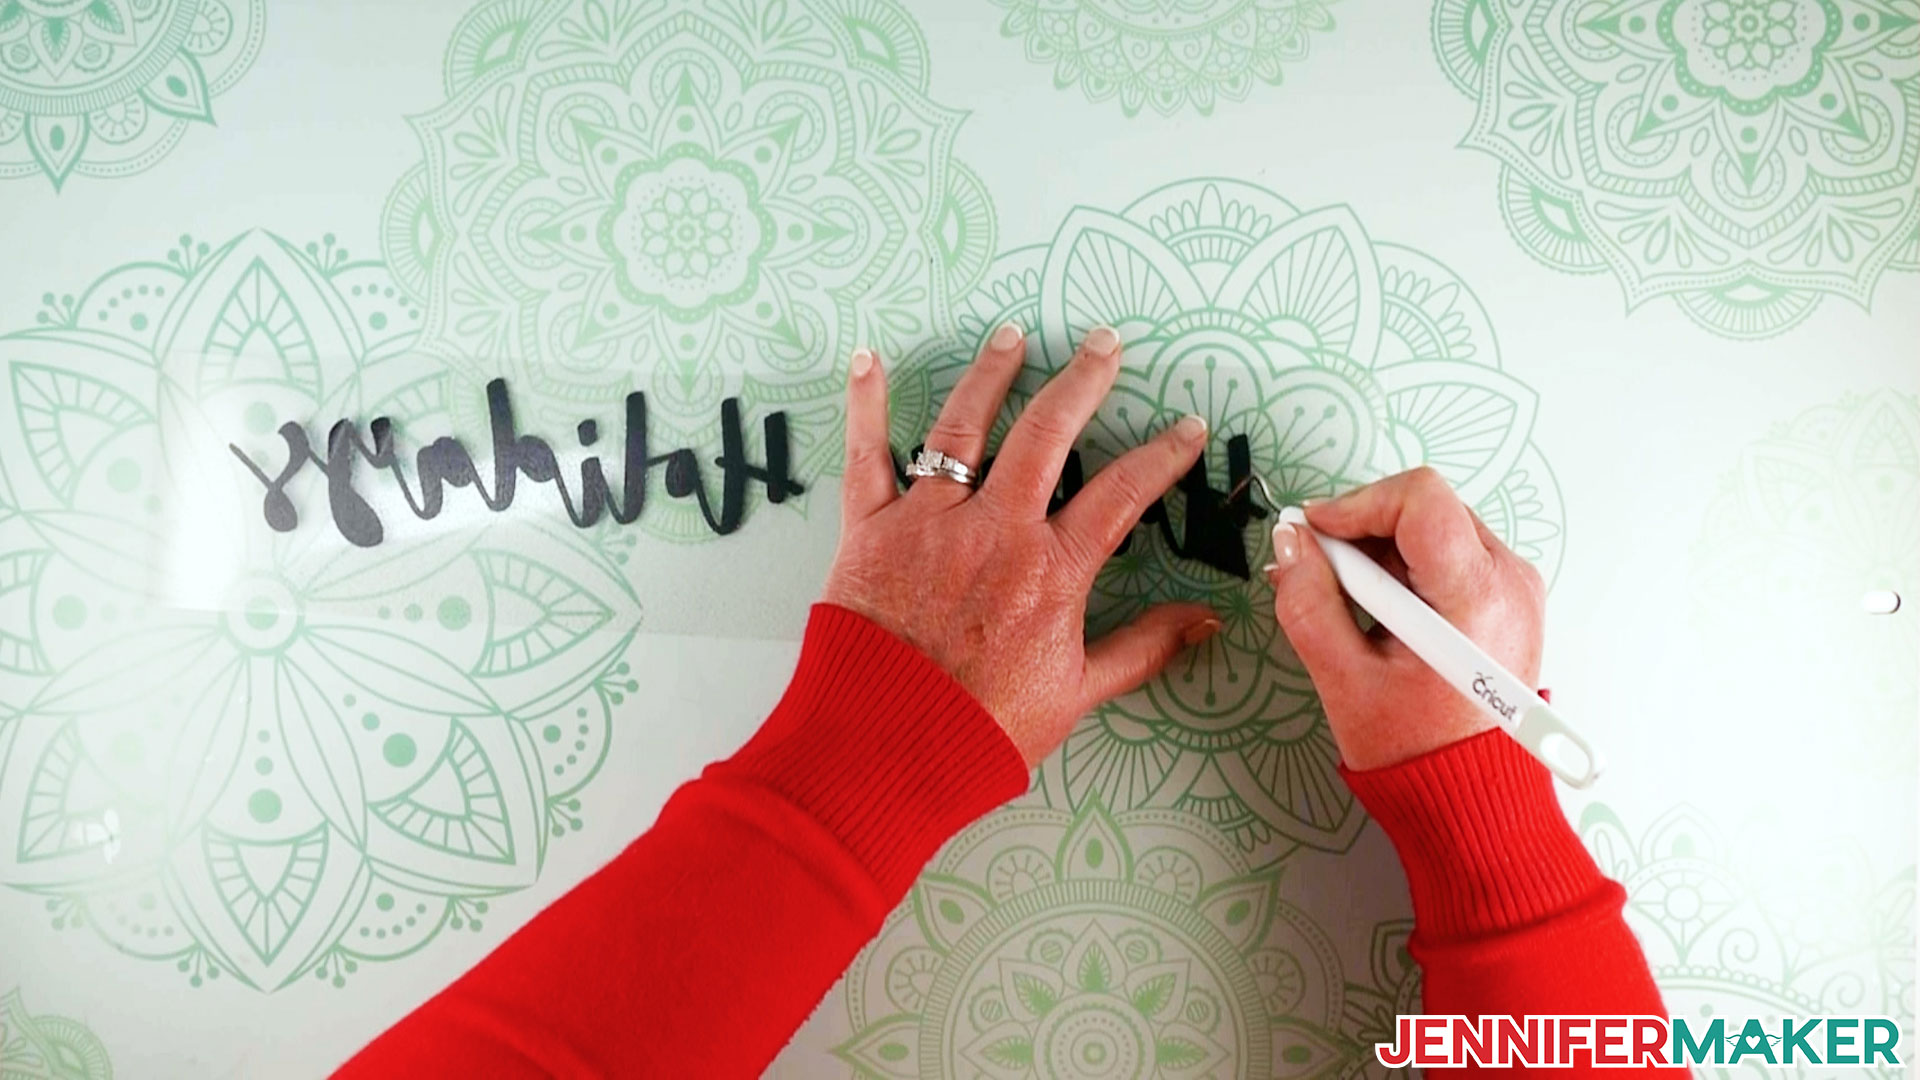
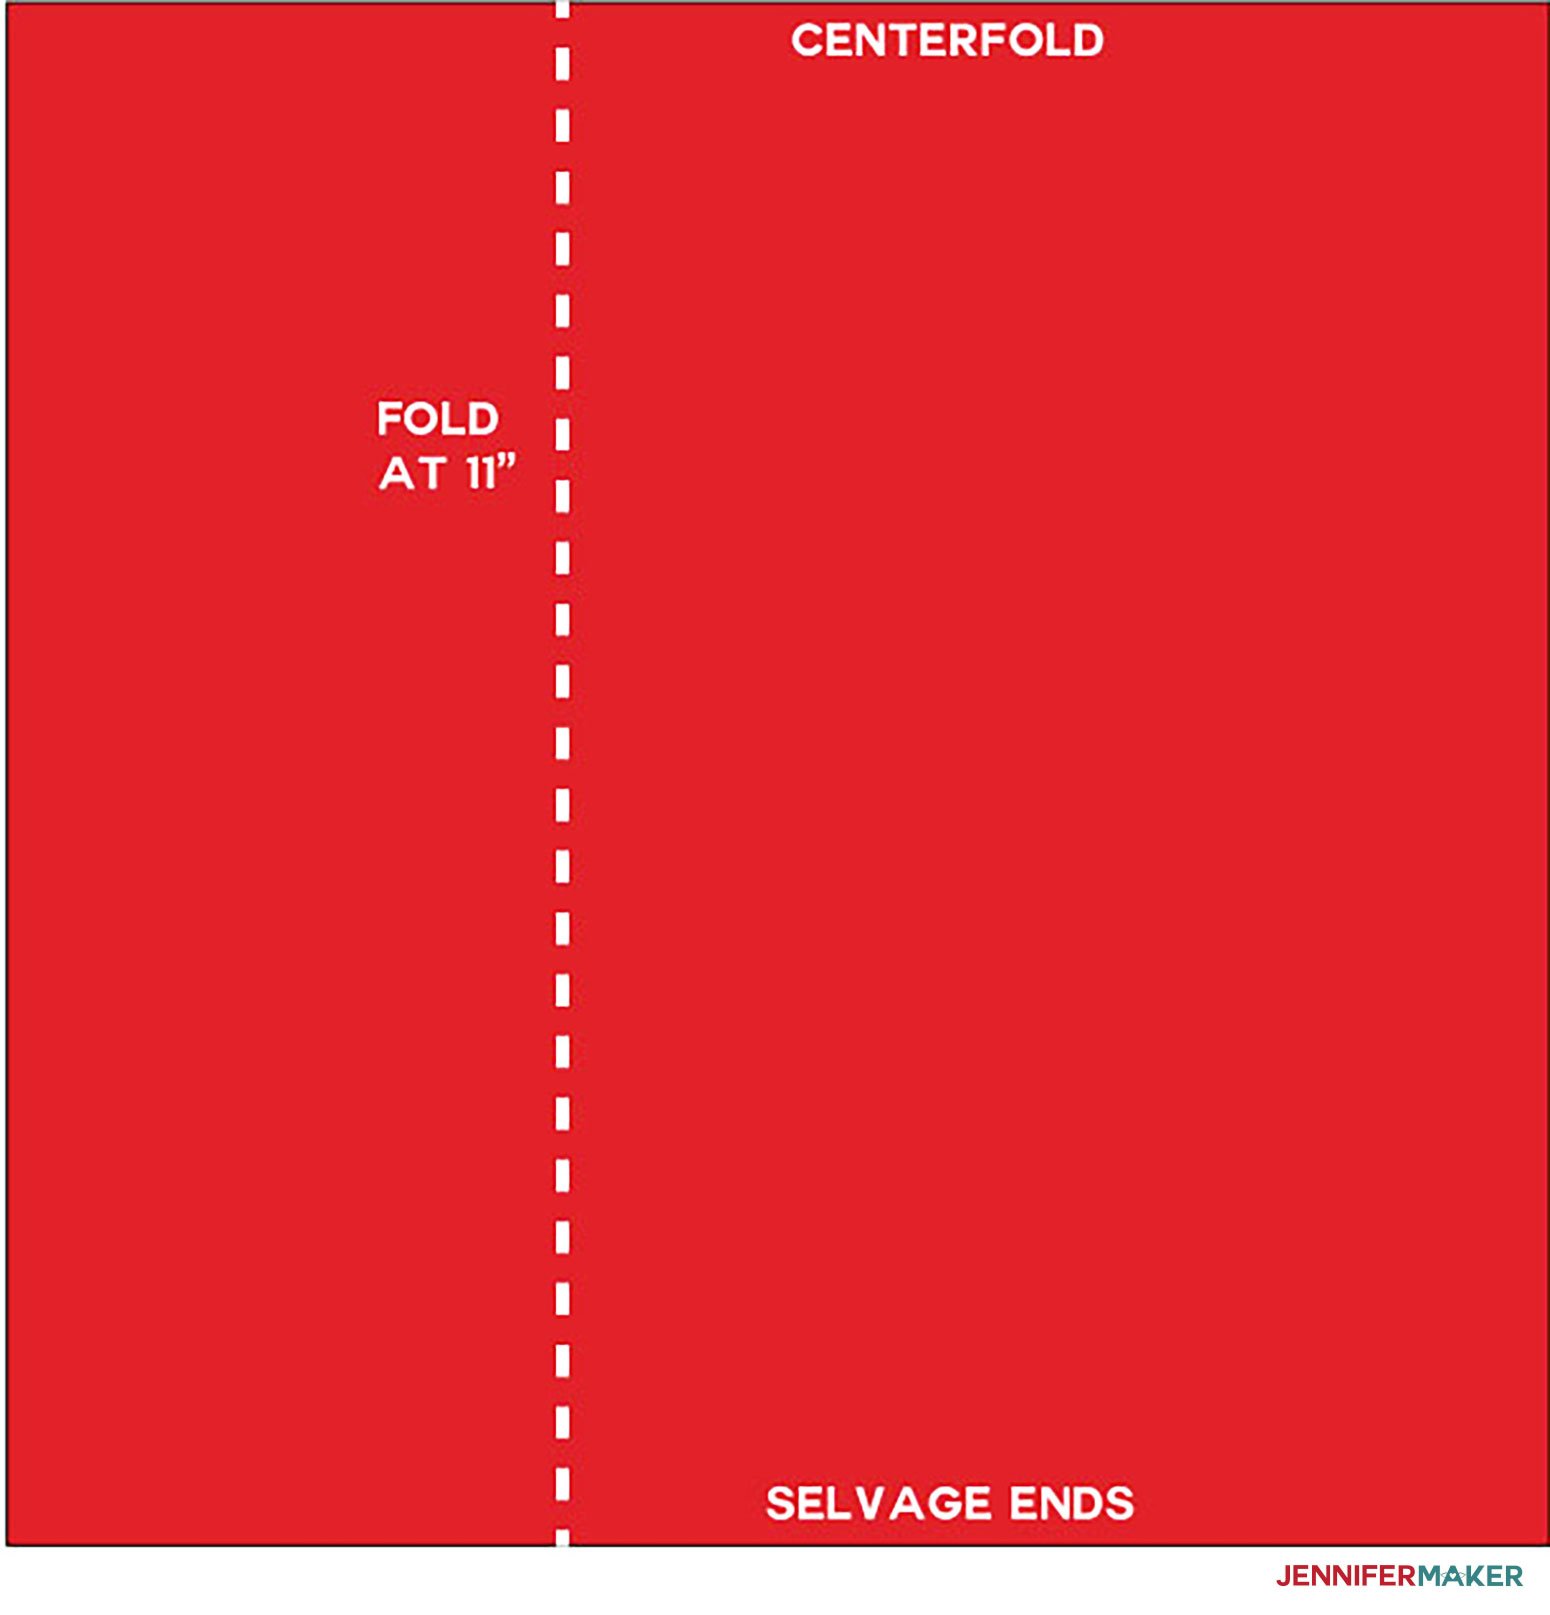
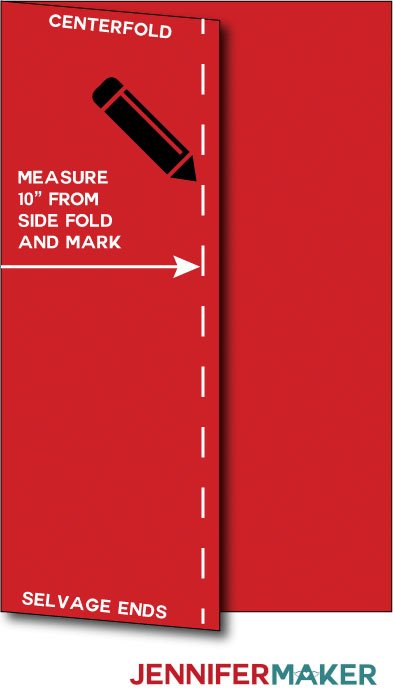
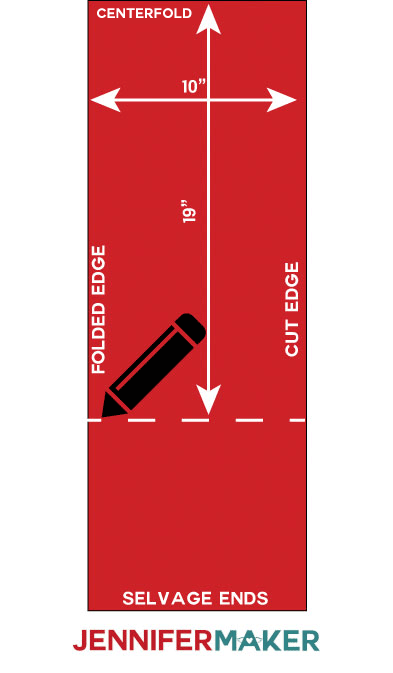
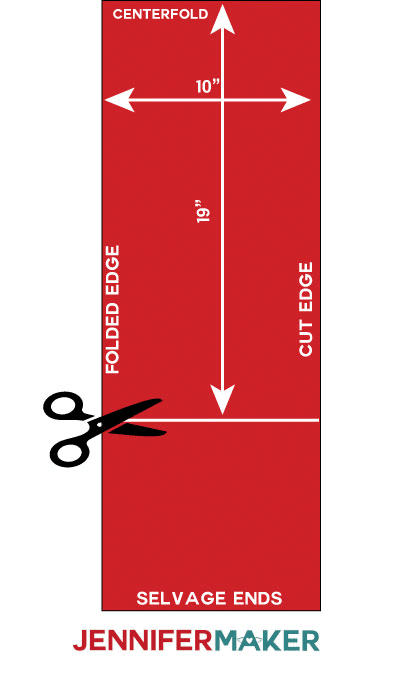
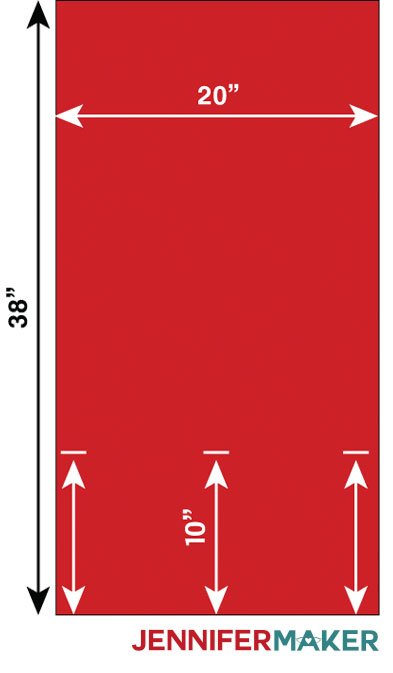
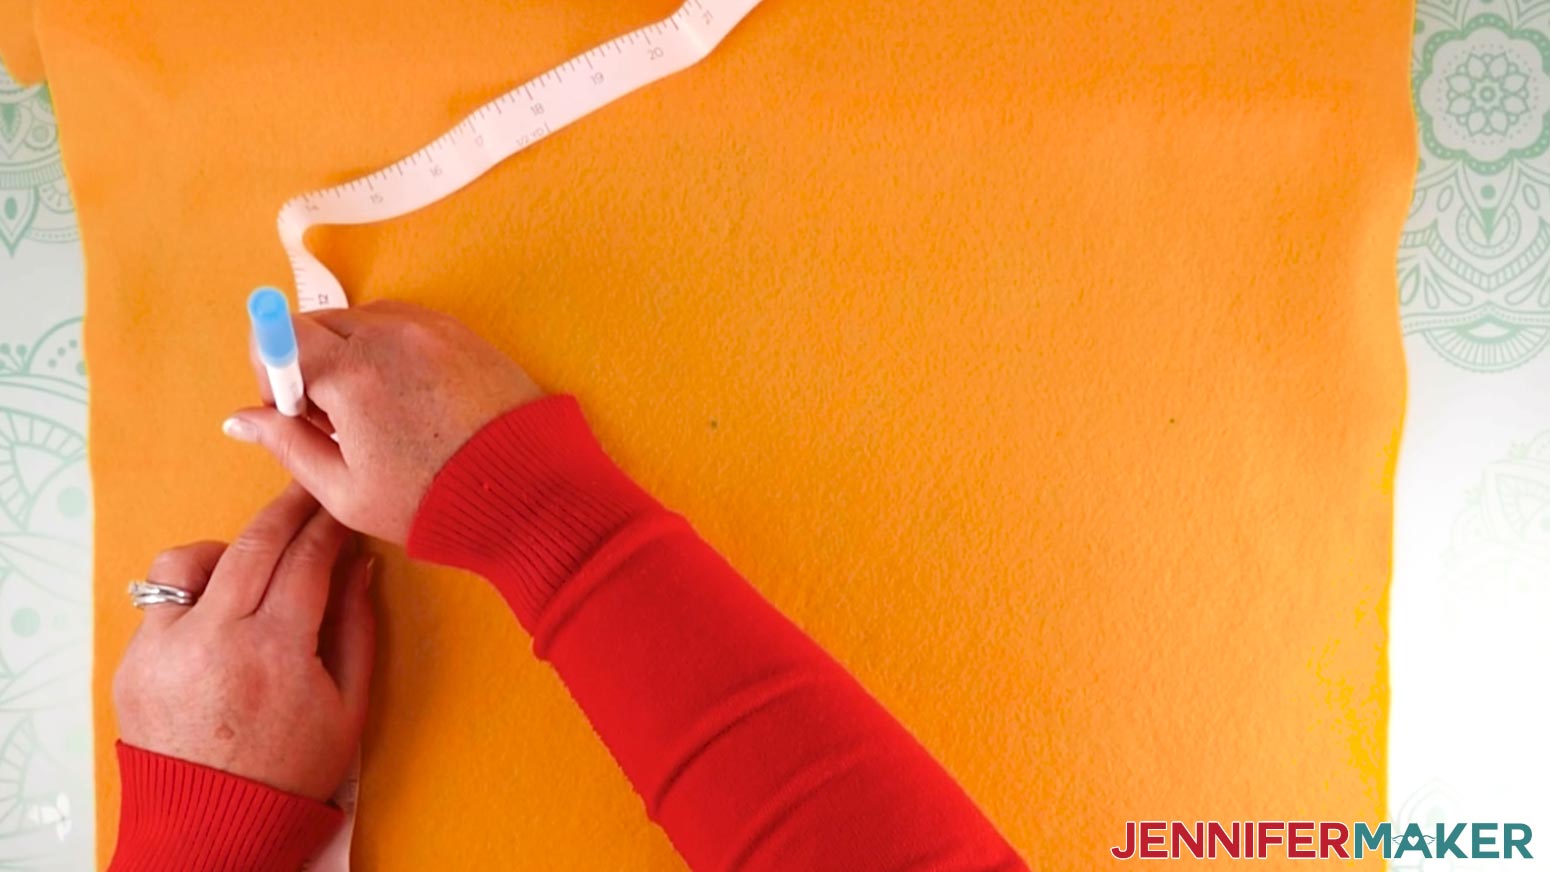
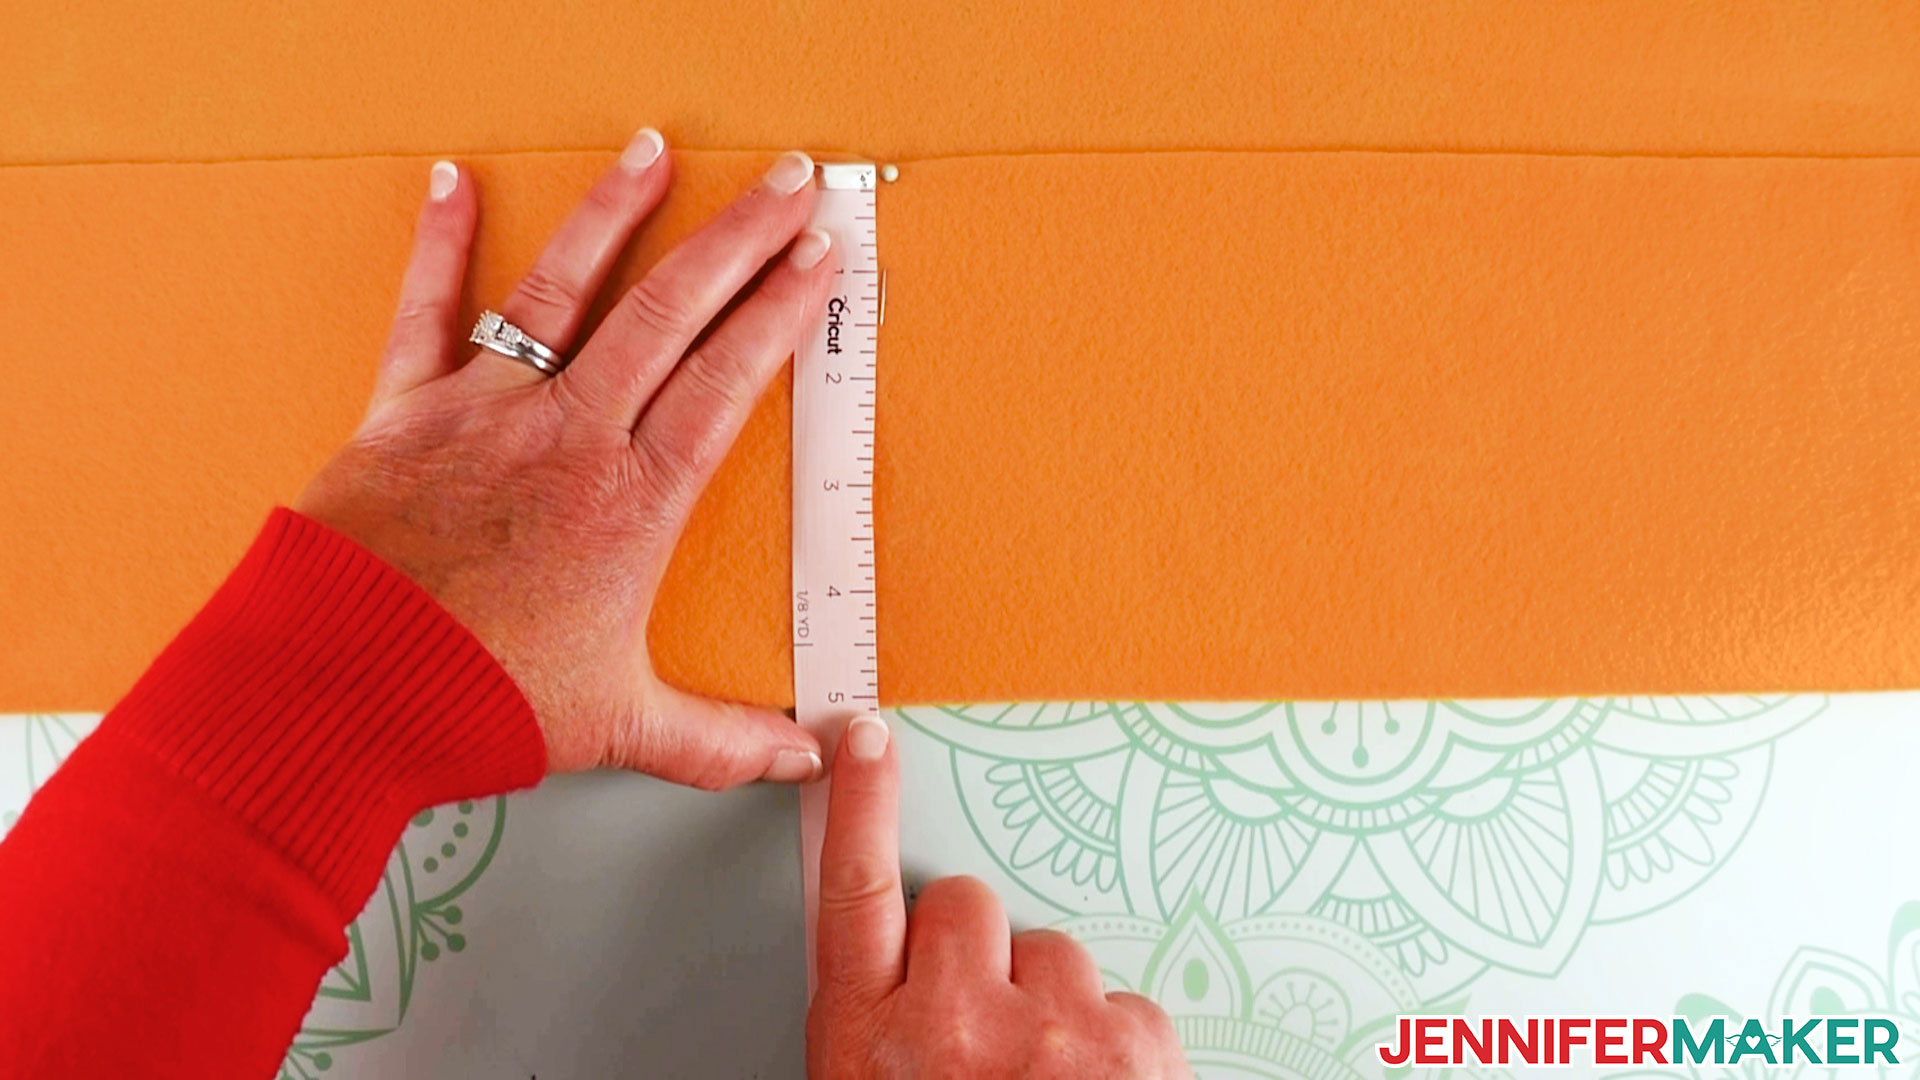
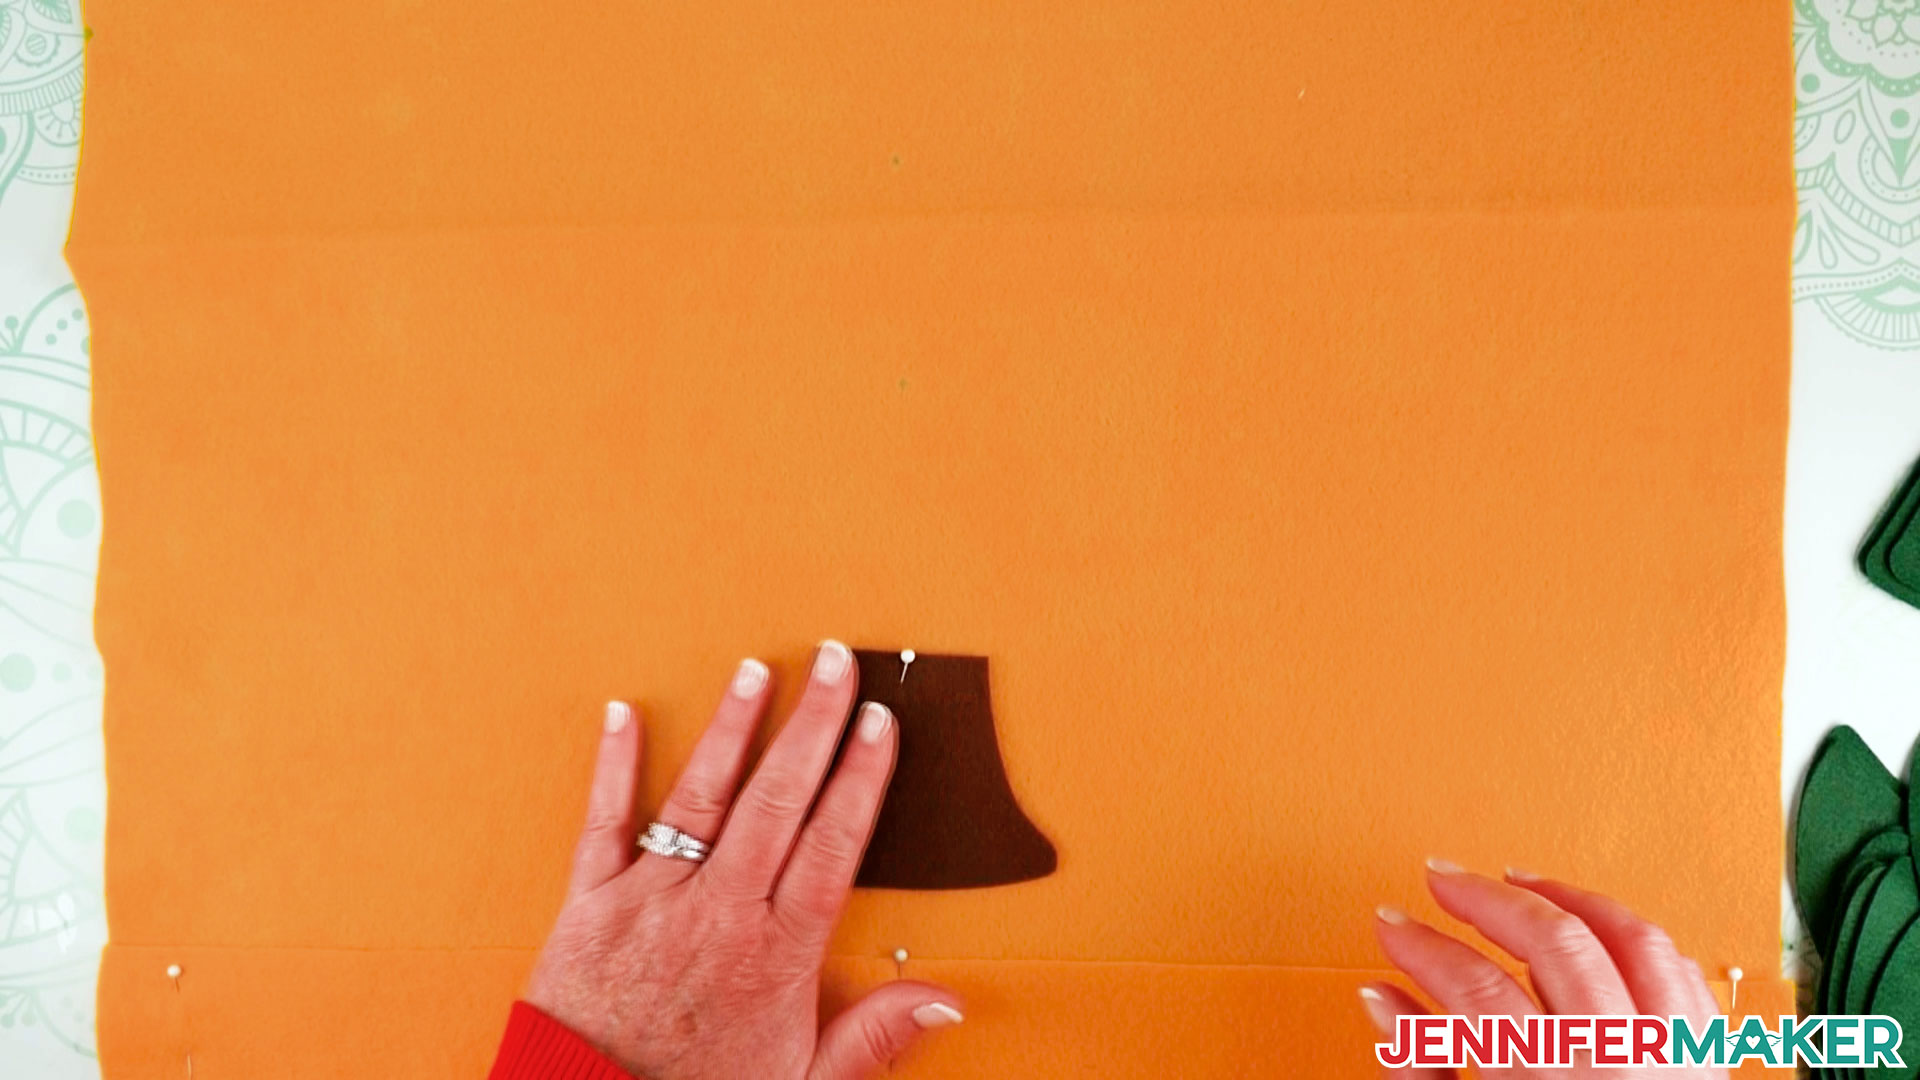
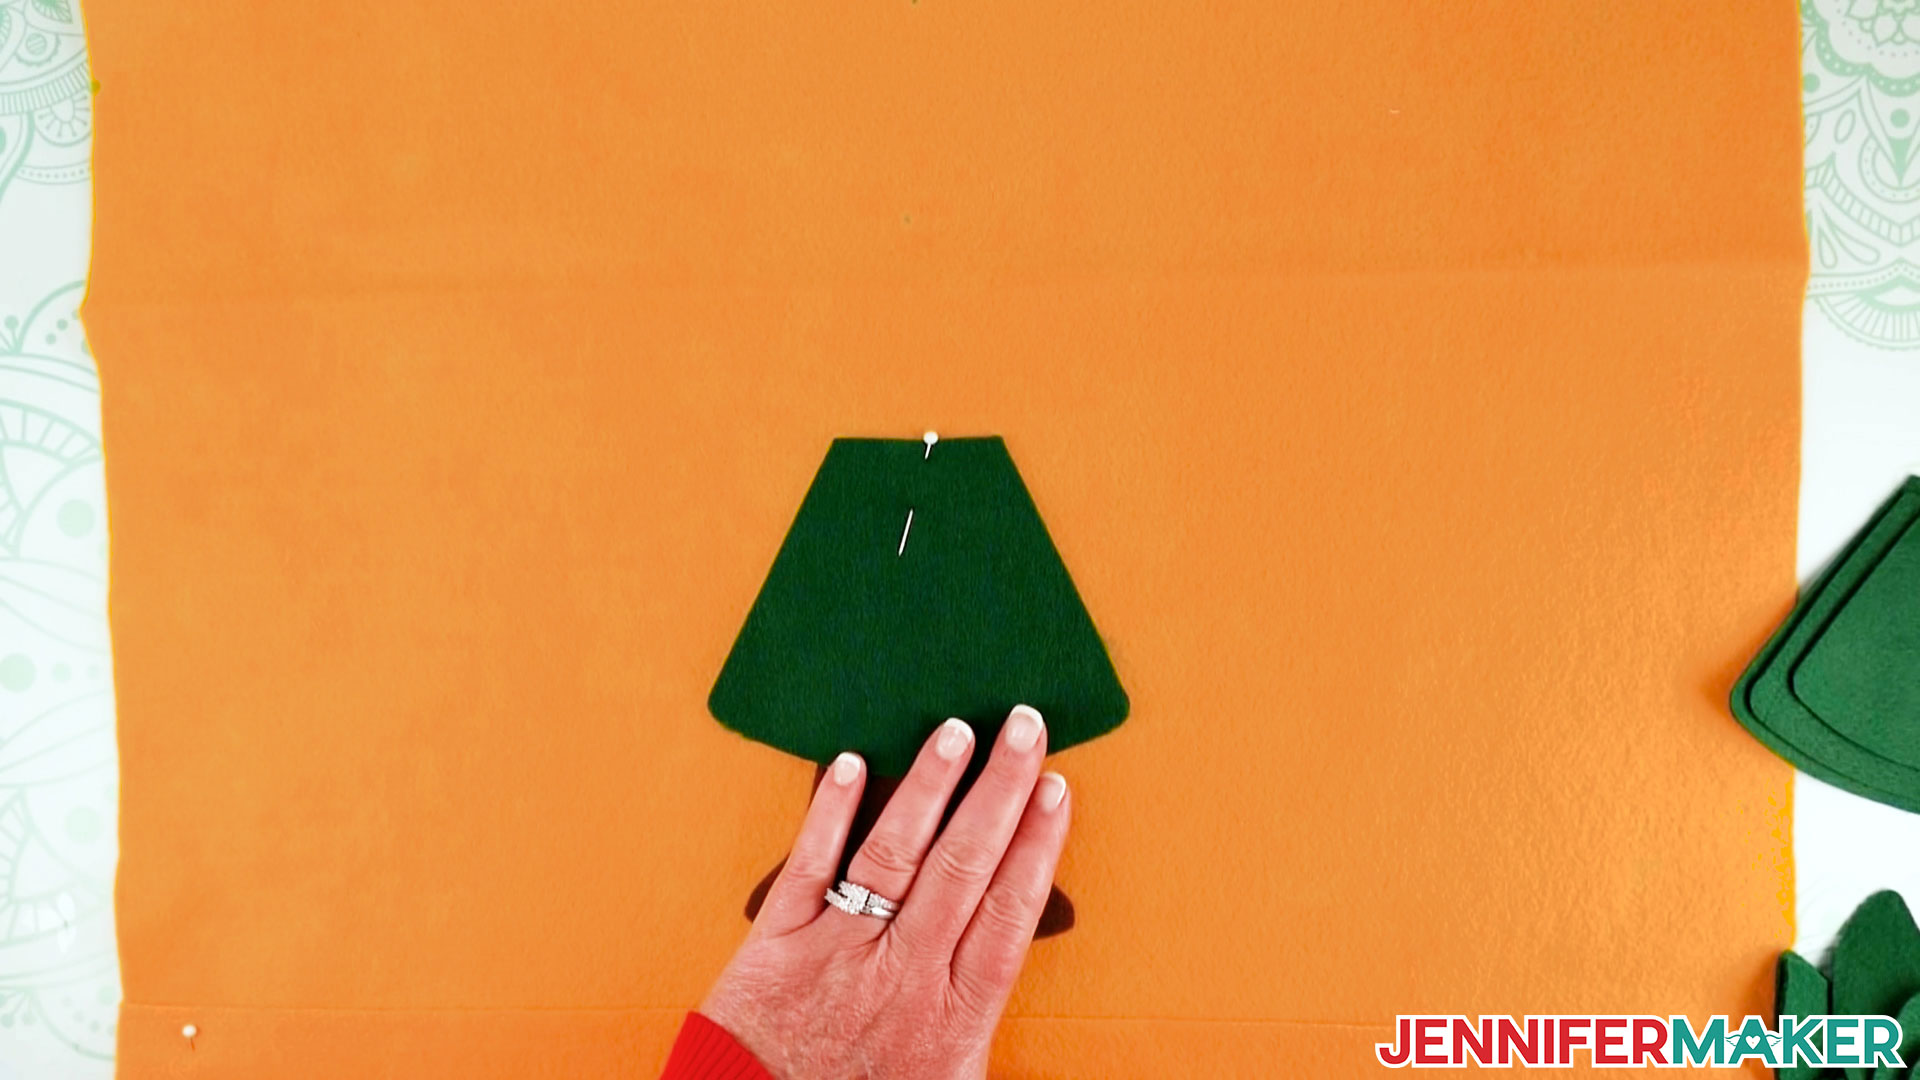
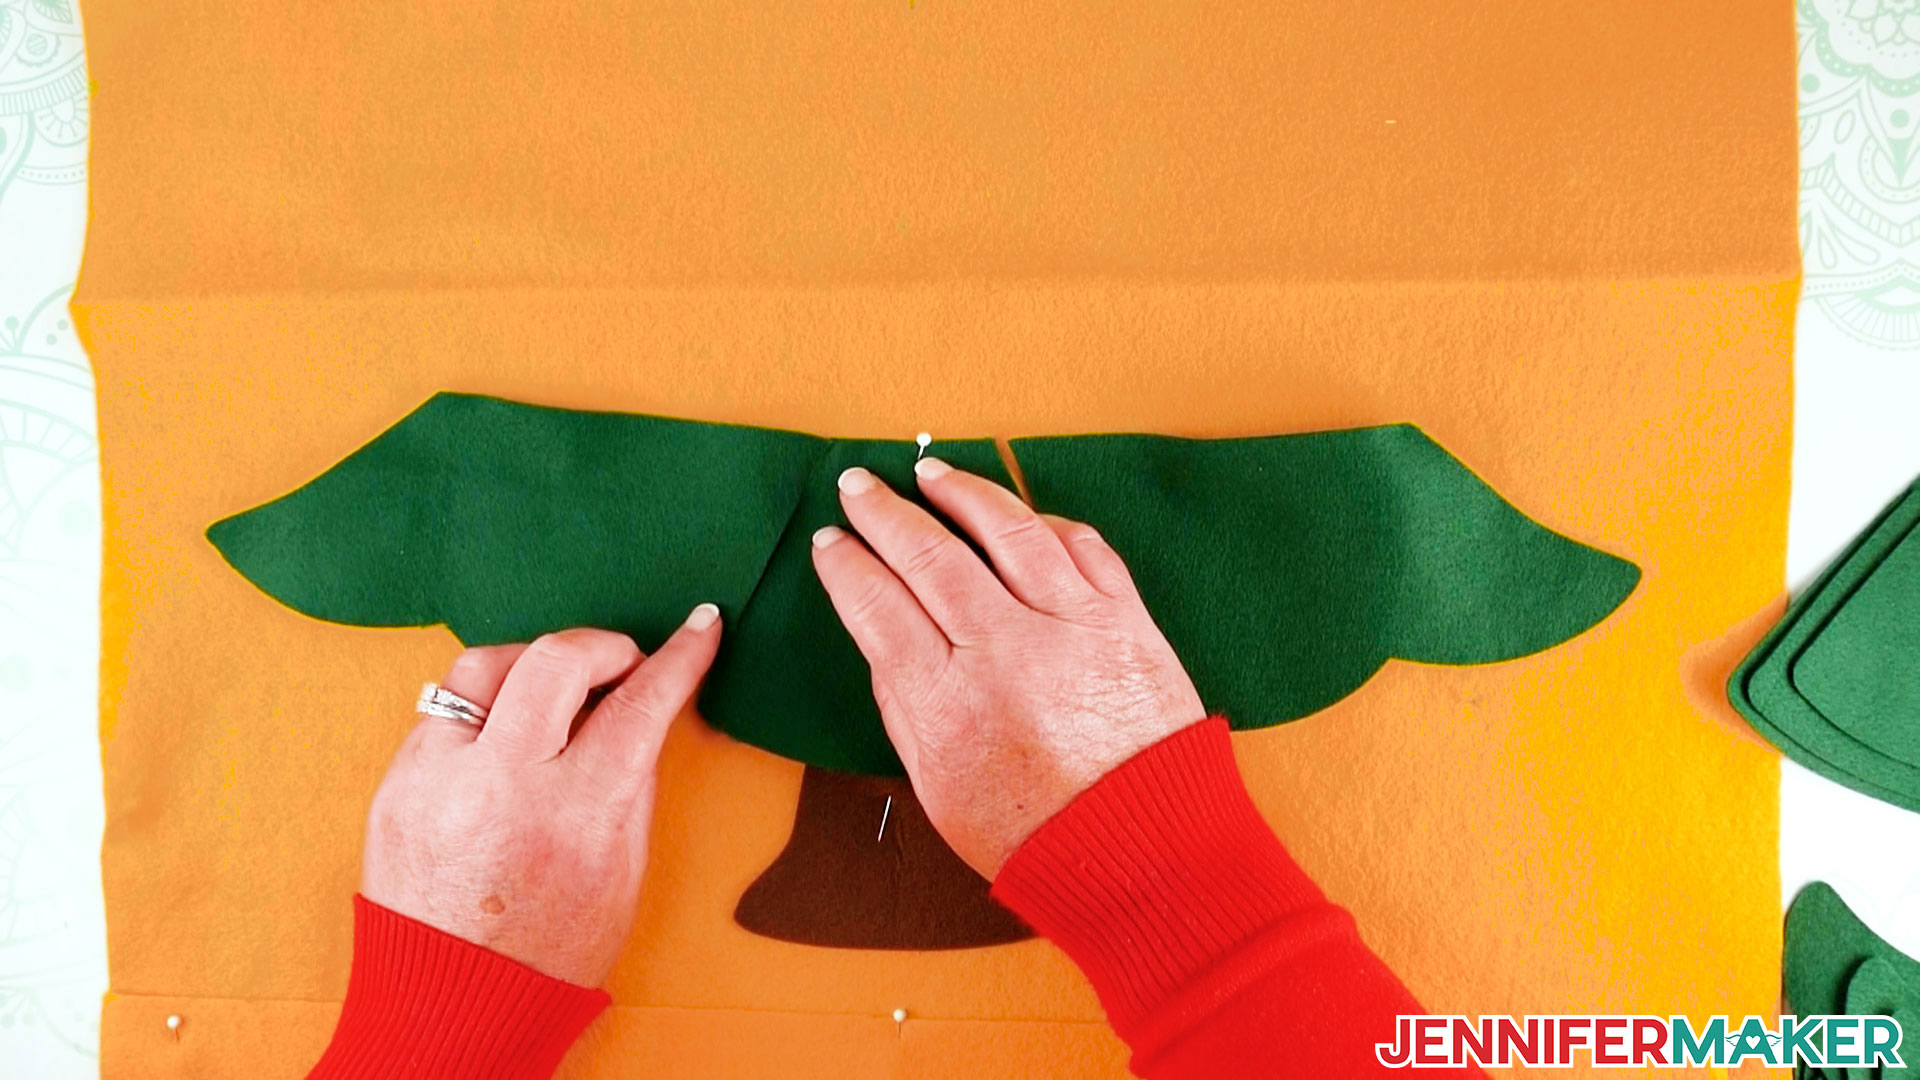
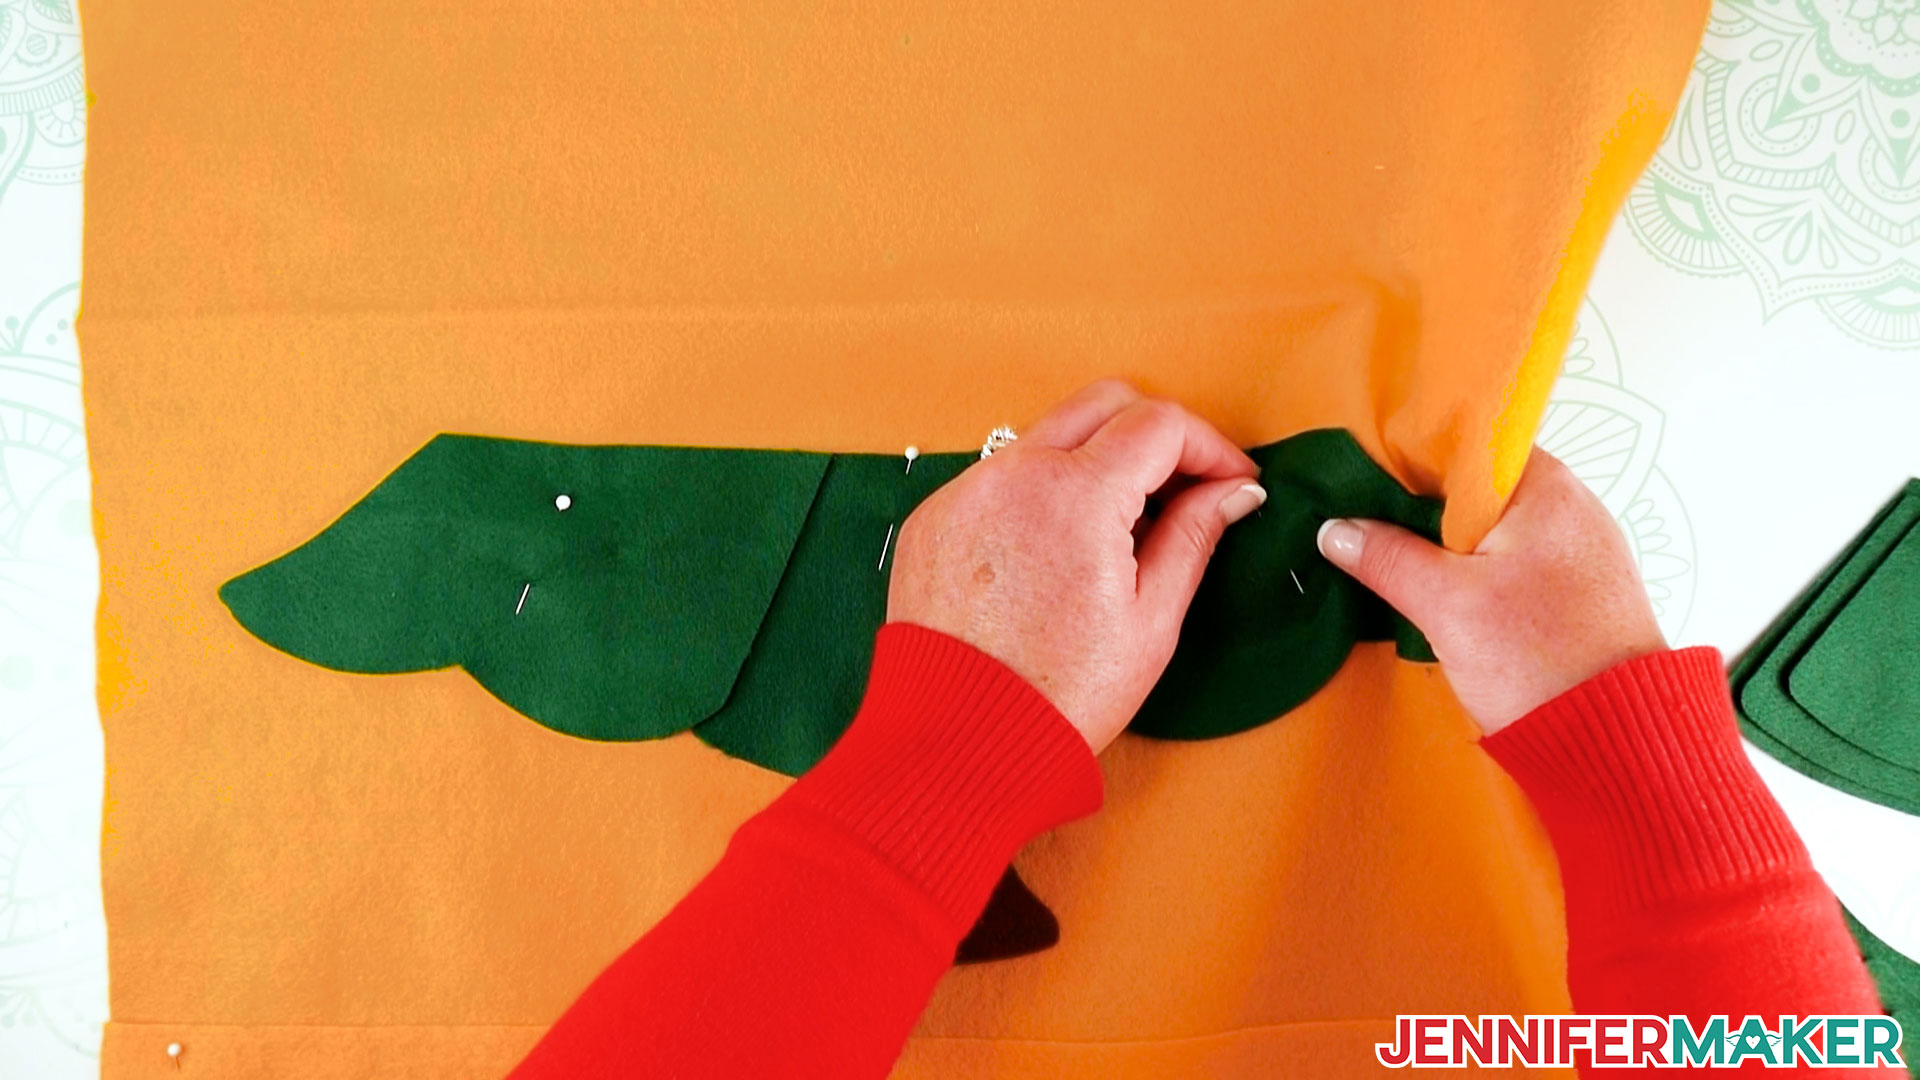
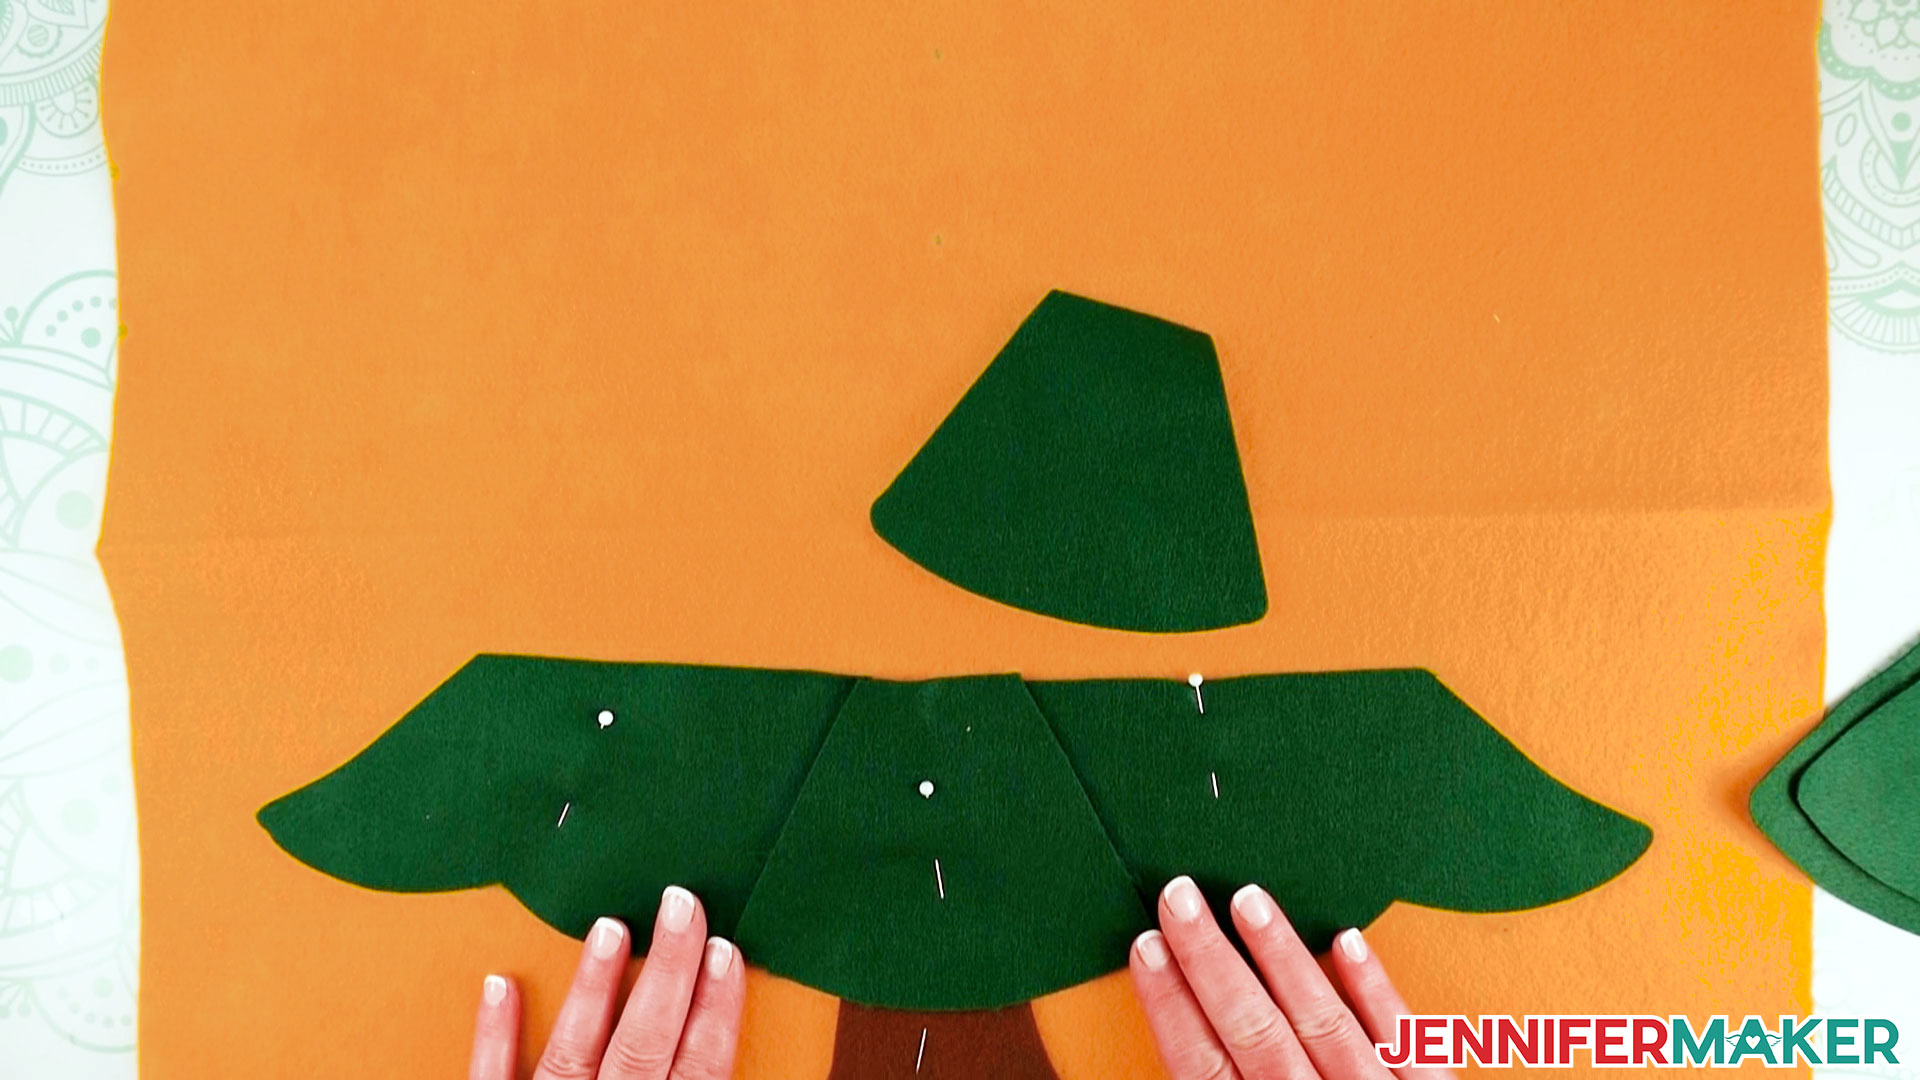
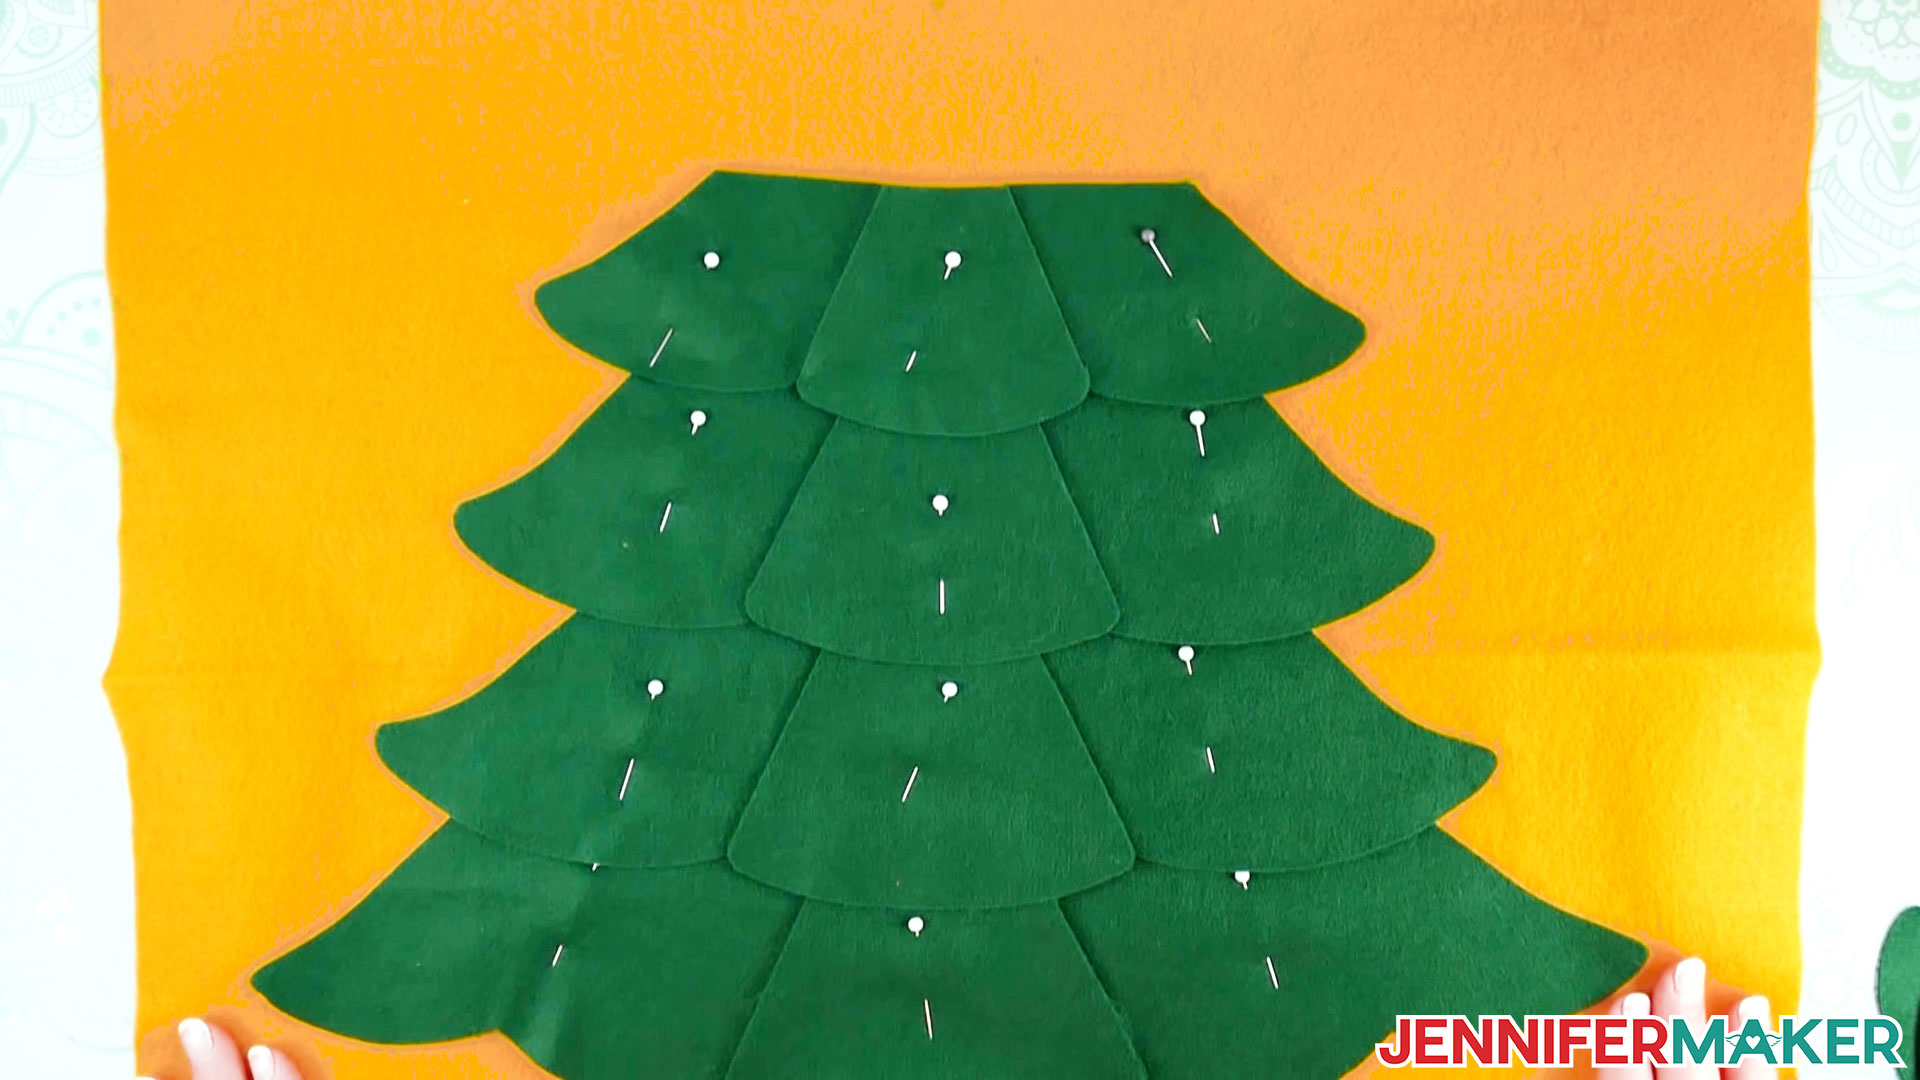
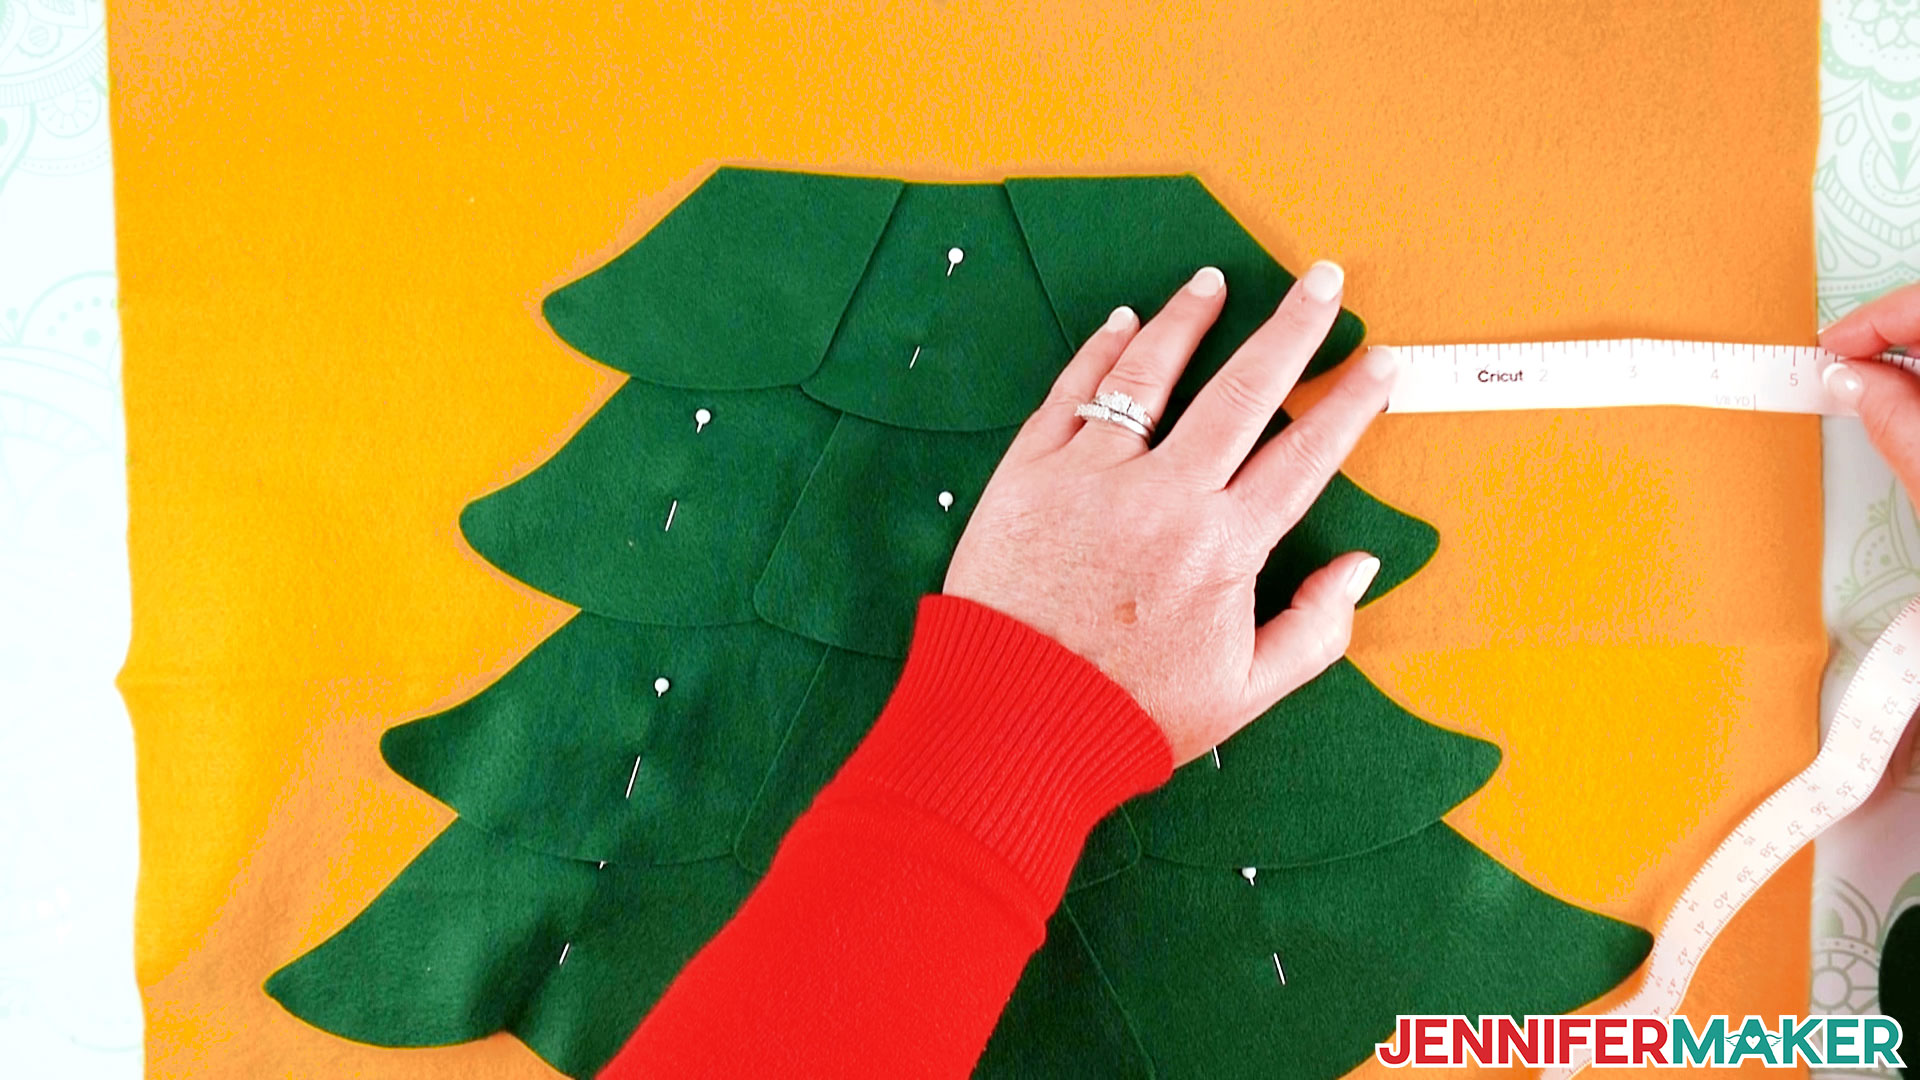
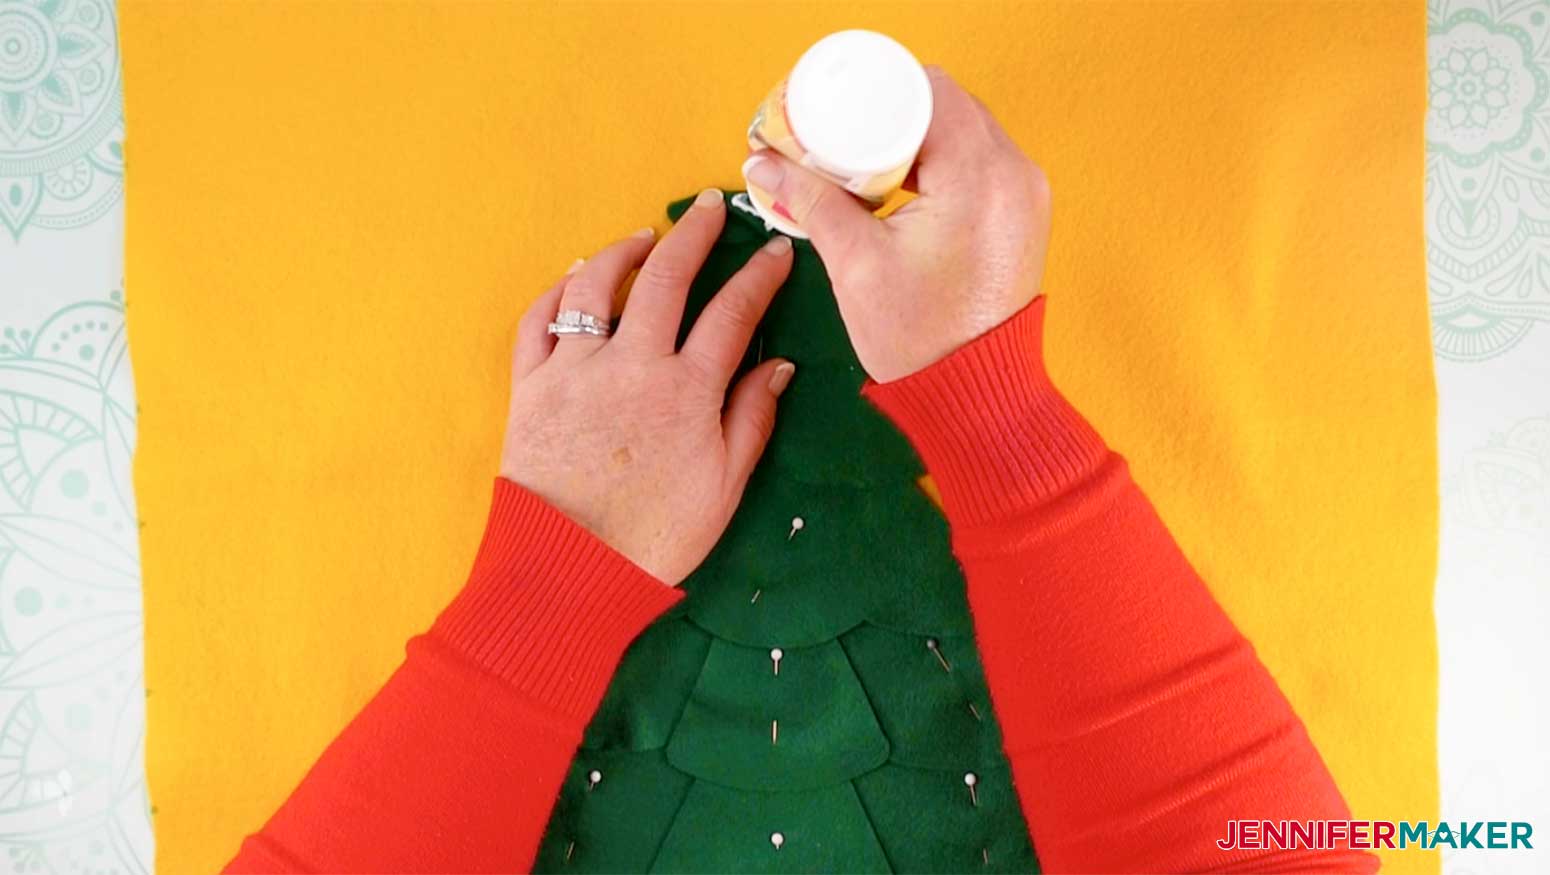
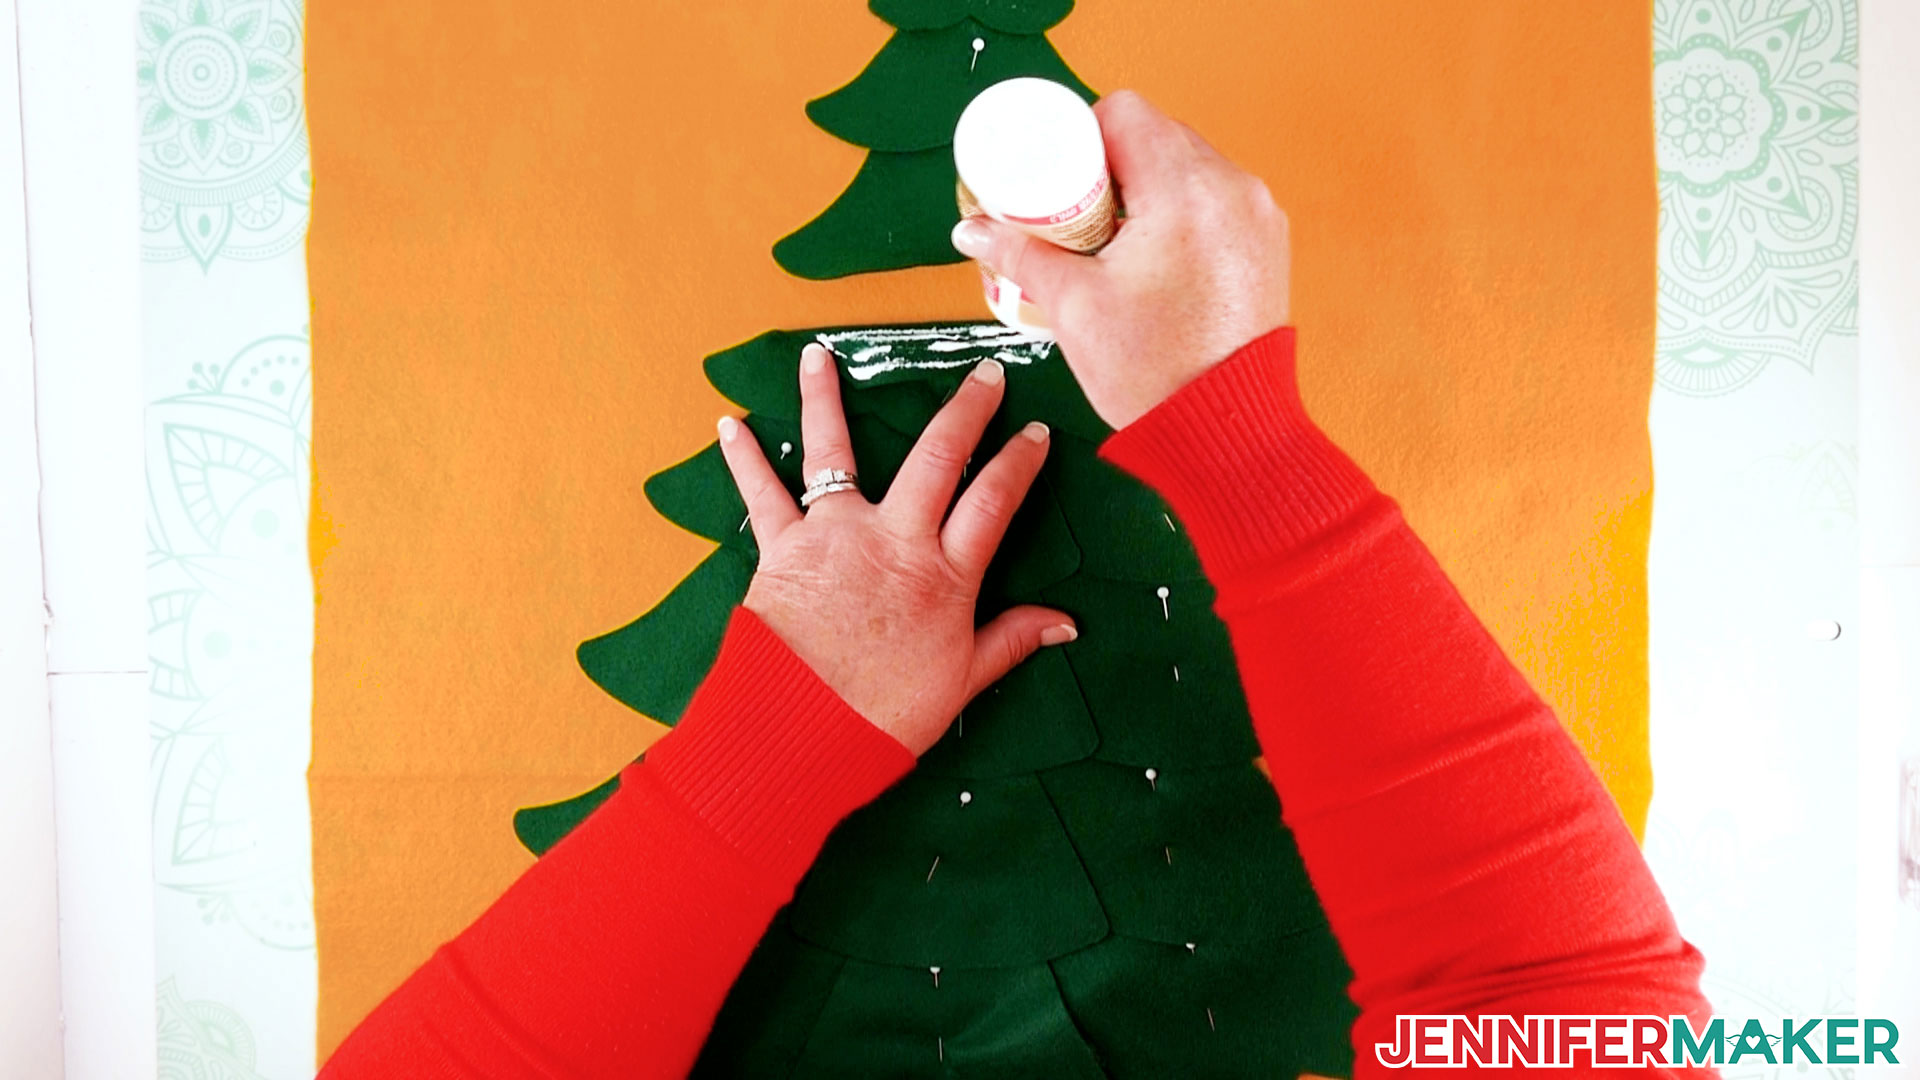
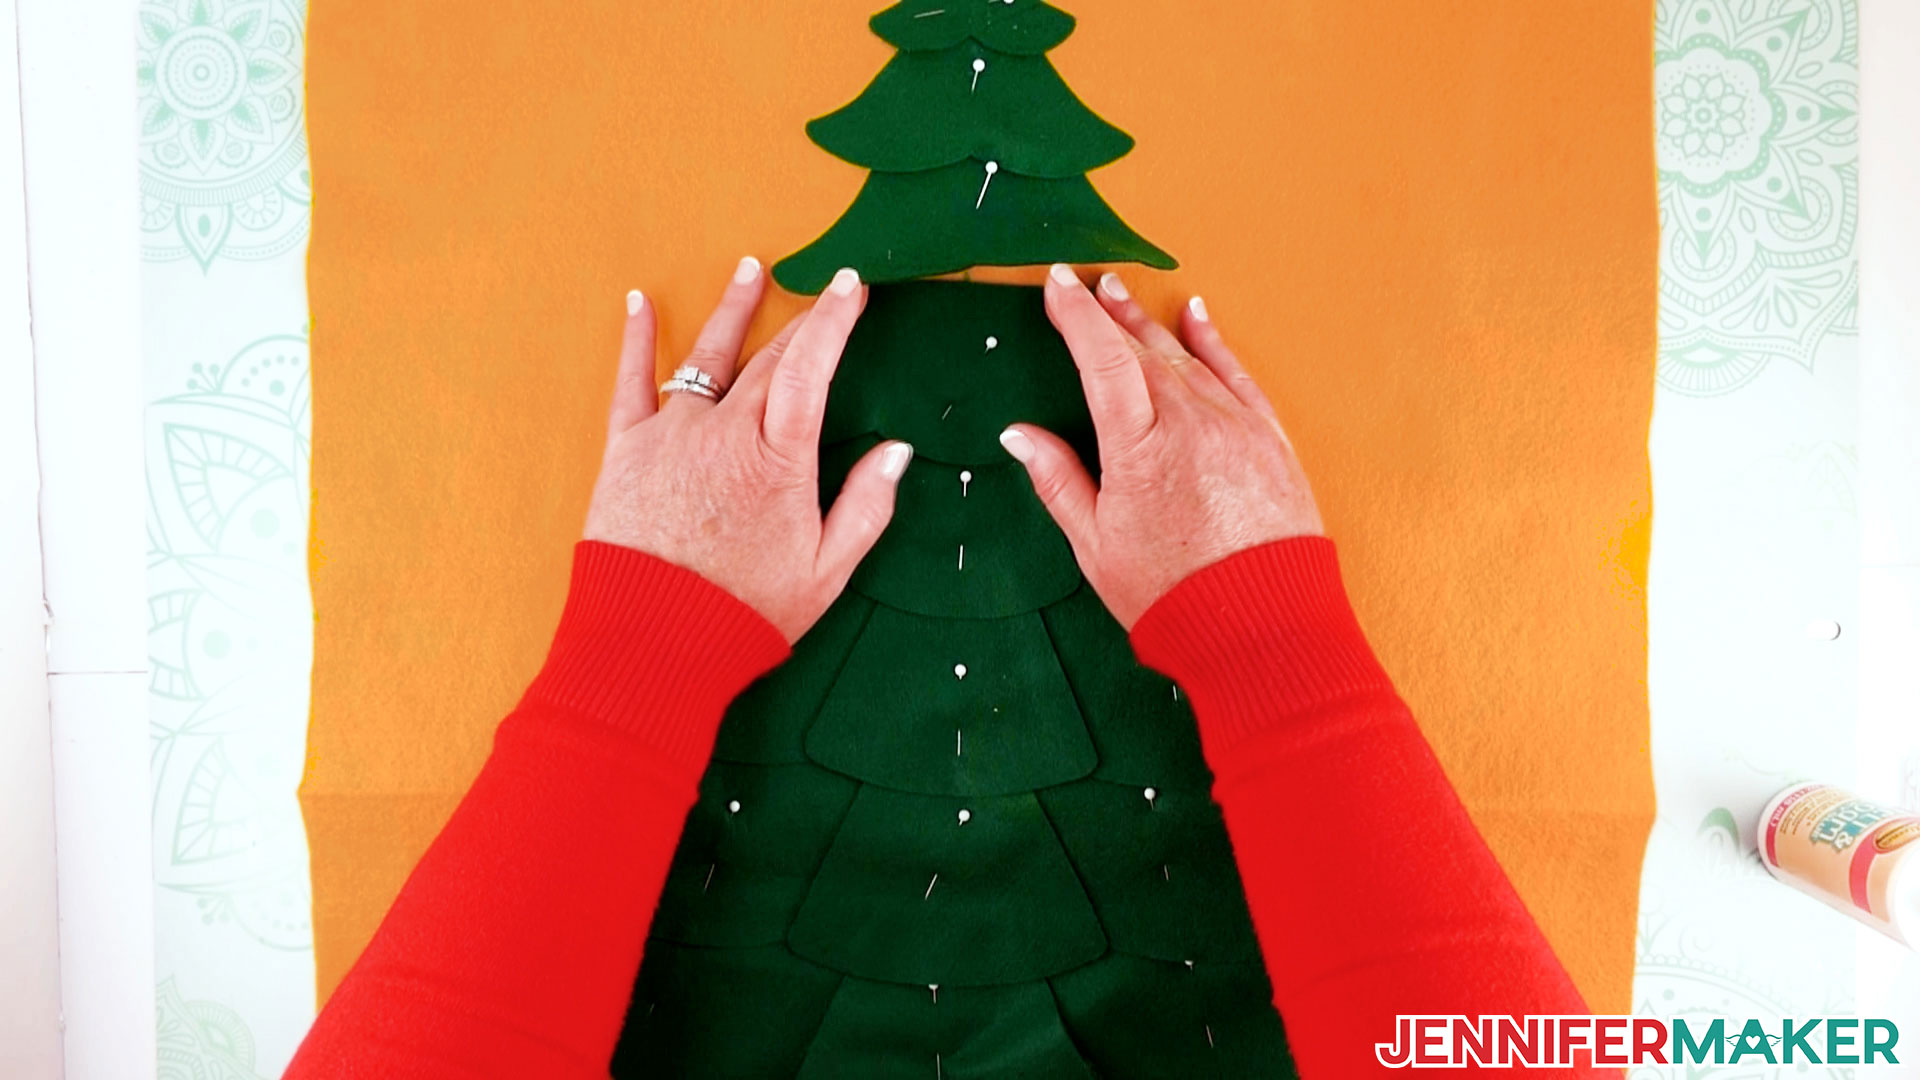
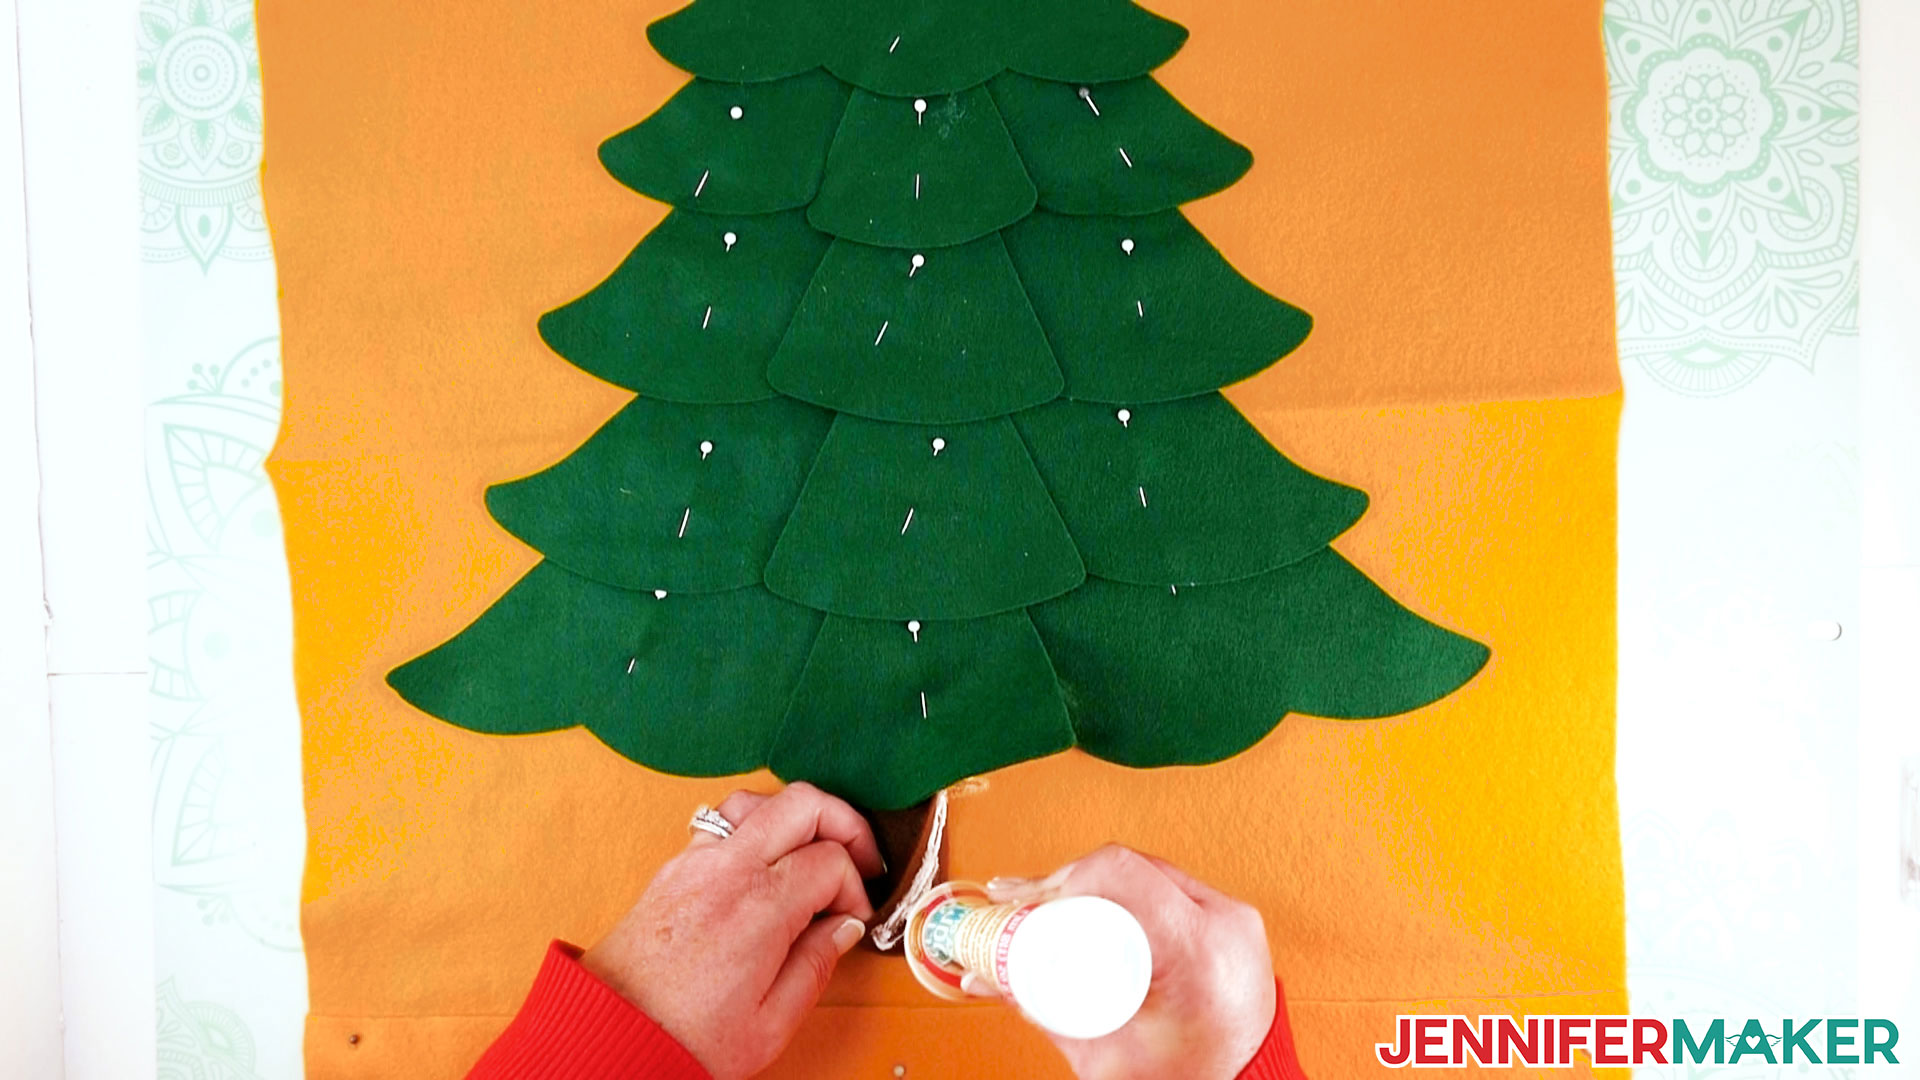
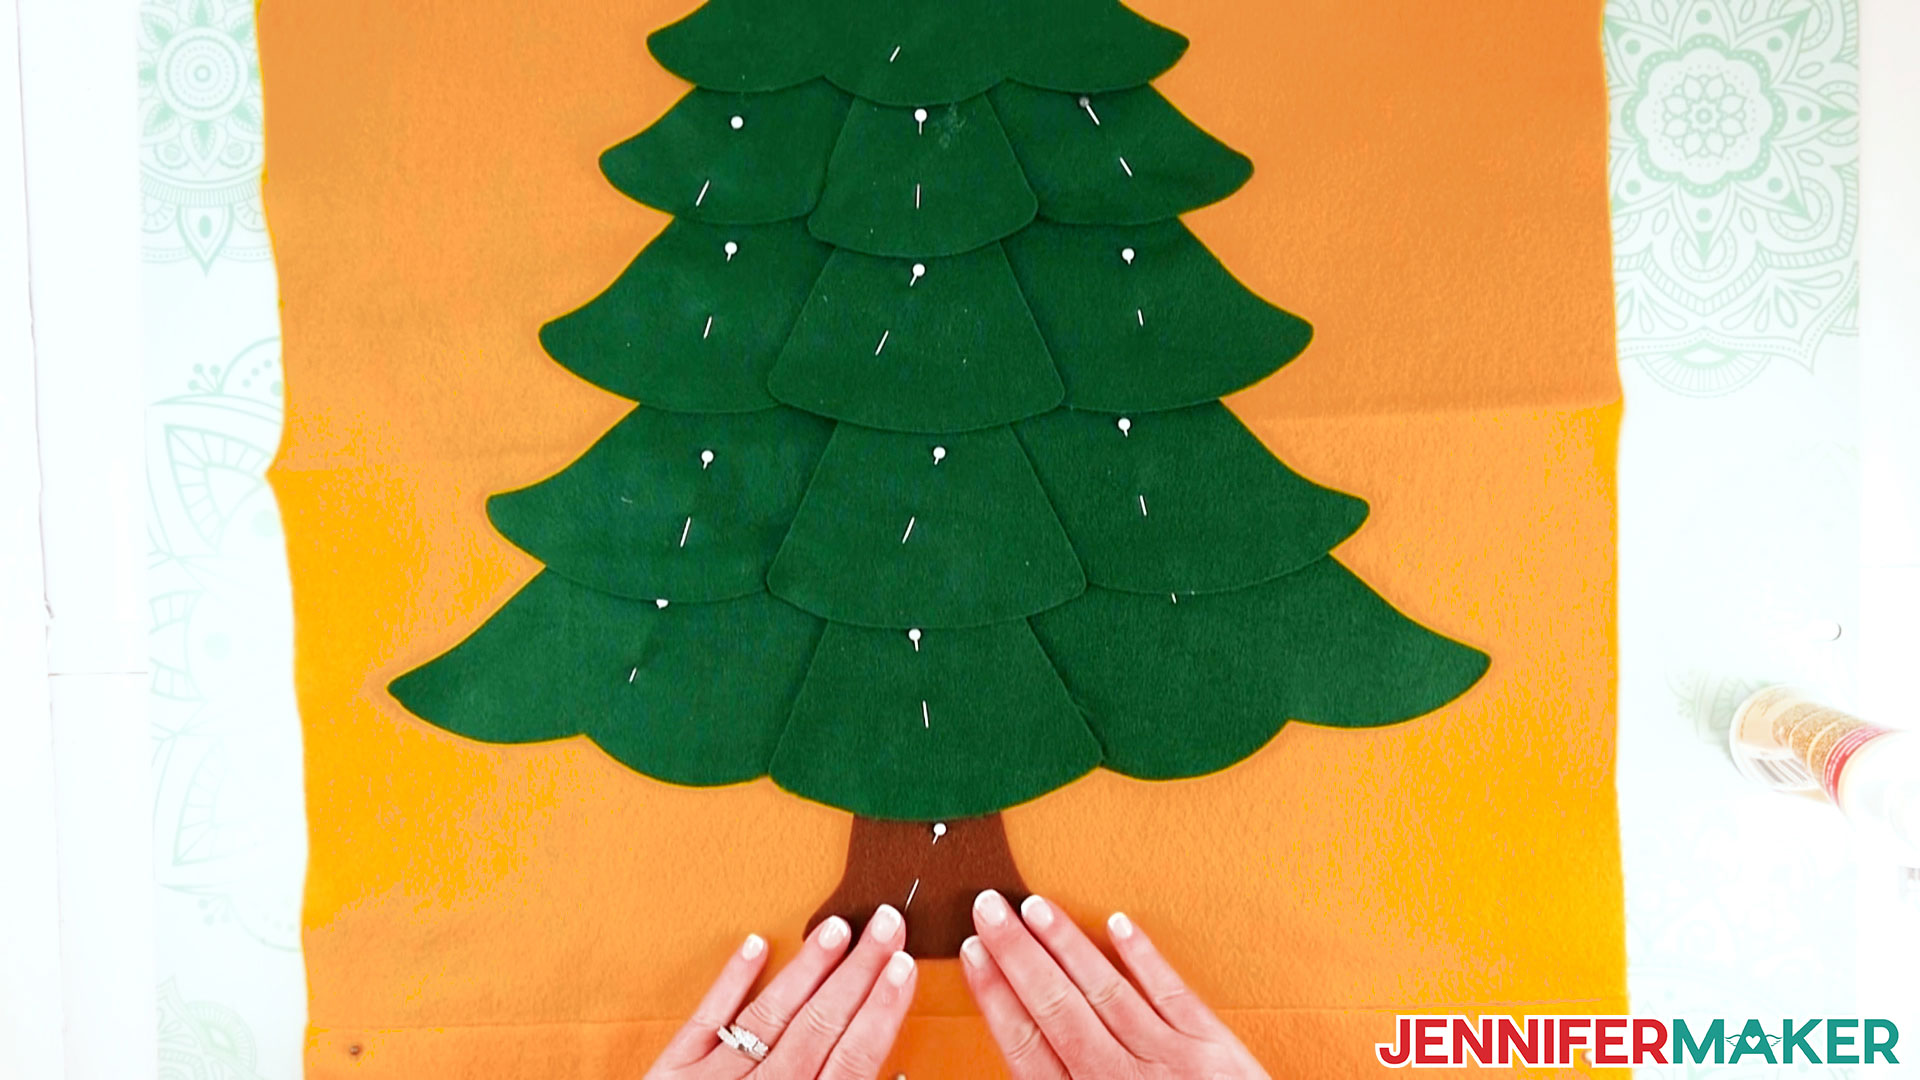
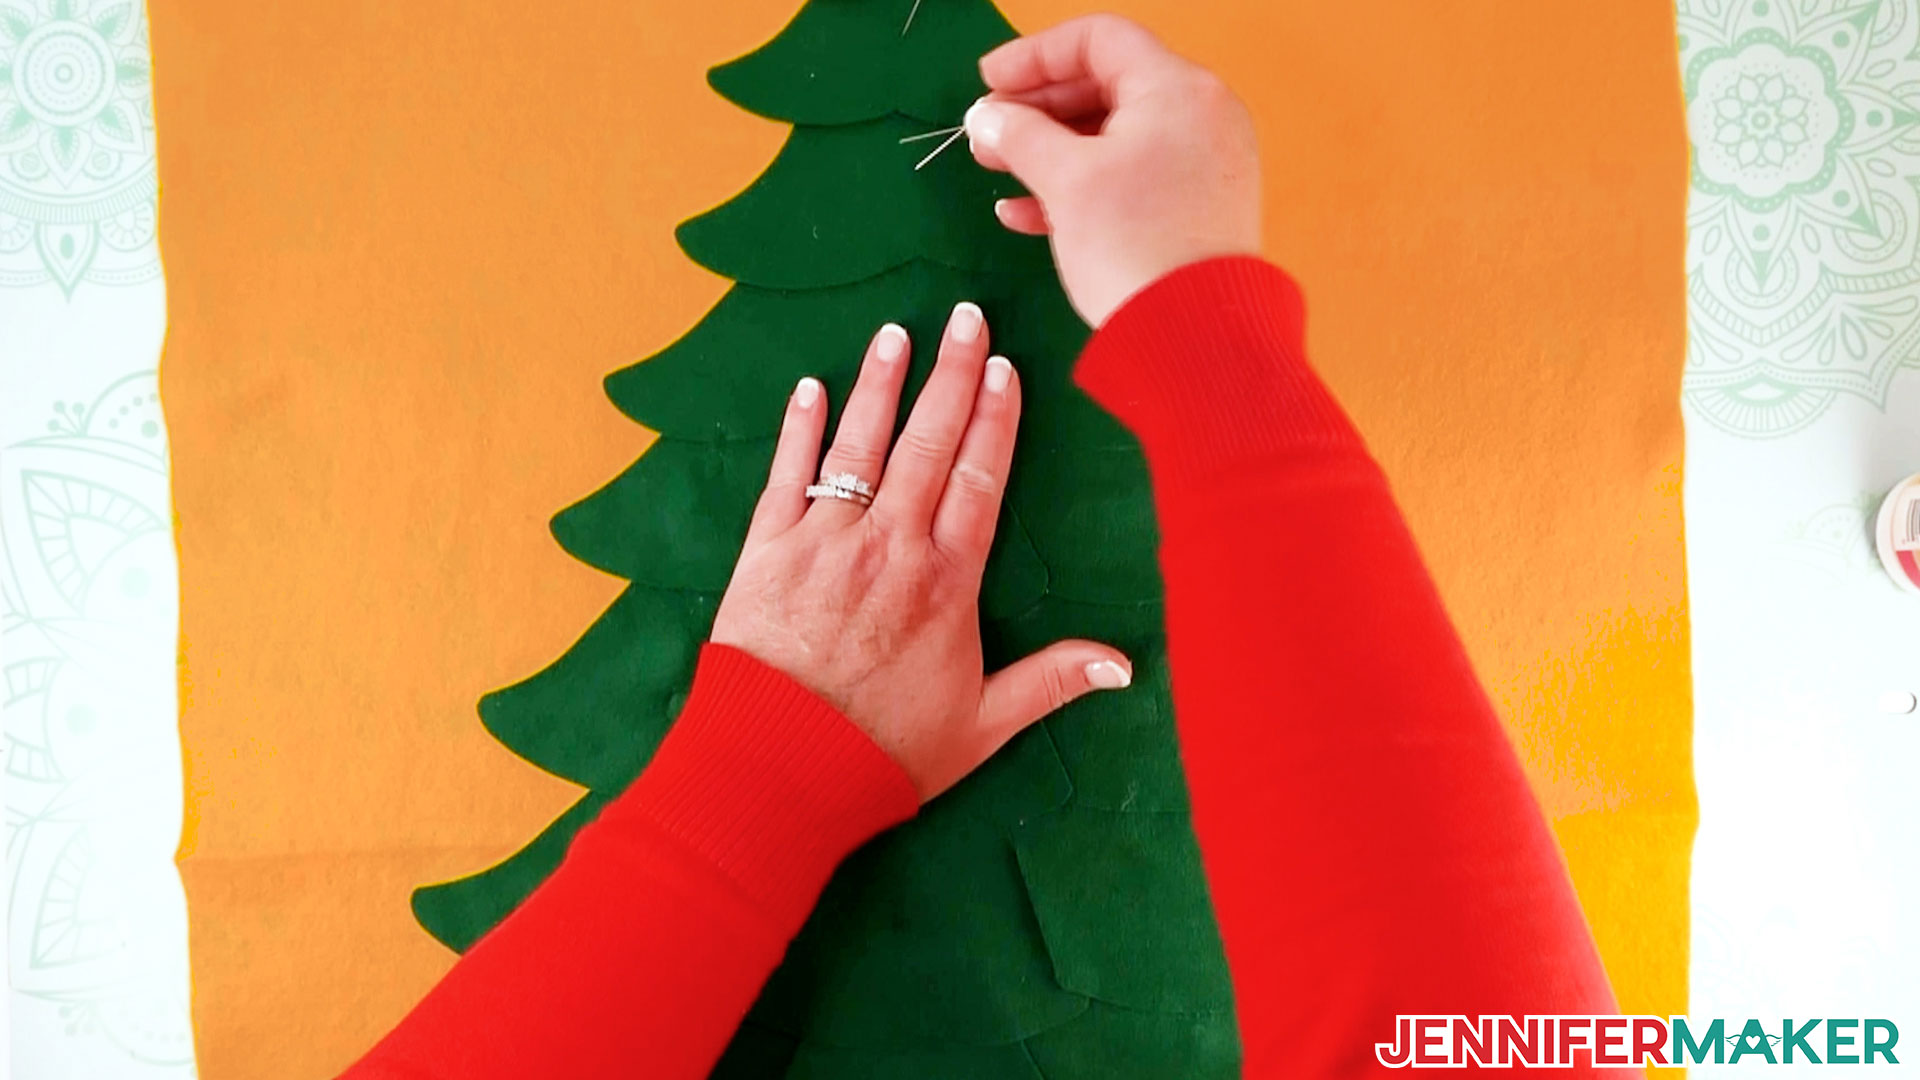
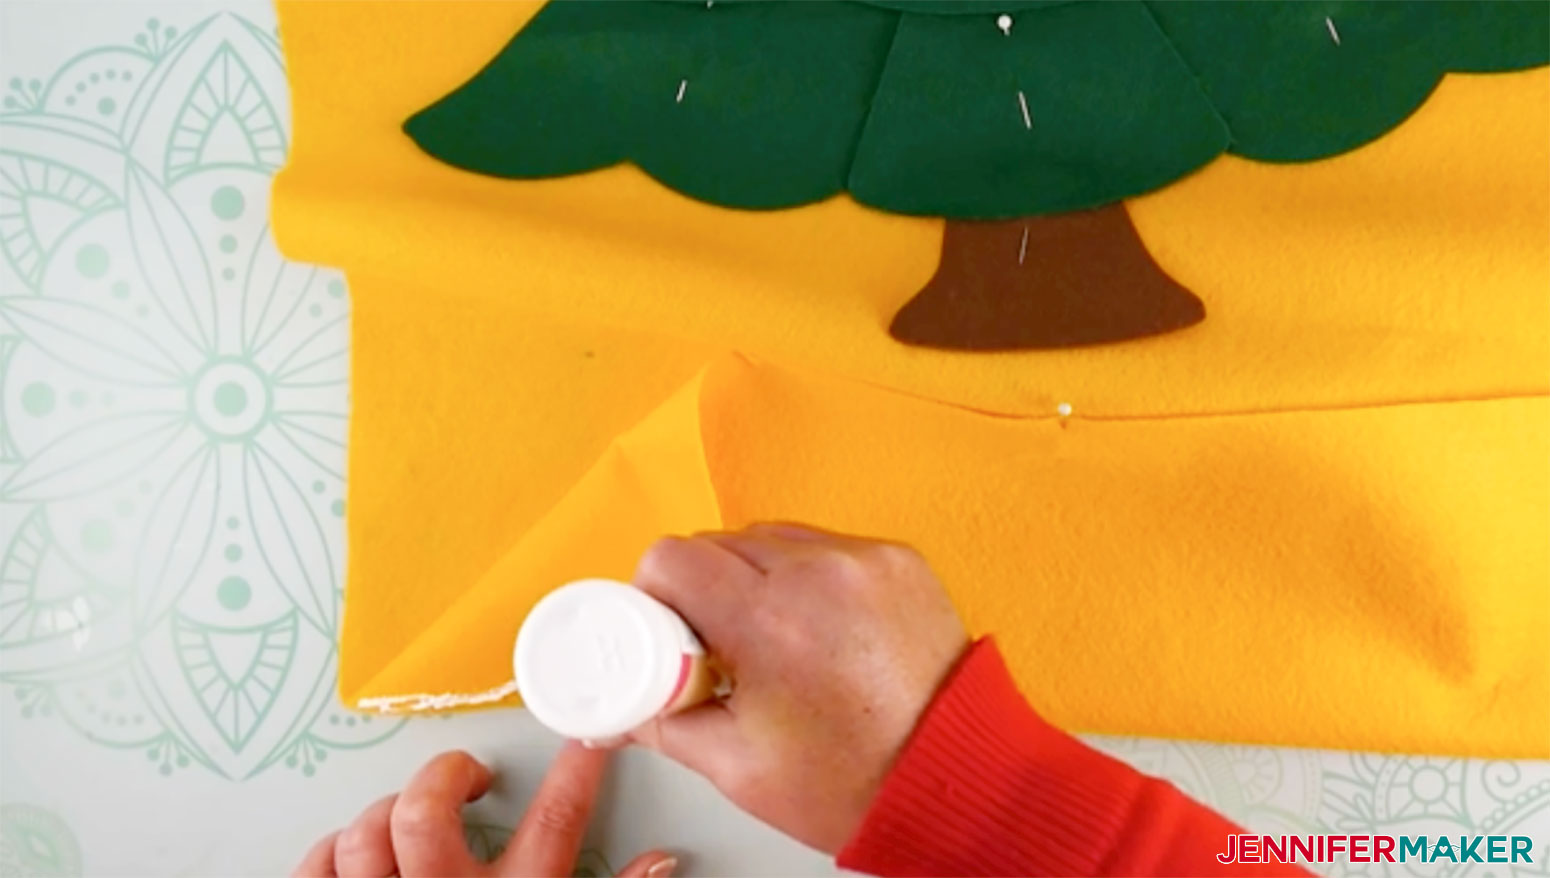
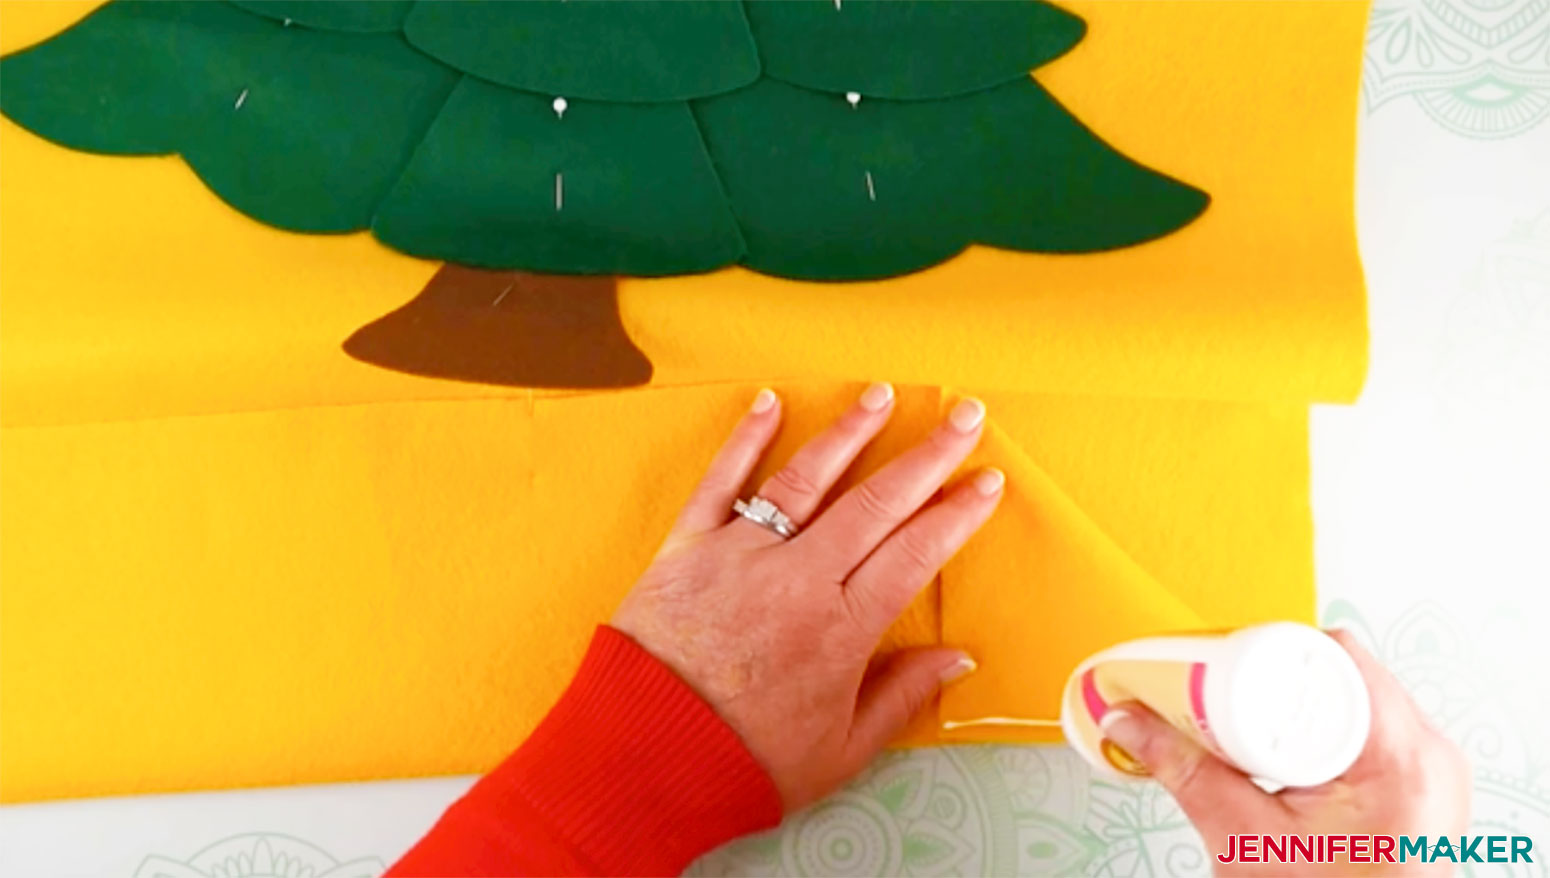
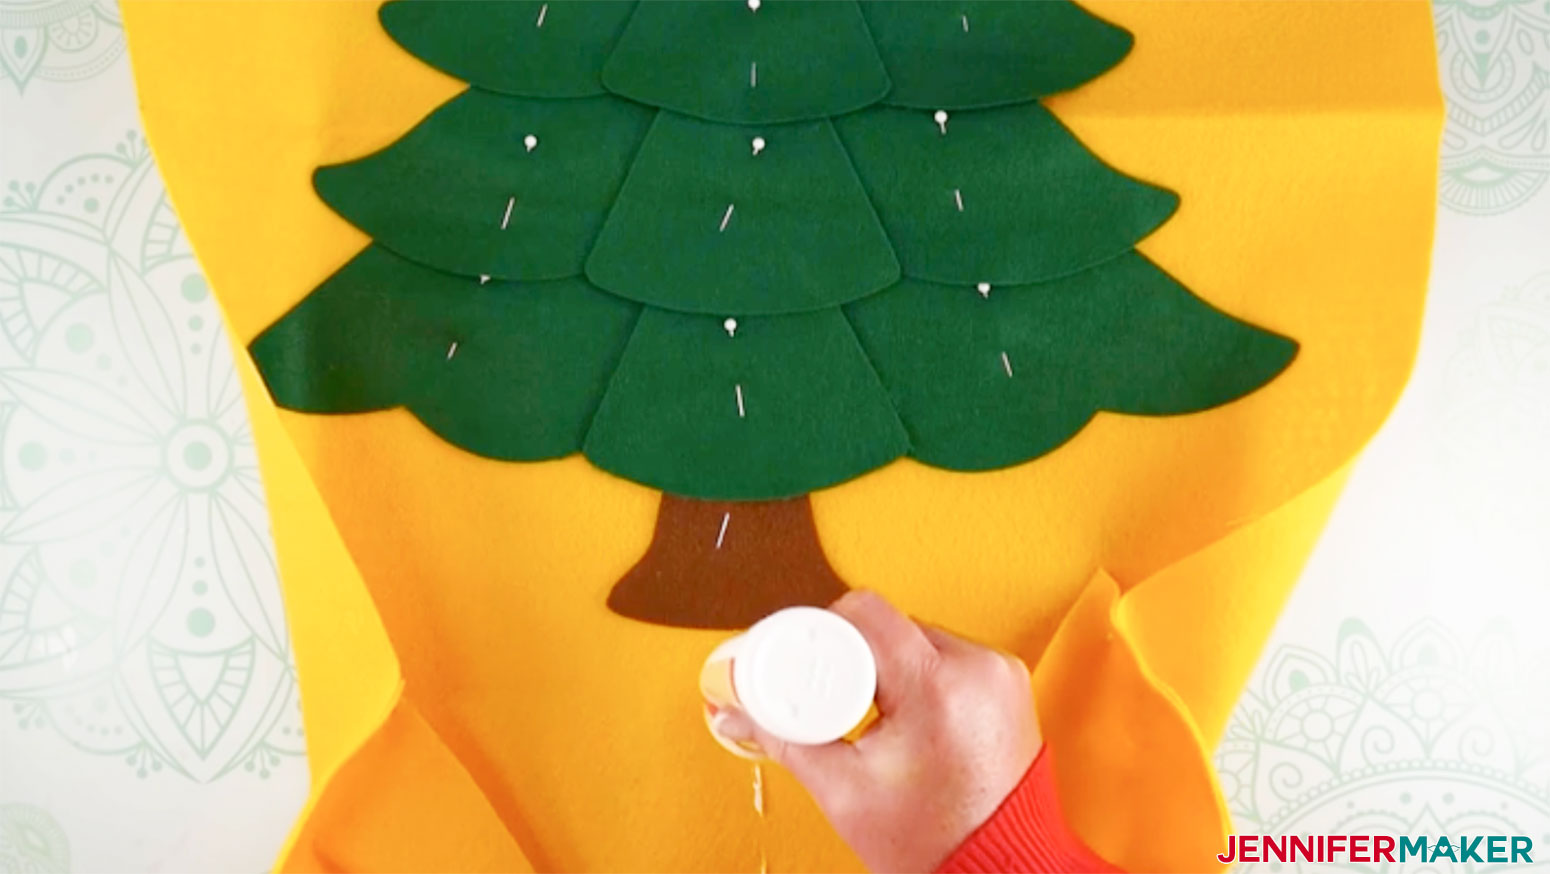
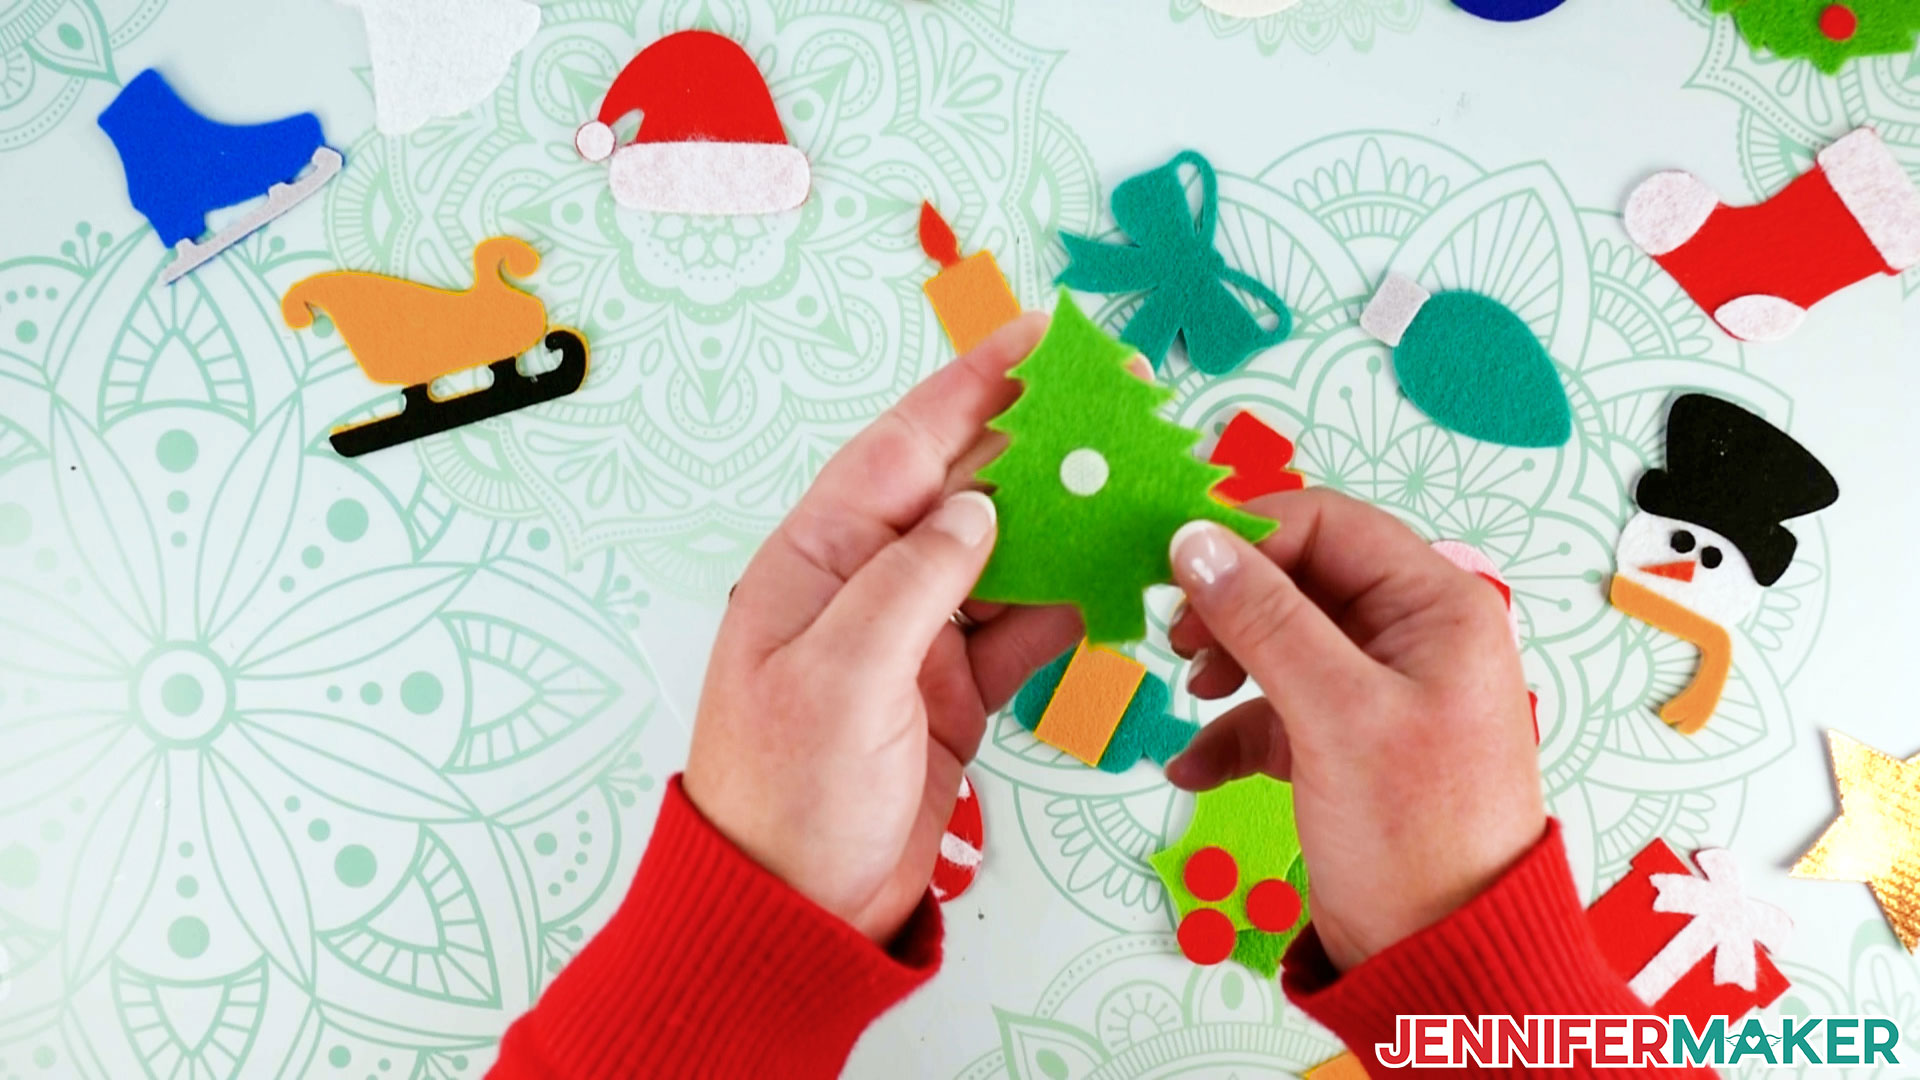
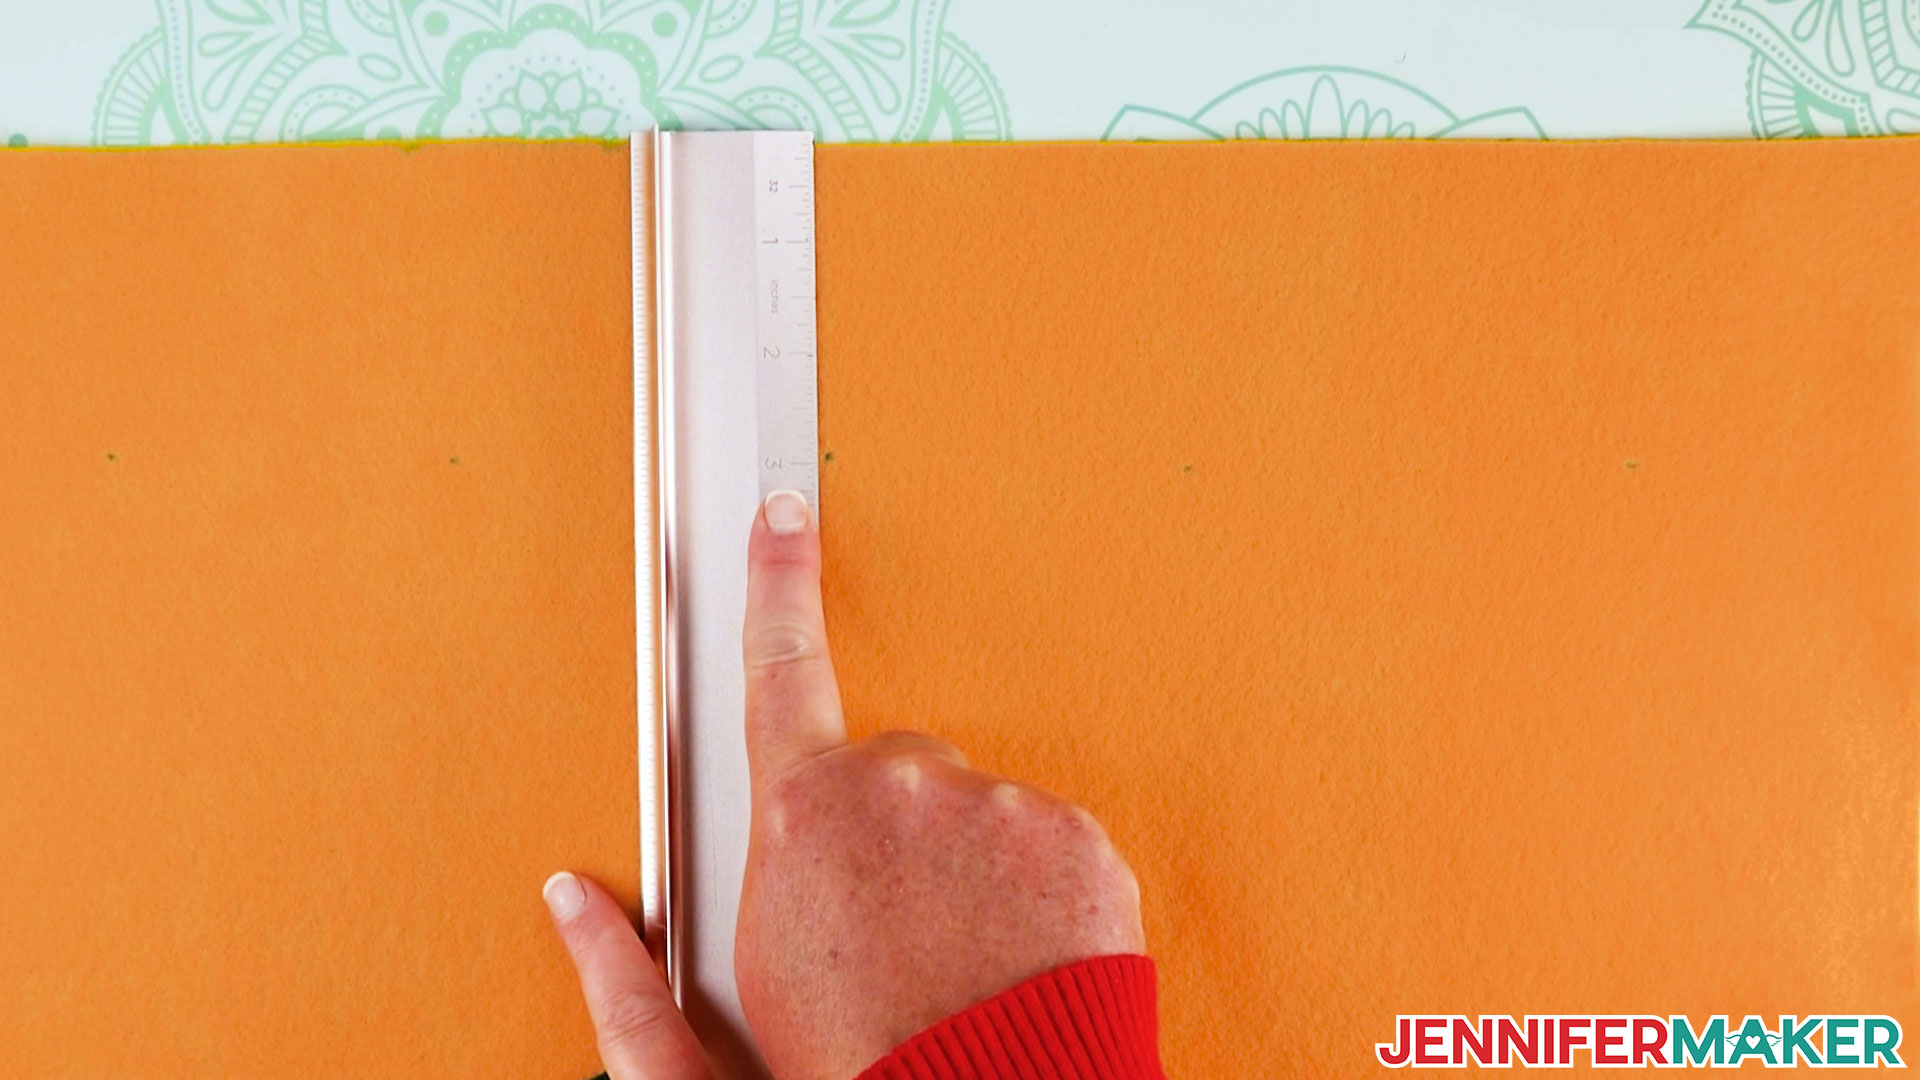
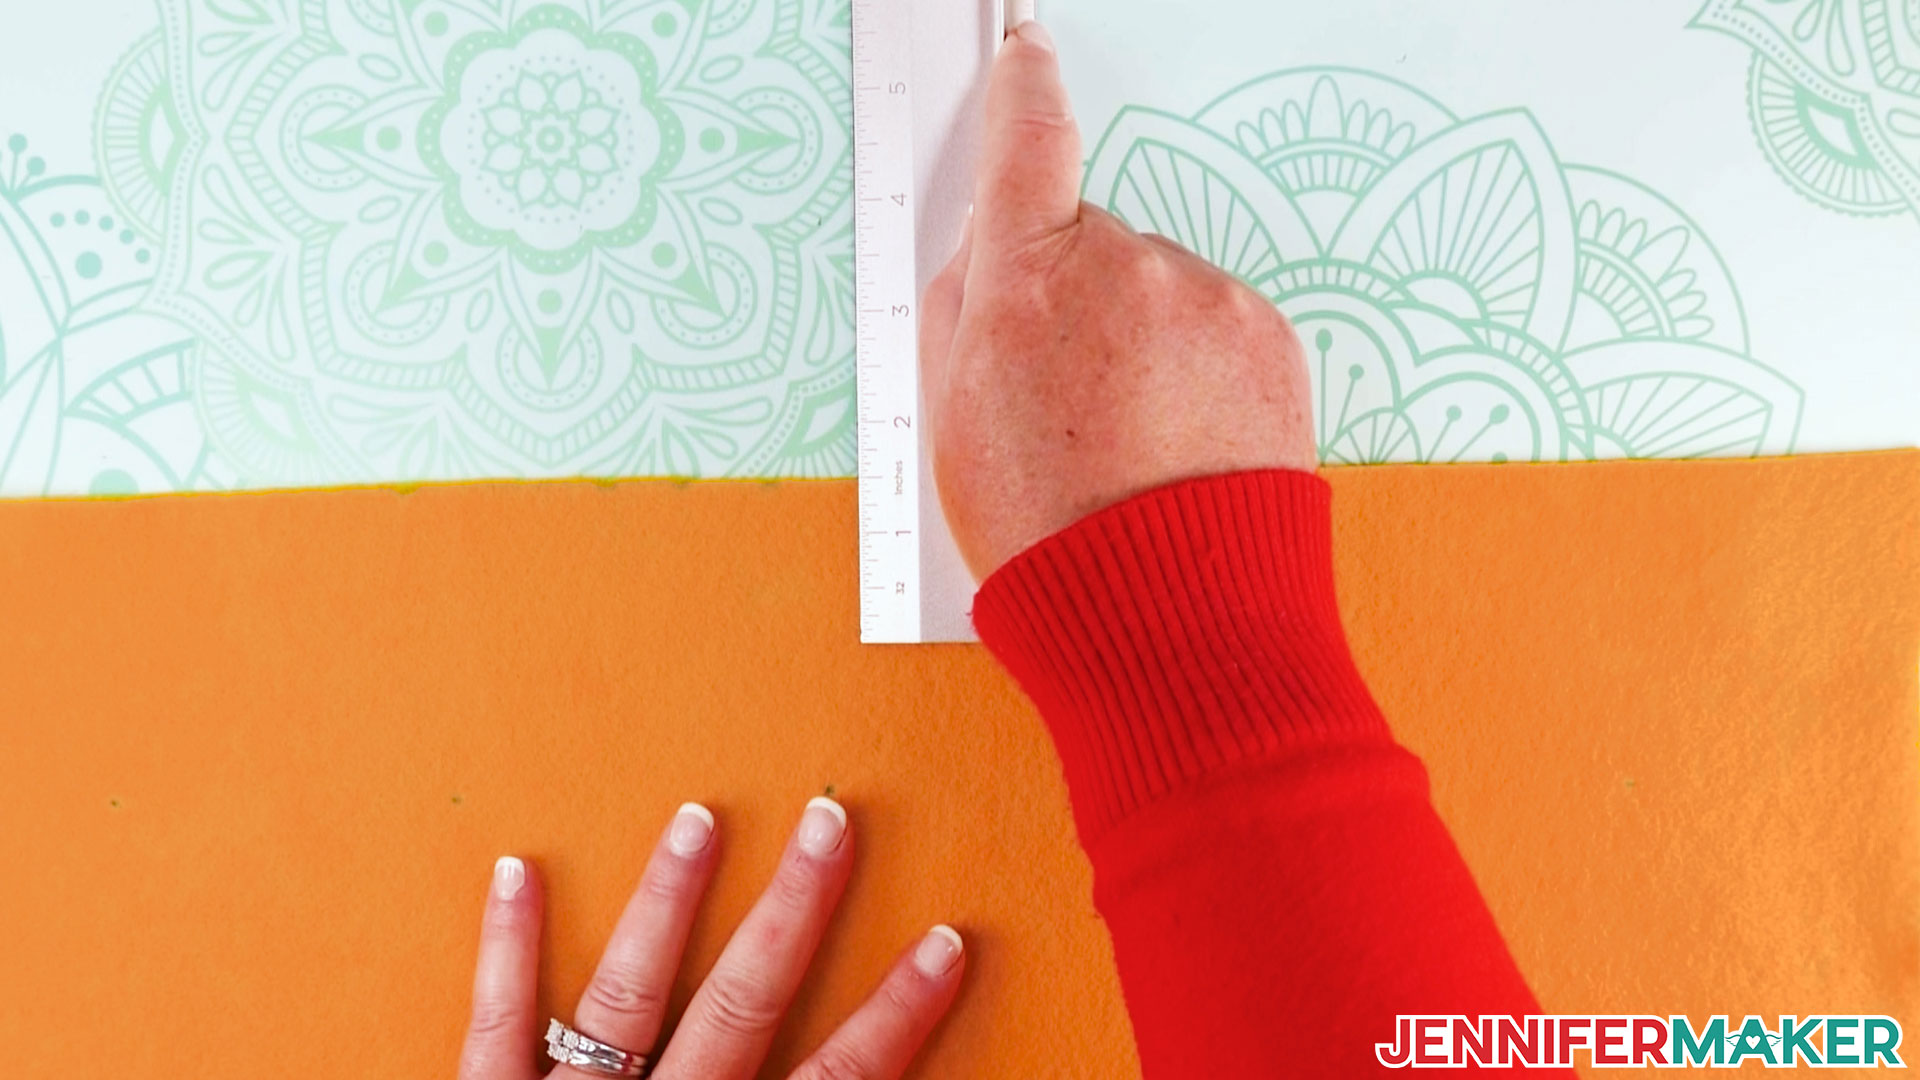
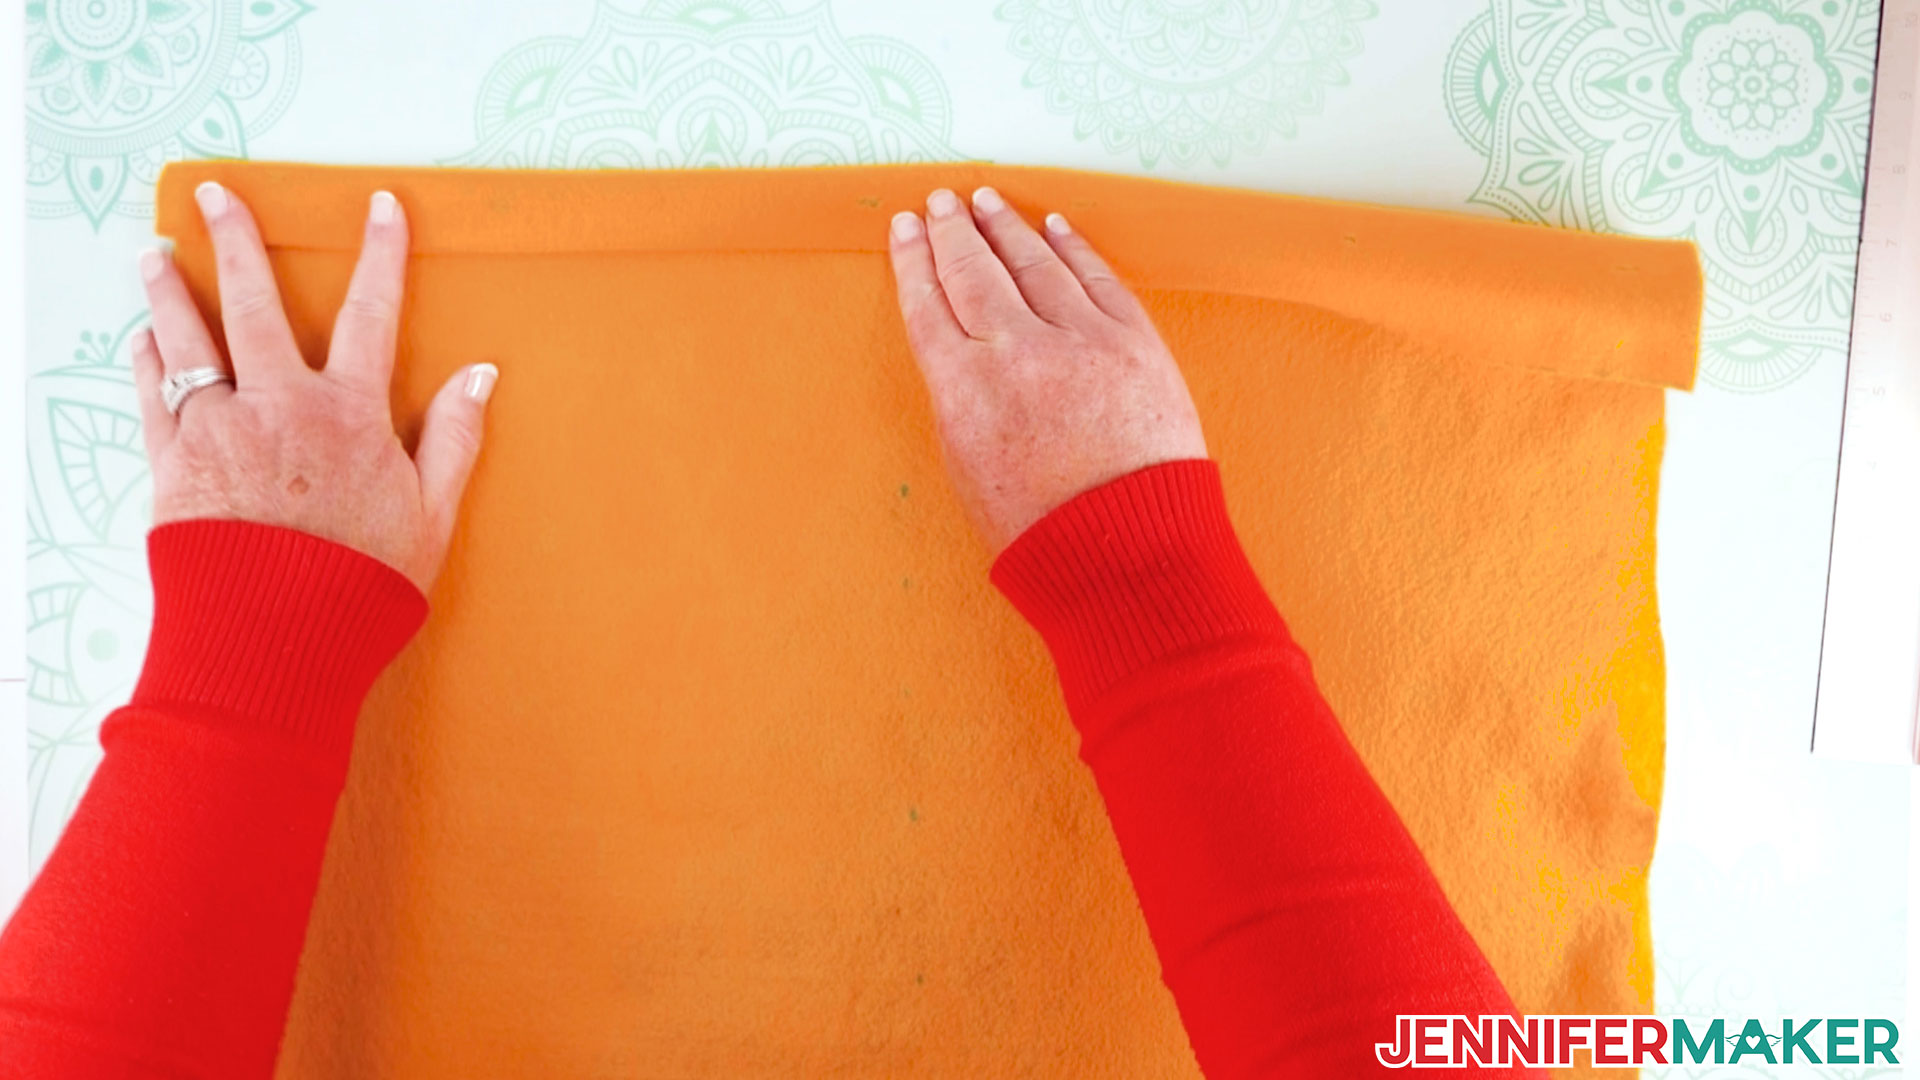
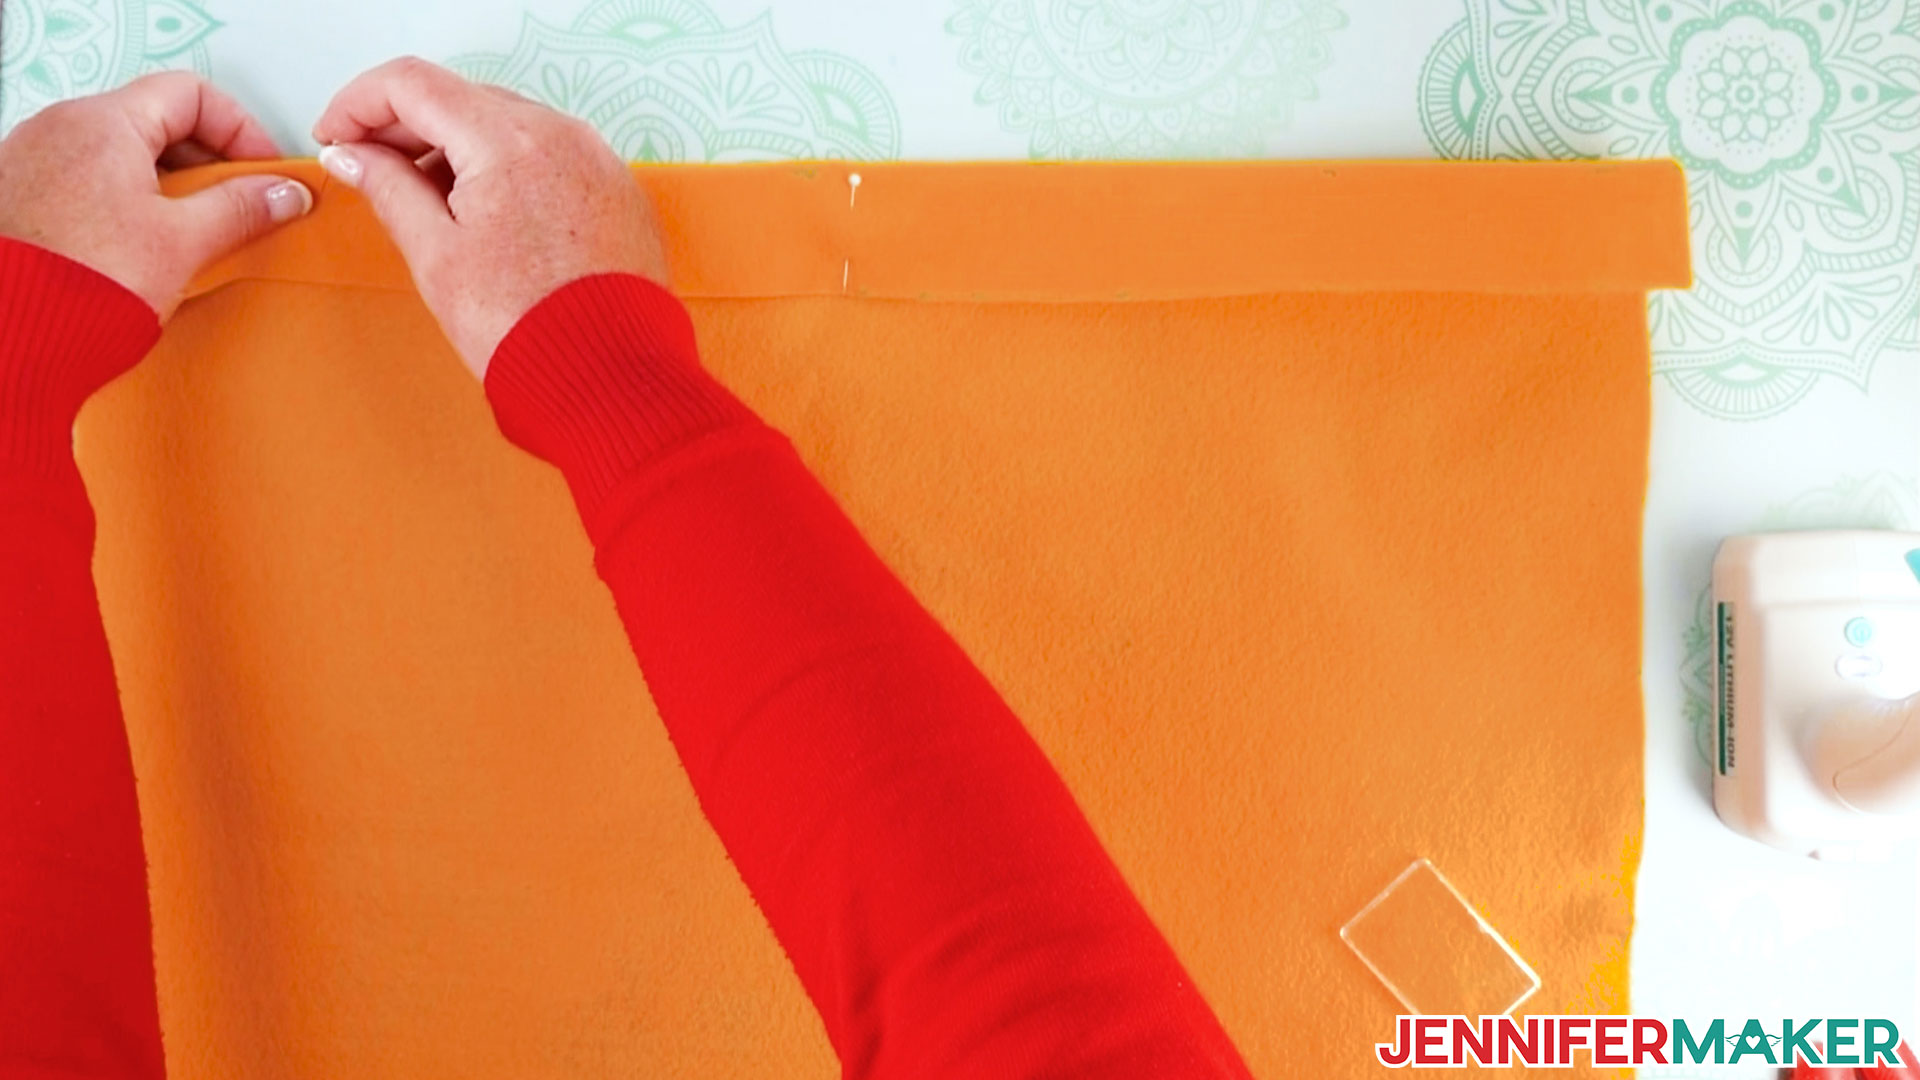
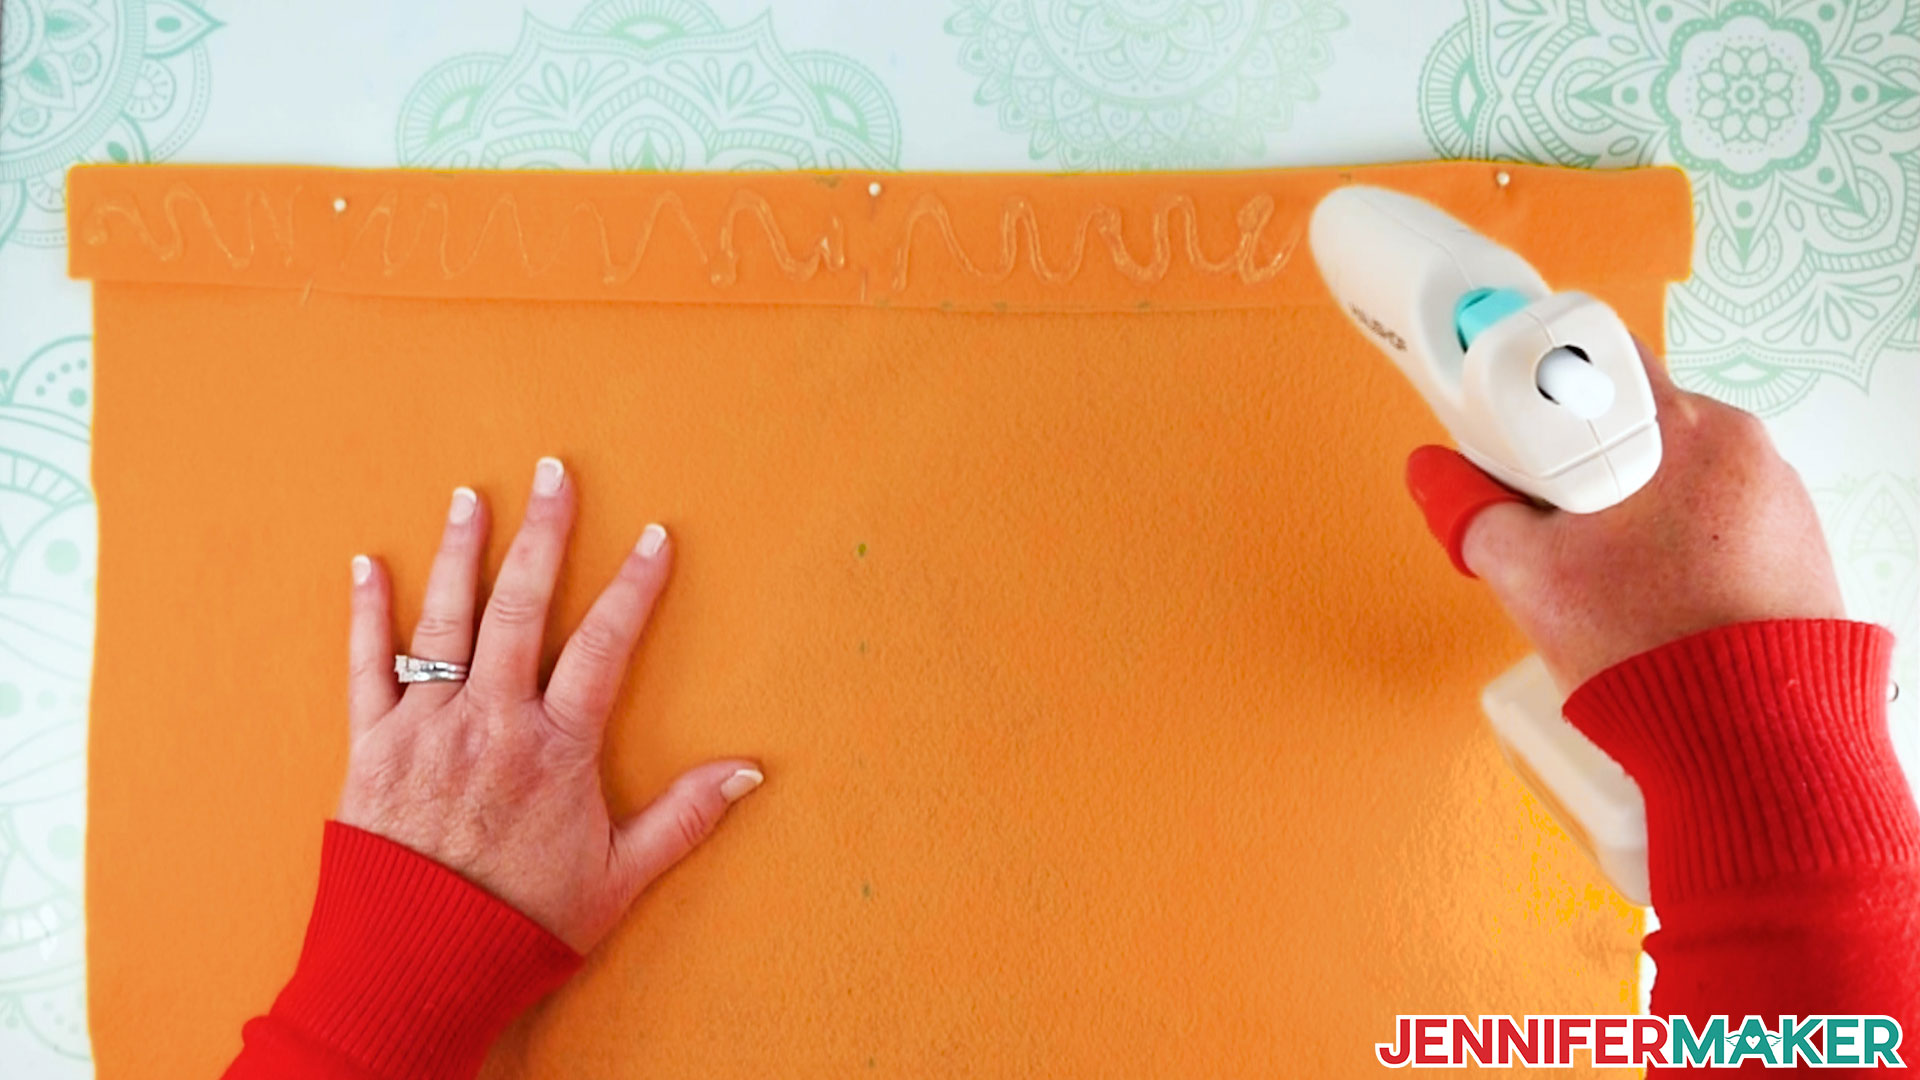
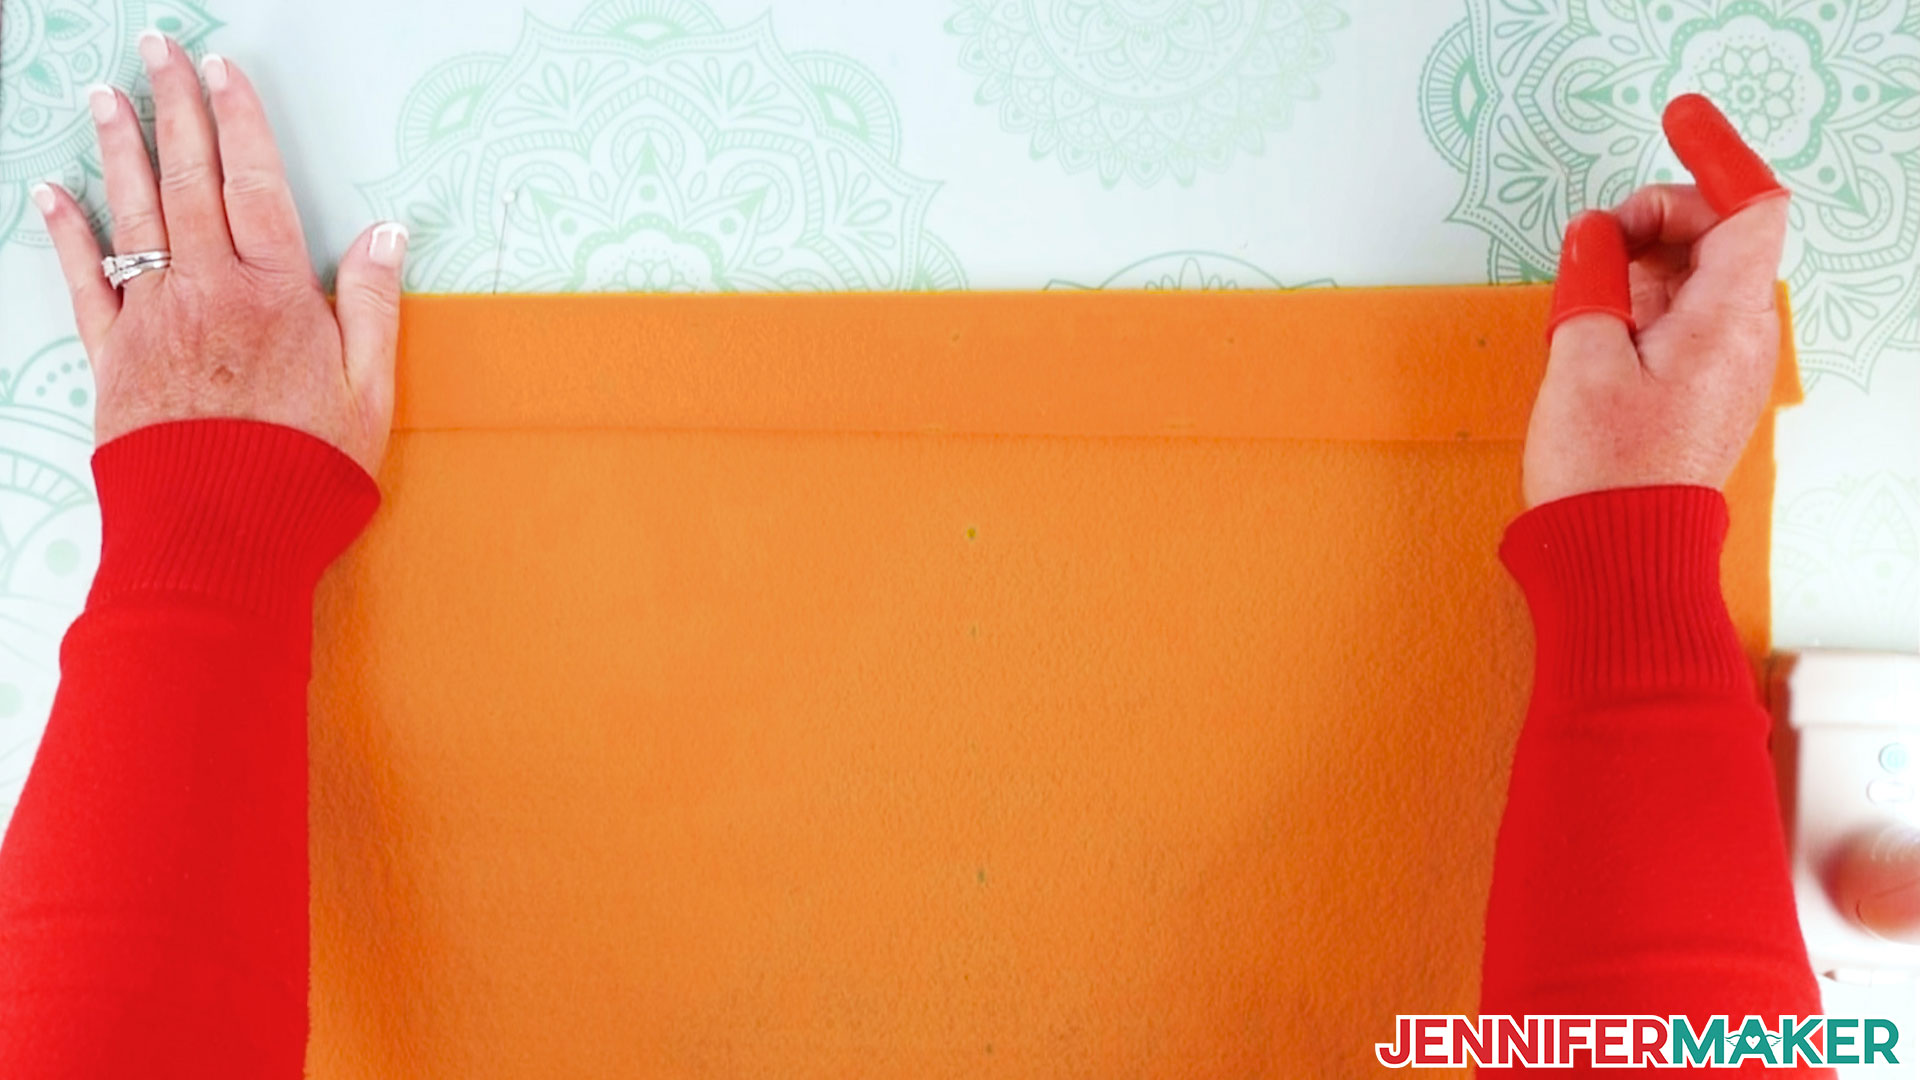
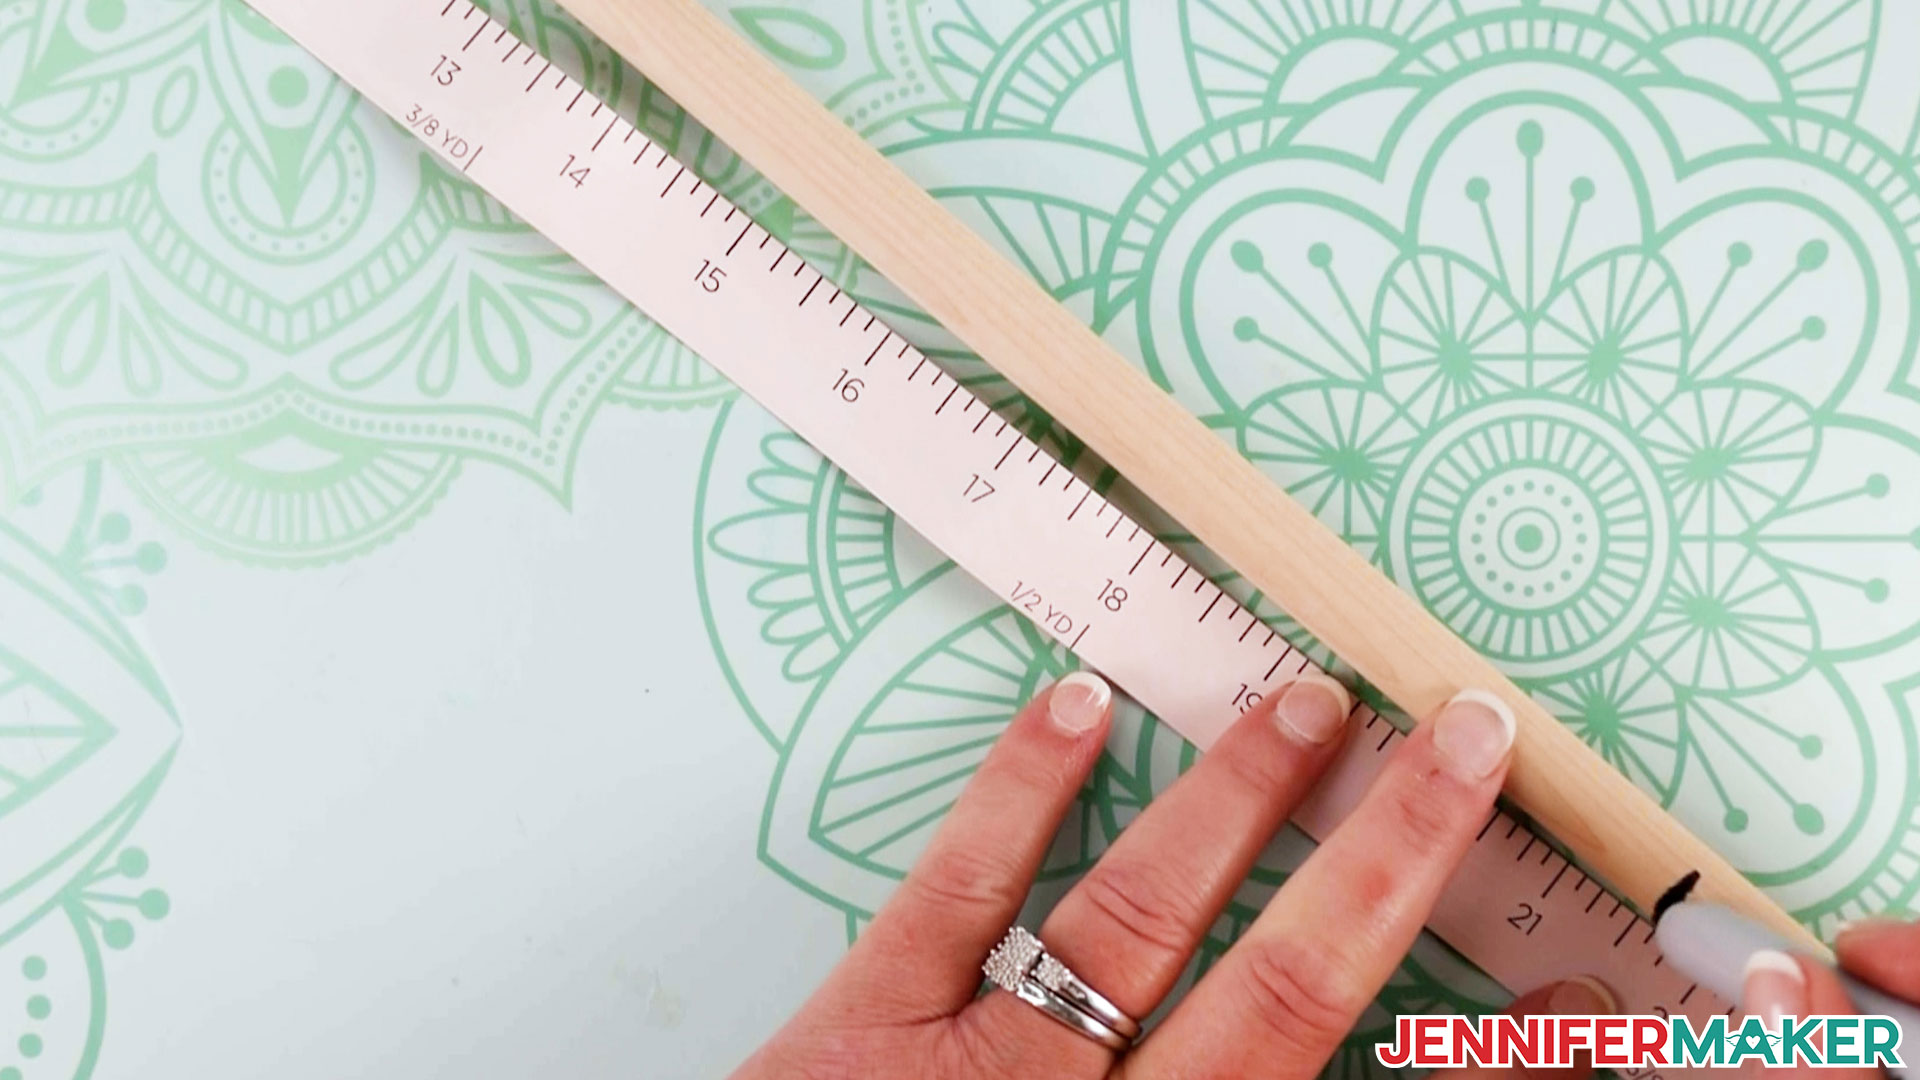
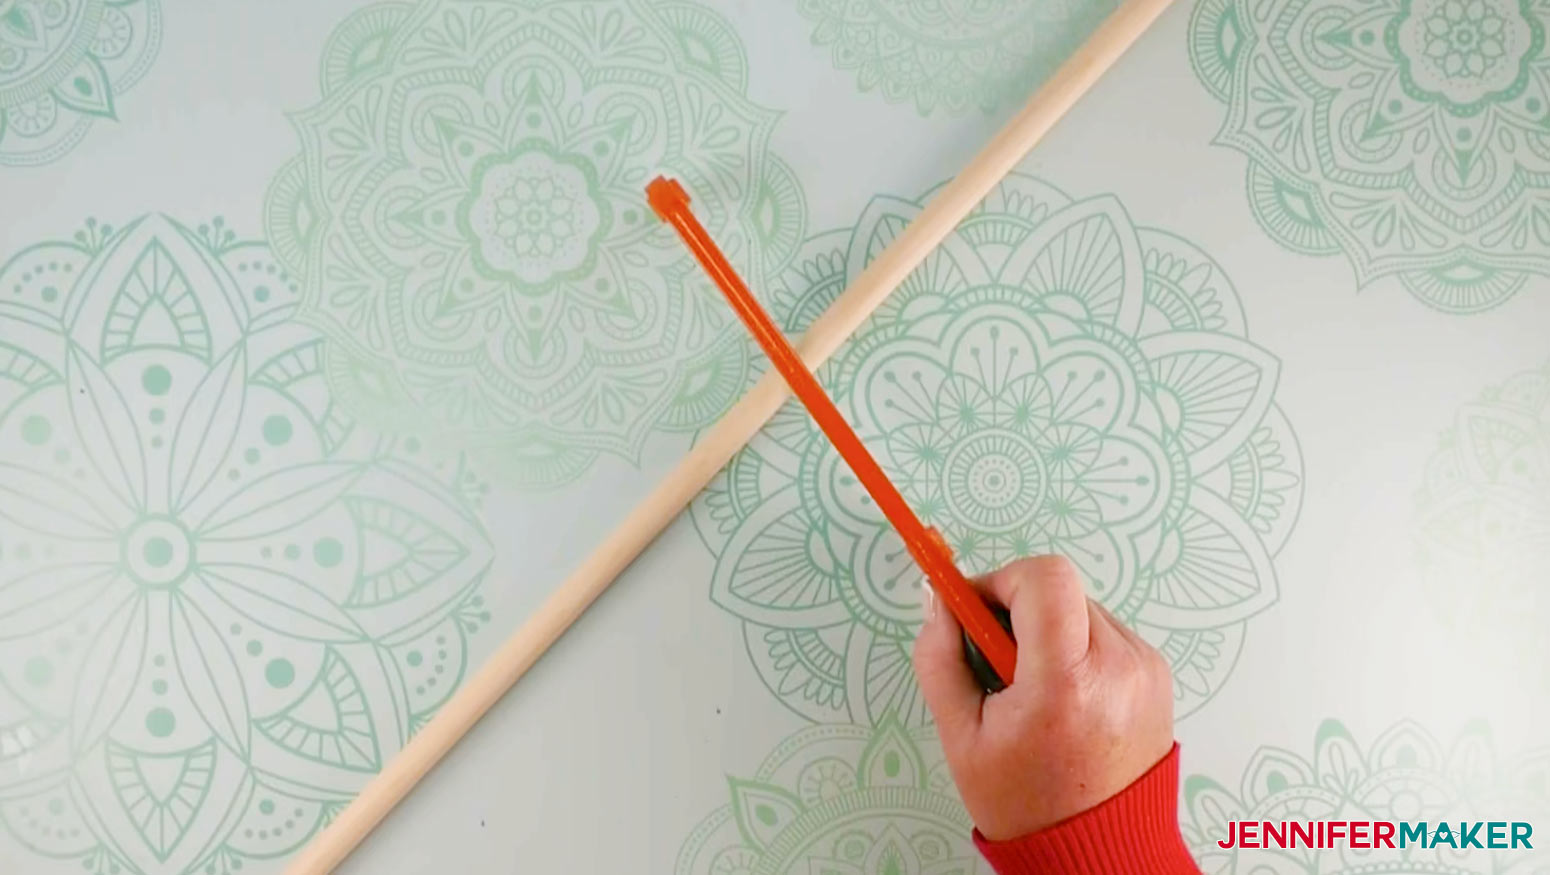
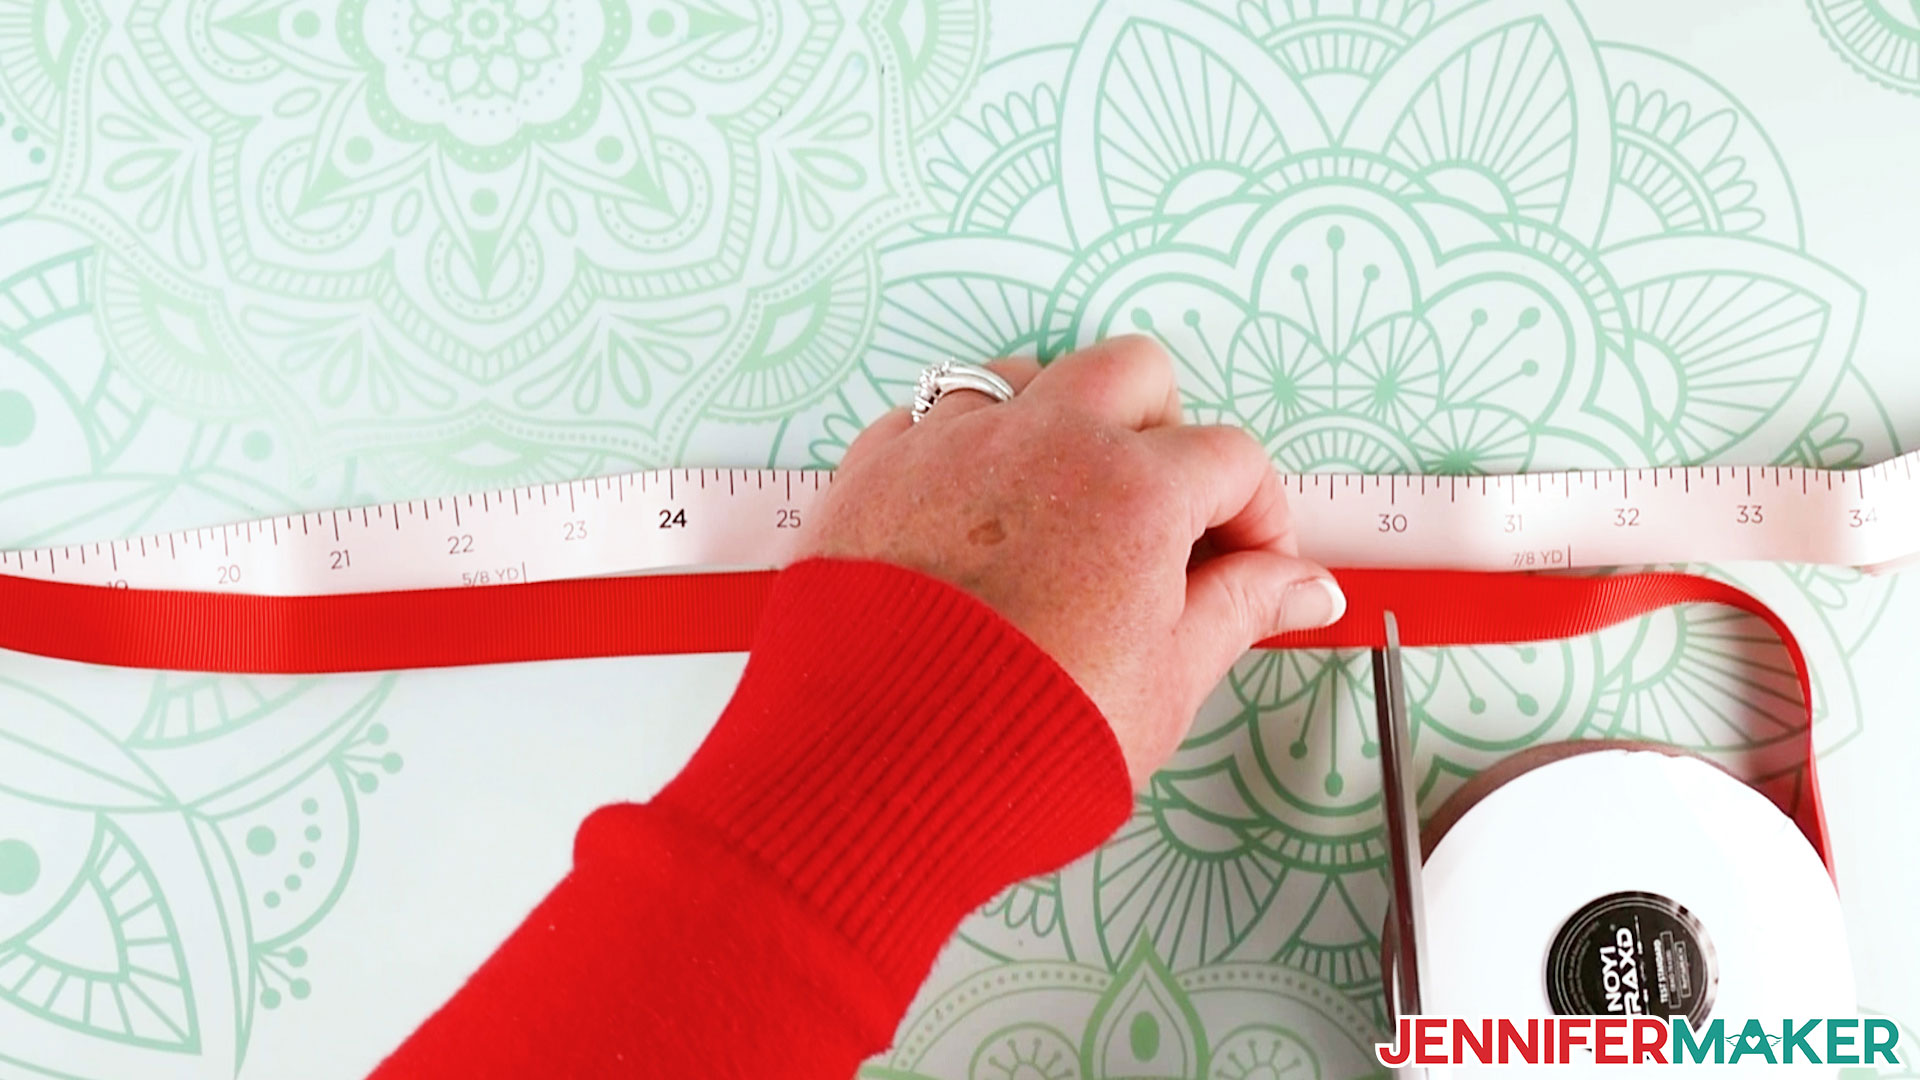
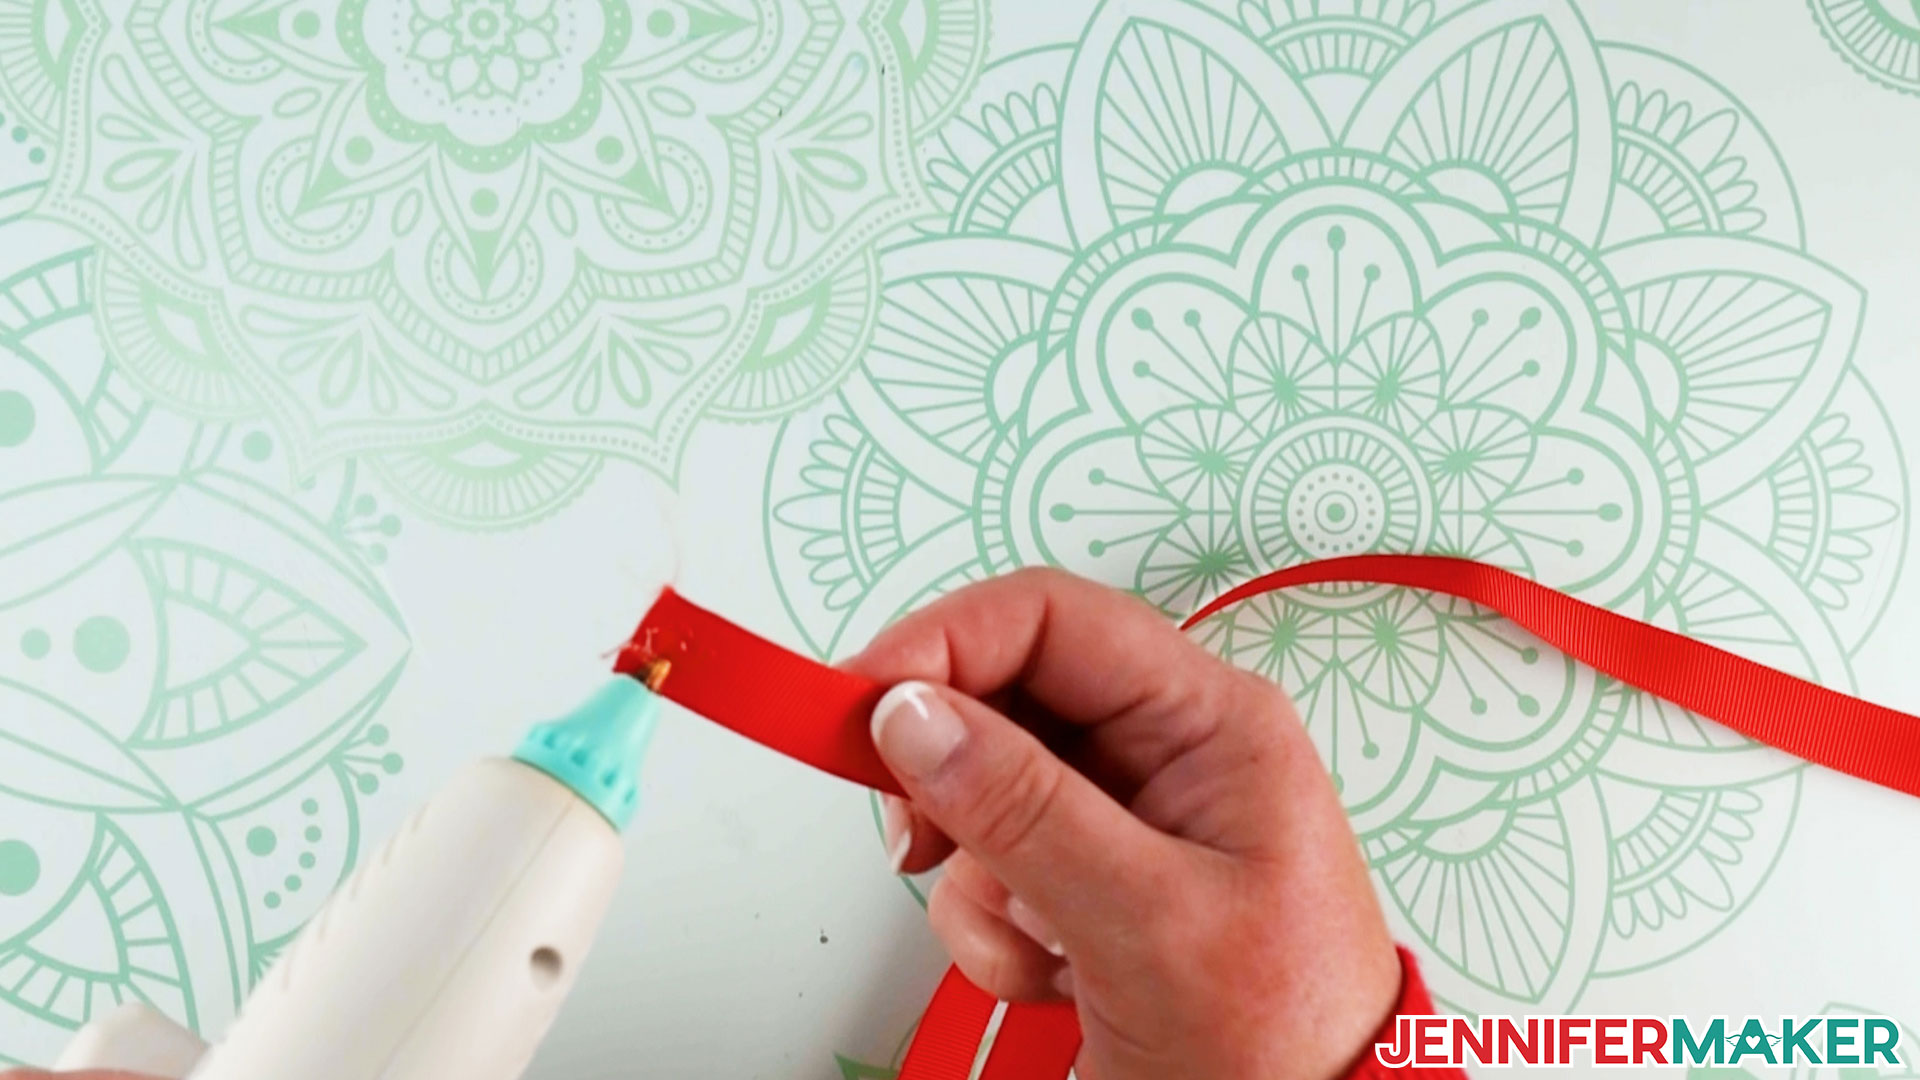
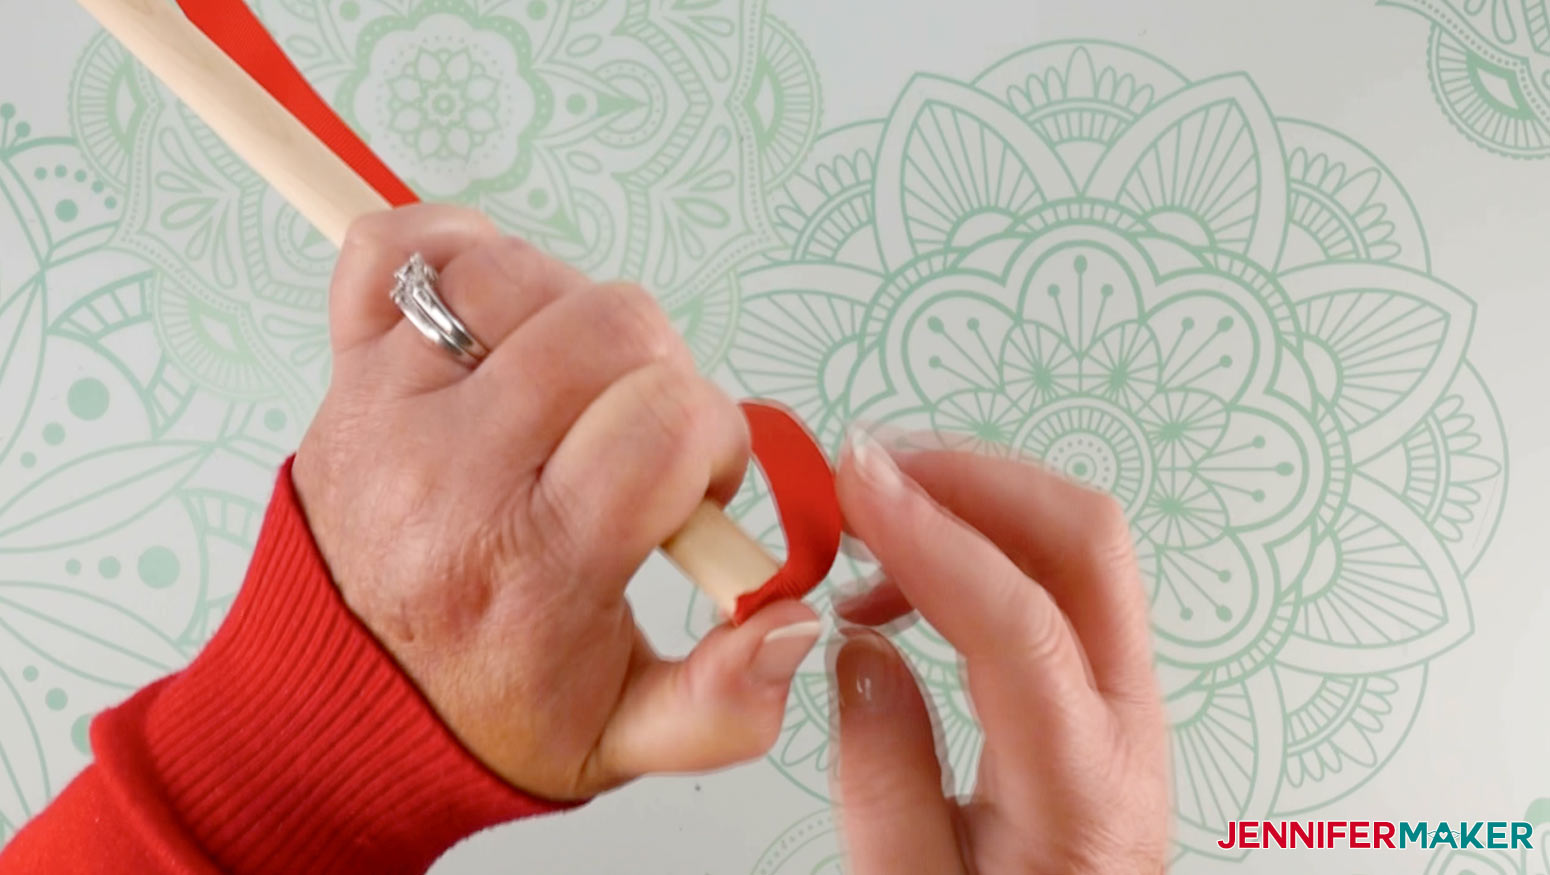
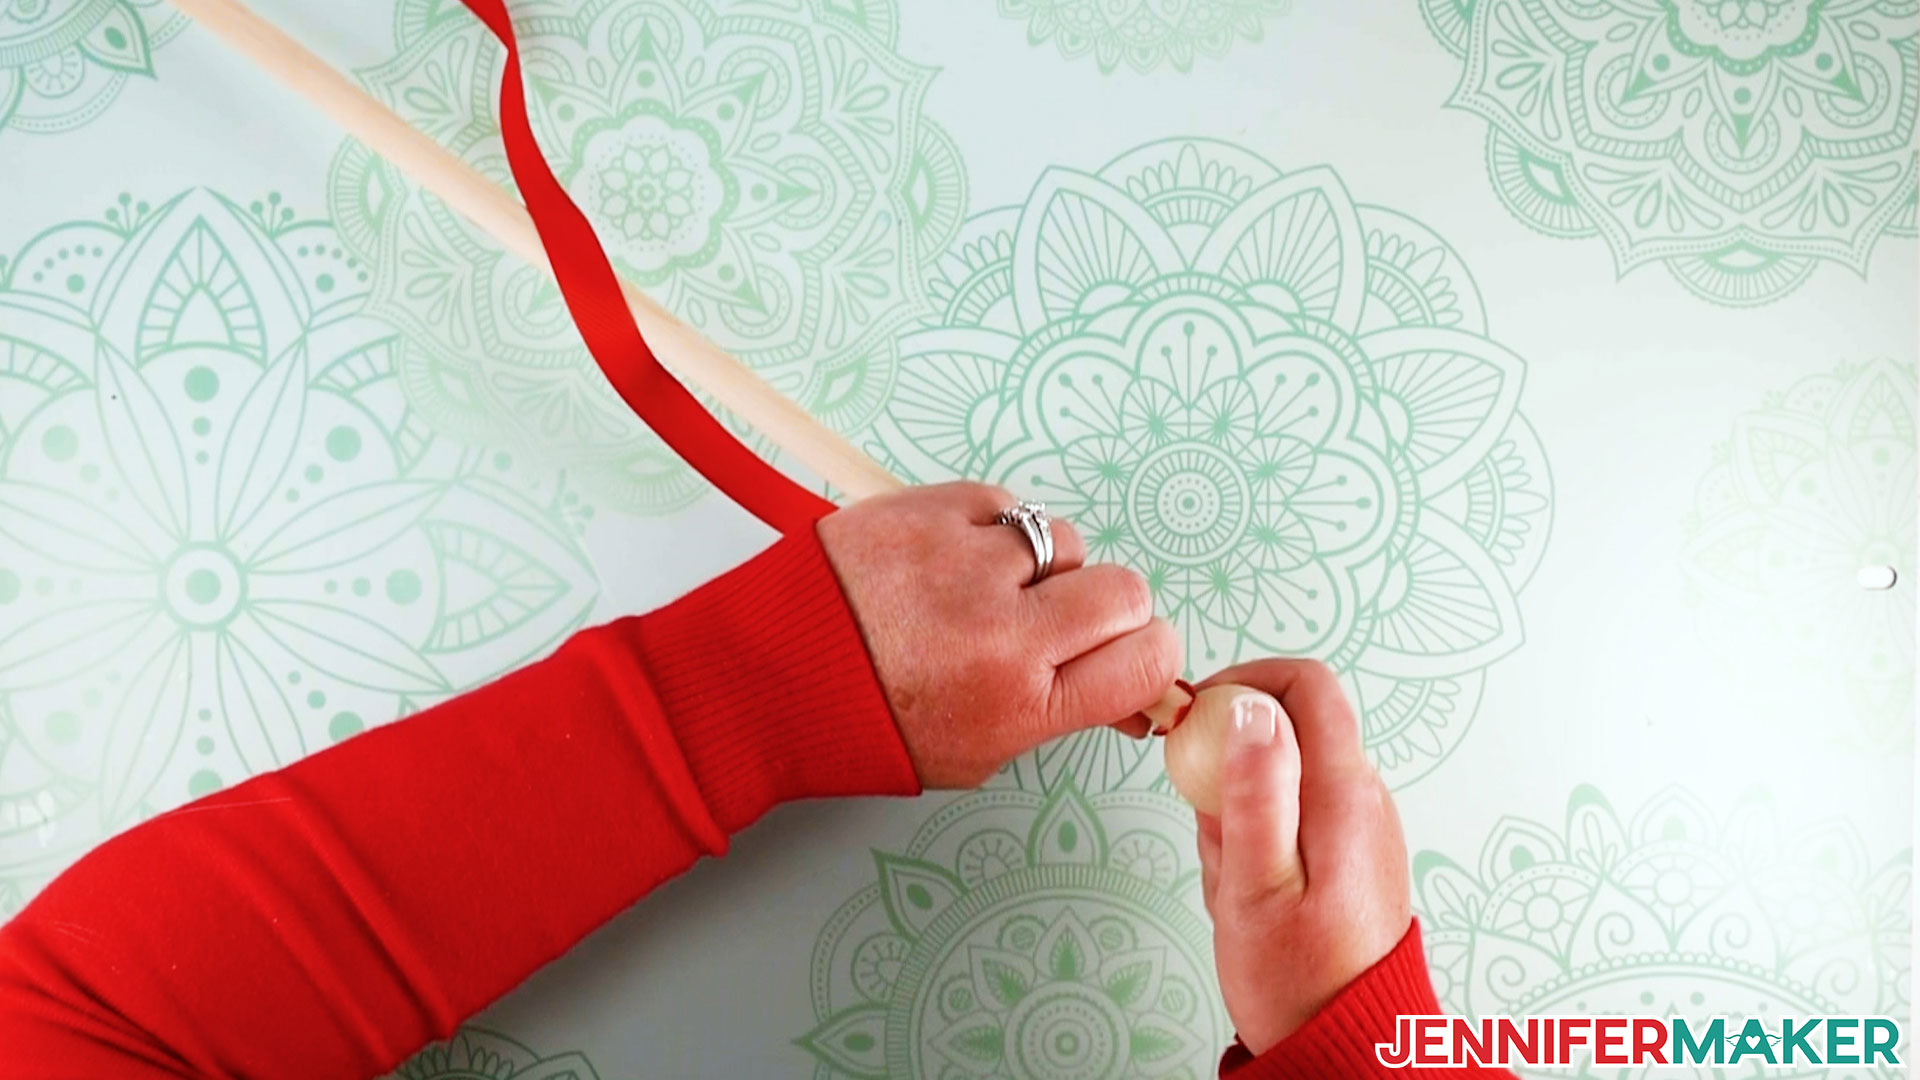
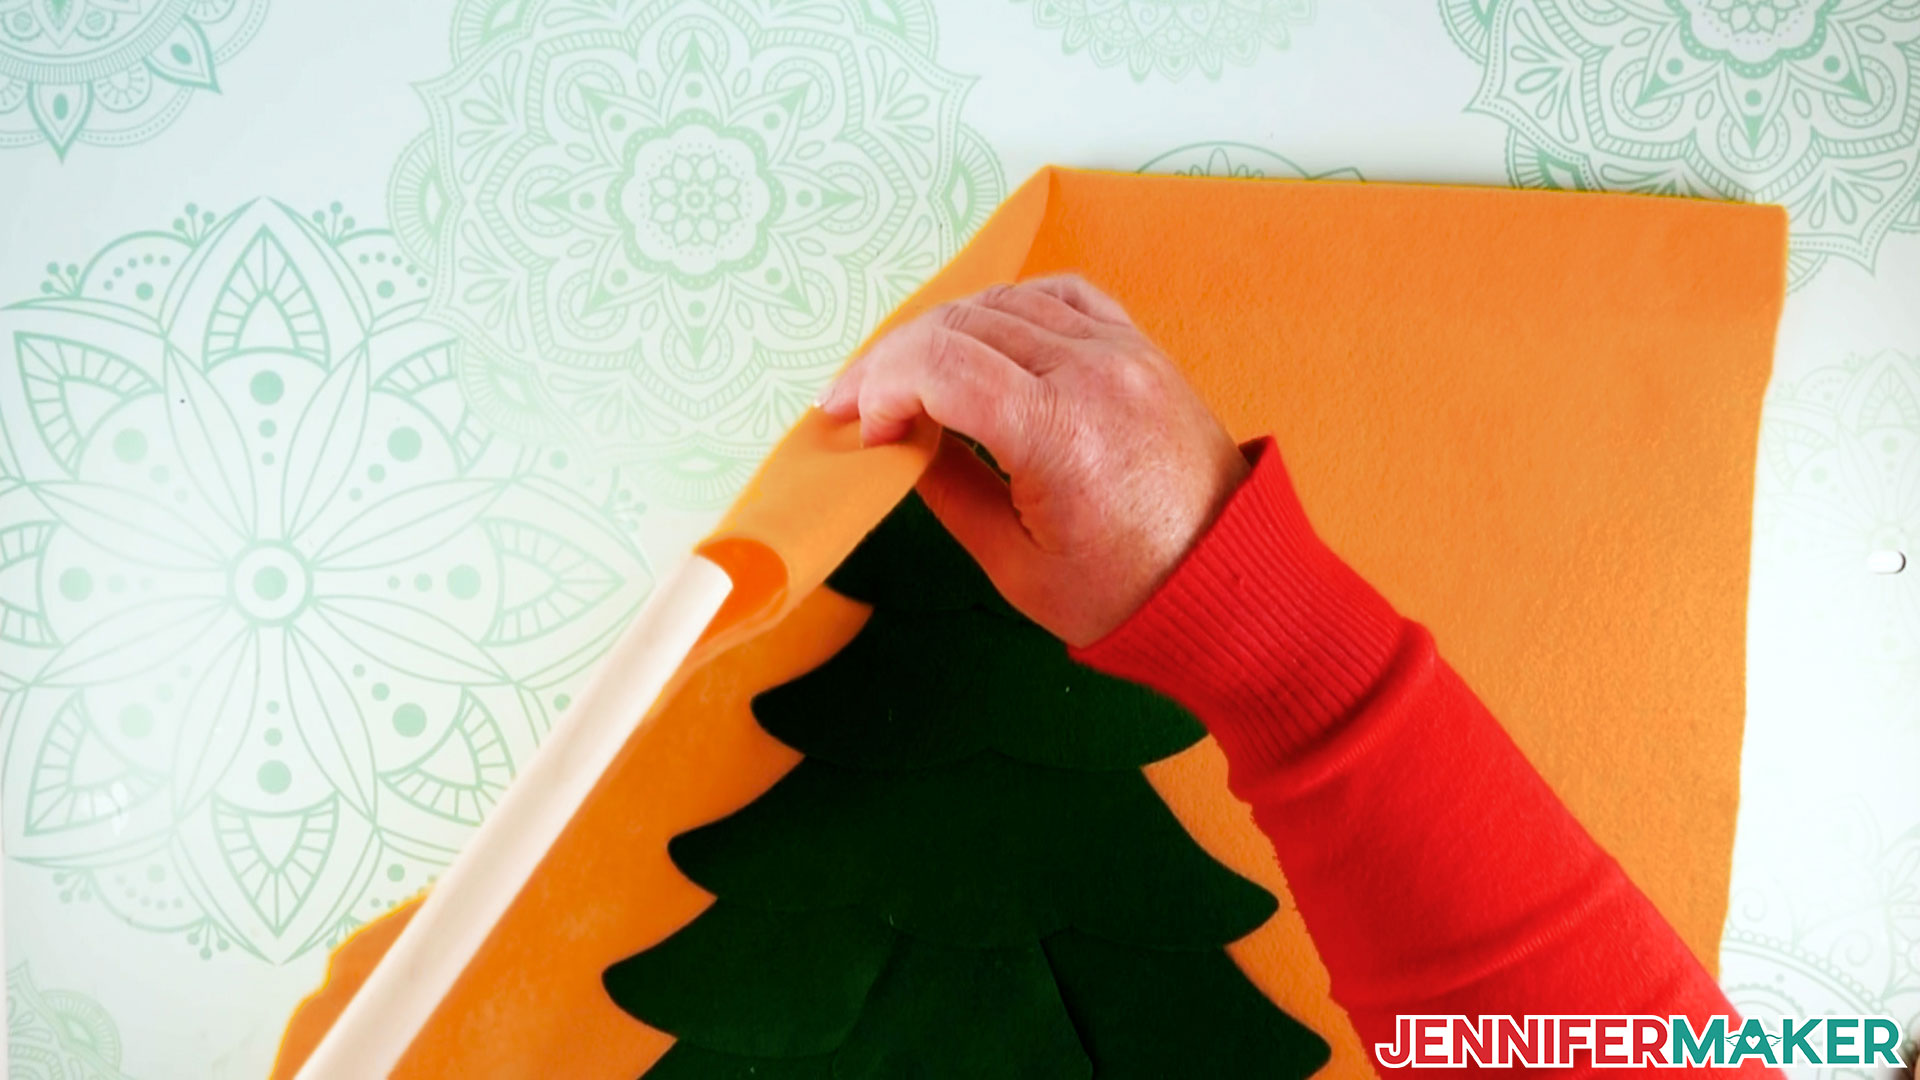
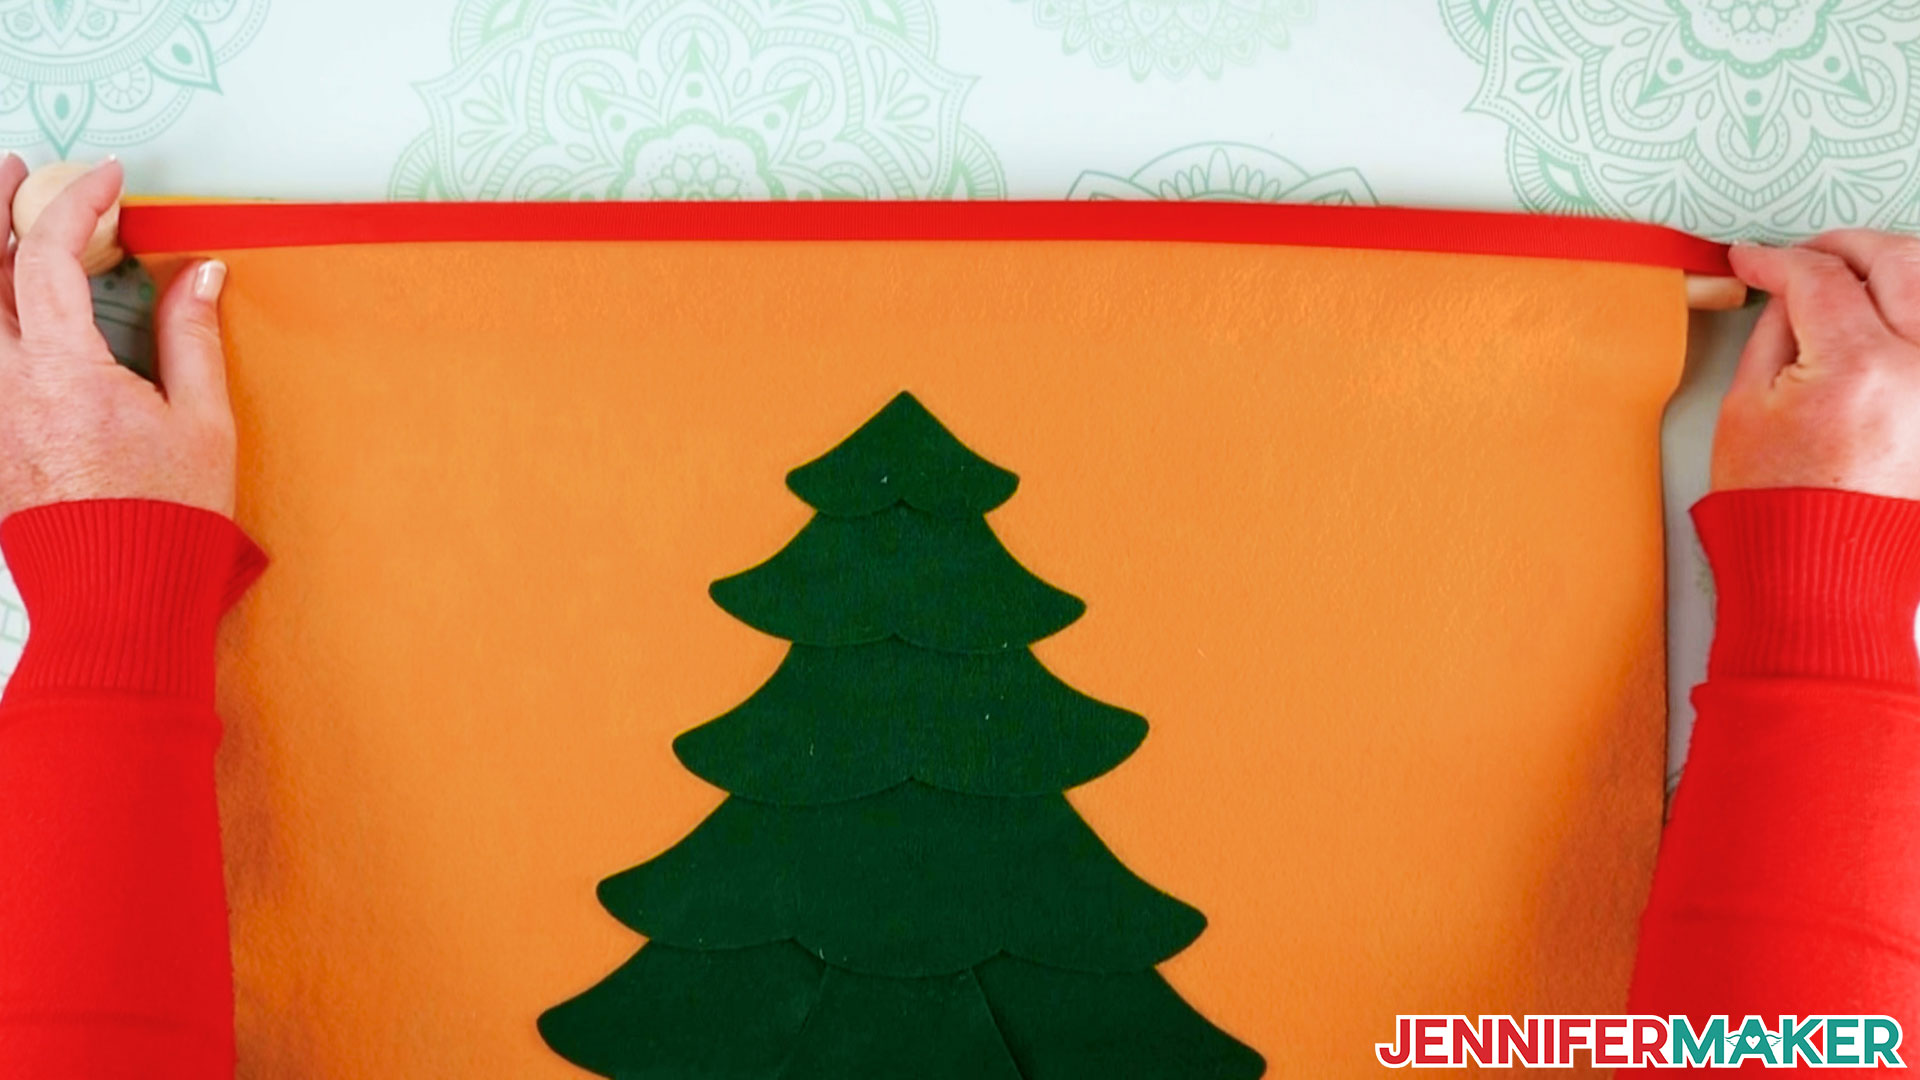
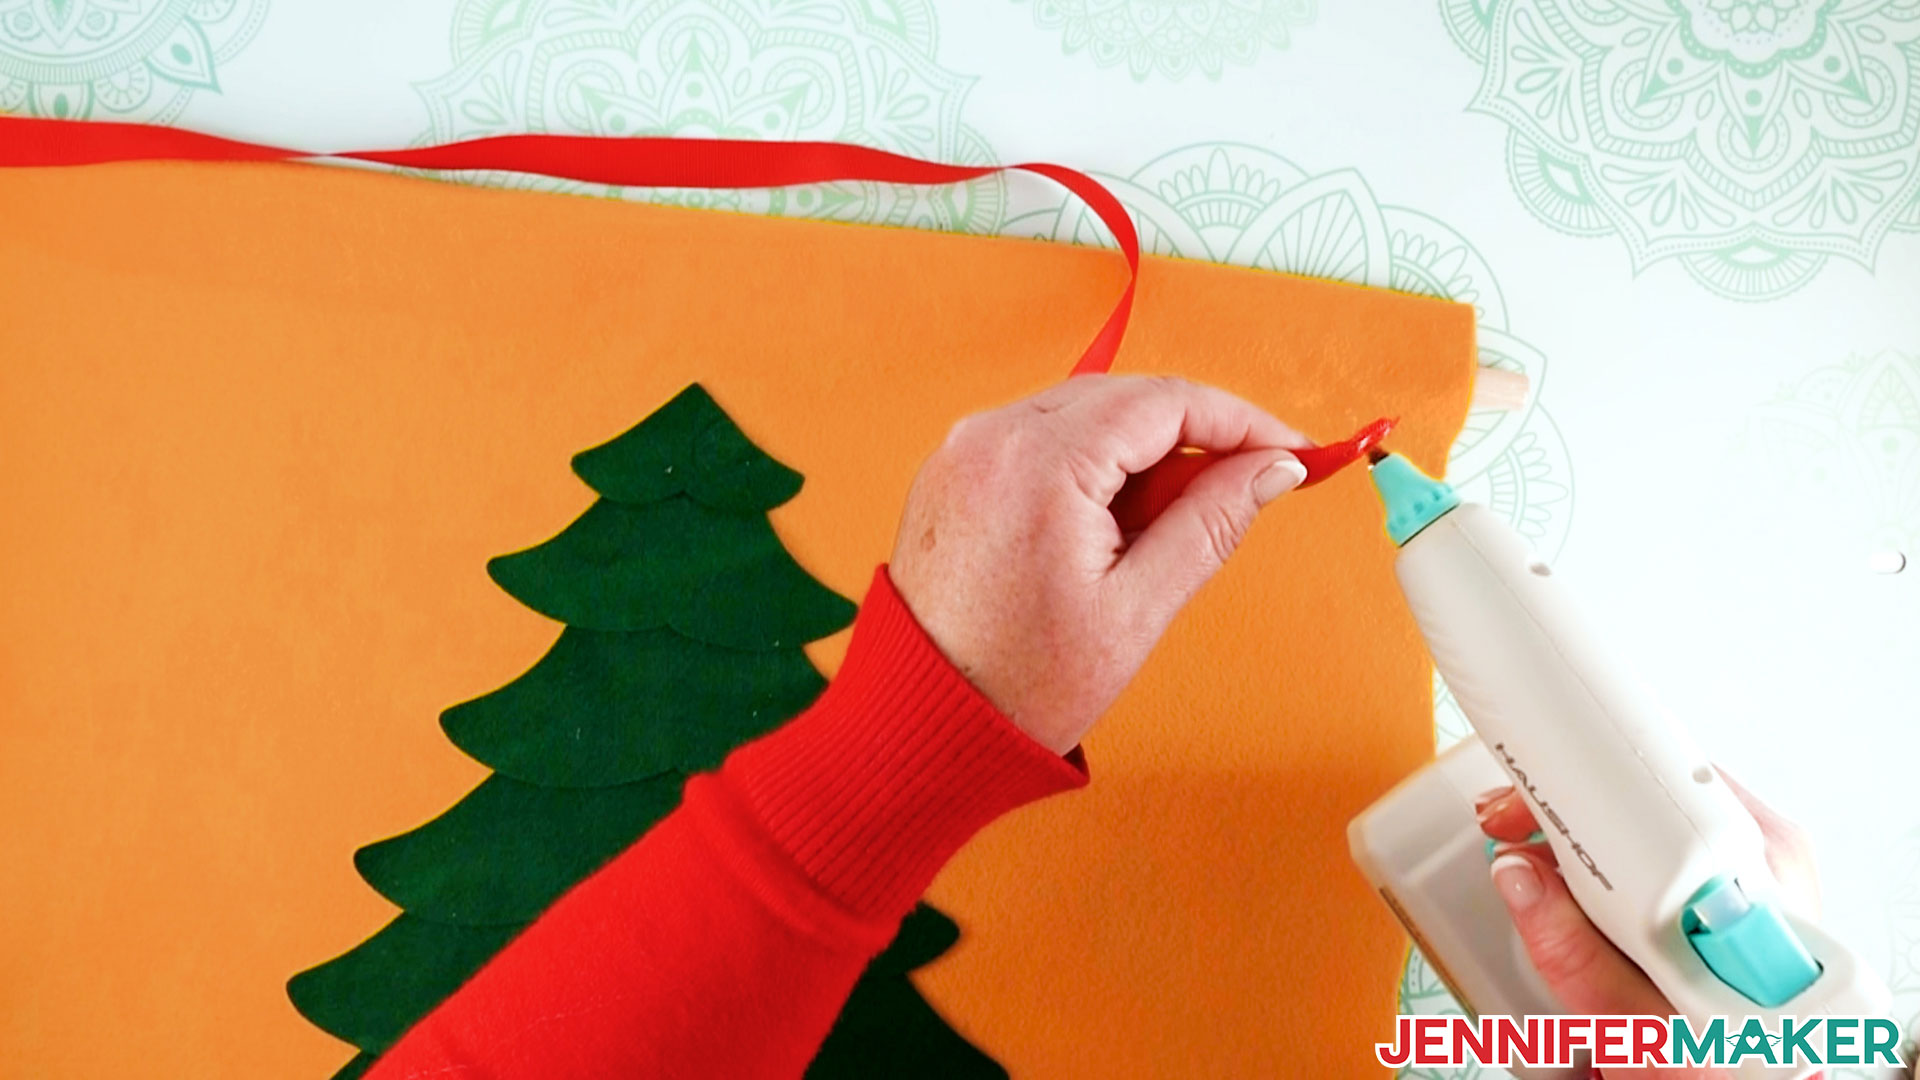
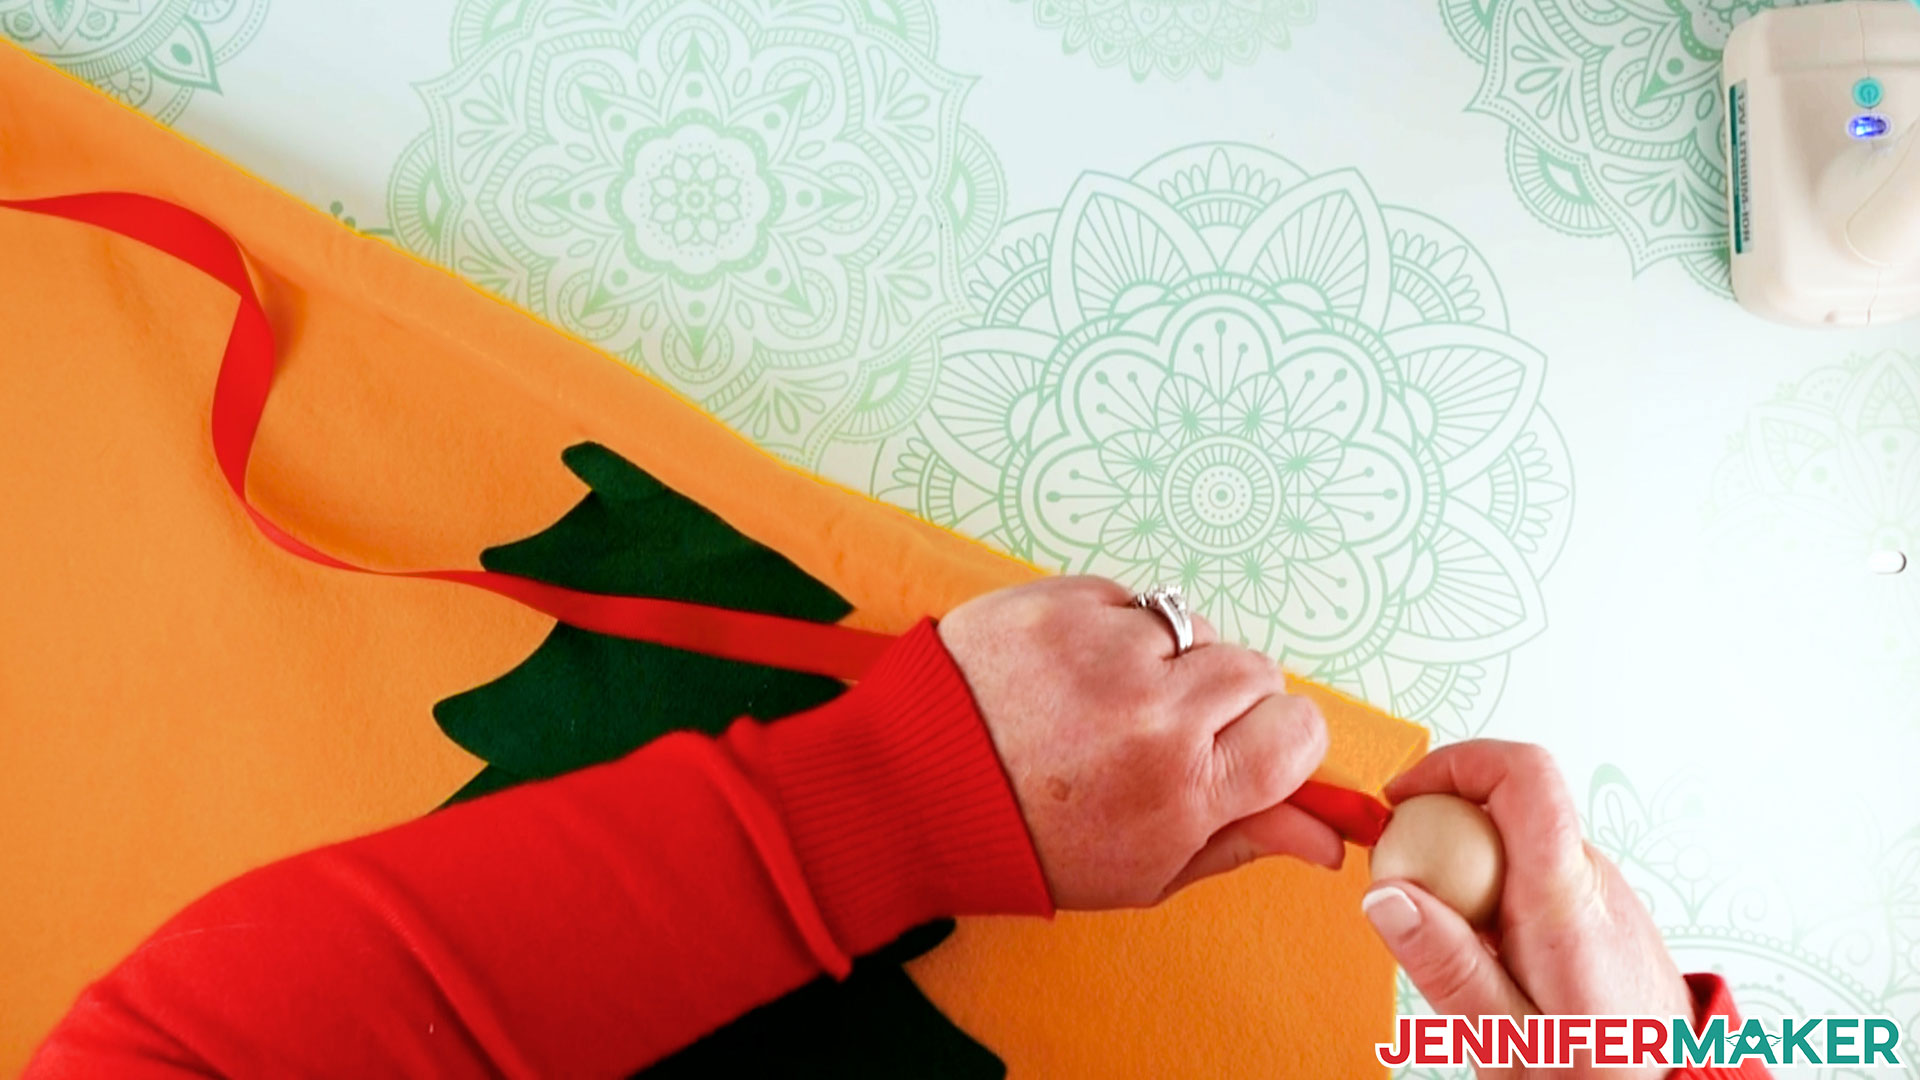
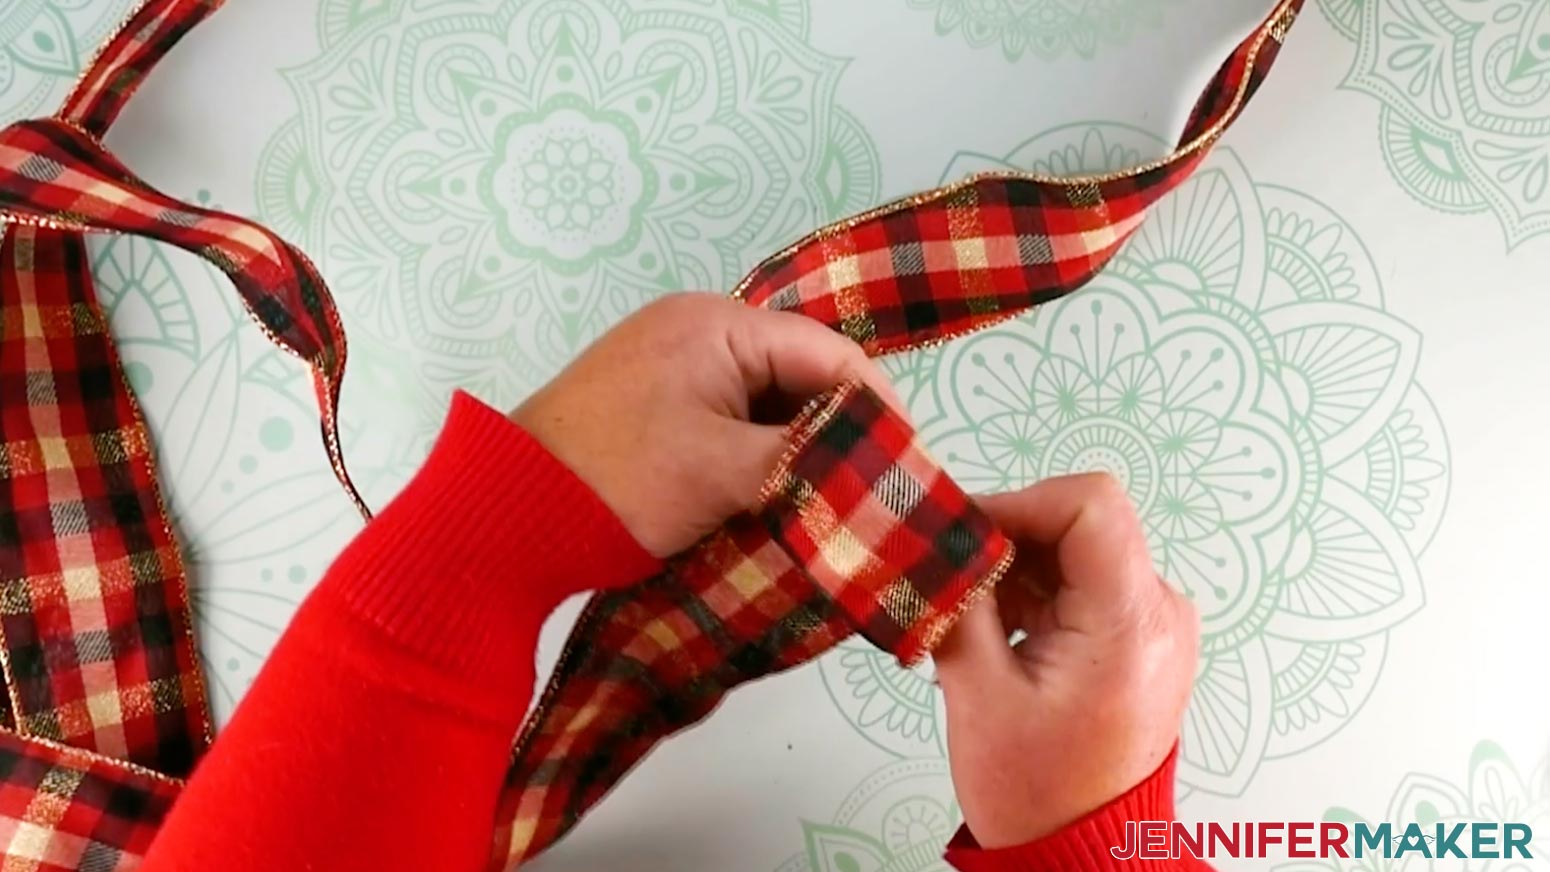
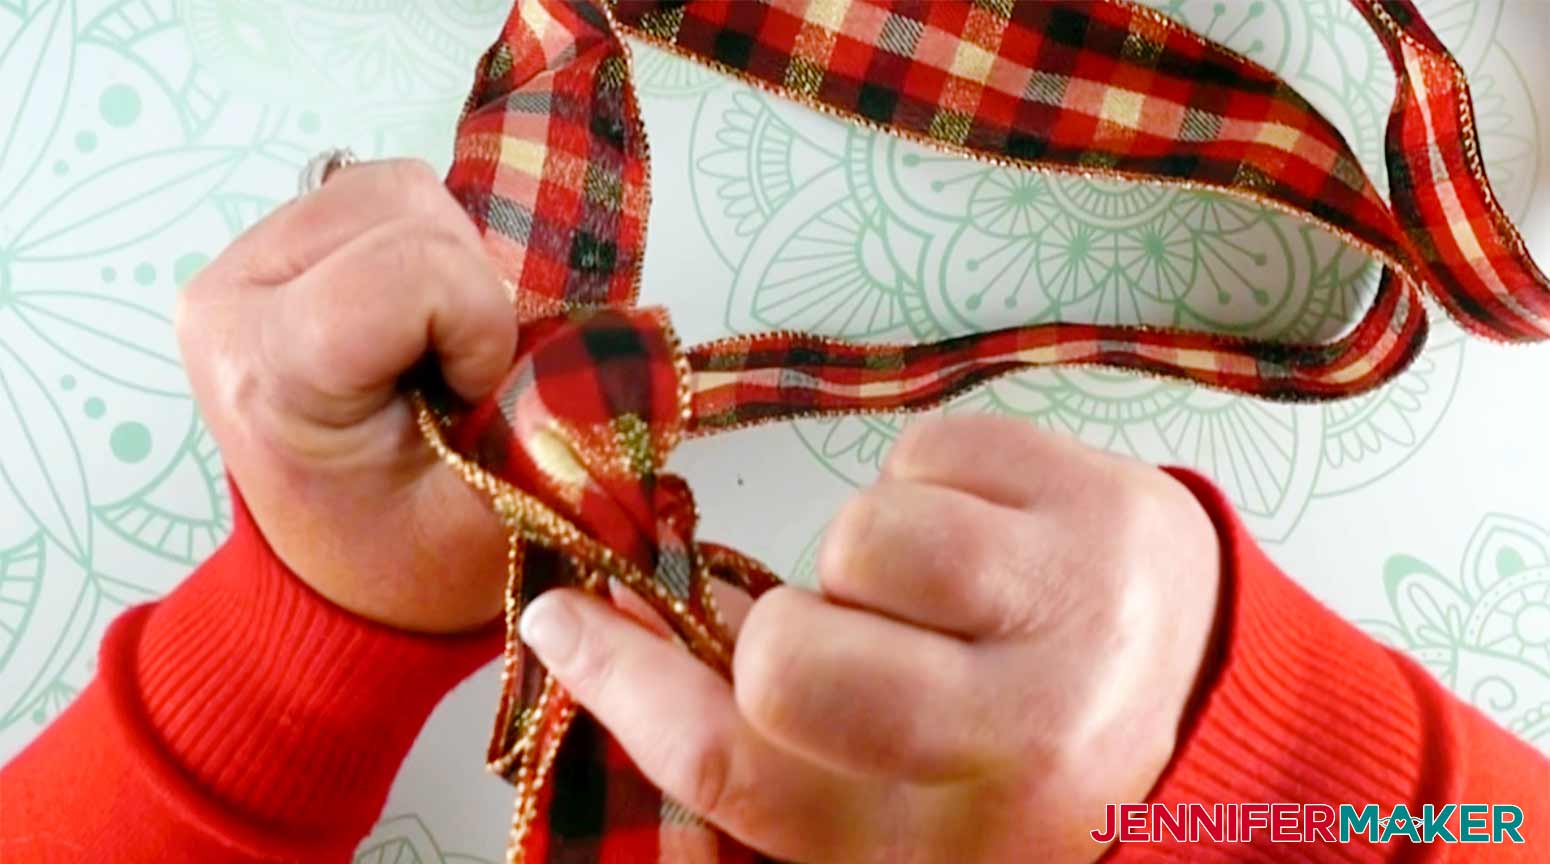
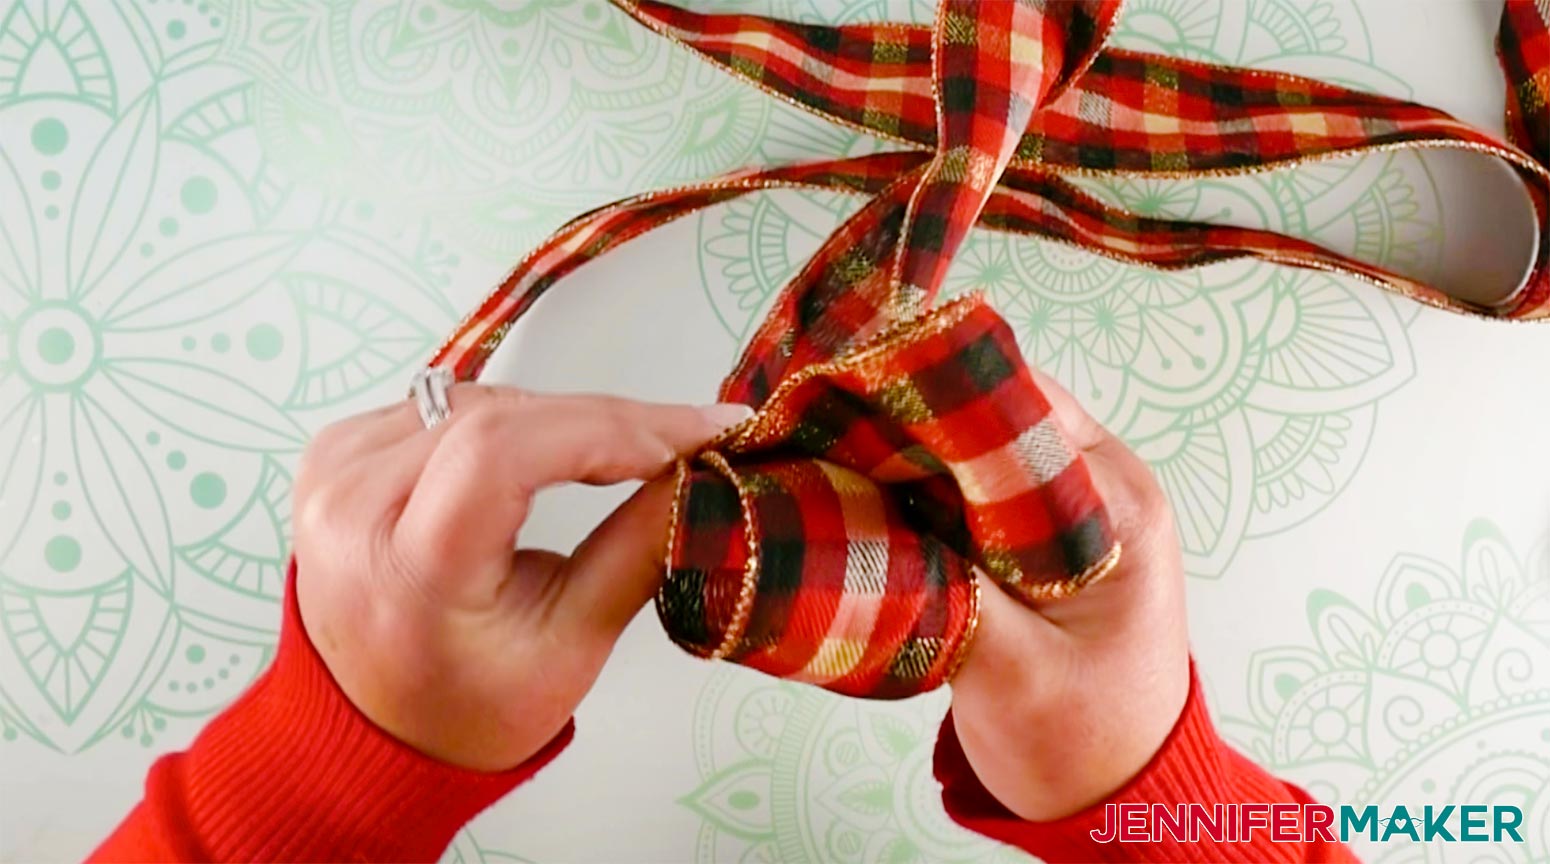
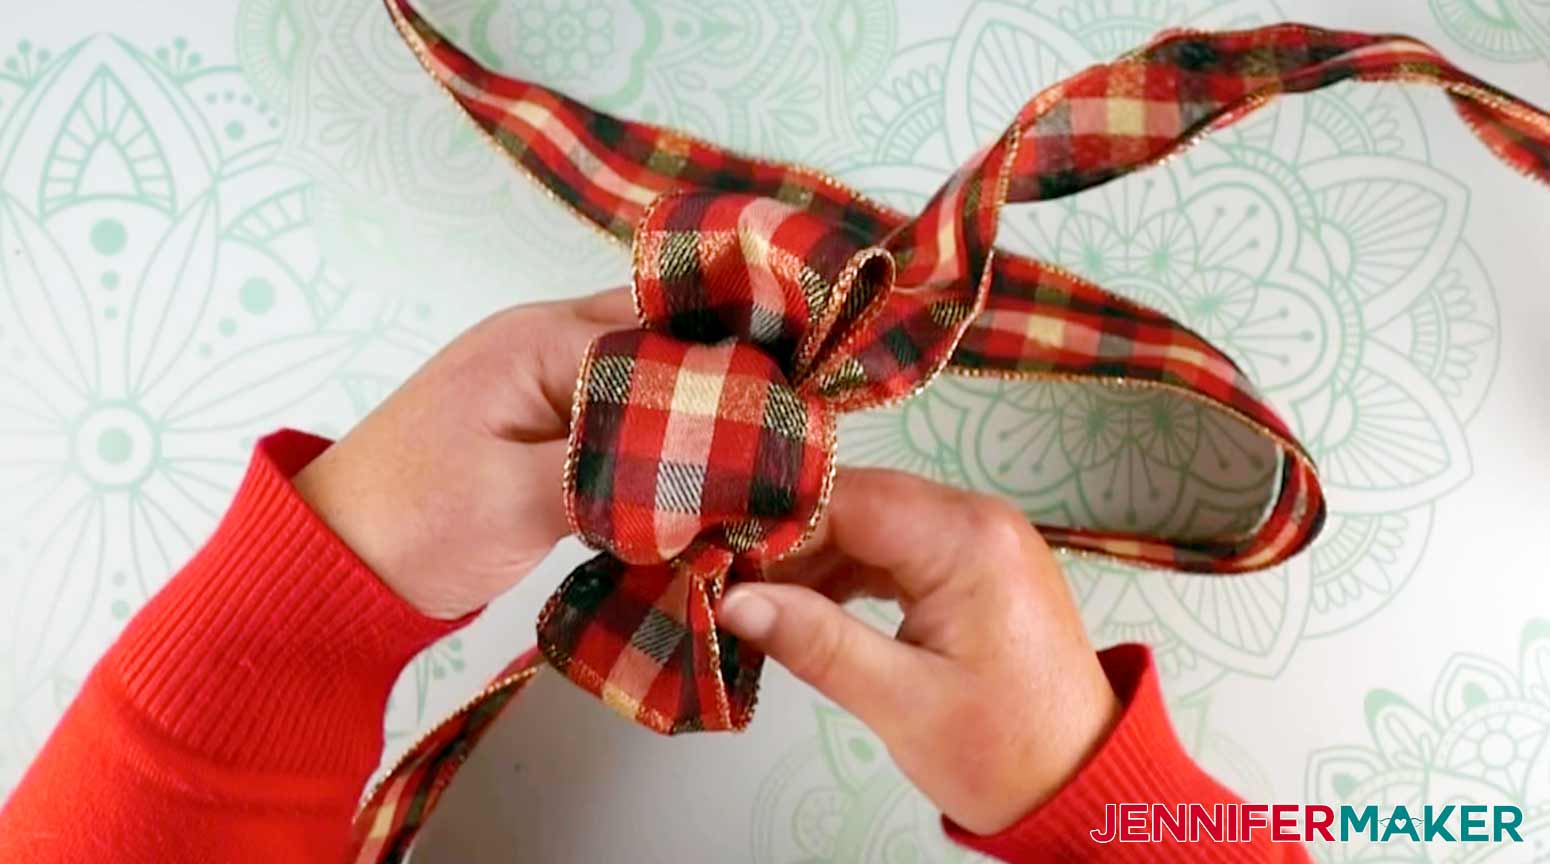
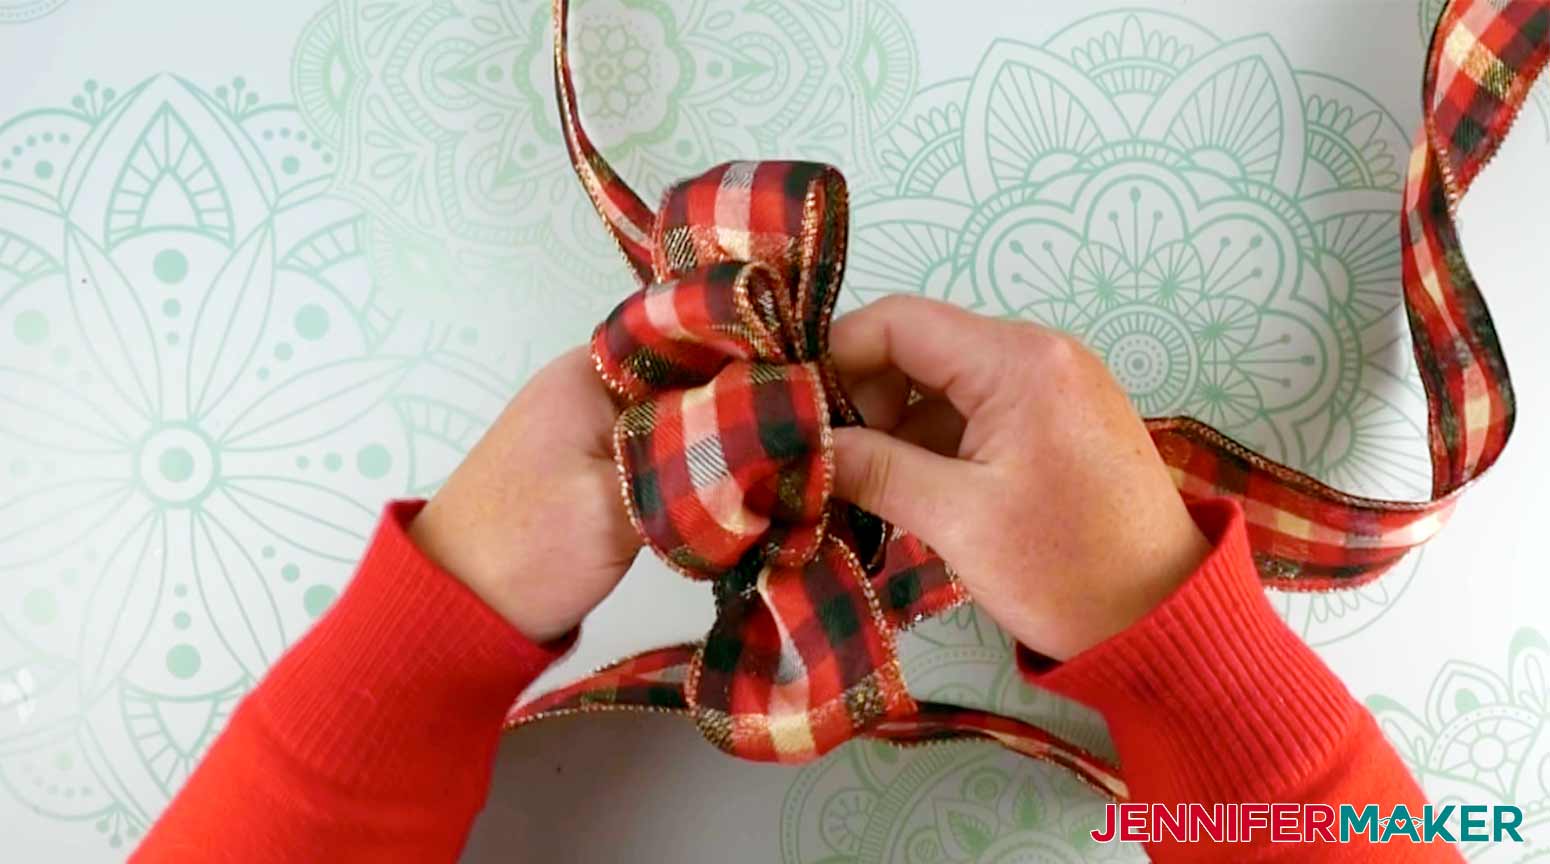
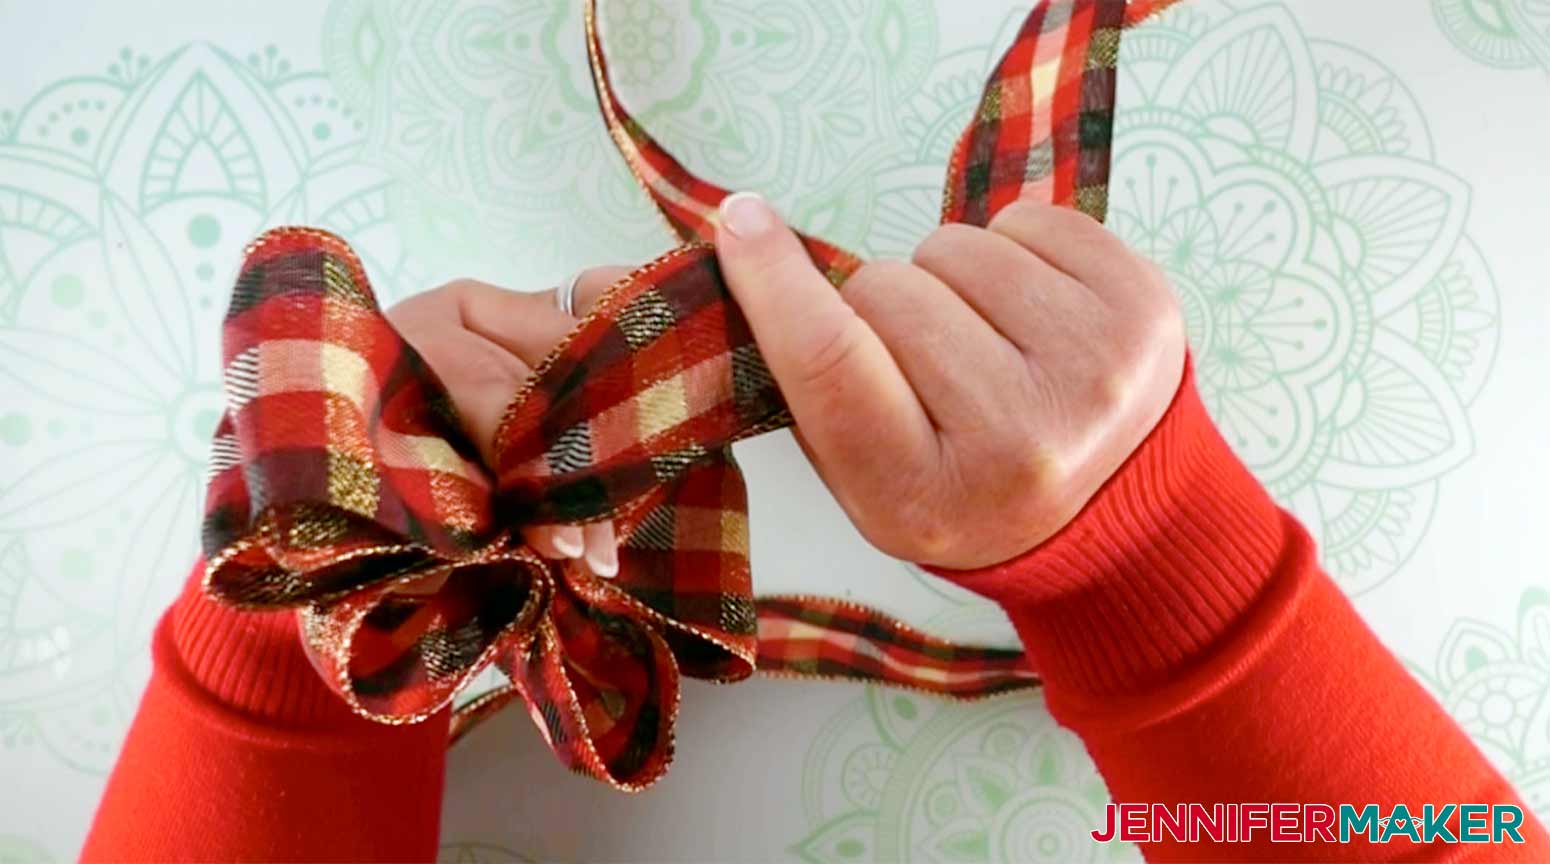
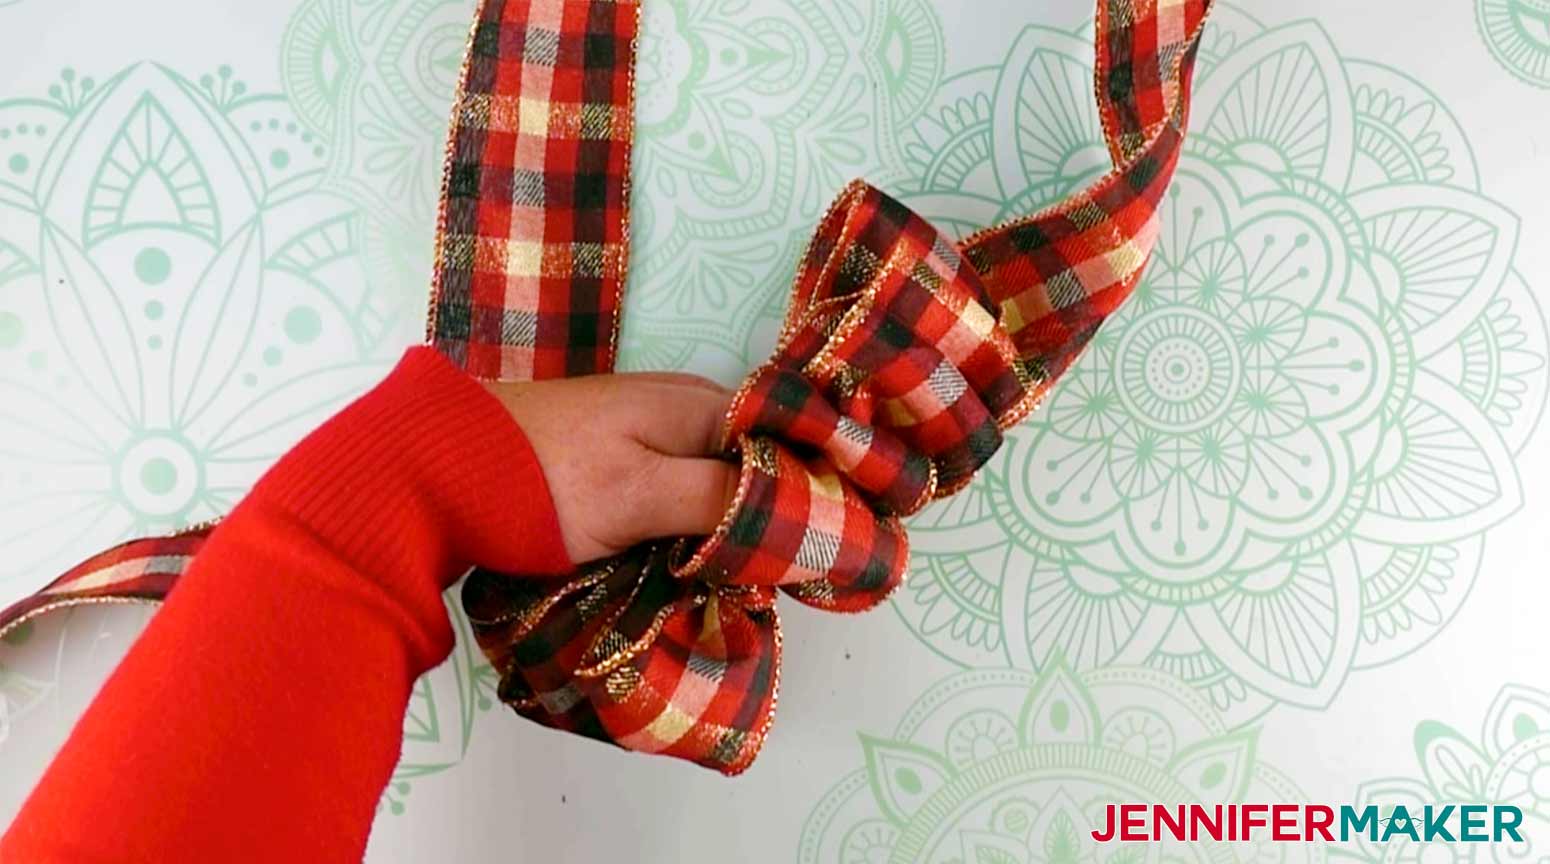
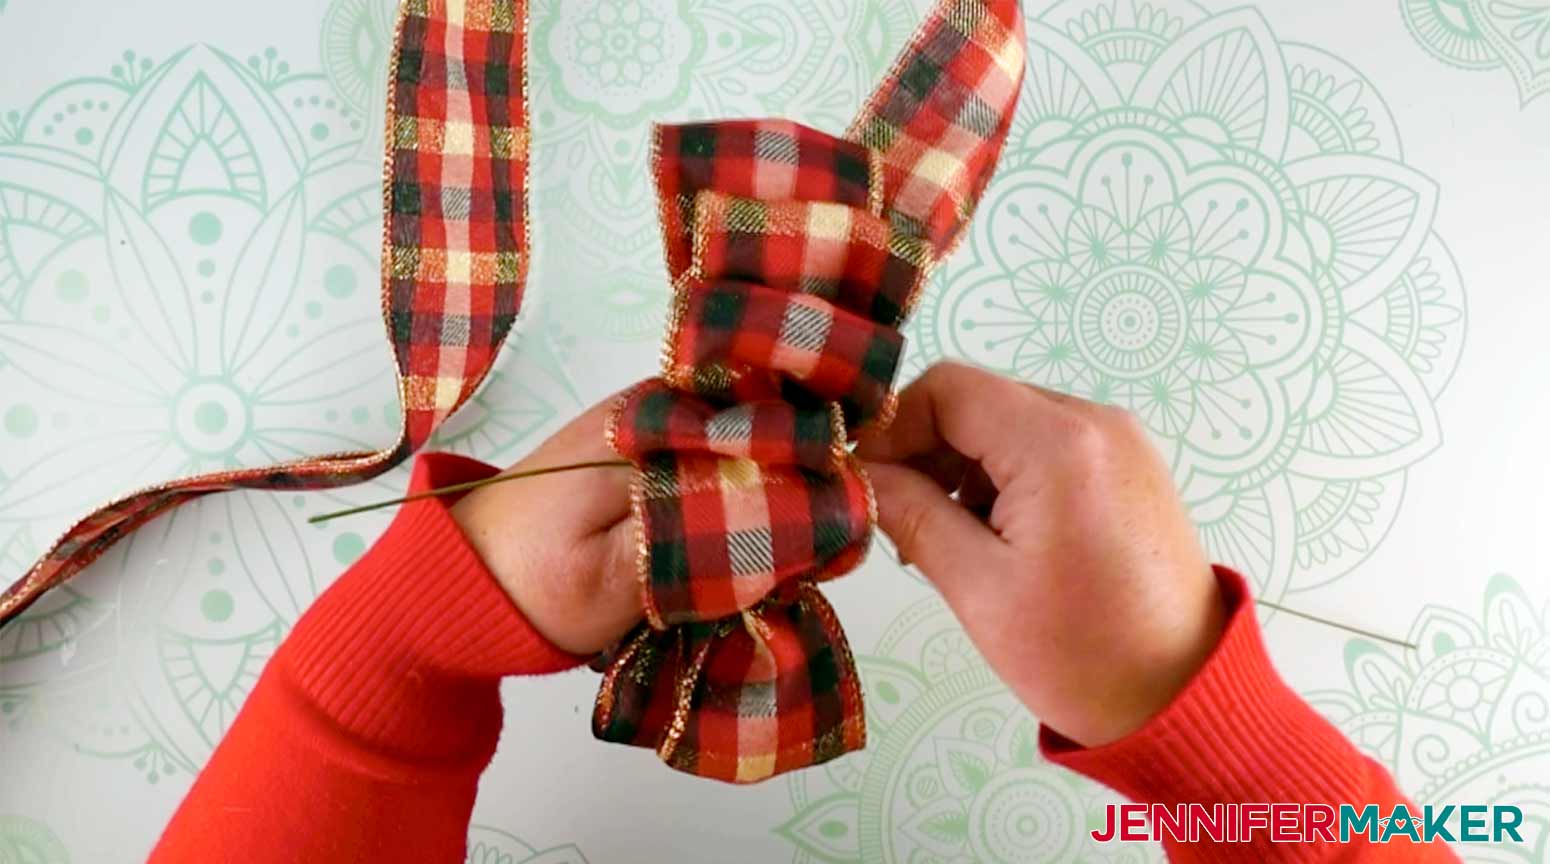
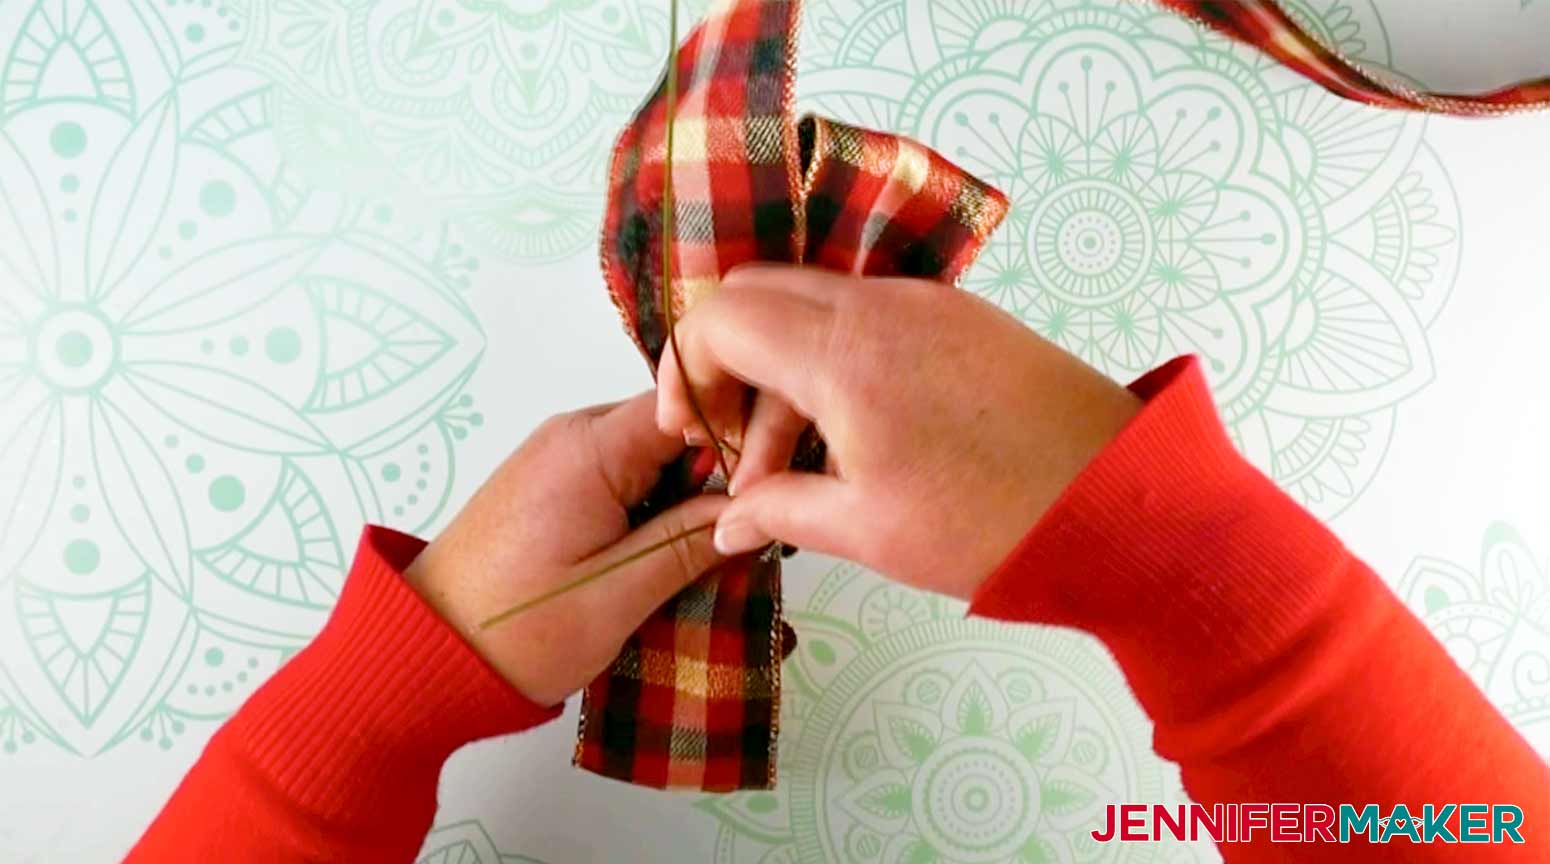
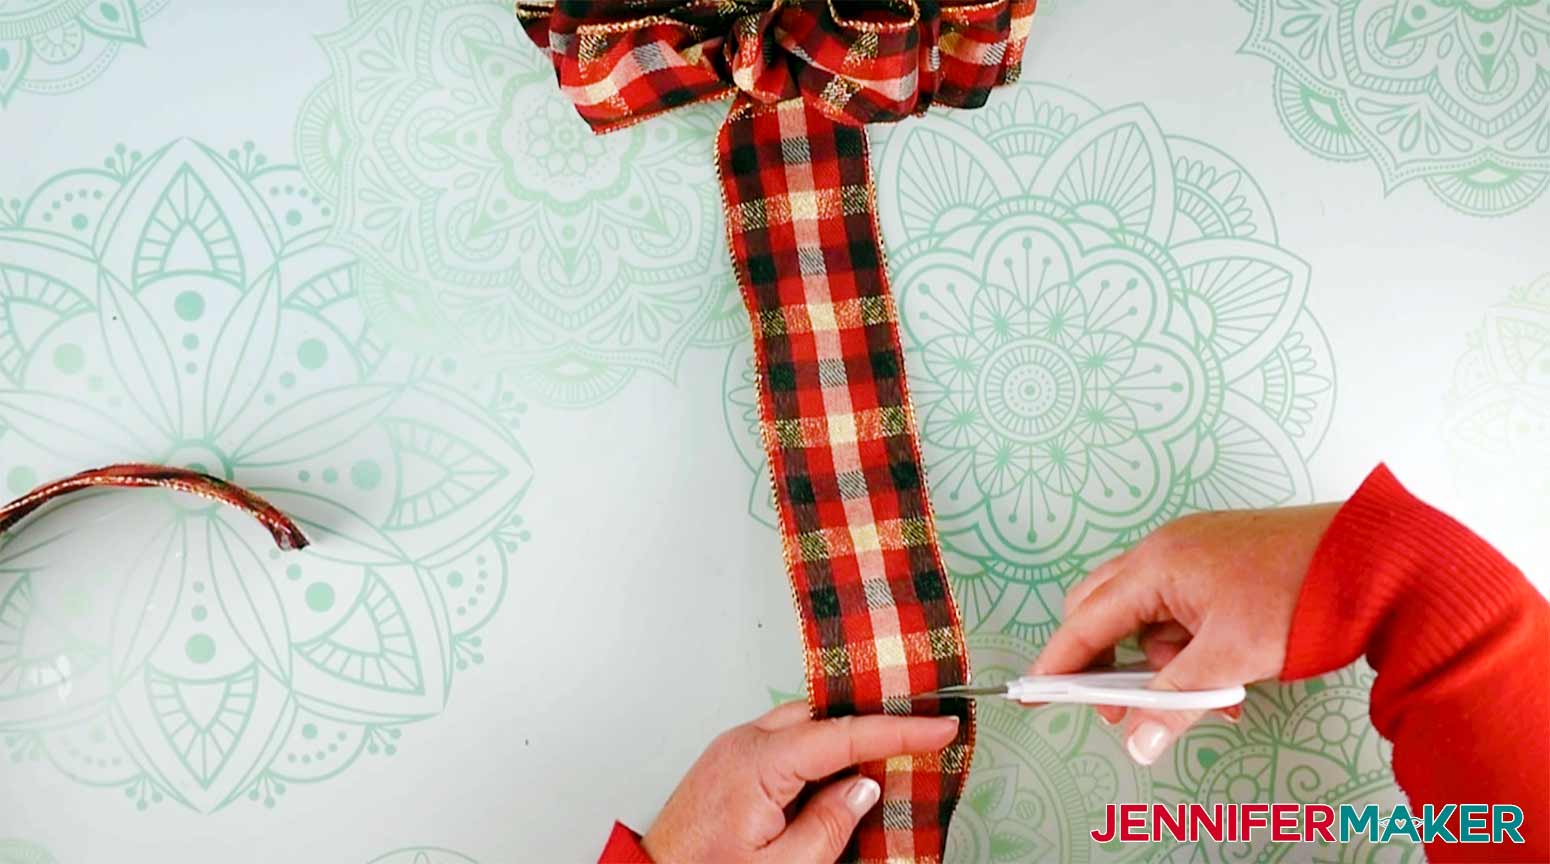
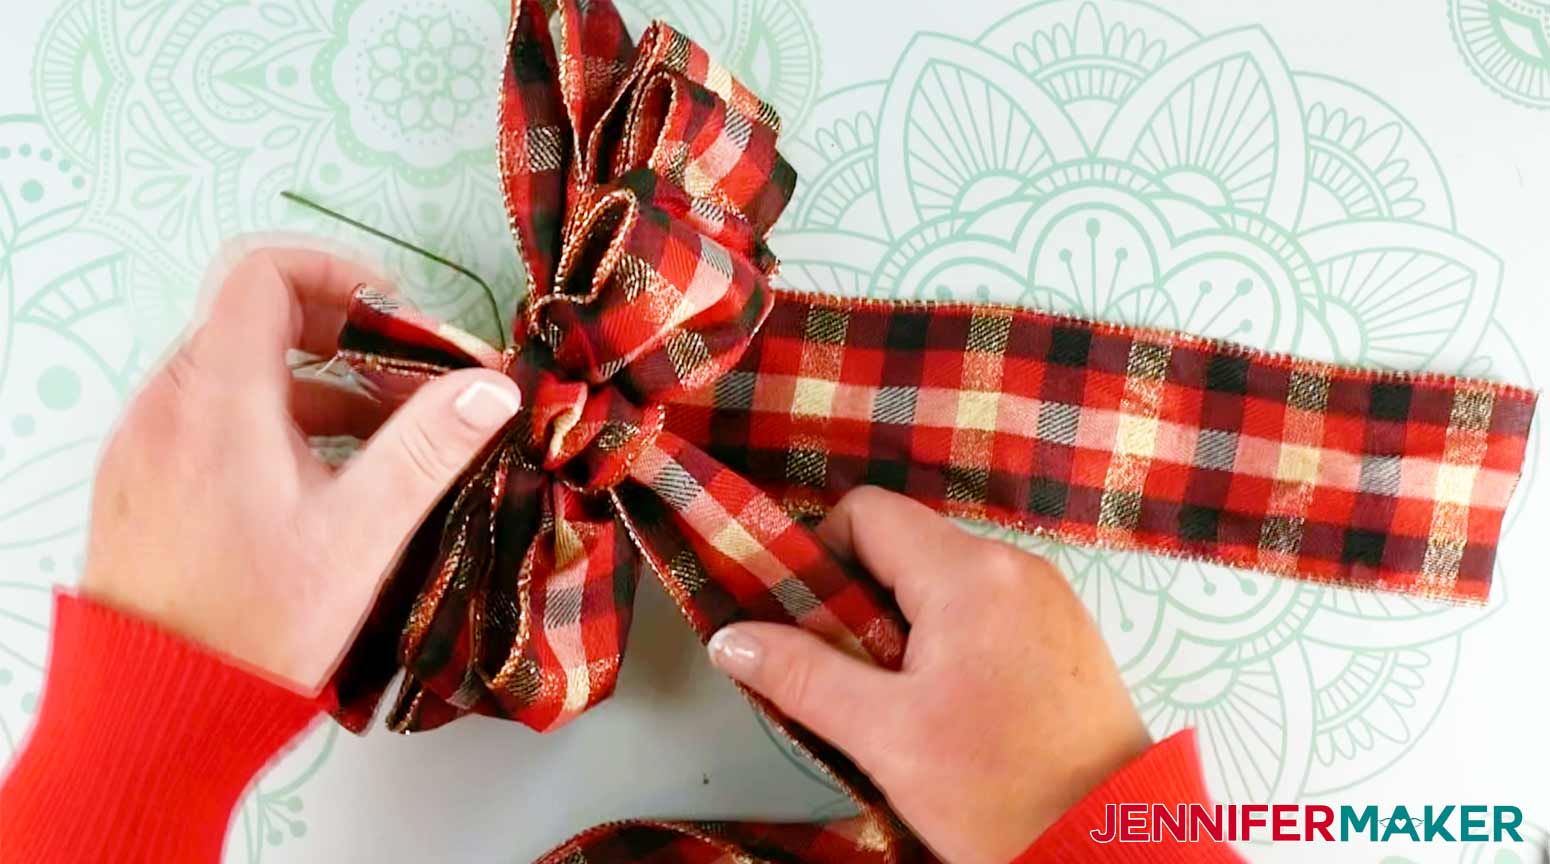
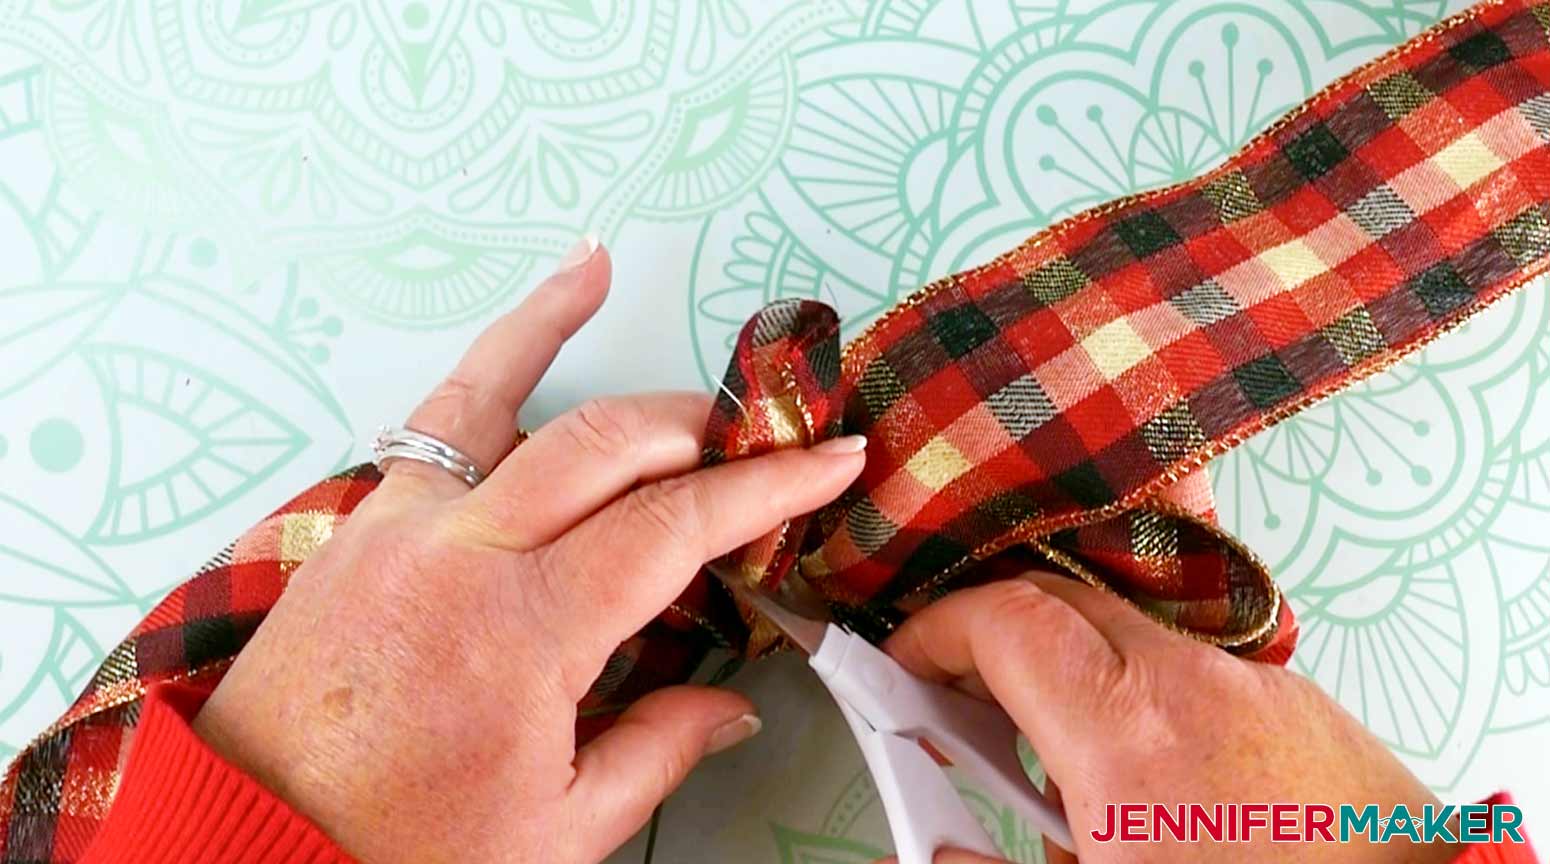
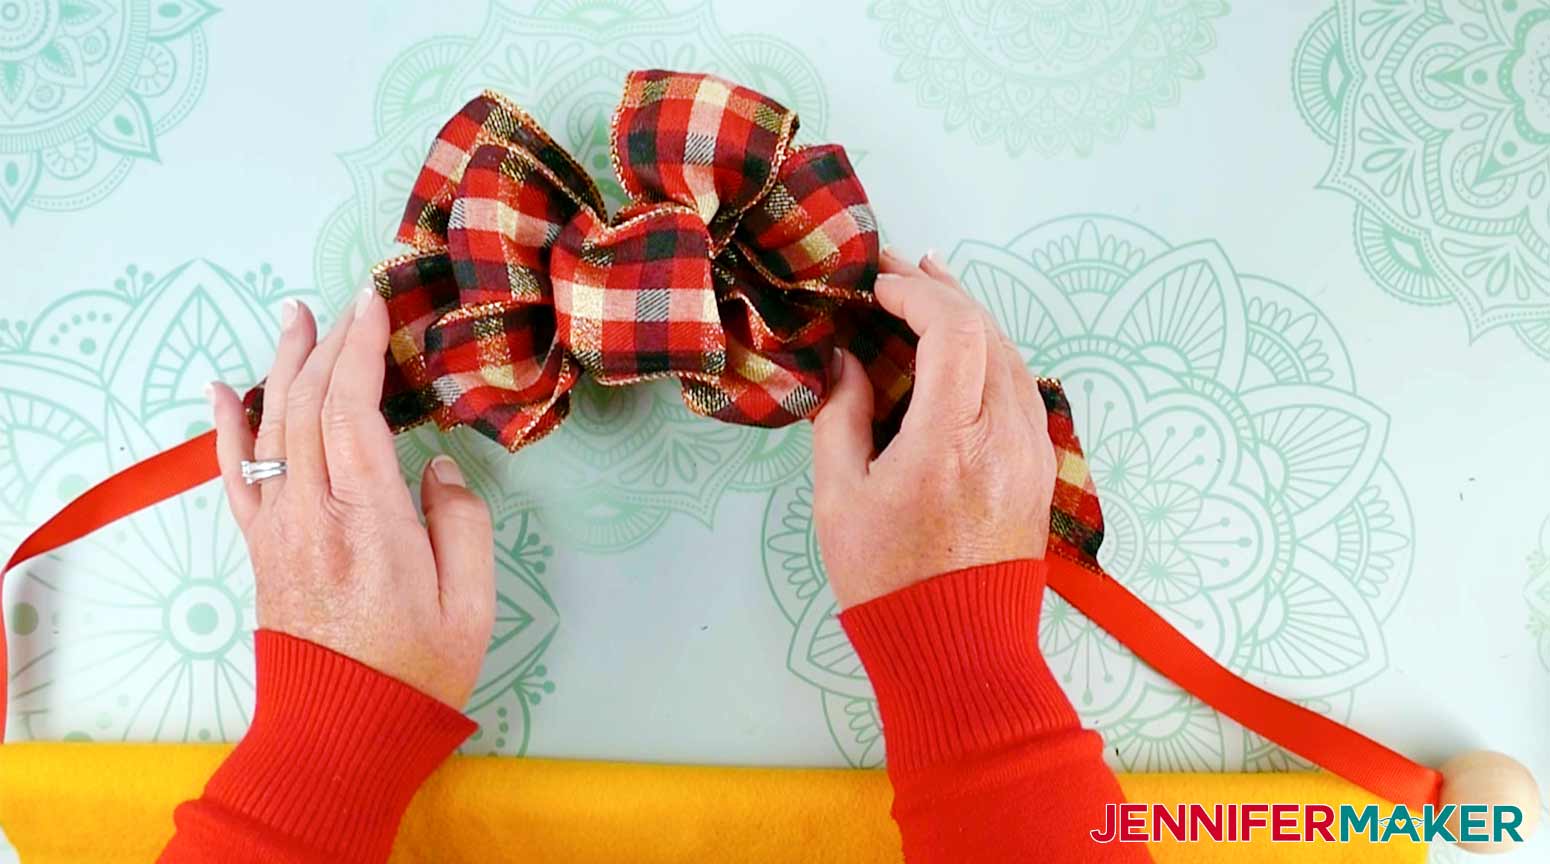
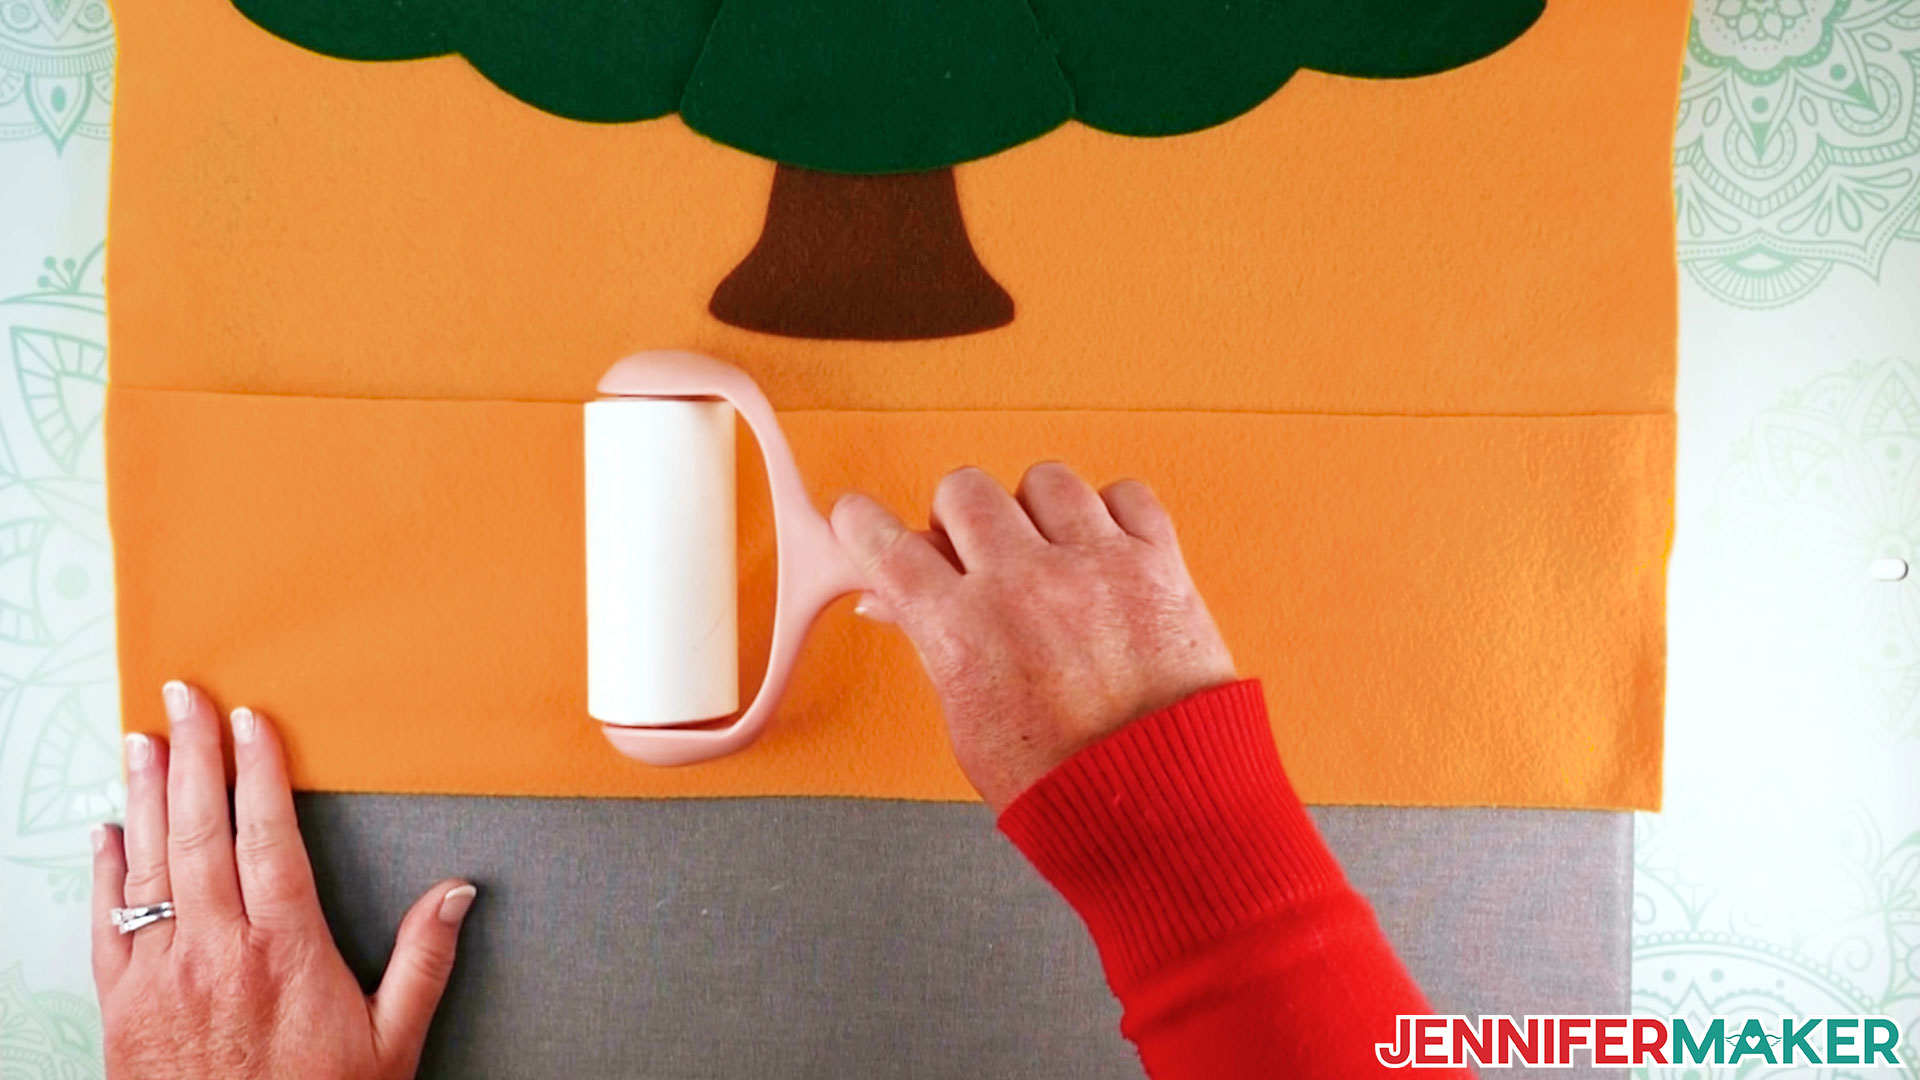
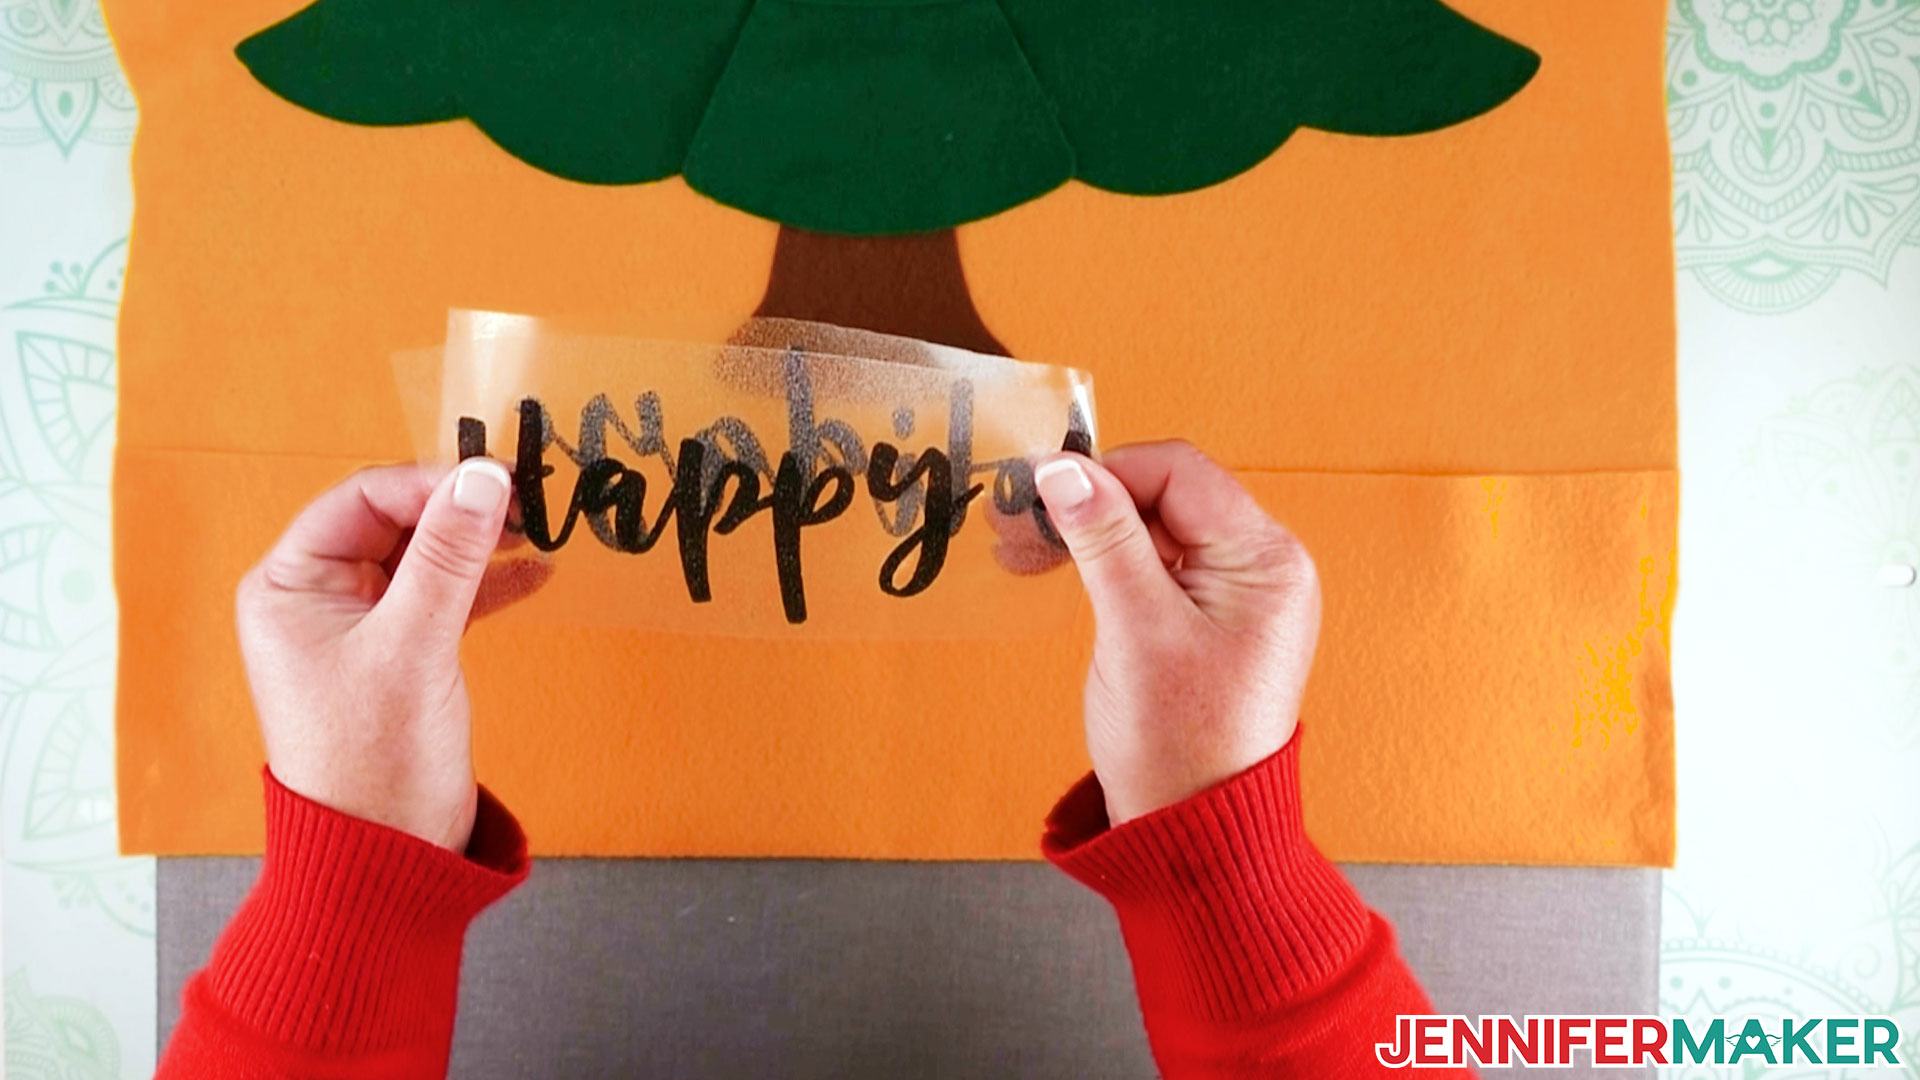
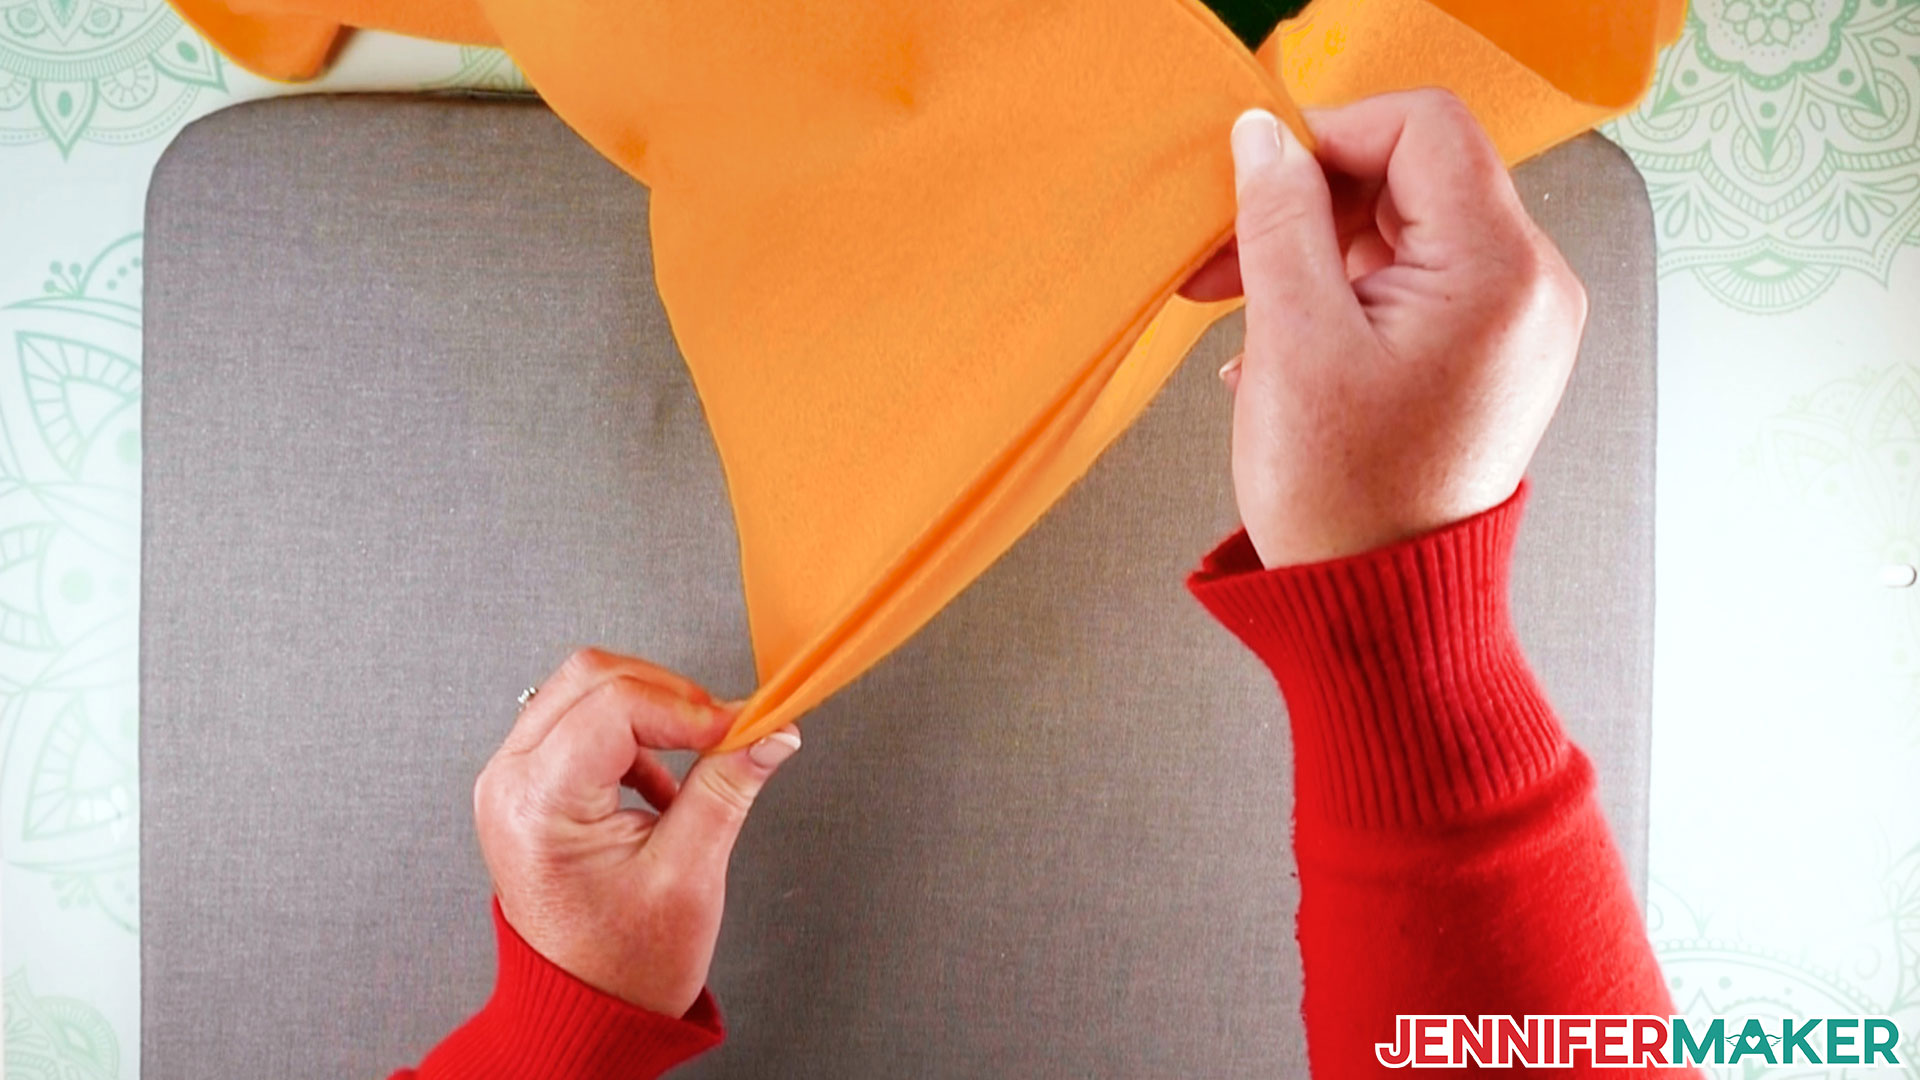
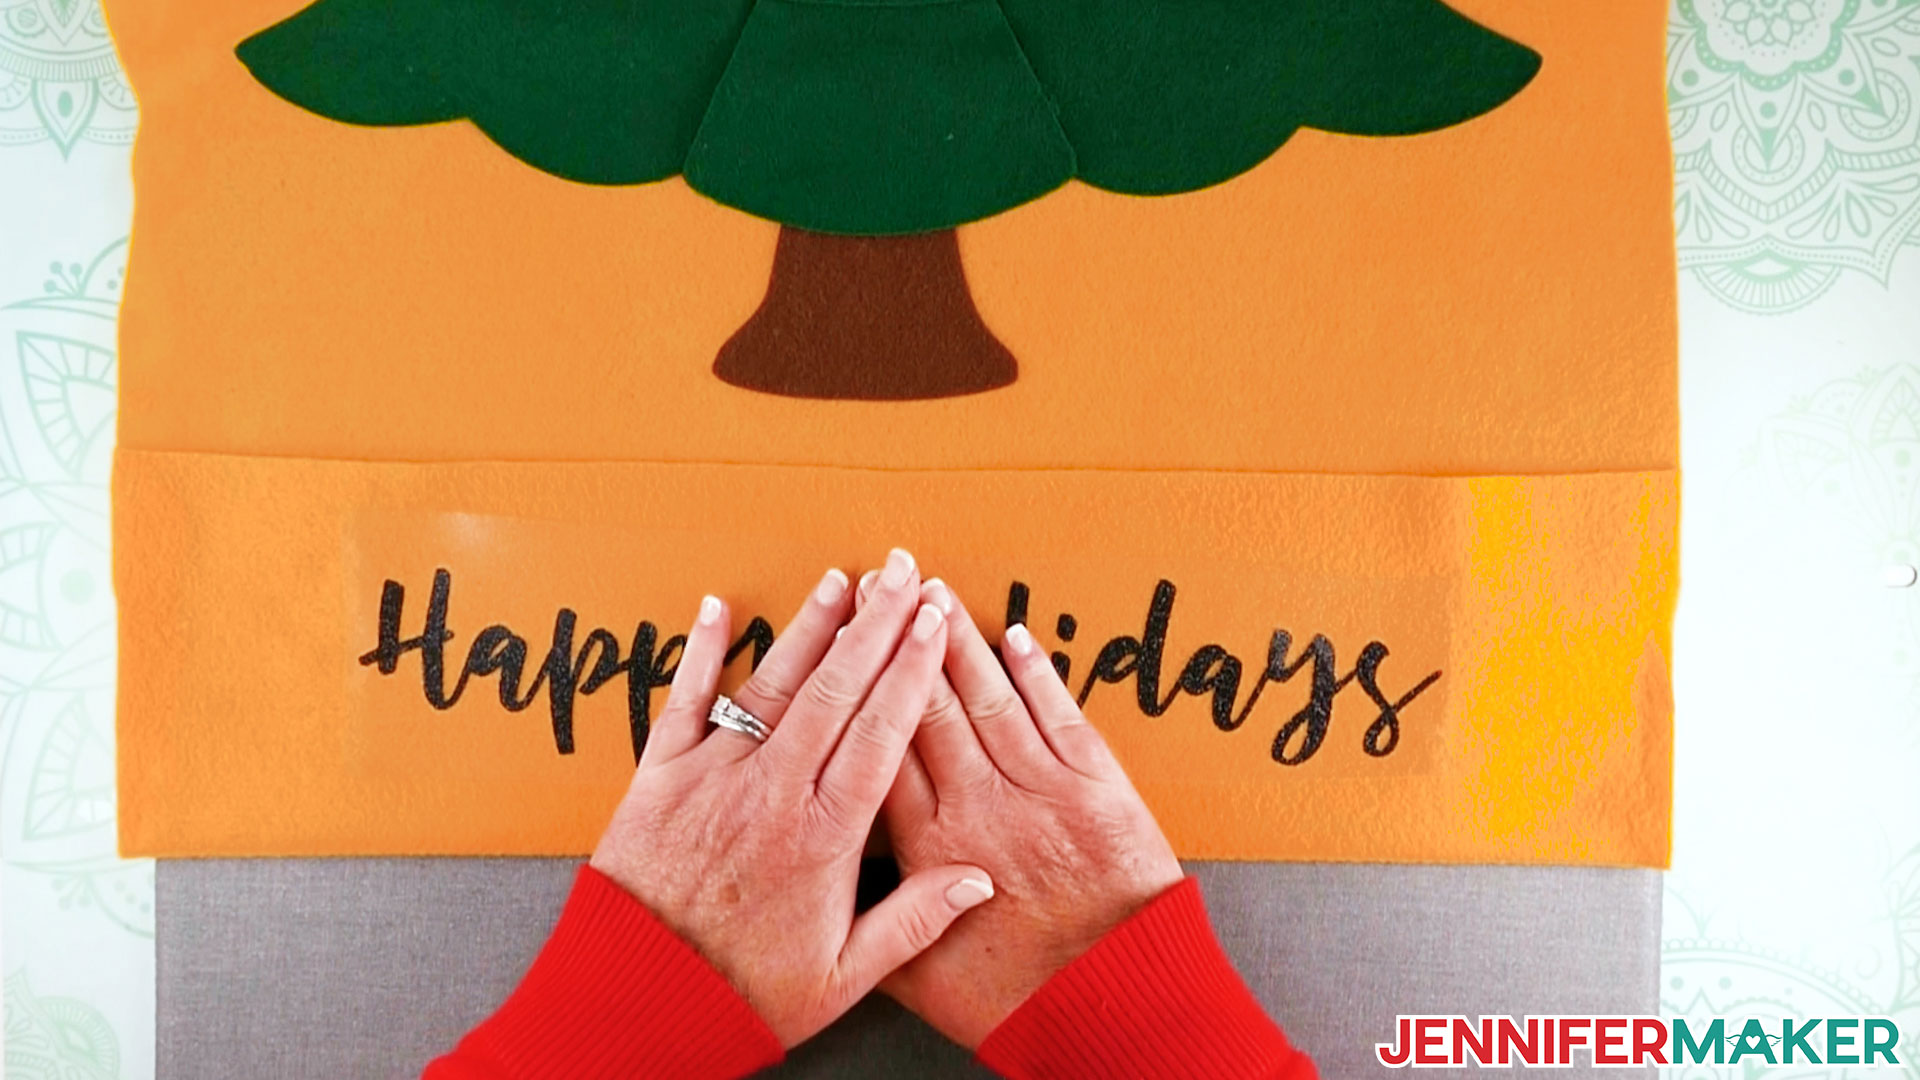
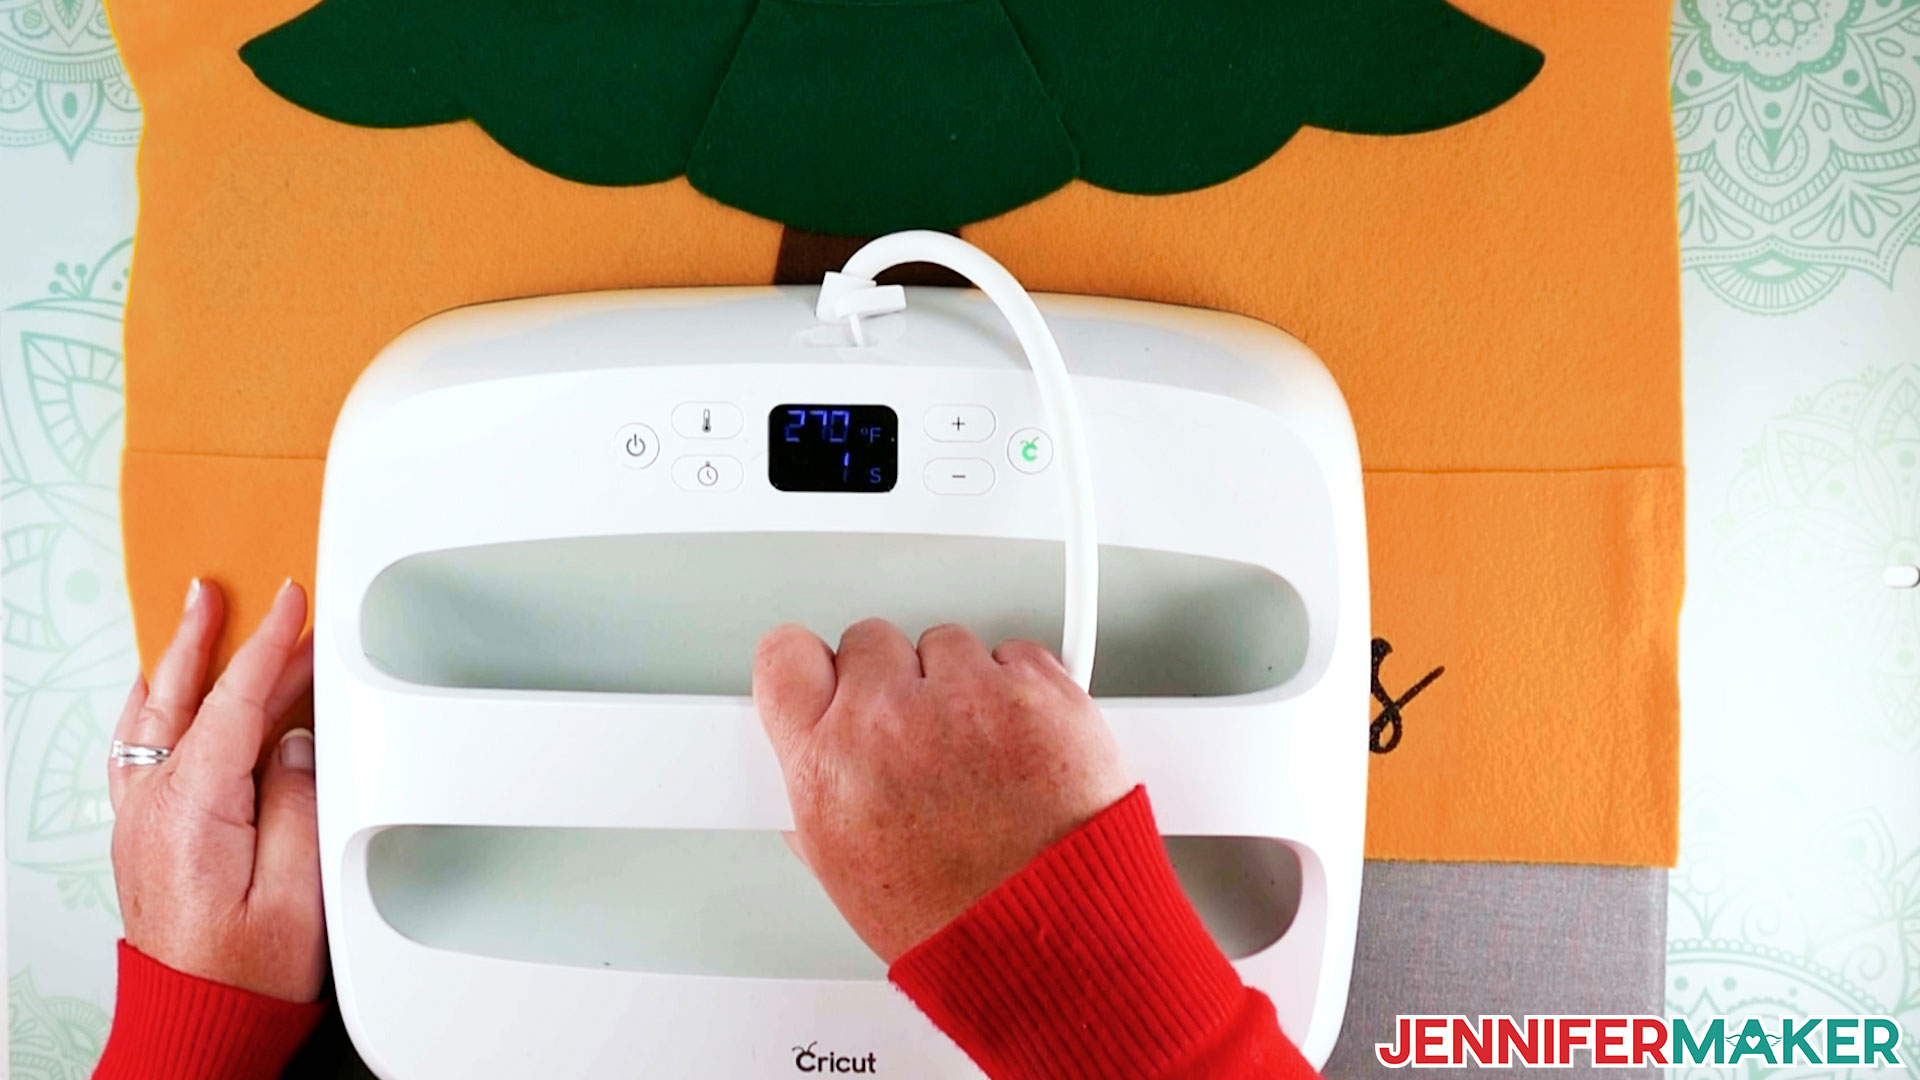
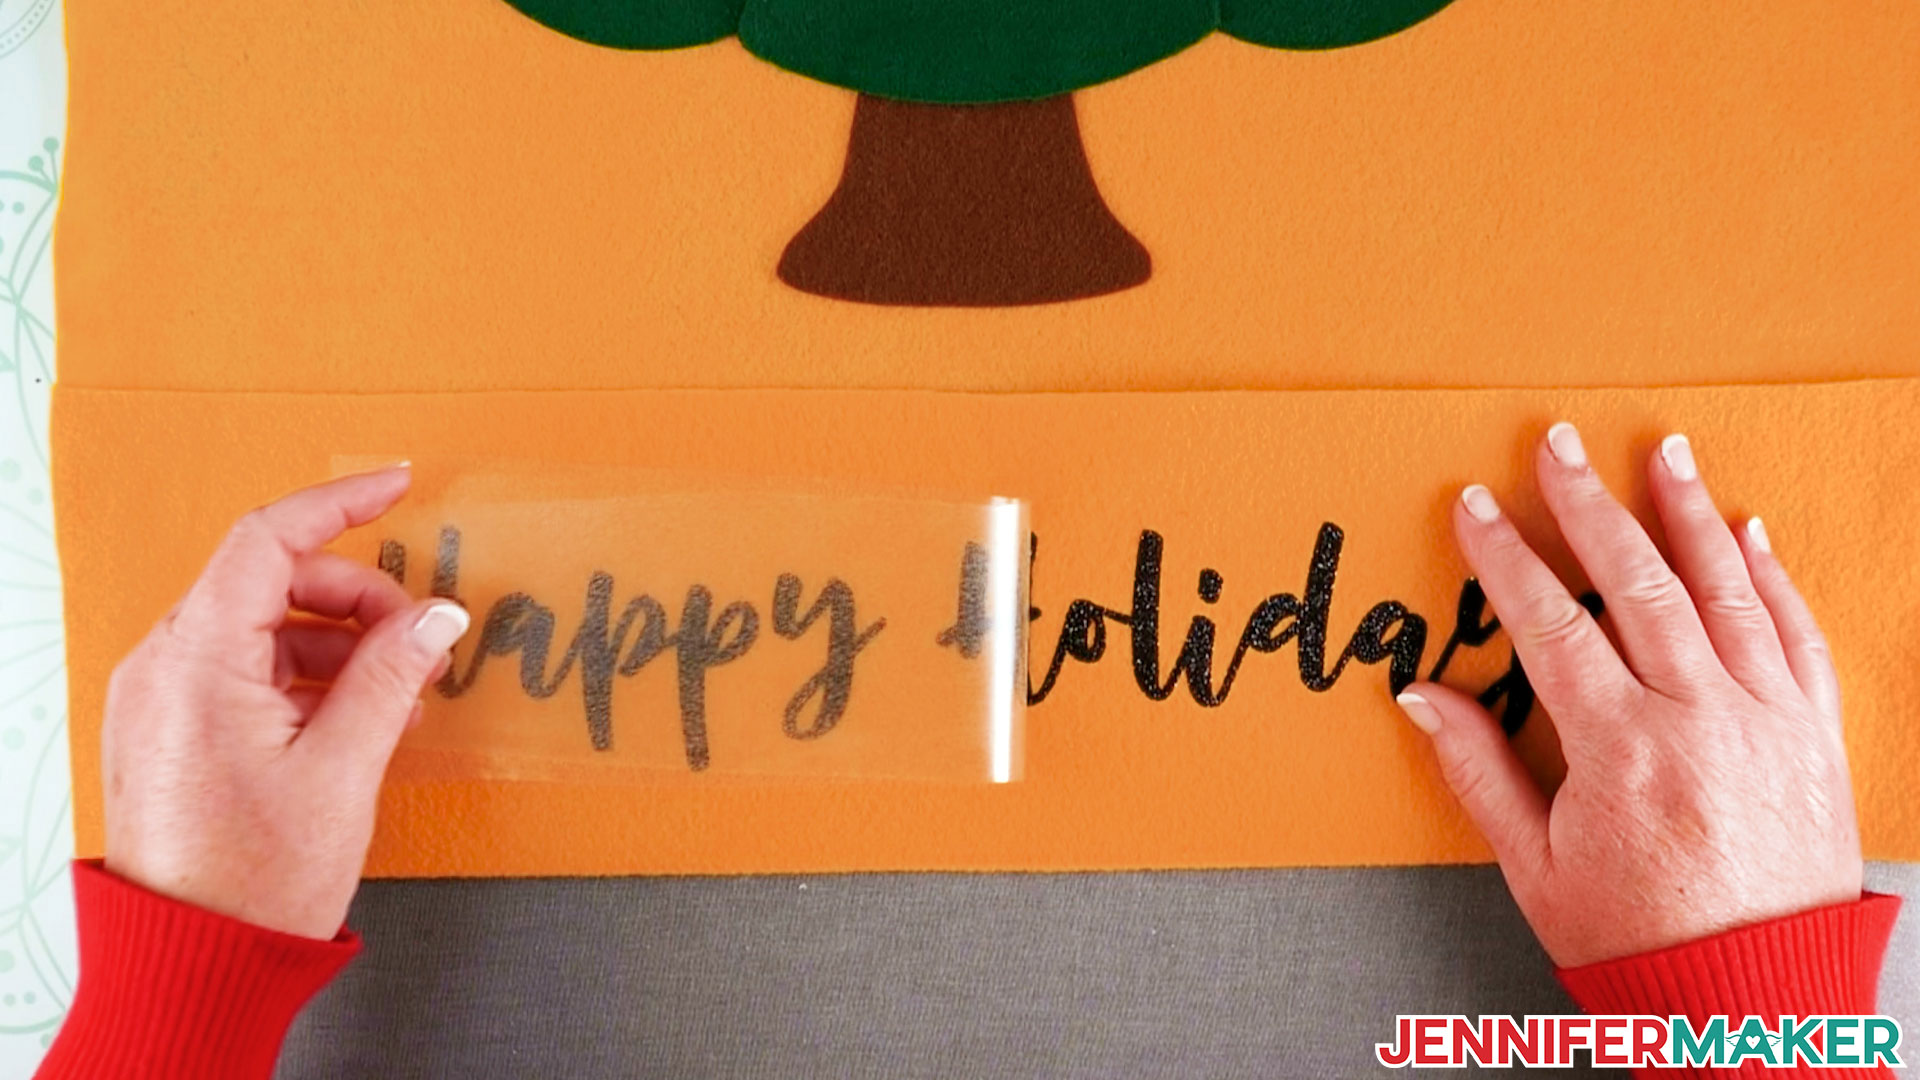
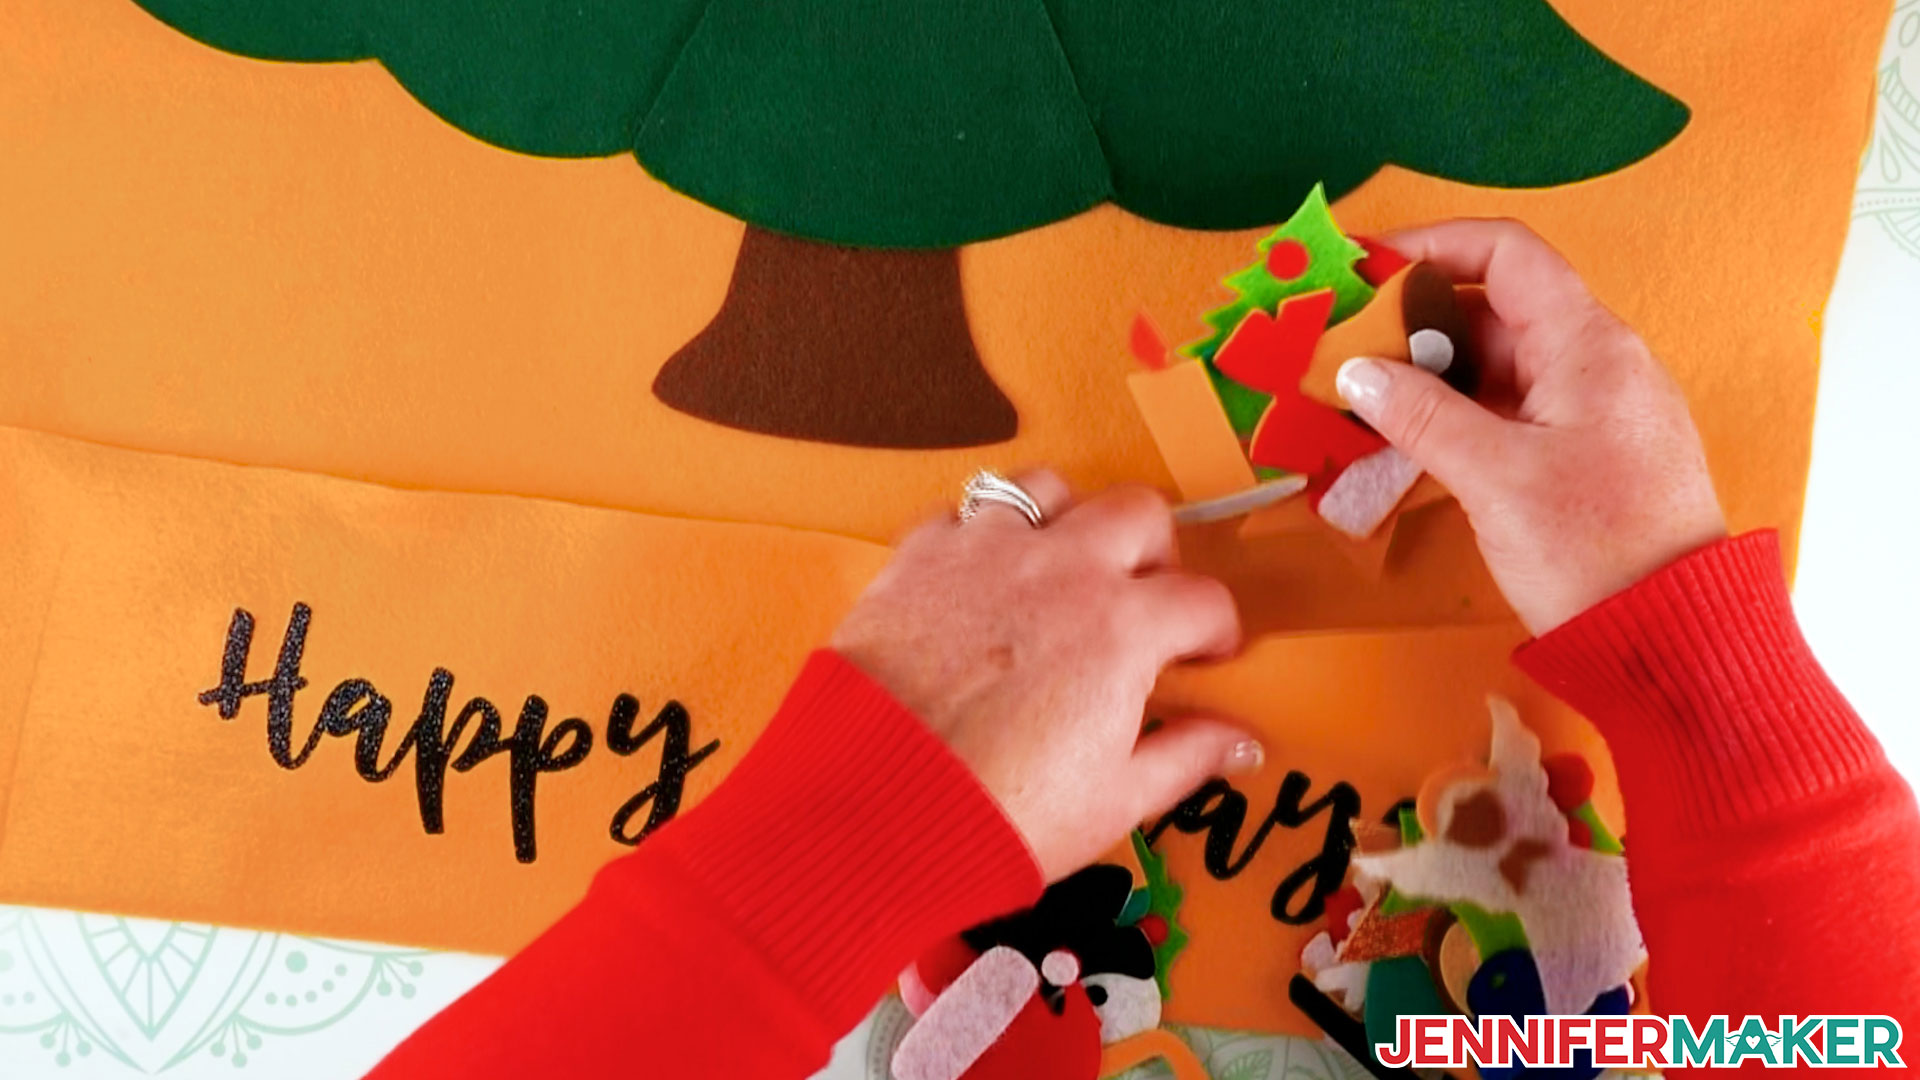
Countdown the days until Christmas by making this beautiful Felt Christmas Tree Advent Calendar with me! First download Design #342, which is my free Felt Christmas Tree Advent Calendar SVG/DXF/PDF from my free resource library. If you're going to cut it on your cutting machine, upload the file to your design software. This is what my Felt Christmas Tree Advent Calendar SVG looks like in Cricut Design Space. You will need to zoom out to see all the pieces by clicking the minus (-) sign next to the magnifying glass on the lower left. TIP: If you're not sure how to upload an SVG cut file to Cricut Design Space, watch this helpful video training series I made. If you're on an iPhone or iPad, here's how to download and upload SVG files to the Cricut Design Space app. Once your design is uploaded to Design Space, take a look at your felt and select pieces of felt that match the colors in my design. You can also change the colors of the design objects to match the colors of felt you want to use. For example, let's say you wanted to make the teal-colored bow a different color. Select the layer for the bow in the layers panel on the right side of the Design Space canvas. In the menu at the top left, under Operation, you will see a teal square next to Basic Cut. Click on the square to select a different color. You can do this for as many elements as you like or you can just leave it as it is. I am going to keep my colors as they are in my design so I will change it back to teal. Click "Make It” in the upper right corner of the screen. NOTE: If you are using a Maker 3 or Explore 3, you will see a screen asking you how you will load your materials for this project. Select "On Mat" then click "Done" to continue. The Prepare screen shows that I have 20 mats to cut. PREPARE THE FELT To help in preparing your felt for cutting, I have included the color and measurements to cut your felt for each of the 20 mats. You certainly can use larger pieces of felt if you want. Mat 1 - White - 12" x 5.5" Use a ruler and scissors (or a rotary cutter on a self-healing mat) to measure your felt and cut each piece to the specifications above. If you are using an Explore Series machine like I am, you will want to cut freezer paper the same size as the felt piece for each mat. This acts as a stabilizer. You can also back your felt with freezer paper for the Maker Series machines as it helps keep your mat clean. To apply the freezer paper to the felt, take out your EasyPress and set the temperature to 300 degrees and the timer to 10 seconds. Place a piece of felt on your heating mat then place the freezer paper on top the felt. Make sure the shiny side of the freezer paper is against the felt and the dull side is facing up. The shiny side has plastic coating which will adhere to the felt when heated. Start the timer for 10 seconds. If your EasyPress does not cover the entire piece of felt, circle your EasyPress around the surface of the freezer paper. Repeat this process to add freezer paper to each piece of felt. CUTTING THE FELT When you have finished preparing all your felt pieces, return to Design Space and click "Continue" in the lower right corner of the Prepare screen. To select our base material, click "Browse all Materials." Type "felt" in the search bar. Select "Felt Wool Bonded" for Explore Series machines and "Felt Acrylic Fabric" for the Maker Series machines then click "Done." For the pressure, select More. Check the box to remember material settings. You will only see this if you are using a Maker 3 and Explore 3 machine. Load your Fine-Point Blade if you are using an Explore Series machine into clamp B. If you are using a Maker Series machine, insert your Rotary Blade into clamp B. Place your piece of felt for mat one on a StrongGrip Machine Cutting mat. This is the purple mat. Use a brayer to secure the felt to the mat. Before we load the mat into the machine we need to move the four white star wheels to the far right. These wheels help keep materials from shifting during cutting. However, when working with thicker materials — like leather, felt, and craft foam — they can leave track marks so we want to move them out of the way. If the carriage is in the way, power OFF your machine, then gently move the carriage to either side until you have enough room to maneuver the star wheels. Grasp a star wheel and move it all the way over to the right side. Repeat for each wheel. Now load the mat into your cutting machine. Press the go button when it begins blinking to begin cutting. When your mat has finished cutting, press the unload button to remove the mat from the machine. To remove the felt from the mat, whether you used freezer paper to back it or not, turn the mat over and bend it slightly to release the felt and freezer paper. TIP: Tweezers, a spatula tool, and a scraper tool are helpful to remove small pieces and freezer paper from the mat. Continue cutting the remaining pieces of felt. It takes approximately two hours to cut all 20 mats. CUTTING THE HEAT-TRANSFER VINYL (OPTIONAL) I have included a "Happy Holidays" greeting for the bottom of your Felt Christmas Tree Advent Calendar, but you can always create your own message. Upload the SVG the same way you uploaded the Felt Christmas Tree Advent Calendar file. This is what the SVG looks like in Design Space. There are two versions of "Happy Holidays." The top version is designed for using a 12" x 24" StandardGrip Machine Cutting mat (or using Smart Vinyl). The bottom version can be cut in on a 12" x 12" StandardGrip Machine Cutting mat (Happy and Holidays will cut on separate mats). First click ungroup at the top of the layers panel. Next, hide or delete the version that you are not using by selecting it on the canvas and hitting delete. I am using iron-on SmartVinyl which requires no mat so I am deleting the bottom group. Click "Make It" in the upper right corner of the canvas. If you are using a Maker 3 or Explore 3, you will see a screen asking you how you will load your materials for this project. I am using black glitter iron-on Smart Vinyl so I am selecting "Without Mat" and then "Done." Review the artwork on the Prepare screen. Make sure to turn "Mirror" on. Without mirroring the design, the text will be backwards when we go to apply it to our felt. Also notice you will need 16 inches of smart vinyl for the cut. Click "Continue" in the lower right corner of the screen. Select Smart iron-on vinyl for your base material. If you are using another material, select "Browse All Materials" in the upper right corner of the base materials section to find and select your material like we did when selecting the felt. Load your Fine-Point Blade into clamp B of your machine. Load your material into the machine. If you are not using Smart Vinyl, apply your iron-on vinyl to a StandardGrip Machine mat (green), pretty/shiny side up and load it into your machine. When blinking, press the go button to begin cutting. When the design has finished cutting and if you are using a Cricut Roll Holder which is optional, use the slicer on the tray to cut the vinyl then remove the tray. Press the unload button to remove the vinyl from the machine. Grab your weeding tool and begin weeding the design. Make sure to weed out all the little bits inside the letters too! It took me approximately ten minutes to cut and weed the design. Set that aside for now, we will add this part later. You will need one piece of felt that is 20" W x 38" H for the background. This is the fabric we will be attaching the tree to. I am going to show you the method I used to get a piece of fabric this size from the yard (36"x72") of fabric I purchased. NOTE: If you purchased different felt, it may not be the same size as mine. Just make sure you cut your felt so you have a piece that measures 20" W x 38" H. Take the yard of fabric that is for the background of the tree. Place the selvage edges toward you and the centerfold of the fabric at the top away from you. A selvage edge of fabric is a tightly woven edge of the fabric created to prevent unraveling or fraying. Make sure the felt is flat and there are no creases. Fold 11" of the left side of the fabric over onto itself. Make sure the centerfold aligns at the top. Measure 10" horizontally from the edge of the left fold and mark the fabric using a Cricut Washable Fabric Marker. Continue measuring 10" marks from the left fold down the length of the felt. Place a yardstick or ruler on the fabric and connect the 10" marks making a vertical line down the fabric with your fabric marker. Take a pair of scissors and cut the fabric on the vertical line. I highly recommend doing this with a nice pair of fabric shears. All-purpose scissors were designed to cut through paper. Fabric scissors are designed to cut through fabric. They give a precise, clean cut. Do not use your fabric scissors to cut paper as it will dull the blade faster. You now have a piece of felt that is 10" wide. Open the felt so it is 20" wide. Measure and mark 19" down from the centerfold at the top of the felt in several places. Take your ruler and make a horizontal line connecting the 19" marks. Use your fabric shears and cut along the 19" line. Open your piece of felt and lay it flat. You should now have a piece that measures 20" x 38". From the bottom of the felt, use your ruler and measure and mark 10" in the center and on the right and left edges. Fold the bottom edge of the felt up so it aligns to the three marks you made. Pin the fabric in place in the center and on each side. This is the pocket which will hold the felt ornament pieces. Use a ruler to double check the folded pocket has the same height measurement. Adjust if necessary. Grab the felt pieces that make up your tree including the tree trunk and some straight pins. There are a total of 17 pieces. From top to bottom, the first four layers are individual pieces. The bottom four layers each consist of three pieces. Place the pieces for the first four layers in a stack smallest to largest. Sort the middle pieces for the bottom four layers smallest to largest. Next, match the left and right sides for the four layers by aligning the top and sort those smallest to largest. I found it easiest to assemble the tree from bottom to top. From the bottom of the felt, at center, make the following measurement marks using a fabric marker: 8 3/4”, 12”, 14 3/4”, 17 1/4”, 19 1/2”, 21 3/4”, 23 1/2”, 25”, and 26 1/4”. These marks represent the placement for the top side of the trunk piece and the pieces for each of the eight rows that make up the tree. Take the trunk piece and align it center on the felt with the top at the 8 3/4" mark. Pin the piece in place in the middle using a straight pin. Take the middle piece for the bottom row of the tree, align it center, and place the top at the 12" mark. The left side piece for the bottom row should align with the top of the middle piece. The right side of the left piece should overlap the middle piece about 1/8-1/4". Pin the piece in place. Place the right side piece for the bottom row so that the top aligns with the middle piece. Overlap the left side with the middle piece about 1/8-1/4". Pin the piece in place. Pull the middle piece so it is in front of the left and right side pieces. Repeat these same steps to place the next three rows. Now is a good time to look at the placement of your rows and take some measurements from the edges of the felt to the edge of the tree pieces to make sure everything is centered. Take the largest of the four tree pieces left and align it center with the top of the piece at 21 3/4” from the bottom of the felt background. Place the next three pieces, largest to smallest, and align them center with the top of the pieces at 23 1/2”, 25”, and 26 1/4”. Lay the felt down in a spot where it can sit for three to four hours. We are going to begin gluing the tree pieces in place. You do not want to move your project while the glue is drying. Add glue to all the tree felt pieces. Beginning with the first row (the top of the tree), add plenty of glue to cover the upper backside of the piece. Use your fingers to press the piece firmly to the background felt. Continue adding plenty of glue to the top third of each piece for each row of the tree. Press the piece firmly to the background. When you get to the trunk of the tree, add glue to the top, sides, and bottom. Press the piece firmly in place using your fingers. Press all the pieces firmly one more time then remove the straight pins from each piece. For the pocket at the bottom, add a line of glue to the left side, right side, and in the center. Leave the tree to sit in place for three to four hours so the glue has time to dry. The ornaments are easy and fun to put together. Below is a reference image of how each ornament looks when assembled. I recommend sorting the felt pieces into piles for each ornament then begin gluing them together. After all your ornaments have been assembled, carefully add the rough side of the hook and loop dot to the back side of each ornament. You will not need the other side of the hook and loop dot. Set the ornaments aside for three to four hours to allow time for the glue to dry. Now that the glue on the tree has dried, let’s add the dowel and ribbon to hang the Felt Christmas Tree Advent Calendar. Lay your Felt Christmas Tree Advent Calendar down so the back side is facing up. First we are going to make an opening for the dowel to slide through. Measure and mark 3" from the top of the felt background in several places across the top. Then measure and mark 1.5" from the top of the felt background in several places across the top. Fold back the felt to the 1.5" marks we just made. Add straight pins in the center and at both sides to hold the fold. Add hot glue to the section we just pinned. Be careful to protect your fingers, the glue is hot. Fold the felt with the hot glue onto to the back of the background and align at the 3" marks. Grab your wooden dowel and measure from one end to 21.5". Place a mark on the dowel. This is where we will cut the dowel. Use a hacksaw to cut the dowel at the line marked. Measure out 30” of grosgrain ribbon and cut. Add a dab of hot glue to one end of the ribbon. Glue the ribbon to one end of the wooden dowel. Place one of the dowel end caps over the end of the dowel and ribbon. It will be a snug fit. If you are having trouble putting it on, pound the end of dowel cap on a soft surface, like carpet, to secure it. You can also use a rubber mallet if you have one handy. Do not use a hammer as this will leave indents in the dowel cap. Insert the dowel into the slot at the top of the felt. Run the grosgrain ribbon across the top of the dowel so it is flat. Add a dot of hot glue to the end of the ribbon and glue it to the end of the dowel. Add a dowel cap to the end of the dowel. NOTE: You can paint or stain your dowel and dowel end caps if you’d like. You can also add a big fluffy bow to the top of the grosgrain ribbon. This adds a beautiful accent and also hides any hook used to hang up the Felt Christmas Tree Advent Calendar. Bows can be tricky but using wired ribbon helps create great bows. Let me show you how to make a simple bow with wired ribbon and about a foot of floral wire. Start by pulling a piece of the ribbon out and roll the end of the ribbon into a circular shape, like this. This will be the center of your bow. From there, twist the ribbon behind the circle you made and loop out the ribbon a bit larger than your circle to make one side of your bow. Pull the ribbon to the other side, twist it again behind the circle, make another loop (on the opposite side of your first loop) and hold it behind the center circle, too. We have the start of the bow! Now twist the ribbon in the back and make a larger loop on the other side. Pull the attached end back across to the other side. Again, twist it in the middle and make another loop about the same size as your last. Continue twisting and looping the ribbon with ever-increasing sizes for each set of two loops. You can add as many loops as you need — I went with four loops on each side of my bow. When you’re satisfied with how it looks, get a piece of floral wire, about 8 inches or so, and feed it through the center circle of your bow. Now twist tightly behind the bow to hold all of the parts together. This will leave a tail hanging down from the bottom of the bow which you can trim to your desired length. To add a matching tail on the other side, feed a piece of ribbon up through the center loop of your ribbon and use the floral wire that’s already wrapped around the bow to secure the tail in place. Trim any excess ribbon from the back. Now just fluff up your ribbon and cut the tails at an angle at whatever length you desire. You can use the floral wire wrapped around the bow to attach it to your project, or just snip off the ends of the wire and hot glue it on! The final step in the assembly of the Felt Christmas Tree Advent Calendar is to apply a festive greeting to the front of the ornament pockets. Heat your EasyPress to 270 degrees and set timer for 30 seconds. Use a lint roller to clean the felt pocket. Preheat the felt for five seconds. Center and place the heat-transfer vinyl onto the felt. I like to fold the vinyl in half so that the left and right ends touch and then press a crease in the liner sheet to identify the center. Fold the pocket part of the felt in half and finger press the felt to identify the center. Place the heat-transfer vinyl onto the felt and center. Make sure the entire design is heated for 30 seconds. You may need to heat one side and then the other. Once the heat-transfer vinyl is cool to the touch you can peel off the liner. Insert the ornaments into the pockets. You are now ready to countdown to Christmas. Beginning December 1, take any ornament from the pocket and add it to your tree. I always like saving the star for the top of the tree as the last ornament. The finished size of the Felt Christmas Tree Advent Calendar is 20" W x 29" H. Cherry Cordial font was used to create "Happy Holidays." This project can be made larger, however, I wouldn't recommend making it smaller due to the size of some of the smaller pieces. As an Amazon Associate and member of other affiliate programs, I earn from qualifying purchases.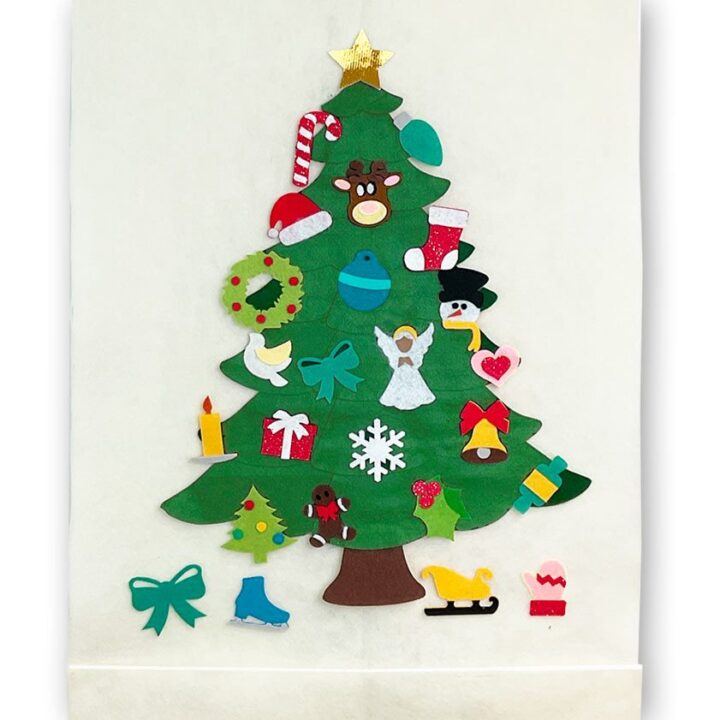
Felt Christmas Tree Advent Calendar
Materials
Tools
Instructions
STEP 1: GET MY FREE FELT CHRISTMAS TREE ADVENT CALENDAR FILE
STEP 2: CUTTING THE DESIGN
Mat 2 - Grey - 7" x 1.5"
Mat 3 - Black - 8" x 2.5"
Mat 4 - Brown - 12" x 3.5"
Mat 5 - Light Tan - 1.5" x 2"
Mat 6 - Light Brown - 3.5" x 3"
Mat 7 - Orange - 2" x 1.5"
Mat 8 - Cream - 3.5" x 2"
Mat 9 - Yellow/Gold - 12" x 5"
Mat 10 - Off White - 3" x 3"
Mat 11 - Green - 9" x 4.5"
Mat 12 - Medium Green - 2.5" x 3.5"
Mat 13-15 - Green (Tree) - 12" x 12"
Mat 16 - Teal - 6.5" x 3.5"
Mat 17 - Blue - 6" x 3.5"
Mat 18 - Dark Blue - 3" x 3"
Mat 19 - Pink - 7" x 3.5"
Mat 20 - Red - 12" x 5"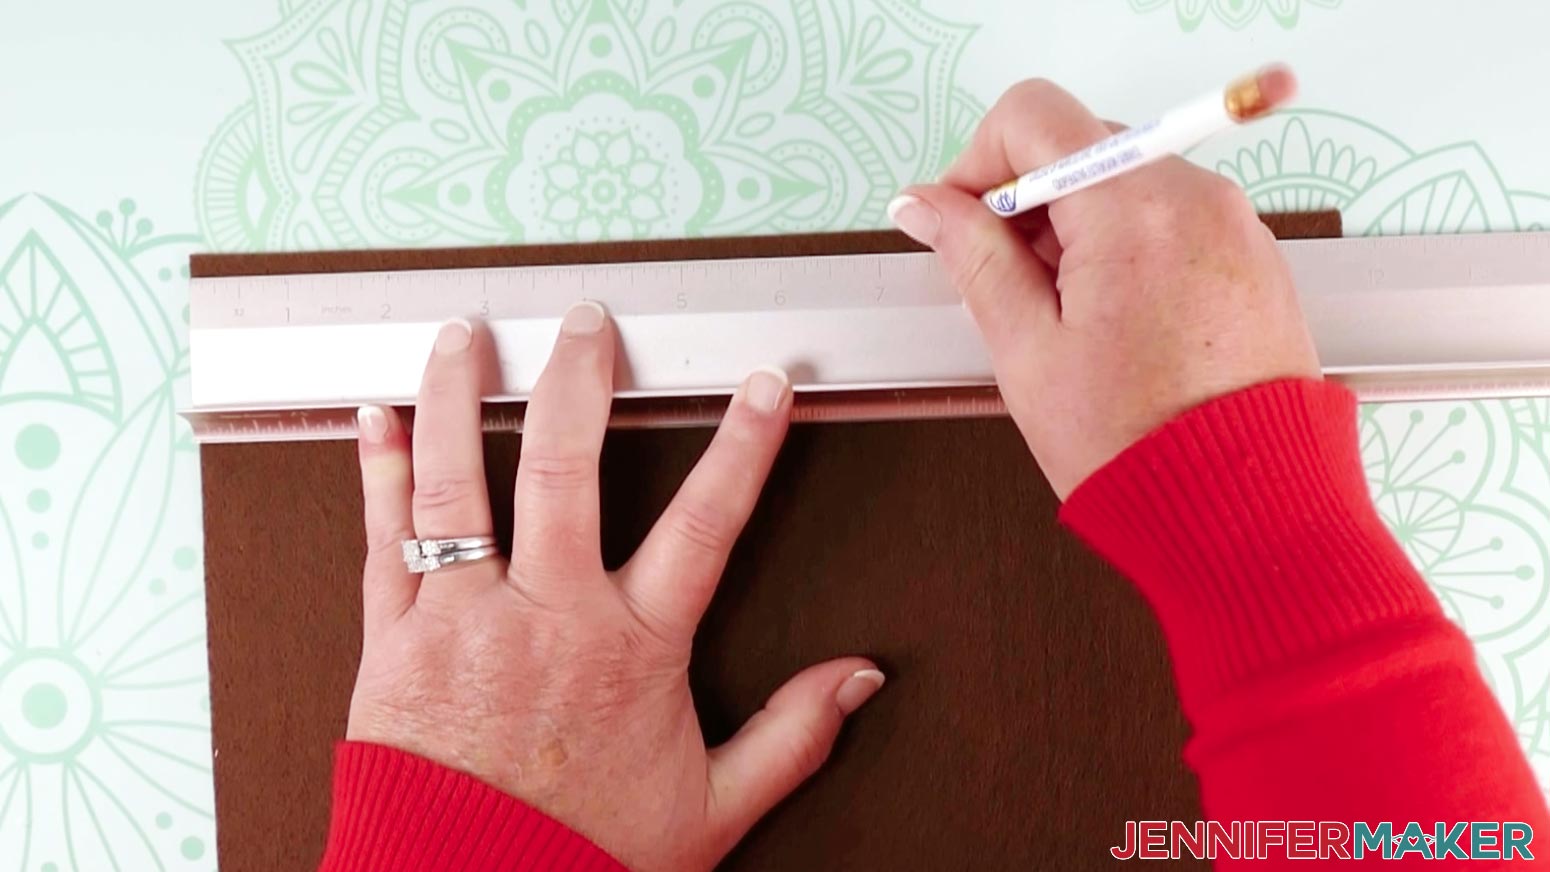


STEP 3: ASSEMBLE THE TREE


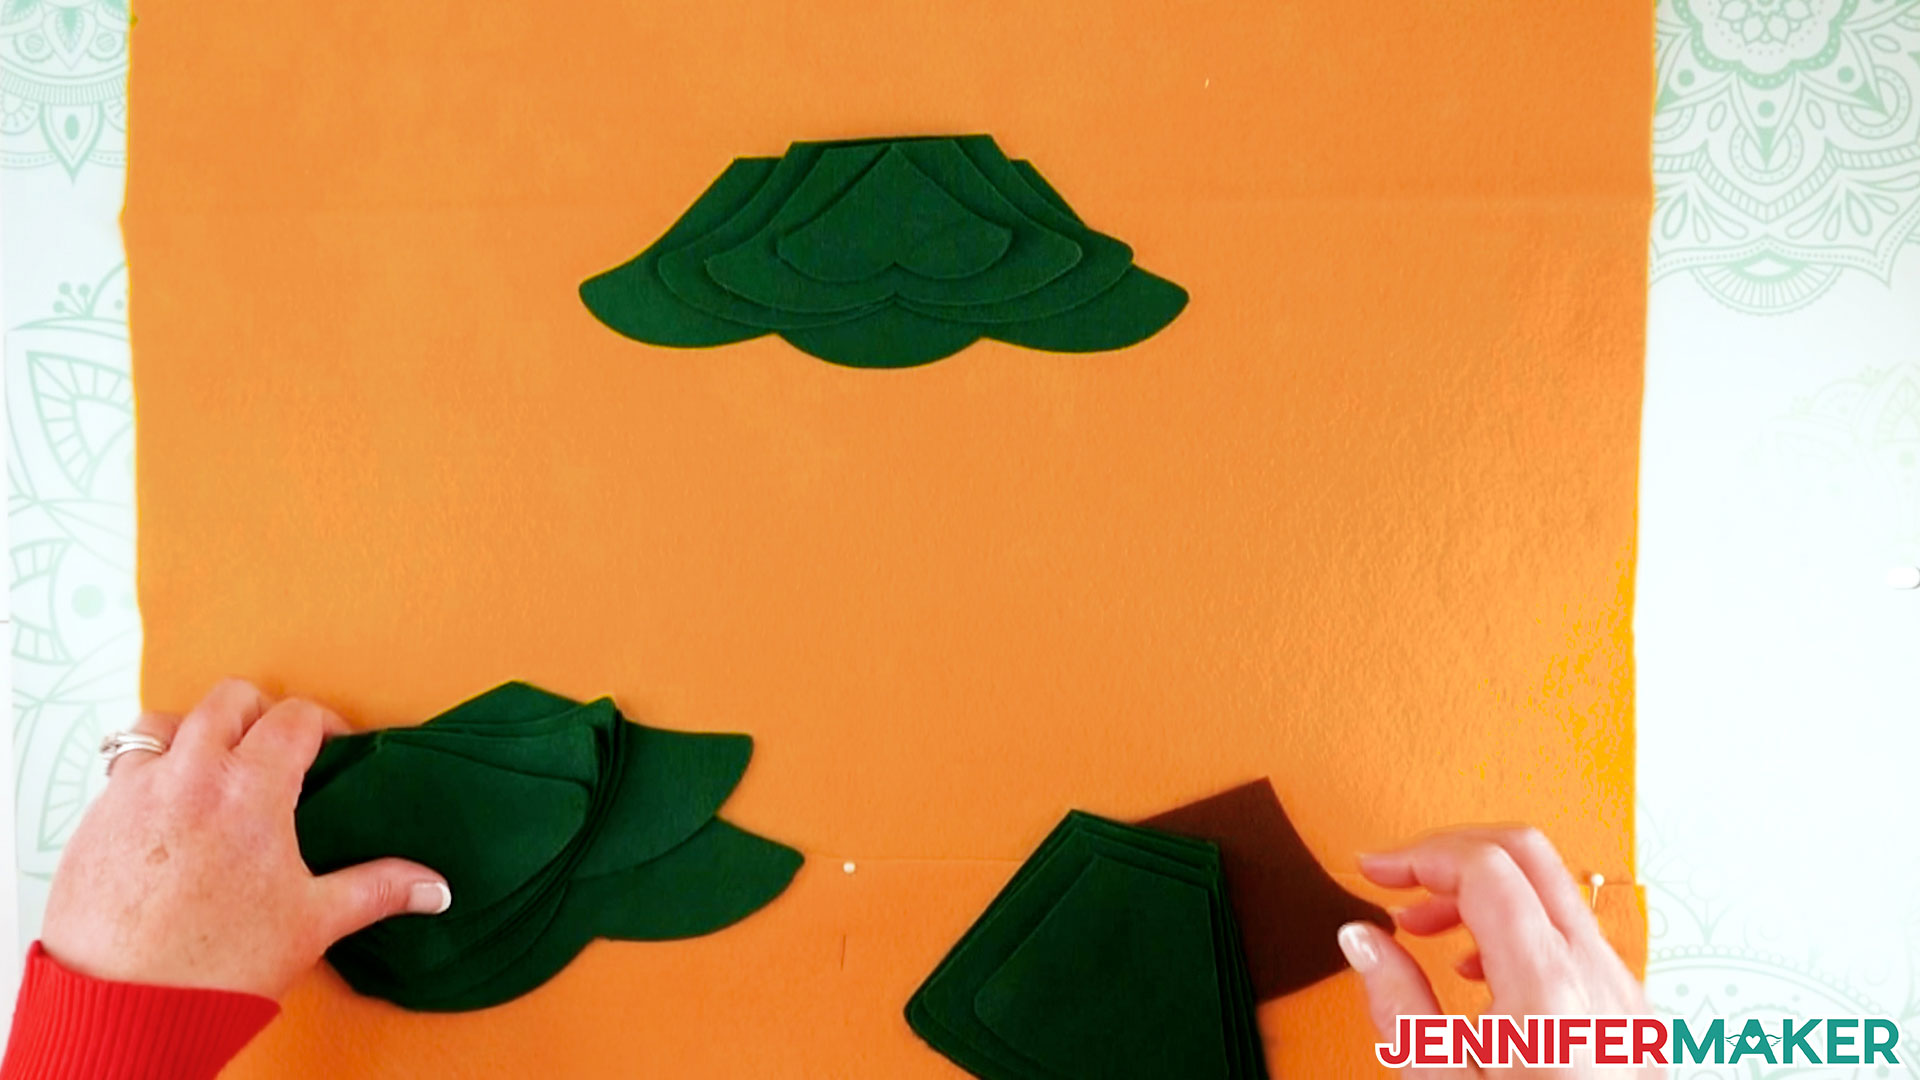
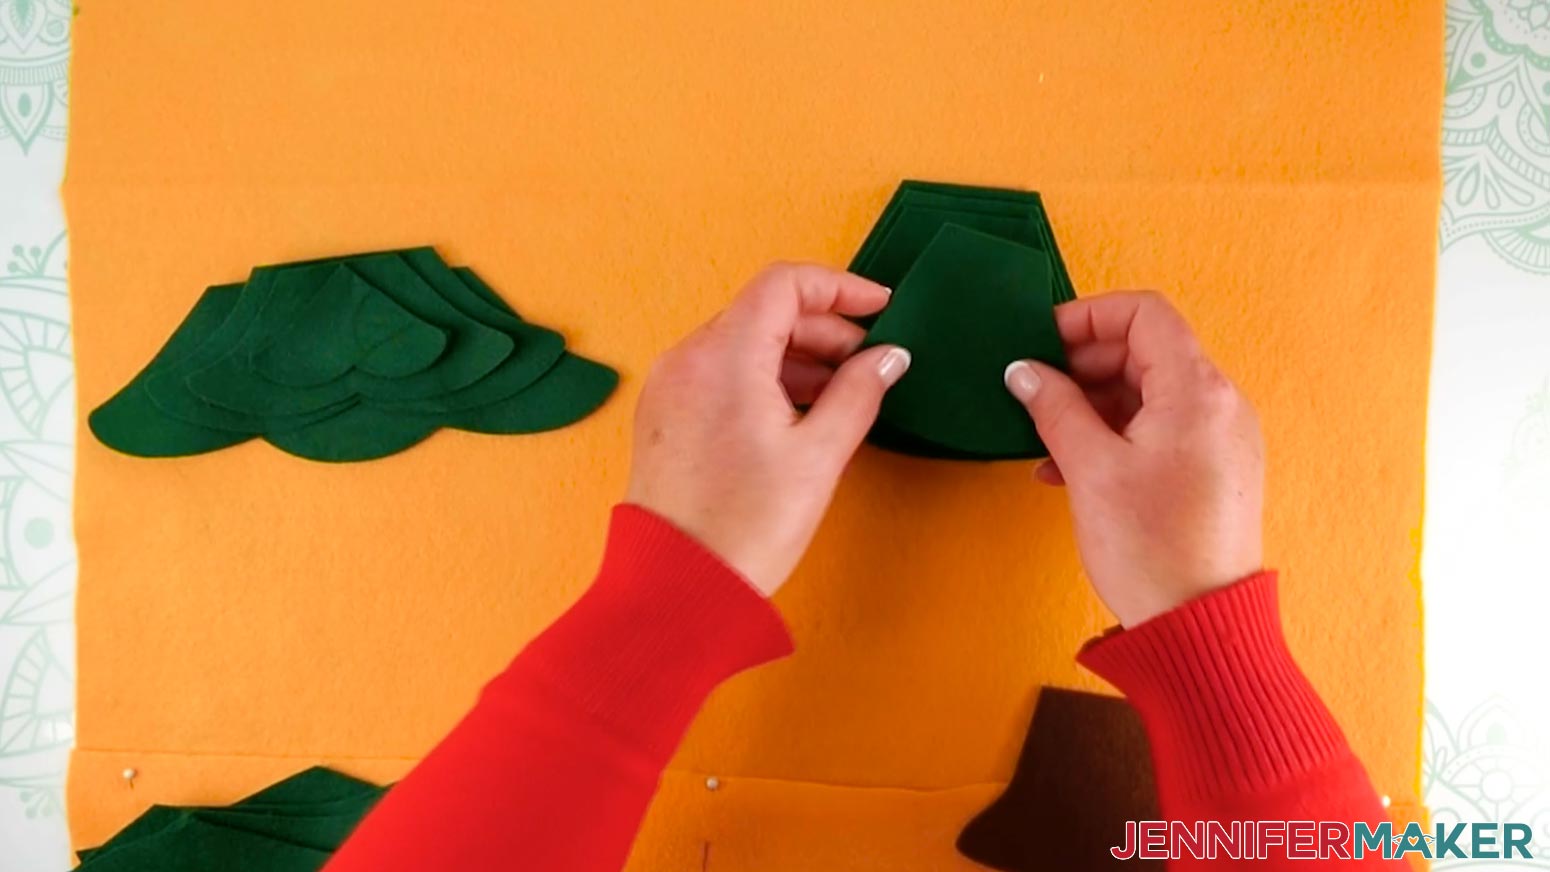
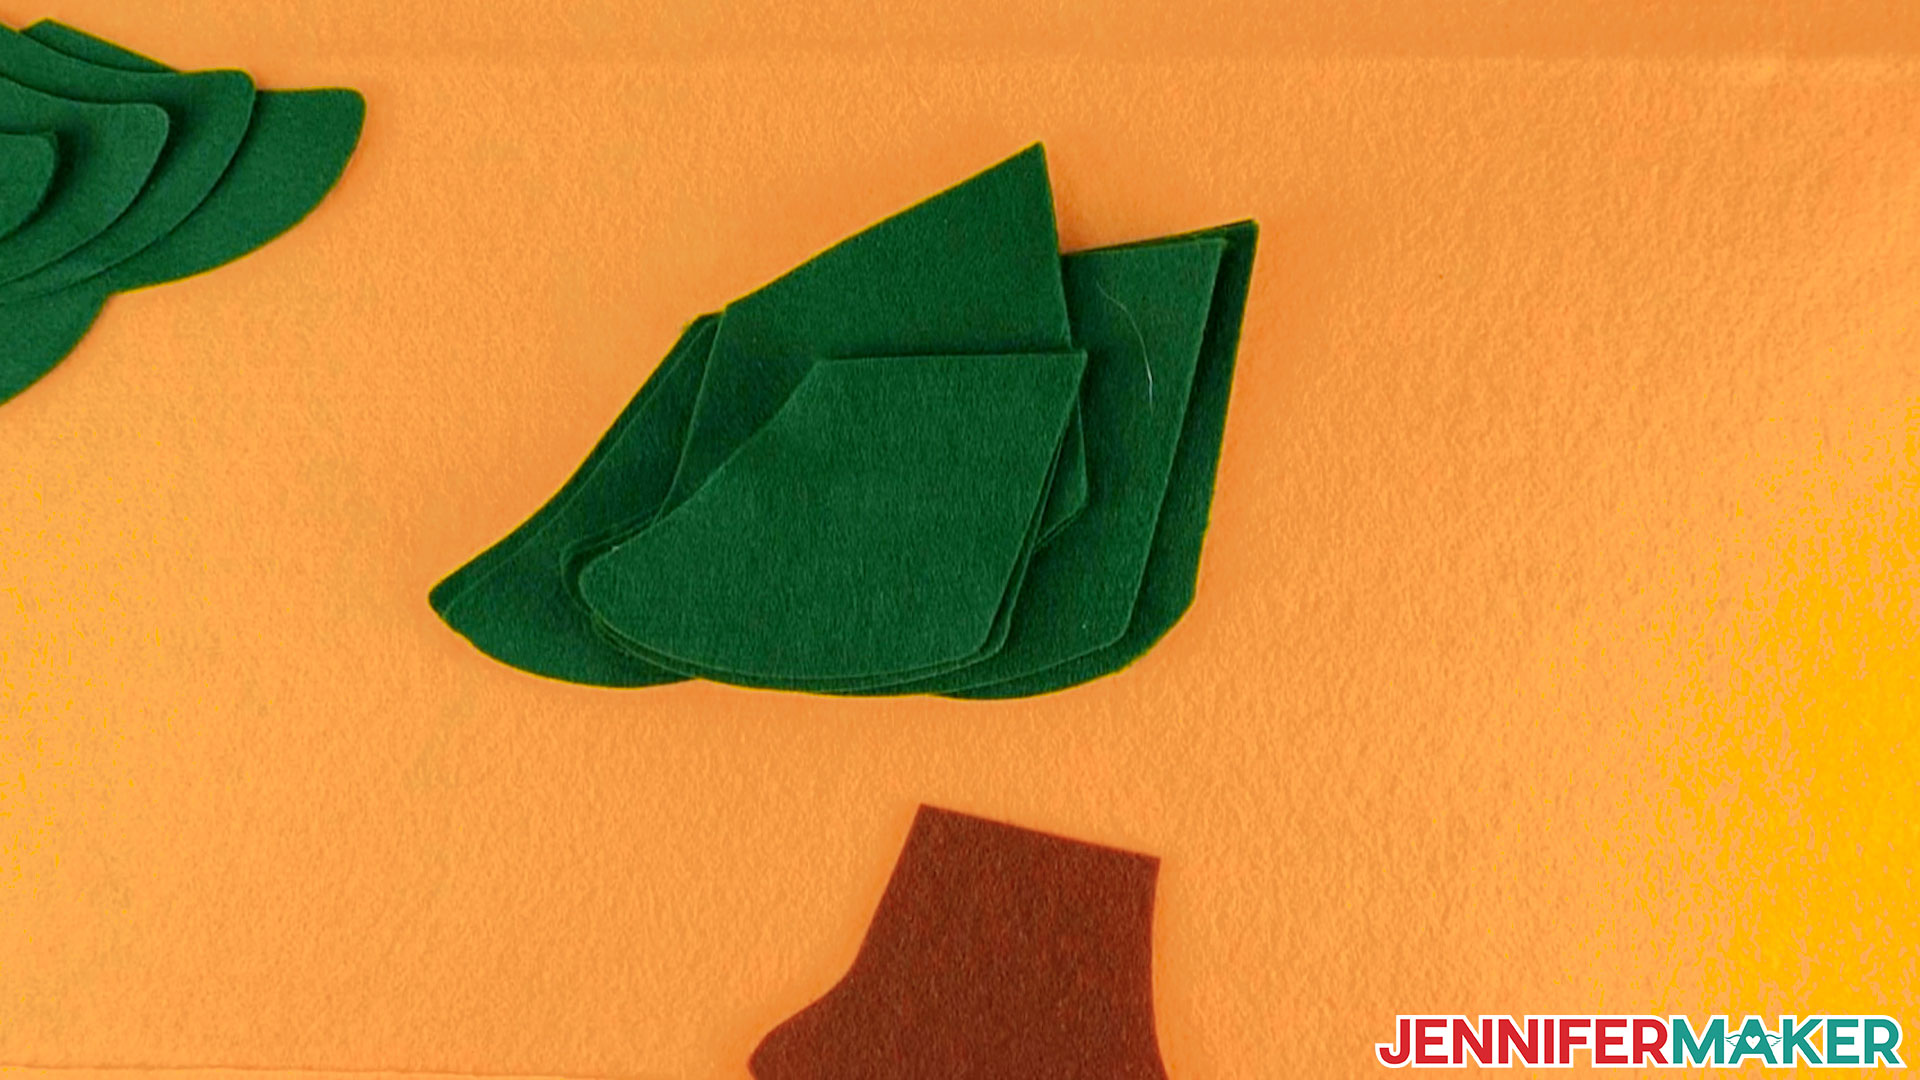


STEP FOUR: ASSEMBLE THE ORNAMENTS

STEP FIVE: ADD THE HANGER AND RIBBON


STEP SIX: ADD HEAT-TRANSFER VINYL (OPTIONAL)

STEP 7: SHOW IT OFF
Notes
Recommended Products


Answers to Your Questions About How to Cut Felt for Your Advent Calendar
Q: What kind of felt do I use?
I recommend stiff felt, as it cuts better and keeps its shape longer. The Cricut felt is particularly good and results in crisp, clean edges!
Q: How do I keep my felt layers stuck together?
To keep the felt layers stuck together permanently, use felt glue. To keep felt layers stuck together temporarily, adhesive hook and loop circles work great!
Q: Can I cut this project on a Cricut Joy?
Yes, if you cut this from cardstock instead of felt and resize it so that the largest piece fits on the Cricut Joy machine mat. See our Resizing Guide for more details.
Q: Can I cut felt on my Cricut Explore Air?
Yes, you can! You’ll just want to put freezer paper on one side of your felt before you cut it, bonding it with an iron or EasyPress. This bonded side then goes against your machine mat to keep the felt in place as you cut it with the fine point blade.
Get my free SVG files to create a beautiful Felt Christmas Tree Advent Calendar
I love seeing what you make with my designs and how you use them! Please share a photo of your advent calendars in our Facebook group or tag me on social media with #jennifermaker.
Love,

Want to remember this? Save this Felt Christmas Tree Advent Calendar Tutorial to your favorite Pinterest Board!