Learn how to use Canva photo editing to transform everyday pictures into craft-ready images for endless creative projects!
The first time I printed what I thought was the perfect vacation photo for a custom puzzle and a set of matching coasters, it came out dark, crooked, and completely… blah. The moments were magical in real life, but the pictures looked totally wrong. That’s when I started playing with Canva photo editing and realized how much you can fix with just a few clicks in your browser… before you ever turn it into your next project. I had so much fun fixing my photos that I ended up making a free downloadable guide with all my favorite tips, because it felt like something you’d want too.
In this tutorial, you’ll learn how to:
- Fix dark and crooked photos in Canva
- Adjust brightness, contrast, and white balance
- Resize images for craft projects
- Turn photos into puzzles, cards, and keepsakes
See the full step-by-step video tutorial on how to use Canva photo editing techniques:

In the video tutorial and FAQ below, I’ll show you exactly how to edit photos in Canva using a free account, so you can rescue those “almost great” shots and turn them into keepsakes. I’ve even got a free PDF guide you can download to help you with my favorite editing techniques! We’ll work right in Google Chrome, so you can start with one of your own images, and walk through the same process I use to get photos ready for crafts like puzzles, coasters, and magnets.

Even though Canva is known as a design tool for web design and social media posts, it’s also a fantastic choice for crafters. We’ll do everything with Canva’s free version, using the built-in free Photo Editor, so you get great results without the premium features that come with a Canva Pro account. The editing tools we’ll use work beautifully for both quick fixes and more complex edits, and I explain it all with easy steps you can repeat anytime. Download my free “Beginner’s Guide to Editing Photos in Canva” PDF guide below to help you while you’re editing!
You’ll see how Canva’s free online Photo Editor lets you edit image details like brightness, contrast, and white balance with simple sliders. We’ll talk about aspect ratio so your photos fit frames and projects, and we’ll use basic adjustments first so nothing feels overwhelming. Then, I’ll show you how to add filters, black-and-white and sepia effects, and depth tricks using tools like “Auto Focus.”
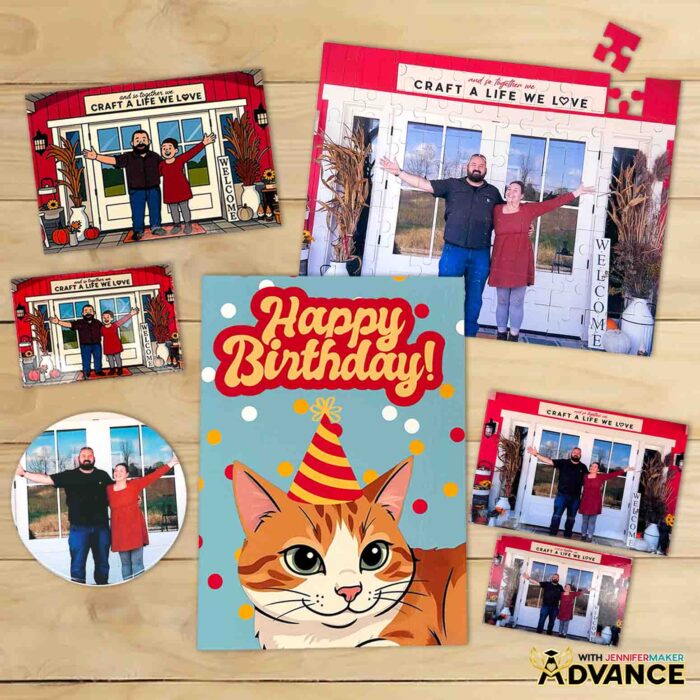
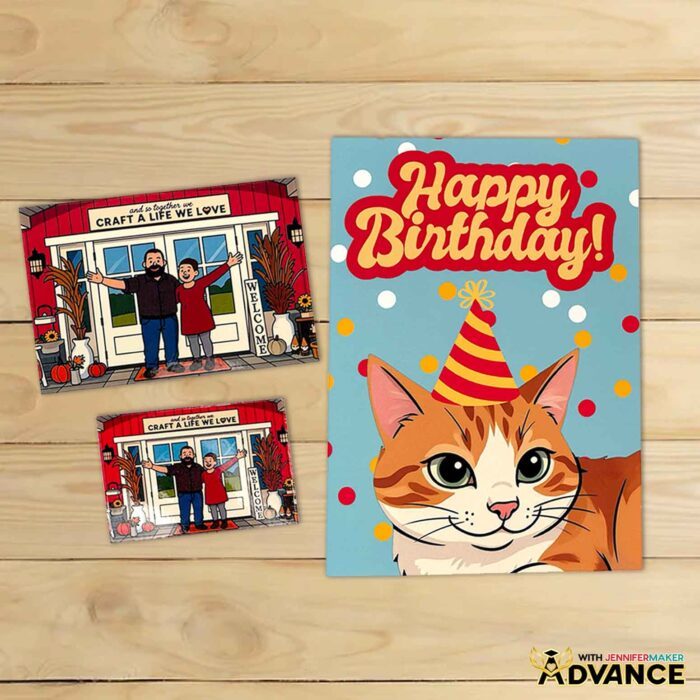
And if you’re ready to take your Canva photo editing skills even further, the ADVANCE version of this project shows you how to turn a favorite photo into a custom greeting card design using free Canva apps. We’ll use an app to cartoonify a photo, then use a background remover app to drop your subject into a fun new background: a confetti-filled scene! It’s a playful way to turn simple snapshots into one-of-a-kind cards for birthdays, celebrations, and just-because happy mail. Plus, it comes with a members-only cheat sheet to help you create custom Duotone effects in Canva! Learn more about ADVANCE with JenniferMaker here!

You absolutely don’t need any photo editing or design experience for this. Even a complete beginner can create professional-looking designs and photos once you see how approachable Canva is! With a free account and a simple picture, you’ll be ready to turn your favorite snapshots into beautiful designs for your next craft project.
Ready to dive in? Watch the video above, then use the written notes and FAQ below to troubleshoot, double-check settings, and get extra ideas for using your edited photos in all kinds of projects.
So, want to learn easy Canva photo editing? Let me show you how fun and easy it is! This post contains some affiliate links for your convenience (which means if you make a purchase after clicking a link I will earn a small commission but it won’t cost you a penny more)! Read my full disclosure policy.
Materials to Make Projects with Canva Photo Editing Techniques
See some useful supplies to go with your Canva photo editing projects!
- Free Canva Account (for all projects)
For coasters:
- One (1) 4-Pack of Cricut Round Ceramic Infusible Ink Coasters
- One (1) Sheet of 8.5″ x 11″ A-SUB Sublimation Paper
- One (1) Sheet of 12″ x 12″ White Cardstock
- White Butcher Paper
- Sublimation Printer or Printer Converted for Sublimation -AND-
- Sublimation Ink
- Heat Press – I used my Cricut EasyPress, but you can also use an Autopress or a traditional heat press
- Cricut EasyPress Mat
- Fan (for ventilation)
- Heat-Resistant Tape
- Brayer
- Lint Roller
- Measuring Tape
For puzzles:
- One (1) Sheet of Printable Sticker Paper 8.5″ x 11″
- Cereal Box with a Front Panel Larger than 8.5″ x 11″
- Light Chipboard – 22 pt. 8.5″ x 11″
- Color Inkjet Printer
- A way to cut your materials – I’m using the Cricut Maker 4 but you can also use a Maker series machine, an Explore series machine, the Venture, or the Joy Xtra
- Deep Point Blade and Housing
- Cricut Purple StrongGrip Machine Mat 12″ x 12″
- Several sheets of 8.5″ x 11″ White Printer Paper (for Print Then Cut calibration)
- Cricut Blue LightGrip Machine Mat 12″ x 12″ (for Print Then Cut calibration)
- Brayer
- Measuring Tape
For magnets:
- One (1) Sheet of Matte Printable Magnet Paper 8.5″ x 11″ -OR-
- One (1) Sheet of Printable Vinyl Sticker Paper 8.5″ x 11″ -AND-
- One (1) 8″ x 10″ Magnetic Adhesive Sheet
- One (1) 9″ x 12″ Self-Laminating Sheet (per sheet of magnets)
- Color Inkjet Printer
- A way to cut your materials – I’m using the Cricut Maker 4 but you can also use a Maker series machine, an explore series machine, the Venture, or the Joy Xtra
- Fine Point Blade and Housing
- Cricut Green StandardGrip Machine Mat 12″ x 12″
- Several sheets of 8.5″ x 11″ White Printer Paper (for Print Then Cut calibration)
- Cricut Blue LightGrip Machine Mat 12″ x 12″ (for Print Then Cut calibration)
- Brayer
- Measuring Tape
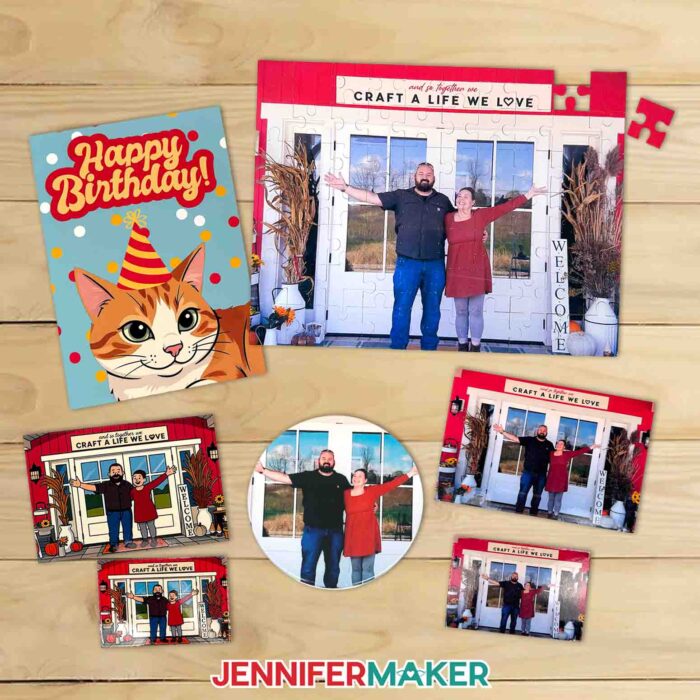
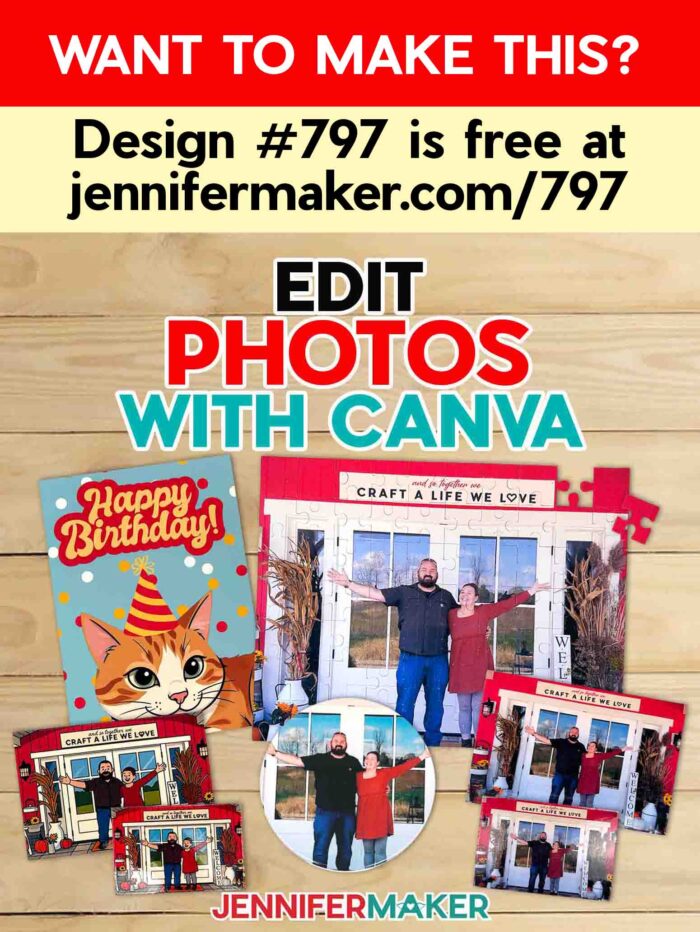
- Design #797 (My free Beginner’s Guide to Editing Photos in Canva is available in my free library – get the password by filling out the form at the bottom of this page)
How to Use Canva Photo Editing Techniques for Crafts
Canva Photo Editing
Learn how to do Canva photo editing for customized photo projects!
Materials
- One (1) 4-Pack of Cricut Round Ceramic Infusible Ink Coasters (for coasters)
- White Butcher Paper (for coasters)
- One (1) Sheet of 12” x 12” White Cardstock (for coasters)
- One (1) Sheet of 8.5” x 11” A-SUB Sublimation Paper (for coasters)
- One (1) Sheet of Cricut Printable Sticker Paper 8.5" x 11 (for puzzle) -OR-
- One (1) Sheet of Joyeza Printable Sticker Paper 8.5" x 11” (for puzzle)
- Cereal Box with a Front Panel Larger than 8.5″ x 11″ (for puzzle) -OR-
- Light Chipboard - 22 pt. 8.5” x 11” (for puzzle)
- One (1) Sheet of Matte Printable Magnet Paper 8.5" x 11" (for magnets) -OR-
- One (1) Sheet of Printable Vinyl Sticker Paper 8.5" x 11" (for magnets) -AND-
- One (1) 8" x 10" Magnetic Adhesive Sheet (for magnets)
- One (1) 9" x 12" Self-Laminating Sheet (per sheet of magnets)
- Several Sheets of 8.5" x 11" White Printer Paper (for Print Then Cut calibration)
- Design #797 (My free PDF design files are available in my free resource library - get the password by filling out the form at the bottom of this page)
Tools
- Free Canva account (for all projects)
- Color Inkjet Printer (for puzzle and magnets)
- A way to cut your materials - I’m using the Cricut Maker 4 but you can also use a Maker series machine, an Explore series machine, the Venture, or the Joy Xtra (for puzzle and magnets)
- Deep Point Blade and Housing (for puzzle)
- Fine Point Blade and Housing (for printable magnet sheet)
- Cricut Blue LightGrip Machine Mat 12" x 12" (for Print Then Cut calibration on puzzle and magnets)
- Cricut Purple StrongGrip Machine Mat 12” x 12” (for puzzle)
- Cricut Green StandardGrip Machine Mat 12” x 12”(for printable magnet sheet)
- Sublimation Printer or Printer Converted for Sublimation (for coasters) -AND-
- Sublimation Ink (for coasters)
- Heat Press - I used my Cricut EasyPress, but you can also use an Autopress or a traditional heat press (for coasters)
- Cricut EasyPress Mat (for coasters)
- Fan (for coasters, for proper ventilation)
- Heat-Resistant Tape (for coasters)
- Brayer (for coasters, puzzle, and magnets)
- Lint Roller (for coasters)
- Measuring Tape (for coasters, puzzle, and magnets)
Instructions
STEP 1: GET MY FREE CANVA PHOTO EDITING REFERENCE GUIDE
First, download my free Canva photo editing reference guide PDF file from my free library – look for Design #797. Alternatively, you can use the Save This Project form near the top of this post and the design link will be emailed to you.
In the PDF folder, you’ll find a guide to my top ten Canva photo editing techniques.
TIP: If you’re not sure how to unzip the download file, go to jennifermaker.com/svgs to learn how. The process is similar for PDF files.
STEP 2: UPLOAD YOUR PHOTO TO CANVA
- To get started, open your computer’s browser and go to jennifermaker.com/canva.
NOTE: If you’re new to Canva, check out my Canva for Beginners tutorial. - Either sign in to your account or follow the prompts on the screen to sign up for a free account.
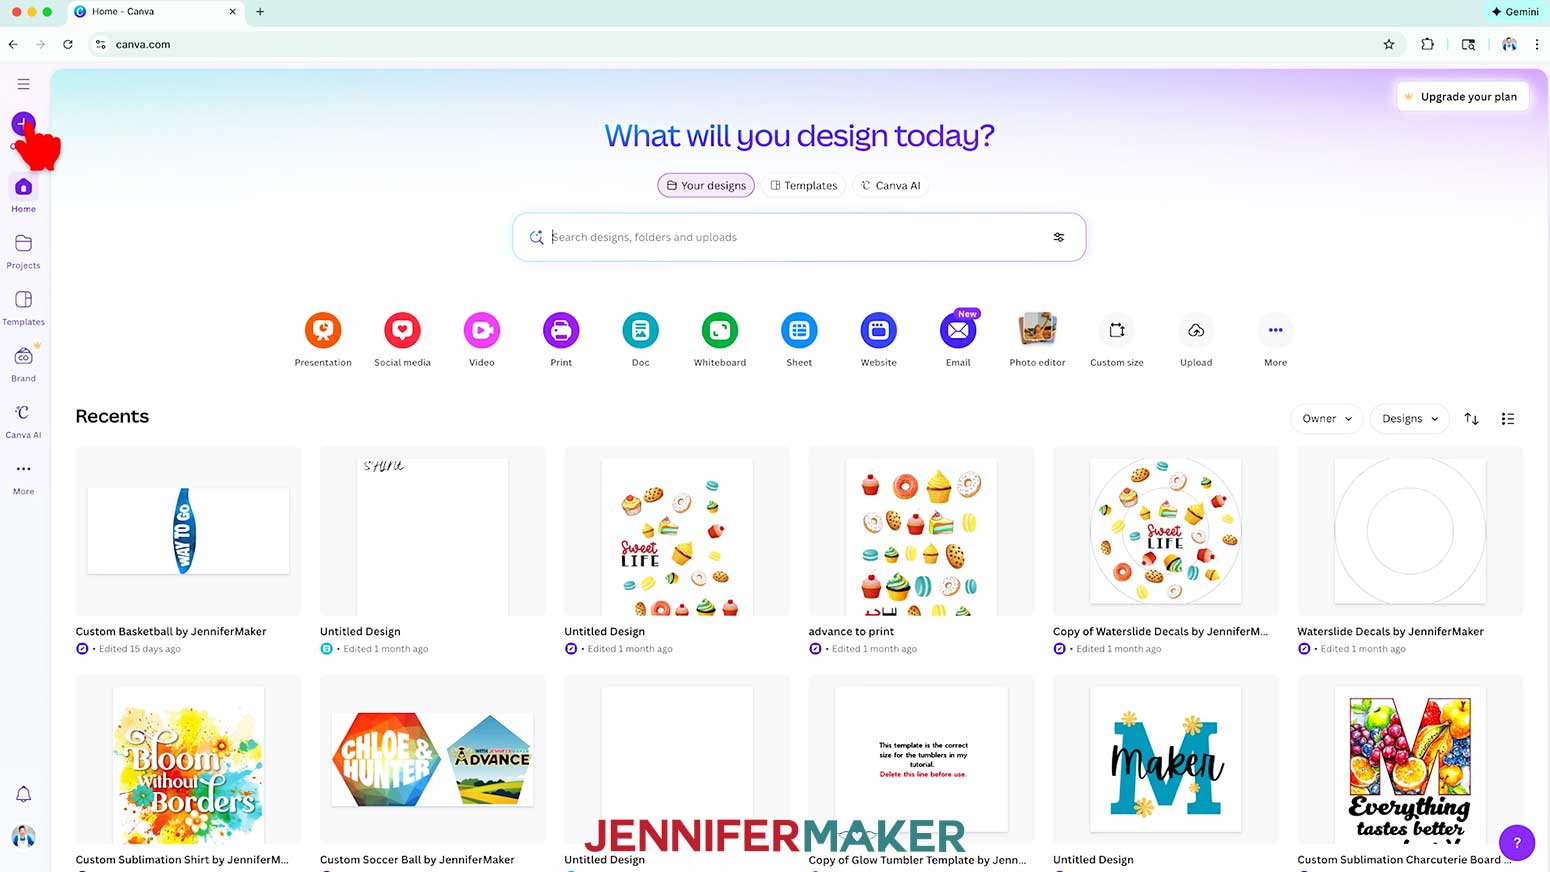
NOTE: Canva does offer paid subscriptions with more tools and elements, but I’ll show you how to do everything with the free account. - On the Canva Home screen, click the “Create” button.

OPTION A: EDIT A PHOTO IN CANVA’S PHOTO EDITOR
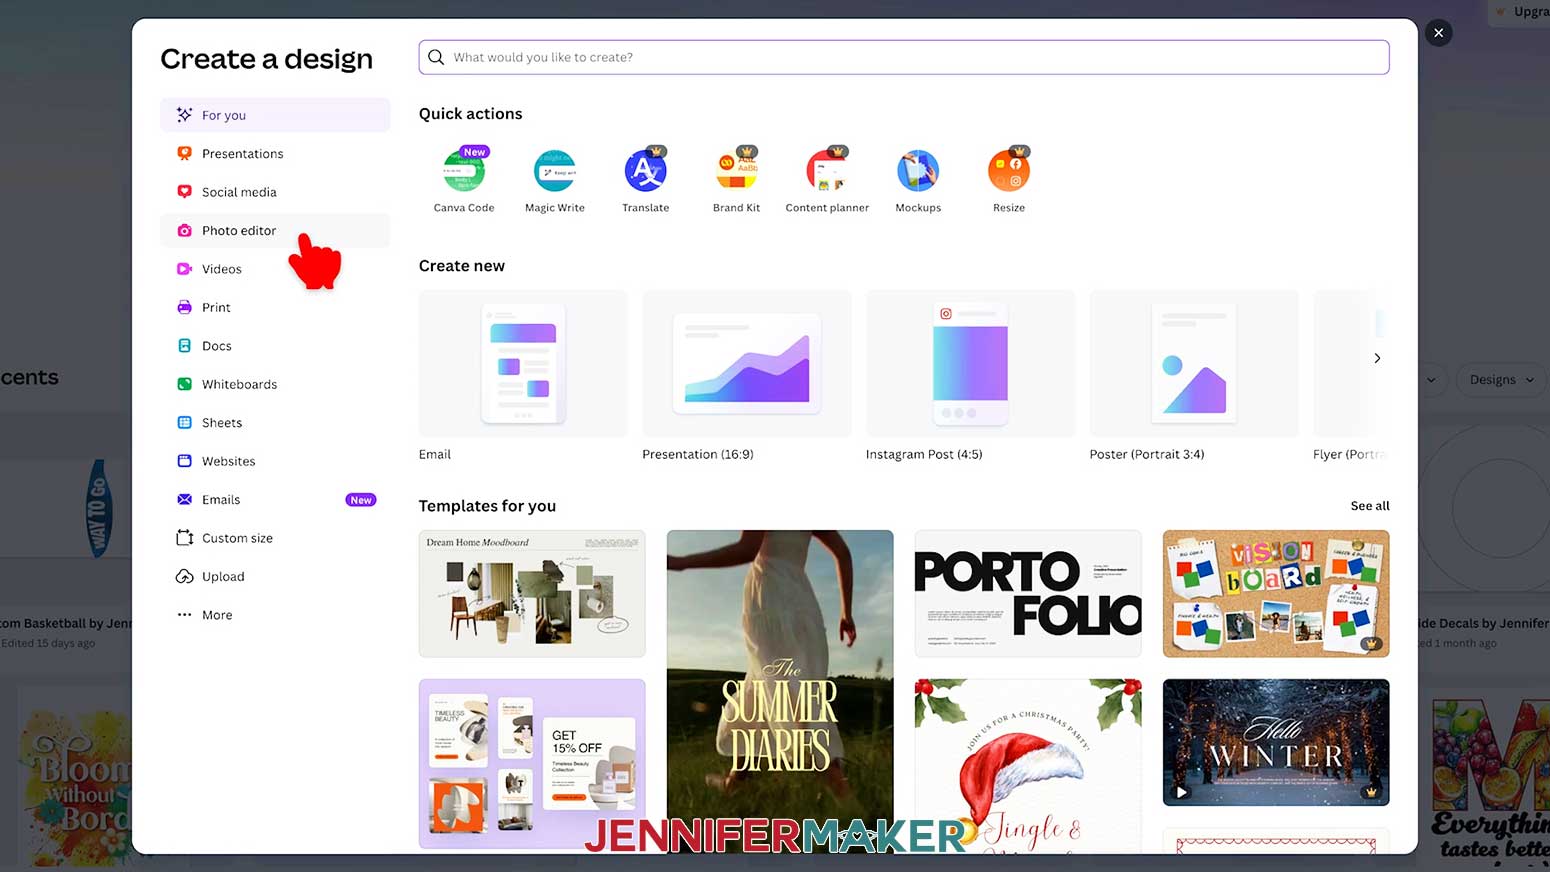
- Click “Photo editor.”
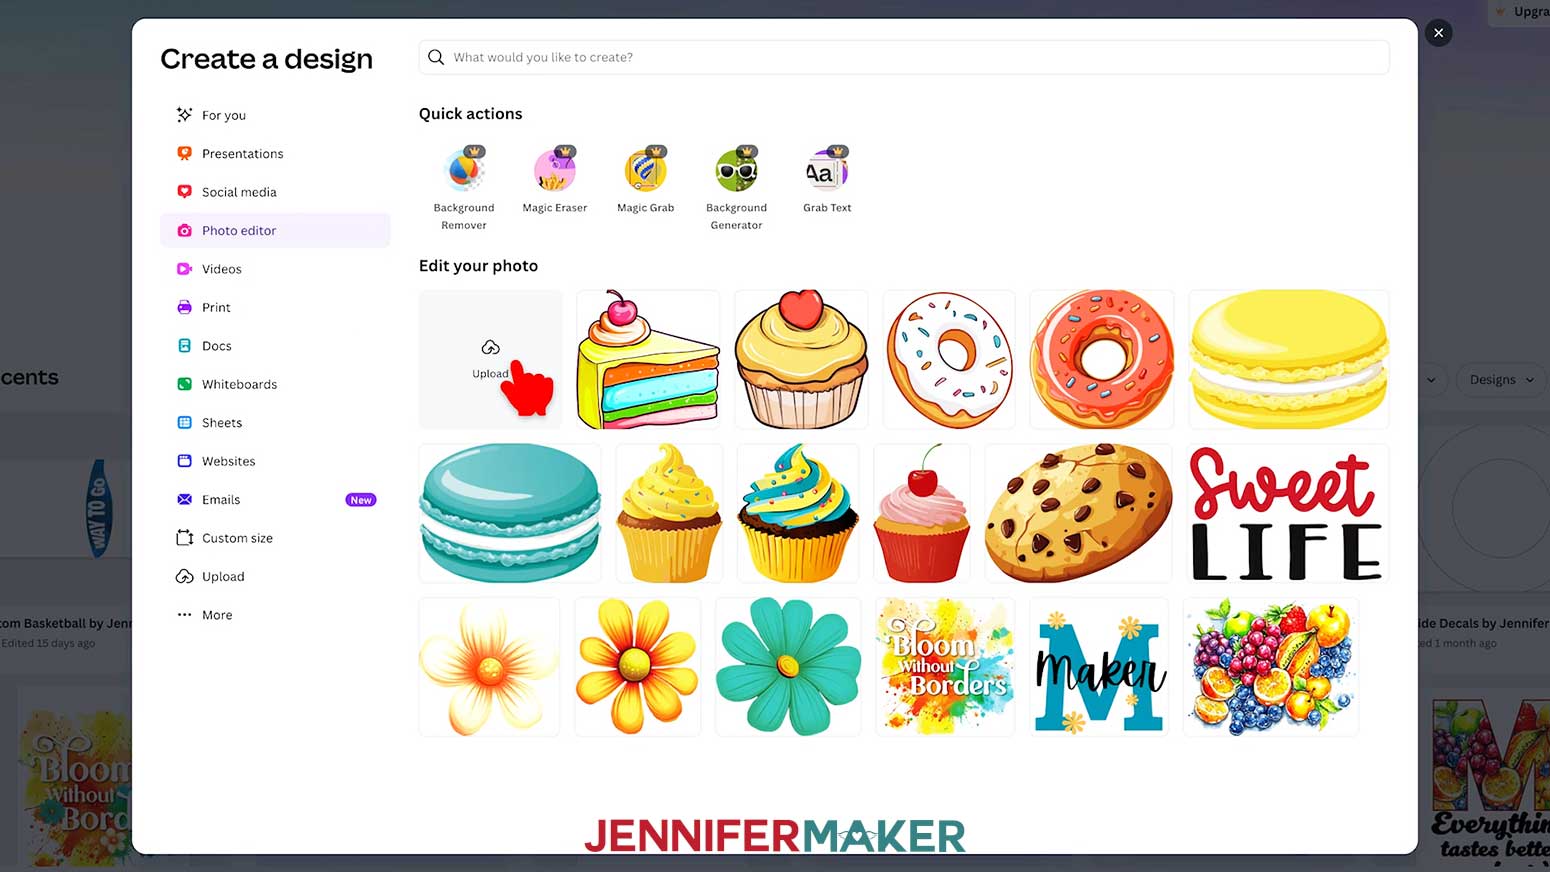
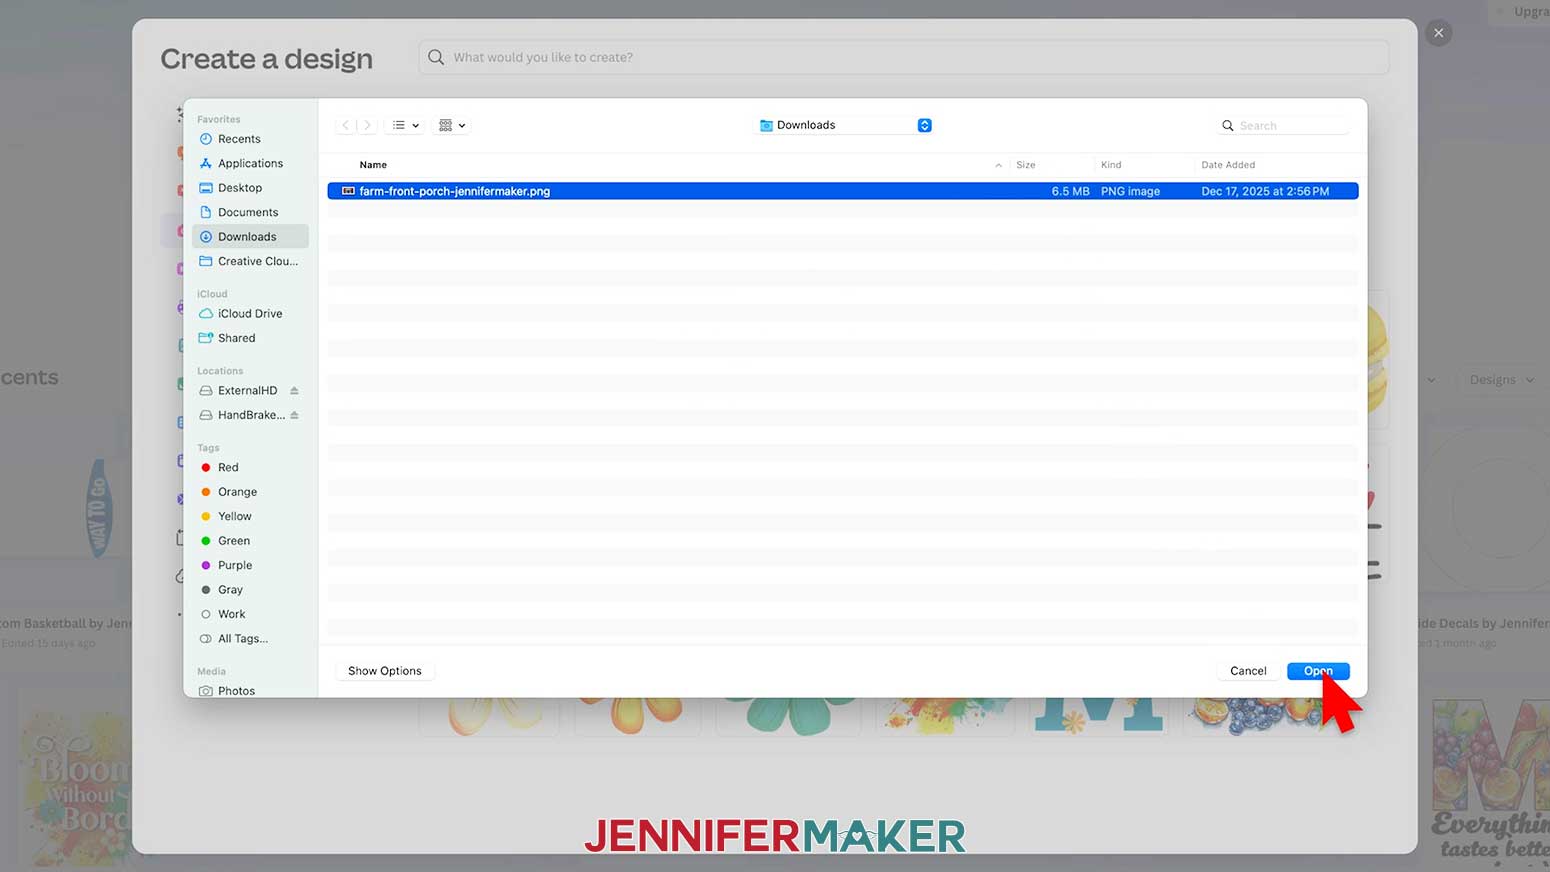
- Under “Edit your photo,” click “Upload.”
- Select your photo, then click “Open.”
- Proceed to “STEP 3: ROTATE & CROP A PHOTO.”
OPTION B: UPLOAD PHOTOS TO A CANVAS FOR EDITING
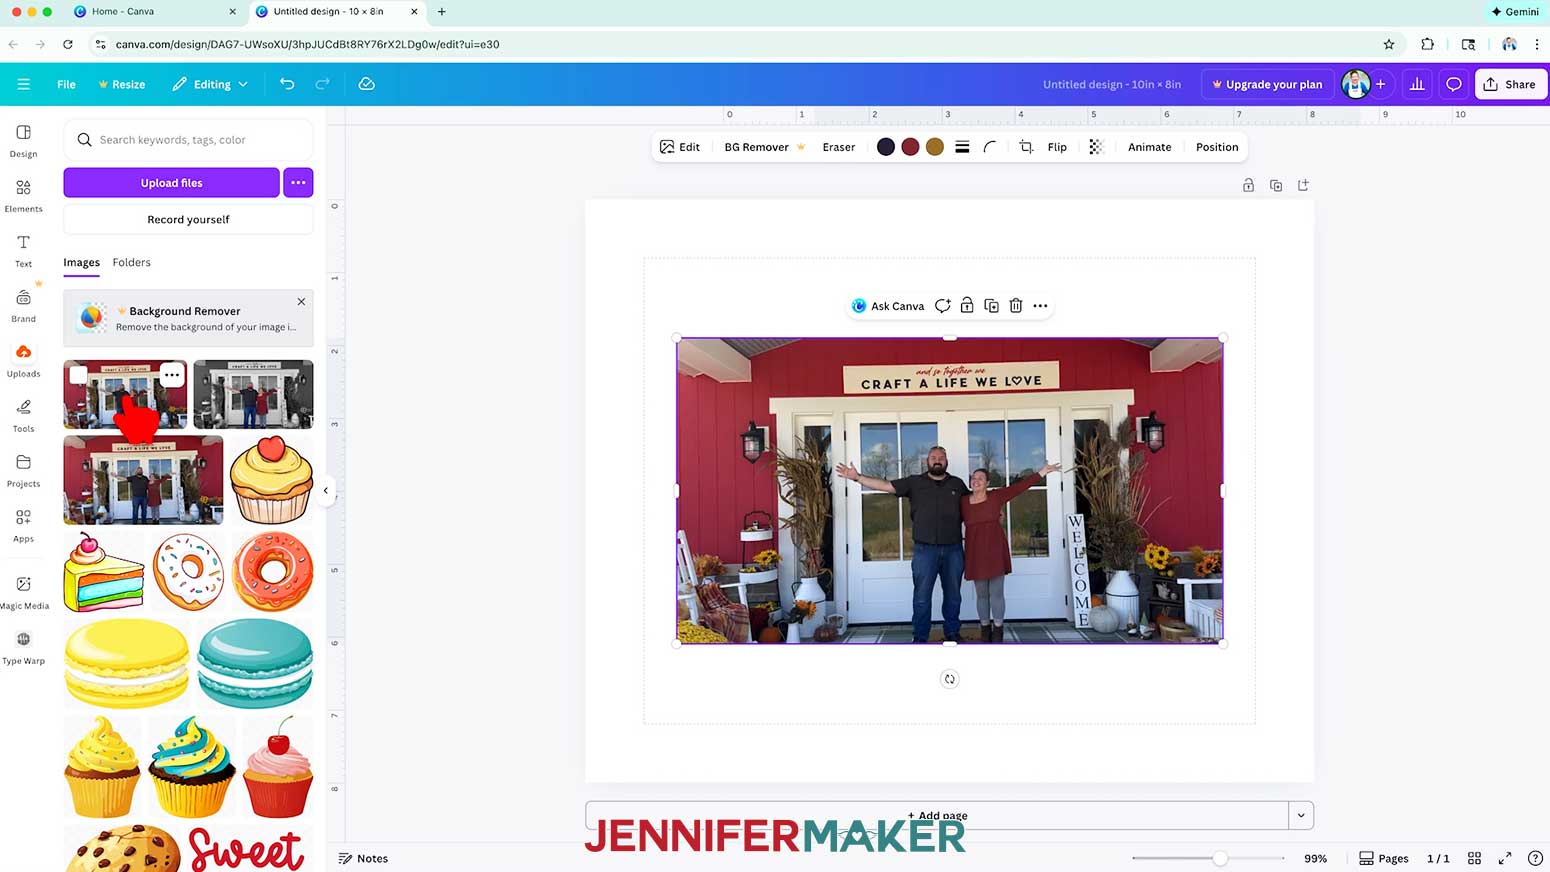
- If you want to add and edit photos on an existing canvas, click “Uploads.”
- Click “Upload files.”
- Select your photo, then click “Open.”
- Under “Images” in the "Uploads" menu, click your photo to add it to your canvas.
NOTE: We’ll continue using Option A (the Photo Editor) for the remaining steps because it’s the quickest path. If you uploaded your photo to a canvas instead (Option B), don’t worry, all of the same editing tools appear in the Edit panel when you click your photo. Just follow along from this point, and your controls will look nearly identical.
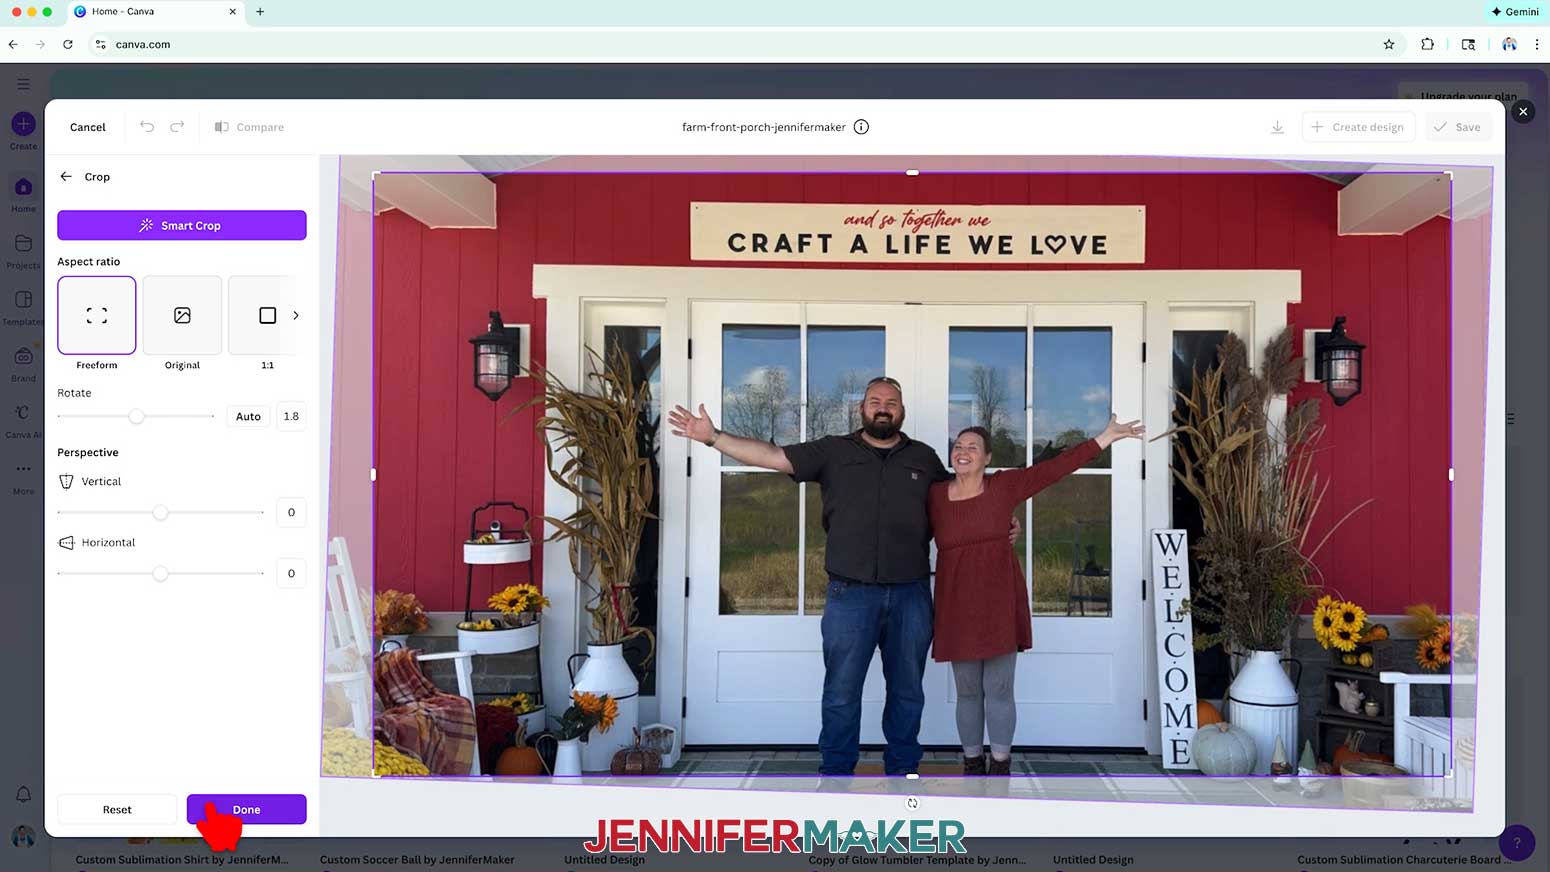
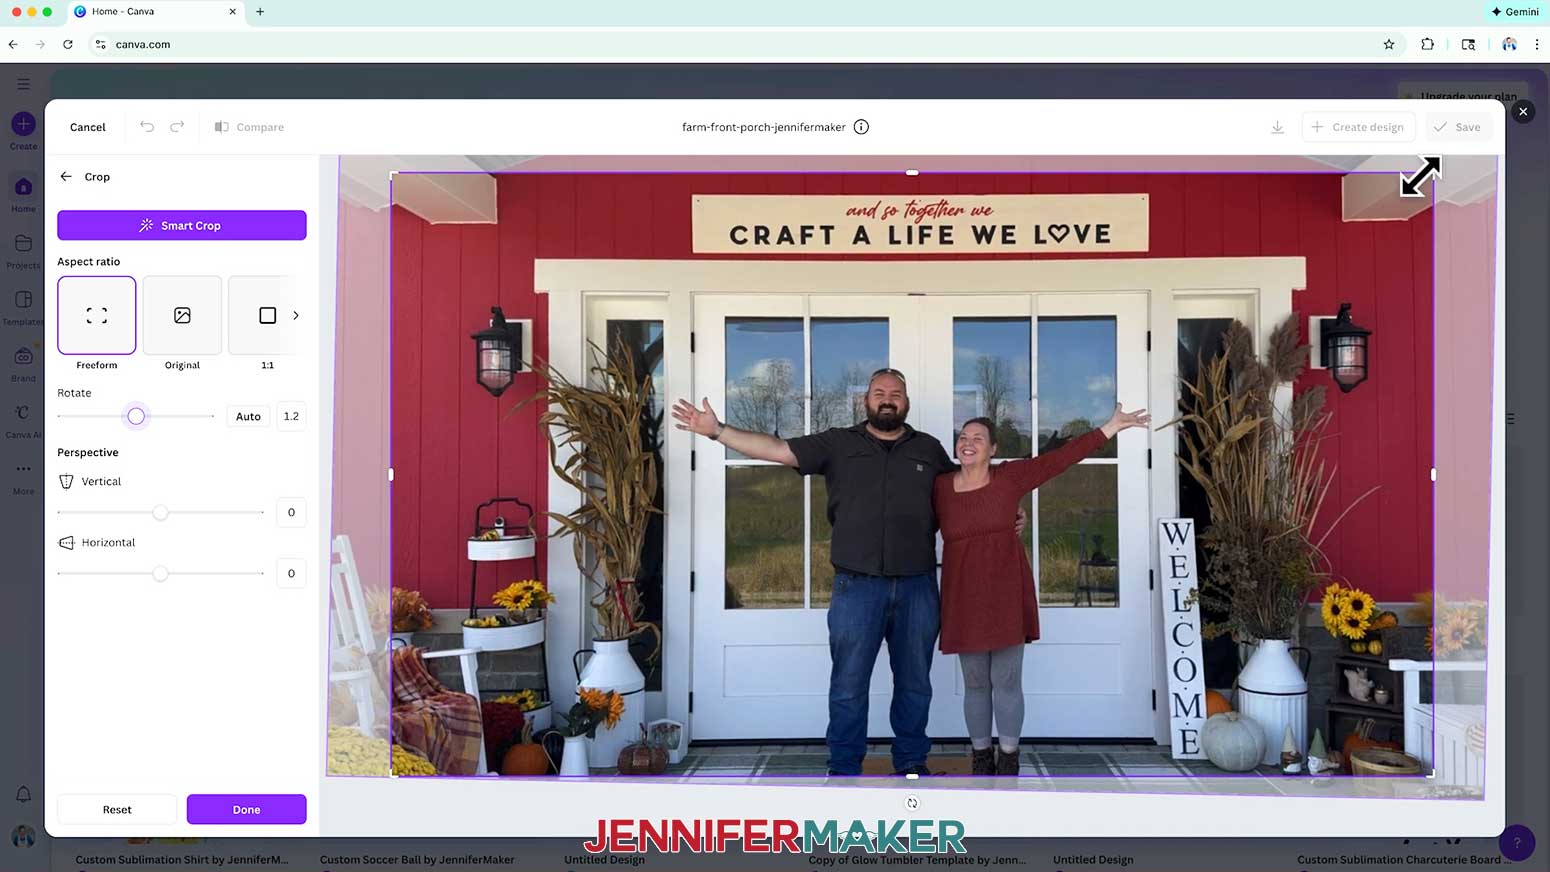
STEP 3: ROTATE & CROP A PHOTO
OPTION 1: SMART CROP
- If you’re using Canva’s Photo Editor, Click “Crop.” If you’re editing the photo on the canvas, double-click it.
- If desired, change your “Aspect ratio.”
TIP: Aspect ratio is the shape of your photo, or the ratio between its width and height.
NOTE: I’ll keep mine on “Freeform.” - Click “Smart Crop.”
NOTE: Smart Crop will automatically rotate and crop your photo to try to create a balanced, neutral result. - Check your crop preview inside the purple selection box. If it looks correct, click “Done” to apply the Smart Crop to your photo.
TIP: If you don’t like the Smart Crop result, click “Reset” to reject the changes, then follow “OPTION 2: MANUALLY ROTATE & CROP.” - Here’s my automatically cropped and rotated photo using Canva’s Smart Crop.
- Click the “back” button to go back to the main editor menu.


OPTION 2: MANUALLY ROTATE & CROP
- Click “Crop.”
- If desired, change your “Aspect ratio.”
NOTE: I’ll keep mine on “Freeform.” - Your crop preview will be inside the purple selection box. If you need to rotate the image, click and drag the “Rotate” slider.
NOTE: I find it easiest to rotate the image first, before cropping it. - To make adjustments to the crop selection, use the corner or edge handles to redefine your crop.
TIP: To check your progress, click and hold the “Compare” tool to look at the original. - Once the image inside the purple selection box looks the way you want it to, click “Done” to apply the crop and/or rotate to your photo.
- Here’s my manually rotated and cropped photo.
- Click the “back” button to go back to the main editor menu.


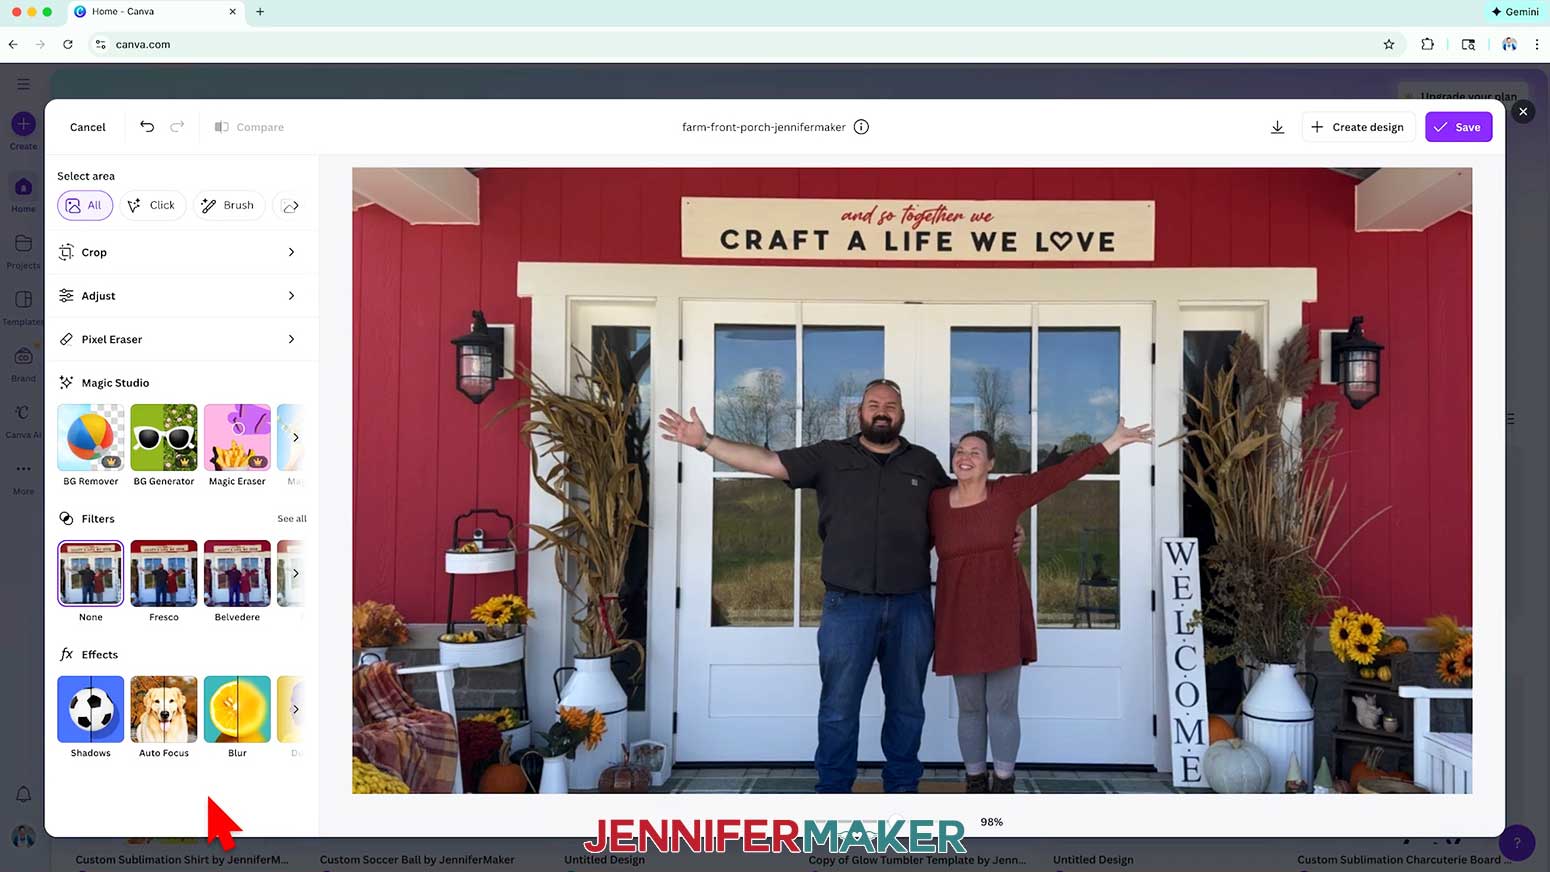
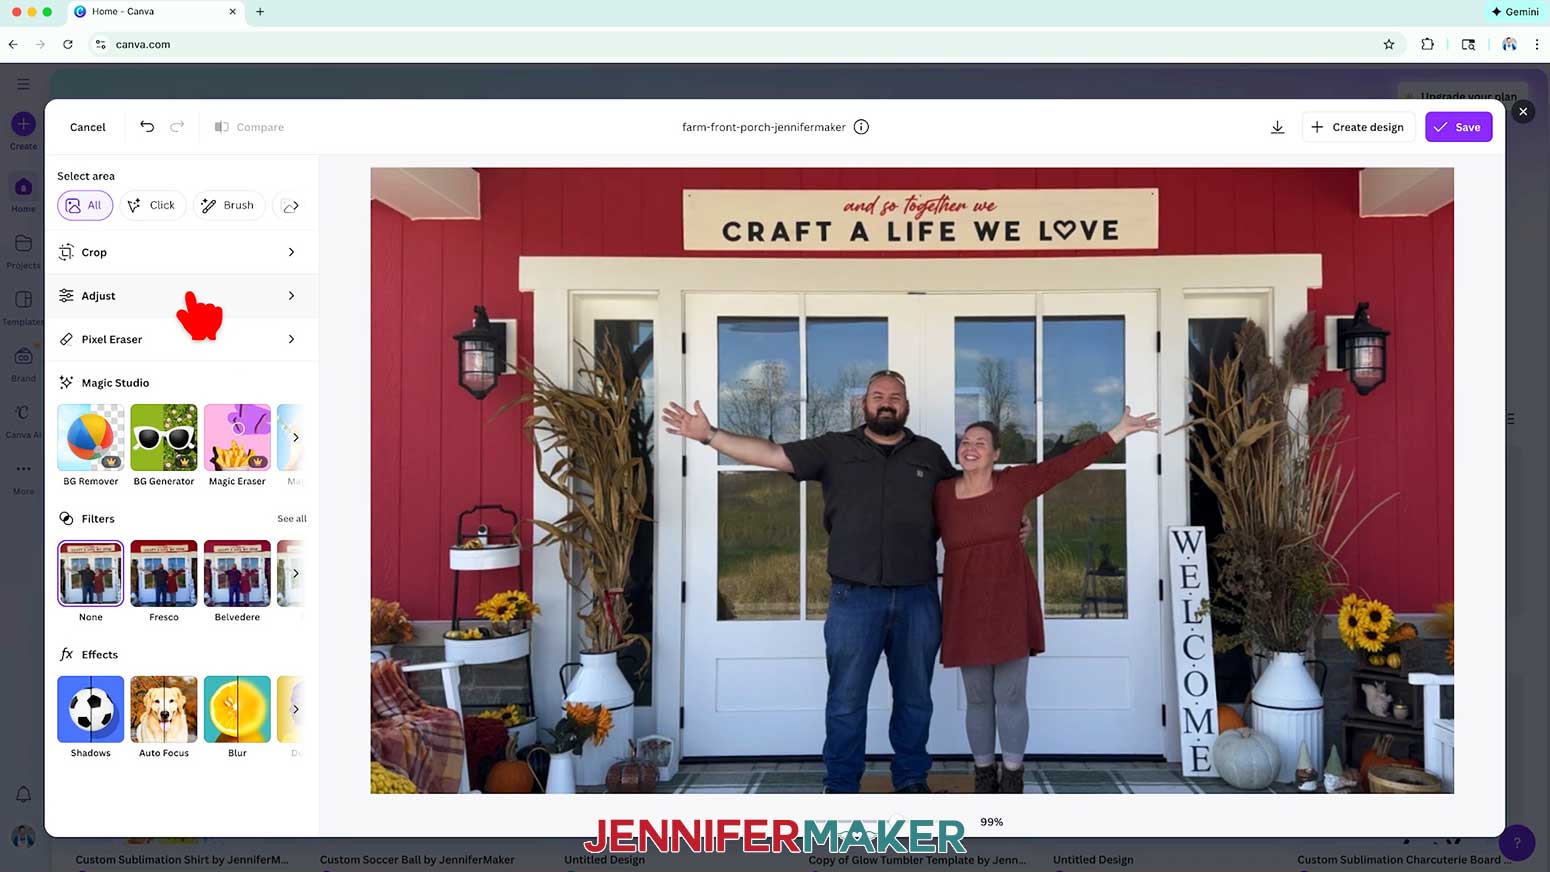
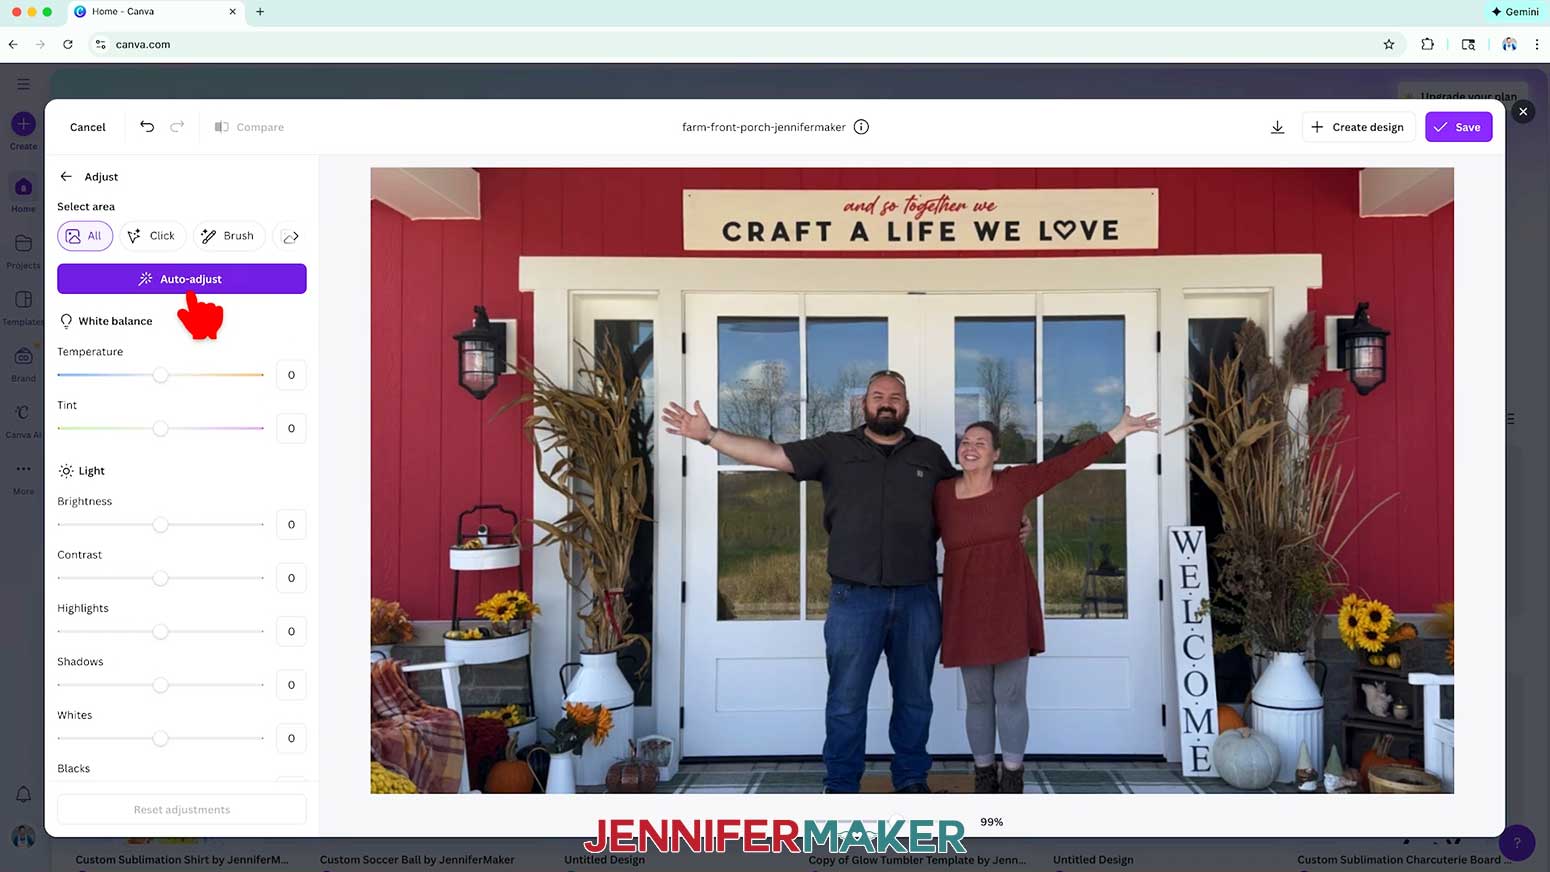
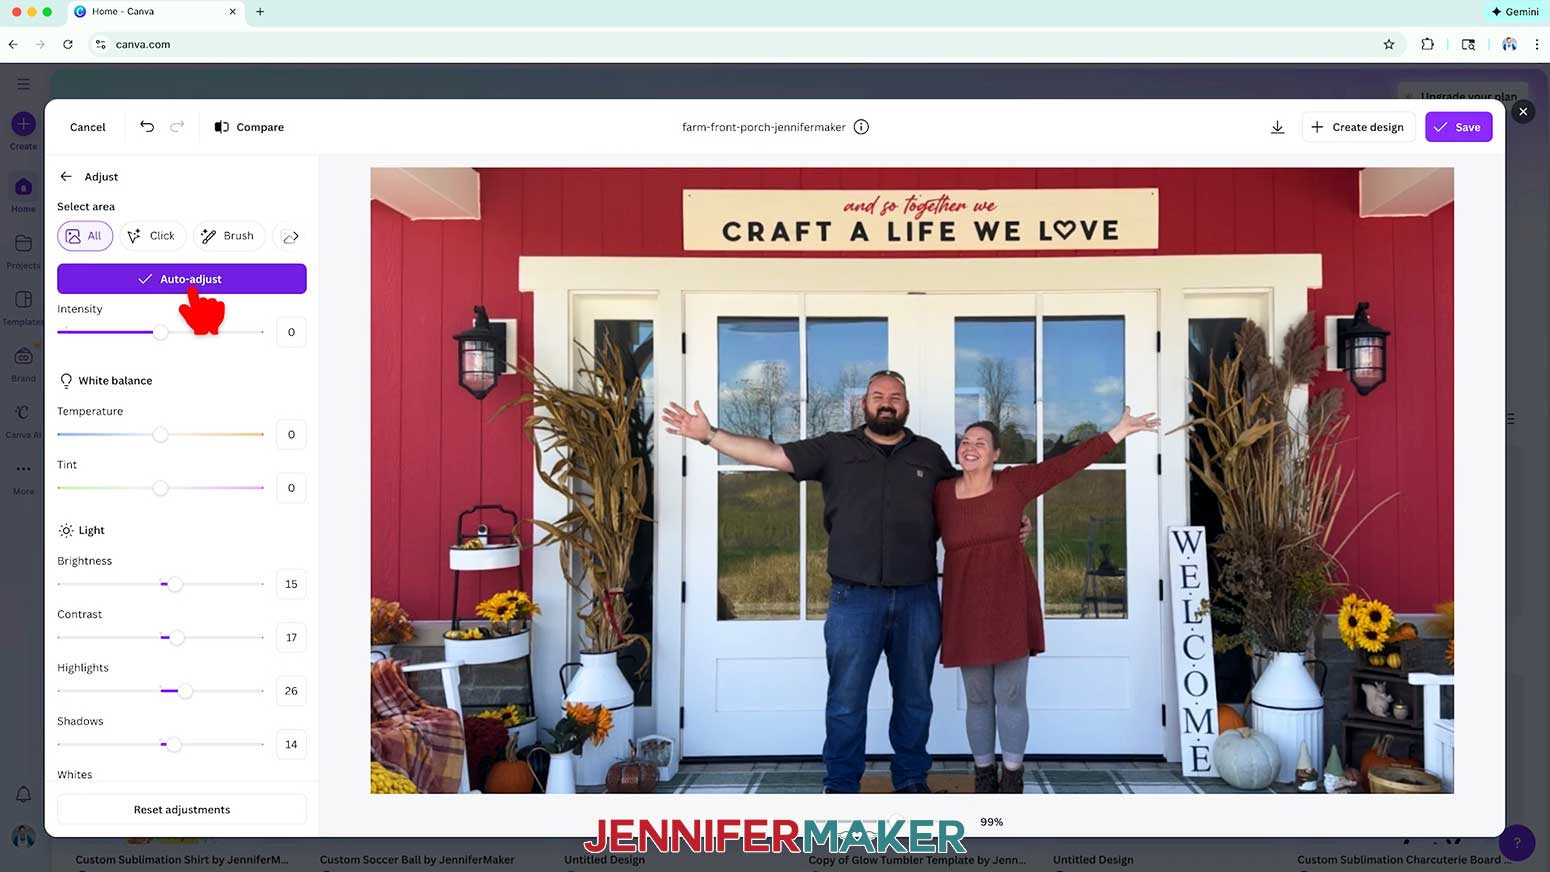
STEP 4: RECOLOR A PHOTO
OPTION 1: AUTO-ADJUST
- Click “Adjust.”
- Click “Auto-adjust.”
- The tool will auto-adjust the photo’s white balance, light, color, and other settings that affect how it looks. You can see the changed settings on the left via their sliders.
- If you need to make adjustments to the photo, use the sliders to change the settings further.
NOTE: If at any point you don’t like your adjustments, click “Reset adjustments” to go back to your photo’s original settings. - Click the “back” button to go back to the main editor menu.
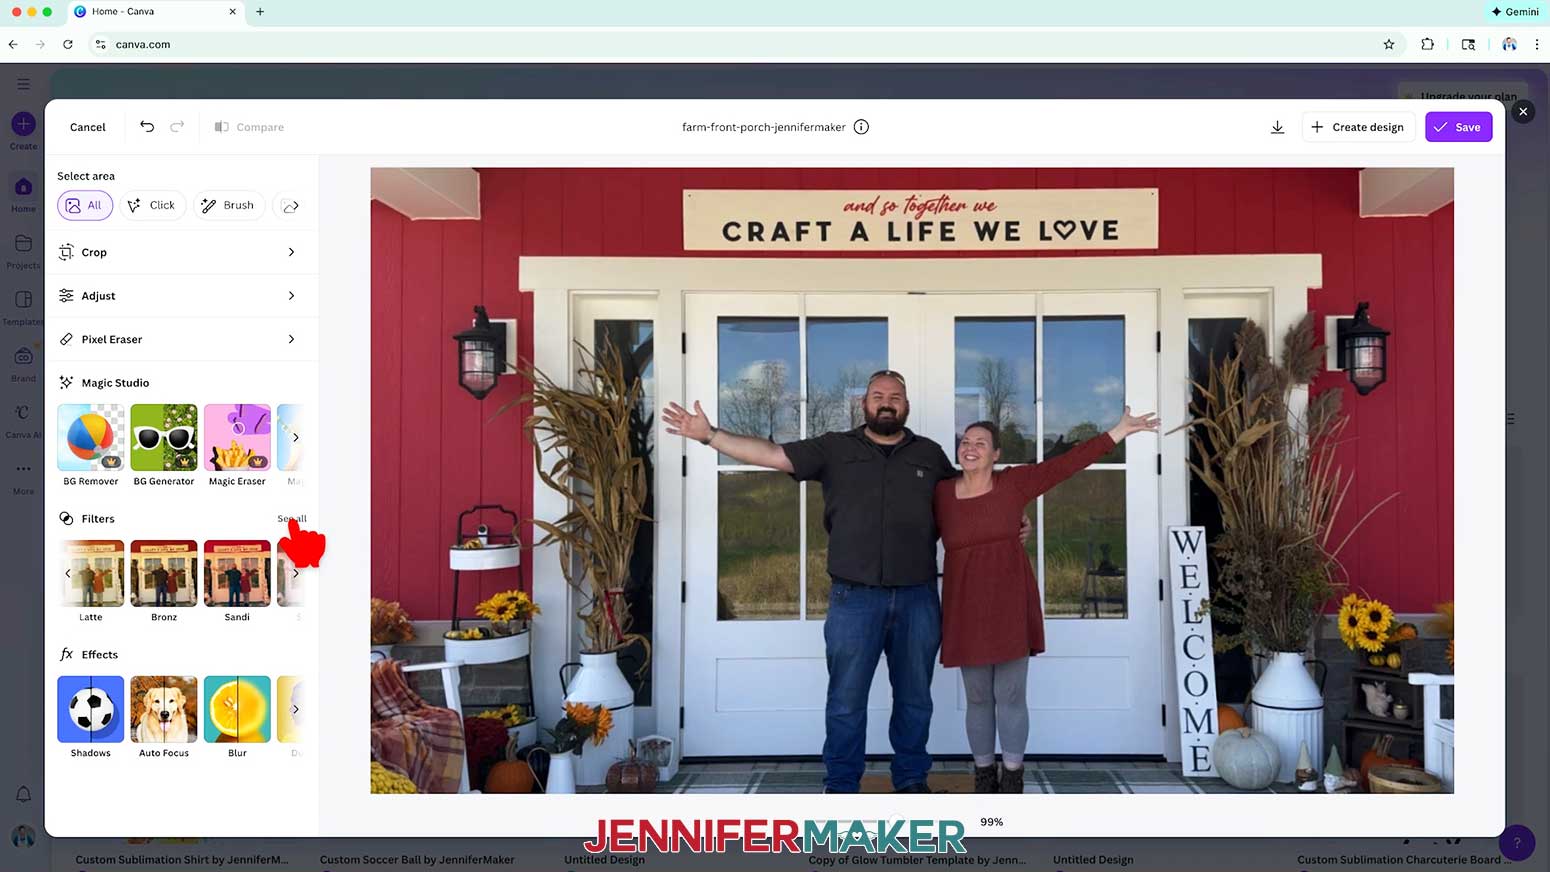
OPTION 2: ADD A FILTER
A “filter” is a preset adjustment that instantly changes your photo’s overall look by tweaking things like color, brightness, and mood all at once.
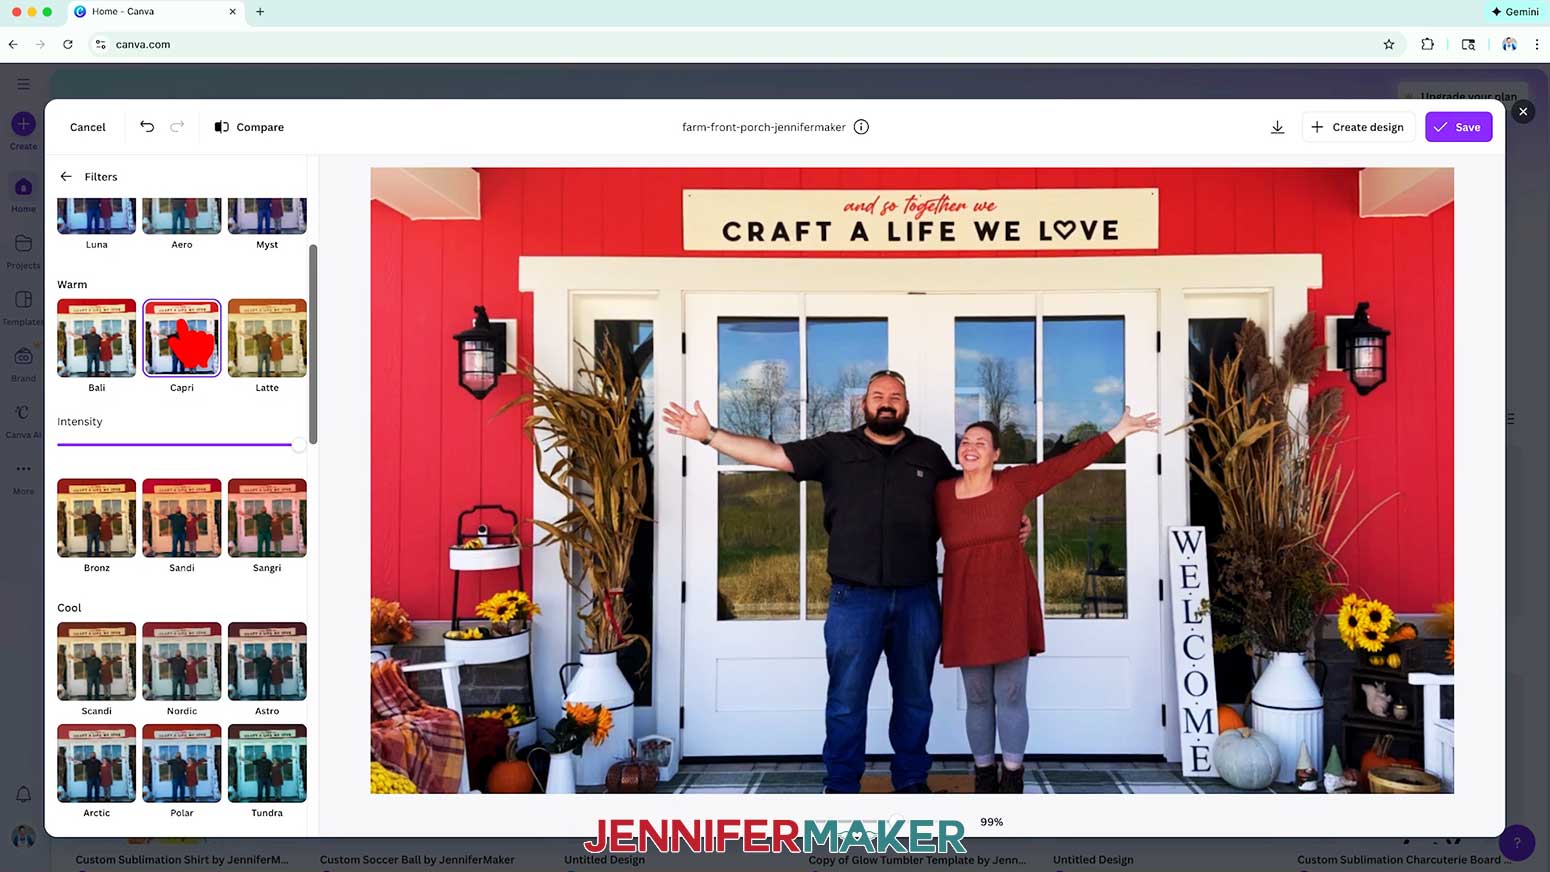
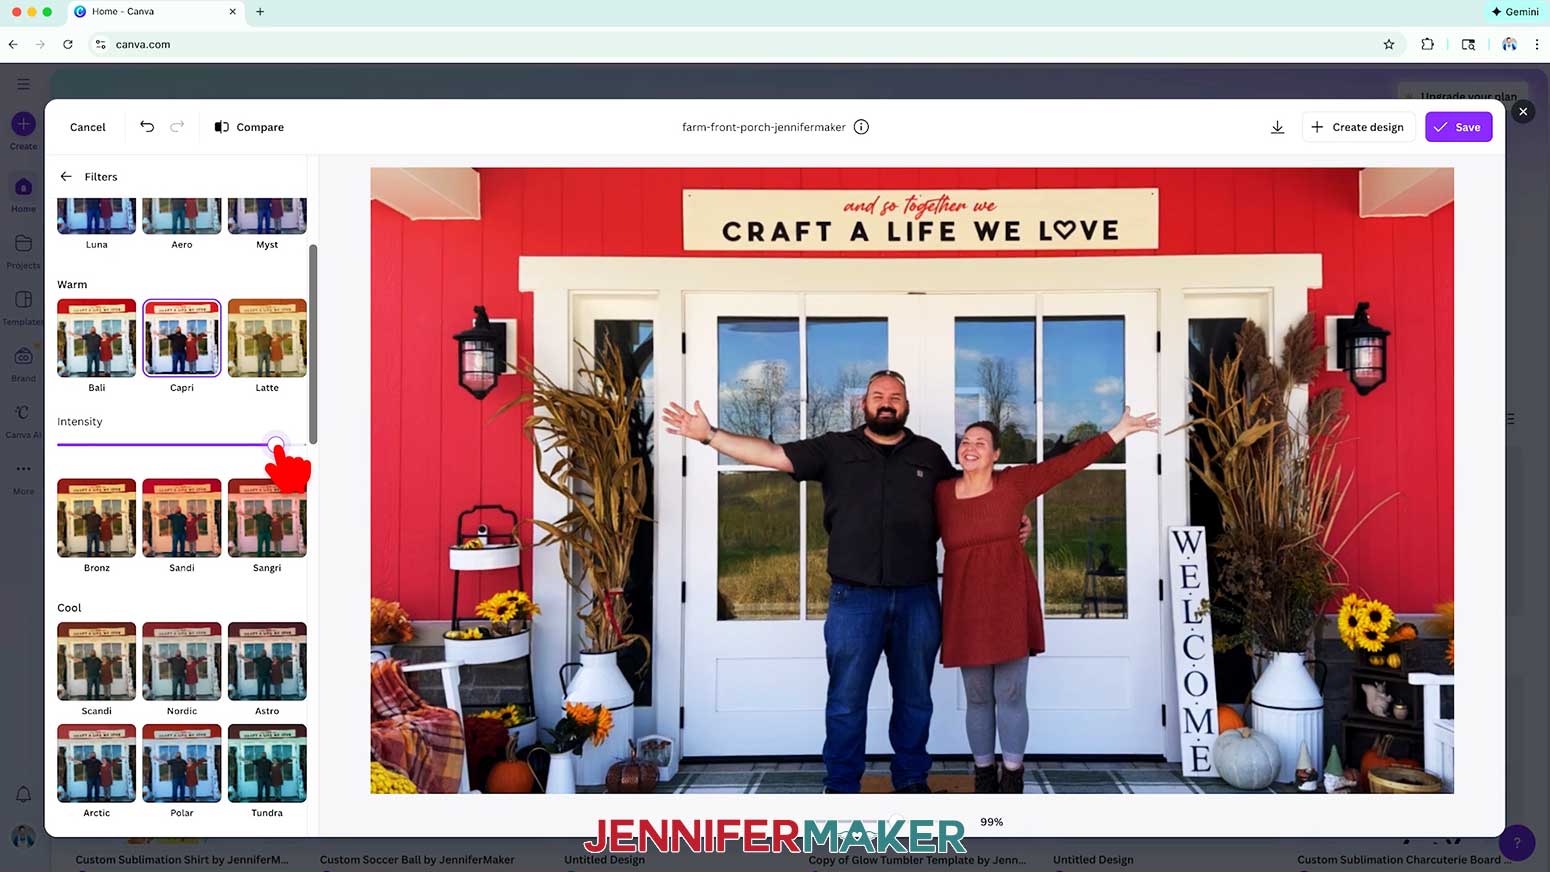
- Under “Filters,” click “See all.”
- Select the colored filter of your choice.
NOTE: I selected “Capri.” - Use the slider under the filter selection to adjust the “Intensity” of the filter.
NOTE: “Intensity” controls how strong or subtle a filter appears on your photo. I reduced my “Capri” filter’s Intensity down by about 10-15%. - Click the “back” button to go back to the main editor menu.
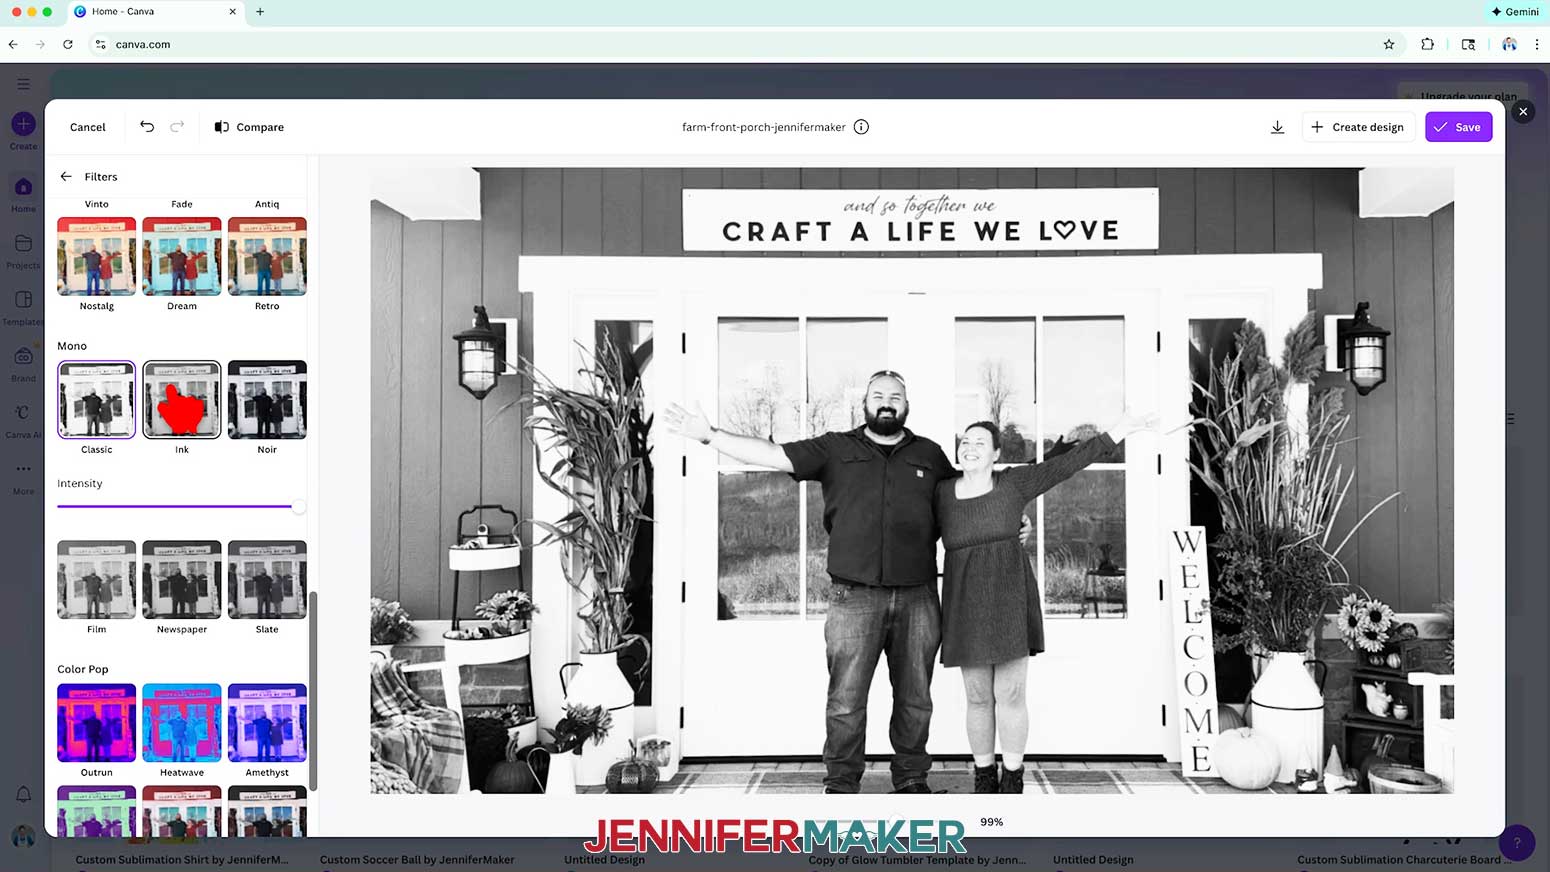
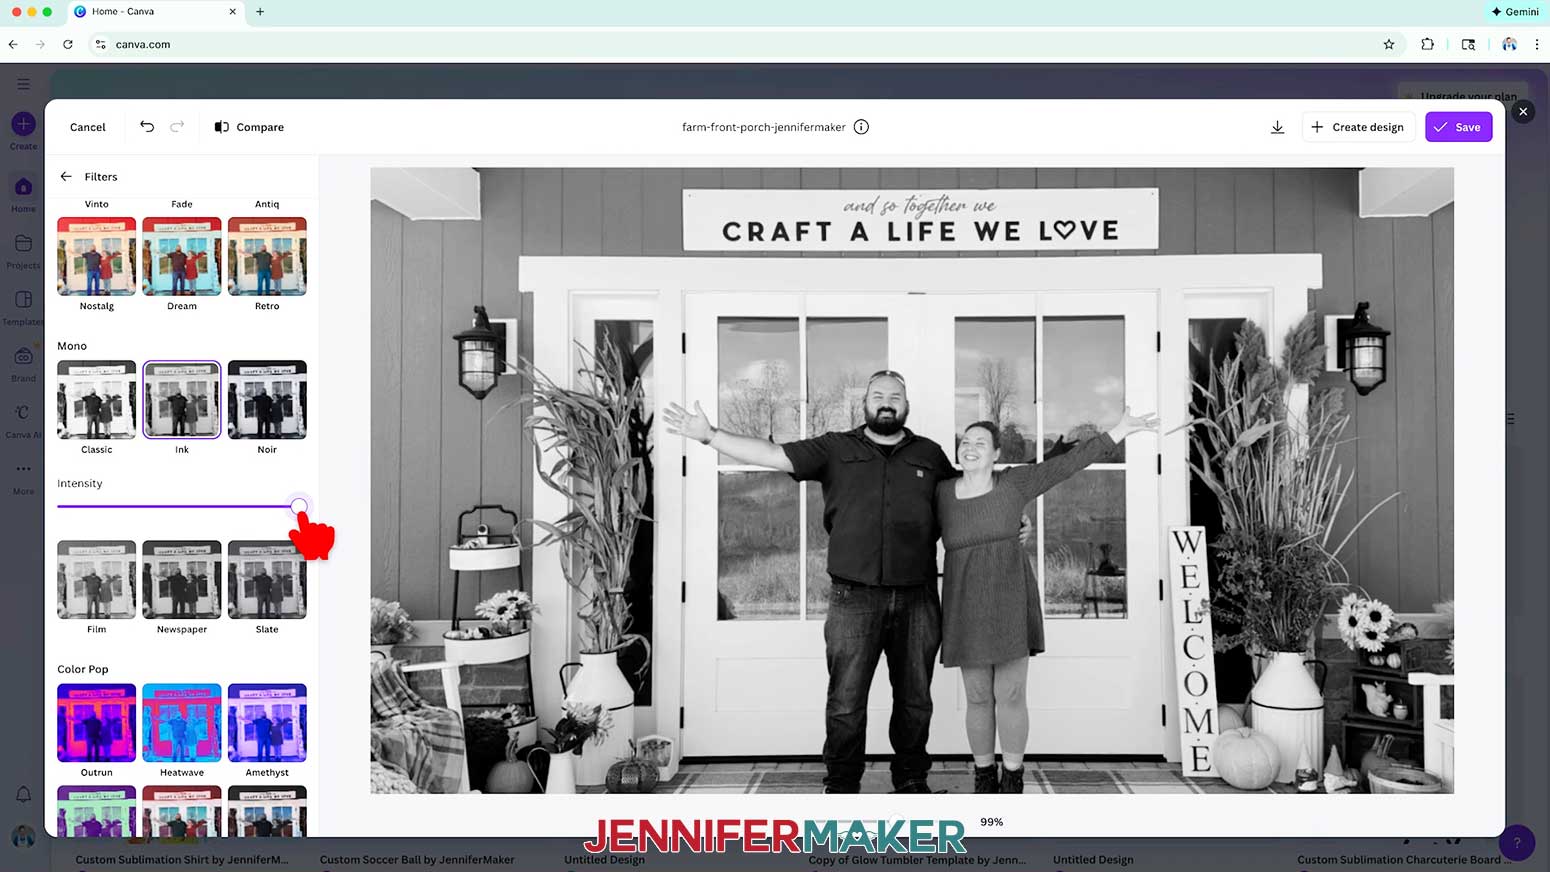
OPTION 3: BLACK & WHITE EFFECT
- Under “Filters,” click “See all.”
- Scroll down to “Mono,” and select a monochromatic filter.
NOTE: A monochromatic filter applies a single dominant color tone across your entire photo, giving it a unified, cohesive look with just one hue.
NOTE: I selected “Ink.” - Use the slider under the filter selection to adjust its “Intensity.”
NOTE: I kept my “Ink” filter’s Intensity at 100. - Click the “back” button to go back to the main editor menu.
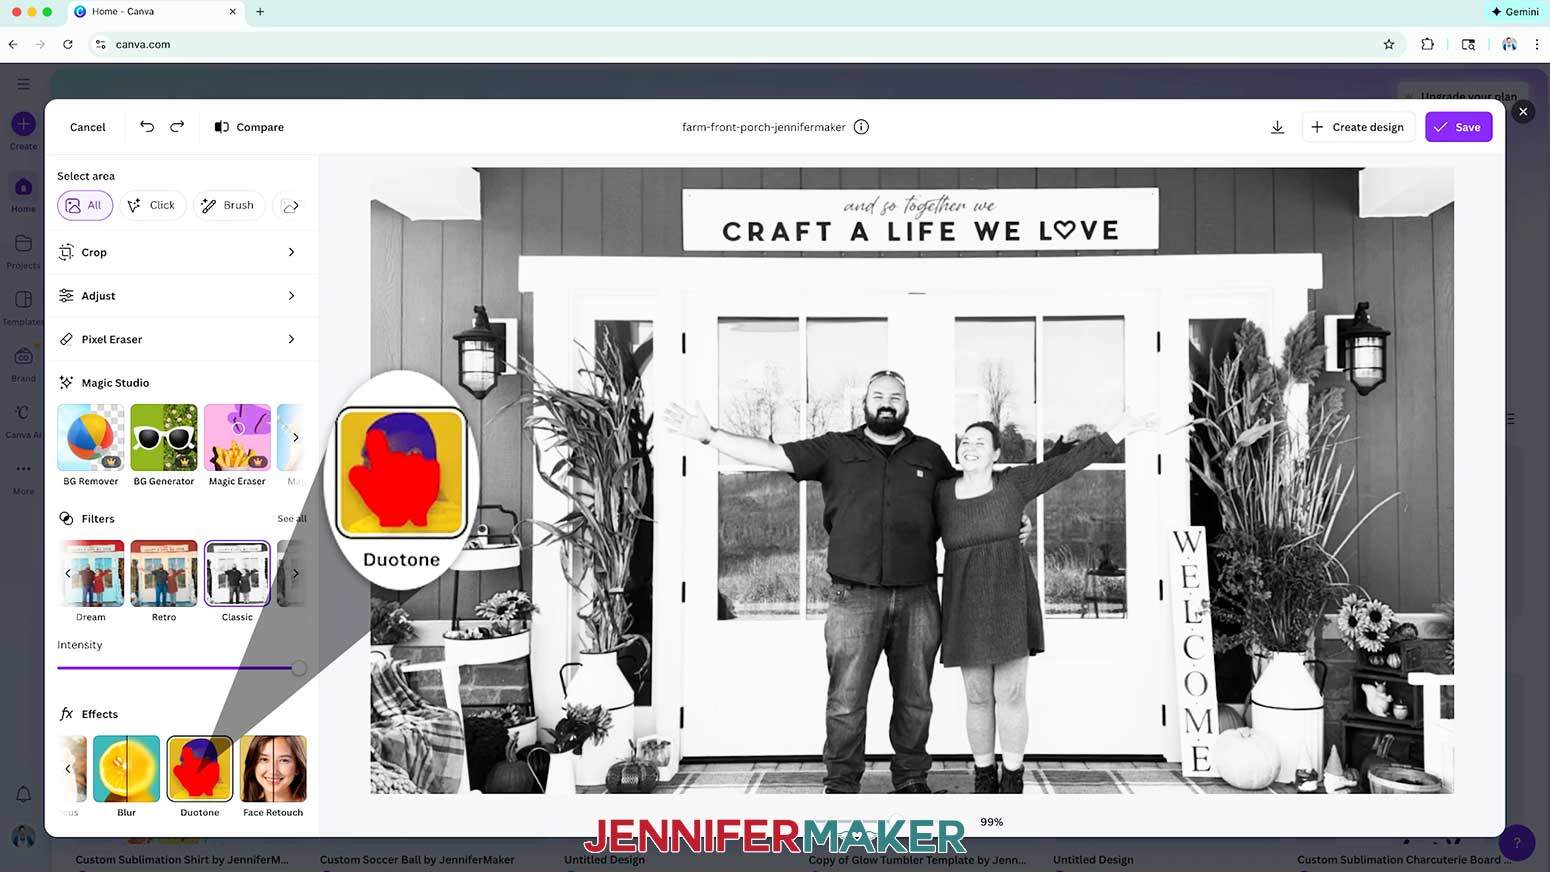
OPTION 4: SEPIA EFFECT
- Under “Effects,” select “Duotone.”
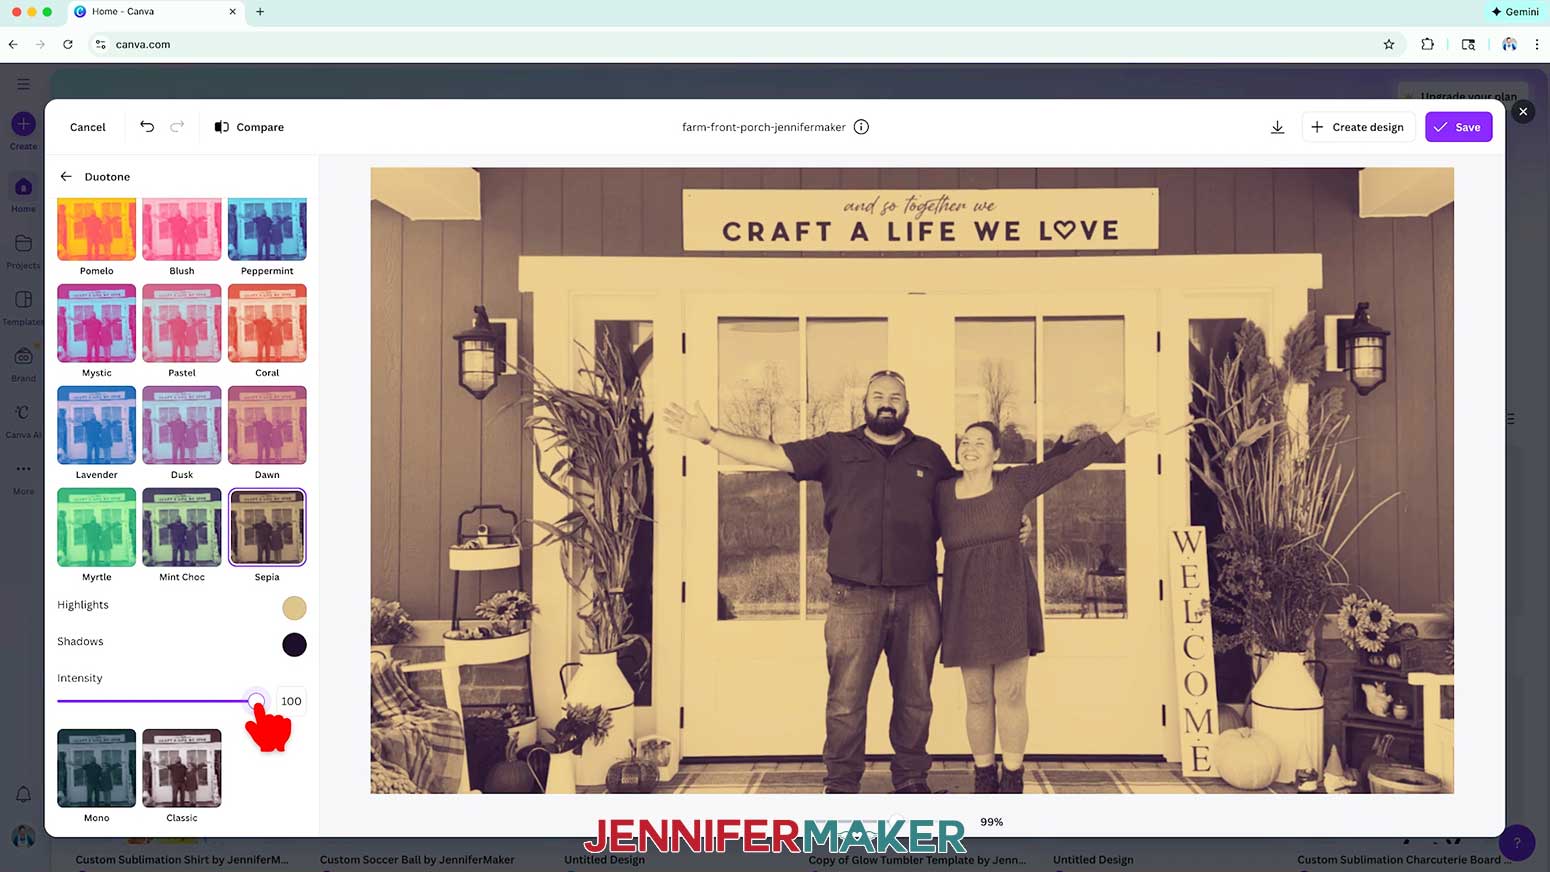
NOTE: “Duotone” is an effect that replaces all the colors in your photo with just two chosen hues, creating a bold, stylized, graphic look. - Scroll down and select “Sepia.”
- Use the slider to adjust the “Intensity” of the Duotone effect.
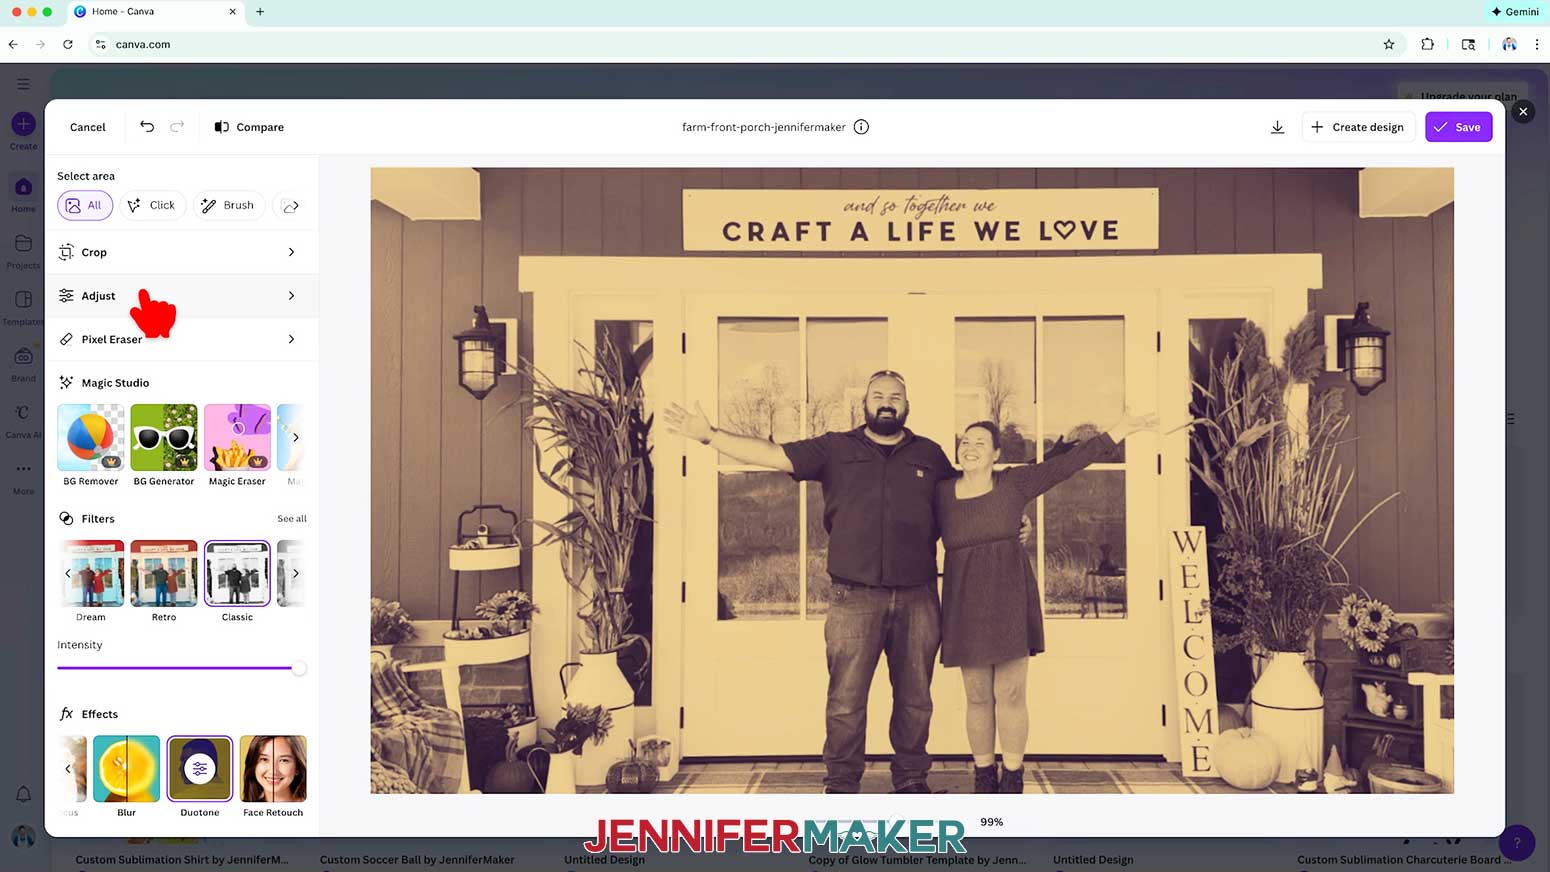
NOTE: I kept my Duotone effect’s Intensity at 100. - If you want to make more adjustments to the filtered image, click the arrow next to “Duotone” at the top to go back.
- Click “Adjust.”
- Use the sliders to adjust the other settings in your photo.
NOTE: I adjusted my photo’s “Brightness” to 50, the “Contrast” to 90, and the “Blacks” to 40. “Brightness” makes your entire photo lighter or darker, “Contrast” increases or decreases the difference between the lightest and darkest areas, and “Blacks” specifically adjusts how deep or soft the darkest tones appear without affecting the rest of your image as much. - Click the “back” button to go back to the main editor menu.


STEP 5: ENHANCE THE FOCAL POINT
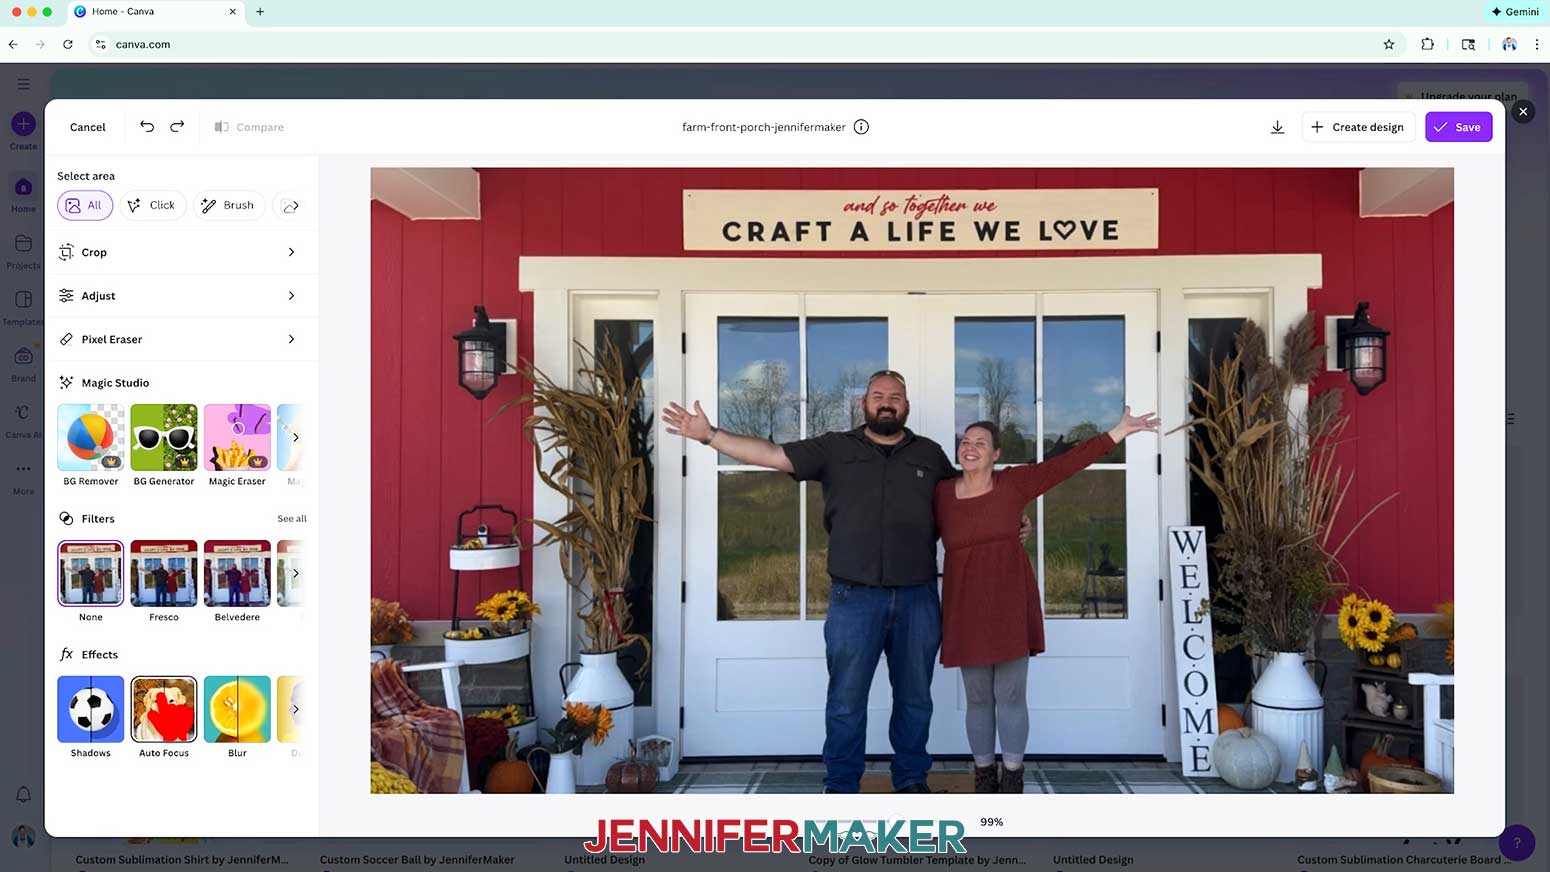
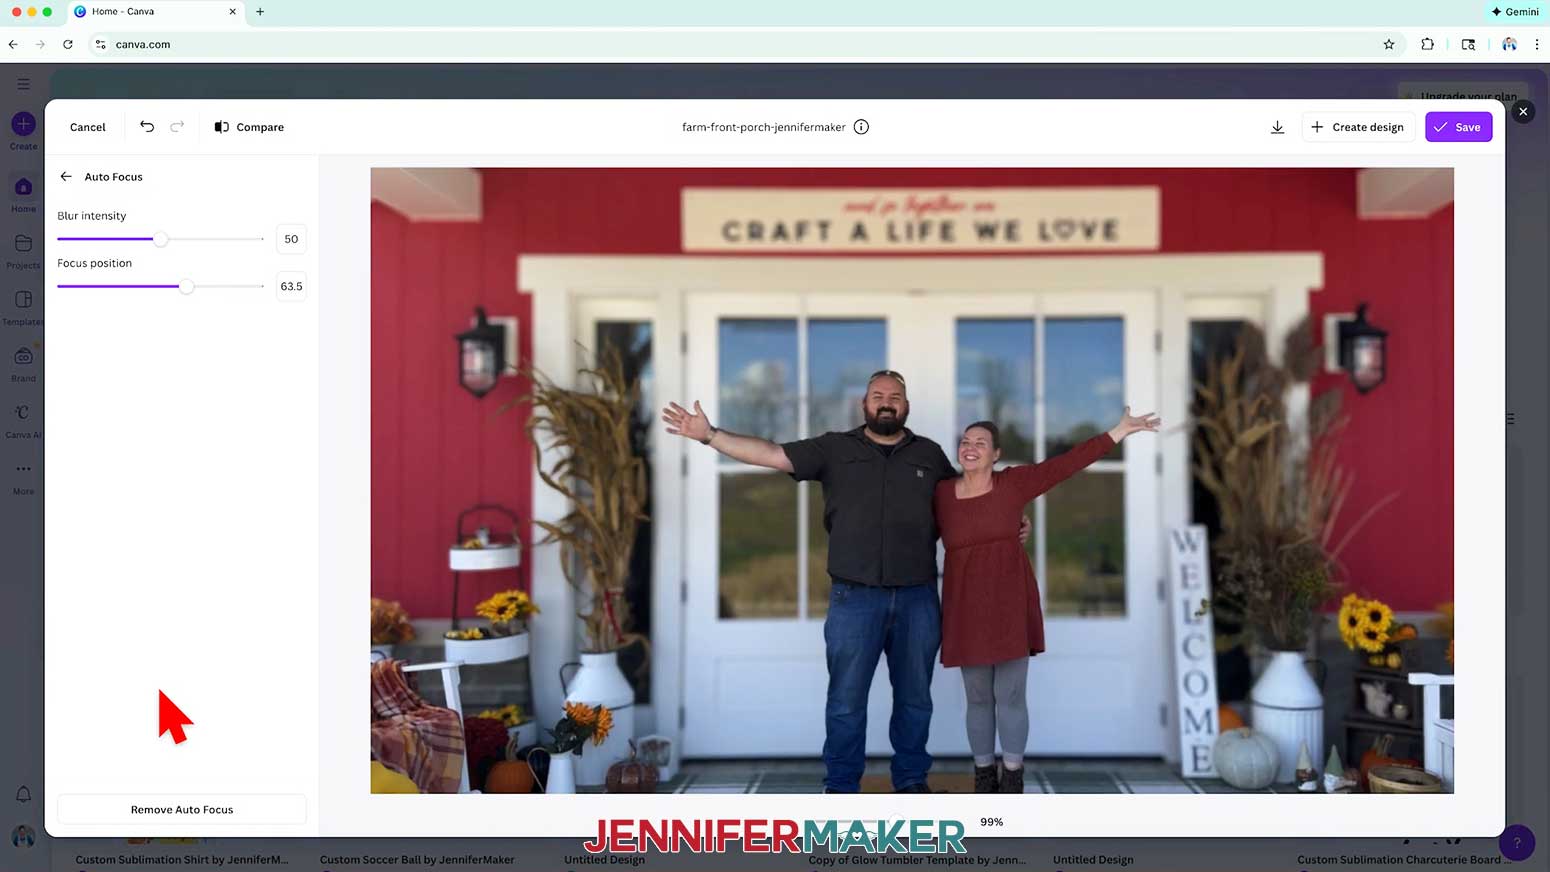
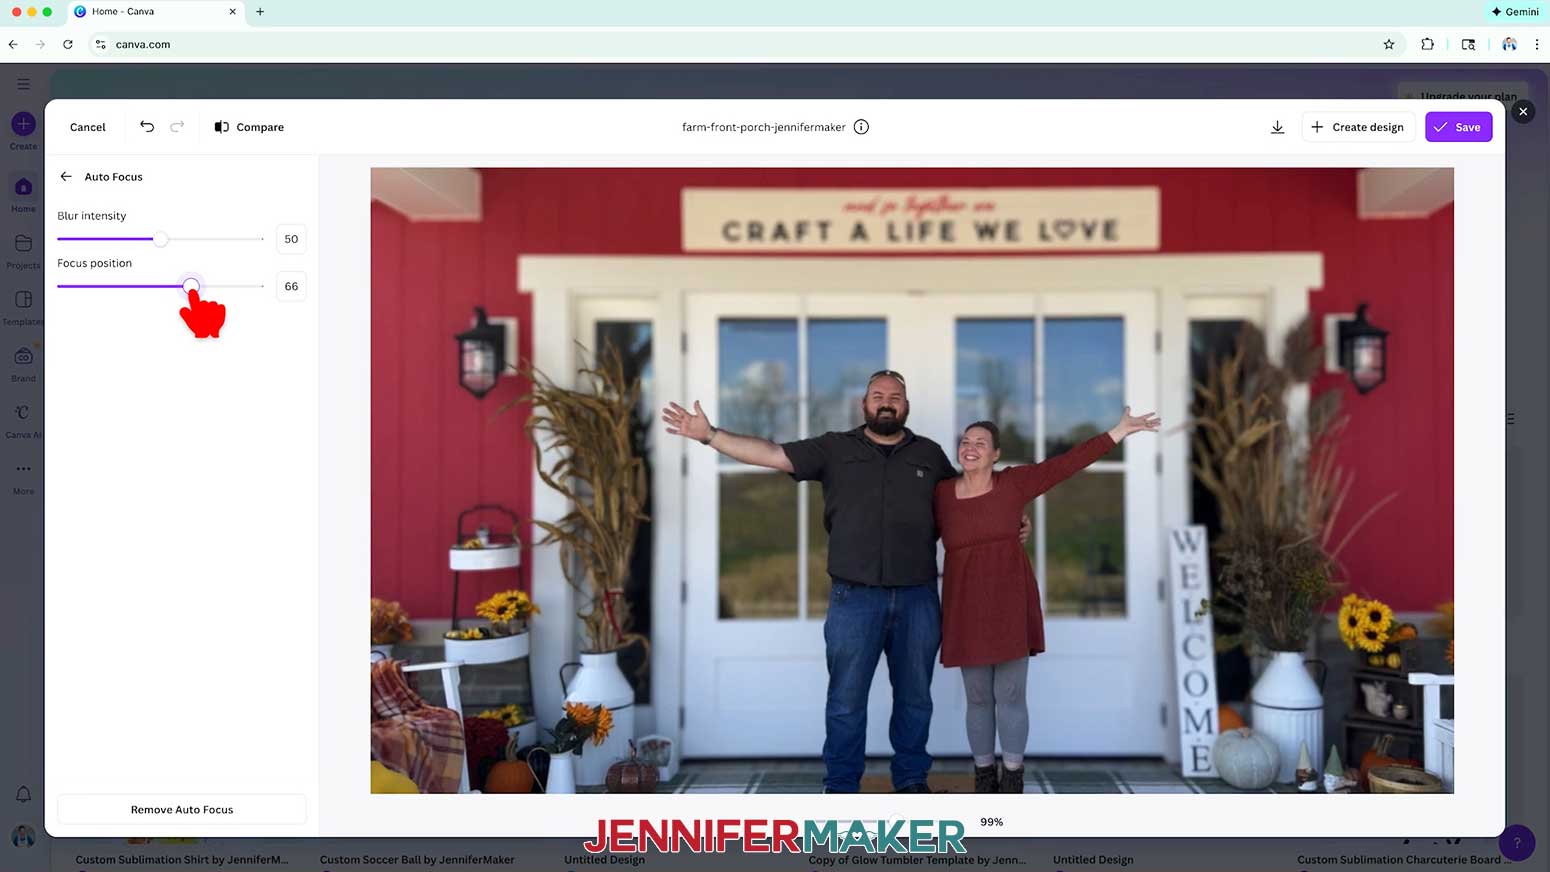
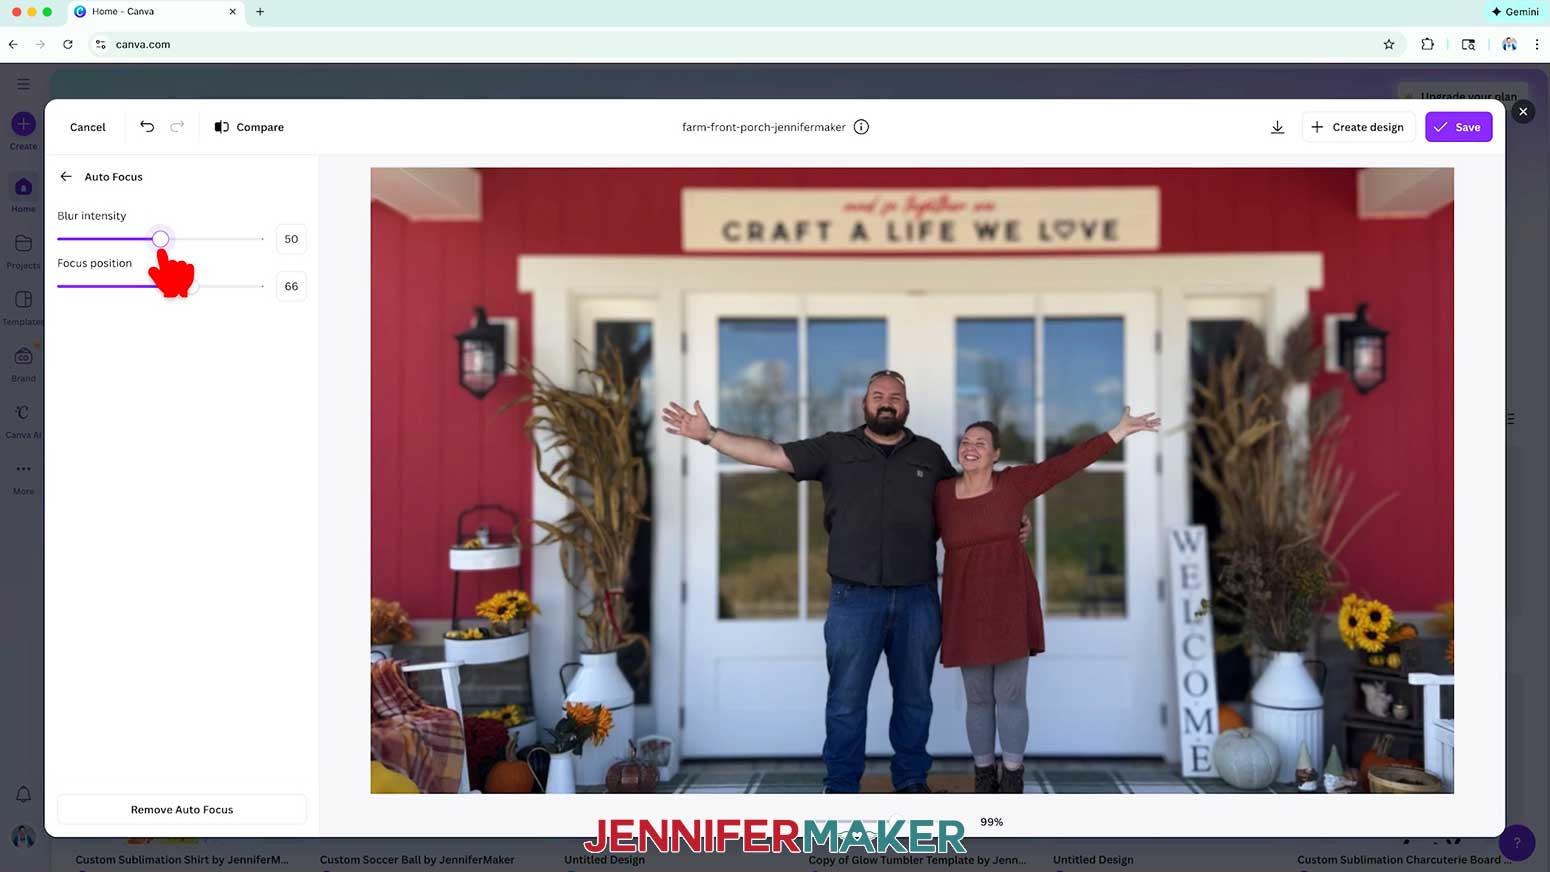
OPTION 1: AUTO FOCUS
- Under “Effects,” scroll to the right and select “Auto Focus.”
NOTE: Auto Focus will automatically keep the foreground (usually the subject) in focus, but add a softened, blurred effect to the background. - To adjust the focal point, use the “Focus position” slider.
NOTE: The Focus Position tool lets you choose exactly where the blur effect should center, guiding the viewer’s eye by sharpening one spot while softly blurring the rest. The areas in solid purple will be in sharp focus in the foreground, while the further back areas will be in a softer focus, and the non-purple areas in the background will be blurred. I adjusted my photo’s “Focus position” to 66, but yours will likely vary. - To adjust how blurred the background appears, use the “Blur intensity” slider.
NOTE: I adjusted my photo’s “Blur intensity” to 50. - Click the “back” button to go back to the main editor menu.
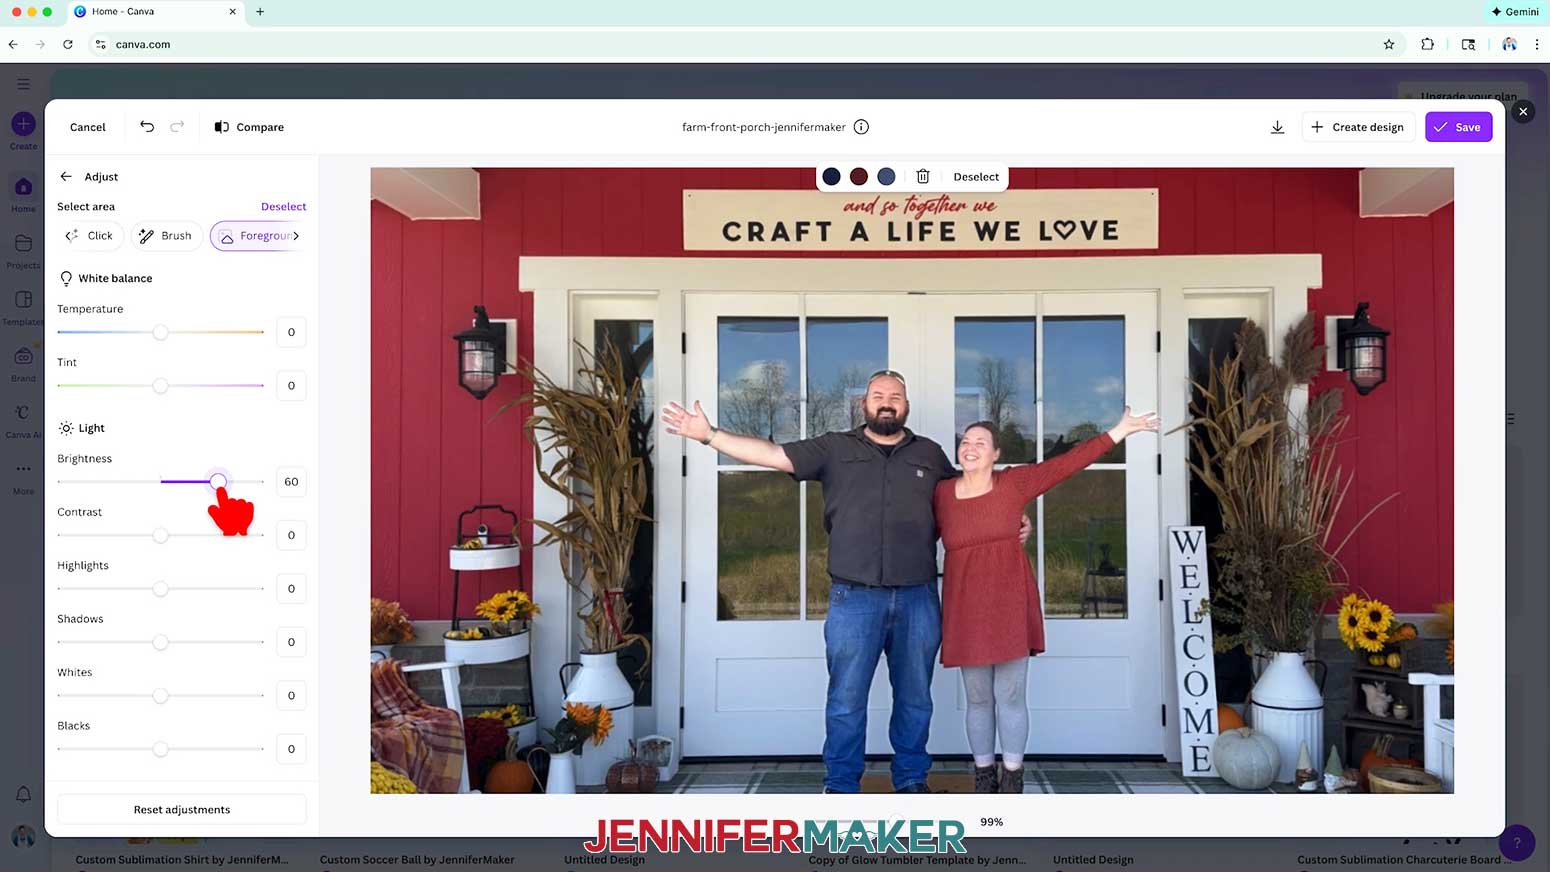
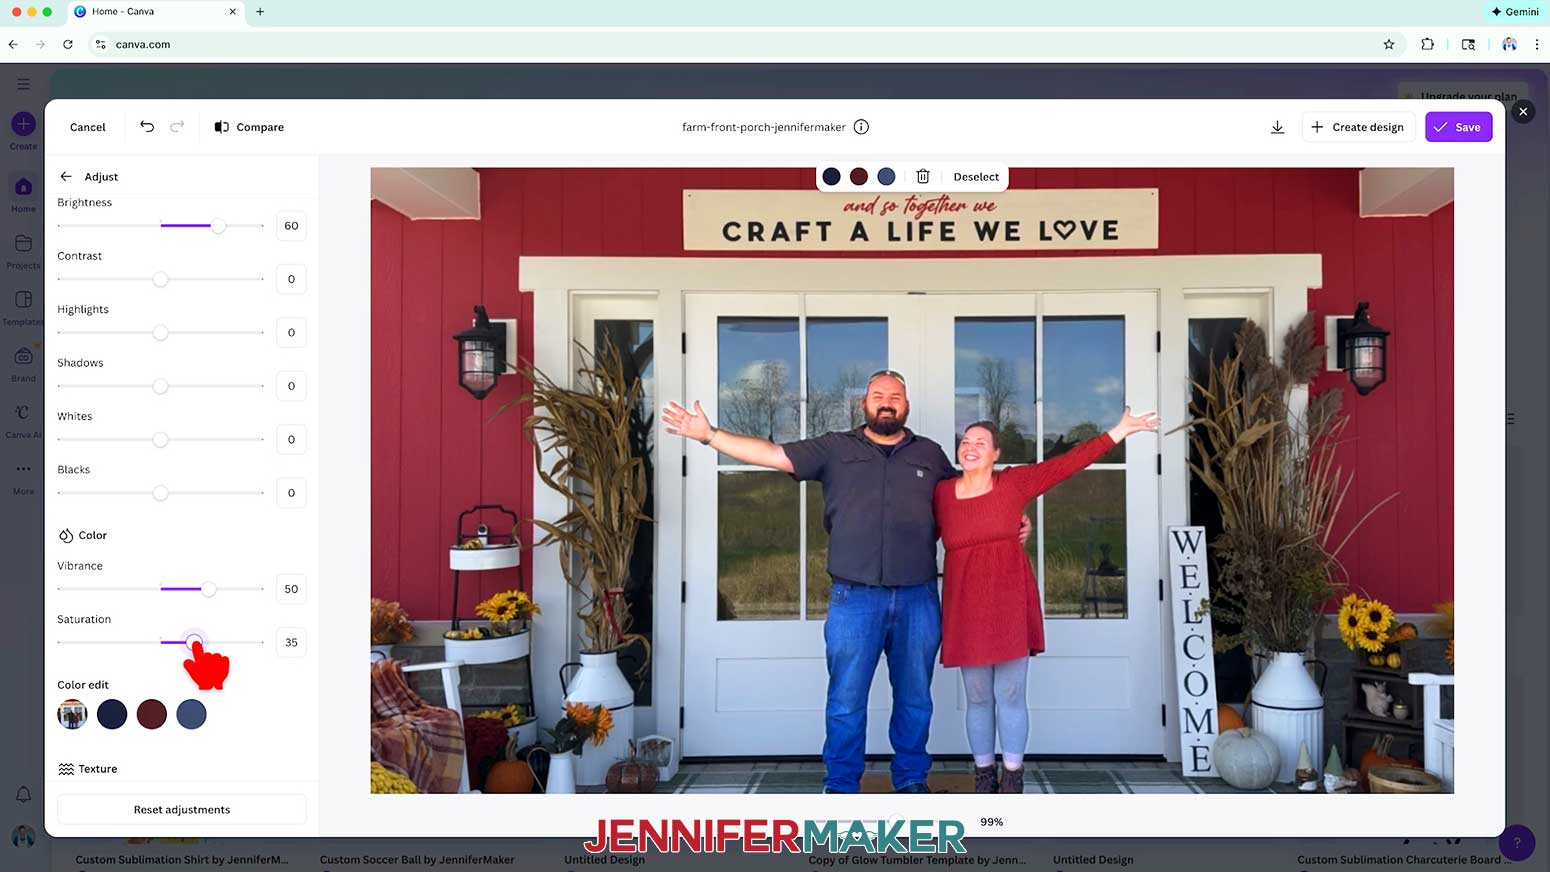
OPTION 2: EMPHASIZE THE FOREGROUND
- Click “Adjust.”
- Under “Select area,” scroll to the right and choose “Foreground.”
- Under “Light,” use the slider to increase the foreground’s “Brightness.”
NOTE: I increased my foreground’s “Brightness” to 60. - Under “Color,” use the sliders to increase the foreground’s color “Vibrance” and “Saturation.”
NOTE: “Vibrance” gently brightens the quieter colors for a natural boost, while “Saturation” amps up all the colors at once for a bolder, more dramatic look. I increased my foreground’s “Vibrance” to 50 and its “Saturation” to 35. - Click the “back” button to go back to the main editor menu.

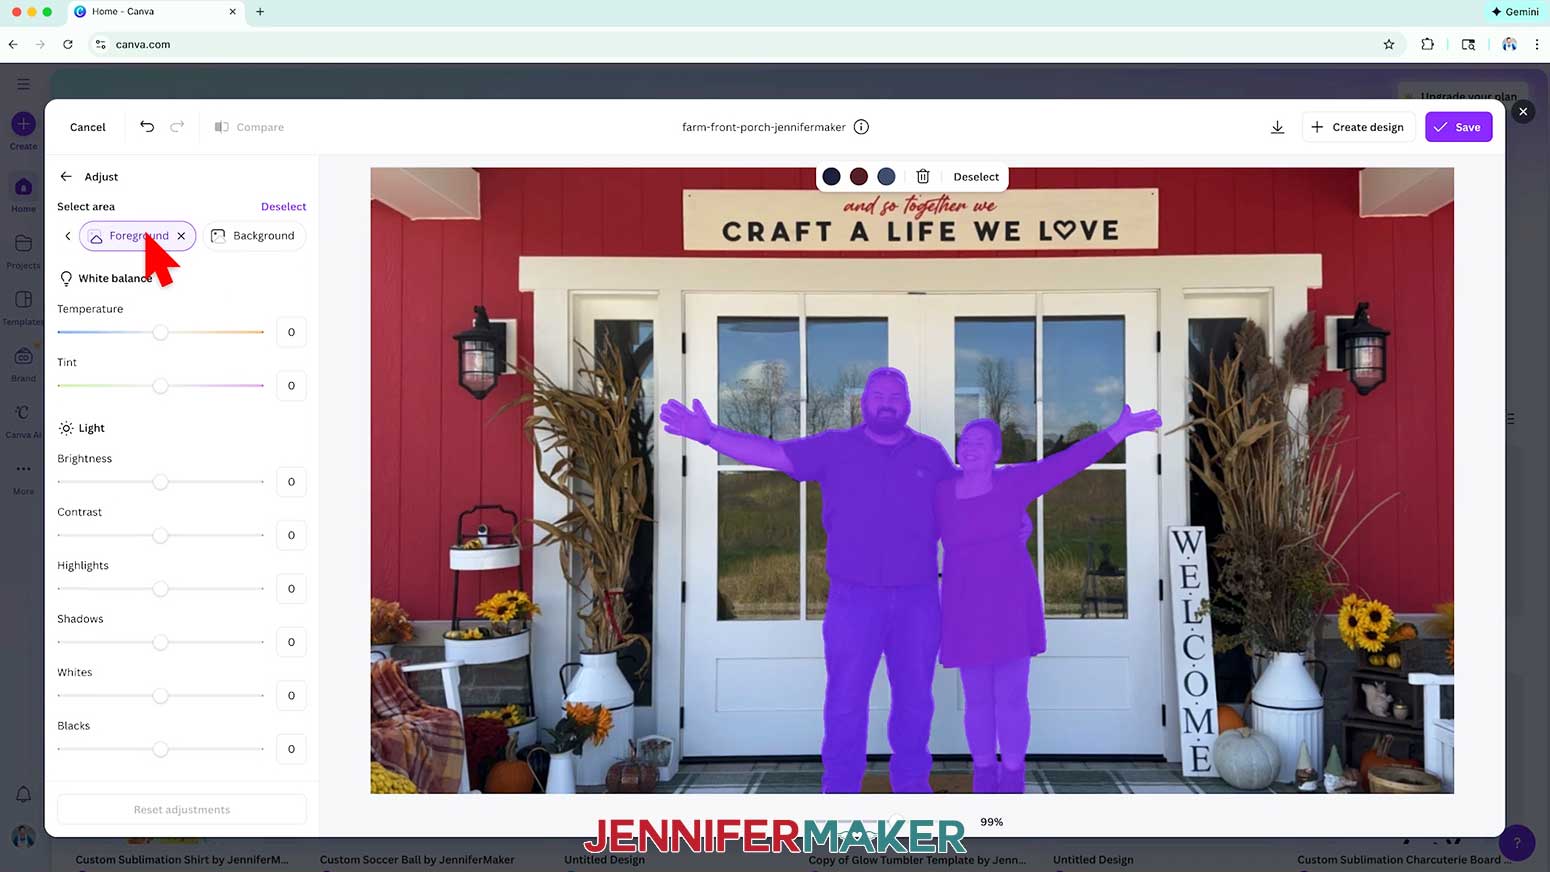
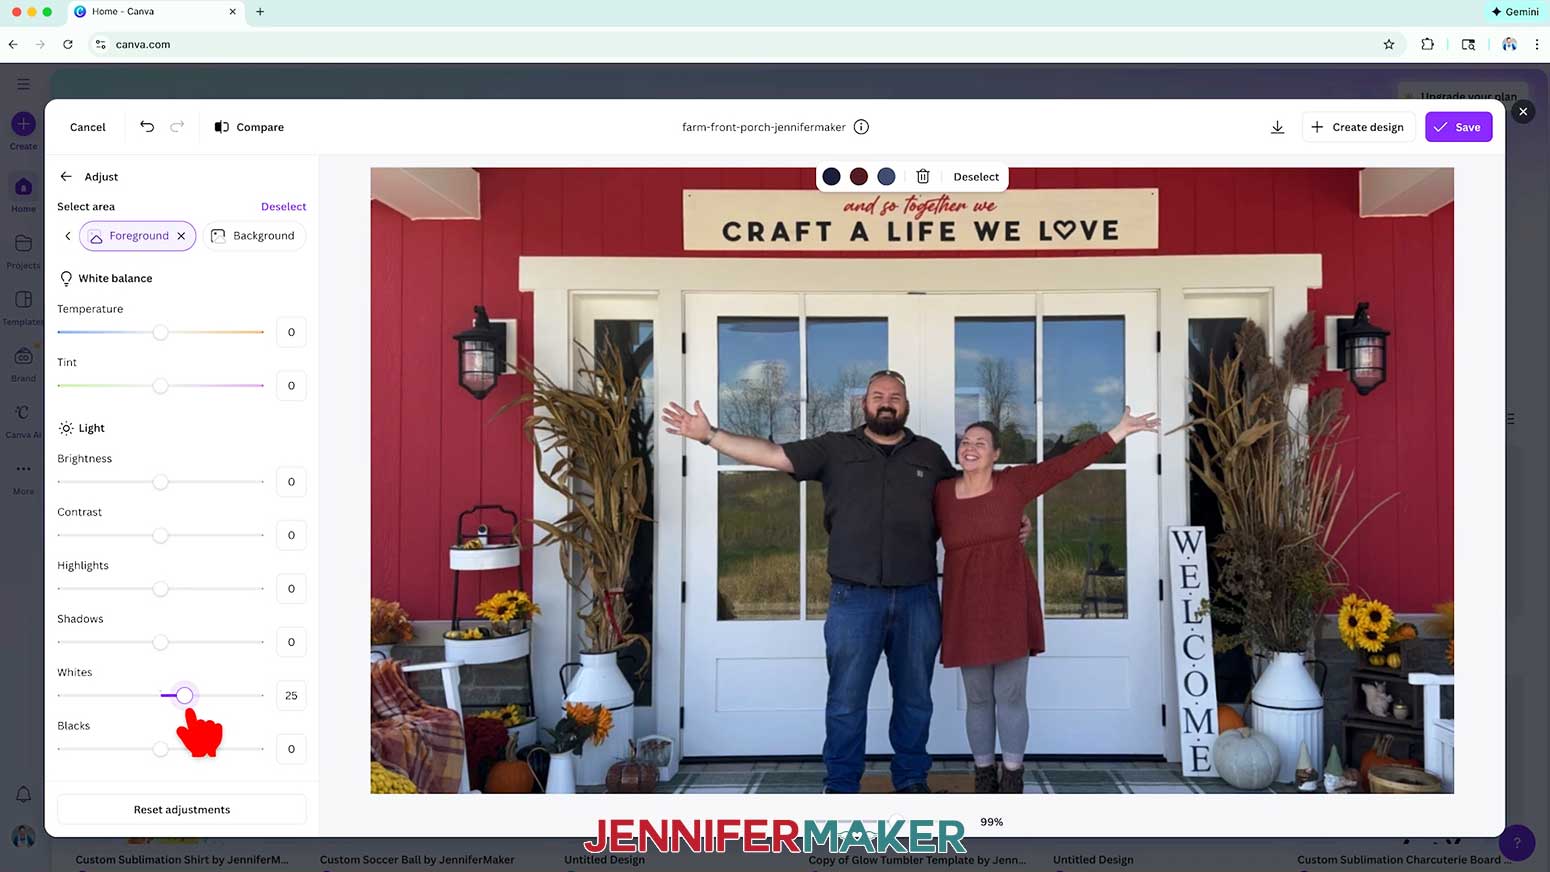
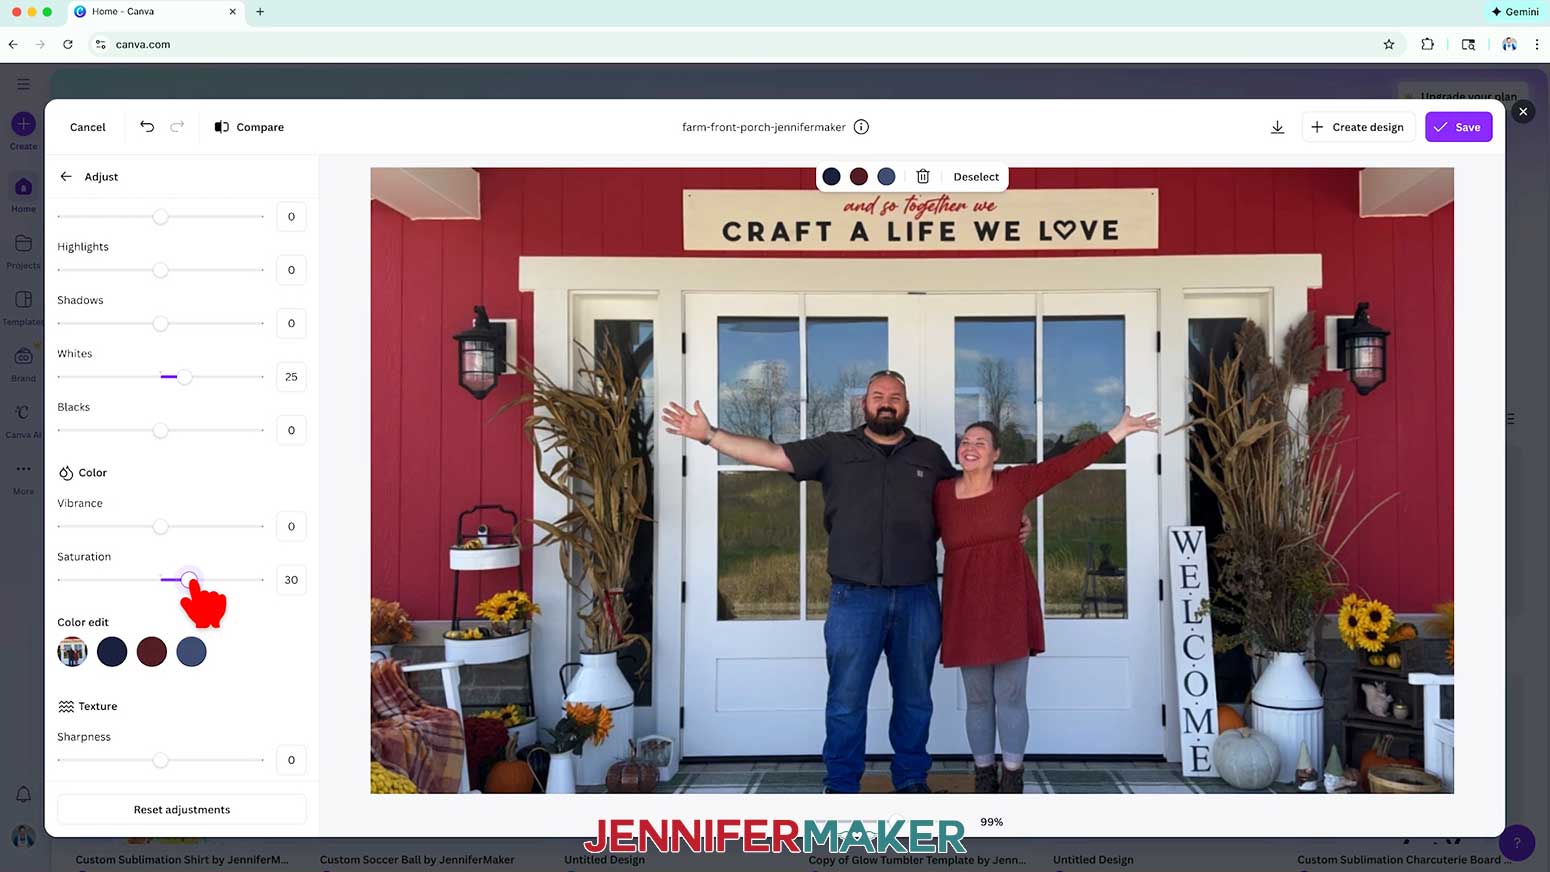
OPTION 3: COLOR FOREGROUND WITH BLACK & WHITE BACKGROUND
- Click “Adjust.”
- Under “Select area,” choose “Foreground.”
- Under “Light,” increase the “Whites” to make the foreground stand out more against the background.
NOTE: “Whites” adjusts the brightest parts of your photo, letting you make highlights crisper and brighter or soften them without drastically changing the rest of the image. I increased the “Whites” in my foreground to 25. - Under “Color,” increase the “Saturation” to make the foreground stand out even more against the background.
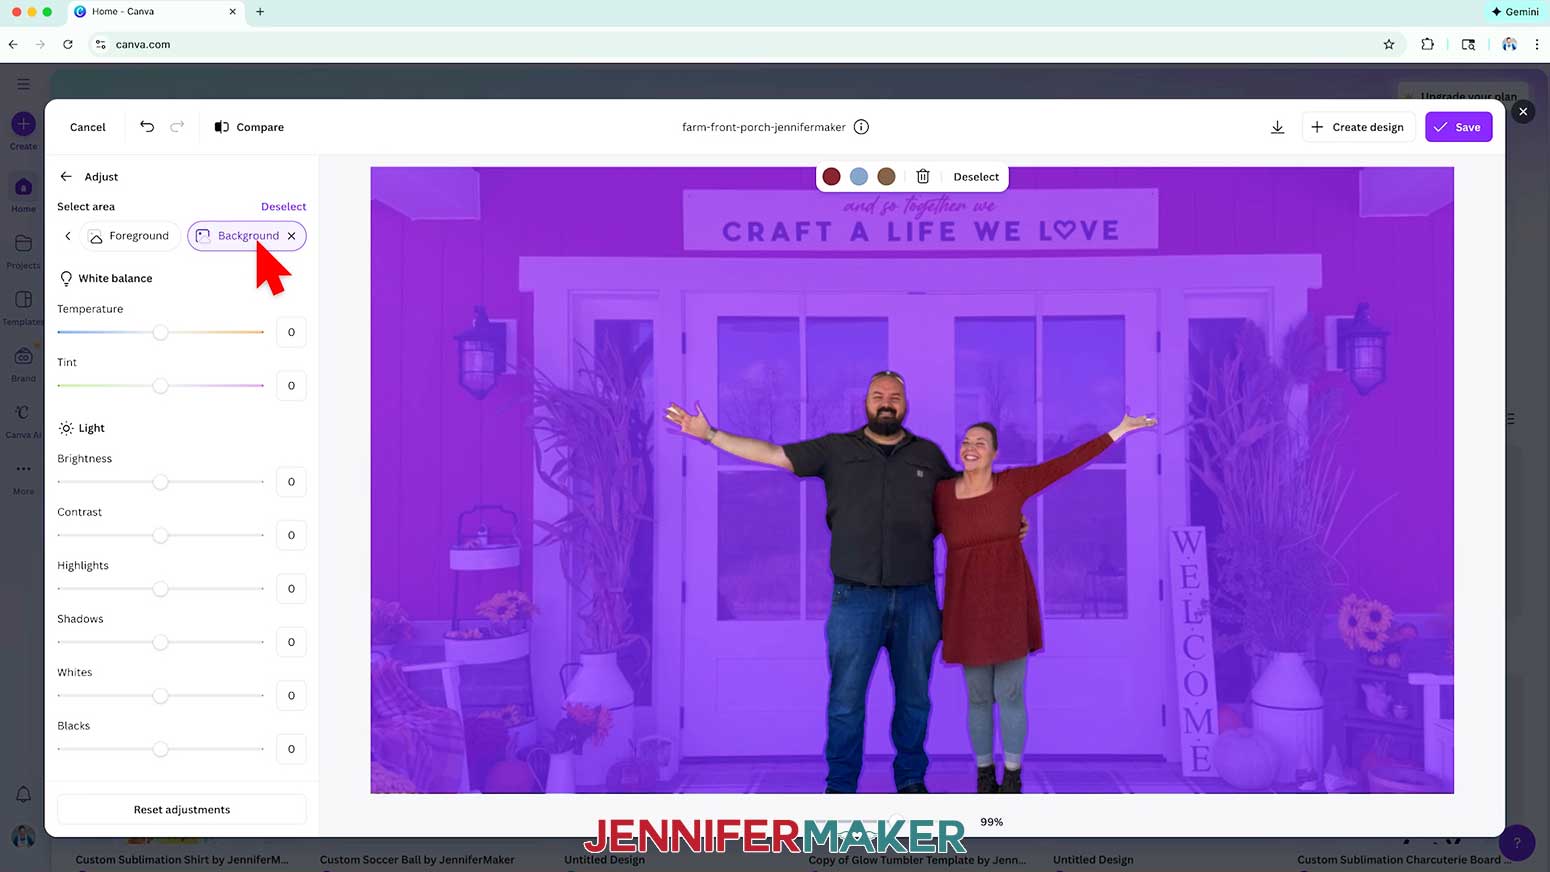
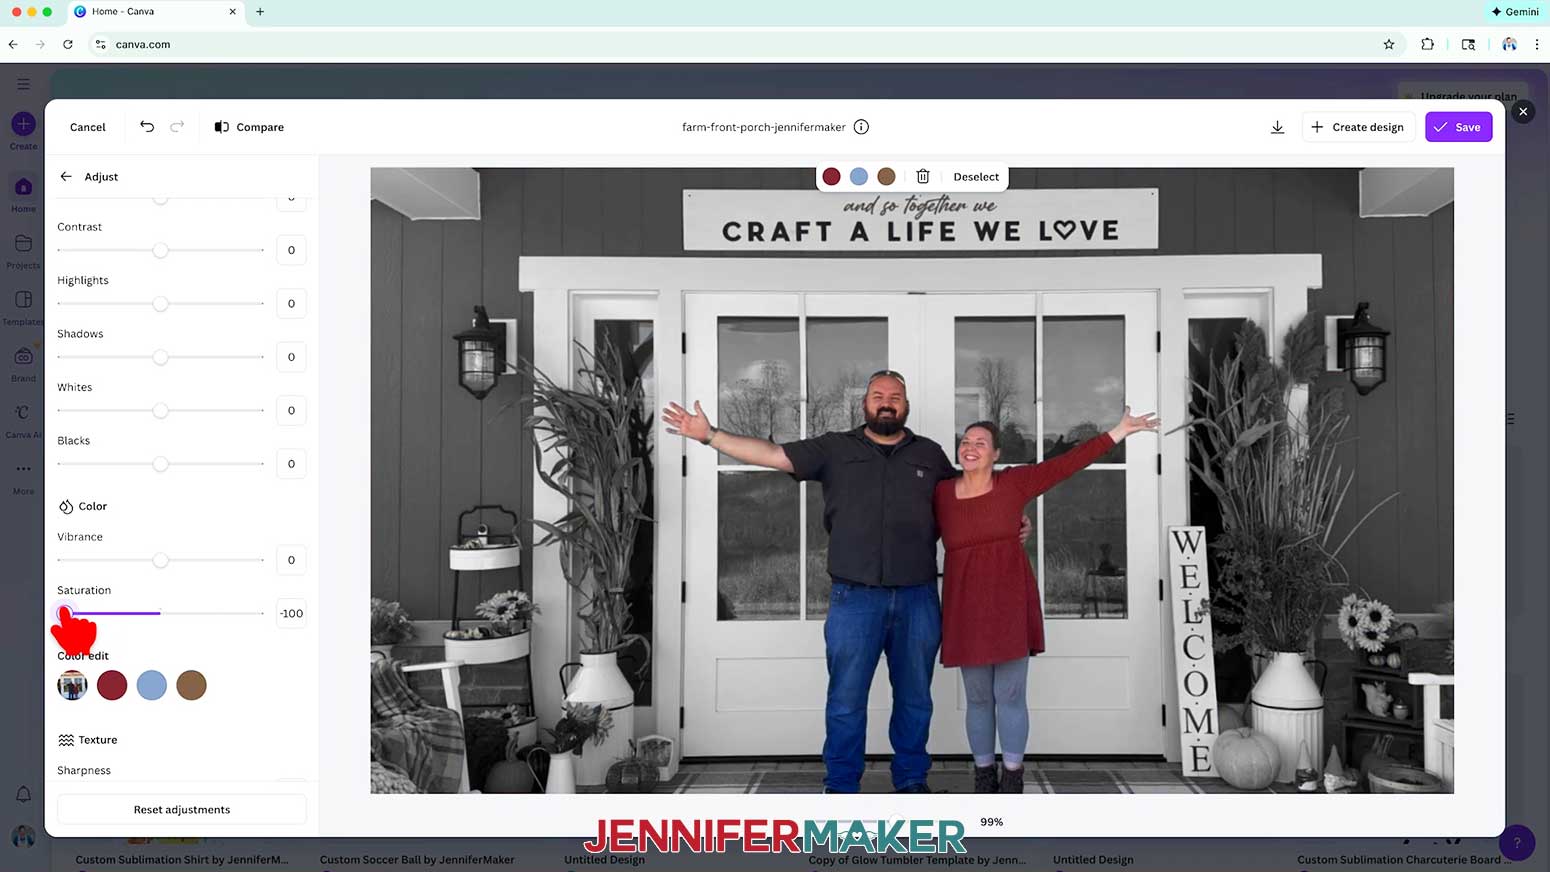
NOTE: I increased the Saturation of my foreground to 30. - Under “Select area,” choose “Background” this time.
- Under “Color,” decrease the “Saturation” to -100 to remove all of the color from the image.
- Click the arrow next to “Adjust” to apply the changes and go back to the main Photo Editor menu.
- Click the “back” button to go back to the main editor menu.
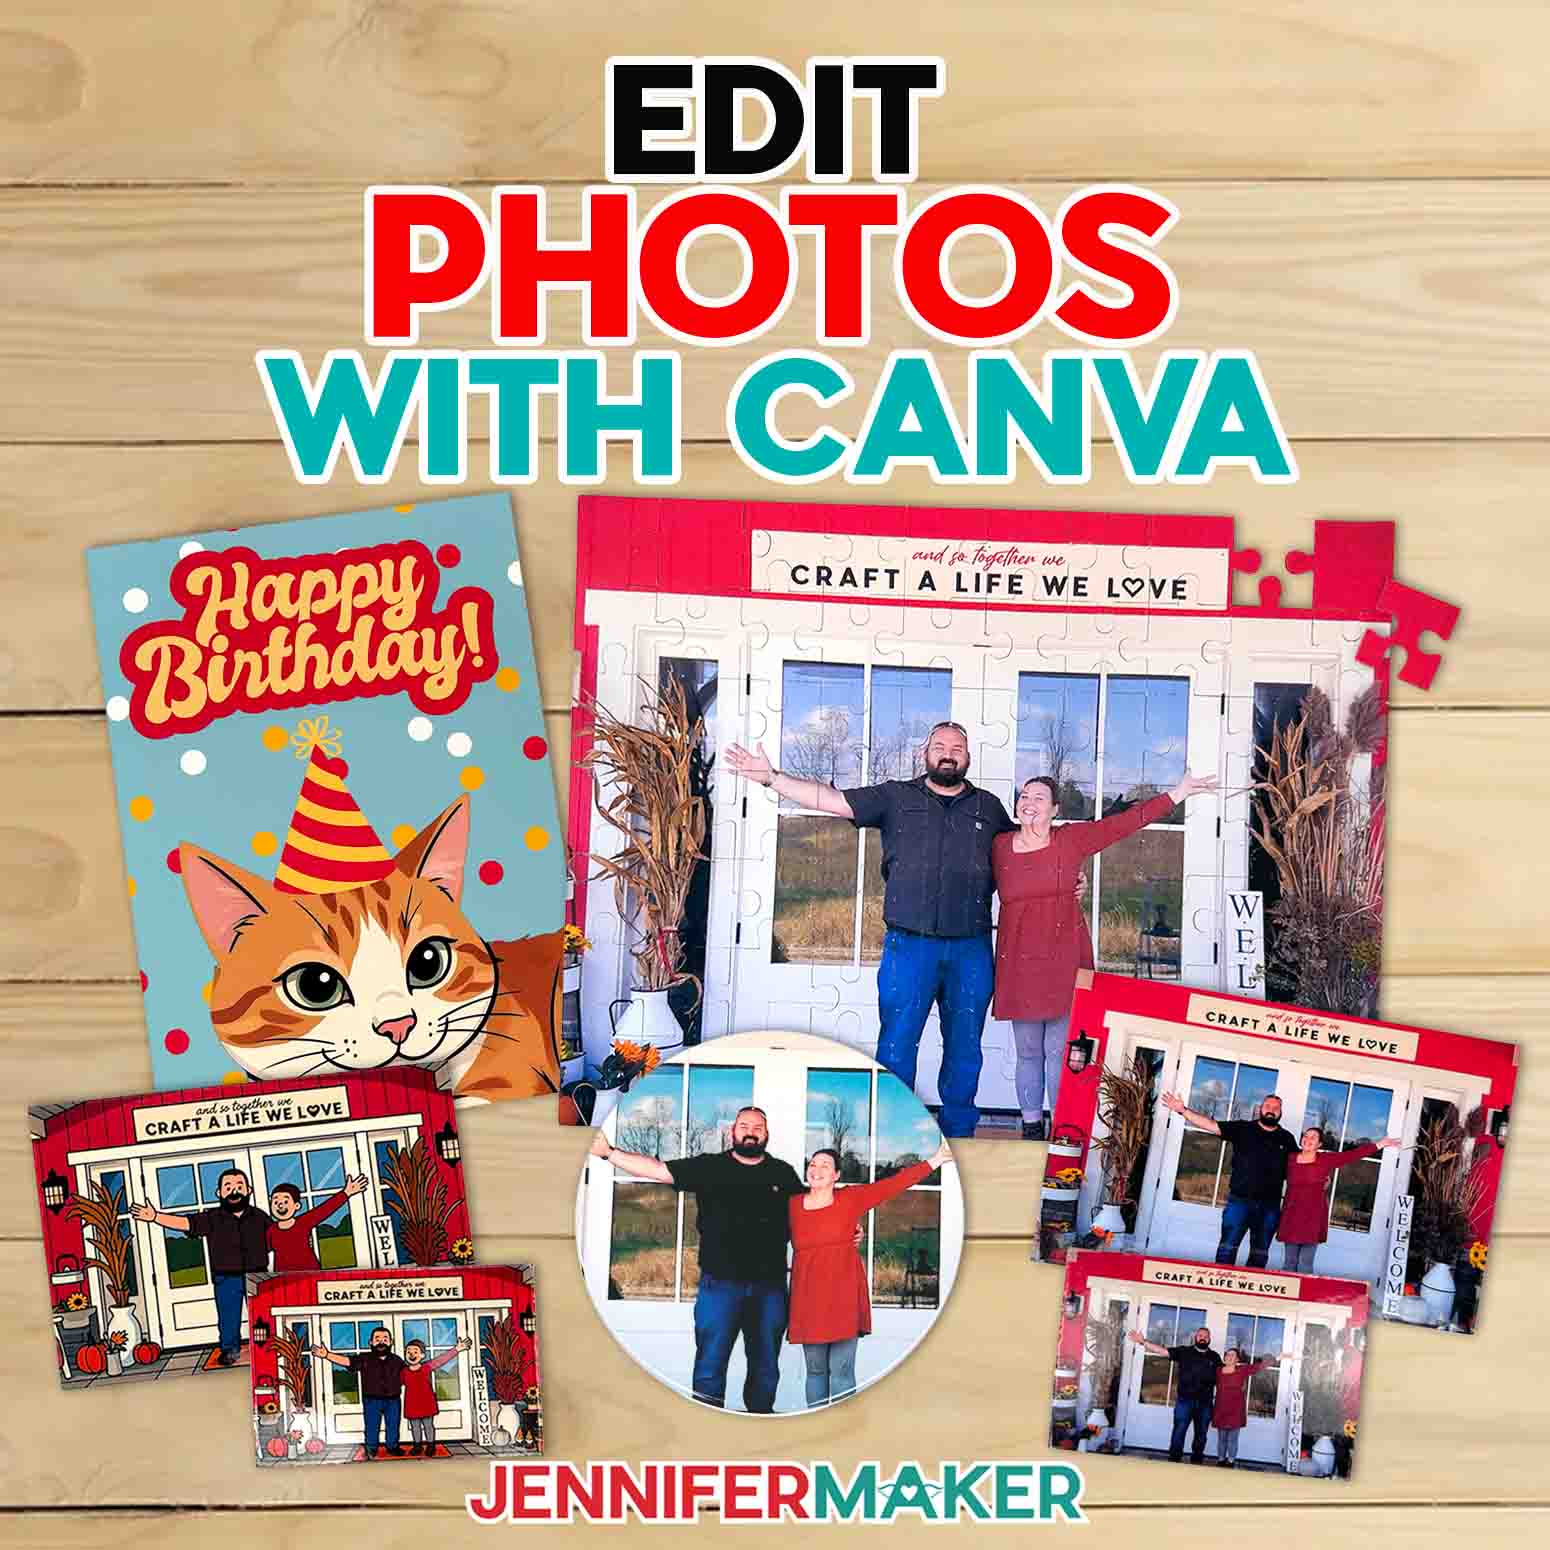
STEP 6: CREATE PROJECTS WITH YOUR PHOTOS
DOWNLOAD YOUR PHOTO
- If you’re using the Photo Editor, click the “Download” icon to download your edited photo to your computer.
TIP: You can also click the checkmark on the top right, then click “Create design” to create a new design that includes your edited photo. - If you edited your photo on your canvas, click “Share” and “Download.” Then select your file type, and click “Download.”
MAKE PROJECTS WITH YOUR PHOTO
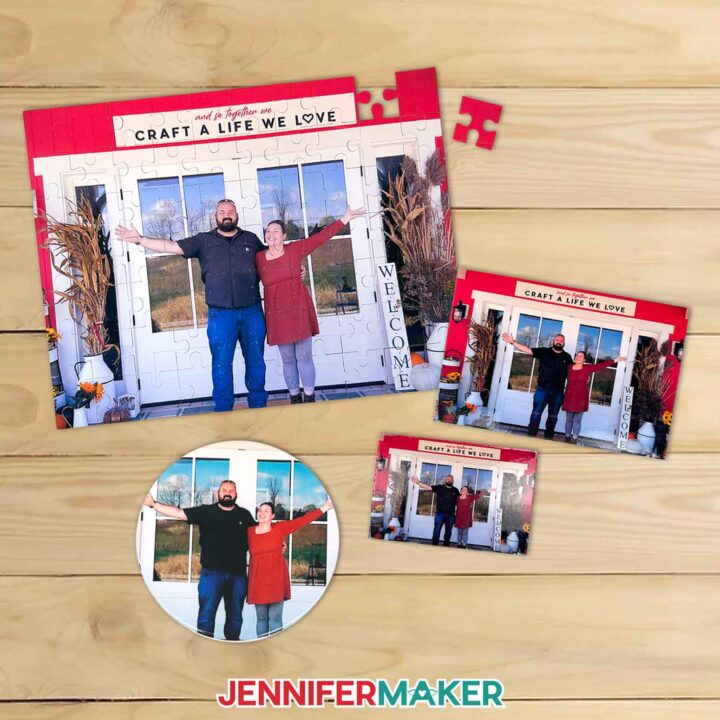
- To make a DIY Jigsaw Puzzle, follow my tutorial at www.jennifermaker.com/646.
- To make Sublimation Coasters, follow my tutorial at www.jennifermaker.com/543.
- To make DIY Fridge Magnets, follow my tutorial at www.jennifermaker.com/396.
- For a list of more crafts to make using Canva-edited photos, scroll down to the FAQ under this tutorial.

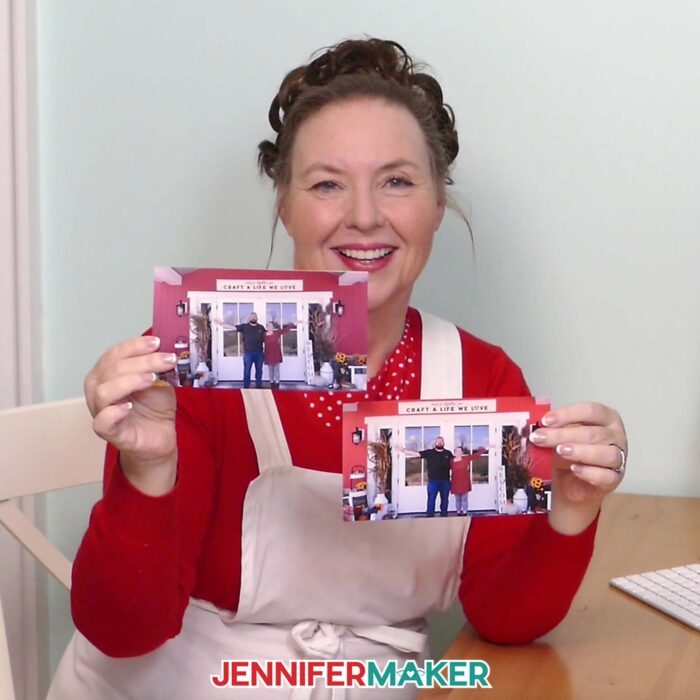
STEP 7: SHOW IT OFF
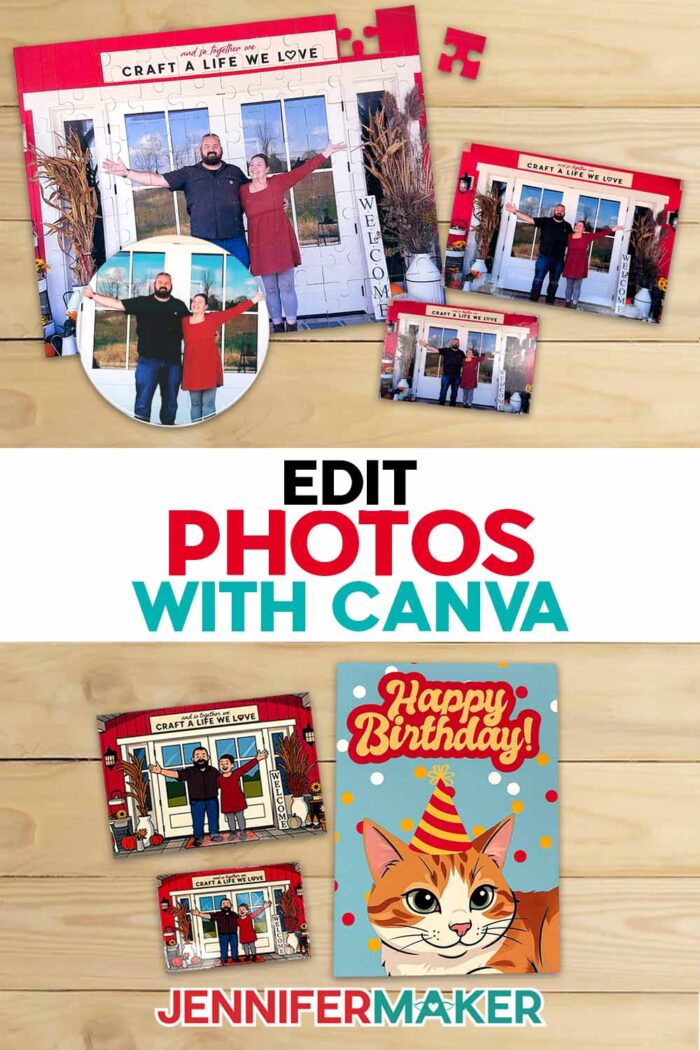
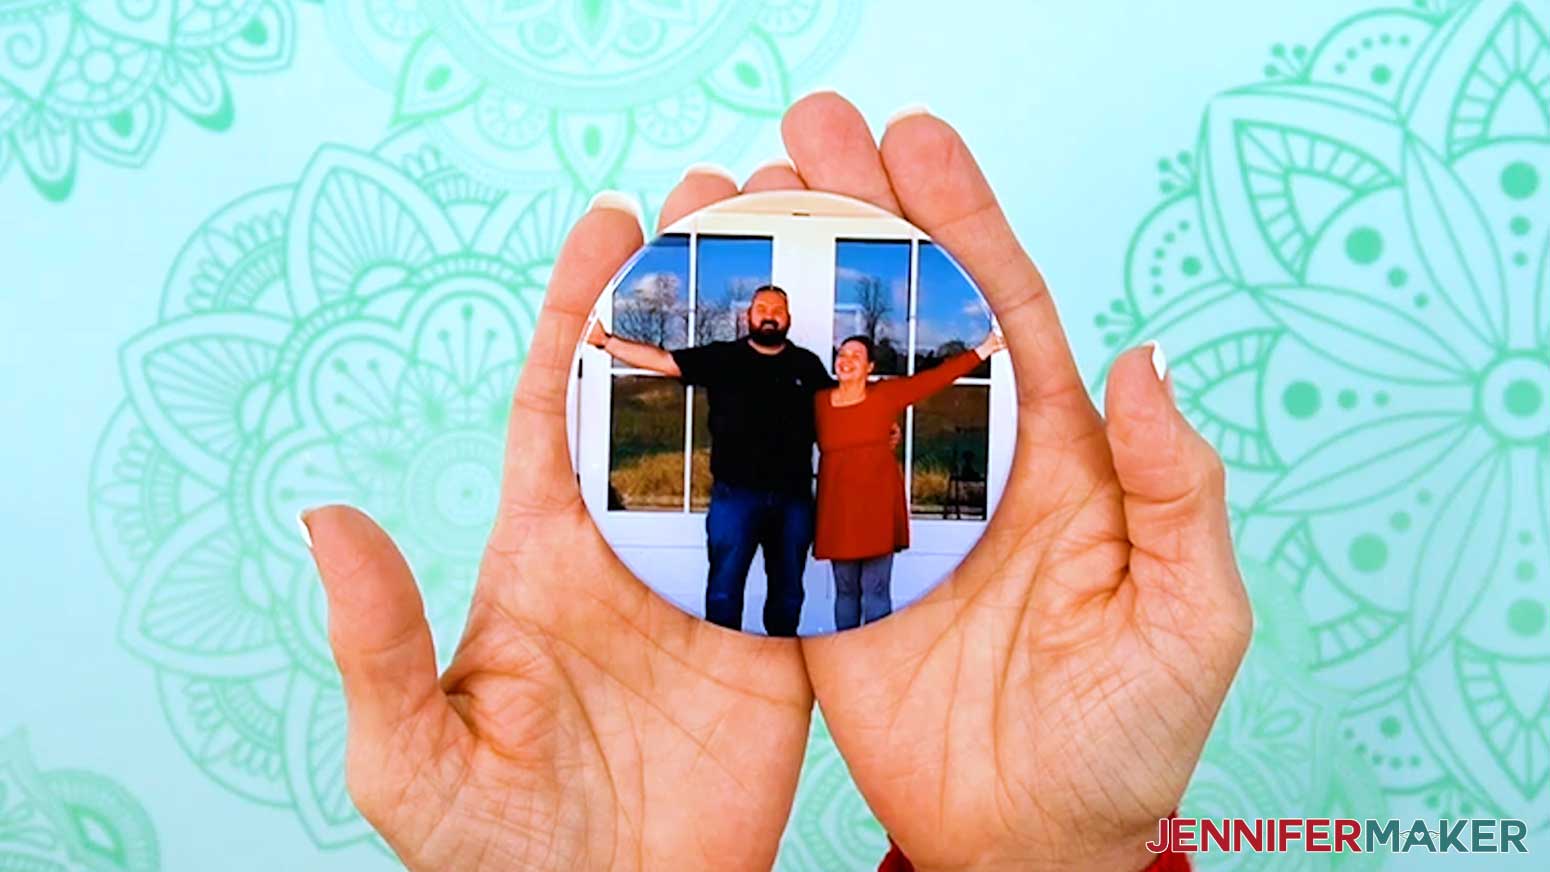
Here’s how my projects using my Canva-edited photos turned out!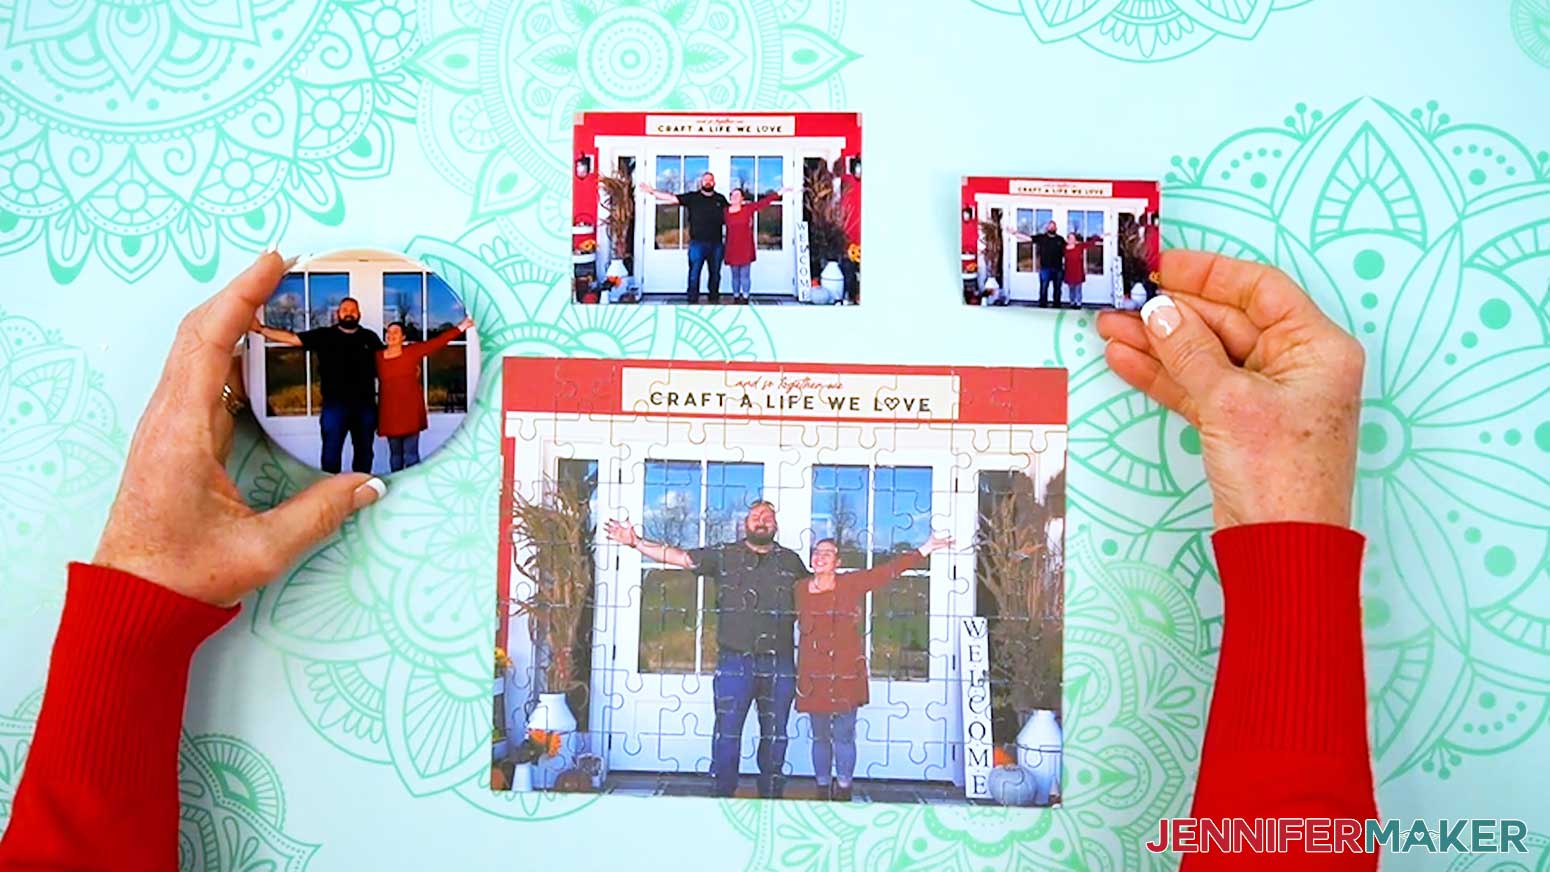
Notes
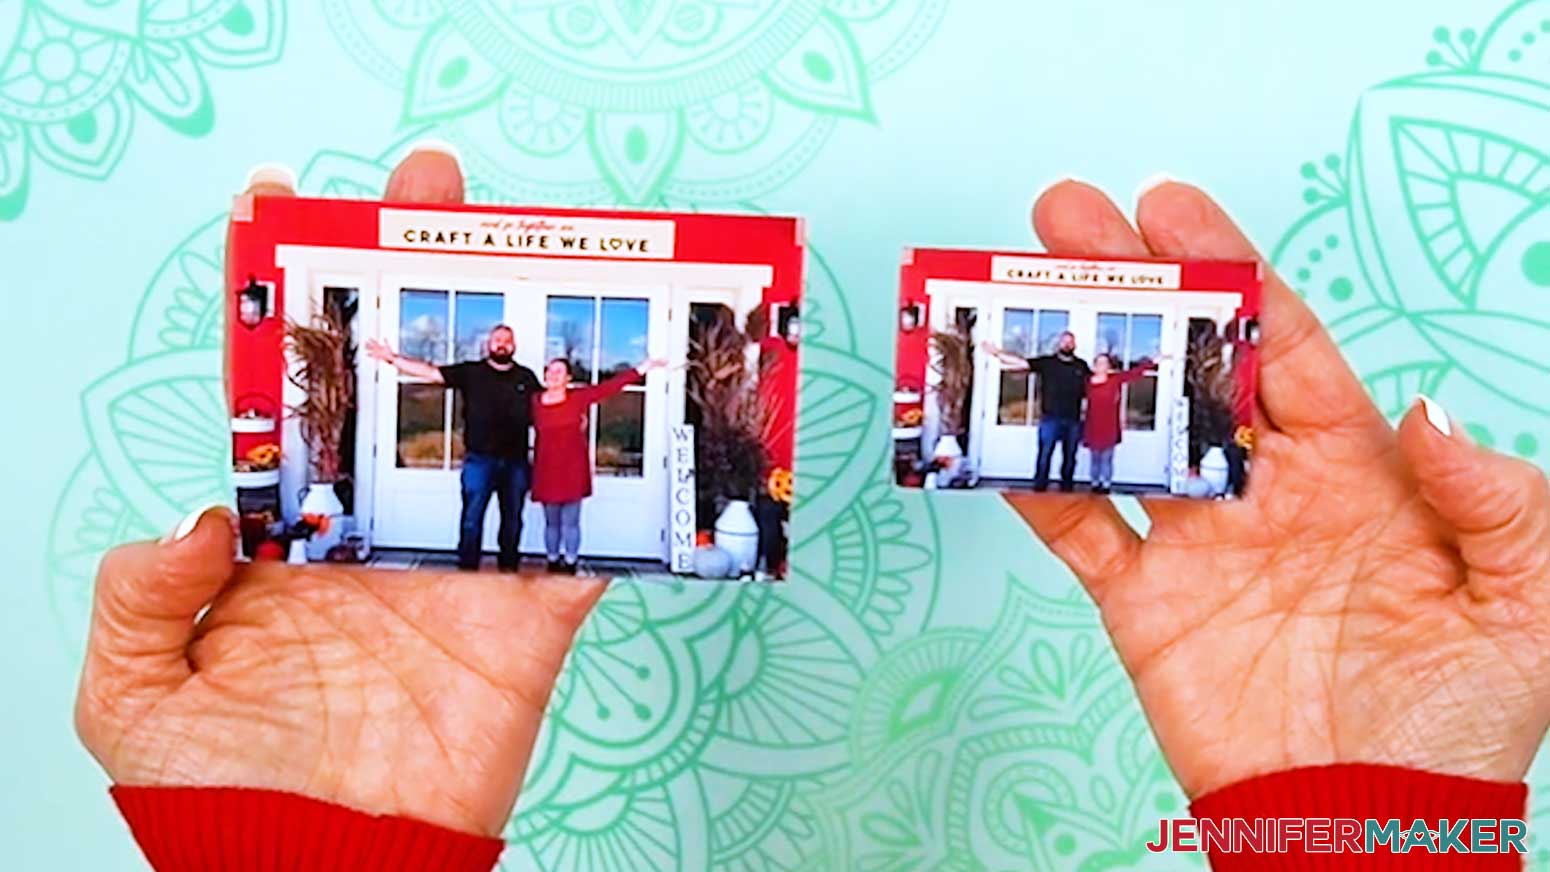
Finished Sizes:
Coaster: 3.5" x 3.5" Circle
Small Magnet: 3" W x 2" H
Large Magnet: 4" W x 3" H
Puzzle: 8.75" W x 6.75" H
Answers to Your Questions About How to Use the Canva Photo Editor
Q: Can I use Canva’s free apps to do more Canva photo editing techniques?
A: You can learn how to design your own custom greeting card using free Canva apps, plus get my cheat sheet on “How to Create a Custom Duotone Effect in Canva” in my ADVANCE program. Learn more about ADVANCE here!
Q: What can I learn to do with Canva’s Photo Editor in this project?
A: In this tutorial, you’ll learn how to crop and straighten your photos, adjust the aspect ratio for different projects, fix white balance and basic exposure, apply filters and effects like black-and-white and sepia, and use tools like auto focus and Select Area to make your subject pop. Then you can download your edited image and use it in crafts like puzzles, coasters, magnets, and more.
Q: Is Canva good for photo editing?
A: Yes, Canva is a great photo editing and graphic design app for everyday photo edits, especially for crafters. For basic adjustments, creative filters, and getting photos ready for projects, social media, and printables, Canva’s photo editor is a fantastic choice.
Q: How do I find elements and designs to add to my photos in Canva?
A: You can use any of the images included in the project files, or find more in my library! You can also use your own photos and designs, graphics from Canva’s library of Elements, and images created through AI generators as long as you follow the tool’s guidelines. You can also use photos from other online sources for your project (depending on usage requirements), like stock photos. If you want to take your photos further, I share more techniques so you can get better results when editing in my Advance program!
Q: Is Canva free for photo editing?
A: Yes. Everything I show in this project uses Canva’s free version. You can sign up for a free account, open Canva’s free online Photo Editor in your browser, and follow the same easy steps without the premium features that come with a Canva Pro account.
Q: Do I need Canva Pro for this project?
A: Nope! I show you how to do several editing techniques, all with the free version. The cropping tools, basic adjustments, filters, auto focus, and most editing tools we use are available to anyone with a free account, so a complete beginner can follow along, easy peasy!
Q: Should I edit in Canva’s Photo Editor or on a canvas?
A: If you’re just cleaning up a single photo, Canva’s Photo Editor is quick and focused. If you want to combine multiple photos, add text, or build a full layout, editing on a canvas is better. The good news is the editing tools are nearly identical in both places, so you can follow the same steps either way.
Q: What does “aspect ratio” mean, and why does it matter for crafts?
A: Aspect ratio is the relationship between your photo’s width and height, like 4:3 or 16:9. It matters because your projects (coasters, puzzles, magnets, etc.) have their own shapes. Adjusting the aspect ratio in Canva helps your photo fit the project without weird cropping or white bars on the sides.
Q: What’s the difference between SmartCrop and cropping manually in Canva?
A: SmartCrop in Canva automatically rotates and crops your photo inside a purple preview box to create a balanced composition with one click. Manual cropping gives you full control: you set the aspect ratio (or keep it on “Freeform”), drag the rotate slider to straighten the image, and use the corner and edge handles to frame the photo exactly how you want. I show you how to do both in the video.
Q: When should I use “Adjust” vs. “Filters” in Canva?
A: Use the Adjust panel when you want control over specific settings like brightness, contrast, and saturation. Filters are best when you want a quick “look” or mood change with one click. In the tutorial, we start with basic adjustments, then use filters and other effects for creative results. Check out my video to see all of these tools in action!
Q: How do I turn a photo black-and-white in Canva?
A: Simply scroll down to the “Mono” section in “Filters” and choose any of the monochrome options. These monochromatic filters remove the color and give you black-and-white or grayscale results. You can use the Intensity slider to make the effect softer or stronger.
Q: How does the “Duotone” effect work, and what is “Sepia?”
A: “Duotone” replaces the colors in your photo with just two hues (one for highlights and one for shadows) creating a bold, graphic look. “Sepia” is a specific duotone preset that makes your photo look warm and desaturated, like an old photograph. Watch the video to see how I use this effect together with others to create a super cool, antique-looking photo.
Q: How do I make my subject stand out from the background in Canva?
A: In the video tutorial, I show you how to use Canva tools to enhance your subject or foreground a few different ways, in color and black-and-white! Watch along to find out how to do it.
Q: What is the point of the “Select area” tools?
A: “Select area” lets you apply adjustments only to parts of your photo instead of the whole thing. Choosing “Foreground” targets your subject, while “Background” targets everything behind them. You can refine the selection with the “Brush,” and adjust “Light” and “Color” sliders to create a strong focal point.
Q: Can I use Canva like Photoshop?
A: You can use Canva to edit photos and create designs, but it doesn’t work like Photoshop in every way. Photoshop is built for very detailed, pixel-level control and complex edits, while Canva is more of an easy, drag-and-drop design tool for fast, good-looking results. For most craft projects and social media posts, Canva is much simpler to learn and use.
Q: Which is better, Photoshop or Canva?
A: It depends on what you need. Photoshop is better for advanced, highly-detailed photo editing and retouching. Canva is better if you want quick, professional-looking designs and photos, without a steep learning curve. For crafting, web design mockups, and everyday projects, Canva’s free online photo editor is often the more practical choice.
Q: Do professional photographers use Canva?
A: Many professional photographers still rely on tools like Photoshop and Lightroom for their main editing, but some do use Canva for things like social media posts, simple graphics, marketing materials, and photo collages. Canva is especially handy when you want to combine your own images with text and graphics quickly!
Q: Is Canva as good as Lightroom?
A: For detailed, high-end photo editing, Lightroom is more powerful and precise. Canva isn’t trying to replace Lightroom; it’s designed to make editing and designing accessible to anyone. If you want fast, simple edits and beautiful designs without deep technical work, Canva is easier and more beginner-friendly.
Q: Which format should my photos be in?
A: You can upload and use these file types in Canva: HEIC, HEIF, GIF, JPG, PNG, SVG, AVIF, WEBP, TIFF, WDP, or JXR.
Q: What file type should I download my edited photo as?
A: For most craft projects and print layouts, PNG or PDF Print are great options. PNG gives you a higher-quality image for things like puzzles and magnets, while PDF Print works well when you’re placing photos into print-ready designs. For sharing online or on social media, JPG is usually best because it’s a smaller file size that still looks good.
Q: Are my pictures safe on Canva?
A: Canva is a large, established platform that uses standard online security practices, and many people safely store designs and photos there. That said, it’s still a cloud-based service, so if you’re working with very sensitive images, it’s always smart to keep your own backups and use good password and account security habits.
Q: Can I make and sell photo projects I made in Canva?
A: If you want to use my designs and projects for commercial use, please familiarize yourself with my important licensing information as well as important licensing information from Canva before selling your projects.
Get my free PDF beginner’s guide to learn more Canva photo editing techniques!
(If you do not see the signup form above, click here.)
I love seeing your Canva projects, and how you use the skills I cover! Once you’ve learned how to edit your own photos in Canva, inspire others and share a photo of your photo project in our Canva Creators Facebook group or tag me on social media with #jennifermaker.
Love,

Want to remember this? Save this Canva Photo Editing Tutorial to your favorite Pinterest Board!