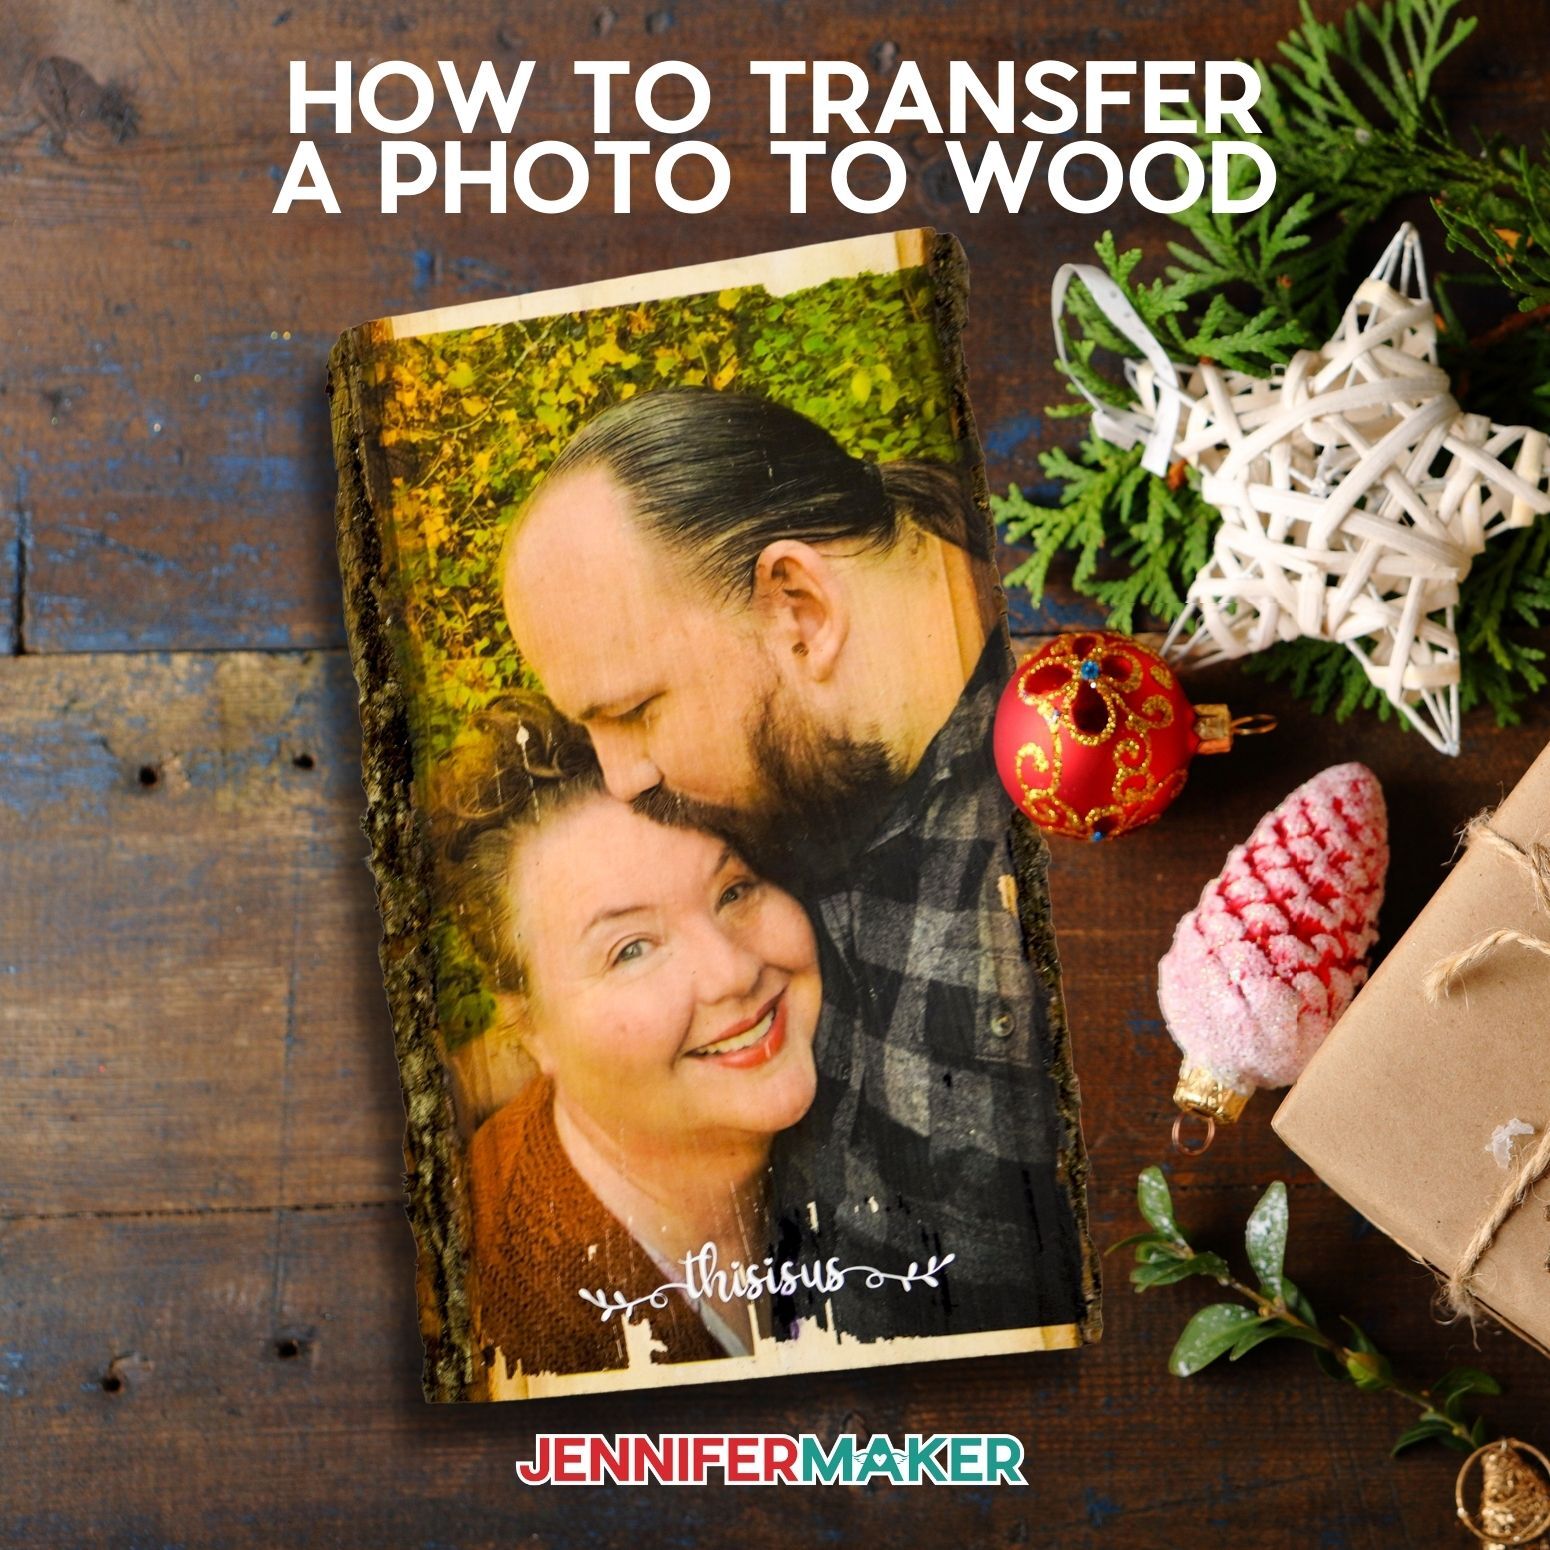
I’m going to show you how to transfer a photo or favorite print to wood! It’s a super inexpensive way to make a beautiful project that’s sure to impress!

And because I love to test things, I tried a bunch of different types of wood, printers and methods, and I’m sharing the exact supplies, tools and techniques for the BEST photo transfer results every time.
I’ll also show you how to take it a step further by adding a little vinyl message to your wood!
This project is SO budget-friendly, beginner-friendly and the best part, I promise, whoever gets it will be super impressed! I mean, seriously, how can you not be impressed with a photo transferred into wood?
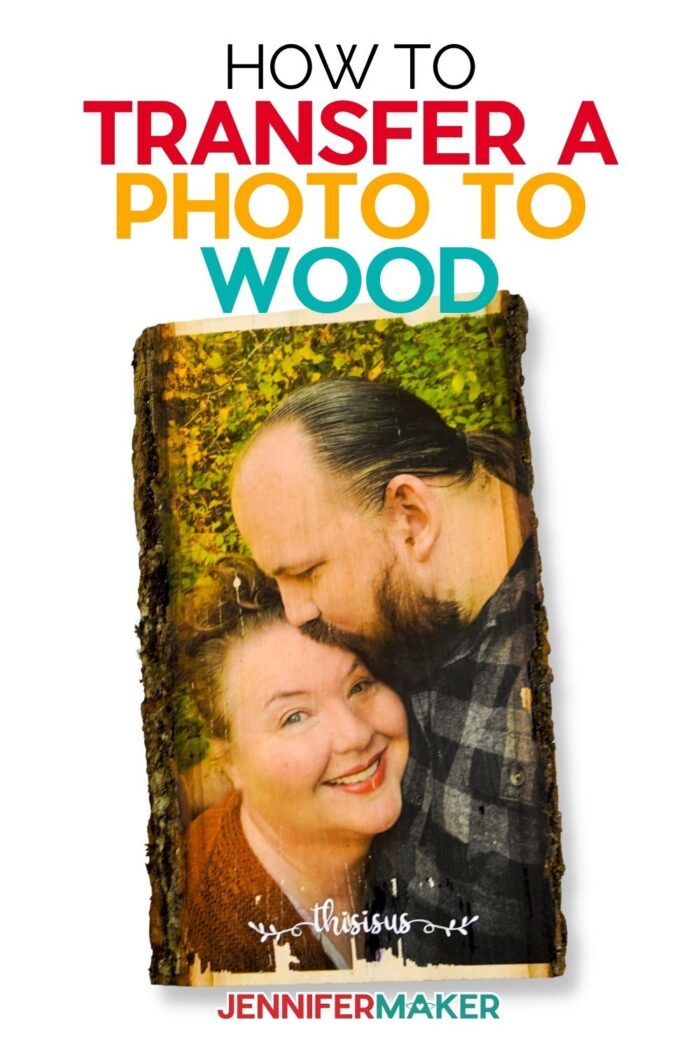
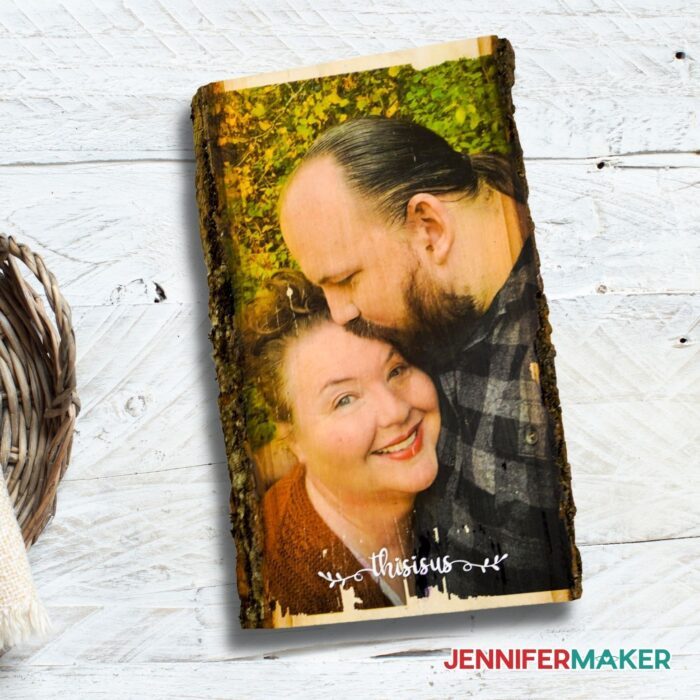
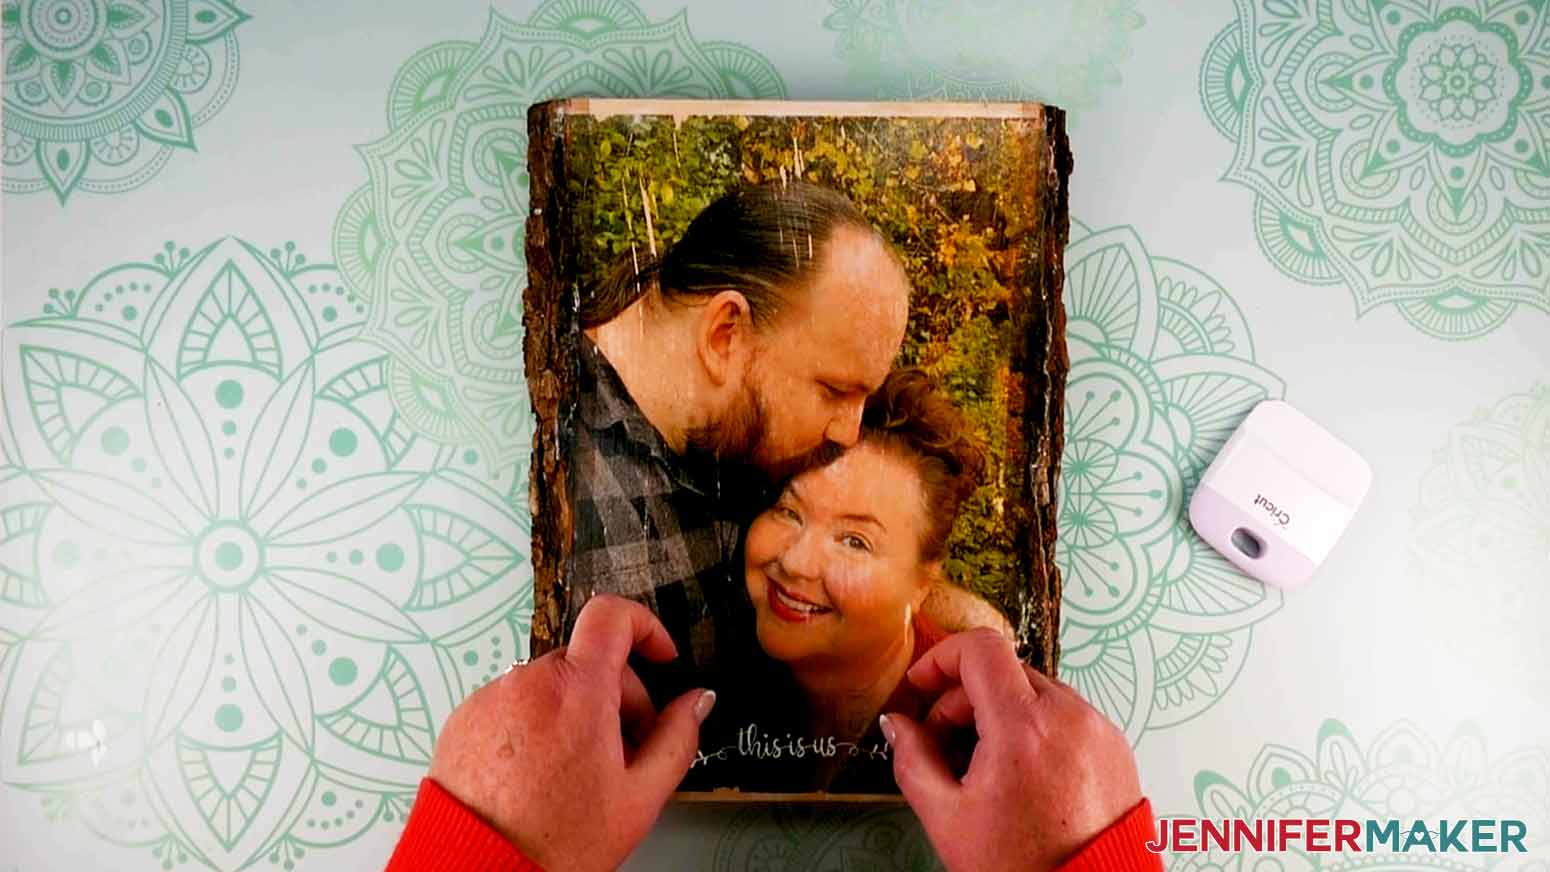
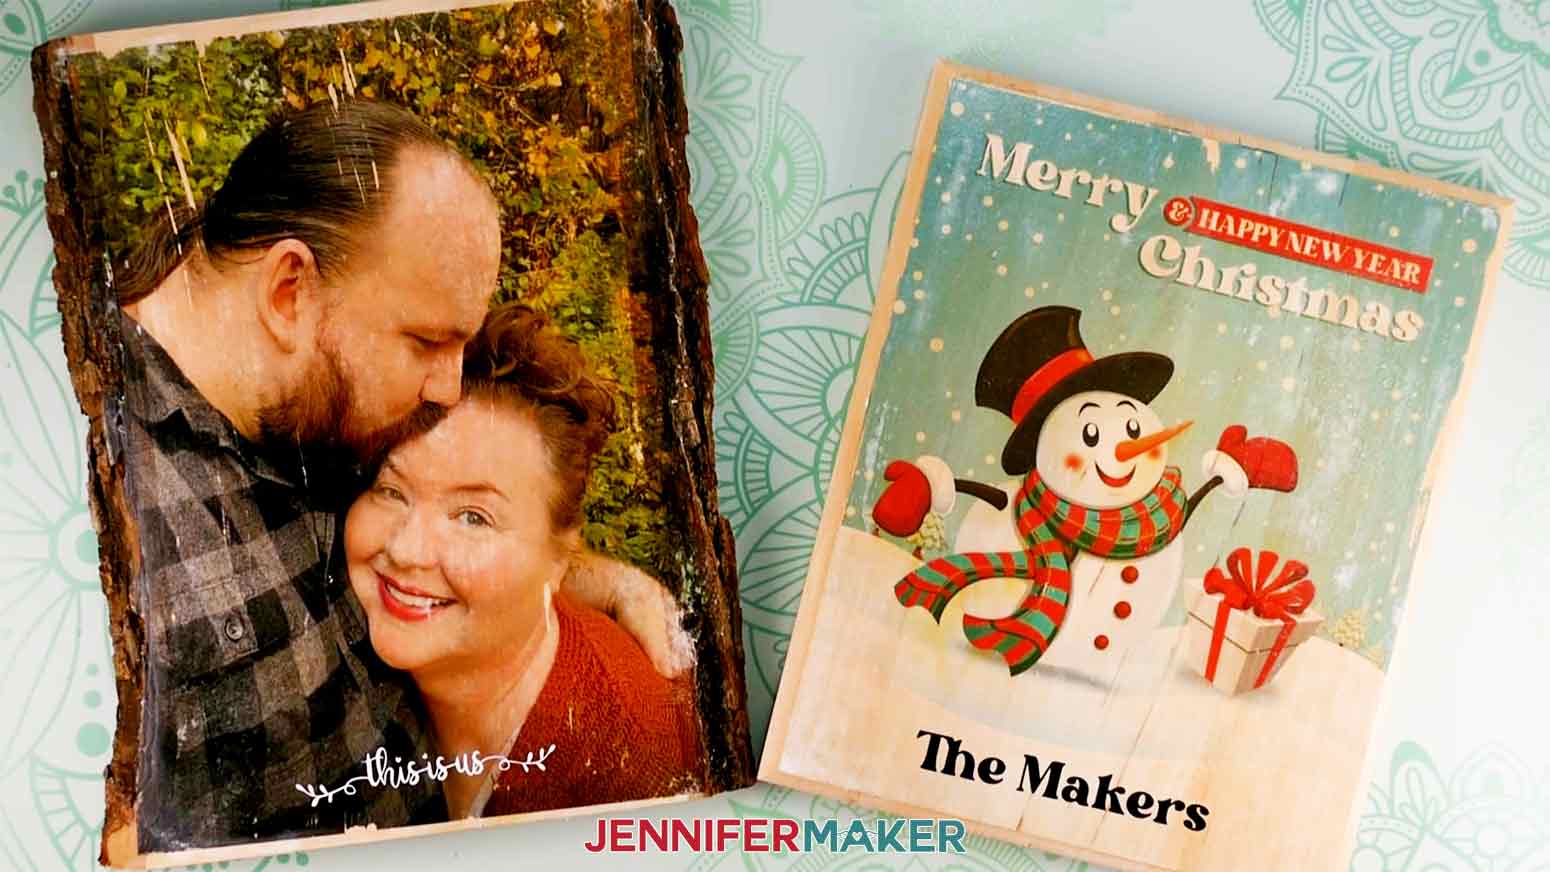
Here’s what I’m talking about. Isn’t this so cool? It’s a picture of Greg and I on a beautiful piece of wood!
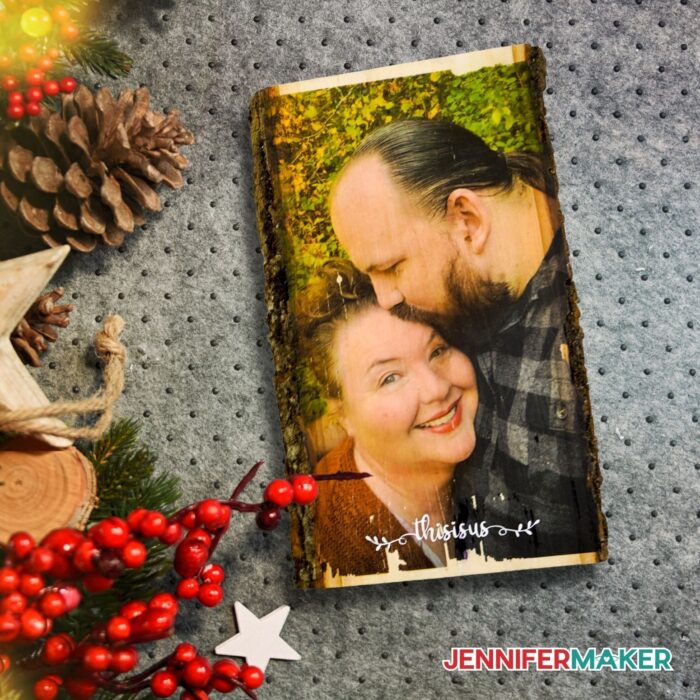
It doesn’t get more personalized than this! And you are not going to believe how easy this is to do.
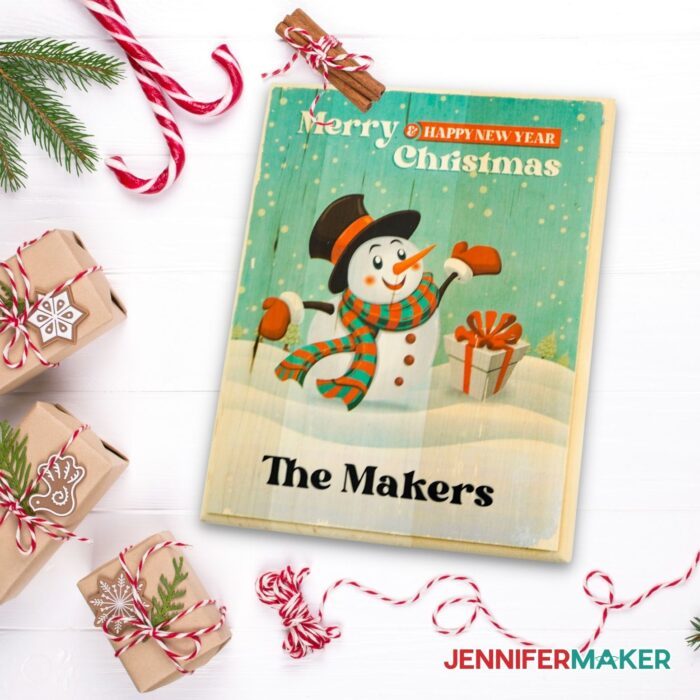
But you can use this technique with ANY image. Here is a snowman sign I made in the same way — it’s super cute as a gift for the holidays or even to hang in your home for some festive holiday decor!
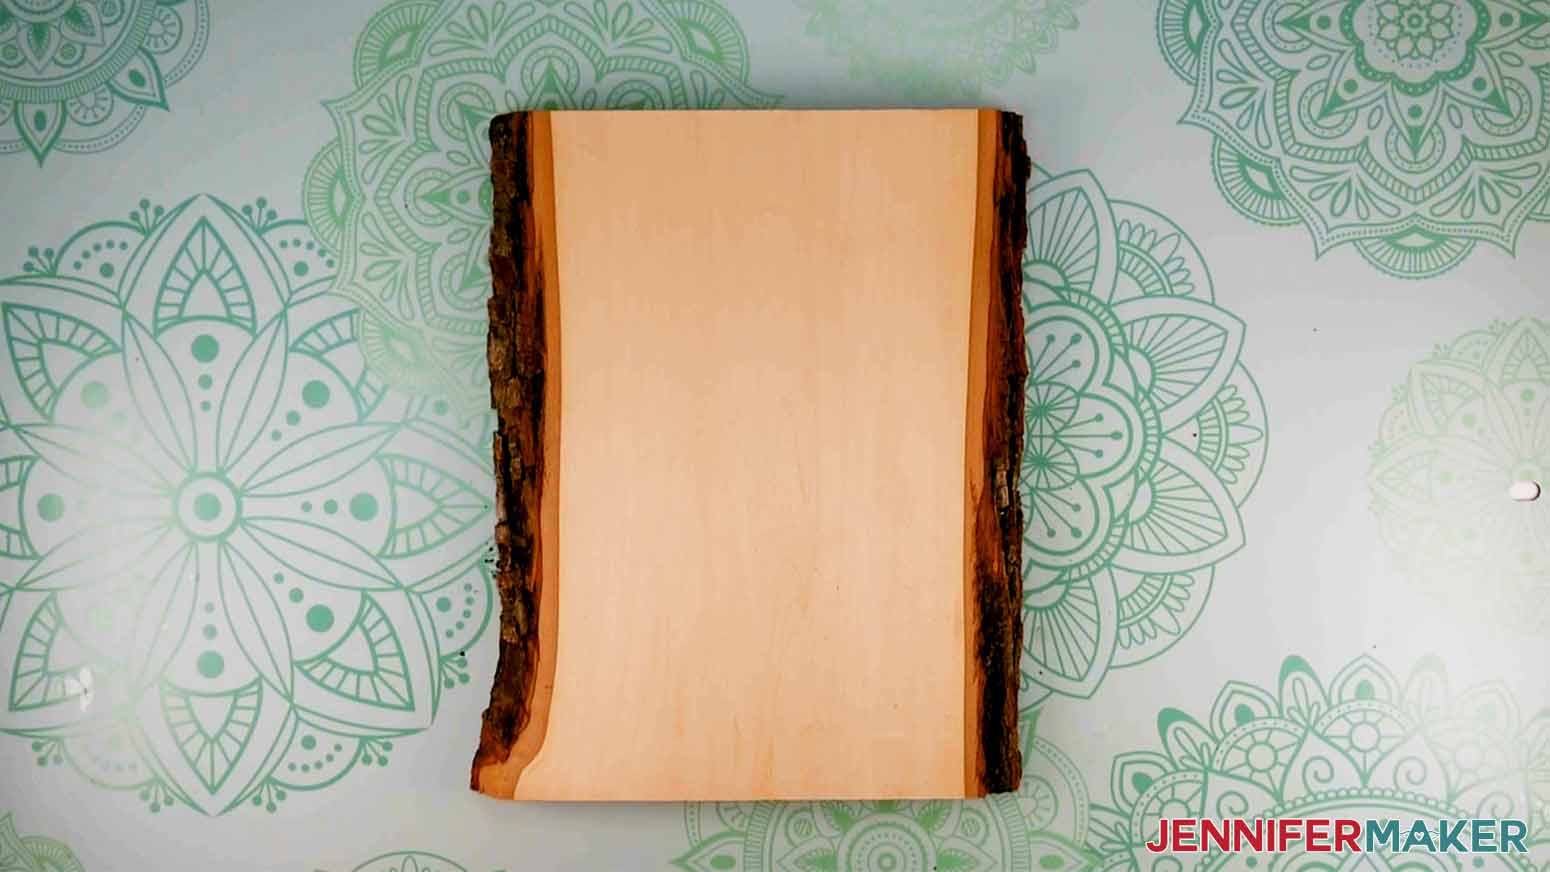
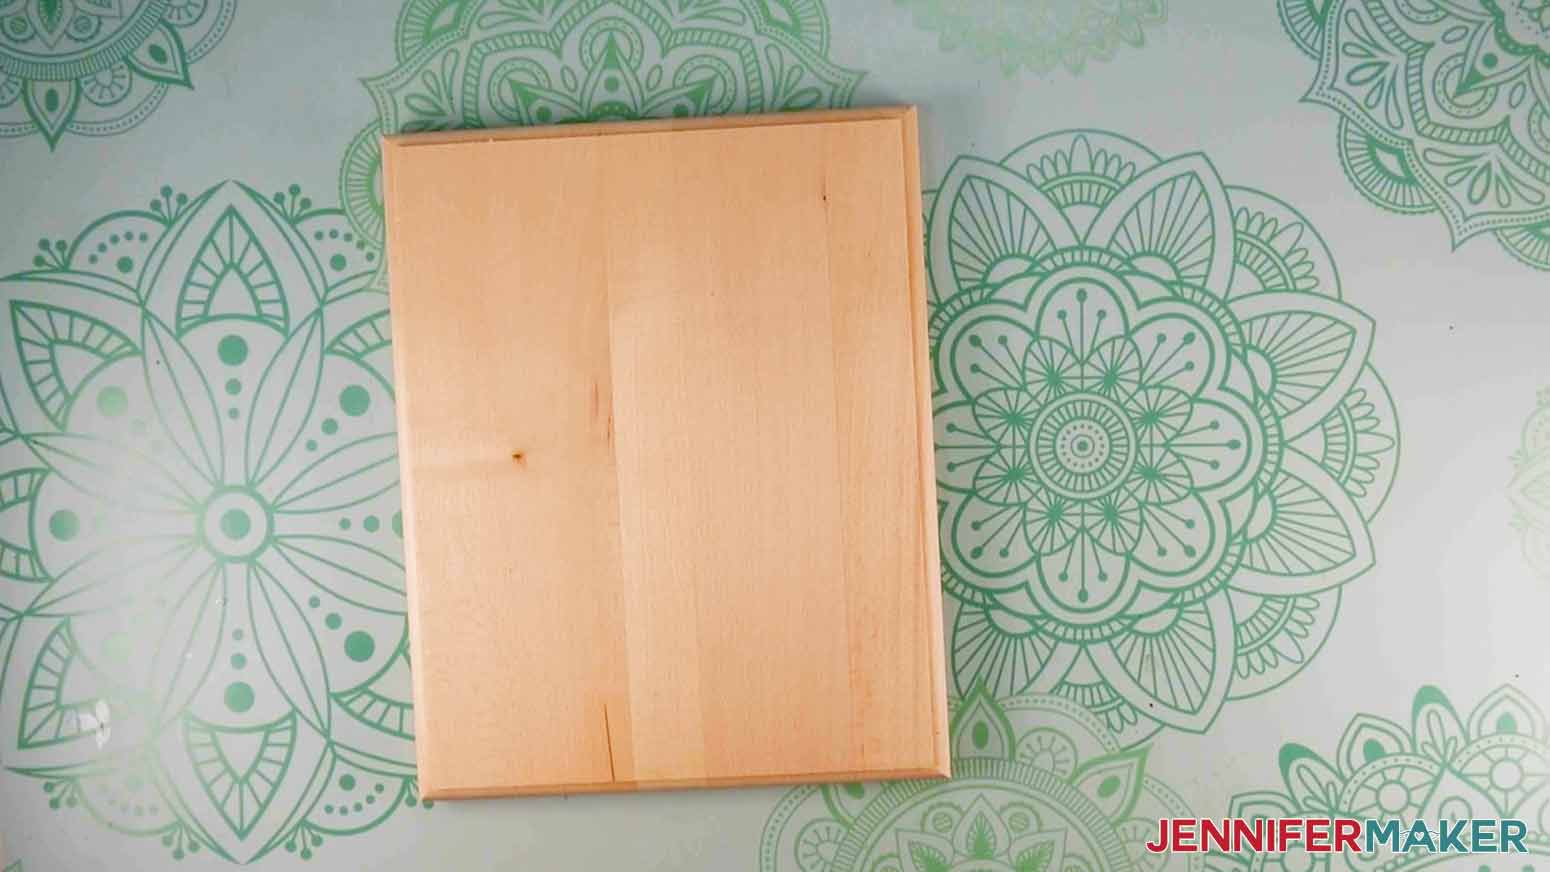
To make this project, we will first need a piece of wood. And the type of wood is important, you don’t want to use wood with any type of finish or your image won’t transfer. It’s best to use soft wood. I’m using basswood, but you can also use natural pine. The most important thing is that your wood is unfinished. You will also need an image, like a special print or photo, printed on light-weight 20 lb. white copy paper.
To print my photos and images, I used a color laser printer. You can use an inkjet printer, but with less vibrant results.
Another super important part of this project is Mod Podge which is one of my favorite craft supplies because there’s just so much you can do with it!
And you will need a spray sealant like Krylon UV sealer spray to seal the wood and give it a nice finish.
And let’s not forget, whenever we use chemicals I always recommend using safety equipment like goggles, gloves, and a respirator if you have one — make sure to use the spray in a well-ventilated area.
To make my project extra special I’m going to add a personal touch with a nice saying made from permanent vinyl. I will be using my Cricut Maker 3 for this, but you can use any Cricut cutting machine. And of course we will need a cutting mat, transfer tape, weeding tool, a brayer and scraper tool. If you want to speed up the drying process you can use a heat gun or hair dryer, but these are optional.
Let me show you how easy it is to make this beautiful transfer photo to wood project with my free SVGs! This post contains some affiliate links for your convenience (which means if you make a purchase after clicking a link I will earn a small commission but it won’t cost you a penny more)! Read my full disclosure policy.
Materials to Make a Transfer Photo to Wood Project
View my Amazon shopping list with the exact items we used to make this project
- Basswood Plank or Basswood Rectangle Plaque
- 20 lb. white copy paper
- Mod Podge (Dishwasher Safe)
- A method to print your photo or image — I used a Lexmark laser printer
- Permanent Vinyl – Black, White
- Krylon UV Resistant Matte Finish Sealer
- Water (To remove photo transfer)
- Foam Roller (optional)
- (Optional) Fonts (I used Sweetie Almeera Font and Bright Font)
- A method to cut your vinyl — I used the amazing Cricut Maker 3, but you can also use the Cricut Maker, Cricut Explore, or Cricut Joy cutting machines
- Cricut Green StandardGrip Mat
- Transfer Tape
- Weeding Tool
- Scraper Tool
- Brayer Tool
- Foam Brushes
- Rag/towel
- Disposable Bowl
- Disposable Gloves
- Respirator
- Safety Glasses
- (Optional) Heat gun, Hairdryer
- Design # 354 (My free SVG/PDF/DXF design files are available in my free resource library – get the password by filling out the form at the bottom of this page)
How to Make Your Own Transfer Photo to Wood Project
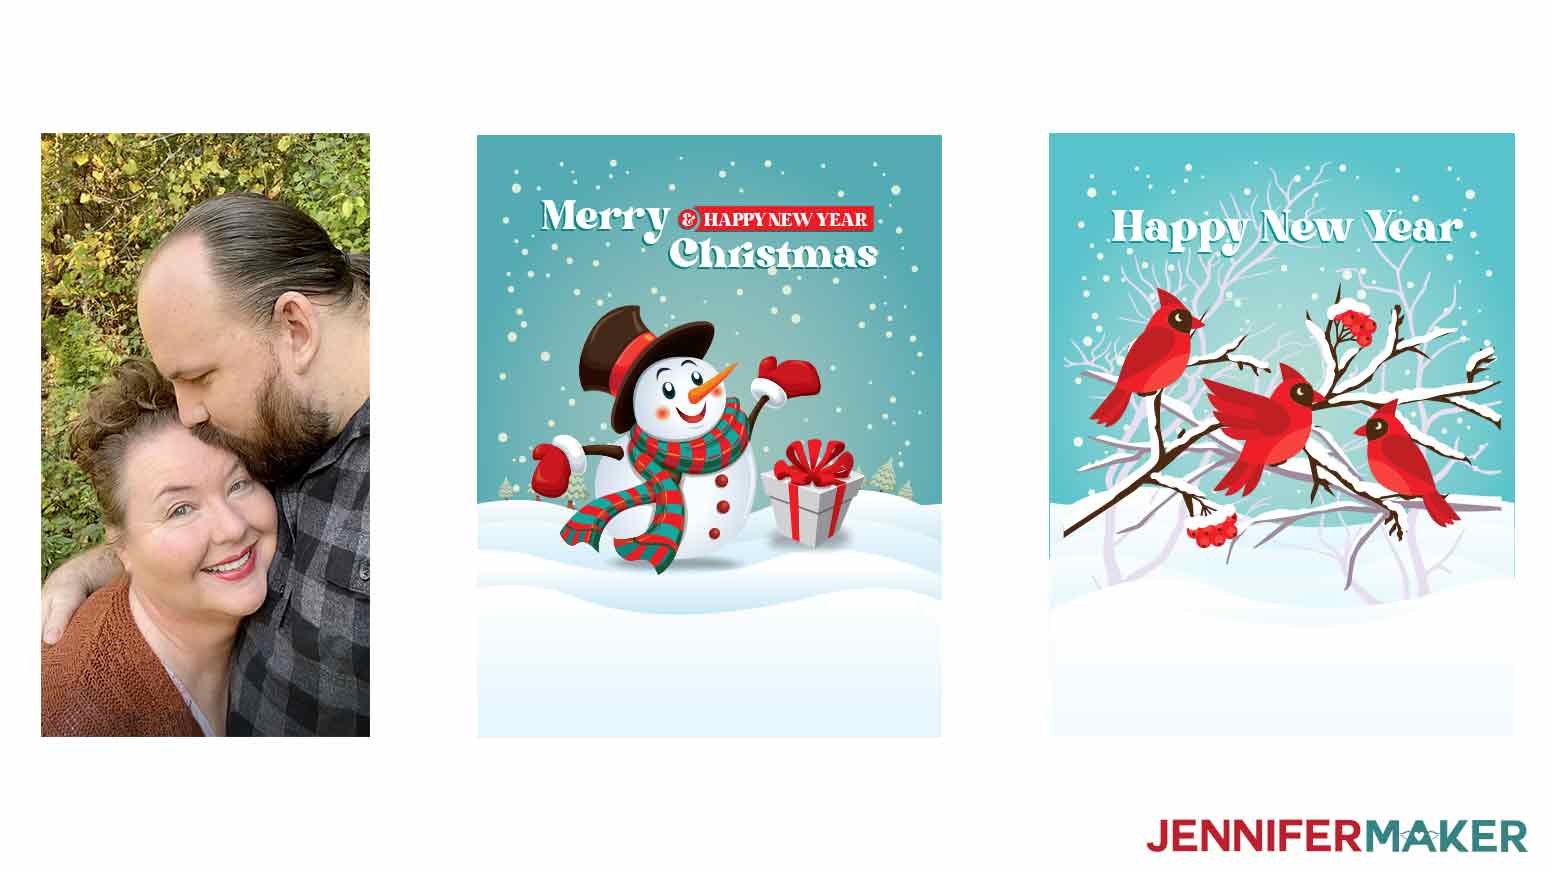
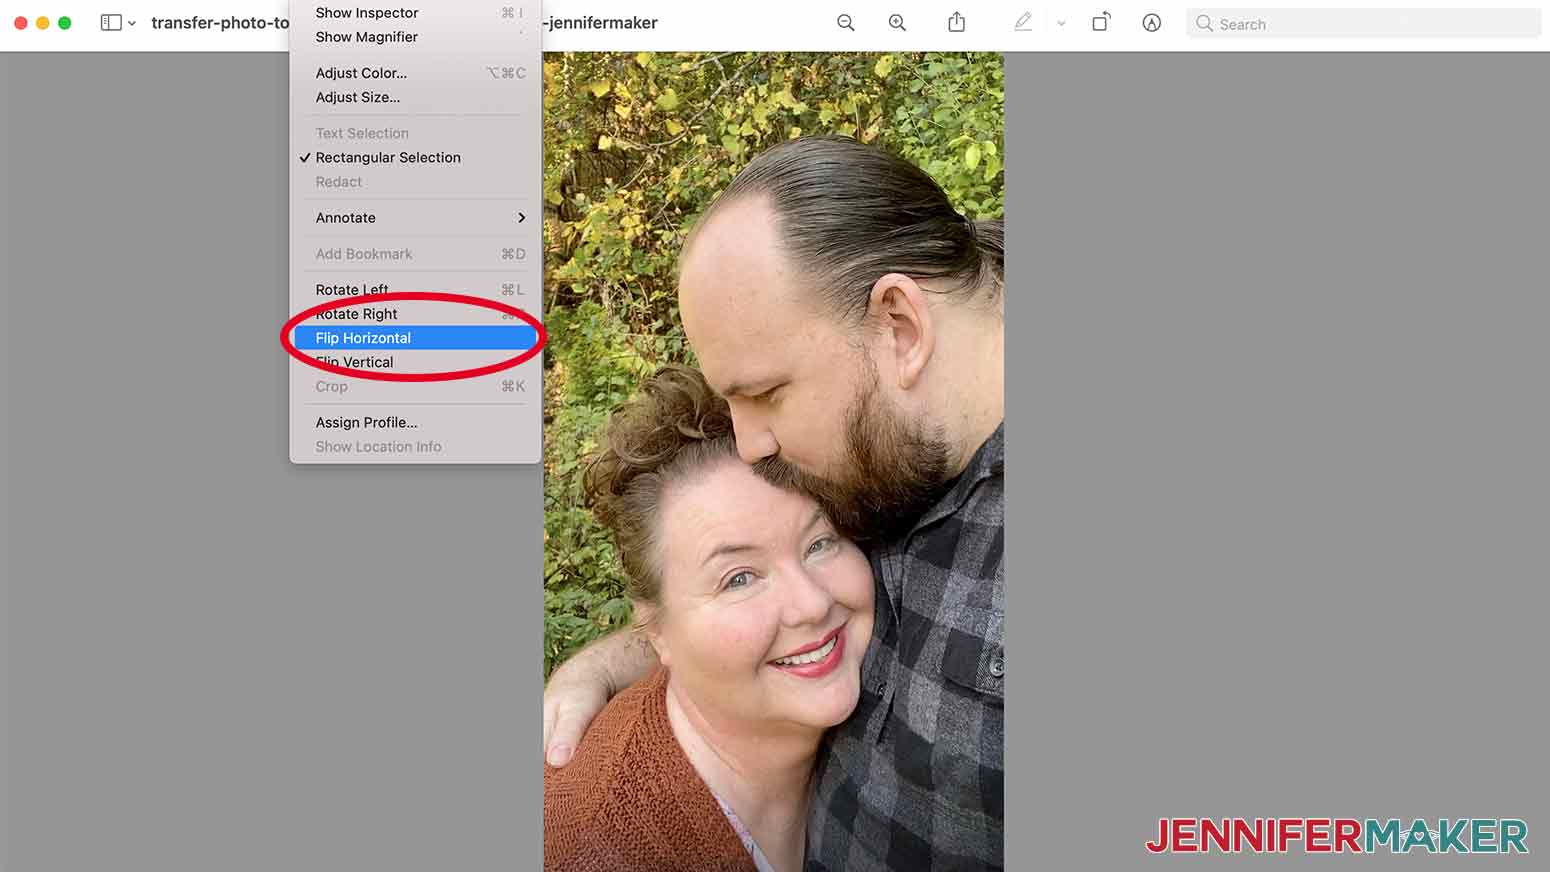
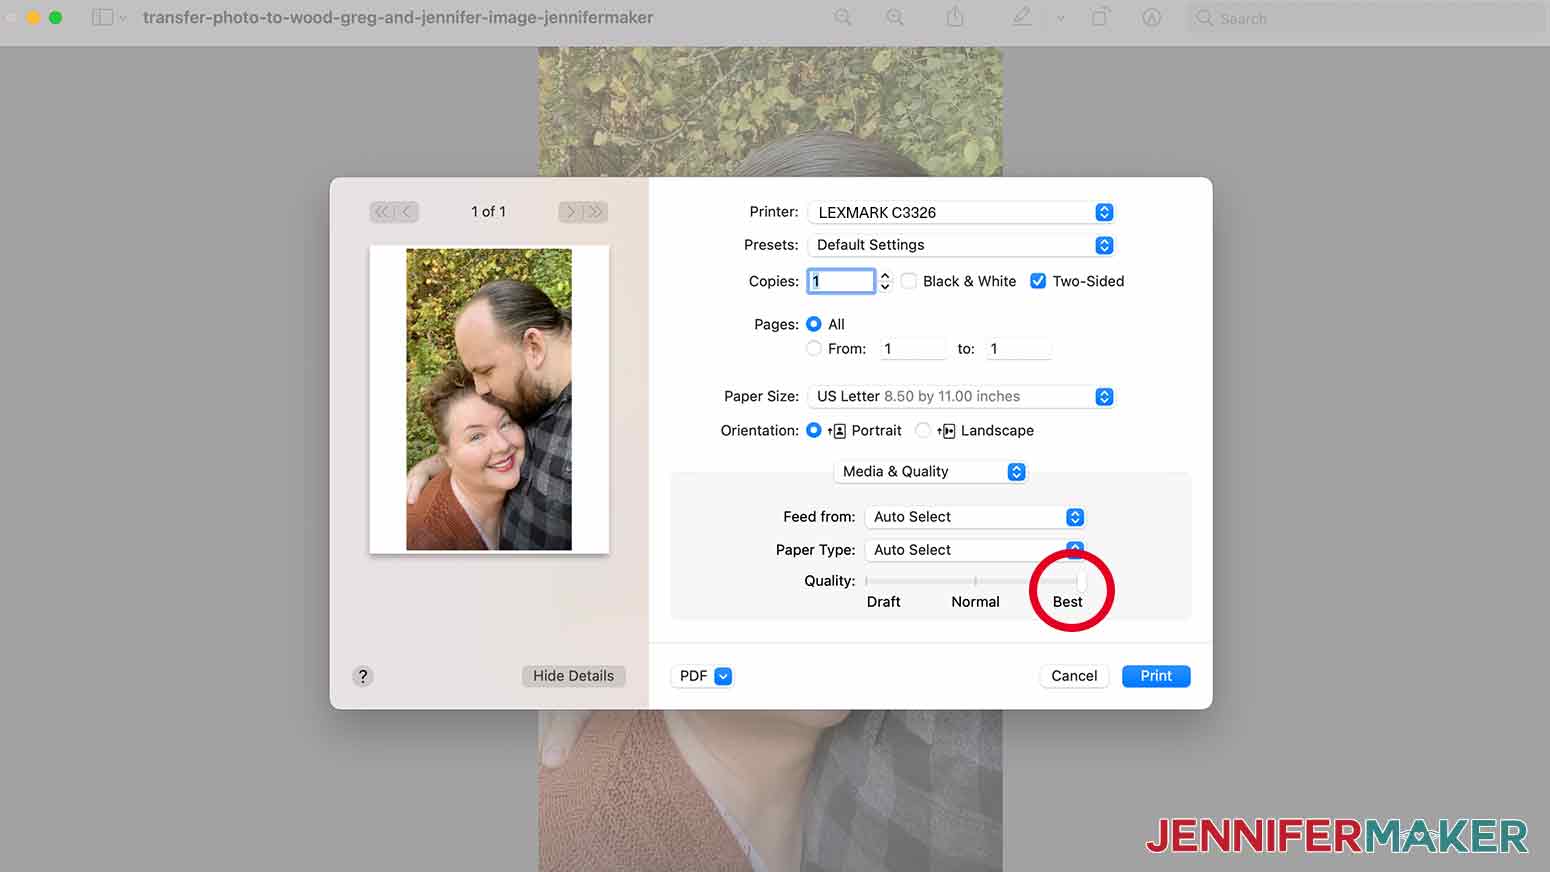
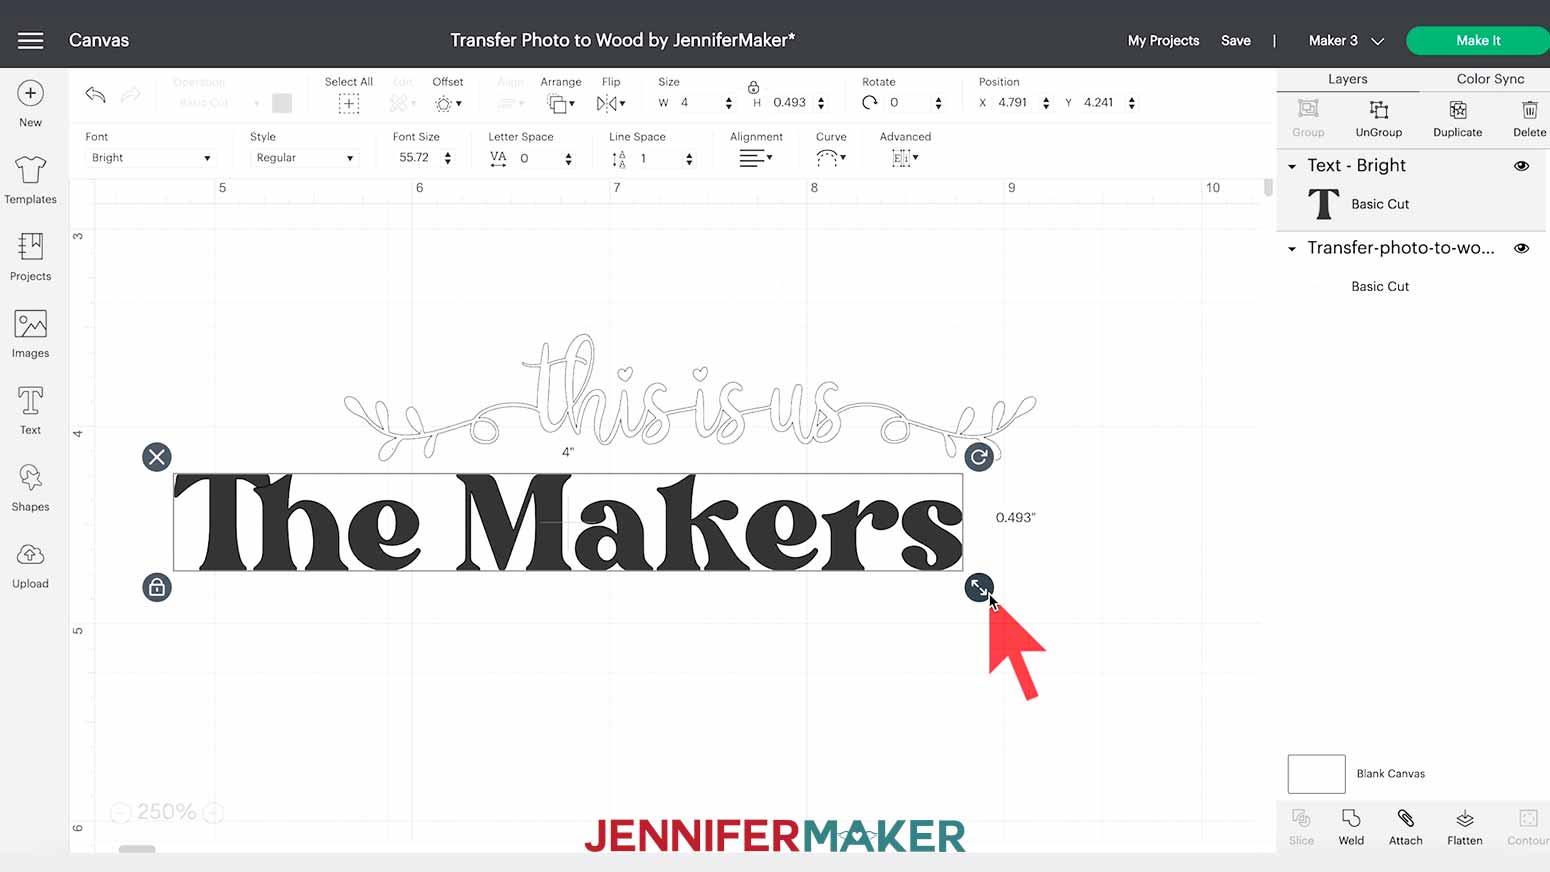
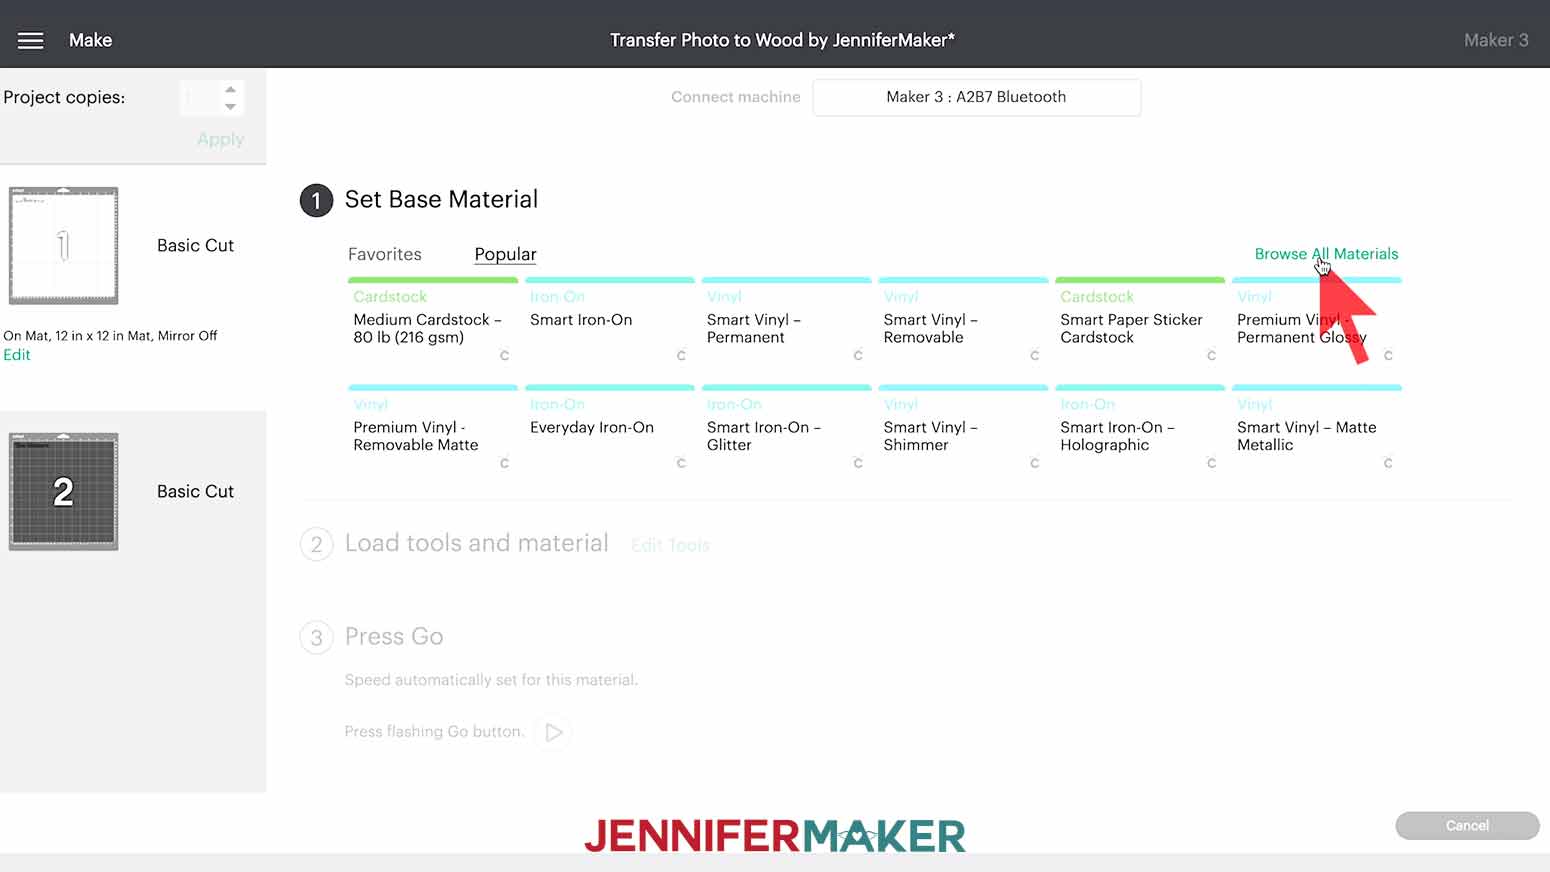
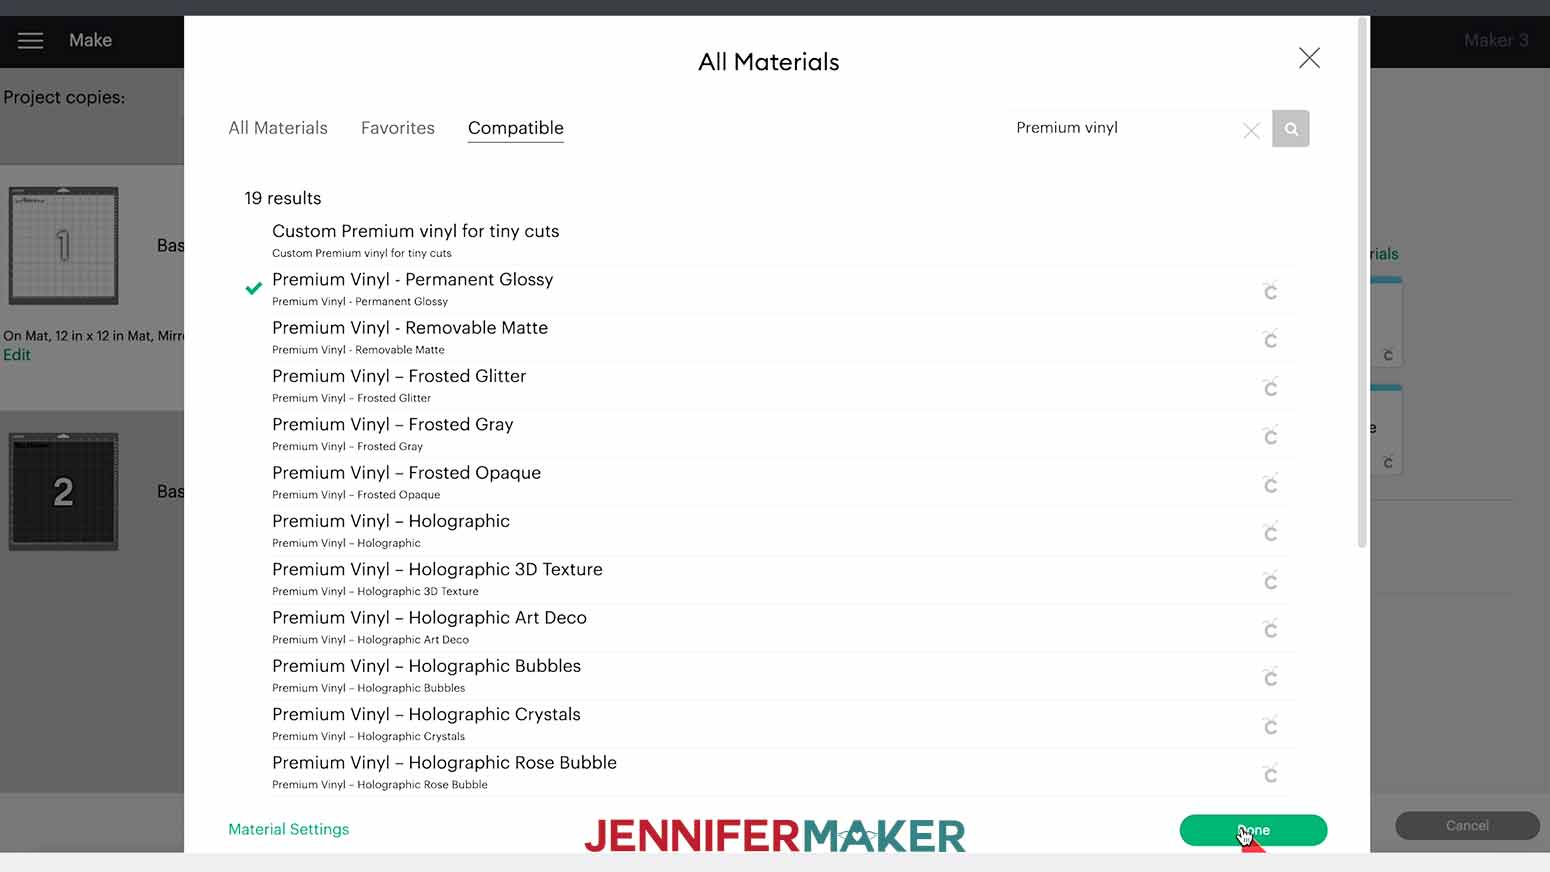
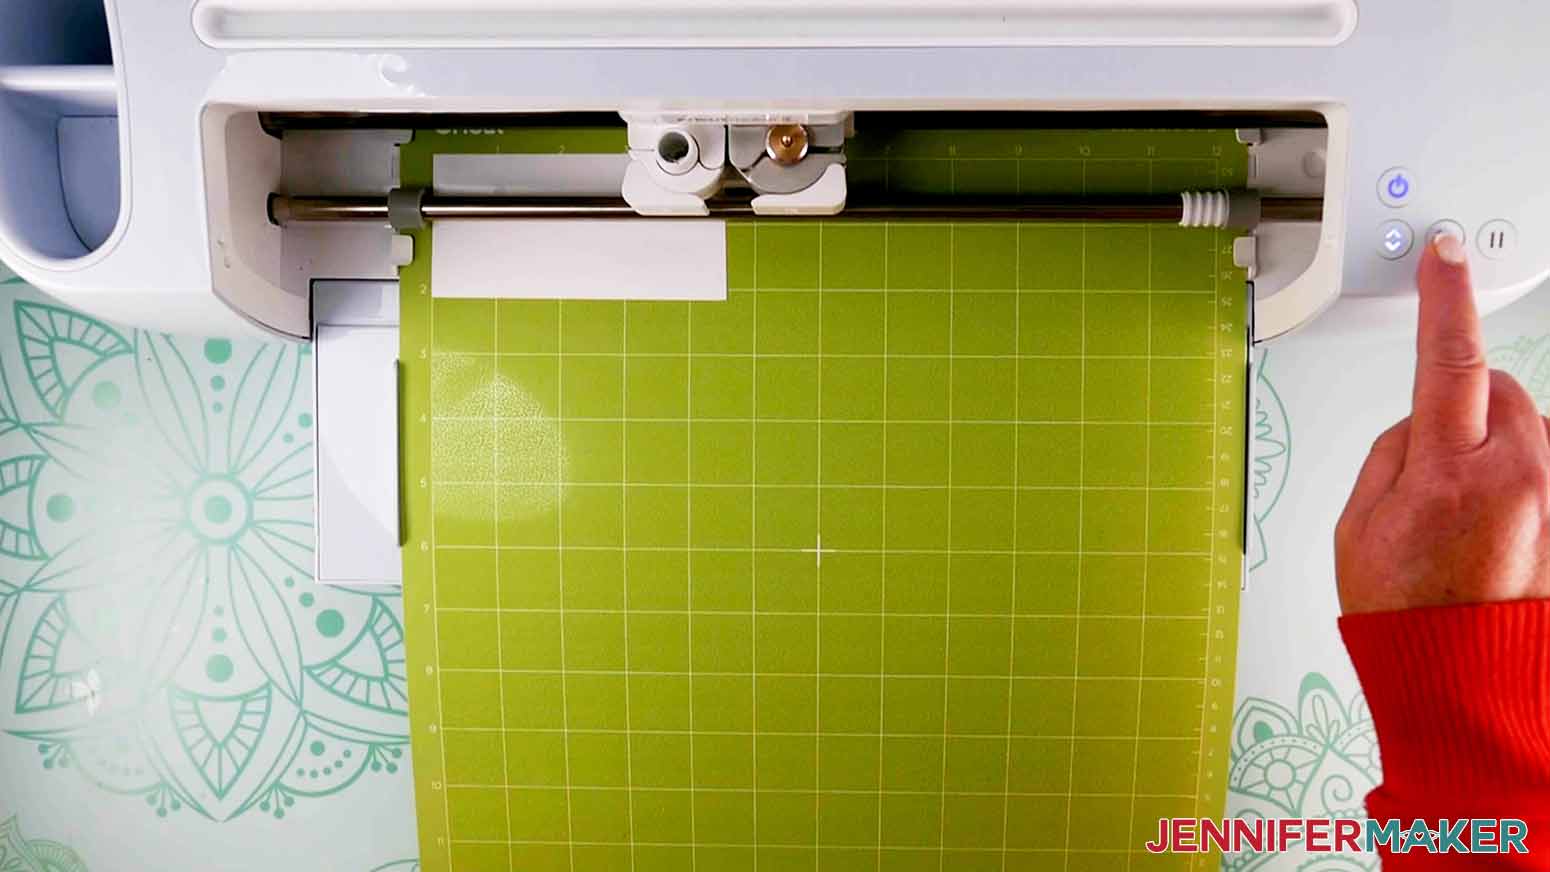
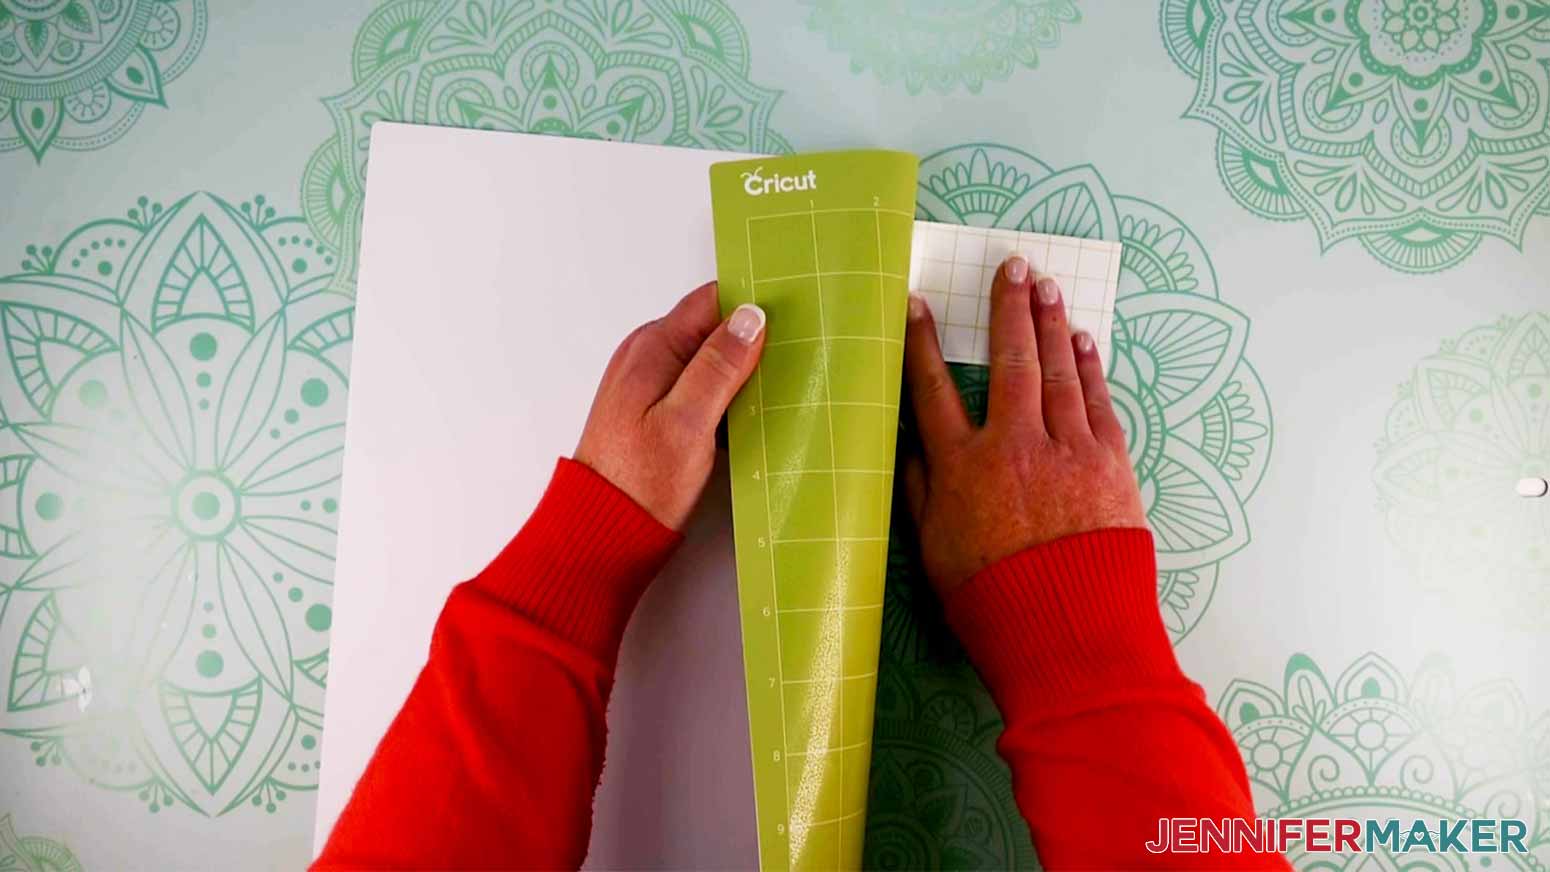
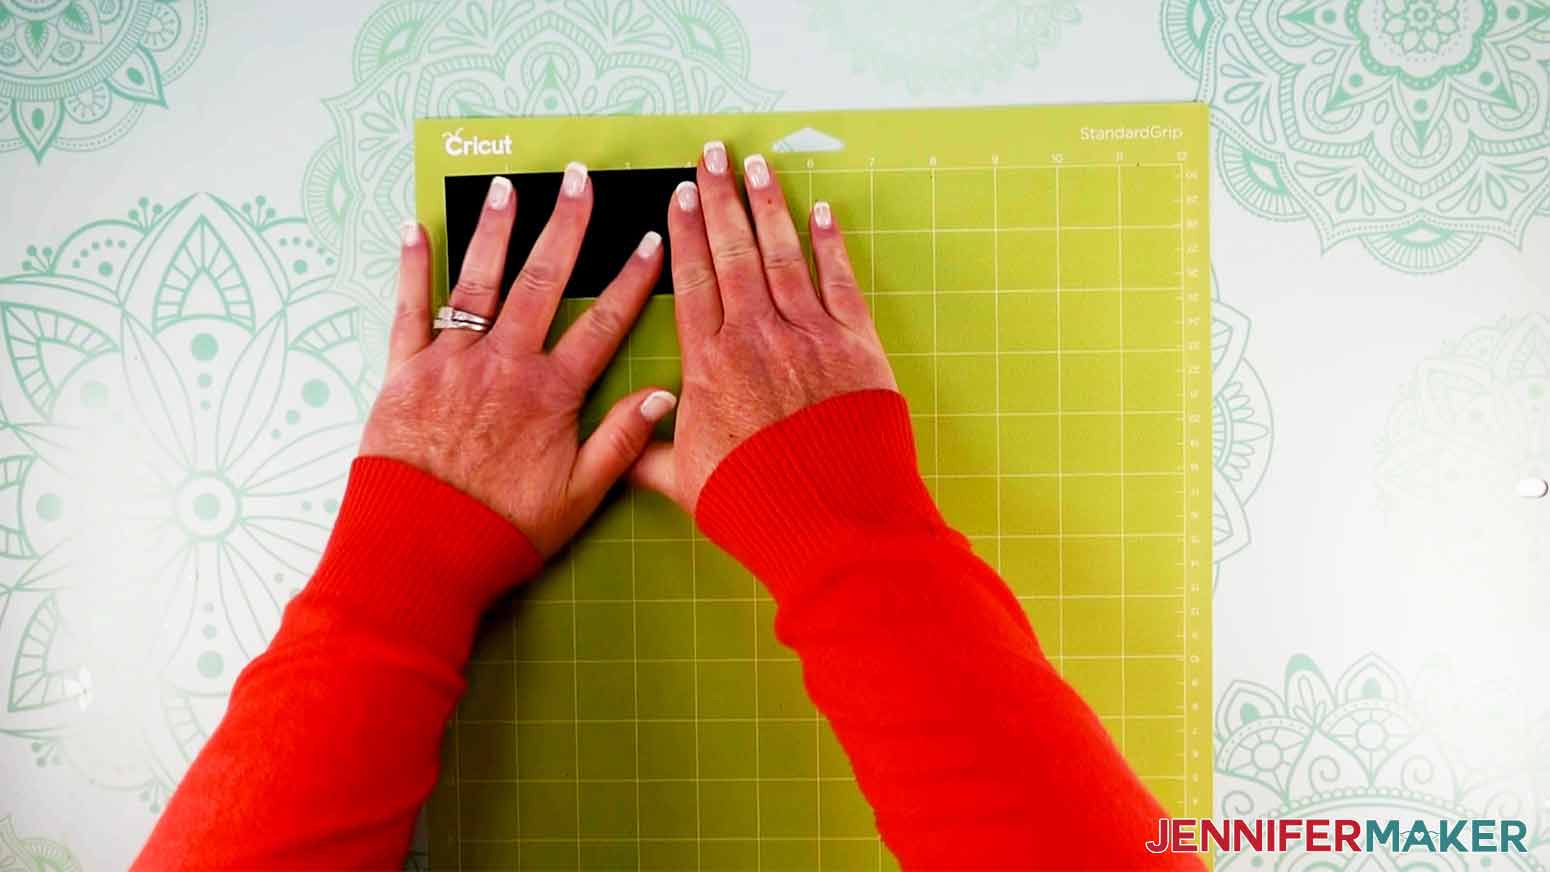
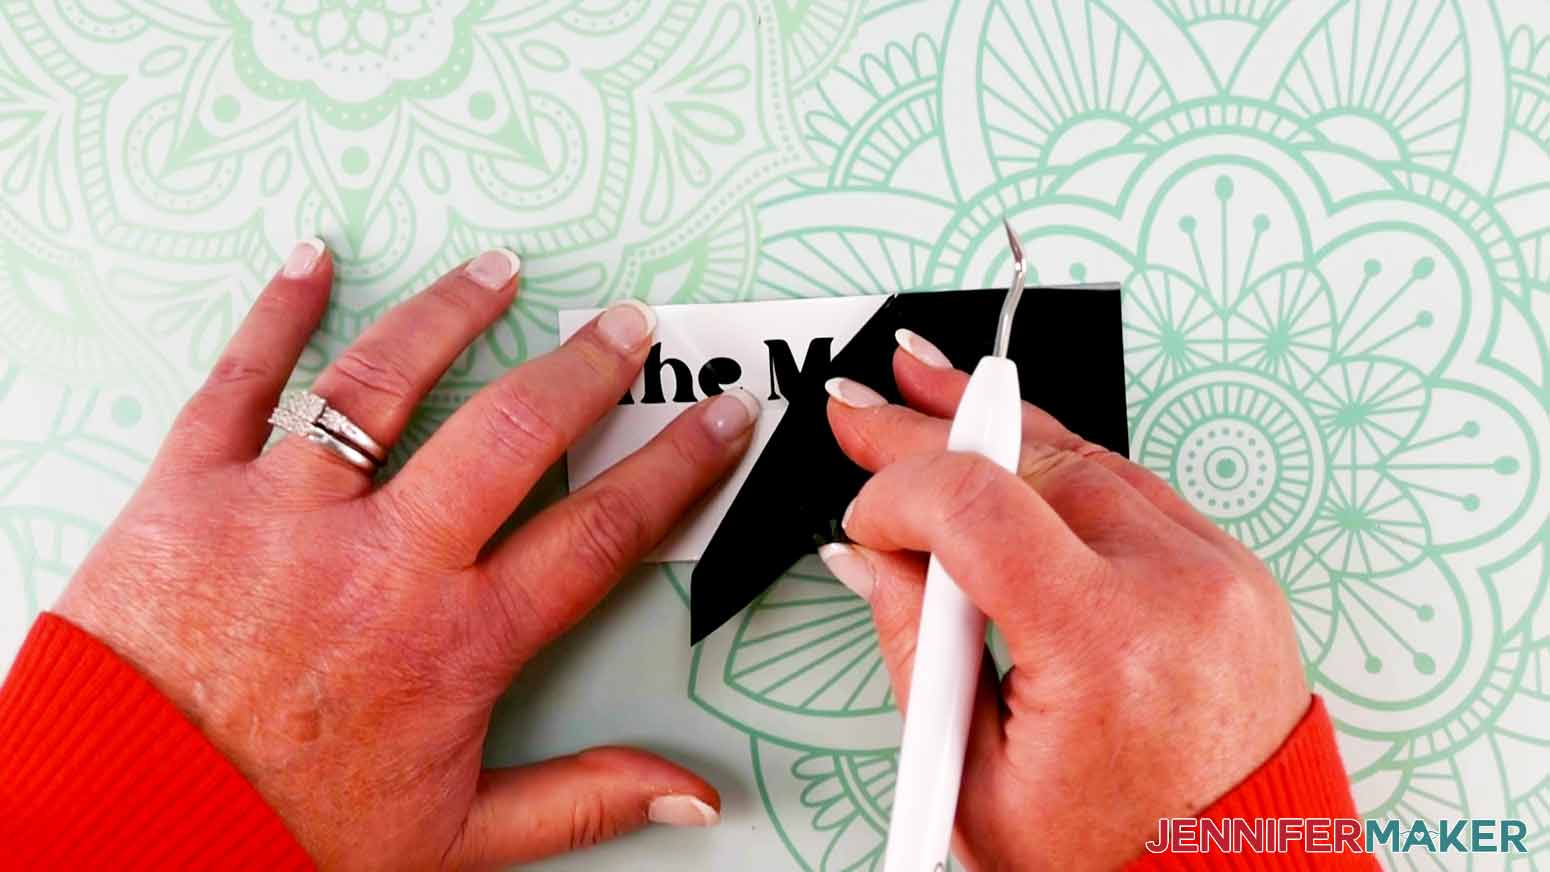
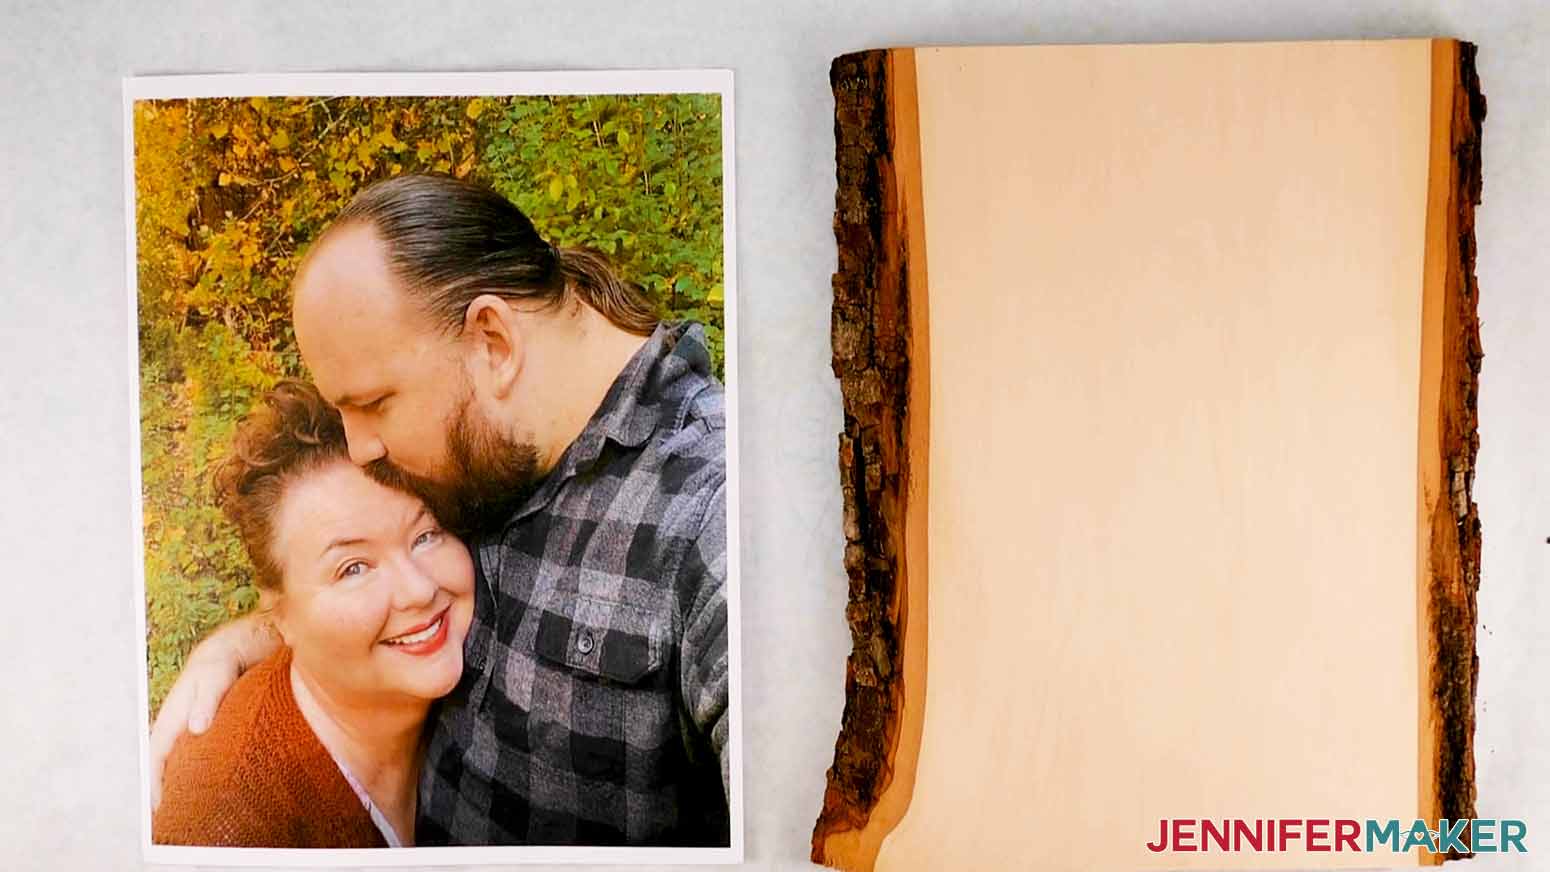
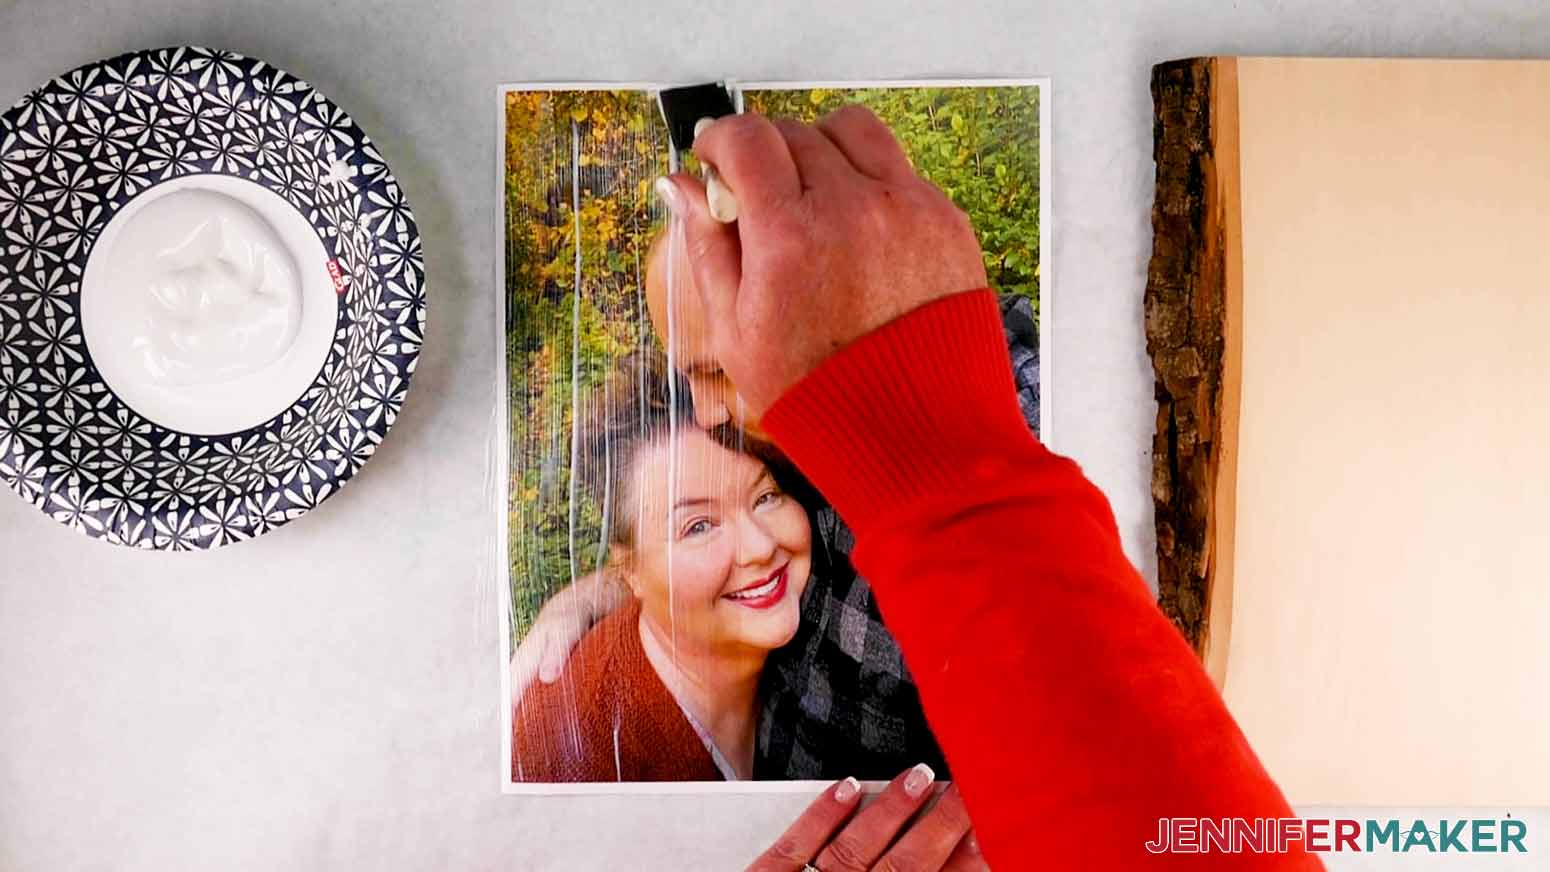
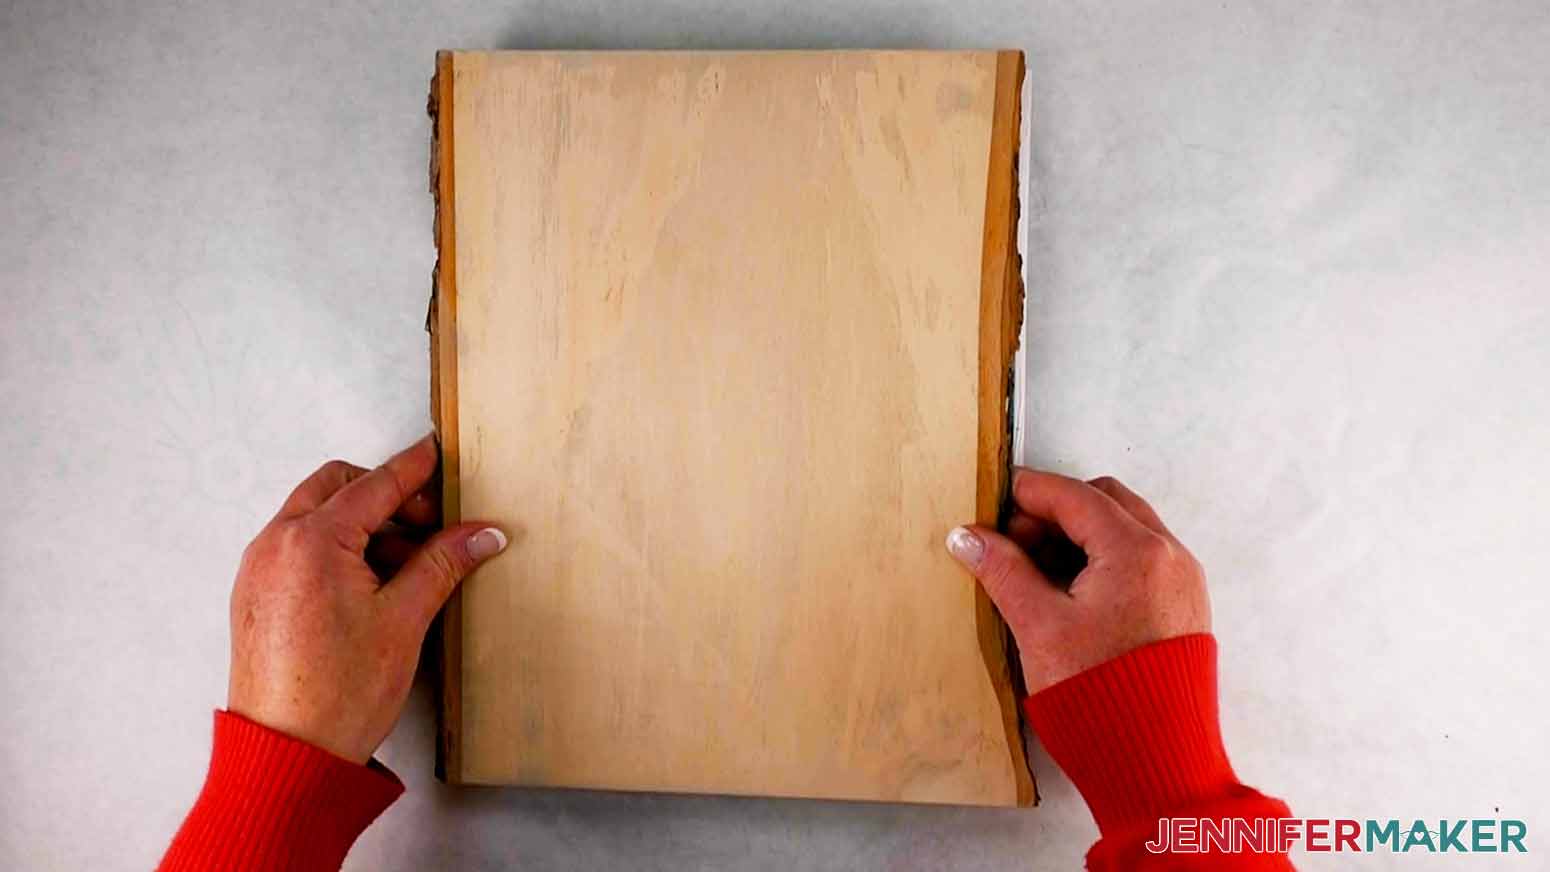
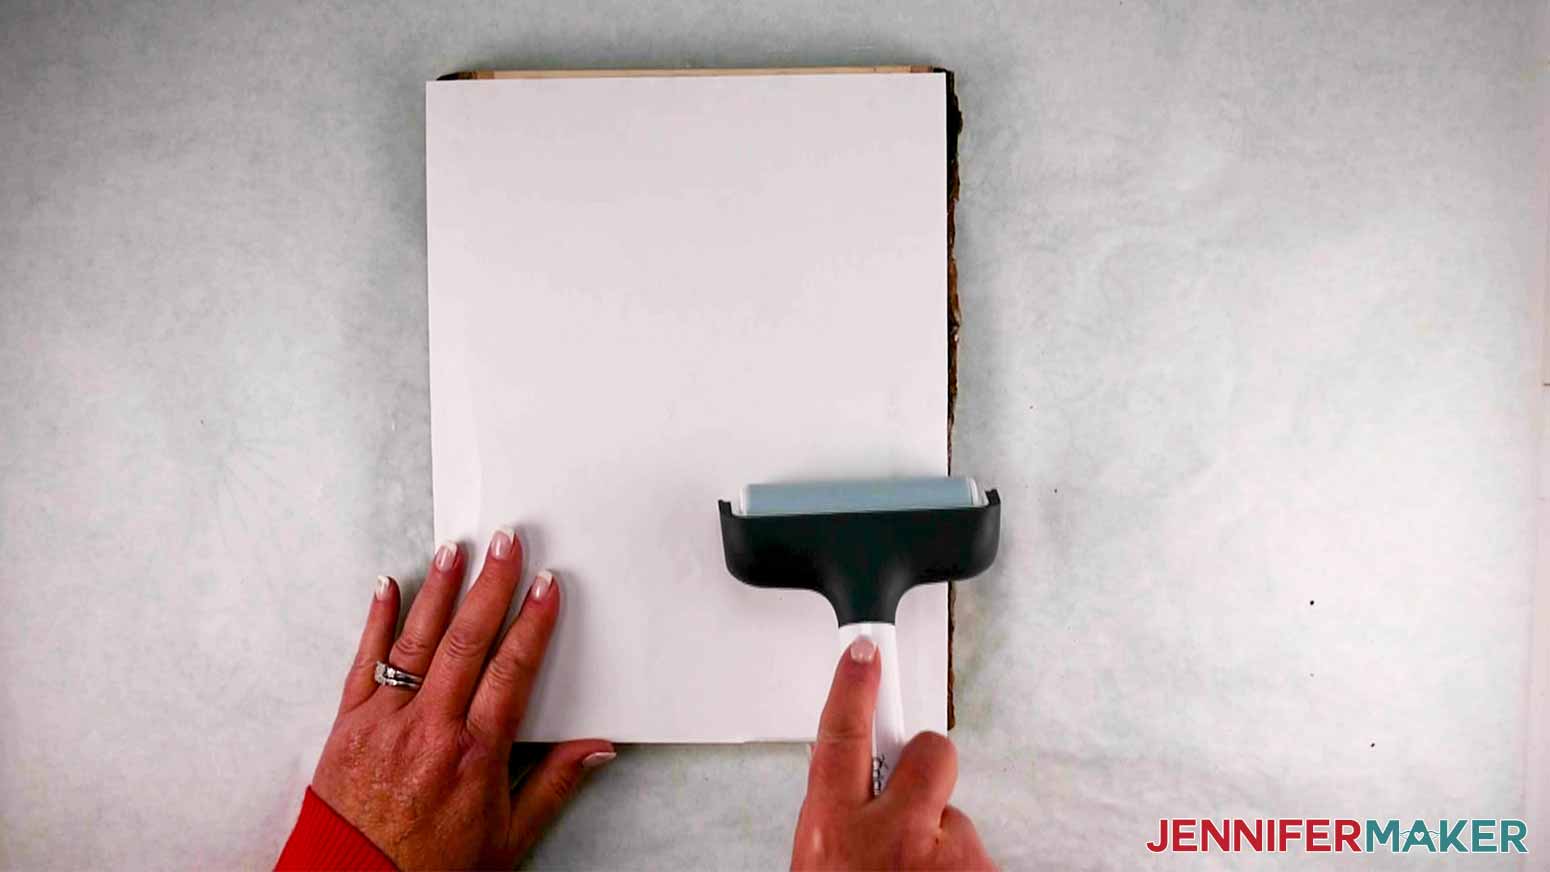
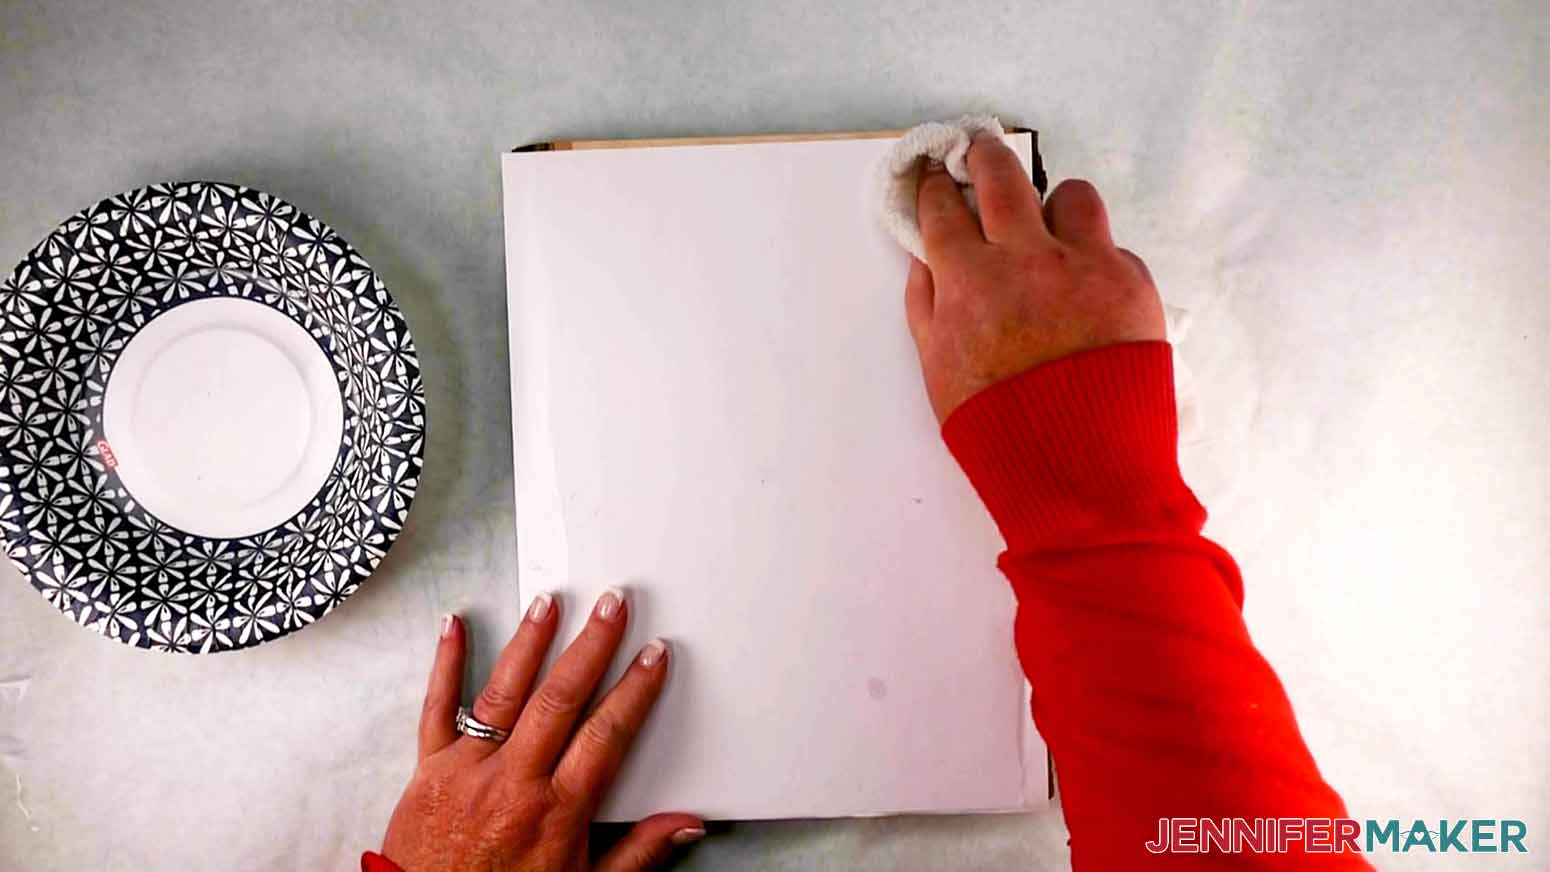
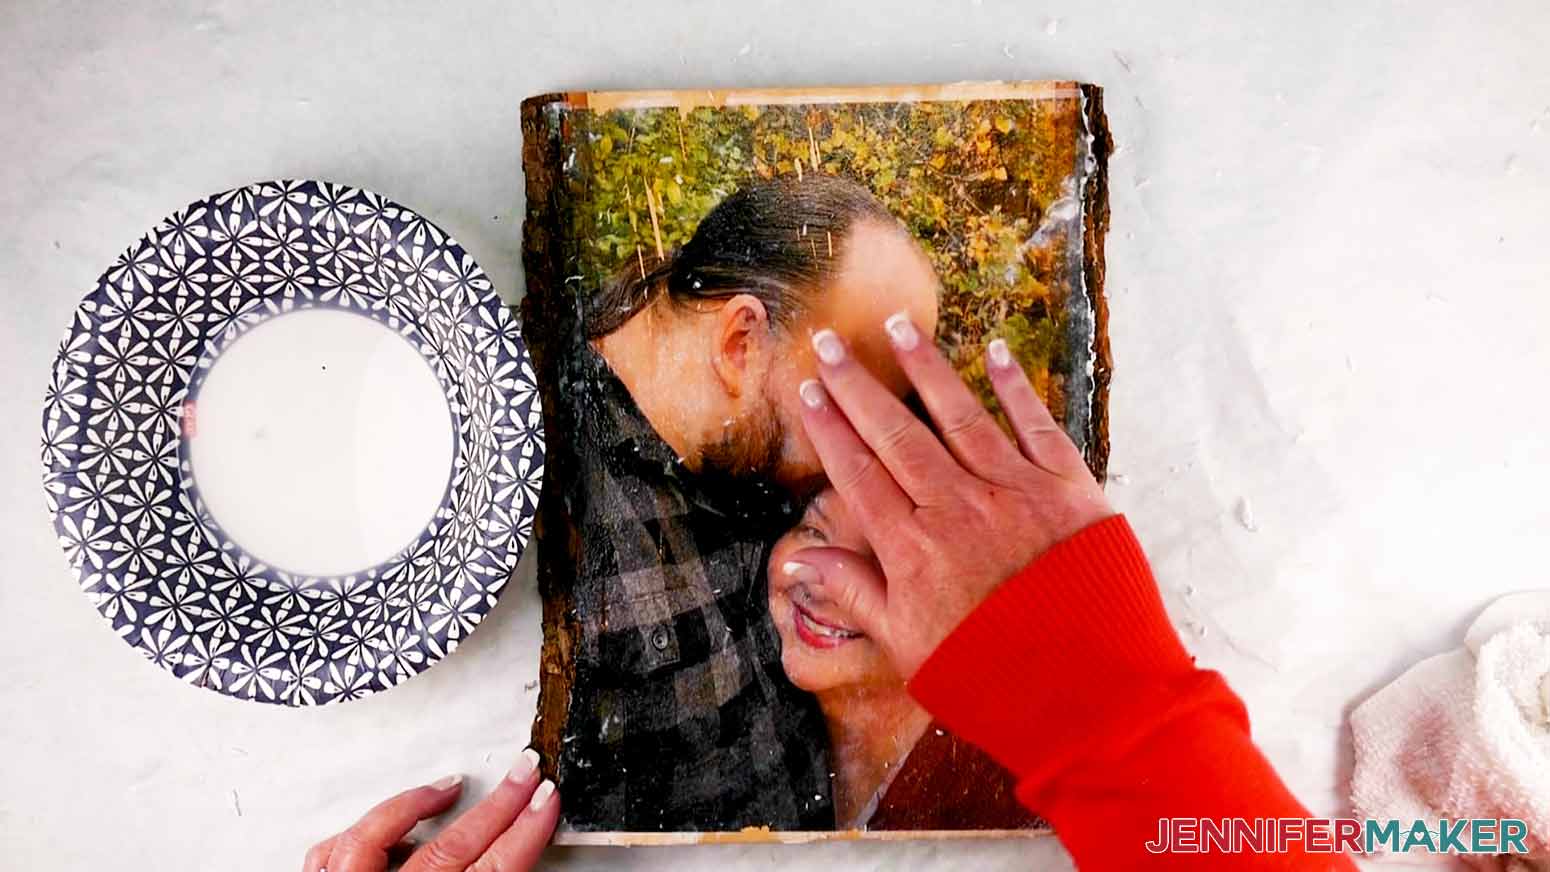
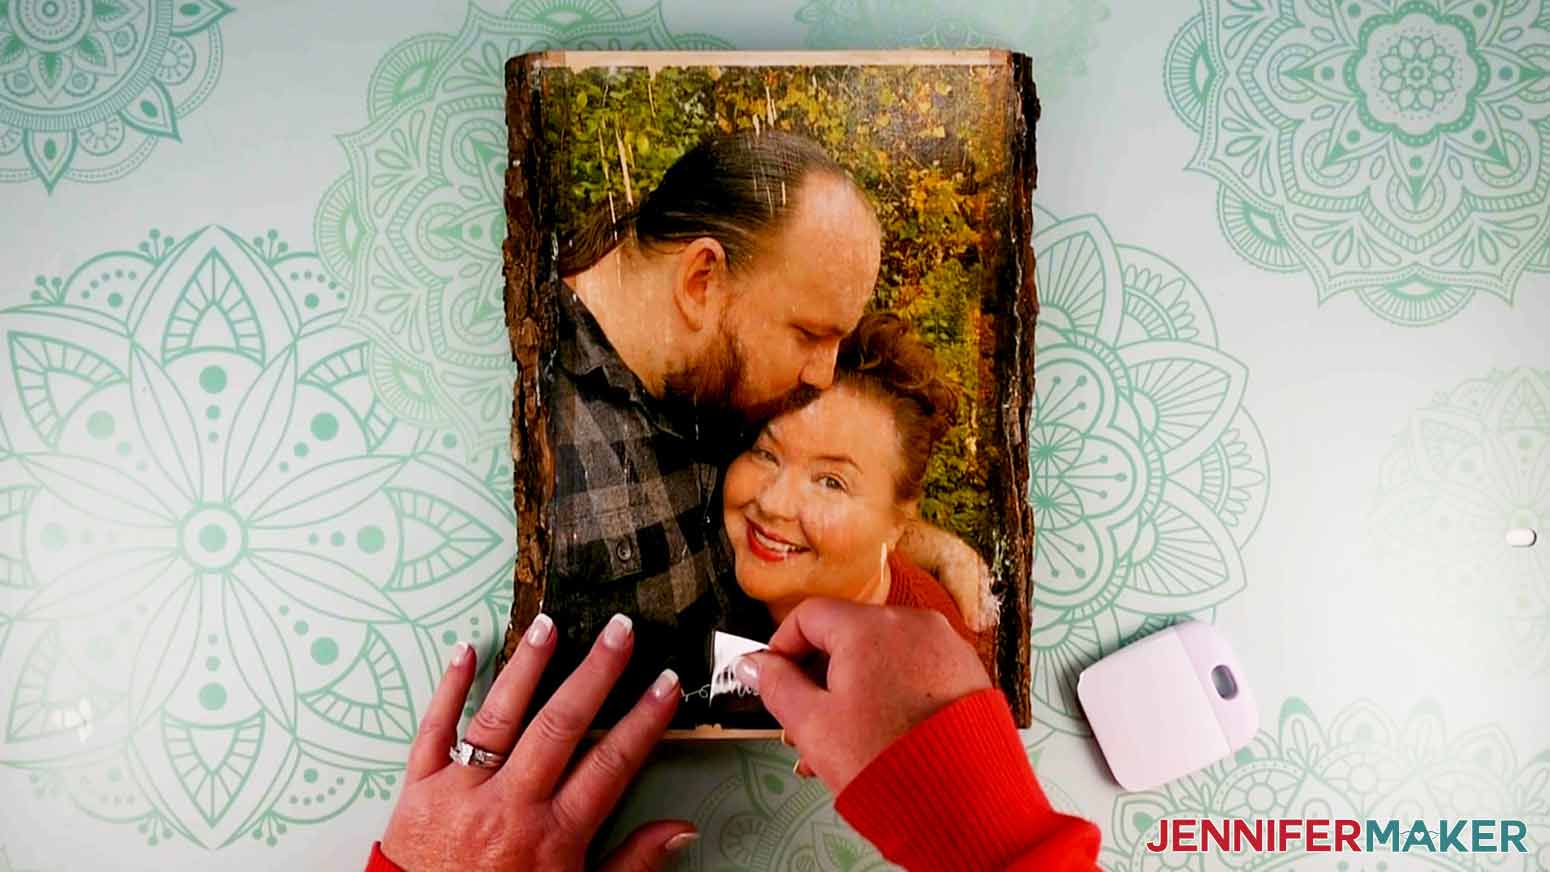
I’m going to show you how to transfer a photo or favorite print to wood! A super inexpensive way to make a beautiful project that’s sure to impress! In this tutorial, I am going to show you how to transfer a photo to wood. To start off, we need a photo to add to the wood. I am using this photo of Greg and I and I have also included two winter photos for you to use. I recommend using a photo with dark or saturated colors as those types of pictures show up well on the wood. For this project, I am using an 8 x 10 aspect ratio that will let me cover my wood entirely. I recommend printing photos that are bigger than your wood surface as it is easier to line up the photo and you don't have as many photo edge cut-offs on wood. NOTE: Any white or tan color will come out the color of your wood. Next, I am going to open my photo on my computer and mirror it, so when we put it on the wood, it will be facing the right way. NOTE: My winter designs are already mirrored so you can go ahead and print them without mirroring them. For Mac: I am going to locate my photo and double click on it, so it opens in the “Preview” app. Once my file is open, I go to “tools” located on the top of the screen and select “Flip Horizontally.” For PC: Locate the photo you would like to use and double-click on it, to open the “Photos” app. Click “Edit & Create” in the toolbar at the top of the screen and then select “Edit” from the drop-down menu. Then select the “Crop & Rotate” button at the top of the screen. Click the “Flip” button on the right side to flip the image. After the picture is flipped, we are going to print it on 20 lb paper from a laser printer. I recommend printing on a laser printer for the best results. If you do not have a laser printer, you can bring your photo to a print shop and have them print it for you. NOTE: You can use an inkjet printer for this project. The result you get from using an inkjet printer vary in quality. Some of the differences include: smeared ink, loss of picture due to adhesion problems, and the colors aren't as vibrant as a laser printer, it looks very vintage. To print, we need to hit Cmd+P (Mac) or Ctrl+P (PC) on the keyboard. On the pop-up screen, I recommend you click Advanced Options and make sure your paper type is set appropriately and make sure your quality is set to "best" for the most vibrant image, and select print. IMPORTANT: Use the thinnest paper you can, thick paper is hard to remove from the wood. Next, we need to choose what kind of wood we want our photo to be transferred to. When deciding what kind of wood to use for this project, it is important to choose a soft wood like basswood or pine and not hardwood like Birchwood or Oak. Hardwood does not let the ink absorb into it like soft wood making it difficult to transfer the photo onto it. DO NOT use finished wood because your image will not transfer. I am going to use this natural basswood plank for the picture of Greg and I. Then I am going to use this Basswood Plaque for my winter photo. Next, get my Transfer Photo to Wood design from my free resource library — look for design #356. The ZIP file contains PDF photos for printing, SVG file for cutting on a Cricut or another cutting machine, DXF file, and a printable PDF for cutting by hand. TIP: If you are not sure how to upload an SVG cut file to Cricut Design Space, watch this helpful video training series I made. If you are on an iPad or iPhone, here is how to download and upload SVG files to the Cricut Design Space app. I love adding a personal touch to all my projects but this step is as always optional. Here is what my SVG looks like in Cricut Design Space. Now, I am going to show you how I created our name in Cricut Design Space. This name will go on my winter display sign but you can add it to any picture you would like. First, click on "Text" on the left. A box will pop up where you can add your text. Feel free to select whatever font you like. I'm going to use the font "Bright" which I purchased from FontBundles.net. TIP: Need help installing a font in Cricut Design Space? Check out this video and blog post I made that explains everything step by step. Now we need to resize "The Makers" saying. First, we need to measure the width of our wood. I am using an 8 x 10 plaque and I want the saying to be about half the width so I am going to resize "The Makers" saying to around 4" wide using the resizing handle. Or you can also type the size into the top menu under size. NOTE: The "this is us" saying is sized for a 7" wide piece of wood. Measure your wood and size accordingly using the technique above. Now, we are going to cut out our designs. I will be using the Cricut Maker 3 for this tutorial, but you can use any Cricut cutting machine for this project. If applicable, select “On Mat” on the next page. There is nothing to change on the prepare screen; so, we can select “Continue” at the bottom right of the screen. I am using Cricut Premium Permanent Vinyl in white for my first mat. So, we are going to select “Browse All Materials.” Then choose “Premium Vinyl - Permanent Glossy” for our material setting; then press “Done.” Then, I am going to select “More Pressure” to get a cleaner cut. Now, place the white vinyl, with the shiny side up, on your Cricut Green Standard Grip Mat, and burnish the vinyl to the mat using the Brayer Tool. Load your mat, and select the blinking "Arrow/Go" button to start the cut. When it has finished cutting, unload your mat. Remove the vinyl from the mat by flipping the mat over and pulling the mat away from the vinyl; this prevents the material from curling. For our second mat, I am using black Premium Vinyl, so I am going to select the same setting as we did for the first mat. Again, I am going to select “More Pressure” to get a cleaner cut. Next, place the black vinyl, with the shiny side up, on your mat. Load your material and start the cut. Once it has finished cutting, unload your mat. Again, remove the vinyl from the mat by flipping the mat over and pulling the mat away from the vinyl. Once your vinyl is cut, you will need to remove the excess vinyl and WEED your title. Now that we have our pieces, it’s time for the fun part, actually transferring the photo to the wood. First, we need to cover our workspace with butcher paper or a protective covering. Next, set your wood, best side up, and photo, print side up, out in front of you. With a foam brush, paint a generous but not thick layer of Dishwasher Safe Mod Podge on the printed side of your picture. Make sure to coat the entire picture. Remember to use long even strokes. DO NOT use a thick coat of mod podge. TIP: I recommend Dishwasher Safe Mod Podge versus other types of Mod Podge because it is not water-soluble and won’t dissolve easily when we put water on it later. Once you have your picture thoroughly coated with Mod Podge, take your wood and line up the good side to your image so that it is centered. Then press the wood down against the photo to adhere it. NOTE: Pressing the wood down against the photo lessens the number of air bubbles that can occur by placing the photo onto the wood. Air bubbles cause a loss in photo transfer so we need to minimize the number of bubbles as much as possible. Carefully flip your wood piece over so you have the picture side facing you and smooth all the bubbles out of the paper using the brayer tool or a foam roller. NOTE: Make sure to wash your brayer tool after you finish smoothing the bubbles as it can get excess Mod Podge on it. Let it dry overnight. To speed the process up with a similar result, you can dry it using a heat gun or hairdryer. Use even heating and make sure the photo is completely dry before moving on. Once your project is completely dry, take an old face towel or rag and dab water onto the photo. I recommend using a bowl of water so you can keep dipping the towel back in the water. Let the water soak in for a minute or two. Next, take your towel and start rubbing the paper off the wood. IMPORTANT: DO NOT scrub very hard. Rubbing too hard can cause the photo to come off with the paper. Once you get the paper peeling off, you can use your fingers to rub the rest of the paper off, which I found to be the best way to get the paper off without peeling the photo up as well. Keep rubbing until all the paper is off the wood. Be patient, this takes time, sometimes up to 20 minutes, but I promise the result is worth it! NOTE: If your paper starts to dry while you're rubbing it off, just add more water and continue rubbing the paper off. Now that the paper is off of the wood, coat the wood with one layer of clear acrylic coating and let it dry. This will seal your picture onto the wood. It will also make sure our photo does not come off when we add our vinyl saying using transfer tape. It takes about 1 hour to dry depending on conditions. IMPORTANT: Remember, as always, safety first! I recommend wearing protective gloves, a mask, and eye protection whenever you are working with any type of household or industrial chemicals. Also, always make sure to follow all of the safety precautions on the product label to avoid any possible issues. Next, we are going to add our vinyl saying. Cut a piece of transfer tape the size of your design and remove the backing. Then, place the transfer tape on top of the vinyl. I like to use the taco method. By holding the transfer tape in the shape of a taco, put the bottom of your “taco” onto the middle of your design. Smooth the tape over the decal from the center outward using the scraper tool. Now burnish it, using the scraper tool to make the vinyl adhere to the tape. Gently pull the transfer tape off; the vinyl should come up with it. If the vinyl does not stick to the transfer tape, place the transfer tape back down and burnish it with the scraper tool again. Now, center your saying on your wood. I am placing mine at the bottom of my picture about half an inch from the bottom but you can place it wherever you like. Next, place the vinyl piece down and burnish it onto the wood using the scraper tool. Gently remove the transfer tape leaving the vinyl in place. To finish the project, spray one or two coats of clear acrylic coating on the surface, so the vinyl and photo stay looking great. Now you have a stunning photo on wood! These make great gifts that everyone will love! Fonts Used: Sweetie Almeera font from FontBundles.com Bright font from FontBundles.com Free Font Alternatives: Daylove font from Dafont.com Margin font from Dafont.com
Transfer Photo to Wood
Materials
Tools
Instructions
STEP 1: PRINT YOUR IMAGE
STEP 2: GET MY FREE TRANSFER PHOTO TO WOOD DESIGN FILE
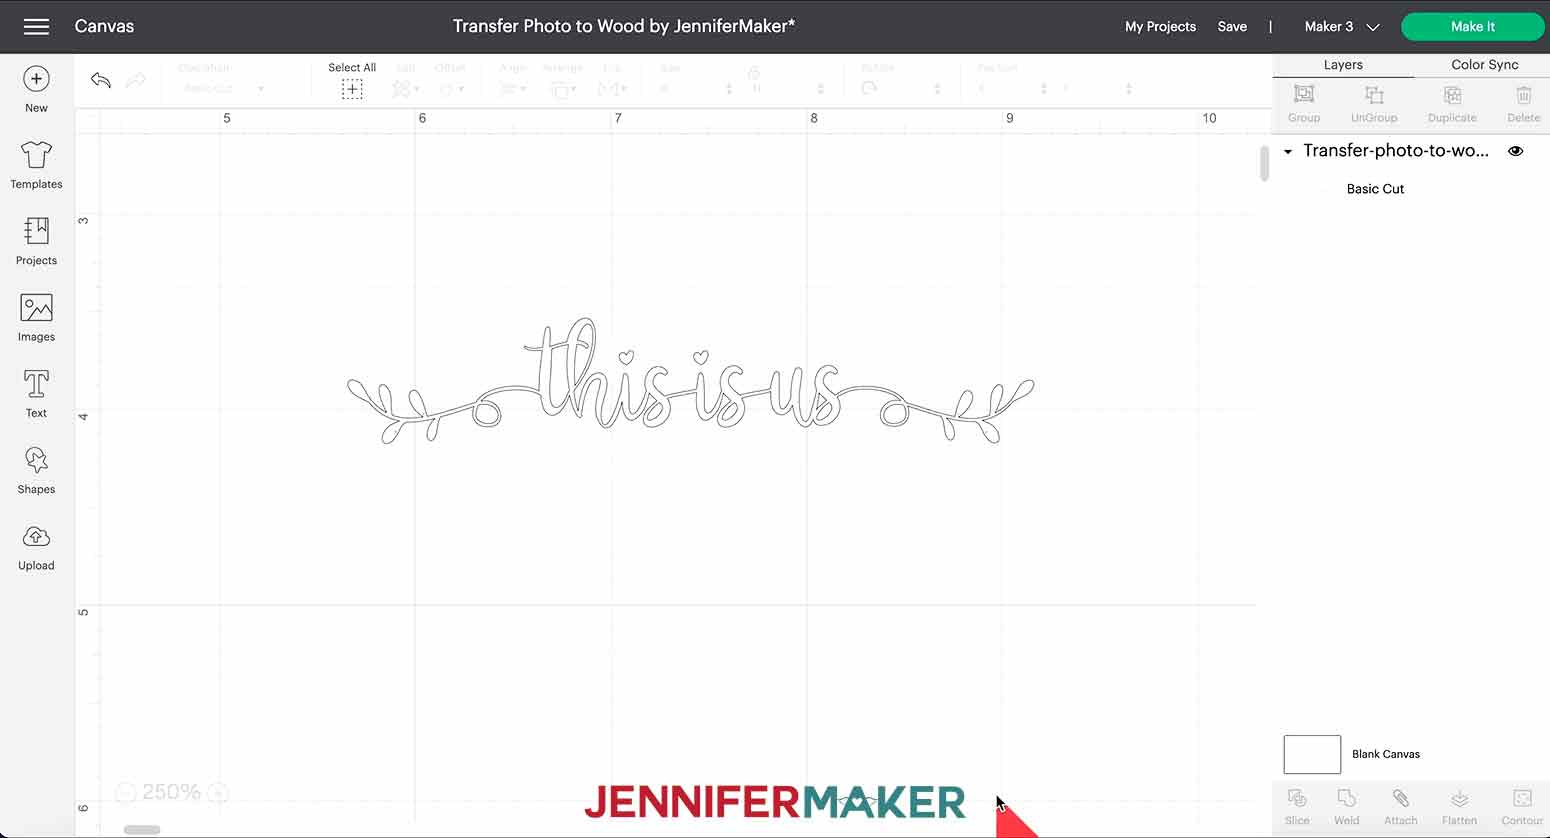 This SVG includes the “this is us” saying that I will be putting on wood along with a picture of Greg and I.
 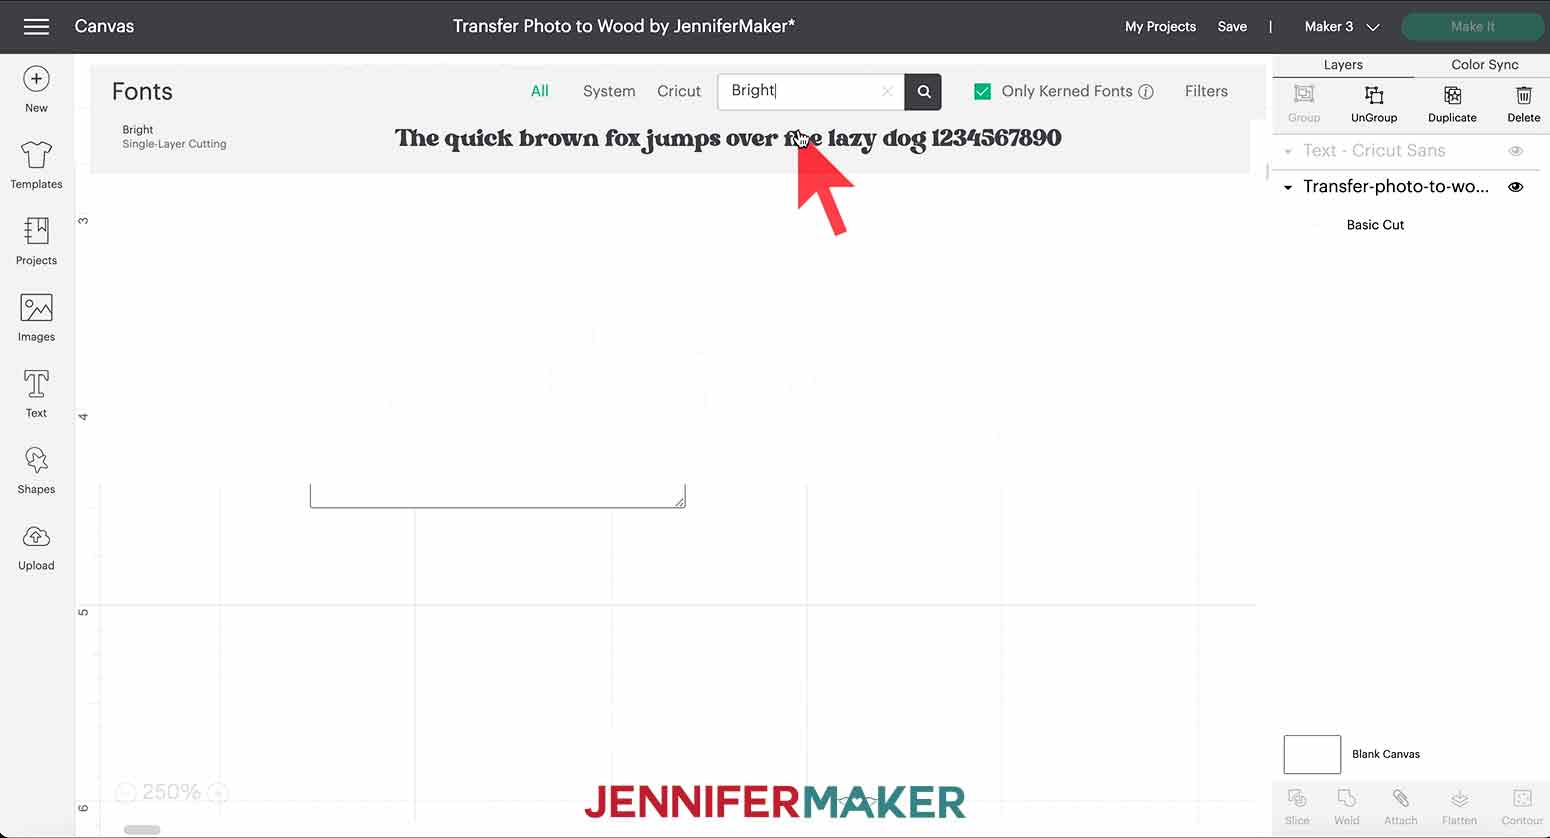 Once you have picked your font, click in the text box and type your word(s). I am going to type “The Makers.”
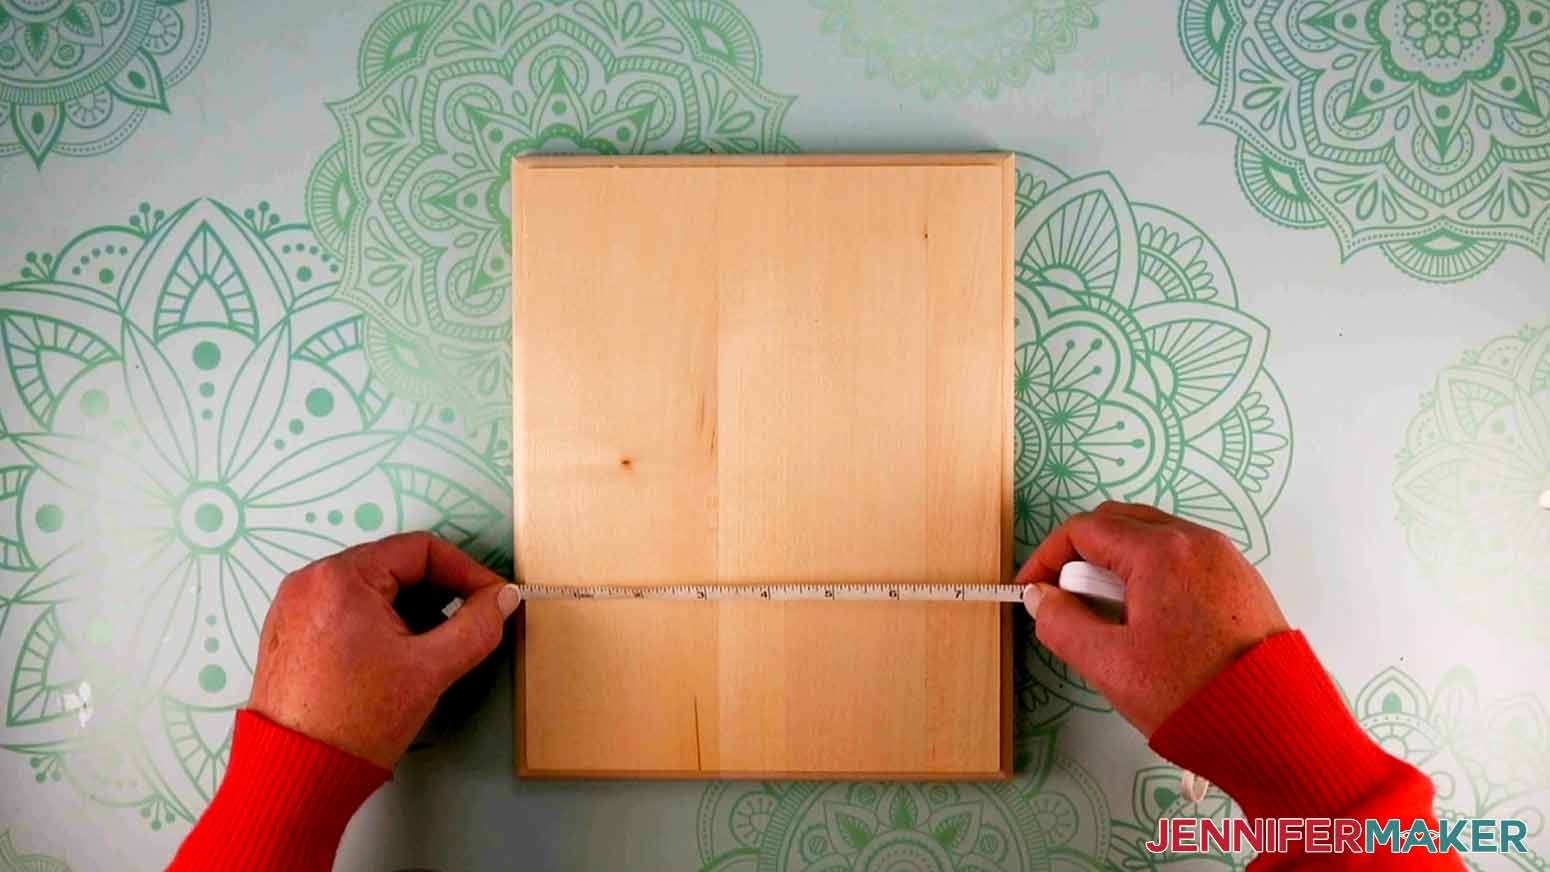
 Once we have our saying(s) resized we are going to click “Make It” in the top right-hand corner of the screen.
STEP 3: CUT YOUR VINYL

STEP 4: ASSEMBLE YOUR WOOD TRANSFER PHOTO

STEP 5: SHOW IT OFF
Notes
Answers to Your Questions About How to Make a Transfer Photo to Wood Project
Q. Is transferring a photo to wood messy?
Well, a bit, but it’s not too bad! The part I found messiest is the paper removal. Those little balls of paper have some Mod Podge on them and may stick to surfaces as they dry. Covering your work surface with butcher paper like in the tutorial keeps them from sticking to it. They can roll, though! Putting some butcher paper under your table edges might help capture paper bits that fall off. If possible, avoid working over carpet or wearing your favorite fuzzy sweater.
Q: What kind of printer paper do I use for my photo?
Paper is really important! I found that thin, 20 lb paper is best. Not photo, premium paper, or cardstock. It’s easier to remove and doesn’t gum up as much as 30 lb paper. So if you’re printing at home, try lighter paper.
Q. Why is my paper gumming up and leaving a white film?
This may be from heavier paper. I found that some extra water helps. Have a bowl of water nearby to keep the paper damp while gently removing it with your fingertips. If you have some stubborn spots, the gloss will help them blend in.
Q: Can I use an old photo on regular photo paper?
No, the photo paper is too thick and the ink is different, so it won’t work the same way. Take a photo of the image and print that using the tutorial.
Q. Can you transfer a glossy photo to wood?
No, the ink won’t transfer correctly. Try taking a photo of the photo avoiding glare and then follow the tutorial to print it on normal paper.
Q. Can I use a laser printer to transfer photos to wood?
Yes, that’s what I had the best results with!
Q. Can you use an inkjet printer to transfer photos to wood?
Yes, the result won’t be as vibrant, but it will still be beautiful!
Q. How do I transfer photos to wood if I don’t have a printer?
That’s ok! Your local Staples or FedEx likely offers printing services. Usually, you send in your files using their website and pick them up soon after. It’s not very expensive! Specify that you want them to use 20 lb paper, but check my tips for dealing with heavier paper gumming up in case they use it.
Or, ask a friend with a printer to join you! They can print, you can share the craft supplies, and both get a fun result!
Q. How hard should I rub to remove the paper?
This project definitely benefits from testing! If possible, try it out on some scrap wood. The best levels of dampness and pressure really vary depending on materials, humidity, and time.
Use gentle pressure at first and slowly press more until the paper gives. If some of the image comes up, gently poke it back in place. The sealer will help it blend in!
Q: Do I have to use Mod Podge to transfer a photo to wood?
Yes, Mod Podge is what transfers the ink to the wood in this tutorial. A generous coat will make the process much easier! I haven’t tested alternatives with the same results.
Q. What if my photo isn’t transferring nicely?
I’m sorry you’re having trouble! If your Mod Podge didn’t totally dry before you dampened the paper, the transfer won’t work correctly. If you have a heat gun available, that did work better than drying overnight in some of my tests. A hair dryer will also help.
Even after lots of practice and testing, you will likely lose a few bits of the image. But that’s what creates the beautiful style we’re going for! Remember, your goal is a beautiful, handmade gift. Not a perfectly perfect machine-made product. Don’t get discouraged. Just take a breath and try again! If you have a spot you really don’t like, try covering it with a decal.
Q. Why is there a white film over my photo after I transferred it?
It’s possible the Mod Podge didn’t dry all the way or small paper fibers didn’t fully peel off of the ink. The sealer can hide some of the film if it’s glossy. If it really bothers you, try the process again using lighter paper, drying the Mod Podge with a heat gun or hair dryer, and really focus on keeping the paper damp with removing it.
Q. How can I get my photo placed better?
Centering the photo might be a bit difficult, especially if you’re using a large piece of wood. Trimming off any extra white paper makes it a bit easier to get good placement. Also, you can try lightly placing the PHOTO on to the WOOD instead of the other way around for better visibility. Make any adjustments to the paper’s alignment before letting it really stick to the wood. Then, press it in place so you can safely flip it over and continue following the tutorial.
Get my free SVG files to create beautiful Transfer Photo to Wood Projects
I love seeing what you make with my designs and how you use them! Please share a photo of your Transfer Photo to Wood project in our Facebook group or tag me on social media with #jennifermaker.
Love,

Want to remember this? Save this How to Transfer a Photo to Wood Tutorial to your favorite Pinterest Board!