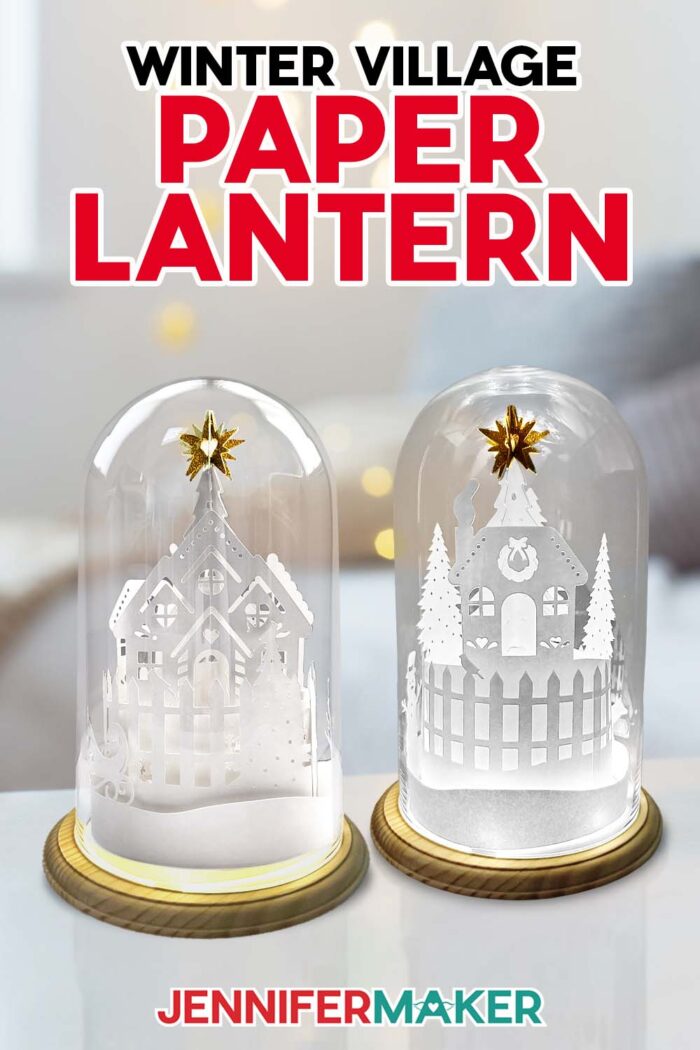
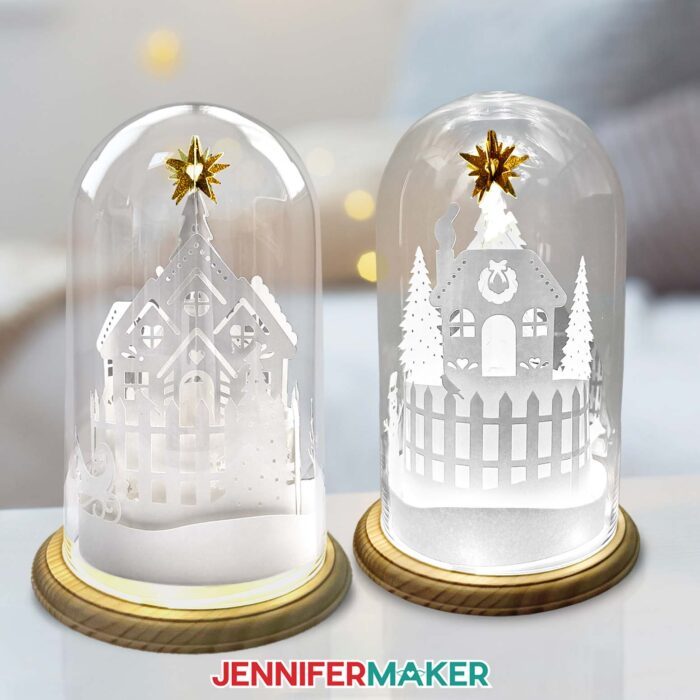
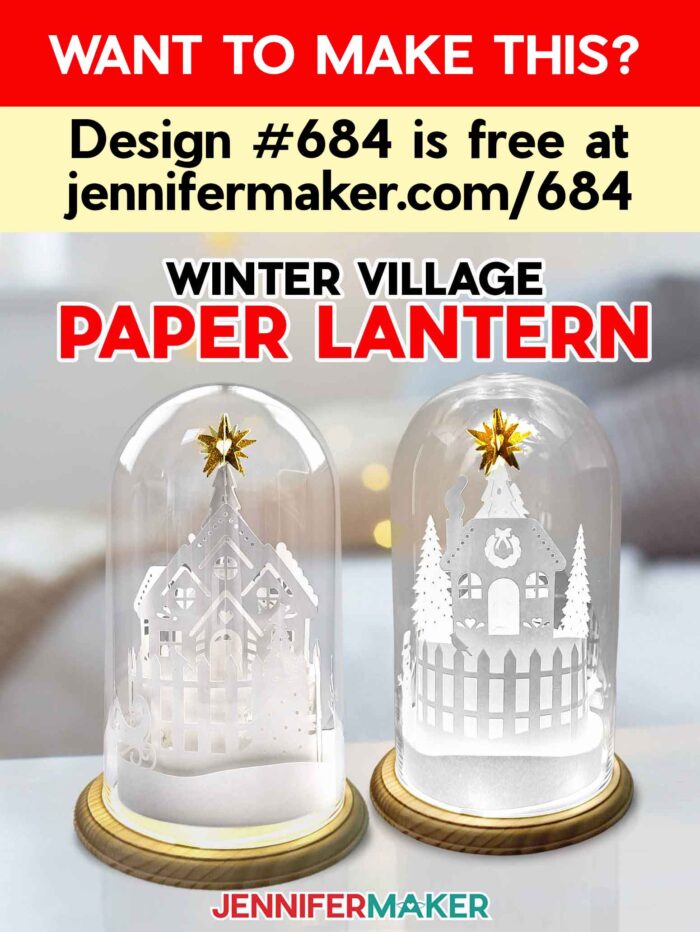
Learn how to make a winter village lantern for heirloom-quality holiday decor!
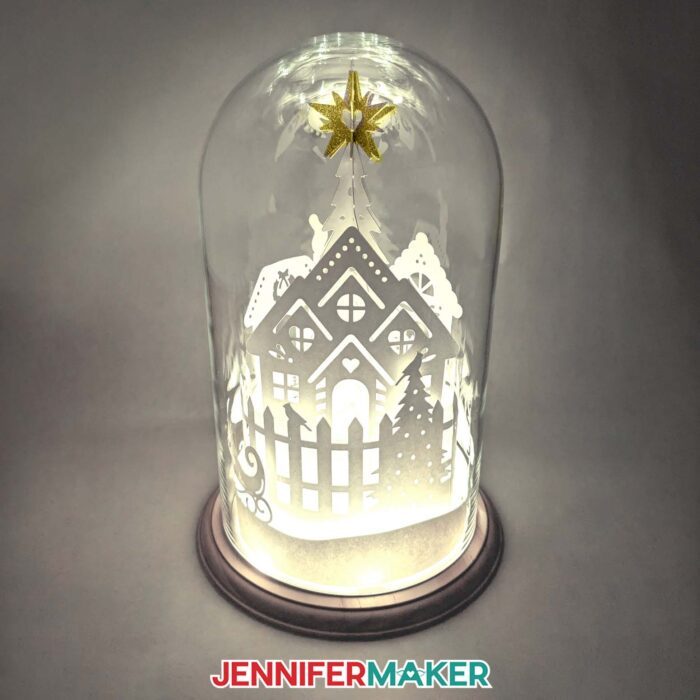
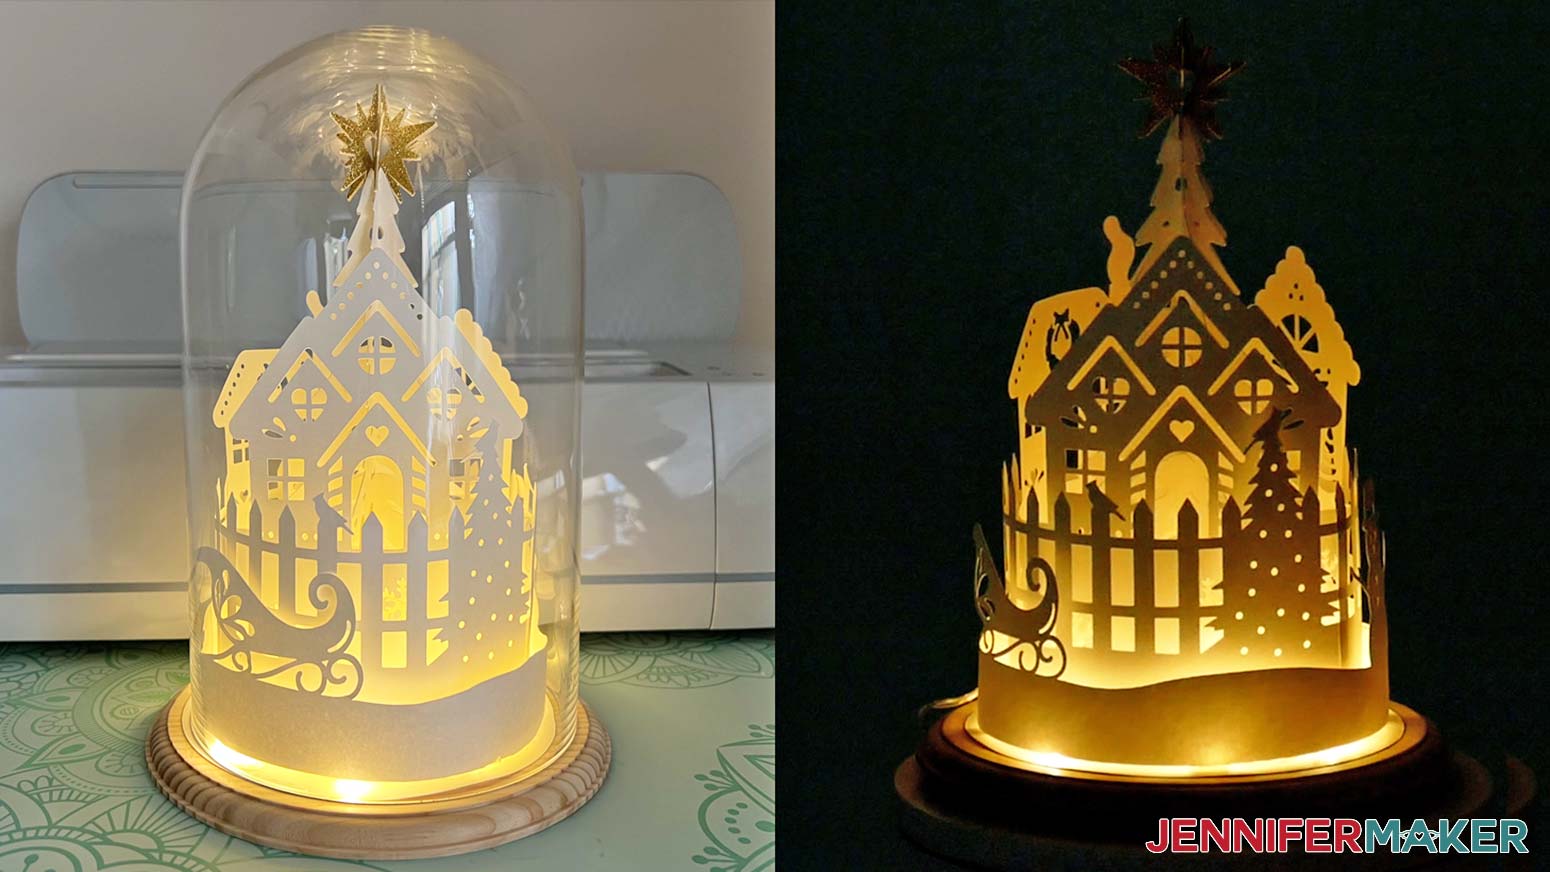
The Christmas season is the perfect time to craft light-up projects and cozy winter scenes. This holiday season, I’ve been busy creating festive decorations, including an adorable lighted winter village lantern! With a glowing Christmas tree surrounded by charming holiday houses and sparkly gold topper, this lantern is the perfect addition to your winter decor. It’s a surprisingly simple craft that produces a stunning result you can display for years, thanks to the protective dome!
Watch the full step-by-step video tutorial on making a lighted winter village lantern:

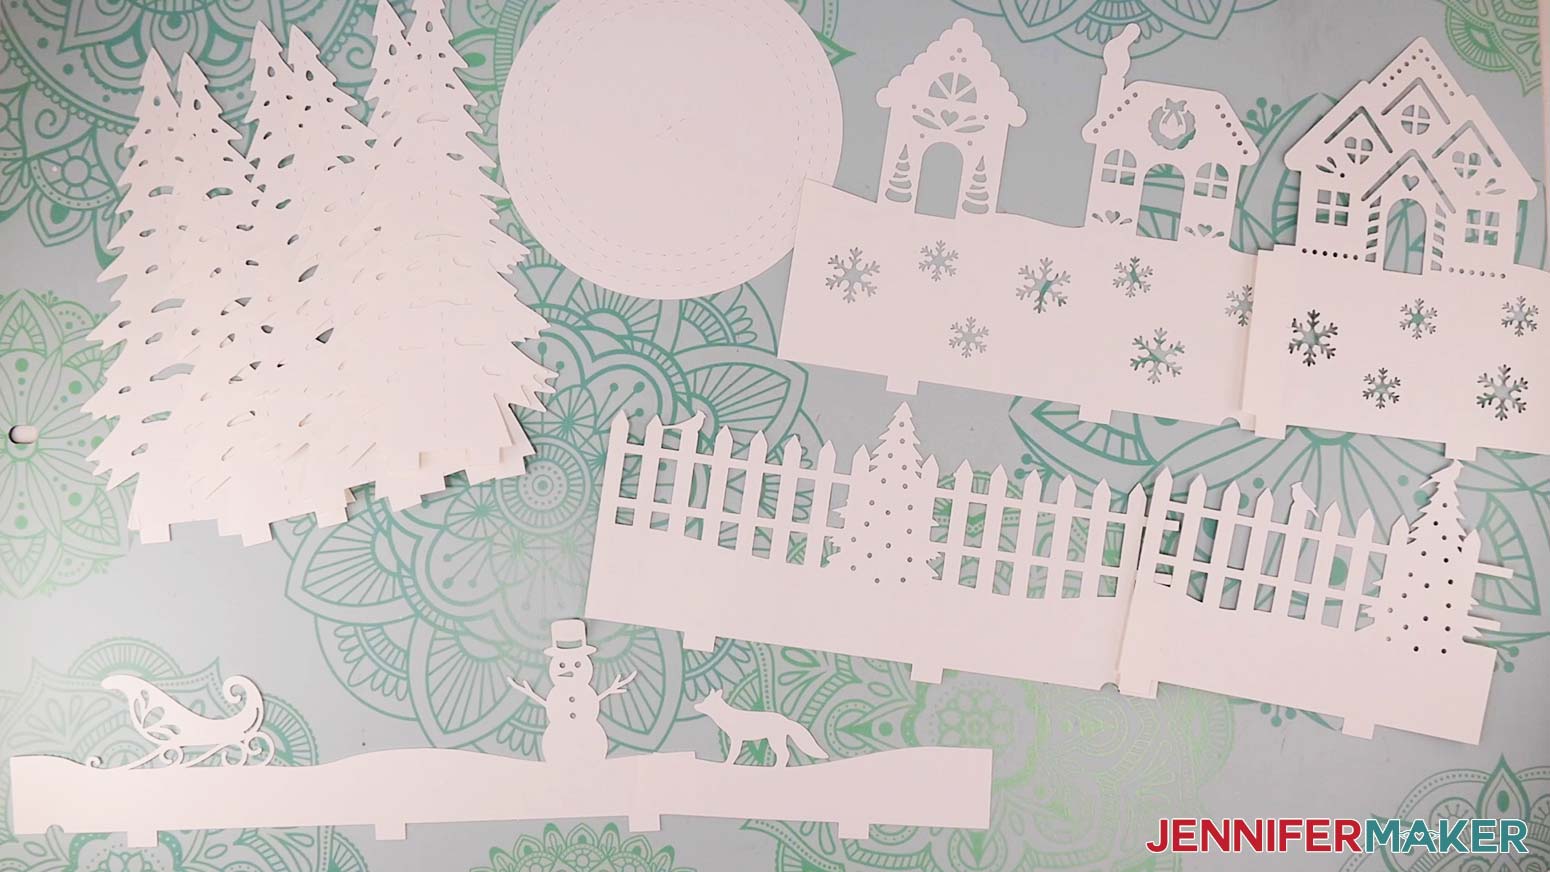
What makes this lantern so special? Aside from the super cool dome cover, it’s all in the layers. The layered white cardstock sheets build a cozy village scene, disguising the fairy lights and letting their warm glow radiate up through the intricate cutouts. The effect is magical!
This is an easy craft with a beautiful result that can be displayed for many years to come, thanks to the dome! You can make the lantern with or without the dome and base, but I like it best with one. Just make sure your dome is a similar shape as the one in my materials list. I’ll show you how to adjust and resize the village scene’s pieces to fit yours!
In the download file, there’s a version of the design with score lines that uses a scoring stylus or single scoring wheel to create the foldable creases, and a no-score version that uses dashed cut lines to make the creases.
If your cutting machine uses DXF files instead of SVGs, no worries — I’ve included those, too! You can also use the included PDF files so you can cut them by hand, but I like to let my cutting machine do the intricate work for me!
I’ll demonstrate how to cut the SVG pieces with my Cricut Maker 3, but you can also use an original Cricut Maker, a Cricut Explore series machine, the Cricut Venture, or the Cricut Joy Xtra.

You’ll need some basic Cricut paper crafting supplies like a green StandardGrip machine mat to cut your cardstock. A spatula can be handy to remove the delicate pieces from the mat, and a scraper tool is so useful for removing any leftover bits that stay behind. I have a full list of tools and craft supplies you’ll need to make it below, along with links where to find them!
White cardstock is notoriously tricky to work with, so I’ll show you how to select the right paper for clean cuts and crisp creases. It comes down to three factors: the quality of the paper, the stickiness of your mat, and using the perfect material settings. But what makes a good quality white cardstock? I’ll share exactly what to look for in the video.
As for the glitter cardstock, that can be tricky too! I tested multiple types of glitter cardstock and found that many don’t crease well. But I found one that did! Watch the video to find out which glitter cardstock makes for the crispest, cleanest folds so your sparkly star topper looks nice and precise without messy, uneven creases.
I love to help, and doing the research and testing for you means that I make the mistakes — so you don’t have to!
If you cut your lantern pieces the same size as mine, you’ll need 5 full page sheets of 12″ x 12″ white cardstock, plus a sheet of 8.5″ x 11″ glitter cardstock. I used gold, but you can pick whichever color you like!
Another trick to better cuts? I recommend taking extra care when attaching the cardstock to the mat before cutting. Adhering it well and using a brayer to make sure it’s securely attached can ensure nice, clean results on the intricate cuts in the winter village scene.
I’ll walk you through assembling the layers of the scene, which is easier than it looks thanks to the crease lines. Just follow along with the video to see how I did it. Assembling the star tree topper can be finicky since the pieces are so small, but I’ll share a trick using reverse-action tweezers that makes it super easy!
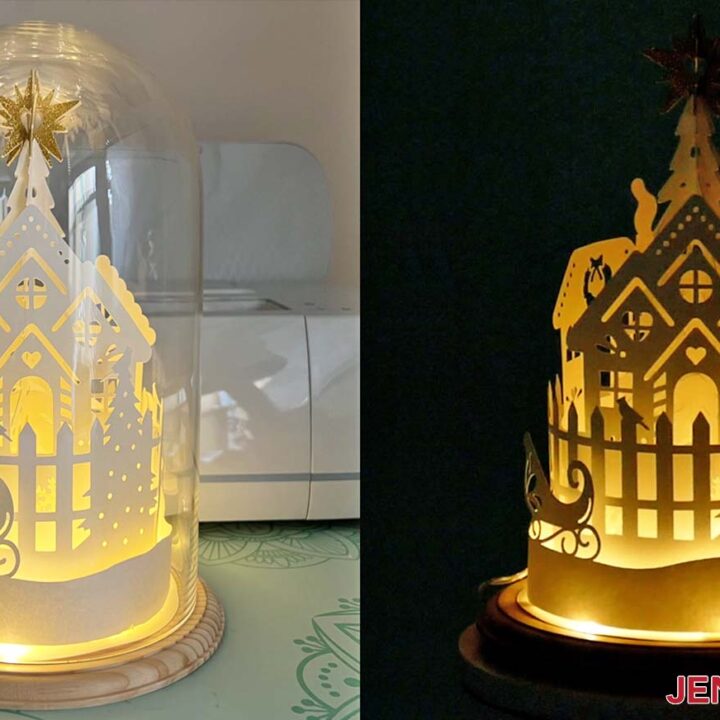
When working with paper, always use LED lights because they don’t heat up and are safe to use. But what kind of LED? For this design, I recommend using LED fairy lights rather than an LED tea light. The strands wrap around the layers of paper, leaving room for the Christmas tree centerpiece. The layered cardstock works as a light cover, so you don’t see the fairy lights themselves — just the glow from within the lantern.
Scroll down to see the written tutorial for full details on preparation, cutting, and assembly of the lantern! I really love how this project came out, and I can’t wait for you to make a Merry Christmas village lantern, too!
Let me show you how to make a winter village lantern! This post contains some affiliate links for your convenience (which means if you make a purchase after clicking a link I will earn a small commission but it won’t cost you a penny more, there is no additional cost)! Read my full disclosure policy.
Materials to Make A Winter Village Lantern
View my Amazon shopping list for the exact items I used!
- Four or Five (4-5) Sheets of 12″ x 12″ 65-80 lb. White Cardstock
- One (1) Sheet of 8.5″ x 11″ Gold Glitter Cardstock (for the star)
- One (1) Strand of 3.3′ Fairy Lights
- One (1) 7″ Round Wood Base
- One (1) 9.8″ x 5.75″ Glass Dome
- Small 3/16″ Zots Glue Dots (optional, for attaching the tabs and lights to the base)
- A way to cut your cardstock – I’m using the Cricut Maker 3, but you can also use the Cricut Maker, a Cricut Explore Series machine, the Cricut Venture, or the Cricut Joy Xtra for smaller files without score lines.
- Cricut Green StandardGrip Machine Mat 12″ x 12″
- Scoring Stylus (optional, for files with score lines) -OR-
- Single Scoring Wheel (optional, for files with score lines)
- Cricut Fine Point Pen in a Light Color (optional, for drawing guidelines on the circular base)
- Craft Glue (I used Bearly Art Precision Glue)
- Brayer
- Spatula
- Weeding Tool
- XL Scraper
- Reverse-Action Tweezers
- Butcher Paper (optional, to keep your cardstock layers clean)
- Measuring Tape (optional, to measure the size of your glass dome)
- Isopropyl Alcohol (optional, to clean your glass dome) -AND-
- Lint-Free Cloth
How to Make a Winter Village Lantern!
Winter Village Lantern
Make a paper cut winter village lantern to display under a glass dome for the holidays.
Materials
- Four or Five (4-5) Sheets of 12" x 12" 65-80 lb. White Cardstock
- One (1) Sheet of 8.5" x 11" Gold Glitter Cardstock (for the star)
- One (1) Strand of 3.3' Fairy Lights
- One (1) 7" Round Wood Base
- One (1) 9.8" x 5.75" Glass Dome
- Small 3/16" Zots Glue Dots (optional, for attaching the tabs and lights to the base)
- Design #684 (My free SVG/PDF/DXF design files are available in my free resource library - get the password by filling out the form at the bottom of this page)
Tools
- A way to cut your cardstock - I’m using the Cricut Maker 3, but you can also use the Cricut Maker, a Cricut Explore Series machine, the Cricut Venture, or the Cricut Joy Xtra for smaller files without score lines.
- Cricut Green StandardGrip Machine Mat 12" x 12"
- Scoring Stylus (optional, for files with score lines) -OR-
- Single Scoring Wheel (optional, for files with score lines)
- Cricut Fine Point Pen in a Light Color (optional, for drawing guidelines on the circular base)
- Craft Glue (I used Bearly Art Precision Glue)
- Brayer
- Spatula
- Weeding Tool
- XL Scraper
- Reverse-Action Tweezers
- Butcher Paper (optional, to keep your cardstock layers clean)
- Measuring Tape (optional, to measure the size of your glass dome)
- Isopropyl Alcohol (optional, to clean your glass dome) -AND-
- Lint-Free Cloth
Instructions
STEP 1: GET MY FREE WINTER VILLAGE LANTERN DESIGN
First, download my Winter Village Lantern files from my free library – look for Design #684. Alternatively, you can use the Save This Project form near the top of this post and the design link will be emailed to you.
Inside the SVG folder, you’ll see two versions of the design -- one with score lines that you can make using a scoring tool, and one with dashed cut lines that only needs the Fine-Point Blade. The scored version has “score" in the file name, and the dashed cut line version has "no-score" in the file name.
For this tutorial, I’ll show you how to make the version with dashed cut lines.
NOTE: If you’d like to make the version with score lines using a scoring wheel or stylus, you can refer to my tutorial at http://jennifermaker.com/cricut-scoring to learn how to adjust the files. All Score layers in the file have a red color swatch, no fill color in the Layers Panel, and are grouped with their corresponding Cut layers.
TIP: If you’re not sure how to upload, go to jennifermaker.com/svgs to learn how to unzip and upload SVG files.
STEP 2: PREPARE YOUR DESIGN
CRICUT DESIGN SPACE
1. In Cricut Design Space, open a blank Canvas.
2. Click “Upload,” then click “Upload Image.”
3. Click “Browse” and select the SVG file you want.
NOTE: I’ll use the “no-score” version.
4. Click “Open.”
5. Click “Continue” and finally click “Upload” to add the design to your Canvas.
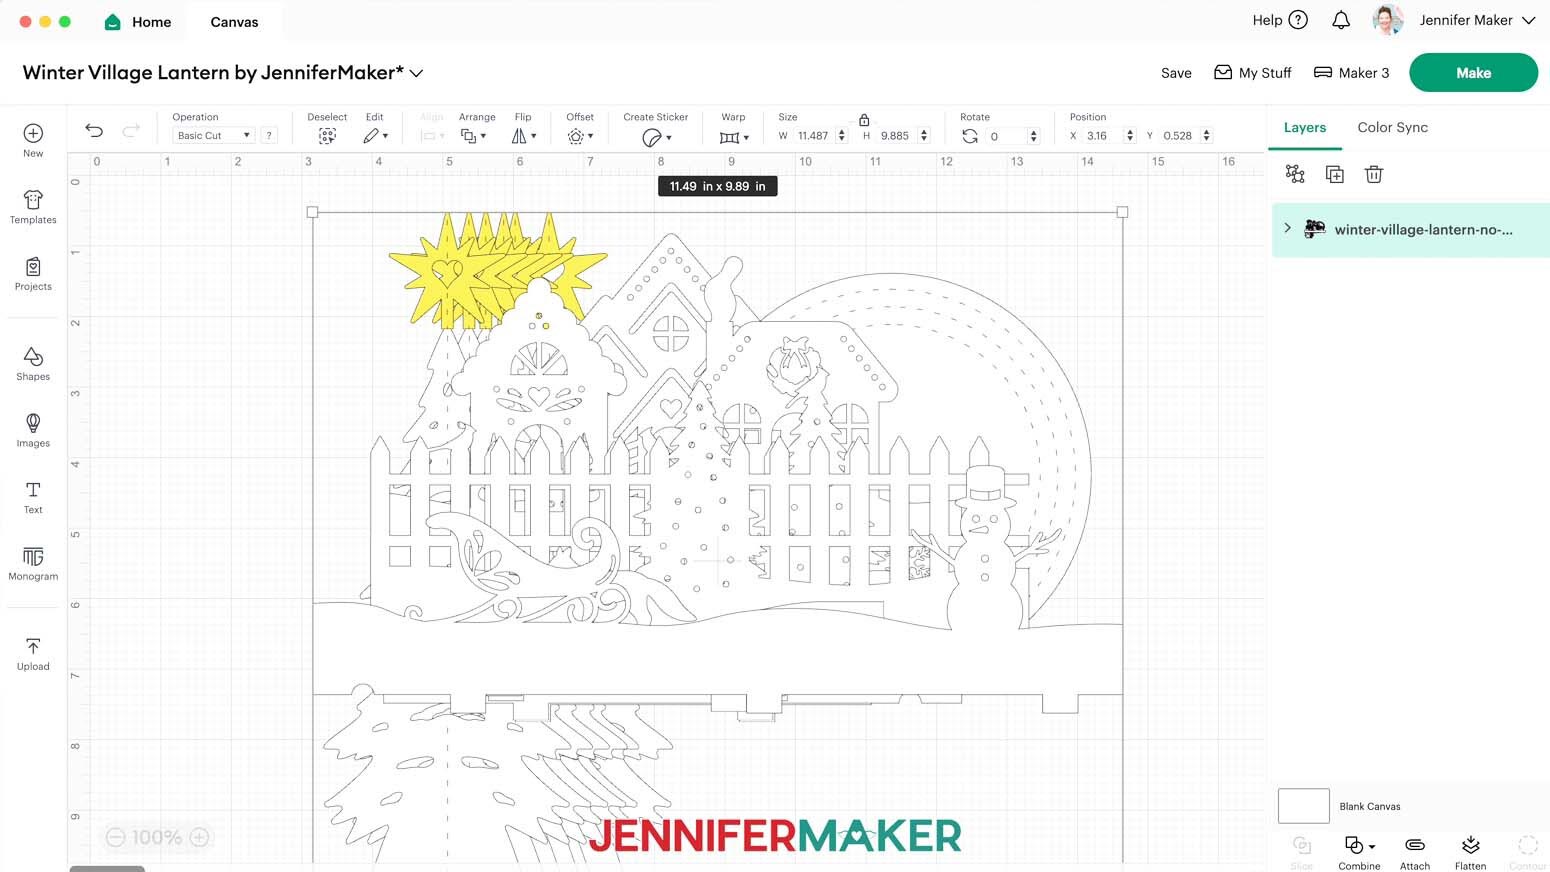
6. The file is sized for the wooden base and glass dome in my materials list and is ready to cut.
NOTE: If you are making the scored version of the design, the circular base piece, trees, and stars have guides and creases, which you will need to convert to “Score” or “Pen” and "Attach" to the correct piece before cutting.
7. If you are using a different-sized dome, you may need to resize the design. First measure the diameter and height of your dome using a tape measure or ruler.

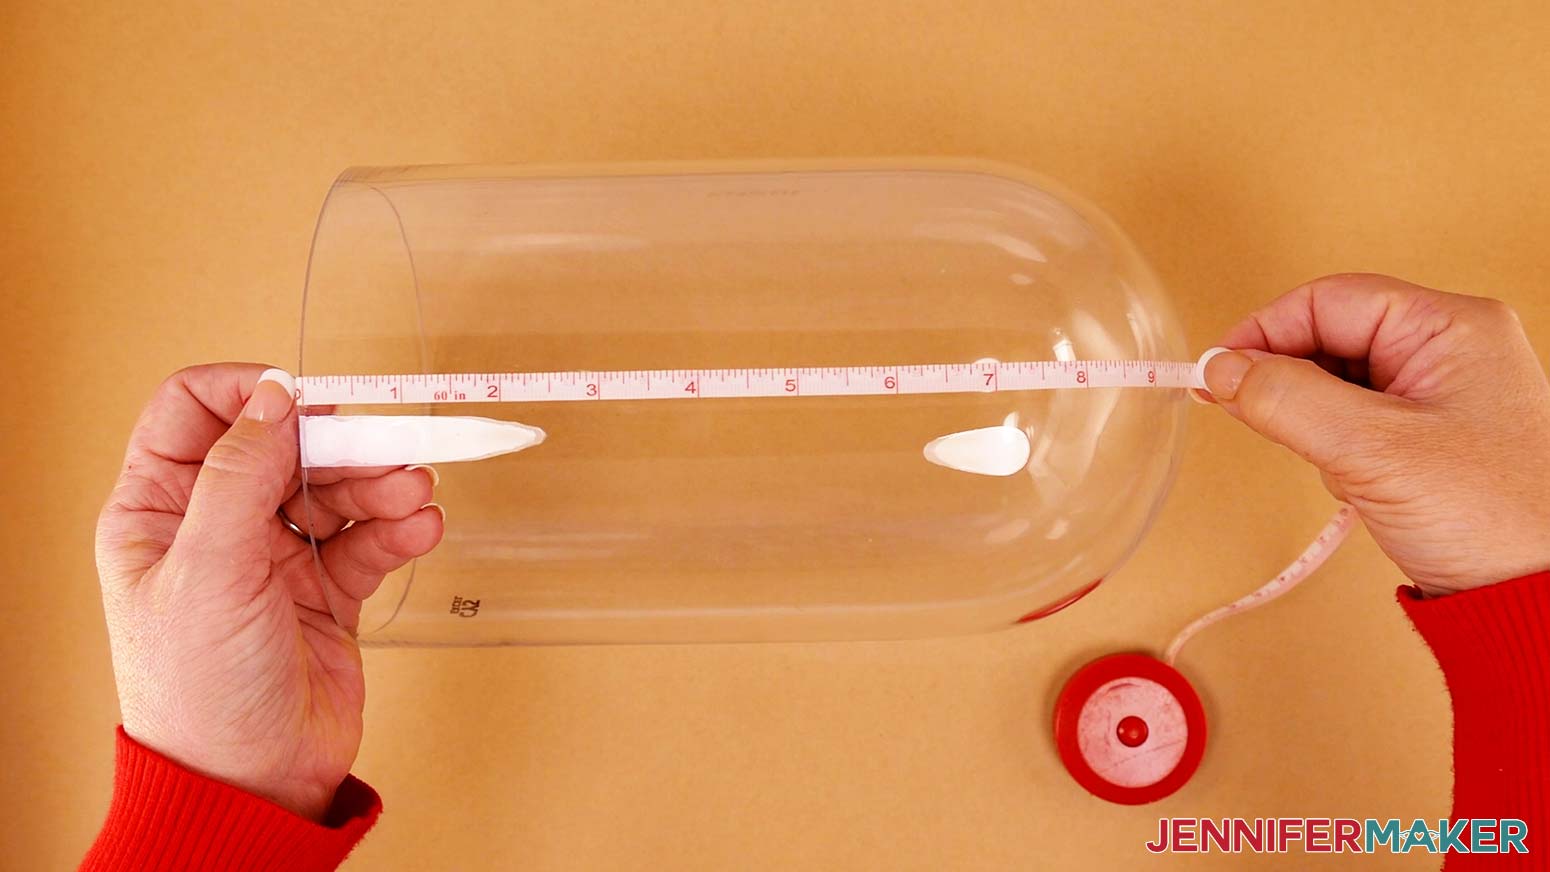
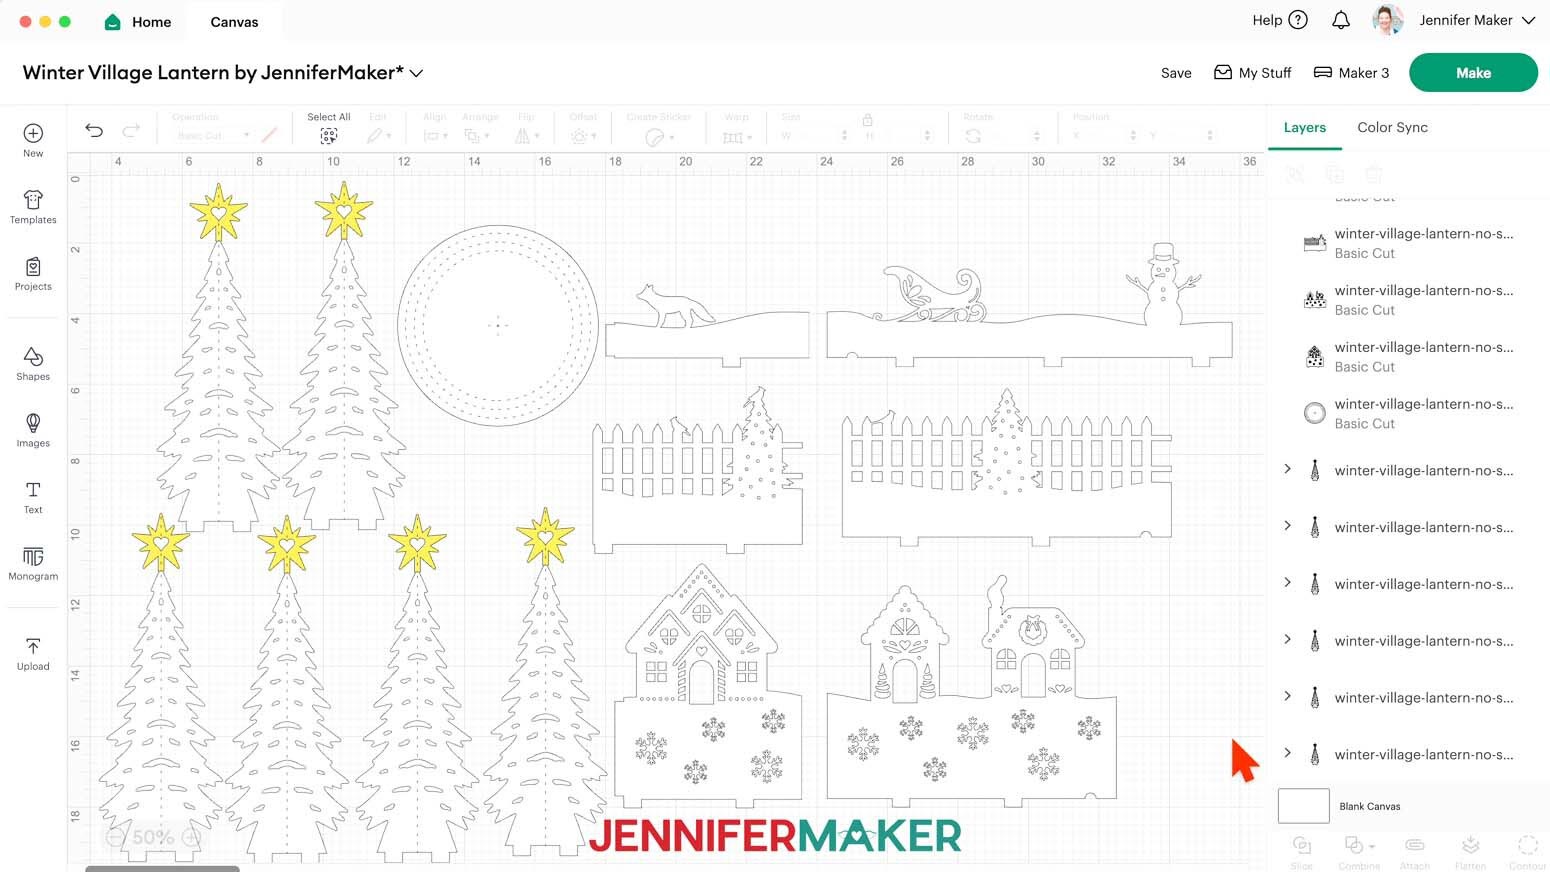
8. Ungroup the design and spread the pieces out. The pieces for each ring are also grouped, so ungroup them to see everything.
9. With the lock icon closed, click and drag a corner of the design to resize it until the circular base piece is slightly smaller (approximately 0.05” smaller) than your dome’s diameter. I will leave mine at 5.7”.
10. Make sure the height of one tree and one star piece together is close to or shorter than your dome’s height.
11. Once your design is sized correctly, make sure the correct machine is selected in the top right.
12. Click “Make It.”
13. If prompted, click "On Mat," choose your mat size, and click “Confirm.”
14. On the Prepare Screen, you should have 6 mats (5 white and 1 yellow).
TIP: You can move objects and combine some of the white mats to save cut time and materials.
15. Change the Material Size for the yellow mat to “8.5 in x 11 in (Letter).”

16. Select the first mat again and click “Continue.”
CUTTING
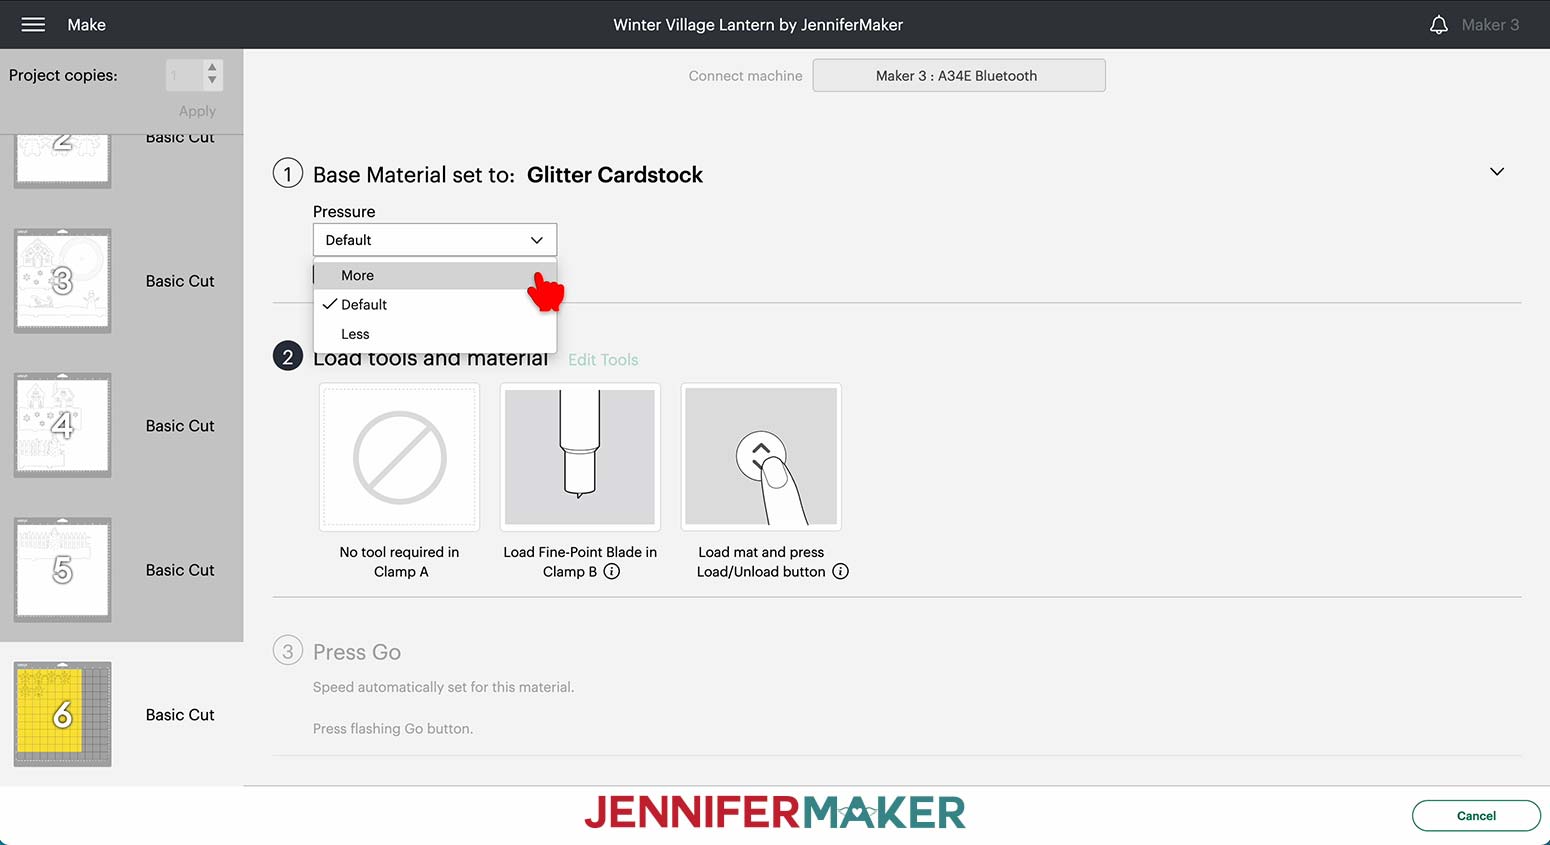
1. On the Make Screen, click “Browse All Materials.”
2. Search for and select the “Medium Cardstock - 80 lb (216 gsm)” setting.
3. Change the Pressure to “More” for a cleaner cut.
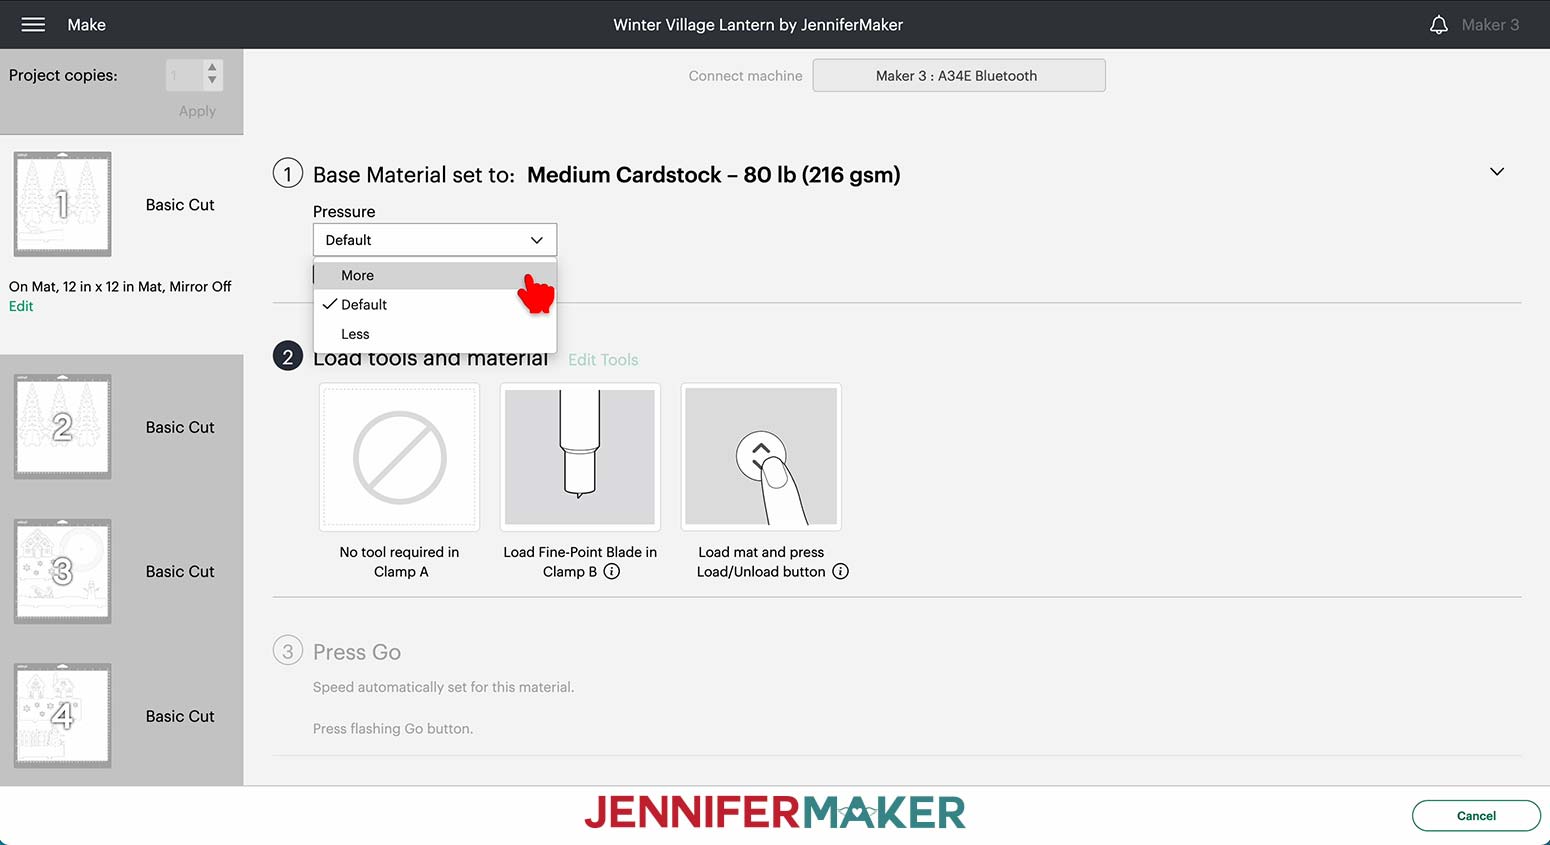
TIP: If you have trouble getting clean cuts, try the “Cardstock (for intricate cuts)” setting with Default Pressure.
4. Check the “Remember material settings” box to save time between cuts.
5. Place the first piece of cardstock face up on a green StandardGrip machine mat.
6. Use a brayer to make sure it’s fully adhered.
7. Check that your Fine-Point Blade is clean and in the clamp.
TIP: You can clean your blade if needed by repeatedly poking the blade tip into a piece of aluminum rolled into a tight ball.
8. Press the flashing “Load/Unload” button to load the prepared mat into your Cricut.
9. Press the flashing “Go” button to begin cutting.
10. When it has finished cutting, unload the mat, flip it over onto your work surface, and roll it back to release the cardstock.
11. Use a spatula to carefully remove any intricate pieces.
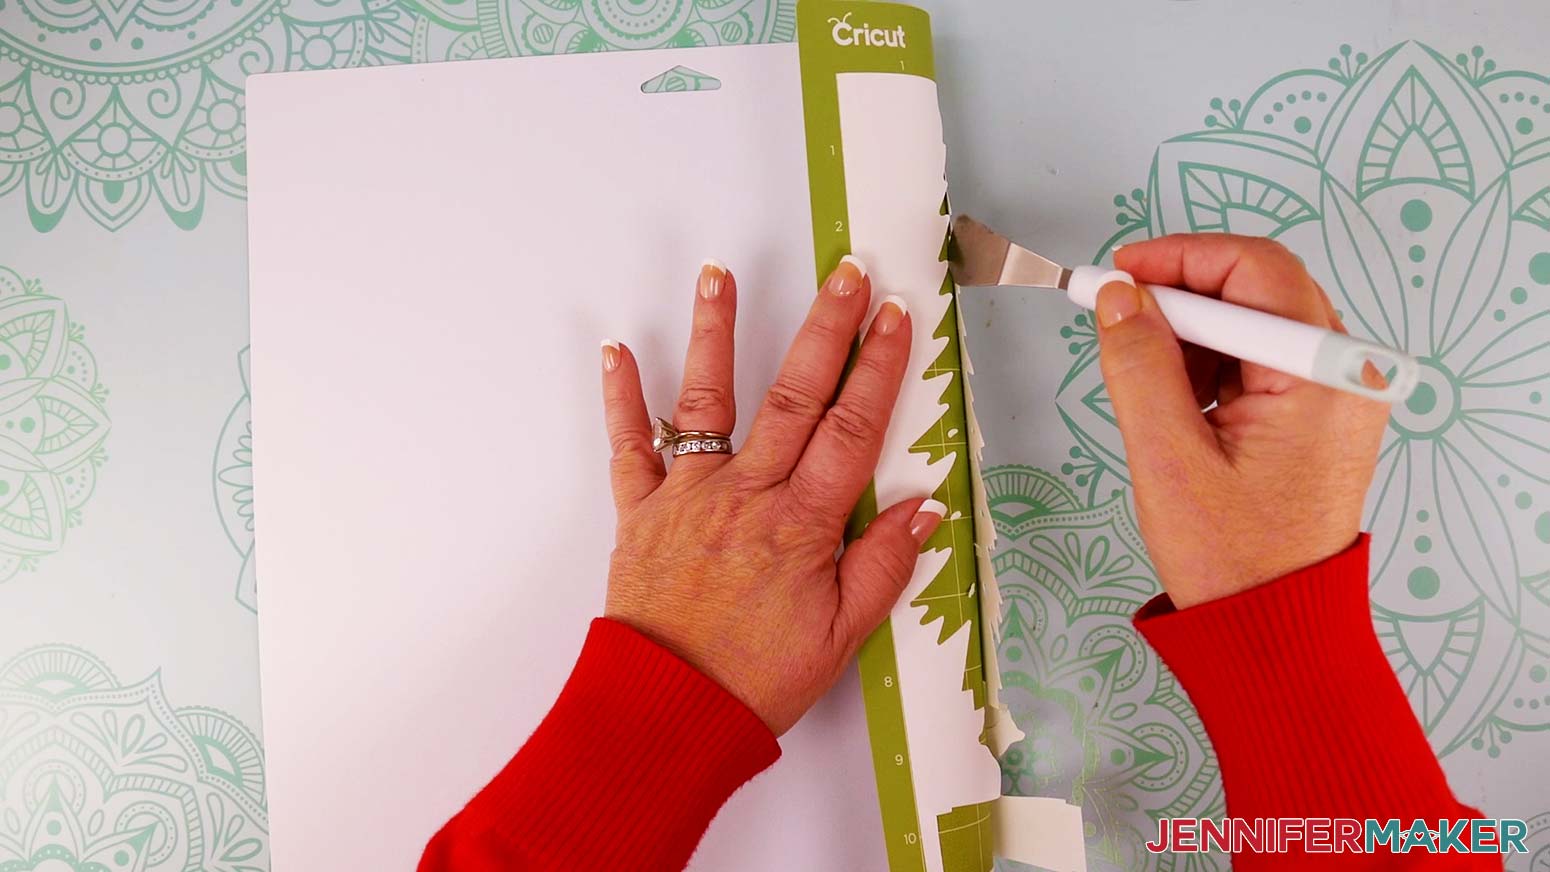
12. Follow steps 5-11 for the rest of the white mats.
13. For the yellow mat, search for and select the “Glitter Cardstock” setting.
14. Select “More” for the Pressure.
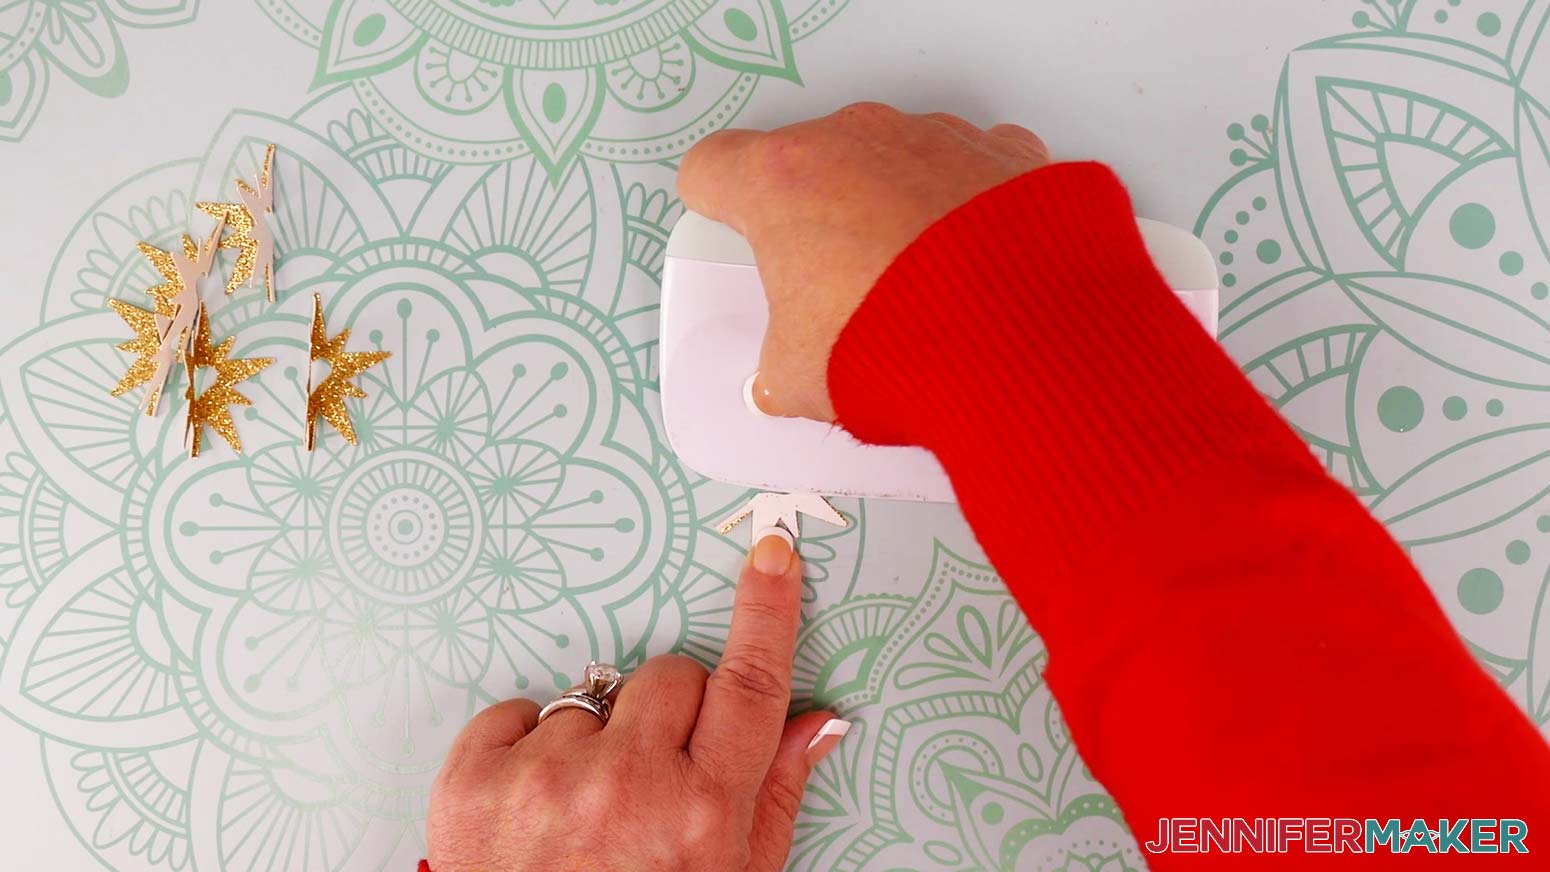
15. Follow steps 5-11 to cut and remove the gold star pieces. Before unloading your mat, check to make sure the pieces cut all the way through. If they didn’t, press the "Start" button to cut them again.
STEP 3: ASSEMBLE YOUR WINTER VILLAGE LANTERN
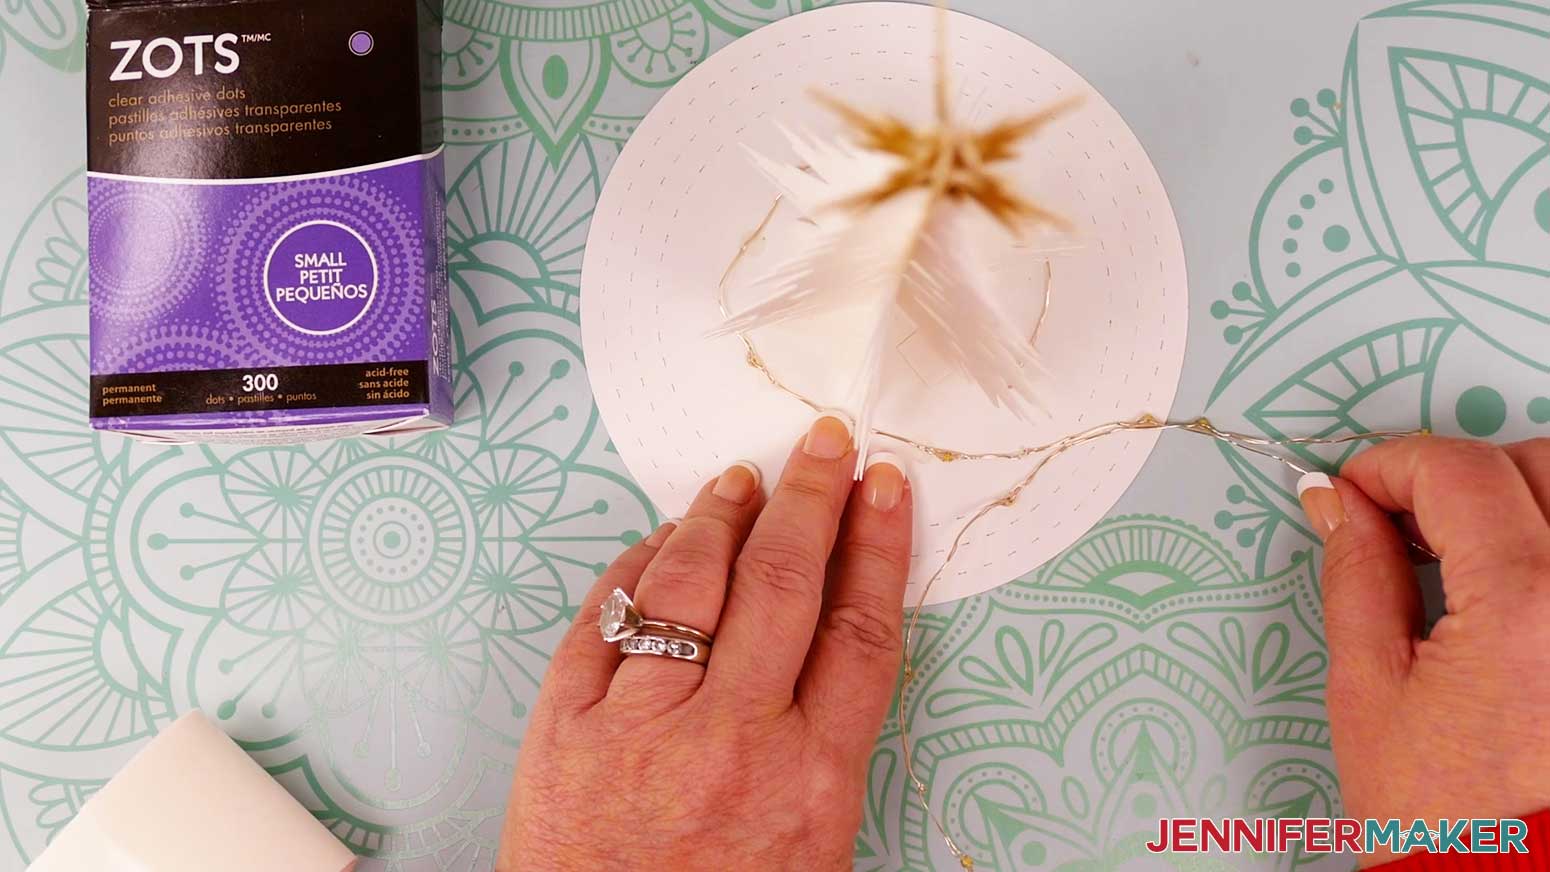
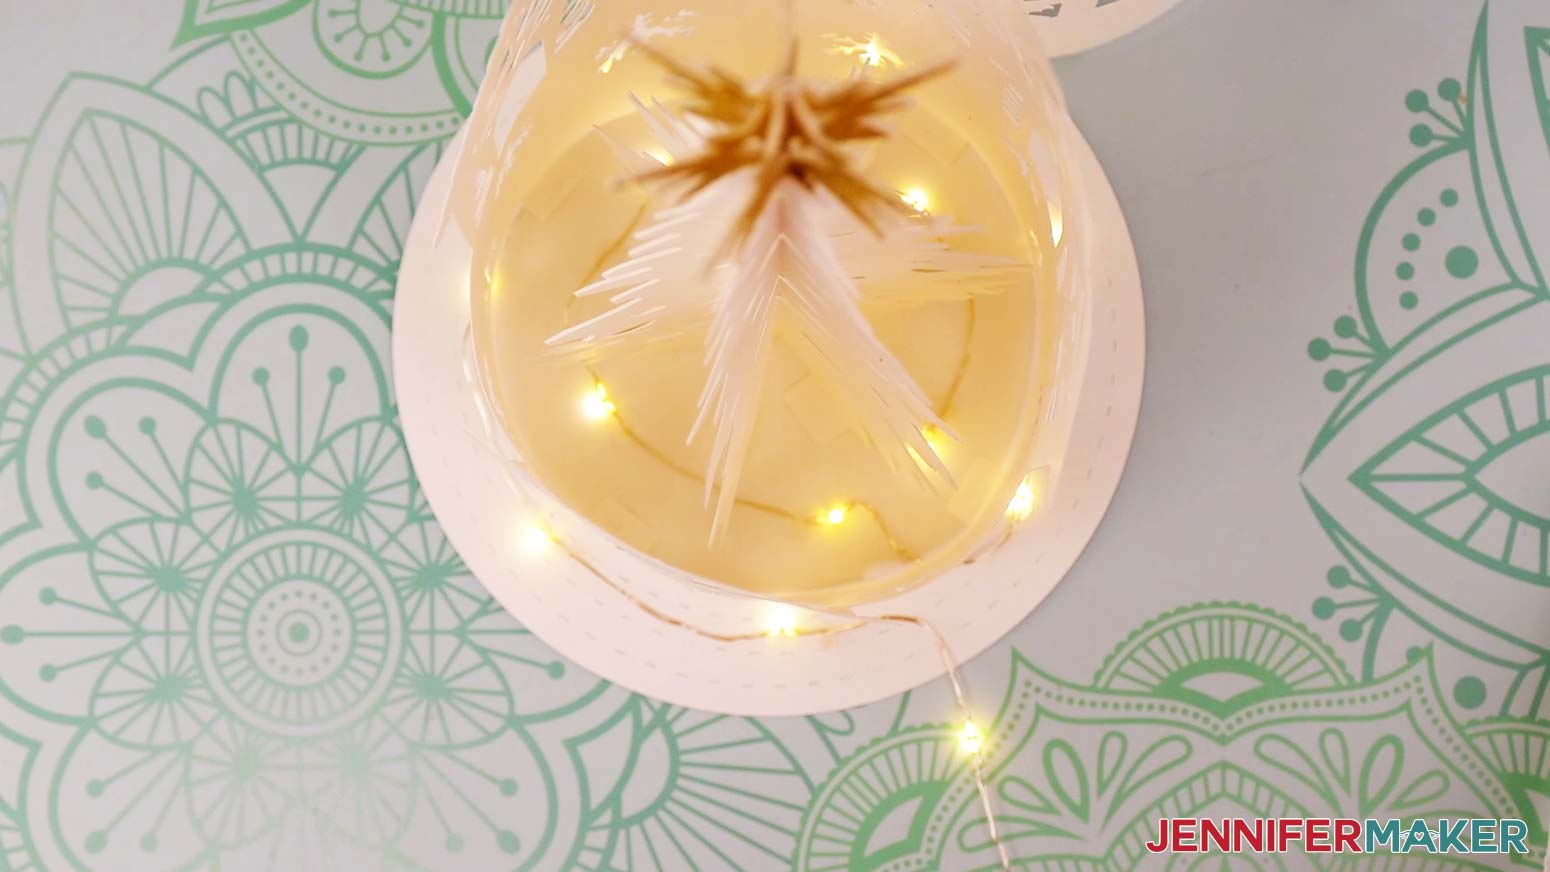
MAKE THE TREE
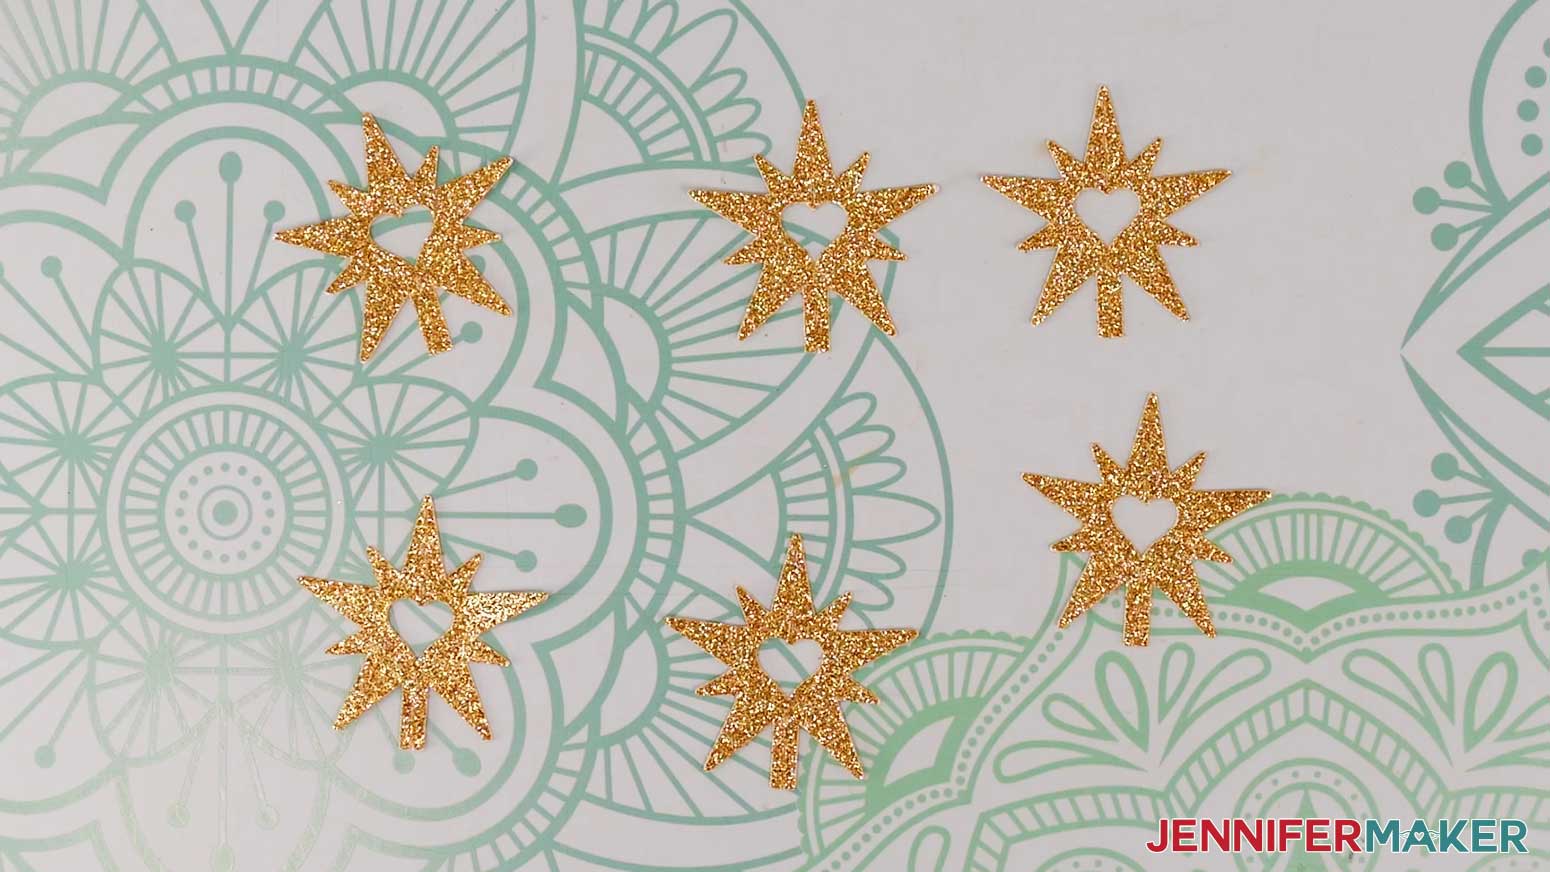
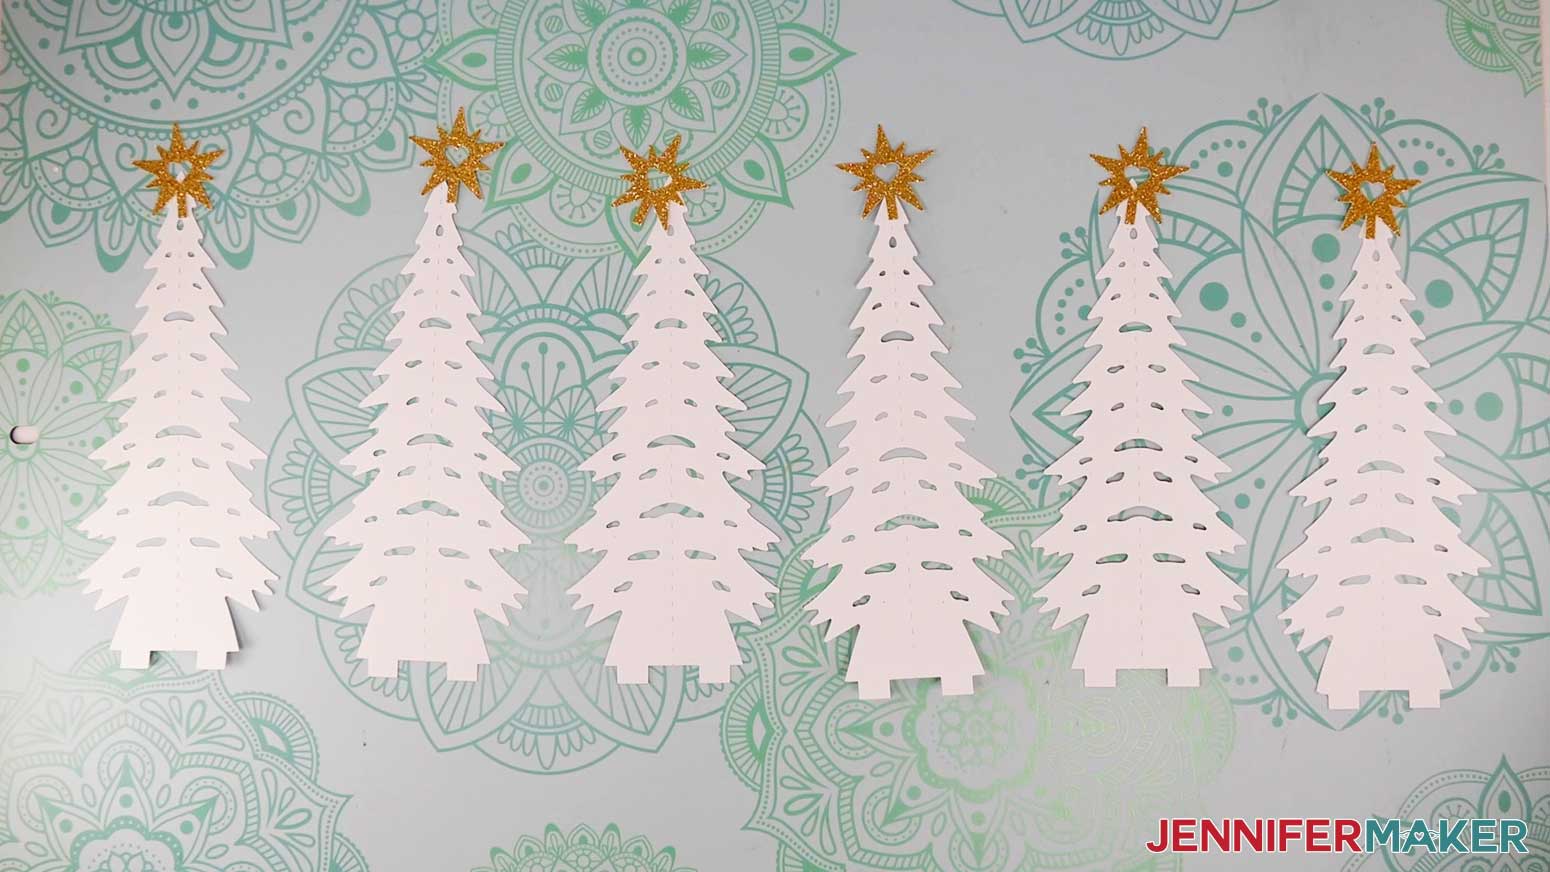
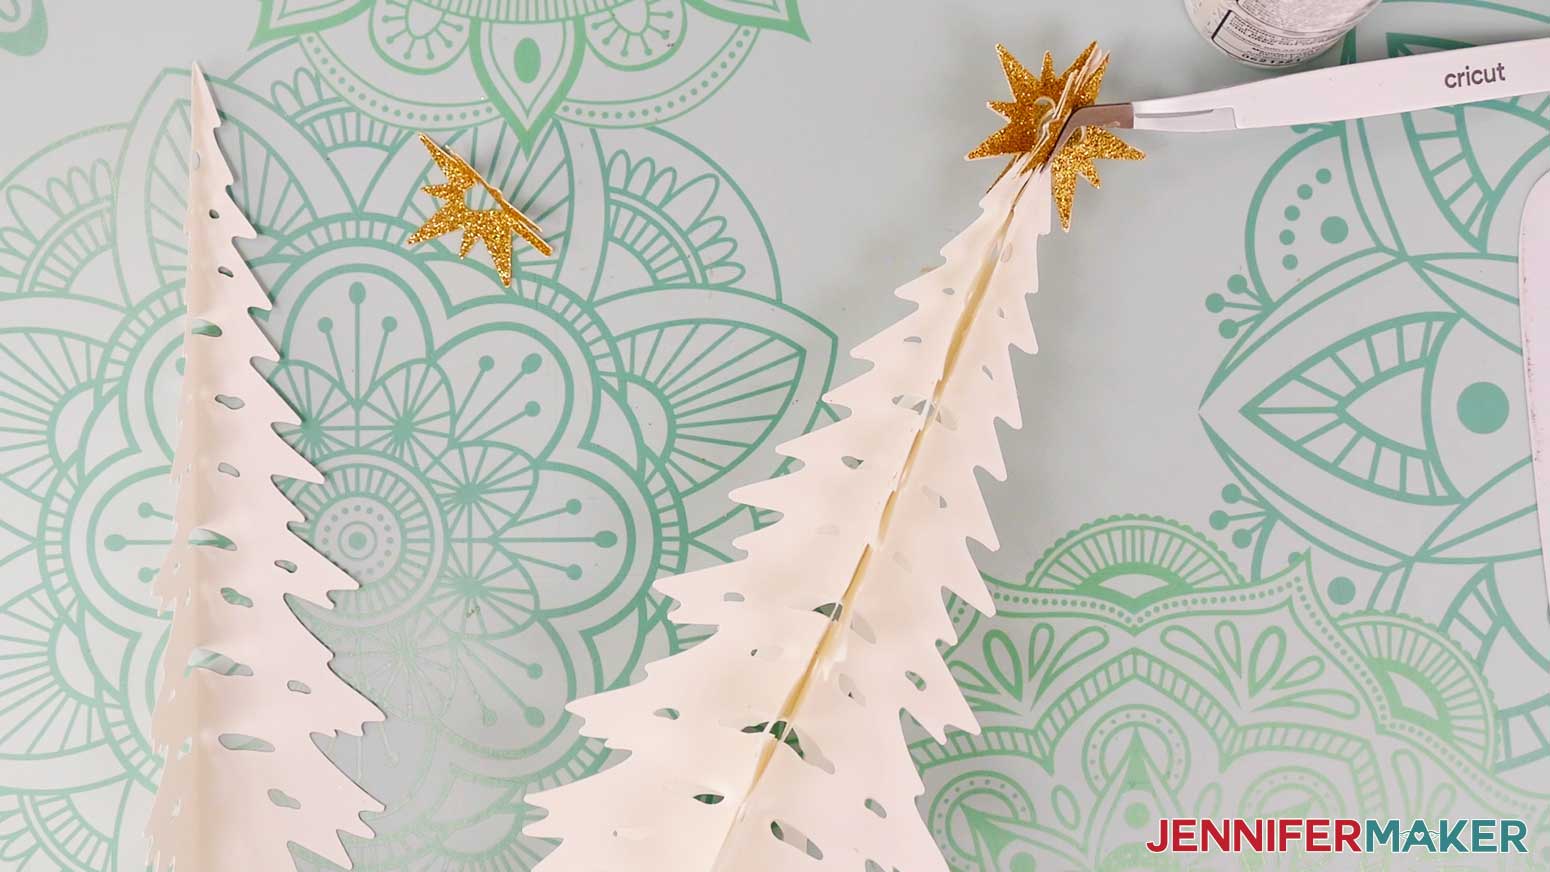
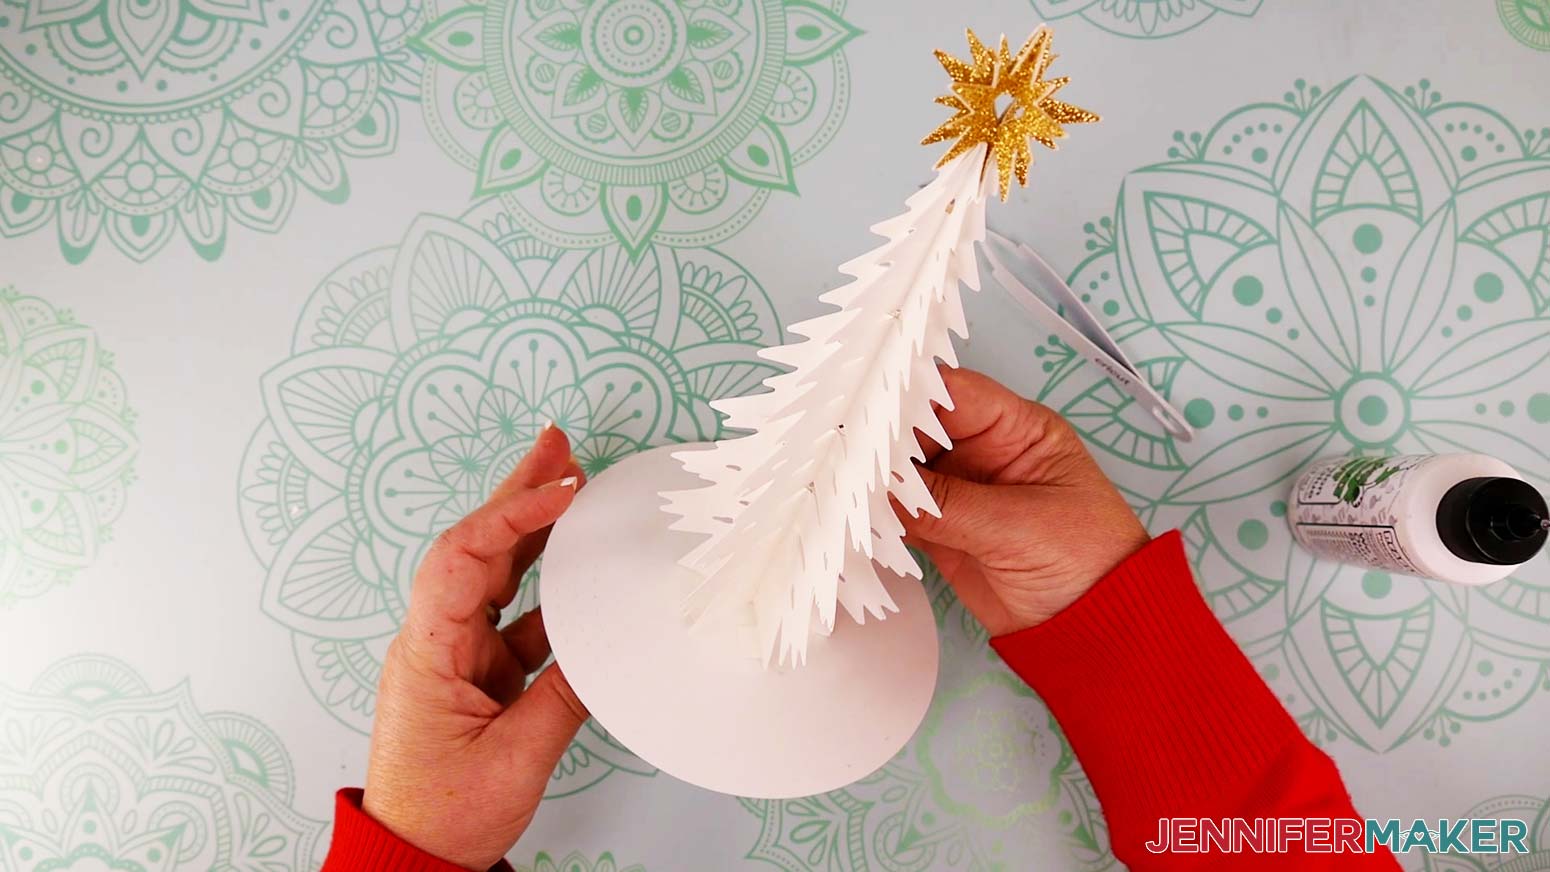
1. Find the six tree pieces and the six star pieces.
2. Fold inward along the dashed lines to make a valley fold down the center of all 12 pieces. Use a scraper tool to get straight creases.
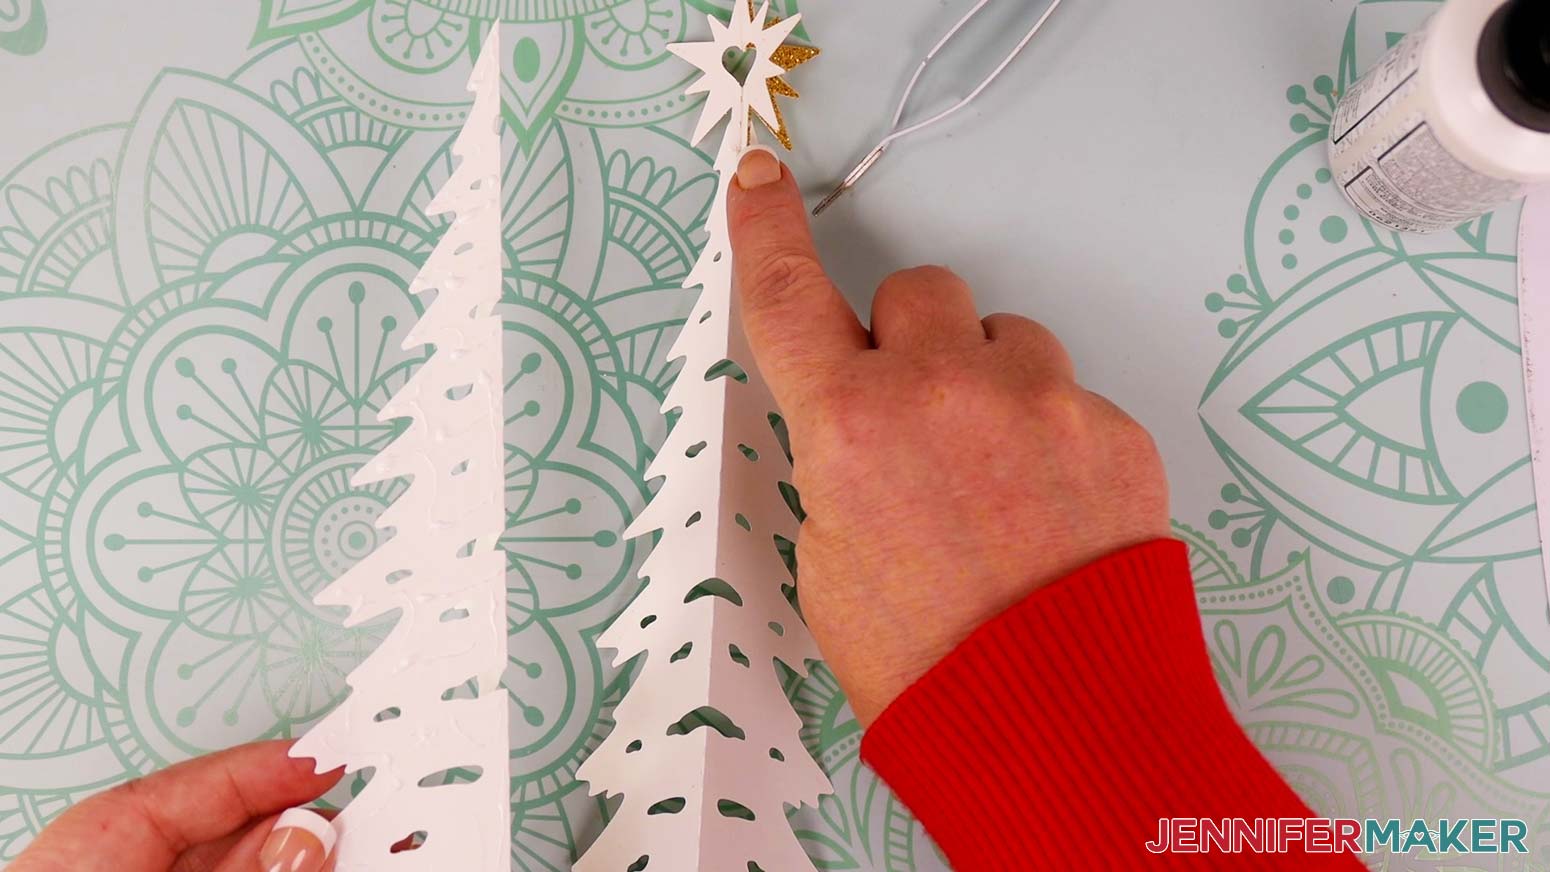
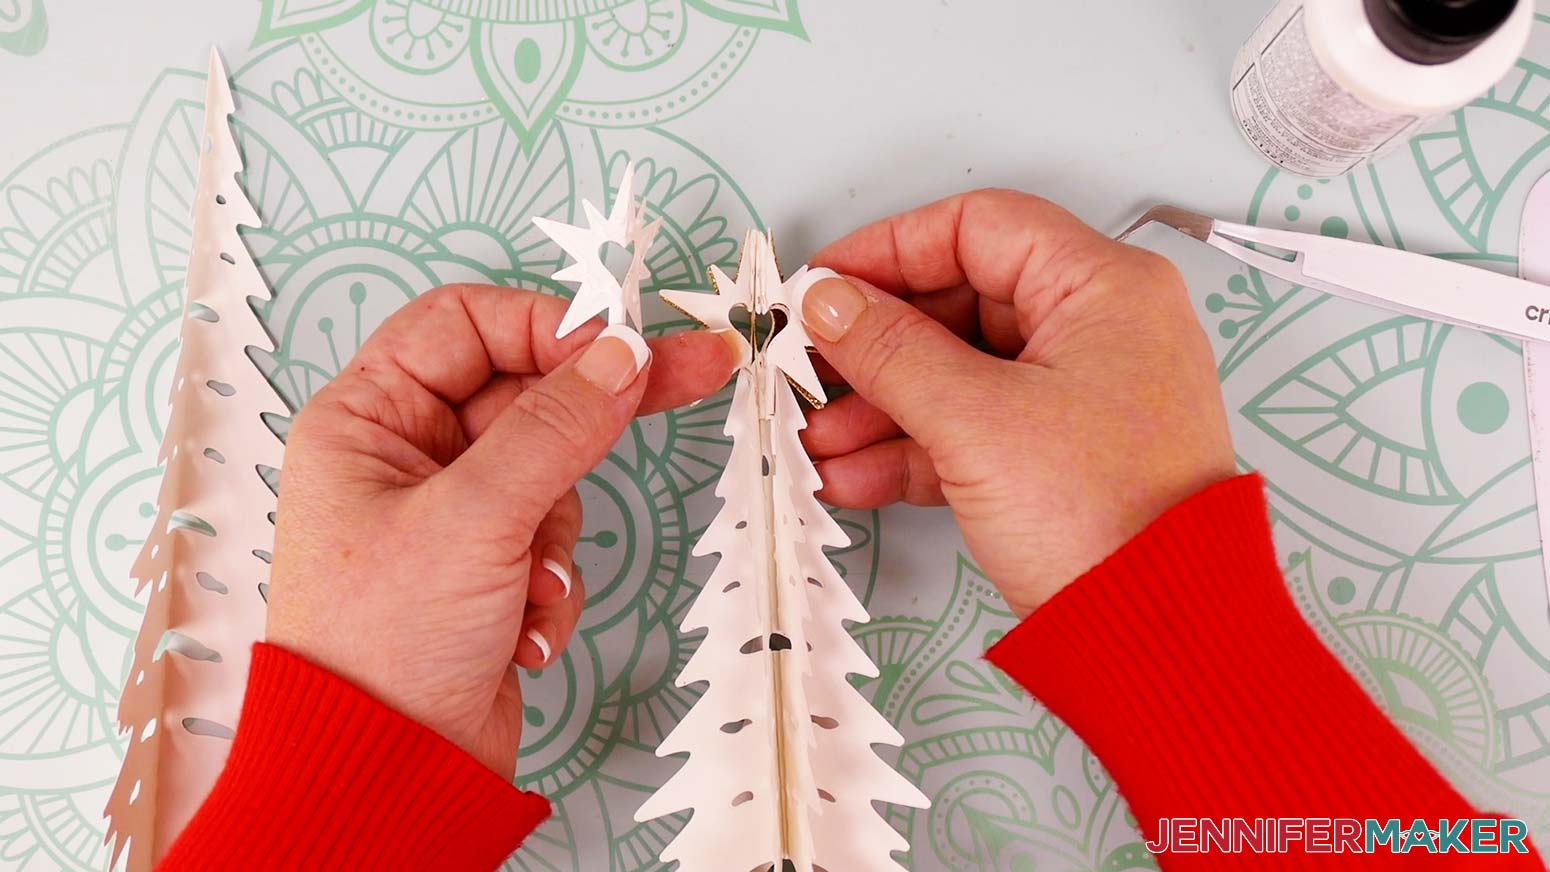
3. Add glue to the small rectangular base of a star piece, on the front (glitter) side.
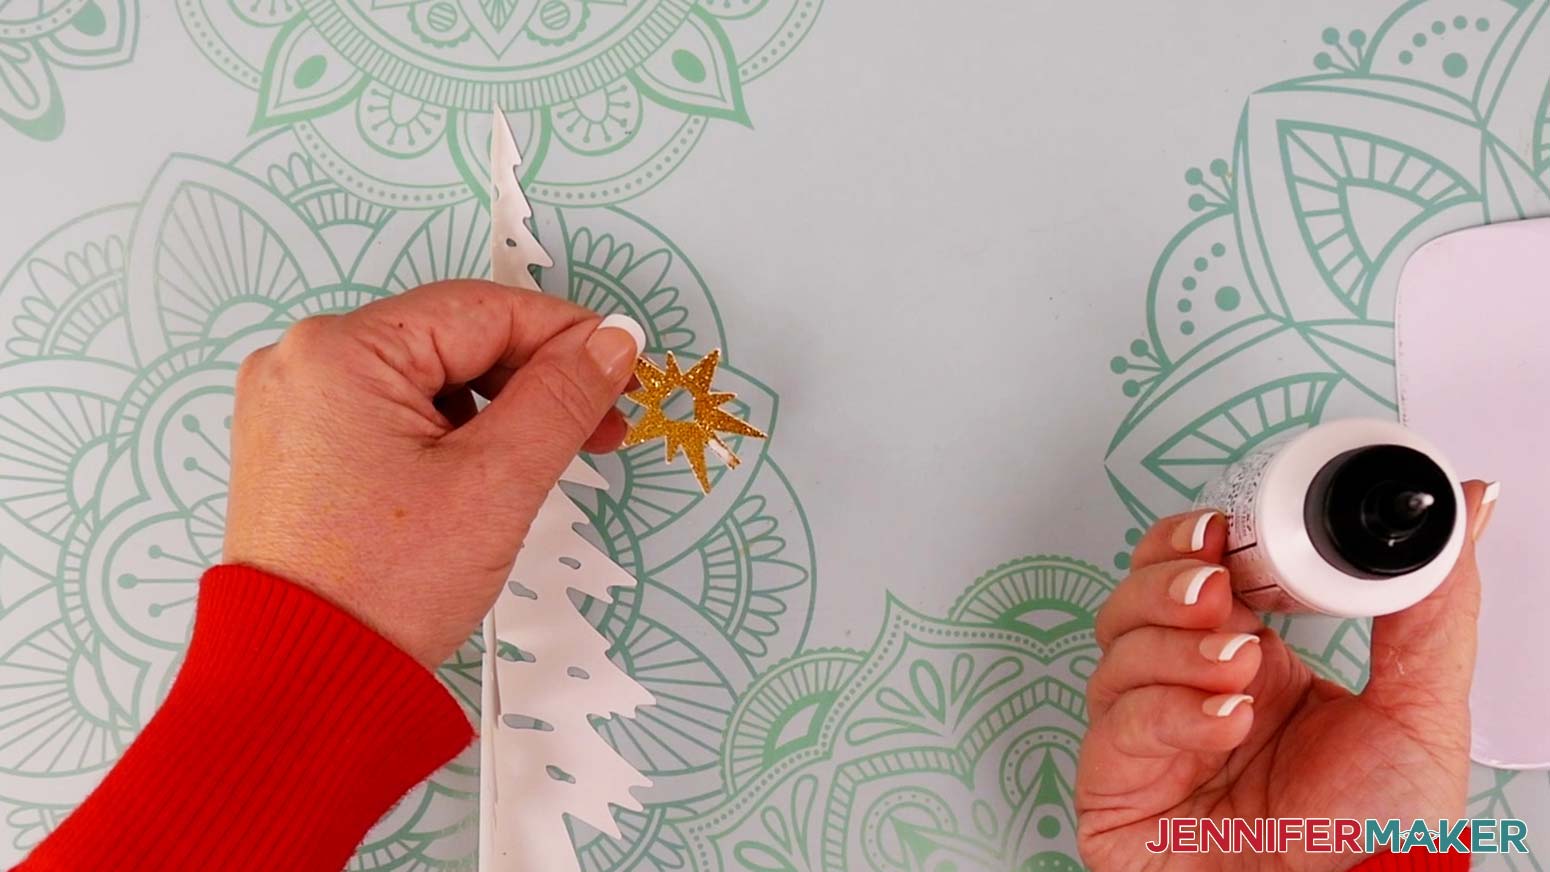
4. Attach the star piece to the top of a tree piece so the rectangular base is behind the top of the tree.
5. Make sure the folds are aligned and the glitter side of the star is face out.
6. Hold the star in place until the glue dries (at least 10 seconds).
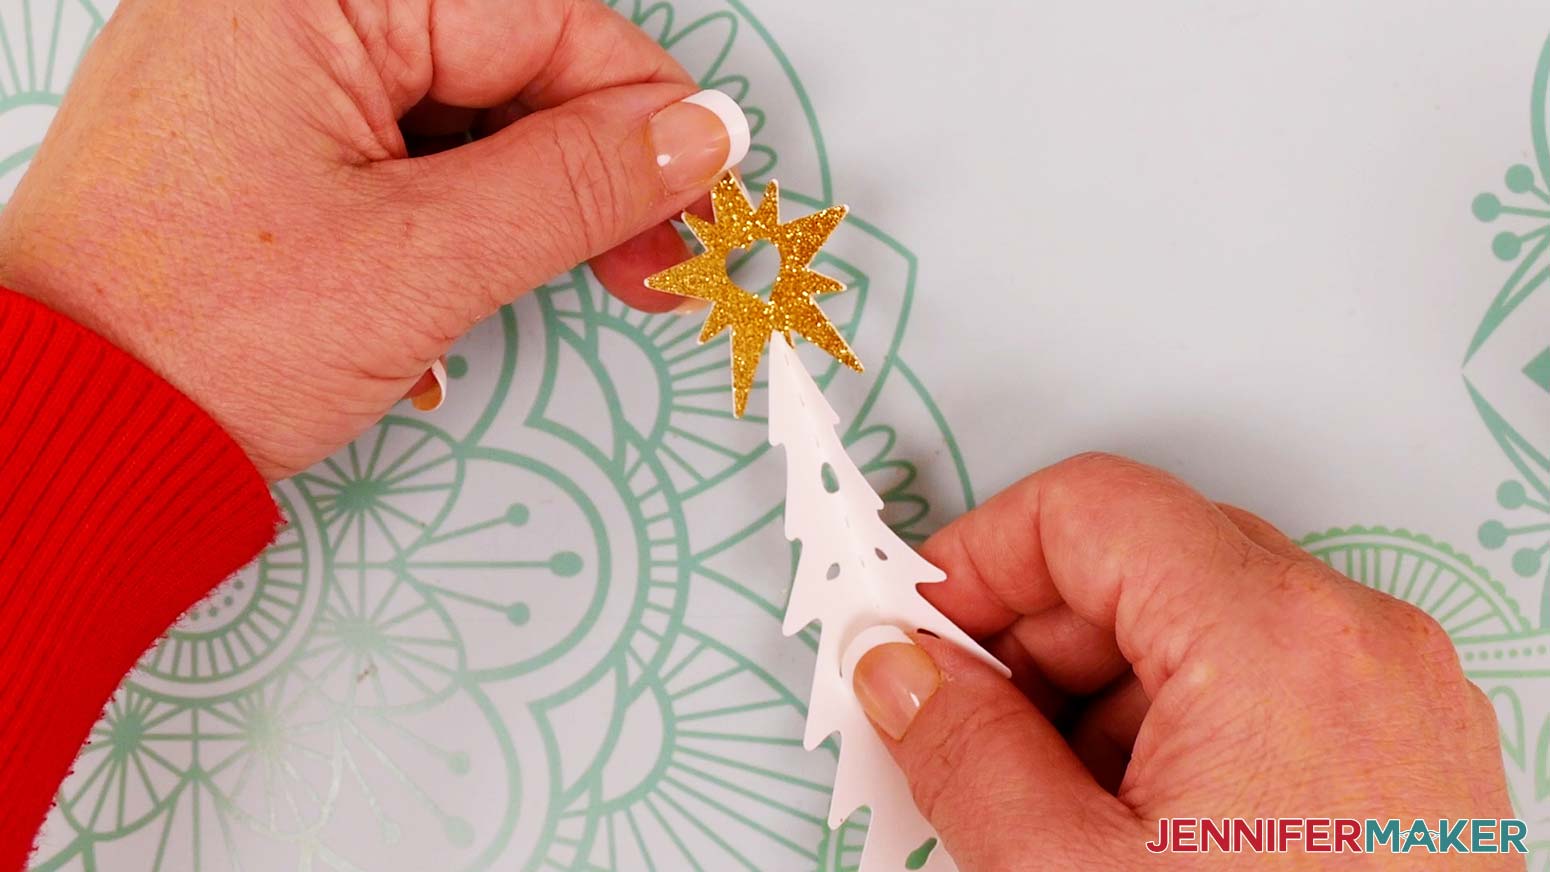
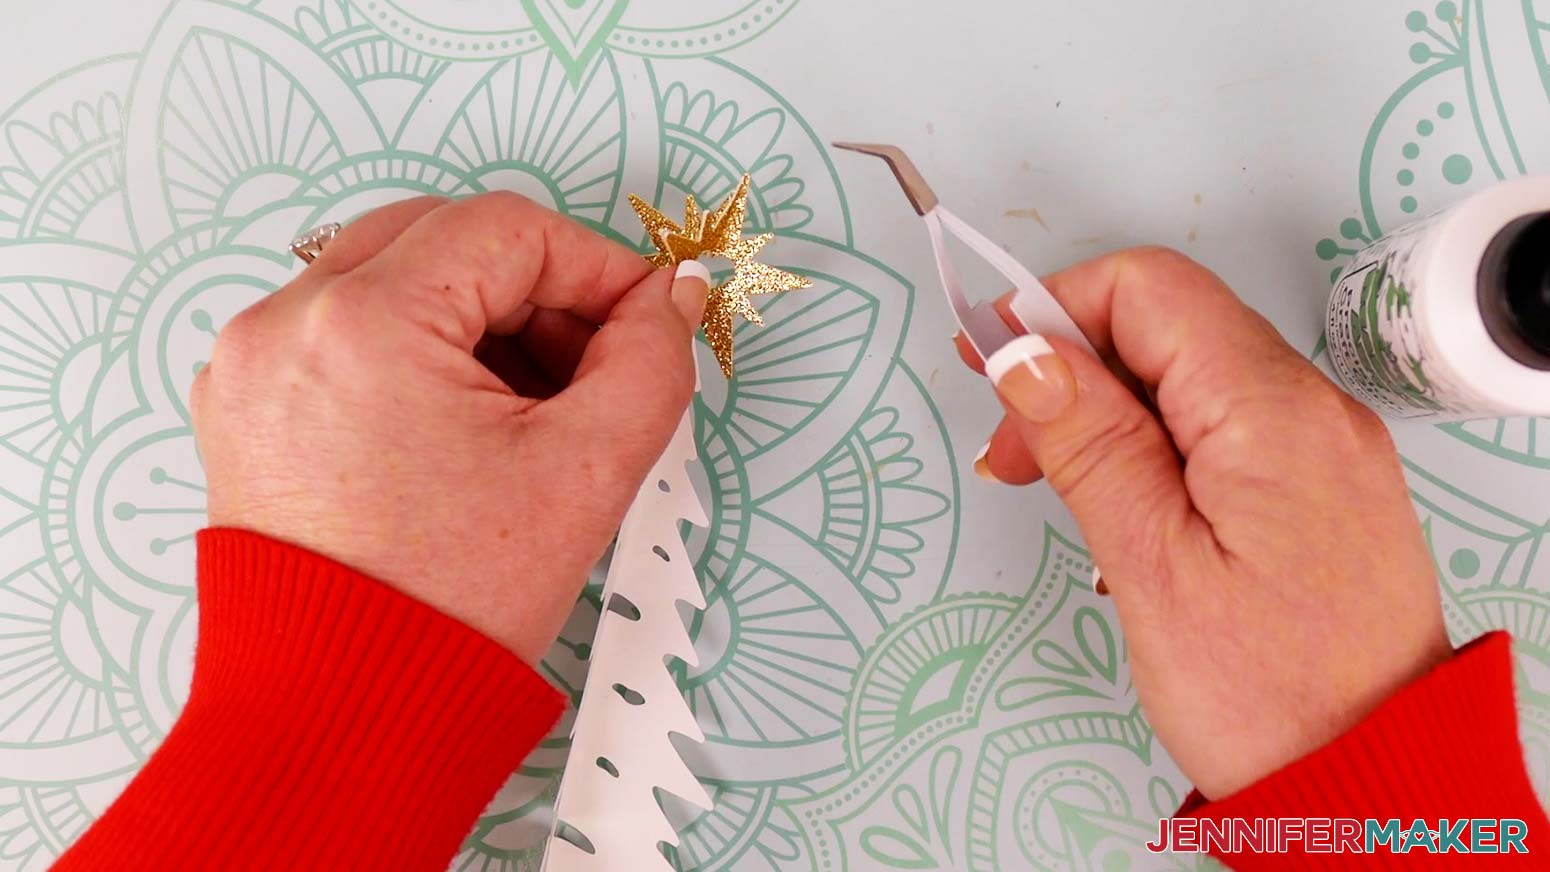
TIP: The reverse-action tweezers can keep the star right in position without getting glue all over your fingers!
7. Add glue to one half of another star piece on the back (plain) side, avoiding the heart-shaped cutout. Make sure to get the very tips of the star points.

8. Attach the glued section to the back of one half of the first star piece, aligning the halves as close as possible at their edges.
9. Add glue to one half of another tree piece on the back side, avoiding the cutouts. Make sure to include the very tips of the branches.
10. Attach the glued section to the first tree piece on the same side as the attached star, aligning the tree halves at their edges. Make sure all the tips and cutouts are lined up before the glue dries.
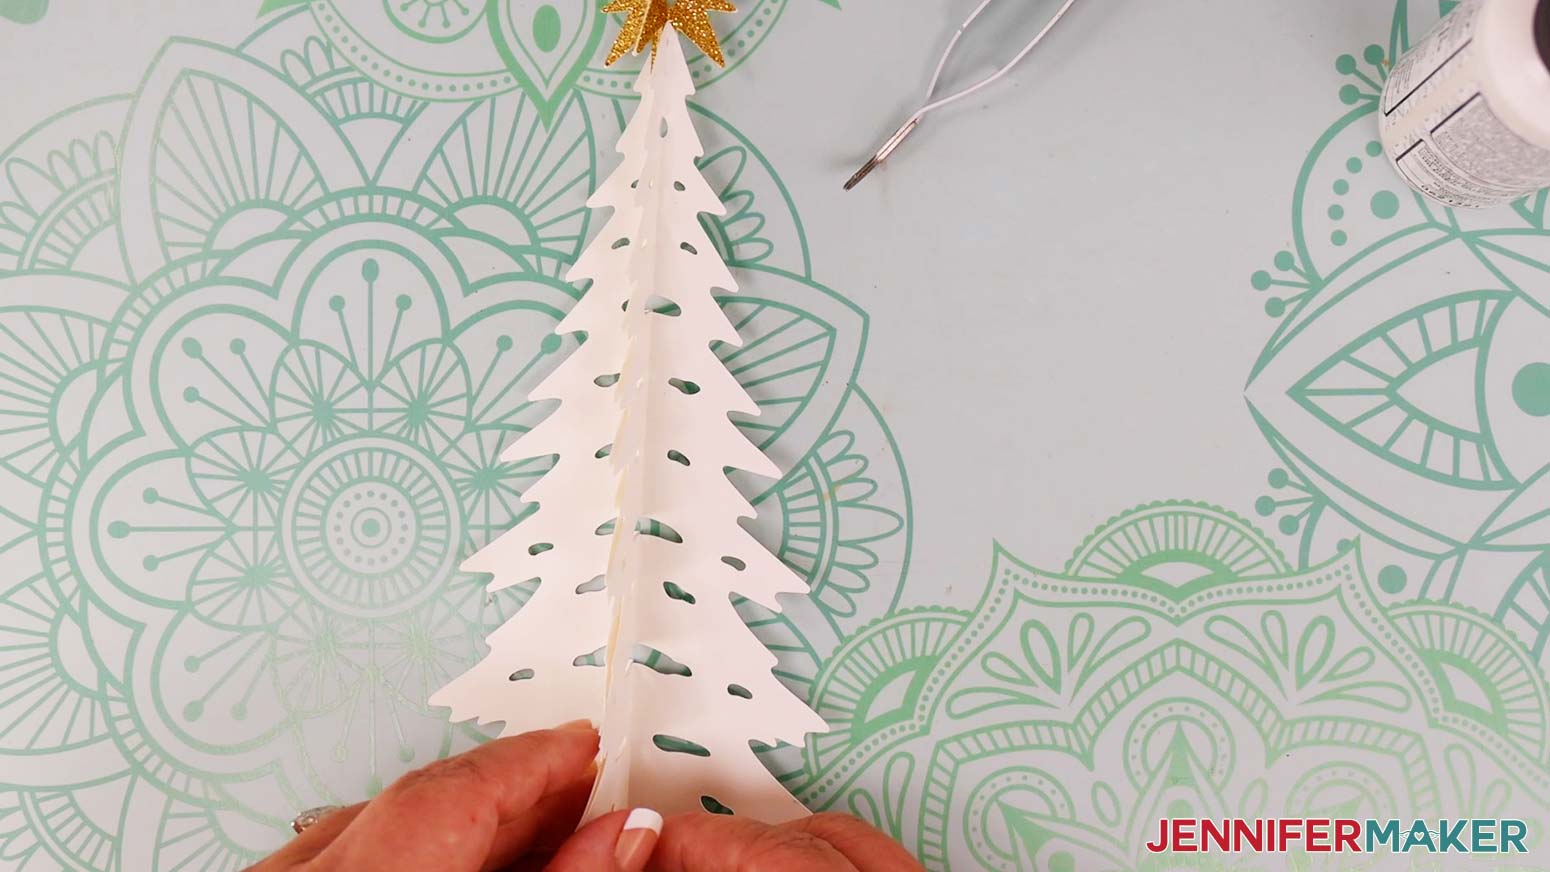
TIP: The pieces are symmetrical and should line up perfectly at their edges no matter which half you started with.
11. The base of your first star piece should now be sandwiched between the two tree halves. All pieces will be sandwiched together like this, making each side of the star and tree twice as thick.
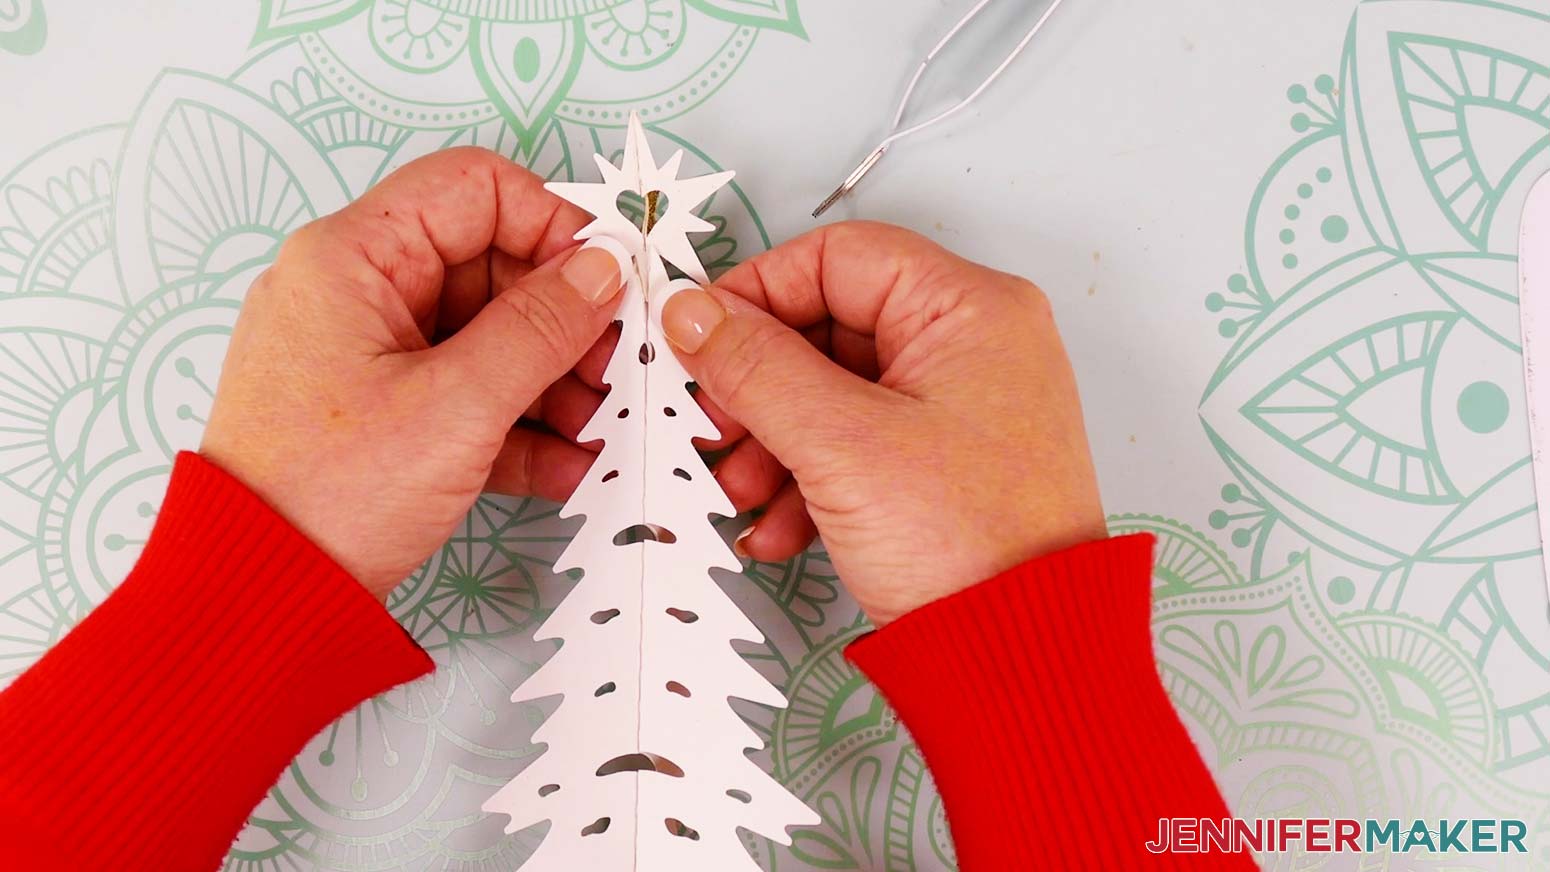
12. Continue attaching star and tree pieces in the same order (star half first, tree half second) until you have one star piece and one tree piece remaining.
13. When you get to the last star piece, glue both halves onto their corresponding star backs attached to the tree.
14. Do the same thing with the last tree piece to complete the 3D shape. Your tree should now have six sides.
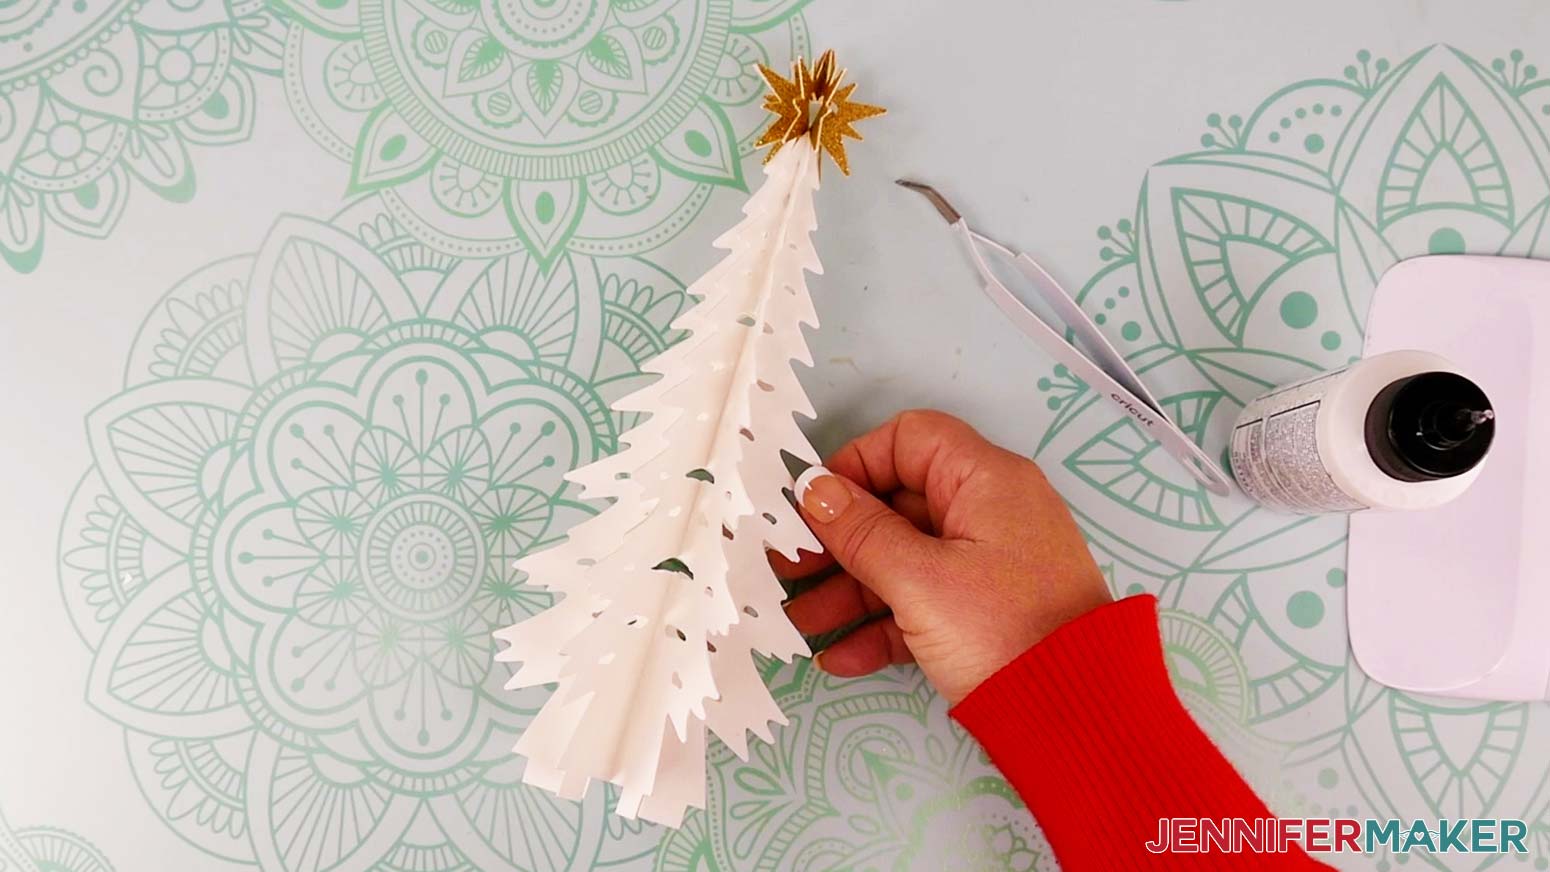
15. Fold all the tabs at the bottom of the tree in the same direction.

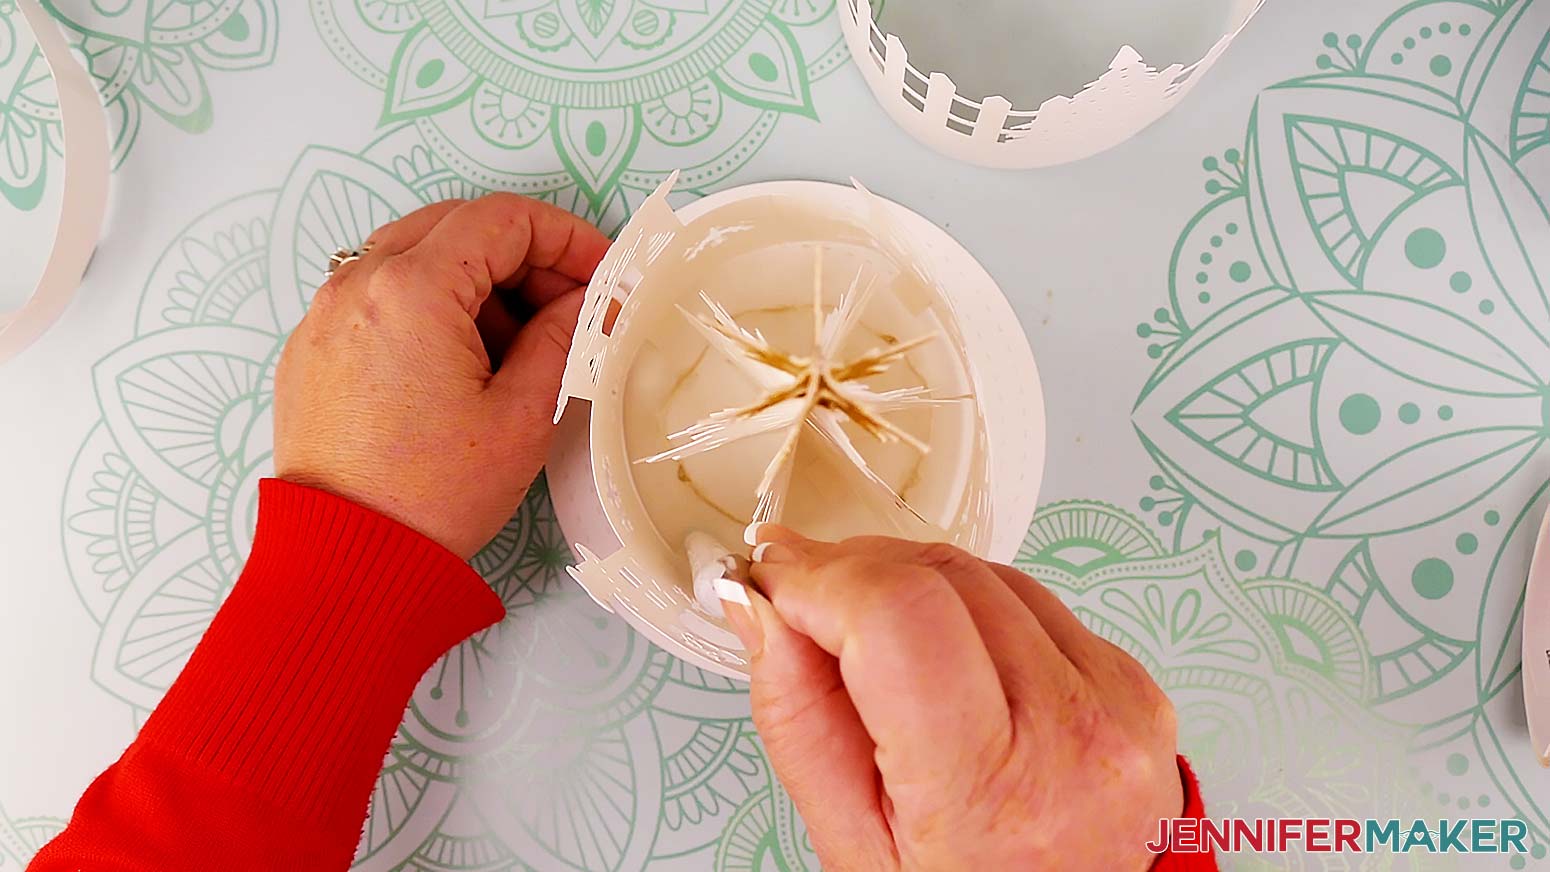
16. Find the circular base piece. You will notice an “X” shape in the center.
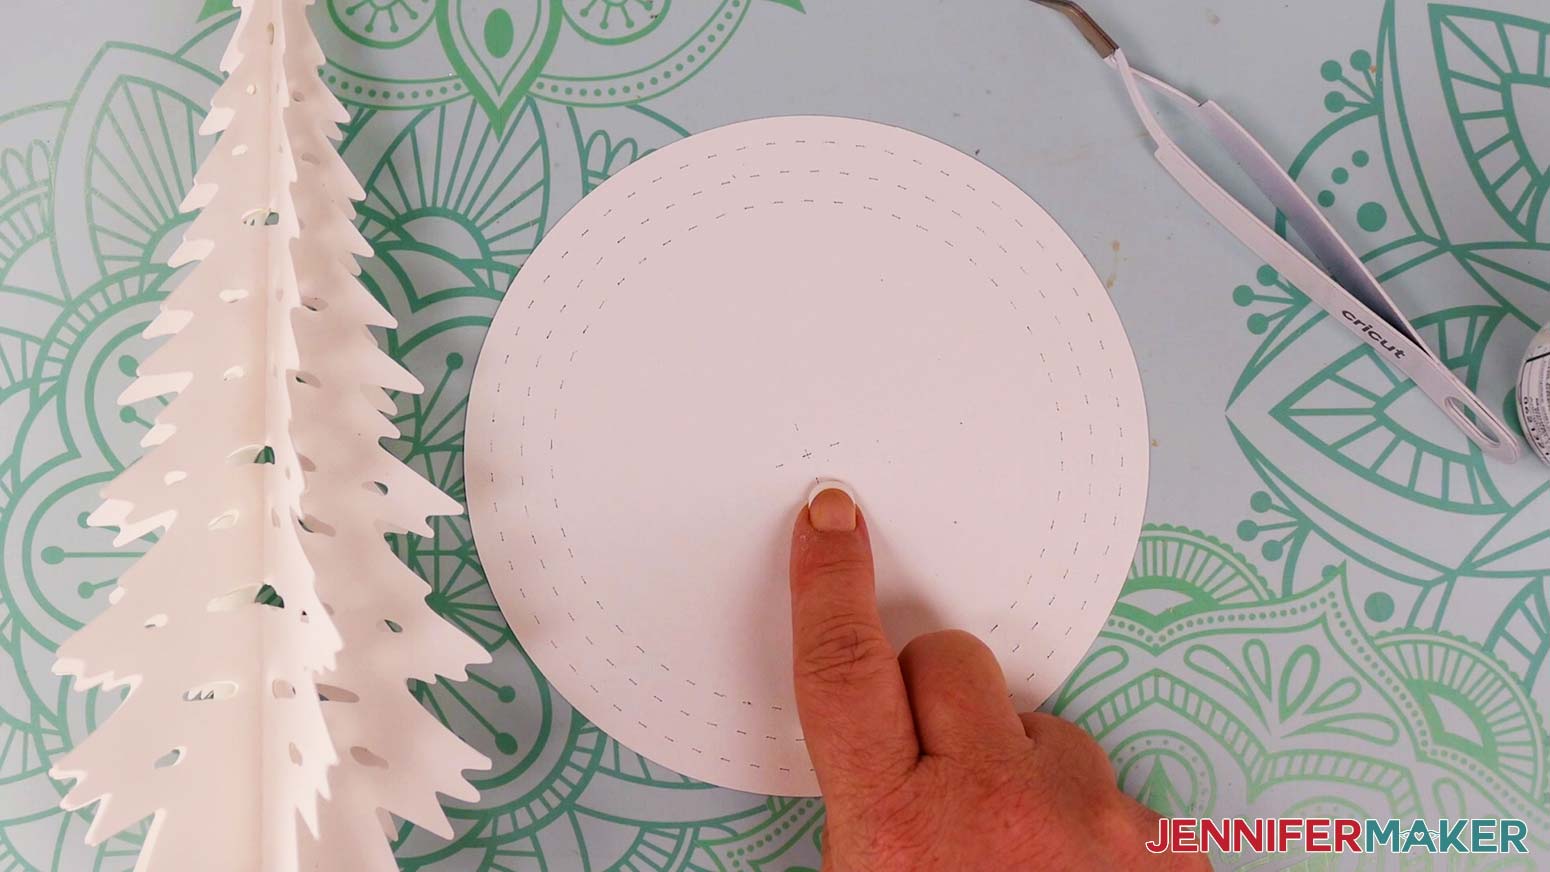
17. Add glue to the bottom of the six tree tabs.
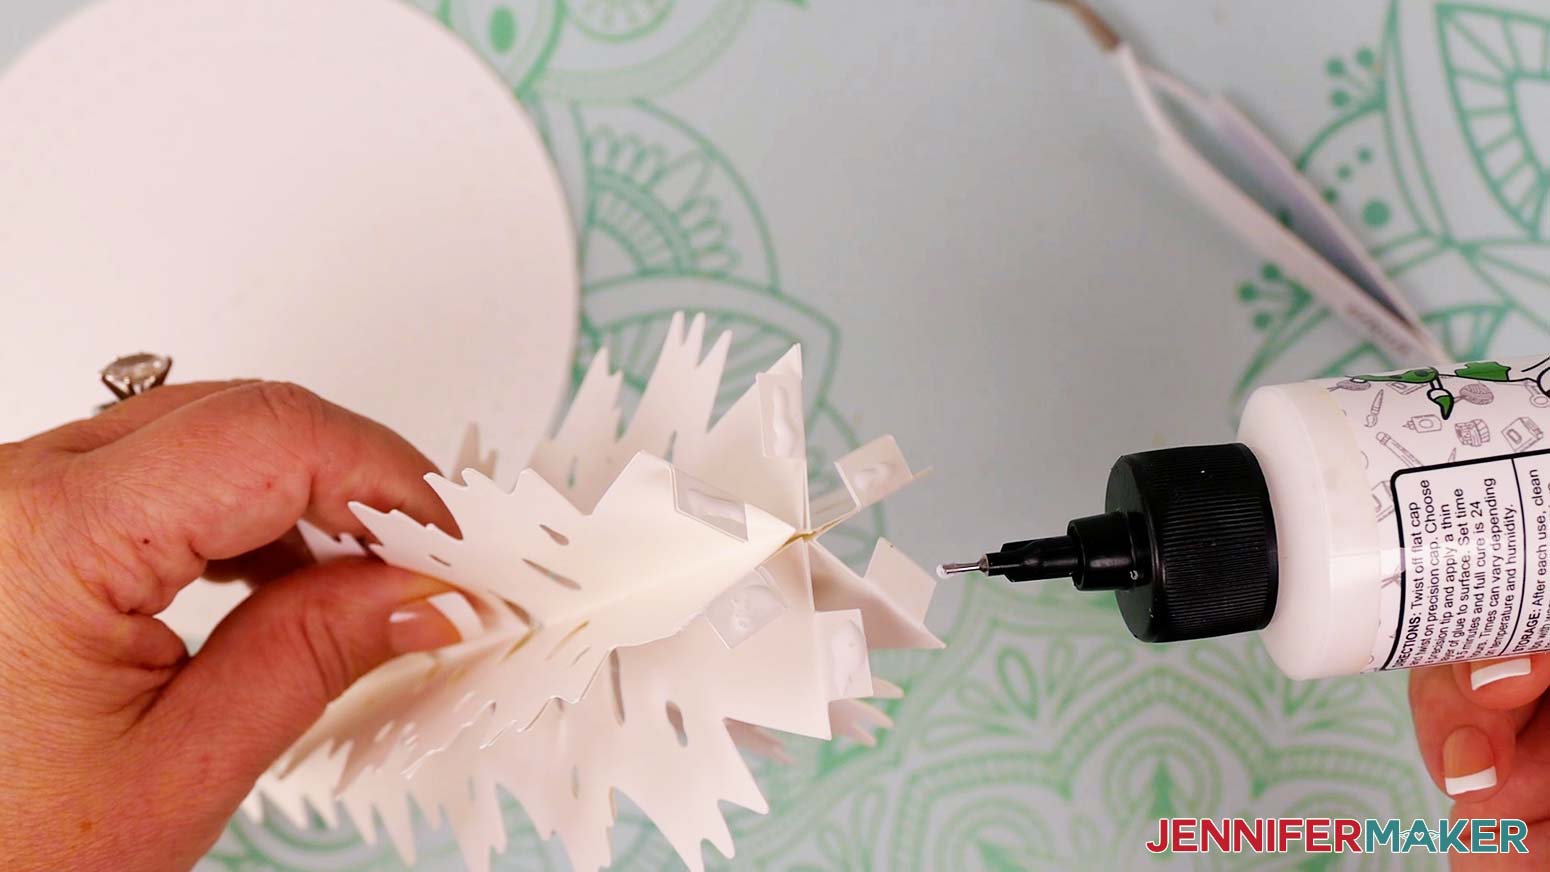
18. Place the assembled tree in the center of the circular base so it’s lined up with the “X.” Press down to adhere the tabs.
ATTACH THE LAYERS AND LIGHTS
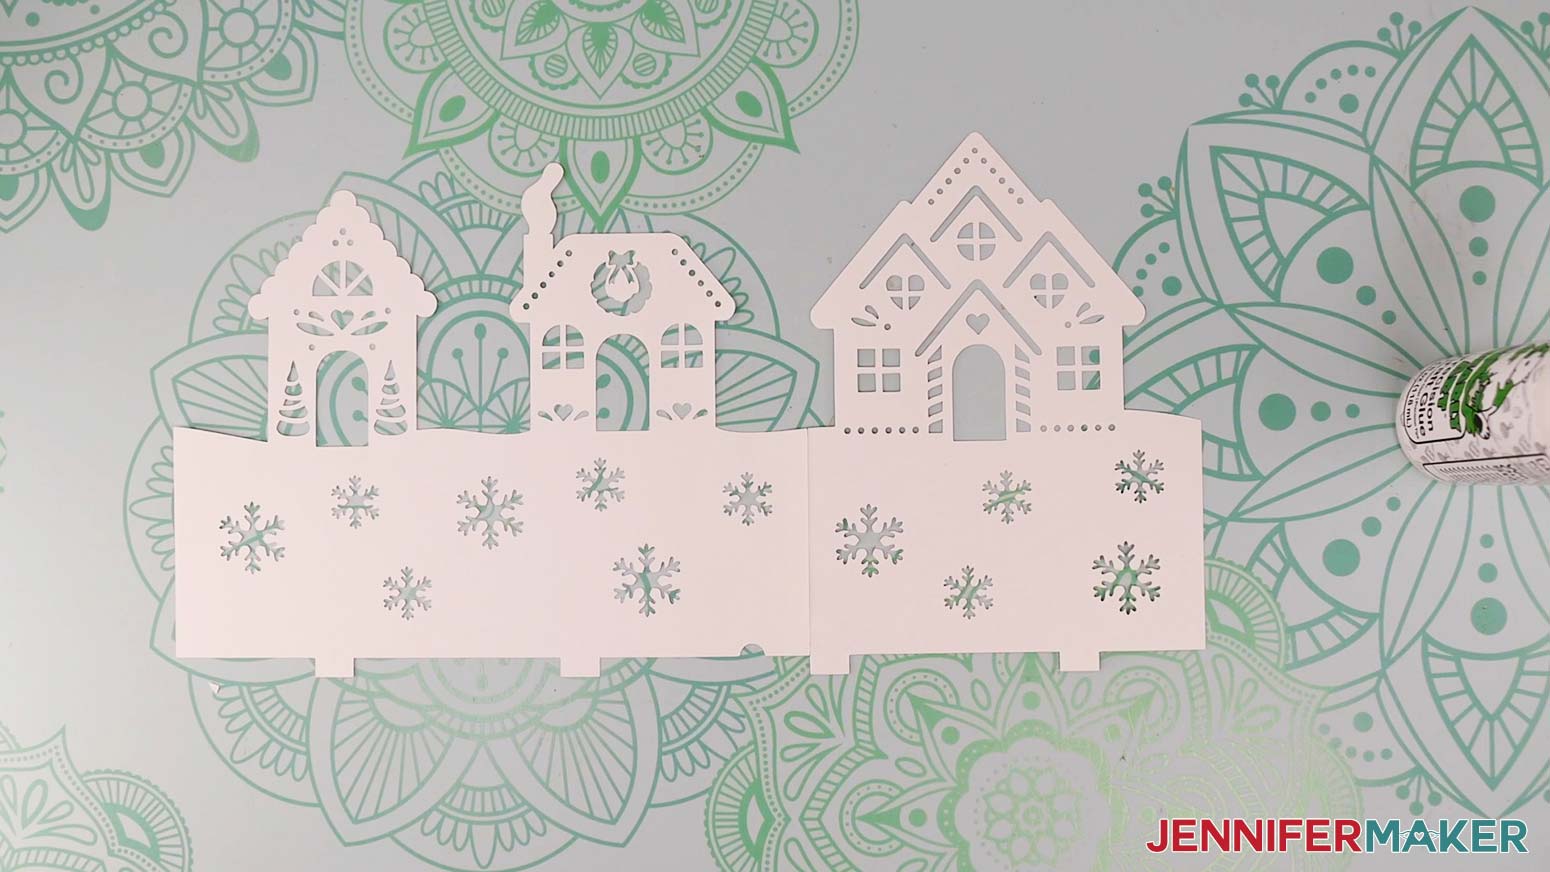
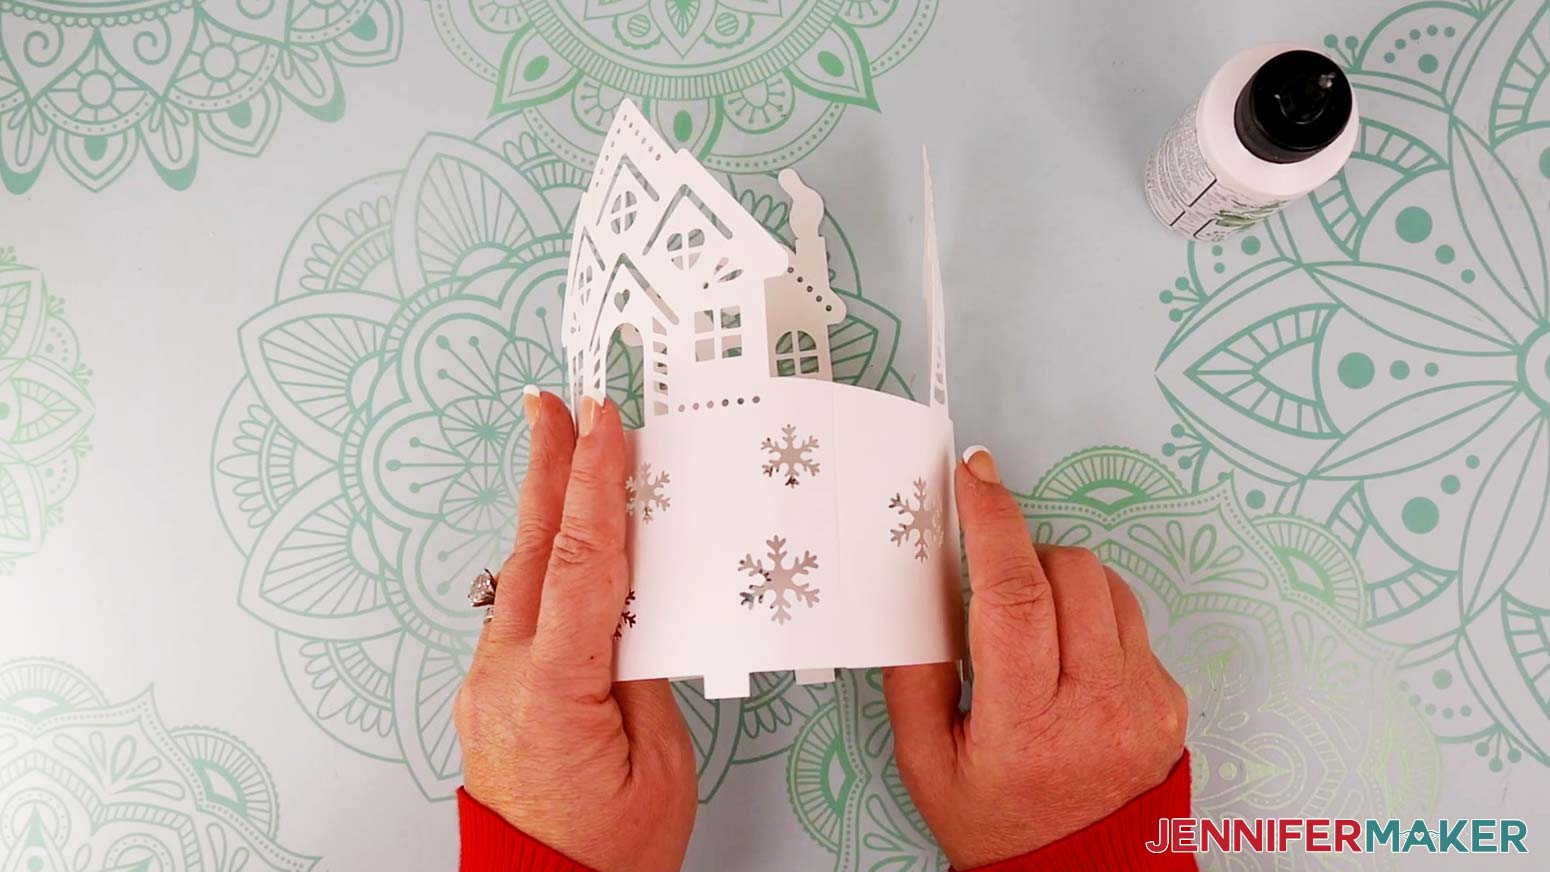
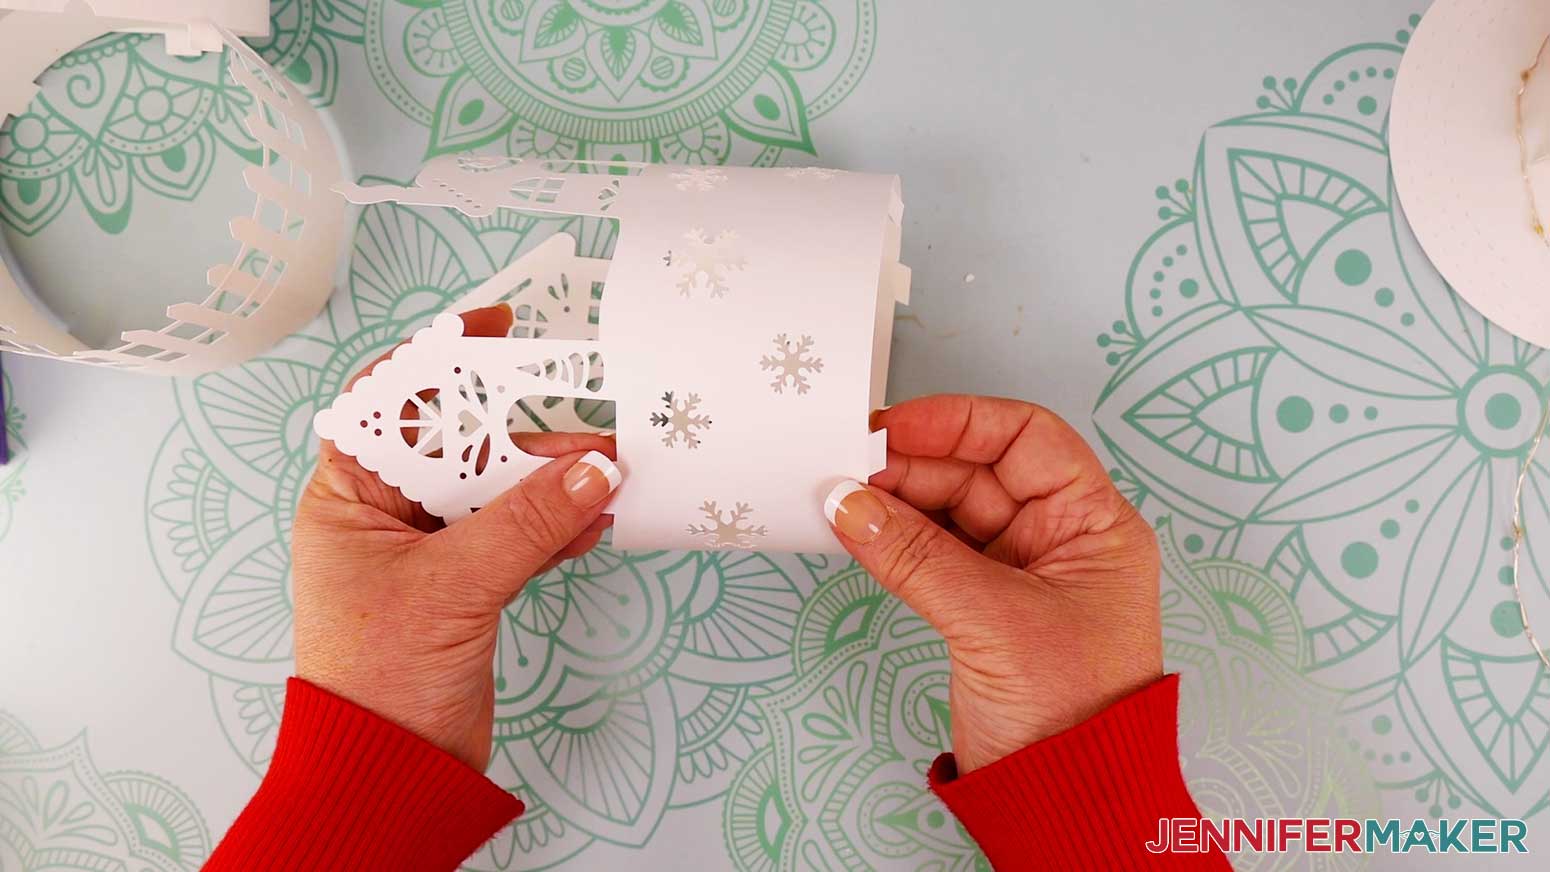
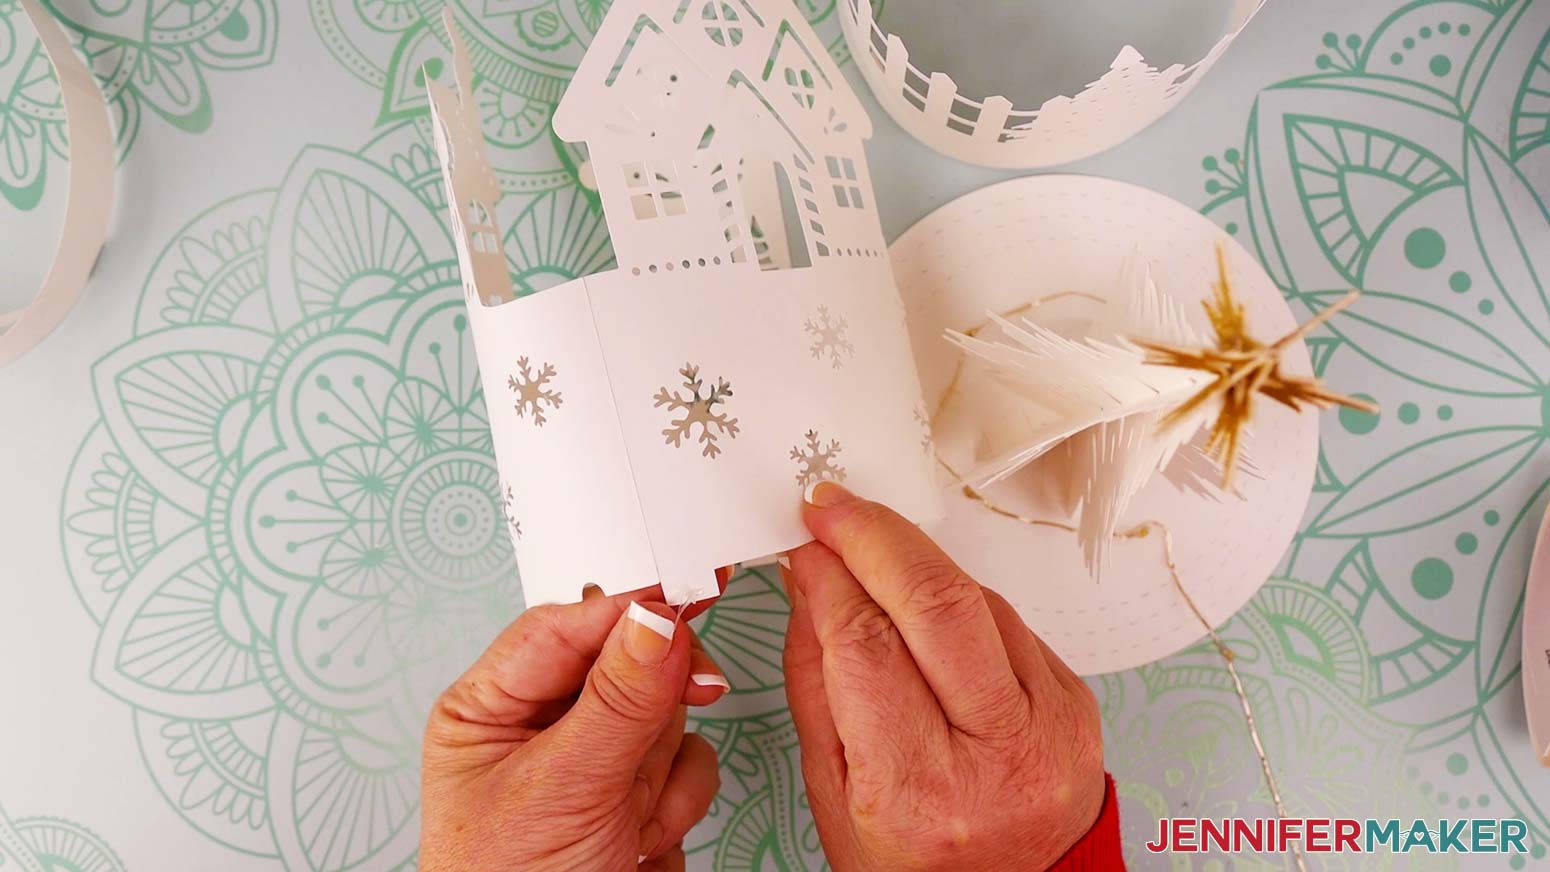
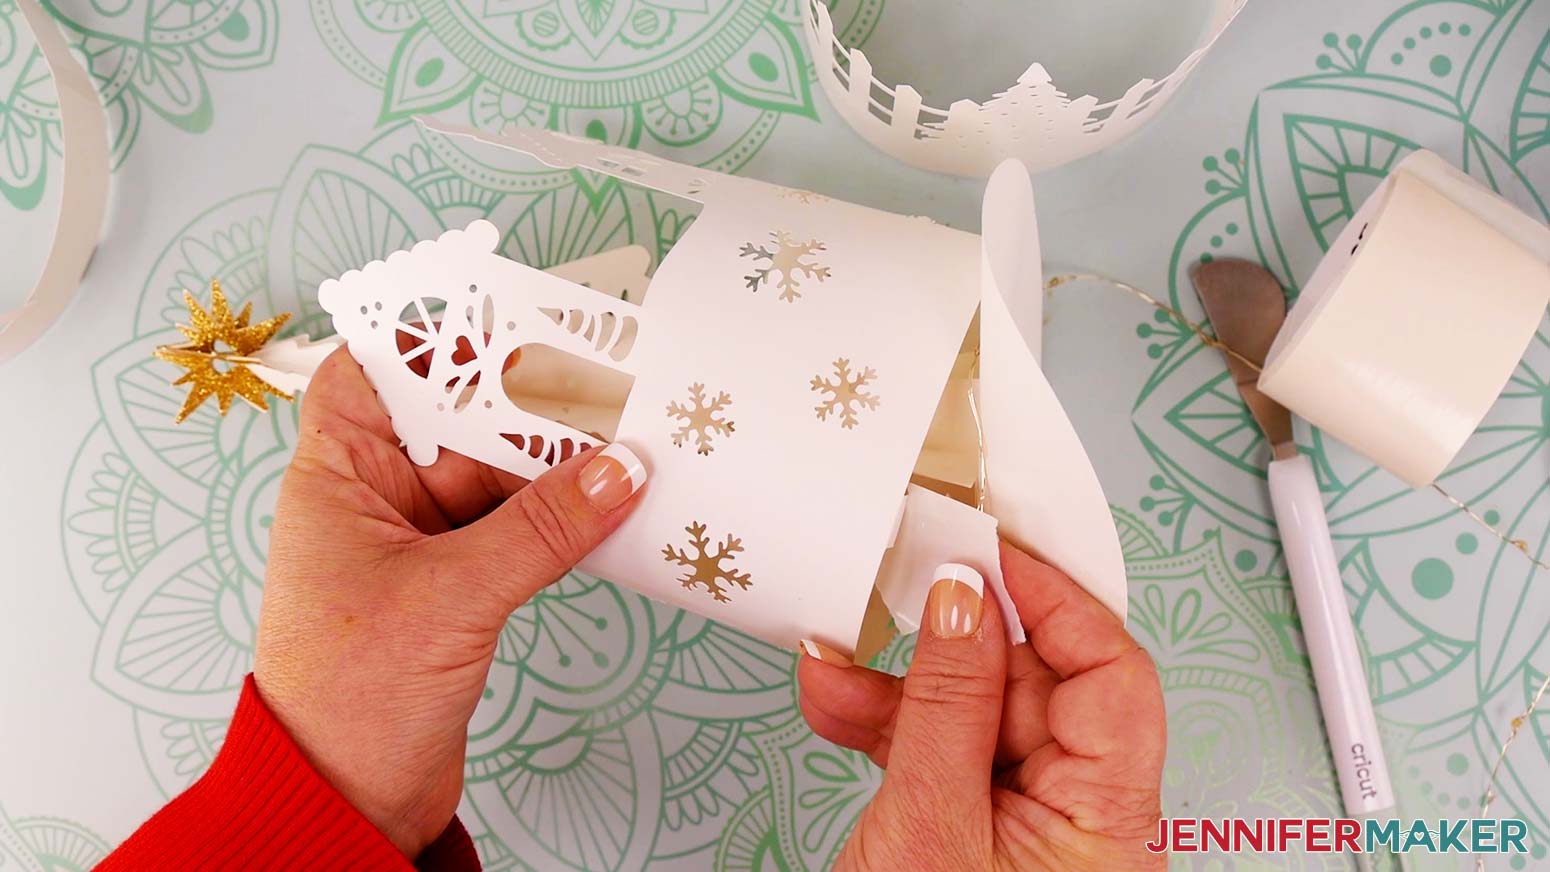
1. Find the two pieces for the innermost layer. These are the ones with houses on them.

2. Glue the two pieces together using the center tab. The large house will go on the right and the two smaller houses will go on the left.
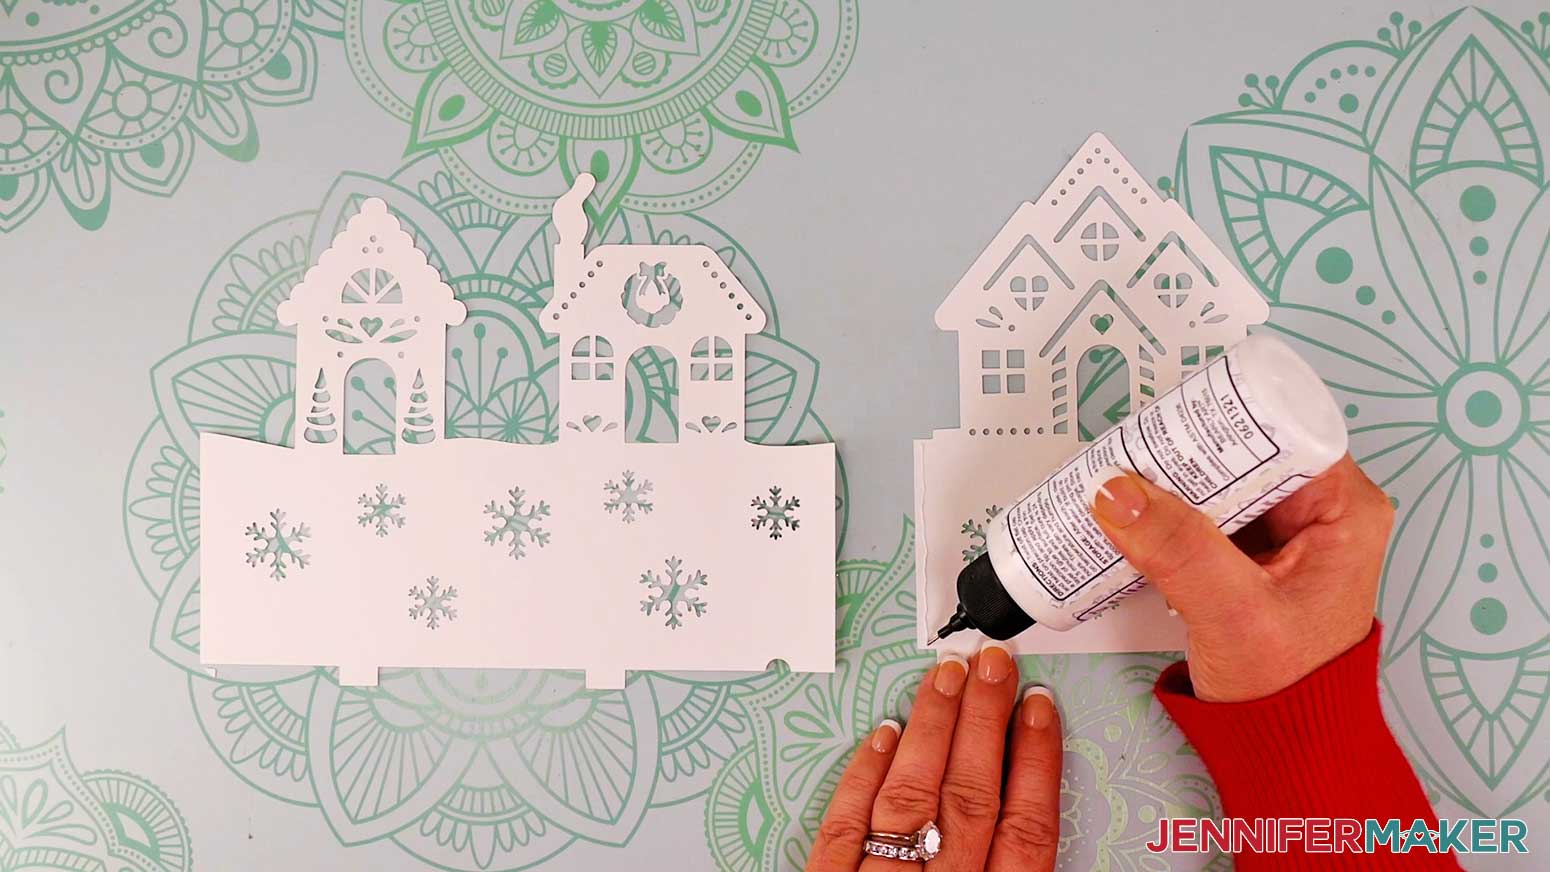
TIP: Refer to the SVG on your Design Space Canvas for help determining the correct position of the pieces.
3. When aligning the pieces, make sure the tops and bottoms of the snow areas are level with each other. The edge of the left piece shouldn’t extend past the small tab on the bottom of the right piece.
4. Gently roll the assembled layer lengthwise to create a soft curve.
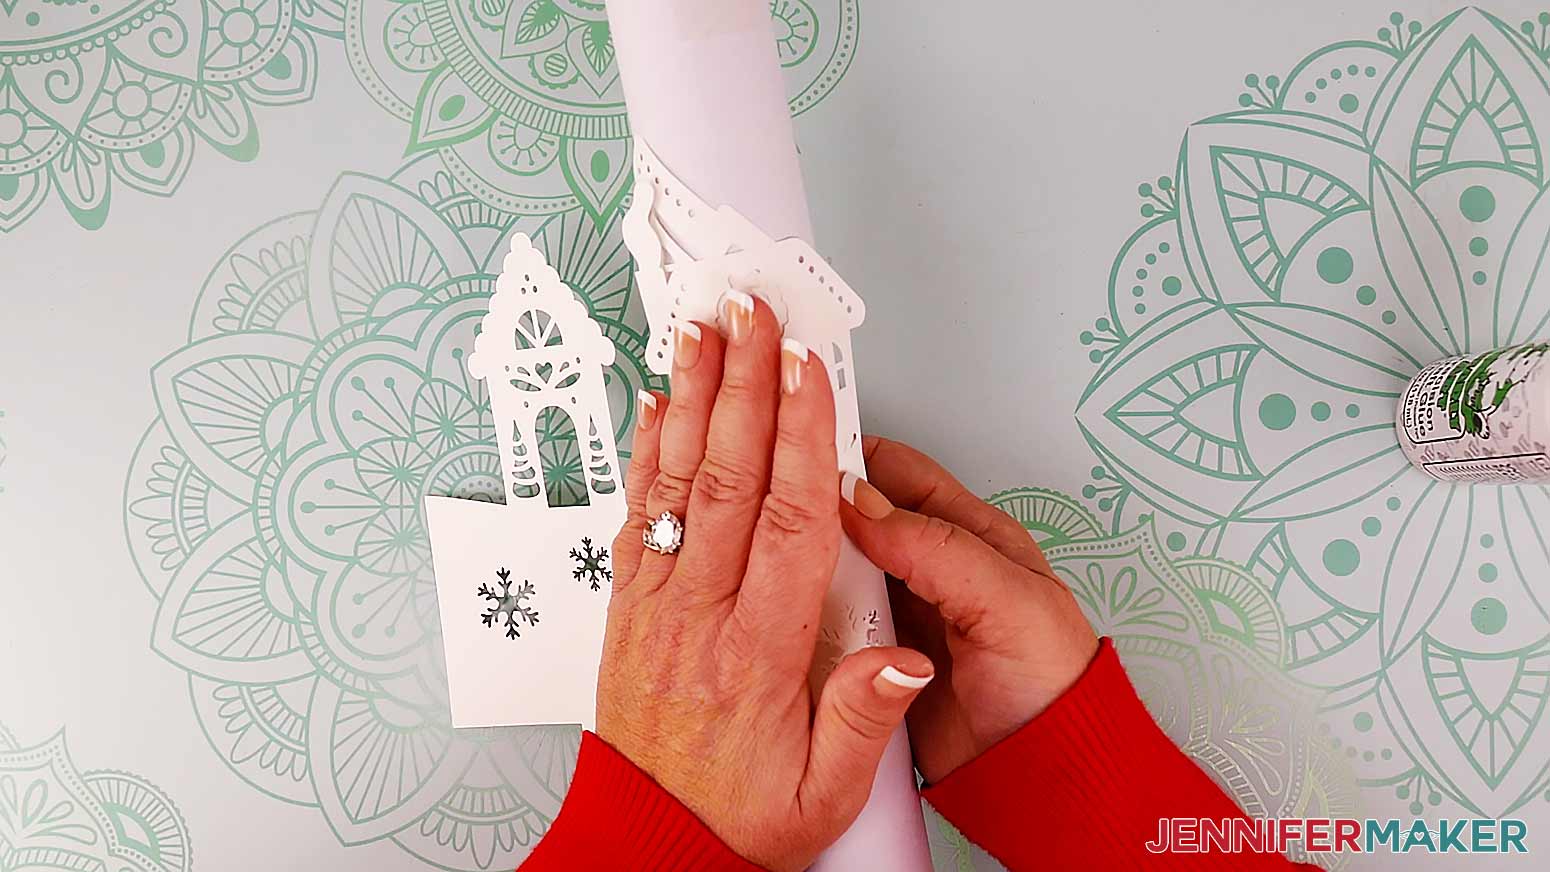
TIP: You can use a cylindrical object, such as a tube of vinyl, to help with this.
5. Glue the ends of the layer together to form a ring or cylinder shape. Overlap the glued ends by about 0.25” (it doesn’t matter which end goes on the inside of the ring).
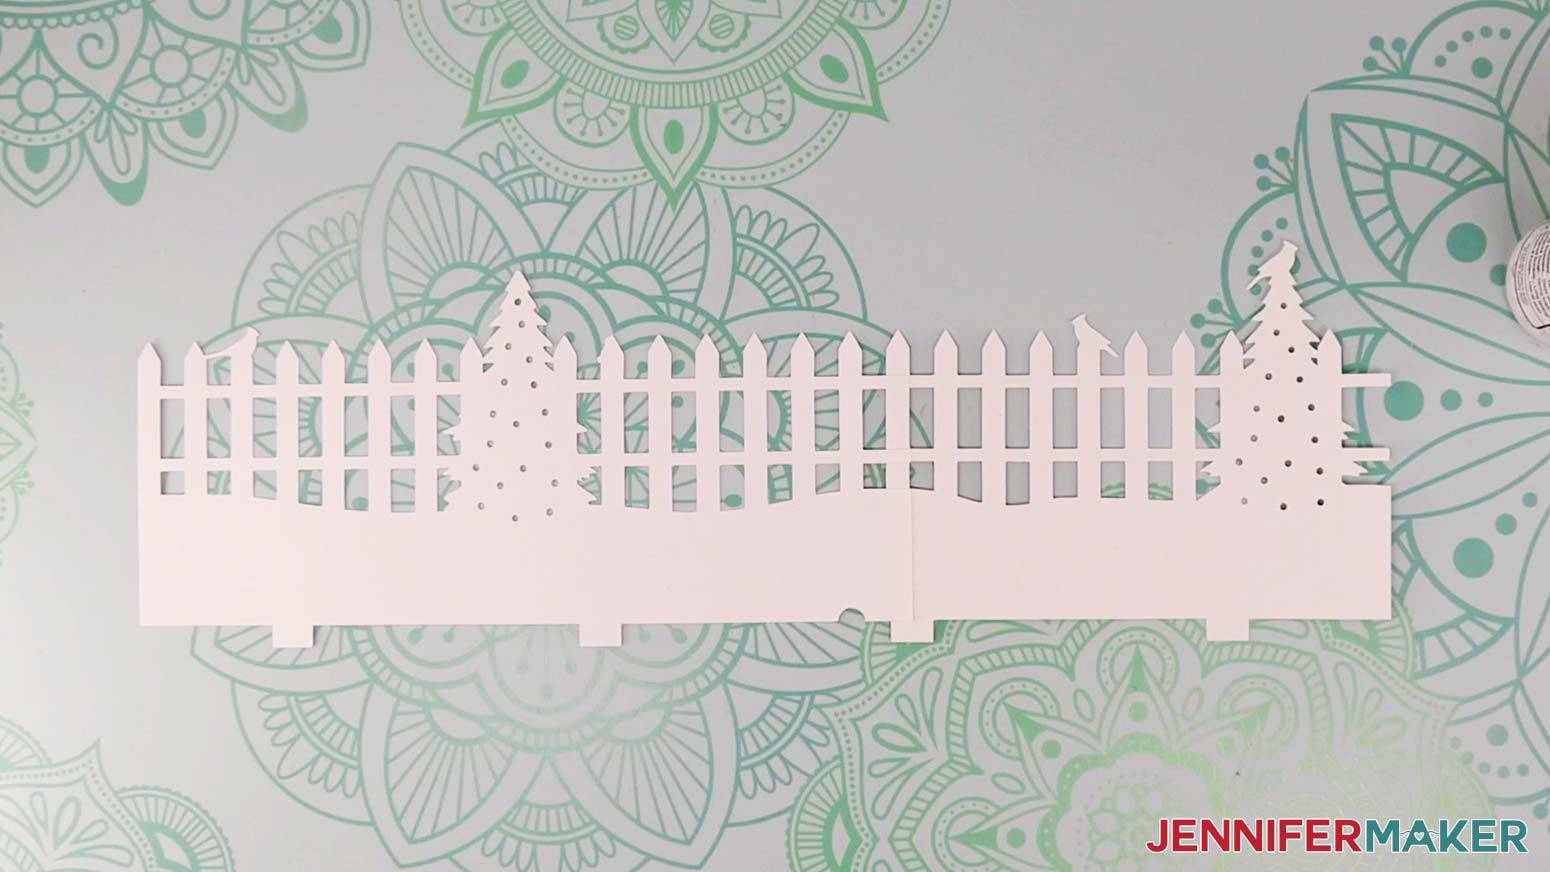
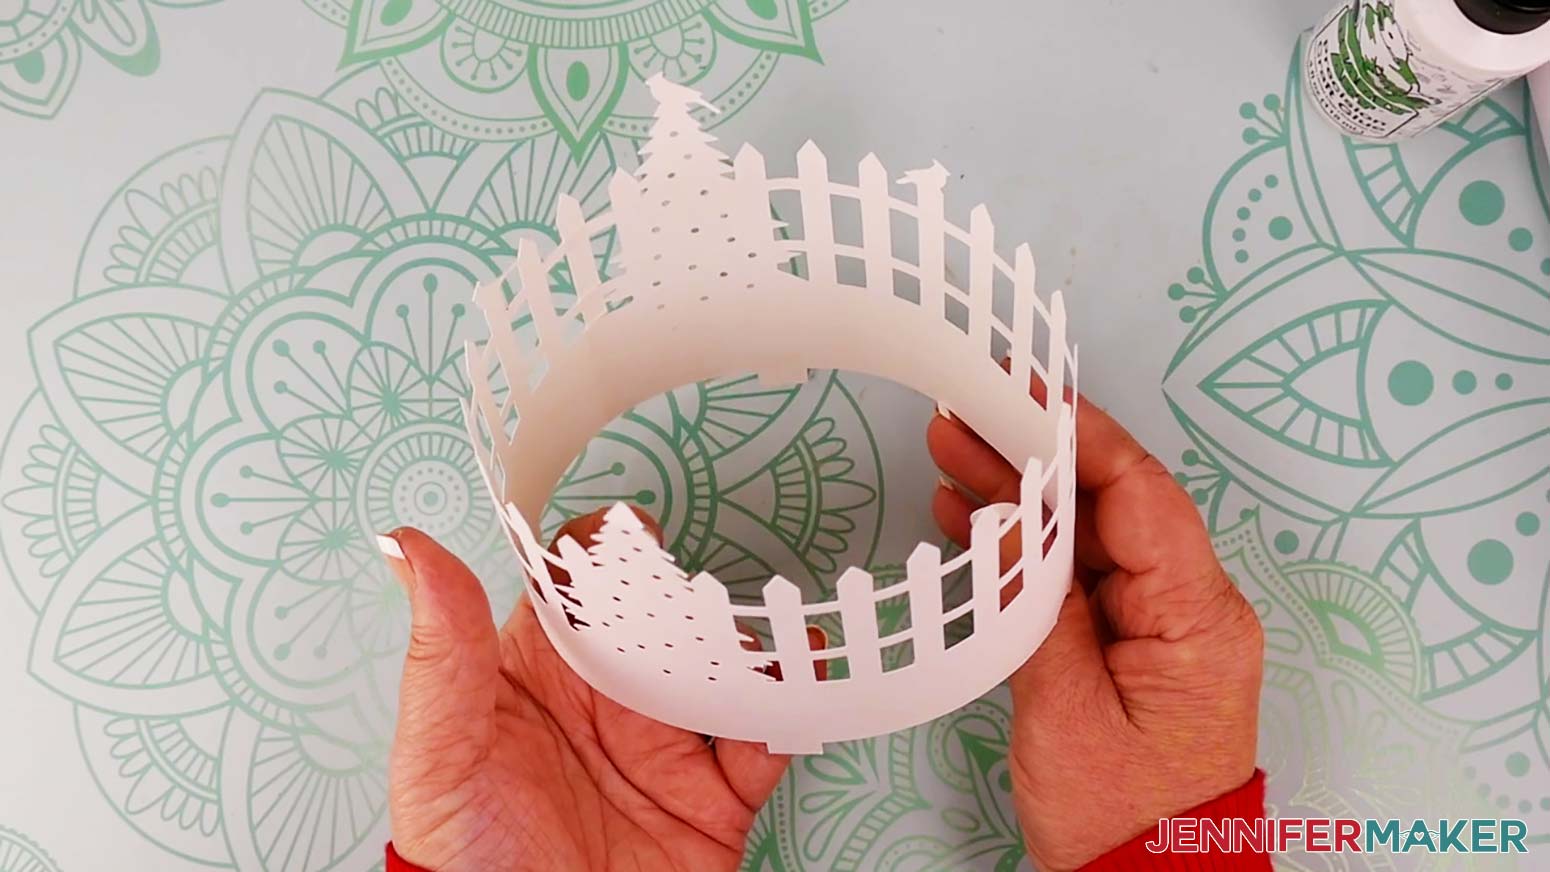
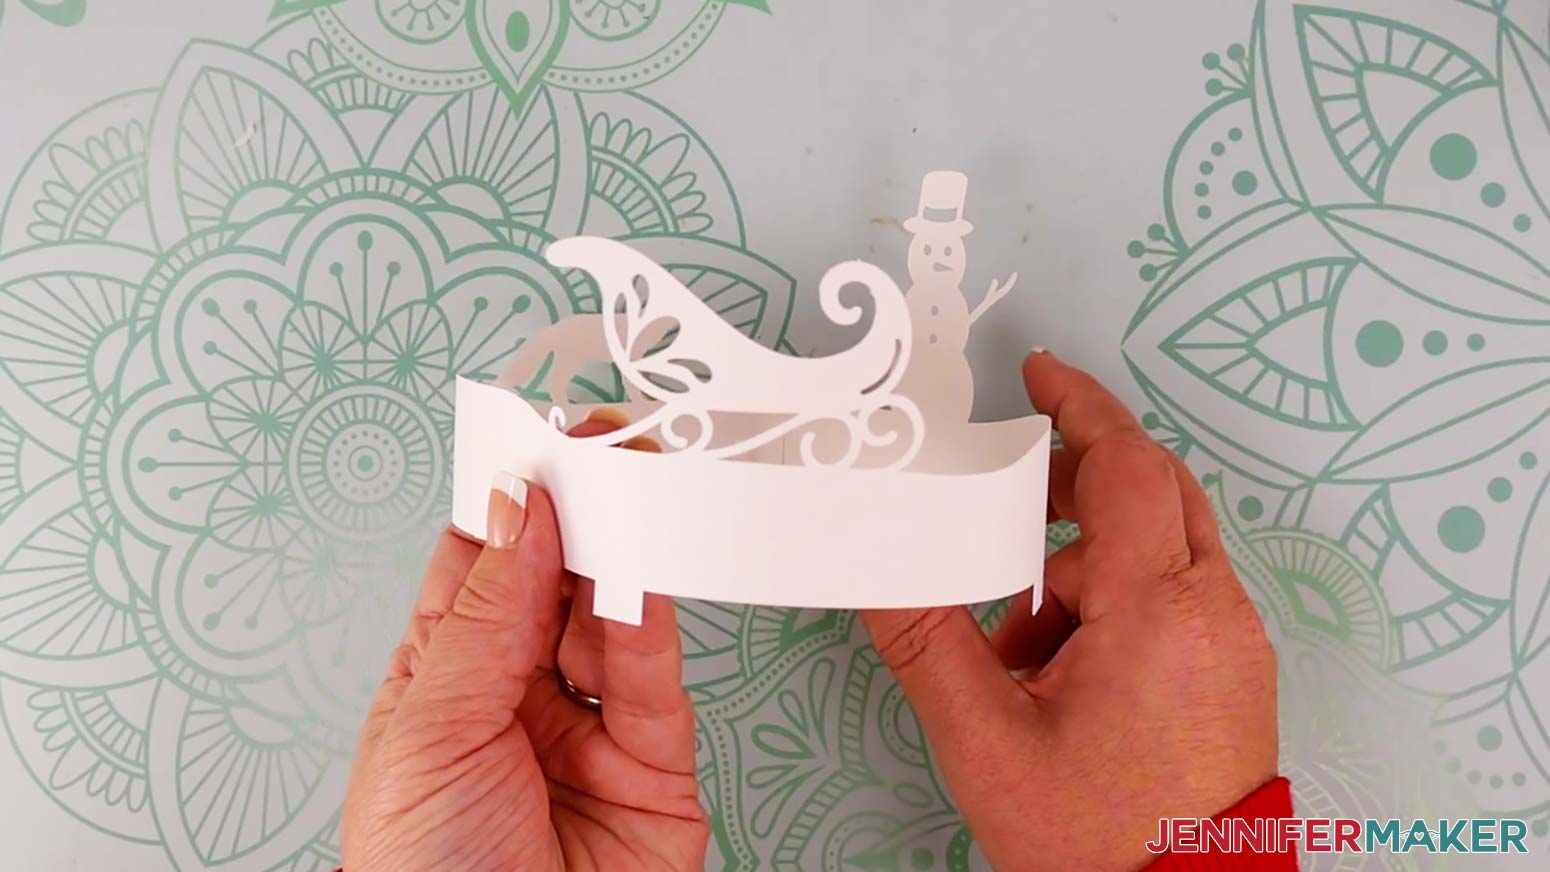
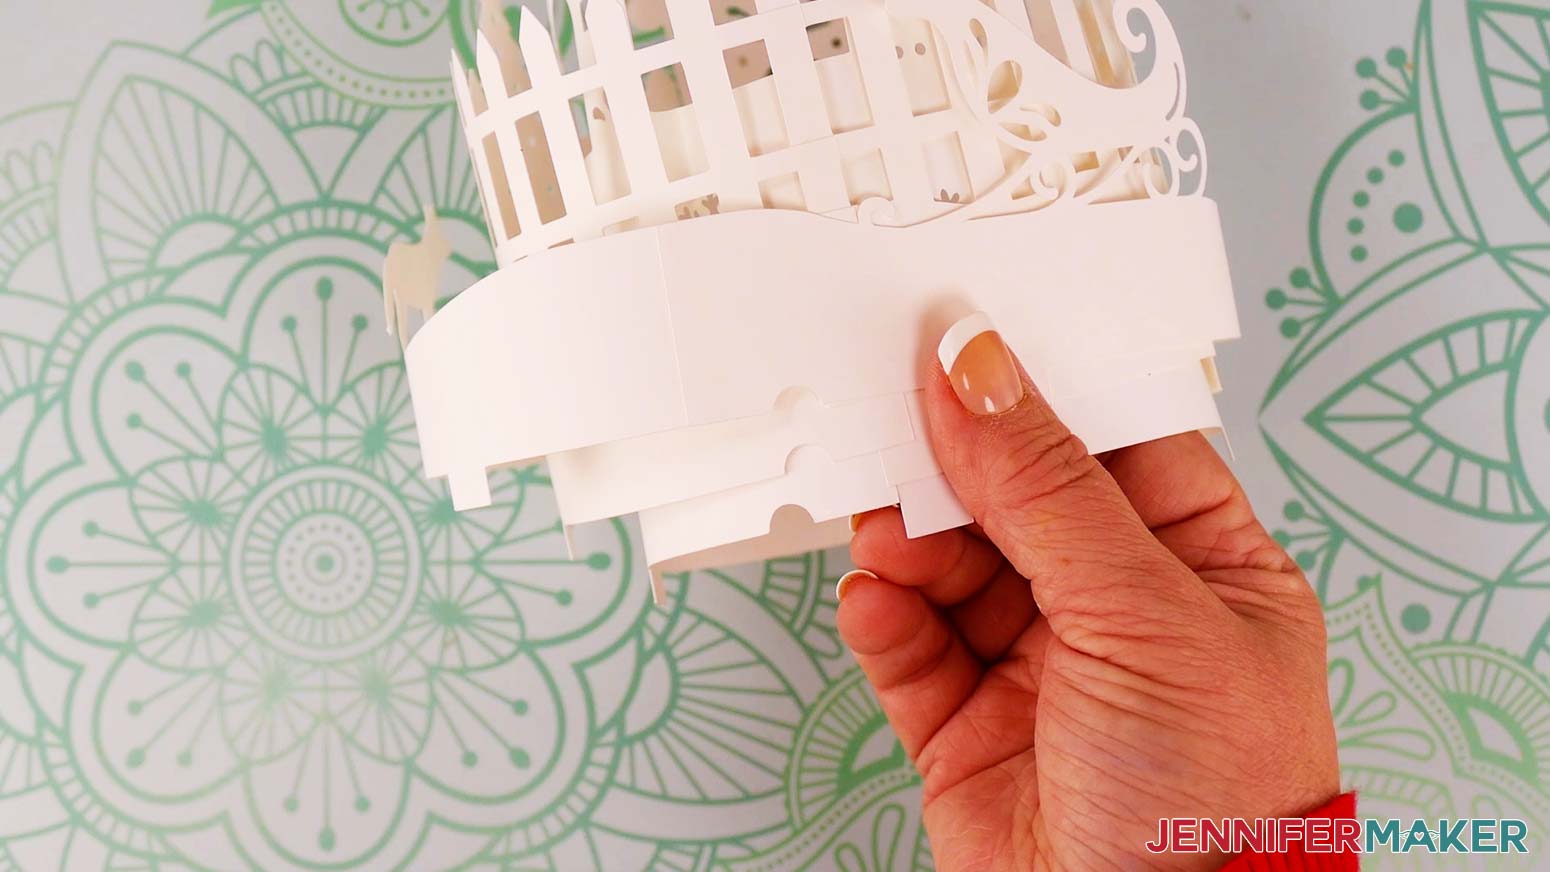
6. Repeat steps 2-5 for the middle (fence) layer and outer (sleigh/snowman) layer. Refer to the design on your Canvas if needed.
NOTE: When attaching the fence pieces together, the fence posts on the left end of each piece will overlap on top of the horizontal slats on the right end of the opposite piece.
7. Unwind your fairy lights and turn them on to make sure they work.
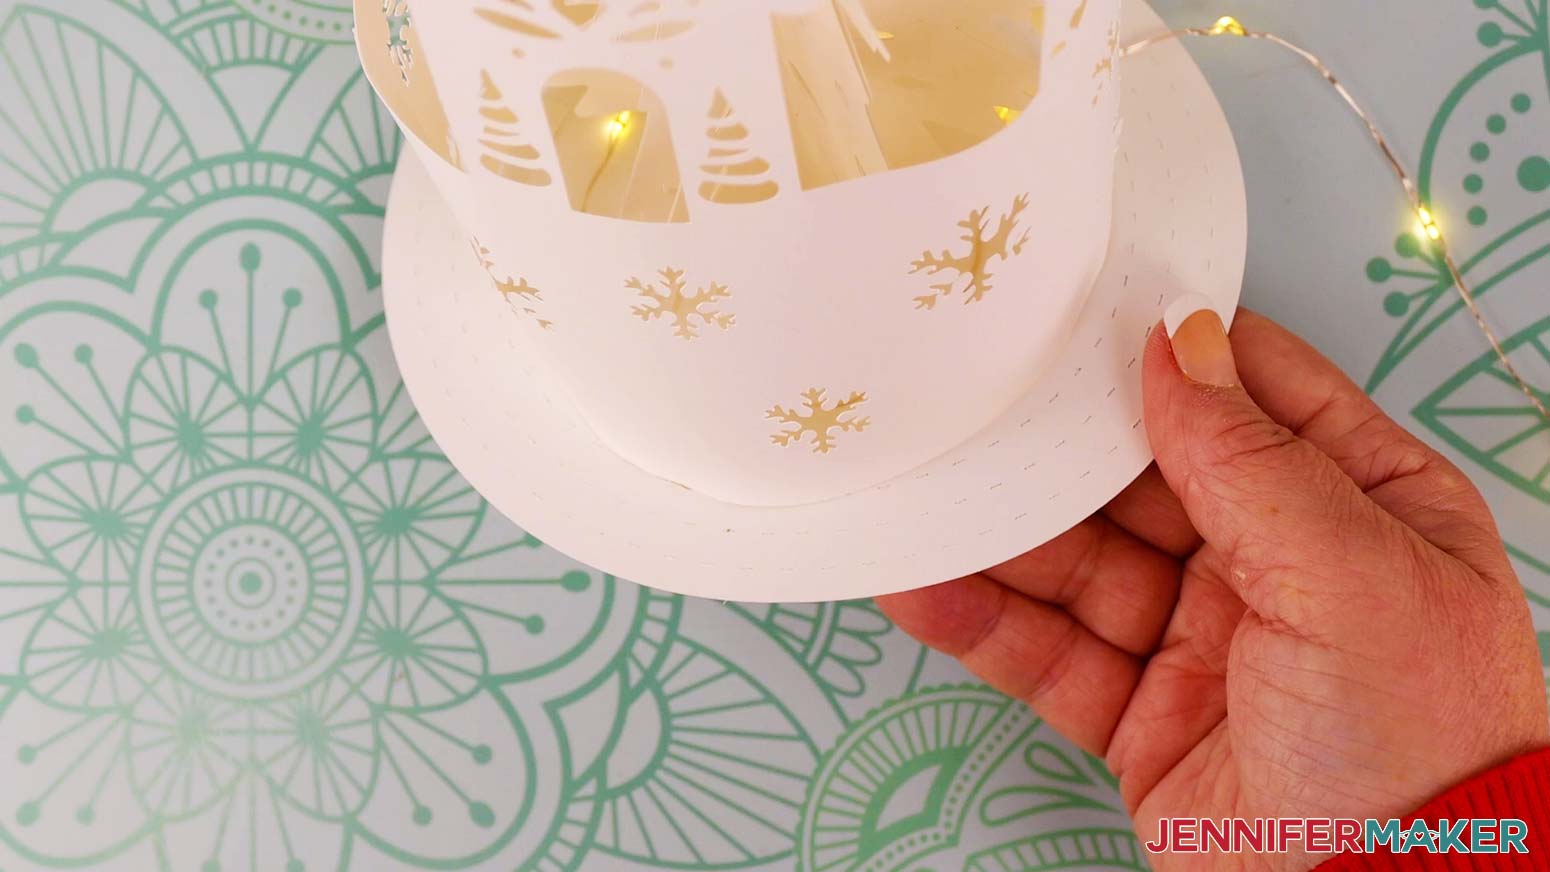
8. Starting at the free end opposite the battery pack, place the lights on the circular base around the outside of the attached tree. Keep the lights inside the innermost drawn, scored, or dashed circle.
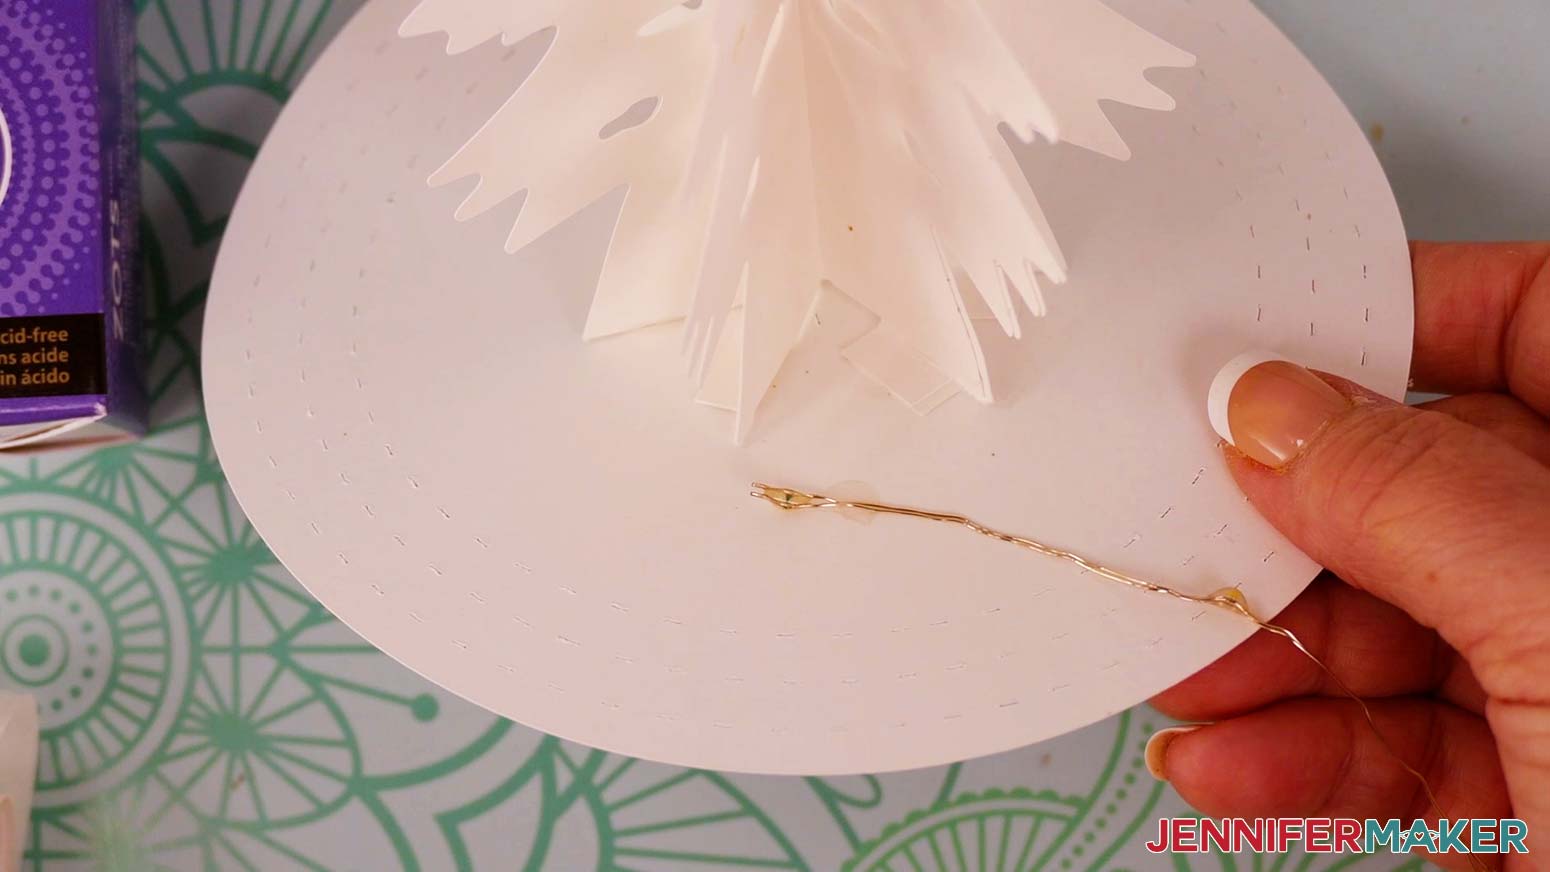
9. Use small glue dots every few inches to secure the lights to the base. You will only need to wrap the lights once around the tree.
10. Secure the cylinder-shaped layers to the base, starting from the inside and working outward.
11. Fold the bottom tabs on each layer inward toward the center of the cylinder, making sure the folds are flush with the bottom of the piece.
12. Decide how you’d like to position your pieces and objects in the scene. Use the three drawn, scored, or dashed circles as guides for the approximate placement of each layer.
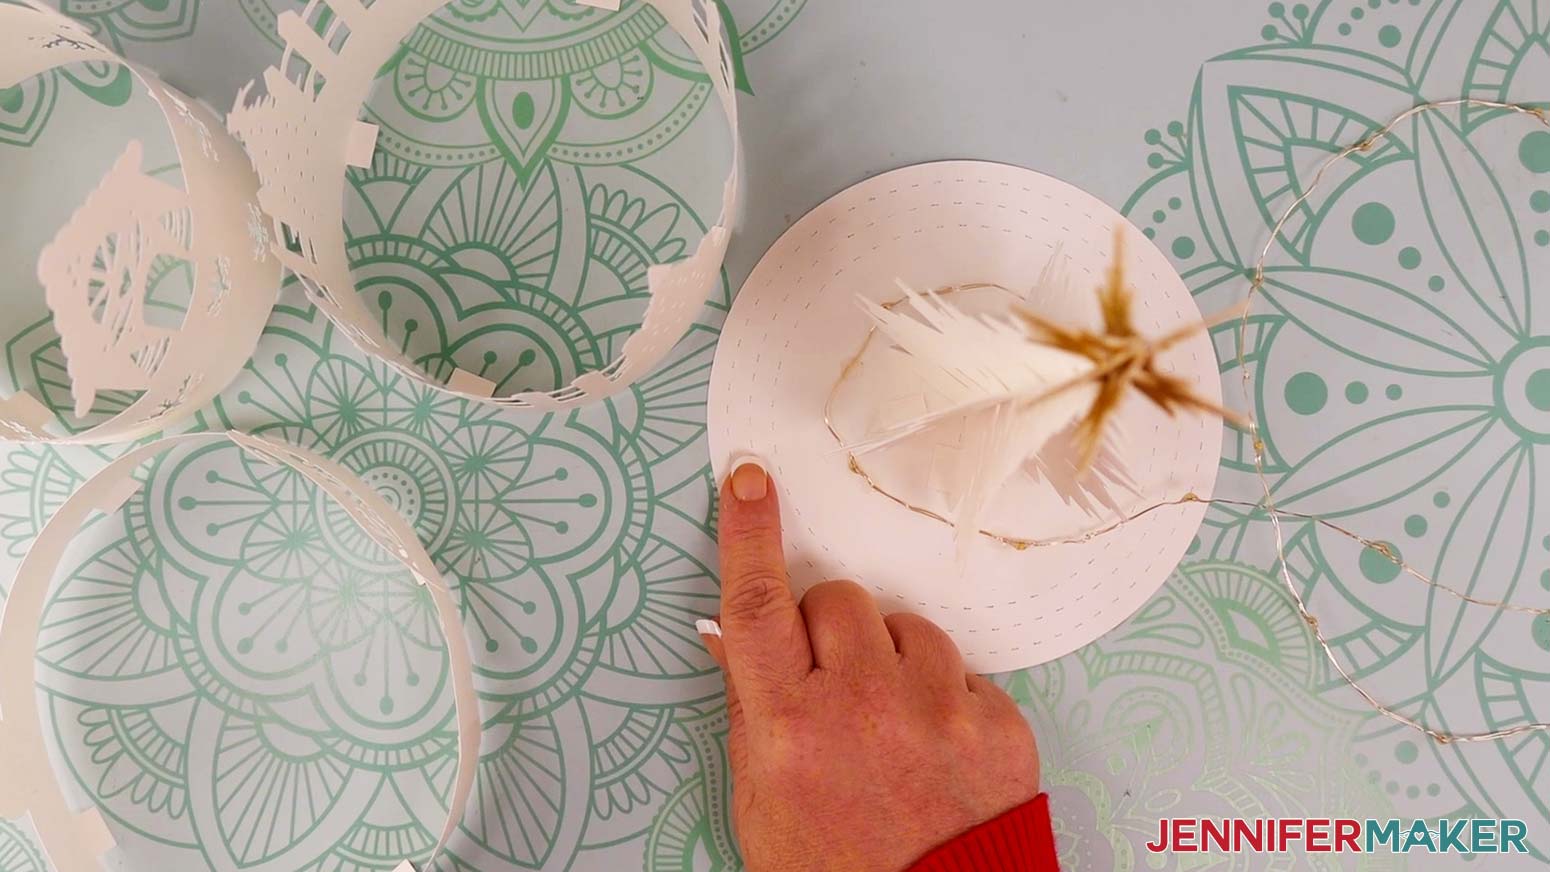
NOTE: Each layer has a small semicircle cutout at the bottom for feeding the lights through. It’s best to position these so they’re close to each other.
13. Add glue or glue dots to the bottom of one or two tabs on the innermost (house) layer.
TIP: Glue dots allow for easier repositioning.
14. Carefully place the layer over the tree and onto the circle base, making sure the semicircle cutout for the lights is near where you stopped attaching the lights to the base.
15. Feed the fairy lights wire underneath the semicircle cutout before securing the tabs on either side of it.
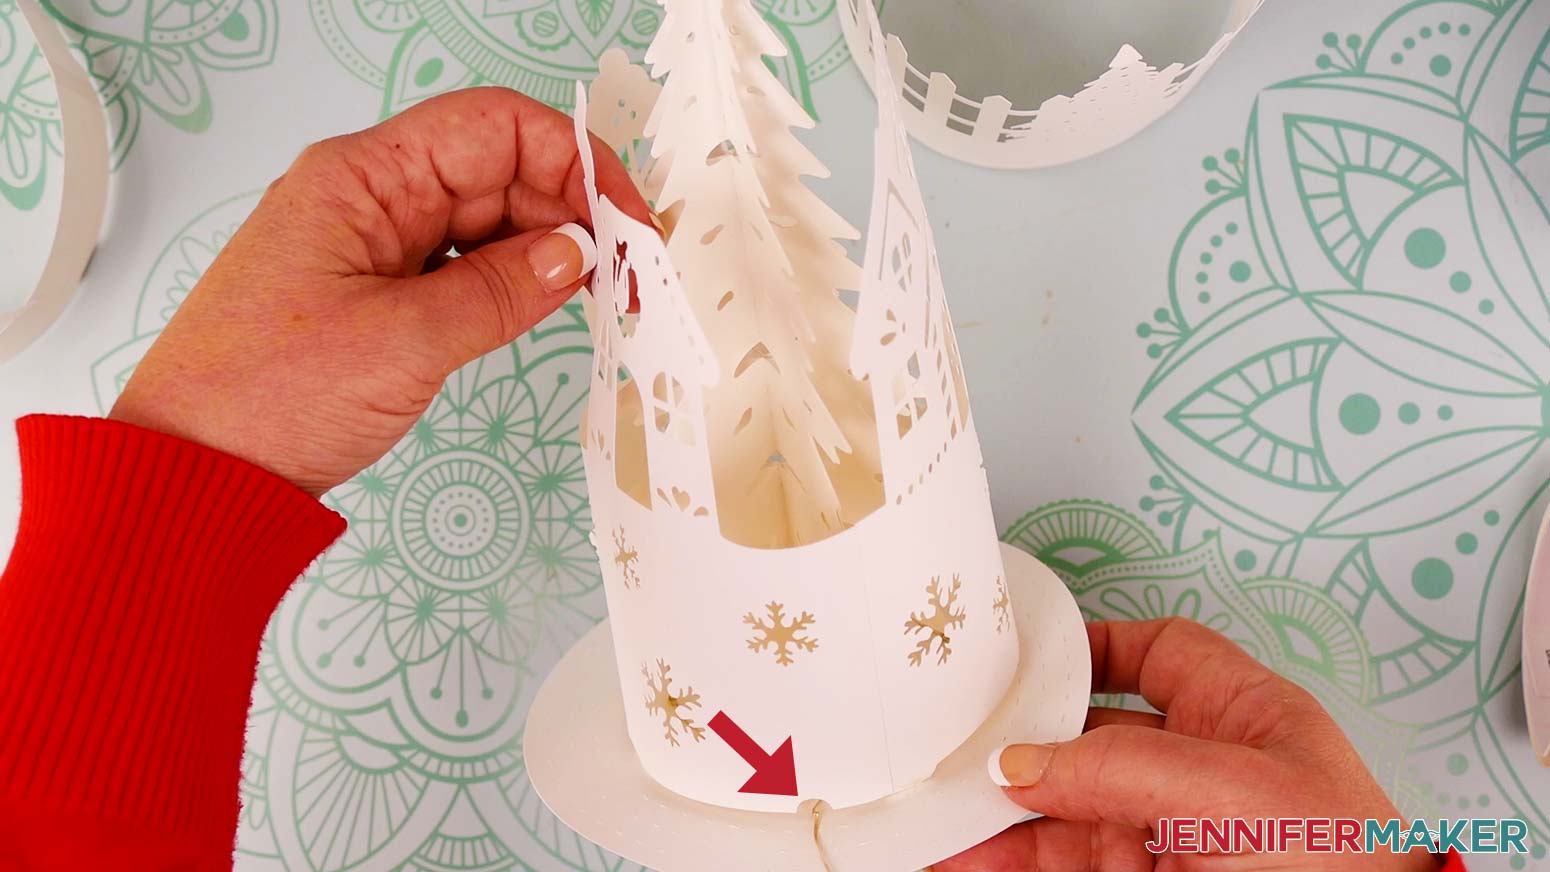
16. Align the bottom of the layer to the innermost circle guide. Press down on the glued tabs to secure them to the base.
TIP: Use a thin object with a blunt end, like the handle end of your spatula or weeding tool, to press the glued tabs down.
17. Once the first tab or tabs are secure, add glue to the next tab by carefully lifting the layer away from the base in that area.
18. Align the glued tab with the guide as closely as you can and press down to adhere it.
NOTE: The layers may not line up perfectly with their guides, and that’s OK! Just try to keep each one from extending outside of its corresponding guide.
19. Repeat steps 16 and 17 for the remaining tab or tabs on the house layer.
20. Wind the lights around the outside of the attached layer, securing them with a few evenly-spaced glue dots. Make sure the lights don’t extend past the middle circle guide.
21. Repeat steps 12-20 to attach the fence layer on the middle guide circle and add the next section of lights around the outside.
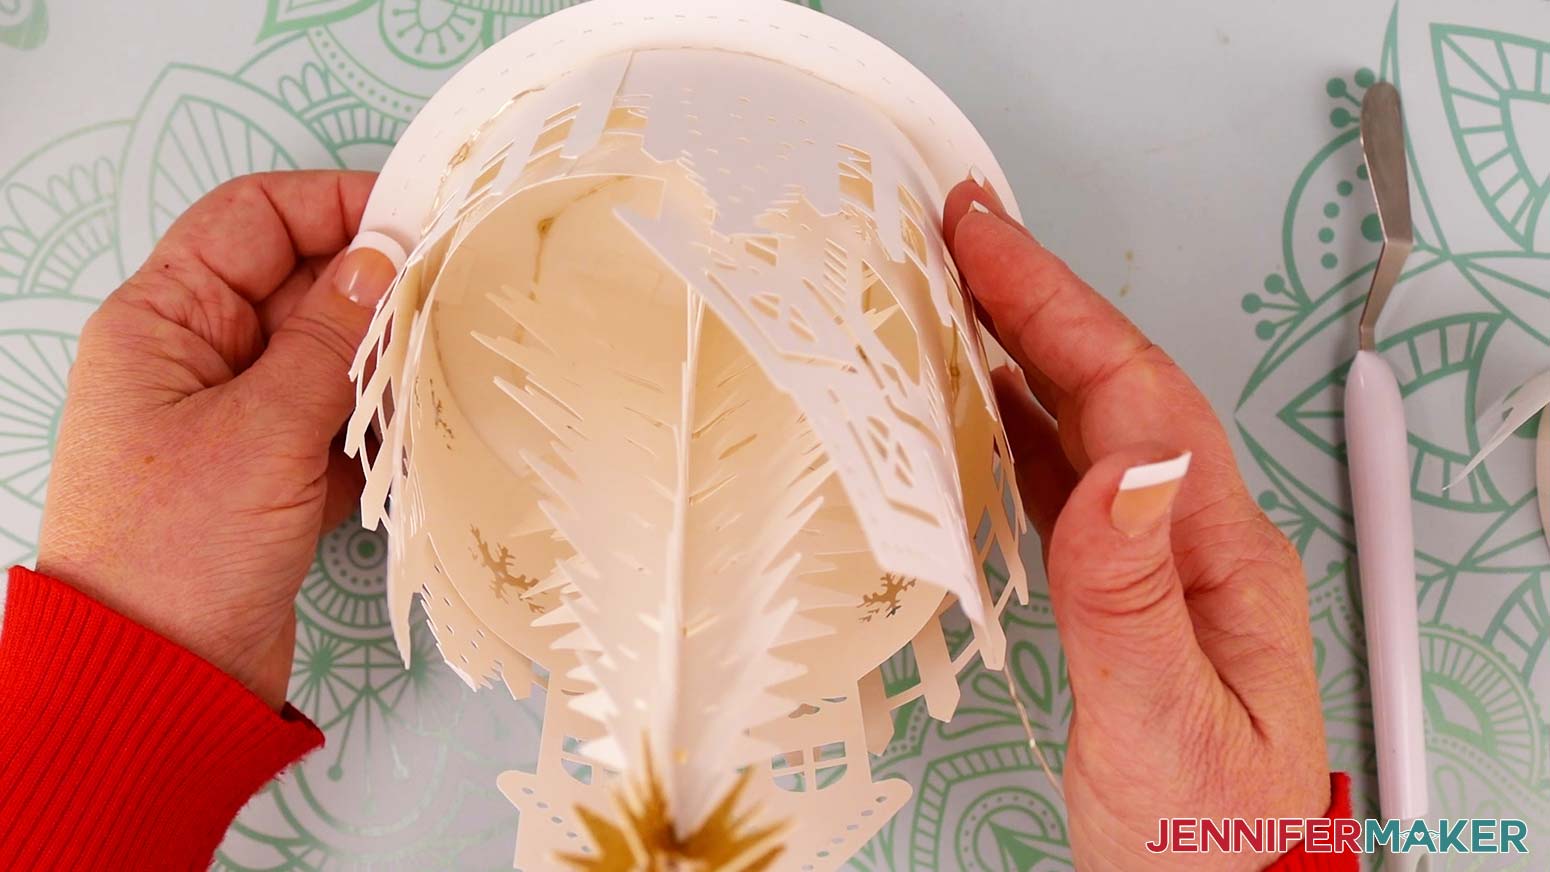
22. If there are any lights left on the strand that will go past the outer guide circle, wrap them around the middle layer one more time until all the lights are used and the free wire is near the cutout again.
TIP: Use tweezers to help position the lights if needed.
23. Add the last layer (the sleigh/snowman) on the outermost circle guide. Remember to run the light strand out through the last cutout.

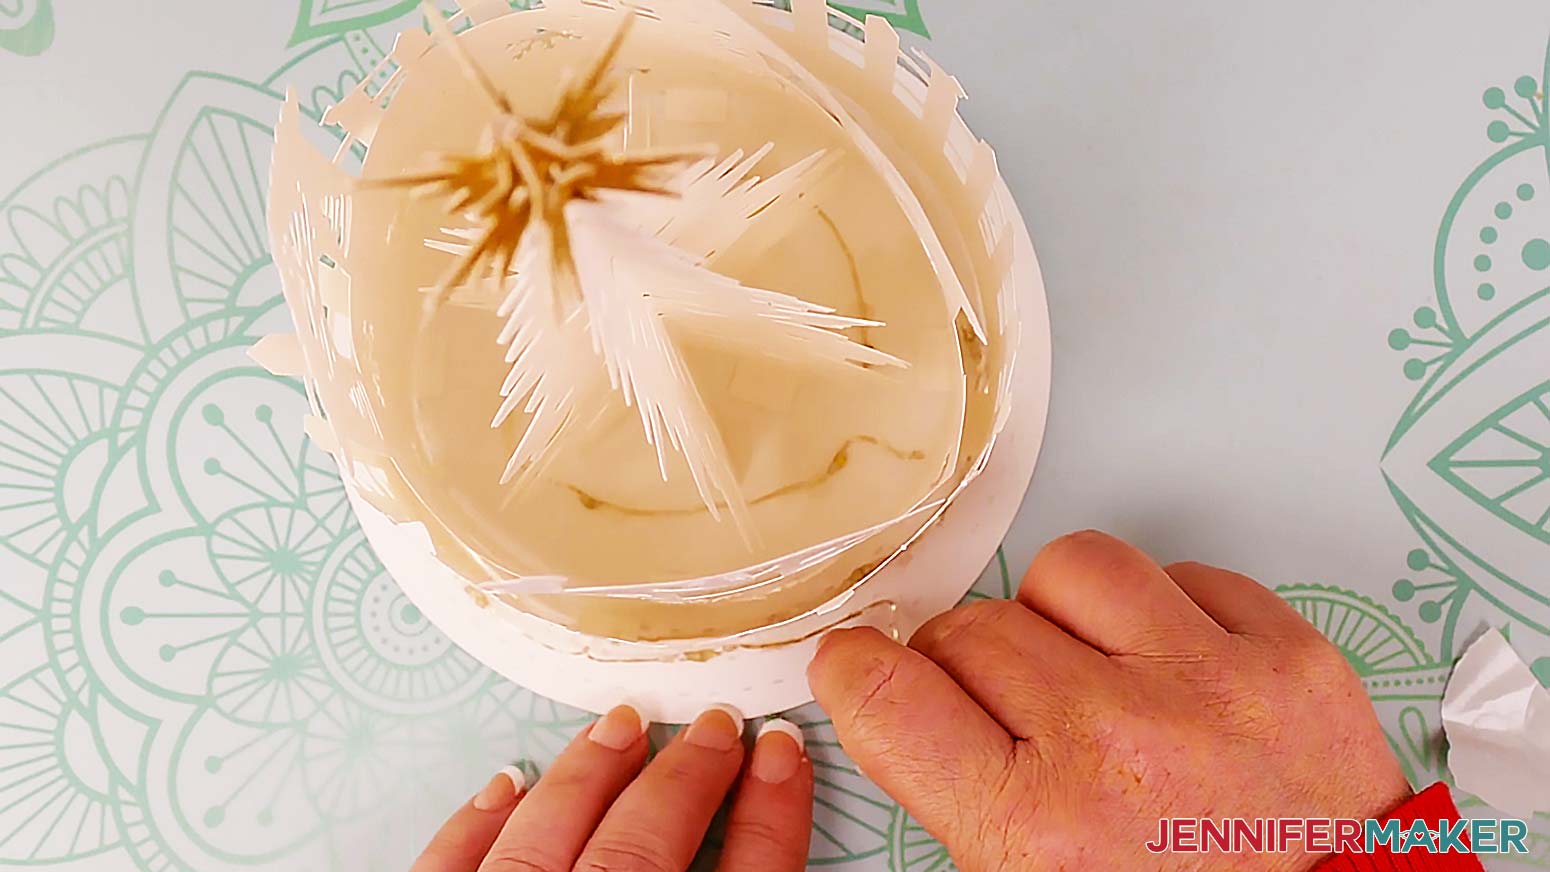
24. Place the bottom of the assembled lantern onto a wooden base. Use several small glue dots to attach it to the wooden base if you’d like to keep it from sliding around.
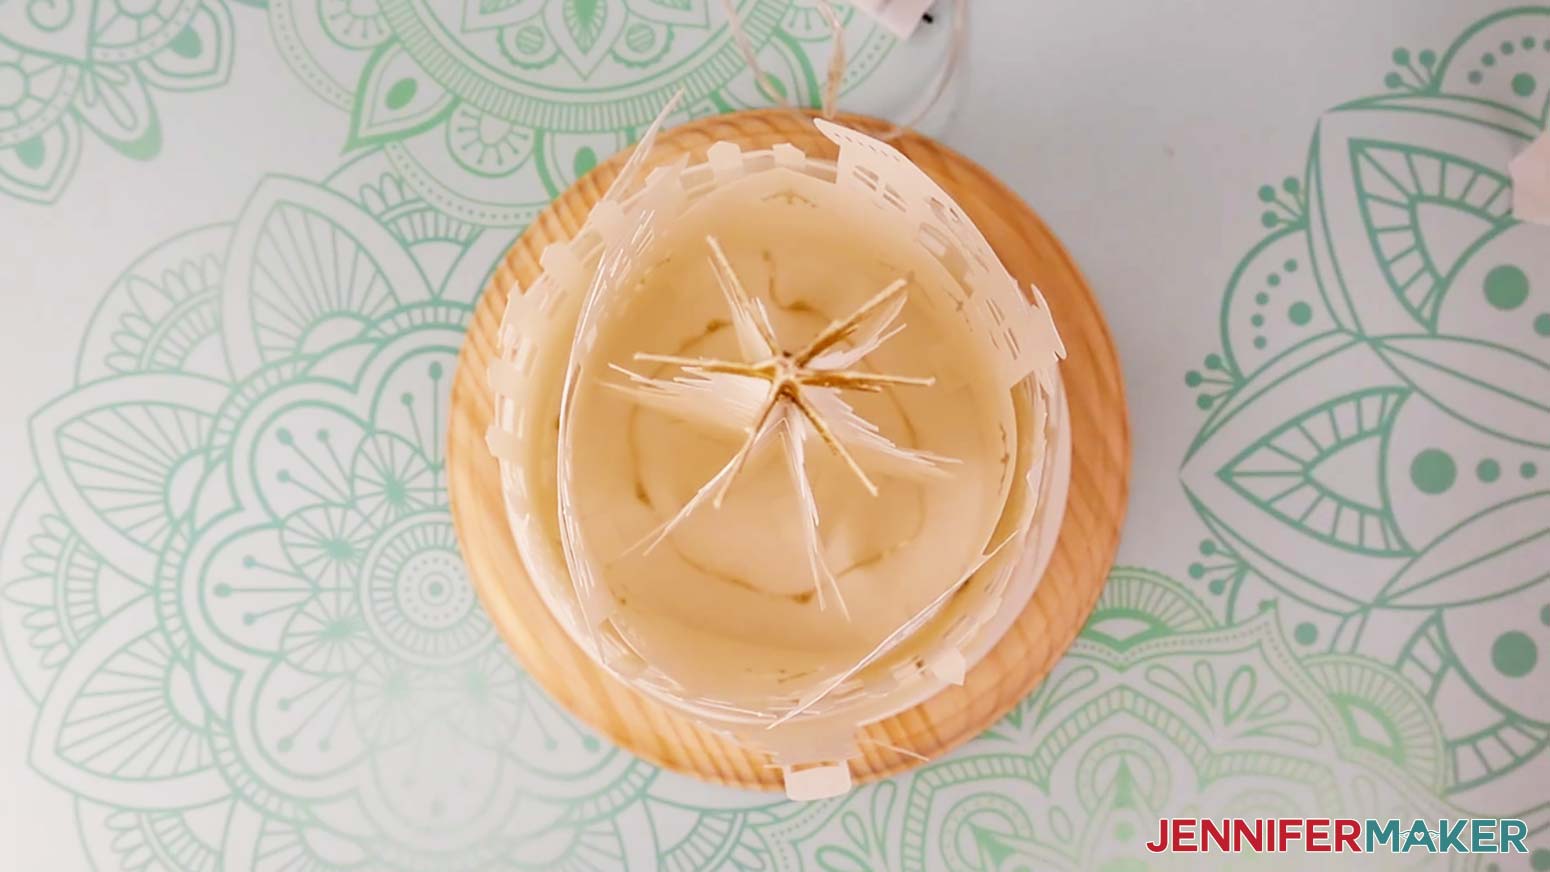
25. Carefully place the glass dome down on top of your assembled lantern. The outermost layer will be very close to the edge of the glass, so be cautious of any intricate pieces that could get caught on the edge, such as the snowman’s arms.

26. Clean the outside of the glass dome with isopropyl alcohol and a lint-free cloth to remove any dust and fingerprints.
STEP 4: SHOW IT OFF!
Here is what my finished Winter Village Lantern looks like! You can display it with or without the wooden base and dome. It looks great on a shelf or table and really shines in the dark!
Notes
Be careful when moving the dome, as the glass is not attached to the wooden base and can slide around easily.
Finished Size (in dome): 7” wide x 10.2” tall
Finished Size (without dome): 5.7” wide x 9.7” tall
Answers to Your Questions About How to Make a Winter Village Lantern
Q: I want a different design. How do I design my own winter village lantern?
A: You can learn how to design your own winter village lantern in my ADVANCE program. Learn more about ADVANCE here!
Q: How do I know if my design is the right size?
A: Not sure if your design is uploading at the correct size? If you are using Cricut Design Space Beta for Desktop, try switching to the Live version as this has worked in our testing. Uninstalling and reinstalling the software may also help. Here are the dimensions you should see for each design on your Canvas:
- winter-village-lantern-no-score-jennifermaker-SVG: 11.49″ x 9.89″
- winter-village-lantern-score-jennifermaker-SVG: 11.49″ x 9.89″
- winter-village-toolkit-noscore-jennifermaker-SVG: 11.49″ x 10.2″
- winter-village-toolkit-score-jennifermaker-SVG: 11.49″ x 10.2″
If you need help resizing your design, see my Resizing Guide.
Q: Can I cut the winter village lantern pieces on a Cricut Joy Xtra or original Cricut Joy?
A: While the pieces will cut on the Cricut Joy Xtra, they are not sized to fit the original Cricut Joy. That said, you can always size it down and give it a try!
Q: Do I have to use a Cricut to cut my winter village lantern pieces?
A: No! You can make a winter village lantern from paper or cardstock that works with your equipment, or even just with scissors. We always include several versions of each free file in the free download ZIP file. If you have a Silhouette Cameo, which uses Silhouette Studio, you can use the DXF file in Silhouette Basic Edition. If you have upgraded to Silhouette Designer Edition, Designer Edition Plus, or Business, you can use the SVG format with your Silhouette machine to cut each intricate design. If you don’t have a cutting machine, you can print and then cut out my digital download PDF files, too! The ZIP archive in my resource library includes these file types and more!
Q: Do you have any other light-up holiday decorations I can make?
A: I have lots of lighted Christmas decor you can make with cardstock at home! Here are some of my favorite projects:
- 3D Paper Christmas Tree Lantern
- Lantern Pop-Up Cards
- Hanging Star Lanterns
- Christmas Tree Explosion Box with optional LED light
- Paper Light-Up Snowman
- Light-Up Paper Winter Village
- Easy Christmas Luminaries
Q: Can I make and sell these lantern designs?
A: I love supporting creative entrepreneurs! If you want to use my designs and projects for commercial use, please familiarize yourself with my important licensing information before selling your crafts.
I do not permit sale of my digital items, but you can sell the creative goods you make with them — as long as you follow my licensing requirements. That means you cannot sell the lantern SVG files, but you can sell items that you made with the files.
Get my free SVG/DXF/PDF files to make a winter village lantern!
(If you do not see the signup form above, click here.)
I love seeing what you make with my designs and how you use them! Please share a photo of your winter village lantern in our Facebook group or tag me on social media with #jennifermaker.
Love,

Want to remember this? Save this Winter Village Lantern Tutorial to your favorite Pinterest Board!