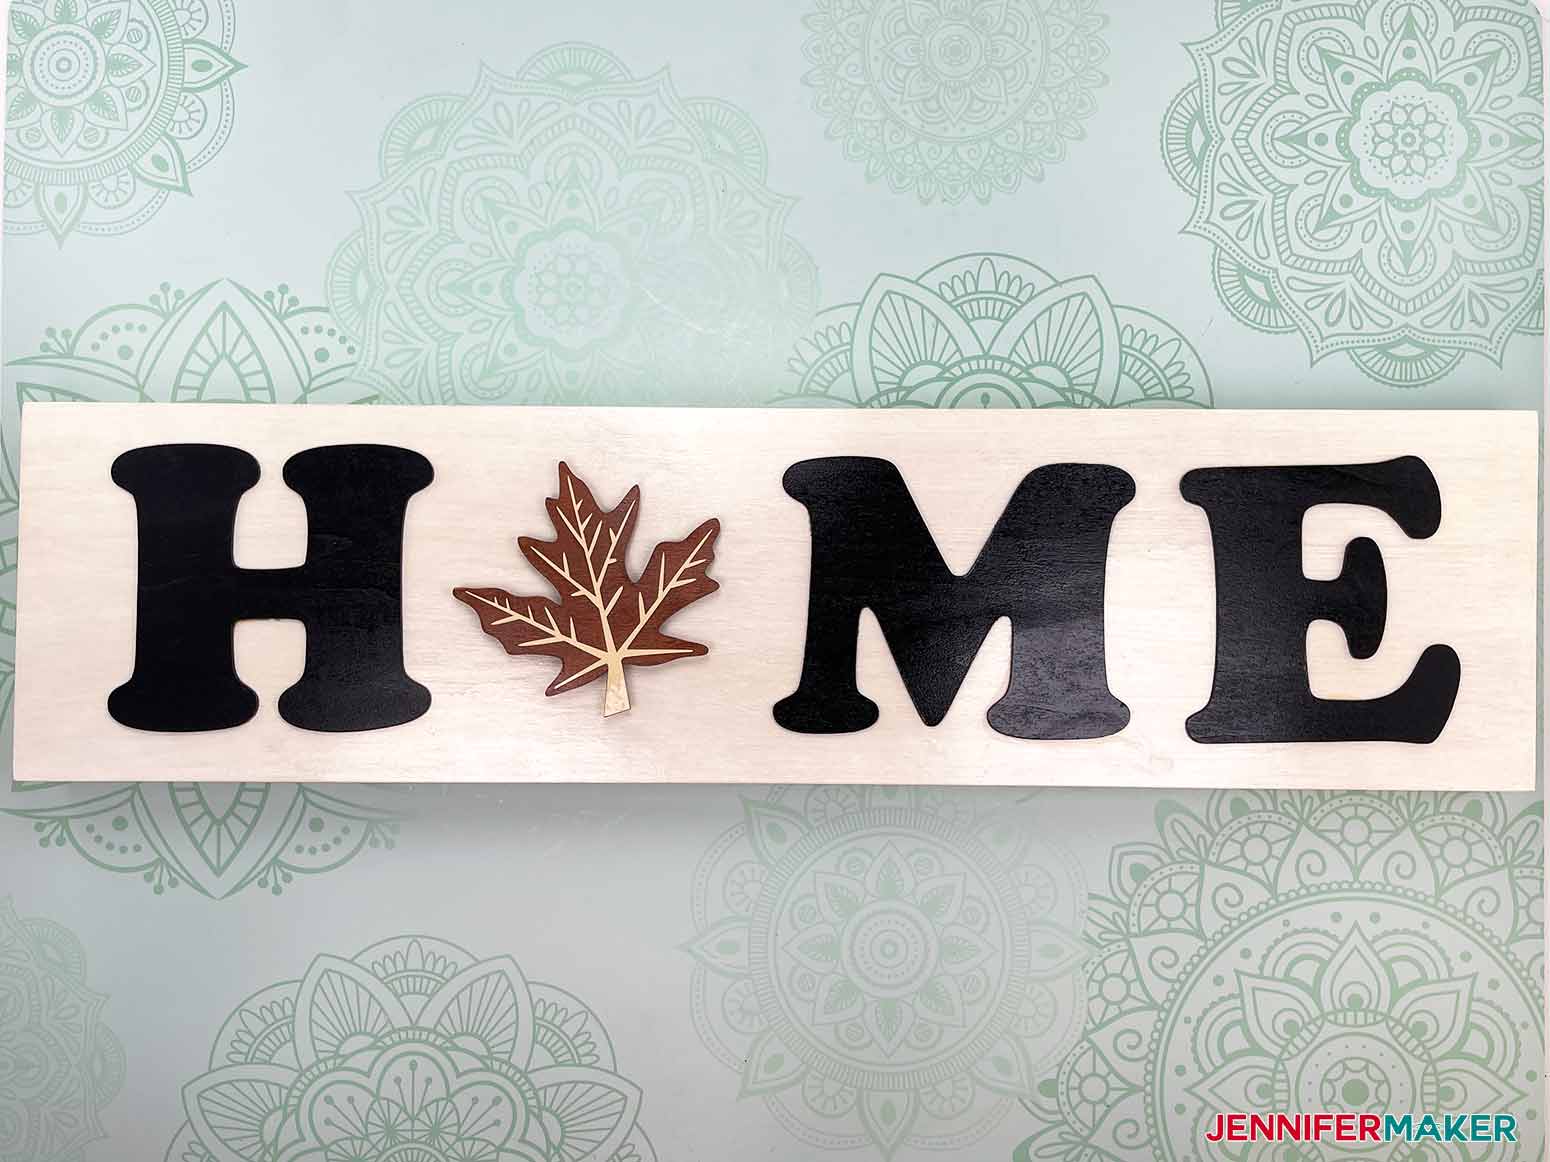
I’m going to show you how to make an adorable HOME sign with interchangeable pieces to celebrate holidays and seasons that you can display all year long.
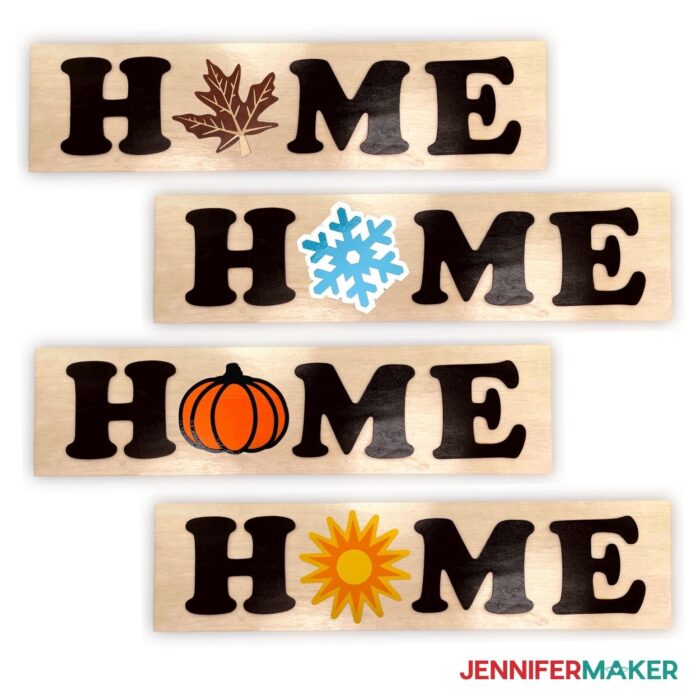
I just love this project for so many reasons. First, I love that one design can be made in so many different ways! You can also make it either as horizontal or a vertical sign, isn’t that so cool? And the second reason I’m a big fan of this project is because I love all the cute interchangeable pieces that make this sign something you can display all year-round!
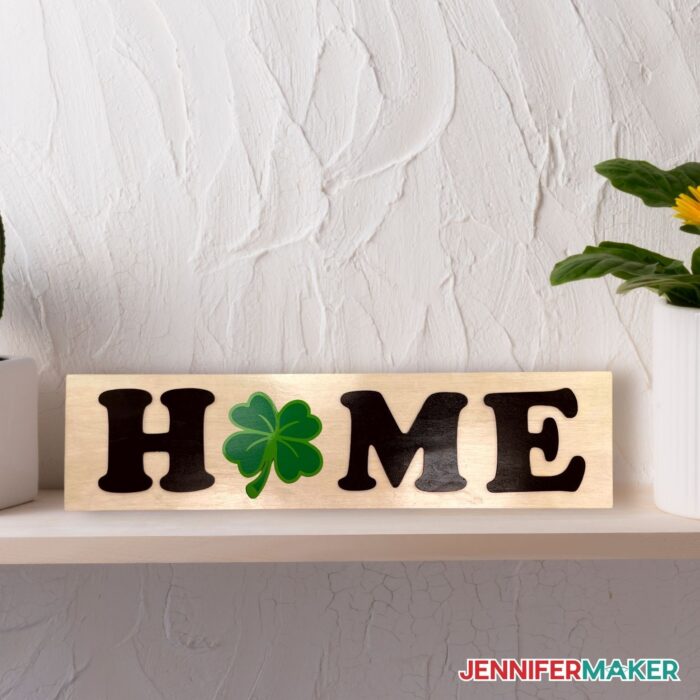
I love the fact that this home sign is interchangeable and fits right in no matter the season or holiday! This year-round home decor sign will make add a special touch to any room in your house.
I’m going to be using wooden panels for this project. These are made of birchwood and measure 6 inches by 24 inches and are one and half inches thick. I’m also going to use Cricut Brand Basswood for all of my interchangeable wooden elements, along with vinyl, paint and stain. I’m using permanent vinyl in a variety of colors, acrylic paint, as well as spray paint.
And we’ll also need Polycrylic Spray and varnish. To stick my interchangeable pieces to my sign I’m going to use velcro dots. Other things we will need for this project include: painter’s tape, a ruler, a brayer, a spatula and weeding tool. Of course we will need our Cricut Cutting Machine and mats. Last but not least, we will be using the Cricut Knife Blade to cut the wood.
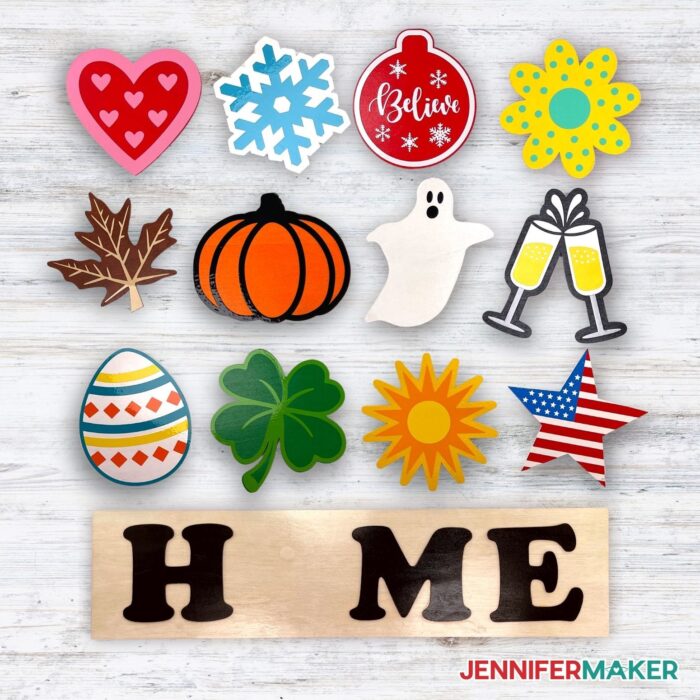
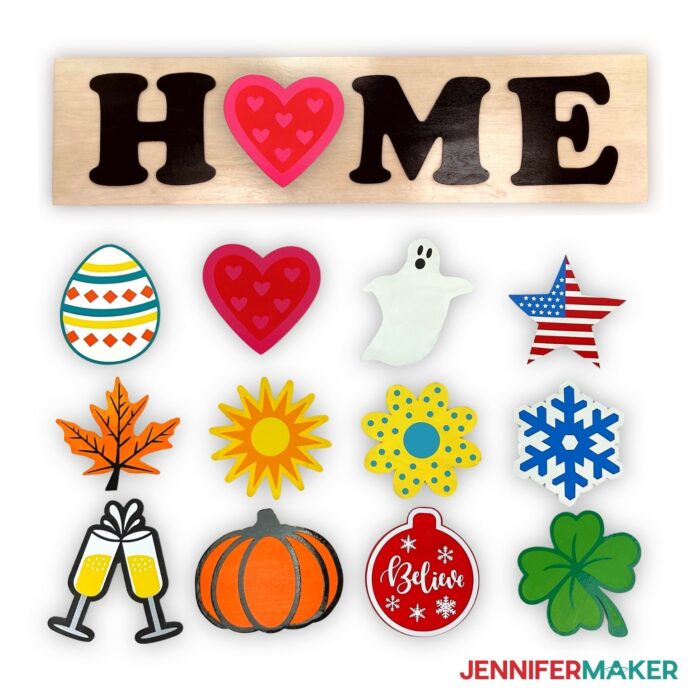
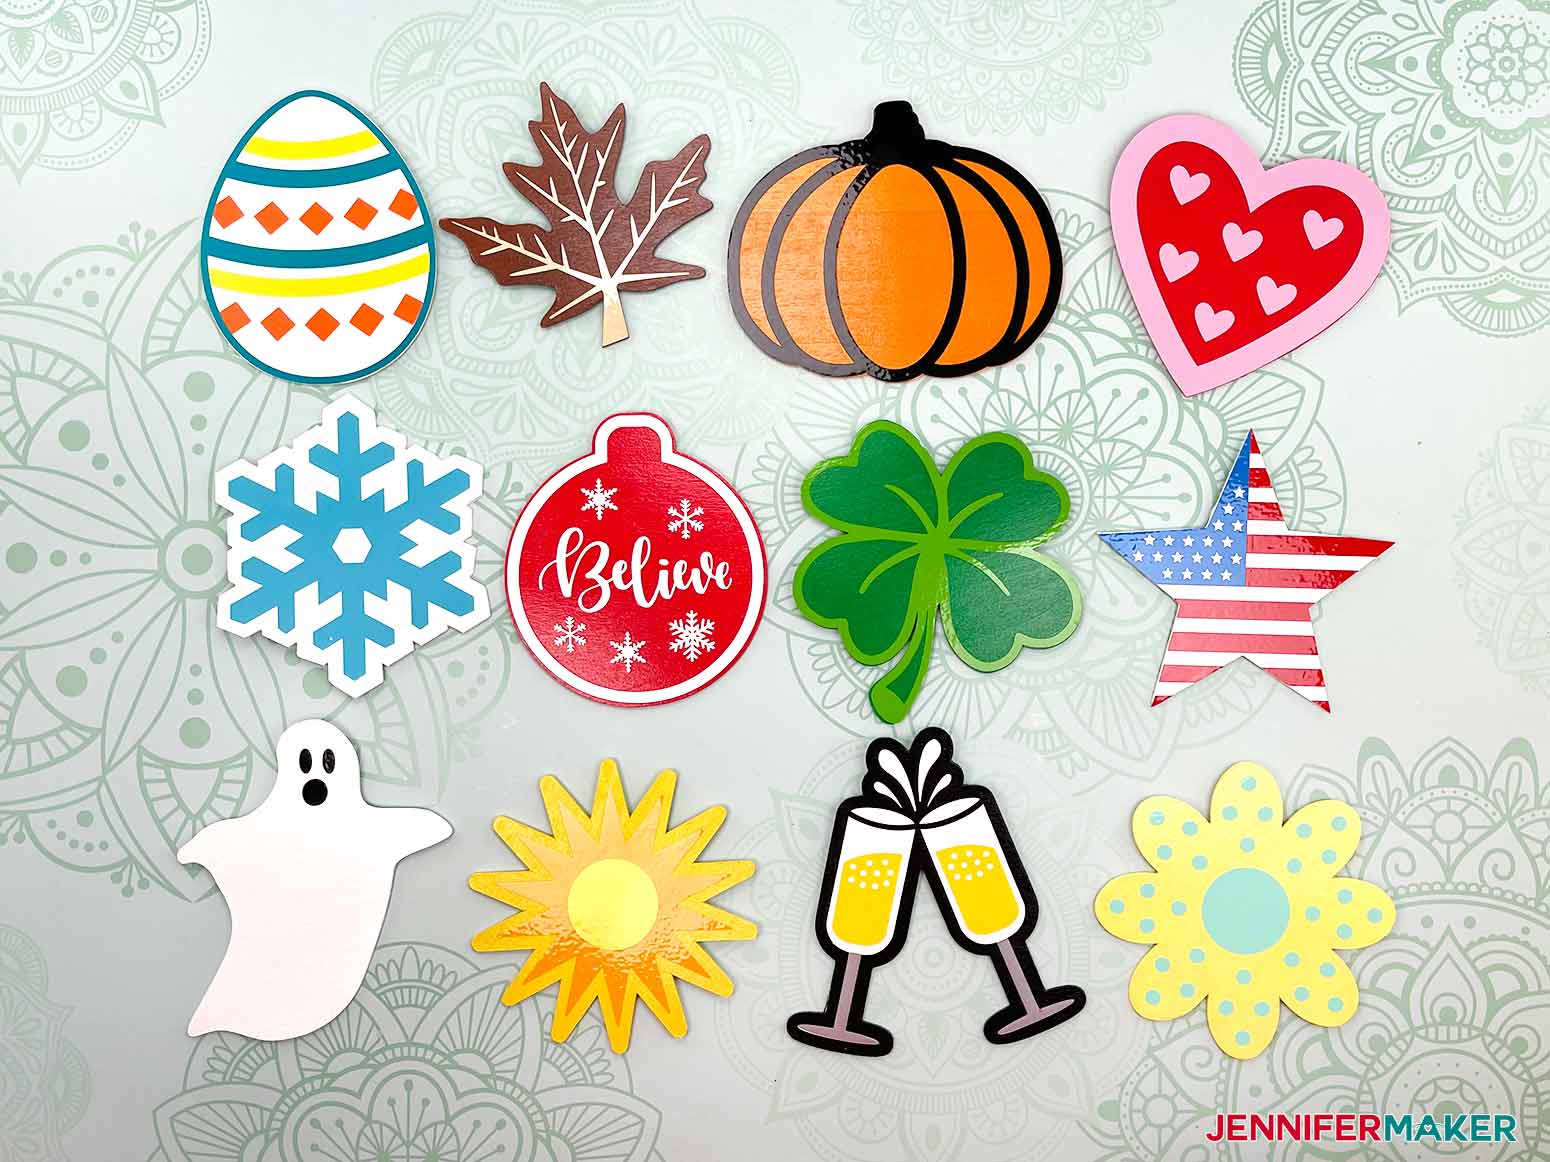
These wood signs are perfect to place in your entrance, living room, kitchen, or even your front porch. They are so much fun to change out during the different seasons and all the seasonal pieces can be custom made to your own liking using your favorite acrylic paints or your own designs. I’ve included 12 different shapes that you can place on your very own interchangeable sign.
I’ve also seen some welcome signs that make for great decor. But I thought, why not take it up a notch and create an adorable sign that can be used to reflect different times of the year!
This interchangeable home sign is nothing more than a wood board with seasonal shapes and velcro pieces that you can change out year round. You can be sure that this will be the first thing your guests see when they enter you home!
Here’s a supply list of what you need to make DIY interchangeable home signs! This post contains some affiliate links for your convenience (which means if you make a purchase after clicking a link I will earn a small commission but it won’t cost you a penny more)! Read my full disclosure policy.
Materials to Make Interchangeable Home Signs
View my Amazon shopping list with the exact items we used to make this project
- 24″ x 6″ Board
- Basswood (2-3 packages)
- Acrylic Craft Paint
- Craft Paint Brush
- Package of Velcro Dots
- Polycrylic Spray
- Antique White Wood Stain
- Wood Glue
- Sheet of Sandpaper (220 Grit)
- Stain Applicator Pads
- Premium Vinyl Sampler Pack
- Cricut Transfer Tape (12″ x 30″)
- DuraClear Gloss Varnish (1/6 bottle)
- Tack Cloth
- (Optional) Black Spray Paint, Craft Paper
- (Optional) Fonts (I used Copper Black Font)
- Knife Blade
- StrongGrip Machine Mat
- StandardGrip Machine Mat
- Painter’s Tape
- Ruler (or other measuring device)
- Basic Tool Kit
- TrueControl Knife
- Brayer
- Rubber Gloves
- Paint Can Opener
- A method to cut your vinyl – I used the amazing Cricut Maker but you can also use the Cricut Explore
- Design #330 – My free SVG/PDF/DXF design files are available in my free resource library (get the password by filling out the form at the bottom of this page)
How to Make Your Own DIY Interchangeable Home Signs
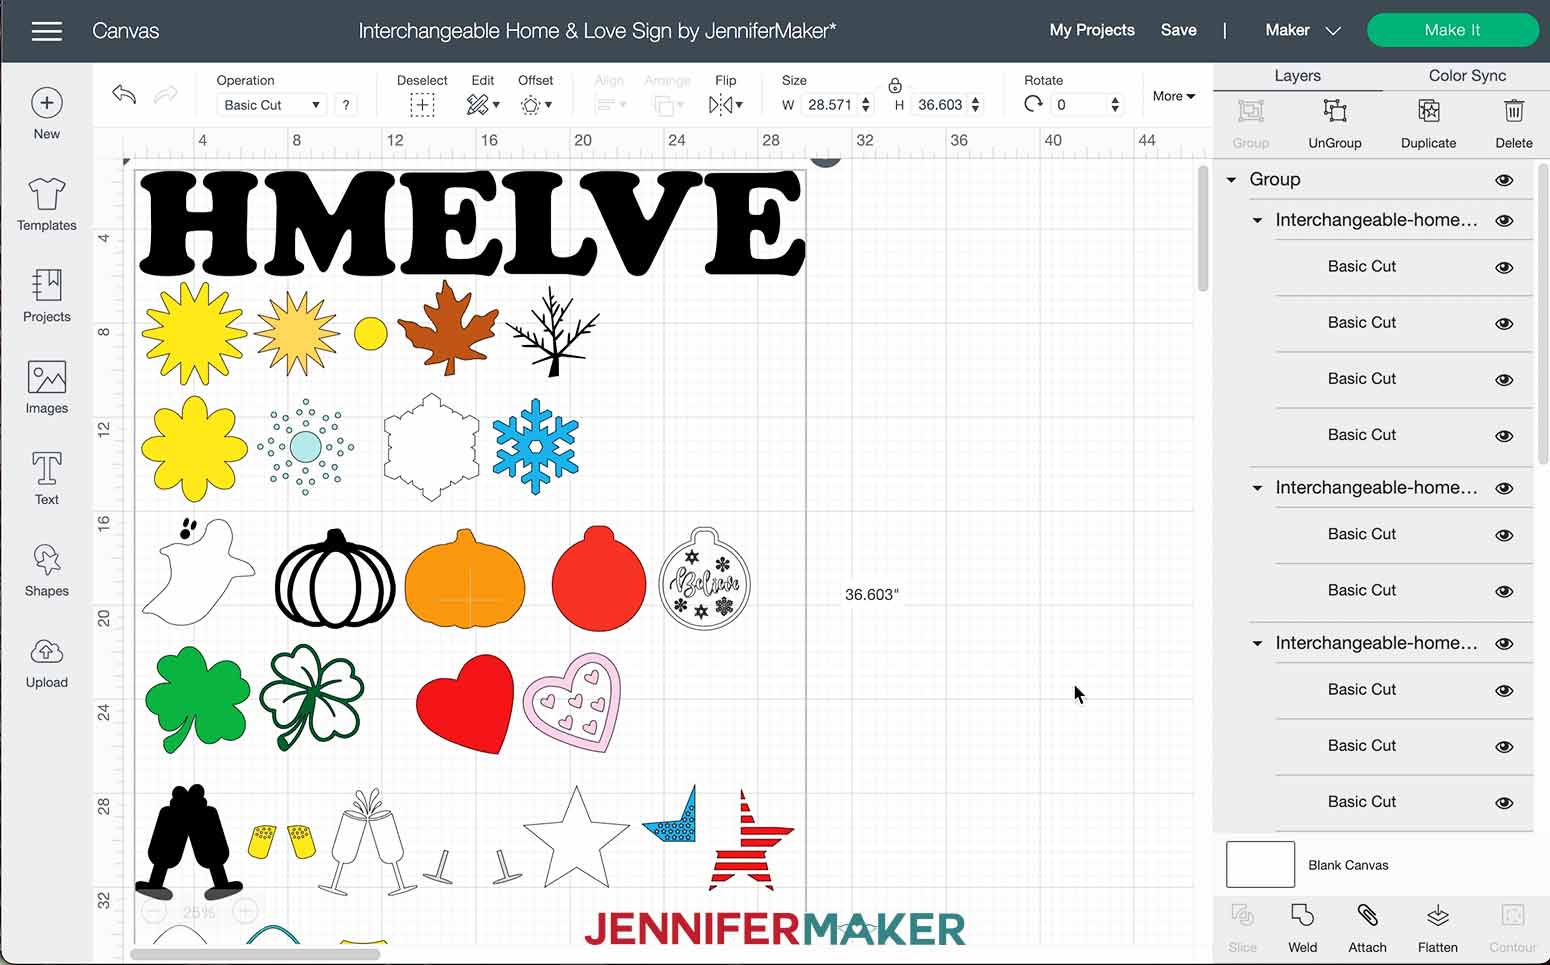
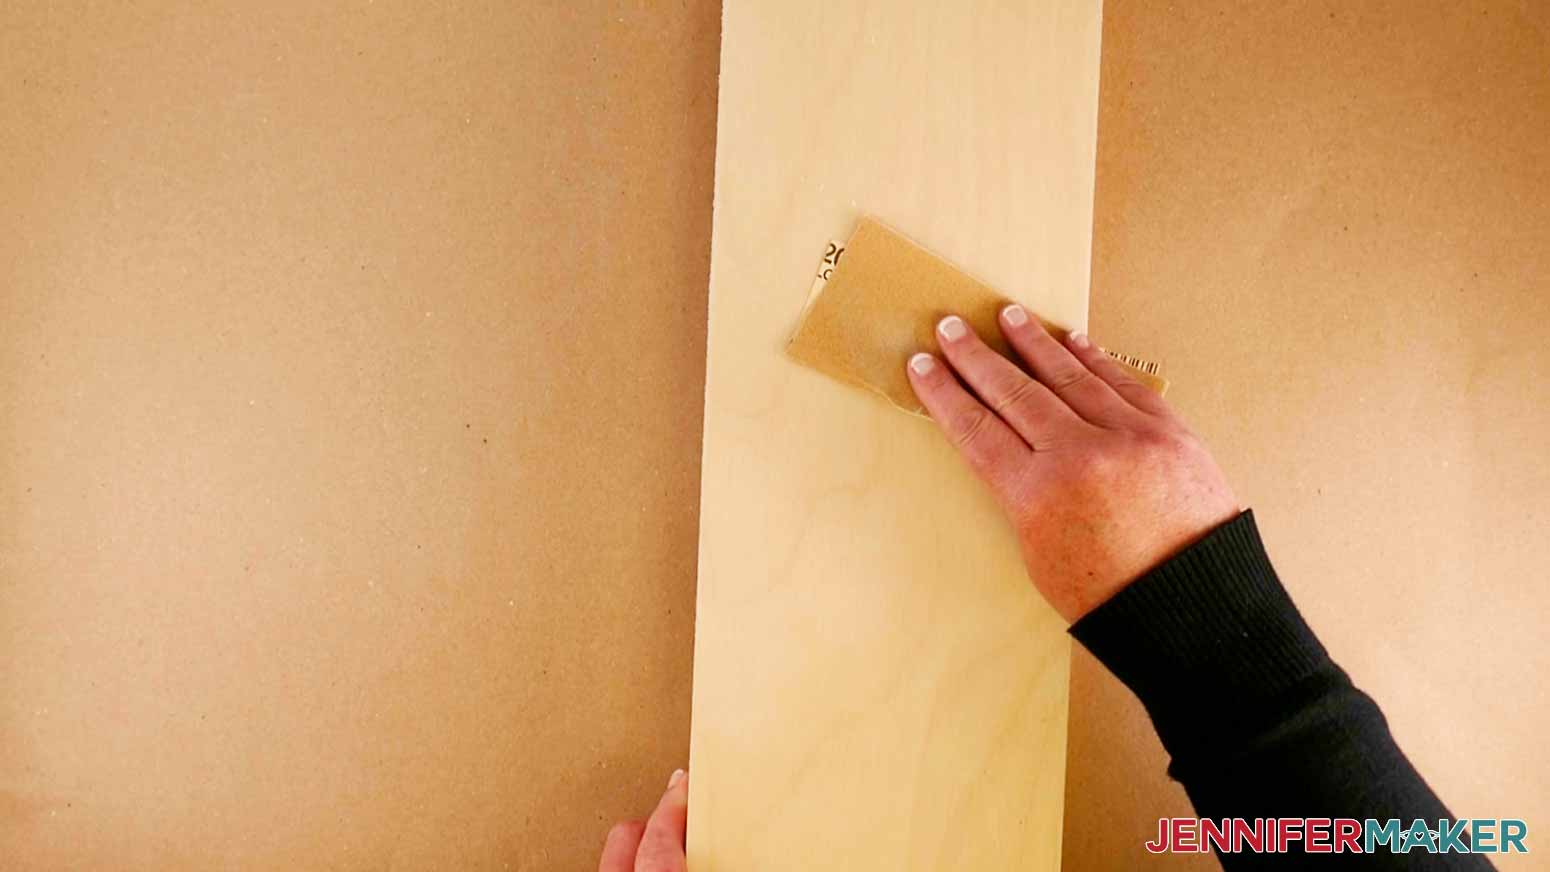
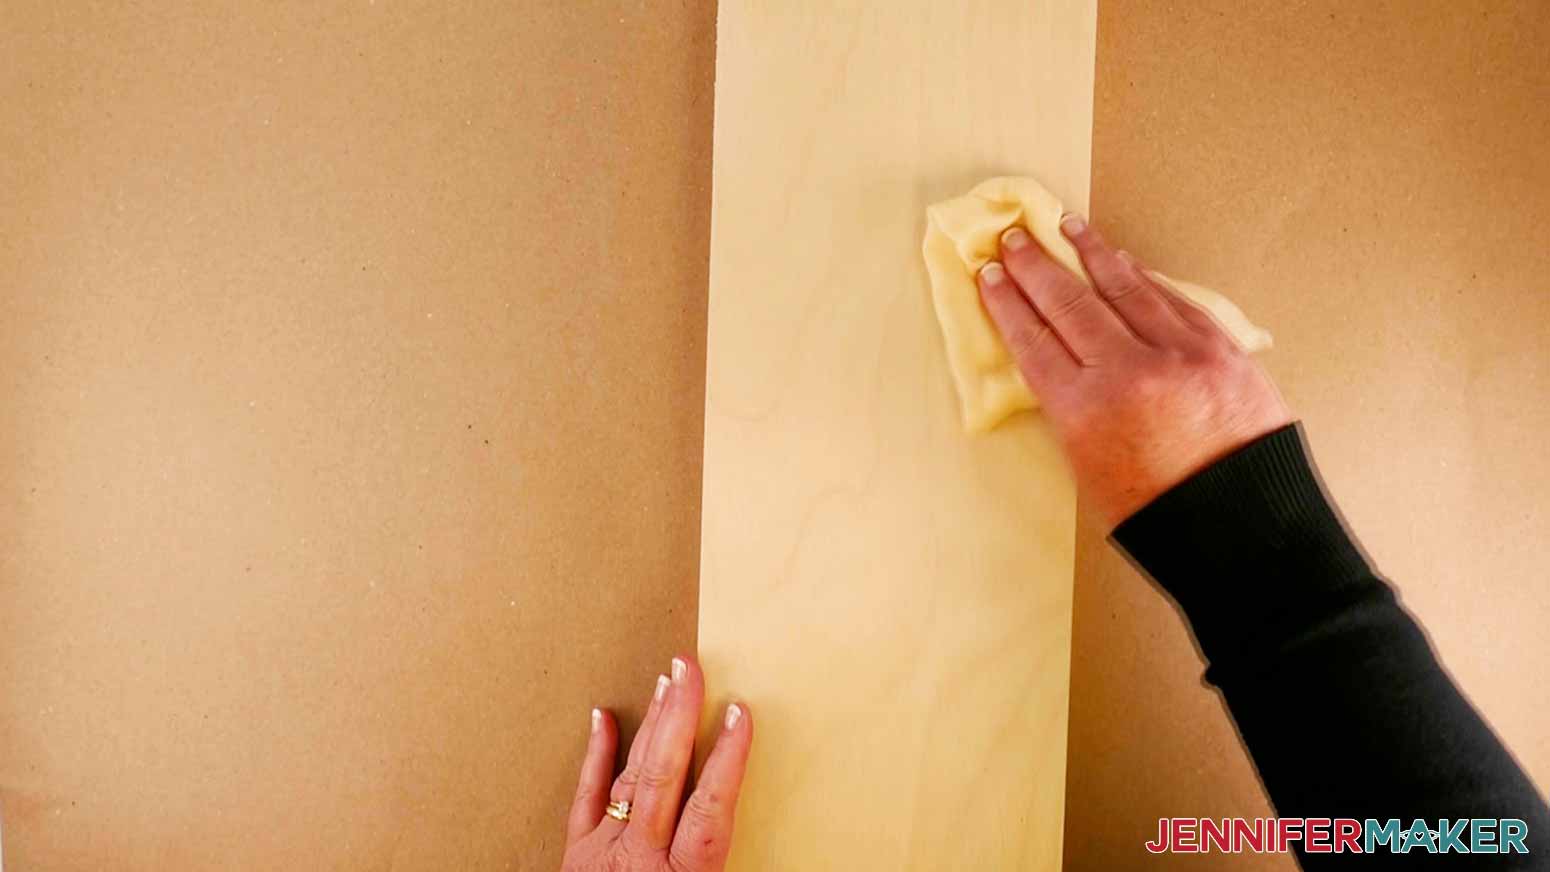
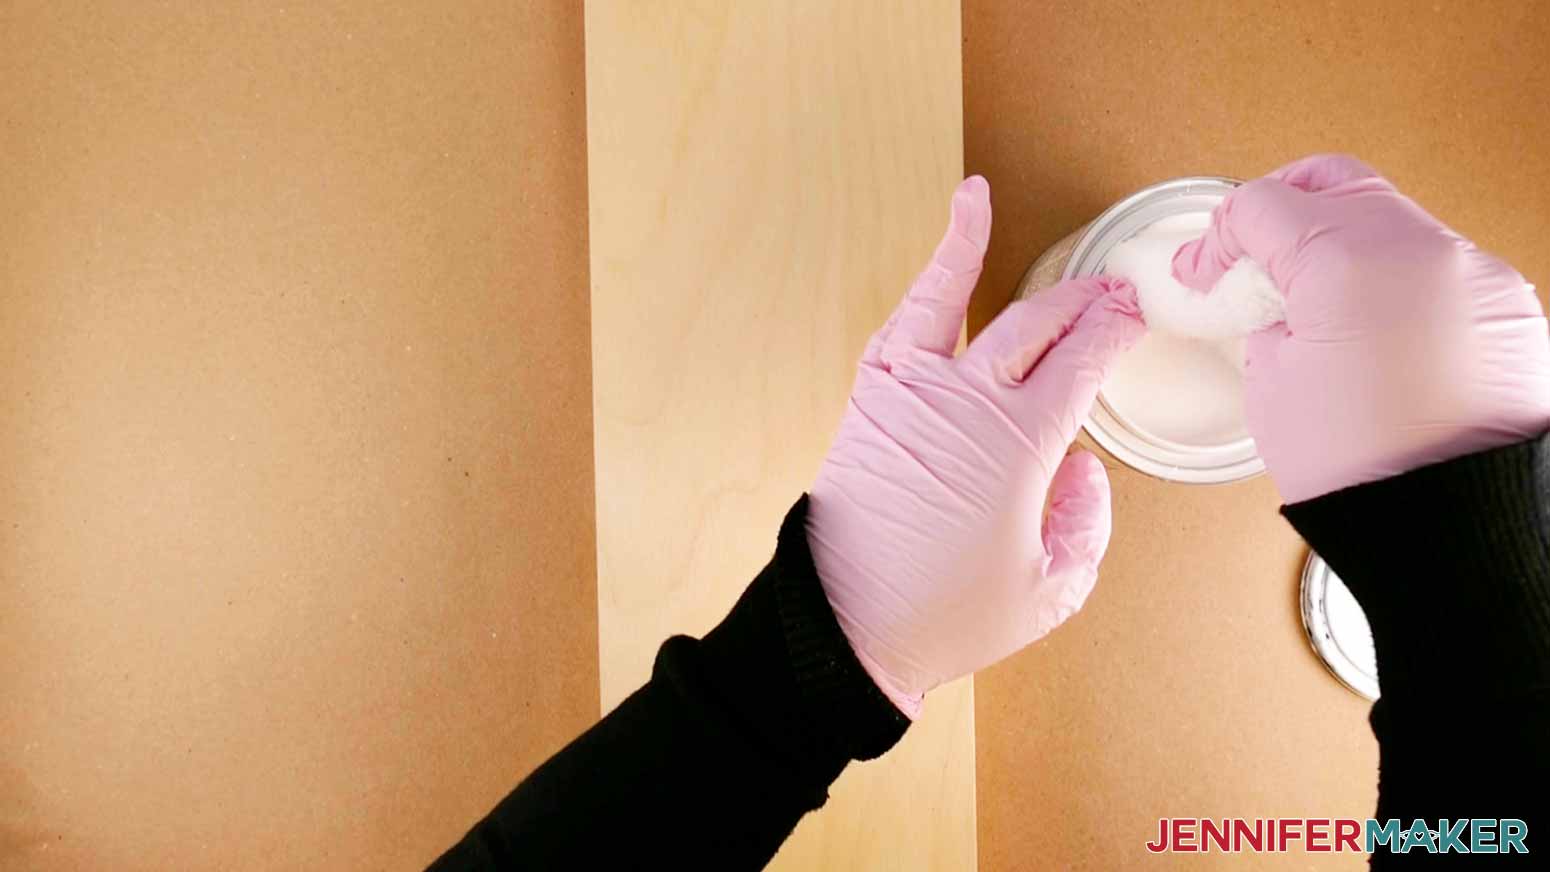
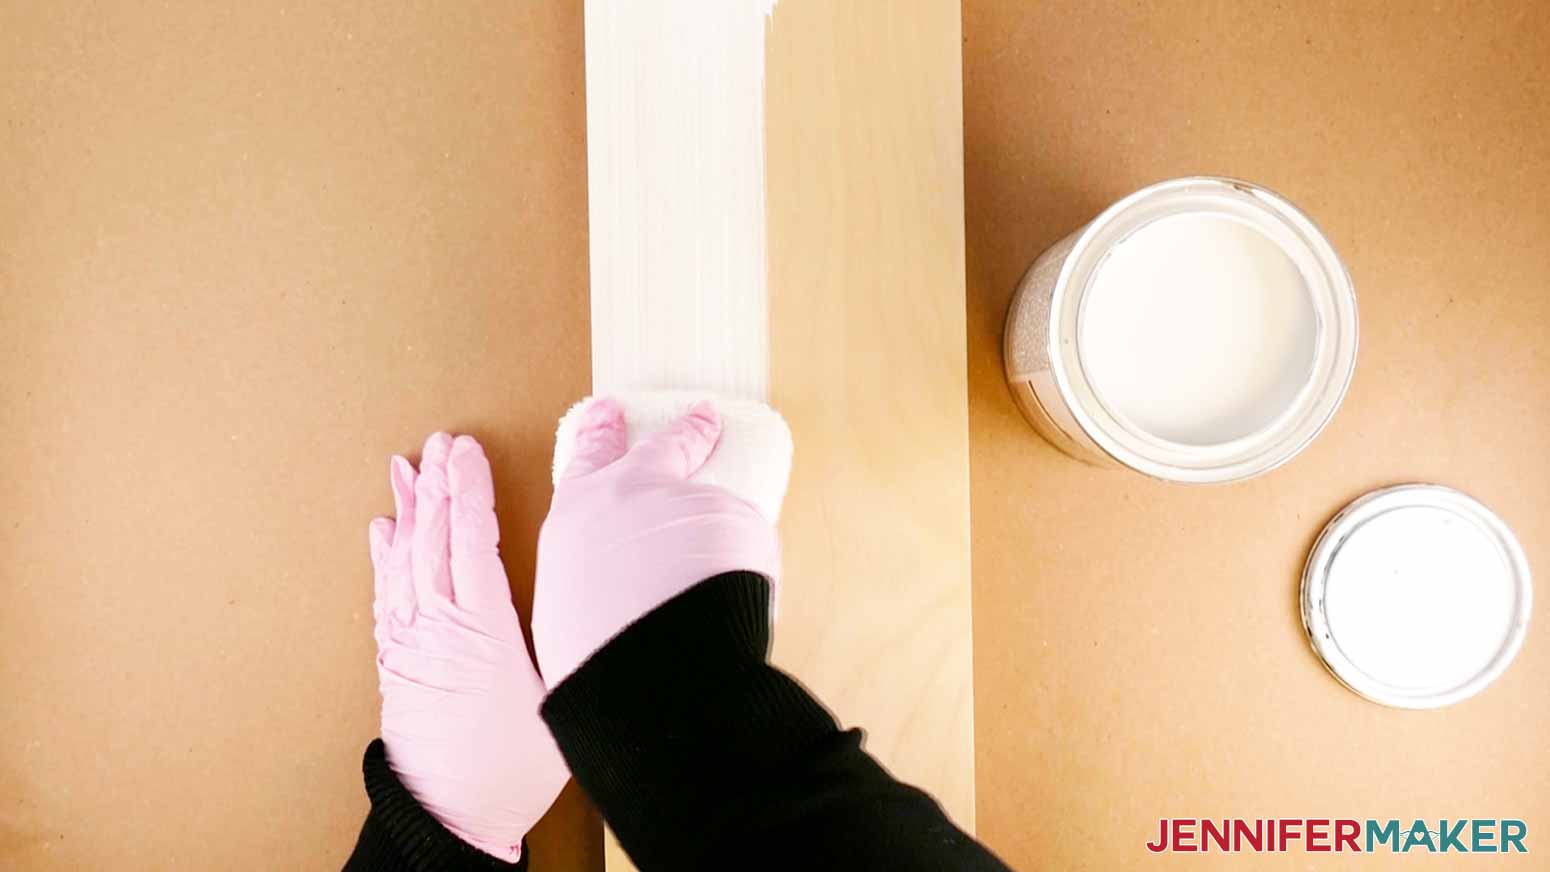
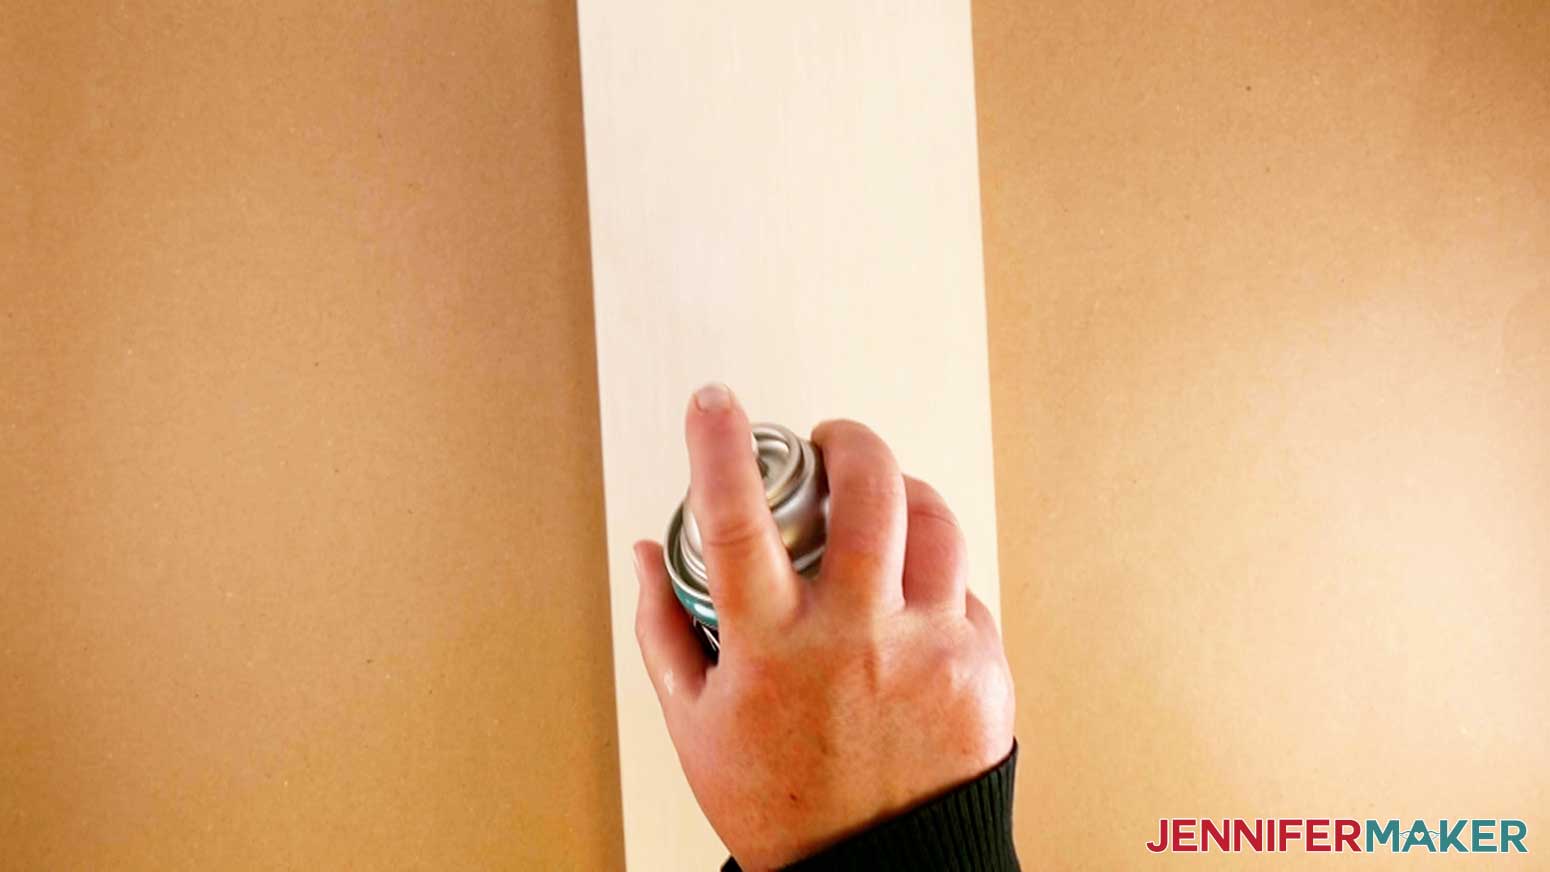
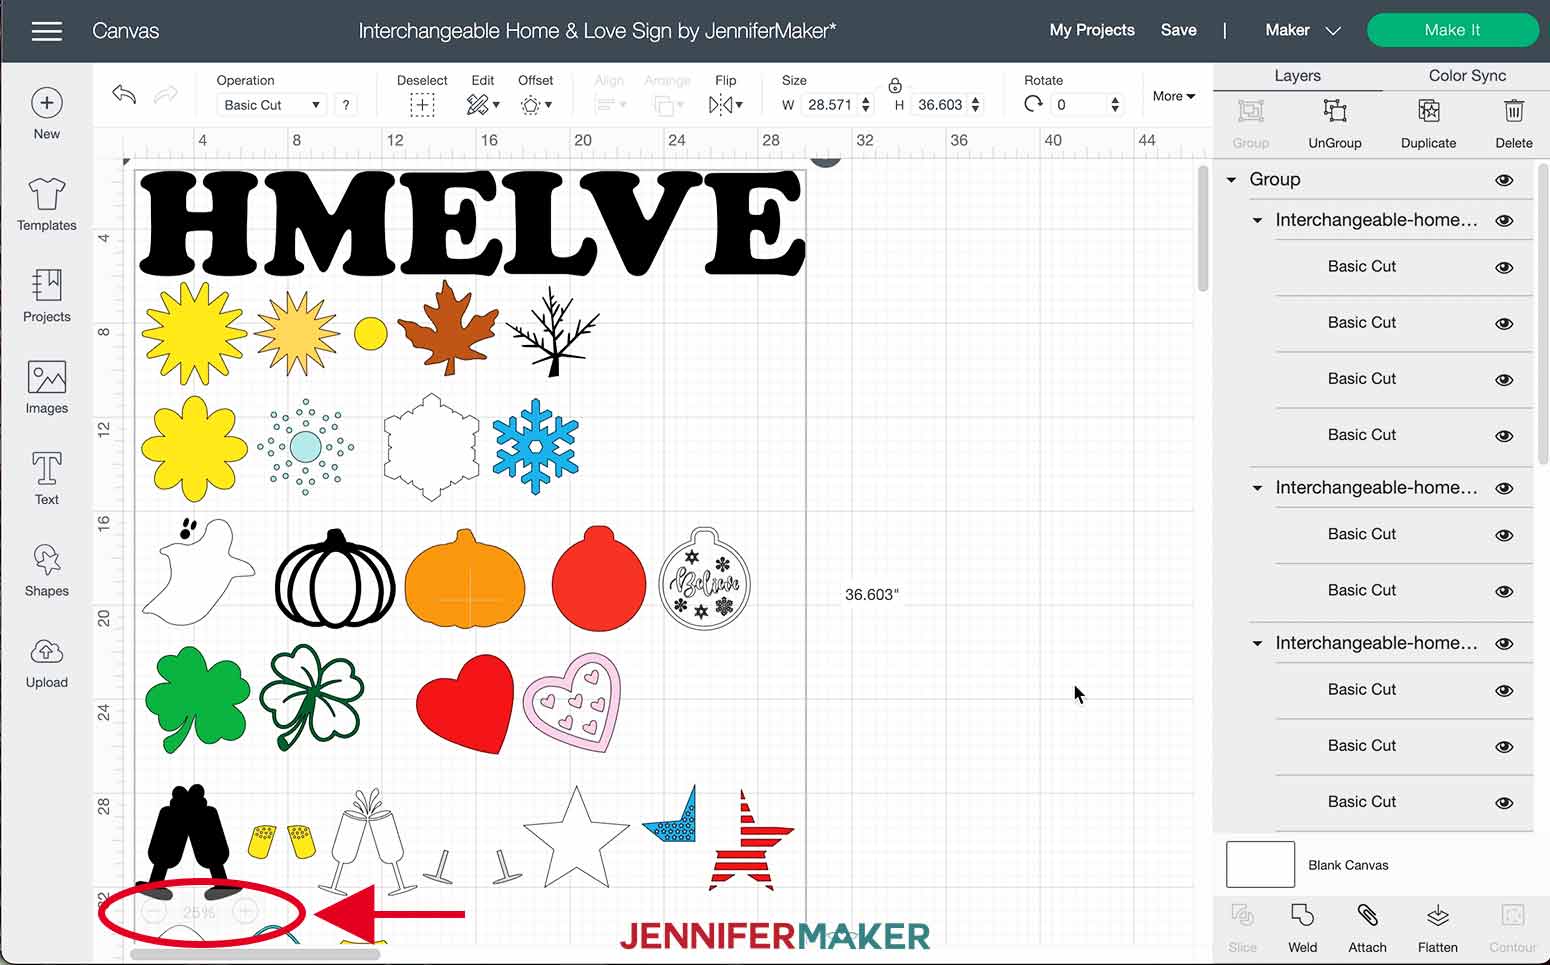
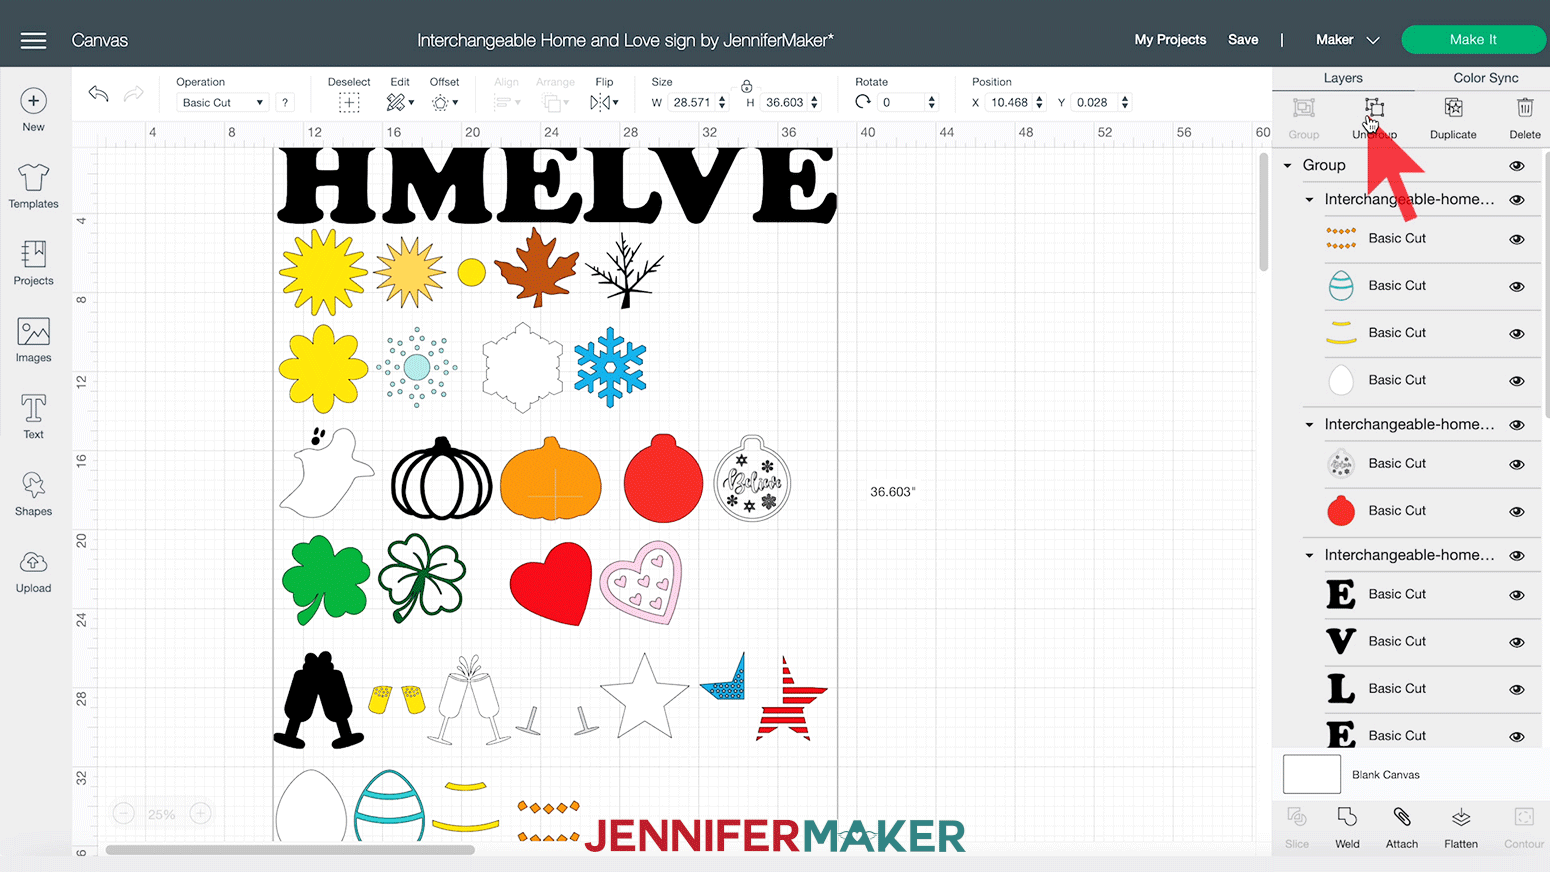
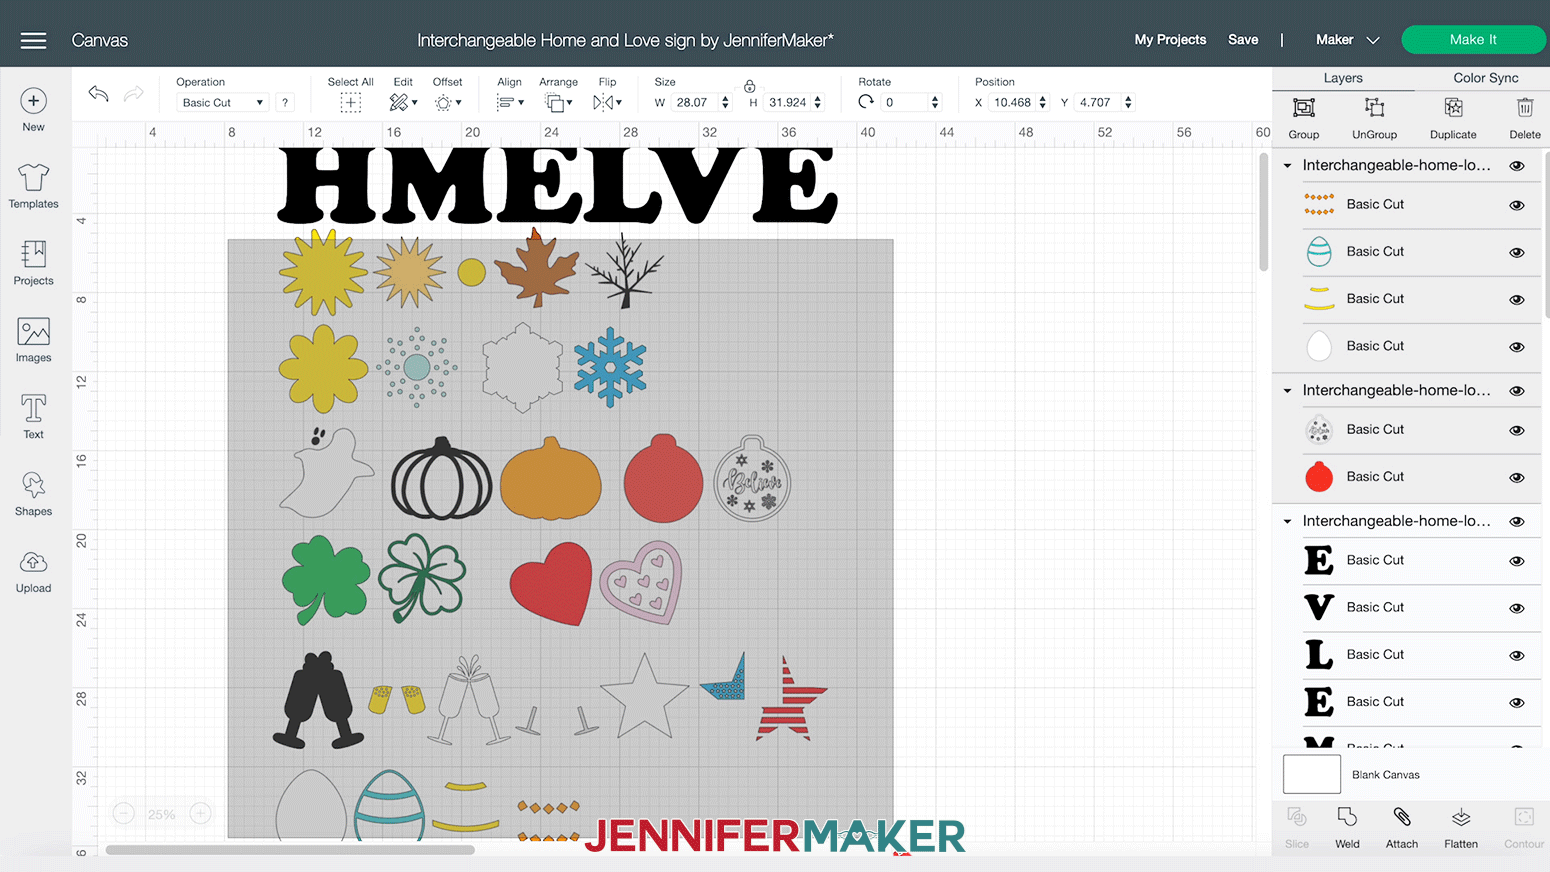
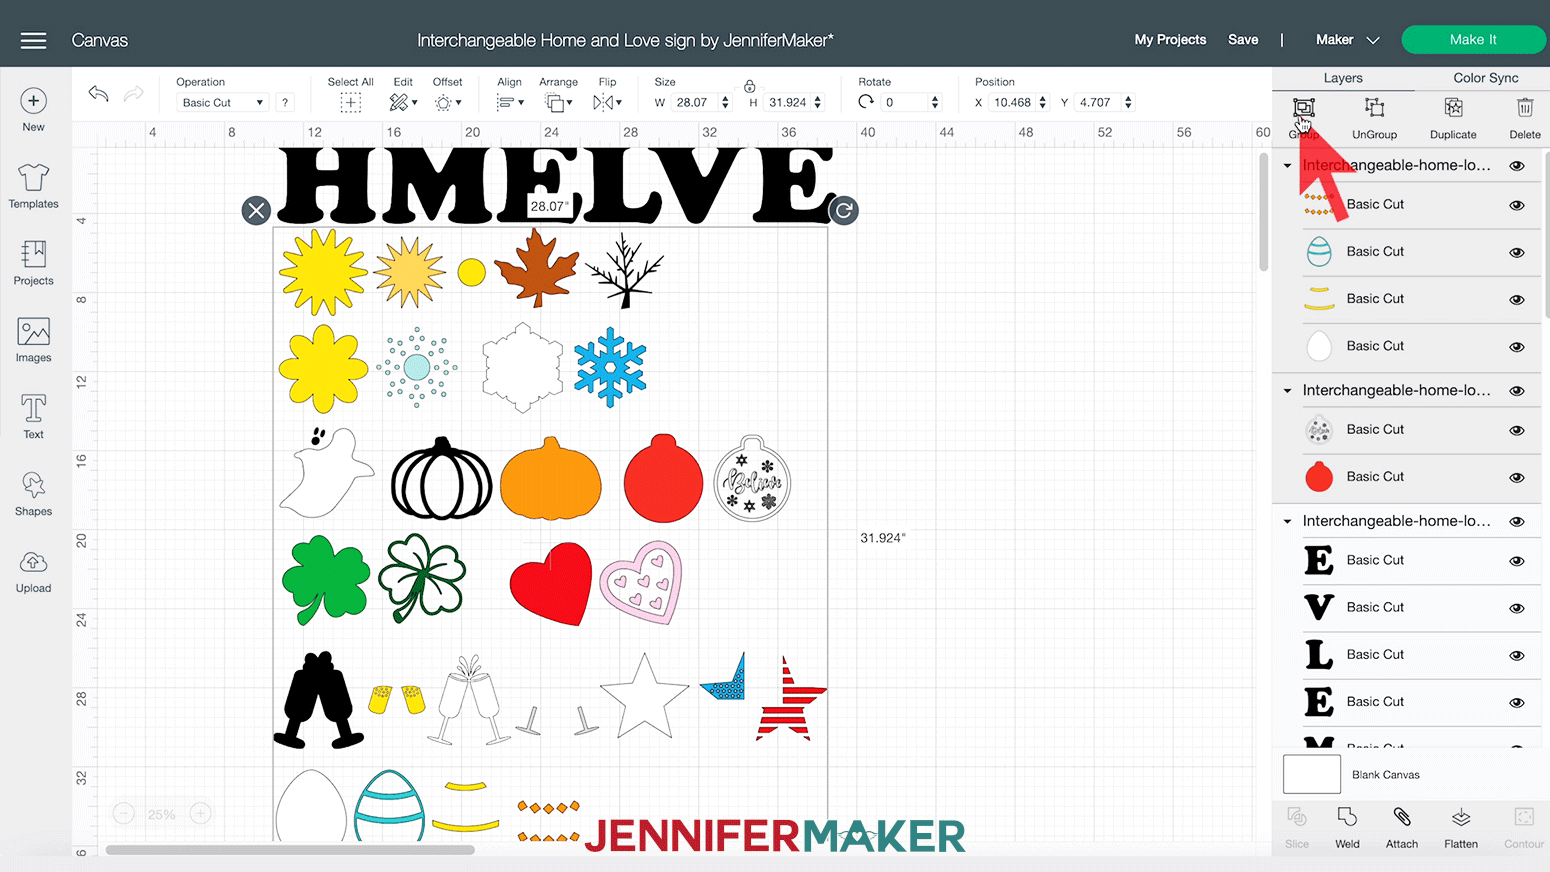
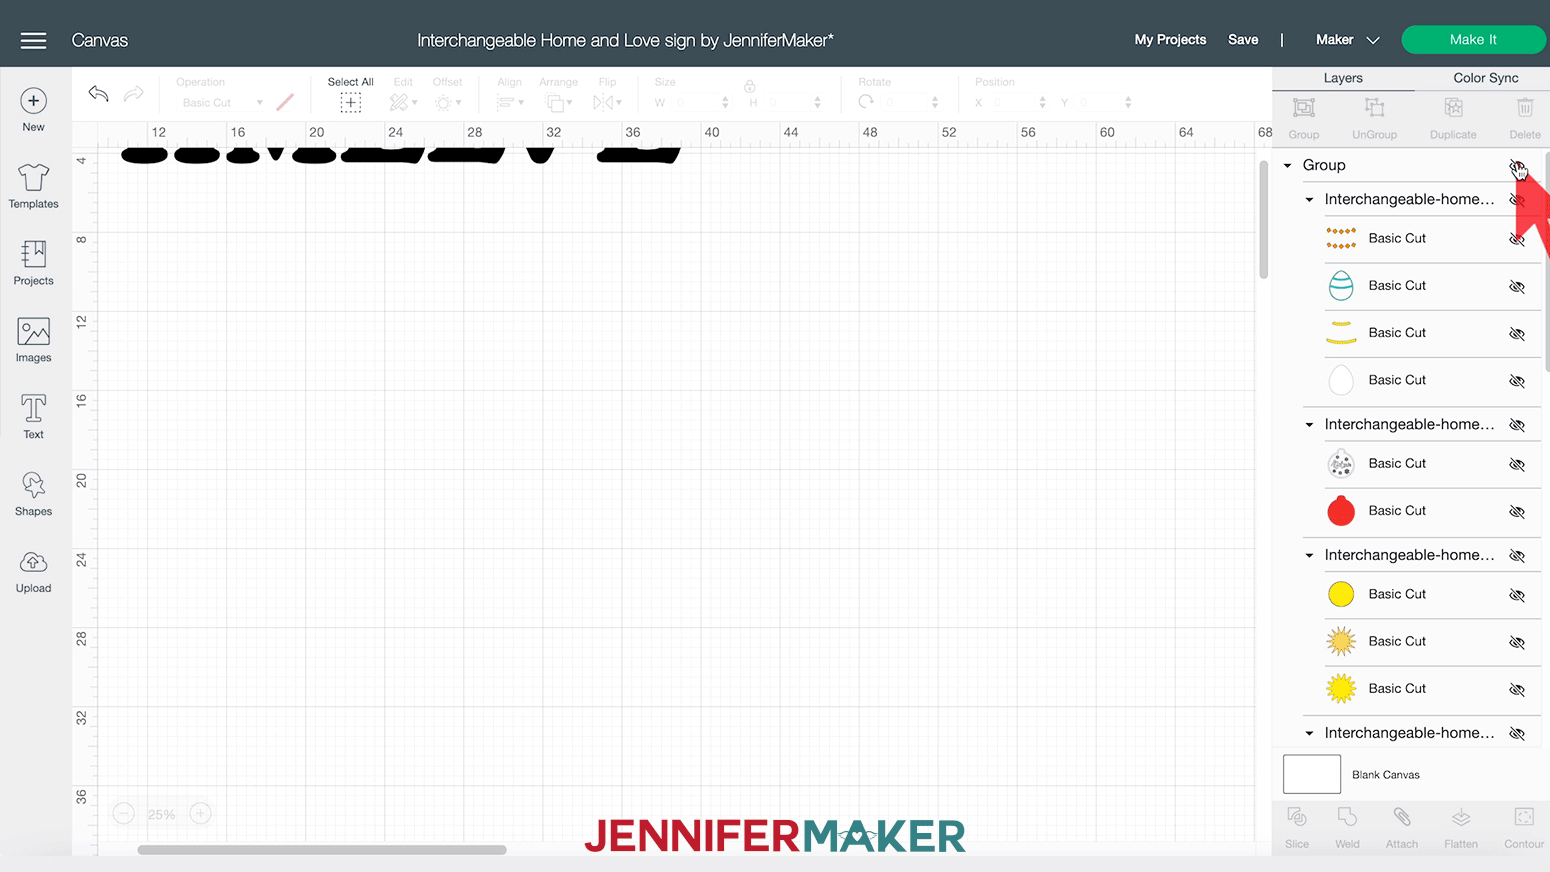
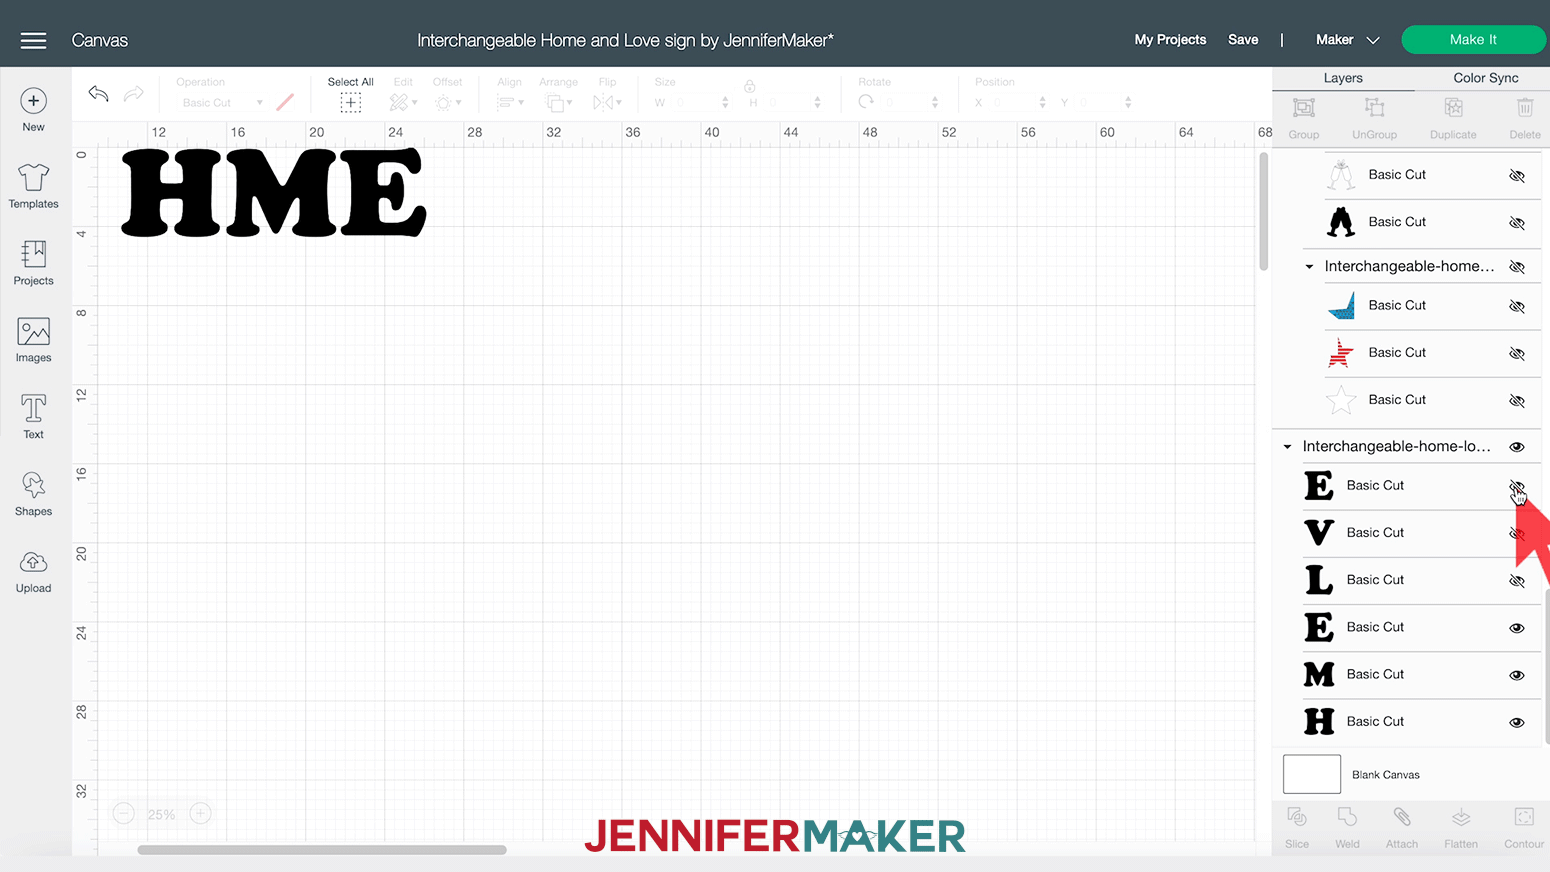
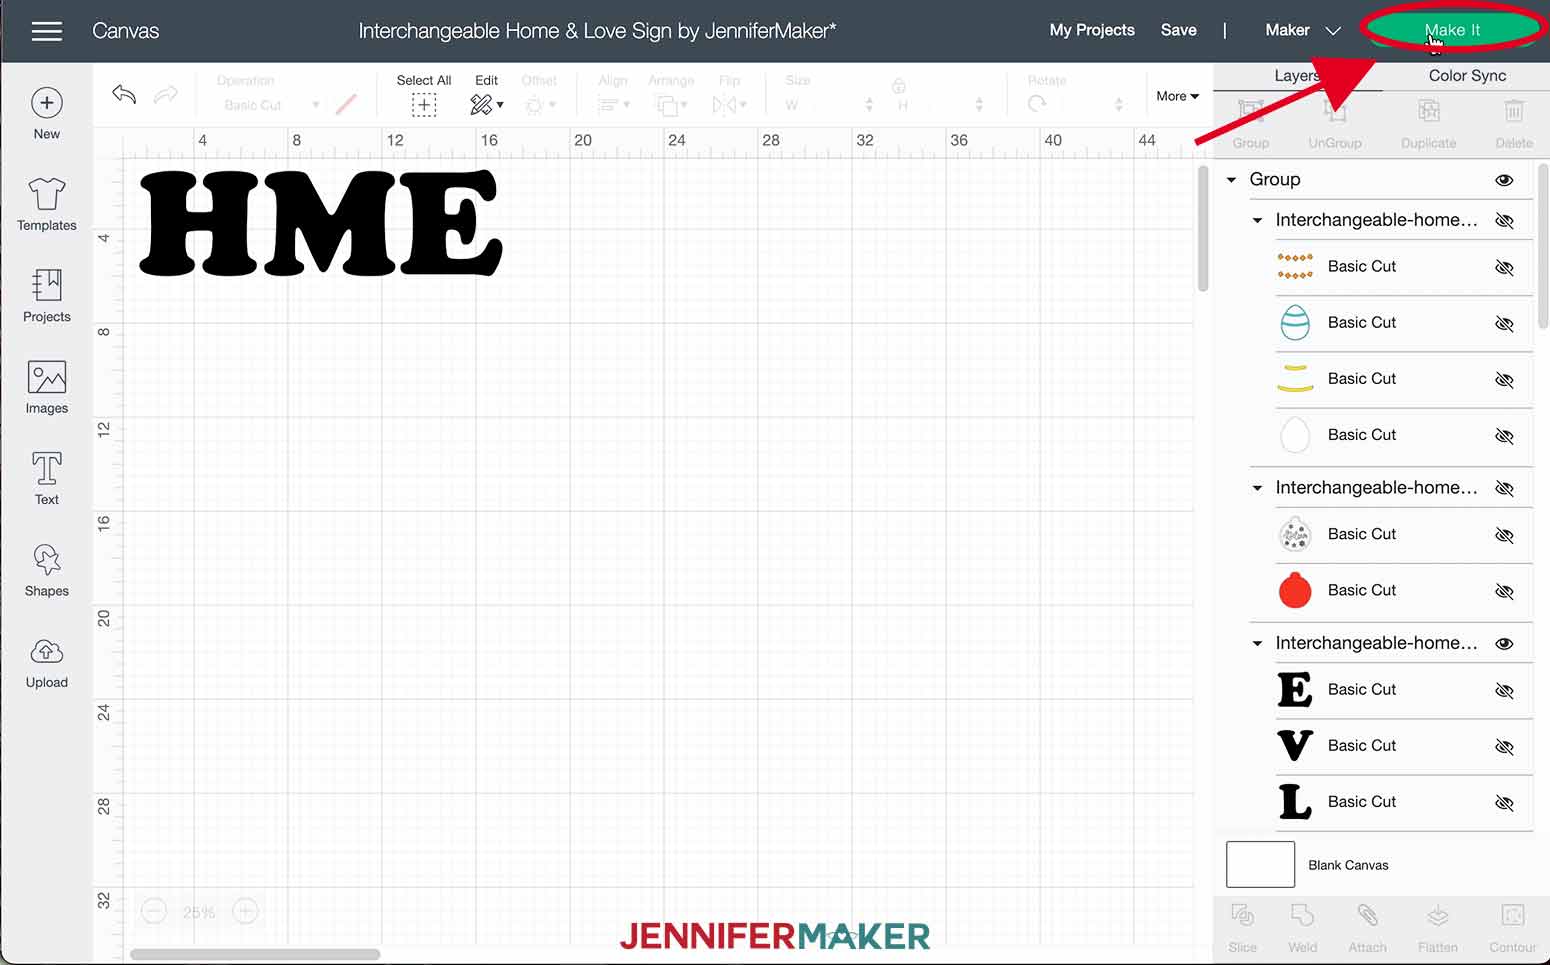
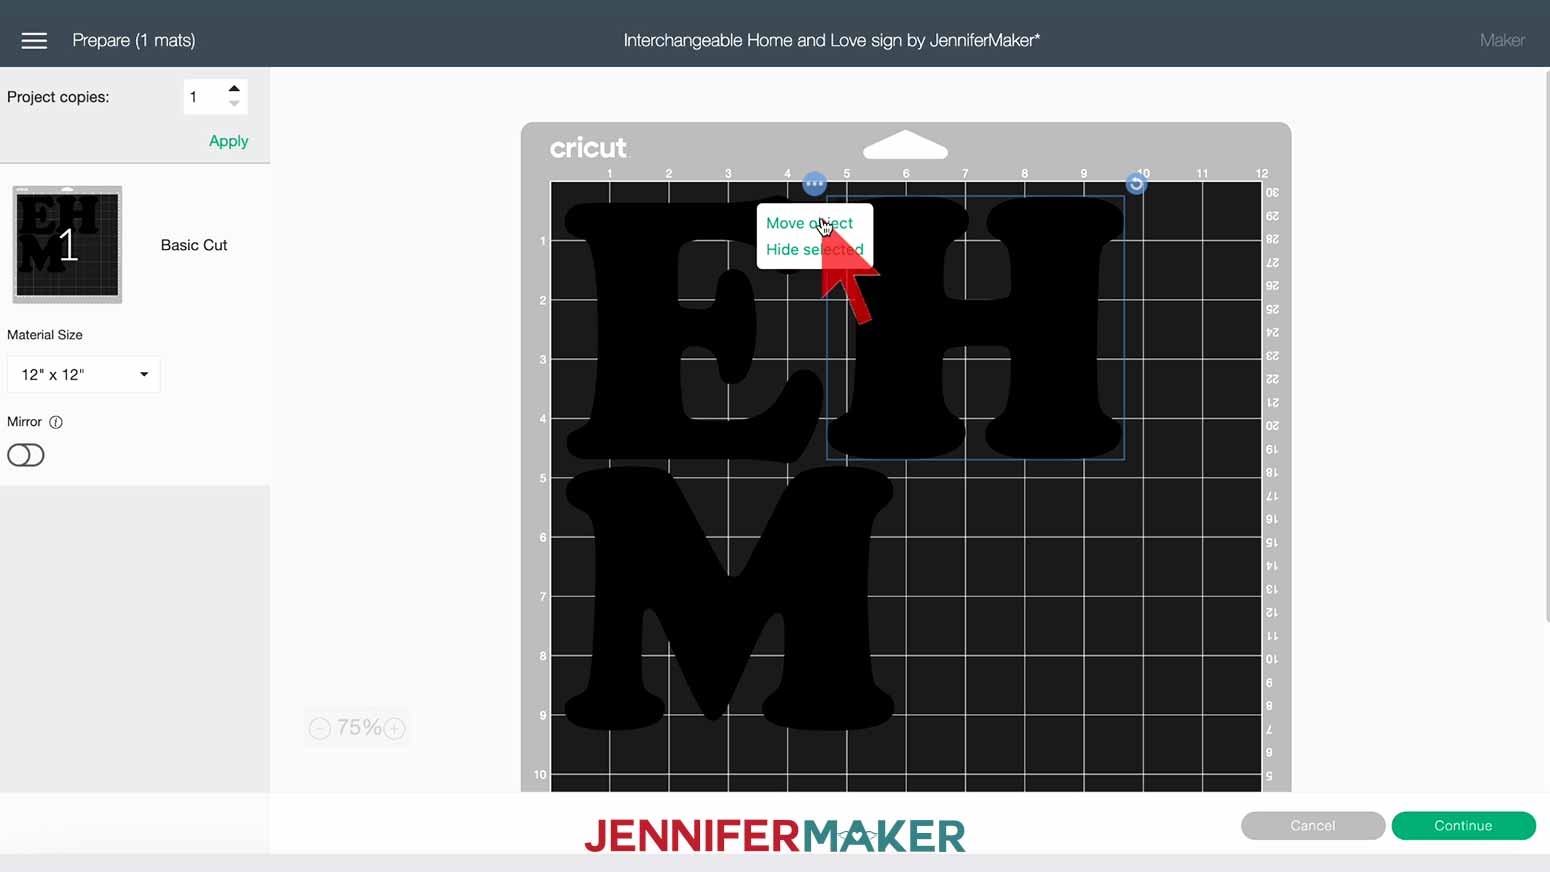
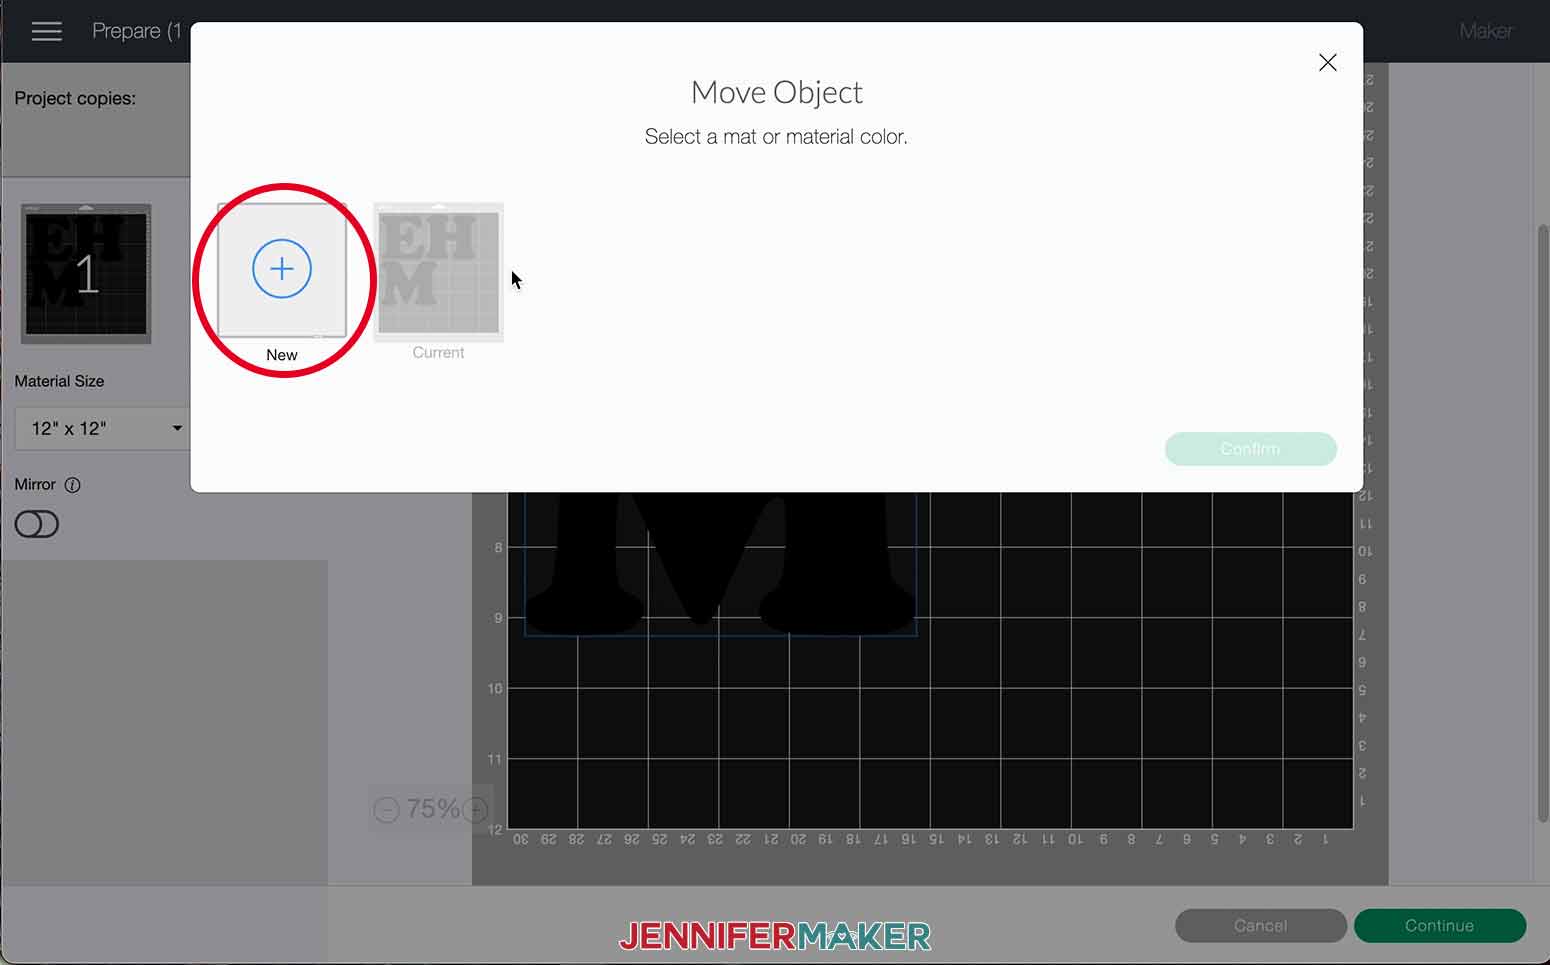
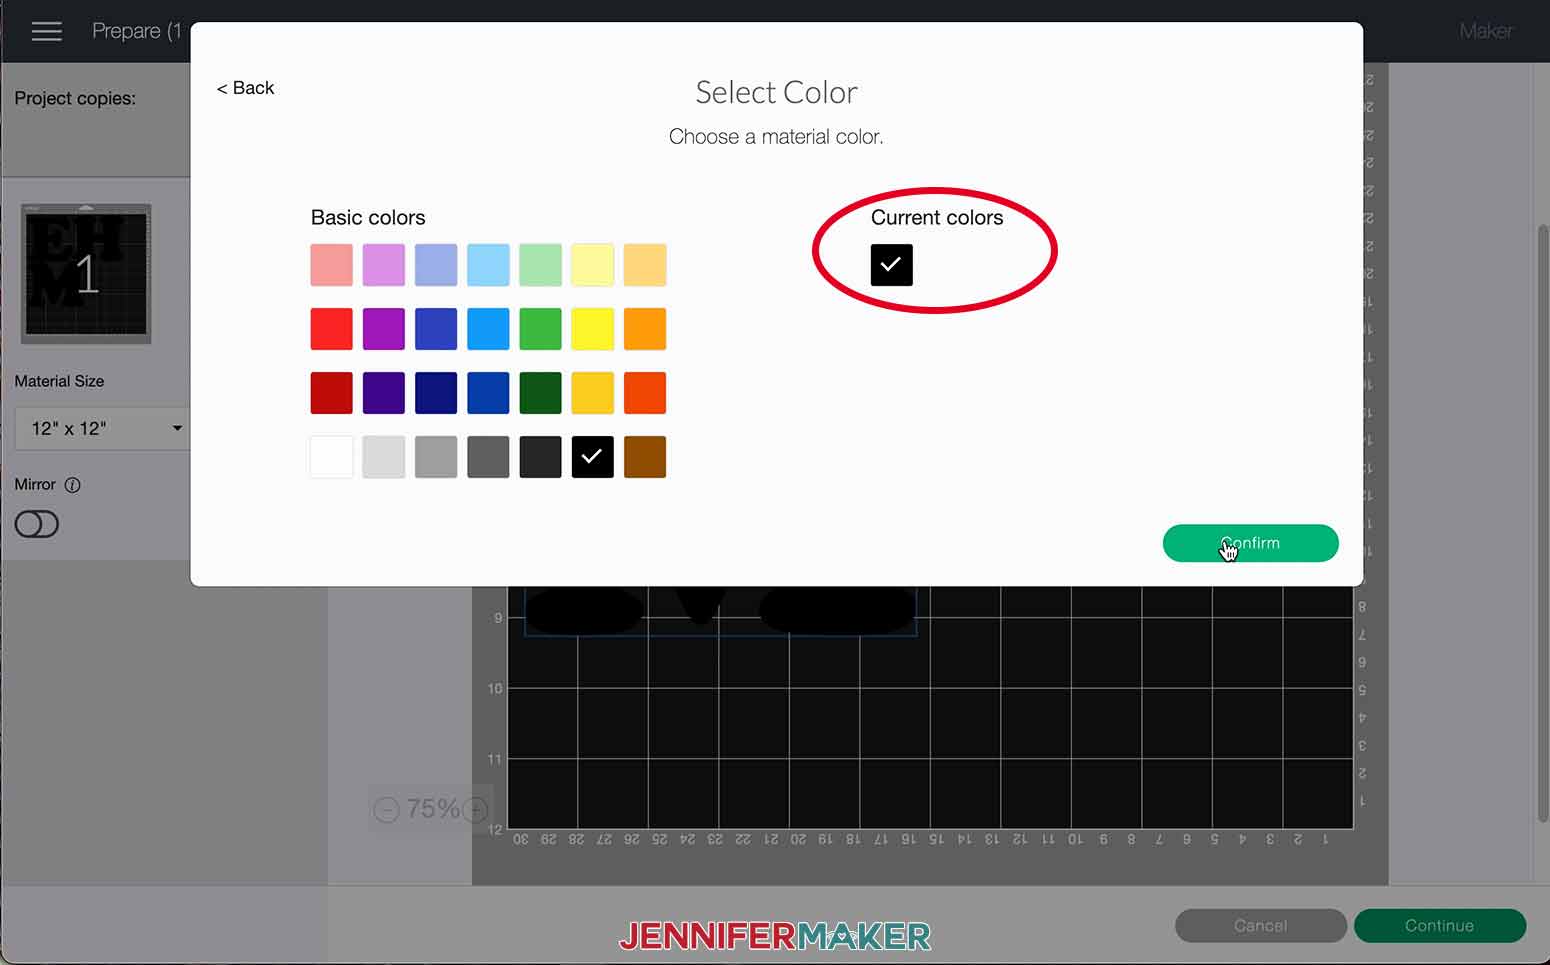
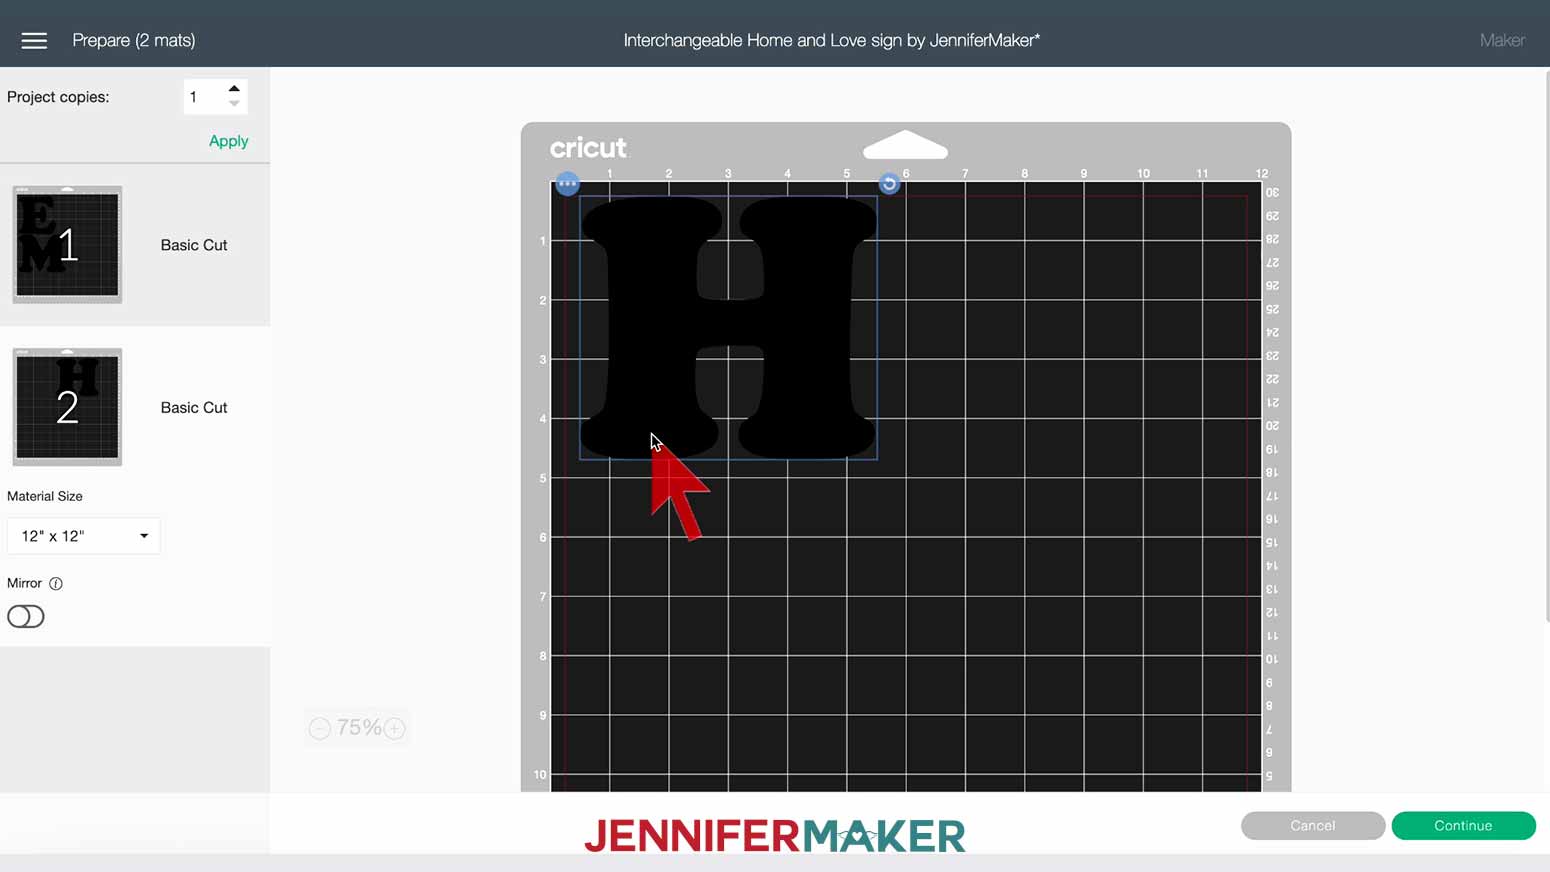
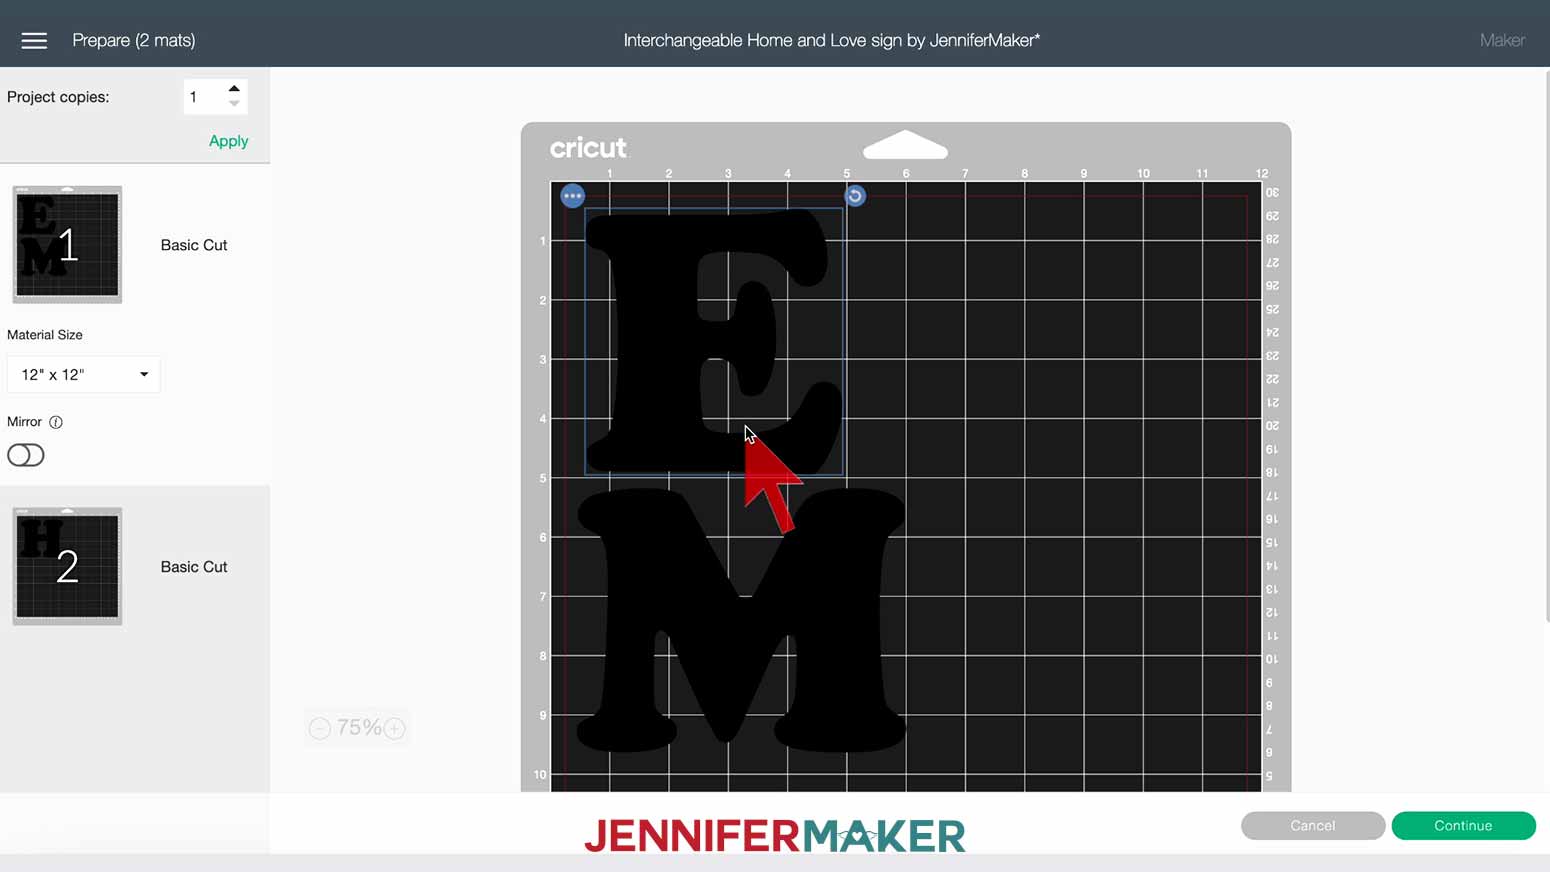
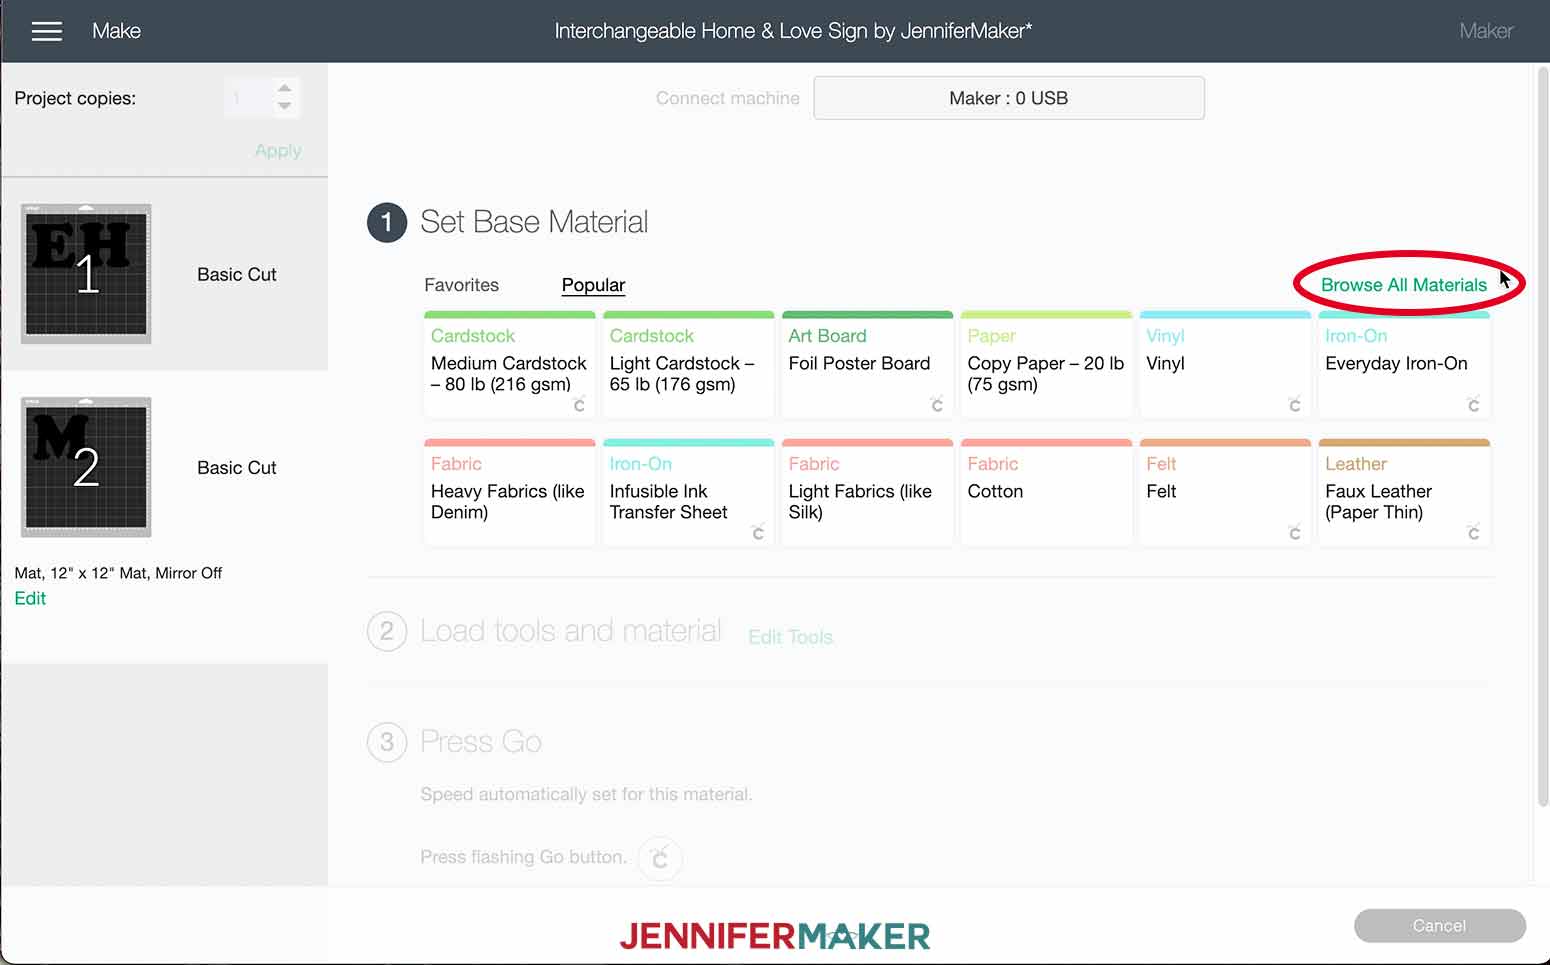
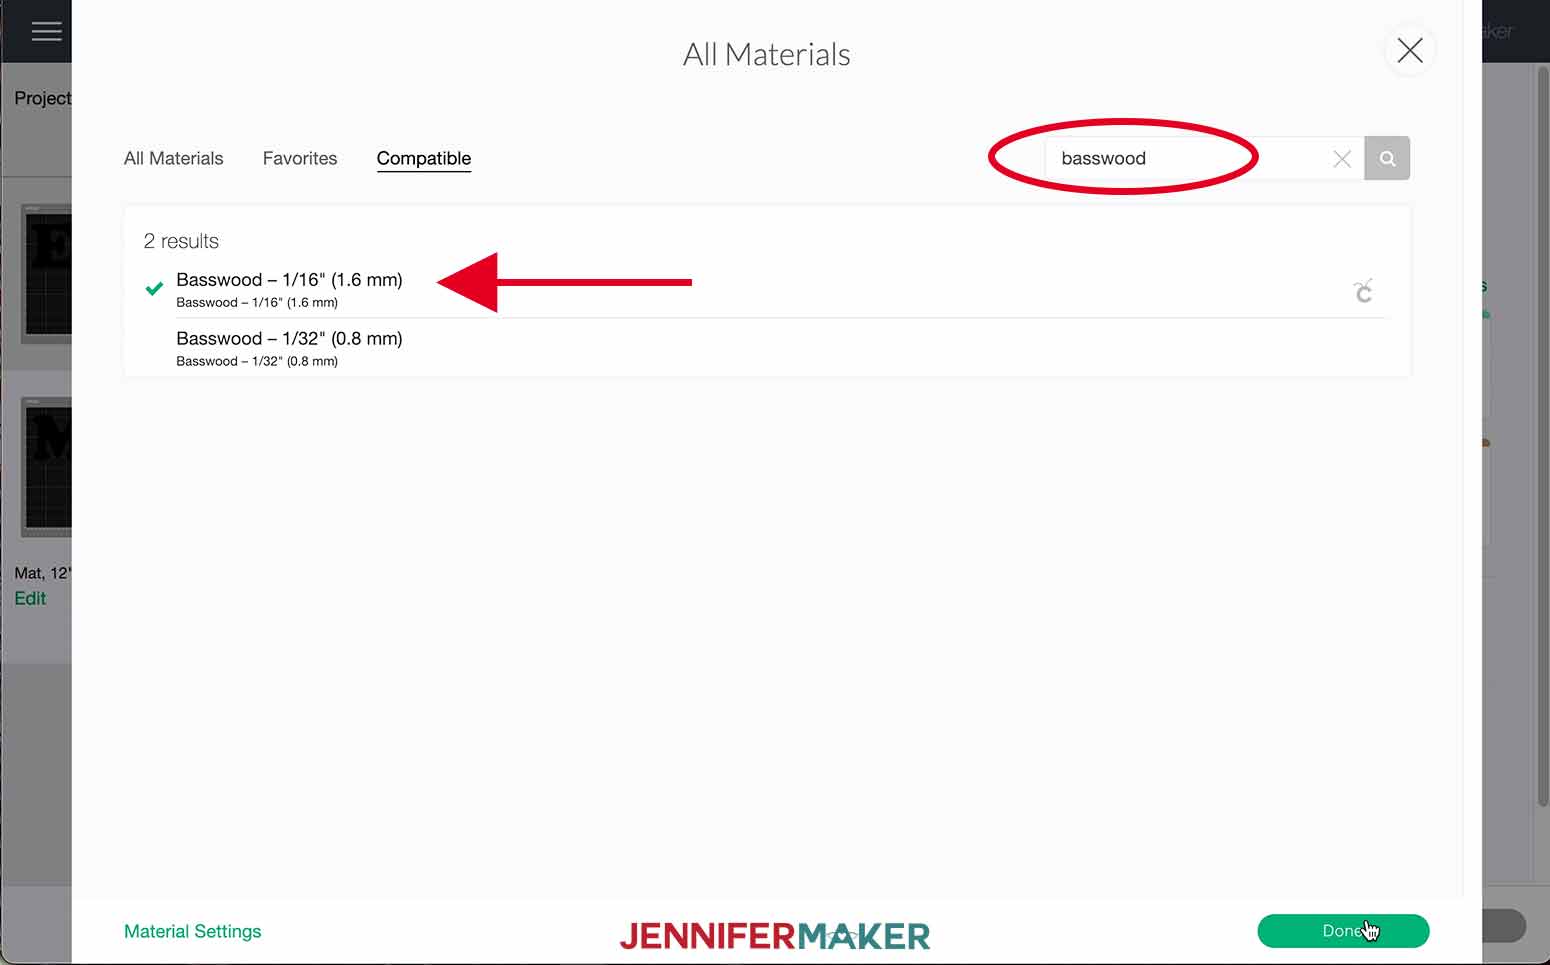
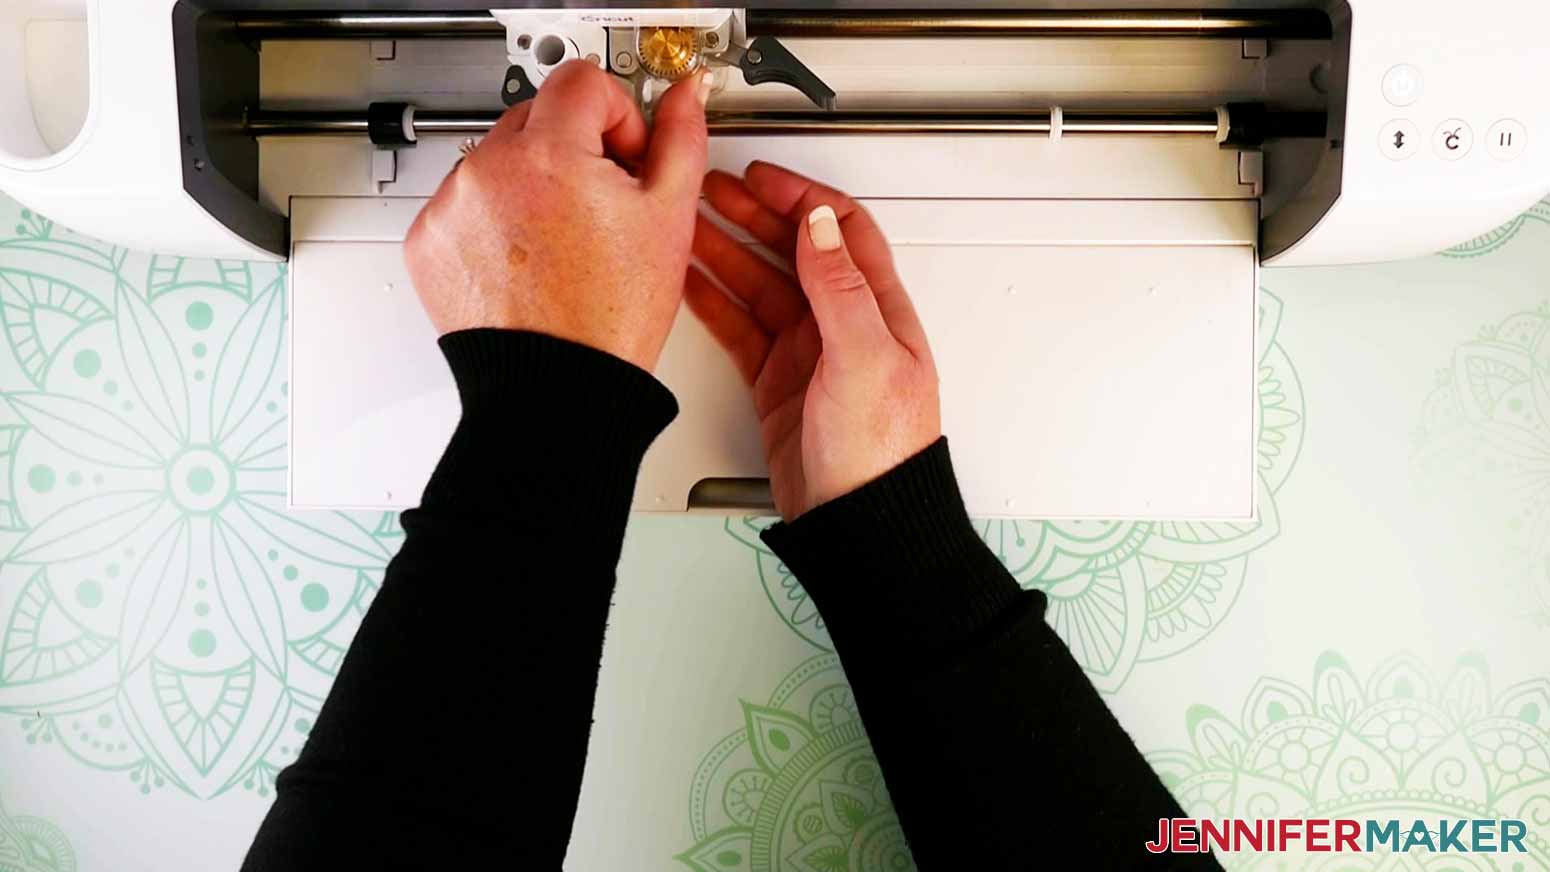
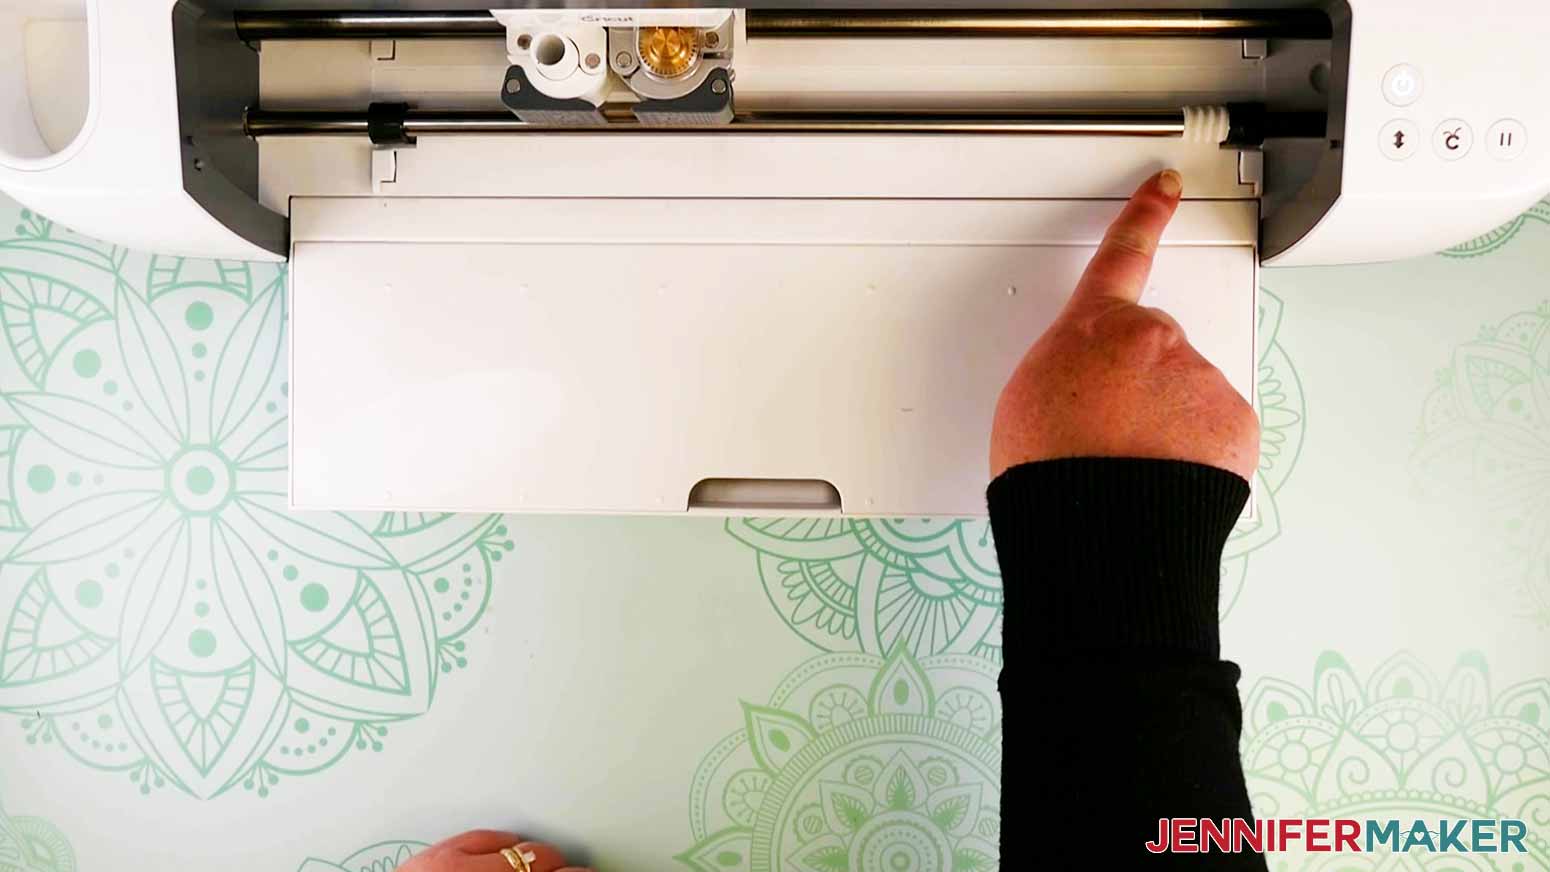
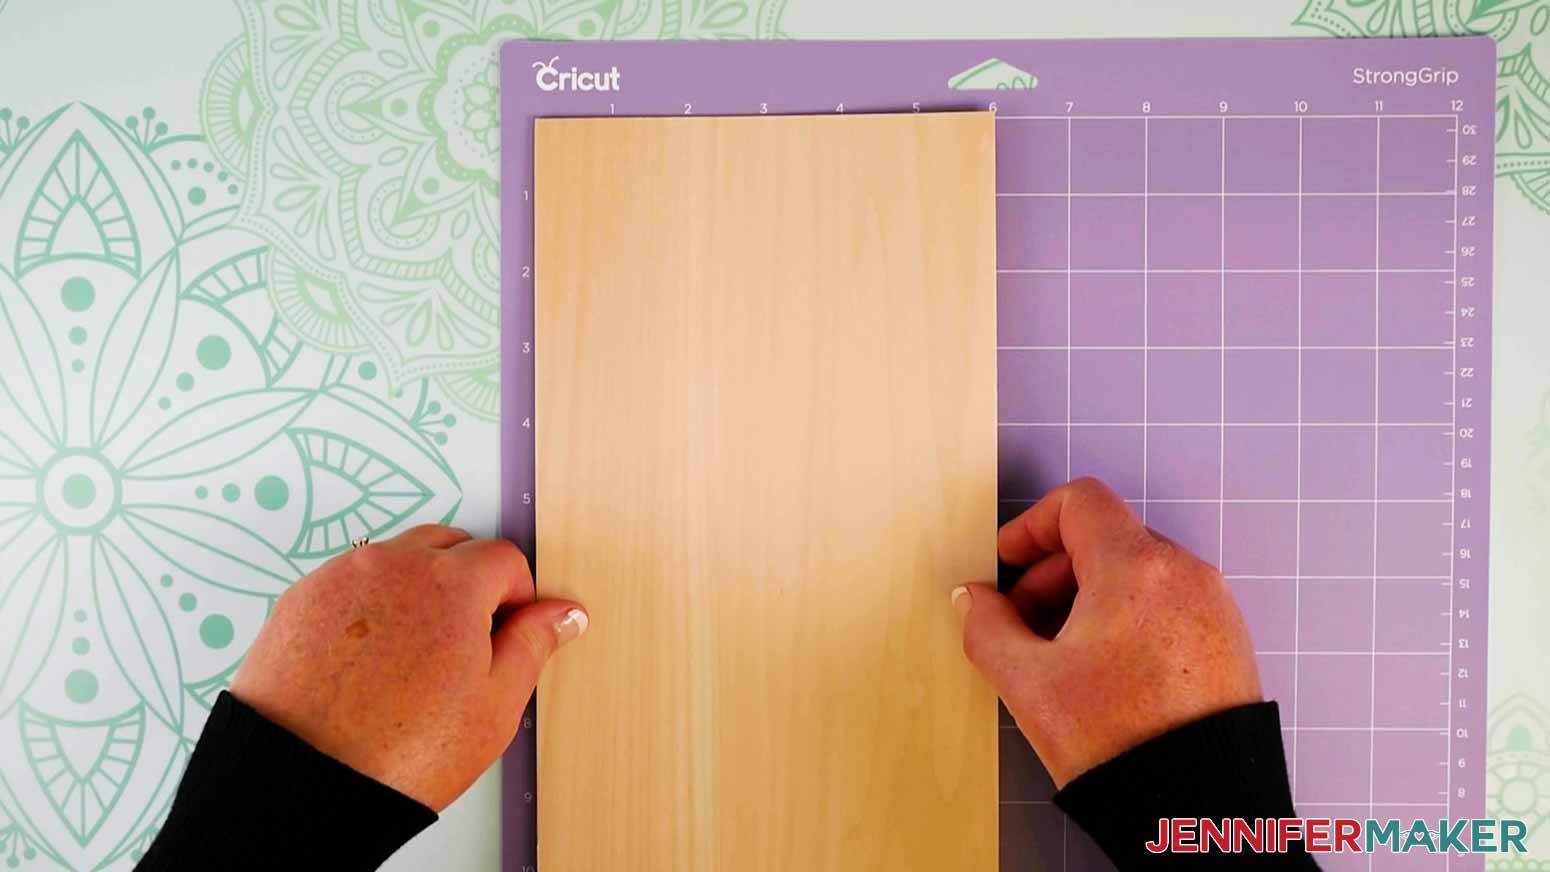
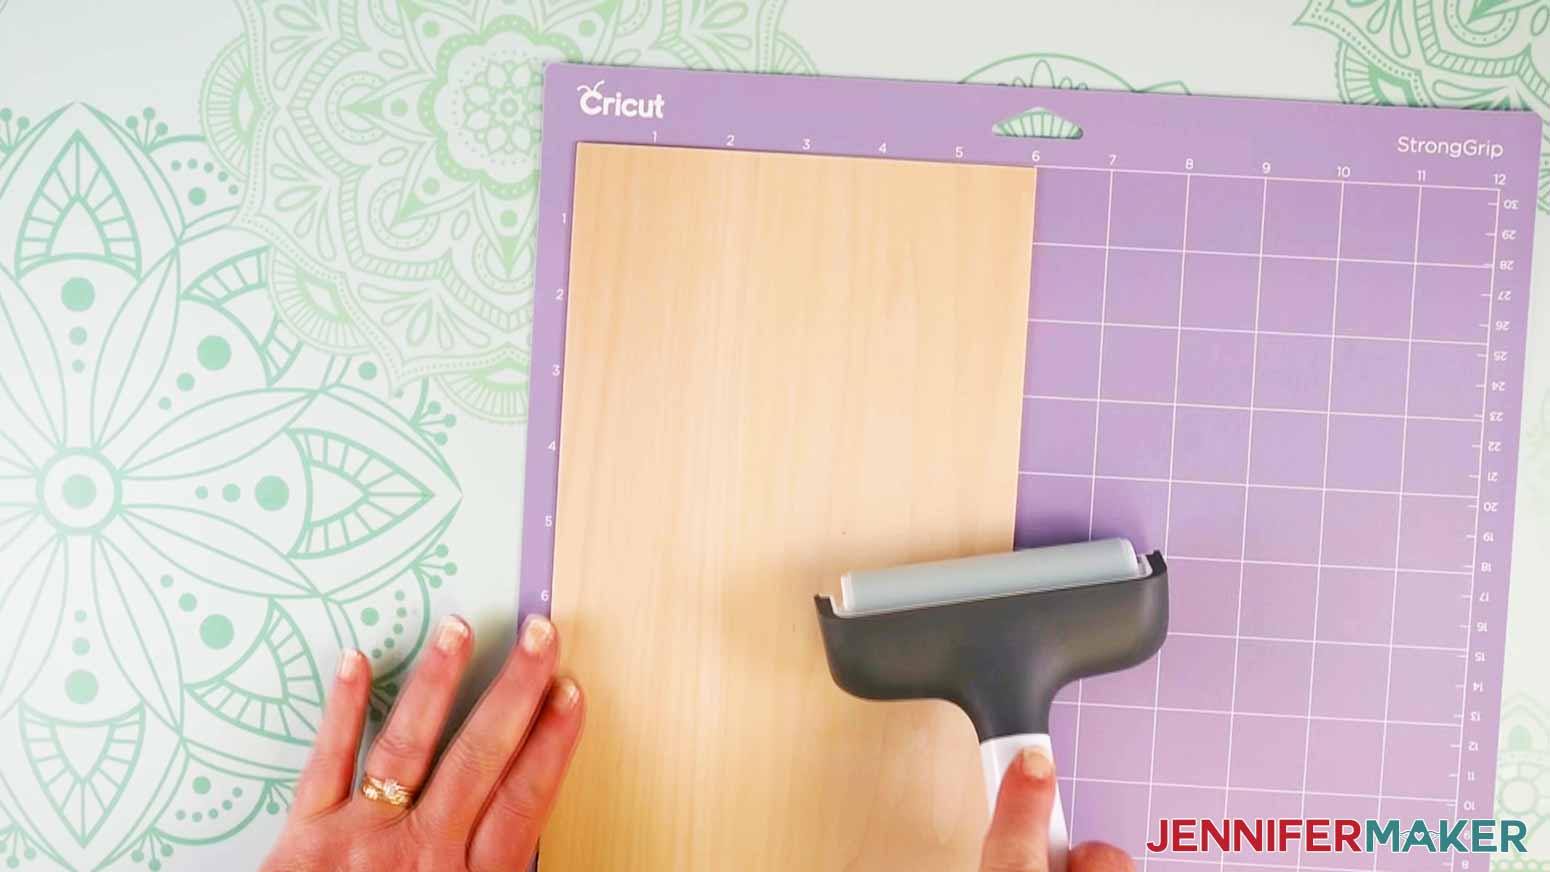
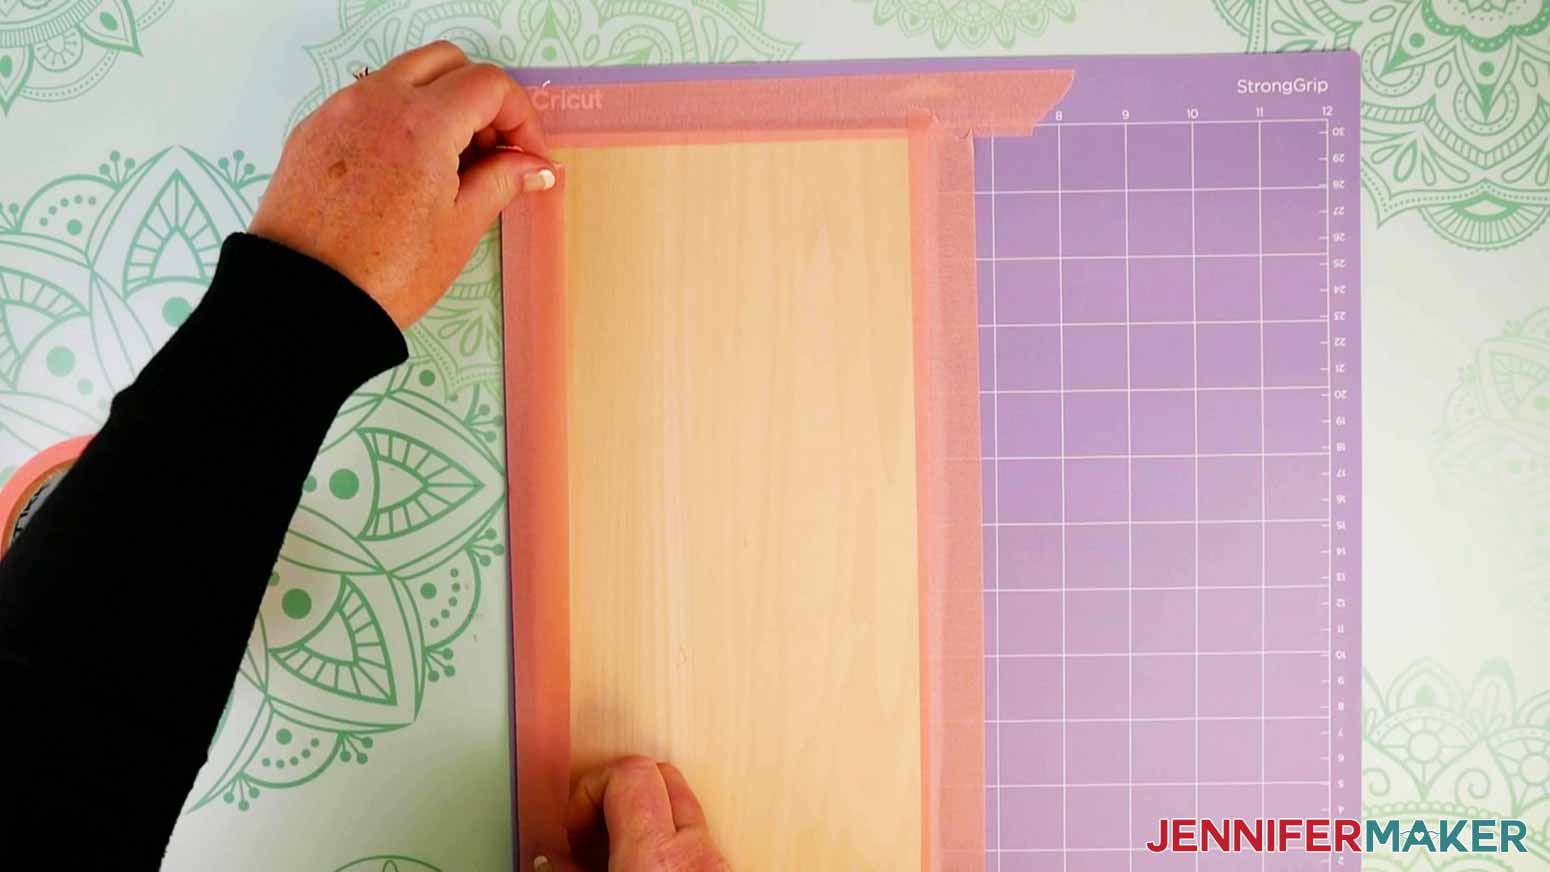
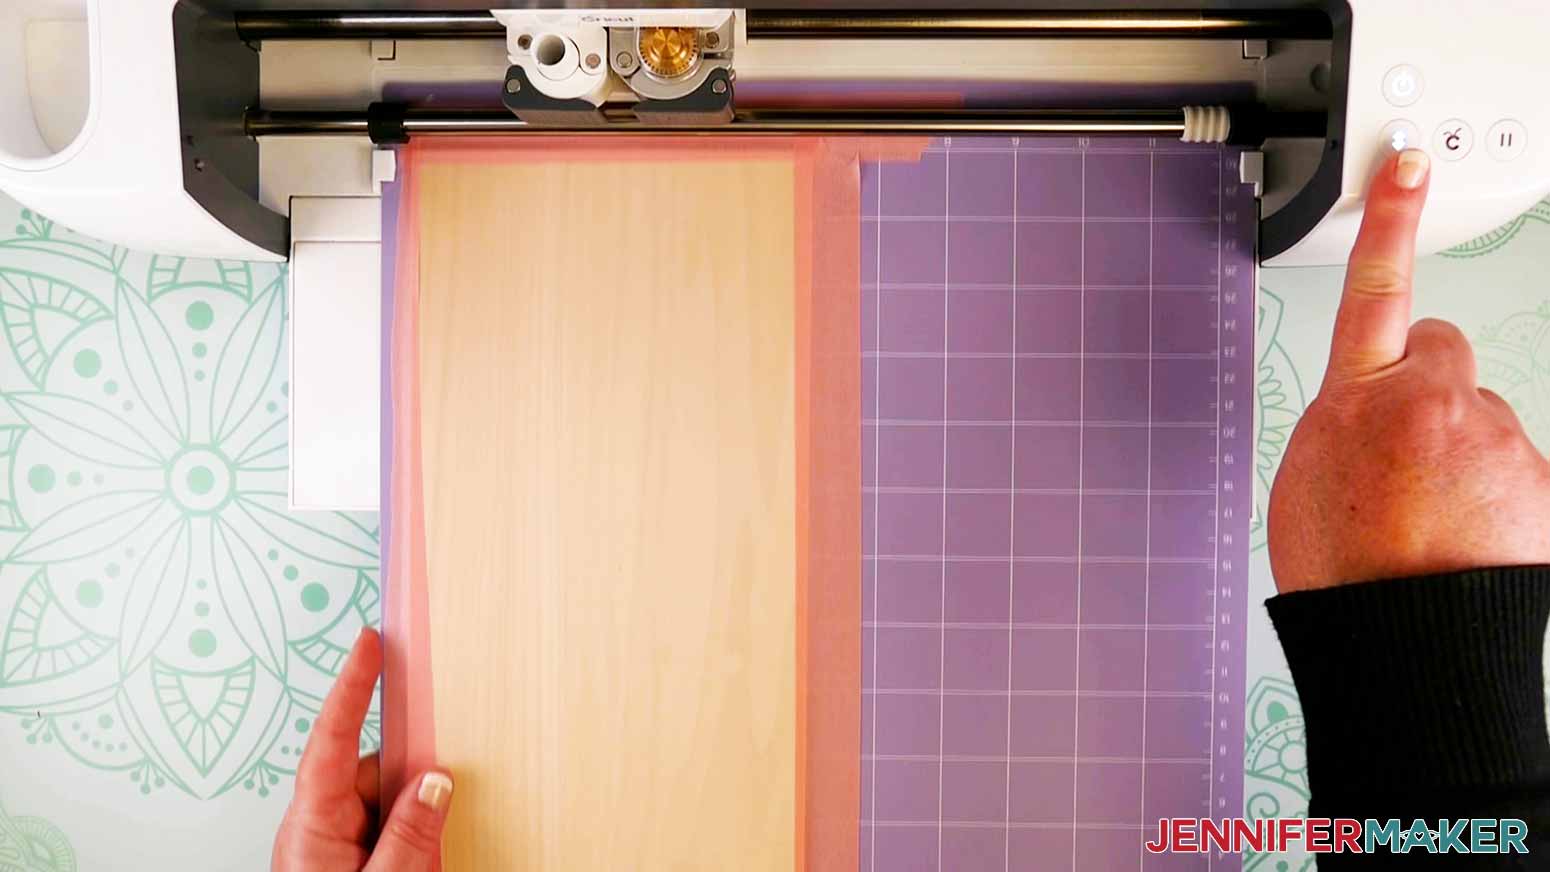
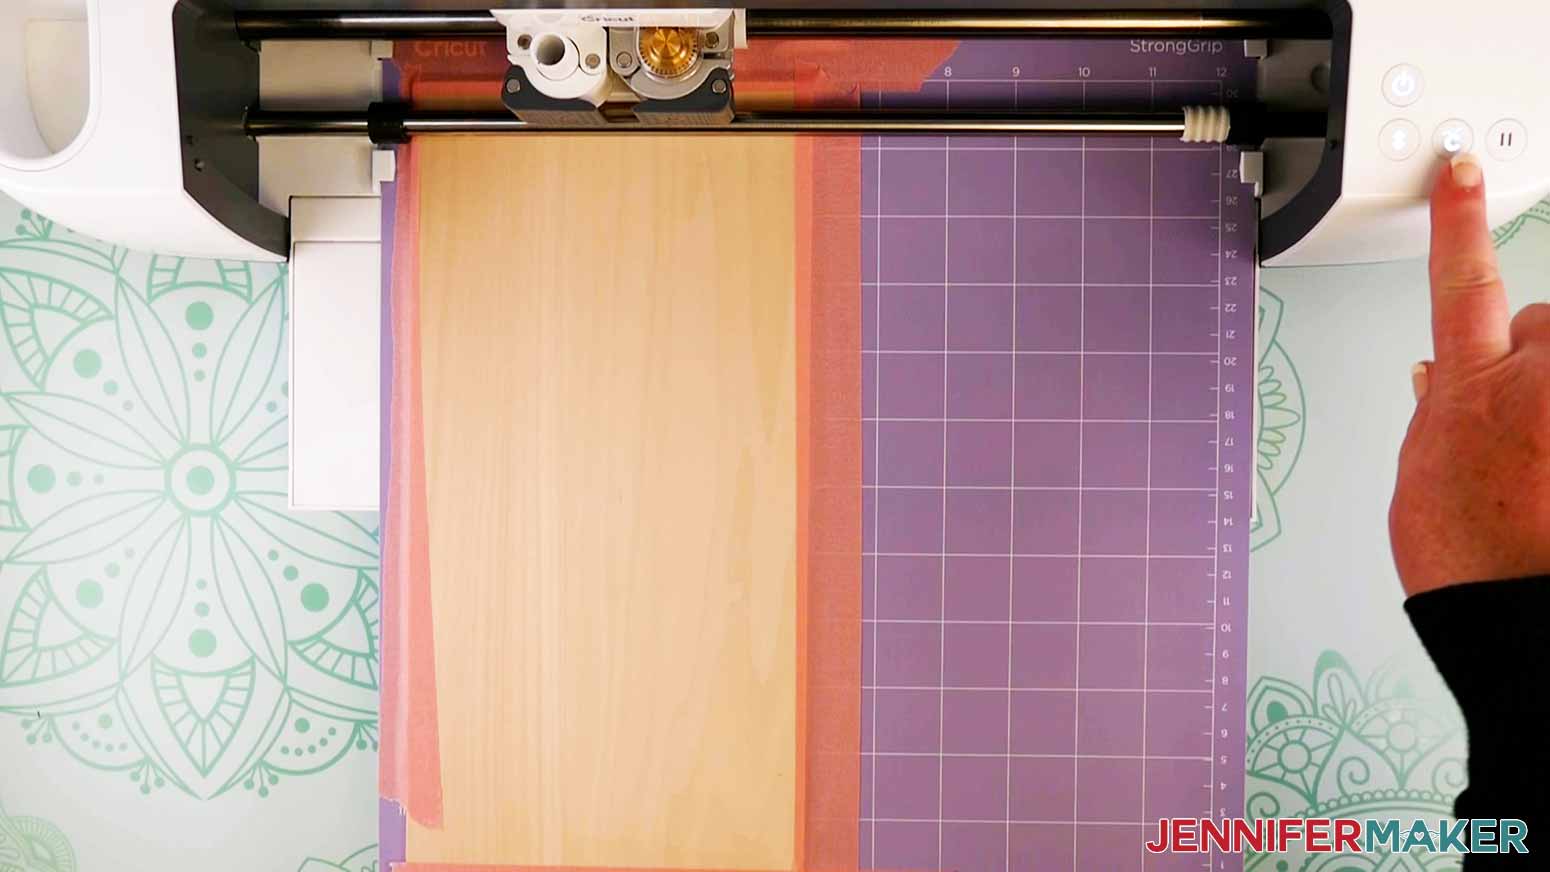
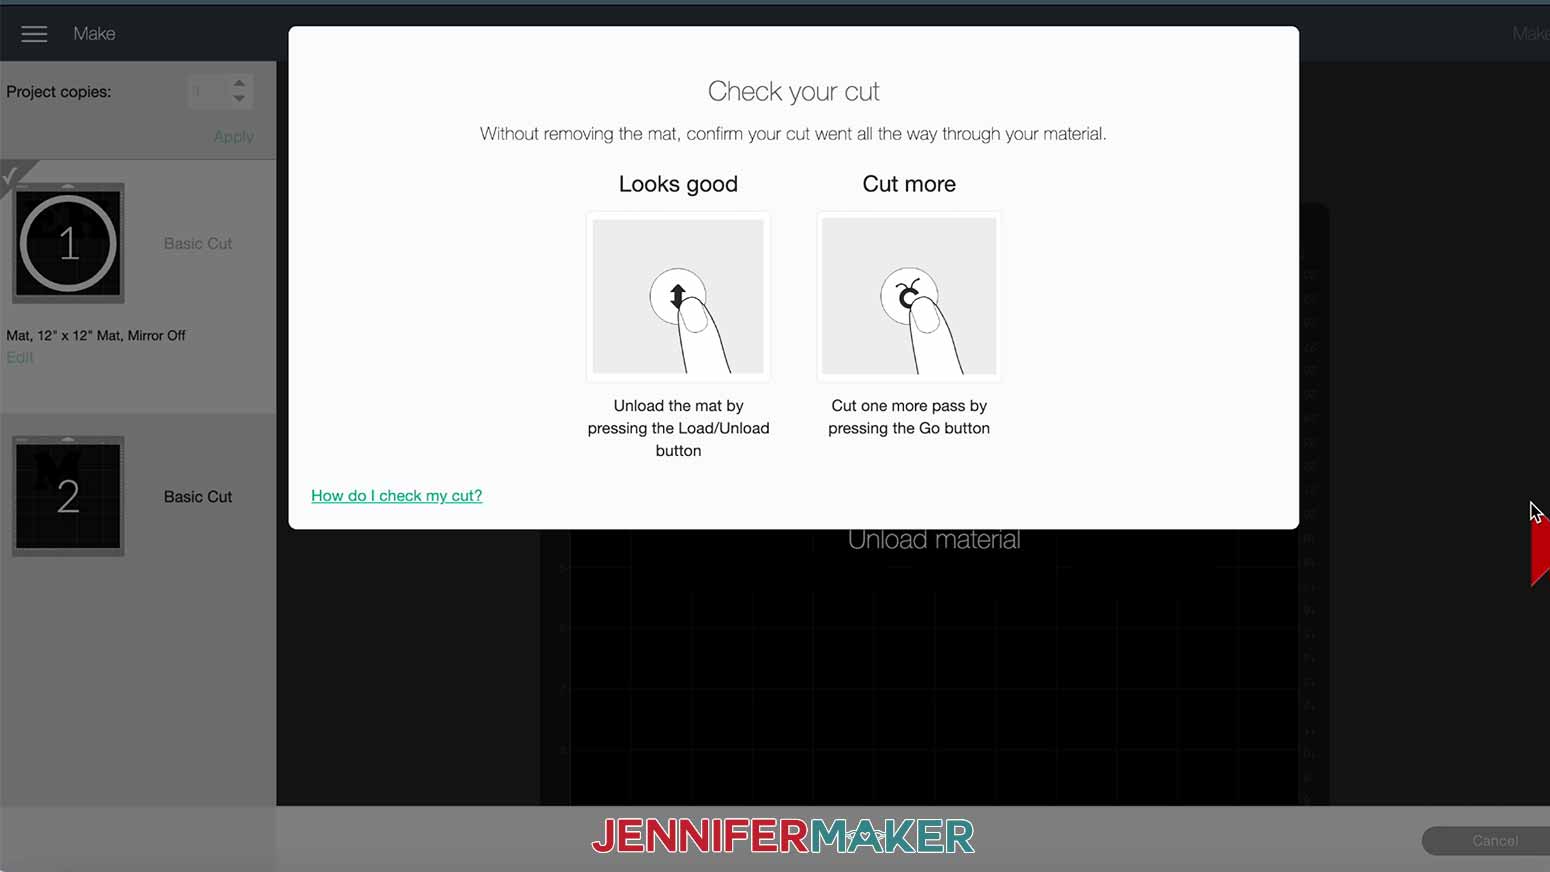
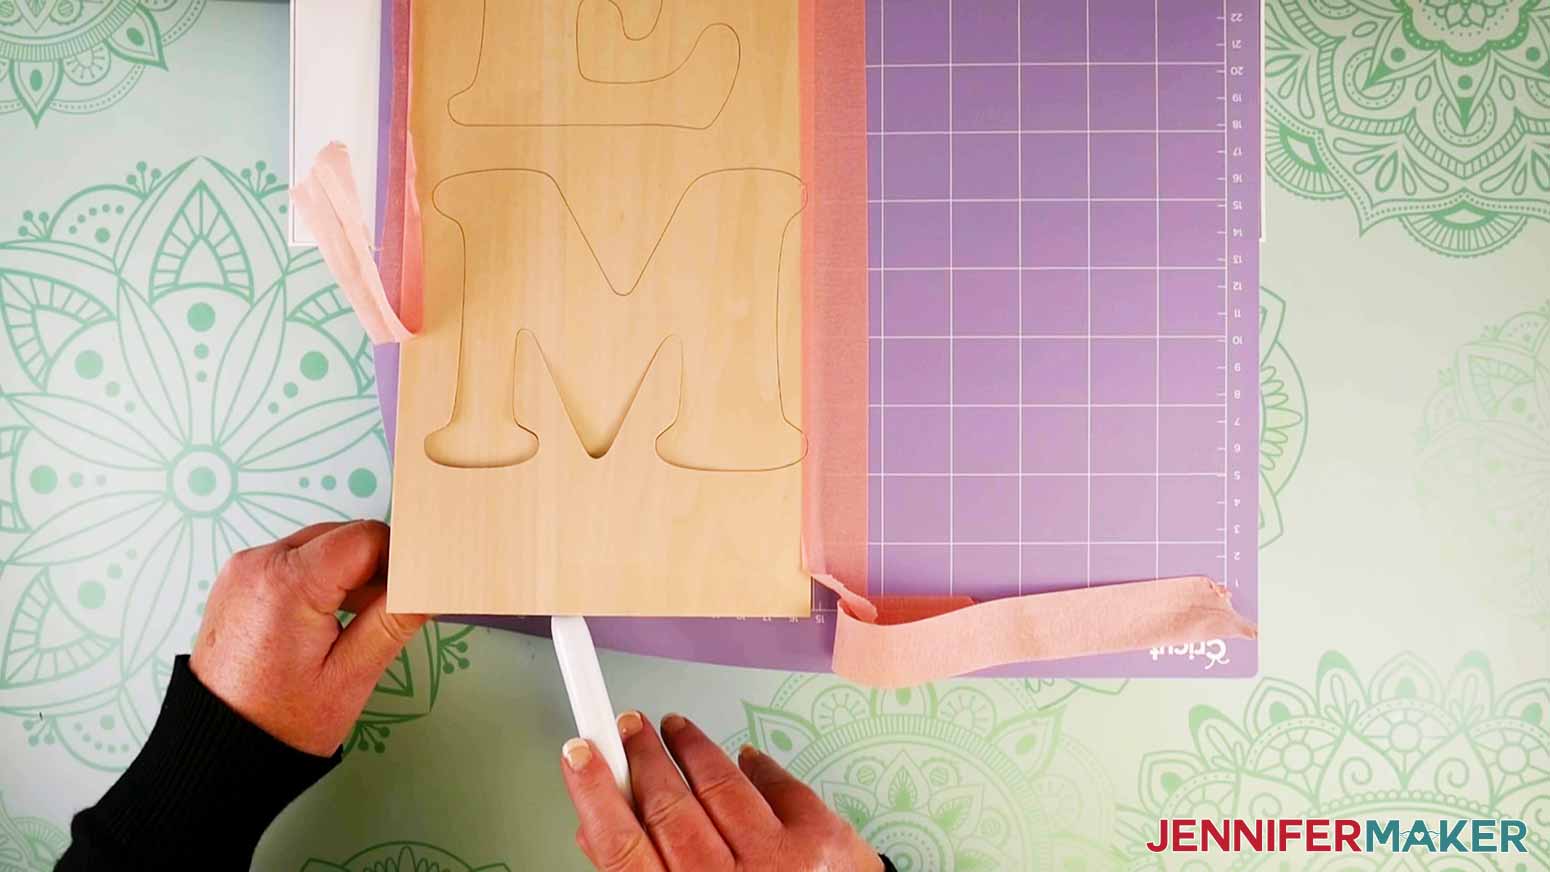
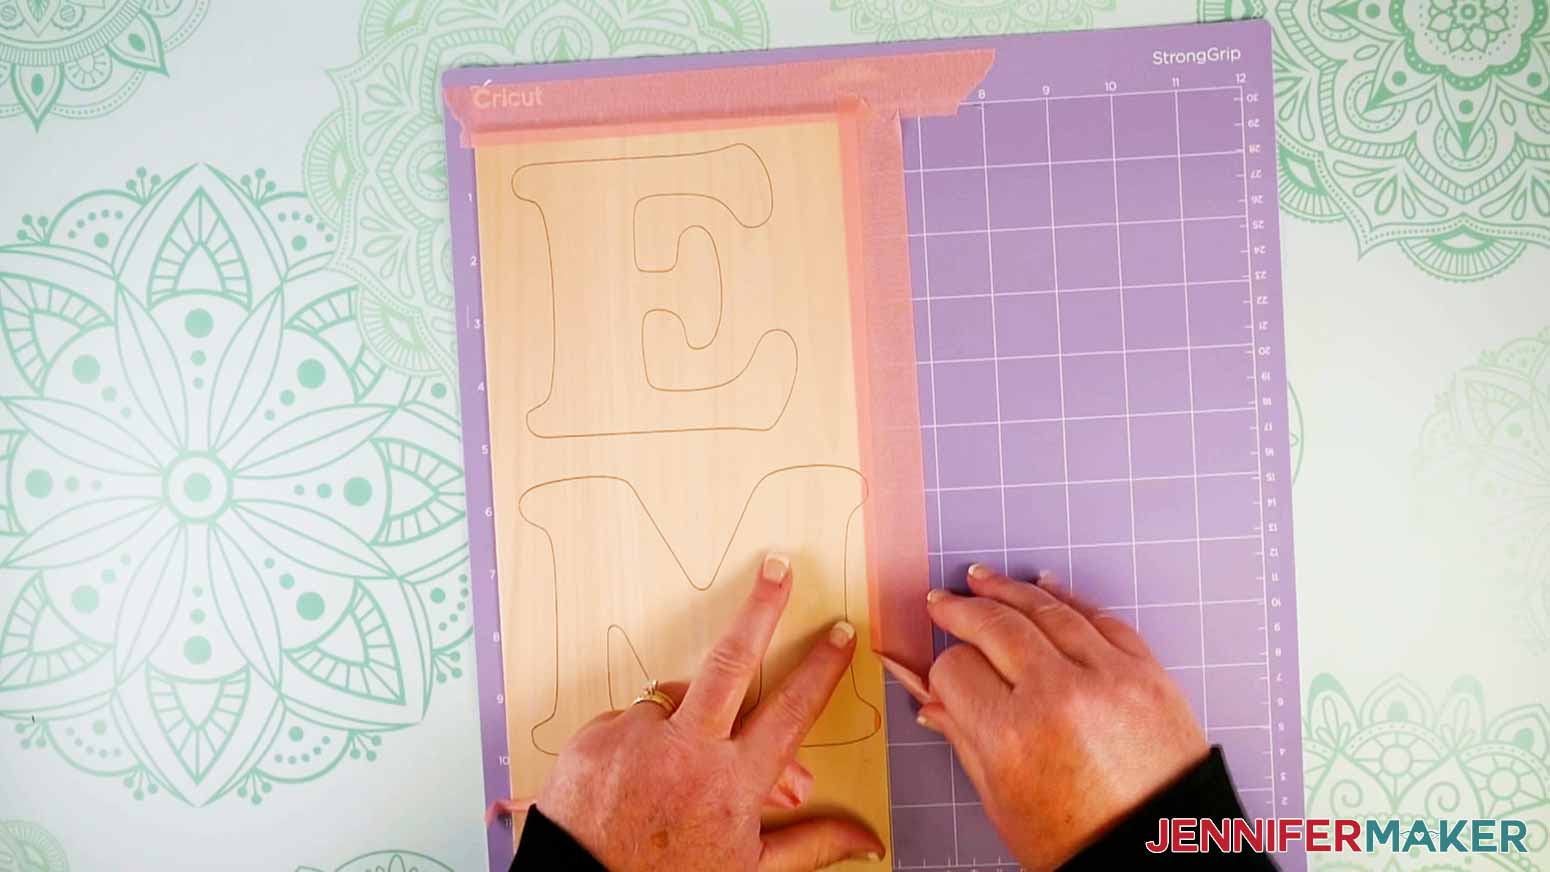
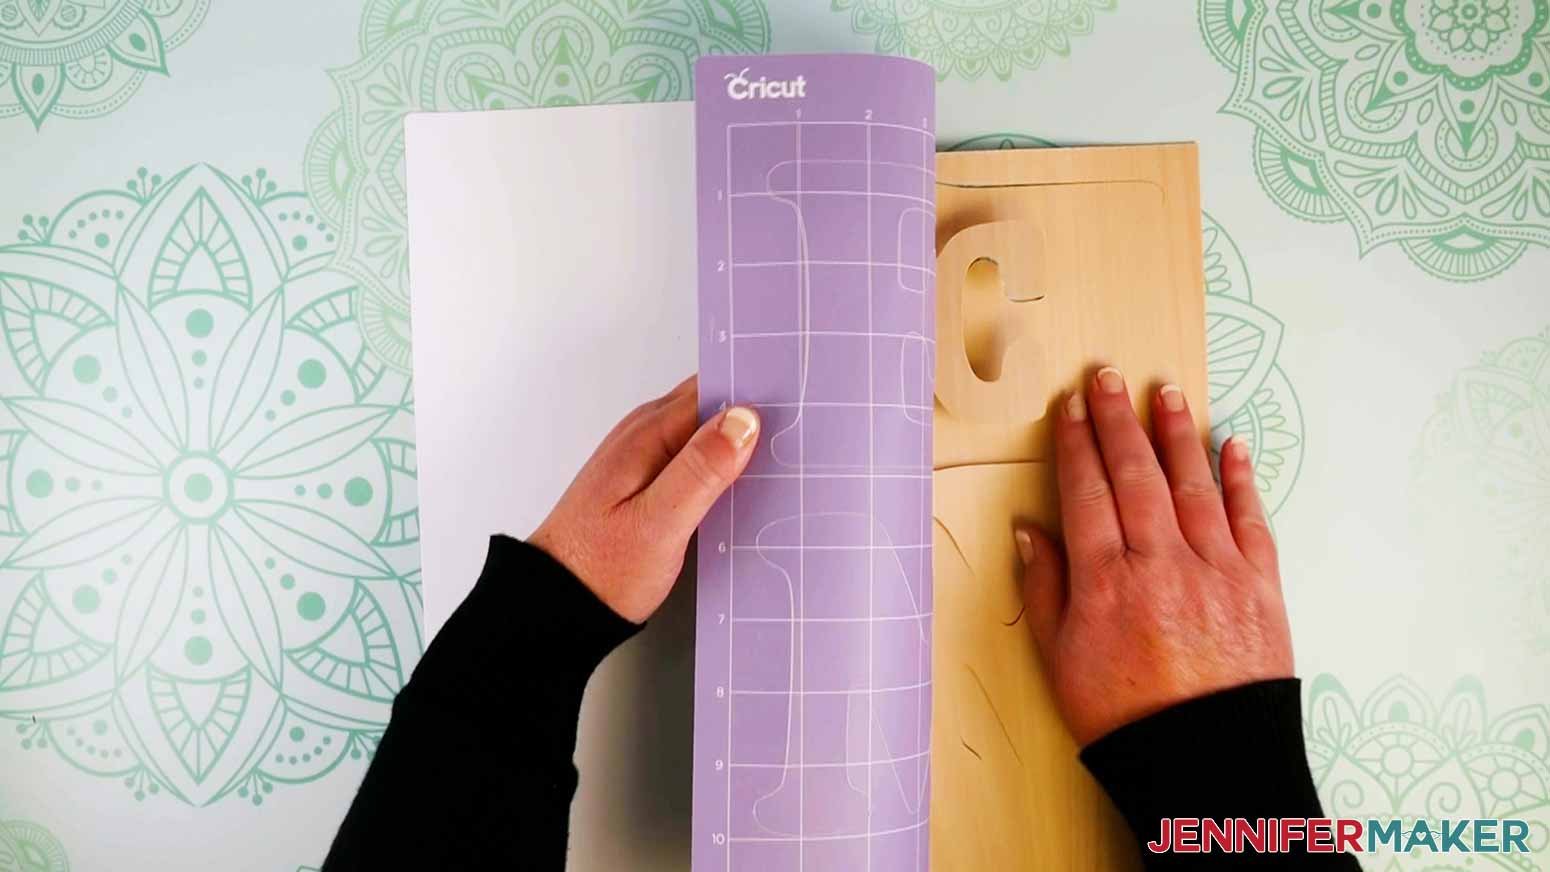
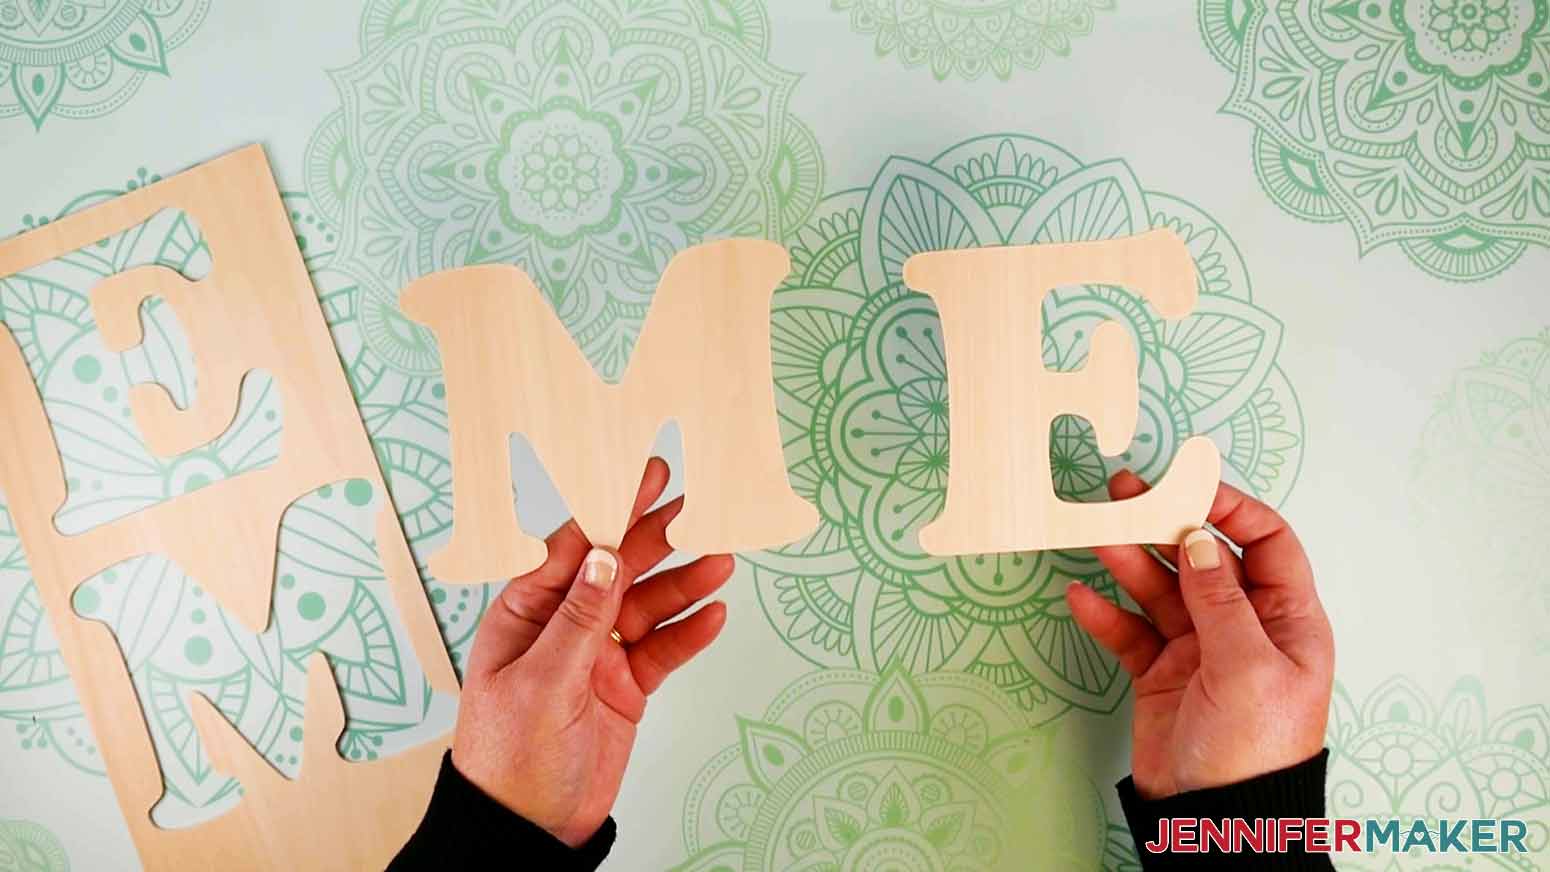
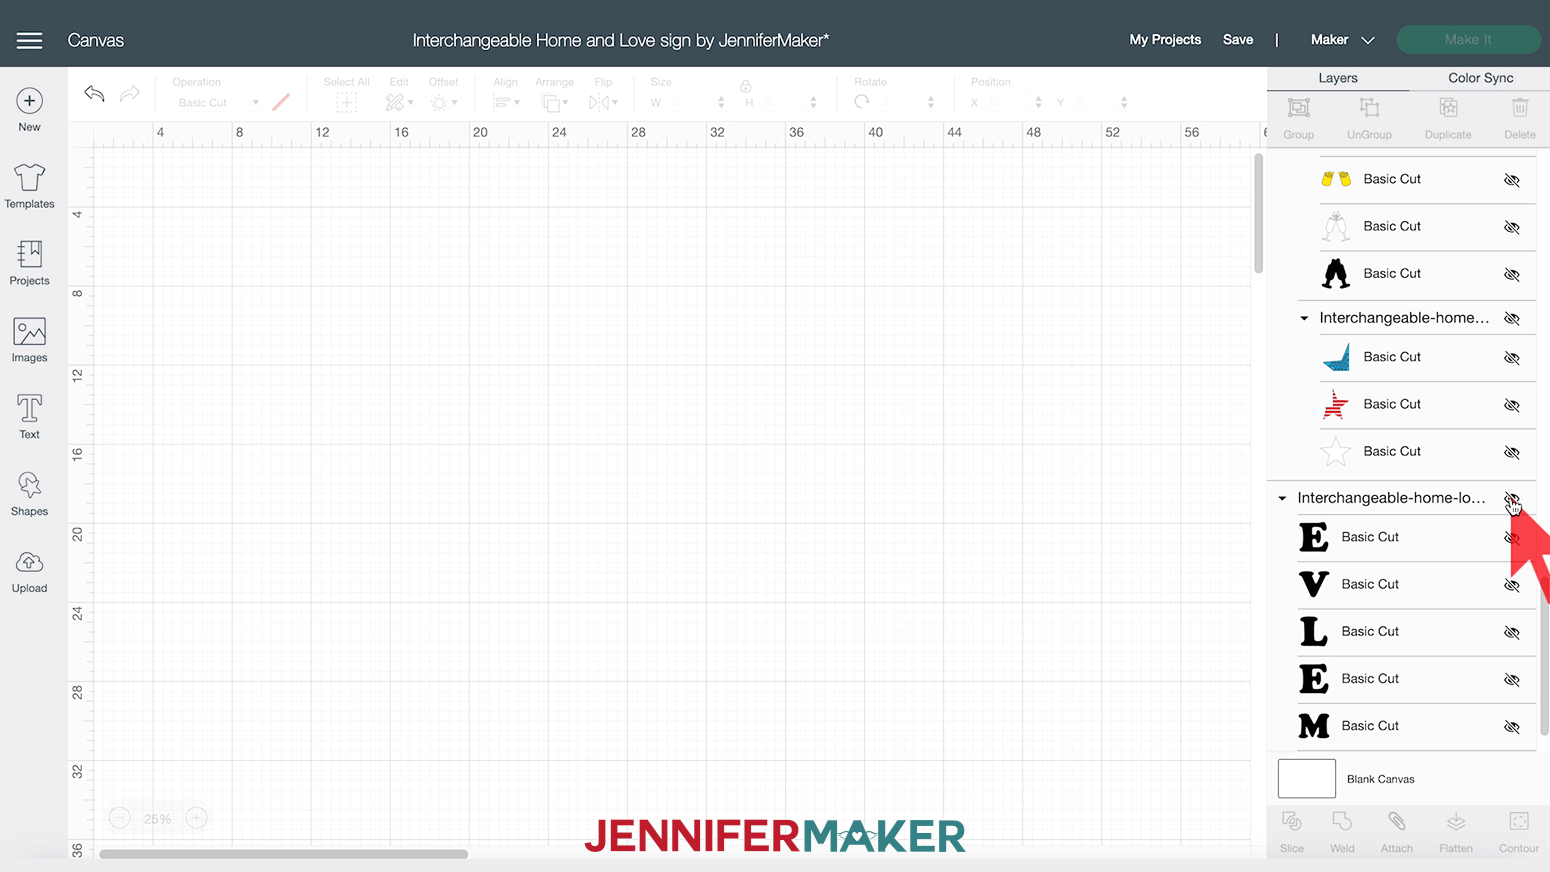
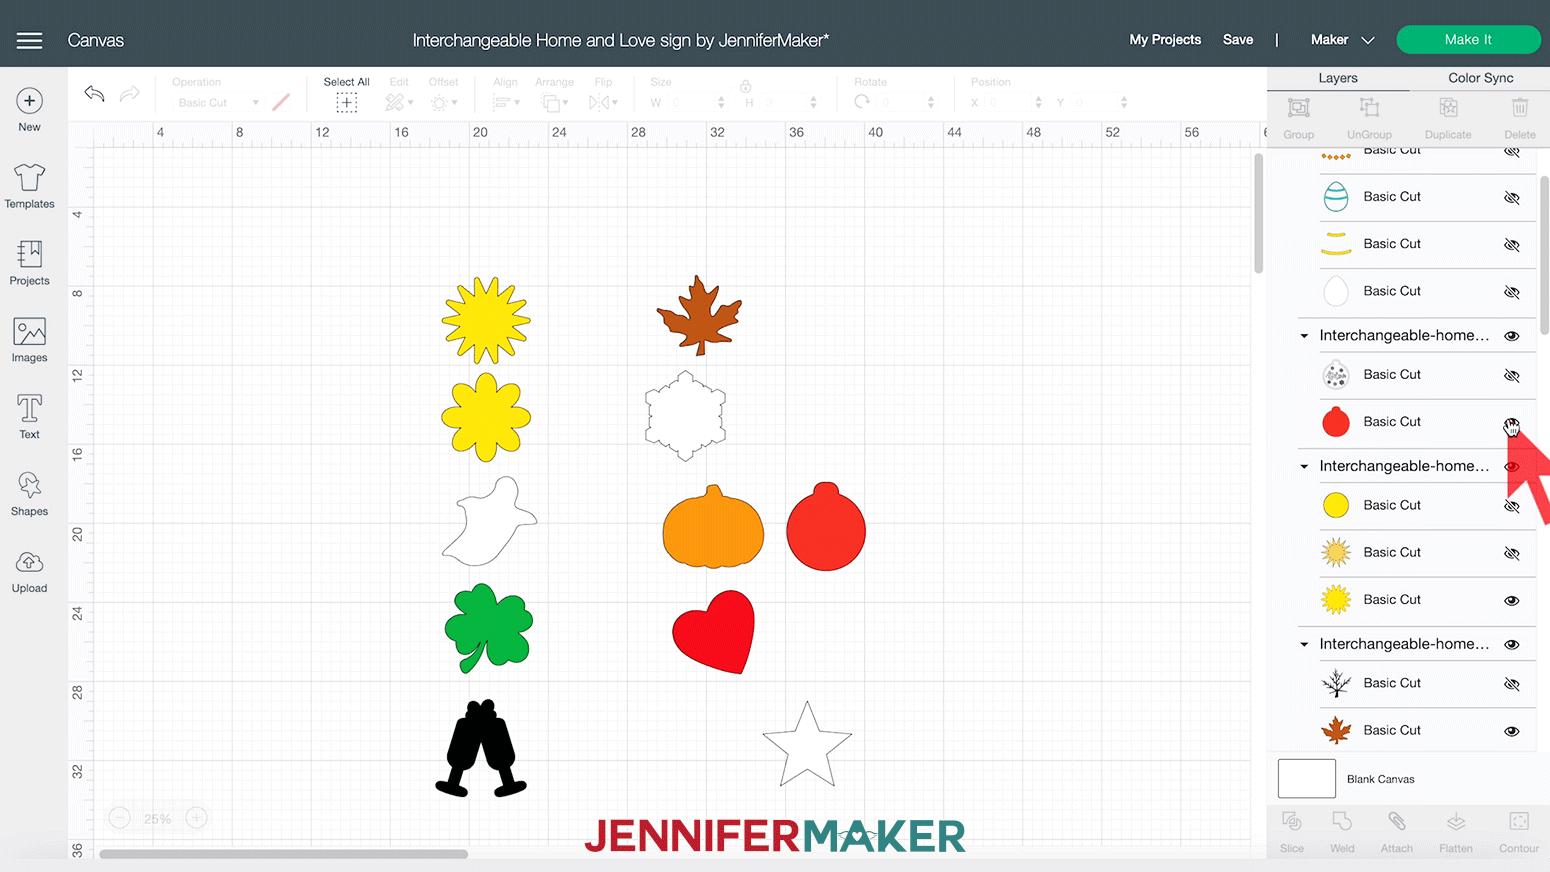
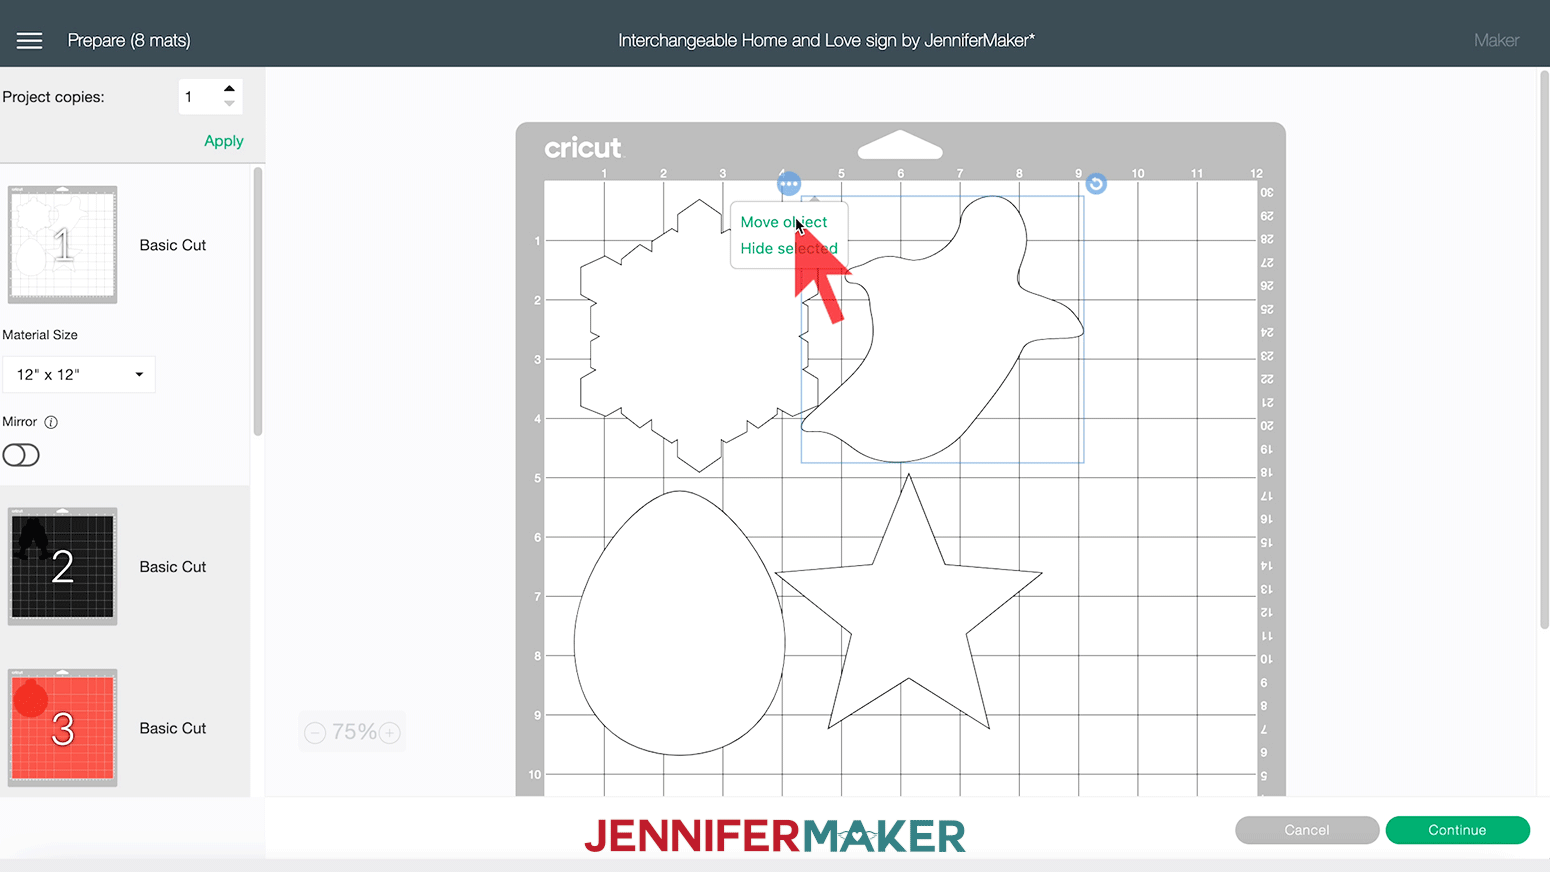
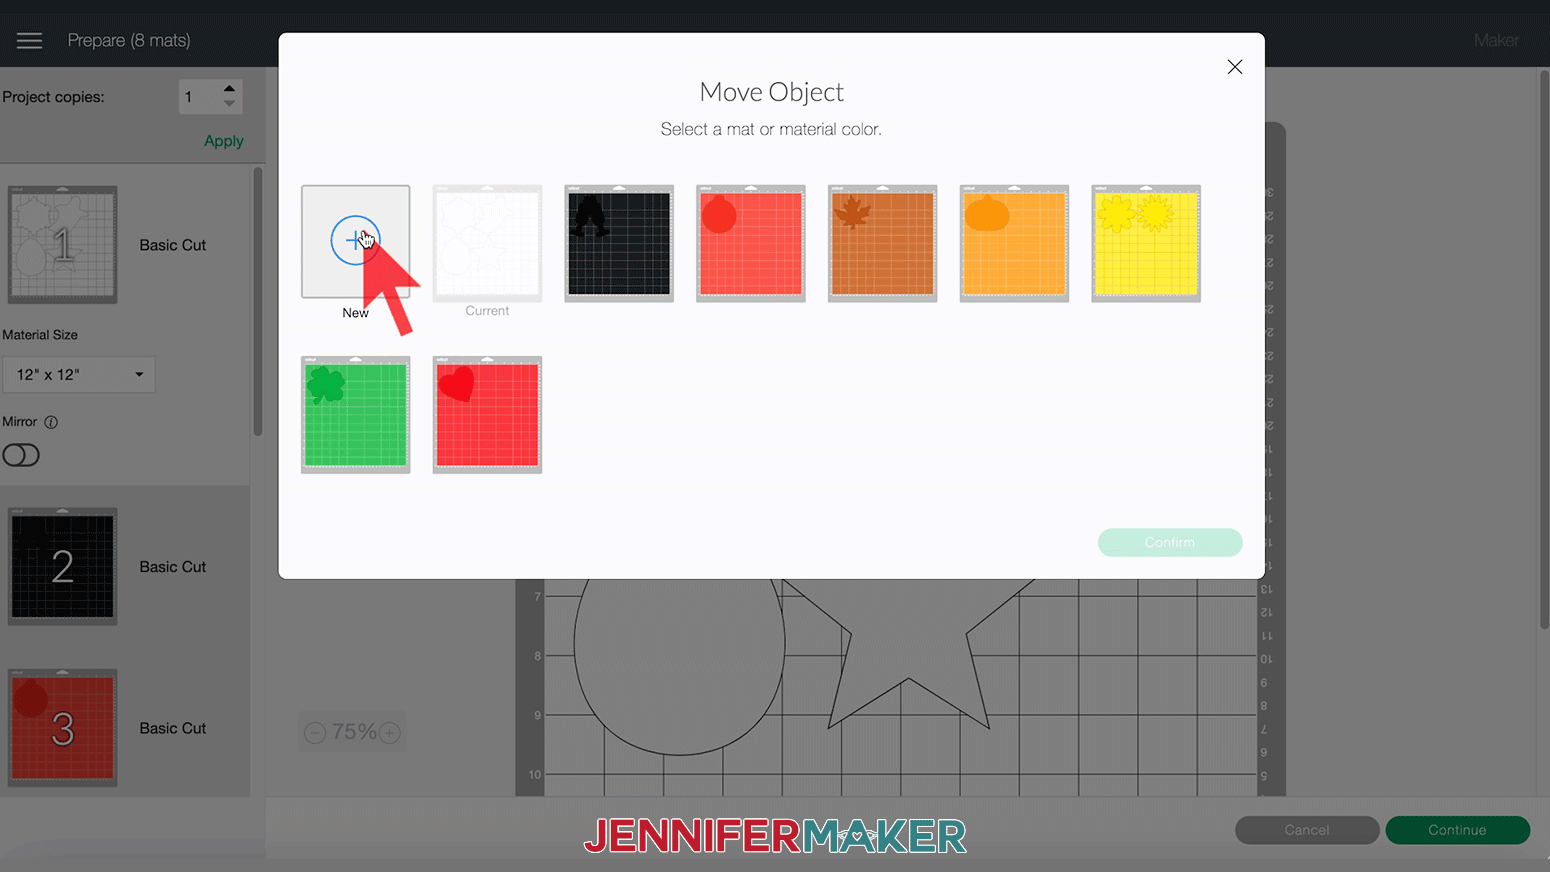
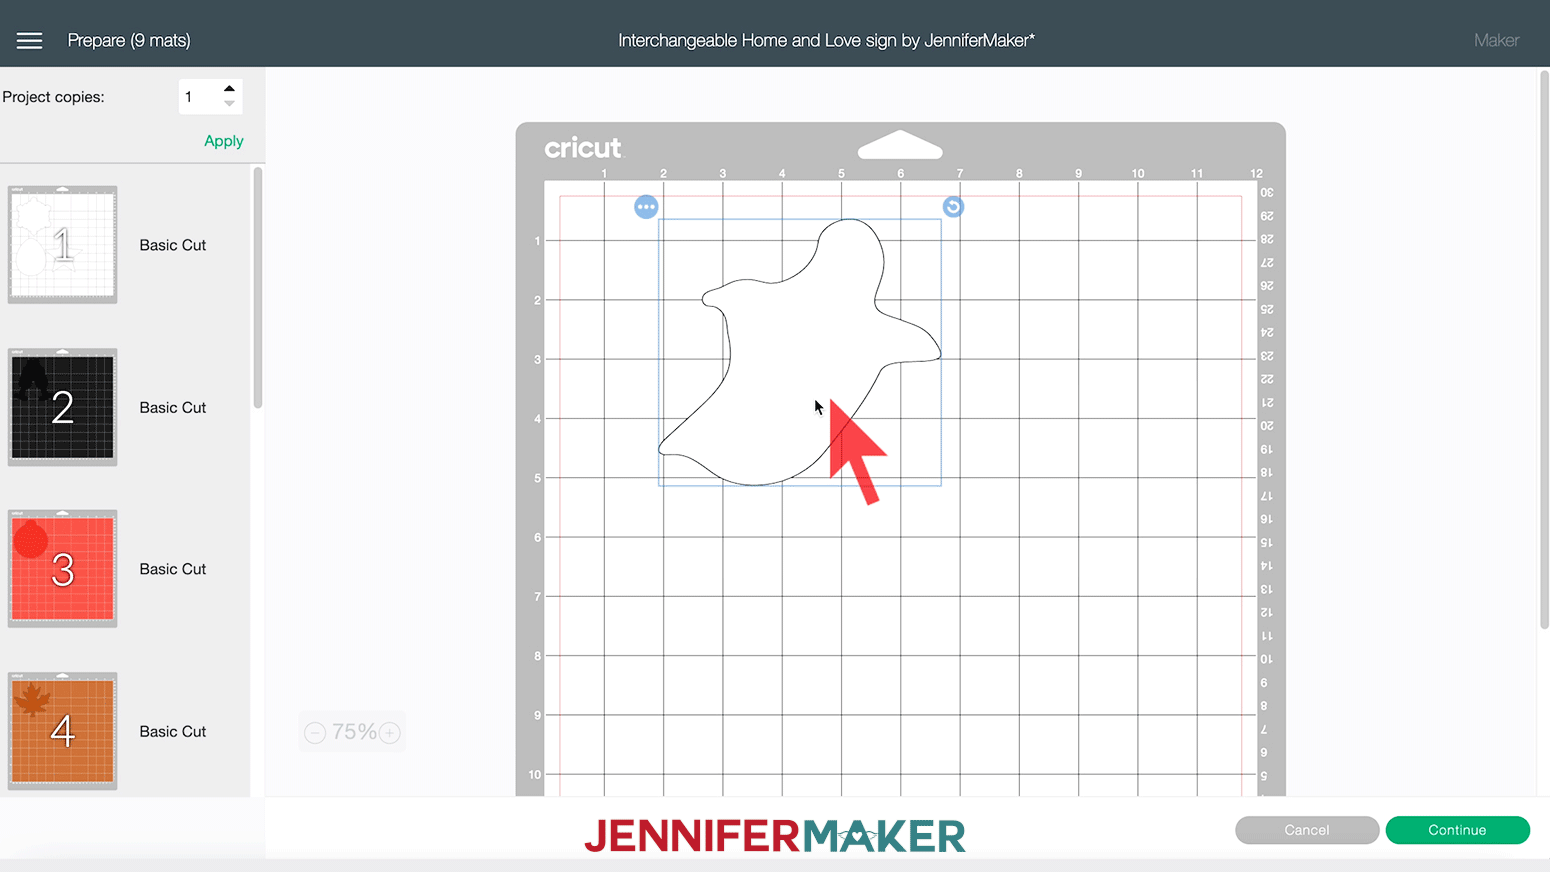
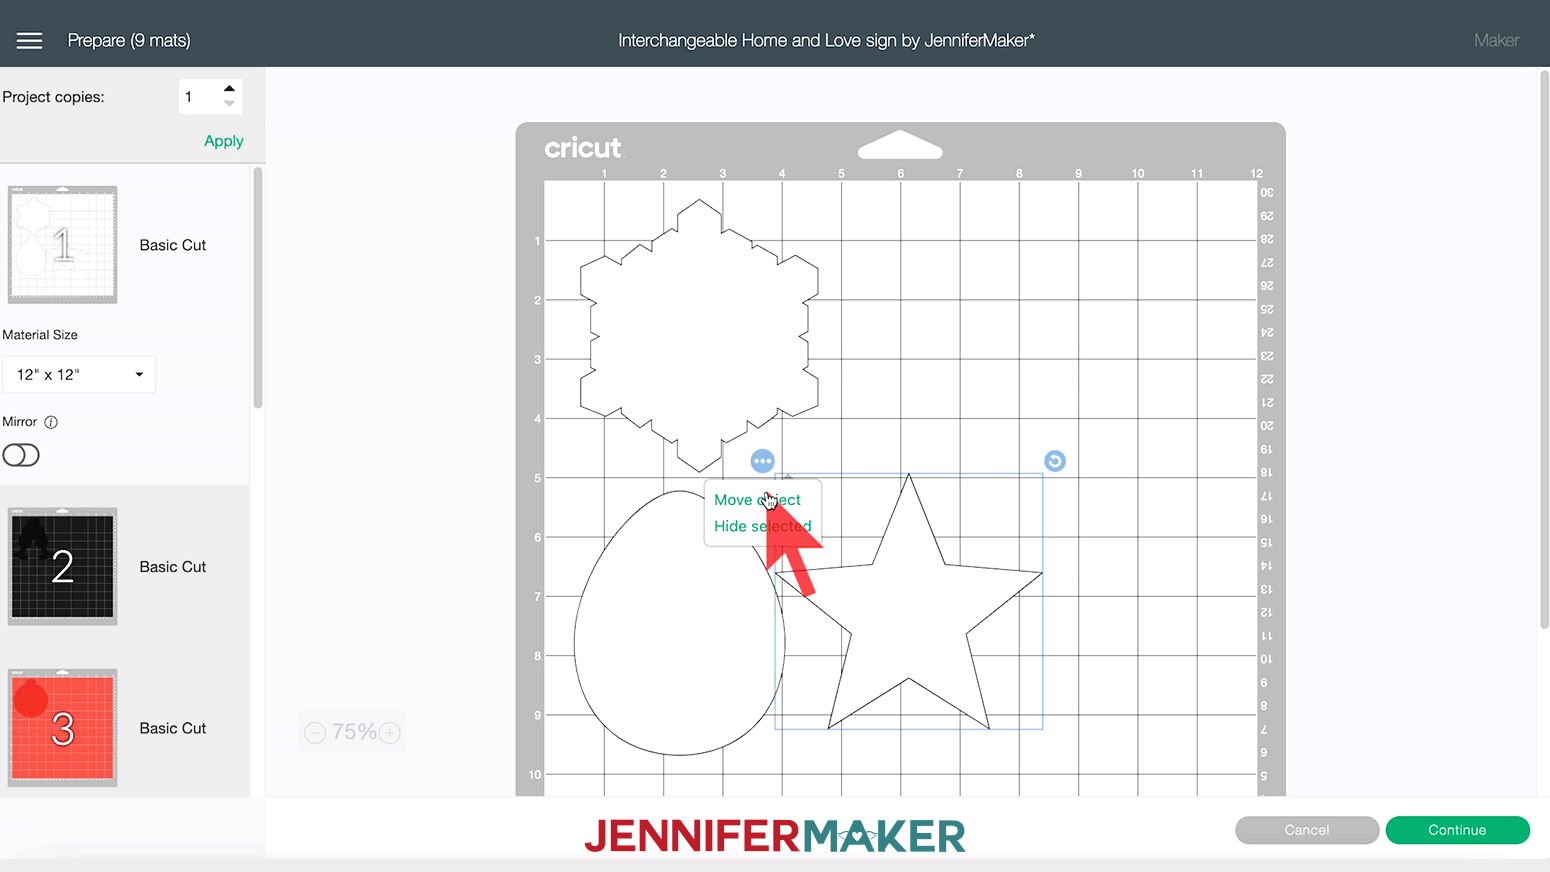
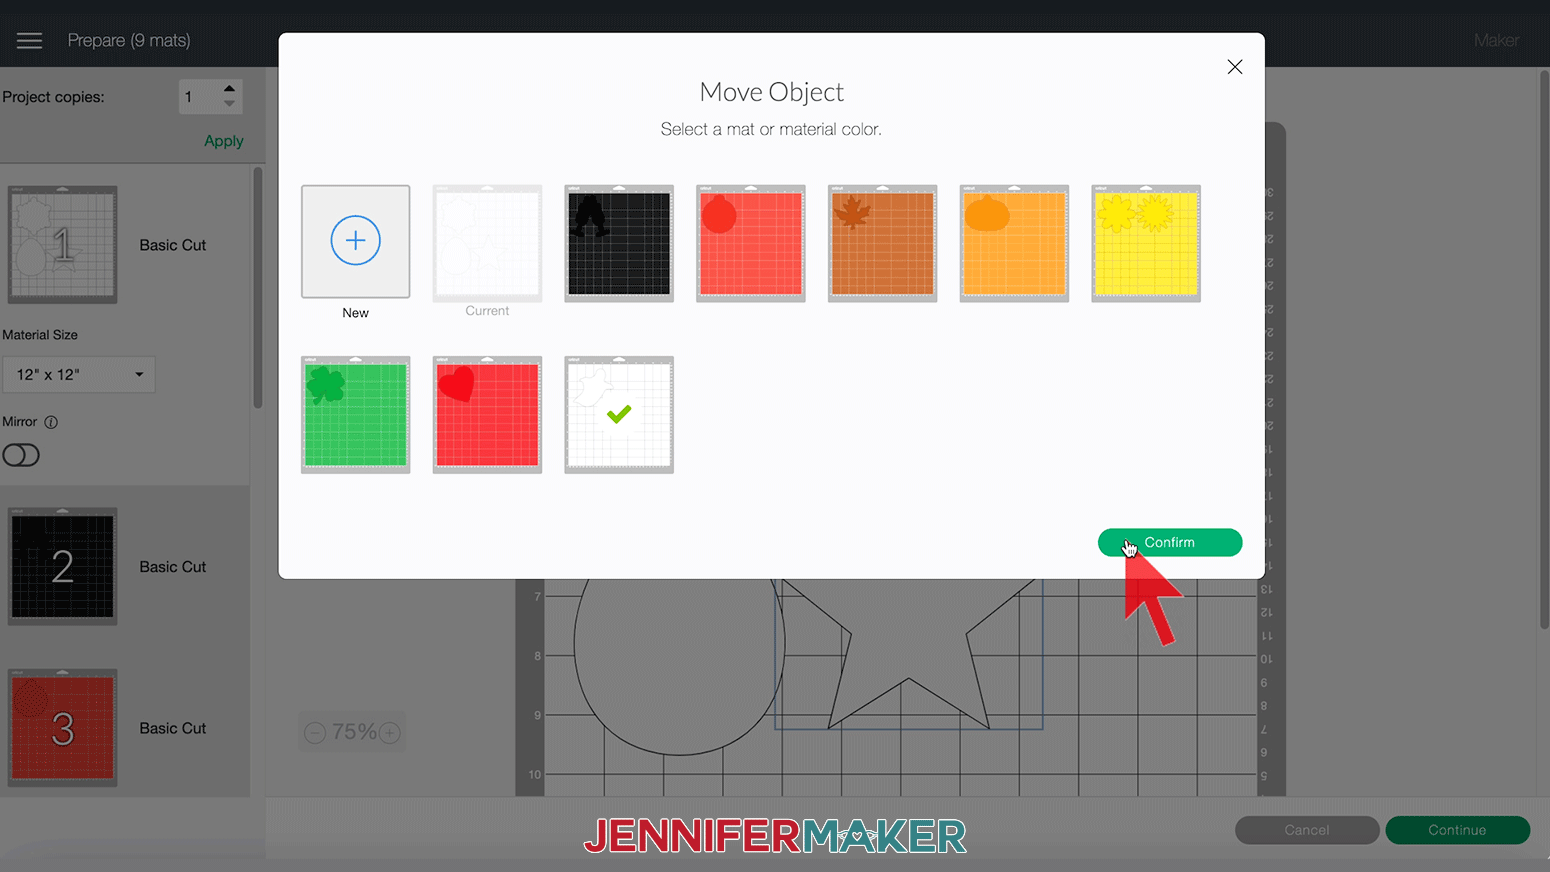
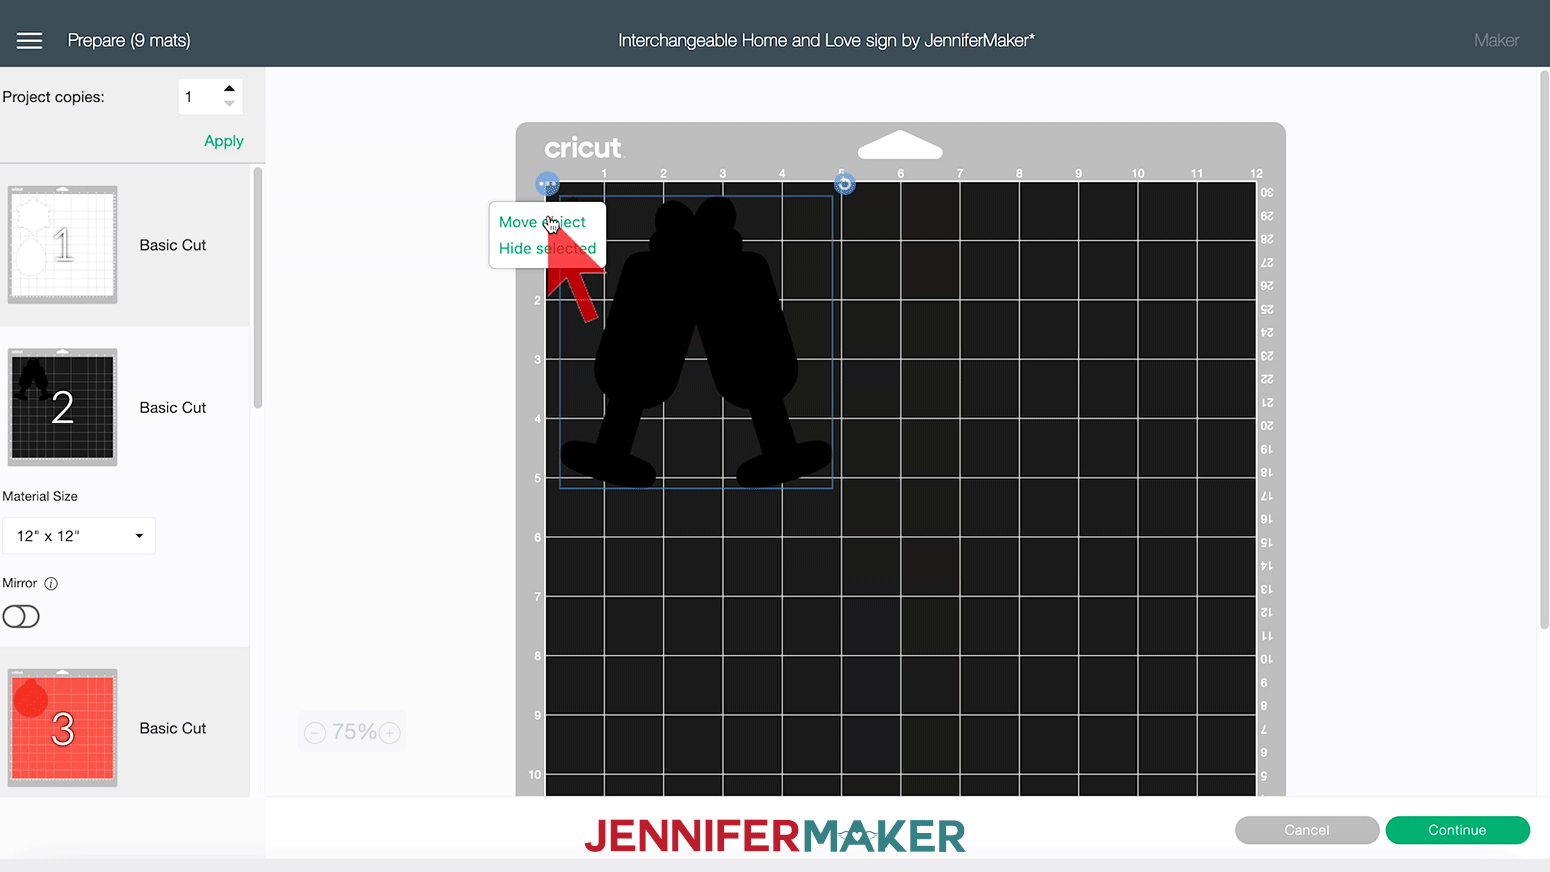
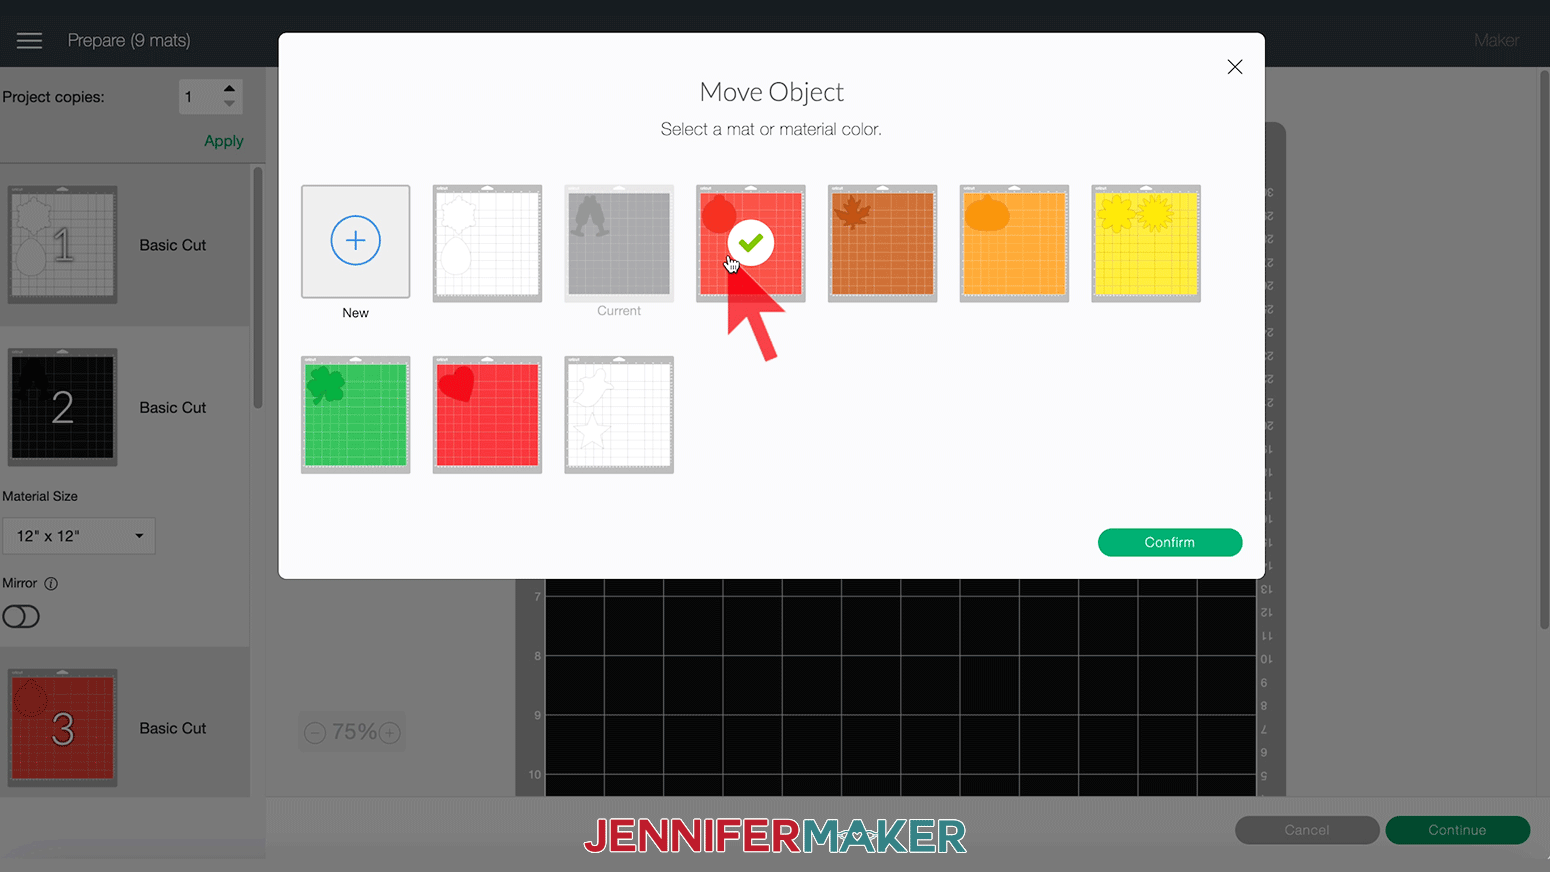
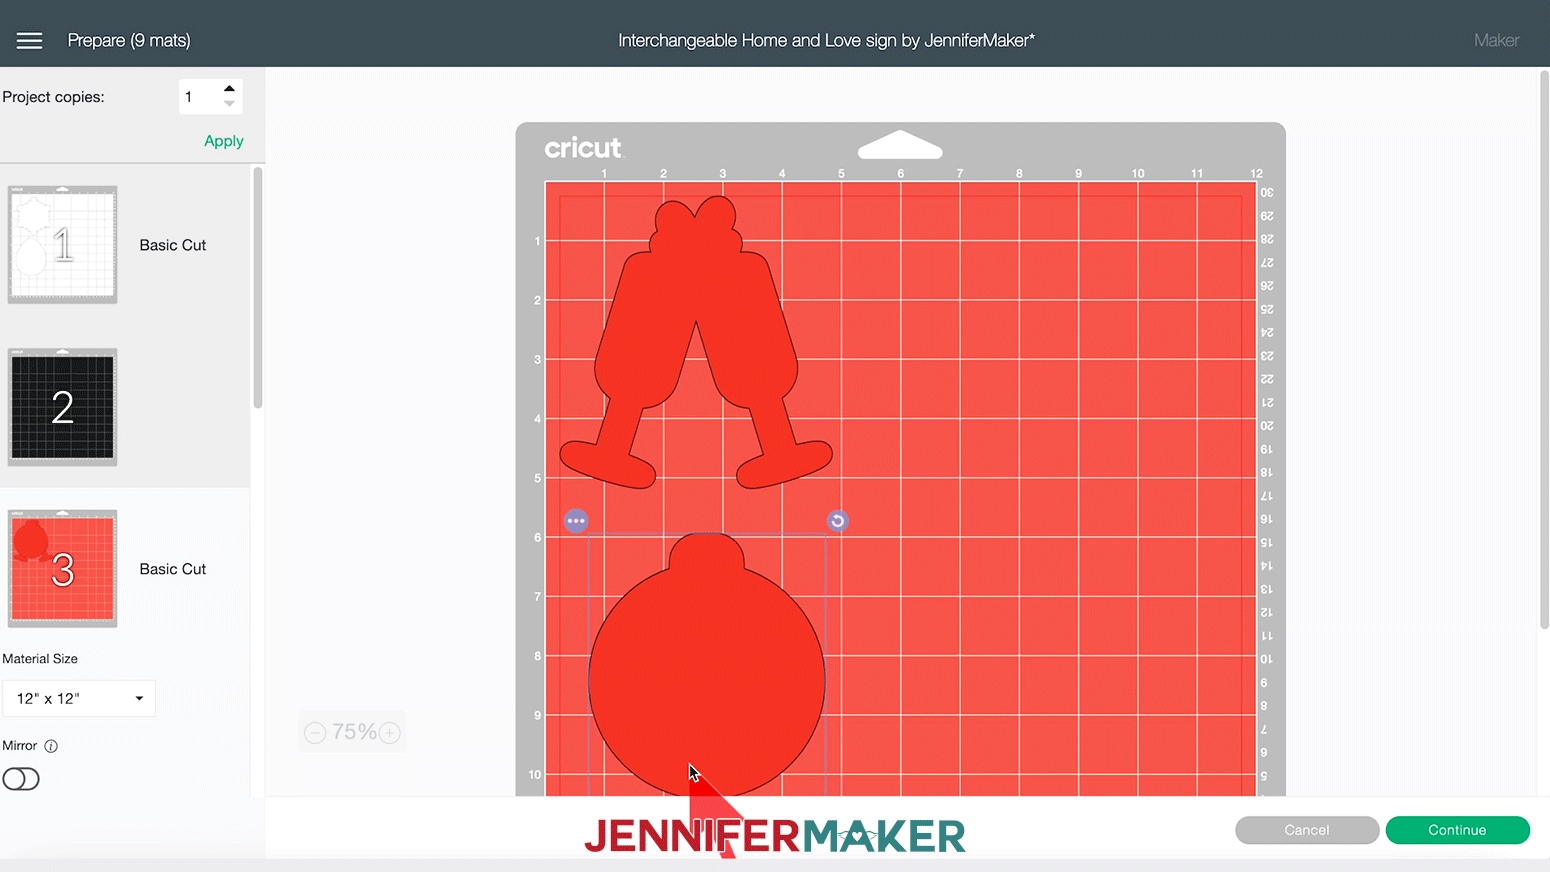
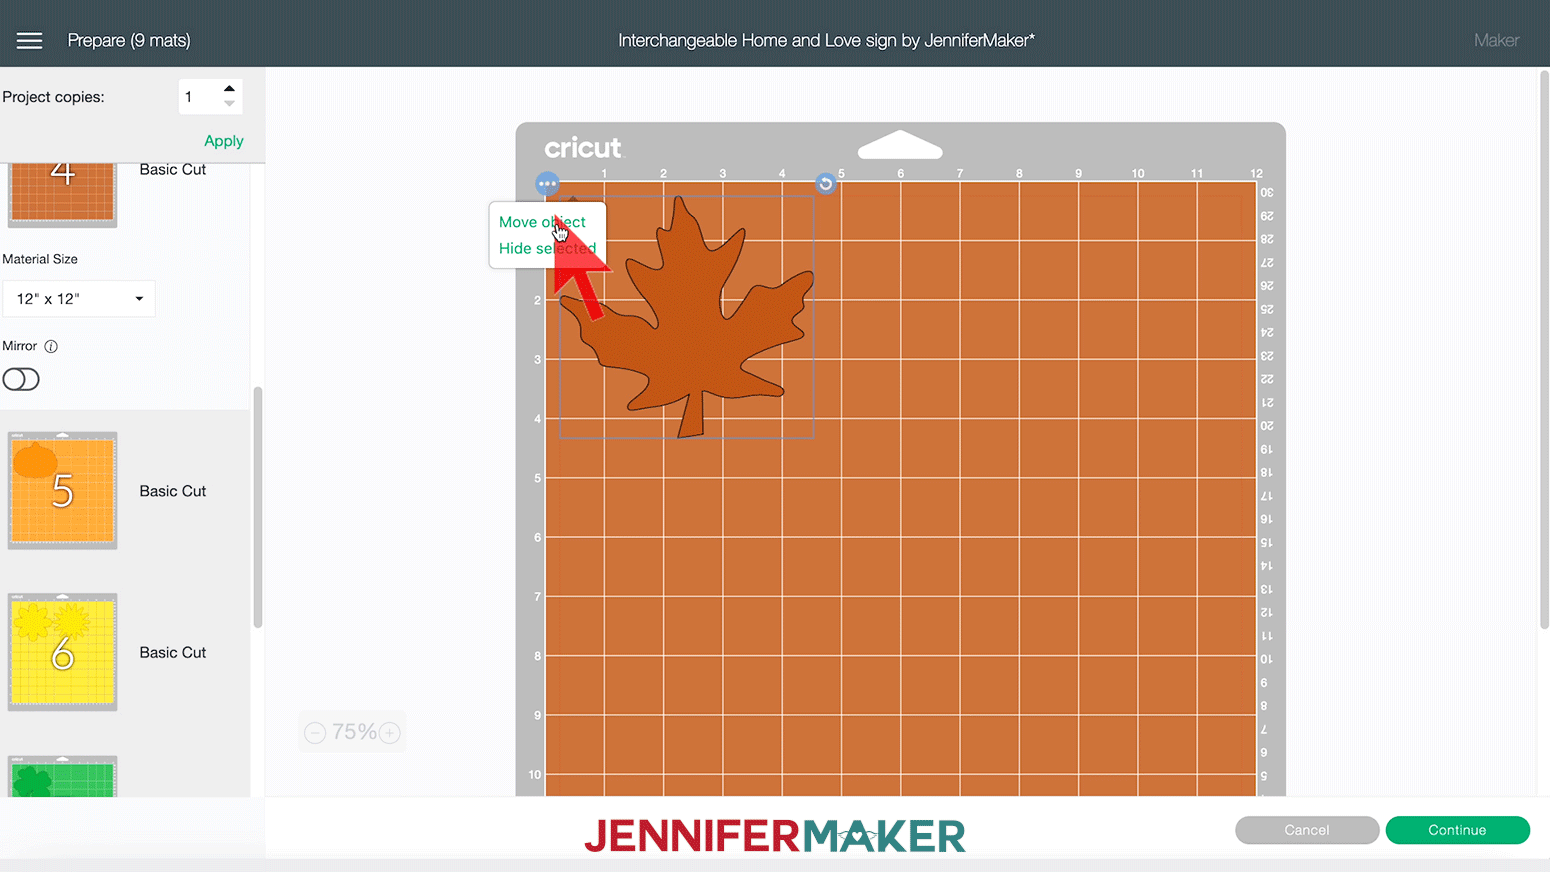
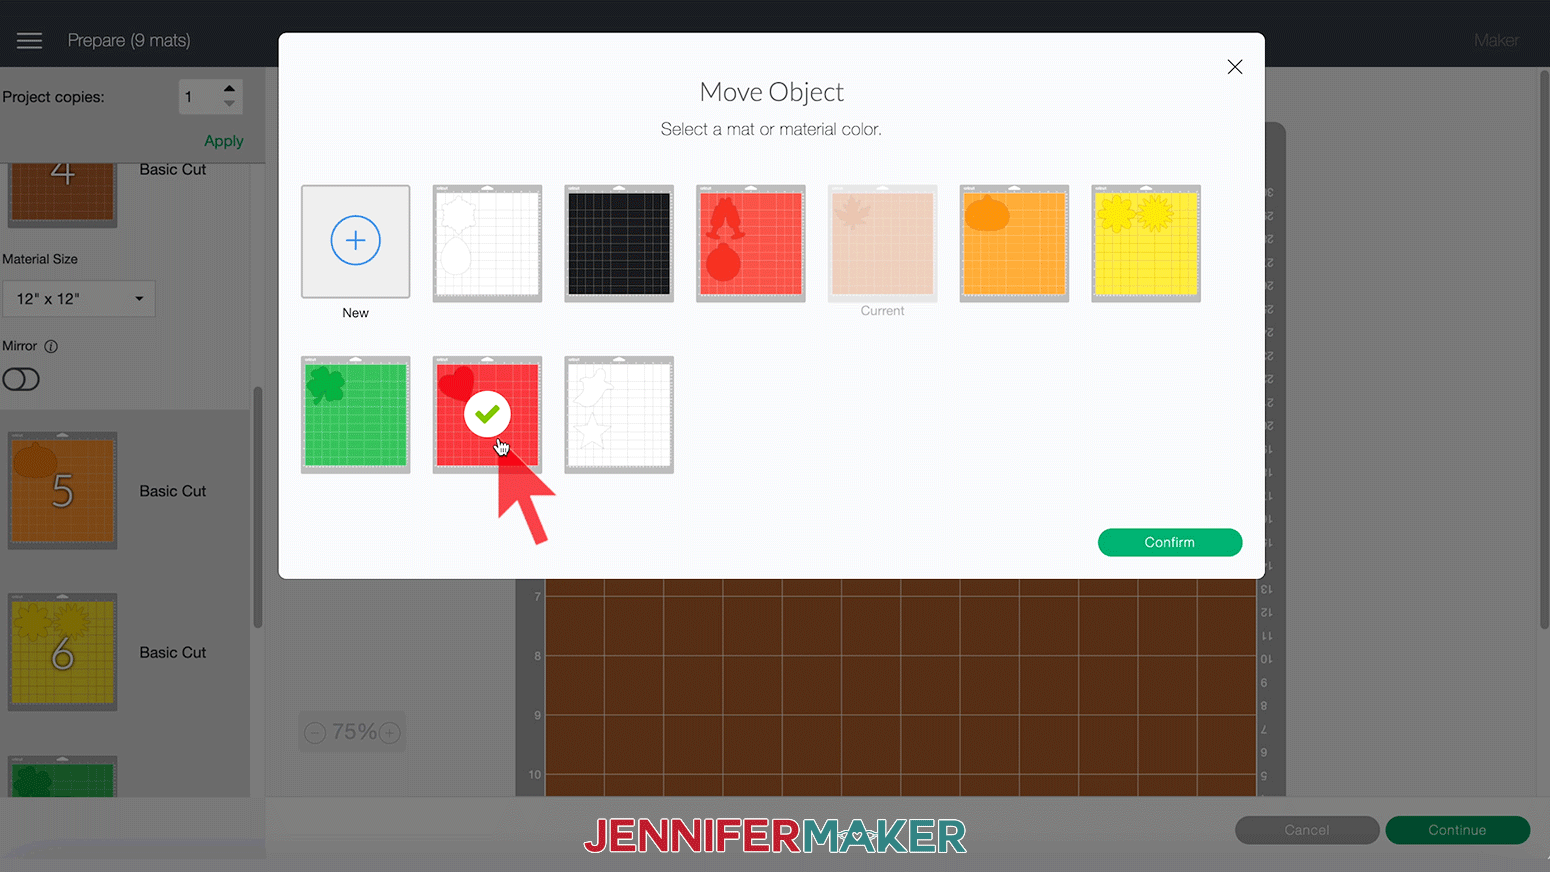
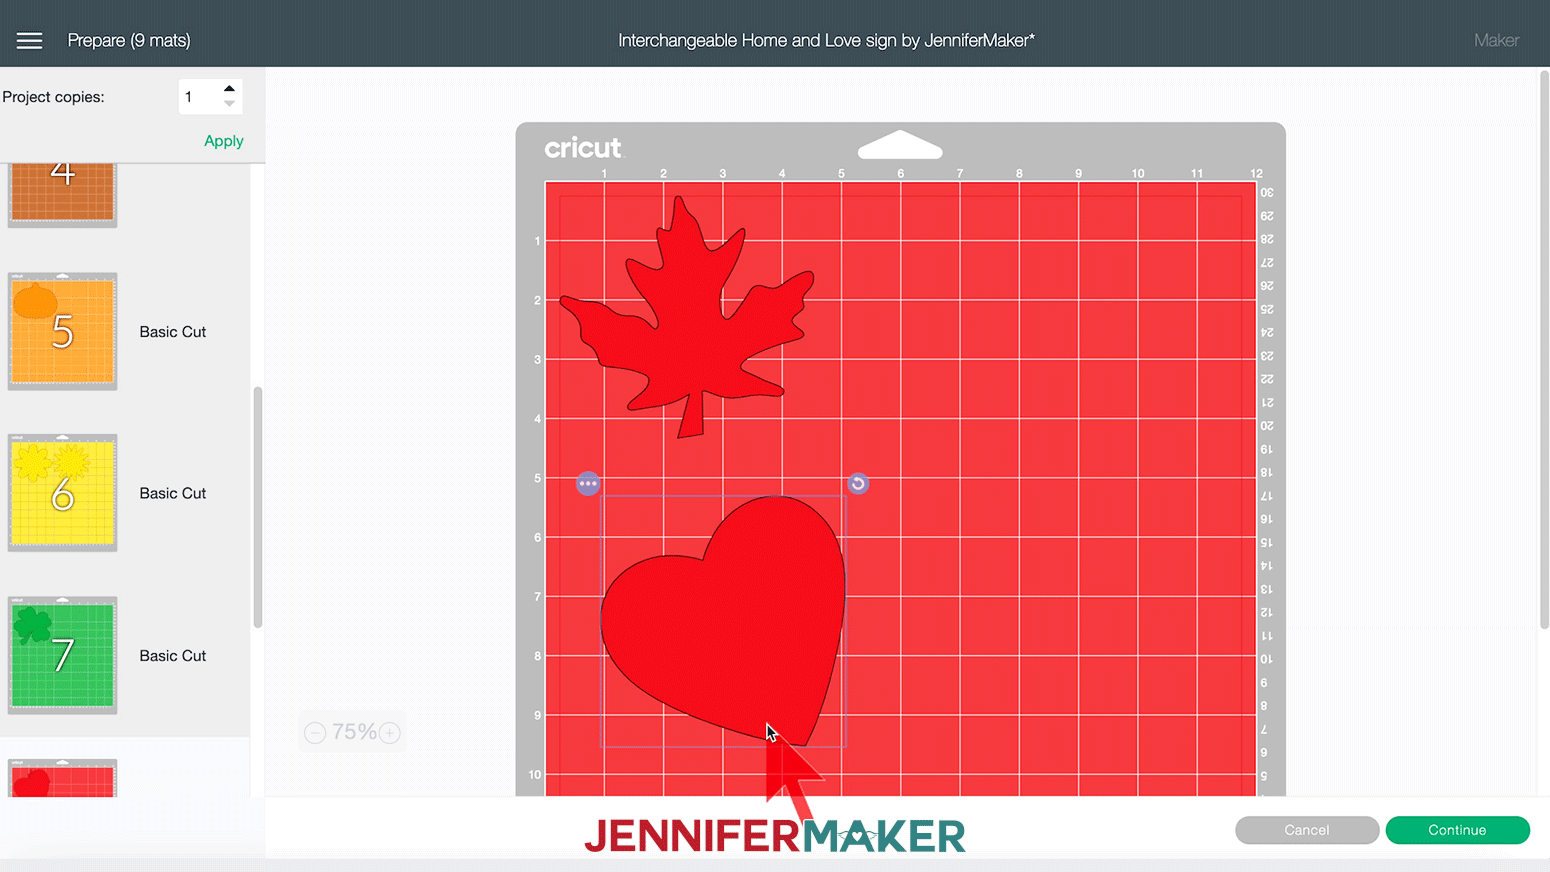
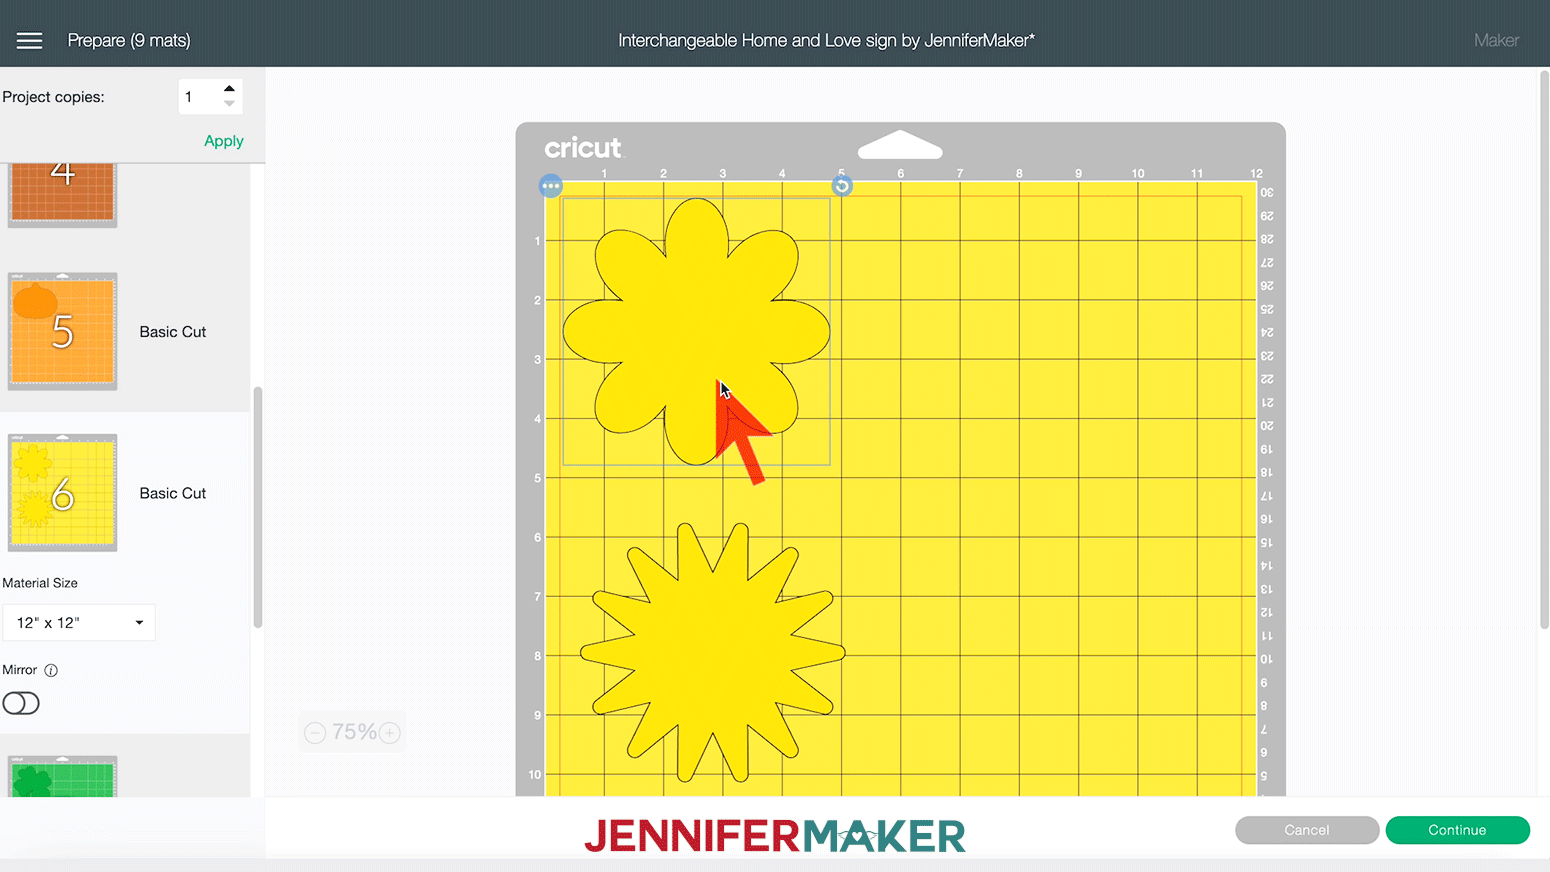
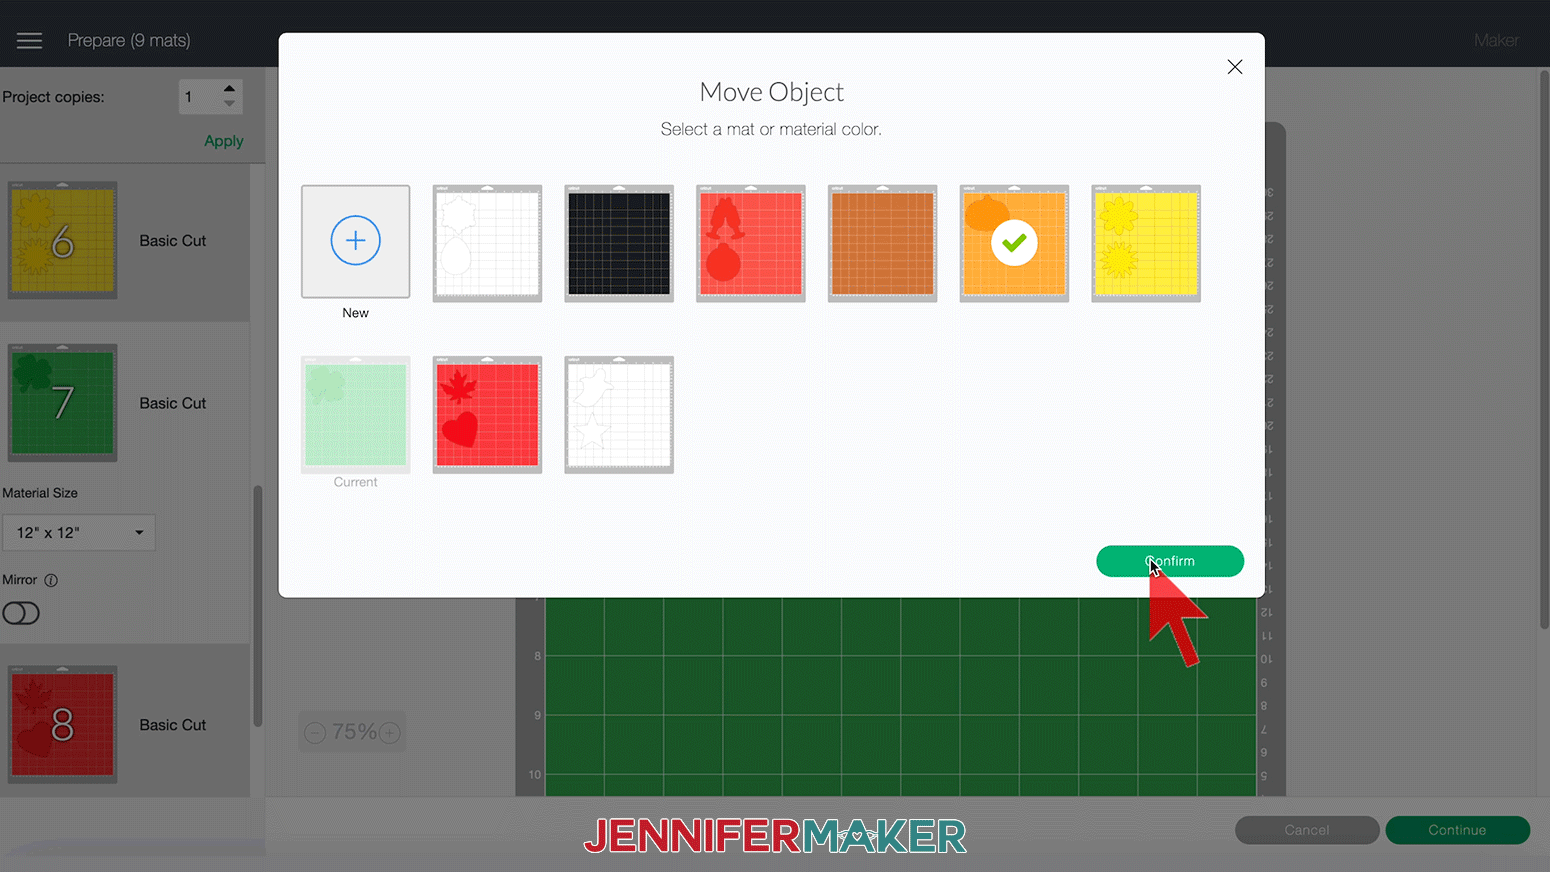
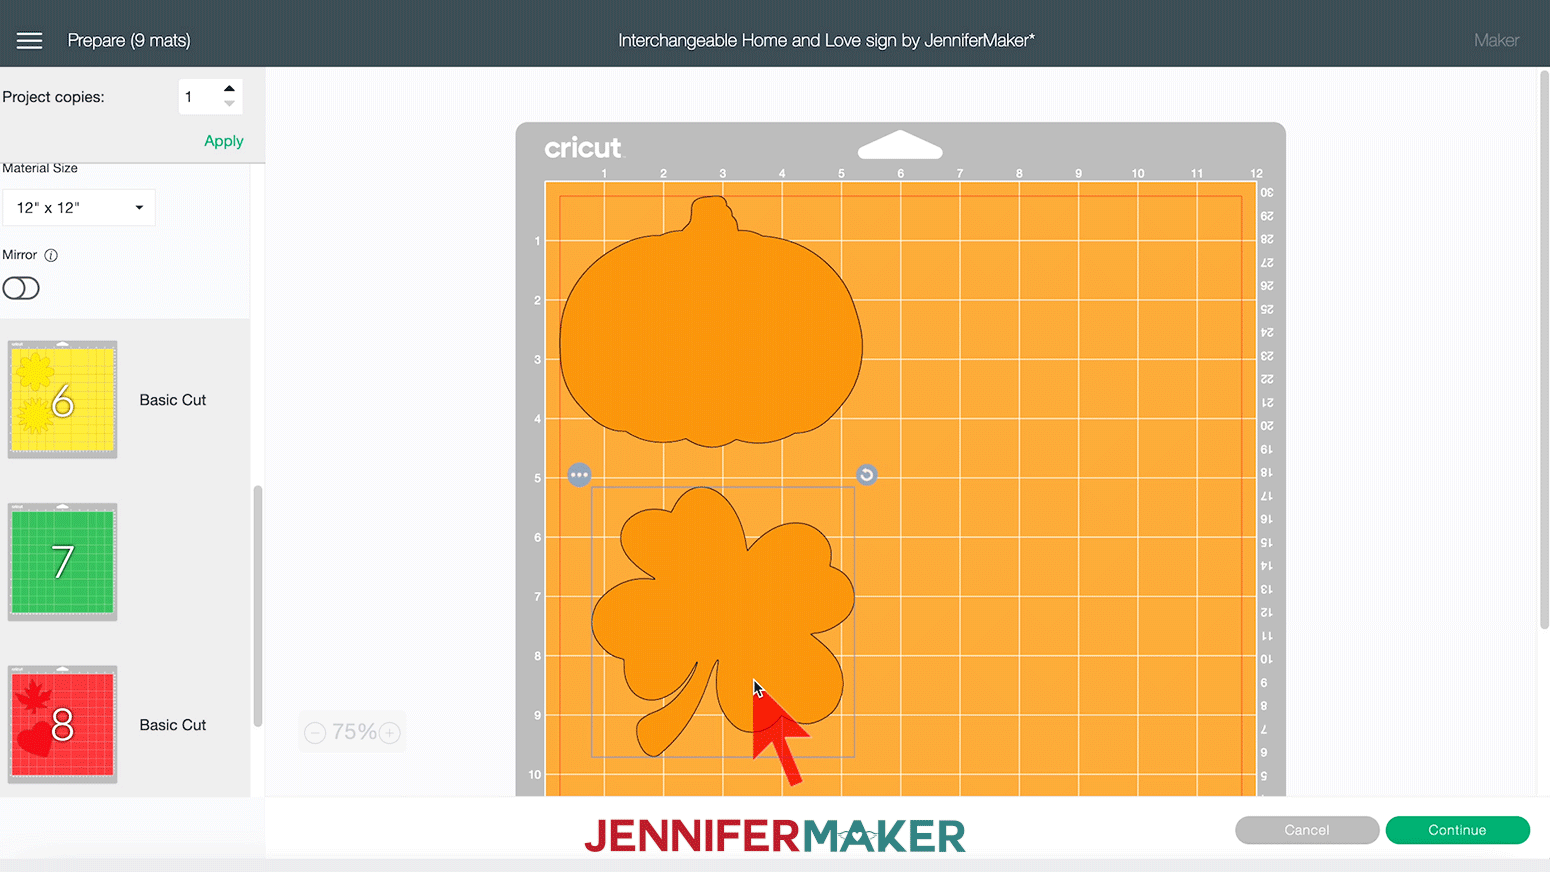
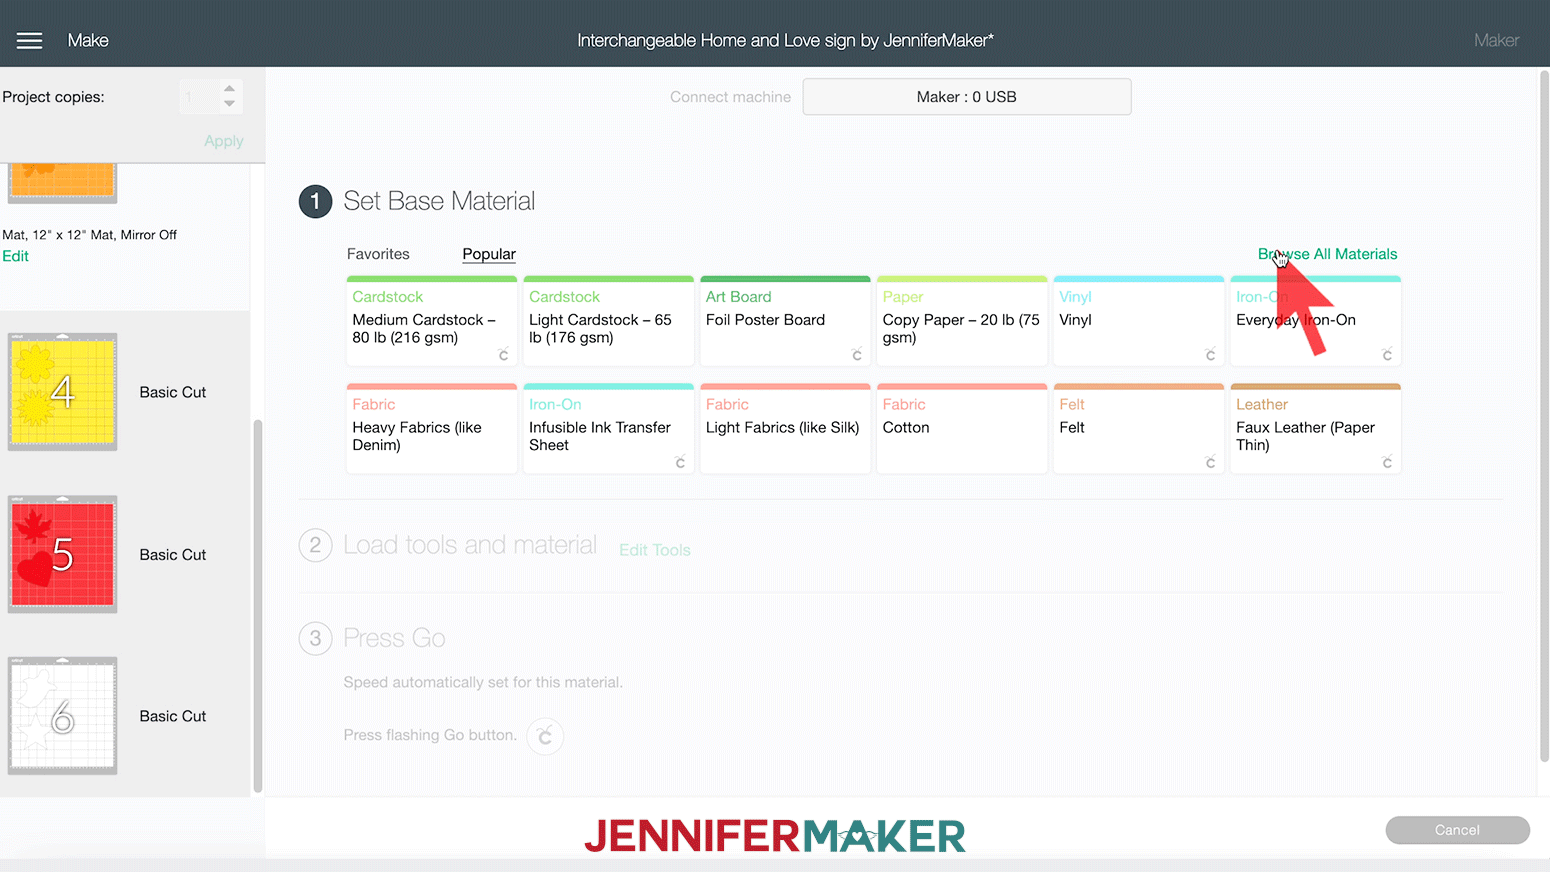
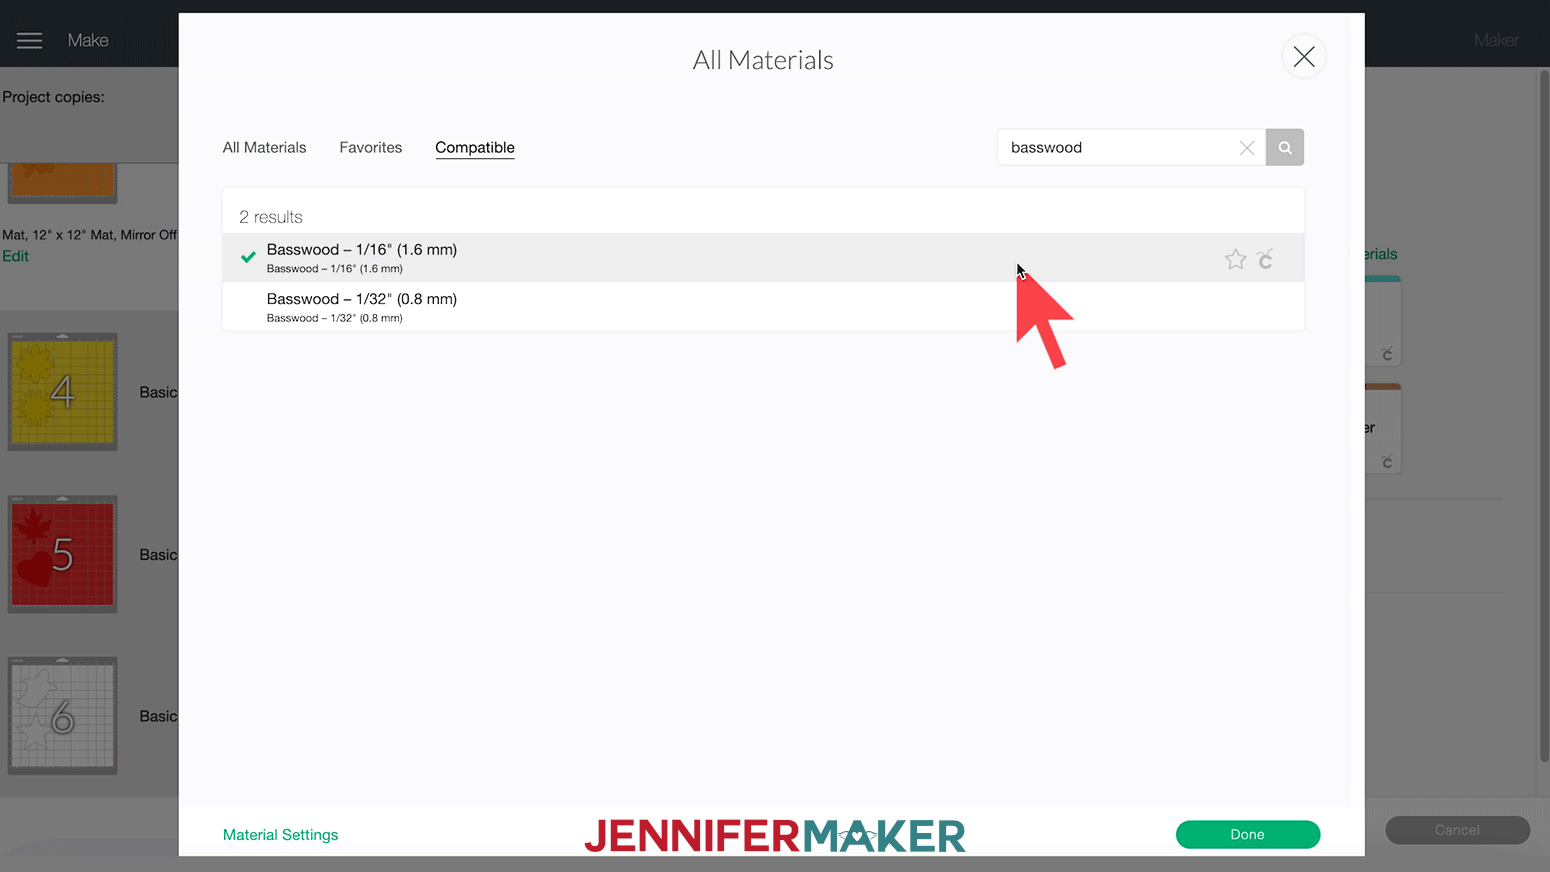
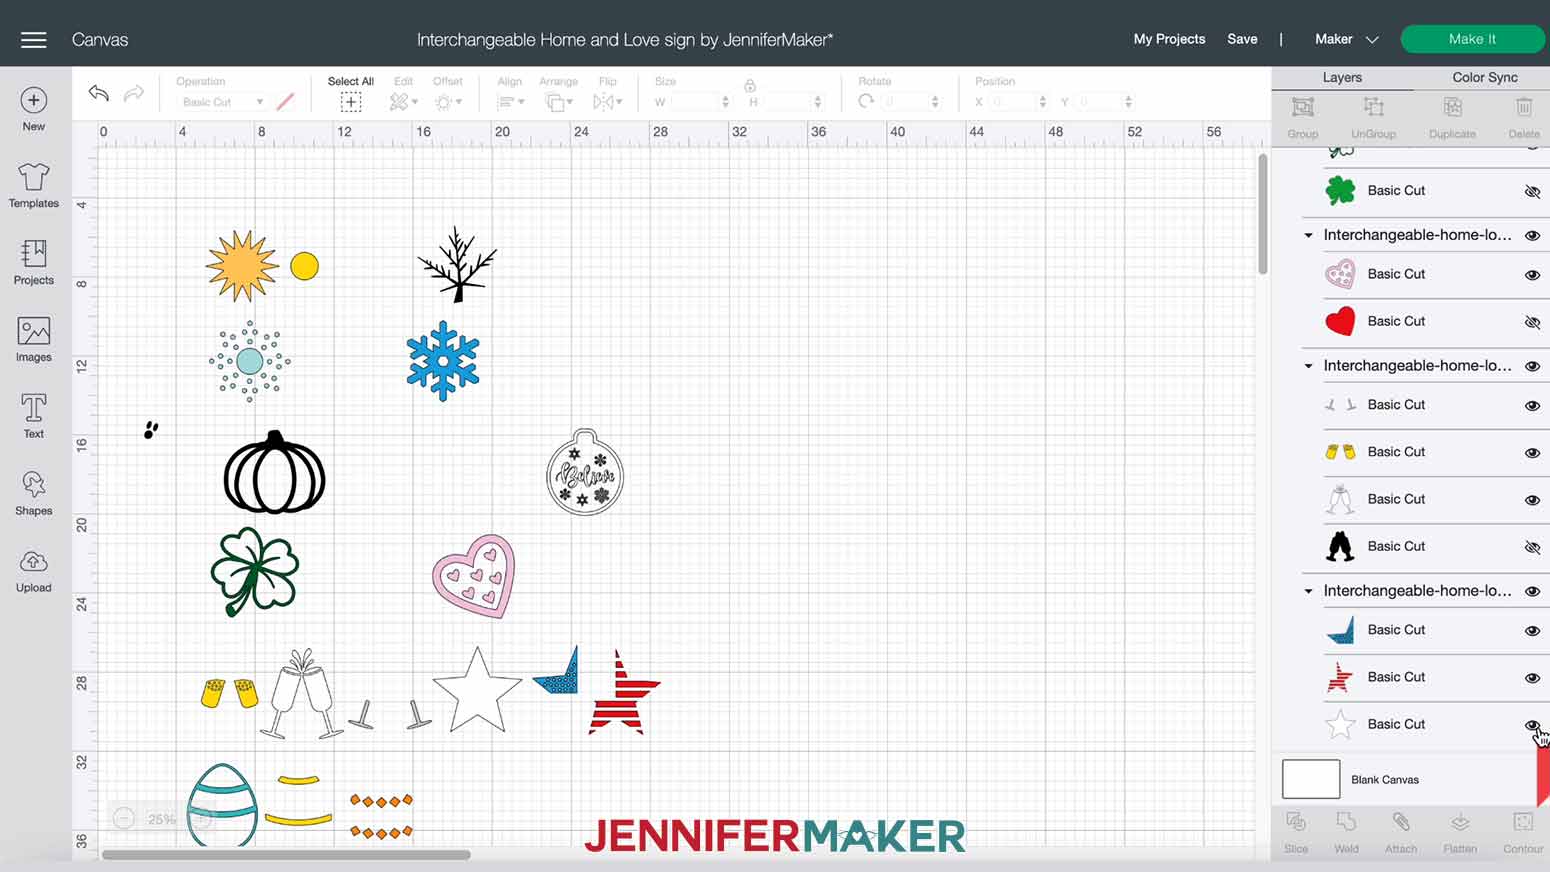
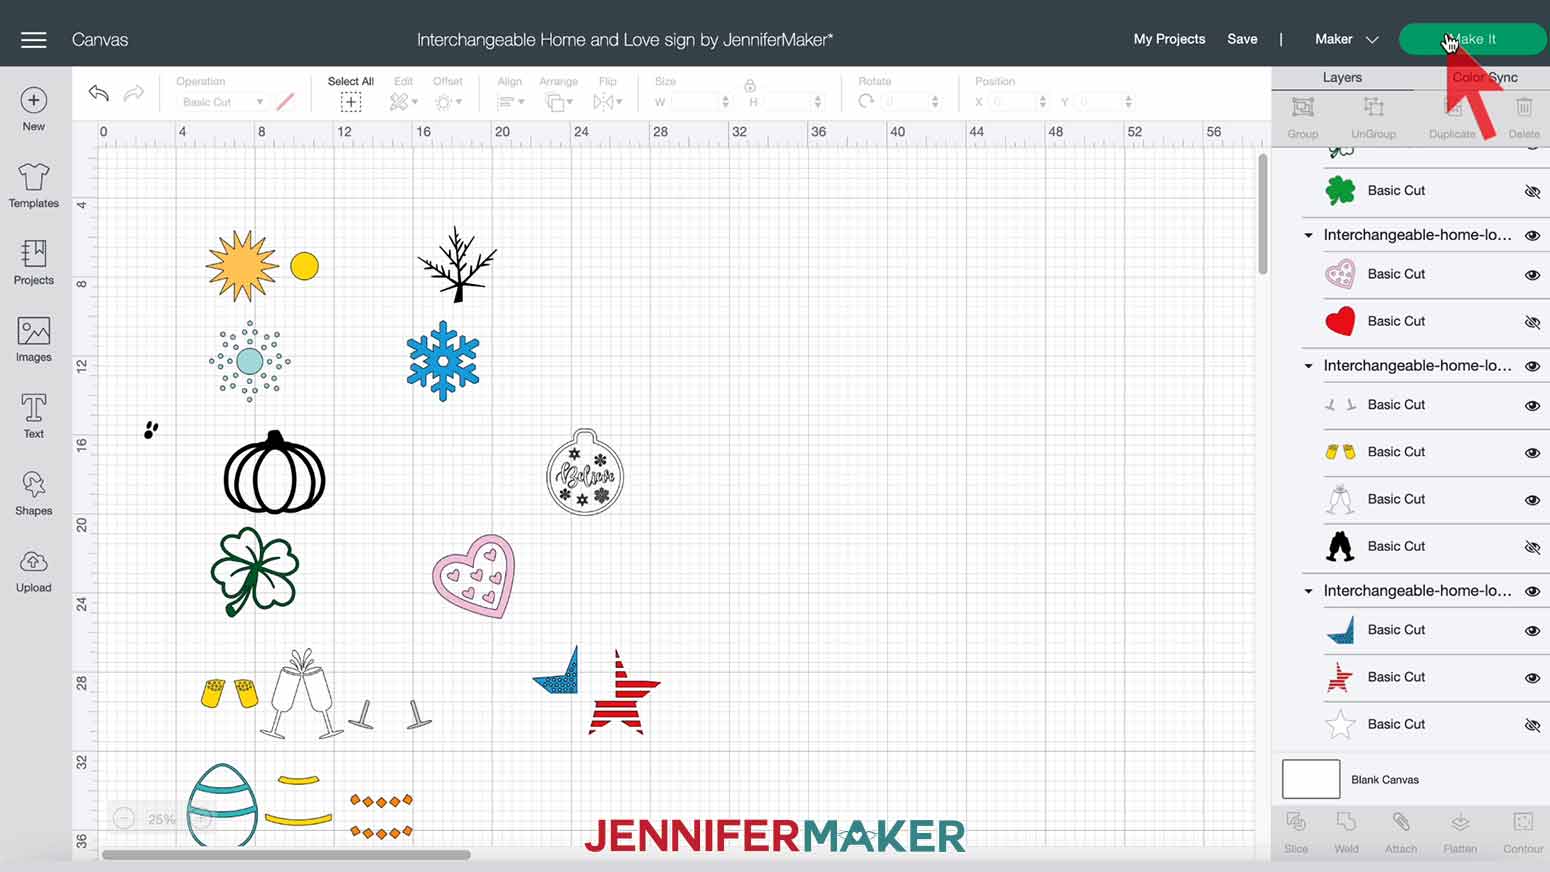
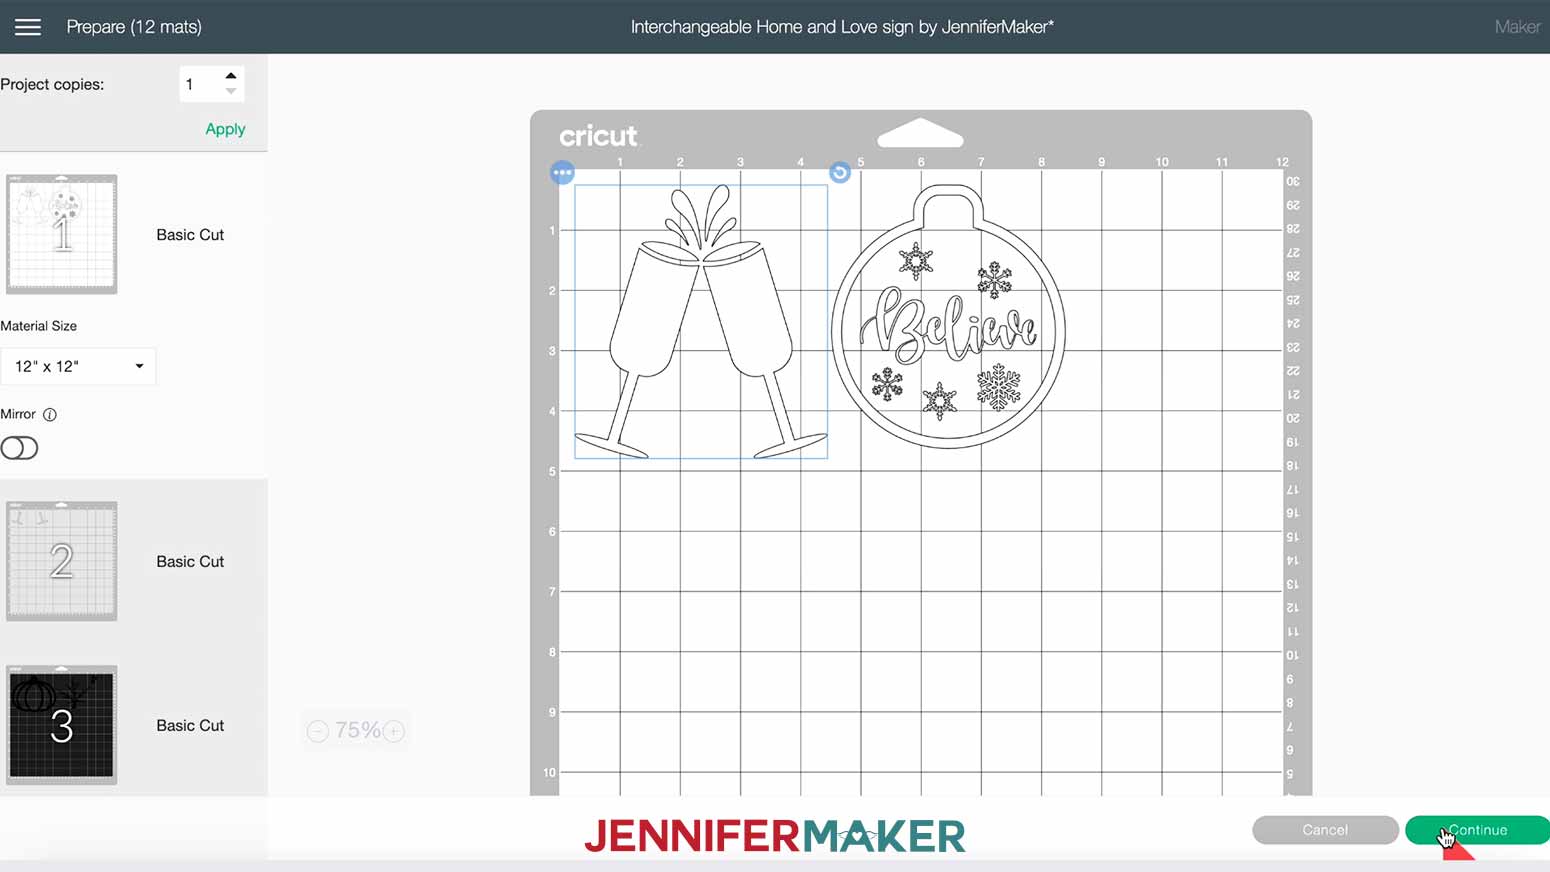
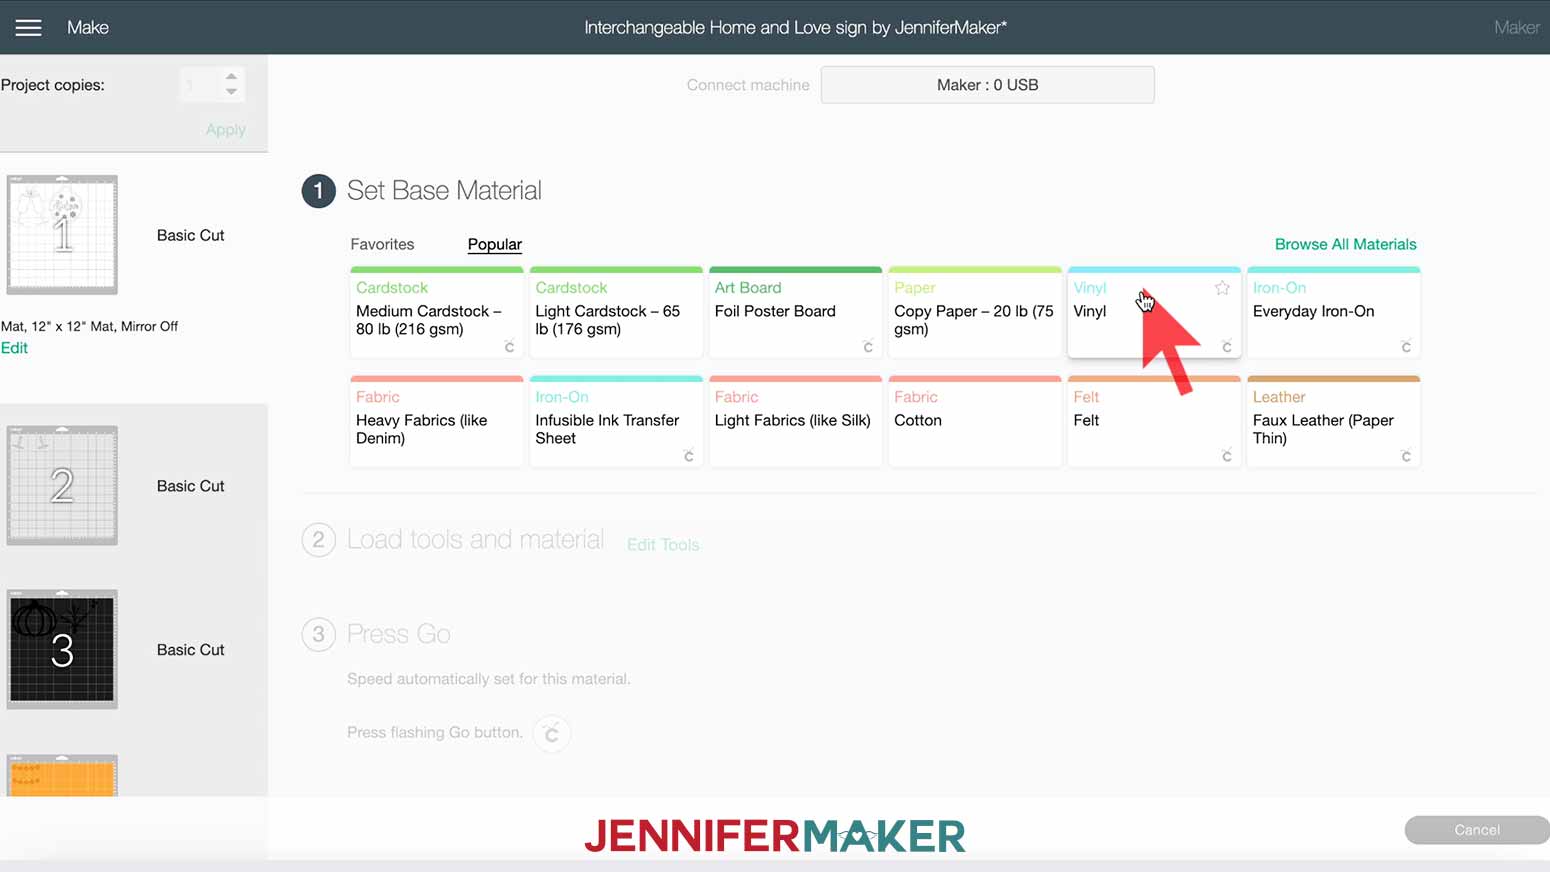
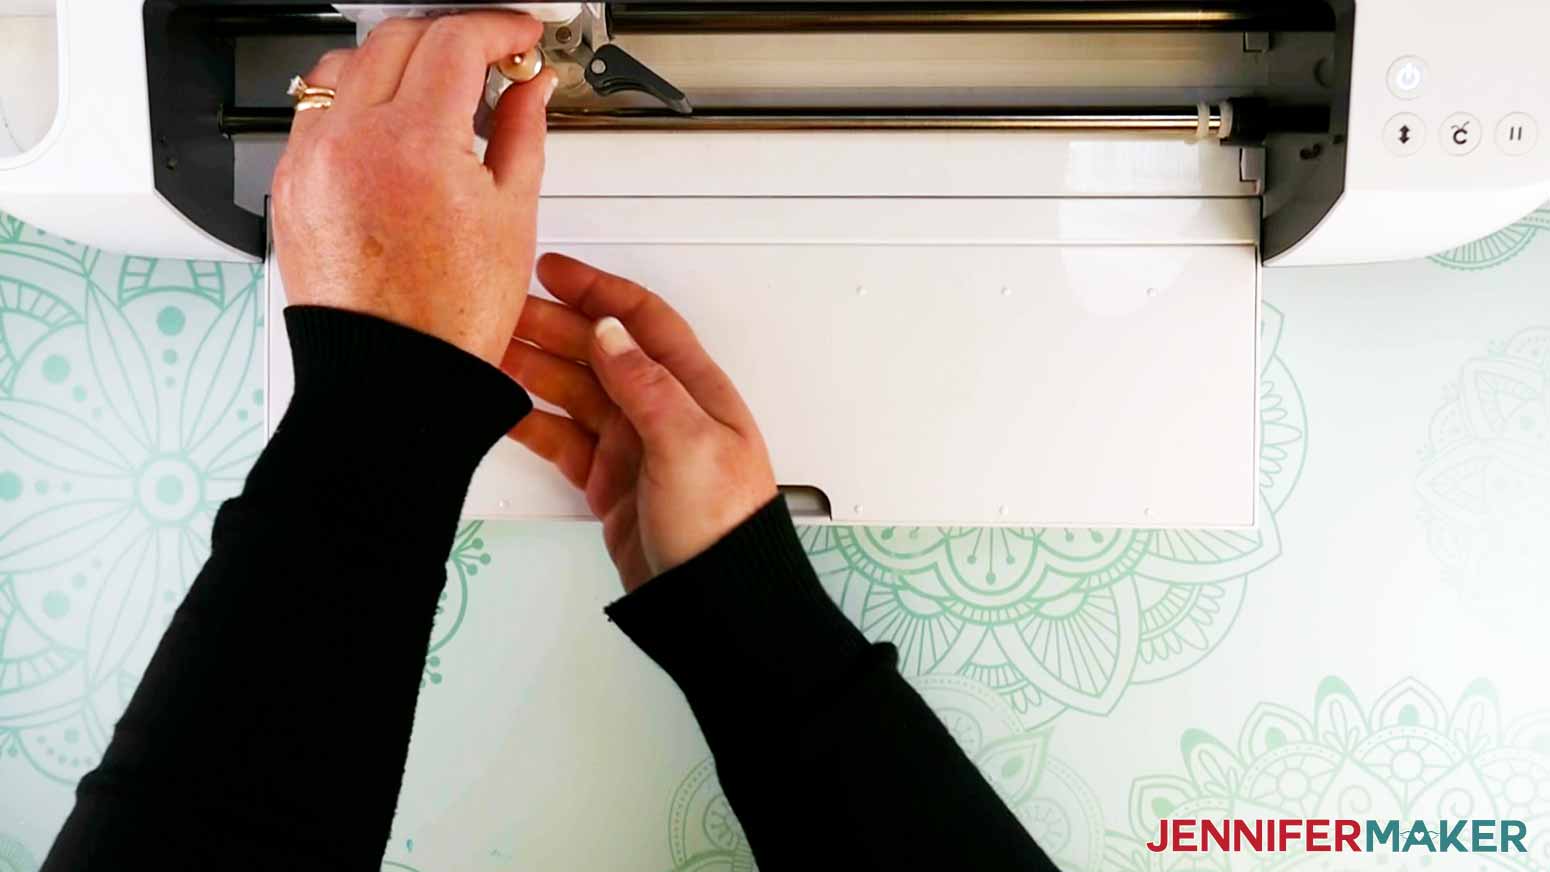
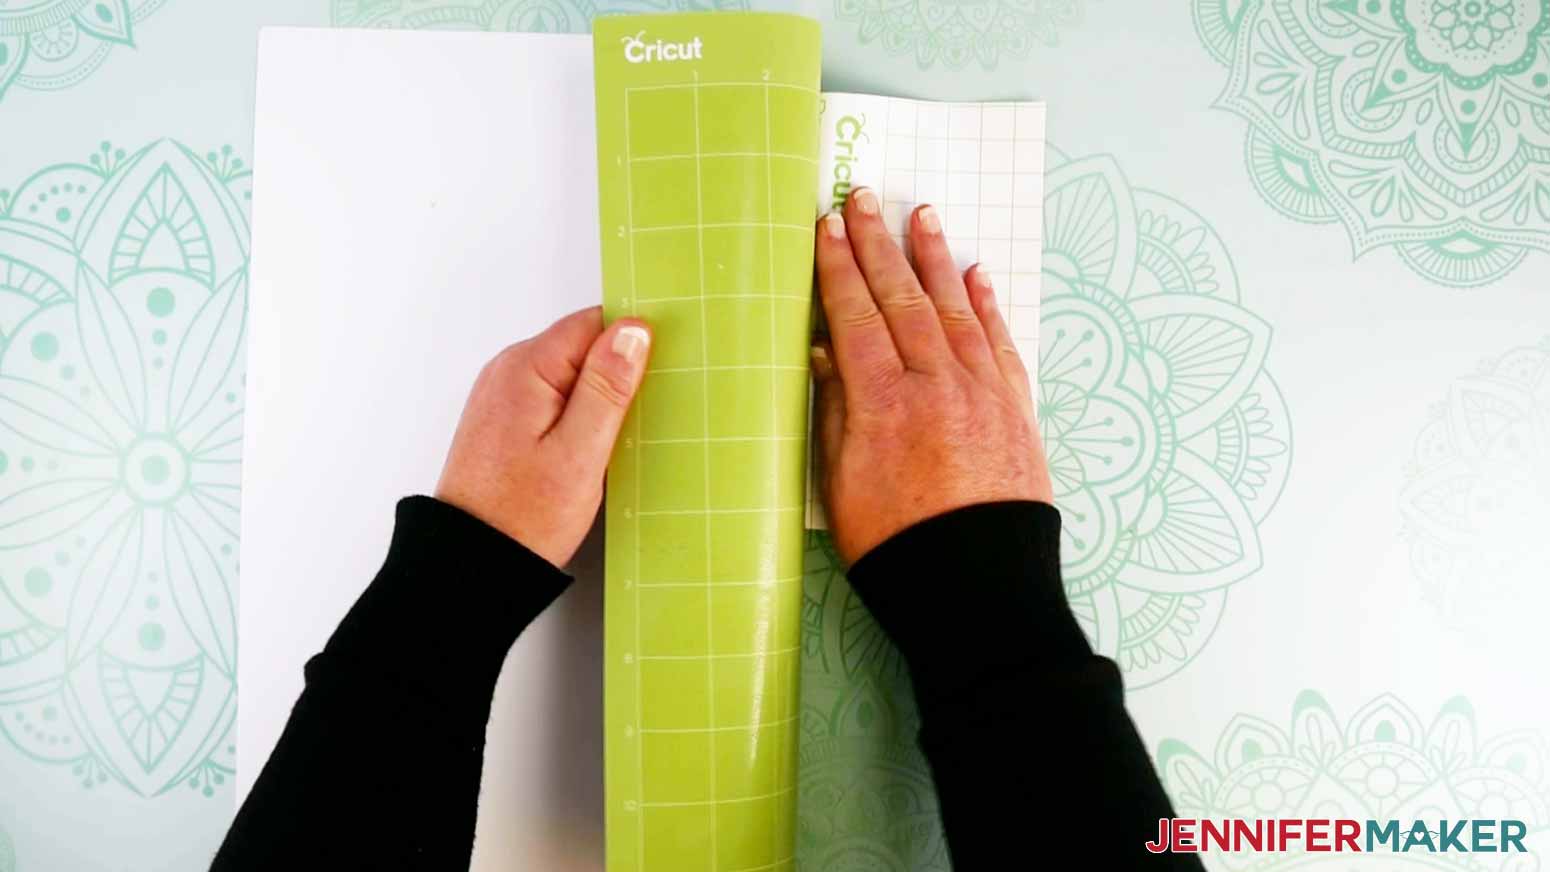
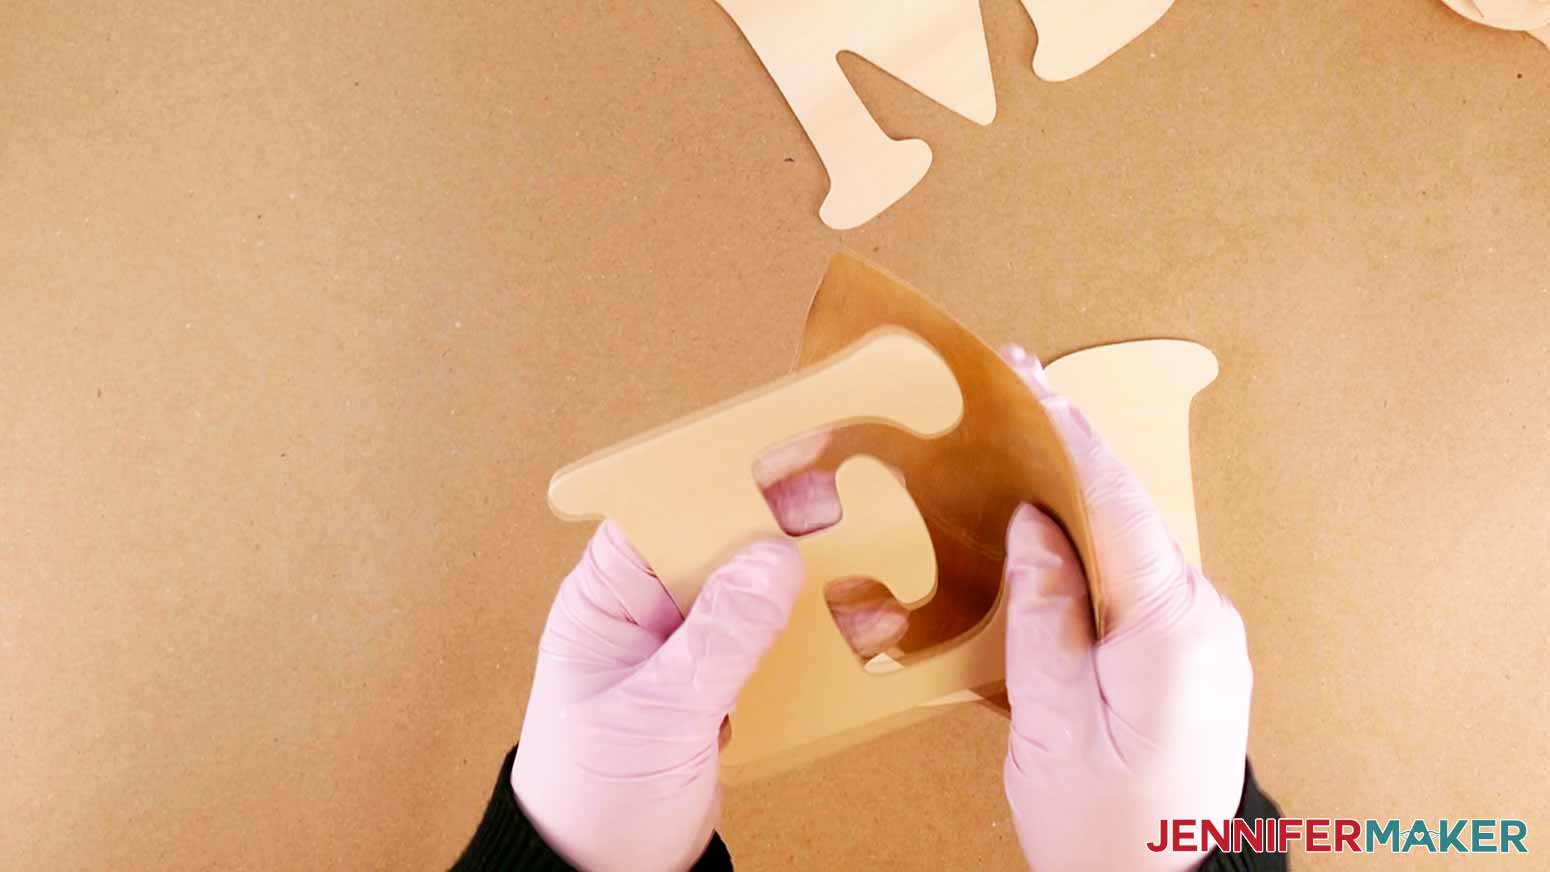
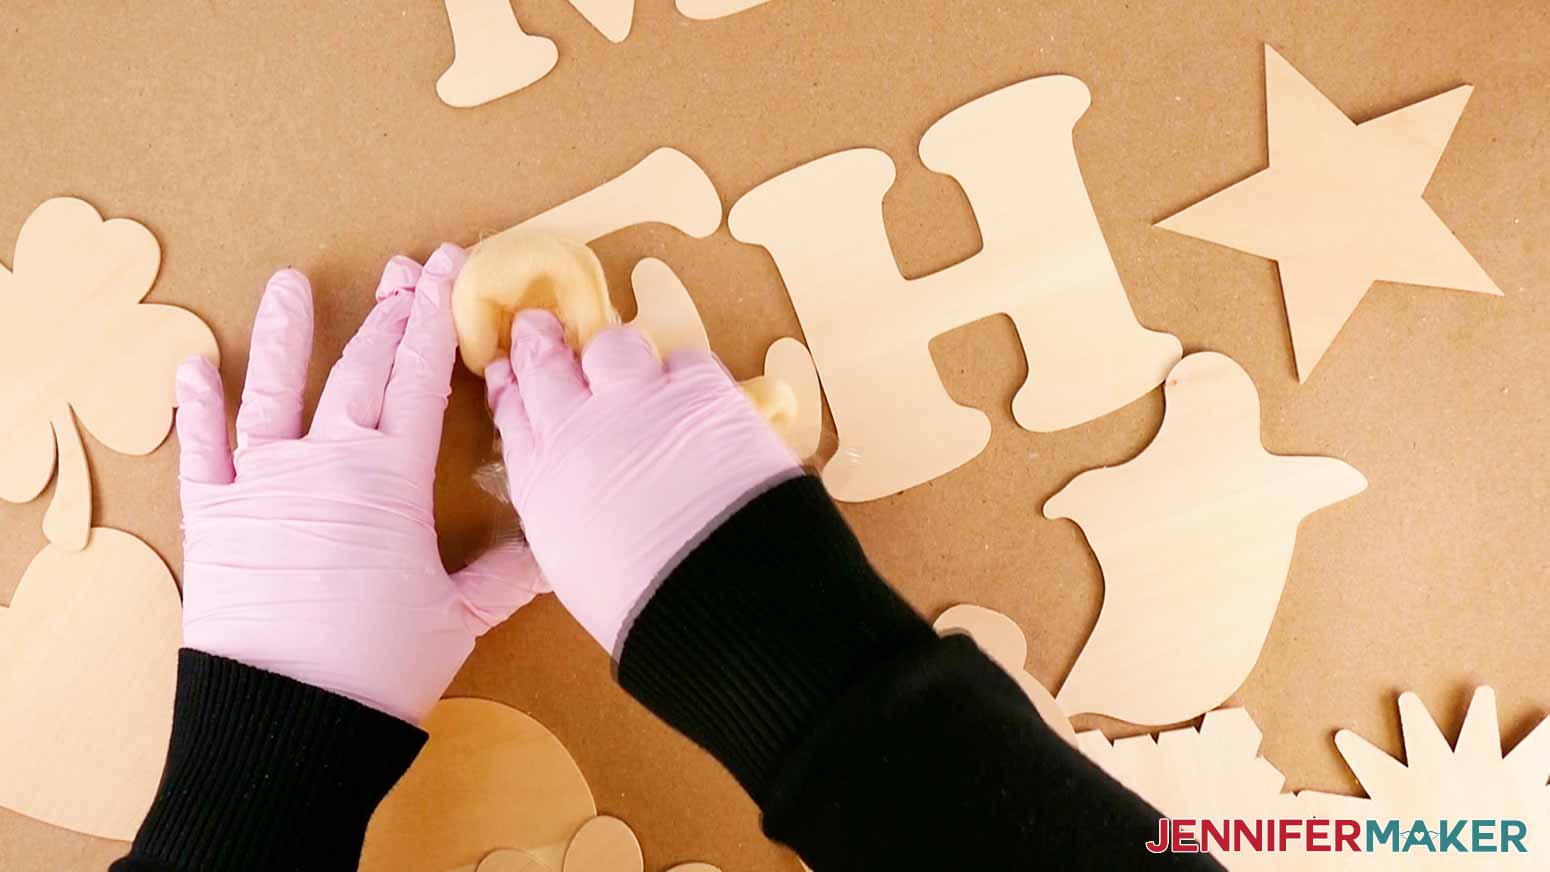
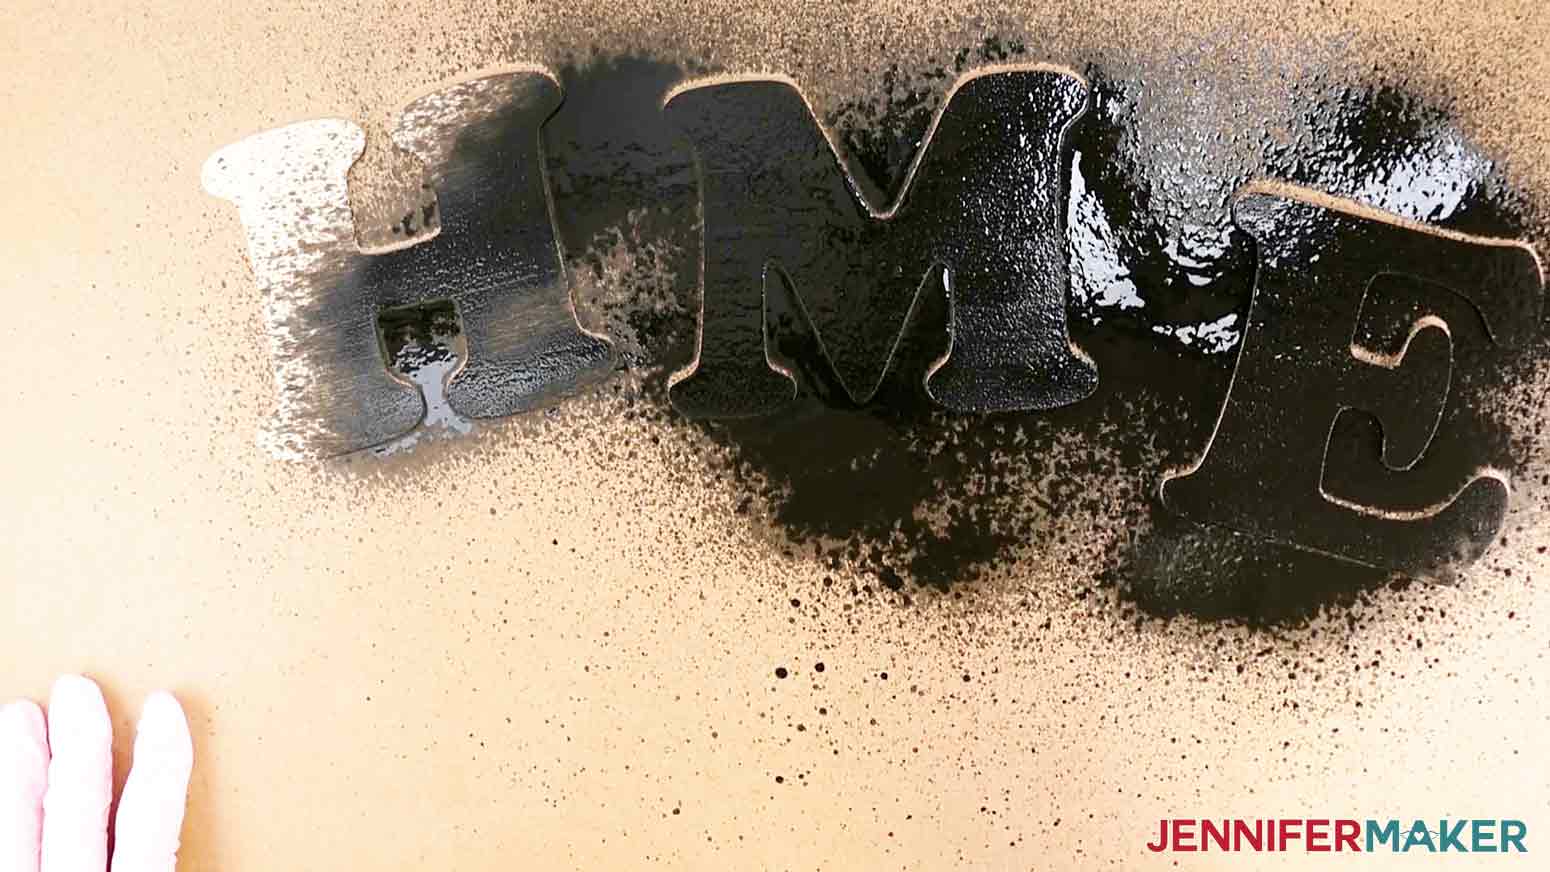
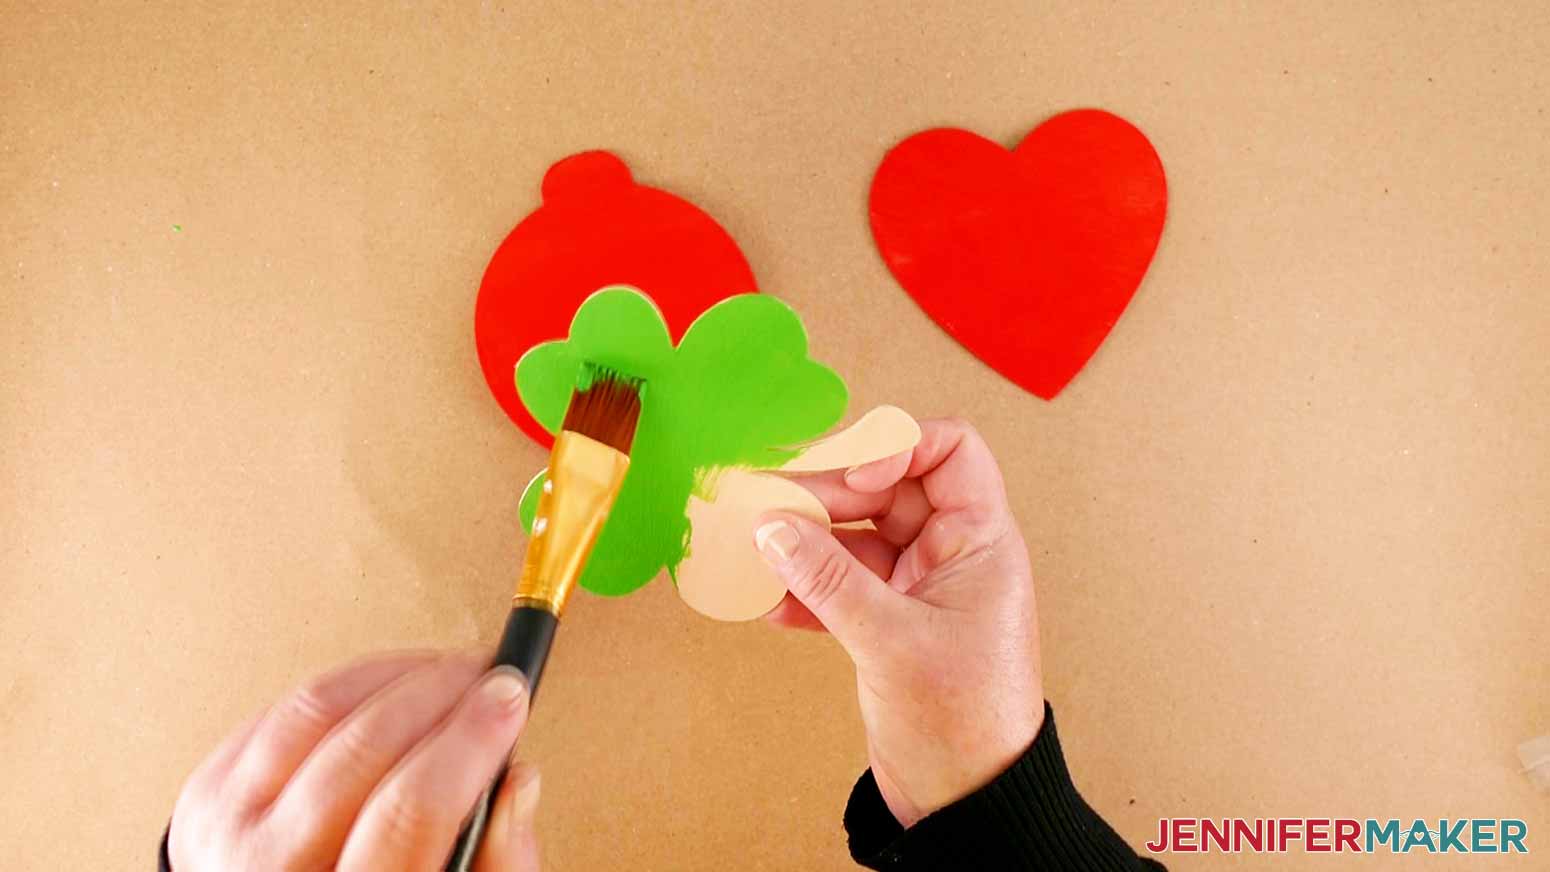
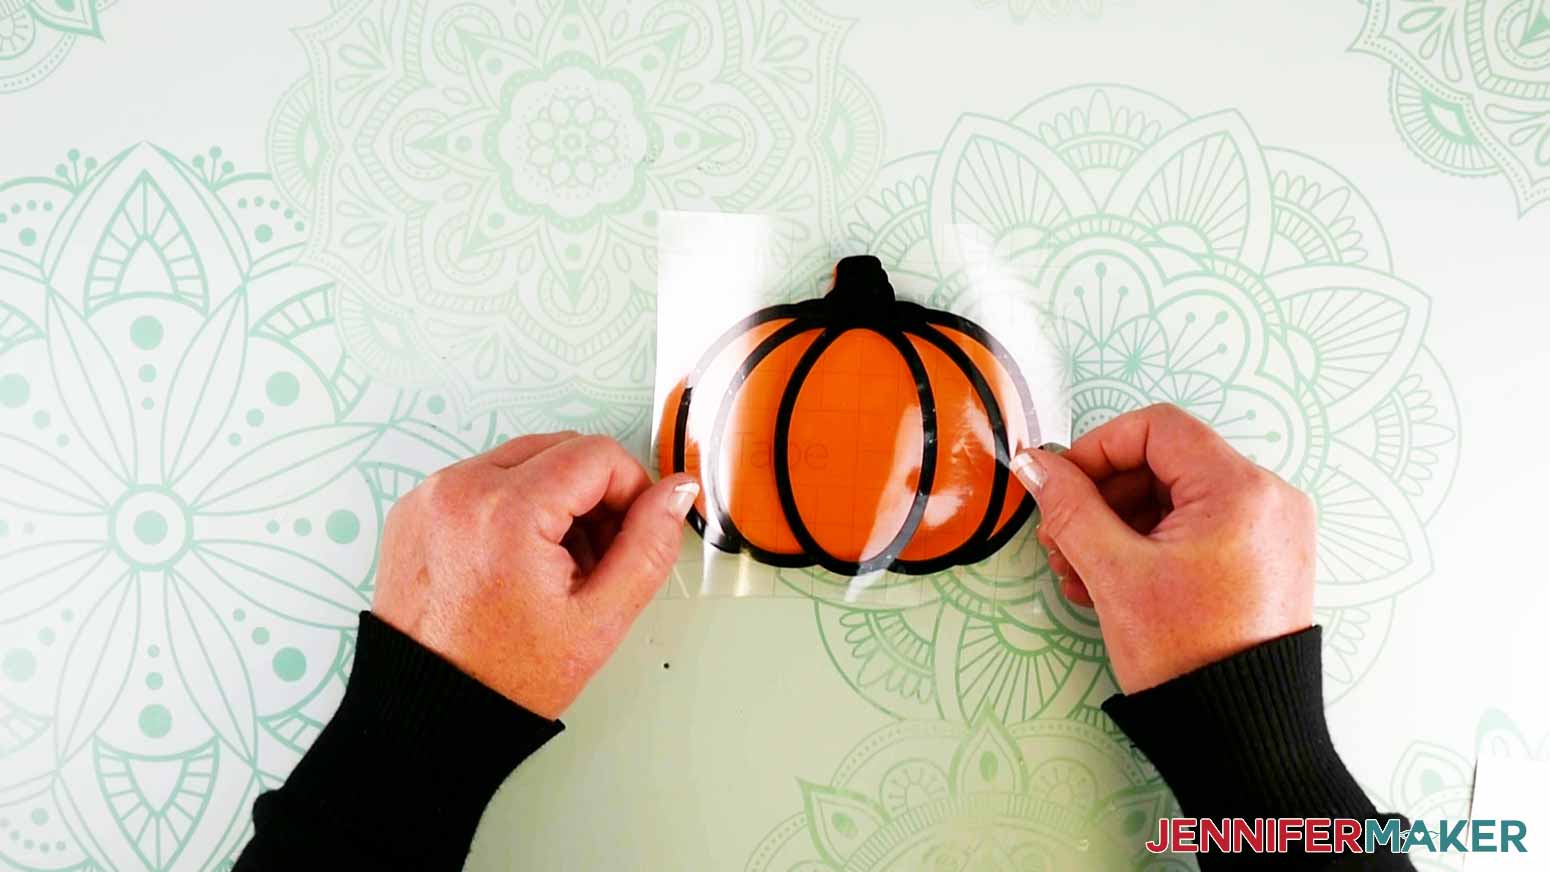
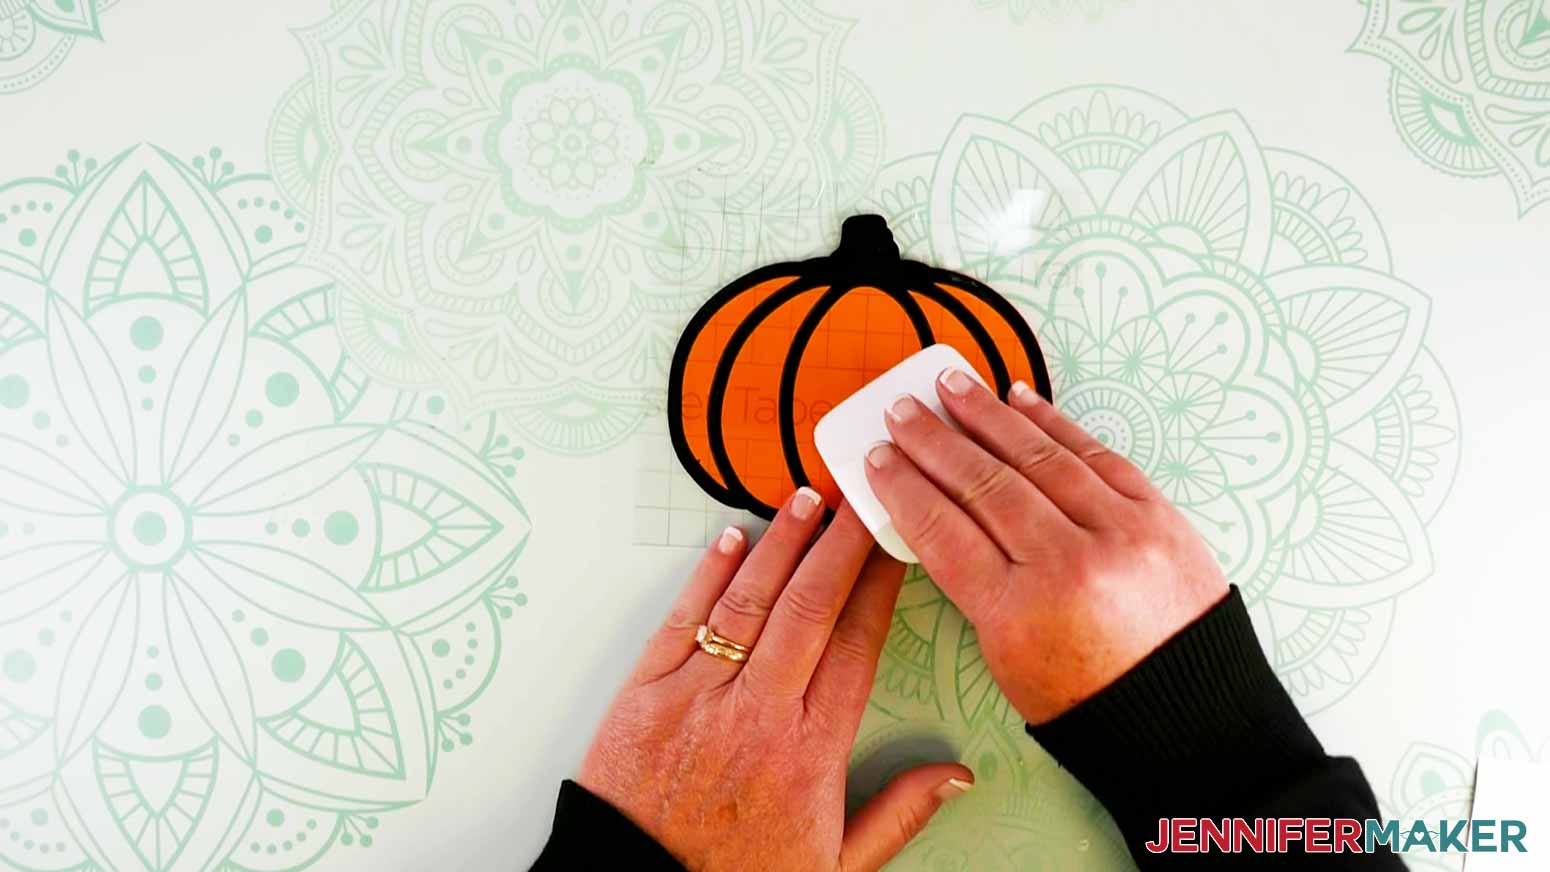
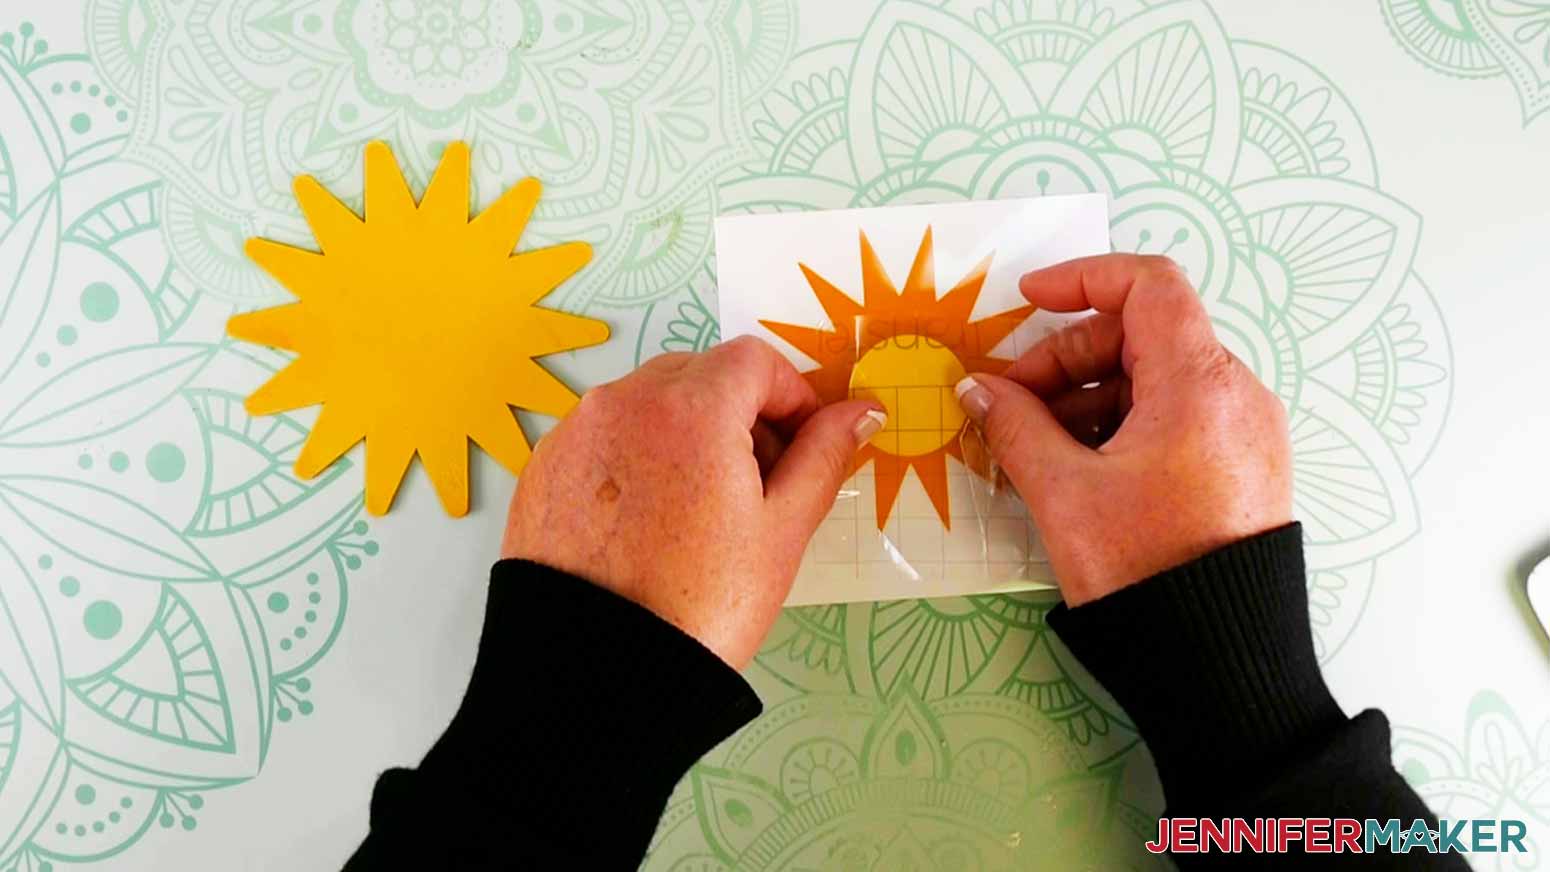
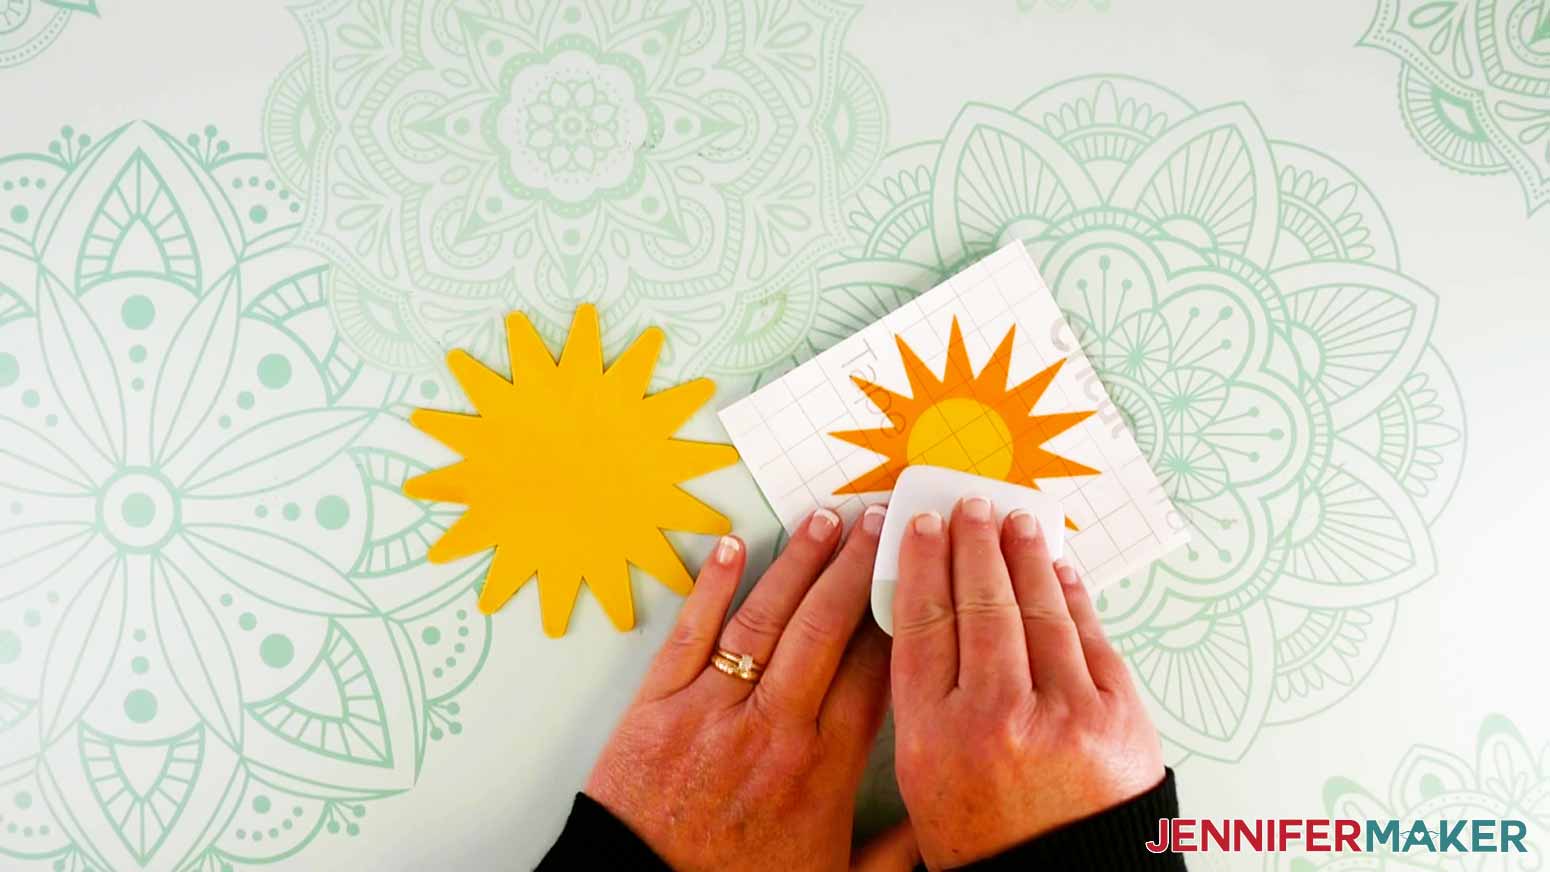
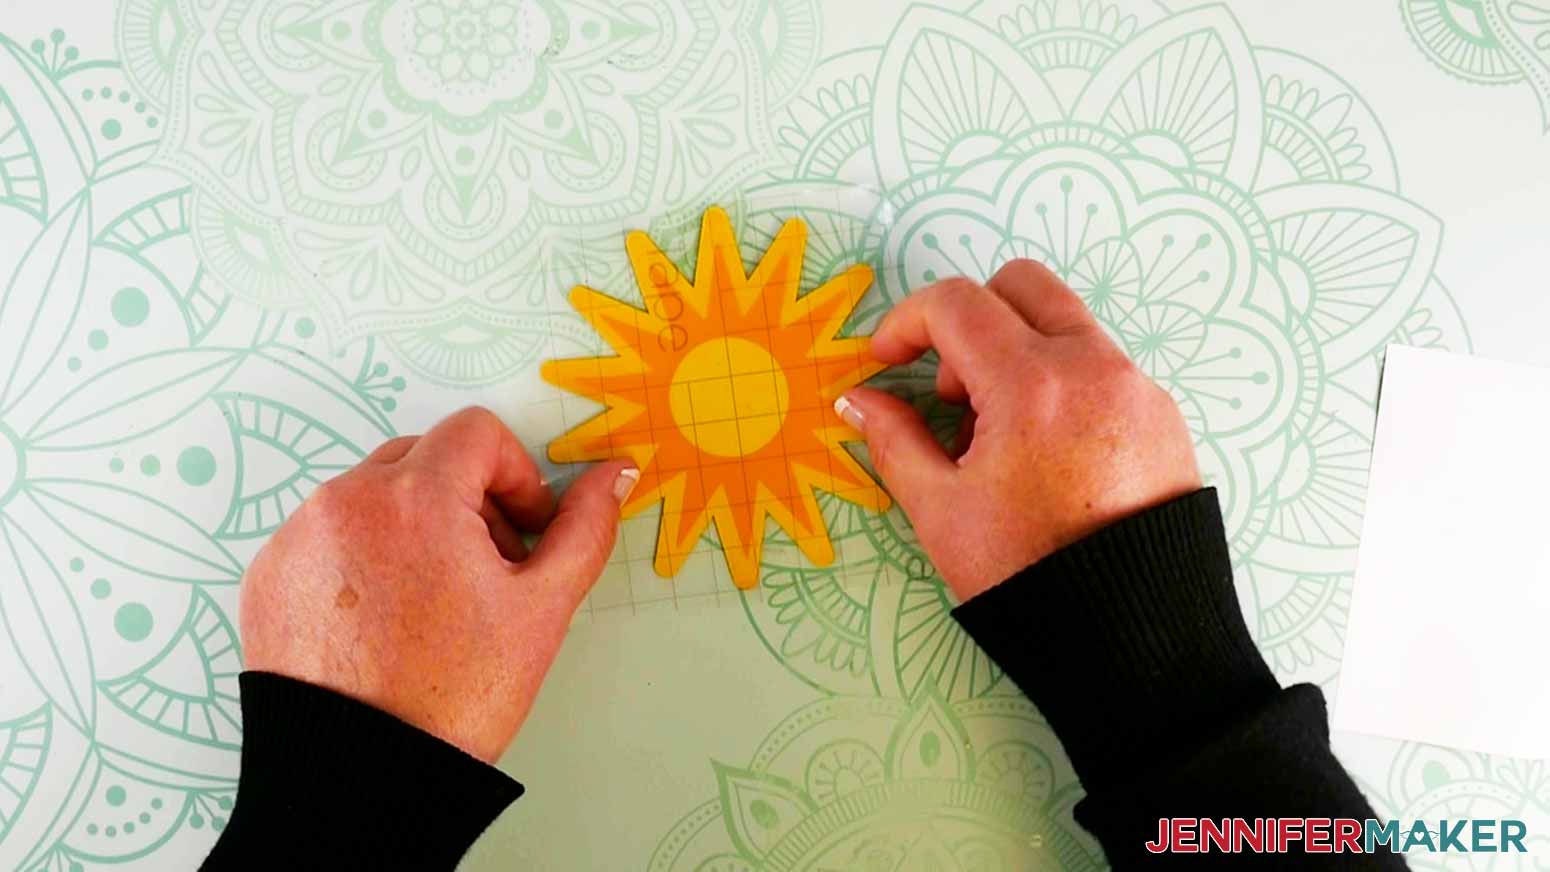
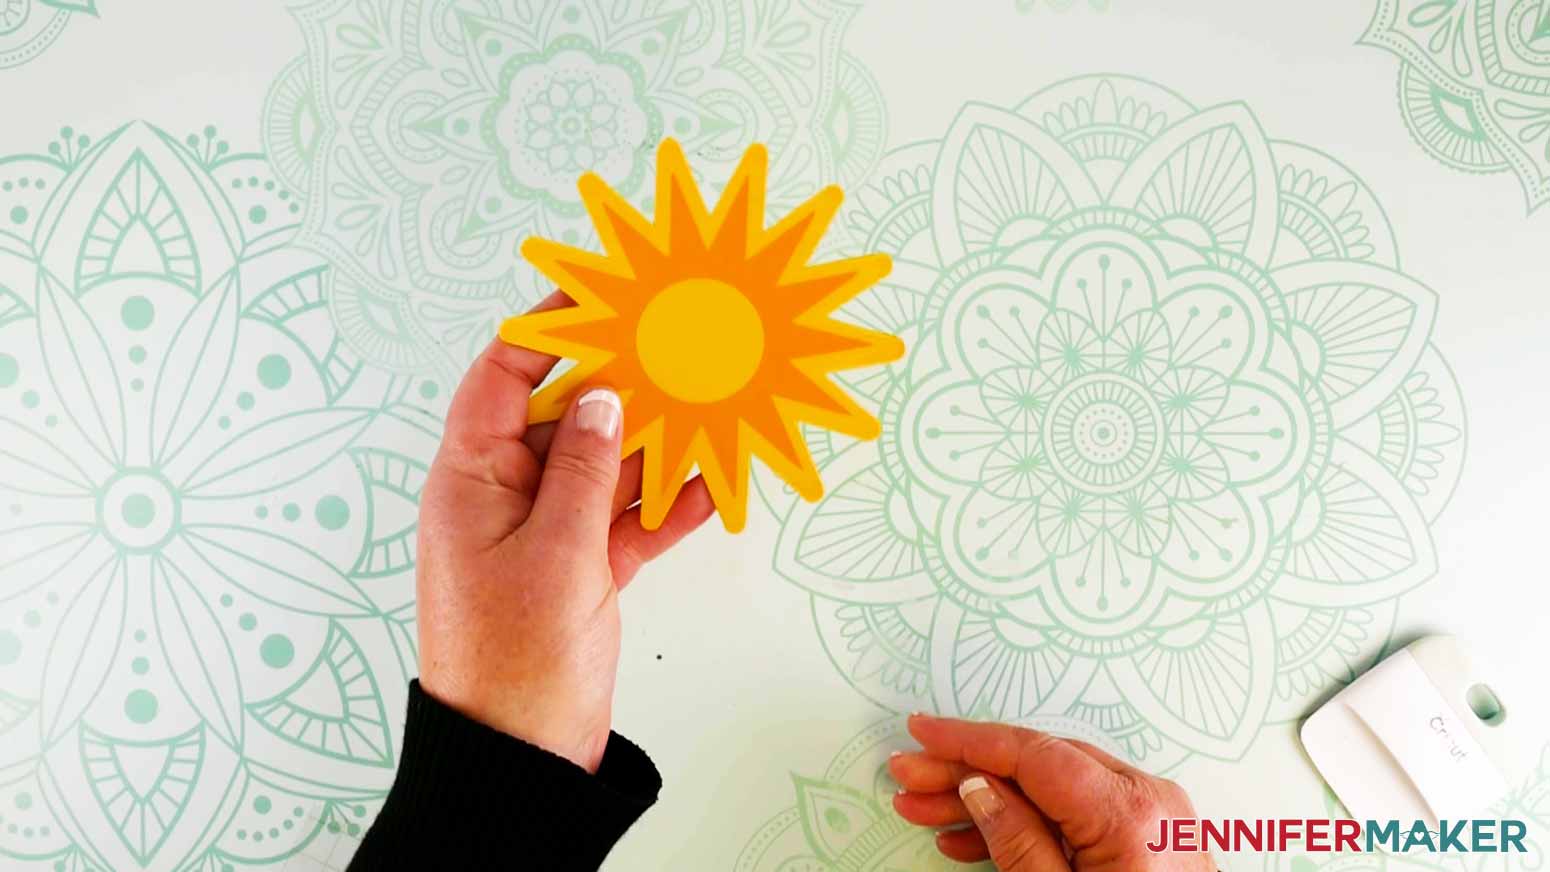
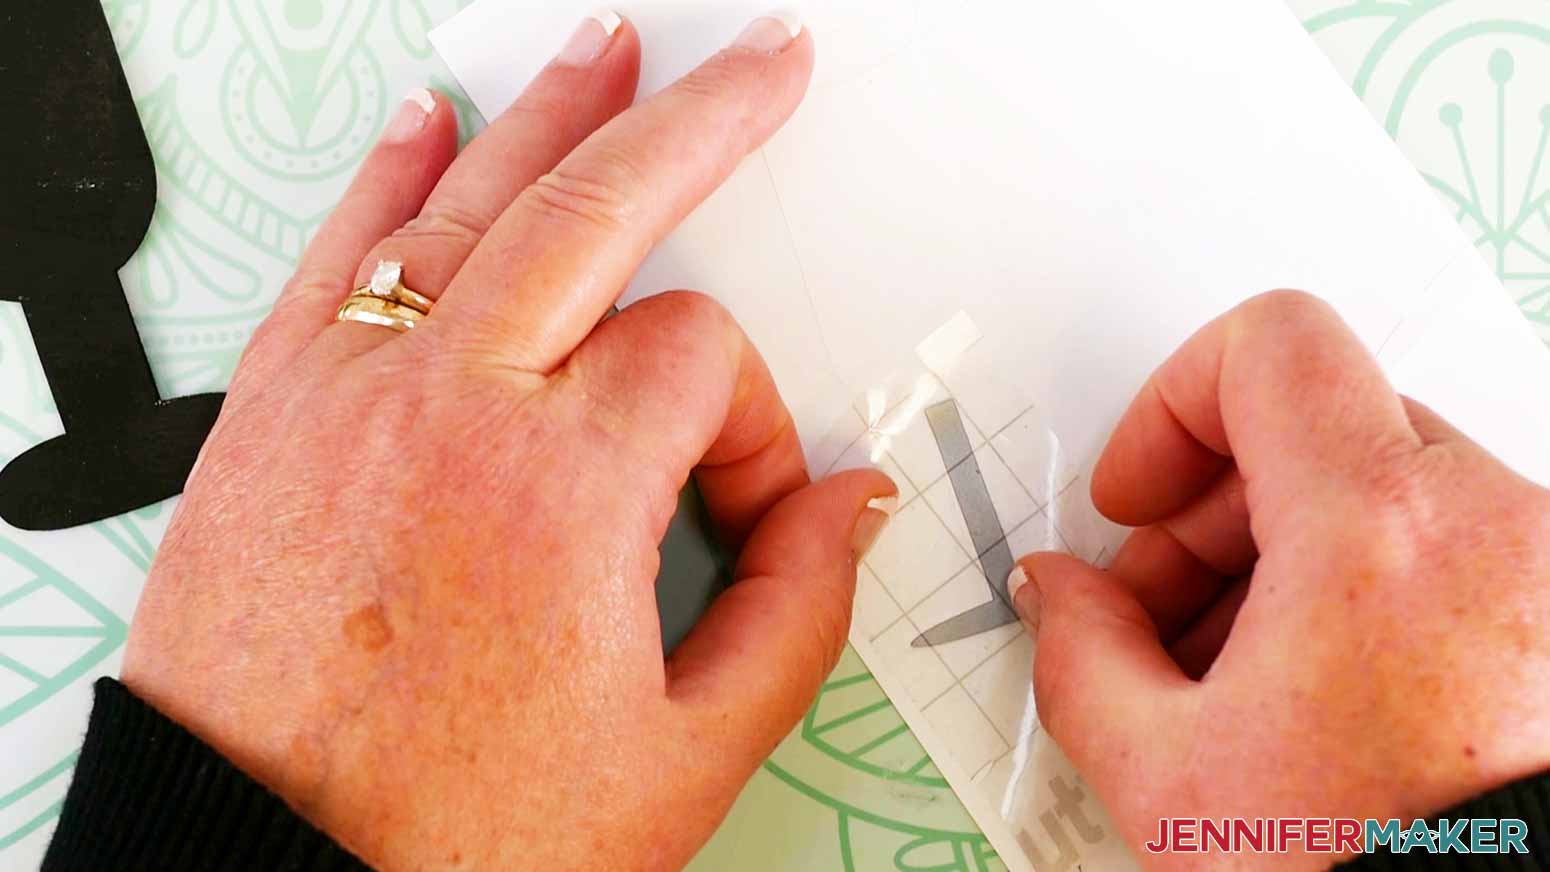
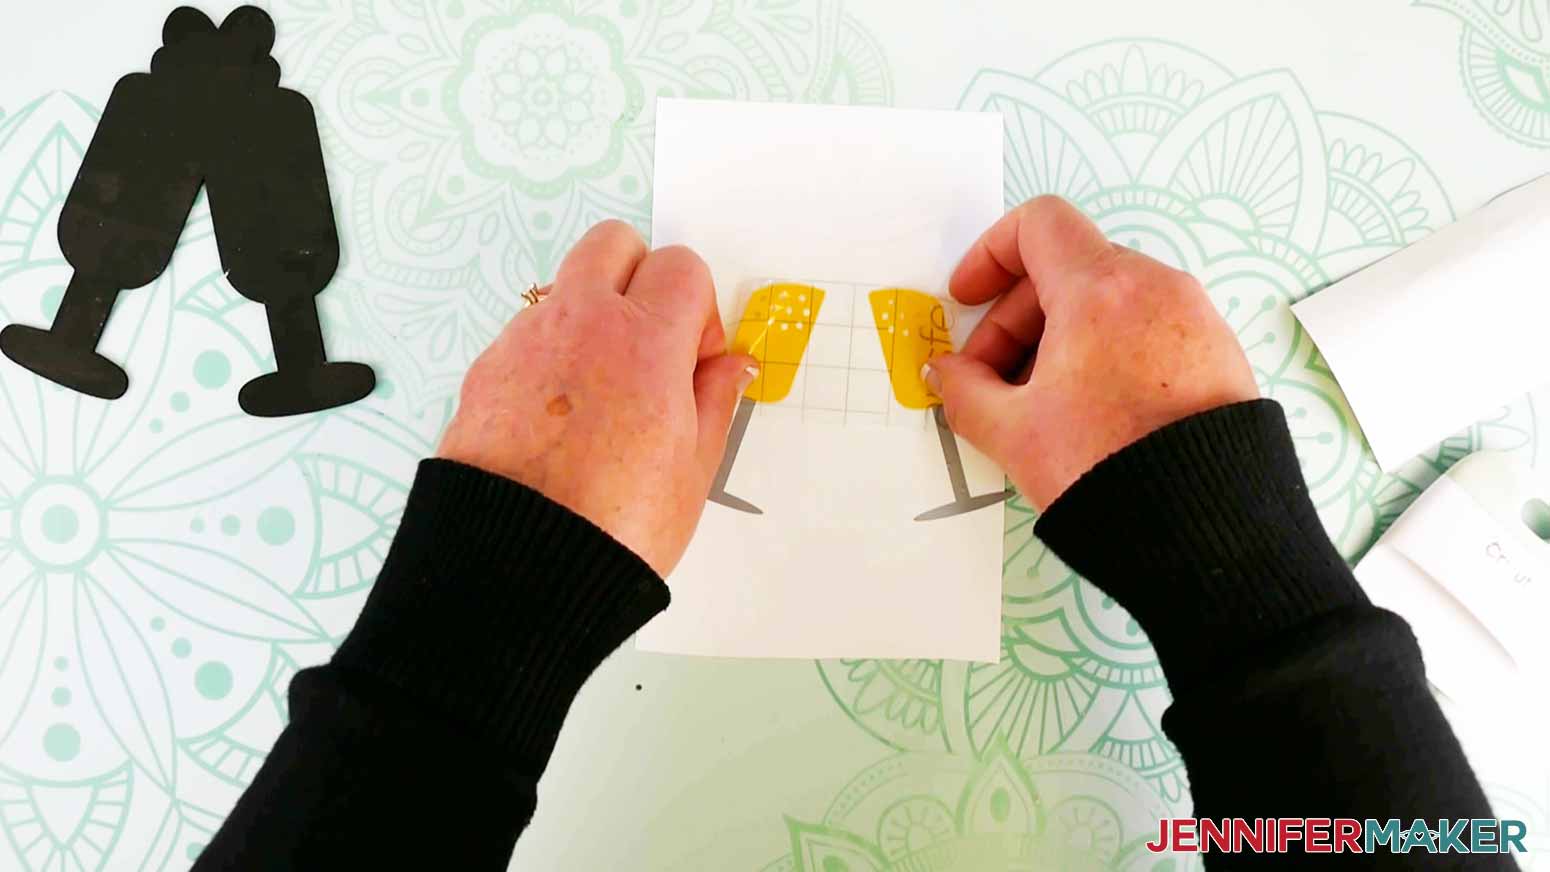
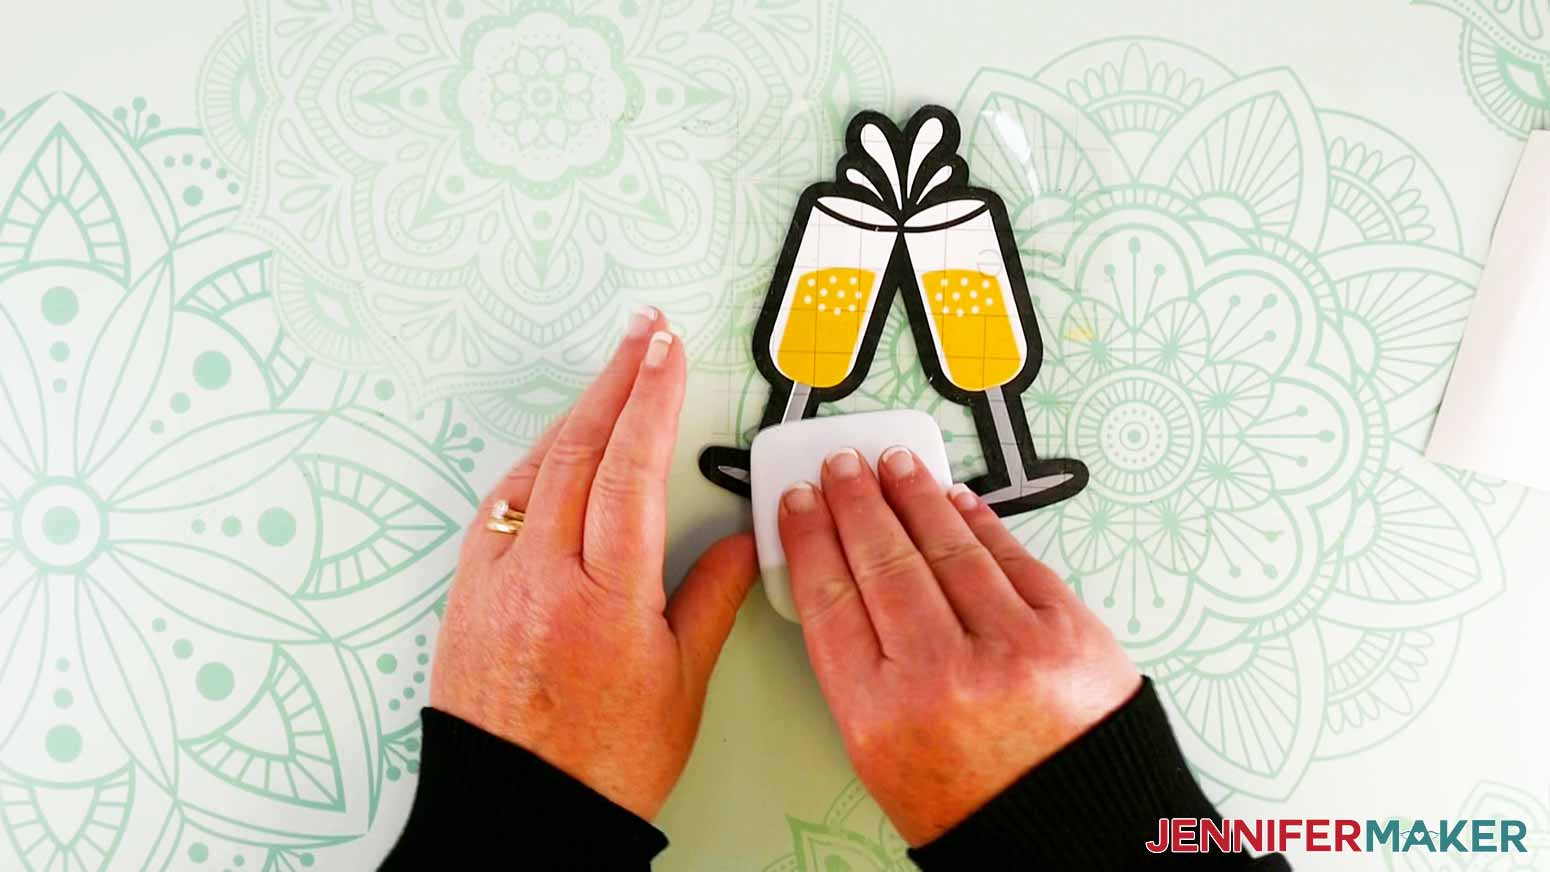
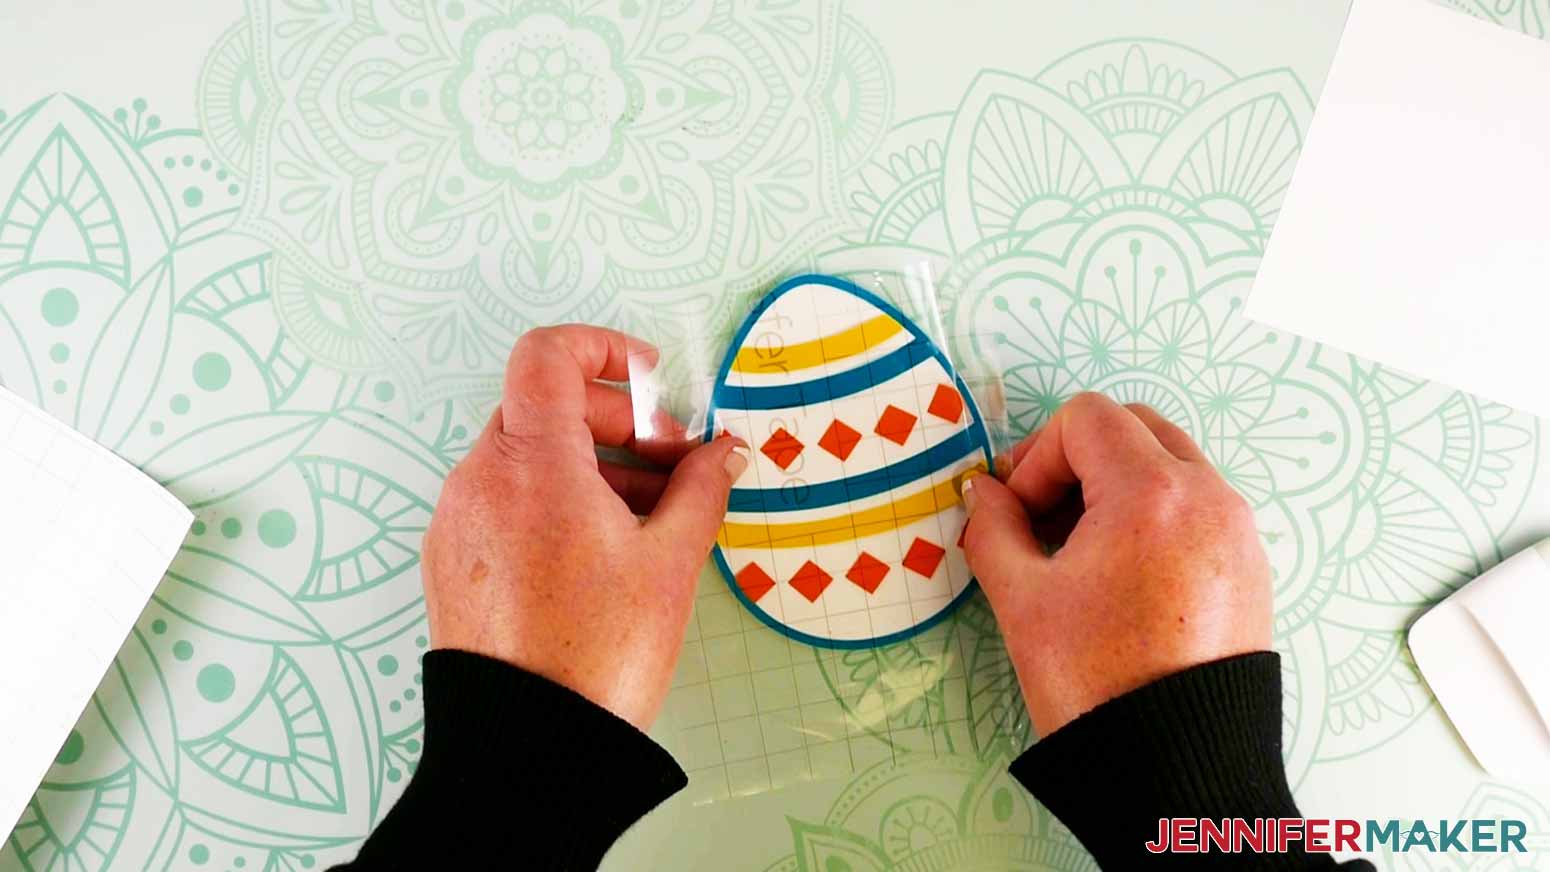
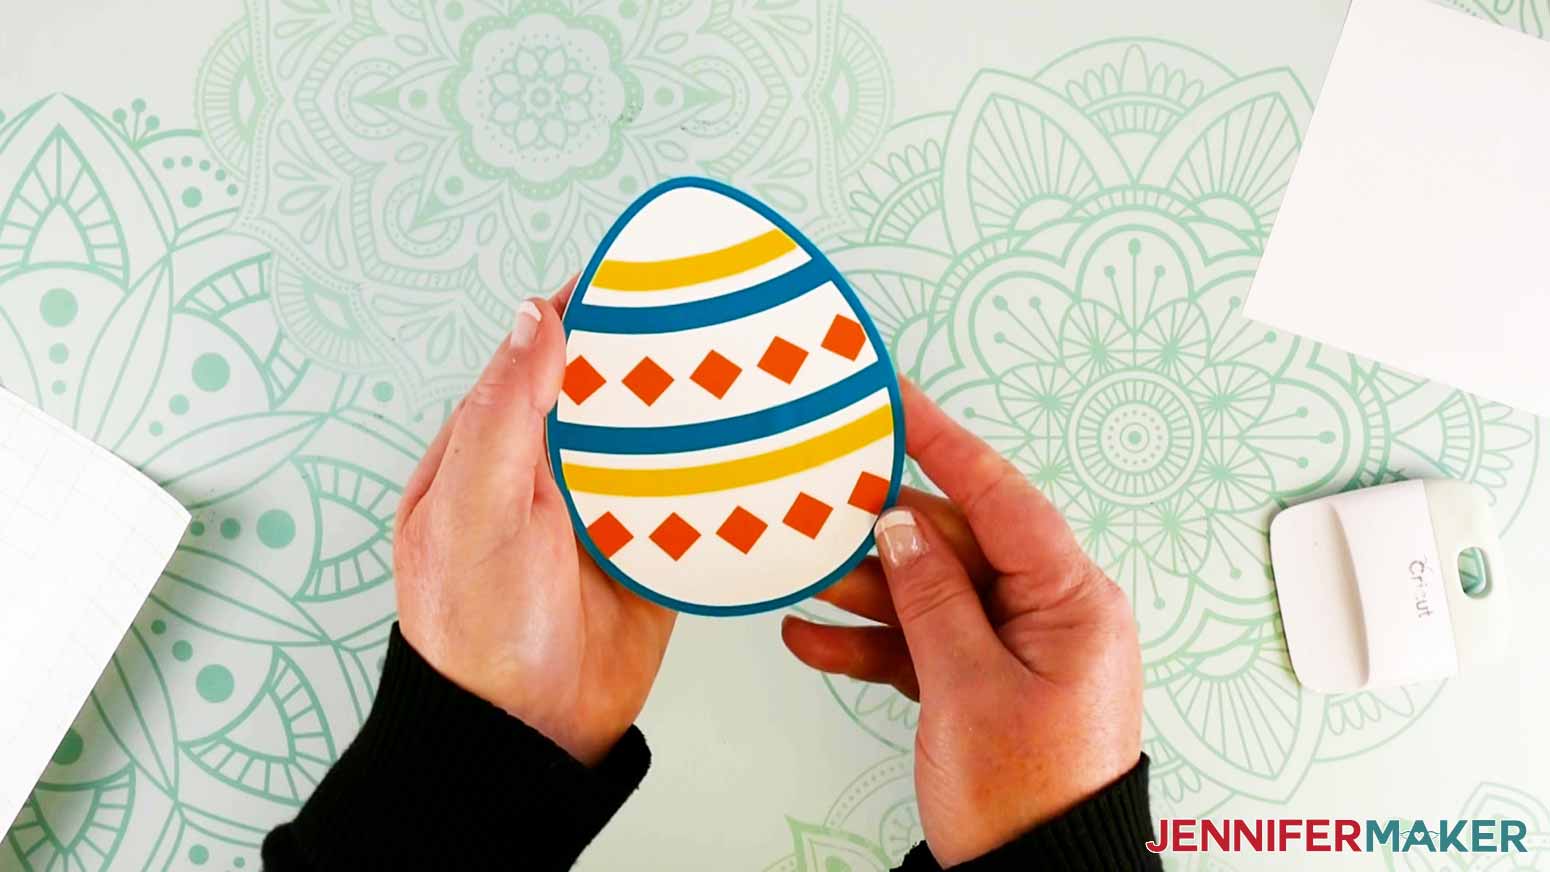
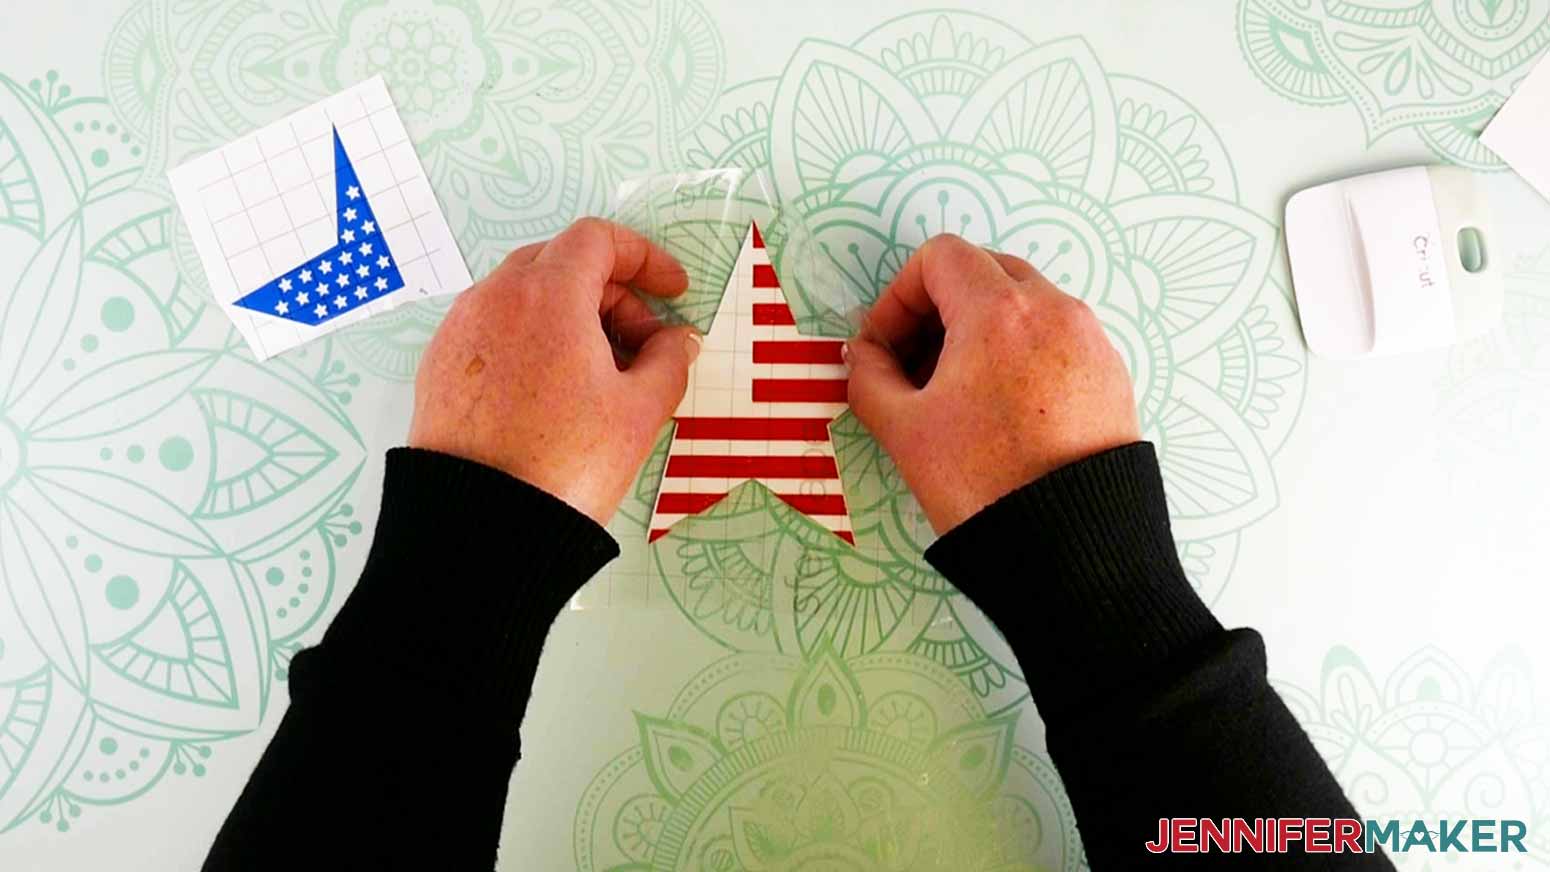
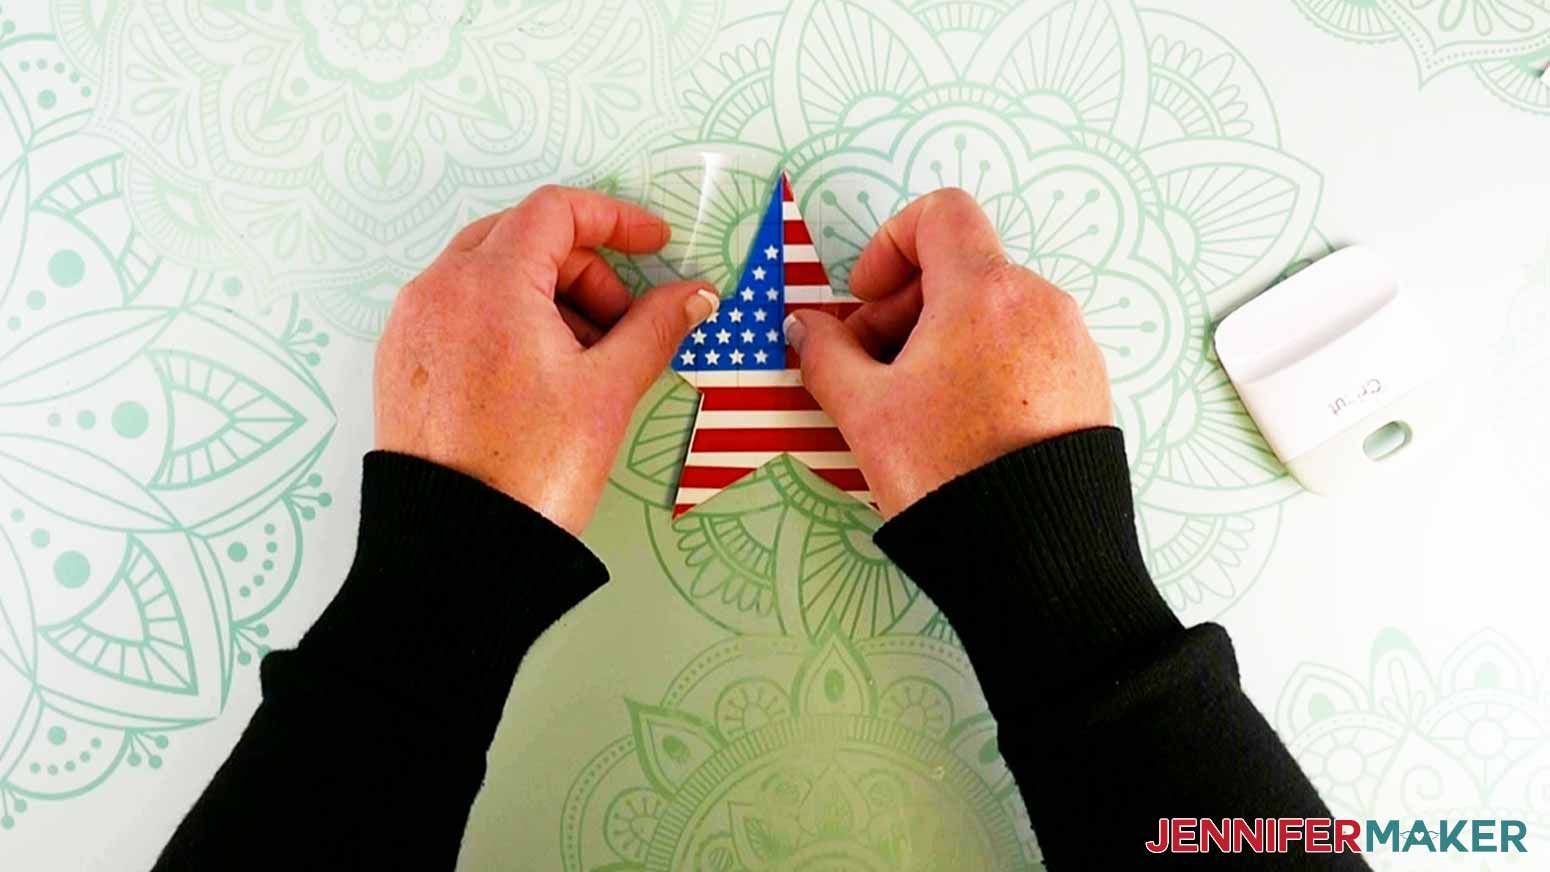
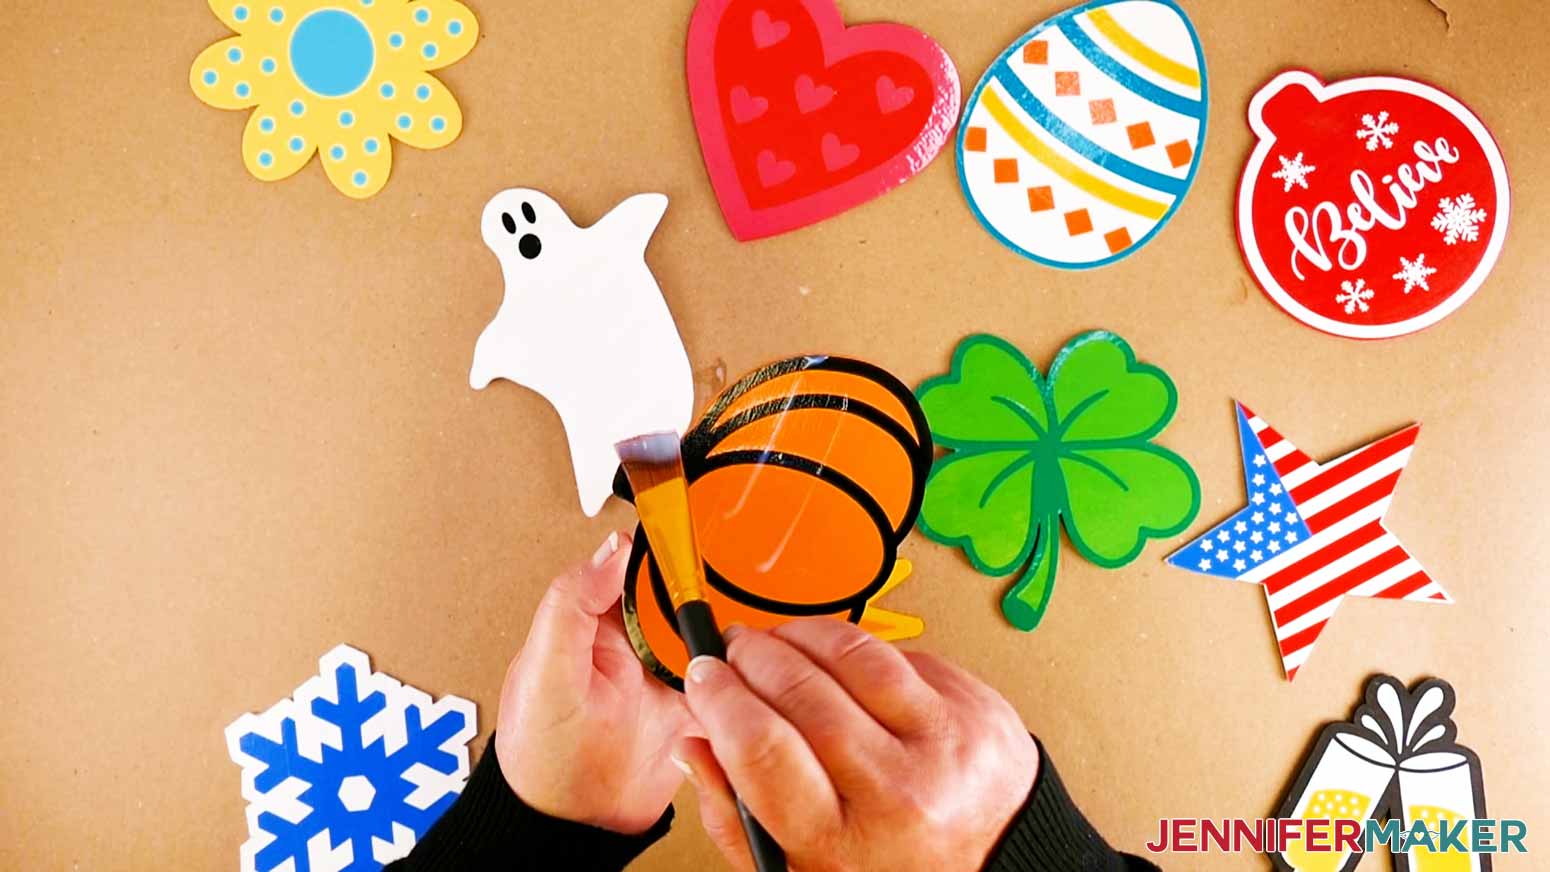
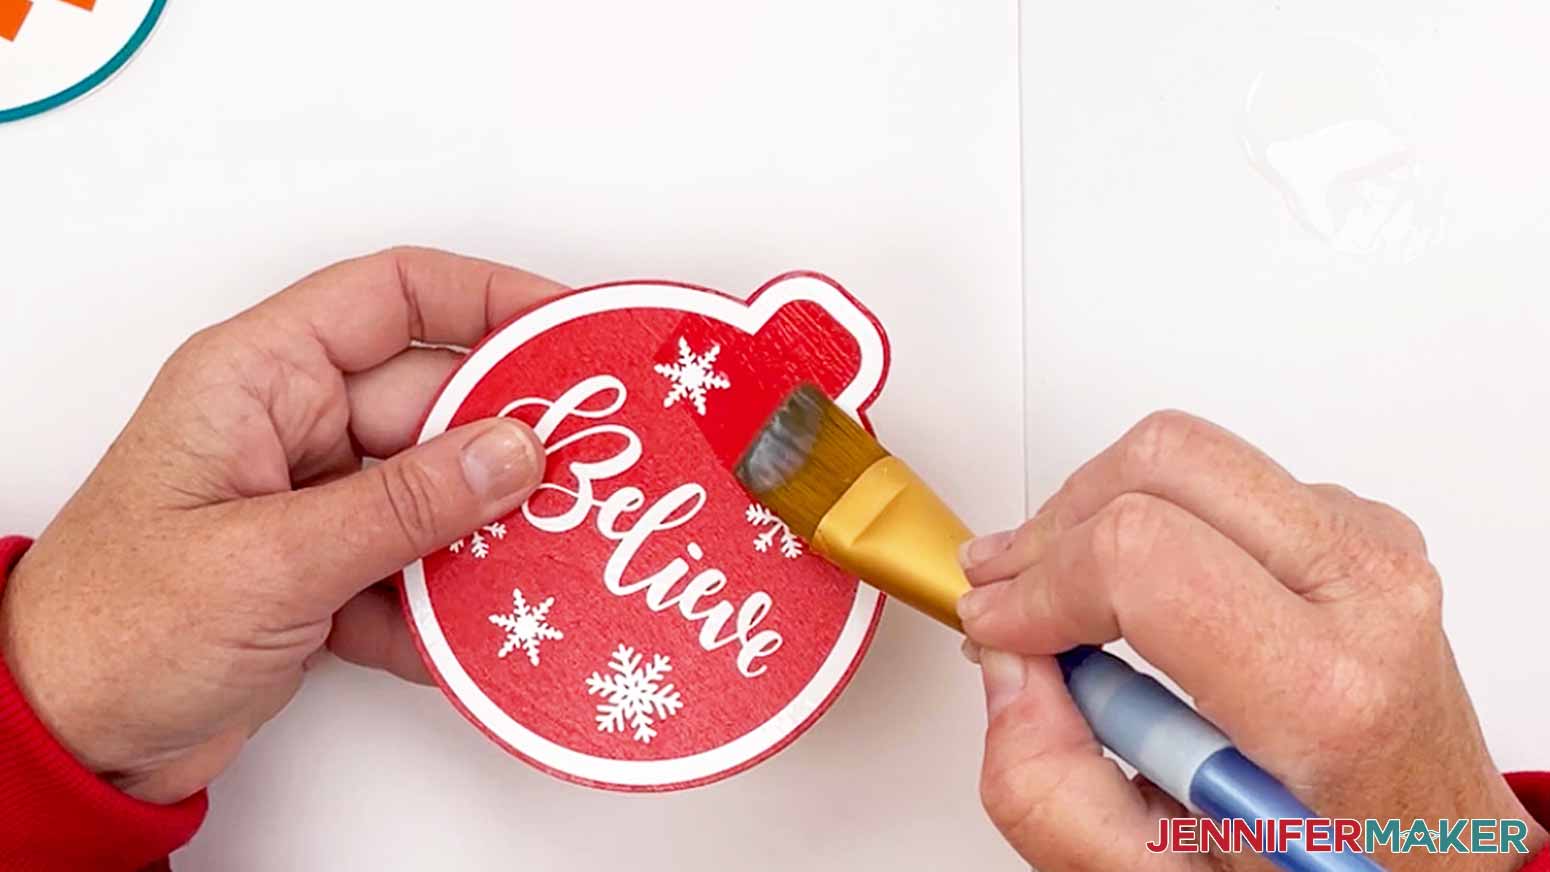
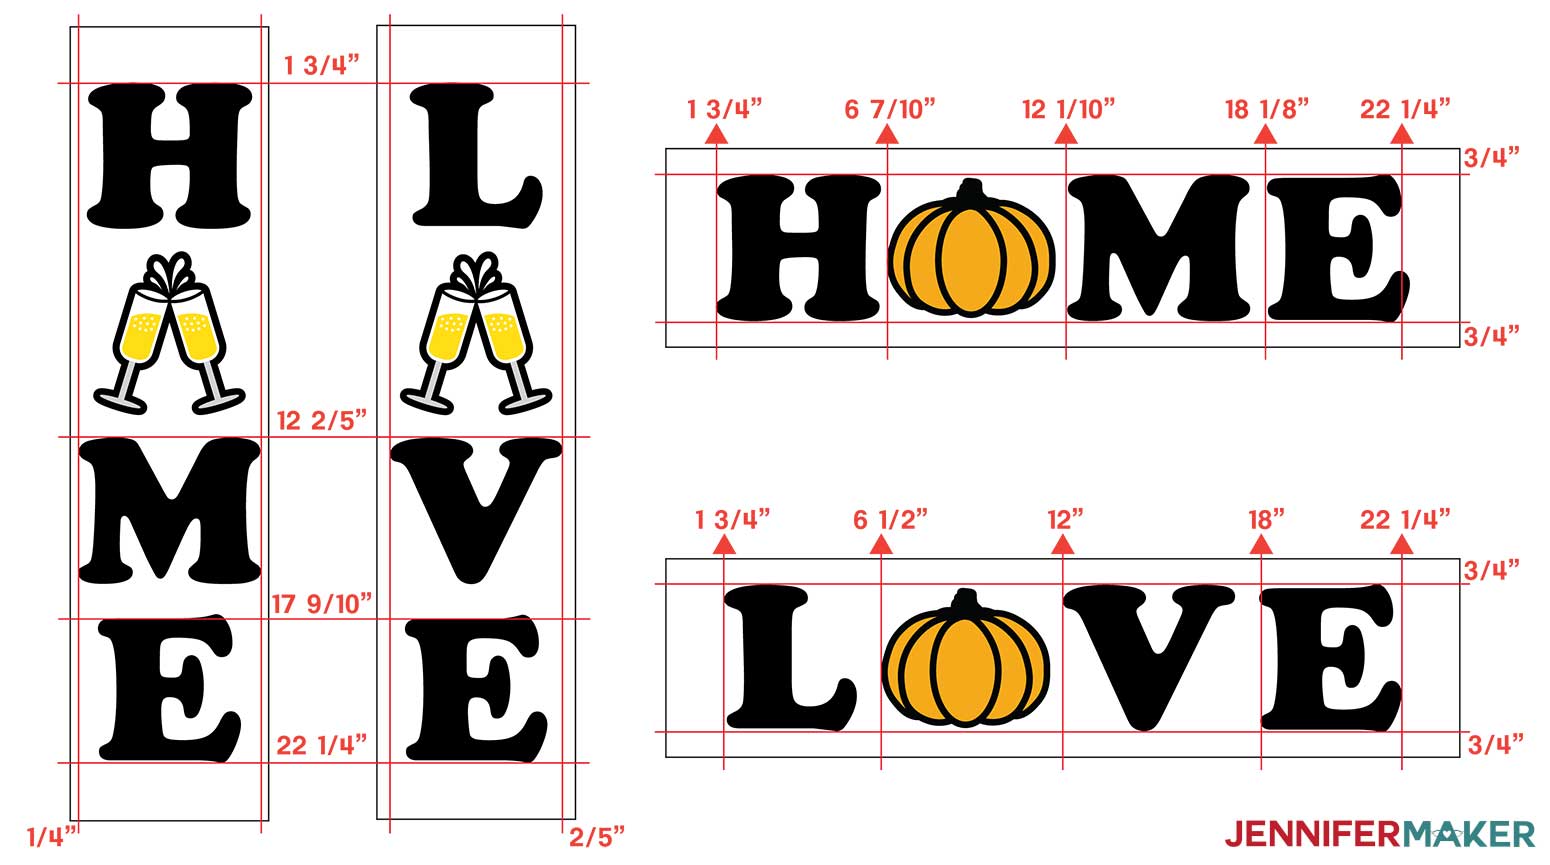
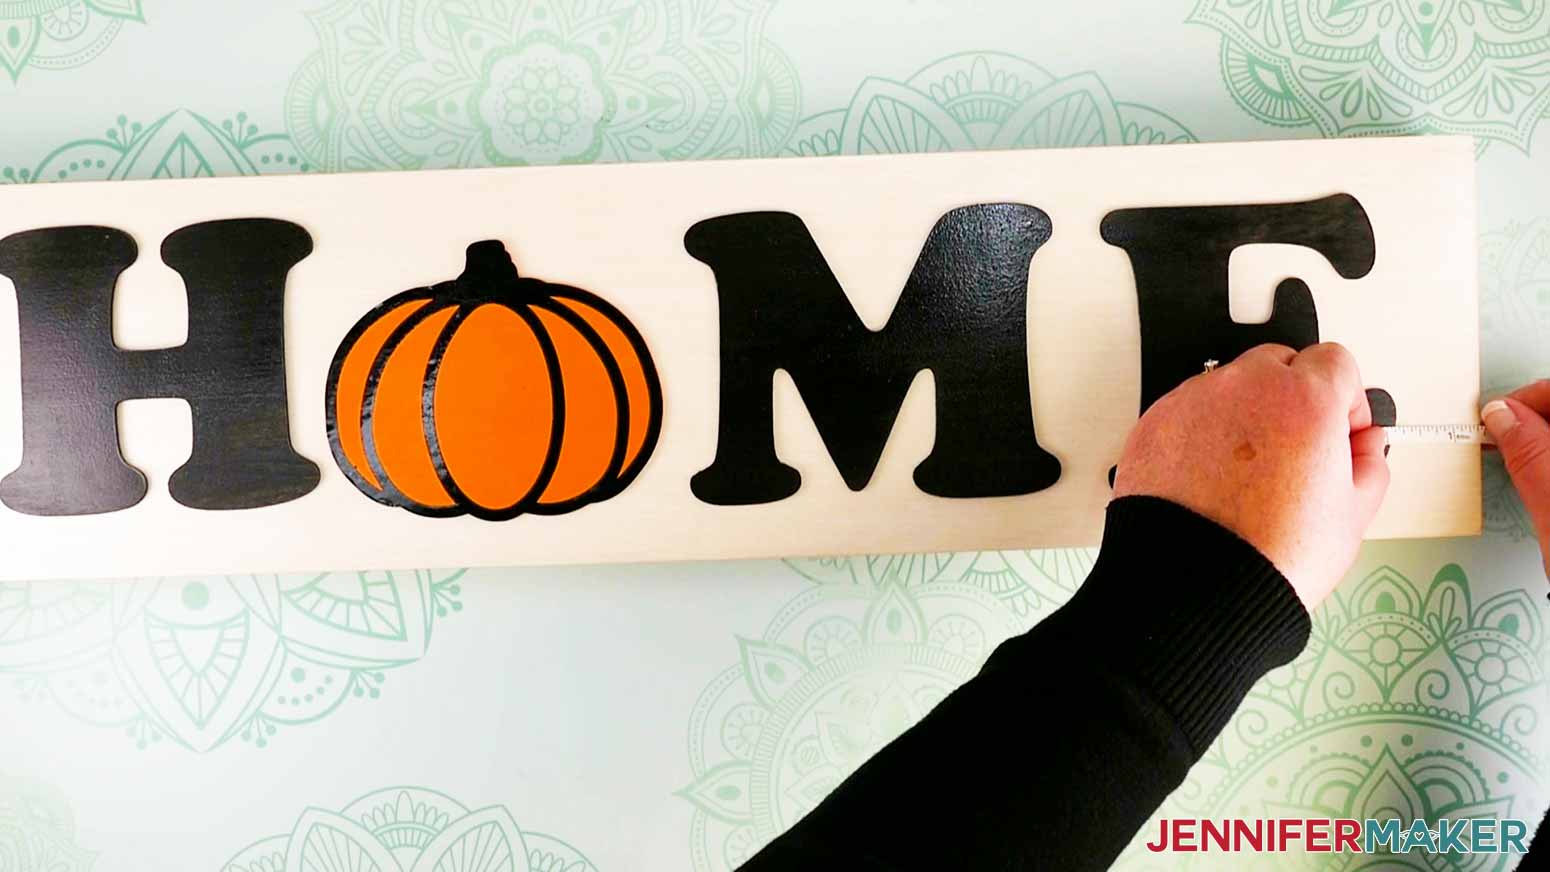
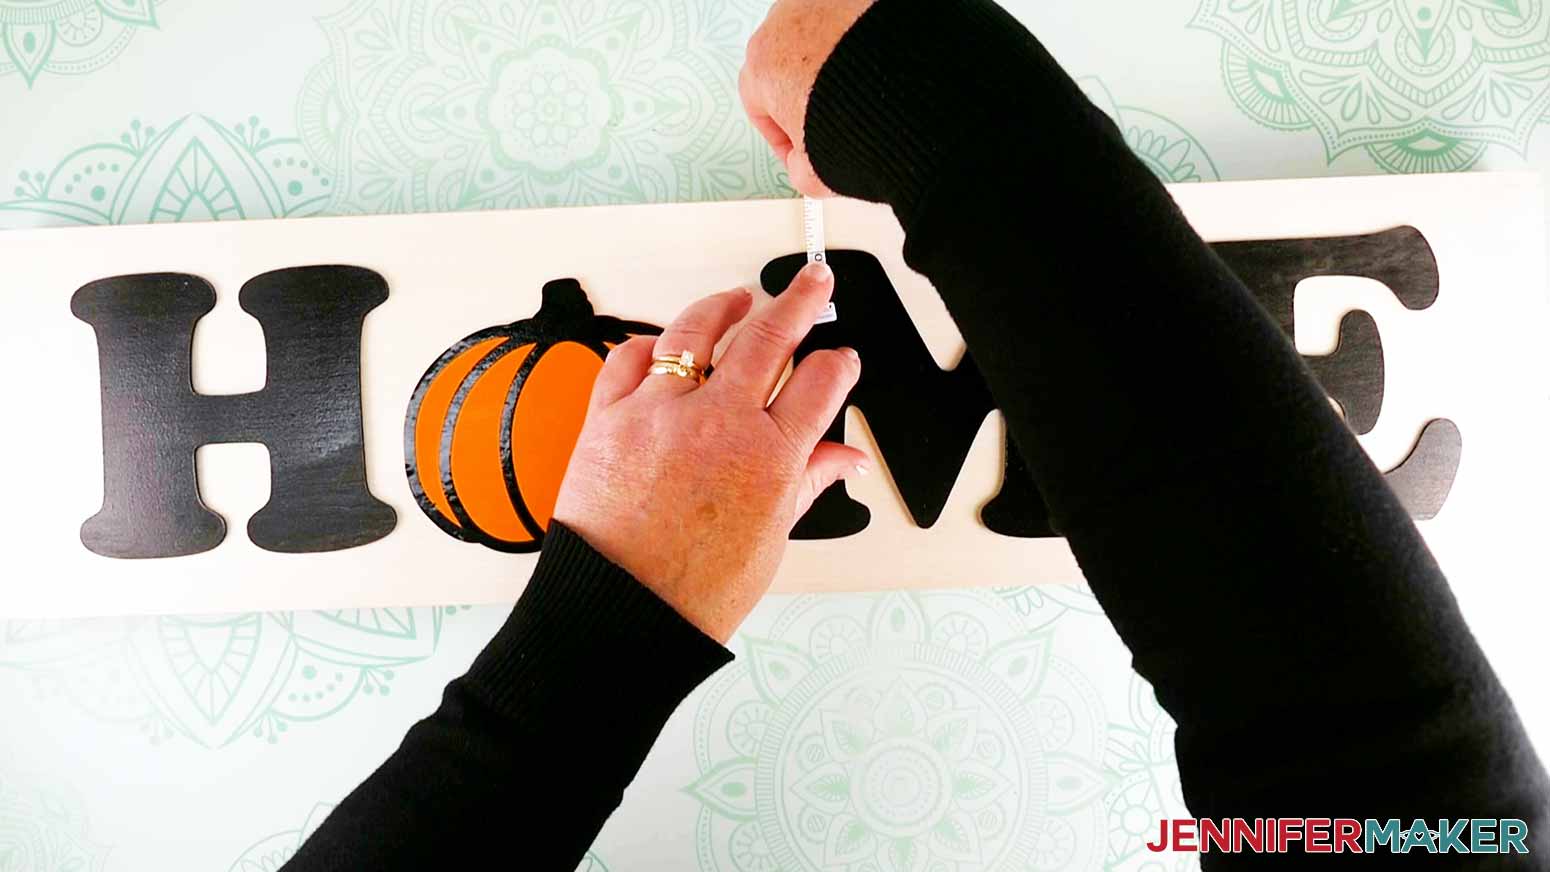
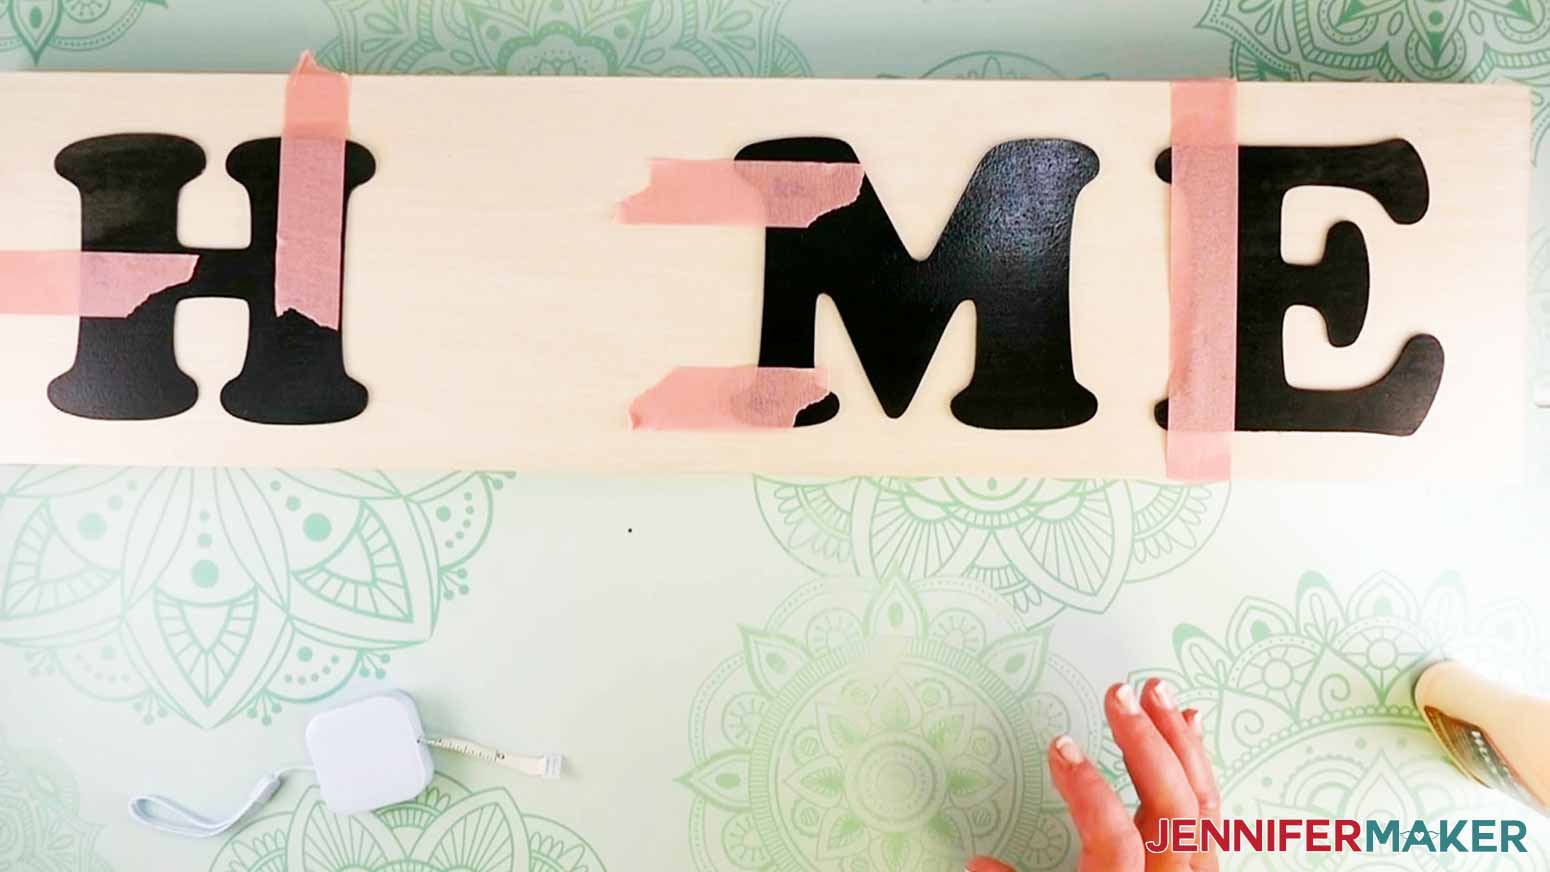
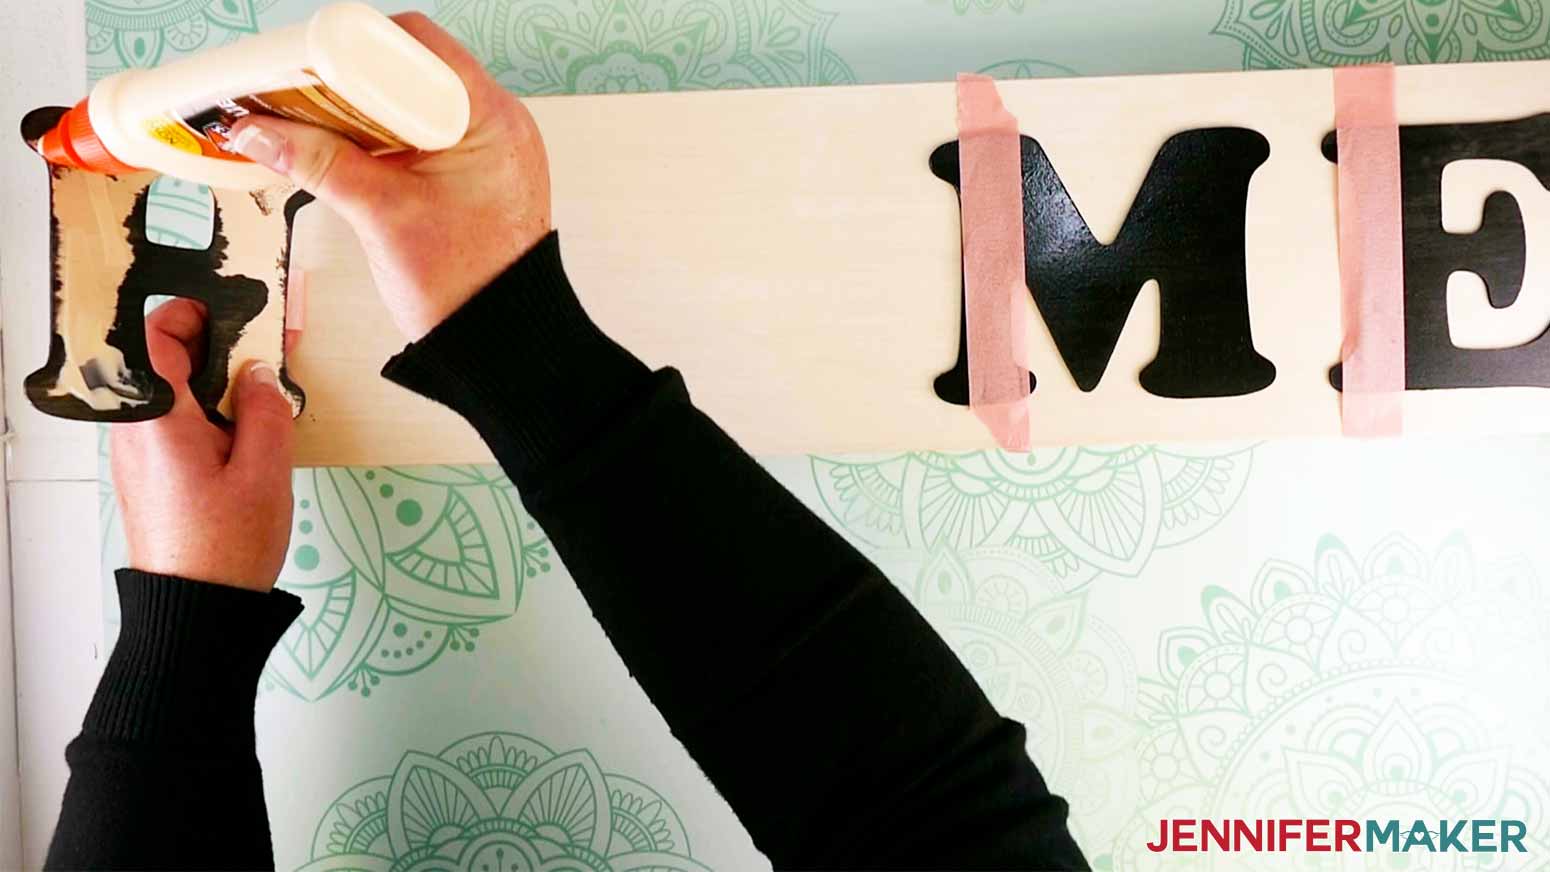
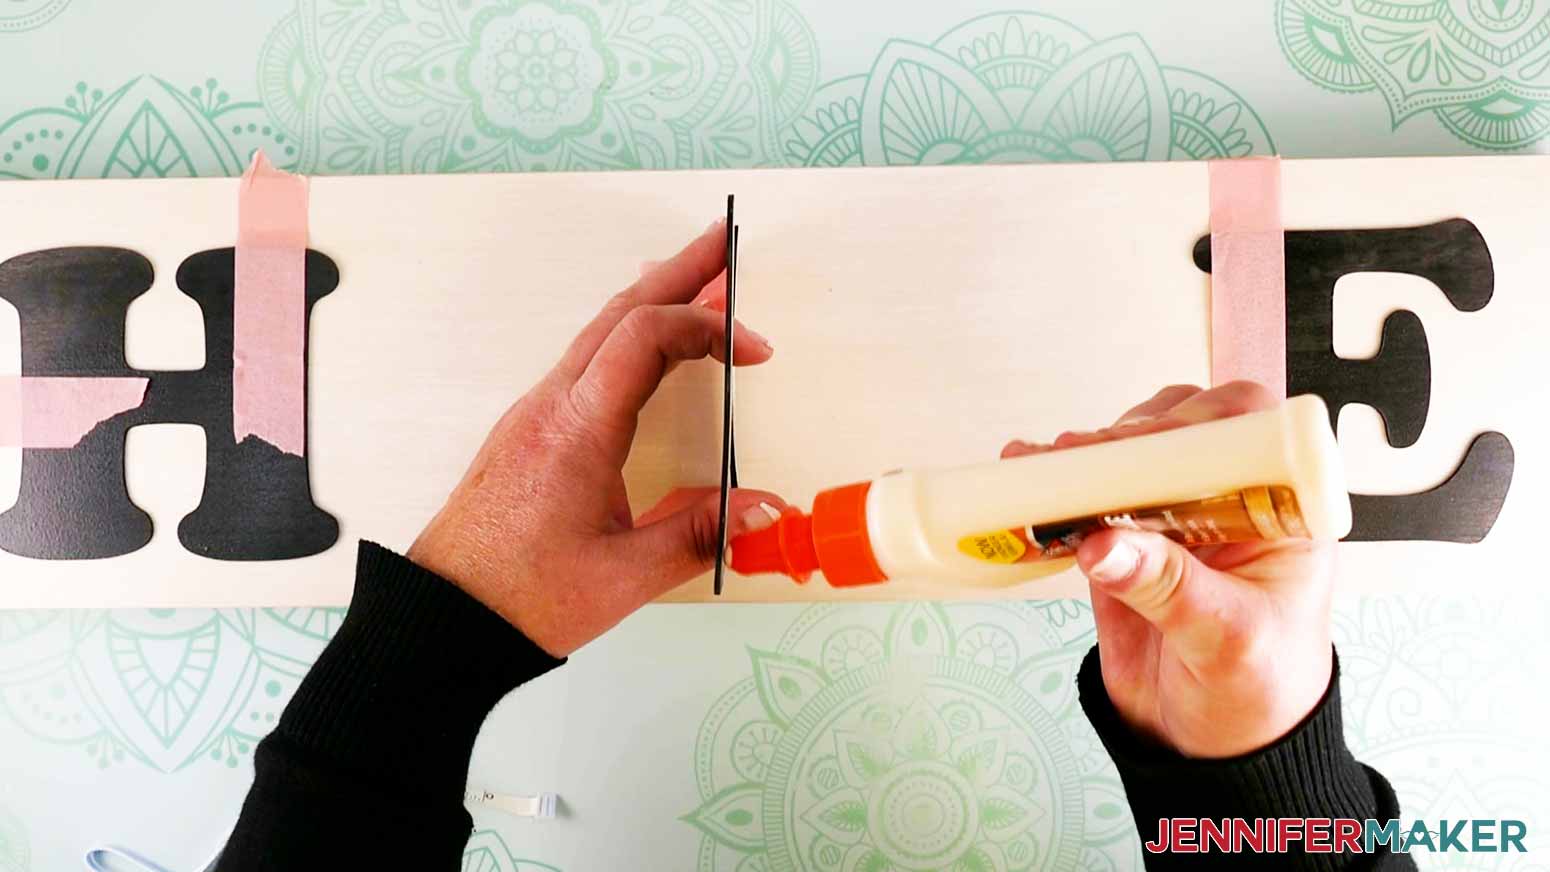
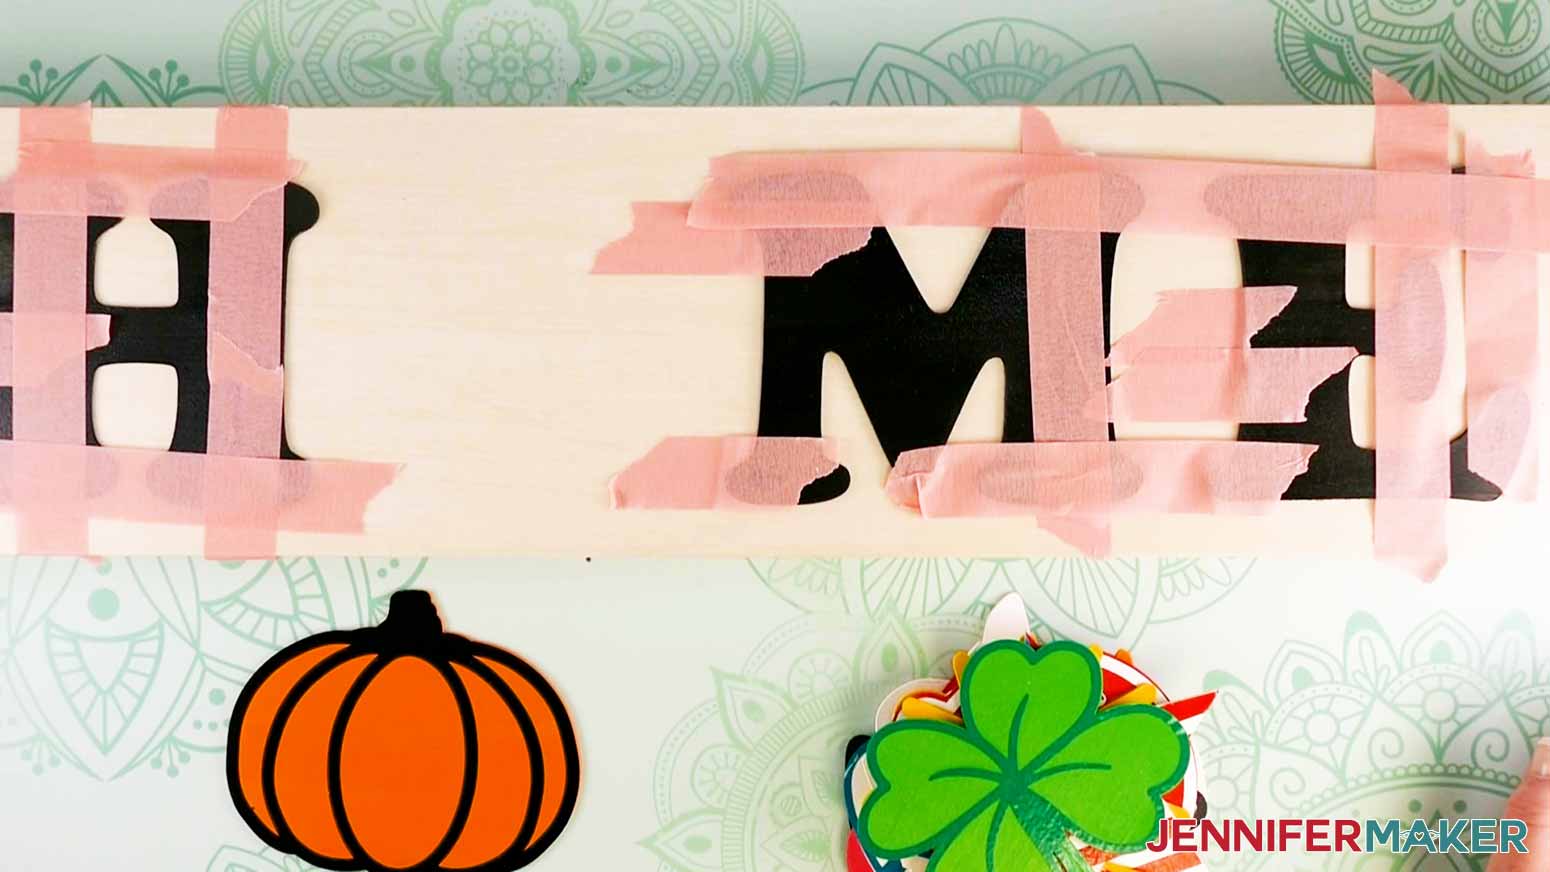
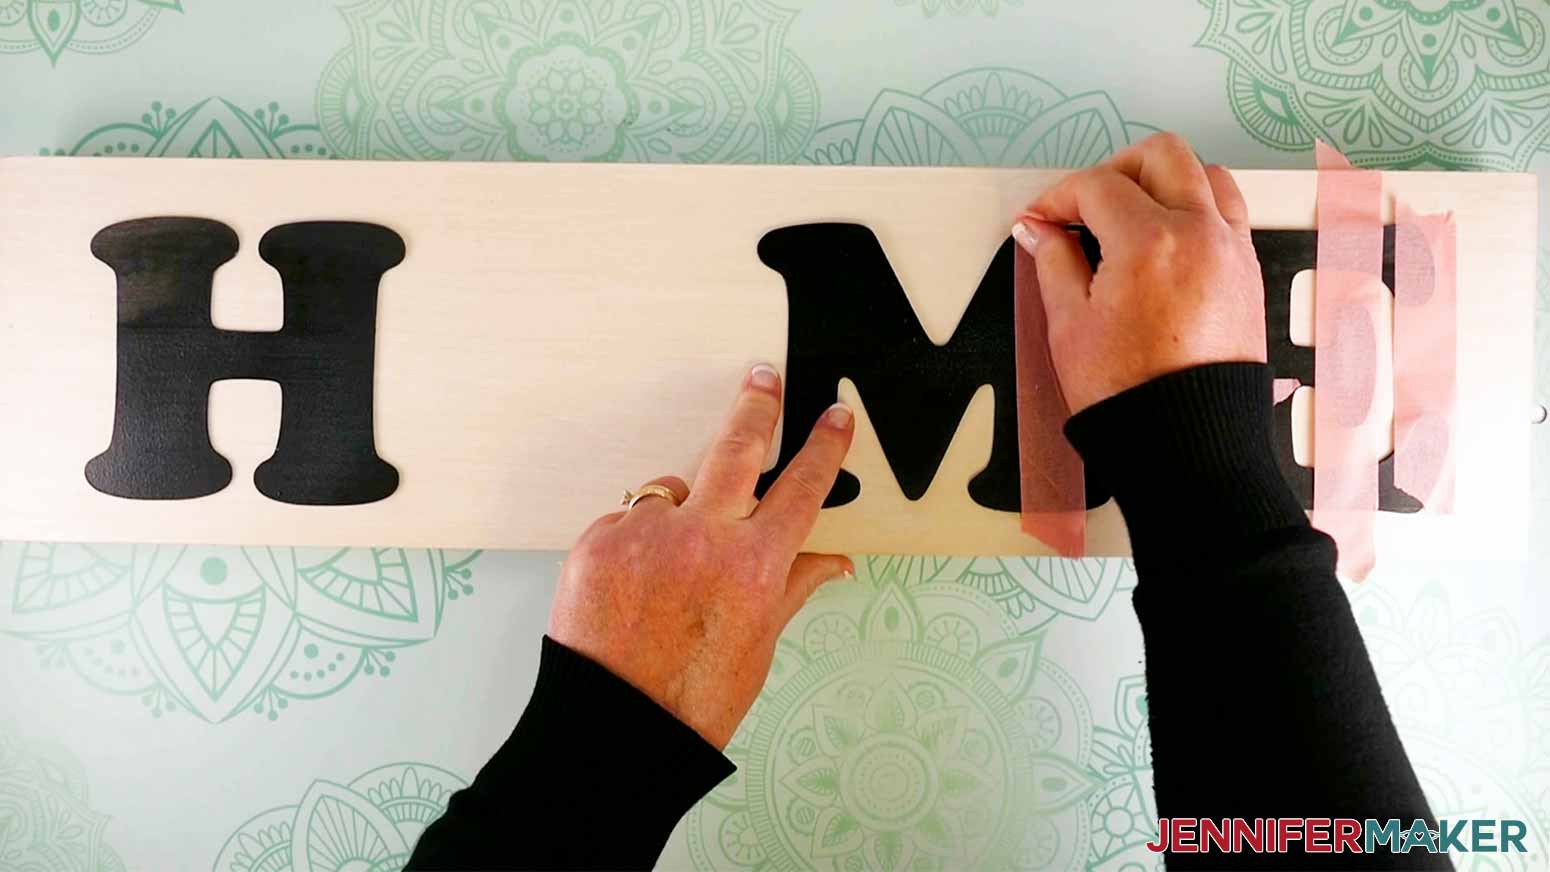
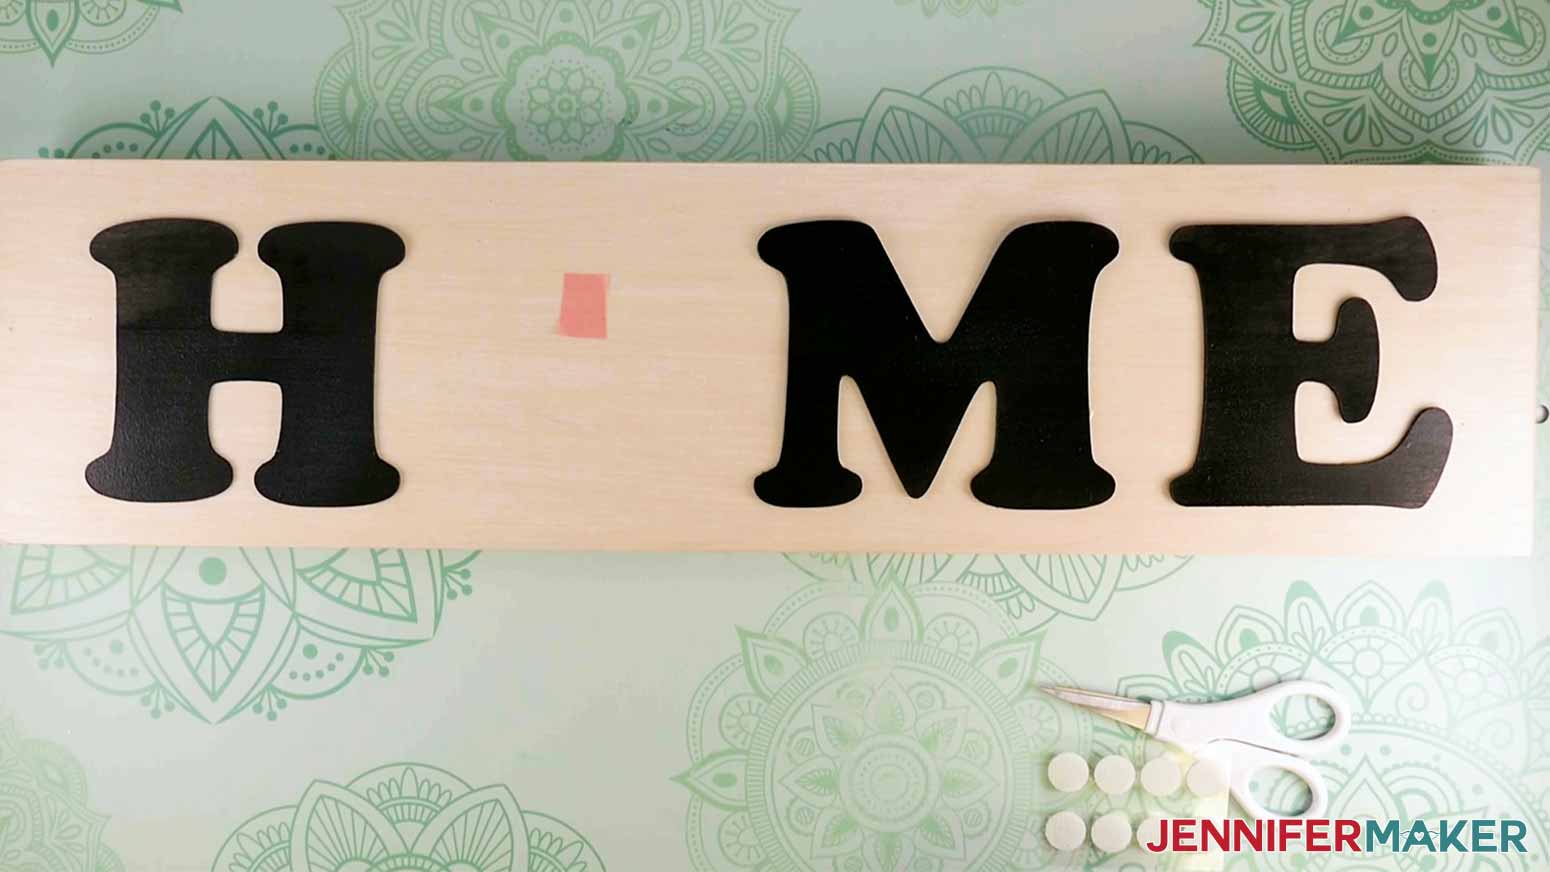
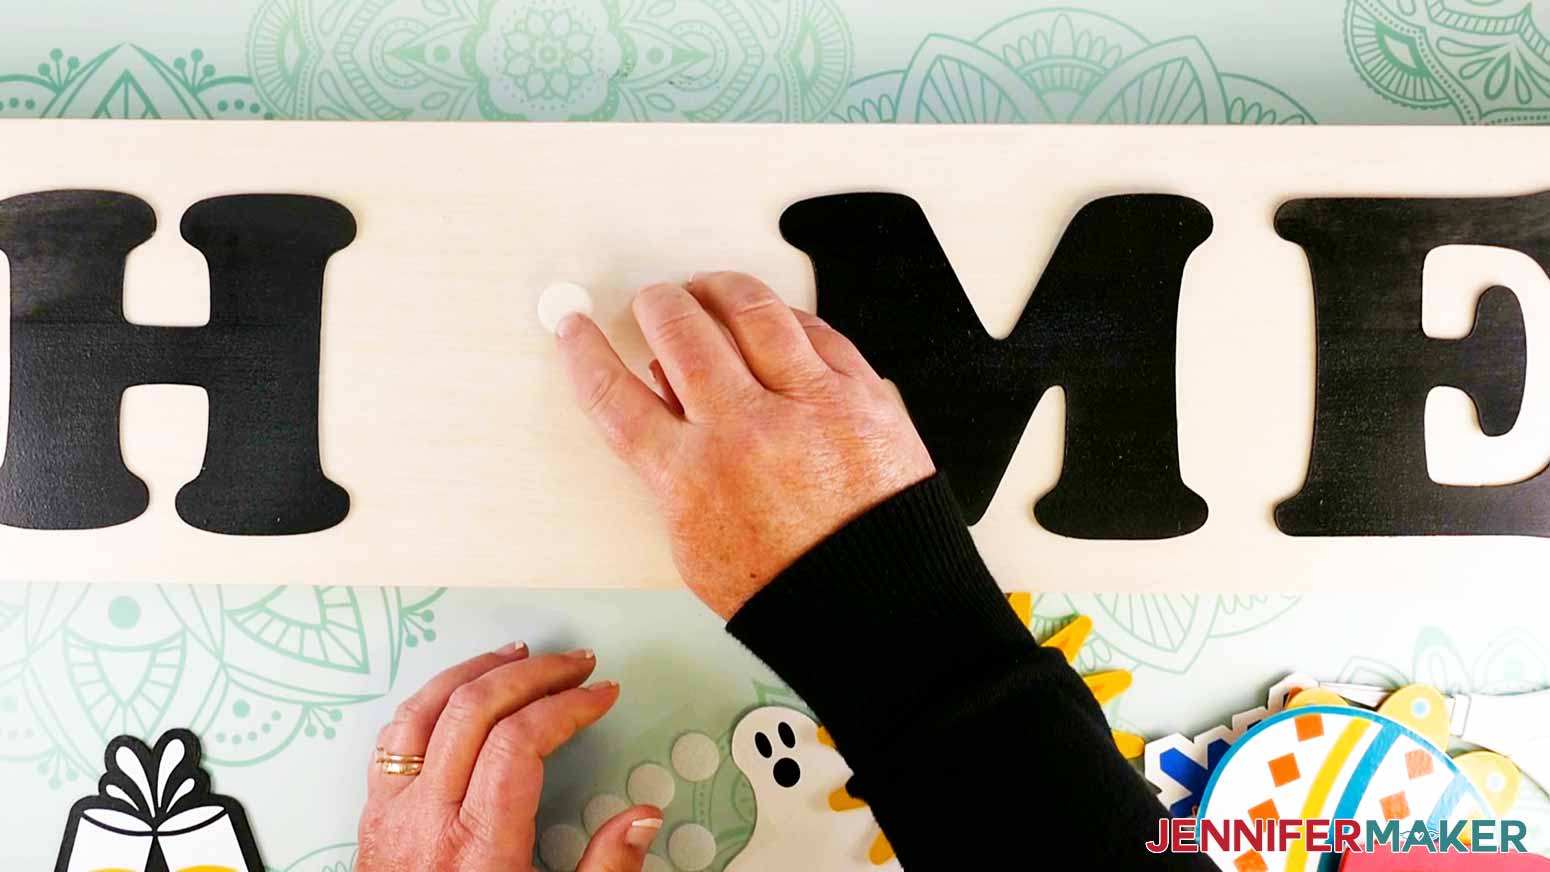
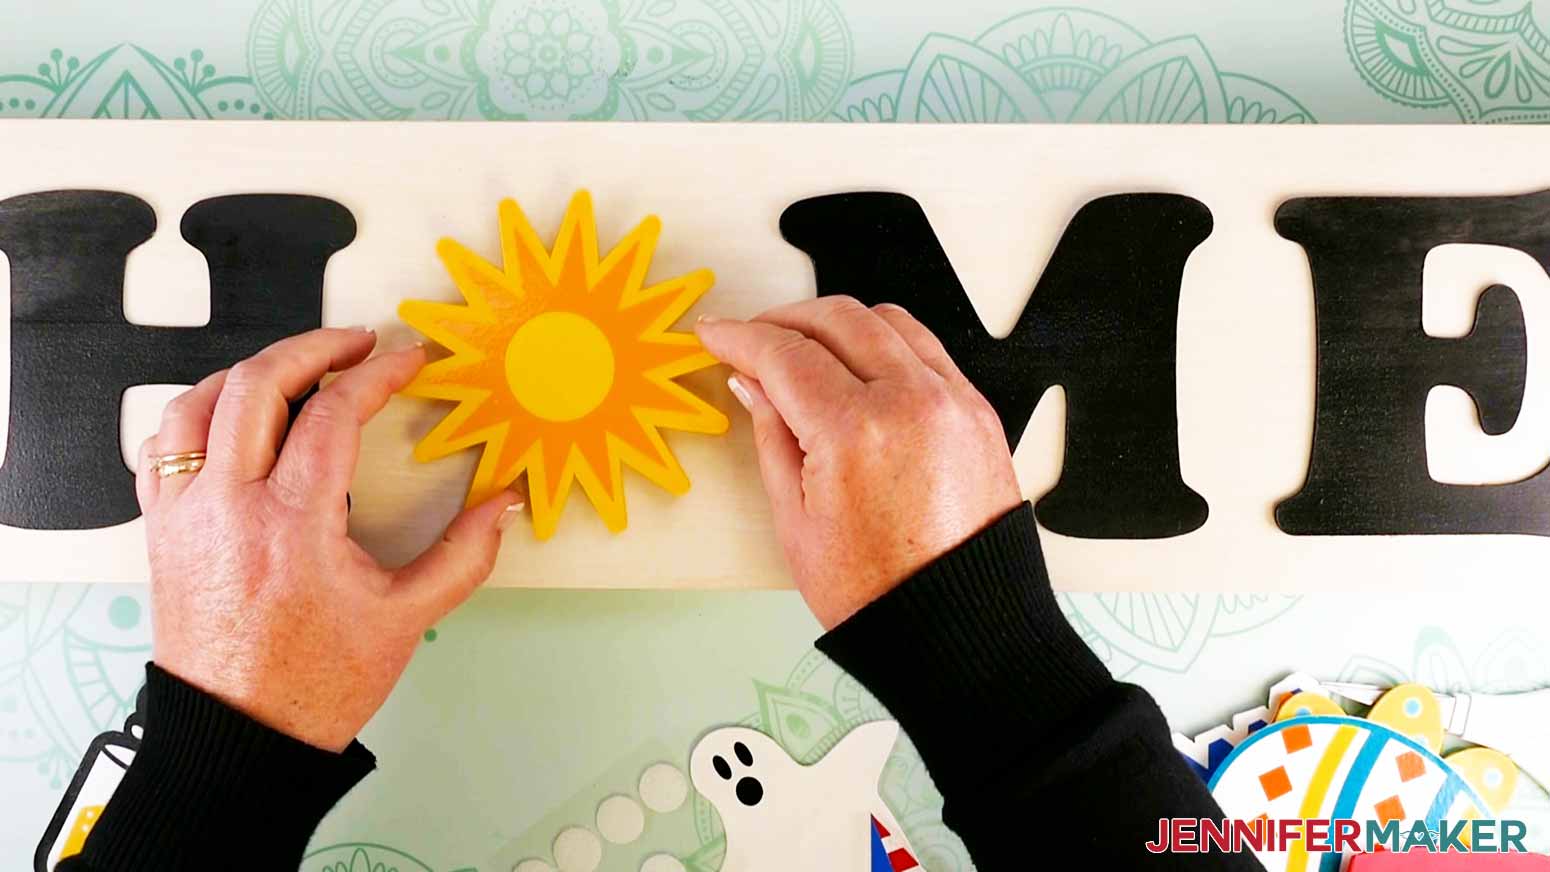
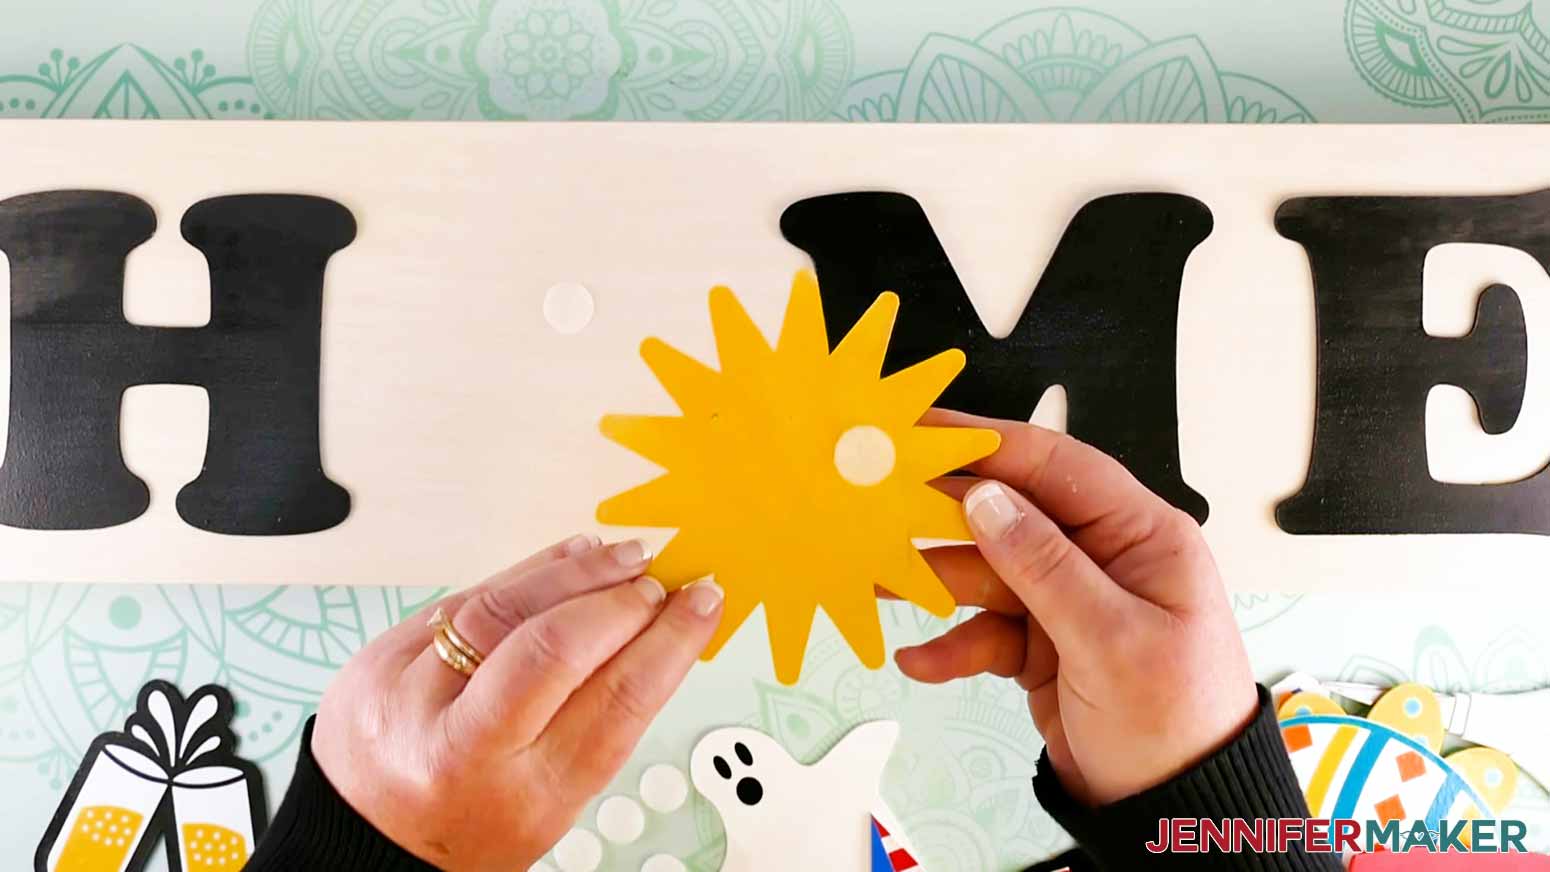
I'm going to show you how to make an adorable HOME and/or LOVE sign with interchangeable pieces to celebrate holidays and seasons that you can display all year long. First, download my Interchangeable Home & Love Sign designs from my library – look for Design #330. TIP: If you're not sure how to upload a file to Cricut Design Space, watch this helpful video training series I made. If you're on an iPhone or iPad, here's how to download and upload files to the Cricut Design Space app. Here is what my Interchangeable HOME and LOVE Sign SVG files look like in Design Space. Before we cut our SVG we need to prep our wood sign. Grab your 24" x 6" wood sign and a piece of sandpaper. Sand the sign in the direction of the wood grain to remove any rough spots or imperfections. Take a tack cloth and wipe the sign to remove dust and particles from sanding. Before we begin staining, make sure you are staining in a well-ventilated area, that your work surface is protected (I used craft paper to protect my work surface), and you follow the manufacturer's application instructions and safety guidelines. Put on a pair of rubber gloves and shake the can of stain (before removing the lid) or use a stir stick to mix it up. To remove the lid, use a paint can opening tool or a screwdriver. Take one of your stain applicator pads and dip one end into the stain. Apply stain liberally to the top of the sign in the direction of the wood grain. Don't forget to stain the sides of the sign. Wipe off any excess stain with the other end of the applicator pad that is clean. When your stain has completely dried (approximately one hour), examine the surface and determine if additional sanding and/or stain applications are needed. After my first coat dried, I sanded some imperfections, used my tack cloth to remove the dust, and applied a second coat of stain to my sign. Repeat this process if additional coats are needed. When your stain has dried, apply two to three coats of polycrylic to the surface of the sign to protect it. Spray in thin, even strokes. Let the polycrylic dry for at least two hours before applying additional coats. Lightly sand the first layer then use a tack cloth to remove dust. Sanding the previous layer ensures an even finish and proper adhesion of additional coats. Follow manufacturer's directions and safety precautions. Allow your sign to dry 24 hours. NOTE: This design uses the Cricut Knife Blade. If this is your first time using the Knife Blade on your Maker Series machine, complete a Knife Blade Calibration now. CUTTING LETTERS FROM BASSWOOD Now that our wood sign is prepped it’s time to cut our wood pieces and vinyl. In Design Space click on the “-“ sign in the lower left to zoom out to see the full SVG. I am going to make a horizontal HOME sign, but you can make it vertical. First, click “Ungroup” at the top of the layers panel. Next, click and drag your mouse over everything except the letters and select “Group.” Then click on the eye icon next to the top group in the layers panel to hide the elements we just selected and grouped. Now click the eye icon next to the “L”, “V” and “E” in the layers panel. That should leave “H”, “M” and the other “E” on the canvas. If you are making the LOVE sign, hide the “H”, “M” and one “E.” Click "Make It." NOTE: If you are using the Maker 3, you will be prompted to select on mat before you see the Prepare screen. On the Prepare screen, I am going to move the letter H to a new mat. This is because a second sheet of basswood will not fit on one 12" x 12" mat with all four sides taped down. To move the letter, click the dots in the upper left of any letter and select "Move object." Select the plus sign to add a new mat. Select black as the color for the mat then click "Confirm." Move the letter so it is 1/4" from the edges of the basswood.. Return to the first mat and arrange the two letters so they too are 1/4" away from the edges. Click "Continue." Click "Browse All Materials." Type basswood in the search bar and then select Basswood that is 1.6mm thick and has the Cricut logo on the right. The Cricut logo indicates that this is their material. Click "Done" in the lower left corner, Insert the Knife Blade into Clamp B of your Cricut Maker Series machine. Again, if this is your first time using the knife blade, you must calibrate your blade before cutting. On your machine, move the four white star wheels all the way over to the right side on the bar. These wheels help keep materials from shifting during cutting, especially when using the Print Then Cut feature. However, when working with thicker materials they can leave track marks. To move the wheels, grasp a star wheel between a thumb and forefinger and use gentle pressure to move it toward the larger rubber rollers on the right side of the roller bar. Repeat for each wheel. NOTE: Firm pressure may be required when moving the star wheels for the first time. Stabilize the machine with one hand as you reposition the star wheels. Take a piece of basswood and make sure all packaging stickers are removed and wipe down with a rag to remove dust, if needed. Press the basswood securely to your StrongGrip Machine Mat (purple) so the grain is vertical. Use a brayer to secure the basswood to the mat. Apply painter's tape to all four sides of the basswood.It is very important that the wood does not move on the machine mat during the cutting process or your cuts will be off. I recommend using a new cutting mat for this project. Insert the first mat into your machine and press go. Do not leave your machine unattended as pieces of wood could break off and you will want to remove them as your machine cuts to prevent any jamming. After your machine makes 14 cut passes in the basswood (approximately 11-12 minutes), the Check Your Cut screen will appear. You are given two options, Looks Good or Cut More. IMPORTANT: Before you unload your mat, check to see if your cut is through the basswood or needs additional passes. To check your cut, carefully remove the painter's tape from the lower left corner of the basswood. Use the spatula tool to lift the basswood sheet and check if the piece cut through the wood. My cut was perfect and required no additional cut passes so I can unload the mat. If your piece needs additional cut passes, put the tape back over the basswood and press the go button. When the additional pass is finished, check your cut again. Repeat this process until you have a successful cut then unload the mat. I used a new Knife Blade and did not require additional passes. Remove the tape around the basswood then flip the mat over and slightly bend it back to release the wood from the mat. If you have any parts of the cut piece that didn't cut through, use a TrueControl Knife to cut in the cut lines to release the piece from the wood. My letters popped right out of the wood. Here is what my first two letters look like. Place the second piece of basswood on the mat, use the brayer to secure to the mat, tape all four sides, and continue cutting the last letter. CUTTING TAGS FROM BASSWOOD Next we will cut the sign tags. Hide the layers for the letters we just cut. The bottom layer in each of the groups is the layer that we will cut from basswood. Unhide the bottom layer for each group. Click "Make It." On the “Prepare” screen we are going to move pieces around on the mats, like we did with the letters, so that only two tag shapes appear on one mat. We will be cutting the tags with the basswood placed vertical on the mat so it is 6" wide and 12" tall. Click on the ghost and three dots will appear in the upper left corner. Click on the dots and select "Move object." Select new on the Move Object window. Select white for the color choice under "Current colors" then click "Confirm." Move the ghost to the left so the piece is at least 1/4" from the edges of the basswood. Return to the first mat and click on the three dots in the upper left corner of the star image. Select "Move object." Select the mat that we just moved the ghost to and click "Confirm." Move the star below the ghost making sure the piece is at least 1/4" from the edges of the basswood. Go to mat 2 (black) and click on the three dot in the upper left corner of the champagne glasses and select "Move object." Select the red mat, which only has one object and then click "Confirm." Move the ornament so it is below the champagne glasses. Make sure both pieces are at least 1/4" from the edges of the basswood. Go to mat 4 (brown) and click on the three dots in the upper left corner of the maple leaf. Select "Move object." Select a mat that only has one piece. I've selected the red mat with the heart. Click "Confirm." Move the heart piece below the maple leaf. Again, make sure both pieces are at least 1/4" from the edges of the basswood. Select mat 6 (yellow) with the sun and the flower. Move the objects so that they are vertical and both pieces are at least 1/4" from the edges of the basswood. Go to mat 7 (green) and click on the three dot in the upper left corner of the shamrock and select "Move object." Select the orange mat with the pumpkin then click "Confirm." Move the shamrock piece below the pumpkin. Make sure both pieces are at least 1/4" from the edges of the basswood. Now that all of our pieces are arranged on the mats so they will cut out properly on our 6” x 12” pieces of basswood, click "Continue" in the lower right corner of the screen. Select "Browse All Materials" under Set Base Material. Type basswood in the search field. Select the basswood that is 1/16" and has the Cricut logo to the right of the material name. The Cricut logo designates that we are using Cricut branded basswood. Click "Done." Notice the yellow warning icon that reminds us to move the star wheels all the way to the right. Ours should already be to the right from the previous cut. Take a piece of basswood and make sure all packaging stickers are removed and wipe down with a rag to remove dust, if needed. Press the basswood securely to your StrongGrip Machine Mat (purple) so the grain is vertical. Use a brayer to secure the basswood to the mat. Apply painter's tape to all four sides of the basswood. It is very important that the wood does not move on the machine mat during the cutting process or your cuts will be off. When applying painter's tape, it is important not to wrap the tape around the sides of the mat. I recommend using a new cutting mat for this project. Insert the first mat into your machine and press go. Do not leave your machine unattended as pieces of wood could break off and you will want to remove them as your machine cuts to prevent any jamming. When your machine has finished cutting, the "Check Your Cut" screen appears. IMPORTANT: Before you unload your mat, check to see if your cut is through the basswood or needs additional passes. To check your cut, carefully remove the painter's tape from the lower left corner of the basswood. Use the spatula tool to lift the basswood sheet and check if the piece cut through the wood. If your piece needs additional cut passes, put the tape back over the basswood and press the go button. When the additional pass is finished, check your cut again. Repeat this process until you have a successful cut then unload the mat. I used a new Knife Blade and did not require additional passes. Remove the tape around the basswood then flip the mat over and slightly bend it back to release the wood from the mat. If you have any parts of the cut piece that didn't cut through, use a TrueControl Knife to cut in the cut lines to release the piece from the wood. My letters popped right out of the wood. You will need six sheets of basswood to cut the tags. Each mat of two tags takes approximately 5-10 minutes to cut. CUTTING THE VINYL Hide all of the layers that we just cut from basswood by clicking the eye icon. Unhide the layers we have not cut yet. These are all vinyl pieces. Click "Make It." NOTE: If you are using the Maker 3 or Explore 3, you will be prompted to select if you are cutting with or without a mat before you see the Prepare screen. On the Prepare screen, review each mat and cut your vinyl the color and size needed for each mat. I used my Cricut Trimmer to cut my vinyl using the same colors in my design. Click "Continue." On the Make screen, select "Vinyl" for your base material. If you do not see this material from the Set Base Material favorites, click "Browse All Materials" to search and select premium vinyl. Remember to switch your blade to the Fine-Point Blade in clamp B of your machine. Use your StandardGrip Machine Mat (green) to cut your vinyl pieces. If you are using Smart Vinyl on your Explore 3 or Maker 3, insert the vinyl directly into the machine. Follow the directives to load and unload each mat. To remove the vinyl from the mat, turn the mat over and slightly bend the mat away from the vinyl to release it. Now that your basswood and vinyl has been cut, it is time to start painting your letters and tag pieces. Before painting, use your sandpaper to smooth out any rough spots on your letters and tags, if needed. Clean off your letters and tags with a tack cloth to remove dust and particles after sanding. I used black spray paint to paint my H, M, and E. Make sure you are using spray paint in a well ventilated area and you follow the manufacturer's instructions and safety guidelines. Apply a thin, even coat of black spray paint to one side of each letter. Wait one hour before applying a second coat if needed. I applied two coats to my letters. Allow the letters to dry for two hours so they are completely dry then apply polycrylic to protect the paint. I applied two coats to my letters and allowed the polycrylic to dry for two hours between coats then 24 hours to dry completely. While the paint dries on the letters, begin painting the basswood tags. I painted my tags the same colors shown in my design, but you can paint yours any way you'd like. Apply a small amount of craft paint to a piece of paper (paper plate, paint palette, etc.) Using a paintbrush, apply a thin layer of paint to the top and sides of the tag. Continue painting all of the tags. The paint may make the basswood slightly bend but don't worry. Once your pieces are painted and dry to the touch (1-2 hours), lay them out on a flat surface (like a table) and place a heavy object on top (like a book) to flatten them. I let my pieces press flat overnight. Begin weeding the vinyl pieces. Place transfer tape onto each piece of vinyl. Use a scraper tool to adhere the transfer tape to the vinyl. Remove the vinyl from the backing sheet. Before I apply the vinyl to a wooden tag, I like to pat the vinyl/transfer tape to my hands or arm to reduce some of the tackiness before sticking it to the vinyl. This helps prevent paint from being peeled off when removing the transfer tape. Align the vinyl on top the pumpkin tag. Use a scraper tool (or a credit card) to press the vinyl to the wood tag then carefully remove the transfer tape from the vinyl. There are four tags that have more than one layer of vinyl. Those tags are the sun, champagne glasses, Easter egg, and the star. For the sun and champagne glasses, I layer the vinyl starting with the bottom piece and then apply the layered vinyl to the wood tag. Apply the center circle to the sun piece of vinyl. You can do this with or without transfer tape. Add transfer tape to the entire sun piece. Apply the sun to the wood sun tag using a scraper tool. Slowly remove the transfer tape from the vinyl. And here is my finished sun tag. For the champagne glasses, place the silver vinyl stems of the glass onto the white vinyl champagne glasses. Next, add the vinyl bubbly champagne pieces to the white champagne glasses piece of vinyl. Add transfer tape to all three layers of vinyl. Apply the layered vinyl champagne glasses to the tag piece using a scraper tool. And here is my finished champagne glasses tag. For the Easter egg tag, using transfer tape, apply the yellow stripes to the vinyl egg piece then apply the orange triangles to the egg piece. Take the layered vinyl piece and apply it to the wooden egg. With the star piece, I found it easier to add the star cut vinyl and the stripe vinyl pieces separately to the star tag. Add transfer tape to the top of the stars and stripes vinyl pieces. Align and place the stripes onto the star tag. Use a scraper tool to burnish the vinyl to the tag. Take the stars piece of vinyl and add that to your star tag. Use a scraper tool to burnish the vinyl to the tag. To give the wooden tag pieces a finishing touch, I am applying two to three coats of Duraclear Varnish. Apply with a clean paintbrush in thin, even layers. Allow the Duraclear to dry one hour between additional coats. Your tags may curl when applying Duraclear. If they do, wait 2-3 hours for them to dry then lay the tags on a hard surface, like a table, and cover with a heavy object, like books, to flatten. Depending on the orientation of your sign, below are some placement measurement guidelines. Use the pumpkin tag to assist with horizontal placement and the champagne glasses for vertical placement. Once you have them aligned, tape down one side of the letters so that you can easily flip them over while maintaining their placement position. Add wood glue to the back side of each letter, flip over and glue them to the sign. Add painter's tape to all sides of each letter. This will keep the edges of the letters from curling up while the glue dries. Allow your wood to glue dry overnight then remove the painter's tape from the letters. The last assembly step is to add velcro to the back of the wooden tags and to the sign. Cut a piece of painter's tape the size of your velcro dot. Place the piece of tape on the sign somewhat in the middle between the first two letters. This represents where you will be putting one side of the velcro dot. To ensure you have your tape in the right spot, begin adding each wooden tag between the H and M placing them as they would when attached to the sign. You do not want to see the painter's tape when you put the tag between the letters. Adjust the piece of tape if needed. Once you have the placement for the velcro dot where you want it, lift off the painter's tape as you replace it with the rough side of a velcro circle. Apply the other half of the velcro circle to the top of the velcro you just placed onto the sign. You want the two pieces of velcro connected and the sticky side up. Position one of the wooden tags over the velcro circle. When you are happy with the placement push down to secure the velcro dot to the back of the tag then remove the tag. Repeat this process to attach a velcro dot to the back side of the remaining tag pieces. Here is what my finished sign looks like. And these are my finished tags for the sign. My finished Interchangeable Love Sign is 24" x 6" and can be made horizontally or vertically. I used Copper Black font for the letters in making this sign.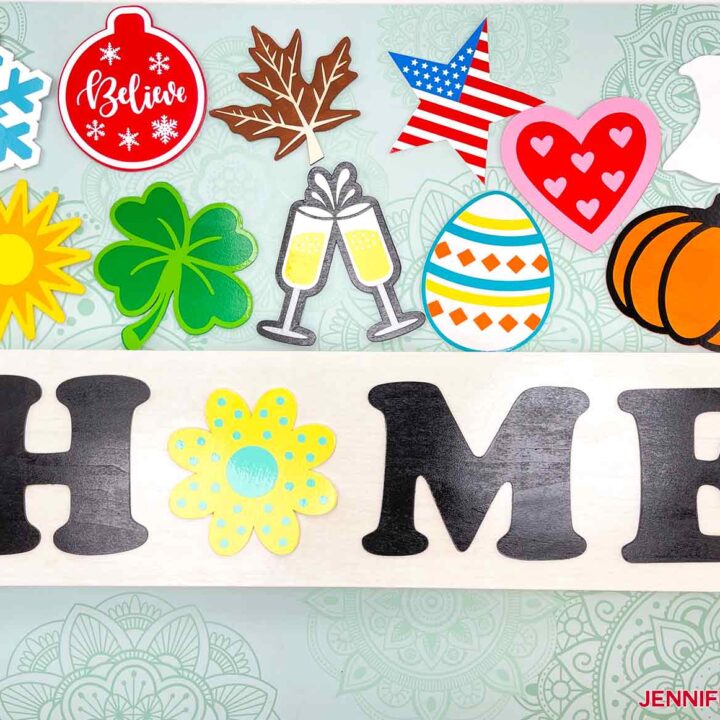
Interchangeable Home & Love Sign
Materials
Tools
Instructions
STEP 1: GET MY FREE INTERCHANGEABLE HOME AND LOVE SIGN DESIGN FILE
STEP 2: PREPARE YOUR SIGN


STEP 3: CUT YOUR DESIGN


STEP 4: PAINT AND ASSEMBLE YOUR TAG PIECES

![]()

![]()
![]()
![]()

STEP 5: ADD LETTERS AND TAGS TO SIGN


Notes
The detailed step-by-step assembly video on how to create personalized round wood door hangers is part of Maker Academy Weekend. Get a pass to watch all 20+ workshops, each with a printable handbook, transcript, audio files, design files, and support with a VIP pass below:

Look at how nice these signs turned out. I must say this is one of my favorite home decor pieces I own and everyone is always surprised when I tell them I made them all on my own!
These are perfect to give out as gifts during the holidays or for a special occasion such as a housewarming present!
Answers to Your Questions About How to Make DIY Interchangeable Home Signs
Q: Where is your tutorial for this project?
This is a special project we made for our free Maker Academy Weekend event! A complete and detailed step-by-step video premiered during the event November 4-7, 2021. Get access to the workshop video and printable workbook with a VIP Pass to Maker Academy Weekend 2021, which comes with other perks and bonuses, too!
Get the free designs for my Interchangeable Home Sign!
I love seeing what you make with my designs and how you use them! Please share a photo of your DIY interchangeable home sign in our Facebook group or tag me on social media with #jennifermaker.
Love,

Want to remember this? Save this DIY Interchangeable Home Signs Tutorial to your favorite Pinterest Board!