Learn how to unclog a sublimation printer with simple steps and my free files!
Are you frustrated because your sublimation design isn’t printing correctly? If you’re using an Epson printer and one or more colors seem to be missing from the print, or look splotchy, you may have a clogging issue. Don’t worry, it’s fixable! I can show you how to unclog a sublimation printer and how to avoid the issue in the future! And if you’re using an Epson inkjet printer, these steps can help you, too!
Watch the full step-by-step video on how to unclog a sublimation printer on my Youtube channel!

Are you ready to sublimate a project but your design is printing wrong? So frustrating, right? There are a few things to check, but it could be a clog in the ink system, which can happen pretty easily. I’ve used dozens of printers over the years and fixed a lot of them Here are some things I’ve learned along the way.
- Not all printer issues mean there is a clog. Before you start this process, review my basic printer troubleshooting tips to see if there’s a simpler answer.
- A clog doesn’t mean your printer is broken, it just needs a little help to get running and extra attention in the future.
- Epson makes sublimation-specific printers and printers that a lot of us have converted to print sublimation designs. In most of them, the ink is held in reservoirs by color: black, cyan, magenta, and yellow. The printer pulls the ink through tubes, then combines them to make your design.
- Sometimes, air bubbles can get stuck in the ink intake tubes (or in the ink cartridges) and cause issues similar to clogs. Usually the air will work itself out of the system if you let the printer sit for a day.
- The ink nozzles on Epson’s printer heads are a common spot for ink clogs because because they’re very, VERY small. Dried-up ink can get stuck in them if the printer isn’t used for a long time. That’s when printing a nozzle check sheet helps you see which color is clogged.

- A printer’s built-in cleaning program can use a lot of ink and shorten your machine’s lifespan, so try printing nozzle check sheets and printer purge files to knock a clog loose before cleaning anything. My tutorial covers the steps and has free files to help!
- Use plain paper to do your testing and save your fancy paper for projects.
- Have extra ink ready, because you might use up quite a bit while fixing your printer.
- Fixing a printer can take time and it might get frustrating. If you really, really need something printed, consider asking a friend for help or finding a printing service so you can concentrate on fixing the printer when you’re less stressed.
- The best way to avoid clogs is to keep ink flowing through the system so it can’t dry out. I recommend printing something at least once a week. If you don’t print that often, try setting a reminder to print my free purge sheet weekly to keep your Epson printer in working order!
Looking for more sublimation support and inspiration? My Sublimation Cookbook has everything you need!
Let me show you how to unclog a sublimation printer! This post contains some affiliate links for your convenience (which means if you make a purchase after clicking a link I will earn a small commission but it won’t cost you a penny more, there is no additional cost)! Read my full disclosure policy.
Materials to Learn How To Unclog A Sublimation Printer
See my shopping list for the supplies I used!
- Sublimation Printer – I’m demonstrating on a converted Epson EcoTank 2800
- Sublimation Ink
- 10-20 sheets regular printer paper – save your sublimation paper for projects
- Isopropyl Alcohol (if you need to clean the printer rollers)
- Pencil (to write down notes)
- Cotton Swabs (if you need to clean the printer’s rollers)
- Screwdriver (optional if you decide to check the maintenance box)
- Design #588 (My free PDF printer purge files are available in my free resource library – get the password by filling out the form at the bottom of this page

How To Unclog A Sublimation Printer

How To Unclog A Sublimation Printer
Learn how to unclog a sublimation printer using processes for Epson printers.
Materials
Tools
- Printer
- Pencil (to write down notes)
- Cotton Swabs (if you need to clean the printer's rollers)
- Screwdriver (optional if you decide to check the maintenance box)
Instructions
STEP 1: DETERMINE IF YOUR PRINTER IS CLOGGED, OR HAVING A DIFFERENT ISSUE
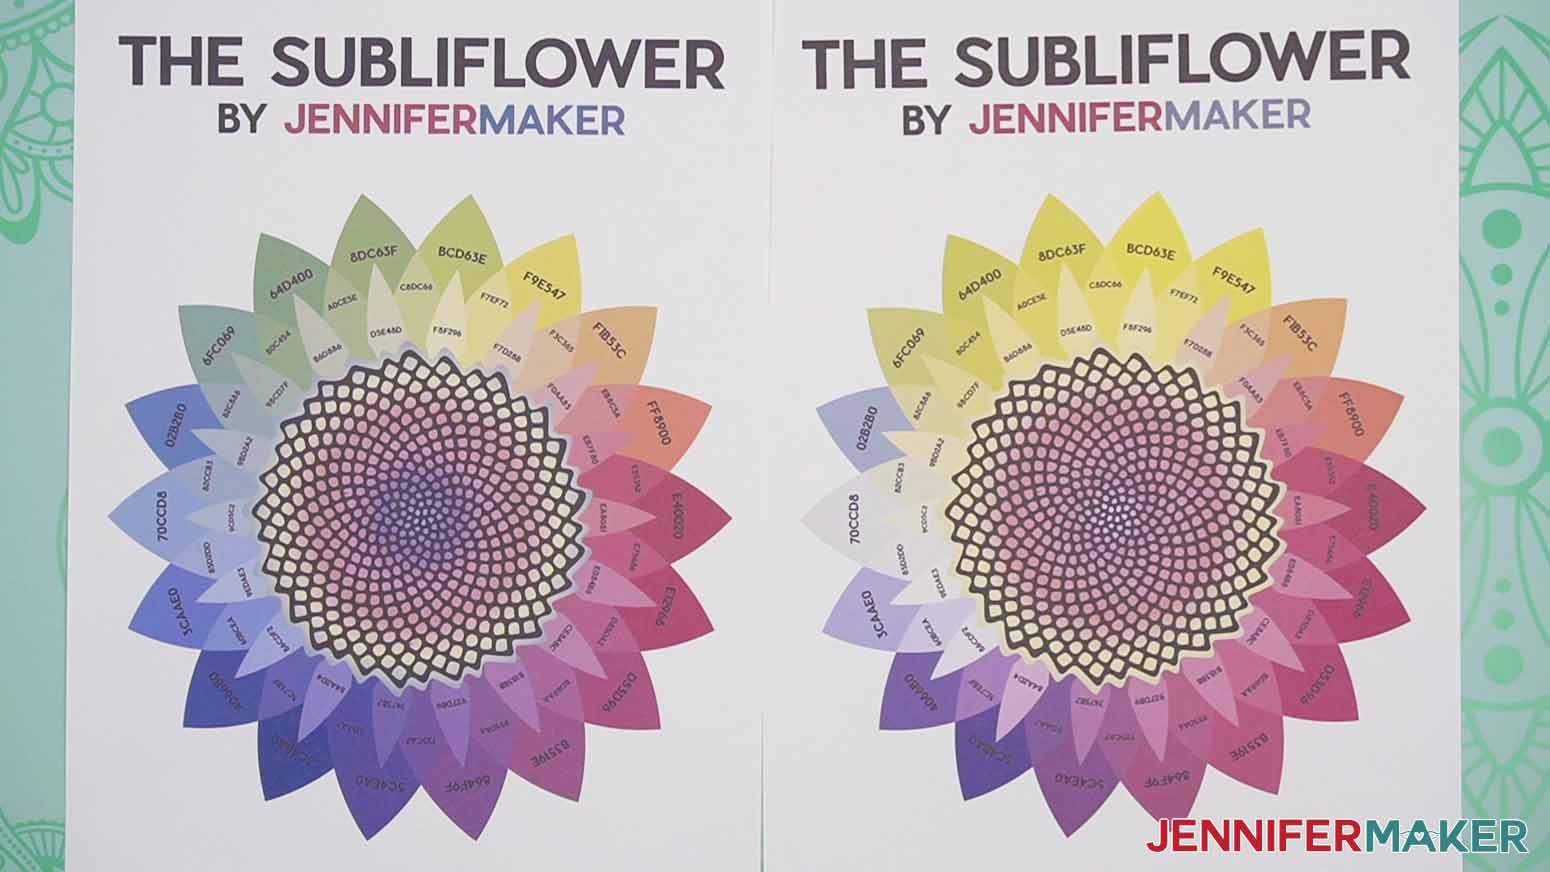
Epson sublimation printers (purpose-built and converted alike) combine four colors of ink to create your designs. They are cyan (blue), magenta (red), yellow, and black. These colors are shortened to CMYK where K represents black, although many Epson printers refer to it as BK instead. Since the colors work together to create your design, an issue with just one color can completely change your printed result. If your sublimation designs aren’t printing as nicely as normal, compare the issues to my list of common sublimation printing issues to make sure it’s not a simple fix, like adding more ink, adjusting your print settings to fix lines across the design, or cleaning the rollers to address little black spots. Sometimes, there may be a little air in the ink lines that is causing trouble, or the ink may not be settled in the reservoir correctly. It’s worth turning the printer off and letting it sit for 24 hours before printing a new test design, like my Subliflower.
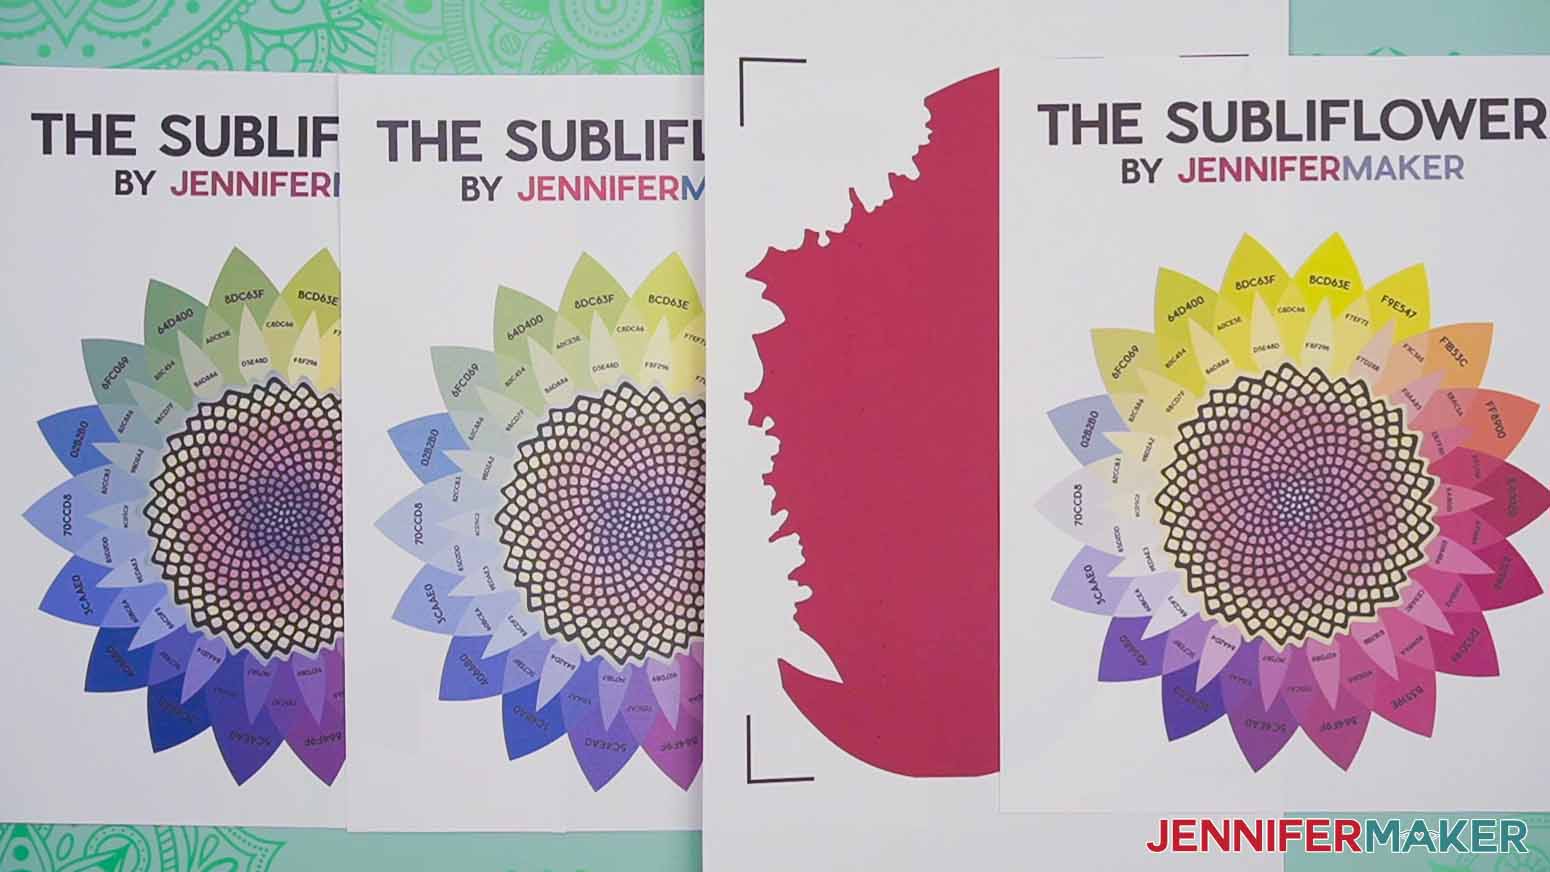 Check a spot that should be mostly blue, red, yellow, or black instead of a mix of those colors to see how the inks are performing. If it looks correct, your printer may have just needed to rest.
But, for example, if the blue areas are very light, or even yellow in the green sections, that probably means something is wrong with your cyan ink or its delivery system. There are many ways to fix clogs, so let’s go through them from least to most resource-heavy. Follow these steps in order, because if you can avoid running printhead or power cleanings, your printer and supplies will last much longer.
STEP 2: PRINT A NOZZLE CHECK SHEET
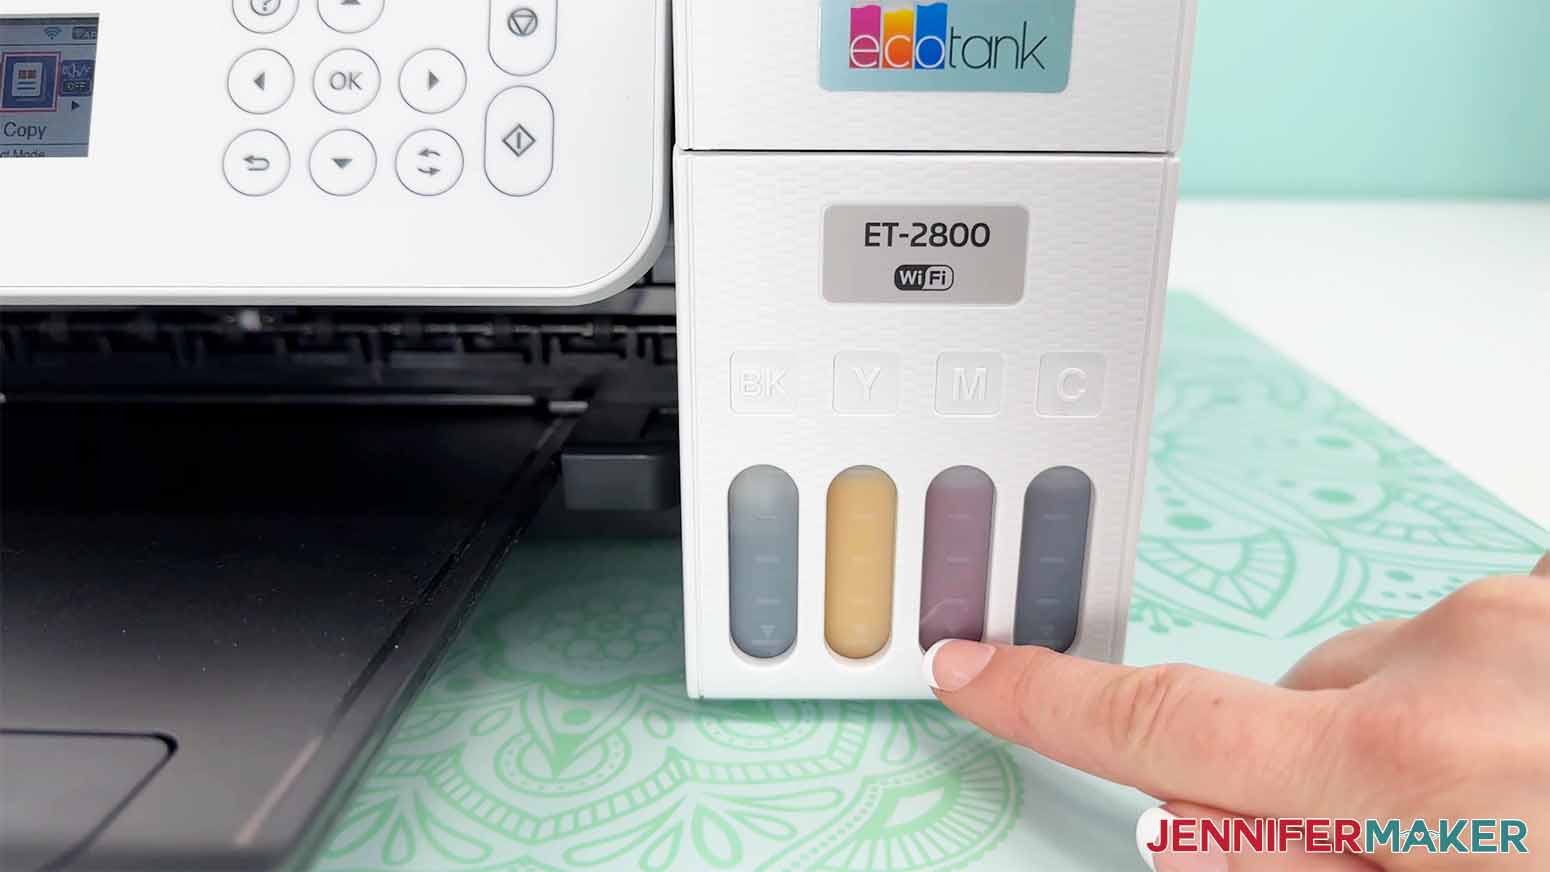
Epson has purpose-built sublimation printers and models that are relatively easy to convert. In EcoTank printers like my 2800, the ink is kept in reservoirs by color: black, cyan, magenta, and yellow. The ink is pulled up from the reservoirs and fed through tubes into specialized components, called print heads. Each print head contains thousands of teeny tiny holes, those are the nozzles. The nozzles create sublimation ink droplets as small as four nanometers, so you can create high quality and high resolution images in full color! But, each one of those tiny nozzles can stop working if dried ink clogs it or some air gets stuck in the delivery line. Once enough nozzles are clogged, your prints will start missing colors. We can fix it!
- Put several sheets of plain copy paper in your printer for testing and save your sublimation paper.
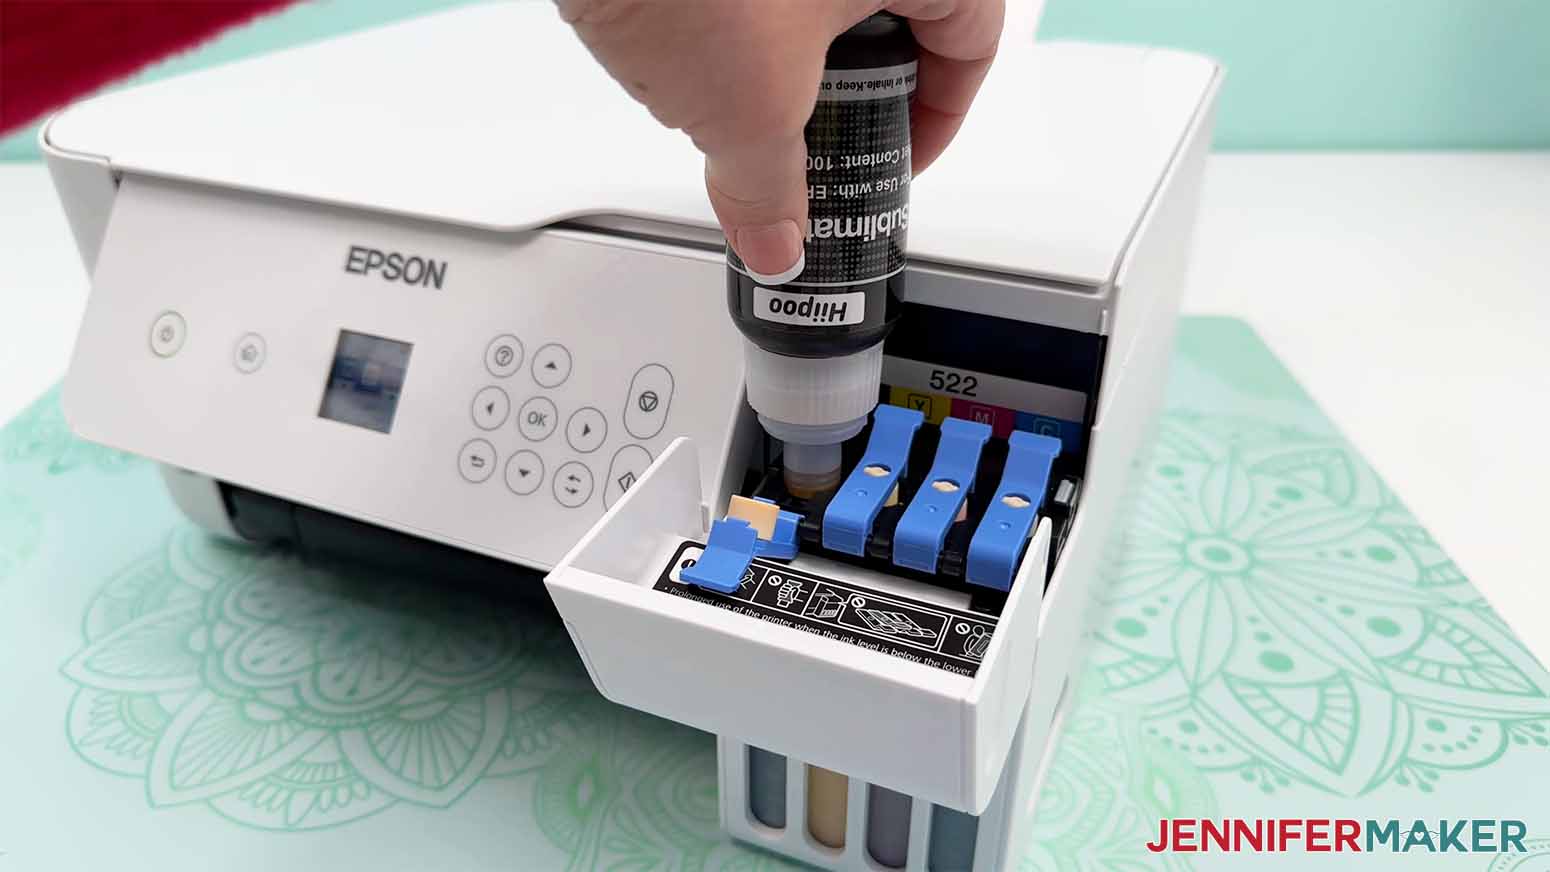
- Make sure your ink reservoirs are filled past the minimum level, because if they get too low that can cause trouble.

- On the printer, navigate to the Home view.
- Select “Maintenance” and “Nozzle Check” or an option like that. TIP: On some printers, you may need to go to “Settings” to find the “Maintenance” screen. NOTE: Do not select anything that mentions “cleaning” because we’re still gathering information.
- You may need to confirm your paper size, then continue to print a nozzle check sheet.
- Let the ink dry.
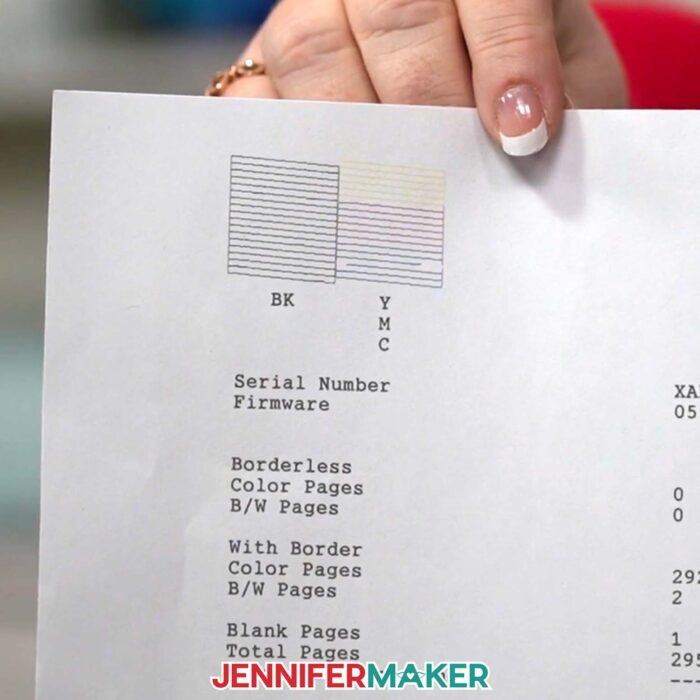
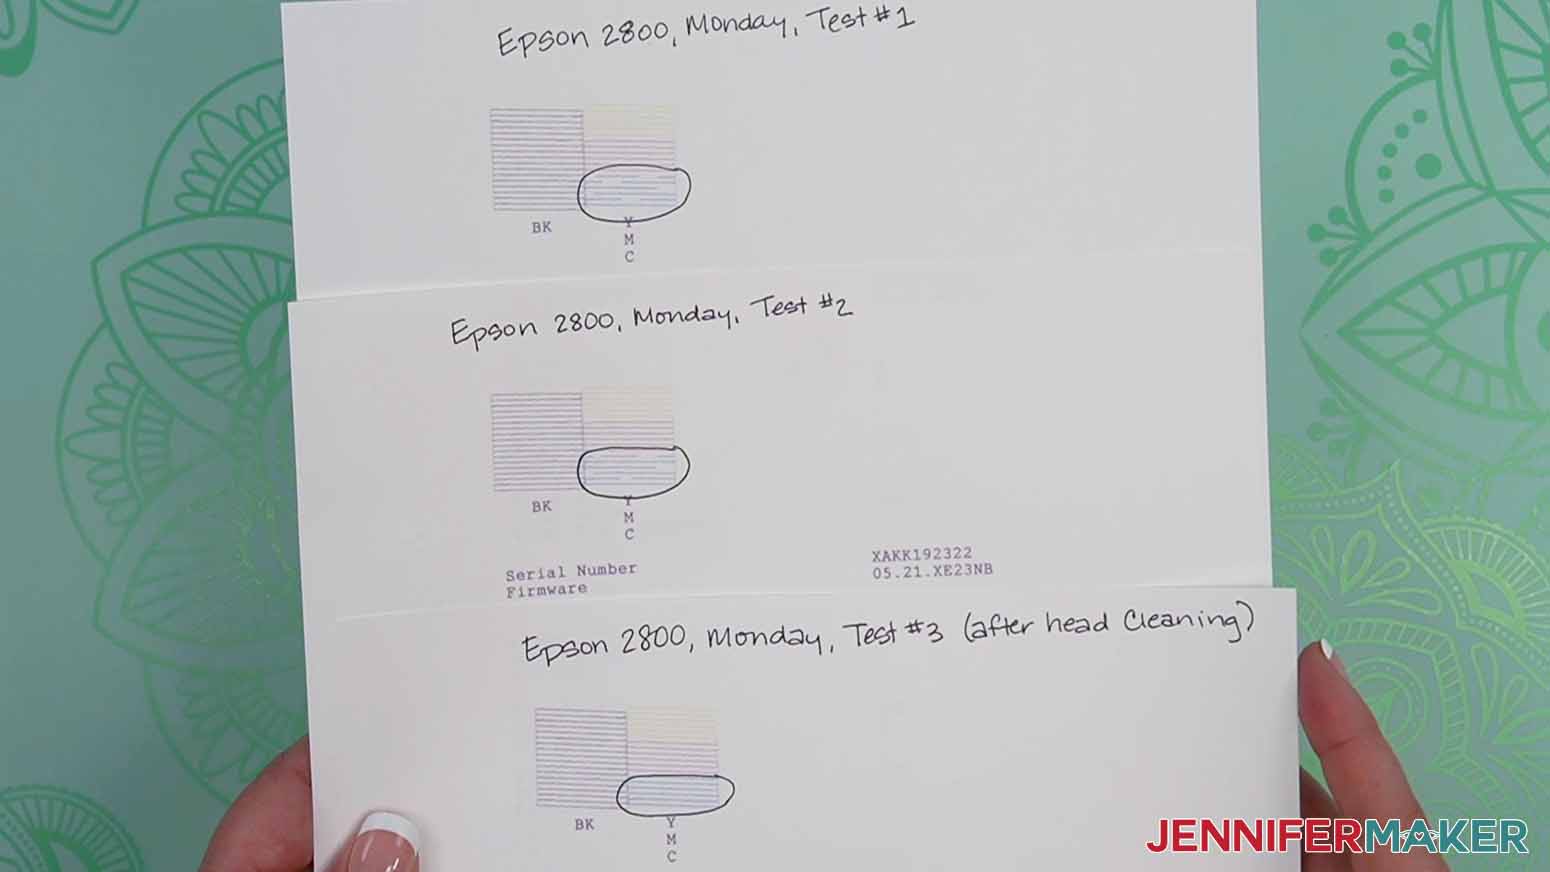
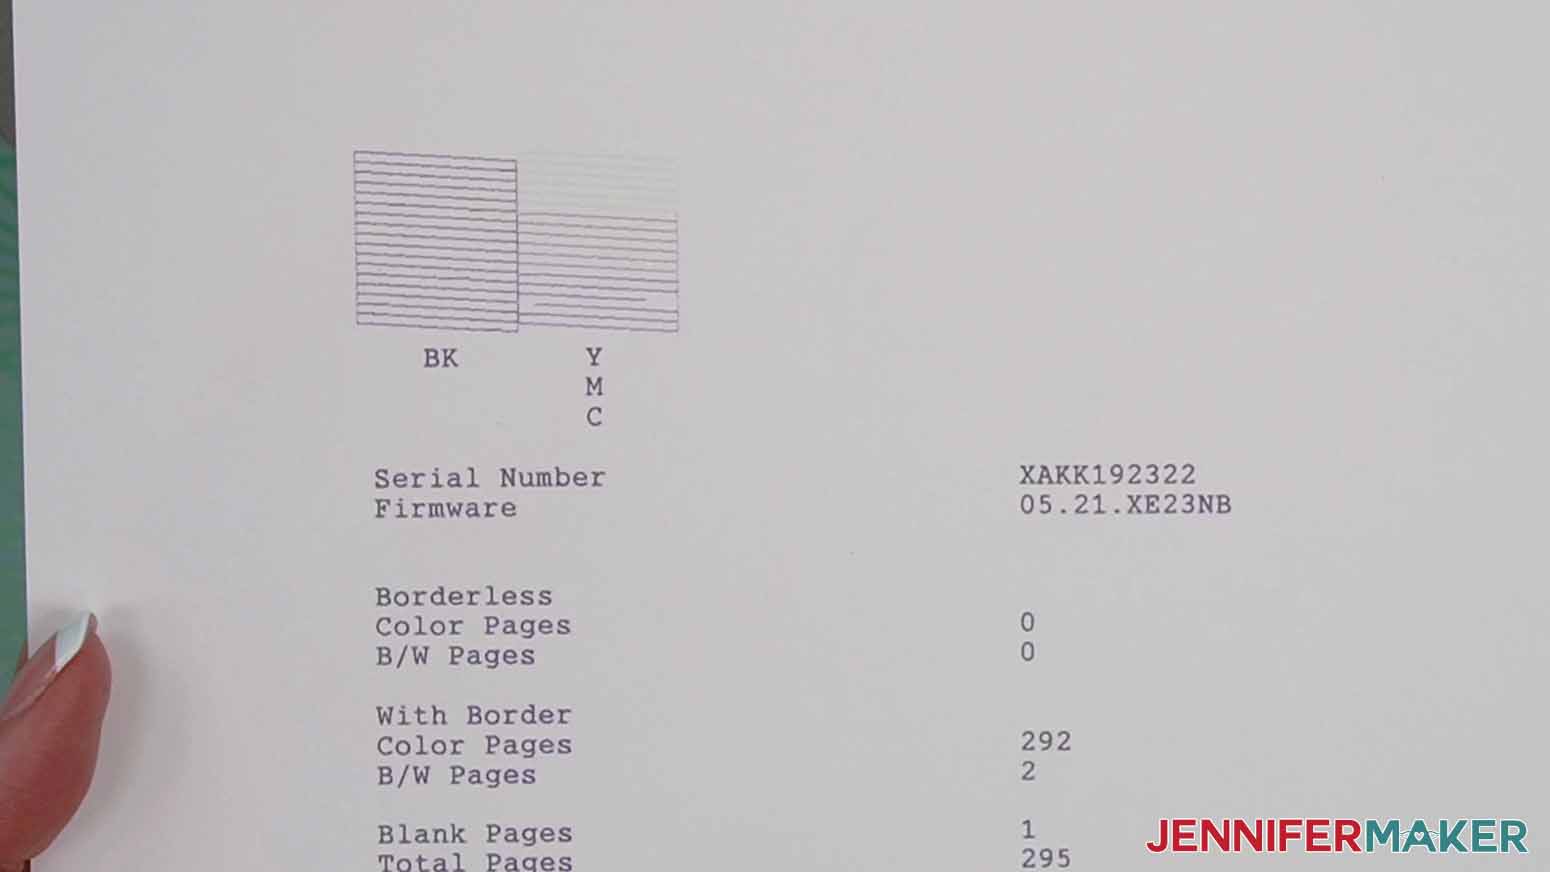
- The screen might ask whether the lines or segments on the sheet are complete or broken. On a correctly working printer, the nozzle check sheet has a large box with horizontal lines in black ink, and smaller ones in yellow, magenta, and cyan. If the lines are all unbroken and consistent, there isn't a clog and you can sanswer the printer's question accordingly. Then try your project file again to see if there are other issues, but there isn’t a clog!
- But if the sheet has missing or faint segments, like this cyan section, that means one or more of the print nozzles on your print heads is clogged.
TIP: If the lines are staggered, you may have an alignment issue. See your printer’s manual for steps to address the issue.
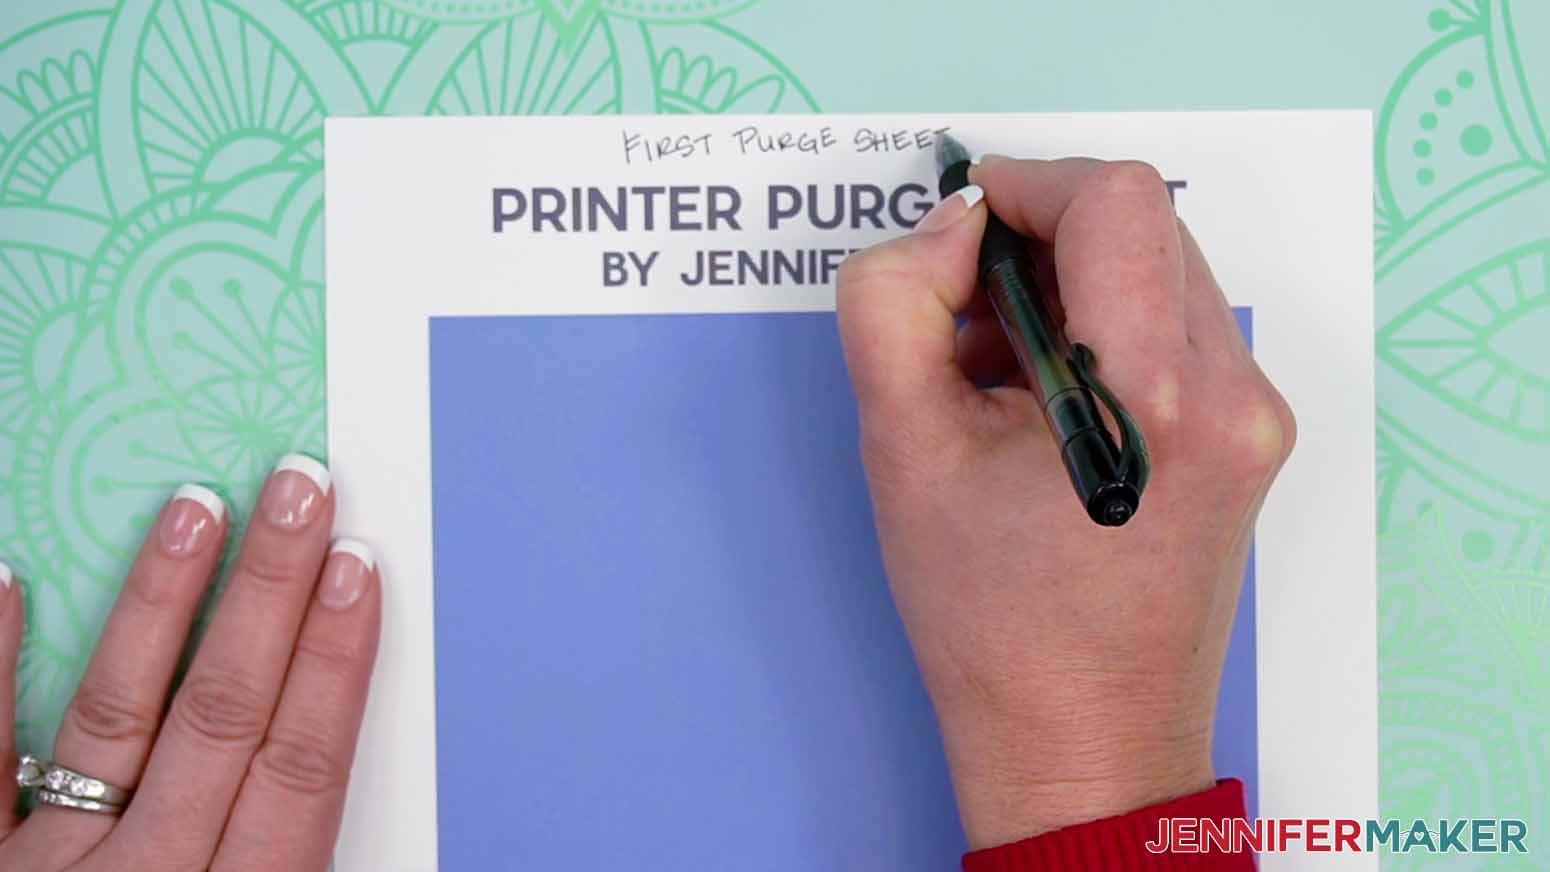
- Label your nozzle check sheet so you can check your progress as you continue.
- Back on the printer, select that your nozzle check sheet does not look correct. My prompt is “Are there any segments missing” so I’ll select "Yes."
- The printer may want to run a Print Head Cleaning right away, but that uses quite a bit of ink in all four colors. It’s especially wasteful if some colors aren’t clogged. Instead, Try a purge sheet next.
 TIP: If the lines are staggered, you may have an alignment issue. See your printer’s manual for steps to address the issue.
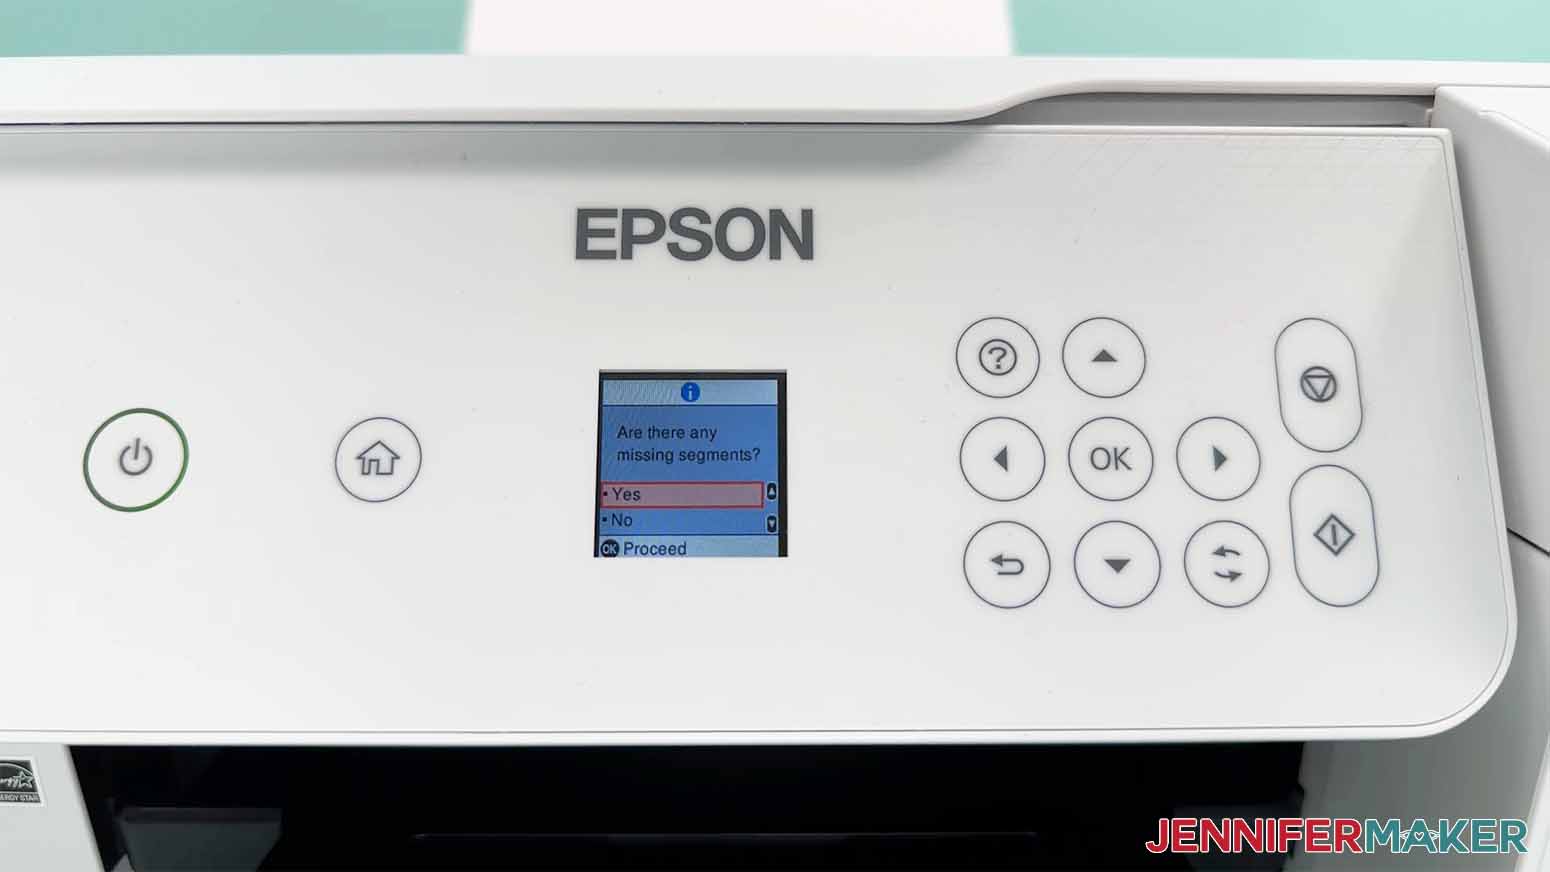
STEP 3: GET MY FREE PRINTER PURGE FILES AND PRINT A PURGE SHEET
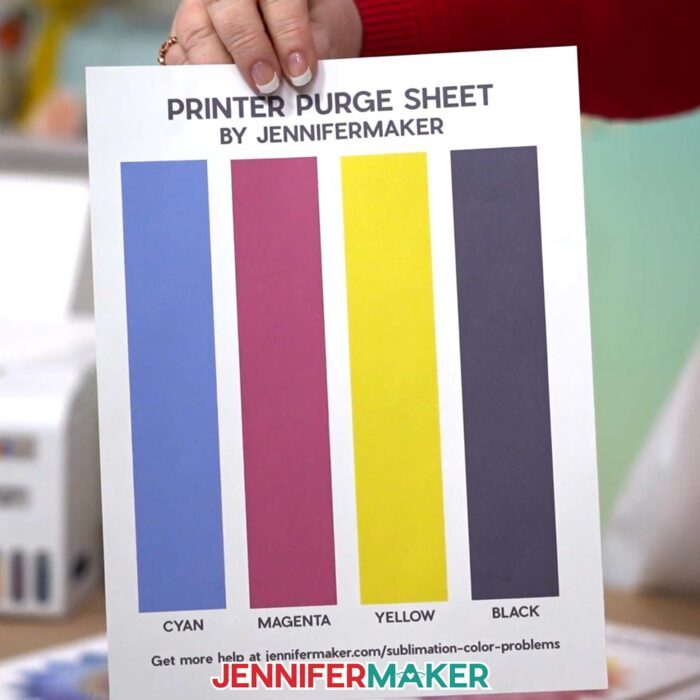
- First, download my Sublimation Printer Purge Files from my free library -- look for Design #588. Alternatively, you can use the Save This Project form near the top of this post and the link will be emailed to you.
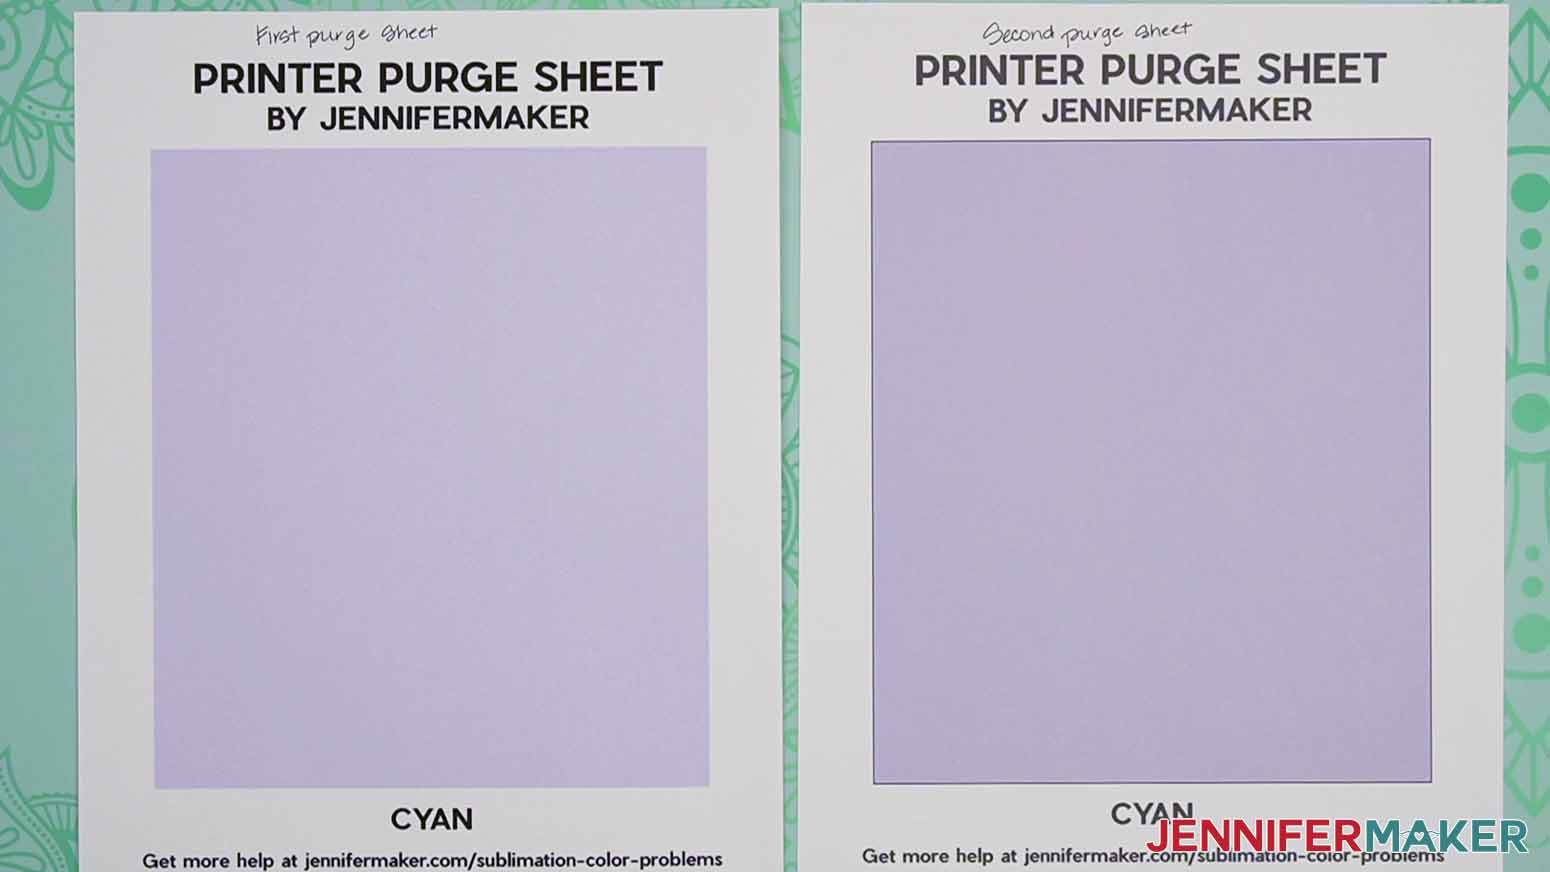
- There are five printer purge sheet files in the PDF folder: one each of cyan, magenta, yellow, and black, and one of all four colors with “cmyk” in the name.
NOTE: One way to clean the nozzles, especially if there is only one color impacted, is to push a lot of ink through all of that ink’s nozzles. That’s exactly what printer purge files like these do! Forcing the machine to print a lot of one color is often enough to remove small clogs or push any air through the system so it will print correctly again.

- On your desktop computer, download the free version of Adobe Acrobat Reader. NOTE: You can use other software to print the PDFs, but I prefer this because it’s free and well-supported.
- Follow the instructions to download, install, and open Adobe Acrobat Reader on your computer.
- Review your nozzle check sheet to see which colors are faint or missing line segments. If the others look good, you don’t need to print them.
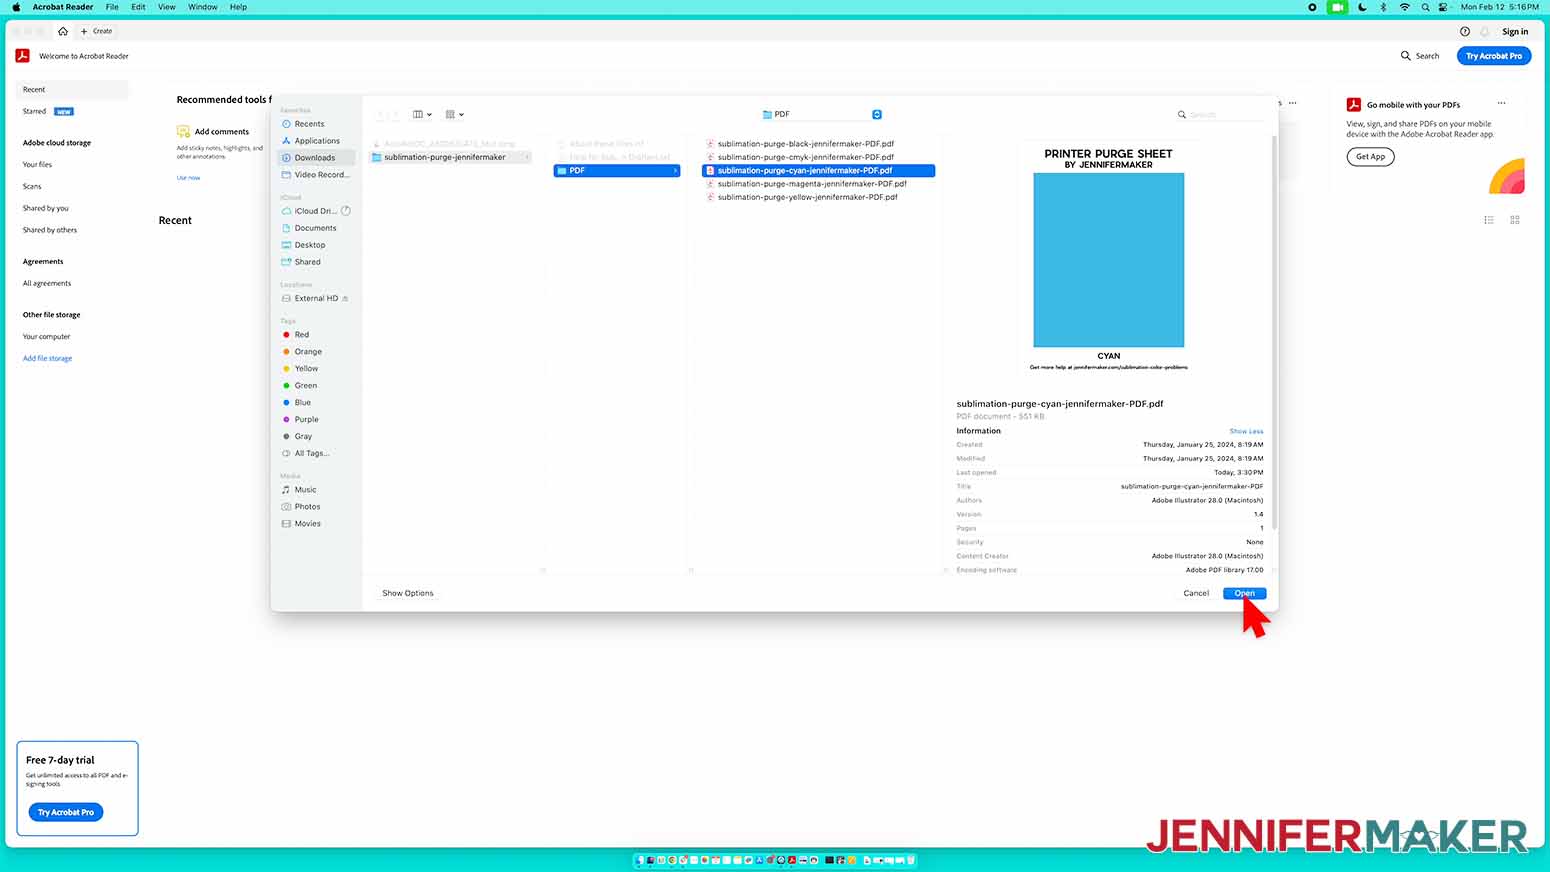
- Back in Adobe Reader, click the “File” menu then “Open.”
- Navigate to the printer purge sheet PDF for the color you want to fix.
NOTE: If there is more than one issue, start with the color with the most problems. Or, if all of your colors were inconsistent, open the purge sheet with “cmyk” in the file name to print all four colors on one page and then follow along.
- Make sure you have the correct color open, then click “File” and select “Print.”
- In the Print dialog box, make sure your sublimation printer is selected in the printer dropdown menu and that the design is set to print using color ink.
- Adjust the controls to your usual sublimation settings. Use the best quality options available.
- Click “Print.”
- Once the printed sheet has dried, label it to keep track of your progress
- Then look closely at it.
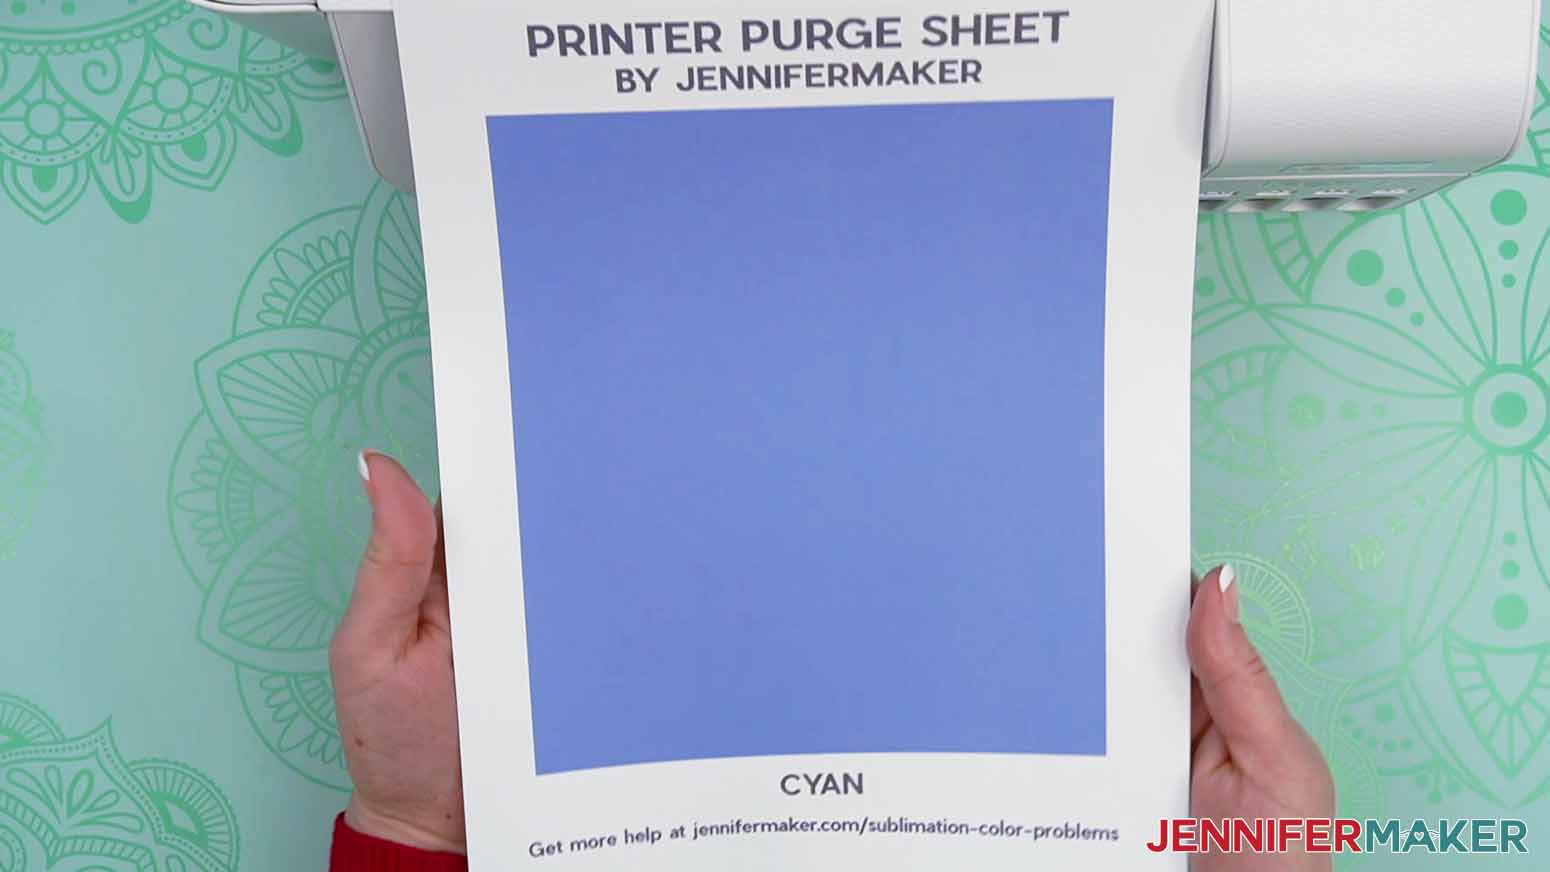
- If a lot of the solid color is consistent, this purge sheet may have done the trick and cleared the clog! If another color is having trouble, move to that ink’s purge sheet and repeat the process. Once your purge sheets look good, you can go back to Step 2 to print an updated nozzle check sheet. Add a note about what you did to improve the results from the first test in case you have a similar problem in the future.
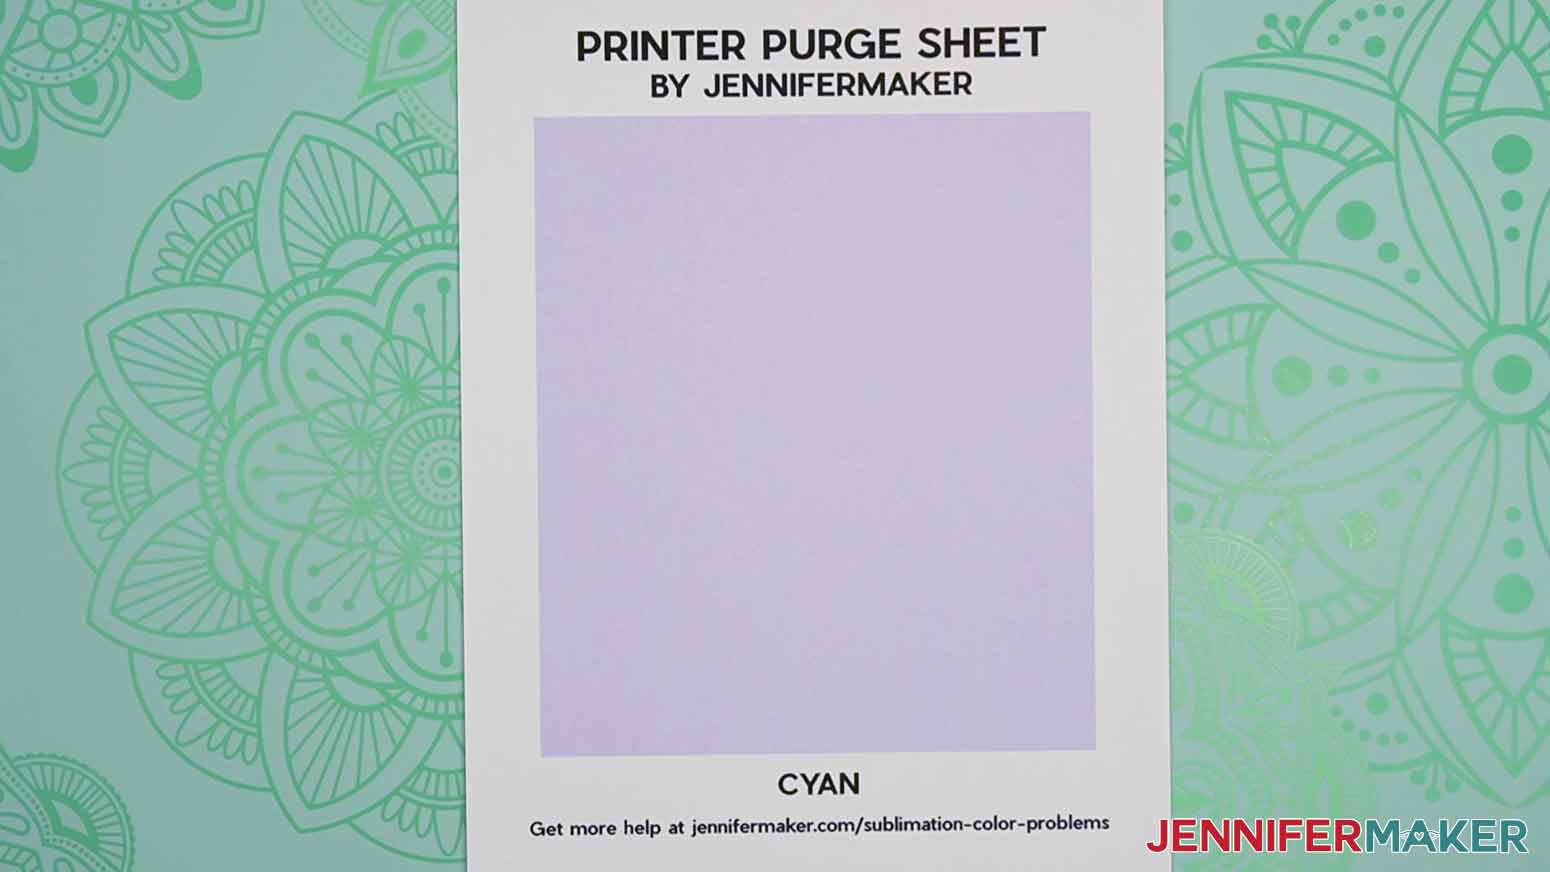
- But if sections are faint like mine, have stripes, or otherwise don’t look consistently better, the clog is likely still there.
- Go back to Adobe Reader and print another purge sheet of the same color to see if a second run helps.
- Label the second purge sheet and check it for any changes.
- I recommend printing up to five purge sheets of a color to see if the clog improves, because this process is easier to control and uses less ink than cleaning the print heads, which we’re trying to avoid.
- The print head cleaning process will push ink through all of the nozzles for each color. So if the first color still hasn’t improved, you don’t have to print purge sheets to check them separately. Instead, let the printer rest for 12 - 24 hours and then continue to Step 4.


STEP 4: CLEAN THE PRINTER NOZZLES AND PRINT HEADS
NOTE: This process takes a significant amount of ink, which is poured into the printer’s maintenance box and soaked up in an ink pad. You can replace this box on some models, but others are pretty difficult, so it’s best to avoid filling up the ink pad. Once the ink pad is full, you’ll need to replace the box before printing. So only try this process if nothing else worked. Make sure you have time to stay with the printer and don’t open it or turn it off while it’s cleaning.
- Make sure the ink in each color ink reservoir is still above the minimum level.
- If one or more reservoir is close to the minimum level, add more ink now. Running these resource-heavy processes without enough ink can damage the printer or give you unreliable results.
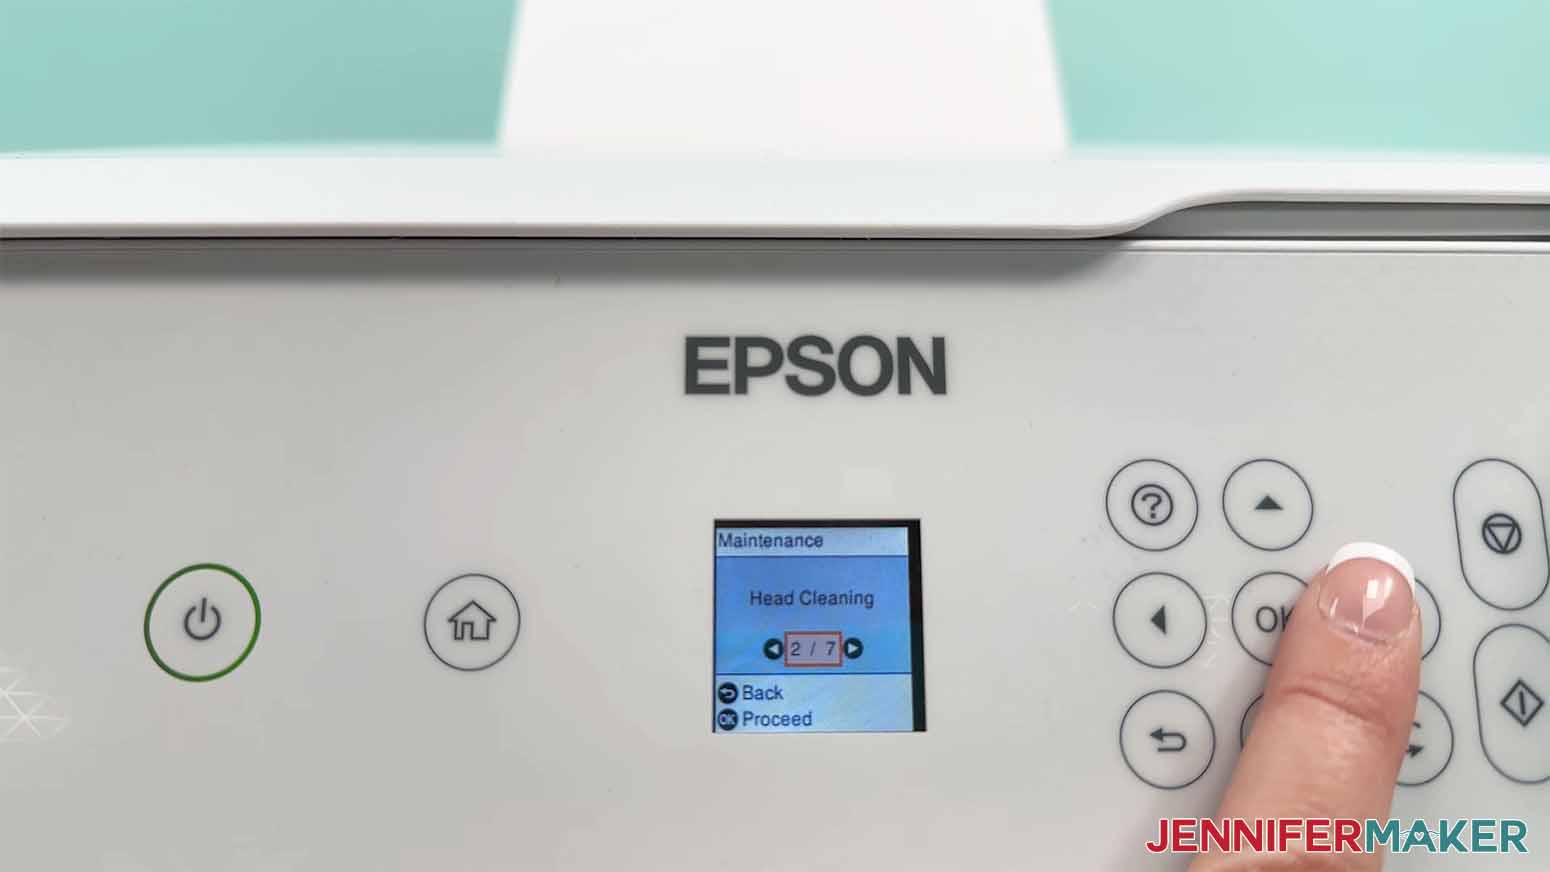
- Navigate to the Home view on the printer and select “Maintenance.”
- Select “Head Cleaning” or a similar option, but nothing that sounds like “Power Cleaning.” That’s the last resort.
- You might need to confirm the print head cleaning and be asked to make sure there is paper loaded.
- Then begin the print head cleaning process. It will take about three minutes while the ink is pushed through every nozzle and deposited into the maintenance box. NOTE: Some of the buttons may flash during the cleaning and a message might appear on the screen, that’s normal. Just keep an eye on the printer while it works.
- When the cleaning is done, a prompt to print a new nozzle check sheet might appear on the screen, or it might print automatically. Print the updated nozzle check sheet and see if the lines are consistent without missing segments, meaning the clogs are cleared.
- Remember to label the nozzle check sheet and note that you had run a print head cleaning to get this result.
- Confirm that the print isn’t missing segments on the printer and you’re ready to go! Go to Step 6 to learn more about how to avoid clogs in the future.
- But if the nozzle check sheet still shows some colors with fading or missing segments, the clog is still there.
- It’s ok, this can take time and experimenting! Try printing another purge sheet for the clogged color. It might shake the last little clog out, but it’s also good practice to let your printer put more ink onto paper before you try another print head cleaning.
- Repeat the process to do up to three print head cleanings.
- If even after three rounds of print head cleanings, your nozzle check sheet still shows problems, turn the printer off and let it sit for 12 to 24 hours. Sometimes the ink needs to settle in the reservoirs, or there may be air in the lines that will come out with rest.
- The next day, print a nozzle check sheet to see if there has been any improvement after the rest time.
- If not, print another purge sheet to try to clear the clog.
- If that doesn’t knock the clog loose, use the same steps to run a print head cleaning to check for progress.
- You can try a third print head cleaning the third day if that still doesn’t work.
If the colors are still not consistent, continue to Step 5.
STEP 5: RUN A POWER CLEANING
NOTE: The last resort I recommend is running a power cleaning cycle. This takes a lot of ink, and is taxing enough on the printer to possibly shorten the machine’s life. But sometimes it’s the only way to get your printer working again.
- Make sure there are several pieces of plain paper correctly loaded in the paper tray.
- Check that your ink reservoirs are at least one third full, because the process can take almost that amount of ink. Running it with low levels can damage the printer.
- See your printer’s user manual for the specific instructions to start a power cleaning for your model.
- On my 2800, it’s under Maintenance. Depending on the model, you may have to confirm that you want to run a Power Cleaning a few times because it really is the last resort.
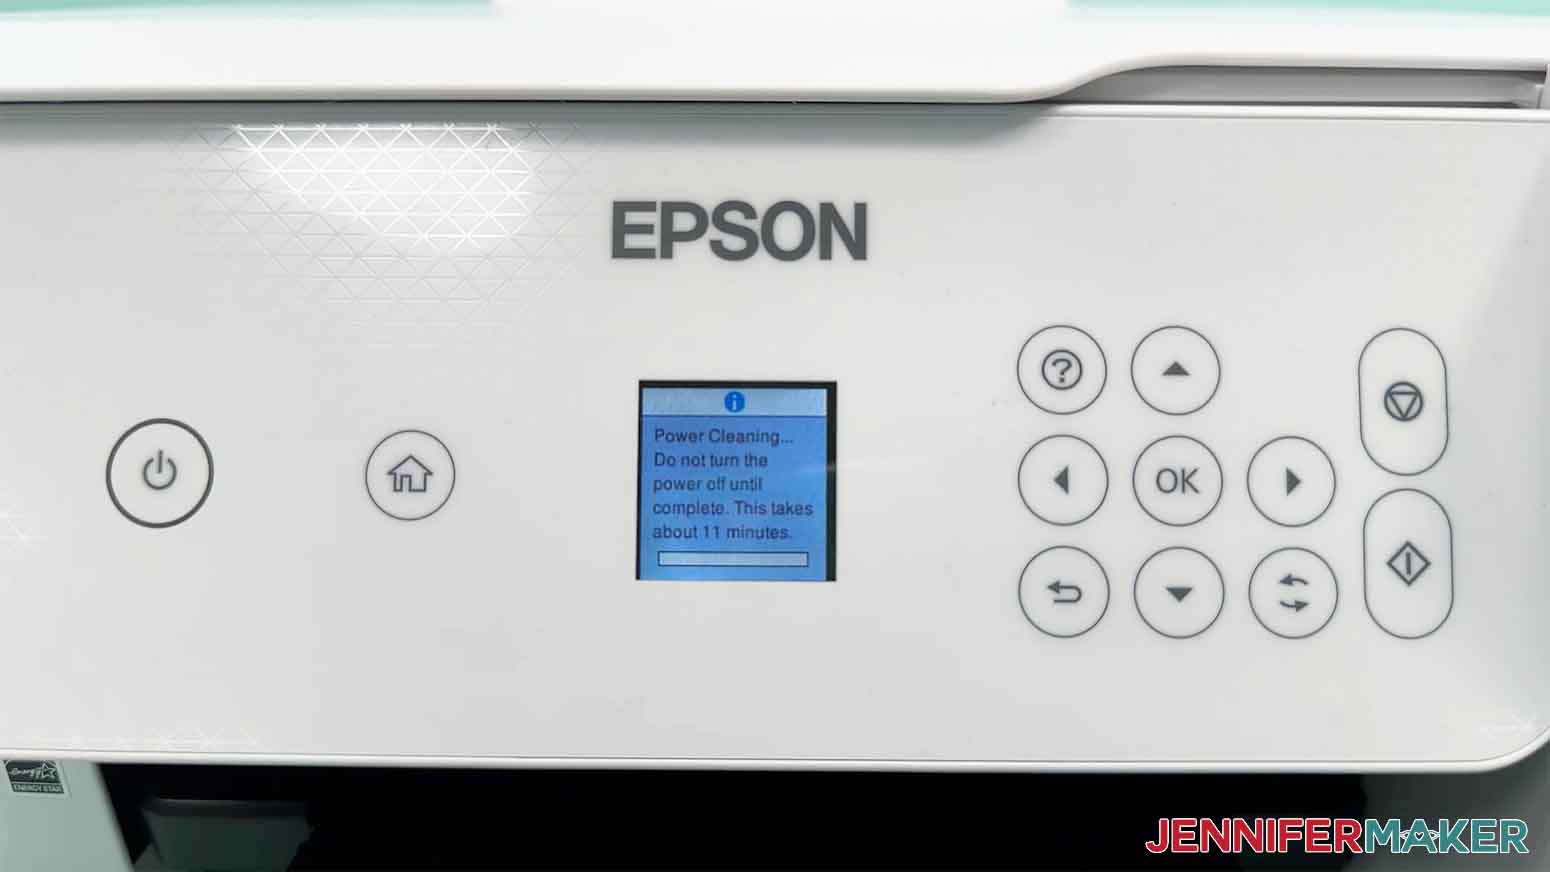
- The power cleaning process will start and take several minutes.
- Stay by your printer to make sure it stays on and to respond to any prompts on the screen. NOTE: Depending on your printer and situation, you may be prompted to update the machine’s firmware, add more ink, or do other maintenance tasks during the power cleaning cycle.
- When the power cleaning is complete, the screen will say to let the printer sit for at least 12 hours before printing again, so turn it off to let it rest.
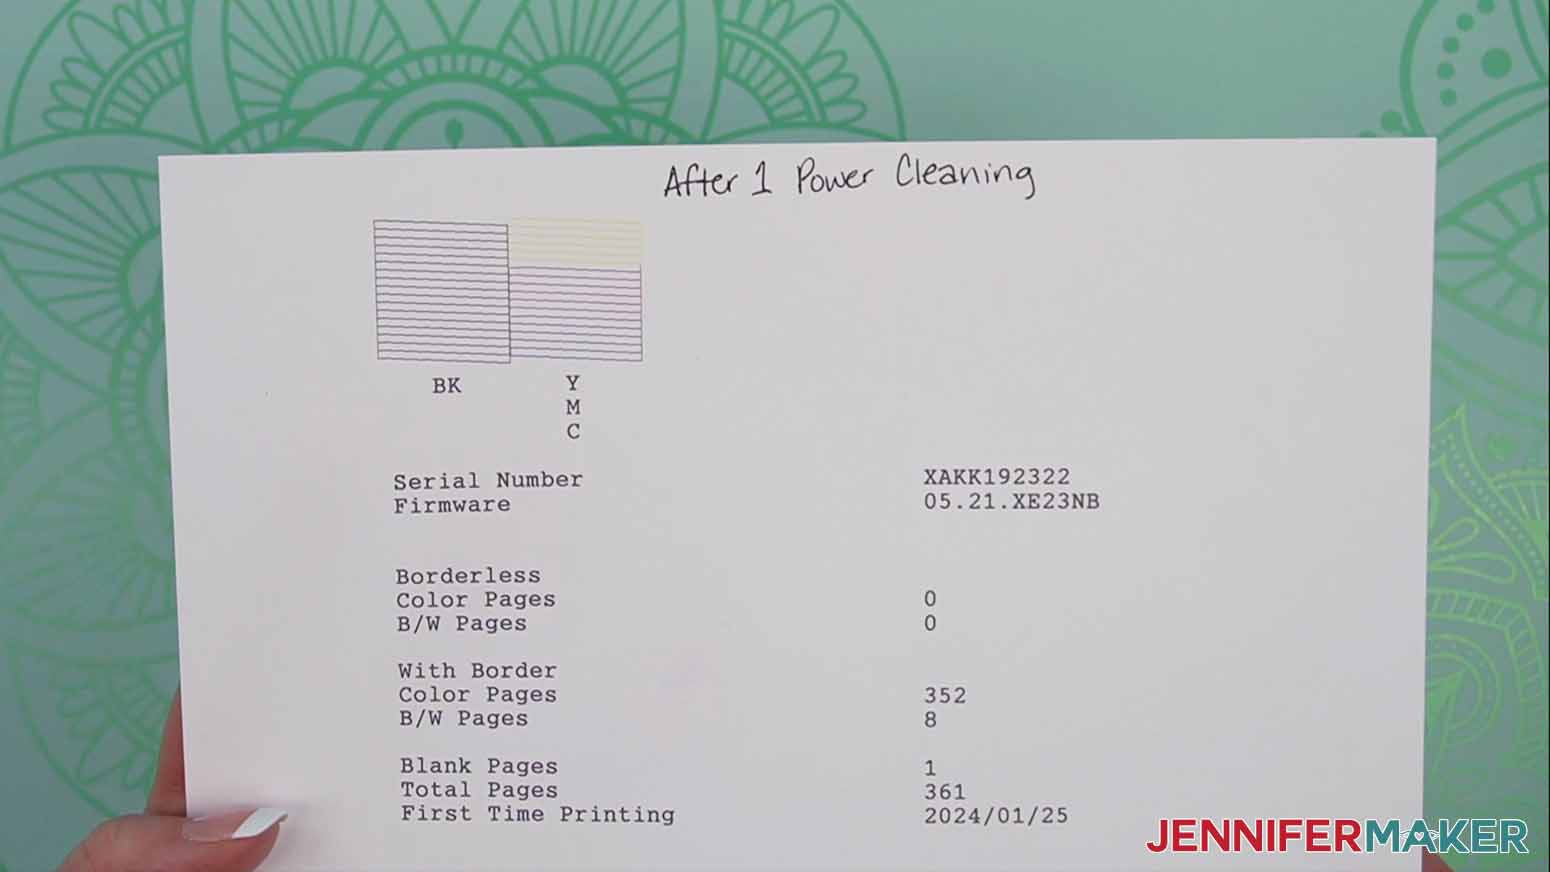
- The next day, print a new nozzle check sheet to see if your power cleaning worked and your color lines are consistent.
- If they look correct, your printer is unclogged! Go to Step 6 for help avoiding future clogs.
- If not, start back on Step 2 to see if any of the other troubleshooting options that are less taxing than running the cleaning cycles are enough to help.
- If the print quality is still not improved, turn the printer off and let it sit for 12 to 24 hours before trying another power cleaning process from the beginning.
- If the quality is still not better, let the printer sit for a few days and start back at Step 2.
STEP 6: HOW TO AVOID FUTURE SUBLIMATION PRINTER CLOGS
- While there are many things that may lead to a clog, your best bet to keep everything running smoothly is to print at least one sheet with all your colors each week.
- If you’re not making sublimation projects that often, you can set yourself a reminder to print weekly.
Answers to Your Questions About How To Unclog A Sublimation Printer
Q: How do I know if my printhead is clogged?
A: A clogged printer will print images with missing colors or faded sections. If you print a nozzle check sheet and segments in a color’s line are missing, that’s a strong sing you have a clog.
Q: How do I unclog my sublimation printer?
A: My tutorial covers the steps to unclog an Epson sublimation printer like a converted EcoTank, or similar models that use inkjet ink. There are some differences in the processes depending on your printer, so the first step is always to check your manual before tackling an issue.
Q: Why is my sublimation print color so dull?
A: Sublimation prints look much duller on the paper than they do after they’re sublimated, so don’t worry if your printed image looks faded or different colors than you expect. Good news, the vibrant colors will show when transferred to the sublimation blanks!
Q: Why is my sublimation not transferring evenly?
A: You may need to tweak your settings if you’re using materials other than the ones in my materials list. The sublimation printing process and transferring has a lot of variables, so follow my notes first on a test cloth, then try adjusting your temperature, time, or pressure if you need to.
Q: What does ghosting mean in sublimation?
A: Ghosting can occur when a freshly sublimated object is moved around too much while it’s still hot. If the object and the sublimation transfer is still hot, the image is still sublimating. To avoid this, simply wait until your sublimated item has cooled off before handling or removing the paper, and don’t move it around more than you need to while it’s sublimating. It’s a natural effect of the sublimation process because the ink is in a gaseous state until it’s cooled.
Q: Why shouldn’t I let the machine clean the print heads automatically?
A: There are various methods to unclog a printer and they take different amounts of time and ink depending on the models and the strategy. Printing a purge sheet makes one color of ink flow through the clogged print heads and system normally, but can be enough to knock a few clogs loose. But running an automatic print head cleaning forces all of the colors through all of the nozzles and into a maintenance box on most Epson printers. A power cleaning does the same, but uses a lot more ink. Most models have a waste ink pad in the maintenance box to capture the forced ink, and when it’s saturated you can’t print until it’s replaced. Both processes are also taxing on the printers. So they’re not the best ways to fix a small issue and I recommend try some of the less drastic and often effective ways in my tutorial.
Q: How do I set up my new printer?
A: I have helpful video tutorials on setting up many types of sublimation printers. I have information on Epsons, Sawgrass printers, and others, including links to the videos in my overview of picking the best printer.
Get my free files and learn how to unclog a sublimation printer!
I love seeing what you make with my designs and how you use them! Please share a photo of your project once your printer is up and running again in our Facebook group or tag me on social media with #jennifermaker.
Love,

Want to remember this? Save this Tutorial on How To Unclog An Epson Printer to your favorite Pinterest Board!