Learn how to make a frame in Canva to level-up your photo design projects!
A while back, I was designing a printable and thought, “Wouldn’t it be fun if this photo was a cool shape?” A quick search later, I discovered Canva frames! What I love most is how simple they are to use. There’s no complicated editing or fiddling, which I love. Just drag and drop to give your design an instantly polished, personal touch. And the best part? You can use Canva frames to create T-shirt designs, stickers, social media posts, and so much more. That’s what inspired me to share this tutorial on how to make a frame in Canva, because once you understand how they work, you’ll see just how versatile and creative they can be! I’ll show you how to use premade frames, a simple Canva app, and Photopea to make your designs pop!
See the full step-by-step video tutorial on how to make a frame in Canva:

Frames in Canva are one of those features that can be easy to overlook, but they’re right there in the side panel, waiting for you to notice them. Canva has made the whole process of using frames really easy and intuitive. Simply drag and drop in your own photos, Canva’s stock images, or graphics, and the frame instantly fills with clean edges and smooth corners. It’s one of the easiest ways to take your Canva design from “pretty good” to “WOW” in seconds.
There are a few different ways to get frame shapes, and I cover them in my tutorial video. But if you’re brand new to Canva frames, the first step is simply opening a blank template and clicking on Elements. There, you’ll find frames with a little placeholder image of a sky and mountains. That tiny picture is your hint that this isn’t just a shape, but a functional frame that will hold your own images.
Once you start, you’ll realize just how many frame options there are. You’ll see a variety of frames in different shapes: squares, circles, hearts, and even more creative outlines. Each one is essentially a different design opportunity, because you can resize, rotate, or test a different frame until your layout feels just right. Double-clicking lets you adjust how your photo sits inside, making sure nothing important is cropped out.
The next step after experimenting with the basics is to play with a variety of shapes and borders to see how they change the feel of your design. It’s fun to see how a simple Polaroid-style frame can give a memory a nostalgic vibe, while a geometric diamond frame adds a modern edge.
But what makes this tutorial extra fun is that you’re not limited to Canva’s built-in collection of frames. You can make custom frame templates using my free frame designs, which are available in my free PDF guide. These are special links that open directly in your Canva account, letting you make your own frames from designs I’ve already prepared. Some are simple, like a single flower frame, while others are more complex, like the butterfly with a flight path. With these frames, you can insert different images or colors and even layer embellishments on top. The result is a frame design that feels personal, polished, and completely your own.
For those who want to take things a step further, Canva even has an app called Frame Maker. You’ll find it in the side panel under Apps. This clever tool lets you create custom frame shapes by adjusting points on a grid. This is one of the different ways you can explore making your own frames, and it’s especially useful if you have a specific custom shape in mind that isn’t already in Canva.

And then there’s Photopea, the free online editor that works a lot like Adobe Photoshop. This method is a little more advanced, but it unlocks a whole new world of custom photo frames. The first step is to create a Canva design by finding an image from the Elements tab that you’d like to turn into a frame, like a snowflake or a flower with an open center. I’ll show you how to bring it into Photopea, make a few simple edits, and export it as a PDF file to upload it back to Canva. Suddenly, it’s a functional frame, just like the built-in ones. This opens the door to different ways of creating frame templates!
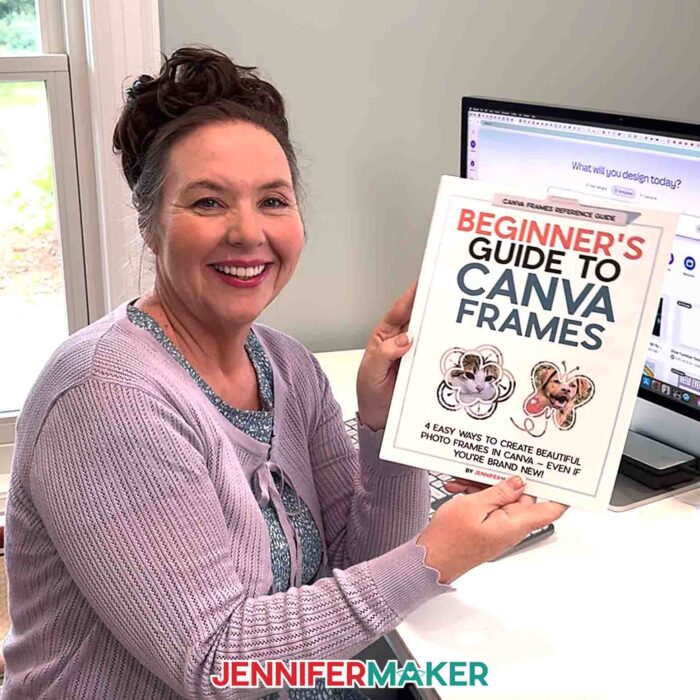
Want a handy cheat sheet to keep by your side while you design? I’ve put together a Beginner’s Guide to Canva Frames PDF, and it’s included in my free download! It walks you through the basics, shows examples of different frame styles, and gives you quick tips so you can create with confidence.
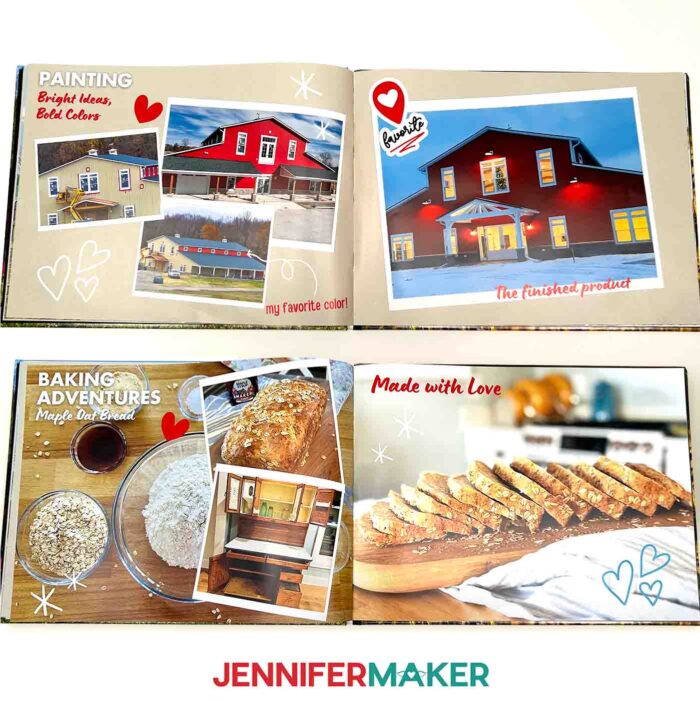
So what can you actually do with frames once you’ve mastered them? The answer is: a lot! Frames aren’t just for playing with photos. They can add structure, personality, and a custom look to all kinds of creative projects, like the Canva Photo Book I just made.
How about printable projects? Frames help you add decorative edges or focal points for calendars, wall art, or planner pages. Want to design stickers? Frames make it easy to cut clean outlines around images, whether you’re using scissors or cutting with a Cricut.
If sublimation is your favorite craft, you can use Canva frames to make sure your photos and patterns fit perfectly on mugs, tumblers, or T-shirts. Making a photo book in Canva? Use frames on your page designs that go with your book’s theme! Social media posts are another great example. Using a variety of frames can give your Instagram grid or small business posts a consistent, eye-catching style. Once you start adding frames to your projects, you’ll see how they elevate even simple designs into something worth showing off.
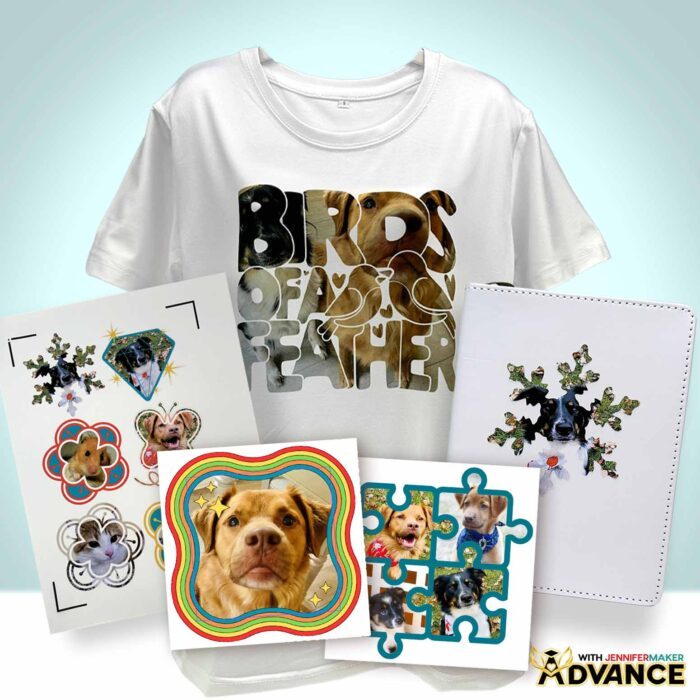
If you’re ready to take frames even further, come discover my ADVANCE with JenniferMaker membership program! I’ll show you how to transform a complex Canva element into a frame that holds a single photo beautifully, and how to design your very own multi-image frame for collages or custom projects. It’s a fun way to level up your Canva skills and create frame designs you simply can’t find anywhere else! Learn more about ADVANCE with JenniferMaker here!
Each time you try a different frame or a different image, you’ll notice how your project takes on a new personality. That’s one real advantage of Canva! You don’t need special software or a design degree to experiment and make beautiful things. Whether you’re filling frames with your own photos, trying a variety of shapes from the library, or designing a custom frame design with an app’s help, you’re learning how to give your work that extra layer of creativity that makes it stand out.
Learning how to make frames in Canva is one of those skills that feels small but makes a huge difference in your projects. And if you’d like to see these steps in action, my full video tutorial will guide you through everything, from using the side panel to find frames, to uploading your own files, to creating unique frame templates. With so many available options and different ways to approach frame design, you’ll never run out of creative inspiration!
Let me show you how to make a frame in Canva! This post contains some affiliate links for your convenience (which means if you make a purchase after clicking a link I will earn a small commission but it won’t cost you a penny more, there is no additional cost)! Read my full disclosure policy.
Materials to Make Projects Using Canva Frames
(Coming soon!) View my Amazon shopping list with the exact items I used for the example projects.
For sublimation T-shirts:
- One (1) White Polyester T-Shirt
- 8.5″ x 11″ Sublimation Paper -AND-
- White Uncoated Butcher Paper -AND-
- 12″ x 12″ White Cardstock
- Sublimation Printer (I used a converted Epson EcoTank ET-2800 Printer)
- Sublimation Ink
- Heat Press (I used the Cricut EasyPress) -AND-
- Cricut EasyPress Mat
- Heat-Resistant Tape
- Lint Roller
- Weeding Tool
- T-Shirt Ruler Guide
- Lint Roller
- Fan (for ventilation during sublimation)
For printable HTV T-shirts:
- One (1) T-Shirt (any color of cotton or cotton/poly blend – I used black cotton)
- Color Inkjet Printer
- Heat Press (I used the Cricut EasyPress) -AND-
- Cricut EasyPress Mat
- Heat-Resistant Tape
- Weeding Tool
- T-Shirt Ruler Guide
- Lint Roller
- One (1) T-Shirt (any color of cotton or cotton/poly blend – I used black cotton)
- 8.5″ x 11″ Printable Iron-On Transfer Paper For Dark Shirts -AND-
- Parchment Paper (if not included in the transfer paper package)
- Color Inkjet Printer
- Heat Press (I used the Cricut EasyPress) -AND-
- Cricut EasyPress Mat
- Heat-Resistant Tape
- Weeding Tool
- T-Shirt Ruler Guide
- Lint Roller
- Brayer
For Print Then Cut stickers:
- 8.5″ x 11″ Printable Holographic Sticker Paper
- Color Inkjet Printer
- Weeding Tool
- Paper Trimmer -OR-
- Scissors
- Brayer
For all projects:
How to Make a Frame in Canva!

How To Make A Frame In Canva
Learn how to make a frame in Canva and use it for projects!
Materials
For Sublimated T-Shirt:
- One (1) White Polyester T-Shirt (for sublimation)
- 8.5" x 11" Sublimation Paper -AND-
- White Uncoated Butcher Paper -AND-
- 12" x 12" White Cardstock (for sublimation)
For Printable Transfer Paper/HTV T-Shirt:
- One (1) T-Shirt (any color of cotton or cotton/poly blend, but I used black cotton; for use with printable transfer paper/HTV)
- 8.5" x 11" Printable Iron-On Transfer Paper For Dark Shirts
- Parchment Paper (if not included in the transfer paper package)
For Print Then Cut Stickers
Tools
- A Free Canva account
- A Free Google account (to print designs)
For Sublimated T-Shirt:
- Sublimation Printer - I used a converted Epson EcoTank ET-2800 Printer
- Sublimation Ink
- Heat Press - I used the Cricut EasyPress -AND-
- Cricut EasyPress Mat
- T-Shirt Ruler Guide
- Fan for Ventilation
- Heat Resistant Tape
- Lint Roller
For Printable Transfer Paper/HTV T-Shirt:
- A way to cut your material - I’m using the Cricut Maker 4, but you can also use any Cricut Maker Series machine, a Cricut Explore Series machine, the Cricut Venture, or the Cricut Joy Xtra
- Color Inkjet Printer
- Heat Press - I used the Cricut EasyPress -AND-
- Cricut EasyPress Mat
- Cricut Green StandardGrip Machine Mat 12" x 12"
- Brayer
- Weeding Tool
- T-Shirt Ruler Guide
- Lint Roller
For Print Then Cut Stickers:
Instructions
Let's learn more about Frames in Canva and look at several options for using and making them.
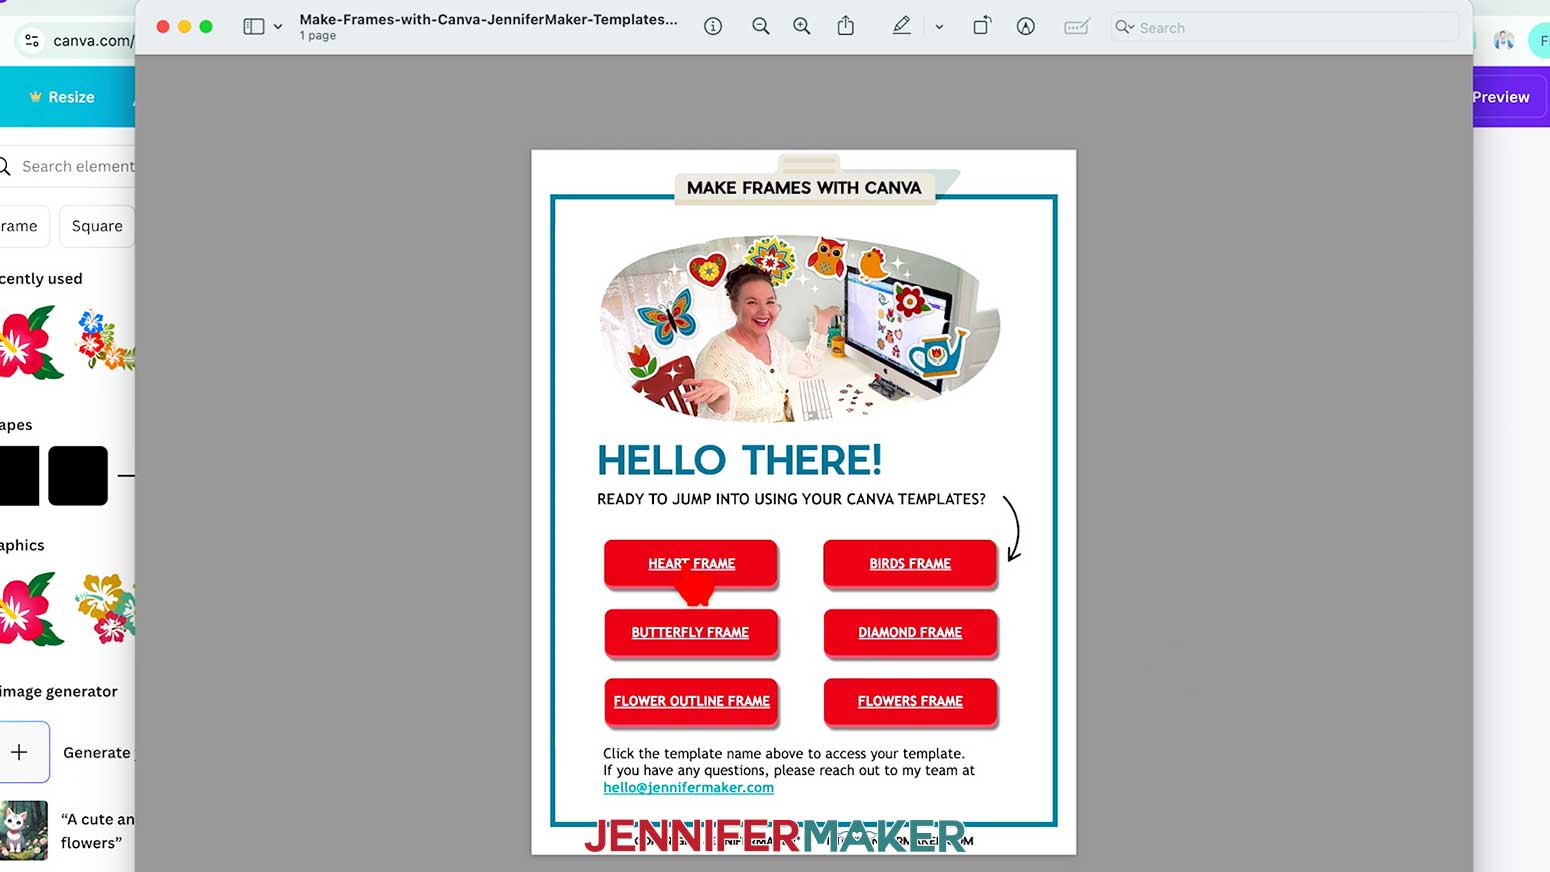
First, download my Canva Frames PDF with links to frame templates and my Canva Frames Reference Guide PDF from my free library – look for Design #764. Alternatively, you can use the Save This Project form near the top of this post and the download link will be emailed to you. In the folder, you’ll find the PDF with links to my pre-made Canva frame designs and a reference guide for each frame process. TIP: If you’re not sure how to unzip the download file, go to jennifermaker.com/svgs to learn how. The process is similar for PDF files.
OPTION 1: CANVA’S BUILT-IN FRAMES
- To get started, open your computer’s browser and go to jennifermaker.com/canva. NOTE: If you’re new to Canva, check out my Canva for Beginners tutorial.
- Either sign in to your account or follow the prompts on the screen to sign up for a free account. NOTE: Canva does offer paid subscriptions with more tools and elements, but I’ll show you how to do everything with the free account.
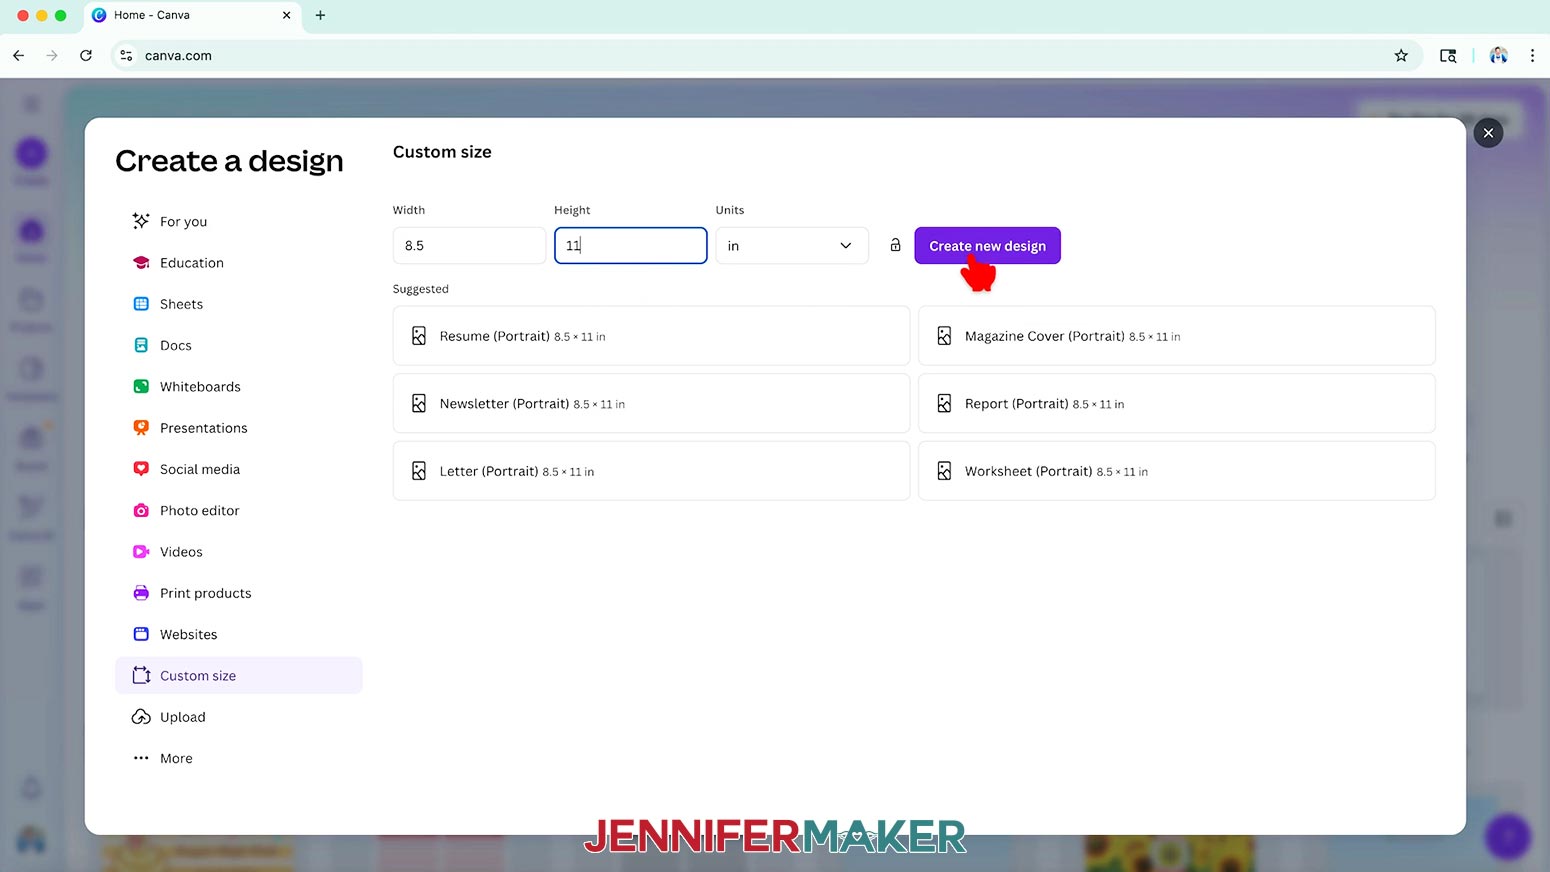
- On the Canva Home screen, click “Create.”
- Click “Custom size.”
- Set the canvas size to your preference to follow along. NOTE: I’ll use 8.5” x 11” so we can print any designs we like on letter-size paper later.
- Click “Create new design.”

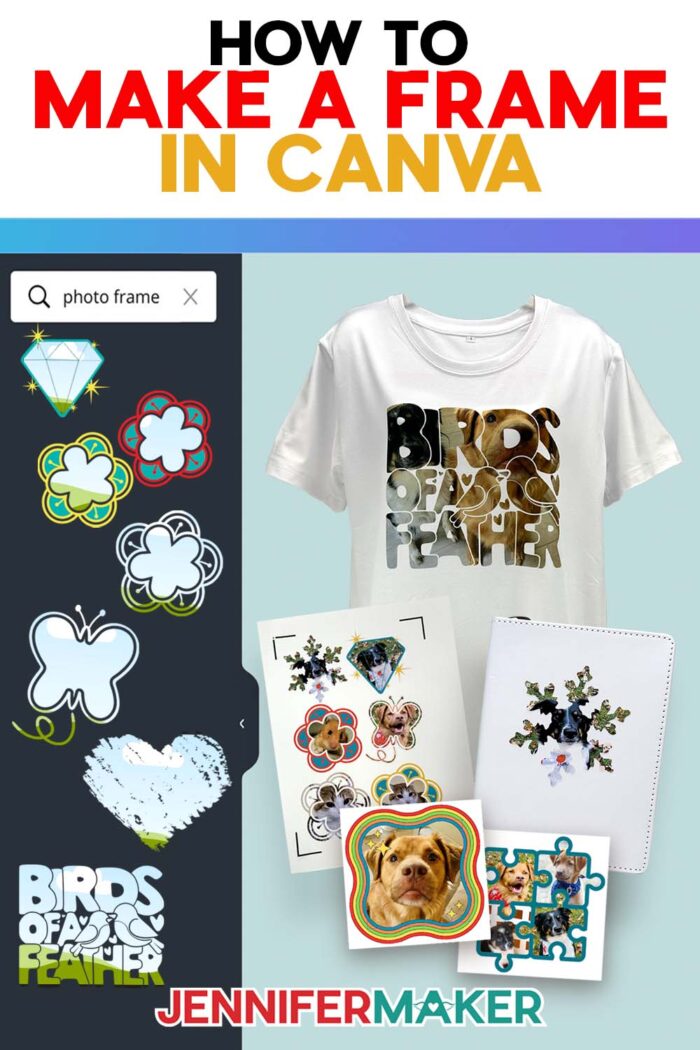
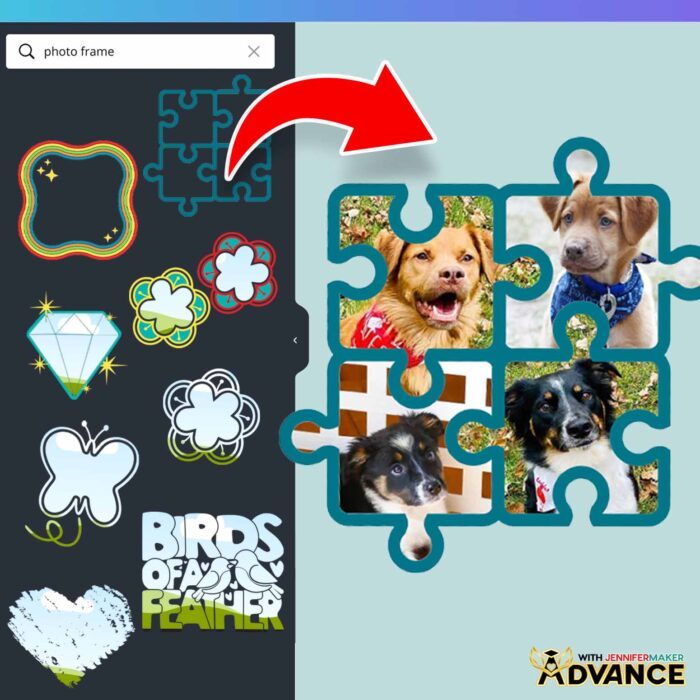
- To explore standard frames, go to the left menu, click “Elements,” and scroll until you see “Frames.” Click one to add it to the canvas. TIP: You can also type “frames” into the search bar. Type “square frame” or “letter frame” to get exactly what you want faster.
- You can drag the corners to resize a frame and rotate it like many Canva elements.
- To fill a frame, just drag any photo from Canva’s photo library or from the “Uploads” menu right into the frame on your canvas.
TIP: Pausing your cursor at the upper left of the frame can help trigger Canva to fill the space with the image.
- If the photo isn’t oriented correctly inside the frame, double-click it. Then, you can rotate or resize the image inside the frame.
TIP: Canva needs one dimension of the photo and frame to match, so it will automatically make the photo larger to fill the frame. The frame’s faint outline helps you position things perfectly, but anything outside that outline won’t print.
NOTE: Keep important parts of your image away from the frame’s edges so nothing gets unintentionally cropped out.
- Click “Done” to return to the Canvas.
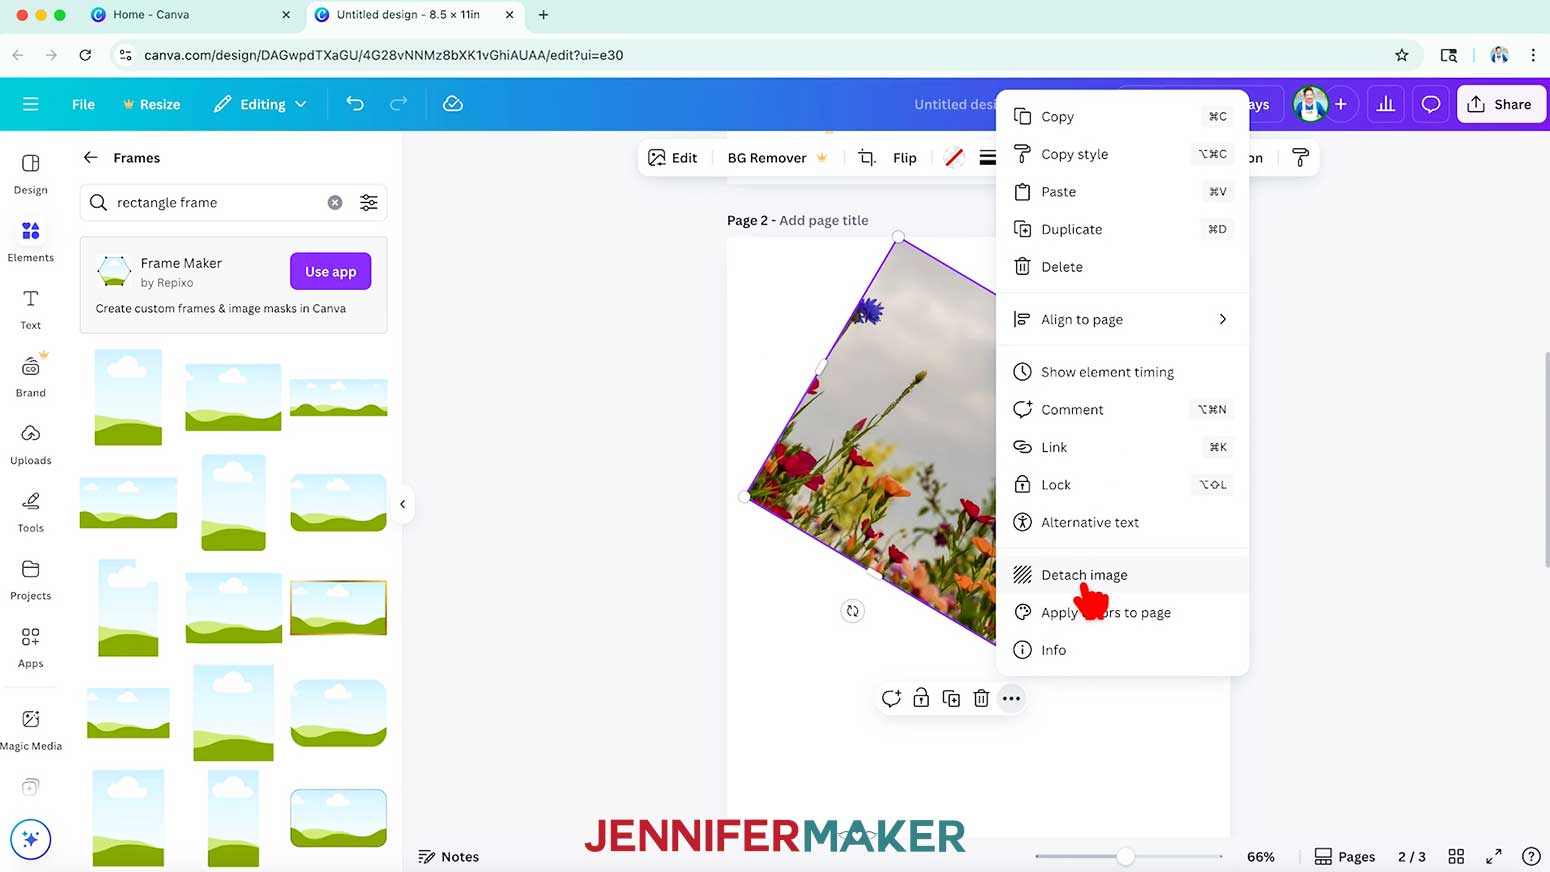
- To try the image in another frame, select the original, click the three dots, then select “Detach image.” Now you can try the image in a new frame.
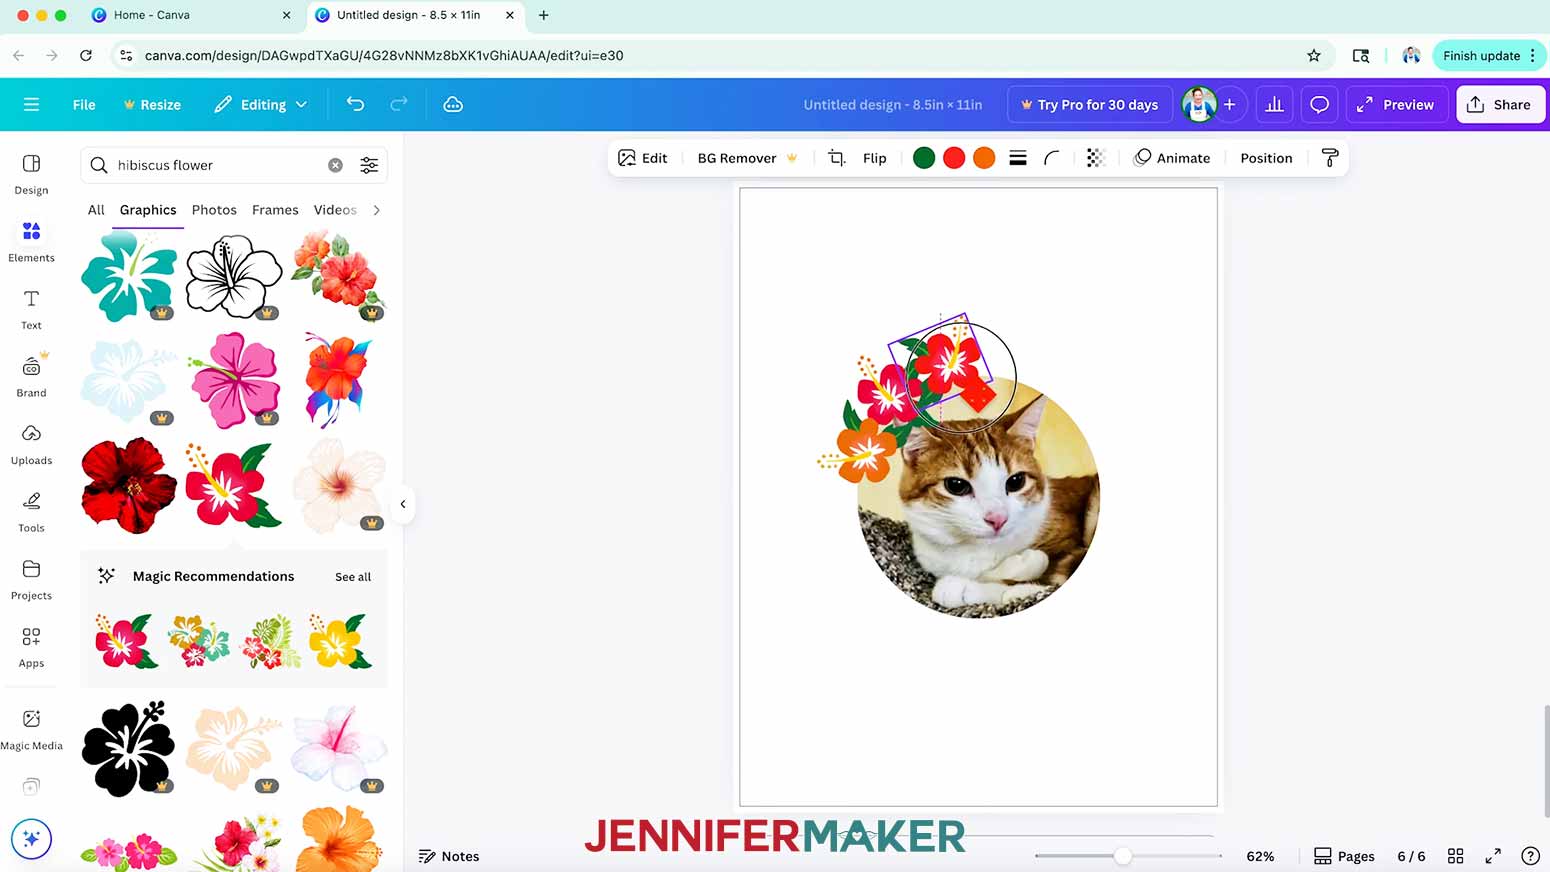
NOTE: All of these steps work with photos, but you can also use many graphics with frames. They won’t all work, though, so try to stay flexible as you design.
TIP: If you’re using Cricut’s Print Then Cut feature, frames can give your image smooth, clean edges that cut beautifully, without jagged lines or awkward white borders.
- You can also go to “Elements” and add fun borders, themed shapes, or seasonal accents without extra editing.
 TIP: If you’re using Cricut’s Print Then Cut feature, frames can give your image smooth, clean edges that cut beautifully, without jagged lines or awkward white borders.

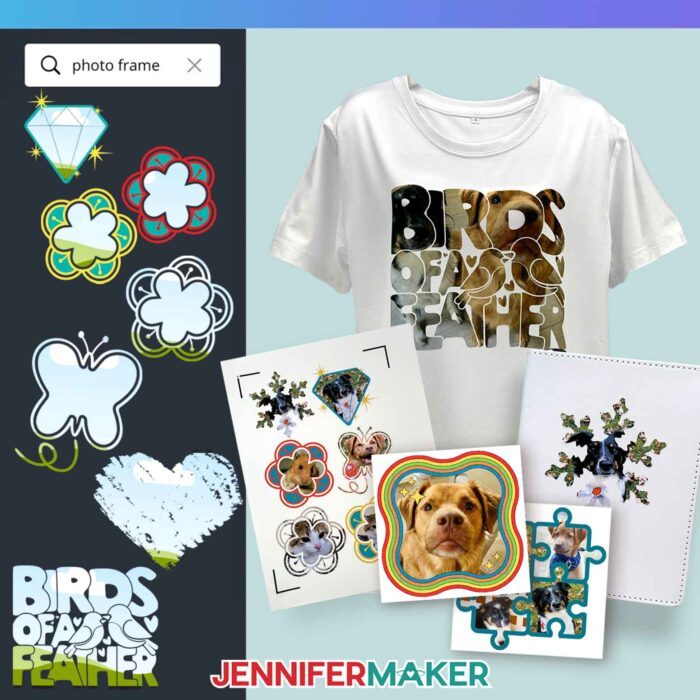
OPTION 2: USE MY FREE FRAMES
- You can also open existing projects in Canva that will work as frames. I’ve shared links to several frames for you in my downloadable PDF. Just click on each to open it in a new browser window.
- The heart frame isn’t a solid shape, so the small non-frame sections will let a background color show through in those areas.
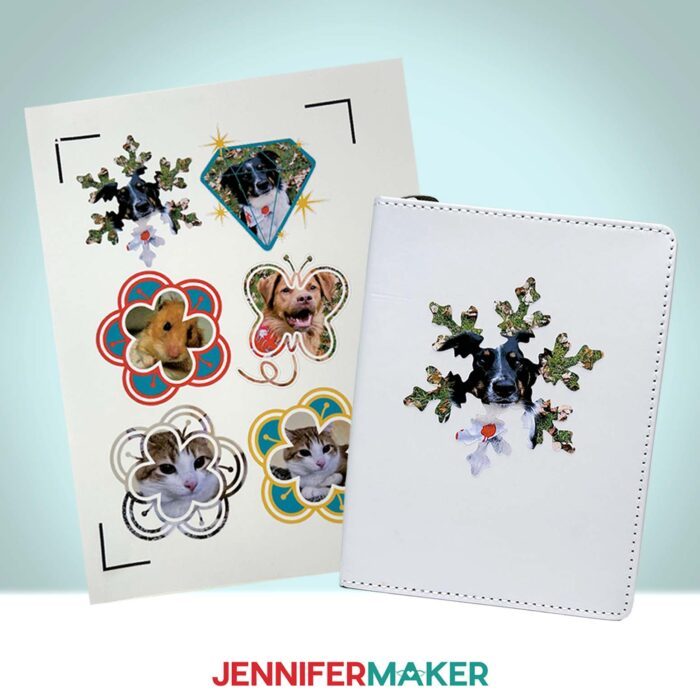
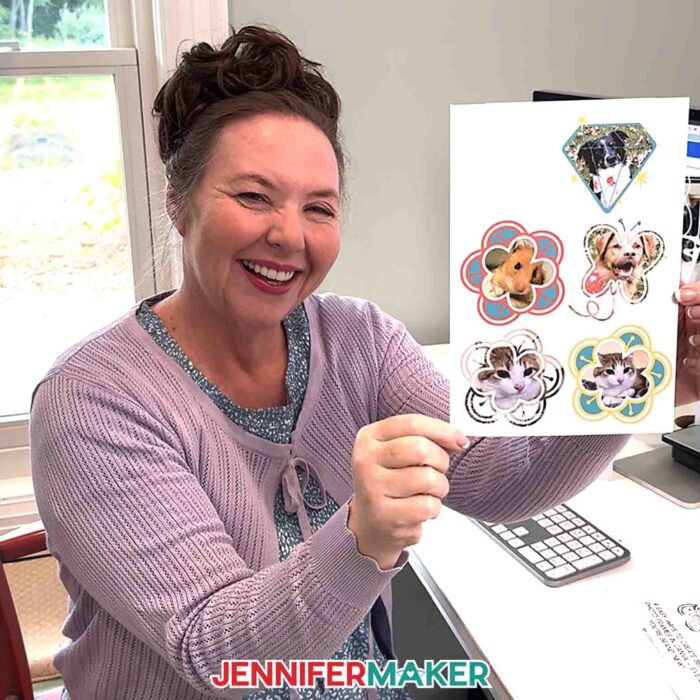
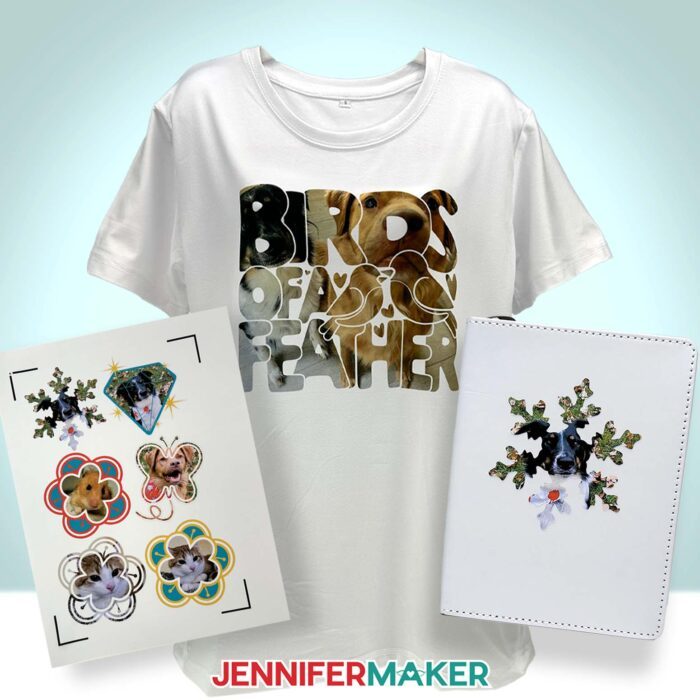
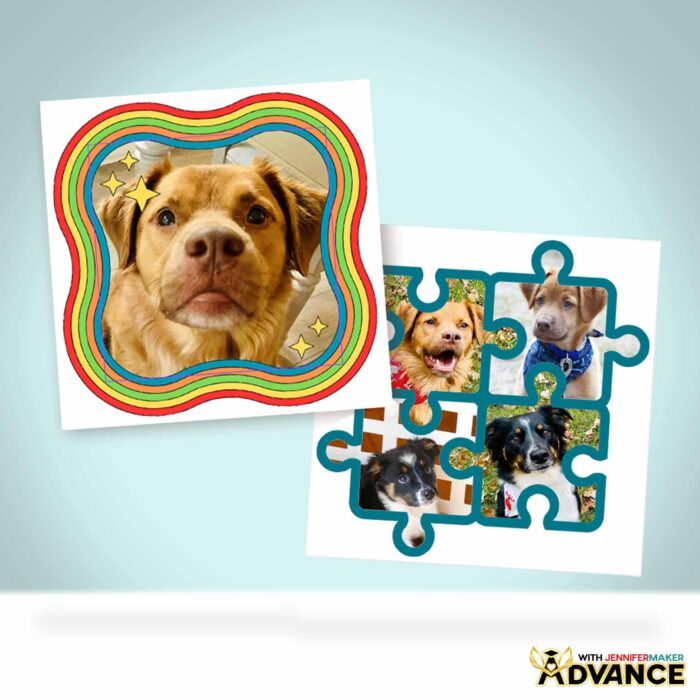
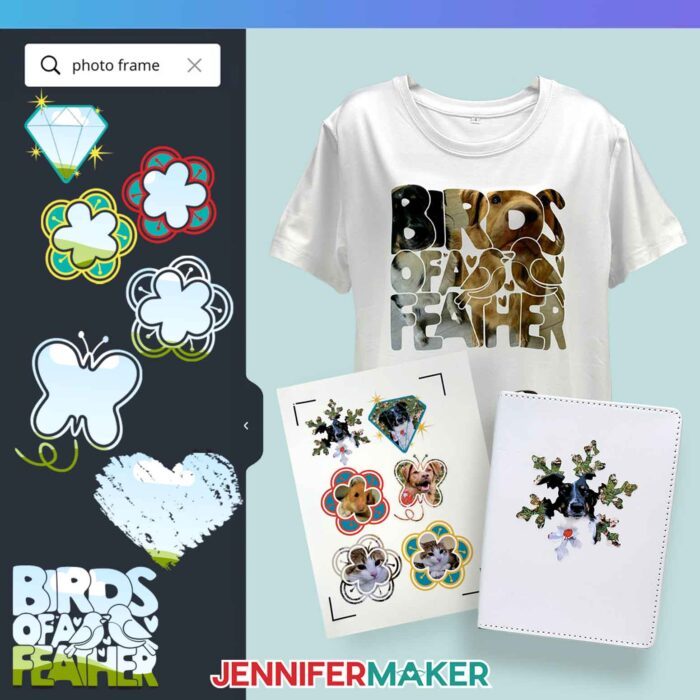
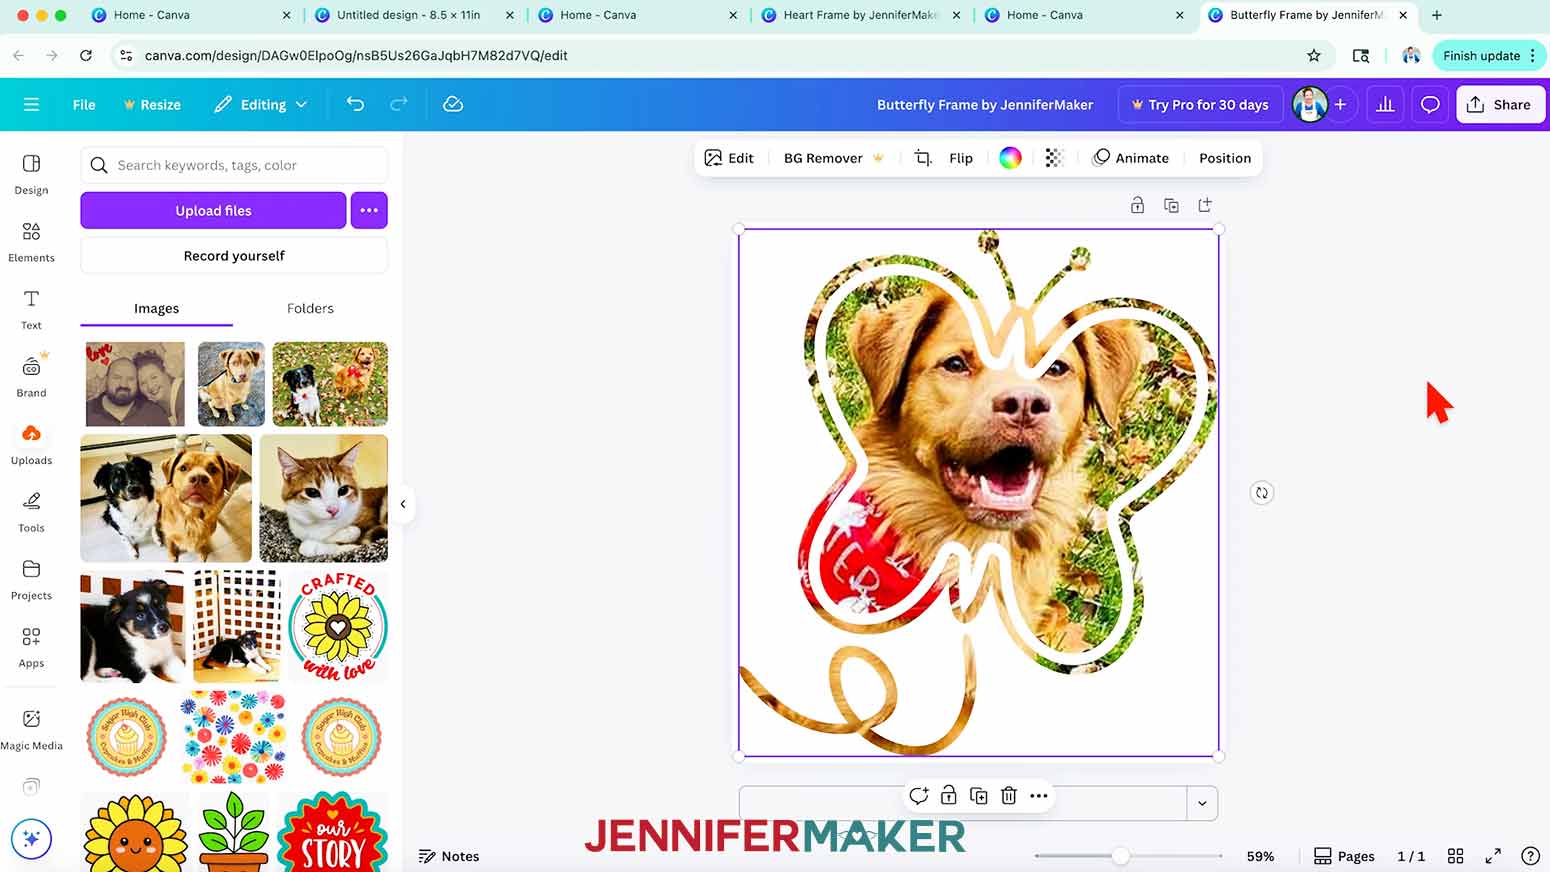
- The butterfly frame uses one photo to fill the main section and the flight path. When picking a photo to use in this frame, search for one with a single subject and a lot of extra background.
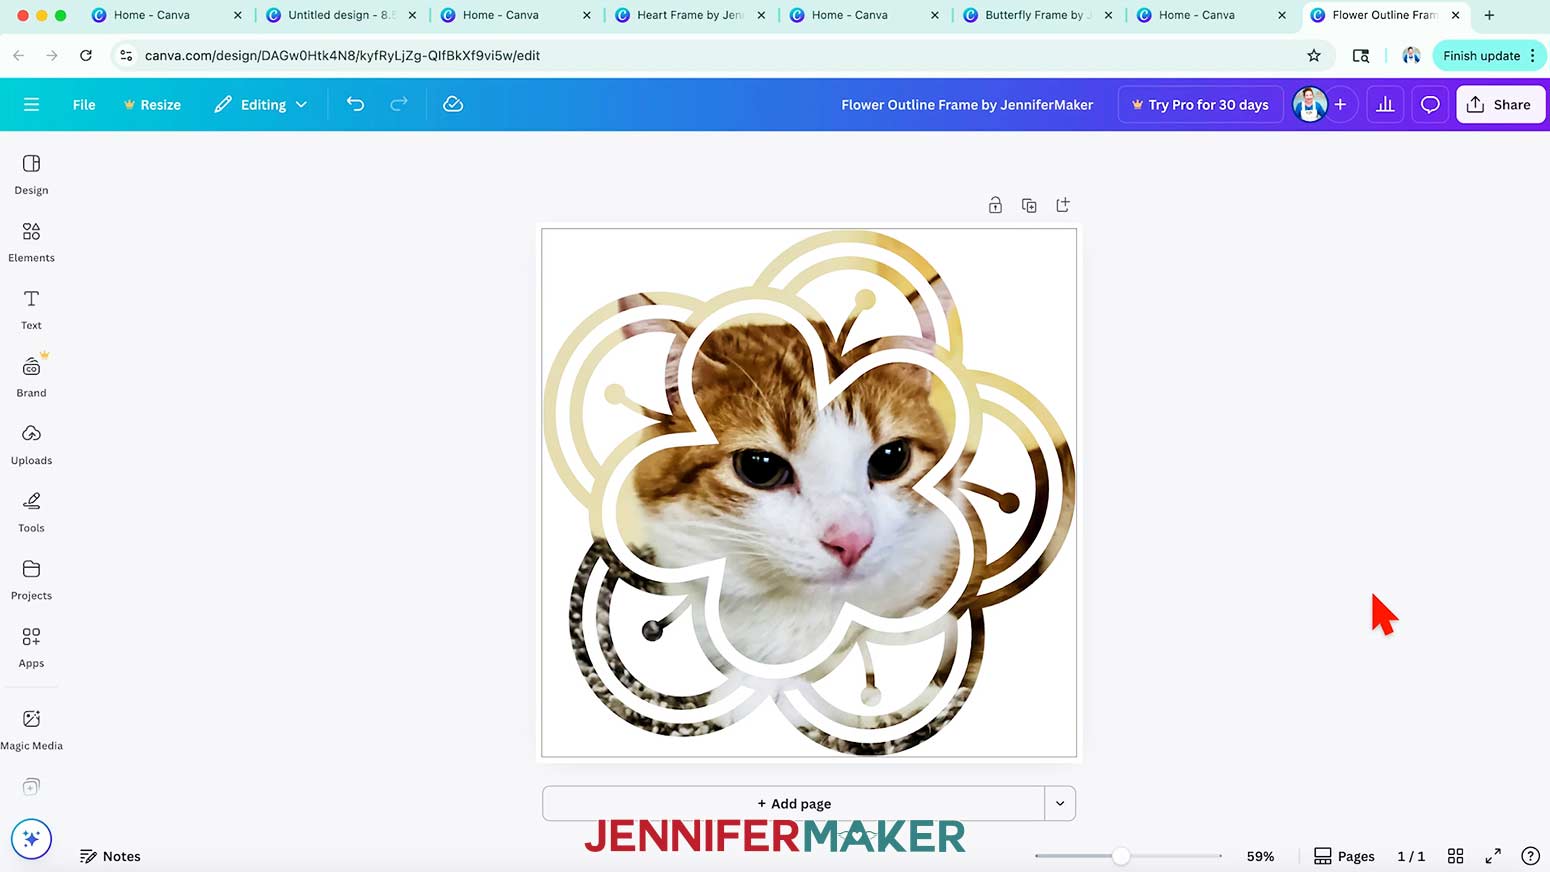
- The single flower outline frame works the same way as the butterfly frame.
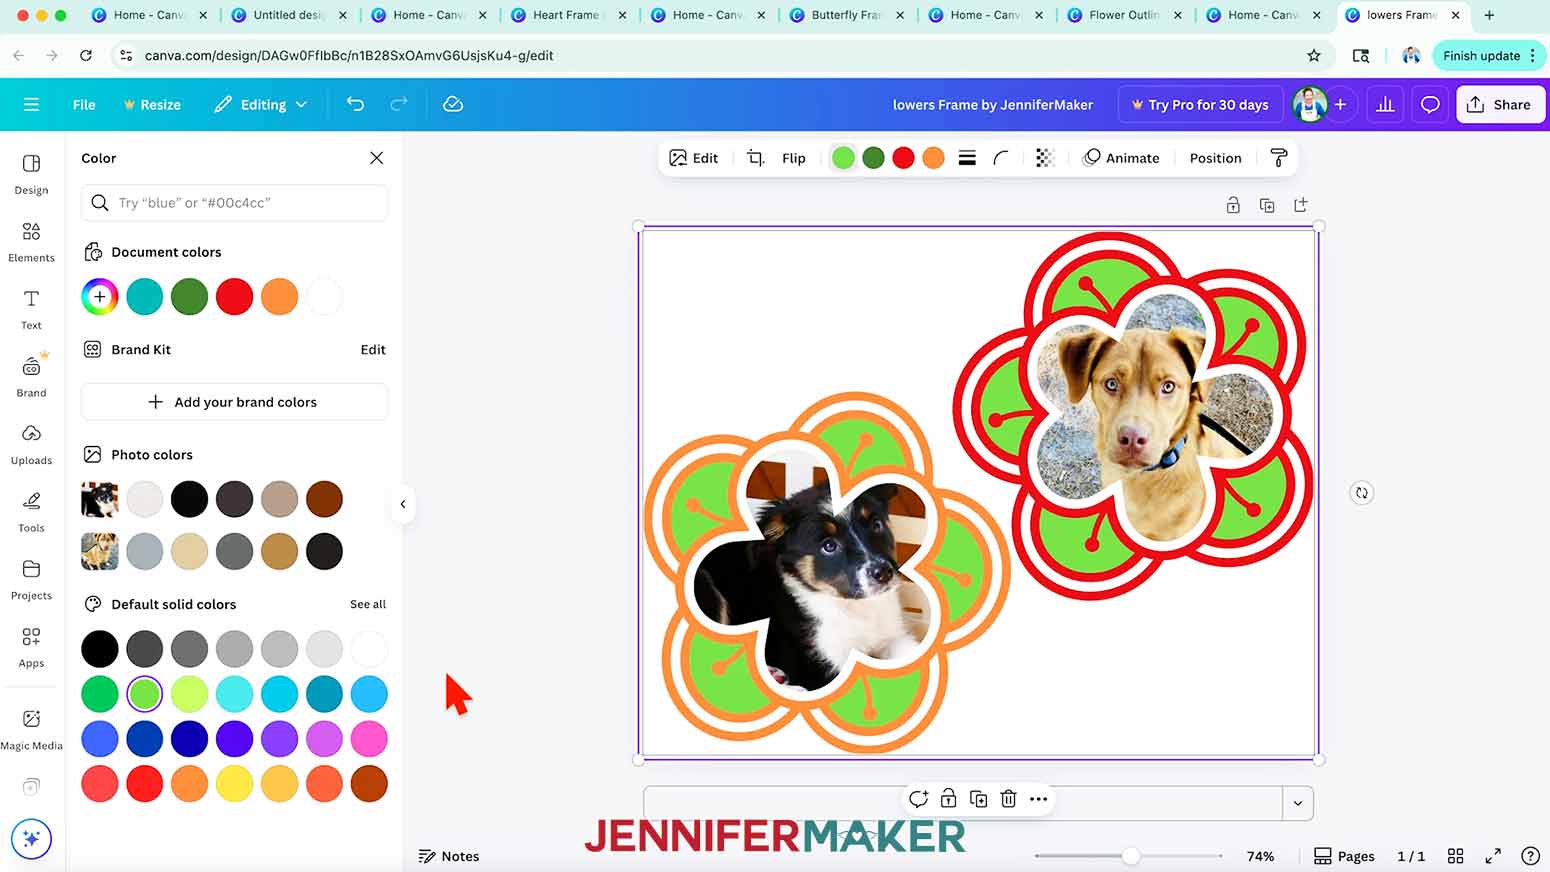
- The flowers frame has two flower-shaped frames (so you can feature two different images), plus colorful decorations you can adjust using the color swatches in Canva’s top menu.
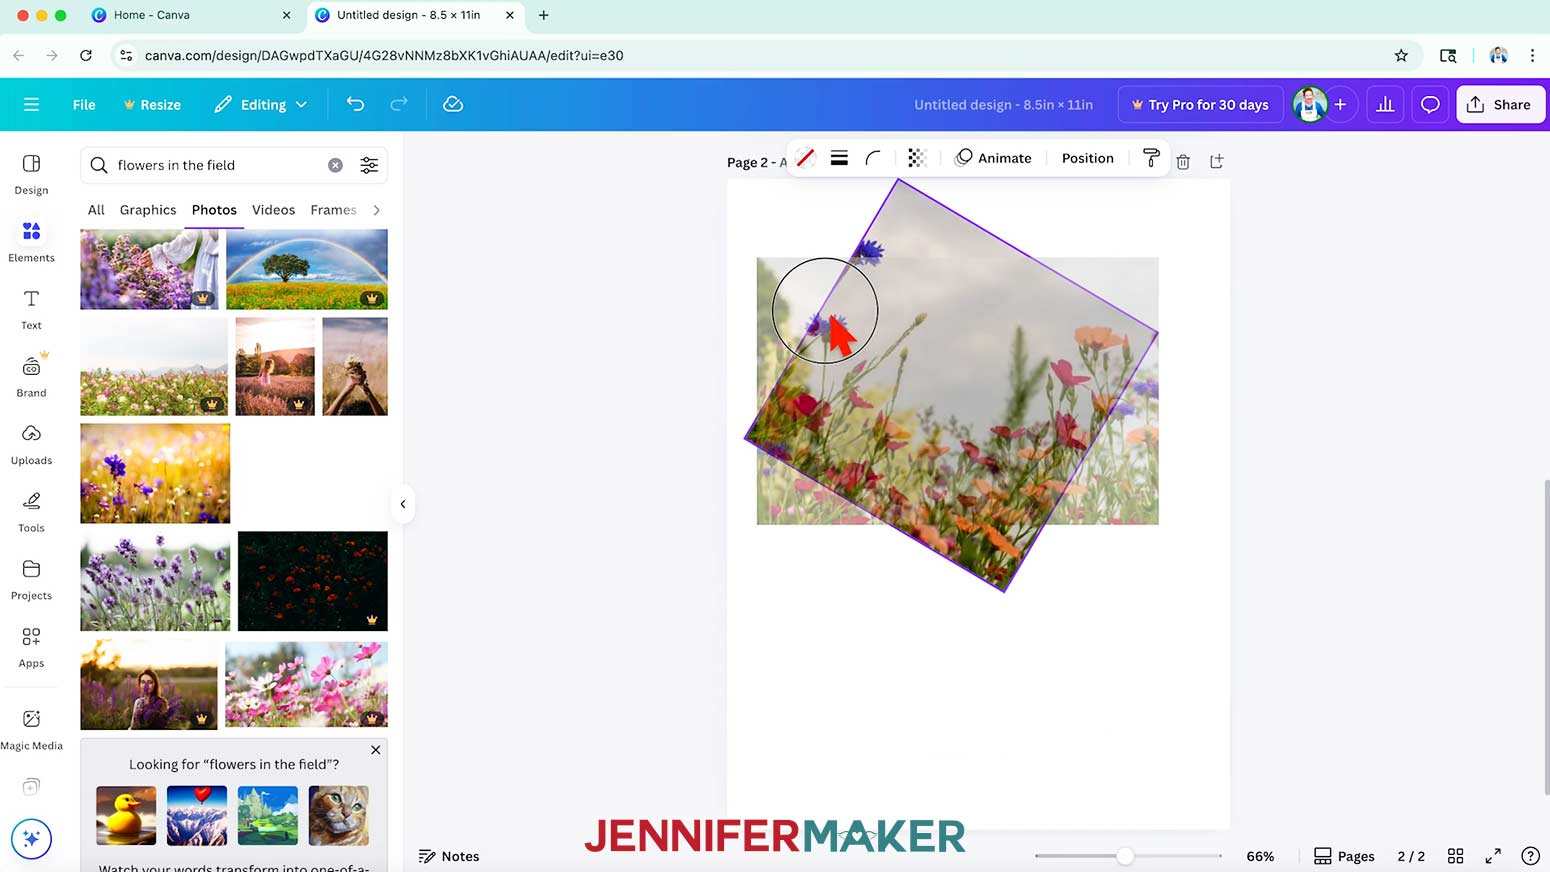
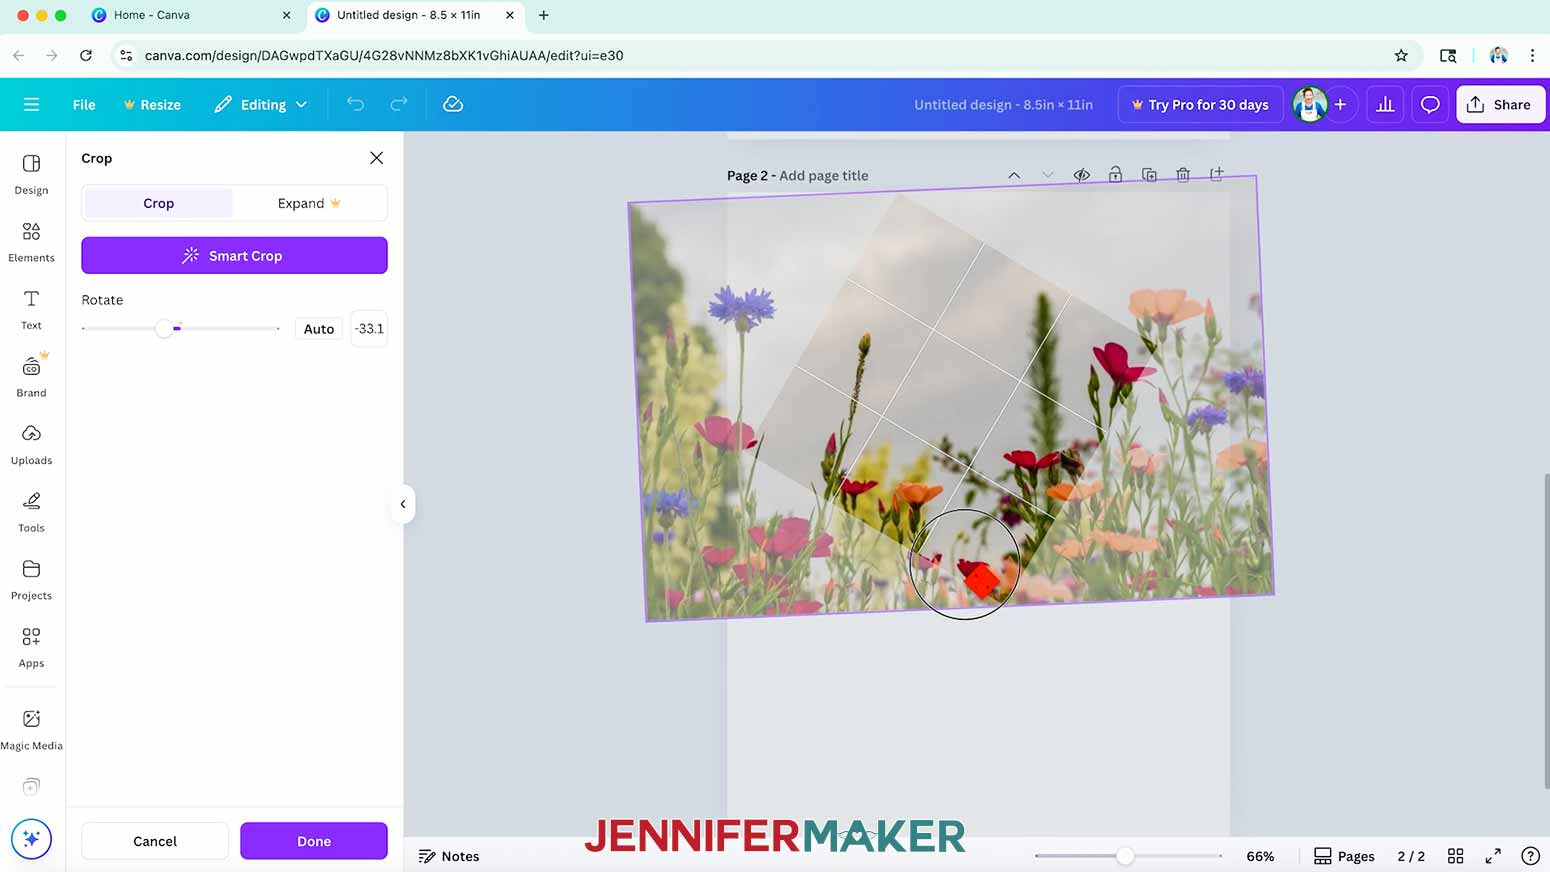
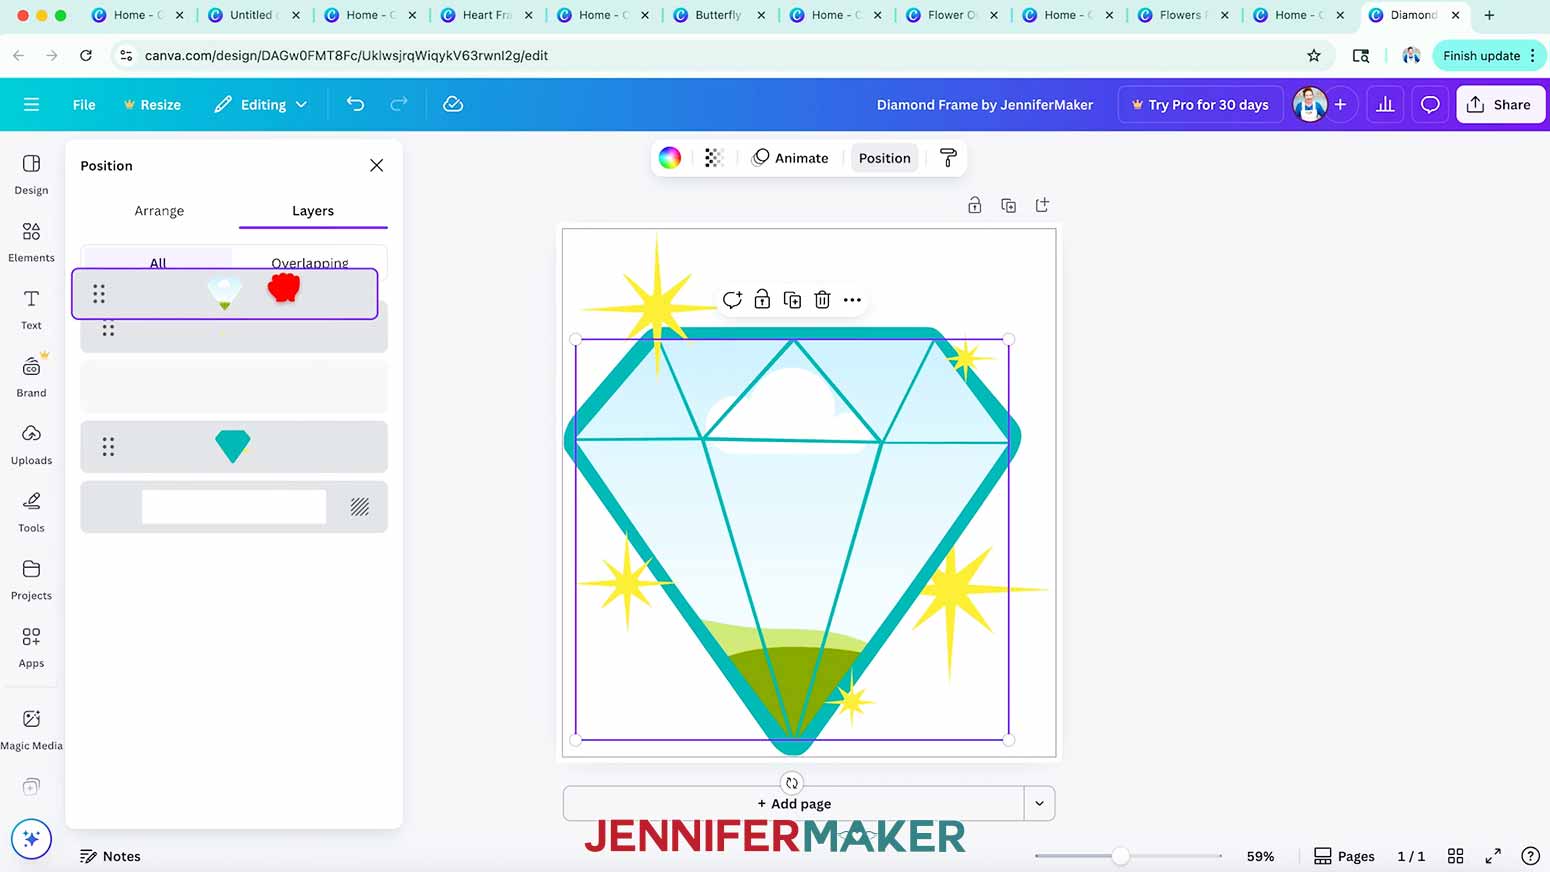
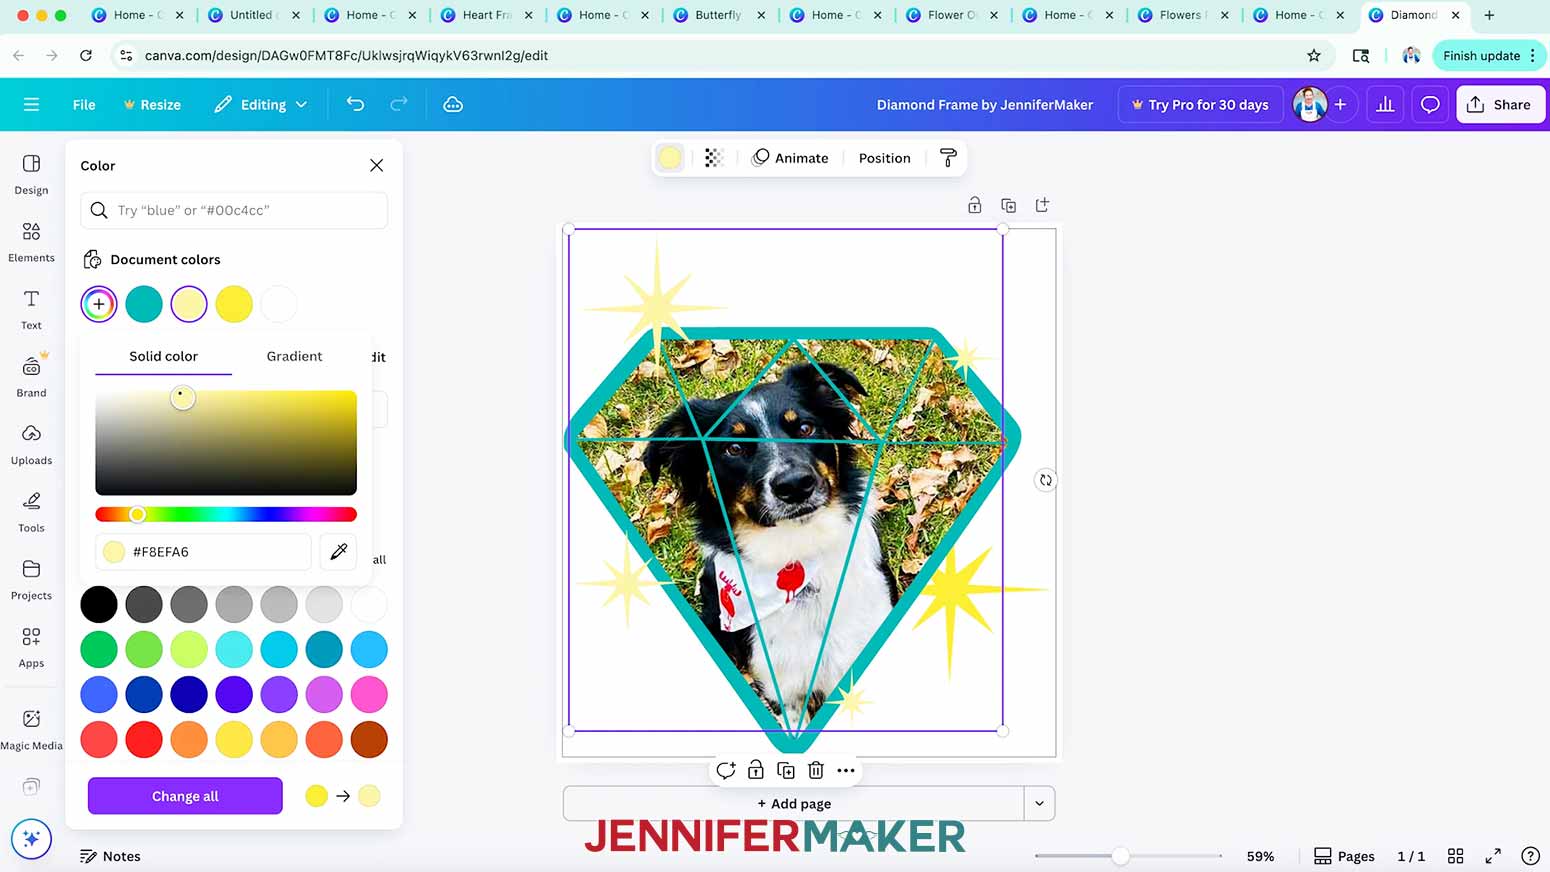
- The diamond frame has sparkle embellishments on top of it, and it requires an extra step to use it in Canva.
- To use the diamond frame, first select the frame and click “Position.”
- Under the “Layers” tab, drag the frame layer with the landscape placeholder on top of the decorations.
- Close the “Position” menu, and you’ll see that I’ve made this frame using several open areas, which let the base color show through in between them. NOTE: This frame will only work with a single photo, so each section of the diamond will show a different part of the same photo.
- Drag your photo into the frame from the "Uploads" menu.
- Then, adjust it as needed by double-clicking and using the cropping tool. TIP: Keep the important parts of your photo in the larger openings.
- Go back to the “Position” menu and drag the decorative sparkle elements to the top again.
- I made the embellishments adjustable, so you can select them, then click the color swatch in the top menu to change their colors.
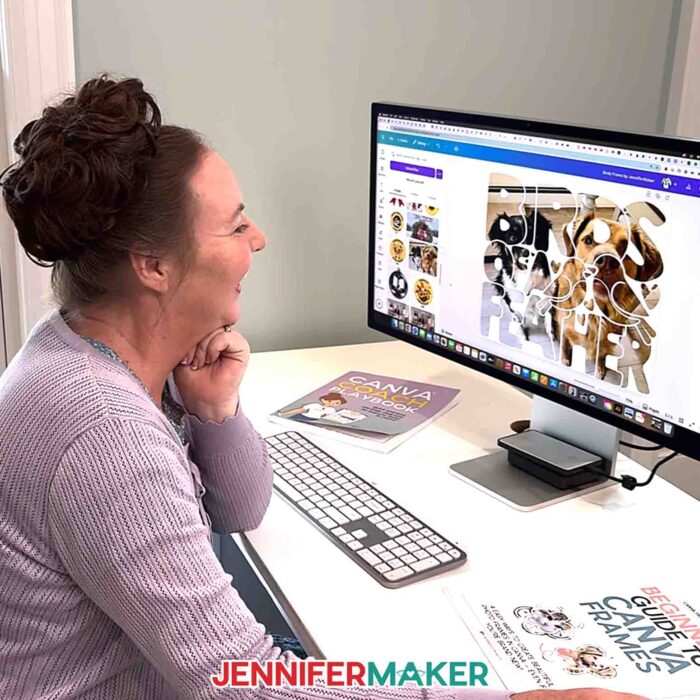
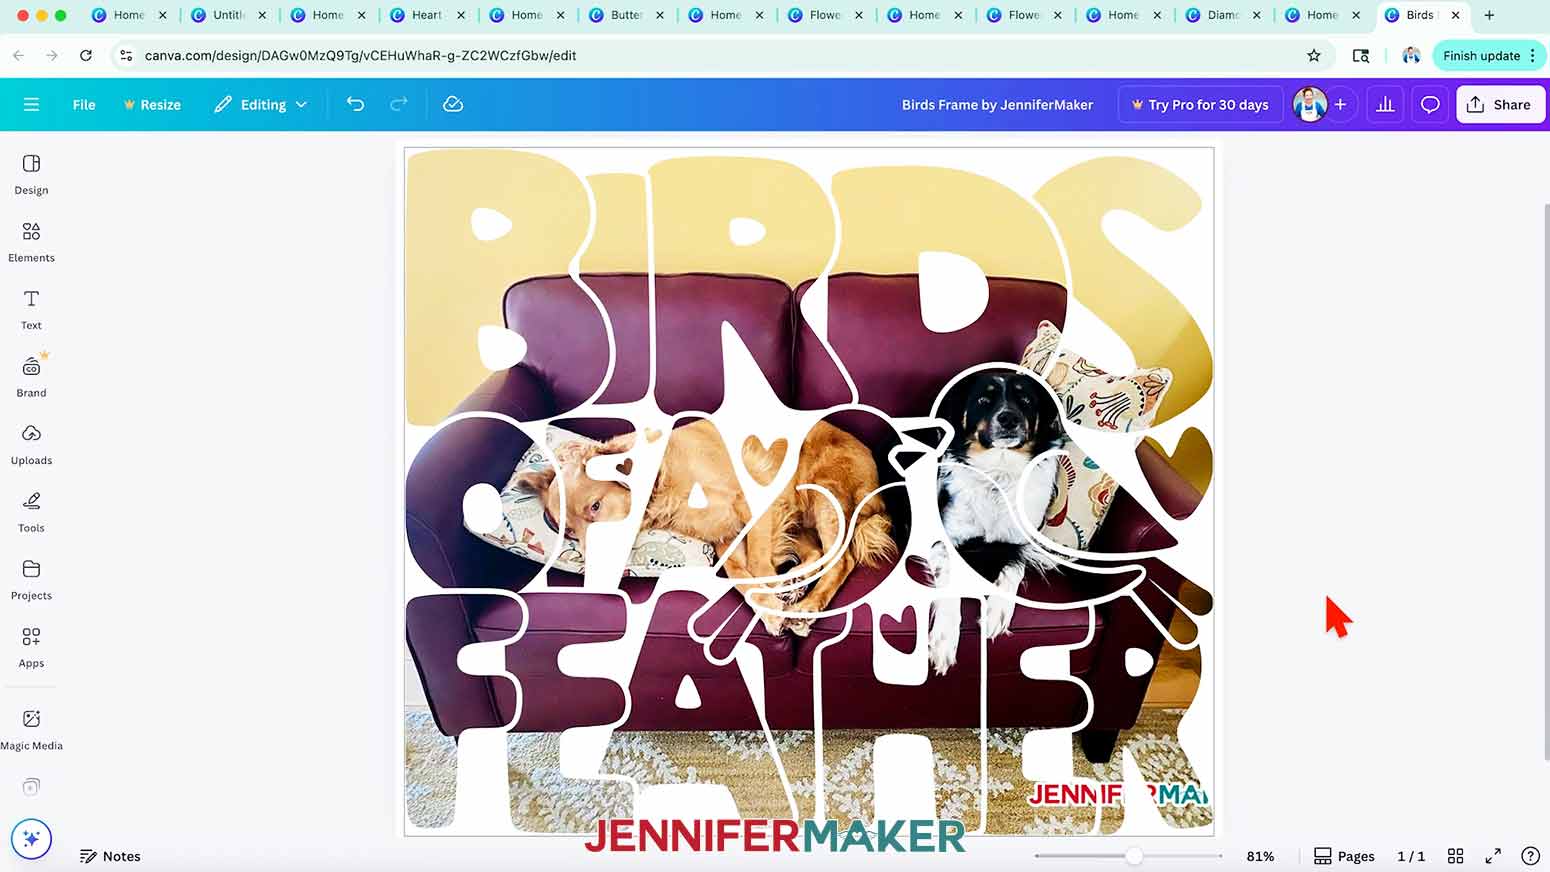
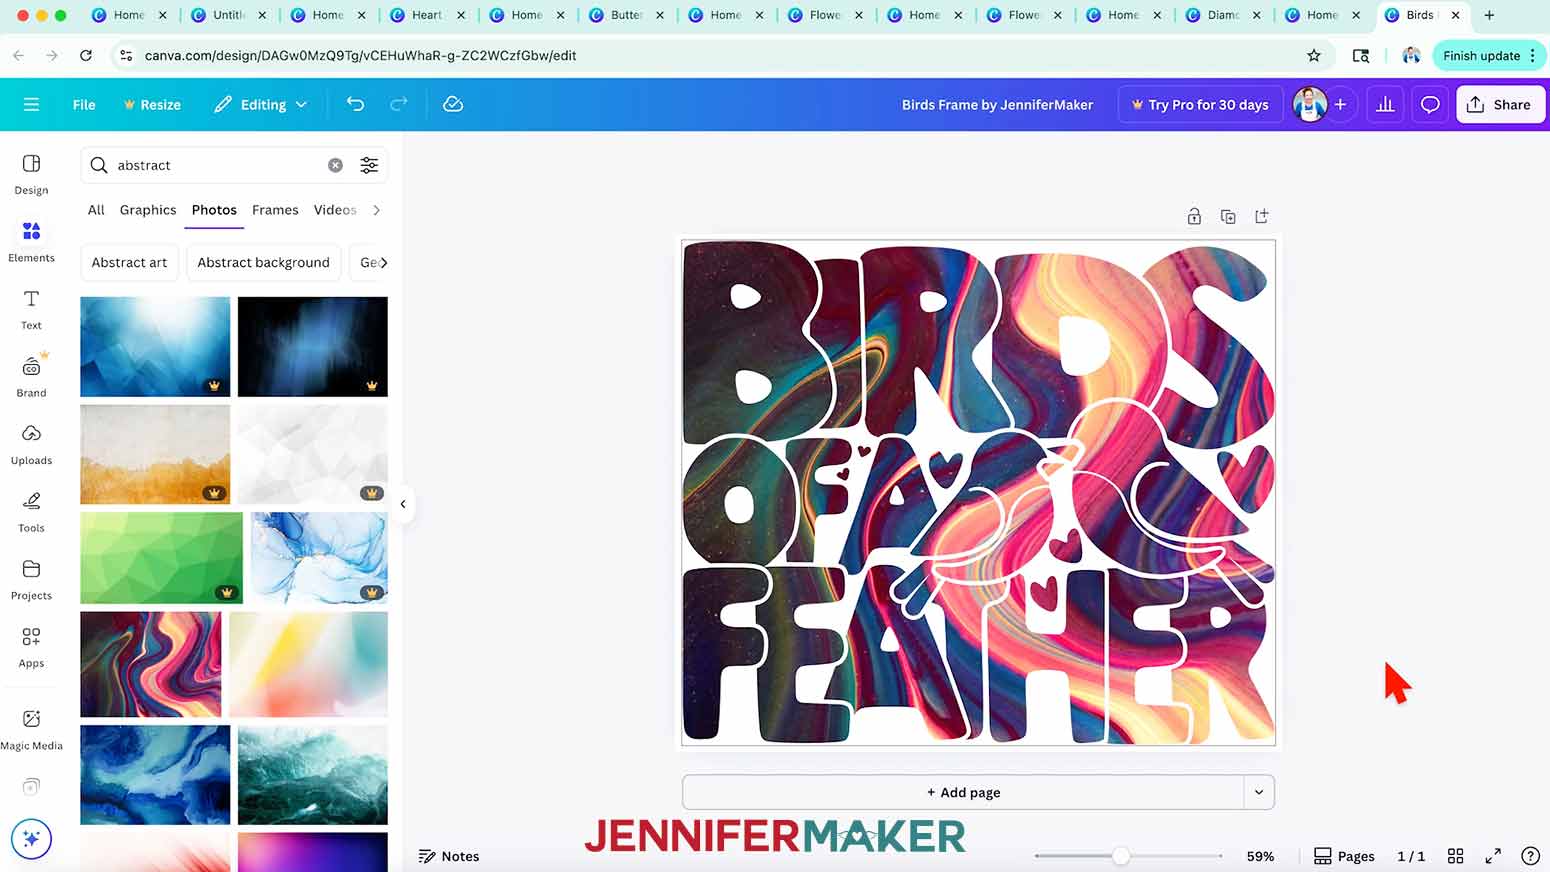
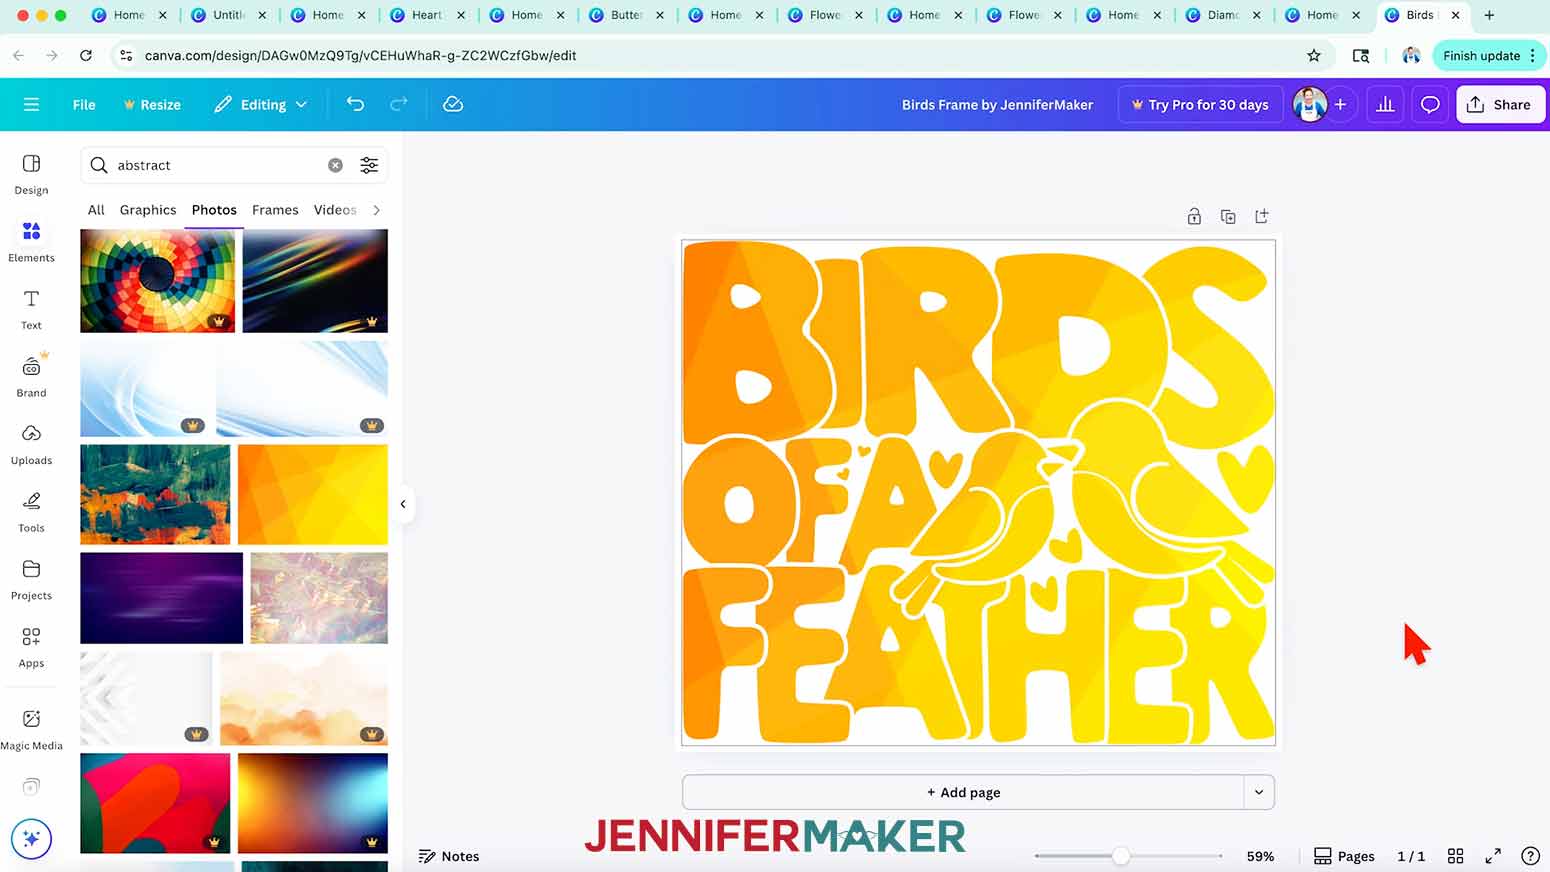
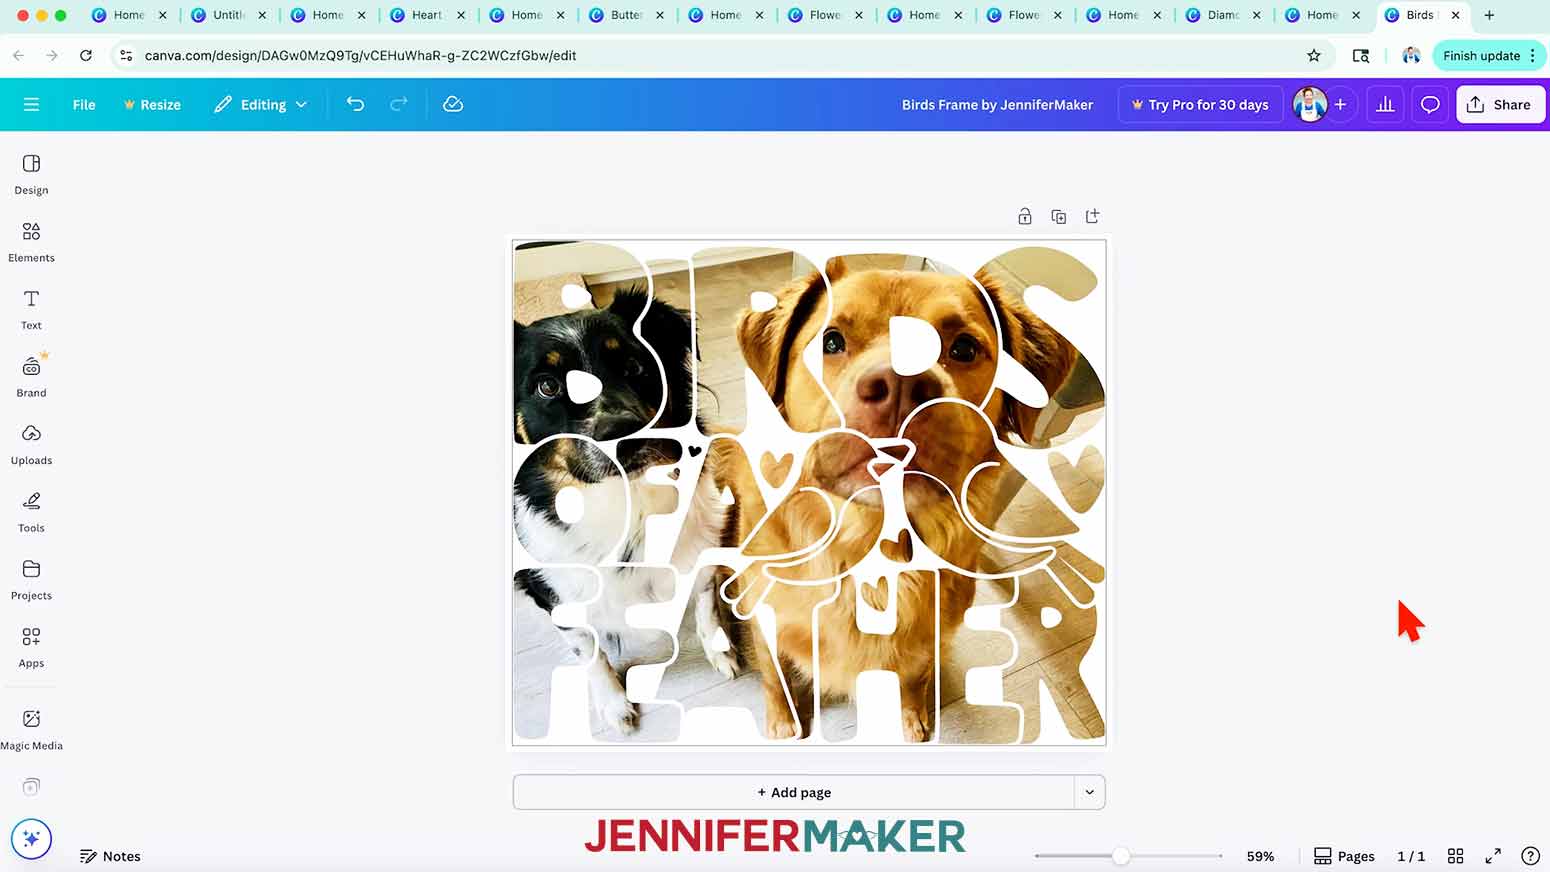
- The birds frame is a more detailed frame, where the shapes are as compelling as what you add to them. Not all photos will work with a complex frame like this, because there are a lot of spaces to balance.
- Patterns or abstract designs help to fill more detailed frames like this. If you want to be able to easily read the “Birds of a Feather” text, pick a subtle pattern so the focus will shift to the design’s shapes instead of the photo. Pick one that’s not too busy so it won’t compete!
- But you can still make a photo work with this frame. Try to position faces (especially eyes and other facial features) in large sections to help make the photo subject recognizable as well as the design’s shapes.
NOTE: I made my designs into sublimated shirts using my sublimation shirts for beginners tutorial. You can also follow my printable HTV/transfer paper process to make a shirt with iron-on vinyl or transfer paper.

 NOTE: I made my designs into sublimated shirts using my
 OPTION 3: CANVA FRAME MAKER APP
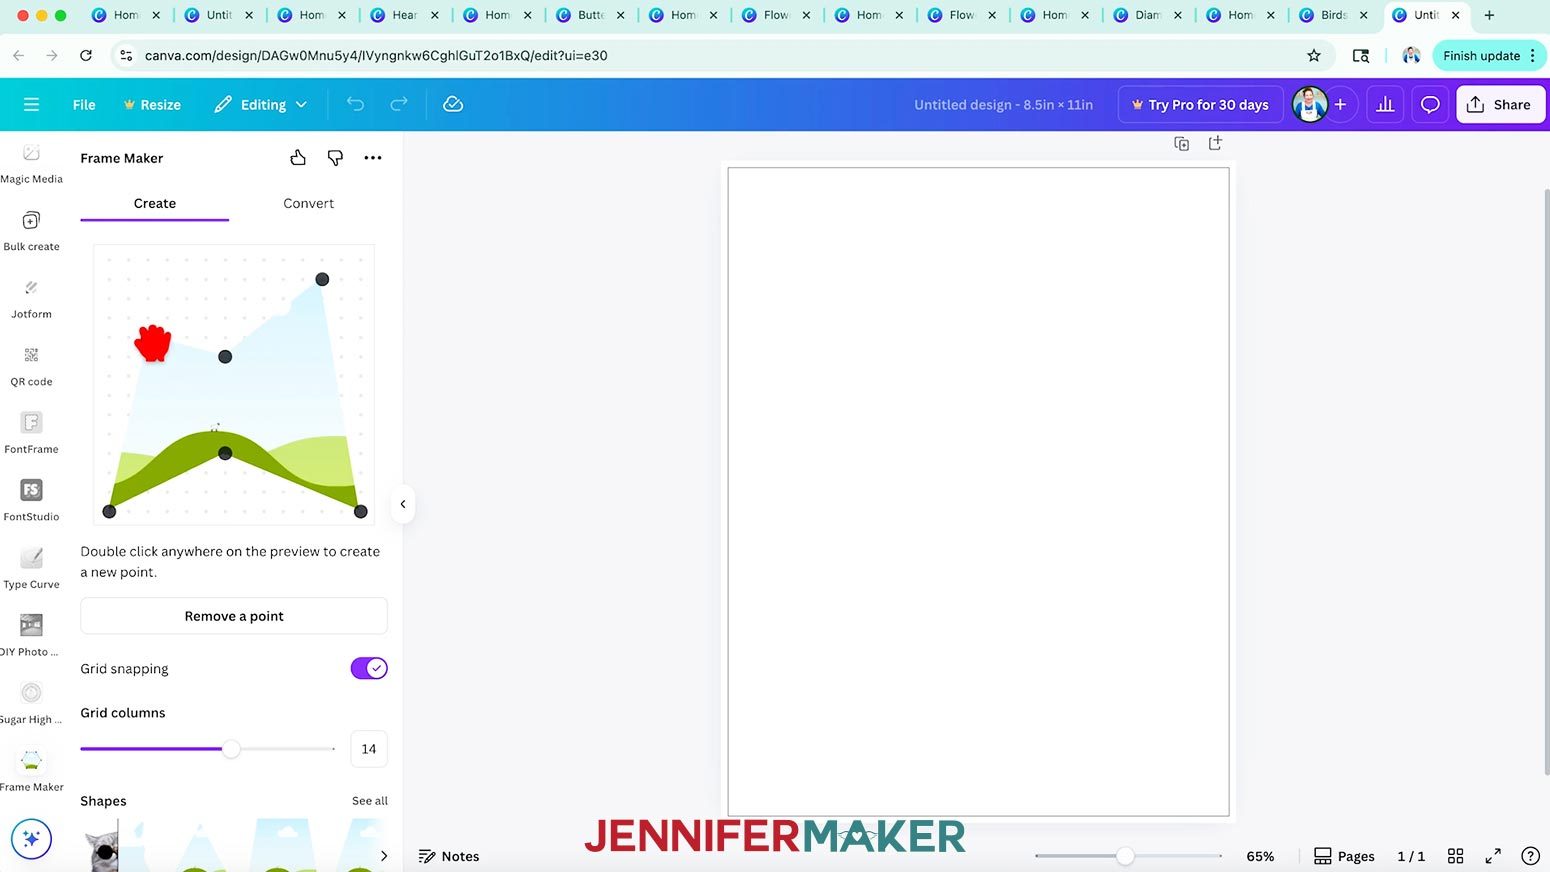
- In the left menu in Canva, scroll down to select “Apps.”
- Then search for “Frame Maker” and click to open the app.
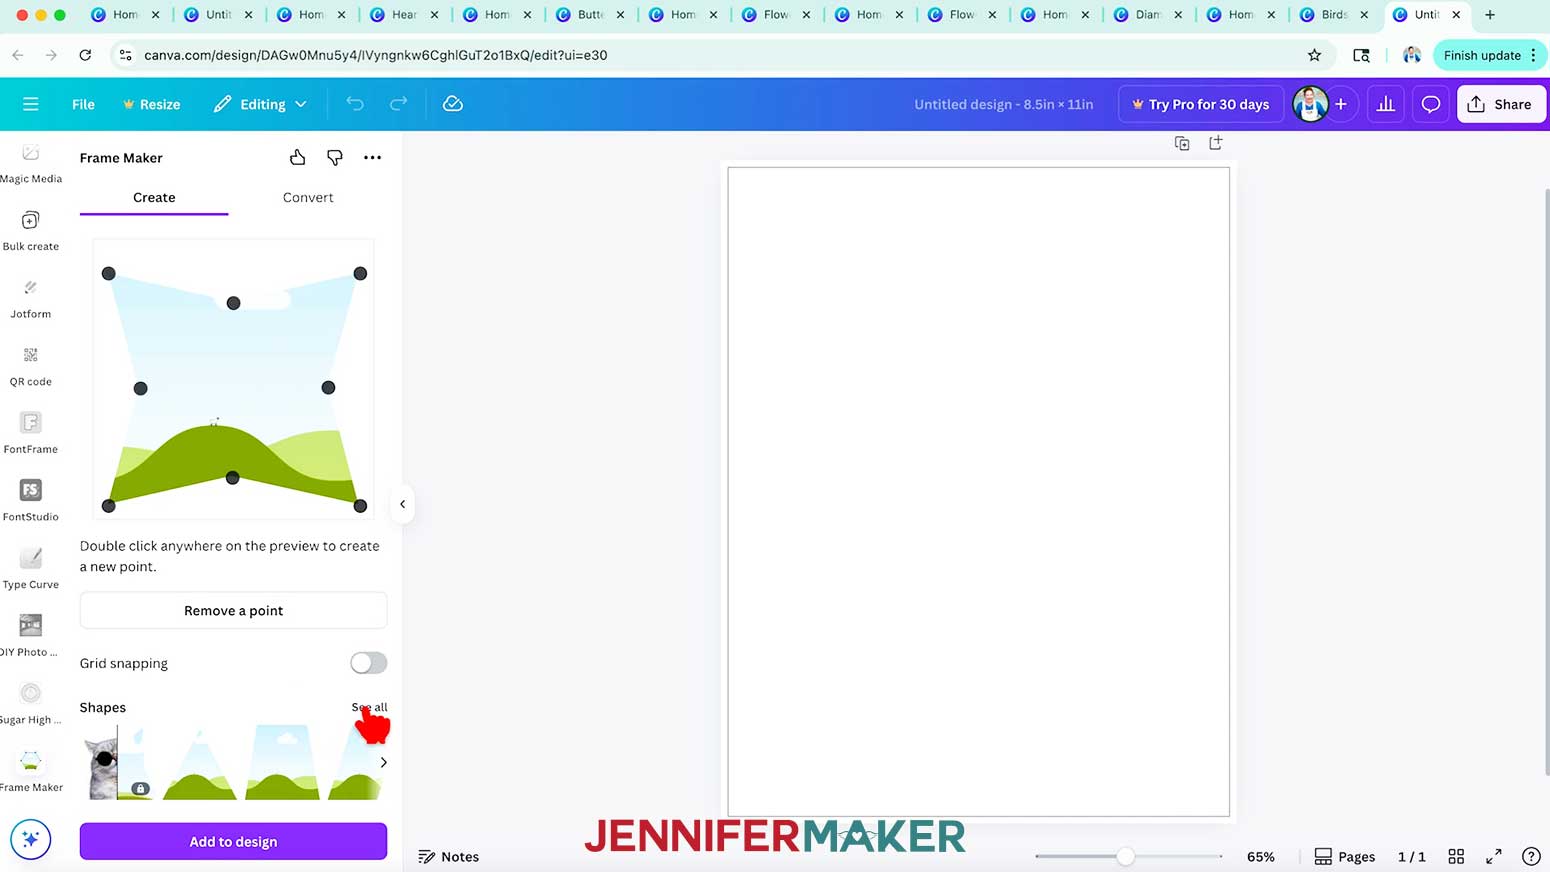
- You can adjust the points on the grid at the top. Double-click to add a new point to adjust the shape.
- To remove a point, click the “Remove a point” button, select the point you want to remove, then click the “Done” button.
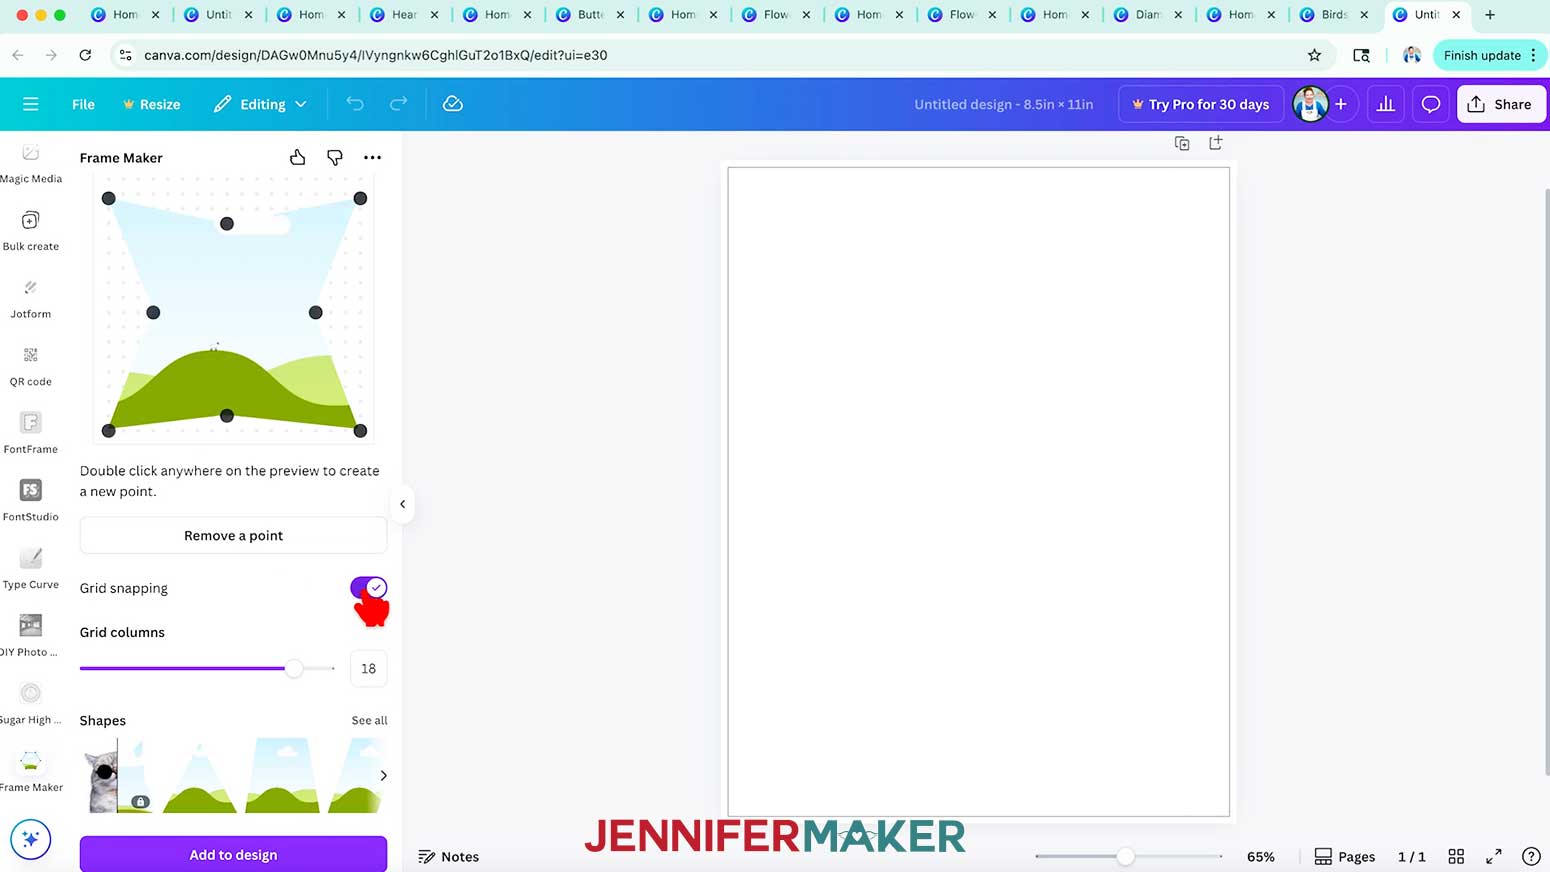
- Increasing the grid columns slider adds more grid points, which gives you more control over point placement.
- You can toggle off grid snapping to remove the grid completely, giving you even more control.
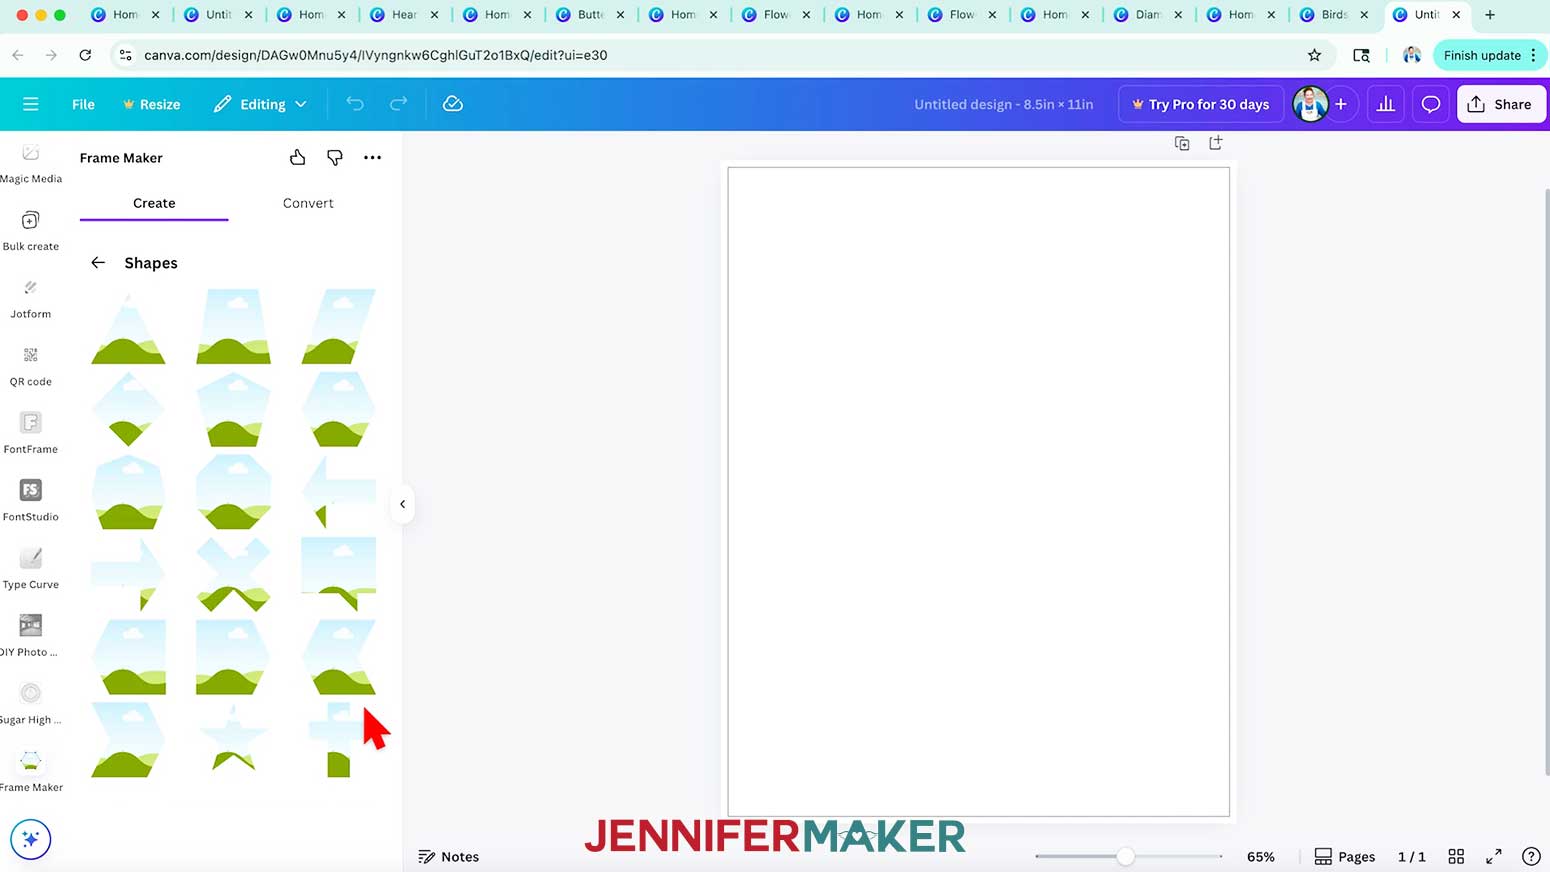
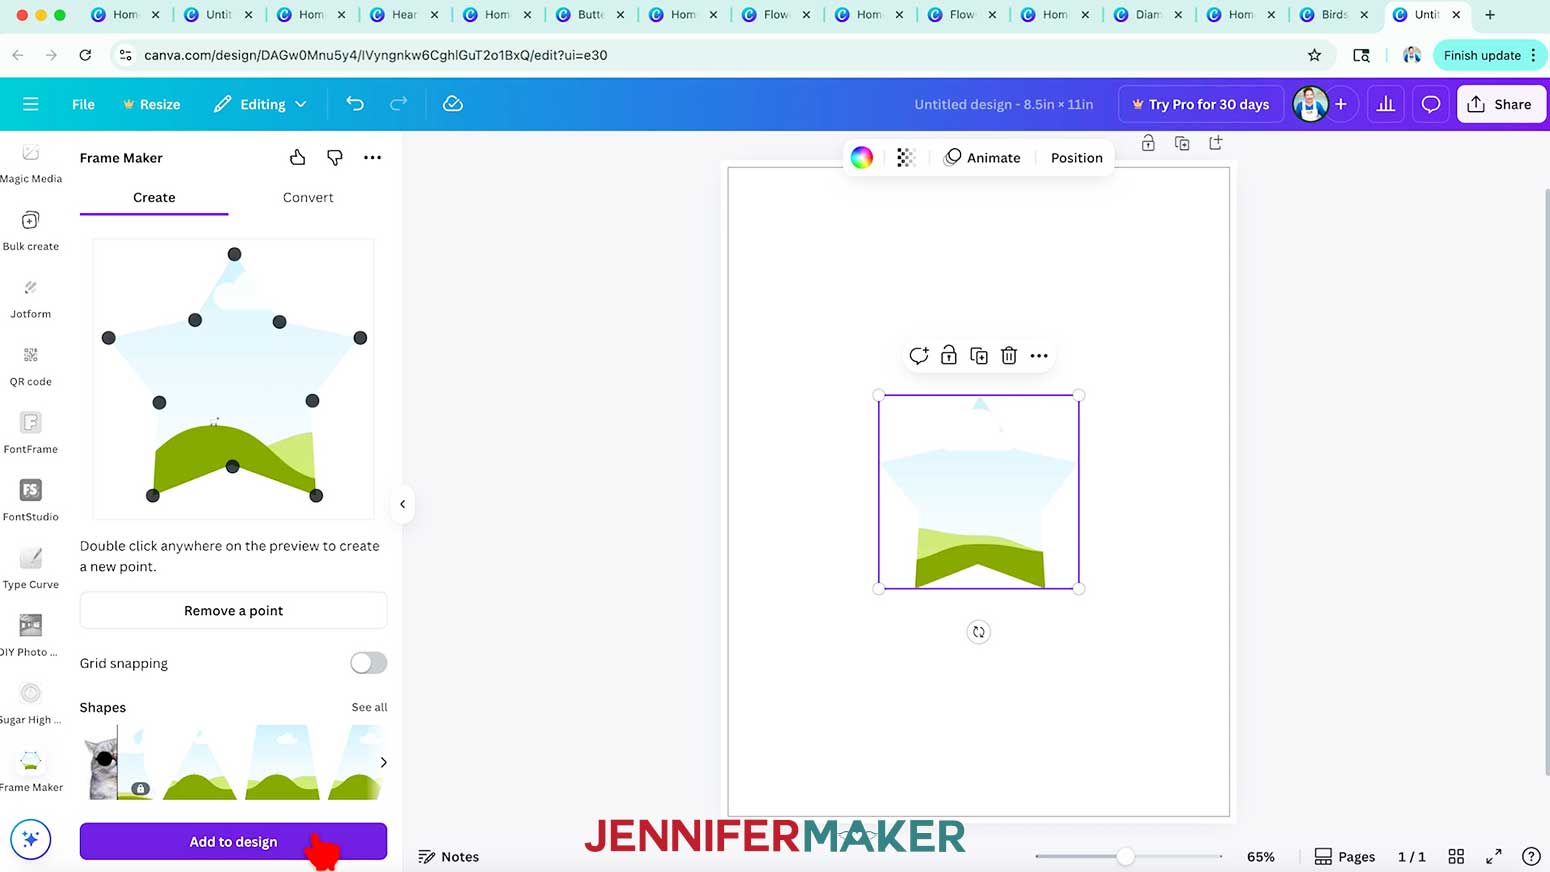
- Or, click “See all” next to the example shapes and you can start with a free option, like a star.
TIP: Start with simple shapes before moving to more complex designs so you get comfortable with the point adjustments.
- When you’re happy with the frame’s shape, click the “Add to design” button at the bottom.
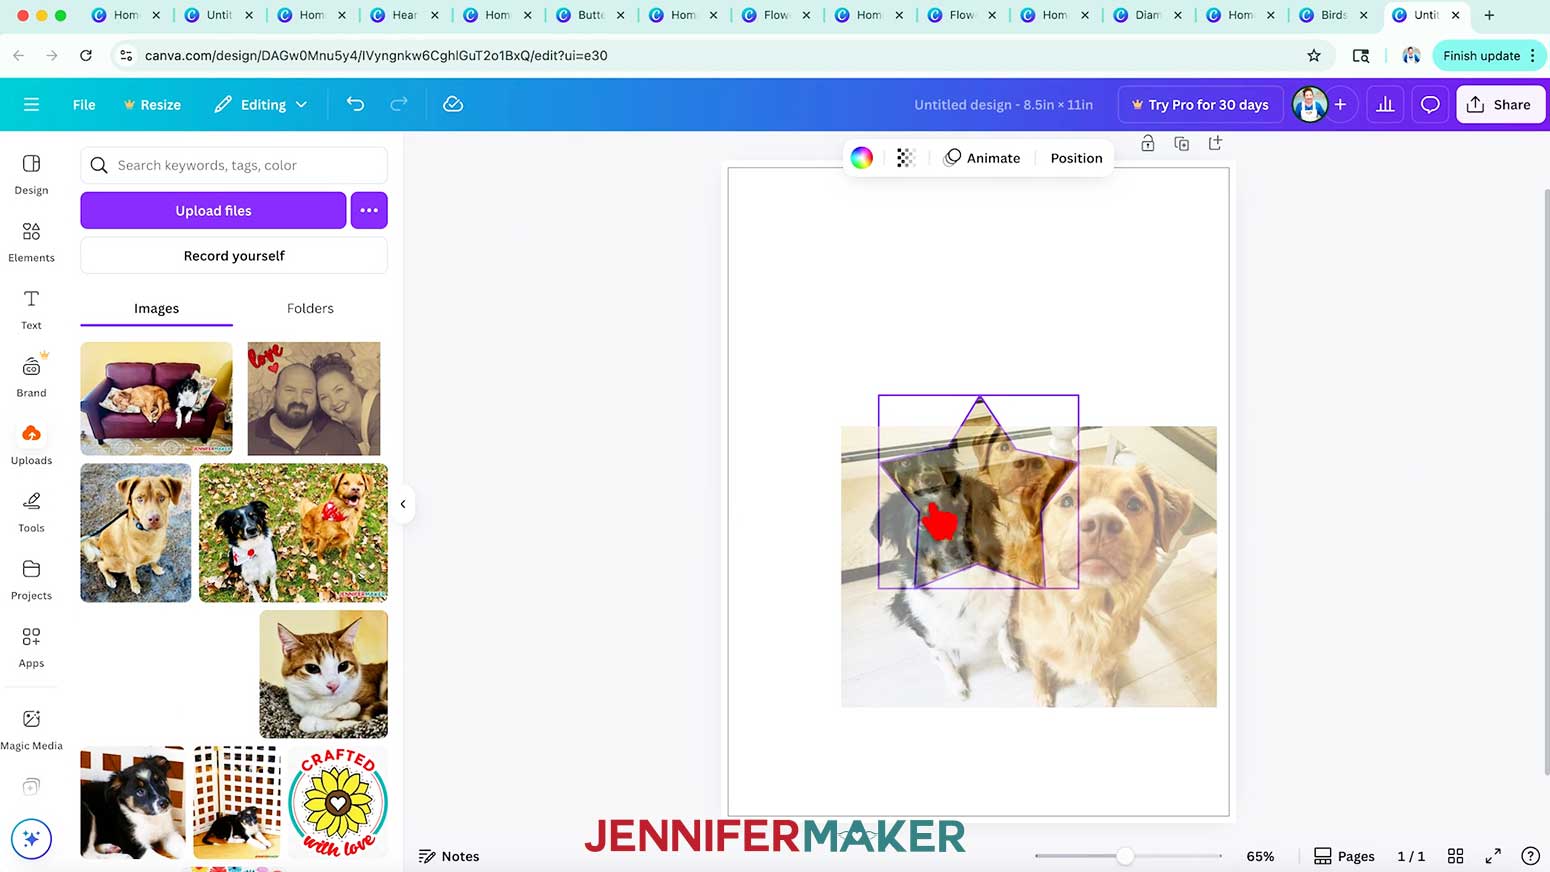
- Canva will turn it into a drag-and-drop photo frame on your canvas.
- Then just add your photo from the "Uploads" menu or Canva’s free photo library.
OPTION 4: CANVA AND PHOTOPEA
- On the Canva home page, click “Custom size.”
- Set the height and width large enough so you can resize the design later without losing quality. NOTE: I made mine 10” x 10.”
- Click “Create new design.”
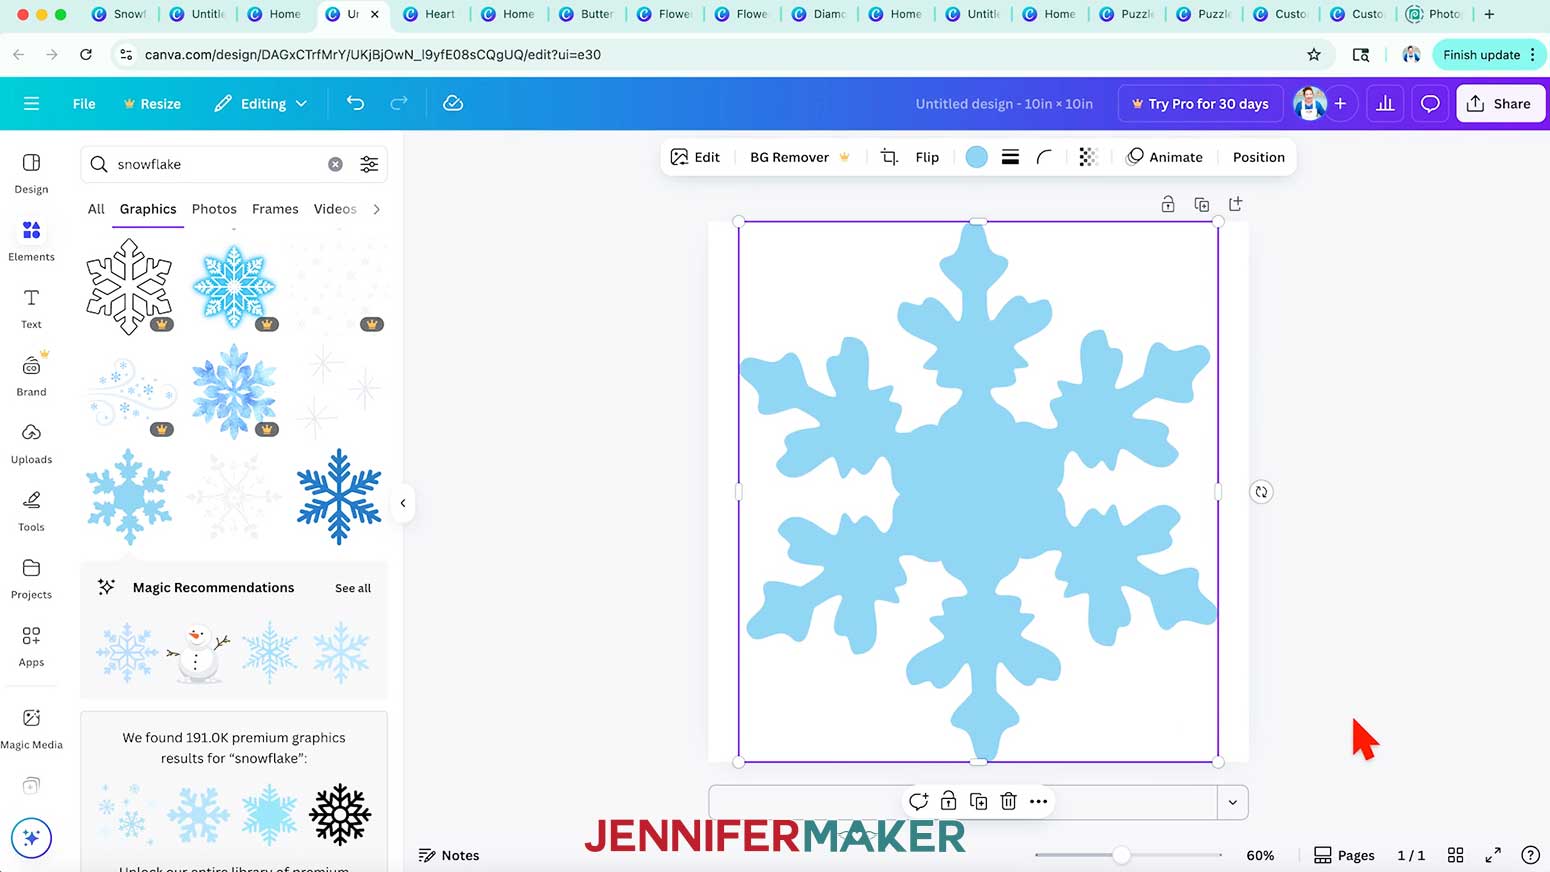
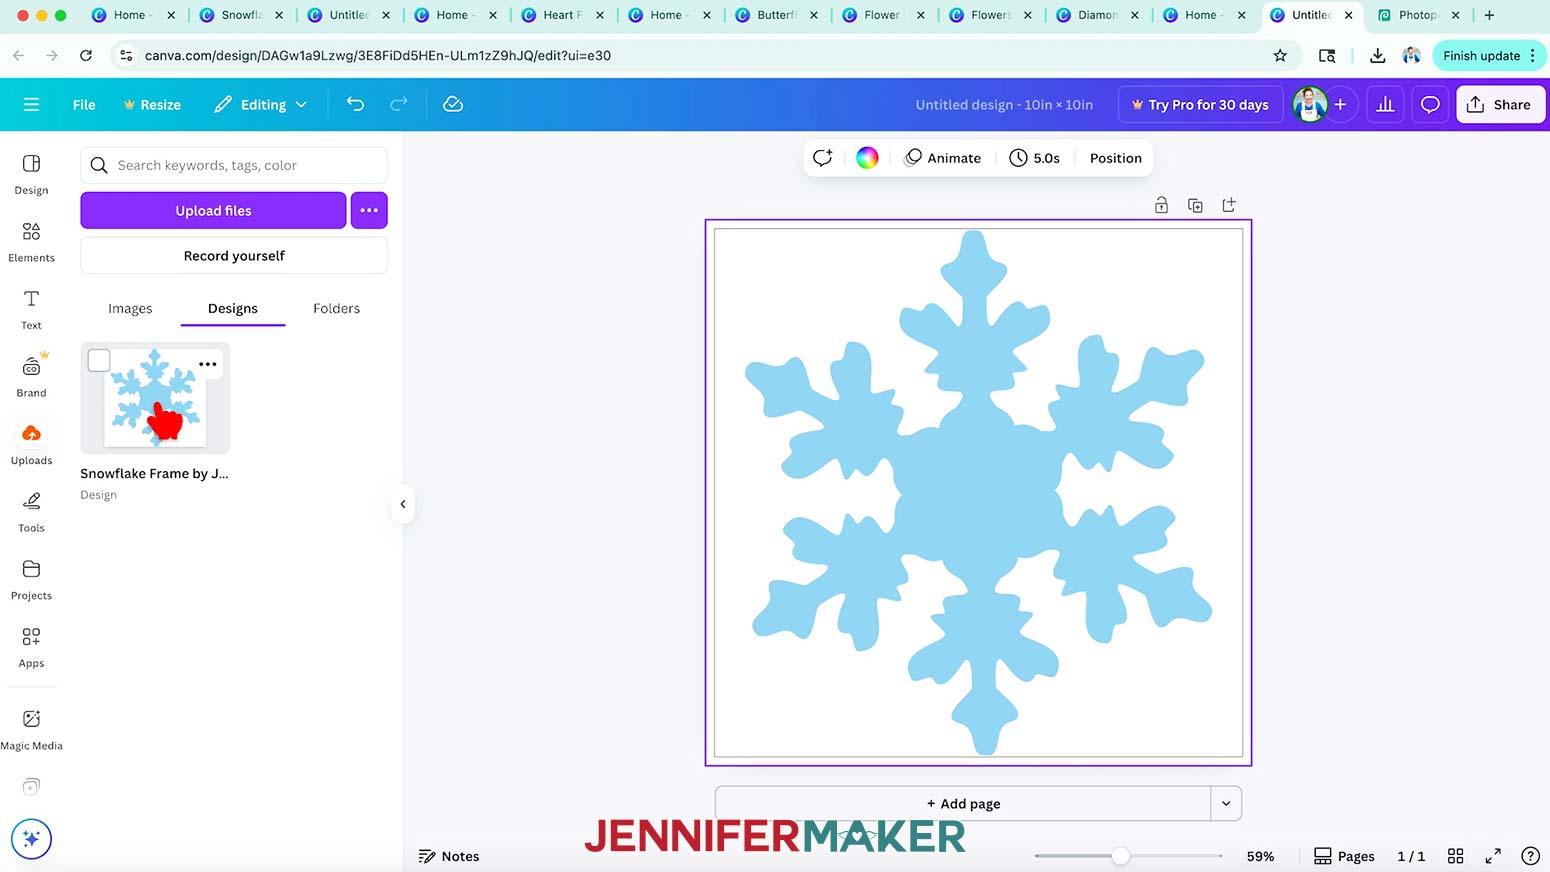
- Go to “Elements” and search for a topic for your frame.
NOTE: I’ll look for a snowflake in the “Graphics” category.
TIP: Choose a graphic with a large open area in the middle to show your image well.
- Click it to add it to the Canvas, then use the corner handles to resize it so it fills the canvas.
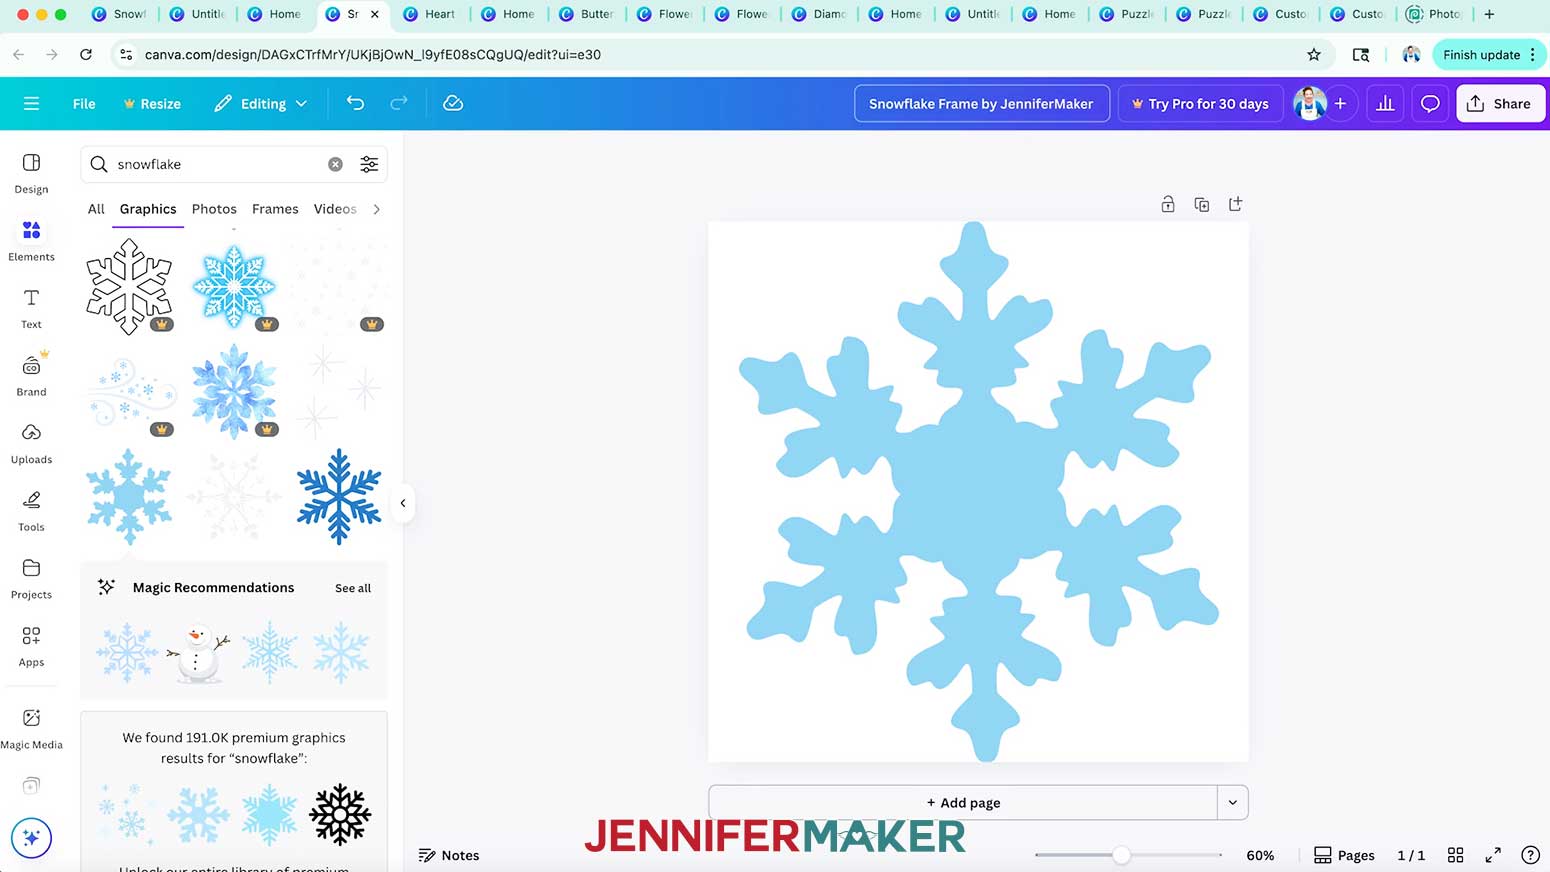
- Click “Position” in the top bar. Then under “Arrange,” click “Center” and then “Middle” to align the element in the canvas’ center.
- Double-click the title section at the top and rename your file so you can find it later.
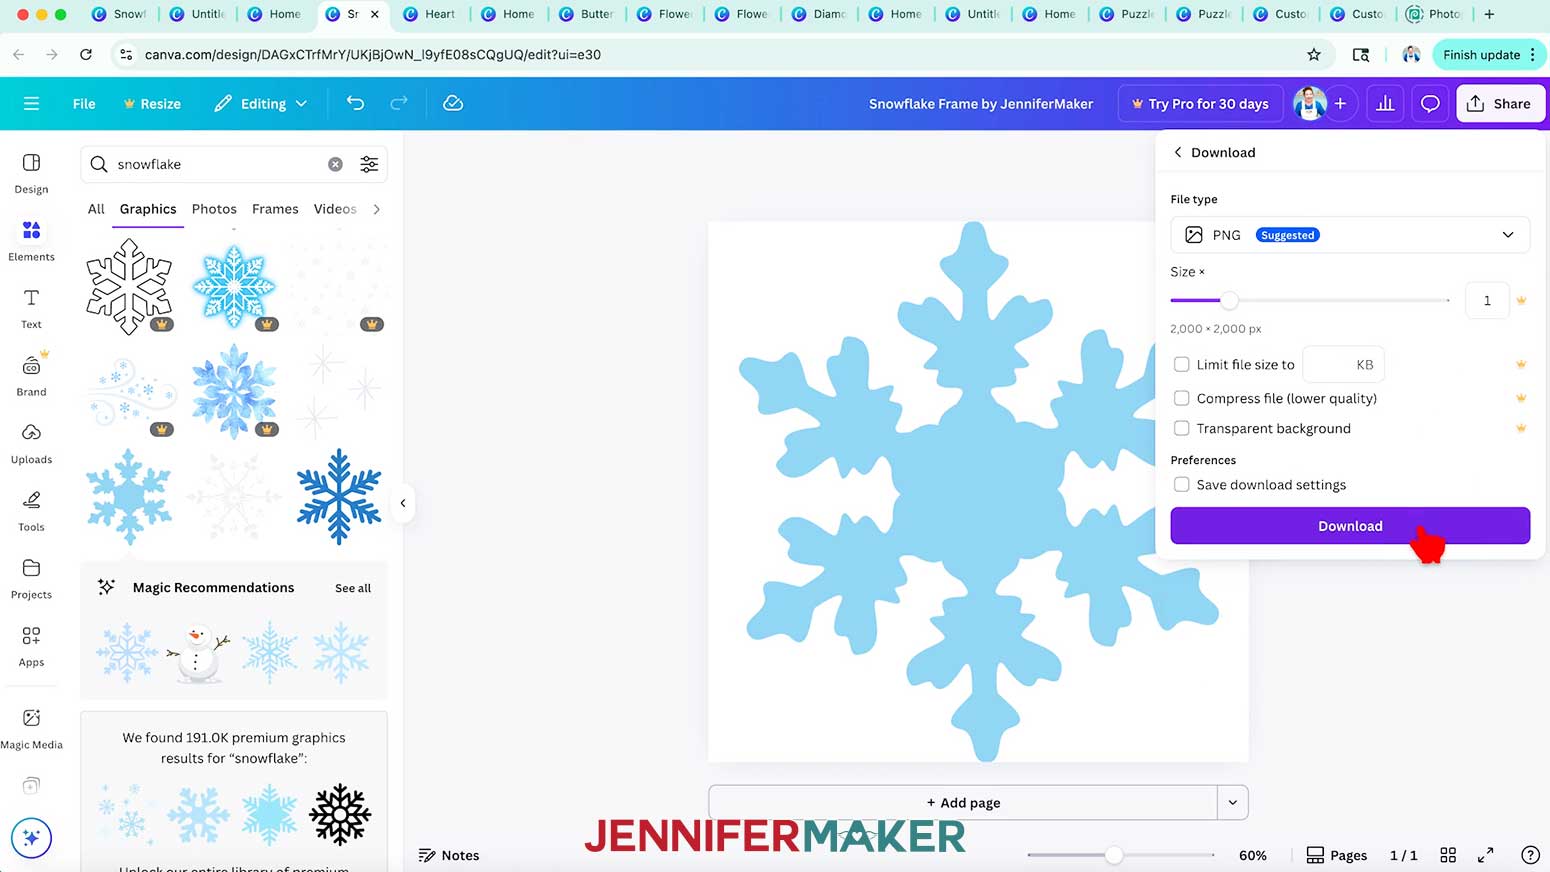
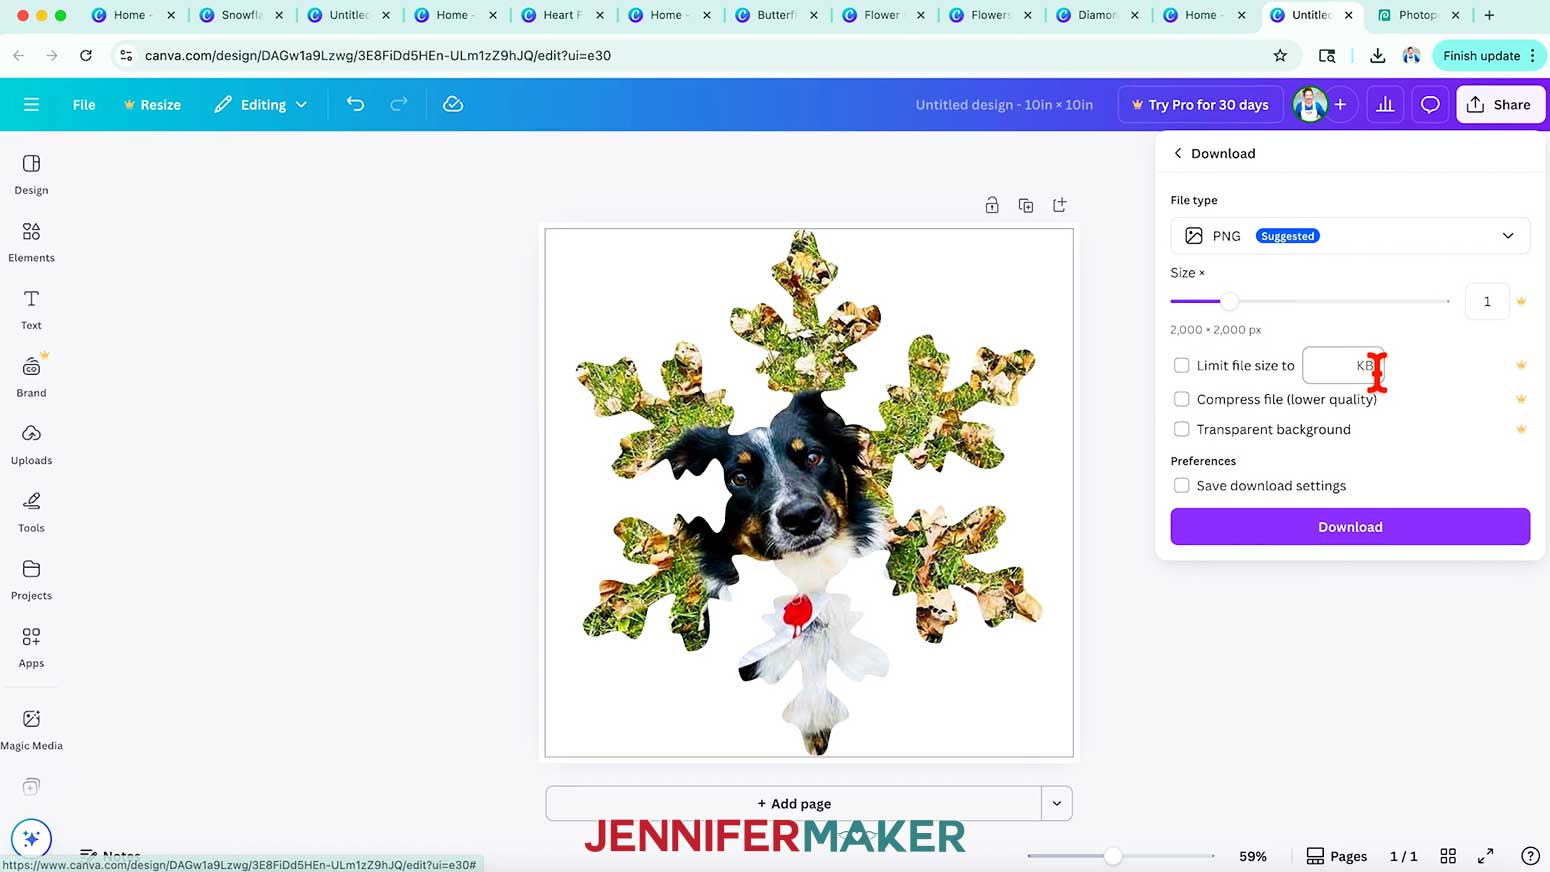
- Click “Share” at the top, then click “Download.”
- With a free account, choose “PNG” and click “Download.”
NOTE: If you have a Pro account, you can use the “Transparent background” option to save a few steps in Photopea.
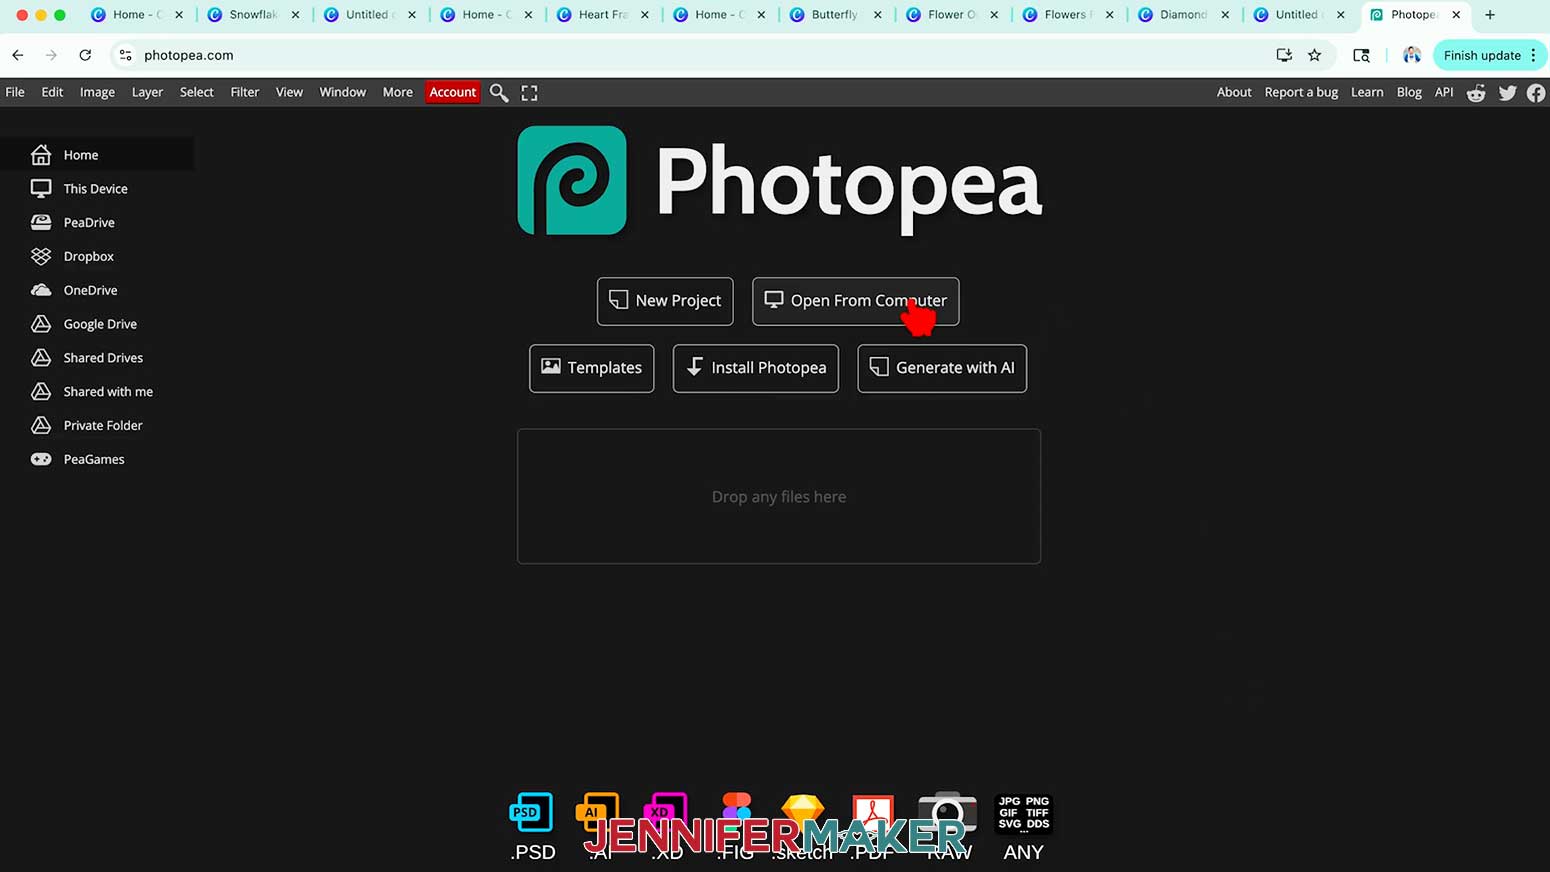
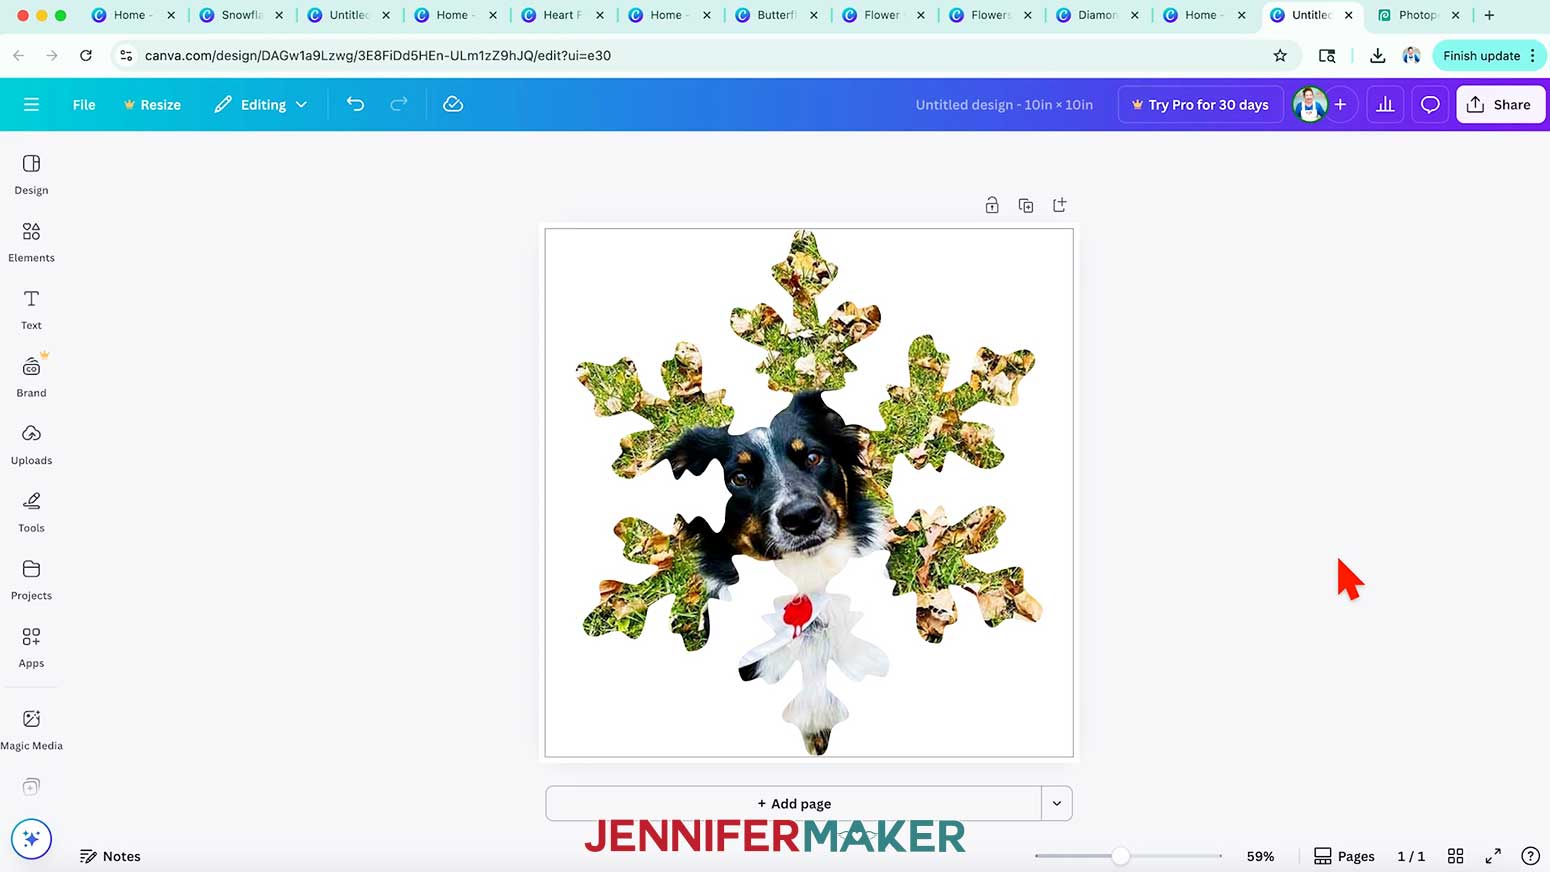
- In a new browser tab, go to photopea.com.
- Click “Open From Computer,” and select your PNG.
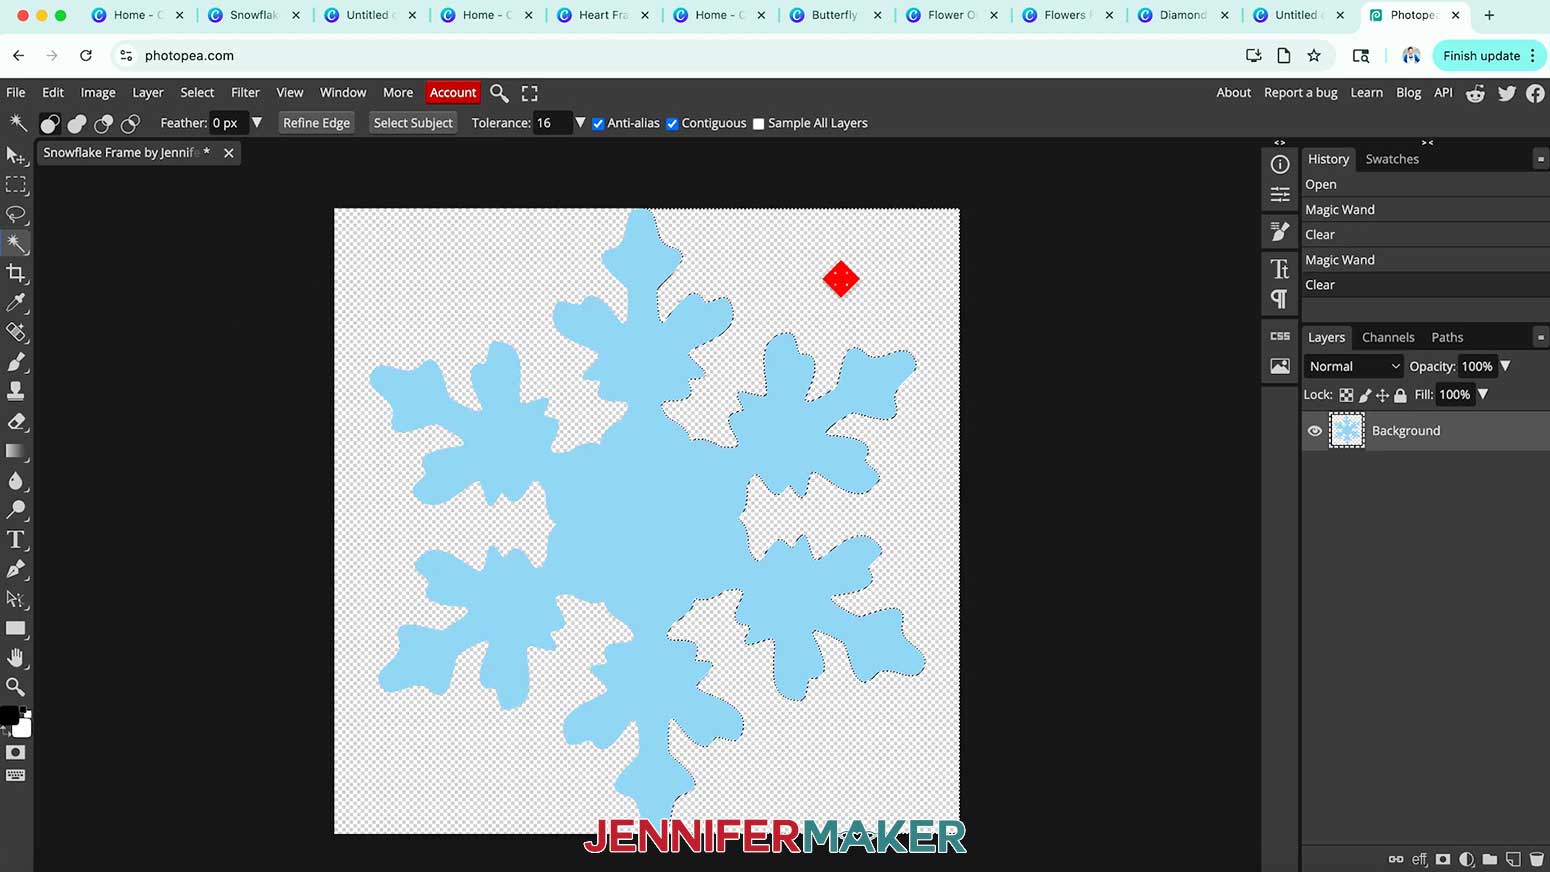
- With the Magic Wand tool selected in the left menu, click inside any area you want to be transparent in the frame, then press "Delete" or "Backspace" on your keyboard.
TIP: If you saved the element with a transparent background using a free account, you can skip this step.
NOTE: I’ll remove the white background sections.
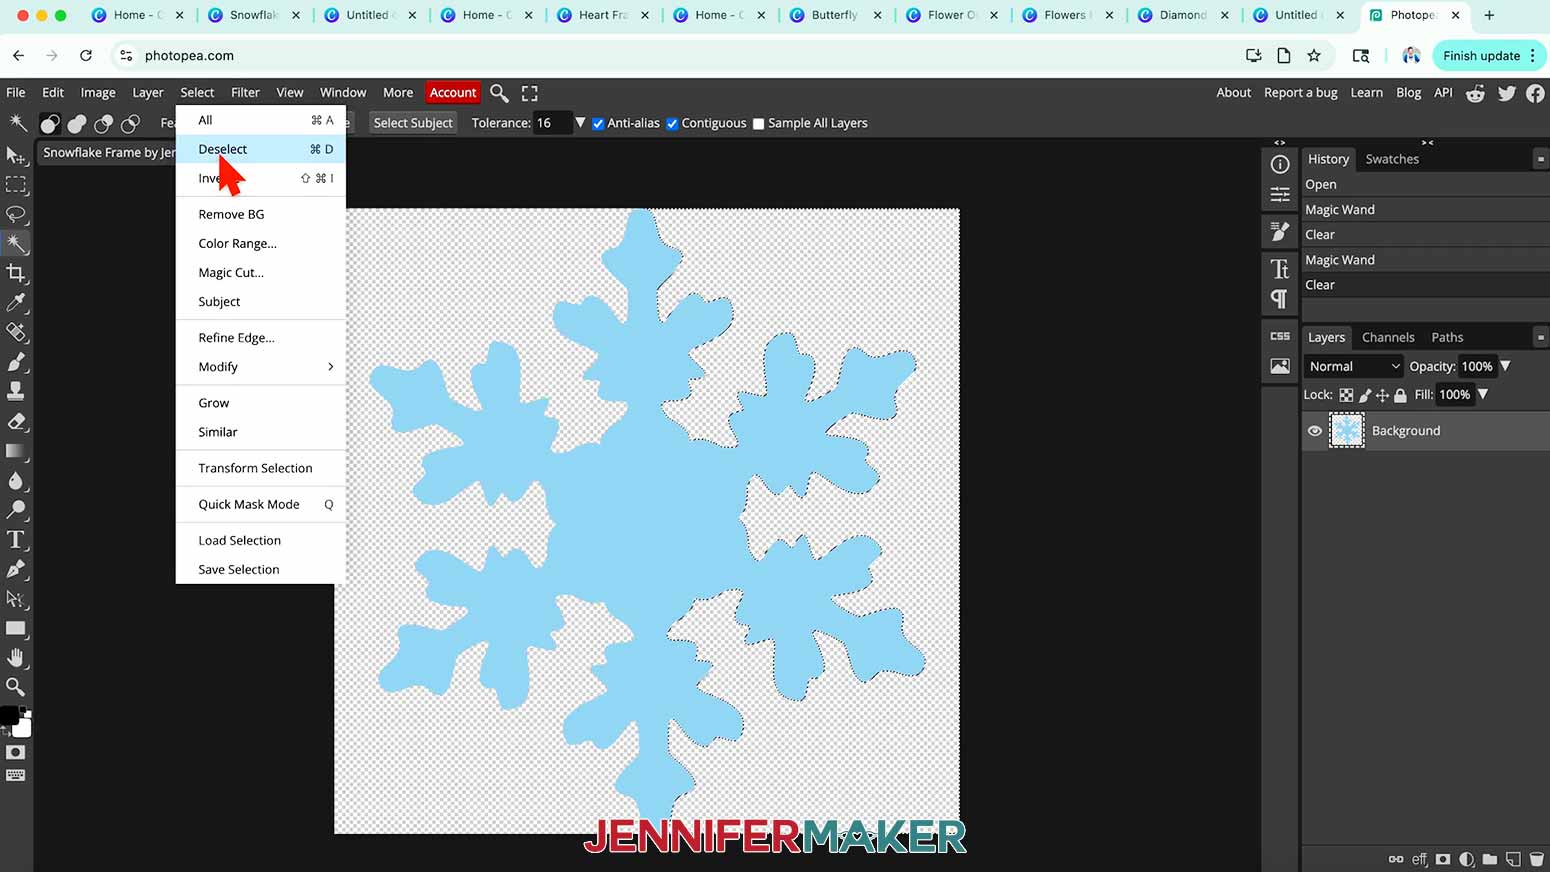
- Go to the “Select” menu and click “Deselect.”
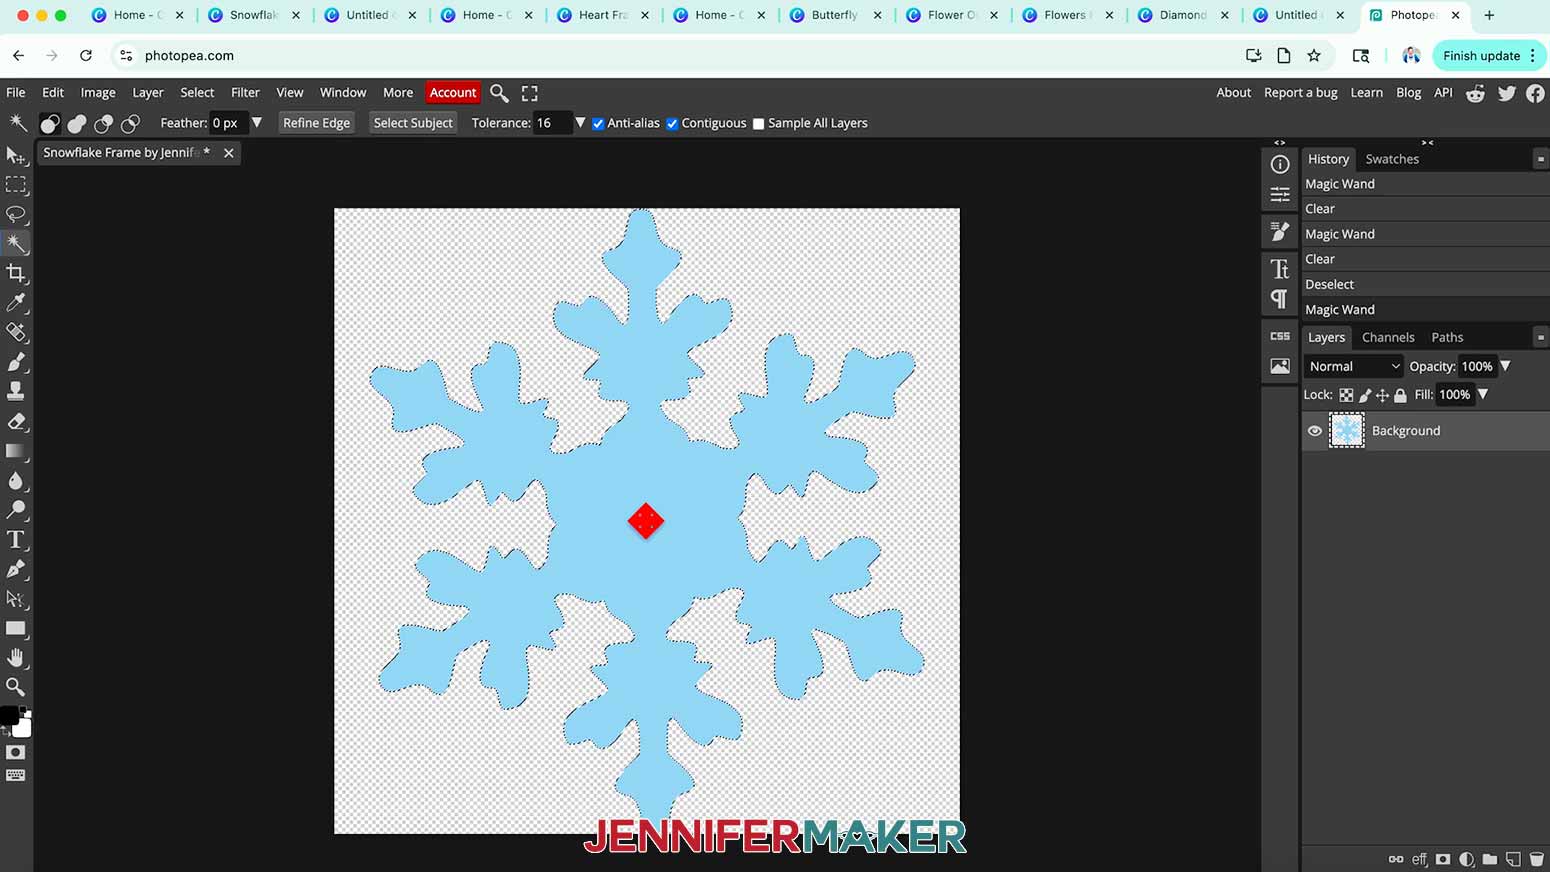
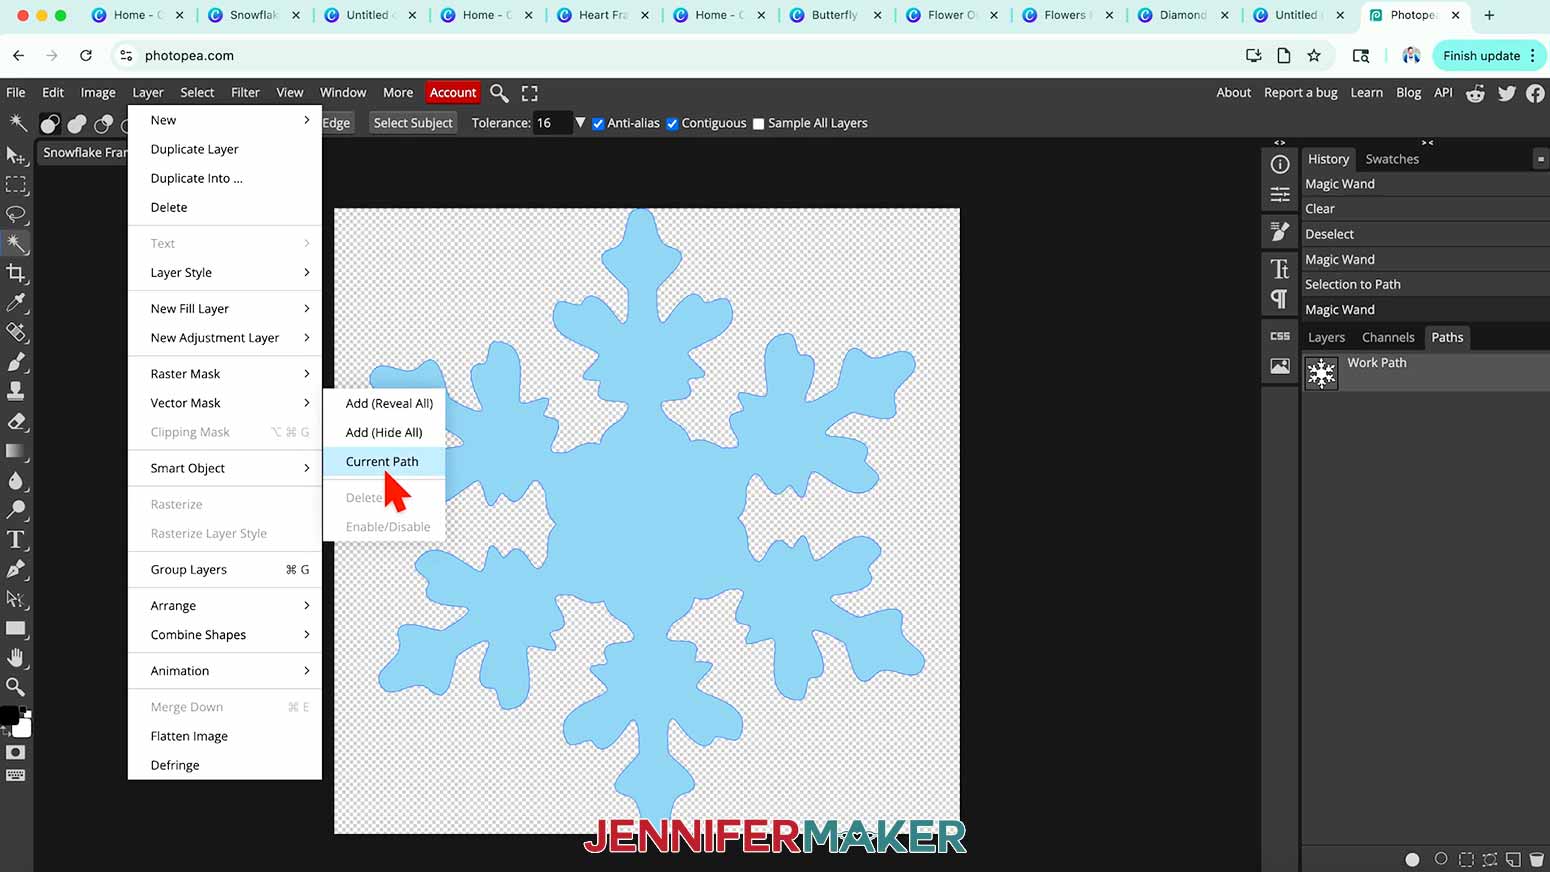
- Now, with the Magic Wand tool still active, click on the snowflake or frame object itself so it’s selected.
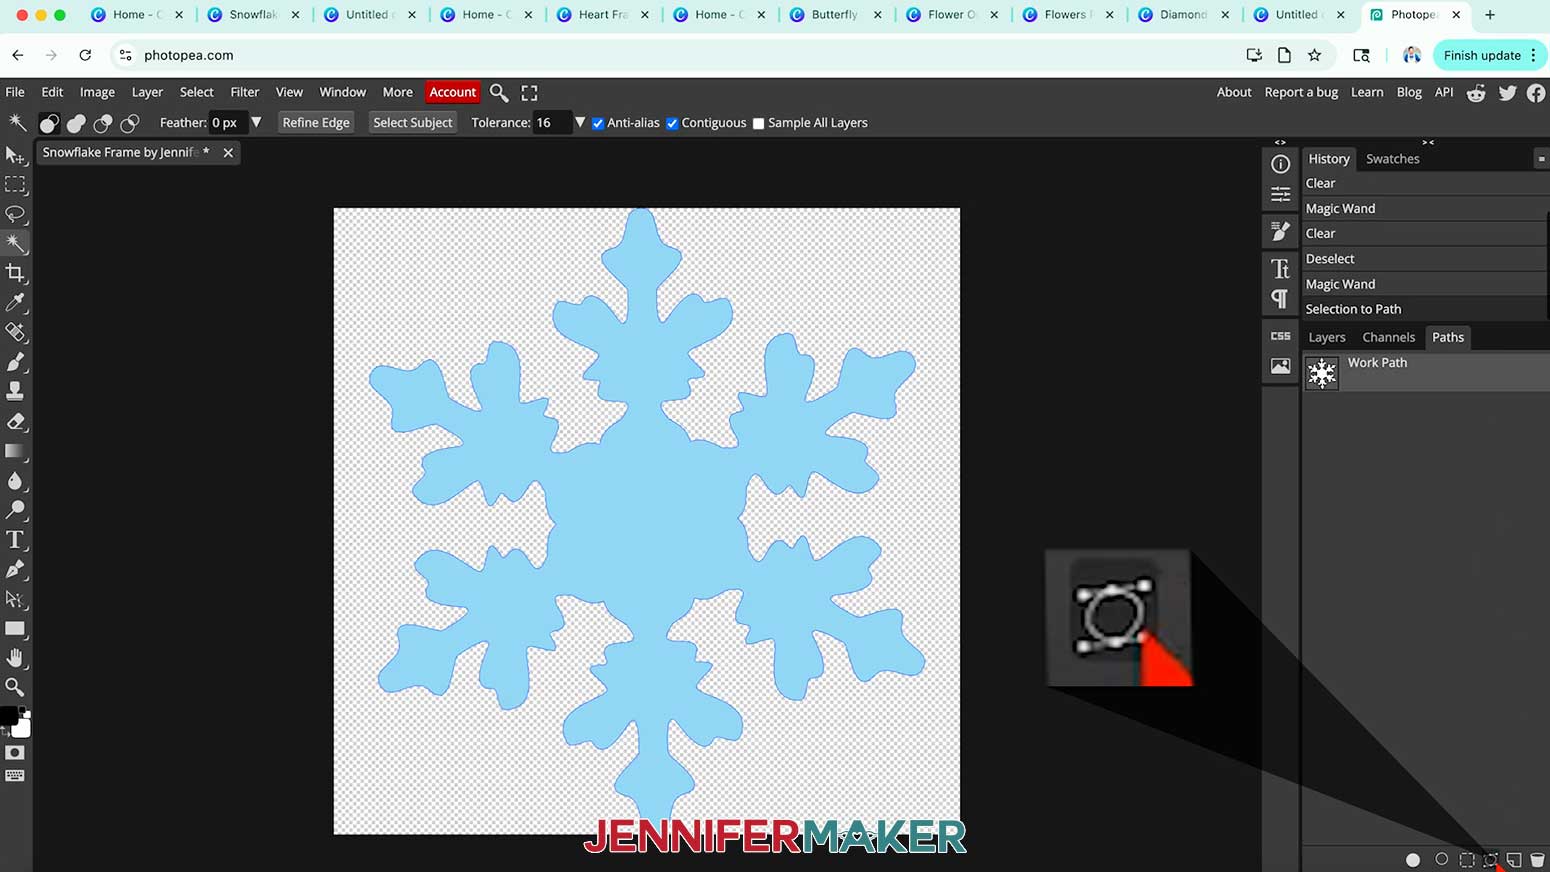
- In the right panel, click the “Paths” tab.
- Below the “Paths” panel, click the icon that looks like a circle with four dots. That’s the “Selection to Path” function and changes the layer’s description to “Work Path.”
TIP: If you make a mistake, use the “Edit” menu and select “Step Backward,” then try again.
- Next, go to the “Layer” menu, choose “Vector Mask,” then “Current Path.”
- This creates a “Background Shape Path” layer, which is what makes the file work as a fillable frame in Canva.
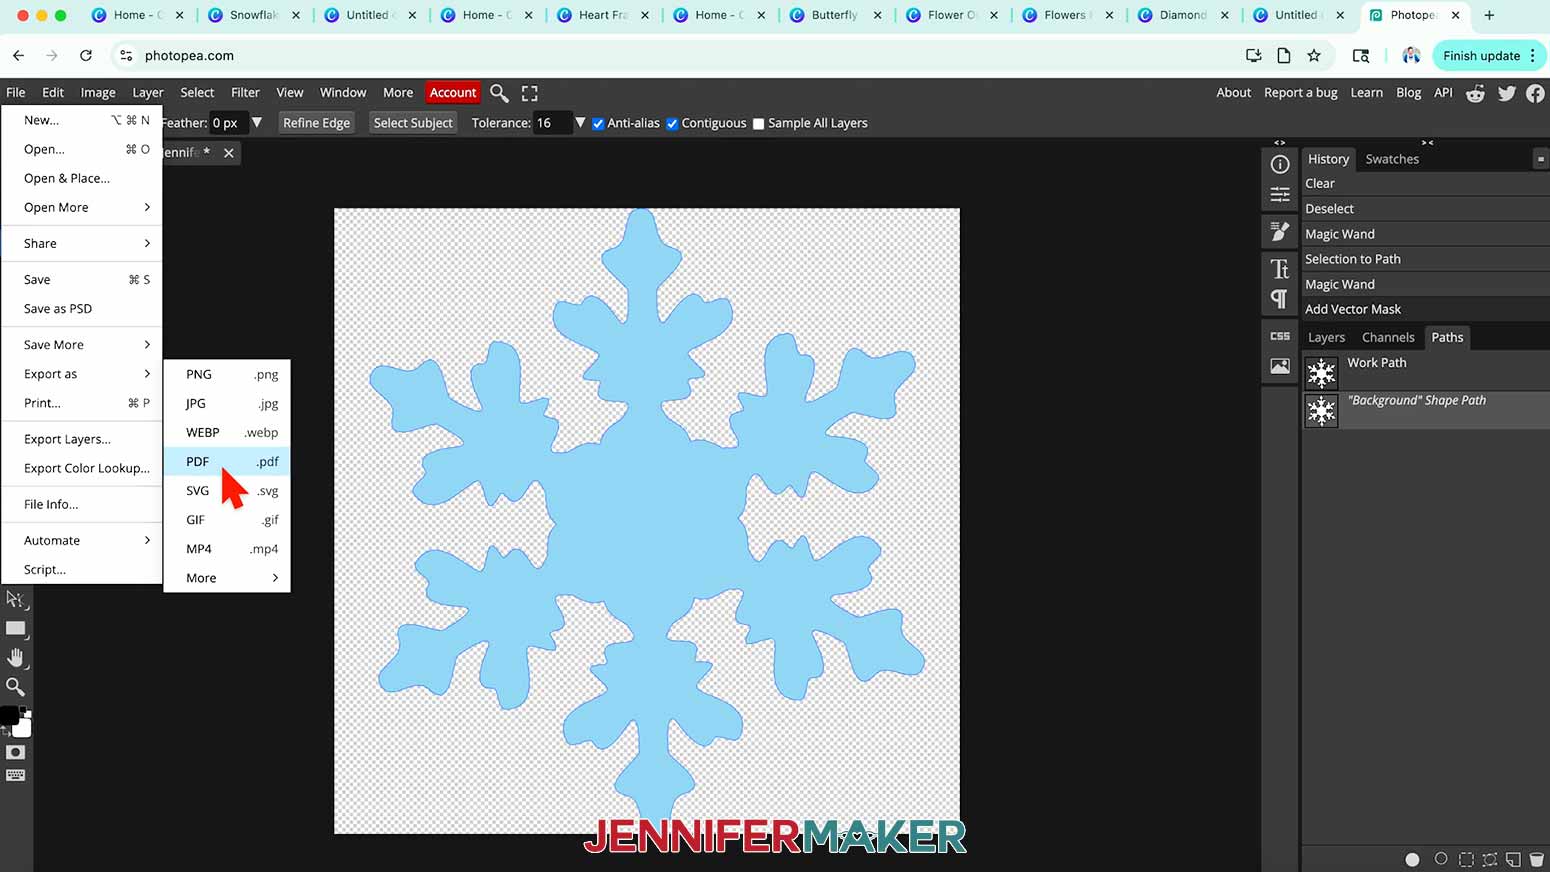
- Go to “File,” “Export As,” and choose “PDF.”
NOTE: PDFs preserve the vector data Canva needs to keep the frame functional.
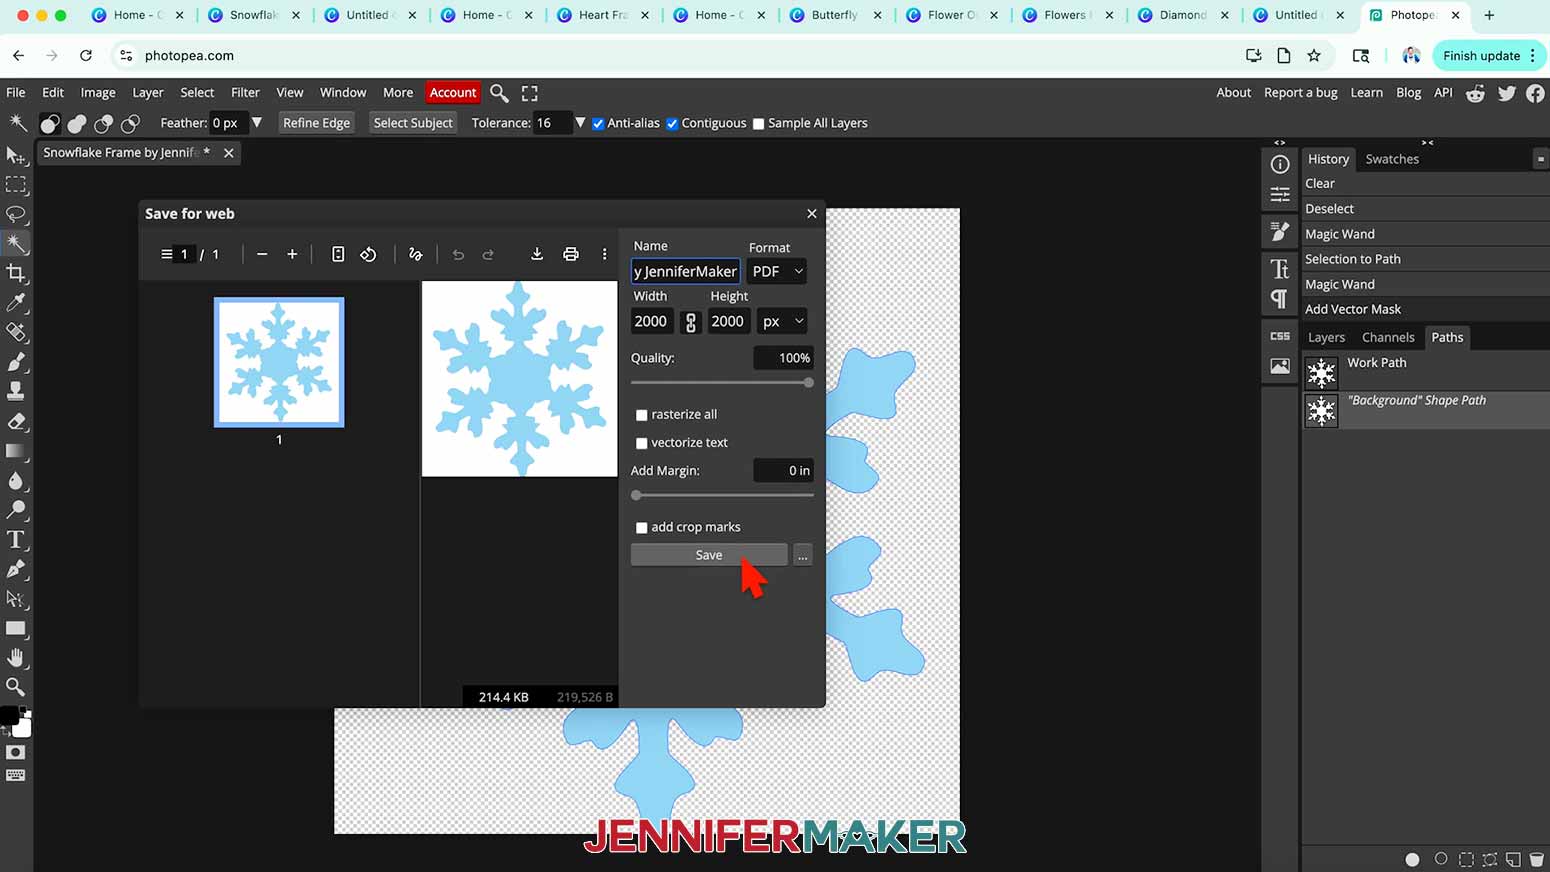
- Rename the design if you like, but don’t change any settings.
- Save the PDF to your computer.
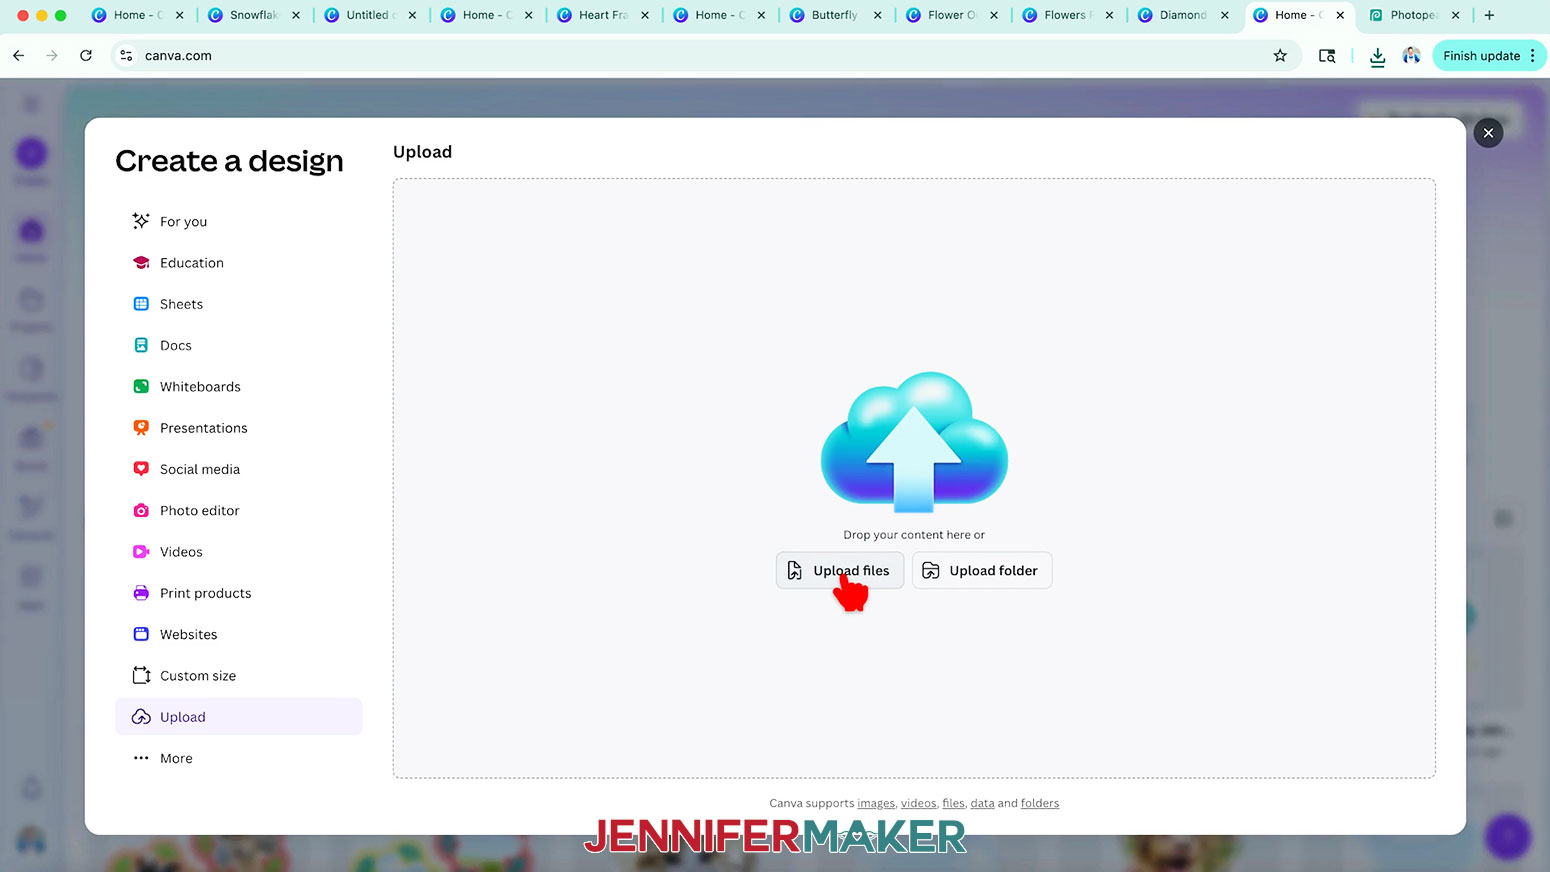
- Back on Canva’s Home screen without a project open, click “Upload,” “Upload Files,” and select your PDF.
NOTE: It may go to your “Designs” folder.
- The frame will look just like the original shape. But even though we can’t see the placeholder landscape, it’s now a fillable frame!
- Find an image from the “Uploads” menu and drag it right into the frame. It will automatically fill just like the other frames, and you can double-click to adjust the placement.
- When you’re happy with the placement, click “Share” at the top.
- Then click “Download” and choose “PDF Print” or “PNG.”.
NOTE: “PDF Print” will give you the highest quality for prints like cards, but I’ll pick “PNG” since I want to make a sticker.
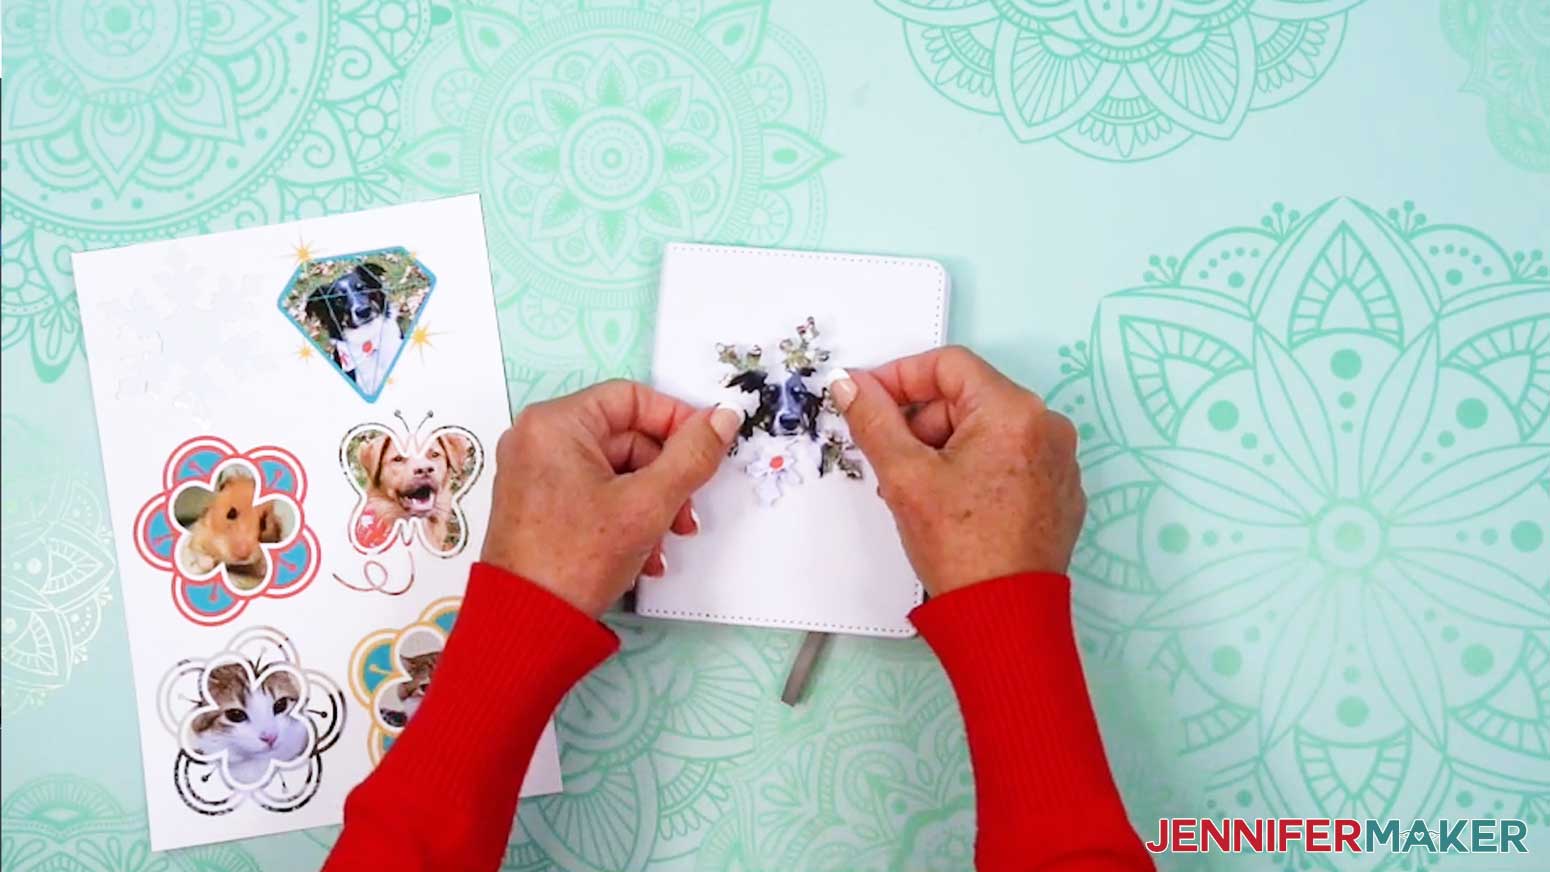
- Then, print the design for whichever project you have in mind! I made mine into a sticker following my Make Stickers in Canva tutorial.


Notes
Font Used for the Birds of a Feather Frame:Whimsical BoldFree Alternative: Grandstander
Answers to Your Questions About How to Make a Frame in Canva
Q: I want to design a custom Canva frame. How do I do that?
A: You can learn how to design custom Canva frames in a video workshop and get a cheatsheet with tips for all three methods I used in the tutorial as part of my ADVANCE program. Learn more about ADVANCE here!
Q: Can you make your own frames in Canva?
A: You can create your own frame by using one from Canva’s frame section, uploading one you’ve downloaded, creating one in the Frame Maker app, or using Photopea for advanced options. It’s easier than you think! Check out my full step-by-step tutorial to see exactly how it’s done.
Q: Can you tell me how to make an image fit into a frame on Canva?
A: It’s simple. Just upload your image, then drag and drop it into the frame. The image will automatically fill the frame! Then, you can double-click it to make any adjustments. I show you how it all works in the tutorial video.
Q: Can you tell me how to create Canva frames and sell them?
A: This tutorial teaches how to design frames in Canva with free elements and tools. My Advance workshop shows you how to create custom multi-image frames, as well as how to transform complex Canva elements into frames. For information on selling Canva frames and other designs through Canva’s website, go to Canva’s Contributor program page.
NOTE: At the time of this blog post, Canva is not accepting new sign-ups for their Contributor program. For now, I recommend researching alternate platforms for selling Canva frames online, but be sure to read all site guidelines and follow their rules.
Q: Can you share tips on how to make your Canva design better?
A: Absolutely! Always start by setting guides and margins so your design elements line up neatly. Try multiple frames in coordinating shapes for an interesting yet cohesive look, use a consistent color palette and font pairings for a professional-looking design, and don’t forget to take advantage of free elements for fast design accents. For even more step-by-step tricks, check out my Canva Coach Playbook. It’s full of easy-to-follow visuals and tips that Canva users of any level can use to improve their projects.
Q: What are some Canva hacks?
A: Some of my favorite Canva hacks include turning on rulers and guides for perfect alignment, using the Position tool to center or layer design elements instantly, and saving a custom template so you don’t have to start over each time. I share lots more in this tutorial and in the Canva Coach Playbook. It’s full of clever shortcuts and my best tips for making your designs look polished without spending a lot of time.
Q: How can I learn more about sublimation?
A: You can create so many sublimation designs with Canva frames! If you want all my best sublimation tips and techniques in one place, grab a copy of my Sublimation Cookbook. It’s packed with easy-to-follow instructions, fixes for common issues, and step-by-step guidance to help you create high-quality sublimation projects with confidence.
Get my free Canva frames links and Beginner’s Guide to Canva Frames PDF!
(If you do not see the signup form above, click here.)
I love seeing what you make with my tutorials and how you customize them! Please share a photo of the projects you made with your Canva frames in our Facebook group or tag me on social media with #jennifermaker.
Love,

Want to remember this? Save this How to Make Frames in Canva tutorial to your favorite Pinterest Board!