Create and print custom designs for sublimation with Cricut Design Space!
Are you curious how to do sublimation with Cricut Design Space? With the right tools and materials, it’s a simple way to prepare full-color designs in just one program! I’ll show you how to combine your favorite photos with my free frame designs in Cricut Design Space, even if you want to go bigger than the Print then Cut area. With a sublimation printer and a few more materials, you’ll be making your own designs in no time!
Watch my complete step-by-step tutorial on sublimation with Cricut Design Space!


Cricut Design Space has lots of helpful features for creating sublimation designs. You can easily add photos, shape elements, and resize designs to fit your project. Then, you can use the Print then Cut capability to control your sublimation printer right from the same window. With my tutorial, you’ll be making your own sublimation designs in no time, without learning new software!
Even better, using a Cricut or other cutting machine in your sublimation process makes it possible to transfer designs to many different materials.
Sublimation crafts might seem like magic, but they’re actually very scientific and have specific requirements. A traditional sublimation image (made with a sublimation printer using compatible ink and paper) really works best on a white polyester surface or something very similar. Since sublimation printers don’t have white ink, the images rely on the white surface showing through the colors to render the image correctly. But what if you’re not using a white surface? Or maybe a cotton fabric, which doesn’t play well with dye sublimation? I have two solutions for you to try with your design:
EasySubli with the compatible mask material:

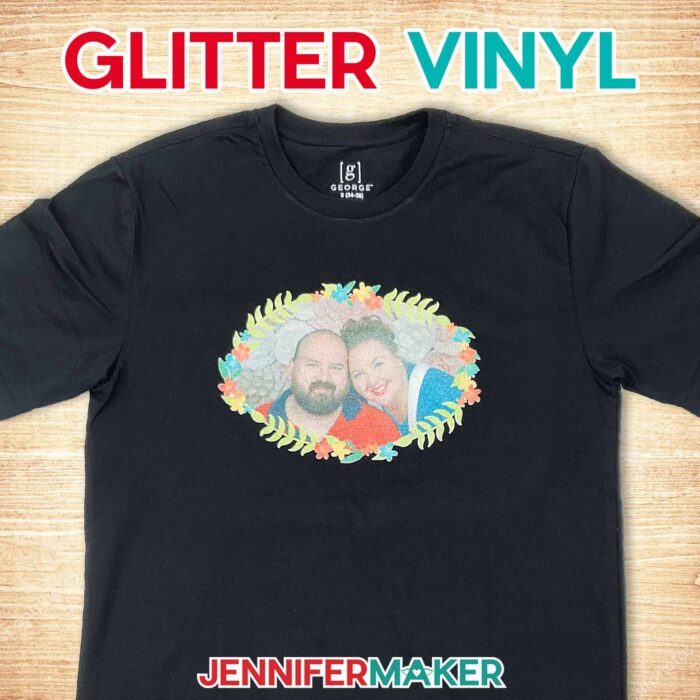
Or white glitter iron-on vinyl.
Both methods take a few extra steps with a Cricut cutting machine (and the accessories listed below) but are a great way to get options! I will share when I do and don’t recommend trying each technique.
To make the sublimation transfers for polyester shirts, you’ll need a sublimation printer with compatible ink and paper, and scissors or a paper cutter. For the EasySubli with mask or Glitter Iron-On Vinyl versions, you’ll also need a cutting machine. I used my Cricut Maker 3, but a Maker or Explore series machine will also work. You’ll also need a green StandardGrip machine mat, brayer, and weeding tool. A blue LightGrip mat and printer paper are also useful to calibrate your machine!
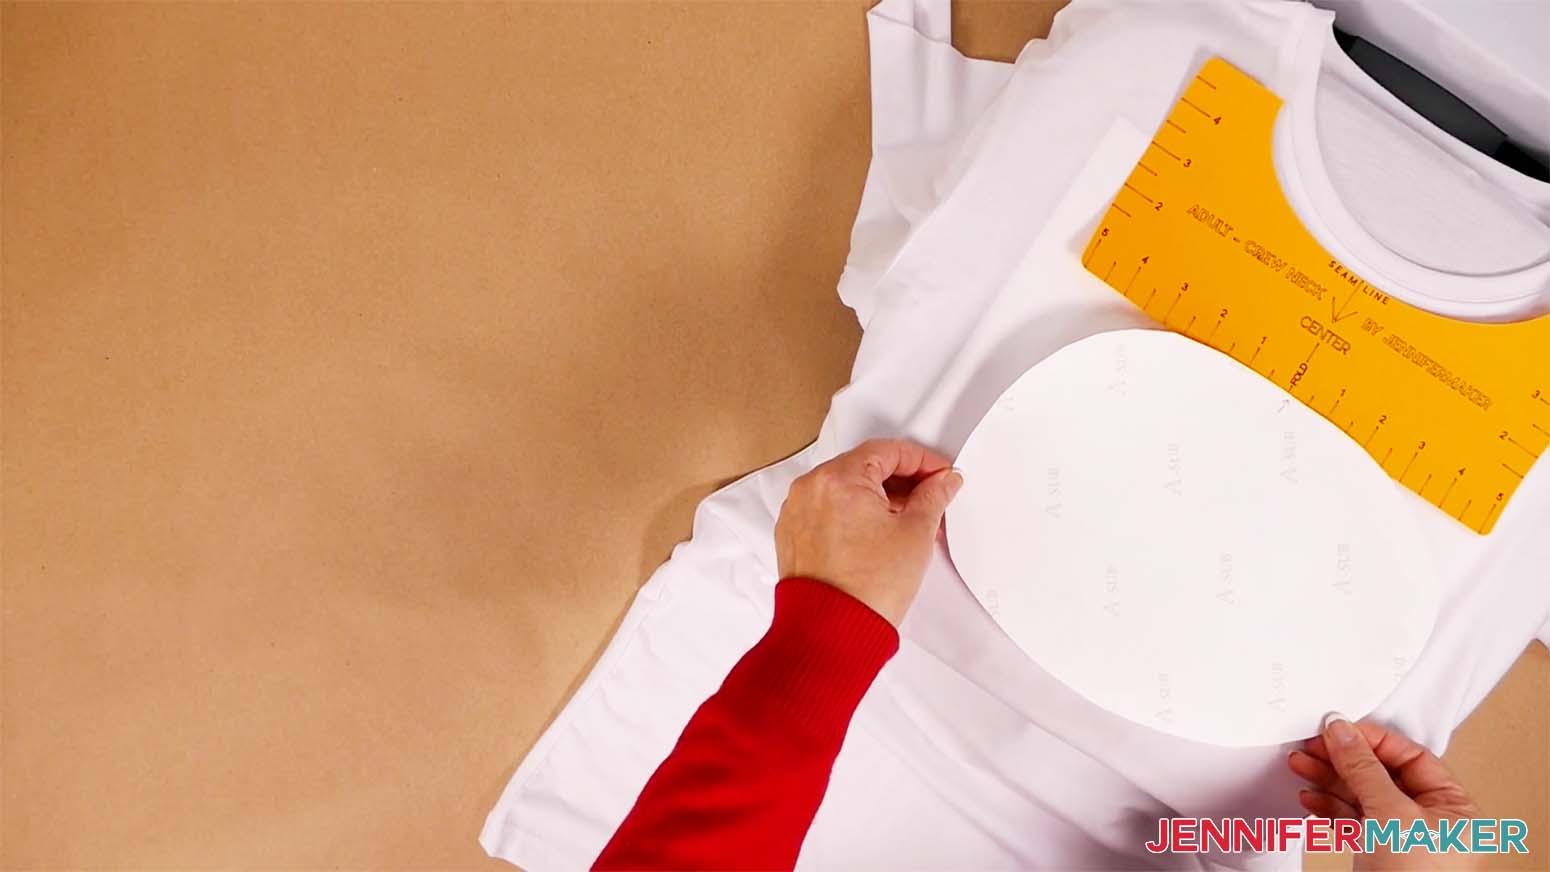
For help with alignment, you can make a set of my T-Shirt Ruler Guides to fit the style you’re decorating.
When you’re working with photos, creating a crisp result is important. Smudged faces are hard to recognize! Preheating your t-shirts removes moisture and wrinkles (avoiding bumps and bleeds) and using a lint roller will remove any debris standing between you and a beautiful transfer. Securing the design in place with heat resistant tape keeps it still, and letting it cool for a few minutes afterward allows the ink to settle in place. Moving the shirt or transfer sheet when they’re still very warm can jostle the ink, creating a ghostly, smudged look.

Speaking of heat, sublimation requires high temperatures. You’ll need a heat source that can get up to about 400° Fahrenheit or 205° Celsius. A home iron won’t be enough! I like to use an EasyPress with a mat, or an Autopress. And as the ink sublimates (turning from a solid, to a gas and back, skipping the liquid phase like magic) it can spread! So have your white cardstock and white butcher paper ready to catch any extra ink before it dyes your tools. Keep a window open and a fan running to dissipate the fumes, too.
If you need a bigger design than the Print then Cut dimensions allow, follow my steps to adjust and slice the image right in Cricut Design Space. Then, I’ll show you how to put them back together during pressing! A paper trimmer helps remove all the white paper near the seam, which is really important to blend the parts of the photo. I’ll show you how to blend them even before the heat with a scraper.
Getting the pieces aligned and the seam hidden takes practice, so try it out on some spare fabric first. As you can see, it took me a few tries!

And when you’re working with images of people, color can be really important! Some of my images looked very different depending on the materials I used. So it’s a good idea to do a test transfer, and use some simple photo editing steps to adjust the file if needed.

Interested in this project but not sure sublimation is for you? Check out my list of 21 Things I Wish I Knew Before I Started Sublimation!
Ready to learn how to do sublimation with Cricut Design Space? I’m super excited to show you how! This post contains some affiliate links for your convenience (which means if you make a purchase after clicking a link I will earn a small commission but it won’t cost you a penny more)! Read my full disclosure policy.
Materials for Sublimation With Cricut Design Space
View my Amazon shopping list with the exact items we used to make this project!
For the main T-shirt project on white, 100% polyester t-shirts, you just need Sublimation Paper – I used A-Sub 8.5″ x 11″.
For a dark or cotton T-shirt version, you will also need:
- Siser EasySubli Sublimation heat transfer vinyl with Siser EasySubli Mask Sheets 8.5″ x 11″ OR
- Cricut White Iron-on Glitter vinyl
- A method to cut your materials— I used the amazing Cricut Maker 3 but you can also use the original Maker or an Explore
- Cricut Green StandardGrip machine mat, 12″ x 12″
- Brayer
- Weeding tool
- Cricut Blue LightGrip Machine Mat, 12″ x 12″ and 8.5″x 11″ Printer Paper help with calibrating your machines for Print then Cut accuracy.
For all versions, you will need:
- Sublimation Printer – I used a converted Epson EcoTank ET-4700 Inkjet Printer
- Compatible sublimation ink – I used Hiipoo Ink
- Heat Press – like a Cricut EasyPress and Pressing Mat or an Autopress
- Heat-Resistant Tape
- White Cardstock 12″ x 12″
- White Butcher Paper
- Paper Trimmer or Scissors – for optionally slicing larger designs
- Scraper – optional to help blend tiled designs with the best results
- T-Shirt Guide – optional but helpful for alignment
- Pencil
- Fan
- Lint Roller
- Ruler
- Personal Digital Photos
- Design #474 – My free sublimation designs (available in my free resource library—get the password at the bottom of this post)

How to Design and Print for Sublimation with Cricut Design Space
Sublimation with Cricut
Learn how to make sublimation prints using Cricut Design Space.
Materials
- 100% Polyester T-Shirt
- 8.5" x 11" Sublimation Paper
- White Butcher Paper
- White 12" x 12" Cardstock
- Heat Resistant Tape
- Siser EasySubli Sublimation HTV - OPTIONAL
- Siser EasySubli Mask Sheets 8.5" x 11" - OPTIONAL
- Cricut Iron on Glitter, White - OPTIONAL
- Printer Paper - for protecting the design if you use a Cricut to cut the shapes
- Digital Photos - optional
- Design #474 – My free designs (available in my free resource library—get the password at the bottom of this post)
Tools
- Sublimation Printer - I used a converted Epson EcoTank ET-4700 Inkjet Printer
- Sublimation Ink - I used Hiipoo Ink
- Heat Press - I used my Cricut Autopress but you can also use an EasyPress with a pressing mat
- A method to cut your materials— I used the amazing Cricut Maker 3 but you can also use the original Maker or an Explore - OPTIONAL
- Fan
- Lint Roller
- Paper Trimmer - OPTIONAL for slicing larger designs -OR-
- Scissors
- T-Shirt Guide - optional
- Pencil
- Cricut Blue LightGrip Machine Mat, 12" x 12" - optional for EasySubli or glitter vinyl technique
- Brayer
- Cricut Green StandardGrip machine mat, 12" x 12" - optional, to cut EasySubli or Glitter Vinyl
- Weeding tool - optional for EasySubli or Glitter Vinyl
- Scraper - optional to help blend tiled designs
Instructions
STEP 1: GET OR PREPARE A SUBLIMATION DESIGN
You can use my Sublimation with Cricut design file from my resource library, Design #474.
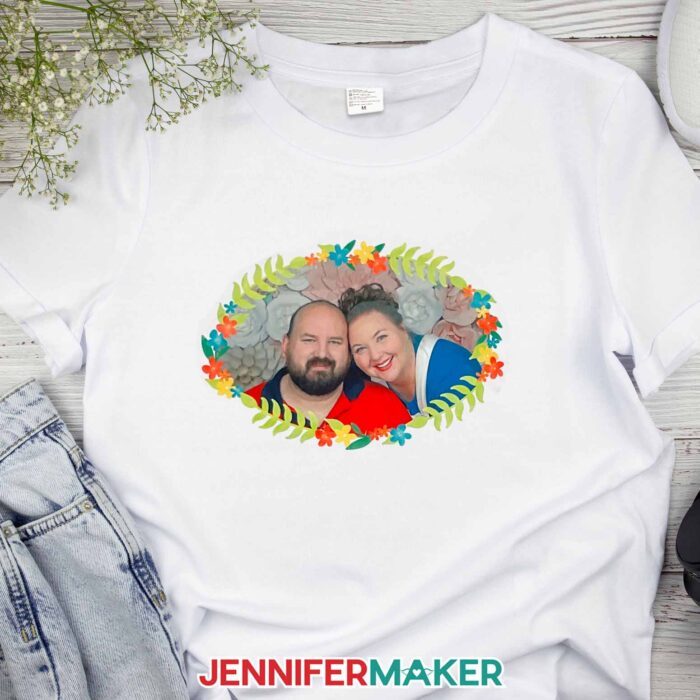
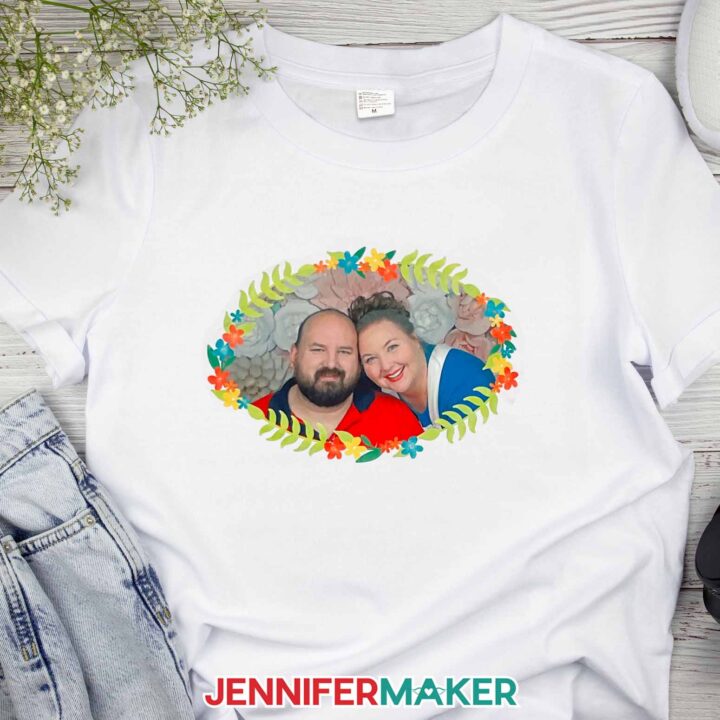
I made two cute wreath frames that we can put a picture in and print directly from Cricut Design Space to a sublimation printer.
An oval shaped frame.

A circle shaped frame.

STEP 2: FILL FRAME WITH PHOTO IN CRICUT DESIGN SPACE
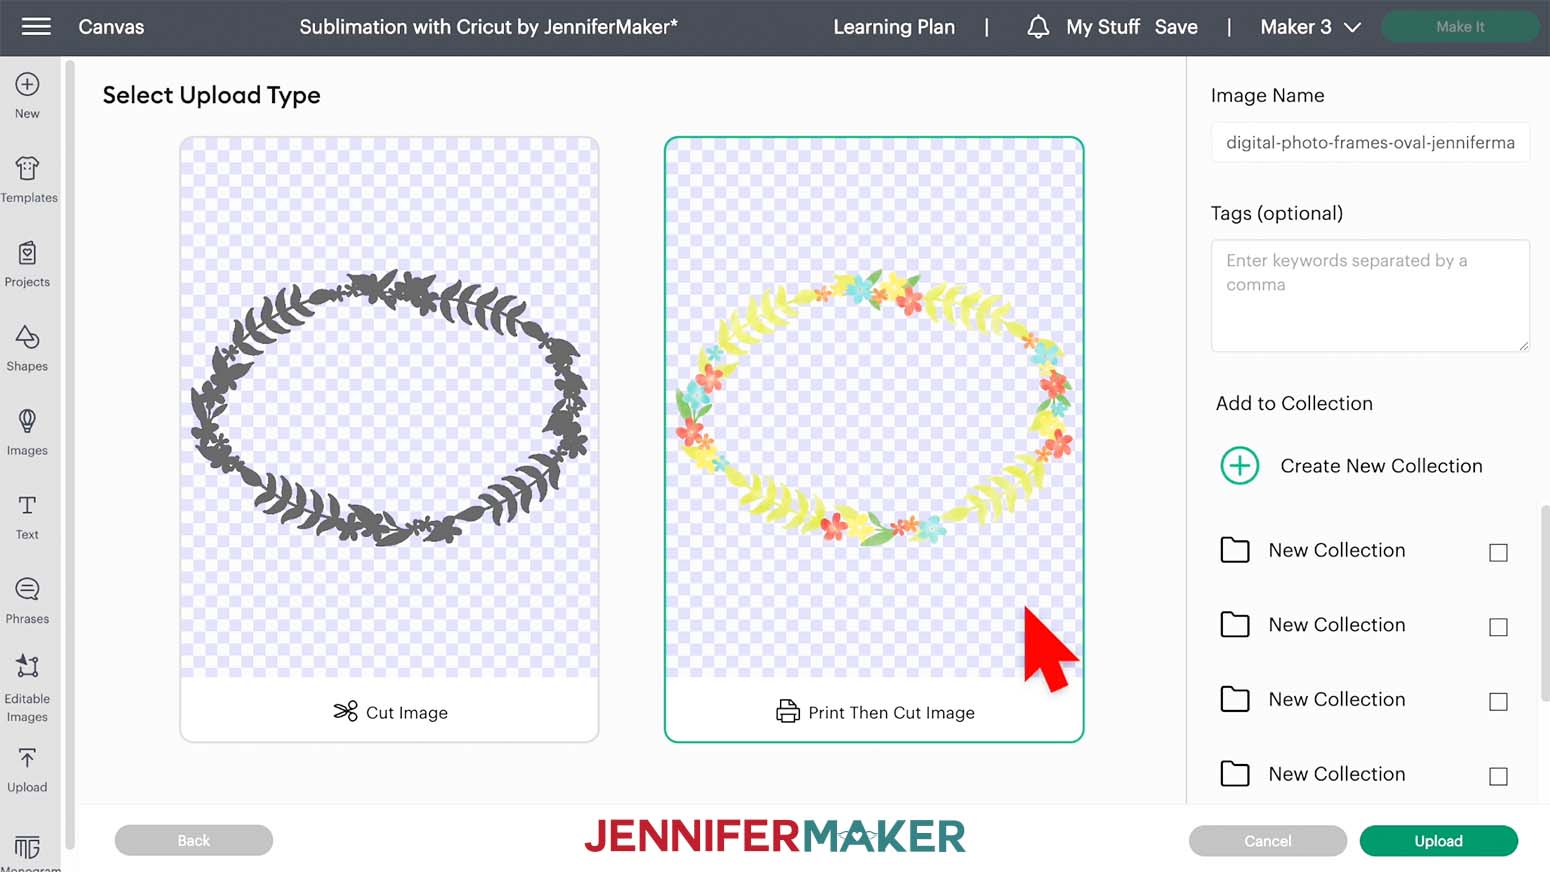
On a blank Canvas, click "Upload" and then "Upload Image." Select the frame you want to use. I'll use the oval PNG.
On the next screen select "Complex" and then click "Continue."
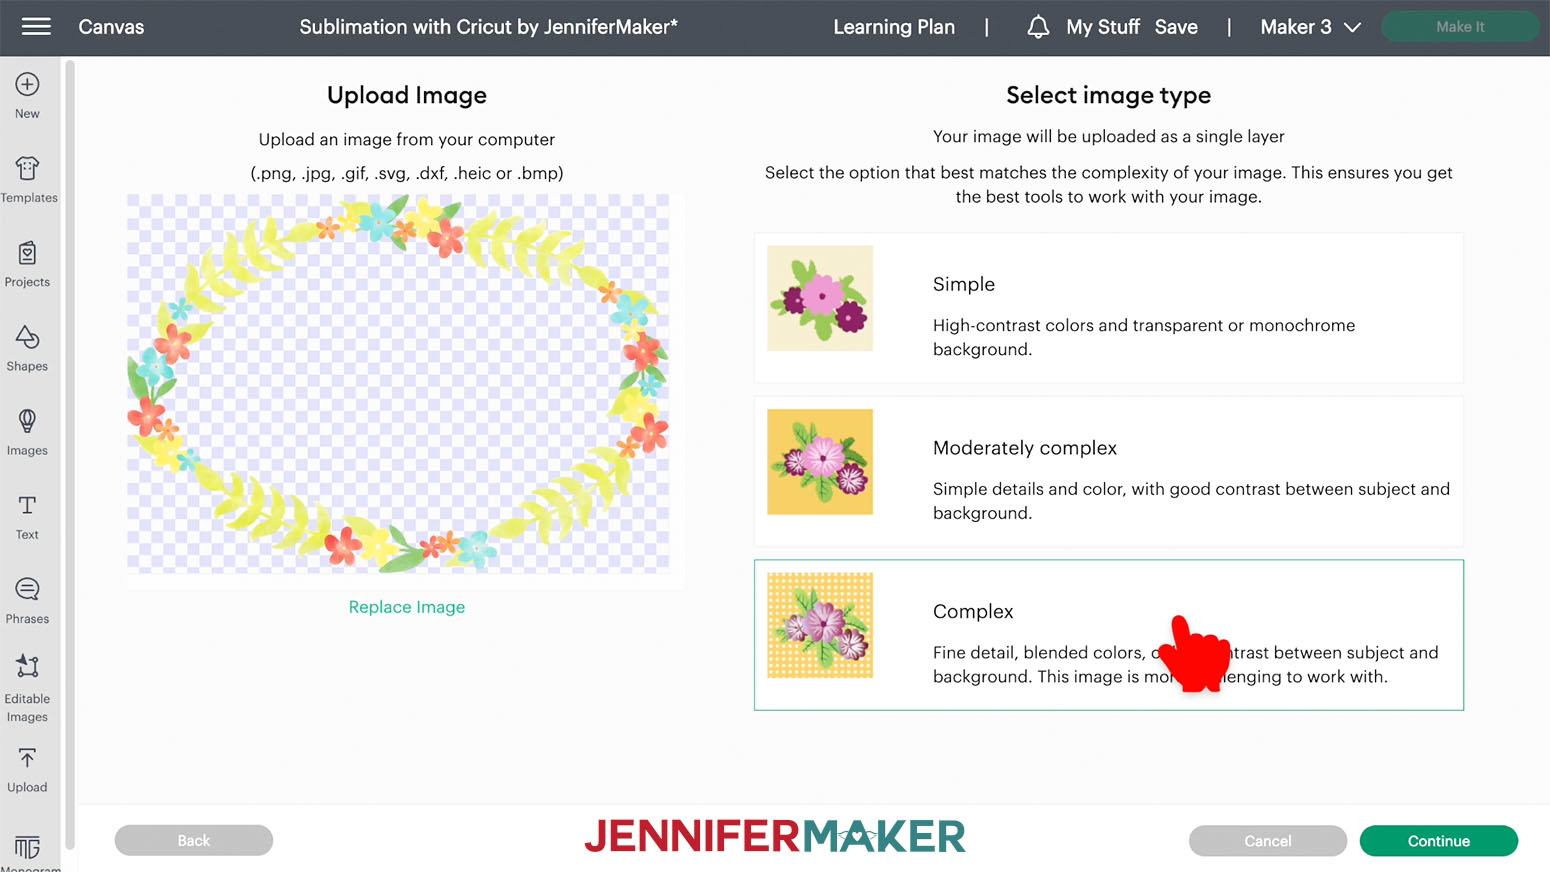
You don't need to do anything on the next screen, so click "Apply & Continue."
On the Select Upload Type screen, select "Print Then Cut Image" and click "Upload."
Add it to your Canvas.
Since PNG files are so large when they are uploaded we need to change the size. Make sure the lock is closed in the Size menu and then enter 9.32" for the width.

NOTE: If you want to create a design larger than the current Print then Cut dimensions, see the instructions in Step 5!
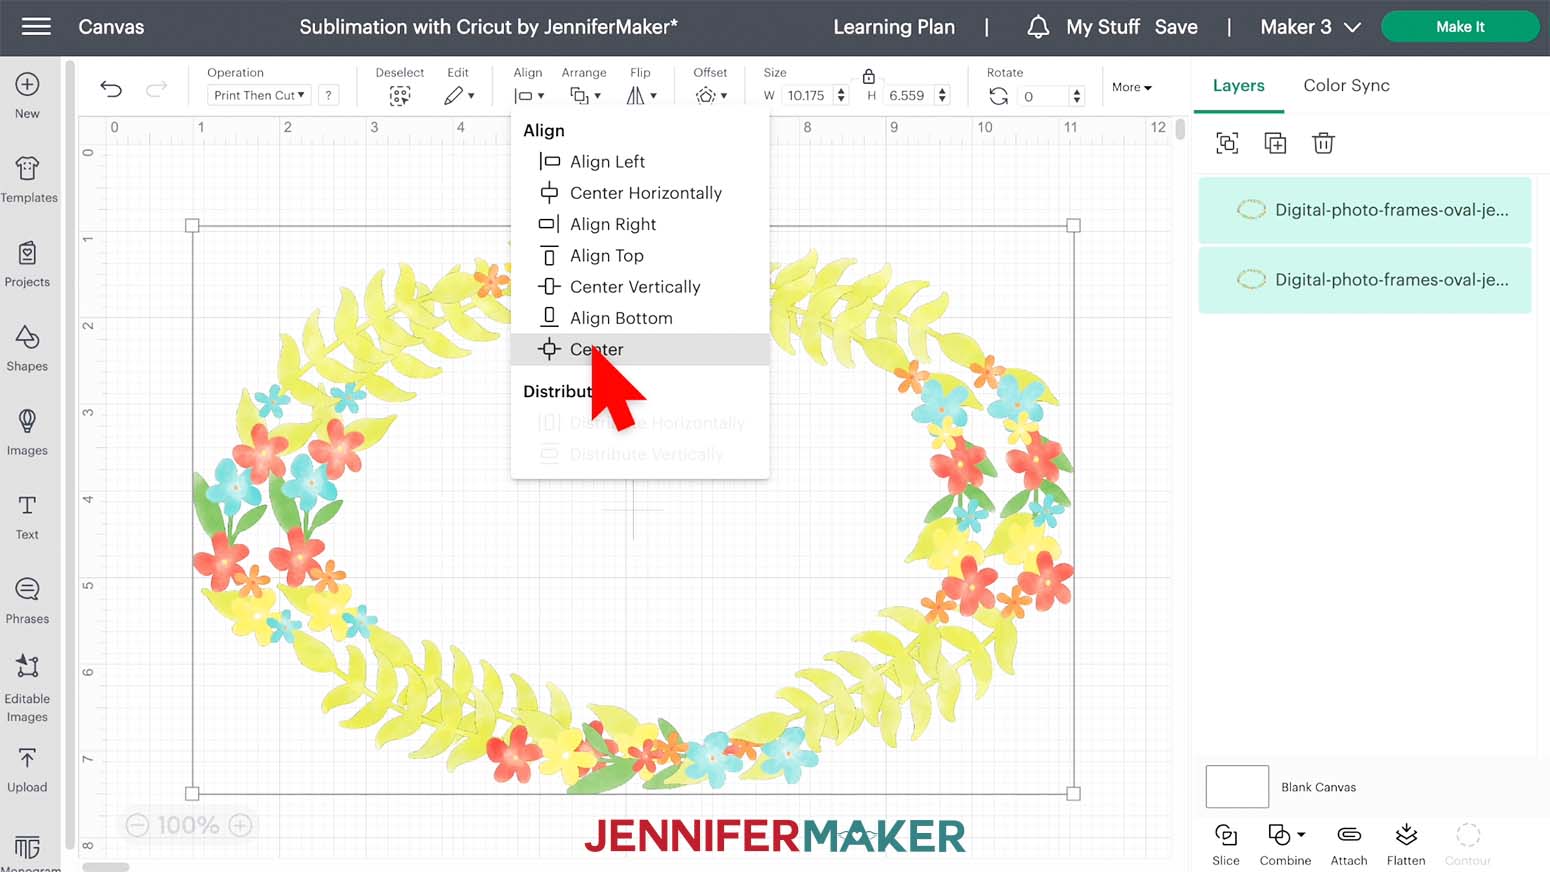
Next, select the frame in the layers panel and click the “Duplicate” button. It’s two boxes with the plus sign.
Select both of the frame layers and in the Align menu and select “Center”.
Next upload a photo for your frame following the steps that we just did.
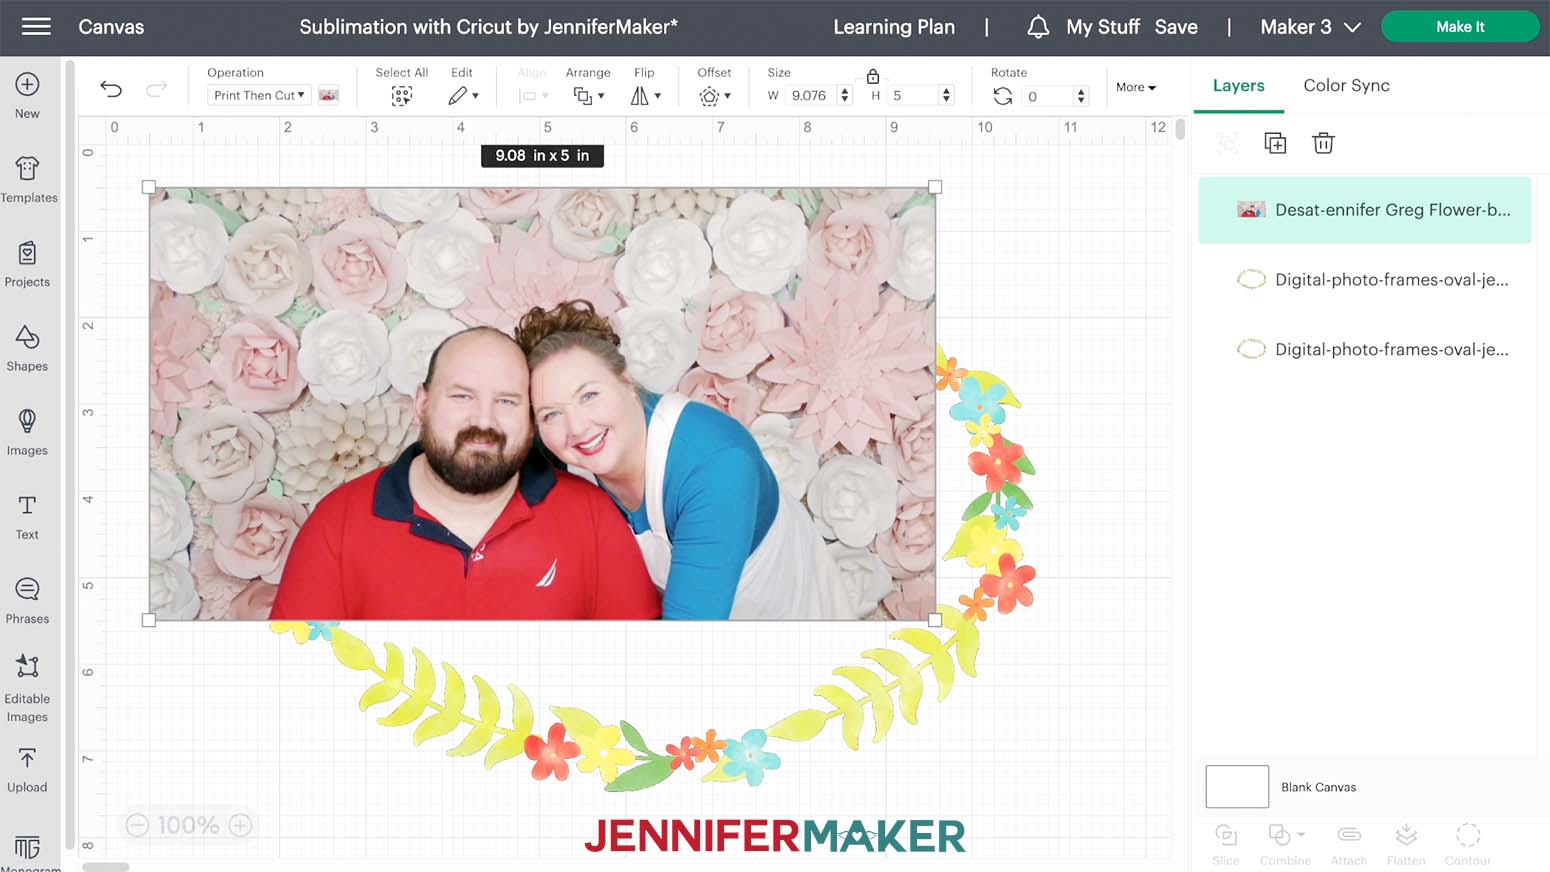
Using the Arrange menu, select "Send To Back" so that the photo appears behind the frame layers.
Now we can resize the photo to fit the frame. Make sure the lock is closed and then drag one of the photo corners until you have a size that you like. Move the photo so the subject is in the frame. Don't worry if your photo edges poke out, we'll take care of that in the next step.
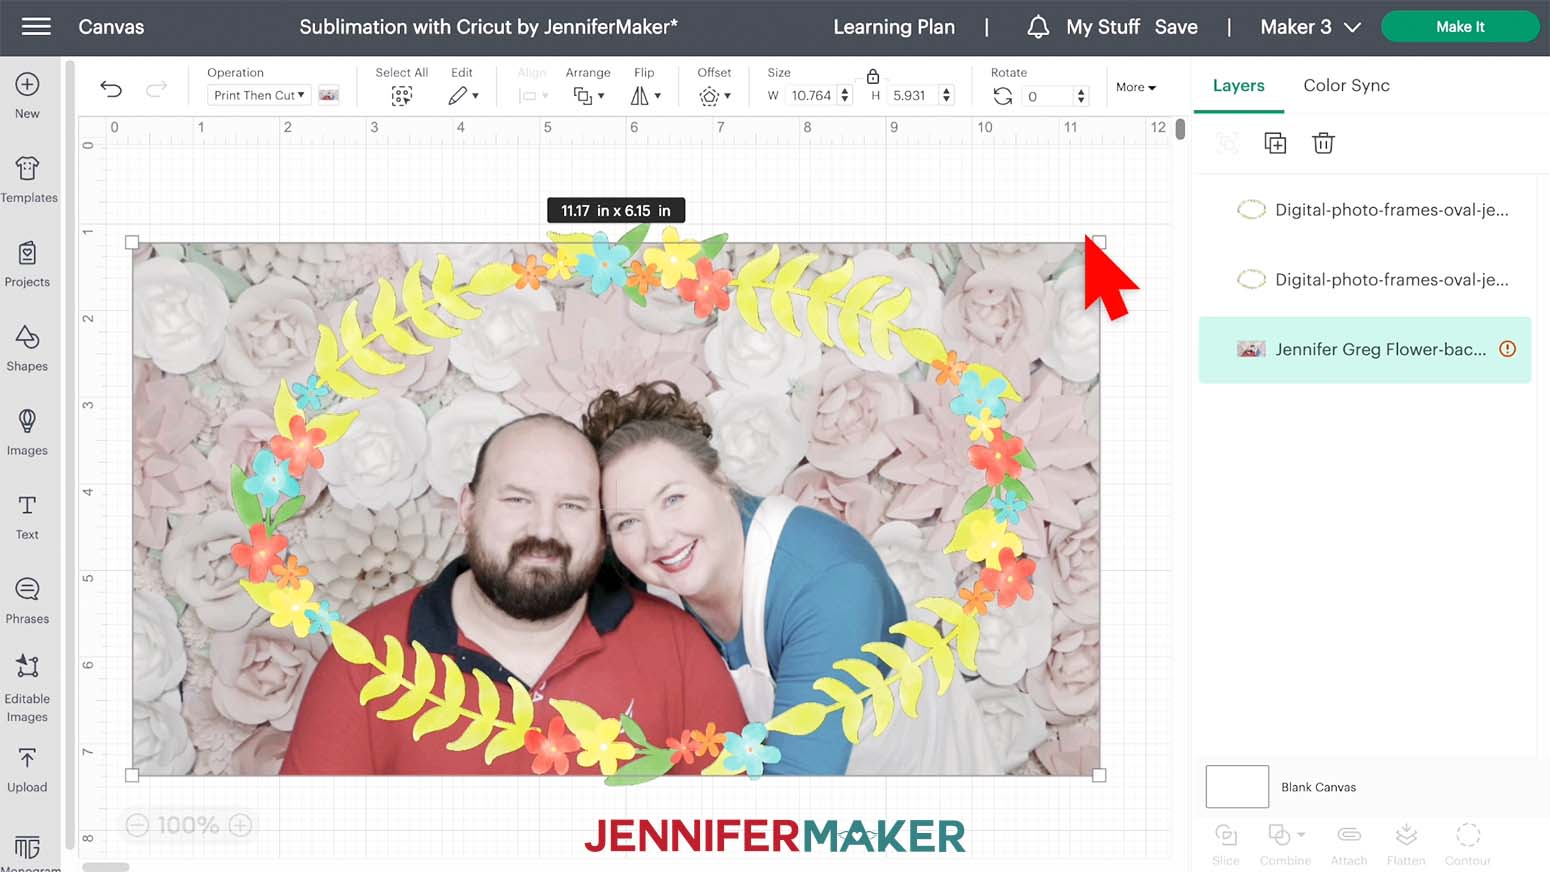
In the Layers Panel, hide one of the frames by clicking on the eye shape to the right in the layer.
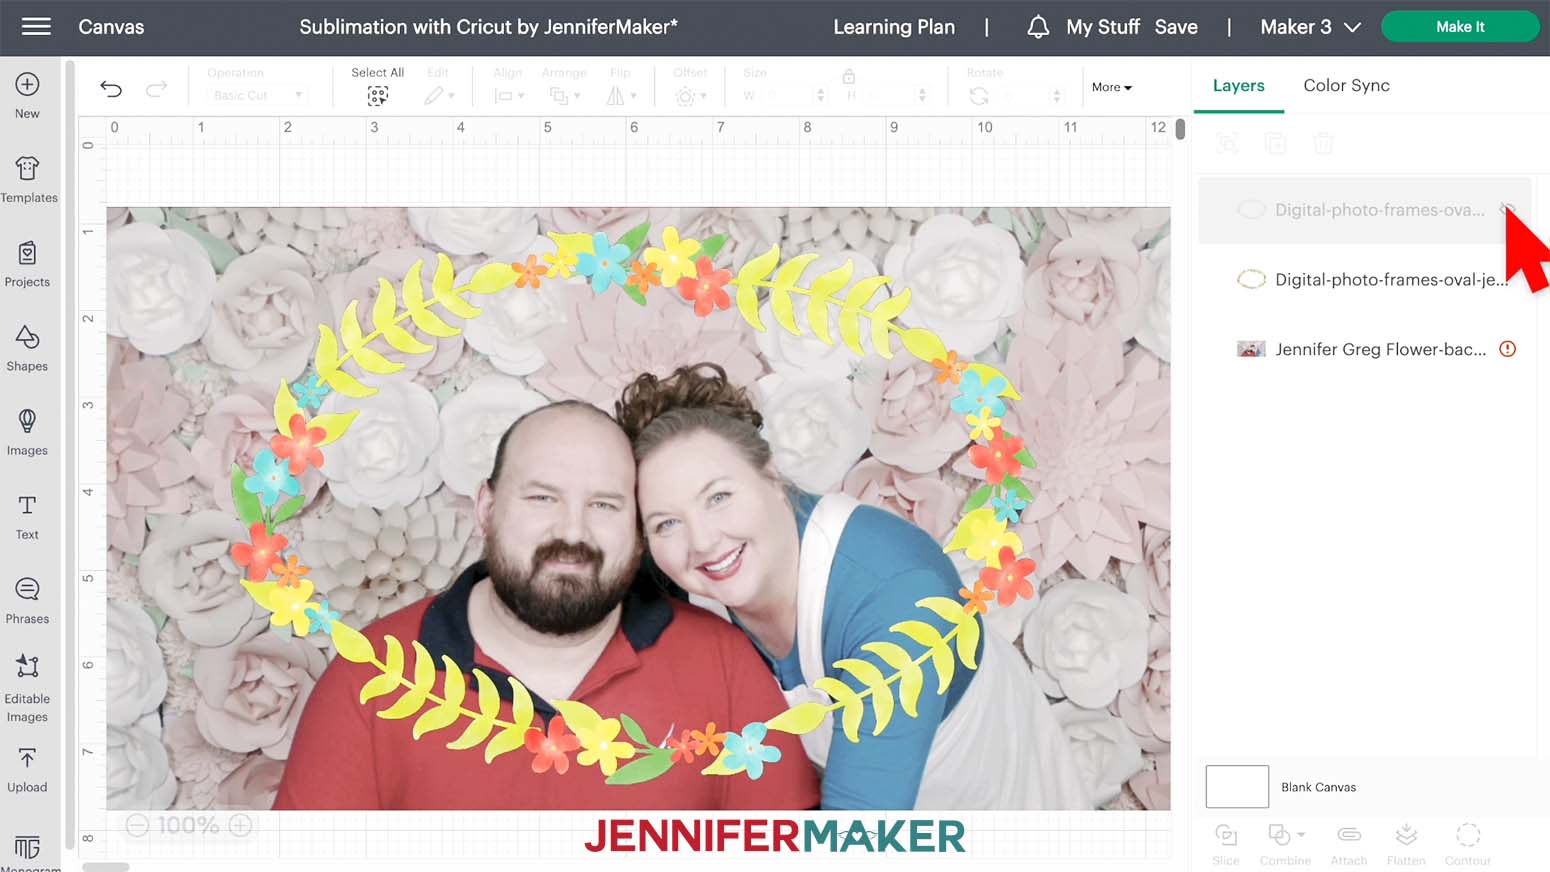
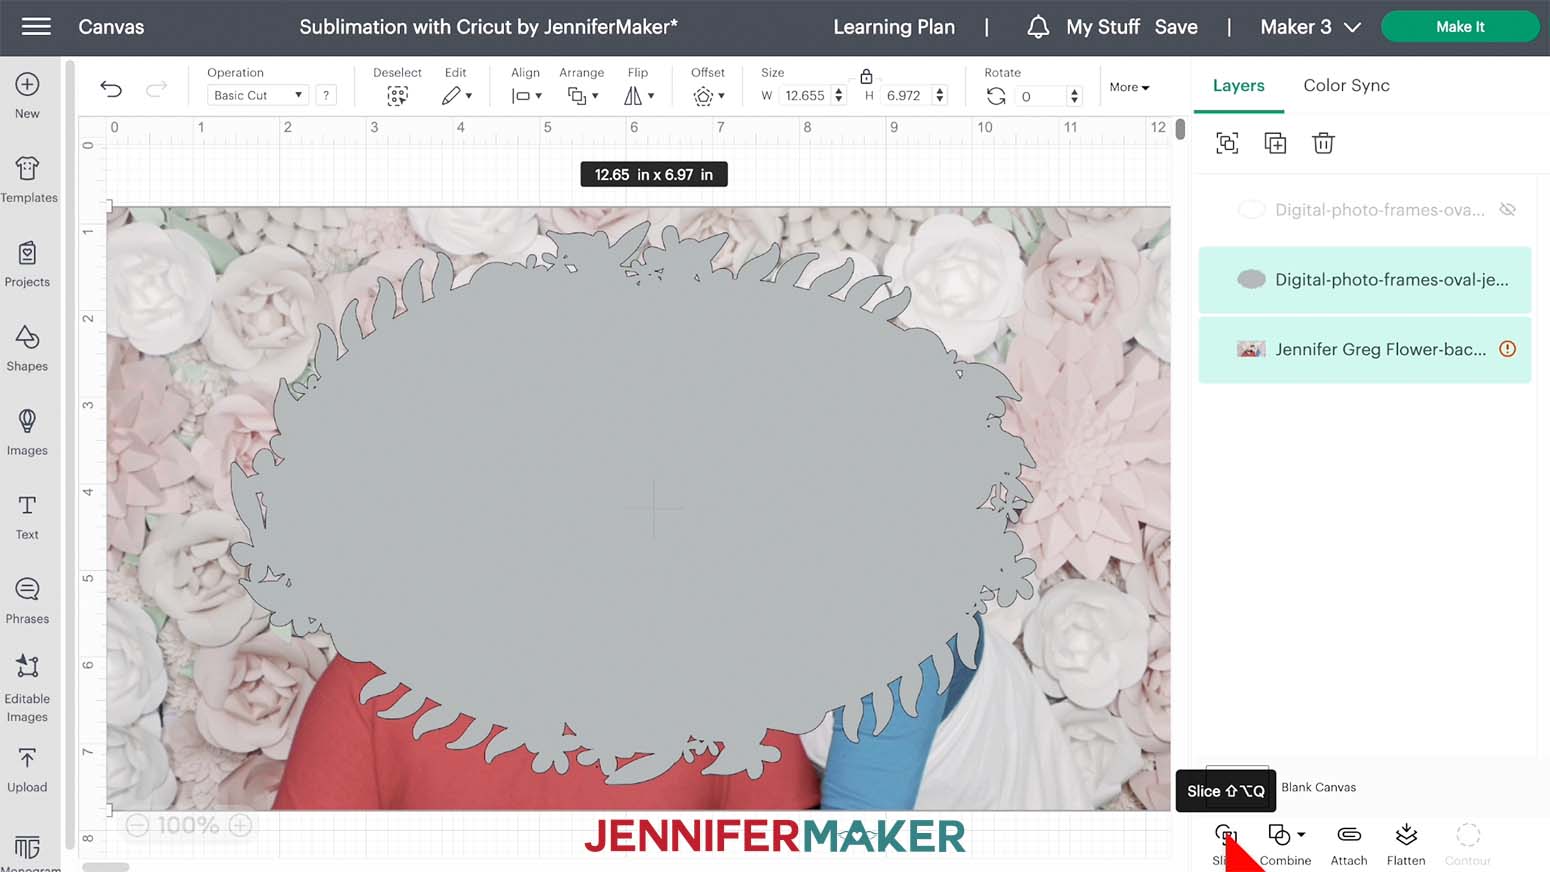
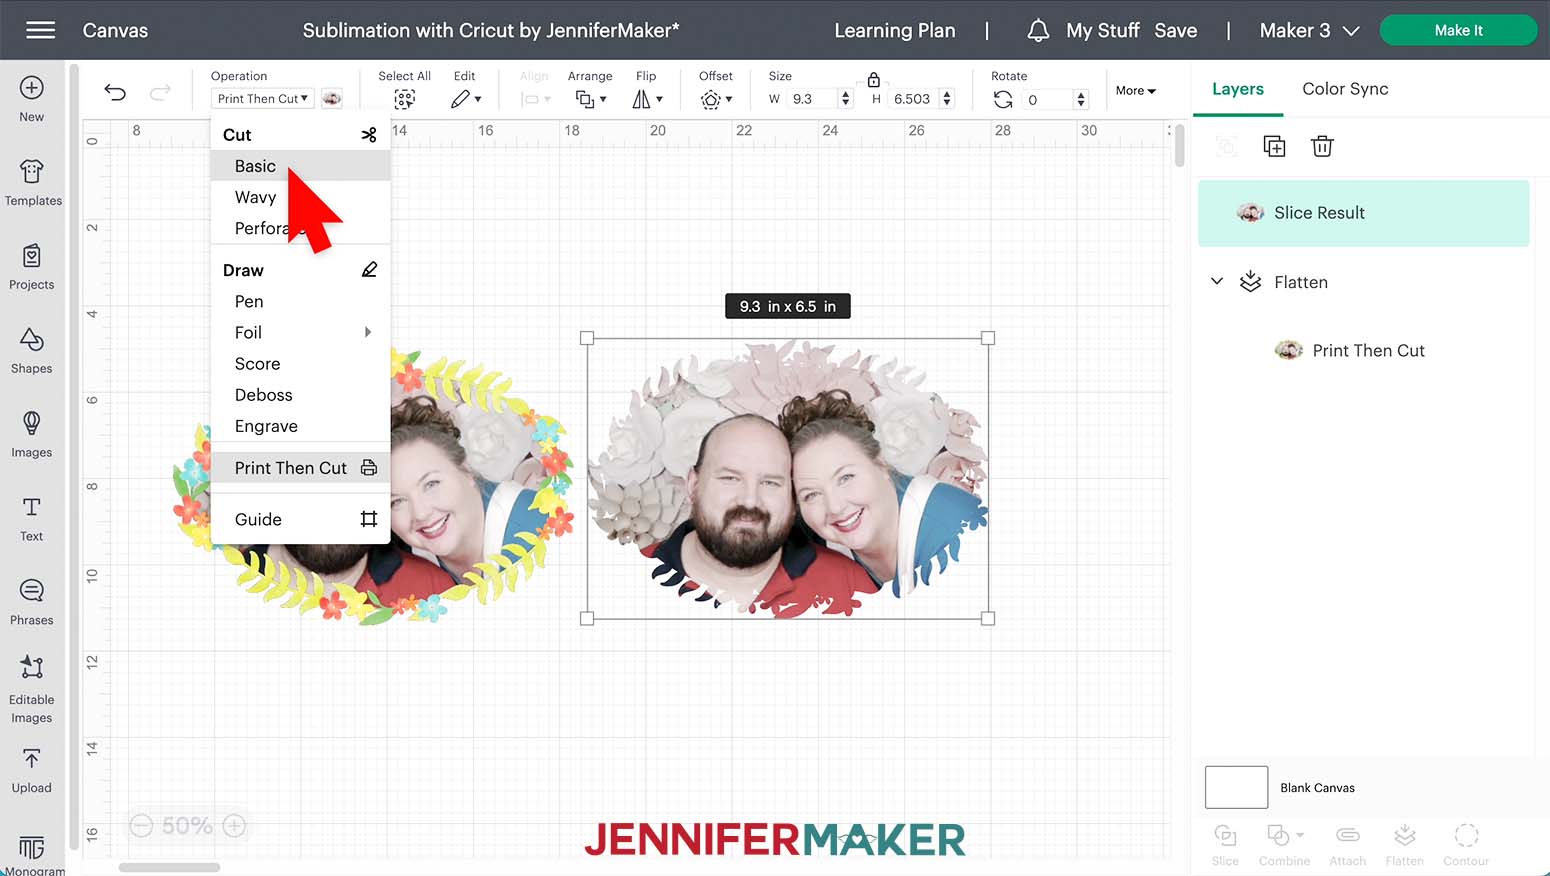
Select the other frame layer and in the Operation menu, select “Basic” under "Cut." The frame will turn to gray.
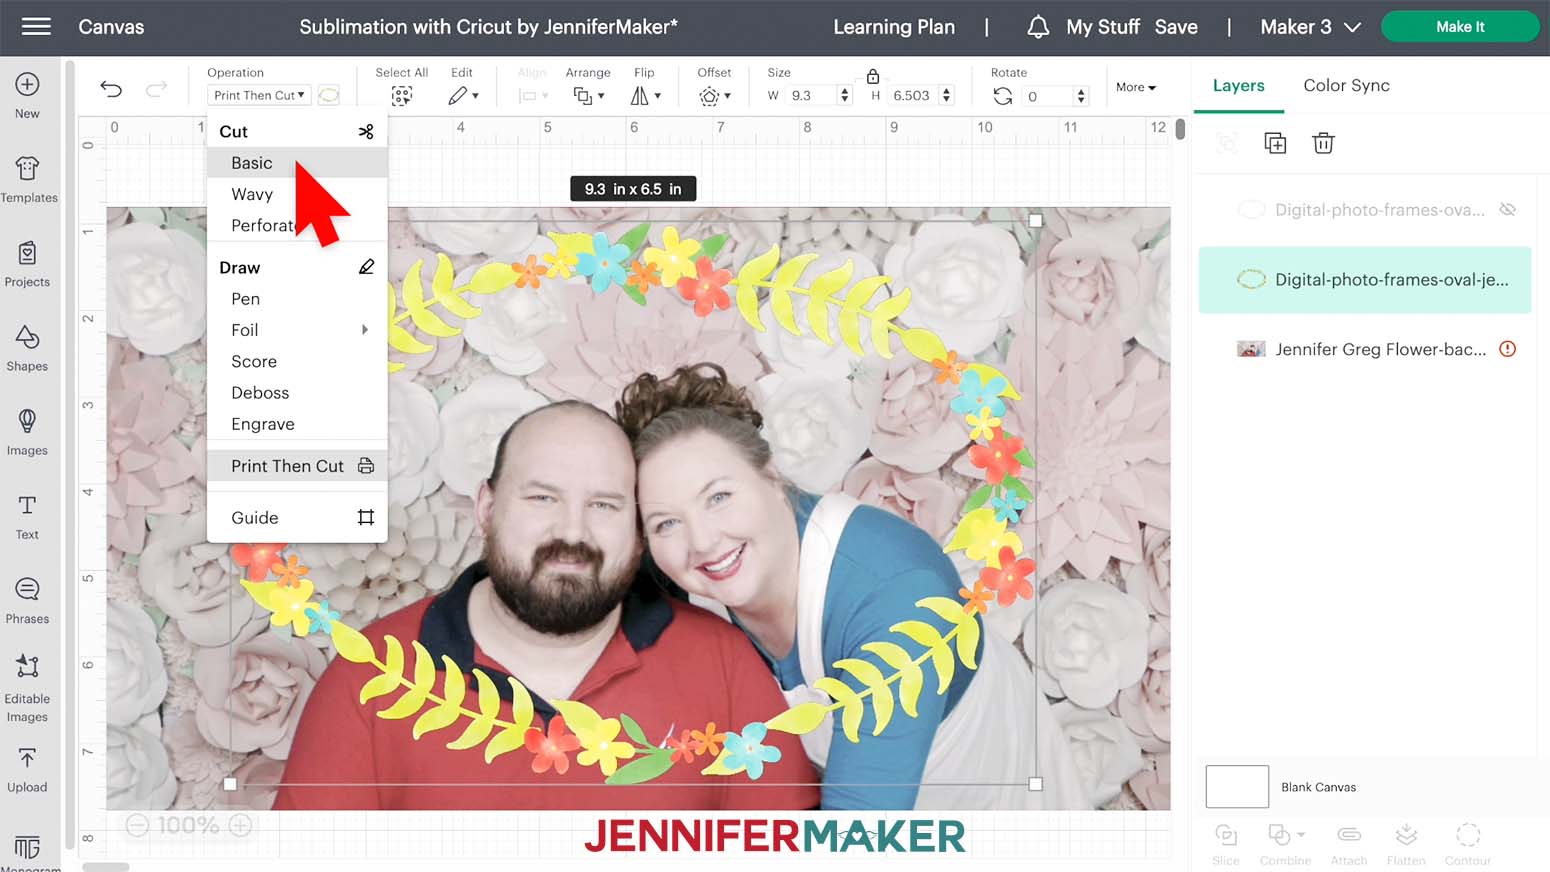
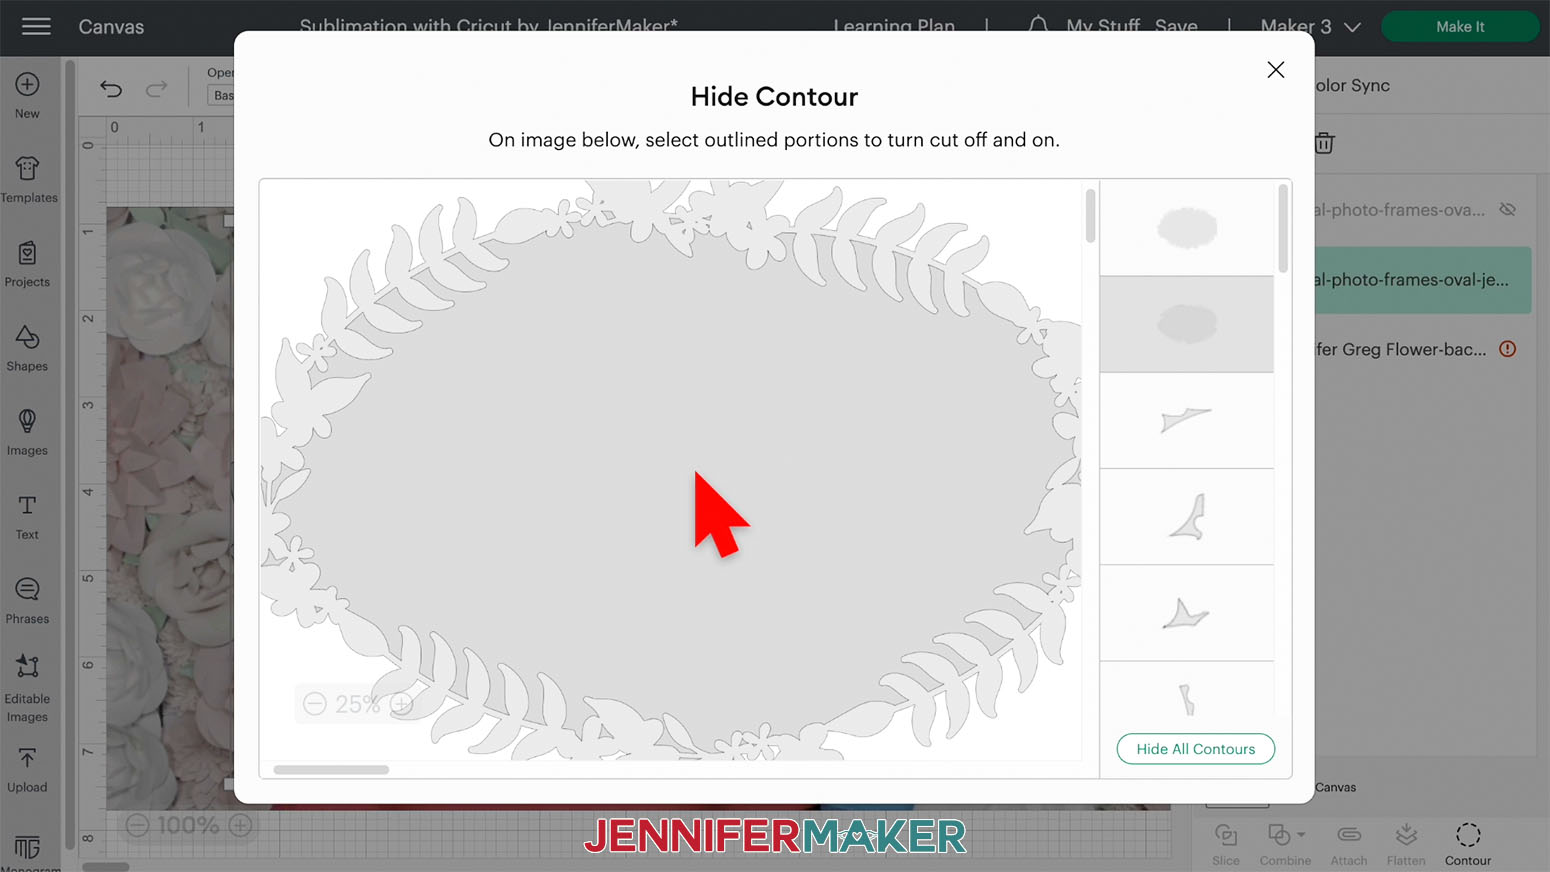
In the lower right corner, click on “Contour”. On the Contour window, click the inside of the frame. And then click the “X” in the upper right corner to close the window. Your frame center should now be filled in with gray.
Select both the contoured frame and photo and then click “Slice” at the bottom. You will notice that there are new “Slice Result” layers now. Delete the layer that has the gray frame and the layer that has the excess photo edges.
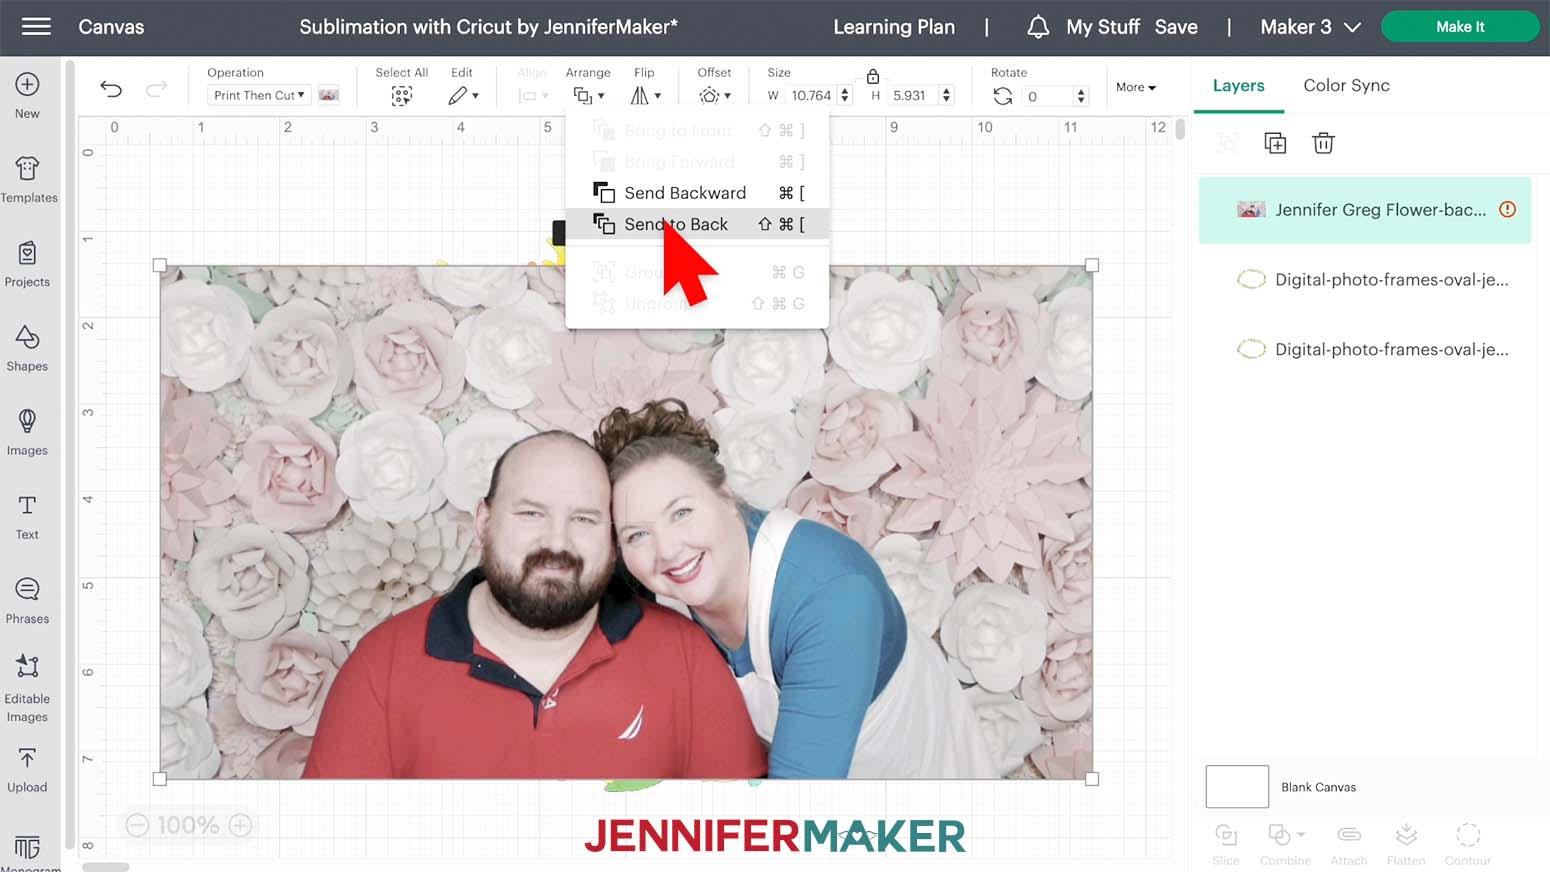
Make the other frame layer visible, by clicking the gray eye to the right. With that layer still selected, go to the Arrange menu and select “Bring to Front”.
Select both layers and click “Flatten” in the lower right corner.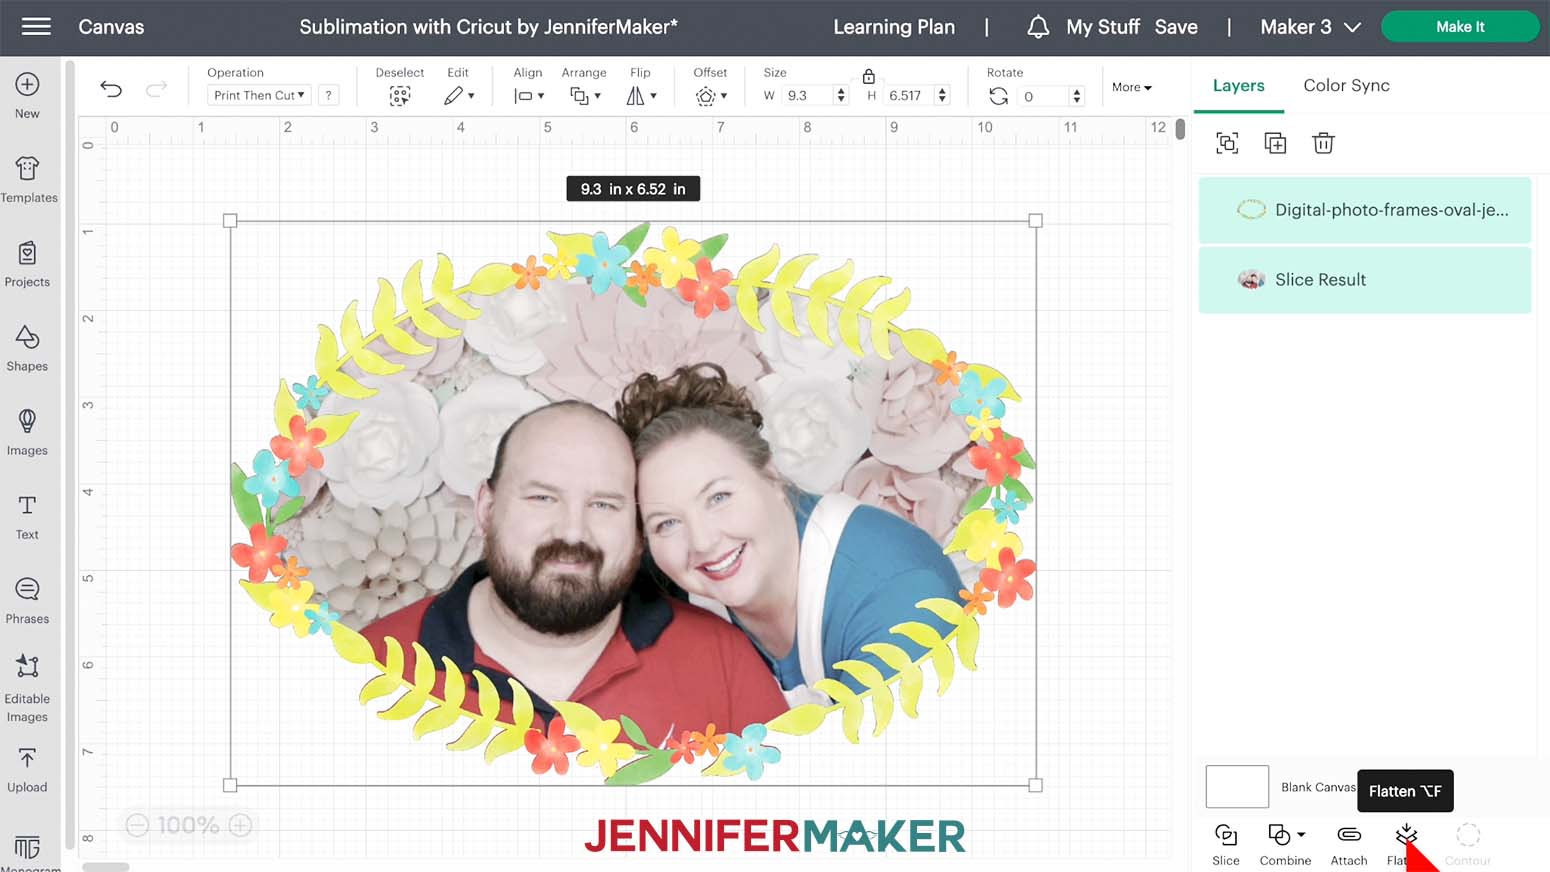
STEP 3: PRINT YOUR SUBLIMATION DESIGN
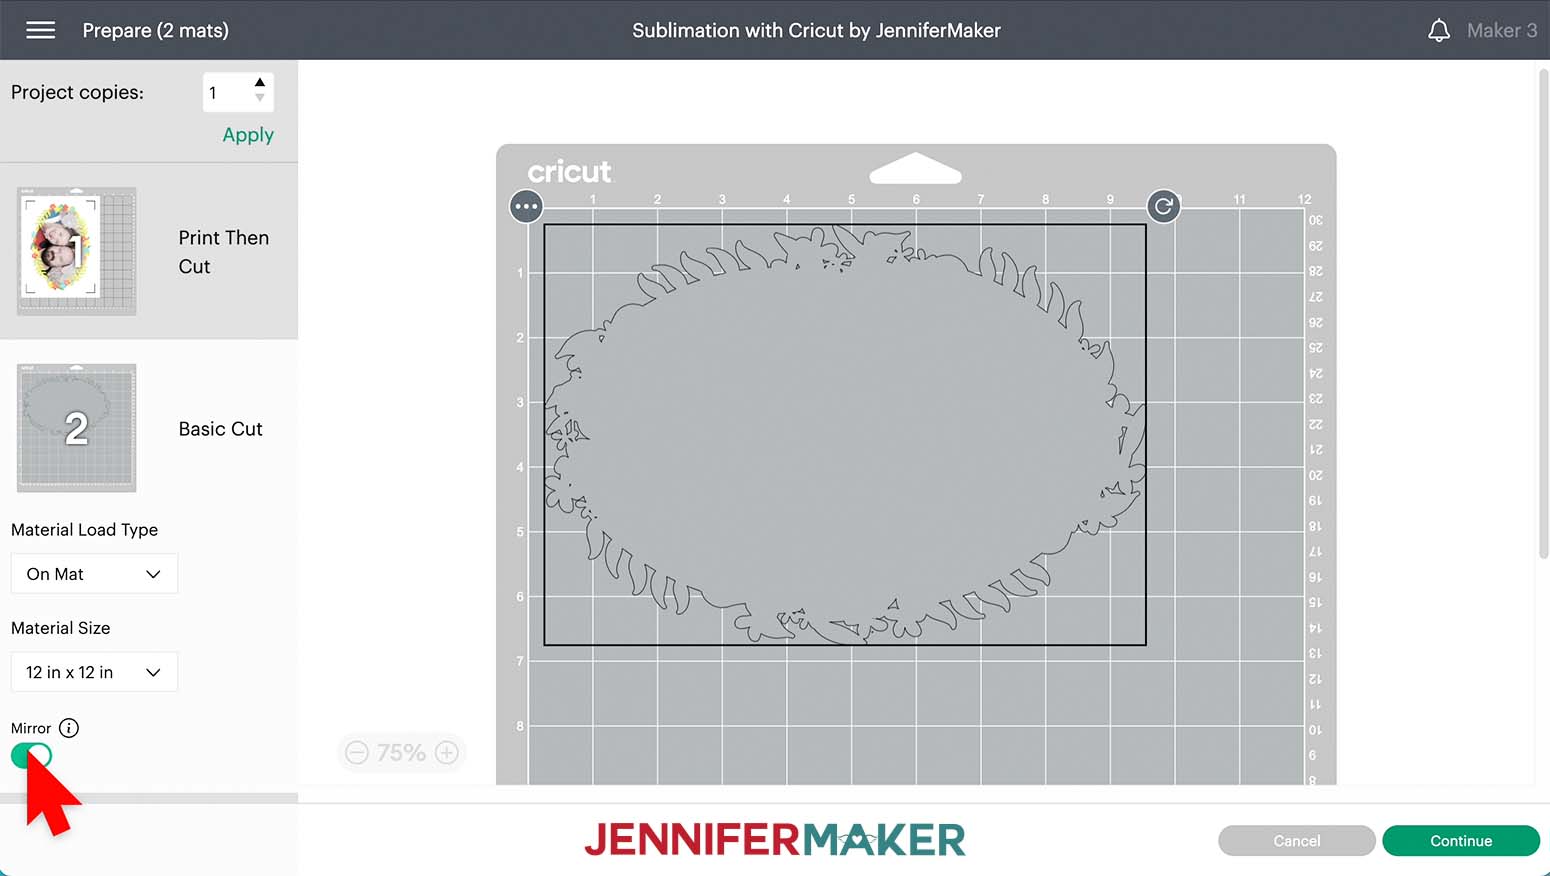
Double check that you design fits into the 9.32" x 6.82" dimensions needed for Print then Cut.
Make sure the correct machine is selected, then click "Make It" in the upper right corner.
If prompted, click "On Mat," "12 x 12," and "Confirm" in the popup.
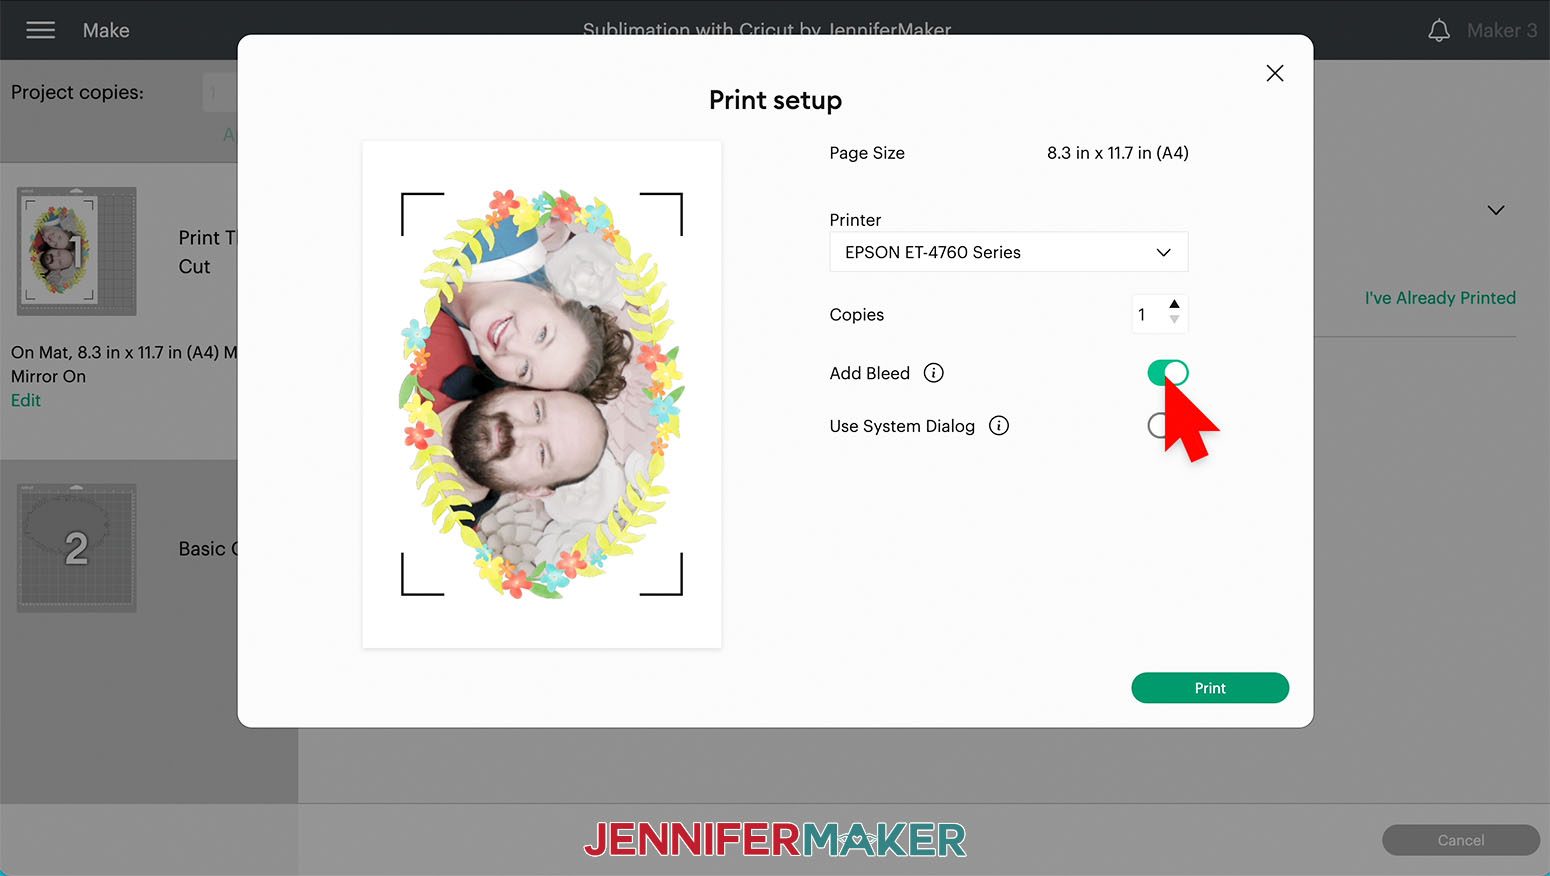
On the Prepare screen, make sure your mat says "Print Then Cut" and that the Material Size fits your sublimation paper. Mine is 8.5" x 11". Make sure the "Mirror" toggle is turned on.

Click "Continue."
Before we print, make sure your paper is loaded correctly. Check your printer manual and paper packaging for help identifying the right side to print on and how to load it.
On the Make screen, click the "Send to Printer" button to prepare to print your design.
Make sure your sublimation printer is listed. Then turn off “Add Bleed” and turn on “Use System Dialog” before clicking the "Print" button.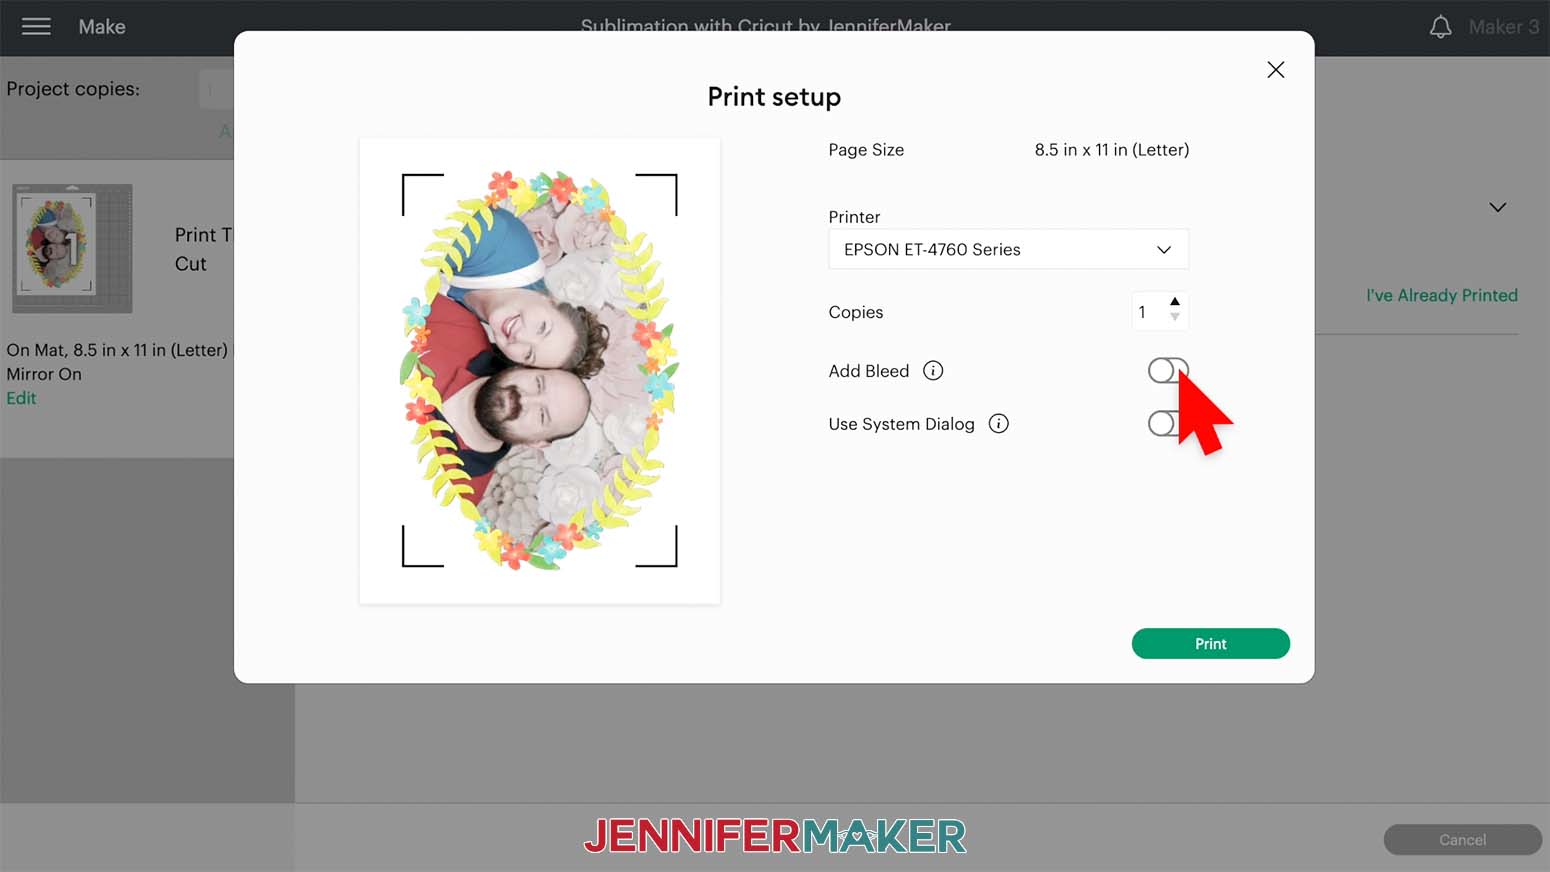
Your printer’s controls will appear, but might be hidden behind Cricut Design Space. Minimize your Cricut window to find it.
Your window may look different depending on your printer, computer, and software. Use my settings as a guideline, but adjust as needed to fit your tools.
Make sure your sublimation printer is selected under "Printer". Use the drop-down to select "Layout" then uncheck "Flip horizontally" since we already mirrored the design.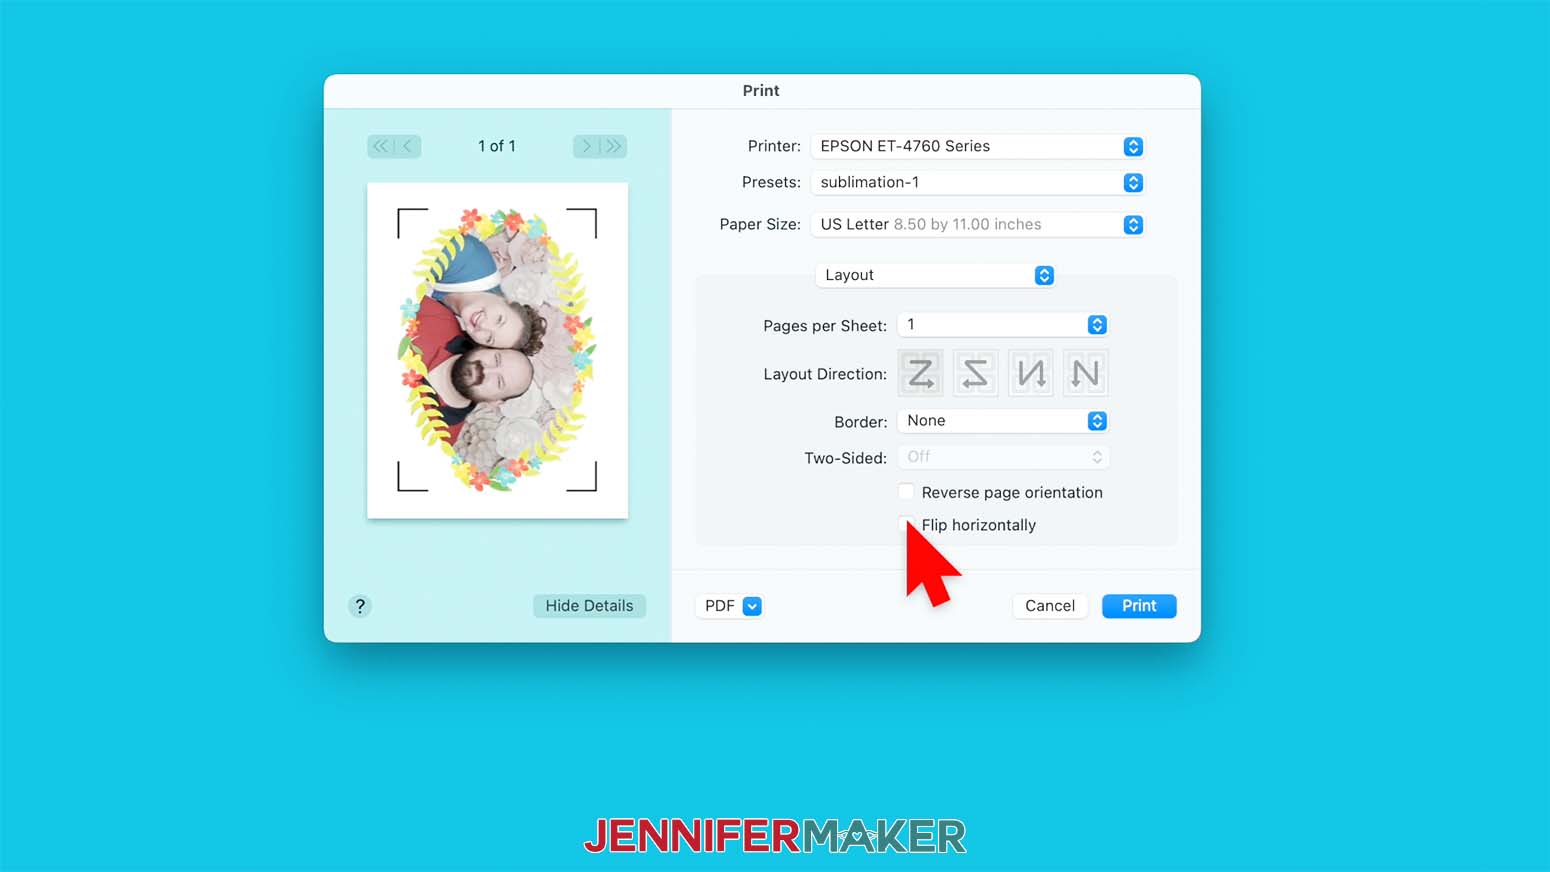
Switch to Color Matching to use ColorSync if you’re on a Mac like me, then select the correct ICC profile from the drop-down. You can find more information on ICC profiles in my Sublimation Printers Overview.
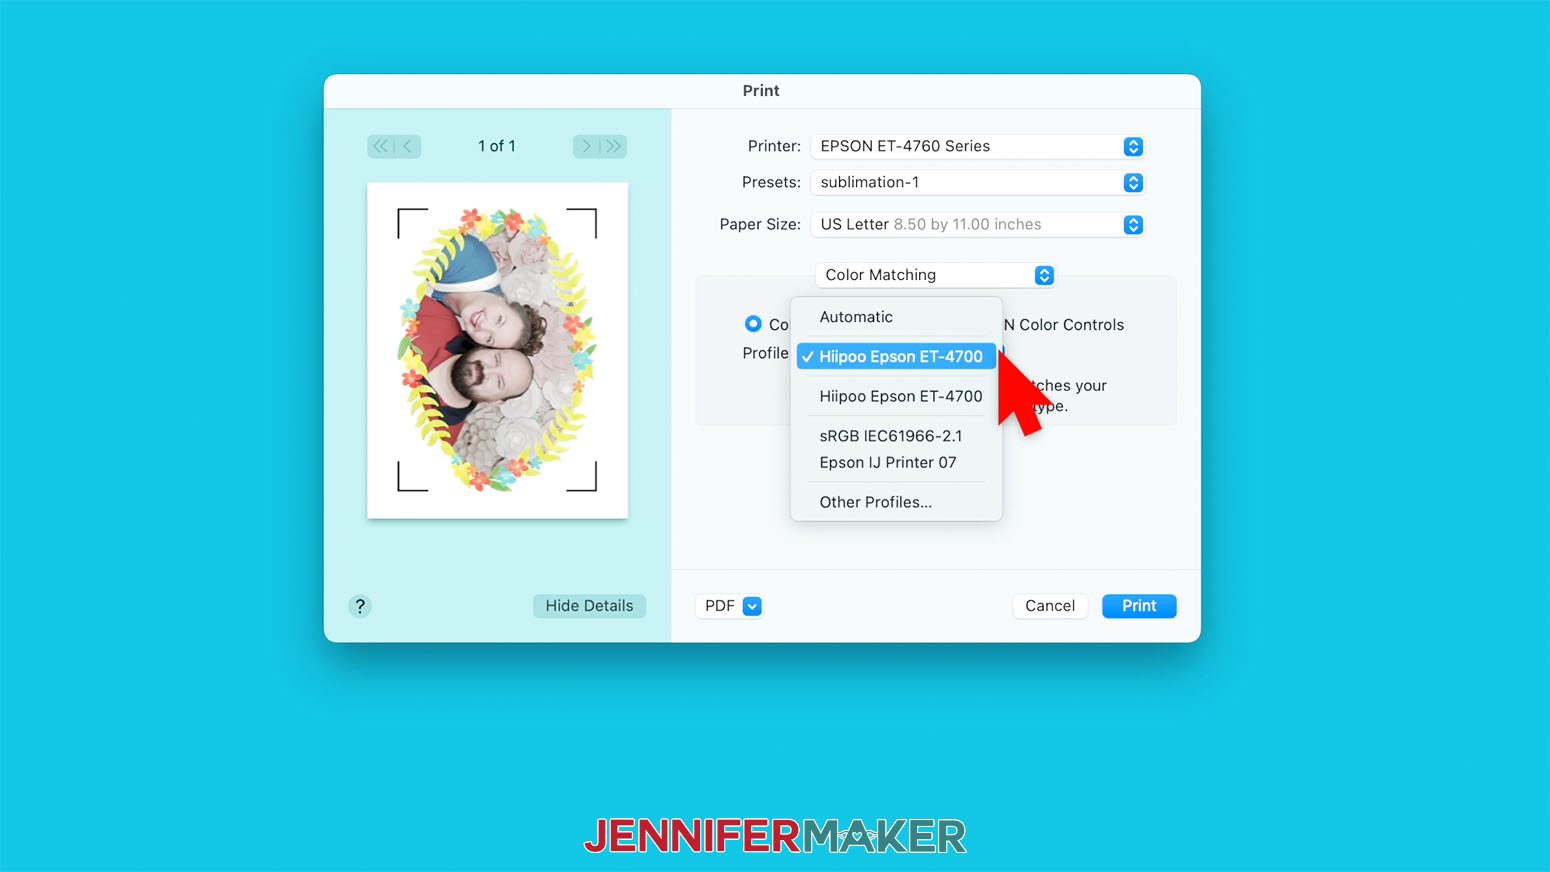
Paper handling should be set to 'Premium Matte" and to "Best" quality.
Then press Print!
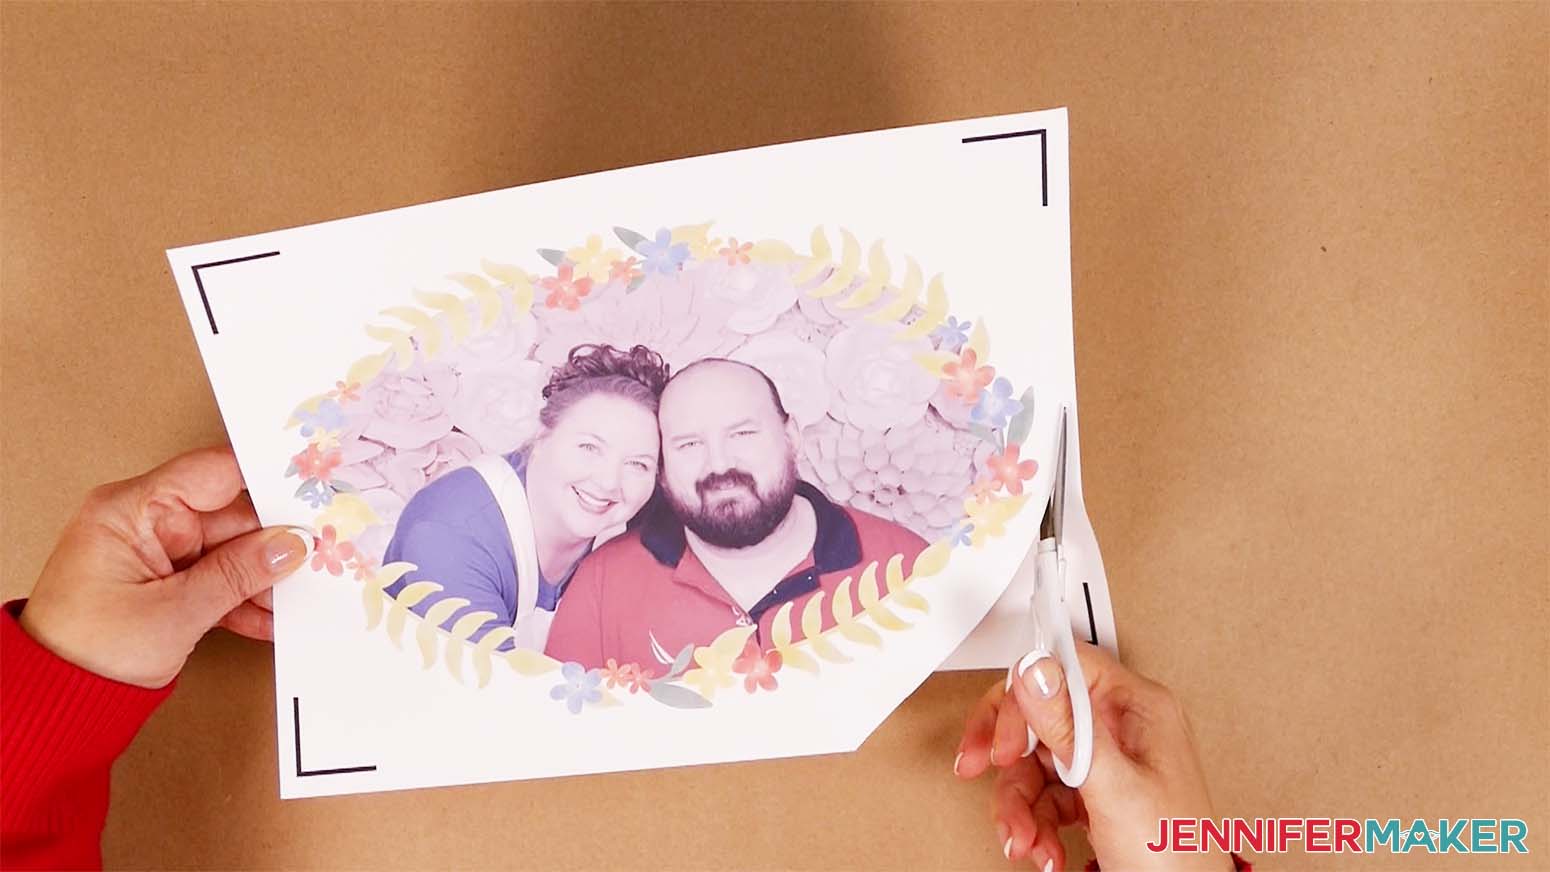
After your design has printed, set it aside until the ink is completely dry to avoid any smears while you prepare it.
For a normal Print then Cut project, we’d put the printed image on a machine mat and use the Cricut to cut out the shape. But since we’re sublimating the design, just trim the black registration marks away. For the best results on a polyester t-shirt you can feather or tear away the extra paper.
NOTE: If you are using EasySubli or glitter HTV, you can also use scissors and cut close around the image.
NOTE: If you plan to sublimate onto heat transfer vinyl or Glitter Iron-on, check out my How to Sublimate on Cotton tutorial which discusses how to Print then Cut HTV and sublimation prints.
NOTE: If you'd like your image to be larger than the 9.32" x 6.82" image size, you can Slice your image in half and then use my Tiling Sublimation Projects tutorial to transfer both parts together.
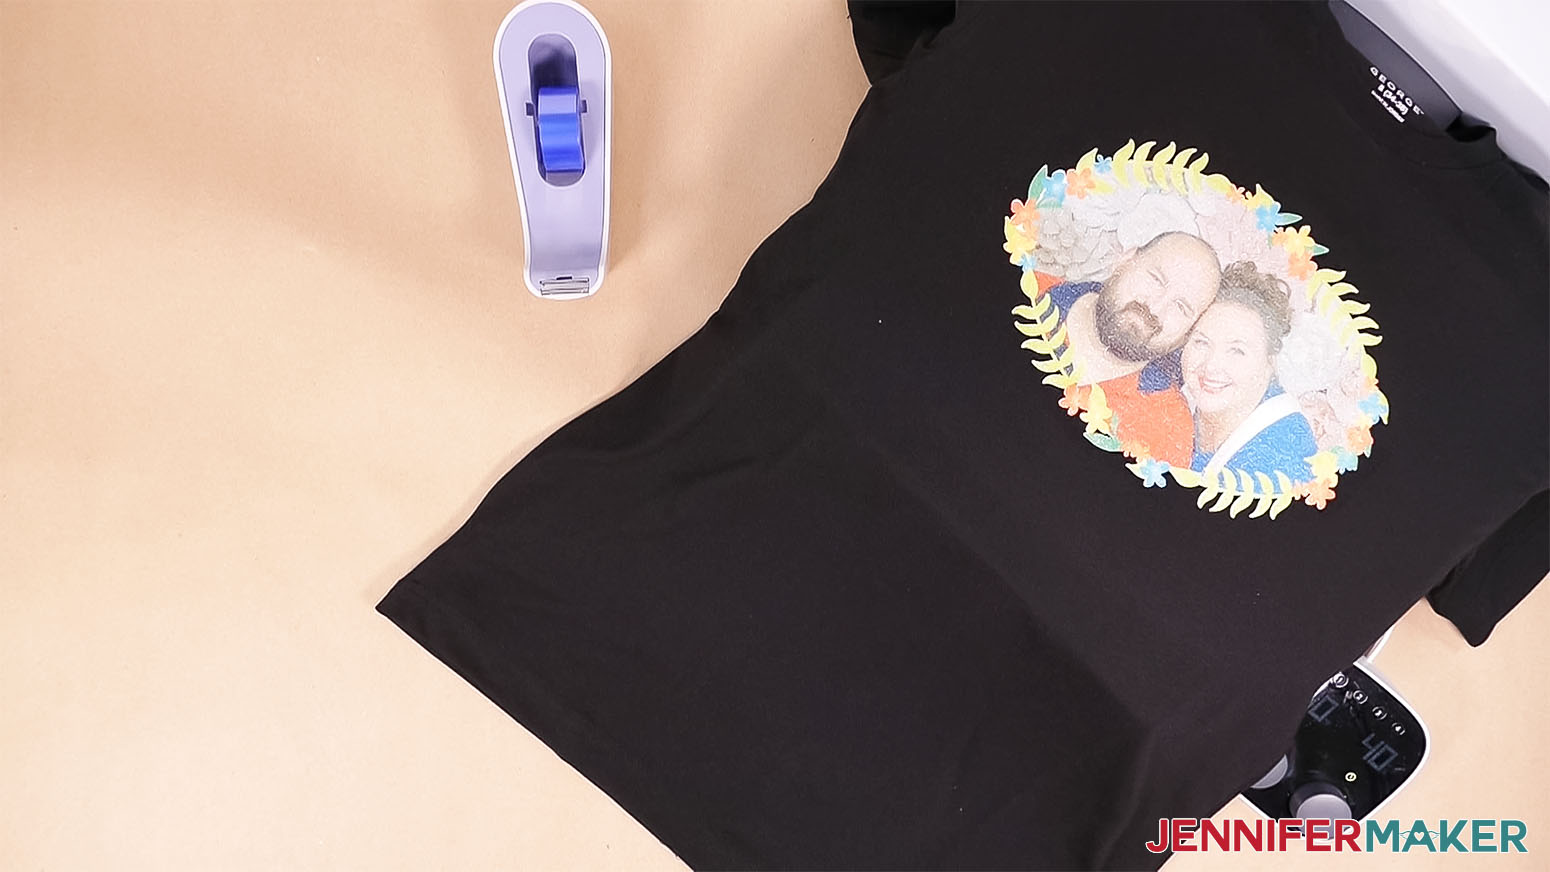
STEP 4: SUBLIMATE YOUR T-SHIRT
I'm using an Autopress, but you can also use an EasyPress with a pressing mat. If you're using different materials or tools, consult the Cricut Heat Guide to check your settings.
Set the temperature of your press to 385° F (197° C) and the time to 10 seconds.
Make sure you have proper ventilation by opening a window or turning on a fan.
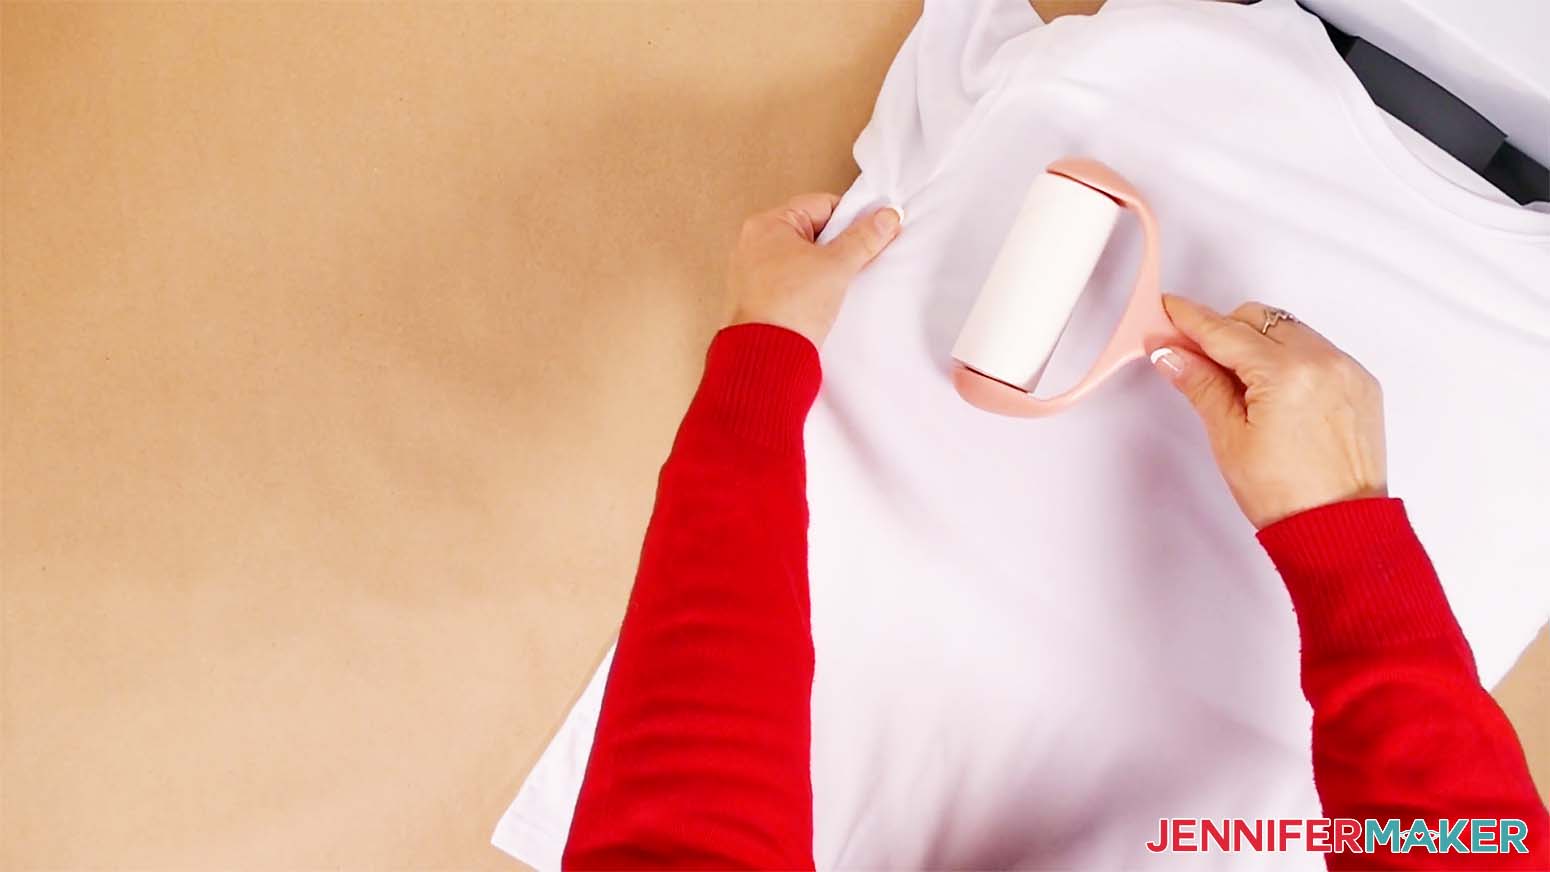
Lint roll the t-shirt to remove any dust and debris.
Place a clean sheet of white cardstock in between the front and back of the t-shirt.
When the press is ready, preheat your t-shirt for 10 seconds. This smooths any wrinkles and removes moisture.
Make a note of which way is up on your print by marking it with a pencil on the back.
Using the t-shirt guide, find where you'd like to place the image. Position it face down.
Secure your print with heat resistant tape.

Cover the project with white butcher paper and press at 385° F (197° C) for 35 seconds.
When the time is up, you can remove the butcher paper. To prevent ghosting, let the print cool for a couple minutes to let the sublimation process complete. After it has cooled, remove the tape, paper, and cardstock.

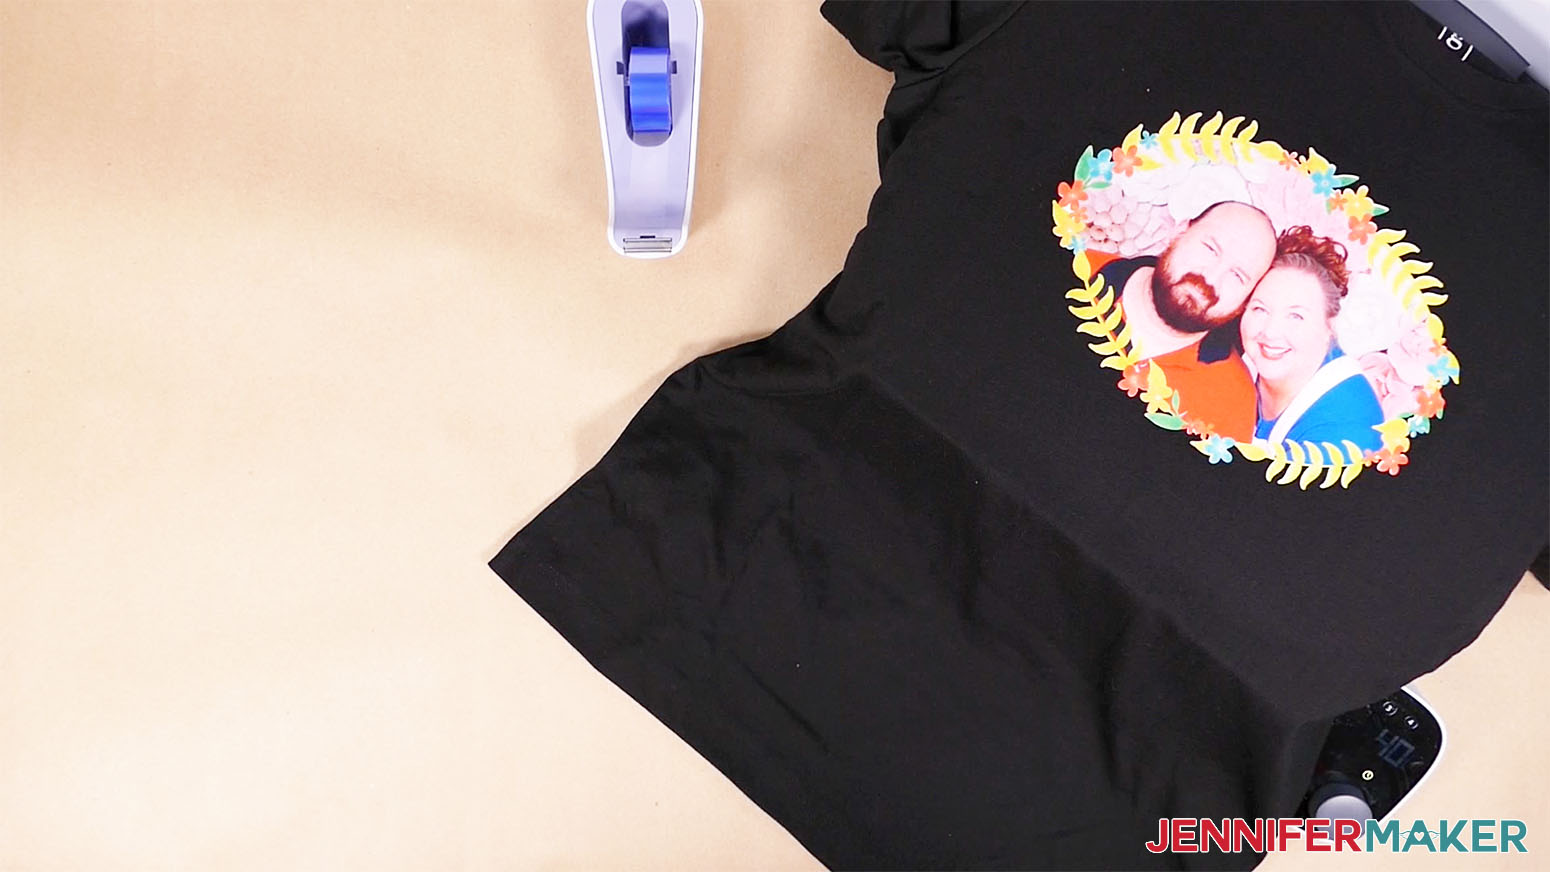
You're done!
VARIATIONS
SLICING LARGER DESIGNS TO FIT IN PRINT THEN CUT DIMENSIONS
If you want to make a framed design larger than the Print then Cut area, you can with a few extra steps.
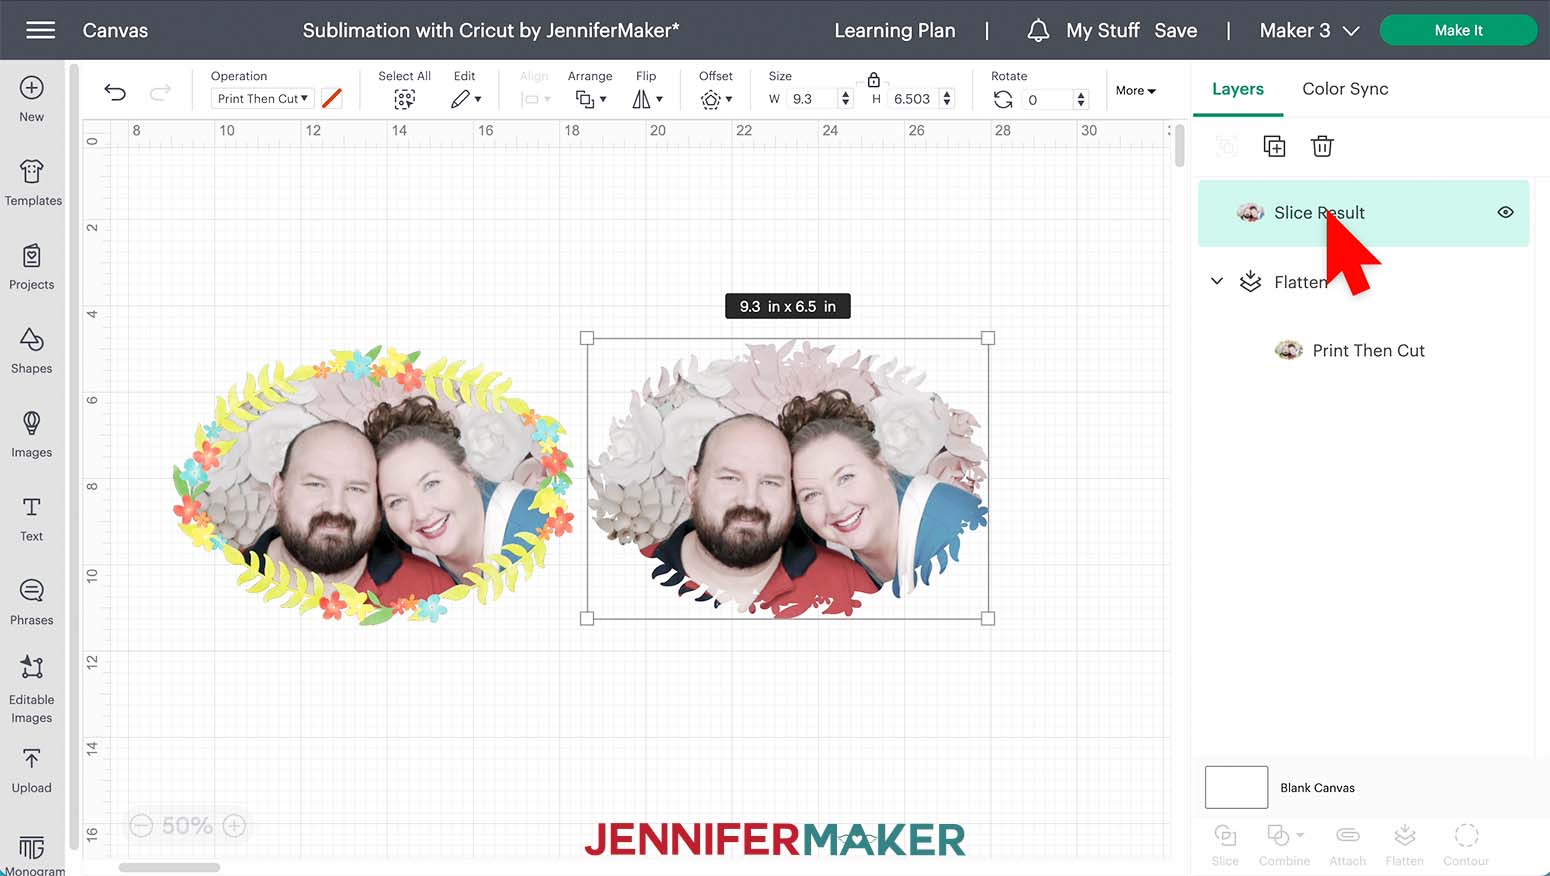
Prepare your frame and photo the same way as the main process, but don't Flatten the result. I'm using the circle frame this time and want to make a design that is 9.08" wide and x 9.25" tall since I really only want to deal with one seam.
Make a duplicate of both the frame and photo layers.
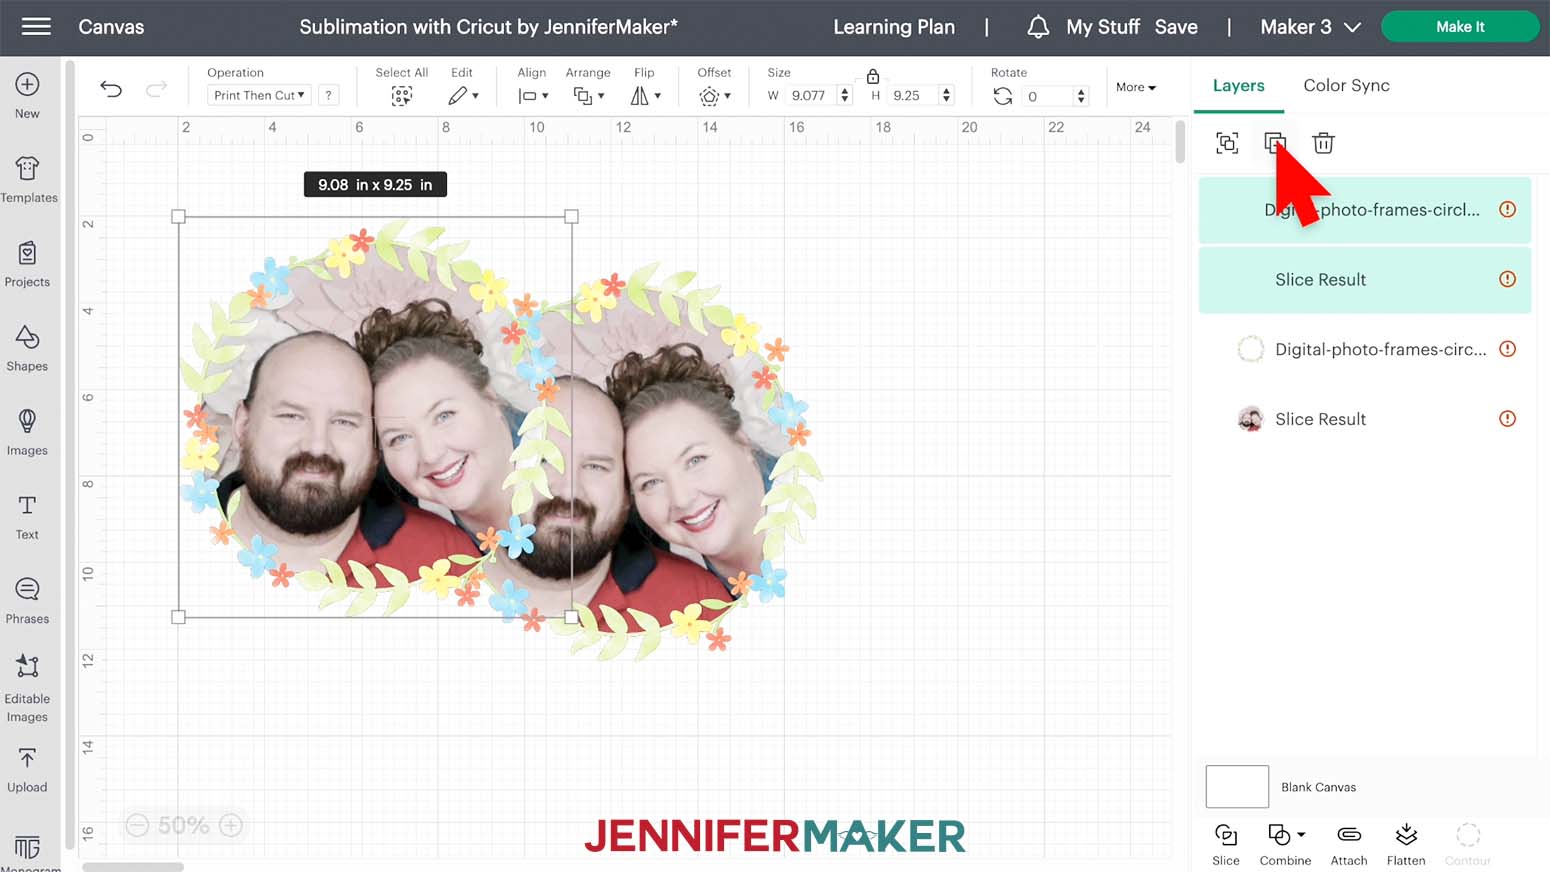
Select all four layers and Select "Center" in the "Align" menu.
We need to Slice each of these layers into two pieces with a bit of overlap to match the seams during the transfer. You can use the Canvas grid to line up the center of your image. With all the layers selected, determine the distance to the middle, either vertically or horizontally. I'll use a vertical seam. Drag the layers so the middle aligns with a grid line.
TIP: If you find that the seam will run through a very important feature in the design, like an eye or a piece of writing, you can adjust the seam to another spot that will be easier to match and more forgiving. Just make sure the separated pieces will still be small enough to fit on a Print then Cut sheet.
Hide one of each of the floral frame and photo layers.
Now we'll create the seam and a slight overlap by splitting the layers. I will start with the left hand side of the images.
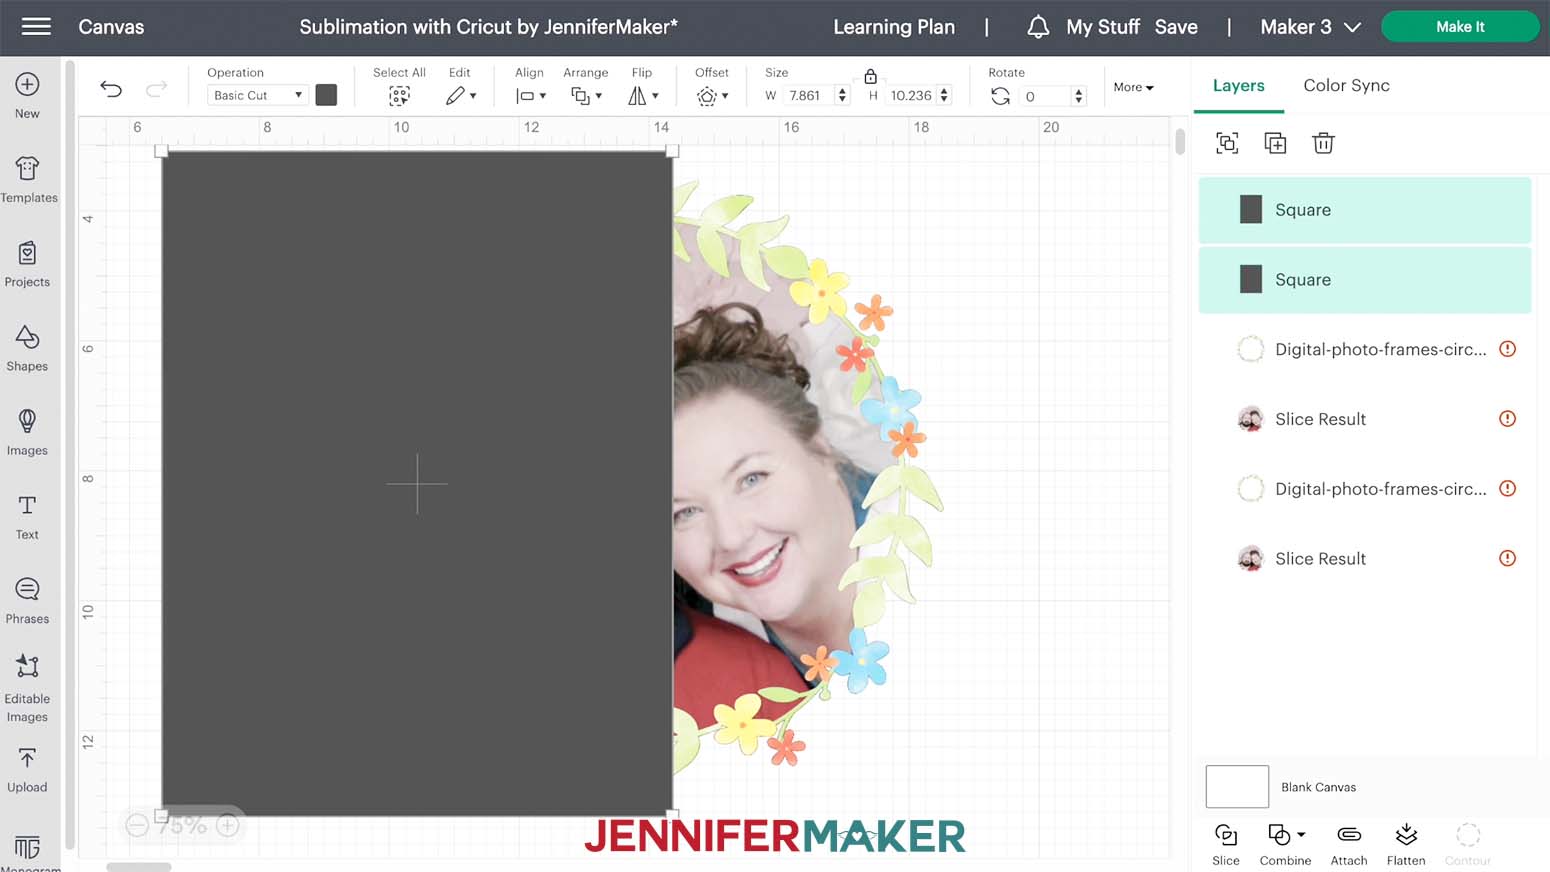
Click on "Shapes" and click on the square shape. Make sure the lock is open and drag a corner of the bounding box to create a rectangle that will cover the left side of the design and about .25" beyond the seam. Duplicate and center align the rectangles. Drag them over the frame and photo so the right hand edges are positioned correctly to create the seam with the overlap space.
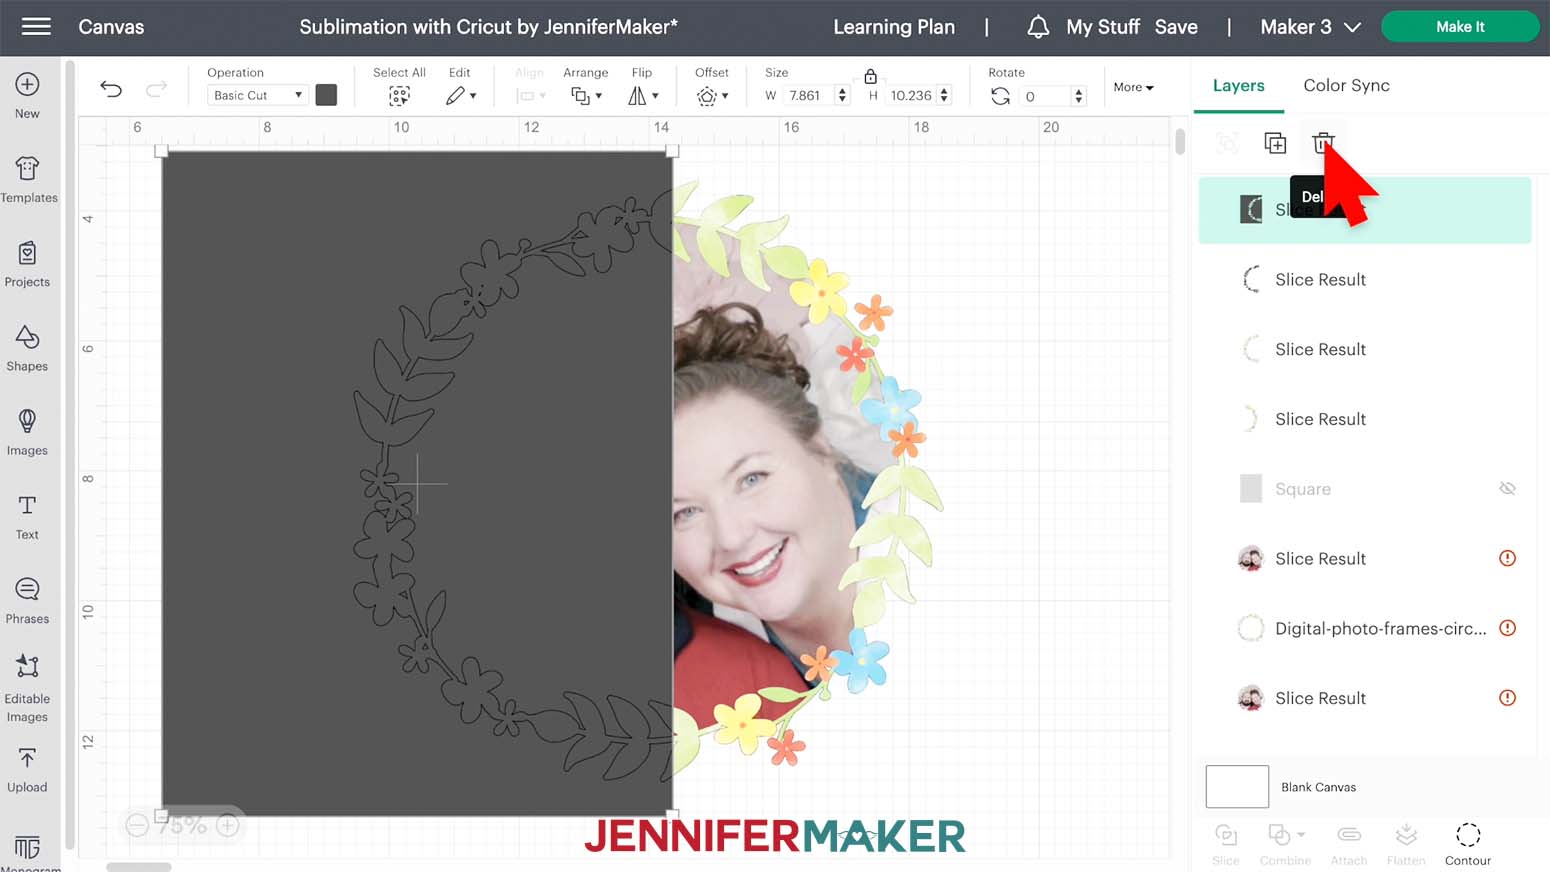
Hide one of the rectangles. Select the visible rectangle and one of the floral frame layers. Then click "Slice."
Using the Layers Panel, select and delete the gray slice layers and the right hand side of the floral frame.
NOTE: Using the Layers Panel will ensure that nothing is moved by mistake on the Canvas.
Hide the sliced left frame layer.
Next, unhide the other rectangle. Select it and one of the photo layers and then click on "Slice." Delete the unwanted layers.
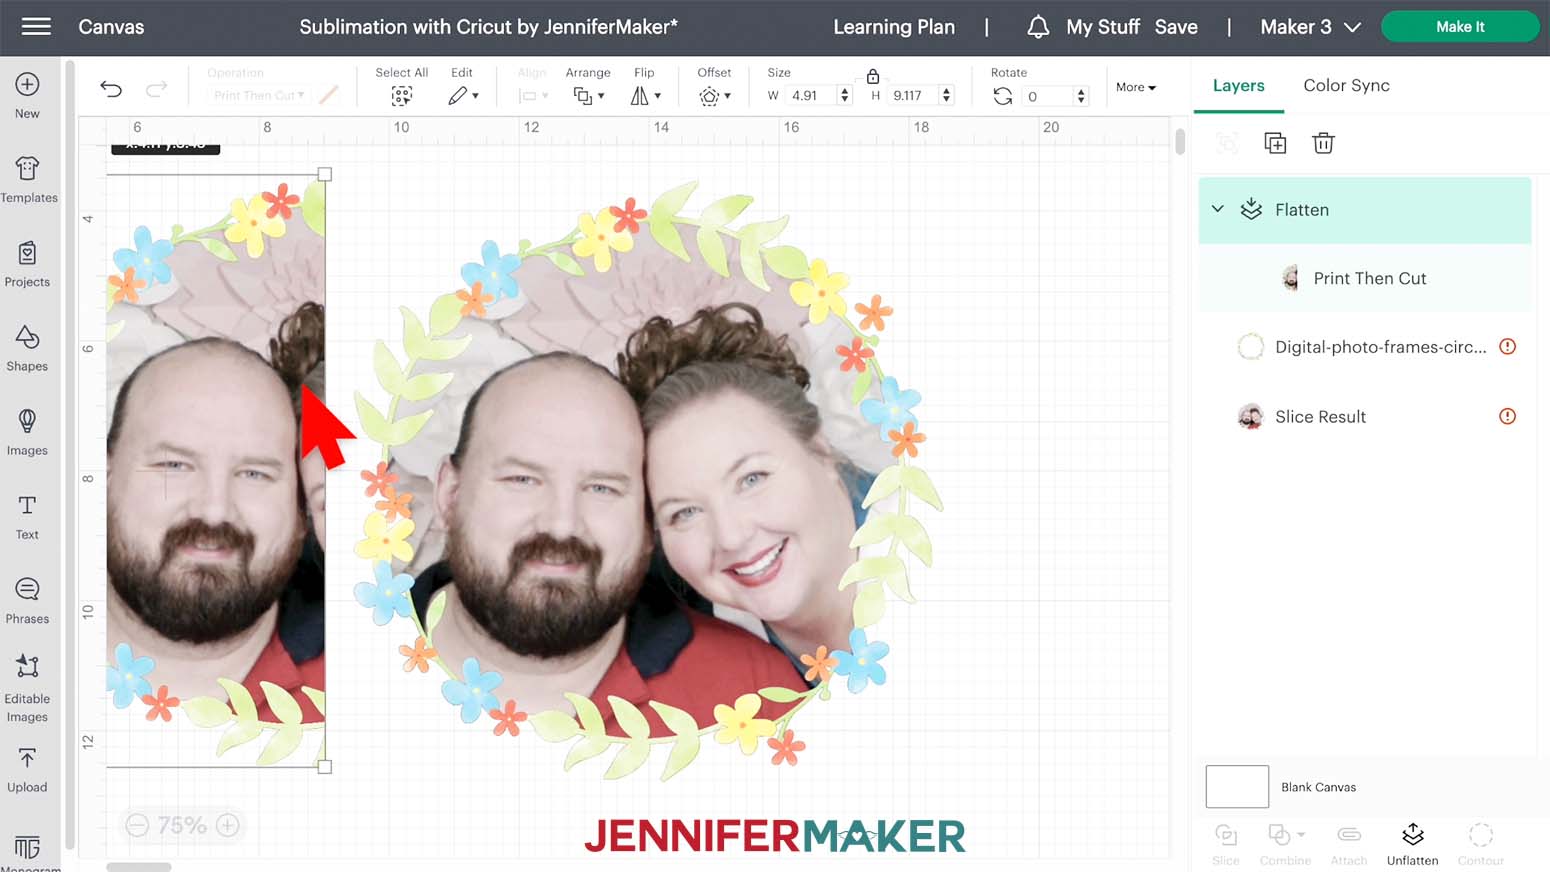
Select the sliced floral frame layer and bring it to the front.
Select both sliced left layers and click "Flatten."
Repeat this process with the right side making sure to position the left edge of the slicing rectangles the same distance beyond the seam. That overlap will help create a seamless design when we tape the halves together.

Click "Make it." On the Prepare screen, make sure the Material size is 8.5" x 11" and "Mirror" is toggled on. If the images are very close to the black registration marks, you can drag them to the center a bit. Click "Continue."
On the Make screen, click "Send to Printer." Turn off "Add Bleed" and turn on "Use System Dialog."
Your printer’s controls will appear, but might be hidden behind Cricut Design Space. Minimize your Cricut window to find it.
Follow the steps above to print both sheets. Let them dry well before handling them.
Trim away the black marks using scissors, leaving some white space above and below the images. Using a paper trimmer, trim along the straight seam line sides of each half. Make sure there is no white showing to the side of the design's seam.
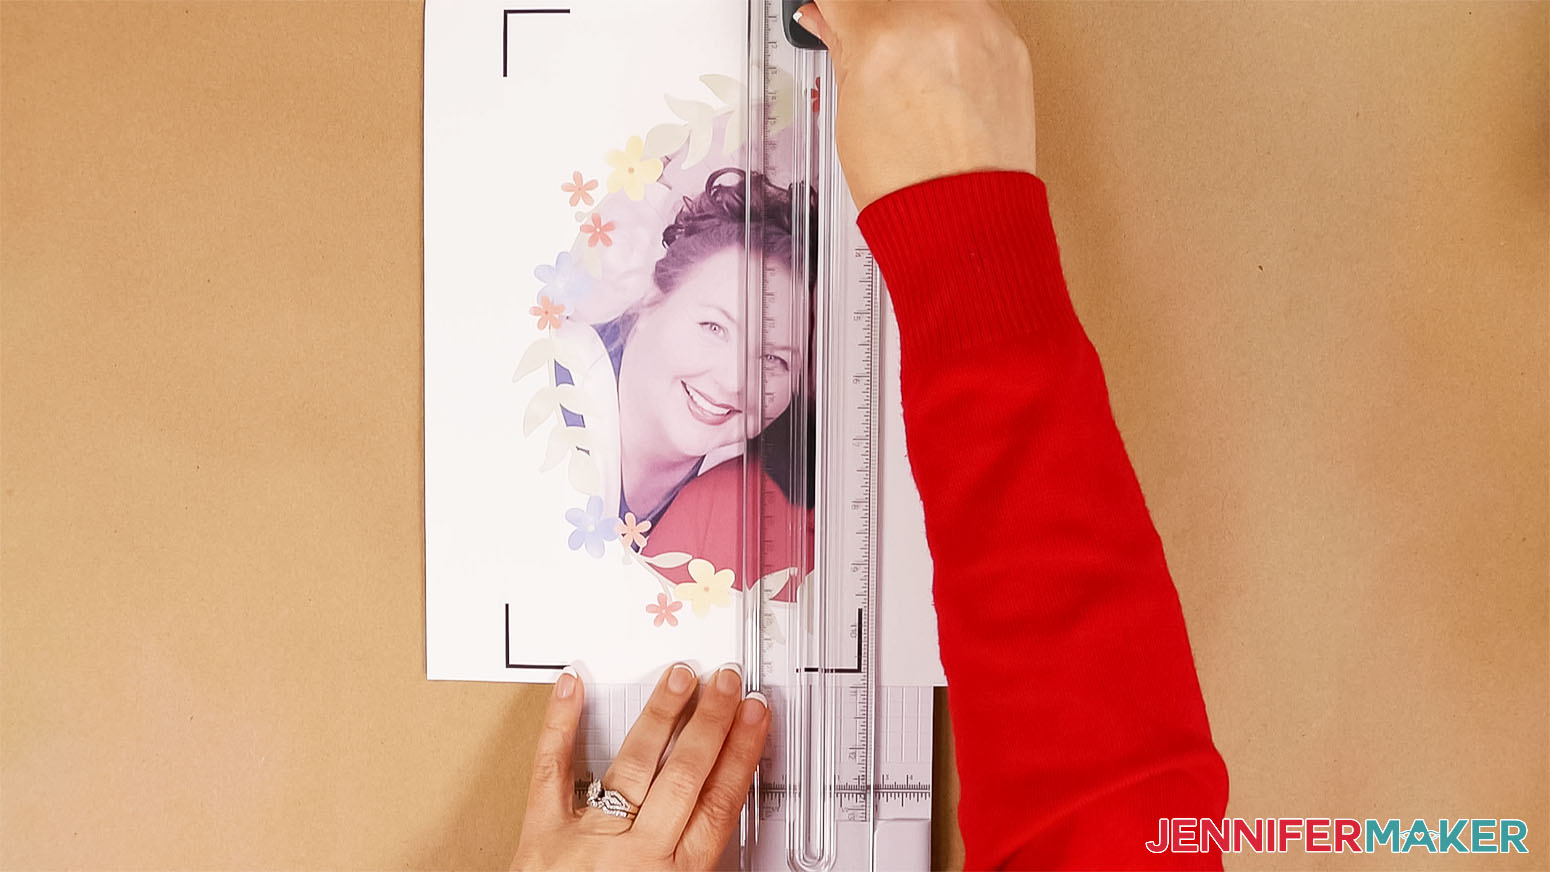
Carefully line up both halves and tape them together using heat resistant tape.
NOTE: Be careful not to tape over any sublimation ink. You can add small amounts of tape to the back to keep it together without shifting, but be aware that it adds another layer and sometimes leaves an impression mark, so avoid it if possible or only use a little bit. Try to tape in non-ink areas only if possible.
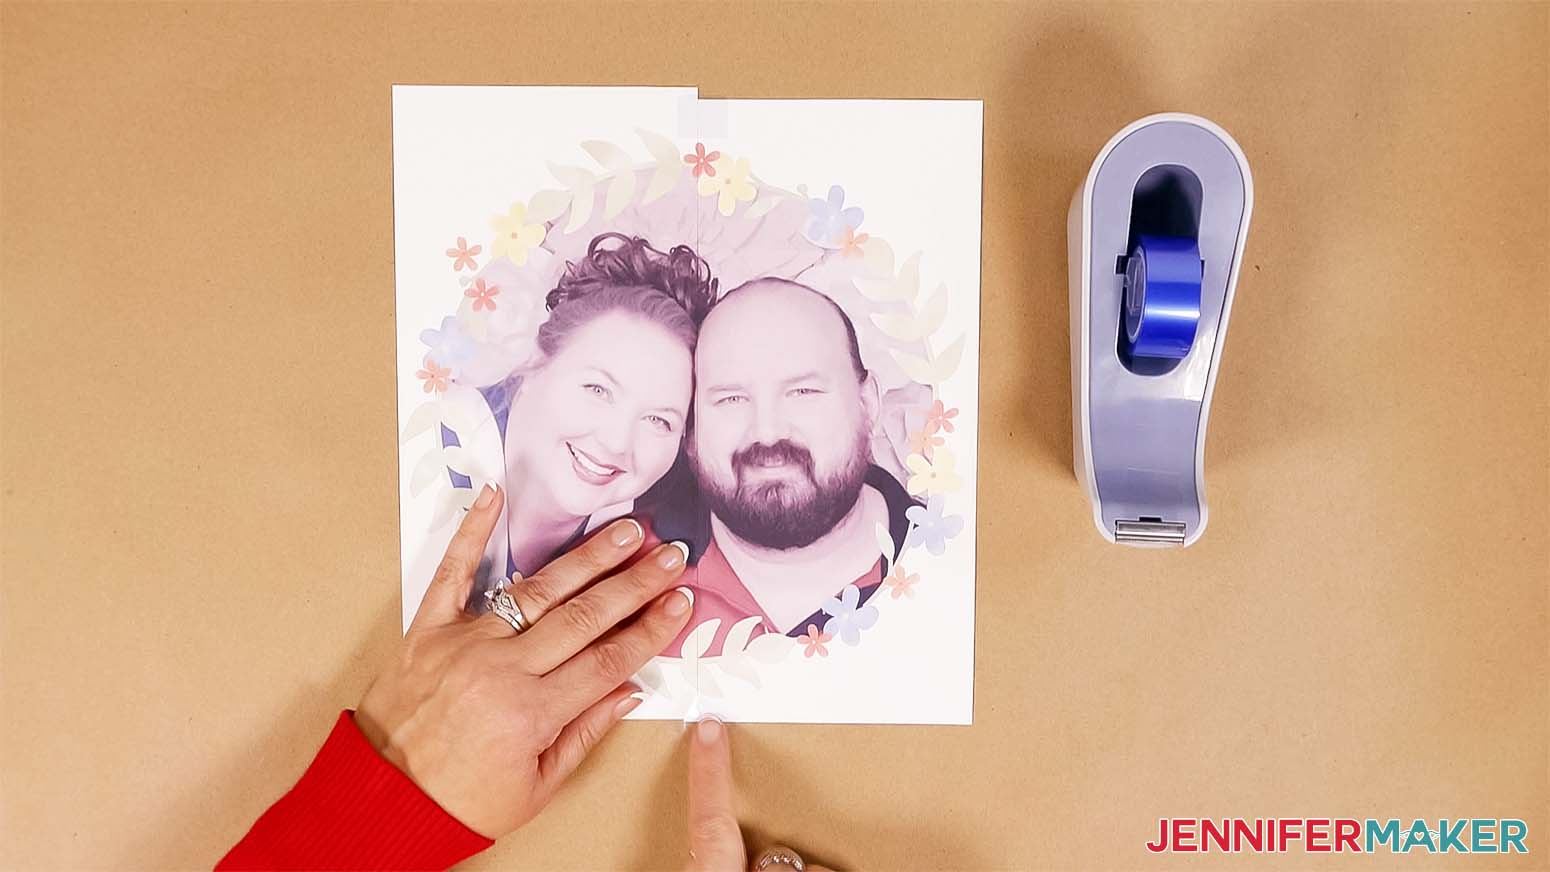
One the halves are secure, use the same steps to prepare to press your design. When you place it face down on the shirt and have it taped in position, run your fingernail or a scraper over the seam to secure the overlapped areas. The layers of ink will press into each other and the fabric to blend a bit easier.
Press your sublimation print according to the instructions above.
PRINT THEN CUT WITH EASYSUBLI OR GLITTER HTV FOR DARK OR COTTON FABRICS
NOTE: Since these techniques do use the Cricut to cut Print then Cut designs, calibrate you printer before beginning. See my DIY Money Holders tutorial for the steps.
EASYSUBLI
Follow all the same main steps to prepare your frame and image in Cricut Design Space, including Flattening the result. Then, make a duplicate of your design.
"Unflatten" the duplicate and delete the floral frame.
Select the leftover layer, which will be the photo that was sliced.
With the photo image selected, go to the Operation menu and select "Basic" under "Cut." The image should turn to a solid gray. This will be the shape we cut out of EasySubli.
Make sure the correct machine is selected and click "Make It."
On the Prepare screen, make sure that the photo mat is mirrored. On the plain shape mat, change the Material Size to match your EasySubli.
Click back on the first mat and click "Continue."
Click the green "Send to Printer" button to open the Print Setup window.
Make sure your printer is listed. Make sure "Add a Bleed" (extra design area to help with precise cutting) and "Use System Dialog" are green. Then click Print. The print screen for your printer will appear, but it might be hidden behind Design Space. Minimize your Cricut window to see the print settings window.
Your window will look different depending on your computer and printer. Make sure your printer is listed in the window. Set the paper and print quality to the best matte options available. Make sure your sublimation paper is loaded correctly and continue.
After your design has printed, set it aside until the ink is completely dry to avoid any smears during the cutting process.
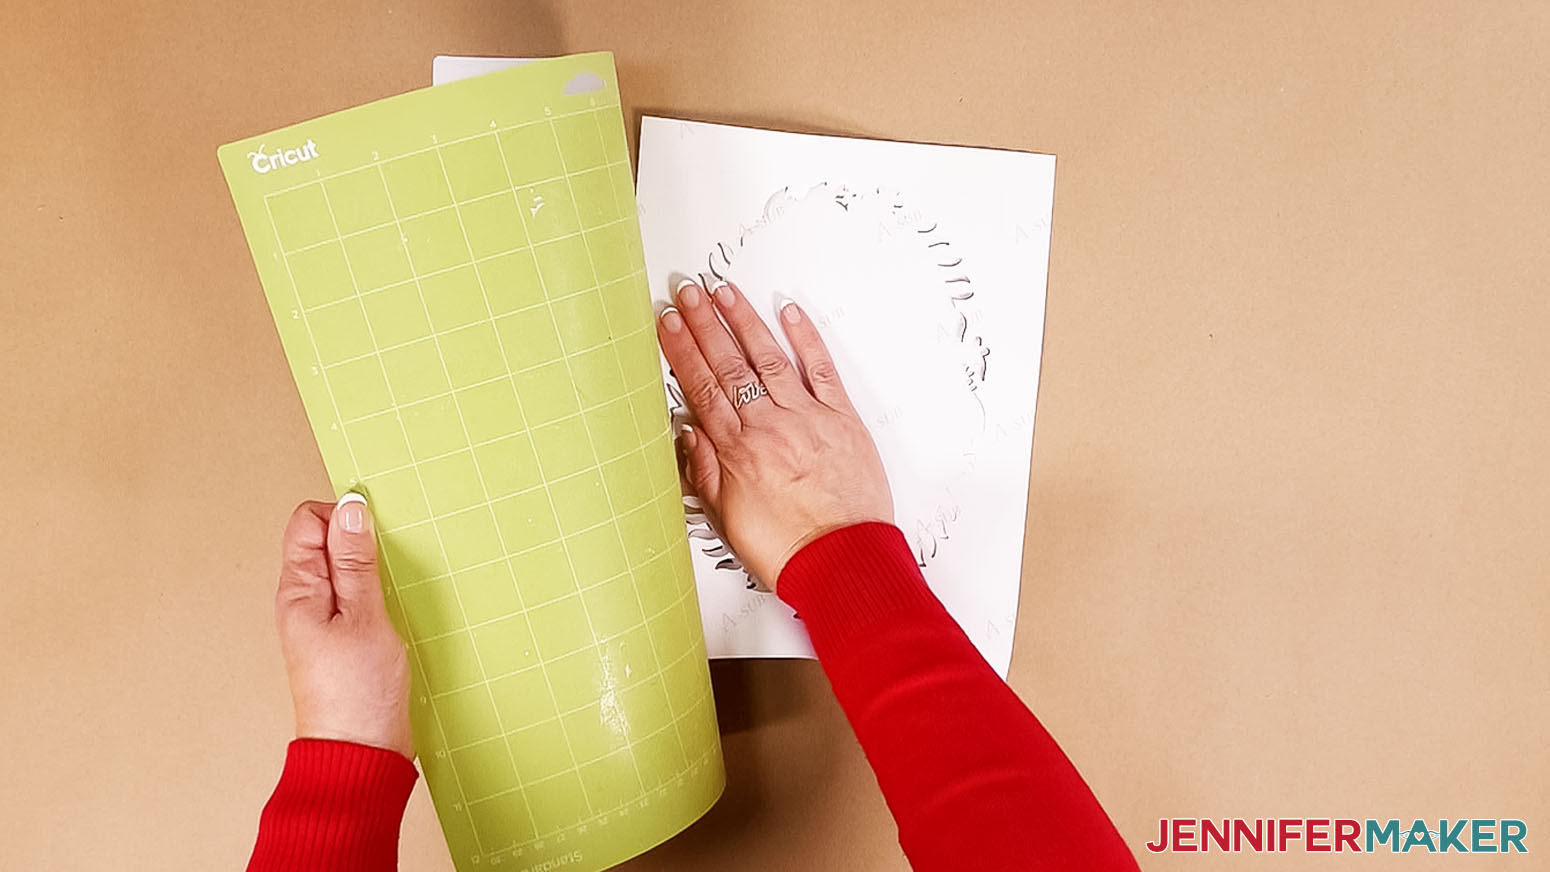
On your Make Screen, set the Print then Cut mat to "Copy Paper, 32 lb" with "Default" pressure.
Place your printed sublimation sheet on your blue LightGrip machine mat like it is on the screen prompt. Lay a clean piece of printer paper over the top and use a brayer to adhere it well.
Then, load the mat with your printed sheet into the Cricut and press the flashing button to cut your design.
When the cut is finished, unload the mat, flip it over, and roll it back to release the paper. This helps prevent the material from curling and ripping.
For the second mat, set it to "Everyday Iron-on" with More pressure.
Place the EasySubli sheet shiny side down on a green StandardGrip machine mat. Adhere it well with the brayer.
Follow the same steps as above to cut and remove your vinyl.
Weed the EasySubli to remove the excess around the design.
Then, grab your EasySubli Mask and place it on top of the EasySubli to lift it off of its carrier backing. For more information on how to do this, please see my How to Sublimate on Cotton tutorial.
Lint roll the t-shirt to remove any dust and debris.
I'm using an Autopress, but you can also use an EasyPress with a pressing mat. If you're using different materials or tools, consult the Cricut Heat Guide to check your settings.
Set the temperature of your press to 380°F (193° C) and the time to 5 seconds.
Make sure you have proper ventilation by opening a window or turning on a fan.
Lint roll the t-shirt to remove any dust and debris.
Place a clean sheet of white cardstock in between the front and back of the t-shirt.
When the press is ready, preheat your t-shirt for 10 seconds. This smooths any wrinkles and removes moisture.
Use the t-shirt guide to place the EasySubli on your t-shirt with the mask on top. You can use heat resistant tape if you like but the mask should be sticky enough to keep it in place.
Tack on the EasySubli at 380°F (193° C) for 5 seconds. Peel the mask sheet away while it is still warm.
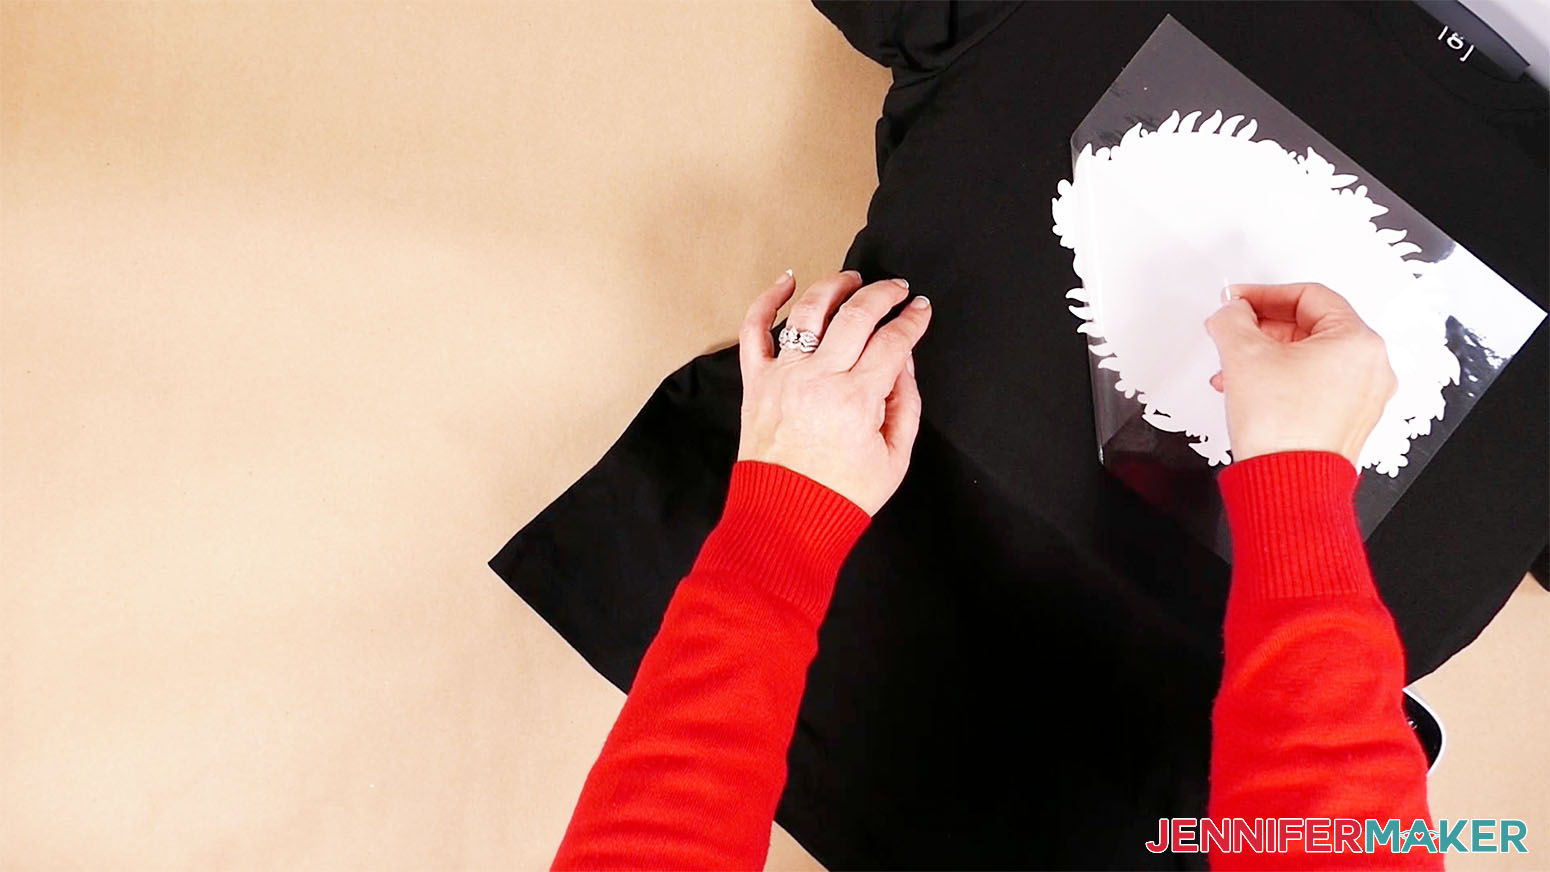
Next, place your print face down on top of the EasySubli. Make sure the edges line up, then use heat resistant tape to secure it.
Place clean white butcher paper on top of the whole area.
Heat the design at 380° (193° C) for 40 seconds.
Remove the butcher paper. Wait for the the print to cool a bit and then remove the tape and paper.
GLITTER HTV
The glitter HTV has a similar process EXCEPT you need to Mirror the Basic Cut shaped mat on the Prepare screen.
On the Make screen, use the "Glitter Iron-On" material setting for the vinyl mat with "More" pressure.
Place the vinyl shiny side down on a green StandardGrip mat.
Prepare your shirt and place the vinyl shiny side up on the shirt the same way as the EasySubli, other than using the EasySubli Mask. Press for 10 seconds at 380°F (193° C) to tack the vinyl on. Let it cool slightly and peel away the plastic carrier sheet.
Next place the sublimation print face down on top the the glitter HTV and secure it with heat resistant tape. Press for 40 seconds at 380° (193° C). Let cool slightly and remove the print.
STEP 5: SHOW IT OFF!
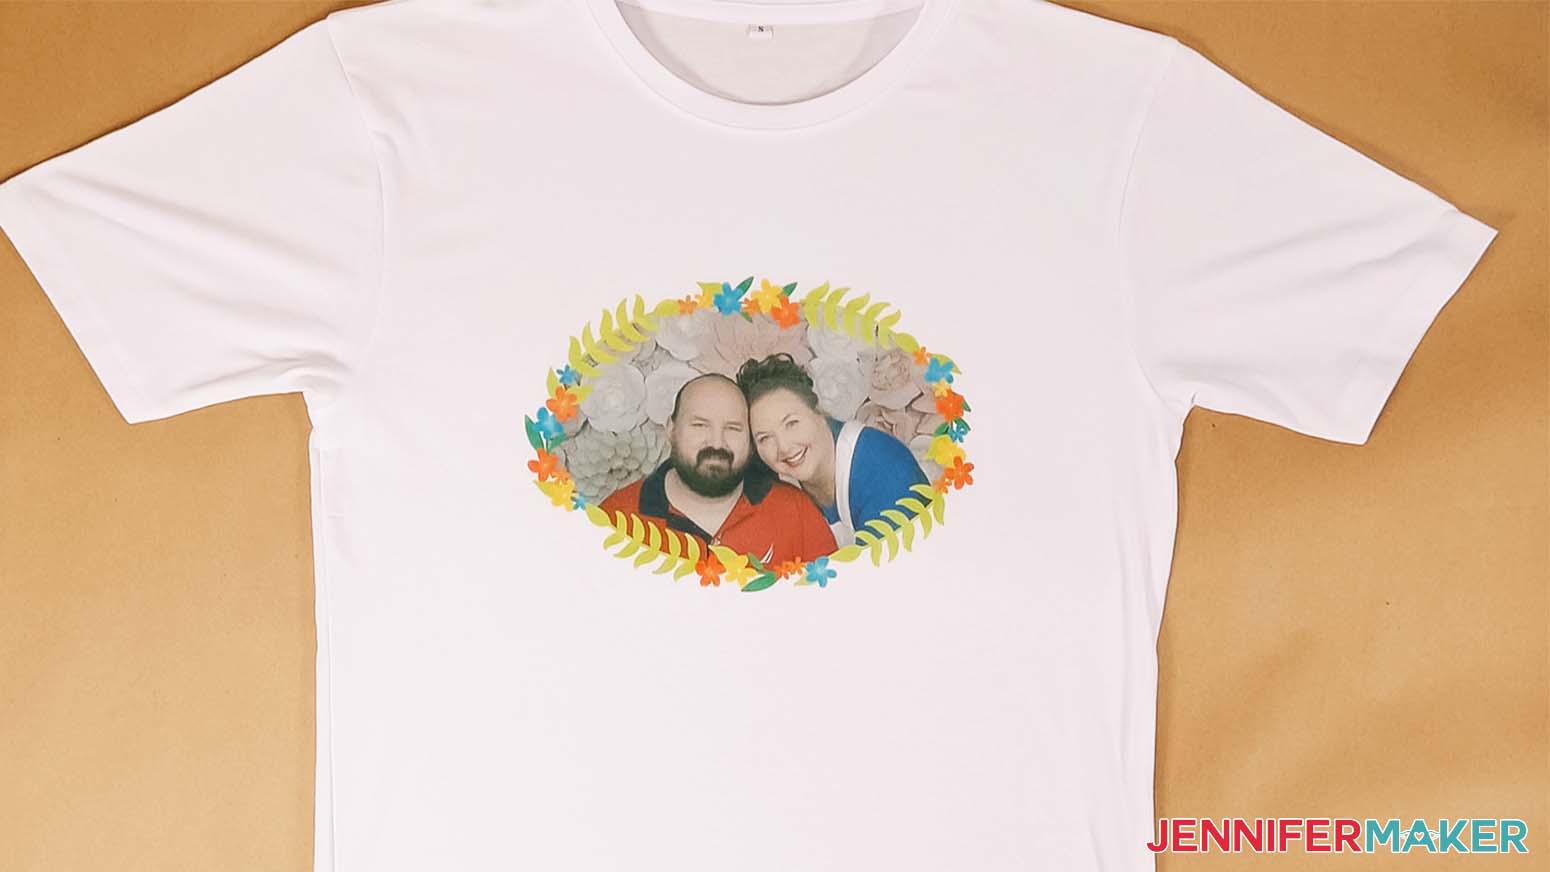
[sublimation-with-cricut-final-result]
Answers to Your Questions About Sublimation with Cricut Design Space
Q: Can you use a Cricut for sublimation?
A: While a Cricut cutting machine doesn’t have the capability to create a physical sublimation design, you can use the Print then Cut feature to create the file in Cricut Design Space and control a sublimation printer for sublimation printing!
Q: Is Cricut infusible ink the same as sublimation?
A: Yes, the patterns on Cricut Infusible Ink Transfer Sheets use the same sublimation process to transfer colored ink to sublimation blanks, dyeing the compatible fibers and surfaces.
Q: Which Cricut machine does sublimation?
A: Cricut machine doesn’t sublimate designs itself and there are no Cricut sublimation printers. But, you can use the Print then Cut feature in Cricut Design Space to send an image to a sublimation printer. Then, you can use a Cricut with the ability to ready the registration marks to cut the image out. The Cricut Joy cannot be used to read and cut Print then Cut designs.
Q: Where can I find high quality images to create sublimation designs in Cricut Design Space?
A: In addition to my free resource library (a great option!), check out Cricut Design Space, Adobe Photoshop, Design Bundles, Silhouette Studio software, Creative Fabrica, Creative Market, Font Bundles, and other online marketplaces for photos.
Q: What kind of paper do I use for sublimation?
A: While some people will use just regular laser paper, I really recommend you use special sublimation paper for vibrant, good results and ink transfer. I used A-SUB paper during my tests.
Q: What kind of ink do I use for sublimation?
A: You must use special ink to do sublimation projects. I like to use Hiipoo sublimation ink.
Q: How do I test my sublimation prints for vibrancy and color?
A: Use my free subliflower design to see how your colors look on the special paper! It’s Design #385 in my resource library!
Q: How do I learn sublimation for beginners?
A: Join Sublimation Startup for a logical, step-by-step guide to getting setup for success with sublimation! You can ask questions and feel confident that you’ll get help! The Sublimation Startup mini-course is also great for those who enjoy learning from our easy-to-understand, calm, and clear method of teaching. This is a no-fluff, no-mess, no-distraction workshop … it’s like sitting down in my craft room to learn directly from me! We work in logical steps to build your understanding and confidence with sublimation, and then provide support to keep helping you as you continue on your journey! Register now!
Q: Can I make this with a Cricut Joy or a Cricut Explore?
A: Technically, yes! Normal Print then Cut Cricut projects don’t work with the Joy because it doesn’t have the correct tool to read the registration marks and avoid making the cut lines in the wrong spots. If you are ok with cutting the designs by hand, you can just set your Design Space machine to a Maker to trick it into letting you print the design no matter which machine you have.
Q: Can I use a sublimation printer for regular prints, too?
A: No, a high-quality sublimation printer (whether purpose-built or converted) only prints in sublimation ink. And you cannot really switch a converted printer back to being an inkjet printer without a LOT of effort and wasted ink. An Epson Ecotank printer is an inexpensive option to convert, but see my reviews to pick the best sublimation printer for your goals!
Get my free download of floral frames to learn how to do sublimation with Cricut Design Space here:
(If you do not see the signup form above, click here.)
If you make any projects using this technique, I’d love to see them! Please share your results in my Cricut Crafters & Makers Facebook group where you’ll find hundreds of thousands of crafters like you, sharing their tips, projects, and inspiration.
By the way, you’re free to use my free digital files to create physical items to sell — I just ask that you share that you used one of my designs on your listing or with your product.
Love,

Want to remember this? Save this How to do Sublimation With Cricut Design Space Tutorial to your favorite Pinterest Board!